22. Web services with the Flask framework
Here, a web service refers to any web application that delivers raw data consumed by a client, often a console script in the examples that follow. We are not concerned with any particular technology, such as REST (REpresentational State Transfer) or SOAP (Simple Object Access Protocol), for example, which deliver more or less raw data in a well-defined format. REST returns jSON, whereas SOAP returns XML. Each of these technologies precisely describes how the client must query the server and the format the server’s response must take. In this course, we will be much more flexible regarding the nature of the client’s request and the server’s response. However, the scripts written and the tools used are similar to those of the REST technology.
22.1. Introduction
Python scripts can be executed by a web server. Such a script becomes a server program capable of serving multiple clients. From the client’s perspective, calling a web service amounts to requesting the URL of that service. The client can be written in any language, including Python. In the latter case, we use the internet functions we just discussed. We also need to know how to "communicate" with a web service, that is, understand the HTTP communication protocol between a web server and its clients. That was the purpose of the section |the HTTP protocol|. The web clients described in this part of the course have allowed us to discover part of the HTTP protocol.

In its simplest form, client/server communication proceeds as follows:
- the client opens a connection to port 80 on the web server;
- it makes a request for a document;
- the web server sends the requested document and closes the connection;
- the client then closes the connection;
The document can be of various types: text in HTML format, an image, a video, etc. It can be an existing document (static document) or a document generated on the fly by a script (dynamic document). In the latter case, this is referred to as web programming. The script for dynamically generating documents can be written in various languages: PHP, Python, Perl, Java, Ruby, C#, VB.net, etc.
In the following, we will use Python scripts to dynamically generate text documents.

- In [1], the client establishes a connection with the server, requests a Python script, and may or may not send parameters to that script;
- In [3], the web server executes the Python script using the Python interpreter. The script generates a document that is sent to the client [2];
- The server closes the connection. The client does the same;
The web server can process multiple clients requests at once.
In the following, we will use two web servers:
- the lightweight Werkzeug server [https://werkzeug.palletsprojects.com/en/1.0.x/]. This server is used by the Flask web framework [https://flask.palletsprojects.com/en/1.1.x/]. We will refer to it more frequently as the Flask server;
- the Apache 2 server [https://httpd.apache.org/];
The Flask server will be used in all examples. The Apache server will be used to host the web application we are going to develop.
The Flask framework is written in Python. It is a module that is installed in a terminal PyCharm:
(venv) C:\Data\st-2020\dev\python\cours-2020\python3-flask-2020\inet\utilitaires>pip install flask
Collecting flask
  Downloading Flask-1.1.2-py2.py3-none-any.whl (94 kB)
     || 94 kB 1.1 MB/s
Collecting click>=5.1
  Downloading click-7.1.2-py2.py3-none-any.whl (82 kB)
     || 82 kB 5.8 MB/s
Collecting itsdangerous>=0.24
  Downloading itsdangerous-1.1.0-py2.py3-none-any.whl (16 kB)
Collecting Jinja2>=2.10.1
  Downloading Jinja2-2.11.2-py2.py3-none-any.whl (125 kB)
     || 125 kB 6.4 MB/s
Collecting Werkzeug>=0.15
  Downloading Werkzeug-1.0.1-py2.py3-none-any.whl (298 kB)
     || 298 kB 6.4 MB/s
Collecting MarkupSafe>=0.23
  Downloading MarkupSafe-1.1.1-cp38-cp38-win_amd64.whl (16 kB)
Installing collected packages: click, itsdangerous, MarkupSafe, Jinja2, Werkzeug, flask
Successfully installed Jinja2-2.11.2 MarkupSafe-1.1.1 Werkzeug-1.0.1 click-7.1.2 flask-1.1.2 itsdangerous-1.1.0
- line 1: the command executed;
- line 19: the components that were installed:
- [flask-1.1.2]: is a Python web development framework;
- [Werkzeug-1.0.1]: is the web server that will respond to requests from clients;
- [Jinja2-2.11.2]: is a tool that allows dynamic elements to be inserted into pages that would otherwise be static;
22.2. [flask/01] scripts: introductory elements of web programming
Our examples will be run in the following architecture:
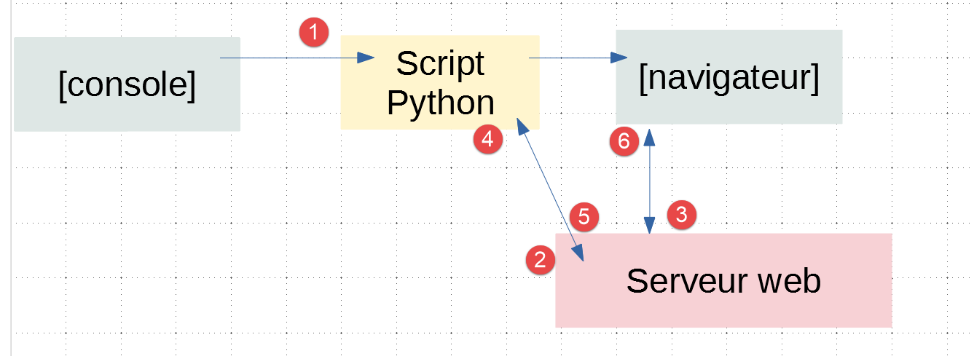
- in [1], a Python script will be executed just like a standard console script;
- in [2], a web server is transparently instantiated and waits for requests. In fact, it will accept only a single URL;
- in [3], the browser will request its single URL from the server;
- in [4], the server will execute the Python script specified by the console [1];
- in [5], the script will return its results to the web server, a text document;
- in [6], the web server will send this text document to the browser;
22.2.1. [exemple_01] script: basics of the HTML language
A web browser can display various documents, the most common being the HTML document (HyperText Markup Language). This is formatted text using tags of the form <tag>text</tag>. Thus, the text <b>important</b> will display the text "important" in bold. There are standalone tags, such as the <hr/> tag, which displays a horizontal line. We will not review all the tags that can be found in a HTML text. There are many WYSIWYG software tools that allow you to build a WEB page without writing a single line of HTML code. These tools automatically generate the HTML code for a layout created using the mouse and predefined controls. You can thus insert (using the mouse) a table into the page and then view the HTML code generated by the software to discover the tags to use for defining a table in a WEB page. It’s as simple as that. Furthermore, knowledge of the HTML language is essential, since dynamic web applications must generate the HTML code themselves to send to the clients web. This code is generated by a program, and you must, of course, know what to generate so that the client receives the web page they want.
In short, there is no need to know the entire HTML language to start web programming. However, this knowledge is necessary and can be acquired through the use of WYSIWYG web page construction software such as WEB and dozens of others. Another way to discover the subtleties of the HTML language is to browse the web and view the source code of pages that feature interesting characteristics you are not yet familiar with.
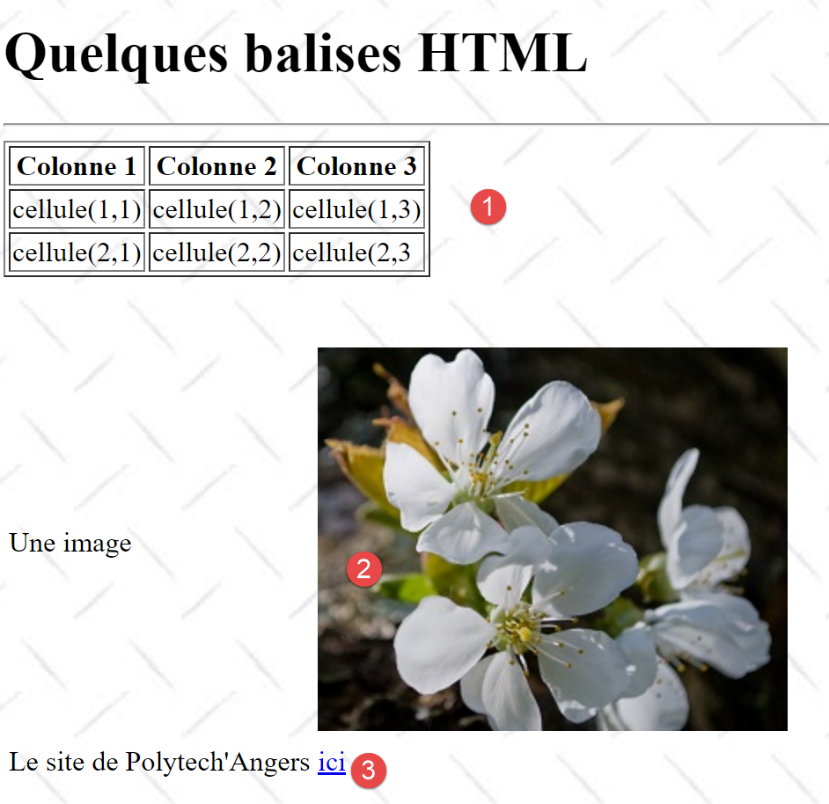
Consider the following example, which highlights some elements that can be found in a web document, such as:
- a table;
- an image;
- a link;
A HTML document is enclosed by the tags <html>…</html>. It consists of two parts:
- <head>…</head>: this is the non-displayable part of the document. It provides information to the browser that will display the document. It often contains the tag <title>…</title>, which sets the text to be displayed in the browser’s title bar. Other tags may also be found here, notably tags defining the document’s keywords, which are then used by search engines. This section may also contain scripts, most often written in javascript or vbscript, which will be executed by the browser;
- <body attributes>…</body>: This is the part that will be displayed by the browser. The tags contained in this section tell the browser the "desired" visual layout for the document. Each browser interprets these tags in its own way. Two browsers may therefore display the same web document differently. This is generally one of the headaches for web designers;
The code for our example document is as follows:
<!DOCTYPE html>
<html xmlns="http://www.w3.org/1999/xhtml">
<head>
  <meta http-equiv="Content-Type" content="text/html; charset=utf-8" />
  <title>Quelques balises HTML</title>
</head>

<body style="background-image: url(/static/images/standard.jpg)">
  <h1 style="text-align: left">Quelques balises HTML</h1>
  <hr />

  <table border="1">
    <thead>
      <tr>
        <th>Colonne 1</th>
        <th>Colonne 2</th>
        <th>Colonne 3</th>
      </tr>
    </thead>
    <tbody>
      <tr>
        <td>cellule(1,1)</td>
        <td style="text-align: center;">cellule(1,2)</td>
        <td>cellule(1,3)</td>
      </tr>
      <tr>
        <td>cellule(2,1)</td>
        <td>cellule(2,2)</td>
        <td>cellule(2,3</td>
      </tr>
    </tbody>
  </table>
  <br /><br />
  <table border="0">
    <tr>
      <td>Une image</td>
      <td>
        <img border="0" src="/static/images/cerisier.jpg" />
      </td>
    </tr>
    <tr>
      <td>Le site de Polytech'Angers</td>
      <td><a href="http://www.polytech-angers.fr/fr/index.html">ici</a></td>
    </tr>
  </table>
</body>
</html>
Element | tags and examples HTML |
<title>Some tags HTML</title> (line 5) The text [Quelques balises HTML] will appear in the browser's title bar when the document is displayed | |
<hr /> : displays a horizontal line (line 10) | |
<table attributes>….</table>: to define the table (lines 12, 32) <thead>…</thead>: to define the column headers (lines 13, 19) <tbody>…</tbody>: to define the table content (lines 20, 31) <tr attributes>…</tr>: to define a row (lines 21, 25) <td attributes>…</td>: to define a cell (line 22) examples: <table border="1">…</table>: the border attribute defines the thickness of the table border <td style="text-align: center;">cell(1,2)</td> (line 23): defines a cell whose content will be cell(1,2). This content will be centered horizontally (text-align: center). | |
<img border="0" src="/static/images/cerisier.jpg"/> (line 38): defines an image with no border (border="0") whose source file is [/static/images/cerisier.jpg] on the web server (src="/static/images/cerisier.jpg"). If this link is found in a web document generated using URL [http://server/chemin/balises.html], then the browser will request URL [http://server/ static/images/cerisier.jpg] to retrieve the image referenced here. | |
<a href="http://www.polytech-angers.fr/fr/index.html">here</a> (line 43): makes the text here serve as a link to URL http://www.polytech-angers.fr/fr/index.html. | |
<body style="background-image: url(/static/images/standard.jpg)"> (line 8): indicates that the image to be used as the page background is located at URL [/static/images/standard.jpg] on the web server. In the context of our example, the browser will request the URL [http://server/static/images/standard.jpg] to retrieve this background image. |
We can see in this simple example that to build the entire document, the browser must make three requests to the server:
- [http://server/chemin/balises.html] to retrieve the source HTML of the document;
- [http://server/static/images/cerisier.jpg] to retrieve the image cerisier.jpg;
- [http://server/static/images/standard.jpg] to retrieve the background image standard.jpg;
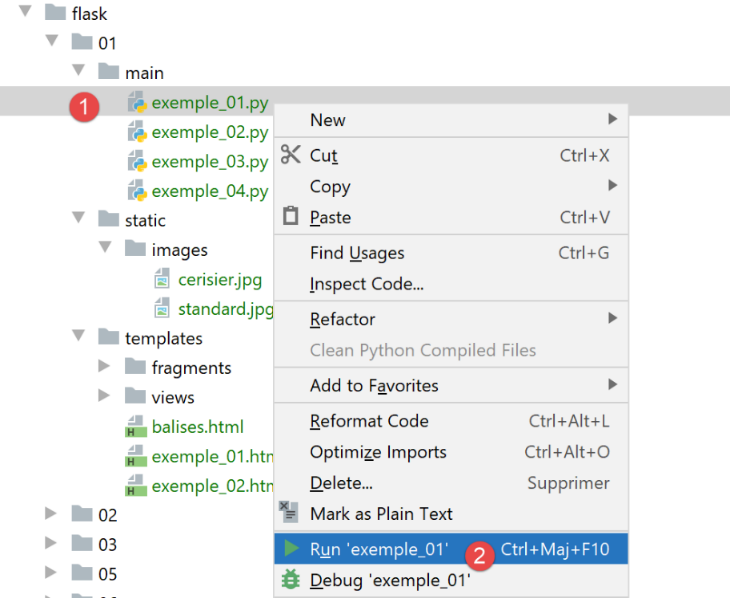
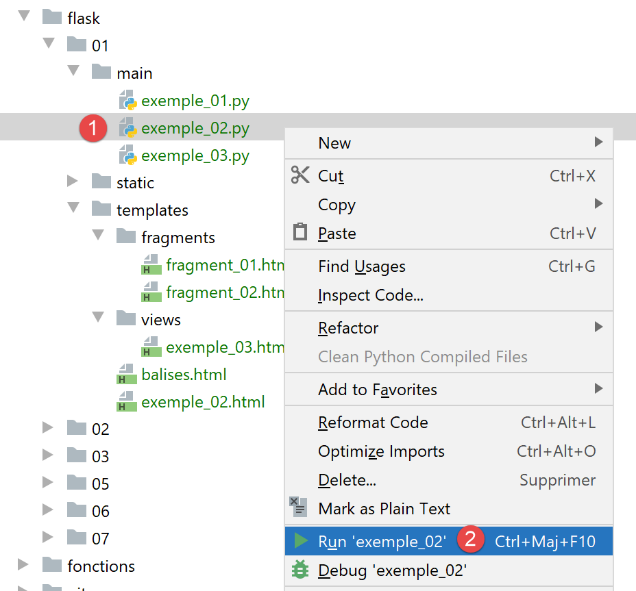
The script [exemple_01] will allow us to display the previous static page [balises.html]:
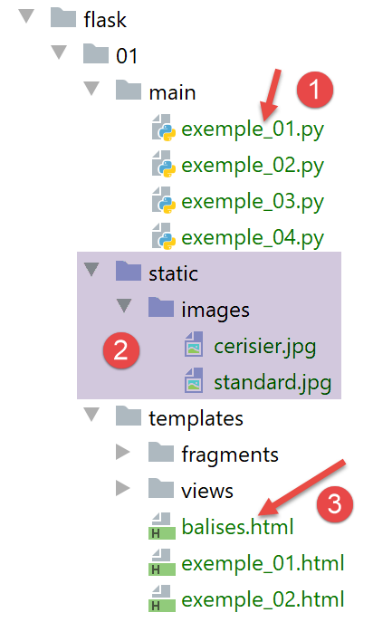
- in [1], the script [exemple_01] that will be executed;
- in [3], the document HTML that will be displayed by the script;
- in [2], the images from the document HTML;
The script [exemple_01] is as follows:
import os

from flask import Flask, make_response, render_template

# flask application
script_dir = os.path.dirname(os.path.abspath(__file__))
app = Flask(__name__, template_folder=f"{script_dir}/../templates", static_folder=f"{script_dir}/../static")


# Home URL
@app.route('/')
def index():
    # page display
    return make_response(render_template("balises.html"))


# hand
if __name__ == '__main__':
    app.config.update(ENV="development", DEBUG=True)
    app.run()
- line 7: we instantiate a Flask application. A Flask application is a web application;
- the first parameter is the name given to the application. You can choose any name you like. Here we used the predefined attribute [__name__], which is set to [__main__] (line 18);
- the second parameter is a named parameter, meaning its position in the parameter list does not matter. The named parameter [template_folder] specifies the folder where the web application’s static pages are located. Static pages are served to the browser as-is. Here, the static pages will be found in the [templates] folder within the project directory tree. On line 7, we have specified a relative path to the [script_dir] folder containing the executed script [exemple_01];
- the third parameter is also a named parameter. [static_folder] refers to the folder where the resources for the HTML document (images, videos, etc.) are located. Here too, we have specified a relative path to the folder [script_dir] containing the executed script [exemple_01];
- lines 10–14: we define the MIME types accepted by the web application. Each MIME type is associated with a function that runs when the MIME type is requested by a web browser;
- line 11: the application’s only URL is the URL [/]. Note that in [@app.route('/')], [app] is the variable initialized on line 7. The definition of the routes (the various URL managed by the application) therefore necessarily comes after the definition of the application [app]. The latter name is arbitrary;
- lines 12–14: the function that executes when the URL [/] is requested from the web application [exemple_01];
- line 12: the function associated with a URL can have any name. It may sometimes have parameters to retrieve elements from the URL associated with it. Here, it does not;
- line 14:
- The [render_template] function returns a string that is the text document generated by its parameter. In this case, the parameter is [balises.html]. Because of the [template_folder] in line 7, this document will be searched for in the [f"{script_dir}/../templates"] folder. That is indeed where it is located;
- the [make_response] function generates a HTTP response for the browser that requested the URL [/]. We saw in the section |the HTTP protocol| that a HTTP response has two elements:
- HTTP headers;
- the document requested by the browser, in this case a HTML document;
On line 14, no parameters were passed to the [make_response] function to generate HTTP headers. It will therefore generate them by default. We will see later how to set these HTTP headers.
- Finally, when the browser requests URL from the Flask application, it receives the [balises.html] page;
- lines 17–20: these lines are used to start the web server that will run the [exemple_01] web application;
- line 18: this condition is true only when the [exemple_01] script is run within a console;
- line 19: the [app] application from line 7 is configured:
- the parameter named [ENV="development"] sets the web server to development mode: as soon as the developer modifies an element of the application, it is regenerated and delivered to the web server. The developer does not need to request a new execution;
- the parameter named [DEBUG=True] allows the developer to set breakpoints in the application code;
- Line 20: The web application is launched: a web server is instantiated, and the web application is deployed on it to respond to requests from clients web;
Here is an example of execution:
The following logs then appear in the execution console:
C:\Data\st-2020\dev\python\cours-2020\python3-flask-2020\venv\Scripts\python.exe C:/Data/st-2020/dev/python/cours-2020/python3-flask-2020/flask/01/main/exemple_01.py
 * Serving Flask app "exemple_01" (lazy loading)
 * Environment: development
 * Debug mode: on
 * Restarting with stat
 * Debugger is active!
 * Debugger PIN: 334-263-283
* Running on http://127.0.0.1:5000/ (Press CTRL+C to quit)
- Line 2: The server displays the executed script;
- line 3: we are in development mode;
- lines 4-5: the server detects that it was launched in [debug] mode. It then restarts (line 5). The [debug] mode therefore slows down startup slightly;
- line 8: the URL where the deployed web application [exemple_01] is available;
Using a web browser, let’s request the URL [http://127.0.0.1:5000/]:
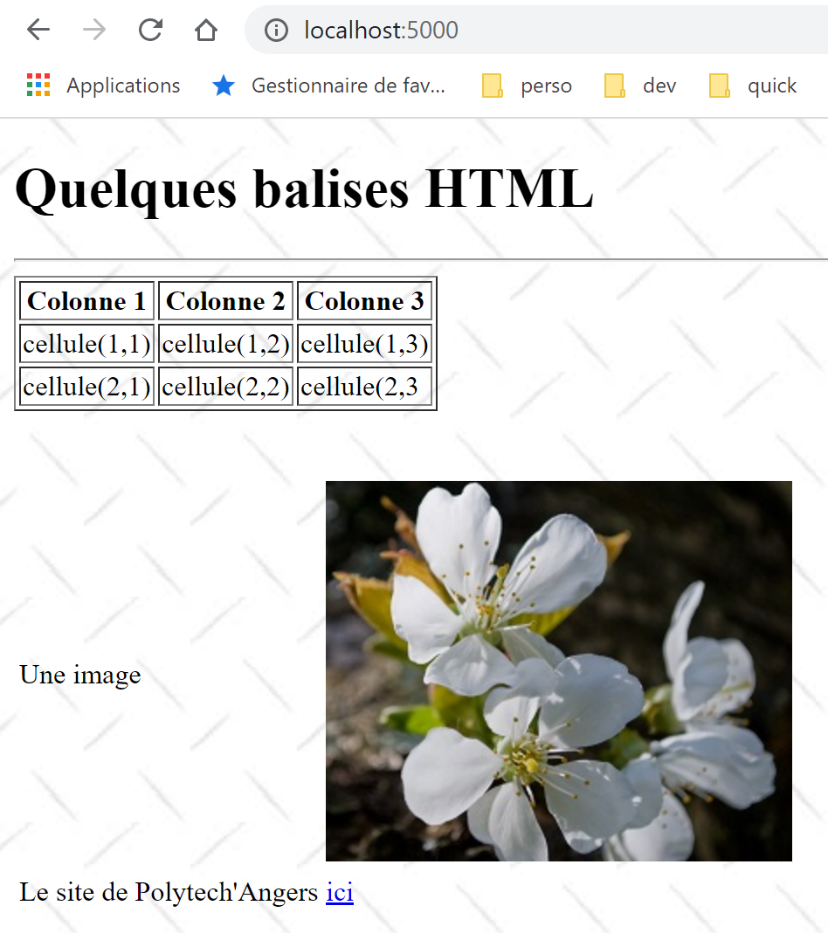
We successfully obtain the expected [balises.html] document.
22.2.2. script [exemple_02]: dynamically generate a HTML document
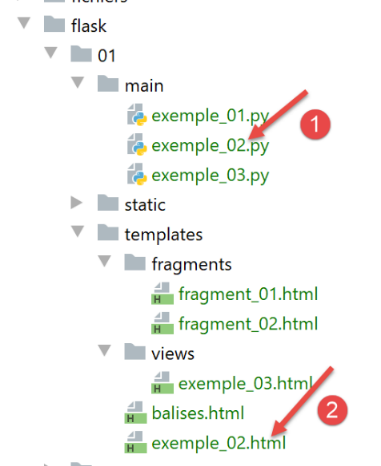
The script [exemple_02] [1] will generate the following [exemple_02.html] [2] document:
<!DOCTYPE html>
<html lang="fr">
<head>
    <meta charset="UTF-8">
    <title>{{page.title}}</title>
</head>
<body>
    <b>{{page.contents}}</b>
</body>
</html>
This document is dynamic because its content is not fully known until the web server serves it. In fact, lines 5 and 8 contain two elements that were unknown at the time the page was written. They are only known when the page is sent to a client. They are then replaced by their values, which are strings.
- Lines 5, 8: the syntax {{expression}} is a syntax of the Jinja2 template language [https://jinja.palletsprojects.com/en/2.11.x/]. Before the page is sent to a client, the dynamic elements of the page (lines 5 and 8) are evaluated and replaced with their values;
- Line 5: The syntax [page.title] was used. We therefore assumed that when the page is generated before being sent, a variable [page] is known; we will see how. In the {{expression}} syntax, we can use any variable names we want. In lines 5 and 8, we could thus have {{title}} and {{contents}}. We could then say that [title] and [contents] are parameters of the page. Going forward, we will always use the same technique:
- the page’s sole parameter will be a dictionary [page];
- the attributes of this dictionary will be used in the page. Here, [page.title] on line 5 and [page.contents] on line 8;
The [exemple_02.py] web application is as follows:
from flask import Flask, make_response, render_template

# flask application
script_dir = os.path.dirname(os.path.abspath(__file__))
app = Flask(__name__, template_folder=f"{script_dir}/../templates", static_folder=f"{script_dir}/../static")


# Home URL
@app.route('/')
def index():
    # page content in the form of a dictionary
    page = {"title": "un titre", "contents": "un contenu"}
    # page display
    return make_response(render_template("exemple_02.html", page=page))


# hand
if __name__ == '__main__':
    app.config.update(ENV="development", DEBUG=True)
    app.run()
- We have already explained this in the previous example, lines 4–5 and 18–20. We will continue to use this structure in our examples;
- Line 9: The only URL served by the web application is URL /;
- line 14: the document served to URL / is the [exemple_02.html] document we just commented on. We know it has a parameter, a dictionary called [page];
- line 12: we define the dictionary that will be passed as a parameter to the [exemple_02.html] page. It can have any name. However, it must have the attributes [title, contents] used in the HTML document;
- Line 14: The function [render_template] is responsible for rendering the character string from the document [exemple_02.html]. Since this is a parameterized document, we pass the expected parameter(s) to the function [render_template]. We do this here by assigning a value to the parameter named [page]. In operation [page=page]:
- to the left of the = sign, we have the parameter [page] used in the document [exemple_02.html];
- to the right of the = sign, we have the value [page] defined on line 12;
- In general, if a document HTML has the parameters [param1, param2, …, paramn], their values will be passed to the function [render_template] in the form [render_template(document, param1=valeur1, param2=valeur2, …];
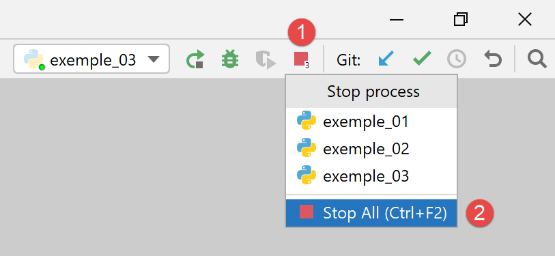
Before executing [exemple_02], we must stop the execution of [exemple_01]:
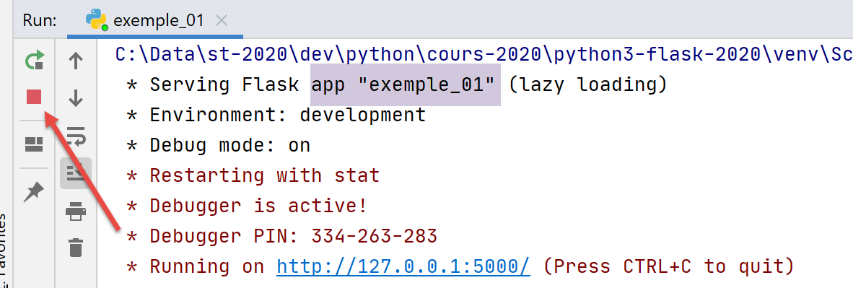
If, while running script 1, it seems like script 2 is running, it is likely because script 2 is still running. To return to a known state, you can stop all running processes in PyCharm (top right in the PyCharm window):
Let’s run the [exemple_02] script:
The console logs are then as follows:
C:\Data\st-2020\dev\python\cours-2020\python3-flask-2020\venv\Scripts\python.exe C:/Data/st-2020/dev/python/cours-2020/python3-flask-2020/flask/01/main/exemple_02.py
 * Serving Flask app "exemple_02" (lazy loading)
 * Environment: development
 * Debug mode: on
 * Restarting with stat
 * Debugger is active!
 * Debugger PIN: 334-263-283
* Running on http://127.0.0.1:5000/ (Press CTRL+C to quit)
Line 8 indicates the deployment port (5000) for the [exemple_02] application (line 1) on the [localhost] machine. Since the preceding lines are always the same, we will not show them again.
Using a browser, we request the URL [http://localhost:5000/]:
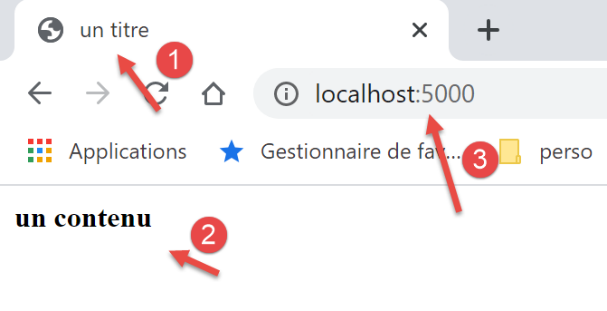
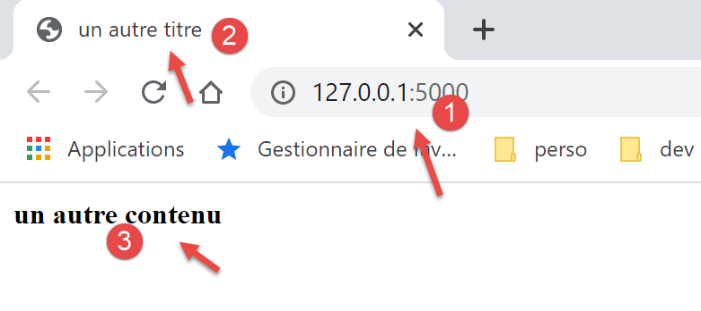
- the expression {{page.title}} produced [1];
- the expression {{page.contents}} produced [2];
22.2.3. script [exemple_03]: use page fragments
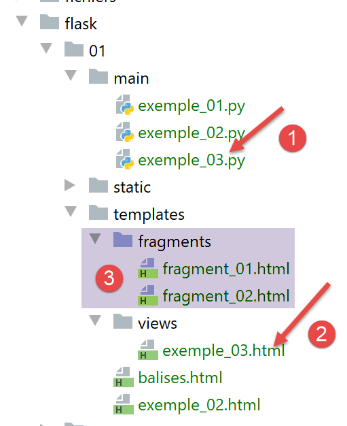
- In [1], the script [exemple_03.py] will generate the dynamic document [exemple_03.html] [2]. This will be constructed from the page fragments [fragment_01.html, fragment_02.html] and [3];
The document [exemple_03.html] will be as follows:
<!DOCTYPE html>
<html lang="fr">
{% include "fragments/fragment_01.html" %}
<body>
{% include "fragments/fragment_02.html" %}
</body>
</html>
- Lines 3 and 5 use the Jinja2 directive [include] to include external elements in the document;
- the syntax is {% include … %}. The parameter for the [include] directive is the path to the document to be included. This path is relative to the [template_folder] parameter of the Flask application:
app = Flask(__name__, template_folder="../templates", static_folder="../static")
So here, the document paths are relative to the [templates] folder.
The [fragment_01.html] snippet (the names are, of course, arbitrary) is as follows:
<meta charset="UTF-8">
<title>{{page.title}}</title>
The fragment [fragment_02.html] is as follows:
<b>{{page.contents}}</b>
If we reconstruct the document [exemple_03.html] using these fragments, we get the following code:
<!DOCTYPE html>
<html lang="fr">
<meta charset="UTF-8">
<title>{{page.title}}</title>
<body>
<b>{{page.contents}}</b>
</body>
</html>
We therefore have a document identical to [exemple_02.html] but built from fragments.
The [exemple_03.py] web script is as follows:
import os

from flask import Flask, make_response, render_template

# flask application
script_dir = os.path.dirname(os.path.abspath(__file__))
app = Flask(__name__, template_folder=f"{script_dir}/../templates", static_folder=f"{script_dir}/../static")


# Home URL
@app.route('/')
def index():
    # page content
    page = {"title": "un autre titre", "contents": "un autre contenu"}
    # page display
    return make_response(render_template("views/exemple_03.html", page=page))


# hand
if __name__ == '__main__':
    app.config.update(ENV="development", DEBUG=True)
    app.run()
The code is similar to that of [exemple_02.py]. Line 16 shows how to reference documents located in subfolders of [template_folder] from line 7.
Running the [exemple_03.py] script produces the following results in the browser:
22.3. [flask/02] scripts: date and time web service

The [date_time_server.html] document is as follows:
<!DOCTYPE html>
<html lang="fr">
<head>
<meta charset="UTF-8">
<title>Date et heure du moment</title>
</head>
<body>
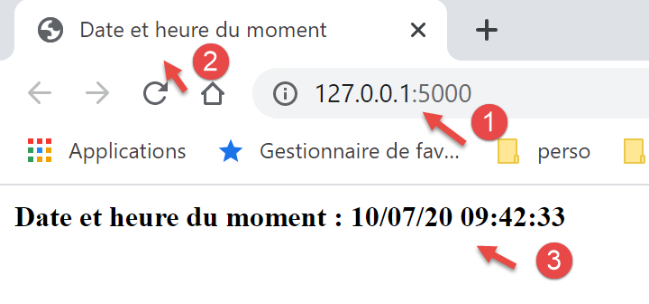
<b>Date et heure du moment : {{page.date_heure}}</b>
</body>
</html>
- line 8: the page accepts the parameter [page.date_heure];
The [date_time_server.py] web service is as follows:
# imports
import os
import time

from flask import Flask, make_response, render_template

# flask application
script_dir = os.path.dirname(os.path.abspath(__file__))
app = Flask(__name__, template_folder=f"{script_dir}")


# Home URL
@app.route('/')
def index():
    # dispatch time to customer
    # time.localtime: number of milliseconds since 01/01/1970
    # time.strftime formats time and date
    # date-time display format
    # d: 2-digit day
    # m: 2-digit month
    # y: 2-digit year
    # H: hour 0.23
    # M: minutes
    # S: seconds

    # current date / time
    time_of_day = time.strftime('%d/%m/%y %H:%M:%S', time.localtime())
    # generate the document to be sent to the customer
    page = {"date_heure": time_of_day}
    document = render_template("date_time_server.html", page=page)
    print("document", type(document), document)
    # HTTP response to customer
    response = make_response(document)
    print("response", type(response), response)
    return response


# hand only
if __name__ == '__main__':
    app.config.update(ENV="development", DEBUG=True)
    app.run()
- line 13: the web application only serves URL / ;
- lines 15–24: explain how to retrieve the date and time and how to display them;
- line 27: string representing the current date and time;
- lines 28–30: the dynamic document [date_time_server.html] is generated by passing it the dictionary [page] from line 29;
- Line 31: We display the type of [document] and the document itself. We want to show that it is a string;
- Line 33: We generate the response HTTP that will be sent to the client (it has not yet been sent);
- line 34: we display its type and value;
- line 35: the response HTTP is sent to the client;
Executing the script produces the following result in a browser:
The logs in the console are as follows:
C:\Data\st-2020\dev\python\cours-2020\python3-flask-2020\venv\Scripts\python.exe C:\Data\st-2020\dev\python\cours-2020\python3-flask-2020\flask\02\date_time_server.py
 * Serving Flask app "date_time_server" (lazy loading)
 * Environment: development
 * Debug mode: on
 * Restarting with stat
 * Debugger is active!
 * Debugger PIN: 334-263-283
* Running on http://127.0.0.1:5000/ (Press CTRL+C to quit)
127.0.0.1 - - [10/Jul/2020 09:32:09] "GET / HTTP/1.1" 200 -
document <class 'str'> <!DOCTYPE html>
<html lang="fr">
<head>
    <meta charset="UTF-8">
    <title>Date et heure du moment</title>
</head>
<body>
    <b>Date et heure du moment : 10/07/20 09:42:33</b>
</body>
</html>
response <class 'flask.wrappers.Response'> <Response 195 bytes [200 OK]>
- line 10: we see that the type of the value returned by [render_template] is of type [str]. This string is none other than the document [date_time_server.html] once interpreted (lines 10–19);
- line 20: we see that the type of the value returned by [make_response] is of type [flask.wrappers.Response]. The function [Response.__str__] was implicitly called to display the object [Response]. The string returned by this function provides two pieces of information about the upcoming HTTP response:
- the sent document is 195 bytes long;
- the status of the HTTP response is [200 OK]. We will see later that we have access to this status code;
22.4. [flask/03] scripts: web services generating plain text
We saw in a previous example that the web service returned the following document:
<!DOCTYPE html>
<html lang="fr">
<head>
    <meta charset="UTF-8">
    <title>Date et heure du moment</title>
</head>
<body>
    <b>Date et heure du moment : {{page.date_heure}}</b>
</body>
</html>
A web client might be interested only in the information [page.date_heure] in line 8 and not in the surrounding formatting HTML. The web service could deliver this information as a simple string of characters. We will present examples of this type of web service here.
22.4.1. script [main_01]
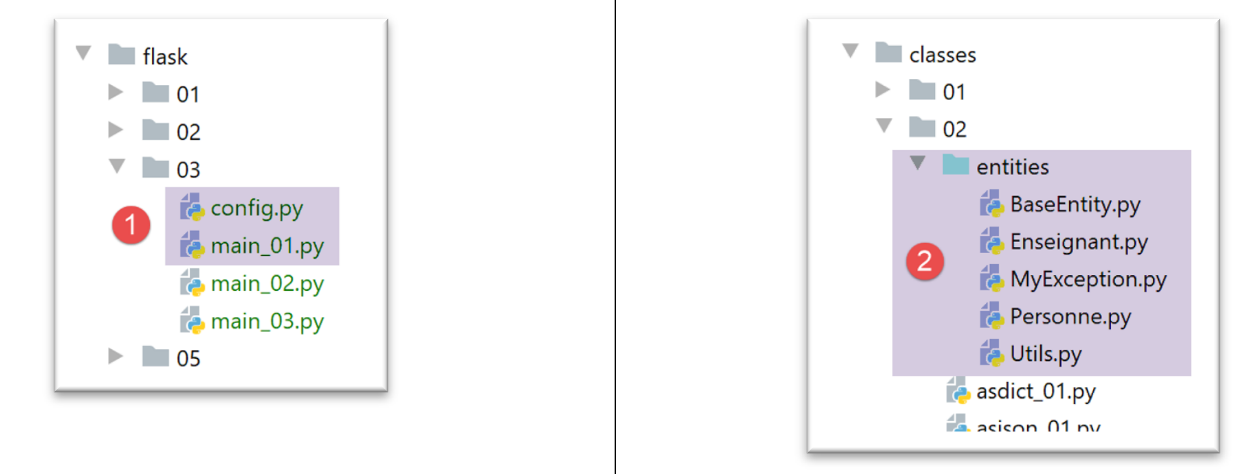
- [main_01] is the web service;
- [config] is the web application configuration script;
- the web service uses some of the entities defined in [2];
The script [config] is as follows:
def configure():
    # absolute path configuration relative path reference
    rootDir = "C:/Data/st-2020/dev/python/cours-2020/python3-flask-2020"

    # application dependencies
    absolute_dependencies = [
        # Person, Utilities, MyException
        f"{rootDir}/classes/02/entities",

    ]
    # set the syspath
    from myutils import set_syspath
    set_syspath(absolute_dependencies)

    # we return the config
    return {}
The primary purpose of this configuration is to define the Python Path for the web service. We need to be able to locate the [2] entities (line 8).
The [main_01] web script is as follows:
# configure the application
import config
config=config.configure()

# imports
from flask import Flask, make_response
from flask_api import status

# dependencies
from Personne import Personne

# flask application (no static documents here)
app = Flask(__name__)


# Home URL
@app.route('/')
def index():
    # a person
    personne = Personne().fromdict({"prénom": "Aglaë", "nom": "de la Hûche", "âge": 87})
    # answer HTTP
    response = make_response(str(personne))
    # headers HTTP
    response.headers.set("Content-type", "application/json; charser=utf8")
    # we return the answer HTTP
    return response, status.HTTP_200_OK


# hand only
if __name__ == '__main__':
    # start the server
    app.config.update(ENV="development", DEBUG=True)
    app.run()
- lines 1-3: the application's Python environment is set;
- lines 5-10: import the elements needed by the script;
- line 17: the web service only serves the URL /;
- line 20: a [Personne] object is created;
- line 22: a HTTP response is created with the string representing the person. The [Personne.__str__] function will be called. This function returns the jSON string from the person’s [asdict] dictionary (see |class BaseEntity|). The parameter of the [make_response] function is the text document sent to the client, so in this case the string jSON for a person;
- line 24: we add a header [Content-type] to the response headers, which tells the client what type of document they will receive—in this case, a jSON document encoded in UTF-8;
- line 26: we return a tuple of two elements:
- the response to the client, headers HTTP and document;
- the response status code. Here we want to return the status code [200 OK]. The various status codes are defined by constants in the [flask_api] module imported on line 7;
The [flask_api] module is not available natively. It must be installed. This is done in a PyCharm terminal:
(venv) C:\Data\st-2020\dev\python\cours-2020\python3-flask-2020\inet\utilitaires>pip install flask_api
Collecting flask_api
  Downloading Flask_API-2.0-py3-none-any.whl (119 kB)
     || 119 kB 544 kB/s
Requirement already satisfied: Flask>=1.1 in c:\data\st-2020\dev\python\cours-2020\python3-flask-2020\venv\lib\site-packages (from flask_api) (1.1.2)
Requirement already satisfied: Jinja2>=2.10.1 in c:\data\st-2020\dev\python\cours-2020\python3-flask-2020\venv\lib\site-packages (from Flask>=1.1->flask_api) (2.11.2)
Requirement already satisfied: Werkzeug>=0.15 in c:\data\st-2020\dev\python\cours-2020\python3-flask-2020\venv\lib\site-packages (from Flask>=1.1->flask_api) (1.0.1)
Requirement already satisfied: click>=5.1 in c:\data\st-2020\dev\python\cours-2020\python3-flask-2020\venv\lib\site-packages (from Flask>=1.1->flask_api) (7.1.2)
Requirement already satisfied: itsdangerous>=0.24 in c:\data\st-2020\dev\python\cours-2020\python3-flask-2020\venv\lib\site-packages (from Flask>=1.1->flask_api) (1.1.0)
Requirement already satisfied: MarkupSafe>=0.23 in c:\data\st-2020\dev\python\cours-2020\python3-flask-2020\venv\lib\site-packages (from Jinja2>=2.10.1->Flask>=1.1->flask_api) (1.1.1
)
Installing collected packages: flask-api
Successfully installed flask-api-2.0
When running the web script [main_01], the following results are obtained in a browser:

- in [2], the received string jSON;
- in [3-4], the content of the received document is displayed. We see that there is no formatting, only the string;
Now let’s look at the role of the [Content-Type] header sent to the client by the web service. We’ll switch the browser to developer mode (usually F12) and request the same URL again. Below is a screenshot from the Chrome browser:
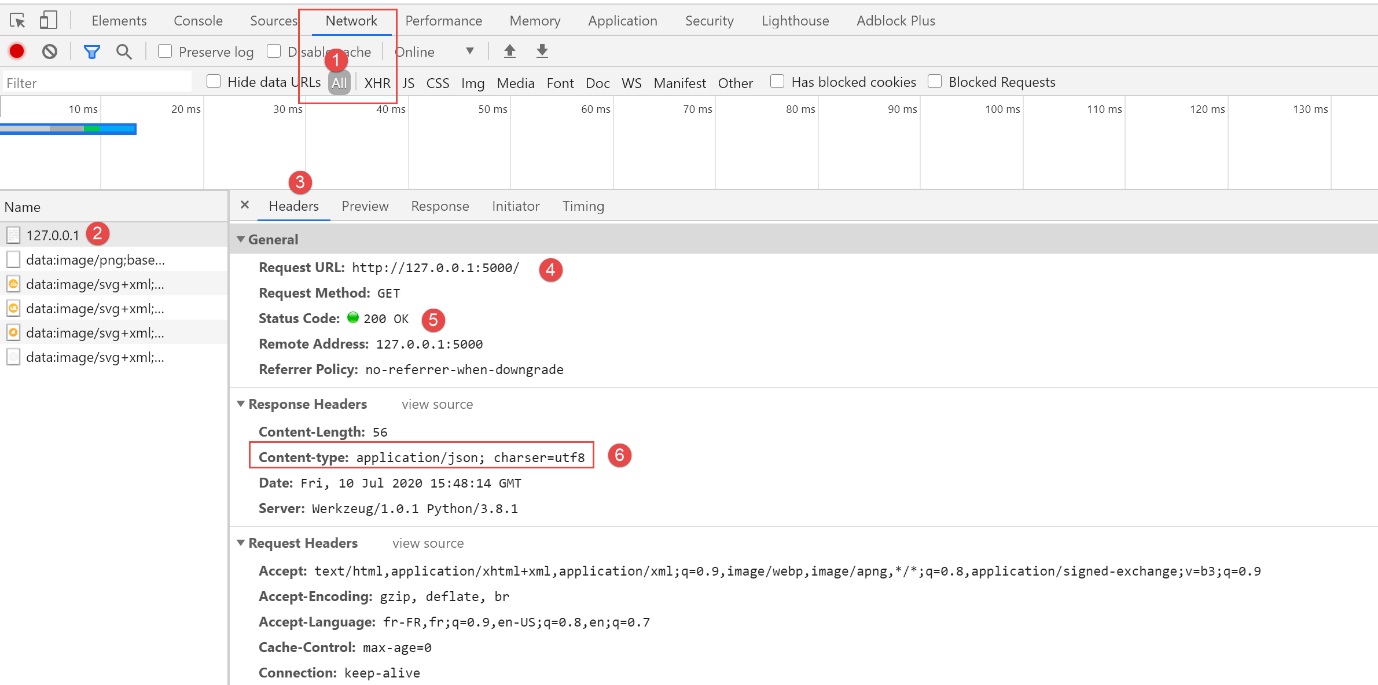
- in [1], select the [Network] tab;
- in [2, 4]: the URL requested by the browser;
- in [3], select the [Headers] tab (HTTP headers);
- in [5], the status code of the received HTTP response;
- in [6], the header indicating to the client that they will receive a jSON text. This allows the client to adapt to the response. Thus, the font used by Chrome to display a jSON response or a basic text response is not the same;
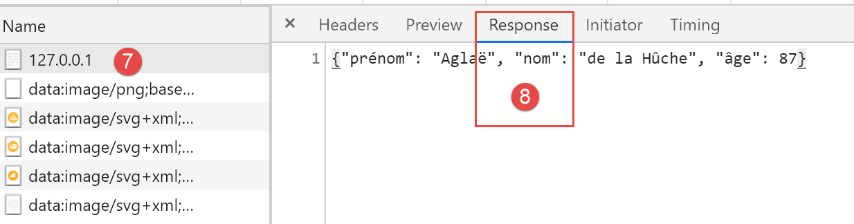
- in [8], we select the [Response] tab to access the document sent by the web service, in this case a simple string jSON;
22.4.2. Postman
[Postman] is the tool that will allow us to query the various URL endpoints of a web application. It allows us to:
- use any URL: these are manually generated;
- to query the web server using a GET, POST, PUT, OPTIONS…;
- specify the parameters of GET or POST;
- to set the HTTP headers of the request;
- to receive a response in the format jSON, XML, HTML,
- to access the HTTP headers of the response. This gives us access to the complete HTTP response from the server;
[Postman] is an excellent educational tool for understanding client/server communication in the HTTP protocol.
[Postman] is available at URL [https://www.getpostman.com/downloads/]. Proceed with the installation of your version from [Postman]. During installation, you will be asked to create an account: this is not needed here. The [Postman] account is used to sync different devices so that the settings on one are replicated on another. None of this is needed here.
Once installed, [Postman] displays the following interface:
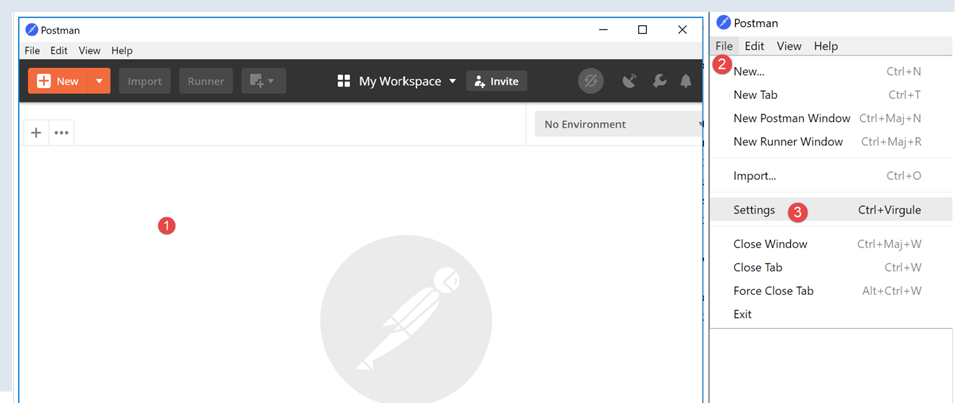
- in [2-3], you can access the product settings;
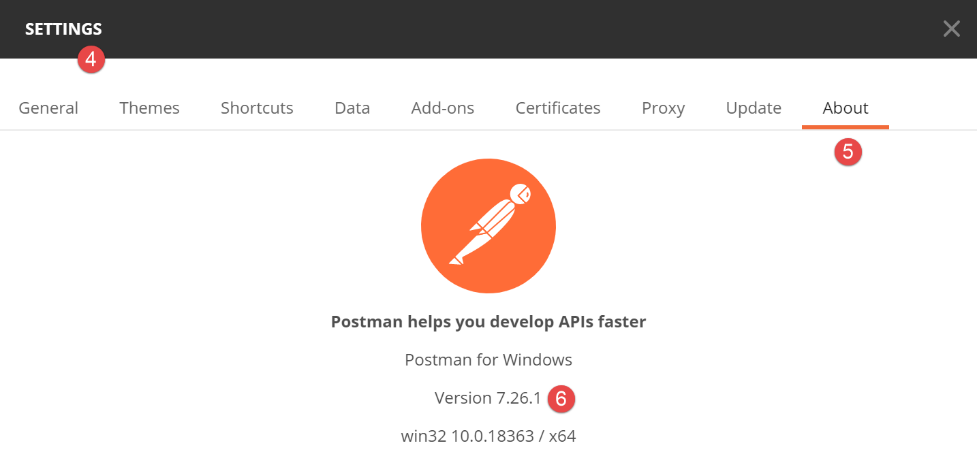
- in [6], the version used in this document;
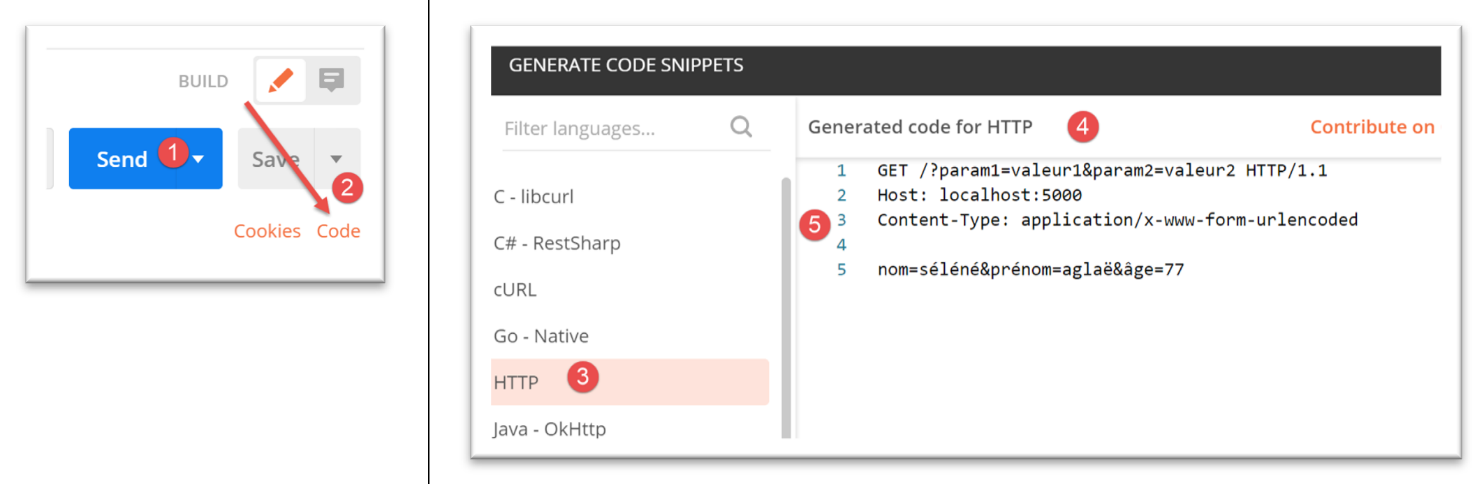
Here, we will use [Postman] to test the previous jSON web service:
- we run the [flask/03/main_01] script;
- then we request URL and [http://localhost:5000/] using Postman;
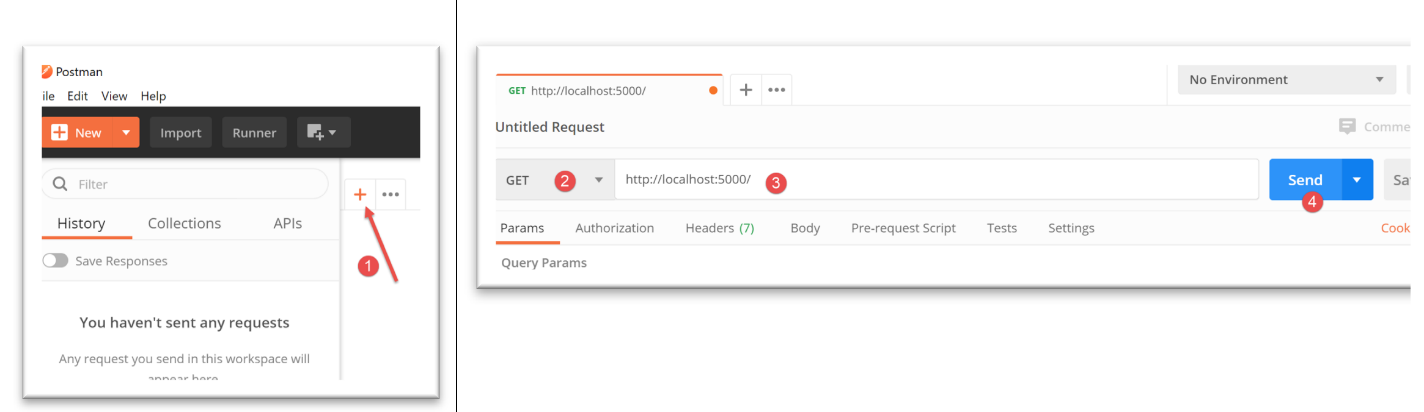
- in [1], we create a request;
- in [2], this will be a request for HTTP and GET;
- in [3], the URL from the queried web service;
- in [4], the request is sent to the web service;
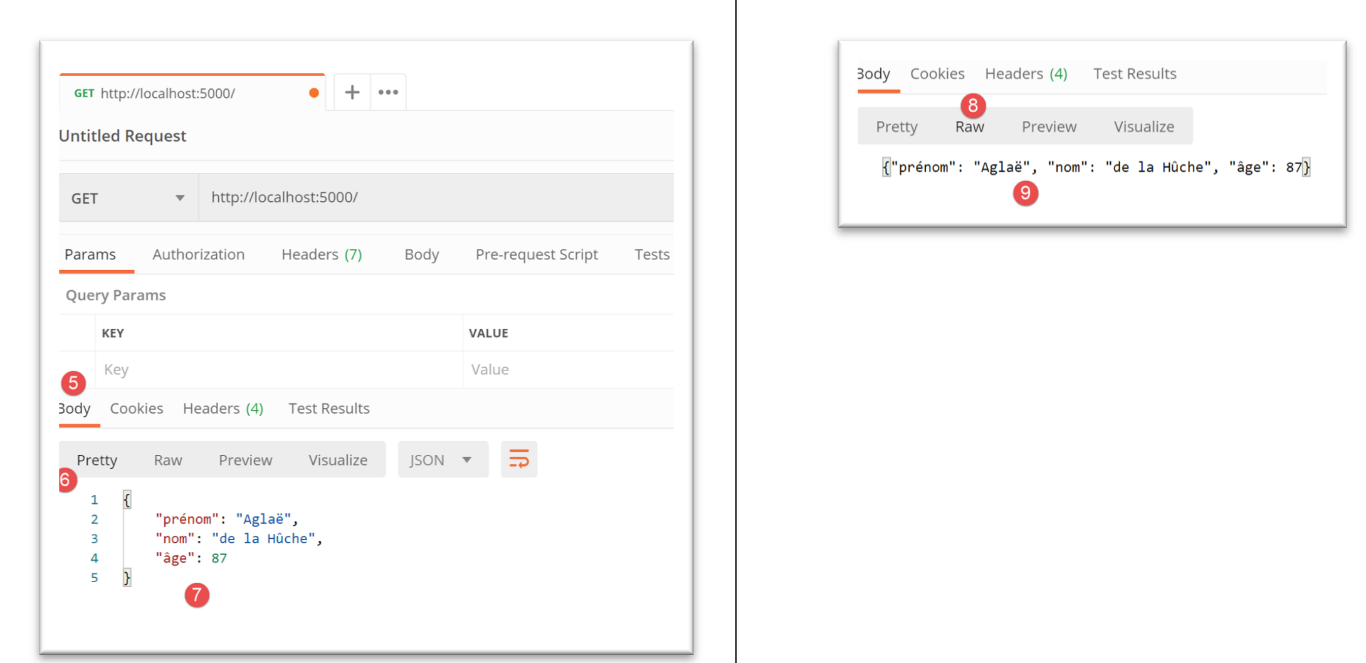
- in [5], select the [Body] tab, which displays the received document;
- in [6], the [Pretty] tab is selected, which displays the received document with appropriate formatting, in this case a format appropriate for a jSON string;
- in [7], the received document jSON;
- in [8-9], the received document without formatting;
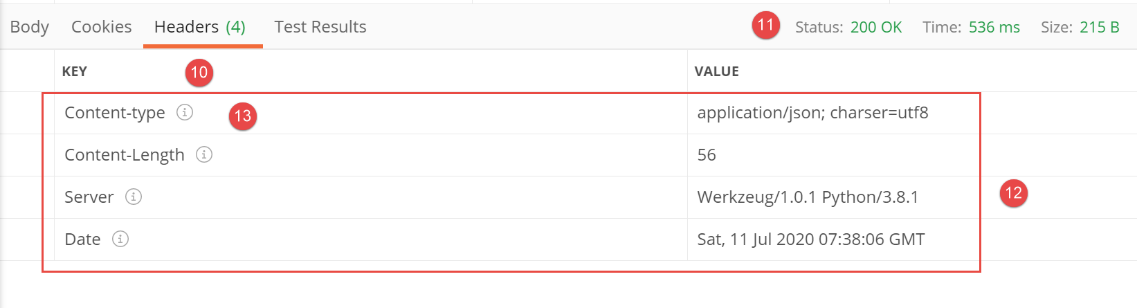
- in [10], the headers HTTP received by Postman are displayed;
- in [11], the status HTTP of the received response;
- in [12], the headers HTTP received;
- in [13], the [Content-type] header that allowed Postman to know it was going to receive a jSON string. Postman used this information to format the received document in a certain way;
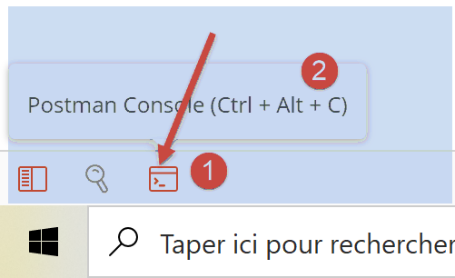
There is another way to use Postman. It involves using the Postman console (Ctrl-Alt-C). This allows you to view the client/server dialogue. In addition to the Ctrl-Alt-C shortcut, the Postman console is accessible via an icon in the bottom-left corner of the main Postman window:
The Postman console records the client/server dialogs that occur when a Postman request is executed:
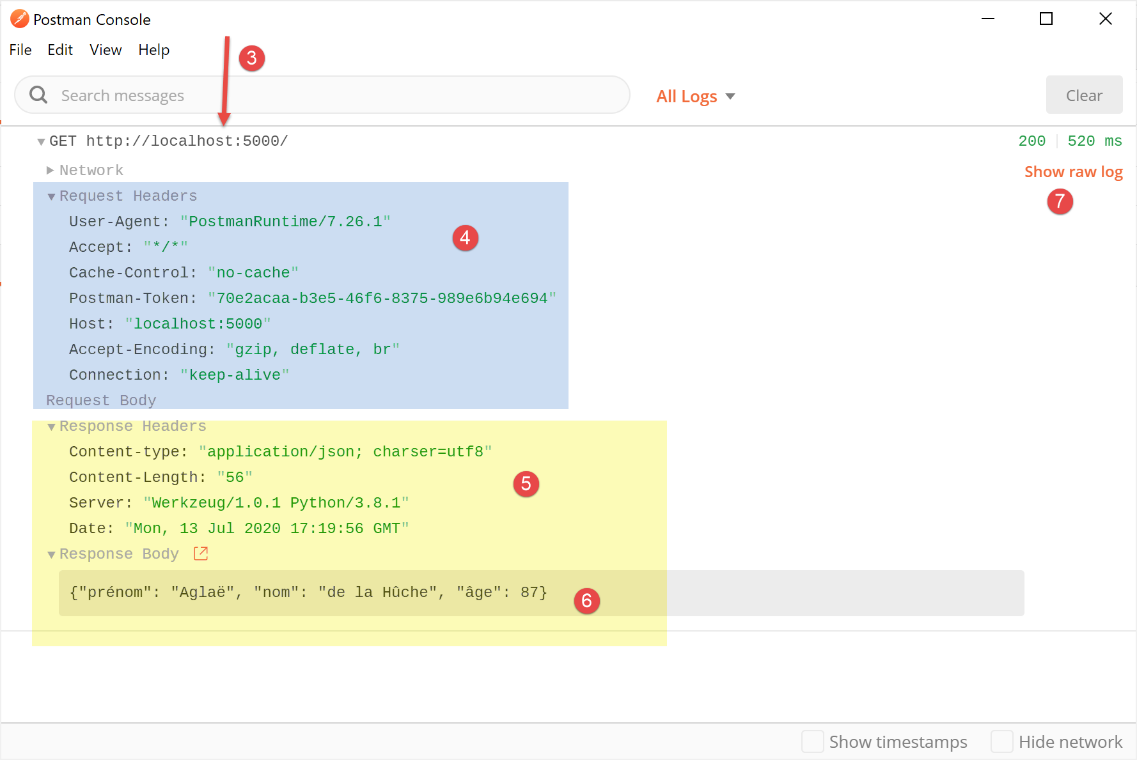
- in [3], the list of requests made by Postman since it was launched. The most recent ones are at the bottom of the list;
- in [4], the request HTTP made by Postman;
- in [5-6], the response HTTP sent by the web server;
- in [7], you can see the logs in [raw] mode, i.e., without any formatting;
In [raw] mode, the console window looks like this:
- in [8], the request HTTP made by Postman to the web server;
- in [9], the response HTTP sent by the web server;
- in [10], you can return to [pretty logs] mode;
To simplify the explanation, we will number the lines obtained from the Postman console.
For the client:
For the server:
From now on, we will mainly use:
- [Postman] as the web client;
- the [Postman] console in [raw mode] to explain the client/server dialogue;
22.4.3. script [main_02]
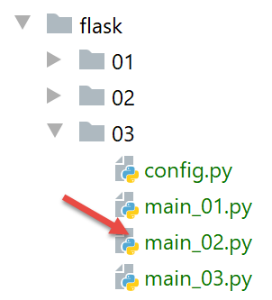
The web script [main_02] is as follows:
# configure the application
import config
config=config.configure()

# imports
from flask import Flask, make_response
from flask_api import status

# dependencies
from Personne import Personne

# flask application
app = Flask(__name__)


# Home URL
@app.route('/')
def index():
    # a person
    personne = Personne().fromdict({"prénom": "Aglaë", "nom": "de la Hûche", "âge": 87})
    # content
    response = make_response(f"personne[{personne.prénom}, {personne.nom}, {personne.âge}]")
    # headers HTTP
    response.headers.set("Content-Type", "text/plain; charset=utf8")
    # answer HTTP
    return response, status.HTTP_200_OK


# hand only
if __name__ == '__main__':
    # start the server
    app.config.update(ENV="development", DEBUG=True)
    app.run()
- The script [main_02] is similar to the script [main_01]. It differs in two ways:
- line 22: the document sent to the client is a raw string, not a jSON string;
- line 24: this is reflected in the HTTP [Content-Type] header, which specifies the [text/plain] type for the document;
We run the [main_02] web script and then use [Postman] to query it:
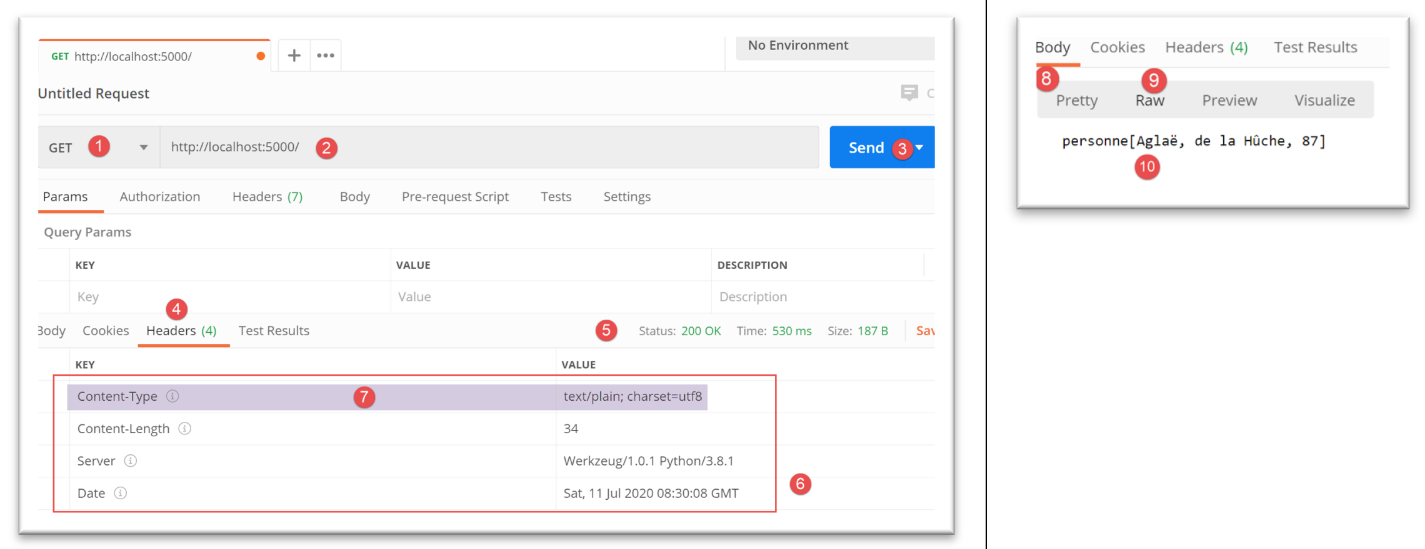
- In [1-3], we send the request to the web service;
- In [5], the OK status of the response;
- in [4, 6], the response headers HTTP;
- in [7], the header [Content-Type];
- to [8-10], the document sent by the web service, a string of characters;
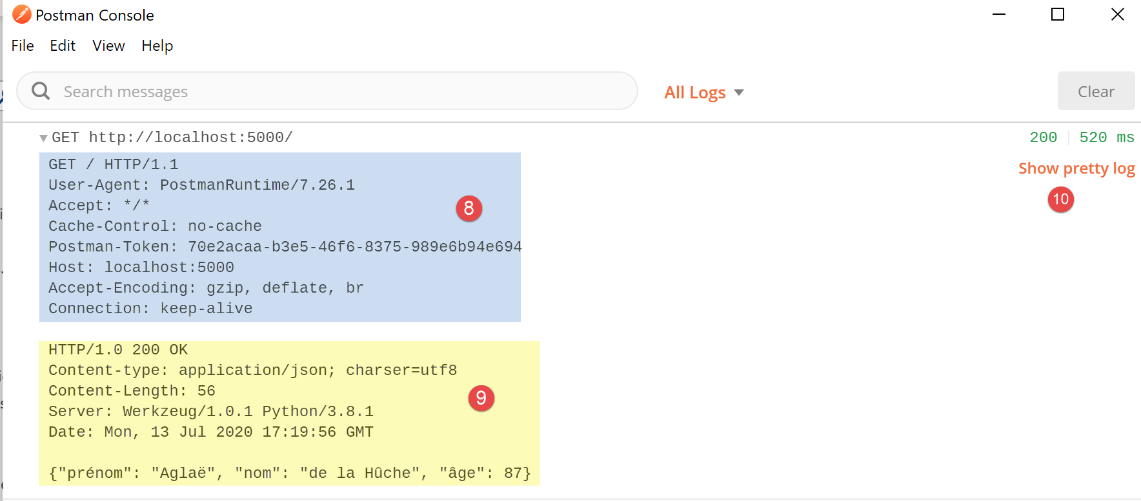
The Postman console displays the following logs:
Client request:
Server response:
HTTP/1.0 200 OK
Content-Type: text/plain; charset=utf8
Content-Length: 34
Server: Werkzeug/1.0.1 Python/3.8.1
Date: Mon, 13 Jul 2020 17:34:22 GMT

personne[Aglaë, de la Hûche, 87]
22.4.4. script [main_03]
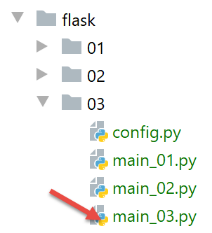
The [main_03] web script is as follows:
# configure the application
import config
config = config.configure()

# imports
from flask import Flask, make_response
from flask_api import status

# dependencies
from MyException import MyException
from Personne import Personne

# flask application
app = Flask(__name__)


# Home URL
@app.route('/')
def index():
    # an incorrect person
    msg_erreur = None
    try:
        personne = Personne().fromdict({"prénom": "", "nom": "", "âge": 87})
    except MyException as erreur:
        msg_erreur = f"{erreur}"
    # mistake?
    if msg_erreur:
        response = make_response(msg_erreur)
        status_code = status.HTTP_500_INTERNAL_SERVER_ERROR
    else:
        response = make_response(f"personne[{personne.prénom}, {personne.nom}, {personne.âge}]")
        status_code = status.HTTP_200_OK
    # headers HTTP
    response.headers.set("Content-Type", "text/plain; charset=utf8")
    # answer HTTP
    return response, status_code


# hand only
if __name__ == '__main__':
    # start the server
    app.config.update(ENV="development", DEBUG=True)
    app.run()
- line 23: an error is triggered by instantiating an incorrect person;
- lines 27–29: due to the error:
- line 28: prepare a response HTTP containing the error message;
- line 29: we assign the status code HTTP an error value of [500 Internal Server Error];
- line 34: the client is informed that plain text is being sent;
- line 36: the response HTTP is sent to the client;
We launch the [main_03] web service and use Postman to make a request:

- In [1-3], we send the request;
- in [4], we receive a response with a status code [500 INTERNAL SERVER ERROR];
- in [5-7]: the response is text describing the error that occurred;
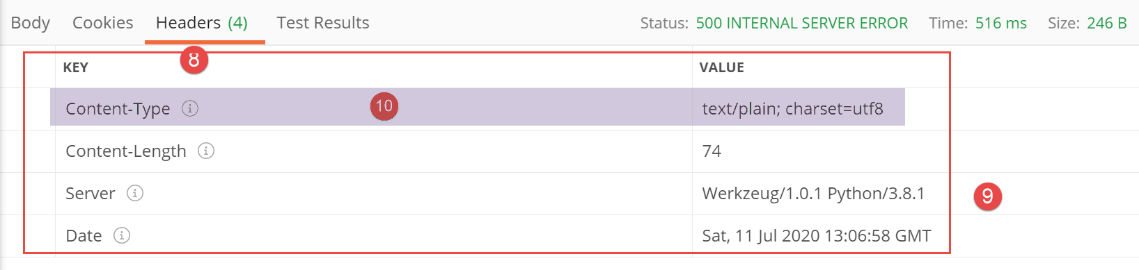
- in [8-10], the headers HTTP from the web service response;
In the Postman console, the results in [raw] mode are as follows:
Client request:
Server response:
HTTP/1.0 500 INTERNAL SERVER ERROR
Content-Type: text/plain; charset=utf8
Content-Length: 74
Server: Werkzeug/1.0.1 Python/3.8.1
Date: Mon, 13 Jul 2020 17:39:24 GMT

MyException[11, Le prénom doit être une chaîne de caractères non vide]
22.5. [flask/04] scripts: information embedded in the request
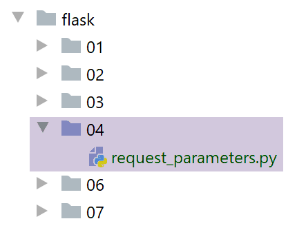
The [request_parameters.py] script aims to demonstrate that the web service has access to various pieces of information embedded in a web client’s request. The code is as follows:
# import
from flask import Flask, make_response, request
from flask_api import status
# flask application
app = Flask(__name__)


# Home URL
@app.route('/', methods=['GET', 'POST'])
def index():
    # query parameters
    request_data = {}
    request_data["environ"] = f"{request.environ}"
    request_data["path"] = request.path
    request_data["full_path"] = request.full_path
    request_data["script_root"] = request.script_root
    request_data["url"] = request.url
    request_data["base_url"] = request.base_url
    request_data["url_root"] = request.url_root
    request_data["accept_charsets"] = request.accept_charsets
    request_data["accept_encodings"] = request.accept_encodings
    request_data["accept_languages"] = request.accept_languages
    request_data["accept_mimetypes"] = request.accept_mimetypes
    request_data["args"] = request.args
    request_data["content_encoding"] = request.content_encoding
    request_data["content_length"] = request.content_length
    request_data["content_type"] = request.content_type
    request_data["endpoint"] = request.endpoint
    request_data["files"] = request.files
    request_data["form"] = request.form
    request_data["host"] = request.host
    request_data["method"] = request.method
    request_data["query_string"] = request.query_string.decode()
    request_data["referrer"] = request.referrer
    request_data["remote_addr"] = request.remote_addr
    request_data["remote_user"] = request.remote_user
    request_data["scheme"] = request.scheme
    request_data["script_root"] = request.script_root
    request_data["user_agent"] = f"{request.user_agent}"
    request_data["values"] = request.values
    # answer HTTP
    response = make_response(request_data)
    # headers HTTP
    response.headers["Content-Type"] = "application/json; charset=utf-8"
    # send reply HTTP
    return response, status.HTTP_200_OK


# hand
if __name__ == '__main__':
    app.config.update(ENV="development", DEBUG=True)
    app.run()
- Line 9: We are making a change. We specify which verbs are allowed in the client request. Postman provides the list:
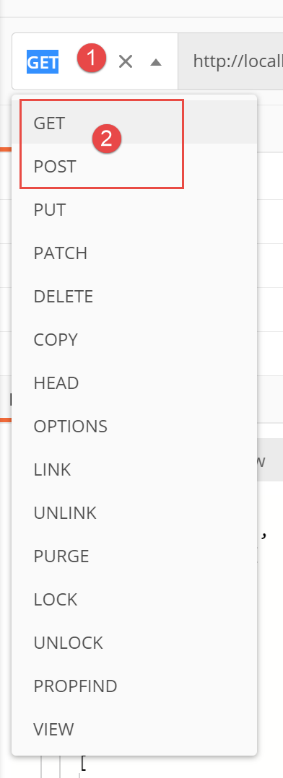
The first two, [GET, POST], are the most commonly used and will also be the only ones used in this document. Returning to line 9 of the code, the [methods] parameter contains the list of methods from the list above that are authorized by URL. In the absence of this parameter, only the [GET] method is allowed. This is what has happened so far;
- line 12: we will construct the dictionary [request_data];
- line 13: the client request is available in a predefined object [request], imported on line 2, of type [werkzeug.local.LocalProxy]. The following lines retrieve various attributes of this object;
- rather than detailing each attribute of the [request] object, we will run this code and examine the results. We will then better understand the meaning of the various attributes displayed;
- line 42: the dictionary [request_data] will be the content of the response HTTP. Remember that this must be text. Flask automatically converts dictionaries into strings jSON;
- line 44: we tell the client that it will receive jSON;
- line 46: we send the response to the client;
Using the Postman client, we send the following request to the previous web service:
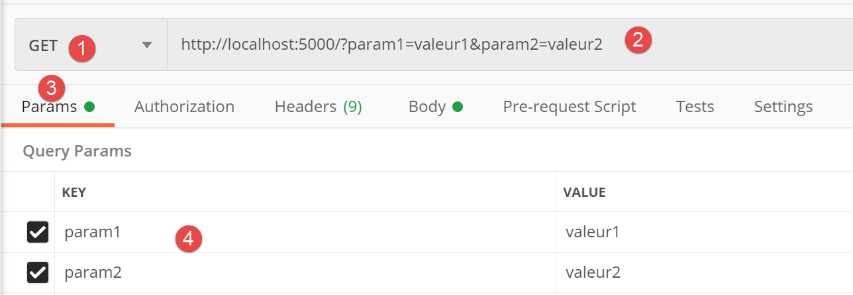
- in [1-2], the request sent;
- in [2], the request is configured. The parameters are appended to URL in the form [ ?param1=valeur1¶m2=valeur2]. There are two ways to enter these parameters in Postman:
- enter them directly in URL;
- enter them in [3-4];
Both methods are equivalent;
We add other parameters to the request:
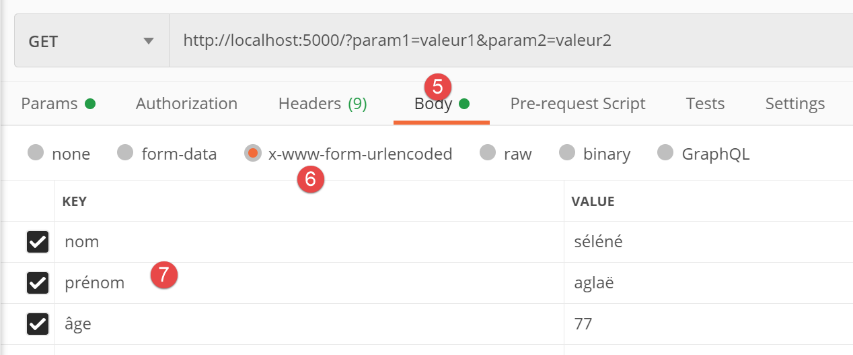
- in [5-7], we add parameters to the body of the request. While the parameters in URL are visible to the user in a web browser, those in the request body are not visible. The browser (or Postman in this case) sends them to the server after the HTTP headers. The web client’s request then has the same structure as the web server’s response: HTTP headers followed by a document. This will cause two new HTTP headers to appear in the client’s request:
- [Content-Type]: the client tells the server what type of document it is sending;
- [Content-Length]: the document size in bytes;
- in [6], the encoding to be used for the parameters declared in [7]. These can be encoded in various ways. [x-www-form-urlencoded] is a method frequently used by browsers;
Here is the request that will be generated:
The response to this request is as follows:
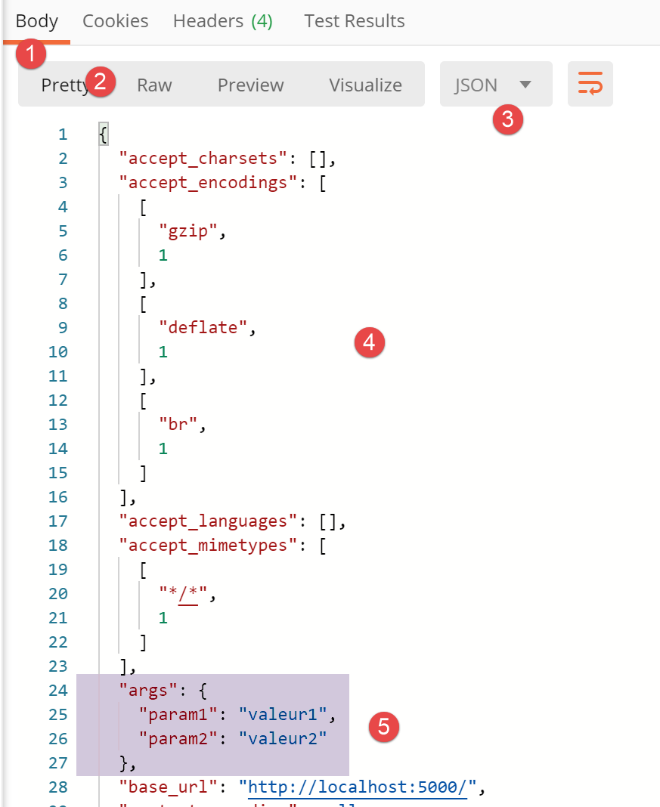
- in [1-5], we received a string jSON [3];
- what generally interests the web service are the parameters of URL [ ?param1=valeur1¶m2=valeur2] and those that were transmitted in the request body (document). This is generally how the client transmits information to it. We can see in [5] that the parameters of URL are available in [request.args];
The rest of the response is as follows:
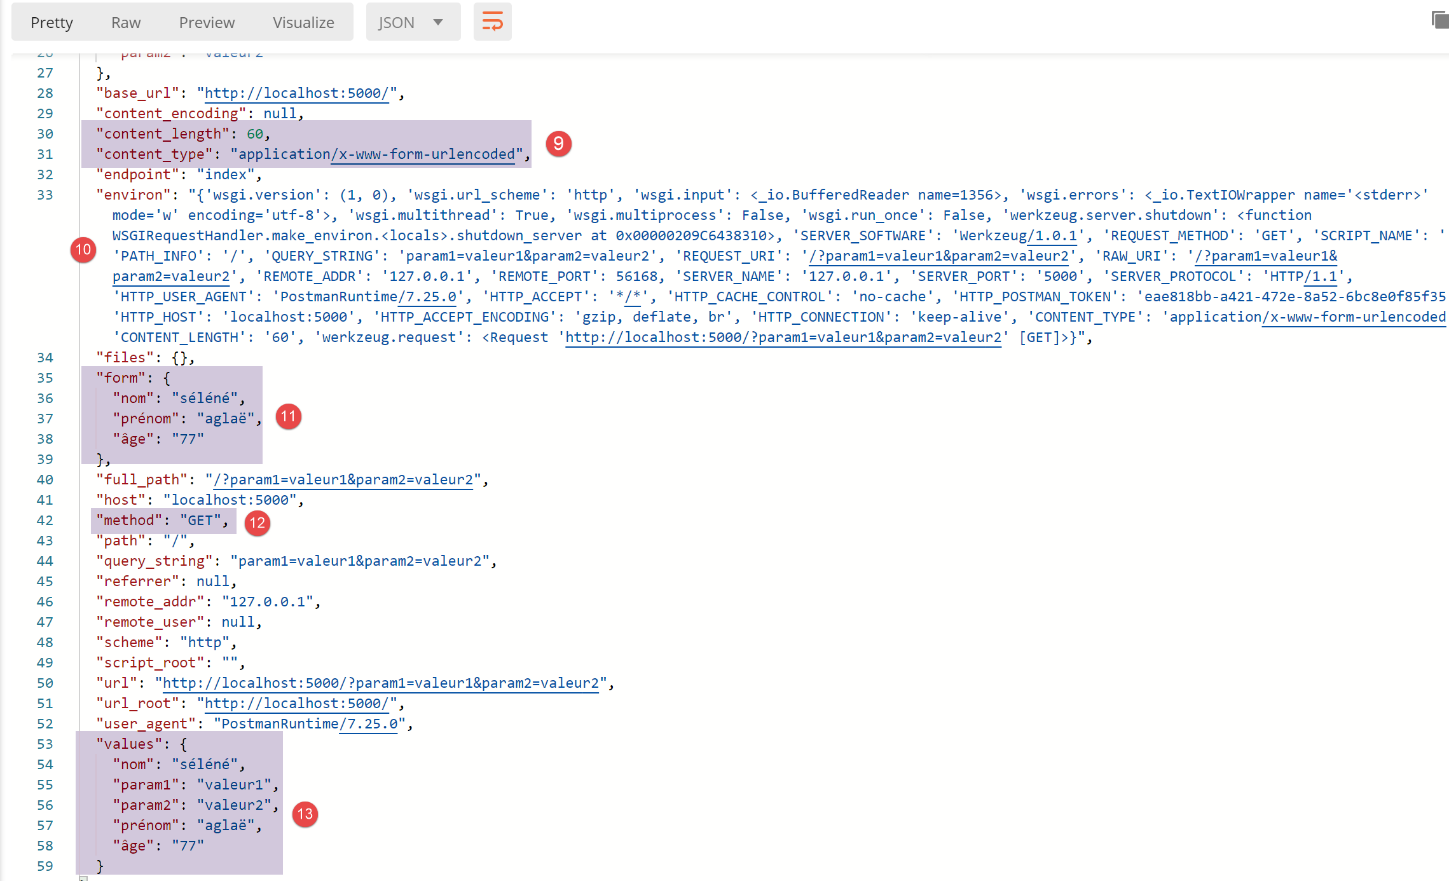
- In [9], the attributes of the parameters included in the request body:
- [content_type] is the type of the document accompanying the request. We saw that this document contained [param=valeur]-type information encoded in the form [x-www-form-urlencoded]. Postman therefore generated a HTTP [Content-Type] header indicating the nature of the document;
- [content_length] is the size of this document in bytes;
- In [10], the attribute [request.environ] contains extensive information about the environment in which the client’s request is processed. Most of this information is found in the other attributes of the [request] object;
- in [11], the parameters present in the request body are available in the [request.form] attribute;
- in [12], the method used to send the request, in this case the [GET] method;
- in [13], the attribute [request.values] is the dictionary of all parameters, including those from URL and those from the document body. To retrieve the request parameters, use the attribute:
- [request.args] to retrieve those present in URL;
- [request.form] to retrieve those present in the document body;
In the Postman console, the logs are as follows:
Client request:
- line 9: the type of document sent to the server on line 12;
- line 11: the HTTP headers of the request are separated from the document sent by a blank line. This is how the server identifies the end of the client’s HTTP headers;
- line 12: the ‘url-encoded’ document. All accented characters have been encoded;
The client’s response is as follows:
HTTP/1.0 200 OK
Content-Type: application/json; charset=utf-8
Content-Length: 2433
Server: Werkzeug/1.0.1 Python/3.8.1
Date: Wed, 15 Jul 2020 06:09:09 GMT
{
"accept_charsets": [],
"accept_encodings": [
[
"gzip",
1
],
[
"deflate",
1
],
[
"br",
1
]
],
"accept_languages": [],
"accept_mimetypes": [
[
"*/*",
1
]
],
"args": {
"param1": "valeur1",
"param2": "valeur2"
},
"base_url": "http://localhost:5000/",
"content_encoding": null,
"content_length": 60,
"content_type": "application/x-www-form-urlencoded",
"endpoint": "index",
"environ": "{'wsgi.version': (1, 0), 'wsgi.url_scheme': 'http', 'wsgi.input': <_io.BufferedReader name=908>, 'wsgi.errors': <_io.TextIOWrapper name='<stderr>' mode='w' encoding='utf-8'>, 'wsgi.multithread': True, 'wsgi.multiprocess': False, 'wsgi.run_once': False, 'werkzeug.server.shutdown': <function WSGIRequestHandler.make_environ.<locals>.shutdown_server at 0x00000173CA6E5160>, 'SERVER_SOFTWARE': 'Werkzeug/1.0.1', 'REQUEST_METHOD': 'GET', 'SCRIPT_NAME': '', 'PATH_INFO': '/', 'QUERY_STRING': 'param1=valeur1¶m2=valeur2', 'REQUEST_URI': '/?param1=valeur1¶m2=valeur2', 'RAW_URI': '/?param1=valeur1¶m2=valeur2', 'REMOTE_ADDR': '127.0.0.1', 'REMOTE_PORT': 50592, 'SERVER_NAME': '127.0.0.1', 'SERVER_PORT': '5000', 'SERVER_PROTOCOL': 'HTTP/1.1', 'HTTP_USER_AGENT': 'PostmanRuntime/7.26.1', 'HTTP_ACCEPT': '*/*', 'HTTP_CACHE_CONTROL': 'no-cache', 'HTTP_POSTMAN_TOKEN': 'cbfac6aa-71a0-4076-a0c3-91d36d74a4c0', 'HTTP_HOST': 'localhost:5000', 'HTTP_ACCEPT_ENCODING': 'gzip, deflate, br', 'HTTP_CONNECTION': 'keep-alive', 'CONTENT_TYPE': 'application/x-www-form-urlencoded', 'CONTENT_LENGTH': '60', 'werkzeug.request': <Request 'http://localhost:5000/?param1=valeur1¶m2=valeur2' [GET]>}",
"files": {},
"form": {
"nom": "s\u00e9l\u00e9n\u00e9",
"pr\u00e9nom": "agla\u00eb",
"\u00e2ge": "77"
},
"full_path": "/?param1=valeur1¶m2=valeur2",
"host": "localhost:5000",
"method": "GET",
"path": "/",
"query_string": "param1=valeur1¶m2=valeur2",
"referrer": null,
"remote_addr": "127.0.0.1",
"remote_user": null,
"scheme": "http",
"script_root": "",
"url": "http://localhost:5000/?param1=valeur1¶m2=valeur2",
"url_root": "http://localhost:5000/",
"user_agent": "PostmanRuntime/7.26.1",
"values": {
"nom": "s\u00e9l\u00e9n\u00e9",
"param1": "valeur1",
"param2": "valeur2",
"pr\u00e9nom": "agla\u00eb",
"\u00e2ge": "77"
}
}
- lines 1-5: the HTTP headers in the response, followed by a blank line;
- lines 41-45: accented characters have been encoded in UTF-8;
If we now use the [POST] method to send the same request with the same parameters, we will get the same response, except that in [12], we will have [‘method’ : ‘POST’].
So what is the difference between the GET and POST methods? The difference is subtle and stems from how browsers have historically used them:
- the parameters in URL are convenient because a URL configured this way can serve as a link within a HTML document. The user can also change the parameters themselves to obtain different responses from the server. In this case, browsers commonly use the [GET] method, and there is no body (content_length=0) in the request sent to the web server (no hidden parameters);
- sometimes you do not want the parameters to be displayed in the URL. This is the case for passwords sent to the server. Furthermore, the size occupied by the parameters in the URL is limited (a URL cannot exceed a certain size). Parameters in the request body do not have this limitation. Furthermore, having too many parameters in the URL makes it unreadable. Let’s consider the common case of a website registration form. Historically, when HTML pages did not yet embed Javascript, browsers sent the entered information via a POST. This was referred to as posted values;
So in the early days of web programming:
- GET methods were generally associated with requesting information from a web server;
- POST methods were primarily associated with sending information from the browser to the server. The server was then “enriched” by this information;
Since then, Javascript has been implemented. Whereas in the previous examples, the developer had no control (clicking a link would always trigger a GET, and submitting a form would always go through a POST), the Javascript has given them back control. In this model, the HTML page is associated with Javascript code that can bypass the browser. Thus, a click on a link can be intercepted by the Javascript code, which can then execute code that sends a request to the server. This request will be transparent to the user; they won’t see it. This code is a web client, and just as we did with Postman, the developer can create any request they want. To return to the example of clicking a link, it can execute a POST, whereas by default the browser would have executed a GET. These changes have made the differences between GET and POST less relevant.
However, developers often follow these rules:
- a GET must not modify the server’s state. Successive GET requests made with the same parameters as in the URL must return the same document. Furthermore, the GET usually has no body (no associated document), only parameters in the URL;
- POST can modify the server’s state. Parameters are most often sent in the request body. These are referred to as posted values. The form example is the most telling: the values entered by the user will be placed in the body of the POST, and the server will store them somewhere, often in a database;
In the rest of this document, we do not adhere to any specific rules.
22.6. [flask-05] scripts: user memory management
22.6.1. Introduction
In the previous client/server examples, the process was as follows:
- the client opens a connection to port 80 on the web server machine;
- it sends the text sequence: headers HTTP, blank line, [document];
- in response, the server sends a sequence of the same type;
- the server closes the connection to the client;
- the client closes the connection to the server;
If the same client makes a new request to the web server shortly thereafter, a new connection is established between the client and the server. The server cannot tell whether the connecting client has visited before or if this is a first request. Between connections, the server “forgets” its client. For this reason, the HTTP protocol is said to be a stateless protocol. However, it is useful for the server to remember its clients. Thus, if an application is secure, the client will send the server a username and password to authenticate itself. If the server “forgets” its client between connections, the client would have to authenticate itself with every new connection, which is not feasible.
To track a client, the server can proceed in various ways:
- When a client makes an initial request, the server includes an identifier in its response, which the client must then send back with every new request. Thanks to this identifier, which is unique to each client, the server can recognize a client. It can then manage a memory for that client in the form of a memory uniquely associated with the client’s identifier. This is how, for example, the PHP services work;
- when a client makes an initial request, the server includes in its response not an identifier but the user’s memory itself. It stores nothing on the server side. To maintain its memory, the web client must resend this memory with each new request. This memory is modified (or not) with each new request and sent back (or not) to the client. This is the method used by the Flask framework;
The differences between the two methods are as follows:
- Method 1 uses less bandwidth. Only an identifier is exchanged between the client and the server. As the user’s memory grows, this has no effect on the identifier, which remains the same. This is not the case with Method 2, where the user’s memory is exchanged with each request and can grow over the course of multiple requests;
- Method 1 consumes more memory space. This is because the server stores the user’s memory on its file systems. If there are a million users, this could potentially pose a problem. Method 2 does not store anything on the server;
Technically, this is how it works in both methods:
- In the response to a new client, the server includes the header HTTP, [Set-Cookie : MotClé=Identifiant], or [Set-Cookie : mémoire]. With Method 1, it does this only on the first request. With Method 2, it does this every time the user’s memory changes;
- in its requests, the client systematically returns what it has received, an identifier or a memory. It does this via the header HTTP [Cookie : MotClé=Valeur];
One might wonder how the server knows it is dealing with a new client rather than a returning one. It is the presence of the HTTP Cookie header in the client’s HTTP headers that tells it. For a new client, this header is absent.
The set of connections from a given client is called a session.
The server may maintain other types of memory:
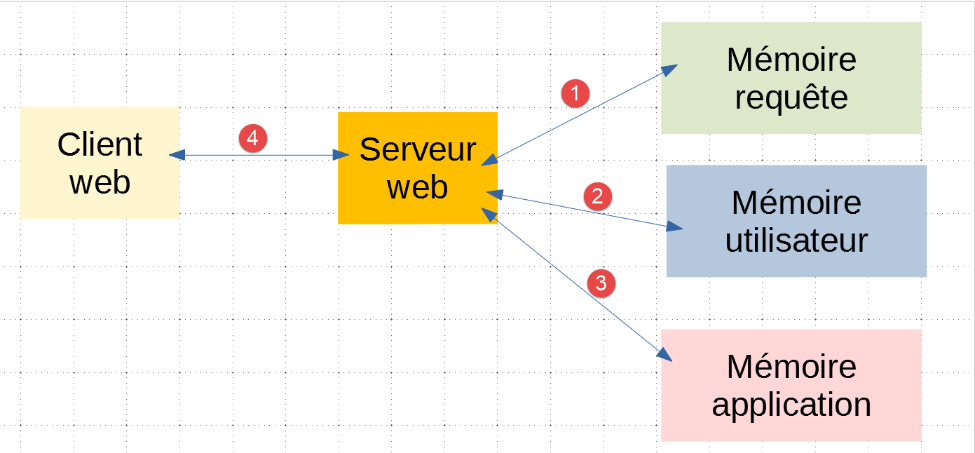
- In [1], request-level memory is unique. It is used when the web client’s request is processed not by a single service (or application) but by multiple ones. To pass information to service i+1, service i can enrich the processed request with this information. This is known as request-level memory. We will not use this type of memory in this document;
- in [2, 4], the user memory we just described. It can be implemented locally ([2]) or maintained using the client ([4]);
- In [3], "application-level" memory is generally read-only. It is shared by all users. It often contains elements of the web application’s configuration, which is shared by all users of the application. Caution is required with this type of memory: writing to it must occur at a time when users have not yet sent requests, most often at application startup. Once requests start coming in, it becomes difficult to write to this memory. When the web server is serving multiple users simultaneously and two of them attempt to write to the ‘application’ level memory, there is a risk that this memory will become corrupted. Indeed, while User 1 has started writing to the ‘application’ level memory, they may be interrupted before even finishing. This results in incomplete application memory. Since it is shared, User 2 may read it and obtain an incorrect state;
22.6.2. script [session_scope_01]
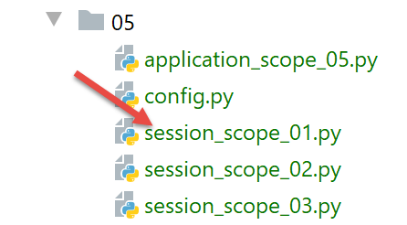
The scripts [session_scope_xx] illustrate user memory management.
The [session_scope_01] script is as follows:
# configure the application
import config
config = config.configure()

# dependencies
import json
from flask import Flask, make_response, session
from flask_api import status

# flask application
app = Flask(__name__)

# session secret key
app.secret_key = config["SECRET_KEY"]


@app.route('/set-session', methods=['GET'])
def set_session():
    # put something in the session
    session['nom'] = 'séléné'
    # send an empty response
    response = make_response()
    response.headers['Content-Length'] = 0
    return response, status.HTTP_200_OK


@app.route('/get-session', methods=['GET'])
def get_session():
    # we retrieve the session and send the response
    response = make_response(json.dumps({"nom": session['nom']}, ensure_ascii=False))
    response.headers['Content-Type'] = 'application/json; charset=utf-8'
    return response, status.HTTP_200_OK


# hand only
if __name__ == '__main__':
    app.config.update(ENV="development", DEBUG=True)
    app.run()
- line 11: a Flask application is instantiated;
- line 14: the [secret_key] attribute of this application is assigned a value taken from the configuration file used in lines 1–3. A Flask session is only possible if this attribute is initialized. You can put anything in it. It is used to encrypt a portion of the ‘user memory’ that will be sent to the client. We generally put something that is difficult to guess. In the [config] file, the secret key is defined as follows:
    # we return the config
    config = {
        # flask configuration
        "SECRET_KEY": "vibnFfrdWYUp?*LQ"
    }
- For the first time, we are defining a web application that serves something other than URL /
- line 17: URL [/set-session] is used to initialize the user’s session;
- line 27: URL [/get-session] is used to retrieve the user’s memory (or user session);
- line 20: we put something into the user’s memory (= the session), in this case a name. The session is managed somewhat like a dictionary. You cannot put just anything into the session. The values placed there must be convertible to jSON. For Python’s predefined types, this happens automatically without developer intervention. For custom objects that Python does not recognize, you must perform the jSON conversion yourself;
- line 22: we create a HTTP response with no content (no parameters passed to make_response);
- line 23: the client is told that it will receive an empty document (0 bytes in size);
- line 24: the response HTTP is sent to the client. The URL [/set-session] therefore does nothing other than initialize a user session;
- line 27: URL and [/get-session] allow the user to see what is in their session;
- line 30: we create a response containing the string from the user’s session. Here, we created the string jSON ourselves instead of letting Flask generate it. This is because we do not want accented characters to be escaped (ensure_ascii=False);
- line 31: we tell the client that we are sending jSON;
- line 32: we send the response HTTP to the client;
The purpose of this script is to demonstrate that the user session allows linking between the user’s successive requests:
- Request 1 will request URL [/set-session];
- Request 2 will request URL [/get-session] and retrieve the name that Request 1 initialized;
The script [config], which configures the scripts in the [flask/05] folder, is as follows:
def configure():
    # absolute path configuration relative path reference
    root_dir = "C:/Data/st-2020/dev/python/cours-2020/python3-flask-2020"

    # application dependencies
    absolute_dependencies = [
        # Person, Utilities, MyException
        f"{root_dir}/classes/02/entities",
    ]
    # set the syspath
    from myutils import set_syspath
    set_syspath(absolute_dependencies)

    # we return the config
    config = {
        # flask configuration
        "SECRET_KEY": "vibnFfrdWYUp?*LQ"
    }

    return config
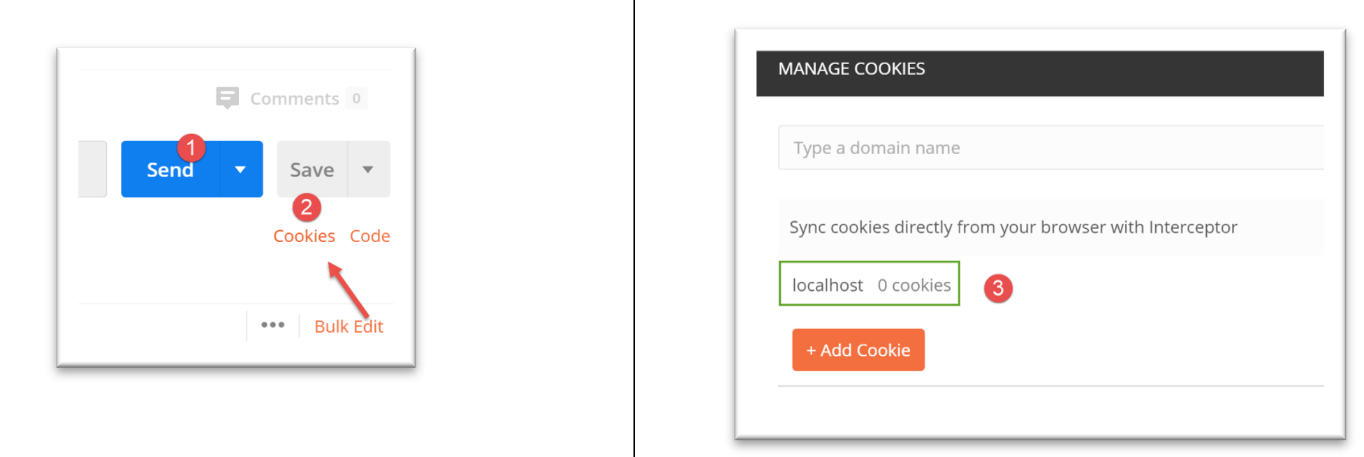
We run the [session_scope_01] script, then use Postman to request the URL and [/set-session]. Before doing so, we’ll check a few elements of the request that will be made:
![]()
- In [1], access Postman’s cookies;
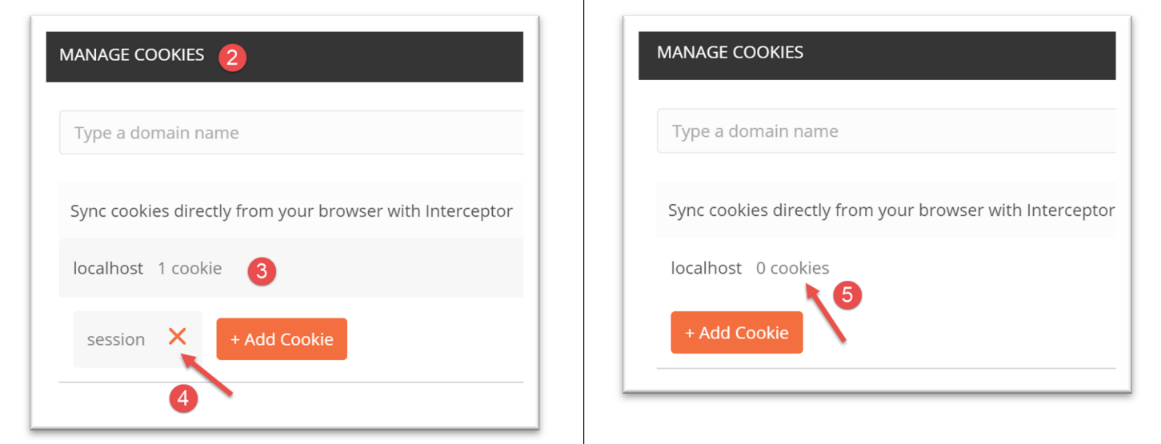
- in [2-4], we check Postman’s known cookies and delete them all in [4-5];
Now let’s check the request HTTP that will be generated:
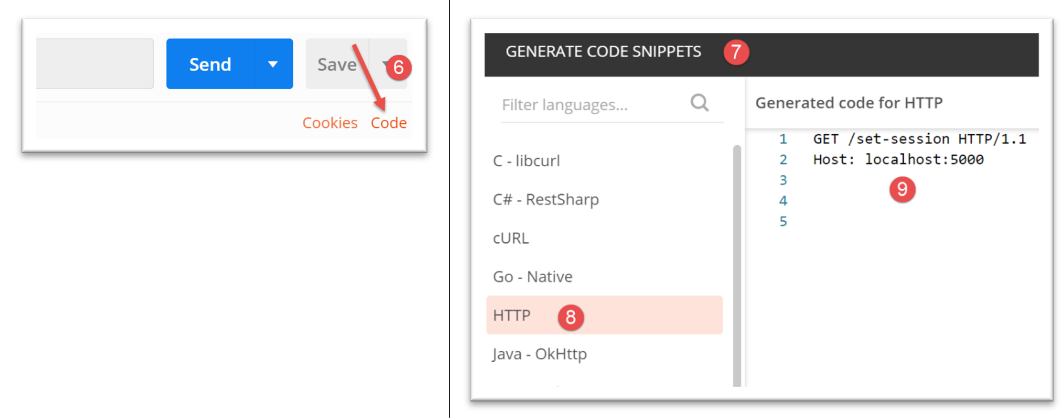
- in [9]: some of the headers HTTP that Postman will include in the request based on the configuration we set up for it. This check allows you to verify that you haven’t omitted any parameters or, conversely, left unnecessary parameters;
Once this is done, we can execute the request:
![]()
There are several ways to check the result. You can start by looking at the main window:
- in [1-2], the request sent to the web service;
- in [3-6], the response headers;
- in [4], since the response type wasn’t specified in the code, Flask used the default type [text/html];
- in [5], the client knows there is no document in the response;
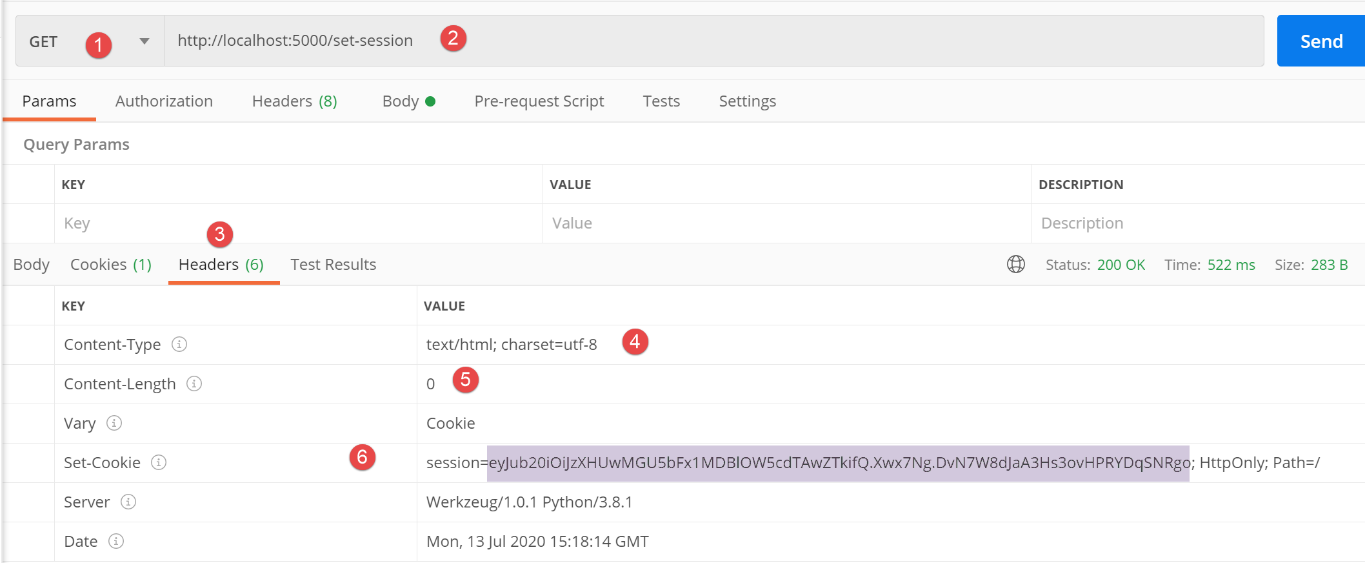
- Line 6: The header [Set-Cookie] was sent by the Flask server. Its value is called a session cookie. It consists of three elements:
- [session=valeur]: this value represents the user’s session in an encrypted form. This session can be decrypted (see |https://blog.miguelgrinberg.com/post/how-secure-is-the-flask-user-session|). However, due to the secret key used by the server, the user cannot modify the received data and then send it back to the server. When the server receives a session, it is thus assured of receiving an uncorrupted session;
- [HttpOnly]: the presence of this element tells the browser receiving it that the cookie must not be accessible to the Javascript that the page it is displaying may contain;
- [Path=/] is the path to which the session cookie must be sent back, which in this case is any path within the web application. Whenever the user explicitly requests (by typing a URL) or implicitly requests (by clicking a link) a URL from this domain, the browser will automatically send back the session cookie it received;
The drawback of the main window is that we do not have access to the complete request that led to this response. What is displayed in this window is confusing:

- in the headers HTTP and [3-4], a session cookie is shown as [5]. One might therefore think that Postman included a session cookie in the request, when in fact it did not. The headers [3] actually represent the headers HTTP that will be sent in the next request, as it is currently configured. Postman has just received a session cookie that it will send back in the next request. That is why we have [5];
You can access the client/server dialog in the Postman console by pressing Ctrl-Alt-C:
GET /set-session HTTP/1.1
User-Agent: PostmanRuntime/7.26.1
Accept: */*
Cache-Control: no-cache
Postman-Token: 3673b73f-7600-4df4-8c4b-c37973e50df8
Host: localhost:5000
Accept-Encoding: gzip, deflate, br
Connection: keep-alive

HTTP/1.0 200 OK
Content-Type: text/html; charset=utf-8
Content-Length: 0
Vary: Cookie
Set-Cookie: session=eyJub20iOiJzXHUwMGU5bFx1MDBlOW5cdTAwZTkifQ.Xw6jGQ.y5Icu70wTIN-B0o_hwx0xDH247I; HttpOnly; Path=/
Server: Werkzeug/1.0.1 Python/3.8.1
Date: Wed, 15 Jul 2020 06:32:57 GMT
- Line 14: the session cookie sent by the server;
Now let’s request URL [/get-session]:
- line 9: the Postman client sent the session cookie it had received back to the server;
- line 18: the string jSON sent by the server;
This example illustrates several points:
- the Postman client sends back the session cookie it receives from the Flask server. Web browsers always do this;
- we see that request 2 ([/get-session]) retrieved information created during request 1 ([/set-session]). This demonstrates user state persistence;
- lines 11–16: the Flask server did not return a session cookie. This is not always the case. The Flask server only returns the session cookie if the last request modified the user’s state;
22.6.3. script [session_scope_02]
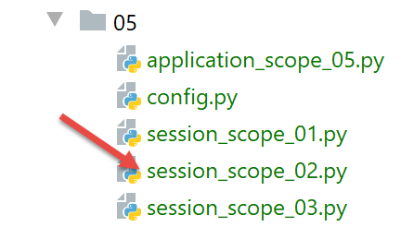
The script [session_02] is as follows:
# dependencies
import os

from flask import Flask, make_response, session
from flask_api import status

# flask application
app = Flask(__name__)

# session secret key
app.secret_key = os.urandom(12).hex()


# Home URL
@app.route('/', methods=['GET'])
def index():
    # we manage three meters
    if session.get('n1') is None:
        session['n1'] = 0
    else:
        session['n1'] = session['n1'] + 1
    if session.get('n2') is None:
        session['n2'] = 10
    else:
        session['n2'] = session['n2'] + 1
    if session.get('n3') is None:
        session['n3'] = 100
    else:
        session['n3'] = session['n3'] + 1
    # meter dictionary
    compteurs = {"n1": session['n1'], "n2": session['n2'], "n3": session['n3']}
    # we send the answer
    response = make_response(compteurs)
    response.headers['Content-Type'] = 'application/json; charset=utf-8'
    return response, status.HTTP_200_OK


# hand
if __name__ == '__main__':
    app.config.update(ENV="development", DEBUG=True)
    app.run()
- line 11: here, the secret key is generated using a function. The advantage of this function is that it randomly generates a complex string of characters. Recall that the variable [app] is the Flask class instance created on line 8;
- line 15: this time, there will be only one route, the / route;
- lines 17–29: we manage a session containing three counters [n1, n2, n3]. On the user’s first request, [n1, n2, n3] = [0, 10, 100], and on each subsequent request, these counters are incremented by 1;
- line 18: during the first request, the application session is empty. The expression [session.get(‘clé’)] returns the value [None]. For subsequent requests, this expression will return the value associated with the key;
- line 31: these counters are placed in a dictionary;
- line 33: this dictionary is the response body HTTP. Recall that Flask automatically converts dictionaries to strings jSON;
- line 34: the web client is told that it will receive jSON;
- line 35: we send the response HTTP to the client;
Let’s run this script and query the web application created this way using Postman after deleting all cookies from the Postman client [1-3]:
In the Postman console, the client/server exchanges are as follows:
GET / HTTP/1.1
User-Agent: PostmanRuntime/7.26.1
Accept: */*
Cache-Control: no-cache
Postman-Token: c7db536d-9352-4aa6-9877-04560e03d935
Host: localhost:5000
Accept-Encoding: gzip, deflate, br
Connection: keep-alive

HTTP/1.0 200 OK
Content-Type: application/json; charset=utf-8
Content-Length: 41
Vary: Cookie
Set-Cookie: session=eyJuMSI6MCwibjIiOjEwLCJuMyI6MTAwfQ.Xw6nLg.v49CeDWwqP-6Dp9Qt330GAe-dNA; HttpOnly; Path=/
Server: Werkzeug/1.0.1 Python/3.8.1
Date: Wed, 15 Jul 2020 06:50:22 GMT

{
"n1": 0,
"n2": 10,
"n3": 100
}
- in [14], the session cookie sent by the server;
- in [18-22], the server's response in the form of a string jSON;
Let’s make the same request a second time. The logs change as follows:
GET / HTTP/1.1
User-Agent: PostmanRuntime/7.26.1
Accept: */*
Cache-Control: no-cache
Postman-Token: 8205ad85-37b3-41f2-a171-70dd3b3a1679
Host: localhost:5000
Accept-Encoding: gzip, deflate, br
Connection: keep-alive
Cookie: session=eyJuMSI6MCwibjIiOjEwLCJuMyI6MTAwfQ.Xw6nLg.v49CeDWwqP-6Dp9Qt330GAe-dNA

HTTP/1.0 200 OK
Content-Type: application/json; charset=utf-8
Content-Length: 41
Vary: Cookie
Set-Cookie: session=eyJuMSI6MSwibjIiOjExLCJuMyI6MTAxfQ.Xw6nsw.OuxIQnGhmhSsan5Qu_FL3Iyu-9k; HttpOnly; Path=/
Server: Werkzeug/1.0.1 Python/3.8.1
Date: Wed, 15 Jul 2020 06:52:35 GMT

{
"n1": 1,
"n2": 11,
"n3": 101
}
- line 9: the Postman client sends back the session cookie it received;
- line 15: in its response, the server sends a new session cookie, because the client’s request modified the user’s state (= the session);
- lines 19–23: the new counter values;
22.6.4. script [session_scope_03]
This new script aims to demonstrate that different Python types can be placed in a session: lists, dictionaries, and objects. The only constraint is that the objects placed in the session must be serializable in jSON. If they are not serializable by default (lists, dictionaries), you must perform the conversion yourself in jSON.
# configure the application
import config
config = config.configure()

# dependencies
import json
import os

from flask import Flask, make_response, session
from flask_api import status
from Personne import Personne

# flask application
app = Flask(__name__)

# session secret key
app.secret_key = os.urandom(12).hex()


# Home URL
@app.route('/', methods=['GET'])
def index():
    # list management
    liste = session.get('liste')
    if liste is None:
        # 1st request
        liste = [0, 10, 100]
    else:
        # following requests
        for i in range(len(liste)):
            liste[i] += 1
    # put the list back in the session
    session['liste'] = liste

    # dictionary management
    dico = session.get('dico')
    if not dico:
        # 1st request
        dico = {"un": 0, "deux": 10, "trois": 100}
    else:
        # following requests
        dico = session['dico']
        for key in dico.keys():
            dico[key] += 1
    # put the dictionary back in the session
    session['dico'] = dico

    # managing a person
    personne_json = session.get('personne')
    if personne_json is None:
        # 1st request
        personne = Personne().fromdict({"prénom": "aglaë", "nom": "séléné", "âge": 70})
    else:
        # following requests
        personne = Personne().fromjson(personne_json)
        personne.âge += 1
    # we put the person back in the session
    session['personne'] = personne.asjson()

    # results dictionary
    résultats = {"liste": liste, "dict": dico, "personne": personne.asdict()}

    # we send a jSON response
    response = make_response(json.dumps(résultats, ensure_ascii=False))
    response.headers['Content-Type'] = 'application/json; charset=utf-8'
    return response, status.HTTP_200_OK


# hand
if __name__ == '__main__':
    app.config.update(ENV="development", DEBUG=True)
    app.run()
- lines 1-3: the web application is configured;
- lines 5-11: dependencies are imported;
- line 14: the Flask application is instantiated;
- Line 17: The attribute [secret_key] is initialized. This enables the use of sessions;
- Line 21: the application’s single route;
- lines 23–33: managing a list in the session. We have placed elements in it that are serializable by default using jSON;
- lines 35–46: managing a dictionary in the session. We have placed elements that are serializable by default in jSON into this dictionary;
- lines 48–58: managing a person. A [Personne] object is not serializable by default to jSON. Therefore, precautions must be taken;
- Line 58: The [BaseEntity.asjson] method is used to store the person’s jSON string in the session. Note that we could have used [personne.asdict] because [personne.asdict] is a dictionary containing values that are serializable by default to jSON;
- line 55: since we stored a string jSON in the session, we retrieve the person from it using the method [BaseEntity.fromjson];
- line 61: we create the dictionary [résultats], which will be sent as a response to the client. We know that in this case, Flask sends the string jSON from the dictionary. Therefore, by default, the dictionary must contain only serializable values in jSON;
- Line 64: We explicitly set the string jSON from the dictionary [résultats] in the response HTTP. Flask would have done this by default. However, by default, it uses the parameter [ensure_ascii=True], which did not suit our needs;
- line 65: we tell the client that it will receive jSON;
- line 66: we send it the response;
We launch the web application. We delete all cookies from the Postman client. Then the client requests URL [http://localhost:5000]. The client/server dialogue in the Postman console is as follows:
GET / HTTP/1.1
User-Agent: PostmanRuntime/7.26.1
Accept: */*
Cache-Control: no-cache
Postman-Token: 5f8b7c63-aa8a-4429-a2fa-62141423d933
Host: localhost:5000
Accept-Encoding: gzip, deflate, br
Connection: keep-alive

HTTP/1.0 200 OK
Content-Type: application/json; charset=utf-8
Content-Length: 135
Vary: Cookie
Set-Cookie: session=.eJw9isEKwyAQRH-lzHkPm15K91dqD2mzBMFq0AgF8d-jsRQG9u3MK1jsO0AKFs1fyMSEPQabOjbOHsKV4GzaFfJgmnr4Sdg0puB9a1EMtmgys959-BjIxWBe3XxWLwNq_39IQ3Q_f5zhnHxdtYs3rqgH4gQvMg.Xw6yGw.Bwpt3q-sH03gFLmg2FIPXV_ZNt8; HttpOnly; Path=/
Server: Werkzeug/1.0.1 Python/3.8.1
Date: Wed, 15 Jul 2020 07:36:59 GMT

{"liste": [0, 10, 100], "dict": {"un": 0, "deux": 10, "trois": 100}, "personne": {"prénom": "aglaë", "nom": "séléné", "âge": 70}}
We make the request a second time:
GET / HTTP/1.1
User-Agent: PostmanRuntime/7.26.1
Accept: */*
Cache-Control: no-cache
Postman-Token: 40fd00ea-d45c-46b7-a51e-d4d433a37b5c
Host: localhost:5000
Accept-Encoding: gzip, deflate, br
Connection: keep-alive
Cookie: session=.eJw9isEKwyAQRH-lzHkPm15K91dqD2mzBMFq0AgF8d-jsRQG9u3MK1jsO0AKFs1fyMSEPQabOjbOHsKV4GzaFfJgmnr4Sdg0puB9a1EMtmgys959-BjIxWBe3XxWLwNq_39IQ3Q_f5zhnHxdtYs3rqgH4gQvMg.Xw6yGw.Bwpt3q-sH03gFLmg2FIPXV_ZNt8

HTTP/1.0 200 OK
Content-Type: application/json; charset=utf-8
Content-Length: 135
Vary: Cookie
Set-Cookie: session=.eJw9isEKwyAQRH-lzHkP2kupv9LtIW2WIBgNGqEg_nu3seQ0b2Zew-zfCa5hlvqBs5aw5-SLolGuUaETgi-7wD0sqaHPk7BJLilGXdEYW-ZqjNxjWhnuwpiWMB3Ti0Haz6MMMfz9EcM5-LrIT7zZjv4F5NYvOQ.Xw6ydQ.PMWRCqKx9HNnb_DyK-ha-9pCF7M; HttpOnly; Path=/
Server: Werkzeug/1.0.1 Python/3.8.1
Date: Wed, 15 Jul 2020 07:38:29 GMT

{"liste": [1, 11, 101], "dict": {"deux": 11, "trois": 101, "un": 1}, "personne": {"prénom": "aglaë", "nom": "séléné", "âge": 71}}
- line 9: the client sends back the session cookie it received;
- line 15: the server sends another one back because the session content has changed (line 19). Note that this content is stored in the session cookie in encrypted form;
22.7. scripts [flask/06]: information shared by all users
22.7.1. Introduction
This section aims to show how to manage application-scope information, i.e., information shared by all users. This information typically consists of application configuration data. We have seen that a web application can maintain different types of memory:
Here, we are focusing on the memory of the [3] application.
22.7.2. script [application_scope_01]
The script [application_scope_01] demonstrates one way to manage ‘application’ scope data:
# configure the application
import config
config = config.configure()

# dependencies
from flask import Flask, make_response
from flask_api import status

# flask application
app = Flask(__name__)


# Home URL
@app.route('/', methods=['GET'])
def index():
    # we aim to show that the application remains in memory between requests from different clients
    # every customer deals with the same application

    # app_infos represents application-level information, not session-level information
    # i.e. it concerns all users, not just one in particular
    # this information is stored here in [config] (not mandatory)

    # results dictionary
    résultats = {"config": config}

    # we send the answer
    response = make_response(résultats)
    response.headers['Content-Type'] = 'application/json; charset=utf-8'
    return response, status.HTTP_200_OK


# hand
if __name__ == '__main__':
    # check whether this code is executed several times
    print("application app lancée")
    # launch the web application
    app.config.update(ENV="development", DEBUG=True)
    app.run()
- Lines 1–3: We retrieve the configuration dictionary. We will demonstrate that the code located outside the routing functions is executed only once. The Flask application remains in memory. All information initialized outside the routes is global to them and therefore known to them. Thus, the [config] dictionary from line 3 will be rendered by the / route (line 24). We will show that all clients web pages will receive the same dictionary and that it is therefore shared by all clients pages. This is therefore ‘application’-scope information;
- line 35: we add a log to see if the code in the lines outside the routing function (lines 1–10, 32–38) is executed multiple times;
The [config] configuration is as follows:
def configure():
    # we return the config
    config = {
        # flask configuration
        "SECRET_KEY": "vibnFfrdWYUp?*LQ"
    }

    return config
We launch this application. The logs in the PyCharm console are as follows:
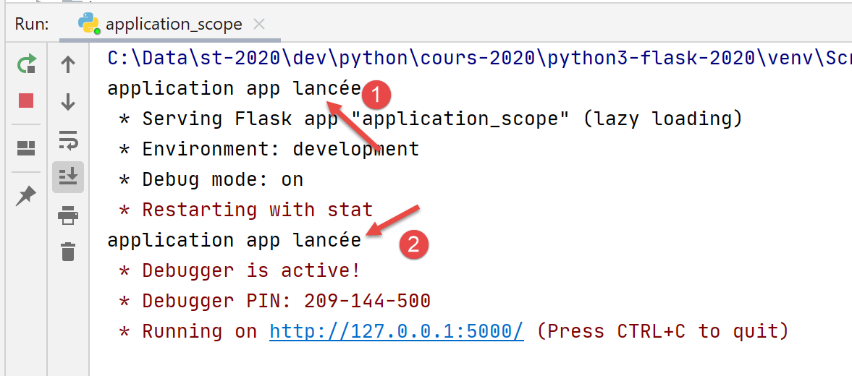
- in [1], initial launch of the application;
- in [2] because we requested [Debug] mode, the application is relaunched in [Debug] mode;
Now, using a browser (Chrome below), we request URL [http://127.0.0.1:5000/]:
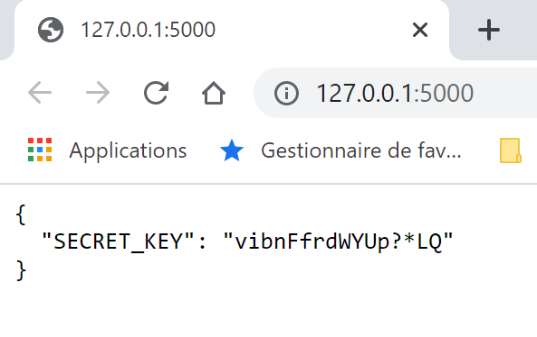
Now using the Firefox browser:
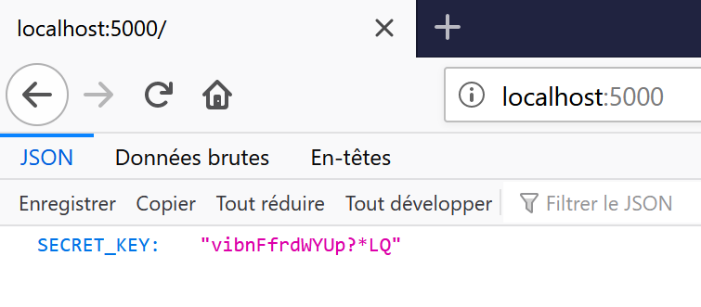
Now using the Postman client:
Now, let’s go back to the [Run] console in PyCharm:
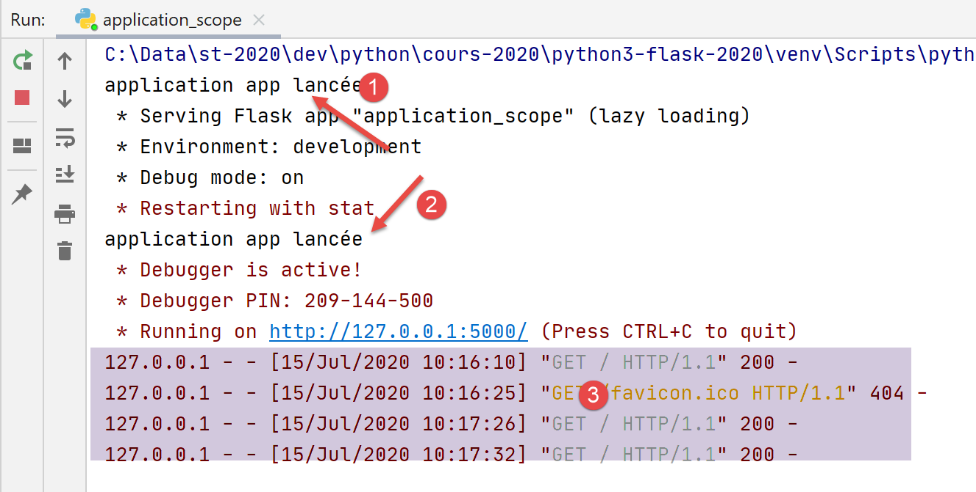
- the two [1, 2] logs are still there, but there are no others, even though we can see the three requests received by the web server;
To be absolutely sure that the application isn’t reloaded with every new request, we can add a counter to the configuration and increment it with each new request. We’ll then see that each client sees the counter in the state left by the previous client. However, it should be noted that clients instances should not modify application-scope data because it is shared among all clients instances, and in a scenario where the server is serving multiple clients instances simultaneously with no guarantee that a client’s requestfrom a client is executed entirely without interruption, a client 1 that issued a request 1 that was interrupted before completion may leave the shared data in a corrupted state for subsequent clients instances.
22.7.3. [application_scope_02] script
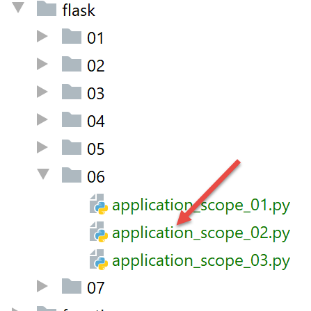
The script [application_scope_02] will do what should not be done: allow clients to modify information shared with other users. We will share a counter among users who will increment it. We will see that each user sees the changes made by other users to the counter.
The script is as follows:
# dependencies

from flask import Flask, make_response
from flask_api import status

# flask application
app = Flask(__name__)

# application scope data
config = {
    "counter": 0
}


# Home URL
@app.route('/', methods=['GET'])
def index():
    # we aim to show that the [config] dictionary is shared by all clients
    # web application

    # increment the counter
    config["counter"] += 1
    # we send the answer
    response = make_response(config)
    response.headers['Content-Type'] = 'application/json; charset=utf-8'
    return response, status.HTTP_200_OK


# hand
if __name__ == '__main__':
    app.config.update(ENV="development", DEBUG=True)
    app.run()
- lines 10–12: the [config] dictionary shared by users. It contains a counter;
- line 22: every time a user requests URL /, the configuration counter is incremented;
- lines 23-26: the string jSON from the dictionary is sent to each client;
We run this script. Then we request URL [http://127.0.0.1:5000/] using a first browser:

We then do the same thing with a second browser:

Then a third time with Postman:
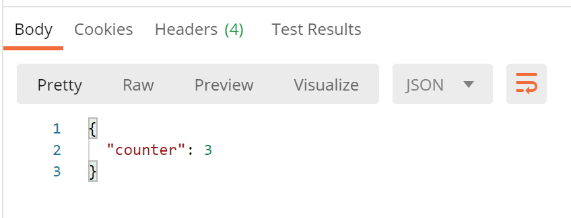
We see that each client retrieves the counter in the state the previous client left it. They therefore have access to the same information.
22.7.4. script [application_scope_03]
The script [application_scope_03] demonstrates why information shared between users must be read-only.
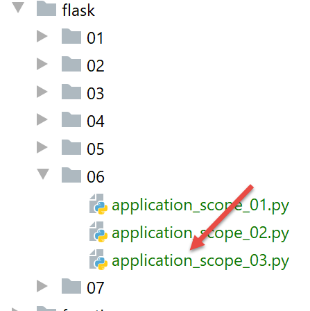
The script is as follows:
# dependencies
import threading
from time import sleep

from flask import Flask, make_response
from flask_api import status

# flask application
app = Flask(__name__)

# application scope data
config = {
    "counter": 0
}


# Home URL
@app.route('/', methods=['GET'])
def index():
    # we aim to show that the [config] dictionary is shared by all clients
    # of the web application and that it must be read-only

    # thread name
    thread_name = threading.current_thread().name
    # read the counter
    counter = config["counter"]
    print(f"compteur lu : {counter}, par le thread {thread_name}")
    # we stop for 5 seconds - then other clients will be served
    sleep(5)
    # increment the configuration counter
    config["counter"] = counter + 1
    # log
    print(f"compteur écrit : {config['counter']}, par le thread {thread_name}")
    # we send the answer
    response = make_response(config)
    response.headers['Content-Type'] = 'application/json; charset=utf-8'
    return response, status.HTTP_200_OK


# hand
if __name__ == '__main__':
    app.config.update(ENV="development", DEBUG=True)
    app.run(threaded=True)
- line 43: we changed the web application’s execution mode. We wrote [threaded=True] to indicate that the application should serve users simultaneously. This is achieved using execution threads:
- there can be multiple concurrent execution threads, each serving a user;
- the machine’s processor is shared by these threads;
- a thread may be interrupted before it has finished its work. It will be resumed later;
- line 19: the function [index] can be executed simultaneously by multiple threads;
- line 24: we retrieve the name of the thread executing the [index] function;
- line 26: the counter value is read. For the purposes of our demonstration, we break down the counter increment as follows:
- Step 1: Thread 1 reads the counter (1, for example);
- Step 2: Thread 1 pauses for 5 seconds (line 29). Because Thread 1 requested a pause, the processor is handed over to another thread, Thread 2. The goal is for this new thread to read the same counter value (=1). Then it, too, pauses for 5 seconds and loses the processor;
- Step 3: Increment the counter, line 31, based on the value read in Step 1 (=1). Thread 1 is the first to do this: it sets the counter to 2 and then finishes executing the function [index]. Then it is thread 2’s turn to wake up and also set the counter to 2 based on the value read in step 1 (=1). Ultimately, after both threads have run, the counter is at 2 when it should be at 3;
- Line 33: We display the counter value for verification;
We run the script and then request the url [http://loaclhost :5000/] with two browsers and then with Postman. The logs in the PyCharm console are then as follows:
C:\Data\st-2020\dev\python\cours-2020\python3-flask-2020\venv\Scripts\python.exe C:/Data/st-2020/dev/python/cours-2020/python3-flask-2020/flask/06/application_scope_03.py
 * Serving Flask app "application_scope_03" (lazy loading)
 * Environment: development
 * Debug mode: on
 * Restarting with stat
 * Debugger is active!
 * Debugger PIN: 334-263-283
* Running on http://127.0.0.1:5000/ (Press CTRL+C to quit)
compteur lu : 0, par le thread Thread-2
compteur lu : 0, par le thread Thread-4
compteur écrit : 1, par le thread Thread-2
127.0.0.1 - - [16/Jul/2020 08:55:37] "GET / HTTP/1.1" 200 -
compteur écrit : 1, par le thread Thread-4
127.0.0.1 - - [16/Jul/2020 08:55:40] "GET / HTTP/1.1" 200 -
compteur lu : 1, par le thread Thread-5
compteur écrit : 2, par le thread Thread-5
127.0.0.1 - - [16/Jul/2020 08:55:46] "GET / HTTP/1.1" 200 -
- lines 9-10: the first two threads, 2 and 4, read the same value 0 from the counter;
- line 11: thread 2 sets the counter to 1;
- line 13: thread 4 increments the counter to 1. From this point on, the counter value is incorrect;
- lines 15-16: thread 5 is not interrupted and correctly handles the counter value;
The lesson from this example is that web application code must not modify the value of information shared by users.
22.8. [flask/07] scripts: route management
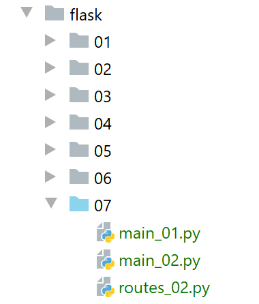
Here we are interested in the route management of an application, i.e., the URL routes served by the web application.
22.8.1. [main_01] script: configured routes
The [main_01] script introduces the ability to configure routes:
from flask import Flask, make_response
from flask_api import status

# flask application
app = Flask(__name__)


# reply sent
def send_plain_response(réponse: str):
    # we send the answer
    response = make_response(réponse)
    response.headers['Content-Type'] = 'text/plain; charset=utf-8'
    return response, status.HTTP_200_OK


# /name/firstname
@app.route('/<string:nom>/<string:prenom>', methods=['GET'])
def index(nom, prenom):
    # answer
    return send_plain_response(f"{prenom} {nom}")


# init-session
@app.route('/init-session/<string:type>', methods=['GET'])
def init_session(type: str):
    # answer
    return send_plain_response(f"/init-session/{type}")


# authenticate-user
@app.route('/authentifier-utilisateur', methods=['POST'])
def authentifier_utilisateur():
    # answer
    return send_plain_response("/authentifier-utilisateur")


# calculate-tax
@app.route('/calculer-impot', methods=['POST'])
def calculer_impot():
    # answer
    return send_plain_response("/calculer-impot")


# lister-simulations
@app.route('/lister-simulations', methods=['GET'])
def lister_simulations():
    # answer
    return send_plain_response("/lister-simulations")


# delete-simulation
@app.route('/supprimer-simulation/<int:numero>', methods=['GET'])
def supprimer_simulation(numero: int):
    # answer
    return send_plain_response(f"/supprimer-simulation/{numero}")


# end of session
@app.route('/fin-session', methods=['GET'])
def fin_session():
    # answer
    return send_plain_response(f"/fin-session")


# hand
if __name__ == '__main__':
    app.config.update(ENV="development", DEBUG=True)
    app.run()
- line 17: we specify the type of the URL parameters. This allows Flask to perform checks. If the parameter is not of the expected type, the client’s request will be rejected (400 Bad Request error). So Flask does some of the work we would have had to do;
- line 18: for the parameters, we must use the exact names of the parameters from line 17 but not necessarily their order;
- line 20: we use the [send_plain_response] function to send the response to the web client;
- line 9: the [send_plain_response] function receives the string to be sent to the client;
- line 11: the body of the HTTP response is constructed;
- line 12: the client is informed that plain text is being sent;
- line 13: the response HTTP is sent;
- lines 23–62: other configured routes that will be used later in an application exercise;
We run the script and query it using the Postman client:

22.8.2. script [main_02]: route externalization
In the previous script [main_01], the code can become lengthy if there are many routes. The script [main_02] shows how to externalize routes.
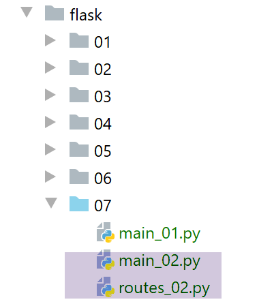
The script [routes_02] groups the functions associated with the routes from the previous script:
from flask import make_response
from flask_api import status


def send_response(réponse: str):
    # we send the answer
    response = make_response(réponse)
    response.headers['Content-Type'] = 'text/plain; charset=utf-8'
    return response, status.HTTP_200_OK


# Home URL
def index(nom, prenom):
    # answer
    return send_response(f"{prenom} {nom}")


# init-session
def init_session(type: str):
    # answer
    return send_response(f"/init-session/{type}")


# authenticate-user
def authentifier_utilisateur():
    # answer
    return send_response("/authentifier-utilisateur")


# calculate-tax
def calculer_impot():
    # answer
    return send_response("/calculer-impot")


# lister-simulations
def lister_simulations():
    # answer
    return send_response("/lister-simulations")


# delete-simulation
def supprimer_simulation(numero: int):
    # answer
    return send_response(f"/supprimer-simulation/{numero}")


# end of session
def fin_session():
    # answer
    return send_response(f"/fin-session")
Note that the script [routes_02] is not a routes script. It is a list of functions. The main script, [main_02], links the routes to the functions:
from flask import Flask

# route functions are deported to their own script
import routes_02

# flask application
app = Flask(__name__)

# route/function associations
app.add_url_rule('/<string:nom>/<string:prenom>', methods=['GET'], view_func=routes_02.index)
app.add_url_rule('/init-session/<string:type>', methods=['GET'], view_func=routes_02.init_session)
app.add_url_rule('/authentifier-utilisateur', methods=['POST'], view_func=routes_02.authentifier_utilisateur)
app.add_url_rule('/calculer-impot', methods=['POST'], view_func=routes_02.calculer_impot)
app.add_url_rule('/lister-simulations', methods=['GET'], view_func=routes_02.lister_simulations)
app.add_url_rule('/supprimer-simulation/<int:numero>', methods=['GET'], view_func=routes_02.supprimer_simulation)
app.add_url_rule('/fin-session', methods=['GET'], view_func=routes_02.fin_session)

# hand
if __name__ == '__main__':
    app.config.update(ENV="development", DEBUG=True)
    app.run()
- line 4: import the script containing the functions associated with the routes;
- lines 9–16: route/function mapping;
With this method, each function associated with a route can be the subject of a separate script if necessary.
The results are the same as those obtained with the previous [main_01] script.