37. Practical exercise: version 17
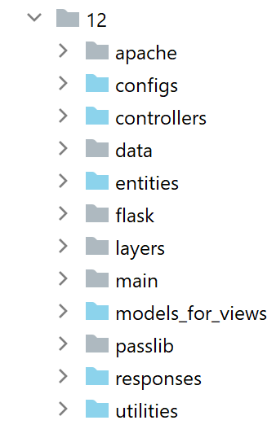
This new version introduces the following changes:
- it will be ported to an Apache/Windows server;
- To perform this port, version 17 contains all the dependencies it needs in its [impots / http-servers/ 12] folder. Note that previous versions retrieved their dependencies from various folders throughout the entire [python-flask-2020] project;
37.1. Relocation of application dependencies
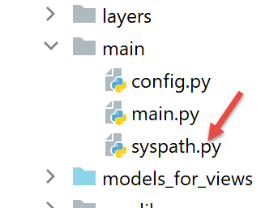
Note that application dependency management is handled in the [syspath] script. In the previous version, this script was as follows:
def configure(config: dict) -> dict:
    import os

    # folder of this file
    script_dir = os.path.dirname(os.path.abspath(__file__))

    # root path
    root_dir = "C:/Data/st-2020/dev/python/cours-2020/python3-flask-2020"

    # dependencies
    absolute_dependencies = [
        # project files
        # BaseEntity, MyException
        f"{root_dir}/classes/02/entities",
        # InterfaceImpôtsDao, InterfaceImpôtsMétier, InterfaceImpôtsUi
        f"{root_dir}/impots/v04/interfaces",
        # AbstractImpôtsdao, ImpôtsConsole, ImpôtsMétier
        f"{root_dir}/impots/v04/services",
        # ImpotsDaoWithAdminDataInDatabase
        f"{root_dir}/impots/v05/services",
        # AdminData, ImpôtsError, TaxPayer
        f"{root_dir}/impots/v04/entities",
        # Constants, slices
        f"{root_dir}/impots/v05/entities",
        # Logger, SendAdminMail
        f"{root_dir}/impots/http-servers/02/utilities",
        # main script folder
        script_dir,
        # configs [database, layers, parameters, controllers, views]
        f"{script_dir}/../configs",
        # controllers
        f"{script_dir}/../controllers",
        # answers HTTP
        f"{script_dir}/../responses",
        # view models
        f"{script_dir}/../models_for_views",
    ]

    # set the syspath
    from myutils import set_syspath
    set_syspath(absolute_dependencies)

    # we return the configuration
    return {
        "root_dir": root_dir,
        "script_dir": script_dir
    }
We need to relocate all dependencies whose absolute path depends on the variable [root_dir] in line 8, i.e., lines 13–26.
The script [syspath] for the new version will be as follows:
def configure(config: dict) -> dict:
    import os

    # folder of this file
    script_dir = os.path.dirname(os.path.abspath(__file__))

    # dependencies
    absolute_dependencies = [
        # application entities
        f"{script_dir}/../entities",
        # layer [dao]
        f"{script_dir}/../layers/dao",
        # layer [métier]
        f"{script_dir}/../layers/métier",
        # utilities
        f"{script_dir}/../utilities",
        # main script folder
        script_dir,
        # configs [database, layers, parameters, controllers, views]
        f"{script_dir}/../configs",
        # controllers
        f"{script_dir}/../controllers",
        # answers HTTP
        f"{script_dir}/../responses",
        # view models
        f"{script_dir}/../models_for_views",
    ]

    # set the syspath
    import sys
    # we add the project's absolute dependencies
    for directory in absolute_dependencies:
        # we check the existence of the file
        existe = os.path.exists(directory) and os.path.isdir(directory)
        if not existe:
            # the developer is notified
            raise BaseException(f"[set_syspath] le dossier du Python Path [{directory}] n'existe pas")
        else:
            # insert the folder at the beginning of the syspath
            sys.path.insert(0, directory)

    # we return the configuration
    return {
        "script_dir": script_dir,
    }
- lines 8–27: all dependencies are now relative to the variable [script_dir] on line 5;
- lines 42-45: the variable [root_dir] has been removed from the syspath configuration;
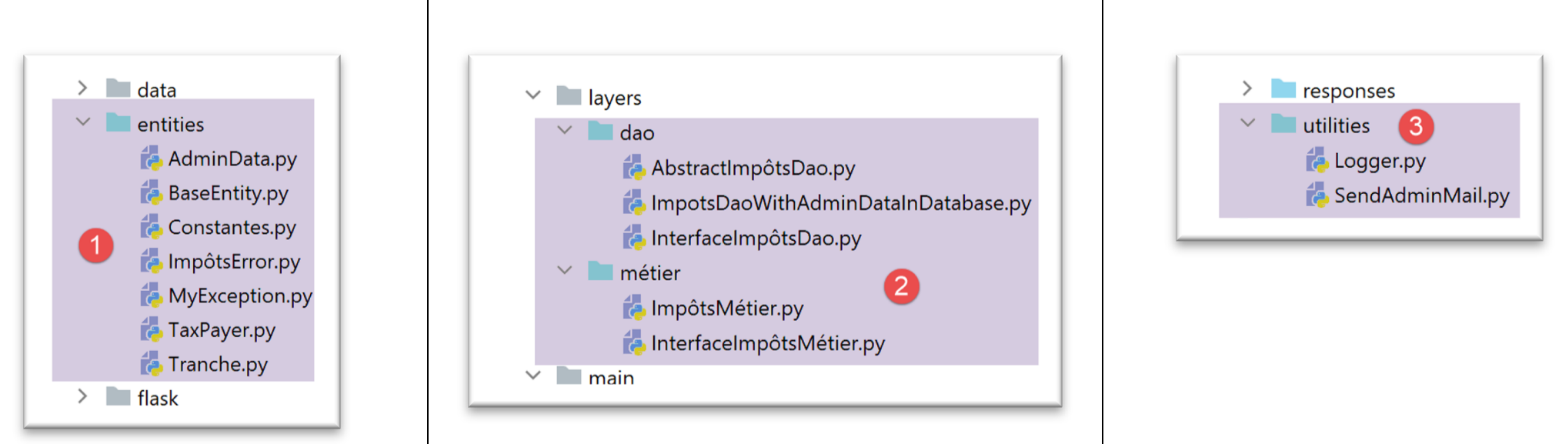
- line 10: the application entities are in the [entities] [1] folder;
- line 12: the layer [dao] is in the folder [layers/dao] [2];
- line 14: layer [métier] is in the folder [layers/métier] [2];
- line 16: the [Logger, SendMail] utilities are in the [utilities] [3] folder;
- lines 29–40: the application’s Python Path is calculated without importing the [myutils] module;
37.2. Tests
At this point, version 17 should be working. Verify it.
37.3. Porting a Python/Flask application to an Apache/Windows server
37.3.1. Sources
To port a Flask application to Apache/Windows, I had to search the Internet. Here is the link that helped me get started: [https://medium.com/@madumalt/flask-app-deployment-in-windows-apache-server-mod-wsgi-82e1cfeeb2ed];
I used the information from this link except for the Apache server configuration. For that, I used a sample Apache server configuration from Laragon.
37.3.2. Installing the Python module mod_wsgi
The Python/Flask application we developed used the WSGI (Web Server Gateway Interface) server provided with Flask. This server is described |here|. The link describes how WSGI servers work. There are various |WSGI servers|. One of these is the Apache server running in WSGI mode. This is the solution adopted here because Laragon, which we installed, comes with an Apache server.
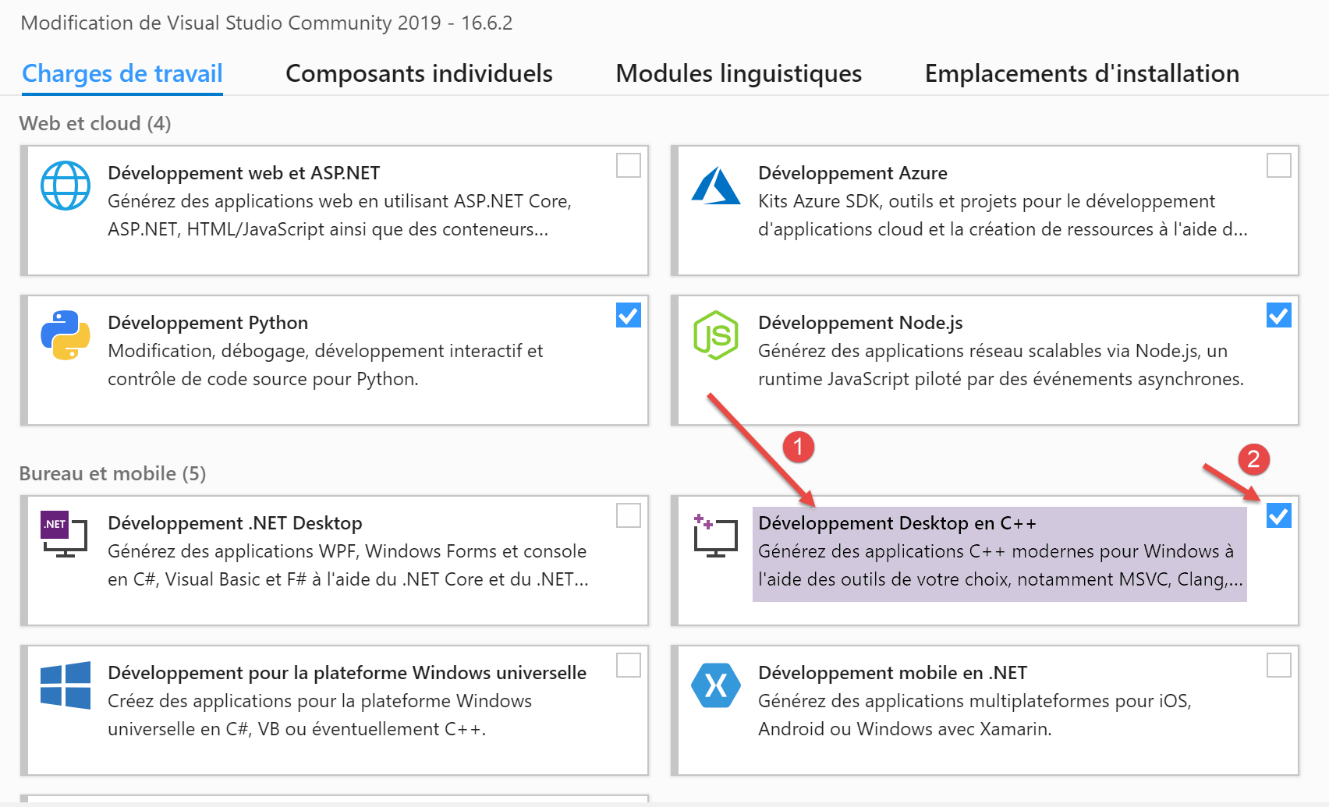
In order for the Apache server to host a Python application, we need to install the Python module [mod_wsgi]. Installing this module is tricky because a C++ compilation takes place during the installation. To complete the installation successfully, you need a Microsoft C++ compiler. A simple solution is to install the latest version of Visual Studio Community.
If you don’t need Visual Studio for anything other than [mod_wsgi], you can limit the installation to the C++ environment:
Once the C++ compiler is installed, the [mod_wsgi] module is installed in a PyCharm terminal:
(venv) C:\Data\st-2020\dev\python\cours-2020\python3-flask-2020\impots\http-servers\11>SET MOD_WSGI_APACHE_ROOTDIR=C:\MyPrograms\laragon\bin\apache\httpd-2.4.35-win64-VC15

(venv) C:\Data\st-2020\dev\python\cours-2020\python3-flask-2020\impots\http-servers\11>pip install mod_wsgi
Collecting mod_wsgi
  Using cached mod_wsgi-4.7.1.tar.gz (498 kB)
Using legacy setup.py install for mod-wsgi, since package 'wheel' is not installed.
Installing collected packages: mod-wsgi
    Running setup.py install for mod-wsgi ... done
Successfully installed mod-wsgi-4.7.1
- Line 1: We set the value of the [MOD_WSGI_APACHE_ROOTDIR] environment variable. This value is the location of the Apache server in the file system. Here, this location is [<laragon>\bin\apache\httpd-2.4.35-win64-VC15], where <laragon> is the Laragon installation folder. You can obtain this location in various ways. Here is one obtained from one of Laragon’s options:

In [1-3], the file [httpd.conf] is the main Apache server configuration file. The file in question is then opened in a text editor (Notepad++ below):
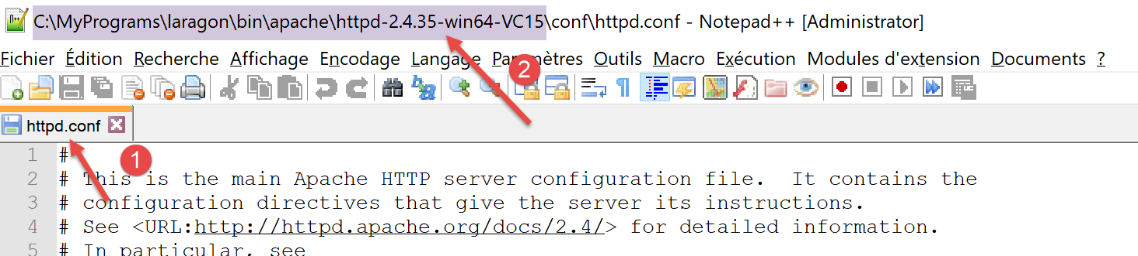
In [2], the Apache installation directory is the part preceding the string [conf\httpd.conf].
Let’s return to the installation of the [mod_wsgi] module:
- lines 3–9: installation of the [mod_wsgi] module;
37.3.3. Configuring the Laragon Apache Server
We will configure the Laragon Apache server. We start with its main configuration file [httpd.conf]:
We go to the end of the [httpd.conf] file:
…
IncludeOptional "C:/MyPrograms/laragon/etc/apache2/alias/*.conf"
IncludeOptional "C:/MyPrograms/laragon/etc/apache2/sites-enabled/*.conf"
Include "C:/MyPrograms/laragon/etc/apache2/httpd-ssl.conf"
Include "C:/MyPrograms/laragon/etc/apache2/mod_php.conf"

# python mod_wsgi
LoadModule wsgi_module "c:/data/st-2020/dev/python/cours-2020/python3-flask-2020/venv/lib/site-packages/mod_wsgi/server/mod_wsgi.cp38-win_amd64.pyd"
- Line 8 has been added to the existing [httpd.conf] file at the end of the file. It tells the Apache server where to find a component of the [mod_wsgi] module that we just installed;
An easy way to get the path for line 8 is to run the following command in a PyCharm terminal:
(venv) C:\Data\st-2020\dev\python\cours-2020\python3-flask-2020\impots\http-servers\11>mod_wsgi-express module-config
LoadModule wsgi_module "c:/data/st-2020/dev/python/cours-2020/python3-flask-2020/venv/lib/site-packages/mod_wsgi/server/mod_wsgi.cp38-win_amd64.pyd"
WSGIPythonHome "c:/data/st-2020/dev/python/cours-2020/python3-flask-2020/venv"
Some documentation states that lines 2 and 3 must be added to the end of the [httpd.conf] file. In my case, line 3 above caused an error (missing [encodings] module). Therefore, it was not included in the [httpd.conf] file. Only line 2 was added. The meanings of the various parameters of the [mod_wsgi] module that can be used in Apache configuration files are described |here|.
Next, we will enable the HTTPS protocol on the Apache server:
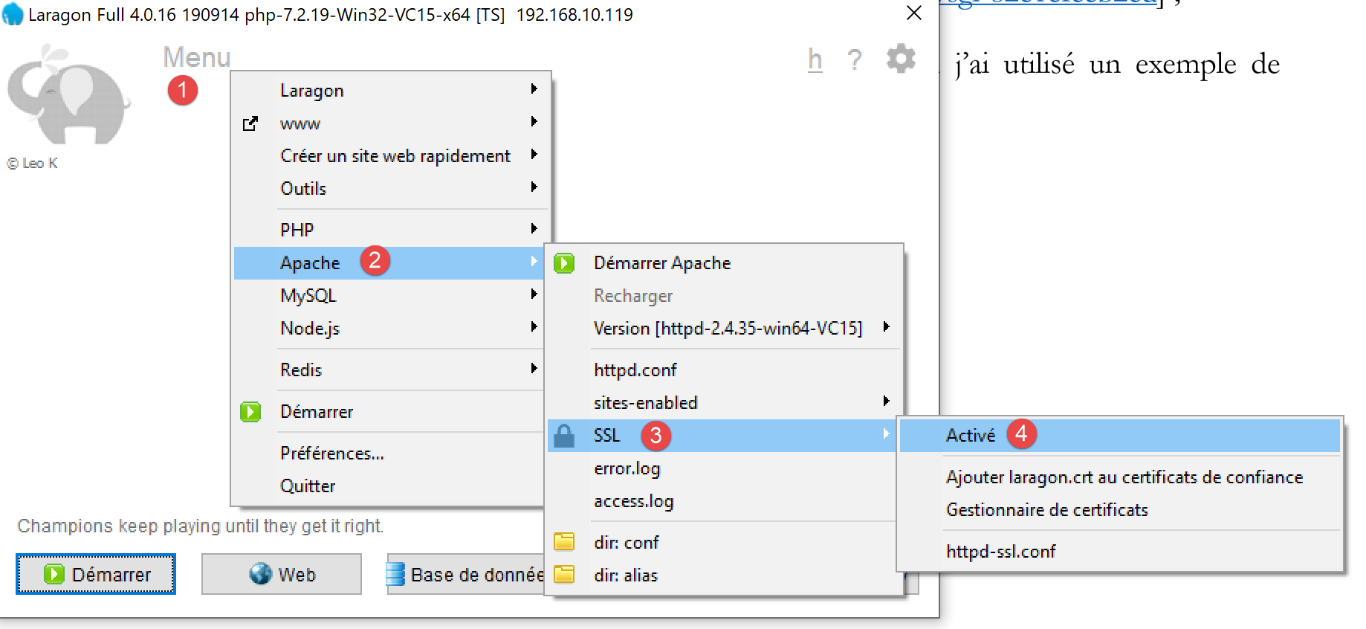
- in [1-4], we enable the HTTPS protocol on the Apache server;
Now, we can use URL and [https://serveur/chemin];
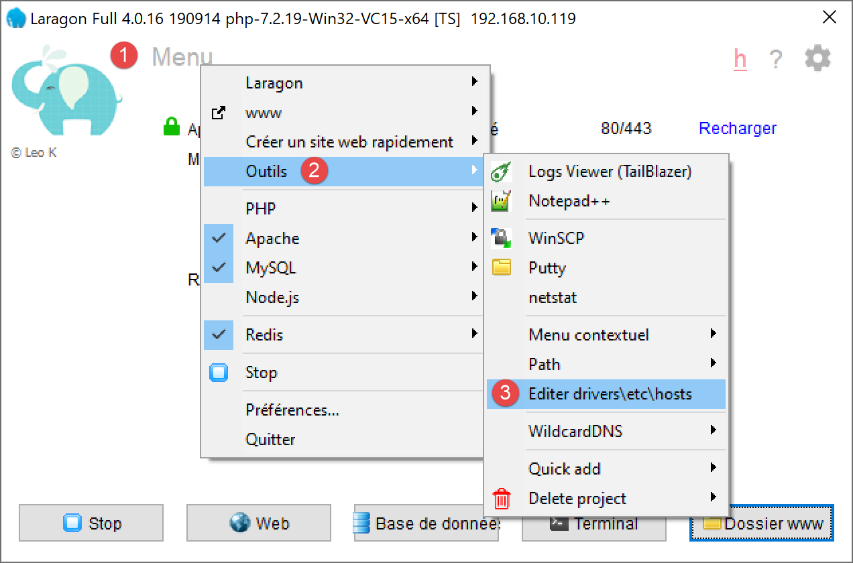
To configure Apache to serve a Flask application, the link referenced |above| uses virtual servers. Laragon also offers virtual server management:
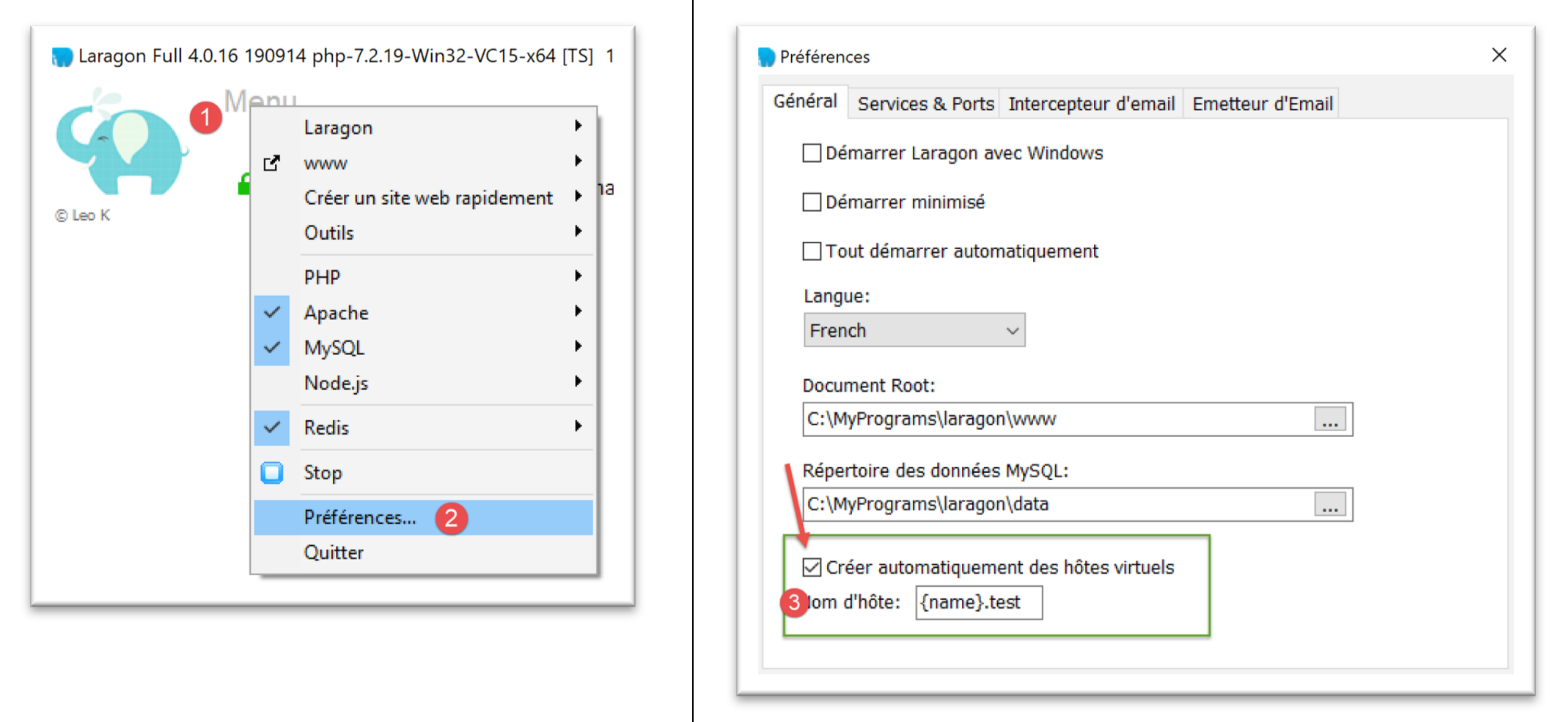
- In [1-3], we ask Laragon to automatically create virtual hosts;
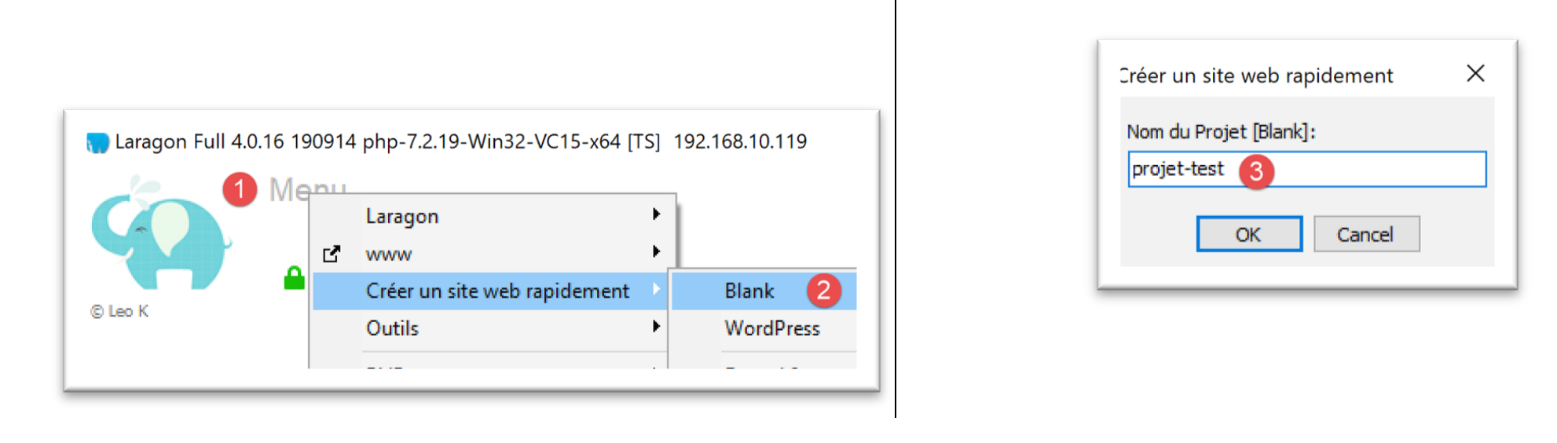
The next step is to create a web project with Laragon:
 |
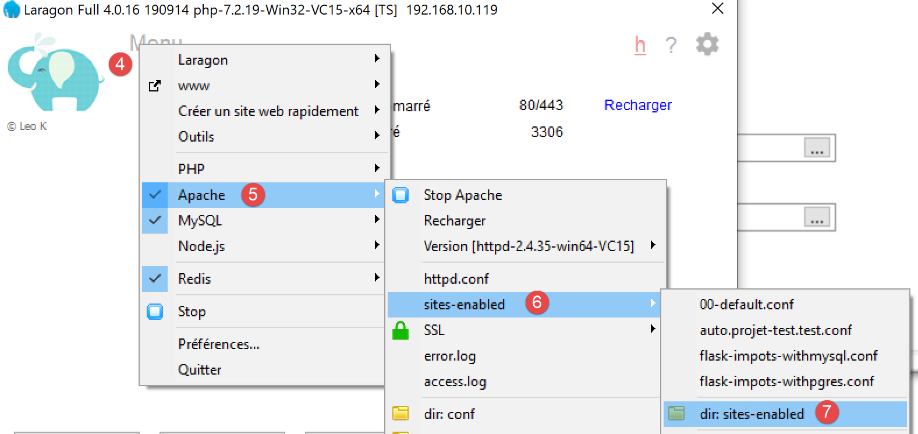 |  |
- In [1-3], create an empty project named PHP;
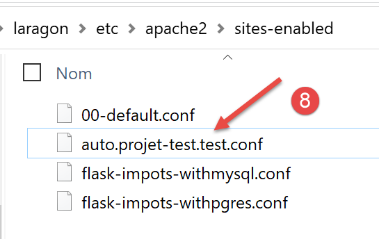
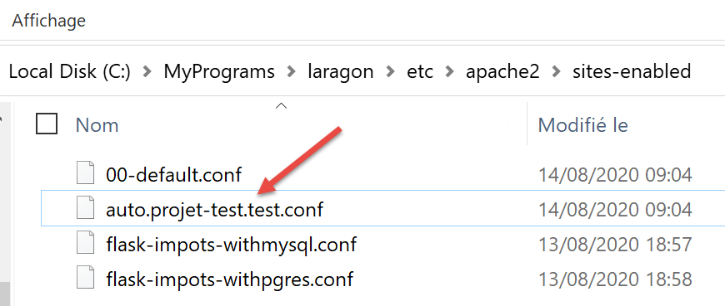
- In [4-8], Laragon created a virtual site named [auto.projet-test.test] configured by the file [auto.projet-test.test.conf] [8] in the folder [sites-enabled] [7]. This folder is located at the address [<laragon>\etc\apache2\sites-enabled], where [laragon] is the Laragon installation folder;
Although this isn’t part of what we’re currently working on, you might be curious to check out the website [projet-test] that we just created:
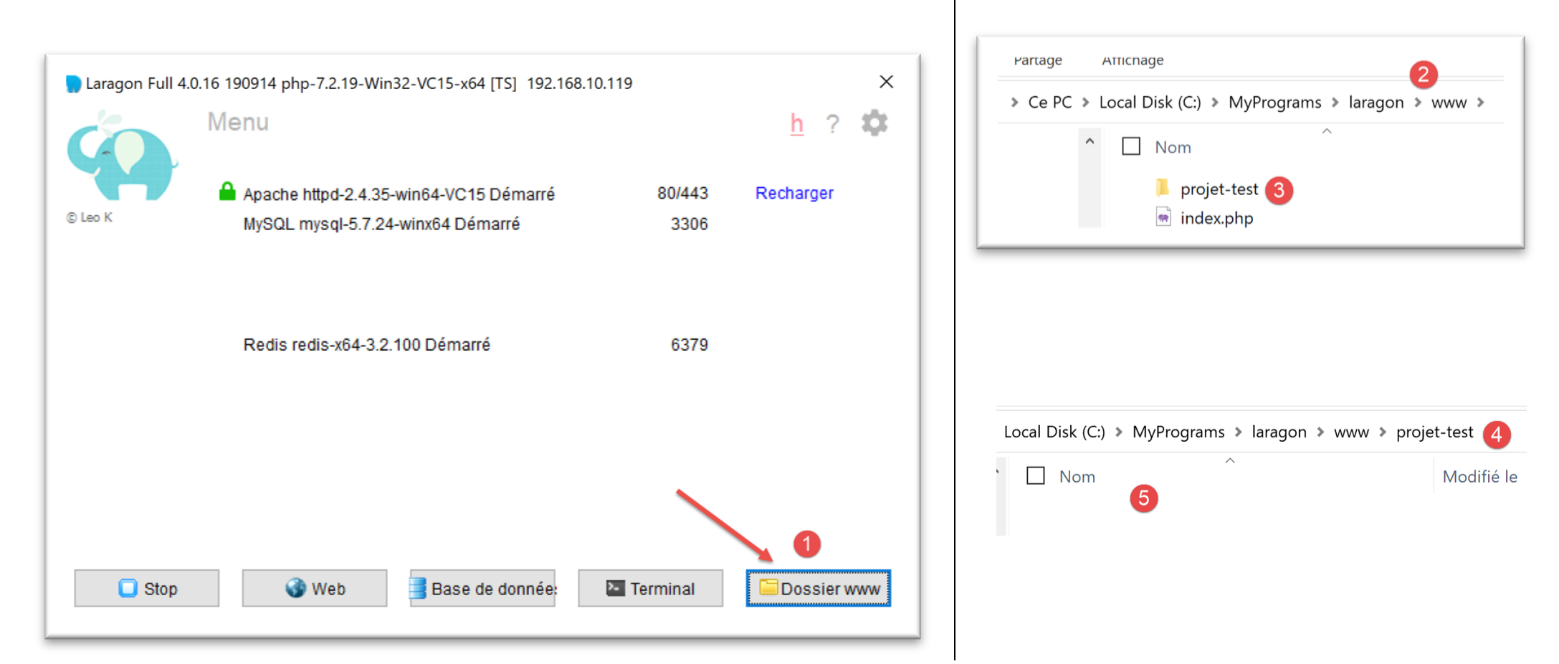
- In [1-5], an empty project has been created. It is a PHP project located in the [<laragon>/www] folder, where [laragon] is the Laragon installation folder;
Now let’s examine the [auto.projet-test.test.conf] file generated by Laragon in the [<laragon>\etc\apache2\sites-enabled] folder:
define ROOT "C:/MyPrograms/laragon/www/projet-test/"
define SITE "projet-test.test"

<VirtualHost *:80>
    DocumentRoot "${ROOT}"
    ServerName ${SITE}
    ServerAlias *.${SITE}
    <Directory "${ROOT}">
        AllowOverride All
        Require all granted
    </Directory>
</VirtualHost>

<VirtualHost *:443>
    DocumentRoot "${ROOT}"
    ServerName ${SITE}
    ServerAlias *.${SITE}
    <Directory "${ROOT}">
        AllowOverride All
        Require all granted
    </Directory>

    SSLEngine on
    SSLCertificateFile      C:/MyPrograms/laragon/etc/ssl/laragon.crt
    SSLCertificateKeyFile   C:/MyPrograms/laragon/etc/ssl/laragon.key

</VirtualHost>
- line 1: the root directory of the created project in the file system;
- line 2: the name of the virtual server. The URL for this server will be in the form [http(s)://projet-test.test/chemin];
- lines 4–12: configuration of the virtual site for port 80 (line 4) and the HTTP protocol;
- lines 14–27: configuration of the virtual site for port 443 (line 14) and the HTTPS protocol;
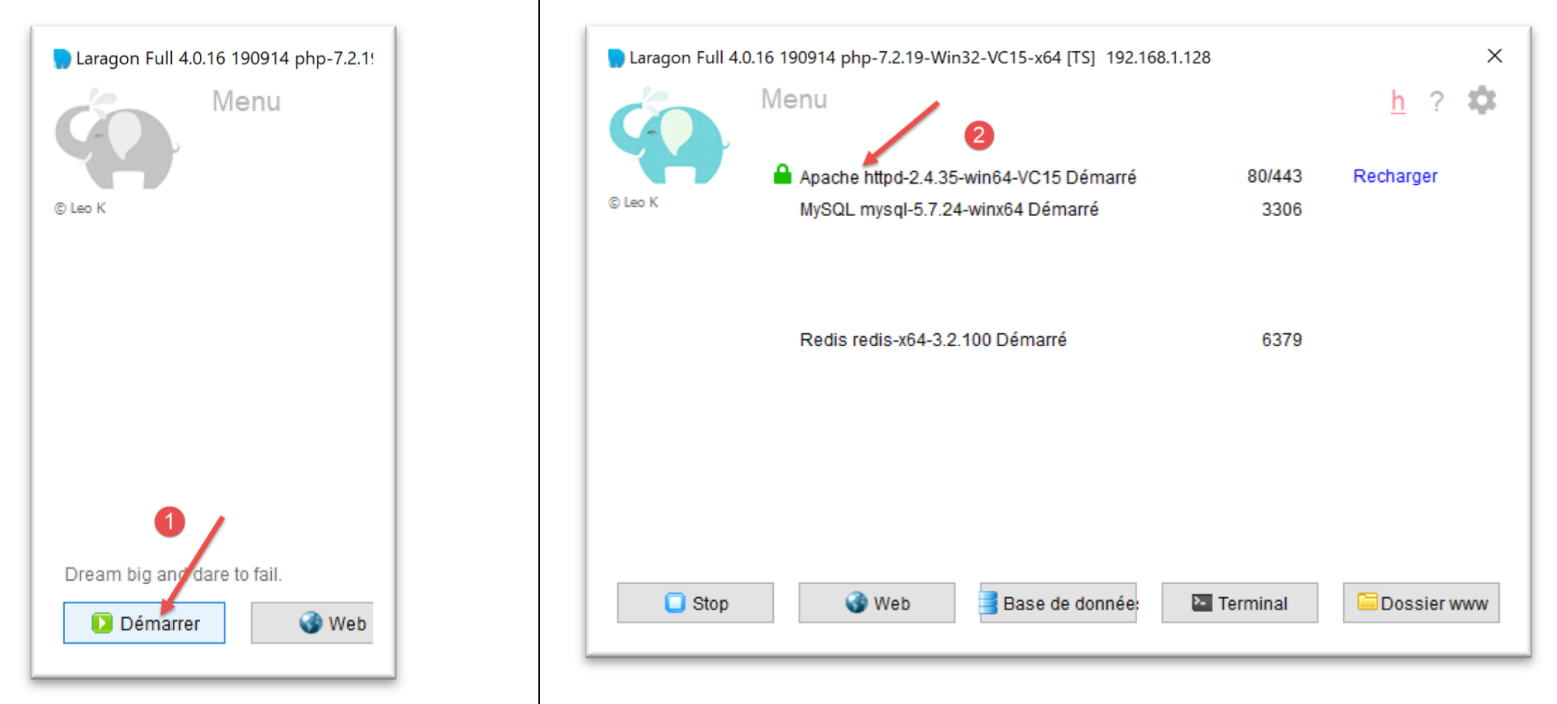
Let’s see how a virtual server works. First, let’s start the Apache server and PHP:
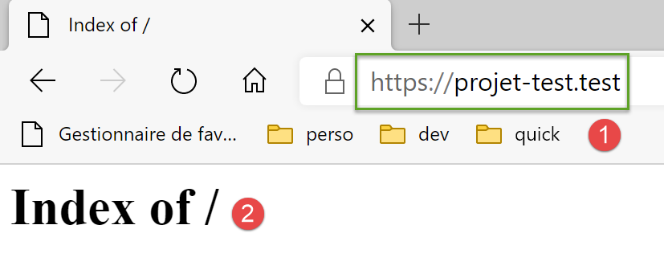
Using a browser, we then request the URL [http://projet-test.test/]:

- in [1], the requested URL;
- to [2], the protocol HTTP was used;
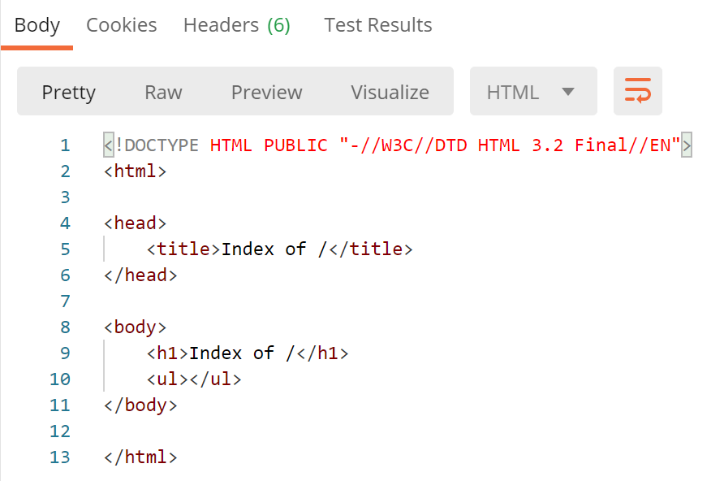
- in [3], because the [projet-test] project is empty, we obtain the index of its folder (list of its contents), an empty index;
Now let’s request the secure URL from [https://projet-test.test/]:
- In [1-2], we get the same response as before but with the protocol HTTPS [1];
Creating the virtual server [projet-test.test] created a new entry in the file [<windows>/system32/drivers/etc/hosts]:
- line 23: the address IP for the name [projet-test.test] is 127.0.0.1, i.e., the address of [localhost] (line 20), the local machine. So when you type URL [http://projet-test.test/chemin] into a browser, the request is sent to the address 127.0.0.1 on port 80. The Apache server on the local machine (localhost) then responds.
You might wonder why, when you type the request [http://projet-test.test/], the Apache server uses the configuration from the file [<laragon>\etc\apache2\sites-enabled\auto.projet-test.test.conf]:
To understand this, we need to see what the browser sends to the Apache server when making this request. Let’s do it with Postman:
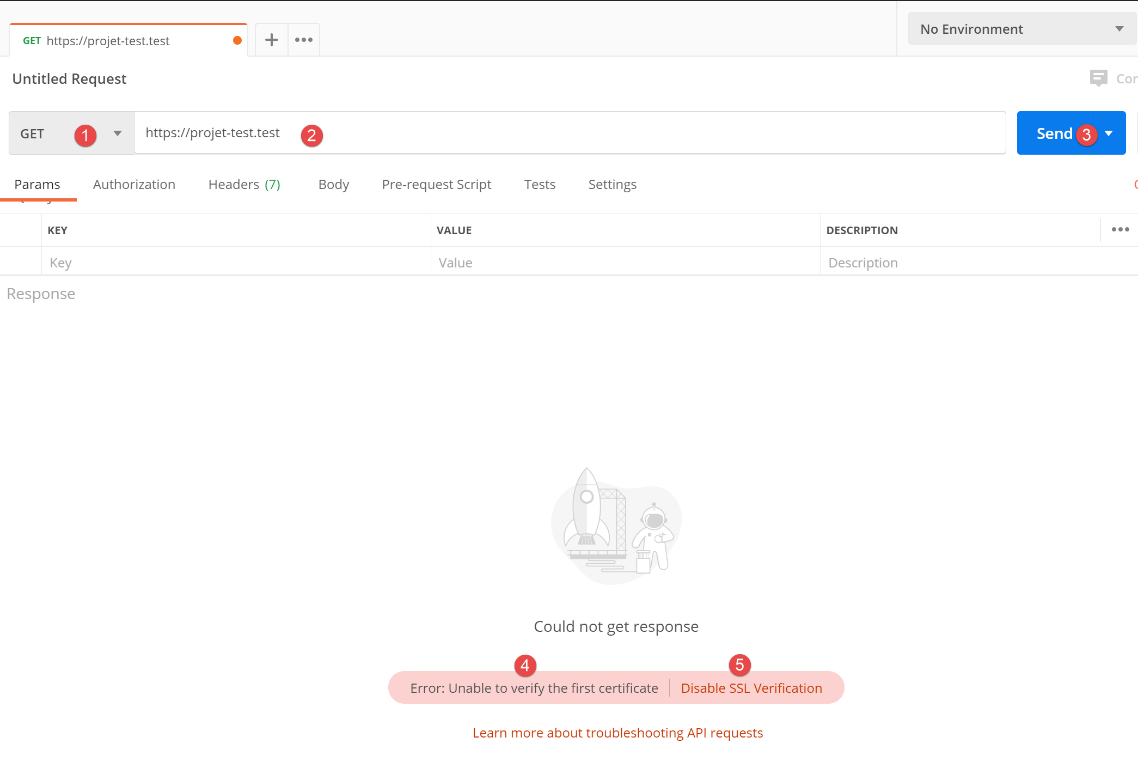
- In [1-3], we send a request for HTTPS [1];
- In [4], Postman indicates that it did not recognize the security certificate. The HTTPS protocol establishes an encrypted connection between the web client (here, Postman) and the Apache server. This encrypted connection is established using certificates exchanged between the client and the server. It is the server that initiates the process of establishing the encrypted connection by sending a security certificate to the client. For this certificate to be accepted by the client, it must be signed—in other words, purchased from companies authorized to issue security certificates. When we enabled Laragon’s HTTPS protocol, Laragon generated the security certificate itself. The certificate is then said to be self-signed. Most web browsers display a warning when they receive a self-signed certificate. This is what Postman does in [4]. Most web browsers then offer to disable verification of the security certificate sent by the server. This is what Postman offers in [5];
We click on the [5] link to disable SSL (Secure Sockets Layer) verification. SSL / TSL (Transport Layer Security) is a security protocol that creates a secure communication channel between two machines on the internet. This is the protocol used here by Apache. The response is as follows:
We receive the same page as with a traditional browser. Now let’s look at the client/server dialogue in the Postman console (Ctrl-Alt-C):
- Line 6: The header HTTP [Host] specifies the name of the server targeted by the web client. This is the principle behind virtual servers. At the same address IP (here 127.0.0.1), a web server can host multiple websites with different names. The header HTTP [Host] allows the client to specify which server (here, with the address 127.0.0.1) it is addressing;
Now, what does Apache do?
When it starts up, Apache reads all configuration files found in the [[<laragon>\etc\apache2\sites-enabled]] folder:
Each configuration file defines a virtual server. For example, in the file [auto.projet-test.test.conf], the following line appears:
define ROOT "C:/MyPrograms/laragon/www/projet-test/"
define SITE "projet-test.test"
…
Line 2 defines the virtual server [projet-test.test]. The file [auto.projet-test.test.conf] is the configuration for this virtual server. Because it reads all configuration files in the [<laragon>\etc\apache2\sites-enabled] folder at startup, the Apache server knows that there is a virtual server named [projet-test.test]. Thus, when it receives the HTTPS request from the Postman client:
It recognizes that the request is addressed to the [projet-test.test] virtual server (line 6) and that it exists. It then uses the configuration of the [projet-test.test] virtual server to respond to the Postman client.
37.4. Creating Your First Apache Virtual Server
Now that we know what virtual servers are used for and how to configure them, we will create one. It will be used to run a Python Flask application installed in the [Apache] directory of the version 17 server currently being deployed on the Apache server:
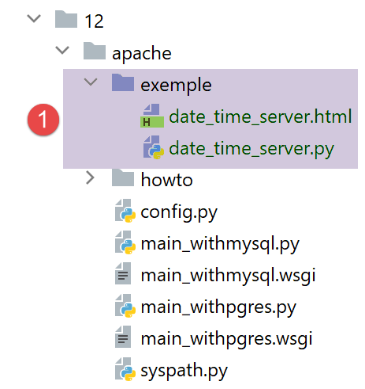
We have placed the application developed in the section |link|—a date/time web service—in the [http-servers/12/apache/exemple] folder:
The [date_time_server.py] server is as follows:
# imports
import os
import sys
import time

# we need to put the modules folder in the Python Path
# for porting to apache windows
sys.path.insert(0, "C:/Data/st-2020/dev/python/cours-2020/python3-flask-2020/venv/lib/site-packages")

from flask import Flask, make_response, render_template

# flask application
script_dir = os.path.dirname(os.path.abspath(__file__))
application = Flask(__name__, template_folder=f"{script_dir}")

# Home URL
@application.route('/')
def index():
    # dispatch time to customer
    # time.localtime: number of milliseconds since 01/01/1970
    # time.strftime formats time and date
    # date-time display format
    # d: 2-digit day
    # m: 2-digit month
    # y: 2-digit year
    # H: hour 0.23
    # M: minutes
    # S: seconds

    # current date / time
    time_of_day = time.strftime('%d/%m/%y %H:%M:%S', time.localtime())
    # generate the document to be sent to the customer
    page = {"date_heure": time_of_day}
    document = render_template("date_time_server.html", page=page)
    print("document", type(document), document)
    # HTTP response to customer
    response = make_response(document)
    print("response", type(response), response)
    return response

# hand only
if __name__ == '__main__':
    application.config.update(ENV="development", DEBUG=True)
    application.run()
The Flask application is referenced by the identifier [application] (lines 14, 43, 44). This name is required. If the Flask application is referenced with a different identifier, the application will not work and will display an error message indicating that it cannot find the requested URL. This error message provides no indication of the source of the error. Therefore, you must be careful about this point.
The HTML file referenced on line 34 is as follows:
<!DOCTYPE html>
<html lang="fr">
<head>
    <meta charset="UTF-8">
    <title>Date et heure du moment</title>
</head>
<body>
    <b>Date et heure du moment : {{page.date_heure}}</b>
</body>
</html>
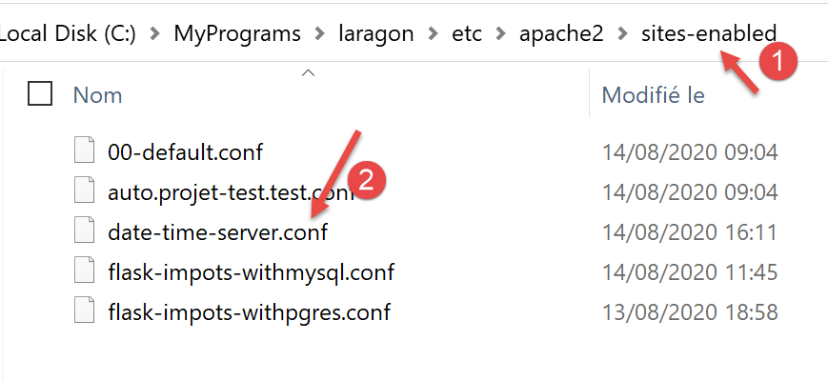
- [date-time-server] will be the virtual server hosting this application. It will be configured by the file [<laragon>\etc\apache2\sites-enabled\date-time-server.conf] (note that this name is arbitrary—Apache reads all files present in [sites-enabled] to discover the hosted virtual sites);
We first obtain this file by copying the file [auto.projet-test.test.conf] and then modify it.
The [date-time-server.conf] file will look like this:
# application python-flask script file
define ROOT "C:/Data/st-2020/dev/python/cours-2020/python3-flask-2020/impots/http-servers/12/apache/exemple"

# name of the website configured by this file
# here it will be called date-time-server
# the URL will be of type http(s)://date-time-server/path
define SITE "date-time-server"

# set address IP 127.0.0.1 for site SITE in c:/windows/system32/drivers/etc/hosts

# URL HTTP
<VirtualHost *:80>
    # with the alias / the URL will have the form http(s)://date-time-server/path/...
    WSGIScriptAlias / "${ROOT}/date_time_server.py"
    DocumentRoot "${ROOT}"
    ServerName ${SITE}
    ServerAlias *.${SITE}
    <Directory "${ROOT}">
        AllowOverride All
        Require all granted
    </Directory>
</VirtualHost>

# URL secured with HTTPS
<VirtualHost *:443>
    # with the alias / the URL will have the form http(s)://date-time-server/path/...
    WSGIScriptAlias / "${ROOT}/date_time_server.py"
    DocumentRoot "${ROOT}"
    ServerName ${SITE}
    ServerAlias *.${SITE}
    <Directory "${ROOT}">
        AllowOverride All
        Require all granted
    </Directory>

    SSLEngine on
    SSLCertificateFile      C:/MyPrograms/laragon/etc/ssl/laragon.crt
    SSLCertificateKeyFile   C:/myprograms/laragon/etc/ssl/laragon.key

</VirtualHost>
- Line 7: We give a name to the virtual server configured by the file;
- line 2: we specify the value of the variable [ROOT] used on lines 14 and 27;
- lines 14 and 27: specify the path to the Python script that must be executed when the virtual server receives a request. Here, we specify that requests for the [date-time-server] server are handled by the Python script [date_time_server.py]. This difference from the [auto.projet-test.test.conf] file stems from the fact that the former configured a PHP server, whereas the [date-time-server.conf] file configures a Python server;
- Lines 14 and 27: The [WSGIScriptAlias /] attribute here indicates that the root of the [date-time-server] server will be [/]. Thus, the URL paths in the application will take the form [http(s)://date-time-server/chemin];
- lines 14 and 27, we can assign a different root to the application, for example [WSGIScriptAlias /show]. Then the URL entries in the application will take the form [http(s)://show/date-time-server/chemin];
We also need to add a line to the [<windows>/system32/drivers/etc/hosts] file:
We add line 25 to assign the address IP [127.0.0.1] to the virtual server [date-time-server].
Let’s check everything. We start the Apache server:
Next, we request the URL and [https://date-time-server] using a browser:
- in [1], the requested URL;
- to [3], the server’s response;
- in [2], the browser indicates that the connection HTTPS is not secure because it detected that the certificate sent by the Apache server was self-signed;
Now, in the file [date-time-server.conf], let’s add an alias to lines 14 and 27:
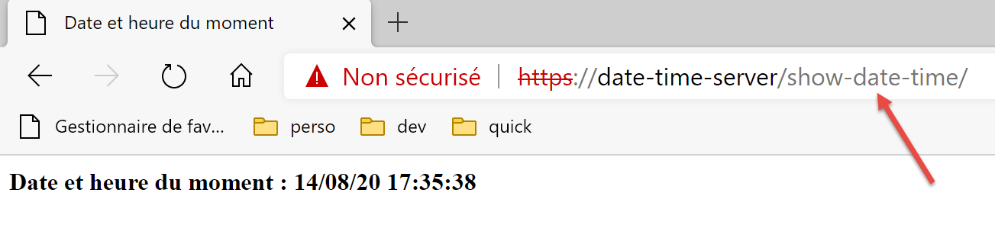
WSGIScriptAlias /show-date-time "${ROOT}/date_time_server.py"
The change is not immediately reflected by the Apache server. You must reload it:

We then request URL [https://date-time-server/show-date-time]. The server’s response is as follows:
37.5. Porting the tax calculation application to Apache / Windows
The [apache] [2] folder is initially obtained by copying the [main] folder. It is important that they be at the same level so that the paths in the [syspath.py] script, copied from [1] to [2], remain valid. To avoid interfering with the functioning [impots / http-servers/ 12] application, we place the configuration to be executed by the Apache server in [apache];
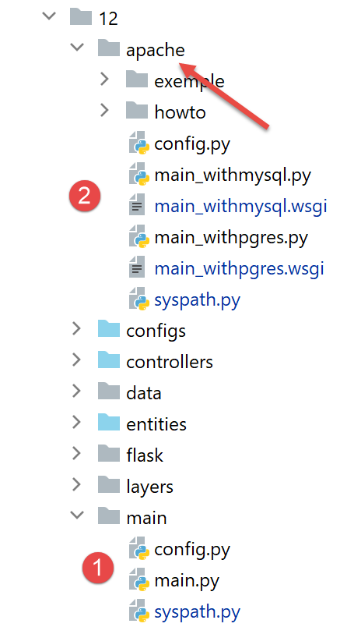
- the file [config] from [2] is the same as [config] from [1];
- the file [syspath] from [2] is the same as [syspath] from [1];
- the file [main_withmysql] from [2] is the file [main] from [1] with the following changes:
The main script [main] received a parameter [mysql / pgres] that told it which SGBD to use. The script [main_withmysql] uses SGBD and MySQL:
# a mysql or pgres parameter is expected
import os
import sys

# configure the application with MySQL
import config
config = config.configure({'sgbd': "mysql"})

# dependencies
from SendAdminMail import SendAdminMail
from Logger import Logger
from ImpôtsError import ImpôtsError
…
On line 7, we set SGBD to MySQL.
- The file [main_withpgres] from [2] is the file [main] from [1] with the following changes: It uses SGBD and PostgreSQL:
# a mysql or pgres parameter is expected
import os
import sys

# configure the application with MySQL
import config
config = config.configure({'sgbd': "pgres"})

# dependencies
from SendAdminMail import SendAdminMail
from Logger import Logger
from ImpôtsError import ImpôtsError
…
On line 7, we set SGBD to PostgreSQL.
Once this is done, we create the following script named [main_withmysql.wsgi] (the suffix used does not matter):
The script [main_withmysql.wsgi] will be the target executed by the Apache server in WSGI mode:
- The Apache server’s target could have been the [main_withmysql.py] script, as was done previously with the [date_time_server.py] script. But it would have required a slight modification:
- unlike when running with a console script, with Apache, the directory containing the target [main_withmysql.py] is not part of the Python environment Path. Therefore, line 6 of the script [main_withmysql.py] causes an error;
- the second modification that would have been necessary is that in [main_withmysql], the Flask application is referenced by the identifier [app]. We know that for Apache / WSGI, it must also be referenced by the identifier [application];
- rather than modifying [main_withmysql.py], we change the Apache target. It will now be the script [main_withmysql.wsgi] above:
- lines 1–7: we place the script folder in Python Path. As a result, line 6 of [main_withmysql.py] no longer causes an error;
- lines 9–10: importing [main_withmysql.py] causes it to run. Additionally, we reference the Flask application [app] found in [main_withmysql.py] using the identifier [application] required by Apache in WSGI mode;
We do the same with the script [main_withpgres.wsgi]:
# folder of this file
import os
script_dir = os.path.dirname(os.path.abspath(__file__))

# we add it to the syspath so that the following import is possible
import sys
sys.path.insert(0, script_dir)

# we import the Flask application [app], giving it the name [application]
from main_withpgres import app as application
We now have the executable targets for the Apache server. We now need to create two virtual servers, one for each target.
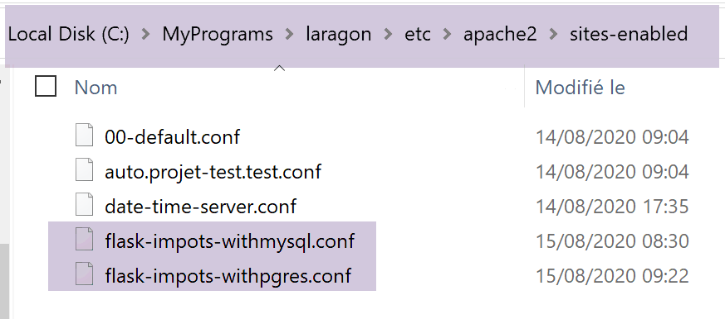
In [<laragon>\etc\apache2\sites-enabled], we create the file [flask-impots-withmysql.conf] (the name doesn’t matter):
# dossier du script .wsgi
define ROOT "C:/Data/st-2020/dev/python/cours-2020/python3-flask-2020/impots/http-servers/12/apache"

# nom du site web configuré par ce fichier
# ici il s'appellera flask-impots-withmysql
# les URL seront du type http(s)://flask-impots-withmysql/path
define SITE "flask-impots-withmysql"

# mettre l'adresse IP 127.0.0.1 pour site SITE dans c:/windows/system32/drivers/etc/hosts

# mettre ici les chemins des bibliothèques Python à utiliser - les séparer par des virgules
# ici les bibliothèques d'un environnement virtuel Python
WSGIPythonPath  "C:/Data/st-2020/dev/python/cours-2020/python3-flask-2020/venv/lib/site-packages"

# Python Home - nécessaire uniquement s'il y a plusieurs versions de Python installées
# WSGIPythonHome "C:/Program Files/Python38"

# URL HTTP
<VirtualHost *:80>
    # avec l'alias / les URL auront la forme /{prefixe_url}/action/...
    # avec l'alias /impots les URL auront la forme /impots/{prefixe_url}/action/...
    # où [prefixe_url] est défini dans parameters.py
    WSGIScriptAlias / "${ROOT}/main_withmysql.wsgi"
    DocumentRoot "${ROOT}"
    ServerName ${SITE}
    ServerAlias *.${SITE}
    <Directory "${ROOT}">
        AllowOverride All
        Require all granted
    </Directory>
</VirtualHost>

# URL sécurisées avec HTTPS
<VirtualHost *:443>
    # avec l'alias / les URL auront la forme /{prefixe_url}/action/...
    # avec l'alias /impots les URL auront la forme /impots/{prefixe_url}/action/...
    # où [prefixe_url] est défini dans parameters.py
    WSGIScriptAlias / "${ROOT}/main_withmysql.wsgi"
    DocumentRoot "${ROOT}"
    ServerName ${SITE}
    ServerAlias *.${SITE}
    <Directory "${ROOT}">
        AllowOverride All
        Require all granted
    </Directory>

    SSLEngine on
    SSLCertificateFile      C:/MyPrograms/laragon/etc/ssl/laragon.crt
    SSLCertificateKeyFile   C:/myprograms/laragon/etc/ssl/laragon.key

</VirtualHost>
- line 2: the application root, the [apache] folder we created;
- lines 23, 38: the target [main_witmysql.wsgi] that we created:
- line 7: the virtual server will be named [flask-impots-withmysql];
- line 13: the [WSGIPythonPath] directive allows us to add folders to the Python Path. Here, Apache is unaware that we used a virtual environment to develop the application and that all modules used by the application are in that virtual environment. Therefore, on line 13, we add the folder containing all modules from the virtual environment used. One option is to copy this folder to another location in the file system and reference that location. Another option is to add this folder directly to the Python Path target within the [main_witmysql.wsgi] target (this is likely a better solution);
- Line 16: You can specify the Python installation directory in the file system to Apache. Normally, this is in the machine’s PATH directory, and this line is often unnecessary (which was the case here). However, there may be multiple Python installations on the machine, and the desired one may not be in the machine’s PATH directory. In that case, this line resolves the issue;
Similarly, create a [flask-impots-withpgres.conf] file:
# dossier du script .wsgi
define ROOT "C:/Data/st-2020/dev/python/cours-2020/python3-flask-2020/impots/http-servers/12/apache"

# nom du site web configuré par ce fichier
# ici il s'appellera flask-impots-withmysql
# les URL seront du type http(s)://flask-impots-withmysql/path
define SITE "flask-impots-withpgres"

# mettre l'adresse IP 127.0.0.1 pour site SITE dans c:/windows/system32/drivers/etc/hosts

# mettre ici les chemins des bibliothèques Python à utiliser - les séparer par des virgules
# ici les bibliothèques d'un environnement virtuel Python
WSGIPythonPath  "C:/Data/st-2020/dev/python/cours-2020/python3-flask-2020/venv/lib/site-packages"

# Python Home - nécessaire uniquement s'il y a plusieurs versions de Python installées
# WSGIPythonHome "C:/Program Files/Python38"

# URL HTTP
<VirtualHost *:80>
    # avec l'alias / les URL auront la forme /{prefixe_url}/action/...
    # avec l'alias /impots les URL auront la forme /impots/{prefixe_url}/action/...
    # où [prefixe_url] est défini dans parameters.py
    WSGIScriptAlias / "${ROOT}/main_withpgres.wsgi"
    DocumentRoot "${ROOT}"
    ServerName ${SITE}
    ServerAlias *.${SITE}
    <Directory "${ROOT}">
        AllowOverride All
        Require all granted
    </Directory>
</VirtualHost>

# URL sécurisées avec HTTPS
<VirtualHost *:443>
    # avec l'alias / les URL auront la forme /{prefixe_url}/action/...
    # avec l'alias /impots les URL auront la forme /impots/{prefixe_url}/action/...
    # où [prefixe_url] est défini dans parameters.py
    WSGIScriptAlias / "${ROOT}/main_withpgres.wsgi"
    DocumentRoot "${ROOT}"
    ServerName ${SITE}
    ServerAlias *.${SITE}
    <Directory "${ROOT}">
        AllowOverride All
        Require all granted
    </Directory>

    SSLEngine on
    SSLCertificateFile      C:/MyPrograms/laragon/etc/ssl/laragon.crt
    SSLCertificateKeyFile   C:/myprograms/laragon/etc/ssl/laragon.key

</VirtualHost>
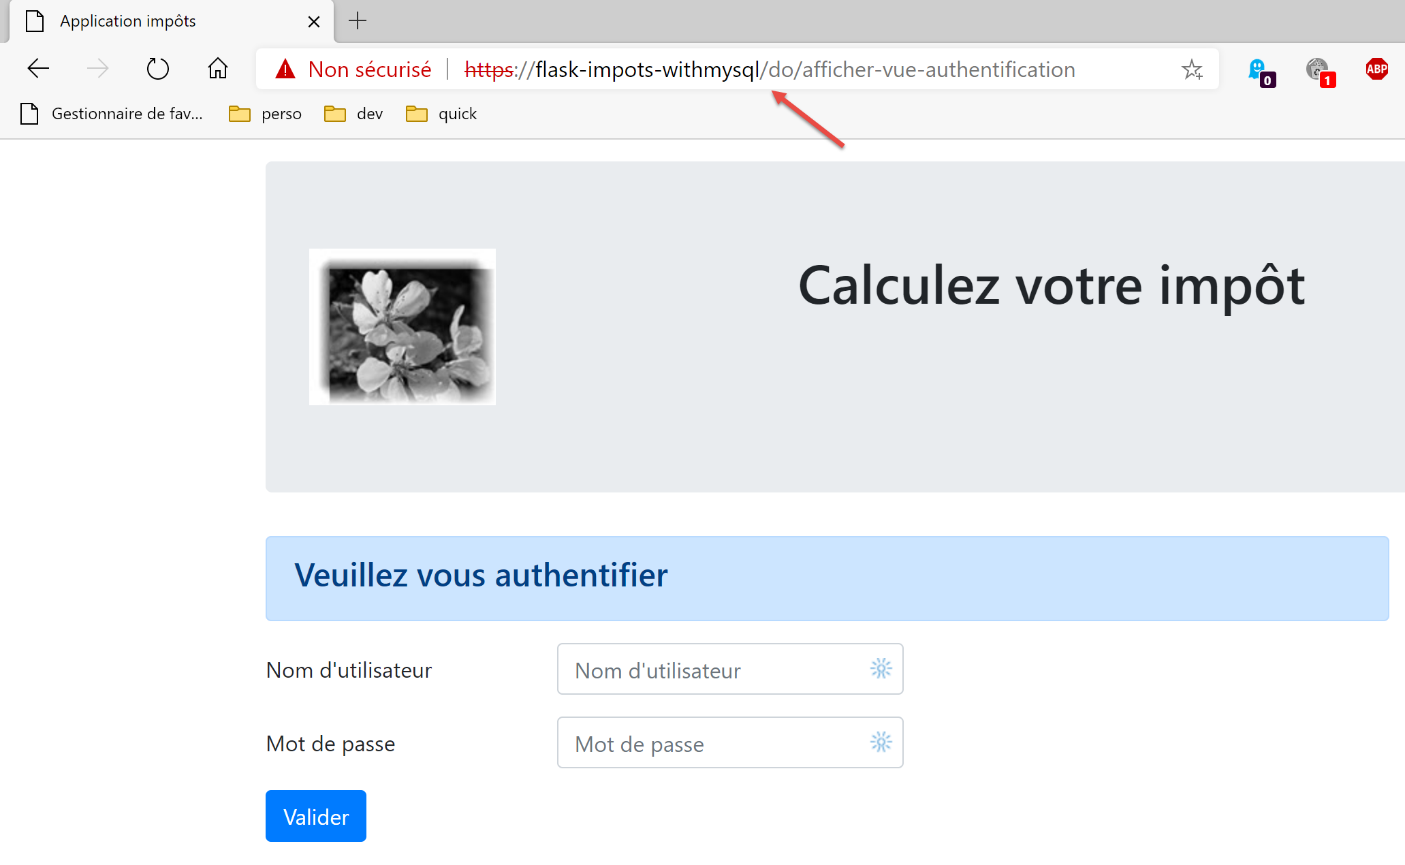
We save all these files, start the Apache server, and launch SGBD, MySQL, and PostgreSQL. The application is configured with the prefix URL [/do] and [with_csrftoken=False] (no token CSRF) in [configs/parameters.py]. We request URL and [https://flask-impots-withmysql/do]. The server’s response is as follows:
We now request URL and [https://flask-impots-pgres/do]. The response is as follows:
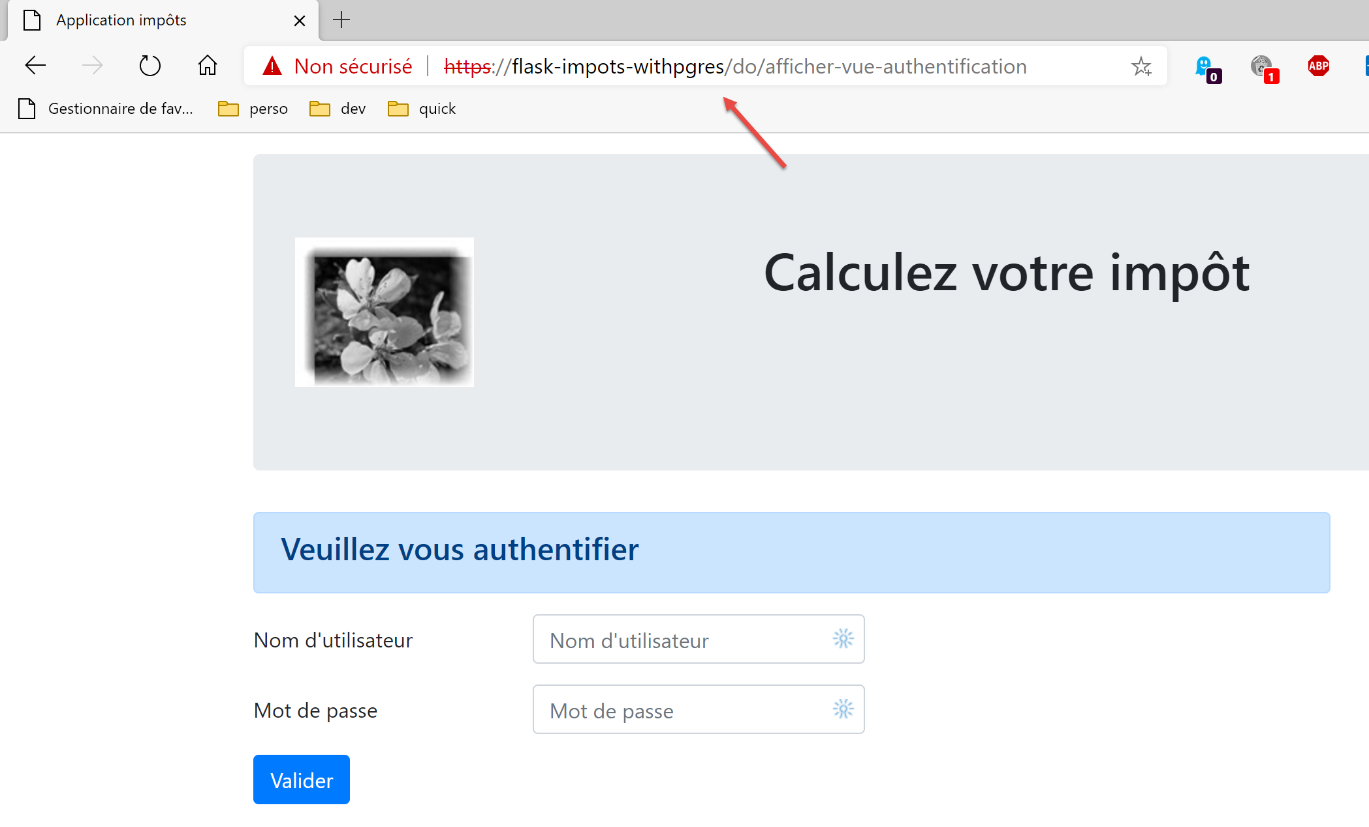
Both applications are working normally.
Now let’s change the parameter [WSGIScriptAlias] to [flask-impots-withmysql.conf]:
# .wsgi script folder
define ROOT "C:/Data/st-2020/dev/python/cours-2020/python3-flask-2020/impots/http-servers/12/apache"

…

# URL HTTP
<VirtualHost *:80>
    # with the alias / the URL will have the form /{prefixe_url}/action/...
    # with the alias /impots the URL will take the form /impots/{prefixe_url}/action/...
    # where [prefixe_url] is defined in parameters.py
    WSGIScriptAlias /impots "${ROOT}/main_withmysql.wsgi"
    …
</VirtualHost>

# URL secured with HTTPS
<VirtualHost *:443>
    # with the alias / the URL will have the form /{prefixe_url}/action/...
    # with the alias /impots the URL will take the form /impots/{prefixe_url}/action/...
    # where [prefixe_url] is defined in parameters.py
    WSGIScriptAlias /impots "${ROOT}/main_withmysql.wsgi"
    …

</VirtualHost>
- lines 11 and 20, the alias WSI is now [/impots];
We stop and restart the Apache server, then request URL and [https://flask-impots-withmysql/impots/do]. The server’s response is as follows:
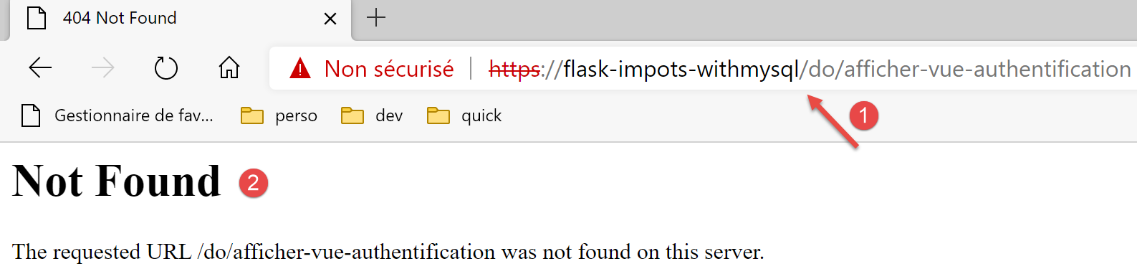
There is a crash. The URL [1] tells us the cause. It should have been [https://flask-impots-withmysql/impots/do/afficher-vue-authentification]. The alias WSGI is missing. This is an error in our application. It can handle a prefix of URL (/do is present). One might think that adding the prefix [/impots/do] to our application would solve the previous problem. But no. We then encounter other types of problems. The alias WSGI does not behave like a prefix of URL.
Let’s try to understand what happened. We requested URL and [https://flask-impots-withmysql/impots/do]. We expected to see the authentication view. In [1], above, we see that the application requested its display but not with the correct URL. Let’s examine the path of the [https://flask-impots-withmysql/impots/do] request.
First, the following route (configs/routes.py) was executed:
    # flask application routes
    # application root
    app.add_url_rule(f'{prefix_url}/', methods=['GET'],
                     view_func=routes.index)
The route in line 3 is, in our example, [https://flask-impots-withmysql/impots/do]. We can see that the route has been stripped of the [https://flask-impots-withmysql/impots] portion, becoming simply [/do]. For the [https://flask-impots-withmysql] portion, this is normal; the server name is not included in the route. But we can see that it also does not include the alias WSGI [/impots]. This is an important point. Even with an alias WSGI, our initial routes remain valid.
Now let’s see what the [index] function on line 4 (configs/routes_without_csrftoken) does:
# application root
def index() -> tuple:
    # redirect to /init-session/html
    return redirect(url_for("init_session", type_response="html"), status.HTTP_302_FOUND)
On line 4, we are redirected to URL from the [init_session] function. In [configs/routes.py], this function has been associated with the [/do/init-session/html] route:
    # init-session
    app.add_url_rule(f'{prefix_url}/init-session/<string:type_response>{csrftoken_param}', methods=['GET'],
                     view_func=routes.init_session)
Line 2: In our test, [csrftoken_param] is the empty string. The application does not handle a CSRF token here.
The [init_session] function is defined as follows (configs/routes_without_csrftoken):
# init-session
def init_session(type_response: str) -> tuple:
    # execute the controller associated with the action
    return front_controller()
Line 4: We start the processing chain for the [init-session] action. This chain ends as follows in [responses/HtmlResponse]:
…
# now it's time to generate the URL redirection, not forgetting the CSRF token if requested
        if config['parameters']['with_csrftoken']:
            csrf_token = f"/{generate_csrf()}"
        else:
            csrf_token = ""

        # redirect response
        return redirect(f"{config['parameters']['prefix_url']}{ads['to']}{csrf_token}"), status.HTTP_302_FOUND
The [init-session] action is a ADS action (Do Something action) that ends with a redirect to a view, line 9. This is where the problem lies. The [redirect] function on line 9 does not automatically add the alias WSGI to the URL redirect. This is shown in the screenshot above. The alias /impots is missing from the URL redirection object.
The following version resolves the alias issue in WSGI.