21. 互联网函数
接下来我们将讨论 Python 的网络函数,这些函数使我们能够进行 TCP/IP(传输控制协议/互联网协议)编程。
21.1. 互联网编程的基础
21.1.1. 概述
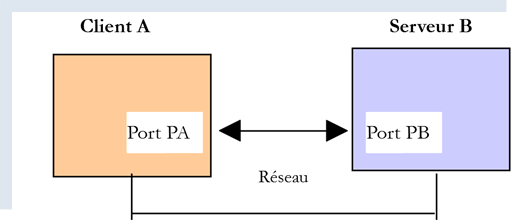
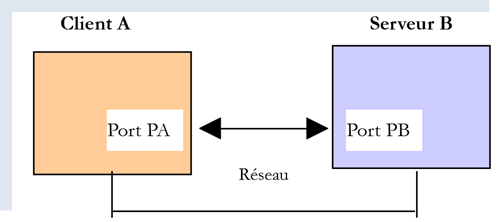
考虑两台远程机器 A 和 B 之间的通信:
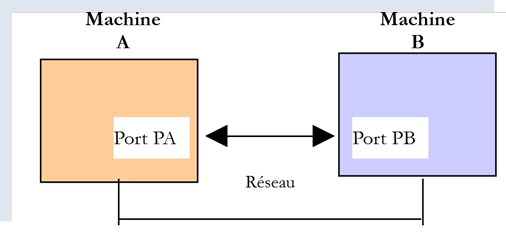
当机器 A 上的应用程序 AppA 想要通过互联网与机器 B 上的应用程序 AppB 进行通信时,它必须了解以下几点:
- 机器 B 的 IP(互联网协议)地址或名称;
- 应用程序 AppB 使用的端口号。事实上,机器 B 可能托管着众多在互联网上运行的应用程序。当它从网络接收信息时,必须知道该信息是发给哪个应用程序的。机器 B 上的应用程序通过接口(也称为通信端口)访问网络。这些信息包含在机器 B 接收的数据包中,以便将其传递给正确的应用程序;
- 机器B所支持的通信协议。在本研究中,我们将仅使用TCP-IP协议;
- 应用程序 AppB 所支持的通信协议。事实上,机器 A 和 B 将相互“通信”。它们交换的数据将被封装在 TCP/IP 协议中。然而,当链路末端的 AppB 应用程序接收到 AppA 应用程序发送的信息时,它必须能够对其进行解码。这类似于两个人 A 和 B 通过电话进行沟通的情况:他们的对话由电话传输。 语音由电话A编码为信号,通过电话线传输,到达电话B后被解码。随后,B才能听到这些话语。这就是通信协议 概念发挥作用的地方:如果A说法语而B不懂该语言,A和B就无法有效沟通;
因此,两个通信应用程序必须就将采用的通信类型达成一致。例如,与FTP服务通信与与POP服务通信并不相同:这两项服务不接受相同的命令。它们采用不同的通信协议;
21.1.2. TCP 协议的特性
在此,我们将仅探讨使用TCP传输协议的网络通信,其主要特征如下:
- 希望传输数据的进程首先会与即将接收该信息的进程建立连接。该连接是在发送机器上的一个端口与接收机器上的一个端口之间建立的。由此在两个端口之间创建了一条虚拟路径,该路径将专用于已建立连接的这两个进程;
- 源进程发送的所有数据包均沿此虚拟路径传输,并按发送顺序到达;
- 传输的信息呈现连续状态。发送进程按自身节奏发送信息。这些信息未必会立即发送:TCP 协议会等待直至积累足够的数据量。数据被存储在一个称为 TCP 分段的结构中。一旦该分段填满,便会被传输至 IP 层,并在那里封装为 IP 数据包;
- TCP协议发送的每个分段都有序号。接收端的TCP协议会验证分段是否按顺序接收。对于每个正确接收的分段,它都会向发送方发送一个确认;
- 当发送方收到该确认时,会通知发送进程。发送进程从而可以确认该分段已安全到达;
- 如果发送数据段的 TCP 协议在经过一定时间后仍未收到确认,它将重传该数据段,从而确保信息传输服务的质量;
- 两个通信进程之间建立的虚拟电路是全双工的:这意味着信息可以双向流动。因此,即使源进程仍在发送信息,目标进程也可以发送确认。这使得源TCP协议能够发送多个分段,而无需等待确认。 如果经过一段时间后,它发现尚未收到针对特定分段编号 n 的确认,它将从该点开始恢复发送分段;
21.1.3. 客户端-服务器关系
互联网上的通信通常是非对称的:机器 A 发起连接以向机器 B 请求服务,并指定希望与机器 B 上的服务 SB1 建立连接。机器 B 会接受或拒绝该请求。 若接受,机器A即可向服务SB1发送请求。这些请求必须符合服务SB1所理解的通信协议。由此,在被称为客户端的机器A与被称为服务器的机器B之间建立起请求-响应对话。双方中的一方将关闭连接。
21.1.4. 客户端架构
请求服务器应用程序服务的网络程序架构如下:
21.1.5. 服务器架构
提供服务的程序架构如下:
服务器程序处理客户端的初始连接请求与后续的服务请求的方式不同。 该程序本身并不提供服务。如果由它直接提供服务,那么在服务进行期间,它将无法继续监听连接请求,从而导致无法为客户端提供服务。因此,它采取了不同的处理方式:一旦在监听端口上收到连接请求并予以接受,服务器就会创建一个任务,负责提供客户端所请求的服务。该服务在服务器机器的另一个端口(称为服务端口)上提供。这样就可以同时为多个客户端提供服务。
一个服务任务将具有以下结构:
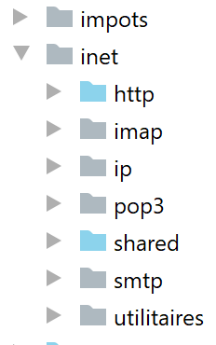
21.2. 了解互联网的通信协议
21.2.1. 简介
当客户端连接到服务器时,双方之间会建立通信通道。这种通信的性质构成了所谓的服务器通信协议。最常见的互联网协议包括以下几种:
- HTTP:超文本传输协议——用于与 Web 服务器(HTTP 服务器)通信的协议;
- SMTP:简单邮件传输协议——用于与电子邮件发送服务器(SMTP 服务器)通信的协议;
- POP:邮局协议——用于与电子邮件存储服务器(POP服务器)通信的协议。该协议涉及检索已接收的电子邮件,而非发送邮件;
- IMAP:互联网邮件访问协议——用于与电子邮件存储服务器(IMAP服务器)通信的协议。该协议已逐渐取代了较早的POP协议;
- FTP:文件传输协议——用于与文件存储服务器(FTP服务器)通信的协议;
所有这些协议均为基于文本的:客户端与服务器之间交换的是文本行。如果您拥有一个具备以下功能的客户端:
- 与 TCP 服务器建立连接;
- 在控制台上显示服务器发送的文本行;
- 将用户在键盘上输入的文本行发送给服务器;
这样,只要我们了解该协议的规则,就能使用基于文本的协议与 TCP 服务器进行通信。
21.2.2. TCP 实用工具

在本文档相关的代码中,包含两个 TCP 通信工具:
- [RawTcpClient] 允许您连接到服务器 S 的端口 P;
- [RawTcpServer] 允许您创建一个在端口 P 上监听客户端的服务器;
这两个 C# 程序的源代码已提供,因此您可以对其进行修改。
TCP 服务器 [RawTcpServer] 通过语法 [RawTcpServer port] 调用,用于在本地机器(您正在使用的计算机)的 [port] 端口上创建一个 TCP 服务:
- 该服务器可同时服务多个客户端;
- 服务器会执行用户通过键盘输入的命令。这些命令如下:
- list:列出当前连接到服务器的客户端。显示格式为 [id=x-name=y]。其中 [id] 字段用于标识客户端;
- send x [text]:向客户端 #x(id=x)发送文本。方括号 [] 不会被发送,但命令中必须包含它们,用于视觉上区分发送给客户端的文本;
- close x:关闭与客户端 #x 的连接;
- quit:关闭所有连接并停止服务;
- 客户端发送给服务器的行将显示在控制台上;
- 所有通信记录都会保存在名为 [machine-port.txt] 的文本文件中,其中
- [machine] 是运行该代码的机器名称;
- [port] 是响应客户端请求的服务端口;
使用语法 [RawTcpClient server port] 调用 TCP 客户端 [RawTcpClient],以连接到服务器 [server] 的端口 [port]:
- 用户在键盘上输入的行会被发送至服务器;
- 服务器发送的行会显示在控制台上;
- 所有通信内容都会记录在一个名为 [server-port.txt] 的文本文件中;
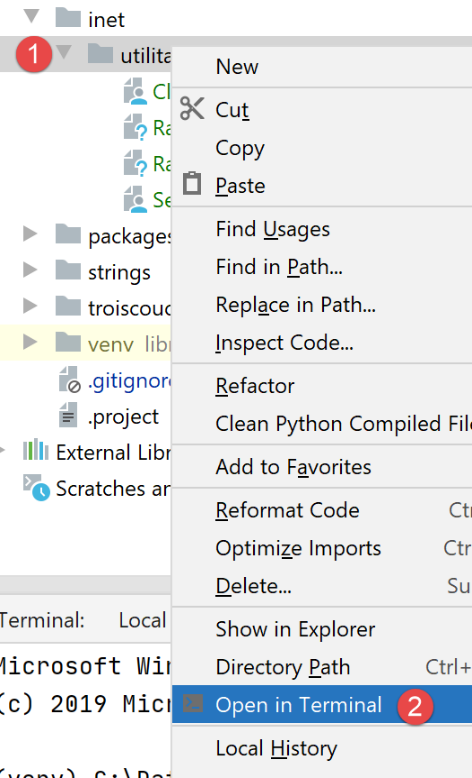
让我们看一个示例。打开两个 PyCharm 终端窗口,并在每个窗口中导航至 utilities 文件夹:
在其中一个窗口中,在端口 100 上启动 [RawTcpServer] 服务器:
(venv) C:\Data\st-2020\dev\python\cours-2020\python3-flask-2020\inet\utilitaires>RawTcpServer.exe 100
server : Serveur générique lancé sur le port 0.0.0.0:100
server : Attente d'un client...
server : Commandes disponibles : [list, send id [texte], close id, quit]
user :
- 第 1 行:我们位于 utilities 文件夹中;
- 第 1 行:我们在 100 端口启动 TCP 服务器;
- 第 2–4 行:服务器等待 TCP 客户端,并显示用户可通过键盘输入的命令列表;
- 第 5 行,服务器等待用户通过键盘输入的命令;
在另一个命令窗口中,我们启动 TCP 客户端:
(venv) C:\Data\st-2020\dev\python\cours-2020\python3-flask-2020\inet\utilitaires>RawTcpClient.exe localhost 100
Client [DESKTOP-30FF5FB:51173] connecté au serveur [localhost-100]
Tapez vos commandes (quit pour arrêter) :
- 第 1 行:我们位于 utilities 文件夹中;
- 第 1 行:我们启动 TCP 客户端;并指示其连接到本地机器(即运行 [RawTcpClient] 代码的机器)的 100 端口;
- 第 2 行,客户端已成功连接到服务器。我们指定客户端的详细信息:它位于机器 [DESKTOP-30FF5FB](本例中的本地机器)上,并使用端口 [51173] 与服务器通信:
- 第 3 行:客户端正在等待用户通过键盘输入的命令;
让我们回到服务器窗口。其内容已发生变化:
(venv) C:\Data\st-2020\dev\python\cours-2020\python3-flask-2020\inet\utilitaires>RawTcpServer.exe 100
server : Serveur générique lancé sur le port 0.0.0.0:100
server : Attente d'un client...
server : Commandes disponibles : [list, send id [texte], close id, quit]
user : server : Client 1-DESKTOP-30FF5FB-51173 connecté...
server : Attente d'un client...
- 第 5 行:已检测到一个客户端。服务器为其分配了 ID 1。服务器正确识别了远程客户端(主机和端口);
- 第 6 行:服务器恢复等待新客户端;
让我们回到客户端窗口,向服务器发送一条命令:
(venv) C:\Data\st-2020\dev\python\cours-2020\python3-flask-2020\inet\utilitaires>RawTcpClient.exe localhost 100
Client [DESKTOP-30FF5FB:51173] connecté au serveur [localhost-100]
Tapez vos commandes (quit pour arrêter) :
hello from client
- 第 4 行,发送到服务器的命令;
让我们回到服务器窗口。其内容已发生变化:
(venv) C:\Data\st-2020\dev\python\cours-2020\python3-flask-2020\inet\utilitaires>RawTcpServer.exe 100
server : Serveur générique lancé sur le port 0.0.0.0:100
server : Attente d'un client...
server : Commandes disponibles : [list, send id [texte], close id, quit]
user : server : Client 1-DESKTOP-30FF5FB-51173 connecté...
server : Attente d'un client...
client 1 : [hello from client]
- 第 7 行,方括号内为服务器接收到的消息;
让我们向客户端发送一个响应:
(venv) C:\Data\st-2020\dev\python\cours-2020\python3-flask-2020\inet\utilitaires>RawTcpServer.exe 100
server : Serveur générique lancé sur le port 0.0.0.0:100
server : Attente d'un client...
server : Commandes disponibles : [list, send id [texte], close id, quit]
user : server : Client 1-DESKTOP-30FF5FB-51173 connecté...
server : Attente d'un client...
client 1 : [hello from client]
send 1 [hello from server]
user :
- 第 8 行,发送给客户端 1 的响应。仅发送方括号内的文本,不包括方括号本身;
让我们回到客户端窗口:
(venv) C:\Data\st-2020\dev\python\cours-2020\python3-flask-2020\inet\utilitaires>RawTcpClient.exe localhost 100
Client [DESKTOP-30FF5FB:51173] connecté au serveur [localhost-100]
Tapez vos commandes (quit pour arrêter) :
hello from client
<-- [hello from server]
- 第5行,客户端收到的响应。收到的文本即方括号中的内容;
让我们回到服务器窗口查看其他命令:
(venv) C:\Data\st-2020\dev\python\cours-2020\python3-flask-2020\inet\utilitaires>RawTcpServer.exe 100
server : Serveur générique lancé sur le port 0.0.0.0:100
server : Attente d'un client...
server : Commandes disponibles : [list, send id [texte], close id, quit]
user : server : Client 1-DESKTOP-30FF5FB-51173 connecté...
server : Attente d'un client...
client 1 : [hello from client]
send 1 [hello from server]
user : list
server : id=1-name=DESKTOP-30FF5FB-51173
user : close 1
server : Connexion client 1 fermée...
user : quit
server : fin du service
- 第 9 行,我们请求客户端列表;
- 第10行,响应;
- 第11行,我们关闭与客户端#1的连接;
- 第12行,服务器的确认;
- 第 13 行,我们关闭服务器;
- 第14行,服务器的确认;
让我们回到客户端窗口:
(venv) C:\Data\st-2020\dev\python\cours-2020\python3-flask-2020\inet\utilitaires>RawTcpClient.exe localhost 100
Client [DESKTOP-30FF5FB:51173] connecté au serveur [localhost-100]
Tapez vos commandes (quit pour arrêter) :
hello from client
<-- [hello from server]
Perte de la connexion avec le serveur...
- 第 6 行,客户端检测到服务结束;
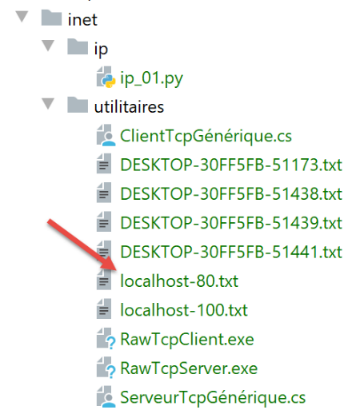
已生成两个日志文件,一个用于服务器,一个用于客户端:
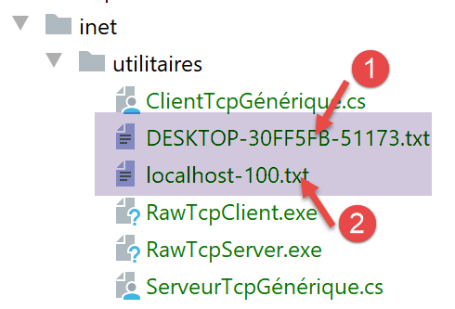
- 在 [1] 中,服务器日志:文件名采用 [机器-端口] 格式,即客户端名称。这使得不同客户端可以使用不同的日志文件;
- 在[2]中,客户端日志显示:文件名是服务器名称,格式为[机器-端口];
服务器日志如下:
<-- [hello from client]
--> [hello from server]
客户端日志如下:
--> [hello from client]
<-- [hello from server]
21.3. 获取互联网上某台机器的名称或 IP 地址
互联网上的计算机通过 IP 地址(IPv4 或 IPv6)进行标识,通常还通过名称进行标识。然而,互联网通信协议最终仅使用 IP 地址。因此,您需要知道通过名称标识的计算机的 IP 地址。
[ip-01.py] 脚本如下:
注释
- 第 2 行:[socket] 模块提供了管理互联网套接字所需的函数。[socket] 指的是电源插座或网络端口;
- 第 6 行:[get_ip_and_name] 函数允许您根据机器的主机名获取以下信息:
- 该机器的 IP 地址;
- 根据上述 IP 地址推导出的机器名称;
- 第 10 行:[socket.gethostbyname] 函数可根据机器的某个名称(一台互联网机器可能拥有主名称和别名)获取其 IP 地址;
- 第 12 行:一旦发生错误,套接字函数会立即引发 [socket.error] 异常;
- 第 19 行:[socket.gethostbyaddr] 函数根据 IP 地址获取机器的名称。我们将看到,获取到的名称可能与第 6 行传入的名称不同;
- 第 30 行:一台机器的名称列表。最后一个名称有误。名称 [localhost] 指的是您正在操作且正在运行该脚本的机器;
- 第 33–35 行:我们显示这些机器的 IP 地址;
结果:
C:\Data\st-2020\dev\python\cours-2020\python3-flask-2020\venv\Scripts\python.exe C:/Data/st-2020/dev/python/cours-2020/python3-flask-2020/inet/ip/ip_01.py
-------------------------------------
ip[istia.univ-angers.fr]=193.49.144.41
names[193.49.144.41]=('ametys-fo-2.univ-angers.fr', [], ['193.49.144.41'])
-------------------------------------
ip[www.univ-angers.fr]=193.49.144.41
names[193.49.144.41]=('ametys-fo-2.univ-angers.fr', [], ['193.49.144.41'])
-------------------------------------
ip[sergetahe.com]=87.98.154.146
names[87.98.154.146]=('cluster026.hosting.ovh.net', [], ['87.98.154.146'])
-------------------------------------
ip[localhost]=127.0.0.1
names[127.0.0.1]=('DESKTOP-30FF5FB', [], ['127.0.0.1'])
-------------------------------------
ip[xx]=[Errno 11001] getaddrinfo failed
Terminé...
Process finished with exit code 0
21.4. HTTP(超文本传输协议)
21.4.1. 示例 1
当浏览器显示一个 URL 时,它充当 Web 服务器的客户端,或者换句话说,是 HTTP 服务器的客户端。它主动发起请求,首先向服务器发送一系列命令。以下是第一个示例:
- 服务器将由 [RawTcpServer] 工具担任;
- 客户端将是一个浏览器;
首先,我们在 100 端口上启动服务器:
(venv) C:\Data\st-2020\dev\python\cours-2020\python3-flask-2020\inet\utilitaires>RawTcpServer.exe 100
server : Serveur générique lancé sur le port 0.0.0.0:100
server : Attente d'un client...
server : Commandes disponibles : [list, send id [texte], close id, quit]
user :
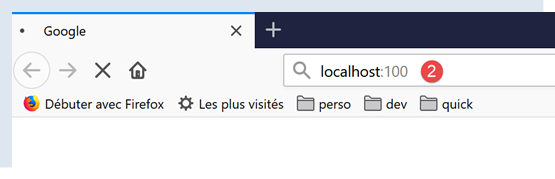
然后,我们使用浏览器请求 URL [http://localhost:100],这意味着我们指定要查询的 HTTP 服务器正在本地机器的 100 端口上运行:
让我们回到服务器窗口:
(venv) C:\Data\st-2020\dev\python\cours-2020\python3-flask-2020\inet\utilitaires>RawTcpServer.exe 100
server : Serveur générique lancé sur le port 0.0.0.0:100
server : Attente d'un client...
server : Commandes disponibles : [list, send id [texte], close id, quit]
user : server : Client 1-DESKTOP-30FF5FB-51438 connecté...
server : Attente d'un client...
server : Client 2-DESKTOP-30FF5FB-51439 connecté...
server : Attente d'un client...
client 1 : [GET / HTTP/1.1]
client 1 : [Host: localhost:100]
client 1 : [Connection: keep-alive]
client 1 : [DNT: 1]
client 1 : [Upgrade-Insecure-Requests: 1]
client 1 : [User-Agent: Mozilla/5.0 (Windows NT 10.0; Win64; x64) AppleWebKit/537.36 (KHTML, like Gecko) Chrome/83.0.4103.116 Safari/537.36]
client 1 : [Accept: text/html,application/xhtml+xml,application/xml;q=0.9,image/webp,image/apng,*/*;q=0.8,application/signed-exchange;v=b3;q=0.9]
client 1 : [Sec-Fetch-Site: none]
client 1 : [Sec-Fetch-Mode: navigate]
client 1 : [Sec-Fetch-User: ?1]
client 1 : [Sec-Fetch-Dest: document]
client 1 : [Accept-Encoding: gzip, deflate, br]
client 1 : [Accept-Language: fr-FR,fr;q=0.9,en-US;q=0.8,en;q=0.7]
client 1 : []
server : Client 3-DESKTOP-30FF5FB-51441 connecté...
server : Attente d'un client...
- 第 5 行,已连接的客户端;
- 第 9–22 行:它发送的一系列文本行:
- 第 9 行:该行格式为 [GET URL HTTP/1.1]。它请求 URL /,并指示服务器使用 HTTP 1.1 协议;
- 第 10 行:该行格式为 [Host: 服务器:端口]。[Host] 命令不区分大小写。请注意,客户端正在查询运行在 100 端口的本地服务器;
- 第 14 行:[User-Agent] 命令用于标识客户端;
- 第 15 行:[Accept] 指令指定客户端接受的文档类型;
- 第 21 行:[Accept-Language] 指令指定了若请求的文档有多种语言版本时,应提供哪种语言的文档;
- 第 11 行:[Connection] 指令指定所需的连接模式:[keep-alive] 表示应保持连接直至数据交换完成;
- 第 22 行:客户端在命令末尾添加空行;
我们通过关闭服务器来终止连接:
client 1 : []
server : Client 3-DESKTOP-30FF5FB-51441 connecté...
server : Attente d'un client...
quit
server : fin du service
21.4.2. 示例 2
既然我们已经了解了浏览器发送的用于请求 URL 的命令,接下来我们将使用我们的 TCP 客户端 [RawTcpClient] 来请求该 URL。Laragon 中的 Apache 服务器(参见 |安装 Laragon| 章节)将作为我们的 Web 服务器。
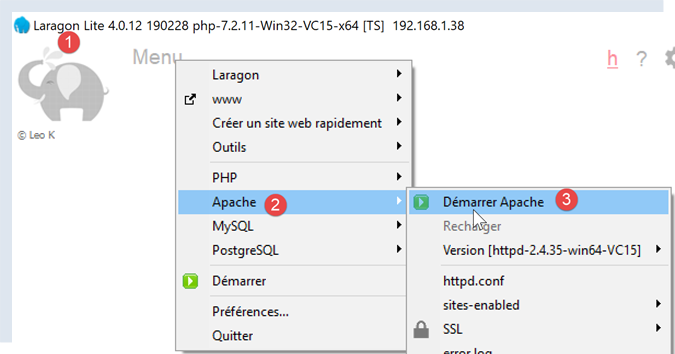
让我们启动 Laragon,然后启动 Apache Web 服务器:

现在,使用浏览器请求 URL [http://localhost:80]。这里我们仅指定服务器 [localhost:80],未指定文档 URL。此时请求的是 URL /,即 Web 服务器的根目录:
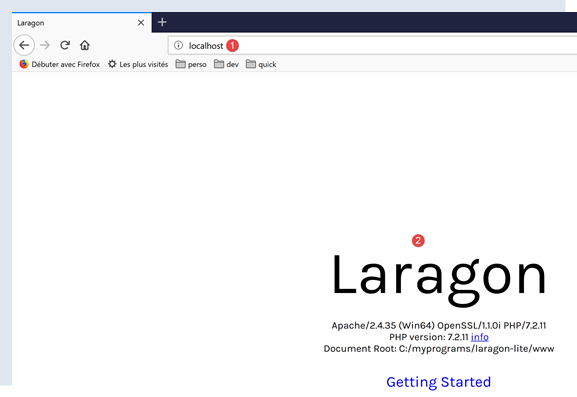
- 在 [1] 中,是请求的 URL。我们最初输入的是 [http://localhost:80],而浏览器(此处为 Firefox)将其简单地转换为 [localhost],因为未指定协议时默认使用 [http] 协议,未指定端口时默认使用端口 [80];
- 在 [2] 中,所查询 Web 服务器的根页面 /;
现在,让我们查看浏览器接收到的文本:
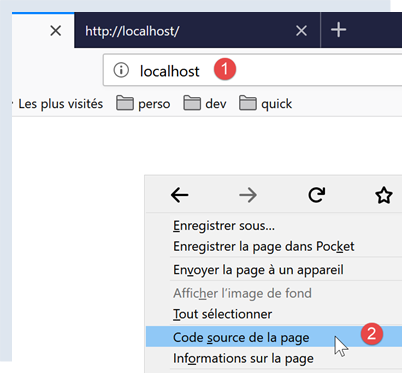
- 右键单击接收到的页面并选择选项 [2]。您将获得以下源代码:
<!DOCTYPE html>
<html>
<head>
<title>Laragon</title>
<link href="https://fonts.googleapis.com/css?family=Karla:400" rel="stylesheet" type="text/css">
<style>
html, body {
height: 100%;
}
body {
margin: 0;
padding: 0;
width: 100%;
display: table;
font-weight: 100;
font-family: 'Karla';
}
.container {
text-align: center;
display: table-cell;
vertical-align: middle;
}
.content {
text-align: center;
display: inline-block;
}
.title {
font-size: 96px;
}
.opt {
margin-top: 30px;
}
.opt a {
text-decoration: none;
font-size: 150%;
}
a:hover {
color: red;
}
</style>
</head>
<body>
<div class="container">
<div class="content">
<div class="title" title="Laragon">Laragon</div>
<div class="info">
<br />
Apache/2.4.35 (Win64) OpenSSL/1.1.1b PHP/7.2.19<br />
PHP version: 7.2.19 <span><a title="phpinfo()" href="/?q=info">info</a></span><br />
Document Root: C:/MyPrograms/laragon/www<br />
</div>
<div class="opt">
<div><a title="Getting Started" href="https://laragon.org/docs">Getting Started</a></div>
</div>
</div>
</div>
</body>
</html>
现在,让我们使用我们的 TCP 客户端请求 URL [http://localhost:80]:
(venv) C:\Data\st-2020\dev\python\cours-2020\python3-flask-2020\inet\utilitaires>RawTcpClient.exe localhost 80
Client [DESKTOP-30FF5FB:51541] connecté au serveur [localhost-80]
Tapez vos commandes (quit pour arrêter) :
- 第 1 行:我们连接到本地主机的 80 端口。Laragon Web 服务器就在此处运行;
现在输入上一段中提到的命令:
(venv) C:\Data\st-2020\dev\python\cours-2020\python3-flask-2020\inet\utilitaires>RawTcpClient.exe localhost 80
Client [DESKTOP-30FF5FB:51544] connecté au serveur [localhost-80]
Tapez vos commandes (quit pour arrêter) :
GET / HTTP/1.1
Host: localhost:80
<-- [HTTP/1.1 200 OK]
<-- [Date: Sun, 05 Jul 2020 12:42:14 GMT]
<-- [Server: Apache/2.4.35 (Win64) OpenSSL/1.1.1b PHP/7.2.19]
<-- [X-Powered-By: PHP/7.2.19]
<-- [Content-Length: 1776]
<-- [Content-Type: text/html; charset=UTF-8]
<-- []
<-- [<!DOCTYPE html>]
<-- [<html>]
<-- [ <head>]
<-- [ <title>Laragon</title>]
<-- []
<-- [ <link href="https://fonts.googleapis.com/css?family=Karla:400" rel="stylesheet" type="text/css">]
<-- []
<-- [ <style>]
<-- [ html, body {]
<-- [ height: 100%;]
<-- [ }]
<-- []
<-- [ body {]
<-- [ margin: 0;]
<-- [ padding: 0;]
<-- [ width: 100%;]
<-- [ display: table;]
<-- [ font-weight: 100;]
<-- [ font-family: 'Karla';]
<-- [ }]
<-- []
<-- [ .container {]
<-- [ text-align: center;]
<-- [ display: table-cell;]
<-- [ vertical-align: middle;]
<-- [ }]
<-- []
<-- [ .content {]
<-- [ text-align: center;]
<-- [ display: inline-block;]
<-- [ }]
<-- []
<-- [ .title {]
<-- [ font-size: 96px;]
<-- [ }]
<-- []
<-- [ .opt {]
<-- [ margin-top: 30px;]
<-- [ }]
<-- []
<-- [ .opt a {]
<-- [ text-decoration: none;]
<-- [ font-size: 150%;]
<-- [ }]
<-- [ ]
<-- [ a:hover {]
<-- [ color: red;]
<-- [ }]
<-- [ </style>]
<-- [ </head>]
<-- [ <body>]
<-- [ <div class="container">]
<-- [ <div class="content">]
<-- [ <div class="title" title="Laragon">Laragon</div>]
<-- [ ]
<-- [ <div class="info"><br />]
<-- [ Apache/2.4.35 (Win64) OpenSSL/1.1.1b PHP/7.2.19<br />]
<-- [ PHP version: 7.2.19 <span><a title="phpinfo()" href="/?q=info">info</a></span><br />]
<-- [ Document Root: C:/MyPrograms/laragon/www<br />]
<-- []
<-- [ </div>]
<-- [ <div class="opt">]
<-- [ <div><a title="Getting Started" href="https://laragon.org/docs">Getting Started</a></div>]
<-- [ </div>]
<-- [ </div>]
<-- []
<-- [ </div>]
<-- [ </body>]
<-- [</html>]
Perte de la connexion avec le serveur...
- 第 4 行,[GET] 命令。我们请求 Web 服务器的根目录 /;
- 第 5 行,[Host] 命令;
- 仅此两条命令是必需的。对于其他命令,Web 服务器将使用默认值;
- 第 6 行,这是必须用于结束客户端命令的空行;
- 第 6 行之后是 Web 服务器的响应;
- 第 7–12 行:服务器响应的 HTTP 头部;
- 第 13 行:表示 HTTP 头部结束的空行;
- 第14–82行:第4行请求的HTML文档;
我们加载日志文件 [localhost-80.txt]:
--> [GET / HTTP/1.1]
--> [Host: localhost:80]
--> []
<-- [HTTP/1.1 200 OK]
<-- [Date: Sun, 05 Jul 2020 12:42:14 GMT]
<-- [Server: Apache/2.4.35 (Win64) OpenSSL/1.1.1b PHP/7.2.19]
<-- [X-Powered-By: PHP/7.2.19]
<-- [Content-Length: 1776]
<-- [Content-Type: text/html; charset=UTF-8]
<-- []
<-- [<!DOCTYPE html>]
<-- [<html>]
<-- [ <head>]
<-- [ <title>Laragon</title>]
<-- []
<-- [ <link href="https://fonts.googleapis.com/css?family=Karla:400" rel="stylesheet" type="text/css">]
<-- []
<-- [ <style>]
<-- [ html, body {]
<-- [ height: 100%;]
<-- [ }]
<-- []
<-- [ body {]
<-- [ margin: 0;]
<-- [ padding: 0;]
<-- [ width: 100%;]
<-- [ display: table;]
<-- [ font-weight: 100;]
<-- [ font-family: 'Karla';]
<-- [ }]
<-- []
<-- [ .container {]
<-- [ text-align: center;]
<-- [ display: table-cell;]
<-- [ vertical-align: middle;]
<-- [ }]
<-- []
<-- [ .content {]
<-- [ text-align: center;]
<-- [ display: inline-block;]
<-- [ }]
<-- []
<-- [ .title {]
<-- [ font-size: 96px;]
<-- [ }]
<-- []
<-- [ .opt {]
<-- [ margin-top: 30px;]
<-- [ }]
<-- []
<-- [ .opt a {]
<-- [ text-decoration: none;]
<-- [ font-size: 150%;]
<-- [ }]
<-- [ ]
<-- [ a:hover {]
<-- [ color: red;]
<-- [ }]
<-- [ </style>]
<-- [ </head>]
<-- [ <body>]
<-- [ <div class="container">]
<-- [ <div class="content">]
<-- [ <div class="title" title="Laragon">Laragon</div>]
<-- [ ]
<-- [ <div class="info"><br />]
<-- [ Apache/2.4.35 (Win64) OpenSSL/1.1.1b PHP/7.2.19<br />]
<-- [ PHP version: 7.2.19 <span><a title="phpinfo()" href="/?q=info">info</a></span><br />]
<-- [ Document Root: C:/MyPrograms/laragon/www<br />]
<-- []
<-- [ </div>]
<-- [ <div class="opt">]
<-- [ <div><a title="Getting Started" href="https://laragon.org/docs">Getting Started</a></div>]
<-- [ </div>]
<-- [ </div>]
<-- []
<-- [ </div>]
<-- [ </body>]
<-- [</html>]
- 第 11–79 行:接收到的 HTML 文档。在上一个示例中,Firefox 接收到的也是同一个文档;
现在我们已经掌握了编写 TCP 客户端以请求 URL 的基础知识。
21.4.3. 示例 3
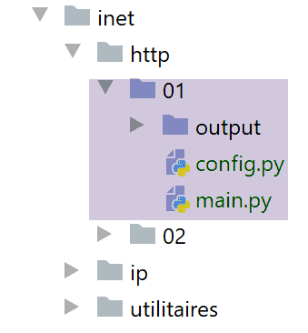
脚本 [http/01/main.py] 是一个由文件 [config.py] 配置的 HTTP 客户端。其内容如下:
- 该文件的内容是一组 URL 列表,列表中的每一项都是一个字典。该字典指定了如何连接到由 [site] 键指定的网站;
- 第 4–10 行:每个字典中各键的含义;
脚本 [http/01/main.py] 如下:
1 2 3 4 5 6 7 8 9 10 11 12 13 14 15 16 17 18 19 20 21 22 23 24 25 26 27 28 29 30 31 32 33 34 35 36 37 38 39 40 41 42 43 44 45 46 47 48 49 50 51 52 53 54 55 56 57 58 59 60 61 62 63 64 65 66 67 68 69 70 71 72 73 74 75 76 77 78 79 80 81 82 83 84 85 86 87 88 89 90 91 92 93 94 95 96 97 98 99 100 101 102 103 104 105 106 107 108 109 110 111 112 113 114 115 116 117 118 119 120 121 122 123 124 | |
代码注释:
- 第 108-109 行:从 [config.py] 模块中获取 [config] 字典;
- 第 111-122 行:使用该字典;
- 第 118 行和第 7 行:[get_url(url)] 函数从网站 url[site] 请求文档,并将其存储在文本文件 url[site].HTML 中。默认情况下,客户端/服务器交互会记录到控制台(tracking=True);
- 所有操作均在 [try / finally] 代码块内完成(第 14–96 行)。没有 [except] 子句。异常会被传播到调用代码中,由其捕获并显示(第 119–120 行);
- 第 16–17 行:建立与 Web 服务器的连接。[socket.create_connection] 函数接受三个参数:
- [param1]:是要连接的互联网主机的名称;
- [param2]:是要连接的服务端口号;
- [param3]:[socket.create_connection] 返回一个套接字,若存在 [param3],则指定该套接字的超时时间。超时时间是指套接字在等待远程机器响应时的最大等待时长;
- 第 27-28 行:创建 [site.html] 文件,用于存储接收到的 HTML 文档;
- 第 34-43 行:客户端的第一个命令必须是 [GET URL HTTP/1.1] 命令;
- 第 43 行:[sock.send] 函数允许客户端向服务器发送数据。此处发送的文本字符串含义如下:“我希望(GET)从当前连接的网站获取页面 [URL]。我使用的是 HTTP 1.1 版本”;
- 第 43 行:语句 [sock.send(bytearray(command, 'utf-8'))] 发送了一个字节数组。该数组是通过将字符串 [command] 转换为 UTF-8 编码的字节序列而获得的;
- 第 44–52 行:发送其他 HTTP 协议字段 [Host, User-Agent, Accept, Accept-Language…]。这些字段的顺序无关紧要;
- 第 53–55 行:发送 HTTP 头部 [Connection: close],用于指示服务器在发送完请求的文档后关闭连接。默认情况下,服务器不会这样做,因此必须显式请求。这样做的好处是,客户端能够检测到连接关闭,从而知道已接收完整的请求文档;
- 第 56–57 行:向服务器发送空行,以表明客户端已发送完 HTTP 头部,现在正在等待所请求的文档;
- 第 68–86 行:服务器将首先发送一系列 HTTP 头部,提供有关请求文档的各种详细信息。这些头部以空行结尾;
- 第 69–73 行:为了逐行读取服务器的响应,我们使用 [sock.makefile(encoding=encoding)] 方法。可选的 [encoding] 参数指定预期的文本编码。执行此操作后,服务器发送的行流即可像标准文本文件一样被读取;
- 第 78 行:我们使用 [readline] 方法读取服务器发送的一行。我们会去除该行的首尾空白(空格、换行符);
- 第 81–83 行:如果该行不为空且已请求跟踪,则将接收到的行显示在控制台上;
- 第 84–86 行:若已获取标记服务器发送的 HTTP 头部结束的空行,则终止第 76 行的循环;
- 第 90–95 行:可通过 while 循环逐行读取服务器响应的文本行,并将其保存到 [html] 文本文件中。当 Web 服务器发送完请求的整个页面后,它将关闭与客户端的连接。在客户端,这将被检测为文件结束,此时我们将退出第 90–95 行的循环;
- 第 96–102 行:无论是否发生错误,代码中使用的所有资源均被释放;
结果:
控制台将显示以下日志:
C:\Data\st-2020\dev\python\cours-2020\python3-flask-2020\venv\Scripts\python.exe C:/Data/st-2020/dev/python/cours-2020/python3-flask-2020/inet/http/01/main.py
-------------------------
localhost
-------------------------
Client : début de la communication avec le serveur [localhost]
--> GET / HTTP/1.1
--> Host: localhost:80
--> User-Agent: client Python
--> Accept: text/HTML
--> Accept-Language: fr
Réponse du serveur [localhost]
<-- HTTP/1.1 200 OK
<-- Date: Sun, 05 Jul 2020 16:27:46 GMT
<-- Server: Apache/2.4.35 (Win64) OpenSSL/1.1.1b PHP/7.2.19
<-- X-Powered-By: PHP/7.2.19
<-- Content-Length: 1776
<-- Connection: close
<-- Content-Type: text/html; charset=UTF-8
-------------------------
sergetahe.com
-------------------------
Client : début de la communication avec le serveur [sergetahe.com]
--> GET / HTTP/1.1
--> Host: sergetahe.com:80
--> User-Agent: client Python
--> Accept: text/HTML
--> Accept-Language: fr
Réponse du serveur [sergetahe.com]
<-- HTTP/1.1 302 Found
<-- Date: Sun, 05 Jul 2020 16:27:45 GMT
<-- Content-Type: text/html; charset=UTF-8
<-- Transfer-Encoding: chunked
<-- Connection: close
<-- Server: Apache
<-- X-Powered-By: PHP/7.3
<-- Location: http://sergetahe.com:80/cours-tutoriels-de-programmation
<-- Set-Cookie: SERVERID68971=2620178|XwH/h|XwH/h; path=/
<-- X-IPLB-Instance: 17106
-------------------------
tahe.developpez.com
-------------------------
Client : début de la communication avec le serveur [tahe.developpez.com]
--> GET / HTTP/1.1
--> Host: tahe.developpez.com:443
--> User-Agent: client Python
--> Accept: text/HTML
--> Accept-Language: fr
Réponse du serveur [tahe.developpez.com]
<-- HTTP/1.1 400 Bad Request
<-- Date: Sun, 05 Jul 2020 16:27:45 GMT
<-- Server: Apache/2.4.38 (Debian)
<-- Content-Length: 453
<-- Connection: close
<-- Content-Type: text/html; charset=iso-8859-1
-------------------------
www.sergetahe.com
-------------------------
Client : début de la communication avec le serveur [www.sergetahe.com]
--> GET /cours-tutoriels-de-programmation/ HTTP/1.1
--> Host: sergetahe.com:80
--> User-Agent: client Python
--> Accept: text/HTML
--> Accept-Language: fr
Réponse du serveur [www.sergetahe.com]
<-- HTTP/1.1 301 Moved Permanently
<-- Date: Sun, 05 Jul 2020 16:27:45 GMT
<-- Content-Type: text/html; charset=iso-8859-1
<-- Content-Length: 263
<-- Connection: close
<-- Server: Apache
<-- Location: https://sergetahe.com/cours-tutoriels-de-programmation/
<-- Set-Cookie: SERVERID68971=2620178|XwH/h|XwH/h; path=/
<-- X-IPLB-Instance: 17095
Terminé...
Process finished with exit code 0
注释
- 第 12 行:找到了 URL [http://localhost/](状态码 200);
- 第 29 行:未找到 URL [http://sergetahe.com/](状态码 302)。状态码 302 表示所请求的页面已更改其 URL。新的 URL 由第 36 行的 HTTP [Location] 标头指示;
- 第 49 行:发送到服务器 [http://tahe.developpez.com] 的请求无效(状态码 400);
- 第 65 行:未找到 URL [http://www.sergetahe.com/](状态码 301)。状态码 301 表示所请求的页面已永久更改其 URL。第 71 行中的 HTTP [Location] 标头指明了新 URL;
通常,HTTP 服务器返回的 3xx、4xx 和 5xx 代码均为错误代码。
执行后生成了以下文件:
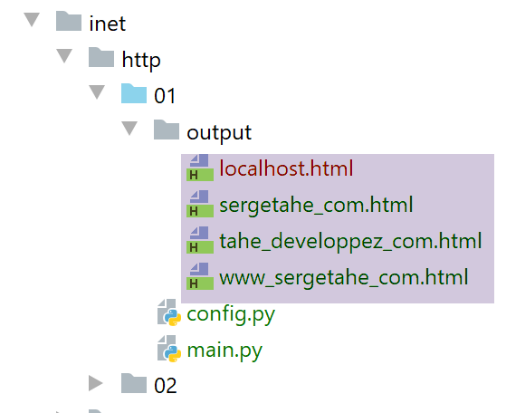
收到的文件 [output/localhost.HTML] 内容如下:
<!DOCTYPE html>
<html>
<head>
<title>Laragon</title>
<link href="https://fonts.googleapis.com/css?family=Karla:400" rel="stylesheet" type="text/css">
<style>
html, body {
height: 100%;
}
body {
margin: 0;
padding: 0;
width: 100%;
display: table;
font-weight: 100;
font-family: 'Karla';
}
.container {
text-align: center;
display: table-cell;
vertical-align: middle;
}
.content {
text-align: center;
display: inline-block;
}
.title {
font-size: 96px;
}
.opt {
margin-top: 30px;
}
.opt a {
text-decoration: none;
font-size: 150%;
}
a:hover {
color: red;
}
</style>
</head>
<body>
<div class="container">
<div class="content">
<div class="title" title="Laragon">Laragon</div>
<div class="info"><br />
Apache/2.4.35 (Win64) OpenSSL/1.1.1b PHP/7.2.19<br />
PHP version: 7.2.19 <span><a title="phpinfo()" href="/?q=info">info</a></span><br />
Document Root: C:/MyPrograms/laragon/www<br />
</div>
<div class="opt">
<div><a title="Getting Started" href="https://laragon.org/docs">Getting Started</a></div>
</div>
</div>
</div>
</body>
</html>
我们确实收到了与Firefox浏览器相同的文档。
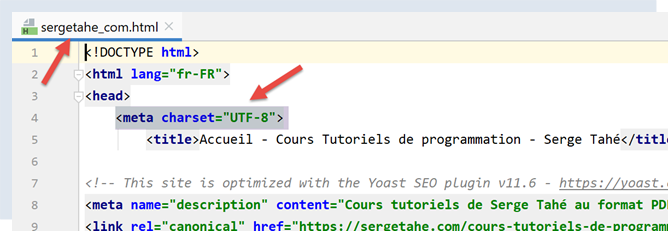
收到的文档 [output/sergetahe_com.html] 如下:
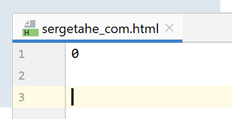
大多数 HTTP 服务器会分块发送对请求的响应。每个发送的分块前都有一行,标明后续分块的字节数。这使得客户端能够读取确切数量的字节来接收该分块。这里,0 表示后续分块为零字节。请注意,服务器曾指出文档 [http://sergetahe.com/] 的 URL 已发生变更。因此,它并未发送任何文档。
文档 [output/tahe_developpez_com.html] 内容如下:
<!DOCTYPE HTML PUBLIC "-//IETF//DTD HTML 2.0//EN">
<html><head>
<title>400 Bad Request</title>
</head><body>
<h1>Bad Request</h1>
<p>Your browser sent a request that this server could not understand.<br />
Reason: You're speaking plain HTTP to an SSL-enabled server port.<br />
Instead use the HTTPS scheme to access this URL, please.<br />
</p>
<hr>
<address>Apache/2.4.38 (Debian) Server at 2eurocents.developpez.com Port 80</address>
</body></html>
- 第 1–12 行:尽管请求有误(结果第 49 行),服务器仍发送了一份 HTML 文档。该 HTML 文档允许服务器指明错误原因。这在第 6 和第 7 行中有所体现:
- 第 7 行:我们的客户端使用了 HTTP 协议;
- 第8行:服务器使用HTTPS协议(S=安全),且不接受HTTP协议;
文档 [output/www_sergetahe_com.html] 内容如下:
<!DOCTYPE HTML PUBLIC "-//IETF//DTD HTML 2.0//EN">
<html><head>
<title>301 Moved Permanently</title>
</head><body>
<h1>Moved Permanently</h1>
<p>The document has moved <a href="https://sergetahe.com/cours-tutoriels-de-programmation/">here</a>.</p>
</body></html>
这里也发生了一个错误(第 3 行)。不过,服务器会发送一份详细说明该错误的 HTML 文档(第 1–7 行)。
21.4.4. 示例 4
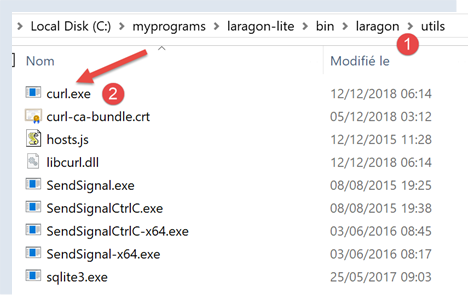
前面的示例表明,我们的 HTTP 客户端功能尚不完善。现在我们将介绍一个名为 [curl] 的工具,它能让我们在处理前述挑战(HTTPS 协议、分块传输的文档、重定向等)的同时检索 Web 文档。该 [curl] 工具已随 Laragon 一起安装:
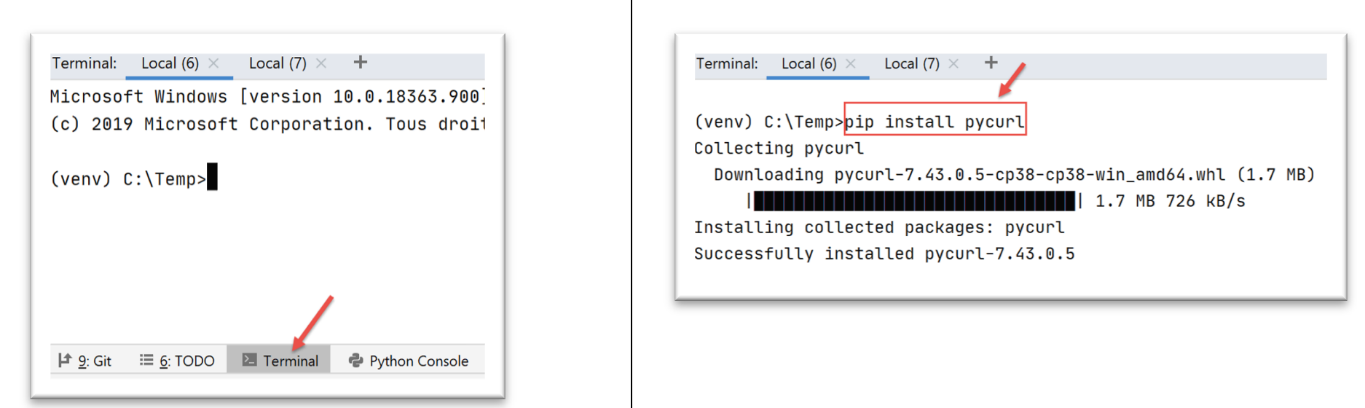
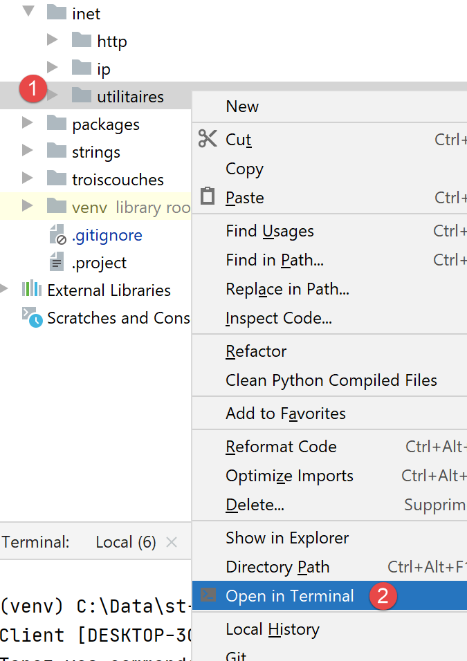
让我们打开 PyCharm 终端 [1]:
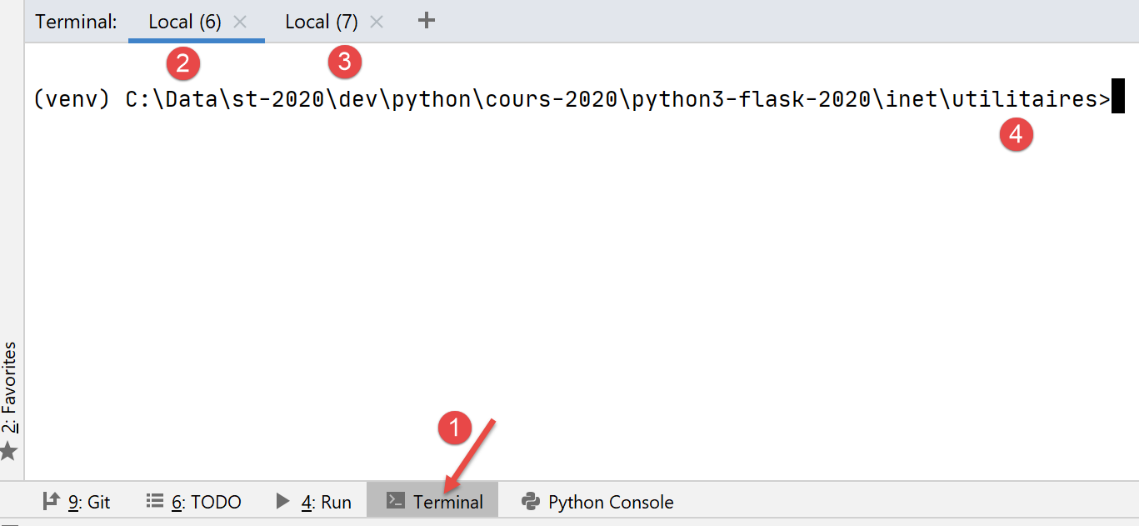
- 在 [1] 中,访问 PyCharm 终端;
- 在 [2-3] 中,显示已激活的终端;
- [4] 显示当前所在的目录。使用哪个终端都无妨;
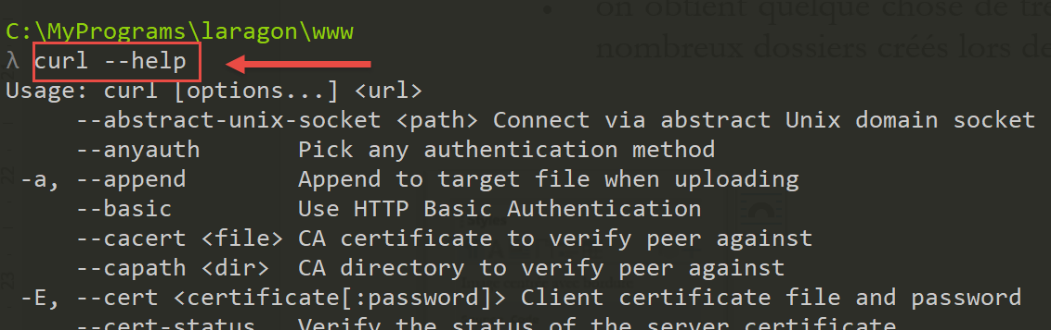
在终端中输入以下命令:
(venv) C:\Data\st-2020\dev\python\cours-2020\python3-flask-2020\inet\utilitaires>curl --help
Usage: curl [options...] <url>
--abstract-unix-socket <path> Connect via abstract Unix domain socket
--anyauth Pick any authentication method
-a, --append Append to target file when uploading
--basic Use HTTP Basic Authentication
--cacert <CA certificate> CA certificate to verify peer against
…
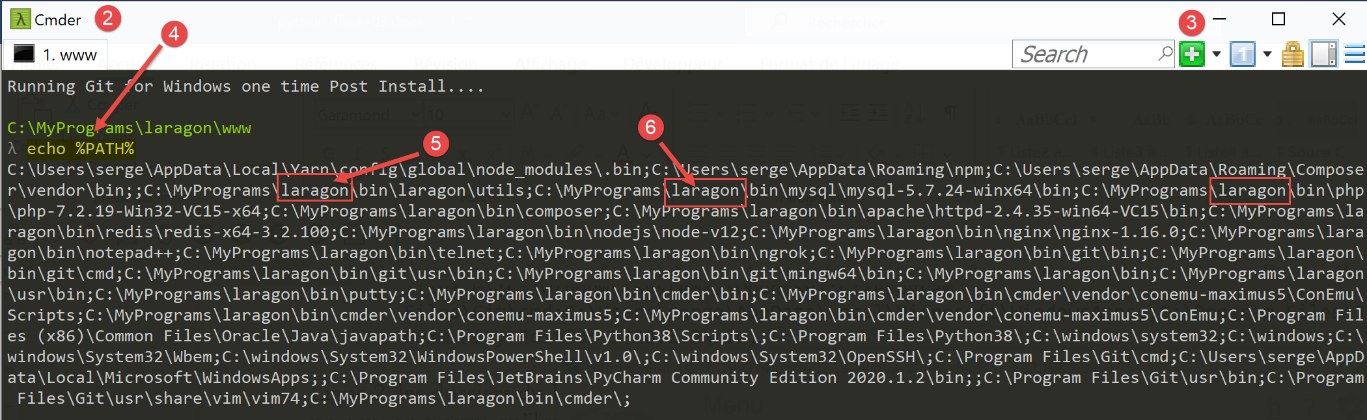
[curl –help] 命令能显示结果,说明 [curl] 命令已在终端的 PATH 环境变量中。在 Windows 系统中,PATH 是指用户输入可执行命令(本例中为 [curl])时系统会搜索的一组文件夹。PATH 的值可通过以下方式确定:
(venv) C:\Data\st-2020\dev\python\cours-2020\python3-flask-2020\inet\utilitaires>echo %PATH%
C:\Data\st-2020\dev\python\cours-2020\python3-flask-2020\venv\Scripts;C:\Program Files (x86)\Common Files\Oracle\Java\javapath;C:\Program Files\Python38\Scripts\;C:\Program Files\Python38\;C:\windows\system32;C:\windows;C:\windows\System32\Wbem;C:\windows\System32\WindowsPowerShell\v1.0\;C:\windows\System32\OpenSSH\;C:\Program Files\Git\cmd;C:\Users\serge\AppData\Local\Microsoft\WindowsApps;;C:\Program Files\JetBrains\PyCharm Community Edition 2020.1.2\bin;
第 2 行:用分号分隔的 PATH 文件夹。此列表中未出现与 Laragon 相关的文件夹。经进一步调查,我们发现 [c:\windows\system32] 文件夹中存在一个 [curl]。这就是之前响应的那个。
若需使用 Laragon 自带的 [curl] 工具,请按以下步骤操作:
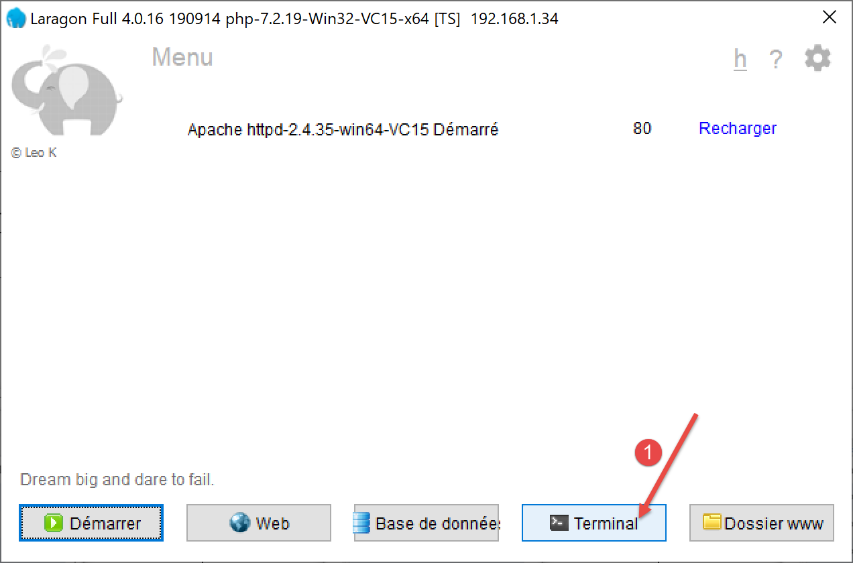
- 在 [2] 中,即 Laragon 终端;
- 在 [3] 中,此按钮可让你创建新的终端,每个终端都会在上方的窗口中以标签页形式打开;
- 在 [4] 中,我们为 Laragon 终端设置 PATH 环境变量;
- 您会发现这与 PyCharm 终端中的结果大不相同。此 PATH 包含 Laragon 安装过程中创建的许多文件夹。其中就包括包含 [curl] 工具的文件夹:
之后,请使用您喜欢的终端。请注意,当您需要使用 Laragon 提供的工具时,建议优先选择 Laragon 终端。
[curl --help] 命令会显示 [curl] 的所有配置选项。这些选项多达数十种。 但我们只会用到其中极少数。要请求一个 URL,只需输入命令 [curl URL]。该命令会在控制台上显示所请求的文档。如果您还想查看客户端与服务器之间的 HTTP 交互,请输入 [curl --verbose URL]。最后,若要将请求的 HTML 文档保存到文件中,请输入 [curl --verbose --output 文件名 URL]。
为避免占用本地文件系统空间,让我们切换到另一个目录(此处我使用的是 Laragon 终端):
λ cd \Temp\
C:\Temp
λ mkdir curl
C:\Temp
λ cd curl\
C:\Temp\curl
λ dir
Le volume dans le lecteur C s’appelle Local Disk
Le numéro de série du volume est B84C-D958
Répertoire de C:\Temp\curl
05/07/2020 19:31 <DIR> .
05/07/2020 19:31 <DIR> ..
0 fichier(s) 0 octets
2 Rép(s) 892 388 098 048 octets libres
- 第3行,我们导航至 [c:\temp] 文件夹。如果该文件夹不存在,您可以创建它或选择另一个;
- 第 6 行,创建一个名为 [curl] 的文件夹;
- 第 9 行,我们进入该文件夹;
- 第 12 行,列出其内容。该文件夹为空(第 20 行);
请确保 Laragon Apache 服务器正在运行,并使用 [curl] 通过命令 [curl –verbose –output localhost.html http://localhost/] 请求 URL [http://localhost/]。您将获得以下结果:
λ curl --verbose --output localhost.html http://localhost/
% Total % Received % Xferd Average Speed Time Time Time Current
Dload Upload Total Spent Left Speed
0 0 0 0 0 0 0 0 --:--:-- --:--:-- --:--:-- 0* Trying ::1...
* TCP_NODELAY set
* Trying 127.0.0.1...
* TCP_NODELAY set
0 0 0 0 0 0 0 0 --:--:-- 0:00:01 --:--:-- 0* Connected to localhost (::1) port 80 (#0)
0 0 0 0 0 0 0 0 --:--:-- 0:00:01 --:--:-- 0> GET / HTTP/1.1
> Host: localhost
> User-Agent: curl/7.63.0
> Accept: */*
>
< HTTP/1.1 200 OK
< Date: Sun, 05 Jul 2020 17:35:43 GMT
< Server: Apache/2.4.35 (Win64) OpenSSL/1.1.1b PHP/7.2.19
< X-Powered-By: PHP/7.2.19
< Content-Length: 1776
< Content-Type: text/html; charset=UTF-8
<
{ [1776 bytes data]
100 1776 100 1776 0 0 1062 0 0:00:01 0:00:01 --:--:-- 1062
* Connection #0 to host localhost left intact
- 第 10–13 行:由 [curl] 发送到 [localhost] 服务器的数据行。HTTP 协议已被识别;
- 第 14–20 行:服务器发回的响应内容;
- 第 14 行:表示已成功接收所请求的文档;
文件 [localhost.html] 包含所请求的文档。您可以通过在文本编辑器中打开该文件来验证这一点。
现在,让我们请求 URL [https://tahe.developpez.com:443/]。要访问此 URL,HTTP 客户端必须支持 HTTPS。而 [curl] 客户端正是如此。
控制台输出如下:
C:\Temp\curl
λ curl --verbose --output tahe.developpez.com.html https://tahe.developpez.com:443/
% Total % Received % Xferd Average Speed Time Time Time Current
Dload Upload Total Spent Left Speed
0 0 0 0 0 0 0 0 --:--:-- --:--:-- --:--:-- 0* Trying 87.98.130.52...
* TCP_NODELAY set
0 0 0 0 0 0 0 0 --:--:-- --:--:-- --:--:-- 0* Connected to tahe.developpez.com (87.98.130.52) port 443 (#0)
* ALPN, offering h2
* ALPN, offering http/1.1
* successfully set certificate verify locations:
* CAfile: C:\MyPrograms\laragon\bin\laragon\utils\curl-ca-bundle.crt
CApath: none
} [5 bytes data]
* TLSv1.3 (OUT), TLS handshake, Client hello (1):
} [512 bytes data]
* TLSv1.3 (IN), TLS handshake, Server hello (2):
{ [122 bytes data]
* TLSv1.3 (IN), TLS handshake, Encrypted Extensions (8):
{ [25 bytes data]
* TLSv1.3 (IN), TLS handshake, Certificate (11):
{ [2563 bytes data]
* TLSv1.3 (IN), TLS handshake, CERT verify (15):
{ [264 bytes data]
* TLSv1.3 (IN), TLS handshake, Finished (20):
{ [52 bytes data]
* TLSv1.3 (OUT), TLS change cipher, Change cipher spec (1):
} [1 bytes data]
* TLSv1.3 (OUT), TLS handshake, Finished (20):
} [52 bytes data]
* SSL connection using TLSv1.3 / TLS_AES_256_GCM_SHA384
* ALPN, server accepted to use http/1.1
* Server certificate:
* subject: CN=*.developpez.com
* start date: Jul 1 15:38:30 2020 GMT
* expire date: Sep 29 15:38:30 2020 GMT
* subjectAltName: host "tahe.developpez.com" matched cert's "*.developpez.com"
* issuer: C=US; O=Let's Encrypt; CN=Let's Encrypt Authority X3
* SSL certificate verify ok.
} [5 bytes data]
> GET / HTTP/1.1
> Host: tahe.developpez.com
> User-Agent: curl/7.63.0
> Accept: */*
>
{ [5 bytes data]
* TLSv1.3 (IN), TLS handshake, Newsession Ticket (4):
{ [281 bytes data]
* TLSv1.3 (IN), TLS handshake, Newsession Ticket (4):
{ [297 bytes data]
* old SSL session ID is stale, removing
{ [5 bytes data]
< HTTP/1.1 200 OK
< Date: Sun, 05 Jul 2020 17:39:53 GMT
< Server: Apache/2.4.38 (Debian)
< X-Powered-By: PHP/5.3.29
< Vary: Accept-Encoding
< Transfer-Encoding: chunked
< Content-Type: text/html
<
{ [6 bytes data]
100 99k 0 99k 0 0 79343 0 --:--:-- 0:00:01 --:--:-- 79343
* Connection #0 to host tahe.developpez.com left intact
- 第 10-39 行:客户端与服务器之间用于建立安全连接的交互:此连接将被加密;
- 第 41-44 行:客户端 [curl] 发送给服务器的 HTTP 头部;
- 第 52 行:找到了请求的文档;
- 第 57 行:文档以分块形式发送;
[curl] 既能正确处理安全的 HTTPS 协议,也能正确处理文档分块传输的情况。发送的文档可在此处的 [tahe.developpez.com.html] 文件中找到。
现在,让我们请求 URL [http://sergetahe.com/cours-tutoriels-de-programmation]。我们看到,对于这个 URL,存在一个重定向到 URL [http://sergetahe.com/cours-tutoriels-de-programmation/](末尾带有 /)。
控制台输出如下:
C:\Temp\curl
λ curl --verbose --output sergetahe.com.html --location http://sergetahe.com/cours-tutoriels-de-programmation
% Total % Received % Xferd Average Speed Time Time Time Current
Dload Upload Total Spent Left Speed
0 0 0 0 0 0 0 0 --:--:-- --:--:-- --:--:-- 0* Trying 87.98.154.146...
* TCP_NODELAY set
* Connected to sergetahe.com (87.98.154.146) port 80 (#0)
> GET /cours-tutoriels-de-programmation HTTP/1.1
> Host: sergetahe.com
> User-Agent: curl/7.63.0
> Accept: */*
>
< HTTP/1.1 301 Moved Permanently
< Date: Sun, 05 Jul 2020 17:44:17 GMT
< Content-Type: text/html; charset=iso-8859-1
< Content-Length: 262
< Server: Apache
< Location: http://sergetahe.com/cours-tutoriels-de-programmation/
< Set-Cookie: SERVERID68971=2620178|XwIRd|XwIRd; path=/
< X-IPLB-Instance: 17095
<
* Ignoring the response-body
{ [262 bytes data]
100 262 100 262 0 0 1858 0 --:--:-- --:--:-- --:--:-- 1858
* Connection #0 to host sergetahe.com left intact
* Issue another request to this URL: 'http://sergetahe.com/cours-tutoriels-de-programmation/'
* Found bundle for host sergetahe.com: 0x14385f8 [can pipeline]
* Could pipeline, but not asked to!
* Re-using existing connection! (#0) with host sergetahe.com
* Connected to sergetahe.com (87.98.154.146) port 80 (#0)
> GET /cours-tutoriels-de-programmation/ HTTP/1.1
> Host: sergetahe.com
> User-Agent: curl/7.63.0
> Accept: */*
>
< HTTP/1.1 301 Moved Permanently
< Date: Sun, 05 Jul 2020 17:44:17 GMT
< Content-Type: text/html; charset=iso-8859-1
< Content-Length: 263
< Server: Apache
< Location: https://sergetahe.com/cours-tutoriels-de-programmation/
< Set-Cookie: SERVERID68971=2620178|XwIRd|XwIRd; path=/
< X-IPLB-Instance: 17095
<
* Ignoring the response-body
{ [263 bytes data]
100 263 100 263 0 0 764 0 --:--:-- --:--:-- --:--:-- 764
* Connection #0 to host sergetahe.com left intact
* Issue another request to this URL: 'https://sergetahe.com/cours-tutoriels-de-programmation/'
* Trying 87.98.154.146...
* TCP_NODELAY set
* Connected to sergetahe.com (87.98.154.146) port 443 (#1)
* ALPN, offering h2
* ALPN, offering http/1.1
* successfully set certificate verify locations:
* CAfile: C:\MyPrograms\laragon\bin\laragon\utils\curl-ca-bundle.crt
CApath: none
} [5 bytes data]
* TLSv1.3 (OUT), TLS handshake, Client hello (1):
} [512 bytes data]
* TLSv1.3 (IN), TLS handshake, Server hello (2):
{ [102 bytes data]
* TLSv1.2 (IN), TLS handshake, Certificate (11):
{ [2572 bytes data]
* TLSv1.2 (IN), TLS handshake, Server key exchange (12):
{ [333 bytes data]
* TLSv1.2 (IN), TLS handshake, Server finished (14):
{ [4 bytes data]
* TLSv1.2 (OUT), TLS handshake, Client key exchange (16):
} [70 bytes data]
* TLSv1.2 (OUT), TLS change cipher, Change cipher spec (1):
} [1 bytes data]
* TLSv1.2 (OUT), TLS handshake, Finished (20):
} [16 bytes data]
0 0 0 0 0 0 0 0 --:--:-- --:--:-- --:--:-- 0* TLSv1.2 (IN), TLS handshake, Finished (20):
{ [16 bytes data]
* SSL connection using TLSv1.2 / ECDHE-RSA-AES128-GCM-SHA256
* ALPN, server accepted to use h2
* Server certificate:
* subject: CN=sergetahe.com
* start date: May 10 01:41:15 2020 GMT
* expire date: Aug 8 01:41:15 2020 GMT
* subjectAltName: host "sergetahe.com" matched cert's "sergetahe.com"
* issuer: C=US; O=Let's Encrypt; CN=Let's Encrypt Authority X3
* SSL certificate verify ok.
* Using HTTP2, server supports multi-use
* Connection state changed (HTTP/2 confirmed)
* Copying HTTP/2 data in stream buffer to connection buffer after upgrade: len=0
} [5 bytes data]
* Using Stream ID: 1 (easy handle 0x2bee870)
} [5 bytes data]
> GET /cours-tutoriels-de-programmation/ HTTP/2
> Host: sergetahe.com
> User-Agent: curl/7.63.0
> Accept: */*
>
{ [5 bytes data]
* Connection state changed (MAX_CONCURRENT_STREAMS == 128)!
} [5 bytes data]
0 0 0 0 0 0 0 0 --:--:-- 0:00:01 --:--:-- 0< HTTP/2 200
< date: Sun, 05 Jul 2020 17:44:19 GMT
< content-type: text/html; charset=UTF-8
< server: Apache
< x-powered-by: PHP/7.3
< link: <https://sergetahe.com/cours-tutoriels-de-programmation/wp-json/>; rel="https://api.w.org/"
< link: <https://sergetahe.com/cours-tutoriels-de-programmation/>; rel=shortlink
< vary: Accept-Encoding
< x-iplb-instance: 17080
< set-cookie: SERVERID68971=2620178|XwIRd|XwIRd; path=/
<
{ [5 bytes data]
100 49634 0 49634 0 0 26040 0 --:--:-- 0:00:01 --:--:-- 37830
* Connection #1 to host sergetahe.com left intact
- 第 2 行:使用 [--location] 选项表示我们要跟随服务器发送的重定向;
- 第 13 行:服务器指示所请求文档的 URL 已更改;
- 第 18 行:它指明了所请求文档的新 URL;
- 第 31 行:[curl] 向新 URL 发送了新的请求;
- 第 36 行:服务器再次响应,表示 URL 已更改;
- 第 41 行:新 URL 与被重定向的 URL 完全相同,只有一个细微差别:协议已更改。它已变为 HTTPS(第 41 行),而之前是 HTTP(第 31 行);
- 第 49 行:向新 URL 发送了新的请求。该请求经过加密。因此,进行了安全协商过程(第 53–91 行);
- 第 92 行:再次请求新 URL,此次使用 HTTP/2 协议;
- 第 100 行:已找到该文档;
所请求的文档位于文件 [sergetahe.com.html] 中。
C:\Temp\curl
λ dir
Le volume dans le lecteur C s’appelle Local Disk
Le numéro de série du volume est B84C-D958
Répertoire de C:\Temp\curl
05/07/2020 19:44 <DIR> .
05/07/2020 19:44 <DIR> ..
05/07/2020 19:35 1 776 localhost.html
05/07/2020 19:44 49 634 sergetahe.com.html
05/07/2020 19:39 101 639 tahe.developpez.com.html
3 fichier(s) 153 049 octets
2 Rép(s) 892 385 628 160 octets libres
21.4.5. 示例 5
Python 有一个名为 [pyccurl] 的模块,它允许你在 Python 程序中使用 [curl] 工具的功能。我们安装这个模块:
我们将编写一个新脚本 [http/02/main.py]:

[http/02/config] 文件内容如下:
该文件包含一组字典列表,每个字典具有以下结构:
- site:Web 服务器的名称;
- encoding:预期的文档编码类型;
- timeout:服务器响应的最长等待时间,单位为毫秒。超过此时间后,客户端将断开连接;
- url:所请求文档的 URL;
脚本代码 [http/02/main.py] 如下:
注释
- 第 5 行:我们导入 [pycurl] 模块;
- 第 3 行:我们导入 [BytesIO] 类,这将使我们能够将从服务器接收到的数据存储在二进制流中;
- 第 70–72 行:我们获取应用程序配置;
- 第 75–85 行:遍历配置中找到的 URL 列表;
- 第 81 行:对于每个 URL,我们调用 [get_url] 函数,该函数将下载 URL url['target'],超时时间为 url['timeout'];
- 第 9 行:[get_url] 函数接收待查询 URL 的配置;
- 第 16–19 行:将 URL 配置数据分别存入独立变量中;
- 第 26、61 行:所有操作都在 try/finally 代码块内执行。此处不捕获异常;异常会被向上传递给调用代码,由其进行处理;
- 第 28 行:准备一个 [curl] 会话。[pycurl.Curl()] 返回一个 [curl] 资源,该资源将与服务器进行交互;
- 第 30 行:实例化用于存储接收数据的二进制流;
- 第 32–48 行:[options] 字典用于配置 [curl] 与服务器的连接。各选项的作用在注释中已说明;
- 第 49–51 行:将连接选项传递给 [curl] 资源;
- 第 53 行:使用已定义的选项连接到请求的 URL。由于 [curl.WRITEDATA: stream] 选项(第 36 行),[curl.perform()] 函数将把接收到的数据存储在 [stream] 中;
- 第 54–60 行:创建用于存储接收到的 HTML 文档的 HTML 文件;
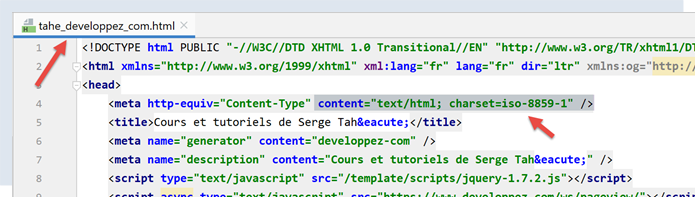
- 第 60 行:二进制流 [flux.getvalue()] 将作为字符串存储在 HTML 文件中。该字符串的编码由 [decode(encoding)] 方法指定。因此,您必须知道服务器发送的文档的编码。如果出错,二进制流的解码将失败。编码在 URL 配置文件中指定(例如第 12 行)。 由于服务器通过 HTTP 头部发送了这些信息,我们本可以动态处理。那样会更好。但为了保持代码简洁,我们没有这样做。要确定文档的编码类型,只需使用浏览器请求目标 URL,并在调试模式(F12)下查看浏览器发送的 HTTP 头部,或者查看文档本身,因为文档中也指定了编码:
- 第 61–66 行:释放已分配的资源;
运行 [main.py] 脚本时,控制台将显示以下输出:
C:\Data\st-2020\dev\python\cours-2020\python3-flask-2020\venv\Scripts\python.exe C:/Data/st-2020/dev/python/cours-2020/python3-flask-2020/inet/http/02/main.py
-------------------------
sergetahe.com
-------------------------
Client : début de la communication avec le serveur [sergetahe.com]
* Trying 87.98.154.146:80...
* TCP_NODELAY set
* Connected to sergetahe.com (87.98.154.146) port 80 (#0)
> GET / HTTP/1.1
Host: sergetahe.com
User-Agent: PycURL/7.43.0.5 libcurl/7.68.0 OpenSSL/1.1.1d zlib/1.2.11 c-ares/1.15.0 WinIDN libssh2/1.9.0 nghttp2/1.40.0
Accept: */*
* Mark bundle as not supporting multiuse
< HTTP/1.1 302 Found
< Date: Mon, 06 Jul 2020 06:45:52 GMT
< Content-Type: text/html; charset=UTF-8
< Transfer-Encoding: chunked
< Server: Apache
< X-Powered-By: PHP/7.3
< Location: http://sergetahe.com/cours-tutoriels-de-programmation
< Set-Cookie: SERVERID68971=26218|XwLIo|XwLIo; path=/
< X-IPLB-Instance: 17102
<
* Ignoring the response-body
* Connection #0 to host sergetahe.com left intact
* Issue another request to this URL: 'http://sergetahe.com/cours-tutoriels-de-programmation'
* Found bundle for host sergetahe.com: 0x25eacafb5d0 [serially]
* Can not multiplex, even if we wanted to!
* Re-using existing connection! (#0) with host sergetahe.com
* Connected to sergetahe.com (87.98.154.146) port 80 (#0)
> GET /cours-tutoriels-de-programmation HTTP/1.1
Host: sergetahe.com
User-Agent: PycURL/7.43.0.5 libcurl/7.68.0 OpenSSL/1.1.1d zlib/1.2.11 c-ares/1.15.0 WinIDN libssh2/1.9.0 nghttp2/1.40.0
Accept: */*
* Mark bundle as not supporting multiuse
< HTTP/1.1 301 Moved Permanently
< Date: Mon, 06 Jul 2020 06:45:52 GMT
< Content-Type: text/html; charset=iso-8859-1
< Content-Length: 262
< Server: Apache
< Location: http://sergetahe.com/cours-tutoriels-de-programmation/
< Set-Cookie: SERVERID68971=26218|XwLIo|XwLIo; path=/
< X-IPLB-Instance: 17102
<
* Ignoring the response-body
* Connection #0 to host sergetahe.com left intact
* Issue another request to this URL: 'http://sergetahe.com/cours-tutoriels-de-programmation/'
* Found bundle for host sergetahe.com: 0x25eacafb5d0 [serially]
* Can not multiplex, even if we wanted to!
* Re-using existing connection! (#0) with host sergetahe.com
* Connected to sergetahe.com (87.98.154.146) port 80 (#0)
> GET /cours-tutoriels-de-programmation/ HTTP/1.1
Host: sergetahe.com
User-Agent: PycURL/7.43.0.5 libcurl/7.68.0 OpenSSL/1.1.1d zlib/1.2.11 c-ares/1.15.0 WinIDN libssh2/1.9.0 nghttp2/1.40.0
Accept: */*
* Mark bundle as not supporting multiuse
< HTTP/1.1 301 Moved Permanently
< Date: Mon, 06 Jul 2020 06:45:52 GMT
< Content-Type: text/html; charset=iso-8859-1
< Content-Length: 263
< Server: Apache
< Location: https://sergetahe.com/cours-tutoriels-de-programmation/
< Set-Cookie: SERVERID68971=26218|XwLIo|XwLIo; path=/
< X-IPLB-Instance: 17102
<
* Ignoring the response-body
* Connection #0 to host sergetahe.com left intact
* Issue another request to this URL: 'https://sergetahe.com/cours-tutoriels-de-programmation/'
* Trying 87.98.154.146:443...
* TCP_NODELAY set
* ….
* Using Stream ID: 1 (easy handle 0x25eaec77010)
> GET /cours-tutoriels-de-programmation/ HTTP/2
Host: sergetahe.com
user-agent: PycURL/7.43.0.5 libcurl/7.68.0 OpenSSL/1.1.1d zlib/1.2.11 c-ares/1.15.0 WinIDN libssh2/1.9.0 nghttp2/1.40.0
accept: */*
* Connection state changed (MAX_CONCURRENT_STREAMS == 128)!
< HTTP/2 200
< date: Mon, 06 Jul 2020 06:45:53 GMT
< content-type: text/html; charset=UTF-8
< server: Apache
< x-powered-by: PHP/7.3
< link: <https://sergetahe.com/cours-tutoriels-de-programmation/wp-json/>; rel="https://api.w.org/"
< link: <https://sergetahe.com/cours-tutoriels-de-programmation/>; rel=shortlink
< vary: Accept-Encoding
< x-iplb-instance: 17080
< set-cookie: SERVERID68971=26218|XwLIp|XwLIp; path=/
<
* Connection #1 to host sergetahe.com left intact
-------------------------
tahe.developpez.com
-------------------------
Client : début de la communication avec le serveur [tahe.developpez.com]
* Trying 87.98.130.52:443...
* TCP_NODELAY set
* Connected to tahe.developpez.com (87.98.130.52) port 443 (#0)
* ALPN, offering h2
* ALPN, offering http/1.1
* SSL connection using TLSv1.3 / TLS_AES_256_GCM_SHA384
* ALPN, server accepted to use http/1.1
* Server certificate:
* subject: CN=*.developpez.com
* start date: Jul 1 15:38:30 2020 GMT
* expire date: Sep 29 15:38:30 2020 GMT
* subjectAltName: host "tahe.developpez.com" matched cert's "*.developpez.com"
* issuer: C=US; O=Let's Encrypt; CN=Let's Encrypt Authority X3
* SSL certificate verify result: unable to get local issuer certificate (20), continuing anyway.
> GET / HTTP/1.1
Host: tahe.developpez.com
User-Agent: PycURL/7.43.0.5 libcurl/7.68.0 OpenSSL/1.1.1d zlib/1.2.11 c-ares/1.15.0 WinIDN libssh2/1.9.0 nghttp2/1.40.0
Accept: */*
* old SSL session ID is stale, removing
* Mark bundle as not supporting multiuse
< HTTP/1.1 200 OK
< Date: Mon, 06 Jul 2020 06:45:53 GMT
< Server: Apache/2.4.38 (Debian)
< X-Powered-By: PHP/5.3.29
< Vary: Accept-Encoding
< Transfer-Encoding: chunked
< Content-Type: text/html
<
* Connection #0 to host tahe.developpez.com left intact
-------------------------
www.polytech-angers.fr
-------------------------
Client : début de la communication avec le serveur [www.polytech-angers.fr]
* Trying 193.49.144.41:80...
* TCP_NODELAY set
* Connected to www.polytech-angers.fr (193.49.144.41) port 80 (#0)
> GET / HTTP/1.1
Host: www.polytech-angers.fr
User-Agent: PycURL/7.43.0.5 libcurl/7.68.0 OpenSSL/1.1.1d zlib/1.2.11 c-ares/1.15.0 WinIDN libssh2/1.9.0 nghttp2/1.40.0
Accept: */*
* Mark bundle as not supporting multiuse
< HTTP/1.1 301 Moved Permanently
< Date: Mon, 06 Jul 2020 06:45:54 GMT
< Server: Apache/2.4.29 (Ubuntu)
< Location: http://www.polytech-angers.fr/fr/index.html
< Cache-Control: max-age=1
< Expires: Mon, 06 Jul 2020 06:45:55 GMT
< Content-Length: 339
< Content-Type: text/html; charset=iso-8859-1
<
* Ignoring the response-body
* Connection #0 to host www.polytech-angers.fr left intact
* Issue another request to this URL: 'http://www.polytech-angers.fr/fr/index.html'
* Found bundle for host www.polytech-angers.fr: 0x25eacafb490 [serially]
* Can not multiplex, even if we wanted to!
* Re-using existing connection! (#0) with host www.polytech-angers.fr
* Connected to www.polytech-angers.fr (193.49.144.41) port 80 (#0)
> GET /fr/index.html HTTP/1.1
Host: www.polytech-angers.fr
User-Agent: PycURL/7.43.0.5 libcurl/7.68.0 OpenSSL/1.1.1d zlib/1.2.11 c-ares/1.15.0 WinIDN libssh2/1.9.0 nghttp2/1.40.0
Accept: */*
* Mark bundle as not supporting multiuse
< HTTP/1.1 200 OK
< Date: Mon, 06 Jul 2020 06:45:54 GMT
< Server: Apache/2.4.29 (Ubuntu)
< Last-Modified: Mon, 06 Jul 2020 04:50:09 GMT
< ETag: "85be-5a9be9bfcf228"
< Accept-Ranges: bytes
< Content-Length: 34238
< Cache-Control: max-age=1
< Expires: Mon, 06 Jul 2020 06:45:55 GMT
< Vary: Accept-Encoding
< Content-Type: text/html; charset=UTF-8
< Content-Language: fr
<
* Connection #0 to host www.polytech-angers.fr left intact
-------------------------
localhost
-------------------------
Client : début de la communication avec le serveur [localhost]
* Trying ::1:80...
* TCP_NODELAY set
* Connected to localhost (::1) port 80 (#0)
> GET / HTTP/1.1
Host: localhost
User-Agent: PycURL/7.43.0.5 libcurl/7.68.0 OpenSSL/1.1.1d zlib/1.2.11 c-ares/1.15.0 WinIDN libssh2/1.9.0 nghttp2/1.40.0
Accept: */*
* Mark bundle as not supporting multiuse
< HTTP/1.1 200 OK
< Date: Mon, 06 Jul 2020 06:45:54 GMT
< Server: Apache/2.4.35 (Win64) OpenSSL/1.1.1b PHP/7.2.19
< X-Powered-By: PHP/7.2.19
< Content-Length: 1776
< Content-Type: text/html; charset=UTF-8
<
* Connection #0 to host localhost left intact
Terminé...
Process finished with exit code 0
注释
- 蓝色部分为发送到服务器的 HTTP 命令;
- 绿色部分为客户端收到的响应数据;
- 我们得到的交互内容与使用 [curl] 工具时相同;
- 第 9 行:请求 URL [http://sergetahe.com/];
- 第 15 行:服务器响应称页面已移动。第 21 行,新的 URL;
- 第 32 行:请求 URL [http://sergetahe.com/cours-tutoriels-de-programmation];
- 第 38 行:服务器响应称页面已移动。第 43 行,新 URL;
- 第 54 行:请求 URL [http://sergetahe.com/cours-tutoriels-de-programmation/];
- 第 60 行:服务器响应称该页面已移动。第 65 行,新的 URL。它使用安全协议 [HTTPS];
- 第 71–75 行:与服务器建立了安全协议;
- 第 76 行:请求 URL [https://sergetahe.com/cours-tutoriels-de-programmation/];
- 第 82 行:找到了请求的文档;
21.4.6. 结论
在本节中,我们探讨了HTTP协议,并编写了一个能够从网络下载URL的脚本 [http/02/main.py]。
21.5. SMTP(简单邮件传输协议)
21.5.1. 简介
本章内容:
- [服务器 B] 将是我们即将安装的本地 SMTP 服务器;
- [客户端 A] 将以多种形式呈现:
- 用于探索 SMTP 协议的 [RawTcpClient] 客户端;
- 一个模拟 [RawTcpClient] 客户端 SMTP 协议的 Python 脚本;
- 一个使用 [smtplib] 模块发送各类邮件的 Python 脚本;
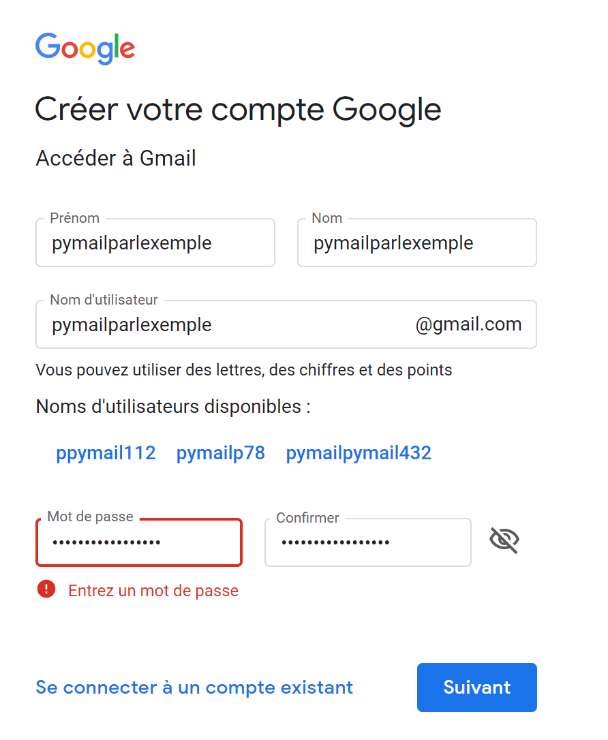
21.5.2. 创建一个 [Gmail] 地址
为了进行 SMTP 测试,我们需要一个用于接收邮件的邮箱地址。为此,我们将创建一个 Gmail 地址 [https://www.google.com/intl/fr/gmail/about/]:
注意:请向您创建的地址发送几封邮件。在确认该账户能够接收邮件之前,请勿继续操作。
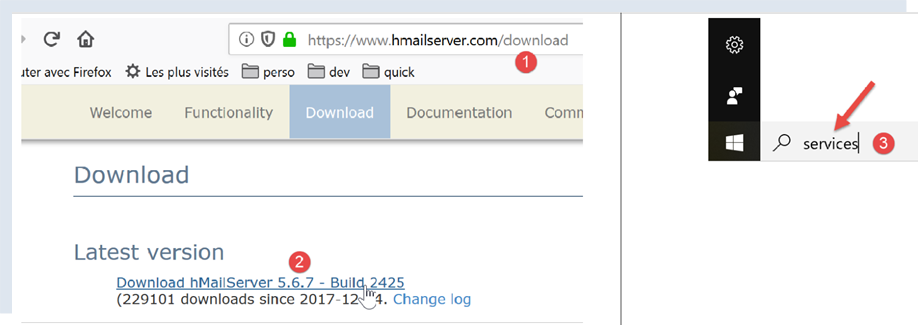
21.5.3. 安装 SMTP 服务器
在本次测试中,我们将安装 [hMailServer] 邮件服务器。该服务器兼具三种功能:作为 SMTP 服务器用于发送邮件;作为 POP3(邮局协议)服务器用于读取服务器上存储的邮件;以及作为 IMAP(互联网邮件访问协议)服务器,不仅支持读取服务器上的邮件,还具备更多功能。特别是,它允许您管理服务器上的邮件存储。
[hMailServer] 邮件服务器可通过 URL [https://www.hmailserver.com/] 获取(2019年5月)。
安装过程中,系统会要求您提供以下信息:
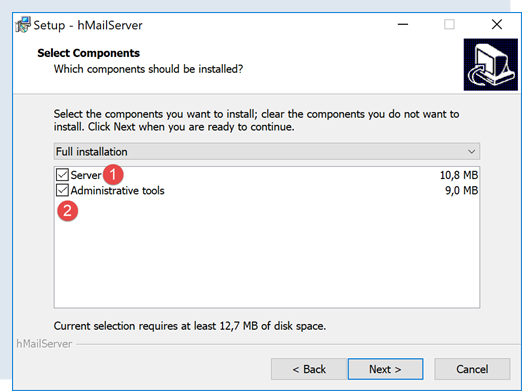
- 在 [1-2] 中,请同时选择邮件服务器及其管理工具;
- 安装过程中,系统会提示您输入管理员密码:请将其记录下来,因为您后续会用到;
[hMailServer] 安装为 Windows 服务,计算机启动时会自动运行。建议选择手动启动:
- 在 [3] 中,在任务栏的搜索框中输入 [services];
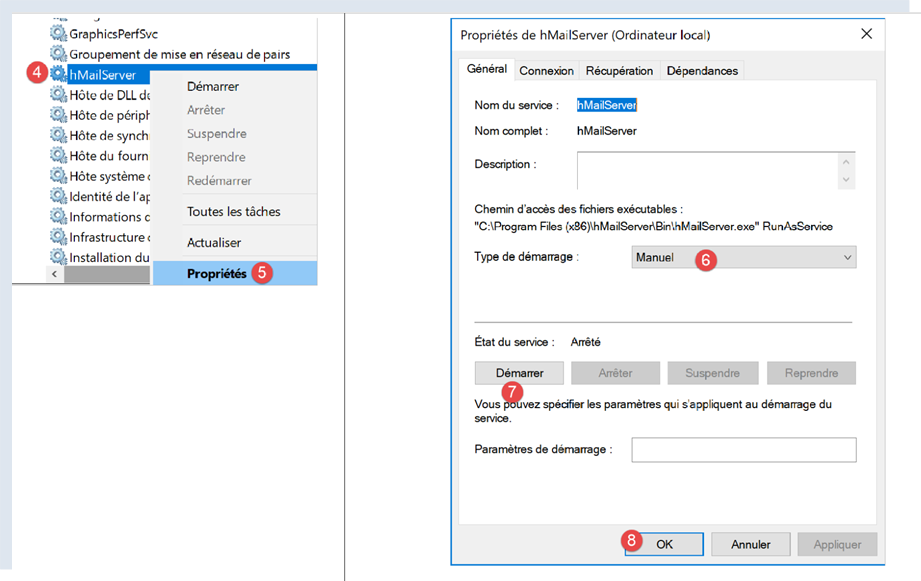
- 在 [4-8] 中,将服务设置为 [手动] 模式(6),然后启动它(7);
启动后,必须配置 [hMailServer]。该服务器随安装程序附带了一个管理程序 [hMailServer Administrator]:
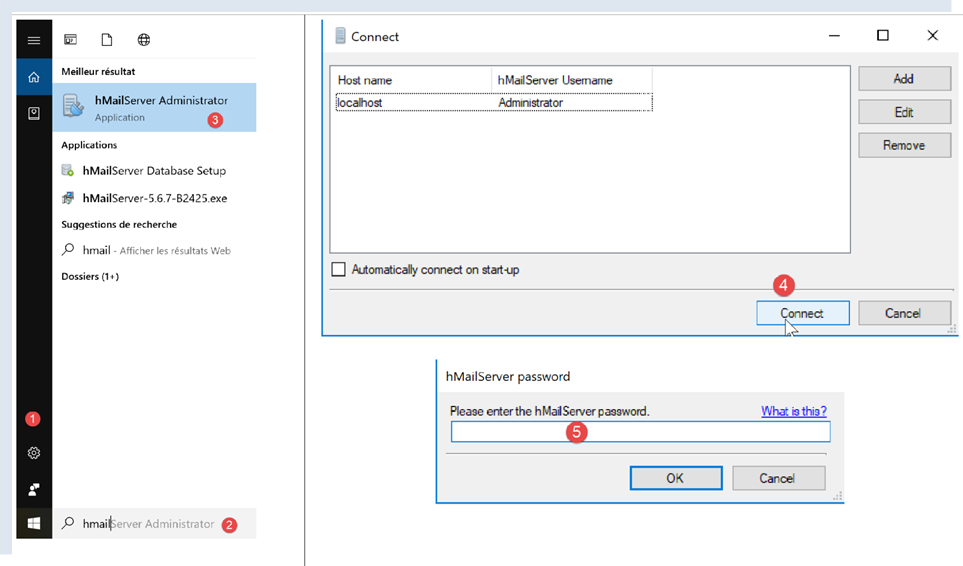
- 在 [2] 中,在状态栏的搜索框中输入 [hmailserver];
- 在 [3] 中,启动管理员;
- 在 [4] 中,将管理员连接到 [hMailServer] 服务器;
- 在 [5] 中,输入安装 [hMailServer] 时设置的密码;
如果您忘记了密码,请按以下步骤操作:
- 停止 [hMailServer] 服务器;
- 打开文件 [<hmailserver>/bin/hmailserver.ini],其中 <hmailserver> 是服务器的安装目录:
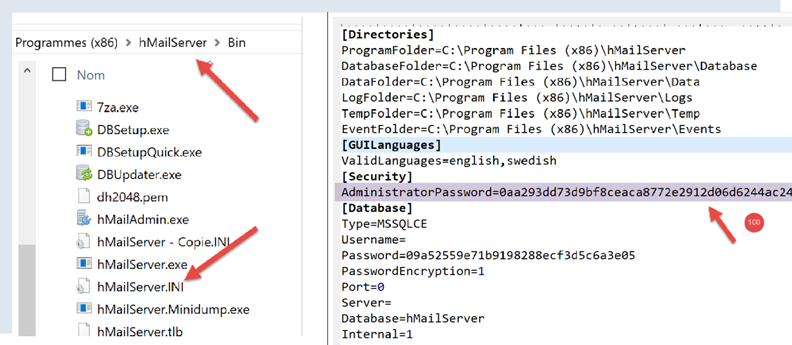
- 在 [100] 处,删除 [AdministratorPassword] 行中的密码。这样管理员账户将不再设置密码。系统提示时,只需按下 [Enter] 键即可;
ValidLanguages=english,swedish
[Security]
AdministratorPassword=
[Database]
让我们继续配置服务器:
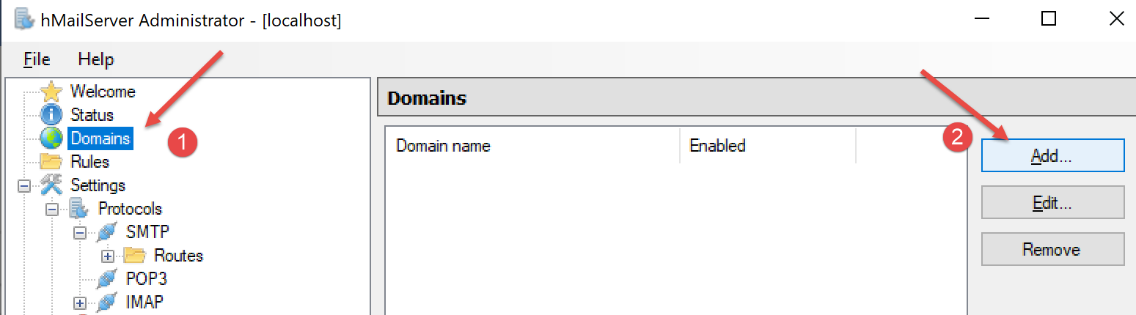
- 在 [1-2] 中,添加一个域(如果尚未存在);
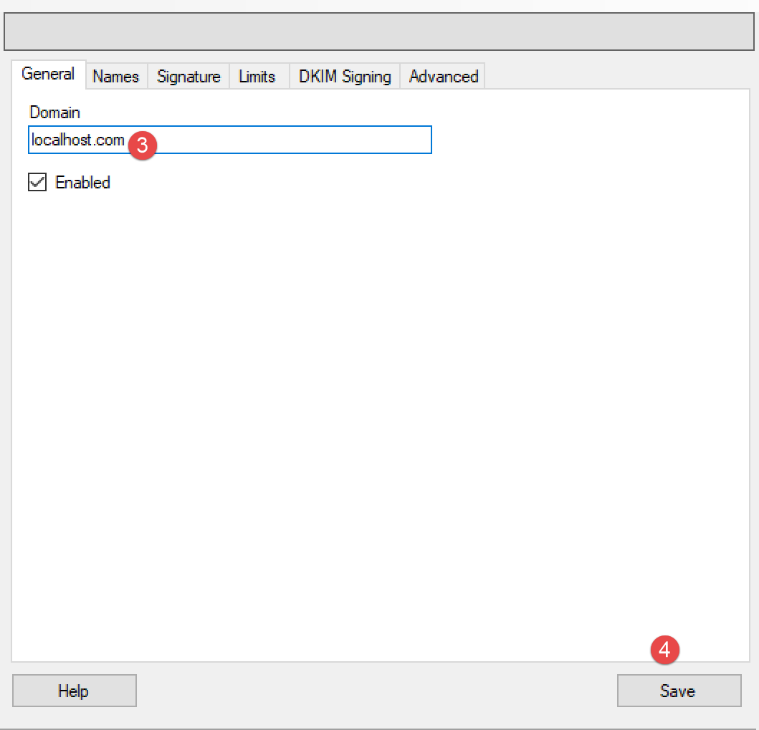
- 在 [3] 中,对于即将进行的测试,您可以输入任意内容。实际上,您需要输入一个现有域的名称;
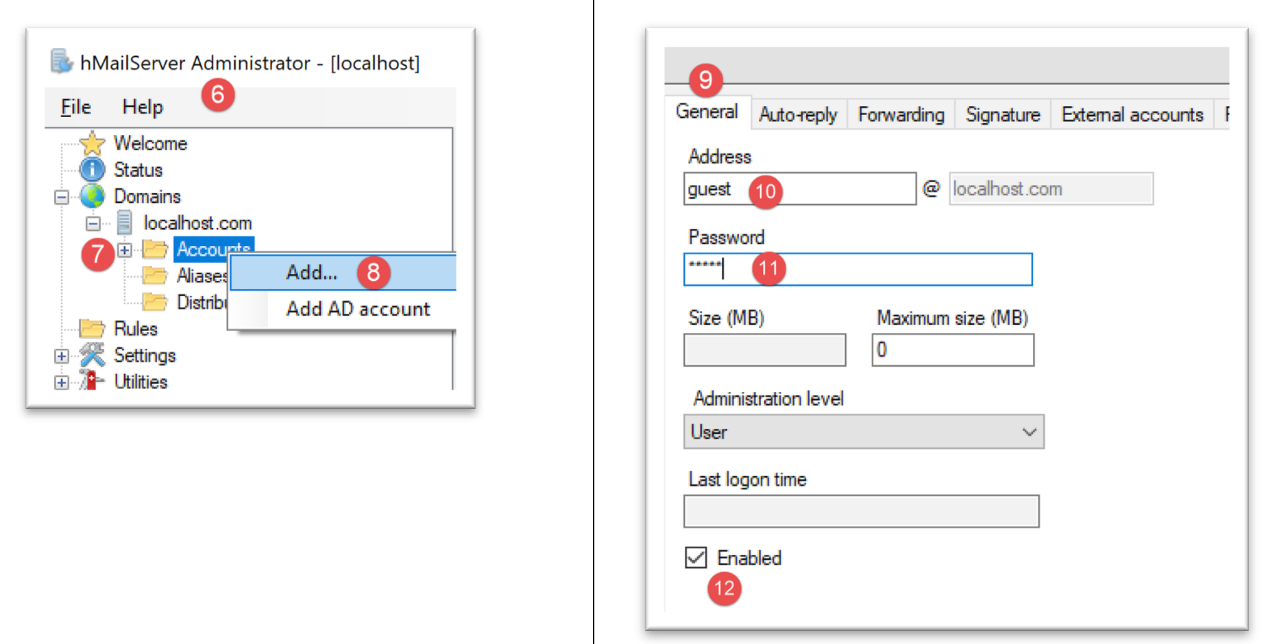
接下来我们将创建一个用户账户:
- 右键单击 [Accounts] (7),然后 (8) 添加新用户;
- 在 [常规] 选项卡 (9) 中,我们定义一个名为 [guest] (10) 的用户,密码为 [guest] (11)。其电子邮件地址为 [guest@localhost] (10);
- 在 [12] 中,[guest] 用户已被启用;
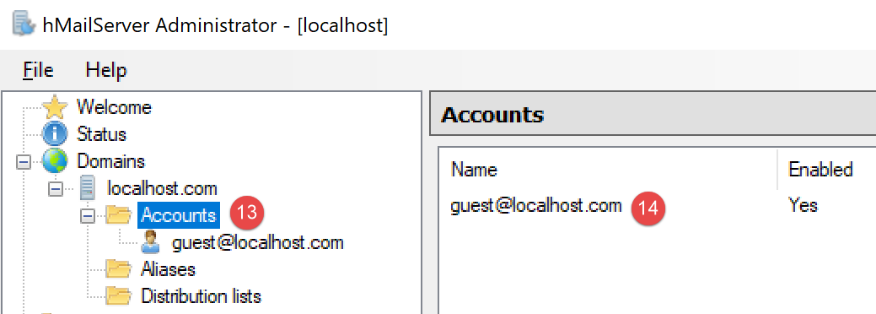
- 在 [13-14] 中,用户已创建;
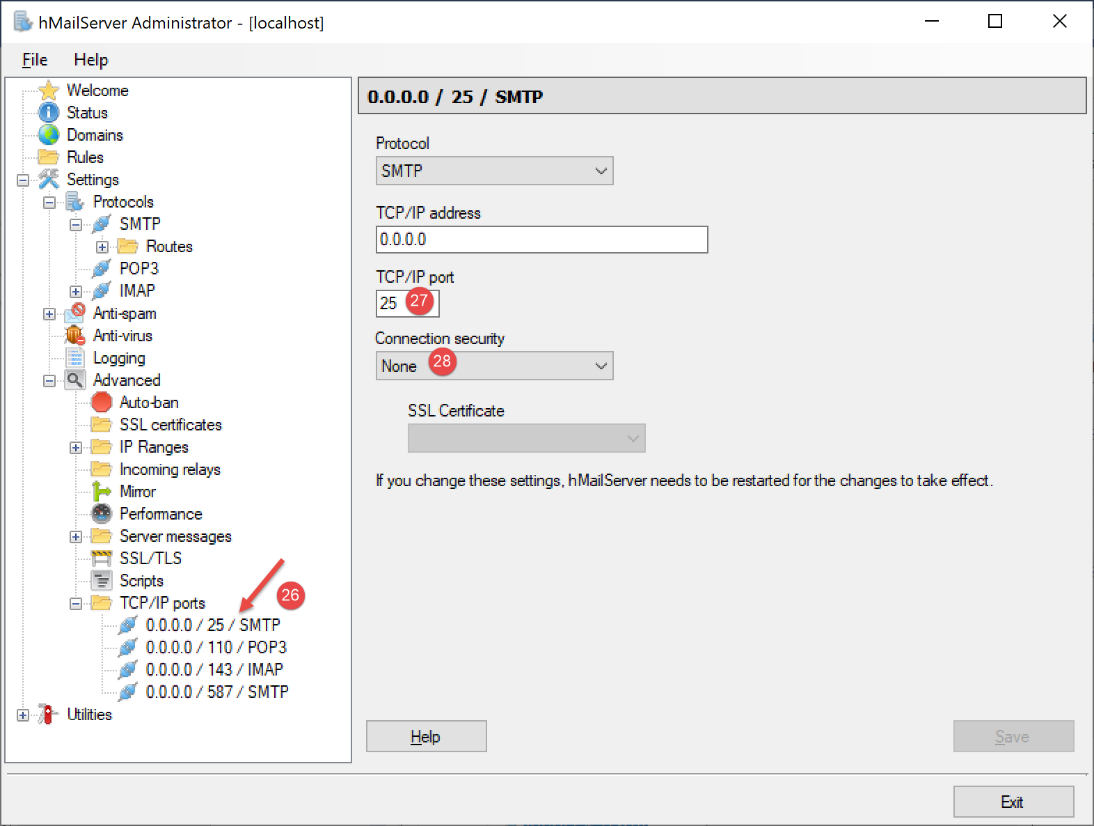
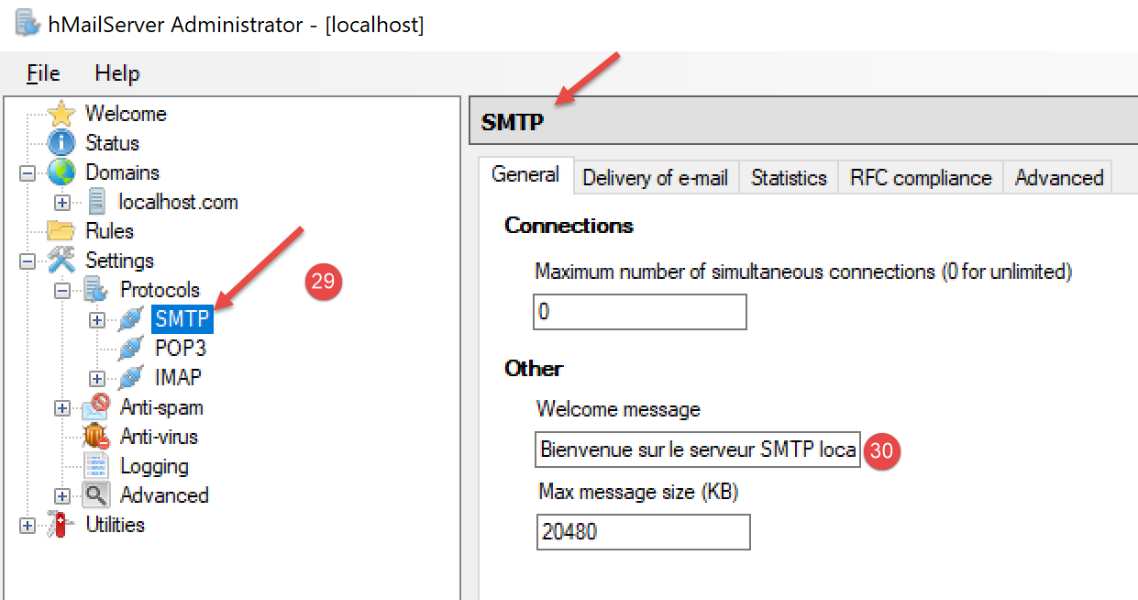
- 在 [27] 中,设置 SMTP 服务端口;
- 在[28]处,该服务无需身份验证;
- 在 [30] 中,输入 SMTP 服务器将发送给其客户端的欢迎信息;
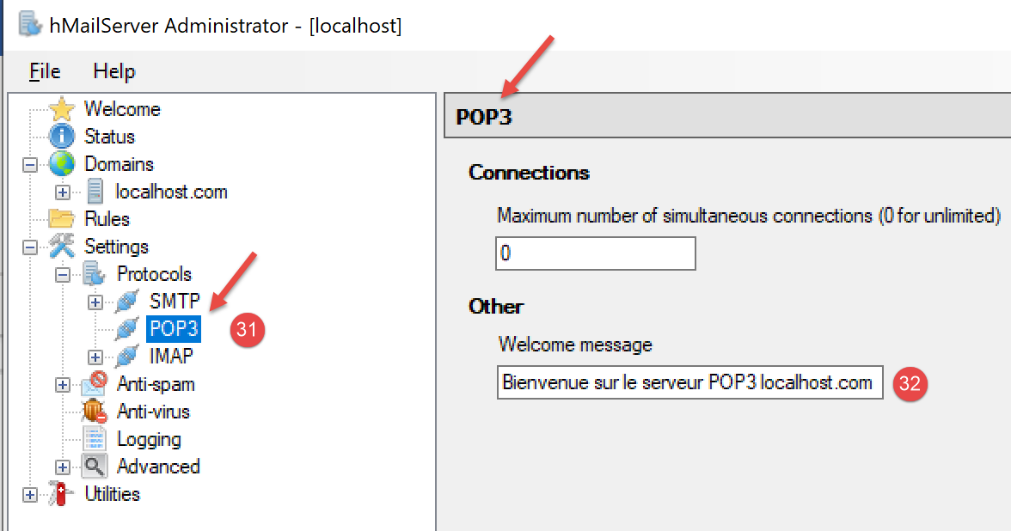
对于 POP3 服务器,我们同样进行设置:
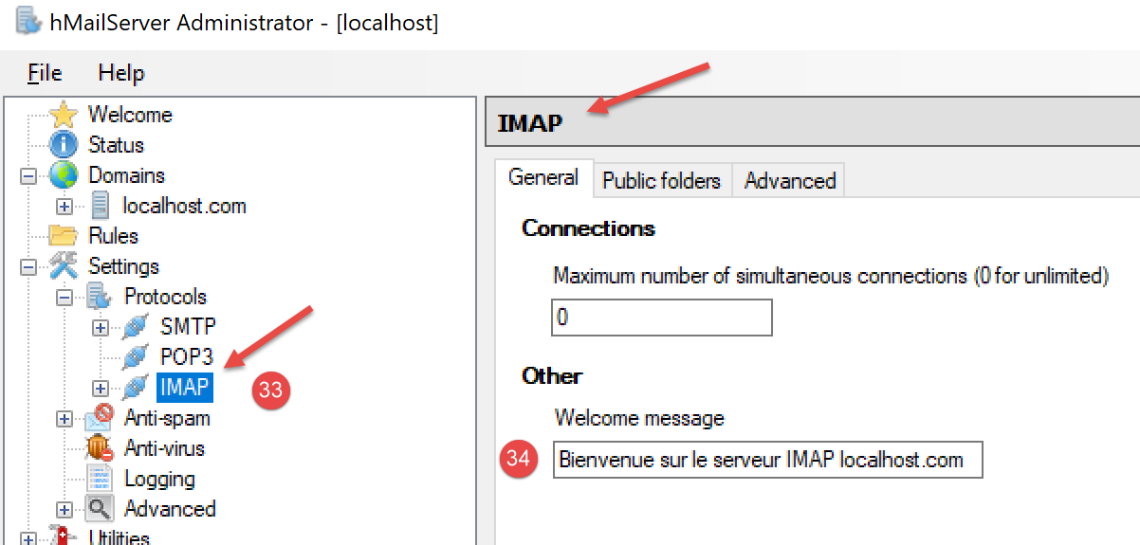
IMAP 服务器也按同样的方式配置:
我们指定 [hMailServer] 服务器的默认域名(可能有多个) :
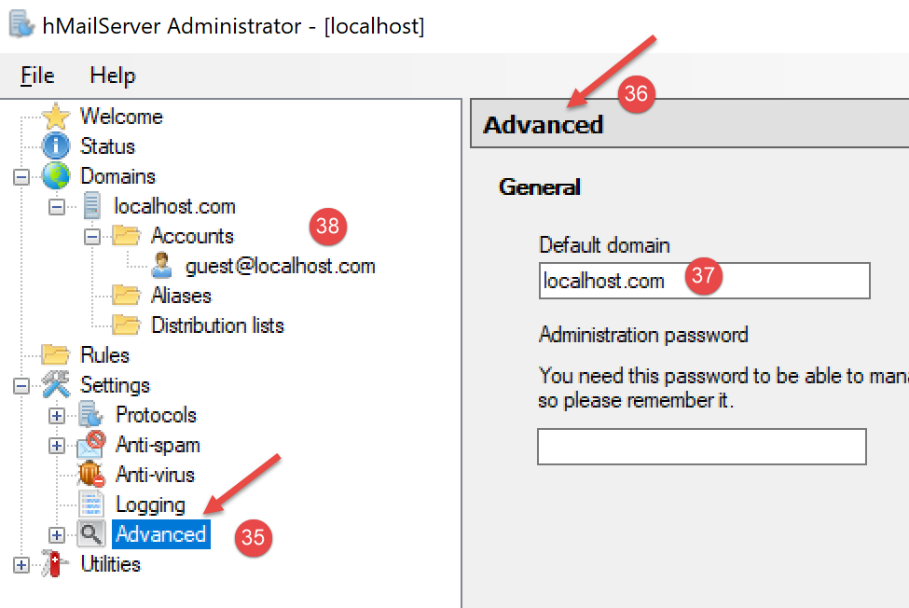
- 在 [37] 中,指定默认 SMTP 服务器域名即为你在 [38] 中创建的那个;
保存此配置后,可按以下方式进行测试。在 utilities 文件夹中打开 PyCharm 终端:
然后输入以下命令:
(venv) C:\Data\st-2020\dev\python\cours-2020\python3-flask-2020\inet\utilitaires>RawTcpClient.exe localhost 25
Client [DESKTOP-30FF5FB:50170] connecté au serveur [localhost-25]
Tapez vos commandes (quit pour arrêter) :
<-- [220 Bienvenue sur le serveur SMTP localhost.com]
- 第 1 行:我们连接到 [localhost] 机器的 25 号端口。这里运行着 [hMailServer] 服务器上的一个非加密 SMTP 服务器;
- 第 4 行:我们收到了在上文第 30 步中配置的欢迎信息;
SMTP 服务器现已启动并运行。输入命令 [quit] 以结束与 SMTP 服务器 25 的会话。
现在,让我们对端口 587 执行相同的操作,该端口是安全 SMTP 邮件中继服务的默认端口:
(venv) C:\Data\st-2020\dev\python\cours-2020\python3-flask-2020\inet\utilitaires>RawTcpClient.exe localhost 587
Client [DESKTOP-30FF5FB:50217] connecté au serveur [localhost-587]
Tapez vos commandes (quit pour arrêter) :
<-- [220 Bienvenue sur le serveur SMTP localhost.com]
- 第 4 行,来自运行在 587 端口的 SMTP 服务器的响应;
现在我们对端口 110 进行同样的操作,该端口是 POP3 邮件检索服务的默认端口:
(venv) C:\Data\st-2020\dev\python\cours-2020\python3-flask-2020\inet\utilitaires>RawTcpClient.exe localhost 110
Client [DESKTOP-30FF5FB:50210] connecté au serveur [localhost-110]
Tapez vos commandes (quit pour arrêter) :
<-- [+OK Bienvenue sur le serveur POP3 localhost.com]
- 第 4 行,我们收到了来自 POP3 服务器的欢迎信息;
现在让我们对 143 端口进行同样的操作,这是 IMAP 邮件检索服务的默认端口:
(venv) C:\Data\st-2020\dev\python\cours-2020\python3-flask-2020\inet\utilitaires>RawTcpClient.exe localhost 143
Client [DESKTOP-30FF5FB:50212] connecté au serveur [localhost-143]
Tapez vos commandes (quit pour arrêter) :
<-- [* OK Bienvenue sur le serveur IMAP localhost.com]
- 第 4 行,我们收到了来自 IMAP 服务器的欢迎信息;
21.5.4. 安装邮件客户端
要阅读我们将要发送的邮件,我们需要一个邮件客户端。对于还没有邮件客户端的用户,我们将向您展示如何安装和配置 [Thunderbird]:
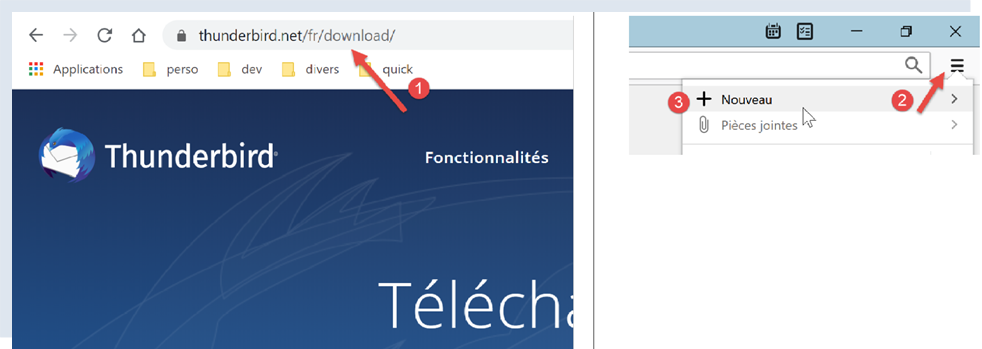
- 步骤 [1]:下载 [Thunderbird] 并进行安装;
- 如果 [hMailServer] 邮件服务器尚未运行,请启动它;
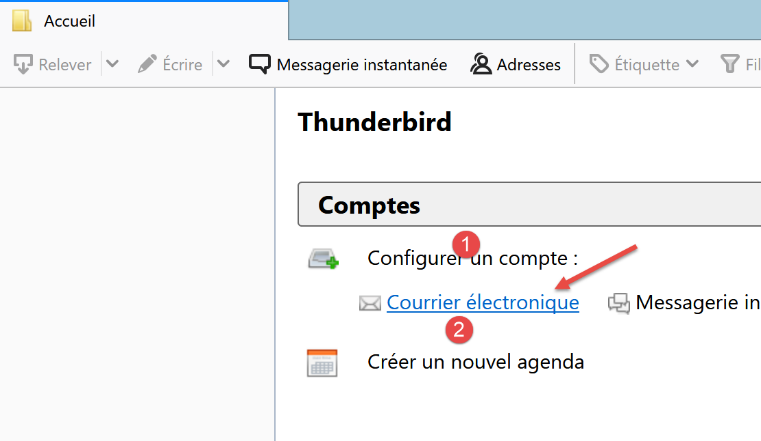
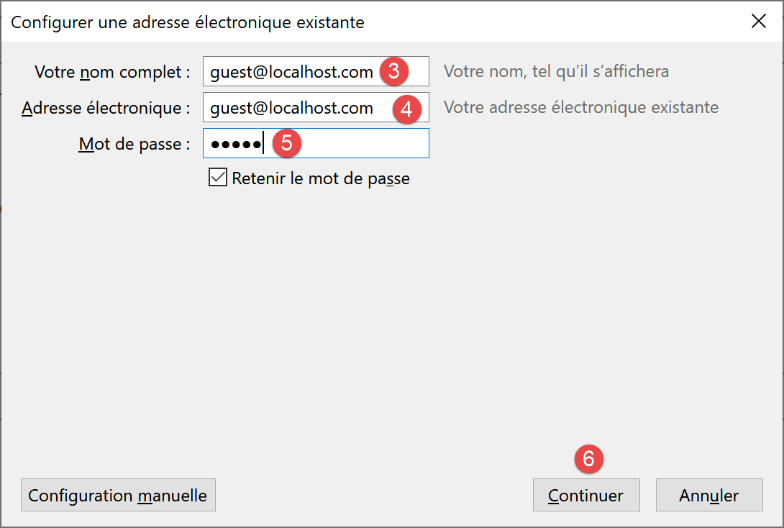
- 步骤 [2-3]:Thunderbird 运行后,我们将在 [hMailServer] 邮件服务器上为 [guest@localhost] 用户创建一个电子邮件账户;
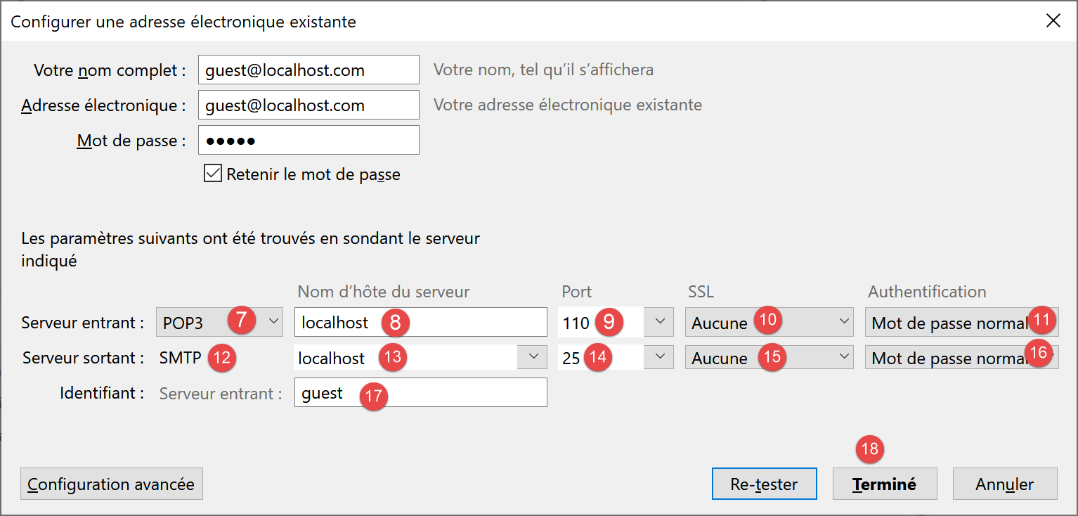
- 在 [7-11] 中:允许我们从 [hMailServer] 邮件服务器读取邮件的 POP3 服务器位于 [localhost],并运行在 110 端口上;
- 在 [12-16] 中:允许我们代表 [hMailServer] 邮件服务器用户发送邮件的 SMTP 服务器位于 [localhost],并运行在 25 端口上;
- [18]:您可以测试此配置是否有效;
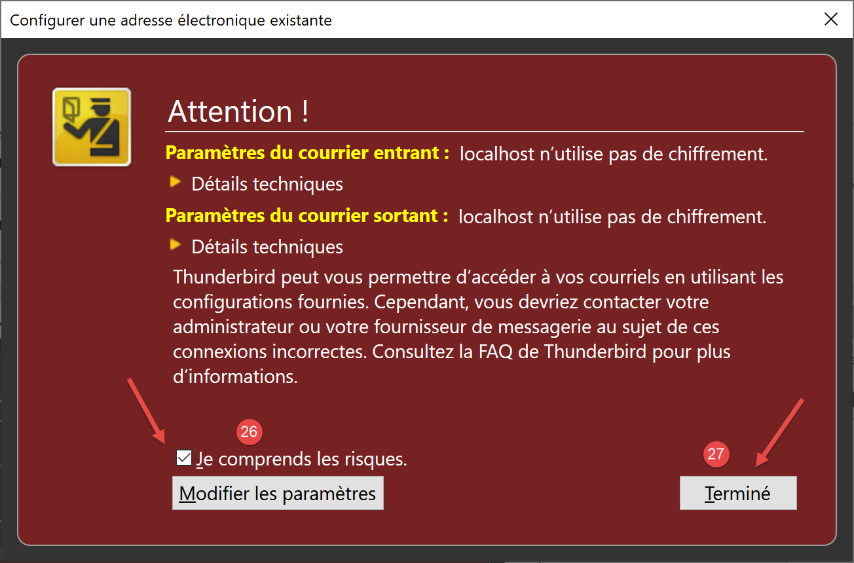
- 在 [26] 中:由于未启用 SSL 加密,Thunderbird 会提示我们此配置存在安全风险;
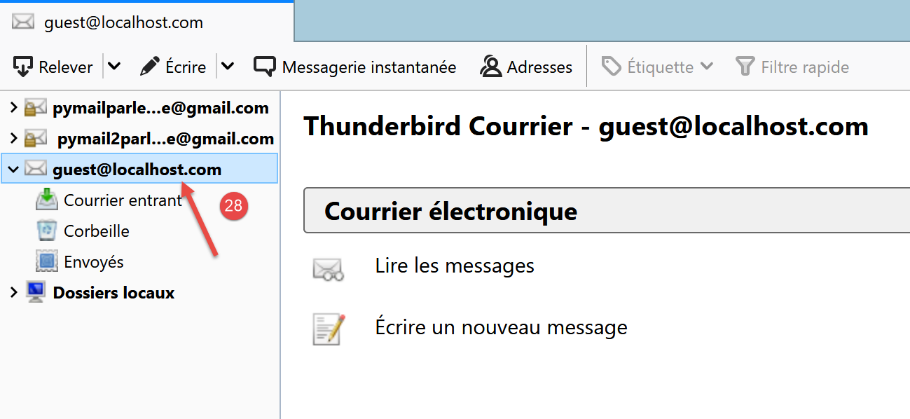
- 在 [28] 中:该账户已创建;
为了测试已创建的账户,我们将使用 Thunderbird 进行:
- 向用户 [guest@localhost.com] 发送一封电子邮件(SMTP 协议);
- 读取该用户收到的邮件(POP3协议);
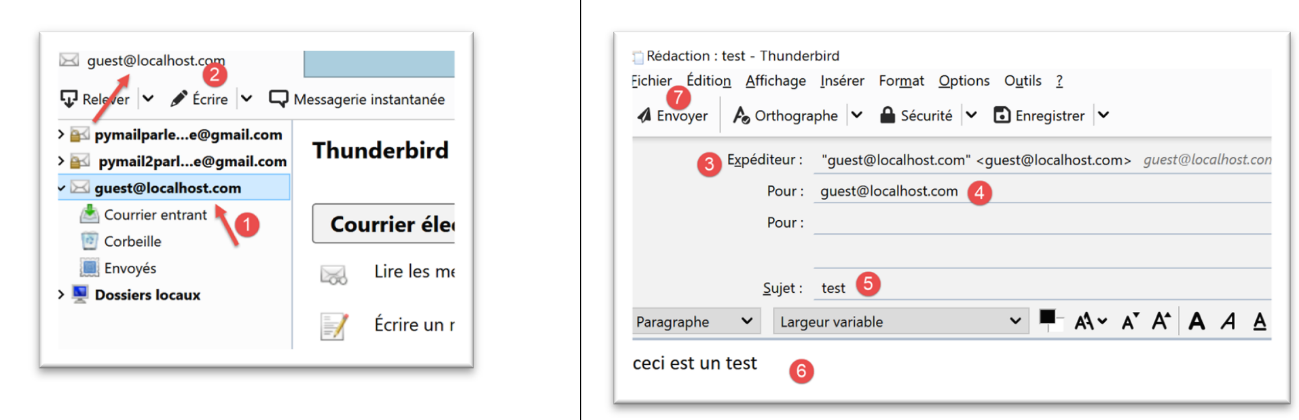
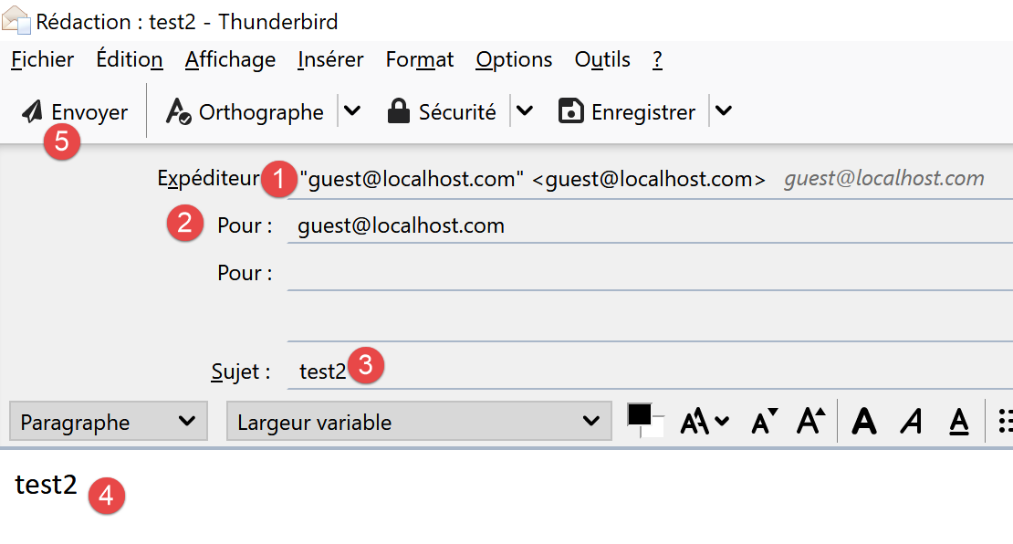
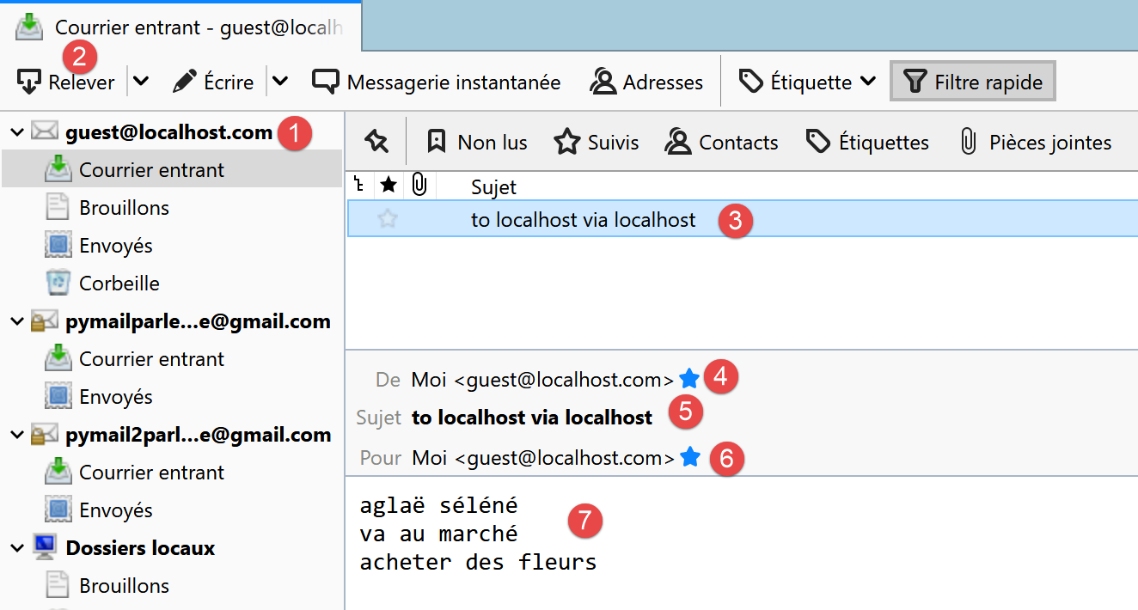
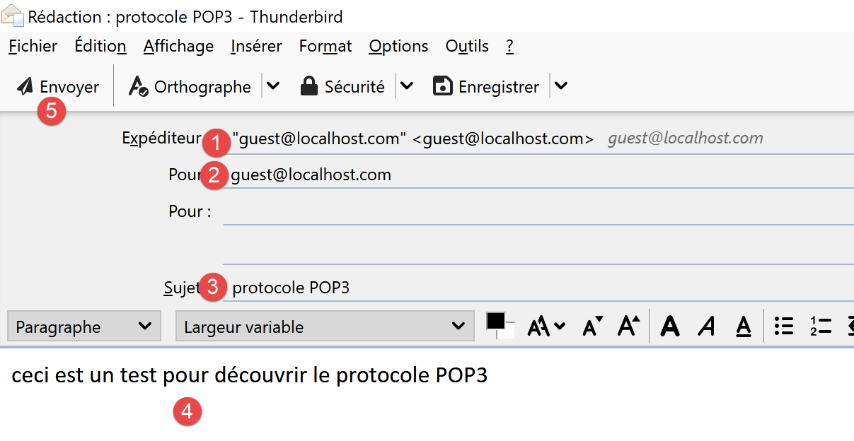
- 在 [3] 中:发件人;
- 在 [4] 中:收件人;
- 在 [5] 中:邮件主题;
- 在 [6] 中:邮件正文;
- 在 [7] 中:发送电子邮件;

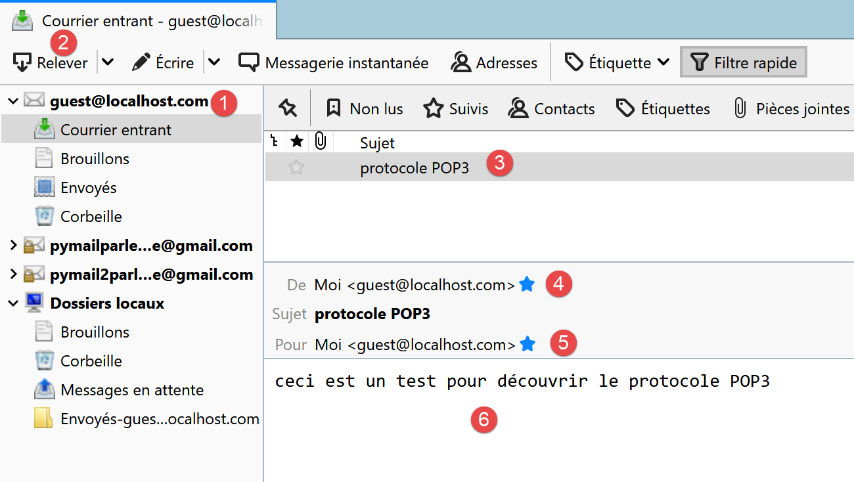
- 在 [8-9]:检索用户的电子邮件 [guest@localhost];
- 在 [10-15] 中:收到的邮件;
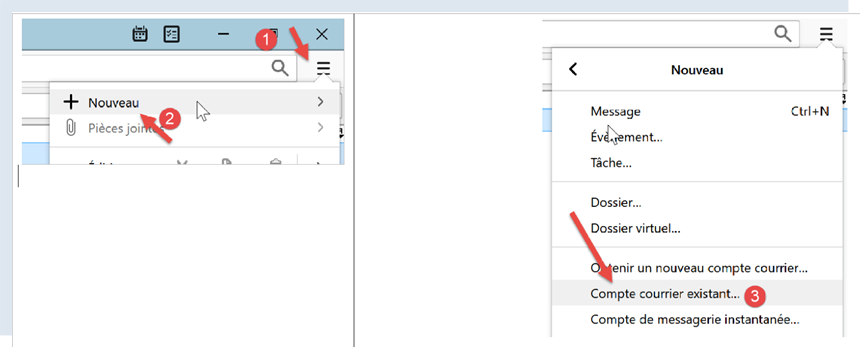
我们还将向用户 [pymailparlexemple@gmail.com] 发送一封邮件。让我们在 Thunderbird 中为他们创建一个账户,以便他们能够阅读收到的邮件:
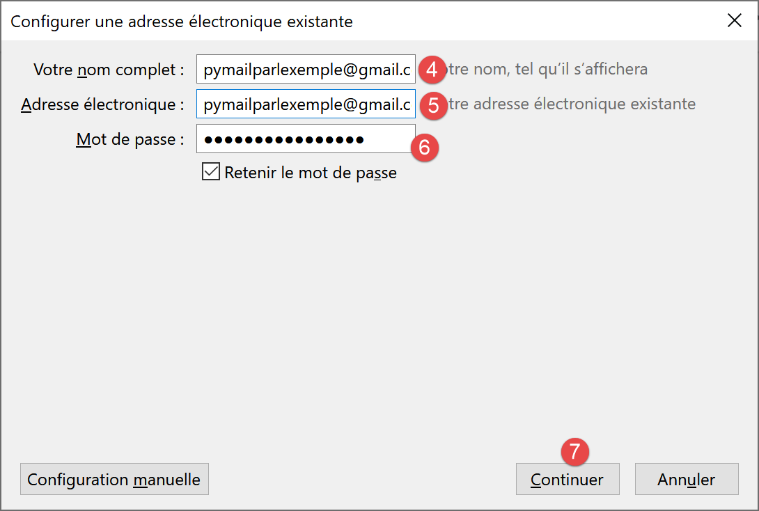
- 在 [4] 中:输入任意内容;
- 在 [5] 中:地址为 [pymailparlexemple@gmail.com];
- 在 [6] 中:输入您在创建该账户时为其设置的密码;
- 在 [7] 中:确认此配置;
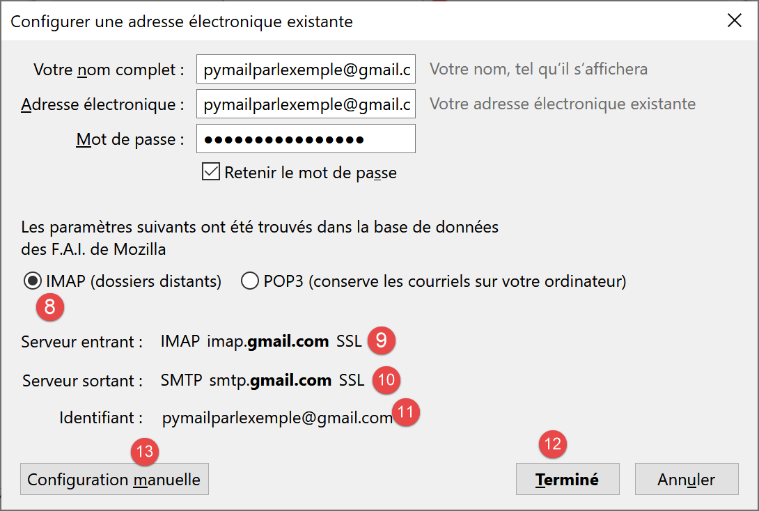
- 在 [8] 中:Thunderbird 已从其数据库中检索到以下信息;
- 在 [9] 中:邮件检索协议已从 POP3 更改为 IMAP。两者的主要区别在于:[POP3] 会将已读邮件下载到邮件客户端所在的本地计算机,并从远程服务器中删除这些邮件;而 [IMAP] 则将邮件保留在远程服务器上;
- 在 [10] 中:SMTP 服务器信息;
- 在 [13] 中:若需获取有关 IMAP 和 SMTP 服务器的更多信息,请切换至手动配置;
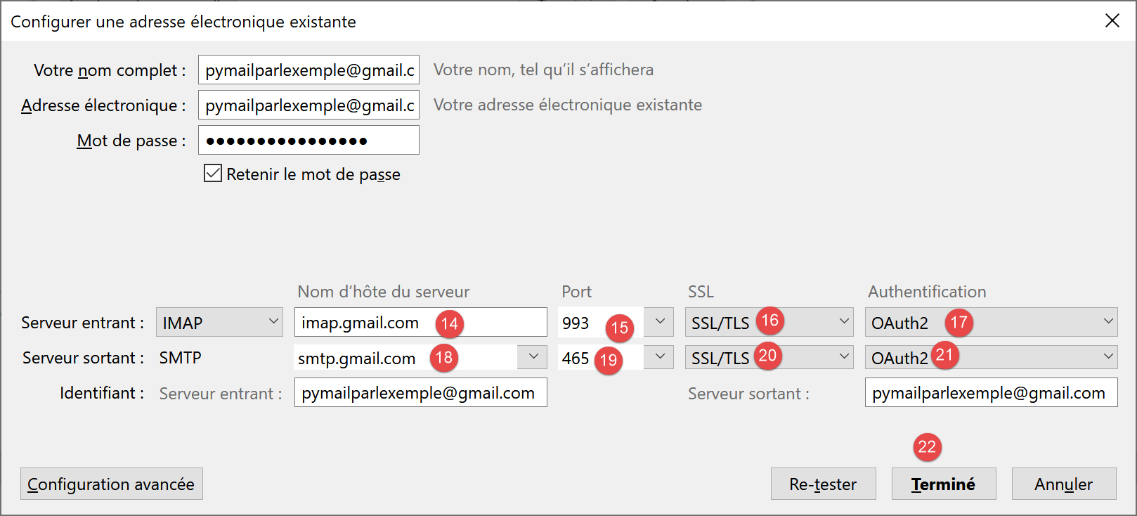
- 在 [14-17] 中:IMAP 服务器设置;
- 在 [18-21]:SMTP 服务器设置;
- 在 [22] 中:完成配置;

- 在 [23-24] 中:新建的 Thunderbird 账户;
- 在 [26] 中:撰写新邮件;

- 在 [27] 中:发件人是 [pymailparlexemple@gmail.com];
- 在 [28] 中:收件人是 [pymailparlexemple@gmail.com];
- 在 [29-30] 中:消息;
- 在 [31] 中:发送它;
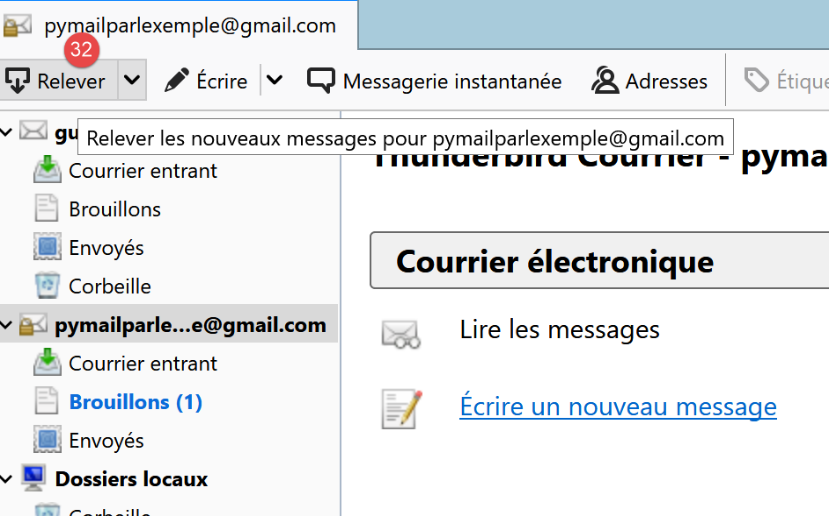
- 在 [32] 中:我们检查来自各个账户的邮件;
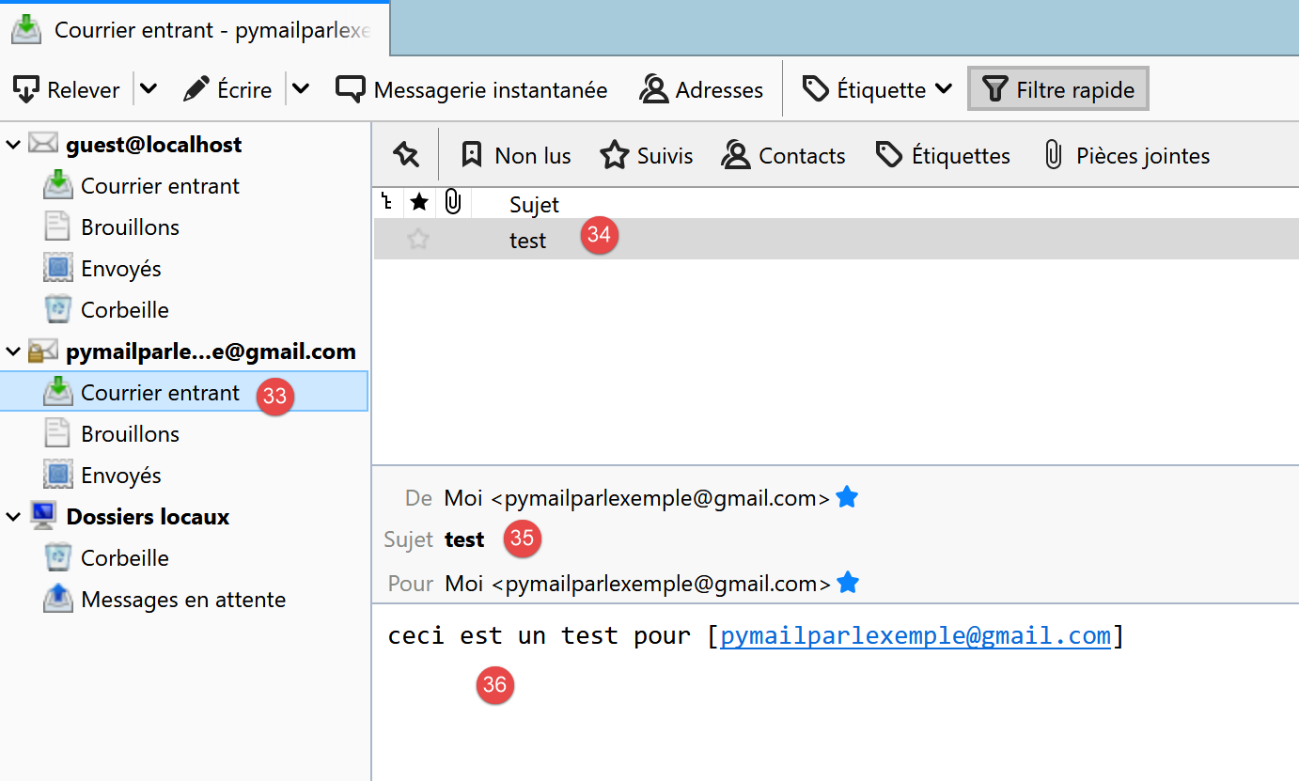
- 在 [33-36] 中:用户 [pymailparlexemple@gmail.com] 收到的电子邮件
我们还创建:
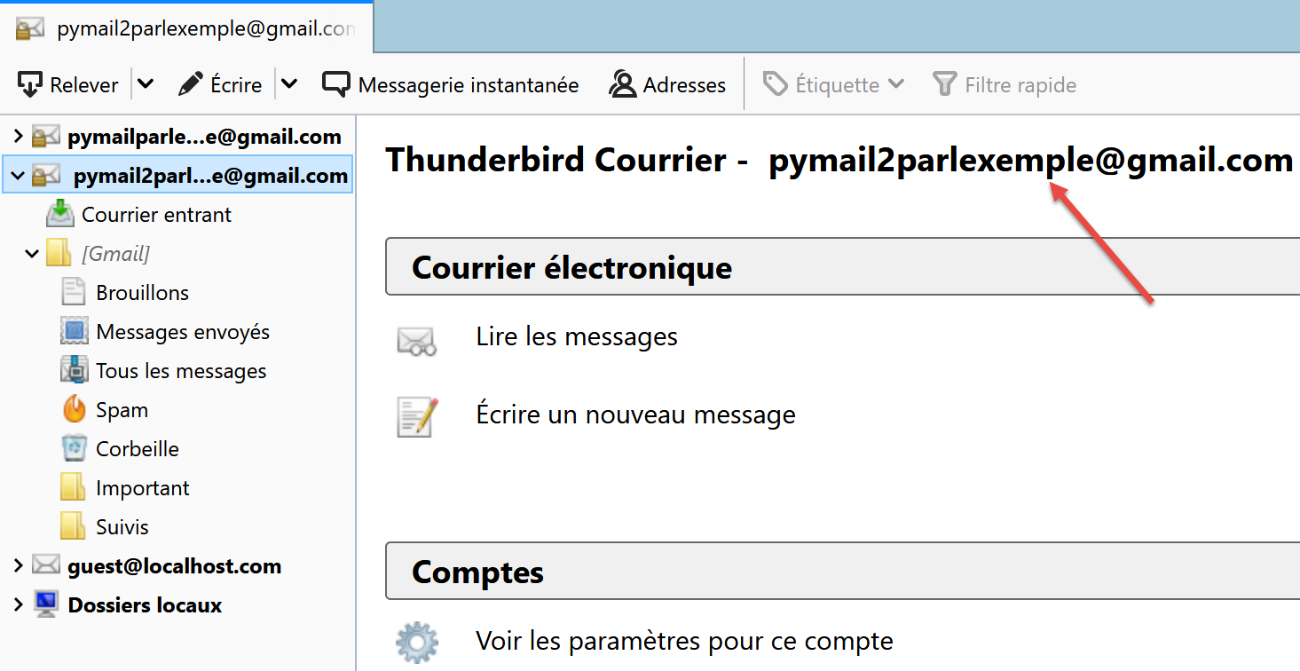
- 一个新的 Gmail 账户 [pymail2parlexemple@gmail.com];
- 一个新的 Thunderbird 账户 [pymail2parlexemple@gmail.com],用于为同名用户收取邮件:

现在我们已经具备了探索 SMTP、POP3 和 IMAP 协议的工具。我们将从 SMTP 协议开始。
21.5.5. SMTP 协议
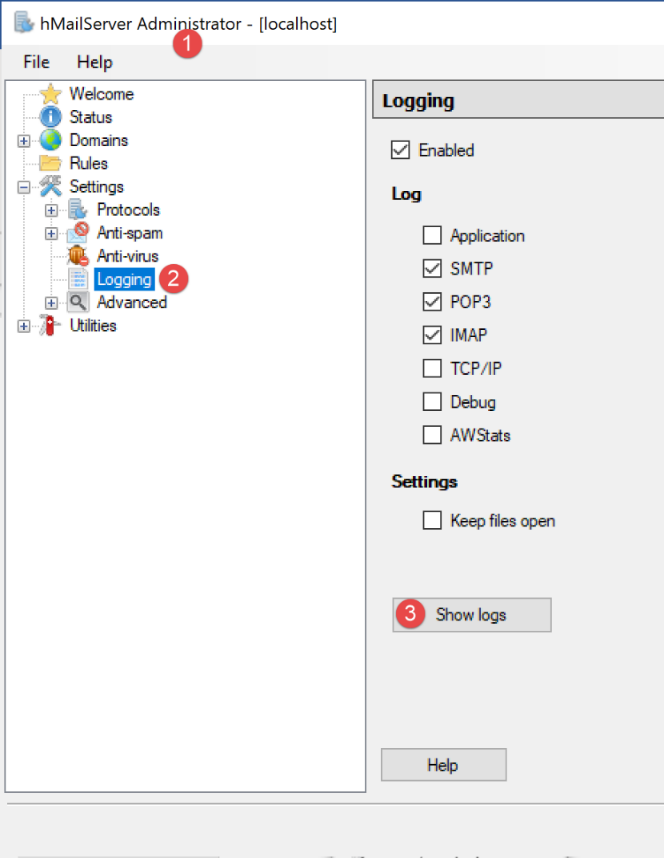
我们将通过分析 [hMailServer] 服务器的日志来探索 SMTP 协议。为此,我们需要使用 [hMailServerAdministrator] 工具启用日志功能:

- 在 [2] 中,日志已启用;
- 在 [3-5] 中:我们分别启用了 SMTP、POP3 和 IMAP 协议的日志;
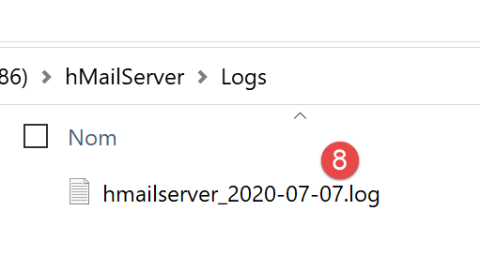
- 在 [7] 中,请求查看日志;
- 在 [8] 中,使用任意文本编辑器打开日志文件;
在下面的示例中,客户端为 [Thunderbird],服务器为 [hMailServer]。 使用 Thunderbird,让用户 [guest@localhost.com] 给自己发送一封邮件:
日志将呈现如下形式:
"SMTPD" 5828 22 "2020-07-07 10:02:54.263" "127.0.0.1" "SENT: 220 Bienvenue sur le serveur SMTP localhost.com"
"SMTPD" 21956 22 "2020-07-07 10:02:54.360" "127.0.0.1" "RECEIVED: EHLO [127.0.0.1]"
"SMTPD" 21956 22 "2020-07-07 10:02:54.362" "127.0.0.1" "SENT: 250-DESKTOP-30FF5FB[nl]250-SIZE 20480000[nl]250-AUTH LOGIN[nl]250 HELP"
"SMTPD" 5828 22 "2020-07-07 10:02:54.381" "127.0.0.1" "RECEIVED: MAIL FROM:<guest@localhost.com> SIZE=433"
"SMTPD" 5828 22 "2020-07-07 10:02:54.386" "127.0.0.1" "SENT: 250 OK"
"SMTPD" 21956 22 "2020-07-07 10:02:54.470" "127.0.0.1" "RECEIVED: RCPT TO:<guest@localhost.com>"
"SMTPD" 21956 22 "2020-07-07 10:02:54.473" "127.0.0.1" "SENT: 250 OK"
"SMTPD" 21956 22 "2020-07-07 10:02:54.478" "127.0.0.1" "RECEIVED: DATA"
"SMTPD" 21956 22 "2020-07-07 10:02:54.479" "127.0.0.1" "SENT: 354 OK, send."
"SMTPD" 21860 22 "2020-07-07 10:02:54.496" "127.0.0.1" "SENT: 250 Queued (0.016 seconds)"
"SMTPD" 21568 22 "2020-07-07 10:02:54.505" "127.0.0.1" "RECEIVED: QUIT"
"SMTPD" 21568 22 "2020-07-07 10:02:54.506" "127.0.0.1" "SENT: 221 goodbye"
以上几行描述了 SMTP 客户端(Thunderbird 邮件客户端)与 SMTP 服务器(hMailServer)之间的通信对话。[SENT] 行表示 SMTP 服务器发送给客户端的内容。[RECEIVED] 行表示 SMTP 服务器从客户端接收到的内容。
- 第 1 行:客户端连接到 SMTP 服务器后,服务器立即向客户端发送欢迎信息;
- 第 2 行:客户端发送 [EHLO] 命令以进行身份验证。在此,它提供了其 IP 地址 [127.0.0.1],该地址指向主机 [localhost],即运行 SMTP 客户端的机器;
- 第 3 行:服务器发送一系列 [250] 响应。[nl] 代表 [newline],即 \n 字符。 响应均采用 [250-] 格式,但最后一条采用 [250 ] 格式。SMTP 客户端通过此格式得知 SMTP 服务器的响应已完成,并可发送新命令。 这一系列 [250] 命令旨在向 SMTP 客户端提示其可使用的命令集;
- 第 4 行:SMTP 客户端发送命令 [MAIL FROM: sender_email_address],该命令指明了邮件的发送者;
- 第 5 行:SMTP 服务器响应 [250 OK],表示已理解该命令;
- 第 6 行:SMTP 客户端发送命令 [RCPT TO: 收件人_电子邮箱地址] 以指定收件人的地址;
- 第 7 行:SMTP 服务器再次确认已理解该命令;
- 第 8 行:SMTP 服务器发送命令 [DATA]。这意味着它即将发送邮件内容;
- 第 9 行:SMTP 服务器通过响应 [354 OK] 表示已准备好接收邮件。文本 [send .] 表示 SMTP 客户端必须以仅包含一个句点的行结束其邮件;
- 接下来我们看不到的是 SMTP 客户端发送了消息。日志中并未显示这一过程;
- 第 10 行:SMTP 客户端已发送表示消息结束的句点。SMTP 服务器响应称已将消息放入队列;
- SMTP 客户端发送 [QUIT] 命令,表示将关闭连接;
- 第 12 行:服务器作出响应;
既然我们已经了解了 SMTP 协议的客户端/服务器对话,现在让我们尝试使用 [RawTcpClient] 进行模拟。我们将使用 PyCharm 终端:
让我们来看一个新示例:
- 客户端 A 将使用通用 TCP 客户端 [RawTcpClient];
- 服务器 B 将由邮件服务器 [hMailServer] 扮演;
- 客户端 A 将请求服务器 B 将用户 [guest@localhost.com] 发送的电子邮件转发给自己;
- 我们将验证收件人是否确实收到了这封邮件;
我们按以下方式启动客户端:
(venv) C:\Data\st-2020\dev\python\cours-2020\python3-flask-2020\inet\utilitaires>RawTcpClient.exe localhost 25 --quit bye
Client [DESKTOP-30FF5FB:53122] connecté au serveur [localhost-25]
Tapez vos commandes (quit pour arrêter) :
<-- [220 Bienvenue sur le serveur SMTP localhost.com]
- 第 [1] 行,我们连接到本地机器的 25 号端口,该端口上运行着 [hMailServer] SMTP 服务。参数 [--quit bye] 表示用户可以通过输入命令 [bye] 退出程序。如果没有此参数,结束程序的命令是 [quit]。然而,[quit] 也是一个 SMTP 协议命令。因此,我们必须避免这种歧义;
- 第 [2] 行,客户端已成功连接;
- 第 [3] 行,客户端正在等待用户通过键盘输入命令;
- 第 [4] 行,服务器向客户端发送欢迎信息;
我们继续对话如下:
(venv) C:\Data\st-2020\dev\python\cours-2020\python3-flask-2020\inet\utilitaires>RawTcpClient.exe localhost 25
Client [DESKTOP-30FF5FB:53155] connecté au serveur [localhost-25]
Tapez vos commandes (quit pour arrêter) :
<-- [220 Bienvenue sur le serveur SMTP localhost.com]
EHLO localhost
<-- [250-DESKTOP-30FF5FB]
<-- [250-SIZE 20480000]
<-- [250-AUTH LOGIN]
<-- [250 HELP]
MAIL FROM: guest@localhost.com
<-- [250 OK]
RCPT TO: guest@localhost.com
<-- [250 OK]
DATA
<-- [354 OK, send.]
from: guest@localhost.com
to: guest@localhost.com
subject: ceci est un test
ligne1
ligne2
.
<-- [250 Queued (37.824 seconds)]
QUIT
Fin de la connexion avec le serveur
- 在 [5] 中,客户端发送命令 [EHLO 客户端机器名]。服务器以 [250-xx] 形式的一系列消息进行响应 (6)。代码 [250] 表示客户端发送的命令成功;
- 在[10]中,客户端指定消息发送者,本例中为[guest@localhost.com];
- 在 [11] 中,服务器作出响应;
- 在 [12] 中,指定了消息接收方,本例中为用户 [guest@localhost.com];
- 在 [13] 中,显示服务器的响应;
- 在 [14] 中,[DATA] 命令告知服务器客户端即将发送消息内容;
- 在 [15] 中,显示服务器的响应;
- 在 [16-22] 中,客户端必须发送一组文本行,最后一行仅包含一个句点。消息可包含 [Subject:, From:, To:] 行(16-18),分别用于定义消息主题、发件人和收件人;
- 在 [19] 中,上述标头后必须跟一个空行;
- 在 [20-21] 中,为消息正文;
- 在 [22] 中,仅包含一个句点的行,该行表示消息的结束;
- 在 [23] 中,一旦服务器接收到仅包含一个句点的行,便将消息加入队列;
- 在 [24] 中,客户端告知服务器操作已完成;
- 在 [25] 中,我们可以看到服务器已关闭与客户端的连接;
现在让我们在 Thunderbird 中检查用户 [guest@localhost.com] 是否确实收到了该消息:
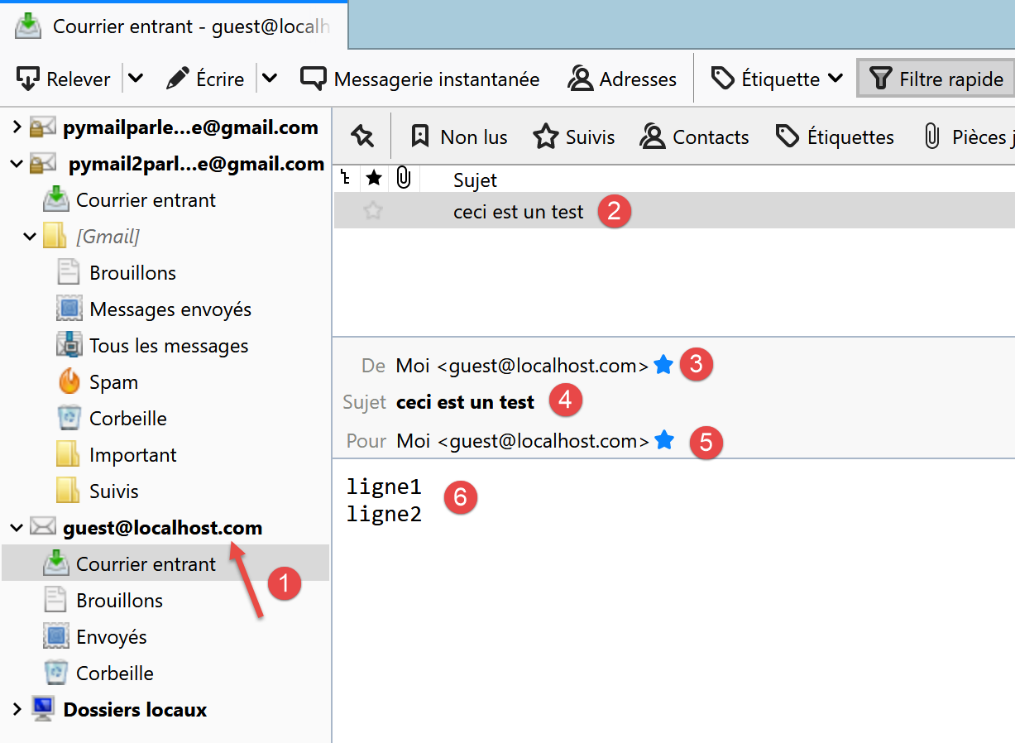
- 在 [1-6] 中,我们可以看到用户 [guest@localhost.com] 确实已收到该邮件;
最后,我们的客户端 [RawTcpClient] 已通过 SMTP 服务器 [localhost] 成功发送了一条消息。现在,让我们使用相同的方法向 [pymailparlexemple@gmail.com] 发送一条消息:
(venv) C:\Data\st-2020\dev\python\cours-2020\python3-flask-2020\inet\utilitaires>RawTcpClient.exe smtp.gmail.com 587
Client [DESKTOP-30FF5FB:53210] connecté au serveur [smtp.gmail.com-587]
Tapez vos commandes (quit pour arrêter) :
<-- [220 smtp.gmail.com ESMTP w13sm643278wrr.67 - gsmtp]
EHLO localhost
<-- [250-smtp.gmail.com at your service, [2a01:cb05:80e8:b500:3c4b:2203:91fa:9b00]]
<-- [250-SIZE 35882577]
<-- [250-8BITMIME]
<-- [250-STARTTLS]
<-- [250-ENHANCEDSTATUSCODES]
<-- [250-PIPELINING]
<-- [250-CHUNKING]
<-- [250 SMTPUTF8]
MAIL FROM: pymailparlexemple@gmail.com
<-- [530 5.7.0 Must issue a STARTTLS command first. w13sm643278wrr.67 - gsmtp]
QUIT
Fin de la connexion avec le serveur
- 第 1 行:我们正在使用 Gmail 的 SMTP 服务器,该服务器运行在 587 端口;
- 第 15 行:我们被阻止是因为 SMTP 服务器要求我们建立安全连接,而我们不知道如何操作。与前一个示例不同,服务器 [smtp.gmail.com](第 1 行)要求进行 身份验证。它只接受在 [gmail.com] 域中注册的客户端。这种身份验证是安全的,并通过加密连接进行。
第一个示例为我们提供了用 Python 构建基础 SMTP 客户端的基础知识。第二个示例则表明,某些 SMTP 服务器(实际上是大多数)要求通过加密连接进行身份验证。
21.5.6. 脚本 [smtp/01]:一个基本的 SMTP 客户端
我们将运用之前学到的 SMTP 协议知识,用 Python 实现相关功能。
[smtp/01/config] 文件对应用程序的配置如下:
- 第 10–35 行:待发送的电子邮件列表。对于每封邮件,需指定以下信息:
- [description]:描述该电子邮件的文本;
- [smtp-server]:要使用的 SMTP 服务器;
- [smtp-port]:其服务端口;
- [发件人]:电子邮件的发件人;
- [收件人]:电子邮件的收件人;
- [主题]:电子邮件的主题;
- [内容类型]:电子邮件编码;
- [message]:电子邮件正文;
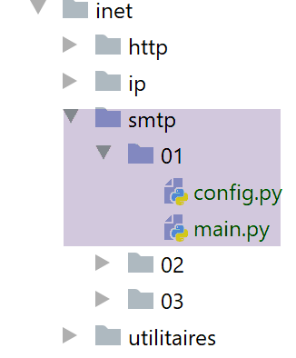
SMTP 客户端的 [01/main] 代码如下:
1 2 3 4 5 6 7 8 9 10 11 12 13 14 15 16 17 18 19 20 21 22 23 24 25 26 27 28 29 30 31 32 33 34 35 36 37 38 39 40 41 42 43 44 45 46 47 48 49 50 51 52 53 54 55 56 57 58 59 60 61 62 63 64 65 66 67 68 69 70 71 72 73 74 75 76 77 78 79 80 81 82 83 84 85 86 87 88 89 90 91 92 93 94 95 96 97 98 99 100 101 102 103 104 105 106 107 108 109 110 111 112 113 114 115 116 117 118 119 120 121 122 123 124 125 126 127 128 129 130 131 132 133 134 135 136 137 138 139 140 141 142 143 144 145 146 147 148 149 150 151 152 153 154 155 156 157 158 159 | |
评论
- 第 134–136 行:配置应用程序;
- 第 139–151 行:处理配置中找到的所有电子邮件;
- 第 141–143 行:显示即将执行的操作;
- 第 144–149 行:定义待发送的消息。消息 [message] 前面带有 [From, To, Subject, Content-type] 这些标头;
- 第 151 行:使用 [sendmail] 函数发送电子邮件,该函数接受两个参数:
- [mail]:包含发送邮件所需信息的字典;
- [verbose]:一个布尔值,用于指定是否应将客户端/服务器之间的交互记录到控制台;
- 第 154–156 行:捕获 [sendmail] 函数抛出的所有异常,并将其显示出来;
- 第 6 行:[mail] 是描述待发送电子邮件的字典;
- 第 14 行:在 SMTP 协议中,客户端必须发送其名称。此处,我们获取将作为客户端的本地机器的名称;
- 第 16 行:连接到将接收该邮件的 SMTP 服务器;
- 第 22–23 行:若与 SMTP 服务器的连接成功,服务器将发送欢迎信息,此处读取该信息;
- 随后,[sendmail] 函数会发送 SMTP 客户端必须发送的各项命令:
- 第 24–25 行:EHLO 命令;
- 第 26–27 行:MAIL FROM: 命令;
- 第 28–29 行:RCPT TO: 命令;
- 第 30–31 行:DATA 命令;
- 第 32–41 行:发送邮件(发件人、收件人、主题、内容类型、正文);
- 第 42–43 行:发送消息结束字符;
- 第 44–457 行:QUIT 命令,用于终止客户端与 SMTP 服务器的对话;
- [sendmail] 的执行位于 [try / finally] 代码块内,这使得所有异常都能传播到调用代码中。我们知道调用代码会捕获所有异常并将其显示出来;
- 第 48–50 行:释放资源;
- 第 54 行:[send_command] 函数负责将客户端的命令发送至 SMTP 服务器。它接受四个参数:
- [connection]:连接客户端与服务器的连接;
- [command]:待发送的命令;
- [verbose]:若为 TRUE,则将客户端/服务器交互记录到控制台;
- [with_rclf]:若为 TRUE,则发送以 \r\n 序列结尾的命令。此参数对所有 SMTP 协议命令均为必需,但 [send_command] 函数也用于发送消息。在此情况下,不会添加 \r\n 序列;
- 第 62 行:仅当命令不为空时才发送;
- 第 65-66 行:将命令作为 UTF-8 字节串发送至服务器;
- 第 70-71 行:读取响应的所有行。我们假设响应长度小于 1000 个字符。响应可能包含多行。每行格式为 XXX-YYY,其中 XXX 是数字代码,但响应的最后一行除外,其格式为 XXX YYY(无连字符);
- 第 76 行:从第一行读取错误代码 XXX;
- 第 78–80 行:如果数字代码 XXX 大于 500,则表示服务器返回了错误。此时将抛出异常;
结果
运行脚本后,控制台输出如下:
C:\Data\st-2020\dev\python\cours-2020\python3-flask-2020\venv\Scripts\python.exe C:/Data/st-2020/dev/python/cours-2020/python3-flask-2020/inet/smtp/01/main.py
----------------------------------
Envoi du message [mail to localhost via localhost]
--> [EHLO DESKTOP-30FF5FB]
<-- [220 Bienvenue sur le serveur SMTP localhost.com]
--> [MAIL FROM: <guest@localhost.com>]
<-- [250-DESKTOP-30FF5FB
250-SIZE 20480000
250-AUTH LOGIN
250 HELP]
--> [RCPT TO: <guest@localhost.com>]
<-- [250 OK]
--> [DATA]
<-- [250 OK]
--> [From: guest@localhost.com
To: guest@localhost.com
Subject: to localhost via localhost
Content-type: text/plain; charset="utf-8"

aglaë séléné
va au marché
acheter des fleurs]
<-- [354 OK, send.]
--> [
.
]
<-- [250 Queued (0.000 seconds)]
--> [QUIT]
<-- [221 goodbye]
Message envoyé...
----------------------------------
Envoi du message [mail to gmail via gmail]
--> [EHLO DESKTOP-30FF5FB]
<-- [220 smtp.gmail.com ESMTP u1sm1364433wrb.78 - gsmtp]
--> [MAIL FROM: <pymailparlexemple@gmail.com>]
<-- [250-smtp.gmail.com at your service, [2a01:cb05:80e8:b500:3c4b:2203:91fa:9b00]
250-SIZE 35882577
250-8BITMIME
250-STARTTLS
250-ENHANCEDSTATUSCODES
250-PIPELINING
250-CHUNKING
250 SMTPUTF8]
--> [RCPT TO: <pymailparlexemple@gmail.com>]
<-- [530 5.7.0 Must issue a STARTTLS command first. u1sm1364433wrb.78 - gsmtp]
L'erreur suivante s'est produite : 5.7.0 Must issue a STARTTLS command first. u1sm1364433wrb.78 - gsmtp


Process finished with exit code 0
- 第 3–30 行:使用 SMTP 服务器 [hMailServer] 向 [guest@localhost] 发送电子邮件正常;
- 第 32–46 行:使用 SMTP 服务器 [smtp.gmail.com] 向 [pymailparlexemple@gmail.com] 发送电子邮件失败:在第 45 行,SMTP 服务器返回错误代码 530 及错误信息。这表明 SMTP 客户端必须先通过安全连接进行身份验证。我们的客户端未执行此操作,因此被拒绝;
Thunderbird 中的结果如下:
21.5.7. 脚本 [smtp/02]:使用 [smtplib] 库编写的 SMTP 客户端

上述客户端至少存在两个缺陷:
- 如果服务器要求使用安全连接,它无法使用安全连接;
- 无法向邮件中附加文件;
我们将在 [smtp/02] 脚本中解决第一个缺陷。在新脚本中,我们将使用 Python 的 [smtplib] 模块。
[smtp/02/main] 脚本将使用以下 JSON 配置文件 [smtp/02/config]:
该文件包含与 [smtp/01/config] 文件相同的字段,当 SMTP 服务器需要身份验证时,还会增加两个字段:
- 第 31 行,[user]:用于连接认证的用户名;
- 第 32 行,[password]:其密码;
只有当所连接的 SMTP 服务器要求身份验证时,才会出现这两个字段。此时将通过安全连接进行身份验证。
[smtp/02/main.py] 脚本的代码如下:
评论
- 第 8–35 行:仅使用了 [sendmail] 函数。现在将使用 [smtplib] 模块(第 2 行);
- 第 16 行:连接到 SMTP 服务器;
- 第 18 行:如果 [verbose=True],客户端与服务器的交互内容将显示在控制台上;
- 第 20–24 行:若 SMTP 服务器要求,则执行身份验证;
- 第 22 行:通过安全连接进行身份验证;
- 第 24 行:进行身份验证;
- 第 26–33 行:发送邮件。随后将与 [smtp/01/main] 脚本进行交互。若需认证,则通过安全连接进行;
- 第 35 行:客户端/服务器交互结束;
在运行 [smtp/02/main] 脚本之前,您必须修改 Gmail 账户设置 [pymailparlexemple@gmail.com]:
- 登录 Gmail 账户 [pymailparlexemple@gmail.com];
- 修改以下设置:
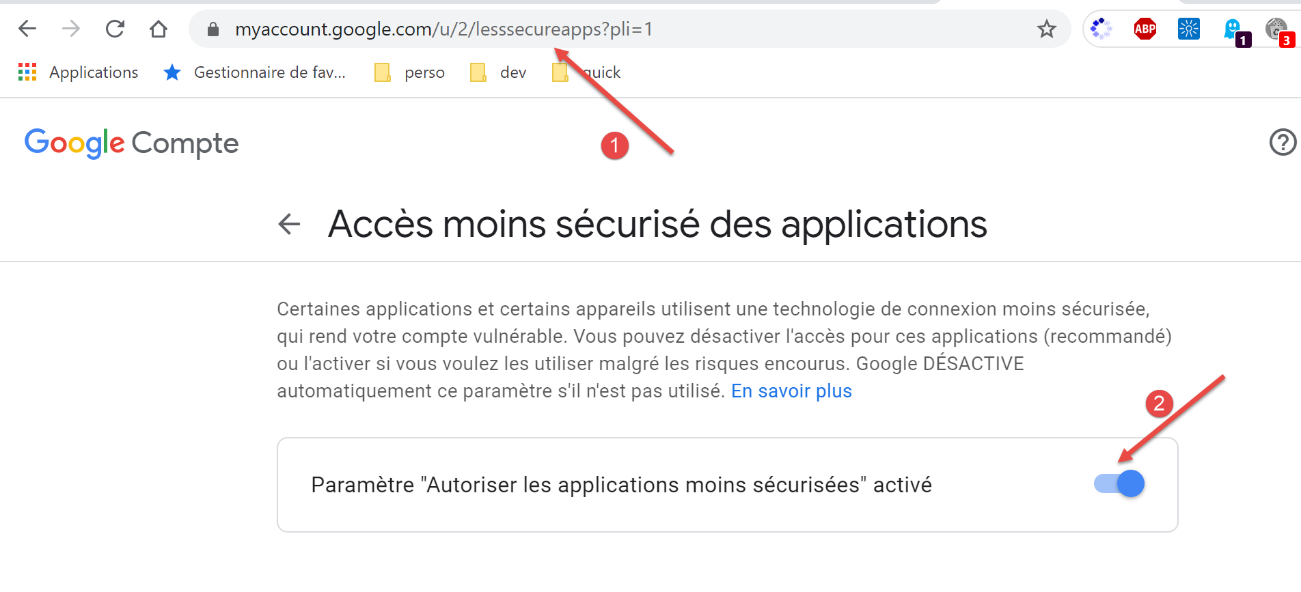
- 在 [2] 中,允许安全性较低的应用访问该账户;
对第二个 Gmail 账户 [pymail2parlexemple@gmail.com] 进行同样的操作。
结果
运行脚本 [smtp/02/main] 时,控制台将显示以下输出:
C:\Data\st-2020\dev\python\cours-2020\python3-flask-2020\venv\Scripts\python.exe C:/Data/st-2020/dev/python/cours-2020/python3-flask-2020/inet/smtp/02/main.py
----------------------------------
Envoi du message [mail to localhost via localhost avec smtplib]
send: 'ehlo [192.168.43.163]\r\n'
reply: b'250-DESKTOP-30FF5FB\r\n'
reply: b'250-SIZE 20480000\r\n'
reply: b'250-AUTH LOGIN\r\n'
reply: b'250 HELP\r\n'
reply: retcode (250); Msg: b'DESKTOP-30FF5FB\nSIZE 20480000\nAUTH LOGIN\nHELP'
send: 'mail FROM:<guest@localhost.com> size=310\r\n'
reply: b'250 OK\r\n'
reply: retcode (250); Msg: b'OK'
send: 'rcpt TO:<guest@localhost.com>\r\n'
reply: b'250 OK\r\n'
reply: retcode (250); Msg: b'OK'
send: 'data\r\n'
reply: b'354 OK, send.\r\n'
reply: retcode (354); Msg: b'OK, send.'
data: (354, b'OK, send.')
send: b'Content-Type: text/plain; charset="utf-8"\r\nMIME-Version: 1.0\r\nContent-Transfer-Encoding: base64\r\nfrom: guest@localhost.com\r\nto: guest@localhost.com\r\ndate: Wed, 08 Jul 2020 08:35:39 +0200\r\nsubject: to localhost via localhost avec smtplib\r\n\r\nYWdsYcOrIHPDqWzDqW7DqQp2YSBhdSBtYXJjaMOpCmFjaGV0ZXIgZGVzIGZsZXVycw==\r\n.\r\n'
reply: b'250 Queued (0.000 seconds)\r\n'
reply: retcode (250); Msg: b'Queued (0.000 seconds)'
data: (250, b'Queued (0.000 seconds)')
send: 'quit\r\n'
reply: b'221 goodbye\r\n'
reply: retcode (221); Msg: b'goodbye'
Message envoyé...
----------------------------------
Envoi du message [mail to gmail via gmail avec smtplib]
send: 'ehlo [192.168.43.163]\r\n'
reply: b'250-smtp.gmail.com at your service, [37.172.118.130]\r\n'
reply: b'250-SIZE 35882577\r\n'
reply: b'250-8BITMIME\r\n'
reply: b'250-STARTTLS\r\n'
reply: b'250-ENHANCEDSTATUSCODES\r\n'
reply: b'250-PIPELINING\r\n'
reply: b'250-CHUNKING\r\n'
reply: b'250 SMTPUTF8\r\n'
reply: retcode (250); Msg: b'smtp.gmail.com at your service, [37.172.118.130]\nSIZE 35882577\n8BITMIME\nSTARTTLS\nENHANCEDSTATUSCODES\nPIPELINING\nCHUNKING\nSMTPUTF8'
send: 'STARTTLS\r\n'
reply: b'220 2.0.0 Ready to start TLS\r\n'
reply: retcode (220); Msg: b'2.0.0 Ready to start TLS'
send: 'ehlo [192.168.43.163]\r\n'
reply: b'250-smtp.gmail.com at your service, [37.172.118.130]\r\n'
reply: b'250-SIZE 35882577\r\n'
reply: b'250-8BITMIME\r\n'
reply: b'250-AUTH LOGIN PLAIN XOAUTH2 PLAIN-CLIENTTOKEN OAUTHBEARER XOAUTH\r\n'
reply: b'250-ENHANCEDSTATUSCODES\r\n'
reply: b'250-PIPELINING\r\n'
reply: b'250-CHUNKING\r\n'
reply: b'250 SMTPUTF8\r\n'
reply: retcode (250); Msg: b'smtp.gmail.com at your service, [37.172.118.130]\nSIZE 35882577\n8BITMIME\nAUTH LOGIN PLAIN XOAUTH2 PLAIN-CLIENTTOKEN OAUTHBEARER XOAUTH\nENHANCEDSTATUSCODES\nPIPELINING\nCHUNKING\nSMTPUTF8'
send: 'AUTH PLAIN AHB5bWFpbDJwYXJsZXhlbXBsZUBnbWFpbC5jb20AIzZwcklsaEQmQDFRWjNURw==\r\n'
reply: b'235 2.7.0 Accepted\r\n'
reply: retcode (235); Msg: b'2.7.0 Accepted'
send: 'mail FROM:<pymail2parlexemple@gmail.com> size=320\r\n'
reply: b'250 2.1.0 OK e5sm4132618wrs.33 - gsmtp\r\n'
reply: retcode (250); Msg: b'2.1.0 OK e5sm4132618wrs.33 - gsmtp'
send: 'rcpt TO:<pymail2parlexemple@gmail.com>\r\n'
reply: b'250 2.1.5 OK e5sm4132618wrs.33 - gsmtp\r\n'
reply: retcode (250); Msg: b'2.1.5 OK e5sm4132618wrs.33 - gsmtp'
send: 'data\r\n'
reply: b'354  Go ahead e5sm4132618wrs.33 - gsmtp\r\n'
reply: retcode (354); Msg: b'Go ahead e5sm4132618wrs.33 - gsmtp'
data: (354, b'Go ahead e5sm4132618wrs.33 - gsmtp')
send: b'Content-Type: text/plain; charset="utf-8"\r\nMIME-Version: 1.0\r\nContent-Transfer-Encoding: base64\r\nfrom: pymail2parlexemple@gmail.com\r\nto: pymail2parlexemple@gmail.com\r\ndate: Wed, 08 Jul 2020 08:35:40 +0200\r\nsubject: to gmail via gmail avec smtplib\r\n\r\nYWdsYcOrIHPDqWzDqW7DqQp2YSBhdSBtYXJjaMOpCmFjaGV0ZXIgZGVzIGZsZXVycw==\r\n.\r\n'
reply: b'250 2.0.0 OK  1594190139 e5sm4132618wrs.33 - gsmtp\r\n'
reply: retcode (250); Msg: b'2.0.0 OK  1594190139 e5sm4132618wrs.33 - gsmtp'
data: (250, b'2.0.0 OK  1594190139 e5sm4132618wrs.33 - gsmtp')
send: 'quit\r\n'
Message envoyé...
reply: b'221 2.0.0 closing connection e5sm4132618wrs.33 - gsmtp\r\n'
reply: retcode (221); Msg: b'2.0.0 closing connection e5sm4132618wrs.33 - gsmtp'

Process finished with exit code 0
- 第 40 行:客户端 [smtplib] 发起对话以与 SMTP 服务器建立加密连接,而我们在脚本 [smtp/main/01] 中未能实现这一点;
- 除此之外,我们可以看到熟悉的 SMTP 协议命令;
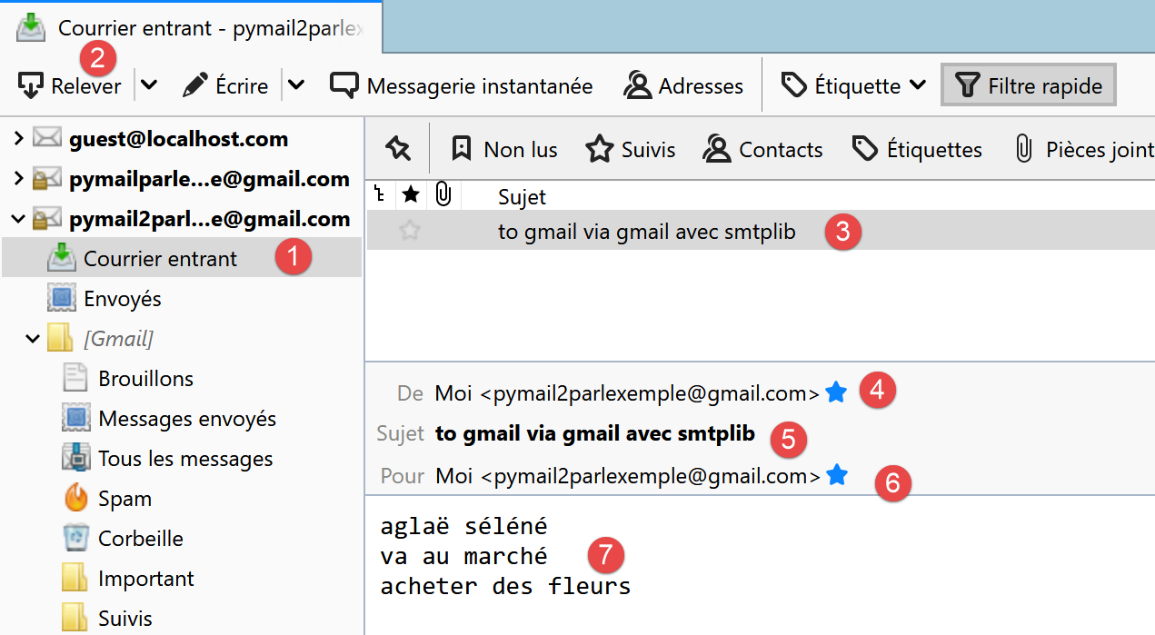
如果我们检查用户 [pymail2parlexemple] 的 Gmail 账户,会看到以下内容:
21.5.8. 脚本 [smtp/03]:处理附件
我们完善 [smtp/02/main] 脚本,以便发送的邮件能够包含附件。
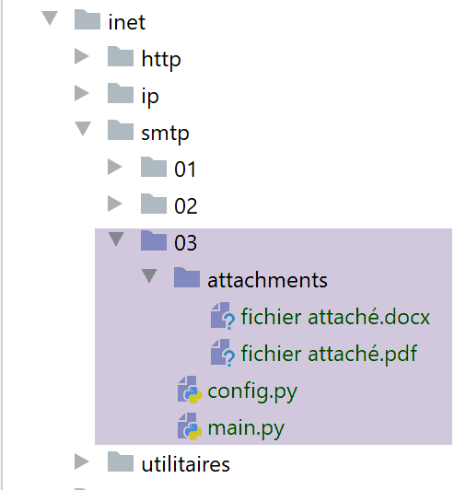
脚本 [smtp/03/main] 由以下脚本 [smtp/03/config] 进行配置:
[smtp/03/config] 文件与之前使用的 [smtp/02/config] 文件的唯一区别在于是否包含一个可选的 [attachments] 列表(第 30–32 行),该列表指定了要附加到待发送邮件中的文件列表。
[smtp/03/main] 脚本如下:
注释
- 第 18-32 行:[sendmail] 函数与没有附件时保持一致;
- 第 35 行:以下代码摘自 Python 官方文档;
- 第 36 行:待发送的消息将由多个部分组成:正文和附件。这被称为 [Multipart] 消息;
- 第 37–40 行:[Multipart] 邮件包含任何电子邮件中常见的字段;
- 第 42 行:[Multipart] 消息 [msg] 的各个部分通过 [msg.attach] 方法(第 81 行)附加到消息中。附加的部分可以是任何类型,它们通过 MIME 类型进行标识。纯文本的 MIME 类型是 [MIMEText];
- 第 44–81 行:待发送消息的所有附件均附加到 [Multipart] 消息 [msg] 上(第 81 行);
- 第 44 行:[path] 表示待附加文件的绝对路径;
- 第 47 行:为确定附件应使用的 MIME 类型,我们将采用待附加文件的文件扩展名(.docx、.php 等)。[mimetypes.guess_type] 方法负责执行此任务。它返回两项信息:
- [ctype]:文件的 MIME 类型;
- [encoding]:关于其编码的信息;
- 第 49–52 行:如果无法确定文件的 MIME 类型,则将其视为二进制文件(第 52 行);
- 第 54 行:文件的 MIME 类型被分解为主要类型 / 次要类型,例如 [application/pdf]。我们将这两个元素分离;
- 第 56–76 行:根据主要 MIME 类型的值处理不同情况。例如,对于 PDF 文件([application/pdf]),将执行第 70–76 行:
- 第 56–59 行:附件为文本文件的情况。此时,创建一个类型为 [MIMEText]、内容为 [fp.read] 的元素;
- 第 60–62 行:文件包含图像的情况。此时,创建一个类型为 [MIMEImage]、内容为 [fp.read] 的元素;
- 第 63–65 行:文件为音频文件的情况。此时,创建一个类型为 [MIMEAudio]、内容为 [fp.read] 的元素;
- 第 66–69 行:文件为电子邮件的情况。 在此情况下,我们创建一个类型为 [MIMEMessage] 的元素(第 69 行),其内容为 [email.message_from_bytes(fp.read())]。与之前 MIME 元素的内容是关联文件的二进制内容不同,此处的 MIMEMessage 元素的内容类型为 [email.message.Message];
- 第 70–76 行:其他情况。这包括例如我们示例中的 Word 和 PDF 文件;
- 第 72 行:以二进制模式(rb=read binary)打开待附加的文件;
- 第 74 行:[fp.read] 读取整个二进制文件;
- 第 72–74 行:[with open(…) as file] 结构有两个作用:
- 它打开文件并将其分配给 [file] 描述符;
- 它确保在退出 [with] 代码块时,无论是否发生错误,[file] 描述符都会被关闭。因此,它是 [try file=open(…)/ finally] 结构的替代方案;
- 第 73 行:创建一个新的 [part] 元素,用于包含在 Multipart 消息中。此处使用了 [MIMEBase] 类,并将第 54 行确定的 [maintype, subtype] 元素传递给构造函数;
- 第 74 行:要包含在 Multipart 消息中的元素必须具有内容。这可以通过 [set_payload] 方法进行初始化;
- 第 75-76 行:附件必须采用 7 位编码。历史上,部分 SMTP 服务器仅支持 7 位编码字符。此处使用名为“Base64”的编码;
- 第 77 行:从这一行开始,处理过程与我们在第 56–76 行创建的所有 MIME 类型 [MIMEMessage, MIMEImage, MIMEAudio, MIMEBase, MIMEText] 相同;
- 第 79 行:要添加到 Multipart 消息中的元素有一个描述它的标头。 此处我们指定所添加的元素对应于一个附件文件。该文件的名称即传递给 [add_header] 方法的第三个参数。电子邮件客户端通常会使用此文件名,将附件以该名称保存在客户端的文件系统中。此前,我们一直使用附件文件的绝对路径。在此,我们仅传递其名称而不带路径(第 78 行);
- 第 81 行:将文件的二进制数据嵌入到 [msg Multipart] 消息中;
- 第 83 行:当消息的所有部分都已附加到 [msg Multipart] 后,该消息即被发送;
结果
如果我们在已存在 [smtp/02/config] 文件的情况下运行 [smtp/03/main] 脚本,[pymail2parlexemple@gmail.com] 账户将收到以下内容:
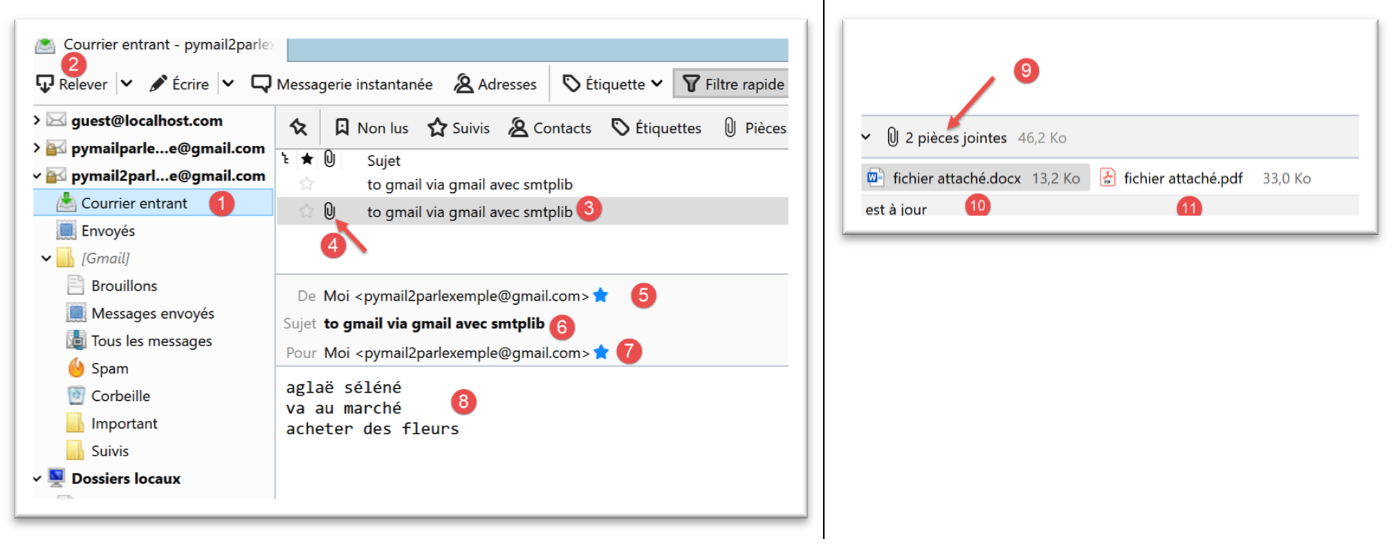
附件文件如[4, 9-11]所示。
现在我们来看一个带有电子邮件附件的示例。我们将保存上文[3]中收到的电子邮件:
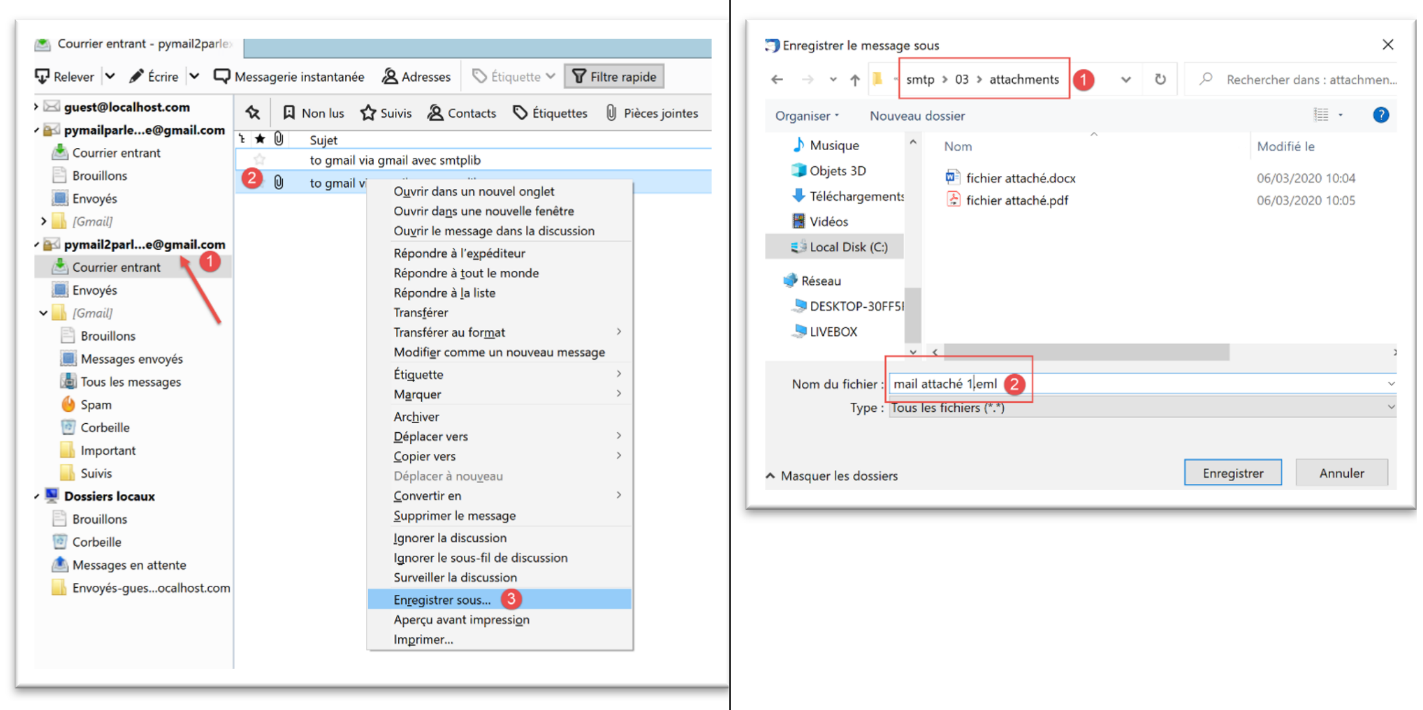
我们将该邮件以 [mail attachment 1.eml] 为名保存至 [smtp/03/attachments] 文件夹中。
接下来,我们将按以下方式修改 [smtp/03/config] 文件:
- 第33行,我们添加了一个附件;
现在我们再次运行 [smtp/03/main] 脚本。这会在用户的邮箱 [pymail2parlexemple@gmail.com] 中产生以下结果:
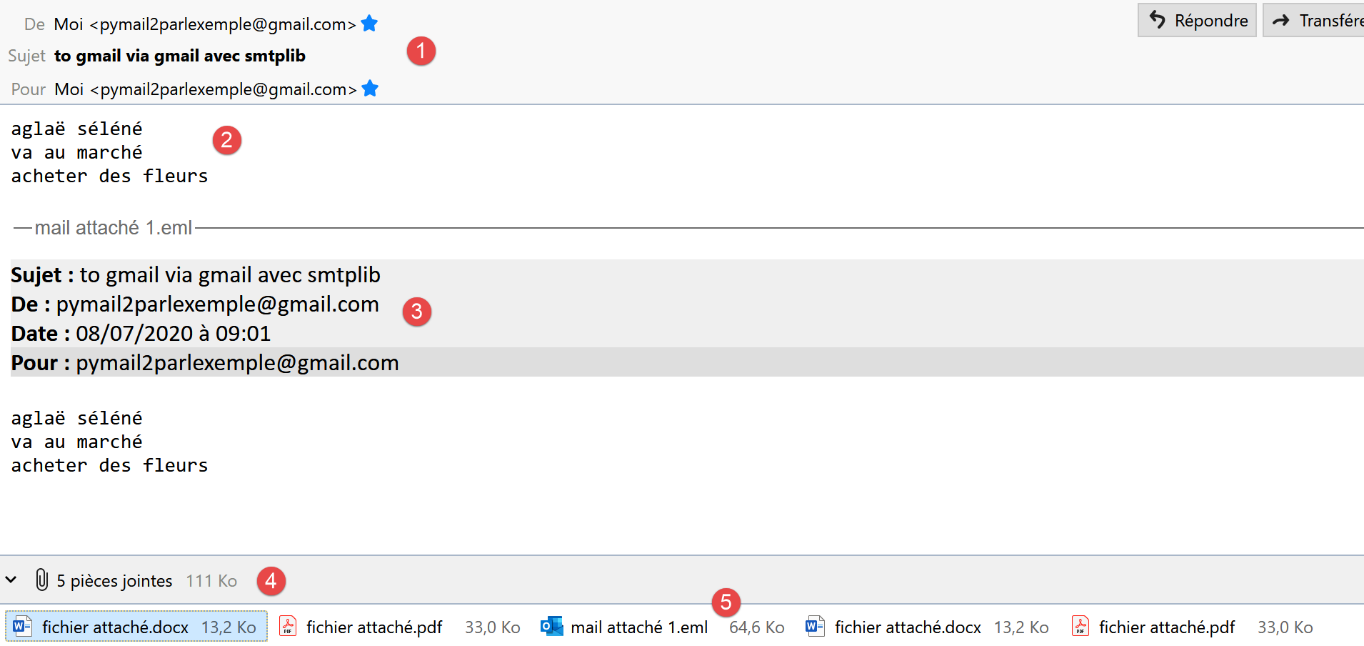
- 在 [1] 中,是收到的电子邮件;
- 在 [2] 中:邮件正文;
- [3]:附件邮件的正文;
- 在 [4] 中:Thunderbird 发现了 5 个附件:
- [attached_file.docx];
- [附件文件.pdf];
- [attached-email-1.eml]。该附件本身是一封包含两个附件的电子邮件:
- [attached_file.docx];
- [attached file.pdf];
21.6. POP3协议
21.6.1. 简介
要读取存储在邮件服务器上的电子邮件,有两种协议:
- POP3(邮局协议)协议,历史上首个协议,但如今已鲜少使用;
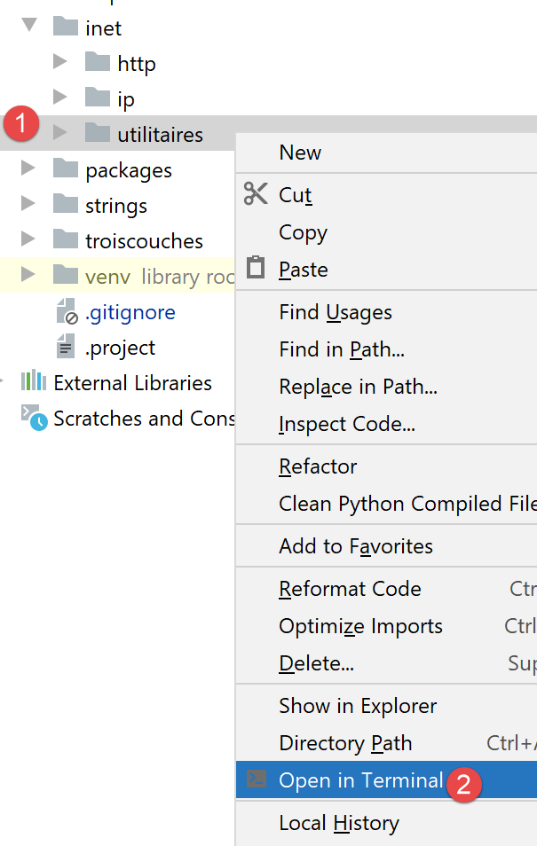
- IMAP(互联网邮件访问协议),该协议比 POP3 更新,目前应用最为广泛;
为了探讨POP3协议,我们将采用以下架构:
- [服务器 B] 将根据具体情况充当:
- 由 [hMailServer] 邮件服务器实现的本地 POP3 服务器;
- 服务器 [pop.gmail.com],即电子邮件服务 [gmail.com] 的 POP3 服务器;
- [客户端 A] 将以多种形式作为 POP3 客户端:
- 用于探索 POP3 协议的 [RawTcpClient] 客户端;
- 一个模拟 [RawTcpClient] 客户端 POP3 协议的 Python 脚本;
- 一个利用 Python 模块处理附件,并在 POP3 服务器要求时建立加密且经过身份验证连接的 Python 脚本;
21.6.2. 探索 POP3 协议
与研究 SMTP 协议时一样,我们将利用 [hMailServer] 邮件服务器的日志来研究 POP3 协议。我们需要启动该服务器。
使用 Thunderbird,我们将:
- 向用户 [guest@localhost.com] 发送一封电子邮件;
- 读取该用户的邮箱;
在上文[3-6]中,用户 [guest@localhost.com] 收到的邮件。
接下来,我们将查看 [hMailServer] 的日志。为此,我们将使用管理工具 [hMailServer Administrator]:
POP3日志如下(今日日志文件中的最后几行):
"POP3D"    35084    5    "2020-07-08 14:19:46.392"    "127.0.0.1"    "SENT: +OK Bienvenue sur le serveur POP3 localhost.com"
"POP3D"    34968    5    "2020-07-08 14:19:46.405"    "127.0.0.1"    "RECEIVED: CAPA"
"POP3D"    34968    5    "2020-07-08 14:19:46.407"    "127.0.0.1"    "SENT: +OK CAPA list follows[nl]USER[nl]UIDL[nl]TOP[nl]."
"POP3D"    35076    5    "2020-07-08 14:19:46.410"    "127.0.0.1"    "RECEIVED: USER guest"
"POP3D"    35076    5    "2020-07-08 14:19:46.411"    "127.0.0.1"    "SENT: +OK Send your password"
"POP3D"    34968    5    "2020-07-08 14:19:46.418"    "127.0.0.1"    "RECEIVED: PASS ***"
"POP3D"    34968    5    "2020-07-08 14:19:46.421"    "127.0.0.1"    "SENT: +OK Mailbox locked and ready"
"POP3D"    34968    5    "2020-07-08 14:19:46.423"    "127.0.0.1"    "RECEIVED: STAT"
"POP3D"    34968    5    "2020-07-08 14:19:46.423"    "127.0.0.1"    "SENT: +OK 1 612"
"POP3D"    34968    5    "2020-07-08 14:19:46.426"    "127.0.0.1"    "RECEIVED: LIST"
"POP3D"    34968    5    "2020-07-08 14:19:46.426"    "127.0.0.1"    "SENT: +OK 1 messages (612 octets)"
"POP3D"    34968    5    "2020-07-08 14:19:46.426"    "127.0.0.1"    "SENT: 1 612[nl]."
"POP3D"    35076    5    "2020-07-08 14:19:46.427"    "127.0.0.1"    "RECEIVED: UIDL"
"POP3D"    35076    5    "2020-07-08 14:19:46.428"    "127.0.0.1"    "SENT: +OK 1 messages (612 octets)[nl]1 42[nl]."
"POP3D"    34968    5    "2020-07-08 14:19:46.435"    "127.0.0.1"    "RECEIVED: RETR 1"
"POP3D"    34968    5    "2020-07-08 14:19:46.436"    "127.0.0.1"    "SENT: ."
"POP3D"    34924    5    "2020-07-08 14:19:46.459"    "127.0.0.1"    "RECEIVED: QUIT"
"POP3D"    34924    5    "2020-07-08 14:19:46.459"    "127.0.0.1"    "SENT: +OK POP3 server saying goodbye..."
- 第1行:POP3服务器向刚连接的客户端(Thunderbird)发送欢迎信息;
- 第2行:客户端发送[CAPA](功能)命令,请求可用的命令列表;
- 第 3 行:服务器响应称支持 [USER, UIDL, TOP] 命令。POP 服务器以 [+OK] 或 [-ERR] 开头进行响应,以指示是否成功执行了客户端的命令;
- 第 4 行:客户端发送 [USER guest] 命令,表示希望访问用户 [guest] 的邮箱;
- 第 5 行:服务器响应 [+OK] 并请求 [guest] 的密码;
- 第 6 行:客户端发送 [PASS password] 命令,提交用户 [guest] 的密码。此处密码以明文形式发送,因为 POP3 服务器未强制要求安全连接。我们将看到,Gmail 的 POP3 服务器在这方面有所不同;
- 第7行:服务器已验证用户名和密码。这表明它正在锁定[guest]用户的邮箱;
- 第 8 行:客户端发送 [STAT] 命令,请求邮箱信息;
- 第 9 行:服务器响应称存在一条 612 字节的消息。通常,服务器会响应称存在 N 条消息,并提供这些消息的总大小;
- 第 10 行:客户端发送 [LIST] 命令。该命令请求邮件列表;
- 第 11 行:服务器以以下格式发送邮件列表:
- 一行摘要,包含消息数量及其总大小;
- 每条消息占一行,显示消息编号及其大小;
- 第 13 行:客户端发送 [UIDL] 命令,请求包含消息标识符的消息列表。每条消息在邮件服务中都由一个唯一编号标识;
- 第 14 行:服务器的响应。我们可以看到,列表中的第 1 条消息的标识符为 42;
- 第 15 行:客户端发送 [RETR 1] 命令,请求将列表中的第 1 条消息传输至客户端;
- 第 16 行:POP3 服务器执行此操作;
- 第 17 行:客户端发送 [QUIT] 命令,表示将与 POP3 服务器断开连接;
- 第 18 行:服务器也将关闭与客户端的连接,但在断开前会先发送一条告别消息;
现在,我们将使用在 PyCharm 窗口中运行的 [RawTcpClient] 客户端重现上述对话中的部分内容:
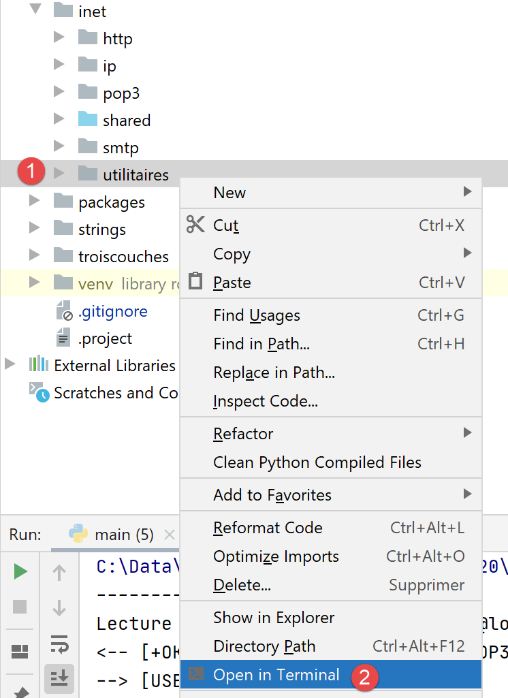
对话内容如下:
(venv) C:\Data\st-2020\dev\python\cours-2020\python3-flask-2020\inet\utilitaires>RawTcpClient.exe localhost 110
Client [DESKTOP-30FF5FB:63762] connecté au serveur [localhost-110]
Tapez vos commandes (quit pour arrêter) :
<-- [+OK Bienvenue sur le serveur POP3 localhost.com]
USER guest
<-- [+OK Send your password]
PASS guest
<-- [+OK Mailbox locked and ready]
LIST
<-- [+OK 1 messages (612 octets)]
<-- [1 612]
<-- [.]
RETR 1
<-- [+OK 612 octets]
<-- [Return-Path: guest@localhost.com]
<-- [Received: from [127.0.0.1] (DESKTOP-30FF5FB [127.0.0.1])]
<-- [   by DESKTOP-30FF5FB with ESMTP]
<-- [   ; Wed, 8 Jul 2020 14:19:36 +0200]
<-- [To: guest@localhost.com]
<-- [From: "guest@localhost.com" <guest@localhost.com>]
<-- [Subject: protocole POP3]
<-- [Message-ID: <ca895136-25c5-411e-373a-a68cbd0eca51@localhost.com>]
<-- [Date: Wed, 8 Jul 2020 14:19:33 +0200]
<-- [User-Agent: Mozilla/5.0 (Windows NT 10.0; WOW64; rv:68.0) Gecko/20100101]
<-- [ Thunderbird/68.10.0]
<-- [MIME-Version: 1.0]
<-- [Content-Type: text/plain; charset=utf-8; format=flowed]
<-- [Content-Transfer-Encoding: 8bit]
<-- [Content-Language: fr]
<-- []
<-- [ceci est un test pour découvrir le protocole POP3]
<-- []
<-- [.]
QUIT
Fin de la connexion avec le serveur
- 第 1 行:我们与 [localhost] 机器的 110 端口建立连接。这是 [hMailServer] POP3 服务运行的位置;
- 在第 5、7、9、13 和 34 行,我们使用 [USER, PASS, LIST, RETR, QUIT] 命令;
- 第 4 行:POP3 服务器的欢迎信息;
- 第 5 行:我们指定要访问用户 [guest] 的邮箱;
- 第 7 行:以明文形式发送 [guest] 用户的密码;
- 第 9 行:我们请求邮箱中的邮件列表;
- 第 13 行:请求第 1 封邮件;
- 第 14–33 行:POP3 服务器发送第 1 封邮件;
- 第 34 行:会话结束;
以下是POP3服务器支持的一些常用命令的汇总:
- [USER] 命令用于指定要读取其邮箱的用户;
- [PASS] 命令用于指定密码;
- [LIST] 命令用于请求用户邮箱中的邮件列表;
- [RETR] 命令用于请求指定编号的邮件;
- [DELE] 命令用于请求删除指定编号的消息;
- [QUIT] 命令用于告知服务器您已结束操作;
服务器的响应可能有以下几种形式:
- 以 [+OK] 开头的单行,表示客户端的上一条命令执行成功;
- 以 [-ERR] 开头的单行,表示客户端的上一条命令失败;
- 多行响应,其中:
- 第一行以 [+OK] 开头;
- 最后一行仅包含一个句点;
21.6.3. 脚本 [pop3/01]:一个基本的 POP3 客户端
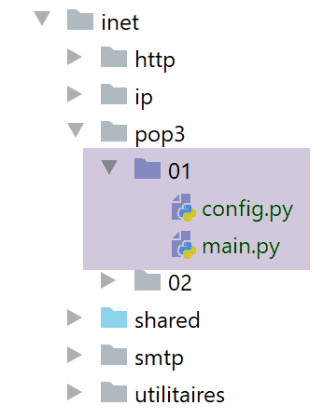
由于 POP3 协议与 SMTP 协议具有相同的结构,脚本 [pop3/01/main.py] 是脚本 [smtp/01/main.py] 的移植版本。它将拥有以下配置文件 [pop3/01/config.py]:
- 第 3–24 行:待检查的邮箱列表。此处仅有一个;
- 第 4–12 行:定义每个邮箱的字典条目含义;
- 第 15 行:要查询的 POP3 服务器是本地服务器 [hMailServer];
- 第 17–18 行:我们要读取用户 [guest@localhost] 的邮箱;
- 第 19 行:我们将最多读取 10 封电子邮件;
- 第 20 行:客户端最多等待 1 秒以获取服务器的响应;
- 第 21 行:检索到的邮件的编码类型;
- 第22行:我们不会删除已下载的消息;
脚本 [pop3/01/main.py] 如下:
注释
正如我们所提到的,[pop3/01/main.py] 是我们之前讨论过的 [smtp/01/main.py] 脚本的移植版本。我们仅就主要差异进行说明:
- 第 64 行:[readmails] 函数负责从邮箱中读取电子邮件。该邮箱的登录凭据存储在 [mailbox] 字典中。第二个参数 [True] 是 [Verbose] 参数,在此情况下,它会启用客户端/服务器通信日志记录;
[readmails] 函数如下:
注释
- 第 8–14 行:获取待检查邮箱的配置信息;
- 第19–20行:建立与POP3服务器的连接;
- 第26–27行:读取服务器发送的欢迎信息;
- 第28–29行:发送[USER]命令以指定我们要获取其邮件的用户;
- 第 30–31 行:发送 [PASS] 命令,提供该用户的密码;
- 第 32–33 行:发送 [LIST] 命令以查询该用户邮箱中的邮件数量。[sendCommand] 函数返回服务器响应的第一行。在此行中,服务器会标明邮箱中的邮件数量;
- 第 34-36 行:从响应的第一行中提取邮件数量;
- 第 39–46 行:我们遍历每封邮件。对于每封邮件,我们发送两个命令:
- RETR i:用于检索第 i 条邮件(第 40–41 行);
- DELE i:若配置要求从服务器删除已读邮件,则执行此操作(第 43-44 行);
- 第 47–48 行:发送 [QUIT] 命令,告知服务器操作已完成;
[send_command] 函数如下:
注释
- 第 13-18 行:只有当 [command] 不为空时,才会将其发送给 POP3 服务器。这是为了读取 POP3 服务器发送的欢迎信息,即使客户端尚未发送任何命令;
- 第19-21行:我们将套接字视为文本文件进行读取。这使我们能够使用[readline]方法(第24行),从而逐行读取邮件。我们使用[mailbox]字典中的[encoding]键来指定待读取行的编码;
- 第 24 行:读取响应的第一行;
- 第 28–32 行:处理可能出现的错误情况。这些错误类型包括 [-ERR 密码无效、-ERR 邮箱未知、-ERR 无法锁定邮箱…];
- 第 32 行:抛出包含错误消息的异常;
- 第 35 行:仅 [list, retr] 命令可能返回多行响应;
- 第 36–45 行:若为多行响应,则显示所有接收到的行(第 42–43 行),直至收到最后一行(第 45 行);
- 第 46 行:返回读取到的第一行,因为对于 [LIST] 命令,该行包含邮箱中的邮件数量;
结果
让我们以之前的示例为例。使用 Thunderbird,我们向用户 [guest@localhost] 发送了以下消息(此时 hMailServer 必须正在运行):
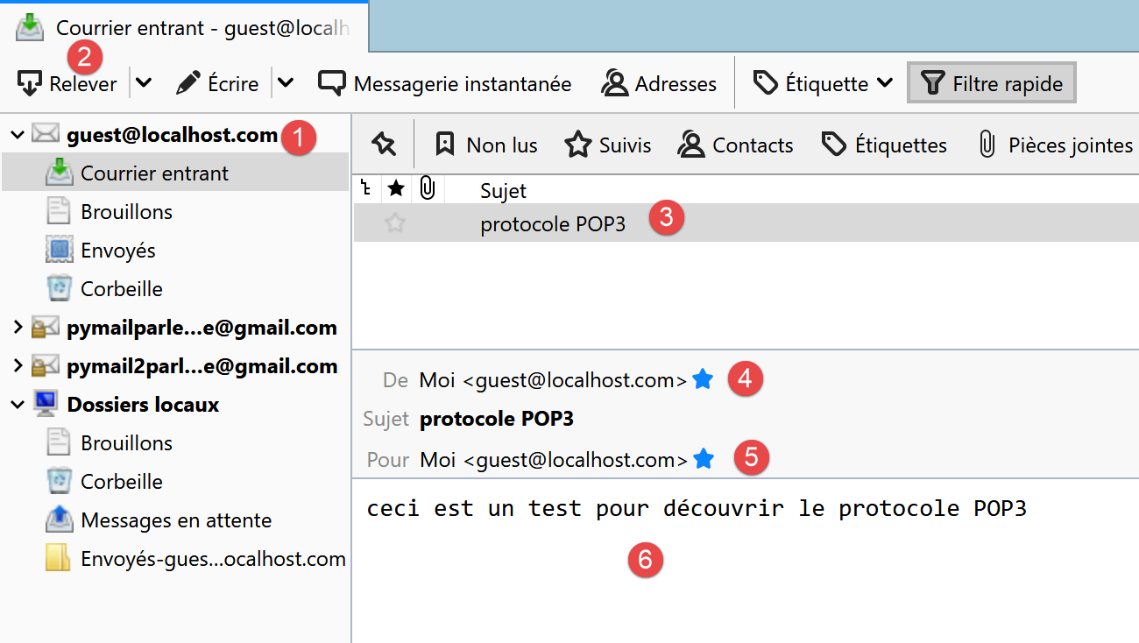
执行后,我们得到以下结果:
C:\Data\st-2020\dev\python\cours-2020\python3-flask-2020\venv\Scripts\python.exe C:/Data/st-2020/dev/python/cours-2020/python3-flask-2020/inet/pop3/01/main.py
----------------------------------
Lecture de la boîte mail POP3 guest@localhost:110
<-- [+OK Bienvenue sur le serveur POP3 localhost.com]
--> [USER guest]
<-- [+OK Send your password]
--> [PASS guest]
<-- [+OK Mailbox locked and ready]
--> [LIST]
<-- [+OK 1 messages (612 octets)]
<-- [1 612]
<-- [.]
--> [RETR 1]
<-- [+OK 612 octets]
<-- [Return-Path: guest@localhost.com]
<-- [Received: from [127.0.0.1] (DESKTOP-30FF5FB [127.0.0.1])]
<-- [by DESKTOP-30FF5FB with ESMTP]
<-- [; Wed, 8 Jul 2020 14:19:36 +0200]
<-- [To: guest@localhost.com]
<-- [From: "guest@localhost.com" <guest@localhost.com>]
<-- [Subject: protocole POP3]
<-- [Message-ID: <ca895136-25c5-411e-373a-a68cbd0eca51@localhost.com>]
<-- [Date: Wed, 8 Jul 2020 14:19:33 +0200]
<-- [User-Agent: Mozilla/5.0 (Windows NT 10.0; WOW64; rv:68.0) Gecko/20100101]
<-- [Thunderbird/68.10.0]
<-- [MIME-Version: 1.0]
<-- [Content-Type: text/plain; charset=utf-8; format=flowed]
<-- [Content-Transfer-Encoding: 8bit]
<-- [Content-Language: fr]
<-- []
<-- [ceci est un test pour découvrir le protocole POP3]
<-- []
<-- [.]
--> [QUIT]
<-- [+OK POP3 server saying goodbye...]
Lecture terminée...

Process finished with exit code 0
- 第 15-31 行:发送到 [guest@localhost] 的消息已正确检索。
这里是一个基础的 POP3 客户端,它缺少某些功能:
- 与安全 POP3 服务器通信的能力;
- 读取邮件附件的能力;
我们将通过一个新脚本实现这两项功能,这次的脚本会更复杂一些。
21.6.4. 脚本 [pop3/02]:使用 [poplib] 和 [email] 模块的 POP3 客户端
我们将编写一个能够处理附件并与安全服务器通信的 POP3 客户端。此外,我们将把邮件及其附件保存到文件中。
我们将使用两个 Python 模块:
- [poplib]:负责处理 POP3 协议;
- [email]:包含多个子模块,用于解析接收到的邮件。每封邮件都是一个结构化字符串,包含:
- 邮件头信息 [From, To, Subject, Return-Path…];
- 文本格式(可能包含 HTML 格式)的邮件正文;
- 附件;
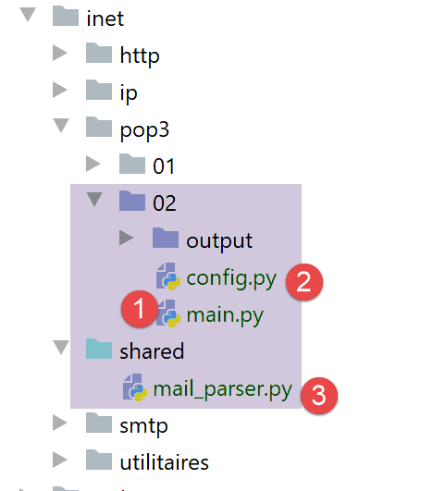
脚本 [inet/pop3/02/main] [1] 由文件 [inet/pop3/02/config] [2] 进行配置,并使用模块 [inet/shared/mail_parser] [3]。
[pop3/02/config] 文件内容如下:
该文件定义了要检查的邮箱列表,并设置了应用程序的 Python 路径。
这里只有一个邮箱:
- 第 22-23 行:我们要读取其邮件的用户;
- 第 20-21 行:存储该用户邮件的 POP3 服务器的名称和端口;
- 第 24 行:要检索的邮件最大数量。实际上,如果你在自己的邮箱上运行此脚本,可能并不希望检索其中存储的数百封邮件;
- 第 25 行:一个布尔值,用于指定邮件在被读取后是否应被删除(delete=True);
- 第 26 行:将 [ssl] 属性设置为 True 表示第 20–21 行定义的 POP3 服务器使用加密连接;
- 第 27 行:服务器响应的最大超时时间,单位为秒;
- 第 28 行:用于存储已读邮件的文件夹。若该文件夹不存在,则会自动创建。这是一个相对路径。执行时,该路径将相对于你运行脚本的文件夹。在 [Pycharm] 中,该文件夹即为包含 [pop3/02] 脚本的文件夹;
[pop3/02/main] 脚本内容如下:
- 第 17-36 行:脚本的 [main] 部分与 [pop3/01] 脚本类似;
[readmails] 函数如下:
注释
- 第 6-7 行:我们导入了第 80 行使用的 [mail_parser.save_message] 函数;
- 该函数的代码被封装在 try(第 22 行)/finally(第 88 行)中。这样,所有异常都会传播到主代码中,由主代码进行捕获并显示;
- 第11–18行:我们获取邮箱配置信息;
- 第23-33行:所有邮件将存储在[output/user]文件夹中,其中[output]和[user]在配置中已定义。 因此,我们先创建 [output] 文件夹,随后创建 [output/user] 文件夹。为创建后者,我们首先在第 31 行将其删除。[shutil] 是一个必须导入的模块。[shutil.rmtree(dir)] 会删除 [dir] 文件夹及其所有内容;
- 对于所有系统文件操作,我们使用 [os] 模块,该模块也必须导入;
- 第 34–38 行:我们与 POP3 服务器建立连接。如果服务器是安全的,我们使用 [poplib.POP3_SSL] 类;否则,使用 [poplib.POP3] 类。第 35 行使用的 [ssl] 属性来自邮箱配置;
- 第 45 行:设置日志级别:
- 0:不记录日志;
- 1:记录 POP3 客户端发送的命令;
- 2:详细日志。我们还可以查看 POP3 客户端接收的内容;
- 第 47 行:连接建立后,POP3 服务器会发送欢迎信息。我们读取该信息;
- 第 48–49 行:POP3 协议的 USER 命令;
- 第 50–51 行:POP3 协议的 PASS 命令;
- 第 52–53 行:POP3 协议的 LIST 命令。响应是一个元组 (response, ['message_number bytes'…], bytes),例如 list = (b'+OK 3 messages (3859 bytes)', [b'1 584', b'2 550', b'3 2725'], 22)。 我们可以看到,元组的前两个元素是字节(前缀为 b)。list[1] 是一个数组,其中每个元素都是一个字节序列,包含两项信息:消息编号及其字节大小;
- 第 56 行:根据上述内容,我们可以推断出邮箱中的消息数量可通过 [len[list1]] 获得;
- 第 59–84 行:我们遍历每条消息。当所有消息均已读取完毕,或达到配置中设定的最大邮件数量时,循环即终止;
- 第 61 行:list[1] 数组的当前元素,即类似 b'1 584' 这样的字节序列;
- 第 63 行:我们将字节序列转换为字符串。现在得到字符串 '1 584';
- 第 66 行:提取邮件编号,此处为字符串 '1';
- 第 68 行:发送 POP3 RETR 命令。我们将收到类似以下的响应:
[message=(b'+OK 584 octets', [b'Return-Path: guest@localhost', b'Received: from [127.0.0.1] (localhost [127.0.0.1])', b'\tby DESKTOP-528I5CU with ESMTPA', b'\t; Tue, 17 Mar 2020 09:41:50 +0100', b'To: guest@localhost', b'From: "guest@localhost" <guest@localhost>', b'Subject: test', b'Message-ID: <2572d0f0-5b7c-2c31-5a70-c628293d5709@localhost>', b'Date: Tue, 17 Mar 2020 09:41:48 +0100', b'User-Agent: Mozilla/5.0 (Windows NT 10.0; WOW64; rv:68.0) Gecko/20100101', b' Thunderbird/68.6.0', b'MIME-Version: 1.0', b'Content-Type: text/plain; charset=utf-8; format=flowed', b'Content-Transfer-Encoding: 8bit', b'Content-Language: fr', b'', b'h\xc3\xa9l\xc3\xa8ne est all\xc3\xa9e au march\xc3\xa9 acheter des l\xc3\xa9gumes.', b''], 614)]
- (续)
- message 是一个包含三个元素的元组;
- message[1] 是一个行数组。每行都是一个字节序列(前缀为 'b')。完整的消息由这一组行构成;
- [Return-Path, Received, To, Subject, Message-ID, Content-Type, Content-Transfer-Encoding, Content-Language] 是邮件头。每个字段都提供有关接收邮件的信息。这些信息将用于检索邮件正文(即 message[1] 数组的倒数第二个元素);
- 第 71–73 行:我们创建字符串 [strMessage],其中包含消息的所有行。 现在,我们已将邮件转换为字符串形式。该消息可能包含其他邮件以及附件。这是因为附件是以字符串形式存储的。因此,需要记住的关键点是:电子邮件最初是一个字符串,必须对这个字符串进行分析,才能提取附件、任何其他嵌入的邮件,当然还有邮件正文——即发件人所写的内容;
- 第 74–78 行:我们将把邮件正文和附件存储在 [dir3] 文件夹中;
- 第 79–80 行:我们将把邮件的分析工作委托给一个名为 [save_message] 的函数:
- 第一个参数是 [dir3],即存储邮件内容的文件夹;
- 第二个参数的类型为 [email.message.Message]。该对象提供方法用于检索消息的各个部分(正文、附件)及其所有头部信息。您必须导入 [email] 模块才能访问该对象。[email.message_from_string] 函数允许您根据消息字符串构建一个 [email.message.Message] 对象;
[save_message] 函数是 [mail_parser] 模块的一部分:
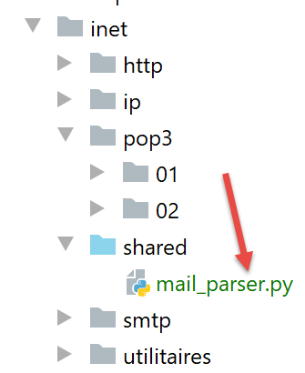
[mail_parser] 模块已在 [readmails] 函数的第 6–7 行被导入;
在 [mail_parser.py] 中,[save_message] 函数如下所示:
# imports
import codecs
import email.contentmanager
import email.header
import email.iterators
import email.message
import os


# sauvegarde d'un message de type email.message.Message
# cette fonction peut être appelée de façon récursive
def save_message(output: str, email_message: email.message.Message, irfc822=0) -> int:
    # output : dossier de sauvegarde des messages
    # email_message : le message à sauvegarder
    # irfc822 : n° courant de la numérotation des mails attachés
    #
    # partie du message
    part = email_message
    # les entêtes [From, To, Subject] sont trouvés dans une des parties multipart
    # ou bien dans une partie [text/*] lorsqu'il n'y a pas de partie [multipart]
    keys = part.keys()
    # From doit faire partie des entêtes, sinon la partie n'a pas les entêtes qu'on cherche
    if "From" in keys:
        # on récupère certains entêtes
        headers = [f"From: {decode_header(part.get('From'))}",
                   f"To: {decode_header(part.get('To'))}",
                   f"Subject: {decode_header(part.get('Subject'))}",
                   f"Return-Path: {decode_header(part.get('Return-Path'))}",
                   f"User-Agent: {decode_header(part.get('User-Agent'))}",
                   f"Date: {decode_header(part.get('Date'))}"]
        # sauvegarde des entêtes dans un fichier texte
        with codecs.open(f"{output}/headers.txt", "w", "utf-8") as file:
            # écriture dans fichier
            string = '\r\n'.join(headers)
            file.write(f"{string}\r\n")

    # type de la partie [part]
    main_type = part.get_content_maintype()
   …
注释
- 第 12 行:该函数最多接受三个参数:
- [output]:保存邮件的文件夹(第2个参数);
- [email_message]:类型为 [email.message.Message] 的消息。这是一个结构化类型。它包含电子邮件正文以及所有附件,并提供方法用于检索其各个元素;
- [irfc822]:此参数用于为封装在 [email_message] 中的电子邮件进行编号;
- 第 18 行:[email_message] 对象被放入 [part] 中。 [email.message.Message] 类型包含若干 [part](邮件正文、附件、封装的电子邮件),这些 [part] 同样属于 [email.message.Message] 类型。每个 [part] 可能包含子部分。因此,[email.message.Message] 类型是一个由 [email.message.Message] 类型元素构成的树:
- 若部分 [part] 包含子部分,则 [part.ismultipart()] 为 [True]。此时可通过 [part.get_payload()] 访问这些子部分;
- 当 [part.ismultipart()] 为 [False] 时,表示我们已到达初始消息树中的叶节点:这可能是:
- 以纯文本形式呈现的消息正文;
- HTML 格式的消息正文;
- 附件(封装消息除外,此时 [part.ismultipart()] 为 [True]);
- 由于 [email.message.Message] 参数具有树状结构,[save_message] 函数将被递归调用。当到达树的叶节点时,即 [part.ismultipart()] 为 [False] 的部分 [part] 时,递归将停止;
- 第 21 行:我们请求当前正在分析的消息的键(或标头)(由于递归,这可能是初始消息的一个子部分);
- 第 23–35 行:我们希望记录这些标头:
- [From]:消息的发送者;
- [To]:消息的接收者;
- [Subject]:消息的主题;
- [Return-Path]:若需回复,应发送回复的收件人。事实上,此信息并不总是包含在 [From] 字段中;
- [User-Agent]:与 POP3 服务器通信的 POP3 客户端;
- [Date]:邮件发送的日期;
- 第 23 行:仅消息的一个部分包含这些标头。对于其他部分,第 23–35 行的代码将被忽略;
- 第 25–30 行:我们创建一个包含这六个标头的列表;
- 第 25 行:让我们分析第一个标头:
- [part.get(key)] 用于检索与键 [key] 关联的标头;
- 该标头可能经过编码。如果编码格式不是 UTF-8,则使用 [decode_header] 函数对标头进行解码并重新编码为 UTF-8;
- 第一个标头将呈现为 [From: pymail2lexemple@gmail.com] 的形式;
- 第 31–35 行:将这些标头保存到文件 [output/headers.txt] 中;
[decode_header] 函数如下(仍在 [mail_parser.py] 中):
注释
- 第 4 行:解码标头:
- 你必须导入 [email.header] 模块;
- 我们会得到一个元组列表 [(header1, encoding1), (header2, encoding2), ...];
- 对于 [From, To, Subject, Return-Path, Date] 这些标头,该列表将仅包含一个元素;
- 第 8 行:获取该单个标头及其编码:
- 如果 [编码 == None],则 [标头] 表示该标头的字符串形式;
- 否则,[header] 是一个表示编码后标头的字节序列;
- 第 10–11 行:如果没有编码,则返回该标头;
- 第 12–14 行:如果存在编码,则将检索到的字节序列解码为字符串并返回;
让我们回到 [save_message] 函数:
注释
- 第 1–26 行:我们处理了初始消息的头部;
- 第 28–31 行:类型为 [email.message.Message] 的消息部分具有主类型和子类型。我们提取它们;
- 第 32–35 行:如果处理后的部分类型为 [text/plain],则表示我们已到达初始消息树中的叶节点。这就是发件人在消息中写下的文本;
- 第 35 行:将此文本写入文件:
- 第一个参数 [output] 是应保存文本的文件夹;
- 第二个参数是消息中包含待保存文本的部分;
- 第三个参数为 0 表示保存纯文本,1 表示保存 HTML 文本;
- 第 37–40 行:如果该部分类型为 [text/html],则我们同样到达了初始消息树中的叶节点。这是发件人在消息中撰写的文本,此次采用 HTML 格式。并非所有电子邮件客户端都支持此格式;
[save_textmessage] 函数的工作原理如下:
注释
- 与邮件头一样,邮件正文也可能经过编码。编码方式有两种:
- 文本的初始编码(UTF-8、ISO-8859-1 等)。这是发送邮件的邮件服务器所使用的编码。可通过接收邮件的 [Content-Type] 标头得知;
- 原始文本在发送过程中可能经过的第二种编码。该信息可通过接收邮件的 [Transfer-Content-Encoding] 标头获取;
- 第 6 行:文本的初始编码;
- 第 11 行:文本在传输至收件人过程中所采用的第二种编码;
- 第 9、13 行:这两条信息被放入 [headers] 列表中。它们将被添加到 [headers.txt] 文件中,该文件记录了某些邮件头信息;
- 第 20 行:[email.contentmanager.raw_data_manager.get_content] 检索了具有初始编码 1 的消息。我们已移除了编码 2。然而,[email.contentmanager.raw_data_manager] 对象仅支持两种类型的 [Transfer-Content-Encoding]:
- [quoted-printable];
- [base64];
它会忽略其他类型。然而,例如 Thunderbird 使用的 [Transfer-Content-Encoding] 名为 "8bit"。该编码会被忽略,导致包含重音字符的消息出现乱码。随后可通过 [part.get_payload()] 方法(第 15–17 行)检索消息;
- 第 21 行:此时,我们已获得去除了传输编码的消息,即发件人原始撰写的消息;
- 第 22–37 行:此处需要保存文本消息;
- 第 24–28 行:我们将第 9 行和第 13 行构建的两个头部保存到文件 [headers.txt] 中。该文件已存在且包含头部信息。 因此,我们使用模式“a”(第25行)打开该文件。“a”代表“追加”,新构建的标头将被追加(位于文件末尾)到[headers.txt]文件的现有内容中;
- 第 30 行:用于保存文本消息的文件名;
- 第 33 行:用于保存 HTML 消息的文件名;
- 第 34–37 行:将 UTF-8 文本保存到文件中;
让我们回到 [save_message] 函数:
注释
- 第 33-40 行:我们已经处理了初始消息树一端(无子部分)的消息的两种可能情况。还有两种情况需要处理:
- 第 43-62 行:分析部分本身包含子部分的情况(part.ismultipart()==True);
- 第 63–68 行:对于剩余的情况,我们仅处理被分析部分为附件的情况;
我们处理这一最后的情况。我们再次处于初始消息的末端(无子部分)。我们已经遇到了两种此类情况:text/plain 和 text/html 类型。现在我们处理附件文件的情况。
- 第 66 行:附件通过 [Content-Disposition] 键进行标识;
- 第 67 行:如果该键存在且以字符串 [attachment] 开头,则表示该消息附带了一个文件;
- 第 68 行:附件保存在 [output] 文件夹中;
[save_attachment] 函数如下:
- 第 4 行:如果 [part] 是附件,则通过 [part.get_filename] 获取附件的文件名。仅保留文件名,不包含其路径;
- 第 8 行:文件名通常与邮件头采用相同的编码方式。因此,我们使用 [decode_header] 函数对其进行解码;
- 第 11 行:附件文件的内容目前是一个字符串,它是通过将原始文件内容编码(通常是 base64)为文本生成的。为了获取原始内容,我们使用 [part.get_payload(decode=True)] 函数。参数 [decode=True] 表示必须对附件文件的内容进行解码。这将返回一个字节序列;
- 第 10 行:将该字节序列保存到文件 [output/filename] 中。打开文件时使用的 "wb" 模式代表 "写二进制";
让我们回到 [save_message] 函数的代码:
注释
- 我们已经处理了涉及初始消息树叶节点的情况:[text/plain、text/html 以及 Content-Disposition=attachment;…] 这些部分 我们还需要处理被分析部分是部分容器的情况,即它包含子部分 [part.is_multipart()==True],第 41 行。因此,为了到达消息树的末端节点,我们必须分析这些子部分;
- 第 43 行:我们以特殊方式处理被分析部分类型为 [message/rfc822] 的情况。这是电子邮件的类型。因此,这对应于一封电子邮件将另一封电子邮件作为附件的情况;
代码如下:
    # si le message est un conteneur de parties
    elif part.is_multipart():
        # cas particulier du mail attaché
        if type_of_part == "message/rfc822":
            # création d'un nouveau dossier output2 pour le mail attaché
            irfc822 += 1
            output2 = f"{output}/rfc822_{irfc822}"
            os.mkdir(output2)
            # sauvegarde des sous-parties du message irfc822 dans output2
            for subpart in part.get_payload():
                # dans le nouveau dossier irfc822 redémarre à 0
                save_message(output2, subpart, 0)

        else:
            # on n'a pas affaire à un mail attaché
            # sauvegarde des sous-parties dans le dossier courant output
            # irfc822 doit alors être incrémenté pour chaque sous-partie message/rfc822
            for subpart in part.get_payload():
                # save_message rend la dernière valeur de irfc822
                # incrémentée de 1 si subpart="message/rfc822", pas incrémentée sinon
                irfc822 = save_message(output, subpart, irfc822)
…
    return irfc822
- [message/rfc822] 部分与其他多部分(multipart)部分的区别在于保存目录会发生变化;
- 第 6–8 行:对于 [message/rfc822] 部分,保存目录变为第 7 行中的 [output/rfc822_x],其中 x 是附件邮件的编号,第一个为 1,第二个为 2……;
- 第 21 行:对于其他多部分,保存目录仍为原始邮件的 [output] 目录。该目录不会改变;
- 第 10–12 行:每个子部分通过递归调用 [save_message] 进行保存。第三个参数是封装在 [subpart] 中的邮件的索引号。初始时,该索引为 0;
- 第 21 行:与第 12 行说明相同,但第三个参数 [irfc822] 的值会发生变化。如果第 18–21 行循环中包含多个封装的电子邮件,则必须将其存储在 […/rfc822-1…/rfc822_2…] 文件夹中。 因此,[save_message] 函数的第三个参数必须取值 1、2、3,依此类推。为此,[save_message] 会设置 [irfc822] 的值(第 21 行)。
让我们举个例子:假设第18行的子部分列表为[subpart1, subpart2, subpart3, subpart4, subpart5],其中[subpart1, subpart3, subpart5]是附件邮件, [subpart2] 是 text/plain 部分,[subpart4] 是附件,且该消息中尚未出现过附件邮件 [irfc822=0]。在此情况下:
- (待续)
- 第 21 行保存了 [subpart1]:执行 [saveMessage] 函数时 irfc822=0;
- [subpart1] 是一封电子邮件附件,因此 irfc822 被设置为 1(代码第 6 行)。创建了一个名为 [output/irfc822_1] 的文件夹。[saveMessage(output,subpart1,0)] 返回的值因此为 1(第 23 行);
- [subpart2] 由第 21 行保存:[saveMessage] 函数以 irfc822=1 的参数执行;
- [subpart2] 不是电子邮件附件。因此,irfc822 保持为 1。这是第 21 行获取的值;
- [subpart3] 由第 21 行保存:[save_message] 函数在 irfc822=1 的条件下执行;
- [subpart3] 是电子邮件附件,因此 irfc822 变为 2(代码第 6 行)。创建了一个名为 [output/irfc822_2] 的文件夹。[save_message(output,subpart1,1)] 返回的值因此为 2(第 21 行);
- [subpart4] 由第 21 行保存:[save_message] 函数以 irfc822=2 的参数执行;
- [subpart4] 不是电子邮件附件。因此,irfc822 保持为 2。这是第 21 行获取的值;
- 第 21 行保存了 [subpart5]:[save_message] 函数以 irfc822=2 的参数被调用;
- [subpart5] 是电子邮件附件,因此 irfc822 变为 3(代码第 6 行)。创建了一个名为 [output/irfc822_3] 的文件夹。[save_message(output,subpart1,2)] 返回的值因此为 3(第 21 行);
执行示例
我们从 [Gmail、Outlook、em Client、Thunderbird] 向 [pymail2parlexemple@gmail.com] 发送 4 封电子邮件
- [Gmail]:[https://mail.google.com/];
- [Outlook]:[https://outlook.live.com/owa/];
- [邮件客户端]:[https://www.emclient.com/];
- [Mozilla Thunderbird]:[https://www.thunderbird.net/fr/];
所有电子邮件的主题行均为 [Hélène goes to the market],正文内容为 [buy vegetables]。我们希望测试带重音符号的字符能否被正确检索。
我们使用配置了以下 [pop3/02/config] 文件的 [pop3/02/main] 脚本读取这些邮件:
结果如下:
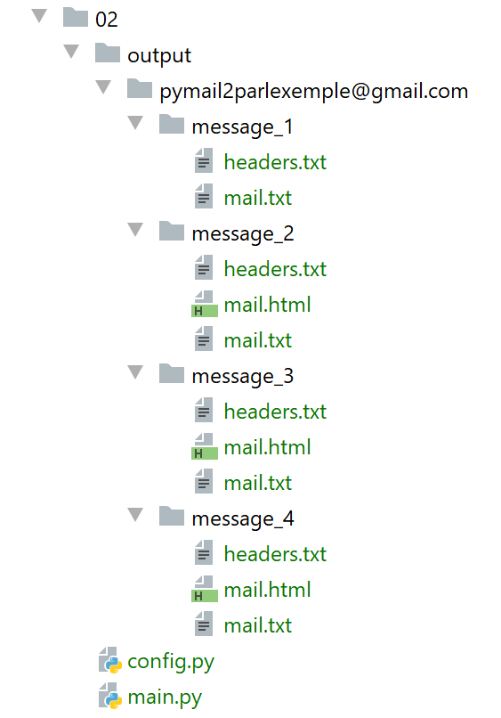
消息 1 是 Thunderbird 发送的:
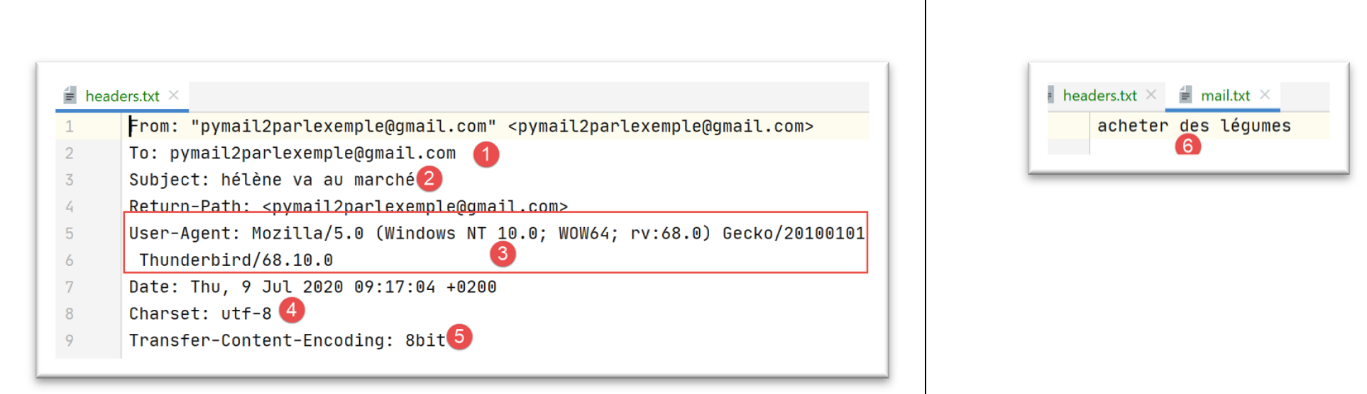
- 在 [5] 中,Thunderbird [3] 使用的 [Transfer-Content-Encoding] 类型为 [8bit];
- 在 [4] 中:该邮件采用 UTF-8 编码;
消息 2 是由 em Client 发送的:
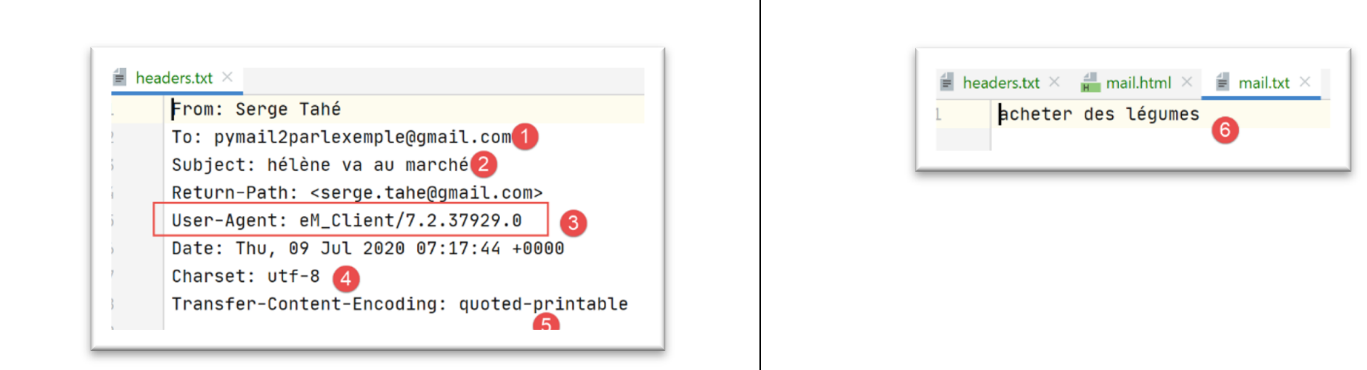
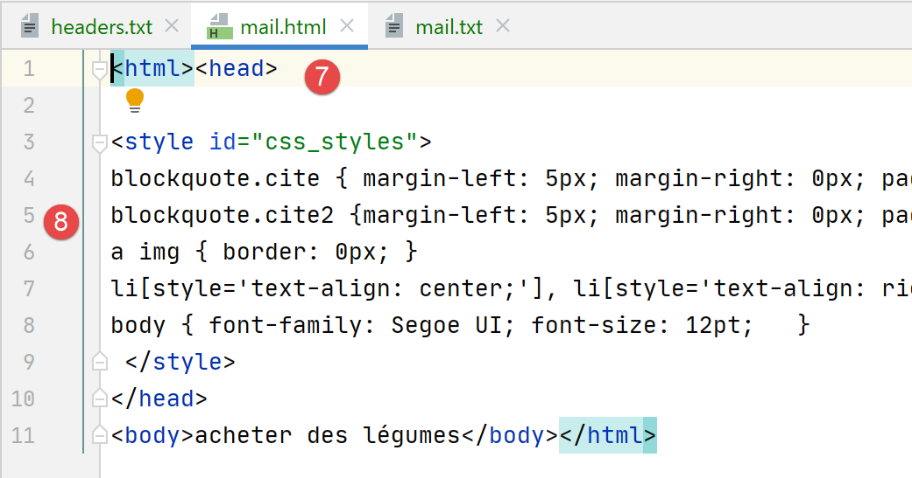
请注意,[em Client] 将文本编码为 UTF-8 [4],并以 [quoted-printable] [5] 格式传输。它还发送了一份 HTML 格式的消息副本 [7-8]。此处测试的所有电子邮件客户端均可实现此功能。这属于配置设置。
消息 3 是由 Gmail 发送的:
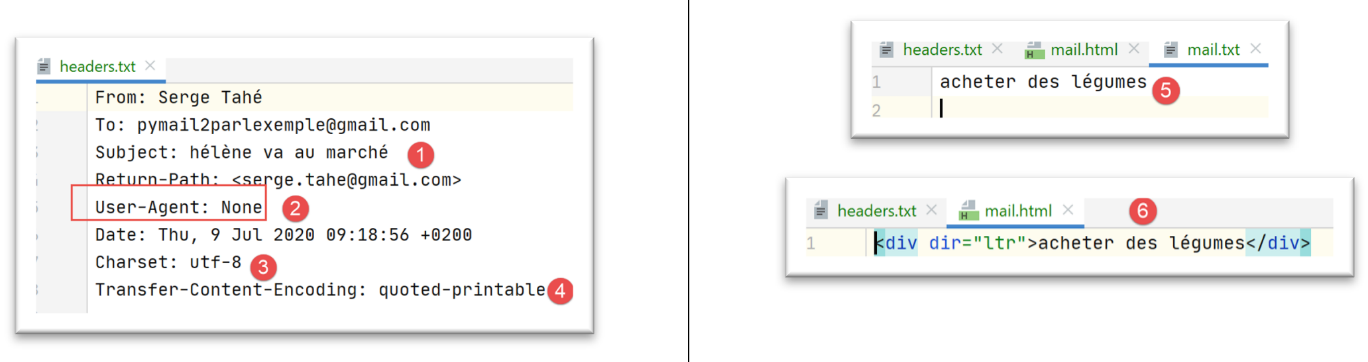
请注意,Gmail 将文本编码为 UTF-8 [3],并以 [quoted-printable] [4] 格式传输。在 [6] 中,是该邮件的 HTML 版本。
消息 4 是由 Outlook 发送的:
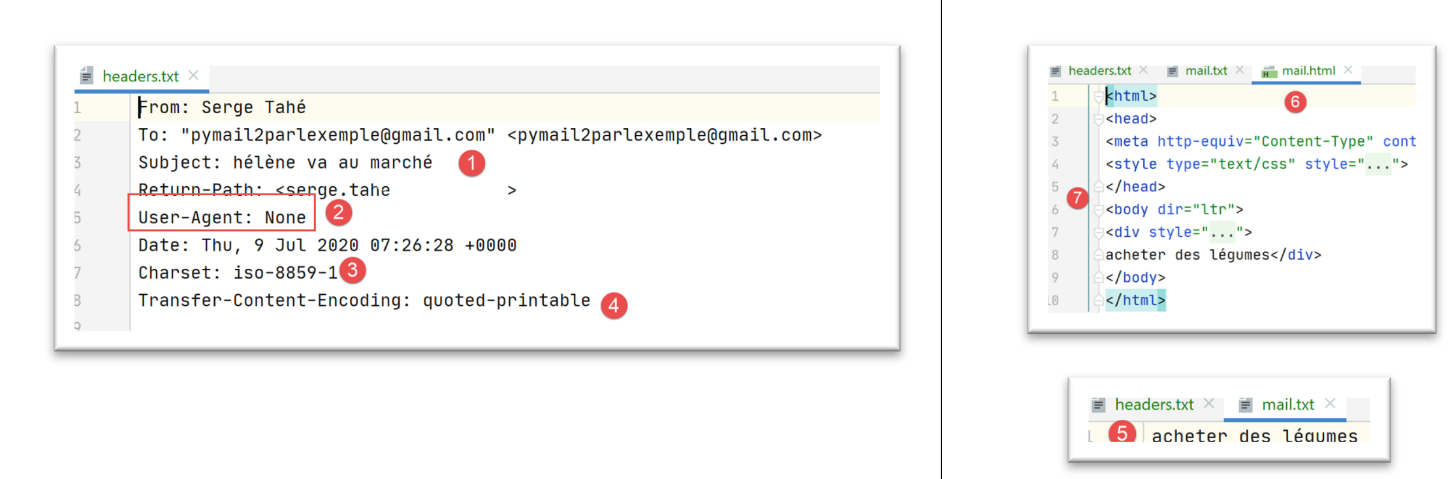
请注意,Outlook 使用 ISO-8859-1 [3] 对文本进行编码,并以 [quoted-printable] [4] 格式传输。
前面的示例说明了两点:
- 我们的客户端 [pop3/02] 一直运行正常;
- 不同的邮件客户端发送邮件的方式各不相同;
现在让我们看看附件。使用 Thunderbird,我们将用户的邮箱 [pymail2parlexemple@gmail.com] 清空。然后,我们使用脚本 [smtp/03/main] 发送一封邮件,配置如下 [smtp/03/config]:
- 第31-33行:我们将以下内容作为附件添加到电子邮件中:
- 一个 Word 文件;
- 一个 PDF 文件;
- 一封包含上述两个附件的电子邮件;
邮件发送后,我们运行 [pop3/02] 脚本读取用户的邮箱 [pymail2parlexemple@gmail.com]。结果如下:
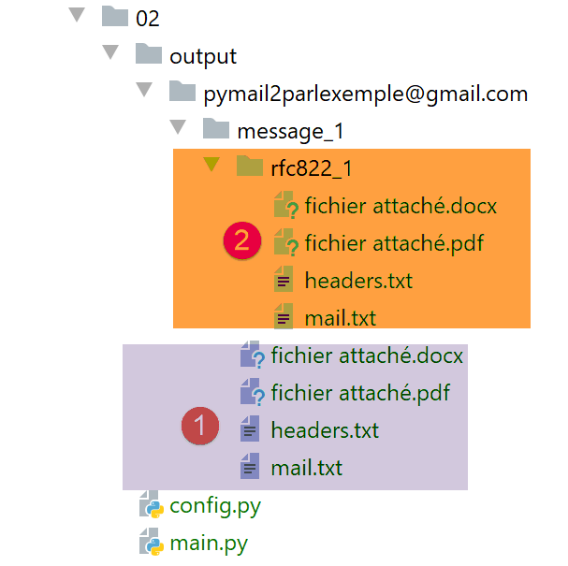
- 在 [1] 中:包含两个附件的邮件;
- 在 [2] 中:带有两个附件的邮件本身;
结论
[mail_parser.py] 模块特别复杂。这是由于电子邮件本身的复杂性所致。我们将复用该模块来处理 IMAP 协议。
21.7. IMAP 协议
21.7.1. 简介
要读取存储在邮件服务器上的电子邮件,有两种协议:
- POP3(邮局协议)协议,历史上首个协议,但如今已鲜少使用;
- IMAP(互联网邮件访问协议),比 POP3 更新,目前使用最为广泛;
为了探讨 IMAP 协议,我们将采用以下架构:
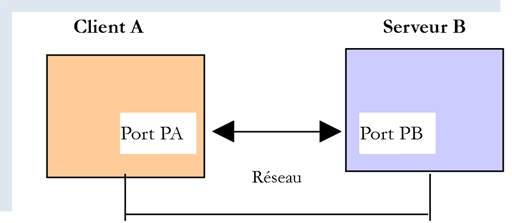
- [服务器 B] 将根据具体情况:
- 一个由 [hMailServer] 邮件服务器实现的本地 IMAP 服务器;
- 服务器 [imap.gmail.com:993],即电子邮件客户端 [Gmail] 的 IMAP 服务器;
- [客户端 A] 将是一个 Python 脚本,它将使用 Python 模块来管理附件,并在 IMAP 服务器要求时建立加密且经过身份验证的连接;
IMAP 协议的功能比 POP3 协议更为全面:
- 电子邮件存储在 IMAP 服务器上,并可组织到文件夹中;
- IMAP客户端可发送命令来创建、修改或删除这些文件夹;
让我们以 Thunderbird 为例进行说明。在以下架构中:
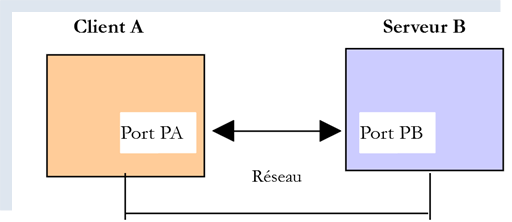
- Thunderbird 是客户端 A;
- [imap.gmail.com] 是服务器 B(Gmail);
现在我们使用 Thunderbird 在用户的邮箱 [pymail2parlexemple@gmail.com] 中创建一个文件夹:
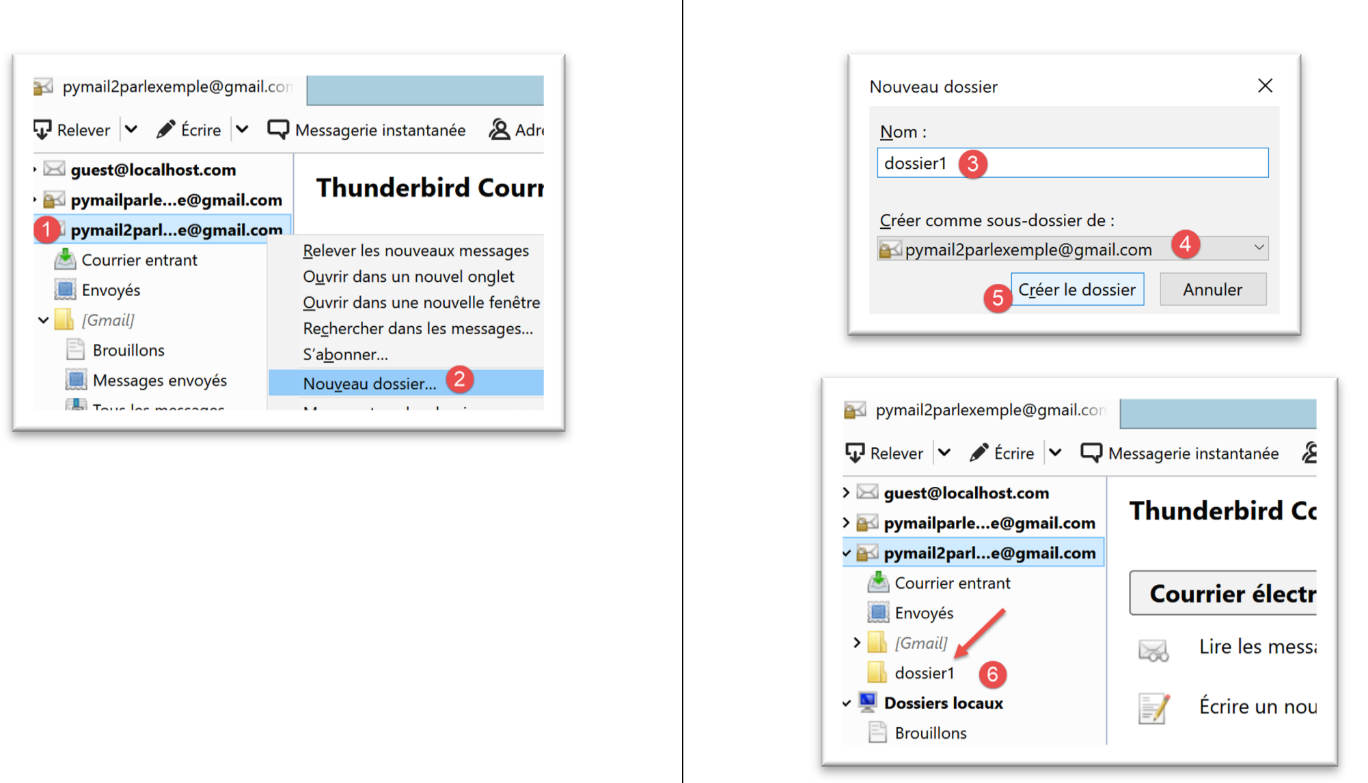
- 在 [1-6] 中,我们创建文件夹 [folder1];
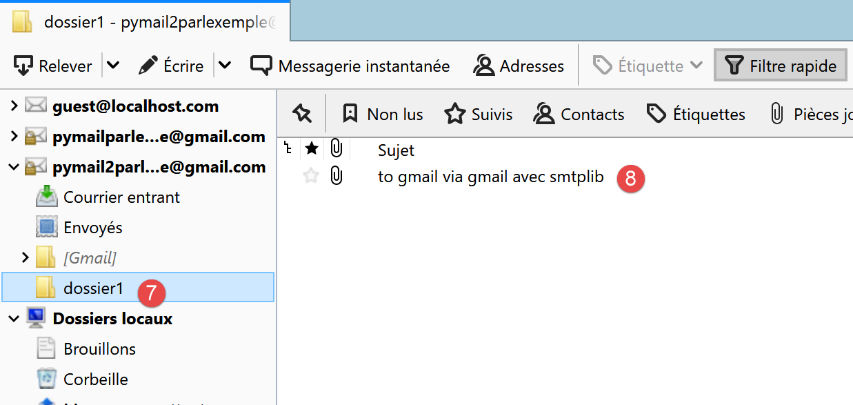
- 在 [7-8] 中,我们将 [收件箱] 文件夹中的所有邮件(使用鼠标)移动到 [folder1] 文件夹中;
现在,让我们登录 Gmail 网站并以用户 [pymail2parlexemple@gmail.com] 的身份登录:

- 在 [2-3] 中,收件箱为空;
- 在 [1] 中,是之前创建的 [folder1] 文件夹;
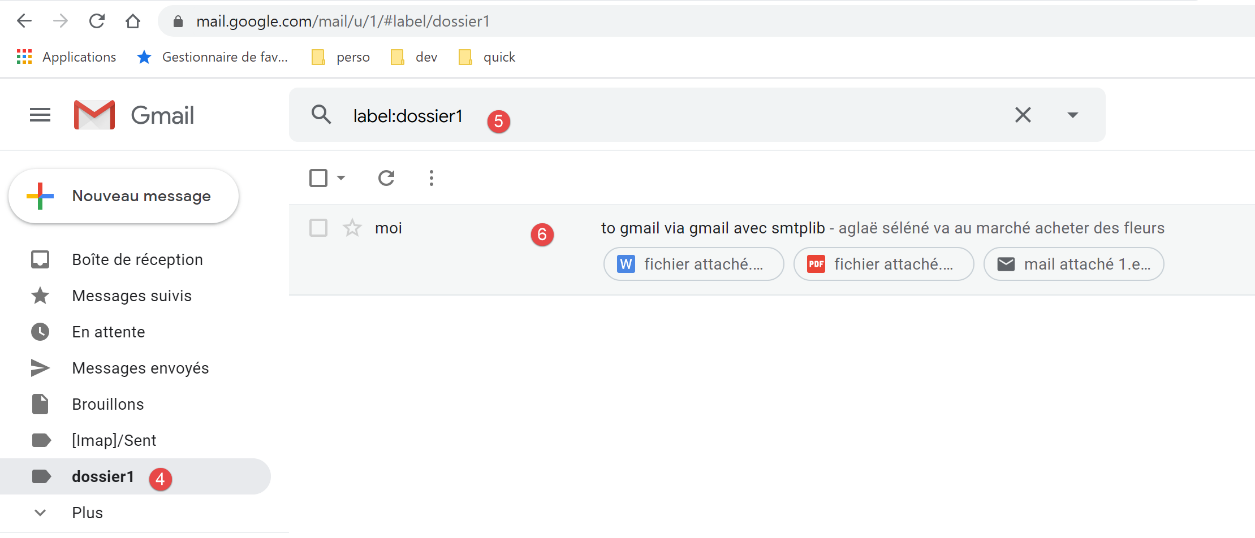
- 在 [4-6] 中:已移动到 [folder1] 文件夹的邮件;
我们现在看到的架构如下:
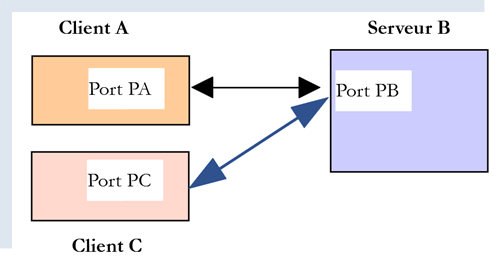
- 客户端 A 是 Thunderbird 应用程序;
- 客户端 C 是 Gmail 网页应用;
- 服务器 B 是 Gmail 的 IMAP 服务器;
用户的文件夹树由 IMAP 服务器维护。随后,所有 IMAP 客户端都会与之同步,以显示用户的账户文件夹。在此,Thunderbird 向以下地址发送了若干命令:
- 创建文件夹 [folder1];
- 将邮件移动到该文件夹中;
21.7.2. 脚本 [imap/main]:使用 [imaplib] 模块的 IMAP 客户端
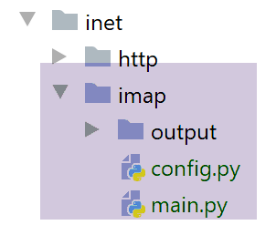
[imap/main] 脚本由以下 [imap/config] 脚本进行配置:
注释
- 第 8–29 行:[mailboxes] 键关联着待检查的邮箱列表;
- 第 20 行:IMAP 服务器;
- 第 21 行:其服务端口;
- 第 22–23 行:您要读取其邮件的用户;
- 第 24 行:要检索的邮件最大数量;
- 第 25 行:指示是否与 IMAP 服务器建立安全连接(True)或不建立(False);
- 第 26 行:等待服务器响应的最大超时时间;
- 第 27 行:保存已读邮件的文件夹;
[imap/main] 脚本如下:
注释
- 第14至36行:我们看到这里采用了与 |pop3/02/main| 脚本中相同的处理方式;
[readmails] 函数如下:
注释
- 第 7–15 行:检索配置设置;
- 第 19、79 行:代码由 try/finally 代码块控制。因此异常未被捕获(没有 except 子句),所以它们被传递给调用代码,由调用代码捕获并显示;
- 第 23–30 行:创建用于保存电子邮件的文件夹;
- 第 31–35 行:连接到 IMAP 服务器。所使用的类取决于是否处理安全 IMAP 服务器(IMAP4_SSL)或非安全 IMAP 服务器(IMAP4);
- 第 36–38 行:设置客户端与服务器之间的通信超时;
- 第 39–40 行:向 IMAP 服务器进行身份验证;
- 第 41–42 行:我们看到 IMAP 用户的邮箱可以组织成文件夹。[INBOX] 文件夹用于存放收到的邮件。要选择 [folder1] 文件夹,我们需要编写 [imapResource.select('folder1')];
- 第 43-45 行:我们请求 [INBOX] 中所有已找到邮件的列表:
- [imapResource.search] 的第一个参数是编码类型。[None] 表示“不进行编码过滤”;
- 第二个参数是筛选条件。表达方式有多种。[ALL] 表示我们希望获取该文件夹中的所有邮件;
[imapResource.search] 的结果如下所示:
typ=OK, data=[b'1 2']
[data] 是一个包含检索到的邮件编号的列表。这些编号以二进制形式存储。在上例中,在 [INBOX] 文件夹中找到了两封邮件;
- 第 49 行:我们提取消息 ID。此时,我们将得到列表 [b'1' b'2'],这是一个由二进制编码的数字组成的列表;
- 第 53–78 行:我们循环遍历 [INBOX] 文件夹中的消息;
- 第 54–55 行:消息编号;
- 第 58–59 行:向 IMAP 服务器请求第 [num] 条消息;
- 第一个参数是目标邮件的编号;
- 第二个参数是一个字符串“(part1)(part2)…”,其中[part]是邮件某部分的名称。我尚未对此进行详细研究。该名称(RFC822)指代整封电子邮件;
我们收到的内容格式如下:
type=OK, data=[(b'1 (RFC822 {614}', b'Return-Path: guest@localhost\r\nReceived: from [127.0.0.1] (localhost [127.0.0.1])\r\n\tby DESKTOP-528I5CU with ESMTPA\r\n\t; Tue, 17 Mar 2020 09:41:50 +0100\r\nTo: guest@localhost\r\nFrom: "guest@localhost" <guest@localhost>\r\nSubject: test\r\nMessage-ID: <2572d0f0-5b7c-2c31-5a70-c628293d5709@localhost>\r\nDate: Tue, 17 Mar 2020 09:41:48 +0100\r\nUser-Agent: Mozilla/5.0 (Windows NT 10.0; WOW64; rv:68.0) Gecko/20100101\r\n Thunderbird/68.6.0\r\nMIME-Version: 1.0\r\nContent-Type: text/plain; charset=utf-8; format=flowed\r\nContent-Transfer-Encoding: 8bit\r\nContent-Language: fr\r\n\r\nh\xc3\xa9l\xc3\xa8ne est all\xc3\xa9e au march\xc3\xa9 acheter des l\xc3\xa9gumes.\r\n\r\n'), b')']
此处的 [data] 是一个包含一个元素的列表,而该元素是一个由三个元素组成的元组:
data = [
    (b'1 (RFC822 {614}',
     b'Return-Path: guest@localhost\r\nReceived: from [127.0.0.1] (localhost [127.0.0.1])\r\n\tby DESKTOP-528I5CU with ESMTPA\r\n\t; Tue, 17 Mar 2020 09:41:50 +0100\r\nTo: guest@localhost\r\nFrom: "guest@localhost" <guest@localhost>\r\nSubject: test\r\nMessage-ID: <2572d0f0-5b7c-2c31-5a70-c628293d5709@localhost>\r\nDate: Tue, 17 Mar 2020 09:41:48 +0100\r\nUser-Agent: Mozilla/5.0 (Windows NT 10.0; WOW64; rv:68.0) Gecko/20100101\r\n Thunderbird/68.6.0\r\nMIME-Version: 1.0\r\nContent-Type: text/plain; charset=utf-8; format=flowed\r\nContent-Transfer-Encoding: 8bit\r\nContent-Language: fr\r\n\r\nh\xc3\xa9l\xc3\xa8ne est all\xc3\xa9e au march\xc3\xa9 acheter des l\xc3\xa9gumes.\r\n\r\n'),
    b')'
]
该元组的第二个元素是一个二进制字符串,表示整个请求的消息。我们可以识别出上述元素,这些元素在学习 [mail_parser] 模块时已经介绍过。
data[0] 表示一个包含两个元素的元组。data[0][1] 表示二进制形式的邮件行。
- 第 68 行:函数 [email.message_from_bytes(data2[0][1])] 根据消息行构建一个类型为 [email.message.Message] 的对象。类型 [email.message.Message] 正是我们之前编写的 [mail_parser] 模块中参数的类型;
- 第 69–73 行:我们为第 #[num] 条消息创建保存文件夹;
- 第 75 行:调用第 5 行 [mail_parser] 模块中的 [save_message] 函数。该函数已在 |pop3/02/main| 章节中进行过说明;
- 第 76–78 行:循环返回以处理下一条消息;
- 第 79–84 行:无论是否发生错误:
- 第 82 行:关闭与所查询文件夹的连接;
- 第 84 行:断开与 IMAP 服务器的连接;
所得结果与使用 [pop3/02/main] 脚本时完全一致。这是正常的,因为使用了相同的邮件解析器 [mail_parser]。