16. 使用 MySQL 数据库管理系统
16.1. 安装 MySQL 数据库管理系统
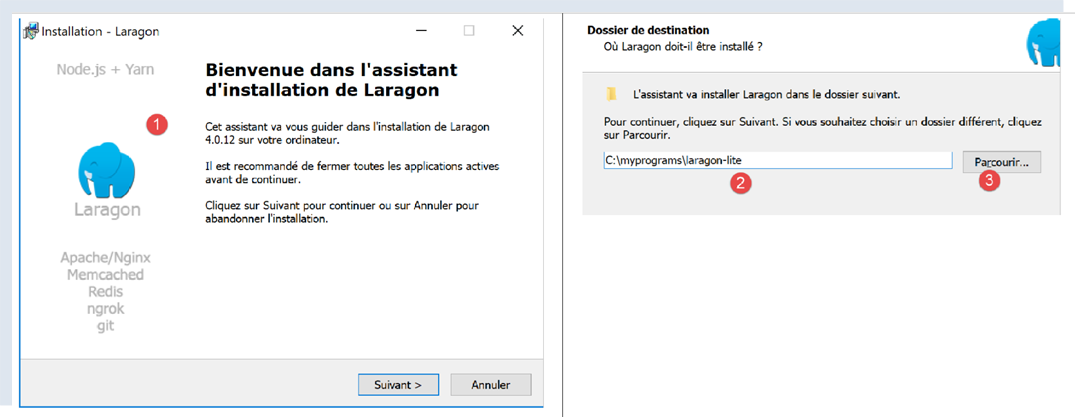
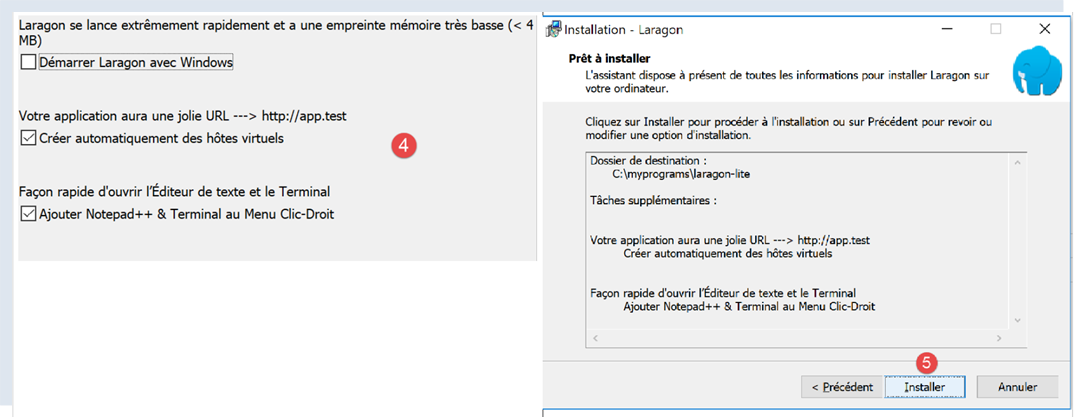
为了使用 MySQL 数据库管理系统,我们将安装 Laragon 软件。
16.1.1. 安装 Laragon
Laragon 是一个集成了多个软件组件的软件包:
- Apache Web 服务器。我们将使用它来编写 Python Web 脚本;
- MySQL 数据库管理系统;
- PHP 脚本语言,我们不会使用它;
- 一个为 Web 应用程序提供缓存功能的 Redis 服务器。我们不会使用它;
Laragon 可于以下地址下载(2020年2月):
- 安装 [1-5] 后,将生成以下目录结构:
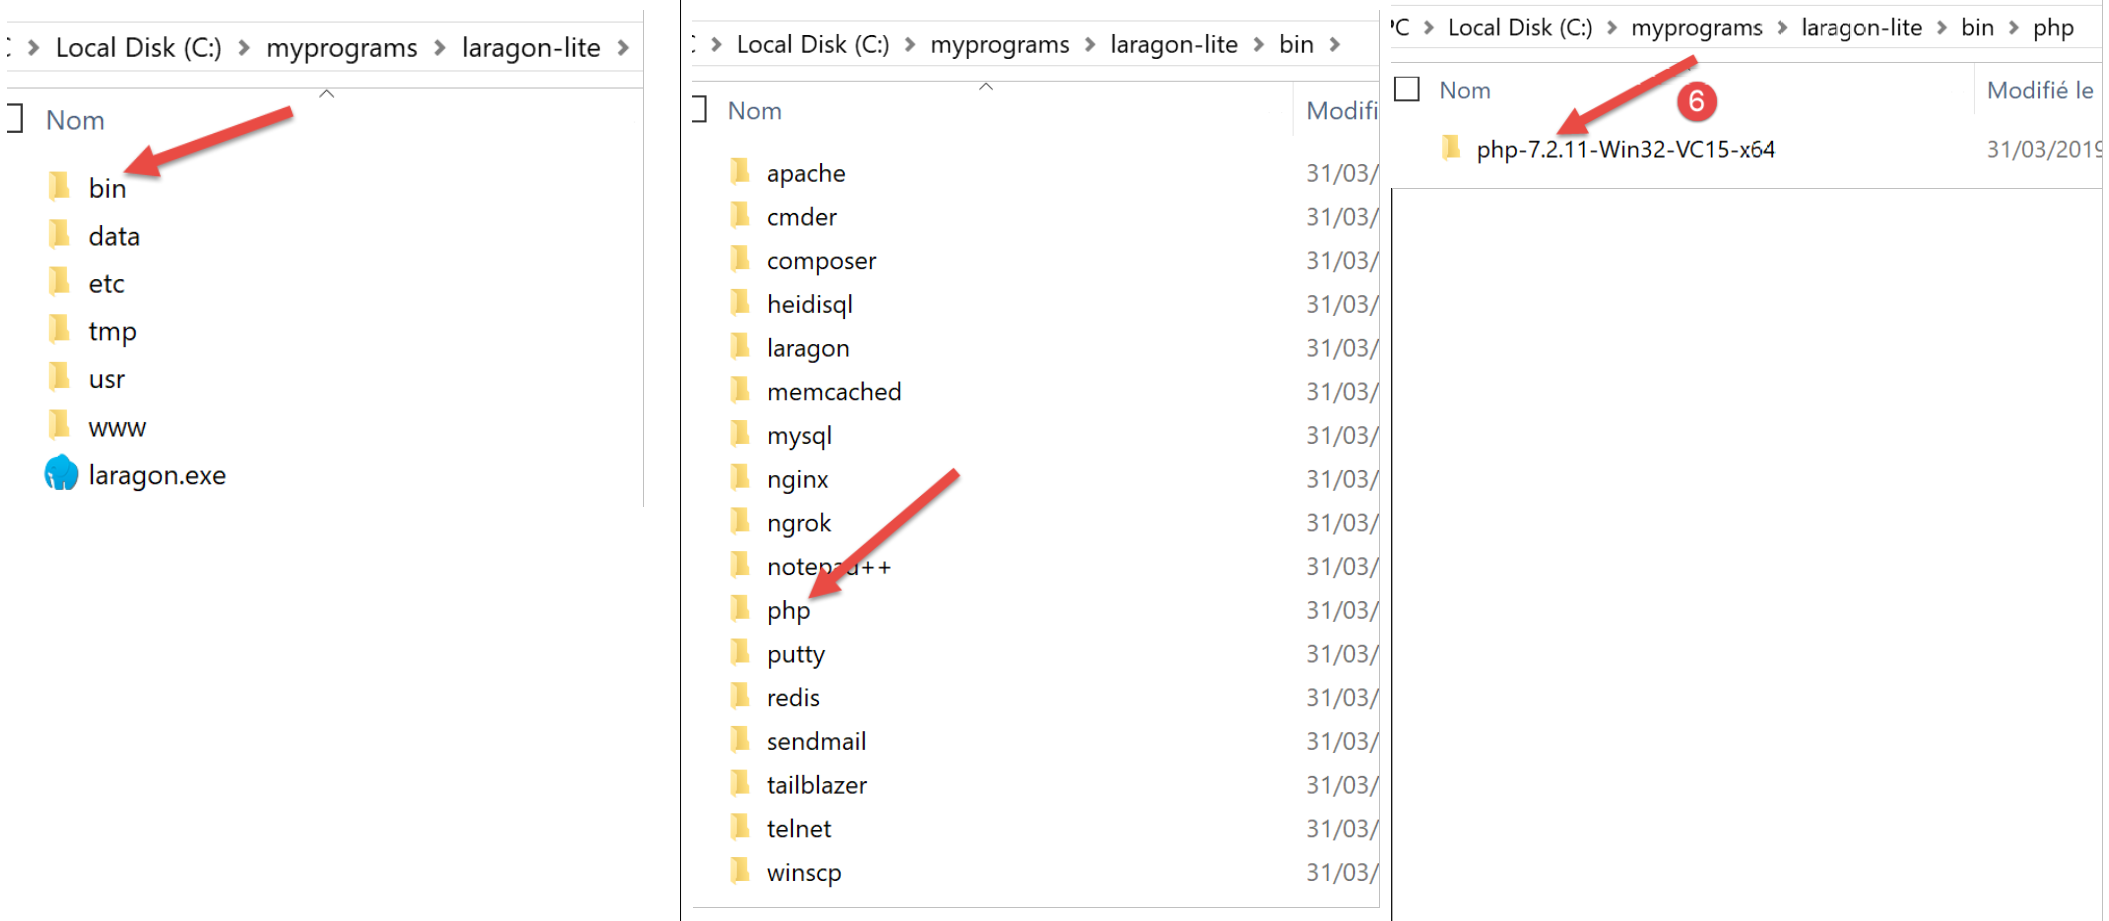
- 在 [6] 中是 PHP 安装文件夹(本文中未使用);
启动 [Laragon] 后将显示以下窗口:
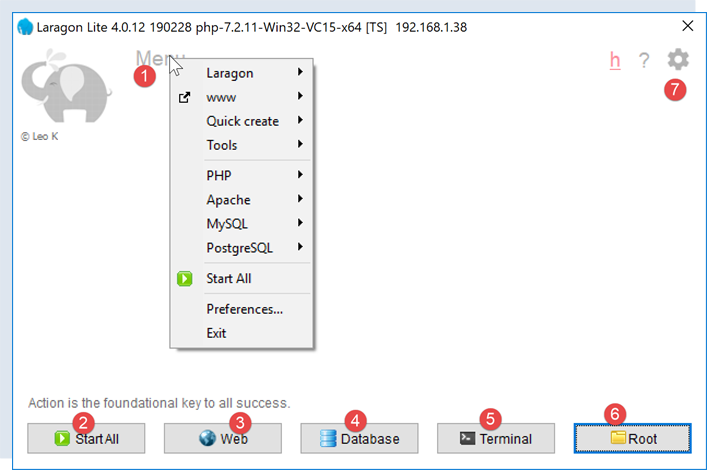
- [1]:Laragon 主菜单;
- [2]:[Start All] 按钮用于启动 Apache Web 服务器和 MySQL 数据库;
- [3]:[WEB] 按钮将显示网页 [http://localhost];
- [4]:[Database] 按钮允许您使用 [phpMyAdmin] 工具管理 MySQL 数据库管理系统。您必须事先安装此工具;
- [5]:[终端] 按钮打开命令行终端;
- [6]:[根目录] 按钮将打开一个定位于 [<laragon>/www] 文件夹的 Windows 资源管理器窗口,该文件夹是 [http://localhost] 网站的根目录。您应将由 Laragon 的 Apache 服务器管理的静态 Web 应用程序放置在此处;
16.1.2. 创建数据库
接下来我们将向您演示如何使用 Laragon 工具创建数据库和 MySQL 用户。
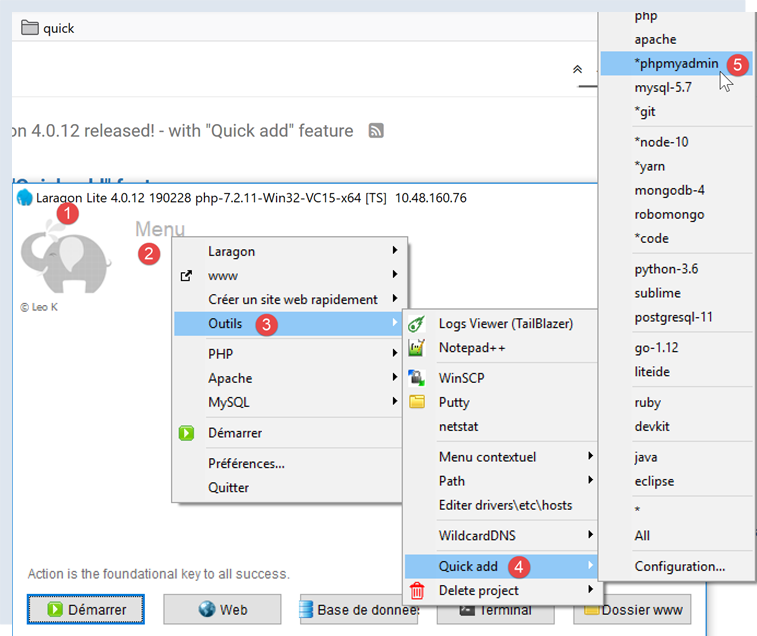
- 启动后,可通过菜单 [2] 管理 Laragon [1];
- 在 [3-5] 中,若尚未安装,请安装 MySQL 管理工具 [phpMyAdmin];

- 在 [6] 处,启动 Apache Web 服务器和 MySQL 数据库管理系统;
- 在 [7],Apache 服务器已启动;
- 在 [8],MySQL 数据库管理系统已启动;
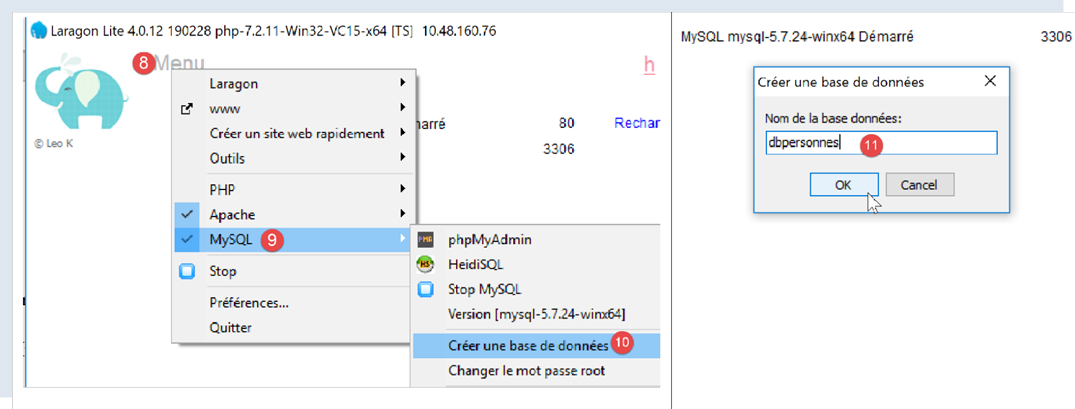
- 在 [8-10] 中,创建一个名为 [dbpersonnes] 的数据库 [11]。我们将构建一个人员数据库;

- 在[11]中,我们将管理刚刚创建的数据库;
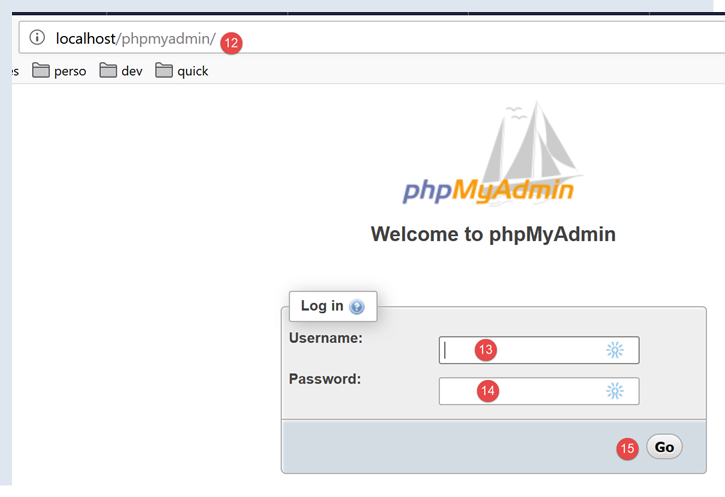
- [数据库] 操作会向 URL [http://localhost/phpmyadmin] [12] 发送一个 Web 请求。Laragon Apache Web 服务器会做出响应。URL [http://localhost/phpmyadmin] 是我们之前安装的 [phpMyAdmin] 工具的访问地址 [5]。该工具允许您管理 MySQL 数据库;
- 默认情况下,数据库管理员的登录凭据为:root [13],且无需密码 [14];
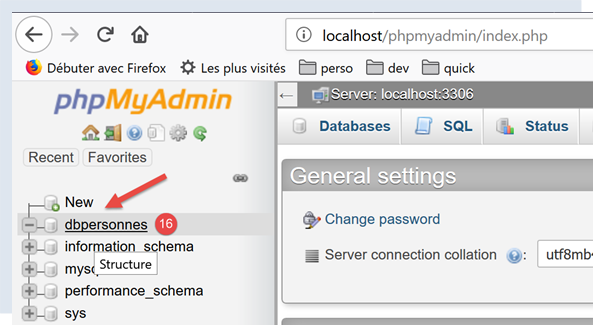
- 在 [16] 中,是我们之前创建的数据库;

- 目前,我们有一个名为 [dbpersonnes] [17] 的空数据库 [18];
我们创建一个用户 [admpersonnes],密码为 [nobody],该用户将拥有 [dbpersonnes] 数据库的全部权限:
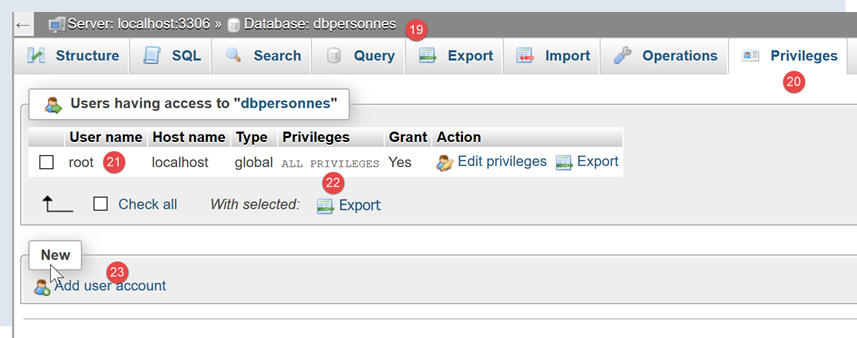
- 在 [19] 中,我们定位在 [dbpersonnes] 数据库上;
- 在 [20] 中,我们选中了 [权限] 选项卡;
- 在 [21-22] 中,我们可以看到用户 [root] 对 [dbpersonnes] 数据库拥有完全权限;
- 在 [23] 中,我们创建一个新用户;
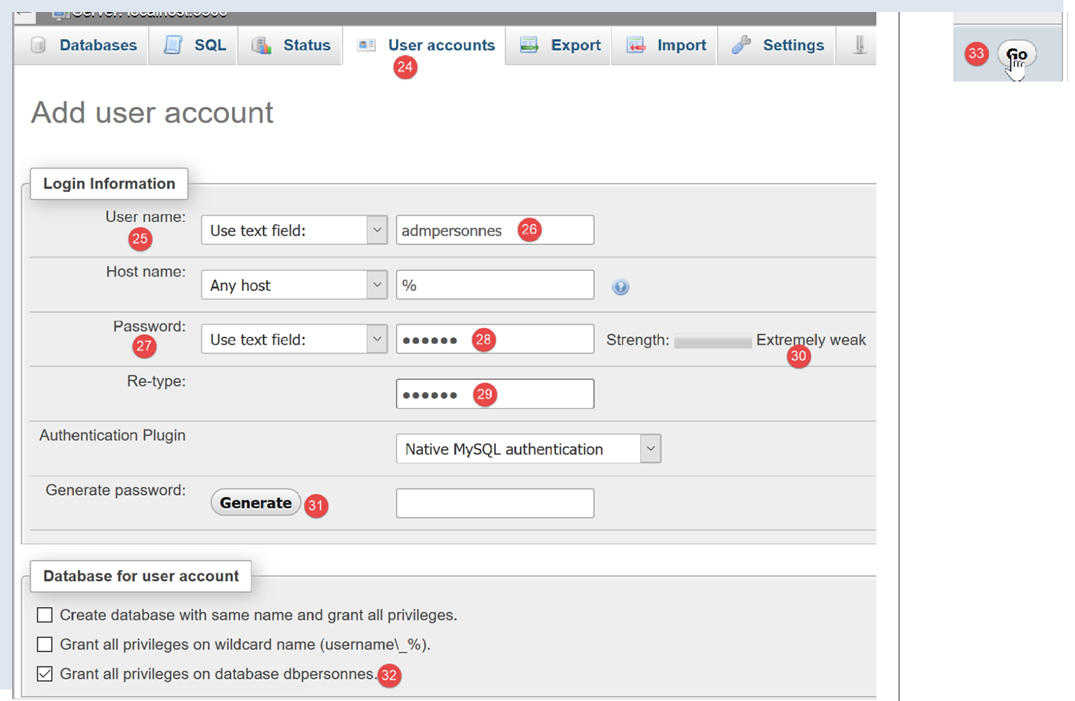
- 在 [25-26] 中,该用户的用户名为 [admdbpersonnes];
- 在 [27-29] 中,其密码将设置为 [nobody];
- 在 [30] 中,phpMyAdmin 提示该密码强度极低(易被破解)。在生产环境中,建议使用 [31] 生成强密码;
- 在 [32] 中,我们指定用户 [admdbpersonnes] 必须对 [dbpersonnes] 数据库拥有完全权限;
- 在 [33] 中,我们确认所提供的信息;

- 在 [35] 中,phpMyAdmin 提示用户已创建成功;
- 在[36]中,显示了在数据库上执行的SQL查询;
- 在 [37] 中,用户 [admpersonnes] 拥有 [dbpersonnes] 数据库的全部权限;
现在我们得到:
- 一个 MySQL 数据库 [dbpersonnes];
- 一个用户 [admpersonnes/nobody],该用户对该数据库拥有完全权限;
16.2. 安装 [mysql-connector-python] 包
我们将编写 Python 脚本,以使用之前创建的数据库,其架构如下:

连接器用于将 Python 代码与所使用的数据库管理系统(DBMS)进行隔离。针对不同的数据库管理系统,都有相应的连接器,且它们都遵循相同的接口。因此,当我们在上面的示例中将 MySQL 数据库管理系统替换为 PostgreSQL 数据库管理系统时,架构如下所示:

由于所有数据库管理系统连接器都遵循相同的接口,因此通常无需修改 Python 脚本。实际上,大多数数据库管理系统使用的都是专有 SQL:
- 它们符合 SQL(结构化查询语言)标准;
- 但会对其进行扩展——因为仅靠标准本身是不够的——通过专有语言扩展;
因此,在更换数据库管理系统时,通常需要对脚本中的 SQL 语句进行修改。
默认情况下,Python 不提供管理 MySQL 数据库的功能。要实现此功能,您必须下载一个包。目前有多种可选方案。在此,我们将使用 [mysql-connector-python] 包,这是 MySQL 所有者 Oracle 公司提供的官方连接器。
该包将在 Pycharm [终端] 窗口中安装:
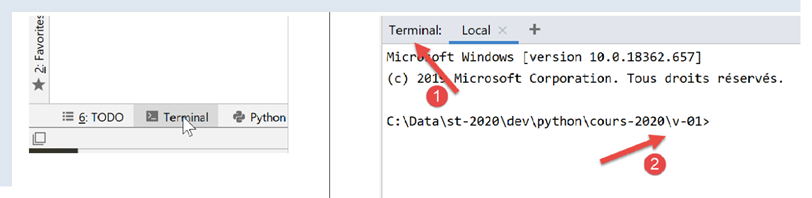
- [2] 中的目录对后续操作无关紧要;
在终端中输入命令 [pip search MySQL]:
- [pip](Python 包管理器)是用于安装 Python 包的工具。该 [pip] 工具会连接到包含 Python 包的仓库;
- [search MySQL]:检索名称中包含 [MySQL](不区分大小写)的包列表;
该命令的执行结果如下:
mysql (0.0.2)                                                   - Virtual package for MySQL-python
jx-mysql (3.49.20042)                                           - jx-mysql - JSON Expressions for MySQL
weibo-mysql (0.1)                                               - insert mysql
bits-mysql (1.0.3)                                              - BITS MySQL
MySQL-python (1.2.5)                                            - Python interface to MySQL
deployfish-mysql (0.2.13)                                       - Deployfish MySQL plugin
mtstat-mysql (0.7.3.3)                                          - MySQL Plugins for mtstat
bottle-mysql (0.3.1)                                            - MySQL integration for Bottle.
WintxDriver-MySQL (2.0.0-1)                                     - MySQL support for Wintx
py-mysql (1.0)                                                  - Operating Mysql for Python.
mysql-utilities (1.4.3)                                         - MySQL Utilities 1.4.3 (part of MySQL Workbench Distribution 6.0.0)
….                                        - Tool to move slices of data from one MySQL store to another
mysql-tracer (2.0.2)                                            - A MySQL client to run queries, write execution reports and export results
mysql-utils (0.0.2)                                             - A simple MySQL library including a set of utility APIs for Python database programming
mysql-connector-repackaged (0.3.1)                              - MySQL driver written in Python
dffml-source-mysql (0.0.5)                                      - DFFML Source for MySQL Protocol
mysql-connector-python (8.0.19)                                 - MySQL driver written in Python
  INSTALLED: 8.0.19 (latest)
prometheus-mysql-exporter (0.2.0)                               - MySQL query Prometheus exporter
backwork-backup-mysql (0.3.0)                                   - Backwork plug-in for MySQL backups.
django-mysql-manager (0.1.4)                                    - django-mysql-manager is a Django based management interface for MySQL users and databases.
….                                              - mysql operate

C:\Data\st-2020\dev\python\cours-2020\v-01>
所有名称或描述中包含关键词 MySQL 的模块均已列出。我们将使用的是(2020年2月版)[mysql-connector-python],位于第17行。要在终端中安装它,请输入命令 [pip install -U mysql-connector-python]:
C:\Data\st-2020\dev\python\cours-2020\v-01>pip install -U mysql-connector-python
Collecting mysql-connector-python
  Using cached mysql_connector_python-8.0.19-py2.py3-none-any.whl (355 kB)
Requirement already satisfied, skipping upgrade: protobuf==3.6.1 in c:\myprograms\python38\lib\site-packages (from mysql-connector-python) (3.6.1)
Requirement already satisfied, skipping upgrade: dnspython==1.16.0 in c:\myprograms\python38\lib\site-packages (from mysql-connector-python) (1.16.0)
Requirement already satisfied, skipping upgrade: six>=1.9 in c:\users\serge\appdata\roaming\python\python38\site-packages (from protobuf==3.6.1->mysql-connector-python) (1.14.0)
Requirement already satisfied, skipping upgrade: setuptools in c:\myprograms\python38\lib\site-packages (from protobuf==3.6.1->mysql-connector-python) (41.2.0)
Installing collected packages: mysql-connector-python
Successfully installed mysql-connector-python-8.0.19
- 第 1 行:[install -U] 选项(U 表示升级)会请求与 [mysql-connector-python] 包相关的各个包的最新版本;
要查看本机 Python 环境中已安装的包,请输入命令 [pip list]:
C:\Data\st-2020\dev\python\cours-2020\v-01>pip list
Package                Version
---------------------- ----------
asgiref                3.2.3
astroid                2.3.3
atomicwrites           1.3.0
attrs                  19.3.0
certifi                2019.11.28
…
MarkupSafe             1.1.1
mccabe                 0.6.1
more-itertools         8.1.0
mysql-connector-python 8.0.19
mysqlclient            1.4.6
packaging              20.0
pip                    20.0.1
pipenv                 2018.11.26
…
- 第 13 行:我们已安装 [mysql-connector-python] 包;
要了解如何使用 [mysql-connector-python] 包管理 MySQL 数据库,请访问该包的网站 |https://dev.mysql.com/doc/connector-python/en/|。下一节将展示一系列示例。
16.3. 脚本 [mysql_01]:连接到 MySQL 数据库 - 1
[mysql_01] 脚本演示了使用数据库的第一步。它将帮助我们验证能否连接到之前创建的 [dbpersonnes] 数据库。
注释
- 第 2 行:从 [mysql.connector] 模块导入某些函数和类;
- 第 6–7 行:将要连接的用户凭据;
- 第 8 行:托管数据库的机器。MySQL 连接器允许您操作远程数据库;
- 第 9 行:我们要连接的数据库名称;
- 第 11–26 行:脚本将(第 16 行)使用用户 [admpersonnes / nobody] 连接到数据库 [dbpersonnes];
- 第 20–26 行:连接可能会失败。因此,该情况在 try/except/finally 代码块中进行处理;
- 第 16 行:[mysq.connector] 模块的 connect 方法接受多种命名参数:
- user:连接所属的用户 [admpersonnes];
- password:用户密码 [nobody];
- host:MySQL 数据库服务器 [localhost];
- database:要连接的数据库。可选。
- 第 20 行:如果抛出异常,其类型为 [DatabaseError] 或 [InterfaceError];
- 第 23–26 行:在 [finally] 子句中,关闭连接;
结果
16.4. 脚本 [mysql_02]:连接到 MySQL 数据库 - 2
在这个新脚本中,数据库连接被封装在一个函数中:
注释:
- 第 6–19 行:一个 [connection] 函数,用于尝试将用户连接到 [dbpersonnes] 数据库,然后断开连接。显示结果;
- 第 29–41 行:主程序——调用 connection 方法两次,并显示任何异常;
结果
16.5. 脚本 [mysql_03]:创建 MySQL 表
既然我们已经知道如何与 MySQL 数据库管理系统建立连接,就可以开始通过此连接执行 SQL 命令了。为此,我们将连接到已创建的数据库 [dbpersonnes],并利用该连接在数据库中创建一个表。
注:
- 第 9 行:execute_sql 函数在已打开的连接上执行 SQL 查询;
- 第 14 行:连接上的 SQL 操作是通过一个称为游标的特殊对象来执行的;
- 第 14 行:获取游标;
- 第 16 行:执行 SQL 查询;
- 第 17–20 行:无论是否发生错误,都会关闭游标。这将释放与其关联的资源。如果发生异常,此处不会进行处理,异常将传播到调用代码;
- 第 33–43 行:建立与数据库的连接;
- 第 38 行:为连接设置 AUTOCOMMIT=True 意味着每次查询执行都在自动事务中进行。默认模式为 AUTOCOMMIT=False,此时由开发者负责管理事务。 事务是一种涵盖 1 到 n 个查询执行的机制。要么所有查询都成功,要么全部失败。因此,如果查询 1 到 i 成功,但查询 i+1 失败,则查询 1 到 i 将被“回滚”,使数据库恢复到执行查询 1 之前的状态;
- 此处有两个 SQL 查询(第 49 行和第 58 行)。每个查询都将在事务内执行。第二个查询失败不会影响第一个查询;
- 第 45–51 行:执行 SQL 语句 [drop table people]。该语句将删除名为 [people] 的表。如果该表不存在,可能会报告错误。此错误被忽略(第 51 行);
- 第 53–55 行:创建 [people] 表的命令。表可视为一组行和列。创建命令指定了列名:
- [id]:一个整数标识符。它对每个人都是唯一的。这将作为主键(PRIMARY KEY)。这意味着在表内,该列的值绝不会重复,可用于识别个人;
- [last_name]:长度不超过 30 个字符的字符串;
- [last_name]:长度不超过 30 个字符的字符串;
- [age]:一个整数;
- 这些列各自的 [NOT NULL] 属性意味着,在表的每一行中,这三个列均不能为空;
- 参数 [unique(last_name, first_name)] 称为约束。此处的行级约束要求行中的 (last_name, first_name) 元组在表中必须唯一。这意味着我们可以根据已知的姓氏和名字,在表中唯一地识别出某个人;
- 第 56–60 行:执行 SQL 语句;
- 第 61–63 行:处理任何异常;
- 第 64–66 行:断开与数据库的连接;
结果
使用 [phpMyAdmin] 验证:
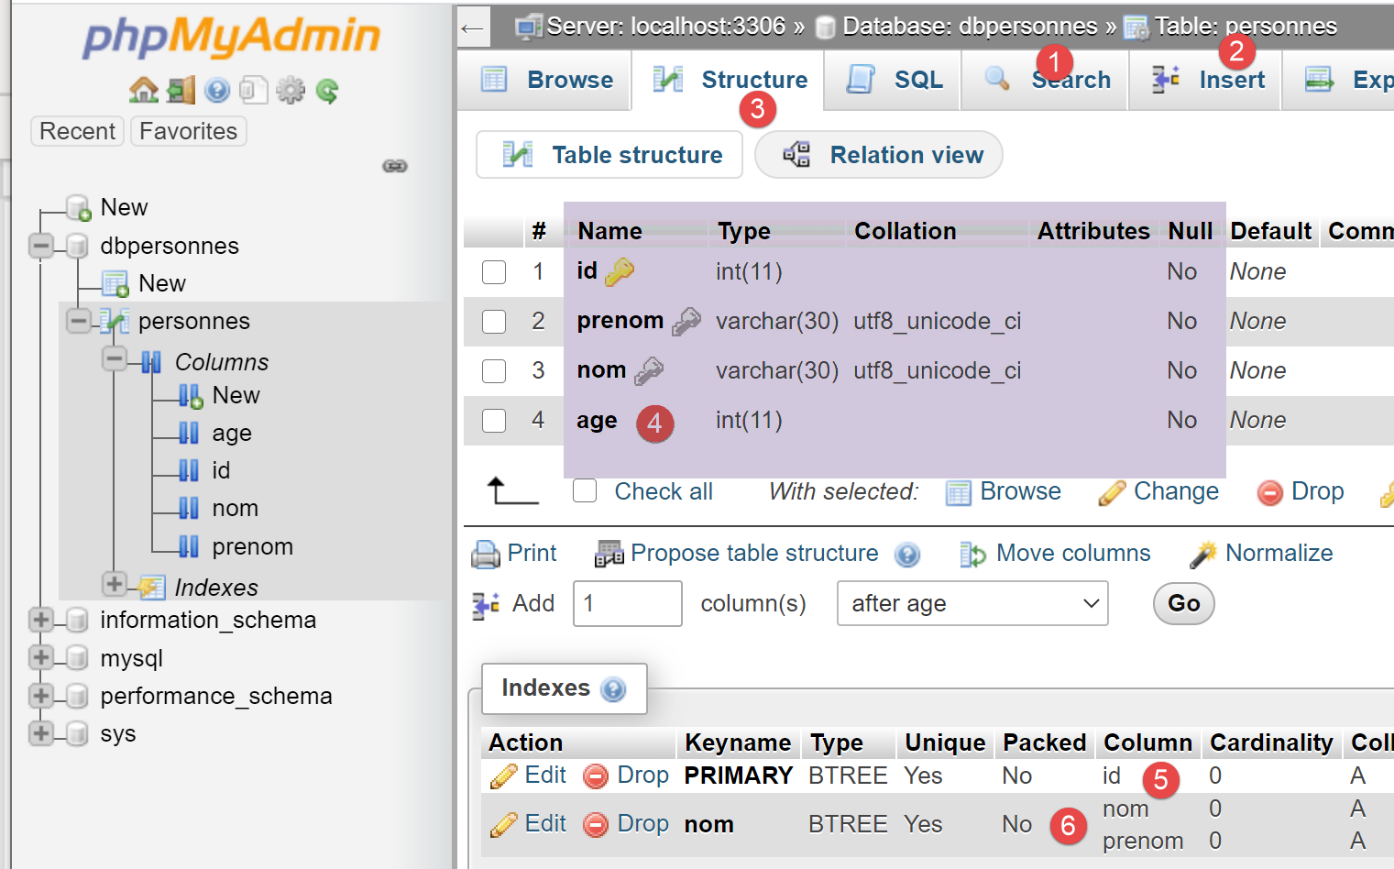
- 数据库 [dbpersonnes] [1] 包含一个表 [personnes] [2],其结构为 [3-4],主键为 [5],并具有唯一性约束 [6];
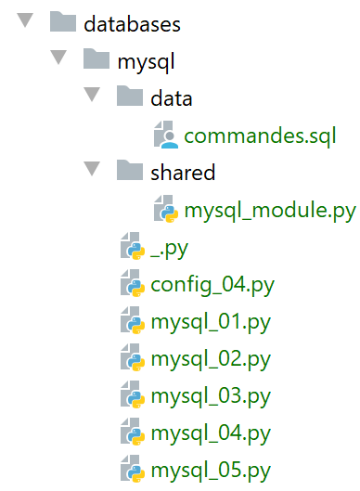
16.6. 脚本 [mysql_04]:执行 SQL 命令文件
在先前创建 [personnes] 表之后,我们现在通过 SQL 语句向其中插入数据并进行查询。
我们希望从文本文件中执行这些 SQL 语句:
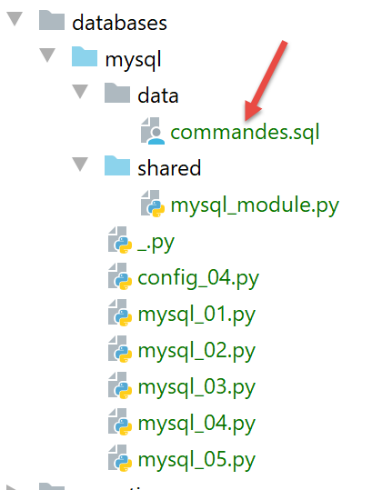
文件 [commands.sql] 的内容如下:
# suppression de la table [personnes]
drop table personnes
# création de la table personnes
create table personnes (prenom varchar(30) not null, nom varchar(30) not null, age integer not null, primary key (nom,prenom))
# insertion de deux personnes
insert into personnes(prenom, nom, age) values('Paul','Langevin',48)
insert into personnes(prenom, nom, age) values ('Sylvie','Lefur',70)
# affichage de la table
select prenom, nom, age from personnes
# erreur volontaire
xx
# insertion de trois personnes
insert into personnes(prenom, nom, age) values ('Pierre','Nicazou',35)
insert into personnes(prenom, nom, age) values ('Geraldine','Colou',26)
insert into personnes(prenom, nom, age) values ('Paulette','Girond',56)
# affichage de la table
select prenom, nom, age from personnes
# liste des personnes par ordre alphabétique des noms et à nom égal par ordre alphabétique des prénoms
select nom,prenom from personnes order by nom asc, prenom desc
# liste des personnes ayant un âge dans l'intervalle [20,40] par ordre décroissant de l'âge
# puis à âge égal par ordre alphabétique des noms et à nom égal par ordre alphabétique des prénoms
select nom,prenom,age from personnes where age between 20 and 40 order by age desc, nom asc, prenom asc
# insertion de mme Bruneau
insert into personnes(prenom, nom, age) values('Josette','Bruneau',46)
# mise à jour de son âge
update personnes set age=47 where nom='Bruneau'
# liste des personnes ayant Bruneau pour nom
select nom,prenom,age from personnes where nom='Bruneau'
# suppression de Mme Bruneau
delete from personnes where nom='Bruneau'
# liste des personnes ayant Bruneau pour nom
select nom,prenom,age from personnes where nom='Bruneau'
首先,我们定义一些函数并将其放入模块中,以便重复使用:

[mysql_module] 脚本如下:
注:
- 第 29 行:[execute_file_of_commands] 函数执行名为 [sql_filename] 的文本文件中包含的 SQL 命令:
- 有关参数的含义,请参阅第 31–38 行的注释;
- 第 40–48 行:处理文本文件 [sql_filename];
- 第 43 行:打开文件;
- 第 34 行:执行 [execute_list_of_commands] 函数,该函数会按列表顺序执行传入的 SQL 命令。此处该列表由文本文件中的所有行组成 [file.readlines()](第 45 行);
[execute_list_of_commands] 函数如下:
注释
- 第 2 行:[execute_list_of_commands] 函数执行 [sql_commands] 列表中包含的 SQL 命令:
- 有关参数的含义,请参阅第 4–11 行的注释;
- 第 2 行:接收到的连接是一个已打开的数据库连接;
- 第 15 行:如果希望 [sql_commands] 列表中的所有命令都在事务内执行,则必须在 AUTOCOMMIT=False 模式下工作。否则,将处于 AUTOCOMMIT=True 模式,此时 [sql_commands] 列表中的每个命令都会在自动事务内执行,且不存在全局事务;
- 第 19 行:请求一个游标来执行各种 SQL 命令;
- 第 22–51 行:依次执行这些命令;
- 第 26–27 行:我们允许在 SQL 命令列表中出现空行和注释。遇到此类情况,我们将直接忽略该命令;
- 第 30–33 行:执行当前查询;
- 第 35–45 行:处理当前查询中可能出现的运行时错误;
- 第 37–38 行:将错误添加到错误表中;
- 第 40–41 行:如果已启用日志记录,则显示错误消息;
- 第 43–45 行:如果调用代码要求在出现第一个错误后停止,或者要求使用事务,则程序必须停止。返回错误数组;
- 第 46–51 行:处理当前查询未发生执行错误的情况;
- 第 48–49 行:若请求了跟踪功能,则显示已执行的查询并标注为“成功”;
- 第 50–51 行:显示已执行查询的结果。稍后我们将回到 [display_info] 函数;
- 第 54–65 行:无论是否发生异常,[finally] 子句都会在所有情况下执行;
- 第 56–57 行:关闭游标。这将释放分配给它的资源;
- 第 59-65 行:处理调用代码要求在事务内执行 SQL 命令的情况;
- 第 60 行:检查 [errors] 列表是否为空,若为空则表示未发生异常。此时提交事务(第 65 行);否则回滚事务(第 62 行);
[display_info] 函数用于显示查询结果:
# ---------------------------------------------------------------------------------
def afficher_infos(curseur: MySQLCursor):
    print(type(curseur))
    # affiche le résultat d'une command sql
    # s'agissait-il d'un select ?
    if curseur.description:
        # le curseur a une description - donc il a exécuté un select
        # description[i] est la description de la colonne n° i du select
        # description[i][0] est le nom de la colonne n° i du select
        # on affiche les noms des champs
        titre = ""
        for i in range(len(curseur.description)):
            titre += curseur.description[i][0] + ", "
        # on affiche la liste des champs sans la virgule de fin
        print(titre[0:len(titre) - 1])
        # ligne séparatrice
        print("*" * (len(titre) - 1))
        # ligne courante du select
        ligne = curseur.fetchone()
        while ligne:
            # on l'affiche
            print(ligne)
            # ligne suivante du select
            ligne = curseur.fetchone()
        # ligne séparatrice
        print("*" * (len(titre) - 1))
    else:
        # le curseur n'a pas de champ [description] - il a donc exécuté un ordre SQL
        # de mise à jour (insert, delete, update)
        print(f"nombre de lignes modifiées : {curseur.rowcount}")
注释
- 第 1 行:该函数的参数是刚刚执行了 SQL 语句的光标。根据该语句是 SELECT 语句还是更新语句(INSERT、UPDATE、DELETE),光标的内容会有所不同;
- 第 6 行:如果游标包含 [description] 字段,则表示它已执行了一条 SELECT 语句,且 [description] 描述了 SELECT 语句中请求的字段:
- description[i] 描述 SELECT 语句中请求的第 i 个字段。它是一个列表;
- description[i][0] 是第 i 个字段的名称;
- 第 11–17 行:显示 SELECT 语句请求的字段名称;
- 第 18–24 行:处理 SELECT 语句的结果;
- 第 20、24 行:SELECT 的结果按顺序处理。该结果是一组行。通过 [cursor.fetchone()](第 19 行)获取当前行,随后获得一个元组;
- 第 27–30 行:如果游标不包含 [description] 字段,则说明它执行了 INSERT、UPDATE 或 DELETE 更新语句。此时我们可以确定该语句的执行修改了表中多少行;
- 第 30 行:[cursor.rowcount] 即为该数值;
主脚本 [mysql-04] 使用了我们刚刚介绍的 [mysql_module] 模块:
[config_04] 文件用于配置 [mysql_04] 脚本的执行环境:
[mysql_04] 脚本如下:
注释
- 第 1-4 行:脚本配置;
- 第 8 行:导入上述 [mysql_module] 模块:
- 第 12-22 行:[mysql-04] 脚本期望接收一个参数,该参数必须取值为 [true / false] 之一。此参数用于指定是否应在事务内执行 SQL 命令文件(true)或不在事务内执行(false);
- 第 14 行:用户传递给脚本的参数位于 [sys.argv] 列表中;
- 第 15 行:需要两个参数,例如 [mysql-04 true]。脚本名称也算作一个参数;
- 第 17-18 行:如果确实有两个参数,则第二个参数必须是一个字符串,其值为 'true' 或 'false';
- 第24–29行:计算第33行显示的文本;
- 第 39–44 行:执行文件 [./data/commands.sql] 中的命令;
- 第 45–49 行:若在连接过程中(第 40 行)发生错误,或 [execute_file_of_commands] 脚本未处理该错误,则显示错误并终止进程;
- 第 55–62 行:若执行成功,则显示执行 SQL 命令时遇到的错误数量;
执行 #1
首先,我们进行一次不使用事务的执行。为此,我们将按照 |配置执行上下文| 一节中的说明创建一个执行配置:
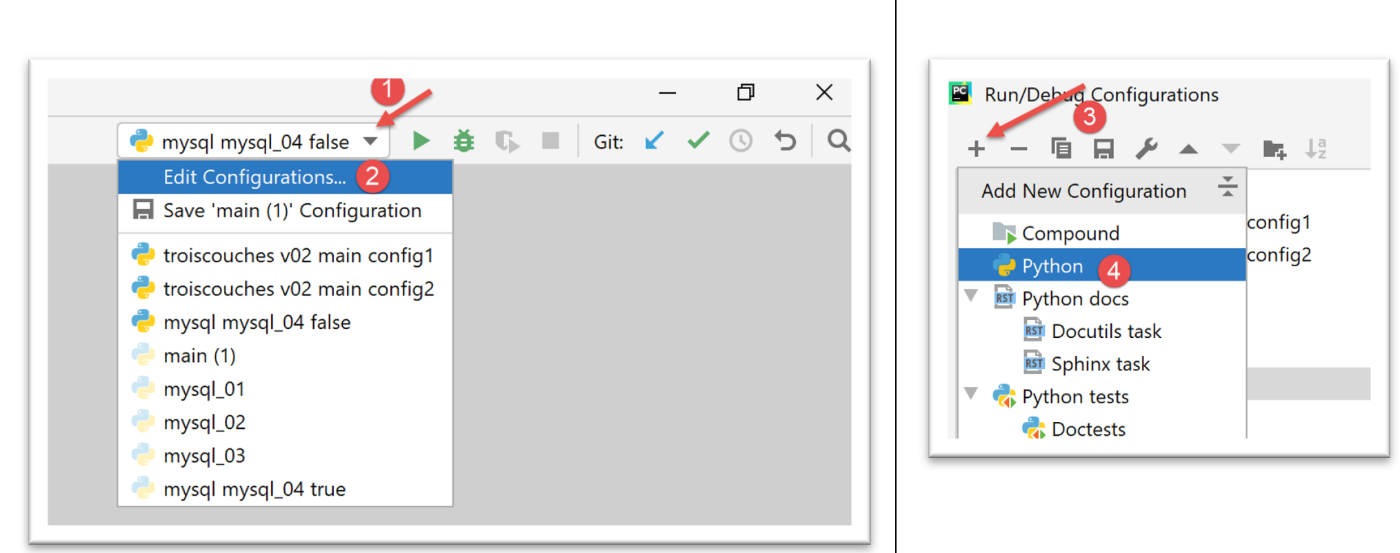
- 在 [1-4] 中,我们创建了一个 Python 执行配置;
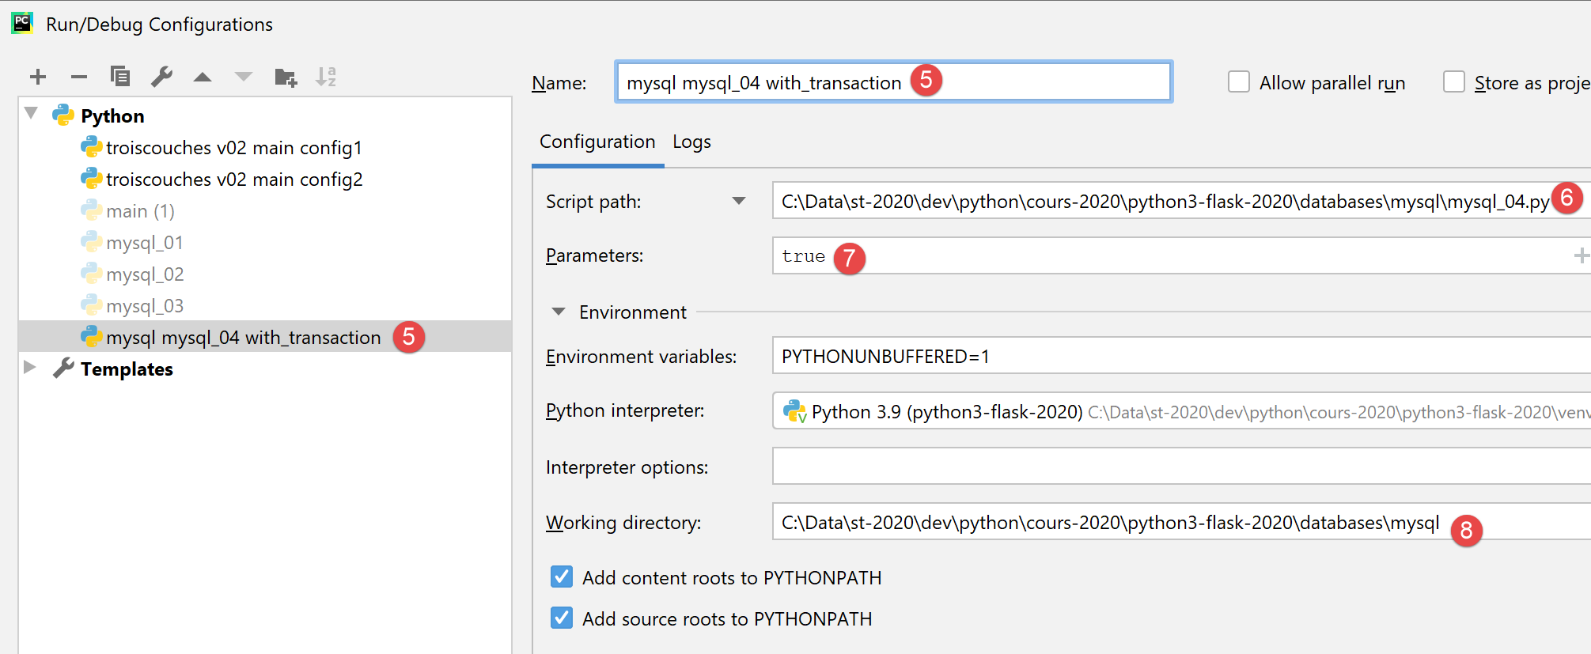
- [5]:执行配置的名称;
- [6]:待执行脚本的路径;
- [7]: 脚本参数;
- [8]: 执行目录;
因此,此配置相当于在事务中执行该 SQL 文件。请点击 [应用] 按钮以确认配置。
我们以相同的方式创建 [mysql mysql-04 without_transaction] 执行配置:
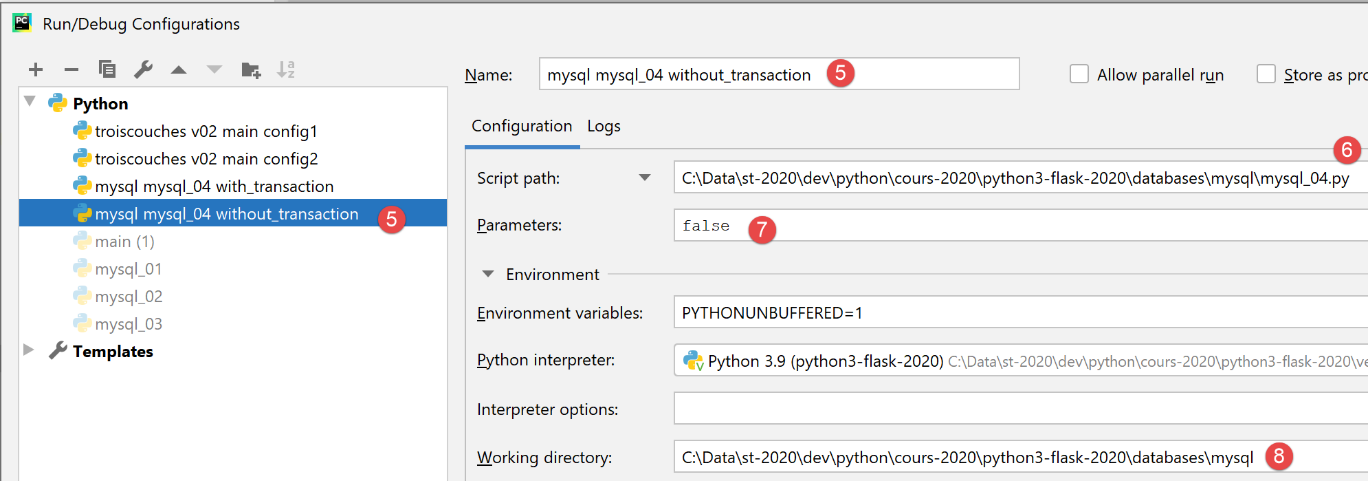
因此,此配置相当于在不使用事务的情况下执行该 SQL 文件。请点击 [应用] 按钮以确认配置。
我们首先运行不带事务的版本:

结果如下:
C:\Data\st-2020\dev\python\cours-2020\python3-flask-2020\venv\Scripts\python.exe C:/Data/st-2020/dev/python/cours-2020/python3-flask-2020/databases/mysql/mysql_04.py false
--------------------------------------------------------------------
Exécution du fichier SQL C:\Data\st-2020\dev\python\cours-2020\python3-flask-2020\databases\mysql/data/commandes.sql sans transaction
--------------------------------------------------------------------
[drop table personnes] : Exécution réussie
nombre de lignes modifiées : 0
[create table personnes (id int primary key, prenom varchar(30) not null, nom varchar(30) not null, age integer not null, unique (nom,prenom))] : Exécution réussie
nombre de lignes modifiées : 0
[insert into personnes(id, prenom, nom, age) values(1, 'Paul','Langevin',48)] : Exécution réussie
nombre de lignes modifiées : 1
[insert into personnes(id, prenom, nom, age) values (2, 'Sylvie','Lefur',70)] : Exécution réussie
nombre de lignes modifiées : 1
[select prenom, nom, age from personnes] : Exécution réussie
prenom, nom, age,
*****************
('Paul', 'Langevin', 48)
('Sylvie', 'Lefur', 70)
*****************
xx : Erreur (1064 (42000): You have an error in your SQL syntax; check the manual that corresponds to your MySQL server version for the right syntax to use near 'xx' at line 1)
[insert into personnes(id, prenom, nom, age) values (3, 'Pierre','Nicazou',35)] : Exécution réussie
nombre de lignes modifiées : 1
[insert into personnes(id, prenom, nom, age) values (4, 'Geraldine','Colou',26)] : Exécution réussie
nombre de lignes modifiées : 1
[insert into personnes(id, prenom, nom, age) values (5, 'Paulette','Girond',56)] : Exécution réussie
nombre de lignes modifiées : 1
[select prenom, nom, age from personnes] : Exécution réussie
prenom, nom, age,
*****************
('Paul', 'Langevin', 48)
('Sylvie', 'Lefur', 70)
('Pierre', 'Nicazou', 35)
('Geraldine', 'Colou', 26)
('Paulette', 'Girond', 56)
*****************
[select nom,prenom from personnes order by nom asc, prenom desc] : Exécution réussie
nom, prenom,
************
('Colou', 'Geraldine')
('Girond', 'Paulette')
('Langevin', 'Paul')
('Lefur', 'Sylvie')
('Nicazou', 'Pierre')
************
[select nom,prenom,age from personnes where age between 20 and 40 order by age desc, nom asc, prenom asc] : Exécution réussie
nom, prenom, age,
*****************
('Nicazou', 'Pierre', 35)
('Colou', 'Geraldine', 26)
*****************
[insert into personnes(id, prenom, nom, age) values(6, 'Josette','Bruneau',46)] : Exécution réussie
nombre de lignes modifiées : 1
[update personnes set age=47 where nom='Bruneau'] : Exécution réussie
nombre de lignes modifiées : 1
[select nom,prenom,age from personnes where nom='Bruneau'] : Exécution réussie
nom, prenom, age,
*****************
('Bruneau', 'Josette', 47)
*****************
[delete from personnes where nom='Bruneau'] : Exécution réussie
nombre de lignes modifiées : 1
[select nom,prenom,age from personnes where nom='Bruneau'] : Exécution réussie
nom, prenom, age,
*****************
*****************
--------------------------------------------------------------------
Exécution terminée
--------------------------------------------------------------------
Il y a eu 1 erreur(s)
xx : Erreur (1064 (42000): You have an error in your SQL syntax; check the manual that corresponds to your MySQL server version for the right syntax to use near 'xx' at line 1)

Process finished with exit code 0
注:
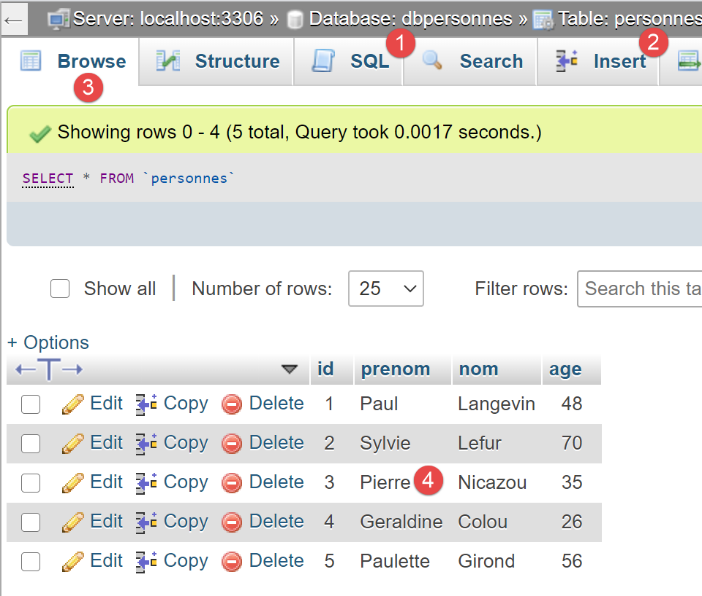
- 第 19 行:我们可以看到,在发生错误后,SQL 语句的执行仍在继续。这是因为执行是在没有事务且使用 [stop=False] 参数的情况下进行的。因此,所有 SQL 语句均已执行。因此,我们应该有一个反映此次执行结果的 [people] 表;
使用 phpMyAdmin 进行验证:
执行 #2
现在我们运行配置 [mysql mysql-04 with_transaction]。结果如下:
C:\Data\st-2020\dev\python\cours-2020\python3-flask-2020\venv\Scripts\python.exe C:/Data/st-2020/dev/python/cours-2020/python3-flask-2020/databases/mysql/mysql_04.py true
--------------------------------------------------------------------
Exécution du fichier SQL C:\Data\st-2020\dev\python\cours-2020\python3-flask-2020\databases\mysql/data/commandes.sql avec transaction
--------------------------------------------------------------------
[drop table personnes] : Exécution réussie
nombre de lignes modifiées : 0
[create table personnes (id int primary key, prenom varchar(30) not null, nom varchar(30) not null, age integer not null, unique (nom,prenom))] : Exécution réussie
nombre de lignes modifiées : 0
[insert into personnes(id, prenom, nom, age) values(1, 'Paul','Langevin',48)] : Exécution réussie
nombre de lignes modifiées : 1
[insert into personnes(id, prenom, nom, age) values (2, 'Sylvie','Lefur',70)] : Exécution réussie
nombre de lignes modifiées : 1
[select prenom, nom, age from personnes] : Exécution réussie
prenom, nom, age,
*****************
('Paul', 'Langevin', 48)
('Sylvie', 'Lefur', 70)
*****************
xx : Erreur (1064 (42000): You have an error in your SQL syntax; check the manual that corresponds to your MySQL server version for the right syntax to use near 'xx' at line 1)
--------------------------------------------------------------------
Exécution terminée
--------------------------------------------------------------------
Il y a eu 1 erreur(s)
xx : Erreur (1064 (42000): You have an error in your SQL syntax; check the manual that corresponds to your MySQL server version for the right syntax to use near 'xx' at line 1)

Process finished with exit code 0
注:
- 第 19 行:我们可以看到,在发生错误后,没有进一步的 SQL 语句被执行。这是因为执行是在事务中进行的,一旦遇到第一个错误,我们就回滚了事务并停止了 SQL 语句的执行。这意味着第 9、11 和 13 行语句的结果已被回滚。因此,[people] 表应该为空;
使用 phpMyAdmin 验证:
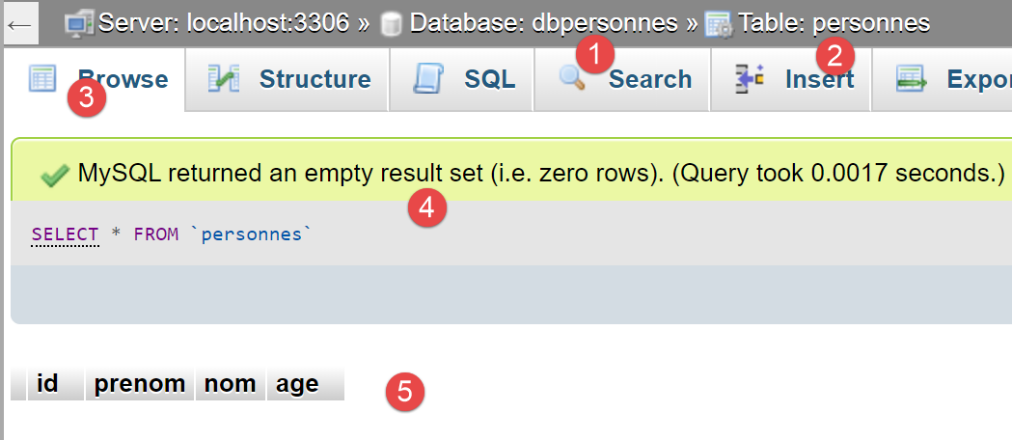
- 在 [5] 中,我们可以看到 [people] 表 [2] 为空;
16.7. 脚本 [mysql_05]:参数化查询的应用
[mysql_05] 脚本介绍了参数化查询的概念:
注释
- 第 12–21 行:我们创建两个人员列表,用于存入数据库 [dbpeople];
- 第27行:连接数据库;
- 第 31 行:清空 [people] 表中的内容;
- 第 33–34 行:使用参数化查询插入人员。在第 34 行中,第一个参数是要执行的 SQL 语句。该语句是不完整的,其中包含占位符 [%s],这些占位符将按顺序依次被第二个参数中的列表值替换;
- 第 36 行:插入人员,这次使用单条语句 [cursor.executemany]。因此,[executemany] 的第二个参数是一个列表的列表;
参数化查询的优势体现在两点:
- 它们的执行速度比“硬编码”查询更快,后者在每次执行时都必须进行解析。而参数化查询 [executemany] 仅需解析一次,随后可执行 n 次而无需再次解析;
- 注入到参数化查询中的参数会经过验证。如果它们包含保留字符(如撇号),这些字符会被“转义”,以免干扰 SQL 语句的执行。为了验证这一点,我们在列表中加入了包含撇号的姓名(第 16 行和第 21 行);
在 phpMyAdmin 中获得的结果如下:
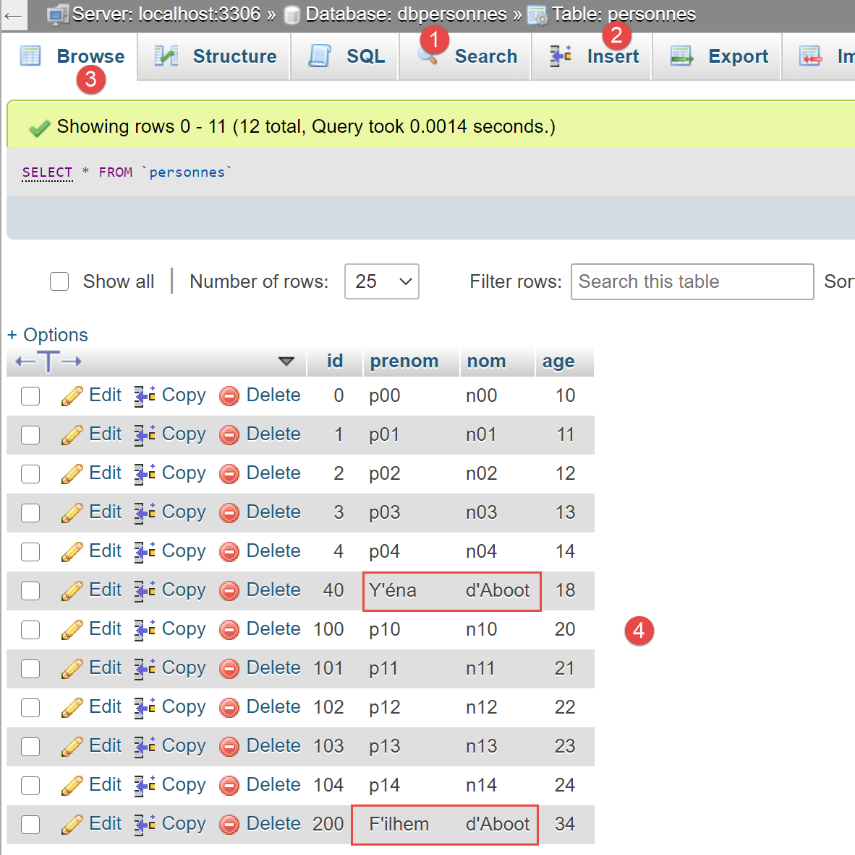
- 请注意,包含单引号(SQL 中的保留字符)的字符串已被正确插入。参数化查询对它们进行了“转义”。如果没有参数化查询,我们就必须自己完成这一步;