6. [Course]: Introduction to the JDBC API
Keywords: relational databases, JDBC API, SQLException.
6.1. Support
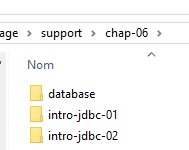 |  |  |
The folder [support / chap-06] contains the Eclipse projects for this chapter.
6.2. Architecture
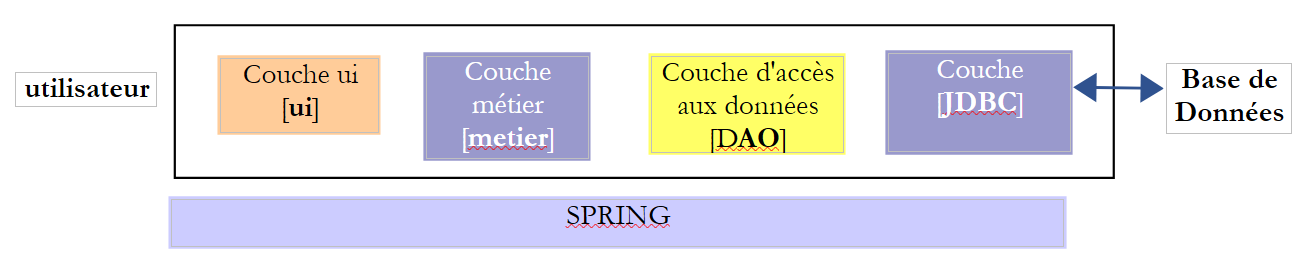 |
The JDBC (Java Database Connectivity) layer is a universal database access interface. It always presents the same interface to the [DAO] layer. If you change the DBMS, you simply need to change the JDBC driver. The [DAO] layer remains unchanged.
6.3. Steps for operating a database
 |
In the architecture above, operating a database via the console program involves the following steps:
- loading the database’s JDBC driver;
- opening a connection to the database;
- executing an SQL statement on the database and processing the results of the SQL statement;
- closing the connection;
Step 1 is performed only once. Steps 2–4 are performed repeatedly. Note that connections are not left open; they are closed as soon as they are no longer needed.
6.3.1. Step 1 - Loading the JDBC driver into memory
        // driver loading JDBC
        try {
            Class.forName(nom de la classe du pilote JDBC);
        } catch (ClassNotFoundException e1) {
             // handle the exception
}
The purpose of the operation on line 3 is to load the database’s JDBC driver into memory. This operation only needs to be performed once. However, repeating it does not cause an error. The JDBC driver class is searched for in the project’s classpath. Therefore, in the Eclipse project, the [jar] file containing the JDBC driver class must have been included in the project’s classpath.
6.3.2. Step 2 - Opening a connection
Once the JDBC driver is in place, we instruct it to open a connection to the database:
The code
package spring.jdbc;

import java.sql.Connection;
import java.sql.DriverManager;
import java.sql.PreparedStatement;
import java.sql.ResultSet;
import java.sql.SQLException;

public class IntroJdbc01 {

...
        Connection connexion = null;
        PreparedStatement ps = null;
        ResultSet rs = null;
        try {
            // opening connection
            connexion = DriverManager.getConnection(url, user, passwd);
...
        } catch (SQLException e1) {
            // we handle the exception
            ...
        } finally {
         // close connection
         if (connexion != null) {
            try {
                connexion.close();
            } catch (SQLException e2) {
                // handle the exception
                ...
            }
         }
}
- Lines 3–7: The classes that implement the JDBC interface are all in the [java.sql] package. Furthermore, in the event of an error, they all throw a [SQLException] (lines 19, 27). This exception derives from the [Exception] class and is a so-called checked exception: you must use a try/catch block to handle it, or alternatively, choose not to handle it and indicate that the method allows the exception to propagate by adding [throws SQLException] to the method signature;
- Line 17: [DriverManager.getConnection] is a static method that takes three parameters:
- [url]: the database URL. This is a string that depends on the database being used. For MySQL, it is in the form [jdbc:mysql://localhost:3306/db_name];
- [user]: the connection owner;
- [passwd]: the user's password;
- lines 24–30: the connection must be closed in the [finally] clause so that it is closed regardless of whether an exception occurs or not.
6.3.3. Step 3 - Executing SQL [SELECT] Statements
Once a connection is established, SQL commands can be executed. The way read commands [SELECT] are handled differs from that used for update operations [UPDATE, INSERT, DELETE]. We’ll start with [SELECT] SQL commands:
The code
Connection connexion = null;
        PreparedStatement ps = null;
        ResultSet rs = null;
        try {
            // opening connection
            connexion = DriverManager.getConnection(url, user, passwd);
            // start of transaction
            connexion.setAutoCommit(false);
            // in read-only mode
            connexion.setReadOnly(true);
            // table [PRODUITS] is read
            ps = connexion.prepareStatement("SELECT ID, NOM, CATEGORIE, PRIX, DESCRIPTION FROM PRODUITS");
            rs = ps.executeQuery();
            System.out.println("Liste des produits : ");
            while (rs.next()) {
                System.out.println(new Produit(rs.getInt(1), rs.getString(2), rs.getInt(3), rs.getDouble(4), rs.getString(5)));
            }
            // commit transaction
            connexion.commit();
        } catch (SQLException e1) {
            // we handle the exception
             doCatchException(connexion,e1);
        } finally {
            // we treat the finally
            doFinally(rs, ps, connexion);
        }

    private void doFinally(ResultSet rs, PreparedStatement ps, Connection connexion) {
....
}
- Lines 8, 10: opening a transaction (line 8) in read-only mode (line 10). A transaction is a sequence of SQL statements that either all succeed or all fail. Thus, in a transaction containing N SQL statements, if the (I+1)th statement fails, then the preceding I statements will be rolled back. For a read operation, a transaction is not necessary. However, creating a read-only transaction can allow certain DBMSs to perform certain optimizations;
- Line 12: use of a [PreparedStatement]. A [PreparedStatement] normally has parameters denoted by the character ?. Here, it does not. A [PreparedStatement] is a statement prepared by the DBMS. This preparation has a cost and is performed only once. This prepared statement is then executed by the DBMS with actual parameters that replace the formal parameters ?. Note that it is preferable to specify the desired columns rather than using the * notation to retrieve all columns. By specifying the column names, their values can then be retrieved based on their position in the SELECT statement;
- Line 13: execution of the [PreparedStatement]. A [ResultSet] object is retrieved;
A [ResultSet] object represents a table, i.e., a set of rows and columns. At any given time, we have access to only one row of the table, called the current row. When the [ResultSet] is initially created, there is no current row. We must perform a [ResultSet.next()] operation to obtain it. The signature of the next method is as follows:
This method attempts to move to the next row of the [ResultSet] and returns true if successful, false otherwise. If successful, the next row becomes the new current row. The previous row is lost and cannot be retrieved.
The [ResultSet] table has columns named labelCol1, labelCol2, ... as specified in the executed [SELECT] query. With the query:
SELECT ID as myId, NOM as myNom, CATEGORIE as myCategorie, PRIX as myPrix, DESCRIPTION as myDescription FROM PRODUITS
- the [ID] column will go into a column in the [ResultSet] named [myId];
- the [NAME] column will go into a column in the [ResultSet] named [myName];
- ...
In the example above, the identifiers [myCol] are called column labels. Without these labels, the names of the [ResultSet] columns depend on the DBMS. When the [SELECT] operates on a single table, the column labels will by default be the names of the columns requested by the SELECT. The problem arises when the [SELECT] operates on multiple tables and those tables contain identical column names, as in the following example:
SELECT PRODUITS.NOM, CATEGORIES.NOM FROM PRODUITS, CATEGORIES WHERE PRODUITS.CATEGORIE_ID=CATEGORIES.ID
Assuming that the [PRODUCTS] table has a foreign key to the [CATEGORIES] table, represented by the relationship [PRODUCTS].CATEGORY_ID --> [CATEGORIES].ID, and that both the [PRODUCTS] and [CATEGORIES] tables have a [NAME] field. In this case, the names given in the [ResultSet] to the columns [PRODUCTS.NAME] and [CATEGORIES.NAME] depend on the DBMS. For portability between DBMSs, column labels must therefore be used here, and we will write:
SELECT PRODUITS.NOM as p_NOM, CATEGORIES.NOM as c_NOM FROM PRODUITS, CATEGORIES WHERE PRODUITS.CATEGORIE_ID=CATEGORIES.ID
To access the various fields of the current row in the [ResultSet], the following methods are available:
to retrieve the column named "labelColi" from the current row, i.e., the column in the [SELECT] statement with that label. Type refers to the data type of the "labelColi" field. The following [getType] methods can be used: getInt, getLong, getString, getDouble, getFloat, getDate, ... Instead of using the column name, you can use its position in the executed [SELECT] query:
where i is the index of the desired column (i>=1).
- lines 15–17: retrieval of values read from the database;
- line 19: the transaction is validated (also known as committed). This terminates it and releases the resources that the DBMS had allocated for it;
- line 25: resources are released in the [finally] block. This calls the following [doFinally] method:
private void doFinally(ResultSet rs, PreparedStatement ps, Connection connexion) {
        // closure ResultSet
        if (rs != null) {
            try {
                rs.close();
            } catch (SQLException e1) {

            }
        }
        // closure [PreparedStatement]
        if (ps != null) {
            try {
                ps.close();
            } catch (SQLException e2) {

            }
        }
        if (connexion != null) {
            try {
                // close connection
                connexion.close();
            } catch (SQLException e3) {
                 // handle the exception
            }
        }
    }
- lines 3-9: close the [ResultSet];
- lines 11–17: close the [PreparedStatement];
- lines 18–27: closing the connection;
The closures in lines 3–17 seem redundant since the connection is closed in lines 18–25. In fact, in some cases they are not redundant, and it is recommended to leave them [http://stackoverflow.com/questions/4507440/must-jdbc-resultsets-and-statements-be-closed-separately-although-the-connection].
- Line 22: The exception is handled by the following [doCatchException] method:
    private static void doCatchException(Connection connexion, Throwable th) {
        // cancel transaction
        try {
            if (connexion != null) {
                connexion.rollback();
            }
        } catch (SQLException e2) {
            // handle the exception
        }
}
- lines 4–6: the transaction is rolled back. This terminates it, and the DBMS can release the resources allocated to it;
6.3.4. Step 3 - Issuing SQL statements [INSERT, UPDATE, DELETE]
SQL statements [INSERT, UPDATE, DELETE] are update operations: they modify the database but do not return any rows. The only information returned is the number of rows affected by the update operation.
The code
Connection connexion = null;
        PreparedStatement ps = null;
        try {
            // ouverture connexion
            connexion = DriverManager.getConnection(url, user, passwd);
            // début transaction
            connexion.setAutoCommit(false);
            // en mode lecture / écriture
            connexion.setReadOnly(false);
            // on met à jour la table
            ps = connexion.prepareStatement("UPDATE PRODUITS SET PRIX=PRIX*1.1 WHERE CATEGORIE=?");
            // catégorie 1
            ps.setInt(1, 10);
            // exécution
            int nbLignes=ps.executeUpdate();
            // commit transaction
            connexion.commit();
        } catch (SQLException e1) {
            // on traite l'exception
            doCatchException(connexion, e1);
        } finally {
            // on traite le finally
            doFinally(null, ps, connexion);
        }
    }
- line 9: the connection is used for reading and writing;
- line 11: a [PreparedStatement] with 1 parameter (represented by ?). There can be multiple parameters. They are numbered starting from 1;
- line 13: its value is assigned to the single parameter. The first parameter of [setType] is the parameter’s position in the [PreparedStatement] (1, 2, ...) and the second is the value assigned to it. You can use the methods [setInt, setLong, setFloat, setDouble, setString, setDate, ...];
- line 15: the [executeUpdate] method is used, not [executeQuery], which is reserved for SELECT statements. The method returns the number of rows affected by the operation. May be 0.
- line 17: the transaction is committed;
6.3.5. Step 4 - Closing the connection
A connection must be closed as quickly as possible in a multi-user environment because a DBMS accepts a limited number of open connections. In the previous examples, it was closed in the [finally] clause of the SQL operations so that it would be closed regardless of whether an exception occurred or not.
6.4. A sample project
6.4.1. Support
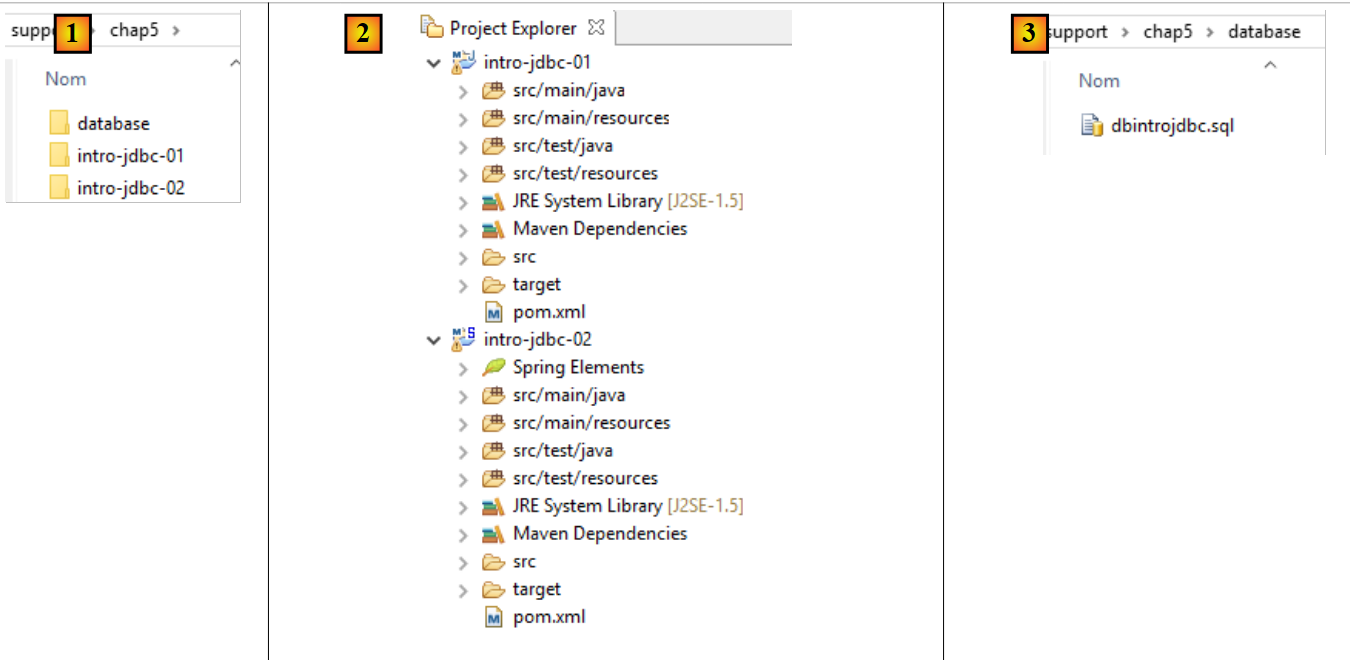 |
The [support / chap5] folder contains the Eclipse projects for this chapter [1, 2]. The [database] folder contains the SQL script for creating the sample MySQL database for this chapter [1, 3].
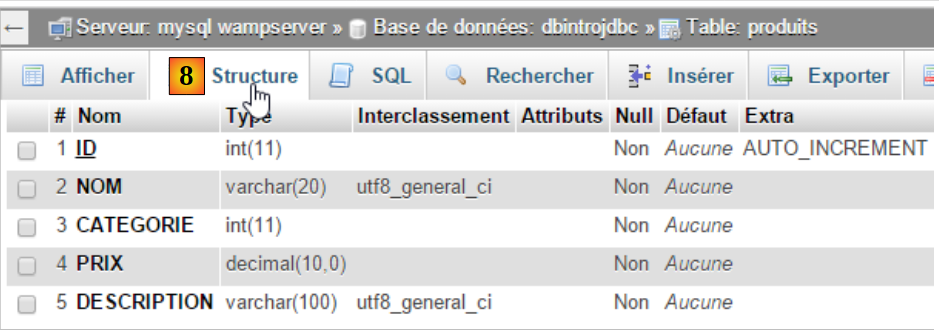
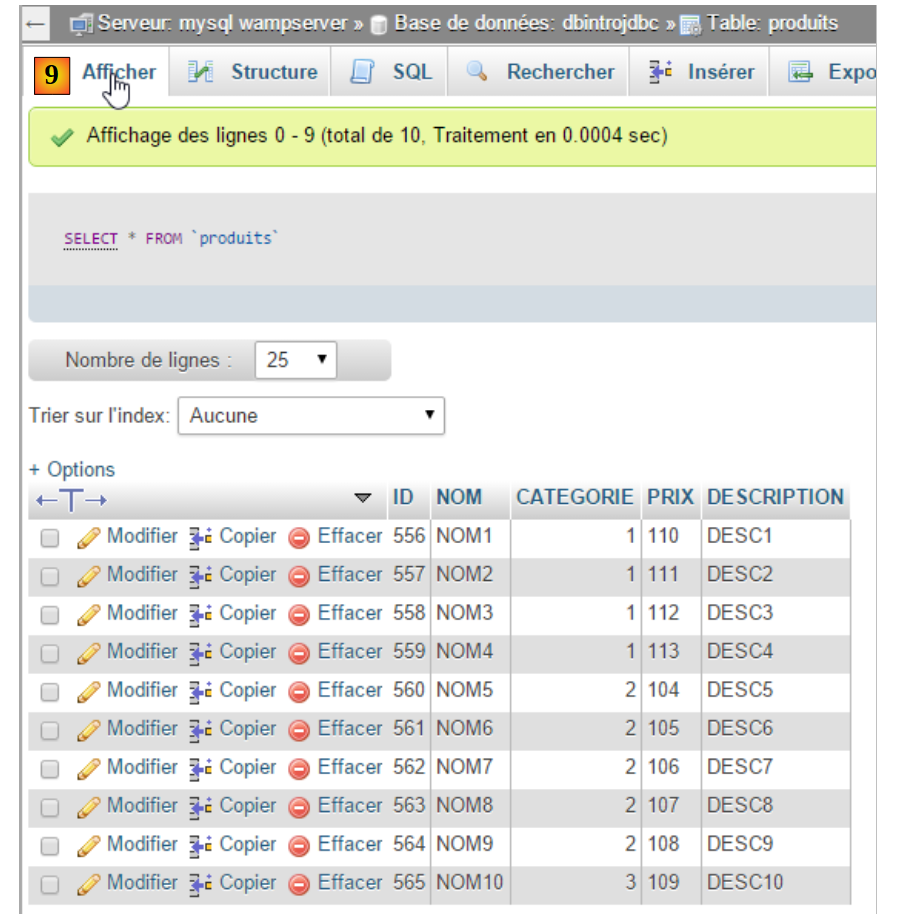
6.4.2. The Database Used
The following examples use the following MySQL database:
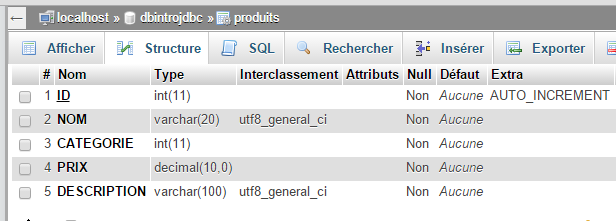 |
- [ID]: primary key in AUTO_INCREMENT mode (if no primary key is specified, the DBMS generates it);
- [NAME]: product name—unique;
- [CATEGORY]: category number;
- [PRICE]: its price;
- [DESCRIPTION]: a description of the product;
We will create it using the [WampServer] tool as follows [1-9]:
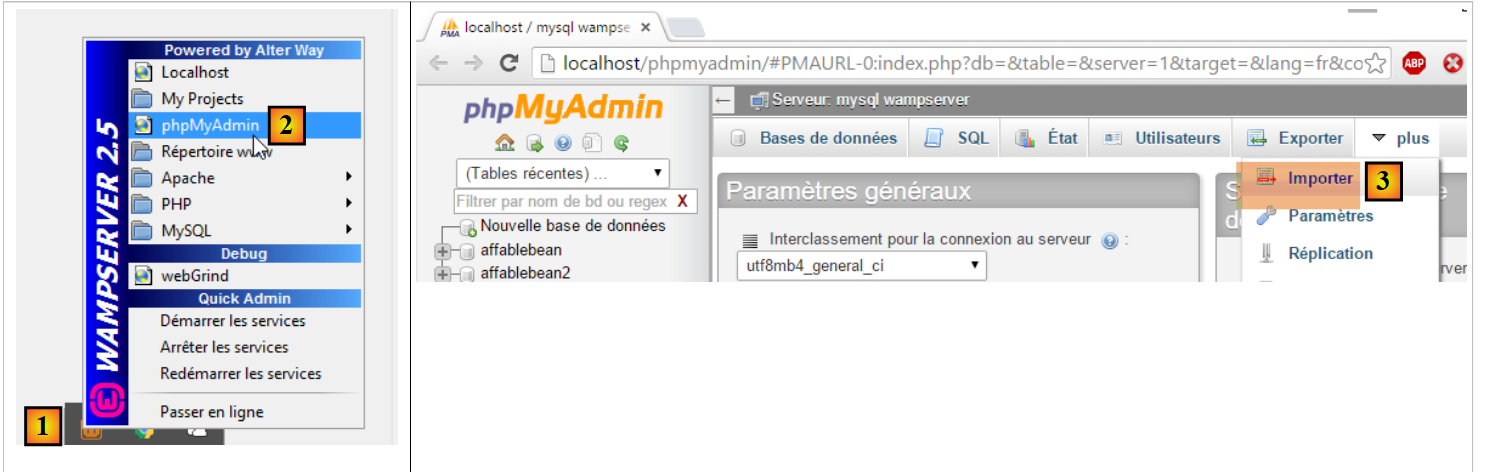 |
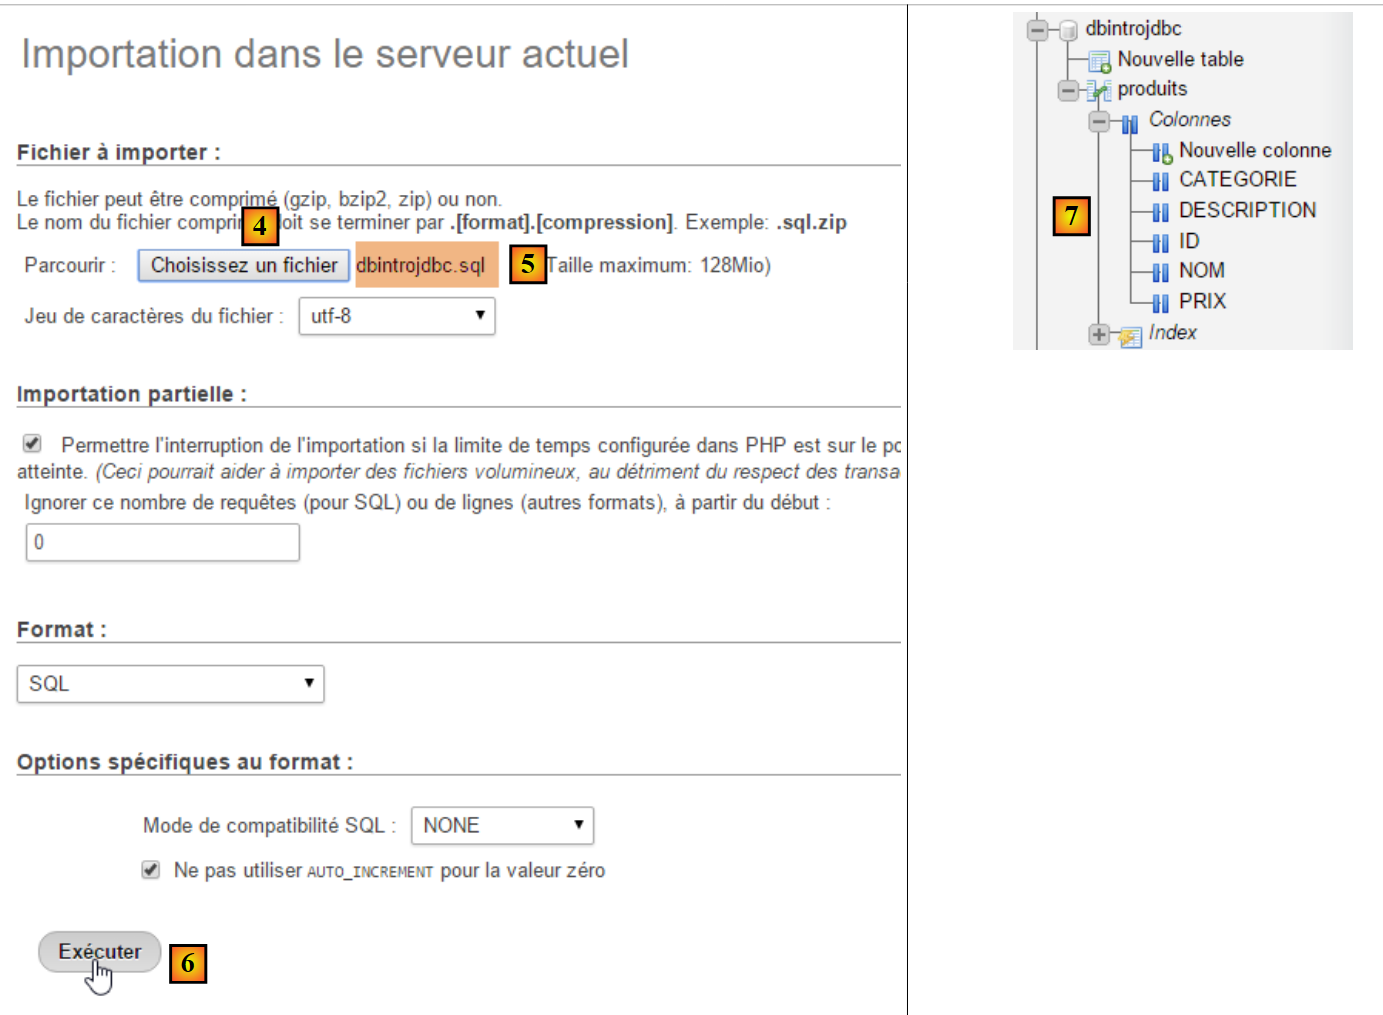 |
 |
 |
6.4.3. The Eclipse Project
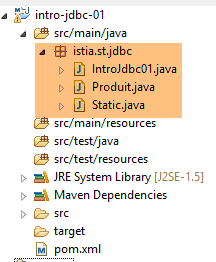 |
The project is a Maven project defined by the following [pom.xml] file:
<project xmlns="http://maven.apache.org/POM/4.0.0" xmlns:xsi="http://www.w3.org/2001/XMLSchema-instance"
    xsi:schemaLocation="http://maven.apache.org/POM/4.0.0 http://maven.apache.org/xsd/maven-4.0.0.xsd">
    <modelVersion>4.0.0</modelVersion>
    <groupId>istia.st.jdbc</groupId>
    <artifactId>intro-jdbc-01</artifactId>
    <version>0.0.1-SNAPSHOT</version>
    <dependencies>
        <dependency>
            <groupId>mysql</groupId>
            <artifactId>mysql-connector-java</artifactId>
            <version>5.1.34</version>
        </dependency>
        <dependency>
            <groupId>com.fasterxml.jackson.core</groupId>
            <artifactId>jackson-databind</artifactId>
            <version>2.5.1</version>
        </dependency>
    </dependencies>
</project>
- lines 8–12: the JDBC driver for the MySQL5 DBMS;
- lines 13–17: a library capable of handling JSON (JavaScript Object Notation) (see Section 22.6). We will use it to display the products from the database in JSON format;
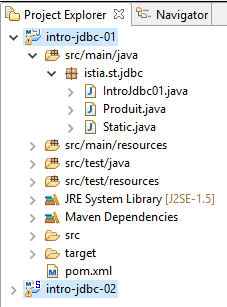
6.4.4. The Product Class
The [Product] class is as follows:
package istia.st.jdbc;

import com.fasterxml.jackson.core.JsonProcessingException;
import com.fasterxml.jackson.databind.ObjectMapper;

public class Produit {

    // fields
    private int id;
    private String nom;
    private int categorie;
    private double prix;
    private String description;

    // manufacturers
    public Produit() {

    }

    public Produit(int id, String nom, int categorie, double prix, String description) {
        this.id = id;
        this.nom = nom;
        this.categorie = categorie;
        this.prix = prix;
        this.description = description;
    }

    // getters and setters
    ...

    // to String
    public String toString() {
        try {
            return new ObjectMapper().writeValueAsString(this);
        } catch (JsonProcessingException e) {
            e.printStackTrace();
            return null;
        }
    }
}
- Line 34: We use the JSON library to display the product's JSON string. This produces an output similar to the following:
Liste des produits :
{"id":1,"nom":"NOM1","categorie":1,"prix":100.0,"description":"DESC1"}
{"id":2,"nom":"NOM2","categorie":1,"prix":101.0,"description":"DESC2"}
The advantage of the [toString] method above is that if fields are added to or removed from the class, its [toString] method remains valid. Furthermore, if the fields themselves are objects (lists, arrays, dictionaries, user objects), JSON libraries can in turn convert them into JSON strings;
6.4.5. The [Static] class
The [Static] class groups together methods containing code frequently used in the main class:
package istia.st.jdbc;

import java.util.ArrayList;
import java.util.List;

public class Static {

    public static List<String> getErreursFromThrowable(Throwable th) {
        // retrieve the list of exception error msgs
        List<String> erreurs = new ArrayList<String>();
        while (th != null) {
            // throwable error message
            erreurs.add(th.getMessage());
            // we move on to the cause of throwable
            th = th.getCause();
        }
        // result
        return erreurs;
    }

    public static void show(String title, List<String> messages){
        // title
        System.out.println(String.format("%s : ",title));
        // messages
        for(String message : messages){
            System.out.println(String.format("- %s",message));
        }
    }
}
- lines 8–19: returns a list of errors encapsulated in an object of type [Throwable], which is the superclass of the [Exception] class;
- lines 21-28: displays a list of messages on the screen;
This code could be in the main class because it is the only one using it here. However, we are considering a broader scenario where other classes might need this code.
6.4.6. The skeleton of the main class
package istia.st.jdbc;

import java.sql.Connection;
import java.sql.DriverManager;
import java.sql.PreparedStatement;
import java.sql.ResultSet;
import java.sql.SQLException;

public class IntroJdbc01 {

    // constants
    final static String url = "jdbc:mysql://localhost:3306/dbIntroJdbc";
    final static String user = "root";
    final static String passwd = "";
    final static String insert = "INSERT INTO PRODUITS(ID, NOM, CATEGORIE, PRIX, DESCRIPTION) VALUES (?, ?, ?, ?, ?)";
    final static String delete = "DELETE FROM PRODUITS";
    final static String select = "SELECT ID, NOM, CATEGORIE, PRIX, DESCRIPTION FROM PRODUITS";
    final static String update = "UPDATE PRODUITS SET PRIX=PRIX*1.1 WHERE CATEGORIE=?";
    final static String insert2 = "INSERT INTO PRODUITS(ID, NOM, CATEGORIE, PRIX, DESCRIPTION) VALUES (100,'X',1,1,'x')";

    public static void main(String[] args) {
        // loading the JDBC driver from MySQL
        try {
            Class.forName("com.mysql.jdbc.Driver");
        } catch (ClassNotFoundException e1) {
            doCatchException("Pilote JDBC introuvable", null, e1);
            return;
        }
        // empty table [PRODUITS]
        delete();
        // fill it
        insert();
        // we read it
        select();
        // update
        update();
        // display
        select();
        // insertion of two identical elements
        // insertion must fail and neither element is inserted because of the transaction
        insert2();
        // we check
        select();
        // finish
        System.out.println("Travail terminé");
    }

    // product list
    private static void select() {
...
    }

    // product deletion
    public static void delete() {
...
    }

    // add products
    public static void insert() {
...
    }

    // add 2 products
    public static void insert2() {
...
    }

    // product updates
    public static void update() {
..
    }

    private static void doFinally(ResultSet rs, PreparedStatement ps, Connection connexion) {
        // closure ResultSet
        if (rs != null) {
            try {
                rs.close();
            } catch (SQLException e1) {

            }
        }
        // closure [PreparedStatement]
        if (ps != null) {
            try {
                ps.close();
            } catch (SQLException e2) {

            }
        }
        // close connection
        if (connexion != null) {
            try {
                connexion.close();
            } catch (SQLException e3) {
                // display error msg
                Static.show("Les erreurs suivantes se sont produites lors de la fermeture de la connexion",
                        Static.getErreursFromThrowable(e3));
            }
        }
    }

    private static void doCatchException(String title, Connection connexion, Throwable th) {
        // display error msg
        Static.show(title, Static.getErreursFromThrowable(th));
        // cancel transaction
        try {
            if (connexion != null) {
                connexion.rollback();
            }
        } catch (SQLException e2) {
            // display error msg
            Static.show(title, Static.getErreursFromThrowable(e2));
        }
    }
}
6.4.7. Deleting the contents of the products table
The [delete] method deletes the contents of the table:
// product deletion
    public static void delete() {
        Connection connexion = null;
        PreparedStatement ps = null;
        try {
            // opening connection
            connexion = DriverManager.getConnection(url, user, passwd);
            // start of transaction
            connexion.setAutoCommit(false);
            // empty table [PRODUITS]
            ps = connexion.prepareStatement(delete);
            ps.executeUpdate();
            // commit transaction
            connexion.commit();
            // return to default mode
            connexion.setAutoCommit(true);
        } catch (SQLException e1) {
            // we handle the exception
            doCatchException("Les erreurs suivantes se sont produites à la suppression du contenu de la table", connexion, e1);
        } finally {
            // we treat the finally
            doFinally(null, null, connexion);
        }
    }
This example uses transactions. A transaction allows you to group SQL statements that must all succeed or all be rolled back. There are four operations to be aware of:
- starting a transaction: [connection.setAutoCommit(false)];
- end of a transaction successfully: [connection.commit()]. In this case, all operations performed on the database during the transaction are committed;
- end of a transaction with failure: [connection.rollback()]. In this case, all operations performed on the database during the transaction are rolled back;
- Return to [auto-commit] mode, which is the default mode for the JDBC API: [connection.setAutoCommit(true)]. In this mode, each SQL statement is part of a transaction. Thus, if you perform two inserts and the second one fails:
- in [AutoCommit=true] mode, the first insertion remains (it was committed by the first AutoCommit);
- in [AutoCommit=false] mode, the first insertion is rolled back;
In our examples, whenever an exception occurs, we roll back the transaction in the [doCatchException] method:
    private static void doCatchException(String title, Connection connexion, Throwable th) {
        // display error msg
        Static.show(title, Static.getErreursFromThrowable(th));
        // cancel transaction
        try {
            if (connexion != null) {
                connexion.rollback();
            }
        } catch (SQLException e2) {
            // display error msg
            Static.show("Erreur lors de l'annulation de la transaction", Static.getErreursFromThrowable(e2));
        }
}
6.4.8. Creating the contents of the products table
The [insert] method creates the table content:
// add products
    public static void insert() {
        Connection connexion = null;
        PreparedStatement ps = null;
        try {
            // opening connection
            connexion = DriverManager.getConnection(url, user, passwd);
            // start of transaction
            connexion.setAutoCommit(false);
            // fill the table
            ps = connexion.prepareStatement(insert);
            for (int i = 0; i < 10; i++) {
                // preparation
                int n = i + 1;
                ps.setInt(1, n);
                ps.setString(2, String.format("NOM%s", n));
                ps.setInt(3, n / 5 + 1);
                ps.setDouble(4, 100 * (1 + (double) i / 100));
                ps.setString(5, String.format("DESC%s", n));
                // execution
                ps.executeUpdate();
            }
            // commit transaction
            connexion.commit();
            // return to default mode
            connexion.setAutoCommit(true);
        } catch (SQLException e1) {
            // we handle the exception
            doCatchException("Les erreurs suivantes se sont produites à la création du contenu de la table", connexion, e1);
        } finally {
            // we treat the finally
            doFinally(null, null, connexion);
        }
    }
6.4.9. Displaying the contents of the products table
The [select] method displays the table contents:
    // product list
    private static void select() {
        Connection connexion = null;
        PreparedStatement ps = null;
        ResultSet rs = null;
        try {
            // opening connection
            connexion = DriverManager.getConnection(url, user, passwd);
            // start of transaction
            connexion.setAutoCommit(false);
            // table [PRODUITS] is read
            ps = connexion.prepareStatement(select);
            rs = ps.executeQuery();
            System.out.println("Liste des produits : ");
            while (rs.next()) {
                System.out.println(new Produit(rs.getInt(1), rs.getString(2), rs.getInt(3), rs.getDouble(4), rs.getString(5)));
            }
            // commit transaction
            connexion.commit();
            // return to default mode
            connexion.setAutoCommit(true);
        } catch (SQLException e1) {
            // we handle the exception
            doCatchException("Les erreurs suivantes se sont produites à la lecture de la table", connexion, e1);
        } finally {
            // we treat the finally
            doFinally(null, null, connexion);
        }
}
6.4.10. Updating the table contents
The [update] method updates certain products:
// product updates
    public static void update() {
        Connection connexion = null;
        PreparedStatement ps = null;
        try {
            // opening connection
            connexion = DriverManager.getConnection(url, user, passwd);
            // start of transaction
            connexion.setAutoCommit(false);
            // table is updated
            ps = connexion.prepareStatement(update);
            // category 1
            ps.setInt(1, 1);
            // execution
            ps.executeUpdate();
            // commit transaction
            connexion.commit();
            // return to default mode
            connexion.setAutoCommit(true);
        } catch (SQLException e1) {
            // we handle the exception
            doCatchException("Les erreurs suivantes se sont produites à la mise à jour du contenu de la table", connexion, e1);
        } finally {
            // we treat the finally
            doFinally(null, null, connexion);
        }
    }
6.4.11. Role of the transaction
The [insert2] method inserts two products with the same primary key into the table, which is not allowed. Since we are in a transaction, the first insertion will be rolled back.
// add 2 pro ducts with the same primary keys
    public static void insert2() {
        Connection connexion = null;
        PreparedStatement ps = null;
        try {
            // opening connection
            connexion = DriverManager.getConnection(url, user, passwd);
            // start of transaction
            connexion.setAutoCommit(false);
            // add 1 line
            ps = connexion.prepareStatement(insert2);
            // execution
            ps.executeUpdate();
            // we add the same line a 2nd time, with the same primary key
            // the insertion must fail and neither of the two elements must be inserted because of the transaction
            ps.executeUpdate();
            // commit transaction
            connexion.commit();
            // return to default mode
            connexion.setAutoCommit(true);
        } catch (SQLException e1) {
            // we handle the exception
            doCatchException("Les erreurs suivantes se sont produites lors de l'ajout", connexion, e1);
        } finally {
            // we treat the finally
            doFinally(null, null, connexion);
        }
    }
6.4.12. Results
The results of executing the [main] method are as follows:
6.5. Using a [DataSource] data source
We will revisit the previous application using a [javax.sql.DataSource] data source:

We will use a data source implemented by the [org.apache.tomcat.jdbc.pool.DataSource] class. This class uses a connection pool, i.e., a set of open connections:
- when the pool is instantiated, a certain number of connections are opened to the database. This number is configurable;
- when the Java code opens a connection, it is provided by the pool;
- when the Java code closes a connection, it is returned to the pool;
Ultimately, connections are opened only once, which improves database access performance. The data source will be defined in a Spring configuration class
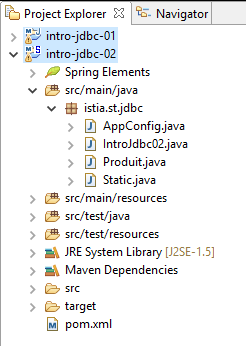
6.5.1. The Eclipse Project
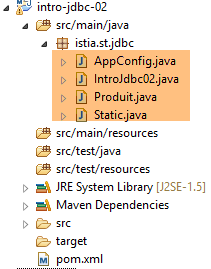 |
The project is a Maven project defined by the following [pom.xml] file:
<project xmlns="http://maven.apache.org/POM/4.0.0" xmlns:xsi="http://www.w3.org/2001/XMLSchema-instance"
    xsi:schemaLocation="http://maven.apache.org/POM/4.0.0 http://maven.apache.org/xsd/maven-4.0.0.xsd">
    <modelVersion>4.0.0</modelVersion>
    <groupId>istia.st.jdbc</groupId>
    <artifactId>intro-jdbc-02</artifactId>
    <version>0.0.1-SNAPSHOT</version>
    <dependencies>
        <!-- MySQL -->
        <dependency>
            <groupId>mysql</groupId>
            <artifactId>mysql-connector-java</artifactId>
            <version>5.1.34</version>
        </dependency>
        <!-- library jSON -->
        <dependency>
            <groupId>com.fasterxml.jackson.core</groupId>
            <artifactId>jackson-databind</artifactId>
            <version>2.5.1</version>
        </dependency>
        <!-- Spring -->
        <dependency>
            <groupId>org.springframework</groupId>
            <artifactId>spring-context</artifactId>
            <version>4.1.3.RELEASE</version>
        </dependency>
        <!-- Tomcat Jdbc -->
        <dependency>
            <groupId>org.apache.tomcat</groupId>
            <artifactId>tomcat-jdbc</artifactId>
            <version>8.0.20</version>
        </dependency>
    </dependencies>
</project>
- lines 21–25: dependency on Spring;
- lines 27–31: dependency on the library that provides the data source;
The Spring configuration class [AppConfig] is as follows:
package istia.st.jdbc;

import org.apache.tomcat.jdbc.pool.DataSource;
import org.springframework.context.annotation.Bean;
import org.springframework.context.annotation.Configuration;

@Configuration
public class AppConfig {

    // constantes
    final static String URL = "jdbc:mysql://localhost:3306/dbIntroJdbc";
    final static String USER = "root";
    final static String PASSWD = "";
    final static String INSERT = "INSERT INTO PRODUITS(ID, NOM, CATEGORIE, PRIX, DESCRIPTION) VALUES (?, ?, ?, ?, ?)";
    final static String DELETE = "DELETE FROM PRODUITS";
    final static String SELECT = "SELECT ID, NOM, CATEGORIE, PRIX, DESCRIPTION FROM PRODUITS";
    final static String UPDATE = "UPDATE PRODUITS SET PRIX=PRIX*1.1 WHERE CATEGORIE=?";
    final static String INSERT2 = "INSERT INTO PRODUITS(ID, NOM, CATEGORIE, PRIX, DESCRIPTION) VALUES (100,'X',1,1,'x')";
    final static String DRIVER_CLASSNAME = "com.mysql.jdbc.Driver";

    @Bean
    public DataSource dataSource() {
        // source de données TomcatJdbc
        DataSource dataSource = new DataSource();
        // configuration accès JDBC
        dataSource.setDriverClassName(DRIVER_CLASSNAME);
        dataSource.setUsername(USER);
        dataSource.setPassword(PASSWD);
        dataSource.setUrl(URL);
        // une connexion ouverte initialement
        dataSource.setInitialSize(1);
        // résultat
        return dataSource;
    }
}
- lines 11–19: the constants previously defined in [IntroJdbc01] have been moved to [AppConfig];
- lines 31–34: the Spring bean defining the data source;
- line 24: creation of the data source, which is not yet configured;
- lines 26–29: the information that allows the data source to connect to the database;
- line 31: creates a pool of 1 connection. We don’t need more than that here. There are never multiple simultaneous connections;
6.5.2. The main class
The main class [IntroJdbc02] is as follows:
package istia.st.jdbc;

import java.sql.Connection;
import java.sql.PreparedStatement;
import java.sql.ResultSet;
import java.sql.SQLException;

import javax.sql.DataSource;

import org.springframework.context.annotation.AnnotationConfigApplicationContext;

public class IntroJdbc02 {
    // data source
    private static DataSource dataSource;

    public static void main(String[] args) {
        // spring context retrieval
        AnnotationConfigApplicationContext ctx = new AnnotationConfigApplicationContext(AppConfig.class);
        // data source recovery
        dataSource = ctx.getBean(DataSource.class);
        // empty table [PRODUITS]
        delete();
...
        // finish
        ctx.close();
        System.out.println("Travail terminé");
    }

    // product list
    private static void select() {
        Connection connexion = null;
        PreparedStatement ps = null;
        ResultSet rs = null;
        try {
            // opening connection
            connexion = dataSource.getConnection();
            // start of transaction
            connexion.setAutoCommit(false);
...
        } catch (SQLException e1) {
            // we handle the exception
            doCatchException("Les erreurs suivantes se sont produites à la lecture de la table", connexion, e1);
        } finally {
            // we treat the finally
            doFinally(null, null, connexion);
        }
    }
...
}
- line 14: the data source. Note that it is of type [javax.sql.DataSource], which is an interface;
- line 18: instantiation of Spring objects;
- line 20: obtaining a reference to the data source. Note that the actual class used is never mentioned. Thus, here, there is nothing to suggest that a [TomcatJdbc] implementation is being used;
- line 36: obtaining an open connection;
- the rest of the code is identical to that of the [IntroJdbc01] class;
6.6. Conclusion
Further information on database management can be found in the document [Working with a Relational Database Using the Spring Ecosystem].