5. Spring Data JPA 简介
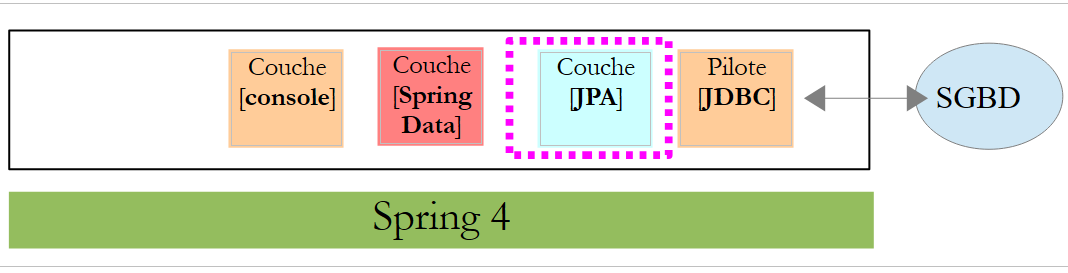
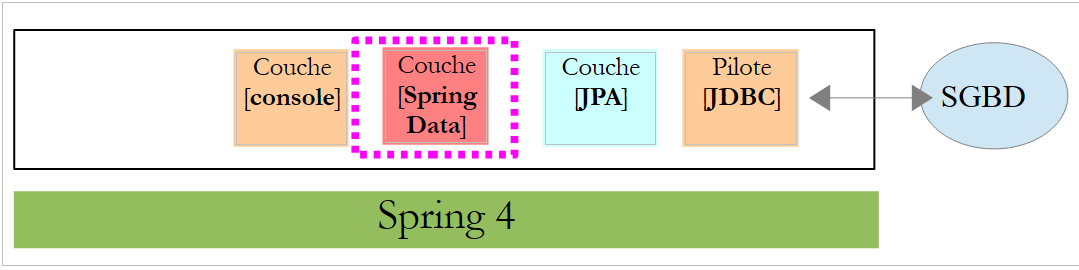
在本章中,我们将探讨以下架构:
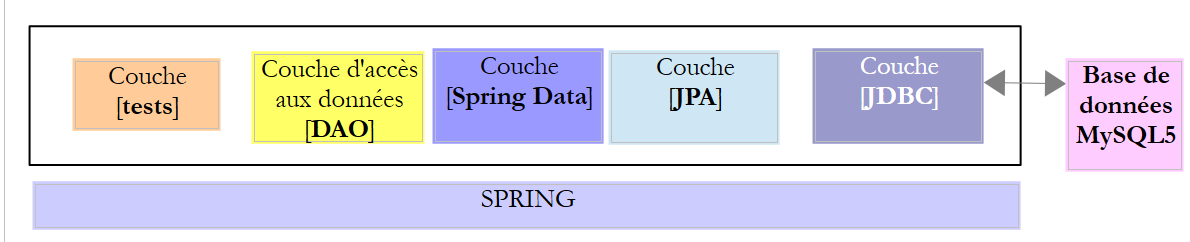 |
我们在 [DAO] 层与 DBMS 的 JDBC 驱动程序之间插入一个 [JPA](Java Persistence API)层。 从此以后,JPA层负责向DBMS发出SQL命令。[DAO]层不再处理SQL命令,而仅处理称为JPA实体的对象——这些对象代表了所用数据库中的各个表。这些实体的字段通过Java注解与表列建立唯一映射关系。正是这种机制使得JPA层能够将[DAO]层对JPA实体的操作转换为SQL语句。
Spring Data 是 Spring 框架的一个分支,专注于数据访问,无论数据存储在关系型数据库管理系统(RDBMS)、NoSQL 数据库还是其他类型的存储中。在此,我们仅关注 RDBMS 以及通过 JPA 访问它们。 后续内容中,我们有时会使用 [Spring JPA] 来实际指代 [Spring Data JPA]。在上述架构中,[Spring Data] 层为 [DAO] 层提供了管理 JPA 实体的工具。
JPA 实际上是一项规范。我们将测试其三个实现:
- Hibernate (http://hibernate.org/);
- EclipseLink (http://www.eclipse.org/eclipselink/);
- OpenJpa (http://openjpa.apache.org/);
5.1. 示例-01
Spring 官网提供了大量入门教程 [http://spring.io/guides]。我们将利用其中一个教程来介绍 Spring Data。为此,我们将使用 Spring Tool Suite (STS)。
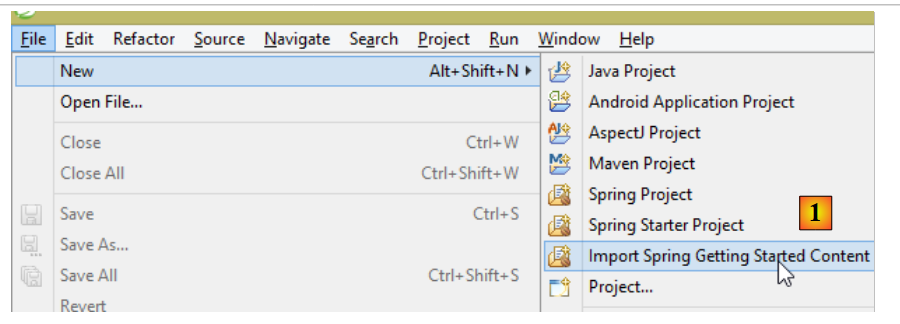 |
- 在 [1] 中,我们从 [spring.io/guides] 导入了一个教程;
 |
- 在 [2] 中,我们选择了 [Accessing Data Jpa] 教程,该教程演示了如何使用 Spring Data 访问数据库;
- 在[3]中,我们选择了一个由Maven配置的项目;
- 在[4]中,该教程提供两种形式:[initial](初始版)是一个空模板,需根据教程逐步填充;[complete](完整版)则是教程的最终版本。我们选择后者;
- 在[5]中,您可以选择在浏览器中查看教程;
- 在 [6] 中,是最终的项目。
5.1.1. 该项目的 Maven 配置
该项目的 Maven 依赖项在 [pom.xml] 文件中进行配置:
    <groupId>org.springframework</groupId>
    <artifactId>gs-accessing-data-jpa</artifactId>
    <version>0.1.0</version>

    <parent>
        <groupId>org.springframework.boot</groupId>
        <artifactId>spring-boot-starter-parent</artifactId>
        <version>1.2.3.RELEASE</version>
    </parent>

    <dependencies>
        <dependency>
            <groupId>org.springframework.boot</groupId>
            <artifactId>spring-boot-starter-data-jpa</artifactId>
        </dependency>
        <dependency>
            <groupId>com.h2database</groupId>
            <artifactId>h2</artifactId>
        </dependency>
    </dependencies>

    <properties>
        <!-- use UTF-8 for everything -->
        <project.build.sourceEncoding>UTF-8</project.build.sourceEncoding>
        <project.reporting.outputEncoding>UTF-8</project.reporting.outputEncoding>
        <start-class>hello.Application</start-class>
</properties>
- 第 5–9 行:定义一个父 Maven 项目。该项目定义了项目的大部分依赖项。这些依赖项可能已经足够,此时无需添加额外依赖;也可能不够,此时会自动添加缺失的依赖;
- 第 12–15 行:定义对 [spring-boot-starter-data-jpa] 的依赖。该工件包含 Spring Data 类;
- 第 16–19 行:定义对 H2 数据库管理系统 (DBMS) 的依赖,它允许您创建和管理内存数据库。
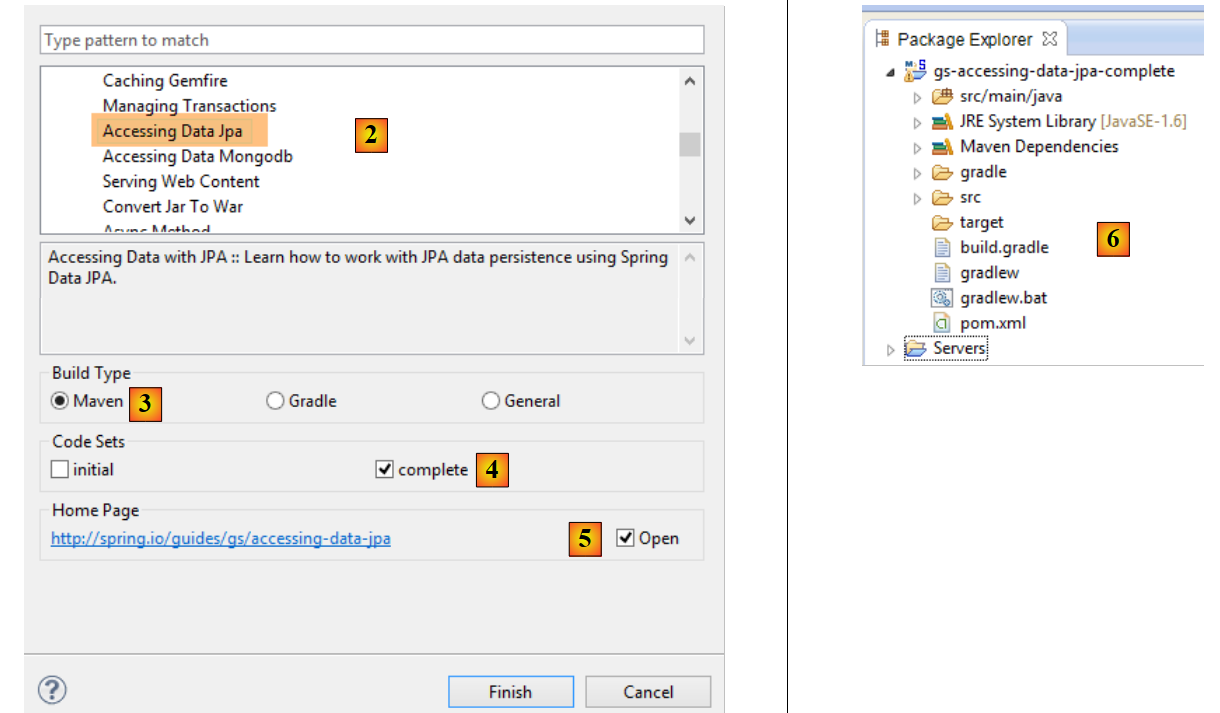
让我们来看看这些依赖项提供的类:
 | 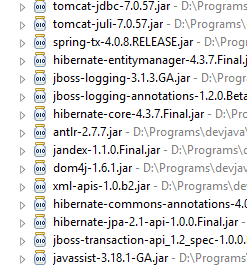 | 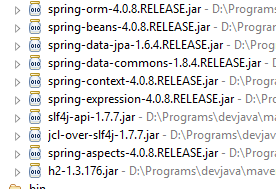 |
数量众多:
- 其中一部分属于 Spring 生态系统(以 spring 开头的);
- 另一些属于 Hibernate 生态系统(如 hibernate、jboss),我们在此处使用的正是其 JPA 实现;
- 还有一些是测试库(junit、hamcrest);
- 还有的是日志库(log4j、logback、slf4j);
我们将保留所有这些。对于生产环境中的应用程序,应仅保留必要的组件。
在 [pom.xml] 文件的第 26 行,我们发现以下内容:
<start-class>hello.Application</start-class>
该行与以下几行相关联:
<build>
        <plugins>
            <plugin>
                <artifactId>maven-compiler-plugin</artifactId>
            </plugin>
            <plugin>
                <groupId>org.springframework.boot</groupId>
                <artifactId>spring-boot-maven-plugin</artifactId>
            </plugin>
        </plugins>
    </build>
第 6–9 行:[spring-boot-maven-plugin] 允许您生成应用程序的可执行 JAR 文件。随后,[pom.xml] 文件的第 26 行指定了该 JAR 文件中的可执行类。
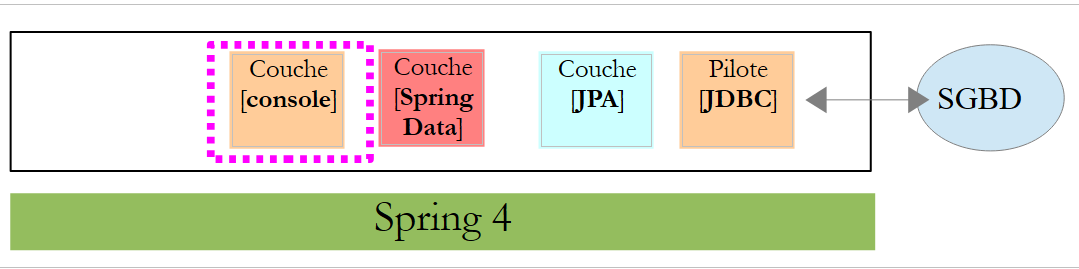
5.1.2. [JPA] 层
数据库访问通过 [JPA] 层(Java Persistence API)进行处理:
 |
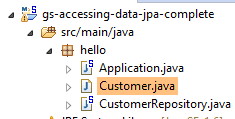 |
该应用程序功能基础,用于管理 [Customer] 实体。 [Customer] 类属于 [JPA] 层,其定义如下:
package hello;

import javax.persistence.Entity;
import javax.persistence.GeneratedValue;
import javax.persistence.GenerationType;
import javax.persistence.Id;

@Entity
public class Customer {

    @Id
    @GeneratedValue(strategy = GenerationType.AUTO)
    private long id;
    private String firstName;
    private String lastName;

    protected Customer() {
    }

    public Customer(String firstName, String lastName) {
        this.firstName = firstName;
        this.lastName = lastName;
    }

    @Override
    public String toString() {
        return String.format("Customer[id=%d, firstName='%s', lastName='%s']", id, firstName, lastName);
    }

}
客户拥有一个 ID [id]、一个名字 [firstName] 和一个姓氏 [lastName]。每个 [Customer] 实例代表数据库表中的一行。
- 第 8 行:JPA 注解,确保 [Customer] 实例的持久化操作(创建、读取、更新、删除)将由 JPA 实现管理。根据 Maven 依赖项,我们可以看出正在使用 JPA/Hibernate 实现;
- 第 11–12 行:JPA 注解,用于将 [id] 字段与 [Customer] 表的主键关联。第 12 行表明 JPA 实现将使用所用数据库管理系统(此处为 H2)特有的主键生成方法;
没有其他 JPA 注解。因此将使用默认值:
- [Customer] 表将以类名命名,即 [Customer];
- 该表的列名将采用类字段的名称:[id, firstName, lastName],需注意表列名不区分大小写;
请注意,所使用的 JPA 实现从未被命名。
5.1.3. [Spring Data] 层
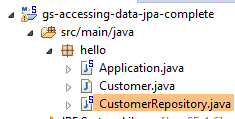
[CustomerRepository] 类实现了 [Customer] 表的访问层。其代码如下:
 |
 |
package hello;

import java.util.List;

import org.springframework.data.repository.CrudRepository;

public interface CustomerRepository extends CrudRepository<Customer, Long> {

    List<Customer> findByLastName(String lastName);
}
因此,这是一个接口而非类(第 7 行)。它继承了 [CrudRepository] 接口,这是一个 Spring Data 接口(第 5 行)。该接口由两种类型参数化:第一种是受管元素的类型,此处为 [Customer] 类型;第二种是受管元素的主键类型,此处为 [Long] 类型。 [CrudRepository] 接口如下所示:
package org.springframework.data.repository;

import java.io.Serializable;

@NoRepositoryBean
public interface CrudRepository<T, ID extends Serializable> extends Repository<T, ID> {

    <S extends T> S save(S entity);

    <S extends T> Iterable<S> save(Iterable<S> entities);

    T findOne(ID id);

    boolean exists(ID id);

    Iterable<T> findAll();

    Iterable<T> findAll(Iterable<ID> ids);

    long count();

    void delete(ID id);

    void delete(T entity);

    void delete(Iterable<? extends T> entities);

    void deleteAll();
}
此接口定义了可在 JPA T 类型上执行的 CRUD(创建 – 读取 – 更新 – 删除)操作:
- 第 8 行:save 方法允许将实体 T 持久化到数据库中。它使用 DBMS 分配的主键将实体持久化。它还允许更新由主键 id 标识的实体 T。这两种操作的选择取决于主键 id 的值:如果为 null,则执行持久化操作;否则,执行更新操作;
- 第 10 行:与上文相同,但针对实体列表;
- 第 12 行:findOne 方法用于根据主键 id 检索实体 T;
- 第 22 行:delete 方法允许您删除一个由主键 id 标识的实体 T;
- 第 24–28 行:[delete] 方法的变体;
- 第 16 行:[findAll] 方法检索所有已持久化的 T 实体;
- 第 18 行:与上文相同,但仅限于已提供标识符列表的实体;
让我们回到 [CustomerRepository] 接口:
package hello;

import java.util.List;

import org.springframework.data.repository.CrudRepository;

public interface CustomerRepository extends CrudRepository<Customer, Long> {

    List<Customer> findByLastName(String lastName);
}
- 第 9 行允许您根据 [lastName] 检索 [Customer];
关于 [DAO] 层的内容就到这里。上述接口没有实现类,它由 [Spring Data] 在运行时自动生成。[CrudRepository] 接口的方法会自动实现。至于添加到 [CustomerRepository] 接口中的方法,则视情况而定。让我们回到 [Customer] 的定义:
    private long id;
    private String firstName;
private String lastName;
第 9 行中的方法由 [Spring Data] 自动实现,因为它引用了 [Customer] 类的 [lastName] 字段(第 3 行)。当遇到待实现接口中的 [findBySomething] 方法时,Spring Data 会使用以下 JPQL(Java 持久化查询语言)查询来实现它:
因此,类型 T 必须有一个名为 [something] 的字段。因此,该方法
将通过类似以下代码实现:
return [em].createQuery("select c from Customer c where c.lastName=:value").setParameter("value",lastName).getResultList()
其中 [em] 指代 JPA 持久化上下文。这仅在 [Customer] 类中存在名为 [lastName] 的字段时才可行,而本例中确实存在该字段。
综上所述,在简单场景下,Spring Data 允许我们通过一个简单的接口来实现 [DAO] 层。
5.1.4. [控制台]层
 |
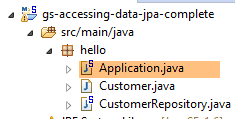 |
[Application] 类如下所示:
package hello;

import org.springframework.beans.factory.annotation.Autowired;
import org.springframework.boot.CommandLineRunner;
import org.springframework.boot.SpringApplication;
import org.springframework.boot.autoconfigure.SpringBootApplication;

@SpringBootApplication
public class Application implements CommandLineRunner {

    @Autowired
    CustomerRepository repository;

    public static void main(String[] args) {
        SpringApplication.run(Application.class);
    }

    @Override
    public void run(String... strings) throws Exception {
        // save a couple of customers
        repository.save(new Customer("Jack", "Bauer"));
        repository.save(new Customer("Chloe", "O'Brian"));
        repository.save(new Customer("Kim", "Bauer"));
        repository.save(new Customer("David", "Palmer"));
        repository.save(new Customer("Michelle", "Dessler"));

        // fetch all customers
        System.out.println("Customers found with findAll():");
        System.out.println("-------------------------------");
        for (Customer customer : repository.findAll()) {
            System.out.println(customer);
        }
        System.out.println();

        // fetch an individual customer by ID
        Customer customer = repository.findOne(1L);
        System.out.println("Customer found with findOne(1L):");
        System.out.println("--------------------------------");
        System.out.println(customer);
        System.out.println();

        // fetch customers by last name
        System.out.println("Customer found with findByLastName('Bauer'):");
        System.out.println("--------------------------------------------");
        for (Customer bauer : repository.findByLastName("Bauer")) {
            System.out.println(bauer);
        }
    }

}
- 第 9 行:该类实现了 [CommandLineRunner] 接口,这是一个 [Spring Boot] 接口(第 4 行)。该接口仅有一个方法,即第 19 行中的方法;
- 第 8 行:@SpringBootApplication 是一个注解,它整合了多个 [Spring Boot] 注解:
- @Configuration:表示该类是配置类;
- @EnableAutoConfiguration:指示 [Spring Boot] 根据各种属性(特别是项目类路径中的内容)自动创建若干 Bean。由于 Hibernate 库位于类路径中,因此 [entityManagerFactory] Bean 将使用 Hibernate 实现。由于 H2 DBMS 库位于类路径中,因此 [dataSource] Bean 将使用 H2 实现。 在 [dataSource] Bean 中,我们还必须定义用户名和密码。在此,Spring Boot 将使用默认的 H2 管理员,该管理员没有密码。由于 [spring-tx] 库位于类路径中,因此将使用 Spring 的事务管理器;
- @EnableWebMvc:如果 [spring-mvc] 库位于类路径中。此时,将对 Web 应用程序进行自动配置;
- @ComponentScan:用于告知 Spring 在何处查找其他 Bean、配置和服务。此处默认在包含注解类(即 [hello] 包)的包中进行搜索。 因此,系统将找到 [Customer] 和 [CustomerRepository] 类。由于前者带有 [@Entity] 注解,它将被归类为实体并由 Hibernate 管理;由于后者继承了 [CrudRepository] 接口,它将被注册为 Spring Bean;
- 第 11–12 行:将 [CustomerRepository] Bean 注入到主类的代码中;
- 第 15 行:执行 Spring Boot 项目中 [SpringApplication] 类的静态 [run] 方法。其参数是带有 [Configuration] 或 [EnableAutoConfiguration] 注解的类。随后将执行之前所述的所有操作。结果是一个 Spring 应用上下文,即一组由 Spring 管理的 Bean;
- 第 19–48 行:后续操作仅调用实现 [CustomerRepository] 接口的 Bean 的方法;
控制台输出如下:
- 第 1-8 行:Spring Boot 项目徽标;
- 第 9 行:执行 [hello.Application] 类;
- 第 10 行:[AnnotationConfigApplicationContext] 是一个实现 Spring [ApplicationContext] 接口的类。它是一个 Bean 容器;
- 第 11 行:[entityManagerFactory] Bean 由 Spring 类 [LocalContainerEntityManagerFactory] 实现。它管理 [JPA] 层;
- 第 12 行:出现了 [Hibernate]。这是所选的 JPA 实现;
- 第 19 行:Hibernate 方言是与数据库管理系统 (DBMS) 配合使用的 SQL 变体。此处的 [H2Dialect] 方言表明 Hibernate 将与 H2 数据库管理系统配合使用;
- 第 21–22 行:创建数据库。创建了 [CUSTOMER] 表。这意味着 Hibernate 已被配置为根据 JPA 定义生成表,本例中即 [Customer] 类的 JPA 定义;
- 第 26–30 行:接口 [findAll] 方法的返回结果;
- 第 34 行:接口 [findOne] 方法的返回结果;
- 第 38–39 行:[findByLastName] 方法的结果;
- 第 41 行及后续行:来自 Spring 上下文闭包的日志。
5.1.5. Spring Data 项目的手动配置
我们将前一个项目复制为 [gs-accessing-data-jpa-02] 项目:
 |
在这个新项目中,我们将不再依赖 Spring Boot 提供的自动配置,而是手动进行配置。如果默认配置不符合我们的需求,这种做法会很有用。
首先,我们将在 [pom.xml] 文件中指定必要的依赖项:
<?xml version="1.0" encoding="UTF-8"?>
<project xmlns="http://maven.apache.org/POM/4.0.0" xsi:schemaLocation="http://maven.apache.org/POM/4.0.0 http://maven.apache.org/maven-v4_0_0.xsd"
    xmlns:xsi="http://www.w3.org/2001/XMLSchema-instance">
    <modelVersion>4.0.0</modelVersion>

    <groupId>org.springframework</groupId>
    <artifactId>gs-accessing-data-jpa-02</artifactId>
    <version>0.1.0</version>

    <parent>
        <groupId>org.springframework.boot</groupId>
        <artifactId>spring-boot-starter-parent</artifactId>
        <version>1.2.3.RELEASE</version>
    </parent>

    <dependencies>
        <!-- Spring Data -->
        <dependency>
            <groupId>org.springframework.data</groupId>
            <artifactId>spring-data-jpa</artifactId>
        </dependency>
        <!-- Hibernate -->
        <dependency>
            <groupId>org.hibernate</groupId>
            <artifactId>hibernate-entitymanager</artifactId>
        </dependency>
        <!-- H2 Database -->
        <dependency>
            <groupId>com.h2database</groupId>
            <artifactId>h2</artifactId>
        </dependency>
        <!-- Tomcat JDBC -->
        <dependency>
            <groupId>org.apache.tomcat</groupId>
            <artifactId>tomcat-jdbc</artifactId>
        </dependency>
    </dependencies>

    <properties>
        <!-- use UTF-8 for everything -->
        <project.build.sourceEncoding>UTF-8</project.build.sourceEncoding>
        <project.reporting.outputEncoding>UTF-8</project.reporting.outputEncoding>
    </properties>

    <build>
        <plugins>
            <plugin>
                <groupId>org.springframework.boot</groupId>
                <artifactId>spring-boot-maven-plugin</artifactId>
            </plugin>
        </plugins>
    </build>

    <repositories>
        <repository>
            <id>spring-releases</id>
            <name>Spring Releases</name>
            <url>https://repo.spring.io/libs-release</url>
        </repository>
        <repository>
            <id>org.jboss.repository.releases</id>
            <name>JBoss Maven Release Repository</name>
            <url>https://repository.jboss.org/nexus/content/repositories/releases</url>
        </repository>
    </repositories>

    <pluginRepositories>
        <pluginRepository>
            <id>spring-releases</id>
            <name>Spring Releases</name>
            <url>https://repo.spring.io/libs-release</url>
        </pluginRepository>
    </pluginRepositories>

</project>
- 第 10–14 行:我们将使用的父 Maven 项目及其库;
- 第 18–21 行:用于访问数据库的 Spring Data;
- 第 23–26 行:JPA 规范的 Hibernate 实现;
- 第 28–31 行:H2 数据库管理系统;
- 第 33–36 行:数据库通常与连接池配合使用,以避免反复打开和关闭连接。此处使用的实现是 [tomcat-jdbc];
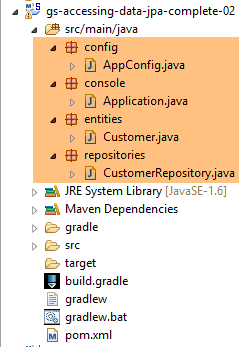
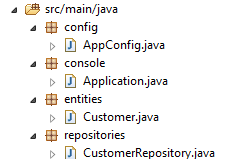
在新项目中,[Customer] 实体和 [CustomerRepository] 接口保持不变。我们将修改 [Application] 类,将其拆分为两个类:
- [Config],作为配置类;
- [Main],作为可执行类;
 |
可执行类 [Application] 现如下所示:
package console;

import org.springframework.context.annotation.AnnotationConfigApplicationContext;

import repositories.CustomerRepository;
import config.AppConfig;
import entities.Customer;

public class Application {
    public static void main(String[] args) {
        // instantiation Spring context
        AnnotationConfigApplicationContext context = new AnnotationConfigApplicationContext(AppConfig.class);
        CustomerRepository repository = context.getBean(CustomerRepository.class);

        // save a couple of customers
        repository.save(new Customer("Jack", "Bauer"));
        repository.save(new Customer("Chloe", "O'Brian"));
        repository.save(new Customer("Kim", "Bauer"));
        repository.save(new Customer("David", "Palmer"));
        repository.save(new Customer("Michelle", "Dessler"));

        ...

        // closing context
        context.close();
    }

}
- 第 9 行:[Application] 类不再包含任何配置注解;
- 第 3–7 行:请注意,不再包含任何 [Spring Boot] 包导入;
- 第 12 行:我们实例化 Spring Bean。我们获取 Spring 上下文,其中包含对已创建 Bean 的引用;
- 第 13 行:我们请求 [CustomerRepository] Bean 的引用;
package config;

import javax.persistence.EntityManagerFactory;

import org.apache.tomcat.jdbc.pool.DataSource;
import org.springframework.context.annotation.Bean;
import org.springframework.context.annotation.Configuration;
import org.springframework.data.jpa.repository.config.EnableJpaRepositories;
import org.springframework.orm.jpa.JpaTransactionManager;
import org.springframework.orm.jpa.JpaVendorAdapter;
import org.springframework.orm.jpa.LocalContainerEntityManagerFactoryBean;
import org.springframework.orm.jpa.vendor.Database;
import org.springframework.orm.jpa.vendor.HibernateJpaVendorAdapter;
import org.springframework.transaction.PlatformTransactionManager;
import org.springframework.transaction.annotation.EnableTransactionManagement;

@EnableTransactionManagement
@EnableJpaRepositories(basePackages = { "repositories" })
@Configuration
// @ComponentScan(basePackages={"package1","package2"})
public class AppConfig {

    // h2 database
    @Bean
    public DataSource dataSource() {
        // data source TomcatJdbc
        DataSource dataSource = new DataSource();
        // configuration access JDBC
        dataSource.setDriverClassName("org.h2.Driver");
        dataSource.setUrl("jdbc:h2:./demo");
        dataSource.setUsername("sa");
        dataSource.setPassword("");
        // an initially open connection
        dataSource.setInitialSize(1);
        // result
        return dataSource;
    }

    // the provider JPA
    @Bean
    public JpaVendorAdapter jpaVendorAdapter() {
        HibernateJpaVendorAdapter hibernateJpaVendorAdapter = new HibernateJpaVendorAdapter();
        hibernateJpaVendorAdapter.setShowSql(false);
        hibernateJpaVendorAdapter.setGenerateDdl(true);
        hibernateJpaVendorAdapter.setDatabase(Database.H2);
        return hibernateJpaVendorAdapter;
    }

    // EntityManagerFactory
    @Bean
    public EntityManagerFactory entityManagerFactory(JpaVendorAdapter jpaVendorAdapter, DataSource dataSource) {
        LocalContainerEntityManagerFactoryBean factory = new LocalContainerEntityManagerFactoryBean();
        factory.setJpaVendorAdapter(jpaVendorAdapter);
        factory.setPackagesToScan("entities");
        factory.setDataSource(dataSource);
        factory.afterPropertiesSet();
        return factory.getObject();
    }

    // Transaction manager
    @Bean
    public PlatformTransactionManager transactionManager(EntityManagerFactory entityManagerFactory) {
        JpaTransactionManager txManager = new JpaTransactionManager();
        txManager.setEntityManagerFactory(entityManagerFactory);
        return txManager;
    }

}
- 第 17 行:[@EnableTransactionManagement] 注解表示必须解析 [@Transactional] 注解。[CrudRepository] 接口的方法带有这些注解,因此它们将在事务中执行;
- 第 18 行:[@EnableJpaRepositories] 注解指定了 Spring Data [CrudRepository] 接口所在的目录。这些接口将作为 Spring 组件存在,并在 Spring 上下文中可用;
- 第 19 行:[@Configuration] 注解将 [Config] 类定义为 Spring 配置类;
- 第 20 行:[@ComponentScan] 注解列出了 Spring 组件的搜索目录。Spring 组件是指带有 @Service、@Component、@Controller 等 Spring 注解的类。此处除了 [AppConfig] 类中定义的组件外没有其他组件,因此该注解已被注释掉;
- 第 24–37 行:定义数据源,即 H2 数据库。正是第 25 行上的 @Bean 注解,使得该方法创建的对象成为 Spring 管理的组件。此处方法名可以是任意名称。但是,如果第 51 行的 EntityManagerFactory 不存在且是通过自动配置定义的,则该方法必须命名为 [dataSource];
- 第 30 行:数据库将命名为 [demo],并生成在项目文件夹中;
- 第 40–47 行:定义所使用的 JPA 实现,本例中为 Hibernate 实现。此处的方法名可以是任意名称;
- 第 43 行:不记录 SQL 日志;
- 第 44 行:若数据库不存在,则创建数据库;
- 第 50–58 行:定义将管理 JPA 持久化的 EntityManagerFactory。该方法必须命名为 [entityManagerFactory];
- 第 51 行:该方法接收两个参数,其类型分别为之前定义的两个 Bean。Spring 将构建这些 Bean 并作为方法参数进行注入;
- 第 53 行:设置要使用的 JPA 实现;
- 第 54 行:指定 JPA 实体的存储目录;
- 第 55 行:设置待管理的数据源;
- 第 61–66 行:事务管理器。该方法必须命名为 [transactionManager]。它接收第 51–58 行定义的 Bean 作为参数;
- 第 64 行:将事务管理器与 EntityManagerFactory 关联;
上述方法可以按任意顺序定义。
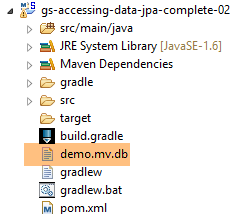
运行该项目将得到相同的结果。项目文件夹中会出现一个新文件,即 H2 数据库文件:
 |
5.1.6. 创建可执行归档文件
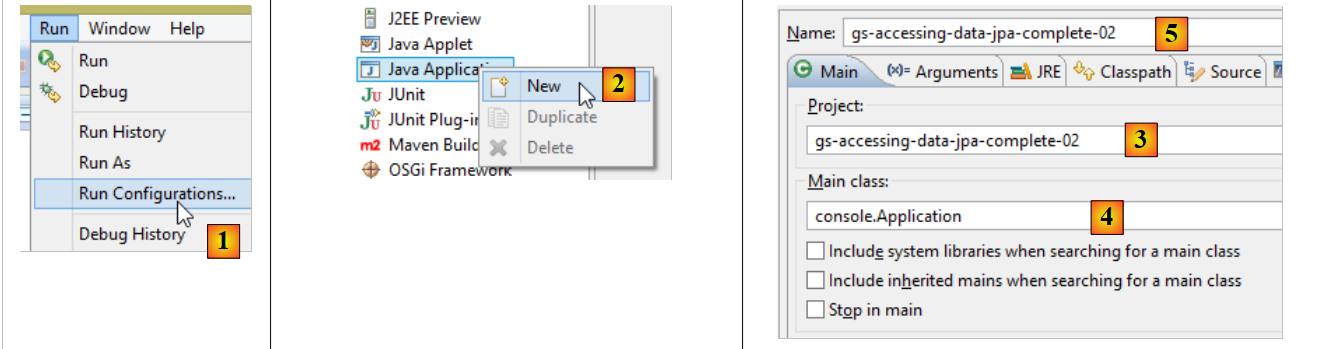 |
- 在 [1] 中:创建一个运行时配置;
- 在 [2] 中:选择 [Java 应用程序] 类型
- 在 [3] 中:指定要运行的项目(使用“浏览”按钮);
- 在 [4] 中:指定要运行的类;
- 在 [5] 中:运行配置的名称——可以是任意名称;
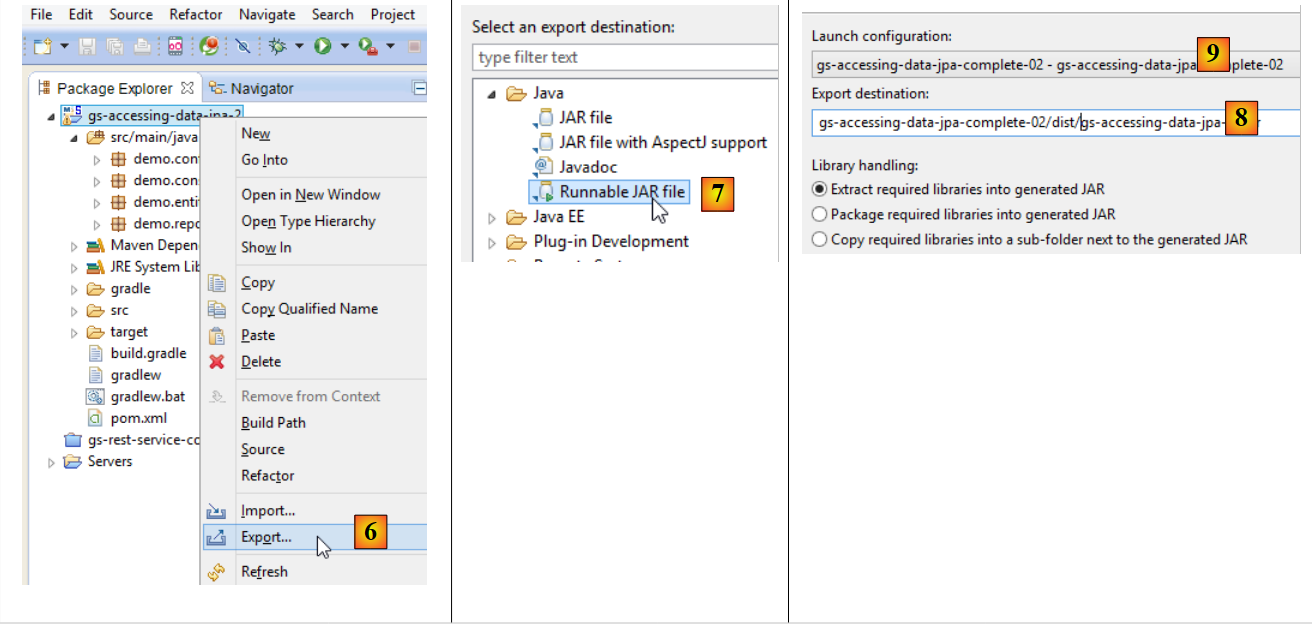 |
- 在 [6] 中:导出项目;
- 在 [7] 中:作为可执行 JAR 归档文件;
- 在 [8] 中:指定要创建的可执行文件的路径和名称;
- 在 [9] 中:在 [5] 中创建的运行配置的名称;
10 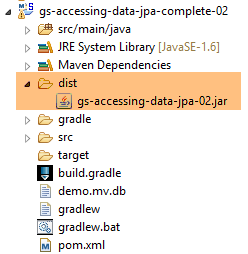 |
- 在 [10] 中,生成的归档文件;
完成上述操作后,在包含可执行归档文件的文件夹中打开一个控制台:
该归档文件的执行方式如下:
.....\dist>java -jar gs-accessing-data-jpa-02.jar
控制台显示的结果如下:
5.1.7. 创建 [Spring Data] 项目
要创建 Spring Data 项目模板,请按照以下步骤操作:
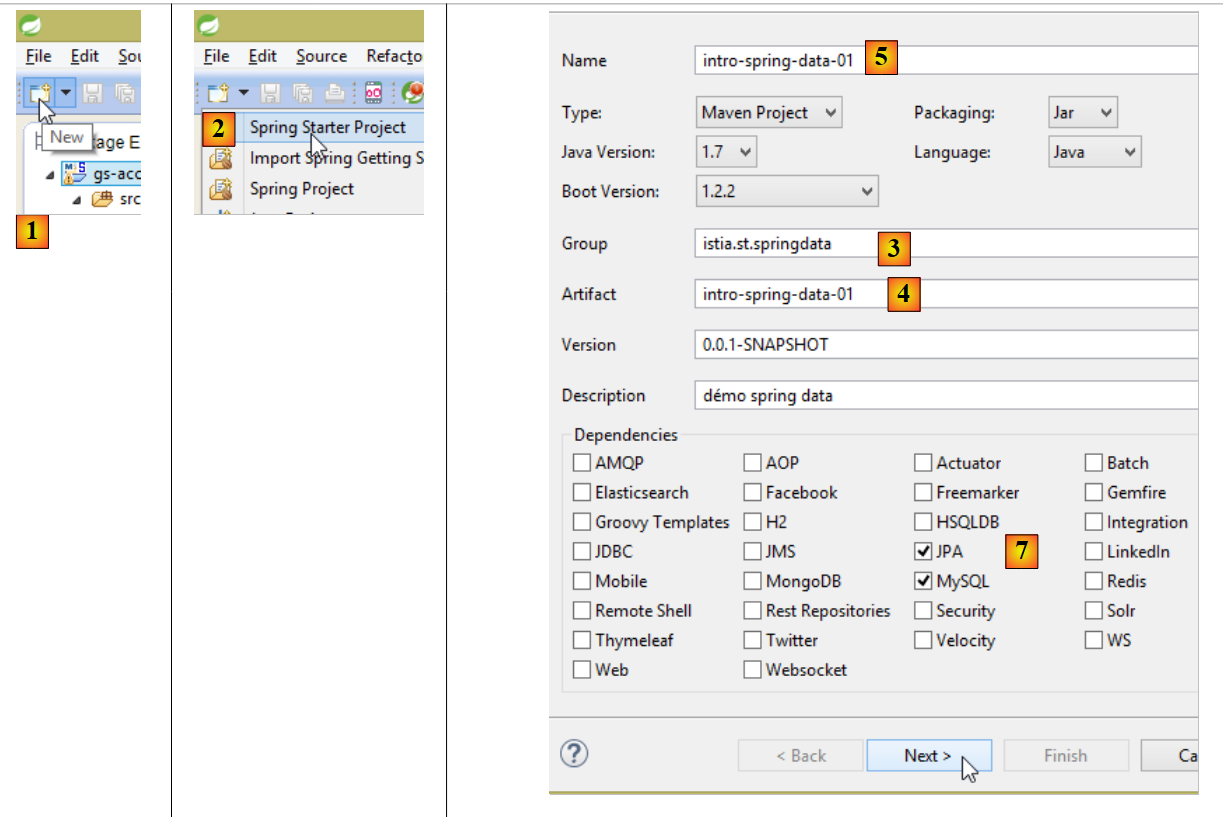 |
- 在 [1] 中,创建一个新项目;
- 在 [2] 中:选择 [Spring Starter Project];
- 生成的项目将是一个 Maven 项目。在 [3] 中,指定项目组名称;
- 在 [4] 中,指定项目构建时将生成的工件(此处为 JAR)的名称;
- 在 [5] 中:项目的 Eclipse 名称——此处可任意命名(不必与 [4] 一致);
- 在 [7] 中:指定您正在创建一个使用 MySQL 数据库管理系统(DBMS)并包含 [JPA] 层的项目。此类项目所需的依赖项随后将被包含在 [pom.xml] 文件中;
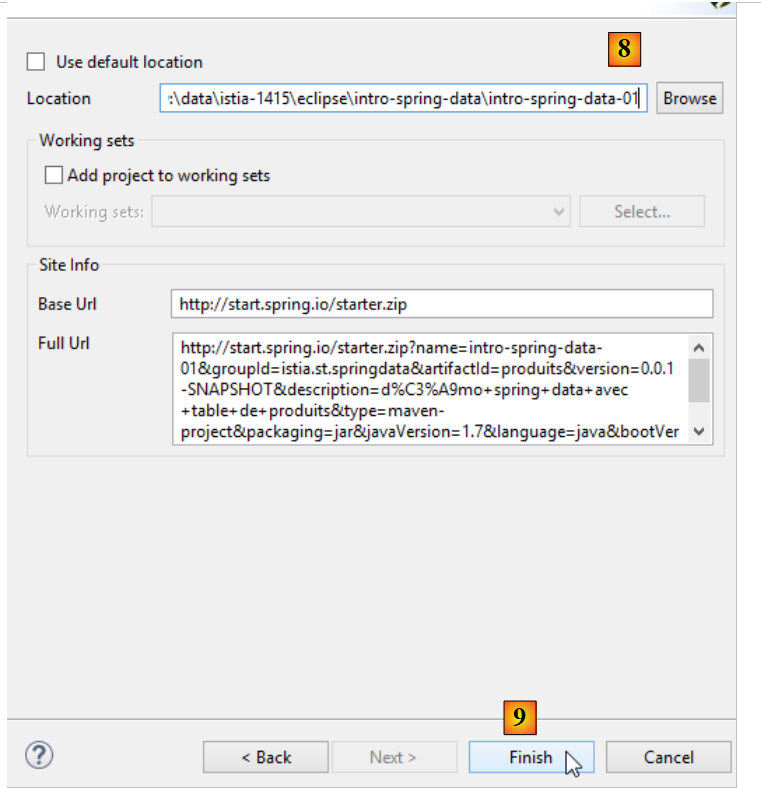 |
- 在 [8] 中,输入项目文件夹的名称;
- 在 [9] 中,完成向导;
 |
- 在 [10] 中:生成的项目;
[pom.xml] 文件包含了 JPA 项目所需的依赖项:
<?xml version="1.0" encoding="UTF-8"?>
<project xmlns="http://maven.apache.org/POM/4.0.0" xmlns:xsi="http://www.w3.org/2001/XMLSchema-instance"
    xsi:schemaLocation="http://maven.apache.org/POM/4.0.0 http://maven.apache.org/xsd/maven-4.0.0.xsd">
    <modelVersion>4.0.0</modelVersion>

    <groupId>istia.st.springdata</groupId>
    <artifactId>intro-spring-data-01</artifactId>
    <version>0.0.1-SNAPSHOT</version>
    <packaging>jar</packaging>

    <name>intro-spring-data-01</name>
    <description>démo spring data avec table de produits</description>

    <parent>
        <groupId>org.springframework.boot</groupId>
        <artifactId>spring-boot-starter-parent</artifactId>
        <version>1.2.3.RELEASE</version>
        <relativePath/> <!-- lookup parent from repository -->
    </parent>

    <properties>
        <project.build.sourceEncoding>UTF-8</project.build.sourceEncoding>
        <start-class>demo.IntroSpringData01Application</start-class>
        <java.version>1.7</java.version>
    </properties>

    <dependencies>
        <dependency>
            <groupId>org.springframework.boot</groupId>
            <artifactId>spring-boot-starter-data-jpa</artifactId>
        </dependency>
        <dependency>
            <groupId>mysql</groupId>
            <artifactId>mysql-connector-java</artifactId>
            <scope>runtime</scope>
        </dependency>
        <dependency>
            <groupId>org.springframework.boot</groupId>
            <artifactId>spring-boot-starter-test</artifactId>
            <scope>test</scope>
        </dependency>
    </dependencies>

    <build>
        <plugins>
            <plugin>
                <groupId>org.springframework.boot</groupId>
                <artifactId>spring-boot-maven-plugin</artifactId>
            </plugin>
        </plugins>
    </build>

</project>
- 第 14–19 行:父级 Maven 项目;
- 第 28–31 行:JPA 所需的依赖项——将包含 [Spring Data];
- 第 32–36 行:对 MySQL JDBC 驱动程序的依赖;
- 第 37–41 行:集成 Spring 的 JUnit 测试所需的依赖项;
可执行的 [Application] 类本身不执行任何操作,但已预先配置:
package demo;

import org.springframework.boot.SpringApplication;
import org.springframework.boot.autoconfigure.SpringBootApplication;

@SpringBootApplication
public class IntroSpringData01Application {

    public static void main(String[] args) {
        SpringApplication.run(IntroSpringData01Application.class, args);
    }
}
- [@SpringBootApplication] 注解将该类设为项目的自动配置类;
测试类 [ApplicationTests] 虽然不执行任何操作,但已预先配置好:
package demo;

import org.junit.Test;
import org.junit.runner.RunWith;
import org.springframework.boot.test.SpringApplicationConfiguration;
import org.springframework.test.context.junit4.SpringJUnit4ClassRunner;

@RunWith(SpringJUnit4ClassRunner.class)
@SpringApplicationConfiguration(classes = IntroSpringData01Application.class)
public class IntroSpringData01ApplicationTests {

    @Test
    public void contextLoads() {
    }

}
- 第 9 行:[@SpringApplicationConfiguration] 注解允许使用 [IntroSpringData01Application] 配置文件。因此,该测试类将能够使用该文件中定义的所有 Bean;
- 第 8 行:[@RunWith] 注解实现了 Spring 与 JUnit 的集成:该类将能够作为 JUnit 测试运行。[@RunWith] 是 JUnit 注解(第 4 行),而 [SpringJUnit4ClassRunner] 类则是 Spring 类(第 6 行);
现在我们已经有了一个 JPA 应用程序的骨架,可以继续完善它。