3. JDBC API 简介
3.1. 设置工作环境
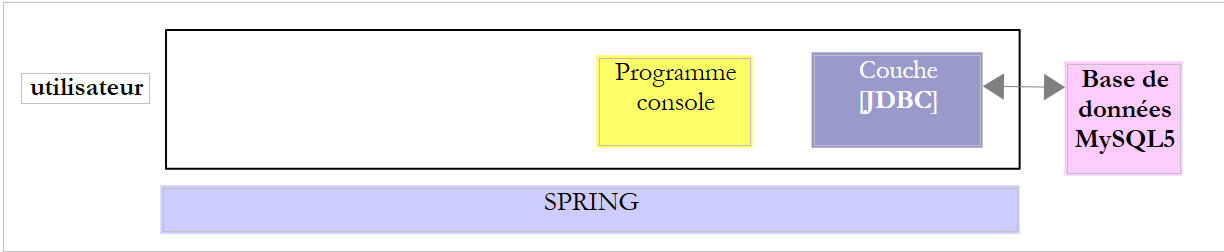
我们将使用 MySQL 5 数据库进行操作。
您必须具备:
- 已安装 JDK(Java 开发工具包)(第 23.1 节);
- 已安装 Maven 依赖管理器(第 23.2 节);
- 已安装 Spring Tool Suite (STS) 集成开发环境 (第 23.3 节);
- 已安装 MySQL 5 数据库管理系统(第 23.4 节)及其 EMS MyManager 客户端(第 23.5 节);
- 从 [http://tahe.developpez.com/java/spring-database] 下载源代码;
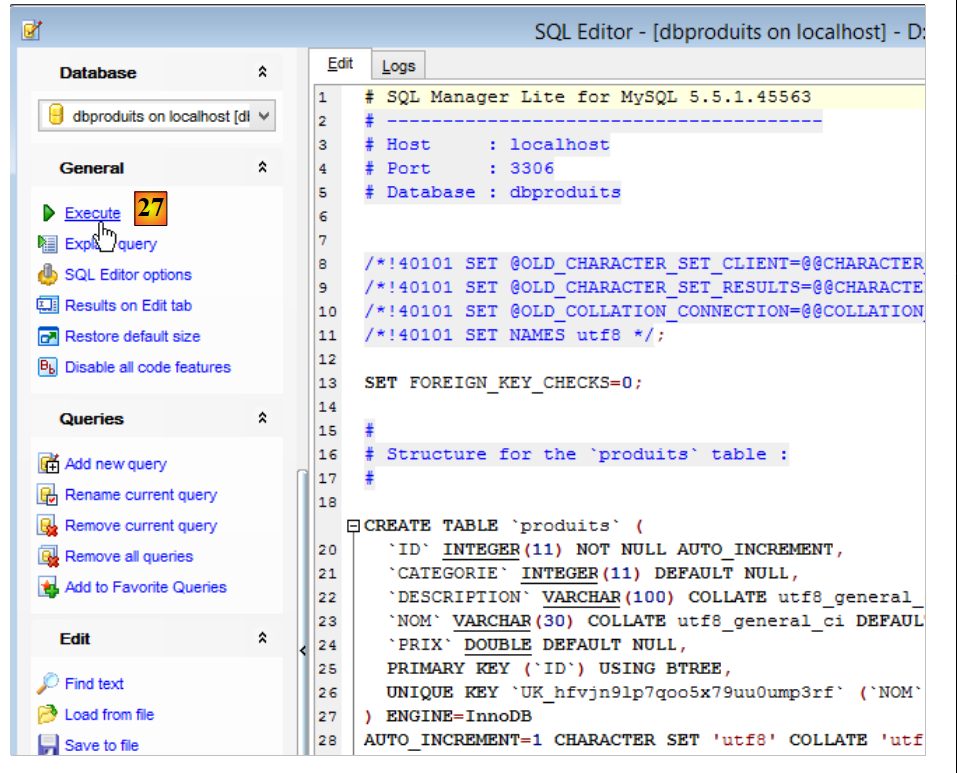
下文假设 MySQL5 管理员为 root,密码为 root。启动 MySQL5 数据库管理系统及其客户端 [MyManager]。使用 [MyManager],我们创建数据库 [dbproduits] [1-34]:
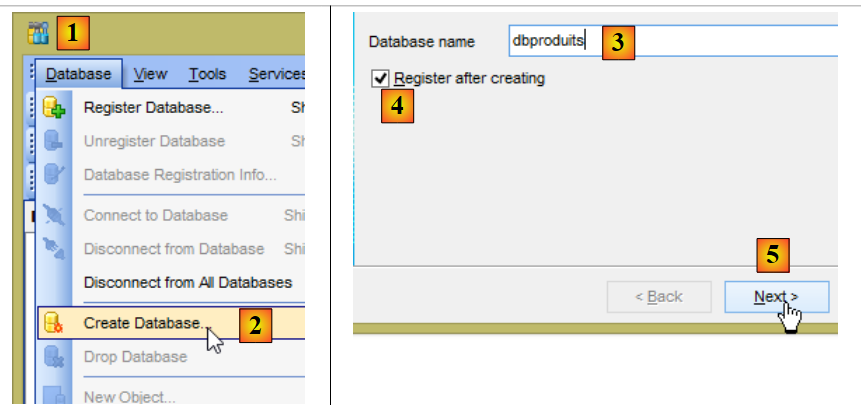 |
- 在 [3] 中,数据库必须命名为 [dbproduits];
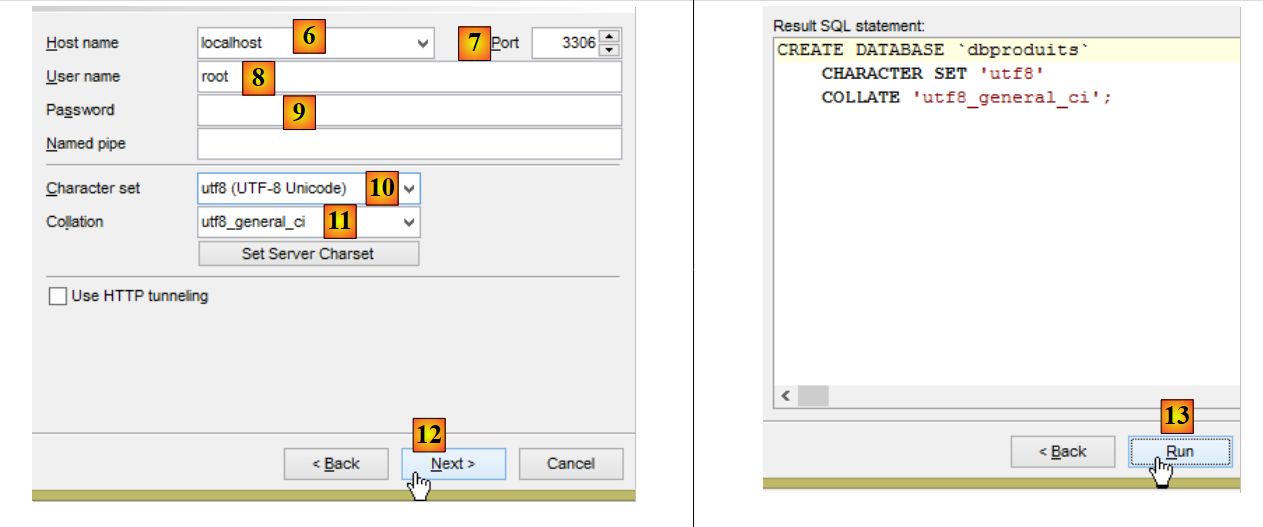 |
- 在 [8-9] 中,使用 root 密码(上图截图中未显示)登录;
 |
- 在 [14a] 中,密码仍是 root(截图中未显示);
- 在 [15] 中,数据库 [dbproduits] 已创建;
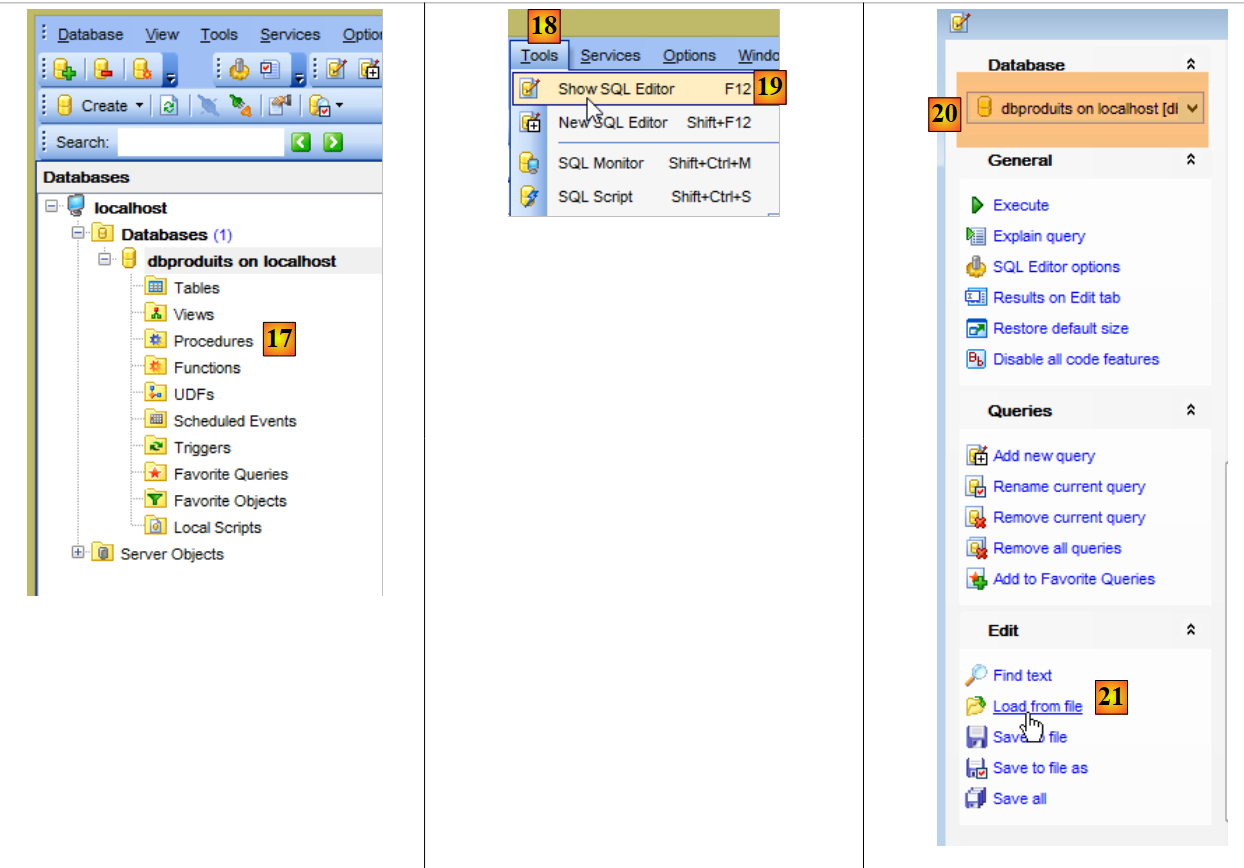 |
- 在 [20] 中,请注意所选的数据库。它必须是 [dbproduits] 数据库;
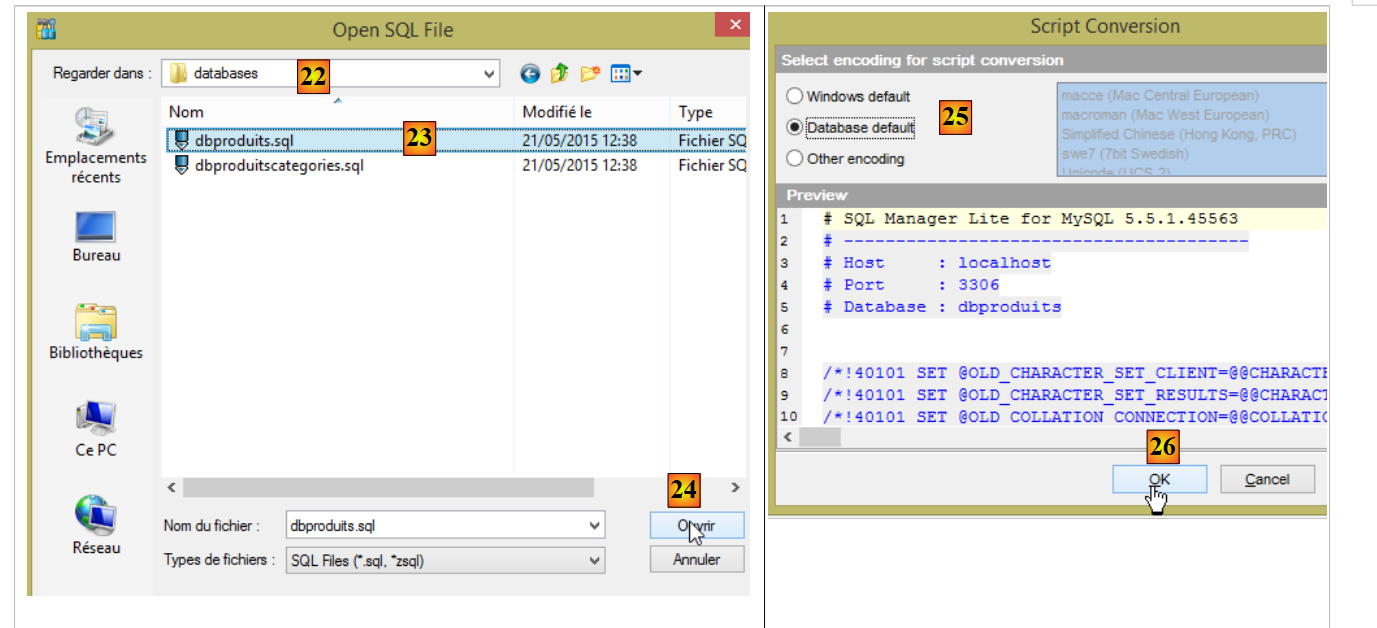 |
- 在 [22] 中,路径为 <examples>/spring-database-config/mysql/databases,其中 <examples> 是包含已下载示例的文件夹;
- 在 [23] 中,选择 SQL 脚本 [dbproduits.sql]。它将在 [dbproduits] 数据库中生成 [PRODUITS] 表;
 |
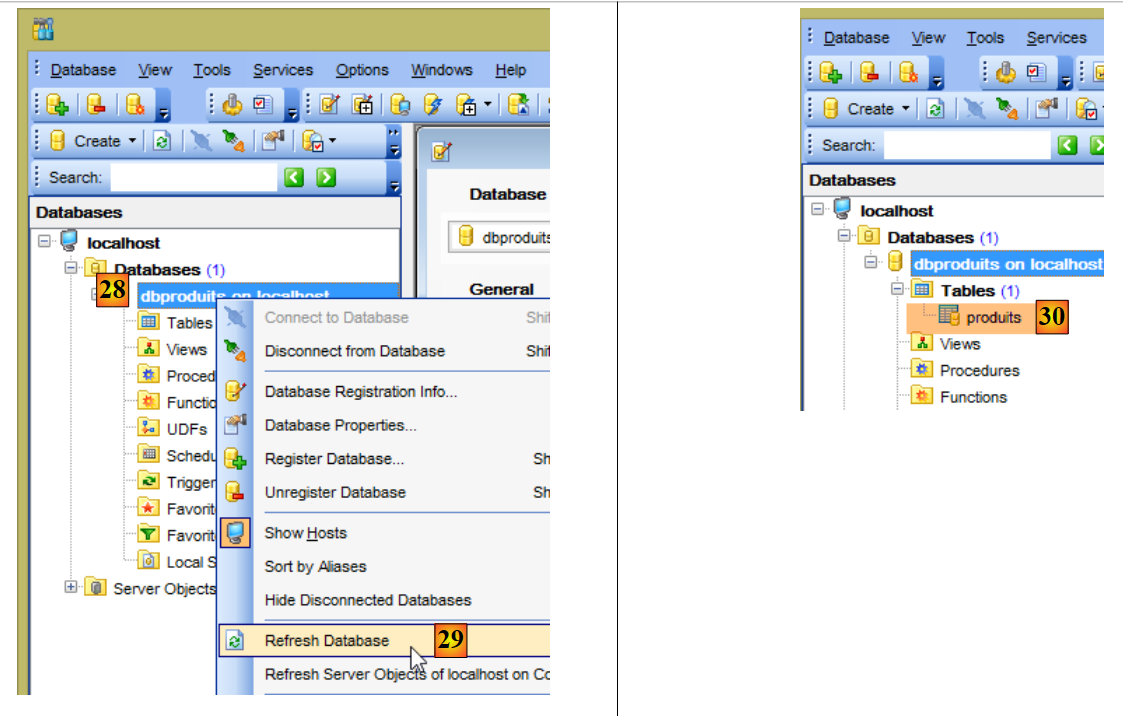 |
- 在[30]中,已创建了[products]表;
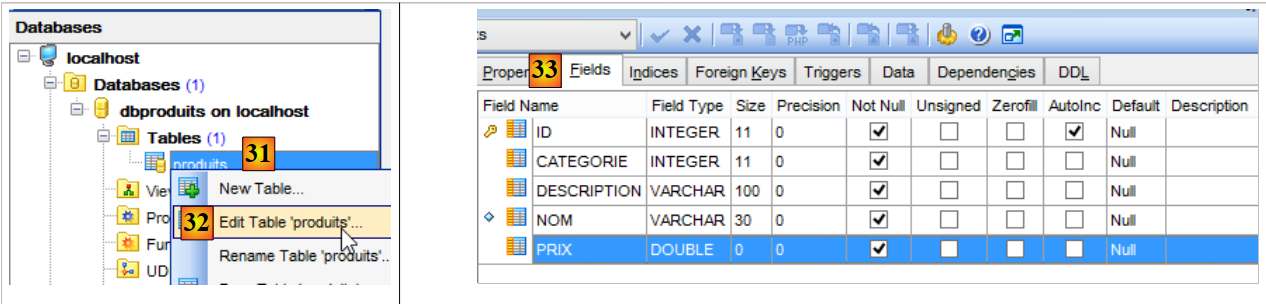 |
- 在 [33] 中,[products] 表的列;
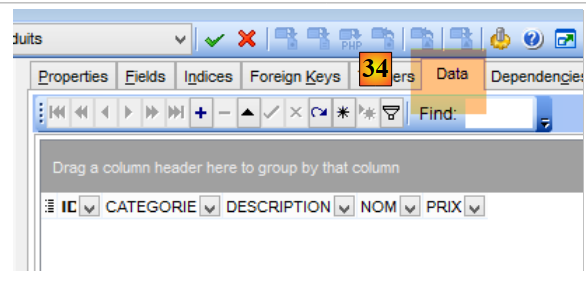 |
- 在 [34] 中,它最初为空;
现在,使用 STS 导入以下项目(操作步骤与 <examples>/spring-core 文件夹中的项目相同):
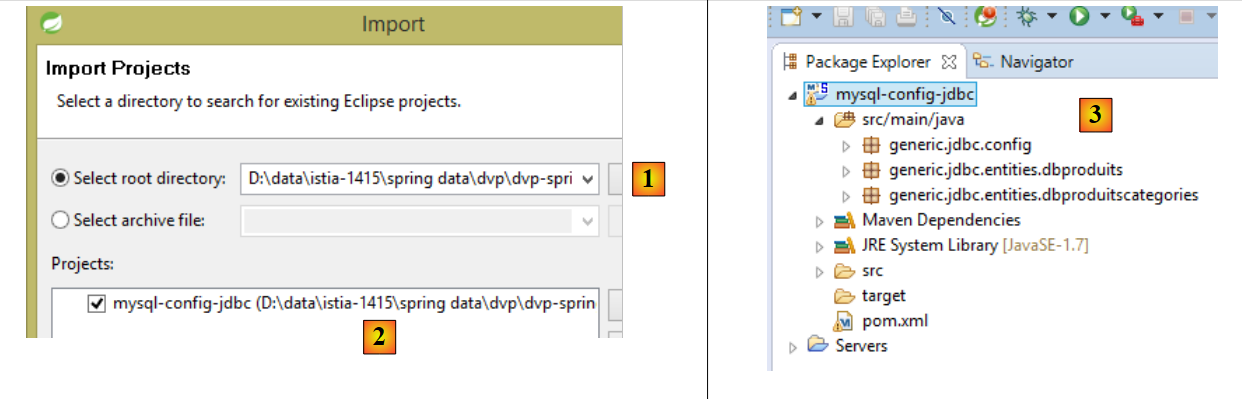 |
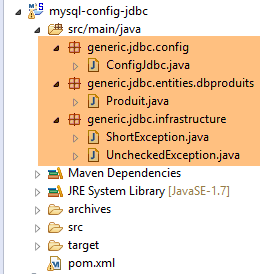
- 在 [2] 中,[mysql-config-jdbc] 项目位于 [<examples>/spring-database-config/mysql/eclipse/mysql-config-jdbc] 文件夹 [1] 中;
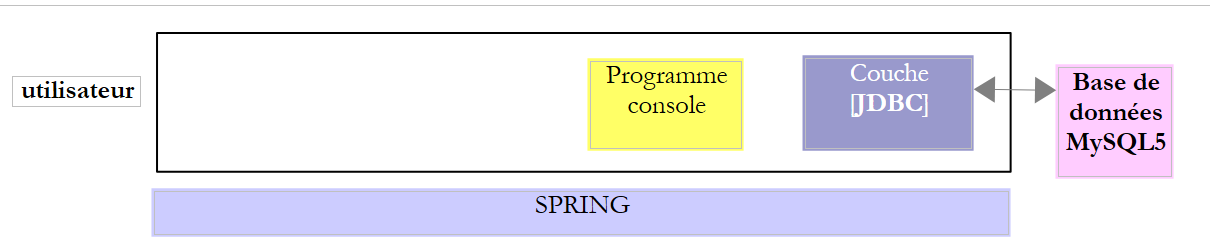
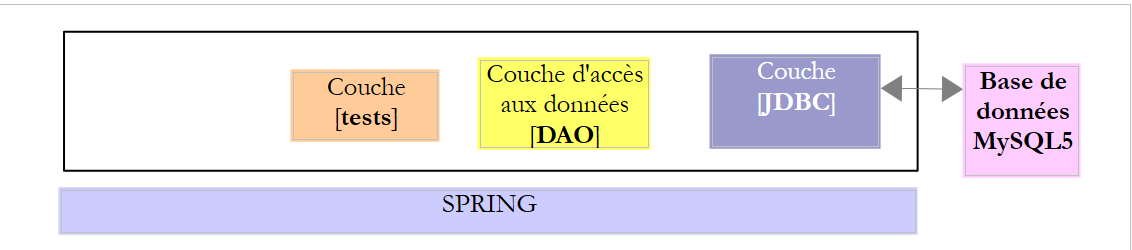
该项目配置了以下架构的 JDBC 层:
 |
然后再次导入以下三个项目:
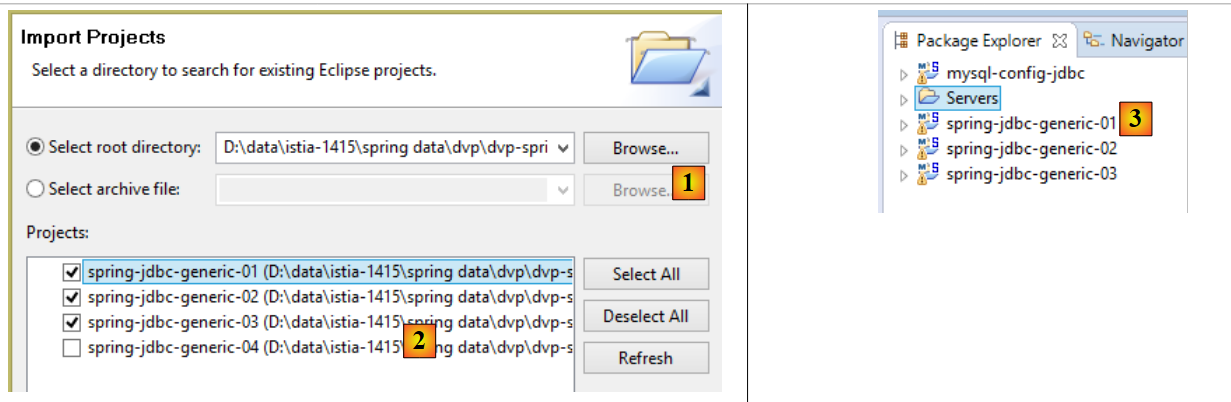 |
- 在 [2] 中,这些项目位于 [<examples>/spring-database-config/spring-jdbc] 文件夹中 [1];
这三个项目是使用 [mysql-config-jdbc] Maven 项目的 Maven 项目。该项目生成以下 Maven 工件(参见 pom.xml):
    <groupId>dvp.spring.database</groupId>
    <artifactId>generic-config-jdbc</artifactId>
<version>0.0.1-SNAPSHOT</version>
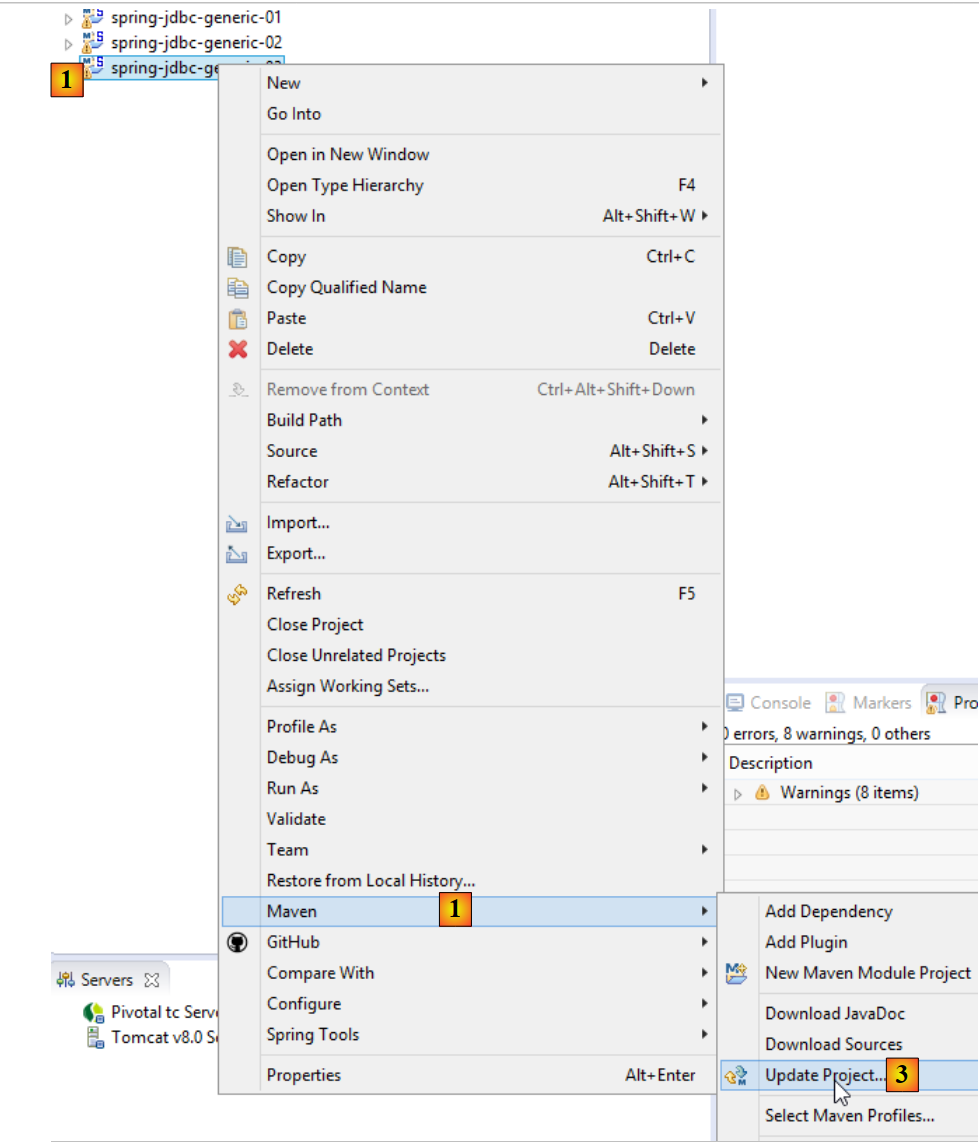
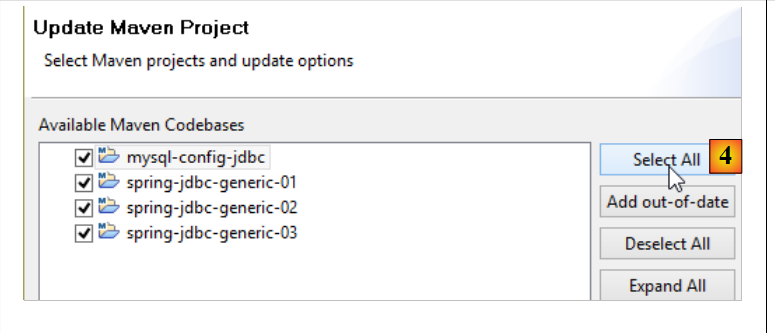
[oracle-config-jdbc、db2-config-jdbc、...] 等项目也会生成相同的工件。为确保当前在 STS 中加载的 [spring-generic-jdbc-*] 项目确实使用了 [mysql-config-jdbc] 项目:
- 请确保没有其他 [sgbd-config-jdbc] 项目同时被加载。这可能会导致难以理解的错误;
- 请按以下方式更新已加载项目的 Maven 配置:
 |
 |
要验证您的配置,请运行 [spring-jdbc-generic-01.IntroJdbc01] 构建配置 [1-3]:
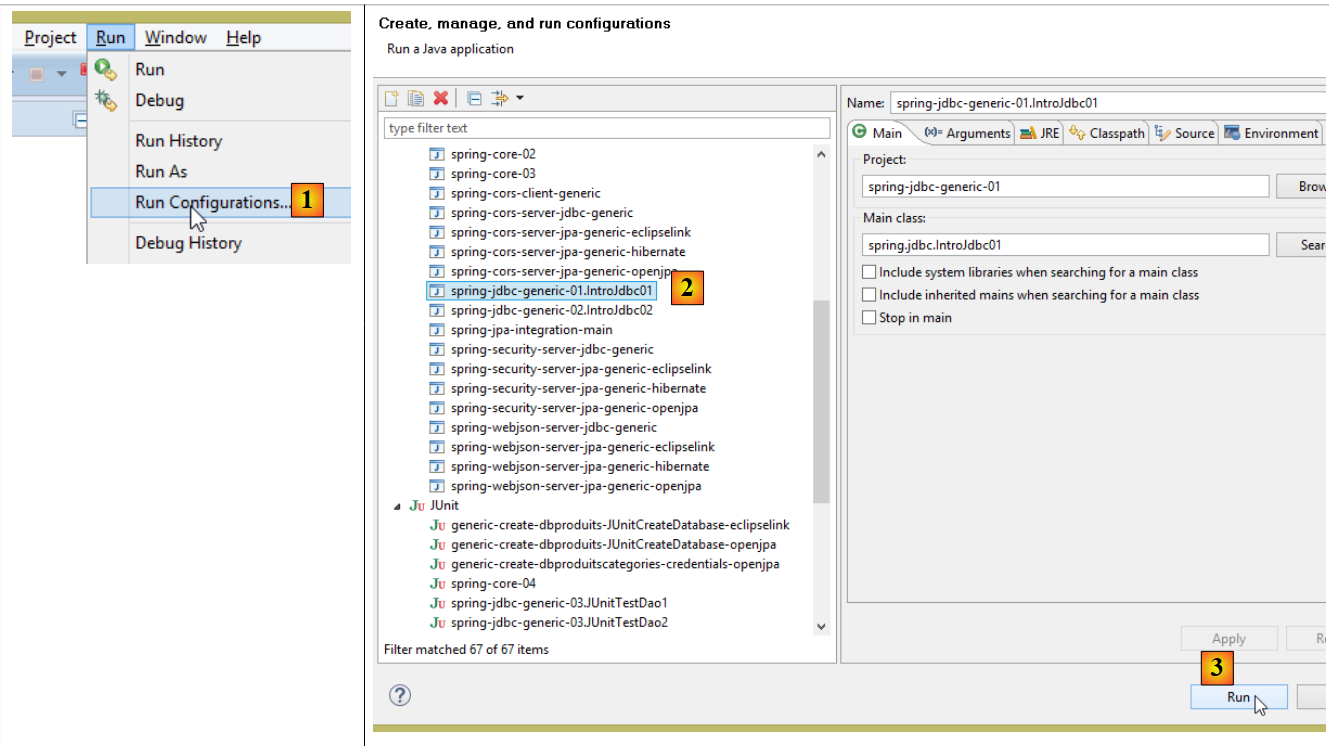 |
您应看到以下控制台输出:
在以下示例中,读者可以:
3.2. 操作数据库的步骤
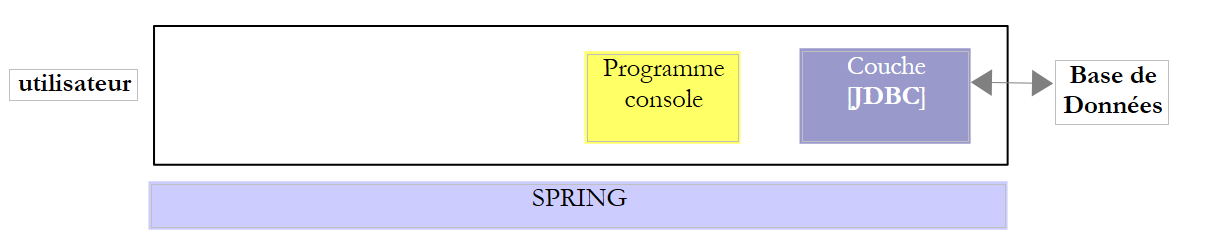 |
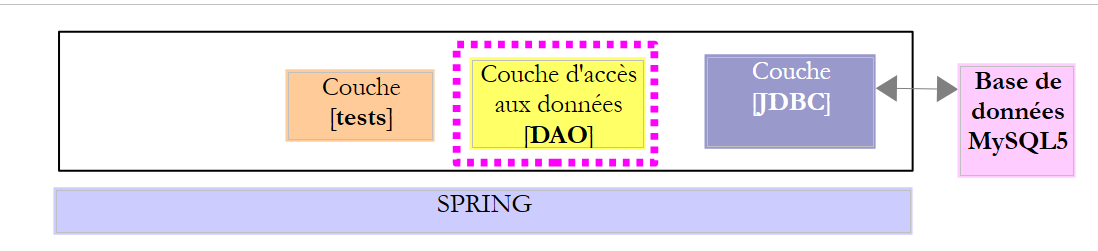
在上述架构中,通过控制台程序操作数据库涉及以下步骤:
- 加载数据库的 JDBC 驱动程序;
- 建立与数据库的连接;
- 在数据库上执行 SQL 查询并处理查询结果;
- 关闭连接;
步骤 1 仅执行一次。步骤 2–4 会反复执行。请注意,连接不会保持打开状态;一旦不再需要,它们就会立即关闭。
3.2.1. 步骤 1 - 将 JDBC 驱动程序加载到内存中
代码
        // driver loading JDBC
        try {
            Class.forName(nom de la classe du pilote JDBC);
        } catch (ClassNotFoundException e1) {
            // handle the exception
}
第 3 行操作的目的是将数据库的 JDBC 驱动程序加载到内存中。此操作只需执行一次。不过,重复执行也不会导致错误。系统会在项目的类路径中搜索 JDBC 驱动程序类。因此,在 Eclipse 项目中,包含 JDBC 驱动程序类的 [jar] 文件必须已添加到项目的类路径中。
3.2.2. 步骤 2 - 建立连接
一旦 JDBC 驱动程序就位,我们就请求它打开与数据库的连接:
代码
package spring.jdbc;

import java.sql.Connection;
import java.sql.DriverManager;
import java.sql.PreparedStatement;
import java.sql.ResultSet;
import java.sql.SQLException;

public class IntroJdbc01 {

...
        Connection connexion = null;
        PreparedStatement ps = null;
        ResultSet rs = null;
        try {
            // opening connection
            connexion = DriverManager.getConnection(url, user, passwd);
...
        } catch (SQLException e1) {
            // we handle the exception
            ...
        } finally {
         // close connection
         if (connexion != null) {
            try {
                connexion.close();
            } catch (SQLException e2) {
                // handle the exception
                ...
            }
         }
}
- 第 3–7 行:实现 JDBC 接口的类均位于 [java.sql] 包中。 此外,一旦发生错误,它们都会抛出 [SQLException](第 19、27 行)。该异常继承自 [Exception] 类,属于所谓的“受检查异常”:必须使用 try/catch 代码块进行处理;或者,也可以选择不进行处理,并在方法签名中添加 [throws SQLException] 来表明该方法允许异常向上传播;
- 第 17 行,[DriverManager.getConnection] 是一个静态方法,需要三个参数:
- [url]:数据库 URL。这是一个字符串,具体取决于所使用的数据库。对于 MySQL,其格式为 [jdbc:mysql://localhost:3306/db_name];
- [user]:连接所有者;
- [passwd]:用户的密码;
- 第 24–30 行:必须在 [finally] 子句中关闭连接,以确保无论是否发生异常,连接都会被关闭。
3.2.3. 步骤 3 - 执行 SQL [SELECT] 语句
建立连接后,即可执行 SQL 命令。读取命令 [SELECT] 的处理方式与更新操作 [UPDATE、INSERT、DELETE] 不同。我们将从 [SELECT] SQL 命令开始讲解:
代码
Connection connexion = null;
        PreparedStatement ps = null;
        ResultSet rs = null;
        try {
            // opening connection
            connexion = DriverManager.getConnection(url, user, passwd);
            // start of transaction
            connexion.setAutoCommit(false);
            // in read-only mode
            connexion.setReadOnly(true);
            // table [PRODUITS] is read
            ps = connexion.prepareStatement("SELECT ID, NOM, CATEGORIE, PRIX, DESCRIPTION FROM PRODUITS");
            rs = ps.executeQuery();
            System.out.println("Liste des produits : ");
            while (rs.next()) {
                System.out.println(new Produit(rs.getInt(1), rs.getString(2), rs.getInt(3), rs.getDouble(4), rs.getString(5)));
            }
            // commit transaction
            connexion.commit();
        } catch (SQLException e1) {
            // we handle the exception
             doCatchException(connexion,e1);
        } finally {
            // we treat the finally
            doFinally(rs, ps, connexion);
        }

    private void doFinally(ResultSet rs, PreparedStatement ps, Connection connexion) {
....
}
- 第 8、10 行:以只读模式(第 10 行)打开事务(第 8 行)。 事务是一系列SQL语句,要么全部成功,要么全部失败。因此,在一个包含N条SQL语句的事务中,如果第(I+1)条语句失败,则前面的I条语句将被回滚。对于读取操作,事务并非必需。但是,创建只读事务可以使某些数据库管理系统(DBMS)执行特定的优化;
- 第 12 行:使用 [PreparedStatement]。通常,[PreparedStatement] 包含用字符 ? 表示的参数。此处则没有。 [PreparedStatement]是由DBMS预编译的语句。该预编译过程会产生开销,且仅执行一次。随后,DBMS会使用实际参数替换占位符参数 ? 来执行该预编译语句。请注意,建议明确指定所需列,而非使用 * 符号来检索所有列。通过指定列名,可以基于它们在 SELECT 语句中的位置检索其值;
- 第 13 行:执行 [PreparedStatement]。获取一个 [ResultSet] 对象;
[ResultSet] 对象代表一张表,即一组行和列。在任何给定时刻,我们只能访问表中的一行,称为当前行。当 [ResultSet] 最初创建时,尚无当前行。我们必须执行 [ResultSet.next()] 操作才能获取它。next 方法的签名如下:
该方法尝试跳转到 [ResultSet] 的下一行,若成功则返回 true,否则返回 false。若成功,下一行将成为新的当前行。上一行将被丢弃且无法恢复。
[ResultSet] 表包含名为 labelCol1、labelCol2、... 的列,这些列名由已执行的 [SELECT] 查询指定。以以下查询为例:
SELECT ID as myId, NOM as myNom, CATEGORIE as myCategorie, PRIX as myPrix, DESCRIPTION as myDescription FROM PRODUITS
- [ID] 列将被映射到 [ResultSet] 中名为 [myId] 的列;
- [NAME] 列将存入 [ResultSet] 中名为 [myName] 的列;
- ...
在上例中,标识符 [myCol] 被称为列标签。如果没有这些标签,[ResultSet] 列的名称将取决于数据库管理系统(DBMS)。当 [SELECT] 操作针对单个表时,列标签默认即为 SELECT 语句所请求的列名。问题出现在 [SELECT] 操作涉及多个表且这些表包含相同列名时,如下例所示:
SELECT PRODUITS.NOM, CATEGORIES.NOM FROM PRODUITS, CATEGORIES WHERE PRODUITS.CATEGORIE_ID=CATEGORIES.ID
假设 [PRODUCTS] 表有一个外键指向 [CATEGORIES] 表,该关系由 [PRODUCTS].CATEGORY_ID --> [CATEGORIES].ID 表示,并且 [PRODUCTS] 和 [CATEGORIES] 表都包含一个 [NAME] 字段。 在此情况下,[ResultSet] 中赋予 [PRODUITS.NOM] 和 [CATEGORIES.NOM] 列的名称取决于数据库管理系统(DBMS)。为了实现跨 DBMS 的可移植性,此处必须使用列标签,因此我们应写为:
SELECT PRODUITS.NOM as p_NOM, CATEGORIES.NOM as c_NOM FROM PRODUITS, CATEGORIES WHERE PRODUITS.CATEGORIE_ID=CATEGORIES.ID
要访问 [ResultSet] 中当前行的各个字段,可使用以下方法:
用于从当前行中检索名为“labelColi”的列,即 [SELECT] 语句中带有该标签的列。 Type 指“labelColi”字段的数据类型。可使用以下 [getType] 方法:getInt、getLong、getString、getDouble、getFloat、getDate 等。除了使用列名,您还可以使用该列在已执行的 [SELECT] 查询中的位置:
其中 i 是目标列的索引(i>=1)。
- 第 15–17 行:从数据库中读取值;
- 第 19 行:事务被提交(也称为提交)。这将终止事务并释放 DBMS 为其分配的资源;
- 第 25 行:在 [finally] 代码块中释放资源。这会调用后续的 [doFinally] 方法:
private void doFinally(ResultSet rs, PreparedStatement ps, Connection connexion) {
        // closure ResultSet
        if (rs != null) {
            try {
                rs.close();
            } catch (SQLException e1) {

            }
        }
        // closure [PreparedStatement]
        if (ps != null) {
            try {
                ps.close();
            } catch (SQLException e2) {

            }
        }
        if (connexion != null) {
            try {
                // close connection
                connexion.close();
            } catch (SQLException e3) {
                // handle the exception
            }
        }
    }
- 第 3–9 行:关闭 [ResultSet];
- 第 11–17 行:关闭 [PreparedStatement];
- 第 18–27 行:关闭连接;
第 3–17 行的关闭语句似乎是多余的,因为连接已在第 18–25 行关闭。事实上,在某些情况下它们并非多余,建议保留这些语句 [http://stackoverflow.com/questions/4507440/must-jdbc-resultsets-and-statements-be-closed-separately-although-the-connection]。
- 第 22 行:该异常由以下 [doCatchException] 方法处理:
    private static void doCatchException(Connection connexion, Throwable th) {
        // cancel transaction
        try {
            if (connexion != null) {
                connexion.rollback();
            }
        } catch (SQLException e2) {
            // handle the exception
        }
}
- 第 4–6 行:事务被回滚。这将终止事务,数据库管理系统(DBMS)可以释放分配给该事务的资源;
3.2.4. 步骤 3 - 执行 SQL 语句 [INSERT, UPDATE, DELETE]
SQL语句 [INSERT、UPDATE、DELETE] 属于更新操作:它们会修改数据库,但不会返回任何行。唯一返回的信息是受更新操作影响的行数。
代码
Connection connexion = null;
        PreparedStatement ps = null;
        try {
            // ouverture connexion
            connexion = DriverManager.getConnection(url, user, passwd);
            // début transaction
            connexion.setAutoCommit(false);
            // en mode lecture / écriture
            connexion.setReadOnly(false);
            // on met à jour la table
            ps = connexion.prepareStatement("UPDATE PRODUITS SET PRIX=PRIX*1.1 WHERE CATEGORIE=?");
            // catégorie 1
            ps.setInt(1, 10);
            // exécution
            int nbLignes=ps.executeUpdate();
            // commit transaction
            connexion.commit();
        } catch (SQLException e1) {
            // on traite l'exception
            doCatchException(connexion, e1);
        } finally {
            // on traite le finally
            doFinally(null, ps, connexion);
        }
    }
- 第 9 行:该连接用于读写操作;
- 第 11 行:一个包含 1 个参数(用 ? 表示)的 [PreparedStatement]。参数可以有多个,编号从 1 开始;
- 第 13 行:将其值赋给该参数。[setType] 的第一个参数是该参数在 [PreparedStatement] 中的位置(1、2、...),第二个参数是赋给它的值。您可以使用 [setInt、setLong、setFloat、setDouble、setString、setDate、...] 等方法;
- 第 15 行:使用 [executeUpdate] 方法,而非 [executeQuery](后者专用于 SELECT 语句)。该方法返回受操作影响的行数,可能为 0。
- 第 17 行:提交事务;
3.2.5. 步骤 4 - 关闭连接
在多用户环境中,必须尽快关闭连接,因为数据库管理系统(DBMS)接受的打开连接数量是有限的。在之前的示例中,连接是在 SQL 操作的 [finally] 子句中关闭的,这样无论是否发生异常,连接都会被关闭。
3.3. 为 MySQL5 数据库管理系统配置 JDBC 层
我们将研究 [mysql-config-jdbc] 项目,该项目对 JDBC 层进行了如下配置:
 |
3.3.1. Eclipse 项目
 |
3.3.2. Maven 配置
该项目的 [pom.xml] 文件如下:
<project xmlns="http://maven.apache.org/POM/4.0.0" xmlns:xsi="http://www.w3.org/2001/XMLSchema-instance"
    xsi:schemaLocation="http://maven.apache.org/POM/4.0.0 http://maven.apache.org/xsd/maven-4.0.0.xsd">
    <modelVersion>4.0.0</modelVersion>
    <groupId>dvp.spring.database</groupId>
    <artifactId>generic-config-jdbc</artifactId>
    <version>0.0.1-SNAPSHOT</version>
    <name>configuration generic jdbc</name>

    <parent>
        <groupId>org.springframework.boot</groupId>
        <artifactId>spring-boot-starter-parent</artifactId>
        <version>1.2.3.RELEASE</version>
    </parent>

    <dependencies>
        <!-- dépendances variables ********************************************** -->
        <!-- driver JDBC from SGBD -->
        <dependency>
            <groupId>mysql</groupId>
            <artifactId>mysql-connector-java</artifactId>
        </dependency>
        <!-- dépendances constantes ********************************************** -->
        <!-- Tomcat JDBC -->
        <dependency>
            <groupId>org.apache.tomcat</groupId>
            <artifactId>tomcat-jdbc</artifactId>
        </dependency>
        <!-- library jSON -->
        <dependency>
            <groupId>com.fasterxml.jackson.core</groupId>
            <artifactId>jackson-core</artifactId>
        </dependency>
        <dependency>
            <groupId>com.fasterxml.jackson.core</groupId>
            <artifactId>jackson-databind</artifactId>
        </dependency>
        <!-- Google Guava -->
        <dependency>
            <groupId>com.google.guava</groupId>
            <artifactId>guava</artifactId>
            <version>16.0.1</version>
        </dependency>
        <!-- Spring Boot -->
        <dependency>
            <groupId>org.springframework.boot</groupId>
            <artifactId>spring-boot</artifactId>
        </dependency>
        <!-- Spring Boot Test -->
        <dependency>
            <groupId>org.springframework.boot</groupId>
            <artifactId>spring-boot-starter-test</artifactId>
        </dependency>
        <!-- logs -->
        <dependency>
            <groupId>org.springframework.boot</groupId>
            <artifactId>spring-boot-starter-logging</artifactId>
        </dependency>
    </dependencies>

    <properties>
        <project.build.sourceEncoding>UTF-8</project.build.sourceEncoding>
        <java.version>1.7</java.version>
    </properties>

    <build>
        <plugins>
            <plugin>
                <groupId>org.apache.maven.plugins</groupId>
                <artifactId>maven-surefire-plugin</artifactId>
                <version>2.18.1</version>
            </plugin>
        </plugins>
    </build>

</project>
此 Maven 配置包含若干存档,这些存档是 [mysql-config-jdbc] 项目或依赖于该项目的其他项目所必需的:
- 第 4–6 行:该项目生成的 Maven 工件。如前所述,所有 [*-config-jdbc] 项目都会生成相同的工件。因此,两个 [*-config-jdbc] 项目不得同时加载;
- 第 9–13 行:本项目的父级 Maven 项目。它定义了 Spring 生态系统中大量所用归档文件的版本。这样可以避免在继承自该项目的子项目中重复指定这些版本;
- 第 18–21 行:MySQL5 数据库管理系统(DBMS)的 JDBC 驱动程序归档文件。这是 [spring-jdbc-01] 项目所需的唯一归档文件;
- 第 24–27 行:[tomcat-jdbc] 工件提供了一个 JDBC 项目 [spring-jdbc-02 至 04] 所需的归档文件;
- 第 29–36 行:提供处理 JSON 所需的库。本文档中几乎所有项目均使用这些库;
- 第 38–42 行:Google Guava 是一个集合管理库。本文档中几乎所有项目均使用该库;
- 第 43–52 行:用于编写集成 Spring 和 JUnit 的测试的库。本文档中几乎所有项目均使用;
- 第 54–57 行:日志记录库。本文档中几乎所有项目均使用;
- 第 67–71 行:用于将 [mysql-config-jdbc] 项目工件安装到本地 Maven 仓库的插件;
3.3.3. [ConfigJdbc] 配置类
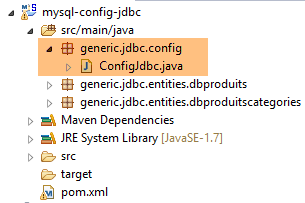 |
[ConfigJdbc] 类如下所示:
package generic.jdbc.config;

import org.springframework.beans.factory.config.ConfigurableBeanFactory;
import org.springframework.context.annotation.Bean;
import org.springframework.context.annotation.Scope;

import com.fasterxml.jackson.databind.ObjectMapper;
import com.fasterxml.jackson.databind.ser.impl.SimpleBeanPropertyFilter;
import com.fasterxml.jackson.databind.ser.impl.SimpleFilterProvider;

public class ConfigJdbc {

    // paramètres de connexion
    public final static String DRIVER_CLASSNAME = "com.mysql.jdbc.Driver";
    public final static String URL_DBPRODUITS = "jdbc:mysql://localhost:3306/dbproduits";
    public final static String USER_DBPRODUITS = "root";
    public final static String PASSWD_DBPRODUITS = "root";
...
    // ordres SQL [jdbc-01, jdbc-02]
    public final static String V1_INSERT_PRODUITS_WITH_ID = "INSERT INTO PRODUITS(ID, NOM, CATEGORIE, PRIX, DESCRIPTION) VALUES (?, ?, ?, ?, ?)";
    public final static String V1_DELETE_PRODUITS = "DELETE FROM PRODUITS";
    //public final static String V1_DELETE_PRODUITS = String.format("DELETE FROM %s", TAB_PRODUITS);
    public final static String V1_SELECT_PRODUITS = "SELECT ID, NOM, CATEGORIE, PRIX, DESCRIPTION FROM PRODUITS";
    public final static String V1_UPDATE_PRODUITS = "UPDATE PRODUITS SET PRIX=PRIX*1.1 WHERE CATEGORIE=?";
    public final static String V1_INSERT_PRODUITS_2 = "INSERT INTO PRODUITS(ID, NOM, CATEGORIE, PRIX, DESCRIPTION) VALUES (100,'X',1,1,'x')";

    // ordres SQL [jdbc-03]
    public final static String V2_INSERT_PRODUITS = "INSERT INTO PRODUITS(NOM, CATEGORIE, PRIX, DESCRIPTION) VALUES (?, ?, ?, ?)";
    public final static String V2_DELETE_ALLPRODUITS = "DELETE FROM PRODUITS";
    public final static String V2_DELETE_PRODUITS = "DELETE FROM PRODUITS WHERE ID=?";
    public final static String V2_SELECT_ALLPRODUITS = "SELECT ID, NOM, CATEGORIE, PRIX, DESCRIPTION FROM PRODUITS";
    public final static String V2_SELECT_PRODUIT_BYID = "SELECT NOM, CATEGORIE, PRIX, DESCRIPTION FROM PRODUITS WHERE ID=?";
    public final static String V2_SELECT_PRODUIT_BYNAME = "SELECT ID, CATEGORIE, PRIX, DESCRIPTION FROM PRODUITS WHERE NOM=?";
    public final static String V2_UPDATE_PRODUITS = "UPDATE PRODUITS SET NOM=?, PRIX=?, CATEGORIE=?, DESCRIPTION=? WHERE ID=?";

...

}
[ConfigJdbc] 类用于配置四个项目 [spring-jdbc-01 至 04] 的 JDBC 层。其中大部分配置与 [spring-jdbc-04] 项目相关。我们将在分析该项目时详细说明这一部分。上文仅展示了 [spring-jdbc-01 至 03] 项目的配置。
- 第 14–17 行:MySQL5 数据库 [dbproduits] 的连接参数;
- 第 20–25 行:项目 [spring-jdbc-01 和 02] 中使用的 SQL 语句;
- 第 28–34 行:[spring-jdbc-03] 项目中使用的 SQL 语句;
这些 SQL 语句使用了 MySQL5 数据库 [dbproducts] 中的 [PRODUCTS] 表,该表具有以下结构:
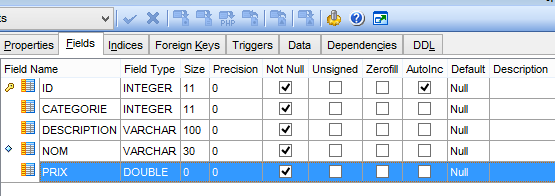 |
- [ID]:处于 AUTO_INCREMENT 模式的主键(如果未指定主键,则由数据库管理系统自动生成);
- [NAME]: 产品名称——必须唯一;
- [CATEGORY]:类别编号;
- [PRICE]:其价格;
- [DESCRIPTION]: 产品的描述;
3.3.4. [Product] 类
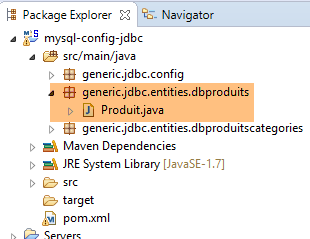 |
[Product] 类表示 [PRODUCTS] 表中的一行:
package generic.jdbc.entities.dbproduits;

public class Produit {

    // fields
    private int id;
    private String nom;
    private int categorie;
    private double prix;
    private String description;

    // manufacturers
    public Produit() {

    }

    public Produit(int id, String nom, int categorie, double prix, String description) {
        this.id = id;
        this.nom = nom;
        this.categorie = categorie;
        this.prix = prix;
        this.description = description;
    }

    // getters and setters
...
}
稍后,我们需要比较两个产品,以确定它们是否相等。我们将定义:如果两个产品的所有字段都相等,则它们相等。为此,我们将重写 [Product] 类所继承的 [Object] 类的 [equals] 方法:
    // méthode d'égalité
    @Override
    public boolean equals(Object o) {
        // cas simples
        if (o == null || o.getClass() != this.getClass()) {
            return false;
        }
        Produit p = (Produit) o;
        return this == o
                || (this.id == p.id && this.nom.equals(p.getNom()) && this.categorie == p.categorie
                        && Math.abs(this.prix - p.prix) < 1e-6 && this.description.equals(p.description));
}
- 第 3 行:[equals] 方法接收一个对象 o,并将其与对象 this 进行比较;
- 第 5–7 行:简单情况,我们可以立即判断两个对象是否相等。[Object].getClass() 返回一个 [Class] 类型的实例,该类型表示对象的实际类;
- 第 8 行:将对象 o 转换为产品 p;
- 第 9 行:如果指向产品的两个引用 o 和 p 相等,则它们物理上指向同一个产品;
- 第 9 行:如果 o 和 p 是指向两个具有相同字段的产品的不同引用,我们将认为它们相等。由于价格的类型为 [double],且计算机科学中无法精确表示实数,因此如果两个价格的差值在 10⁻⁶ 以内,我们将认为它们是相同的;
此外,我们将重定义 [Object] 类的 [hashCode] 方法:
    // hashcode
    @Override
    public int hashCode() {
        return id + 2 * nom.hashCode() + 3 * categorie + 4 * description.hashCode();
}
如果 [equals] 方法已声明两个产品相等,则它们的 hashCode 值必须相同。该 hashCode 值用于将对象排序到字典等集合中。在上例中,如果两个产品完全相同,它们的 hashCode 值确实会相同。
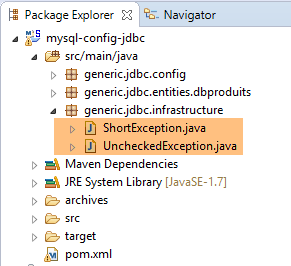
3.3.5. [UncheckedException]
 |
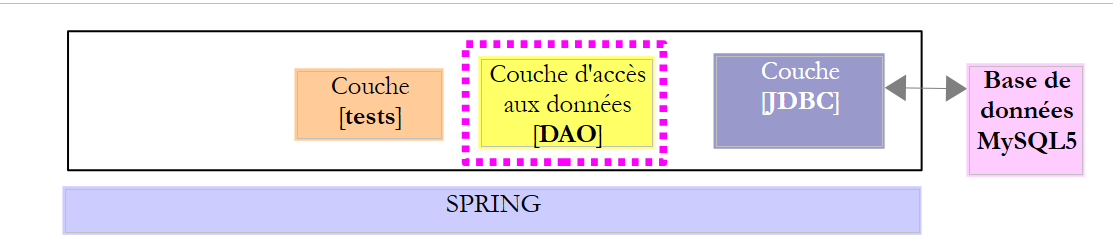
请考虑以下架构:
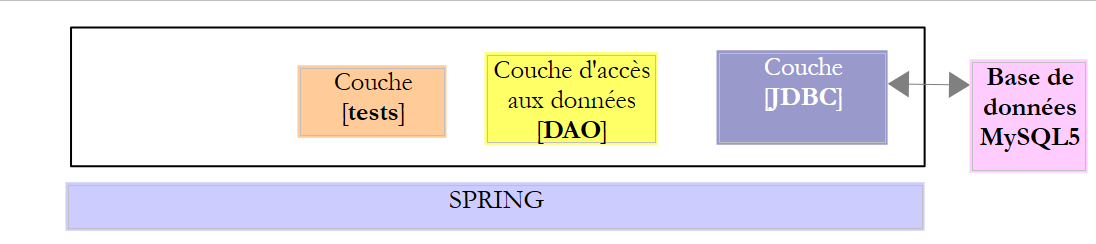 |
- [JDBC] 层抛出了 [SQLException] 异常。该异常必须向上传播至各层,直至到达最高层,即本例中的测试层;
[DAO] 层本可以直接让 [SQLException] 向上传播至测试层。但由于该异常属于未检查异常(它直接继承自 [Exception]),这意味着 [DAO] 层的 [IDao] 接口将如下所示:
public interface IDao {

    // ajouter des produits
    public List<Produit> addProduits(List<Produit> produits) throws SQLException;

    // liste de tous les produits
    public List<Produit> getAllProduits() throws SQLException;

    // un produit particulier
    public Produit getProduitById(int id) throws SQLException;

    public Produit getProduitByName(String name) throws SQLException;

    // mise à jour de plusieurs produits
    public int updateProduits(List<Produit> produits) throws SQLException;

    // suppression de tous les produits
    public int deleteAllProduits() throws SQLException;

    // suppression de plusieurs produits
    public int deleteProduits(int[] ids) throws SQLException;
}
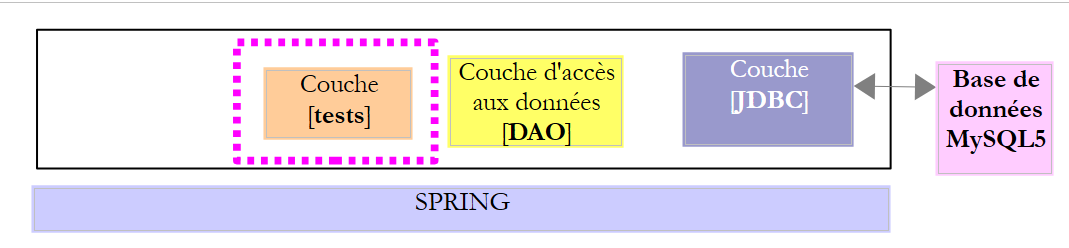
这非常令人烦恼,因为它阻止我们使用会抛出不同异常的类来实现 [IDao] 接口。为了解决这个问题,[DAO] 层将抛出一个未处理的 [DaoException](继承自 [RuntimeException]),这使我们能够在接口方法签名中省略 [throws] 子句。 因此,任何也会抛出未检查异常(可能与 [DaoException] 不同)的类都可以实现该接口。我们的架构现在如下所示:
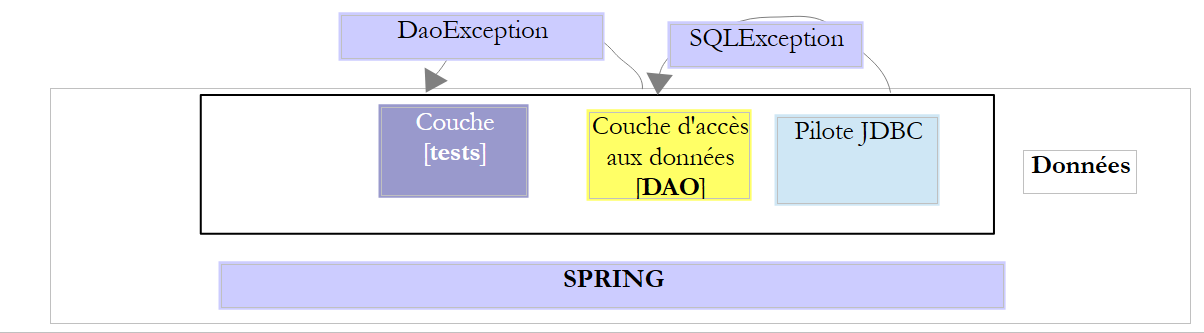 |
为了便于为应用程序的不同层创建未检查异常,我们为它们创建了一个父类 [UncheckedException]:
|
package generic.jdbc.infrastructure;

import java.util.ArrayList;
import java.util.List;

import com.fasterxml.jackson.core.JsonProcessingException;
import com.fasterxml.jackson.databind.ObjectMapper;

// generic exception class
// the exception is uncontrolled

public class UncheckedException extends RuntimeException {

    // serial ID generated
    private static final long serialVersionUID = -2924871763340170310L;

    // properties
    private int code;
    private String trace;
    private List<ShortException> exceptions;

    // manufacturers
    public UncheckedException() {
        super();
    }

    public UncheckedException(int code, Throwable e, String simpleClassName) {
        super(e);
        // local
        this.code = code;
        this.exceptions = getErreursForException(e);
        // trace
        String fileName = String.format("%s.java", simpleClassName);
        StackTraceElement[] traces = e.getStackTrace();
        boolean trouve = false;
        for (int i = 0; !trouve && i < traces.length; i++) {
            StackTraceElement trace = traces[i];
            if (fileName.equals(trace.getFileName())) {
                this.trace = String.format("[%s,%s,%s]", simpleClassName, trace.getMethodName(), trace.getLineNumber());
                trouve = true;
            }
        }
    }

    @Override
    public String getMessage() {
        return this.toString();
    }

    @Override
    public void printStackTrace() {
        System.out.println(this);
    }

    // list of exception error messages
    private List<ShortException> getErreursForException(Throwable th) {
        // retrieve the elements of the exception stack
        Throwable cause = th;
        List<ShortException> exceptions = new ArrayList<ShortException>();
        while (cause != null) {
            // retrieve the current exception
            exceptions.add(new ShortException(cause.getClass().getName(), cause.getMessage()));
            // following exception
            cause = cause.getCause();
        }
        return exceptions;
    }

    @Override
    public String toString() {
        ObjectMapper jsonMapper = new ObjectMapper();
        try {
            return String.format("[code=%s, trace=%s, exceptions=%s", code, trace, jsonMapper.writeValueAsString(exceptions));
        } catch (JsonProcessingException e) {
            e.printStackTrace();
            return null;
        }
    }

    // getters and setters
...
}
- 第 12 行:该类继承自 [RuntimeException],因此属于未检查异常类型。它将用于将受检查异常(SQLException)封装为未检查异常类型(UncheckedException);
- 为了区分不同的 [UncheckedException] 异常,我们可以为其分配一个代码,该代码将存储在第 18 行的私有字段中。拦截 [UncheckedException] 的 Java 代码可以通过 [getCode] 方法(第 80 行及之后)访问此错误代码;
- 第 20 行:存储来自封装异常堆栈的错误消息;
- 第 23–43 行:构造 [UncheckedException] 类型对象的不同方法;
- 第 56–67 行:一个私有方法,允许从 [Throwable] 对象或其派生类型(特别是 [Exception] 类型)构建第 20 行中的错误列表;
- 第 69–78 行:[toString] 方法返回一个表示该异常的字符串。为了显示第 20 行中的错误列表,它使用了一个 JSON 库。该库已包含在项目的 Maven 依赖项中:
        <!-- library jSON -->
        <dependency>
            <groupId>com.fasterxml.jackson.core</groupId>
            <artifactId>jackson-core</artifactId>
        </dependency>
        <dependency>
            <groupId>com.fasterxml.jackson.core</groupId>
            <artifactId>jackson-databind</artifactId>
</dependency>
- 第 45–48 行:重定义父类 [RuntimeException] 的 [getMessage] 方法。此处,它返回该类的 [toString] 签名;
- 第 50–53 行:重定义父类 [RuntimeException] 的 [printStackTrace] 方法。将显示该类的 [toString] 签名;
[UncheckedException] 类在第 20 行的字段中存储了一个由以下 [ShortException] 类型描述的异常列表:
package pam.dao.exceptions;

public class ShortException {

    // properties
    private String className;
    private String errorMessage;

    // manufacturers
    public ShortException() {

    }

    public ShortException(String className, String errorMessage) {
        this.className = className;
        this.errorMessage = errorMessage;
    }

    // getters and setters
...
}
- 第 6 行:发生的异常的类名;
- 第 7 行:相关的错误消息;
让我们来分析 [UncheckedException] 类的以下构造函数:
    public UncheckedException(int code, Throwable e, String simpleClassName) {
        super(e);
        // local
        this.code = code;
        this.exceptions = getErreursForException(e);
        // trace
        String fileName = String.format("%s.java", simpleClassName);
        StackTraceElement[] traces = e.getStackTrace();
        boolean trouve = false;
        for (int i = 0; !trouve && i < traces.length; i++) {
            StackTraceElement trace = traces[i];
            if (fileName.equals(trace.getFileName())) {
                this.trace = String.format("[%s,%s,%s]", simpleClassName, trace.getMethodName(), trace.getLineNumber());
                trouve = true;
            }
        }
}
- 第 1 行,参数如下:
- [code]:错误代码;
- [e]:被封装的异常。[Throwable] 是 [Exception] 类的父类,并直接继承自 [Object] 类。它是所有 C 类的父类,用户可以使用 [throw c;] 写入代码,其中 c 是 C 的实例;
- [simpleClassName]:检测到异常 e 的用户代码类的简单名称;
- 第 4 行:记录错误代码;
- 第 5 行:根据作为参数传递的 [Throwable e] 构建 [ShortException] 列表;
- 第 7–16 行:检查所谓的异常跟踪。初始异常发生在代码的特定位置,随后向后传播至调用该方法的父方法,依此类推,直至被 try/catch 代码块捕获。 在此传播过程中,初始异常会在异常 e 的 [e.stackTrace] 数组中留下痕迹。这些痕迹在此处第 8 行从作为参数传递的 [Throwable e] 中检索出来。每个类型为 [StackTraceElement] 的元素都是一个具有以下字段的对象:
- [fileName]:发生异常的 Java 文件名;
- [fileName]:发生异常的 Java 文件名;
- [methodName]:该文件中发生异常的方法名称;
- 第 10–16 行会在作为参数传递的异常的跟踪数组中进行搜索,查找条件 [trace.fileName == simpleClassName.java] 的首次出现,其中 [simpleClassName] 是构造函数的第三个参数。其目的是记录异常在用户代码中的发生位置。用户代码将按如下方式包装异常:
- 第 13 行:我们创建一个类型为 [文件名, 方法名, 行号] 的字符串,用于描述用户代码中捕获异常 e 的位置;
现在,让我们查看记录前一个构造函数封装的 [Throwable th] 异常的异常堆栈中异常列表的代码:
    // liste des messages d'erreur d'une exception
    private List<ShortException> getErreursForException(Throwable th) {
        // on récupère les éléments de la pile de l'exception
        Throwable cause = th;
        List<ShortException> exceptions = new ArrayList<ShortException>();
        while (cause != null) {
            // on récupère l'exception courante
            exceptions.add(new ShortException(cause.getClass().getName(), cause.getMessage()));
            // exception suivante
            cause = cause.getCause();
        }
        return exceptions;
}
当异常通过 try/catch 代码块回传至捕获它的方法时,初始异常 e 可能已被封装在另一个异常之中。随后,正是这个后面的异常回传至最终捕获它的方法。因此,它同样可以被封装。最终,当一个方法决定捕获异常 th 并处理它时,它会发现初始异常 e 被埋藏在异常栈的最底层。 因此,在上例中,参数 [Throwable th] 仅仅是异常冰山的一角。其属性 [th.cause] 揭示了它自身所封装的异常。以此类推。当异常 e 满足 [e.getCause()==null] 时,意味着 e 即是初始异常。
- 第 8 行:对于 [Throwable th] 异常堆栈中的每个异常,会存储两项信息:
- [getClass().getName()]:异常的完整名称;
- [getMessage()]:相关的错误消息;
3.4. 示例-01
3.4.1. 项目架构
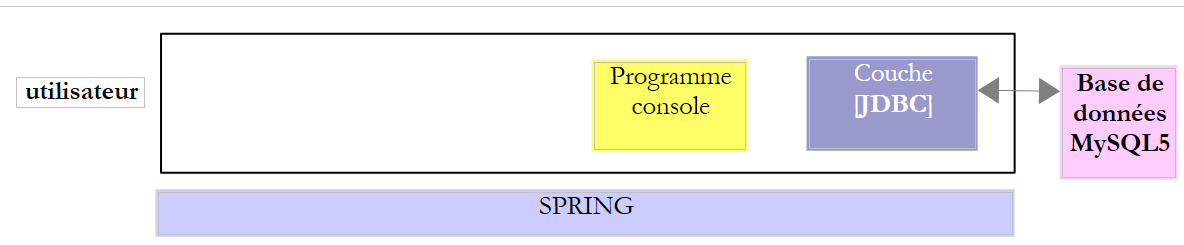 |
在此示例中,一个控制台程序使用了 [JDBC] 层接口。
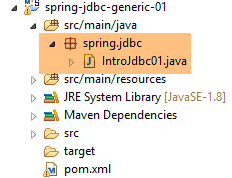
3.4.2. Eclipse 项目
我们按照第 2.5.2.1 节中的步骤创建一个 Spring/Maven 项目 [spring-jdbc-01]。
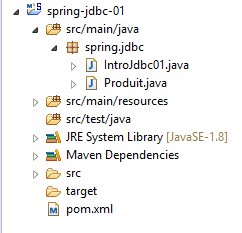 |
该项目是一个由以下 [pom.xml] 文件定义的 Maven 项目:
<?xml version="1.0" encoding="UTF-8"?>
<project xmlns="http://maven.apache.org/POM/4.0.0" xmlns:xsi="http://www.w3.org/2001/XMLSchema-instance"
    xsi:schemaLocation="http://maven.apache.org/POM/4.0.0 http://maven.apache.org/xsd/maven-4.0.0.xsd">
    <modelVersion>4.0.0</modelVersion>

    <groupId>dvp.spring.database</groupId>
    <artifactId>spring-jdbc-generic-01</artifactId>
    <version>0.0.1-SNAPSHOT</version>
    <packaging>jar</packaging>

    <name>spring-jdbc-generic-01</name>
    <description>Demo project for API JDBC</description>

    <parent>
        <groupId>org.springframework.boot</groupId>
        <artifactId>spring-boot-starter-parent</artifactId>
        <version>1.2.3.RELEASE</version>
        <relativePath /> <!-- lookup parent from repository -->
    </parent>

    <properties>
        <project.build.sourceEncoding>UTF-8</project.build.sourceEncoding>
        <java.version>1.8</java.version>
    </properties>

    <dependencies>
        <!-- configuration JDBC of SGBD -->
        <dependency>
            <groupId>dvp.spring.database</groupId>
            <artifactId>generic-config-jdbc</artifactId>
            <version>0.0.1-SNAPSHOT</version>
        </dependency>
    </dependencies>

    <build>
        <plugins>
            <plugin>
                <groupId>org.apache.maven.plugins</groupId>
                <artifactId>maven-surefire-plugin</artifactId>
                <version>2.18.1</version>
            </plugin>
        </plugins>
    </build>

</project>
- 第 28–32 行:该项目使用了我们刚才分析过的 [mysql-config-jdbc] 项目中的 [generic-config-jdbc] 组件。因此,[spring-jdbc-01] 项目可以访问 [mysql-config-jdbc] 项目的所有元素;
通过检查该项目的 Maven 依赖项,我们可以从两个方面验证这一点:
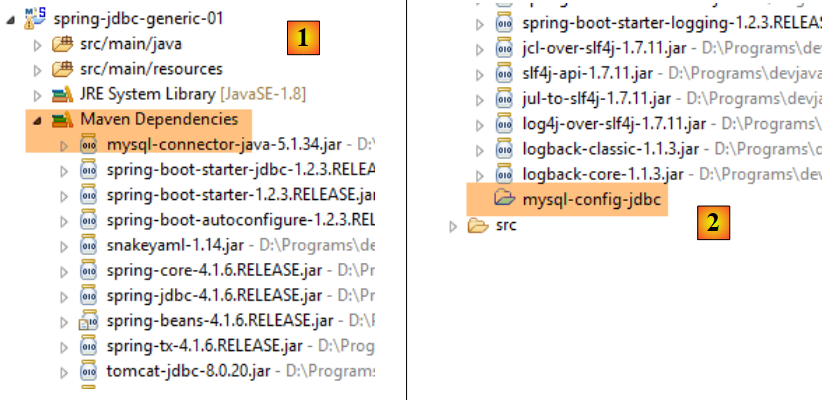 |
- 在[2]中,我们可以看到[mysql-config-jdbc]项目被列在该项目的Maven依赖中。由于这些依赖位于项目的Classpath中,这意味着[mysql-config-jdbc]项目也位于该Classpath中,因此其类和接口在[spring-jdbc-01]项目中是可见的;
Maven 项目 [mysql-config-jdbc] 无需出现在 [Package Explorer] 选项卡中,其他 Maven 项目即可使用它。它只需存在于本地 Maven 仓库中即可。与 NetBeans 等 IDE 不同,Eclipse 不会自动完成此操作。必须手动强制执行:
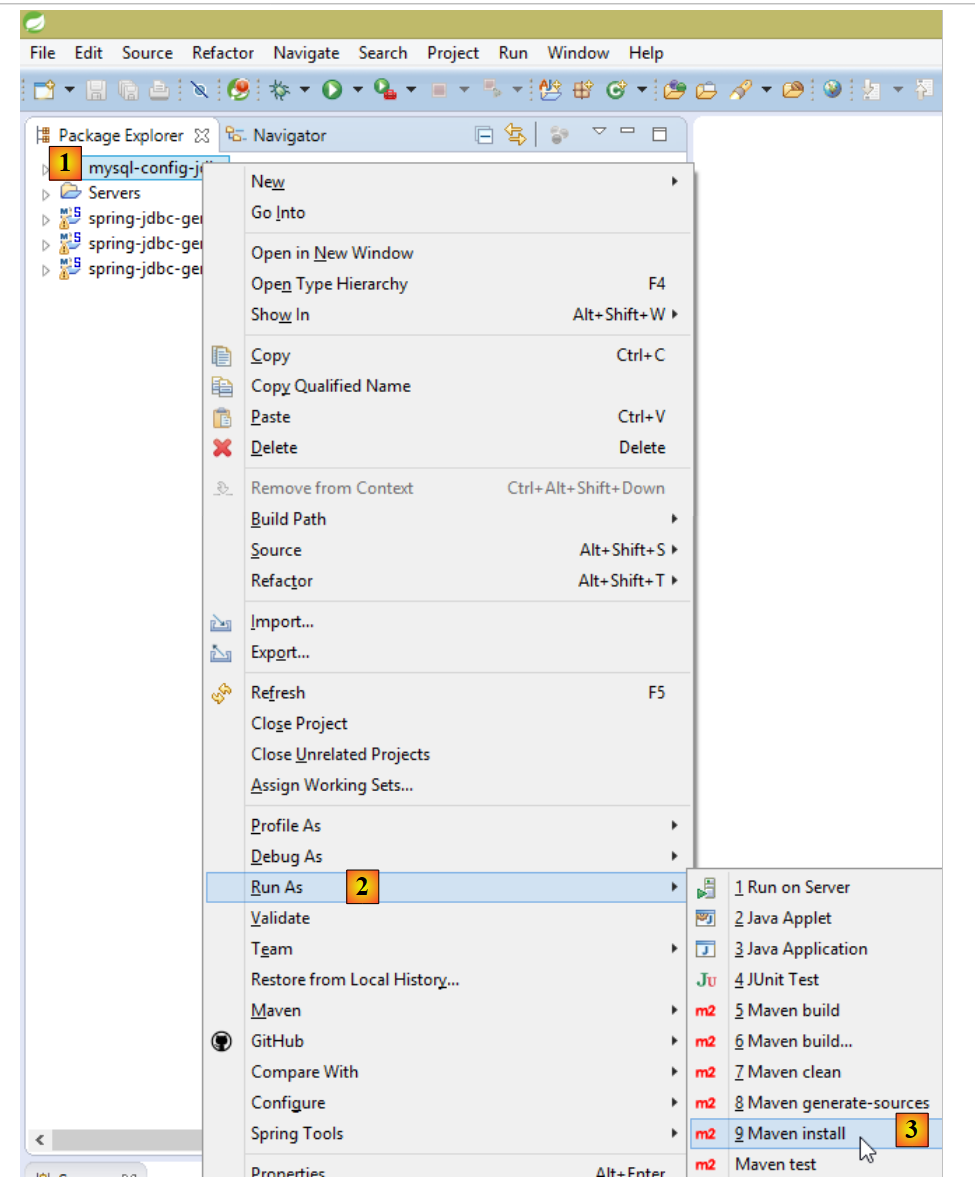 |
我们在第 2.3.5 节中已详细说明了触发此生成的条件。一旦生成完成,您即可将 [mysql-config-jdbc] 项目从 [Package Explorer] 选项卡中移除:
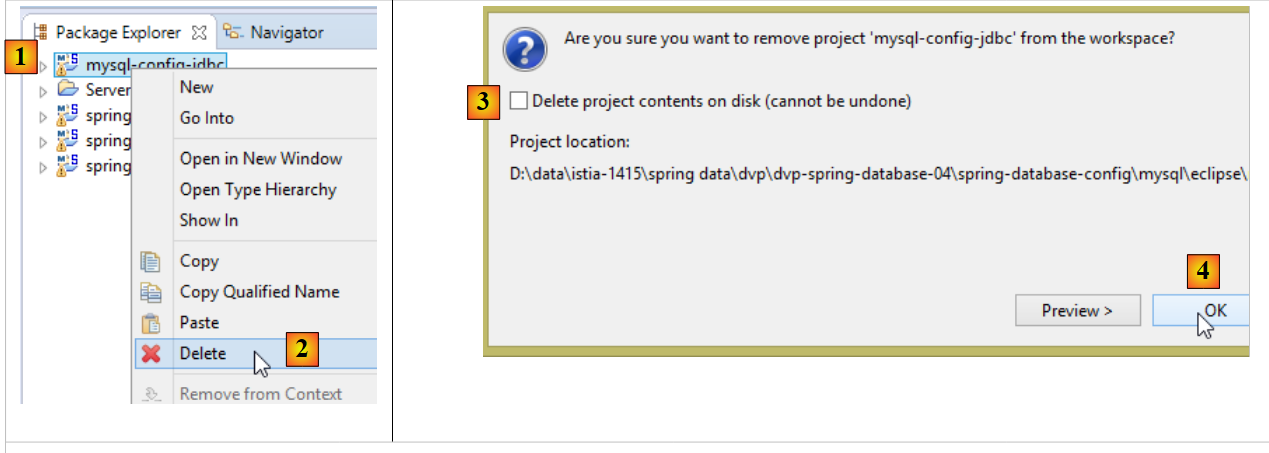 |
- 请勿勾选 [3],此操作会将项目从磁盘上彻底删除,导致无法恢复;
此操作将重新计算依赖于从 [Package Explorer] 中移除的项目的 Maven 依赖项。这会更改这些项目的 [Maven Dependencies] 分支。例如,对于 [spring-jdbc-01] 项目,[Maven Dependencies] 分支将变为如下所示:
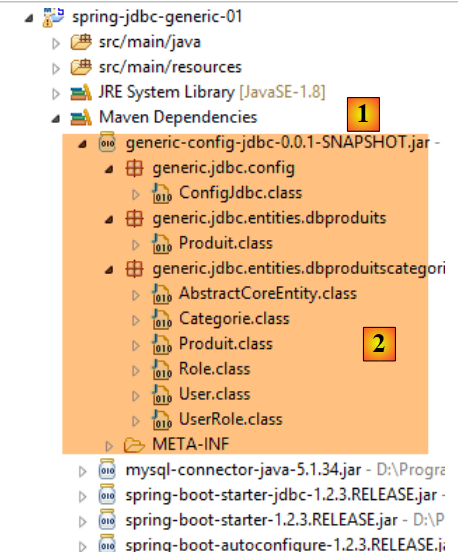 |
此时,依赖关系不再指向某个项目,而是指向其 Maven 工件,本例中即 [generic-config-jdbc] 工件 [1]。我们可以看到,我们确实可以访问该工件中的所有类和接口。如前所述,该工件将由所有 [*-config-jdbc] 项目生成。为避免错误,我们:
- 始终在 [Package Explorer] 选项卡中仅保留一个 [*-config-jdbc] 项目;
- 更新 [Package Explorer] 标签页中所有项目的 Maven 配置(Alt-F5),确保它们在 Maven 依赖中包含 [*-config-jdbc] 项目;
3.4.3. 主类的骨架
 |
主类的骨架 [IntroJdbc01] 如下:
package spring.jdbc;

import generic.jdbc.config.ConfigJdbc;
import generic.jdbc.entities.dbproduits.Produit;

import java.sql.Connection;
import java.sql.DriverManager;
import java.sql.PreparedStatement;
import java.sql.ResultSet;
import java.sql.SQLException;
import java.util.ArrayList;
import java.util.List;

import com.fasterxml.jackson.core.JsonProcessingException;
import com.fasterxml.jackson.databind.ObjectMapper;

public class IntroJdbc01 {

    // constants
    final static ObjectMapper jsonMapper = new ObjectMapper();

    public static void main(String[] args) {
        // loading the JDBC driver from SGBD
        try {
            Class.forName(ConfigJdbc.DRIVER_CLASSNAME);
        } catch (ClassNotFoundException e1) {
            doCatchException("Pilote JDBC introuvable", null, e1);
            return;
        }
        // empty table [PRODUITS]
        System.out.println(String.format("------------------------------ %s", "Vidage de la table [PRODUITS]"));
        delete();
        // fill it
        System.out.println(String.format("------------------------------ %s", "Remplissage de la table [PRODUITS]"));
        insert();
        // we read it
        System.out.println(String.format("------------------------------ %s", "Affichage de la table [PRODUITS]"));
        select();
        // update
        System.out.println(String.format("------------------------------ %s", "Mise à jour de la table [PRODUITS]"));
        update();
        // display
        System.out.println(String.format("------------------------------ %s", "Affichage de la table [PRODUITS]"));
        select();
        // empty table [PRODUITS]
        System.out.println(String.format("------------------------------ %s", "Vidage de la table [PRODUITS]"));
        delete();
        // we display it
        System.out.println(String.format("------------------------------ %s", "Affichage de la table [PRODUITS]"));
        select();
        // INSERTion of two identical elements
        // the INSERTion must fail and neither element is inserted because of the transaction
        System.out.println(String.format("------------------------------ %s",
                "Insertion de deux produits de même clé primaire dans la table [PRODUITS]"));
        insert2();
        // we check
        System.out.println(String.format("------------------------------ %s", "Affichage de la table [PRODUITS]"));
        select();
        // finish
        System.out.println(String.format("------------------------------ %s", "Travail terminé"));
    }

    // product list
    private static void select() {
    ...
    }

    // display jSON of an object
    private static void affiche(Object object) {
...
    }

    // product deletion
    public static void delete() {
...
    }

    // add products
    public static void insert() {
...
    }

    // add 2 products with the same primary keys
    public static void insert2() {
...
    }

    // product updates
    public static void update() {
...
    }

    private static void doFinally(ResultSet rs, PreparedStatement ps, Connection connexion) {
        // closure ResultSet
        if (rs != null) {
            try {
                rs.close();
            } catch (SQLException e1) {

            }
        }
        // closure [PreparedStatement]
        if (ps != null) {
            try {
                ps.close();
            } catch (SQLException e2) {

            }
        }
        if (connexion != null) {
            try {
                // close connection
                connexion.close();
            } catch (SQLException e3) {
                // display error msg
                show("Les erreurs suivantes se sont produites lors de la fermeture de la connexion",
                        getErreursFromThrowable(e3));
            }
        }
    }

    private static void doCatchException(String title, Connection connexion, Throwable th) {
        // display error msg
        show(title, getErreursFromThrowable(th));
        // cancel transaction
        try {
            if (connexion != null) {
                connexion.rollback();
            }
        } catch (SQLException e2) {
            // display error msg
            show("Erreur lors de l'annulation de la transaction", getErreursFromThrowable(e2));
        }
    }

    private static List<String> getErreursFromThrowable(Throwable th) {
        // retrieve the list of exception error msgs
        List<String> erreurs = new ArrayList<String>();
        while (th != null) {
            // throwable error message
            erreurs.add(th.getMessage());
            // we move on to the cause of throwable
            th = th.getCause();
        }
        // result
        return erreurs;
    }

    private static void show(String title, List<String> messages) {
        // title
        System.out.println(String.format("%s : ", title));
        // messages
        for (String message : messages) {
            System.out.println(String.format("- %s", message));
        }
    }
}
- 第 23–29 行:加载 DBMS 的 JDBC 驱动程序。第 25 行使用了在 [mysql-config-jdbc] 项目中定义的常量 [ConfigJdbc.DRIVER_CLASSNAME];
- 第 136–147 行:[getErrorsFromThrowable] 方法返回封装在 [Throwable] 类型对象中的错误消息列表,该类型是 [Exception] 类的父类。 一个异常可能包含另一个异常,可通过 [Throwable].getCause() 方法获取。这使我们能够遍历 [Throwable] 对象中封装的所有异常;
- 第 149–156 行:[show(String title, List<String> messages)] 方法会显示以文本 [title] 为前缀的消息;
- 第 122–134 行:方法 [doCatchException(String title, Connection connection, Throwable th)] 处理该类方法遇到的异常。被处理的异常由参数 [Throwable th] 表示。该方法的目的是:
- 回滚 [Connection connection] 对象的当前事务(第 127–129 行);
- 写入封装在异常 [Throwable th] 中的错误消息(第 124、132 行);
- 第 93–120 行:方法 [doFinally(ResultSet rs, PreparedStatement ps, Connection connection)] 处理 DBMS 访问方法的 [finally] 代码块。其目的是释放连接所分配的资源;
3.4.4. 删除 products 表中的内容
[delete] 方法用于删除表中的内容:
    // product deletion
    public static void delete() {
        Connection connexion = null;
        PreparedStatement ps = null;
        try {
            // opening connection
            connexion = DriverManager.getConnection(ConfigJdbc.URL_DBPRODUITS , ConfigJdbc.USER_DBPRODUITS, ConfigJdbc.PASSWD_DBPRODUITS);
            // start of transaction
            connexion.setAutoCommit(false);
            // in read/write mode
            connexion.setReadOnly(false);
            // empty table [PRODUITS]
            ps = connexion.prepareStatement(ConfigJdbc.V1_DELETE_PRODUITS);
            ps.executeUpdate();
            // commit transaction
            connexion.commit();
        } catch (SQLException e1) {
            // we handle the exception
            doCatchException("Les erreurs suivantes se sont produites à la suppression du contenu de la table", connexion, e1);
        } finally {
            // we treat the finally
            doFinally(null, ps, connexion);
        }
}
第 7 行使用了 [ConfigJdbc] 类中的以下常量:
public final static String URL_DBPRODUITS = "jdbc:mysql://localhost:3306/dbproduits";
public final static String USER_DBPRODUITS = "root";
public final static String PASSWD_DBPRODUITS = "";
第 13 行,预编译的 SQL 语句如下:
public final static String V1_DELETE_PRODUITS = "DELETE FROM PRODUITS";
[delete] 方法使用事务。事务允许您将 SQL 语句分组,这些语句必须全部成功,否则全部回滚。需要注意以下四种操作:
- 事务开始:[connection.setAutoCommit(false)];
- 成功事务的结束:[connection.commit()]。此时,事务期间在数据库上执行的所有操作均被提交;
- 结束失败的事务:[connection.rollback()]。此时,事务期间在数据库上执行的所有操作都会被回滚;
在我们的示例中,每当发生异常时,我们都会在 [doCatchException] 方法中回滚事务:
    private static void doCatchException(String title, Connection connexion, Throwable th) {
        // display error msg
        Static.show(title, Static.getErreursFromThrowable(th));
        // cancel transaction
        try {
            if (connexion != null) {
                connexion.rollback();
            }
        } catch (SQLException e2) {
            // display error msg
            Static.show("Erreur lors de l'annulation de la transaction", Static.getErreursFromThrowable(e2));
        }
}
3.4.5. 创建 products 表的内容
[insert] 方法用于创建表的内容:
public static void insert() {
        Connection connexion = null;
        PreparedStatement ps = null;
        try {
            // opening connection
            connexion = DriverManager.getConnection(ConfigJdbc.URL_DBPRODUITS , ConfigJdbc.USER_DBPRODUITS, ConfigJdbc.PASSWD_DBPRODUITS);
            // start of transaction
            connexion.setAutoCommit(false);
            // in read/write mode
            connexion.setReadOnly(false);
            // fill the table
            ps = connexion.prepareStatement(ConfigJdbc.V1_INSERT_PRODUITS_WITH_ID);
            for (int i = 0; i < 10; i++) {
                // preparation
                int n = i + 1;
                ps.setInt(1, n);
                ps.setString(2, String.format("NOM%s", n));
                ps.setInt(3, n / 5 + 1);
                ps.setDouble(4, 100 * (1 + (double) i / 100));
                ps.setString(5, String.format("DESC%s", n));
                // execution
                ps.executeUpdate();
            }
            // commit transaction
            connexion.commit();
        } catch (SQLException e1) {
            // we handle the exception
            doCatchException("Les erreurs suivantes se sont produites à la création du contenu de la table", connexion, e1);
        } finally {
            // we treat the finally
            doFinally(null, ps, connexion);
        }
    }
第 12 行,预编译的 SQL 语句如下:
public final static String V1_INSERT_PRODUITS_WITH_ID = "INSERT INTO PRODUITS(ID, NOM, CATEGORIE, PRIX, DESCRIPTION) VALUES (?, ?, ?, ?, ?)";
3.4.6. 显示 products 表的内容
[select] 方法用于显示表的内容:
// product list
    private static void select() {
        Connection connexion = null;
        PreparedStatement ps = null;
        ResultSet rs = null;
        try {
            // opening connection
            connexion = DriverManager.getConnection(ConfigJdbc.URL_DBPRODUITS , ConfigJdbc.USER_DBPRODUITS, ConfigJdbc.PASSWD_DBPRODUITS);
            // start of transaction
            connexion.setAutoCommit(false);
            // in read-only mode
            connexion.setReadOnly(true);
            // table [PRODUITS] is read
            ps = connexion.prepareStatement(ConfigJdbc.V1_SELECT_PRODUITS);
            rs = ps.executeQuery();
            System.out.println("Liste des produits : ");
            while (rs.next()) {
                affiche(new Produit(rs.getInt(1), rs.getString(2), rs.getInt(3), rs.getDouble(4), rs.getString(5)));
            }
            // commit transaction
            connexion.commit();
        } catch (SQLException e1) {
            // we handle the exception
            doCatchException("Les erreurs suivantes se sont produites à la lecture de la table", connexion, e1);
        } finally {
            // we treat the finally
            doFinally(rs, ps, connexion);
        }
    }
第 14 行,生成的 SQL 语句如下:
public final static String V1_SELECT_PRODUITS = "SELECT ID, NOM, CATEGORIE, PRIX, DESCRIPTION FROM PRODUITS";
[display] 方法(第 18 行)如下:
    // display jSON of an object
    private static void affiche(Object object) {
        try {
            System.out.println(jsonMapper.writeValueAsString(object));
        } catch (JsonProcessingException e) {
            e.printStackTrace();
        }
}
它会显示作为参数传递的对象的 JSON 表示形式(参见第 23.12 节中的 JSON)。
3.4.7. 更新表内容
[update] 方法用于更新特定产品:
    // product updates
    public static void update() {
        Connection connexion = null;
        PreparedStatement ps = null;
        try {
            // opening connection
            connexion = DriverManager.getConnection(ConfigJdbc.URL_DBPRODUITS , ConfigJdbc.USER_DBPRODUITS, ConfigJdbc.PASSWD_DBPRODUITS);
            // start of transaction
            connexion.setAutoCommit(false);
            // in read/write mode
            connexion.setReadOnly(false);
            // table is updated
            ps = connexion.prepareStatement(ConfigJdbc.V1_UPDATE_PRODUITS);
            // category 1
            ps.setInt(1, 1);
            // execution
            ps.executeUpdate();
            // commit transaction
            connexion.commit();
        } catch (SQLException e1) {
            // we handle the exception
            doCatchException("Les erreurs suivantes se sont produites à la mise à jour du contenu de la table", connexion, e1);
        } finally {
            // we treat the finally
            doFinally(null, ps, connexion);
        }
}
第 13 行,预编译的 SQL 语句如下:
public final static String V1_UPDATE_PRODUITS = "UPDATE PRODUITS SET PRIX=PRIX*1.1 WHERE CATEGORIE=?";
3.4.8. 事务的作用
[insert2] 方法试图将两个主键相同的产品插入表中,这是不可行的。由于我们处于事务中,第一次插入操作将被回滚。
    // add 2 products with the same primary keys
    public static void insert2() {
        Connection connexion = null;
        PreparedStatement ps = null;
        try {
            // opening connection
            connexion = DriverManager.getConnection(ConfigJdbc.URL_DBPRODUITS , ConfigJdbc.USER_DBPRODUITS, ConfigJdbc.PASSWD_DBPRODUITS);
            // start of transaction
            connexion.setAutoCommit(false);
            // in read/write mode
            connexion.setReadOnly(false);
            // add 1 line
            ps = connexion.prepareStatement(ConfigJdbc.V1_INSERT_PRODUITS_2);
            // execution
            ps.executeUpdate();
            // we add the same line a 2nd time, with the same primary key
            // the INSERTion must fail and neither element must be inserted because of the transaction
            ps.executeUpdate();
            // commit transaction
            connexion.commit();
        } catch (SQLException e1) {
            // we handle the exception
            doCatchException("Les erreurs suivantes se sont produites lors de l'ajout de deux produits de même clé primaire",
                    connexion, e1);
        } finally {
            // we treat the finally
            doFinally(null, ps, connexion);
        }
}
第 13 行,预编译的 SQL 语句如下:
public final static String V1_INSERT_PRODUITS_2 = "INSERT INTO PRODUITS(ID, NOM, CATEGORIE, PRIX, DESCRIPTION) VALUES (100,'X',1,1,'x')";
3.4.9. 结果
我们执行名为 [spring-jdbc-generic-01.IntroJdbc01] 的执行配置:
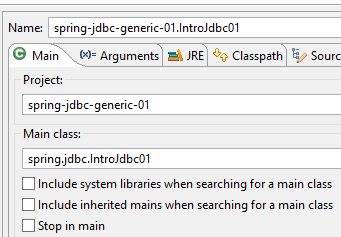 |
得到以下控制台输出:
------------------------------ Vidage de la table [PRODUITS]
------------------------------ Remplissage de la table [PRODUITS]
------------------------------ Affichage de la table [PRODUITS]
Liste des produits :
{"id":1,"nom":"NOM1","categorie":1,"prix":100.0,"description":"DESC1"}
{"id":2,"nom":"NOM2","categorie":1,"prix":101.0,"description":"DESC2"}
{"id":3,"nom":"NOM3","categorie":1,"prix":102.0,"description":"DESC3"}
{"id":4,"nom":"NOM4","categorie":1,"prix":103.0,"description":"DESC4"}
{"id":5,"nom":"NOM5","categorie":2,"prix":104.0,"description":"DESC5"}
{"id":6,"nom":"NOM6","categorie":2,"prix":105.0,"description":"DESC6"}
{"id":7,"nom":"NOM7","categorie":2,"prix":106.0,"description":"DESC7"}
{"id":8,"nom":"NOM8","categorie":2,"prix":107.0,"description":"DESC8"}
{"id":9,"nom":"NOM9","categorie":2,"prix":108.0,"description":"DESC9"}
{"id":10,"nom":"NOM10","categorie":3,"prix":109.0,"description":"DESC10"}
------------------------------ Mise à jour de la table [PRODUITS]
------------------------------ Affichage de la table [PRODUITS]
Liste des produits :
{"id":1,"nom":"NOM1","categorie":1,"prix":110.0,"description":"DESC1"}
{"id":2,"nom":"NOM2","categorie":1,"prix":111.0,"description":"DESC2"}
{"id":3,"nom":"NOM3","categorie":1,"prix":112.0,"description":"DESC3"}
{"id":4,"nom":"NOM4","categorie":1,"prix":113.0,"description":"DESC4"}
{"id":5,"nom":"NOM5","categorie":2,"prix":104.0,"description":"DESC5"}
{"id":6,"nom":"NOM6","categorie":2,"prix":105.0,"description":"DESC6"}
{"id":7,"nom":"NOM7","categorie":2,"prix":106.0,"description":"DESC7"}
{"id":8,"nom":"NOM8","categorie":2,"prix":107.0,"description":"DESC8"}
{"id":9,"nom":"NOM9","categorie":2,"prix":108.0,"description":"DESC9"}
{"id":10,"nom":"NOM10","categorie":3,"prix":109.0,"description":"DESC10"}
------------------------------ Vidage de la table [PRODUITS]
------------------------------ Affichage de la table [PRODUITS]
Liste des produits :
------------------------------ Insertion de deux produits de même clé primaire dans la table [PRODUITS]
Les erreurs suivantes se sont produites lors de l'ajout de deux produits de même clé primaire :
- Duplicate entry '100' for key 'PRIMARY'
------------------------------ Affichage de la table [PRODUITS]
Liste des produits :
------------------------------ Travail terminé
- 第 30 行:在插入两个主键相同的产品之前,表为空;
- 第 35 行:插入两个主键相同的产品后,表为空。这说明了事务的作用:
- 第一次插入成功。它没有理由失败;
- 第二次插入失败(第32行)。因此,由于这两次插入属于同一个事务,该事务中的所有SQL语句都会被回滚,包括第一次插入。
3.4.10. 结论
上述代码片段中引人注目的是,大量篇幅用于处理 [SQLException]。由于任何 JDBC 操作都可能抛出此异常,因此代码中存在大量 try/catch 代码块。
3.5. 示例-02
我们将使用 [javax.sql.DataSource] 数据源重新审视前面的应用程序:
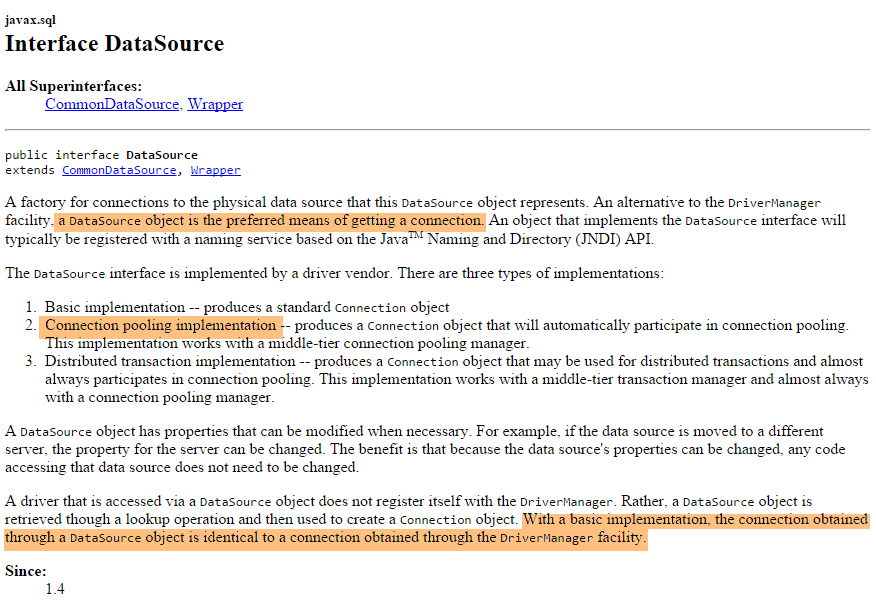
我们将使用由 [org.apache.tomcat.jdbc.pool.DataSource] 类实现的数据源。该类使用连接池,即一组已打开的连接:
- 当连接池被实例化时,会向数据库打开一定数量的连接。该数量可通过配置调整;
- 当 Java 代码打开连接时,该连接由连接池提供;
- 当 Java 代码关闭连接时,该连接将返回给连接池;
最终,连接仅被打开一次,从而提升了数据库访问性能。该数据源将在一个 Spring 配置类中进行定义
3.5.1. 项目架构
 |
在此示例中,一个控制台程序使用了 [JDBC] 层接口。
3.5.2. Eclipse 项目
可以通过复制前一个项目 [1-6] 来获取新的 Eclipse 项目:
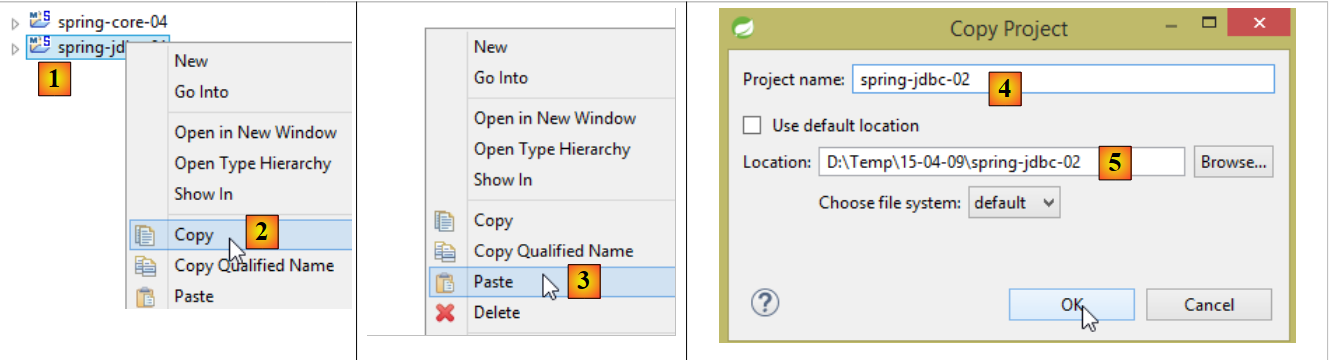 |
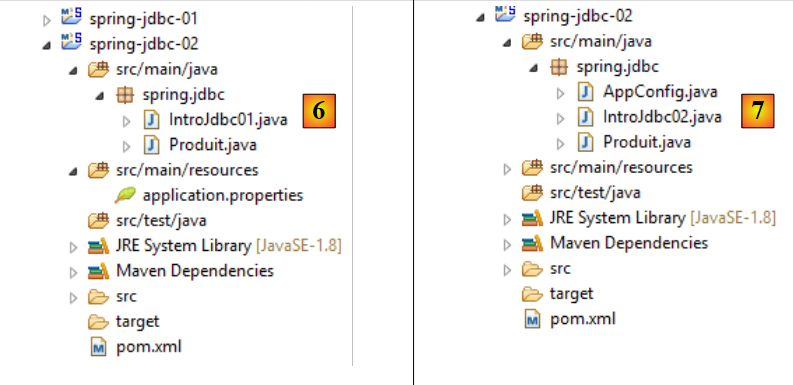 |
然后,我们将项目从 [6] 演进到 [7]:
3.5.3. Maven 配置
项目 [7] 是一个由以下 [pom.xml] 文件定义的 Maven 项目:
<?xml version="1.0" encoding="UTF-8"?>
<project xmlns="http://maven.apache.org/POM/4.0.0" xmlns:xsi="http://www.w3.org/2001/XMLSchema-instance"
    xsi:schemaLocation="http://maven.apache.org/POM/4.0.0 http://maven.apache.org/xsd/maven-4.0.0.xsd">
    <modelVersion>4.0.0</modelVersion>

    <groupId>dvp.spring.database</groupId>
    <artifactId>spring-jdbc-generic-02</artifactId>
    <version>0.0.1-SNAPSHOT</version>
    <packaging>jar</packaging>

    <name>spring-jdbc-generic-02</name>
    <description>Demo project for API JDBC</description>

    <parent>
        <groupId>org.springframework.boot</groupId>
        <artifactId>spring-boot-starter-parent</artifactId>
        <version>1.2.3.RELEASE</version>
        <relativePath /> <!-- lookup parent from repository -->
    </parent>

    <properties>
        <project.build.sourceEncoding>UTF-8</project.build.sourceEncoding>
        <java.version>1.8</java.version>
    </properties>

    <dependencies>
        <!-- configuration JDBC of SGBD -->
        <dependency>
            <groupId>dvp.spring.database</groupId>
            <artifactId>generic-config-jdbc</artifactId>
            <version>0.0.1-SNAPSHOT</version>
        </dependency>
    </dependencies>

    <build>
        <plugins>
            <plugin>
                <groupId>org.springframework.boot</groupId>
                <artifactId>spring-boot-maven-plugin</artifactId>
            </plugin>
            <plugin>
                <groupId>org.apache.maven.plugins</groupId>
                <artifactId>maven-surefire-plugin</artifactId>
                <version>2.18.1</version>
            </plugin>
        </plugins>
    </build>

</project>
- 第 28–33 行:对 [mysql-config-jdbc] 项目的 Maven 依赖;
正是 [mysql-config-jdbc] 项目在其 Maven 依赖中包含了提供 [javax.sql.DataSource] 数据源实现的库(参见第 3.3.2 节):
        <!-- Tomcat JDBC -->
        <dependency>
            <groupId>org.apache.tomcat</groupId>
            <artifactId>tomcat-jdbc</artifactId>
</dependency>
3.5.4. Spring 配置
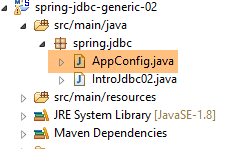 |
Spring 配置类 [AppConfig] 如下所示:
package spring.jdbc;

import generic.jdbc.config.ConfigJdbc;

import org.apache.tomcat.jdbc.pool.DataSource;
import org.springframework.context.annotation.Bean;
import org.springframework.context.annotation.Configuration;
import org.springframework.context.annotation.Import;

@Configuration
@Import({ generic.jdbc.config.ConfigJdbc.class })
public class AppConfig {
    // data source
    @Bean
    public DataSource dataSource() {
        // data source TomcatJdbc
        DataSource dataSource = new DataSource();
        // configuration access JDBC
        dataSource.setDriverClassName(ConfigJdbc.DRIVER_CLASSNAME);
        dataSource.setUsername(ConfigJdbc.USER_DBPRODUITS);
        dataSource.setPassword(ConfigJdbc.PASSWD_DBPRODUITS);
        dataSource.setUrl(ConfigJdbc.URL_DBPRODUITS);
        // initially open connections
        dataSource.setInitialSize(5);
        // result
        return dataSource;
    }

}
- 第 10 行:[AppConfig] 是一个 Spring 配置类;
- 第 11 行:导入 [mysql-config-jdbc] 项目中定义的配置类 [generic.jdbc.config.ConfigJdbc.class]。这意味着该配置文件中定义的所有 Bean 均可使用;
- 第 14–27 行:定义数据源的 Spring Bean;
- 第 17 行:创建数据源,此时该数据源尚未配置;
- 第 19–22 行:允许数据源连接到数据库的信息;
- 第 24 行:创建一个包含 5 个连接的连接池。此处我们仅需一个连接,因为绝不会出现多个并发连接;
3.5.5. 主类
主类 [IntroJdbc02] 如下所示:
package spring.jdbc;

import generic.jdbc.config.ConfigJdbc;
import generic.jdbc.entities.dbproduits.Produit;

import java.sql.Connection;
import java.sql.PreparedStatement;
import java.sql.ResultSet;
import java.sql.SQLException;
import java.util.ArrayList;
import java.util.List;

import javax.sql.DataSource;

import org.springframework.context.annotation.AnnotationConfigApplicationContext;

import com.fasterxml.jackson.core.JsonProcessingException;
import com.fasterxml.jackson.databind.ObjectMapper;

public class IntroJdbc02 {

    // mapper jSON
    final static ObjectMapper jsonMapper = new ObjectMapper();
    // data source
    private static DataSource dataSource;

    public static void main(String[] args) {
        AnnotationConfigApplicationContext ctx = null;
        try {
            // spring context retrieval
            ctx = new AnnotationConfigApplicationContext(AppConfig.class);
            // data source recovery
            dataSource = ctx.getBean(DataSource.class);
            // empty table [PRODUITS]
            System.out.println(String.format("------------------------------ %s", "Vidage de la table [PRODUITS]"));
            delete();
...
        // finish
        System.out.println(String.format("------------------------------ %s", "Travail terminé"));
    }

    // product list
    private static void select() {
        Connection connexion = null;
        PreparedStatement ps = null;
        ResultSet rs = null;
        try {
            // opening connection
            connexion = dataSource.getConnection();
            // start of transaction
            connexion.setAutoCommit(false);
            // in read-only mode
            connexion.setReadOnly(true);
            // table [PRODUITS] is read
            ps = connexion.prepareStatement(ConfigJdbc.V1_SELECT_PRODUITS);
            rs = ps.executeQuery();
            System.out.println("Liste des produits : ");
            while (rs.next()) {
                affiche(new Produit(rs.getInt(1), rs.getString(2), rs.getInt(3), rs.getDouble(4), rs.getString(5)));
            }
            // commit transaction
            connexion.commit();
        } catch (SQLException e1) {
            // we handle the exception
            doCatchException("Les erreurs suivantes se sont produites à la lecture de la table", connexion, e1);
        } finally {
            // we treat the finally
            doFinally(rs, ps, connexion);
        }
    }
...
- 第 25 行:数据源。请注意,其类型为 [javax.sql.DataSource](第 13 行),这是一个接口;
- 第 31 行:Spring 对象的实例化;
- 第 32 行:获取数据源的引用。请注意,实际使用的类从未被提及。因此,此处没有任何迹象表明正在使用 [TomcatJdbc] 的实现;
- 第 49 行:获取已打开的连接。这就是 [IntroJdbc02] 中各种方法获取数据库连接的方式。其余代码与 [IntroJdbc01] 类完全相同;
3.5.6. 测试
我们运行名为 [spring-jdbc-generic-02.IntroJdbc02] 的执行配置:
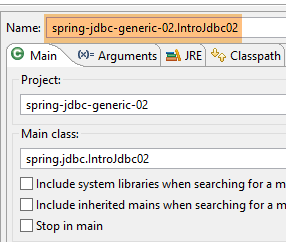 |
我们得到了与之前(第3.4.9节)相同的结果。
3.6. 示例-03
3.6.1. 项目架构
 |
在此示例中,数据访问方法被封装在 [dao] 层中。这些方法将通过 JUnit 测试进行验证。
3.6.2. Eclipse 项目
Eclipse 项目 [spring-jdbc-03] 是一个 Spring/Maven 项目,其构建方式与前一个项目相同,并进行了以下补充:
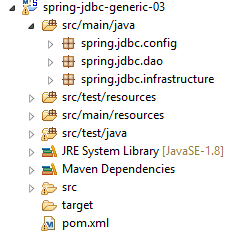 | 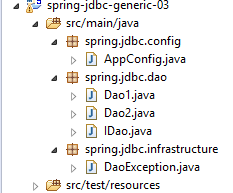 |
各个包的作用如下:
- [spring.jdbc.config]:Spring 项目配置;
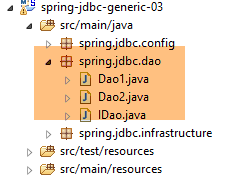
- [spring.jdbc.dao]:[DAO] 层的实现;
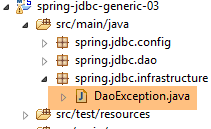
- [spring.jdbc.infrastructure]:实现未处理的异常 [DaoException];
3.6.3. Maven 配置
该 Maven 项目通过以下 [pom.xml] 文件进行配置:
<?xml version="1.0" encoding="UTF-8"?>
<project xmlns="http://maven.apache.org/POM/4.0.0" xmlns:xsi="http://www.w3.org/2001/XMLSchema-instance"
    xsi:schemaLocation="http://maven.apache.org/POM/4.0.0 http://maven.apache.org/xsd/maven-4.0.0.xsd">
    <modelVersion>4.0.0</modelVersion>

    <groupId>dvp.spring.database</groupId>
    <artifactId>spring-jdbc-generic-03</artifactId>
    <version>0.0.1-SNAPSHOT</version>
    <packaging>jar</packaging>

    <name>spring-jdbc-generic-03</name>
    <description>Demo project for API JDBC</description>

    <parent>
        <groupId>org.springframework.boot</groupId>
        <artifactId>spring-boot-starter-parent</artifactId>
        <version>1.2.3.RELEASE</version>
        <relativePath /> <!-- lookup parent from repository -->
    </parent>

    <properties>
        <project.build.sourceEncoding>UTF-8</project.build.sourceEncoding>
        <java.version>1.8</java.version>
    </properties>

    <dependencies>
        <!-- configuration JDBC of SGBD -->
        <dependency>
            <groupId>dvp.spring.database</groupId>
            <artifactId>generic-config-jdbc</artifactId>
            <version>0.0.1-SNAPSHOT</version>
        </dependency>
    </dependencies>

    <build>
        <plugins>
            <plugin>
                <groupId>org.springframework.boot</groupId>
                <artifactId>spring-boot-maven-plugin</artifactId>
            </plugin>
            <plugin>
                <groupId>org.apache.maven.plugins</groupId>
                <artifactId>maven-surefire-plugin</artifactId>
                <version>2.18.1</version>
            </plugin>
        </plugins>
    </build>

</project>
它与 [spring-jdbc-02] 项目的配置完全相同。特别是,它使用了 [mysql-config-jdbc] 项目的 Maven 依赖项(第 28–32 行)。
3.6.4. [DAO] 层接口
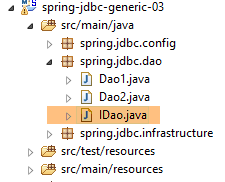 |
[DAO] 层提供了以下 [IDao] 接口:
package spring.jdbc.dao;

import java.util.List;

import spring.jdbc.entities.Produit;

public interface IDao {

    // add products
    public List<Produit> addProduits(List<Produit> produits);

    // list of all products
    public List<Produit> getAllProduits();

    // a special product
    public Produit getProduitById(int id);

    public Produit getProduitByName(String name);

    // several product updates
    public int updateProduits(List<Produit> produits);

    // removal of all products
    public int deleteAllProduits();

    // removal of several products
    public int deleteProduits(int[] ids);
}
3.6.5. [DaoException] 类
[DaoException] 类只是继承了第 3.3.5 节中介绍的 [UncheckedException] 类:
 |
package spring.jdbc.infrastructure;

public class DaoException extends UncheckedException {

    private static final long serialVersionUID = 1L;

    // manufacturers
    public DaoException() {
        super();
    }

    public DaoException(int code, Throwable e, String className) {
        super(code, e, className);
    }

}
3.6.6. Spring 项目配置
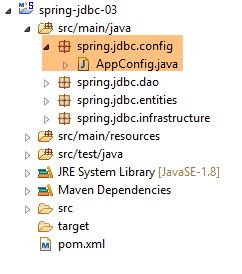 |
用于配置 Spring 项目的 [AppConfig] 类与 [spring-jdbc-02] 示例中的 Spring 配置文件完全相同,仅第 11 行有所不同:
package spring.jdbc.config;

import generic.jdbc.config.ConfigJdbc;

import org.apache.tomcat.jdbc.pool.DataSource;
import org.springframework.context.annotation.Bean;
import org.springframework.context.annotation.ComponentScan;
import org.springframework.context.annotation.Configuration;

@Configuration
@ComponentScan(basePackages = { "spring.jdbc.dao" })
public class AppConfig {
    // data source
    @Bean
    public DataSource dataSource() {
        // data source TomcatJdbc
        DataSource dataSource = new DataSource();
        // configuration access JDBC
        dataSource.setDriverClassName(ConfigJdbc.DRIVER_CLASSNAME);
        dataSource.setUsername(ConfigJdbc.USER_DBPRODUITS);
        dataSource.setPassword(ConfigJdbc.PASSWD_DBPRODUITS);
        dataSource.setUrl(ConfigJdbc.URL_DBPRODUITS);
        // initially open connections
        dataSource.setInitialSize(5);
        // result
        return dataSource;
    }
}
- 第 11 行:系统将扫描 [spring.jdbc.dao] 包,以查找除本配置文件中定义的组件之外的其他 Spring 组件;
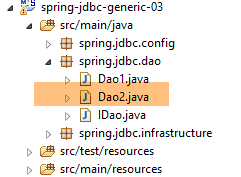
3.6.7. [DAO] 层的实现
 |
 |
回顾(第3.6.4节)可知,[DAO]层实现了以下[IDao]接口:
package spring.jdbc.dao;

import generic.jdbc.entities.dbproduits.Produit;

import java.util.List;

public interface IDao {

    // add products
    public List<Produit> addProduits(List<Produit> produits);

    // list of all products
    public List<Produit> getAllProduits();

    // a special product
    public Produit getProduitById(int id);

    public Produit getProduitByName(String name);

    // several product updates
    public int updateProduits(List<Produit> produits);

    // removal of all products
    public int deleteAllProduits();

    // removal of several products
    public int deleteProduits(int[] ids);
}
[Dao1] 和 [Dao2] 类都实现了该接口。[Dao2] 类是 [Dao1] 类的变体,引入了一项新的语法特性。我们将重点关注 [Dao1] 类。其骨架如下:
package spring.jdbc.dao;

import generic.jdbc.config.ConfigJdbc;
import generic.jdbc.entities.dbproduits.Produit;

import java.sql.Connection;
import java.sql.PreparedStatement;
import java.sql.ResultSet;
import java.sql.SQLException;
import java.util.ArrayList;
import java.util.List;

import javax.sql.DataSource;

import org.springframework.beans.factory.annotation.Autowired;
import org.springframework.stereotype.Component;

import spring.jdbc.infrastructure.DaoException;

@Component("dao1")
public class Dao1 implements IDao {

    // class name
    private String simpleClassName = getClass().getSimpleName();
    // data source
    @Autowired
    protected DataSource dataSource;

    // manufacturer
    public Dao1() {
        System.out.println("building Dao1...");
    }

    // ------------------------------- interface
    @Override
    public List<Produit> getAllProduits() {
...
    }

    @Override
    public Produit getProduitById(int id) {
...
    }

    @Override
    public Produit getProduitByName(String name) {
...
    }

    @Override
    public List<Produit> addProduits(List<Produit> produits) {
....
    }

    @Override
    public int updateProduits(List<Produit> produits) {
...
    }

    @Override
    public int deleteAllProduits() {
...
    }

    @Override
    public int deleteProduits(int[] ids) {
...
    }

    // ---------------------------------------- local methods
    // management finally
    protected DaoException doFinally(ResultSet rs, PreparedStatement ps, Connection connexion, int code,
            DaoException daoException) {
        ...
    }

    // catch management
    protected DaoException doCatchException(Connection connexion, Throwable th, int code, DaoException daoException) {
...
}
- 第 20 行:[Dao] 类是名为 [dao1] 的 Spring 组件。该名称是可选的。若未指定,则使用类名的首字母小写形式;
- 第 24 行:类名。我们避免硬编码 [Dao],以便在重命名类时无需重新定义此字段,从而保持其有效性;
- 第 26–27 行:注入在配置类 [AppConfig] 中定义的数据源 [tomcat-jdbc];
- 第 36–68 行:实现 [IDao] 接口;
- 第 78–80 行:集中处理各方法的 catch 代码块;
- 第72–75行:集中处理各个方法的`finally`代码块;
各方法的 catch 代码块处理方式如下:
    // gestion catch
    protected DaoException doCatchException(Connection connexion, Throwable th, int code) {
        // annulation transaction
        try {
            if (connexion != null) {
                connexion.rollback();
            }
        } catch (SQLException e2) {
            e2.printStackTrace();
        }
        // daoException
        return new DaoException(code, th, simpleClassName);
}
- 第 2 行:该方法声明为 [protected],这意味着子类可以使用它,而无需将其设为 public。它接受以下参数:
- [Connection connection]:与数据库管理系统(DBMS)的连接——可以为 null;
- [Throwable th]:发生的异常,将被封装为 [DaoException] 类型;
- [int code]:若该方法创建新的 [DaoException] 时使用的错误代码;
- 第 4–7 行:该方法的主要作用是回滚与作为参数 1 传入的连接相关联的事务;
- 第 8–10 行:如果事务回滚失败,将把异常跟踪信息写入控制台。由于我们将在第 12 行抛出异常,因此除此之外我们无能为力;
各方法的 *finally* 代码块处理如下:
// management finally
    protected DaoException doFinally(ResultSet rs, PreparedStatement ps, Connection connexion, int code,
            DaoException daoException) {
        // closure ResultSet
        if (rs != null) {
            try {
                rs.close();
            } catch (SQLException e1) {

            }
        }
        // closure [PreparedStatement]
        if (ps != null) {
            try {
                ps.close();
            } catch (SQLException e2) {

            }
        }
        // close connection
        if (connexion != null) {
            try {
                connexion.close();
            } catch (SQLException e3) {
                // record the error if possible
                if (daoException == null) {
                    daoException = new DaoException(code, e3, simpleClassName);
                }
            }
        }
        // result
        return daoException;
    }
- 第 2 行:此方法也被声明为 [protected]。它接受以下参数:
- [ResultSet rs]:若执行了 [SELECT] 操作,则为 [ResultSet] 对象——可能为空;
- [PreparedStatement ps]:已执行的 [PreparedStatement]——可能为 null;
- [Connection connection]:与数据库管理系统(DBMS)的连接——可能为空;
- [int code]:若该方法抛出新的 [DaoException] 时使用的错误代码;
- [DaoException daoException]:如果在 finally 代码块之前发生了 [DaoException],则返回该异常——可能为 null;
- 第 21–30 行:此方法的主要目的是关闭连接(第 23 行);
- 第 24–29 行:若在关闭连接过程中发生异常,则检查传入的 [DaoException daoException] 参数的状态:若 [daoException == null],则使用作为参数传入的代码创建一个新的 [DaoException];
- 第 32 行:将旧的或新的 [DaoException] 作为结果返回;
我们不会列出 [Dao] 类的所有方法,仅展示其中几个。它们的实现原理都大同小异。
3.6.7.1. [getProductById] 方法
[getProductById] 方法返回主键等于 [id] 参数的产品,否则返回 null;
@Override
    public Produit getProduitById(int id) {
        // connection resources
        Connection connexion = null;
        PreparedStatement ps = null;
        ResultSet rs = null;
        // initially no exceptions
        DaoException daoException = null;
        // the product you are looking for
        Produit produit = null;
        try {
            // opening connection
            connexion = dataSource.getConnection();
            // start of transaction
            connexion.setAutoCommit(false);
            // in read-only mode
            connexion.setReadOnly(true);
            // table [PRODUITS] is read
            ps = connexion.prepareStatement(ConfigJdbc.V2_SELECT_PRODUIT_BYID);
            ps.setInt(1, id);
            rs = ps.executeQuery();
            if (rs.next()) {
                produit = new Produit(id, rs.getString(1), rs.getInt(2), rs.getDouble(3), rs.getString(4));
            }
            // commit transaction
            connexion.commit();
            // return to default mode
            connexion.setAutoCommit(true);
        } catch (SQLException e1) {
            // we handle the exception
            daoException = doCatchException(connexion, e1, 112);
        } finally {
            // we treat the finally
            daoException = doFinally(rs, ps, connexion, 113, daoException);
        }
        // exception?
        if (daoException != null) {
            throw daoException;
        }
        // result
        return produit;
    }
- 第 10 行:待返回的产品被设置为 null;
- 第 19 行:SQL 语句 [ConfigJdbc.V2_SELECT_PRODUCT_BYID] 如下:
public final static String V2_SELECT_PRODUIT_BYID = "SELECT NOM, CATEGORIE, PRIX, DESCRIPTION FROM PRODUITS WHERE ID=?";
- 第 22–24 行:如果 [ResultSet] 包含一行,则使用该行创建待返回的产品;否则,待返回的产品保持为 null;
- 第 41 行:返回该产品;
- 第 8 行:将方法的 [DaoException] 初始化为 null;
- 第 31 行:[doCatchException] 方法创建一个 [DaoException];
- 第 34 行:[doFinally] 方法的 [daoException] 参数要么为 null,要么是 [doCatchException] 方法创建的异常。如果 [doFinally] 方法成功关闭连接,则该参数保持不变;
- 若成功关闭连接,则保持该参数不变;
- 若关闭连接失败且此前已发生过 [DaoException],则保持该参数不变;
- 若关闭连接失败且此前未发生过 [DaoException],则创建一个新的 [DaoException];
- 第 37–39 行:如果本地 [daoException] 不为 null,则抛出该异常;否则,返回请求的结果(第 41 行);
3.6.7.2. [deleteProducts] 方法
[deleteProduits] 方法用于删除主键作为参数传递给它的产品。它返回已删除的产品数量。
@Override
    public int deleteProduits(int[] ids) {
        // connection resources
        PreparedStatement ps = null;
        Connection connexion = null;
        // initially no exceptions
        DaoException daoException = null;
        // number of products updated
        int nbProduits = 0;
        try {
            // opening connection
            connexion = dataSource.getConnection();
            // start of transaction
            connexion.setAutoCommit(false);
            // in read/write mode
            connexion.setReadOnly(false);
            // we do away with products
            ps = connexion.prepareStatement(ConfigJdbc.V2_DELETE_PRODUITS);
            for (int id : ids) {
                // settings
                ps.setInt(1, id);
                // execution
                nbProduits += ps.executeUpdate();
            }
            // commit transaction
            connexion.commit();
            // return to default mode
            connexion.setAutoCommit(true);
        } catch (SQLException e1) {
            // we handle the exception
            daoException = doCatchException(connexion, e1, 171);
        } finally {
            // we treat the finally
            daoException = doFinally(null, ps, connexion, 172, daoException);
        }
        // exception?
        if (daoException != null) {
            throw daoException;
        }
        // result
        return nbProduits;
    }
- 第 18 行,SQL 语句 [ConfigJdbc.V2_DELETE_PRODUITS] 如下:
public final static String V2_DELETE_PRODUITS = "DELETE FROM PRODUITS WHERE ID=?";
- 第 18–24 行:删除产品的代码。我们可以看到,SQL 语句被预编译一次(第 18 行),并执行 n 次(第 19–24 行)。这就是 [PreparedStatement] 对象的优势;
- 第 23 行:[PreparedStatement].executeUpdate() 方法返回受更新操作影响的行数;
- 第 41 行:返回已更新的产品数量;
3.6.7.3. [updateProducts] 方法
[updateProducts] 方法将作为参数传递给它的产品更新到数据库中。它返回更新成功的产品数量。
@Override
    public int updateProduits(List<Produit> produits) {
        // connection resources
        PreparedStatement ps = null;
        Connection connexion = null;
        // initially no exceptions
        DaoException daoException = null;
        // number of products updated
        int nbProduits = 0;
        try {
            // opening connection
            connexion = dataSource.getConnection();
            // start of transaction
            connexion.setAutoCommit(false);
            // in read/write mode
            connexion.setReadOnly(false);
            // table [PRODUITS] is updated
            ps = connexion.prepareStatement(ConfigJdbc.V2_UPDATE_PRODUITS);
            for (Produit produit : produits) {
                // settings
                ps.setString(1, produit.getNom());
                ps.setDouble(2, produit.getPrix());
                ps.setInt(3, produit.getCategorie());
                ps.setString(4, produit.getDescription());
                ps.setInt(5, produit.getId());
                // execution
                nbProduits += ps.executeUpdate();
            }
            // commit transaction
            connexion.commit();
            // return to default mode
            connexion.setAutoCommit(true);
        } catch (SQLException e1) {
            // we handle the exception
            daoException = doCatchException(connexion, e1, 131);
        } finally {
            // we treat the finally
            daoException = doFinally(null, ps, connexion, 132, daoException);
        }
        // exception?
        if (daoException != null) {
            throw daoException;
        }
        // result
        return nbProduits;
    }
- 第 18 行:SQL 语句 [ConfigJdbc.V2_UPDATE_PRODUITS] 如下:
public final static String V2_UPDATE_PRODUITS = "UPDATE PRODUITS SET NOM=?, PRIX=?, CATEGORIE=?, DESCRIPTION=? WHERE ID=?";
- 第 19–28 行:产品更新代码;
3.6.7.4. [addProducts] 方法
[addProducts] 方法将作为参数传递给它的产品添加到数据库中。它返回这些产品的主键(在添加到数据库之前,产品没有主键)。
@Override
    public List<Produit> addProduits(List<Produit> produits) {
        // connection resources
        PreparedStatement ps = null;
        Connection connexion = null;
        // initially no exceptions
        DaoException daoException = null;
        try {
            // opening connection
            connexion = dataSource.getConnection();
            // in read/write mode
            connexion.setReadOnly(false);
            // start of transaction
            connexion.setAutoCommit(false);
            // add elements to table [PRODUITS]
            String generatedColumns[] = { ConfigJdbc.TAB_PRODUITS_ID };
            ps = connexion.prepareStatement(ConfigJdbc.V2_INSERT_PRODUITS, generatedColumns);
            for (Produit produit : produits) {
                // settings
                ps.setString(1, produit.getNom());
                ps.setLong(2, produit.getCategorie());
                ps.setDouble(3, produit.getPrix());
                ps.setString(4, produit.getDescription());
                // order execution
                ps.executeUpdate();
                // generated primary key
                ResultSet generatedKeys = ps.getGeneratedKeys();
                if (generatedKeys.next()) {
                    produit.setId(generatedKeys.getInt(1));
                } else {
                    throw new RuntimeException(String.format("Le produit de nom [%s] n'a pas récupéré de clé primaire",
                            produit.getNom()));
                }
            }
            // commit transaction
            connexion.commit();
            // return to default mode
            connexion.setAutoCommit(true);
        } catch (SQLException | RuntimeException e1) {
            // we handle the exception
            daoException = doCatchException(connexion, e1, 151);
        } finally {
            // we treat the finally
            daoException = doFinally(null, ps, connexion, 152, daoException);
        }
        // exception?
        if (daoException != null) {
            throw daoException;
        }
        // result
        return produits;
}
- 第 16 行,SQL 语句 [ConfigJdbc.V2_INSERT_PRODUITS] 如下:
public final static String V2_INSERT_PRODUITS = "INSERT INTO PRODUITS(NOM, CATEGORIE, PRIX, DESCRIPTION) VALUES (?, ?, ?, ?)";
在上文中,产品插入语句未包含主键 [ID]。由于 MySQL 数据库中的主键具有 [AUTOINCREMENT] 属性,数据库管理系统(DBMS)会在每次插入时自动生成主键。问题在于如何获取该主键。这一点至关重要,因为对产品的操作均需通过主键进行。因此,我们需要获取这些主键;
- 第 17–33 行:产品插入循环;
- 第 16 行:[prepareStatement] 方法的特定形式。第二个参数 [generatedColumns] 是一个数组,其中包含插入后需要检索值的列名。在第 16 行,我们指定了需要检索 [id] 列的值。 请注意,尽管表列名不区分大小写,但 PostgreSQL 数据库管理系统要求该名称必须为小写。这通常是在将代码从一个数据库管理系统移植到另一个时会遇到的问题;
- 第 24 行:向数据库插入一行;
- 第 26 行:将第 16 行指定的列值检索到 [ResultSet] 中。在此,对于单次插入操作,[ResultSet] 将包含一行,且该行仅有一列,其中包含主键;
- 第 28 行:获取 DBMS 生成的主键;
- 第29–32行:若未获取到生成的主键,则抛出[RuntimeException],该异常将被封装在[DaoException]中(第38–40行);
3.6.8. [Dao2] 类
 |
 |
[Dao2] 类是 [Dao1] 类的变体,它使用了一种名为 try-with-resource(resource) 的语法:
- [resource] 是一个实现了 [java.lang.AutoCloseable] 接口的资源。所有使用 [close] 方法释放的资源都属于这一类。这种语法确保在第 4 行时,[resource] 将会被关闭。这样就无需编写 [finally] 子句来执行此关闭操作;
让我们以 [Dao2] 类的 [getAllProducts] 方法为例:
    @Override
    public List<Produit> getAllProduits() {
        // possible exception
        DaoException daoException = null;
        // product list
        List<Produit> produits = new ArrayList<Produit>();
        try (Connection connexion = dataSource.getConnection()) {
            // start of transaction
            connexion.setAutoCommit(false);
            // in read-only mode
            connexion.setReadOnly(true);
            // table [PRODUITS] is read
            try (PreparedStatement ps = connexion.prepareStatement(ConfigJdbc.V2_SELECT_ALLPRODUITS)) {
                try (ResultSet rs = ps.executeQuery()) {
                    while (rs.next()) {
                        produits.add(new Produit(rs.getInt(1), rs.getString(2), rs.getInt(3), rs.getDouble(4), rs.getString(5)));
                    }
                }
                // end transaction
                connexion.commit();
                // return to default mode
                connexion.setAutoCommit(true);
            } catch (SQLException e1) {
                // cancel the transaction
                daoException = doRollback(connexion, e1, 111);
            }
        } catch (SQLException e2) {
            // we handle the exception
            if (daoException == null) {
                daoException = new DaoException(112, e2, simpleClassName);
            }
        }
        // exception?
        if (daoException != null) {
            throw daoException;
        }
        // result
        return produits;
}
- 第 7 行:包含 [Connection] 资源的 try 代码块。第 27 行确保其被关闭;
- 第 13 行:包含 [PreparedStatement] 资源的 try 代码块。第 23 行确保其已关闭;
- 第 14 行:包含 [ResultSet] 资源的 try 代码块。第 19 行确保其被关闭;
- 第 25 行:事务按以下方式回滚:
    private DaoException doRollback(Connection connexion, Throwable e1, int code) {
        try {
            if (connexion != null) {
                connexion.rollback();
            }
        } catch (SQLException e) {
            e.printStackTrace();
        }
        // génération de l'exception
        return new DaoException(code, e1, simpleClassName);
}
最终,我们得到了更易于阅读的代码。
3.6.9. 测试层的实现
3.6.9.1. 测试类
 |
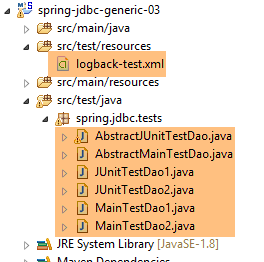 |
- 测试 [JUnitTestDao1] 是针对类 [Dao1] 的 JUnit 测试;
- [JUnitTestDao2] 测试是针对 [Dao2] 类的 JUnit 测试;
- [AbstractJUnitTestDao] 是前两个测试类的父类;
- [MainTestDao1] 是针对 [Dao1] 类的控制台测试类;
- [MainTestDao2] 是针对 [Dao2] 类的控制台测试类;
- [AbstractMainTestDao] 是前两个类的父类。它复用了前面已介绍的控制台类 [IntroJdbc01, IntroJdbc02] 中的代码,因此我们不再详细探讨这些控制台类;
[JUnitTestDao1] 类如下所示:
package spring.jdbc.tests;

import org.junit.runner.RunWith;
import org.springframework.beans.factory.annotation.Autowired;
import org.springframework.beans.factory.annotation.Qualifier;
import org.springframework.boot.test.SpringApplicationConfiguration;
import org.springframework.test.context.junit4.SpringJUnit4ClassRunner;

import spring.jdbc.config.AppConfig;
import spring.jdbc.dao.IDao;

@SpringApplicationConfiguration(classes = AppConfig.class)
@RunWith(SpringJUnit4ClassRunner.class)
public class JUnitTestDao1 extends AbstractJUnitTestDao {

    // layer [DAO]
    @Autowired
    @Qualifier("dao1")
    private IDao dao;

    @Override
    IDao getDao() {
        return dao;
    }

}
- 第 12–13 行的注解已在第 2.5.5 节中讨论过。它们允许 JUnit 测试轻松访问 Spring 上下文及其 Bean。该上下文由第 2.4.3 节中讨论的 [AppConfig] 类(第 12 行)进行配置;
- 第 14 行:该类继承了 [AbstractJUnitTestDao] 类,我们稍后将对此进行讨论。JUnit 测试方法位于该类内部;
- 第17–19行:名为[dao1]的Bean(第18行)被注入(第17行)。因此,此处注入的是[Dao1]类的实例;
- 第 21–24 行:[getDao] 方法重写了父类中同名的方法;
归根结底,该类的目的是为父类提供对需要测试的 [DAO] 层的引用,在本例中即 [Dao1] 的实例。同样地,[JUnitTestDao2] 类为父类 [AbstractJUnitTestDao] 提供了 [Dao2] 类的实例。
[AbstractJUnitTestDao] 类是一个 JUnit 测试类:
package spring.jdbc.tests;

import generic.jdbc.entities.dbproduits.Produit;

import java.util.ArrayList;
import java.util.List;

import org.junit.Assert;
import org.junit.Before;
import org.junit.Test;
import org.springframework.beans.BeansException;

import spring.jdbc.dao.IDao;
import spring.jdbc.infrastructure.DaoException;

import com.fasterxml.jackson.core.JsonProcessingException;
import com.fasterxml.jackson.databind.ObjectMapper;

public abstract class AbstractJUnitTestDao {

    // layer [DAO]
    abstract IDao getDao();

    // mapper jSON
    final static ObjectMapper jsonMapper = new ObjectMapper();

    @Before
    public void clean() {
        // the base is cleaned before each test
        log("Vidage de la base de données", 1);
        getDao().deleteAllProduits();
    }

    @Test
    public void getProduits() throws JsonProcessingException {
    ...
    }

    @Test
    public void getProduitBy() {
    ...
    }

    @Test
    public void doInsertsInTransaction() {
...
    }

    @Test
    public void updateProduits() {
    ...
    }

    @Test
    public void deleteProduits() {
    ....
    }

    @Test
    public void perf1() {
        ...
    }

    @Test
    public void perf2() {
    ...
    }

    @Test
    public void perf3() {
    ....
    }

    // -------------- private methods
...
}
- 第 19 行:[AbstractJUnitTestDao] 类是抽象类;
- 第 22 行:抽象方法 [getDao],该方法提供对待测试的 [DAO] 层的引用。此方法由子类实现;
- 第 25 行:一个 JSON 映射器,用于在控制台上显示产品的 JSON 值;
- 第 27–32 行:在每次测试开始前(第 27 行),清空 [PRODUCTS] 表;
3.6.9.2. 私有方法 [fill]
私有方法 [fill] 用于向 [PRODUCTS] 表中添加产品。
private List<Produit> fill(int nbProduits) {
        log("Remplissage de la base de données", 1);
        // on crée une liste de produits
        List<Produit> produits = new ArrayList<Produit>();
        for (int i = 0; i < nbProduits; i++) {
            int n = i + 1;
            // int id, String nom, int categorie, double prix, String description
            produits.add(new Produit(0, String.format("NOM%s", n), n / 5 + 1, 100 * (1 + (double) i / 100), String.format(
                    "DESC%s", n)));
        }
        // on la persiste en base - on récupère des produits avec leur clé primaire
        produits = getDao().addProduits(produits);
        // on crée un dictionnaire des produits pour pouvoir les retrouver + facilement
        // la clé du dictionnaire est la clé primaire du produit en base
        for (Produit produit : produits) {
            mapProduits.put(produit.getId(), produit);
        }
        // on rend les produits
        return produits;
    }
- 第 1 行:[fill] 方法将 [nbProducts] 插入到 [PRODUCTS] 表中,该表被假定为空;
- 第 3–10 行:创建一个产品列表,格式如下:
new Produit(0, String.format("NOM%s", n), n / 5 + 1, 100 * (1 + (double) i / 100), String.format("DESC%s", n)));
该代码使用了 Product 构造函数(int id, String name, int category, double price, String description)。第一个参数 [id](即 [PRODUCTS] 表的主键)的值无关紧要,因为第 10 行的 [addProducts] 方法不会将其插入数据库,而是让数据库管理系统 (DBMS) 自动生成该值;
- 第 12 行:产品列表被持久化到数据库中。该列表中的每个产品都被分配了一个新的主键 [id]。[addProduits] 方法返回其 [produits] 参数。因此,我们可以省略获取结果的步骤;
- 第 15–17 行:产品被放入一个字典中:
    // dictionnaire des produits
    private Map<Integer, Produit> mapProduits = new HashMap<Integer, Produit>();
字典键是产品的主键,其关联值即为产品本身;
- 第 19 行:我们返回产品列表;
3.6.9.3. [getProducts] 测试
具体如下:
    @Test
    public void getProduits() throws JsonProcessingException {
        // remplissage
        fill(10);
        // liste des produits
        log("Liste des produits", 2);
        List<Produit> produits = getDao().getAllProduits();
        affiche(produits);
        // on vérifie que la liste récupérée et celle persistée sont les mêmes
        for (Produit produit : produits) {
            Produit found = mapProduits.get(produit.getId());
            Assert.assertEquals(found, produit);
            mapProduits.remove(found.getId());
        }
        // tous les produits initiaux doivent avoir disparu du dictionnaire
        Assert.assertEquals(0, mapProduits.size());
}
}
- 第 4 行:向数据库中添加了 10 件商品;
- 第 7 行:完成后,我们请求查看数据库中的所有产品;
- 第 8 行:显示这些产品。目的是验证产品是否已成功保存,并且它们具有主键;
- 第10–13行:我们验证检索到的产品与已持久化的产品完全一致,并且能在字典[mapProduits]中找到;
- 第 11 行:从字典中检索与数据库返回的主键相同的商品。这表明持久化的商品确实已被分配了主键;
- 第 12 行:我们确保这两个产品是相同的。请注意,[Product] 类已定义了 [equals] 方法(参见第 3.3.4 节);
- 第 13 行:将找到的元素从字典中移除;
- 第 16 行:我们验证初始产品的字典是否确实为空,这意味着这些初始产品均存在于从数据库检索到的产品列表中;
第 8 行中的 [display] 方法是以下私有方法:
    // product list display
    private <T> void affiche(List<T> elements) throws JsonProcessingException {
        for (T element : elements) {
            System.out.println(jsonMapper.writeValueAsString(element));
        }
}
- 第 2 行:[display] 方法是一个泛型方法。它由类型 T 参数化,语法上表示为 <T>。如果它由两个类型 T1 和 T2 参数化,则应写为 <T1,T2>。由类型 T 参数化的方法 m 的语法如下:
在方法 m 的代码中,我们会找到类型为 T 的数据。然后可以按以下方式调用类 C 的实例 c 的方法 m:
其中 T1 是将替换方法 m 的形式类型 T 的实际类型。大多数情况下,编译器能够从方法 m 的参数中推断出类型 T1。因此,上述语句通常会被简化为:
让我们回到 [display] 方法。它会显示一个由类型 T 的元素组成的列表。之所以能实现这一点,是因为第 4 行使用的 JSON 映射器能够渲染任何对象类型的 JSON 表示形式。在这个具体示例中,唯一使用的类型 T 将是 [Product] 类型。
[display] 方法也可以按以下方式编写:
    // product list display
    private void affiche(Object o) throws JsonProcessingException {
            System.out.println(jsonMapper.writeValueAsString(o));
        }
由于实际参数是一个产品列表,第 3 行本应打印该列表的 JSON 表示形式。这与逐个打印其每个元素的表示形式并不相同。
[getProducts] 测试生成的输出如下:
3.6.9.4. [getProductBy] 测试
具体如下:
    @Test
    public void getProduitBy() {
        // remplissage
        fill(10);
        log("getProduitBy", 1);
        Produit produit = getDao().getProduitByName("NOM3");
        Produit produit2 = getDao().getProduitById(produit.getId());
        Assert.assertNotNull(produit2);
        Assert.assertEquals(produit2.getNom(), produit.getNom());
        Assert.assertEquals(produit2.getId(), produit.getId());
}
- 第 6 行:使用 [IDao] 接口的 [getProductByName] 方法检索名为 [NAME3] 的产品;
- 第 7 行:随后使用 [IDao] 接口的 [getProductById] 方法检索同一产品,此次通过其主键进行标识;
- 第 8–10 行:我们验证 [product2] 和 [product] 具有相同的属性;
3.6.9.5. [doInsertsInTransaction] 测试
具体如下:
    @Test
    public void doInsertsInTransaction() {
        log("Ajout de deux produits de même nom", 1);
        // on fait l'insertion
        List<Produit> inserts = new ArrayList<Produit>();
        inserts.add(new Produit(0, "x", 1, 1.0, ""));
        inserts.add(new Produit(0, "x", 1, 1.0, ""));
        boolean erreur = false;
        try {
            getDao().addProduits(inserts);
        } catch (DaoException daoException) {
            erreur = true;
        }
        // vérifications
        Assert.assertTrue(erreur);
        List<Produit> produits = getDao().getAllProduits();
        Assert.assertEquals(0, produits.size());
}
- 第 5-7 行:我们创建了一个包含两个同名 [x] 产品的列表;
- 第 10 行:将这两个产品插入到空的 [PRODUCTS] 表中(由 [@Before] 注解标记的 [clean] 方法)。第一次插入将成功,但第二次会失败,因为 [PRODUCTS] 表对产品名称设有唯一约束。因此必然会抛出异常。第 15 行对此进行了测试;
- 由于 [IDao] 接口的所有方法都在事务内执行,第二次插入失败将导致整个事务回滚,包括第一次插入。最终,[PRODUCTS] 表不应有任何插入操作;
- 第 16–17 行:我们通过检索 [PRODUCTS] 表中的产品列表并验证该列表为空来验证这一点;
3.6.9.6. [updateProducts] 测试
具体如下:
    @Test
    public void updateProduits() {
        // remplissage
        fill(10);
        log("Mise à jour du prix des produits de catégorie 1", 1);
        // on récupère les produits
        List<Produit> produits = getDao().getAllProduits();
        // on met à jour ceux de catégorie 1
        List<Produit> updated = new ArrayList<Produit>();
        int nbUpdated = 0;
        for (Produit produit : produits) {
            if (produit.getCategorie() == 1) {
                // int id, String nom, int categorie, double prix, String description
                updated
                        .add(new Produit(produit.getId(), produit.getNom(), 1, produit.getPrix() * 1.1, produit.getDescription()));
                nbUpdated++;
            }
        }
        int nbProduits = getDao().updateProduits(updated);
        // vérifications
        // Assert.assertEquals(nbUpdated, nbProduits); -- does not work with DB2
        for (Produit produit : updated) {
            Produit produit2 = getDao().getProduitById(produit.getId());
            Assert.assertEquals(produit2.getPrix(), produit.getPrix(), 1e-6);
        }
}
- 第 4 行:我们将 10 种产品插入数据库;
- 第7行:检索这些产品;
- 第9–18行:我们将第1类商品的价格提高10%;
- 第 19 行:将这些更改保存到数据库中;
- 第22–25行:遍历内存中用于更新的商品列表。对于每一项,我们在数据库中查找具有相同主键的商品,并验证价格更新是否成功;
- 第19行:获取[updateProducts]操作更新的商品数量;
- 第 21 行:我们验证该数字是否确实为预期值。除 DB2 之外,此测试在所有数据库管理系统(DBMS)上均通过。因此我们已将其注释掉;
3.6.9.7. [deleteProducts] 测试
该测试如下:
    @Test
    public void deleteProduits() {
        // filling
        fill(10);
        log("deleteProduits", 1);
        // product list
        List<Produit> produits = getDao().getAllProduits();
        // discontinuation of two products
        Produit produit0 = produits.get(0);
        Produit produit5 = produits.get(5);
        int nbDeleted = getDao().deleteProduits(new int[] { produit0.getId(), produit5.getId() });
        // checks
        // Assert.assertEquals(2, nbDeleted); -- does not pass with DB2
        Assert.assertNull(getDao().getProduitById(produit0.getId()));
        Assert.assertNull(getDao().getProduitById(produit5.getId()));
        Assert.assertEquals(produits.size() - 2, getDao().getAllProduits().size());
}
- 第 4 行:我们将 10 件商品插入数据库;
- 第 7–11 行:从数据库中检索所有产品,并移除位于第 0 和第 5 位的产品;
- 第14–16行:我们验证这两个产品已不再存在于数据库中,且数据库中的产品数量减少了两个;
- 第13行的测试在DB2数据库管理系统上失败。在其他数据库管理系统上则通过;
3.6.9.8. 性能测试
我们在测试中纳入了三种方法,其唯一目的是评估DBMS的性能:
    @Test
    public void perf1() {
        // remplissage
        fill(10000);
    }

    @Test
    public void perf2() {
        // remplissage
        fill(10000);
        // modification
        List<Produit> produits = getDao().getAllProduits();
        // on met à jour ceux de catégorie 1
        List<Produit> updated = new ArrayList<Produit>();
        for (Produit produit : produits) {
            // int id, String nom, int categorie, double prix, String description
            updated.add(new Produit(produit.getId(), produit.getNom(), 1, produit.getPrix() * 1.1, produit.getDescription()));
        }
        getDao().updateProduits(updated);
    }

    @Test
    public void perf3() {
        // remplissage
        fill(10000);
        // suppression
        List<Produit> produits = getDao().getAllProduits();
        // clés primaires
        int[] keys = new int[produits.size()];
        for (int i = 0; i < keys.length; i++) {
            keys[i] = produits.get(i).getId();
        }
        getDao().deleteProduits(keys);
}
- 第 1–5 行:插入 10,000 件商品;
- 第 8–20 行:插入 10,000 件商品,然后使用主键对其进行修改;
- 第23–34行:插入10,000个产品,随后通过主键删除它们;
要运行 [JUnitTestDao1] 和 [JUnitTestDao2] 测试,可以使用以下测试配置:
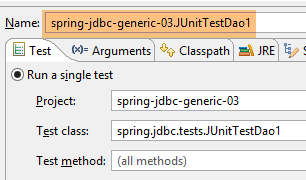 |  |
[JUnitTestDao1] 测试的结果如下:
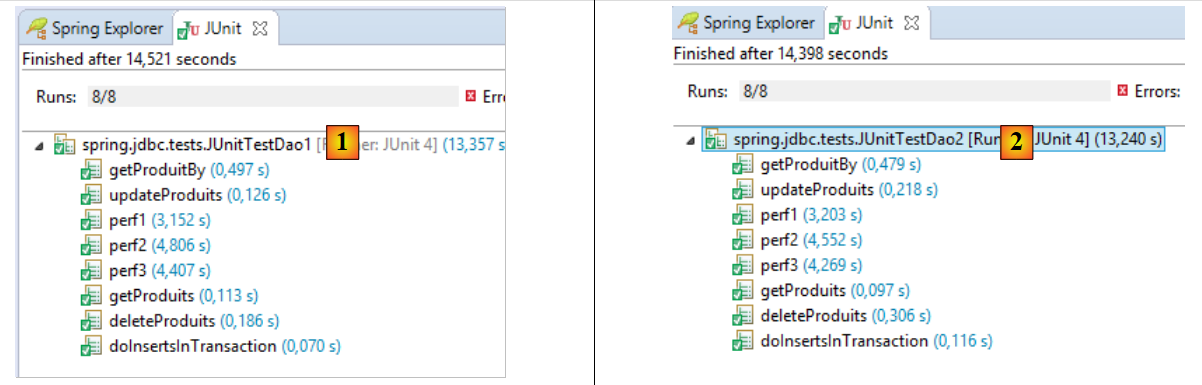 |
[1] 中显示的是 [JUnitTestDao1] 的结果,[2] 中显示的是 [JUnitTestDao2] 的结果。两者之间没有显著差异。在 [1] 中:
- 测试通过;
- 插入 10,000 件商品耗时 3.15 秒;
- 插入 10,000 件商品并随后进行修改耗时 4.80 秒;
- 插入 10,000 件商品并随后删除耗时 4.40 秒;
- 因此最耗时的操作是插入;