3. The Basics of Web Development in Java
We will now discuss the development of dynamic web applications, c.a.d—applications in which the pages HTML sent to the user are generated by programs.
3.1. Creating a Web Project in Eclipse
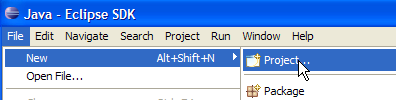
We will develop our first web application using Eclipse/Tomcat. We will follow a process similar to the one used to create a web application without Eclipse. Once Eclipse is running, we create a new project:
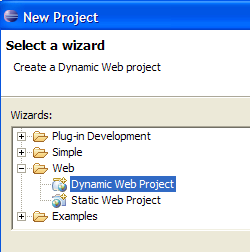
which we define as a dynamic web project:
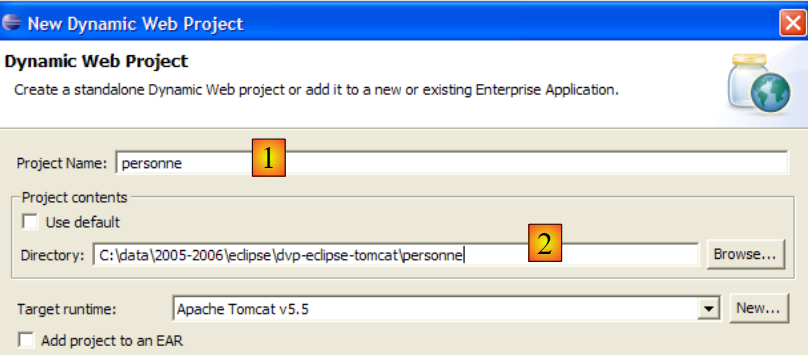
On the first page of the creation wizard, we specify the project name [1] and its location [2]:
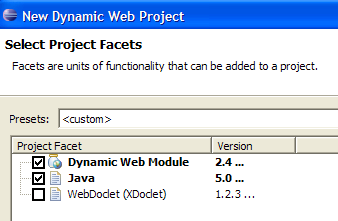
On the second page of the wizard, we accept the default values:
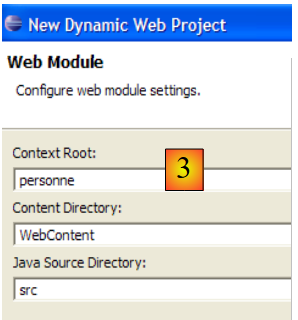
The last page of the wizard asks us to define the application context [3]:
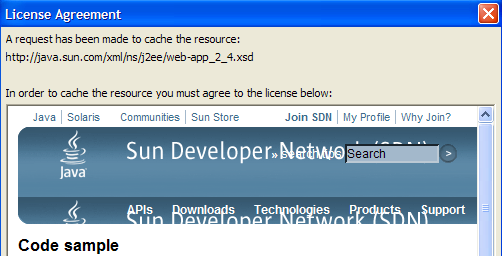
Once the wizard is confirmed by [Finish], Eclipse connects to the site [http://java.sun.com] to retrieve certain documents it wants to cache in order to avoid unnecessary network traffic. A license agreement is then requested:
We accept it. Eclipse creates the web project. To display it, it uses an environment, called a perspective, that is different from the one used for a traditional Java project:
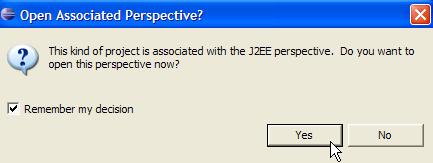
The perspective associated with a web project is the J2EE perspective. We accept it to see... The result is as follows:
The J2EE perspective is actually unnecessarily complex for simple web projects. In this case, the Java perspective is sufficient. To access it, we use the option and [Window -> Open perspective -> Java] perspectives:

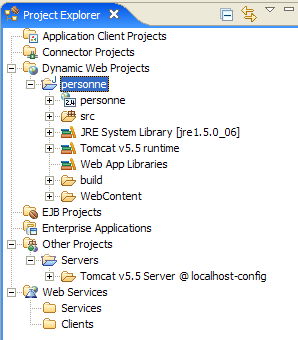
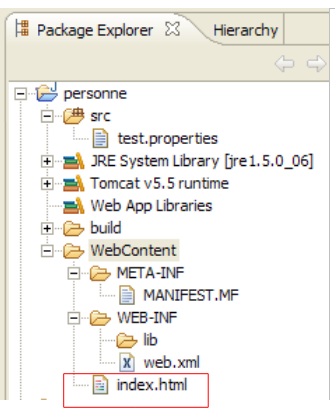
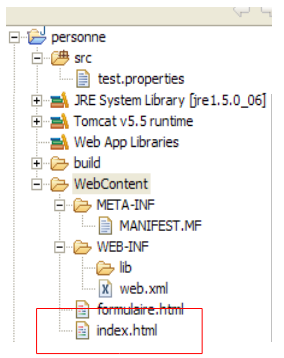
src: will contain the Java code for the application’s classes as well as the files that must be in the application’s classpath.
build/classes (not shown): will contain the .class files of the compiled classes as well as a copy of all non-.java files placed in src. A web application frequently uses so-called "resource" files that must be in the application’s classpath, c.a.d. All the directories that are scanned by JVM when the application references a class, either during compilation or at runtime. Eclipse ensures that the build/classes directory is part of the application’s classpath. “Resource” files are placed in the src directory, knowing that Eclipse will automatically copy them to build/classes.
WebContent: will contain the web application resources that do not need to be in the application’s Classpath.
WEB-INF/lib: will contain the .jar archives required by the web application.
Let’s examine the contents of the [WEB-INF/web.xml] file that configures the [personne] application:
<?xml version="1.0" encoding="UTF-8"?>
<web-app id="WebApp_ID" version="2.4" xmlns="http://java.sun.com/xml/ns/j2ee" xmlns:xsi="http://www.w3.org/2001/XMLSchema-instance" xsi:schemaLocation="http://java.sun.com/xml/ns/j2ee http://java.sun.com/xml/ns/j2ee/web-app_2_4.xsd">
    <display-name>    personne</display-name>
    <welcome-file-list>
        <welcome-file>index.html</welcome-file>
        <welcome-file>index.htm</welcome-file>
        <welcome-file>index.jsp</welcome-file>
        <welcome-file>default.html</welcome-file>
        <welcome-file>default.htm</welcome-file>
        <welcome-file>default.jsp</welcome-file>
    </welcome-file-list>
</web-app>
We have already encountered this type of configuration when we studied the creation of welcome pages in section 2.3.4. This file does nothing more than define a series of welcome pages. We keep only the first one. The file [web.xml] becomes the following:
<?xml version="1.0" encoding="UTF-8"?>
<web-app id="WebApp_ID" version="2.4"
    xmlns="http://java.sun.com/xml/ns/j2ee"
    xmlns:xsi="http://www.w3.org/2001/XMLSchema-instance"
    xsi:schemaLocation="http://java.sun.com/xml/ns/j2ee http://java.sun.com/xml/ns/j2ee/web-app_2_4.xsd">
    <display-name>personne</display-name>
    <welcome-file-list>
        <welcome-file>index.html</welcome-file>
    </welcome-file-list>
</web-app>
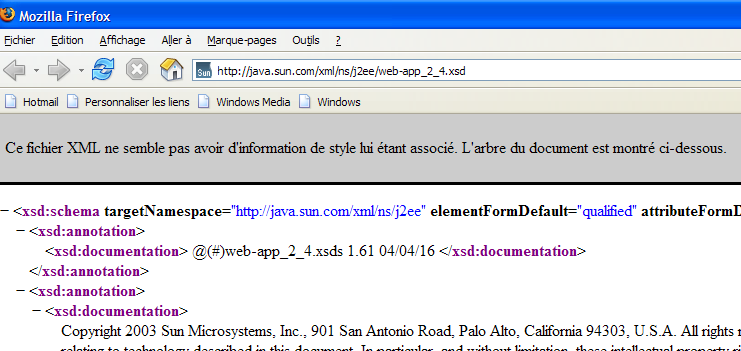
The content of the XML file above must comply with the syntax rules defined in the file specified by the [xsi:schemaLocation] attribute of the opening <web-app> tag. This file is [http://java.sun.com/xml/ns/j2ee/web-app_2_4.xsd]. This is a XML file that can be requested directly using a browser. If the browser is recent enough, it will display a XML file:
Eclipse will attempt to validate the XML document using the .xsd file specified in the [xsi:schemaLocation] attribute of the opening <web-app> tag. To do this, it will make a network request. If your computer is on a private network, you must tell Eclipse which machine to use to exit the private network, known as the HTTP proxy. This is done using the option [Window -> Preferences -> Internet]:
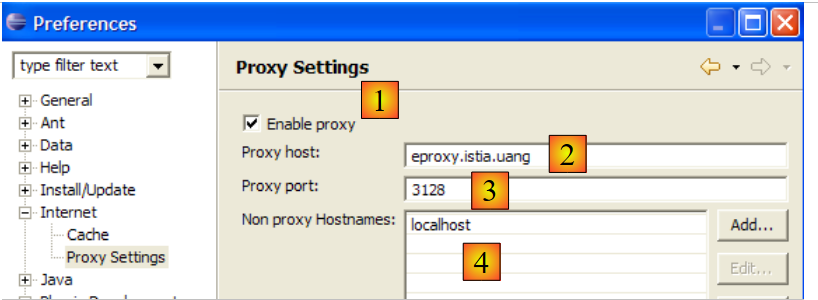
Check (1) if you are on a private network. In (2), enter the name of the machine that hosts the HTTP proxy, and in (3), its listening port. Finally, in (4), specify the machines that should not go through the proxy—machines that are on the same private network as the machine you are working on.
We will now create the [index.html] file for the home page.
3.2. Creating a home page
Right-click on the [WebContent] folder, then select option [New -> Other]:
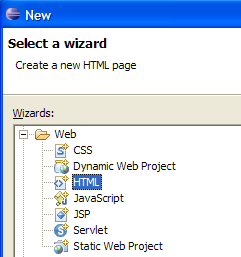
We select the [HTML] type and proceed to [Next] ->
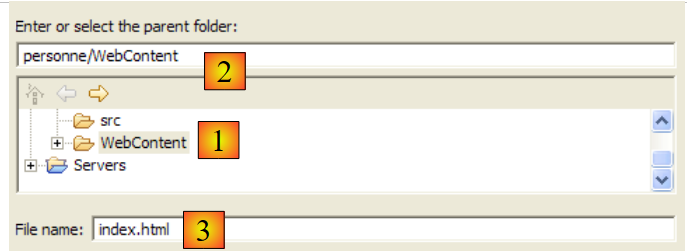
Above, we select the parent folder [WebContent] in (1) or (2), then specify the name of the file to be created in (3). Once this is done, we move on to the next page of the wizard:
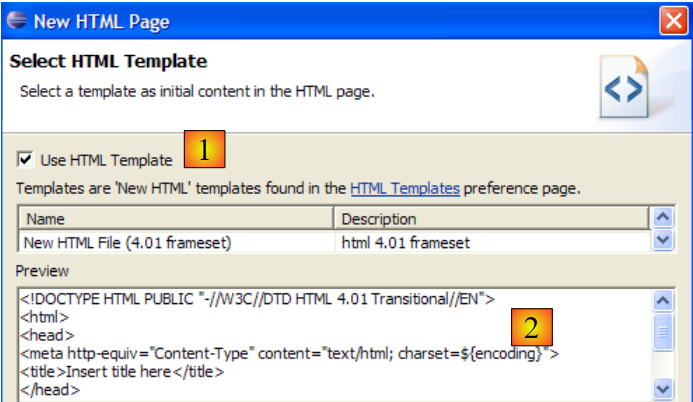
With (1) selected, we can generate a HTML file pre-filled with (2). If we deselect (1), we generate an empty HTML file. We leave (1) checked to get a code template. We finish the wizard with [Finish]. The [index.html] file is then created:
with the following content:
<!DOCTYPE HTML PUBLIC "-//W3C//DTD HTML 4.01 Transitional//EN">
<html>
<head>
<meta http-equiv="Content-Type" content="text/html; charset=ISO-8859-1">
<title>Insert title here</title>
</head>
<body>

</body>
</html>
We modify this file as follows:
<!DOCTYPE HTML PUBLIC "-//W3C//DTD HTML 4.01 Transitional//EN">
<html>
<head>
<meta http-equiv="Content-Type" content="text/html; charset=ISO-8859-1">
<title>Application personne</title>
</head>
<body>
Application personne active...
<br>
<br>
Vous êtes sur la page d'home
</body>
</html>
3.3. Home page test
If it is not present, display the [Servers] view with option and [Window - > Show View -> Other -> Servers], then right-click on the Tomcat 5.5 server:
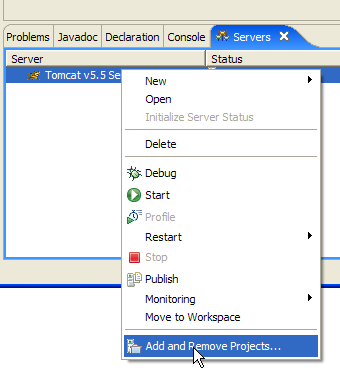
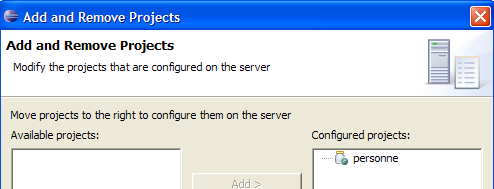
The option [Add and Remove Objects] above allows you to add or remove web applications from the Tomcat server:
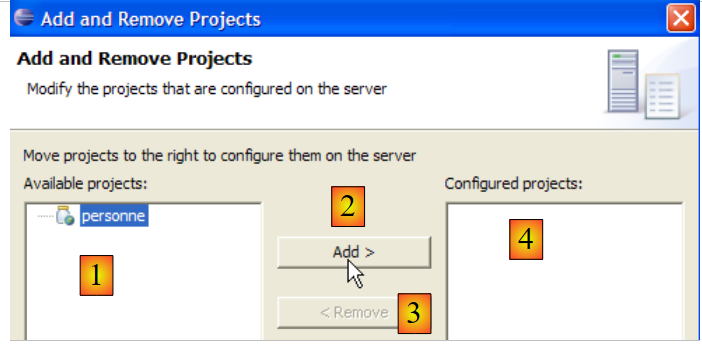
Web projects recognized by Eclipse are listed in (1). You can register them on the Tomcat server via (2). Web applications registered with the Tomcat server appear in (4). You can unregister them using (3). Let’s register the [personne] project:
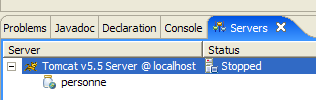
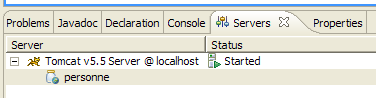
then complete the registration wizard with [Finish]. The [Servers] view shows that the [personne] project has been registered on Tomcat:
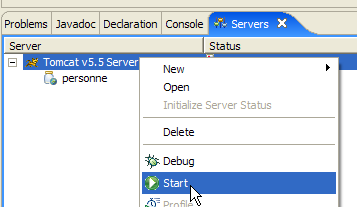
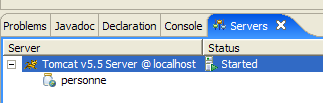
Now, let’s start the Tomcat server:
 |  |
Open a web browser:

then request url [http://localhost:8080/personne]. This url is the root of the web application. No document is requested. In this case, the application’s home page is displayed. If it does not exist, an error is reported. Here, the home page exists. It is the [index.html] file we created earlier. The result is as follows:
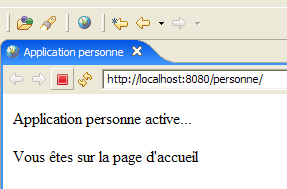
It matches what was expected. Now, let’s use a browser outside of Eclipse and request the same url:
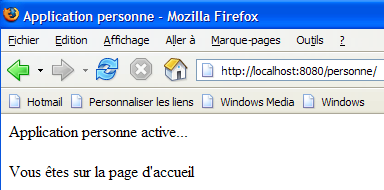
The [personne] web application is therefore also accessible outside of Eclipse.
3.4. Creating a HTML form
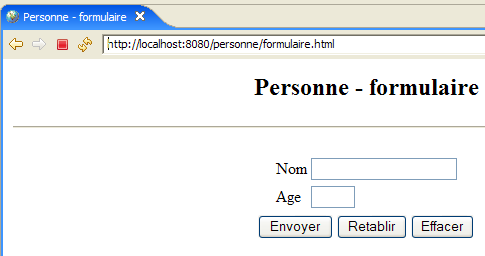
We will now create a static HTML document named [formulaire.html] in the [personne] folder:
To create it, follow the procedure described in section 3.2 on page 33. Its content will be as follows:
<!DOCTYPE HTML PUBLIC "-//W3C//DTD HTML 4.01 Transitional//EN">
<html>
  <head>
    <title>Personne - formulaire</title>
</head>
<body>
  <center>
    <h2>Personne - formulaire</h2>
    <hr>
    <form action="" method="post">
    <table>
      <tr>
        <td>Nom</td>
        <td><input name="txtNom" value="" type="text" size="20"></td>
      </tr>
      <tr>
        <td>Age</td>
        <td><input name="txtAge" value="" type="text" size="3"></td>
      </tr>
    </table>
    <table>
      <tr>
        <td><input type="submit" value="Envoyer"></td>
        <td><input type="reset" value="Retablir"></td>
        <td><input type="button" value="Effacer"></td>
      </tr>
    </table>
    </form>
  </center>
</body>
</html>
The code HTML above corresponds to the form below:
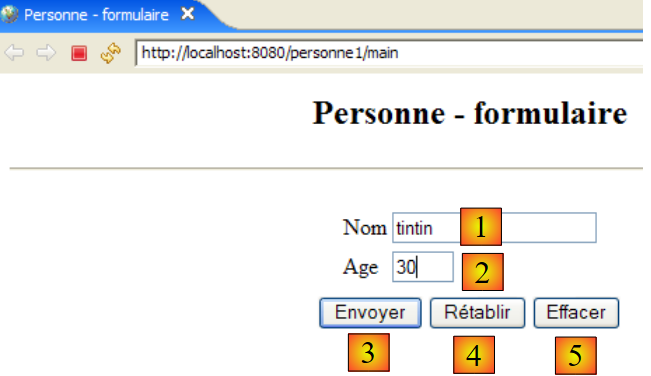
Type HTML | name | Code HTML | role | |
<input type="text"> | txtNom | line 14 | name entry | |
<input type="text"> | txtAge | line 18 | age entry | |
<input type="submit"> | line 23 | Send entered values to the server at url /person1/main | ||
<input type="reset"> | line 24 | to restore the page to the state in which it was initially received by the browser | ||
<input type="button"> | line 25 | to clear the contents of the input fields [1] and [2] |
Let’s save the document in the <person>/WebContent folder. Start Tomcat if necessary. Using a browser, request URL http://localhost:8080/personne/formulaire.html:
The client/server architecture of this basic application is as follows:
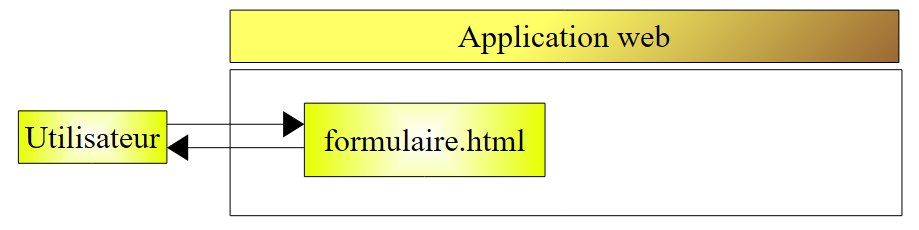
The web server sits between the user and the web application and has not been depicted here. [formulaire.html] is a static document that returns the same content for every client request. Web programming aims to generate content tailored to the client’s request. This content is then generated programmatically. One solution is to use a JSP (Java Server Page) instead of the static HTML file. This is what we will now examine.
3.5. Creating a JSP page
[ref1] readings: Chapter 1, Chapter 2: 2.2, 2.2.1, 2.2.2, 2.2.3, 2.2.4
The previous client/server architecture is transformed as follows:
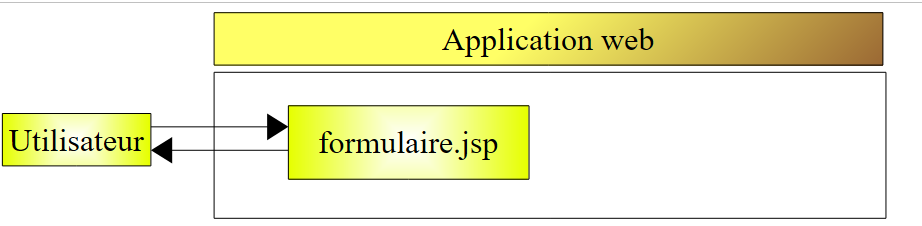
A JSP page is a parameterized version of the HTML page. Certain elements of the page only receive their values at runtime. These values are calculated by the program. We therefore have a dynamic page: successive requests for the page may yield different responses. Here, we refer to the response as the HTML page displayed by the client browser. Ultimately, it is always a HTML document that the browser receives. This HTML document is generated by the web server from the JSP page. This page serves as a template. Its dynamic elements are replaced by their actual values at the time the HTML document is generated.
To create a page named JSP, right-click on the folder [WebContent], then select option [New -> Other]:
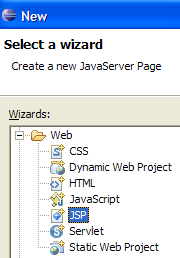
We select the [JSP] type and proceed to [Next] ->
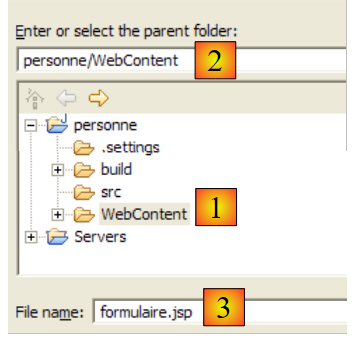
Above, we select the parent folder [WebContent] in (1) or (2), then specify the name of the file to be created in (3). Once this is done, we move on to the next page of the wizard:
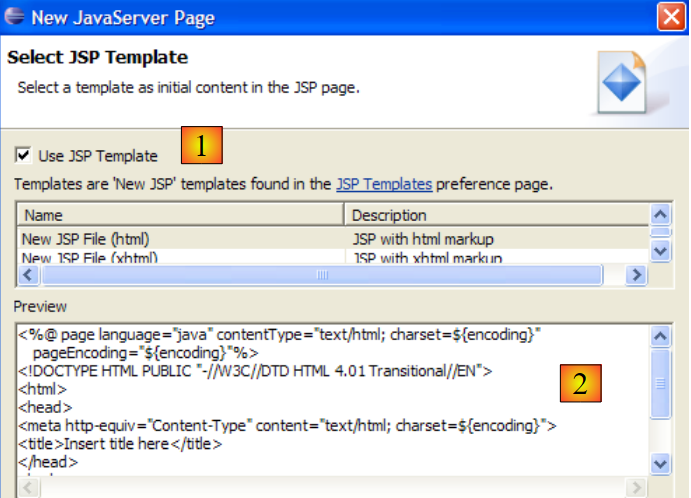
With (1), we can generate a JSP file pre-filled with (2). If we uncheck (1), we generate an empty JSP file. We leave (1) checked to benefit from a code template. We complete the wizard with [Finish]. The file [formulaire.jsp] is then created:
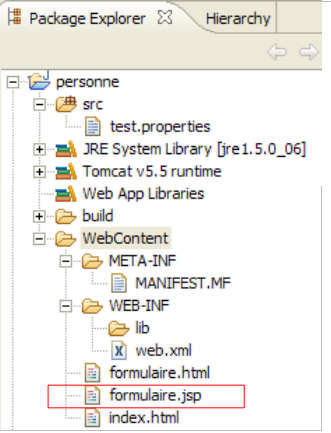
with the following content:
<%@ page language="java" contentType="text/html; charset=ISO-8859-1" pageEncoding="ISO-8859-1"%>
<!DOCTYPE HTML PUBLIC "-//W3C//DTD HTML 4.01 Transitional//EN">
<html>
<head>
<meta http-equiv="Content-Type" content="text/html; charset=ISO-8859-1">
<title>Insert title here</title>
</head>
<body>

</body>
</html>
Line 1 indicates that we are dealing with a JSP page. We transform the text above as follows:
<%@ page language="java" contentType="text/html; charset=ISO-8859-1"
    pageEncoding="ISO-8859-1"%>
<!DOCTYPE HTML PUBLIC "-//W3C//DTD HTML 4.01 Transitional//EN">
<%
    // parameters are retrieved
  String nom=request.getParameter("txtNom");
  if(nom==null) nom="inconnu";
  String age=request.getParameter("txtAge");
  if(age==null) age="xxx";
%>

<html>
    <head>
    <meta http-equiv="Content-Type" content="text/html; charset=ISO-8859-1">
      <title>Personne - formulaire</title>
  </head>
  <body>
      <center>
        <h2>Personne - formulaire</h2>
      <hr>
      <form action="" method="post">
          <table>
            <tr>
              <td>Nom</td>
            <td><input name="txtNom" value="<%= nom %>" type="text" size="20"></td>
          </tr>
          <tr>
              <td>Age</td>
            <td><input name="txtAge" value="<%= age %>" type="text" size="3"></td>
          </tr>
        </table>
        <table>
            <tr>
              <td><input type="submit" value="Envoyer"></td>
            <td><input type="reset" value="Rétablir"></td>
            <td><input type="button" value="Effacer"></td>
          </tr>
        </table>
      </form>
    </center>
  </body>
</html>
The initially static document has now become dynamic through the introduction of Java code. For this type of document, we will always proceed as follows:
- we place Java code at the beginning of the document to retrieve the parameters needed for the document to display. These will often be in the request object. This object represents the client’s request. It may pass through several servlets and JSP pages that may have enriched it. Here, it will come directly from the browser.
- The code follows. It will most often simply display variables previously calculated in the Java code using <%= variable %> tags. Note here that the = sign is right next to the % sign. This is a common cause of errors.
What does the previous dynamic document do?
- Lines 6–9: It retrieves two parameters from the request, named [txtNom] and [txtAge], and assigns their values to the variables [nom] (line 6) and [age] (line 8). If it does not find the parameters, it assigns default values to the associated variables.
- It displays the values of the two variables [nom, age] in the following HTML code (lines 25 and 29).
Let’s run an initial test. Start Tomcat if necessary, then use a browser to request URL http://localhost:8080/person/formulaire.jsp:
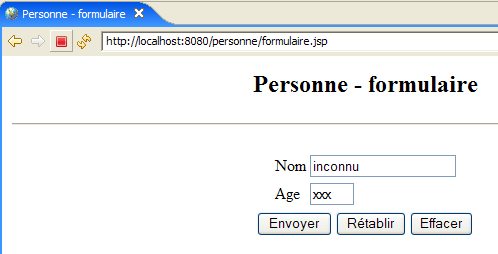
The formulaire.jsp document was called without passing any parameters. The default values were therefore displayed. Now let’s request URL http://localhost:8080/person/formulaire.jsp?txtNom=martin&txtAge=14:
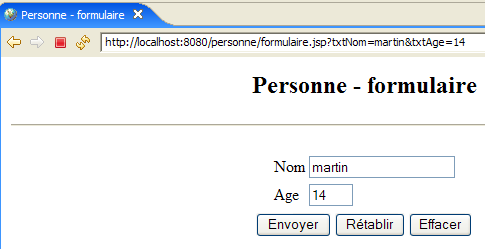
This time, we passed the parameters txtNom and txtAge—which the document formulaire.jsp expects—to it. It therefore displayed them. We know there are two methods for passing parameters to a web document: GET and POST. In both cases, the passed parameters are found in the predefined request object. Here, they were passed using the GET method.
3.6. Creating a servlet
[ref1] readings: Chapter 1, Chapter 2: 2.1, 2.1.1, 2.1.2, 2.3.1
In the previous version, the client request was handled by a JSP page. Upon the first call to this page, the web server—in this case, Tomcat—creates a Java class from this page and compiles it. It is the result of this compilation that ultimately processes the client request. The class generated from the JSP page is a servlet because it implements the [javax.Servlet] interface:

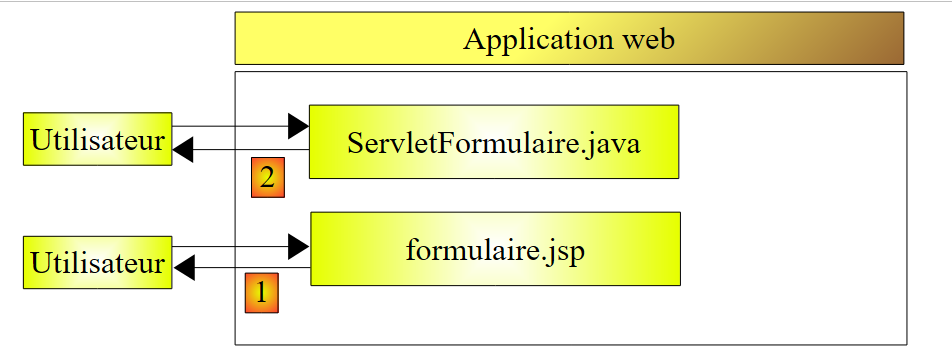
The client’s request can be processed by any class that implements this interface. We will now create such a class: ServletFormulaire. The previous client/server architecture is transformed as follows:
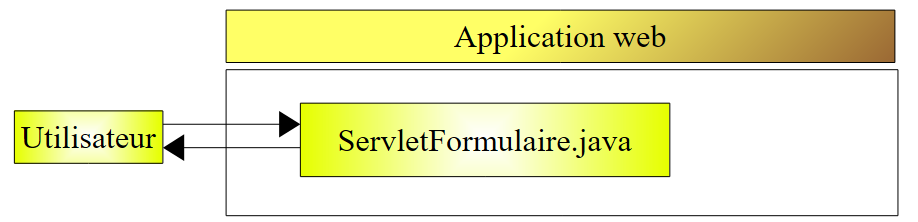
With the page-based architecture JSP, the document HTML sent to the client was generated by the web server from the page JSP, which served as a template. Here, the HTML document sent to the client will be generated entirely by the servlet.
3.6.1. Creating the servlet
In Eclipse, right-click on the [src] folder and select the option option to create a class:
then define the characteristics of the class to be created:
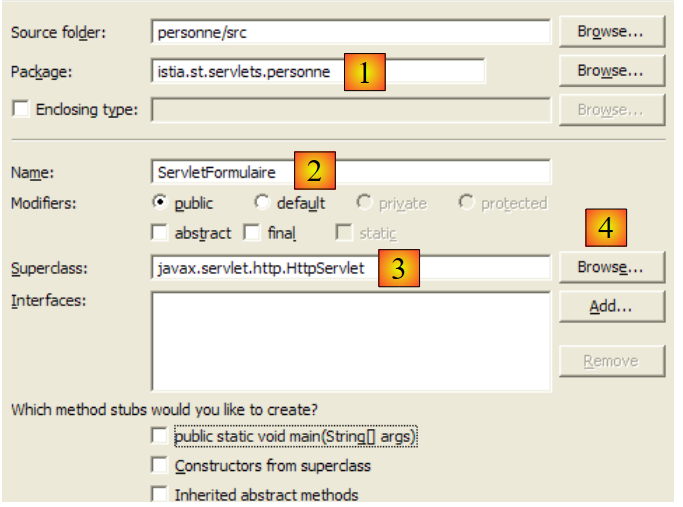
In (1), enter a package name; in (2), enter the name of the class to be created. This class must extend the class specified in (3). There is no need to type the full name of the class yourself. The button (4) provides access to the classes currently in the web application’s classpath:
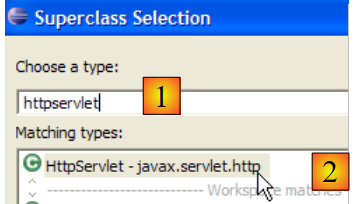
In (1), type the name of the class you are looking for. In (2), you will see the classes in the Classpath whose names contain the string typed in (1).
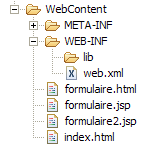
After confirming the creation wizard, the web project [personne] is modified as follows:
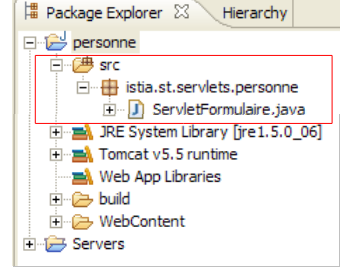
The [ServletFormulaire] class has been created with a code skeleton:
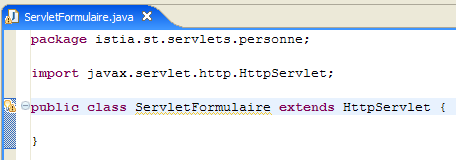
The screenshot above shows that Eclipse flags a [warning] on the line declaring the class. Click the icon (lightbulb) indicating this [warning]:

After clicking on (1), solutions for removing the [warning] are suggested in (2). Selecting one of them causes the code change that this choice will result in to appear in (3).
Java 1.5 introduced changes to the Java language, and what was correct in a previous version may now trigger warnings. These do not indicate errors that could prevent the class from compiling. They are there to draw the developer’s attention to areas of code that could be improved. The [warning] shown here indicates that a class should have a version number. This is used for the serialization/deserialization of objects, c.a.d, when a Java .class object in memory must be converted into a sequence of bits sent sequentially in a write stream, or conversely, when a Java .class object in memory must be created from a sequence of bits read sequentially in a read stream. All of this is far removed from our current concerns. So we will ask the compiler to ignore this warning by choosing the solution [Add @SuppressWarnings ...]. The code then becomes the following:
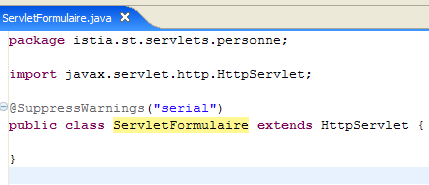
There is no longer any [warning]. The added line is called an "annotation," a concept introduced with Java 1.5. We will complete this code later.
3.6.2. Classpath of an Eclipse project
The classpath of a Java application is the set of folders and files that are searched when the compiler compiles it or when the runtime executes it. These two classpaths are not necessarily identical, as some classes are only needed at runtime and not during compilation. Both the Java compiler and the JVM have an argument that allows you to specify the classpath of the application to be compiled or executed. In a manner that is more or less transparent to the user, Eclipse handles the construction and passing of this argument to the JVM.
How can you determine the elements of an Eclipse project’s classpath? Using the option [<projet> / Build Path / Configure Build Path]:
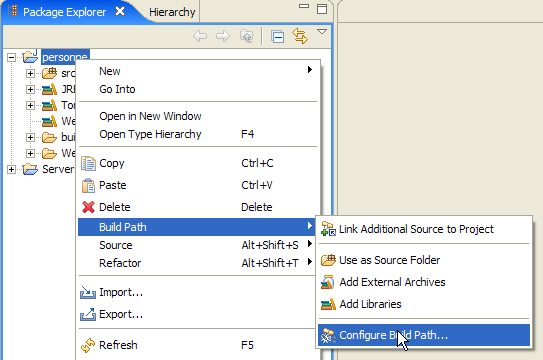
We then get the following configuration wizard:
The (1) [Libraries] tab allows you to define the list of .jar archives that are part of the application’s Classpath. They are therefore scanned by the JVM when the application requests a class. The [2] and [3] buttons allow you to add archives to the Classpath. The [2] button allows you to select archives located in the folders of projects managed by Eclipse, while the [3] button allows you to select any archive from the computer’s file system.
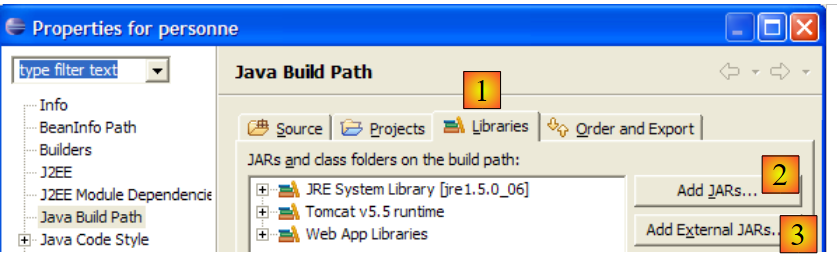
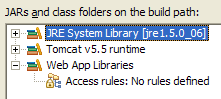
Above, three libraries appear:
- [JRE System Library]: base library for Eclipse Java projects:
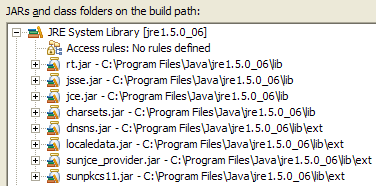
- [Tomcat v5.5 runtime]: library provided by the Tomcat server. It contains the classes necessary for web development. This library is included in any Eclipse web project that has been associated with the Tomcat server.
It is the [servlet-api.jar] archive that contains the [javax.servlet.http.HttpServlet] class, the parent class of the [ServletFormulaire] class we are currently creating. It is because this archive is in the application’s Classpath that it was suggested as a parent class in the wizard shown below.
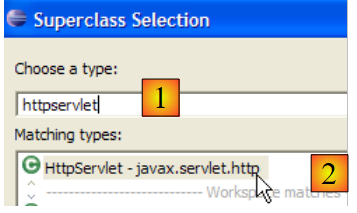
If this had not been the case, it would not have appeared in the suggestions for [2]. Therefore, if in this wizard you want to reference a parent class and it is not suggested, it means either that you have misspelled the class name, or that the archive containing it is not in the application’s classpath.
- [Web App Libraries] contains the archives present in the [WEB-INF/lib] folder of the project. Here it is empty:
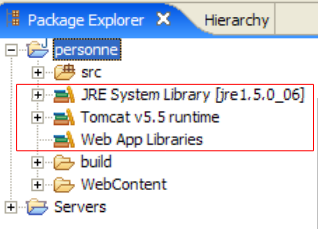
The archives in the Eclipse project’s Classpath are listed in the Project Explorer. For example, for the web project [personne]:
The project explorer gives us access to the contents of these archives:
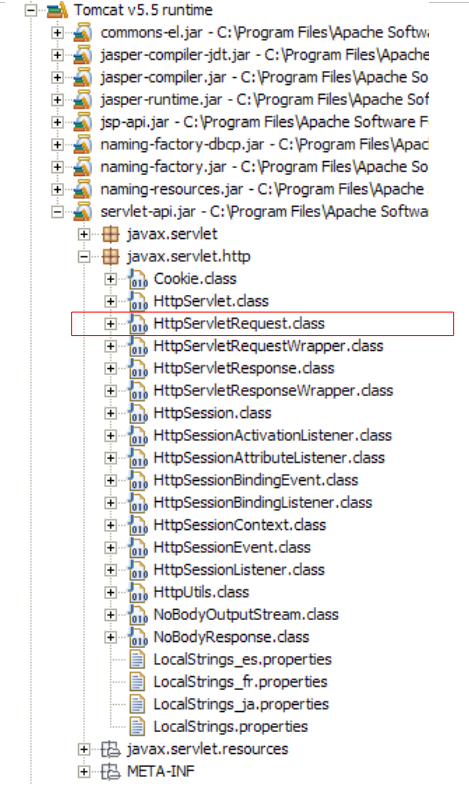
As shown above, we can see that the [servlet-api.jar] archive contains the [javax.servlet.http.HttpServlet] class.
3.6.3. Servlet configuration
[ref1] readings: Chapter 2: 2.3, 2.3.1, 2.3.2, 2.3.3, 2.3.4
The [WEB-INF/web.xml] file is used to configure the web application:
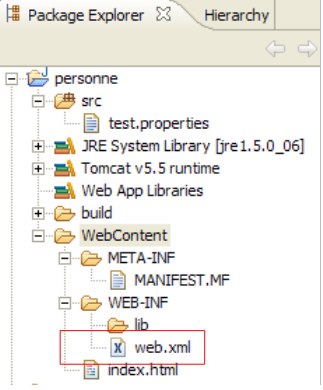
This file, for the [personne] project, is currently as follows (see page 32):
<?xml version="1.0" encoding="UTF-8"?>
<web-app id="WebApp_ID" version="2.4"
    xmlns="http://java.sun.com/xml/ns/j2ee"
    xmlns:xsi="http://www.w3.org/2001/XMLSchema-instance"
    xsi:schemaLocation="http://java.sun.com/xml/ns/j2ee http://java.sun.com/xml/ns/j2ee/web-app_2_4.xsd">
    <display-name>personne</display-name>
    <welcome-file-list>
        <welcome-file>index.html</welcome-file>
    </welcome-file-list>
</web-app>
It only indicates the existence of a welcome file (line 8). We modify it to declare:
- the existence of the [ServletFormulaire] servlet
- the URL files processed by this servlet
- the servlet's initialization parameters
The web.xml file in our application will be as follows:
<?xml version="1.0" encoding="UTF-8"?>
<web-app id="WebApp_ID" version="2.4"
    xmlns="http://java.sun.com/xml/ns/j2ee"
    xmlns:xsi="http://www.w3.org/2001/XMLSchema-instance"
    xsi:schemaLocation="http://java.sun.com/xml/ns/j2ee http://java.sun.com/xml/ns/j2ee/web-app_2_4.xsd">
    <display-name>personne</display-name>
    <servlet>
        <servlet-name>formulairepersonne</servlet-name>
        <servlet-class>
            istia.st.servlets.personne.ServletFormulaire
        </servlet-class>
        <init-param>
            <param-name>defaultNom</param-name>
            <param-value>inconnu</param-value>
        </init-param>
        <init-param>
            <param-name>defaultAge</param-name>
            <param-value>XXX</param-value>
        </init-param>
    </servlet>
    <servlet-mapping>
        <servlet-name>formulairepersonne</servlet-name>
        <url-pattern>/formulaire</url-pattern>
    </servlet-mapping>
    <welcome-file-list>
        <welcome-file>index.html</welcome-file>
    </welcome-file-list>
</web-app>
The main points of this configuration file are as follows:
- Lines 7–24 are related to the presence of the [ServletFormulaire] servlet
- lines 7–20: a servlet is configured between the <servlet> and </servlet> tags. An application can contain multiple servlets and therefore as many <servlet>...</servlet> configuration sections.
- line 8: the <servlet-name> tag assigns a name to the servlet—it can be anything
- lines 9–11: The <servlet-class> tag specifies the full name of the class corresponding to the servlet. Tomcat will look for this class in the classpath of the [personne] web project. It will find it in [build/classes]:
![]()
- lines 12–15: the <init-param> tag is used to pass configuration parameters to the servlet. These are generally read in the servlet’s init method because its configuration parameters must be known as soon as it is first loaded.
- lines 13–14: the <param-name> tag sets the parameter name and <param-value> sets its value.
- Lines 12–15 define a parameter named [defaultNom,"inconnu"], and lines 16–19 define a parameter named [defaultAge,"XXX"]
- Lines 21–24: The <servlet-mapping> tag is used to associate a servlet (servlet-name) with a URL pattern (url-pattern). Here, the pattern is simple. It specifies that whenever a URL takes the form /form, the form-person servlet, c.a.d, must be used. the [istia.st.servlets.ServletFormulaire] class (lines 8-11). Therefore, only one url is accepted by the [formulairepersonne] servlet.
3.6.4. The code for the [ServletFormulaire] servlet
The [ServletFormulaire] servlet will have the following code:
Just by reading the servlet, we can see that it is much more complex than the corresponding JSP page. This is a general rule: a servlet is not suited for generating HTML code. JSP pages are designed for that purpose. We’ll have the opportunity to revisit this later. Let’s clarify a few important points about the servlet above:
- When a servlet is called for the first time, its init method (line 20) is called. This is the only time it is called.
- If the servlet was called by the method HTTP GET, the method doGet (line 32) is called to process the client’s request.
- If the servlet was called by the method HTTP POST, the method doPost (line 82) is called to process the client request.
The init method is used here to retrieve the values of the initialization parameters named "defaultNom" and "defaultAge" from [web.xml]. The init method, executed when the servlet is first loaded, is the appropriate place to retrieve the contents of the [web.xml] file.
- Line 22: The [config] configuration of the web project is retrieved. This object reflects the contents of the application's [WEB-INF/web.xml] file.
- Line 23: From this configuration, we retrieve the value of type String for the parameter named "defaultNom". This parameter will hold the name of a person. If it does not exist, the value will be null.
- Lines 24–25: If the parameter named "defaultNom" does not exist, a default value is assigned to the variable [defaultNom].
- Lines 26–29: The same is done for the parameter named "defaultAge".
The method doPost refers to the method doGet. This means that the client can send its parameters using either POST or GET.
The doGet method:
- line 32: the method receives two parameters, request and response. request is an object representing the entire client request. It is of type HttpServletRequest, which is an interface. response is of type HttpServletResponse, which is also an interface. The response object is used to send a response to the client.
- request.getParameter("param") is used to retrieve the value of the parameter named "param" from the client's request. On line 36, the value of the parameter "txtNom" is retrieved; on line 40, the value of the parameter "txtAge" is retrieved. If these parameters are not present in the request, the parameter value is set to null.
- Lines 37–39: If the parameter "txtNom" is not in the request, the variable "name" is assigned the default name "defaultNom" initialized in the init method. The same is done in lines 41–43 for the age.
- Line 45: response.setContentType(String) is used to set the value of the HTTP Content-Type header. This header informs the client of the nature of the document it will receive. The type text/html indicates a HTML document.
- Line 46: response.getWriter() is used to obtain a write stream to the client
- Lines 47–78: The HTML document to be sent to the client is written to the write stream obtained in line 46.
Compiling this servlet will generate a .class file in the [build/classes] folder of the [personne] project:

Readers are encouraged to consult the Java help on servlets. Tomcat can be used for this purpose. On the Tomcat 5 home page, there is a link named [Documentation]:
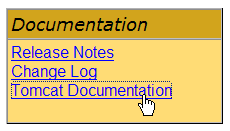
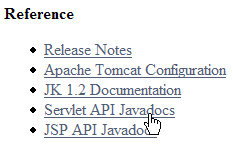
This link leads to a page that the reader is invited to explore. The link to the servlet documentation is as follows:
3.6.5. Testing the servlet
We are ready to run a test. Start the Tomcat server if necessary.
Then, using a browser, request URL [http://localhost:8080/personne/formulaire]. Here, we are requesting url [/formulaire] from the [/personne] context. The [web.xml] file in this context indicates that url and [/formulaire] are handled by the servlet named [formulairepersonne]. In the same file, it is indicated that this servlet is the class [istia.st.servlets.ServletFormulaire]. Tomcat will therefore entrust this class with processing the client request. If the class was not already loaded, it will be loaded. It will then remain in memory for future requests.
We get the following result using Eclipse’s built-in browser:
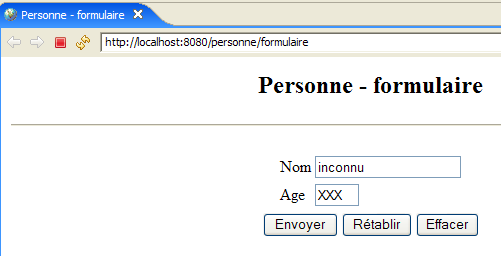
We get the default values for name and age, those specified in the [web.xml] file. Now let’s request URL [http://localhost:8080/personne/formulaire?txtNom=tintin&txtAge=30]:
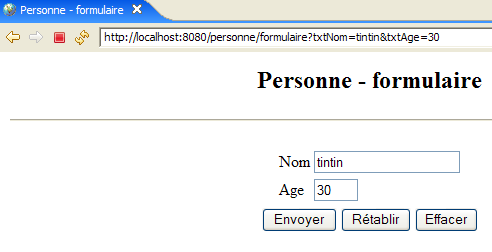
This time, we get the parameters passed in the request. The reader is invited to review the code for the [ServletFormulaire] servlet if they do not understand these two results.
3.6.6. Automatic reloading of the web application context
Let’s start Tomcat:

then modify the servlet code as follows:
- Line 8 has been modified
Let’s save the new class. This save will trigger an automatic recompilation of the [ServletFormulaire] class by Eclipse, which Tomcat will detect. It will then reload the [personne] web application context to reflect the changes. This appears in the logs of the [console] view:

Let’s request the url [http://localhost:8080/personne/formulaire] without restarting Tomcat:
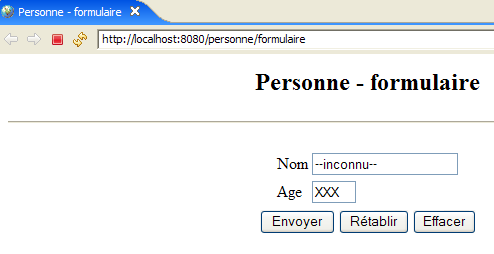
The change has been successfully applied.
Now, let’s modify the [web.xml] file as follows:
<?xml version="1.0" encoding="UTF-8"?>
<web-app id="WebApp_ID" version="2.4"
    xmlns="http://java.sun.com/xml/ns/j2ee"
    xmlns:xsi="http://www.w3.org/2001/XMLSchema-instance"
    xsi:schemaLocation="http://java.sun.com/xml/ns/j2ee http://java.sun.com/xml/ns/j2ee/web-app_2_4.xsd">
    <display-name>personne</display-name>
    <servlet>
        <servlet-name>formulairepersonne</servlet-name>
...
        <init-param>
            <param-name>defaultNom</param-name>
            <param-value>INCONNU</param-value>
        </init-param>
...
    </servlet>
...
</web-app>
- Line 12 has been modified
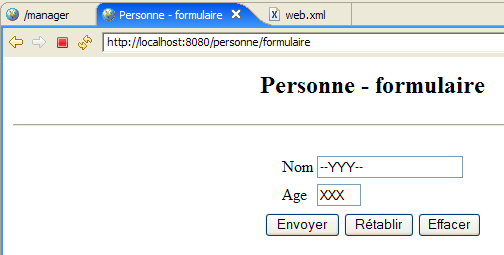
Now that this is done, let’s save the new file [web.xml]. In the [console] view, no log indicates that the application context has been reloaded. Let’s request url and [http://localhost:8080/personne/formulaire] without restarting Tomcat:
The change made was not applied. Let’s restart Tomcat [clic droit sur serveur -> Restart -> Start]:
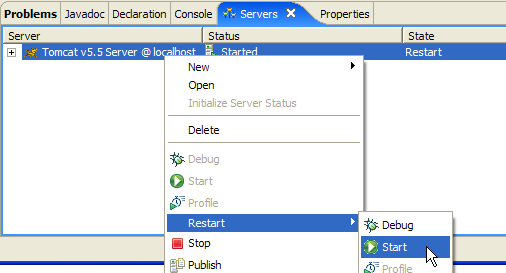
then request url and [http://localhost:8080/personne/formulaire] again:

This time, the change made in [web.xml] is visible.
A change to [web.xml] therefore does not trigger an automatic reload of the application that would take the new configuration file into account. To force the web application to reload, you can restart Tomcat as we did, but this is a rather slow process. It is preferable to use the [manager] tool for managing applications deployed in Tomcat. For this to be possible, Tomcat must have been configured within Eclipse as shown in Section 2.5.
First, using Eclipse’s internal browser, access url [http://localhost:8080] and then follow the link [Tomcat Manager], as explained at the end of Section 2.5:

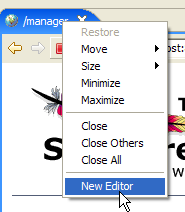
Let’s open a second browser [clic droit sur le navigateur -> New Editor]:
 | 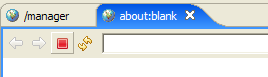 |
In this second browser, request url [http://localhost:8080/formulaire]:
Modify the [web.xml] file as follows, then save it:
<!--  ServletFormulaire -->
    <servlet>
        <servlet-name>formulairepersonne</servlet-name>
        <servlet-class>
            istia.st.servlets.personne.ServletFormulaire
        </servlet-class>
        <init-param>
            <param-name>defaultNom</param-name>
            <param-value>YYY</param-value>
        </init-param>
        <init-param>
            <param-name>defaultAge</param-name>
            <param-value>XXX</param-value>
        </init-param>
    </servlet>
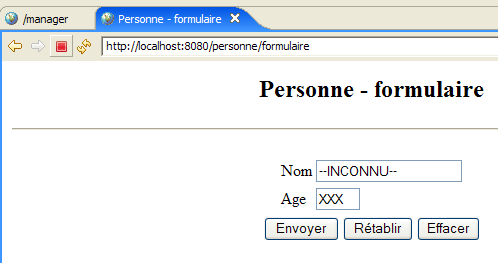
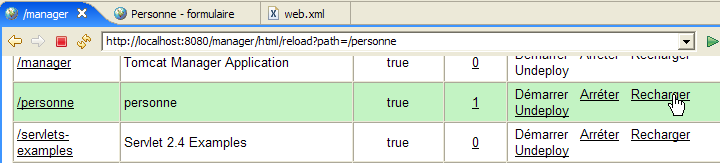
Then request url [http://localhost:8080/formulaire] again. We can see that the change has not been applied. Now, go to the first browser and reload the [personne] application:
Then request url [http://localhost:8080/formulaire] again using the second browser:
The change to [web.xml] has been applied. In practice, it is useful to have a browser open on the [manager] application in Tomcat to handle this type of situation.
3.7. Servlet and JSP page cooperation
[ref1] readings: Chapter 2: 2.3.7
Let’s return to the two architectures we examined:
Neither of these two architectures is satisfactory. They both have the drawback of mixing two technologies: Java programming, which handles the logic of the web application, and HTML coding, which handles the presentation of information in a browser.
- The [1] solution based on the JSP page has the drawback of mixing HTML code and Java code within the same page. We didn’t see this in the example we covered, which was basic. But if [formulaire.jsp] had to validate the parameters [txtNom, txtAge] in the client’s request, we would have been forced to put Java code in the page. This quickly becomes unmanageable.
- The servlet-based solution [2] has the same problem. Although there is only Java code in the class, it must generate a HTML document. Again, unless the HTML document is basic, generating it becomes complicated and nearly impossible to maintain.
We will avoid mixing Java and HTML technologies by adopting the following architecture:
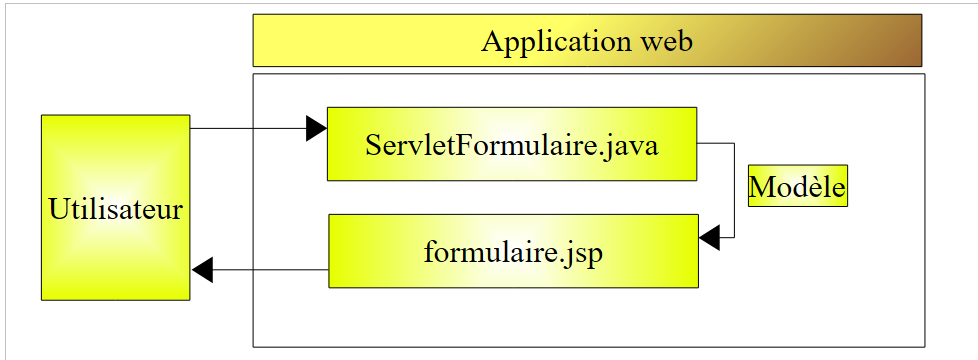
- The user sends their request to the servlet. The servlet processes it and constructs the values of the dynamic parameters for the JSP [formulaire.jsp] page, which will be used to generate the HTML response to the client. These values form what is known as the template for the JSP page.
- Once its work is complete, the servlet will ask the JSP and [formulaire.jsp] pages to generate the HTML response for the client. At the same time, it will provide the client with the elements that the JSP page needs to generate this response—the elements that make up the page template.
We will now explore this new architecture.
3.7.1. The [ServletFormulaire2] servlet
In the architecture above, the servlet will be named [ServletFormulaire2]. It will be built in the same [personne] project as before, along with all future servlets:
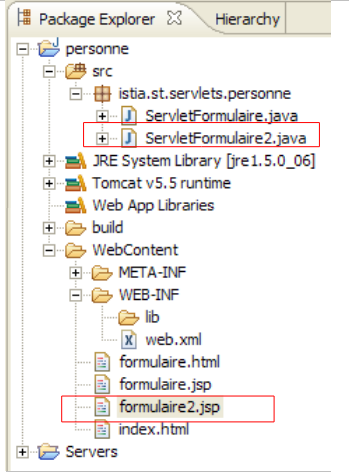
[ServletFormulaire2] is first created by copying and pasting [ServletFormulaire] within Eclipse:
- select [ServletFormulaire.java] -> right-click -> Copy
- Select [istia.st.servlets.personne] -> right-click -> Paste -> rename to [ServletFormulaire2.java]
Then, we modify the code of [ServletFormulaire2] as follows:
Only the part generating the HTTP response has changed (lines 44–46):
- line 46: response generation is handled by the JSP formulaire2.jsp page. This page, which has not yet been examined, will be responsible for displaying the parameters retrieved from the client’s request: a name (lines 35–38) and an age (lines 39–42).
- These two values are placed in the attributes of the [request] request, associated with keys. The attributes of a request are managed as a dictionary.
- Line 44: The name is placed in the query associated with the "name" key
- line 45: the age is placed in the query associated with the key "age"
- Line 46: Requests the display of the JSP [formulaire2.jsp] page. The following is passed as a parameter to it:
- the client’s [request] request, which will allow the JSP page to access its attributes that have just been initialized by the servlet
- the response [response], which will allow the page JSP to generate the response HTTP to the client
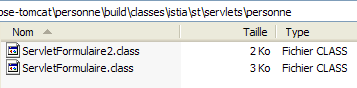
Once the [ServletFormulaire2] class has been written, its compiled code appears in [build/classes]:
3.7.2. The page JSP [formulaire2.jsp]
The page JSP formulaire2.jsp is obtained by copying and pasting from the page [formulaire.jsp]
and then transformed as follows:
<%@ page language="java" contentType="text/html; charset=ISO-8859-1"
    pageEncoding="ISO-8859-1"%>
<!DOCTYPE HTML PUBLIC "-//W3C//DTD HTML 4.01 Transitional//EN">
<%
    // retrieve values required for display
  String nom=(String)request.getAttribute("nom");
  String age=(String)request.getAttribute("age");
%>

<html>
    <head>
    <meta http-equiv="Content-Type" content="text/html; charset=ISO-8859-1">
      <title>Personne - formulaire2</title>
  </head>
  <body>
      <center>
        <h2>Personne - formulaire2</h2>
      <hr>
      <form action="" method="post">
          <table>
            <tr>
              <td>Nom</td>
            <td><input name="txtNom" value="<%= nom %>" type="text" size="20"></td>
          </tr>
          <tr>
              <td>Age</td>
            <td><input name="txtAge" value="<%= age %>" type="text" size="3"></td>
          </tr>
        </table>
        <table>
            <tr>
              <td><input type="submit" value="Envoyer"></td>
            <td><input type="reset" value="Rétablir"></td>
            <td><input type="button" value="Effacer"></td>
          </tr>
        </table>
      </form>
    </center>
  </body>
</html>
Only lines 4–8 have changed compared to [formulaire.jsp]:
- line 6: retrieves the value of the attribute named "name" in the [request] request, an attribute created by the [ServletFormulaire2] servlet.
- line 7: does the same for the "age" attribute
3.7.3. Application configuration
The configuration file [web.xml] is modified as follows:
<?xml version="1.0" encoding="UTF-8"?>
<web-app id="WebApp_ID" version="2.4"
    xmlns="http://java.sun.com/xml/ns/j2ee"
    xmlns:xsi="http://www.w3.org/2001/XMLSchema-instance"
    xsi:schemaLocation="http://java.sun.com/xml/ns/j2ee http://java.sun.com/xml/ns/j2ee/web-app_2_4.xsd">
    <display-name>personne</display-name>
    <!--  ServletFormulaire -->
    <servlet>
        <servlet-name>formulairepersonne</servlet-name>
        <servlet-class>
            istia.st.servlets.personne.ServletFormulaire
        </servlet-class>
        <init-param>
            <param-name>defaultNom</param-name>
            <param-value>inconnu</param-value>
        </init-param>
        <init-param>
            <param-name>defaultAge</param-name>
            <param-value>XXXX</param-value>
        </init-param>
    </servlet>
    <!--  ServletFormulaire 2-->
    <servlet>
        <servlet-name>formulairepersonne2</servlet-name>
        <servlet-class>
            istia.st.servlets.personne.ServletFormulaire2
        </servlet-class>
        <init-param>
            <param-name>defaultNom</param-name>
            <param-value>inconnu</param-value>
        </init-param>
        <init-param>
            <param-name>defaultAge</param-name>
            <param-value>XXX</param-value>
        </init-param>
    </servlet>
    <!--  Mapping ServletFormulaire -->
    <servlet-mapping>
        <servlet-name>formulairepersonne</servlet-name>
        <url-pattern>/formulaire</url-pattern>
    </servlet-mapping>
    <!--  Mapping ServletFormulaire 2-->
    <servlet-mapping>
        <servlet-name>formulairepersonne2</servlet-name>
        <url-pattern>/formulaire2</url-pattern>
    </servlet-mapping>
    <!--  welcome files -->
    <welcome-file-list>
        <welcome-file>index.html</welcome-file>
    </welcome-file-list>
</web-app>
We kept the existing code and added:
- lines 22–36: a <servlet> section to define the new ServletFormulaire2 servlet
- lines 42-46: a <servlet-mapping> section to associate it with URL /form2
Start or restart the Tomcat server if necessary. We request the URL
http://localhost:8080/person/form2?txtNom=milou&txtAge=10:
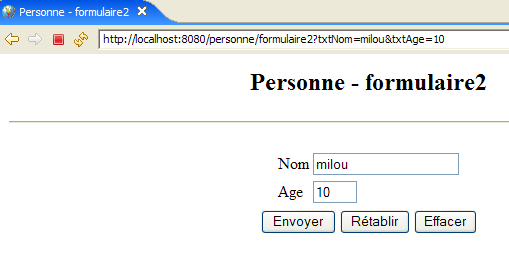
We get the same result as before, but the structure of our application is now clearer: a servlet that contains application logic and delegates the task of sending the response to the client to a page. We will now always proceed in this manner.