19. 使用 Spring Security 保护 Web 服务的访问安全
19.1. Spring Security在Web应用中的定位
让我们将 Spring Security 置于 Web 应用程序开发的大背景下。通常,该应用程序将基于如下所示的多层架构构建:
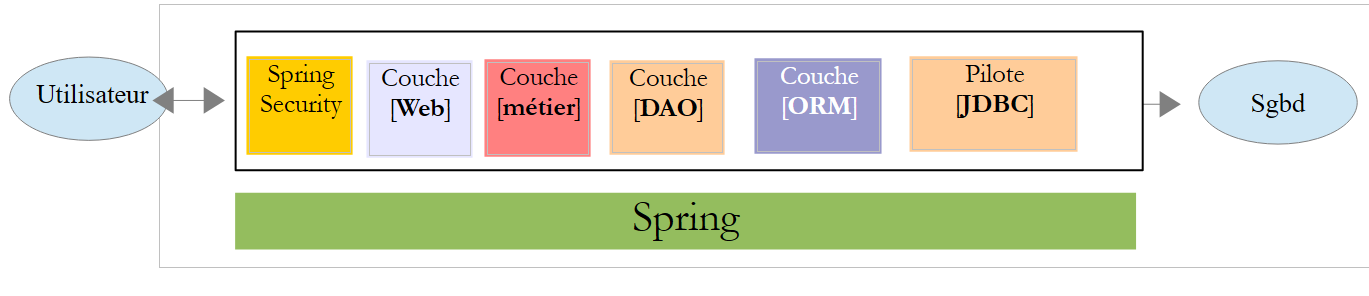 |
- [Spring Security]层仅允许授权用户访问[web]层。
19.2. Spring Security 入门教程
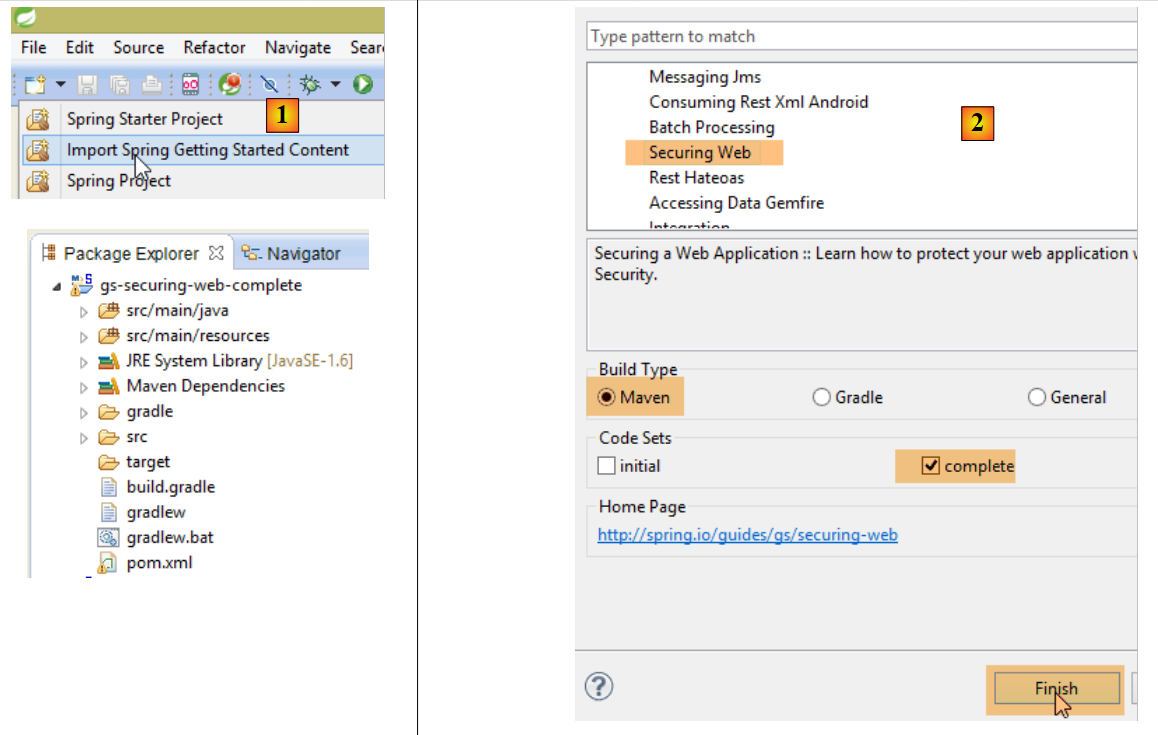
我们将再次导入一份 Spring 指南,具体步骤如下:
 |
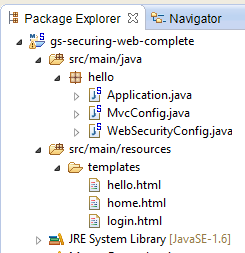 |
该项目包含以下组件:
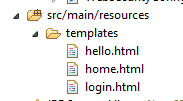
- 在 [templates] 文件夹中,包含项目的 HTML 页面;
- [Application]:是项目的可执行类;
- [MvcConfig]:是 Spring 的配置类MVC;
- [WebSecurityConfig]:是 Spring Security 的配置类;
19.2.1. Maven 配置
项目 [3] 是一个 Maven 项目。让我们查看其 [pom.xml] 文件,了解其依赖项:
<?xml version="1.0" encoding="UTF-8"?>
<project xmlns="http://maven.apache.org/POM/4.0.0" xmlns:xsi="http://www.w3.org/2001/XMLSchema-instance"
    xsi:schemaLocation="http://maven.apache.org/POM/4.0.0 http://maven.apache.org/xsd/maven-4.0.0.xsd">
    <modelVersion>4.0.0</modelVersion>

    <groupId>org.springframework</groupId>
    <artifactId>gs-securing-web</artifactId>
    <version>0.1.0</version>

    <parent>
        <groupId>org.springframework.boot</groupId>
        <artifactId>spring-boot-starter-parent</artifactId>
        <version>1.2.3.RELEASE</version>
    </parent>

    <dependencies>
        <dependency>
            <groupId>org.springframework.boot</groupId>
            <artifactId>spring-boot-starter-thymeleaf</artifactId>
        </dependency>
        <!-- tag::security[] -->
        <dependency>
            <groupId>org.springframework.boot</groupId>
            <artifactId>spring-boot-starter-security</artifactId>
        </dependency>
        <!-- end::security[] -->
    </dependencies>

    <properties>
        <start-class>hello.Application</start-class>
    </properties>

    <build>
        <plugins>
            <plugin>
                <groupId>org.springframework.boot</groupId>
                <artifactId>spring-boot-maven-plugin</artifactId>
            </plugin>
        </plugins>
    </build>

</project>
- 第 10-14 行:该项目是一个 Spring Boot 项目;
- 第 17-20 行:依赖于 [Thymeleaf] 框架;
- 第 22-25 行:依赖于 Spring Security 框架;
19.2.2. Thymeleaf视图
 |
[home.html]视图如下:
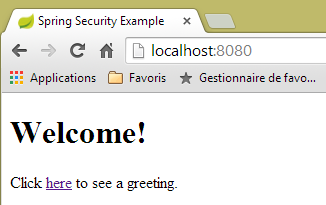 |
<!DOCTYPE html>
<html xmlns="http://www.w3.org/1999/xhtml"
    xmlns:th="http://www.thymeleaf.org"
    xmlns:sec="http://www.thymeleaf.org/thymeleaf-extras-springsecurity3">
<head>
<title>Spring Security Example</title>
</head>
<body>
    <h1>Welcome!</h1>

    <p>
        Click <a th:href="@{/hello}">here</a> to see a greeting.
    </p>
</body>
</html>
- 第 12 行:[th:href="@{/hello}"] 属性将生成 <a> 标签的 [href] 属性。 值 [@{/hello}] 将生成路径 [<context>/hello],其中 [context] 是 Web 应用程序的上下文;
生成的代码 HTML 如下:
<!DOCTYPE html>

<html xmlns="http://www.w3.org/1999/xhtml" xmlns:sec="http://www.thymeleaf.org/thymeleaf-extras-springsecurity3">
    <head>
        <title>Spring Security Example</title>
    </head>
    <body>
        <h1>Welcome!</h1>

        <p>
            Click
            <a href="/hello">here</a>
            to see a greeting.
        </p>
    </body>
</html>
视图 [hello.html] 如下所示:
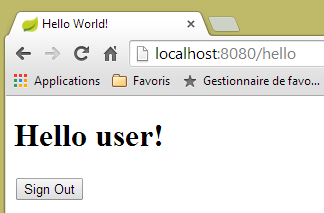 |
<!DOCTYPE html>
<html xmlns="http://www.w3.org/1999/xhtml"
    xmlns:th="http://www.thymeleaf.org"
    xmlns:sec="http://www.thymeleaf.org/thymeleaf-extras-springsecurity3">
<head>
<title>Hello World!</title>
</head>
<body>
    <h1 th:inline="text">Hello [[${#httpServletRequest.remoteUser}]]!</h1>
    <form th:action="@{/logout}" method="post">
        <input type="submit" value="Sign Out" />
    </form>
</body>
</html>
- 第 9 行:属性 [th:inline="text"] 将生成 <h1> 标签的文本。该文本包含一个需要求值的 $ 表达式。 元素 [[${#httpServletRequest.remoteUser}]] 是当前查询 HTTP 中 [RemoteUser] 属性的值。这是已登录用户的名称;
- 第 10 行:一个 HTML 表单。[th:action="@{/logout}"] 属性将生成 [form] 标签的 [action] 属性。 值 [@{/logout}] 将生成路径 [<context>/logout],其中 [context] 是 Web 应用程序的上下文;
生成的代码 HTML 如下:
<!DOCTYPE html>

<html xmlns="http://www.w3.org/1999/xhtml" xmlns:sec="http://www.thymeleaf.org/thymeleaf-extras-springsecurity3">
    <head>
        <title>Hello World!</title>
    </head>
    <body>
        <h1>Hello user!</h1>
        <form method="post" action="/logout">
            <input type="submit" value="Sign Out" />
            <input type="hidden" name="_csrf" value="b152e5b9-d1a4-4492-b89d-b733fe521c91" />
        </form>
    </body>
</html>
- 第 8 行:Hello [categorie[2]]! 的翻译;
- 第 9 行:@{/logout} 的翻译;
- 第 11 行:一个名为 _csrf 的隐藏字段(属性 name);
最后一个视图 [login.html] 如下:
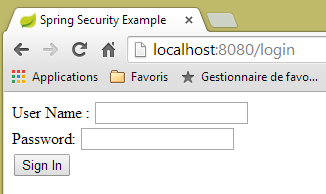 |
<!DOCTYPE html>
<html xmlns="http://www.w3.org/1999/xhtml"
    xmlns:th="http://www.thymeleaf.org"
    xmlns:sec="http://www.thymeleaf.org/thymeleaf-extras-springsecurity3">
<head>
<title>Spring Security Example</title>
</head>
<body>
    <div th:if="${param.error}">Invalid username and password.</div>
    <div th:if="${param.logout}">You have been logged out.</div>
    <form th:action="@{/login}" method="post">
        <div>
            <label> User Name : <input type="text" name="username" />
            </label>
        </div>
        <div>
            <label> Password: <input type="password" name="password" />
            </label>
        </div>
        <div>
            <input type="submit" value="Sign In" />
        </div>
    </form>
</body>
</html>
- 第 9 行:属性 [th:if="${param.error}"] 确保只有当显示登录页面的 URL 包含参数 [error](http://context/login?error)时,才会生成 <div> 标签;
- 第 10 行:属性 [th:if="${param.logout}"] 确保只有当显示登录页面的 URL 包含参数 [logout](http://context/login?logout)时,才会生成 <div> 标签;
- 第 11-23 行:一个 HTML 表单;
- 第 11 行:表单将提交至 URL [<context>/login],其中 <context> 是 Web 应用程序的上下文;
- 第 13 行:一个名为 [username] 的输入字段;
- 第 17 行:一个名为 [password] 的输入字段;
生成的代码 HTML 如下:
<!DOCTYPE html>

<html xmlns="http://www.w3.org/1999/xhtml" xmlns:sec="http://www.thymeleaf.org/thymeleaf-extras-springsecurity3">
    <head>
        <title>Spring Security Example </title>
    </head>
    <body>

        <div>
            You have been logged out.
        </div>
        <form method="post" action="/login">
            <div>
                <label>
                    User Name :
                    <input type="text" name="username" />
                </label>
            </div>
            <div>
                <label>
                    Password:
                    <input type="password" name="password" />
                </label>
            </div>
            <div>
                <input type="submit" value="Sign In" />
            </div>
            <input type="hidden" name="_csrf" value="ef809b0a-88b4-4db9-bc53-342216b77632" />
        </form>
    </body>
</html>
请注意第28行,Thymeleaf添加了一个名为[_csrf]的隐藏字段。
19.2.3. Spring 配置 MVC
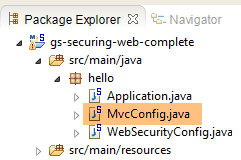 |
类 [MvcConfig] 配置了 Spring 框架 MVC:
package hello;

import org.springframework.context.annotation.Configuration;
import org.springframework.web.servlet.config.annotation.ViewControllerRegistry;
import org.springframework.web.servlet.config.annotation.WebMvcConfigurerAdapter;

@Configuration
public class MvcConfig extends WebMvcConfigurerAdapter {

    @Override
    public void addViewControllers(ViewControllerRegistry registry) {
        registry.addViewController("/home").setViewName("home");
        registry.addViewController("/").setViewName("home");
        registry.addViewController("/hello").setViewName("hello");
        registry.addViewController("/login").setViewName("login");
    }

}
- 第 7 行:注解 [@Configuration] 将类 [MvcConfig] 设为配置类;
- 第 8 行:类 [MvcConfig] 继承自类 [WebMvcConfigurerAdapter],以重写其中某些方法;
- 第 10 行:重定义父类的某个方法;
- 第 11-16 行:方法 [addViewControllers] 用于将 URL 与视图 HTML 关联。其中建立了以下关联:
视图 | |
/templates/home.html | |
/templates/hello.html | |
/templates/login.html |
后缀 [html] 和文件夹 [templates] 是 Thymeleaf 使用的默认值。它们可以通过配置进行更改。文件夹 [templates] 必须位于项目类路径的根目录下:
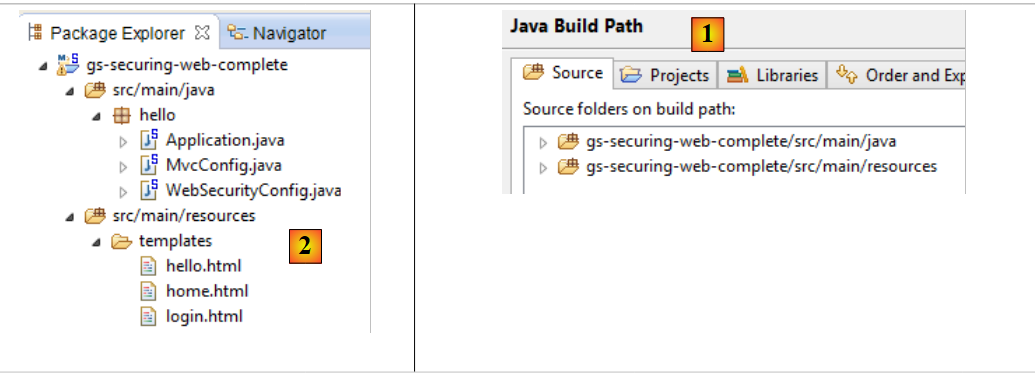 |
在 [1] 之上,文件夹 [java] 和 [resources] 均为源文件夹(source folders)。这意味着它们的内容将位于项目类路径的根目录下。 因此,在 [2] 中,文件夹 [hello] 和 [templates] 将位于类路径的根目录下。
19.2.4. Spring Security 配置
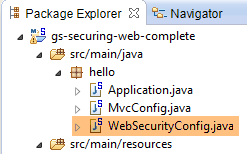 |
类 [WebSecurityConfig] 配置 Spring Security 框架:
package hello;

import org.springframework.context.annotation.Configuration;
import org.springframework.security.config.annotation.authentication.builders.AuthenticationManagerBuilder;
import org.springframework.security.config.annotation.web.builders.HttpSecurity;
import org.springframework.security.config.annotation.web.configuration.WebSecurityConfigurerAdapter;
import org.springframework.security.config.annotation.web.servlet.configuration.EnableWebMvcSecurity;

@Configuration
@EnableWebMvcSecurity
public class WebSecurityConfig extends WebSecurityConfigurerAdapter {
    @Override
    protected void configure(HttpSecurity http) throws Exception {
        http.authorizeRequests().antMatchers("/", "/home").permitAll().anyRequest().authenticated();
        http.formLogin().loginPage("/login").permitAll().and().logout().permitAll();
    }

    @Override
    protected void configure(AuthenticationManagerBuilder auth) throws Exception {
        auth.inMemoryAuthentication().withUser("user").password("password").roles("USER");
    }
}
- 第 9 行:注解 [@Configuration] 将类 [WebSecurityConfig] 设为配置类;
- 第 10 行:注解 [@EnableWebSecurity] 将类 [WebSecurityConfig] 设为 Spring Security 配置类;
- 第 11 行:类 [WebSecurity] 继承自类 [WebSecurityConfigurerAdapter],以重写其中某些方法;
- 第 12 行:重写父类的某个方法;
- 第 13-16 行:重写方法 [configure(HttpSecurity http)],用于定义应用程序中各个 URL 的访问权限;
- 第14行:方法[http.authorizeRequests()]用于将URL与访问权限关联。其中建立了以下关联:
规则 | 代码 | |
无需身份验证的访问 | | |
仅限经过身份验证的访问 |
- 第 15 行:定义身份验证方法。身份验证通过表单 URL [/login] 进行,该表单对所有人开放 [http.formLogin().loginPage("/login").permitAll()]。注销(logout)功能同样对所有人开放;
- 第19-21行:重新定义了管理用户的[configure(AuthenticationManagerBuilder auth)]方法;
- 第20行:身份验证使用硬编码的用户进行 [auth.inMemoryAuthentication()]。 此处定义的用户登录名 [user],密码 [password],角色 [USER]。可为具有相同角色的用户授予相同的权限;
19.2.5. 可执行类
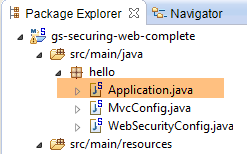 |
类 [Application] 如下所示:
package hello;

import org.springframework.boot.autoconfigure.EnableAutoConfiguration;
import org.springframework.boot.SpringApplication;
import org.springframework.context.annotation.ComponentScan;
import org.springframework.context.annotation.Configuration;

@EnableAutoConfiguration
@Configuration
@ComponentScan
public class Application {

    public static void main(String[] args) throws Throwable {
        SpringApplication.run(Application.class, args);
    }

}
- 第 8 行:注解 [@EnableAutoConfiguration] 要求 Spring Boot(第 3 行)进行开发者未显式配置的配置;
- 第 9 行:将类 [Application] 设为 Spring 配置类;
- 第 10 行:要求扫描 [Application] 类的文件夹,以查找 Spring 组件。 [MvcConfig] 和 [WebSecurityConfig] 这两个类将因此被发现,因为它们带有 [@Configuration] 注解;
- 第 13 行:可执行类的 [main] 方法;
- 第 14 行:静态方法 [SpringApplication.run] 被调用,其参数为配置类 [Application]。 我们之前已经遇到过这个流程,并且知道项目 Maven 依赖中嵌入的 Tomcat 服务器将被启动,项目也将部署到该服务器上。我们看到有四个 URL 由 [/, /home, /login, /hello] 管理,其中部分受访问权限保护。
19.2.6. 应用程序测试
首先,我们请求 URL(即 [/]),这是四个被接受的 URL 之一。它关联的视图是 [/templates/home.html]:
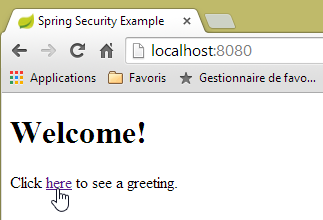 |
所请求的 URL(即 [/])对所有人开放。这就是我们获取它的原因。[here] 的链接如下:
点击该链接后,系统将请求 URL [/hello]。该文件受保护:
规则 | 代码 | |
无需身份验证即可访问 | | |
仅限经过身份验证的访问 |
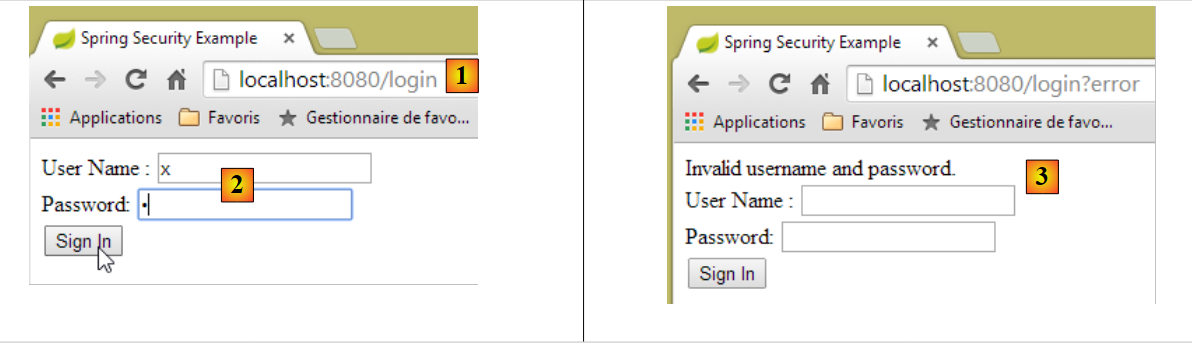
必须经过身份验证才能获取。Spring Security 随后会将客户端浏览器重定向至身份验证页面。根据所见配置,该页面为 URL [/login]。该页面对所有人开放:
http.formLogin().loginPage("/login").permitAll().and().logout().permitAll();
因此我们得到 [1]:
 |
所得页面的源代码如下:
- 第7行出现了一个隐藏字段,该字段在原始页面[login.html]中并不存在。这是Thymeleaf添加的。该代码名为CSRF(跨站请求伪造),旨在消除一个安全漏洞。 该令牌必须随身份验证信息一并发送回 Spring Security,才能被后者接受;
我们记得,Spring Security 仅识别 user/password 用户名和密码。如果我们在 [2] 中输入其他内容,我们会看到相同的页面,并在 [3] 中收到一条错误消息。 Spring Security 将浏览器重定向到了 URL [http://localhost:8080/login?error]。参数 [error] 的存在触发了以下标签的显示:
<div th:if="${param.error}">Invalid username and password.</div>
现在,输入预期的用户名/密码值 [4]:
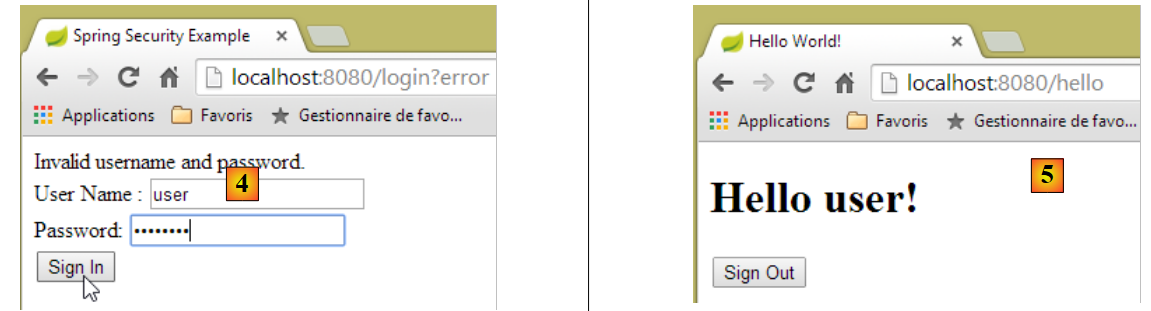 |
- 在 [4] 中,我们进行身份验证;
- 在 [5] 处,Spring Security 将我们重定向至 URL [/hello],因为当我们被重定向到登录页面时,我们请求的是 URL。 用户身份由 [hello.html] 中的以下行显示:
页面 [5] 显示以下表单:
    <form th:action="@{/logout}" method="post">
        <input type="submit" value="Sign Out" />
</form>
点击按钮 [Sign Out] 后,将在 URL 和 [/logout] 上生成一个 POST。 该文件与 URL、[/login] 一样,对所有人开放:
http.formLogin().loginPage("/login").permitAll().and().logout().permitAll();
在我们的关联 URL / 视图中,我们未对 URL [/logout] 进行任何定义。会发生什么情况?让我们试一试:
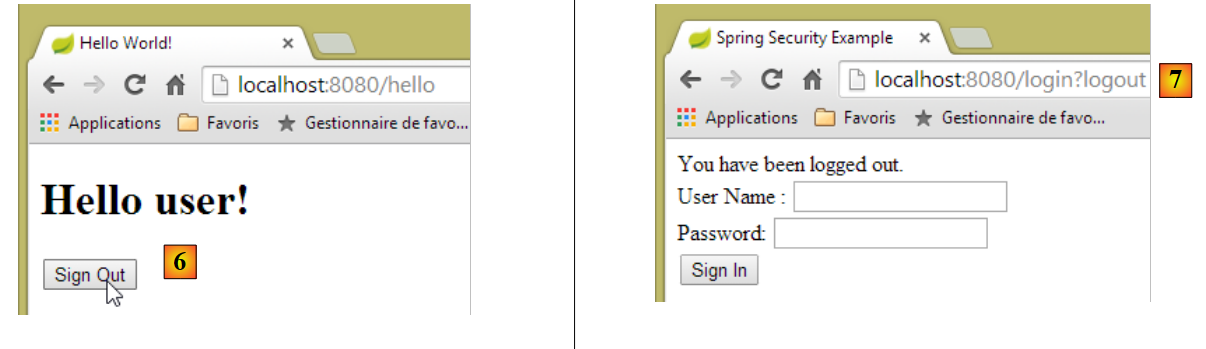 |
- 在 [6] 中,我们点击 [Sign Out] 按钮;
- 在 [7] 处,我们看到已被重定向至 URL [http://localhost:8080/login?logout]。这是 Spring Security 请求的重定向。 由于 URL 中存在 [logout] 参数,视图中显示了以下内容:
<div th:if="${param.logout}">You have been logged out.</div>
19.2.7. 结论
在前面的示例中,我们本可以先编写 Web 应用程序,然后再对其进行安全加固。Spring Security 并不具有侵入性。我们可以为已经编写好的 Web 应用程序配置安全机制。此外,我们还发现了以下几点:
- 可以定义一个身份验证页面;
- 身份验证必须附带由 Spring Security 签发的令牌 CSRF;
- 若认证失败,系统将重定向至认证页面,且URL中会包含一个error参数;
- 若认证成功,将重定向至认证发生时请求的页面。 如果直接请求身份验证页面而不经过中间页面,则 Spring Security 会将我们重定向到 URL [/](此情况未被提及);
- 通过请求 URL [/logout] 并携带 POST 参数即可注销。 Spring Security 随后会将我们重定向至包含 logout 参数的 URL 认证页面;
所有这些结论均基于 Spring Security 的默认行为。通过重写 [WebSecurityConfigurerAdapter] 类的某些方法,可以配置更改这些行为。
之前的教程在后续内容中帮助不大。实际上,我们将使用:
- 一个数据库来存储用户、密码及其角色;
- 基于 HTTP 头部的身份验证;
关于我们此处要实现的功能,现有的教程相当有限。即将提出的解决方案是整合了从各处收集的代码。