3. API 简介 JDBC
3.1. 搭建工作环境
我们将使用 MySQL5 数据库进行操作。
您需要:
- 已安装 JDK(Java 开发工具包)(第 23.1 节);
- 已安装Maven依赖管理器(参见第23.2节);
- 已安装 Spring Tool Suite(IDE)(STS)(第 23.3 节);
- 安装了 SGBD MySQL5(第 23.4 节)及其客户端 EMS MyManager(第 23.5 节);
- 下载了文档 [http://tahe.developpez.com/java/spring-database] 的源代码;
下文假设 MySQL5 的管理员为 root,密码为 root。启动 SGBD、MySQL5 及其客户端 [MyManager]。 借助 [MyManager],我们创建数据库 [dbproduits] [1-34]:
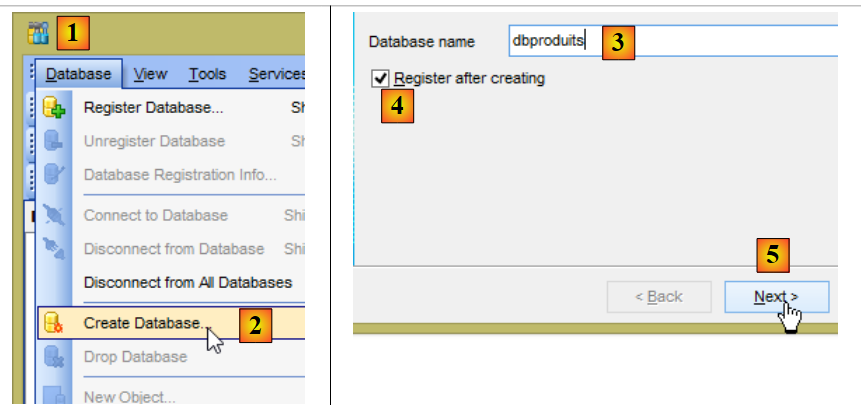 |
- 在 [3] 中,该基础应命名为 [dbproduits];
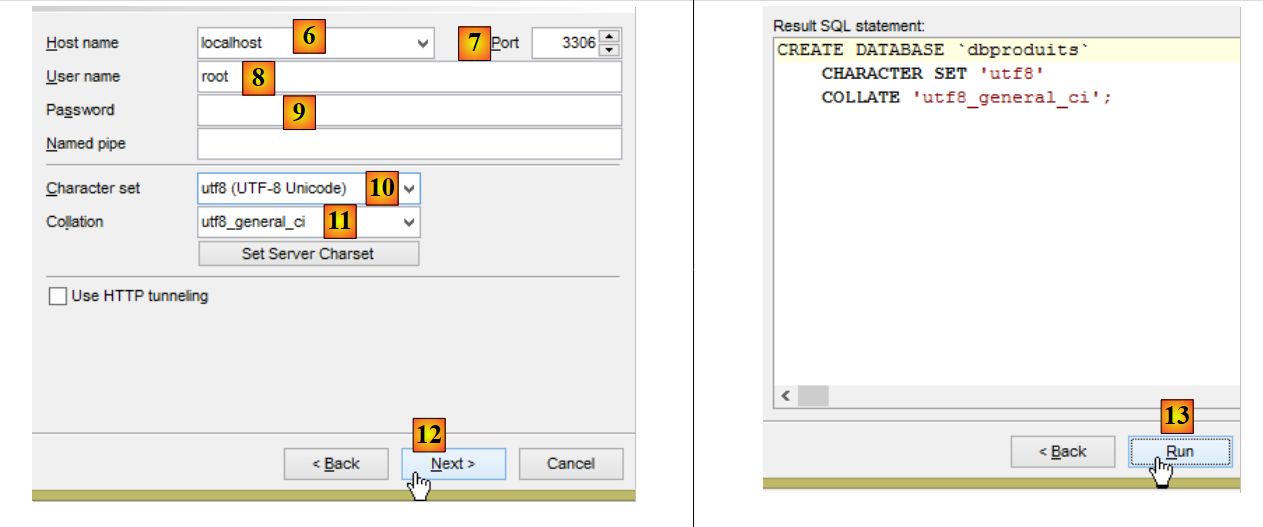 |
- 在 [8-9] 中,使用 root 用户及 root 密码(上图截图中未显示);
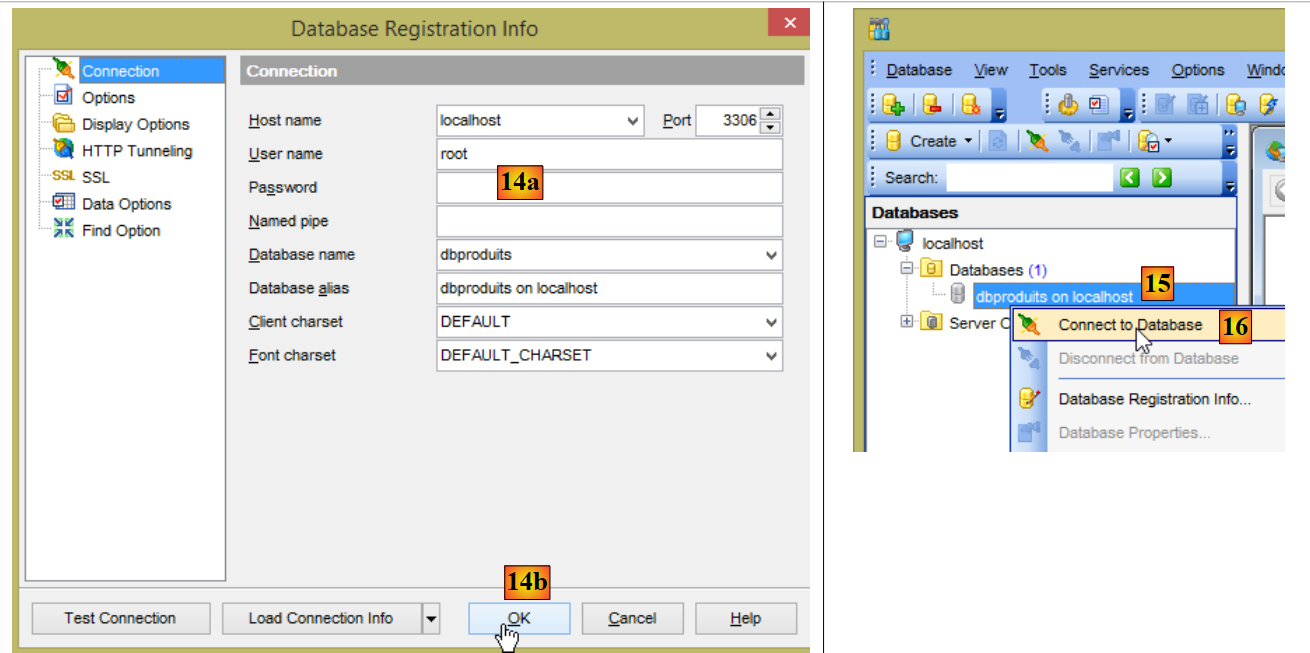 |
- 更名为 [14a],密码再次为 root(截图中未显示);
- 在 [15] 中,已创建数据库 [dbproduits];
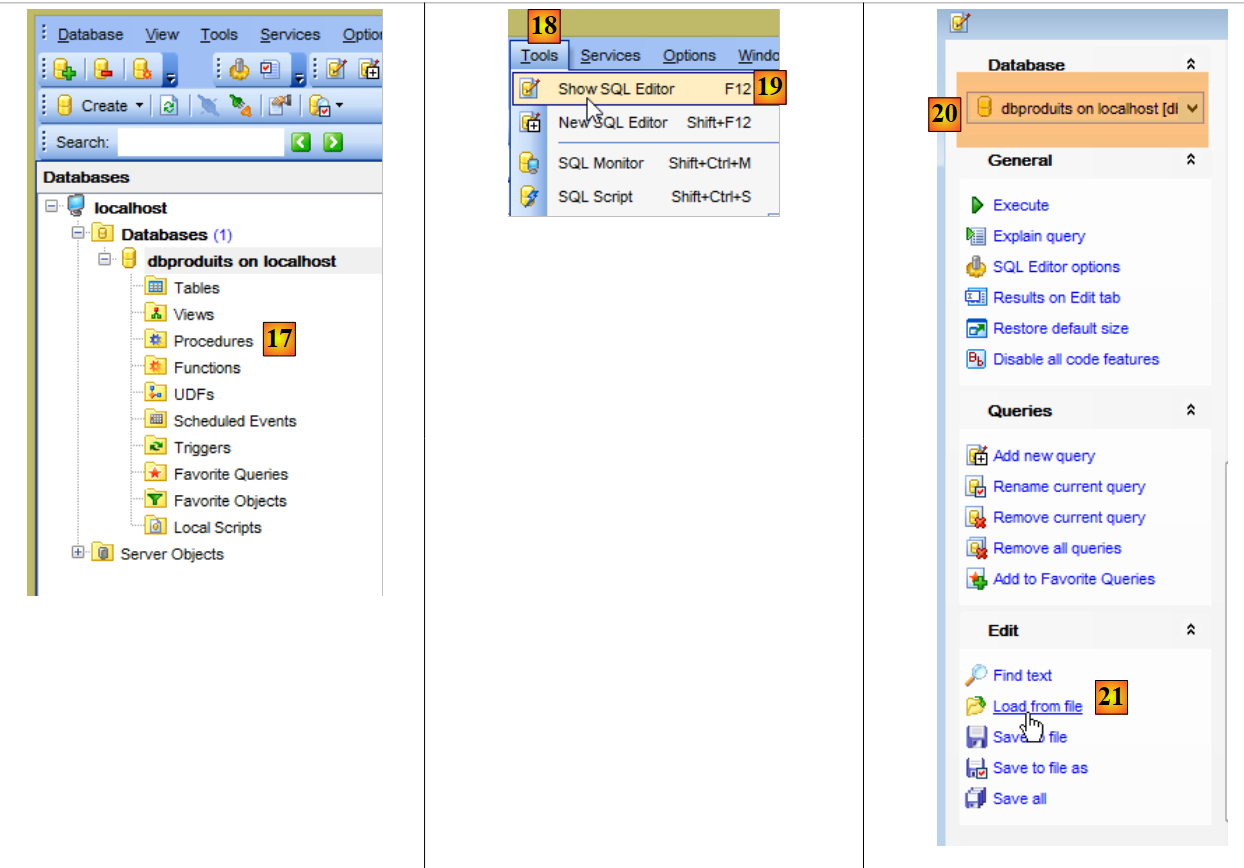 |
- 在 [20] 中,请注意所选的数据库。必须是 [dbproduits] 数据库;
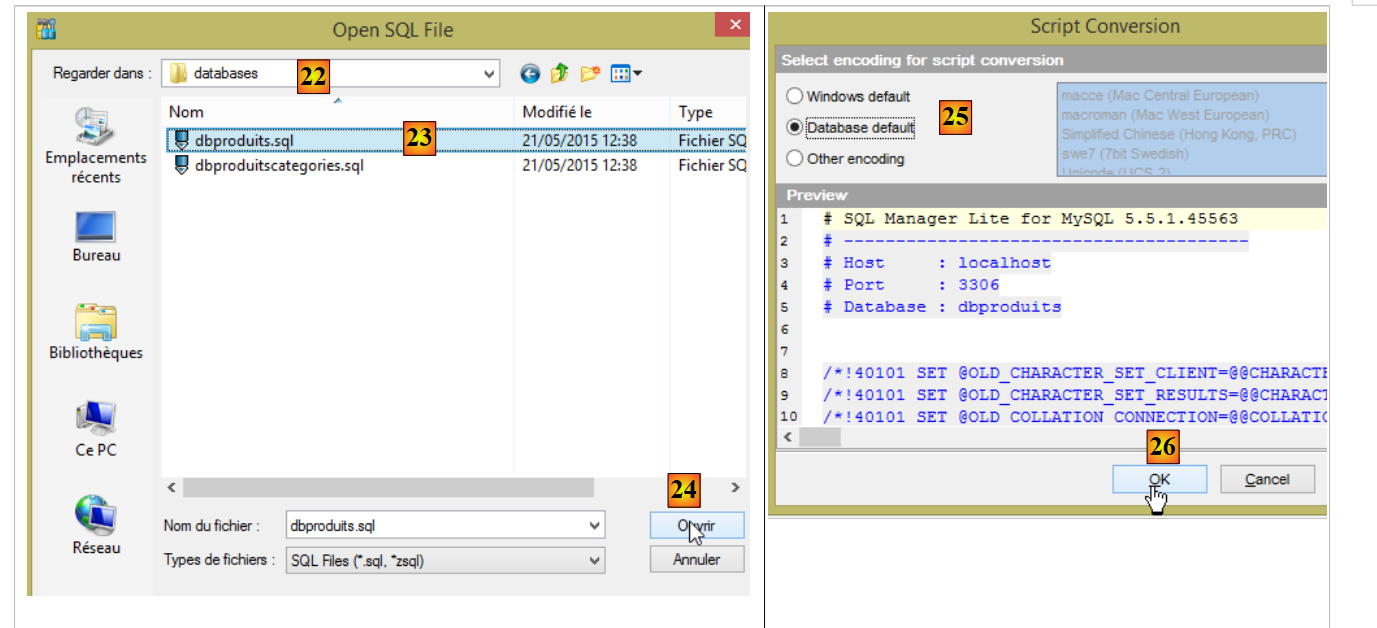 |
- 更名为 [22],文件夹路径为 <exemples>/spring-database-config/mysql/databases,其中 <exemples> 是下载的示例文件夹;
- 在 [23] 中,选择脚本 SQL [dbproduits.sql]。它将在数据库 [dbproduits] 中生成表 [PRODUITS];
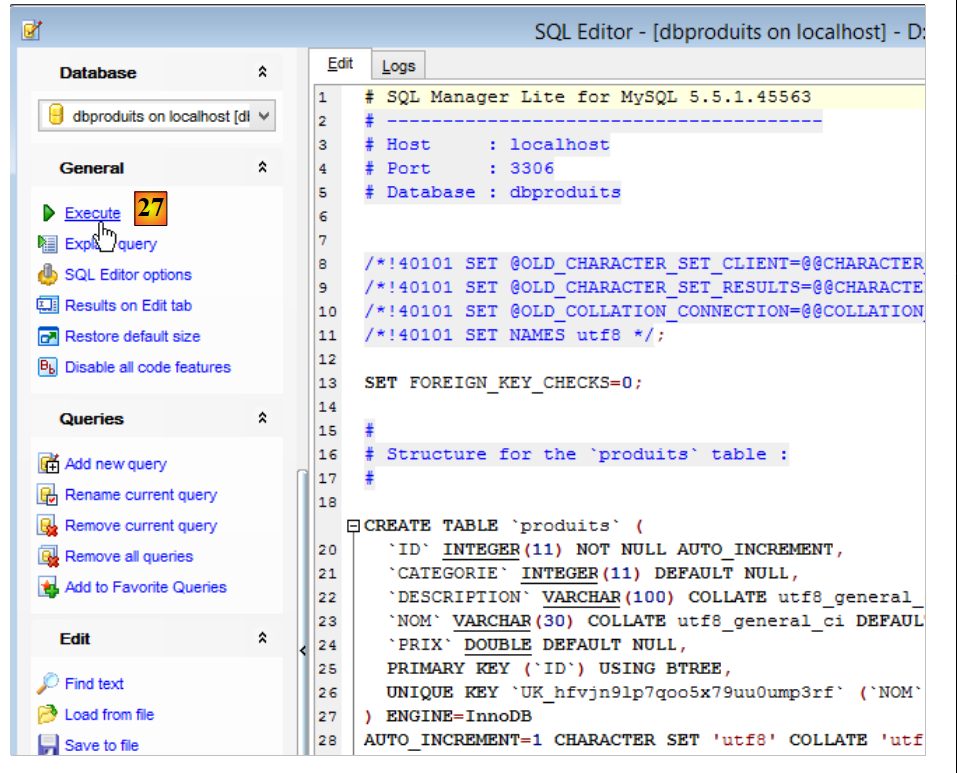 |
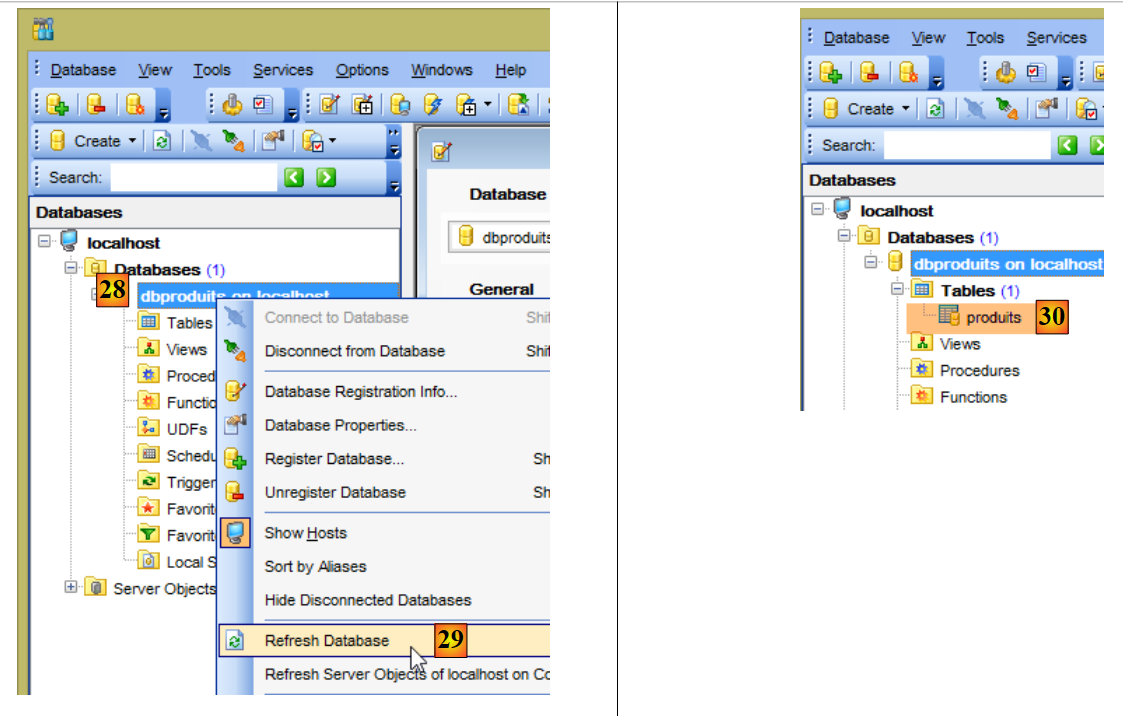 |
- 在 [30] 中,已创建表 [produits];
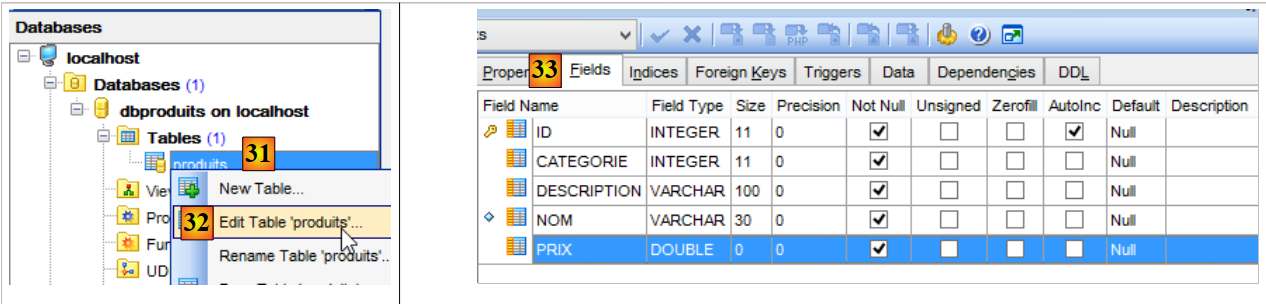 |
- 在 [33] 中,表 [produits] 的列;
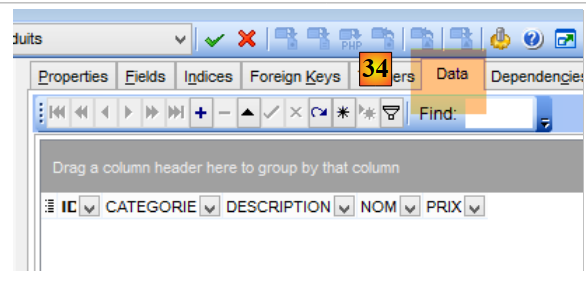 |
- 导入到 [34],该表初始为空;
现在使用 STS,导入以下项目(请遵循 <exemples>/spring-core 文件夹中项目的操作步骤):
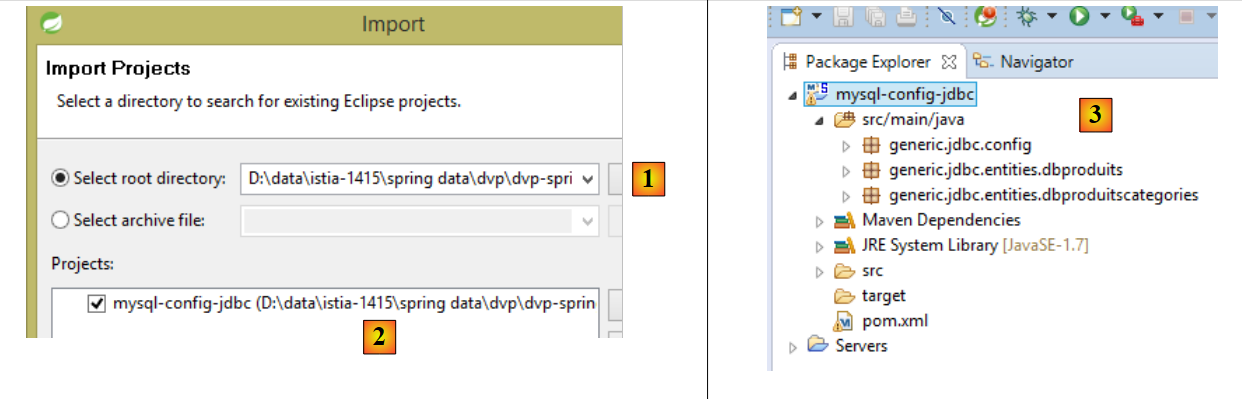 |
- 在 [2] 中,项目 [mysql-config-jdbc] 将位于文件夹 [<exemples>/spring-database-config/mysql/eclipse/mysql-config-jdbc] [1] 中;
该项目配置了以下架构中的 JDBC 层:
 |
然后重新导入以下三个项目:
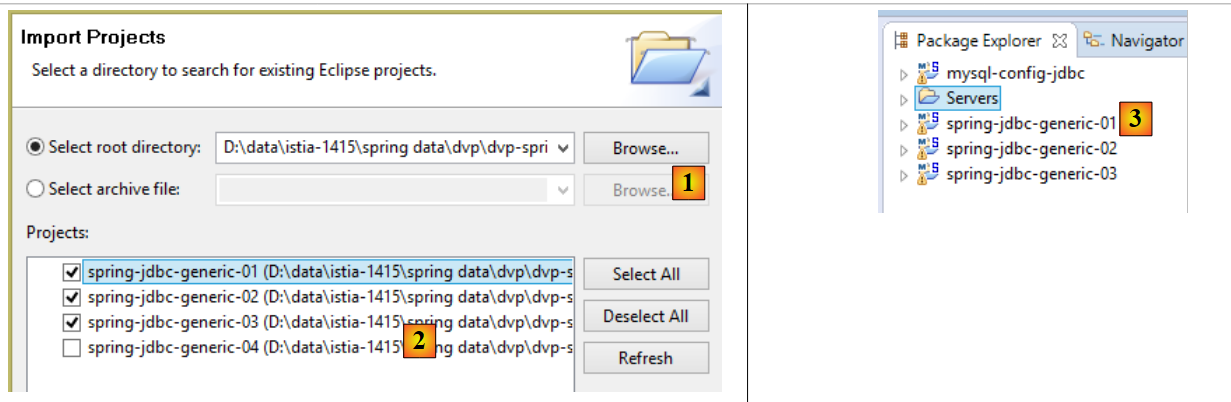 |
- 导入到 [2] 中,这些项目将位于 [<exemples>/spring-database-config/spring-jdbc] 和 [1] 文件夹中;
这三个项目是使用 Maven 项目 [mysql-config-jdbc] 的 Maven 项目。该项目生成以下 Maven 工件(参见 pom.xml):
    <groupId>dvp.spring.database</groupId>
    <artifactId>generic-config-jdbc</artifactId>
<version>0.0.1-SNAPSHOT</version>
项目 [oracle-config-jdbc, db2-config-jdbc, ...] 也会生成相同的工件。为确保当前加载在 STS 中的 [spring-generic-jdbc-*] 项目确实使用了 [mysql-config-jdbc] 项目:
- 请确保未同时加载另一个名为 [sgbd-config-jdbc] 的项目。这可能会导致难以理解的错误;
- 请按以下方式更新已加载项目的 Maven 配置:
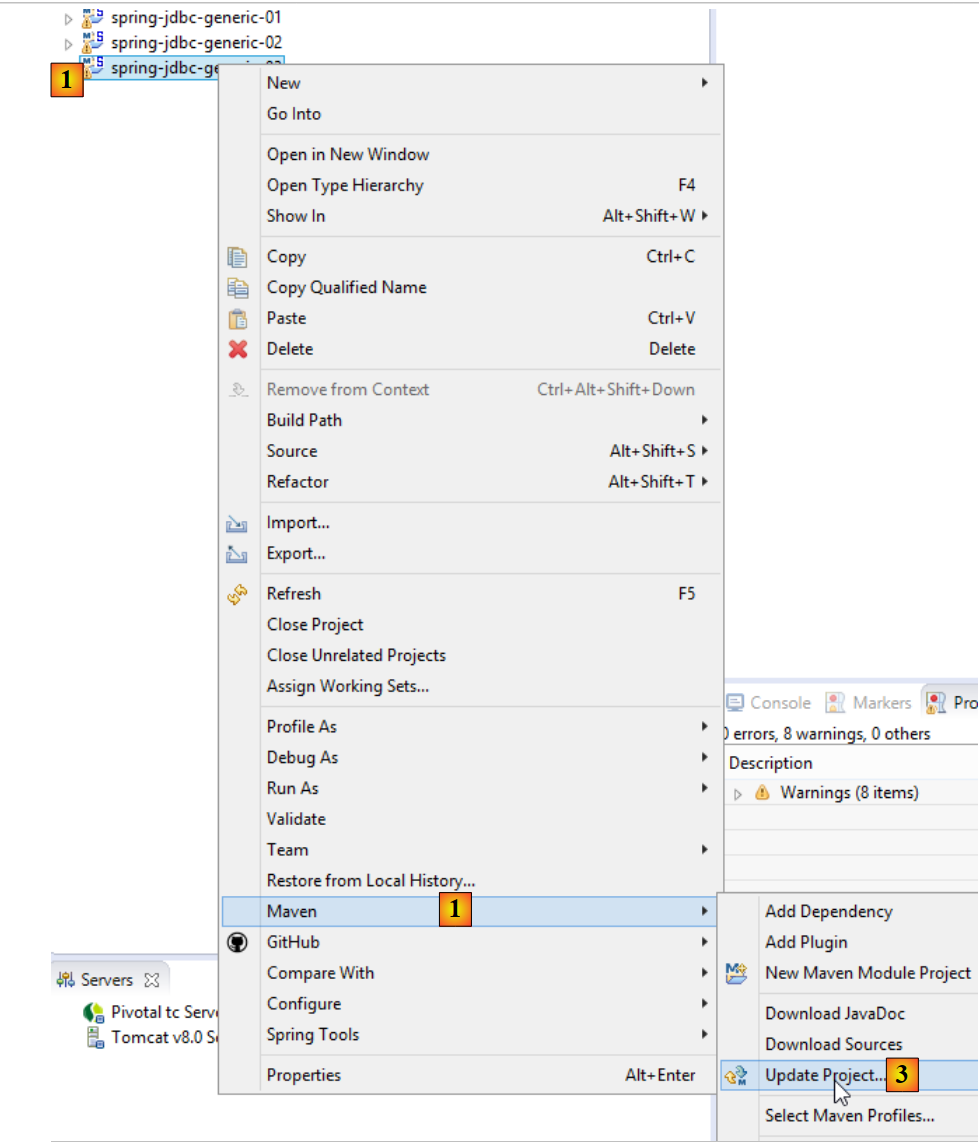 |
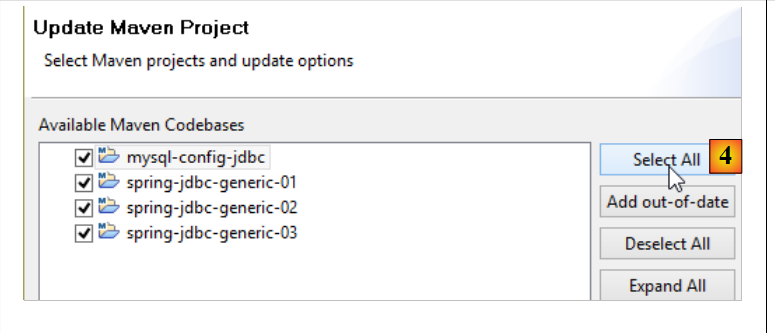 |
要验证您的配置,请运行运行配置 [spring-jdbc-generic-01.IntroJdbc01] [1-3]:
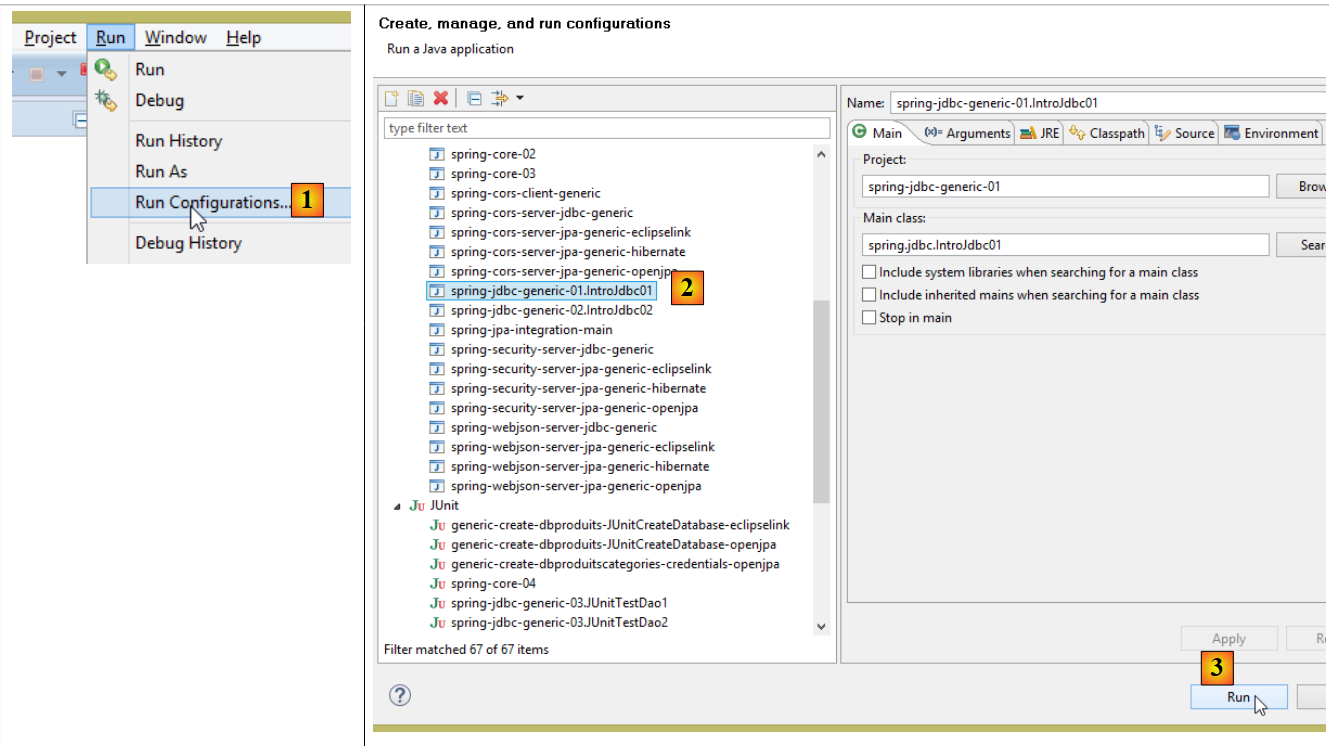 |
您应看到以下控制台输出:
------------------------------ Vidage de la table [PRODUITS]
------------------------------ Remplissage de la table [PRODUITS]
------------------------------ Affichage de la table [PRODUITS]
Liste des produits :
{"id":1,"nom":"NOM1","categorie":1,"prix":100.0,"description":"DESC1"}
{"id":2,"nom":"NOM2","categorie":1,"prix":101.0,"description":"DESC2"}
{"id":3,"nom":"NOM3","categorie":1,"prix":102.0,"description":"DESC3"}
{"id":4,"nom":"NOM4","categorie":1,"prix":103.0,"description":"DESC4"}
{"id":5,"nom":"NOM5","categorie":2,"prix":104.0,"description":"DESC5"}
{"id":6,"nom":"NOM6","categorie":2,"prix":105.0,"description":"DESC6"}
{"id":7,"nom":"NOM7","categorie":2,"prix":106.0,"description":"DESC7"}
{"id":8,"nom":"NOM8","categorie":2,"prix":107.0,"description":"DESC8"}
{"id":9,"nom":"NOM9","categorie":2,"prix":108.0,"description":"DESC9"}
{"id":10,"nom":"NOM10","categorie":3,"prix":109.00000000000001,"description":"DESC10"}
------------------------------ Mise à jour de la table [PRODUITS]
------------------------------ Affichage de la table [PRODUITS]
Liste des produits :
{"id":1,"nom":"NOM1","categorie":1,"prix":110.00000000000001,"description":"DESC1"}
{"id":2,"nom":"NOM2","categorie":1,"prix":111.10000000000001,"description":"DESC2"}
{"id":3,"nom":"NOM3","categorie":1,"prix":112.2,"description":"DESC3"}
{"id":4,"nom":"NOM4","categorie":1,"prix":113.30000000000001,"description":"DESC4"}
{"id":5,"nom":"NOM5","categorie":2,"prix":104.0,"description":"DESC5"}
{"id":6,"nom":"NOM6","categorie":2,"prix":105.0,"description":"DESC6"}
{"id":7,"nom":"NOM7","categorie":2,"prix":106.0,"description":"DESC7"}
{"id":8,"nom":"NOM8","categorie":2,"prix":107.0,"description":"DESC8"}
{"id":9,"nom":"NOM9","categorie":2,"prix":108.0,"description":"DESC9"}
{"id":10,"nom":"NOM10","categorie":3,"prix":109.00000000000001,"description":"DESC10"}
------------------------------ Vidage de la table [PRODUITS]
------------------------------ Affichage de la table [PRODUITS]
Liste des produits :
------------------------------ Insertion de deux produits de même clé primaire dans la table [PRODUITS]
Les erreurs suivantes se sont produites lors de l'ajout de deux produits de même clé primaire :
- Duplicate entry '100' for key 'PRIMARY'
------------------------------ Affichage de la table [PRODUITS]
Liste des produits :
------------------------------ Travail terminé
在接下来的示例中,读者可以:
- 直接使用之前加载的项目;
- 或者自行构建项目;
3.2. 数据库操作步骤
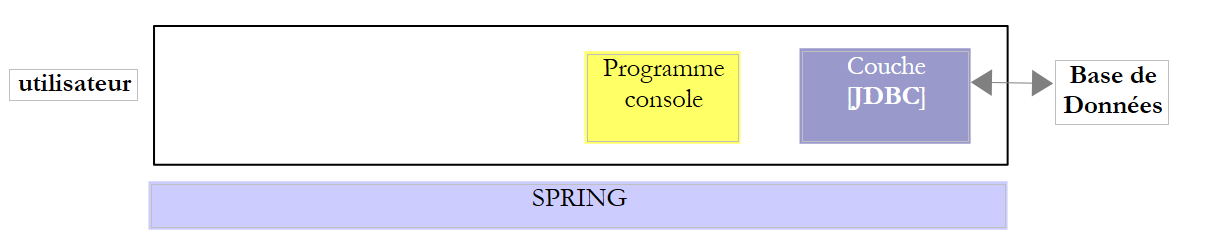 |
在上述架构中,控制台程序对数据库的操作包括以下步骤:
- 加载数据库驱动程序 JDBC;
- 建立与数据库的连接;
- 向数据库发出 SQL 命令,并处理 SQL 命令的结果;
- 关闭连接;
步骤 1 仅执行一次。步骤 2-4 则会循环执行。需要注意的是,不会让连接保持打开状态。一旦不再需要,就会立即关闭连接。
3.2.1. 步骤 1 - 将驱动程序 JDBC 加载到内存中
代码
        // 加载驱动程序 JDBC
        try {
            Class.forName(nom de la classe du pilote JDBC);
        } catch (ClassNotFoundException e1) {
            // 处理异常
}
第 3 行操作旨在将数据库中的 JDBC 驱动程序加载到内存中。此操作只需执行一次。但重复执行也不会导致错误。系统会在项目的类路径中查找 JDBC 驱动程序的类。 因此,在Eclipse项目中,必须将包含驱动程序类JDBC的[jar]文件添加到项目的Classpath中。
3.2.2. 步骤 2 - 建立连接
在安装好 JDBC 驱动程序后,需要让其与 BD 建立连接:
代码
package spring.jdbc;

import java.sql.Connection;
import java.sql.DriverManager;
import java.sql.PreparedStatement;
import java.sql.ResultSet;
import java.sql.SQLException;

public class IntroJdbc01 {

...
        Connection connexion = null;
        PreparedStatement ps = null;
        ResultSet rs = null;
        try {
            // 建立连接
            connexion = DriverManager.getConnection(url, user, passwd);
...
        } catch (SQLException e1) {
            // 处理异常
            ...
        } finally {
         // 关闭连接
         if (connexion != null) {
            try {
                connexion.close();
            } catch (SQLException e2) {
                // 处理异常
                ...
            }
         }
}
- 第 3-7 行:JDBC 接口的实现类均位于 [java.sql] 包中。 此外,一旦发生错误,它们都会抛出类型为 [SQLException] 的异常(第 19、27 行)。 该异常继承自 [Exception] 类,属于所谓的受控异常:必须使用 try/catch 语句进行处理;或者,若不进行处理,则需通过在方法签名中添加 [throws SQLException] 来表明该方法允许抛出异常;
- 第 17 行,[DriverManager.getConnection] 是一个静态方法,它期望三个参数:
- [url]:数据库中的 URL。这是一个字符串,其值取决于所使用的 BD。 对于 MySQL,其格式为 [jdbc:mysql://localhost:3306/nom_de_la_bd];
- [user]:连接的所有者;
- [passwd]:其密码;
- 第24-30行:必须在[finally]子句中关闭连接,以确保无论是否发生异常,连接都会被关闭。
3.2.3. 步骤 3 - 发出命令 SQL [SELECT]
建立连接后,即可发出 SQL 命令。处理 [SELECT] 读取命令的方式与处理 [UPDATE, INSERT, DELETE] 更新操作的方式不同。 我们先从 SQL 和 [SELECT] 命令开始:
代码
Connection connexion = null;
        PreparedStatement ps = null;
        ResultSet rs = null;
        try {
            // 建立连接
            connexion = DriverManager.getConnection(url, user, passwd);
            // 开始事务
            connexion.setAutoCommit(false);
            // 只读模式
            connexion.setReadOnly(true);
            // 读取表 [PRODUITS]
            ps = connexion.prepareStatement("SELECT ID, NOM, CATEGORIE, PRIX, DESCRIPTION FROM PRODUITS");
            rs = ps.executeQuery();
            System.out.println("Liste des produits : ");
            while (rs.next()) {
                System.out.println(new Produit(rs.getInt(1), rs.getString(2), rs.getInt(3), rs.getDouble(4), rs.getString(5)));
            }
            // 提交事务
            connexion.commit();
        } catch (SQLException e1) {
            // 处理异常
             doCatchException(connexion,e1);
        } finally {
            // 处理 finally 块
            doFinally(rs, ps, connexion);
        }

    private void doFinally(ResultSet rs, PreparedStatement ps, Connection connexion) {
....
}
- 第 8、10 行:以只读模式(第 10 行)开启事务(第 8 行)。事务是一系列 SQL 命令,这些命令要么全部成功,要么全部失败。 因此,在包含 N 个 SQL 命令的事务中,如果第 I+1 个命令失败,则前面的 I 个命令将被取消。对于读取操作,通常不需要事务。然而,创建一个只读事务可以使某些 SGBD 命令进行特定的优化;
- 第12行:使用了[PreparedStatement]。通常[PreparedStatement]的参数会用“?”表示,但此处没有。 [PreparedStatement]是由SGBD预编译的语句。该预编译过程会产生开销,且仅执行一次。随后,该预编译语句将由SGBD使用不同的实际参数执行,这些参数将替换形式参数“?”。 需注意,最好直接指定所需列名,而非使用 * 符号来获取所有列。通过明确列名,随后可根据其在 SELECT 查询中的位置获取其值;
- 第 13 行:执行 [PreparedStatement]。获取一个 [ResultSet] 类型的对象;
类型为 [ResultSet] 的对象代表一张表,即一组行和列。在某个时刻,我们只能访问表中的一行,称为当前行。在初始创建 [ResultSet] 时,不存在当前行。 必须执行 [ResultSet.next()] 操作才能获取它。方法 next 的签名如下:
该方法尝试跳转到 [ResultSet] 的下一行,若成功则返回 true,否则返回 false。若操作成功,下一行将成为新的当前行。上一行将被丢失,且无法回溯以恢复该行。
[ResultSet]表包含名为labelCol1、labelCol2等的列,这些列在已执行的[SELECT]查询中已指定。使用以下查询:
SELECT ID as myId, NOM as myNom, CATEGORIE as myCategorie, PRIX as myPrix, DESCRIPTION as myDescription FROM PRODUITS
- [ID] 列将映射到 [ResultSet] 表中名为 [myId] 的列;
- [NOM] 列将映射到 [ResultSet] 表中名为 [myNom] 的列;
- ...
在上文中,标识符 [myCol] 被称为列标签。如果没有这些标签,[ResultSet] 的列名将取决于 SGBD。 当 [SELECT] 操作单一表时,列标签将默认采用 SELECT 所请求的列名。 问题出现在 [SELECT] 操作多个表时,且这些表中存在相同的列名,如下例所示:
SELECT PRODUITS.NOM, CATEGORIES.NOM FROM PRODUITS, CATEGORIES WHERE PRODUITS.CATEGORIE_ID=CATEGORIES.ID
假设表 [PRODUITS] 通过关系 [Produits] 与表 [CATEGORIES] 建立外键关联。CATEGORIE_ID --> [CATEGORIES].ID,且表 [PRODUITS] 和 [CATEGORIES] 均包含字段 [NOM]。 在这种情况下,[ResultSet]中为[PRODUITS.NOM]和[CATEGORIES.NOM]列指定的名称取决于SGBD。 因此,为了实现与 SGBD 之间的可移植性,此处必须使用列标签,写法如下:
SELECT PRODUITS.NOM as p_NOM, CATEGORIES.NOM as c_NOM FROM PRODUITS, CATEGORIES WHERE PRODUITS.CATEGORIE_ID=CATEGORIES.ID
要利用 [ResultSet] 当前行中的各个字段,可使用以下方法:
用于获取当前行中名为“labelColi”的列,从而获取[SELECT]中具有该标签的列。Type表示字段coli的类型。 可以使用以下 [getType] 方法:getInt、getLong、getString、 getDouble、getFloat、getDate、…… 除了使用列名,还可以使用该列在已执行的 [SELECT] 查询中的位置:
其中 i 是所需列的索引(i>=1)。
- 第 15-17 行:从 BD 中读取的值;
- 第 19 行:事务被提交(也称为“commit”)。这将结束事务,并释放 SGBD 为该事务调用的资源;
- 第25行:在[finally]中释放资源。该程序调用后续的[doFinally]方法:
private void doFinally(ResultSet rs, PreparedStatement ps, Connection connexion) {
        // 关闭 ResultSet
        if (rs != null) {
            try {
                rs.close();
            } catch (SQLException e1) {

            }
        }
        // 关闭 [PreparedStatement]
        if (ps != null) {
            try {
                ps.close();
            } catch (SQLException e2) {

            }
        }
        if (connexion != null) {
            try {
                // 关闭连接
                connexion.close();
            } catch (SQLException e3) {
                // 处理异常
            }
        }
    }
- 第3-9行:关闭[ResultSet];
- 第 11-17 行:关闭 [PreparedStatement];
- 第 18-27 行:关闭连接;
第3-17行的关闭操作看似冗余,因为第18-25行已关闭连接。实际上,在某些情况下并非如此,建议保留这些操作。
- 第22行:该异常由以下方法处理:
    private static void doCatchException(Connection connexion, Throwable th) {
        // 撤销事务
        try {
            if (connexion != null) {
                connexion.rollback();
            }
        } catch (SQLException e2) {
            // 处理异常
        }
}
- 第4-6行:事务被回滚。这将终止事务,SGBD 方法将能够释放为该事务调用的资源;
3.2.4. 步骤 3 - 发出 SQL 和 [INSERT, UPDATE, DELETE] 命令
SQL 和 [INSERT, UPDATE, DELETE] 命令属于更新操作:它们会修改数据库,但不会返回任何行。唯一返回的信息是受更新操作影响的行数。
代码
Connection connexion = null;
        PreparedStatement ps = null;
        try {
            // 建立连接
            connexion = DriverManager.getConnection(url, user, passwd);
            // 开始事务
            connexion.setAutoCommit(false);
            // 读写模式
            connexion.setReadOnly(false);
            // 更新表
            ps = connexion.prepareStatement("UPDATE PRODUITS SET PRIX=PRIX*1.1 WHERE CATEGORIE=?");
            // 类别 1
            ps.setInt(1, 10);
            // 执行
            int nbLignes=ps.executeUpdate();
            // 提交事务
            connexion.commit();
        } catch (SQLException e1) {
            // 处理异常
            doCatchException(connexion, e1);
        } finally {
            // 处理 finally 语句
            doFinally(null, ps, connexion);
        }
    }
- 第 9 行:连接用于读写;
- 第 11 行:一个 [PreparedStatement] 语句,带 1 个参数(用 ? 表示)。参数可以有多个,从 1 开始编号;
- 第13行:将值赋给该唯一参数。[setType]的第一个参数是该参数在[PreparedStatement]中的位置(1、2、...),第二个参数则是其被赋予的值。 可以使用方法 [setInt, setLong, setFloat, setDouble, setString, setDate, ...];
- 第 15 行:应使用方法 [executeUpdate],而非仅用于 SELECT 命令的 [executeQuery]。该方法返回受此操作影响的行数。可能为 0。
- 第17行:事务已提交;
3.2.5. 步骤 4 - 关闭连接
在多用户环境中,应尽快关闭连接,因为 SGBD 仅支持有限数量的打开连接。 在之前的示例中,连接是在 SQL 操作的 [finally] 子句中关闭的,以确保无论是否发生异常,连接都会被关闭。
3.3. SGBD 的 JDBC 层配置 MySQL5
我们将研究项目 [mysql-config-jdbc],该项目配置了下方的 JDBC 层:
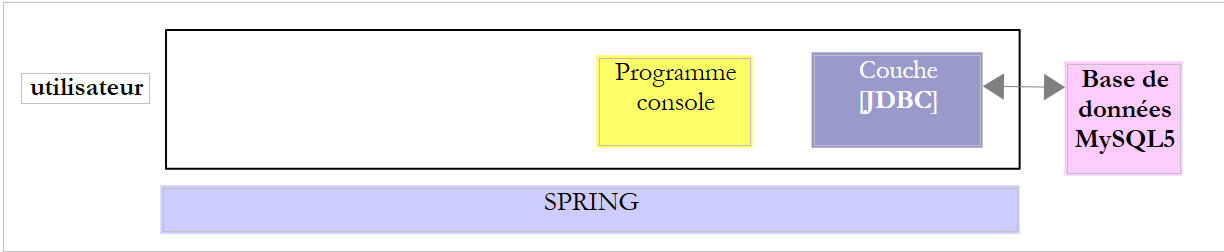 |
3.3.1. Eclipse 项目
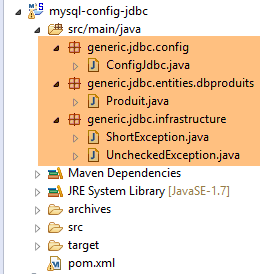 |
3.3.2. Maven配置
该项目的 [pom.xml] 文件如下:
<project xmlns="http://maven.apache.org/POM/4.0.0" xmlns:xsi="http://www.w3.org/2001/XMLSchema-instance"
    xsi:schemaLocation="http://maven.apache.org/POM/4.0.0 http://maven.apache.org/xsd/maven-4.0.0.xsd">
    <modelVersion>4.0.0</modelVersion>
    <groupId>dvp.spring.database</groupId>
    <artifactId>generic-config-jdbc</artifactId>
    <version>0.0.1-SNAPSHOT</version>
    <name>configuration generic jdbc</name>

    <parent>
        <groupId>org.springframework.boot</groupId>
        <artifactId>spring-boot-starter-parent</artifactId>
        <version>1.2.3.RELEASE</version>
    </parent>

    <dependencies>
        <!-- 变量依赖 ********************************************** -->
        <!-- SGBD 的驱动程序 JDBC -->
        <dependency>
            <groupId>mysql</groupId>
            <artifactId>mysql-connector-java</artifactId>
        </dependency>
        <!-- 常量依赖项 ********************************************** -->
        <!-- Tomcat JDBC -->
        <dependency>
            <groupId>org.apache.tomcat</groupId>
            <artifactId>tomcat-jdbc</artifactId>
        </dependency>
        <!-- 库 jSON -->
        <dependency>
            <groupId>com.fasterxml.jackson.core</groupId>
            <artifactId>jackson-core</artifactId>
        </dependency>
        <dependency>
            <groupId>com.fasterxml.jackson.core</groupId>
            <artifactId>jackson-databind</artifactId>
        </dependency>
        <!-- Google Guava -->
        <dependency>
            <groupId>com.google.guava</groupId>
            <artifactId>guava</artifactId>
            <version>16.0.1</version>
        </dependency>
        <!-- Spring Boot -->
        <dependency>
            <groupId>org.springframework.boot</groupId>
            <artifactId>spring-boot</artifactId>
        </dependency>
        <!-- Spring Boot 测试 -->
        <dependency>
            <groupId>org.springframework.boot</groupId>
            <artifactId>spring-boot-starter-test</artifactId>
        </dependency>
        <!-- 日志 -->
        <dependency>
            <groupId>org.springframework.boot</groupId>
            <artifactId>spring-boot-starter-logging</artifactId>
        </dependency>
    </dependencies>

    <properties>
        <project.build.sourceEncoding>UTF-8</project.build.sourceEncoding>
        <java.version>1.7</java.version>
    </properties>

    <build>
        <plugins>
            <plugin>
                <groupId>org.apache.maven.plugins</groupId>
                <artifactId>maven-surefire-plugin</artifactId>
                <version>2.18.1</version>
            </plugin>
        </plugins>
    </build>

</project>
在此 Maven 配置中,我们整合了若干存档文件,这些文件对于 [mysql-config-jdbc] 项目或基于该项目的子项目而言均不可或缺:
- 第 4-6 行:该项目生成的 Maven 工件。如前所述,所有 [*-config-jdbc] 类型的项目都会生成相同的工件。因此,不应同时加载两个 [*-config-jdbc] 类型的项目;
- 第 9-13 行:该项目的父级 Maven 项目。它定义了 Spring 生态系统中大量所用归档文件的版本。这避免了在衍生项目中重复指定这些版本;
- 第 18-21 行:SGBD 和 MySQL5 的驱动程序 JDBC 包。这是 [spring-jdbc-01] 项目所需的唯一包;
- 第24-27行:[tomcat-jdbc]构建产物为JDBC和[spring-jdbc-02 à 04]项目引入了必要的归档文件;
- 第29-36行:引入了管理jSON所需的库。这些库在文档中的几乎所有项目中都有使用;
- 第38-42行:Google Guava是一个集合管理库。几乎用于文档中的所有项目;
- 第 43-52 行:用于编写集成 Spring 和 JUnit 的测试的库。几乎在本文档中的所有项目中都使用;
- 第 54-57 行:日志库。几乎用于本文档中的所有项目;
- 第 67-71 行:用于将 [mysql-config-jdbc] 项目的构建产物安装到本地 Maven 仓库的插件;
3.3.3. 配置类 [ConfigJdbc]
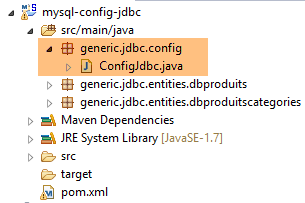 |
[ConfigJdbc] 类如下:
package generic.jdbc.config;

import org.springframework.beans.factory.config.ConfigurableBeanFactory;
import org.springframework.context.annotation.Bean;
import org.springframework.context.annotation.Scope;

import com.fasterxml.jackson.databind.ObjectMapper;
import com.fasterxml.jackson.databind.ser.impl.SimpleBeanPropertyFilter;
import com.fasterxml.jackson.databind.ser.impl.SimpleFilterProvider;

public class ConfigJdbc {

    // 连接参数
    public final static String DRIVER_CLASSNAME = "com.mysql.jdbc.Driver";
    public final static String URL_DBPRODUITS = "jdbc:mysql://localhost:3306/dbproduits";
    public final static String USER_DBPRODUITS = "root";
    public final static String PASSWD_DBPRODUITS = "root";
...
    // 命令SQL [jdbc-01, jdbc-02]
    public final static String V1_INSERT_PRODUITS_WITH_ID = "INSERT INTO PRODUITS(ID, NOM, CATEGORIE, PRIX, DESCRIPTION) VALUES (?, ?, ?, ?, ?)";
    public final static String V1_DELETE_PRODUITS = "DELETE FROM PRODUITS";
    //public final static String V1_DELETE_PRODUITS = String.format("DELETE FROM %s", TAB_PRODUITS);
    public final static String V1_SELECT_PRODUITS = "SELECT ID, NOM, CATEGORIE, PRIX, DESCRIPTION FROM PRODUITS";
    public final static String V1_UPDATE_PRODUITS = "UPDATE PRODUITS SET PRIX=PRIX*1.1 WHERE CATEGORIE=?";
    public final static String V1_INSERT_PRODUITS_2 = "INSERT INTO PRODUITS(ID, NOM, CATEGORIE, PRIX, DESCRIPTION) VALUES (100,'X',1,1,'x')";

    // 订单 SQL [jdbc-03]
    public final static String V2_INSERT_PRODUITS = "INSERT INTO PRODUITS(NOM, CATEGORIE, PRIX, DESCRIPTION) VALUES (?, ?, ?, ?)";
    public final static String V2_DELETE_ALLPRODUITS = "DELETE FROM PRODUITS";
    public final static String V2_DELETE_PRODUITS = "DELETE FROM PRODUITS WHERE ID=?";
    public final static String V2_SELECT_ALLPRODUITS = "SELECT ID, NOM, CATEGORIE, PRIX, DESCRIPTION FROM PRODUITS";
    public final static String V2_SELECT_PRODUIT_BYID = "SELECT NOM, CATEGORIE, PRIX, DESCRIPTION FROM PRODUITS WHERE ID=?";
    public final static String V2_SELECT_PRODUIT_BYNAME = "SELECT ID, CATEGORIE, PRIX, DESCRIPTION FROM PRODUITS WHERE NOM=?";
    public final static String V2_UPDATE_PRODUITS = "UPDATE PRODUITS SET NOM=?, PRIX=?, CATEGORIE=?, DESCRIPTION=? WHERE ID=?";

...

}
类 [ConfigJdbc] 用于配置四个项目 [spring-jdbc-01 à 04] 的 JDBC 层。配置的大部分内容涉及项目 [spring-jdbc-04]。我们将在研究该项目时介绍这一部分。 上文仅保留了 [spring-jdbc-01 à 03] 项目的配置。
- 第14-17行:连接数据库的参数 MySQL5 [dbproduits];
- 第20-25行:项目[spring-jdbc-01 et 02]中使用的SQL命令;
- 第28-34行:在项目[spring-jdbc-03]中使用的命令SQL;
这些 SQL 命令利用了数据库 MySQL5 [dbproduits] 中的表 [PRODUITS],其结构如下:
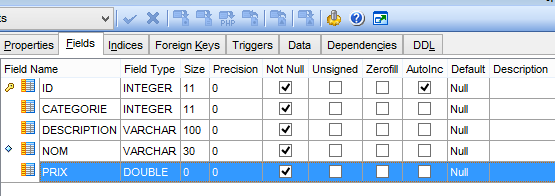 |
- [ID]:AUTO_INCREMENT模式下的主键(若未指定主键,则由SGBD生成);
- [NOM]:产品名称——唯一标识;
- [CATEGORIE]:其类别编号;
- [PRIX]:其价格;
- [DESCRIPTION]:产品描述;
3.3.4. 类 [Produit]
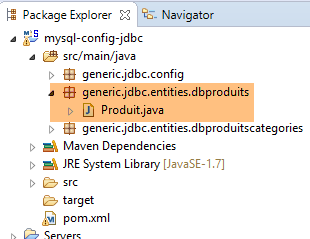 |
类 [Produit] 是表 [PRODUITS] 中某行数据的映射:
package generic.jdbc.entities.dbproduits;

public class Produit {

    // 字段
    private int id;
    private String nom;
    private int categorie;
    private double prix;
    private String description;

    // 构造函数
    public Produit() {

    }

    public Produit(int id, String nom, int categorie, double prix, String description) {
        this.id = id;
        this.nom = nom;
        this.categorie = categorie;
        this.prix = prix;
        this.description = description;
    }

    // 获取器和设置器
...
}
后续我们需要比较两个产品,以确定它们是否相等。 如果两个产品的所有字段都相等,我们就认为它们是相等的。为此,我们将重写类 [Object] 中的方法 [equals],类 [Produit] 继承自该类:
    // 相等性方法
    @Override
    public boolean equals(Object o) {
        // 简单情况
        if (o == null || o.getClass() != this.getClass()) {
            return false;
        }
        Produit p = (Produit) o;
        return this == o
                || (this.id == p.id && this.nom.equals(p.getNom()) && this.categorie == p.categorie
                        && Math.abs(this.prix - p.prix) < 1e-6 && this.description.equals(p.description));
}
- 第 3 行:方法 [equals] 接收一个对象 o,并将其与对象 this 进行比较;
- 第 5-7 行:简单情况,可立即判断两个对象不相等。[Object].getClass() 返回一个 [Class] 类型的实例,该类型表示对象的实际类;
- 第 8 行:对象 o 被转换为产品 p;
- 第 9 行:如果指向同一产品的两个引用 o 和 p 相等,则它们在物理上代表同一产品;
- 第9行:如果 o 和 p 是指向两个具有相同字段的产品的不同引用,则认为它们相等。由于价格的类型为 [double],且计算机中无法精确表示实数,因此我们将误差在 10⁻⁶ 范围内的两个价格视为相同;
此外,我们将重新定义类 [Object] 中的方法 [hasCode]:
    // 哈希码
    @Override
    public int hashCode() {
        return id + 2 * nom.hashCode() + 3 * categorie + 4 * description.hashCode();
}
如果方法 [equals] 已声明两个产品相等,则这两个产品的 hashCode 值必须相同。hashCode 的该值用于将对象分配到字典等集合中。 如上所述,如果两个产品是相同的,它们的 hashCode 值将相同。
3.3.5. [UncheckedException] 异常
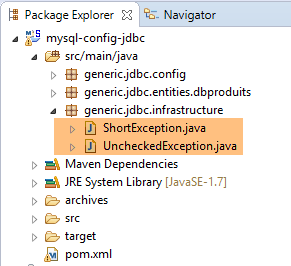 |
考虑以下架构:
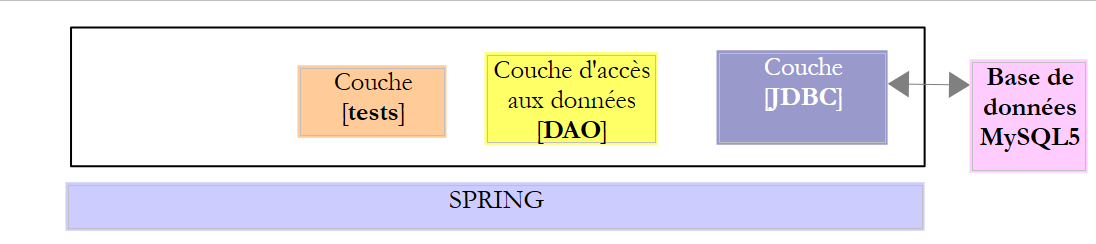 |
- [JDBC]层抛出[SQLException]类型的异常。该异常必须向上传递至最高层,即此处的测试层;
[DAO]层本可以仅让[SQLException]异常向上传播至测试层。 但由于该异常为未受控异常(直接源自 [Exception]),这意味着 [DAO] 层的 [IDao] 接口应如下所示:
public interface IDao {

    // 添加产品
    public List<Produit> addProduits(List<Produit> produits) throws SQLException;

    // 所有产品的列表
    public List<Produit> getAllProduits() throws SQLException;

    // 特定商品
    public Produit getProduitById(int id) throws SQLException;

    public Produit getProduitByName(String name) throws SQLException;

    // 更新多个产品
    public int updateProduits(List<Produit> produits) throws SQLException;

    // 删除所有产品
    public int deleteAllProduits() throws SQLException;

    // 删除多个产品
    public int deleteProduits(int[] ids) throws SQLException;
}
这非常令人困扰,因为它阻碍了我们通过抛出不同异常的类来实现 [IDao] 接口。 为解决这一难题,[DAO] 层将抛出一个未受控的 [DaoException] 异常(继承自 [RuntimeException]), 从而避免在接口方法签名中使用 [throws] 子句。这样一来,该接口便可由任何同样抛出未受控异常的类来实现,且该异常可以不同于 [DaoException] 异常。我们的架构现在变为如下:
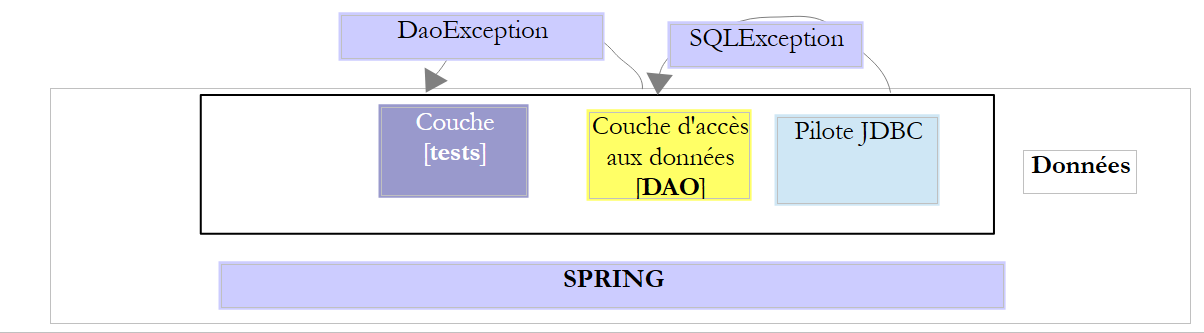 |
为了便于为应用程序的不同层创建不受控异常,我们为它们创建了一个父类 [UncheckedException]:
|
package generic.jdbc.infrastructure;

import java.util.ArrayList;
import java.util.List;

import com.fasterxml.jackson.core.JsonProcessingException;
import com.fasterxml.jackson.databind.ObjectMapper;

// 通用异常类
// 异常为非受控异常

public class UncheckedException extends RuntimeException {

    // 生成的序列号 ID
    private static final long serialVersionUID = -2924871763340170310L;

    // 属性
    private int code;
    private String trace;
    private List<ShortException> exceptions;

    // 构造函数
    public UncheckedException() {
        super();
    }

    public UncheckedException(int code, Throwable e, String simpleClassName) {
        super(e);
        // 局部
        this.code = code;
        this.exceptions = getErreursForException(e);
        // 跟踪
        String fileName = String.format("%s.java", simpleClassName);
        StackTraceElement[] traces = e.getStackTrace();
        boolean trouve = false;
        for (int i = 0; !trouve && i < traces.length; i++) {
            StackTraceElement trace = traces[i];
            if (fileName.equals(trace.getFileName())) {
                this.trace = String.format("[%s,%s,%s]", simpleClassName, trace.getMethodName(), trace.getLineNumber());
                trouve = true;
            }
        }
    }

    @Override
    public String getMessage() {
        return this.toString();
    }

    @Override
    public void printStackTrace() {
        System.out.println(this);
    }

    // 异常的错误消息列表
    private List<ShortException> getErreursForException(Throwable th) {
        // 获取异常堆栈中的元素
        Throwable cause = th;
        List<ShortException> exceptions = new ArrayList<ShortException>();
        while (cause != null) {
            // 获取当前异常
            exceptions.add(new ShortException(cause.getClass().getName(), cause.getMessage()));
            // 下一个异常
            cause = cause.getCause();
        }
        return exceptions;
    }

    @Override
    public String toString() {
        ObjectMapper jsonMapper = new ObjectMapper();
        try {
            return String.format("[code=%s, trace=%s, exceptions=%s", code, trace, jsonMapper.writeValueAsString(exceptions));
        } catch (JsonProcessingException e) {
            e.printStackTrace();
            return null;
        }
    }

    // 获取器和设置器
...
}
- 第 12 行:该类继承自 [RuntimeException],因此属于未受控异常类型。它将用于将受控异常(SQLException)封装在未受控异常类型(UncheckedException)中;
- 为了区分不同类型的 [UncheckedException] 异常,可以为其分配一个代码,该代码将由第 18 行的私有字段存储。 拦截 [UncheckedException] 类型异常的 Java 代码可通过 [getCode] 方法(第 80 行及之后)访问该错误代码;
- 第20行:存储封装异常堆栈中的错误消息;
- 第 23-43 行:构建 [UncheckedException] 类型对象的各种方法;
- 第 56-67 行:一个私有方法,用于根据 [Throwable] 对象或其派生对象(特别是 [Exception] 类型)构建第 20 行中的错误列表;
- 第 69-78 行:方法 [toString] 返回一个表示异常的字符串。为了显示第 20 行的错误列表,它使用了库 jSON。该库包含在项目的 Maven 依赖中:
        <!-- jSON 库 -->
        <dependency>
            <groupId>com.fasterxml.jackson.core</groupId>
            <artifactId>jackson-core</artifactId>
        </dependency>
        <dependency>
            <groupId>com.fasterxml.jackson.core</groupId>
            <artifactId>jackson-databind</artifactId>
</dependency>
- 第 45-48 行:重定义了父类 [RuntimeException] 的方法 [getMessage]。此处,该方法返回了该类的 [toString] 签名;
- 第 50-53 行:重定义父类 [RuntimeException] 的方法 [printStackTrace]。此时将显示该类的 [toString] 签名;
类 [UncheckedException] 在第 20 行的字段中记录了一组由以下类型 [ShortException] 描述的异常:
package pam.dao.exceptions;

public class ShortException {

    // 属性
    private String className;
    private String errorMessage;

    // 构造函数
    public ShortException() {

    }

    public ShortException(String className, String errorMessage) {
        this.className = className;
        this.errorMessage = errorMessage;
    }

    // 获取器和设置器
...
}
- 第 6 行:已发生异常的类名称;
- 第 7 行:相关的错误消息;
让我们查看 [UncheckedException] 类的以下构造函数:
    public UncheckedException(int code, Throwable e, String simpleClassName) {
        super(e);
        // 局部
        this.code = code;
        this.exceptions = getErreursForException(e);
        // 跟踪
        String fileName = String.format("%s.java", simpleClassName);
        StackTraceElement[] traces = e.getStackTrace();
        boolean trouve = false;
        for (int i = 0; !trouve && i < traces.length; i++) {
            StackTraceElement trace = traces[i];
            if (fileName.equals(trace.getFileName())) {
                this.trace = String.format("[%s,%s,%s]", simpleClassName, trace.getMethodName(), trace.getLineNumber());
                trouve = true;
            }
        }
}
- 第 1 行,参数如下:
- [code]:一个错误代码;
- [e]:被封装的异常。[Throwable]是类[Exception]的父类,并直接继承自类[Object]。 它是所有 C 类的父类,其中 [throw c;] 表示 c 是 C 类的实例;
- [simpleClassName]:检测到异常 e 的用户代码类的简短名称;
- 第 4 行:记录错误代码;
- 第 5 行:根据作为参数传递的 [Throwable e] 构建 [ShortException] 列表;
- 第7-16行:我们正在分析所谓的异常跟踪信息。初始异常发生在代码的某个特定位置,随后向上追溯至调用该方法的父方法,依此类推,直到被try/catch语句捕获为止。 在此回溯过程中,初始异常会在异常 e 的 [e.stackTrace] 数组中留下记录。此处的记录是在第 8 行通过作为参数传递的 [Throwable e] 获取的。 每个类型为 [StackTraceElement] 的元素都是一个对象,其字段包括以下内容:
- [fileName]:发生异常的 Java 文件名称;
- [lineNumber]:该文件中发生异常的行号;
- [methodName]:该文件中发生异常的方法名称;
- 第 10-16 行在作为参数传递的异常跟踪数组中,查找条件 [trace.fileName==simpleClassName.java] 的首次出现,其中 [simpleClassName] 是构造函数的第 3 个参数。 其目的是记录异常在用户代码中的发生位置。用户代码将按以下方式封装异常:
- 第 13 行:创建一个类型为 [fileName, methodName, lineNumber] 的字符串,用于标识用户代码中异常被捕获的位置;
现在,让我们查看记录由前一个构造函数封装的 [Throwable th] 异常的异常堆栈列表的代码:
    // 异常的错误消息列表
    private List<ShortException> getErreursForException(Throwable th) {
        // 获取异常堆栈中的元素
        Throwable cause = th;
        List<ShortException> exceptions = new ArrayList<ShortException>();
        while (cause != null) {
            // 获取当前异常
            exceptions.add(new ShortException(cause.getClass().getName(), cause.getMessage()));
            // 下一个异常
            cause = cause.getCause();
        }
        return exceptions;
}
在通过 try/catch 结构回溯至捕获它的方法的过程中,初始异常 e 可能已被封装到另一个异常中。随后,正是这个被封装的异常继续回溯至最终捕获它的方法。因此,它本身也可能被进一步封装。 最终,当某个方法决定捕获异常 th 并进行处理时,它会发现最初的异常 e 深埋在异常堆栈的底层。因此,在上文中,参数 [Throwable th] 仅仅是异常冰山的一角。 其属性 [th.cause] 用于识别其自身封装的异常。以此类推。当异常 e 的属性为 [e.getCause()==null] 时,即表明 e 是初始异常。
- 第 8 行:对于 [Throwable th] 异常堆栈中的每个异常,需记录两项信息:
- [getClass().getName()]:异常的完整名称;
- [getMessage()]:相关的错误消息;
3.4. 示例-01
3.4.1. 项目架构
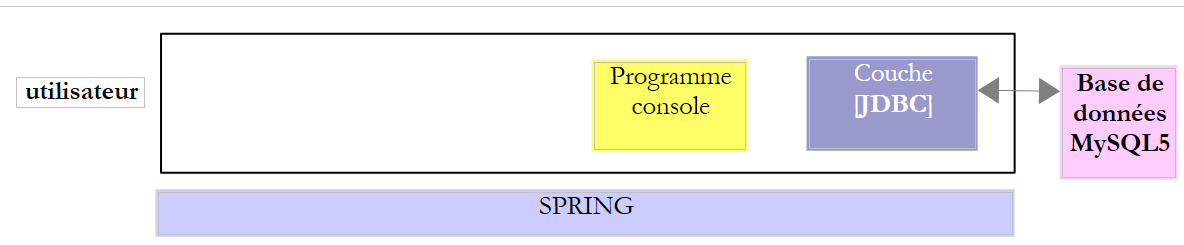 |
在此示例中,一个控制台程序使用了 [JDBC] 层的接口。
3.4.2. Eclipse 项目
我们按照第 2.5.2.1 节中的步骤创建一个 Spring / Maven 项目 [spring-jdbc-01]。
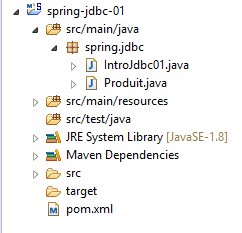 |
该项目是一个由以下 [pom.xml] 文件定义的 Maven 项目:
<?xml version="1.0" encoding="UTF-8"?>
<project xmlns="http://maven.apache.org/POM/4.0.0" xmlns:xsi="http://www.w3.org/2001/XMLSchema-instance"
    xsi:schemaLocation="http://maven.apache.org/POM/4.0.0 http://maven.apache.org/xsd/maven-4.0.0.xsd">
    <modelVersion>4.0.0</modelVersion>

    <groupId>dvp.spring.database</groupId>
    <artifactId>spring-jdbc-generic-01</artifactId>
    <version>0.0.1-SNAPSHOT</version>
    <packaging>jar</packaging>

    <name>spring-jdbc-generic-01</name>
    <description>Demo project for API JDBC</description>

    <parent>
        <groupId>org.springframework.boot</groupId>
        <artifactId>spring-boot-starter-parent</artifactId>
        <version>1.2.3.RELEASE</version>
        <relativePath /> <!-- 从存储库中查找父级 -->
    </parent>

    <properties>
        <project.build.sourceEncoding>UTF-8</project.build.sourceEncoding>
        <java.version>1.8</java.version>
    </properties>

    <dependencies>
        <!-- SGBD 的配置 -->
        <dependency>
            <groupId>dvp.spring.database</groupId>
            <artifactId>generic-config-jdbc</artifactId>
            <version>0.0.1-SNAPSHOT</version>
        </dependency>
    </dependencies>

    <build>
        <plugins>
            <plugin>
                <groupId>org.apache.maven.plugins</groupId>
                <artifactId>maven-surefire-plugin</artifactId>
                <version>2.18.1</version>
            </plugin>
        </plugins>
    </build>

</project>
- 第 28-32 行:该项目使用了我们刚刚研究过的 [mysql-config-jdbc] 项目中的 [generic-config-jdbc] 构建产物。 因此,项目 [spring-jdbc-01] 可以访问项目 [mysql-config-jdbc] 中的所有元素;
通过检查项目的 Maven 依赖关系,可以从两个方面看到这一点:
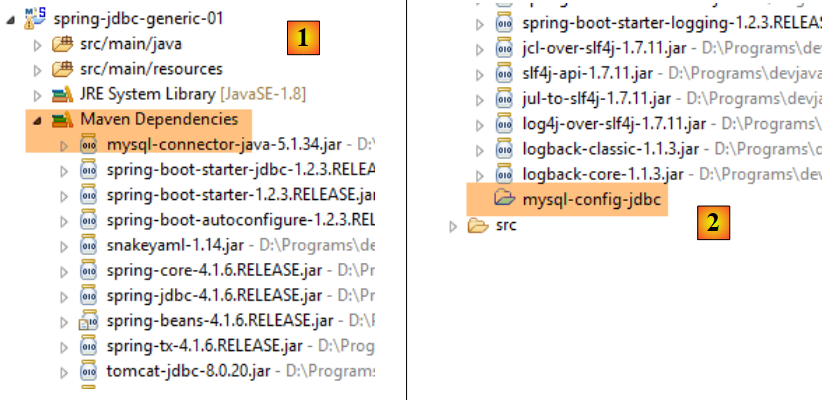 |
- 在 [2] 中,可以看到项目 [mysql-config-jdbc] 位于该项目的 Maven 依赖中。 由于这些依赖位于项目的类路径中,这意味着项目 [mysql-config-jdbc] 也位于该类路径中,因此其类和接口在项目 [spring-jdbc-01] 中是可见的;
Maven 项目 [mysql-config-jdbc] 无需出现在 [Package Explorer] 标签页中,即可被其他 Maven 项目使用。只需将其放置在本地 Maven 仓库中即可。 与 NetBeans 中的 IDE 不同,在 Eclipse 中该依赖不会自动存在。必须手动强制添加:
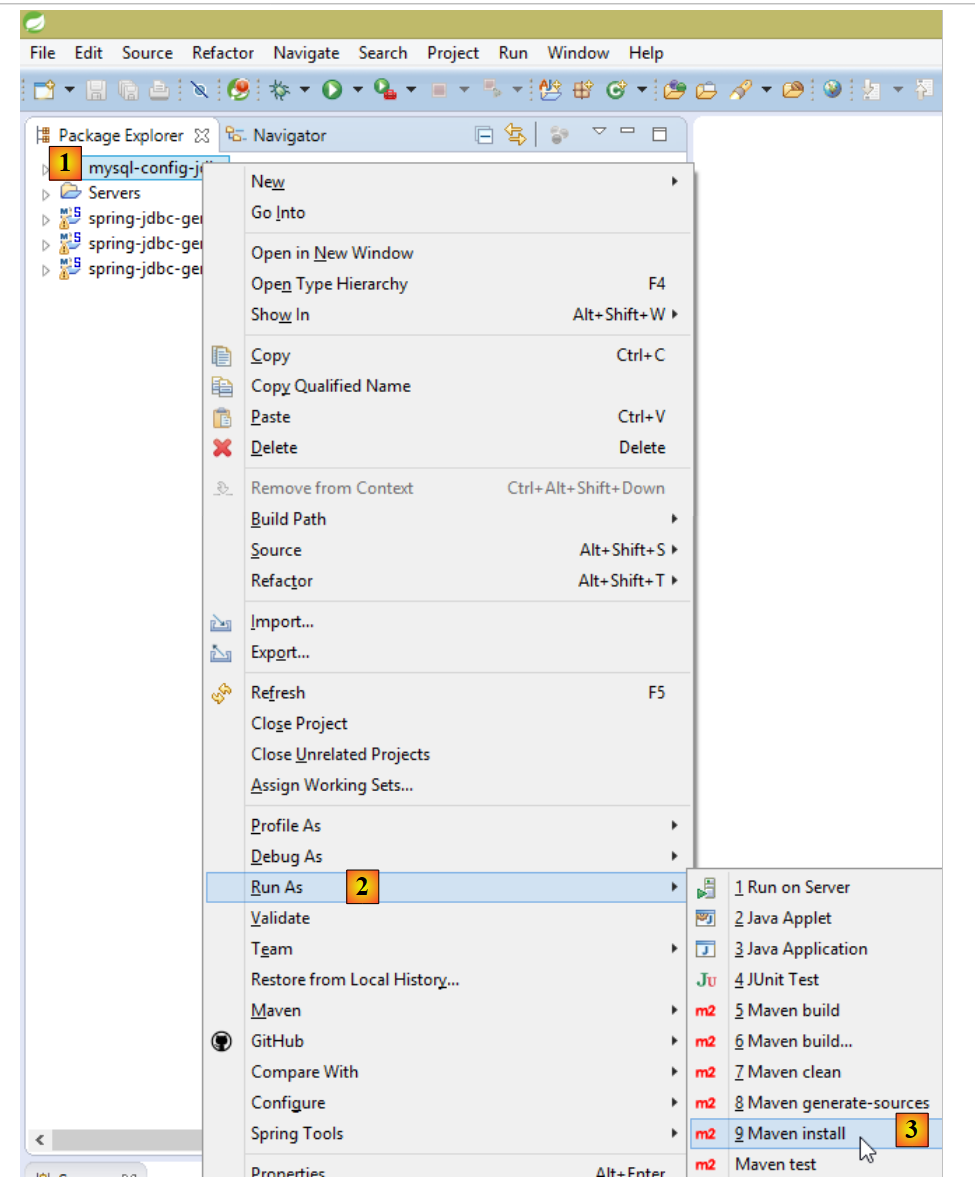 |
我们在第 2.3.5 节中已探讨了实现此生成所需的条件。生成完成后,即可从 [Package Explorer] 选项卡中移除 [mysql-config-jdbc] 项目:
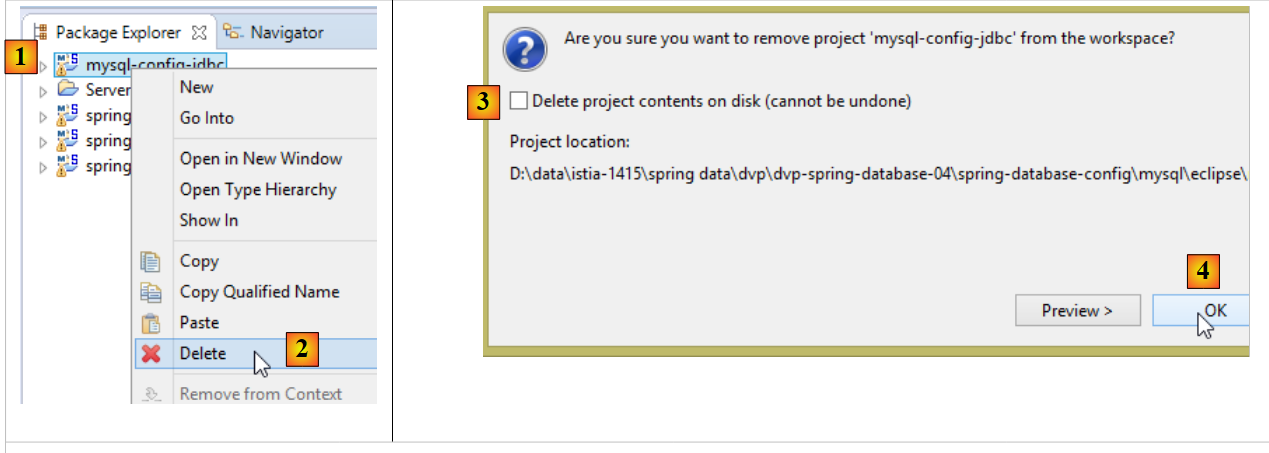 |
- 请勿勾选 [3],该选项会物理删除项目,使其无法恢复;
此操作将重新计算依赖于从 [Package Explorer] 导出的项目的 Maven 依赖关系。这会更改这些项目的 [Maven Dependencies] 分支。 例如,对于项目 [spring-jdbc-01],分支 [Maven Dependencies] 将变为:
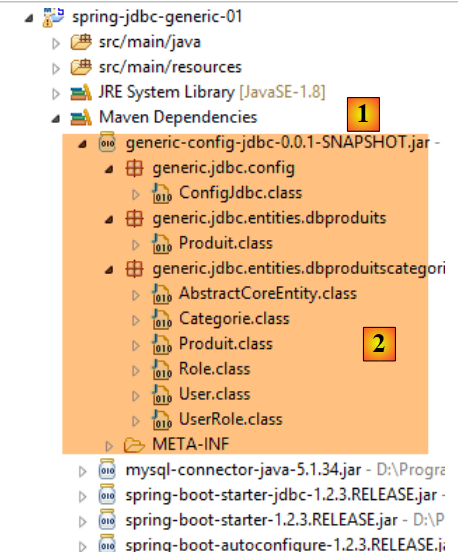 |
这次,依赖关系不再指向某个项目,而是指向该项目的 Maven 工件,即此处的 [generic-config-jdbc] [1] 工件。 我们可以看到,确实可以访问该工件中的所有类和接口。如前所述,该工件将由所有 [*-config-jdbc] 项目生成。为避免错误,我们将:
- 始终在 [Package Explorer] 选项卡中保留唯一一个 [*-config-jdbc] 项目;
- 更新“[Package Explorer]”选项卡中所有项目的 Maven 配置(Alt-F5),使其在 Maven 依赖项中包含所使用的 [*-config-jdbc] 项目;
3.4.3. 主类的骨架
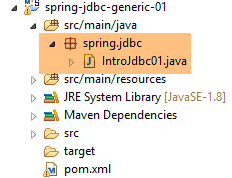 |
主类 [IntroJdbc01] 的骨架如下:
package spring.jdbc;

import generic.jdbc.config.ConfigJdbc;
import generic.jdbc.entities.dbproduits.Produit;

import java.sql.Connection;
import java.sql.DriverManager;
import java.sql.PreparedStatement;
import java.sql.ResultSet;
import java.sql.SQLException;
import java.util.ArrayList;
import java.util.List;

import com.fasterxml.jackson.core.JsonProcessingException;
import com.fasterxml.jackson.databind.ObjectMapper;

public class IntroJdbc01 {

    // 常量
    final static ObjectMapper jsonMapper = new ObjectMapper();

    public static void main(String[] args) {
        // 加载 SGBD 的驱动程序 JDBC
        try {
            Class.forName(ConfigJdbc.DRIVER_CLASSNAME);
        } catch (ClassNotFoundException e1) {
            doCatchException("Pilote JDBC introuvable", null, e1);
            return;
        }
        // 清空表 [PRODUITS]
        System.out.println(String.format("------------------------------ %s", "Vidage de la table [PRODUITS]"));
        delete();
        // 填充该表
        System.out.println(String.format("------------------------------ %s", "Remplissage de la table [PRODUITS]"));
        insert();
        // 读取该表
        System.out.println(String.format("------------------------------ %s", "Affichage de la table [PRODUITS]"));
        select();
        // 更新
        System.out.println(String.format("------------------------------ %s", "Mise à jour de la table [PRODUITS]"));
        update();
        // 显示
        System.out.println(String.format("------------------------------ %s", "Affichage de la table [PRODUITS]"));
        select();
        // 清空表 [PRODUITS]
        System.out.println(String.format("------------------------------ %s", "Vidage de la table [PRODUITS]"));
        delete();
        // 显示
        System.out.println(String.format("------------------------------ %s", "Affichage de la table [PRODUITS]"));
        select();
        // INSERTion 包含两个相同的元素
        // INSERTion 操作将失败,且由于事务原因,两个元素均未被插入
        System.out.println(String.format("------------------------------ %s",
                "Insertion de deux produits de même clé primaire dans la table [PRODUITS]"));
        insert2();
        // 验证
        System.out.println(String.format("------------------------------ %s", "Affichage de la table [PRODUITS]"));
        select();
        // 完成
        System.out.println(String.format("------------------------------ %s", "Travail terminé"));
    }

    // 产品列表
    private static void select() {
    ...
    }

    // 显示对象 jSON
    private static void affiche(Object object) {
...
    }

    // 删除产品
    public static void delete() {
...
    }

    // 添加产品
    public static void insert() {
...
    }

    // 添加两个主键相同的产品
    public static void insert2() {
...
    }

    // 更新部分产品
    public static void update() {
...
    }

    private static void doFinally(ResultSet rs, PreparedStatement ps, Connection connexion) {
        // 关闭ResultSet
        if (rs != null) {
            try {
                rs.close();
            } catch (SQLException e1) {

            }
        }
        // 关闭 [PreparedStatement]
        if (ps != null) {
            try {
                ps.close();
            } catch (SQLException e2) {

            }
        }
        if (connexion != null) {
            try {
                // 关闭连接
                connexion.close();
            } catch (SQLException e3) {
                // 显示错误信息
                show("Les erreurs suivantes se sont produites lors de la fermeture de la connexion",
                        getErreursFromThrowable(e3));
            }
        }
    }

    private static void doCatchException(String title, Connection connexion, Throwable th) {
        // 显示错误信息
        show(title, getErreursFromThrowable(th));
        // 取消交易
        try {
            if (connexion != null) {
                connexion.rollback();
            }
        } catch (SQLException e2) {
            // 显示错误消息
            show("Erreur lors de l'annulation de la transaction", getErreursFromThrowable(e2));
        }
    }

    private static List<String> getErreursFromThrowable(Throwable th) {
        // 获取异常的错误消息列表
        List<String> erreurs = new ArrayList<String>();
        while (th != null) {
            // 抛出对象的错误消息
            erreurs.add(th.getMessage());
            // 跳转至可抛异常的起因
            th = th.getCause();
        }
        // 结果
        return erreurs;
    }

    private static void show(String title, List<String> messages) {
        // 标题
        System.out.println(String.format("%s : ", title));
        // 消息
        for (String message : messages) {
            System.out.println(String.format("- %s", message));
        }
    }
}
- 第 23-29 行:加载 SGBD 中的 JDBC 驱动程序。第 25 行,使用了在 [mysql-config-jdbc] 项目中定义的常量 [ConfigJdbc.DRIVER_CLASSNAME];
- 第136-147行:方法[getErreursFromThrowable]返回错误消息列表,这些消息封装在一个类型为[Throwable]的对象中,该对象是类[Exception]的父类。 一个异常可能包含另一个异常,可通过调用方法 [Throwable].getCause() 获取。这样便可以遍历封装在 [Throwable] 对象中的所有异常;
- 第 149-156 行:方法 [show(String title, List<String> messages)] 显示以文本 [title] 开头的消息;
- 第 122-134 行:方法 [doCatchException(String title, Connection connexion, Throwable th))] 处理该类方法遇到的异常。被处理的异常由参数 [Throwable th] 表示。该方法的目标是:
- 取消对象 [Connection connexion] 的当前事务(第 127-129 行);
- 输出封装在异常 [Throwable th] 中的错误消息(第 124、132 行);
- 第 93-120 行:方法 [doFinally(ResultSet rs, PreparedStatement ps, Connection connexion)] 负责处理 [finally] 分支,该分支属于 SGBD 的访问方法。其目的是释放连接所占用的资源;
3.4.4. 删除产品表中的内容
方法 [delete] 清空表中的内容:
    // 删除产品
    public static void delete() {
        Connection connexion = null;
        PreparedStatement ps = null;
        try {
            // 建立连接
            connexion = DriverManager.getConnection(ConfigJdbc.URL_DBPRODUITS , ConfigJdbc.USER_DBPRODUITS, ConfigJdbc.PASSWD_DBPRODUITS);
            // 开始交易
            connexion.setAutoCommit(false);
            // 读写模式
            connexion.setReadOnly(false);
            // 清空表 [PRODUITS]
            ps = connexion.prepareStatement(ConfigJdbc.V1_DELETE_PRODUITS);
            ps.executeUpdate();
            // 提交事务
            connexion.commit();
        } catch (SQLException e1) {
            // 处理异常
            doCatchException("Les erreurs suivantes se sont produites à la suppression du contenu de la table", connexion, e1);
        } finally {
            // 处理 finally 块
            doFinally(null, ps, connexion);
        }
}
第 7 行使用了 [ConfigJdbc] 类的以下常量:
public final static String URL_DBPRODUITS = "jdbc:mysql://localhost:3306/dbproduits";
public final static String USER_DBPRODUITS = "root";
public final static String PASSWD_DBPRODUITS = "";
第 13 行,生成的 SQL 命令如下:
public final static String V1_DELETE_PRODUITS = "DELETE FROM PRODUITS";
方法 [delete] 使用事务。事务可将 SQL 订单进行分组,这些订单必须全部成功或全部取消。需要了解以下四项操作:
- 开始事务:[connexion.setAutoCommit(false)];
- 成功结束事务:[connexion.commit()]。此时,事务期间在BD上执行的所有操作均被确认;
- 事务失败结束:[connexion.rollback()]。在此情况下,该事务中在 BD 上执行的所有操作均被回滚;
在我们的示例中,每当发生异常时,我们都会在方法 [doCatchException] 中回滚事务:
    private static void doCatchException(String title, Connection connexion, Throwable th) {
        // 显示错误消息
        Static.show(title, Static.getErreursFromThrowable(th));
        // 回滚事务
        try {
            if (connexion != null) {
                connexion.rollback();
            }
        } catch (SQLException e2) {
            // 显示错误消息
            Static.show("Erreur lors de l'annulation de la transaction", Static.getErreursFromThrowable(e2));
        }
}
3.4.5. 创建产品表的内容
方法 [insert] 创建表的内容:
public static void insert() {
        Connection connexion = null;
        PreparedStatement ps = null;
        try {
            // 建立连接
            connexion = DriverManager.getConnection(ConfigJdbc.URL_DBPRODUITS , ConfigJdbc.USER_DBPRODUITS, ConfigJdbc.PASSWD_DBPRODUITS);
            // 开始事务
            connexion.setAutoCommit(false);
            // 读写模式
            connexion.setReadOnly(false);
            // 填充表
            ps = connexion.prepareStatement(ConfigJdbc.V1_INSERT_PRODUITS_WITH_ID);
            for (int i = 0; i < 10; i++) {
                // 准备
                int n = i + 1;
                ps.setInt(1, n);
                ps.setString(2, String.format("NOM%s", n));
                ps.setInt(3, n / 5 + 1);
                ps.setDouble(4, 100 * (1 + (double) i / 100));
                ps.setString(5, String.format("DESC%s", n));
                // 执行
                ps.executeUpdate();
            }
            // 提交事务
            connexion.commit();
        } catch (SQLException e1) {
            // 处理异常
            doCatchException("Les erreurs suivantes se sont produites à la création du contenu de la table", connexion, e1);
        } finally {
            // 处理 finally 块
            doFinally(null, ps, connexion);
        }
    }
第 12 行,准备好的 SQL 命令如下:
public final static String V1_INSERT_PRODUITS_WITH_ID = "INSERT INTO PRODUITS(ID, NOM, CATEGORIE, PRIX, DESCRIPTION) VALUES (?, ?, ?, ?, ?)";
3.4.6. 显示产品表的内容
方法 [select] 显示表内容:
// 产品列表
    private static void select() {
        Connection connexion = null;
        PreparedStatement ps = null;
        ResultSet rs = null;
        try {
            // 建立连接
            connexion = DriverManager.getConnection(ConfigJdbc.URL_DBPRODUITS , ConfigJdbc.USER_DBPRODUITS, ConfigJdbc.PASSWD_DBPRODUITS);
            // 开始事务
            connexion.setAutoCommit(false);
            // 只读模式
            connexion.setReadOnly(true);
            // 读取表 [PRODUITS]
            ps = connexion.prepareStatement(ConfigJdbc.V1_SELECT_PRODUITS);
            rs = ps.executeQuery();
            System.out.println("Liste des produits : ");
            while (rs.next()) {
                affiche(new Produit(rs.getInt(1), rs.getString(2), rs.getInt(3), rs.getDouble(4), rs.getString(5)));
            }
            // 提交事务
            connexion.commit();
        } catch (SQLException e1) {
            // 处理异常
            doCatchException("Les erreurs suivantes se sont produites à la lecture de la table", connexion, e1);
        } finally {
            // 处理 finally 块
            doFinally(rs, ps, connexion);
        }
    }
第 14 行,生成的 SQL 命令如下:
public final static String V1_SELECT_PRODUITS = "SELECT ID, NOM, CATEGORIE, PRIX, DESCRIPTION FROM PRODUITS";
方法 [affiche](第 18 行)如下:
    // 显示对象 jSON
    private static void affiche(Object object) {
        try {
            System.out.println(jsonMapper.writeValueAsString(object));
        } catch (JsonProcessingException e) {
            e.printStackTrace();
        }
}
它显示作为参数传递的对象的 jSON 表示形式(参见 jSON 第 23.12 节)。
3.4.7. 更新表内容
方法 [update] 会更新某些产品:
    // 更新某些产品
    public static void update() {
        Connection connexion = null;
        PreparedStatement ps = null;
        try {
            // 建立连接
            connexion = DriverManager.getConnection(ConfigJdbc.URL_DBPRODUITS , ConfigJdbc.USER_DBPRODUITS, ConfigJdbc.PASSWD_DBPRODUITS);
            // 开始事务
            connexion.setAutoCommit(false);
            // 读写模式
            connexion.setReadOnly(false);
            // 更新表
            ps = connexion.prepareStatement(ConfigJdbc.V1_UPDATE_PRODUITS);
            // 类别 1
            ps.setInt(1, 1);
            // 执行
            ps.executeUpdate();
            // 提交事务
            connexion.commit();
        } catch (SQLException e1) {
            // 处理异常
            doCatchException("Les erreurs suivantes se sont produites à la mise à jour du contenu de la table", connexion, e1);
        } finally {
            // 处理 finally 块
            doFinally(null, ps, connexion);
        }
}
第 13 行,生成的 SQL 命令如下:
public final static String V1_UPDATE_PRODUITS = "UPDATE PRODUITS SET PRIX=PRIX*1.1 WHERE CATEGORIE=?";
3.4.8. 事务的作用
方法 [insert2] 试图将两个具有相同主键的产品插入表中,这是不可行的。由于处于事务中,第一次插入操作将被回滚。
    // 添加两个主键相同的产品
    public static void insert2() {
        Connection connexion = null;
        PreparedStatement ps = null;
        try {
            // 建立连接
            connexion = DriverManager.getConnection(ConfigJdbc.URL_DBPRODUITS , ConfigJdbc.USER_DBPRODUITS, ConfigJdbc.PASSWD_DBPRODUITS);
            // 开始事务
            connexion.setAutoCommit(false);
            // 处于读写模式
            connexion.setReadOnly(false);
            // 添加1行
            ps = connexion.prepareStatement(ConfigJdbc.V1_INSERT_PRODUITS_2);
            // 执行
            ps.executeUpdate();
            // 再次添加同一行,因此主键相同
            // 由于事务的原因,INSERTion 必须失败,且两个元素均不得插入
            ps.executeUpdate();
            // 提交事务
            connexion.commit();
        } catch (SQLException e1) {
            // 处理异常
            doCatchException("Les erreurs suivantes se sont produites lors de l'ajout de deux produits de même clé primaire",
                    connexion, e1);
        } finally {
            // 处理 finally 块
            doFinally(null, ps, connexion);
        }
}
第 13 行,已准备好的 SQL 命令如下:
public final static String V1_INSERT_PRODUITS_2 = "INSERT INTO PRODUITS(ID, NOM, CATEGORIE, PRIX, DESCRIPTION) VALUES (100,'X',1,1,'x')";
3.4.9. 结果
执行名为 [spring-jdbc-generic-01.IntroJdbc01] 的运行配置:
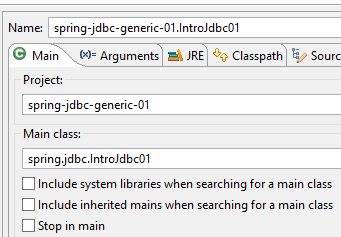 |
获得以下控制台结果:
------------------------------ Vidage de la table [PRODUITS]
------------------------------ Remplissage de la table [PRODUITS]
------------------------------ Affichage de la table [PRODUITS]
Liste des produits :
{"id":1,"nom":"NOM1","categorie":1,"prix":100.0,"description":"DESC1"}
{"id":2,"nom":"NOM2","categorie":1,"prix":101.0,"description":"DESC2"}
{"id":3,"nom":"NOM3","categorie":1,"prix":102.0,"description":"DESC3"}
{"id":4,"nom":"NOM4","categorie":1,"prix":103.0,"description":"DESC4"}
{"id":5,"nom":"NOM5","categorie":2,"prix":104.0,"description":"DESC5"}
{"id":6,"nom":"NOM6","categorie":2,"prix":105.0,"description":"DESC6"}
{"id":7,"nom":"NOM7","categorie":2,"prix":106.0,"description":"DESC7"}
{"id":8,"nom":"NOM8","categorie":2,"prix":107.0,"description":"DESC8"}
{"id":9,"nom":"NOM9","categorie":2,"prix":108.0,"description":"DESC9"}
{"id":10,"nom":"NOM10","categorie":3,"prix":109.0,"description":"DESC10"}
------------------------------ Mise à jour de la table [PRODUITS]
------------------------------ Affichage de la table [PRODUITS]
Liste des produits :
{"id":1,"nom":"NOM1","categorie":1,"prix":110.0,"description":"DESC1"}
{"id":2,"nom":"NOM2","categorie":1,"prix":111.0,"description":"DESC2"}
{"id":3,"nom":"NOM3","categorie":1,"prix":112.0,"description":"DESC3"}
{"id":4,"nom":"NOM4","categorie":1,"prix":113.0,"description":"DESC4"}
{"id":5,"nom":"NOM5","categorie":2,"prix":104.0,"description":"DESC5"}
{"id":6,"nom":"NOM6","categorie":2,"prix":105.0,"description":"DESC6"}
{"id":7,"nom":"NOM7","categorie":2,"prix":106.0,"description":"DESC7"}
{"id":8,"nom":"NOM8","categorie":2,"prix":107.0,"description":"DESC8"}
{"id":9,"nom":"NOM9","categorie":2,"prix":108.0,"description":"DESC9"}
{"id":10,"nom":"NOM10","categorie":3,"prix":109.0,"description":"DESC10"}
------------------------------ Vidage de la table [PRODUITS]
------------------------------ Affichage de la table [PRODUITS]
Liste des produits :
------------------------------ Insertion de deux produits de même clé primaire dans la table [PRODUITS]
Les erreurs suivantes se sont produites lors de l'ajout de deux produits de même clé primaire :
- Duplicate entry '100' for key 'PRIMARY'
------------------------------ Affichage de la table [PRODUITS]
Liste des produits :
------------------------------ Travail terminé
- 第 30 行:在插入两个主键相同的产品之前,表为空;
- 第 35 行:插入两个主键相同的产品后,表为空。这说明了事务的作用:
- 第一次插入成功。它没有任何理由失败;
- 第二次插入失败(第32行)。因此,由于这两次插入都在同一个事务中,该事务中的所有SQL命令都被撤销,包括第一次插入。
3.4.10. 结论
上述代码中值得注意的是,对异常 [SQLException] 的处理占据了很大篇幅。由于任何 JDBC 操作都可能触发该异常,因此代码中包含大量 try / catch 语句。
3.5. 示例-02
我们将基于前面的应用程序,使用 [javax.sql.DataSource] 类型的数据源:
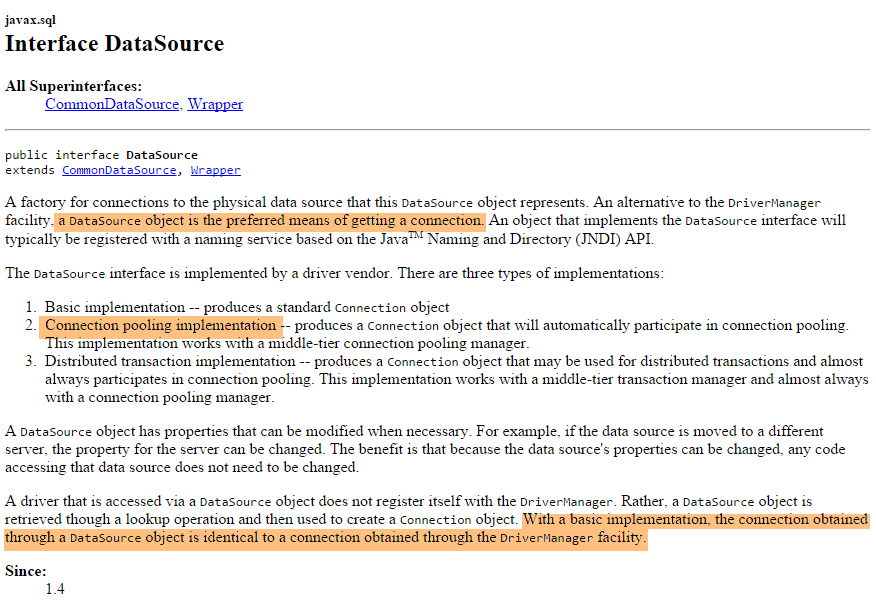
我们将使用由类 [org.apache.tomcat.jdbc.pool.DataSource] 实现的数据源。该类使用连接池,即一组已打开的连接:
- 当连接池被实例化时,会与数据库建立一定数量的连接。该数量可配置;
- 当Java代码建立连接时,该连接由连接池提供;
- 当 Java 代码关闭连接时,该连接将归还给连接池;
最终,连接仅需建立一次,从而提升了数据库访问性能。数据源将在一个 Spring 配置类中定义
3.5.1. 项目架构
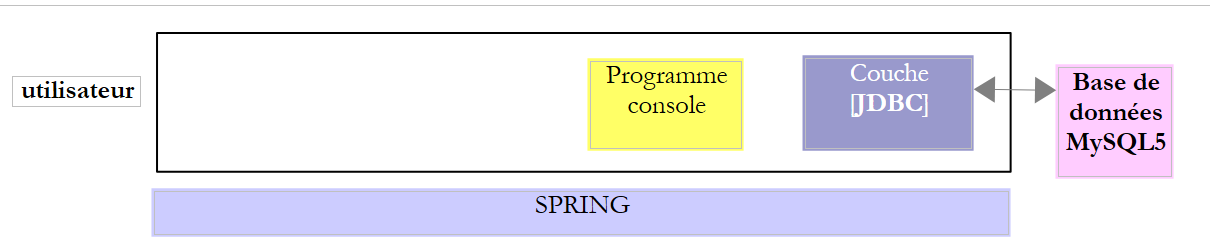 |
在此示例中,一个控制台程序使用了 [JDBC] 层的接口。
3.5.2. Eclipse 项目
可以通过复制之前的 [1-6] 项目来获取新的 Eclipse 项目:
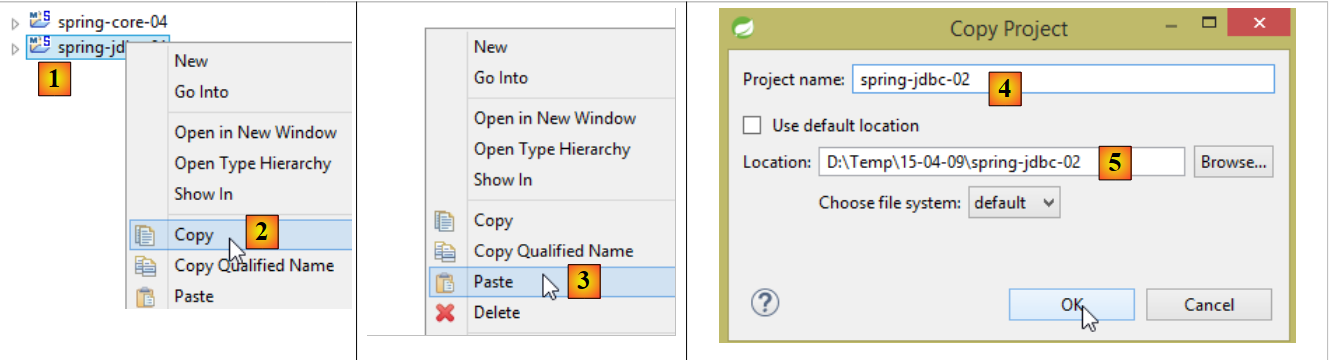 |
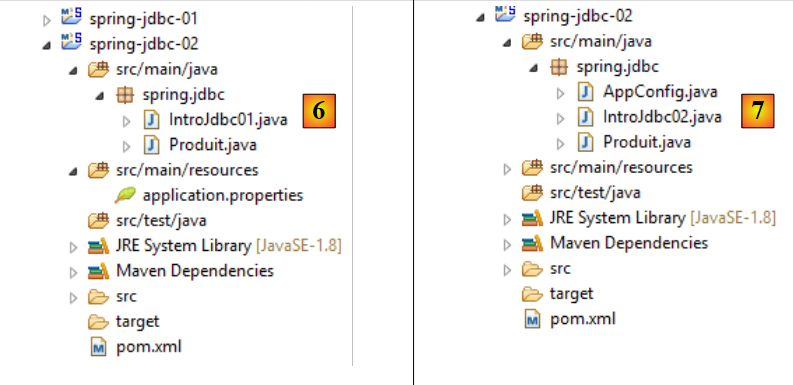 |
随后将项目 [6] 升级为 [7]:
3.5.3. Maven 配置
项目 [7] 是一个由以下 [pom.xml] 文件定义的 Maven 项目:
<?xml version="1.0" encoding="UTF-8"?>
<project xmlns="http://maven.apache.org/POM/4.0.0" xmlns:xsi="http://www.w3.org/2001/XMLSchema-instance"
    xsi:schemaLocation="http://maven.apache.org/POM/4.0.0 http://maven.apache.org/xsd/maven-4.0.0.xsd">
    <modelVersion>4.0.0</modelVersion>

    <groupId>dvp.spring.database</groupId>
    <artifactId>spring-jdbc-generic-02</artifactId>
    <version>0.0.1-SNAPSHOT</version>
    <packaging>jar</packaging>

    <name>spring-jdbc-generic-02</name>
    <description>Demo project for API JDBC</description>

    <parent>
        <groupId>org.springframework.boot</groupId>
        <artifactId>spring-boot-starter-parent</artifactId>
        <version>1.2.3.RELEASE</version>
        <relativePath /> <!-- 从存储库中查找父级 -->
    </parent>

    <properties>
        <project.build.sourceEncoding>UTF-8</project.build.sourceEncoding>
        <java.version>1.8</java.version>
    </properties>

    <dependencies>
        <!-- SGBD 的配置 JDBC -->
        <dependency>
            <groupId>dvp.spring.database</groupId>
            <artifactId>generic-config-jdbc</artifactId>
            <version>0.0.1-SNAPSHOT</version>
        </dependency>
    </dependencies>

    <build>
        <plugins>
            <plugin>
                <groupId>org.springframework.boot</groupId>
                <artifactId>spring-boot-maven-plugin</artifactId>
            </plugin>
            <plugin>
                <groupId>org.apache.maven.plugins</groupId>
                <artifactId>maven-surefire-plugin</artifactId>
                <version>2.18.1</version>
            </plugin>
        </plugins>
    </build>

</project>
- 第 28-33 行:对项目 [mysql-config-jdbc] 的 Maven 依赖;
正是项目 [mysql-config-jdbc] 在其 Maven 依赖中引入了提供 [javax.sql.DataSource] 类型数据源实现的库(参见第 3.3.2 节):
        <!-- Tomcat JDBC -->
        <dependency>
            <groupId>org.apache.tomcat</groupId>
            <artifactId>tomcat-jdbc</artifactId>
</dependency>
3.5.4. Spring 配置
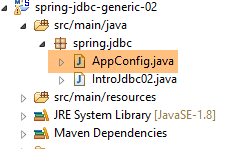 |
Spring 配置类 [AppConfig] 如下所示:
package spring.jdbc;

import generic.jdbc.config.ConfigJdbc;

import org.apache.tomcat.jdbc.pool.DataSource;
import org.springframework.context.annotation.Bean;
import org.springframework.context.annotation.Configuration;
import org.springframework.context.annotation.Import;

@Configuration
@Import({ generic.jdbc.config.ConfigJdbc.class })
public class AppConfig {
    // 数据源
    @Bean
    public DataSource dataSource() {
        // 数据源 TomcatJdbc
        DataSource dataSource = new DataSource();
        // 访问配置JDBC
        dataSource.setDriverClassName(ConfigJdbc.DRIVER_CLASSNAME);
        dataSource.setUsername(ConfigJdbc.USER_DBPRODUITS);
        dataSource.setPassword(ConfigJdbc.PASSWD_DBPRODUITS);
        dataSource.setUrl(ConfigJdbc.URL_DBPRODUITS);
        // 初始打开的连接
        dataSource.setInitialSize(5);
        // 结果
        return dataSource;
    }

}
- 第 10 行:[AppConfig] 是一个 Spring 配置类;
- 第 11 行:导入在项目 [mysql-config-jdbc] 中定义的配置类 [generic.jdbc.config.ConfigJdbc.class]。这意味着可以使用该配置文件中定义的所有 Bean;
- 第 14-27 行:定义数据源的 Spring Bean;
- 第 17 行:创建尚未配置的数据源;
- 第 19-22 行:用于使数据源连接到数据库的信息;
- 第 24 行:创建一个包含 5 个连接的连接池。此处仅需一个连接。系统中从未存在多个并发连接;
3.5.5. 主类
主类 [IntroJdbc02] 如下所示:
package spring.jdbc;

import generic.jdbc.config.ConfigJdbc;
import generic.jdbc.entities.dbproduits.Produit;

import java.sql.Connection;
import java.sql.PreparedStatement;
import java.sql.ResultSet;
import java.sql.SQLException;
import java.util.ArrayList;
import java.util.List;

import javax.sql.DataSource;

import org.springframework.context.annotation.AnnotationConfigApplicationContext;

import com.fasterxml.jackson.core.JsonProcessingException;
import com.fasterxml.jackson.databind.ObjectMapper;

public class IntroJdbc02 {

    // 映射jSON
    final static ObjectMapper jsonMapper = new ObjectMapper();
    // 数据源
    private static DataSource dataSource;

    public static void main(String[] args) {
        AnnotationConfigApplicationContext ctx = null;
        try {
            // 获取 Spring 上下文
            ctx = new AnnotationConfigApplicationContext(AppConfig.class);
            // 获取数据源
            dataSource = ctx.getBean(DataSource.class);
            // 清空表 [PRODUITS]
            System.out.println(String.format("------------------------------ %s", "Vidage de la table [PRODUITS]"));
            delete();
...
        // 完成
        System.out.println(String.format("------------------------------ %s", "Travail terminé"));
    }

    // 产品列表
    private static void select() {
        Connection connexion = null;
        PreparedStatement ps = null;
        ResultSet rs = null;
        try {
            // 建立连接
            connexion = dataSource.getConnection();
            // 开始交易
            connexion.setAutoCommit(false);
            // 只读模式
            connexion.setReadOnly(true);
            // 读取表 [PRODUITS]
            ps = connexion.prepareStatement(ConfigJdbc.V1_SELECT_PRODUITS);
            rs = ps.executeQuery();
            System.out.println("Liste des produits : ");
            while (rs.next()) {
                affiche(new Produit(rs.getInt(1), rs.getString(2), rs.getInt(3), rs.getDouble(4), rs.getString(5)));
            }
            // 提交事务
            connexion.commit();
        } catch (SQLException e1) {
            // 处理异常
            doCatchException("Les erreurs suivantes se sont produites à la lecture de la table", connexion, e1);
        } finally {
            // 处理 finally 块
            doFinally(rs, ps, connexion);
        }
    }
...
- 第 25 行:数据源。请注意,其类型为 [javax.sql.DataSource](第 13 行),这是一个接口;
- 第 31 行:Spring 对象的实例化;
- 第 32 行:获取数据源的引用。需要注意的是,代码中从未直接提及实际使用的类。因此,此处没有任何迹象表明使用了 [TomcatJdbc] 的实现;
- 第49行:获取已建立的连接。[IntroJdbc02]类的各个方法正是通过这种方式建立与数据库的连接。其余代码与[IntroJdbc01]类完全相同;
3.5.6. 测试
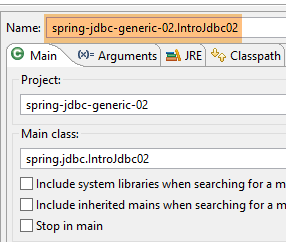
执行名为 [spring-jdbc-generic-02.IntroJdbc02] 的运行配置:
 |
结果与之前(第 3.4.9 节)相同。
3.6. 示例-03
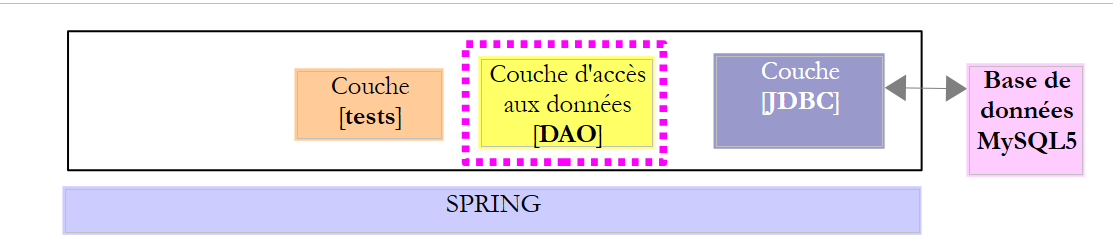
3.6.1. 项目架构
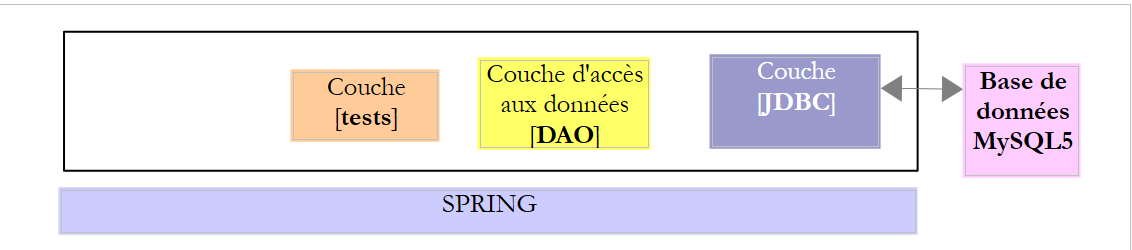 |
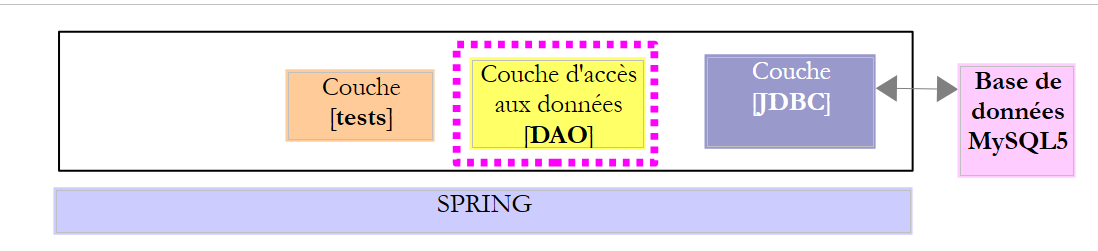
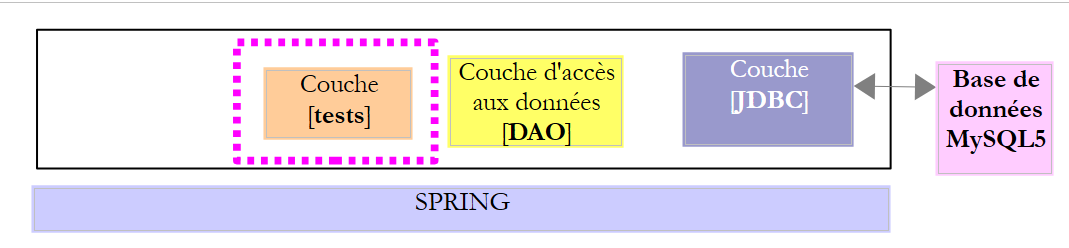
在此示例中,数据访问方法被隔离在 [dao] 层中。它们将通过 JUnit 测试进行测试。
3.6.2. Eclipse 项目
Eclipse 项目 [spring-jdbc-03] 是一个 Spring / Maven 项目,其构建方式与前一个项目相同,并按以下方式进行了补充:
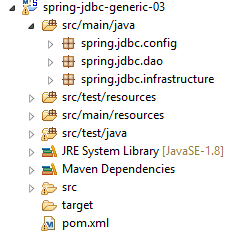 | 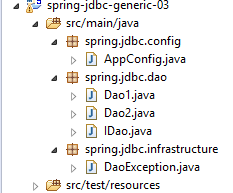 |
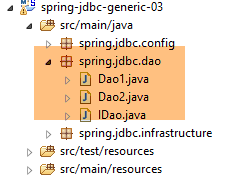
各个包的作用如下:
- [spring.jdbc.config]:Spring 项目配置;
- [spring.jdbc.dao]:实现 [DAO] 层;
- [spring.jdbc.infrastructure]:实现未处理异常 [DaoException];
3.6.3. Maven 配置
Maven 项目由以下文件 [pom.xml] 进行配置:
<?xml version="1.0" encoding="UTF-8"?>
<project xmlns="http://maven.apache.org/POM/4.0.0" xmlns:xsi="http://www.w3.org/2001/XMLSchema-instance"
    xsi:schemaLocation="http://maven.apache.org/POM/4.0.0 http://maven.apache.org/xsd/maven-4.0.0.xsd">
    <modelVersion>4.0.0</modelVersion>

    <groupId>dvp.spring.database</groupId>
    <artifactId>spring-jdbc-generic-03</artifactId>
    <version>0.0.1-SNAPSHOT</version>
    <packaging>jar</packaging>

    <name>spring-jdbc-generic-03</name>
    <description>Demo project for API JDBC</description>

    <parent>
        <groupId>org.springframework.boot</groupId>
        <artifactId>spring-boot-starter-parent</artifactId>
        <version>1.2.3.RELEASE</version>
        <relativePath /> <!-- 从存储库中查找父对象 -->
    </parent>

    <properties>
        <project.build.sourceEncoding>UTF-8</project.build.sourceEncoding>
        <java.version>1.8</java.version>
    </properties>

    <dependencies>
        <!-- SGBD 的配置 JDBC -->
        <dependency>
            <groupId>dvp.spring.database</groupId>
            <artifactId>generic-config-jdbc</artifactId>
            <version>0.0.1-SNAPSHOT</version>
        </dependency>
    </dependencies>

    <build>
        <plugins>
            <plugin>
                <groupId>org.springframework.boot</groupId>
                <artifactId>spring-boot-maven-plugin</artifactId>
            </plugin>
            <plugin>
                <groupId>org.apache.maven.plugins</groupId>
                <artifactId>maven-surefire-plugin</artifactId>
                <version>2.18.1</version>
            </plugin>
        </plugins>
    </build>

</project>
它与项目 [spring-jdbc-02] 的配置完全相同。它特别使用了项目 [mysql-config-jdbc] 的 Maven 依赖(第 28-32 行)。
3.6.4. [DAO] 层的接口
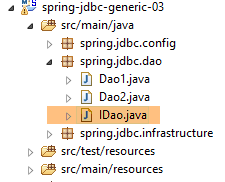 |
[DAO] 层提供以下 [IDao] 接口:
package spring.jdbc.dao;

import java.util.List;

import spring.jdbc.entities.Produit;

public interface IDao {

    // 添加产品
    public List<Produit> addProduits(List<Produit> produits);

    // 所有产品的列表
    public List<Produit> getAllProduits();

    // 特定产品
    public Produit getProduitById(int id);

    public Produit getProduitByName(String name);

    // 更新多个产品
    public int updateProduits(List<Produit> produits);

    // 删除所有产品
    public int deleteAllProduits();

    // 删除多个产品
    public int deleteProduits(int[] ids);
}
3.6.5. [DaoException]类
类 [DaoException] 仅扩展了第 3.3.5 节中介绍的类 [UncheckedException]:
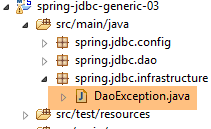 |
package spring.jdbc.infrastructure;

public class DaoException extends UncheckedException {

    private static final long serialVersionUID = 1L;

    // 制造商
    public DaoException() {
        super();
    }

    public DaoException(int code, Throwable e, String className) {
        super(code, e, className);
    }

}
3.6.6. Spring 项目配置
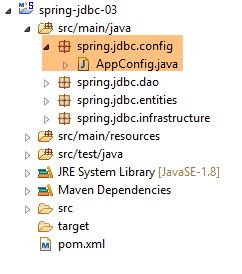 |
用于配置 Spring 项目的类 [AppConfig] 与示例 [spring-jdbc-02] 中的 Spring 配置文件完全相同,仅第 11 行有所不同:
package spring.jdbc.config;

import generic.jdbc.config.ConfigJdbc;

import org.apache.tomcat.jdbc.pool.DataSource;
import org.springframework.context.annotation.Bean;
import org.springframework.context.annotation.ComponentScan;
import org.springframework.context.annotation.Configuration;

@Configuration
@ComponentScan(basePackages = { "spring.jdbc.dao" })
public class AppConfig {
    // 数据源
    @Bean
    public DataSource dataSource() {
        // 数据源 TomcatJdbc
        DataSource dataSource = new DataSource();
        // 访问配置JDBC
        dataSource.setDriverClassName(ConfigJdbc.DRIVER_CLASSNAME);
        dataSource.setUsername(ConfigJdbc.USER_DBPRODUITS);
        dataSource.setPassword(ConfigJdbc.PASSWD_DBPRODUITS);
        dataSource.setUrl(ConfigJdbc.URL_DBPRODUITS);
        // 初始打开的连接
        dataSource.setInitialSize(5);
        // 结果
        return dataSource;
    }
}
- 第 11 行:将扫描 [spring.jdbc.dao] 包,以查找除该配置文件中定义的组件之外的其他 Spring 组件;
3.6.7. [DAO] 层的实现
 |
 |
需要提醒的是(参见第 3.6.4 节),[DAO] 层实现了以下 [IDao] 接口:
package spring.jdbc.dao;

import generic.jdbc.entities.dbproduits.Produit;

import java.util.List;

public interface IDao {

    // 添加产品
    public List<Produit> addProduits(List<Produit> produits);

    // 所有产品列表
    public List<Produit> getAllProduits();

    // 特定产品
    public Produit getProduitById(int id);

    public Produit getProduitByName(String name);

    // 更新多个产品
    public int updateProduits(List<Produit> produits);

    // 删除所有产品
    public int deleteAllProduits();

    // 删除多个产品
    public int deleteProduits(int[] ids);
}
类 [Dao1, Dao2] 和 [Dao2] 均实现了该接口。类 [Dao2] 是类 [Dao1] 的变体,引入了一项语法新特性。我们将重点探讨类 [Dao1]。 该类的骨架如下:
package spring.jdbc.dao;

import generic.jdbc.config.ConfigJdbc;
import generic.jdbc.entities.dbproduits.Produit;

import java.sql.Connection;
import java.sql.PreparedStatement;
import java.sql.ResultSet;
import java.sql.SQLException;
import java.util.ArrayList;
import java.util.List;

import javax.sql.DataSource;

import org.springframework.beans.factory.annotation.Autowired;
import org.springframework.stereotype.Component;

import spring.jdbc.infrastructure.DaoException;

@Component("dao1")
public class Dao1 implements IDao {

    // 类名称
    private String simpleClassName = getClass().getSimpleName();
    // 数据源
    @Autowired
    protected DataSource dataSource;

    // 制造商
    public Dao1() {
        System.out.println("building Dao1...");
    }

    // ------------------------------- 接口
    @Override
    public List<Produit> getAllProduits() {
...
    }

    @Override
    public Produit getProduitById(int id) {
...
    }

    @Override
    public Produit getProduitByName(String name) {
...
    }

    @Override
    public List<Produit> addProduits(List<Produit> produits) {
....
    }

    @Override
    public int updateProduits(List<Produit> produits) {
...
    }

    @Override
    public int deleteAllProduits() {
...
    }

    @Override
    public int deleteProduits(int[] ids) {
...
    }

    // ---------------------------------------- 本地方法
    // finally 处理
    protected DaoException doFinally(ResultSet rs, PreparedStatement ps, Connection connexion, int code,
            DaoException daoException) {
        ...
    }

    // catch 处理
    protected DaoException doCatchException(Connection connexion, Throwable th, int code, DaoException daoException) {
...
}
- 第 20 行:类 [Dao] 是名为 [dao1] 的 Spring 组件。该名称为可选项。若未指定,则使用类名的首字母大写、其余小写的名称;
- 第24行:类名。避免硬编码[Dao],以便日后重命名类时无需重新定义该字段,从而保持其有效性;
- 第 26-27 行:注入在配置类 [AppConfig] 中定义的数据源 [tomcat-jdbc];
- 第 36-68 行:实现接口 [IDao];
- 第 78-80 行:对不同方法的 catch 进行集中管理;
- 第 72-75 行:集中管理不同方法的 finally;
不同方法的 catch 按以下方式进行管理:
    // catch 处理
    protected DaoException doCatchException(Connection connexion, Throwable th, int code) {
        // 事务回滚
        try {
            if (connexion != null) {
                connexion.rollback();
            }
        } catch (SQLException e2) {
            e2.printStackTrace();
        }
        // daoException
        return new DaoException(code, th, simpleClassName);
}
- 第2行:声明方法[protected],这使得子类可以调用该方法,而无需将其设为公共方法。该方法接收以下参数:
- [Connection connexion]:与 SGBD 的连接——可能是 null;
- [Throwable th]:发生的异常,将被封装为 [DaoException] 类型;
- [int code]:如果该方法创建了一个新的 [DaoException],则使用此错误代码;
- 第 4-7 行:该方法的主要作用是回滚作为参数 1 传入的连接所关联的事务;
- 第 8-10 行:如果事务回滚失败,则将异常跟踪信息写入控制台。鉴于第 12 行将抛出异常,因此无法进行其他操作;
各方法中的 finally 处理方式如下:
// 最终处理
    protected DaoException doFinally(ResultSet rs, PreparedStatement ps, Connection connexion, int code,
            DaoException daoException) {
        // 关闭ResultSet
        if (rs != null) {
            try {
                rs.close();
            } catch (SQLException e1) {

            }
        }
        // 关闭 [PreparedStatement]
        if (ps != null) {
            try {
                ps.close();
            } catch (SQLException e2) {

            }
        }
        // 关闭连接
        if (connexion != null) {
            try {
                connexion.close();
            } catch (SQLException e3) {
                // 如果可能,记录错误
                if (daoException == null) {
                    daoException = new DaoException(code, e3, simpleClassName);
                }
            }
        }
        // 结果
        return daoException;
    }
- 第2行:该方法同样声明为[protected]。它接收以下参数:
- [ResultSet rs]:若已执行 [SELECT] 操作,则为相应的 [ResultSet]——也可能是 null;
- [PreparedStatement ps]:已执行的 [PreparedStatement] —— 可能是 null;
- [Connection connexion]:与 SGBD 的连接——可能是 null;
- [int code]:如果该方法创建了一个新的 [DaoException],则应使用此错误代码;
- [DaoException daoException]:若在 finally 之前发生异常,则可能生成 [DaoException]——也可能是 null;
- 第21-30行:该方法的首要目标是关闭连接(第23行);
- 第24-29行: 若在关闭过程中发生异常,则检查传入的参数 [DaoException daoException] 的状态:若为 [daoException == null],则使用传入的代码创建一个新的 [DaoException];
- 第32行:返回旧的或新的[DaoException]作为结果;
我们不会介绍 [Dao] 类的所有方法,仅列举其中几个。它们的实现方式都大同小异。
3.6.7.1. 方法 [getProduitById]
方法 [getProduitById] 返回主键等于参数 [id] 的记录,否则返回其他记录;
@Override
    public Produit getProduitById(int id) {
        // 连接资源
        Connection connexion = null;
        PreparedStatement ps = null;
        ResultSet rs = null;
        // 初始时无异常
        DaoException daoException = null;
        // 搜索到的产品
        Produit produit = null;
        try {
            // 建立连接
            connexion = dataSource.getConnection();
            // 事务开始
            connexion.setAutoCommit(false);
            // 只读模式
            connexion.setReadOnly(true);
            // 读取表 [PRODUITS]
            ps = connexion.prepareStatement(ConfigJdbc.V2_SELECT_PRODUIT_BYID);
            ps.setInt(1, id);
            rs = ps.executeQuery();
            if (rs.next()) {
                produit = new Produit(id, rs.getString(1), rs.getInt(2), rs.getDouble(3), rs.getString(4));
            }
            // 提交事务
            connexion.commit();
            // 返回默认模式
            connexion.setAutoCommit(true);
        } catch (SQLException e1) {
            // 处理异常
            daoException = doCatchException(connexion, e1, 112);
        } finally {
            // 处理 finally 块
            daoException = doFinally(rs, ps, connexion, 113, daoException);
        }
        // 异常?
        if (daoException != null) {
            throw daoException;
        }
        // 结果
        return produit;
    }
- 第 10 行:要返回的产品设置为 null;
- 第19行:订单SQL [ConfigJdbc.V2_SELECT_PRODUIT_BYID]如下:
public final static String V2_SELECT_PRODUIT_BYID = "SELECT NOM, CATEGORIE, PRIX, DESCRIPTION FROM PRODUITS WHERE ID=?";
- 第22-24行:如果[ResultSet]有一行,则使用该行创建待退货产品,否则待退货产品仍保留在null中;
- 第 41 行:返回该产品;
- 第 8 行:将方法的异常 [DaoException] 初始化为 null;
- 第 31 行:方法 [doCatchException] 抛出异常 [DaoException];
- 第 34 行:方法 [doFinally] 的参数 [daoException] 要么是 null,,要么是方法 [doCatchException] 抛出的异常。 方法 [doFinally]:
- 若成功关闭连接,则保持该参数不变;
- 若无法关闭连接且此前已存在 [DaoException],则保持该参数不变;
- 若无法关闭连接且此前未执行过 [DaoException],则创建新的 [DaoException];
- 第37-39行:如果本地异常[daoException]不等于null,则抛出该异常;否则返回请求的结果(第41行);
3.6.7.2. 方法 [deleteProduits]
方法 [deleteProduits] 用于删除作为参数传入主键的产品。该方法返回被删除的产品数量。
@Override
    public int deleteProduits(int[] ids) {
        // 连接资源
        PreparedStatement ps = null;
        Connection connexion = null;
        // 初始时无异常
        DaoException daoException = null;
        // 已更新的产品数量
        int nbProduits = 0;
        try {
            // 建立连接
            connexion = dataSource.getConnection();
            // 事务开始
            connexion.setAutoCommit(false);
            // 读写模式
            connexion.setReadOnly(false);
            // 删除产品
            ps = connexion.prepareStatement(ConfigJdbc.V2_DELETE_PRODUITS);
            for (int id : ids) {
                // 参数
                ps.setInt(1, id);
                // 执行
                nbProduits += ps.executeUpdate();
            }
            // 提交事务
            connexion.commit();
            // 恢复默认模式
            connexion.setAutoCommit(true);
        } catch (SQLException e1) {
            // 处理异常
            daoException = doCatchException(connexion, e1, 171);
        } finally {
            // 处理 finally 块
            daoException = doFinally(null, ps, connexion, 172, daoException);
        }
        // 异常?
        if (daoException != null) {
            throw daoException;
        }
        // 结果
        return nbProduits;
    }
- 第18行,SQL [ConfigJdbc.V2_DELETE_PRODUITS]的顺序如下:
public final static String V2_DELETE_PRODUITS = "DELETE FROM PRODUITS WHERE ID=?";
- 第 18-24 行:产品删除代码。可以看到,SQL 命令被准备 1 次(第 18 行)并执行 n 次(第 19-24 行)。这就是 [PreparedStatement] 对象的意义所在;
- 第23行:方法[PreparedStatement].executeUpdate()返回受更新操作影响的行数;
- 第 41 行:返回被更新的产品数量;
3.6.7.3. 方法 [updateProduits]
方法 [updateProduits] 将作为参数传递的产品更新到数据库中。它返回被更新的产品数量。
@Override
    public int updateProduits(List<Produit> produits) {
        // 连接资源
        PreparedStatement ps = null;
        Connection connexion = null;
        // 初始时无异常
        DaoException daoException = null;
        // 已更新的产品数量
        int nbProduits = 0;
        try {
            // 建立连接
            connexion = dataSource.getConnection();
            // 事务开始
            connexion.setAutoCommit(false);
            // 读写模式
            connexion.setReadOnly(false);
            // 正在更新表 [PRODUITS]
            ps = connexion.prepareStatement(ConfigJdbc.V2_UPDATE_PRODUITS);
            for (Produit produit : produits) {
                // 参数
                ps.setString(1, produit.getNom());
                ps.setDouble(2, produit.getPrix());
                ps.setInt(3, produit.getCategorie());
                ps.setString(4, produit.getDescription());
                ps.setInt(5, produit.getId());
                // 执行
                nbProduits += ps.executeUpdate();
            }
            // 提交事务
            connexion.commit();
            // 返回默认模式
            connexion.setAutoCommit(true);
        } catch (SQLException e1) {
            // 处理异常
            daoException = doCatchException(connexion, e1, 131);
        } finally {
            // 处理 finally 代码块
            daoException = doFinally(null, ps, connexion, 132, daoException);
        }
        // 异常?
        if (daoException != null) {
            throw daoException;
        }
        // 结果
        return nbProduits;
    }
- 第18行:SQL [ConfigJdbc.V2_UPDATE_PRODUITS]的顺序如下:
public final static String V2_UPDATE_PRODUITS = "UPDATE PRODUITS SET NOM=?, PRIX=?, CATEGORIE=?, DESCRIPTION=? WHERE ID=?";
- 第 19-28 行:产品更新代码;
3.6.7.4. 方法 [addProduits]
方法 [addProduits] 将作为参数传递的产品插入数据库。该方法返回这些产品的主键(在插入数据库之前,产品没有主键)。
@Override
    public List<Produit> addProduits(List<Produit> produits) {
        // 连接资源
        PreparedStatement ps = null;
        Connection connexion = null;
        // 初始时无异常
        DaoException daoException = null;
        try {
            // 建立连接
            connexion = dataSource.getConnection();
            // 读写模式
            connexion.setReadOnly(false);
            // 开始事务
            connexion.setAutoCommit(false);
            // 向表 [PRODUITS] 中添加元素
            String generatedColumns[] = { ConfigJdbc.TAB_PRODUITS_ID };
            ps = connexion.prepareStatement(ConfigJdbc.V2_INSERT_PRODUITS, generatedColumns);
            for (Produit produit : produits) {
                // 参数
                ps.setString(1, produit.getNom());
                ps.setLong(2, produit.getCategorie());
                ps.setDouble(3, produit.getPrix());
                ps.setString(4, produit.getDescription());
                // 执行命令
                ps.executeUpdate();
                // 生成主键
                ResultSet generatedKeys = ps.getGeneratedKeys();
                if (generatedKeys.next()) {
                    produit.setId(generatedKeys.getInt(1));
                } else {
                    throw new RuntimeException(String.format("Le produit de nom [%s] n'a pas récupéré de clé primaire",
                            produit.getNom()));
                }
            }
            // 提交事务
            connexion.commit();
            // 返回默认模式
            connexion.setAutoCommit(true);
        } catch (SQLException | RuntimeException e1) {
            // 处理异常
            daoException = doCatchException(connexion, e1, 151);
        } finally {
            // 处理 finally 代码块
            daoException = doFinally(null, ps, connexion, 152, daoException);
        }
        // 异常?
        if (daoException != null) {
            throw daoException;
        }
        // 结果
        return produits;
}
- 第 16 行,SQL [ConfigJdbc.V2_INSERT_PRODUITS] 的顺序如下:
public final static String V2_INSERT_PRODUITS = "INSERT INTO PRODUITS(NOM, CATEGORIE, PRIX, DESCRIPTION) VALUES (?, ?, ?, ?)";
上文中的产品插入命令未包含主键 [ID]。 由于数据库 MySQL 的主键具有属性 [AUTOINCREMENT],因此 SGBD 将在每次插入时生成一个主键。 这便引出了如何获取该主键的问题。这一点至关重要,因为对产品的操作都是通过其主键进行的。因此必须知道这些主键;
- 第 17-33 行:产品插入循环;
- 第16行:[prepareStatement]方法的一种特殊形式。 第二个参数 [generatedColumns] 是一个列名数组,表示插入后需要获取其值的列。在第 16 行,我们指定了要获取列 [id] 的值。 需要注意的是,尽管表中列名不区分大小写(大写/小写),但SGBD PostgreSQL要求该名称必须为小写。 这正是将代码从一个 SGBD 迁移到另一个时常会遇到的典型问题;
- 第 24 行:向数据库插入一行;
- 第26行:获取[ResultSet]中第16行指定列的值列表。在此,对于1次插入,[ResultSet]将包含1行,且该行仅有一列,其中包含主键;
- 第28行:获取由SGBD生成的主键;
- 第29-32行:若未获取到生成的主键,则启动一个[RuntimeException],该操作将被封装在第38-40行的[DaoException]中;
3.6.8. 类 [Dao2]
 |
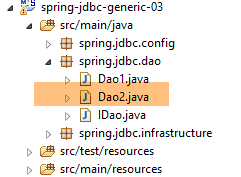 |
类 [Dao2] 是类 [Dao1] 的变体,它使用了一种称为 try-with-resource(resource) 的语法:
- [resource] 是一个实现 [java.lang.AutoCloseable] 接口的资源。 所有通过 [close] 方法释放的资源都属于该类。这种语法确保在第 4 行,资源 [resource] 将被关闭。这避免了编写 [finally] 语句来完成此关闭操作;
以类 [Dao2] 中的方法 [getAllProduits] 为例:
    @Override
    public List<Produit> getAllProduits() {
        // 可能的异常
        DaoException daoException = null;
        // 产品列表
        List<Produit> produits = new ArrayList<Produit>();
        try (Connection connexion = dataSource.getConnection()) {
            // 开始事务
            connexion.setAutoCommit(false);
            // 只读模式
            connexion.setReadOnly(true);
            // 读取表 [PRODUITS]
            try (PreparedStatement ps = connexion.prepareStatement(ConfigJdbc.V2_SELECT_ALLPRODUITS)) {
                try (ResultSet rs = ps.executeQuery()) {
                    while (rs.next()) {
                        produits.add(new Produit(rs.getInt(1), rs.getString(2), rs.getInt(3), rs.getDouble(4), rs.getString(5)));
                    }
                }
                // 事务结束
                connexion.commit();
                // 恢复默认模式
                connexion.setAutoCommit(true);
            } catch (SQLException e1) {
                // 撤销事务
                daoException = doRollback(connexion, e1, 111);
            }
        } catch (SQLException e2) {
            // 处理异常
            if (daoException == null) {
                daoException = new DaoException(112, e2, simpleClassName);
            }
        }
        // 异常?
        if (daoException != null) {
            throw daoException;
        }
        // 结果
        return produits;
}
- 第 7 行:使用资源 [Connection] 的 try 语句。第 27 行,可确保该资源已被关闭;
- 第 13 行:使用资源 [PreparedStatement] 的 try 语句。第 23 行,确保该资源已关闭;
- 第 14 行:使用资源 [ResultSet] 进行 try 操作。第 19 行,确保该资源已关闭;
- 第25行:事务按以下方式回滚:
    private DaoException doRollback(Connection connexion, Throwable e1, int code) {
        try {
            if (connexion != null) {
                connexion.rollback();
            }
        } catch (SQLException e) {
            e.printStackTrace();
        }
        // 生成异常
        return new DaoException(code, e1, simpleClassName);
}
最终,我们得到了更易于阅读的代码。
3.6.9. 测试层的实现
3.6.9.1. 测试类
 |
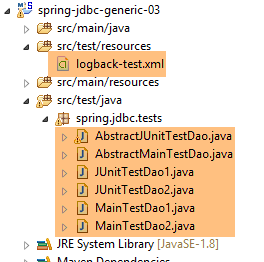 |
- 测试 [JUnitTestDao1] 是类 [Dao1] 下的测试 JUnit;
- 测试 [JUnitTestDao2] 是类 [Dao2] 下的测试 JUnit;
- [AbstractJUnitTestDao] 是上述两个测试类的父类;
- [MainTestDao1] 是 [Dao1] 类的测试控制台类;
- [MainTestDao2] 是类 [Dao2] 的测试控制台类;
- [AbstractMainTestDao] 是前两个类的父类。它继承了前面已介绍的 [IntroJdbc01, IntroJdbc02] 控制台类的代码,因此我们将不再研究这些控制台类;
[JUnitTestDao1] 类如下:
package spring.jdbc.tests;

import org.junit.runner.RunWith;
import org.springframework.beans.factory.annotation.Autowired;
import org.springframework.beans.factory.annotation.Qualifier;
import org.springframework.boot.test.SpringApplicationConfiguration;
import org.springframework.test.context.junit4.SpringJUnit4ClassRunner;

import spring.jdbc.config.AppConfig;
import spring.jdbc.dao.IDao;

@SpringApplicationConfiguration(classes = AppConfig.class)
@RunWith(SpringJUnit4ClassRunner.class)
public class JUnitTestDao1 extends AbstractJUnitTestDao {

    // 层 [DAO]
    @Autowired
    @Qualifier("dao1")
    private IDao dao;

    @Override
    IDao getDao() {
        return dao;
    }

}
- 第12-13行的注解已在第2.5.5节中介绍。它们使JUnit测试能够轻松访问Spring上下文及其Bean。该上下文由第2.4.3节中讨论的[AppConfig]类(第12行)进行配置;
- 第14行:该类继承了我们将要介绍的[AbstractJUnitTestDao]类。JUnit测试方法就位于该类中;
- 第17-19行:名为[dao1]的Bean(第18行)被注入(第17行)。因此,此处注入的是[Dao1]类的实例;
- 第21-24行:方法[getDao]重写了父类中同名的方法;
最终,该类的目的是向父类返回一个指向待测试的 [DAO] 层的引用,此处为 [Dao1] 的实例。 同样地,类 [JUnitTestDao2] 向父类 [AbstractJUnitTestDao] 返回类 [Dao2] 的一个实例。
类 [AbstractJUnitTestDao] 是类 JUnit 的测试类:
package spring.jdbc.tests;

import generic.jdbc.entities.dbproduits.Produit;

import java.util.ArrayList;
import java.util.List;

import org.junit.Assert;
import org.junit.Before;
import org.junit.Test;
import org.springframework.beans.BeansException;

import spring.jdbc.dao.IDao;
import spring.jdbc.infrastructure.DaoException;

import com.fasterxml.jackson.core.JsonProcessingException;
import com.fasterxml.jackson.databind.ObjectMapper;

public abstract class AbstractJUnitTestDao {

    // 层 [DAO]
    abstract IDao getDao();

    // 映射 jSON
    final static ObjectMapper jsonMapper = new ObjectMapper();

    @Before
    public void clean() {
        // 每次测试前都要清理数据库
        log("Vidage de la base de données", 1);
        getDao().deleteAllProduits();
    }

    @Test
    public void getProduits() throws JsonProcessingException {
    ...
    }

    @Test
    public void getProduitBy() {
    ...
    }

    @Test
    public void doInsertsInTransaction() {
...
    }

    @Test
    public void updateProduits() {
    ...
    }

    @Test
    public void deleteProduits() {
    ....
    }

    @Test
    public void perf1() {
        ...
    }

    @Test
    public void perf2() {
    ...
    }

    @Test
    public void perf3() {
    ....
    }

    // -------------- 私有方法
...
}
- 第 19 行,类 [AbstractJUnitTestDao] 是抽象类;
- 第 22 行:抽象方法 [getDao],用于获取待测试的 [DAO] 层的引用。该方法由子类实现;
- 第25行:映射器jSON,用于在控制台显示产品值jSON;
- 第 27-32 行:在每次测试之前(第 27 行),将清空表 [PRODUITS];
3.6.9.2. 私有方法 [fill]
私有方法 [fill] 用于将产品插入表 [PRODUITS] 中。
private List<Produit> fill(int nbProduits) {
        log("Remplissage de la base de données", 1);
        // 创建产品列表
        List<Produit> produits = new ArrayList<Produit>();
        for (int i = 0; i < nbProduits; i++) {
            int n = i + 1;
            // int id, String 名称, int 类别, double 价格, String 描述
            produits.add(new Produit(0, String.format("NOM%s", n), n / 5 + 1, 100 * (1 + (double) i / 100), String.format(
                    "DESC%s", n)));
        }
        // 将其保存到数据库中 - 根据主键检索产品
        produits = getDao().addProduits(produits);
        // 创建产品字典以便更轻松地检索
        // 字典的键是数据库中产品的主键
        for (Produit produit : produits) {
            mapProduits.put(produit.getId(), produit);
        }
        // 返回产品
        return produits;
    }
- 第 1 行:方法 [fill] 将 [nbProduits] 插入到假设为空的表 [PRODUITS] 中;
- 第 3-10 行:创建形式如下所示的产品列表:
new Produit(0, String.format("NOM%s", n), n / 5 + 1, 100 * (1 + (double) i / 100), String.format("DESC%s", n)));
该列表使用构造函数 Produit(int id, String nom, int categorie, double prix, String description)。第一个参数 [id] (表 [PRODUITS] 的主键)并不重要,因为第 10 行中的方法 [addProduits] 不会将其插入数据库,而是让 SGBD 生成其值;
- 第12行:产品列表被持久化到数据库中。该列表中的每个产品都新增了一个主键 [id]。方法 [addProduits] 返回其参数 [produits]。 因此,本可以不获取该结果;
- 第15-17行:将产品放入字典中:
    // 产品字典
    private Map<Integer, Produit> mapProduits = new HashMap<Integer, Produit>();
字典的键是产品的主键,关联的值则是产品本身;
- 第19行:返回产品列表;
3.6.9.3. 测试 [getProduits]
该测试如下:
    @Test
    public void getProduits() throws JsonProcessingException {
        // 填充
        fill(10);
        // 产品列表
        log("Liste des produits", 2);
        List<Produit> produits = getDao().getAllProduits();
        affiche(produits);
        // 验证检索到的列表与持久化列表是否一致
        for (Produit produit : produits) {
            Produit found = mapProduits.get(produit.getId());
            Assert.assertEquals(found, produit);
            mapProduits.remove(found.getId());
        }
        // 所有初始产品都应已从产品词典中移除
        Assert.assertEquals(0, mapProduits.size());
}
}
- 第4行:将10个产品存入数据库;
- 第7行:操作完成后,查询数据库中的所有产品;
- 第8行:显示这些产品。目的是验证产品是否已成功保存,并确认它们具有主键;
- 第10-13行:验证检索到的产品与已持久化的产品完全一致,且可在字典中找到[mapProduits];
- 第11行:从字典中检索与数据库中检索到的产品具有相同主键的产品。这表明持久化的产品确实已获取了主键;
- 第 12 行:确保这两个产品是相同的。需要提醒的是,类 [Produit] 定义了一个方法 [equals](参见第 3.3.4 节);
- 第13行:将找到的元素从字典中删除;
- 第16行:验证初始产品字典是否为空,这意味着这些初始产品均已包含在从数据库检索回来的产品列表中;
第 8 行中的方法 [affiche] 是以下私有方法:
    // 显示产品列表
    private <T> void affiche(List<T> elements) throws JsonProcessingException {
        for (T element : elements) {
            System.out.println(jsonMapper.writeValueAsString(element));
        }
}
- 第2行:方法[affiche]是一个泛型方法。 它由类型 T 作为参数,语法上表示为 <T>。如果它由两个类型 T1 和 T2 作为参数,则应写为 <T1,T2>。 由类型 T 参数化方法 m 的语法如下:
在方法 m 的代码中,我们会发现类型为 T 的数据。因此,可以按以下方式调用类 C 的实例 c 上的方法 m:
其中 T1 是将替换方法 m 的形式类型 T 的实际类型。大多数情况下,编译器能够根据方法 m 的参数推导出类型 T1。因此,上述语句通常会被简化为:
让我们回到方法 [affiche]。它会显示一个类型为 T 的元素列表。之所以能实现这一点,是因为第 4 行使用的映射器 jSON 能够将任何类型的对象转换为 jSON 表示形式。 在这个具体示例中,唯一使用的 T 类型将是 [Produit] 类型。
方法 [affiche] 也可以按以下方式编写:
    // 显示产品列表
    private void affiche(Object o) throws JsonProcessingException {
            System.out.println(jsonMapper.writeValueAsString(o));
        }
由于实际参数是一个产品列表,第 3 行将生成该列表的 jSON 表示形式。这与逐个生成每个元素的表示形式并不相同。
测试 [getProduits] 生成的显示结果如下:
3.6.9.4. 测试 [getProduitBy]
其结果如下:
    @Test
    public void getProduitBy() {
        // 填充
        fill(10);
        log("getProduitBy", 1);
        Produit produit = getDao().getProduitByName("NOM3");
        Produit produit2 = getDao().getProduitById(produit.getId());
        Assert.assertNotNull(produit2);
        Assert.assertEquals(produit2.getNom(), produit.getNom());
        Assert.assertEquals(produit2.getId(), produit.getId());
}
- 第 6 行:使用接口 [IDao] 中的方法 [getProduitByName] 来获取名称为 [NOM3] 的产品;
- 第7行:随后使用接口[IDao]中的方法[getProduitById],根据主键检索同一产品;
- 第 8-10 行:验证 [produit2] 和 [produit] 是否具有相同的特征;
3.6.9.5. [doInsertsInTransaction] 的测试
该测试如下:
    @Test
    public void doInsertsInTransaction() {
        log("Ajout de deux produits de même nom", 1);
        // 进行插入
        List<Produit> inserts = new ArrayList<Produit>();
        inserts.add(new Produit(0, "x", 1, 1.0, ""));
        inserts.add(new Produit(0, "x", 1, 1.0, ""));
        boolean erreur = false;
        try {
            getDao().addProduits(inserts);
        } catch (DaoException daoException) {
            erreur = true;
        }
        // 核对
        Assert.assertTrue(erreur);
        List<Produit> produits = getDao().getAllProduits();
        Assert.assertEquals(0, produits.size());
}
- 第5-7行:创建一个包含两个同名产品([x])的列表;
- 第10行:将这两个产品插入到空表[PRODUITS]中(方法[clean],注解为[@Before])。 第一次插入将成功,但第二次插入会失败,因为表 [PRODUITS] 对产品名称设有唯一性约束。因此应抛出异常。第 15 行对该异常进行了检测;
- 由于接口 [IDao] 的所有方法都在事务内部执行,第二次插入失败将导致整个事务被回滚,从而使第一次插入也失效。最终,表 [PRODUITS] 中不应有任何插入操作;
- 第16-17行:通过查询表[PRODUITS]中的产品列表并验证该列表为空,来确认这一点;
3.6.9.6. 测试 [updateProduits]
该测试如下:
    @Test
    public void updateProduits() {
        // 填充
        fill(10);
        log("Mise à jour du prix des produits de catégorie 1", 1);
        // 获取产品
        List<Produit> produits = getDao().getAllProduits();
        // 更新第1类商品
        List<Produit> updated = new ArrayList<Produit>();
        int nbUpdated = 0;
        for (Produit produit : produits) {
            if (produit.getCategorie() == 1) {
                // int id, String 名称, int 类别, double 价格, String 描述
                updated
                        .add(new Produit(produit.getId(), produit.getNom(), 1, produit.getPrix() * 1.1, produit.getDescription()));
                nbUpdated++;
            }
        }
        int nbProduits = getDao().updateProduits(updated);
        // 验证
        // Assert.assertEquals(nbUpdated, nbProduits); -- 无法通过 DB2
        for (Produit produit : updated) {
            Produit produit2 = getDao().getProduitById(produit.getId());
            Assert.assertEquals(produit2.getPrix(), produit.getPrix(), 1e-6);
        }
}
- 第4行:向数据库中插入10个产品;
- 第7行:检索这些产品;
- 第9-18行:将第1类商品的价格提高10%;
- 第19行:将这些修改写入数据库;
- 第22-25行:遍历内存中用于更新的商品列表。对于每件商品,从数据库中查找具有相同主键的商品,并验证价格更新是否成功;
- 第19行:获取操作[updateProduits]更新的产品数量;
- 第21行:验证该数量是否与预期一致。此验证对所有SGBD操作均通过,唯独SGBD和DB2除外。因此已将其注释掉;
3.6.9.7. [deleteProduits] 测试
该测试如下:
    @Test
    public void deleteProduits() {
        // 填充
        fill(10);
        log("deleteProduits", 1);
        // 产品列表
        List<Produit> produits = getDao().getAllProduits();
        // 删除两款产品
        Produit produit0 = produits.get(0);
        Produit produit5 = produits.get(5);
        int nbDeleted = getDao().deleteProduits(new int[] { produit0.getId(), produit5.getId() });
        // 验证
        // Assert.assertEquals(2, nbDeleted); -- 无法通过 DB2
        Assert.assertNull(getDao().getProduitById(produit0.getId()));
        Assert.assertNull(getDao().getProduitById(produit5.getId()));
        Assert.assertEquals(produits.size() - 2, getDao().getAllProduits().size());
}
- 第4行:向数据库中插入10个产品;
- 第7-11行:从数据库中检索所有产品,并删除位于第0和第5位置的产品;
- 第14-16行:验证上述两件商品已从数据库中移除,且数据库中的商品数量减少了两件;
- 第13行的测试在SGBD和DB2上未通过。但在其他SGBD上通过;
3.6.9.8. 性能测试
测试中包含三种方法,其唯一目的是评估 SGBD 的性能:
    @Test
    public void perf1() {
        // 填充
        fill(10000);
    }

    @Test
    public void perf2() {
        // 填充
        fill(10000);
        // 修改
        List<Produit> produits = getDao().getAllProduits();
        // 更新第1类数据
        List<Produit> updated = new ArrayList<Produit>();
        for (Produit produit : produits) {
            // int id, String 名称, int 类别, double 价格, String 描述
            updated.add(new Produit(produit.getId(), produit.getNom(), 1, produit.getPrix() * 1.1, produit.getDescription()));
        }
        getDao().updateProduits(updated);
    }

    @Test
    public void perf3() {
        // 填充
        fill(10000);
        // 删除
        List<Produit> produits = getDao().getAllProduits();
        // 主键
        int[] keys = new int[produits.size()];
        for (int i = 0; i < keys.length; i++) {
            keys[i] = produits.get(i).getId();
        }
        getDao().deleteProduits(keys);
}
- 第1-5行:插入10000个产品;
- 第8-20行:插入10000个产品,随后通过主键对其进行修改;
- 第23-34行:插入10000个产品,随后通过主键删除这些产品;
要执行测试 [JUnitTestDao1] 和 [JUnitTestDao2],可以使用以下执行配置:
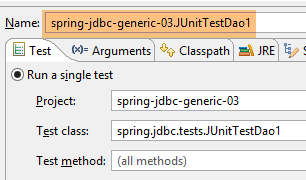 | 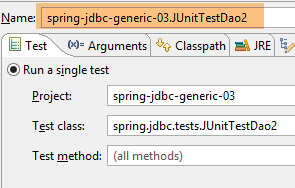 |
测试 [JUnitTestDao1] 的结果如下:
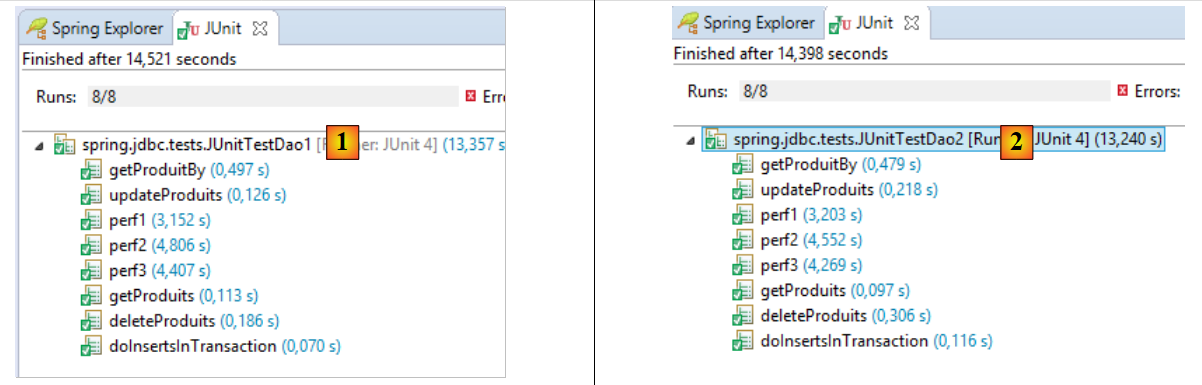 |
在 [1] 中包含 [JUnitTestDao1] 的结果,而在 [2] 中包含 [JUnitTestDao2] 的结果。它们之间没有显著差异。 在 [1] 中:
- 测试成功;
- 插入10000个产品耗时3.15秒;
- 插入 10000 件商品并随后进行修改耗时 4.80 秒;
- 插入10000个产品并随后删除耗时4.40秒;
- 因此最耗时的操作是插入;