10. Execution threads
10.1. The Thread Class
When an application is launched, it runs in an execution flow called a thread. The .NET class that models a thread is the System.Threading.Thread class and has the following definition:
Constructors
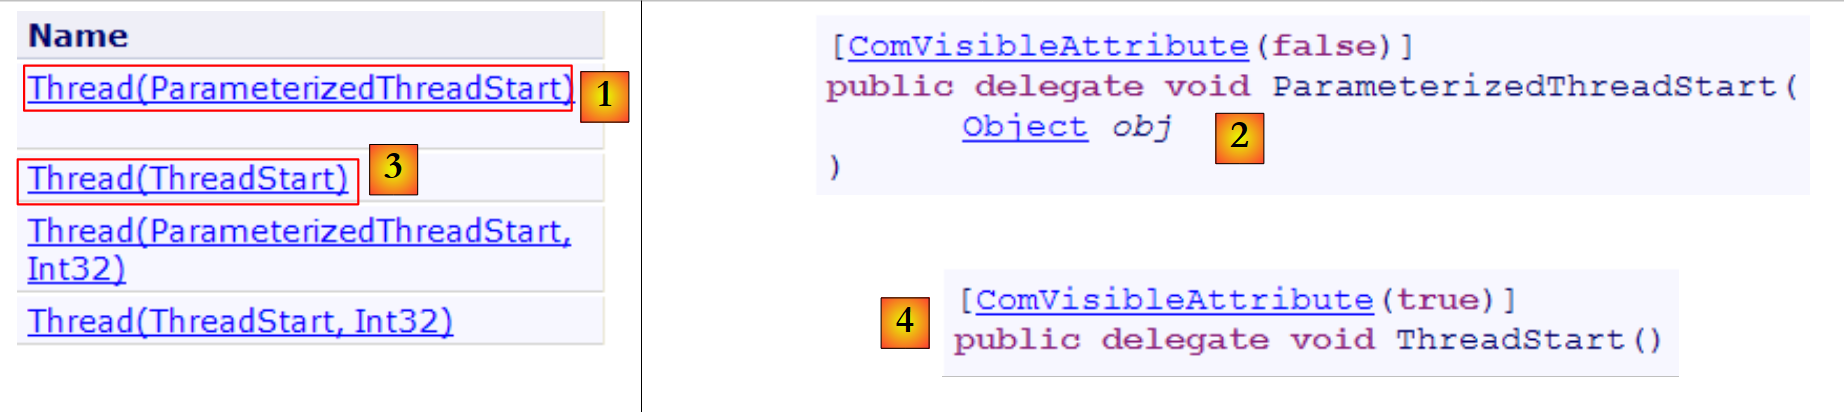 |
In the following examples, we will use only the constructors [1,3]. The constructor [1] accepts as a parameter a method with the signature [2] or c.a.d. with a parameter of type object and returning no result. The constructor [3] accepts as a parameter a method with the signature [4], c.a.d. having no parameters and returning no result.
Properties
Some useful properties:
- Thread CurrentThread: static property that returns a reference to the thread in which the code that requested this property is located
- string Name: the name of the thread
- bool IsAlive: indicates whether the thread is currently running or not.
Methods
The most commonly used methods are as follows:
- Start(), Start(object obj): starts the asynchronous execution of the thread, optionally passing it information in an object type.
- Abort(), Abort(object obj): to forcefully terminate a thread
- Join(): thread T1, which executes T2.Join, is blocked until thread T2 has finished. There are variants to end the wait after a specified time.
- Sleep(int n): static method—the thread executing the method is suspended for n milliseconds. It then loses the CPU, which is given to another thread.
Let’s look at a simple application that demonstrates the existence of a main execution thread, the one in which a class’s Main function runs:
using System;
using System.Threading;

namespace Chap8 {
    class Program {
        static void Main(string[] args) {
            // init current thread
            Thread main = Thread.CurrentThread;
            // display
            Console.WriteLine("Thread courant : {0}", main.Name);
            // we change the name
            main.Name = "main";
            // check
            Console.WriteLine("Thread courant : {0}", main.Name);

            // infinite loop
            while (true) {
                // display
                Console.WriteLine("{0} : {1:hh:mm:ss}", main.Name, DateTime.Now);
                // temporary shutdown
                Thread.Sleep(1000);
            }//while
        }
    }
}
- line 8: we retrieve a reference to the thread in which the [main] method is running
- lines 10–14: we display and modify its name
- lines 17–22: a loop that displays the output every second
- line 21: the thread in which the [main] method is running will be suspended for 1 second
The screen output is as follows:
- line 1: the current thread had no name
- line 2: it has one
- lines 3-7: the display that occurs every second
- line 8: the program is terminated by Ctrl-C.
10.2. Creating execution threads
It is possible to have applications where pieces of code execute "simultaneously" in different execution threads. When we say that threads run simultaneously, we are often using the term loosely. If the machine has only one processor, as is still often the case, the threads share that processor: they each take turns using it for a brief moment (a few milliseconds). This is what creates the illusion of parallel execution. The amount of time allocated to a thread depends on various factors, including its priority, which has a default value but can also be set programmatically. When a thread has the processor, it normally uses it for the entire time allotted to it. However, it can release it early:
- by waiting for an event (Wait, Join)
- by sleeping for a specified period of time (Sleep)
- A thread T is first created using one of the constructors presented above, for example:
where Start is a method with one of the following two signatures:
Creating a thread does not start it.
- The execution of thread T is initiated by T.Start(): the Start method passed to the constructor of T is then executed by thread T. The program executing the instruction T.Start() does not wait for task T to finish: it immediately proceeds to the next instruction. We now have two tasks running in parallel. They often need to communicate with each other to know the status of the shared work to be done. This is the problem of thread synchronization.
- Once launched, thread T runs autonomously. It will stop when the Start method it is executing has finished its work.
- We can force thread T to terminate:
- T.Abort() instructs thread T to terminate.
- We can also wait for it to finish executing using T.Join(). This is a blocking instruction: the program executing it is blocked until task T has finished its work. This is a means of synchronization.
Let’s examine the following program:
using System;
using System.Threading;

namespace Chap8 {
    class Program {
        public static void Main() {
            // init Current thread
            Thread main = Thread.CurrentThread;
            // name the Thread
            main.Name = "Main";

            // creation of execution threads
            Thread[] tâches = new Thread[5];
            for (int i = 0; i < tâches.Length; i++) {
                // create thread i
                tâches[i] = new Thread(Affiche);
                // set the thread name
                tâches[i].Name =  i.ToString();
                // start execution of thread i
                tâches[i].Start();
            }

            // end of hand
            Console.WriteLine("Fin du thread {0} à {1:hh:mm:ss}",main.Name,DateTime.Now);
        }

        public static void Affiche() {
            // display start of execution
            Console.WriteLine("Début d'exécution de la méthode Affiche dans le Thread {0} : {1:hh:mm:ss}",Thread.CurrentThread.Name,DateTime.Now);
            // sleep for 1 s
            Thread.Sleep(1000);
            // display end of run
            Console.WriteLine("Fin d'exécution de la méthode Affiche dans le Thread {0} : {1:hh:mm:ss}", Thread.CurrentThread.Name, DateTime.Now);
        }
    }
}
- lines 8-10: we give a name to the thread executing the method [Main]
- Lines 13–21: Five threads are created and executed. The thread references are stored in an array so they can be retrieved later. Each thread executes the Affiche method in lines 27–35.
- Line 20: Thread #i is launched. This operation is non-blocking. Thread #i will run in parallel with the thread of the [Main] method that launched it.
- Line 24: The thread executing the [Main] method terminates.
- Lines 27–35: The [Affiche] method performs output operations. It displays the name of the thread executing it, as well as the start and end times of execution.
- Line 31: Any thread executing the [Affiche] method will pause for 1 second. The processor will then be handed over to another thread waiting for the processor. At the end of the one-second pause, the paused thread will become a candidate for the processor. It will receive it when its turn comes. This depends on various factors, including the priority of the other threads waiting for the processor.
The results are as follows:
These results are very informative:
- first, we see that starting a thread’s execution is not blocking. The Main method started the execution of 5 threads in parallel and finished executing before they did. The operation
starts the execution of the thread tâches[i], but once this is done, execution immediately continues with the next statement without waiting for the thread to finish.
- All created threads must execute the Display method. The execution order is unpredictable. Even though in the example, the execution order appears to follow the order of execution requests, no general conclusions can be drawn from this. The operating system here has 6 threads and one processor. It will allocate the processor to these 6 threads according to its own rules.
- The results show an effect of the Sleep method. In the example, thread 0 is the first to execute the Affiche method. The start-of-execution message is displayed, then it executes the Sleep method, which suspends it for 1 second. It then loses the processor, which becomes available to another thread. The example shows that thread 1 will obtain it. Thread 1 will follow the same path as the other threads. When the one-second sleep period for thread 0 ends, its execution can resume. The system grants it the processor, and it can complete the execution of the Affiche method.
Let’s modify our program to end the Main method with the following instructions:
            // end of hand
            Console.WriteLine("Fin du thread " + main.Name);
            // stop all threads
Environment.Exit(0);
Running the new program yields the following results:
- Lines 1–5: The threads created by the Main function begin execution and are suspended for 1 second
- Line 6: The thread [Main] regains the CPU and executes the instruction:
This instruction stops all threads in the application, not just the Main thread.
If the Main method wants to wait for the threads it created to finish executing, it can use the Join method of the Thread class:
        public static void Main() {
...
            // we wait for all threads
            for (int i = 0; i < tâches.Length; i++) {
                // wait for thread i to finish execution
                tâches[i].Join();
            }
            // end of hand
            Console.WriteLine("Fin du thread {0} à {1:hh:mm:ss}", main.Name, DateTime.Now);
}
- Line 6: The thread [Main] waits for each of the threads. It is first blocked waiting for thread #1, then thread #2, and so on. Ultimately, when it exits the loop in lines 2–5, it is because the 5 threads it launched have finished.
We then obtain the following results:
- Line 11: Thread [Main] ended after the threads it had launched.
10.3. Benefits of threads
Now that we have highlighted the existence of a default thread—the one that executes the Main method—and that we know how to create others, let’s consider the benefits of threads for us and the reasons why we are presenting them here. There is a type of application that lends itself well to the use of threads: Internet client-server applications. We will discuss them in the following chapter. In a client-server Internet application, a server located on machine S1 responds to requests from clients located on remote machines C1, C2, ..., Cn.
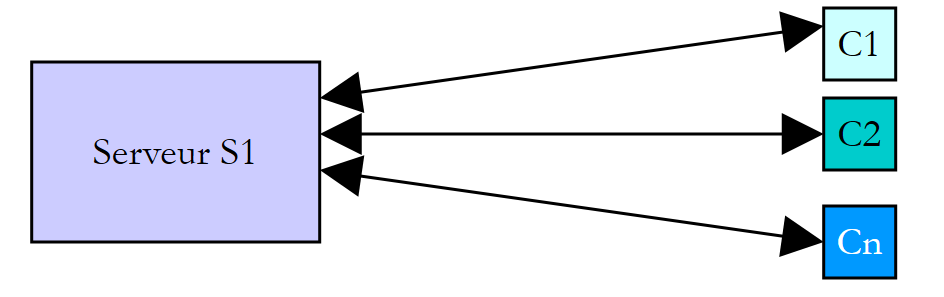 |
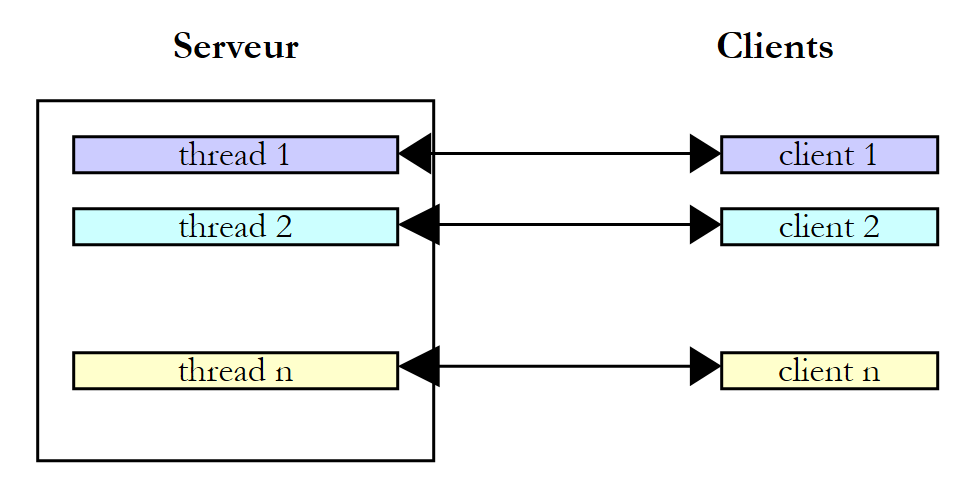
We use Internet applications that follow this pattern every day: web services, email, forum browsing, file transfer... In the diagram above, server S1 must serve the clients Ci simultaneously. If we take the example of a FTP (File Transfer Protocol) server that delivers files to its clients clients, we know that a file transfer can sometimes take several minutes. It is, of course, out of the question for a single client to monopolize the server for such a long period. What is usually done is that the server creates as many execution threads as there are clients clients. Each thread is then responsible for handling a specific client. Since the processor is cyclically shared among all active threads on the machine, the server spends a little time with each client, thereby ensuring the concurrency of the service.
 |
In practice, the server uses a thread pool with a limited number of threads, 50 for example. The 51st client is then asked to wait.
10.4. Information exchange between threads
In the previous examples, a thread was initialized as follows:
where Run was a method with the following signature:
It is also possible to use the following signature:
This allows information to be passed to the launched thread. Thus
will start the thread t, which will then execute the Run method associated with it by default, passing it the actual parameter obj1. Here is an example:
using System;
using System.Threading;

namespace Chap8 {
    class Program4 {
        public static void Main() {
            // init Current thread
            Thread main = Thread.CurrentThread;
            // name the Thread
            main.Name = "Main";

            // creation of execution threads
            Thread[] tâches = new Thread[5];
            Data[] data = new Data[5];
            for (int i = 0; i < tâches.Length; i++) {
                // create thread i
                tâches[i] = new Thread(Sleep);
                // set the thread name
                tâches[i].Name = i.ToString();
                // start execution of thread i
                tâches[i].Start(data[i] = new Data { Début = DateTime.Now, Durée = i+1 });
            }
            // we wait for all threads
            for (int i = 0; i < tâches.Length; i++) {
                // wait for thread i to finish execution
                tâches[i].Join();
                // result display
                Console.WriteLine("Thread {0} terminé : début {1:hh:mm:ss}, durée programmée {2} s, fin {3:hh:mm:ss}, durée effective {4}",
                    tâches[i].Name,data[i].Début,data[i].Durée,data[i].Fin,(data[i].Fin-data[i].Début));
            }
            // end of hand
            Console.WriteLine("Fin du thread {0} à {1:hh:mm:ss}", main.Name, DateTime.Now);
        }

        public static void Sleep(object infos) {
            // parameter is retrieved
            Data data = (Data)infos;
            // sleep mode for Duration
            Thread.Sleep(data.Durée*1000);
            // end of execution
            data.Fin = DateTime.Now;
        }
    }

    internal class Data {
        // miscellaneous information
        public DateTime Début { get; set; }
        public int Durée { get; set; }
        public DateTime Fin { get; set; }
    }
}
- lines 45-50: [Data]-type information passed to the threads:
- Start: time when the thread begins execution—set by the launching thread
- Duration: duration in seconds of the Sleep executed by the launched thread - set by the launching thread
- End: start time of the thread's execution—set by the launched thread
- lines 35-43: the Sleep method executed by the threads has the signature void Sleep(object obj). The actual parameter obj will be of type [Data], defined on line 45.
- lines 15–22: creation of 5 threads
- line 17: each thread is associated with the Sleep method on line 35
- line 21: an object of type [Data] is passed to the Start method, which launches the thread. This object contains the start time of the thread’s execution as well as the duration in seconds for which it must sleep. This object is stored in the array on line 14.
- Lines 24–30: The thread [Main] waits for all the threads it has launched to finish.
- Lines 28–29: The thread [Main] retrieves the object data[i] from thread #i and displays its contents.
- lines 35-42: the Sleep method executed by the threads
- line 37: the parameter of type [Data] is retrieved
- line 39: the Duration field of the parameter is used to set the duration of the Sleep
- Line 41: The End field of the parameter is initialized
The execution results are as follows:
This example shows that two threads can exchange information:
- the calling thread can control the execution of the called thread by providing it with information
- the launched thread can return results to the launching thread.
For the launched thread to know when the results it is waiting for are available, it must be notified of the end of the launched thread. Here, it waited for it to finish using the Join method. There are other ways to do the same thing. We will look at them later.
10.5. Concurrent Access to Shared Resources
10.5.1. Unsynchronized concurrent access
In the section on information exchange between threads, the information was exchanged only between two threads and at very specific times. This was a classic example of parameter passing. There are other cases where information is shared by multiple threads that may want to read or update it at the same time. This raises the issue of the integrity of this information. Suppose the shared information is a structure S containing various pieces of information I1, I2, ... In.
- A thread T1 begins updating structure S: it modifies field I1 and is interrupted before completing the full update of structure S
- A thread T2 that acquires the processor then reads structure S to make decisions. It reads a structure in an unstable state: some fields are up to date, others are not.
This situation is called accessing a shared resource—in this case, the structure S—and it is often quite tricky to manage. Let’s consider the following example to illustrate the problems that can arise:
- an application will generate n threads, where n is passed as a parameter
- the shared resource is a counter that must be incremented by each generated thread
- at the end of the application, the counter’s value is displayed. We should therefore see n.
The program is as follows:
using System;
using System.Threading;

namespace Chap8 {
    class Program {

        // class variables
        static int cptrThreads = 0;    // thread counter

        //hand
        public static void Main(string[] args) {
            // instructions for use
            const string syntaxe = "pg nbThreads";
            const int nbMaxThreads = 100;

            // verification no. of arguments
            if (args.Length != 1) {
                // error
                Console.WriteLine(syntaxe);
                // stop
                Environment.Exit(1);
            }
            // argument quality check
            int nbThreads = 0;
            bool erreur = false;
            try {
                nbThreads = int.Parse(args[0]);
                if (nbThreads < 1 || nbThreads > nbMaxThreads)
                    erreur = true;
            } catch {
                // error
                erreur = true;
            }
            // mistake?
            if (erreur) {
                // error
                Console.Error.WriteLine("Nombre de threads incorrect (entre 1 et 100)");
                // end
                Environment.Exit(2);
            }
            // thread creation and generation
            Thread[] threads = new Thread[nbThreads];
            for (int i = 0; i < nbThreads; i++) {
                // creation
                threads[i] = new Thread(Incrémente);
                // naming
                threads[i].Name = "" + i;
                // launch
                threads[i].Start();
            }//for
            // waiting for threads to finish
            for (int i = 0; i < nbThreads; i++) {
                threads[i].Join();
            }
            // counter display
            Console.WriteLine("Nombre de threads générés : " + cptrThreads);
        }

        public static void Incrémente() {
            // increases thread counter
            // meter reading
            int valeur = cptrThreads;
            // follow-up
            Console.WriteLine("A {0:hh:mm:ss}, le thread {1}  a lu la valeur du compteur : {2}", DateTime.Now, Thread.CurrentThread.Name, cptrThreads);
            // waiting
            Thread.Sleep(1000);
            // counter incrementation
            cptrThreads = valeur + 1;
            // follow-up
            Console.WriteLine("A {0:hh:mm:ss}, le thread {1}  a écrit la valeur du compteur : {2}", DateTime.Now, Thread.CurrentThread.Name, cptrThreads);
        }
    }
}
We won’t dwell on the thread creation part, which we’ve already covered. Instead, let’s focus on the Increment method in line 59, which each thread uses to increment the static counter cptrThreads in line 8.
- line 62: the counter is read
- line 66: the thread pauses for 1 second. It therefore loses the CPU
- line 68: the counter is incremented
Step 2 is only there to force the thread to lose the CPU. The CPU will be given to another thread. In practice, there is no guarantee that a thread will not be interrupted between the moment it reads the counter and the moment it increments it. Even if we write cptrThreads++, giving the illusion of a single instruction, there is a risk of losing the CPU between the moment we read the counter’s value and the moment we write its value incremented by 1. In fact, the high-level operation cptrThreads++ will be broken down into several elementary instructions at the processor level. The one-second sleep step in step 2 is therefore only there to systematize this risk.
The results obtained with 5 threads are as follows:
Looking at these results, it is clear what is happening:
- Line 1: A first thread reads the counter. It finds 0. It pauses for 1 second and thus loses the CPU
- Line 2: A second thread then takes the CPU and also reads the counter value. It is still 0 since the previous thread has not yet incremented it. It also pauses for 1 second and, in turn, loses the CPU.
- Lines 1–5: In 1 second, all 5 threads have time to run and read the value 0.
- Lines 6–10: When they wake up one after another, they will increment the value 0 they read and write the value 1 to the counter, which is confirmed by the main program (Main) on line 11.
Where does the problem come from? The second thread read an incorrect value because the first thread was interrupted before it finished its task, which was to update the counter in the window. This brings us to the concept of critical resources and critical sections in a program:
- a critical resource is a resource that can be held by only one thread at a time. Here, the critical resource is the counter.
- A critical section of a program is a sequence of instructions in a thread’s execution flow during which it accesses a critical resource. We must ensure that during this critical section, it is the only one with access to the resource.
In our example, the critical section is the code between reading the counter and writing its new value:
            // meter reading
            int valeur = cptrThreads;
            // waiting
            Thread.Sleep(1000);
            // counter incrementation
cptrThreads = valeur + 1;
To execute this code, a thread must be guaranteed to be alone. It may be interrupted, but during that interruption, no other thread must be able to execute this same code. The .NET platform offers various tools to ensure single-threaded entry into critical sections of code. We will look at a few of them now.
10.5.2. The lock clause
The lock clause allows you to delimit a critical section as follows:
obj must be an object reference visible to all threads executing the critical section. The lock clause ensures that only one thread at a time will execute the critical section. The previous example is rewritten as follows:
using System;
using System.Threading;

namespace Chap8 {
    class Program2 {

        // class variables
        static int cptrThreads = 0;    // thread counter
        static object synchro = new object(); // synchronization object

        //hand
        public static void Main(string[] args) {
    ...
            // waiting for threads to finish
            Thread.CurrentThread.Name = "Main";
            for (int i = nbThreads - 1; i >= 0; i--) {
                Console.WriteLine("A {0:hh:mm:ss}, le thread {1} attend la fin du thread {2}", DateTime.Now, Thread.CurrentThread.Name, threads[i].Name);
                threads[i].Join();
                Console.WriteLine("A {0:hh:mm:ss}, le thread {1} a été prévenu de la fin du thread {2}", DateTime.Now, Thread.CurrentThread.Name, threads[i].Name);
            }
            // counter display
            Console.WriteLine("Nombre de threads générés : " + cptrThreads);
        }

        public static void Incrémente() {
            // increases thread counter
            // exclusive access to the meter is required
            Console.WriteLine("A {0:hh:mm:ss}, le thread {1}  attend l'autorisation d'entrer dans la section critique", DateTime.Now, Thread.CurrentThread.Name);
            lock (synchro) {
                // meter reading
                int valeur = cptrThreads;
                // follow-up
                Console.WriteLine("A {0:hh:mm:ss}, le thread {1}  a lu la valeur du compteur : {2}", DateTime.Now, Thread.CurrentThread.Name, cptrThreads);
                // waiting
                Thread.Sleep(1000);
                // counter incrementation
                cptrThreads = valeur + 1;
                // follow-up
                Console.WriteLine("A {0:hh:mm:ss}, le thread {1}  a écrit la valeur du compteur : {2}", DateTime.Now, Thread.CurrentThread.Name, cptrThreads);
            }
            Console.WriteLine("A {0:hh:mm:ss}, le thread {1} a quitté la section critique", DateTime.Now, Thread.CurrentThread.Name);
        }
    }
}
- line 9: synchro is the object that will enable synchronization of all threads.
- lines 16–23: The [Main] method waits for the threads in the reverse order of their creation.
- lines 29–40: the critical section of the Increment method has been enclosed by the lock clause.
The results obtained with 3 threads are as follows:
- Thread 0 is the first to enter the critical section: lines 1, 2, 6, 8
- The other two threads will be blocked until thread 0 exits the critical section: lines 3 and 4
- Thread 1 then proceeds: lines 7, 9, 10
- Thread 2 then proceeds: lines 11, 12, 13
- Line 14: The Main thread, which was waiting for thread 2 to finish, is notified
- line 15: the Main thread is now waiting for thread 1 to finish. Thread 1 has already finished. The Main thread is notified immediately, line 16.
- lines 17–18: the same process occurs with thread 0
- line 19: the number of threads is correct
10.5.3. The Mutex class
The System.Threading.Mutex class also allows you to delimit critical sections. It differs from the lock clause in terms of visibility:
- the lock clause allows you to synchronize threads within the same application
- the Mutex class allows you to synchronize threads from different applications.
We will use the following constructor and methods:
creates a Mutex M | |
Thread T1, which executes the operation M.WaitOne(), requests ownership of the synchronization object M. If the mutex M is not held by any thread (which is the case initially), it is "granted" to thread T1, which requested it. If, a little later, thread T2 attempts the same operation, it will be blocked. This is because a mutex can belong to only one thread at a time. It will be released when thread T1 releases the mutex M it holds. Consequently, multiple threads may be blocked while waiting for mutex M. | |
Thread T1, which performs the operation M.ReleaseMutex(), relinquishes ownership of the Mutex M. When thread T1 loses the processor, the system can grant it to one of the threads waiting for Mutex M. Only one will obtain it in turn; the others waiting for M remain blocked |
A mutex M manages access to a shared resource R. A thread requests resource R via M.WaitOne() and returns it via M.ReleaseMutex(). A critical section of code that must be executed by only one thread at a time is a shared resource. Synchronization of the critical section’s execution can be done as follows:
where M is a Mutex object. It is important to release a Mutex that is no longer needed so that another thread can enter the critical section; otherwise, threads waiting for the Mutex that was never released will never gain access to the processor.
If we apply what we’ve just seen to the previous example, our application becomes the following:
using System;
using System.Threading;

namespace Chap8 {
    class Program3 {

        // class variables
        static int cptrThreads = 0;    // thread counter
        static Mutex synchro = new Mutex(); // synchronization object

        //hand
        public static void Main(string[] args) {
    ...
        }

        public static void Incrémente() {
....
            synchro.WaitOne();
            try {
...
            } finally {
...
                synchro.ReleaseMutex();
            }
        }
    }
}
- line 9: the thread synchronization object is now a Mutex.
- line 18: start of the critical section—only one thread should enter it. We wait until the synchronization Mutex is free.
- line 33: Because a Mutex must always be released, regardless of whether an exception occurs, we handle the critical section with a try/finally block to release the Mutex in the finally block.
- line 23: the Mutex is released once the critical section is over.
The results obtained are the same as before.
10.5.4. The AutoResetEvent class
A AutoResetEvent object is a barrier that allows only one thread to pass at a time, like the two previous tools, lock and Mutex. We construct a AutoResetEvent object as follows:
The boolean state indicates whether the barrier is closed (false) or open (true). A thread wishing to pass through the barrier will do so as follows:
- If the barrier is open, the thread passes through and the barrier is closed behind it. If multiple threads were waiting, we are assured that only one will pass.
- If the barrier is closed, the thread is blocked. Another thread will open it when the time comes. This timing depends entirely on the problem being addressed. The barrier will be opened by the operation:
It may happen that a thread wants to close a barrier. It can do so using:
If, in the previous example, we replace the Mutex object with an object of type AutoResetEvent, the code becomes the following:
using System;
using System.Threading;

namespace Chap8 {
    class Program4 {

        // class variables
        static int cptrThreads = 0;    // thread counter
        static EventWaitHandle synchro = new AutoResetEvent(false); // synchronization object

        //hand
        public static void Main(string[] args) {
....
            // we open the critical section barrier
            Console.WriteLine("A {0:hh:mm:ss}, le thread {1} ouvre la barrière de la section critique", DateTime.Now, Thread.CurrentThread.Name);
            synchro.Set();
            // waiting for threads to finish
...
            // counter display
            Console.WriteLine("Nombre de threads générés : " + cptrThreads);
        }

        public static void Incrémente() {
            // increases thread counter
            // exclusive access to the meter is required
...
            synchro.WaitOne();
            try {
...
            } finally {
                // release the resource
...
                synchro.Set();
            }
        }
    }
}
- Line 9: The barrier is created in a closed state. It will be opened by the Main thread on line 16.
- line 27: the thread responsible for incrementing the thread counter requests permission to enter the critical section. The various threads will accumulate in front of the closed barrier. When the Main thread opens it, one of the waiting threads will pass through.
- line 33: when it has finished its work, it reopens the barrier, allowing another thread to enter.
We obtain results similar to the previous ones.
10.5.5. The Interlocked Class
The Interlocked class allows a group of operations to be made atomic. In an atomic group of operations, either all operations are executed by the thread executing the group, or none are. We do not end up in a state where some have been executed and others have not. The synchronization objects lock, Mutex, and AutoResetEvent all serve the purpose of making a group of operations atomic. This result is achieved at the cost of blocking threads. The Interlocked class allows, for simple but fairly frequent operations, the avoidance of thread blocking. The Interlocked class offers the following static methods:

The Increment method has the following signature:
It increments the location parameter by 1. The operation is guaranteed to be atomic.
Our thread counting program can then be as follows:
using System;
using System.Threading;

namespace Chap8 {
    class Program5 {

        // class variables
        static int cptrThreads = 0;    // thread counter

        //hand
        public static void Main(string[] args) {
...
        }

        public static void Incrémente() {
            // increments the thread counter
            Interlocked.Increment(ref cptrThreads);
        }
    }
}
- line 17: the thread counter is incremented atomically.
10.6. Concurrent access to multiple shared resources
10.6.1. An example
In our previous examples, a single resource was shared by the different threads. The situation can become more complicated if there are several resources and they are dependent on one another. In particular, a deadlock situation may arise. This situation, also known as a deadlock, is one in which two threads are waiting for each other. Consider the following actions, which occur sequentially:
- a thread T1 acquires ownership of a Mutex M1 to access a shared resource R1
- a thread T2 acquires a Mutex M2 to access a shared resource R2
- Thread T1 requests Mutex M2. It is blocked.
- Thread T2 requests Mutex M1. It is blocked.
Here, threads T1 and T2 are waiting for each other. This situation occurs when threads need two shared resources: resource R1 controlled by Mutex M1 and resource R2 controlled by Mutex M2. One possible solution is to request both resources at the same time using a single mutex M. However, this is not always possible if, for example, it results in a long lock-in of a costly resource. Another solution is for a thread holding M1 that cannot obtain M2 to release M1 to avoid deadlock.
- We have an array where some threads write data (writers) and others read it (readers).
- The writers are equal to one another but exclusive: only one writer at a time can deposit data into the array.
- Readers are equal to one another but exclusive: only one reader at a time can read the data stored in the array.
- A reader can only read data from the array when a writer has placed data in it, and a writer can only place new data in the array when the data already there has been read by a reader.
We can distinguish between two types of shared resources:
- the writable table: only one writer at a time may access it.
- the read-only table: only one reader at a time may access it.
and an order for using these resources:
- a reader must always follow a writer.
- A writer must always follow a reader, except the first time.
Access to these two resources can be controlled using two barriers of type AutoResetEvent:
- The peutEcrire barrier will control writers' access to the array.
- The peutLire barrier will control readers' access to the array.
- The peutEcrire barrier will be created initially open, allowing a first writer to pass through and blocking all others.
- The barrier peutLire will be created initially closed, blocking all readers.
- When a writer has finished their work, they will open the peutLire barrier to let a reader in.
- When a reader has finished their work, they will open the barrier peutEcrire to let a writer in.
The program illustrating this event-driven synchronization is as follows:
using System;
using System.Threading;

namespace Chap8 {
    class Program {
        // use of reader and writer threads
        // illustrates the use of synchronization events


        // class variables
        static int[] data = new int[3];    // resource shared between reader and writer threads
        static Random objRandom = new Random(DateTime.Now.Second);    // a random number generator
        static AutoResetEvent peutLire;    // indicates that the contents of data can be read
        static AutoResetEvent peutEcrire;    // indicates that you can write the contents of data

        //hand
        public static void Main(string[] args) {

            // number of threads to generate
            const int nbThreads = 2;

            // flag initialization
            peutLire = new AutoResetEvent(false);    // cannot be read yet
            peutEcrire = new AutoResetEvent(true);    // we can already write

            // creation of reader threads
            Thread[] lecteurs = new Thread[nbThreads];
            for (int i = 0; i < nbThreads; i++) {
                // creation
                lecteurs[i] = new Thread(Lire);
                lecteurs[i].Name = "L" + i.ToString();
                // launch
                lecteurs[i].Start();
            }

            // creating writer threads
            Thread[] écrivains = new Thread[nbThreads];
            for (int i = 0; i < nbThreads; i++) {
                // creation
                écrivains[i] = new Thread(Ecrire);
                écrivains[i].Name = "E" + i.ToString();
                // launch
                écrivains[i].Start();
            }

            //end of hand
            Console.WriteLine("Fin de Main...");
        }

        // read the contents of the table
        public static void Lire() {
...
        }

        // write in the table
        public static void Ecrire() {
....
        }
    }
}
- line 11: the array data is the shared resource between the reader and writer threads. It is shared for reading by the reader threads and for writing by the writer threads.
- line 13: the object peutLire is used to notify the reader threads that they can read the array data. It is set to true by the writer thread that has filled the array data. It is initialized to false on line 23. A writer thread must first fill the array before setting the peutLire event to true.
- Line 14: The object peutEcrire is used to notify writer threads that they can write to the array data. It is set to true by the reader thread that has processed the entire array data. It is initialized to true on line 24. In fact, the array data is writable.
- lines 27–34: creation and launch of reader threads
- Lines 37–44: creation and launch of writer threads
The Read method executed by the reader threads is as follows:
public static void Lire() {
            // follow-up
            Console.WriteLine("Méthode [Lire] démarrée par le thread n° {0}", Thread.CurrentThread.Name);
            // we have to wait for reading authorization
            peutLire.WaitOne();
            // table reading
            for (int i = 0; i < data.Length; i++) {
                //wait 1 s
                Thread.Sleep(1000);
                // display
                Console.WriteLine("{0:hh:mm:ss} : Le lecteur {1} a lu le nombre {2}", DateTime.Now, Thread.CurrentThread.Name, data[i]);
            }
            // we can write
            peutEcrire.Set();
            // follow-up
            Console.WriteLine("Méthode [Lire] terminée par le thread n° {0}", Thread.CurrentThread.Name);
        }
- line 5: we wait for a writer thread to signal that the array has been filled. When this signal is received, only one of the reader threads waiting for this signal will be able to proceed.
- lines 7-12: processing the array data with a Sleep in the middle to force the thread to yield the CPU.
- line 14: tells the writer threads that the array has been read and can be filled again.
The Write method executed by the writer threads is as follows:
public static void Ecrire() {
            // follow-up
            Console.WriteLine("Méthode [Ecrire] démarrée par le thread n° {0}", Thread.CurrentThread.Name);
            // we have to wait for write authorization
            peutEcrire.WaitOne();
            // writing table
            for (int i = 0; i < data.Length; i++) {
                //wait 1 s
                Thread.Sleep(1000);
                // display
                data[i] = objRandom.Next(0, 1000);
                Console.WriteLine("{0:hh:mm:ss} : L'écrivain {1} a écrit le nombre {2}", DateTime.Now, Thread.CurrentThread.Name, data[i]);
            }
            // you can read
            peutLire.Set();
            // follow-up
            Console.WriteLine("Méthode [Ecrire] terminée par le thread n° {0}", Thread.CurrentThread.Name);
        }
- line 5: we wait for a reader thread to signal that the array has been read. When this signal is received, only one of the writer threads waiting for this signal will be able to proceed.
- lines 7-13: processing the array data with a Sleep in the middle to force the thread to yield the CPU.
- Line 15: Notifies the reader threads that the array has been filled and can be read again.
Execution yields the following results:
The following points can be noted:
- there is indeed only one reader at a time, although it loses the CPU in the Read critical section
- there is indeed only one writer at a time, although it loses the CPU in the Write critical section
- A reader only reads when there is something to read in the array
- A writer writes only when the array has been fully read
10.6.2. The Monitor class
In the previous example:
- there are two shared resources to manage
- for a given resource, the threads are equal.
When the writer threads are blocked on the peutEcrire.WaitOne statement, one of them—any one—is unblocked by the peutEcrire.Set operation. If the previous operation must open the barrier for a specific writer, things become more complicated.
We can draw an analogy with a public service facility with counters, where each counter specializes in a specific service. When a customer arrives, they take a ticket from the ticket dispenser for counter X and then go sit down. Each ticket is numbered, and the clients operations are called by their number over a loudspeaker. While waiting, the customer does whatever they want. They can read or doze off. They are woken up each time by the loudspeaker announcing that number Y is being called to counter X. If it is their turn, the customer gets up and goes to counter X; otherwise, they continue what they were doing.
We can operate in a similar way here. Let’s take the example of writers:
their threads are blocked | |
The thread that was reading the array tells the writers that the array is available. It or another thread has selected the writer thread that must pass the barrier. | |
Each thread checks to see if it is the chosen one. If so, it passes through the barrier. If not, it goes back to waiting. |
The Monitor class allows you to implement this scenario.
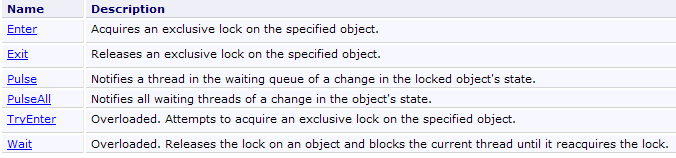
We will now describe a standard pattern, proposed in the Threading chapter of the C# 3.0 book referenced in the introduction to this document, capable of resolving barrier problems with entry conditions.
- First, the threads that share a resource (the counter, etc.) access it via an object we will call a token. To open the barrier leading to the counter, you must have the token, and there is only one token. The threads must therefore pass the token among themselves.
- To go to the counter, the threads first request the token:
If the token is available, it is given to the thread that executed the previous operation; otherwise, the thread is put on hold for the token.
- If access to the counter is unordered, c.a.d. in cases where the person entering does not matter, the previous operation is sufficient. The thread holding the token goes to the counter. If access is ordered, the thread holding the token checks that it meets the condition to go to the counter:
If the thread is not the one expected at the counter, it yields its turn by returning the token. It enters a blocked state. It will be awakened as soon as the token becomes available to it again. It will then check again whether it meets the condition to proceed to the counter. The operation Monitor.Wait(token), which releases the token, can only be performed if the thread owns the token. If this is not the case, an exception is thrown.
- The thread that checks the condition for going to the counter proceeds there:
- // work at the counter
- ....
Before leaving the counter, the thread must return its token; otherwise, the threads blocked while waiting for it will remain blocked indefinitely. There are two different situations:
- the first situation is where the thread holding the token is also the one that signals to the threads waiting for the token that it is free. It will do so as follows:
Line 6 wakes up the threads waiting for the token. This wake-up means they become eligible to receive the token. It does not mean they receive it immediately. Line 8 releases the token. All eligible threads will receive the token in turn, in a non-deterministic manner. This will give them the opportunity to check again whether they satisfy the access condition. The thread that released the token modified this condition on line 4 to allow a new thread to enter. The first one to satisfy it keeps the token and proceeds to the counter in turn.
- The second situation is one where the thread holding the token is not the one responsible for signaling to the threads waiting for the token that it is free. It must nevertheless release it because the thread tasked with sending this signal must be the token holder. It will do so using the operation:
The token is now available, but the threads waiting for it (they performed a Wait(token) operation) are not notified. This task is entrusted to another thread that, at some point, will execute code similar to the following:
Ultimately, the standard construction proposed in the Threading chapter of the C# 3.0 book is as follows:
- define the token for accessing the counter:
- request access to the counter:
is equivalent to
Note that in this scheme, the token is released immediately once the barrier is passed. Another thread can then check the access condition. The previous construct therefore allows all threads checking the access condition to enter. If this is not the desired behavior, we can write:
where the token is released only after the thread has accessed the counter.
- modify the condition for accessing the counter and notify the other threads
lock(jeton){
     // modify counter access conditions
    ...
     // notify threads waiting for the token
    Monitor.PulseAll(jeton);
}
In the code above, the access condition can only be modified by the thread holding the token. We could also write:
     // modify counter access conditions
    ...
     // notify threads waiting for the token
    Monitor.PulseAll(jeton);
     // release the token
    Monitor.Exit(jeton);
if the thread already has the token.
With this information, we can rewrite the reader/writer application by establishing an order for readers and writers to access their respective slots. The code is as follows:
using System;
using System.Threading;

namespace Chap8 {
    class Program2 {
        // use of reader and writer threads
        // illustrates the use of synchronization events


        // class variables
        static int[] data = new int[3];            // resource shared between reader and writer threads
        static Random objRandom = new Random(DateTime.Now.Second);    // a random number generator
        static object peutLire = new object();        // indicates that the contents of data can be read
        static object peutEcrire = new object();    // indicates that you can write the contents of data
        static bool lectureAutorisée = false;    // to authorize the reading of the table
        static bool écritureAutorisée = false;    // to authorize writing in the table
        static string[] ordreLecture;    // sets the order of readers
        static string[] ordreEcriture;    // sets the order for writers
        static int lecteurSuivant = 0;    // indicates the next drive number
        static int écrivainSuivant = 0;    // indicates the number of the following writer

        //hand
        public static void Main(string[] args) {

            // number of threads to generate
            const int nbThreads = 5;

            // creation of reader threads
            Thread[] lecteurs = new Thread[nbThreads];
            for (int i = 0; i < nbThreads; i++) {
                // creation
                lecteurs[i] = new Thread(Lire);
                lecteurs[i].Name = "L" + i.ToString();
                // launch
                lecteurs[i].Start();
            }

            // create playback order
            ordreLecture = new string[nbThreads];
            for (int i = 0; i < nbThreads; i++) {
                ordreLecture[i] = lecteurs[nbThreads - i - 1].Name;
                Console.WriteLine("Le lecteur {0} est en position {1}", ordreLecture[i], i);
            }

            // creating writer threads
            Thread[] écrivains = new Thread[nbThreads];
            for (int i = 0; i < nbThreads; i++) {
                // creation
                écrivains[i] = new Thread(Ecrire);
                écrivains[i].Name = "E" + i.ToString();
                // launch
                écrivains[i].Start();
            }

            // creation of writing order
            ordreEcriture = new string[nbThreads];
            for (int i = 0; i < nbThreads; i++) {
                ordreEcriture[i] = écrivains[i].Name;
                Console.WriteLine("L'écrivain {0} est en position {1}", ordreEcriture[i], i);
            }

             // write authorization
            lock (peutEcrire) {
               écritureAutorisée = true;
                Monitor.Pulse(peutEcrire);
            }


            //end of hand
            Console.WriteLine("Fin de Main...");
        }

        // read the contents of the table
        public static void Lire() {
...
        }

        // write in the table
        public static void Ecrire() {
...
        }
    }
}
Access to the reading terminal is subject to the following conditions:
- line 13: token peutLire
- line 15: the Boolean lectureAutorisée
- line 17: the ordered array of readers. Readers proceed to the reading counter in the order of this array, which contains their names.
- line 19: lecteurSuivant indicates the number of the next reader authorized to go to the counter.
Access to the write counter is determined by the following elements:
- line 14: the token peutEcrire
- line 16: the Boolean écritureAutorisée
- line 18: the ordered array of writers. Writers proceed to the write counter in the order of this array, which contains their names.
- line 20: écrivainSuivant indicates the number of the next writer authorized to go to the counter.
The other elements of the code are as follows:
- lines 29–36: creation and launch of reader threads. They will all be blocked because reading is not permitted (line 15).
- Lines 39–43: Their order of service at the counter will be in reverse order of their creation.
- lines 46-53: creation and launch of writer threads. They will all be blocked because writing is not permitted (line 16).
- lines 56-60: their order of service at the counter will be in the order of their creation.
- Line 64: Writing is permitted
- line 65: writers are notified that something has changed.
The Read method is as follows:
        public static void Lire() {
            // follow-up
            Console.WriteLine("Méthode [Lire] démarrée par le thread n° {0}", Thread.CurrentThread.Name);
            // we have to wait for reading authorization
            lock (peutLire) {
                while (!lectureAutorisée || ordreLecture[lecteurSuivant] != Thread.CurrentThread.Name) {
                    Monitor.Wait(peutLire);
                }
                // table reading
                for (int i = 0; i < data.Length; i++) {
                    //wait 1 s
                    Thread.Sleep(1000);
                    // display
                    Console.WriteLine("{0:hh:mm:ss} : Le lecteur {1} a lu le nombre {2}", DateTime.Now, Thread.CurrentThread.Name, data[i]);
                }
                 // next reader
                lectureAutorisée = false;
                lecteurSuivant++;
                // writers are warned that they can write
                lock (peutEcrire) {
                    écritureAutorisée = true;
                    Monitor.PulseAll(peutEcrire);
                }

                // follow-up
                Console.WriteLine("Méthode [Lire] terminée par le thread n° {0}", Thread.CurrentThread.Name);
            }
}
- All access to the counter is controlled by the lock in lines 5–27. The reader who acquires the token holds it for the duration of their visit to the counter
- Lines 6–8: A reader who has acquired the token on line 5 releases it if reading is not permitted or if it is not their turn.
- Lines 10–15: Interaction at the counter (processing the array)
- Lines 17–18: The thread changes the access conditions for the read counter. Note that it still holds the read token and that these changes do not yet allow a reader to proceed.
- lines 20–23: the thread changes the access conditions for the write queue and notifies all waiting writers that something has changed.
- line 27: the lock is released, and the token peutLire is released. A read thread could then acquire it on line 5, but it would not pass the access condition since the boolean lectureAutorisée is false. Furthermore, all threads waiting for the token peutLire remain in that state because the operation PulseAll(peutLire) has not yet taken place.
The Write method is as follows:
        public static void Ecrire() {
            // follow-up
            Console.WriteLine("Méthode [Ecrire] démarrée par le thread n° {0}", Thread.CurrentThread.Name);
            // we have to wait for write authorization
            lock (peutEcrire) {
                while (!écritureAutorisée || ordreEcriture[écrivainSuivant] != Thread.CurrentThread.Name) {
                    Monitor.Wait(peutEcrire);
                }
                // writing table
                for (int i = 0; i < data.Length; i++) {
                    //wait 1 s
                    Thread.Sleep(1000);
                    // display
                    data[i] = objRandom.Next(0, 1000);
                    Console.WriteLine("{0:hh:mm:ss} : L'écrivain {1} a écrit le nombre {2}", DateTime.Now, Thread.CurrentThread.Name, data[i]);
                }
                // next writer
                écritureAutorisée = false;
                écrivainSuivant++;
                // wake up readers waiting for the peutLire token
                lock (peutLire) {
                    lectureAutorisée = true;
                    Monitor.PulseAll(peutLire);
                }
                // follow-up
                Console.WriteLine("Méthode [Ecrire] terminée par le thread n° {0}", Thread.CurrentThread.Name);
            }
}
- All access to the write queue is controlled by the lock in lines 5–27. The writer who acquires the token holds it for the duration of its time at the queue
- Lines 6–8: A writer who has acquired the token on line 5 releases it if the write is not authorized or if it is not their turn.
- Lines 10–16: Interaction at the counter (processing the array)
- lines 18–19: the thread changes the access conditions for the write queue. Note that it still holds the write token and that these changes do not yet allow a writer to proceed.
- lines 21–24: the thread changes the access conditions for the read queue and notifies all waiting readers that something has changed.
- line 27: the lock is released, and the token peutEcrire is released. A write thread could then acquire it on line 5, but it would not pass the access condition since the boolean écritureAutorisée is false. Furthermore, all threads waiting for the token peutEcrire remain waiting for a new operation PulseAll(peutEcrire).
An example of execution is as follows:
10.7. Thread pools
Until now, to manage threads:
- we created them using Thread T = new Thread(...)
- then executed them using T.Start()
We saw in the "Databases" chapter that with certain SGBD functions, it was possible to have pools of open connections:
- n connections are opened when the pool starts
- when a thread requests a connection, it is given one of the open connections from the pool
- when the thread closes the connection, it is not closed but returned to the pool
The use of a connection pool is transparent at the code level. The benefit lies in improved performance: opening a connection is costly. Here, 10 open connections can handle hundreds of requests.
A similar system exists for threads:
- min threads are created when the pool starts. The value of min is set using the method ThreadPool.SetMinThreads(min1,min2). A thread pool can be used to execute blocking or non-blocking tasks, known as asynchronous tasks. The first parameter, min1, sets the number of blocking threads, and the second, min2, sets the number of asynchronous threads. The current values of these two parameters can be obtained via ThreadPool.GetMinThreads(out min1,out min2).
- If this number is insufficient, the pool will create additional threads to handle requests up to the max threads limit. The value of max is set using the method ThreadPool.SetMaxThreads(max1,max2). The two parameters have the same meaning as in the method SetMinThreads. The current values of these two parameters can be obtained using ThreadPool.GetMaxThreads(out max1,out max2). Once the max1 limit is reached, requests for threads for blocking tasks will be queued until a free thread becomes available in the pool.
A thread pool offers various advantages:
- As with the connection pool, it saves time on thread creation: 10 threads can handle hundreds of requests.
- it secures the application: by setting a maximum number of threads, the application is prevented from being overwhelmed by too many requests. These requests will be queued.
To assign a task to a thread in the pool, use one of the following methods:
- ThreadPool.QueueWorkItem(WaitCallBack)
- ThreadPool.QueueWorkItem(WaitCallBack,object)
where WaitCallBack is any method with the signature void WaitCallBack(object). Method 1 instructs a thread to execute the method WaitCallBack without passing any parameters to it. Method 2 does the same thing but passes a parameter of type object to the method WaitCallBack.
Here is a program illustrating these concepts:
using System;
using System.Threading;

namespace Chap8 {
    class Program {
        public static void Main() {
            // init Current thread
            Thread main = Thread.CurrentThread;
            // name the Thread
            main.Name = "Main";

            // we use a thread pool
            int min1, min2;
            // set the minimum number of blocking threads
            ThreadPool.GetMinThreads(out min1, out min2);
            Console.WriteLine("Nombre minimum de tâches bloquantes dans le pool : {0}", min1);
            Console.WriteLine("Nombre minimum de tâches asynchrones dans le pool : {0}", min2);
            ThreadPool.SetMinThreads(3, min2);
            ThreadPool.GetMinThreads(out min1, out min2);
            Console.WriteLine("Nombre minimum de tâches bloquantes dans le pool après changement : {0}", min1);
            // set the maximum number of blocking threads
            int max1, max2;
            ThreadPool.GetMaxThreads(out max1, out max2);
            Console.WriteLine("Nombre maximum de tâches bloquantes dans le pool : {0}", max1);
            Console.WriteLine("Nombre maximum de tâches asynchrones dans le pool : {0}", max2);
            ThreadPool.SetMaxThreads(5, max2);
            ThreadPool.GetMaxThreads(out max1, out max2);
            Console.WriteLine("Nombre maximum de tâches bloquantes dans le pool après changement : {0}", max1);
            // 7 threads are executed
            for (int i = 0; i < 7; i++) {
                // start execution of thread i in a pool
                ThreadPool.QueueUserWorkItem(Sleep, new Data2 { Numéro = i.ToString(), Début = DateTime.Now, Durée = i + 10 });
            }
            // end of hand
            Console.Write("Tapez [entrée] pour terminer le thread {0} à {1:hh:mm:ss:FF}", main.Name, DateTime.Now);
            // waiting
            Console.ReadLine();
        }

        public static void Sleep(object infos) {
            // parameter is retrieved
            Data2 data = infos as Data2;
            Console.WriteLine("A {2:hh:mm:ss:FF}, le thread n° {0} va dormir pendant {1} seconde(s)", data.Numéro, data.Durée,DateTime.Now);
            // pool status
            int cpt1, cpt2;
            ThreadPool.GetAvailableThreads(out cpt1, out cpt2);
            Console.WriteLine("Nombre de threads pour tâches bloquantes disponibles dans le pool : {0}", cpt1);
            // sleep mode for Duration
            Thread.Sleep(data.Durée * 1000);
            // end of execution
            data.Fin = DateTime.Now;
            Console.WriteLine("A {3:hh:mm:ss:FF}, le thread n° {0} se termine. Il était programmé pour durer {1} seconde(s). Il a duré {2} seconde(s)", data.Numéro, data.Durée, data.Fin - data.Début,DateTime.Now);
        }
    }

    internal class Data2 {
        // miscellaneous information
        public string Numéro { get; set; }
        public DateTime Début { get; set; }
        public int Durée { get; set; }
        public DateTime Fin { get; set; }
    }
}
- lines 15–17: we query and display the current minimum number of both types of threads in the thread pool
- line 18: we change the minimum number of threads for blocking tasks to 2
- lines 19–21: display the new minimums
- lines 22–28: we do the same to set the maximum number of threads for blocking tasks: 5
- lines 30–33: we execute 7 tasks in a pool of 5 threads. 5 tasks should get 1 thread each; the first 2 should get one quickly since 2 threads are always available, while the other 3 should have a wait time of 0.5 seconds. 2 tasks should wait for a thread to become available.
- line 32: the tasks call the Sleep method in lines 40–54, passing it a Data2 parameter defined in lines 56–62.
- Line 40: The Sleep method executed by the tasks
- Line 42: The parameter passed to the Sleep method is retrieved.
- Line 43: The task prints its name to the console
- Lines 45–47: We display the number of threads currently available. We want to see how it changes.
- line 49: the task pauses for a few seconds (blocking task).
- line 52: when it wakes up, we display some information about its account.
The results obtained are as follows.
For the minimum and maximum number of threads in the pool:
For the execution of the 7 threads:
- Lines 1–6: The first 3 tasks are executed one after another. They immediately find 1 available thread (MinThreads=3) and then go to sleep.
- Lines 7–9: For tasks 3 and 4, it’s a bit more complicated (long). For each of them, there was no free thread. A new one had to be created. This mechanism is possible up to 5 (MaxThreads=5).
- line 10: there are no more threads available: tasks 5 and 6 will have to wait.
- Lines 11–12: Task 0 finishes. Task 5 takes its thread.
- Lines 13–14: Task 1 finishes. Task 6 takes its thread.
- Lines 17–21: The tasks finish one after another.
10.8. The BackgroundWorker class
10.8.1. Example 1
The BackgroundWorker class belongs to the [System.ComponentModel] namespace. It is used like a thread but has specific features that may, in some cases, make it more useful than the [Thread] class:
- it emits the following events:
- DoWork: a thread has requested the execution of BackgroundWorker
- ProgressChanged: the BackgroundWorker object executed the ReportProgress method. This method is used to provide an execution percentage.
- RunWorkerCompleted: The BackgroundWorker object has completed its work. It may have completed normally, or due to cancellation or an exception.
These events make BackgroundWorker useful in graphical interfaces: a long-running task will be assigned to a BackgroundWorker, which can report its progress using the ProgressChanged event and its completion using the RunWorkerCompleted event. The work to be performed by the BackgroundWorker will be carried out by a method associated with the DoWork event.
- It is possible to request its cancellation. In a graphical user interface, a long-running task can thus be canceled by the user.
- BackgroundWorker objects belong to a pool and are recycled as needed. An application that needs a BackgroundWorker object will obtain it from the pool, which will provide an existing but unused thread. Recycling threads in this way, rather than creating a new one each time, improves performance.
We use this tool in the previous application when access to the thread pool is uncontrolled:
using System;
using System.Threading;
using System.ComponentModel;

namespace Chap8 {
    class Program2 {
        // use of reader and writer threads
        // illustrates the simultaneous use of shared resources and synchronization

        // class variables
        const int nbThreads = 2;                    // total number of threads
        static int nbLecteursTerminés = 0;        // number of terminated threads
        static int[] data = new int[5];            // shared array between reader and writer threads
        static object appli;                            // synchronizes access to number of completed threads
        static Random objRandom = new Random(DateTime.Now.Second);    // a random number generator
        static AutoResetEvent peutLire;        // indicates that the contents of the table can be read
        static AutoResetEvent peutEcrire;        // points out that we can write in the table
        static AutoResetEvent finLecteurs;    // signals the end of readers

        //hand
        public static void Main(string[] args) {

            // give the thread a name
            Thread.CurrentThread.Name = "Main";

            // flag initialization
            peutLire = new AutoResetEvent(false);        // cannot be read yet
            peutEcrire = new AutoResetEvent(true);    // we can already write
            finLecteurs = new AutoResetEvent(false);    // application not completed

            // synchronizes access to terminated thread counter
            appli = new object();

            // creation of reader threads
            MyBackgroundWorker[] lecteurs = new MyBackgroundWorker[nbThreads];
            for (int i = 0; i < nbThreads; i++) {
                // creation
                lecteurs[i] = new MyBackgroundWorker();
                lecteurs[i].Numéro = "L" + i;
                lecteurs[i].DoWork += Lire;
                lecteurs[i].RunWorkerCompleted += EndLecteur;
                // launch
                lecteurs[i].RunWorkerAsync();
            }

            // creating writer threads
            MyBackgroundWorker[] écrivains = new MyBackgroundWorker[nbThreads];
            for (int i = 0; i < nbThreads; i++) {
                // creation
                écrivains[i] = new MyBackgroundWorker();
                écrivains[i].Numéro = "E" + i;
                écrivains[i].DoWork += Ecrire;
                // launch
                écrivains[i].RunWorkerAsync();
            }

            // wait for all threads to finish
            finLecteurs.WaitOne();
            //end of hand
            Console.WriteLine("Fin de Main...");
        }

        public static void EndLecteur(object sender, RunWorkerCompletedEventArgs infos) {
...
        }

        // read the contents of the table
        public static void Lire(object sender, DoWorkEventArgs infos) {
...
        }

        // write in the table
        public static void Ecrire(object sender, DoWorkEventArgs infos) {
...
        }
    }

    // thread
    internal class MyBackgroundWorker : BackgroundWorker {
        // miscellaneous information
        public string Numéro { get; set; }
    }

}
We will only detail the changes:
- The Thread class is replaced by the MyBackgroundWorker class in lines 79–82. The BackgroundWorker class was derived to assign a number to the thread. We could have done this differently by passing an object to the RunWorkerAsync method in lines 43 and 54, an object containing the thread number.
- Line 58: The Main method terminates after all reader threads have completed their work. To do this, on line 12, the counter nbLecteursTerminés counts the number of reader threads that have finished their work. This counter is incremented by the method EndLecteur on lines 63–65, which is executed every time a reader thread terminates. It is this procedure that controls the AutoResetEvent finLecteurs event on line 18, with which the Main method synchronizes on line 59.
- Line 16: Because multiple reader threads may attempt to increment the nbLecteursTerminés counter simultaneously, exclusive access to it is ensured by the appli synchronization object. This scenario is unlikely but theoretically possible.
- Lines 35–44: creation of reader threads
- Line 38: creation of the thread of type MyBackgroundWorker
- line 39: assigning it a number
- line 40: the Read method to be executed is assigned to it
- line 41: the EndLecteur method will be executed after the thread ends
- line 43: the thread is launched
- lines 47–55: creation of writer threads
- line 50: create the thread of type MyBackgroundWorker
- line 51: it is assigned a number
- Line 52: The Write method is assigned to be executed
- Line 54: The thread is launched
The Read and Write methods remain unchanged. The EndLecteur method is executed at the end of each reader thread. Its code is as follows:
        public static void EndLecteur(object sender, RunWorkerCompletedEventArgs infos) {
            // increment no. of completed drives
            lock (appli) {
                nbLecteursTerminés++;
                if (nbLecteursTerminés == nbThreads)
                    finLecteurs.Set();
            }
}
The role of the EndLecteur method is to notify the Main method that all readers have completed their work.
- line 4: the counter nbLecteursTerminés is incremented.
- Lines 5–6: If all readers have completed their work, then the finLecteurs event is set to true to notify the Main method, which is waiting for this event.
- Because the EndLecteur procedure is executed by multiple threads, the preceding critical section is protected by the lock clause in line 3.
The execution yields results similar to those of version using threads.
10.8.2. Example 2
The following code illustrates other features of the BackgroundWorker class:
- the ability to cancel the task
- propagating an exception thrown within the task
- passing an I/O parameter to the task
using System;
using System.Threading;
using System.ComponentModel;

namespace Chap8 {
    class Program3 {

        // threads
        static BackgroundWorker[] tâches = new BackgroundWorker[5];

        public static void Main() {
            // init Current thread
            Thread main = Thread.CurrentThread;
            // name the Thread
            main.Name = "Main";

            // thread creation
            for (int i = 0; i < tâches.Length; i++) {
                // create thread n° i
                tâches[i] = new BackgroundWorker();
                // on l'initialise
                tâches[i].DoWork += Sleep;
                tâches[i].RunWorkerCompleted += End;
                tâches[i].WorkerSupportsCancellation = true;
                // launch it
                tâches[i].RunWorkerAsync(new Data { Numéro = i, Début = DateTime.Now, Durée = i + 1 });
            }
            // cancel the last thread
            tâches[4].CancelAsync();

            // end of hand
            Console.WriteLine("Fin du thread {0}, tapez [entrée] pour terminer...", main.Name);
            Console.ReadLine();
            return;
        }

        public static void Sleep(object sender, DoWorkEventArgs infos) {
...
        }

        public static void End(object sender, RunWorkerCompletedEventArgs infos) {
...
        }

        internal class Data {
            // miscellaneous information
            public int Numéro { get; set; }
            public DateTime Début { get; set; }
            public int Durée { get; set; }
            public DateTime Fin { get; set; }
        }
    }
}
- line 9: the array from BackgroundWorker
- lines 18–27: creation of threads
- line 20: thread creation
- line 22: the thread will execute the Sleep method in lines 39-41
- line 23: the End method from lines 43-45 will be executed at the end of the thread
- line 24: the thread can be canceled
- line 26: the thread is launched with a parameter of type [Data], defined in lines 49-52. This object has the following fields:
- Number (input): thread number
- Start (input): thread execution start time
- Duration (input): duration of the Sleep
- End (output): end of thread execution
- Line 29: Thread No. 4 is canceled
All threads execute the following Sleep method:
        public static void Sleep(object sender, DoWorkEventArgs infos) {
            // we use the info parameter
            Data data = (Data)infos.Argument;
            // exception for task no. 3
            if (data.Numéro == 3) {
                throw new Exception("test....");
            }
            // duration of sleep with a stop every second
            for (int i = 1; i <= data.Durée && !tâches[data.Numéro].CancellationPending; i++) {
                // wait 1 second
                Thread.Sleep(1000);
            }
            // end of execution
            data.Fin = DateTime.Now;
            // on initialise le résultat
            infos.Result = data;
            infos.Cancel = tâches[data.Numéro].CancellationPending;
}
- line 1: the Sleep method has the standard signature for event handlers. It takes two parameters:
- sender: the event sender, in this case BackgroundWorker, which executes the method
- infos: of type DoWorkEventArgs, which provides information about the DoWork event. This parameter is used both to pass information to the thread and to retrieve its results.
- line 3: the parameter passed to the task’s RunWorkerAsync method is retrieved in the infos.Argument property.
- Lines 5–7: An exception is thrown for task #3
- lines 9–12: the thread “sleeps” for Duration seconds in one-second intervals to allow the cancellation test in line 9. This simulates a long-running task during which the thread would regularly check for a cancellation request. To indicate that it has been canceled, the thread must set the infos.Cancel property to true (line 17).
- Line 16: The thread can return a result to the thread that launched it. It places this result in infos.Result.
Once finished, the threads execute the following End method:
public static void End(object sender, RunWorkerCompletedEventArgs infos) {
            // the infos parameter is used to display the result of execution
            // exception?
            if (infos.Error != null) {
                Console.WriteLine("Le thread {1} a rencontré l'erreur suivante : {0}", infos.Error.Message, sender);
            } else
                if (!infos.Cancelled) {
                    Data data = (Data)infos.Result;
                    Console.WriteLine("Thread {0} terminé : début {1:hh:mm:ss}, durée programmée {2} s, fin {3:hh:mm:ss}, durée effective {4}",
                    data.Numéro, data.Début, data.Durée, data.Fin, (data.Fin - data.Début));
                } else {
                    Console.WriteLine("Thread {0} annulé", sender);
                }
        }
- line 1: The End method has the standard signature for event handlers. It takes two parameters:
- sender: the event sender, in this case BackgroundWorker, which executes the method
- infos: of type RunWorkerCompletedEventArgs, which provides information about the RunWorkerCompleted event.
- line 4: the infos.Error field of type Exception is populated only if an exception has occurred.
- line 7: the field infos.Cancelled, of type Boolean, has the value true if the thread was canceled.
- Line 8: If there was no exception or cancellation, then infos.Result is the result of the executed thread. Using this result if the thread was canceled or if the thread threw an exception causes an exception. Thus, in lines 5 and 13, we are unable to display the number of the canceled thread or the thread that threw an exception because that number is in infos.Result. This problem can be circumvented by deriving the BackgroundWorker class to store the information to be exchanged between the calling thread and the called thread, as was done in the previous example. We then use the sender argument, which represents BackgroundWorker, instead of the infos argument.
The execution results are as follows:
10.9. Thread-local data
10.9.1. The principle
Consider a three-tier application:
 |
Suppose the application is multi-user, a web application for example. Each user is served by a dedicated thread. The thread’s lifecycle is as follows:
- the thread is created or requested from a thread pool to fulfill a user request
- if this request requires data, the thread executes a method in the [ui] layer, which calls a method in the [metier] layer, which in turn calls a method in the [dao] layer
- The thread returns the response to the user. It then disappears or is recycled into a thread pool.
In Operation 2, it may be useful for the thread to have its own data, c.a.d, not shared with other threads. This data could, for example, belong to the specific user that the thread is serving. This data could then be used in the various layers, [ui, metier, dao].
The Thread class supports this scenario through a sort of private dictionary where the keys are of type LocalDataStoreSlot:
creates an entry in the thread's private dictionary for the key name. | |
associates the value data with the key name in the thread’s private dictionary | |
retrieves the value associated with the key name from the thread's private dictionary |
A usage example might be as follows:
- To create a (key, value) pair associated with the current thread:
- To retrieve the value associated with the key:
10.9.2. Application of the principle
Consider the following three-tier application:
 |
Suppose that the [dao] layer manages a product database and that its interface is initially as follows:
using System.Collections.Generic;

namespace Chap8 {
    public interface IDao {
        int InsertArticle(Article article);
        List<Article> GetAllArticles();
        void DeleteAllArticles();
    }
}
- Line 5: to insert an article into the database
- line 6: to retrieve all articles from the database
- line 7: to delete all articles from the database
Later on, there is a need for a method to insert an array of items using a transaction because we want to operate on an all-or-nothing basis: either all items are inserted or none are. We can then modify the interface to accommodate this new requirement:
using System.Collections.Generic;

namespace Chap8 {
    public interface IDao {
        int InsertArticle(Article article);
        void insertArticles(Article[] articles);
        List<Article> GetAllArticles();
        void DeleteAllArticles();
    }
}
- Line 6: to add an array of articles to the database
Later, for another application, the need arises to delete a list of articles stored in a list, still within a transaction. We can see that to meet different business needs, the [dao] layer will have to expand. We can take a different approach:
- only include the basic operations InsertArticle, DeleteArticle, UpdateArticle, SelectArticle, and SelectArticles
- to move the operations for simultaneously updating multiple items to the [métier] layer. These would use the basic operations of the [dao] layer.
The advantage of this solution is that the same [dao] layer could be used without modification with different [metier] layers. It introduces a challenge in managing the transaction that groups updates to be performed atomically on the database:
- the transaction must be initiated by the [metier] layer before it calls the methods of the [dao] layer
- the methods of the [dao] layer must be aware of the transaction’s existence in order to participate in it if it exists
- the transaction must be terminated by the [métier] layer.
To ensure that the methods of the [dao] layer are aware of the existence of a potential ongoing transaction, the transaction could be added as a parameter to each method of the [dao] layer. This parameter will then appear in the signature of the interface methods, which will bind the interface to a specific data source: the database. The thread’s local data provides a more elegant solution: the [métier] layer will place the transaction in the thread’s local data, and that is where the [dao] layer will retrieve it. The method signatures of the [dao] layer therefore do not need to be changed.
We implement this solution with the following Visual Studio project:
 |
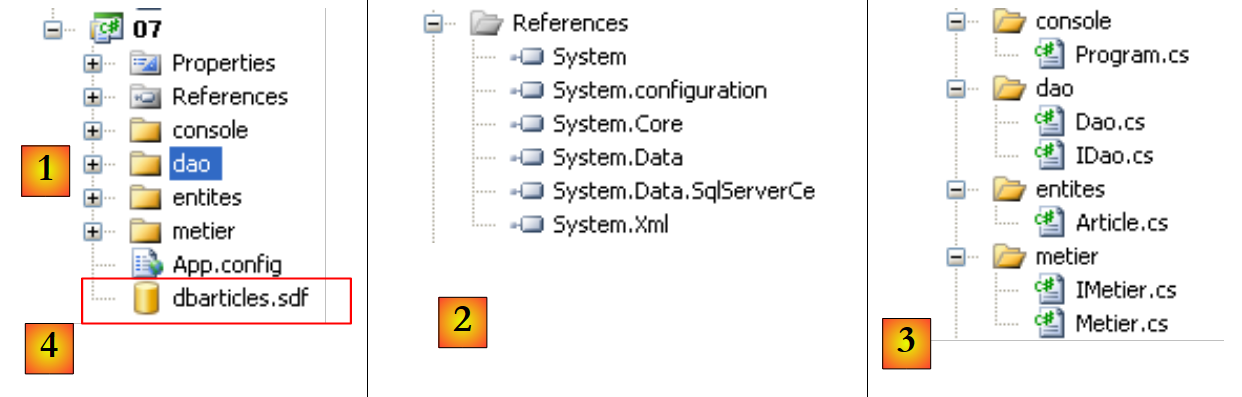 |
- in [1]: the solution as a whole
- in [2]: the references used. Since the [4] database is a SQL Server Compact database, the [System.Data.SqlServerCe] reference is required.
- in [3]: the different layers of the application.
The [4] database is the SQL Server Compact database already used in the previous chapter, specifically in section 9.3.1.
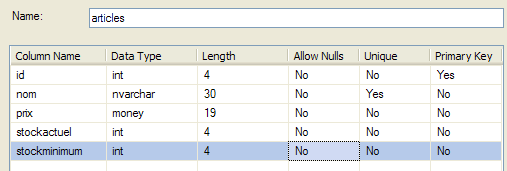 |
The Article class
A row from the previous table [articles] is encapsulated in an object of type Article:
namespace Chap8 {
    public class Article {
        // properties
        public int Id { get; set; }
        public string Nom { get; set; }
        public decimal Prix { get; set; }
        public int StockActuel { get; set; }
        public int StockMinimum { get; set; }

        // manufacturers
        public Article() {
        }

        public Article(int id, string nom, decimal prix, int stockActuel, int stockMinimum) {
            Id = id;
            Nom = nom;
            Prix = prix;
            StockActuel = stockActuel;
            StockMinimum = stockMinimum;
        }

        // identity
        public override string ToString() {
            return string.Format("[{0},{1},{2},{3},{4}]", Id, Nom, Prix, StockActuel, StockMinimum);
        }
    }
}
Interface of the [dao] layer
The IDao interface of the [dao] layer will be as follows:
using System.Collections.Generic;

namespace Chap8 {
    public interface IDao {
        int InsertArticle(Article article);
        List<Article> GetAllArticles();
        void DeleteAllArticles();
    }
}
- Line 5: to insert an article into the [articles] table
- line 6: to put all rows of the [articles] table into a list of Article objects
- line 7: to delete all rows from table [articles]
Interface of layer [metier]
The interface IMetier of the layer [metier] will be as follows:
using System.Collections.Generic;

namespace Chap8 {
    interface IMetier {
        void InsertArticlesInTransaction(Article[] articles);
        void InsertArticlesOutOfTransaction(Article[] articles);
        List<Article> GetAllArticles();
        void DeleteAllArticles();
    }
}
- line 5: to insert a set of items within a transaction
- line 6: same as above, but without a transaction
- line 7: to retrieve the list of all articles
- line 8: to delete all items
Implementation of the [metier] layer
The business implementation of the IMetier interface will be as follows:
using System.Collections.Generic;
using System.Data;
using System.Data.SqlServerCe;
using System.Threading;

namespace Chap8 {
    public class Metier : IMetier {
        // layer [dao]
        public IDao Dao { get; set; }
        // connecting chain
        public string ConnectionString { get; set; }

        // insert an array of items within a transaction
        public void InsertArticlesInTransaction(Article[] articles) {
            // create the connection to the
            using (SqlCeConnection connexion = new SqlCeConnection(ConnectionString)) {
                // opening connection
                connexion.Open();
                // transaction
                SqlCeTransaction transaction = null;
                try {
                    // start of transaction
                    transaction = connexion.BeginTransaction(IsolationLevel.ReadCommitted);
                    // register the transaction in the thread
                    Thread.SetData(Thread.GetNamedDataSlot("transaction"), transaction);
                    // inserting articles
                    foreach (Article article in articles) {
                        Dao.InsertArticle(article);
                    }
                    // validate the transaction
                    transaction.Commit();
                } catch {
                    // we undo the transaction
                    if (transaction != null)
                        transaction.Rollback();
                }
            }
        }

        // insert item table without transaction
        public void InsertArticlesOutOfTransaction(Article[] articles) {
            // inserting articles
            foreach (Article article in articles) {
                Dao.InsertArticle(article);
            }
        }

        // list of items
        public List<Article> GetAllArticles() {
            return Dao.GetAllArticles();
        }
        // delete all items
        public void DeleteAllArticles() {
            Dao.DeleteAllArticles();
        }
    }
}
The class has the following properties:
- line 9: a reference to the [dao] layer
- line 11: the connection string used to connect to the product database
We will only comment on the InsertArticlesInTransaction method, which is the only one that presents difficulties:
- line 16: a connection to the database is established
- line 18: the connection is opened
- line 23: a transaction is created
- line 25: it is saved in the thread’s local data, associated with the “transaction” key
- lines 27–29: the single-insertion method of the [dao] layer is called for each item to be inserted
- lines 21 and 32: the entire array insertion is controlled by a try/catch
- line 31: if we reach this point, it means no exception occurred. We then commit the transaction.
- lines 34-35: an exception occurred; we roll back the transaction
- Line 37: We exit the using clause. The connection opened on line 18 is automatically closed.
Implementation of the [dao] layer
The Dao implementation of the IDao interface will be as follows:
using System.Collections.Generic;
using System.Data;
using System.Data.SqlServerCe;
using System.Threading;

namespace Chap8 {
    public class Dao : IDao {
        // connecting chain
        public string ConnectionString { get; set; }
        // requests
        public string InsertText { get; set; }
        public string DeleteAllText { get; set; }
        public string GetAllText { get; set; }

        // interface implementation

        // article insertion
        public int InsertArticle(Article article) {
            // is there a transaction in progress?
            SqlCeTransaction transaction = Thread.GetData(Thread.GetNamedDataSlot("transaction")) as SqlCeTransaction;
            // retrieve or create connection
            SqlCeConnection connexion = null;
            if (transaction != null) {
                // recover connection
                connexion = transaction.Connection as SqlCeConnection;
            } else {
                // create it
                connexion = new SqlCeConnection(ConnectionString);
                connexion.Open();
            }
            try {
                // preparation of insertion order
                SqlCeCommand sqlCommand = new SqlCeCommand();
                sqlCommand.Transaction = transaction;
                sqlCommand.Connection = connexion;
                sqlCommand.CommandText = InsertText;
                sqlCommand.Parameters.Add("@nom", SqlDbType.NVarChar, 30);
                sqlCommand.Parameters.Add("@prix", SqlDbType.Money);
                sqlCommand.Parameters.Add("@sa", SqlDbType.Int);
                sqlCommand.Parameters.Add("@sm", SqlDbType.Int);
                sqlCommand.Parameters["@nom"].Value = article.Nom;
                sqlCommand.Parameters["@prix"].Value = article.Prix;
                sqlCommand.Parameters["@sa"].Value = article.StockActuel;
                sqlCommand.Parameters["@sm"].Value = article.StockMinimum;
                // execution
                return sqlCommand.ExecuteNonQuery();
            } finally {
                // if you were not in a transaction, you close the connection
                if (transaction == null) {
                    connexion.Close();
                }
            }
        }

        // list of items
        public List<Article> GetAllArticles() {
...
        }

        // article deletion
        public void DeleteAllArticles() {
...
        }
    }
}
The class has the following properties:
- line 9: the connection string used to connect to the product database
- line 11: the command SQL to insert an item
- line 12: the command SQL to delete all items
- line 13: the command SQL to retrieve all items
These properties will be initialized from the following configuration file [App.config]:
<?xml version="1.0" encoding="utf-8" ?>
<configuration>
    <connectionStrings>
        <add name="dbArticlesSqlServerCe" connectionString="Data Source=|DataDirectory|\dbarticles.sdf;Password=dbarticles;" />
    </connectionStrings>
    <appSettings>
        <add key="insertText" value="insert into articles(nom,prix,stockactuel,stockminimum) values(@nom,@prix,@sa,@sm)"/>
        <add key="getAllText" value="select id,nom,prix,stockactuel,stockminimum from articles"/>
        <add key="deleteAllText" value="delete from articles"/>
    </appSettings>
</configuration>
We comment on the InsertArticle method:
- line 20: we retrieve any transaction that the [metier] layer may have placed in the thread
- lines 23–25: if a transaction is present, we retrieve the connection to which it was linked.
- lines 26–30: otherwise, a new connection is created and opened.
- Lines 33–44: The insert command is prepared. It is configured (see line g of App.config).
- Line 33: The object Command is created.
- Line 34: It is associated with the current transaction. If the transaction does not exist (transaction=null), this is equivalent to executing the command SQL without an explicit transaction. Note that there is still an implicit transaction in this case. With SQL Server CE, this implicit transaction is in autocommit mode by default: the command SQL is committed after execution.
- Line 35: The object Command is associated with the current connection
- line 36: the text SQl to be executed is set. This is the parameterized query from line g of App.config.
- Lines 37–44: The 4 parameters of the query are initialized
- line 46: the query is executed.
- Lines 49–51: Keep in mind that if there was no transaction, a new connection to the database was opened in lines 26–30. In this case, it must be closed. If there was a transaction, the connection must not be closed because the [metier] layer manages it.
The other two methods cover what was discussed in the "Databases" chapter:
        // list of items
        public List<Article> GetAllArticles() {
            // item list - empty at start
            List<Article> articles = new List<Article>();
            // operation connection
            using (SqlCeConnection connexion = new SqlCeConnection(ConnectionString)) {
                // opening connection
                connexion.Open();
                // executes sqlCommand with select query
                SqlCeCommand sqlCommand = new SqlCeCommand(GetAllText, connexion);
                using (SqlCeDataReader reader = sqlCommand.ExecuteReader()) {
                    // operating income
                    while (reader.Read()) {
                        // current line operation
                        articles.Add(new Article(reader.GetInt32(0), reader.GetString(1), reader.GetDecimal(2), reader.GetInt32(3), reader.GetInt32(4)));
                    }
                }
            }
            // we return the result
            return articles;
        }

        // article deletion
        public void DeleteAllArticles() {
            using (SqlCeConnection connexion = new SqlCeConnection(ConnectionString)) {
                // opening connection
                connexion.Open();
                // executes sqlCommand with update request
                new SqlCeCommand(DeleteAllText, connexion).ExecuteNonQuery();
            }
}
The [console] test application
The test application [console] is as follows:
using System;
using System.Configuration;

namespace Chap8 {
    class Program {
        static void Main(string[] args) {
            // using the configuration file
            string connectionString = null;
            string insertText;
            string getAllText;
            string deleteAllText;
            try {
                // connecting chain
                connectionString = ConfigurationManager.ConnectionStrings["dbArticlesSqlServerCe"].ConnectionString;
                // other parameters
                insertText = ConfigurationManager.AppSettings["insertText"];
                getAllText = ConfigurationManager.AppSettings["getAllText"];
                deleteAllText = ConfigurationManager.AppSettings["deleteAllText"];
            } catch (Exception e) {
                Console.WriteLine("Erreur de configuration : {0}", e.Message);
                return;
            }
            // layer creation [dao]
            Dao dao = new Dao();
            dao.ConnectionString = connectionString;
            dao.DeleteAllText = deleteAllText;
            dao.GetAllText = getAllText;
            dao.InsertText = insertText;
            // layer creation [business]
            Metier metier = new Metier();
            metier.Dao = dao;
            metier.ConnectionString = connectionString;
            // create a table of items
            Article[] articles = new Article[2];
            for (int i = 0; i < articles.Length; i++) {
                articles[i] = new Article(0, "article", 100, 10, 1);
            }
            // delete all articles
            Console.WriteLine("Suppression de tous les articles...");
            metier.DeleteAllArticles();
            // insert the array outside the transaction
            Console.WriteLine("Insertion des articles hors transaction...");
            try {
                metier.InsertArticlesOutOfTransaction(articles);
            } catch (Exception e){
                Console.WriteLine("Exception : {0}", e.Message);
            }
            // display articles
            Console.WriteLine("Liste des articles");
            AfficheArticles(metier);
            // delete all articles
            Console.WriteLine("Suppression de tous les articles...");
            metier.DeleteAllArticles();
            // insert the array in a transaction
            Console.WriteLine("Insertion des articles dans une transaction...");
            metier.InsertArticlesInTransaction(articles);
            // display articles
            Console.WriteLine("Liste des articles");
            AfficheArticles(metier);
        }

        private static void AfficheArticles(IMetier metier) {
            // display articles
            foreach(Article article in metier.GetAllArticles()){
                Console.WriteLine(article);
            }
        }

    }
}
- lines 12–22: the file [App.config] is processed.
- lines 24-28: the [dao] layer is instantiated and initialized
- lines 30-32: the same is done for the [metier] layer
- lines 34-37: an array of 2 items with the same name is created. The table [articles] in the database SQL server This [dbarticles.sdf] has a uniqueness constraint on the name. The insertion of the second item will therefore be rejected. If the table is inserted outside a transaction, the first item will be inserted first and will remain. If the table is inserted within a transaction, the first item will be inserted first and then removed when the transaction is rolled back.
- Lines 39–50: Insert the table containing two items outside the transaction and verify.
- Lines 52–59: Same as above, but within a transaction
The results upon execution are as follows:
- Lines 5-6: Inserting outside a transaction left the first item in the database
- line 9: inserting within a transaction left no items in the database
10.9.3. Conclusion
The previous example demonstrated the value of thread-local data for transaction management. It should not be replicated as-is. Frameworks such as Spring, Nhibernate, ... use this technique but make it even more transparent: it is possible for the [metier] layer to use transactions without the [dao] layer needing to know about it. There is therefore no Transaction object in the [dao] layer code. This is achieved using a proxy technique called AOP (Aspect-Oriented Programming). Once again, we can only encourage the reader to use these frameworks.
10.10. Further reading...
To delve deeper into the challenging field of thread synchronization, you can read the Threading chapter of the C# 3.0 book referenced in the introduction to this document. It presents numerous synchronization techniques for various types of situations.