6. 3-layer architectures
6.1. Introduction
Let's take a look at the latest version of the tax calculation application:
using System;

namespace Chap3 {
    class Program {
        static void Main() {
             // interactive tax calculator
             // the user enters three data points on the keyboard: married nbEnfants salary
             // the program then displays Tax payable
...

             // creation of a IImpot object
            IImpot impot = null;
            try {
                 // creation of a IImpot object
                impot = new FileImpot("DataImpotInvalide.txt");
            } catch (FileImpotException e) {
                 // error display
...
                 // program stop
                Environment.Exit(1);
            }
             // infinite loop
            while (true) {
                 // tax calculation parameters are requested
                Console.Write("Paramètres du calcul de l'Impot au format : Marié (o/n) NbEnfants Salaire ou rien pour arrêter :");
                string paramètres = Console.ReadLine().Trim();
...
                 // parameters are correct - Impot is calculated
                Console.WriteLine("Impot=" + impot.calculer(marié == "o", nbEnfants, salaire) + " euros");
                 // next taxpayer
             }//while
        }
    }
}
The previous solution includes classic :
- retrieve data stored in files, databases, etc. lines 12-21
- dialogue with the user, lines 26 (inputs) and 29 (displays)
- the use of a business algorithm, line 29
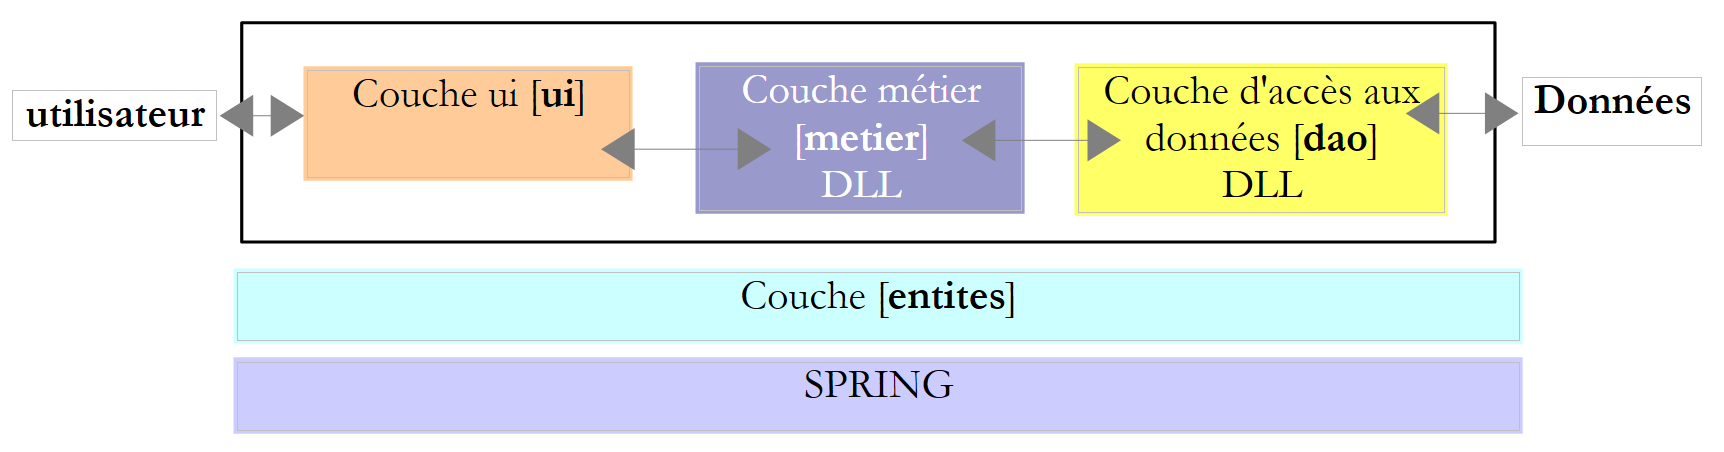
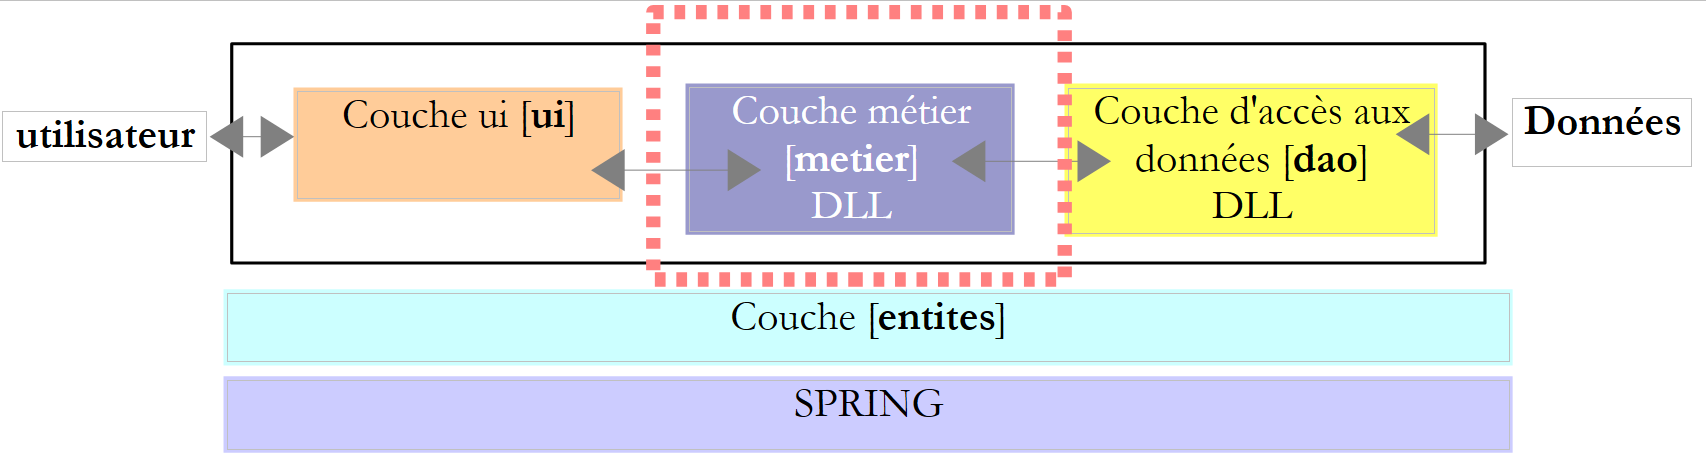
Practical experience has shown that isolating these different processes in separate classes improves the maintainability of applications. The architecture of an application structured in this way is as follows:
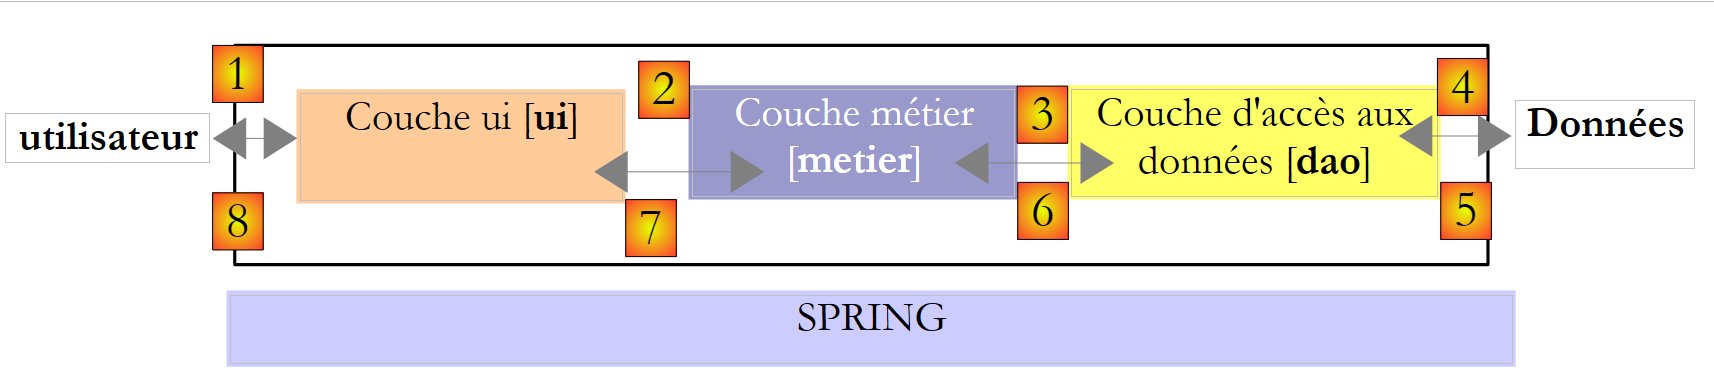 |
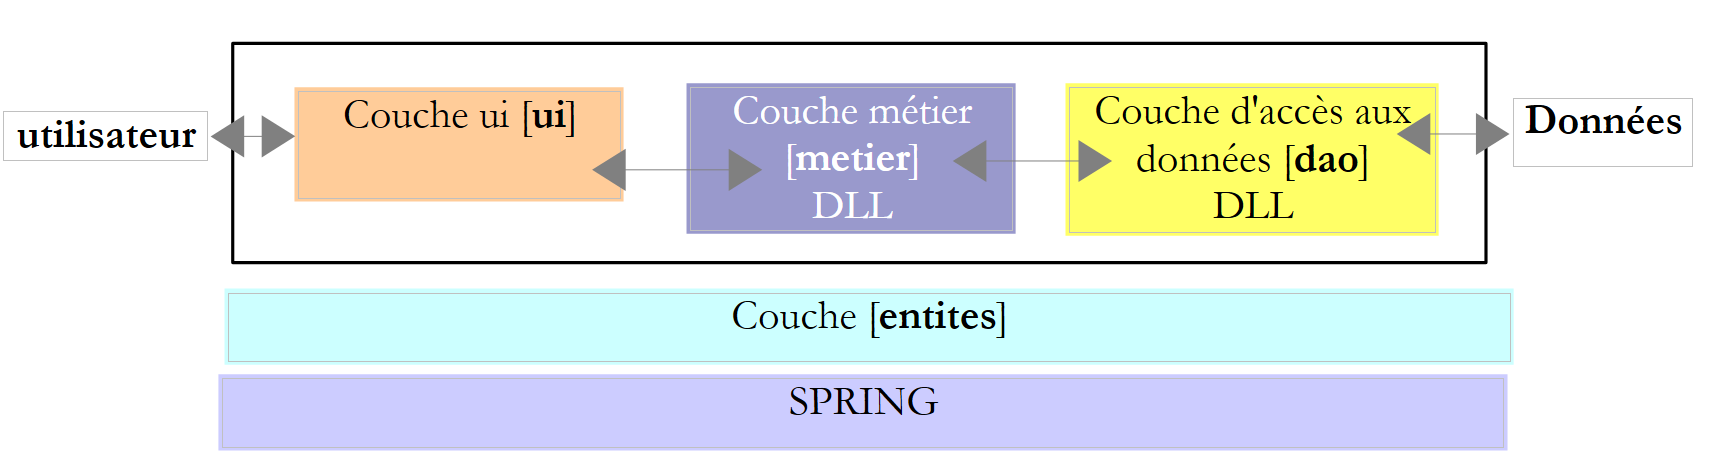
This architecture is calledthree-tier architecture"three tier architecture". The term "three tier" normally refers to an architecture where each tier is on a different machine. When the tiers are on the same machine, the architecture becomes a "three-tier" architecturethree layers".
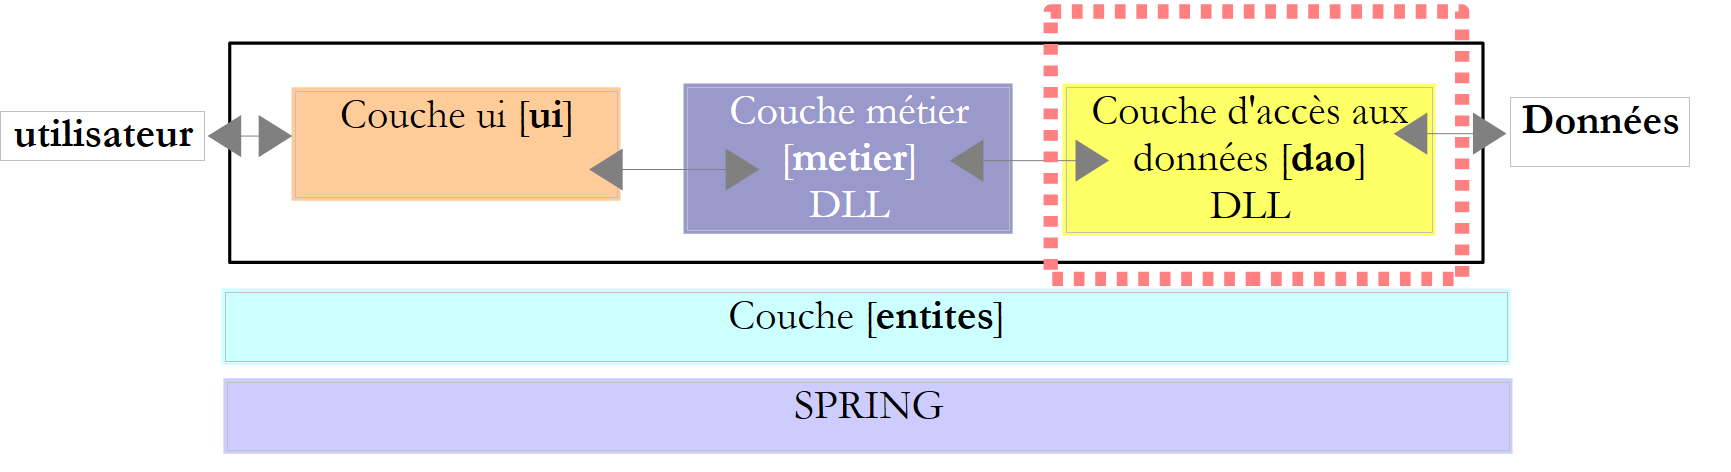
- the [business] layer contains the application's business rules. For our tax calculation application, these are the rules used to calculate a taxpayer's tax. This layer needs data to work:
- tax brackets, which change every year
- number of children, marital status and taxpayer's annual salary
In the diagram above, data can come from two places:
- the data access layer or [dao] (DAO = Data Access Object) for data already stored in files or databases. This could be the case for ici tax brackets, as was done in the previous version of the application.
- the user interface layer or [ui] (UI = User Interface) for data entered by the user or displayed to the user. This could be the case ici for the number of children, marital status and annual salary of the taxpayer
- in general, the [dao] layer handles access to persistent data (files, databases) or non-persistent data (network, sensors, etc.).
- the [ui] layer handles interactions with the user, if any.
- the three layers are made independent through the use of interfaces.
We're going to take the application [Impots] we've already studied several times and give it a 3-layer architecture. To do this, we'll study the layers [ui, metier, dao] one after the other, starting with the [dao] layer, which handles persistent data.
First, we need to define the interfaces of the various application layers [Impots].
6.2. Application interfaces [Impots]
Remember that an interface defines a set of method signatures. Classes implementing the interface give content to these methods.
Let's return to the 3-layer architecture of our application:
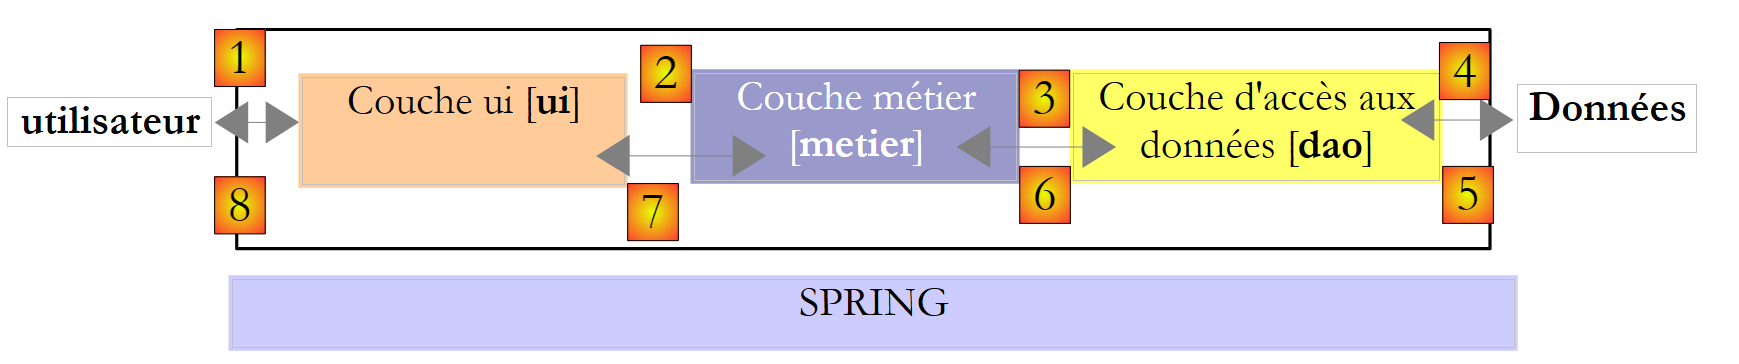 |
In this type of architecture, it is often the user who takes the initiative. He makes a request in [1] and receives a response in [8]. This is known as the request-response cycle. Let's take the example of a taxpayer's tax calculation. This will require several steps:
- layer [ui] will need to ask the user for his number of children, marital status and annual salary. This is operation [1] above.
- once this has been done, the [ui] layer will ask the business layer to calculate the tax. To do this, it will transmit the data it has received from the user. This is operation [2].
- the [metier] layer needs certain information to carry out its work: tax brackets. It will request this information from layer [dao] with path [3, 4, 5, 6]. [3] is the initial request and [6] the response to this request.
- with all the data it needs, the [metier] layer calculates the tax.
- the [metier] layer can now respond to the request made by the [ui] layer in (b). This is path [7].
- the [ui] layer will format these results and present them to the user. This is the path [8].
- we could imagine that the user performs tax simulations and wants to save them. He would use path [1-8] to do so.
This description shows that a layer will use the resources of the layer to its right, but never of the layer to its left. Consider two contiguous layers:
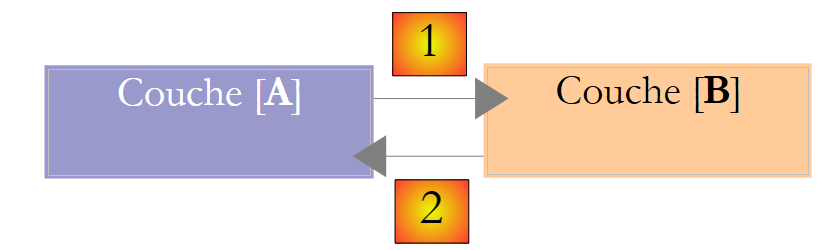 |
Layer [A] makes requests to layer [B]. In the simplest cases, a layer is implemented by a single class. An application evolves over time. So layer [B] may have different implementation classes [B1, B2, ...]. If layer [B] is layer [dao], it may have a first implementation [B1] which fetches data from a file. A few years later, you may want to put the data in a database. We then build a second implementation class [B2]. If, in the initial application, layer [A] worked directly with class [B1], we are obliged to partially rewrite the code of layer [A]. For example, let's assume that layer [A] has been written as follows:
- line 1: an instance of class [B1] is created
- line 3: data are requested from this instance
If we assume that the new implementation class [B2] uses methods with the same signature as those of class [B1], we'll have to change all the [B1s] to [B2s]. This is a very favourable case, and quite unlikely if you haven't paid attention to these method signatures. In practice, classes [B1] and [B2] often don't have the same method signatures, so much of layer [A] has to be completely rewritten.
This can be improved by creating an interface between layers [A] and [B]. This means freezing in an interface the signatures of methods presented by layer [B] to layer [A]. The previous diagram then becomes the following:
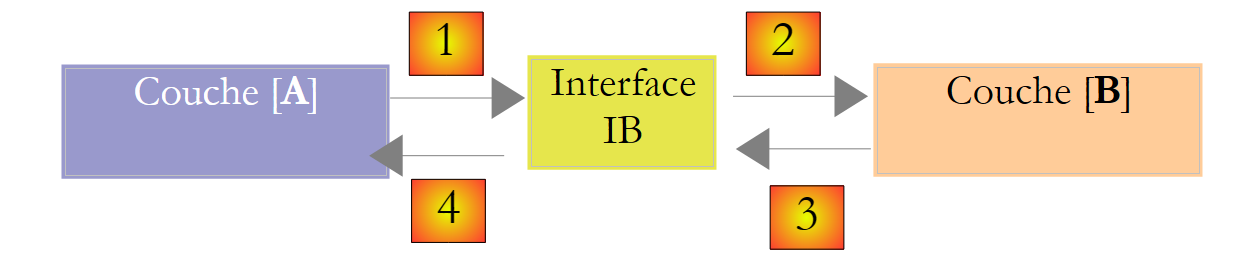 |
Layer [A] no longer addresses layer [B] directly, but rather its interface [IB]. Thus, in the code of layer [A], the implementation class [Bi] of layer [B] only appears once, when the interface [IB] is implemented. Once this has been done, it is the [IB] interface and not its implementation class that is used in the code. The previous code becomes the following:
- line 1: an instance [ib] implementing interface [IB] is created by instantiating class [B1]
- line 3: data are requested from instance [ib]
Now, if we replace the [B1] implementation of layer [B] with a [B2] implementation, and both implementations respect the same [IB] interface, then only line 1 of layer [A] needs to be modified and no others. This is a great advantage, and in itself justifies the systematic use of interfaces between two layers.
We can go even further and make layer [A] totally independent of layer [B]. In the code above, line 1 is problematic because it references the [B1] class. Ideally, layer [A] should have an implementation of the [IB] interface without having to name a class. This would be consistent with our diagram above. We can see that layer [A] addresses interface [IB], and we don't see why it would need to know the name of the class that implements this interface. This detail is of no use to layer [A].
The Spring framework (http://www.springframework.org) achieves this. The previous architecture evolves as follows:
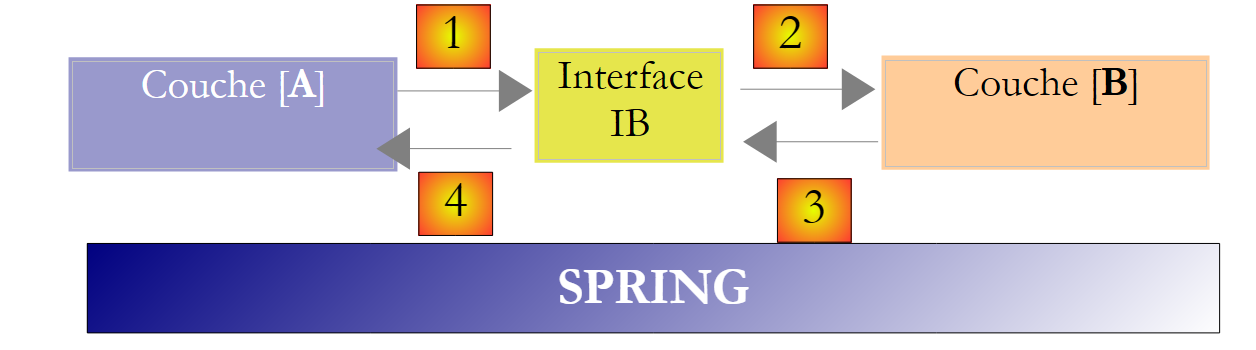 |
The transversal layer [Spring] will enable a layer to obtain a reference to the layer to its right by configuration, without having to know the name of the layer's implementation class. This name will be in the configuration files and not in the in the C# code. The C# code for layer [A] then takes the following form:
- line 1: an instance [ib] implementing the [IB] interface of layer [B]. This instance is created by Spring on the basis of information found in a configuration file. Spring will create :
- the [b] instance implementing the [B] layer
- the [a] instance implementing layer [A]. This instance will be initialized. The [ib] field above will be set to the reference [b] of the object implementing layer [B]
- line 3: data are requested from instance [ib]
We can now see that the implementation class [B1] of layer B appears nowhere in the code of layer [A]. When implementation [B1] is replaced by a new implementation [B2], nothing will change in the code of class [A]. We simply change the Spring configuration files to instantiate [B2] instead of [B1].
The couple Spring and interfaces C# brings a decisive improvement to application maintenance by making the layers of the application watertight. This is the solution we'll be using for a new version of the [Impots] application.
Let's return to the three-layer architecture of our application:
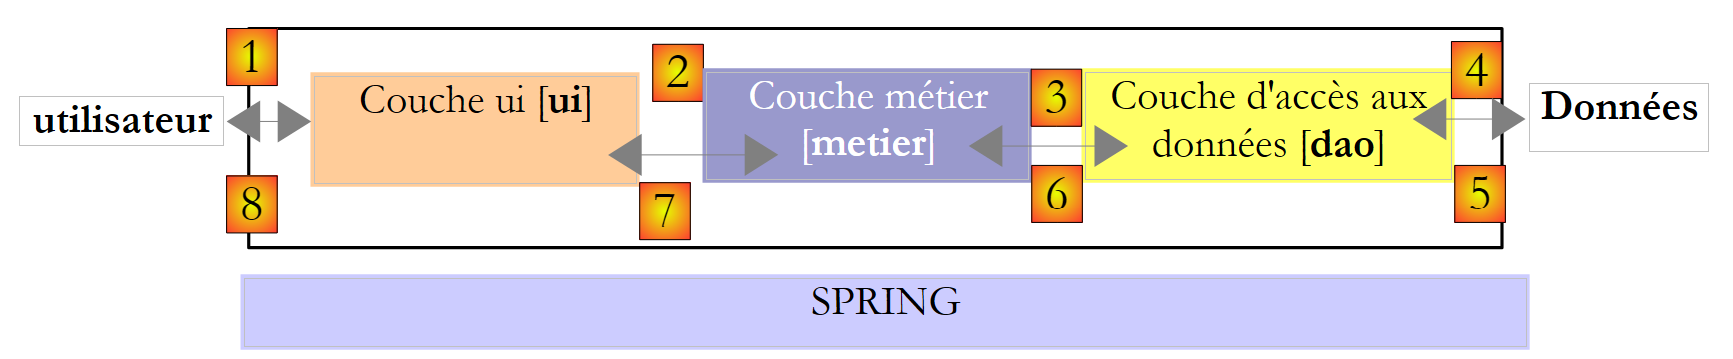 |
In simple cases, we can start from the [business] layer to discover the application's interfaces. To work, it needs :
- already available in files, databases or via the network. They are provided by the [dao] layer.
- not yet available. They are supplied by the [ui] layer, which obtains them from the application user.
What interface should the [dao] layer offer to the [metier] layer? What are the possible interactions between these two layers? The [dao] layer must provide the [metier] layer with the following data:
- tax brackets
In our application, the [dao] layer uses existing data but does not create new data. An interface definition for the [dao] layer could be as follows:
using Entites;

namespace Dao {
    public interface IImpotDao {
         // tax brackets
        TrancheImpot[] TranchesImpot{get;}
    }
}
- line 3: layer [dao] will be placed in namespace [Dao]
- line 6: the interface IImpotDao defines the property TranchesImpot which will supply the tax brackets to the [business] layer.
- line 1: imports the namespace in which the structure is defined TrancheImpot :
namespace Entites {
     // a tax bracket
    public struct TrancheImpot {
        public decimal Limite { get; set; }
        public decimal CoeffR { get; set; }
        public decimal CoeffN { get; set; }
    }
}
Let's return to the three-layer architecture of our application:
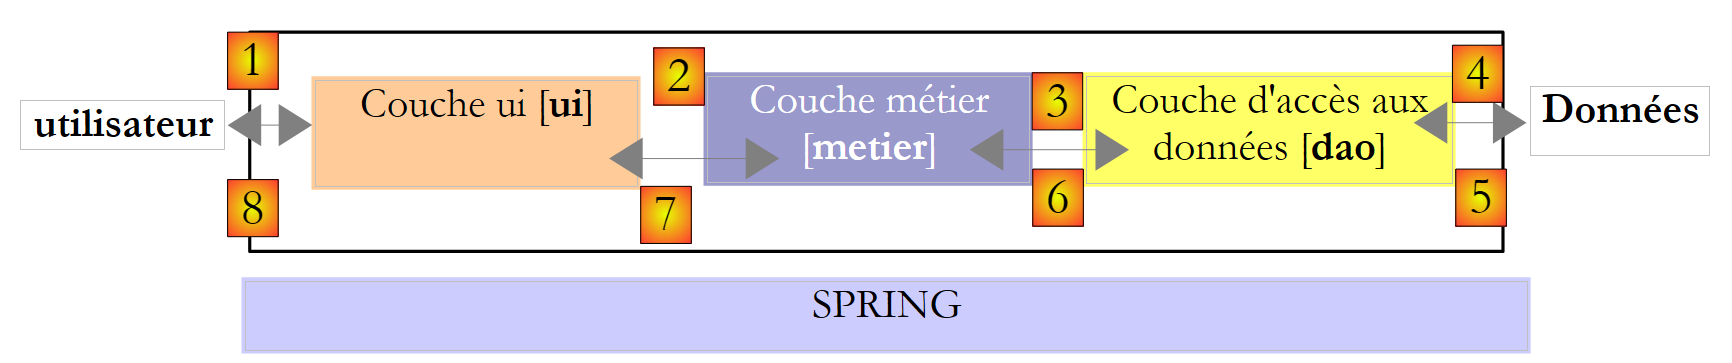 |
What interface should the [metier] layer present to the [ui] layer? Let's recall the interactions between these two layers:
- the [ui] layer asks the user for their number of children, marital status and annual salary. This is operation [1] above.
- once this has been done, the [ui] layer will ask the business layer to calculate the seats. To do this, it will transmit the data it has received from the user. This is operation [2].
An interface definition for the [metier] layer could be as follows:
namespace Metier {
    interface IImpotMetier {
        int CalculerImpot(bool marié, int nbEnfants, int salaire);
    }
}
- line 1: we'll put everything concerning the [metier] layer in the [Metier] namespace.
- line 2: the interface IImpotMetier defines only one method: that of calculating a taxpayer's tax liability on the basis of marital status, number of children and annual salary.
We study an initial implementation of this layered architecture.
6.3. Sample application - version 4
6.3.1. The Visual Studio project
The Visual Studio project will be as follows:
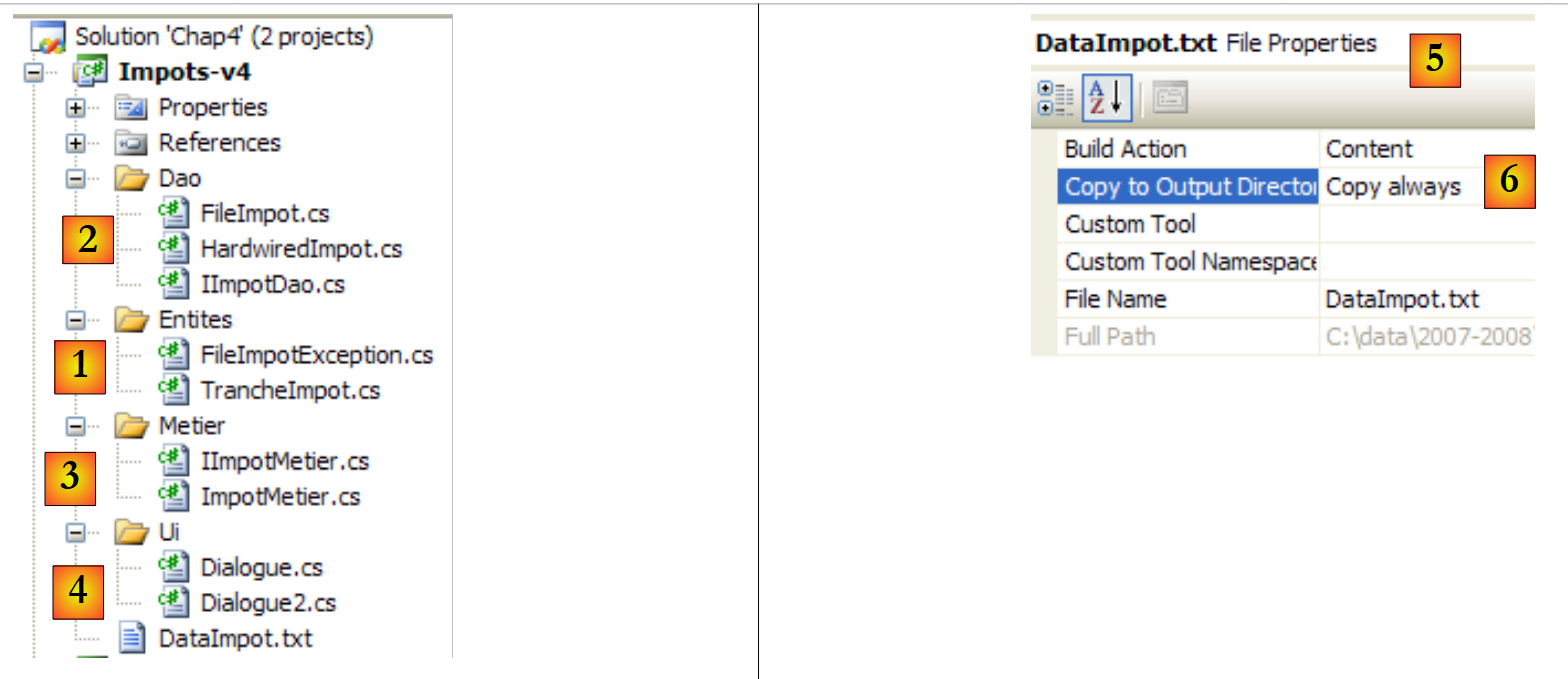 |
- [1]: the [Entites] folder contains objects that cross the [ui, metier, dao] layers: the structure TrancheImpot, the exception FileImpotException.
- [2]: the [Dao] folder contains the classes and interfaces of the [dao] layer. We'll be using two implementations of the IImpotDao : the class HardwiredImpot discussed in paragraph 4.10 and FileImpot discussed in paragraph 5.8.
- [3]: [Metier] folder contains classes and interfaces for the [metier] layer
- [4]: folder [Ui] contains the classes of layer [ui]
- [5]: file [DataImpot.txt] contains the tax brackets used by the implementation FileImpot layer [dao]. It is configured [6] to be automatically copied to the project execution folder.
6.3.2. Application entities
Let's go back to the 3-layer architecture of our application:
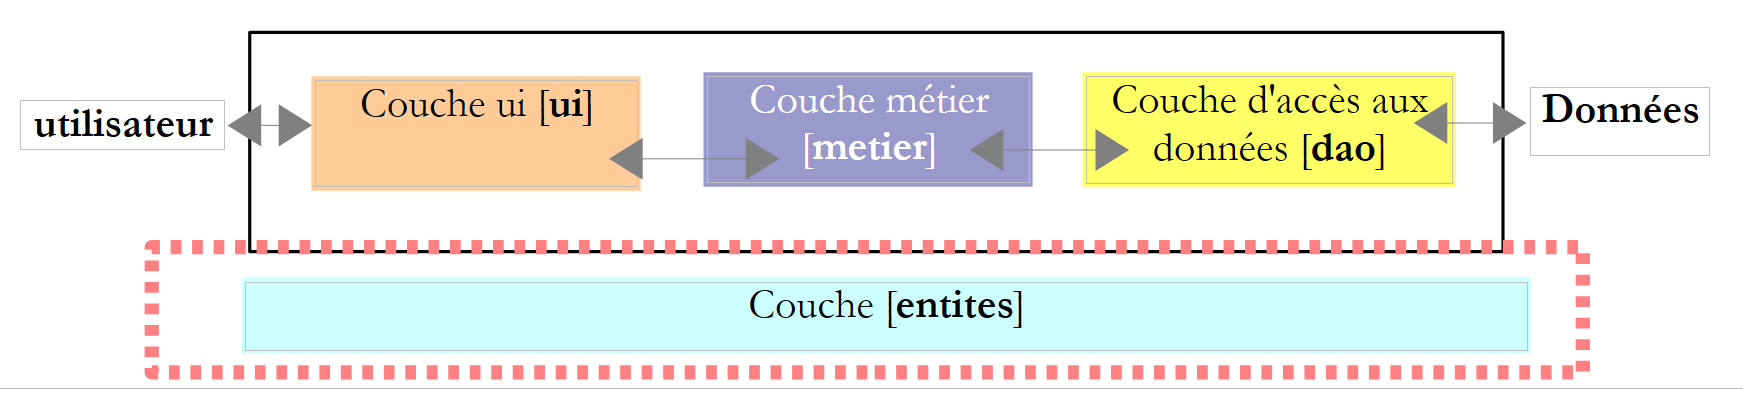 |
We call it entities cross-layer classes. This is generally the case for classes and structures that encapsulate data from the [dao] layer. These entities generally go all the way back to layer [ui].
The application's entities are as follows:
The structure TrancheImpot
namespace Entites {
     // a tax bracket
    public struct TrancheImpot {
        public decimal Limite { get; set; }
        public decimal CoeffR { get; set; }
        public decimal CoeffN { get; set; }
    }
}
L'exception FileImpotException
using System;

namespace Entites {
    public class FileImpotException : Exception {
         // error codes
        [Flags]
        public enum CodeErreurs { Acces = 1, Ligne = 2, Champ1 = 4, Champ2 = 8, Champ3 = 16 };

         // error code
        public CodeErreurs Code { get; set; }

         // manufacturers
        public FileImpotException() {
        }
        public FileImpotException(string message)
            : base(message) {
        }
        public FileImpotException(string message, Exception e)
            : base(message, e) {
        }
    }
}
Note: the FileImpotException is only useful if the [dao] layer is implemented by the FileImpot.
6.3.3. The [dao] layer
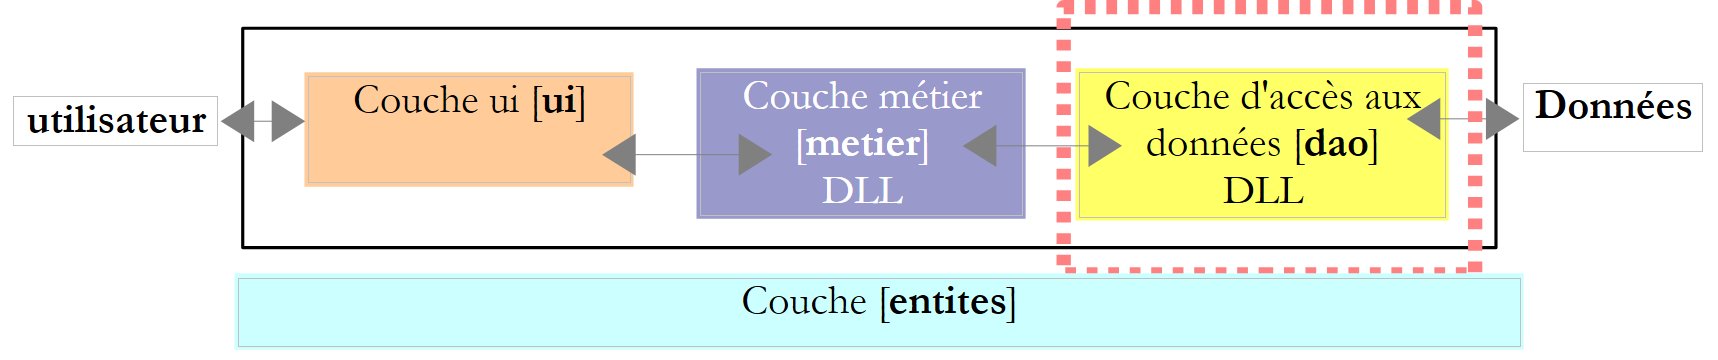 |
Recall the [dao] layer interface:
using Entites;

namespace Dao {
    public interface IImpotDao {
         // tax brackets
        TrancheImpot[] TranchesImpot{get;}
    }
}
We'll implement this interface in two different ways.
First with the HardwiredImpot discussed in paragraph 4.10 :
using System;
using Entites;

namespace Dao {
    public class HardwiredImpot : IImpotDao {

         // data tables required to calculate the
        decimal[] limites = { 4962M, 8382M, 14753M, 23888M, 38868M, 47932M, 0M };
        decimal[] coeffR = { 0M, 0.068M, 0.191M, 0.283M, 0.374M, 0.426M, 0.481M };
        decimal[] coeffN = { 0M, 291.09M, 1322.92M, 2668.39M, 4846.98M, 6883.66M, 9505.54M };
         // ranges
        public TrancheImpot[] TranchesImpot { get; private set; }

         // manufacturer
        public HardwiredImpot() {
             // creation of a table of
            TranchesImpot = new TrancheImpot[limites.Length];
             // filling
            for (int i = 0; i < TranchesImpot.Length; i++) {
                TranchesImpot[i] = new TrancheImpot { Limite = limites[i], CoeffR = coeffR[i], CoeffN = coeffN[i] };
            }
        }
     }// class
}// namespace
- line 5: the classroom HardwiredImpot implements the IImpotDao
- line 12: implementation of the TranchesImpot interface IImpotDao. This property is an automatic property. It implements the get property TranchesImpot interface IImpotDao. We also declared a method set which is internal to the class, so that the constructor of lines 15-22 can initialize the tax brackets table.
The interface IImpotDao will also be implemented by the class FileImpot discussed in paragraph 5.8 :
using System;
using System.Collections.Generic;
using System.IO;
using System.Text.RegularExpressions;
using Entites;

namespace Dao {
    class FileImpot : IImpotDao {

         // data file
        public string FileName { get; set; }

         // tax brackets
        public TrancheImpot[] TranchesImpot { get; private set; }

         // manufacturer
        public FileImpot(string fileName) {
             // save the file name
            FileName = fileName;
             // data
            List<TrancheImpot> listTranchesImpot = new List<TrancheImpot>();
            int numLigne = 1;
             // exception
            FileImpotException fe = null;
             // read the contents of the fileName file, line by line
            Regex pattern = new Regex(@"s*:\s*");
             // initially no error
            FileImpotException.CodeErreurs code = 0;
            try {
                using (StreamReader input = new StreamReader(FileName)) {
                    while (!input.EndOfStream && code == 0) {
                         // current line
                        string ligne = input.ReadLine().Trim();
                         // ignore empty lines
                        if (ligne == "")
                            continue;
                         // line broken down into three fields separated by :
                        string[] champsLigne = pattern.Split(ligne);
                         // do we have 3 fields?
                        if (champsLigne.Length != 3) {
                            code = FileImpotException.CodeErreurs.Ligne;
                        }
                         // 3-field conversions
                        decimal limite = 0, coeffR = 0, coeffN = 0;
                        if (code == 0) {
                            if (!Decimal.TryParse(champsLigne[0], out limite))
                                code = FileImpotException.CodeErreurs.Champ1;
                            if (!Decimal.TryParse(champsLigne[1], out coeffR))
                                code |= FileImpotException.CodeErreurs.Champ2;
                            if (!Decimal.TryParse(champsLigne[2], out coeffN))
                                code |= FileImpotException.CodeErreurs.Champ3;
                            ;
                        }
                         // mistake?
                        if (code != 0) {
                            // on note l'erreur
                            fe = new FileImpotException(String.Format("Ligne n° {0} incorrecte", numLigne)) { Code = code };
                        } else {
                             // the new tax bracket is memorized
                            listTranchesImpot.Add(new TrancheImpot() { Limite = limite, CoeffR = coeffR, CoeffN = coeffN });
                             // next line
                            numLigne++;
                        }
                    }
                }
            } catch (Exception e) {
                // on note l'erreur
                fe = new FileImpotException(String.Format("Erreur lors de la lecture du fichier {0}", FileName), e) { Code = FileImpotException.CodeErreurs.Acces };
            }
             // error to report?
            if (fe != null) {
                // on lance l'exception
                throw fe;
            } else {
                 // return the listImpot list in the tranchesImpot array
                TranchesImpot = listTranchesImpot.ToArray();
            }
        }
    }
}
- this code has already been studied in paragraph 5.8.
- line 14: the method TranchesImpot interface IImpotDao
- line 76: initialization of tax brackets in the class constructor, from the file given to the constructor on line 17.
6.3.4. The diaper [metier]
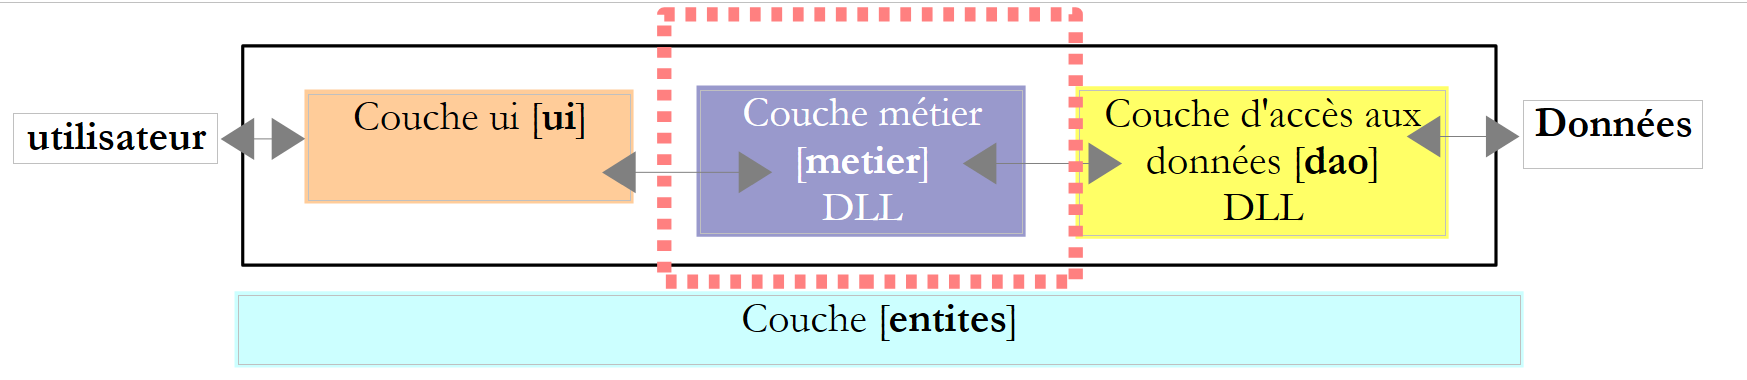 |
Let's recall the interface of this layer:
namespace Metier {
    public interface IImpotMetier {
        int CalculerImpot(bool marié, int nbEnfants, int salaire);
    }
}
Implementation ImpotMetier of this interface is as follows:
using Entites;
using Dao;

namespace Metier {
    public class ImpotMetier : IImpotMetier {

         // layer [dao]
        private IImpotDao Dao { get; set; }

         // tax brackets
        private TrancheImpot[] tranchesImpot;

         // manufacturer
        public ImpotMetier(IImpotDao dao) {
             // memorization
            Dao = dao;
             // tax brackets
            tranchesImpot = dao.TranchesImpot;
        }

         // tAX CALCULATION
        public int CalculerImpot(bool marié, int nbEnfants, int salaire) {
             // calculating the number of shares
            decimal nbParts;
            if (marié)
                nbParts = (decimal)nbEnfants / 2 + 2;
            else
                nbParts = (decimal)nbEnfants / 2 + 1;
            if (nbEnfants >= 3)
                nbParts += 0.5M;
             // calculation of taxable income & family quota
            decimal revenu = 0.72M * salaire;
            decimal QF = revenu / nbParts;
             // tAX CALCULATION
            tranchesImpot[tranchesImpot.Length - 1].Limite = QF + 1;
            int i = 0;
            while (QF > tranchesImpot[i].Limite)
                i++;
             // return result
            return (int)(revenu * tranchesImpot[i].CoeffR - nbParts * tranchesImpot[i].CoeffN);
         }//calculate
     }//class

}
- line 5: the [Metier] class implements the [IImpotMetier] interface.
- lines 14-19: the [metier] layer must collaborate with the [dao] layer. It must therefore have a reference to the object implementing the interface IImpotDao. This is why this reference is passed as a parameter to the constructor.
- line 16: the layer reference [dao] is stored in the private field of line 8
- line 18: from this reference, the builder requests the table of tax brackets and stores a reference in the private property on line 8.
- lines 22-41: method implementation CalculerImpot interface IImpotMetier. This implementation uses the tax bracket table initialized by the constructor.
6.3.5. The [ui] layer
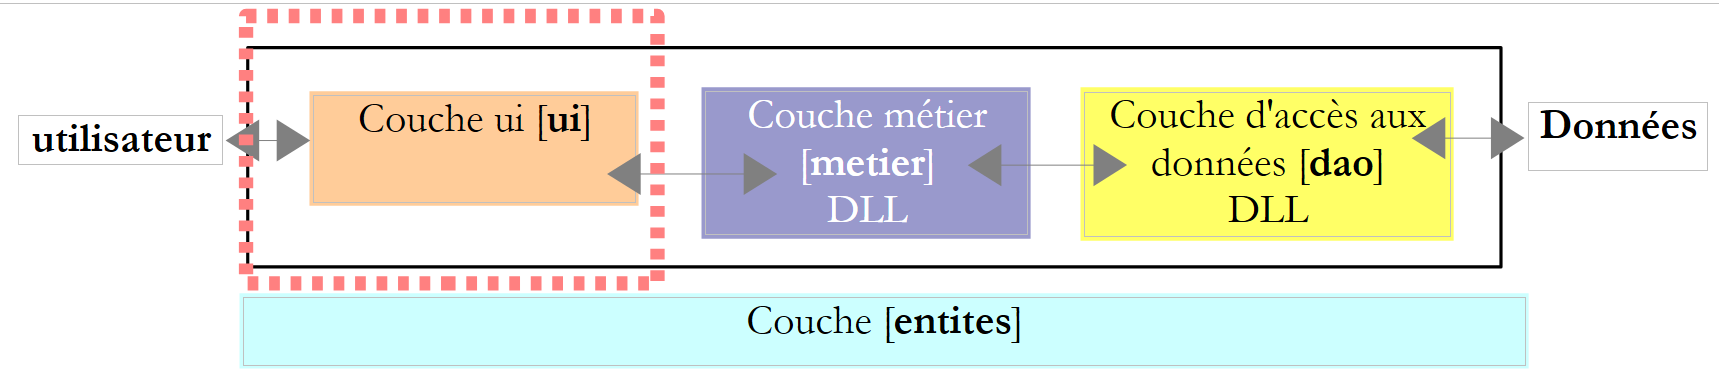 |
The user dialog classes in versions 2 and 3 were very similar. The one for version 2 was as follows:
using System;

namespace Chap2 {
    public class Program {
        static void Main() {
...

             // creation of
            IImpot impot = new HardwiredImpot();

             // infinite loop
            while (true) {
...
             }//while
        }
    }
}
and version 3 :
using System;

namespace Chap3 {
    public class Program {
        static void Main() {
...

             // creation of a IImpot object
            IImpot impot = null;
            try {
                 // creation of a IImpot object
                impot = new FileImpot("DataImpotInvalide.txt");
            } catch (FileImpotException e) {
                 // error display
                string msg = e.InnerException == null ? null : String.Format(", Exception d'origine : {0}", e.InnerException.Message);
                Console.WriteLine("L'erreur suivante s'est produite : [Code={0},Message={1}{2}]", e.Code, e.Message, msg == null ? "" : msg);
                 // program stop
                Environment.Exit(1);
            }
             // infinite loop
            while (true) {
...
             }//while
        }
    }
}
The only thing that changes is the way you instantiate the IImpot which is used to calculate the tax. This object corresponds ici to our [business] layer.
For an implementation [dao] with the class HardwiredImpot, the dialog class is as follows:
using System;
using Metier;
using Dao;
using Entites;

namespace Ui {
    public class Dialogue2 {
        static void Main() {
...

             // we create the layers [metier and dao]
            IImpotMetier metier = new ImpotMetier(new HardwiredImpot());

             // infinite loop
            while (true) {
...
                 // the parameters are correct - the
                Console.WriteLine("Impot=" + metier.CalculerImpot(marié == "o", nbEnfants, salaire) + " euros");
                 // next taxpayer
             }//while
        }
    }
}
- line 12: instantiation of layers [dao] and [metier]. Remember that the [metier] layer requires the [dao] layer.
- line 18: using the [metier] layer to calculate tax
For an implementation [dao] with the class FileImpot, the dialog class is as follows:
using System;
using Metier;
using Dao;
using Entites;

namespace Ui {
    public class Dialogue {
        static void Main() {
...
             // we create the layers [metier and dao]
            IImpotMetier metier = null;
            try {
         // layer creation [job]
                metier = new ImpotMetier(new FileImpot("DataImpot.txt"));
            } catch (FileImpotException e) {
                 // error display
                string msg = e.InnerException == null ? null : String.Format(", Exception d'origine : {0}", e.InnerException.Message);
                Console.WriteLine("L'erreur suivante s'est produite : [Code={0},Message={1}{2}]", e.Code, e.Message, msg == null ? "" : msg);
                 // program stop
                Environment.Exit(1);
            }
             // infinite loop
            while (true) {
...
                 // parameters are correct - Impot is calculated
                Console.WriteLine("Impot=" + metier.CalculerImpot(marié == "o", nbEnfants, salaire) + " euros");
                 // next taxpayer
             }//while
        }
    }
}
- line 11-21: instantiation of layers [dao] and [metier]. Instantiation of the [dao] layer can throw an exception, which is handled by
- line 26: use of the [metier] layer to calculate tax, as in the previous version
6.3.6. Conclusion
The layered architecture and use of interfaces has brought a certain flexibility to our application. This is particularly apparent in the way the [ui] layer instantiates the [dao] and [business] layers:
        // on crée les couches [metier et dao]
IImpotMetier metier = new ImpotMetier(new HardwiredImpot());
in one case and :
// we create the layers [metier and dao]
            IImpotMetier metier = null;
            try {
         // layer creation [job]
                metier = new ImpotMetier(new FileImpot("DataImpot.txt"));
            } catch (FileImpotException e) {
                 // error display
                string msg = e.InnerException == null ? null : String.Format(", Exception d'origine : {0}", e.InnerException.Message);
                Console.WriteLine("L'erreur suivante s'est produite : [Code={0},Message={1}{2}]", e.Code, e.Message, msg == null ? "" : msg);
                 // program stop
                Environment.Exit(1);
            }
in the other. With the exception of exception handling in case 2, instantiation of the [dao] and [metier] layers is similar in both applications. Once the [dao] and [metier] layers have been instantiated, the code for the [ui] layer is identical in both cases. This is due to the fact that the [metier] layer is manipulated via its interface IImpotMetier and not via its implementation class. Changing the application's [metier] layer or [dao] layer without changing their interfaces will always mean changing only the previous lines in the [ui] layer.
Another example of the flexibility brought about by this architecture is the implementation of the [business] layer:
using Entites;
using Dao;

namespace Metier {
    public class ImpotMetier : IImpotMetier {

         // layer [dao]
        private IImpotDao Dao { get; set; }

         // tax brackets
        private TrancheImpot[] tranchesImpot;

         // manufacturer
        public ImpotMetier(IImpotDao dao) {
             // memorization
            Dao = dao;
             // tax brackets
            tranchesImpot = dao.TranchesImpot;
        }

         // tAX CALCULATION
        public int CalculerImpot(bool marié, int nbEnfants, int salaire) {
...
         }//calculate
     }//class

}
Line 14 shows that the [business] layer is built from a reference to the [dao] layer interface. Changing the latter's implementation therefore has zero impact on the [business] layer. This is why our single implementation of the [business] layer was able to work unchanged with two different implementations of the [dao] layer.
6.4. Application example - version 5
 |
This new version is based on the previous version and includes the following changes:
- the [business] and [dao] layers are each encapsulated in a DLL and tested with the NUnit unit test framework.
- layer integration is provided by the Spring framework
In large projects, several developers work on the same project. Layered architectures facilitate this way of working: because layers communicate with each other via well-defined interfaces, a developer working on one layer doesn't have to worry about the work of other developers on other layers. All that's needed is for everyone to respect the interfaces.
In the example above, the developer of the [business] layer will need an implementation of the [dao] layer when testing his layer. Until this is completed, he can use a dummy implementation of the [dao] layer, as long as it complies with the [dao] interface IImpotDao. This is another advantage of layered architecture: a delay in the [dao] layer does not prevent testing of the [business] layer. The dummy implementation of the [dao] layer also has the advantage of often being easier to implement than the real [dao] layer, which may require the launch of a SGBD, network connections, ...
When the [dao] layer is completed and tested, it will be delivered to the [business] layer developers in the form of a DLL rather than source code. In the end, the application is often delivered in the form of an .exe executable (for the [ui] layer) and .dll class libraries (for the other layers).
6.4.1. NUnit
Up to now, the tests carried out for our various applications were based on visual verification. We checked that we were getting what was expected on the screen. This method is unusable when there are many tests to be carried out. Human beings are prone to fatigue, and their ability to verify tests dulls as the day goes by. Tests must therefore be automated, and aim for zero human intervention.
An application evolves over time. Each time it evolves, we need to check that the application does not "regress", c.a.d. that it continues to pass the functional tests that were performed when it was first written. These tests are called "non-regression" tests. A large application may require hundreds of tests. Every method of every class in the application is tested. These are called unit tests. These can involve a lot of developers if they have not been automated.
Tools have been developed to automate testing. One of them is called NUnit. It is available on the [http://www.nunit.org] :
 | 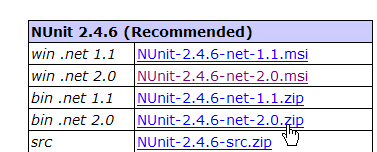 |
Version 2.4.6 above was used for this document (March 2008). Installation places an icon [1] on the desktop:
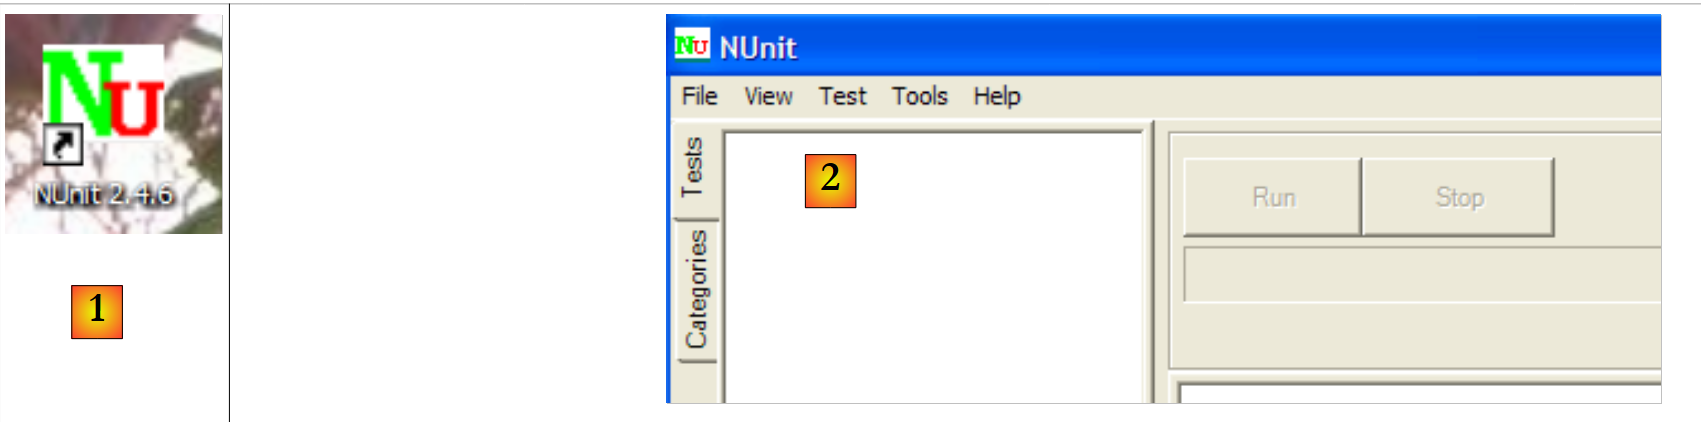 |
A double-click on the icon [1] launches the NUnit GUI [2]. This does nothing to help test automation, as once again we are reduced to visual verification: the tester checks the test results displayed in the GUI. However, tests can also be run by batch tools and their results saved in XML files. This is the method used by development teams: tests are run at night and developers have the results the next morning.
Let's take a look at an example of NUnit testing. First, let's create a new C# project of type Application Console :
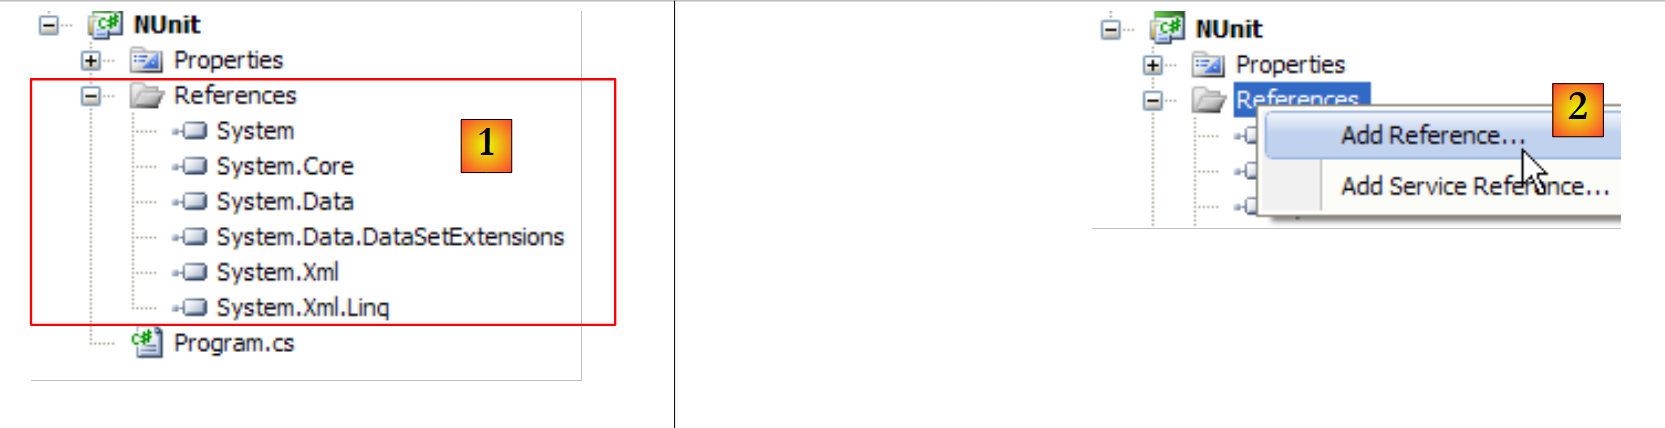 |
In [1], we see the references of the project. These references are DLL containing classes and interfaces used by the project. Those presented in [1] are included by default in every new C# project. To be able to use the classes and interfaces of the NUnit framework, we need to add [2] a new reference to the project.
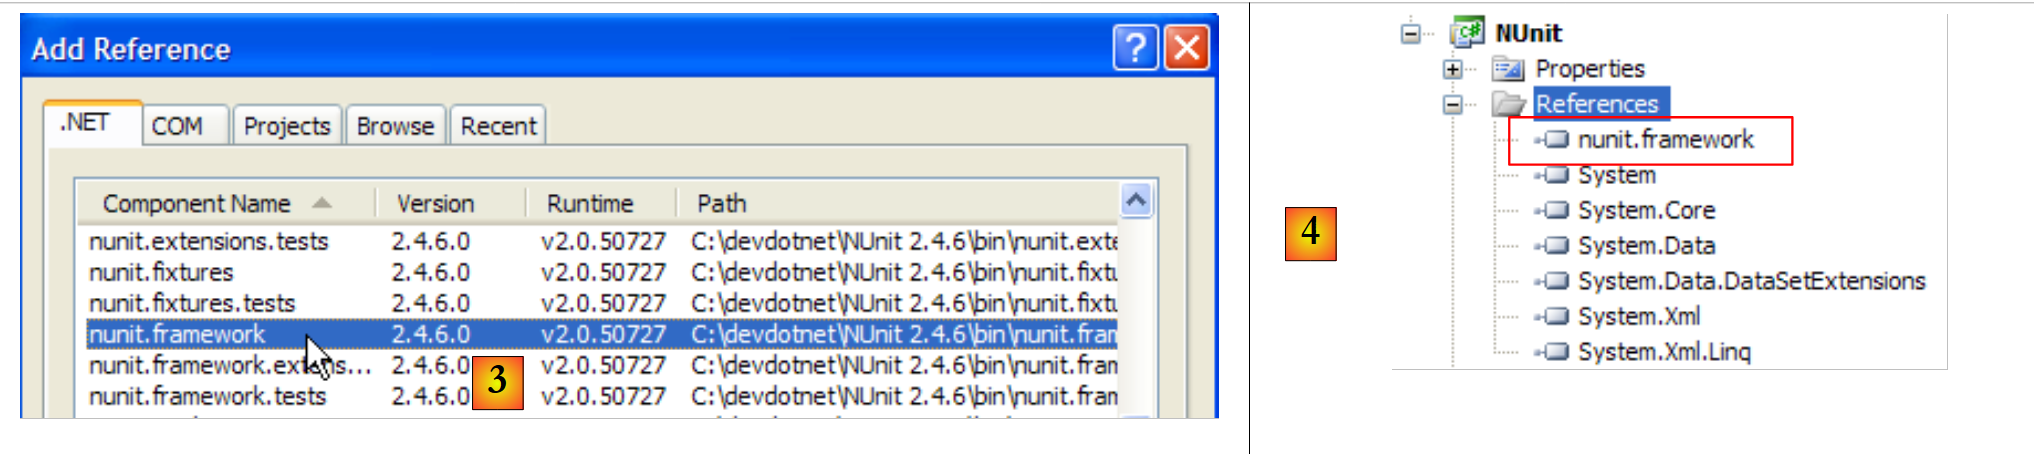 |
In the .NET tab above, we select the component [nunit.framework]. The components [nunit.*] above are not components present by default in the .NET environment. They were brought there by the previous installation of the NUnit framework. Once the reference has been added, it appears [4] in the list of project references.
Before generating the application, the project's [bin/Release] folder is empty. After generation (F6), the [bin/Release] folder is no longer empty:
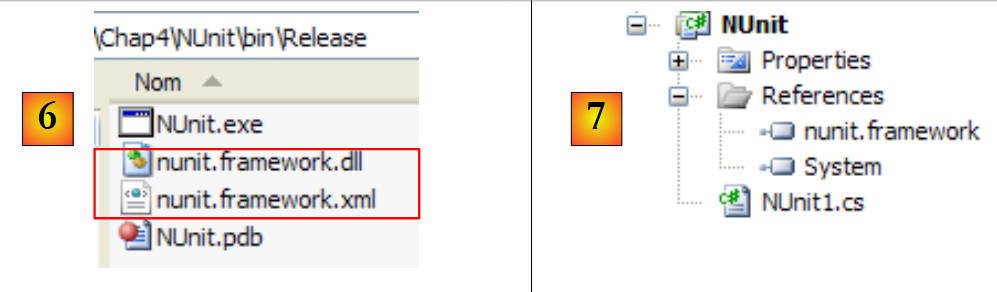 |
In [6], we see the presence of DLL [nunit.framework.dll]. It was the addition of reference [nunit.framework] that caused this DLL to be copied into the execution folder. This is in fact one of the folders that will be explored by the CLR (Common Language Runtime) .NET to find the classes and interfaces referenced by the project.
Let's build a first test class NUnit. To do this, we delete the default class [Program.cs] and add a new class [Nunit1.cs] to the project. We also delete unnecessary references [7].
The test class NUnit1 will be as follows:
using System;
using NUnit.Framework;

namespace NUnit {
    [TestFixture]
    public class NUnit1 {
        public NUnit1() {
            Console.WriteLine("constructeur");
        }
        [SetUp]
        public void avant() {
            Console.WriteLine("Setup");
        }
        [TearDown]
        public void après() {
            Console.WriteLine("TearDown");
        }
        [Test]
        public void t1() {
            Console.WriteLine("test1");
            Assert.AreEqual(1, 1);
        }
        [Test]
        public void t2() {
            Console.WriteLine("test2");
            Assert.AreEqual(1, 2, "1 n'est pas égal à 2");
        }
    }
}
- line 6: the class NUnit1 must be public. The keyword public is not generated by Visual Studio by default. It must be added.
- line 5: the [TestFixture] is an attribute NUnit. It indicates that the class is a test class.
- lines 7-9: the constructor. It is only used ici to write a message to the screen. We want to see when it is executed.
- line 10: the [SetUp] defines an executed method before each unit test.
- line 14: the [TearDown] defines an executed method after each unit test.
- line 18: attribute [Testattribute ] defines a test method. For each method annotated with the [Test], the annotated [SetUp] will be executed before the test, and the [TearDown] will be executed after the test.
- line 21: one of the [Assert.*defined by the NUnit framework. The following [Assert] methods are available:
- [Assert.AreEqual(expression1, expression2)] : checks that the values of the two expressions are equal. Many expression types are supported (int, string, float, double, decimal, ...). If the two expressions are not equal, an exception is thrown.
- [Assert.AreEqual(real1, real2, delta)] : verifies that two real numbers are equal to delta nearby, c.a.d abs(real1-real2)<=delta. For example, we can write [Assert.AreEqual(real1, real2, 1E-6)] to check that two values are equal to 10-6 close.
- [Assert.AreEqual(expression1, expression2, message)] and [Assert.AreEqual(real1, real2, delta, message)] are variants used to specify the error message to be associated with the exception thrown when the [Assert.AreEqual] fails.
- [Assert.IsNotNull(object)] and [Assert.IsNotNull(object, message)] : verifies that object is not equal to null.
- [Assert.IsNull(object)] and [Assert.IsNull(object, message)] : verifies that object is equal to null.
- [Assert.IsTrue(expression)] and [Assert.IsTrue(expression, message)] : checks that expression is equal to true.
- [Assert.IsFalse(expression)] and [Assert.IsFalse(expression, message)] : checks that expression is equal to false.
- [Assert.AreSame(object1, object2)] and [Assert.AreSame(object1, object2, message)] : checks that references object1 and object2 refer to the same object.
- [Assert.AreNotSame(object1, object2)] and [Assert.AreNotSame(object1, object2, message)] : checks that references object1 and object2 do not designate the same object.
- line 21: the assertion must succeed
- line 26: the assertion must fail
Let's configure the project so that its generation produces a DLL rather than an .exe executable:
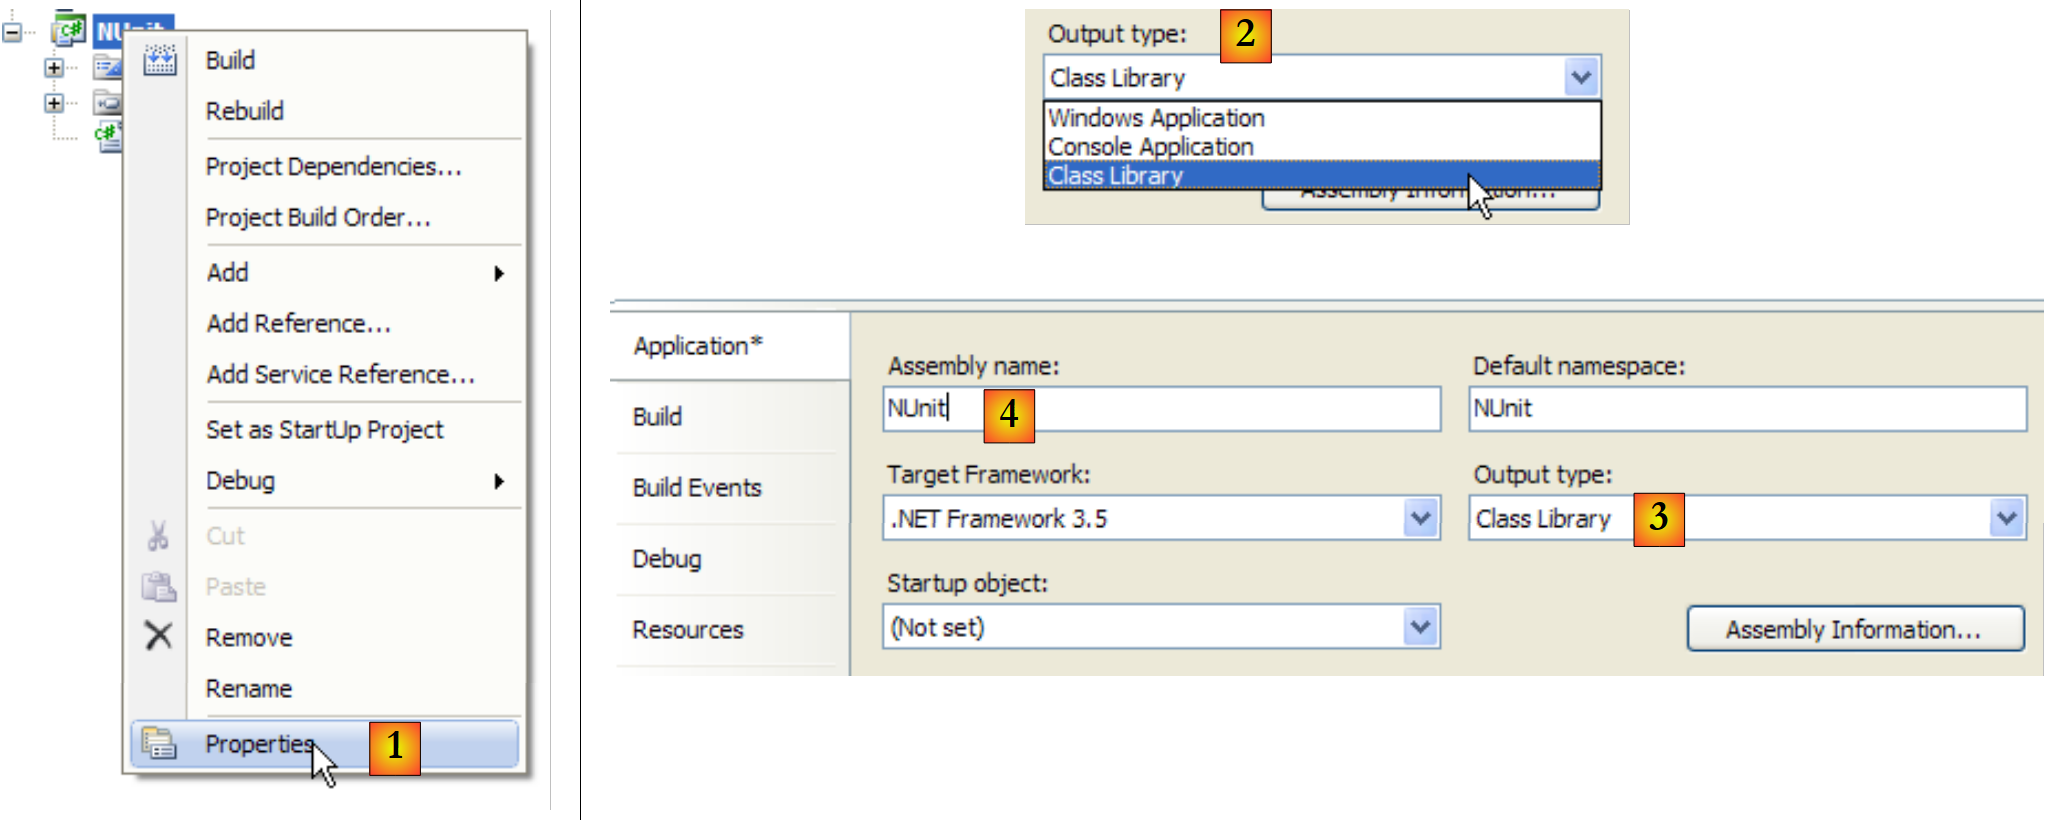 |
- in [1]: project properties
- in [2, 3]: select [Class Library] as the project type
- in [4]: project generation will produce a DLL (assembly) called [Nunit.dll]
Now let's use NUnit to execute the test class:
 |
- in [1]: open a NUnit project
- in [2, 3]: load the DLL bin/Release/Nunit.dll produced by C# project generation
- in [4]: the DLL has been loaded
- in [5]: the test tree
- in [6]: they are executed
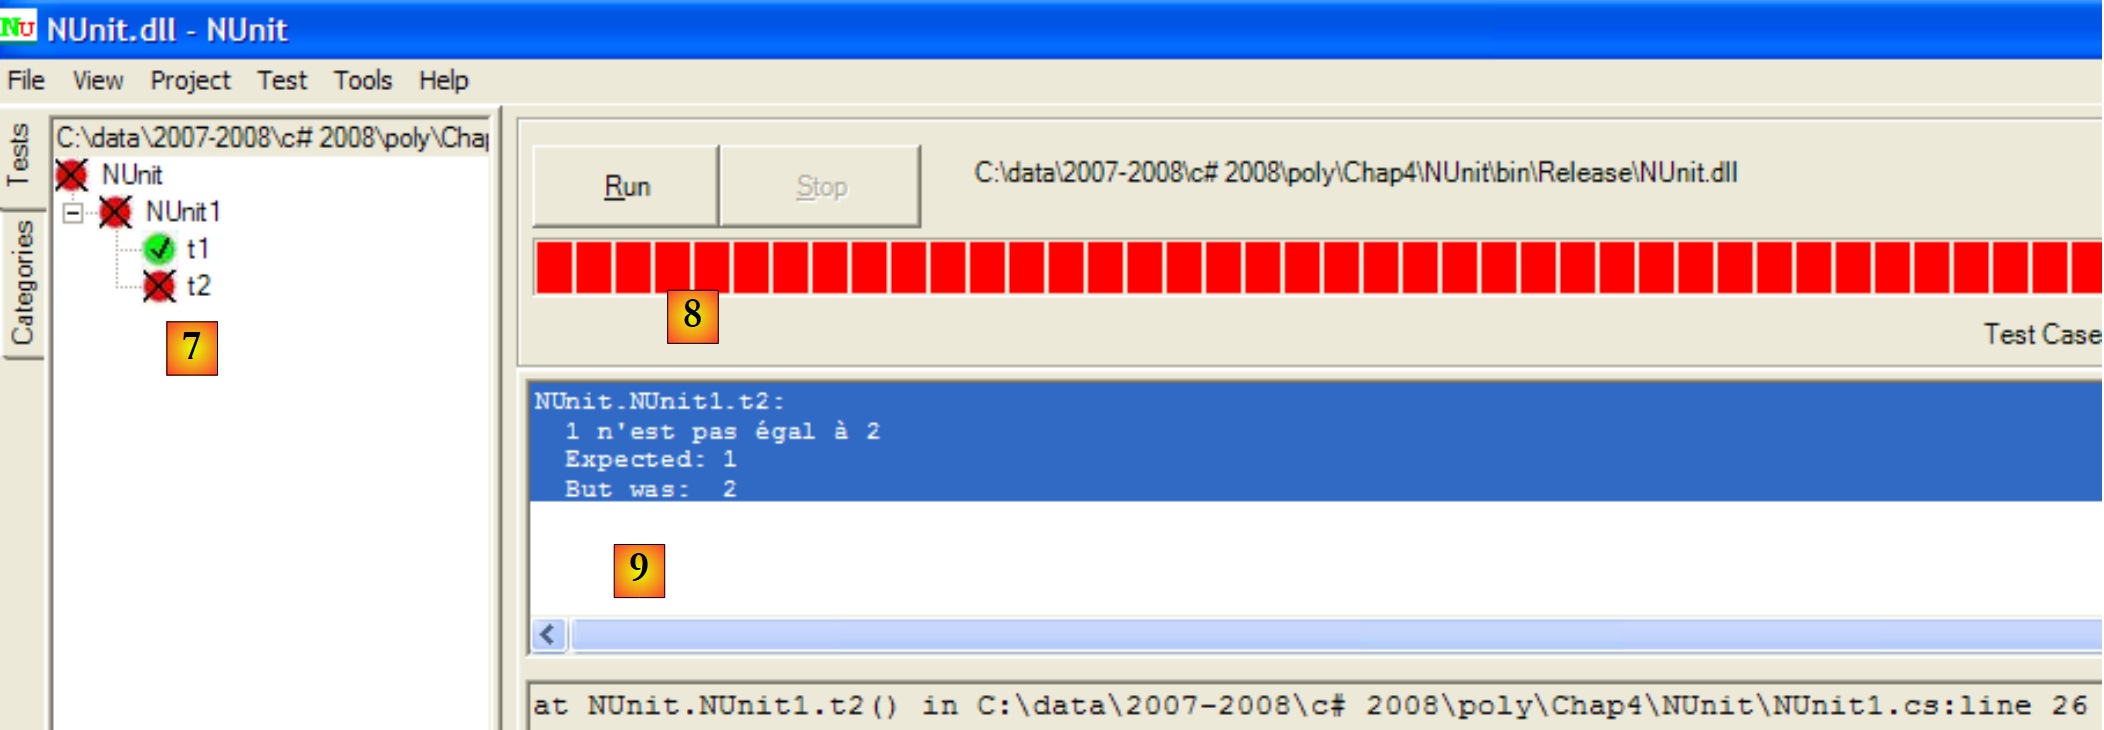 |
- in [7]: results: t1 succeeded, t2 failed
- in [8]: a red bar indicates overall failure of the test class
- in [9]: the failed test error message
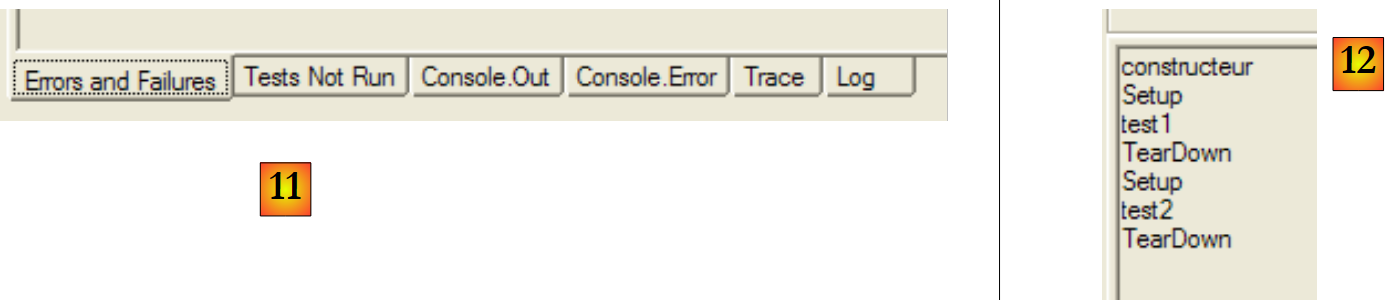 |
- in [11]: the different tabs in the results window
- in [12]: the [Console.Out] tab. Here we see that :
- the builder has only been run once
- the [SetUp] method was executed before each of the two tests
- the [TearDown] method was executed after each of the two tests
You can specify the methods to be tested:
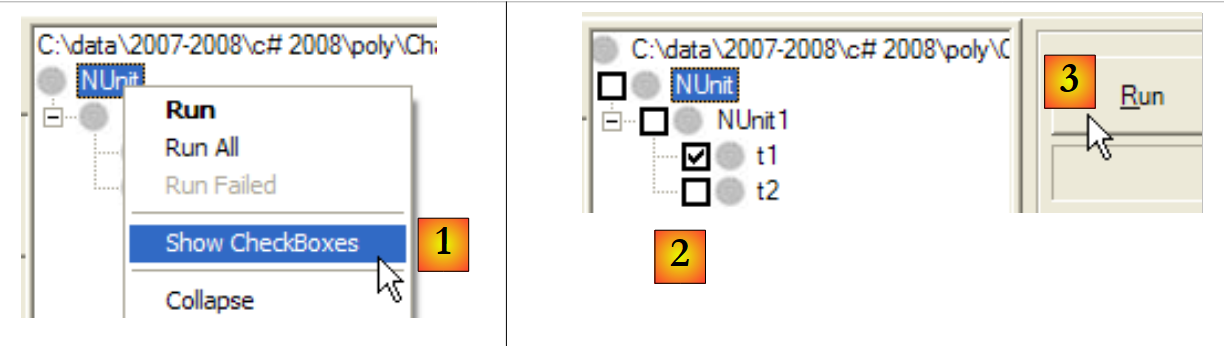 |
- in [1]: a checkbox is displayed next to each test
- in [2]: check the tests to be run
- in [3]: they are executed
To correct errors, simply correct the C# project and regenerate it. NUnit detects that the DLL it is testing has been changed and automatically loads the new one. All you have to do is run the tests again.
Consider the following new test class:
using System;
using NUnit.Framework;

namespace NUnit {
    [TestFixture]
    public class NUnit2 : AssertionHelper {
        public NUnit2() {
            Console.WriteLine("constructeur");
        }
        [SetUp]
        public void avant() {
            Console.WriteLine("Setup");
        }
        [TearDown]
        public void après() {
            Console.WriteLine("TearDown");
        }
        [Test]
        public void t1() {
            Console.WriteLine("test1");
            Expect(1, EqualTo(1));
        }
        [Test]
        public void t2() {
            Console.WriteLine("test2");
            Expect(1, EqualTo(2), "1 n'est pas égal à 2");
        }
    }
}
Starting with version 2.4 of NUnit, a new syntax has become available, that of lines 21 and 26. For this, the test class must derive from the AssertionHelper (line 6).
The (non-exhaustive) correspondence between old and new syntax is as follows:
Let's add the following test to the NUnit2 class:
        [Test]
        public void t3() {
            bool vrai = true, faux = false;
            Expect(vrai, True);
            Expect(faux, False);
            Object obj1 = new Object(), obj2 = null, obj3=obj1;
            Expect(obj1, Not.Null);
            Expect(obj2, Null);
            Expect(obj3, SameAs(obj1));
            double d1 = 4.1, d2 = 6.4, d3 = d1;
            Expect(d1, EqualTo(d3).Within(1e-6));
            Expect(d1, Not.EqualTo(d2));
}
If we generate (F6) the new DLL of the C# project, the NUnit project becomes the following:
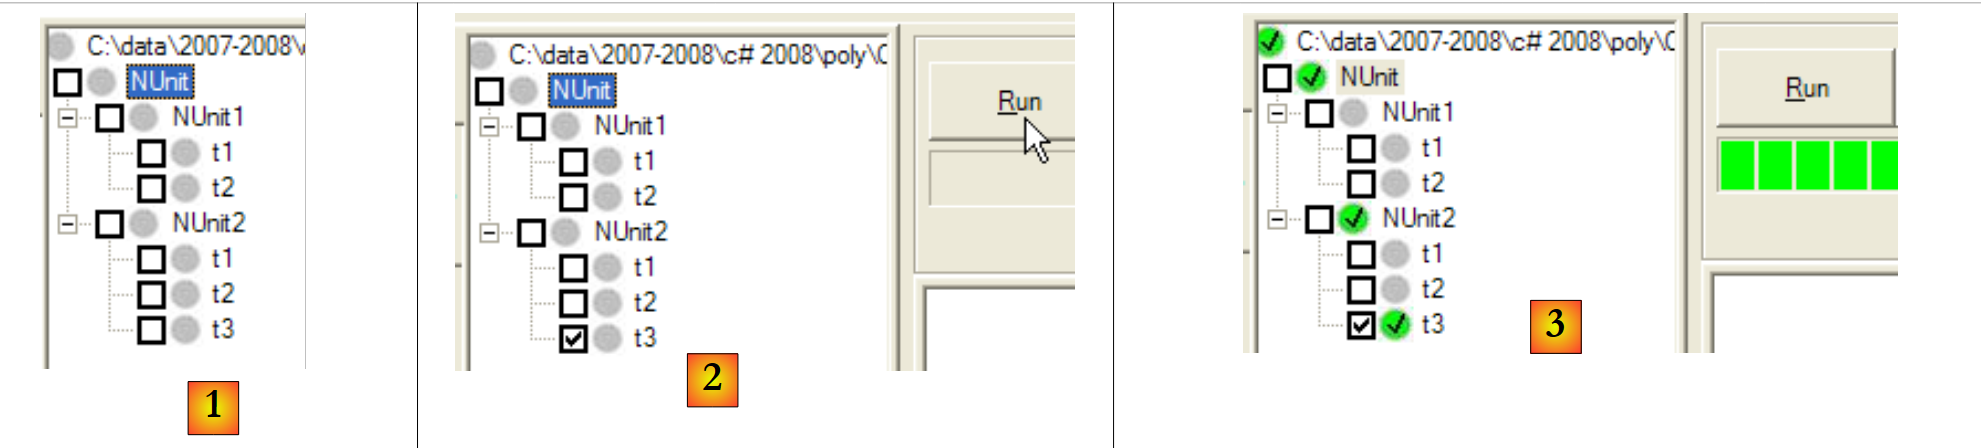 |
- in [1]: the new test class [NUnit2] has been automatically detected
- in [2]: run the t3 test of NUnit2
- in [3]: t3 test passed
To find out more about NUnit, read the help for NUnit :
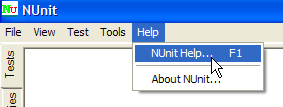 | 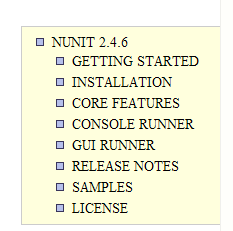 |
6.4.2. The Visual Studio solution
 |
We will gradually build the following Visual Studio solution:
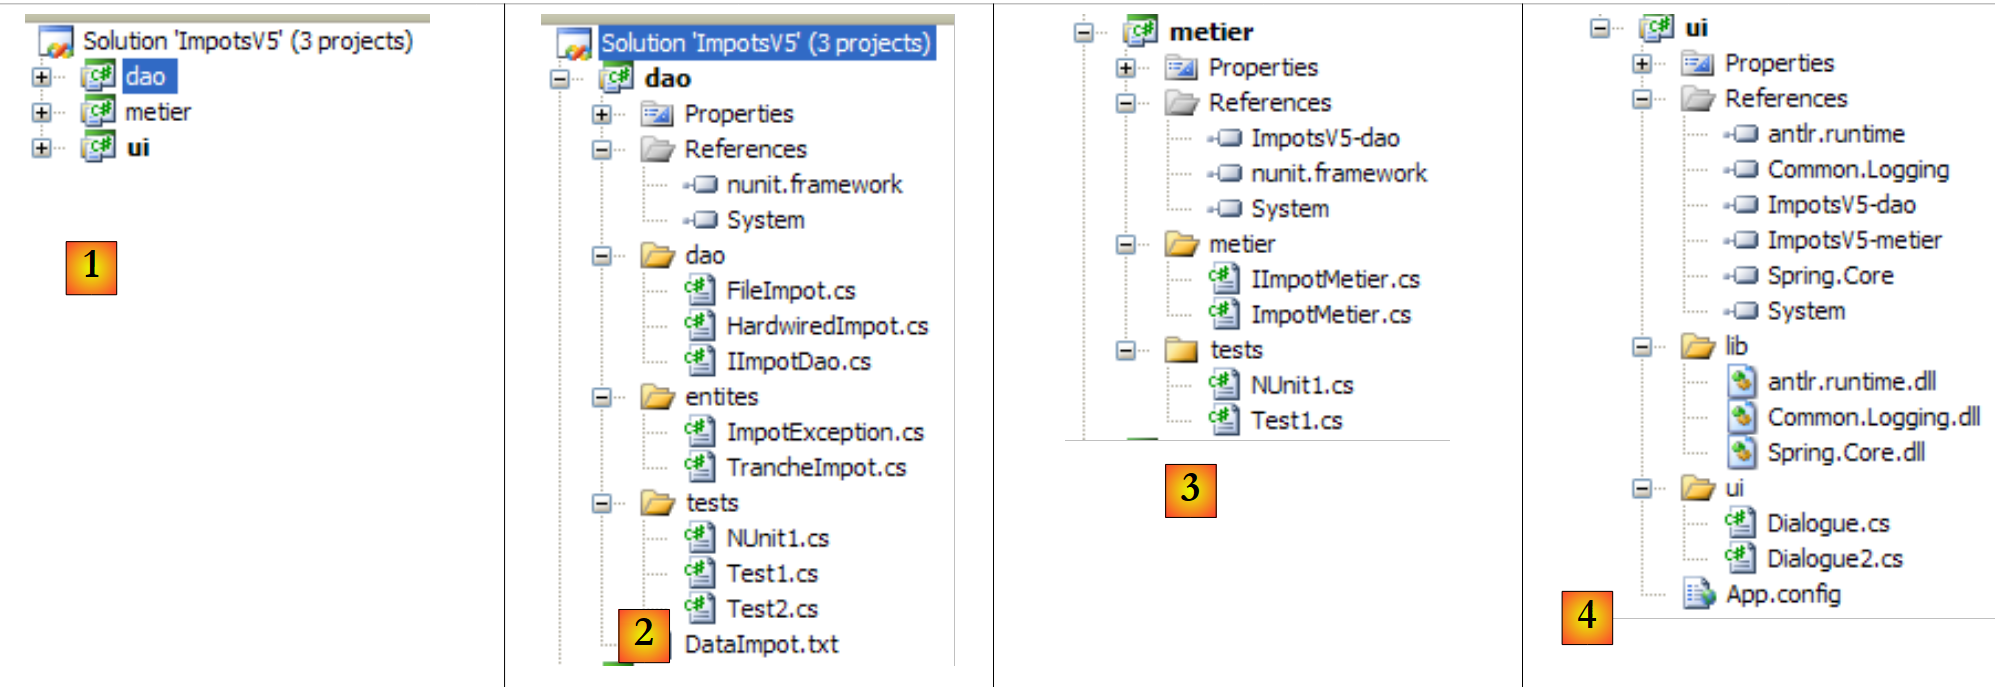 |
- in [1]: the solution ImpotsV5 is made up of three projects, one for each of the application's three layers
- in [2]: project [dao] from layer [dao]
- en [3] : the [metier] project for the [metier] layer
- in [4]: project [ui] from layer [ui]
The solution ImpotsV5 can be constructed as follows:
1 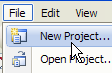 | 234 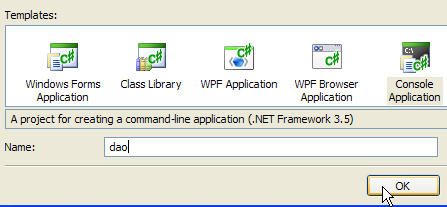 | 5 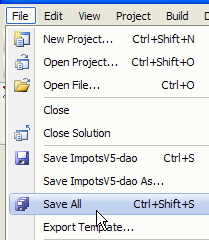 |
- en [1]: create a new project
- en [2]: select a console application
- in [3]: call the project [dao]
- in [4]: create the project
- in [5]: once the project has been created, save it
 |
- in [6]: keep the name [dao] for the project
- in [7]: specify a folder to save the project and its solution
- in [8]: name the solution
- in [9]: indicate that the solution must have its own file
- in [10]: save the project and its solution
- in [11]: the [dao] project in its solution ImpotsV5
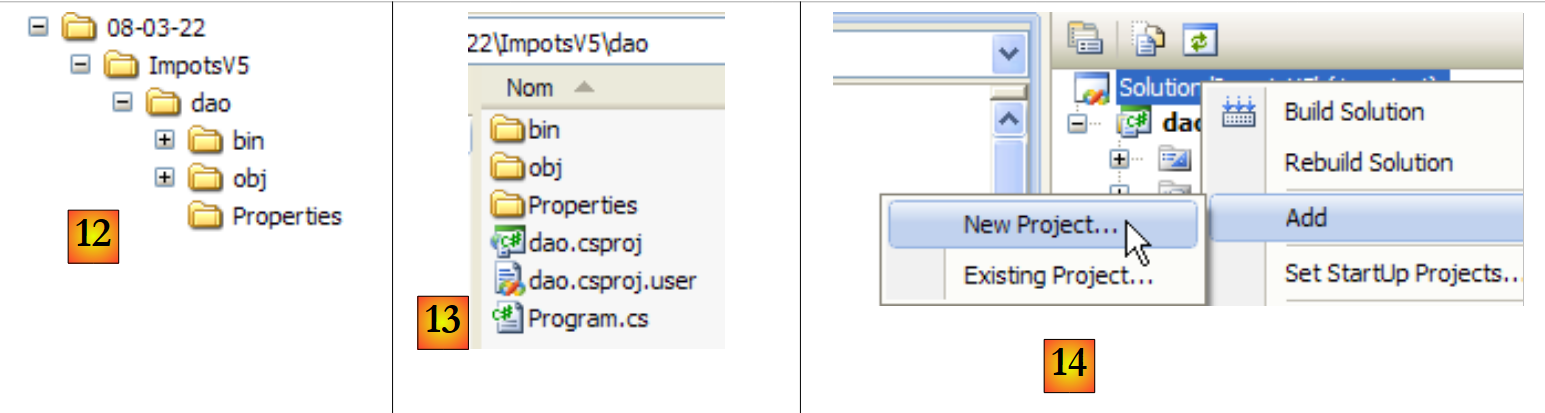 |
- in [12]: the solution file ImpotsV5. It contains the [dao] folder from the [dao] folder.
- in [13]: the contents of folder [dao]
- in [14]: a new project is added to the solution ImpotsV5
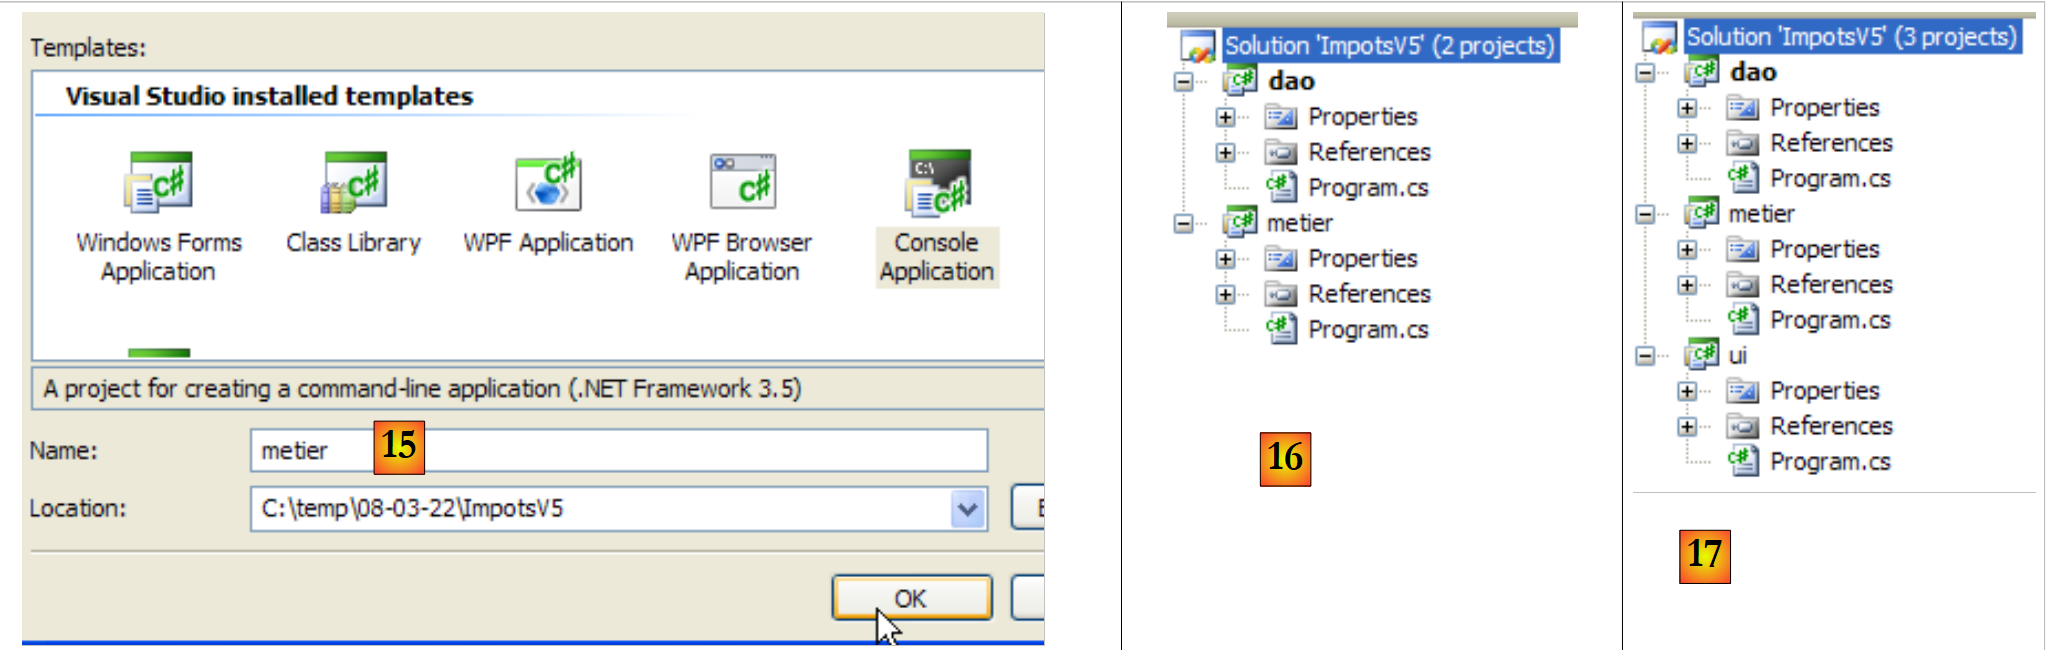 |
- en [15]: the new project is called [metier]
- in [16]: the solution with its two projects
- in [17]: the solution, once the 3rd project [ui] has been added
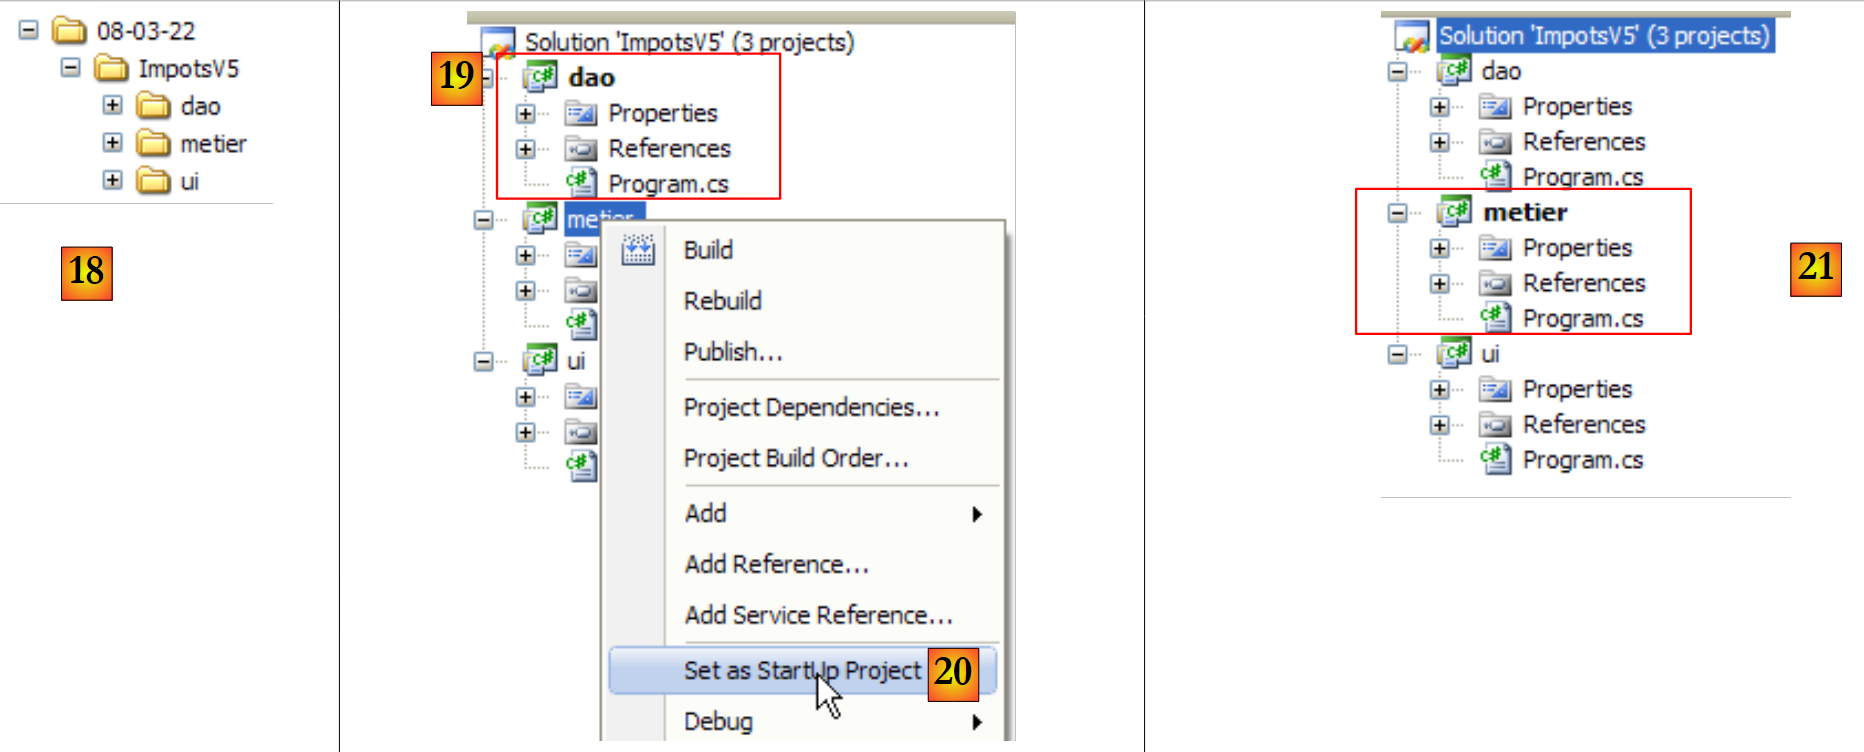 |
- in [18]: the solution file and the files for the three projects
- when a solution is executed using (Ctrl+F5), it is the active project which is executed. The same applies when generating (F6) the solution. The name of the active project is in bold [19] in the solution.
- in [20]: to change the solution's active project
- in [21]: the [metier] project is now the active project in the solution
6.4.3. The [ layerdao]
 |
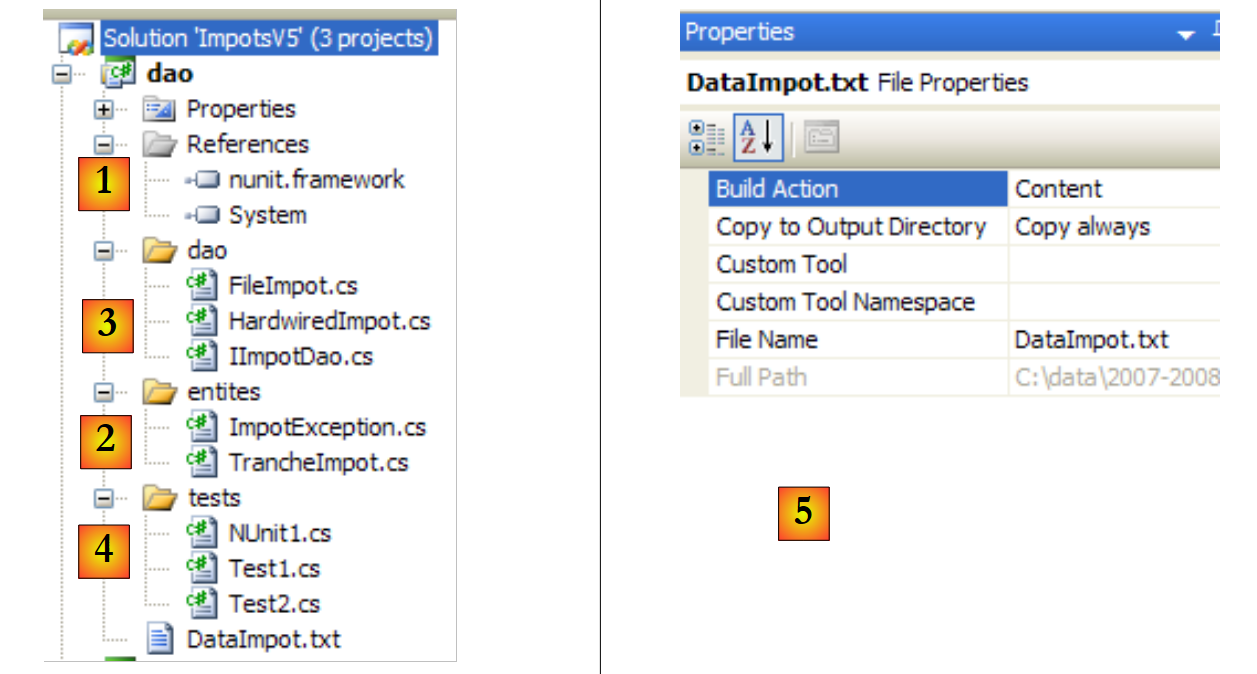 |
Project references (see [1] in the project)
We add the [nunit.framework] reference required for [NUnit] tests
The entities (see [2] in the project)
The [TrancheImpot] class is the same as in previous versions. The class [FileImpotException] from the previous version is renamed to [ImpotException] to make it more generic and not to link it to a particular [dao] layer:
using System;

namespace Entites {
    public class ImpotException : Exception {

         // error code
        public int Code { get; set; }

         // manufacturers
        public ImpotException() {
        }
        public ImpotException(string message)
            : base(message) {
        }
        public ImpotException(string message, Exception e)
            : base(message, e) {
        }
    }
}
The [dao] layer (see [3] in the project)
The [IImpotDao] interface is the same as in the previous version. The same applies to the [HardwiredImpot] class. The [FileImpot] class has been modified to take account of the change of the [FileImpotException] exception to [ImpotException]:
...

namespace Dao {
    public class FileImpot : IImpotDao {

         // error codes
        [Flags]
        public enum CodeErreurs { Acces = 1, Ligne = 2, Champ1 = 4, Champ2 = 8, Champ3 = 16 };

...

         // manufacturer
        public FileImpot(string fileName) {
             // save the file name
            FileName = fileName;
...
             // initially no error
            CodeErreurs code = 0;
            try {
                using (StreamReader input = new StreamReader(FileName)) {
                    while (!input.EndOfStream && code == 0) {
...
                         // mistake?
                        if (code != 0) {
                            // on note l'erreur
                            fe = new ImpotException(String.Format("Ligne n° {0} incorrecte", numLigne)) { Code = (int)code };
                        } else {
...
                        }
                    }
                }
            } catch (Exception e) {
                // on note l'erreur
                fe = new ImpotException(String.Format("Erreur lors de la lecture du fichier {0}", FileName), e) { Code = (int)CodeErreurs.Acces };
            }
             // error to report?
...
        }
    }
}
- line 8: error codes previously in class [FileImpotException] have migrated to class [FileImpot]. These are error codes specific to this implementation of the [IImpotDao] interface.
- lines 26 and 34: to encapsulate an error, class [ImpotException] is used instead of class [FileImpotException].
The [Test1] test (see [4] in the project)
The [Test1] class simply displays the tax brackets on the screen:
using System;
using Dao;
using Entites;

namespace Tests {
    class Test1 {
        static void Main() {

             // create the [dao] layer
            IImpotDao dao = null;
            try {
                 // layer creation [dao]
                dao = new FileImpot("DataImpot.txt");
            } catch (ImpotException e) {
                 // error display
                string msg = e.InnerException == null ? null : String.Format(", Exception d'origine : {0}", e.InnerException.Message);
                Console.WriteLine("L'erreur suivante s'est produite : [Code={0},Message={1}{2}]", e.Code, e.Message, msg == null ? "" : msg);
                 // program stop
                Environment.Exit(1);
            }
             // display tax brackets
            TrancheImpot[] tranchesImpot = dao.TranchesImpot;
            foreach (TrancheImpot t in tranchesImpot) {
                Console.WriteLine("{0}:{1}:{2}", t.Limite, t.CoeffR, t.CoeffN);
            }
        }
    }
}
- line 13: layer [dao] is implemented by class [FileImpot]
- line 14: handles the [ImpotException] exception that may occur.
The [DataImpot.txt] file required for testing is automatically copied to the project execution folder (see [5] in the project). The [dao] project will have several classes containing a [Main] method. In this case, you must explicitly indicate the class to be executed when the user requests project execution by pressing Ctrl-F5 :
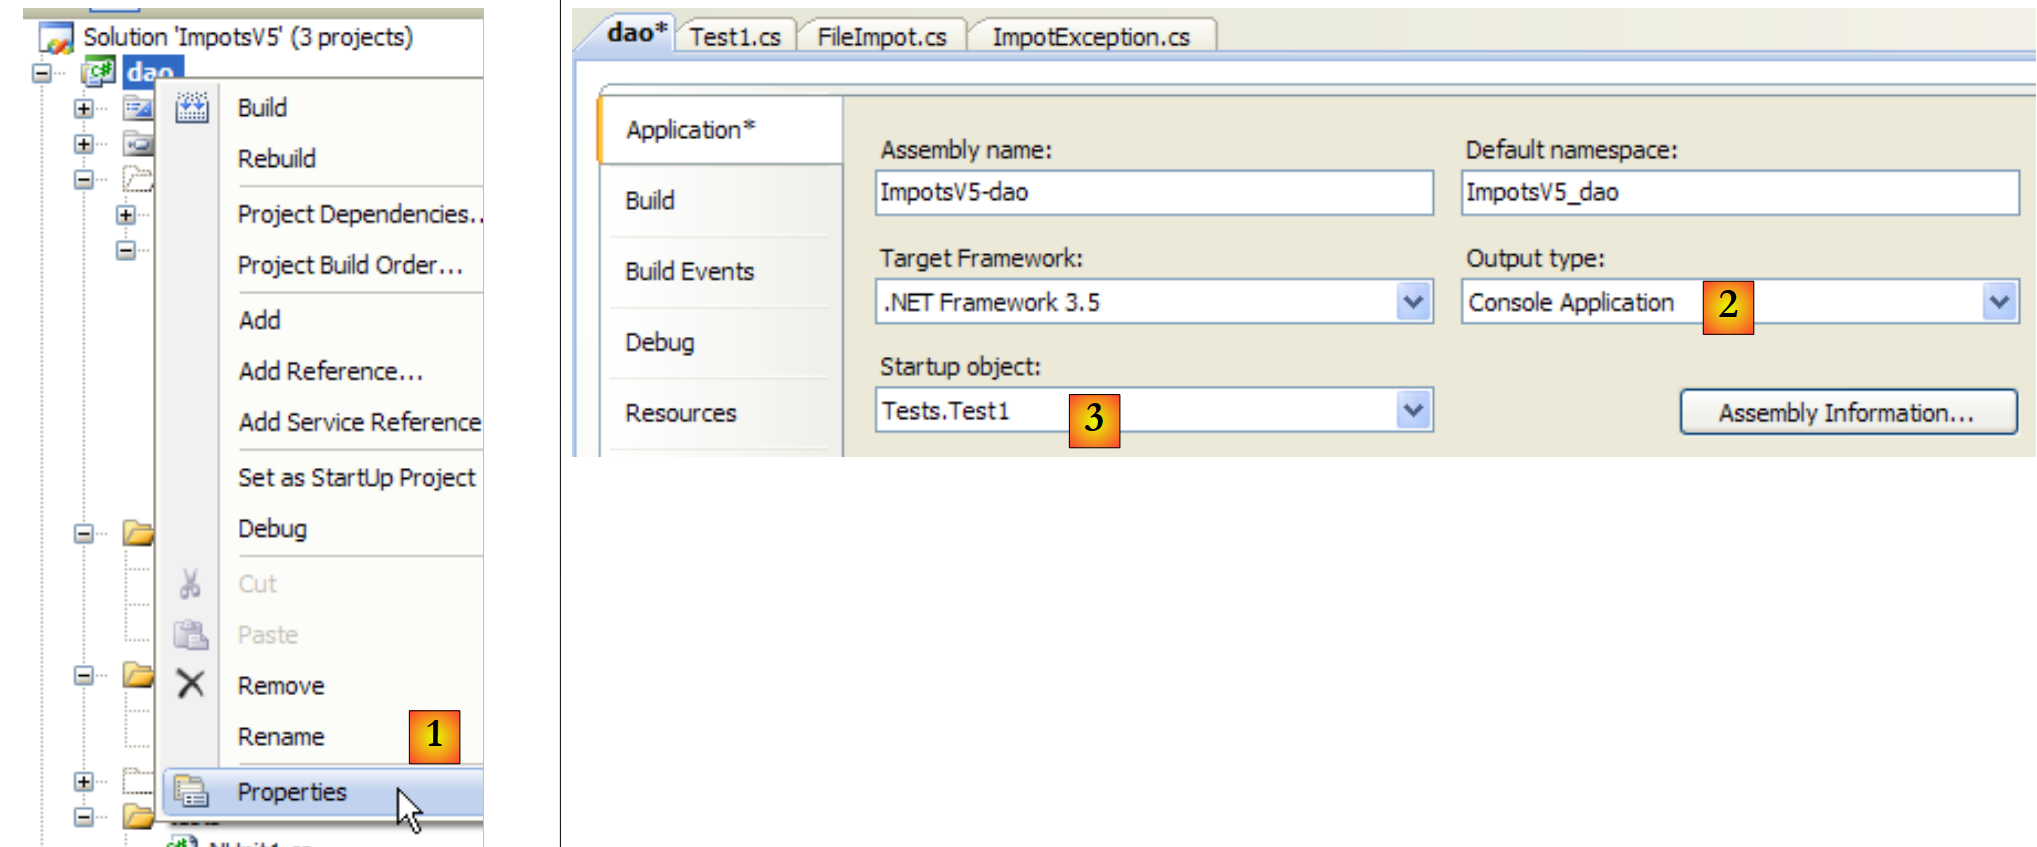 |
- en [1]: access project properties
- en [2]: specify that this is a console application
- in [3]: specify the class to be executed
Execution of the previous [Test1] class gives the following results:
4962:0:0
8382:0,068:291,09
14753:0,191:1322,92
23888:0,283:2668,39
38868:0,374:4846,98
47932:0,426:6883,66
0:0,481:9505,54
The [Test2] test (see [4] in the project)
The [Test2] class does the same as the [Test1] class, implementing the [dao] layer with the [HardwiredImpot] class. Line 13 of [Test1] is replaced by the following:
dao = new HardwiredImpot();
The project is modified to run the [Test2] class:
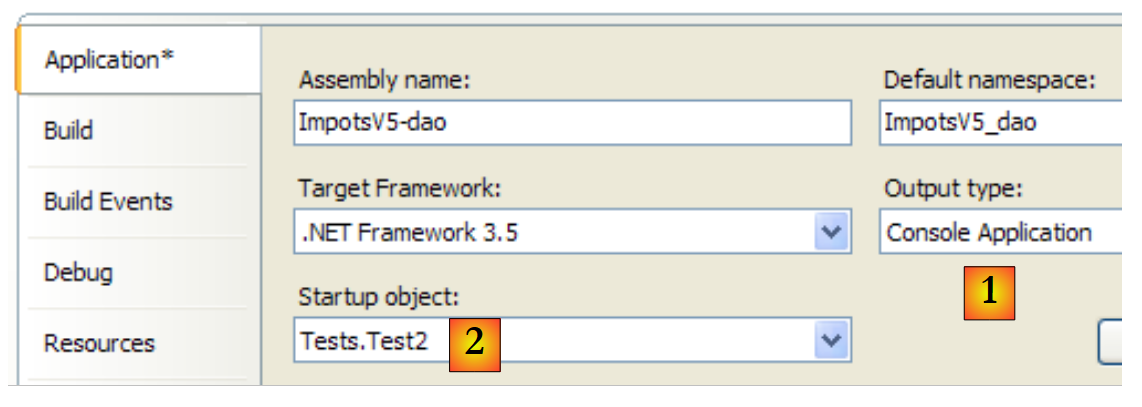 |
The screen results are the same as before.
The NUnit [NUnit1] test (see [4] in the project)
The unit test [NUnit1] is as follows:
using System;
using Dao;
using Entites;
using NUnit.Framework;

namespace Tests {
    [TestFixture]
    public class NUnit1 : AssertionHelper{
         // layer [dao] to be tested
        private IImpotDao dao;

         // manufacturer
        public NUnit1() {
             // dao] layer initialization
            dao = new FileImpot("DataImpot.txt");
        }

         // test
        [Test]
        public void ShowTranchesImpot(){
             // display tax brackets
            TrancheImpot[] tranchesImpot = dao.TranchesImpot;
            foreach (TrancheImpot t in tranchesImpot) {
                Console.WriteLine("{0}:{1}:{2}", t.Limite, t.CoeffR, t.CoeffN);
            }
             // some tests
            Expect(tranchesImpot.Length,EqualTo(7));
            Expect(tranchesImpot[2].Limite,EqualTo(14753));
            Expect(tranchesImpot[2].CoeffR, EqualTo(0.191));
            Expect(tranchesImpot[2].CoeffN, EqualTo(1322.92));
        }
    }
}
- the test class derives from the [AssertionHelper] class, enabling the use of the static method Expect (lines 27-30).
- line 10: a reference to the [dao] layer
- lines 13-16: the constructor instantiates layer [dao] with class [FileImpot]
- lines 19-20: the test method
- line 22: retrieves the tax bracket table from the [dao] layer
- lines 23-25: displayed as before. This display would not be necessary in a real unit test. Ici, this display has a pedagogical purpose.
- lines 27: check that there are 7 tax brackets
- lines 28-30: check values for tax bracket no. 2
To run this unit test, the project must be of type [Class Library] :
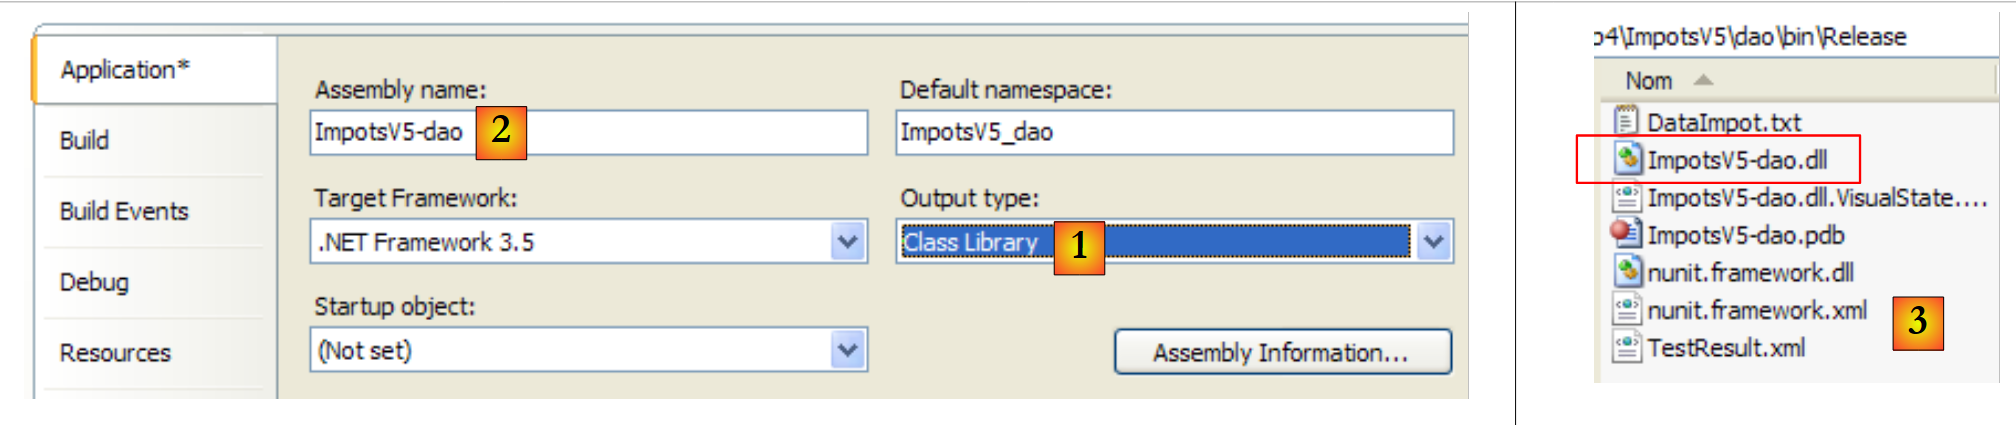 |
- in [1]: the nature of the project has been changed
- in [2]: the DLL generated will be called [ImpotsV5-dao.dll]
- in [3]: after generating (F6) the project, the folder [dao/bin/Release] contains the DLL [ImpotsV5-dao.dll]
The DLL [ImpotsV5-dao.dll] is then loaded into the framework NUnit and executed :
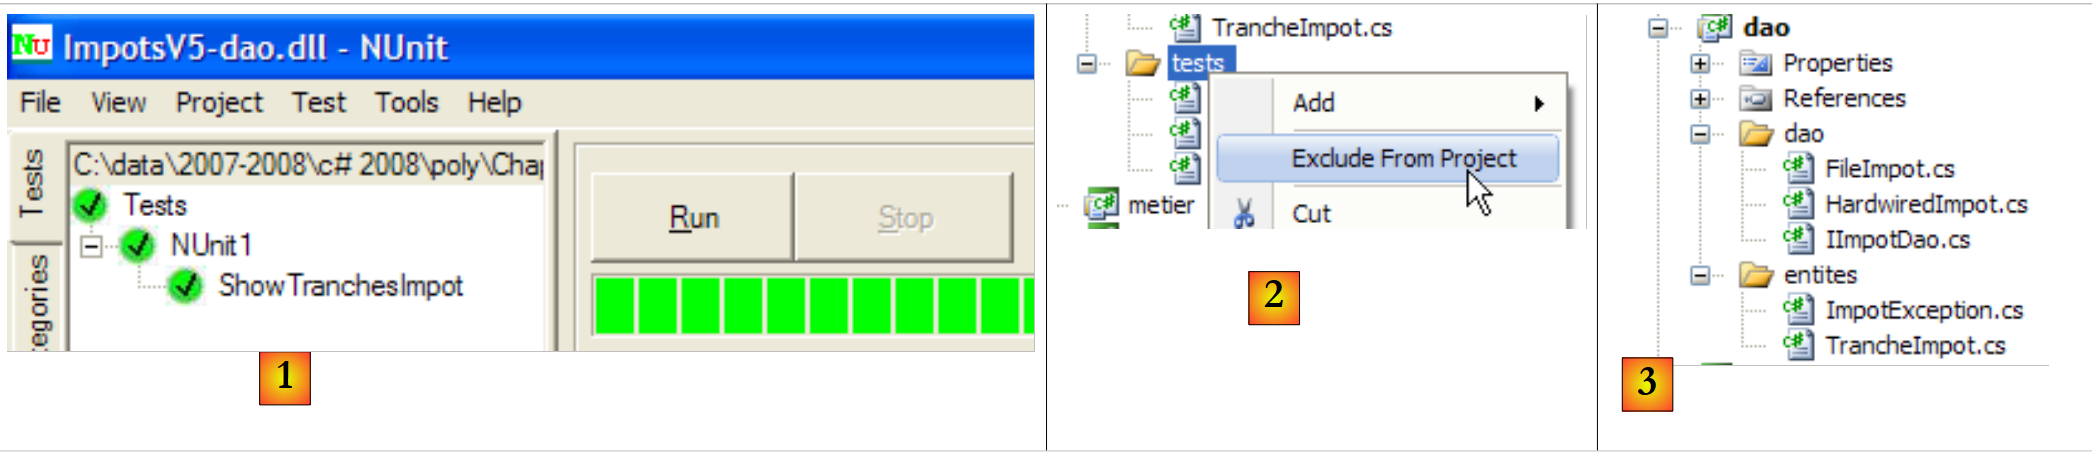 |
- in [1]: tests passed. We now consider the [dao] layer operational. Its DLL contains all the project's classes, including the test classes. These are no longer needed. We rebuild DLL to exclude the test classes.
- in [2]: the [tests] folder is excluded from the project
- in [3]: the new project. This is regenerated by pressing F6 to generate a new DLL.
6.4.4. The [ layerjob]
 |
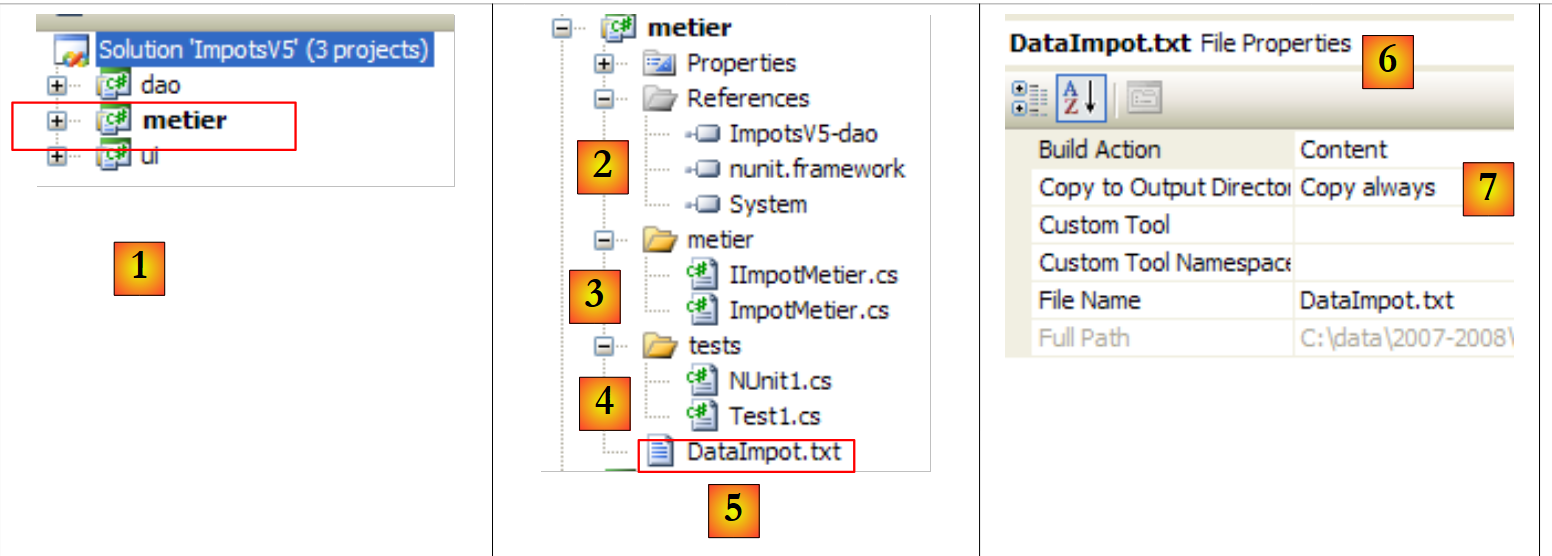 |
- in [1], the [metier] project became the solution's active project
- in [2]: project references
- en [3]: the [metier] layer
- in [4]: test classes
- in [5]: the tax bracket file [DataImpot.txt] configured [6] to be automatically copied to the project execution folder [7]
Project references (see [2] in the project)
As with the [dao] project, we add the [nunit.framework] reference required for [NUnit] tests. The [metier] layer needs the [dao] layer. It therefore needs a reference to the DLL of this layer. Proceed as follows:
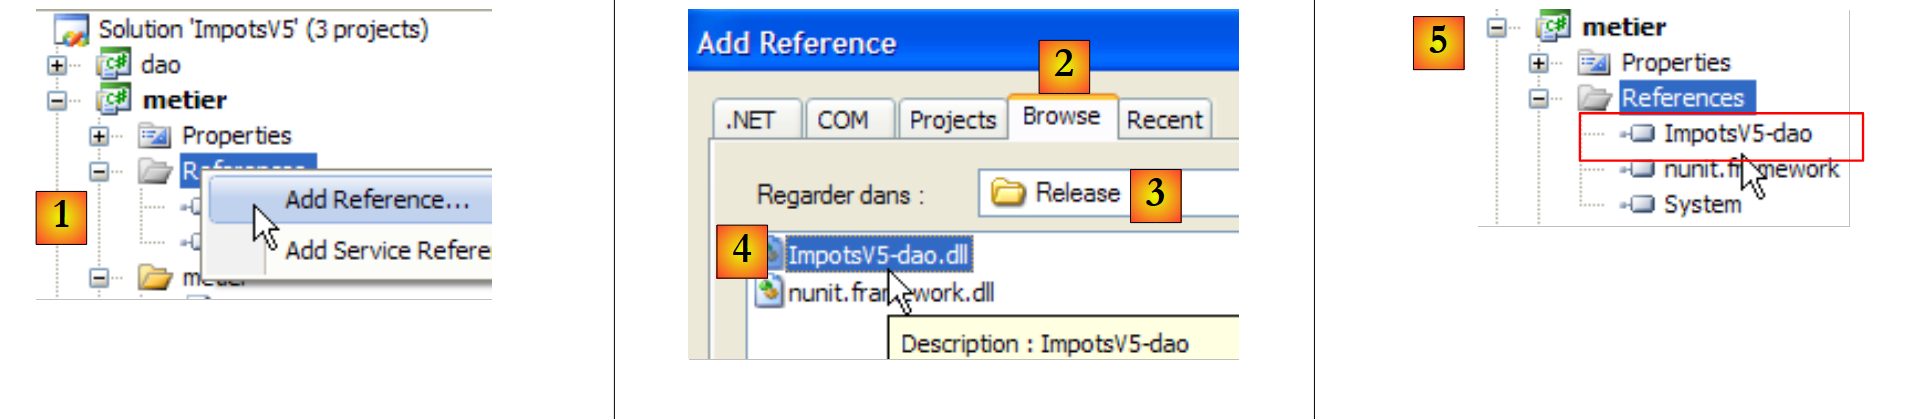 |
- in [1]: a new reference is added to the project references [metier]
- in [2]: select the [Browse] tab
- in [3]: select the folder [dao/bin/Release]
- in [4]: select the DLL [ImpotsV5-dao.dll] generated in project [dao]
- in [5]: the new reference
The diaper [metier] (see [3] in the project)
The [IImpotMetier] interface is the same as in the previous version. The same applies to the [ImpotMetier] class.
The [Test1] test (see [4] in the project)
The [Test1] class simply performs a few salary calculations:
using System;
using Dao;
using Entites;
using Metier;

namespace Tests {
    class Test1 {
        static void Main() {

             // we create the [metier] layer
            IImpotMetier metier = null;
            try {
                 // layer creation [job]
                metier = new ImpotMetier(new FileImpot("DataImpot.txt"));
            } catch (ImpotException e) {
                 // error display
                string msg = e.InnerException == null ? null : String.Format(", Exception d'origine : {0}", e.InnerException.Message);
                Console.WriteLine("L'erreur suivante s'est produite : [Code={0},Message={1}{2}]", e.Code, e.Message, msg == null ? "" : msg);
                 // program stop
                Environment.Exit(1);
            }
            // on calcule qqs impots
            Console.WriteLine(String.Format("Impot(true,2,60000)={0} euros", metier.CalculerImpot(true, 2, 60000)));
            Console.WriteLine(String.Format("Impot(false,3,60000)={0} euros", metier.CalculerImpot(false, 3, 60000)));
            Console.WriteLine(String.Format("Impot(false,3,60000)={0} euros", metier.CalculerImpot(false, 3, 6000)));
            Console.WriteLine(String.Format("Impot(false,3,60000)={0} euros", metier.CalculerImpot(false, 3, 600000)));
        }
    }
}
- line 14: creation of [metier] and [dao] layers. The [dao] layer is implemented with the [FileImpot] class
- lines 12-21: handling of a possible [ImpotException] exception
- lines 23-26: repeated calls to the single method CalculerImpot interface [IImpotMetier].
The [metier] project is configured as follows:
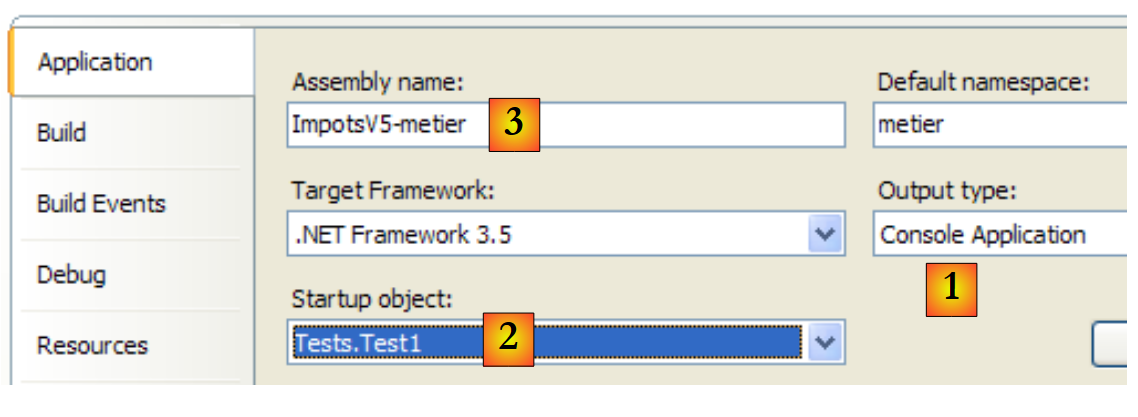 |
- [1]: the project is a console application
- [2]: the class executed is [Test1]
- [3]: project generation will produce executable [ImpotsV5-metier.exe]
The results of the project are as follows:
The [NUnit1] test (see [4] in the project)
The unit test class [NUnit1] repeats the four previous calculations and checks the results:
using Dao;
using Metier;
using NUnit.Framework;

namespace Tests {
    [TestFixture]
    public class NUnit1:AssertionHelper {
         // layer [metier] to test
        private IImpotMetier metier;

         // manufacturer
        public NUnit1() {
             // initialization layer [metier]
            metier = new ImpotMetier(new FileImpot("DataImpot.txt"));
        }

         // test
        [Test]
        public void CalculsImpot(){
             // display tax brackets
            Expect(metier.CalculerImpot(true, 2, 60000), EqualTo(4282));
            Expect(metier.CalculerImpot(false, 3, 60000), EqualTo(4282));
            Expect(metier.CalculerImpot(false, 3, 6000), EqualTo(0));
            Expect(metier.CalculerImpot(false, 3, 600000), EqualTo(179275));
        }
    }
}
- line 14: creation of [metier] and [dao] layers. The [dao] layer is implemented with the [FileImpot] class
- lines 21-24: repeated calls to the single method CalculerImpot interface [IImpotMetier] with verification of results.
The [metier] project is now configured as follows:
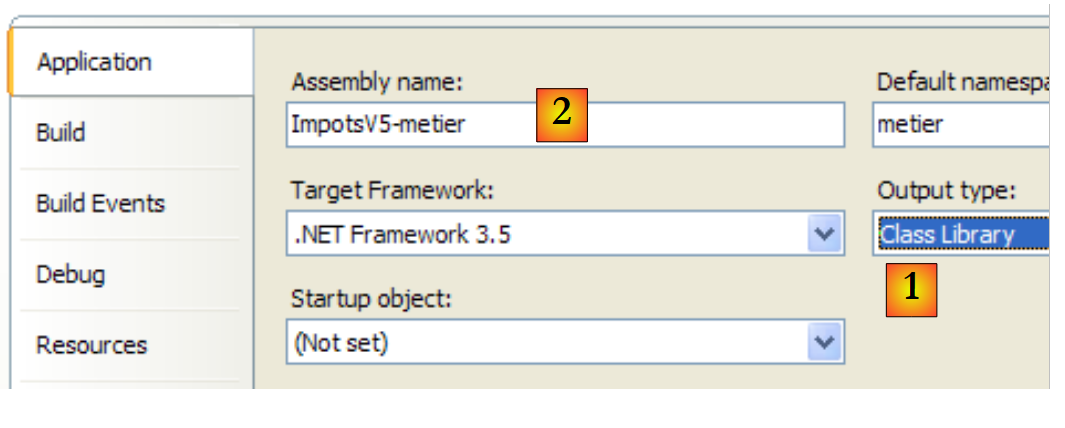 |
- [1]: the project is of the "class library" type
- [2]: project generation will produce DLL [ImpotsV5-metier.dll]
The project is generated (F6). Then the DLL [ImpotsV5-metier.dllgenerated is loaded into NUnit and tested :
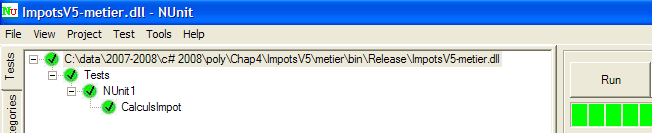 |
The tests above were successful. We now consider the [metier] layer operational. Its DLL contains all the project classes, including the test classes. These are no longer needed. We rebuild DLL to exclude the test classes.
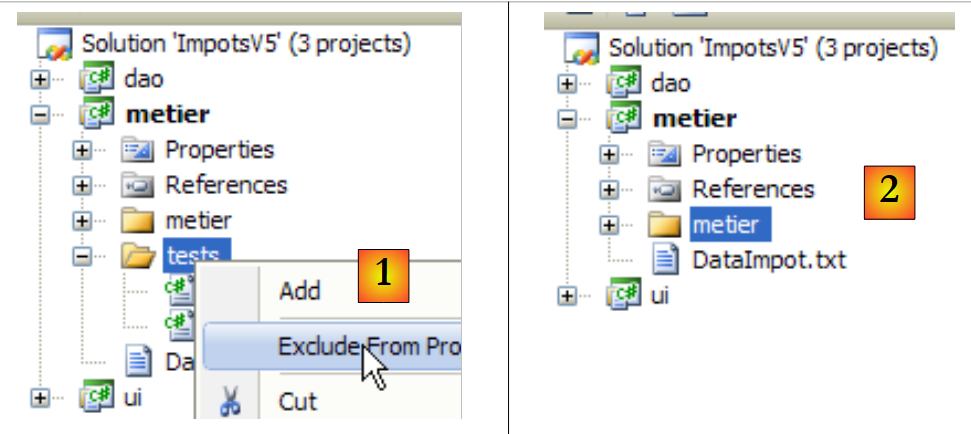 |
- in [1]: the [tests] folder is excluded from the project
- in [2]: the new project. This is regenerated by pressing F6 to generate a new DLL.
6.4.5. The [ui] layer
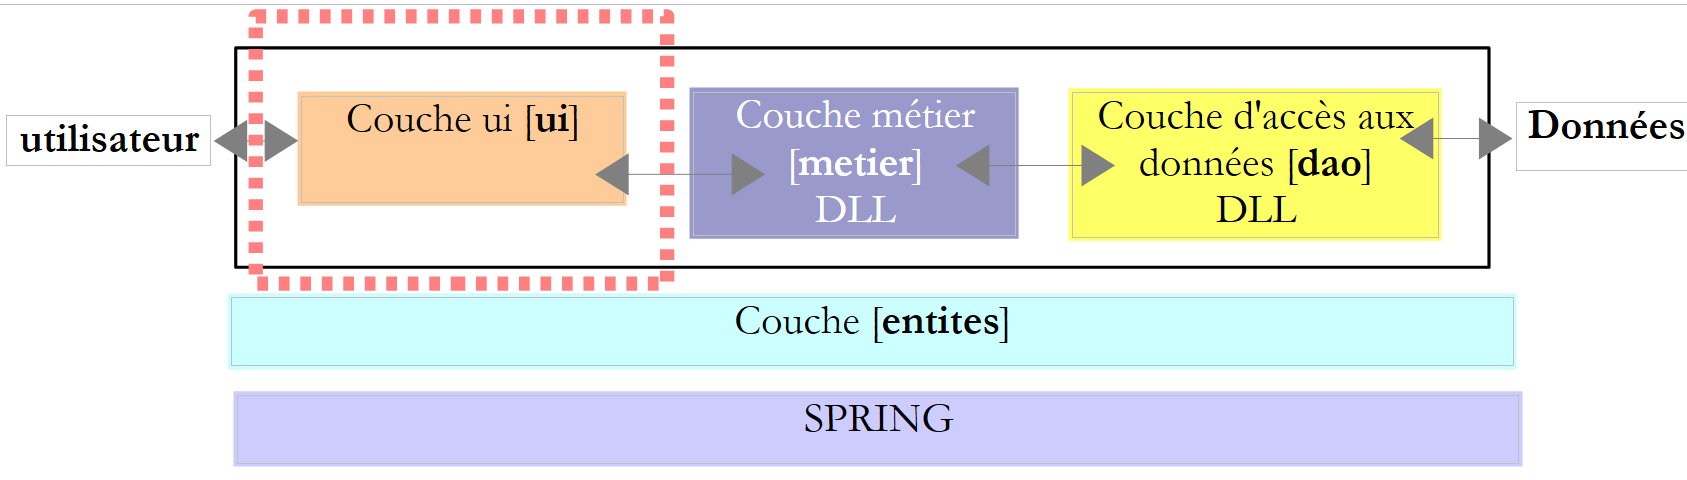 |
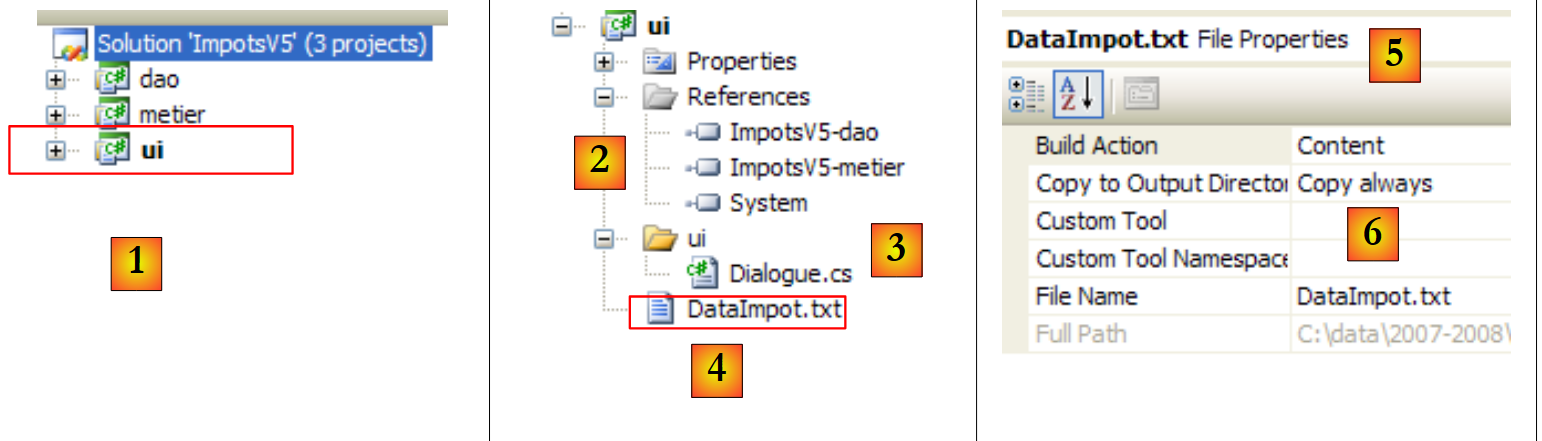 |
- in [1], the [ui] project became the active project for the solution
- in [2]: project references
- in [3]: the [ui] layer
- in [4]: the [DataImpot.txt] tax bracket file, configured [5] to be automatically copied to the project execution folder [6]
Project references (see [2] in the project)
The [ui] layer needs the [metier] and [dao] layers to carry out its tax calculations. It therefore needs a reference to the DLL of these two layers. Proceed as shown for the [metier] layer
The main class [Dialogue.cs] (see [3] in the project)
The [Dialogue.cs] class is the same as in the previous version.
Tests
The [ui] project is configured as follows:
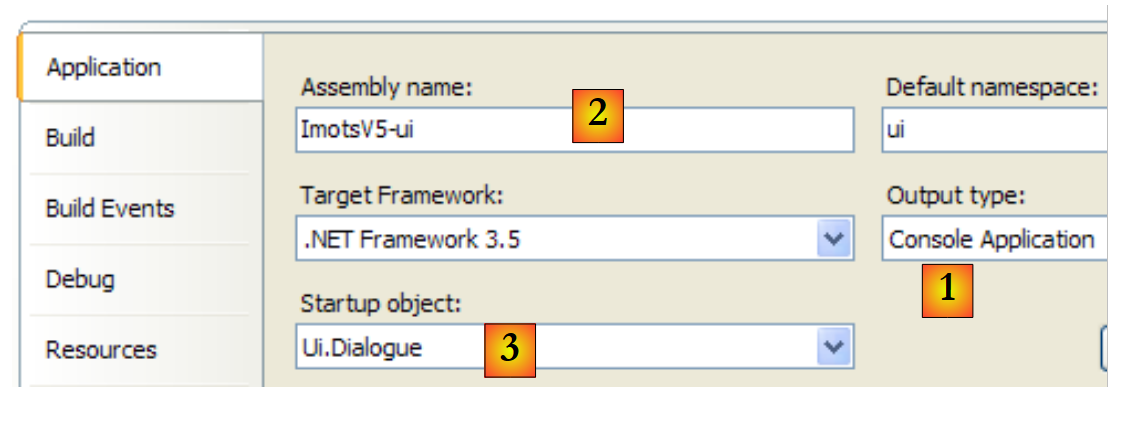 |
- [1]: the project is of the "application console" type
- [2]: project generation will produce executable [ImpotsV5-ui.exe]
- [3]: the class to be executed
An example of execution (Ctrl+F5) is shown below:
Paramètres du calcul de l'Impot au format : Marié (o/n) NbEnfants Salaire ou rien pour arrêter :o 2 60000
Impot=4282 euros
6.4.6. The [ layerSpring]
Let's return to the code in [Dialogue.cs] which creates the [dao] and [metier] layers:
// on crée les couches [metier et dao]
            IImpotMetier metier = null;
            try {
        // création couche [metier]
                metier = new ImpotMetier(new FileImpot("DataImpot.txt"));
            } catch (ImpotException e) {
                // affichage erreur
...
                // arrêt programme
                Environment.Exit(1);
            }
Line 5 creates the [dao] and [metier] layers, explicitly naming the implementation classes for both layers: FileImpot for the [dao] layer, ImpotMetier for the [metier] layer. If one of the layers is implemented with a new class, line 5 will be changed. For example:
metier = new ImpotMetier(new HardwiredImpot());
Apart from this change, nothing will change in the application, as each layer communicates with the next via an interface. As long as the interface remains unchanged, communication between layers remains unchanged. The framework Spring allows us to take layer independence a step further, by externalizing the names of the classes implementing the various layers to a configuration file. Changing the implementation of a layer is equivalent to changing a configuration file. There is no impact on the application code.
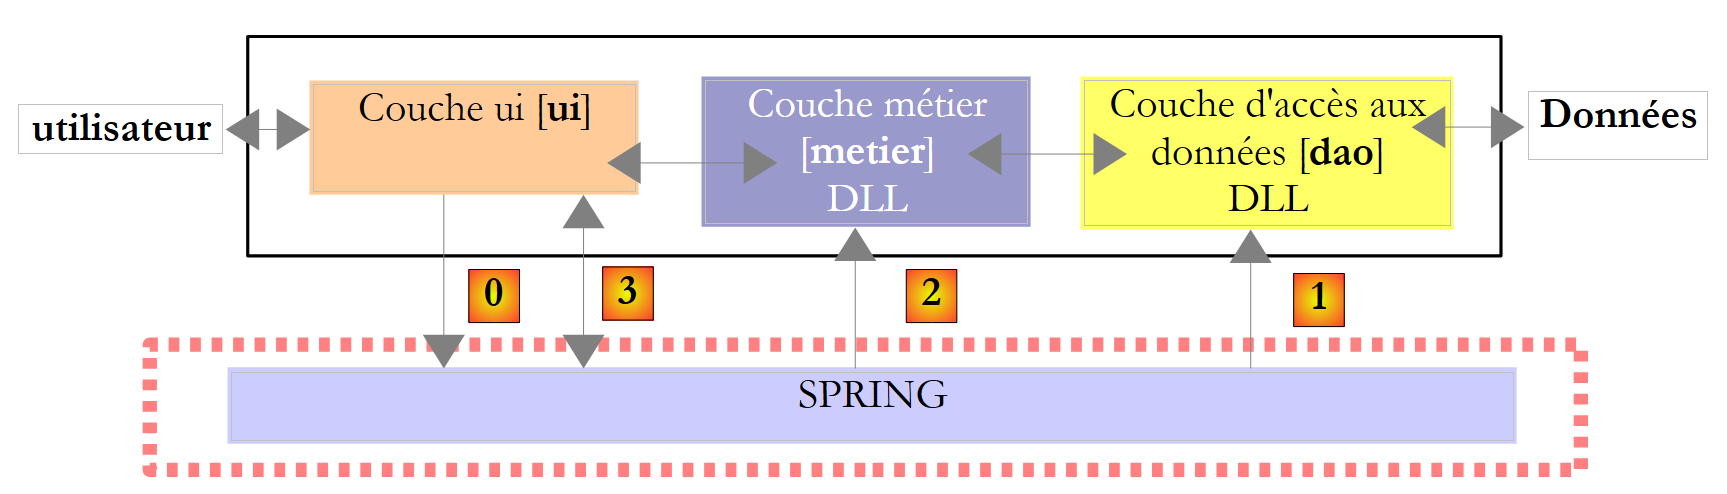 |
Above, the [ui] layer will ask [0] Spring to instantiate the [dao] [1] and [metier] [2] layers according to information contained in a configuration file. The [ui] layer will then ask Spring [3] for a reference to the [metier] layer:
             // we create the layers [metier and dao]
            IImpotMetier metier = null;
            try {
                 // spring context
                IApplicationContext ctx = ContextRegistry.GetContext();
                 // a reference is requested on the [metier] layer
                metier = (IImpotMetier)ctx.GetObject("metier");
            } catch (Exception e1) {
...
}
- line 5: instantiation of layers [dao] and [metier] by Spring
- line 7: a reference to the [metier] layer is retrieved. Note that the [ui] layer got this reference without giving the name of the class implementing the [metier] layer.
The Spring framework exists in two versions: Java and .NET. Version .NET is available at url (March 2008) [http://www.springframework.net/]:
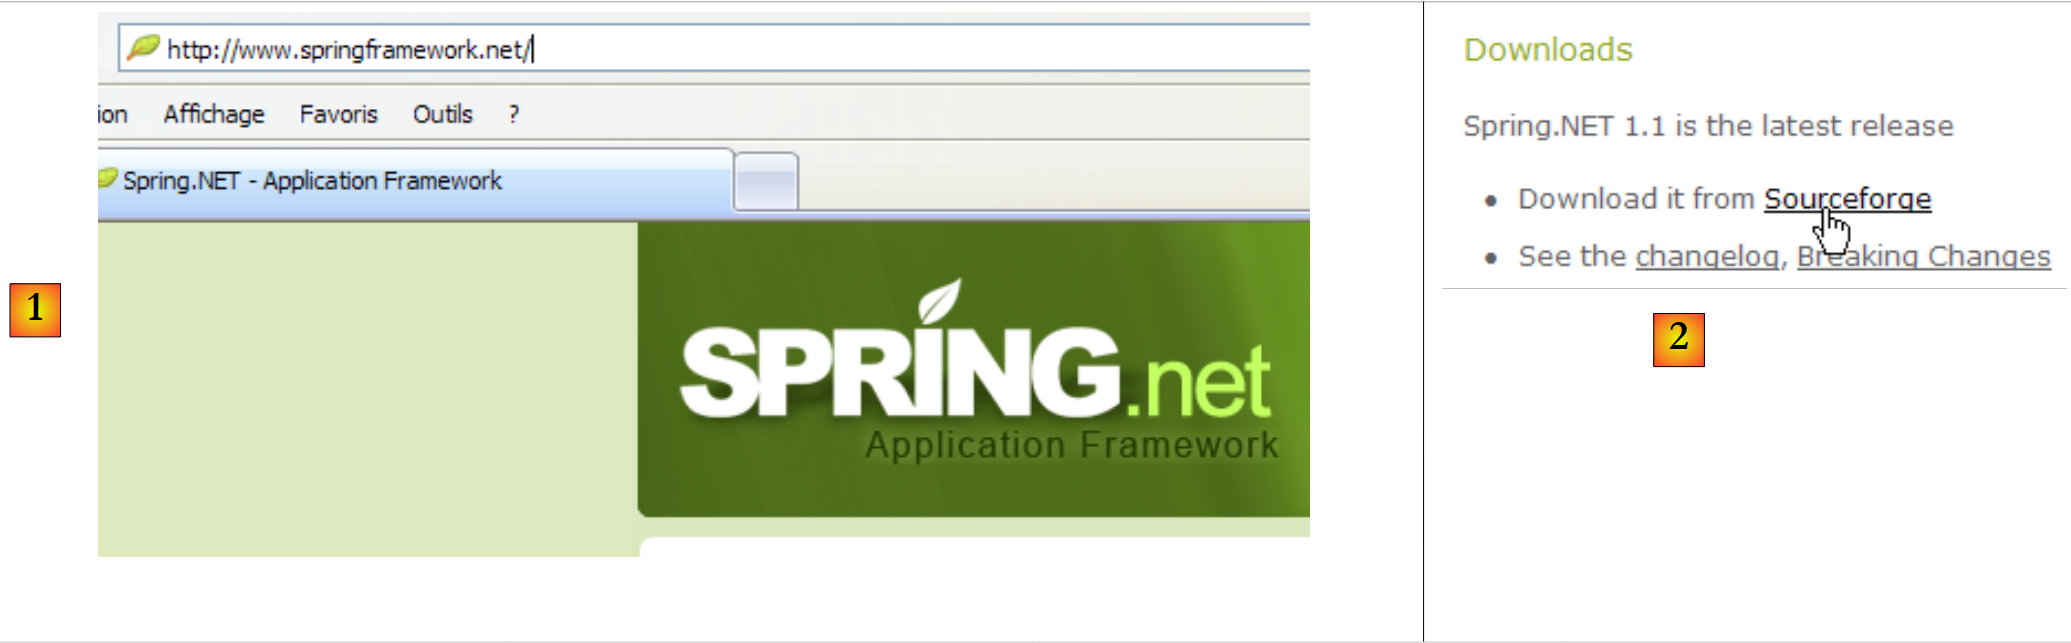 |
- in [1]: the [Spring.net] site
- in [2]: downloads page
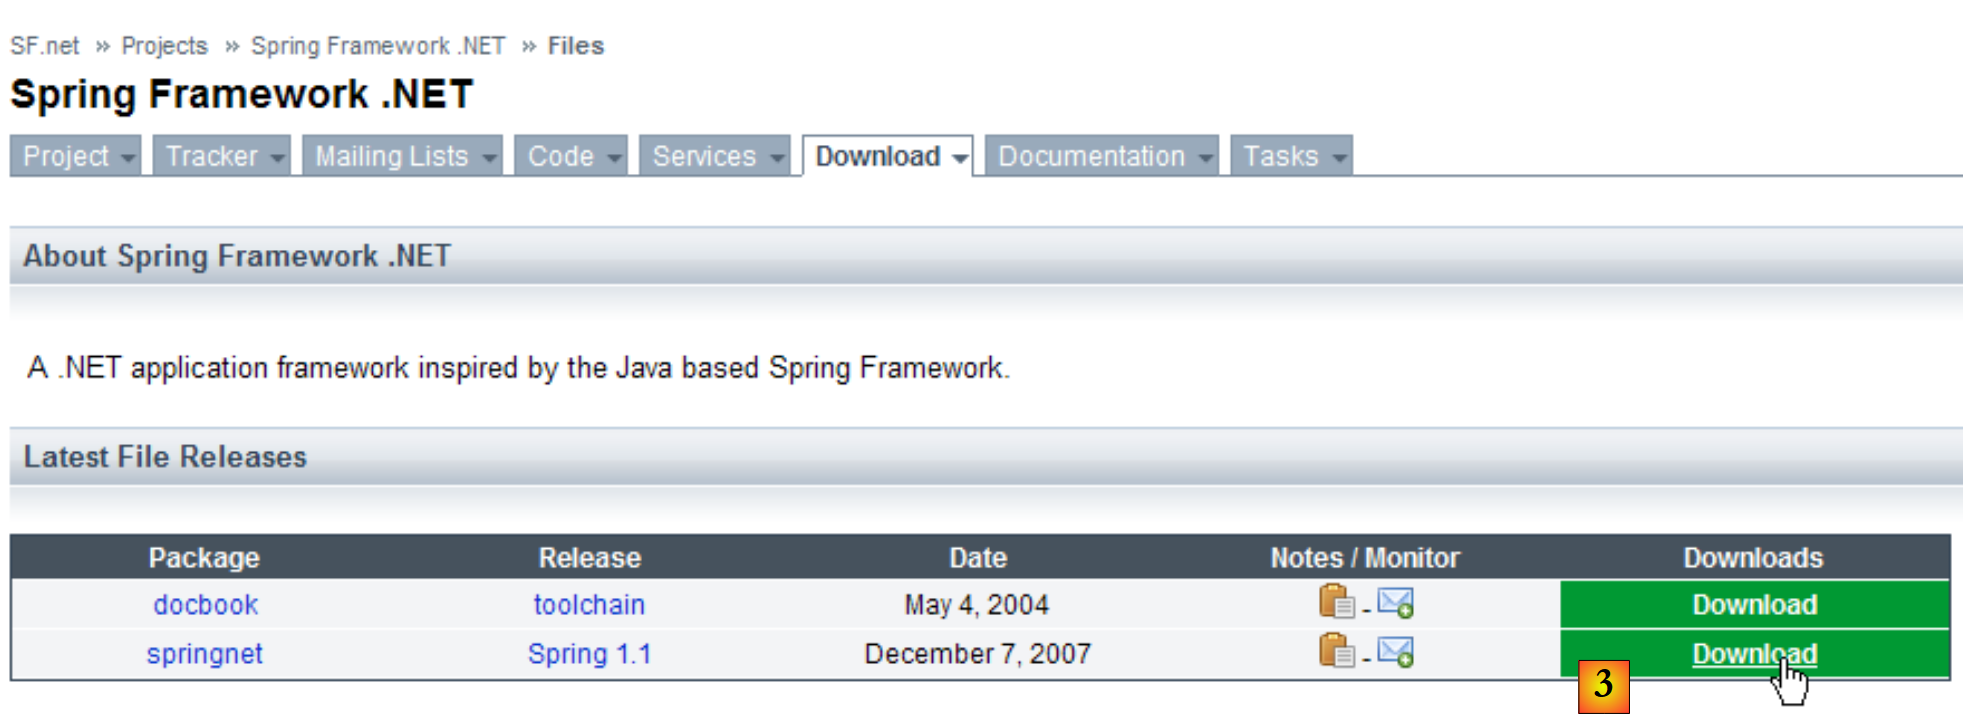 |
- in [3]: download Spring 1.1 (March 2008)
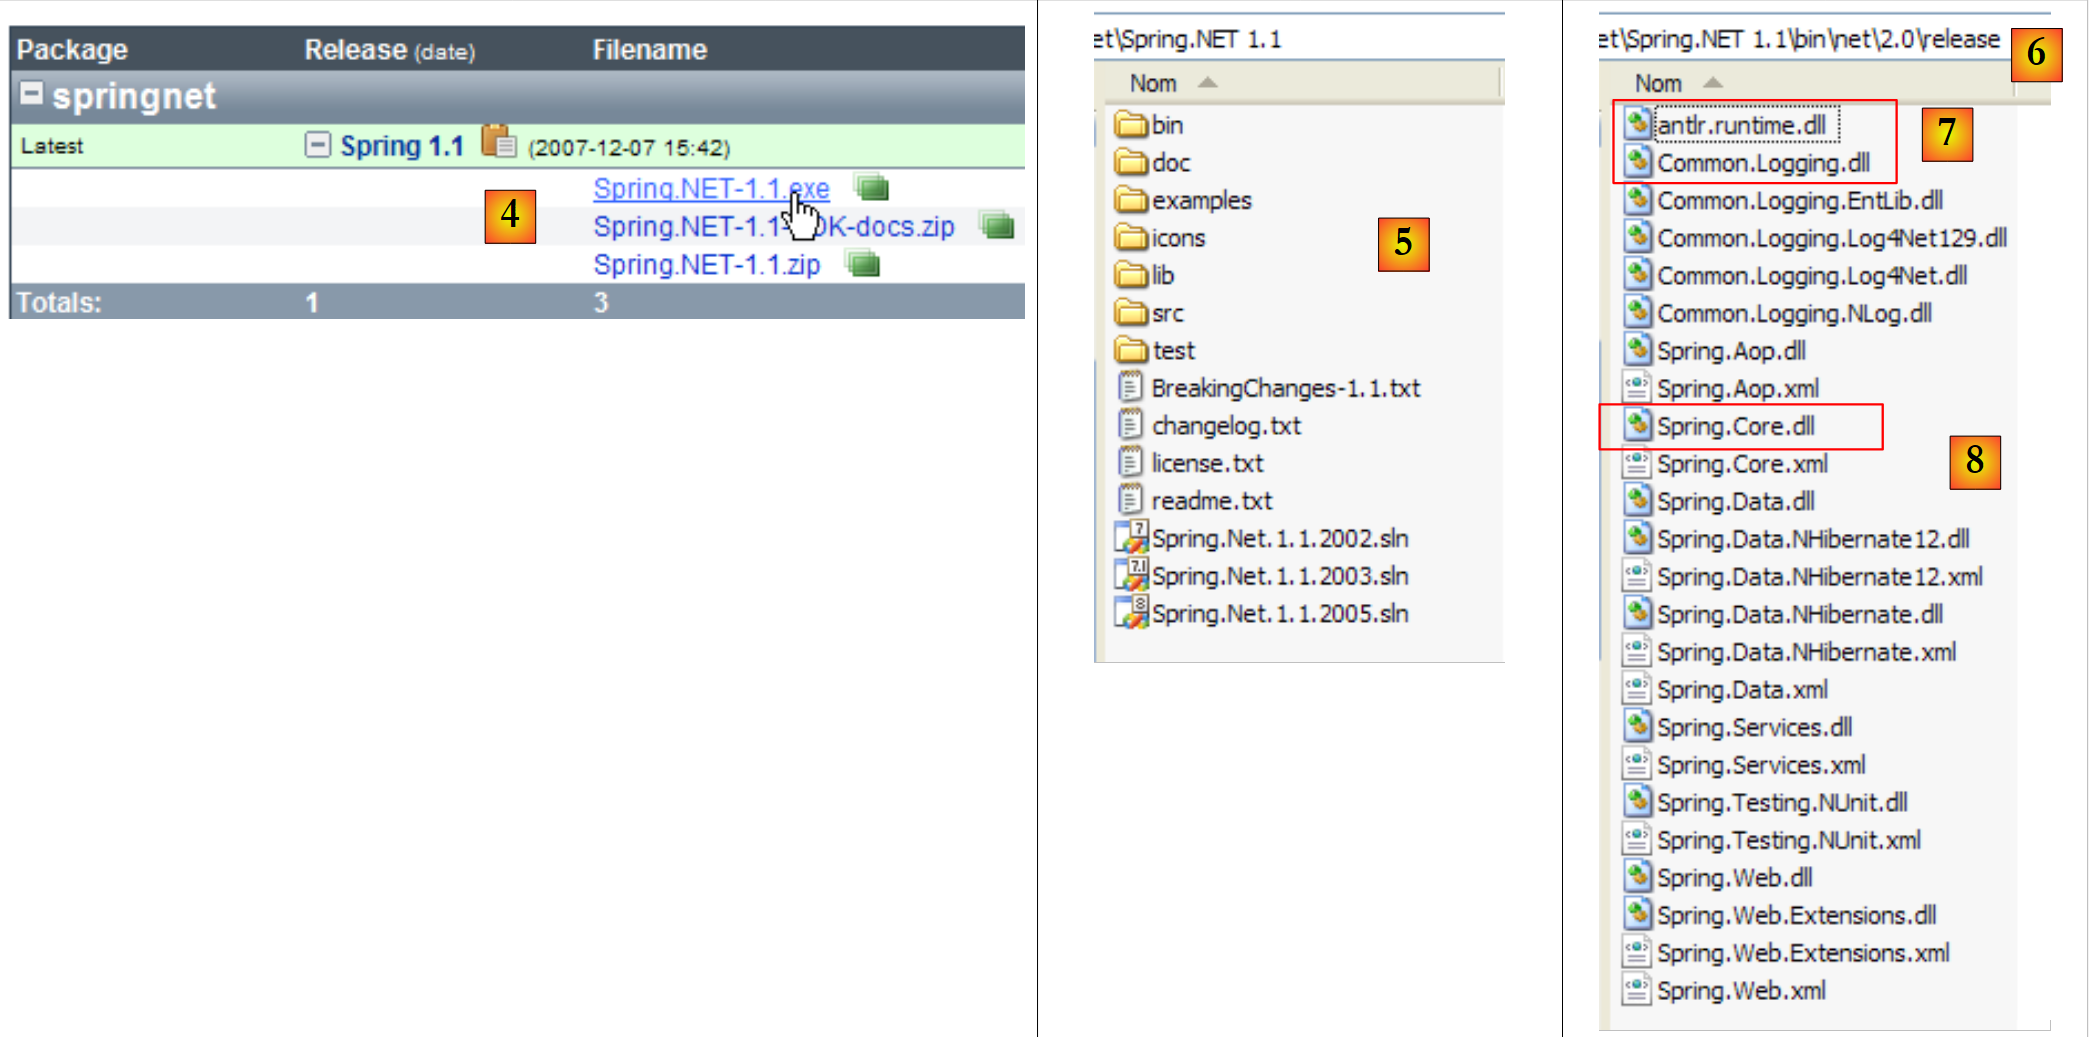 |
- en [4]: download and install the .exe version
- in [5]: the folder generated by the installation
- in [6]: the [bin/net/2.0/release] folder contains DLL from Spring for Visual Studio .NET 2.0 or higher projects. Spring is a rich framework. The aspect of Spring that we're going to use ici to manage the integration of layers in an application is called IoC : Inversion of Control or DI : Dependence Injection. Spring provides libraries for database access with NHibernate, generation and operation of web services, web applications, ...
- the DLL needed to manage the integration of layers in an application are the DLL [7] and [8].
We store these three DLL in a [lib] folder in our project:
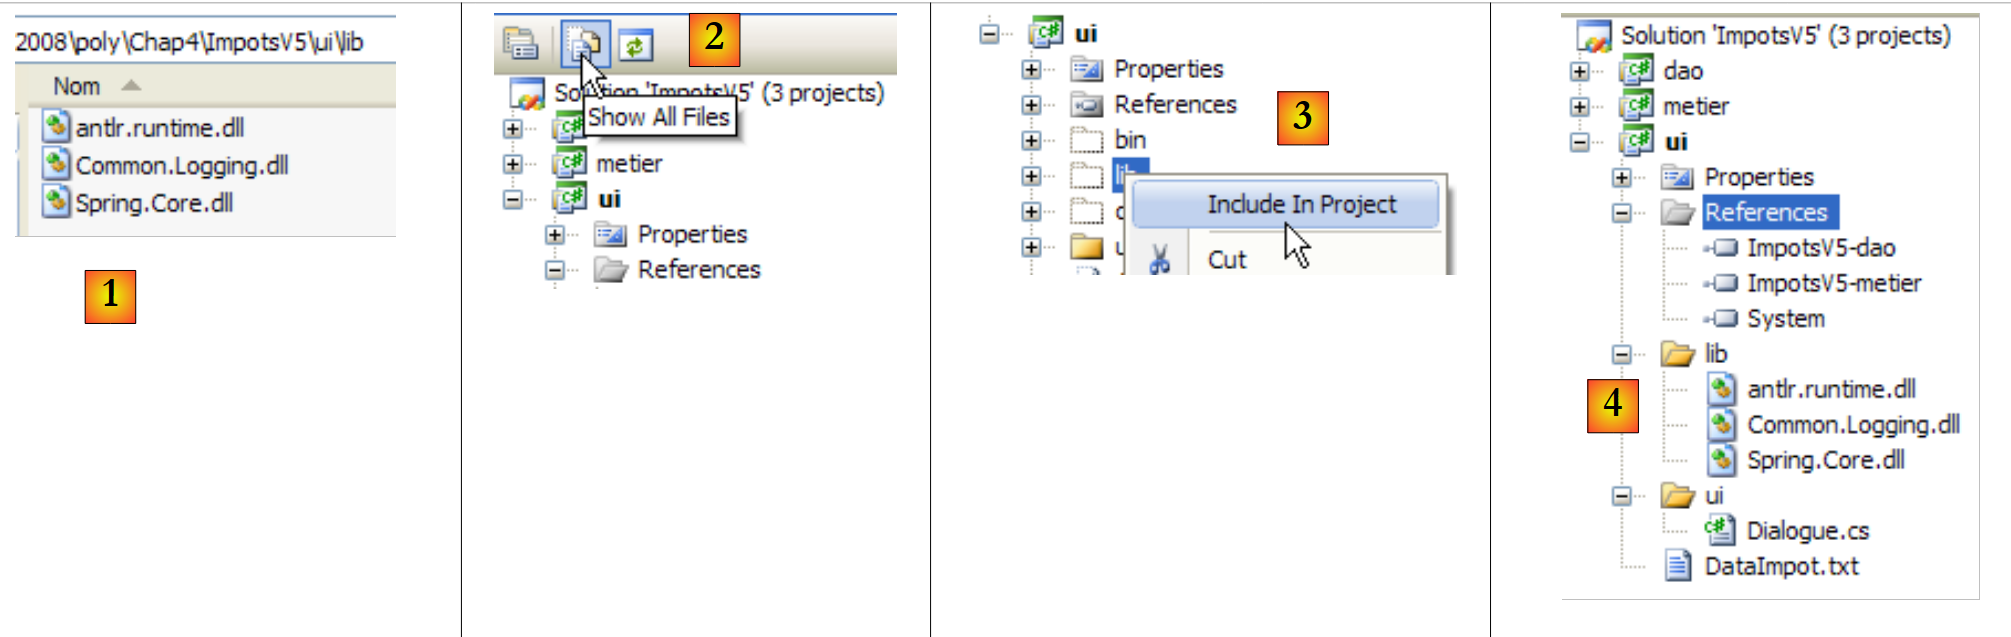 |
- [1]: the three DLL are placed in the [lib] folder with Windows Explorer
- [2]: in project [ui], display all files
- [3]: the [ui/lib] folder is now visible. We include it in the
- [4]: the [ui/lib] folder is part of the project
The [lib] folder creation operation is by no means essential. The references could be created directly on the three DLL in the [bin/net/2.0/release] folder of [Spring.net]. However, by creating the [lib] folder, the application can be developed on a workstation without [Spring.net], making it less dependent on the available development environment.
We are adding references to the three new DLL to the [ui] project:
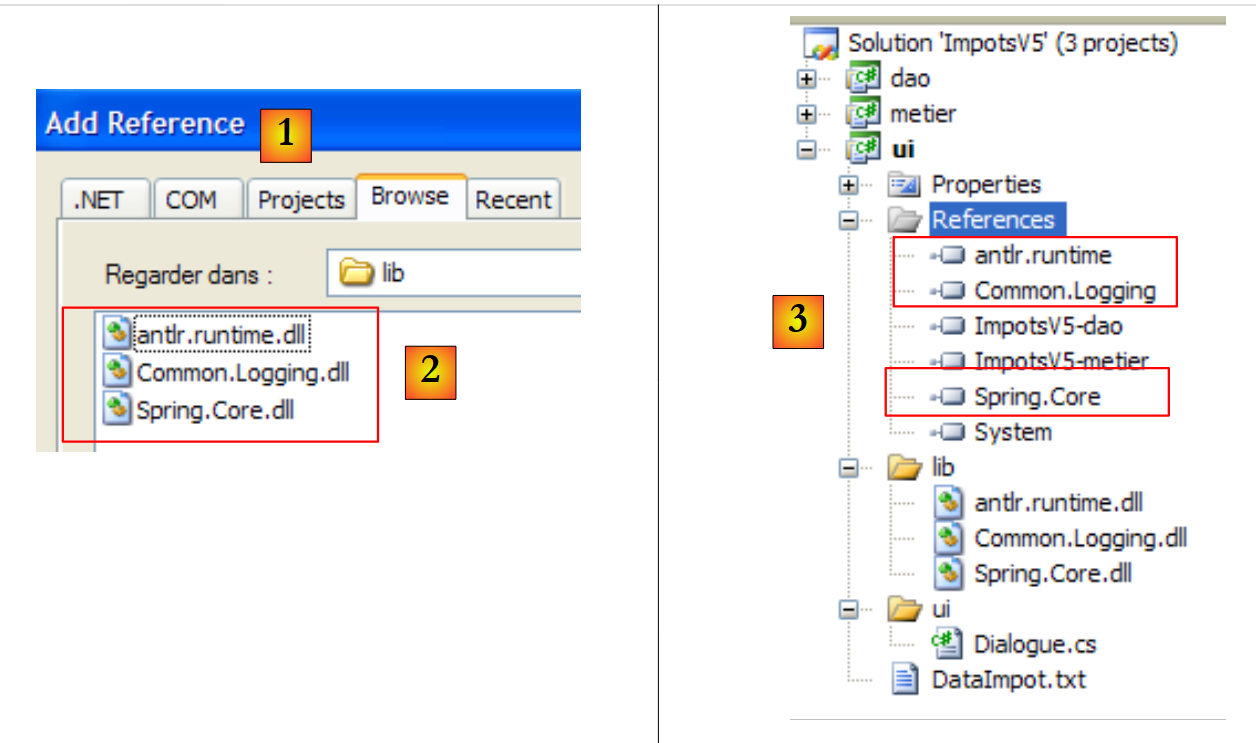 |
- [1]: create references to the three DLL in the [lib] folder [2]
- [3]: the three DLL are part of the project references
Let's return to an overview of the application architecture:
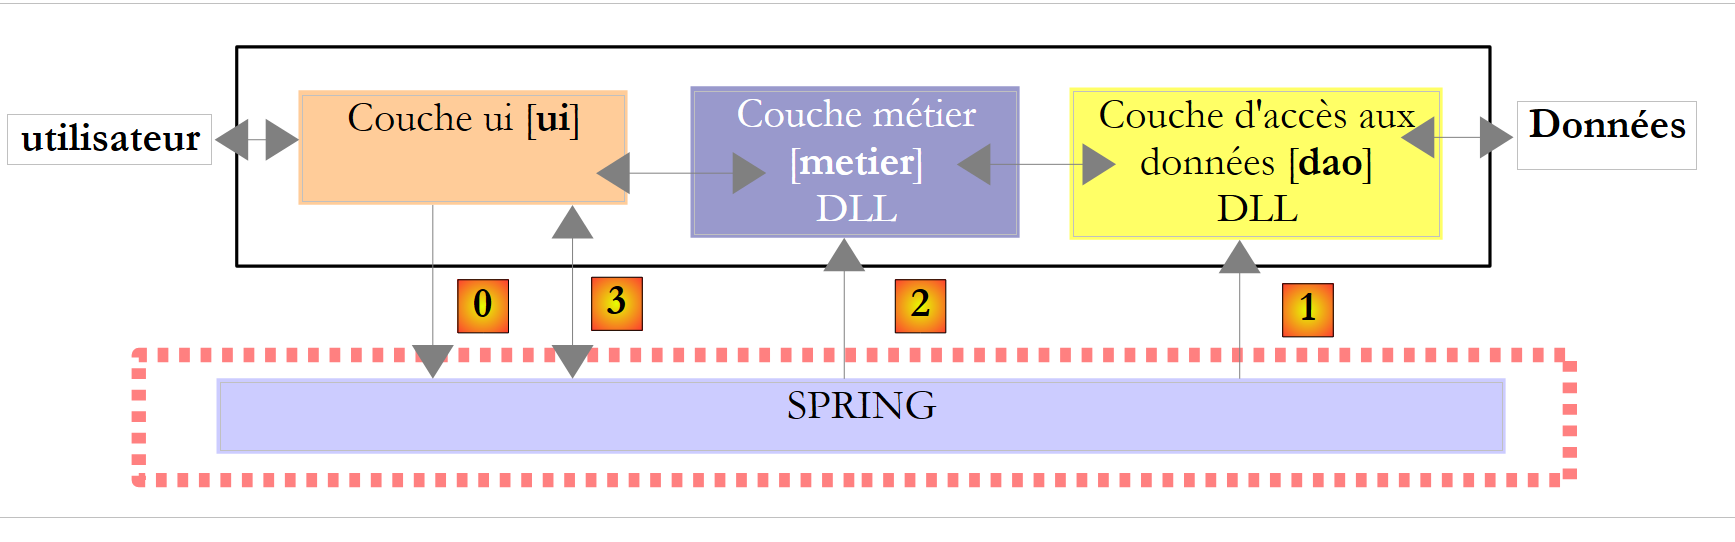 |
Above, the [ui] layer will ask [0] Spring to instantiate the [dao] [1] and [metier] [2] layers according to information contained in a configuration file. The [ui] layer will then ask Spring [3] for a reference to the [metier] layer. This will result in the following code in the [ui] layer:
             // we create the layers [metier and dao]
            IImpotMetier metier = null;
            try {
                 // spring context
                IApplicationContext ctx = ContextRegistry.GetContext();
                 // a reference is requested on the [metier] layer
                metier = (IImpotMetier)ctx.GetObject("metier");
            } catch (Exception e1) {
...
}
- line 5: instantiation of layers [dao] and [metier] by Spring
- line 7: recovers a reference on the [metier] layer.
Line [5] above uses the [App.config] configuration file in the Visual Studio project. In a C# project, this file is used to configure the application. [App.config] is therefore not a Spring notion, but a Visual Studio notion that Spring exploits. Spring knows how to use configuration files other than [App.config]. The solution presented ici is therefore not the only one available.
Let's create the file [App.config] with the Visual Studio wizard:
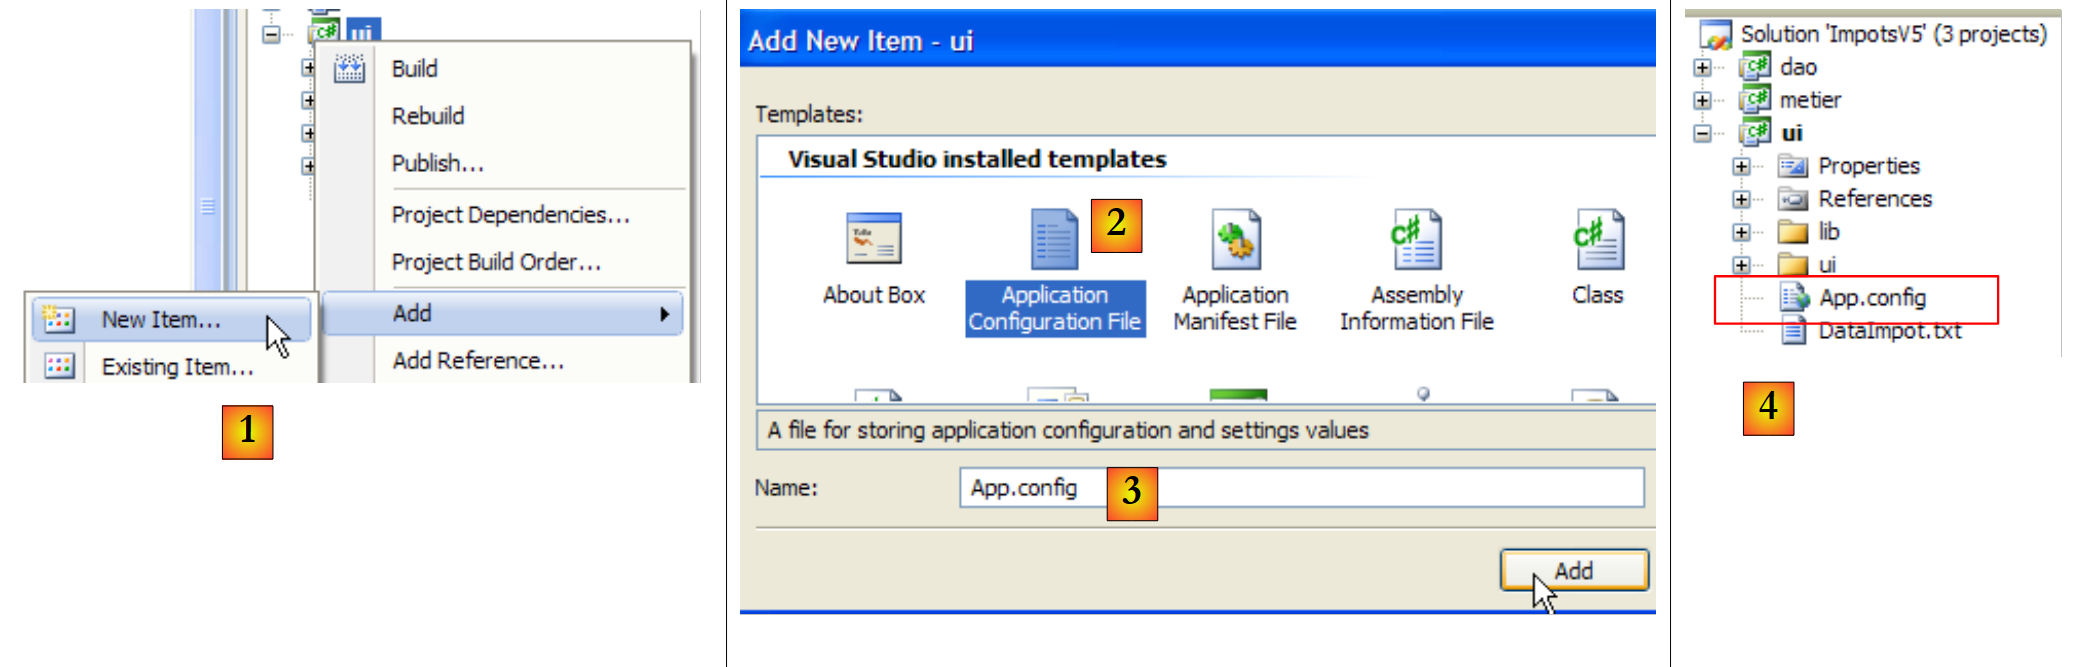 |
- in [1]: add a new element to the project
- in [2]: select "Application Configuration File"
- in [3]: [App.config] is the default name of this configuration file
- in [4]: file [App.config] has been added to the project
The contents of file [App.config] are as follows:
<?xml version="1.0" encoding="utf-8" ?>
<configuration>
</configuration>
[App.config] is a XML file. The project configuration is enclosed in <configuration> tags. The configuration required for Spring is as follows:
<?xml version="1.0" encoding="utf-8" ?>
<configuration>

    <configSections>
        <sectionGroup name="spring">
            <section name="context" type="Spring.Context.Support.ContextHandler, Spring.Core" />
            <section name="objects" type="Spring.Context.Support.DefaultSectionHandler, Spring.Core" />
        </sectionGroup>
    </configSections>

    <spring>
        <context>
            <resource uri="config://spring/objects" />
        </context>
        <objects xmlns="http://www.springframework.net">
            <object name="dao" type="Dao.FileImpot, ImpotsV5-dao">
                <constructor-arg index="0" value="DataImpot.txt"/>
            </object>
            <object name="metier" type="Metier.ImpotMetier, ImpotsV5-metier">
                <constructor-arg index="0" ref="dao"/>
            </object>
        </objects>
    </spring>
</configuration>
- lines 11-23: the section delimited by the <spring> tag is called the <spring> section group. You can create as many section groups as you like in [App.config].
- a group of sections has sections: this is the case ici :
- lines 12-14: the <spring/context> section
- lines 15-22: the <spring/objects> section
- lines 4-9: the <configSections> region defines the list of section group handlers present in [App.config].
- lines 5-8: defines the list of section managers in the <spring> group (name="spring").
- line 6: the manager of the <context> section of the <spring> group:
- name : name of managed section
- type : name of the class managing the section in the form NomClasse, NomDLL.
- the <context> section of the <spring> group is managed by the [Spring.Context.Support.ContextHandler] which will be found in the DLL [Spring.Core.dll]
- line 7: the manager of the <objects> section of the <spring> group
Lines 4-9 are standard in a [App.config] file with Spring. We simply copy them from one project to another.
- lines 12-14: defines section <spring/context>.
- line 13: the < tagresource> indicates the location of the file defining the classes that Spring is to instantiate. These may be in [App.config] like ici, but they may also be in another configuration file. The location of these classes is indicated in the attribute uri tag <resource> :
- <resource uri="config://spring/objects> indicates that the list of classes to be instantiated is in file [App.config] (configuring:), in the //spring/objects, c.a.d. in the <objects> tag of the <spring> tag.
- <resource uri="file://spring-config.xml"> would indicate that the list of classes to be instantiated can be found in file [spring-config.xml]. This file should be placed in the project's runtime folders (bin/Release or bin/Debug). The easiest way is to place it, as was done for the [DataImpot.txt] file, at the root of the project with the [Copy to output directory=always] property.
Lines 12-14 are standard in a [App.config] file with Spring. We simply copy them from one project to another.
- lines 15-22: define classes to be instantiated. This is where the specific configuration of an application takes place. The <objects> delimits the definition section for classes to be instantiated.
- lines 16-18: define the class to instantiate for layer [dao]
- line 16: each object instantiated by Spring is the subject of a < tagobject>. This has an attribute name which is the name of the instantiated object. This is how the application asks Spring for a reference: "give me a reference to the object called dao". The attribute type defines the class to be instantiated as NomClasse, NomDLL. Line 16 defines an object calleddao"instance of the "Dao.FileImpot"which can be found in the DLL"ImpotsV5-dao.dll". Note that the full class name (including namespace) is given, and that the .dll suffix is not specified in the DLL name.
A class can be instantiated in two ways with Spring :
- via a special constructor to which parameters are passed: this is done in lines 16-18.
- via the default constructor without parameters. The object is then initialized via its public property : the <object> tag then has sub-tags <property> to initialize these properties. We have no example of this ici case.
- (continued)
- line 16: the instantiated class is the FileImpot. It has the following builder :
public FileImpot(string fileName);
Constructor parameters are defined using <constructor-arg>.
- line 17: defines the 1st and only constructor parameter. The attribute index is the number of the constructor parameter, the attribute value its value : <constructor-arg index="i" value="valuei"/>
- lines 19-21: define the class to instantiate for the [metier] layer: class [Metier.ImpotMetier], which is in DLL [ImpotsV5-metier.dll].
- line 19: the instantiated class is the ImpotMetier. It has the following builder :
<div class="odt-code-rich" data-linenums="false" style="counter-reset: odtline 0;"><pre><code class="language-text">
<span class="odt-code-line"><span class="odt-code-line-content">        <span style="color:#0000ff">public</span> ImpotMetier(<span style="color:#2b91af">IImpotDao</span> dao);</span></span>
</code></pre></div>
- (continued)
- line 20: defines the 1st and only constructor parameter. Above, parameter dao of the constructor is an object reference. In this case, in the <constructor-arg> tag, we use the attribute ref attribute instead of value used for the [dao] layer : <constructor-arg index="i" ref="refi"/>. In the above constructor, the parameter dao represents an instance on layer [dao]. This instance has been defined by lines 16-18 of the configuration file. Thus, in line 20 :
<constructor-arg index="0" ref="dao"/>
ref="dao" représente l'objet Spring "dao" défini par les lignes 16-18.
To summarize, the file [App.config] :
- instantiates layer [dao] with class FileImpot which receives as parameter DataImpot.txt (line 16-18). The resulting object is called "dao"
- instantiates the [metier] layer with the class ImpotMetier which receives the previous "dao" object as a parameter (lines 19-21).
All that remains is to use this Spring configuration file in the [ui] layer. To do this, we duplicate the [Dialogue.cs] class in [Dialogue2.cs] and make the latter the main class of the [ui] project:
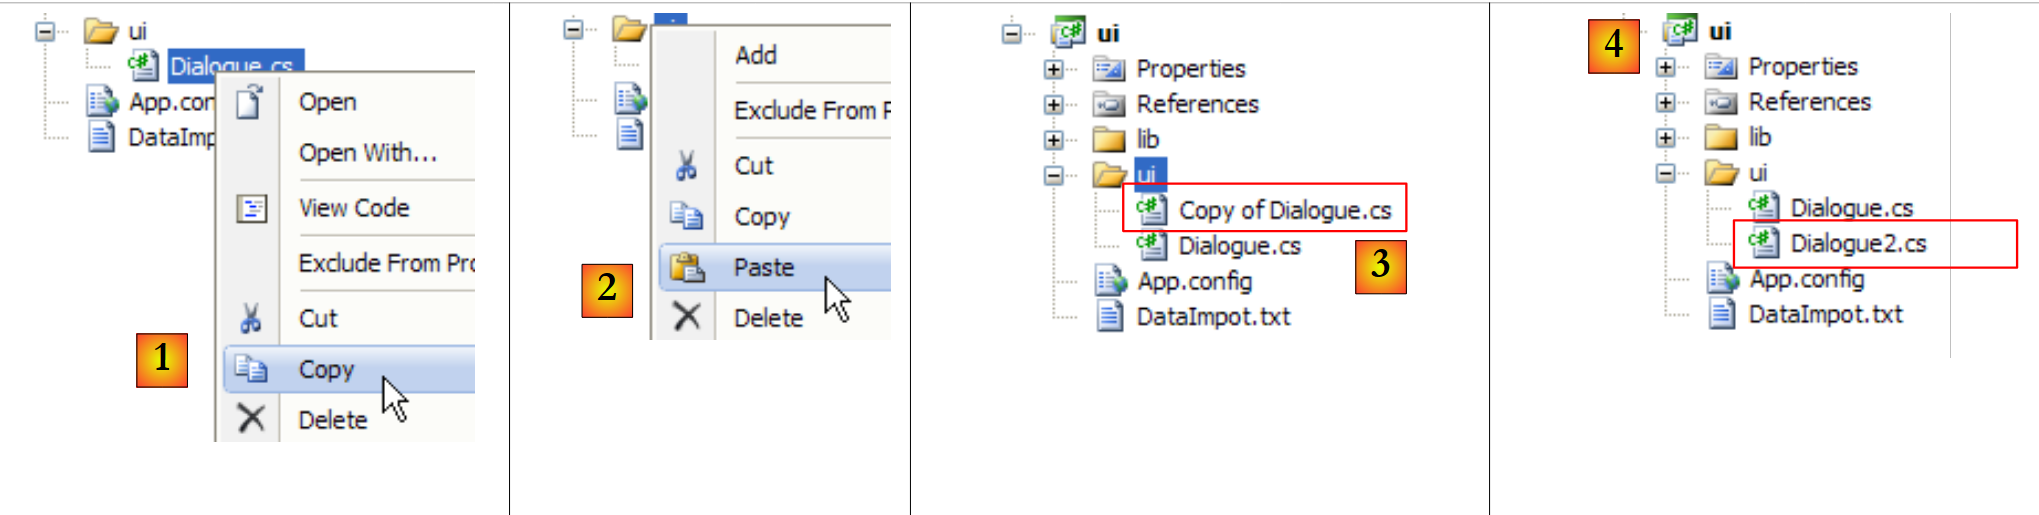 |
- in [1]: copy of [Dialogue.cs]
- en [2]: gluing
- in [3]: the copy of [Dialogue.cs]
- in [4]: renamed [Dialogue2.cs]
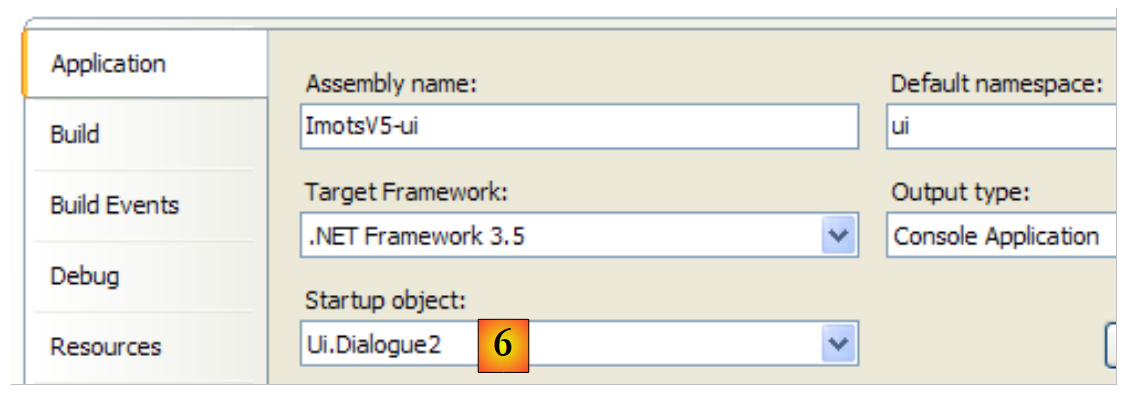 |
- in [6]: we make [Dialogue2.cs] the main class of the [ui] project.
The following code from [Dialogue.cs] :
             // we create the layers [metier and dao]
            IImpotMetier metier = null;
            try {
         // layer creation [job]
                metier = new ImpotMetier(new FileImpot("DataImpot.txt"));
            } catch (ImpotException e) {
                 // error display
                string msg = e.InnerException == null ? null : String.Format(", Exception d'origine : {0}", e.InnerException.Message);
                Console.WriteLine("L'erreur suivante s'est produite : [Code={0},Message={1}{2}]", e.Code, e.Message, msg == null ? "" : msg);
                 // program stop
                Environment.Exit(1);
            }
             // infinite loop
            while (true) {
...
becomes the following in [Dialogue2.cs] :
             // we create the layers [metier and dao]
            IApplicationContext ctx = null;
            try {
                 // spring context
                ctx = ContextRegistry.GetContext();
            } catch (Exception e1) {
                 // error display
                Console.WriteLine("Chaîne des exceptions : \n{0}", "".PadLeft(40, '-'));
                Exception e = e1;
                while (e != null) {
                    Console.WriteLine("{0}: {1}", e.GetType().FullName, e.Message);
                    Console.WriteLine("".PadLeft(40, '-'));
                    e = e.InnerException;
                }
                 // program stop
                Environment.Exit(1);
            }
             // a reference is requested on the [metier] layer
            IImpotMetier metier = (IImpotMetier)ctx.GetObject("metier");
             // infinite loop
            while (true) {
....................................
- line 2: IApplicationContext gives access to the set of objects instantiated by Spring. We call this object the application's Spring context, or simply the application's context. For the moment, this context has not been initialized. The try / catch that follows does so.
- line 5: the configuration of Spring in [App.config] is read and used. After this operation, if no exception has been raised, all objects in section <objects> will be read have been instantiated :
- object Spring "dao" is an instance on layer [dao]
- the Spring "metier" object is an instance on the [metier] layer
- line 19: the [Dialogue2.cs] class needs a reference to the [metier] layer. This is requested from the application context. The object IApplicationContext gives access to Spring objects via their name (attribute name tag <object> configuration Spring). The rendered reference is a reference to the generic type Object. We need to transtype the rendered reference into the correct type, ici the type of the [metier] layer interface: IImpotMetier.
If all has gone well, after line 19, [Dialogue2.cs] has a reference on the [metier] layer. The code on lines 21 and beyond is that of the [Dialogue.cs] class already studied.
- lines 6-17: handling of the exception that occurs when the Spring configuration file cannot be processed. There may be various reasons for this: incorrect syntax in the configuration file itself, or inability to instantiate one of the configured objects. In our example, the latter would occur if the file DataImpot.txt of line 17 of [App.config] was not found in the project execution file.
The exception on line 6 is a chain of exceptions where each exception has two properties:
- Message : exception error message
- InnerException : the previous exception in the exception chain
The loop on lines 10-14 displays all the exceptions in the chain in the form: exception class and associated message.
When the [ui] project is run with a valid configuration file, the usual results are obtained:
Paramètres du calcul de l'Impot au format : Marié (o/n) NbEnfants Salaire ou rien pour arrêter :o 2 60000
Impot=4282 euros
When running the [ui] project with a non-existent [DataImpotInexistant.txt] file,
            <object name="dao" type="Dao.FileImpot, ImpotsV5-dao">
                <constructor-arg index="0" value="DataImpotInexistant.txt"/>
            </object>
we obtain the following results:
- line 17: the original exception of type [FileNotFoundException]
- line 15: the [dao] layer encapsulates this exception in a [Entites.ImpotException] type
- line 9: the exception thrown by Spring because it failed to instantiate the object named "dao". In the process of creating this object, two other exceptions occurred earlier: those on lines 11 and 13.
- because the "dao" object could not be created, the application context could not be created. This is the meaning of the exception on line 5. Previously, another exception, that of line 7, had occurred.
- line 3: the highest-level exception, the last in the chain: a configuration error is reported.
From all this, we'll remember that it's the deepest exception, ici that of line 17, which is often the most significant. Note, however, that Spring has kept the error message from line 17, and passed it on to the highest-level exception on line 3, in order to have the original cause of the error at the highest level.
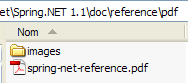
Spring alone deserves a book. We have only touched on ici. It can be explored in greater depth with the document [spring-net-reference.pdf] found in the Spring installation folder:
 |
See also [http://tahe.developpez.com/dotnet/springioc], a Spring tutorial presented in a VB.NET context.