9. Database Access
9.1. ADO Connector NET
Let’s revisit the layered architecture used on several occasions
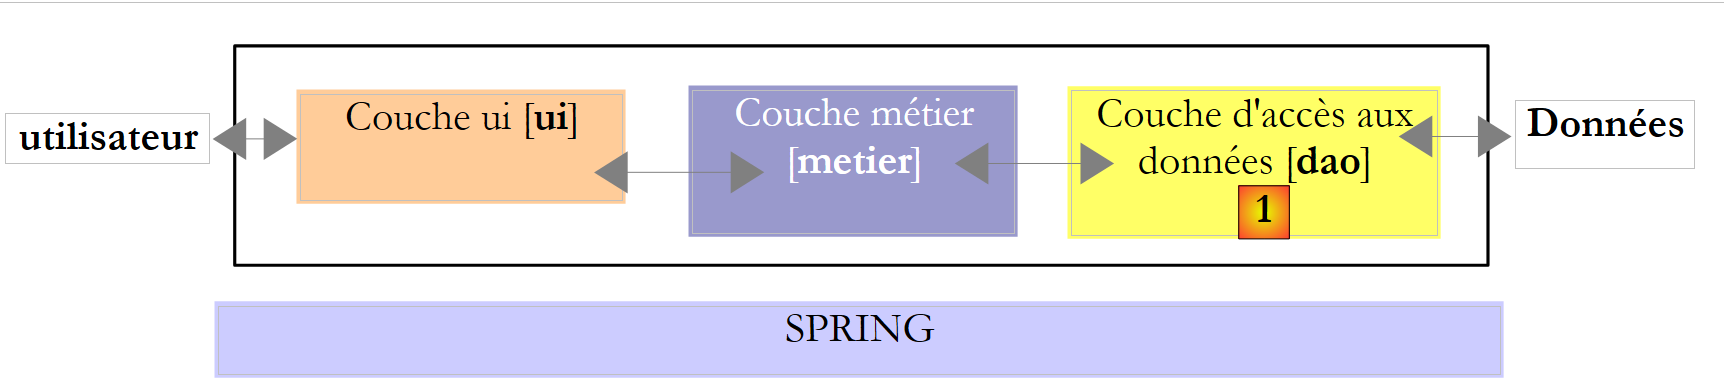 |
In the examples studied, the [dao] layer has so far utilized two types of data sources:
- data hard-coded into the code
- data from text files
In this chapter, we will examine the case where data comes from a database. The 3-layer architecture then evolves into a multi-layer architecture. There are various types. We will explore the basic concepts using the following:
 |
In the diagram above, the [dao] layer communicates with the [1] layer througha class library specific to the SGBD being used and included with it. This layer implements standard features grouped under the term ADO (ActiveX Data Objects). Such a layer is called a provider (in this case, a database access provider) or a connector. Most SGBD now have an ADO.NET connector, which was not the case in the early days of the .NET platform. .NET connectors do not provide a standard interface to the [dao] layer, so the latter includes the names of the connector’s classes in its code. If you change the SGBD, you change the connector and the classes, and you must then change the [dao] layer. This is both a high-performance architecture because the .NET was written for a specific SGBD and knows how to make the best use of it, and a rigid one because changing the SGBD implies changing the [dao] layer. This second argument should be put into perspective: companies do not change SGBD very often. Furthermore, we will see later that since version 2.0 of .NET, there has been a generic connector that provides flexibility without sacrificing performance.
9.2. The two modes of operating a data source
The .NET platform allows a data source to be used in two different ways:
- connected mode
- offline mode
In connected mode, the application
- opens a connection to the data source
- works with the data source in read/write mode
- closes the connection
In offline mode, the application
- opens a connection to the data source
- retrieves a memory copy of all or part of the data from the source
- closes the connection
- works with the in-memory copy of the data in read/write mode
- when the work is finished, opens a connection, sends the modified data to the data source so that it can be updated, and closes the connection
Here, we are only considering the connected mode.
9.3. Basic concepts of database operation
We will explain the main concepts of using a database with SQL Server Compact 3.5. This SGBD is included with Visual Studio Express. It is a lightweight SGBD that can only handle one user at a time. However, it is sufficient for an introduction to database programming. Later, we will introduce other SGBDs.
The architecture used will be as follows:
 |
A [1] console application will utilize a SqlServer Compact [3,4] database via the ADO connector.Net of this SGBD [2].
9.3.1. : Sample Database
We will build the database directly in Visual Studio Express. To do this, we create a new console project.
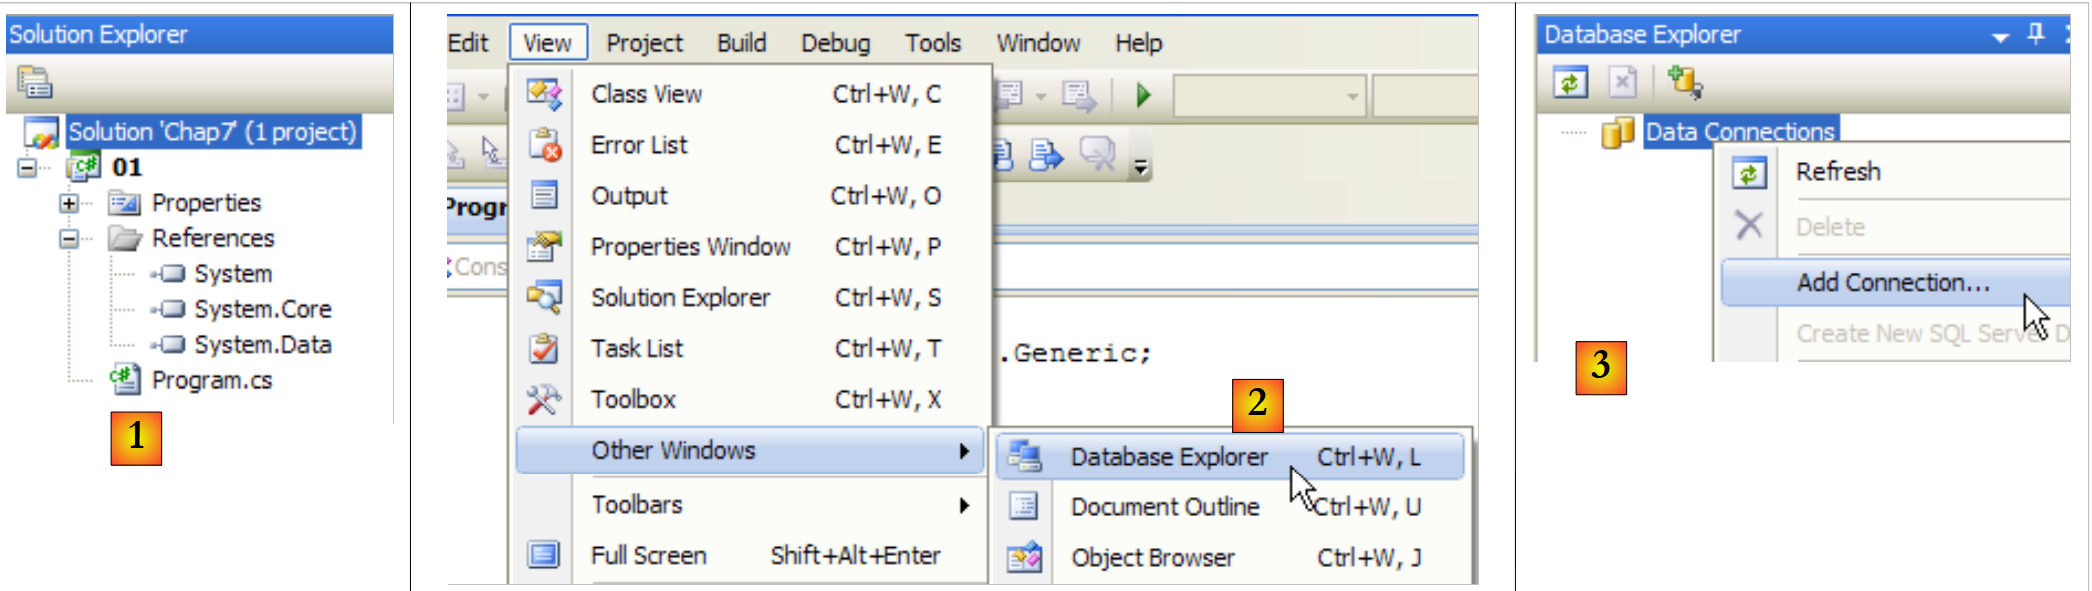 |
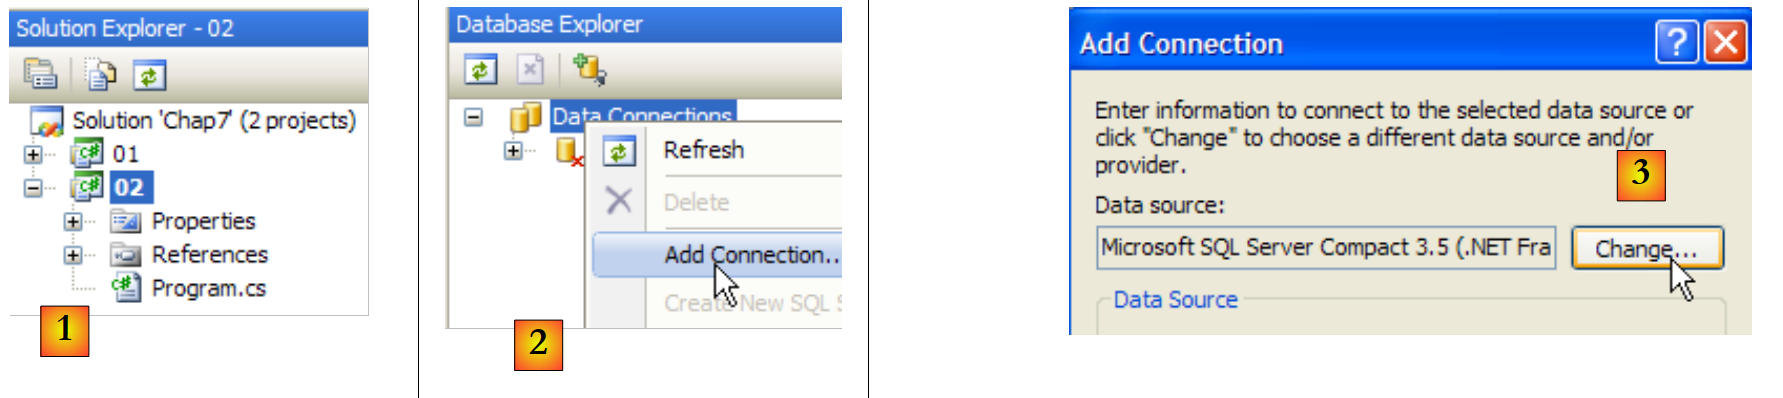
- [1]: the project
- [2]: Open the "Database Explorer" view
- [3]: Create a new connection
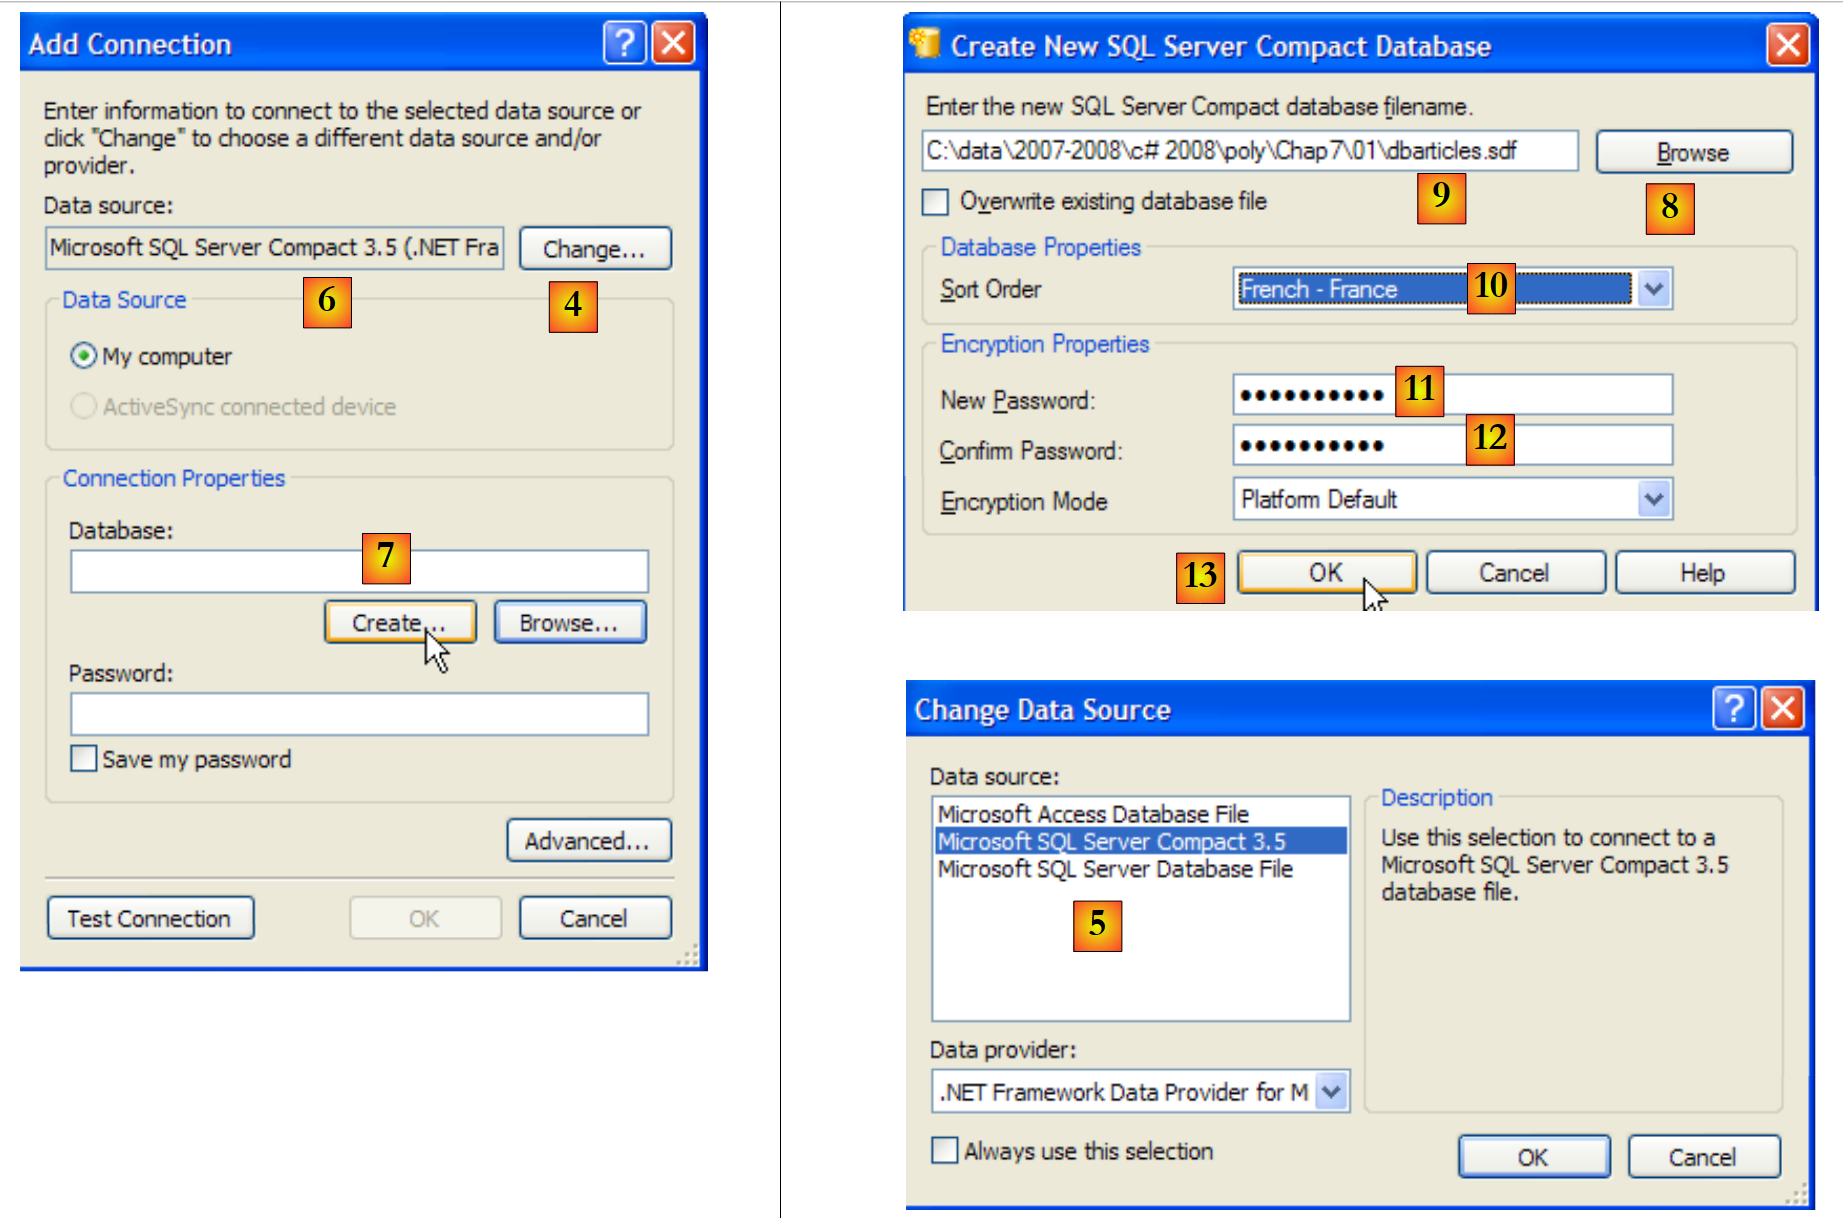 |
- [4]: Select the type of SGBD
- [5,6]: Select the SGBD SQL Server Compact
- [7]: Create the database
- [8]: A SQL Server Compact database is encapsulated in a single file with the .sdf extension. Specify where to create it; here, in the C# project folder.
- [9]: We have named the new database [dbarticles.sdf]
- [10]: Select French as the language. This affects sorting operations.
- [11,12]: The database can be password-protected. Here, "dbarticles".
- [13]: We confirm the information page. The database will now be physically created:
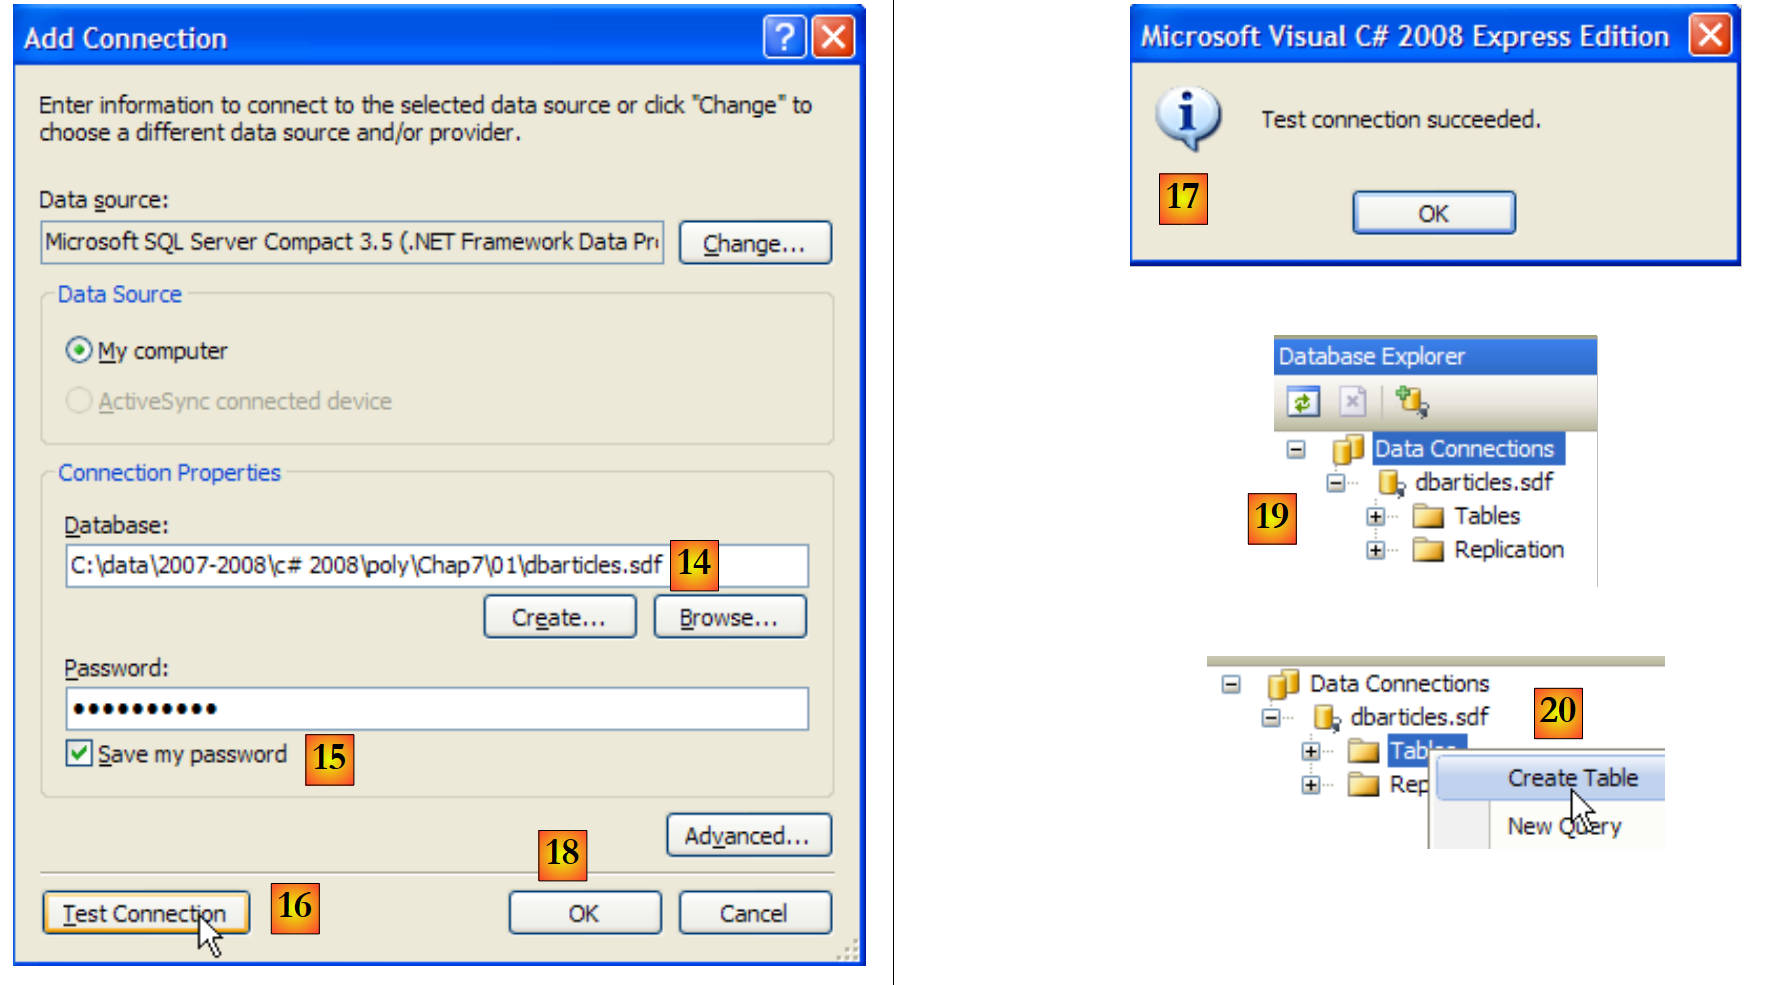 |
- [14]: the name of the database that has just been created
- [15]: Check the "Save my password" box so you don’t have to re-enter it every time
- [16]: Verify the connection
- [17]: everything is fine
- [18]: Confirm the information page
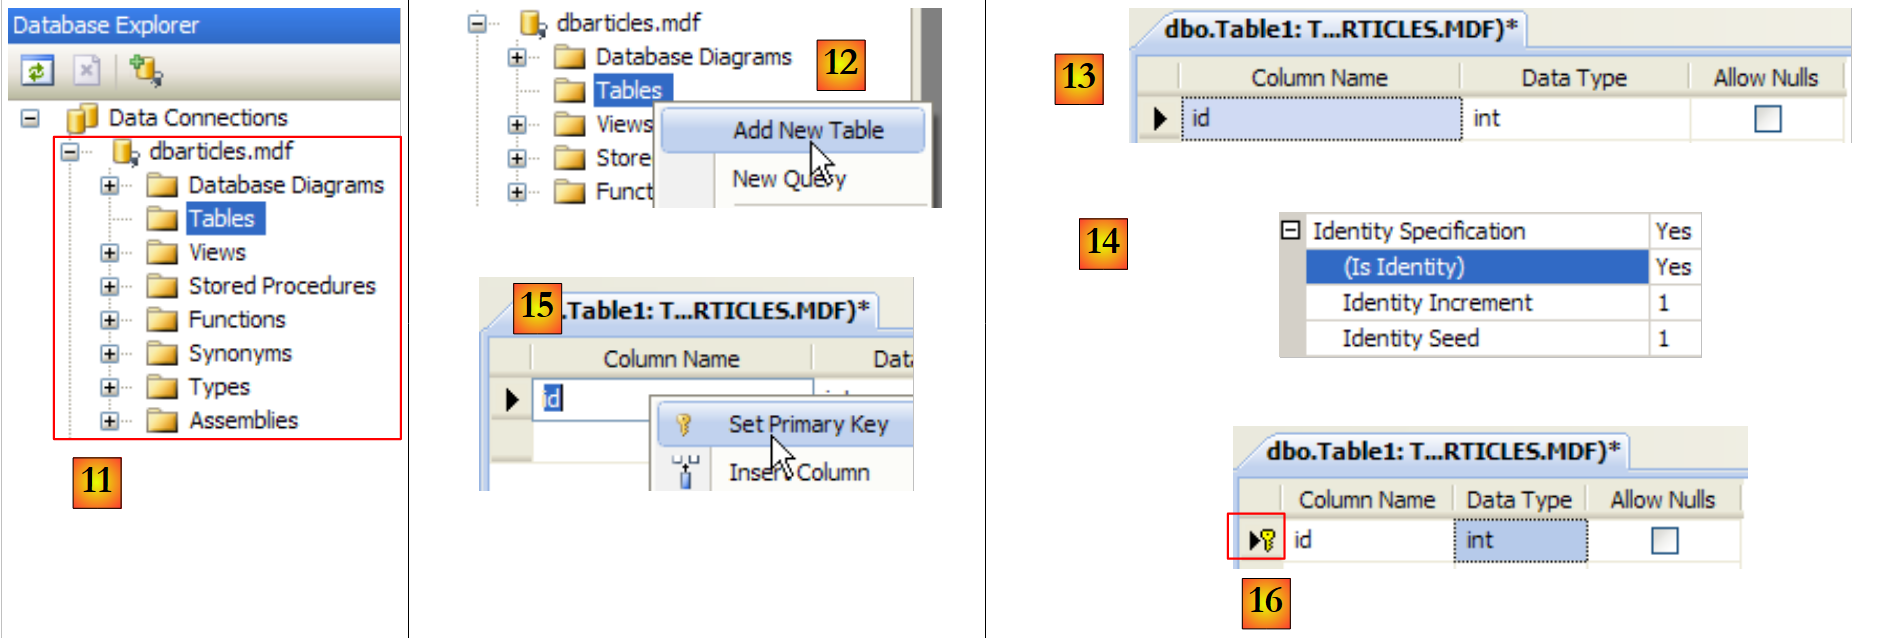
- [19]: The connection appears in the database explorer
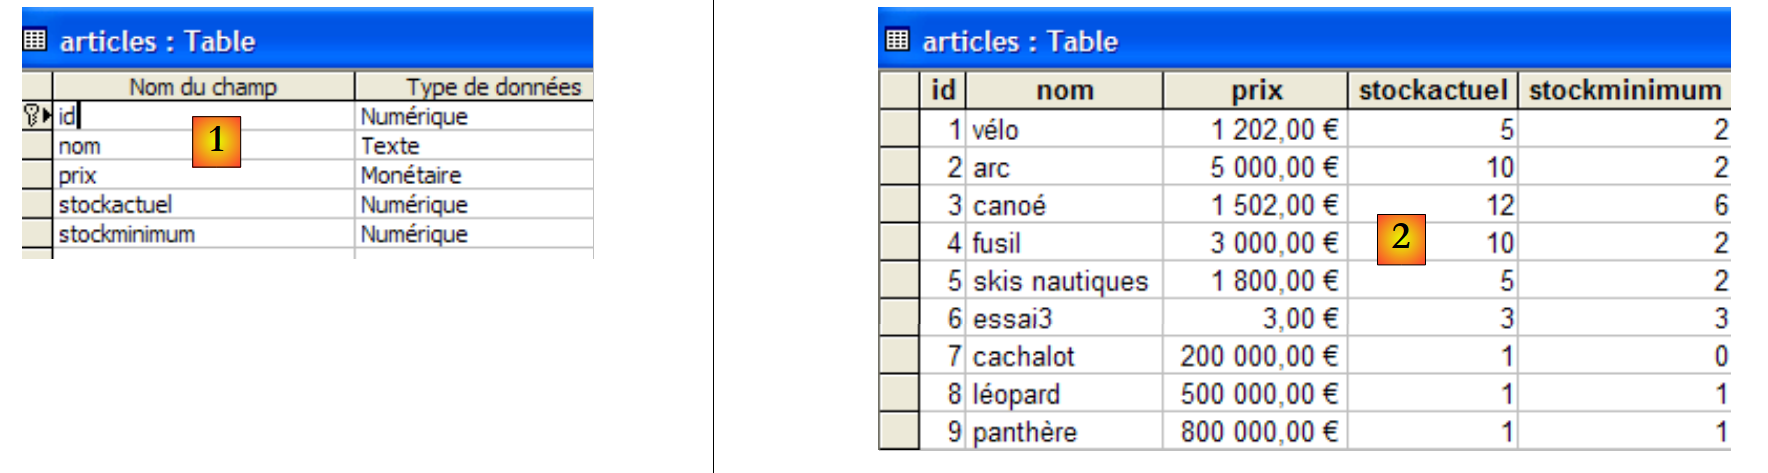
- [20]: For now, the database has no tables. We’ll create one. An article will have the following fields:
- id: a unique identifier - primary key
- name: article name - unique
- price: price of the item
- current stock: its current stock
- minimumStock: the minimum stock level below which the item must be restocked
 |
- [21]: The field [id] is of type integer and is the primary key [22] of the table.
- [23]: this primary key is of the Identity type. This concept specific to the SGBD SQL Server indicates that the primary key will be generated by the SGBD itself. Here, the primary key will be an integer starting at 1 and incremented by 1 for each new key.
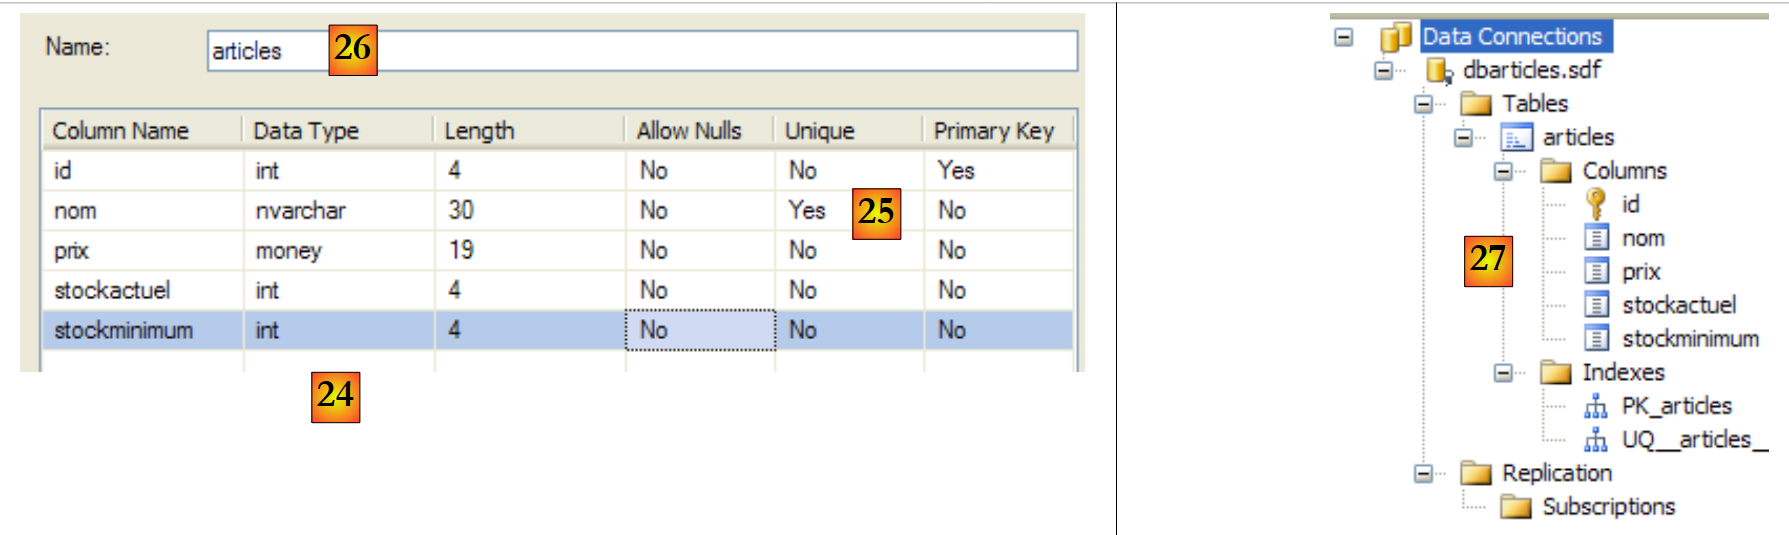 |
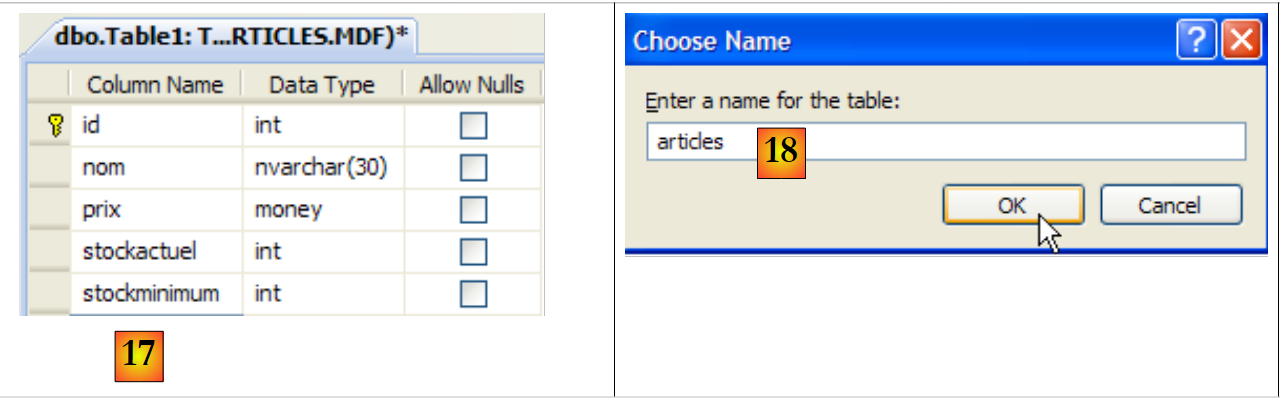
- [24]: the other fields are created. Note that the [nom] field has a [25] uniqueness constraint.
- [26]: the table is named
- [27]: After validating the table structure, the table appears in the database.
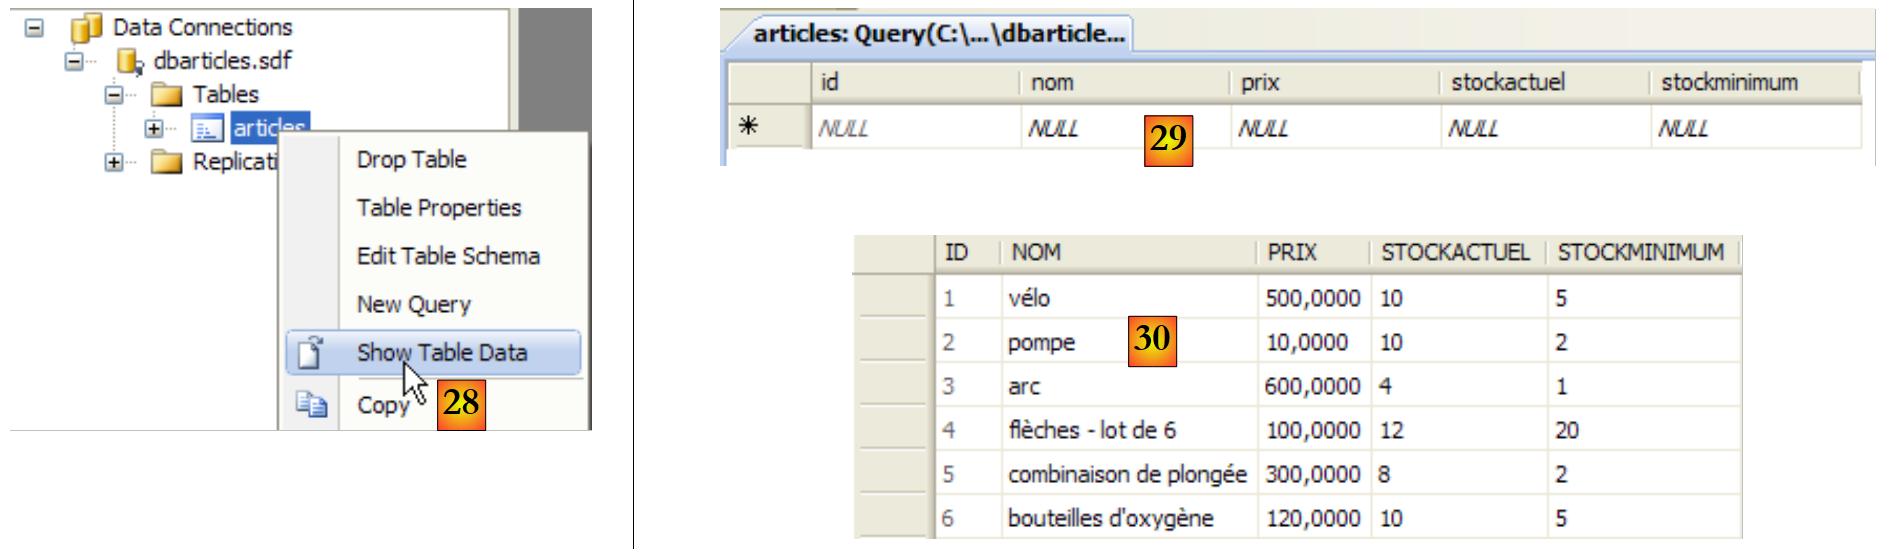 |
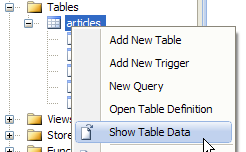
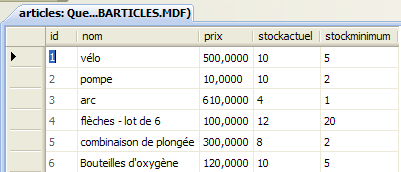
- [28]: we request to view the table's contents
- [29]: it is empty for now
- [30]: We populate it with some data. A row is validated as soon as we move on to entering the next row. The [id] field is not entered: it is generated automatically when the row is validated.
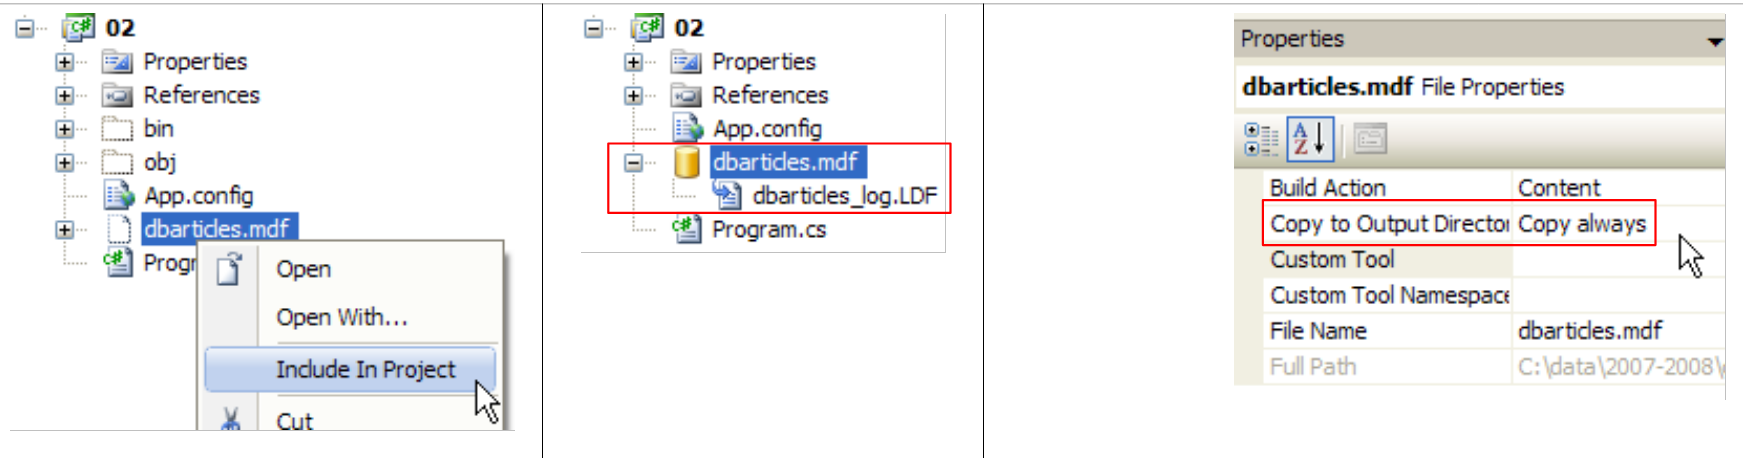
We still need to configure the project so that this database, which is currently at the root of the project, is automatically copied to the project’s runtime folder:
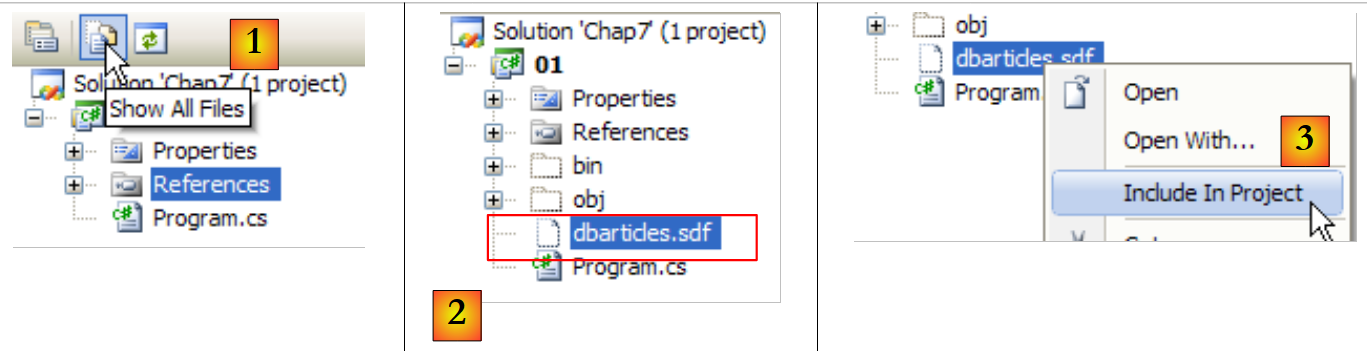 |
- [1]: we request to view all files
- [2]: the [dbarticles.sdf] database appears
- [3]: we include it in the project
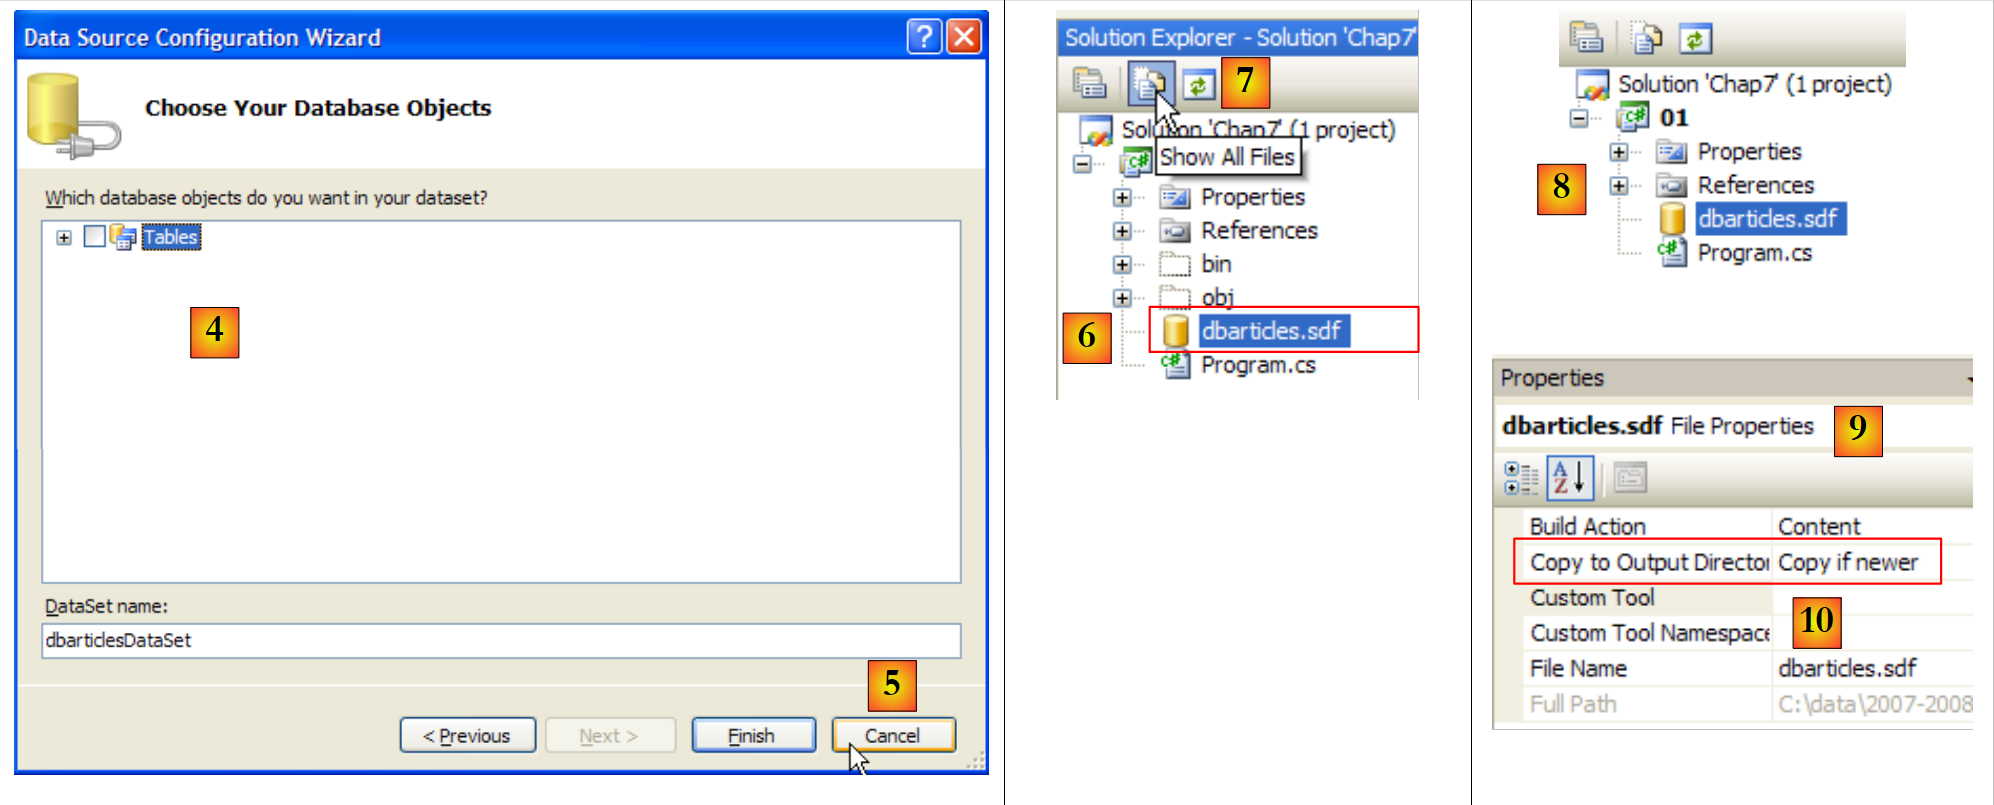 |
- [4]: The operation to add a data source to a project launches a wizard that we do not need here [5].
- [6]: The database is now part of the project. We return to normal mode [7].
- [8]: The project with its database
- [9]: In the database properties, we can see [10] that it will be automatically copied to the project’s runtime folder. This is where the program we’re going to write will retrieve it.
Now that we have a database available, we can start using it. Before we do that, let’s review a few basics SQL.
9.3.2. The four basic commands of the SQL
SQL (Structured Query Language) is a partially standardized language for querying and updating databases. All SGBD dialects comply with the standardized part of SQL but add proprietary extensions to the language that take advantage of certain features of SGBD. We have already encountered two examples of this: the automatic generation of primary keys and the allowed types for a table’s columns are often dependent on SGBD.
The four basic commands of the SQL language that we present are standardized and accepted by all SGBD:
The query used to retrieve data from a database. Only the keywords in the first line are required; the others are optional. There are other keywords not listed here.
| |
Inserts a row into table. (col1, col2, ...) specifies the columns of the row to be initialized with the values (val1, val2, ...). | |
Updates the rows in table that satisfy condition (all rows if no where clause). For these rows, the col1 column is set to the value val1 | |
Deletes all table rows that satisfy the condition |
We will write a console application to execute SQL commands on the [dbarticles] database we created earlier. Here is an example of the execution . The reader is encouraged to understand the SQL commands executed and their results.
- row 1: the connection string: it contains all the parameters needed to connect to the database.
- Line 3: We retrieve the contents of table [articles]
- line 16: we insert a new row. Note that the id field is not initialized in this operation because SGBD will generate the value for this field.
- Line 19: Verification. Line 28: The row has been successfully added.
- Line 30: Increase the price of the item that was just added by 10%.
- Line 33: verification
- Line 42: The price increase has indeed taken place
- Line 44: We delete the item we added previously
- Line 47: Verify
- Lines 53–55: The item is no longer there.
9.3.3. The basic interfaces of ADO.NET for connected mode
Let’s return to the diagram of an application accessing a database via an ADO.NET connector:
 |
In connected mode, the application:
- opens a connection to the data source
- works with the data source in read/write mode
- closes the connection
Three ADO.NET interfaces are primarily involved in these operations:
- IDbConnection, which encapsulates the connection’s properties and methods.
- IDbCommand, which encapsulates the properties and methods of the executed SQL command.
- IDataReader, which encapsulates the properties and methods of the result of a SQL Select command.
The IDbConnection
is used to manage the connection to the database. The methods M and properties P of this interface that we will use are as follows:
Name | Type | Role |
P | Database connection string. It specifies all the parameters required to establish a connection to a specific database. | |
M | Opens the connection to the database defined by ConnectionString | |
M | closes the connection | |
M | starts a transaction. | |
P | Connection status: ConnectionState.Closed, ConnectionState.Open, ConnectionState.Connecting, ConnectionState.Executing, ConnectionState.Fetching, ConnectionState.Broken |
If Connection is a class that implements the IDbConnection interface, the connection can be opened as follows:
The IDbCommand
Used to execute a SQL command or a stored procedure. The methods M and properties P of this interface that we will use are as follows:
Name | Type | Role |
P | specifies what to execute - takes its values from an enumeration: - CommandType.Text: executes the command SQL defined in the property CommandText. This is the default value. - CommandType.StoredProcedure: executes a stored procedure in the database | |
P | - the text of the SQL command to execute if CommandType= CommandType.Text - the name of the stored procedure to execute if CommandType = CommandType.StoredProcedure | |
P | The IDbConnection connection to use to execute the SQL request | |
P | The transaction IDbTransaction in which to execute the command SQL | |
P | The list of parameters for a configured SQL command. The command `update articles set price=price*1.1 where id=@id` has the parameter @id. | |
M | to execute a SQL Select statement. This returns a IDataReader object representing the result of the Select statement. | |
M | to execute a SQL Update, Insert, or Delete statement. The number of rows affected by the operation (updated, inserted, or deleted) is returned. | |
M | to execute a SQL Select statement that returns a single result, such as: select count(*) from articles. | |
M | to create the parameters IDbParameter for a parameterized SQL command. | |
M | optimizes the execution of a parameterized query when it is executed multiple times with different parameters. |
If Command is a class implementing the IDbCommand interface, the execution of a SQL command without a transaction will take the following form:
The IDataReader interface
is used to encapsulate the results of a SQL Select command. A IDataReader object represents a table with rows and columns, which are processed sequentially: first the first row, then the second, and so on. The methods M and properties P of this interface that we will use are as follows:
Name | Type | Role |
P | The number of columns in the table IDataReader | |
M | GetName(i) returns the name of column number i in table IDataReader. | |
P | Item[i] represents column no. i of the current row in table IDataReader. | |
M | moves to the next row of table IDataReader. Returns True if the read was successful, False otherwise. | |
M | Closes the table IDataReader. | |
M | GetBoolean(i): returns the Boolean value of column i in the current row of table IDataReader. The other similar methods are as follows: GetDateTime, GetDecimal, GetDouble, GetFloat, GetInt16, GetInt32, GetInt64, GetString. | |
M | Getvalue(i): returns the value of column i in the current row of table IDataReader as an object type. | |
M | IsDBNull(i) returns True if column i of the current row in table IDataReader has no value, which is represented by the value SQL NULL. |
The evaluation of a IDataReader object often looks like the following:
9.3.4. Error handling
Let’s revisit the architecture of a database application:
 |
The [dao] layer may encounter numerous errors while operating the database. These errors will be reported as exceptions thrown by the ADO.NET connector. The code in the [dao] layer must handle them. Any operation involving the database must be performed within a try/catch/finally block to intercept and handle any exceptions and release the necessary resources. Thus, the code shown above for processing the result of a SELECT statement becomes the following:
Regardless of what happens, the IDataReader and IDbConnection objects must be closed. That is why this closure is performed in the finally clauses.
Closing the connection and the IDataReader object can be automated with a using clause:
- Line 3: the using clause ensures that the connection opened within the using(...){...} block will be closed outside of it, regardless of how the block is exited—whether normally or due to an exception. We save a finally block, but the benefit lies not in this minor saving. Using a `using` statement prevents the developer from having to close the connection manually. However, forgetting to close a connection can go unnoticed and cause the application to "crash" in a seemingly random manner, whenever the SGBD reaches the maximum number of open connections it can support.
- Line 11: We proceed in a similar manner to close the IDataReader object.
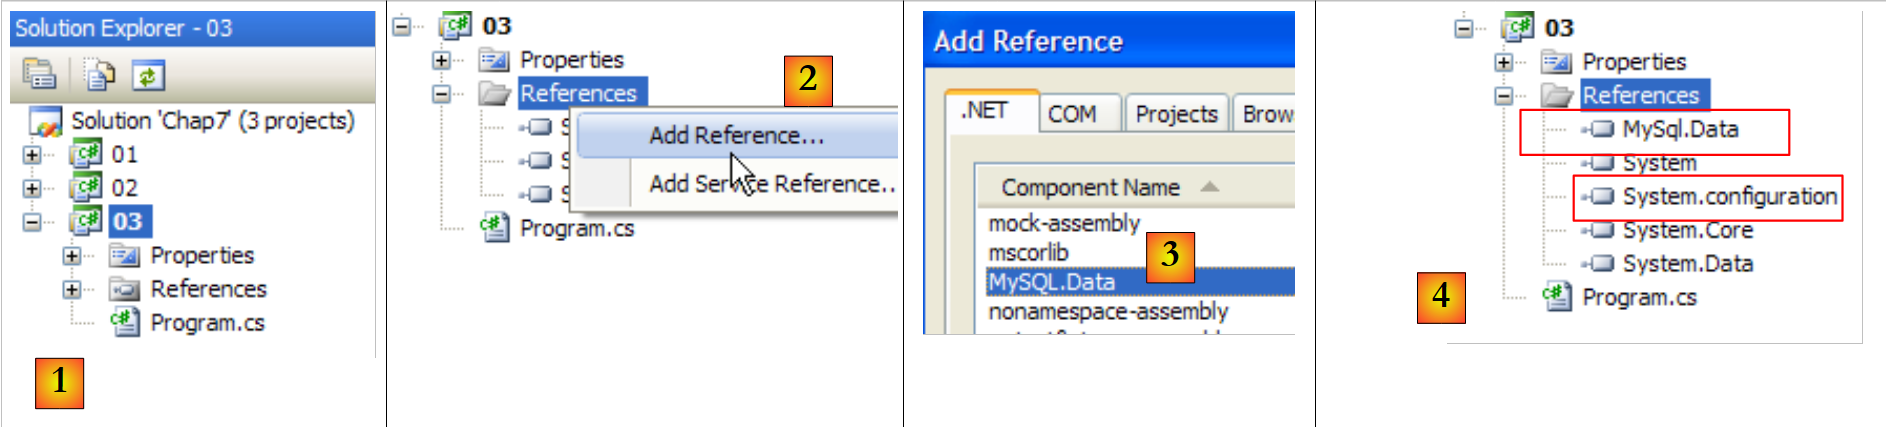
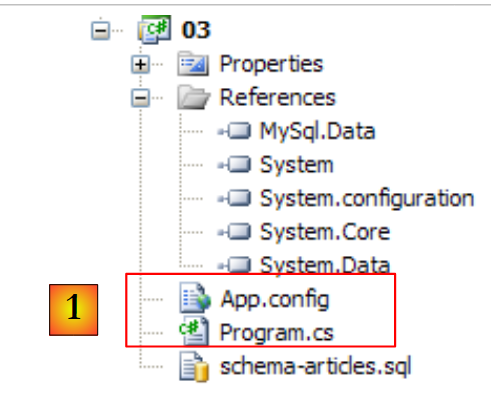
9.3.5. Configuring the sample project
The final project will be as follows:
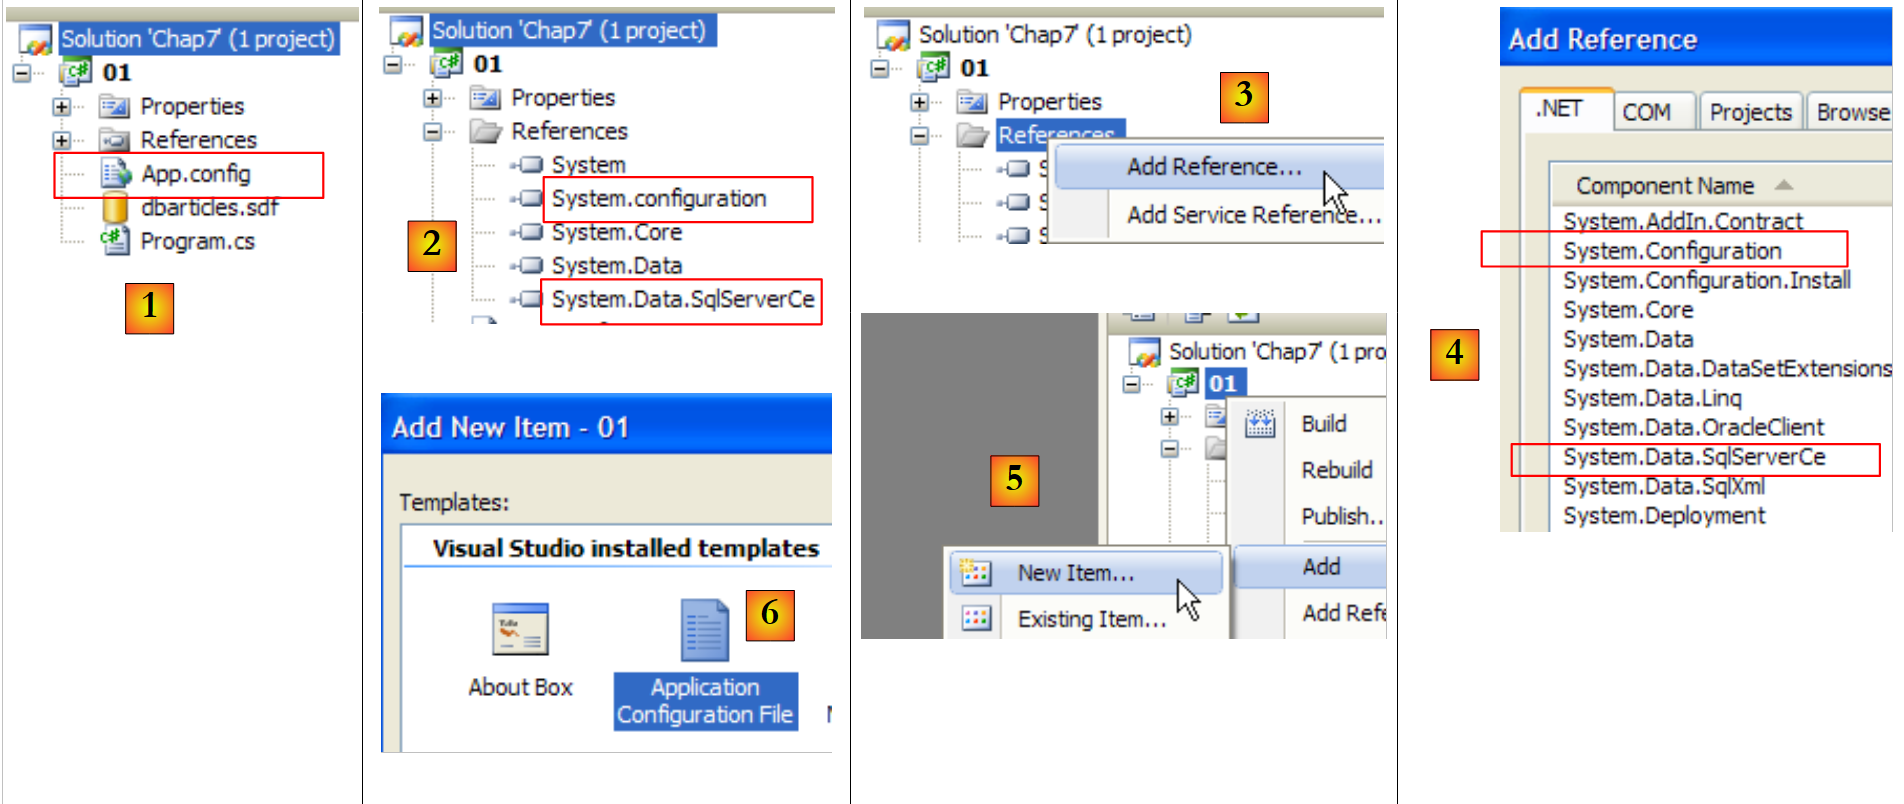 |
- [1]: the project will have a configuration file [App.config]
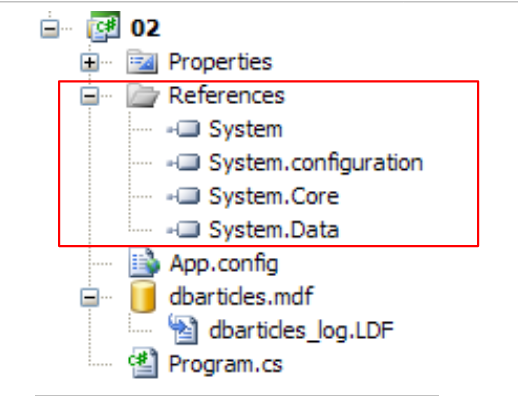
- [2]: it uses classes from two DLL files that are not referenced by default and must therefore be added to the project references:
- [System.Configuration] to use the configuration file [App.config]
- [System.Data.SqlServerCe] to use the Sql Server Compact database
- [3, 4]: explains how to add references to a project.
- [5, 6]: explains how to add the [App.config] file to a project.
The configuration file [App.config] will be as follows:
<?xml version="1.0" encoding="utf-8" ?>
<configuration>
 <connectionStrings>
  <add name="dbSqlServerCe" connectionString="Data Source=|DataDirectory|\dbarticles.sdf;Password=dbarticles;" />
 </connectionStrings>
</configuration>
- Lines 3-5: The <connectionStrings> tag (in the plural) defines connection strings to databases. A connection string has the form "parameter1=value1;parameter2=value2;...". It specifies all the parameters required to establish a connection with a specific database. These connection strings vary for each SGBD. The [http://www.connectionstrings.com/] site provides the format for these strings for the main SGBDs.
- Line 4: defines a specific connection string, in this case for the SQL Server Compact database dbarticles.sdf that we created earlier:
- name = connection string name. The C# program retrieves a connection string using this name
- connectionString: the connection string for a SQL Server Compact database
- DataSource: specifies the database path. The syntax |DataDirectory| specifies the project's execution folder.
- Password: the database password. This parameter is omitted if there is no password.
The C# code to retrieve the previous connection string is as follows:
string connectionString = ConfigurationManager.ConnectionStrings["dbSqlServerCe"].ConnectionString;
- ConfigurationManager is the class of DLL [System.Configuration], which allows you to use the [App.config] file.
- ConnectionsStrings["nom"].ConnectionString: refers to the connectionString attribute of the < tag name="name" connectionString="..."> tag in the <connectionStrings> section of [App.config]
The project is now configured. We will now examine the [Program.cs] class, for which we previously saw an example of execution.
9.3.6. The example program
The program [program.cs] is as follows:
using System;
using System.Collections.Generic;
using System.Data.SqlServerCe;
using System.Text;
using System.Text.RegularExpressions;
using System.Configuration;

namespace Chap7 {
    class SqlCommands {
        static void Main(string[] args) {

            // console application - executes SQL requests typed from the keyboard
            // on a database whose connection string is obtained from a configuration file

            // use of configuration file [App.config]
            string connectionString = null;
            try {
                connectionString = ConfigurationManager.ConnectionStrings["dbSqlServerCe"].ConnectionString;
            } catch (Exception e) {
                Console.WriteLine("Erreur de configuration : {0}", e.Message);
                return;
            }

            // display connection string
            Console.WriteLine("Chaîne de connexion à la base : [{0}]\n", connectionString);

            // build a dictionary of accepted sql commands
            string[] commandesSQL = new string[] { "select", "insert", "update", "delete" };
            Dictionary<string, bool> dicoCommandes = new Dictionary<string, bool>();
            for (int i = 0; i < commandesSQL.Length; i++) {
                dicoCommandes.Add(commandesSQL[i], true);
            }

            // read-execute SQL commands typed on the keyboard
            string requête = null;    // query text SQL
            string[] champs;            // query fields
            Regex modèle = new Regex(@"\s+");    // sequence of spaces

            // input-execution loop for SQL commands typed on keyboard
            while (true) {
                // request for query
                Console.Write("\nRequête SQL (rien pour arrêter) : ");
                requête = Console.ReadLine().Trim().ToLower();
                // finished?
                if (requête == "")
                    break;
                // the query is broken down into fields
                champs = modèle.Split(requête);
                // valid request?
                if (champs.Length == 0 || ! dicoCommandes.ContainsKey(champs[0])) {
                    // error msg
                    Console.WriteLine("Requête invalide. Utilisez select, insert, update, delete ou rien pour arrêter");
                    // following request
                    continue;
                }
                // query execution
                if (champs[0] == "select") {
                    ExecuteSelect(connectionString, requête);
                } else
                    ExecuteUpdate(connectionString, requête);
            }
        }

        // execute an update request
        static void ExecuteUpdate(string connectionString, string requête) {
    ...
        }

        // execute a Select query
        static void ExecuteSelect(string connectionString, string requête) {
....
        }
    }
}
- Lines 1–6: the namespaces used in the application. Managing a SQL Server Compact database requires the [System.Data.SqlServerCe] namespace from line 3. There is a dependency here on a namespace specific to SGBD. We can infer that the program will need to be modified if we change the SGBD.
- Line 18: The database connection string is read from the [App.config] file and displayed on line 25. It will be used to establish a connection with the database.
- Lines 28–32: A dictionary storing the names of the four authorized SQL commands: select, insert, update, delete.
- Lines 40–62: The loop for entering SQL commands typed on the keyboard and executing them on the database
- Line 48: The line typed on the keyboard is broken down into fields to identify the first term, which must be: select, insert, update, delete
- lines 50-55: if the query is invalid, an error message is displayed and the program moves on to the next query.
- lines 57–61: the entered command SQL is executed. This execution takes a different form depending on whether it is a select command or an insert, update, or delete command. In the first case, the command retrieves data from the database without modifying it; in the second, it updates the database without retrieving data. In both cases, execution is delegated to a method that requires two parameters:
- the connection string that will allow it to connect to the database
- the SQL command to be executed on this connection
9.3.7. Executing a SELECT query
Executing SQL commands requires the following steps:
- Connecting to the database
- Sending the SQL commands to the database
- Processing the results of the SQL command
- Closing the connection
Steps 2 and 3 are performed repeatedly; the connection is closed only at the end of the database operation. Open connections are limited resources of a SGBD. They must be conserved. Therefore, we will always seek to limit the lifetime of an open connection. In the example studied, the connection is closed after each SQL command. A new connection is opened for the next SQL command. Opening and closing a connection is costly. To reduce this cost, some SGBD systems offer the concept of open connection pools: during application initialization, N connections are opened and assigned to the pool. They remain open until the application ends. When the application opens a connection, it receives one of the N connections already open in the pool. When it closes the connection, it is simply returned to the pool. The advantage of this system is that it is transparent to the developer: the program does not need to be modified to use the connection pool. The configuration of the connection pool depends on SGBD.
We will first focus on the execution of SQL Select statements. The ExecuteSelect method in our example program is as follows:
// execute a Select query
        static void ExecuteSelect(string connectionString, string requête) {
            // handle any exceptions
            try {
                using (SqlCeConnection connexion = new SqlCeConnection(connectionString)) {
                    // opening connection
                    connexion.Open();
                    // executes sqlCommand with select query
                    SqlCeCommand sqlCommand = new SqlCeCommand(requête, connexion);
                    SqlCeDataReader reader= sqlCommand.ExecuteReader();
                    // displaying results
                    AfficheReader(reader);
                }
            } catch (Exception ex) {
                // error msg
                Console.WriteLine("Erreur d'accès à la base de données (" + ex.Message + ")");
            }
        }

        // reader display
        static void AfficheReader(IDataReader reader) {
...
        }
- Line 2: The method receives two parameters:
- the connection string [connectionString], which will allow it to connect to the database
- the command SQL Select [requête] to be executed on this connection
- Line 4: Any database operation can generate an exception that you may want to handle. This is especially important here because the SQL commands entered by the user may contain syntax errors. We need to be able to notify the user of this. Therefore, all the code is enclosed within a try/catch block.
- Line 5: There are several things happening here:
- The connection to the database is initialized with the connection string [connectionString]. It is not yet open. It will be opened on line 7.
- The using (Resource) {...} clause is a syntactic convenience that ensures the Resource (in this case, a connection) is released when exiting the block controlled by the using statement.
- The connection is of a proprietary type: SqlCeConnection, specific to the SGBD SQL Server Compact.
- Line 7: The connection is opened. This is when the connection string parameters are used.
- Line 9: A SQL command is issued via a proprietary SqlCeCommand object. Line 9 initializes this object with two pieces of information: the connection to use and the SQL command to issue on it. The SqlCeCommand object is used to execute a Select command as well as an Update, Insert, or Delete command. Its properties and methods were presented in section 9.3.3.
- Line 10: A SQL Select command is executed via the ExecuteReader method of the SqlCeCommand object, which returns a IDataReader object whose methods and properties were presented in section 9.3.3.
- Line 12: The display of results is handled by the following AfficheReader method:
        // reader display
        static void AfficheReader(IDataReader reader) {
            using (reader) {
                // exploitation of results
                // -- columns
                StringBuilder ligne = new StringBuilder();
                int i;
                for (i = 0; i < reader.FieldCount - 1; i++) {
                    ligne.Append(reader.GetName(i)).Append(",");
                }
                ligne.Append(reader.GetName(i));
                Console.WriteLine("\n{0}\n{1}\n{2}\n", "".PadLeft(ligne.Length, '-'), ligne, "".PadLeft(ligne.Length, '-'));
                // -- data
                while (reader.Read()) {
                    // current line operation
                    ligne = new StringBuilder();
                    for (i = 0; i < reader.FieldCount; i++) {
                        ligne.Append(reader[i].ToString()).Append(" ");
                    }
                    Console.WriteLine(ligne);
                }
            }
}
- Line 2: The method receives a IDataReader object. Note that here we have used an interface rather than a specific class.
- line 3: the using clause is used to automatically manage the closure of the IDataReader object.
- lines 8–10: We display the column names from the result table of the SELECT statement. These are the columns col1, col2, ... from the query SELECT col1, col2, ... from table ...
- Lines 14–21: We iterate through the result table and display the values of each row in the table.
- Line 18: We do not know the type of column number i in the result because we do not know the table being queried. Therefore, we cannot use the syntax reader.GetXXX(i), where XXX is the type of column number i, because we do not know that type. We therefore use the syntax reader.Item[i].ToString() to obtain the representation of column i as a character string. The syntax reader.Item[i].ToString() can be abbreviated to reader[i].ToString().
9.3.8. Executing an update command: INSERT, UPDATE, DELETE
The code for method ExecuteUpdate is as follows:
        // execute an update request
        static void ExecuteUpdate(string connectionString, string requête) {
            // handle any exceptions
            try {
                using (SqlCeConnection connexion = new SqlCeConnection(connectionString)) {
                    // opening connection
                    connexion.Open();
                    // executes sqlCommand with update request
                    SqlCeCommand sqlCommand = new SqlCeCommand(requête, connexion);
                    int nbLignes = sqlCommand.ExecuteNonQuery();
                    // result display
                    Console.WriteLine("Il y a eu {0} ligne(s) modifiée(s)", nbLignes);
                }
            } catch (Exception ex) {
                // error msg
                Console.WriteLine("Erreur d'accès à la base de données (" + ex.Message + ")");
            }
}
We mentioned that executing a Select query is no different from executing an Update command, Insert, or Delete only in terms of the method of the SqlCeCommand object used: ExecuteReader for Select, ExecuteNonQuery for Update, Insert, and Delete. We are only commenting out the latter method in the code above:
- line 10: the Update, Insert, Delete command is executed by the ExecuteNonQuery method of the SqlCeCommand object. If successful, this method returns the number of rows updated, inserted, or deleted.
- line 12: this number of rows is displayed on the screen
The reader is invited to review an example of this code in action in Section 9.3.2.
9.4. Other ADO connectors: NET
The code we have studied is proprietary: it depends on the [System.Data.SqlServerCe] namespace intended for the SGBD SQL Server Compact. We will now build the same program with different .NET connectors and see what changes.
9.4.1. SQL Server 2005 Connector
The architecture used will be as follows:
 |
The installation of SQL Server 2005 is described in the appendices in section 1.1.
We create a second project in the same solution as before, then we create the SQL Server 2005 database. The SGBD SQL Server 2005 must be launched before the following operations:
 |
- [1]: Create a new project in the current solution and make it the current project.
- [2]: Create a new connection
- [3]: select the connection type
 |
- [4]: Select SGBD SQL Server
- [5]: result of the previous selection
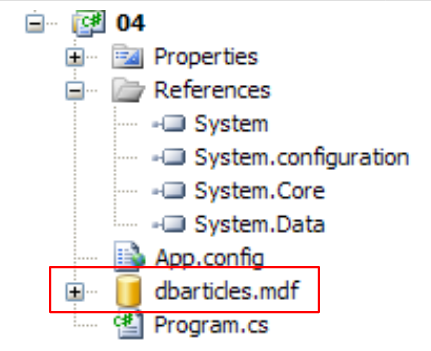
- [6]: Use the [Browse] button to specify where to create the SQL Server 2005 database. The database is encapsulated in an .mdf file.
- [7]: Select the root directory for the new project and name the database [dbarticles.mdf].
- [8]: Use Windows authentication.
- [9]: Validate the information page
 |
- [11]: the SQL Server database
- [12]: Create a table. This will be identical to the SQL Server Compact database created previously.
- [13]: the field [id]
- [14]: The [id] field is of type Identity.
- [15,16]: The [id] field is the primary key
 |
- [17]: the other fields in the table
- [18]: Name the table [articles] when saving it (Ctrl+S).
Now we need to add data to the table:
 |  |
We include the database in the project:
 |
The project references are as follows:
 |
The configuration file [App.config] is as follows:
<?xml version="1.0" encoding="utf-8" ?>
<configuration>
 <connectionStrings>
  <add name="connectString1" connectionString="Data Source=.\SQLEXPRESS;AttachDbFilename=|DataDirectory|\dbarticles.mdf;Integrated Security=True;Connect Timeout=30;User Instance=True;" />
     <add name="connectString2" connectionString="Data Source=.\SQLEXPRESS;AttachDbFilename=|DataDirectory|\dbarticles.mdf;Uid=sa;Pwd=msde;Connect Timeout=30;" />
 </connectionStrings>
</configuration>
- Line 4: The connection string to the [dbarticles.mdf] database with Windows authentication
- line 5: the connection string to the [dbarticles.mdf] database with SQL Server authentication. [sa,msde] is the (login, password) pair for the administrator of the SQL Server, as defined in section 1.1.
The [Program.cs] program is as follows:
using System.Data.SqlClient;
...

namespace Chap7 {
    class SqlCommands {
        static void Main(string[] args) {
...
            // use of configuration file [App.config]
            string connectionString = null;
            try {
                connectionString = ConfigurationManager.ConnectionStrings["connectString2"].ConnectionString;
            } catch (Exception e) {
...
            }
...
            // read-execute SQL commands typed on the keyboard
...
        }

        // execute an update request
        static void ExecuteUpdate(string connectionString, string requête) {
            // handle any exceptions
            try {
                using (SqlConnection connexion = new SqlConnection(connectionString)) {
                    // opening connection
                    connexion.Open();
                    // executes sqlCommand with update request
                    SqlCommand sqlCommand = new SqlCommand(requête, connexion);
                    int nbLignes = sqlCommand.ExecuteNonQuery();
                    // result display
                    Console.WriteLine("Il y a eu {0} ligne(s) modifiée(s)", nbLignes);
                }
            } catch (Exception ex) {
....
            }
        }

        // execute a Select query
        static void ExecuteSelect(string connectionString, string requête) {
            // handle any exceptions
            try {
                using (SqlConnection connexion = new SqlConnection(connectionString)) {
                    // opening connection
                    connexion.Open();
                    // executes sqlCommand with select query
                    SqlCommand sqlCommand = new SqlCommand(requête, connexion);
                    SqlDataReader reader = sqlCommand.ExecuteReader();
                    // exploitation of results
...
                }
            } catch (Exception ex) {
...
            }
        }
    }
}
- line 1: the [System.Data.SqlClient] namespace contains the classes used to manage a SQL Server 2005 database
- line 24: the connection is of type SQLConnection
- line 28: the object encapsulating the SQL commands is of type SQLCommand
- line 47: the object encapsulating the result of a SQL Select command is of type SQLDataReader
The code is identical to that used with the SGBD SQL Server Compact, except for the class names. To execute it, you can use (line 11) either of the two connection strings defined in [App.config].
9.4.2. MySQL5 Connector
The architecture used will be as follows:
 |
The installation of MySQL5 is described in the appendices in section 1.2, and that of the Ado.Net connector in section 1.2.5.
We create a third project in the same solution as before and add the references it needs:
 |
- [1]: the new project
- [2]: to which we add references
- [3]: the DLL and [MySQL.Data] from the Ado.Net from MySql5 as well as that of [System.Configuration] [4].
We will now create the [dbarticles] database and its [articles] table. The SGBD and MySQL5 processes must be started. Additionally, we start the [Query Browser] client (see section 1.2.3).
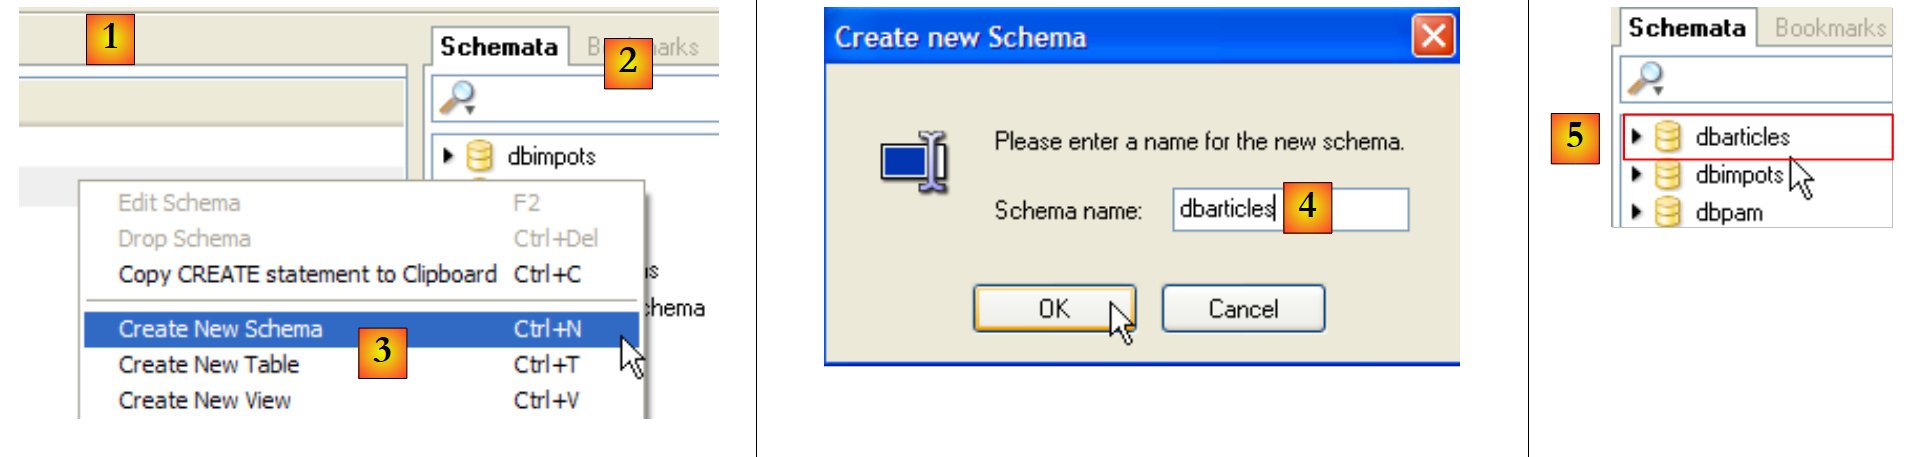 |
- [1]: In [Query Browser], right-click in the [Schemata] [2] area to create [3], a new schema, which refers to a database.
- [4]: The database will be named [dbarticles]. In [5], we can see it. It currently has no tables. We will run the following script: SQL:
- Line 1: The database [dbarticles] becomes the current database. The following SQL statements will be executed on it.
- Lines 4–10: Definition of the table [ARTICLES]. Note that SQL is the owner of MySQL. The column types and the automatic generation of the primary key (attribute AUTO_INCREMENT) differ from what was encountered with the SGBD and SQL Server Compact and Express tables.
- Lines 12–14: insertion of three lines
- Lines 16–21: Add integrity constraints to the columns.
This script is executed in [MySQL Query Browser]:
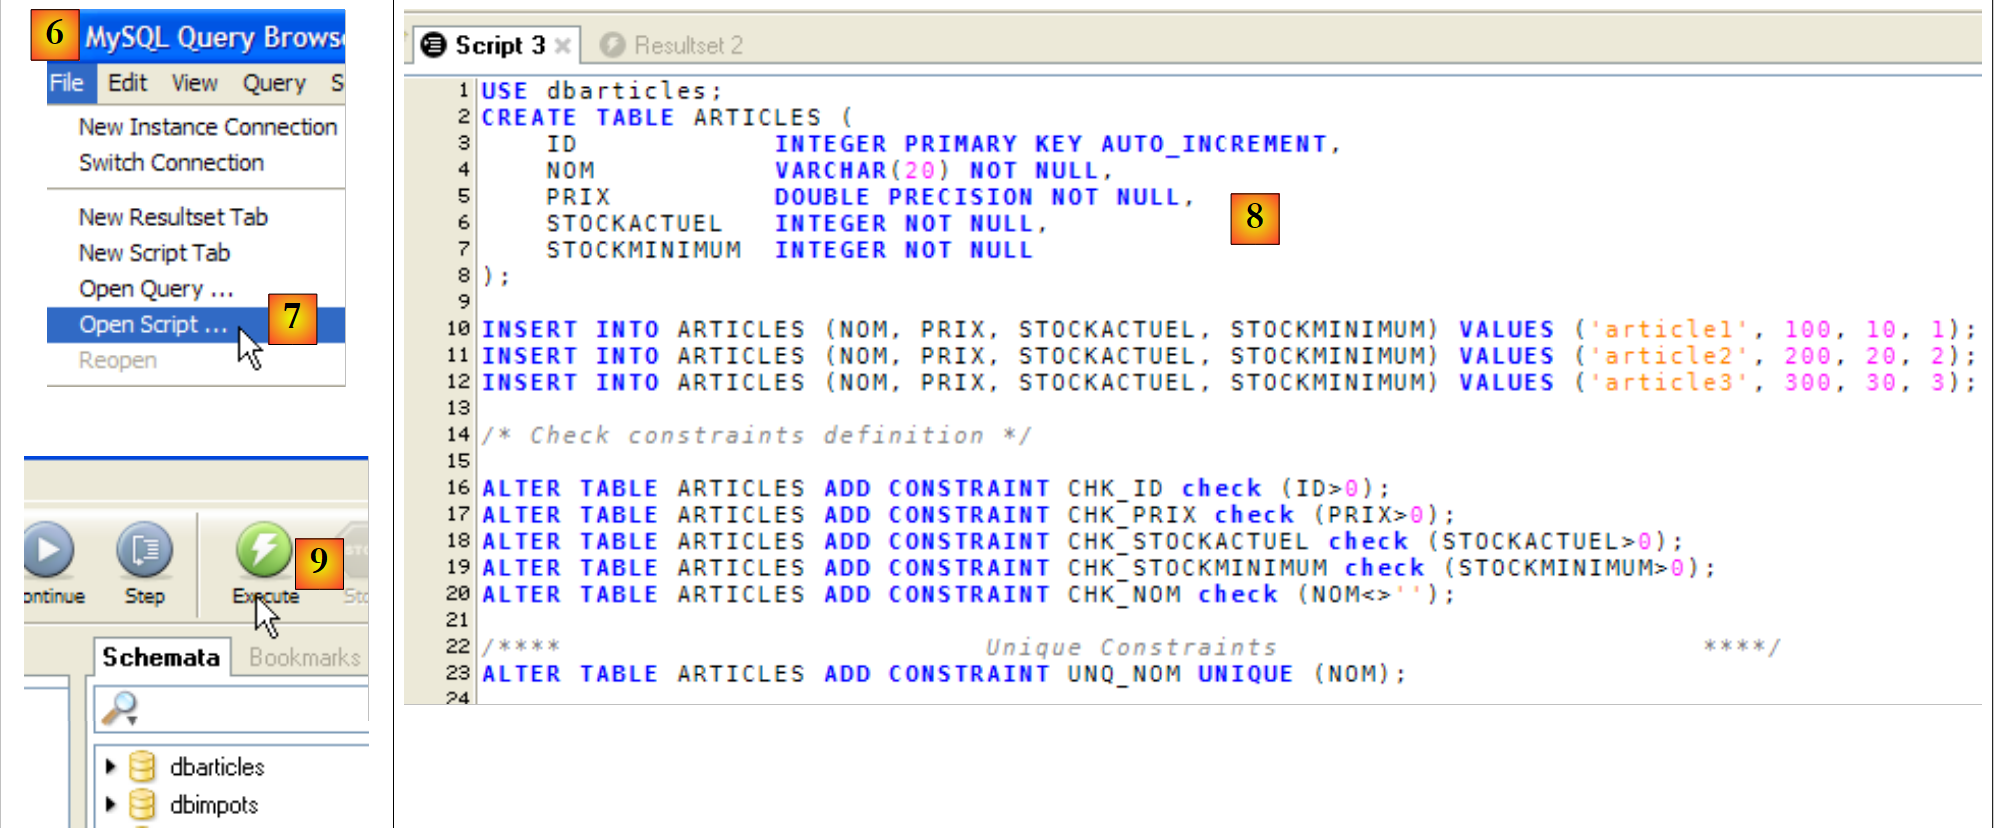 |
- In [MySQL Query Browser] and [6], the script [7] is loaded. This can be seen in [8]. In [9], it is executed.
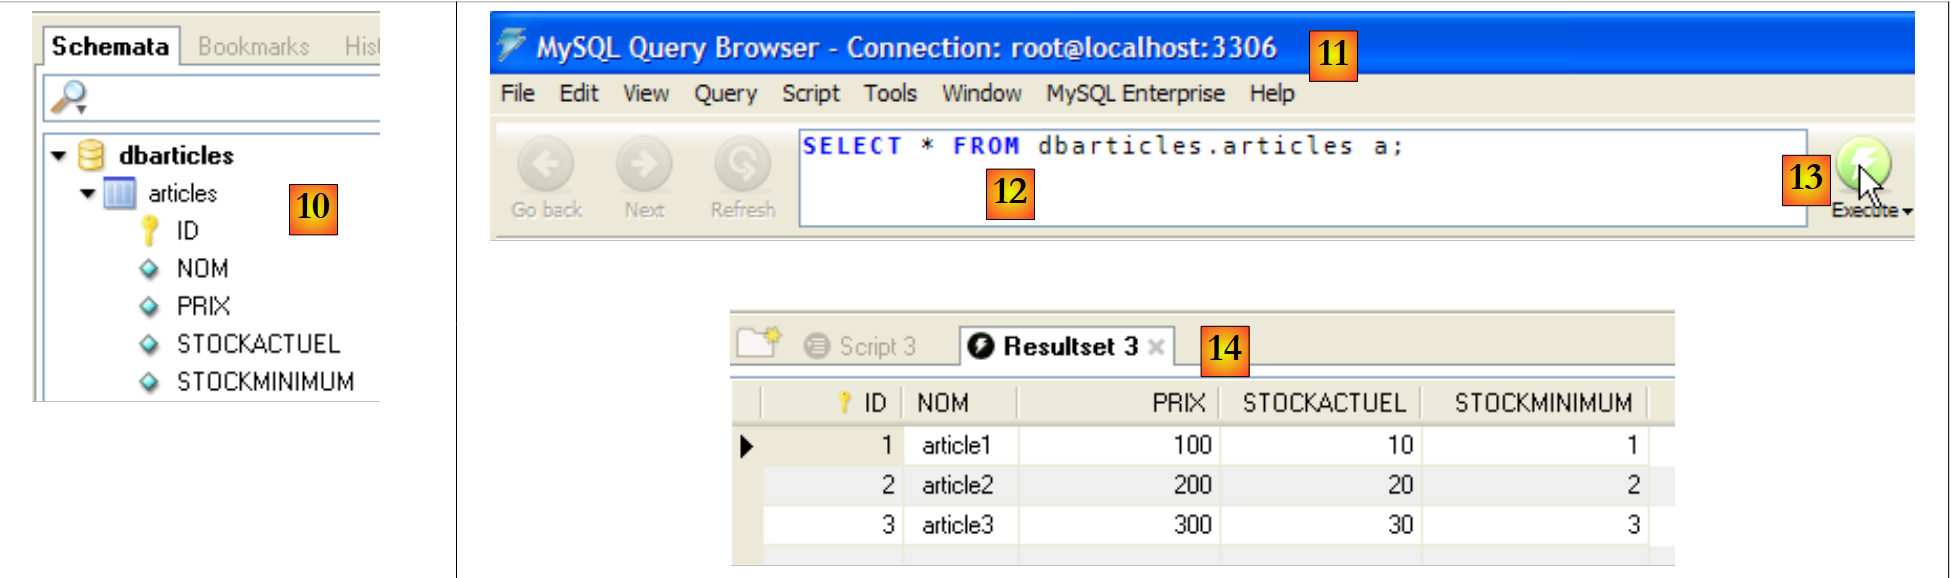 |
- In [10], the table [articles] has been created. Double-click on it. This brings up the [11] window with the query [12] inside, ready to be executed by [13]. In [14], the result of the execution. We have the expected three rows. Note that the values in the [ID] field were generated automatically (AUTO_INCREMENT attribute of the field).
Now that the database is ready, we can return to developing the application in Visual Studio.
 |
In [1], the program [Program.cs] and the configuration file [App.config]. The configuration file is as follows:
<?xml version="1.0" encoding="utf-8" ?>
<configuration>
 <connectionStrings>
     <add name="dbArticlesMySql5" connectionString="Server=localhost;Database=dbarticles;Uid=root;Pwd=root;" />
 </connectionStrings>
</configuration>
Line 4: The connection string elements are as follows:
- Server: name of the machine on which SGBD MySQL is located, here localhost, c.a.d. The machine on which the program will be executed.
- Database: the name of the database being managed, here dbarticles
- Uid: the user login, here root
- Pwd: the password, in this case "root." These two pieces of information refer to the administrator account created in section 1.2.
The [Program.cs] program is identical to that of previous versions, with the following minor differences:
MySql.Data.MySqlClient | |
MySqlConnection | |
MySqlCommand | |
MySqlDataReader |
The program uses the connection string named dbArticlesMySql5 in the file [App.config]. Execution yields the following results:
9.4.3. Connector ODBC
The architecture used will be as follows:
 |
The advantage of ODBC connectors is that they provide a standard interface to the applications that use them. Thus, the new application will be able, with a single code, to communicate with any SGBD having a ODBC or c.a.d connector, as well as most SGBD units. The performance of ODBC connectors is inferior to that of "proprietary" connectors, which can take full advantage of all the features of a specific SGBD. On the other hand, this provides great application flexibility: you can switch SGBD instances without changing the code.
We are examining an example where the application uses a MySQL5 database or a SQL Server Express database depending on the connection string provided. In the following, we assume that:
- the SGBD, SQL, and MySQL5 Express Server instances have been started
- the ODBC driver for MySQL5 is present on the machine (see section 1.2.6). The driver for SQL Server 2005 is present by default.
- The databases used are those from section 9.4.2 for the MySQL5 database, and those from section 9.4.1 for the SQL Server Express database.
The new Visual Studio project is as follows:
 |
Above, the SQL Server [dbarticles.mdf] database created in section 9.4.1 has been copied into the project folder.
The configuration file [App.config] is as follows:
<?xml version="1.0" encoding="utf-8" ?>
<configuration>
 <connectionStrings>
     <add name="dbArticlesOdbcMySql5" connectionString="Driver={MySQL ODBC 3.51 Driver};Server=localhost;Database=dbarticles; User=root;Password=root;" />
     <add name="dbArticlesOdbcSqlServer2005" connectionString="Driver={SQL Native Client};Server=.\SQLExpress;AttachDbFilename=|DataDirectory|\dbarticles.mdf;Uid=sa;Pwd=msde;" />
 </connectionStrings>
</configuration>
- Line 4: The connection string for the ODBC MySQL5 source. This is a string we have already examined, which includes a new "Driver" parameter that specifies the ODBC driver to be used.
- Line 5: The connection string for the ODBC SQL Server Express source. This is the string already used in a previous example, to which the Driver parameter has been added.
The [Program.cs] program is identical to that of previous versions, with the following minor differences:
System.Data.Odbc | |
OdbcConnection | |
OdbcCommand | |
OdbcDataReader |
The program uses one of the two connection strings defined in the file [App.config]. The execution yields the following results:
With the connection string [dbArticlesOdbcSqlServer2005]:
With the connection string [dbArticlesOdbcMySql5]:
9.4.4. Connector OLE DB
The architecture used will be as follows:
 |
Like the ODBC connectors, the OLE and DB (Object Linking and Embedding DataBase) connectors provide a standard interface to the applications that use them. The ODBC drivers provide access to databases. The data sources for the OLE and DB drivers are more varied: databases, email systems, directories, etc. Any data source can be the subject of an Ole driver DB if a publisher so decides. This provides standard access to a wide variety of data.
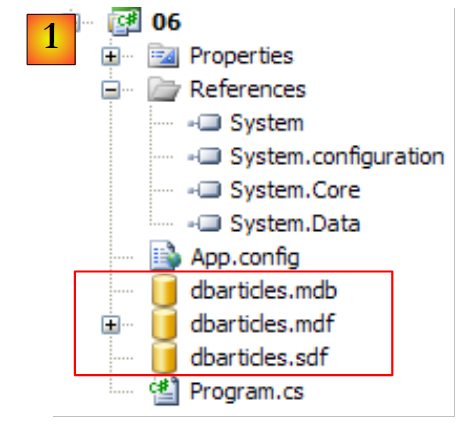
We will examine an example where the application uses a ACCESS database or a SQL Server Express database depending on the connection string provided. In the following, we assume that the SGBD SQL Server Express has been launched and that the database used is the one from the previous example.
The new Visual Studio project is as follows:
 |
- In [1]: the namespace required for the OLE and DB connectors is present in the [System.Data.OleDb] reference above. The SQL database was copied from the previous project. The [dbarticles.mdb] database was created using Access.
- In [2]: like the SQL Server database, the ACCESS database has the [Copy to Output Directory=Copy Always] property so that it is automatically copied to the project's runtime folder.
The ACCESS database structure is as follows:
 |
In [1], the structure of the table [articles], and in [2], its contents.
The configuration file [App.config] is as follows:
<?xml version="1.0" encoding="utf-8" ?>
<configuration>
 <connectionStrings>
     <add name="dbArticlesOleDbAccess"  connectionString="Provider=Microsoft.Jet.OLEDB.4.0;Data Source=|DataDirectory|\dbarticles.mdb;"/>
     <add name="dbArticlesOleDbSqlServer2005" connectionString="Provider=SQLNCLI;Server=.\SQLEXPRESS;AttachDbFilename=|DataDirectory|\dbarticles.mdf;Uid=sa;Pwd=msde;" />
 </connectionStrings>
</configuration>
- Line 4: the connection string for the OLE DB ACCESS source. It contains the Provider parameter, which defines the OLE DB driver to be used, as well as the database path
- line 5: the connection string for the OLE DB Server Express source.
The [Program.cs] program is identical to that of previous versions, with the following minor differences:
System.Data.OleDb | |
OleDbConnection | |
OleDbCommand | |
OleDbDataReader |
The program uses one of the two connection strings defined in the file [App.config]. Running the program yields the following results with the connection string [dbArticlesOleDbAccess]:
9.4.5. Generic connector
The architecture used will be as follows:
 |
Like the ODBC, OLE, and DB connectors, the generic connector provides a standard interface to the applications that use it but improves performance without sacrificing flexibility. In fact, the generic connector relies on the proprietary SGBD connectors. The application uses classes from the generic connector. These classes serve as intermediaries between the application and the proprietary connector.
For example, when the application requests a connection to the generic connector, the connector returns a IDbConnection instance, the connection interface described in Section 9.3.3, implemented by a MySQLConnection or SQLConnection class depending on the nature of the request made to it. The generic connector is said to have factory-type classes: a factory class is used to ask it to create objects and provide references (pointers) to them. Hence its name (factory = object production facility).
There is no generic connector for all SGBD (April 2008). To find out which ones are installed on a machine, you can use the following program:
using System;
using System.Data;
using System.Data.Common;

namespace Chap7 {
    class Providers {
        public static void Main() {
            DataTable dt = DbProviderFactories.GetFactoryClasses();
            foreach (DataColumn col in dt.Columns) {
                Console.Write("{0}|", col.ColumnName);
            }
            Console.WriteLine("\n".PadRight(40, '-'));
            foreach (DataRow row in dt.Rows) {
                foreach (object item in row.ItemArray) {
                    Console.Write("{0}|", item);
                }
                Console.WriteLine("\n".PadRight(40, '-'));
            }
        }
    }
}
- Line 8: The static method [DbProviderFactories.GetFactoryClasses()] returns the list of installed generic connectors in the form of an in-memory database table (DataTable).
- Lines 9–11: display the names of the columns in the dt table:
- dt.Columns is the list of columns in the table. A column C is of type DataColumn
- [DataColumn].ColumnName is the column name
- lines 13–18: display the rows of the dt table:
- dt.Rows is the list of rows in the table. A row L is of type DataRow
- [DataRow].ItemArray is an array of objects where each object represents a column of the row
The result of running this on my machine is as follows:
- Line 1: The table has four columns. The first three are the most useful to us here.
The following display shows that the following generic connectors are available:
Name | ID |
System.Data.Odbc | |
System.Data.OleDb | |
System.Data.OracleClient | |
System.Data.SqlClient | |
System.Data.SqlServerCe.3.5 | |
MySql.Data.MySqlClient |
A generic connector is accessible in a C# program via its identifier.
We will examine an example where the application utilizes the various databases we have built so far. The application will receive two parameters:
- the first parameter specifies the type of SGBD used so that the correct class library is utilized
- the second parameter specifies the database being used, via a connection string.
The new Visual Studio project is as follows:
 |
- in [1]: the namespace required for generic connectors is [System.Data.common], present in the [System.Data] reference.
The configuration file [App.config] is as follows:
<?xml version="1.0" encoding="utf-8" ?>
<configuration>
    <connectionStrings>
        <add name="dbArticlesSqlServerCe" connectionString="Data Source=|DataDirectory|\dbarticles.sdf;Password=dbarticles;" />
        <add name="dbArticlesSqlServer" connectionString="Data Source=.\SQLEXPRESS;AttachDbFilename=|DataDirectory|\dbarticles.mdf;Uid=sa;Pwd=msde;" />
        <add name="dbArticlesMySql5" connectionString="Server=localhost;Database=dbarticles;Uid=root;Pwd=root;" />
        <add name="dbArticlesOdbcMySql5" connectionString="Driver={MySQL ODBC 3.51 Driver};Server=localhost;Database=dbarticles; User=root;Password=root;Option=3;" />
        <add name="dbArticlesOleDbSqlServer2005" connectionString="Provider=SQLNCLI;Server=.\SQLExpress;AttachDbFilename=|DataDirectory|\dbarticles.mdf;Uid=sa;Pwd=msde;" />
        <add name="dbArticlesOdbcSqlServer2005" connectionString="Driver={SQL Native Client};Server=.\SQLExpress;AttachDbFilename=|DataDirectory|\dbarticles.mdf;Uid=sa;Pwd=msde;" />
        <add name="dbArticlesOleDbAccess"  connectionString="Provider=Microsoft.Jet.OLEDB.4.0;Data Source=|DataDirectory|\dbarticles.mdb;Persist Security Info=True"/>
    </connectionStrings>
    <appSettings>
        <add key="factorySqlServerCe" value="System.Data.SqlServerCe.3.5"/>
        <add key="factoryMySql" value="MySql.Data.MySqlClient"/>
        <add key="factorySqlServer" value="System.Data.SqlClient"/>
        <add key="factoryOdbc" value="System.Data.Odbc"/>
        <add key="factoryOleDb" value="System.Data.OleDb"/>
    </appSettings>
</configuration>
- lines 3–11: the connection strings for the various databases used.
- Lines 13–17: The names of the generic connectors to be used
The program [Program.cs] is as follows:
...
using System.Data.Common;

namespace Chap7 {
    class SqlCommands {
        static void Main(string[] args) {

            // console application - executes SQL requests typed from the keyboard
            // on a database whose connection string is obtained from a configuration file, along with the connector name of the associated SGBD

            // checking parameters
            if (args.Length != 2) {
                Console.WriteLine("Syntaxe : pg factory connectionString");
                return;
            }

            // using the configuration file
            string factory = null;
            string connectionString = null;
            DbProviderFactory connecteur = null;
            try {
                // factory
                factory = ConfigurationManager.AppSettings[args[0]];
                // connecting chain
                connectionString = ConfigurationManager.ConnectionStrings[args[1]].ConnectionString;
                // we retrieve a generic connector for the SGBD
                connecteur = DbProviderFactories.GetFactory(factory);
            } catch (Exception e) {
                Console.WriteLine("Erreur de configuration : {0}", e.Message);
                return;
            }

            // displays
            Console.WriteLine("Provider factory : [{0}]\n", factory);
            Console.WriteLine("Chaîne de connexion à la base : [{0}]\n", connectionString);

...
                // query execution
                if (champs[0] == "select") {
                    ExecuteSelect(connecteur,connectionString, requête);
                } else
                    ExecuteUpdate(connecteur, connectionString, requête);
            }
        }

        // execute an update request
        static void ExecuteUpdate(DbProviderFactory connecteur, string connectionString, string requête) {
            // handle any exceptions
            try {
                using (DbConnection connexion = connecteur.CreateConnection()) {
                    // connection configuration
                    connexion.ConnectionString = connectionString;
                    // opening connection
                    connexion.Open();
                    // configuration Command
                    DbCommand sqlCommand = connecteur.CreateCommand();
                    sqlCommand.CommandText = requête;
                    sqlCommand.Connection = connexion;
                    // request execution
                    int nbLignes = sqlCommand.ExecuteNonQuery();
                    // result display
                    Console.WriteLine("Il y a eu {0} ligne(s) modifiée(s)", nbLignes);
                }
            } catch (Exception ex) {
                // error msg
                Console.WriteLine("Erreur d'accès à la base de données (" + ex.Message + ")");
            }
        }

        // execute a Select query
        static void ExecuteSelect(DbProviderFactory connecteur, string connectionString, string requête) {
            // handle any exceptions
            try {
                using (DbConnection connexion = connecteur.CreateConnection()) {
                    // connection configuration
                    connexion.ConnectionString = connectionString;
                    // opening connection
                    connexion.Open();
                    // configuration Command
                    DbCommand sqlCommand = connecteur.CreateCommand();
                    sqlCommand.CommandText = requête;
                    sqlCommand.Connection = connexion;
                    // request execution
                    DbDataReader reader = sqlCommand.ExecuteReader();
                    // display of results
...
                }
            } catch (Exception ex) {
                // error msg
                Console.WriteLine("Erreur d'accès à la base de données (" + ex.Message + ")");
            }
        }
    }
}
- lines 12–14: the application receives two parameters: the name of the generic connector and the database connection string in the form of keys from the [App.config] file.
- lines 23, 25: the name of the generic connector and the connection string are retrieved from [App.config]
- Line 27: The generic connector is instantiated. From this point on, it is associated with a specific SGBD.
- lines 39–43: execution of the SQL command entered via the keyboard is delegated to two methods, to which the following are passed:
- the query to be executed
- the connection string that identifies the database on which the query will be executed
- the generic connector that identifies the classes to be used to communicate with the SGBD managing the database.
- lines 50–54: A connection is established using the CreateConnection method (line 50) of the generic connector, then configured with the connection string for the database to be managed (line 52). It is then opened (line 54).
- Lines 56–58: The Command object required to execute the SQL command is created using the CreateCommand method of the generic connector. It is then configured with the text of the SQL command to be executed (line 57) and the connection on which to execute it (line 58).
- Line 60: The update command SQL is executed
- Lines 74–87: similar code is found. The new element is found on line 84. The Reader object obtained by executing the Select command is of type DbDataReader, which is used in the same way as the OleDbDataReader, OdbcDataReader, ... objects we have already encountered.
Here are a few examples of execution.
With the MySQL5 database:
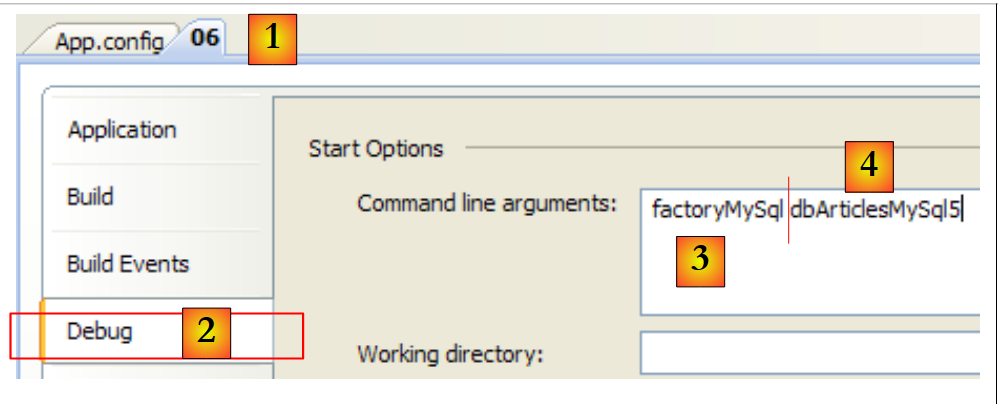 |
Open the properties page for the [1] project and select the [Debug] [2] tab. In [3], the connector key from line 14 of [App.config]. In [4], the connection string key from line 6 of [App.config]. The execution results are as follows:
With the SQL Server Compact database:
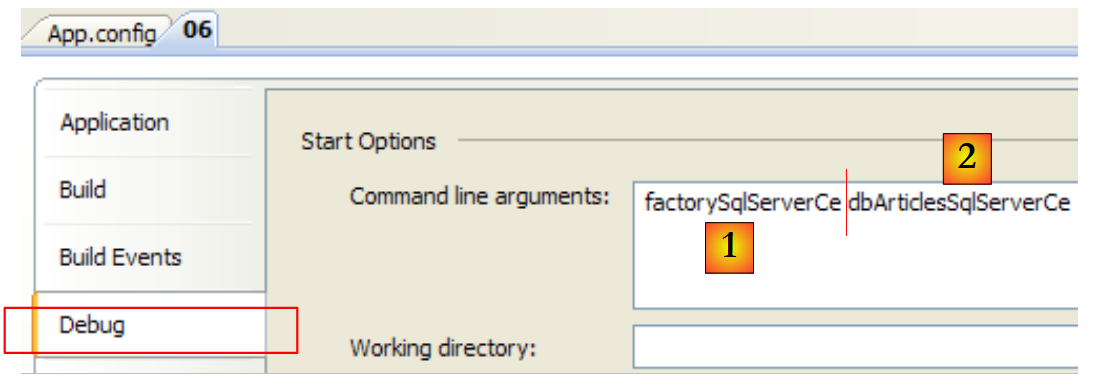 |
In [1], the connector key from line 13 of [App.config]. In [2], the connection string key from line 4 of [App.config]. The execution results are as follows:
Readers are invited to test the other databases.
9.4.6. Which connector should you choose?
Let’s return to the architecture of a database application:
 |
We have seen various types of ADO.NET connectors:
- proprietary connectors offer the best performance but make the [dao] layer dependent on proprietary classes. Changing the SGBD requires changing the [dao] layer.
- The ODBC, OLE, and DB connectors allow you to work with multiple databases without changing the [dao] layer. They are less efficient than the proprietary connectors.
- The generic connector relies on the proprietary connectors while providing a standard interface to the [dao] layer.
It therefore seems that the generic connector is the ideal connector. In practice, however, the generic connector is unable to hide all the specific features of a SGBD behind a standard interface. In the following section, we will explore the concept of parameterized queries. With SQL Server, a parameterized query takes the following form:
With MySQL5, the same query would be written as:
There is therefore a difference in syntax. The property of the IDbCommand interface described in section 9.3.3, related to the parameters, is as follows:
the list of parameters for a configured SQL order. The order update articles set price=price*1.1 where id=@id has the parameter @id. |
The Parameters property is of type IDataParameterCollection, an interface. It represents the set of parameters for the order SQL CommandText. The Parameters property has an Add method to add parameters of type IDataParameter, which is also an interface. This interface has the following properties:
- ParameterName: parameter name
- DbType: the SQL type of the parameter
- Value: the value assigned to the parameter
- ...
The type IDataParameter is well suited for the parameters of the order SQL
because it contains named parameters. The ParameterName property can be used.
The type IDataParameter is not suitable for the statement SQL
because the parameters are not named. It is the order in which the parameters are added to the [IDbCommand.Parameters] collection that is then taken into account. In this example, the 4 parameters must be inserted in the order name, price, currentStock, minimumStock. In a query with named parameters, the order in which the parameters are added does not matter. Ultimately, the developer cannot completely ignore the SGBD they use when initializing the parameters of a parameterized query. This is one of the current limitations of the generic connector.
There are frameworks that overcome these limitations and also bring new features to the [dao] layer:
 |
A framework is a set of class libraries designed to facilitate a specific approach to application architecture. Several frameworks exist that enable the creation of [dao] layers that are both high-performance and insensitive to changes in SGBD:
- Spring.Net [http://www.springframework.net/], already presented in this document, offers the equivalent of the generic connector discussed, without its limitations, as well as various features that simplify data access. There is a Java version.
- iBatis.Net [http://ibatis.apache.org] is older and more feature-rich than Spring.Net. There is a Java version of version.
- NHibernate [http://www.hibernate.org/] is a port of the version Java Hibernate, which is very well known in the Java world. NHibernate allows the [dao] layer to communicate with SGBD without issuing SQL commands. The [dao] layer works with Hibernate objects. A HBL query language (Hibernate Query Language) allows querying objects managed by Hibernate. It is these objects that issue SQL commands. Hibernate can adapt to the SQL objects that own the SGBD objects.
- LINQ (INtegrated Query Language), integrated into version 3.5 and available in C# 2008. LINQ follows in the footsteps of NHibernate, but for now (May 2008) only the SGBD SQL Server is supported. This is expected to change over time. LINQ goes further than NHibernate: its query language allows you to query three different types of data sources in a standard way:
- collections of objects (LINQ to Objects)
- a Xml file (LINQ to Xml)
- a database (LINQ to SQL)
These frameworks will not be covered in this document. However, their use is strongly recommended in professional applications.
9.5. Parameterized Queries
We mentioned parameterized queries in the previous section. We present them here with an example for the SGBD SQL Server Compact. The project is as follows
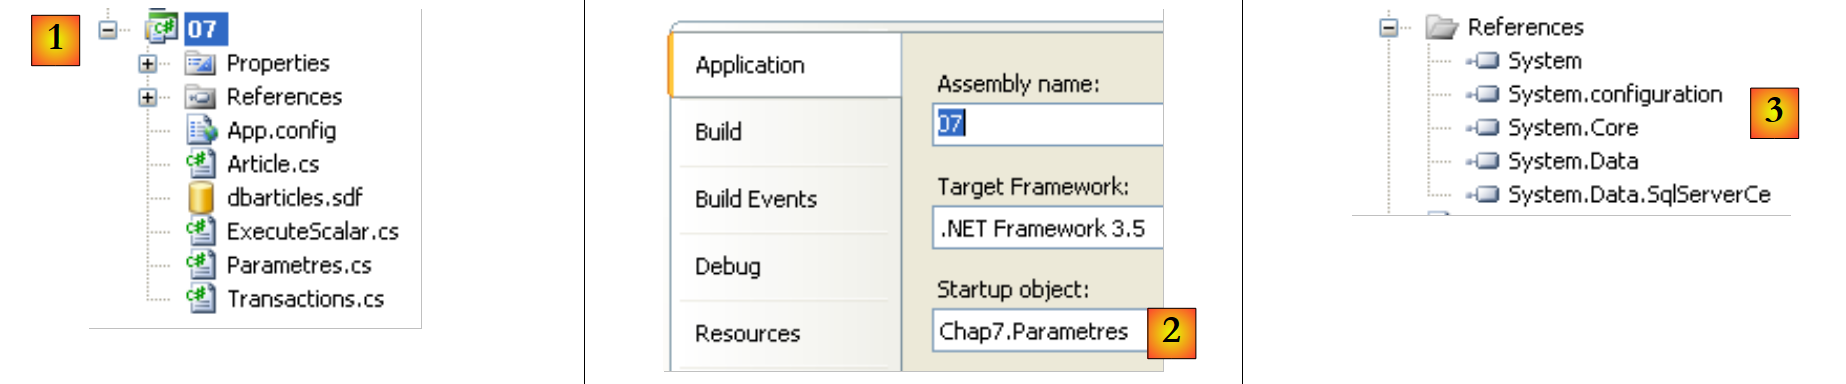 |
- in [1], the project. Only [App.config], [Article.cs], and [Parametres.cs] are used. Note also the SQL Server database. This [dbarticles.sdf].
- In [2], the project is configured to run [Parametres.cs]
- in [3], the project references
The [App.config] configuration file defines the database connection string:
<?xml version="1.0" encoding="utf-8" ?>
<configuration>
    <connectionStrings>
        <add name="dbArticlesSqlServerCe" connectionString="Data Source=|DataDirectory|\dbarticles.sdf;Password=dbarticles;" />
    </connectionStrings>
</configuration>
The [Article.cs] file defines a [Article] class. An Article object will be used to encapsulate the information from a row in the ARTICLES table of the [dbarticles.sdf] database:
namespace Chap7 {
    class Article {
        // properties
        public int Id { get; set; }
        public string Nom { get; set; }
        public decimal Prix { get; set; }
        public int StockActuel { get; set; }
        public int StockMinimum { get; set; }

        // manufacturers
        public Article() {
        }

        public Article(int id, string nom, decimal prix, int stockActuel, int stockMinimum) {
            Id = id;
            Nom = nom;
            Prix = prix;
            StockActuel = stockActuel;
            StockMinimum = stockMinimum;
        }

    }
}
The [Parametres.cs] application implements parameterized queries:
using System;
using System.Data.SqlServerCe;
using System.Text;
using System.Data;
using System.Configuration;

namespace Chap7 {
    class Parametres {
        static void Main(string[] args) {

            // using the configuration file
            string connectionString = null;
            try {
                // connecting chain
                connectionString = ConfigurationManager.ConnectionStrings["dbArticlesSqlServerCe"].ConnectionString;
            } catch (Exception e) {
                Console.WriteLine("Erreur de configuration : {0}", e.Message);
                return;
            }

            // displays
            Console.WriteLine("Chaîne de connexion à la base : [{0}]\n", connectionString);

            // create a table of items
            Article[] articles = new Article[5];
            for (int i = 1; i <= articles.Length; i++) {
                articles[i-1] = new Article(0, "article" + i, i * 100, i * 10, i);
            }

            // handle any exceptions
            try {

                // delete existing items from the database
                ExecuteUpdate(connectionString, "delete from articles");

                // table items are displayed
                ExecuteSelect(connectionString, "select id,nom,prix,stockactuel,stockminimum from articles");

                // insert the table of items into the database
                InsertArticles(connectionString, articles);

                // table items are displayed
                ExecuteSelect(connectionString, "select id,nom,prix,stockactuel,stockminimum from articles");
            } catch (Exception ex) {
                // error msg
                Console.WriteLine("Erreur d'accès à la base de données (" + ex.Message + ")");
            }
        }

        // insert table of items
        static void InsertArticles(string connectionString, Article[] articles) {
            using (SqlCeConnection connexion = new SqlCeConnection(connectionString)) {
                // opening connection
                connexion.Open();
                // control configuration
                string requête = "insert into articles(nom,prix,stockactuel,stockminimum) values(@nom,@prix,@sa,@sm)";
                SqlCeCommand sqlCommand = new SqlCeCommand(requête, connexion);
                sqlCommand.Parameters.Add("@nom",SqlDbType.NVarChar,30);
                sqlCommand.Parameters.Add("@prix", SqlDbType.Money);
                sqlCommand.Parameters.Add("@sa", SqlDbType.Int);
                sqlCommand.Parameters.Add("@sm", SqlDbType.Int);
                // command compilation
                sqlCommand.Prepare();
                // line insertion
                for (int i = 0; i < articles.Length; i++) {
                    // parameter initialization
                    sqlCommand.Parameters["@nom"].Value = articles[i].Nom;
                    sqlCommand.Parameters["@prix"].Value = articles[i].Prix;
                    sqlCommand.Parameters["@sa"].Value = articles[i].StockActuel;
                    sqlCommand.Parameters["@sm"].Value = articles[i].StockMinimum;
                    // request execution
                    sqlCommand.ExecuteNonQuery();
                }
            }
        }

        // execute an update request
        static void ExecuteUpdate(string connectionString, string requête) {
...
        }

        // executing a Select query
        static void ExecuteSelect(string connectionString, string requête) {
...
        }

        // reader display
        static void AfficheReader(IDataReader reader) {
...
    }
}
The new feature compared to what we saw previously is the [InsertArticles] procedure in lines 51–75:
- line 51: the procedure receives two parameters:
- the connection string connectionString, which allows the procedure to connect to the database
- an array of Article objects to be added to the Articles table in the database
- line 56: the query to insert an object [Article]. It has four parameters:
- @name: the name of the item
- @price: its price
- @sa: its current stock
- @min: its minimum stock
The syntax of this parameterized query is specific to SQL Server Compact. We saw in the previous section that with MySQL5, the syntax would be as follows:
With SQL Server Compact, each parameter must be preceded by the @ character. The parameter names are arbitrary.
- Lines 58–61: We define the characteristics of each of the four parameters and add them, one by one, to the parameter list of the SqlCeCommand object, which encapsulates the SQL command that will be executed.
Here, we use the method [SqlCeCommand].Parameters.Add, which has six signatures. We use the following two:
Add(string parameterName, SQLDbType type)
adds and configures the parameter named parameterName. This name must be one of those in the configured parameterized query: (@name, ...). type specifies the SQL type of the column associated with the parameter. There are many types available, including the following:
type SQL | C# type | comment |
Int64 | ||
DateTime | ||
Decimal | ||
Double | ||
Int32 | ||
Decimal | ||
String | fixed-length string | |
String | variable-length string | |
Single |
Add(string parameterName, SQLDbType type, int size)
The third parameter, size, sets the column size. This information is only useful for certain types, such as SQL or NVarChar.
- Line 63: The parameterized query is compiled. This is also referred to as "preparing" the query, hence the method’s name. This operation is not essential; it is included to improve performance. When a SGBD executes a SQL command, it performs certain optimization work before executing it. A parameterized query is intended to be executed multiple times with different parameters. The query text itself does not change. The optimization work can therefore be done only once. Some SGBDs have the ability to "prepare" or "compile" parameterized queries. An execution plan is then defined for this query. This is the optimization phase we mentioned. Once compiled, the query is executed repeatedly, each time with new actual parameters but the same execution plan.
Compilation is not the only advantage of parameterized queries. Let’s revisit the query we examined:
We might want to construct the query text programmatically:
string requête="insert into articles(nom,prix,stockactuel,stockminimum) values('"+nom+"',"+prix+","+sa+","+sm+")";
In the example above, if (name, price, currentStock, minimumStock) equals ("article1", 100, 10, 1), the query becomes:
string requête="insert into articles(nom,prix,stockactuel,stockminimum) values('article1',100,10,1)";
Now, if (name, price, sa, sm) equals ("the article1", 100, 10, 1), the previous query becomes:
string requête="insert into articles(nom,prix,stockactuel,stockminimum) values('l'article1',100,10,1)";
and becomes syntactically incorrect because of the apostrophe in the name "l'article1." If the name comes from user input, this means we have to check whether the input contains any apostrophes and, if it does, remove them. This removal depends on SGBD. The advantage of the prepared statement is that it does this work itself. This convenience alone justifies the use of a prepared statement.
- lines 65–73: the table entries are inserted one by one
- lines 67–70: each of the four query parameters receives its value via its Value property.
- Line 72: The now-complete insert query is executed in the usual way.
Here is an example of execution:
- line 3: message after deleting all rows from the table
- Lines 5–7: show that the table is empty
- Lines 10–18: show the table after inserting the 5 items
9.6. Transactions
9.6.1. General
A transaction is a sequence of SQL commands executed "atomically":
- either all operations succeed
- or one of them fails, in which case all preceding operations are rolled back
Ultimately, the operations in a transaction are either all successfully applied, or none are applied. When the user has control over the transaction, they commit it with a COMMIT command or roll it back with a ROLLBACK command.
In our previous examples, we did not use a transaction. And yet there were transactions, because in a SGBD, a SQL command is always executed within a transaction. If the client .NET does not start an explicit transaction itself, the SGBD uses an implicit transaction. There are then two common cases:
- Each individual SQL command is part of a transaction, initiated by SGBD before the command and closed afterward. This is referred to as autocommit mode. Everything therefore proceeds as if the .NET client were performing transactions for each SQL order.
- SGBD is not in autocommit mode and starts an implicit transaction on the first order SQL that client .NET issues outside of a transaction, and it lets the client close it. All SQL commands issued by the client .NET are then part of the implicit transaction. This transaction can end due to various events: the client closes the connection, starts a new transaction, etc., but this results in a situation dependent on SGBD. This mode should be avoided.
The default mode is generally set by configuring the SGBD. Some SGBD are in autocommit mode by default, others are not. SQLServer Compact is in autocommit mode by default.
Commands from different users are executed simultaneously in transactions running in parallel. Operations performed by one transaction can affect those performed by another transaction. There are four levels of isolation between transactions from different users:
- Uncommitted Read
- Committed Read
- Repeatable Read
- Serializable
Uncommitted Read
This isolation level is also known as "Dirty Read." Here is an example of what can happen in this mode:
- User U1 starts a transaction on table T
- User U2 starts a transaction on the same table T
- User U1 modifies rows in table T but does not commit them yet
- User U2 "sees" these changes and makes decisions based on what they see
- the user rolls back their transaction using a ROLLBACK
We can see that in step 4, user U2 made a decision based on data that will later turn out to be incorrect.
Committed Read
This isolation level avoids the previous pitfall. In this mode, user U2 in step 4 will not "see" the changes made by user U1 to table T. They will only see them after U1 has committed their transaction with a COMMIT.
In this mode, also known as "Unrepeatable Read," the following situations may nevertheless occur:
- User U1 starts a transaction on table T
- User U2 starts a transaction on the same table T
- User U2 performs a SELECT to obtain the average of column C for rows in T that meet a certain condition
- User U1 modifies (UPDATE) certain values in column C of T and commits them (COMMIT)
- User U2 runs the same SELECT as in step 3. They will find that the average of column C has changed due to the modifications made by U1.
Now user U2 sees only the changes "committed" by U1. But while remaining in the same transaction, two identical operations 3 and 5 yield different results. The term "Unrepeatable Read" refers to this situation. This is a frustrating situation for someone who wants a consistent view of table T.
Repeatable Read
In this isolation mode, a user is guaranteed to get the same results from database reads as long as they remain within the same transaction. They work on a snapshot that never reflects changes made by other transactions, even if those transactions have been committed. They will only see these changes once they themselves end their transaction with a COMMIT or ROLLBACK.
This isolation mode is not yet perfect, however. After operation 3 above, the rows queried by user U2 are locked. During operation 4, user U1 will not be able to modify (UPDATE) the values in column C of these rows. However, they can add rows (INSERT). If some of the added rows satisfy the condition tested in step 3, operation 5 will yield a different average than the one found in step 3 due to the added rows. These rows are sometimes called phantom rows.
To resolve this new issue, you must switch to "Serializable" isolation.
Serializable
In this isolation mode, transactions are completely isolated from one another. It ensures that the result of two transactions performed simultaneously will be the same as if they were performed one after the other. To achieve this result, during operation 4, when user U1 attempts to add rows that would alter the result of user U1’s SELECT, they will be prevented from doing so. An error message will indicate that the insertion is not possible. It will become possible once user U2 has committed their transaction.
The four transaction isolation levels are not available in all transactions. The default isolation level is generally Committed Read. The desired isolation level for a transaction can be explicitly specified when a client creates an explicit transaction.
9.6.2. The API transaction management
A connection implements the IDbConnection interface described in section 9.3.3. This interface has the following method:
M | starts a transaction. |
This method has two signatures:
- IDbTransaction BeginTransaction(): starts a transaction and returns the IDbTransaction object used to control it
- IDbTransaction BeginTransaction(IsolationLevel level): further specifies the desired isolation level for the transaction. level takes its values from the following enumeration:
the transaction can read data written by another transaction that has not yet been committed—to be avoided | |
the transaction cannot read data written by another transaction that it has not yet committed. However, data read twice in succession within the transaction may change (not repeatable reads) because another transaction may have modified it in the meantime (the rows being read are not locked—only the updated rows are). Furthermore, another transaction may have added rows (ghost rows) that will be included in the second read. | |
The rows read by the transaction are locked, just like the updated rows. This prevents another transaction from modifying them. It does not prevent the addition of rows. | |
The tables used by the transaction are locked, preventing another transaction from adding new rows. It is as if the transaction were running alone. This reduces performance because transactions no longer run in parallel. | |
The transaction works on a copy of the data taken at time T. Used when the transaction is read-only. Provides the same result as Serializable while avoiding its cost. |
Once the transaction has started, it is controlled by the object of type IDbTransaction, an interface whose properties P and methods M we will use as follows:
Name | Type | Role |
P | The connection IDbConnection that supports the transaction | |
M | commits the transaction—the results of the SQL commands issued in the transaction are copied to the database. | |
M | rolls back the transaction - the results of the SQL commands issued in the transaction are not copied to the database. |
9.6.3. The sample program
We return to the previous project to now focus on the program [Transactions.cs]:
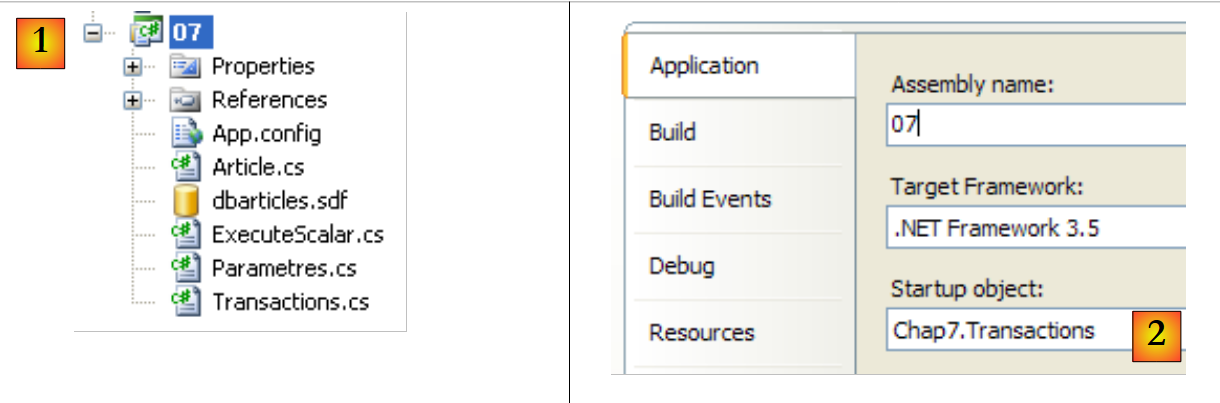 |
- in [1], the project.
- In [2], the project is configured to run [Transactions.cs]
The code for [Transactions.cs] is as follows:
using System;
using System.Configuration;
using System.Data;
using System.Data.SqlServerCe;
using System.Text;

namespace Chap7 {
    class Transactions {
        static void Main(string[] args) {

            // using the configuration file
            string connectionString = null;
            try {
                // connecting chain
                connectionString = ConfigurationManager.ConnectionStrings["dbArticlesSqlServerCe"].ConnectionString;
            } catch (Exception e) {
                Console.WriteLine("Erreur de configuration : {0}", e.Message);
                return;
            }

            // displays
            Console.WriteLine("Chaîne de connexion à la base : [{0}]\n", connectionString);

            // create a table of 2 items with the same name
            Article[] articles = new Article[2];
            for (int i = 1; i <= articles.Length; i++) {
                articles[i - 1] = new Article(0, "article", i * 100, i * 10, i);
            }
            // handle any exceptions
            try {
                Console.WriteLine("Insertion sans transaction...");
                // the table of items is first inserted into the database without a transaction
                ExecuteUpdate(connectionString, "delete from articles");
                try {
                    InsertArticlesOutOfTransaction(connectionString, articles);
                } catch (Exception ex) {
                    // error msg
                    Console.WriteLine("Erreur d'accès à la base de données (" + ex.Message + ")");
                }
                ExecuteSelect(connectionString, "select id,nom,prix,stockactuel,stockminimum from articles");

                // we do the same thing again, but in a transaction this time
                Console.WriteLine("\n\nInsertion dans une transaction...");
                ExecuteUpdate(connectionString, "delete from articles");
                InsertArticlesInTransaction(connectionString, articles);
                ExecuteSelect(connectionString, "select id,nom,prix,stockactuel,stockminimum from articles");
            } catch (Exception ex) {
                // error msg
                Console.WriteLine("Erreur d'accès à la base de données (" + ex.Message + ")");
            }
        }

        // insert item table without transaction
        static void InsertArticlesOutOfTransaction(string connectionString, Article[] articles) {
....
        }

        // insert an array of items into a transaction
        static void InsertArticlesInTransaction(string connectionString, Article[] articles) {
....
        }

        // execute an update request
        static void ExecuteUpdate(string connectionString, string requête) {
....
        }

        // execute a Select query
        static void ExecuteSelect(string connectionString, string requête) {
...
        }

        // reader display
        static void AfficheReader(IDataReader reader) {
...
            }
        }
    }
}
- lines 12-19: the connection string to the database SQLServer is read from [App.config]
- lines 25-28: an array of two Article objects is created. These two articles have the same name, "article". However, the database [dbarticles.sdf] has a uniqueness constraint on its column [nom] (see section 9.3.1). Therefore, these two items cannot exist in the database at the same time. The two items named "article" are added to the articles table. This will cause a problem: c.a.d. An exception is thrown by SGBD and relayed by its ADO.NET connector. To demonstrate the effect of the transaction, the two items will be inserted in two different environments:
- first outside of any transaction. It is important to remember here that, in this case, SQLServer Compact operates in autocommit mode, c.a.d. inserts each SQL command into an implicit transaction. The first record will be inserted. The second will not.
- Then, within an explicit transaction that encapsulates both inserts. Because the second insert will fail, the first will be rolled back. Ultimately, no inserts will be made.
- Line 33: The articles table is emptied
- Line 35: Insertion of the two items without an explicit transaction. Since we know the second insertion will throw an exception, it is handled by a try/catch block
- Line 46: Display of the articles table
- Lines 44–46: We repeat the same sequence, but this time an explicit transaction is used to perform the inserts. The exception encountered here is handled by the InsertArticlesInTransaction method.
- lines 54–56: the method InsertArticlesOutOfTransaction is the same as the method InsertArticles from the program [Parametres.cs] discussed earlier.
- Lines 64–66: The method ExecuteUpdate is the same as before. The SQL command is executed in an implicit transaction. This is possible here because we know that, in this case, SQLServer Compact operates in autocommit mode.
- Lines 69–71: The same applies to method ExecuteSelect.
The InsertArticlesInTransaction method is as follows:
// insert an array of items into a transaction
        static void InsertArticlesInTransaction(string connectionString, Article[] articles) {
            using (SqlCeConnection connexion = new SqlCeConnection(connectionString)) {
                // opening connection
                connexion.Open();
                // control configuration
                string requête = "insert into articles(nom,prix,stockactuel,stockminimum) values(@nom,@prix,@sa,@sm)";
                SqlCeCommand sqlCommand = new SqlCeCommand(requête, connexion);
                sqlCommand.Parameters.Add("@nom", SqlDbType.NVarChar, 30);
                sqlCommand.Parameters.Add("@prix", SqlDbType.Money);
                sqlCommand.Parameters.Add("@sa", SqlDbType.Int);
                sqlCommand.Parameters.Add("@sm", SqlDbType.Int);
                // command compilation
                sqlCommand.Prepare();
                // transaction
                SqlCeTransaction transaction = null;
                try {
                    // start of transaction
                    transaction = connexion.BeginTransaction(IsolationLevel.ReadCommitted);
                    // the SQL command must be executed in this transaction
                    sqlCommand.Transaction = transaction;
                    // line insertion
                    for (int i = 0; i < articles.Length; i++) {
                        // parameter initialization
                        sqlCommand.Parameters["@nom"].Value = articles[i].Nom;
                        sqlCommand.Parameters["@prix"].Value = articles[i].Prix;
                        sqlCommand.Parameters["@sa"].Value = articles[i].StockActuel;
                        sqlCommand.Parameters["@sm"].Value = articles[i].StockMinimum;
                        // request execution
                        sqlCommand.ExecuteNonQuery();
                    }
                    // validate the transaction
                    transaction.Commit();
                    Console.WriteLine("transaction validée...");
                } catch {
                    // we undo the transaction
                    if (transaction != null)transaction.Rollback();
                    Console.WriteLine("transaction invalidée...");
                }
            }
        }
We will only detail what distinguishes it from the InsertArticles method of the [Parametres.cs] program studied previously:
- line 16: a SqlCeTransaction transaction is declared.
- lines 17, 35: the try/catch block to handle the exception that will occur after the second insertion
- line 19: the transaction is created. It belongs to the current connection.
- line 21: the configured SQL command is placed in the transaction
- Lines 23–31: The inserts are performed
- Line 33: Everything went well—the transaction is committed—the inserts will be permanently added to the database.
- line 37: there was a problem. The transaction is rolled back if it existed.
Execution yields the following results:
- row 4: displayed by ExecuteUpdate ("delete from articles") - there were no rows in the table
- line 5: the exception caused by the second insertion. The message indicates that the UQ__ARTICLES__0000000000000010 constraint was not checked. You can find out more by looking at the database properties:
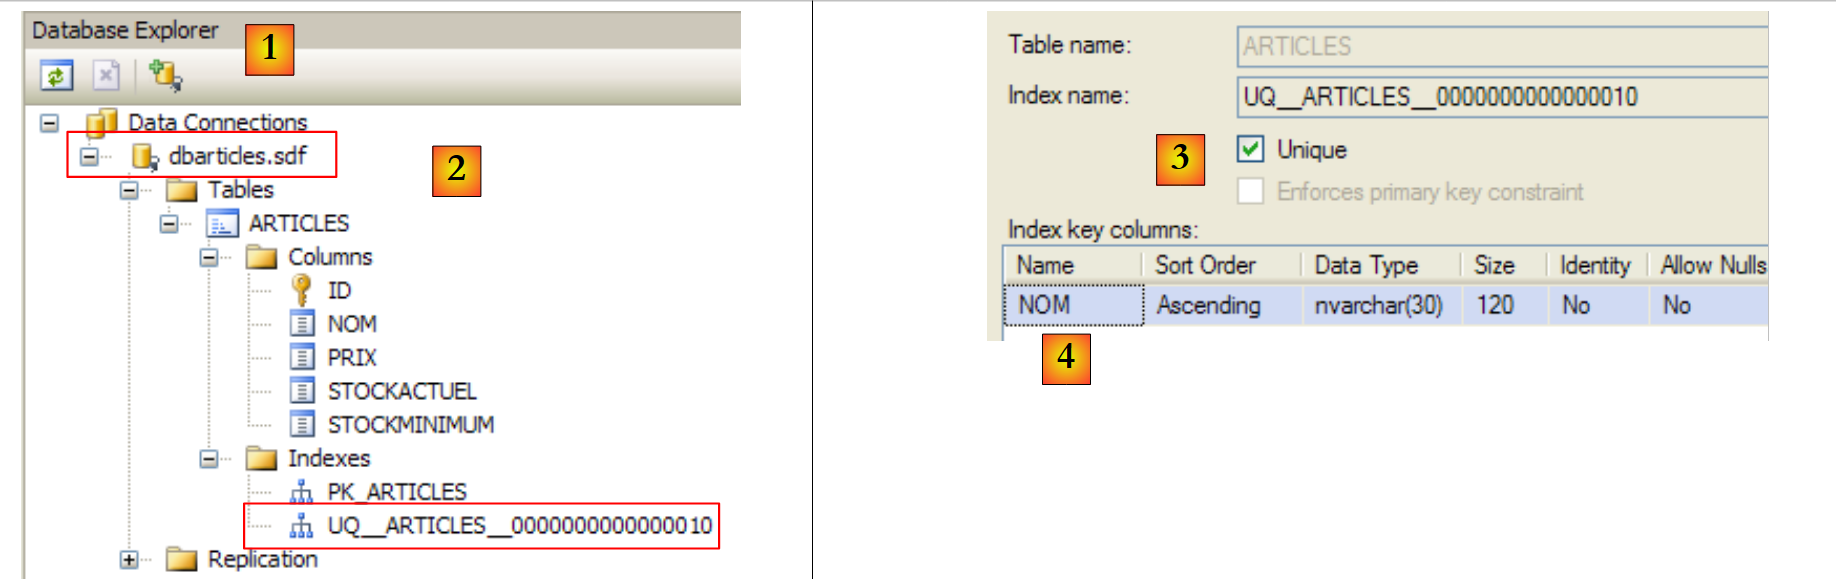 |
- In the [1] view in Visual Studio, a connection named [2] was created for the database [dbarticles.sdf]. This connection has an index named UQ__ARTICLES__0000000000000010. By right-clicking on this index, you can access its properties (Index properties)
- In [3,4], we see that the index UQ__ARTICLES__0000000000000010 corresponds to a uniqueness constraint on the column [NOM]
- Lines 7–11: Display of the articles table after the two inserts. It is not empty: the first article has been inserted.
- Line 15: displayed by ExecuteUpdate ("delete from articles")—there was a row in the table
- Line 16: message displayed by InsertArticlesInTransaction when the transaction fails.
- Lines 18–20: show that no insertions were made. The transaction rollback undid the first insertion.
9.7. The ExecuteScalar method
9.7.1. Among the methods of the IDbCommand interface described in section 9.3.3, there was the following method:
M | to execute a SQL Select statement that returns a single result, such as: select count(*) from articles. |
Here is an example of how to use this method. Let’s return to the project:
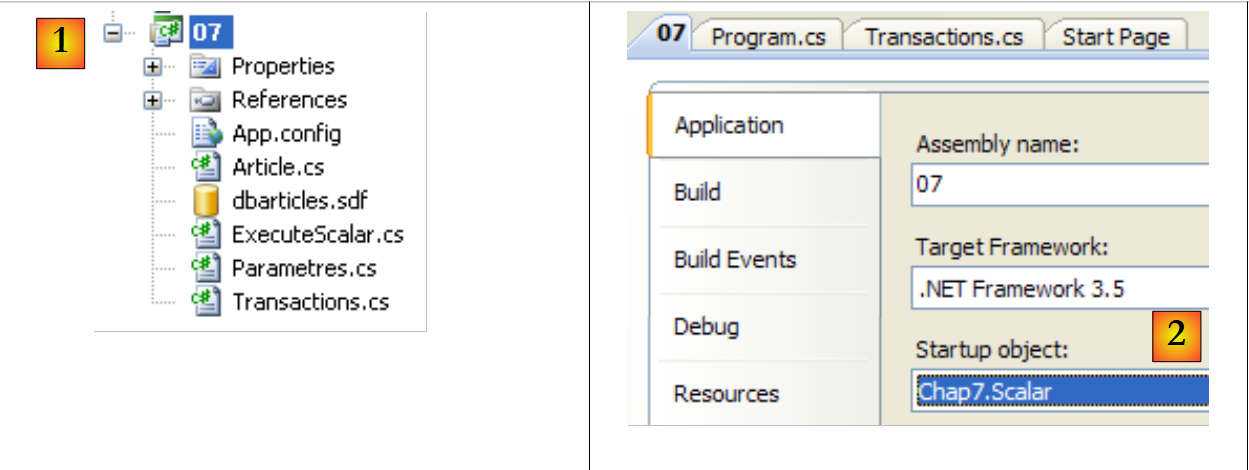 |
- in [1], the project.
- In [2], the project is configured to execute [ExecuteScalar.cs]
The program [ExecuteScalar.cs] is as follows:
...
namespace Chap7 {
    class Scalar {
        static void Main(string[] args) {

            // using the configuration file
            string connectionString = null;
...

            // displays
            Console.WriteLine("Chaîne de connexion à la base : [{0}]\n", connectionString);

            // creation of a 5-item table
            Article[] articles = new Article[5];
            for (int i = 1; i <= articles.Length; i++) {
                articles[i - 1] = new Article(0, "article" + i, i * 100, i * 10, i);
            }

            // handle any exceptions
            try {
                // insert the item table into a transaction
                ExecuteUpdate(connectionString, "delete from articles");
                InsertArticlesInTransaction(connectionString, articles);
                ExecuteSelect(connectionString, "select id,nom,prix,stockactuel,stockminimum from articles");
                // average item prices
                decimal prixMoyen = (decimal)ExecuteScalar(connectionString, "select avg(prix) from articles");
                Console.WriteLine("Prix moyen des articles={0}", prixMoyen);
                // or the number of items
                int nbArticles = (int)ExecuteScalar(connectionString, "select count(id) from articles");
                Console.WriteLine("Nombre d'articles={0}", nbArticles);
            } catch (Exception ex) {
                // error msg
                Console.WriteLine("Erreur d'accès à la base de données (" + ex.Message + ")");
            }
        }

        // insert an array of items into a transaction
        static void InsertArticlesInTransaction(string connectionString, Article[] articles) {
...
        }


        // execute an update request
        static object ExecuteScalar(string connectionString, string requête) {
            using (SqlCeConnection connexion = new SqlCeConnection(connectionString)) {
                // opening connection
                connexion.Open();
                // request execution
                return new SqlCeCommand(requête, connexion).ExecuteScalar();
            }
        }

        // execute an update request
        static void ExecuteUpdate(string connectionString, string requête) {
...
        }

        // executing a Select query
        static void ExecuteSelect(string connectionString, string requête) {
...
        }

        // reader display
        static void AfficheReader(IDataReader reader) {
...
        }
    }
}
- lines 14–17: creation of an array of 5 items
- line 22: the items table is cleared
- line 23: it is filled with the 5 items
- line 24: it is displayed
- line 26: calculates the average price of the items
- line 29: retrieves the number of items
- line 49: uses the method [IDbCommand].ExecuteScalar() to calculate each of these values.
The results of the execution are as follows:
Lines 15 and 16 show the two values returned by the ExecuteScalar method.
9.8. Example application - version 7
We return to the example application IMPOTS. The previous version was discussed in Section 7.6. It was the following three-tier application:
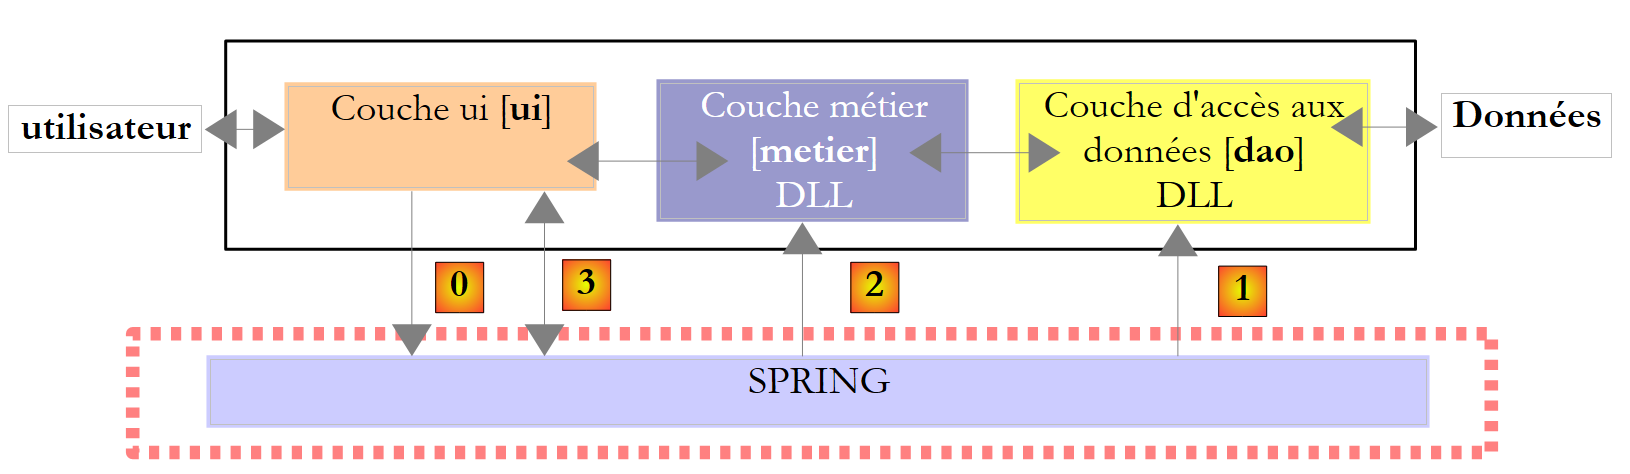 |
- the [ui] layer was a graphical user interface ([A]), and the [dao] layer retrieved its data from a text file ([B]).
- Spring handled the instantiation of the layers and their integration into the application.
 |
We are modifying the [dao] layer so that it retrieves its data from a database.
9.8.1. Database im
The contents of the previous text file [B] are placed in a database named MySQL5. Here’s how to do it:
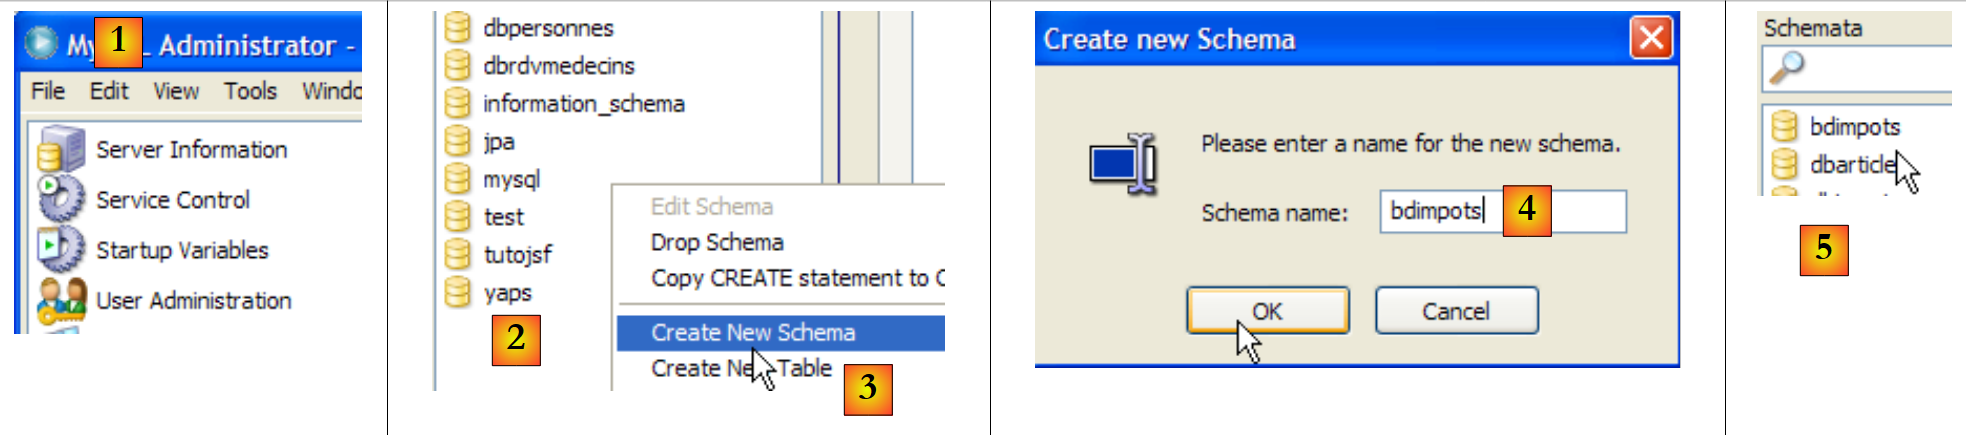 |
- [1]: MySQL Administrator has been launched
- [2,3]: In the [Schemata] area, right-click and select option [Create Schema] to create a new database
- [4]: the database will be named [bdimpots]
- [5]: It has been added to the tables in the [Schemata] area.
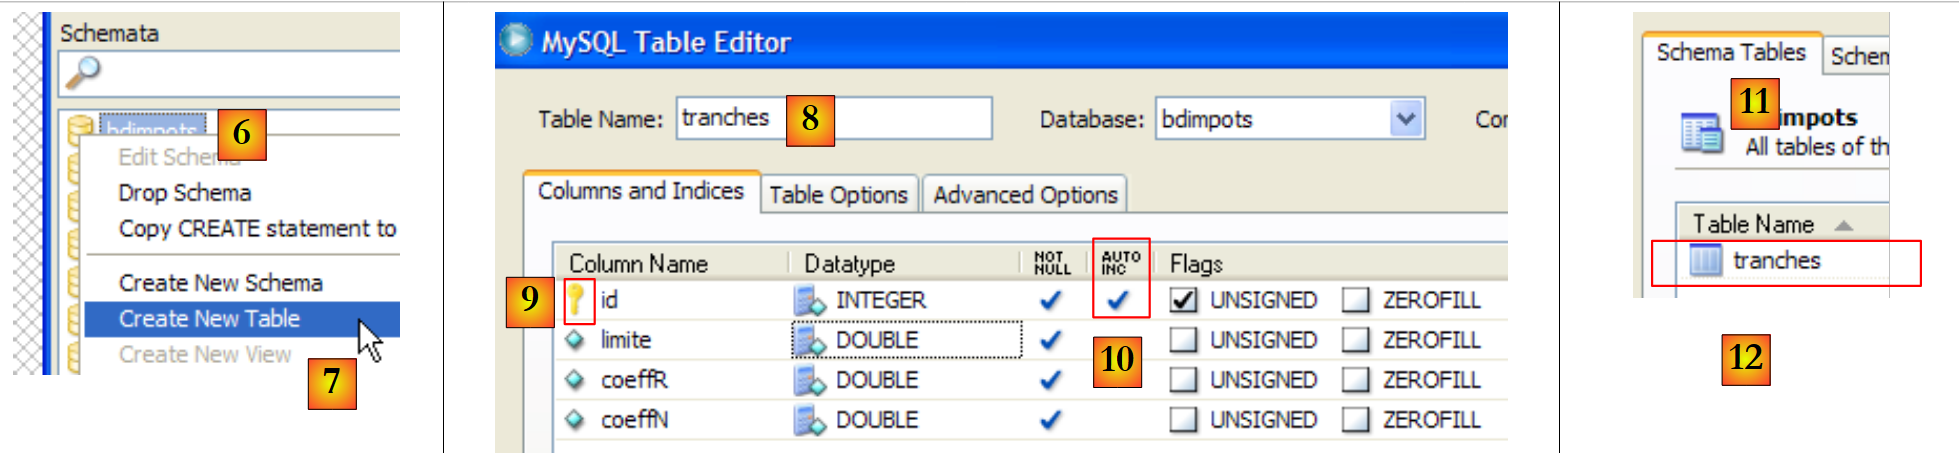 |
- [6,7]: Right-click on the table and select option [Create New Table] to create a table
- [8]: The table will be named [tranches]. It will have the columns from [id, limite, coeffR, coeffN].
- [9,10]: [id] is the primary key of type INTEGER and has the attribute AUTO_INCREMENT [10]: SGBD will be responsible for filling this column when rows are added.
- The [limite, coeffR, coeffN] columns are of type DOUBLE.
- [11,12]: The new table appears in the [Schema Tables] tab of the database.
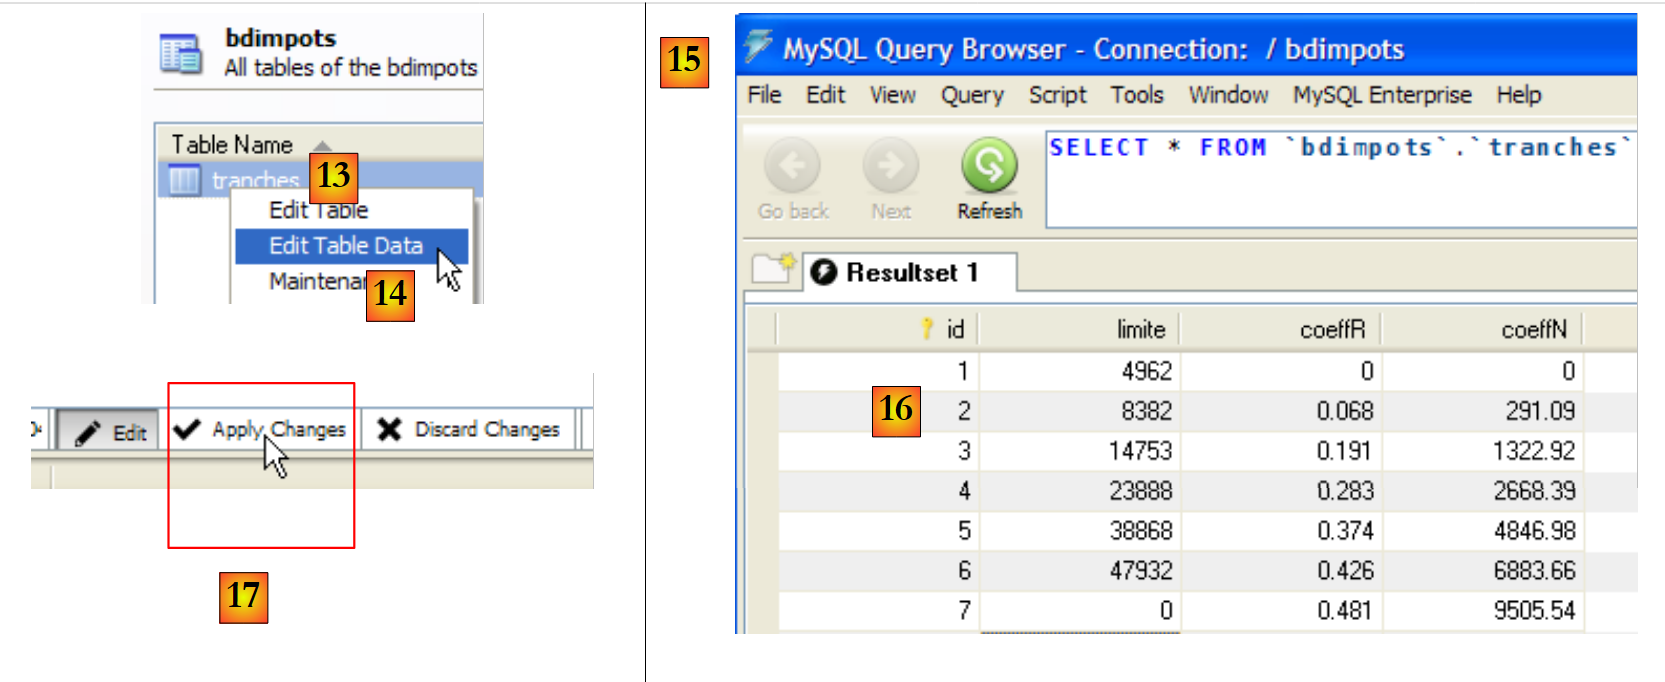 |
- [13,14]: to insert data into the table
- [15]: [Query Browser] has been launched
- [16]: Data has been entered and validated for the columns in [limite, coeffR, coeffN]. Column [id] was filled by SGBD. Validation took place with [17].
 |
- Still in [Query Browser] [18], we execute [20] the query [19]. This creates a user named 'admimpots' with the password 'mdpimpots' and grants them all privileges (grant all privileges) on all objects in the bdimpots database (on bdimpots.*). This will allow us to work on the [bdimpots] database using the [admimpots] user instead of the [root] administrator.
9.8.2. The Visual Studio Solution
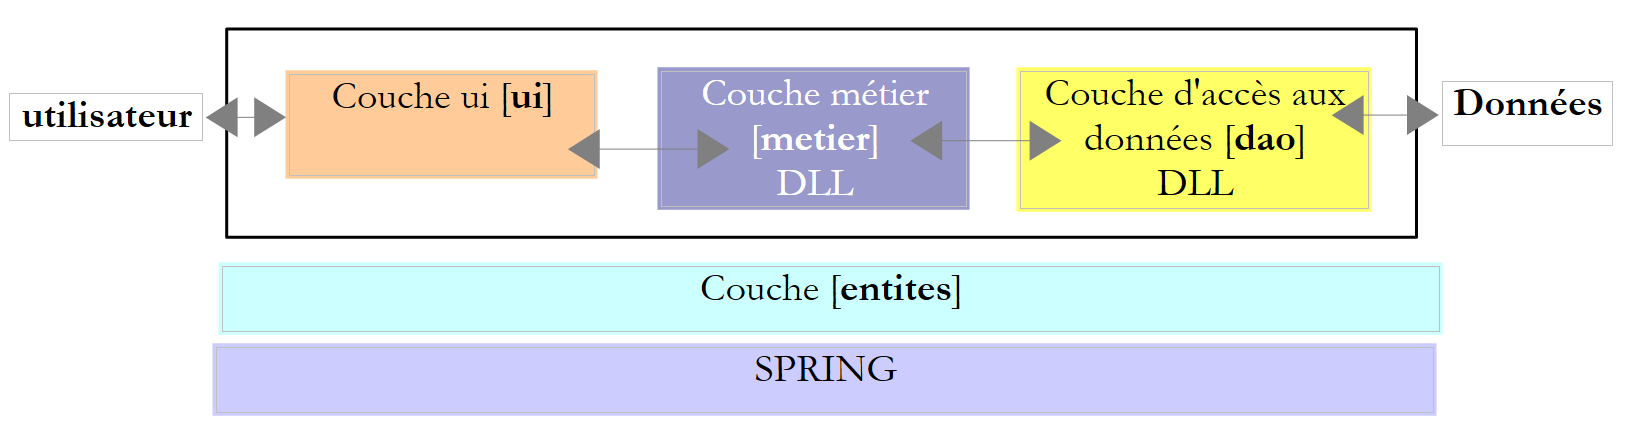 |
We will follow the approach discussed for version 5 of the sample application (see Section 6.4). We will gradually build the following Visual Studio solution:
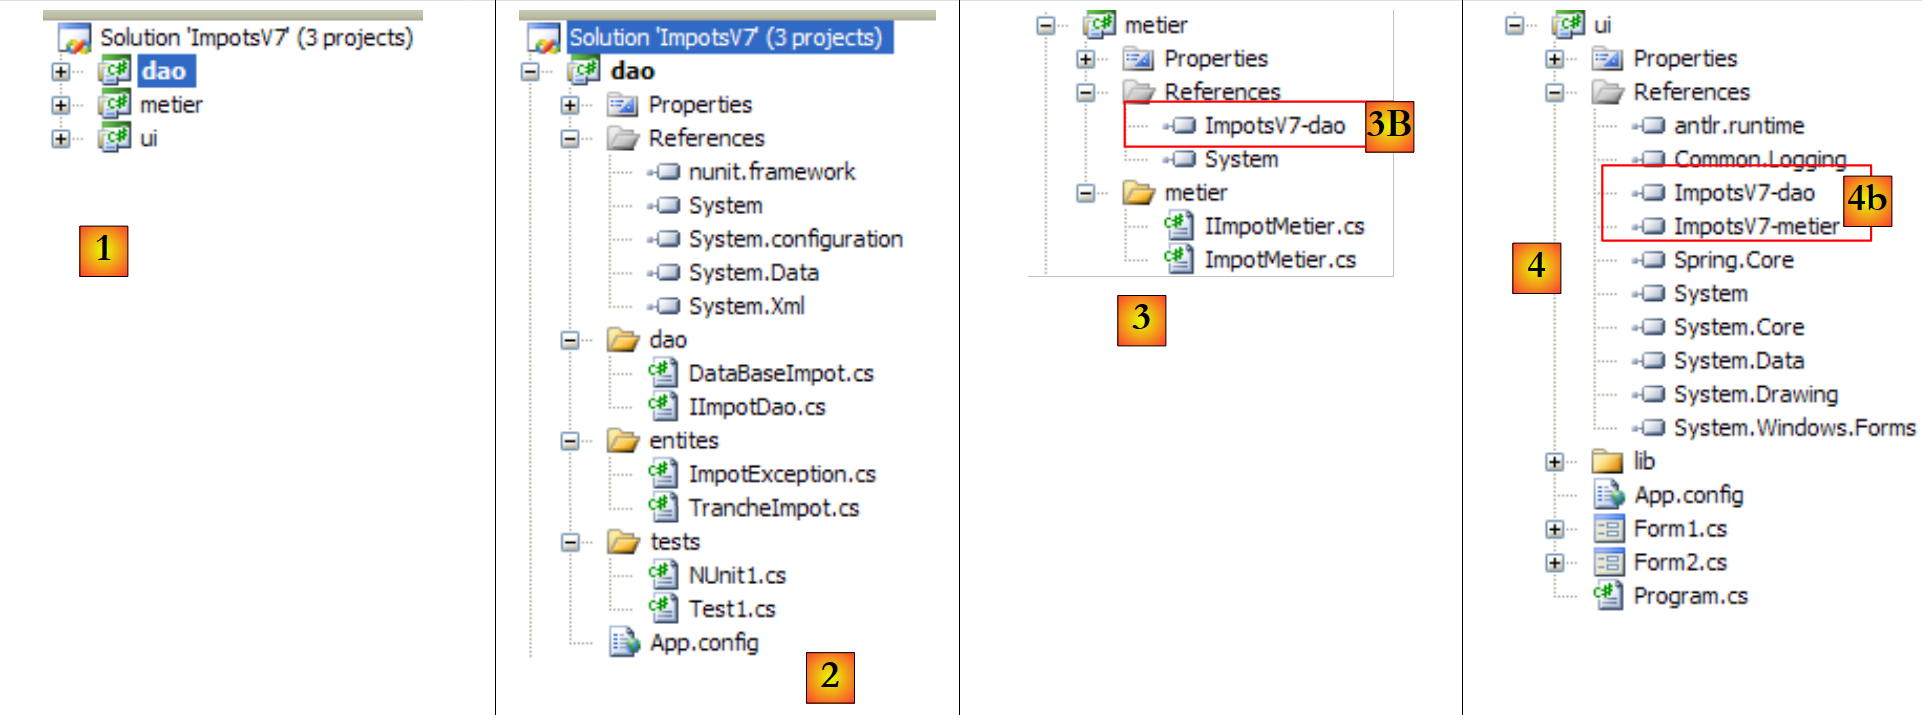 |
- in [1]: the ImpotsV7 solution consists of three projects, one for each of the application’s three layers
- in [2]: the [dao] project of the [dao] layer, which will now use a database
- in [3]: the [metier] project of the [metier] layer. Here we are reusing the [metier] layer from version 5, described in section 6.4.4.
- in [4]: the [ui] project from the [ui] layer. Here we reuse the [ui] layer from version 6, described in section 7.6.
We build on existing work to reuse two previously written layers, the [ui] and [metier] layers. This is made possible by the chosen layered architecture. We will nevertheless need the source code for layers [ui] and [metier]. It is not possible to rely solely on the DLL layers. When, in version 5, the DLL of layer [metier] was created, it had a dependency on the DLL of layer [dao]. This dependency was hard-coded into DLL of the [metier] layer (name of DLL of the [dao] layer, version, identity token, ...). Thus, the DLL of the version 5 [ImpotsV5-metier.dll] only workswith the DLL and [ImpotsV5-dao.dll] with which it was compiled. If the DLL of the [dao] layer is changed, the [metier] layer must be recompiled to create a new DLL for it. The same applies to the [ui] layer. Layers [ui] and [metier] will therefore not be modified, but they will be recompiled to work with DLL from the new layer [dao].
9.8.3. The [dao] layer
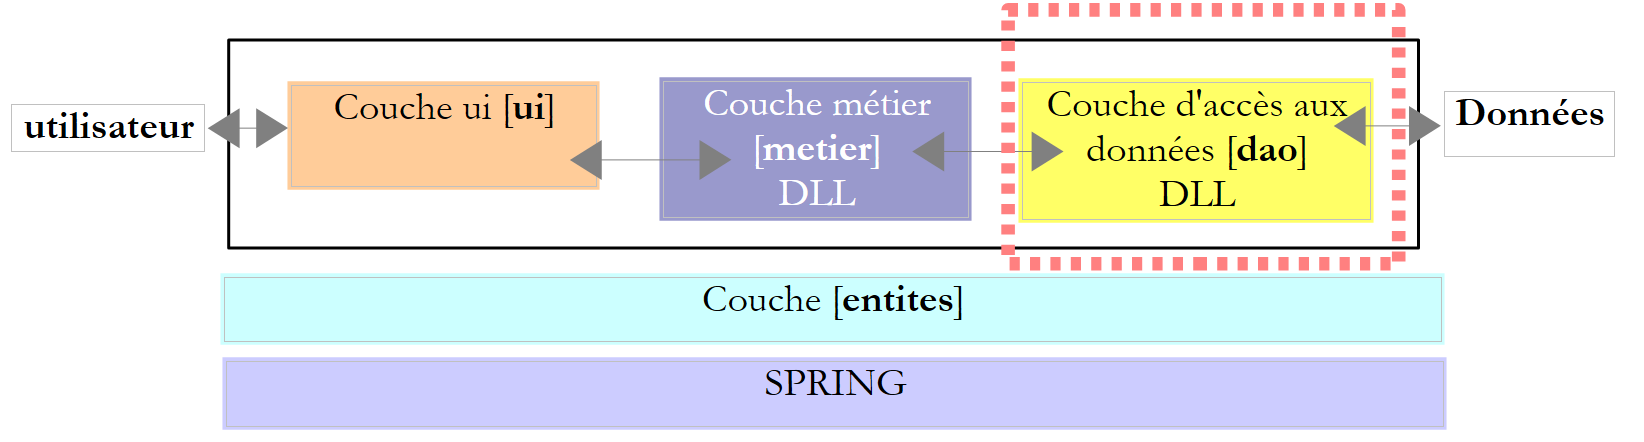 |
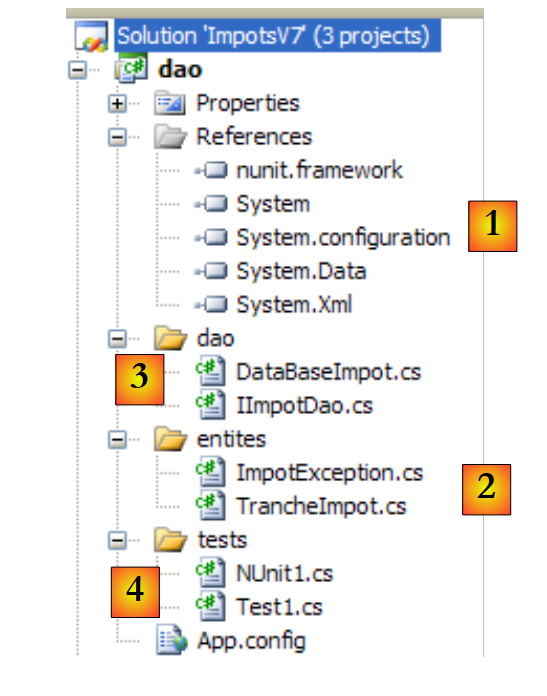 |
Project references (see [1] in the project)
- nunit.framework: for testing NUnit
- System.Configuration: to process the configuration file [App.config]
- System.Data: because we are using a database.
The entities (see [2] in the project)
The classes [TrancheImpot] and [ImpotException] are those from previous versions.
The [dao] layer (see [3] in the project)
The [IImpotDao] interface has not changed:
using Entites;

namespace Dao {
    public interface IImpotDao {
        // tax brackets
        TrancheImpot[] TranchesImpot{get;}
    }
}
The implementation class [DataBaseImpot] for this interface is as follows:
using System;
using System.Collections.Generic;
using System.Data.Common;
using Entites;

namespace Dao {
    public class DataBaseImpot : IImpotDao {
        // tax brackets
        private TrancheImpot[] tranchesImpot;
        public TrancheImpot[] TranchesImpot { get { return tranchesImpot; } }

        // manufacturer
        public DataBaseImpot(string factory, string connectionString, string requête) {
            // factory: the factory of the target SGBD
            // connectionString: connection string to tax bracket base
            // handle any exceptions
            try {
                // we retrieve a generic connector for the SGBD
                DbProviderFactory connecteur = DbProviderFactories.GetFactory(factory);
                using (DbConnection connexion = connecteur.CreateConnection()) {
                    // connection configuration
                    connexion.ConnectionString = connectionString;
                    // opening connection
                    connexion.Open();
                    // configuration Command
                    DbCommand sqlCommand = connecteur.CreateCommand();
                    sqlCommand.CommandText = requête;
                    sqlCommand.Connection = connexion;
                    // request execution
                    List<TrancheImpot> listTrancheImpot = new List<TrancheImpot>();
                    using (DbDataReader reader = sqlCommand.ExecuteReader()) {
                        while (reader.Read()) {
                            // we create a new tax trance
                            listTrancheImpot.Add(new TrancheImpot() { Limite = reader.GetDecimal(0), CoeffR = reader.GetDecimal(1), CoeffN = reader.GetDecimal(2) });
                        }
                    }
                    // put the tax brackets in your instance
                    tranchesImpot = listTrancheImpot.ToArray();
                }
            } catch (Exception ex) {
                // encapsulate the exception in a ImpotException type
                throw new ImpotException("Erreur de lecture des tranches d'impôt", ex) { Code = 101 };
            }

        }
    }
}
- line 7: the class [DataBaseImpot] implements the interface [IImpotDao].
- line 10: the implementation of the [TranchesImpot] method of the interface. It simply returns a reference to the tax bracket array from line 9. This array will be constructed by the class constructor.
- Line 13: the constructor. It uses a generic connector (see Section 9.4.5) to query the tax bracket database. The constructor receives three parameters:
- the name of the "factory" from which it will request the classes to connect to the database, issue SQL commands, and process the result of a SELECT query.
- the connection string it must use to connect to the database
- the SQL Select command it must execute to retrieve the tax brackets.
- Line 19: requests a connector from the "factory"
- line 20: creates a connection with this connector. It is created but not yet operational
- line 22: the connection string for the connection is initialized. We can now connect.
- line 24: connects
- Line 26: Requests a [DbCommand] object from the connector to execute a SQL order
- line 27: sets the SQL command to be executed
- line 28: sets the connection on which to execute it
- line 30: a [listTrancheImpot] list of [TrancheImpot] objects is created empty.
- Line 31: The SQL Select command is executed
- Lines 32–35: The [DbDataReader] object resulting from the Select is processed. Each row of the Select result table is used to instantiate an object of type [TrancheImpot], which is added to the [listTrancheImpot] list.
- Line 38: The list of objects of type [TrancheImpot] is transferred to the array in line 9.
- Lines 40–43: Any exception is encapsulated in a [ImpotException] type and assigned error code 101 (arbitrary).
The [Test1] test (see [4] in the project)
The [Test1] class simply displays the tax brackets on the screen. This is the one already used in version 5 (section 6.4.3) except for the statement that instantiates the [dao] layer (line 14).
using System;
using Dao;
using Entites;
using System.Configuration;

namespace Tests {
    class Test1 {
        static void Main() {

            // create the [dao] layer
            IImpotDao dao = null;
            try {
                // layer creation [dao]
                dao = new DataBaseImpot(ConfigurationManager.AppSettings["factoryMySql5"], ConfigurationManager.ConnectionStrings["dbImpotsMySql5"].ConnectionString, ConfigurationManager.AppSettings["requete"]);
            } catch (ImpotException e) {
                // error display
                string msg = e.InnerException == null ? null : String.Format(", Exception d'origine : {0}", e.InnerException.Message);
                Console.WriteLine("L'erreur suivante s'est produite : [Code={0},Message={1}{2}]", e.Code, e.Message, msg == null ? "" : msg);
                // program stop
                Environment.Exit(1);
            }
            // display tax brackets
            TrancheImpot[] tranchesImpot = dao.TranchesImpot;
            foreach (TrancheImpot t in tranchesImpot) {
                Console.WriteLine("{0}:{1}:{2}", t.Limite, t.CoeffR, t.CoeffN);
            }
        }
    }
}
Line 14 uses the following [App.config] configuration file:
<?xml version="1.0" encoding="utf-8" ?>
<configuration>
    <connectionStrings>
        <add name="dbImpotsMySql5" connectionString="Server=localhost;Database=bdimpots;Uid=admimpots;Pwd=mdpimpots;" />
    </connectionStrings>
    <appSettings>
        <add key="requete" value="select limite, coeffr, coeffn from tranches"/>
        <add key="factoryMySql5" value="MySql.Data.MySqlClient"/>
    </appSettings>
</configuration>
- Line 4: the connection string to the MySQL5 database. Note that the user [admimpots] will establish the connection.
- Line 8: the "factory" for working with SGBD and MySQL5
- Line 7: The SQL SELECT query to retrieve the tax brackets.
The project is configured to run [Test1.cs]:
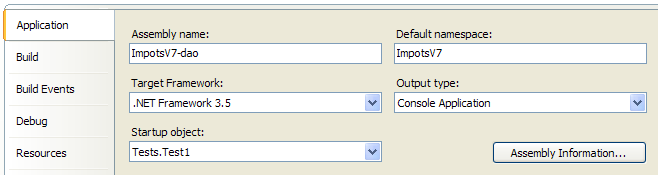
Running the test yields the following results:
The NUnit [NUnit1] test (see [4] in the project)
The unit test [NUnit1] is the one already used in version 5 (section 6.4.3) except for the statement that instantiates the layer [dao] (line 16).
using System;
using System.Configuration;
using Dao;
using Entites;
using NUnit.Framework;

namespace Tests {
    [TestFixture]
    public class NUnit1 : AssertionHelper{
        // layer [dao] to be tested
        private IImpotDao dao;

        // manufacturer
        public NUnit1() {
            // layer initialization [dao]
            dao = new DataBaseImpot(ConfigurationManager.AppSettings["factoryMySql5"], ConfigurationManager.ConnectionStrings["dbImpotsMySql5"].ConnectionString, ConfigurationManager.AppSettings["requete"]);
        }

        // test
        [Test]
        public void ShowTranchesImpot(){
            // display tax brackets
            TrancheImpot[] tranchesImpot = dao.TranchesImpot;
            foreach (TrancheImpot t in tranchesImpot) {
                Console.WriteLine("{0}:{1}:{2}", t.Limite, t.CoeffR, t.CoeffN);
            }
            // some tests
            Expect(tranchesImpot.Length,EqualTo(7));
            Expect(tranchesImpot[2].Limite,EqualTo(14753).Within(1e-6));
            Expect(tranchesImpot[2].CoeffR, EqualTo(0.191).Within(1e-6));
            Expect(tranchesImpot[2].CoeffN, EqualTo(1322.92).Within(1e-6));
        }
    }
}
To run this unit test, the project must be of type [Class Library]:
 |
- in [1]: the project type has been changed
- to [2]: the generated DLL will be named [ImpotsV7-dao.dll]
- in [3]: after generating (F6) the project, the [dao/bin/Release] folder contains DLL and [ImpotsV7-dao.dll]. It also contains the configuration file [App.config], renamed to [nom DLL].config. This is standard in Visual Studio.
DLL [ImpotsV7-dao.dll] is then loaded into the NUnit framework and executed:
 |
- in [1]: the tests were successful. We now consider the [dao] layer operational. Its DLL contains all the classes in the project, including the test classes. These are unnecessary. We are rebuilding DLL to exclude the test classes.
- in [2]: the [tests] folder is excluded from the project
- in [3]: the new project. This is regenerated by F6 to generate a new DLL. It is this DLL that will be used by the [metier] and [ui] layers of the application.
9.8.4. The [metier]
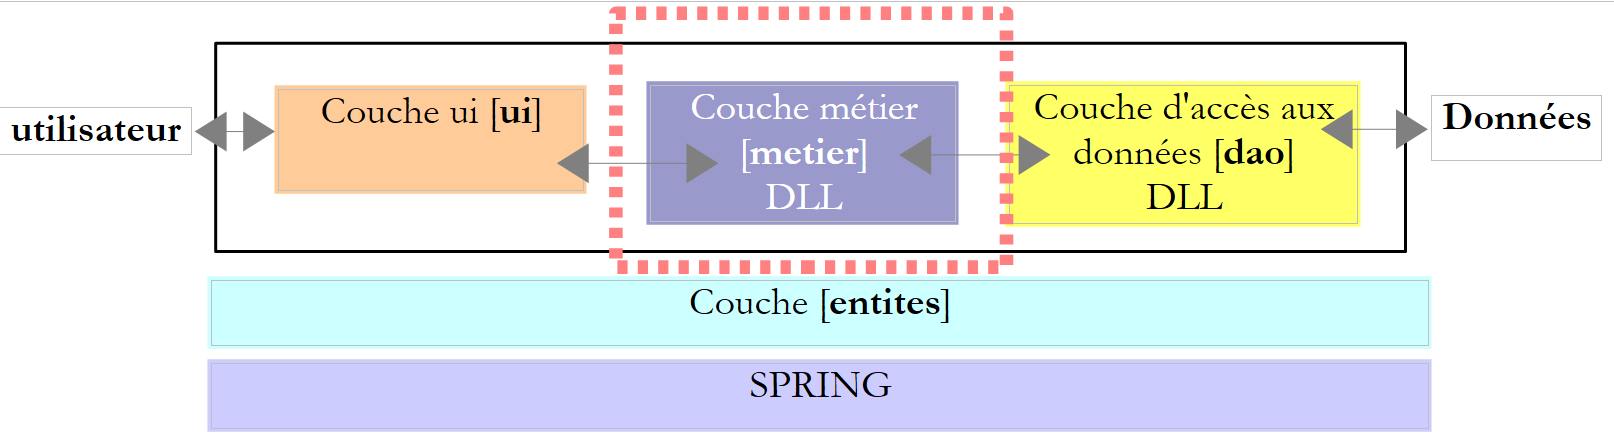 |
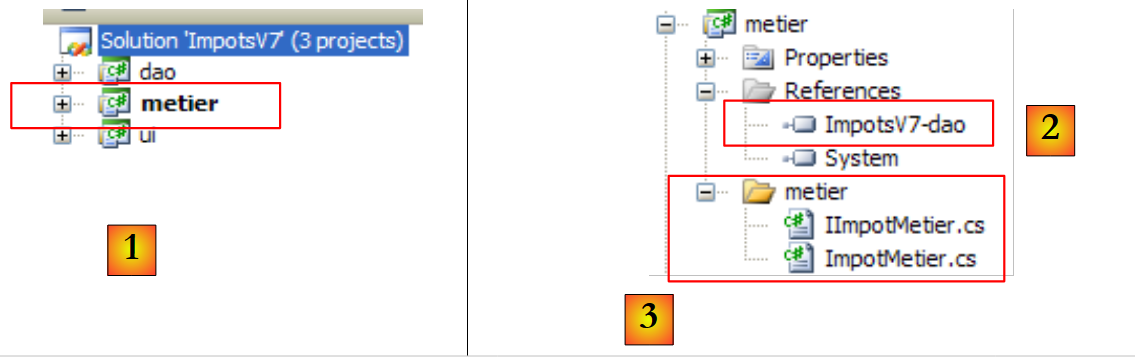 |
- to [1], the [metier] project became the active project in the solution
- to [2]: the project references. Note the reference to DLL in the previously created layer [dao]. This procedure for adding a reference was described in version 5, in section 6.4.4.
- In [3]: the [metier] layer. This is the one from version 5, described in section 6.4.4.
The [metier] project is configured to generate a DLL:
 |
- [1]: the project is of the "class library" type
- [2]: generating the project will produce DLL, [ImpotsV7-metier.dll], and [3].
The project is generated (F6).
9.8.5. The layer [ui]
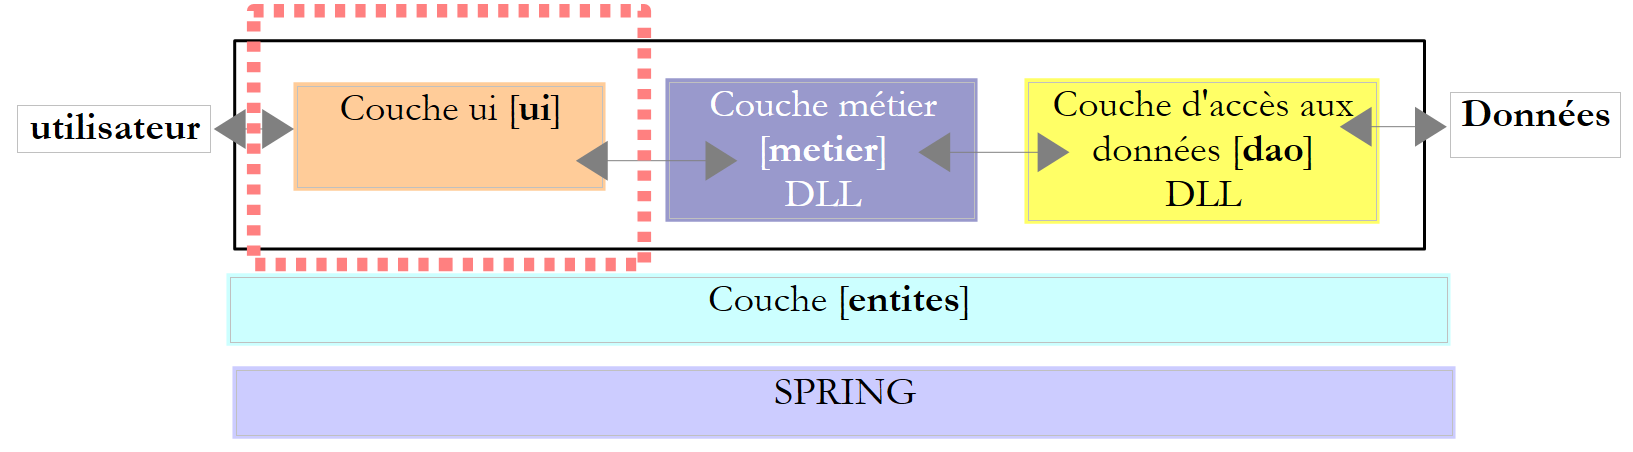 |
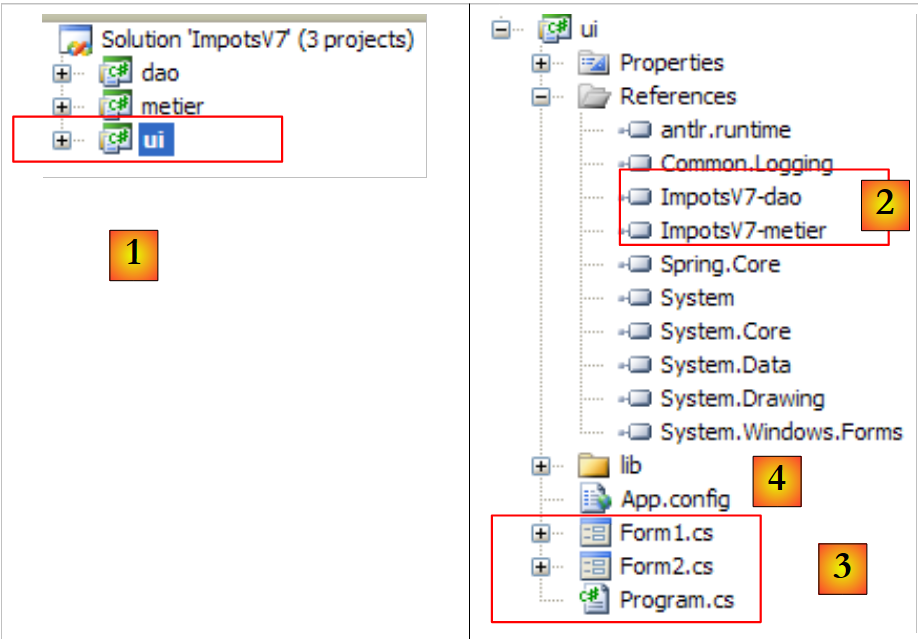 |
- in [1], the [ui] project has become the active project in the solution
- to [2]: the project references. Note the references on DLL for layers [dao] and [metier].
- in [3]: the layer [ui]. This is the one for version 6 described in section 7.6.
- In [4], the configuration file [App.config] is similar to that of version 6. It differs only in the way the [dao] layer is instantiated by Spring:
<?xml version="1.0" encoding="utf-8" ?>
<configuration>

    <configSections>
        <sectionGroup name="spring">
            <section name="context" type="Spring.Context.Support.ContextHandler, Spring.Core" />
            <section name="objects" type="Spring.Context.Support.DefaultSectionHandler, Spring.Core" />
        </sectionGroup>
    </configSections>

    <spring>
        <context>
            <resource uri="config://spring/objects" />
        </context>
        <objects xmlns="http://www.springframework.net">
            <object name="dao" type="Dao.DataBaseImpot, ImpotsV7-dao">
                <constructor-arg index="0" value="MySql.Data.MySqlClient"/>
                <constructor-arg index="1" value="Server=localhost;Database=bdimpots;Uid=admimpots;Pwd=mdpimpots;"/>
                <constructor-arg index="2" value="select limite, coeffr, coeffn from tranches"/>
            </object>
            <object name="metier" type="Metier.ImpotMetier, ImpotsV7-metier">
                <constructor-arg index="0" ref="dao"/>
            </object>
        </objects>
    </spring>
</configuration>
- lines 11–25: the Spring configuration
- lines 15-24: objects instantiated by Spring
- lines 16-20: instantiation of the [dao] layer
- line 16: the [dao] layer is instantiated by the [Dao.DataBaseImpot] class, which is located in DLL [ImpotsV7-Dao]
- lines 17–19: the three parameters (factory of the SGBD used, connection string, SQL request) to be provided to the constructor of the [Dao.DataBaseImpot] class
- lines 21-23: instantiation of the [metier] layer. This is the same configuration as in version 6.
Tests
The [ui] project is configured as follows:
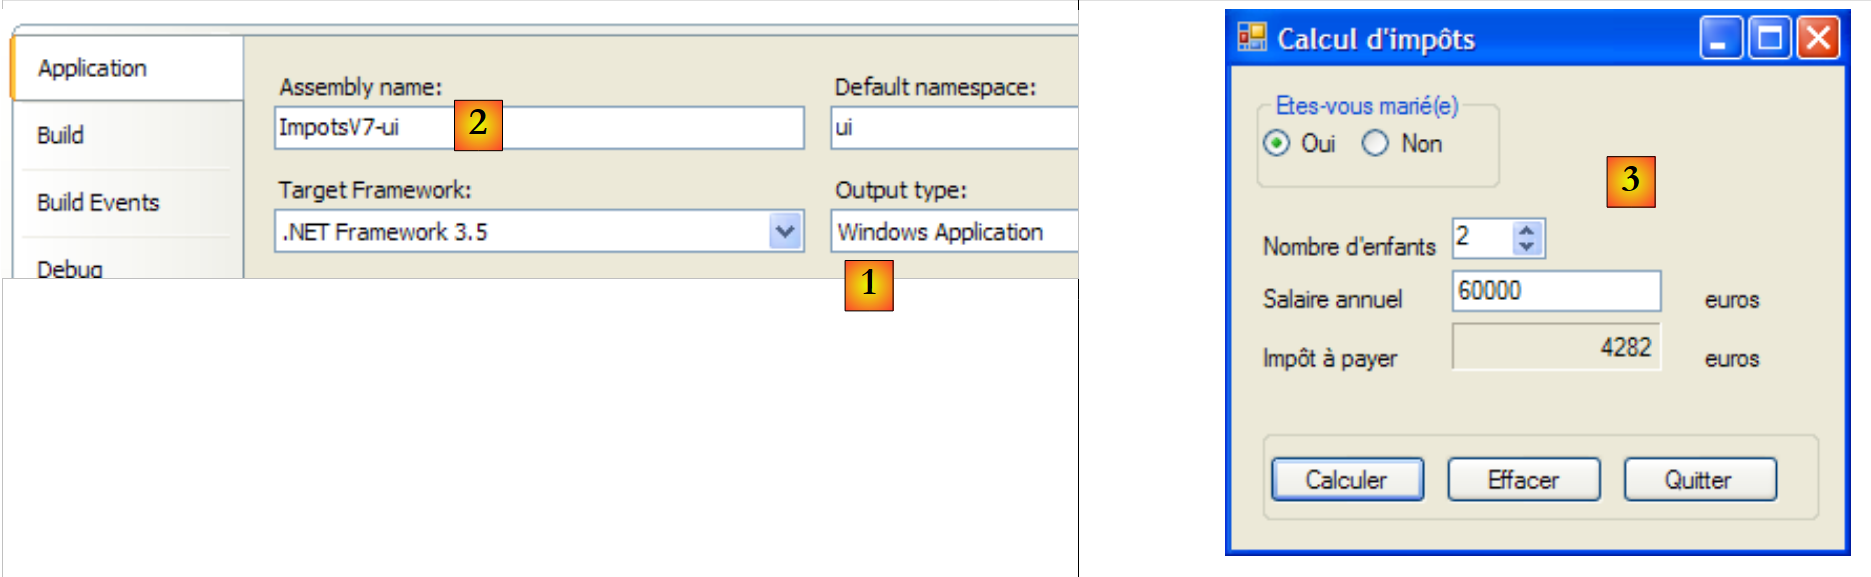 |
- [1]: the project is of type "Windows Application"
- [2]: building the project will produce the executable [ImpotsV7-ui.exe]
An example of execution is provided in [3].
9.8.6. Changing the database
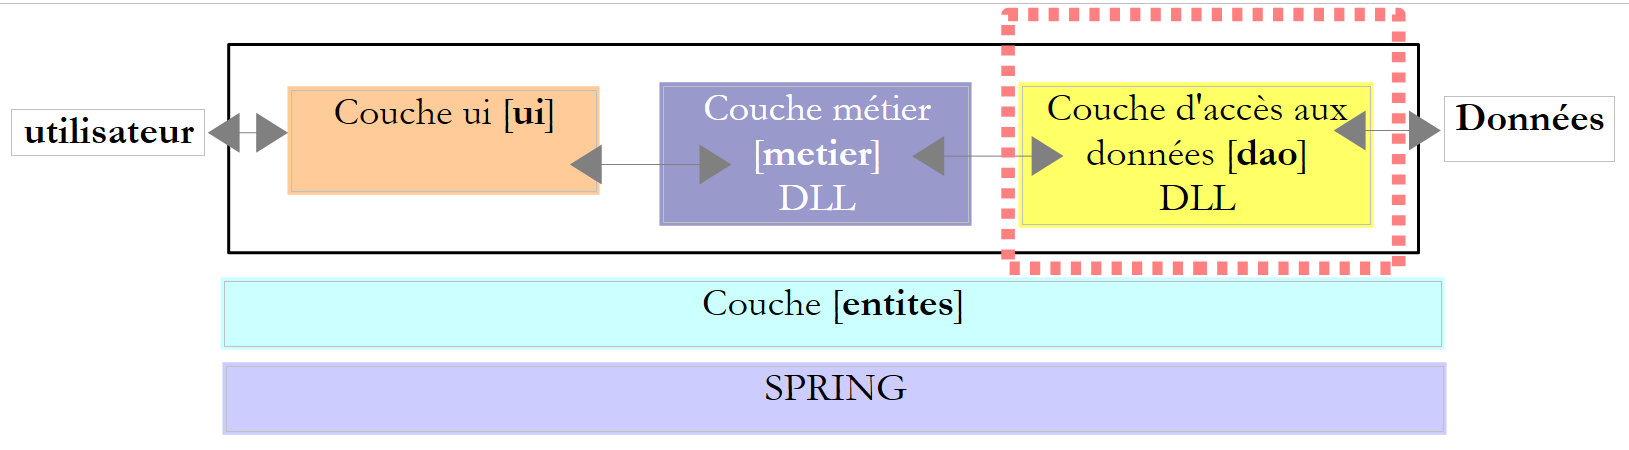 |
The [dao] layer above was written with a generic connector and a MySQL5 database. Here, we propose switching to a SQL Server Compact database to demonstrate that only the configuration will change.
The SQL Server Compact database will be as follows:
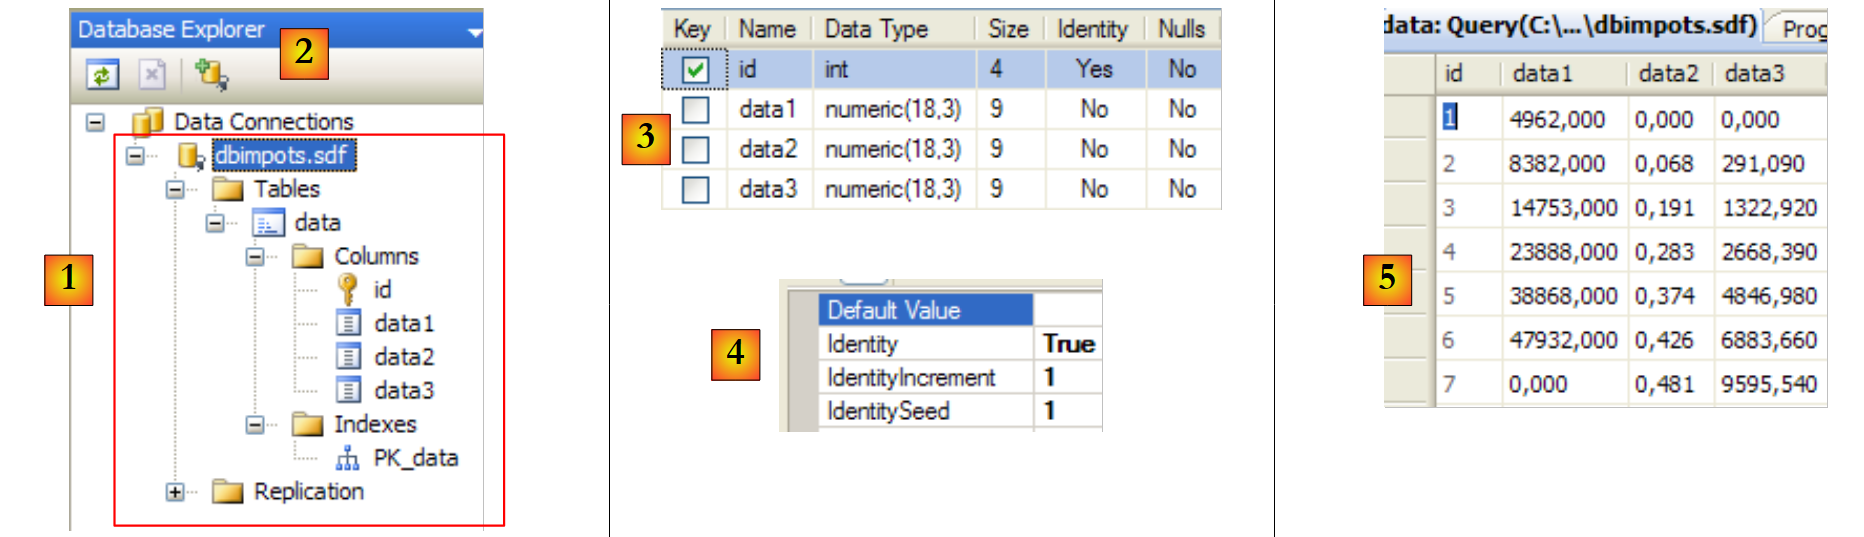 |
- [1]: the [dbimpots.sdf] database in the [DataBase Explorer] view of Visual Studio [2]. It was created without a password.
- [3]: the table [data], which contains the data. We deliberately chose different names for the table and columns than those used with the MySQL5 database to emphasize once again the importance of putting this kind of detail in the configuration file rather than in the code.
- [4]: The [id] column is the primary key and has the Identity attribute: SGBD will assign its values.
- [5]: the contents of the [data] table.
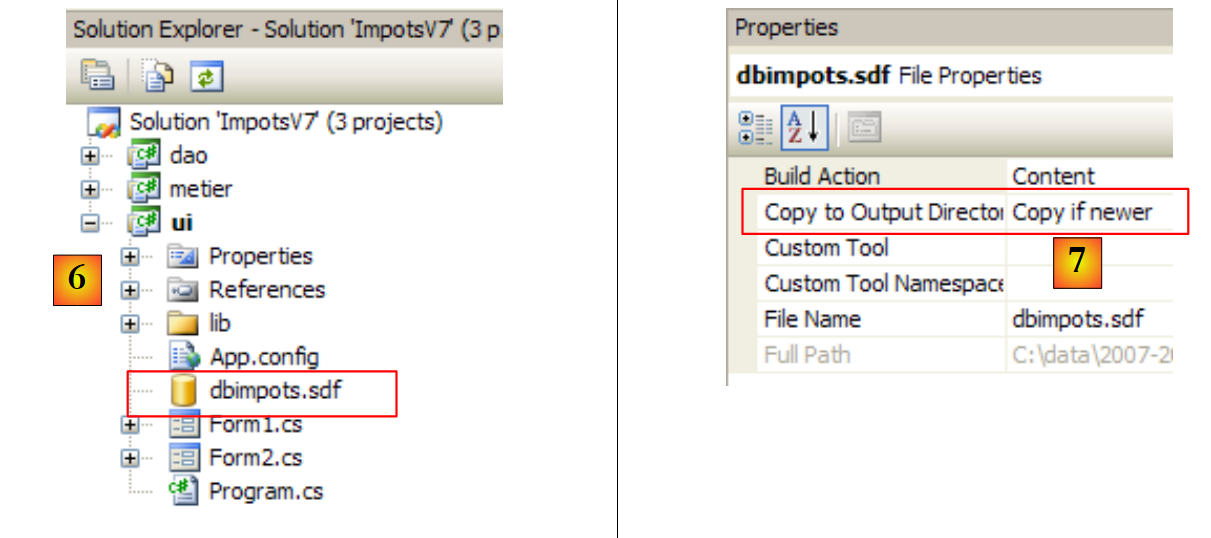 |
- [6]: The [dbimpots.sdf] database has been placed in the [ui] project folder and integrated into this project.
- [7]: The database [dbimpots.sdf] will be copied to the project's runtime folder.
The configuration file [App.config] for the new database is as follows:
<?xml version="1.0" encoding="utf-8" ?>
<configuration>

    <configSections>
        <sectionGroup name="spring">
            <section name="context" type="Spring.Context.Support.ContextHandler, Spring.Core" />
            <section name="objects" type="Spring.Context.Support.DefaultSectionHandler, Spring.Core" />
        </sectionGroup>
    </configSections>

    <spring>
        <context>
            <resource uri="config://spring/objects" />
        </context>
        <objects xmlns="http://www.springframework.net">
            <!--
            <object name="dao" type="Dao.DataBaseImpot, ImpotsV7-dao">
                <constructor-arg index="0" value="MySql.Data.MySqlClient"/>
                <constructor-arg index="1" value="Server=localhost;Database=bdimpots;Uid=admimpots;Pwd=mdpimpots;"/>
                <constructor-arg index="2" value="select limite, coeffr, coeffn from tranches"/>
            </object>
            -->
            <object name="dao" type="Dao.DataBaseImpot, ImpotsV7-dao">
                <constructor-arg index="0" value="System.Data.SqlServerCe.3.5"/>
                <constructor-arg index="1" value="Data Source=|DataDirectory|\dbimpots.sdf;" />
                <constructor-arg index="2" value="select data1, data2, data3 from data"/>
            </object>
            <object name="metier" type="Metier.ImpotMetier, ImpotsV7-metier">
                <constructor-arg index="0" ref="dao"/>
            </object>
        </objects>
    </spring>
</configuration>
- Lines 23–27: Configuration of the [dao] layer to access the [dbimpots.sdf] database.
The execution results are identical to the previous ones. Note the benefit of using a generic connector to make the [dao] layer insensitive to changes in SGBD. However, we have seen that this connector is not suitable for all situations, particularly those where parameterized queries are used. There are other solutions, such as the one mentioned, third-party data access frameworks (Spring, iBatis, NHibernate, LINQ, ...).
9.9. To learn more...
- LINQ is featured in numerous publications, notably in the book: C# 3.0 in a Nutshell, by Joseph and Ben Albahari, published by O'Reilly, which was already mentioned in the introduction to this document.
- iBatis is featured in the book: iBatis in Action, by Clinton Begin, published by Manning
- Nhibernate in Action, published by Manning, is scheduled for July 2008
Spring, iBatis, and NHibernate have reference manuals available on the websites of these various frameworks.