14. Appendices
14.1. SGBD SQL Server Express 2005
14.1.1. Installation
The SGBD SQL Server Express 2005 is available at the url [http://msdn.microsoft.com/vstudio/express/sql/download/]:
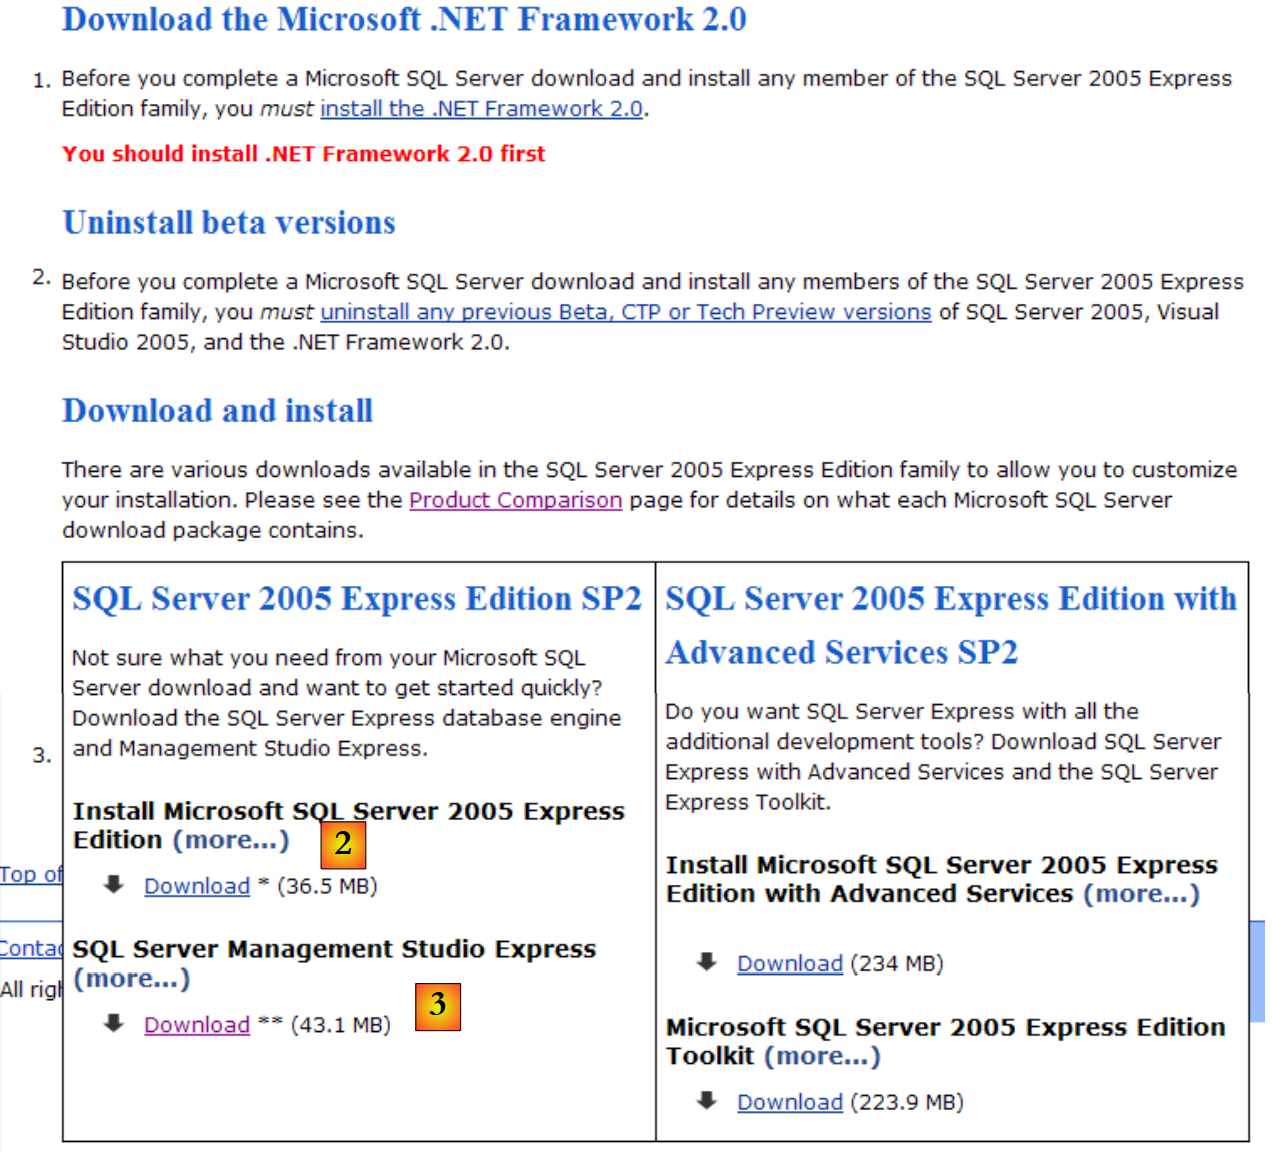 |
- in [1]: first download and install the .NET Framework 2.0
- in [2]: then install and download SQL Server Express 2005
- in [3]: then install and download SQL Server Management Studio Express, which allows you to administer SQL Server
Installing SQL Server Express creates a folder in [Démarrer / Programmes ]:
 |
- in [1]: the configuration application for SQL Server. It also allows you to start/stop the server
- in [2]: the server administration application
14.1.2. Start / Stop SQL Server
As with the previous SGBD entries, the SQL Server Express has been installed as a Windows service that starts automatically. We are changing this configuration:
[Démarrer / Panneau de configuration / Performances et maintenance / Outils d'administration / Services ]:
 |
- to [1]: we double-click on [Services]
- to [2]: we see that a service named [SQL Server] is present, that it is running [3], and that it starts automatically [4].
- in [5]: another service related to SQL Server, called "SQL Server Browser," is also active and set to start automatically.
To change this behavior, double-click the [SQL Server] service:
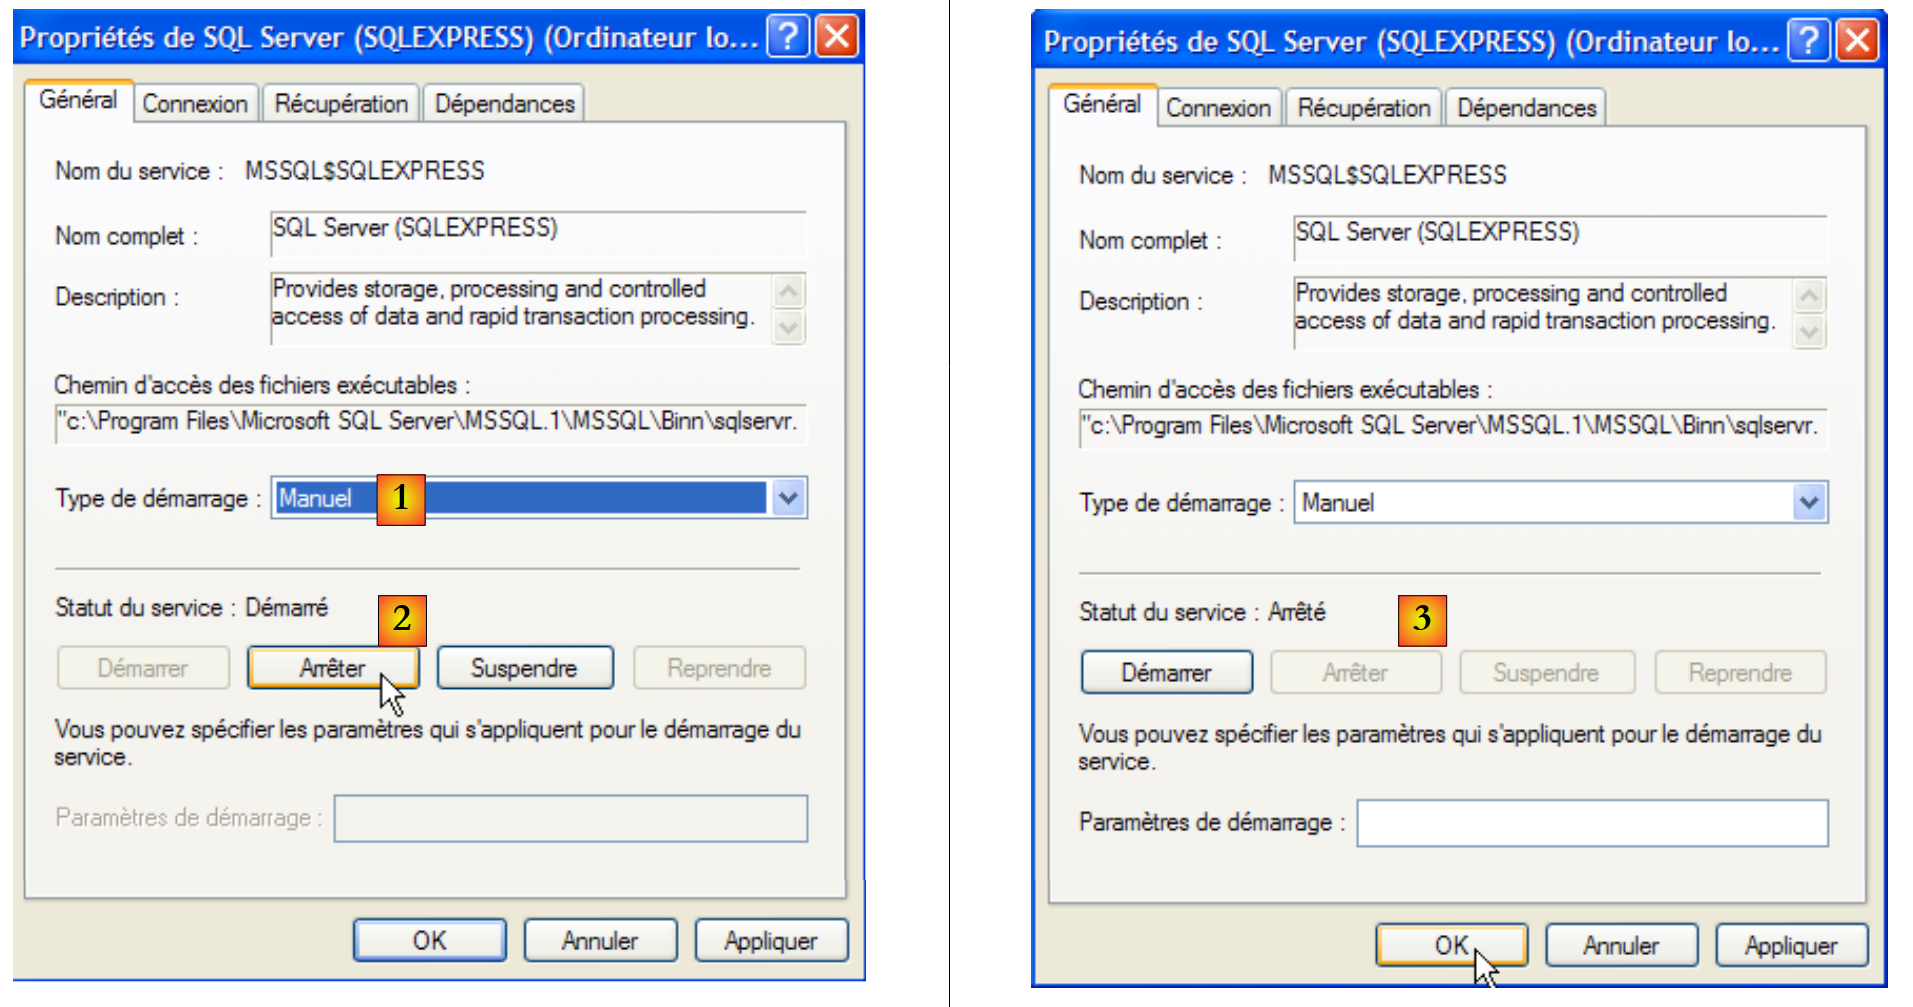 |
- to [1]: set the service to manual startup
- in [2]: stop it
- in [3]: confirm the new service configuration
We will do the same with the [SQL Server Browser] service (see [5] above). To manually start and stop the SQL Server 2005 service, you can use the [1] application in the [SQL server] folder:
 |
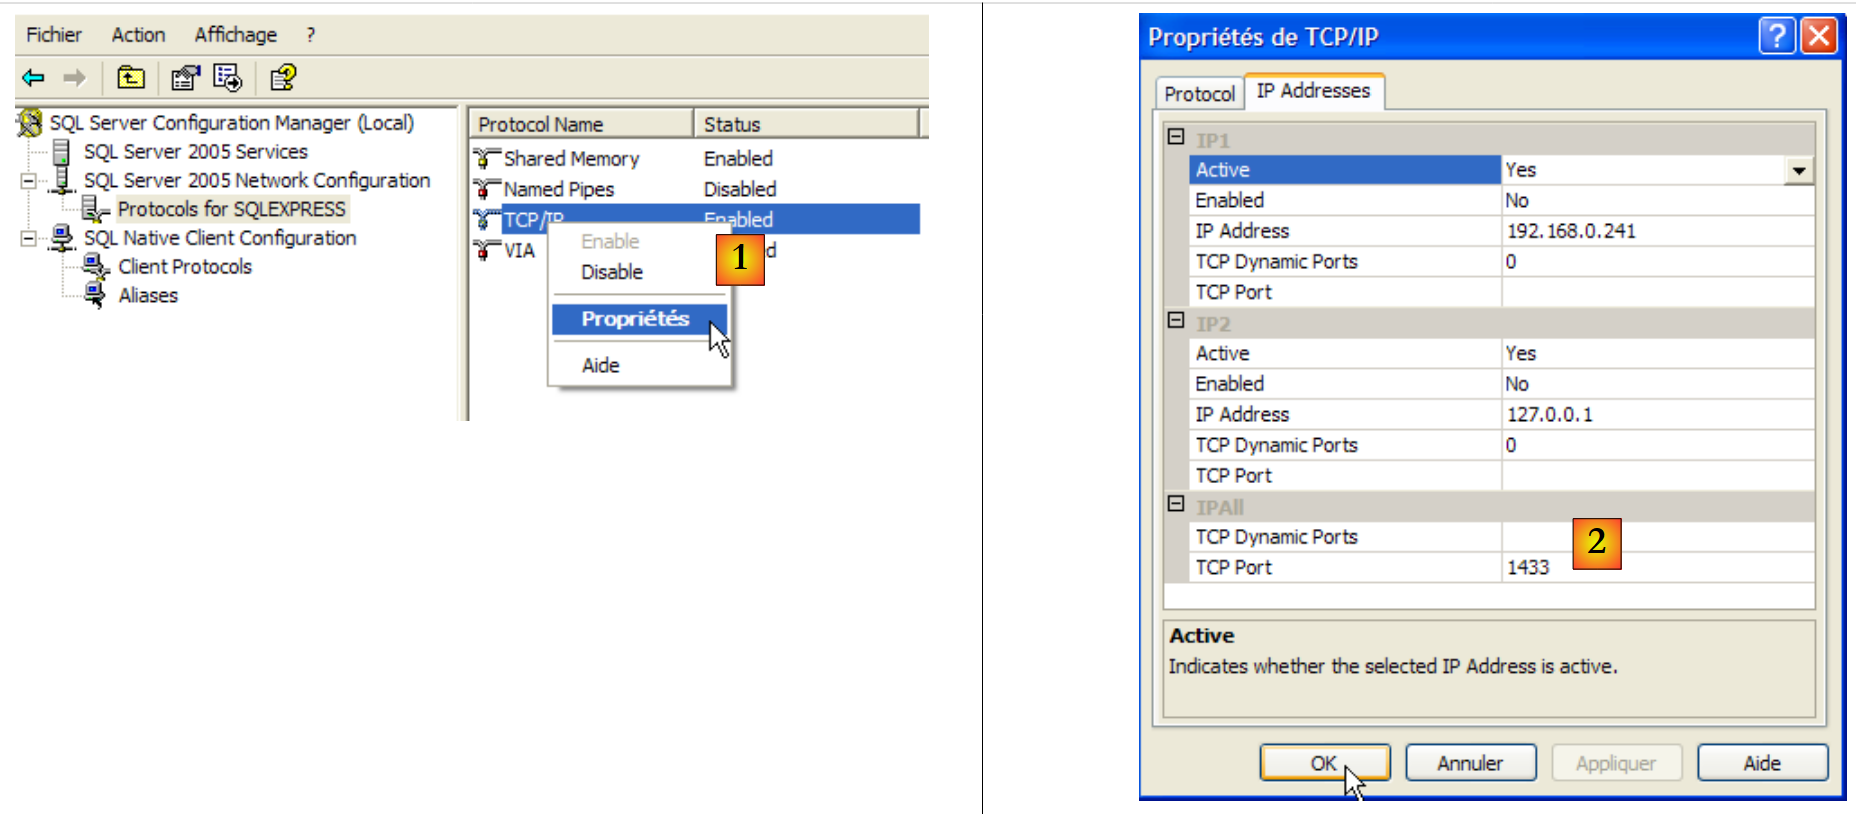 |
- In [1]: ensure that the TCP/IP protocol is enabled, then go to the protocol properties.
- in [2]: in the [IP Addresses], option, and [IPAll] tabs:
- the [TCP Dynamic ports] field is left blank
- the server listening port is set to 1433 in [TCP Port]
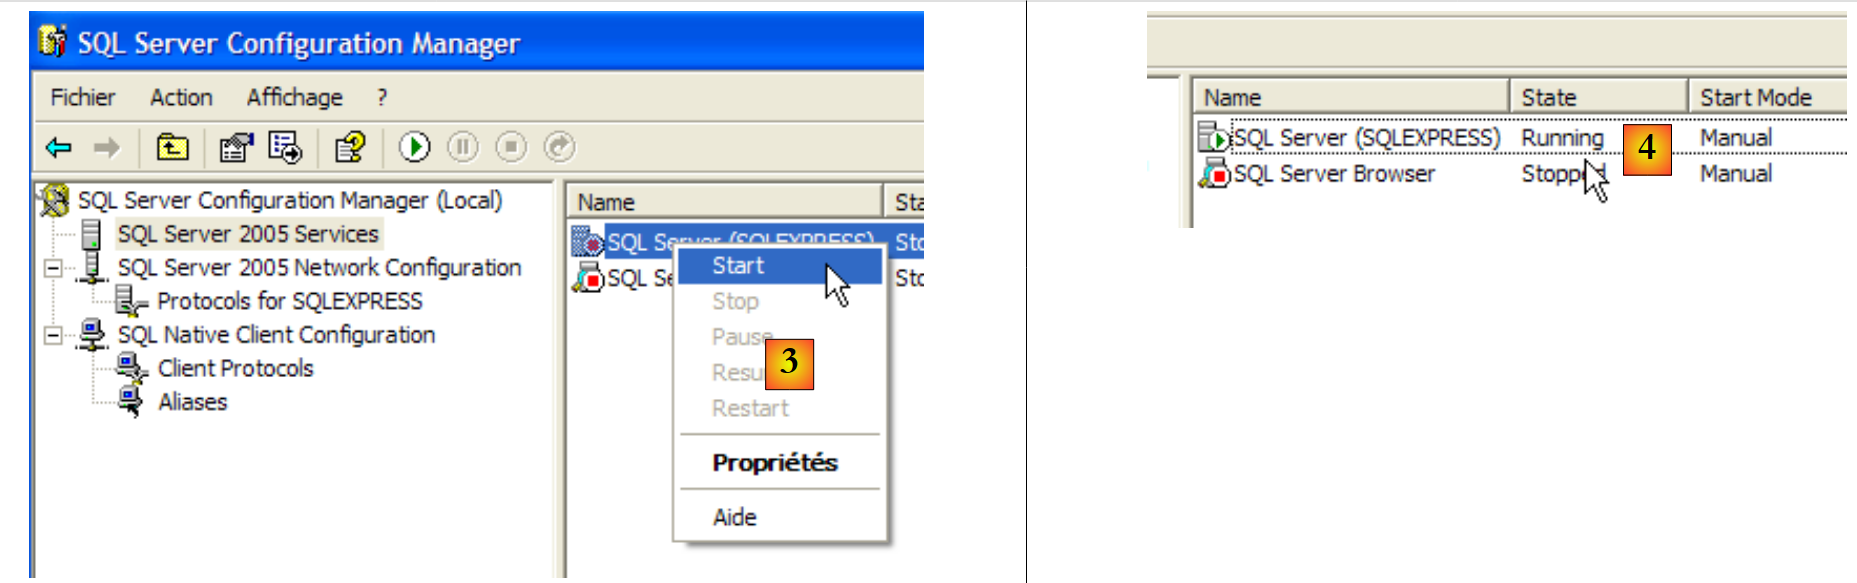 |
- in [3]: right-clicking on the [SQL Server] service gives access to the server's start/stop options. Here, we start it.
- In [4]: SQL Server is running
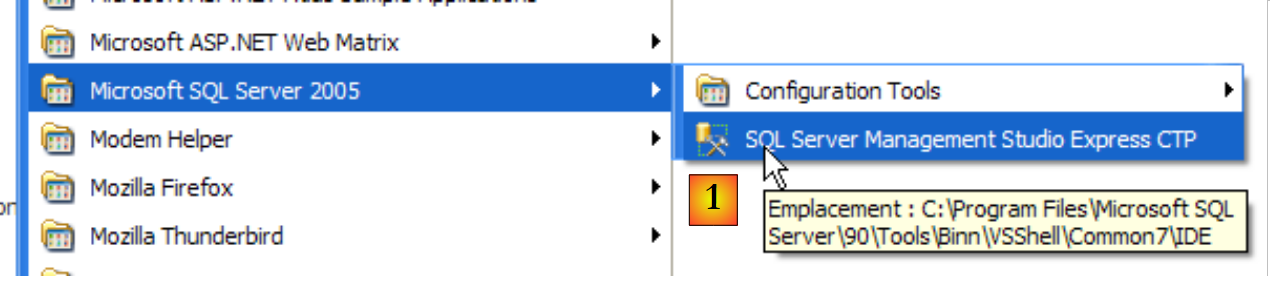
14.1.3. Creating a jpa user and a jpa database
Let’s launch SGBD as shown above, then the [1] administration application via the menu below:
 |
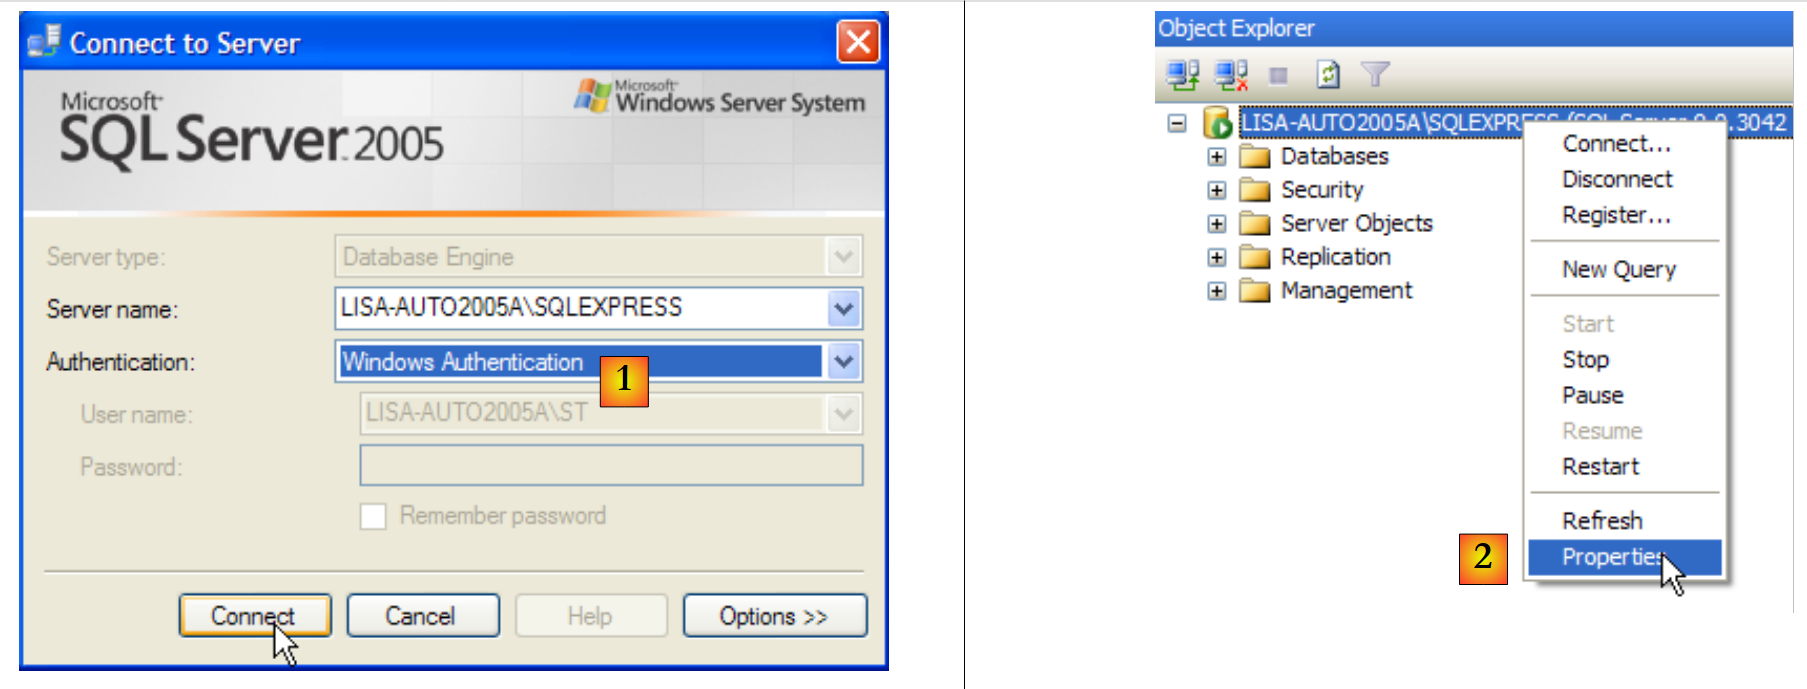 |
- In [1]: Log in to the SQL Server as a Windows administrator
- In [2]: configure the connection properties
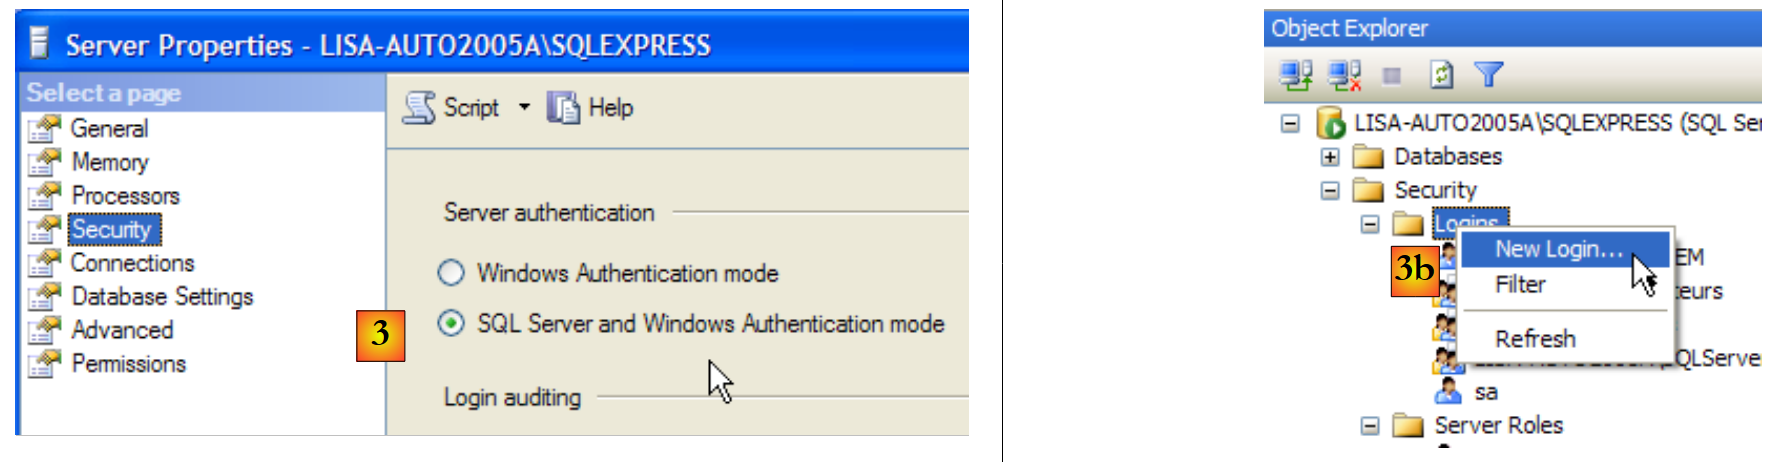 |
- in [3]: enable mixed login mode to the server: either with a Windows login (a Windows user) or with a SQL Server login (an account defined within SQL Server, independent of any Windows account).
- in [3b]: create a SQL Server user
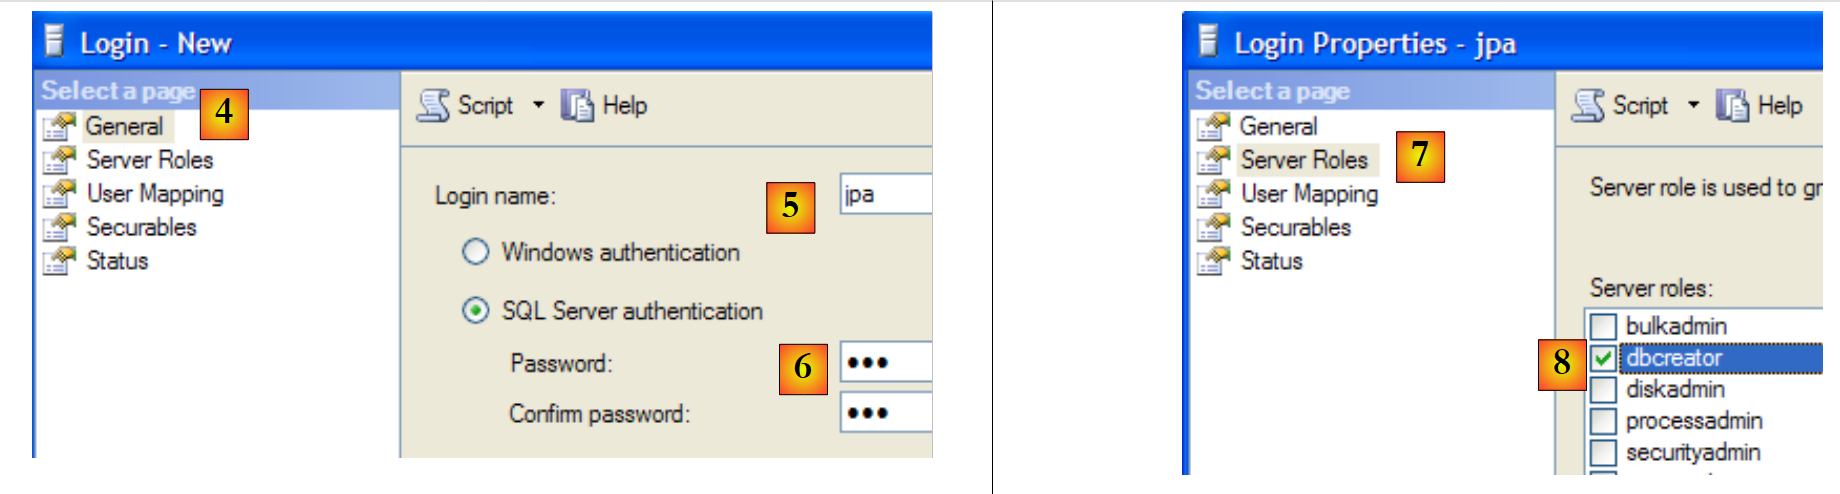 |
- in [4]: option [General]
- in [5]: the login
- in [6]: the password (jpa here)
- in [7]: option [Server Roles]
- in [8]: the user jpa will have the right to create databases
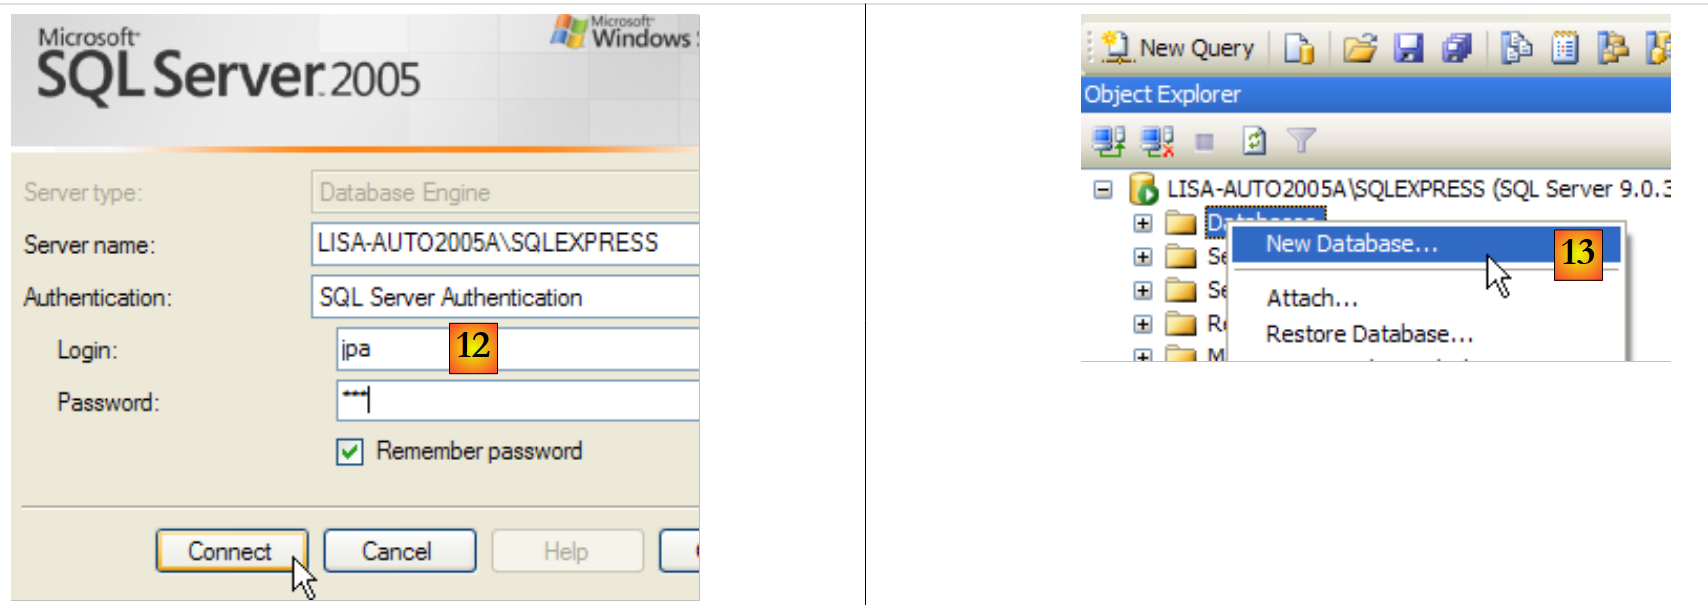
We validate this configuration:
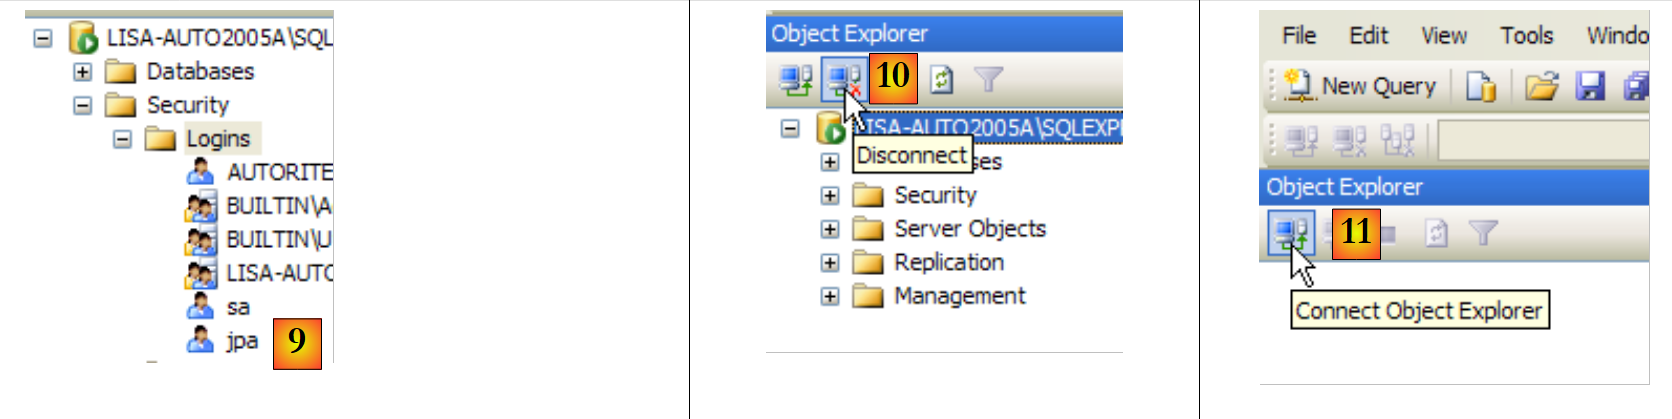 |
- in [9]: the user jpa has been created
- in [10]: we log out
- in [11]: we log back in
 |
- in [12]: we log in as user jpa/jpa
- in [13]: once logged in, the user jpa creates a database
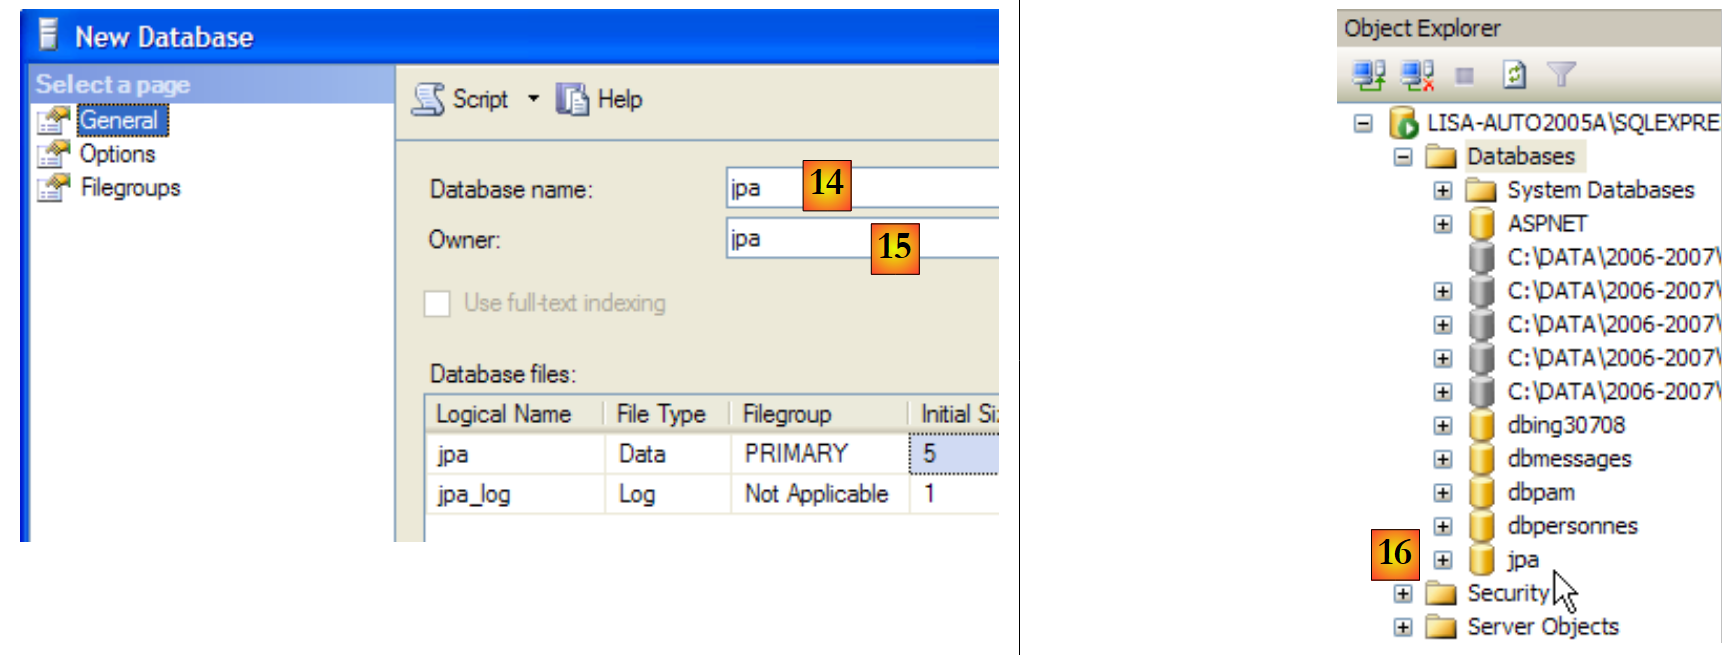 |
- in [14]: the database will be named jpa
- in [15]: and will belong to the user jpa
- in [16]: the jpa database has been created
14.1.4. Creating the table [ARTICLES] in the jpa database
We are creating a table named [ARTICLES] using the following script:
/* table creation */

CREATE TABLE ARTICLES (
    ID            INTEGER NOT NULL,
    NOM           VARCHAR(20) NOT NULL,
    PRIX          DOUBLE PRECISION NOT NULL,
    STOCKACTUEL   INTEGER NOT NULL,
    STOCKMINIMUM  INTEGER NOT NULL
);

INSERT INTO ARTICLES (ID, NOM, PRIX, STOCKACTUEL, STOCKMINIMUM) VALUES (1, 'article1', 100, 10, 1);
INSERT INTO ARTICLES (ID, NOM, PRIX, STOCKACTUEL, STOCKMINIMUM) VALUES (2, 'article2', 200, 20, 2);
INSERT INTO ARTICLES (ID, NOM, PRIX, STOCKACTUEL, STOCKMINIMUM) VALUES (3, 'article3', 300, 30, 3);

/* integrity constraints */

ALTER TABLE ARTICLES ADD CONSTRAINT CHK_ID check (ID>0);
ALTER TABLE ARTICLES ADD CONSTRAINT CHK_PRIX check (PRIX>0);
ALTER TABLE ARTICLES ADD CONSTRAINT CHK_STOCKACTUEL check (STOCKACTUEL>0);
ALTER TABLE ARTICLES ADD CONSTRAINT CHK_STOCKMINIMUM check (STOCKMINIMUM>0);
ALTER TABLE ARTICLES ADD CONSTRAINT CHK_NOM check (NOM<>'');
ALTER TABLE ARTICLES ADD CONSTRAINT UNQ_NOM UNIQUE (NOM);


/* primary key */

ALTER TABLE ARTICLES ADD CONSTRAINT PK_ARTICLES PRIMARY KEY (ID);
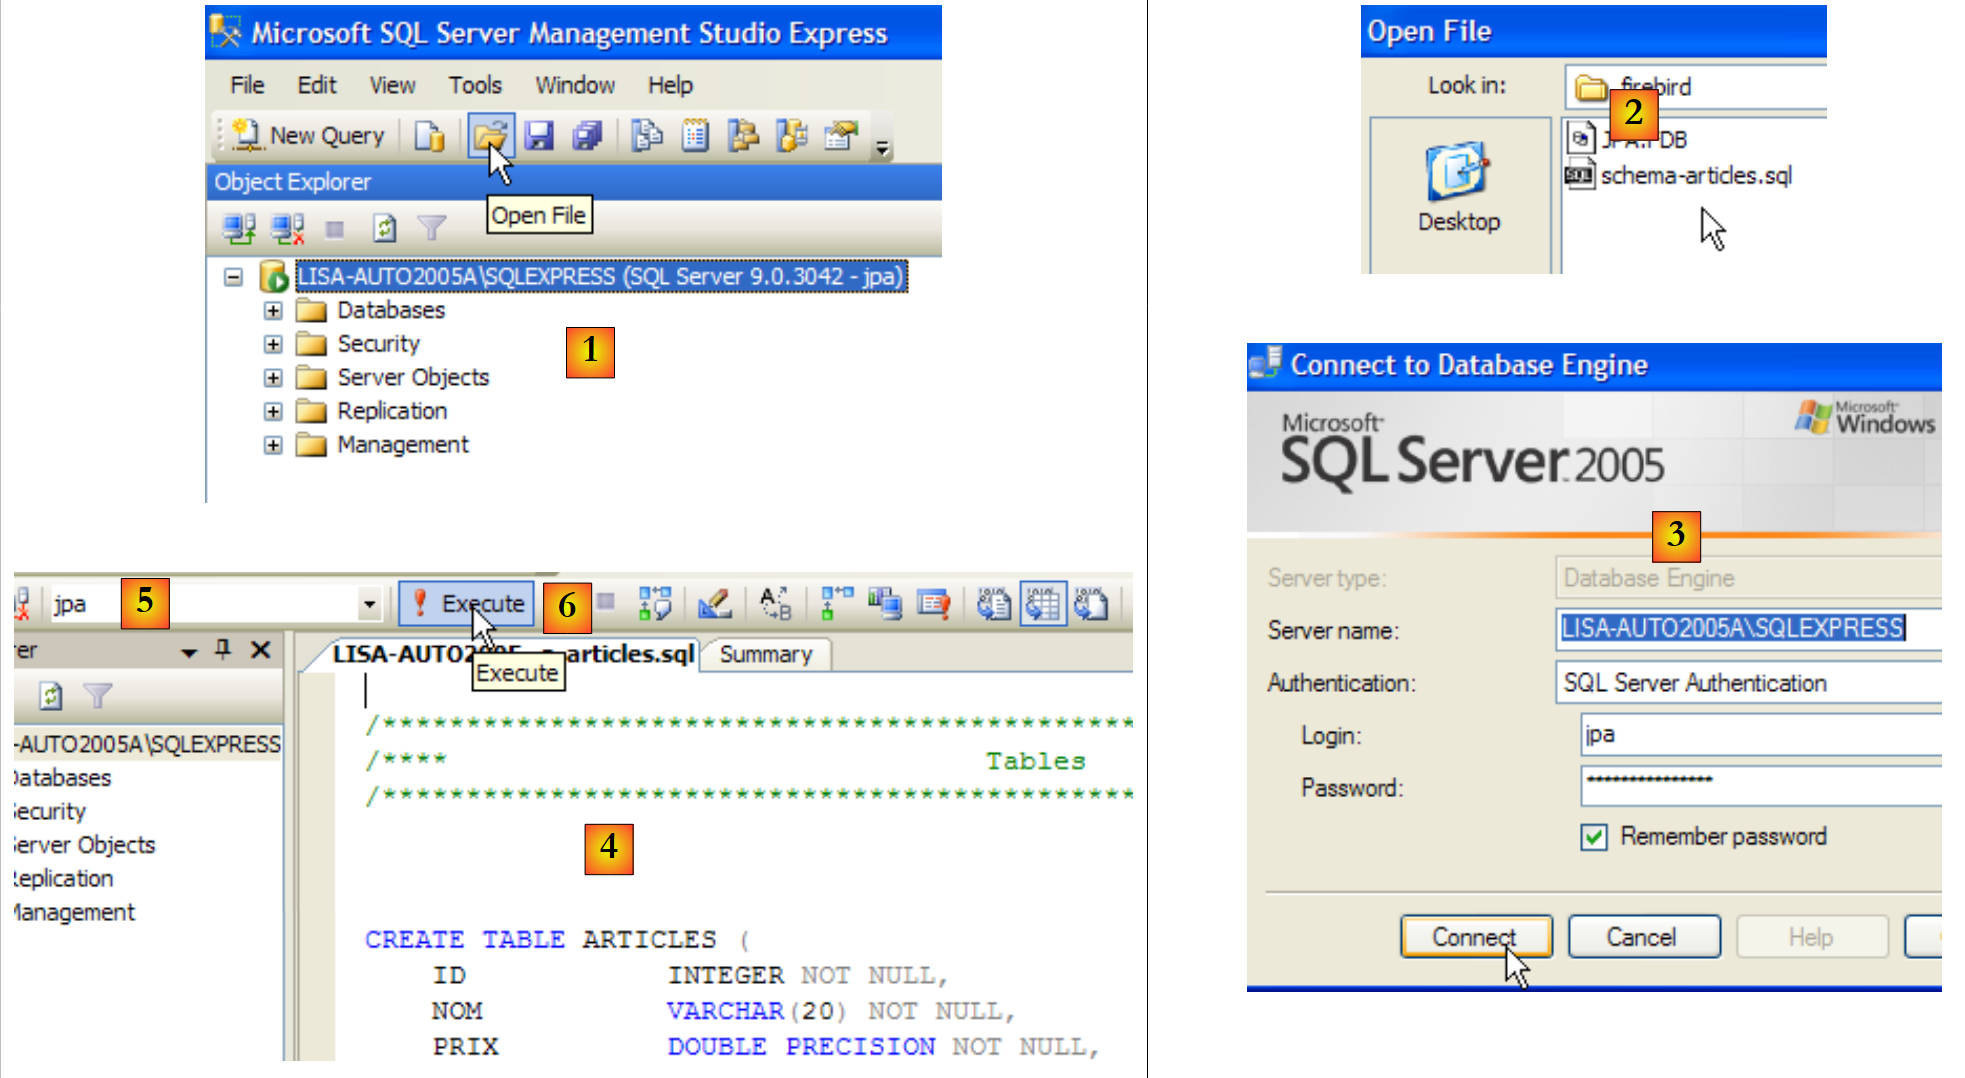 |
- in [1]: open a script SQL
- in [2]: specify the script SQL
- in [3]: you must log in again (jpa/jpa)
- in [4]: the script to be executed
- in [5]: select the database in which the script will be executed
- in [6]: execute it
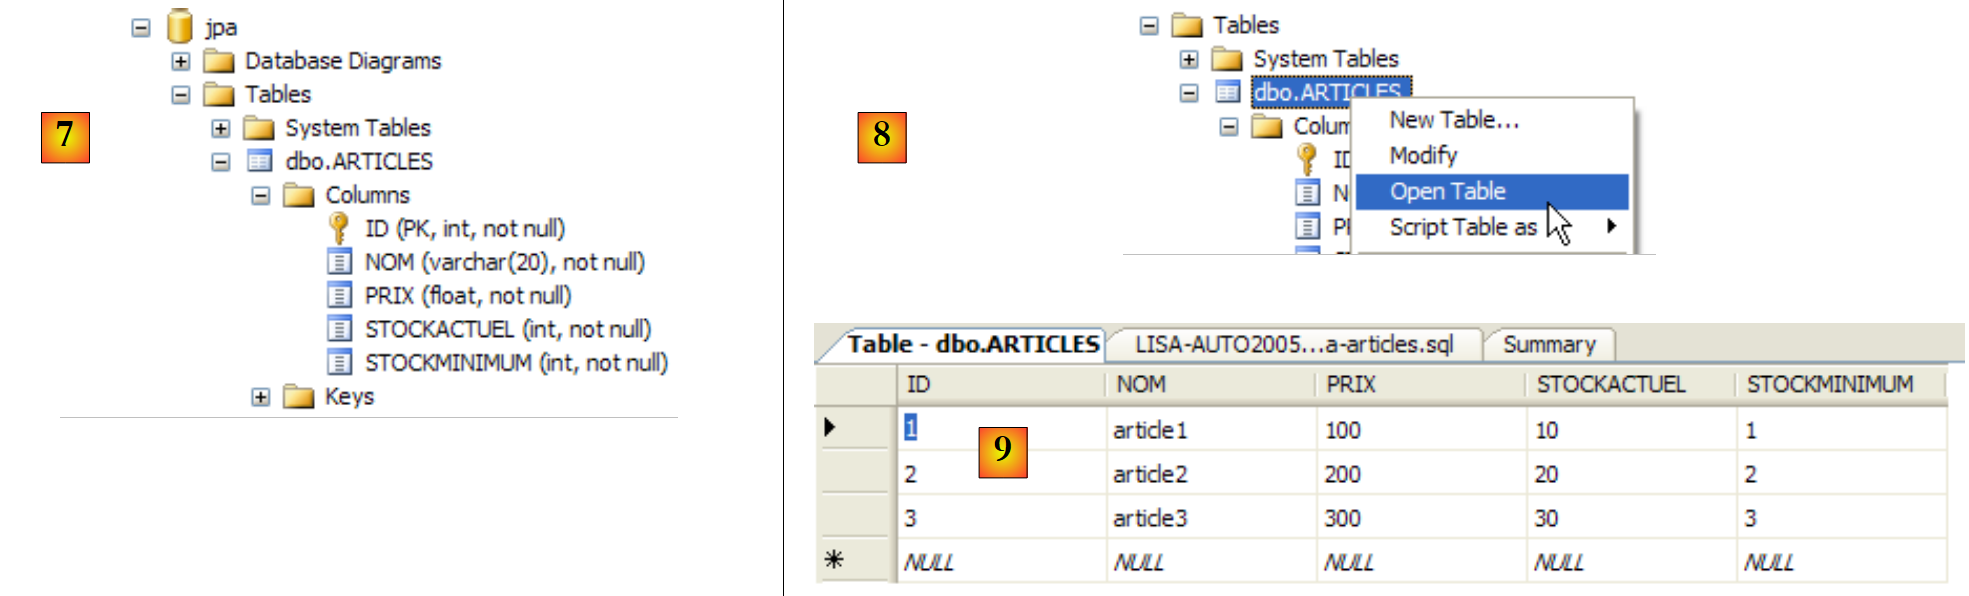 |
- in [7]: the result of the execution: the table [ARTICLES] has been created.
- in [8]: we request to view its contents
- in [9]: the table's contents.
14.1.5. The ADO.NET connector for SQL Server Express
 |
The ADO.NET connector is the set of classes that allow a .NET application to use the SGBD SQL Server Express 2005. The connector classes are in the [System.Data] namespace, natively available on any .NET platform.
14.2. The SGBD MySQL5
14.2.1. Installation
SGBD MySQL5 is available at url [http://dev.mysql.com/downloads/]:
 |
- in [1]: select the desired version
- in [2]: select a Windows version
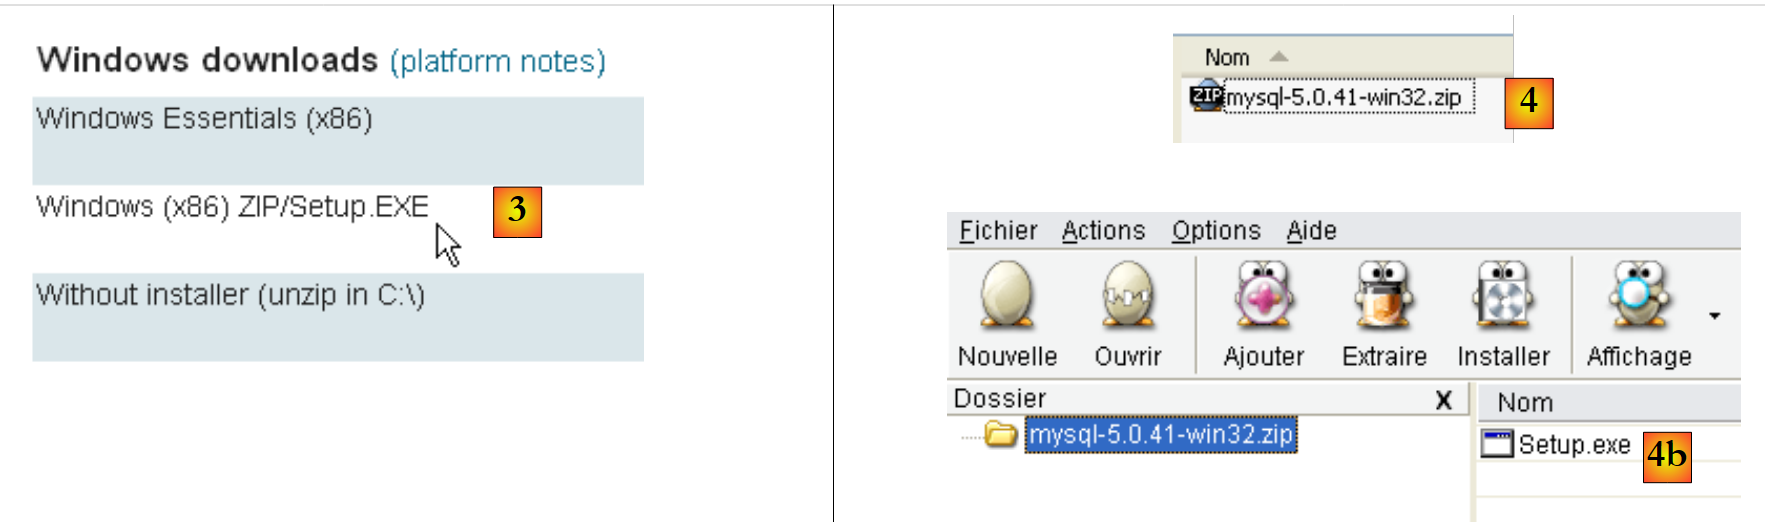 |
- in [3]: select the desired version Windows
- in [4]: the downloaded zip file contains an executable [Setup.exe] [4b] that must be extracted and run to install MySQL5
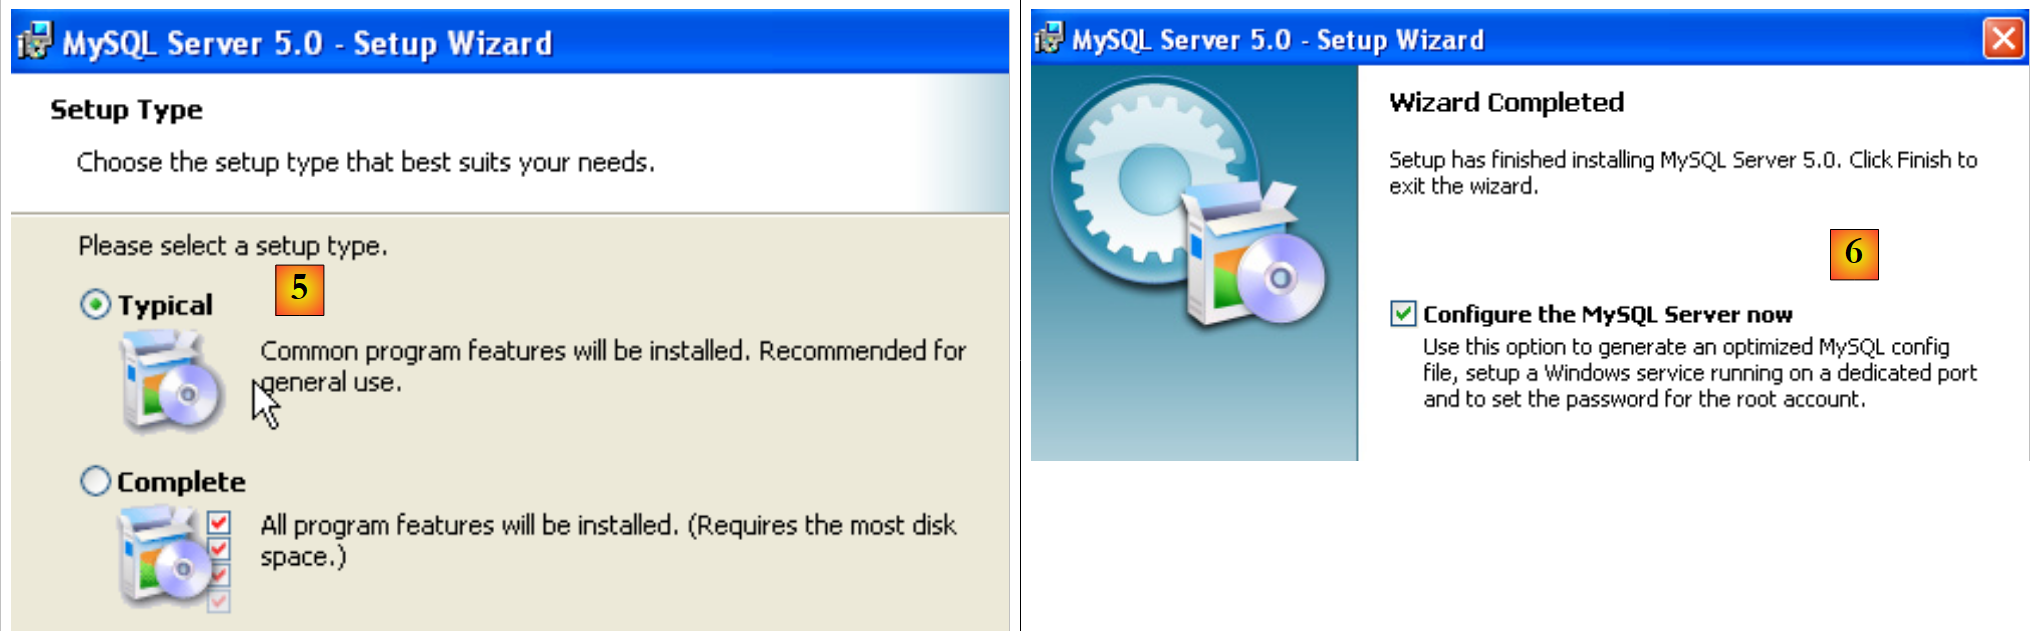 |
- in [5]: choose a typical installation
- in [6]: once the installation is complete, you can configure the server MySQL5
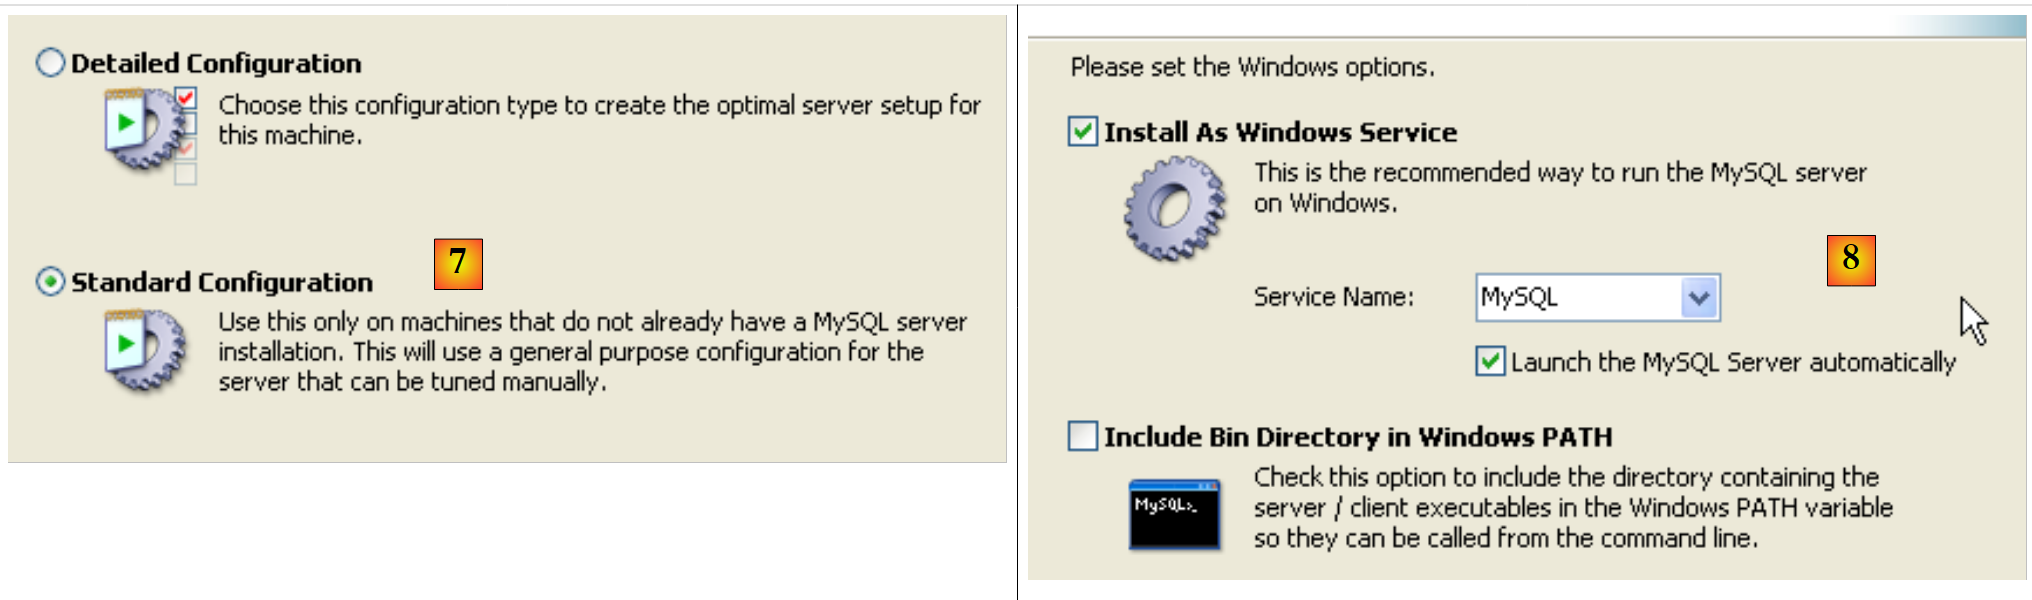 |
- in [7]: choose a standard configuration, the one that asks the fewest questions
- in [8]: the server MySQL5 will be a Windows service
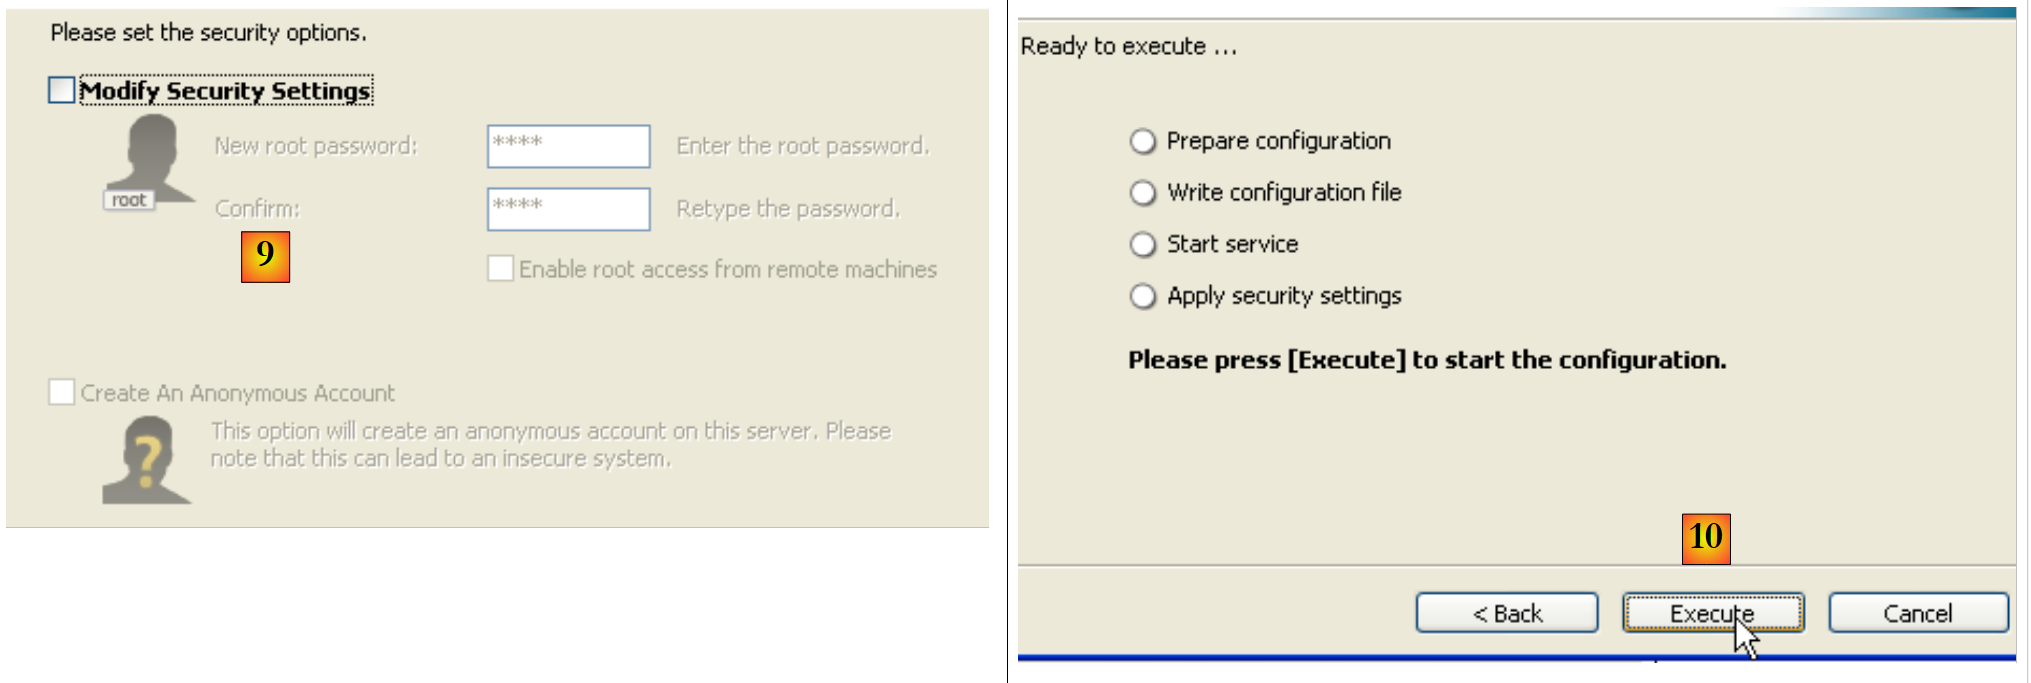 |
- to [9]: by default, the server administrator is root with no password. You can keep this configuration or set a new password for root. If the installation of MySQL5 follows the uninstallation of a previous version, this operation may fail. There is little way to recover from this.
- In [10]: you are prompted to configure the server
Installing MySQL5 creates a folder in [Démarrer / Programmes ]:

You can use [MySQL Server Instance Config Wizard] to reconfigure the server:
 |
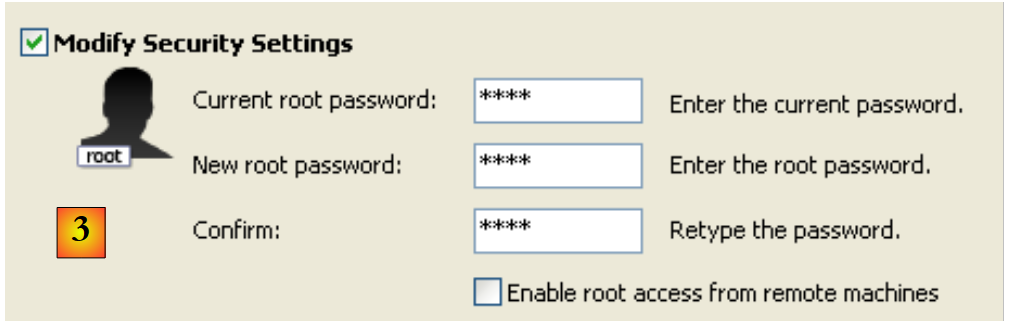 |
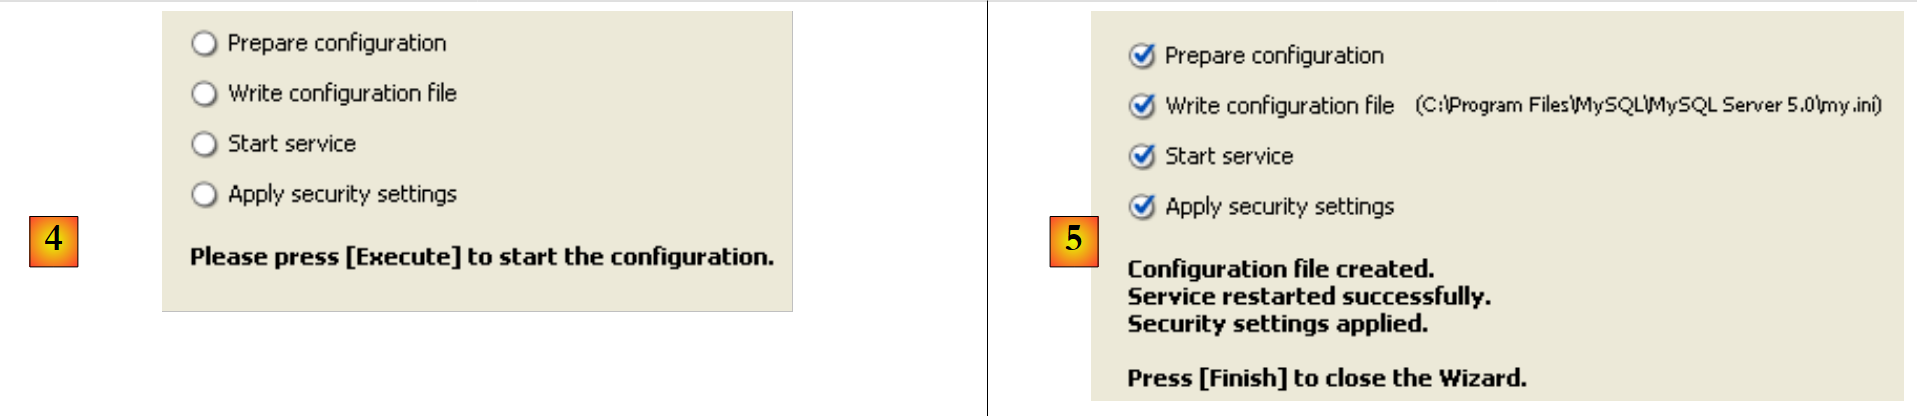 |
- In [3]: we change the root password (here root/root)
14.2.2. Start / Stop MySQL5
The MySQL5 server was installed as a Windows service that starts automatically; c.a.d launches as soon as Windows starts. This operating mode is impractical. We will change it:
[Démarrer / Panneau de configuration / Performances et maintenance / Outils d'administration / Services ]:
 |
- to [1]: we double-click on [Services]
- to [2]: we see that a service named [MySQL] is present, that it is running ([3]), and that it starts automatically ([4]).
To change this behavior, we double-click on the [MySQL] service:
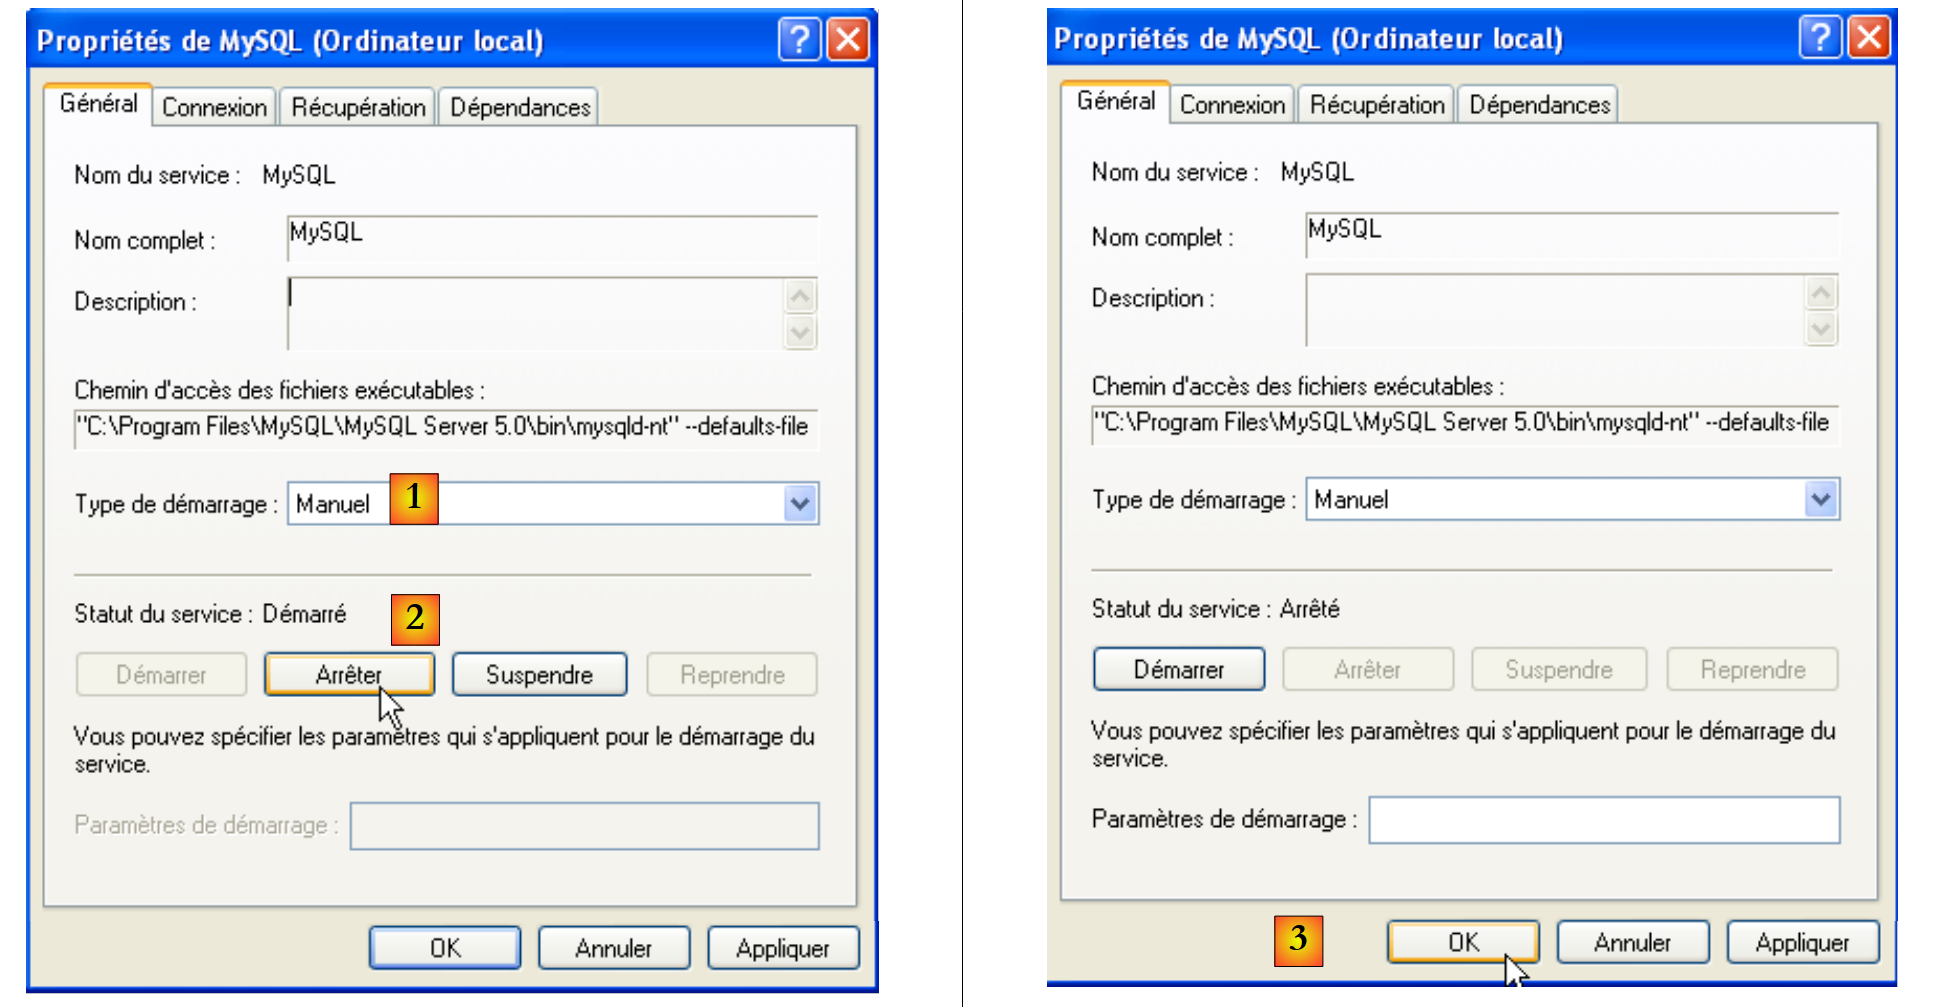 |
- to [1]: set the service to manual startup
- to [2]: stop it
- in [3]: confirm the new service configuration
To manually start and stop the MySQL service, you can create two shortcuts:
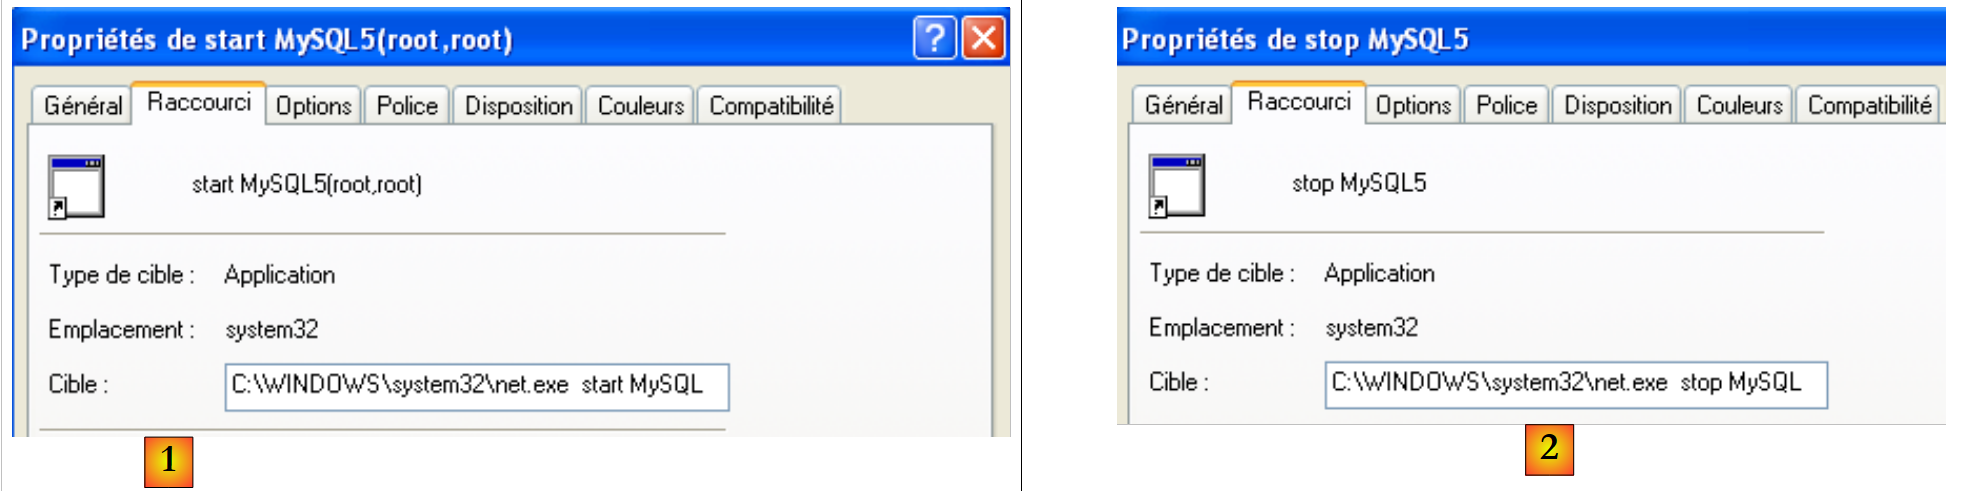 |
- in [1]: the shortcut to start MySQL5
- in [2]: the shortcut to stop it
14.2.3. Clients administration MySQL
On the MySQL website, you can find clients for managing SGBD:
 |
- in [1]: select [MySQL GUI Tools], which contains various graphical clients tools for either administering the SGBD or operating it
- in [2]: select the appropriate Windows version
 |
- in [3]: download an .msi file to run
- as [4]: once the installation is complete, new shortcuts appear in the [Menu Démarrer / Programmes / mySQL] folder.
Launch MySQL (using the shortcuts you created), then launch [MySQL Administrator] via the menu above:
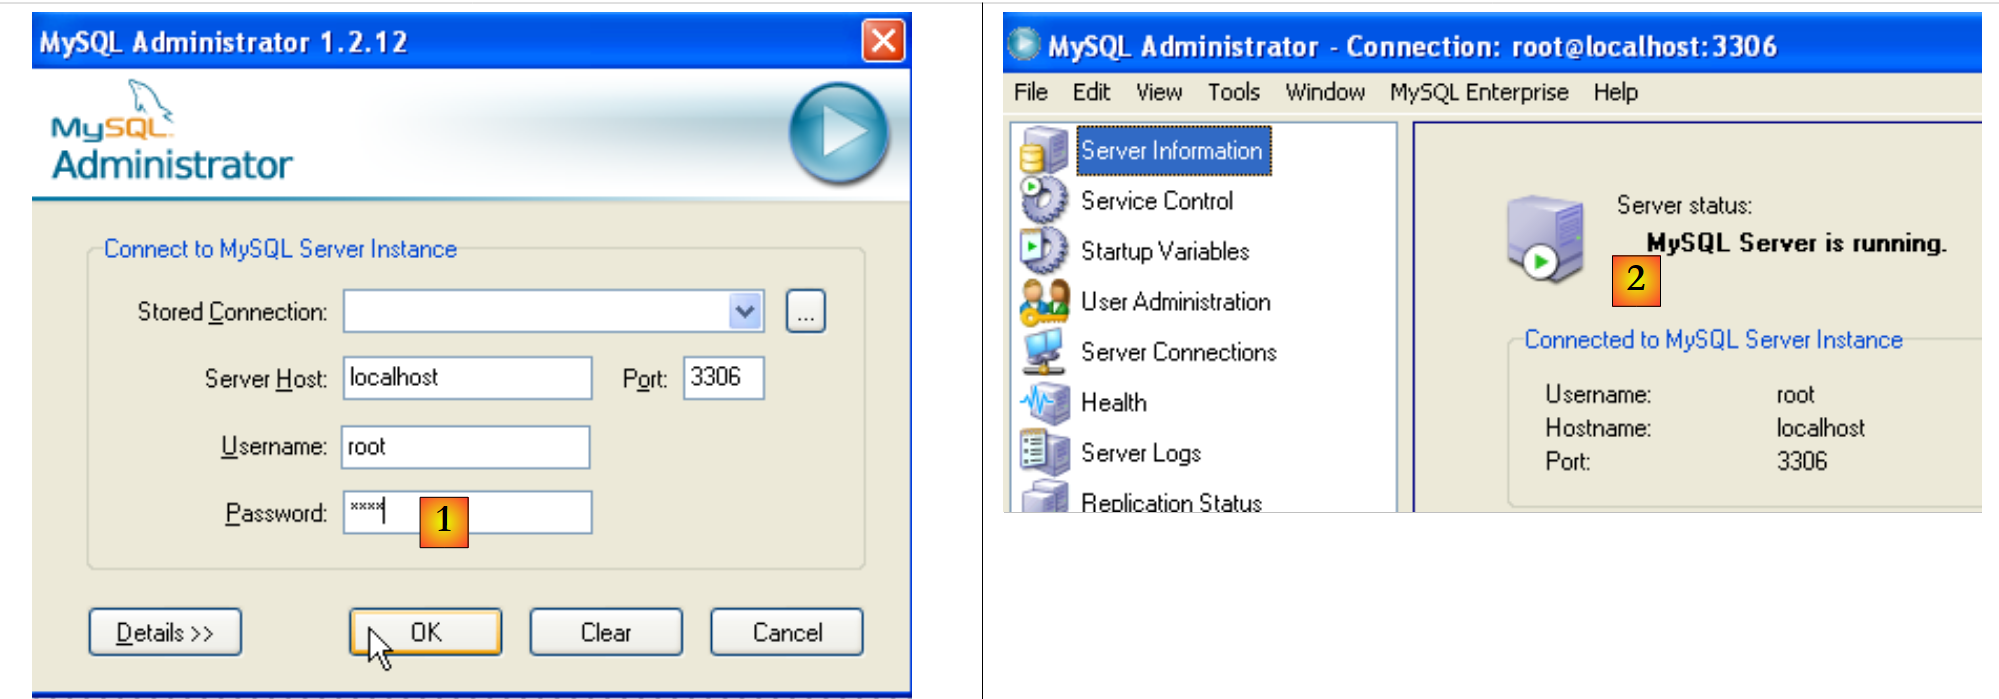 |
- in [1]: enter the root user’s password (root here)
- In [2]: you are logged in and can see that MySQL is active
14.2.4. Creating a jpa user and a jpa database
We will now create a database named jpa and a user with the same name. First, the user:
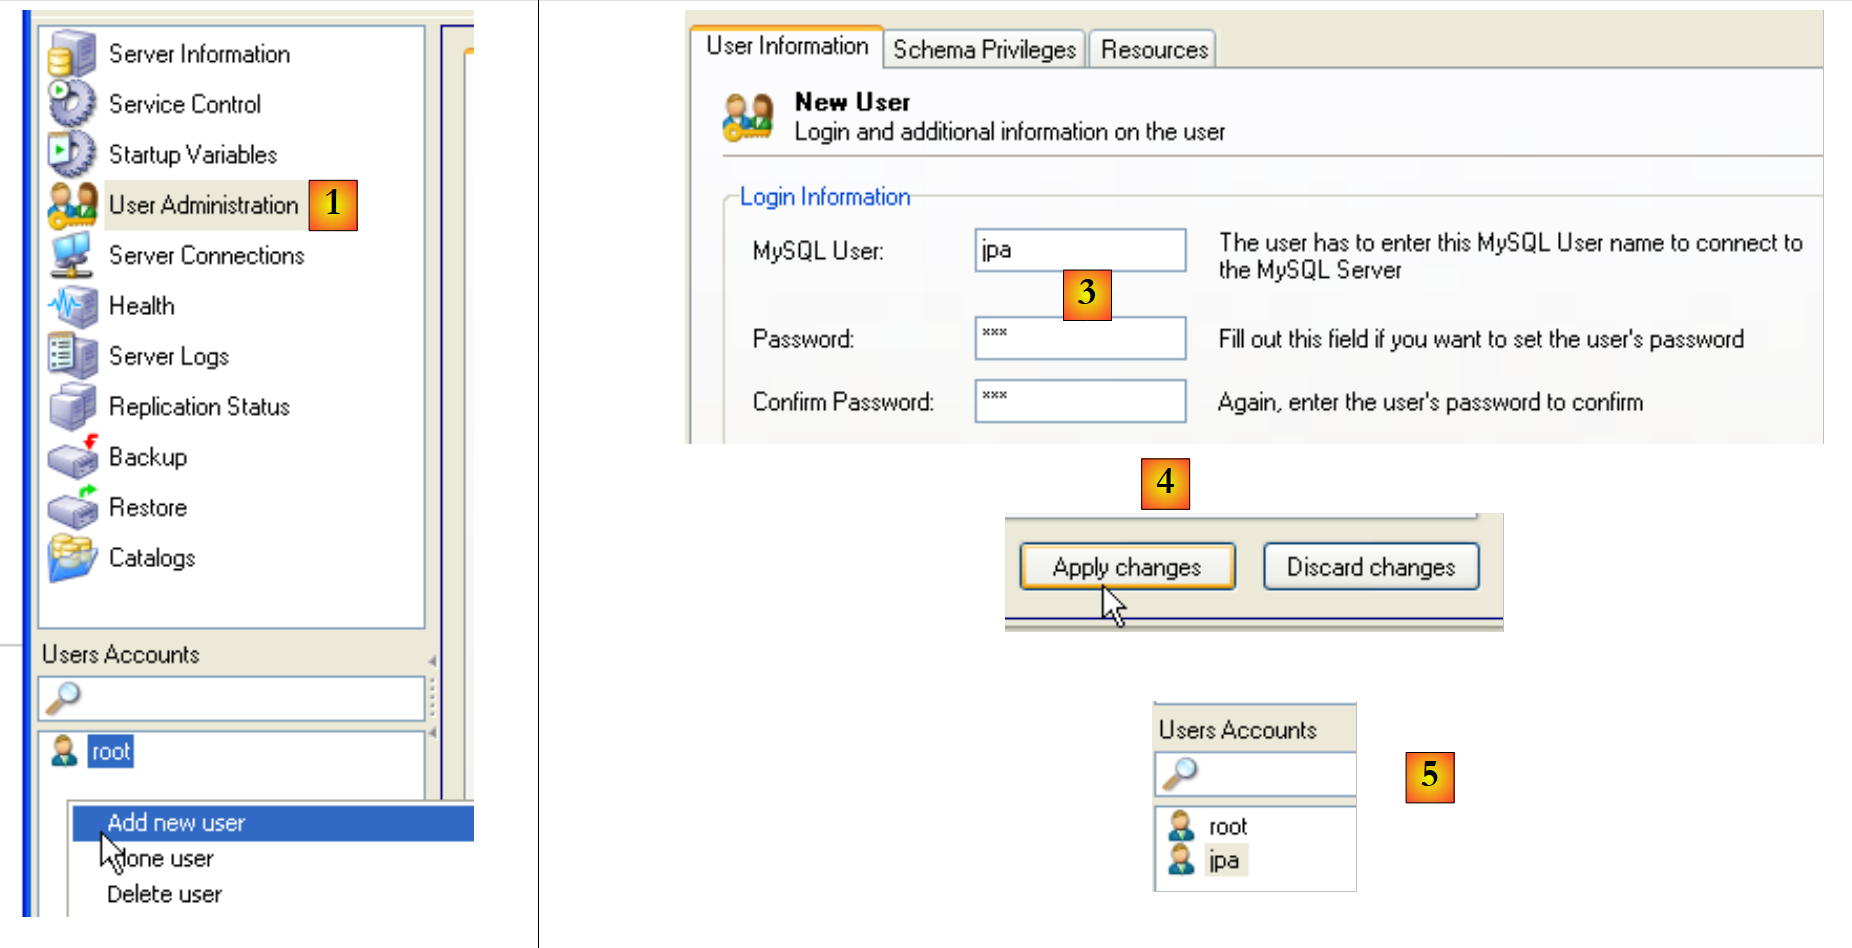 |
- In [1]: select [User Administration]
- In [2]: right-click in the [User accounts] section to create a new user
- In [3]: the user is named jpa and their password is jpa
- In [4]: Confirm the creation
- in [5]: the user [jpa] appears in the [User Accounts] window
Now the database:
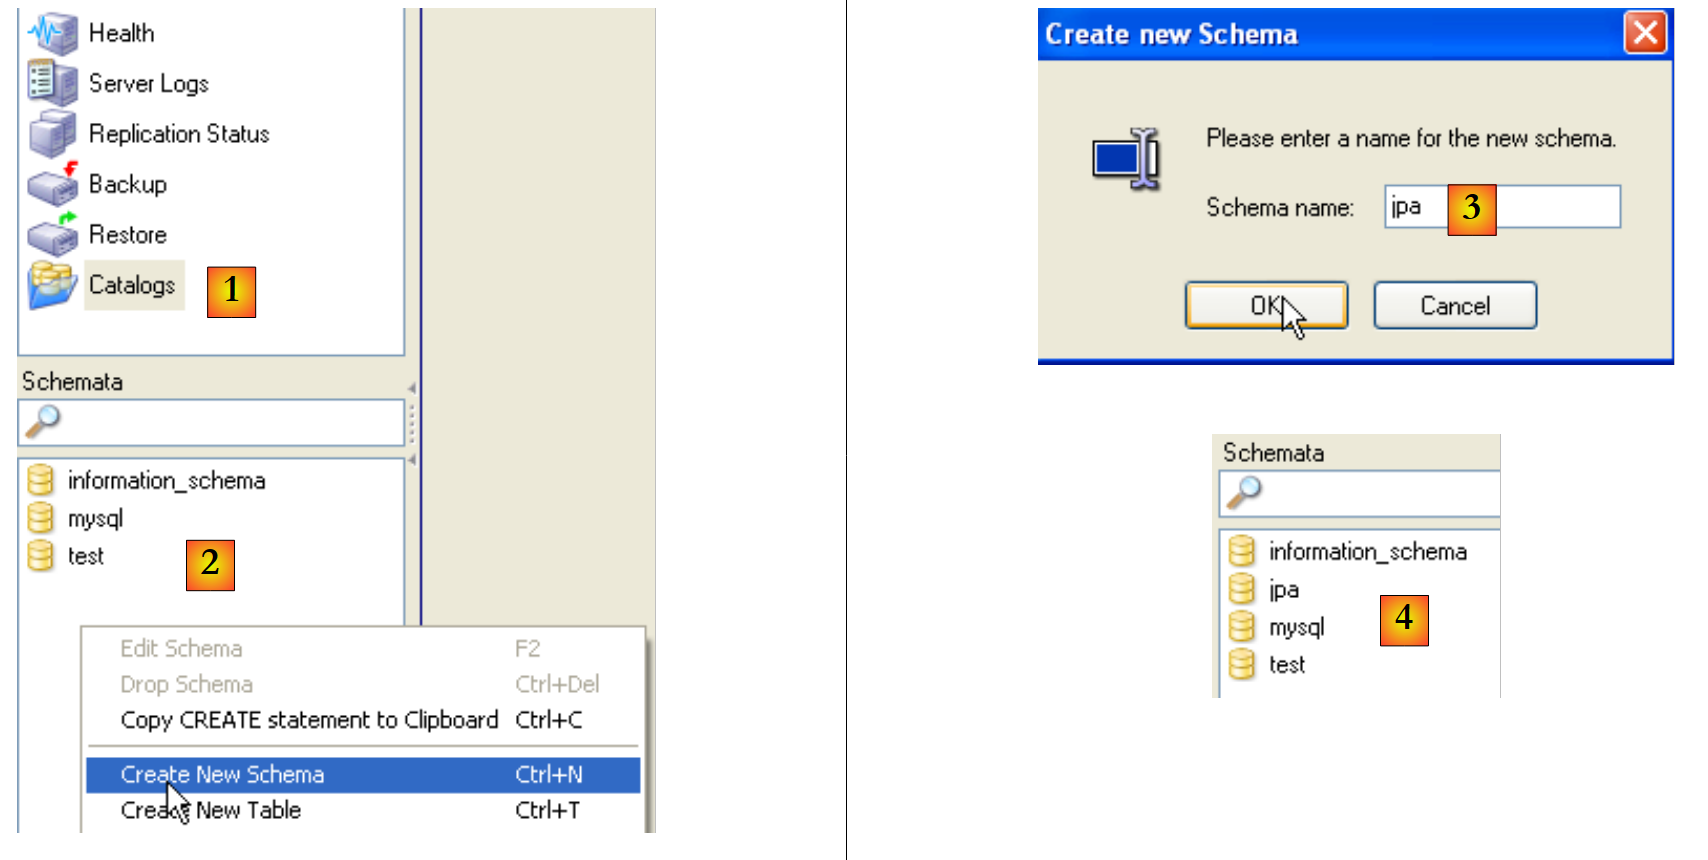 |
- in [1]: select option [Catalogs]
- In [2]: right-click on the [Schemata] window to create a new schema (designates a database)
- in [3]: name the new schema
- in [4]: it appears in the [Schemata] window
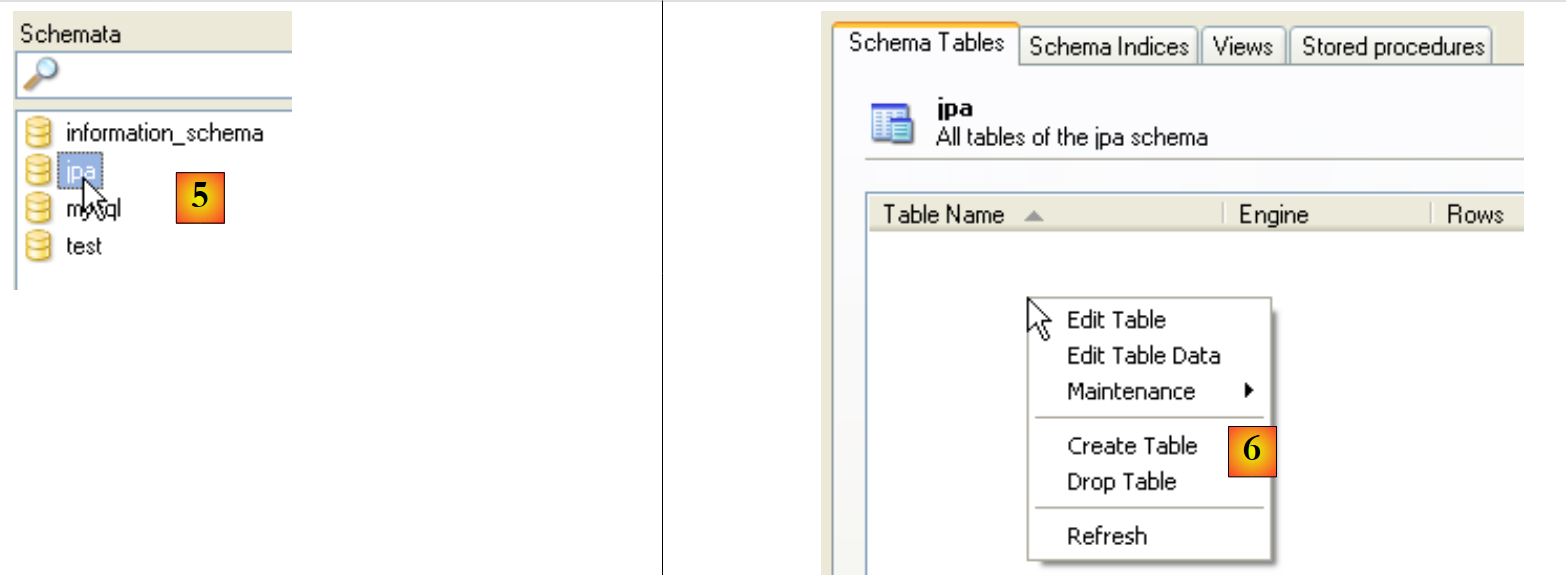 |
- in [5]: select the schema [jpa]
- in [6]: the objects of the schema [jpa] appear, including the tables. There are none yet. A right-click would allow you to create them. We’ll leave that to the reader.
Let’s return to the user [jpa] to grant them full permissions on the schema [jpa]:
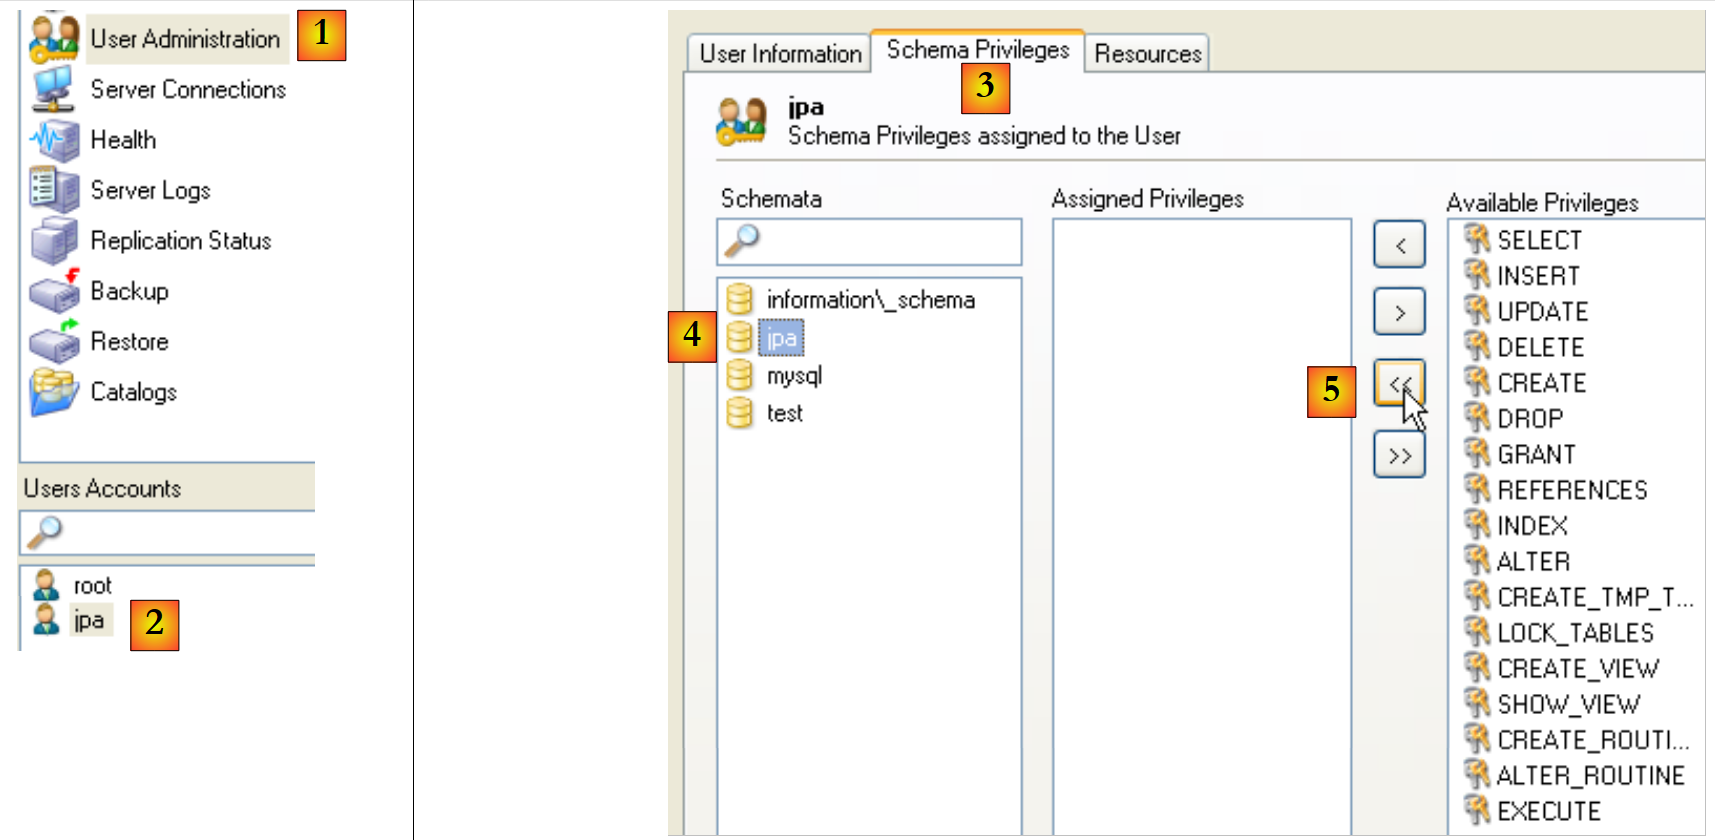 |
- in [1], then [2]: select user [jpa]
- in [3]: select the [Schema Privileges] tab
- in [4]: select the schema [jpa]
- in [5]: grant user [jpa] full privileges on schema [jpa]
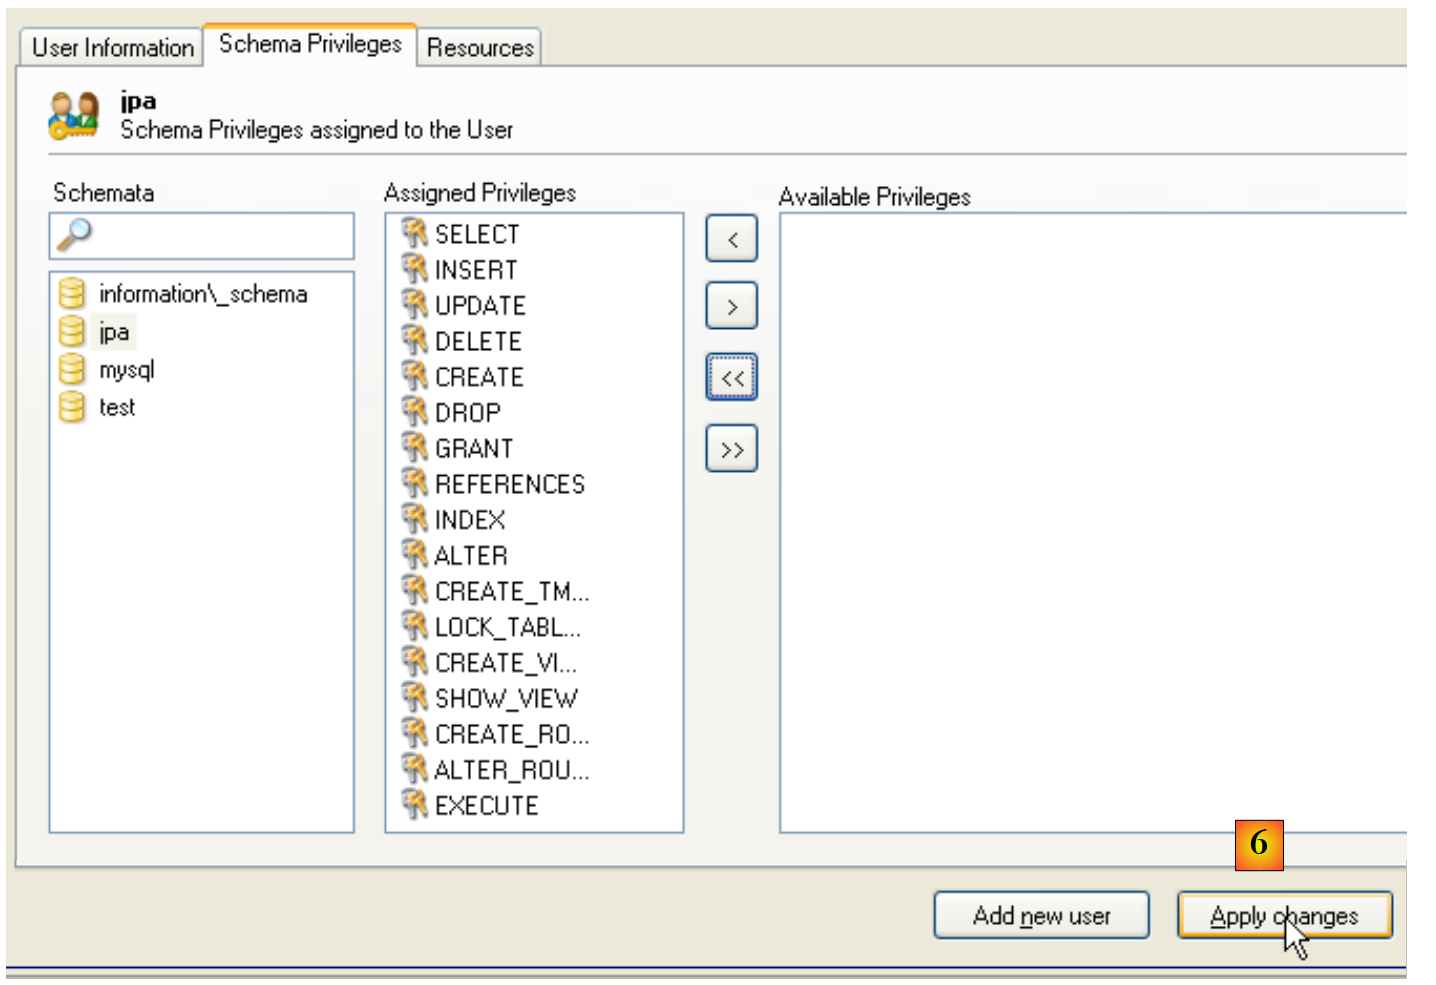 |
- In [6]: we validate the changes made
To verify that user [jpa] can work with schema [jpa], we shut down administrator MySQL. We restart it and log in this time under the name [jpa/jpa]:
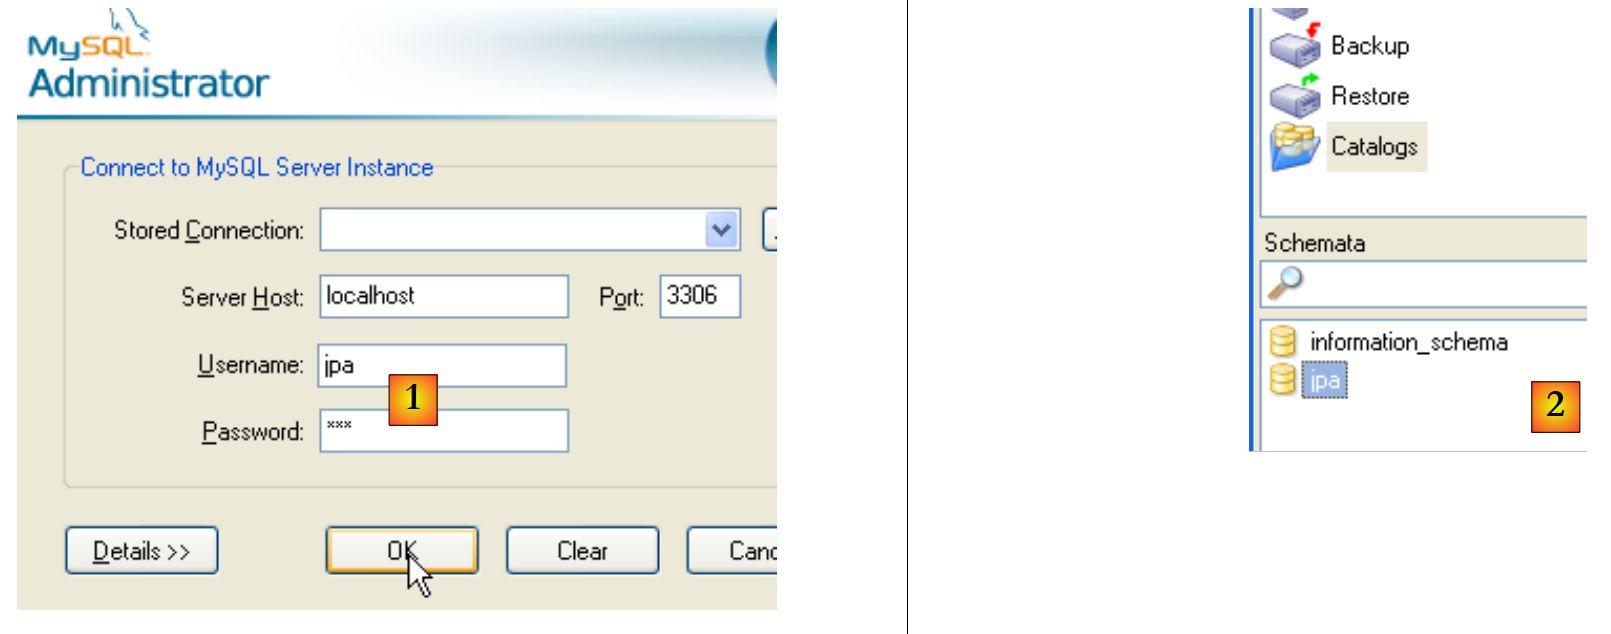 |
- as [1]: log in (jpa/jpa)
- as [2]: the login was successful, and in [Schemata], we see the schemas for which we have permissions. We see the schema [jpa].
We will now create a table [ARTICLES] using a script SQL.
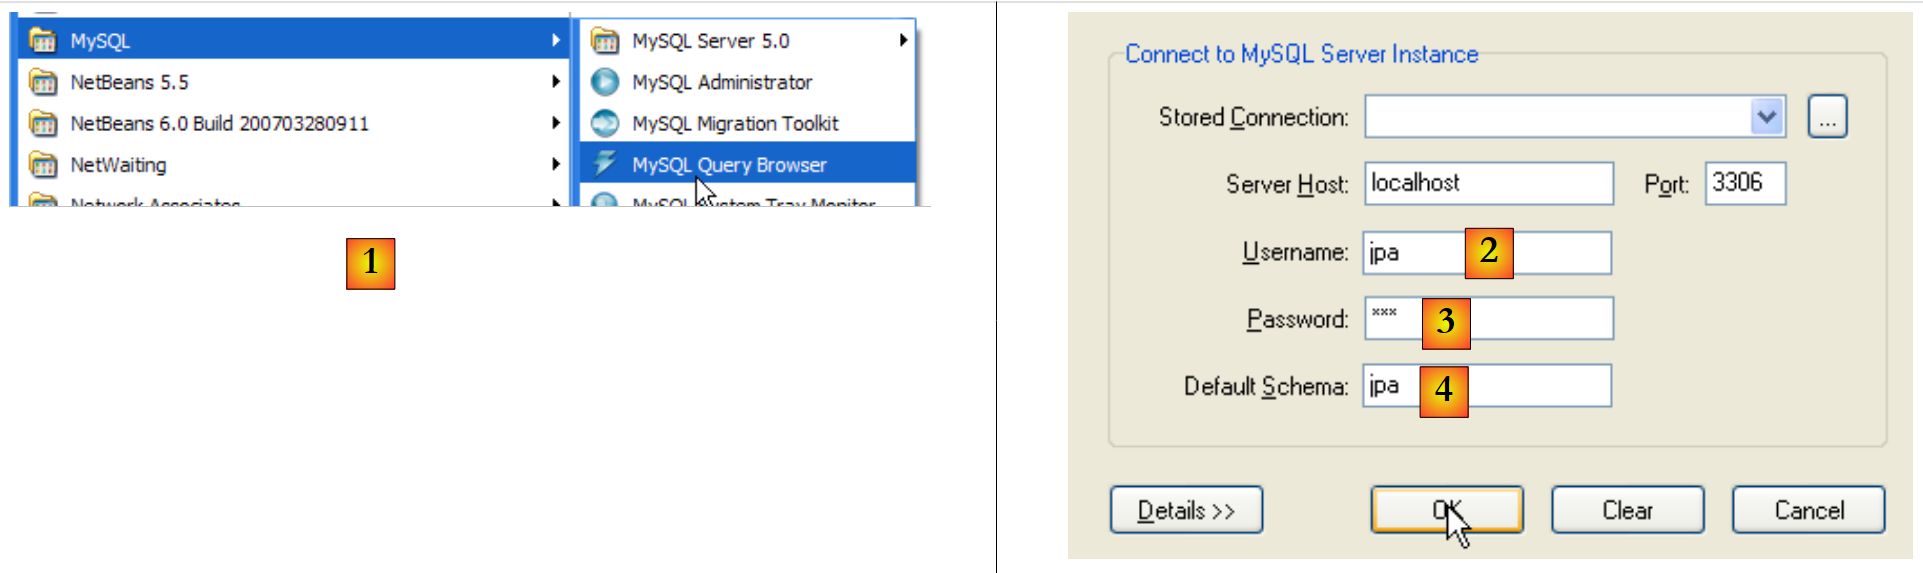 |
- In [1]: use the [MySQL Query Browser] application
- In [2], [3], [4]: log in (jpa / jpa / jpa)
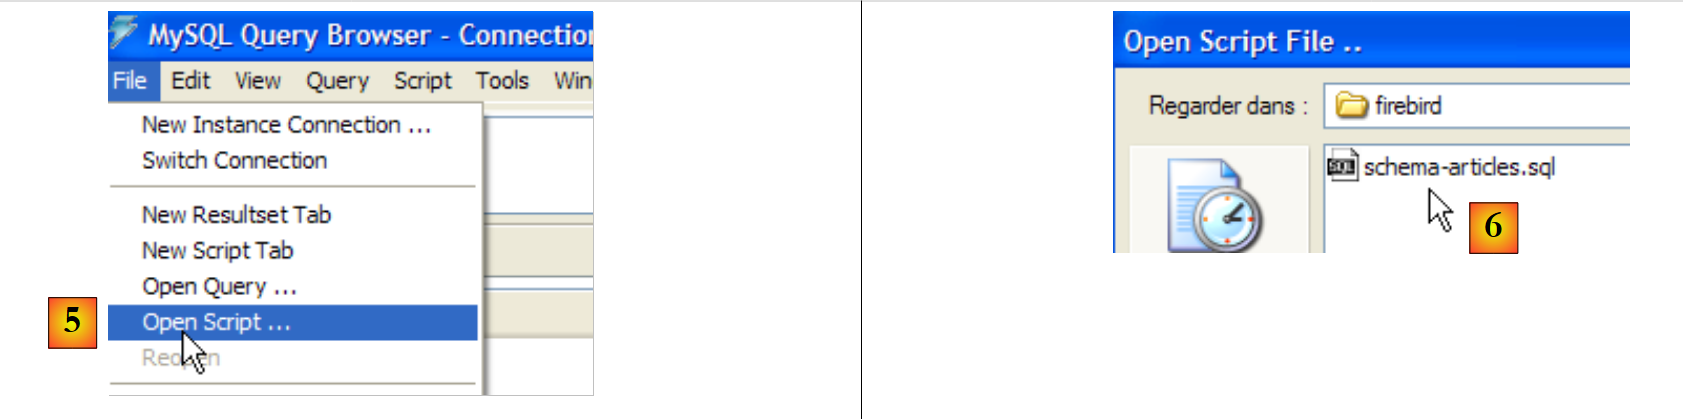 |
- in [5]: open a script SQL to run it
- in [6]: specify the following script [schema-articles.sql]:
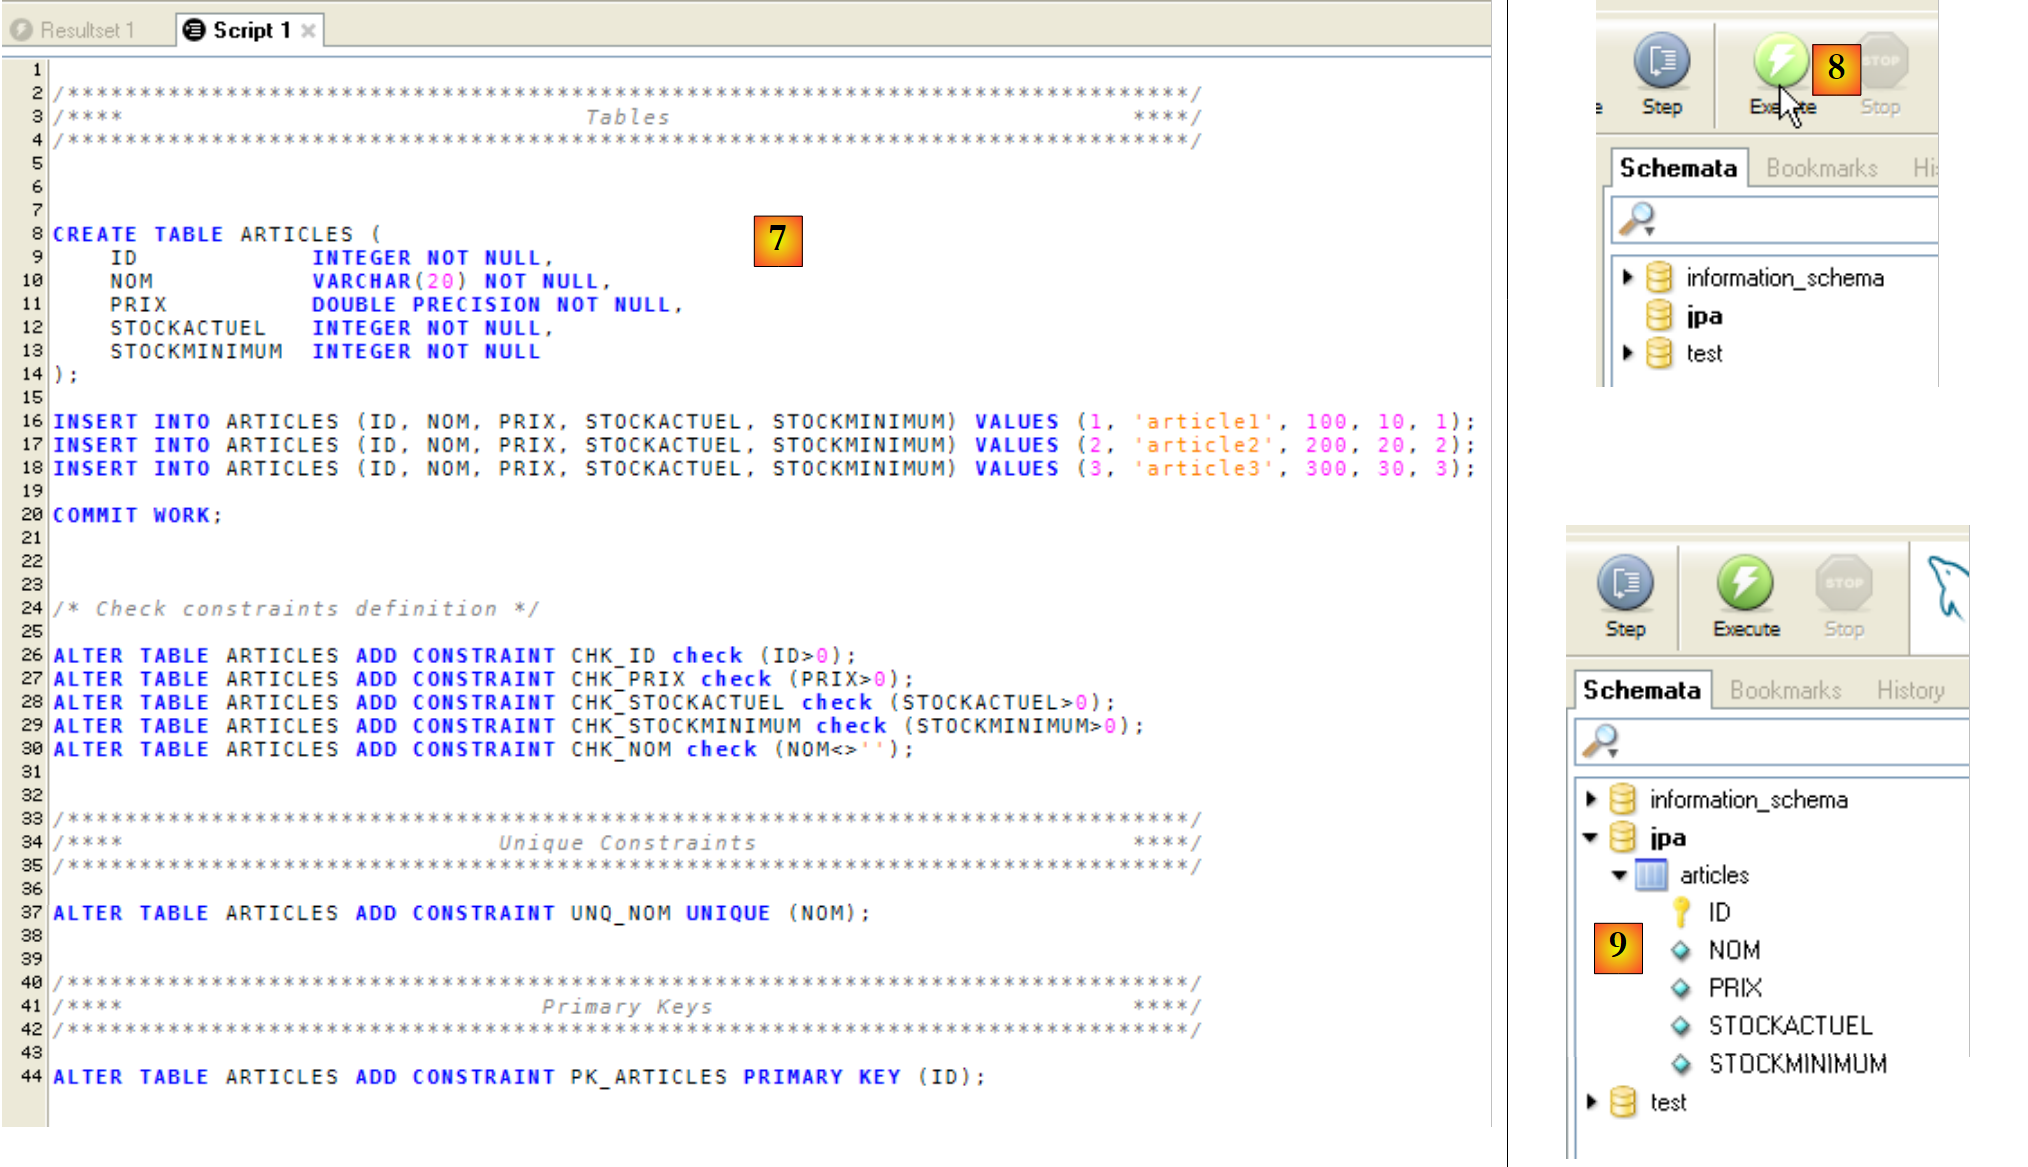 |
- in [7]: the script loaded
- in [8]: it is executed
- in [9]: the table [ARTICLES] has been created
14.2.5. Installation of the ADO.NET connector from MySQL5
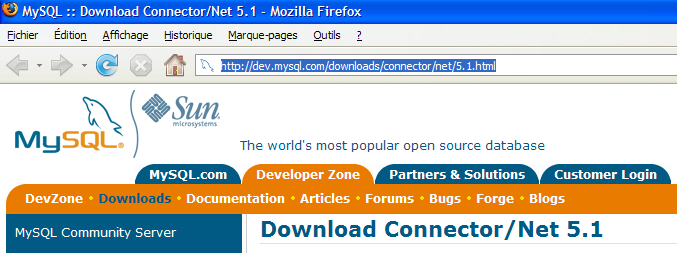
The ADO.NET connector from MySQL5 is available (April 2008) at [http://dev.mysql.com/downloads/connector/net/5.1.html]:
 |
Installing this connector adds a namespace to the .NET platform:
14.2.6. Installation of the ODBC driver from MySQL5
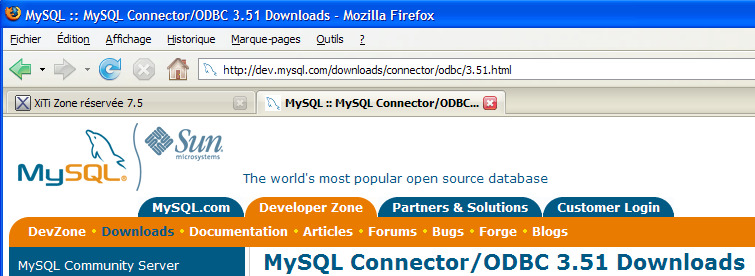
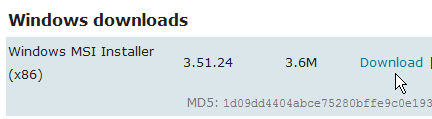
The ODBC connector (Open DataBase Connectivity) from MySQL5 is available (April 2008) at [http://dev.mysql.com/downloads/connector/odbc/3.51.html]:
 |  |
After installation, the presence of the ODBC connector can be verified as follows:
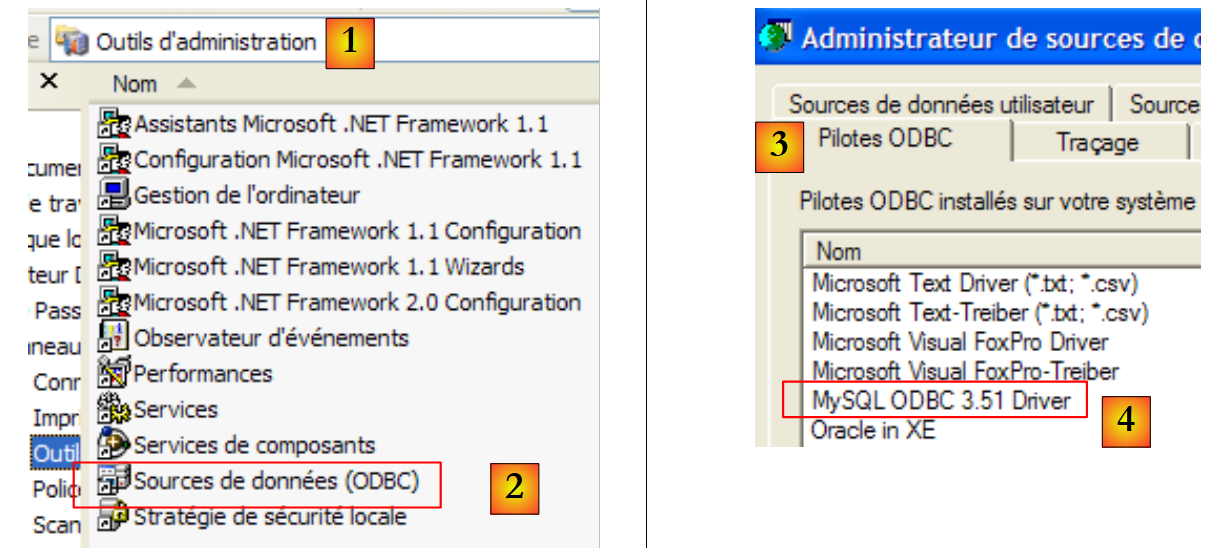 |
- In [1], select [Outils d'administration] (in XP Pro: Start Menu / Control Panel / Performance and Maintenance / Administrative Tools)
- In [2], double-click [Sources de données (ODBC)]
- in [3], select the [Pilotes ODBC] tab
- in [4], the driver ODBC from MySQL