3. 首个 [nuxt.js] 应用程序
3.1. 应用程序的创建
在我们的 [nuxt.js] 开发中,我们将继续使用 VS Code。我们创建了一个空文件夹 [dvp],用于存放示例代码。然后打开该文件夹:
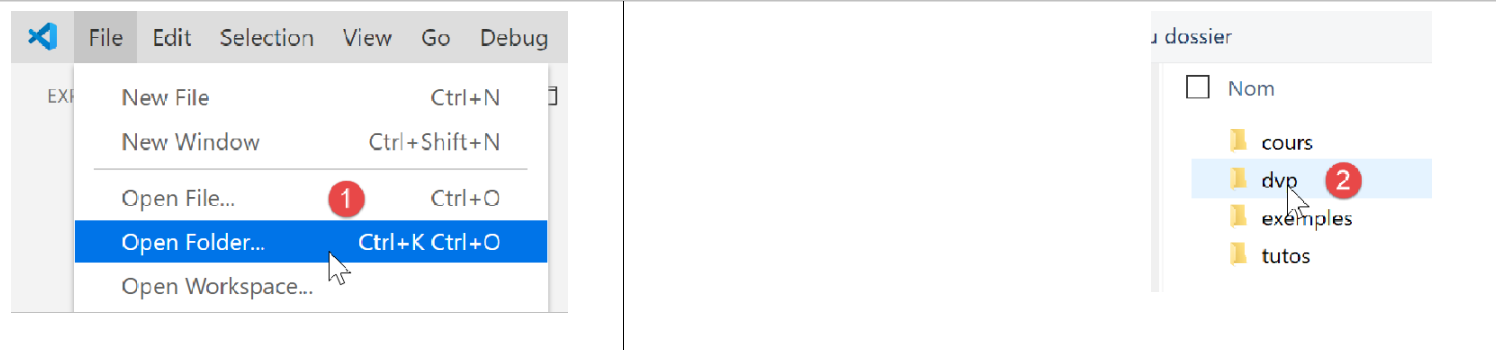
我们将工作区保存为 [intro-nuxtjs] [3-5]:
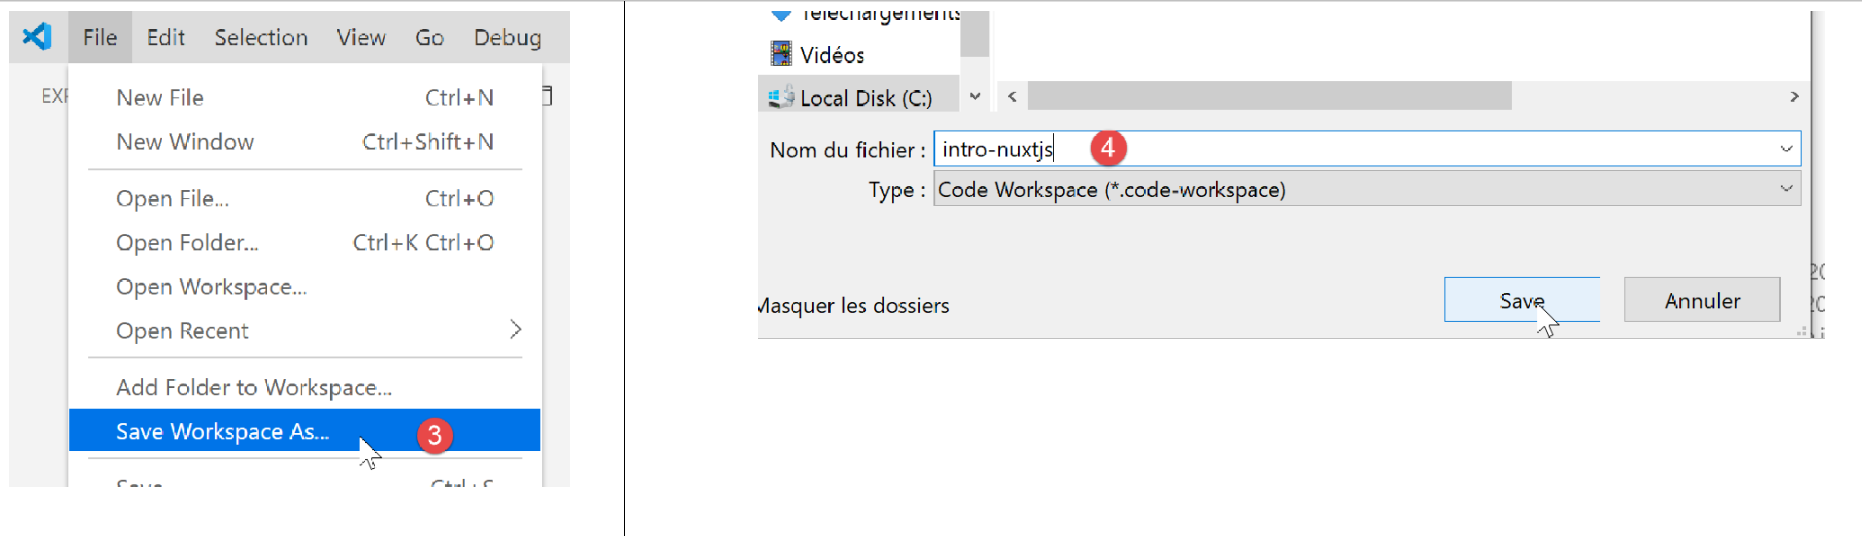
我们打开终端 [6-7]:

到目前为止,我们一直使用的是 JavaScript 包管理器 [npm]。 为了换个方式,我们将在此使用 [yarn] 管理器。该管理器与 [npm] 一样,随 [node.js] 的最新版本一同安装。 要创建第一个 [nuxt] 应用程序,我们使用命令 [yarn create nuxt-app <dossier>] [1]。 该命令将要求提供有关待生成项目的若干信息,获取这些信息后,将生成 [2]:
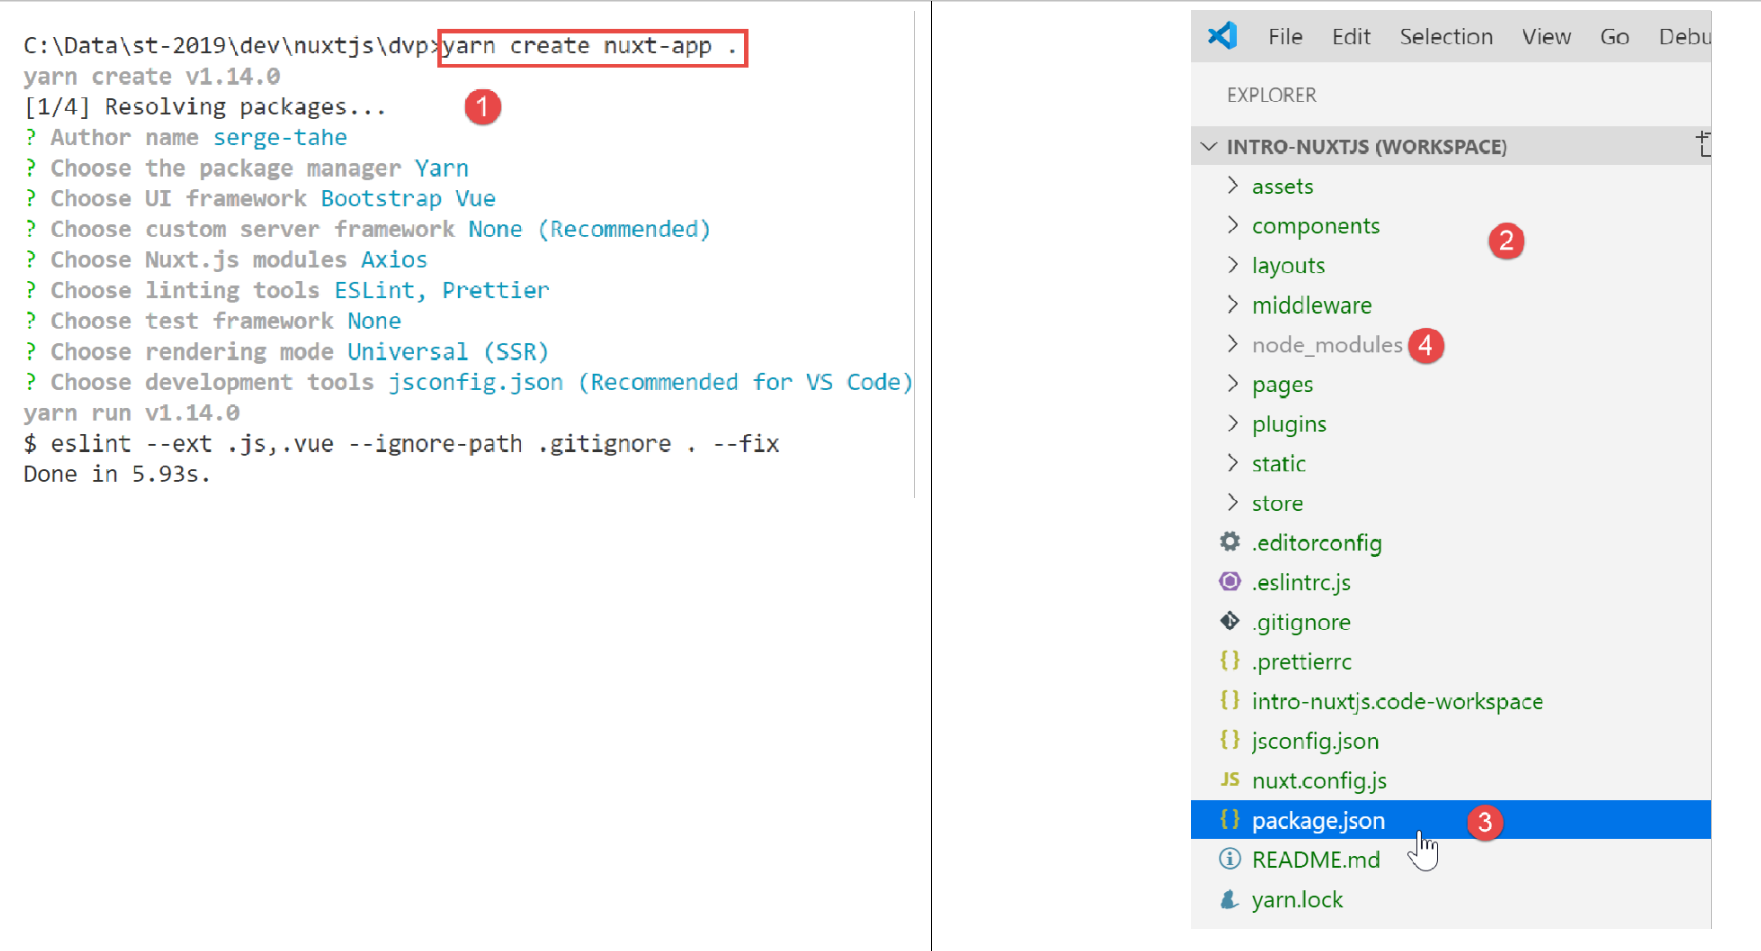
在 [2] 中,已创建了一个完整的文件树。文件 [package.json] 列出了下载到文件夹 [node-modules] 和 [4] 中的 JavaScript 库:
{
  "name": "nuxt-intro",
  "version": "1.0.0",
  "description": "nuxt-intro",
  "author": "serge-tahe",
  "private": true,
  "scripts": {
    "dev": "nuxt",
    "build": "nuxt build",
    "start": "nuxt start",
    "generate": "nuxt generate",
    "lint": "eslint --ext .js,.vue --ignore-path .gitignore ."
  },
  "dependencies": {
    "nuxt": "^2.0.0",
    "bootstrap-vue": "^2.0.0",
    "bootstrap": "^4.1.3",
    "@nuxtjs/axios": "^5.3.6"
  },
  "devDependencies": {
    "@nuxtjs/eslint-config": "^1.0.1",
    "@nuxtjs/eslint-module": "^1.0.0",
    "babel-eslint": "^10.0.1",
    "eslint": "^6.1.0",
    "eslint-plugin-nuxt": ">=0.4.2",
    "eslint-config-prettier": "^4.1.0",
    "eslint-plugin-prettier": "^3.0.1",
    "prettier": "^1.16.4"
  }
}
该文件反映了针对命令 [create nuxt-app] 生成的响应,用于定义所创建的项目(2019年11月)。读者可能拥有不同的 [package.json] 文件:
- 可能是因为对问题的回答不同;
- 自本文撰写以来,命令 [create nuxt-app] 已发生变化:依赖项和版本已更新;
脚本的第8行是启动应用程序的命令:
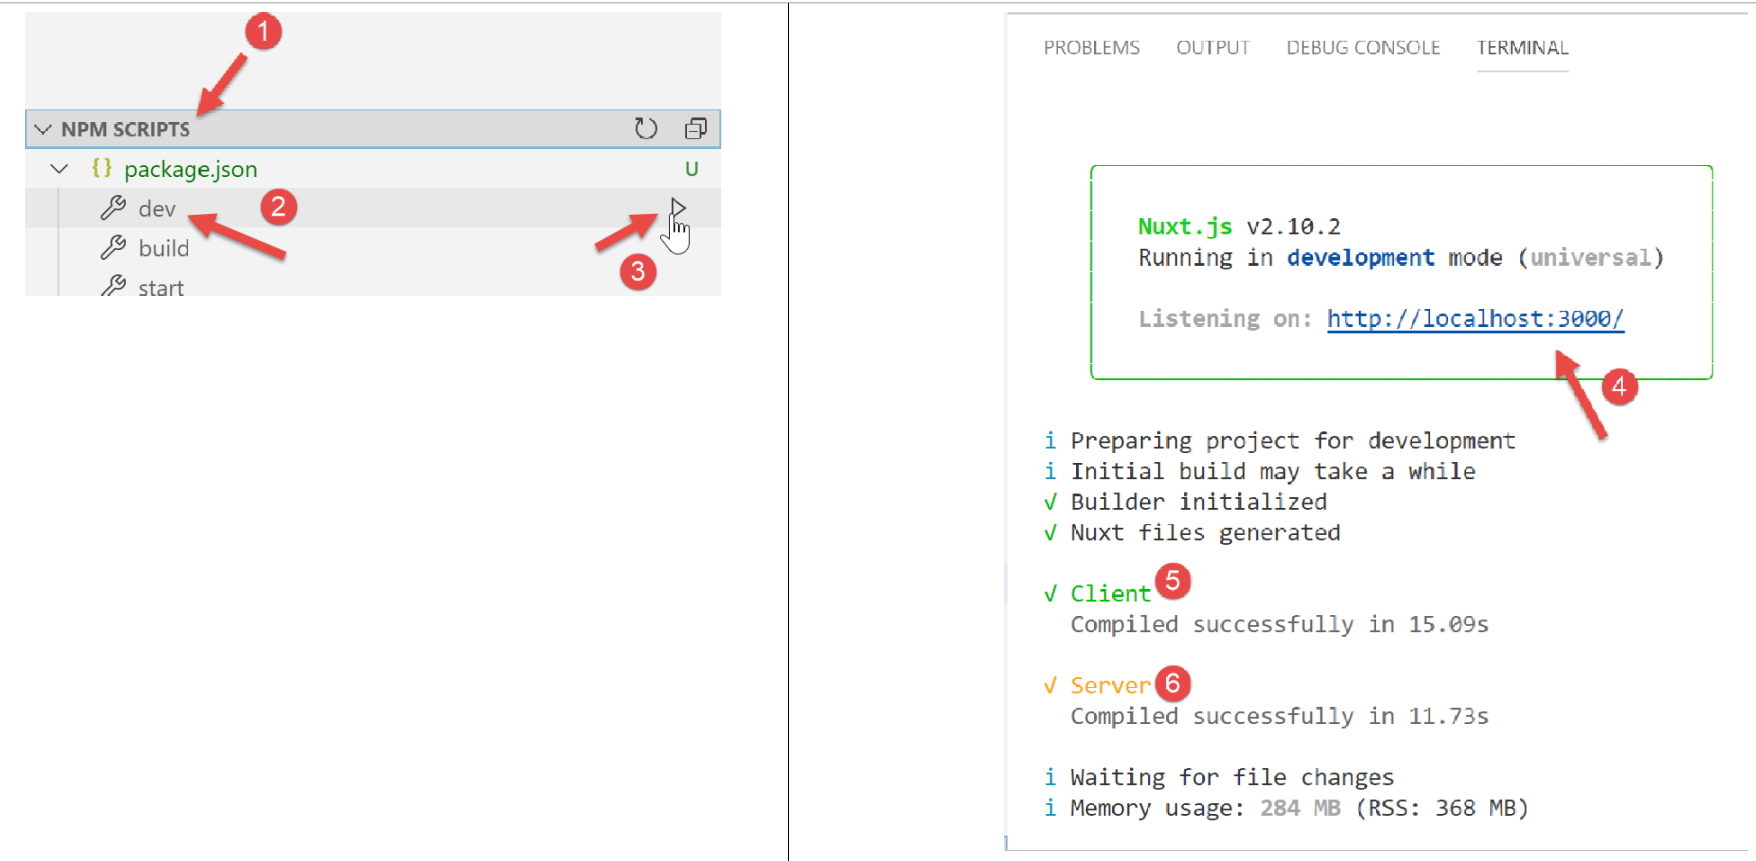
- 在 [4] 中,可见该应用程序可在 URL 和 [localhost:3000] 上访问;
- 在 [5-6] 中,可以看到该应用程序生成了一台服务器 [6] 以及一个(该服务器的)客户端 [5];
我们在浏览器中请求 URL [http://localhost:3000/]:

3.2. [nuxt] 应用程序的树形结构说明
让我们回顾一下所创建应用程序的结构:
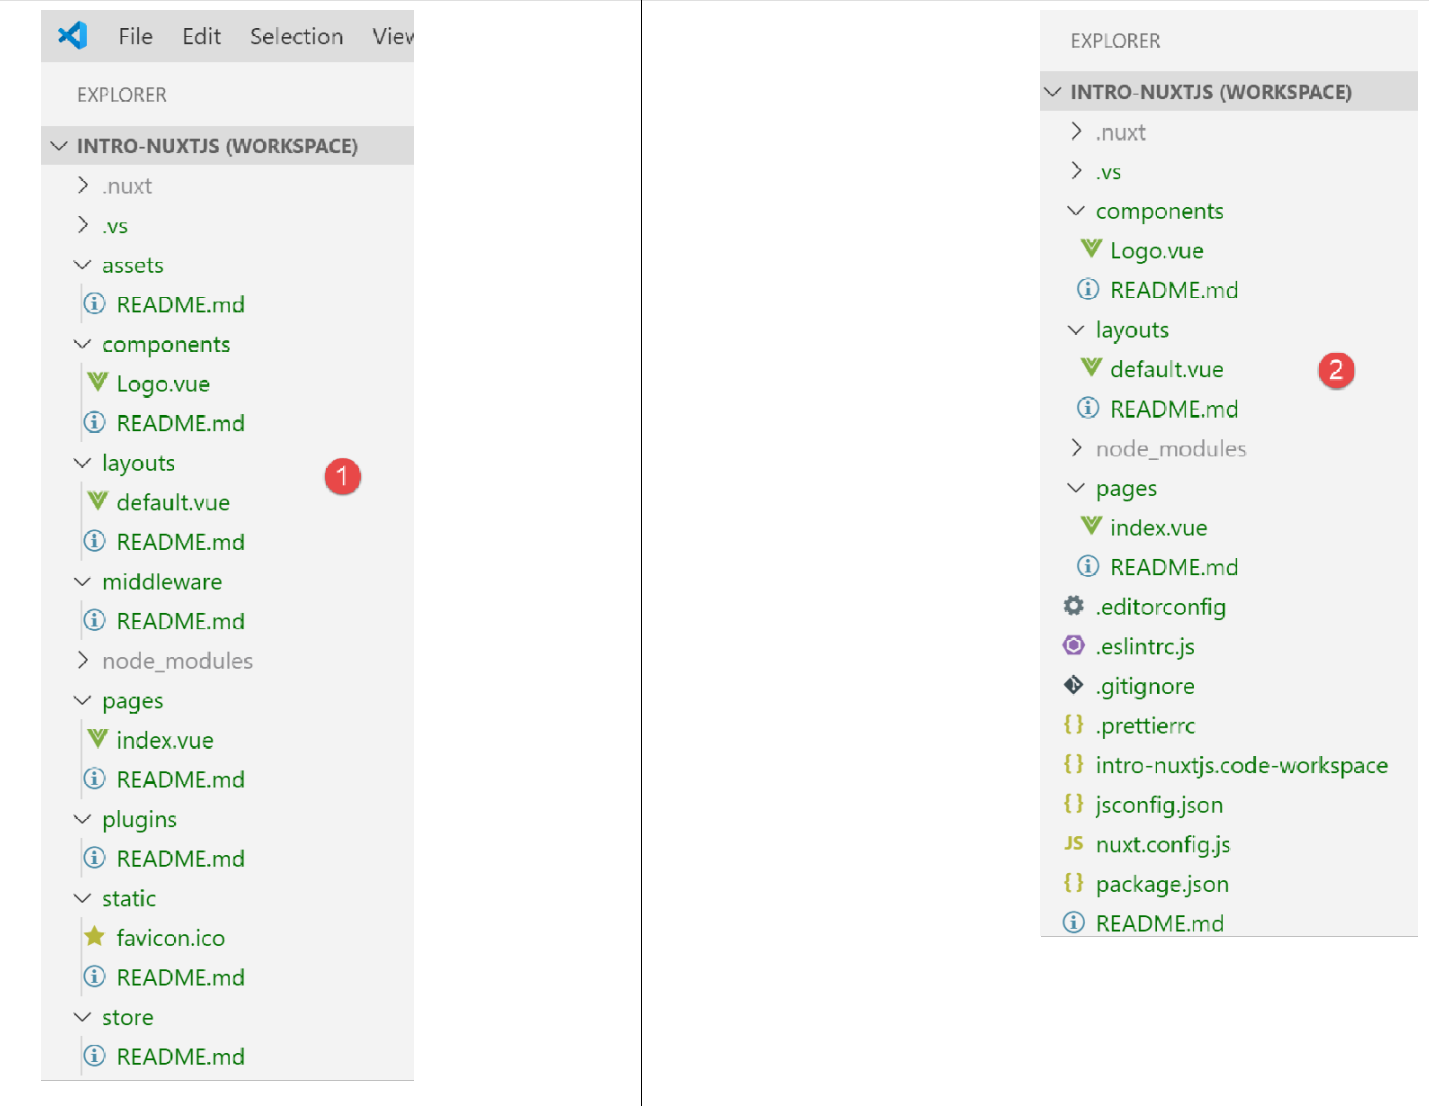
各文件夹的作用如下:
assets | 应用程序的未编译资源(图片等); |
static | 该文件夹中的文件将位于应用程序根目录下。此文件夹用于存放必须位于应用程序根目录的文件,例如供搜索引擎使用的文件 [robots.txt]; |
components | 应用程序中用于 [layouts] 和 [pages] 的组件 [vue]; |
layouts | 应用程序中用于为 [pages] 提供版式的组件 [vue]; |
页面 | 由应用程序不同路由显示的 [vue] 组件。这些可以称为应用程序的视图。 页面在 [nuxt] 中扮演着特殊角色:路由是根据 [pages] 文件夹中的目录结构动态生成的; |
中间件 | 在每次路由变更时执行的脚本。它们用于控制路由; |
插件 | 名称容易引起混淆。该文件夹既可能包含插件,也可能包含普通脚本。其中发现的脚本会在应用程序启动时执行; |
store | 如果包含脚本 [index.js],则该脚本将定义 [Vuex] 存储的实例; |
如果某个文件夹为空,可以将其从目录树中删除。上文中的 [assets, static, middleware, plugins, store] 文件夹可以被删除,[2] 亦然。
3.3. 配置文件 [nuxt.config]
应用程序的运行由以下 [nuxt.config.js] 文件控制:
export default {
  mode: 'universal',
  /*
   ** Headers of the page
   */
  head: {
    title: process.env.npm_package_name || '',
    meta: [
      { charset: 'utf-8' },
      { name: 'viewport', content: 'width=device-width, initial-scale=1' },
      {
        hid: 'description',
        name: 'description',
        content: process.env.npm_package_description || ''
      }
    ],
    link: [{ rel: 'icon', type: 'image/x-icon', href: '/favicon.ico' }]
  },
  /*
   ** Customize the progress-bar color
   */
  loading: { color: '#fff' },
  /*
   ** Global CSS
   */
  css: [],
  /*
   ** Plugins to load before mounting the App
   */
  plugins: [],
  /*
   ** Nuxt.js dev-modules
   */
  buildModules: [
    // 文档:https://github.com/nuxt-community/eslint-module
    '@nuxtjs/eslint-module'
  ],
  /*
   ** Nuxt.js modules
   */
  modules: [
    // 文档:https://bootstrap-vue.js.org
    'bootstrap-vue/nuxt',
    // 文档:https://axios.nuxtjs.org/usage
    '@nuxtjs/axios'
  ],
  /*
   ** Axios module configuration
   ** See https://axios.nuxtjs.org/options
   */
  axios: {},
  /*
   ** Build configuration
   */
  build: {
    /*
     ** You can extend webpack config here
     */
    extend(config, ctx) {}
  }
}
- 第 2 行:生成的应用程序类型:
- [universal]:客户端/服务器应用程序。在应用程序的初始加载以及浏览器每次刷新页面时,都会向服务器请求提供页面;
- [sap]:[Single Page Application] 类型的应用程序:服务器最初提供整个应用程序。随后客户端独立运行,即使在浏览器中刷新页面时也是如此;
- 第 6-18 行:定义了应用程序各页面中 HTML <head> 的页眉:
- 第 7 行:页面标题的 <title> 标签;
- 第8-16行:<meta>标签;
- 第 17 行:<link> 标签
在生成的应用程序中,<head> 标签如下(浏览器中显示的页面源代码):
<title>nuxt-intro</title>
<meta data-n-head="ssr" charset="utf-8">
<meta data-n-head="ssr" name="viewport" content="width=device-width, initial-scale=1">
<meta data-n-head="ssr" data-hid="description" name="description" content="nuxt-intro">
<link data-n-head="ssr" rel="icon" type="image/x-icon" href="/favicon.ico">
<link rel="preload" href="/_nuxt/runtime.js" as="script">
<link rel="preload" href="/_nuxt/commons.app.js" as="script">
<link rel="preload" href="/_nuxt/vendors.app.js" as="script">
<link rel="preload" href="/_nuxt/app.js" as="script">
现在,我们将文件 [nuxt.config] 修改如下:
head: {
    title: 'Introduction à [nuxt.js]',
    meta: [
      { charset: 'utf-8' },
      { name: 'viewport', content: 'width=device-width, initial-scale=1' },
      {
        hid: 'description',
        name: 'description',
        content: 'ssr routing loading asyncdata middleware plugins store'
      }
    ],
    link: [{ rel: 'icon', type: 'image/x-icon', href: '/favicon.ico' }]
},
当我们重新运行应用程序时,<head> 标签变为如下所示(浏览器中显示的页面源代码):
  <head >
    <title>Introduction à [nuxt.js]</title>
    <meta data-n-head="ssr" charset="utf-8">
    <meta data-n-head="ssr" name="viewport" content="width=device-width, initial-scale=1">
    <meta data-n-head="ssr" data-hid="description" name="description" content="ssr routing loading asyncdata middleware plugins store">
    <link data-n-head="ssr" rel="icon" type="image/x-icon" href="/favicon.ico">
    <link rel="preload" href="/_nuxt/runtime.js" as="script">
    <link rel="preload" href="/_nuxt/commons.app.js" as="script">
    <link rel="preload" href="/_nuxt/vendors.app.js" as="script">
<link rel="preload" href="/_nuxt/app.js" as="script">
让我们回到文件 [nuxt.config]:
export default {
  mode: 'universal',
  /*
   ** Headers of the page
   */
  head: {
    ...
  },
  /*
   ** Customize the progress-bar color
   */
  loading: { color: '#fff' },
  /*
   ** Global CSS
   */
  css: [],
  /*
   ** Plugins to load before mounting the App
   */
  plugins: [],
  /*
   ** Nuxt.js dev-modules
   */
  buildModules: [
    // 文档:https://github.com/nuxt-community/eslint-module
    '@nuxtjs/eslint-module'
  ],
  /*
   ** Nuxt.js modules
   */
  modules: [
    // 文档:https://bootstrap-vue.js.org
    'bootstrap-vue/nuxt',
    // 文档:https://axios.nuxtjs.org/usage
    '@nuxtjs/axios'
  ],
  /*
   ** Axios module configuration
   ** See https://axios.nuxtjs.org/options
   */
  axios: {},
  /*
   ** Build configuration
   */
  build: {
    /*
     ** You can extend webpack config here
     */
    extend(config, ctx) {}
  }
}
- 第 12 行:在 [nuxt] 客户端的每个路由之间,如果路由切换需要一定时间,会出现一个加载条。[loading] 属性用于配置此加载条,此处配置的是加载条的颜色;
- 第16行:全局文件[css]。这些文件将自动包含在应用程序的所有页面中;
- 第24-27行:应用程序构建(build)所需的JavaScript模块;
- 第 31-36 行:应用程序使用的 JavaScript 模块;
- 第 41 行:当用户选择 [axios] 库用于与第三方服务器交互的 HTTP 对话框时,该库的配置;
- 第 45-50 行:项目构建(build)的配置;
可以在配置文件中添加其他键。特别是可以配置服务端口(默认值为 3000)和项目根目录(默认是项目的根文件夹)。现在我们就通过添加以下键来完成这些配置:
// 源代码目录
  srcDir: '.',
  router: {
    // URL 应用程序页面的根目录
    base: '/nuxt-intro/'
  },
  // 服务器
  server: {
    // 服务端口 - 默认 3000
    port: 81,
    // 监听的网络地址 - 默认 localhost=127.0.0.1
    host: '0.0.0.0'
  }
- 第 2 行:项目源代码的位置。此处位于当前文件夹中,即与文件 [nuxt.config.js] 处于同一层级。这是默认值;
- 第 8-13 行:配置服务器(请注意,[nuxt] 类型的应用程序(如 [universal])需同时安装在服务器和该服务器的客户端浏览器上);
- 第 10 行:应用程序的页面将通过服务器的 81 端口提供;
- 第12行:默认值为[localhost](网络地址127.0.0.1)。如果一台机器属于多个网络,则可能拥有多个网络地址。地址0.0.0.0表示Web服务器监听该机器的所有网络地址;
- 第3-6行:配置应用程序路由器 [nuxt];
- 第 5 行:应用程序的页面将可在 URL 和 [http://localhost:81/nuxt-intro/] 上访问;
将这些行添加到 [nuxt.config.js] 文件中,然后运行项目(npm dev 脚本)。结果如下:
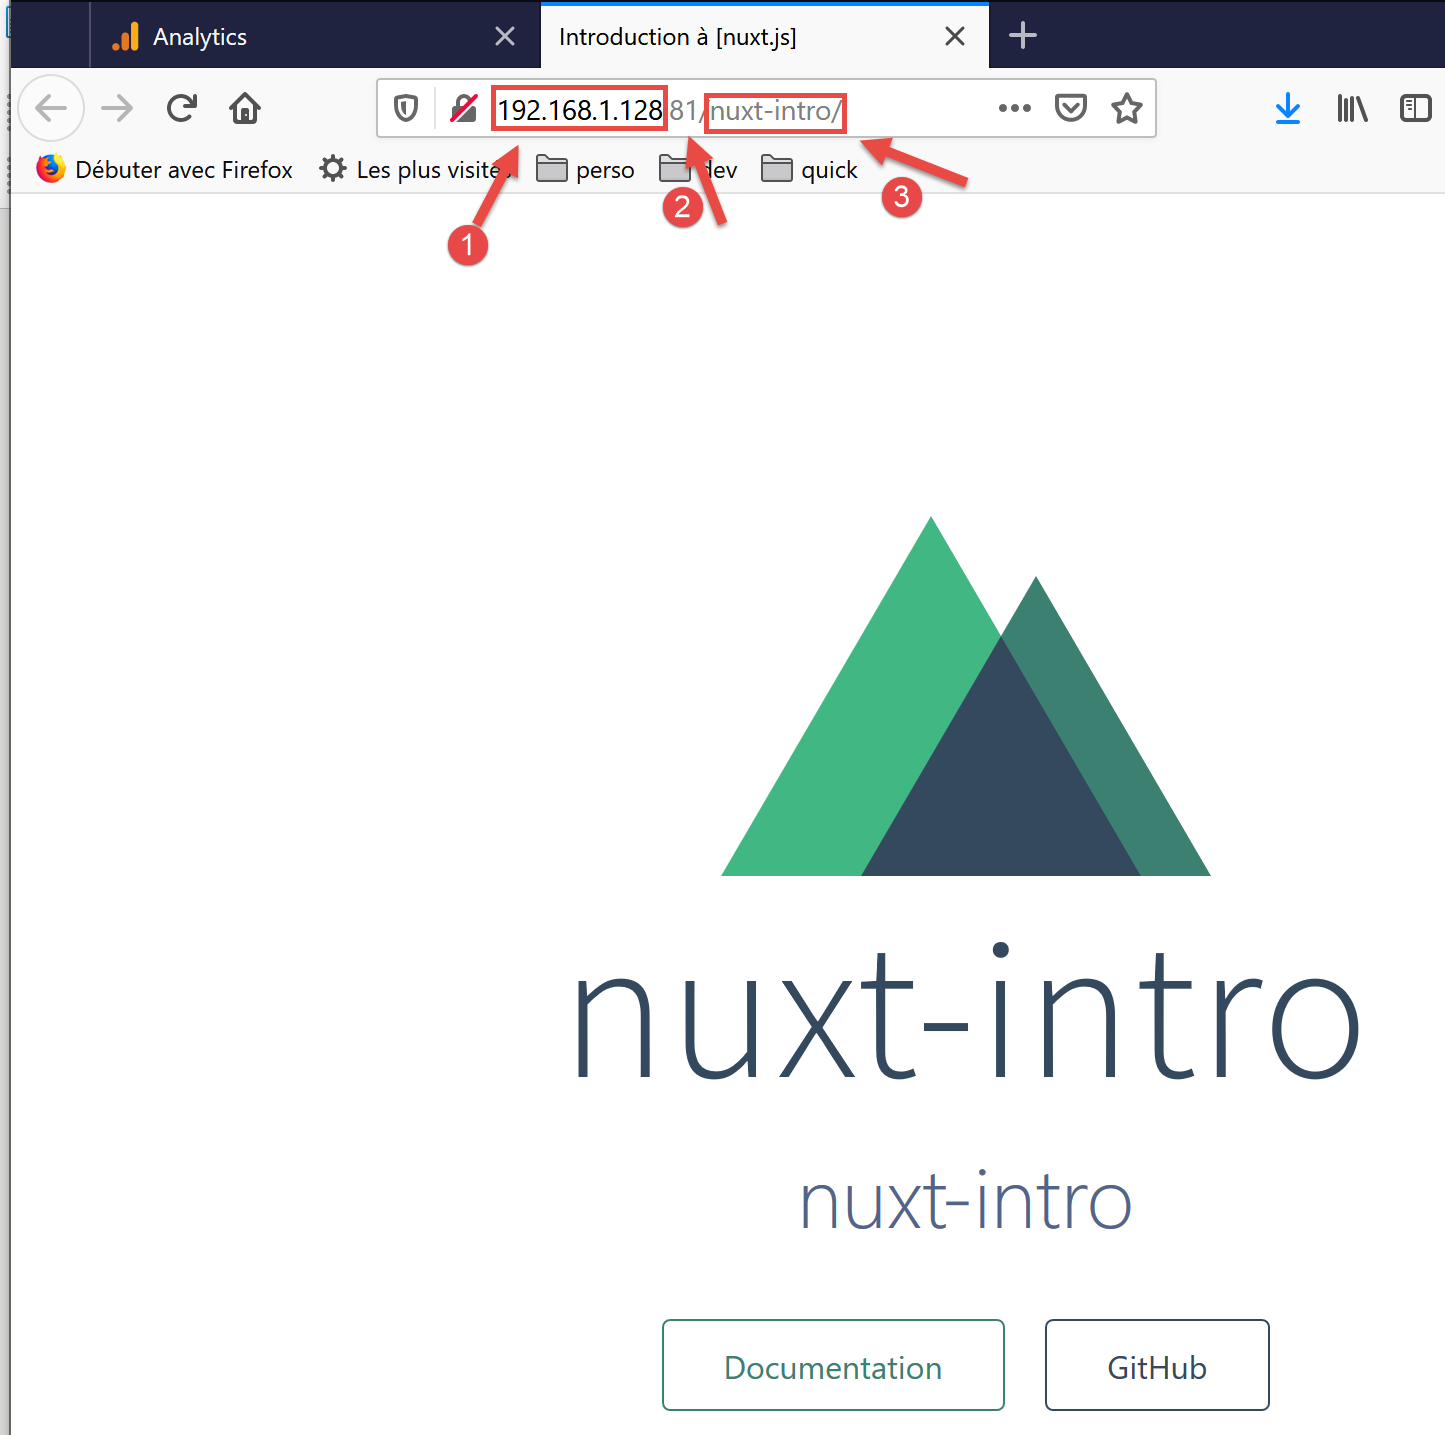
- 在 [1] 中,公共网络上的机器地址;
- 在 [2] 中,服务端口;
- [3] 表示应用程序的根目录;
3.4. 文件 [layouts]
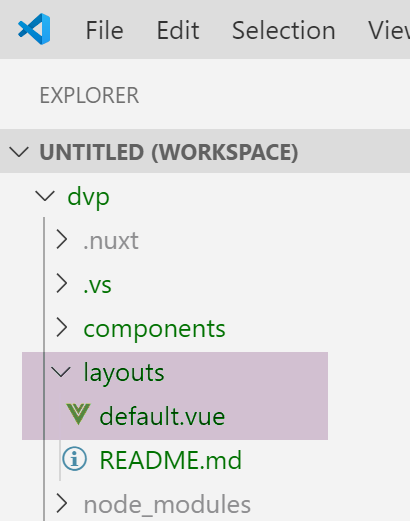
文件夹 [layouts] 用于布局组件。默认情况下,使用名为 [default.vue] 的组件。在此项目中,该组件如下所示:
<template>
  <div>
    <nuxt />
  </div>
</template>

<style>
html {
  font-family: 'Source Sans Pro', -apple-system, BlinkMacSystemFont, 'Segoe UI',
    Roboto, 'Helvetica Neue', Arial, sans-serif;
  font-size: 16px;
  word-spacing: 1px;
  -ms-text-size-adjust: 100%;
  -webkit-text-size-adjust: 100%;
  -moz-osx-font-smoothing: grayscale;
  -webkit-font-smoothing: antialiased;
  box-sizing: border-box;
}

*,
*:before,
*:after {
  box-sizing: border-box;
  margin: 0;
}

.button--green {
  display: inline-block;
  border-radius: 4px;
  border: 1px solid #3b8070;
  color: #3b8070;
  text-decoration: none;
  padding: 10px 30px;
}

.button--green:hover {
  color: #fff;
  background-color: #3b8070;
}

.button--grey {
  display: inline-block;
  border-radius: 4px;
  border: 1px solid #35495e;
  color: #35495e;
  text-decoration: none;
  padding: 10px 30px;
  margin-left: 15px;
}

.button--grey:hover {
  color: #fff;
  background-color: #35495e;
}
</style>
注释
- 第 1-5 行:组件的 [template];
- 第 3 行:<nuxt /> 标签指定了路由的当前页面;
- 第 7-55 行:布局组件内嵌的样式。由于该组件包含当前路由页面,因此该样式将应用于应用程序中的所有路由页面;
由此可见,[default.vue] 页面的主要目的是为路由页面应用样式。
3.5. 文件夹 [pages]
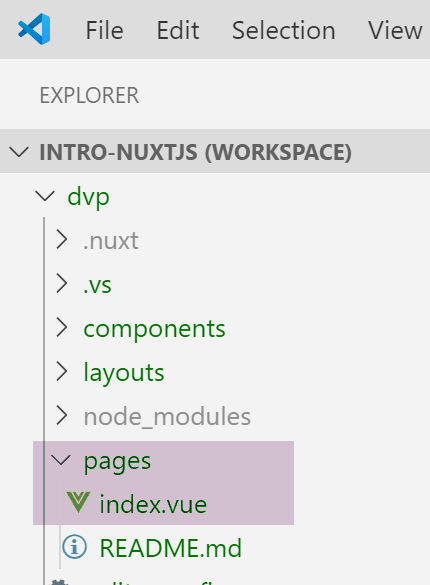
文件夹 [pages] 包含路由视图,即用户所看到的页面。页面 [index.vue] 是应用程序的首页。对于 [nuxt.js],没有路由文件。 路由是根据文件夹 [pages] 的结构确定的。 在此,[index.vue] 文件的存在将自动创建一个名为 [index] 的路由,其路径 [/index] 将被简化为 [/],因为这是首页。 因此,将创建以下路由:
此处的 [index.vue] 文件如下:
<template>
  <div class="container">
    <div>
      <logo />
      <h1 class="title">
        nuxt-intro
      </h1>
      <h2 class="subtitle">
        nuxt-intro
      </h2>
      <div class="links">
        <a href="https://nuxtjs.org/" target="_blank" class="button--green">
          Documentation
        </a>
        <a
          href="https://github.com/nuxt/nuxt.js"
          target="_blank"
          class="button--grey"
        >
          GitHub
        </a>
      </div>
    </div>
  </div>
</template>

<script>
import Logo from '~/components/Logo.vue'

export default {
  components: {
    Logo
  }
}
</script>

<style>
.container {
  margin: 0 auto;
  min-height: 100vh;
  display: flex;
  justify-content: center;
  align-items: center;
  text-align: center;
}

.title {
  font-family: 'Quicksand', 'Source Sans Pro', -apple-system, BlinkMacSystemFont,
    'Segoe UI', Roboto, 'Helvetica Neue', Arial, sans-serif;
  display: block;
  font-weight: 300;
  font-size: 100px;
  color: #35495e;
  letter-spacing: 1px;
}

.subtitle {
  font-weight: 300;
  font-size: 42px;
  color: #526488;
  word-spacing: 5px;
  padding-bottom: 15px;
}

.links {
  padding-top: 15px;
}
</style>
[template] 的第 1-25 行显示如下:

图像 [1] 由 [template] 的第 4 行生成。 因此可以看出,该页面使用了一个名为 [logo] 的组件。该组件在页面脚本的第 27-35 行中定义。第 28 行中,[~] 表示项目的根目录。
3.6. 组件 [Logo]
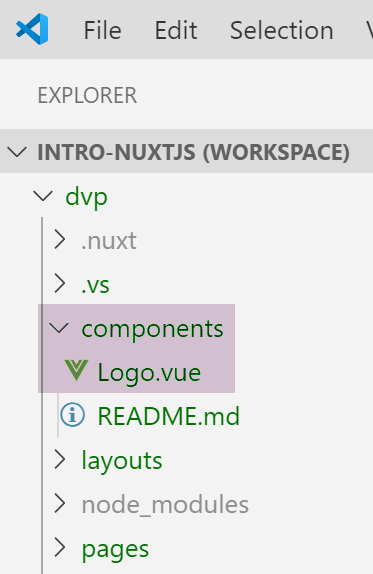
组件 [Logo.vue] 如下所示:
<template>
  <div class="VueToNuxtLogo">
    <div class="Triangle Triangle--two" />
    <div class="Triangle Triangle--one" />
    <div class="Triangle Triangle--three" />
    <div class="Triangle Triangle--four" />
  </div>
</template>

<style>
.VueToNuxtLogo {
  display: inline-block;
  animation: turn 2s linear forwards 1s;
  transform: rotateX(180deg);
  position: relative;
  overflow: hidden;
  height: 180px;
  width: 245px;
}

.Triangle {
  position: absolute;
  top: 0;
  left: 0;
  width: 0;
  height: 0;
}

.Triangle--one {
  border-left: 105px solid transparent;
  border-right: 105px solid transparent;
  border-bottom: 180px solid #41b883;
}

.Triangle--two {
  top: 30px;
  left: 35px;
  animation: goright 0.5s linear forwards 3.5s;
  border-left: 87.5px solid transparent;
  border-right: 87.5px solid transparent;
  border-bottom: 150px solid #3b8070;
}

.Triangle--three {
  top: 60px;
  left: 35px;
  animation: goright 0.5s linear forwards 3.5s;
  border-left: 70px solid transparent;
  border-right: 70px solid transparent;
  border-bottom: 120px solid #35495e;
}

.Triangle--four {
  top: 120px;
  left: 70px;
  animation: godown 0.5s linear forwards 3s;
  border-left: 35px solid transparent;
  border-right: 35px solid transparent;
  border-bottom: 60px solid #fff;
}

@keyframes turn {
  100% {
    transform: rotateX(0deg);
  }
}

@keyframes godown {
  100% {
    top: 180px;
  }
}

@keyframes goright {
  100% {
    left: 70px;
  }
}
</style>
该组件主要由样式和动画组成,用于创建动态图像。
3.7. 视图 DevTools
[Vue DevTools] 是一款浏览器扩展,用于在浏览器中检查 [nuxt.js] 和 [vue.js] 对象。 我们在关于 [vue.js] 的章节中已经使用过它。让我们看看当应用程序的主页显示时,该工具会发现什么:
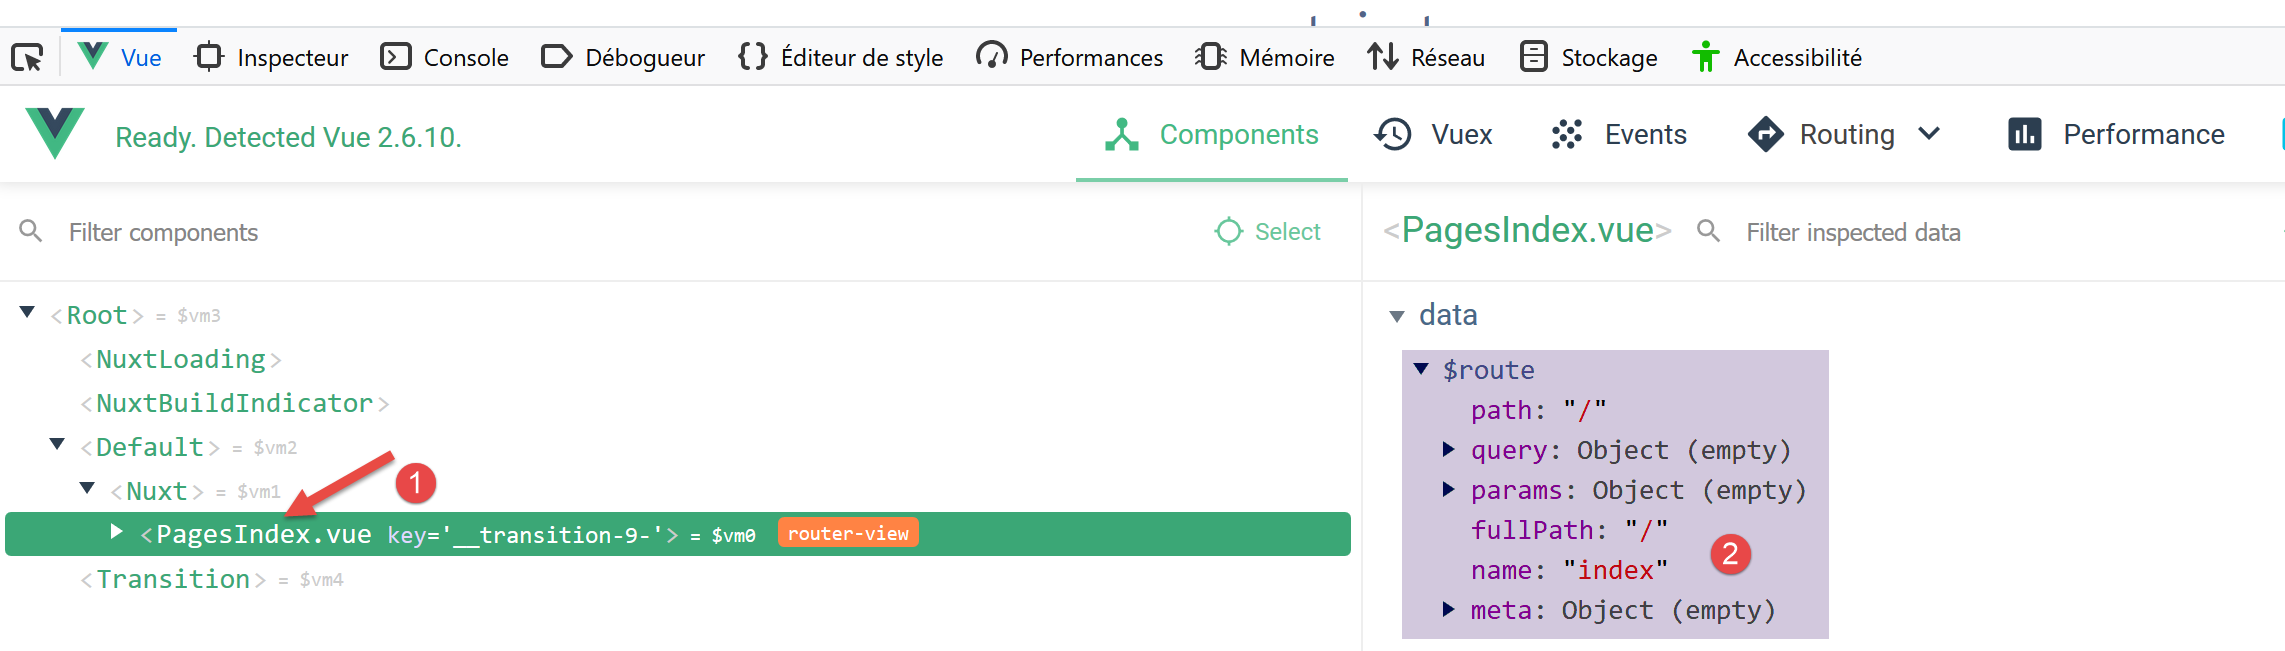
- 在 [1] 中,组件 [PagesIndex] 指向页面 [pages/index.vue];
- 从 [2] 可见,该组件具有一个名为 [$route] 的属性,即引导至页面 [index] 的路由;
作为简单的练习,让我们在控制台中显示这条路径。
3.8. 修改首页
我们将修改文件 [index.vue]。在我们的项目安装中,我们安装了两个依赖项:
- [eslint]:用于检查 JavaScript 文件和 Vue 组件的语法。 如果已安装 VSCode 的扩展 [ESLint],则在输入文本时会验证语法,并立即报告错误;
- [prettier]:用于按标准格式化 JavaScript 代码;
这些依赖项记录在文件 [package.json] 中:
"devDependencies": {
    "@nuxtjs/eslint-config": "^1.0.1",
    "@nuxtjs/eslint-module": "^1.0.0",
    "babel-eslint": "^10.0.1",
    "eslint": "^6.1.0",
    "eslint-config-prettier": "^4.1.0",
    "eslint-plugin-nuxt": ">=0.4.2",
    "eslint-plugin-prettier": "^3.0.1",
    "prettier": "^1.16.4"
}
我注意到(2019年11月),通过 [yarn create nuxt-app] 命令进行的安装中,[eslint, prettier] 工具在输入文本时无法正常工作。错误仅在编译时才会被报告。经过一番研究,我找到了一种可行的配置:
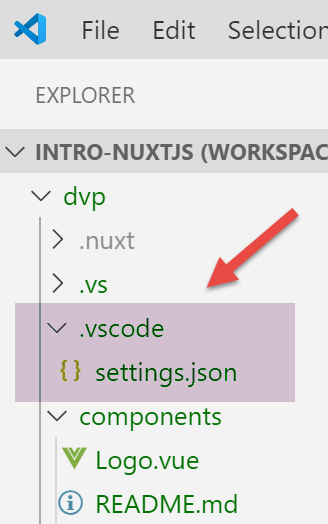
在项目根目录下创建一个名为 [.vscode] 的文件夹,并在其中放入以下 [settings.json] 文件:
{
  "eslint.validate": [
    {
      "language": "vue",
      "autoFix": true
    },
    {
      "language": "javascript",
      "autoFix": true
    }
  ],
  "eslint.autoFixOnSave": true,
  "editor.formatOnSave": false
}
- 第2-11行:指定当[eslint]验证.vue和.js文件时,需修正其能修正的错误;
- 第 12 行:当文件被保存时,[eslint] 必须修正其能够修正的错误;
- 第 13 行:禁用 VSCode 在保存时默认执行的格式化操作。该操作将由 [prettier] 执行;
采用此配置后:
- 在输入文本时,语法或格式错误会立即被标记;
- 格式错误将在文件保存时自动更正;
[prettier]库由[.prettierrc]文件配置:
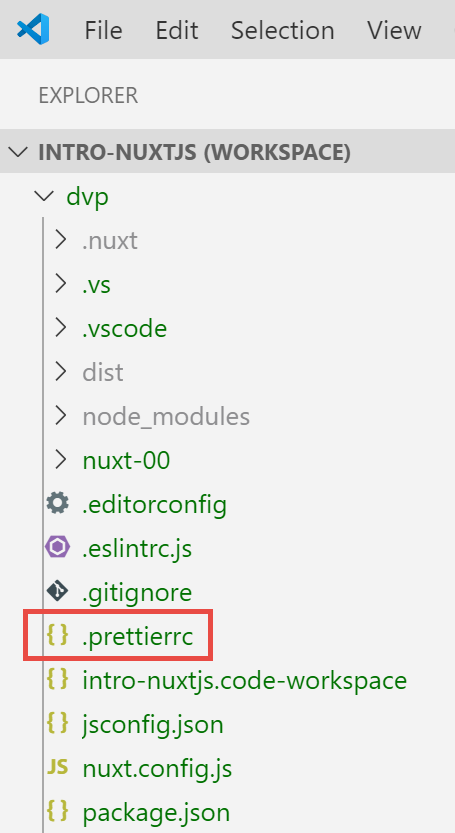
该文件的默认内容如下:
{
  "semi": false,
  "arrowParens": "always",
  "singleQuote": true
}
- 第 1 行:指令末尾不加分号;
- 第 2 行:如果“箭头”函数(arrow)只有一个参数,则该参数用圆括号括起来;
- 第 3 行:字符串用单引号括起(不使用双引号);
我们添加以下两条规则:
{
  "semi": false,
  "arrowParens": "always",
  "singleQuote": true,
  "printWidth": 120,
  "endOfLine": "auto"
}
- 第 5 行:代码行长度最多为 120 个字符;
- 第 6 行:行结束标记可以是 CRLF(Windows)或 LF(Unix);
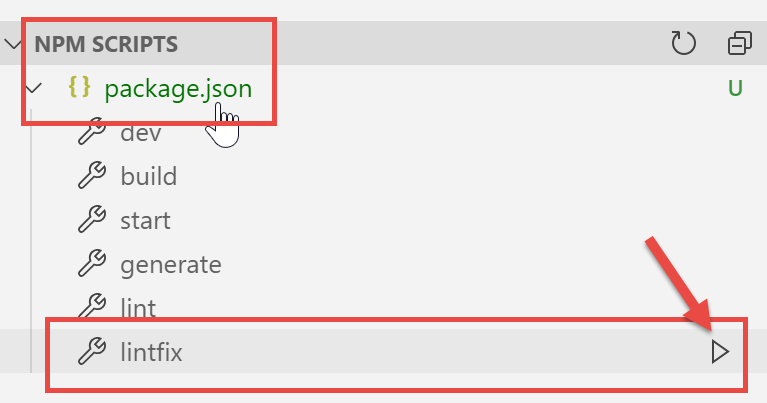
最后,文件 [package.json] 按以下方式修改:
"scripts": {
    "dev": "nuxt",
    "build": "nuxt build",
    "start": "nuxt start",
    "generate": "nuxt generate",
    "lint": "eslint --ext .js,.vue --ignore-path .gitignore .",
    "lintfix": "eslint --fix --ext .js,.vue --ignore-path .gitignore ."
},
- 第 7 行:我们添加了命令 [lintfix],该命令与第 6 行的 [lint] 完全相同,只是额外增加了参数 [--fix]。 命令 [lint] 会检查项目中所有文件的语法和格式,并报告任何错误。 [lintfix] 执行相同操作,但会自动修正可修复的格式问题。若因文件格式问题导致编译失败,请使用 [lintfix] 命令;
完成上述操作后,我们将文件 [index.vue] 修改如下:
<script>
/* eslint-disable no-console */
import Logo from '~/components/Logo.vue'

export default {
  components: {
    Logo
  },
  // 生命周期
  created() {
    console.log('created, route=', this.$route)
  }
}
</script>
- 第 10-12 行:添加函数 [created],该函数在组件创建后会自动执行;
- 第 11 行:显示当前路径;
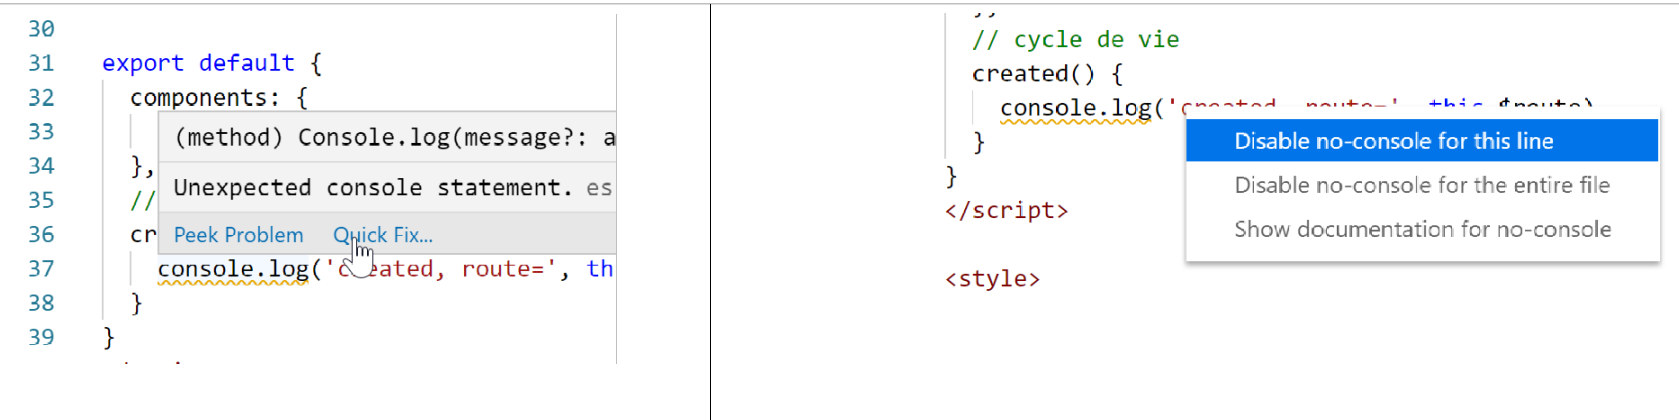
- 第 2 行:针对 [eslint] 的注释。若无此注释,[eslint] 会报错第 11 行:不允许在生命周期函数中包含 [console] 指令。 [eslint] 支持配置。我们将保留其默认配置,并使用类似第 2 行那样的注释来禁用 [eslint] 的特定规则。我们将使用两种类型的注释:
- /* 禁用规则 [eslint] */:禁用整个文件中的某条规则;
- // 禁用规则 [eslint]:仅禁用下一行的规则;
输入时会提示错误,并提供 [Quick Fix] 函数:
运行项目:
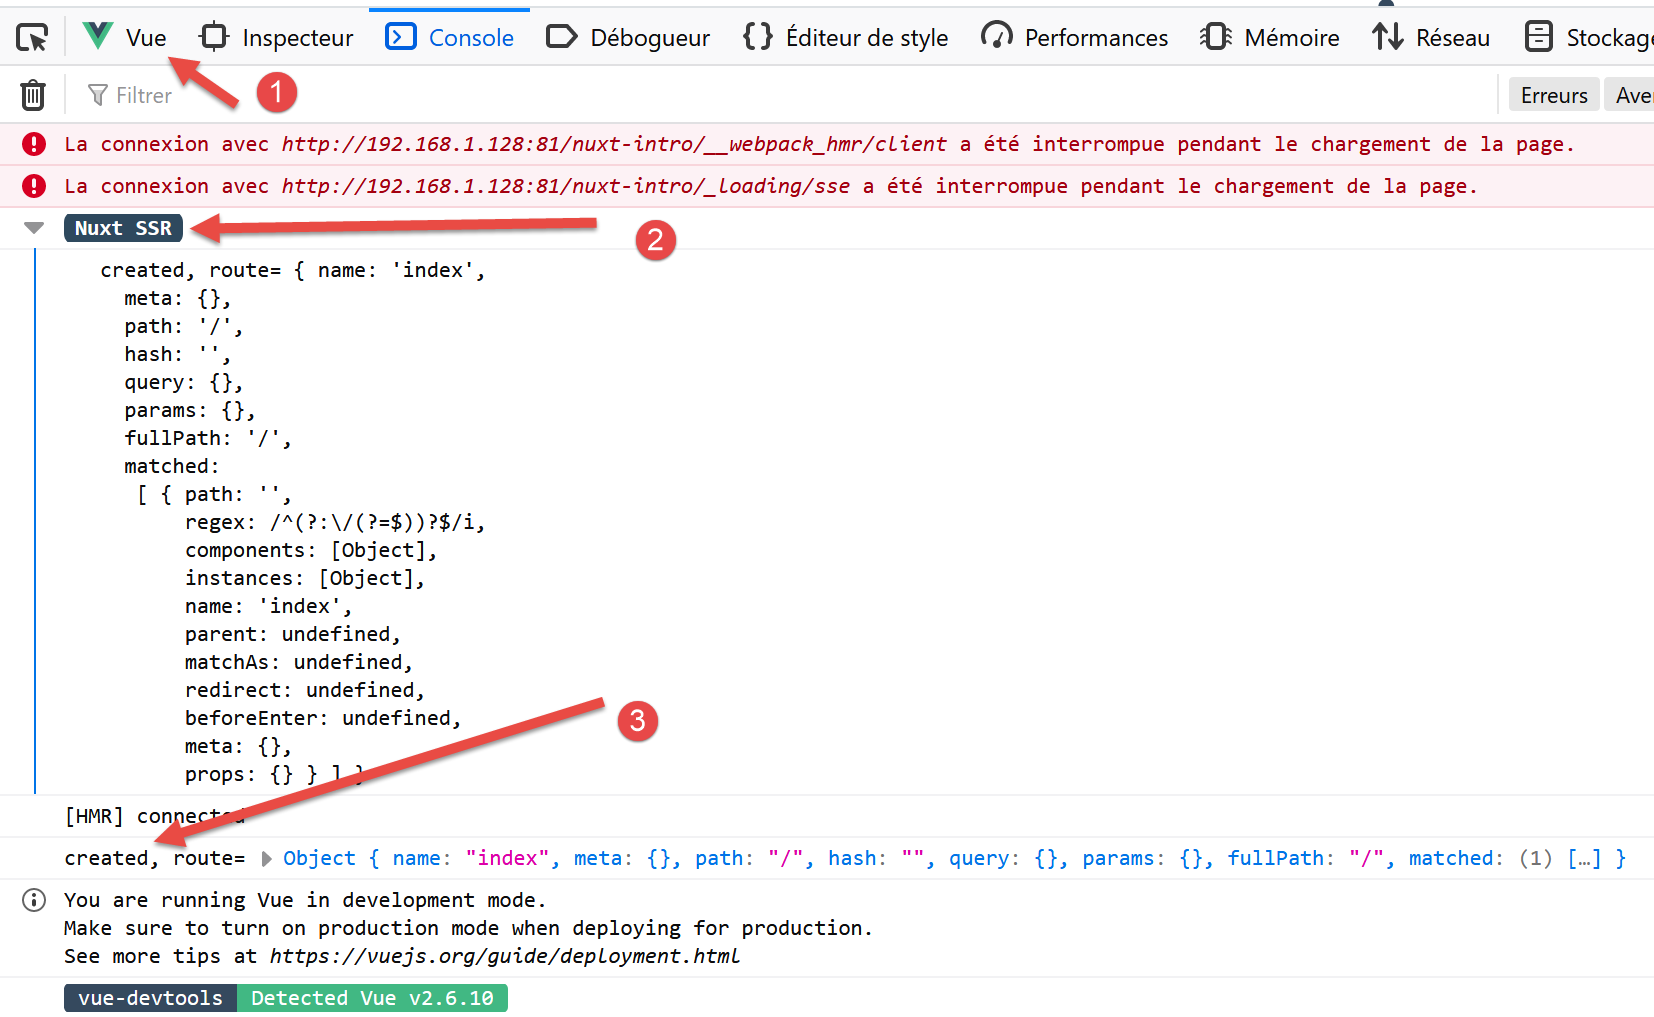
- 在 [1] 中,浏览器开发工具(F12)的 [Vue] 选项卡;
- 在 [2] 和 [3] 中,显示路线;
为什么是两个显示界面而不是一个?
一个 [nuxt] 应用程序由两个部分组成:服务器和客户端:
- 服务器在应用程序启动时提供页面,并在浏览器刷新页面(F5)或用户手动输入应用程序的URL时提供页面;
- 浏览器返回的每个页面都包含所请求的页面以及整个应用程序的 JavaScript 代码,该代码随后在浏览器中执行。这就是客户端。 只要浏览器未刷新页面,应用程序就会像经典的 Vue 应用程序一样以单页应用程序(SPA)模式运行。一旦用户手动触发页面刷新,系统就会向服务器请求该页面,并返回之前的第 1 阶段。
需要理解的是,无论是由服务器还是客户端提供的,都是[pages]文件夹中的同一组页面。正因如此,[nuxt]的设计者将此类页面称为同构页面。 相同的[.vue]页面既可由客户端解析,也可由服务器解析。以[index]页面为例:
<template>
  <div class="container">
    <div>
      <logo />
      <h1 class="title">
        nuxt-intro
      </h1>
      <h2 class="subtitle">
        nuxt-intro
      </h2>
      <div class="links">
        <a href="https://nuxtjs.org/" target="_blank" class="button--green">
          Documentation
        </a>
        <a
          href="https://github.com/nuxt/nuxt.js"
          target="_blank"
          class="button--grey"
        >
          GitHub
        </a>
      </div>
    </div>
  </div>
</template>

<script>
/* eslint-disable no-console */
import Logo from '~/components/Logo.vue'

export default {
  components: {
    Logo
  },
  // 生命周期
  created() {
    console.log('created, route=', this.$route)
  }
}
</script>
由于这是首页,应用程序启动时由服务器提供该页面。服务器上的页面同样具有生命周期,与经典的 [Vue] 页面相同,只是服务器端不存在 [beforeMount, monted] 函数。 函数 [created] 被执行,这解释了第一个日志记录。顺便提一下,这意味着服务器能够执行 JavaScript 脚本。在此处以及通常情况下,该服务器是 [node.js] 服务器。 页面在服务器上生成后,会传输至浏览器并再次经历生命周期。函数 [created] 被第二次执行,从而产生了第二条日志。
[nuxt] 应用程序的架构可能如下:
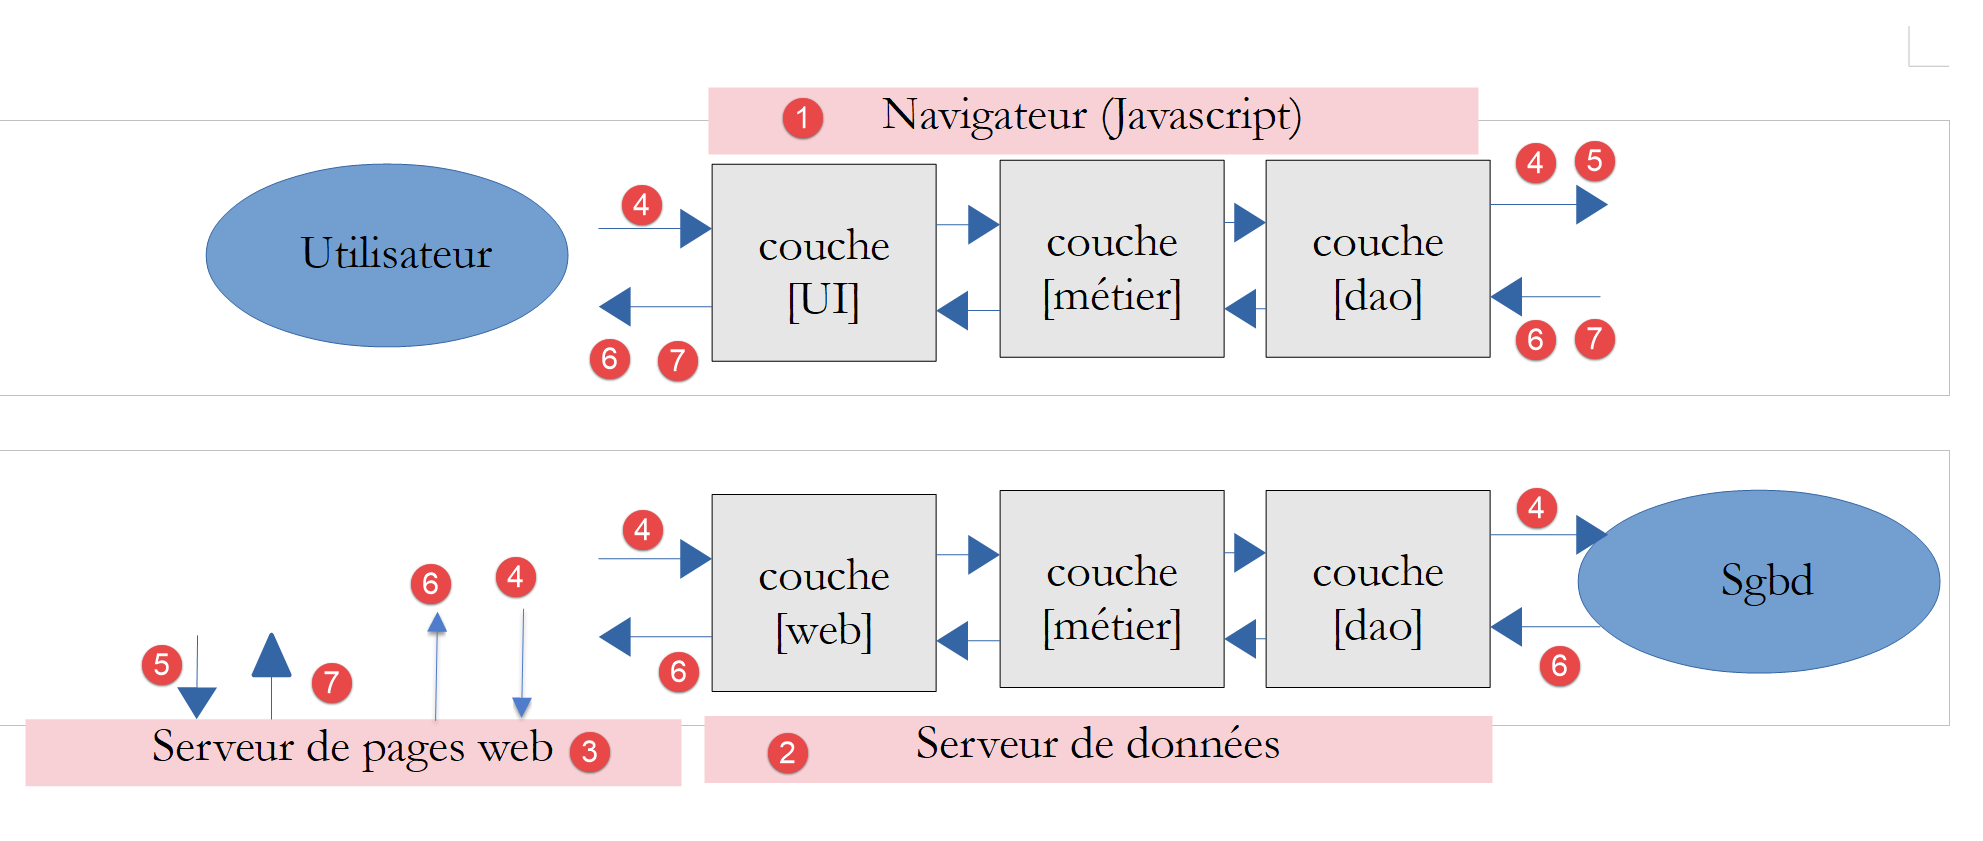
- [1]:当应用程序 [nuxt] 加载到浏览器后,托管该应用程序的浏览器。这就是所谓的客户端 [nuxt];
- [3]:最初托管应用程序 [nuxt] 的服务器。 该应用程序在启动时会被加载到浏览器 [1] 上,并且每当用户刷新当前浏览器页面或手动输入应用程序的 URL 时,都会被重新加载。这正是其与传统 Vue 应用程序在运行机制上的区别。 对于该应用,一旦在浏览器中加载完毕,服务器便不再被调用。 另一个目前尚未提及的重要区别在于:Vue 应用的服务器是静态服务器,无法解析 [.vue] 格式的页面;而 [universal] 类型的 Nuxt 应用则采用 JavaScript 服务器。 在将页面发送给浏览器之前,服务器可以执行脚本,例如从 [2] 服务器上获取数据;
- [2]:是向客户端 [nuxt]、[1] 或向服务器 [nuxt]、[3] 提供数据的服务器;
在上图中,我们可以区分出三个客户端/服务器子系统:
- [1, 3]:托管应用程序 [nuxt]。 [3] 在应用程序启动时提供该应用程序及首页,并在用户每次手动请求页面时提供。[1] 托管从 [3] 接收的 [nuxt] 应用程序,只要未向 [3] 手动请求页面,[3] 便以 [SAP] 模式运行;
- [1, 2]:在 [SAP] 模式下,客户端 [nuxt] 从一个或多个服务器获取外部数据;
- [3, 2]:在生成用户请求的页面时,[3]服务器也可从一个或多个服务器获取外部数据;
因此,正是服务器 [3] 将应用程序 [nuxt] 与应用程序 [vue] 区分开来。每当用户手动请求页面时,都会调用该服务器。 它处理的页面([.vue])与客户端([vue]、[1])相同。这是一个能够执行页面中脚本的JavaScript服务器。例如,这可以改变使用外部数据生成主页的方式: 在 [vue] 应用程序中,这些数据必然来自客户端 [1];而在这里,它们可以在页面发送给客户端之前由服务器 [3] 获取。 这样,首页就变得更有意义,并有助于提升应用程序的SEO。
注:在开发模式下,这三个实体通常位于同一台机器上。本文中的所有示例均采用此配置。
3.9. 将应用程序源代码移至单独的文件夹
接下来,我们将在同一个文件夹中创建多个 [nuxt] 应用程序。 事实上,为每个 [nuxt] 项目生成的 [node_modules] 依赖项文件夹可能达到数百兆字节。 我们将在 [dvp] 文件夹中创建多个 [nuxt-00, nuxt-01, ...] 文件夹,用于存放待测试示例的源代码。 然后,我们将使用配置文件 [nuxt-config.js] 来指定项目 [dvp] 的源代码位置,该项目将是本教程中唯一保留的项目 [nuxt]。
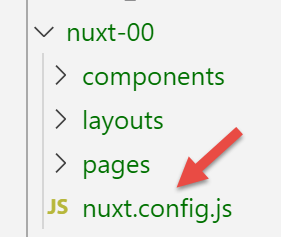
我们将最初通过命令 [yarn create nuxt-app] 生成的应用程序源代码移动到文件夹 [nuxt-00] 中:
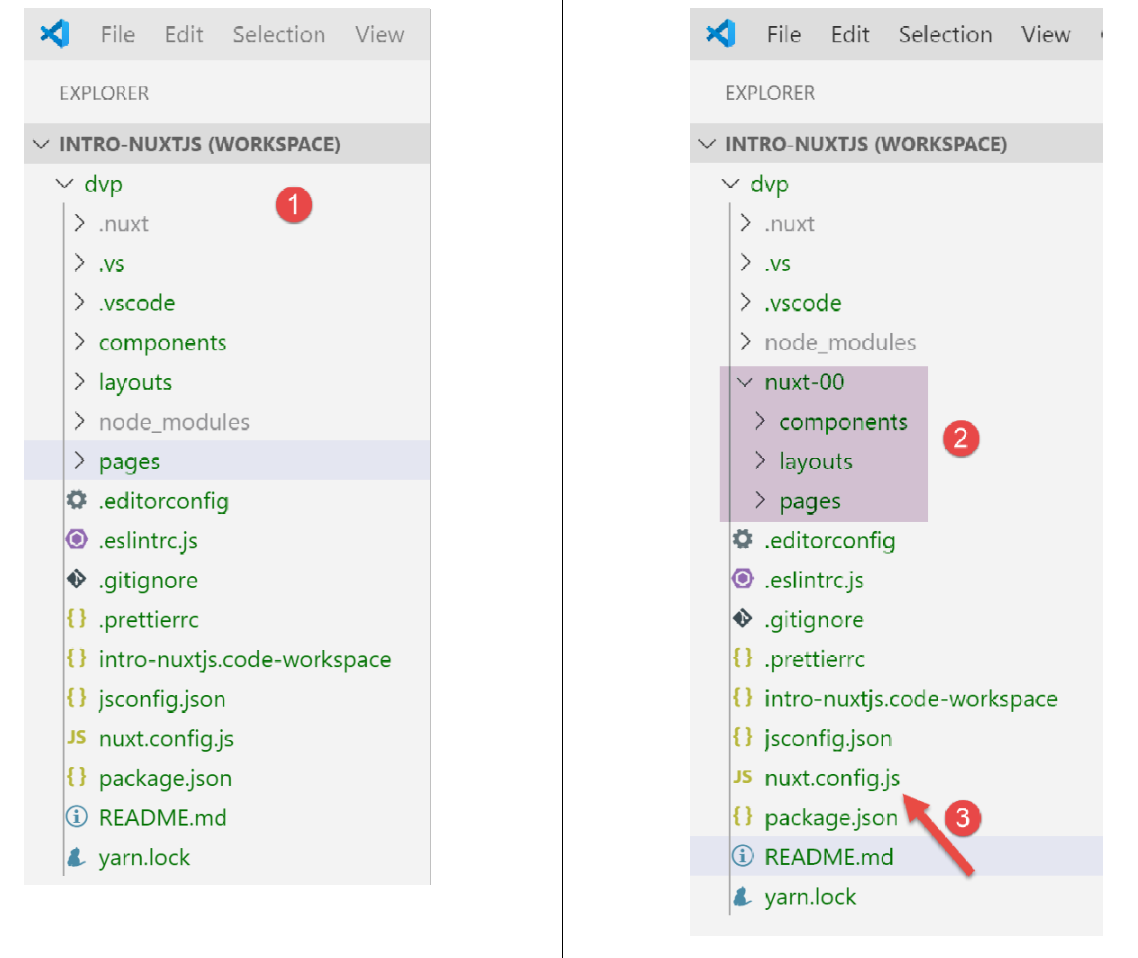
- 在 [2] 中,我们将 [components, layouts, pages] 文件夹移动到了 [nuxt-00] 文件夹中;
- 在 [3] 中,我们需要修改文件 [nuxt.config.js];
我们将文件 [nuxt.config.js] 修改如下:
export default {
  mode: 'universal',
  /*
   ** Headers of the page
   */
  ...
  /*
   ** Build configuration
   */
  build: {
    /*
     ** You can extend webpack config here
     */
    extend(config, ctx) {}
  },
  // 源代码目录
  srcDir: 'nuxt-00',
  // 路由器
  router: {
    // 应用程序的 URL 根目录
    base: '/nuxt-00/'
  },
  // 服务器
  server: {
    // 服务端口,默认值为 3000
    port: 81,
    // 监听的网络地址,默认 localhost:127.0.0.1
    // 0.0.0.0 = 该机器的所有网络地址
    host: '0.0.0.0'
  }
}
该文件有两处修改:
- 第 17 行:指定项目 [dvp] 的源代码位于文件夹 [nuxt-00] 中;
- 第 21 行:指定应用程序的根目录 URL 现更改为 [/nuxt-00/]。此更改并非强制要求。 若不设置此属性,URL 的根目录将默认为 [/]。此处设置有助于我们明确,实际执行的源代码来自 [nuxt-00] 文件夹;
完成上述操作后,[dvp]项目将如前所述执行:
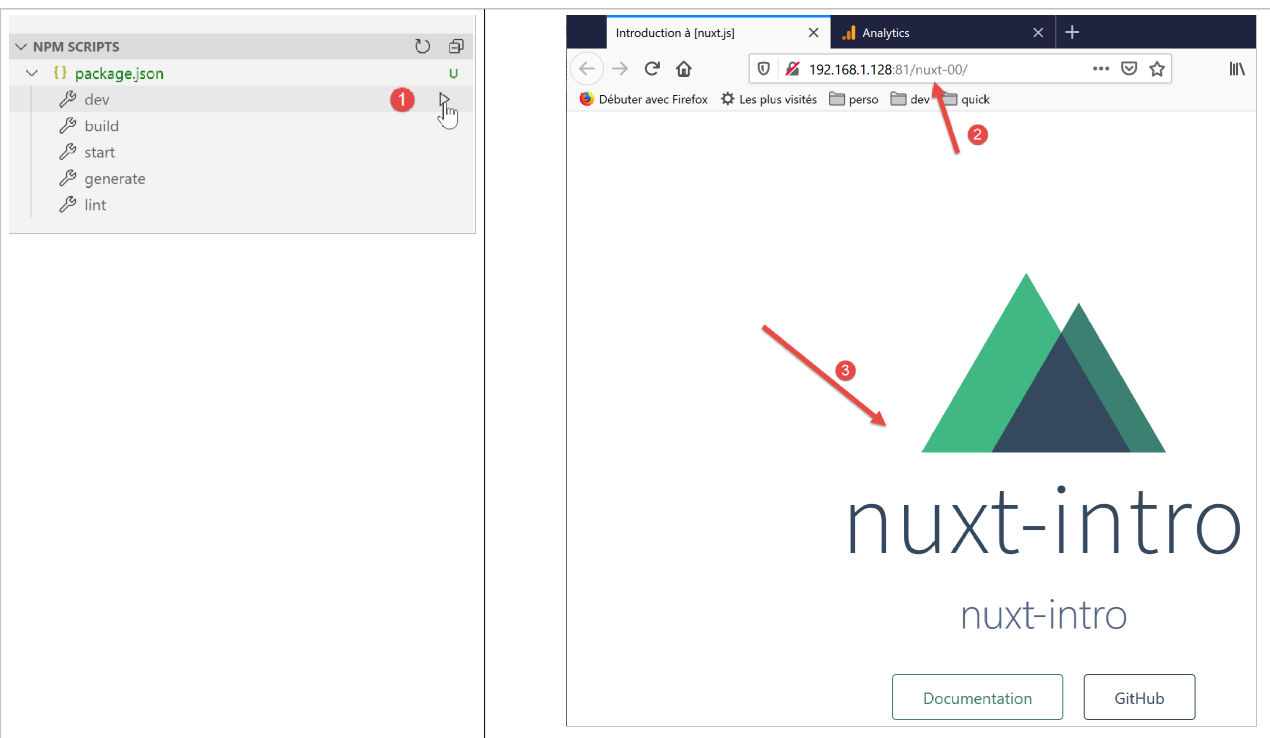
3.10. 部署应用程序 [nuxt-00]
我们将在 VSCode 的集成环境之外,执行应用程序 [nuxt-00]。
首先,我们编译该应用程序:
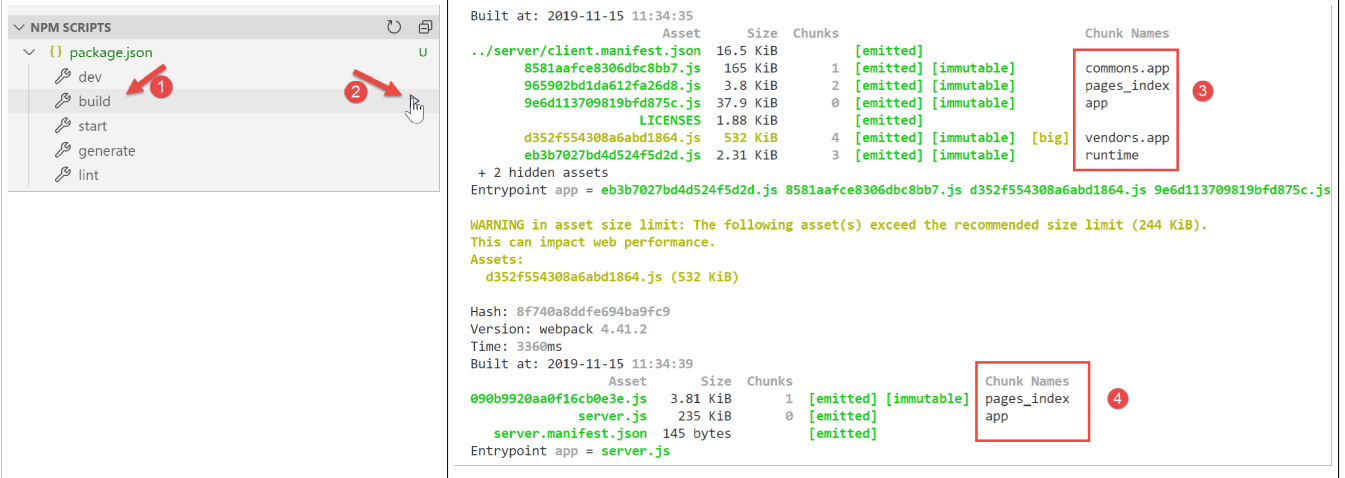
- 编译为 [3],即客户端的编译结果。将由浏览器执行;
- 编译为 [4],即服务器端编译结果。将由 [node.js] 服务器执行;
编译结果保存在文件夹 [.nuxt] 中:
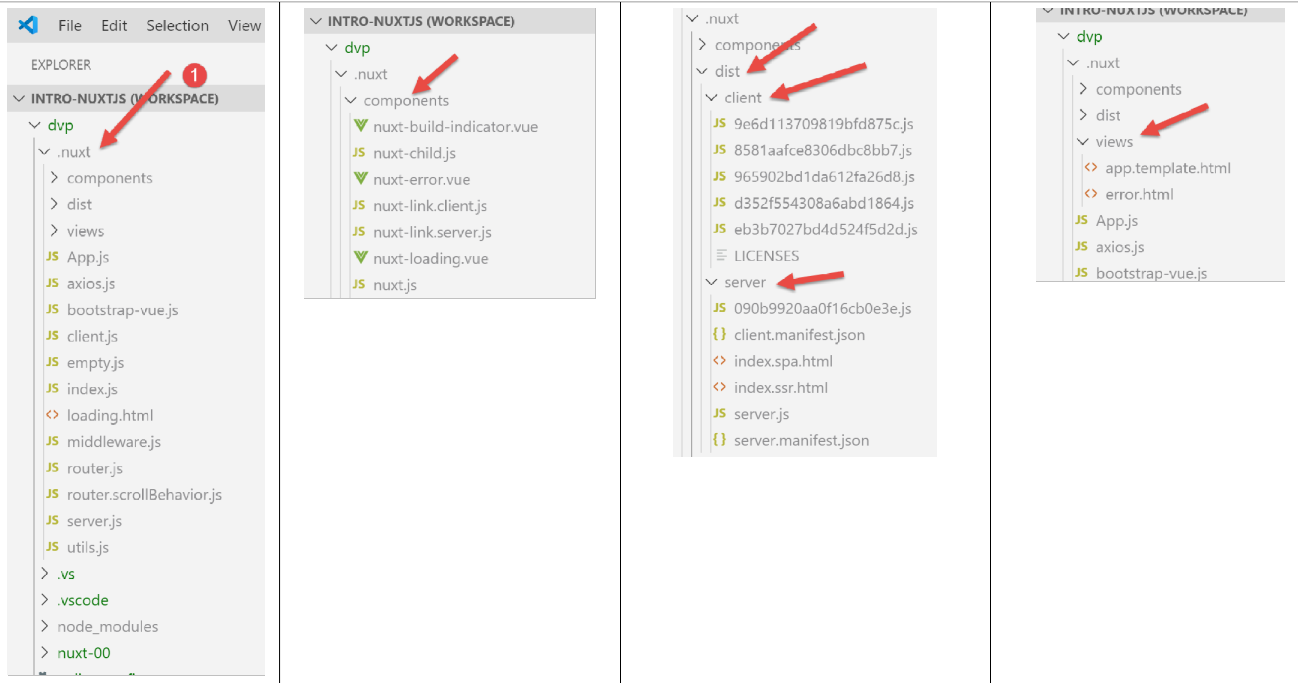
我们将文件夹 [.nuxt, node_modules] 和文件 [package.json, nuxt.config.js] 复制到一个单独的文件夹中:
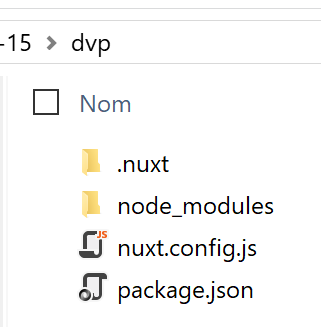
文件 [package.json] 已按以下方式简化:
{
  "scripts": {
    "start": "nuxt start"
  }
}
- 仅保留脚本 [start],该脚本用于执行项目的编译版本;
文件 [nuxt.config.js] 简化如下:
export default {
  // 路由器
  router: {
    // 应用程序的 URL 根节点
    base: '/nuxt-00/'
  },
  // 服务器
  server: {
    // 服务端口,默认值为 3000
    port: 81,
    // 监听的网络地址,默认 localhost:127.0.0.1
    // 0.0.0.0 = 该机器的所有网络地址
    host: '0.0.0.0'
  }
}
- 第 5 行:设置编译后应用程序的基础 URL;
- 第 8-14 行:定义服务端口及监听的网络地址;
完成上述操作后,打开 Laragon 终端并进入包含项目编译版本的文件夹。虽然可以使用任何类型的终端,但可执行文件 [npm] 必须位于终端的 PATH 目录下。Laragon 终端即符合此要求。
完成上述操作后,输入命令 [npm run start]:
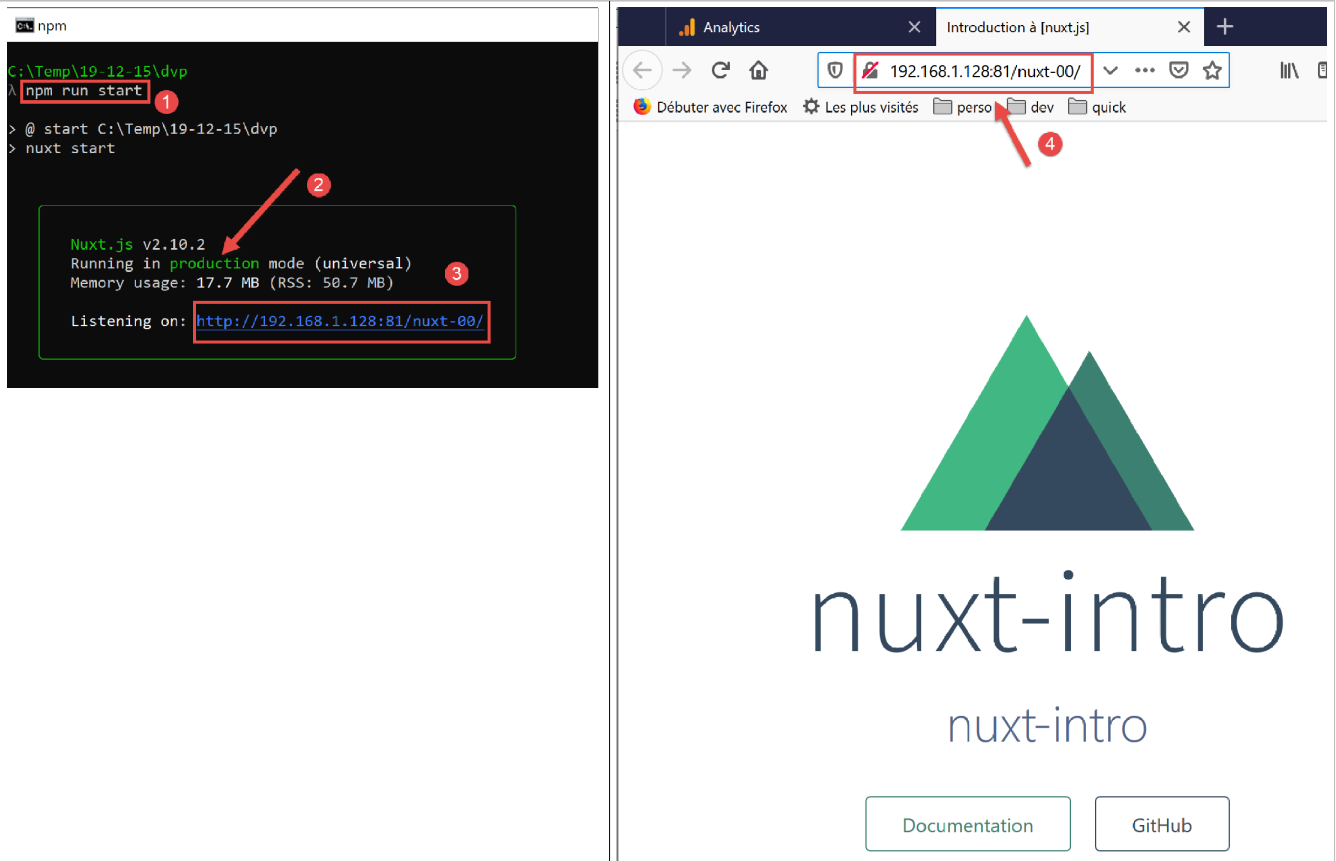
在 [3] 中,可以看到一个服务器已启动,并且正在监听 URL 和 [http://192.168.1.128:81/nuxt-00/]。 现在,我们使用浏览器访问该 URL 地址。结果与之前完全一致。 在终端端,已写入日志 [5]。这是服务器 [node.js] 执行的页面 [index.vue] 中,位于方法 [created] 内的日志。
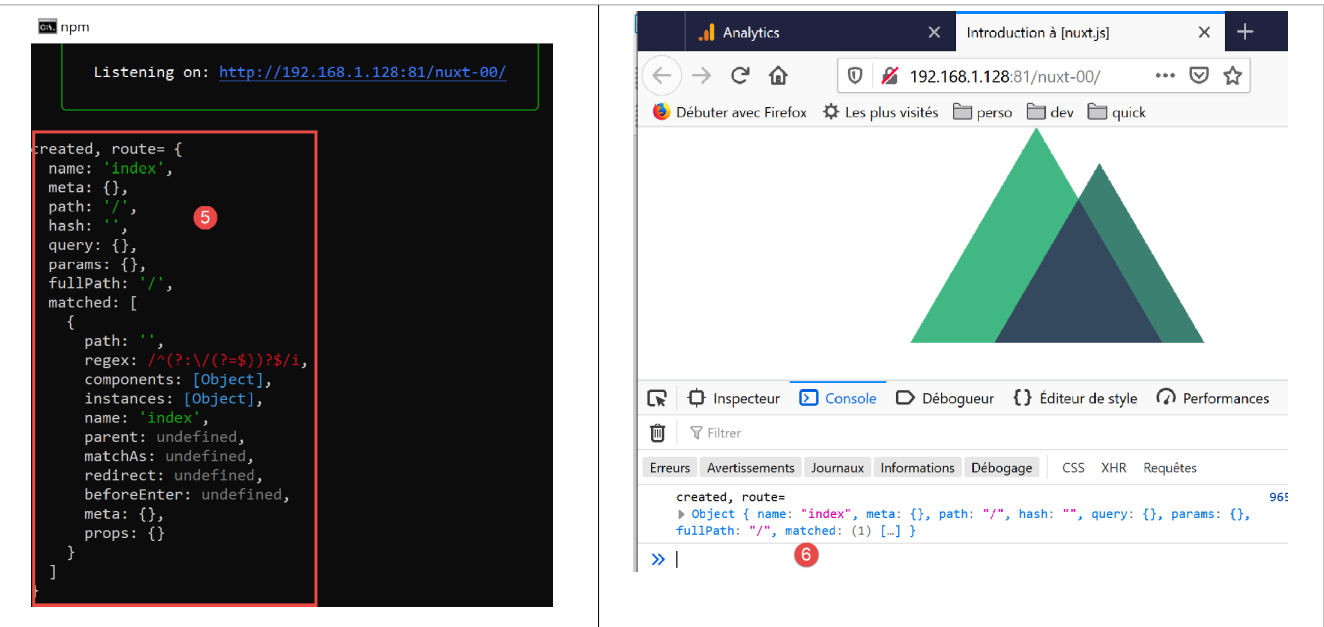
在浏览器端 [6] 中,同样记录了页面 [index.vue] 中方法 [created] 的日志,但此次是由客户端执行的。
3.11. 部署安全服务器
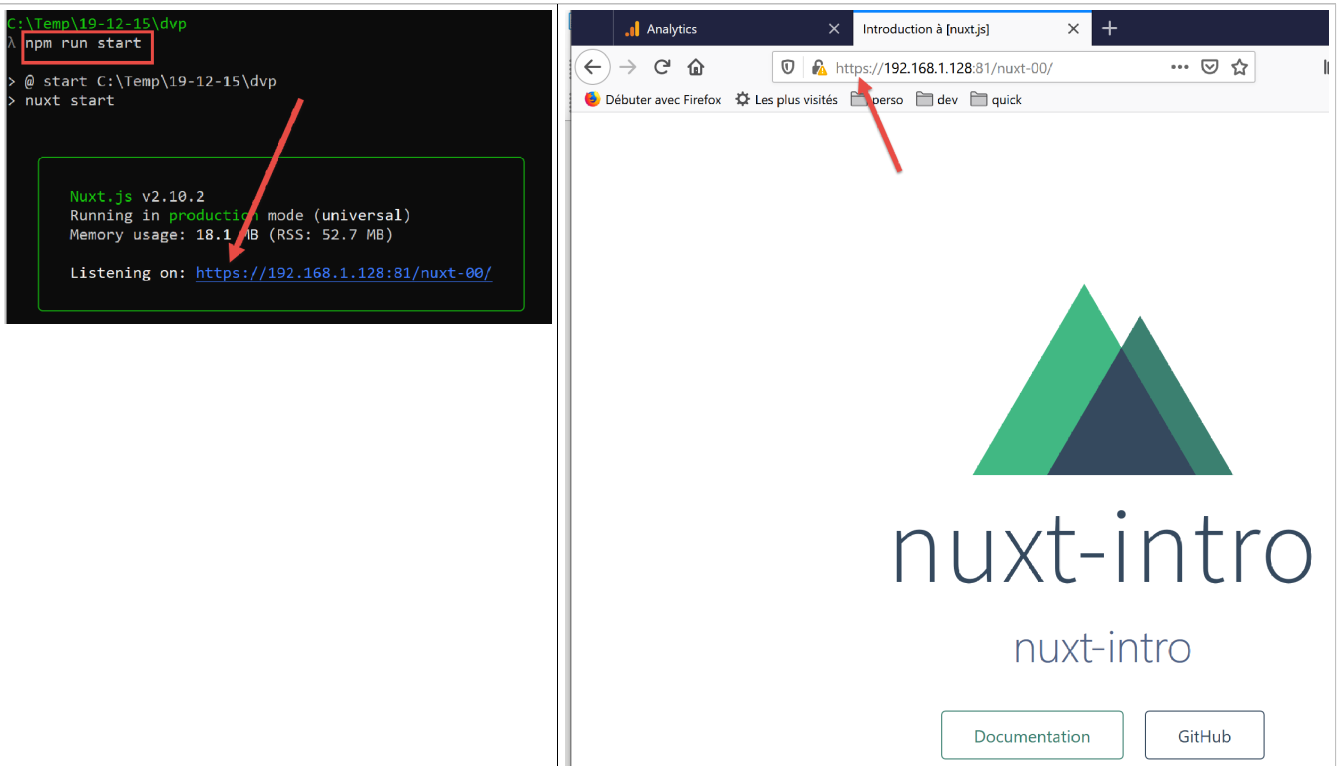
上文中,该应用程序的URL为[http://192.168.1.128/nuxt-00/]。我们希望将其改为[https://192.168.1.128/nuxt-00/]。因此,我们需要构建一个安全服务器。下面将展示具体操作步骤。
注:该方法摘自文章 [https://stackoverflow.com/questions/56966137/how-to-run-nuxt-npm-run-dev-with-https-in-localhost]。
首先,我们使用 [openssl] 生成一对私钥和公钥。[openssl] 通常会随 Laragon 服务器一同安装。因此,该命令在所有 Laragon 终端中均可使用。现在,请打开 Laragon 终端并进入已部署应用程序的目录:
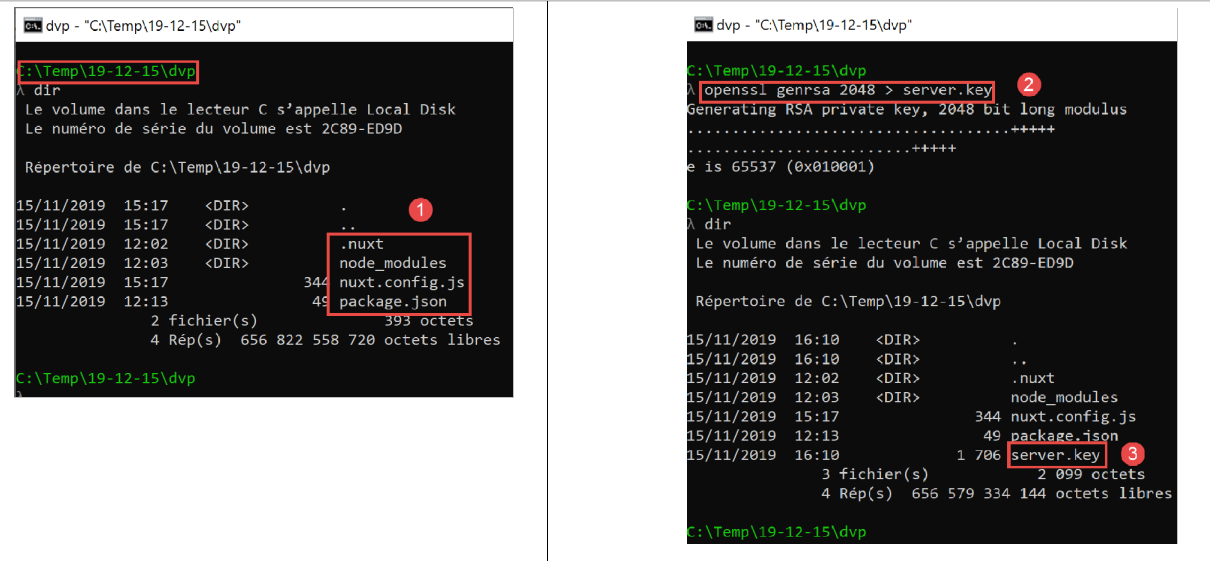
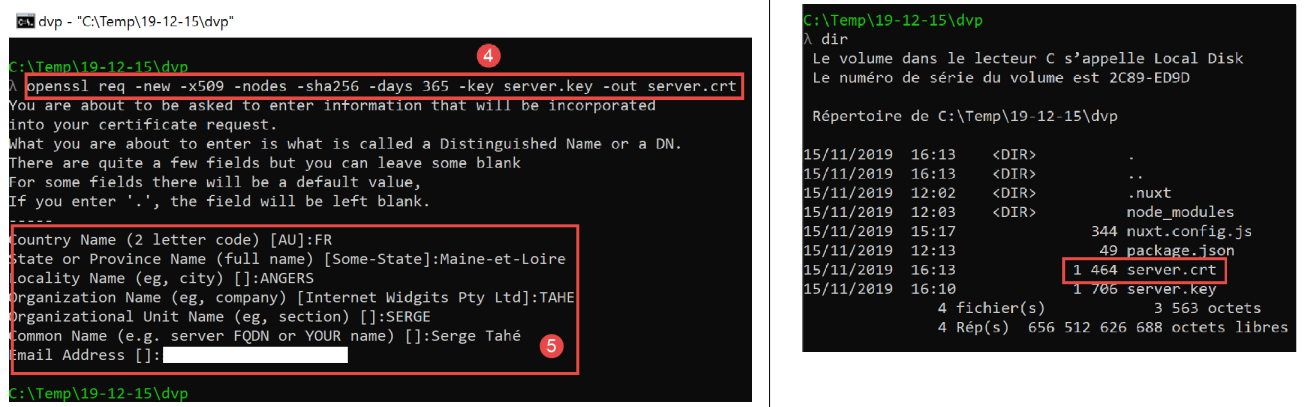
- 在 [2] 中,输入命令 [openssl genrsa 2048 > server.key];
- 在 [3] 目录下,生成文件 [server.key];
- 在 [4] 中,输入命令 [openssl req -new -x509 -nodes -sha256 -days 365 -key server.key -out server.crt];
- 在 [5] 中,生成文件 [server.crt];
这两个文件共同构成一个自签名证书。大多数浏览器仅在请求该页面的用户批准后才会接受它们。
现在,Web 应用程序必须使用 [server.key, server.crt] 文件。为此,需按以下方式修改 [nuxt.config.js] 文件:
import path from 'path'
import fs from 'fs'

export default {
  // 路由器
  router: {
    // 应用程序的 URL 根节点
    base: '/nuxt-00/'
  },
  // 服务器
  server: {
    // 服务端口,默认值为 3000
    port: 81,
    // 监听的网络地址,默认 localhost:127.0.0.1
    // 0.0.0.0 = 该机器的所有网络地址
    host: '0.0.0.0',
    // 自签名证书
    https: {
      key: fs.readFileSync(path.resolve(__dirname, 'server.key')),
      cert: fs.readFileSync(path.resolve(__dirname, 'server.crt'))
    }
  }
}
第 18-21 行负责实现 [https] 协议。
现在重新运行应用程序:
3.12. 第一个示例结束
第一个示例现已完成。它让我们学到了许多关于 [nuxt] 的概念。 接下来我们将开发其他示例,并将它们放置在 [nuxt-01, nuxt-02, ...] 文件夹中。由于这些示例将使用不同的 [nuxt.config.js] 文件,因此我们将在每个文件夹中保存用于执行它们的 [nuxt.config.js] 文件: