17. Web 服务
注:此处所说的“Web 服务”,是指任何向客户端(在后续示例中为控制台脚本)提供原始数据的 Web 应用程序。我们并不关注任何特定的技术——例如 REST(表征状态转移)或 SOAP(简单对象访问协议)——这些技术以明确定义的格式提供或多或少的原始数据。 REST 返回 JSON,而 SOAP 返回 XML。这些技术各自精确定义了客户端必须如何向服务器发起请求,以及服务器响应必须采用的格式。在本课程中,我们将对客户端请求和服务器响应的性质采取更灵活的态度。不过,所编写的脚本和使用的工具与 REST 技术类似。
17.1. 简介
由于 PHP 程序可由 Web 服务器执行,此类程序便成为能够为多个客户端提供服务的服务器端程序。从客户端的角度来看,调用 Web 服务即相当于请求该服务的 URL。客户端可以使用任何语言编写,包括 PHP。在后一种情况下,我们将使用刚才介绍过的网络函数。 我们还需要了解如何与 Web 服务“通信”,即理解 Web 服务器与其客户端之间通信所使用的 HTTP 协议。这正是“链接”一节的宗旨。
“链接”一节中描述的 Web 客户端让我们得以探索 HTTP 协议的一部分。

在最简单的形式下,客户端与服务端之间的交互过程如下:
- 客户端向 Web 服务器的 80 端口建立连接;
- 它请求一个文档;
- Web 服务器发送所请求的文档并关闭连接;
- 随后客户端关闭连接;
文档可以是多种类型:HTML格式的文本、图片、视频……它可以是现成的文档(静态文档),也可以是由脚本即时生成的文档(动态文档)。在后一种情况下,我们称之为Web编程。用于动态生成文档的脚本可以使用多种语言编写:PHP、Python、Perl、Java、Ruby、C#、VB.NET……
下文中,我们将使用 PHP 脚本动态生成文本文档。

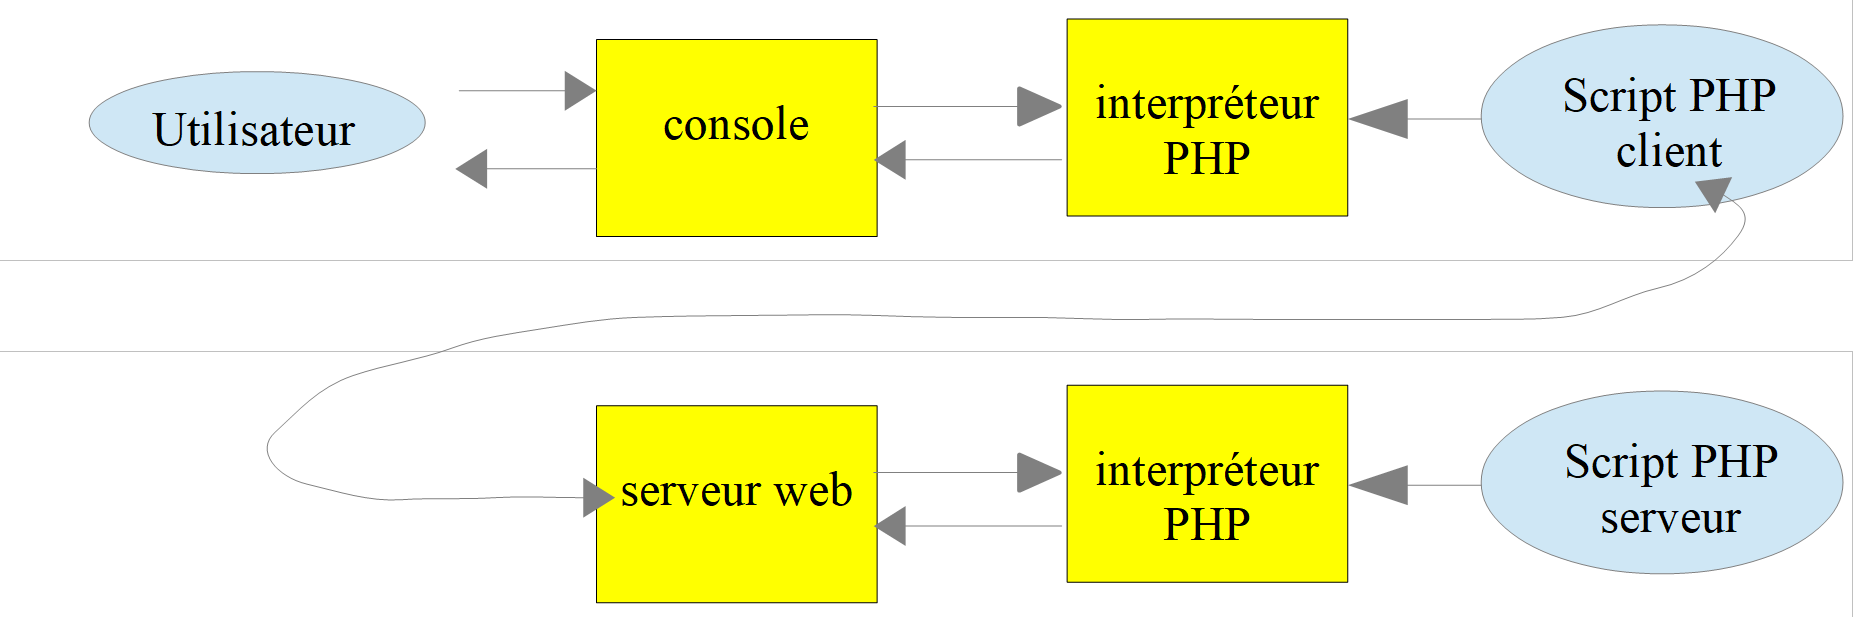
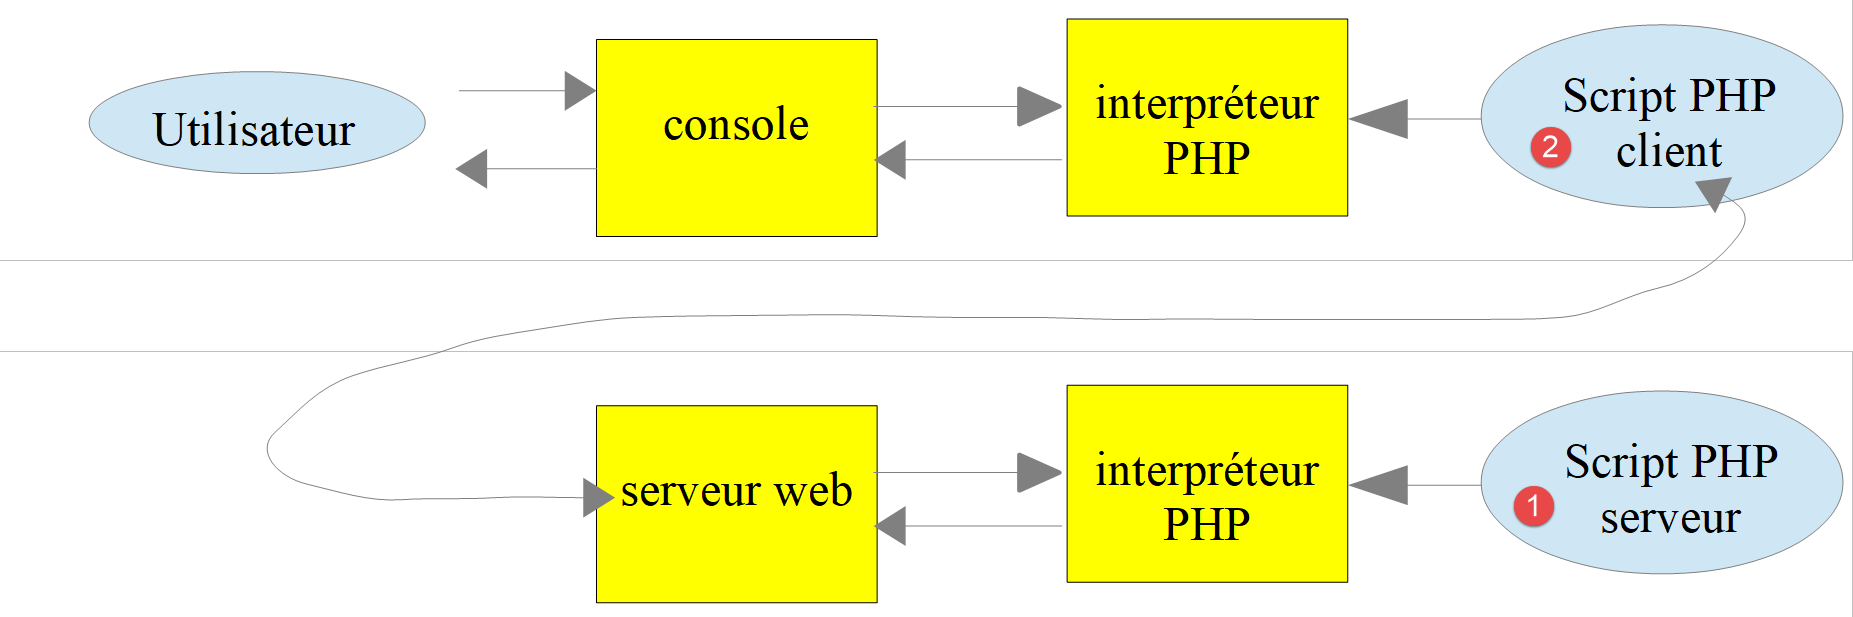
- 在[1]中,客户端与服务器建立连接,请求一个PHP脚本,并可能向该脚本发送参数,也可能不发送;
- 在[2]中,Web服务器使用PHP解释器执行该PHP脚本。脚本生成一个文档并将其发送给客户端[3];
- 服务器关闭连接。客户端也执行同样的操作;
Web 服务器可以同时处理多个客户端。
在 [Laragon] 软件包中,Web 服务器采用 Apache 服务器,这是 Apache 基金会(http://www.apache.org/)提供的一款开源服务器。在以下应用场景中,必须启动 [Laragon]:

这将启动 Apache Web 服务器以及 MySQL 数据库管理系统。
Web 服务器执行的脚本将使用 NetBeans 工具编写。到目前为止,我们编写的是在控制台环境中执行的 PHP 脚本:

用户通过控制台请求执行 PHP 脚本并接收结果。
在接下来的客户端/服务器应用程序中:
- 客户端脚本在控制台环境中执行;
- 服务器脚本在 Web 环境中执行;
服务器端的 PHP 脚本不能随意放置在文件系统的任意位置。实际上,Web 服务器会根据配置中指定的位置来查找用户请求的静态和动态文档。 Laragon 的默认配置会将文档搜索范围限定在 <Laragon>/www 文件夹内,其中 <Laragon> 代表 Laragon 的安装目录( )。因此,如果 Web 客户端通过 URL [http://localhost/D] 请求文档 D,Web 服务器将返回位于路径 [<Laragon>/www/D] 下的文档 D。
在以下示例中,我们将服务器脚本放置在 [www/php7/scripts-web] 文件夹中。如果某个服务器脚本命名为 S.php,则将通过 URL [http://localhost/php7/scripts-web/S.php] 向 Web 服务器请求该脚本。随后,系统将返回文档 [<Laragon>/www/php7/scripts-web/S.php]。

- 在 [1] 中,是 [<laragon>/www] 文件夹;
- 在 [2] 中,是 [php7/scripts-web] 文件夹;
要使用 NetBeans 创建服务器脚本,我们将按以下步骤进行:
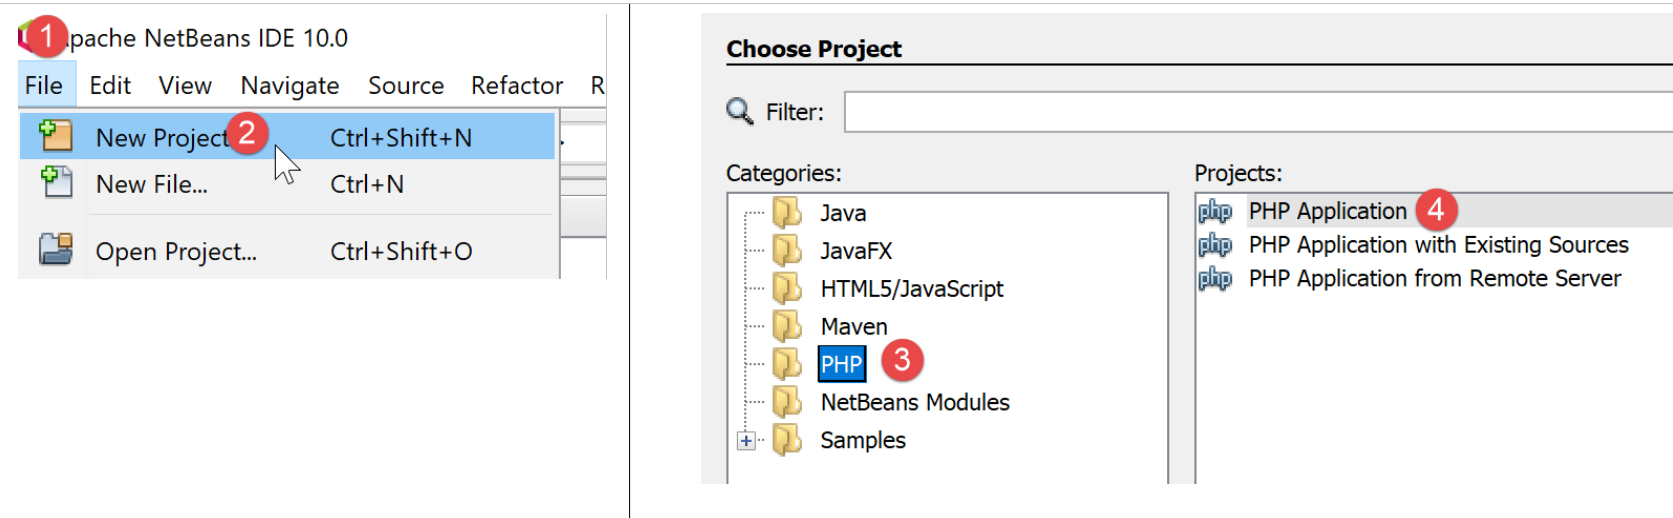
- 在 [1-2] 中,我们创建一个新项目
- 在 [3-4] 中,选择 [PHP] 类别和 [PHP 应用程序] 项目
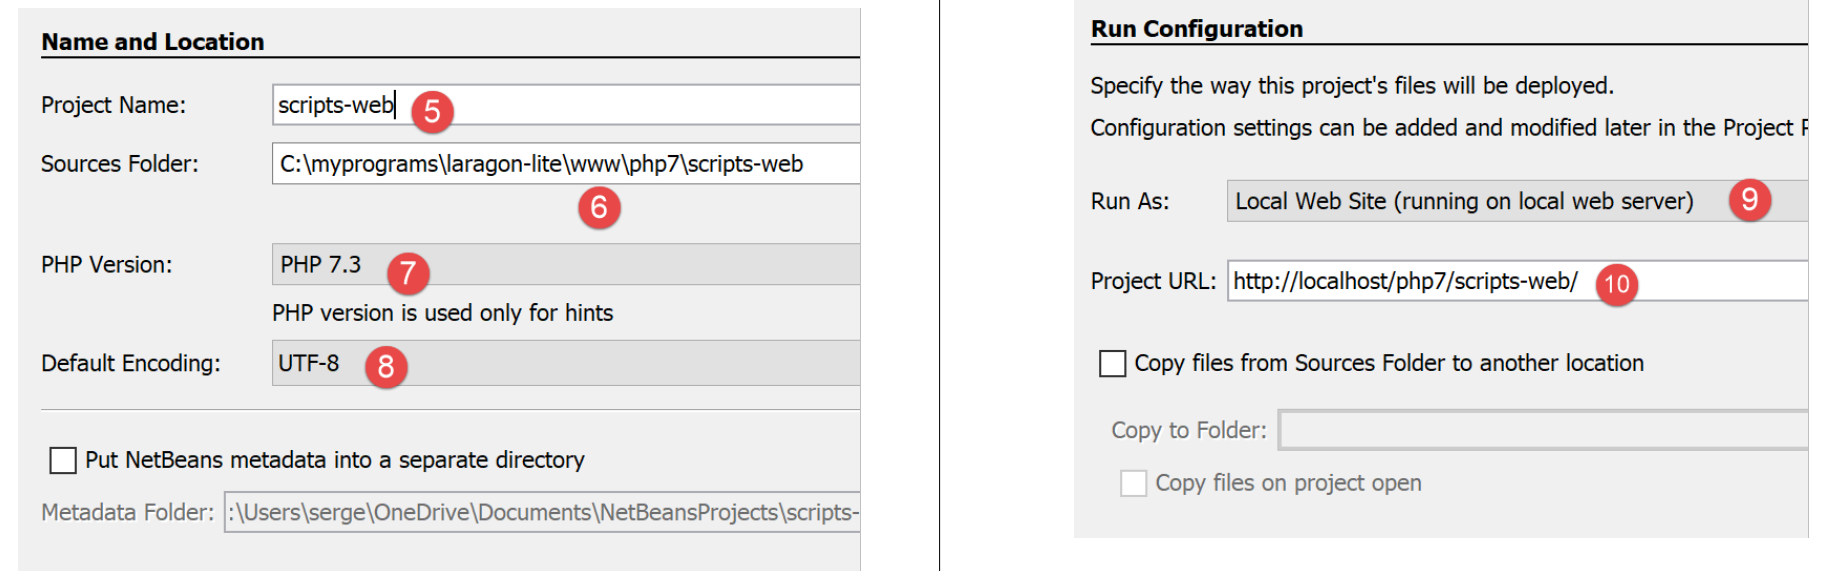
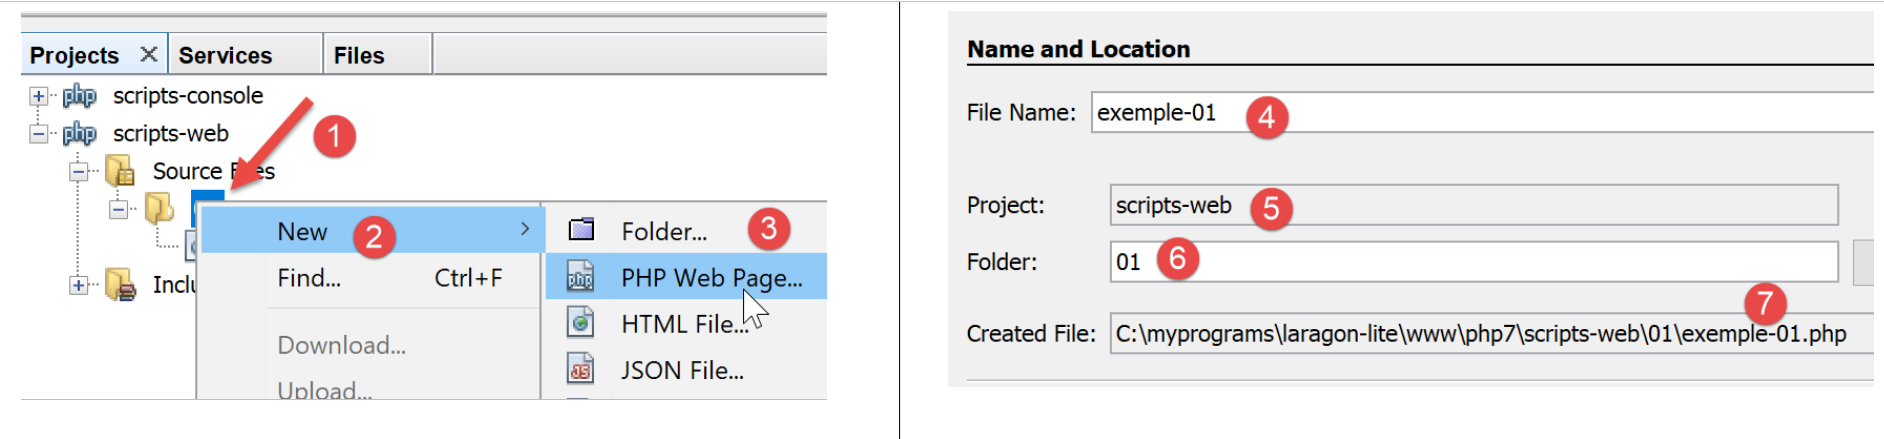
- 在 [5] 中,输入项目名称;
- 在 [6] 中,指定文件系统中的项目文件夹。请注意,此处位于 [<laragon>/www] 文件夹中,位置正确;
- 在 [7-8] 中,接受默认值;
- 在 [9-10] 中,接受提供的默认值。在 [10] 中,请注意我们将放置在此项目中的脚本的 URL 将以路径 [http://localhost/php7/scripts-web/] 开头;
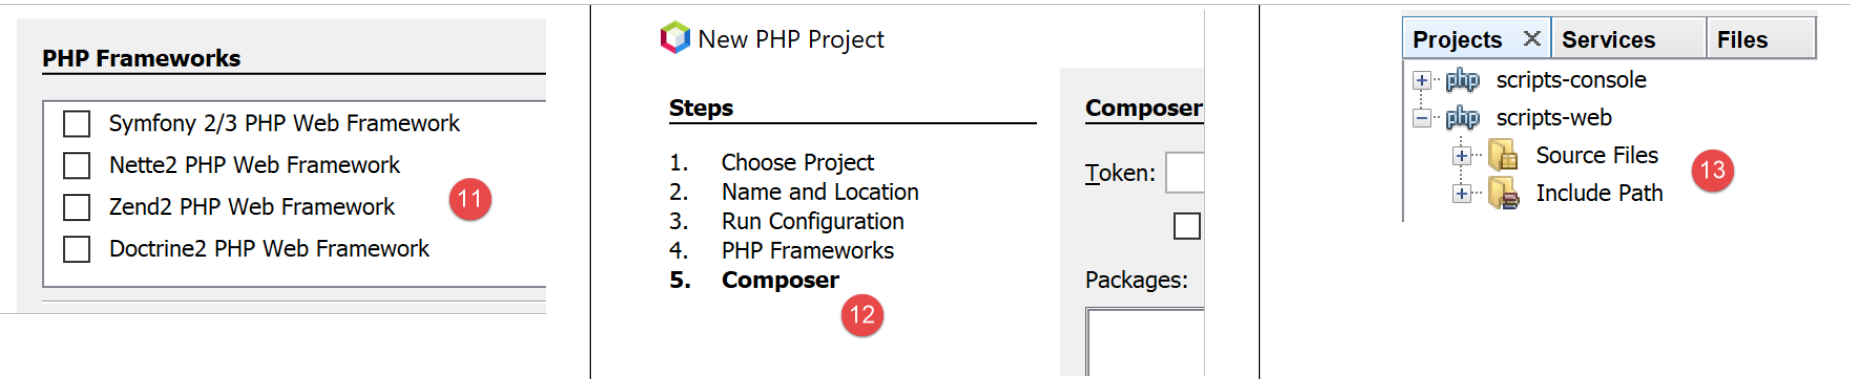
- 在 [11] 中,系统向您提供了基于 PHP 编写的 Web 框架。一旦 Web 应用程序规模扩大,这些框架就必不可少;
- 在 [12] 中,您可以使用 [Composer] 工具添加 PHP 库。我们在 Laragon [终端] 窗口中使用过两次该工具:
- 安装 [SwiftMailer] 库,该库支持发送电子邮件;
- 安装 [php-mime-mail-parser] 库,该库可用于读取电子邮件;
- 在[13]中,一旦项目创建向导确认完成,该项目便会出现在[13]的“项目”选项卡中;
17.2. 编写静态页面
注意:在本指南的后续部分中,[Laragon] 必须处于运行状态。
我们将演示如何使用 NetBeans 创建静态 HTML(超文本标记语言)页面:
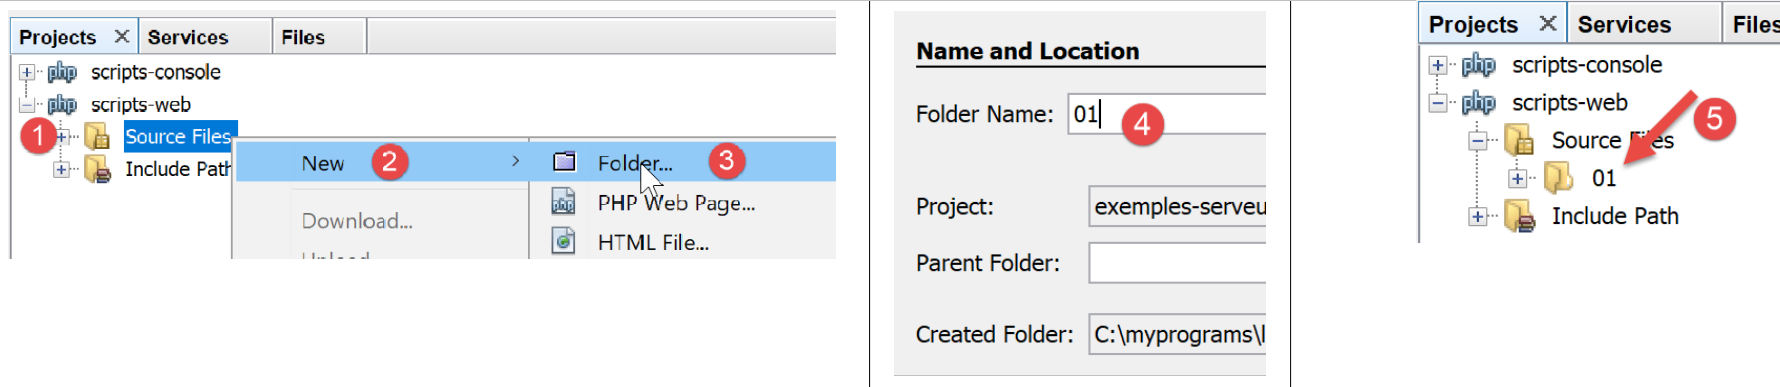
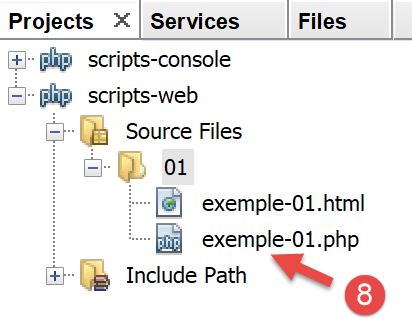
- 在[1-5]中,我们创建了一个名为[01]的文件夹;
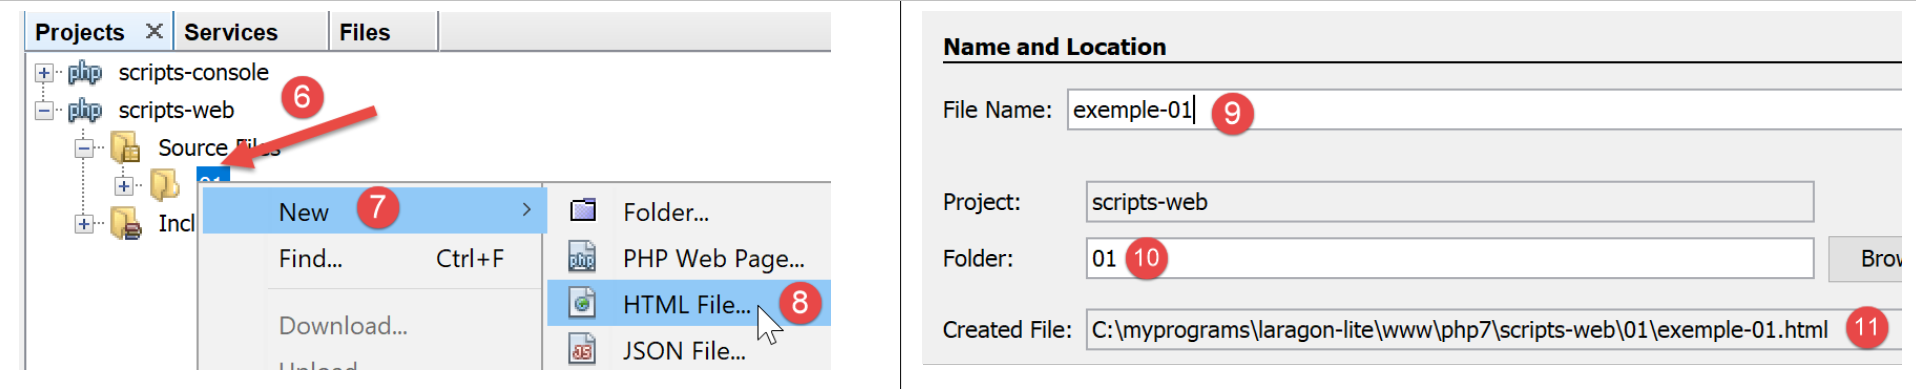
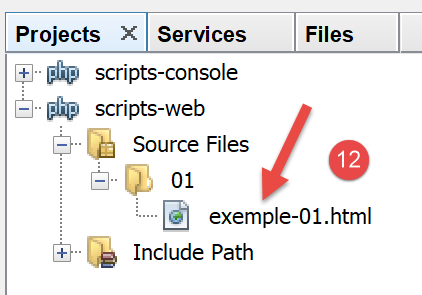
- 在 [6-12] 中,我们创建了一个名为 [example-01.html] 的 HTML 文件;
[example-01.html] 文件生成时包含以下预填充内容(2019年5月):
<!DOCTYPE html>
<!--
To change this license header, choose License Headers in Project Properties.
To change this template file, choose Tools | Templates
and open the template in the editor.
-->
<html>
    <head>
        <title>TODO supply a title</title>
        <meta charset="UTF-8">
        <meta name="viewport" content="width=device-width, initial-scale=1.0">
    </head>
    <body>
        <div>TODO write content</div>
    </body>
</html>
让我们将其内容更新如下:
<!DOCTYPE html>
<html>
    <head>
        <title>PHP7 par l'exemple</title>
        <meta charset="UTF-8">
        <meta name="viewport" content="width=device-width, initial-scale=1.0">
    </head>
    <body>
        <div><b>Ceci est un exemple de page statique</b></div>
    </body>
</html>
我们更改了页面标题(第 4 行)及其内容(第 9 行)。
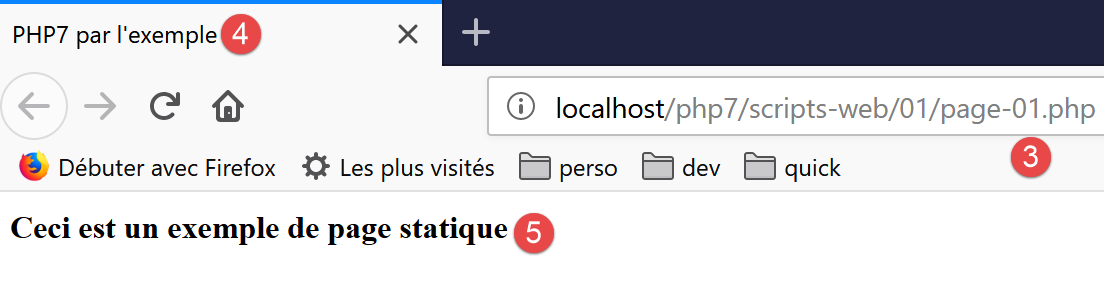
现在让我们让 Laragon 的 Apache 服务器显示这个 HTML 页面:
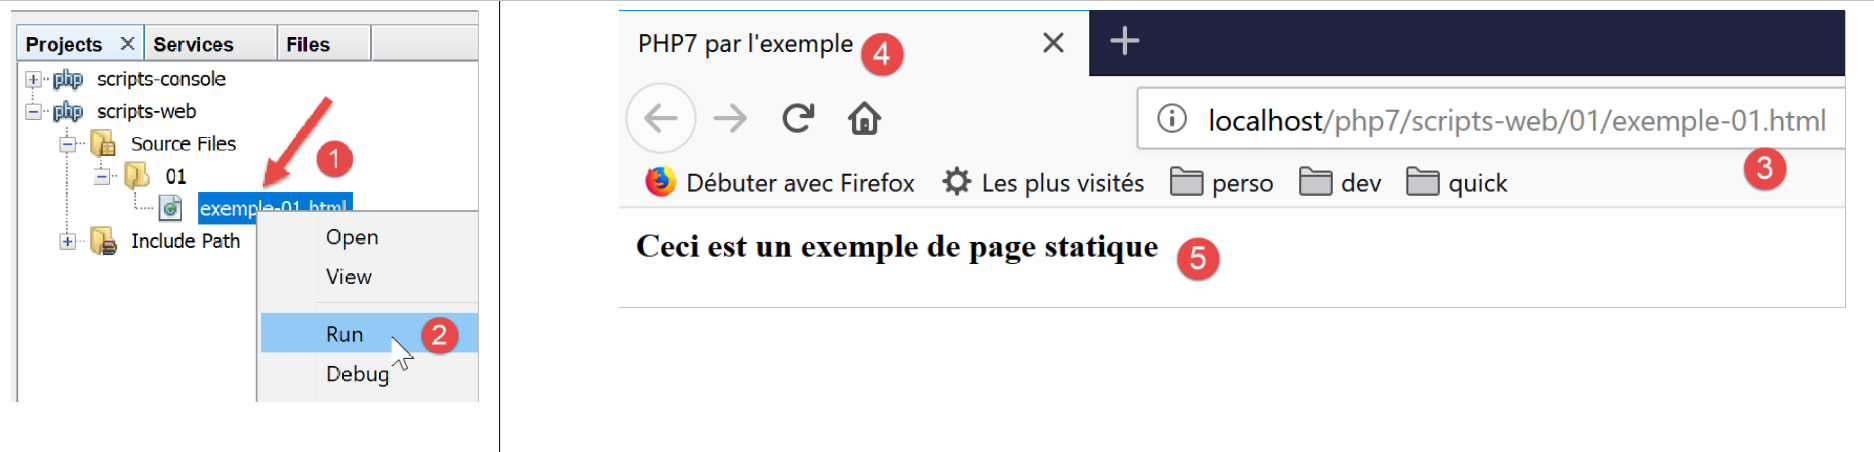
- 在[1-2]中,我们让 Laragon Apache 服务器显示该页面;
- 在 [3] 中,显示页面的 URL;
- 在 [4] 中,是我们修改过的标题;
- 在 [5] 中,是我们修改后的内容;
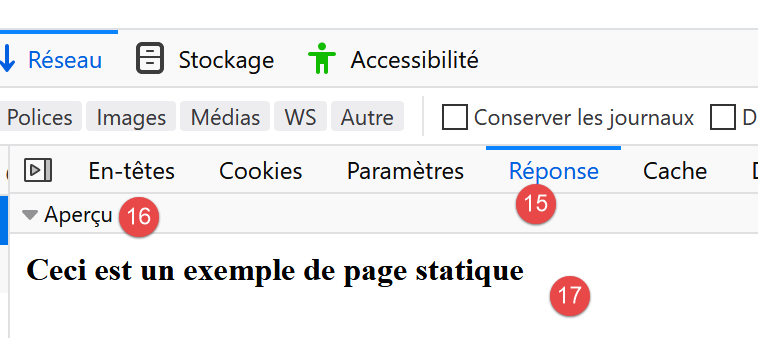
显示的页面是一个静态页面:您可以在浏览器中随意刷新(按 F5 键),显示的内容始终保持不变。
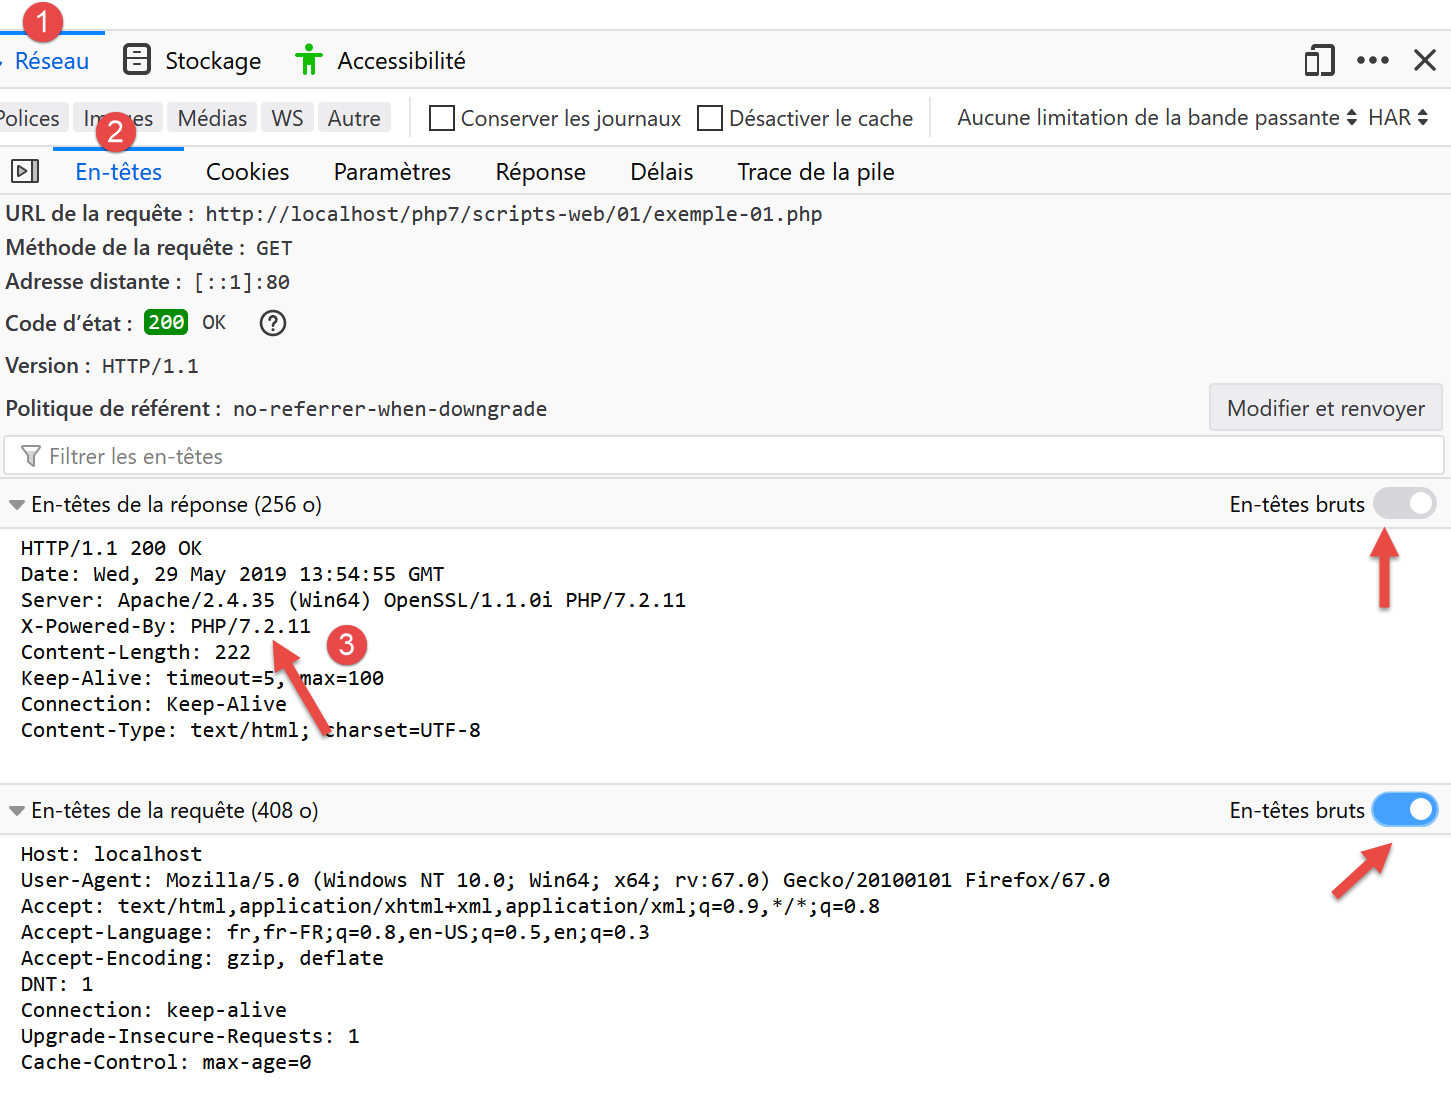
大多数浏览器都提供了访问客户端与服务器之间交换数据的途径,具体方法如“链接”一节所述。在 Firefox 浏览器中(截至 2019 年 5 月),按 F12 键即可访问这些数据:
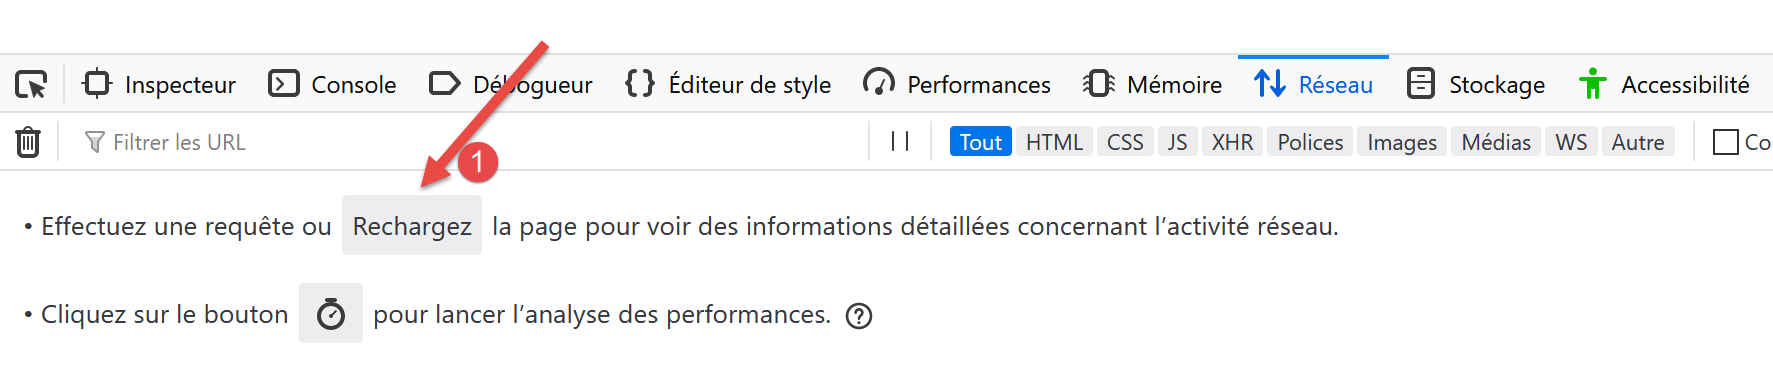
如[1]中所述,让我们刷新页面(F5):

- 在[2]中,浏览器加载的文档:我们选中它;
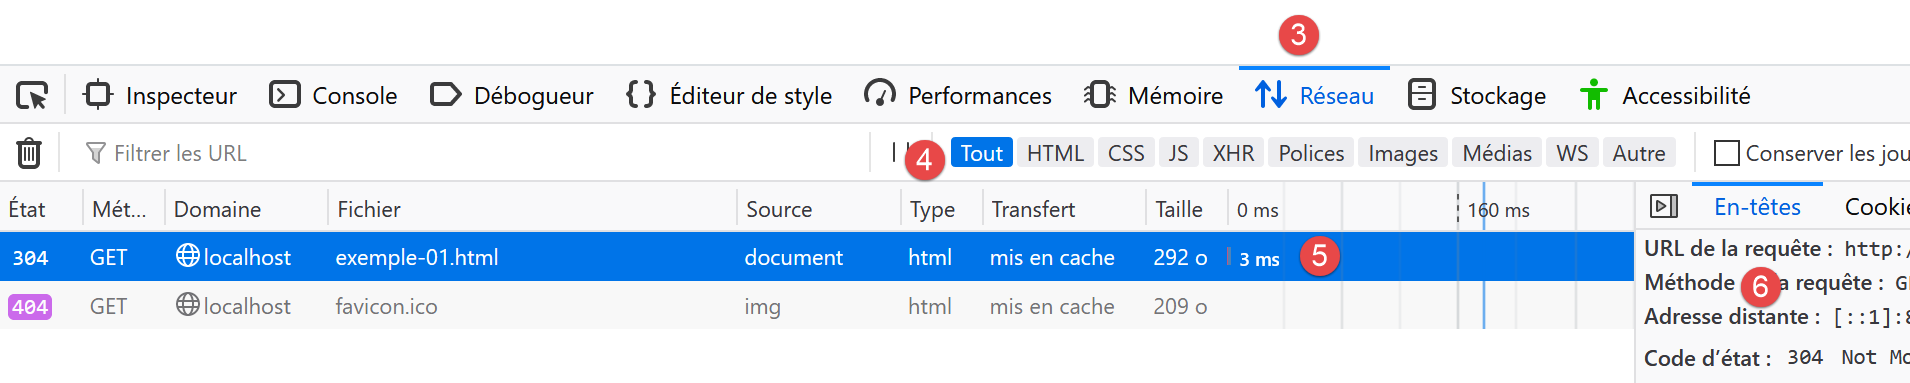
- 在[5]中,选中待分析的文档;
- 在 [3-4] 中,我们请求查看客户端/服务器交互;
- 在 [6] 中,显示这些交互;
- 在 [7] 中,选择“标头”选项卡;
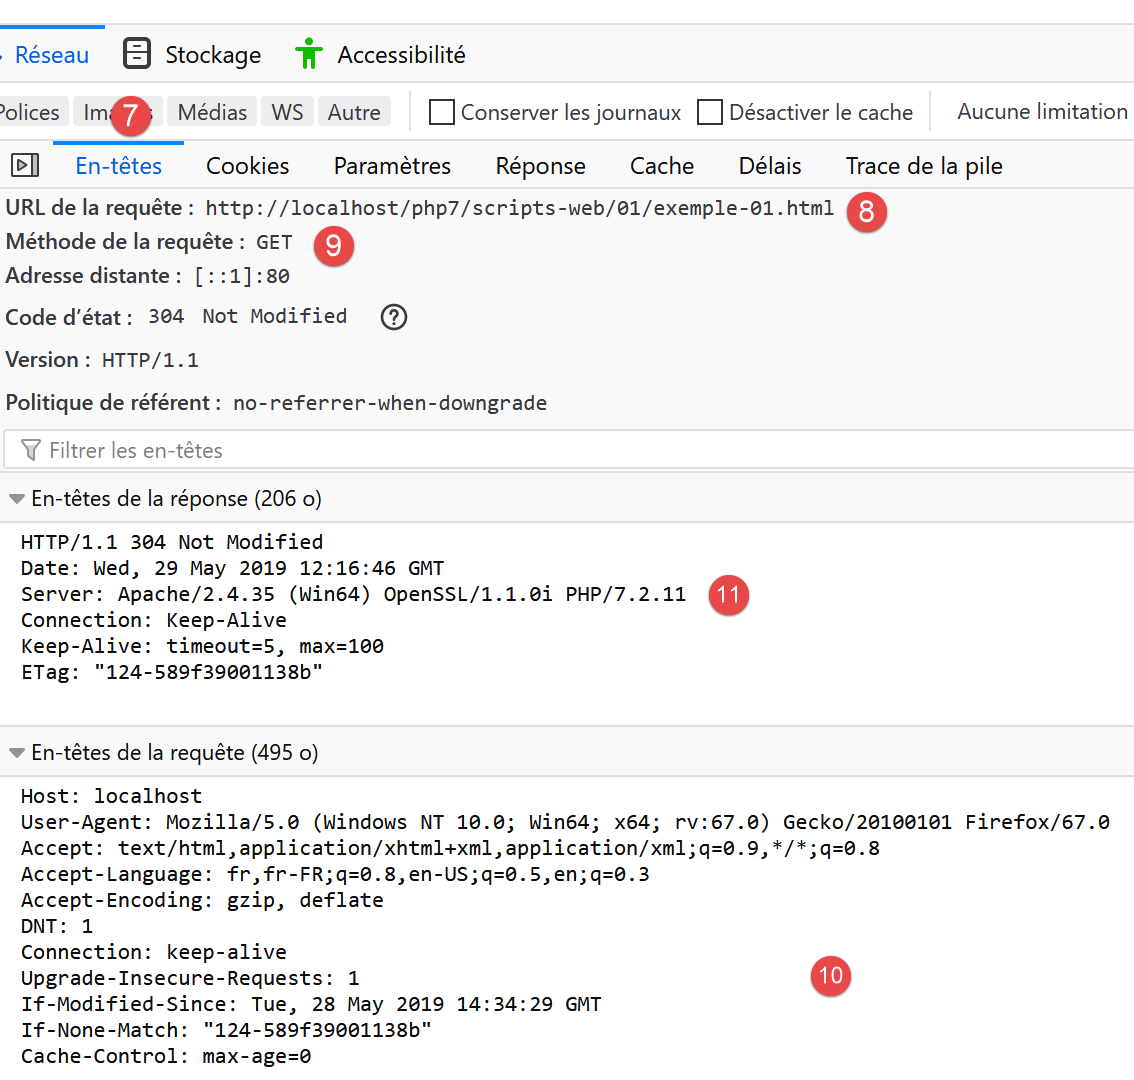
- 在[8]中,浏览器请求的URL;
- 在 [9] 中,发送到服务器的命令是 [GET http://localhost/php7/scripts-web/01/exemple-01.html HTTP/1.1];
- 在 [10] 中,浏览器(客户端)随后发送的 HTTP 头部;
- 在 [11] 中,是服务器响应的 HTTP 头部;
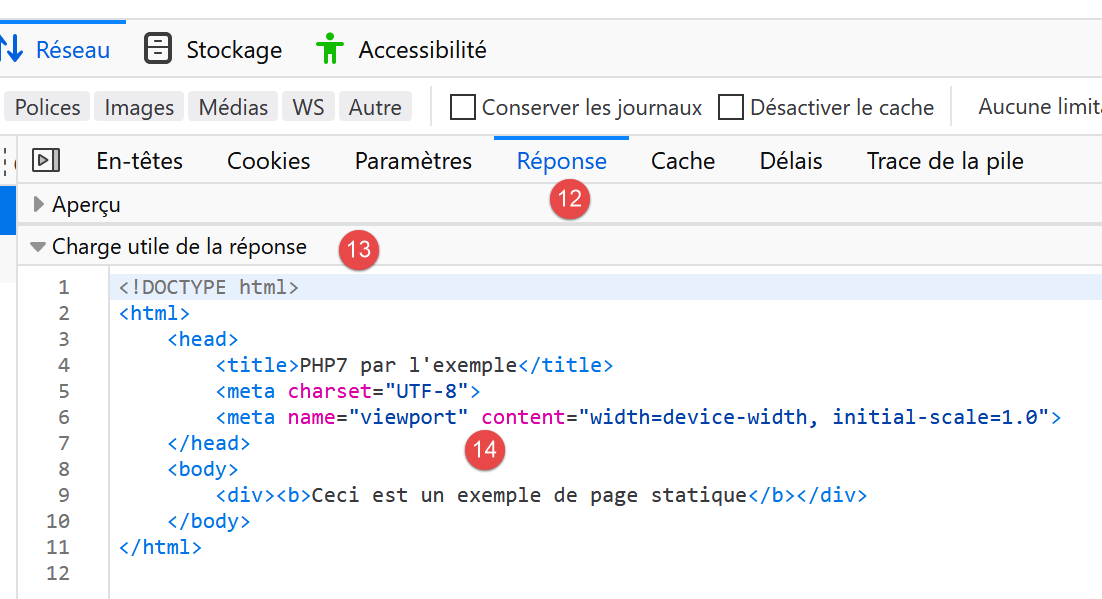
- 在 [12-14] 中,是 HTTP 头部之后发送的服务器响应;
- 在 [14] 中,我们可以看到客户端浏览器已收到我们构建的 HTML 页面。随后,它解析了该代码并显示如下内容:
17.3. 使用 PHP 创建动态页面
现在我们将用 PHP 编写一个动态页面:
- 在 [1-8] 中,我们创建了一个页面 [example-01.php];
[example-01.php] 文件生成时已预填充如下内容(2019年5月):
<!DOCTYPE html>
<!--
To change this license header, choose License Headers in Project Properties.
To change this template file, choose Tools | Templates
and open the template in the editor.
-->
<html>
    <head>
        <meta charset="UTF-8">
        <title></title>
    </head>
    <body>
        <?php
        // put your code here
        ?>
    </body>
</html>
我们将上述代码修改如下:
<!DOCTYPE html>
<html>
    <head>
        <meta charset="UTF-8">
        <title>Exemple de page dynamique</title>
    </head>
    <body>
        <?php
        // time : nb de millisecondes entre le moment présent et le 01/01/1970
        // format affichage date-heure
        // d : jour sur 2 chiffres
        // m : mois sur 2 chiffres
        // y : année sur 2 chiffres
        // H : heure 0,23
        // I : minutes
        // s: secondes
        print "<b>Date et heure du jour : </b>" . date("d/m/y H:i:s", time());
        ?>
    </body>
</html>
评论
- 第 5 行:我们更改了页面标题;
- 第17行:打印当前日期和时间;
基本上,上面的 PHP 脚本会将当前时间打印到控制台。然而,当由 Web 服务器执行时,[print] 语句的输出——通常会导向脚本的执行控制台——会被重定向到连接服务器与客户端的通道中。因此,在 Web 环境中,上面的脚本会将当前时间作为文本发送给客户端,在本例中即浏览器。
让我们运行 [example-01.php] 脚本:

- 在 [3] 中,是从 Apache Web 服务器请求的 URL;
- 在 [4] 中,是我们修改过的页面标题;
- 在 [5] 中,是 [print] 语句生成的内容;
这是一个动态页面,因为如果你在浏览器中多次刷新页面(按 F5 键),其内容会发生变化(时间会更新)。
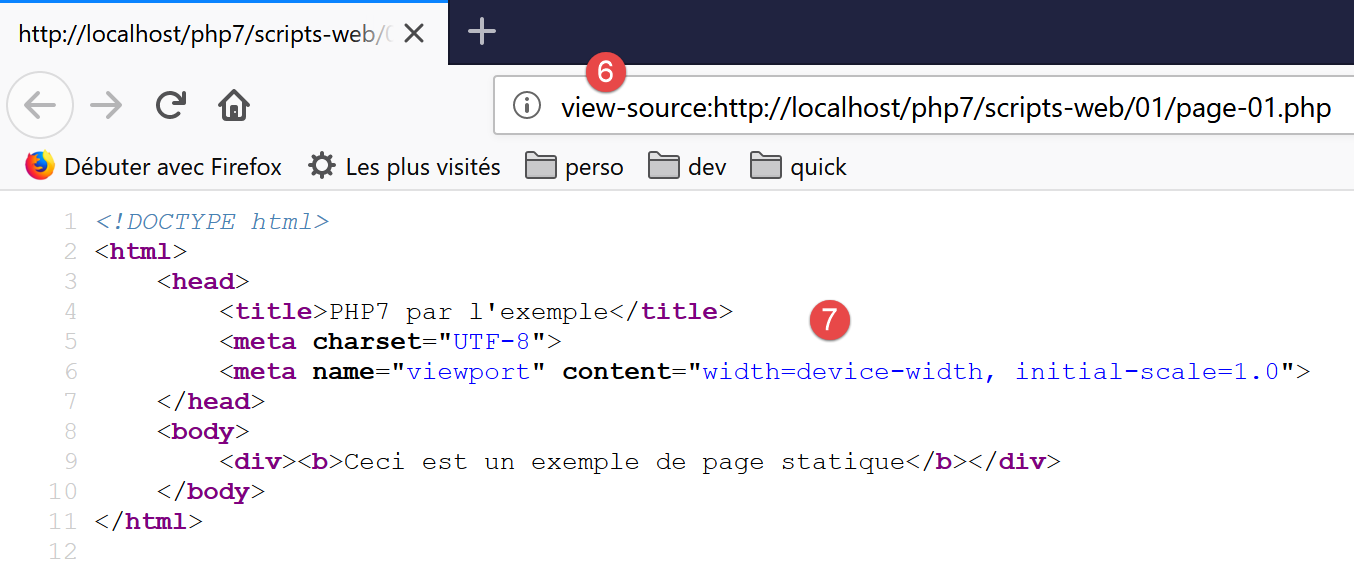
浏览器已接收到了一个 HTML 数据流。要查看它,您需要在浏览器中显示该页面的源代码:
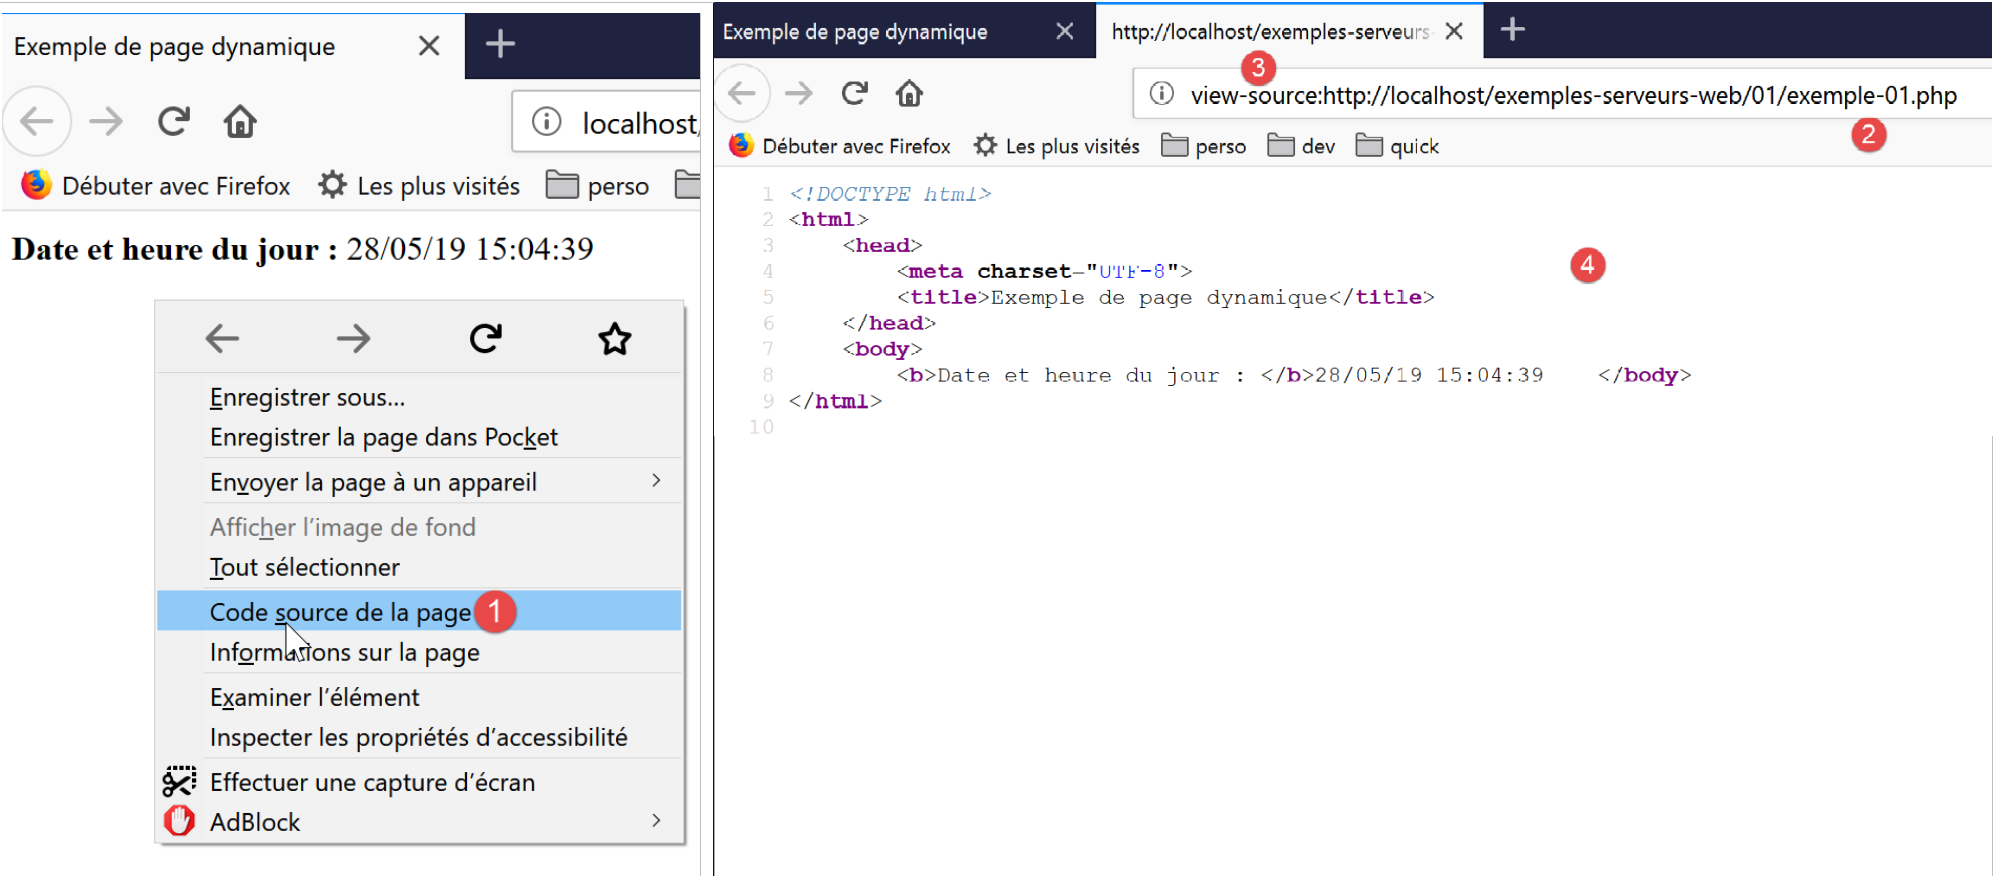
- 要访问菜单 [1],请在浏览器中右键单击页面;
- 在 [2] 中,页面的 URL [example-01.php] 需在前面添加前缀 [view-source:] [3];
- 在 [4] 中,浏览器显示的 HTML 内容;
因此,必须牢记:旨在由 Web 服务器执行的 PHP 脚本必须生成 HTML 数据流。
现在让我们通过 F12 查看服务器发送给客户端浏览器的 HTTP 头部:
- 在 [3] 中,出现了一个在请求静态页面时不存在的 HTTP 头。该头表明服务器的响应是由 PHP 脚本生成的;
我们已经看到,服务器的响应(此处的HTML输出)可以由PHP脚本生成。该脚本还可以生成HTTP头以及服务器响应中的几乎所有元素。
17.4. HTML 基础
本章不会深入探讨 PHP 网页编程。相关章节中已介绍了 MVC Web 应用程序的开发。本章主要关注 Web 服务:即通过 Web 服务器向其他 PHP 客户端提供数据的 PHP 页面。尽管如此,我们认为向读者介绍一些 HTML 基础知识仍会有所帮助。
Web 浏览器可以显示各种文档,其中最常见的是 HTML(超文本标记语言)文档。这些文档由采用 <tag>text</tag> 形式的标签进行格式化的文本组成。因此,文本 <b>important</b> 将以粗体显示“important”一词。还有一些独立标签,例如 <hr/> 标签,它会显示一条水平线。我们不会逐一讲解 HTML 文本中可能出现的所有标签。 有许多所见即所得(WYSIWYG)软件,允许您无需编写任何 HTML 代码即可构建网页。这些工具会自动为使用鼠标和预定义控件创建的布局生成 HTML 代码。因此,您可以(使用鼠标)将表格插入页面,然后查看软件生成的 HTML 代码,从而了解在网页上定义表格应使用的标签。就是这么简单。 此外,掌握 HTML 知识至关重要,因为动态 Web 应用程序必须自行生成 HTML 代码并发送给 Web 客户端。该代码是通过编程方式生成的,而您当然必须清楚该生成什么内容,才能确保客户端收到他们想要的网页。
简而言之,您无需精通整个HTML语言即可开始进行网页编程。不过,这些知识是必要的,并且可以通过使用DreamWeaver等所见即所得(WYSIWYG)网页编辑器来掌握。探索HTML奥秘的另一种方法是浏览网页,查看那些包含您尚未接触过的有趣元素的页面源代码。
请看以下示例,其中列举了网页文档中常见的一些元素,例如:
- 表格;
- 图片;
- 一个链接。
HTML 文档通常具有以下形式:
<html> <head> <title>标题</title> ... </head> <body 属性> ... </body></html>
整个文档由 <html>…</html> 标签包围。它由两部分组成:
- <head>…</head>:这是文档中不可显示的部分。它向将显示该文档的浏览器提供信息。该部分通常包含 <title>…</title> 标签,用于设置浏览器标题栏中显示的文本。 该部分还可能包含其他标签,尤其是定义文档关键词的标签,这些关键词随后会被搜索引擎使用。该部分还可能包含脚本,通常采用 JavaScript 或 VBScript 编写,这些脚本将由浏览器执行。
- <body attributes>…</body>:这是浏览器将显示的部分。该部分包含的 HTML 标签向浏览器说明了文档的“预期”视觉布局。每个浏览器对这些标签的解释方式各不相同。因此,两个浏览器可能以不同的方式显示同一个网页文档。这通常是网页设计师面临的挑战之一。
本示例文档的 HTML 代码如下:
<!DOCTYPE html>
<html xmlns="http://www.w3.org/1999/xhtml">
    <head>
        <meta http-equiv="Content-Type" content="text/html; charset=utf-8" />
        <title>Quelques balises HTML</title>
    </head>

    <body style="background-image: url(images/standard.jpg)">
        <h1 style="text-align: left">Quelques balises HTML</h1>
        <hr />

        <table border="1">
            <thead>
                <tr>
                    <th>Colonne 1</th>
                    <th>Colonne 2</th>
                    <th>Colonne 3</th>
                </tr>
            </thead>
            <tbody>
                <tr>
                    <td>cellule(1,1)</td>
                    <td style="text-align: center;">cellule(1,2)</td>
                    <td>cellule(1,3)</td>
                </tr>
                <tr>
                    <td>cellule(2,1)</td>
                    <td>cellule(2,2)</td>
                    <td>cellule(2,3</td>
                </tr>
            </tbody>
        </table>
        <br/><br/>
        <table border="0">
            <tr>
                <td>Une image</td>
                <td>
                    <img border="0" src="images/cerisier.jpg"/></td>
            </tr>
            <tr>
                <td>Le site de Polytech'Angers</td>
                <td><a href="http://www.polytech-angers.fr/fr/index.html">ici</a></td>
            </tr>
        </table>
    </body>
</html>
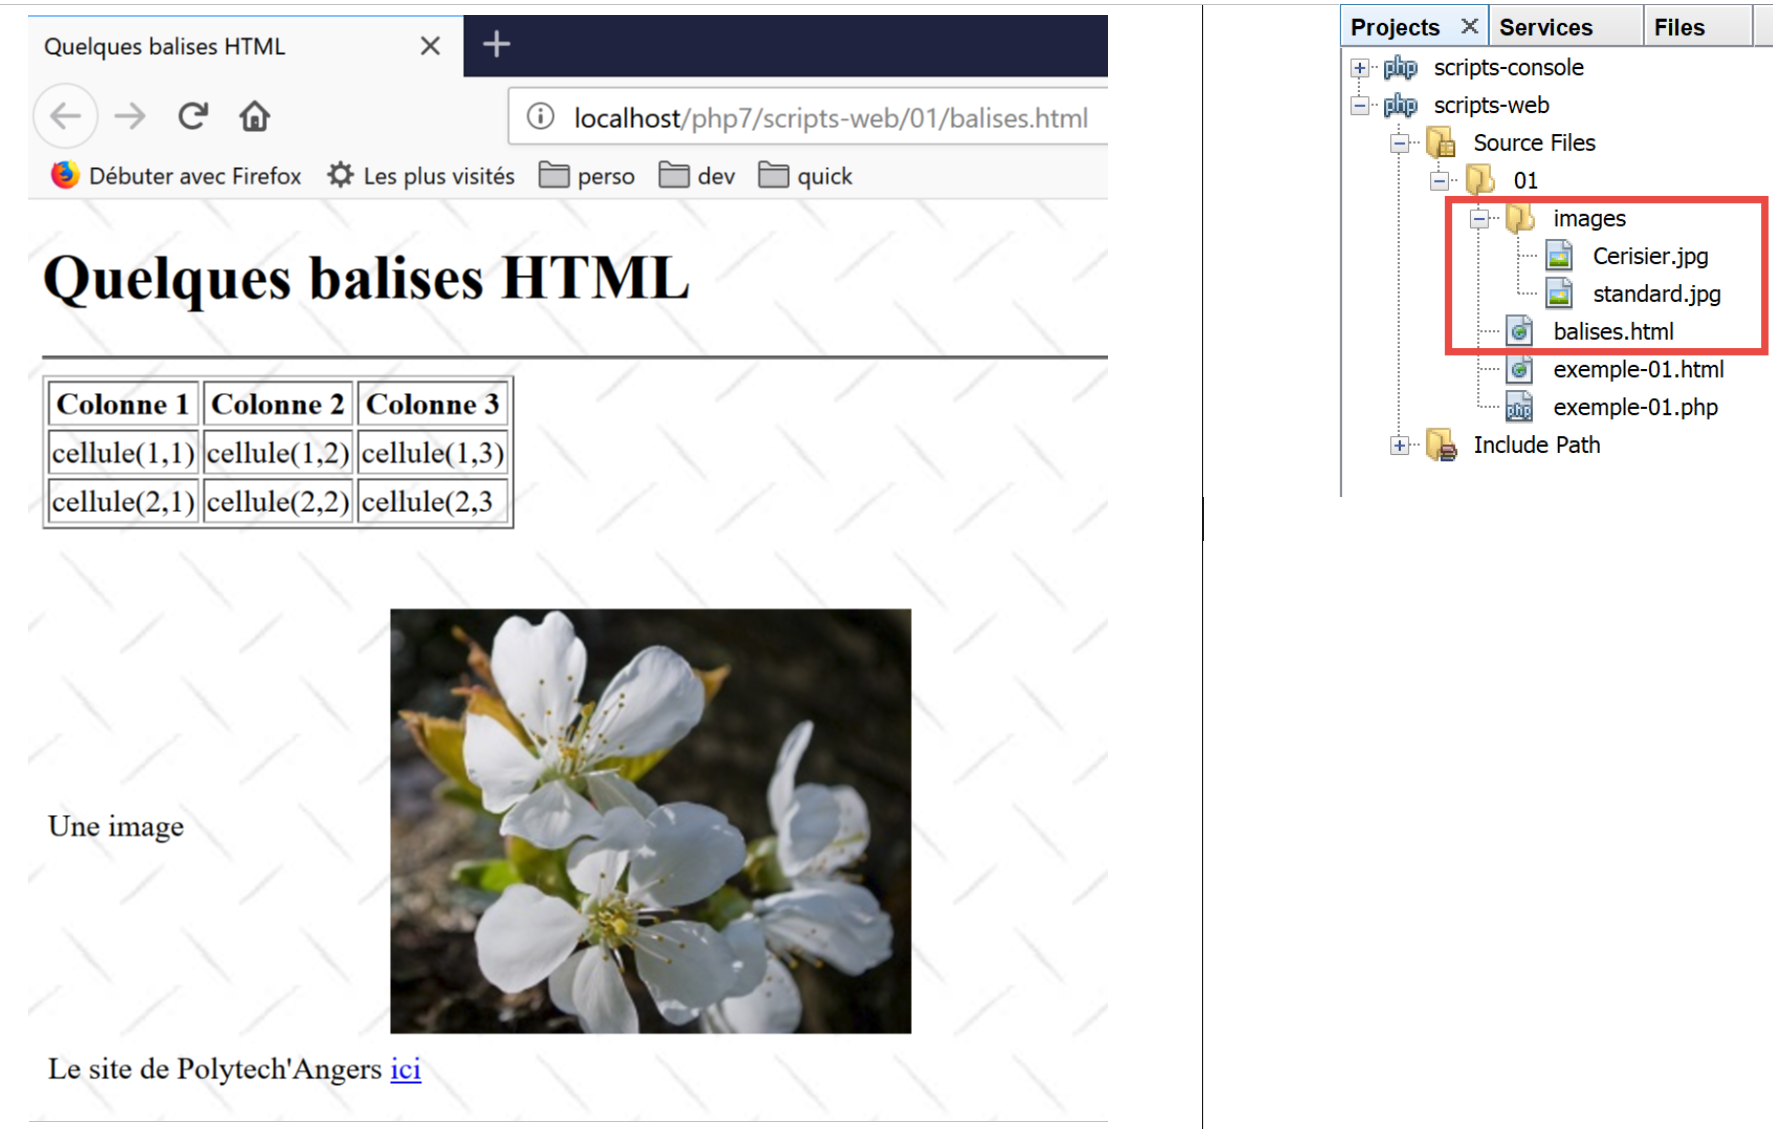
HTML 标签及示例 | |
<title>一些 HTML 标签</title> (第 5 行) 当文档显示时,文本 [一些 HTML 标签] 将出现在浏览器的标题栏中 | |
<hr />:显示一条水平线(第 10 行) | |
<table attributes>….</table>:用于定义表格(第 12、32 行) <thead>…</thead>:定义列标题(第13、19行) <tbody>…</tbody>:定义表格内容(第 20、31 行) <tr attributes>…</tr>:定义行(第 21、25 行) <td attributes>…</td>:用于定义单元格(第 22 行) 示例: <table border="1">…</table>:border 属性定义表格边框的粗细 <td style="text-align: center;">单元格(1,2)</td>(第23行):定义一个内容为单元格(1,2)的单元格。该内容将水平居中(text-align: center)。 | |
<img border="0" src="images/cherrytree.jpg"/>(第 38 行):定义了一张无边框(border="0")的图片,其源文件位于 Web 服务器上的 [images/cherrytree.jpg](src="images/cherrytree.jpg")。 该链接位于可通过 URL http://localhost/php7/scripts-web/01/balises.html 访问的网页文档中。因此,浏览器将请求 URL http://localhost/php7/scripts-web/01/images/cerisier.jpg 以获取此处引用的图片。 | |
<a href="http://www.polytech-angers.fr/fr/index.html">here</a>(第 42 行):使文本“here”作为指向 URL http://www.polytech-angers.fr/fr/index.html 的链接。 | |
<body style="background-image: url(images/standard.jpg)">(第8行):表示用作页面背景的图片位于Web服务器上的URL [images/standard.jpg]。在本示例中,浏览器将请求URL http://localhost/php7/scripts-web/01/images/standard.jpg 以获取此背景图片。 |
在这个简单的示例中,我们可以看到,为了构建整个文档,浏览器必须向服务器发出三次请求:
- http://localhost/php7/scripts-web/01/images/balises.html 以获取文档的 HTML 源代码
- http://localhost/php7/scripts-web/01/images/cerisier.jpg 用于获取图片 cerisier.jpg
- http://localhost/php7/scripts-web/01/images/standard.jpg 用于获取背景图片 standard.jpg
这可以通过客户端与服务器之间的网络流量(在浏览器中按 F12)来查看:
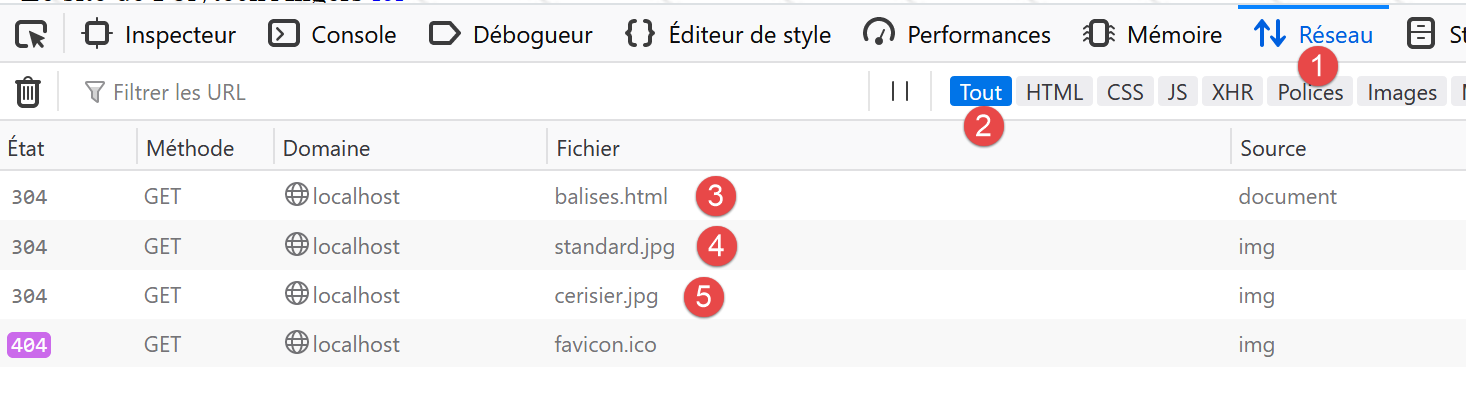
- 在[3-5]中,我们可以看到浏览器发出的三个请求;
17.5. 将静态页面变为动态
让我们演示如何将 HTML 页面 [example-01.html] 变为动态页面。复制内容
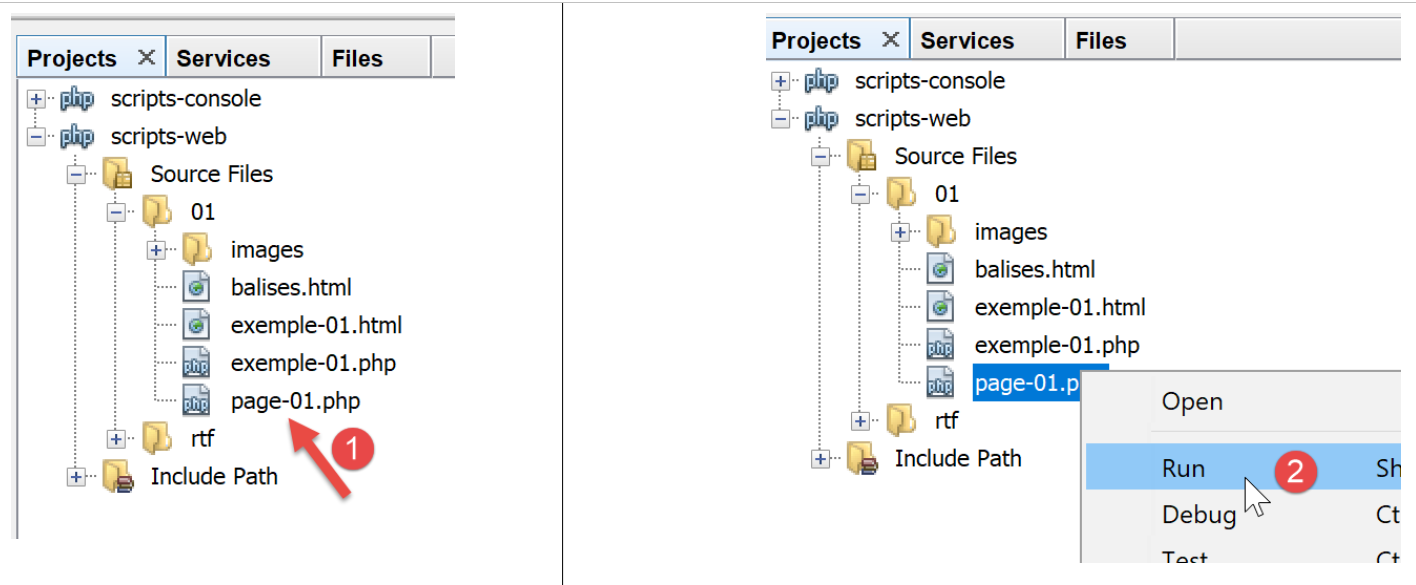
我们将 [example-01.html] 的内容复制到了文件 [page-01.php] 中。如果运行 [2] 这个 Web 脚本,浏览器中会显示如下内容:
- 在 [3] 中,请求的 URL;
- 在 [4] 中,页面标题;
- 在 [5] 中,页面内容;
如果查看浏览器接收到的代码,我们会发现如下内容:
- 在 [7] 中,[example-01.php] 脚本中放置的 HTML 代码
PHP 解释器解析了 [page-01.php] 脚本,并生成了与静态页面 [example-01.html] 完全相同的 HTML 输出。在 [page-01.php] 脚本中,并没有 PHP 代码,只有 HTML。这告诉我们一个道理:当 PHP 解释器在 PHP 脚本中发现 HTML 时,它会保持原样,并将它原样发送给客户端。
现在,让我们在 [page-01.php] 脚本中添加一些 PHP 指令,以便 PHP 解释器有任务可执行:
<!DOCTYPE html>
<html>
    <head>
        <title><?php print $page->title ?></title>
        <meta charset="UTF-8">
        <meta name="viewport" content="width=device-width, initial-scale=1.0">
    </head>
    <body>
        <div><b><?php print $page->contents ?></b></div>
    </body>
</html>
在第 4 行和第 9 行,我们添加了 PHP 代码以动态生成页面标题和内容。这里,我们假设变量 [$page] 是一个包含待显示数据的对象。
如果运行这段新代码,浏览器中将显示以下结果:
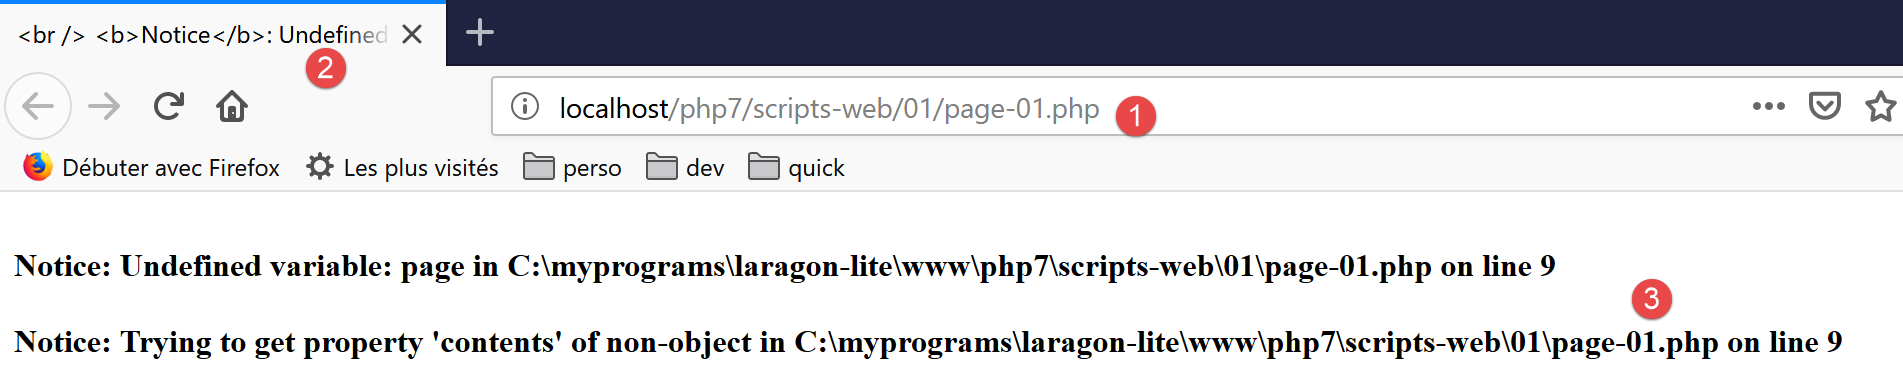
- 在 [1] 中,是请求的 URL;
- 在 [2] 中,由于变量 [$page] 未定义,因此无法显示页面标题;
- 在 [3] 中,内容同样无法显示;
现在,让我们编写以下 Web 脚本 [example-02.php]:
脚本 [example-02.php] 内容如下:
<?php

// define the page elements to be displayed
$page=new \stdclass();
$page->title="Un nouveau titre";
$page->contents="Un nouveau contenu généré dynamiquement";
// display [page-01]
require_once "page-01.php";
- 第 4-6 行:我们定义了 [$page] 对象;
- 第 8 行:包含脚本 [page-01.php]。随后将解析该脚本中的代码:
- 变量 [$page] 现已定义,PHP 解释器将使用它;
- 来自 [page-01.php] 的 HTML 代码将原样发送给客户端;
- PHP [print] 操作的结果将被包含在发送给客户端的文本流中;
现在,如果我们运行 Web 脚本 [example-02.php],浏览器中将显示以下内容:
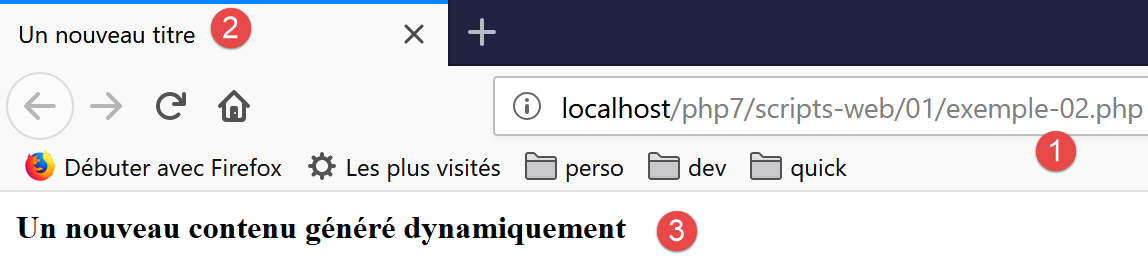
如果查看浏览器接收到的文本内容:
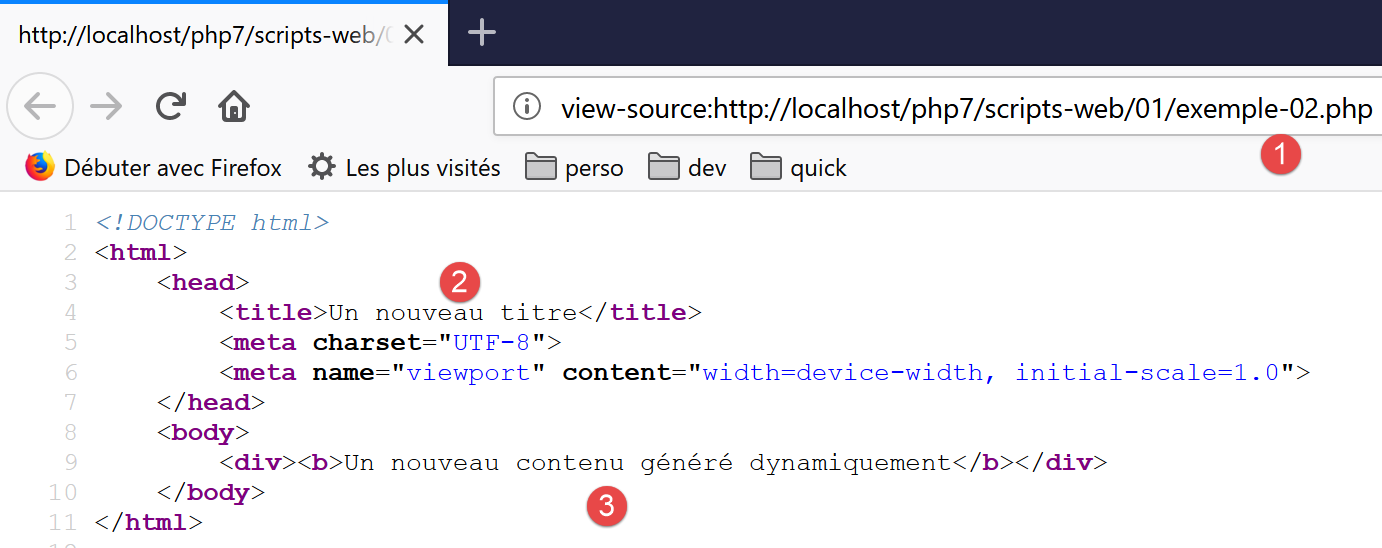
- 原先位于 [2] 和 [3] 中的 PHP 代码已被两个 [print] 命令的执行结果所替换;
从这个例子中,我们可以得出两个关键点:
- 面向浏览器的 HTML 页面可以被封装在仅包含 HTML 代码和少量由 PHP 代码生成的动态部分的 PHP 脚本中。这些页面中的 PHP 代码应尽可能少;
- 所有用于生成 HTML 页面中动态数据的逻辑,都必须封装在纯 PHP 脚本中,且这些脚本不应包含任何页面呈现代码(HTML、CSS、JavaScript 等);
这使得任务分离成为可能:
- 创建待显示网页的任务(HTML、CSS、JavaScript 等);
- 我们正在构建的 Web 应用程序逻辑的任务。该逻辑可以采用三层架构来实现,这与我们处理控制台脚本时完全一致;
接下来,我们将构建具体的 Web 脚本;
- 这些脚本仅向客户端发送数据,而不包含任何呈现元素(HTML、CSS、JavaScript)。因此,它们将作为数据服务器而非网页存在;
- 这些 Web 脚本的客户端将是控制台脚本,它们将检索服务器发送的数据并进行处理;
17.6. 客户端/服务器日期/时间应用程序
目前我们的配置如下:
我们将编写:
- 一个 Web 脚本 [1],用于将当前日期和时间发送给客户端;
- 一个控制台脚本 [2],它将作为 Web 脚本的客户端:它将接收 Web 脚本发送的日期和时间,并在控制台显示出来;
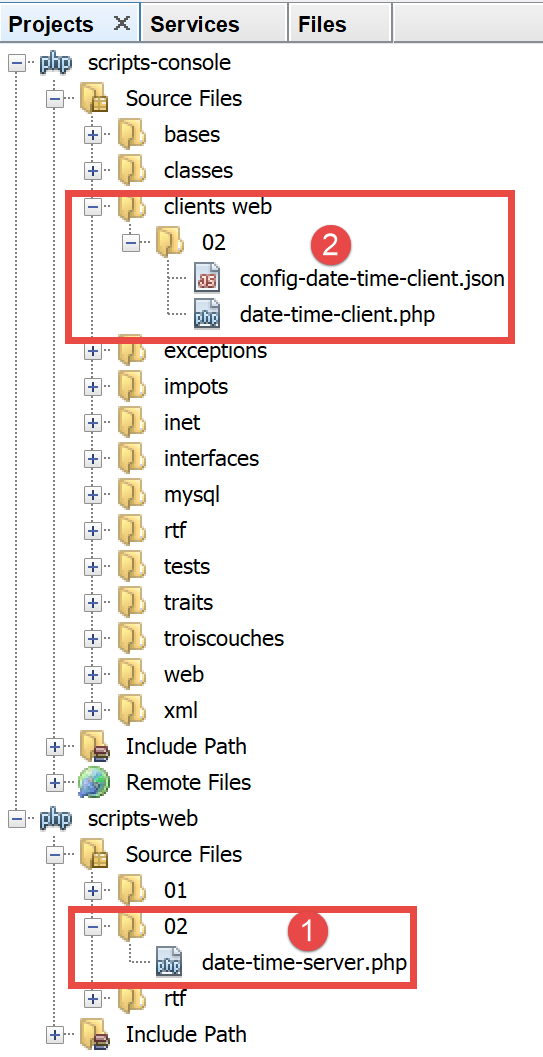
- 在 [1] 中,即 Web 脚本 [date-time-server.php];
- 在 [2] 中,控制台脚本 [date-time-client],它是 Web 脚本的客户端;
17.6.1. 服务器脚本
我们在前面的章节中已经编写了一个生成当前日期和时间的 Web 脚本。该脚本如下所示 [example-01.php]:
<!DOCTYPE html>
<html>
    <head>
        <meta charset="UTF-8">
        <title>Exemple de page dynamique</title>
    </head>
    <body>
        <?php
        // time : nb de millisecondes depuis 01/01/1970
        // format affichage date-heure
        // d: jour sur 2 chiffres
        // m: mois sur 2 chiffres
        // y : année sur 2 chiffres
        // H : heure 0,23
        // i : minutes
        // s: secondes
        print "<b>Date et heure du jour : </b>" . date("d/m/y H:i:s", time());
        ?>
    </body>
</html>
我们说过要编写数据服务器:不带 HTML 标记的原始数据。那么服务器脚本 [date-time-server.php] 将如下所示:
<?php

// set header HTP [Content-Type]
header('Content-Type: text/plain; charset=UTF-8');
//
// send date and time
// time: number of milliseconds since 01/01/1970
// date-time display format
// d: 2-digit day
// m: 2-digit month
// y: 2-digit year
// H: hour 0.23
// i : minutes
// s: seconds
print date("d/m/y H:i:s", time());
- 第 4 行:我们设置了 HTTP 头部 [Content-Type],用于告知客户端将接收的文档类型。此前,[Content-Type] 的设置为:[Content-Type: text/html; charset=UTF-8]。 在此,我们告知客户端该文档是不含 HTML 标记的纯文本。这对我们的控制台客户端并不重要,因为它不会使用此标头。但对浏览器客户端而言则更为重要,因为它们确实会使用此标头;
让我们运行这个服务器端脚本:
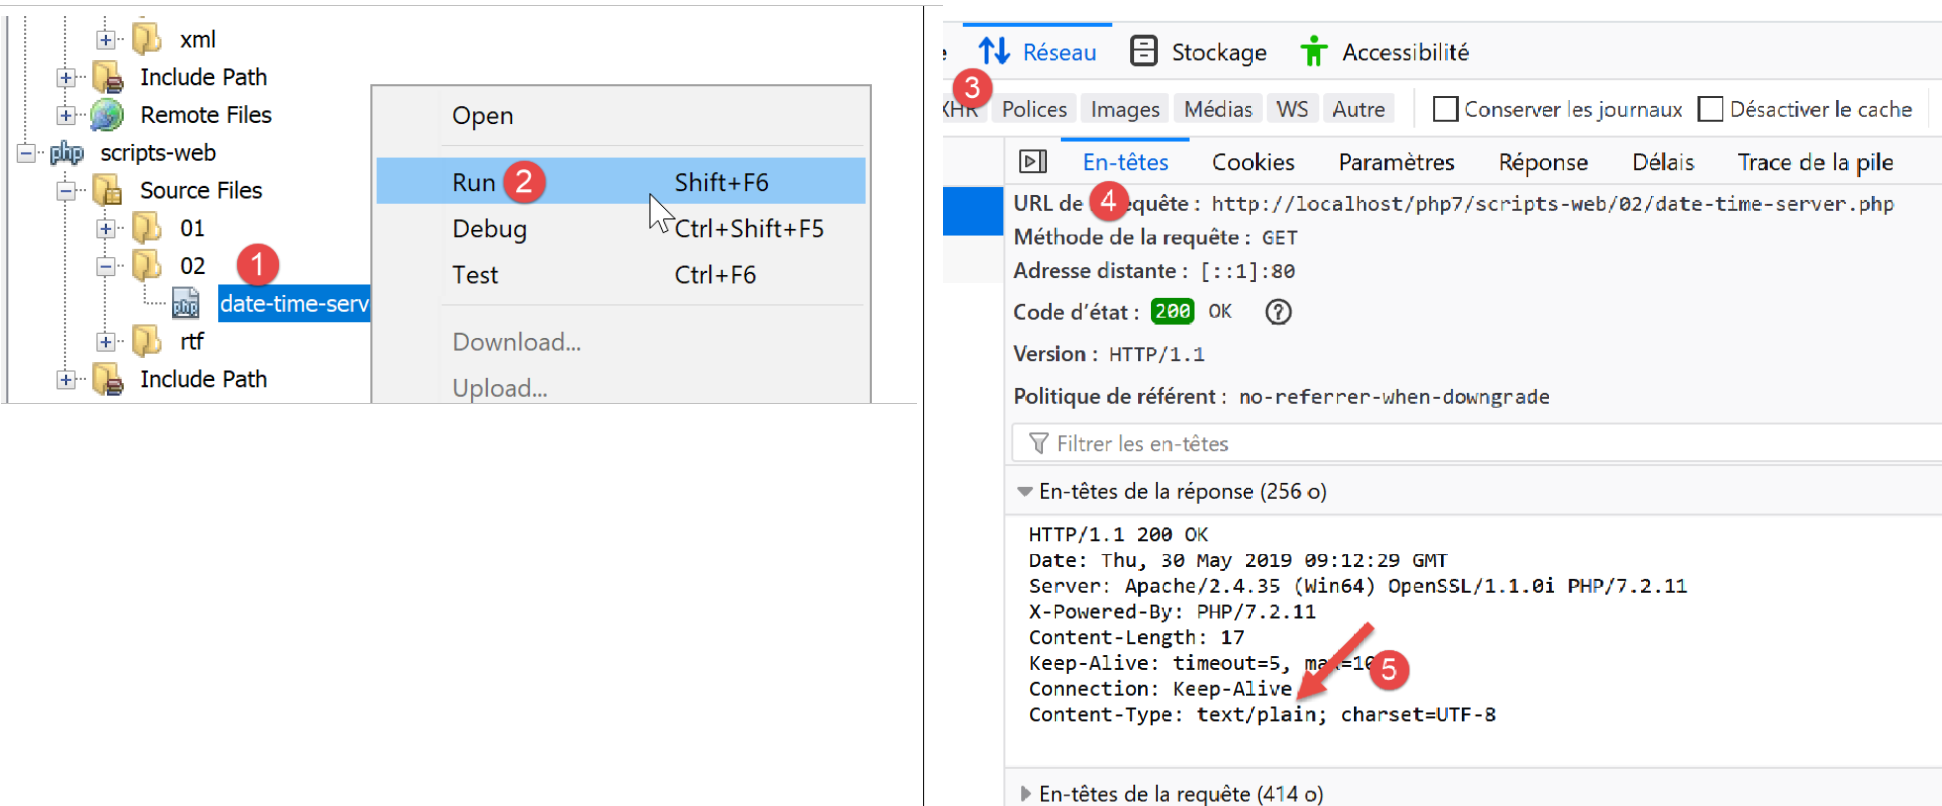
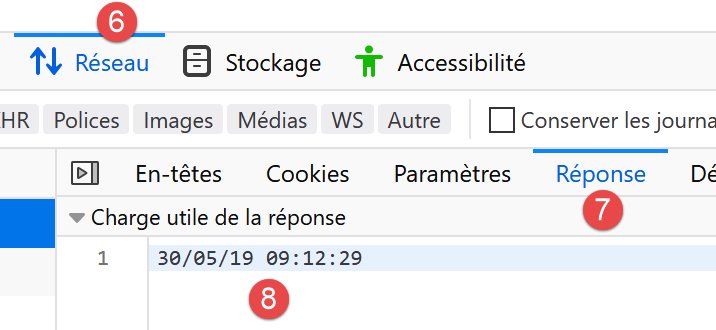
如果我们在浏览器中检查服务器的响应(F12),可以看到在[5]处是服务器脚本设置的HTTP头部,而在[8]处则是接收到的文本文档;
17.6.2. 客户端脚本
在前一节中,我们开发了几个 HTTP 客户端。 我们可以利用它们来获取由服务器脚本 [date-time-server.php] 发送的文本文件。但我们不会这样做。正如我们处理 SMTP 和 IMAP 协议时所做的那样,我们将使用一个第三方库,即 Symfony 框架 [https://symfony.com/doc/master/components/http_client.html] 中的 [HttpClient] 组件。
与前两个库一样,我们使用 [Composer] 工具来安装 Symfony 的 [HttpClient] 组件。在 Laragon [终端] 窗口中(参见相关章节),输入以下命令:

- 在 [3] 中,请确认您当前位于 [<laragon>/www/] 目录下,其中 <laragon> 是 Laragon 的安装目录;
- 在 [4] 中,执行 [composer] 命令以安装 Symfony [HttpClient] 库;
- 在 [5] 中,由于该机器上已安装 [HttpClient] 库,因此未进行安装;
- 在 [6-7] 中,[<laragon>/www/vendor/symfony] 目录下会出现新的文件夹;
与 [5] 不同,您应该看到类似以下内容:
C:\myprograms\laragon-lite\www
? composer require symfony/http-client
Using version ^4.3 for symfony/http-client
./composer.json has been updated
Loading composer repositories with package information
Updating dependencies (including require-dev)
Package operations: 4 installs, 0 updates, 0 removals
  - Installing symfony/polyfill-php73 (v1.11.0): Downloading (100%)
  - Installing symfony/http-client-contracts (v1.1.1): Downloading (100%)
  - Installing psr/log (1.1.0): Loading from cache
  - Installing symfony/http-client (v4.3.0): Downloading (100%)
Writing lock file
Generating autoload files
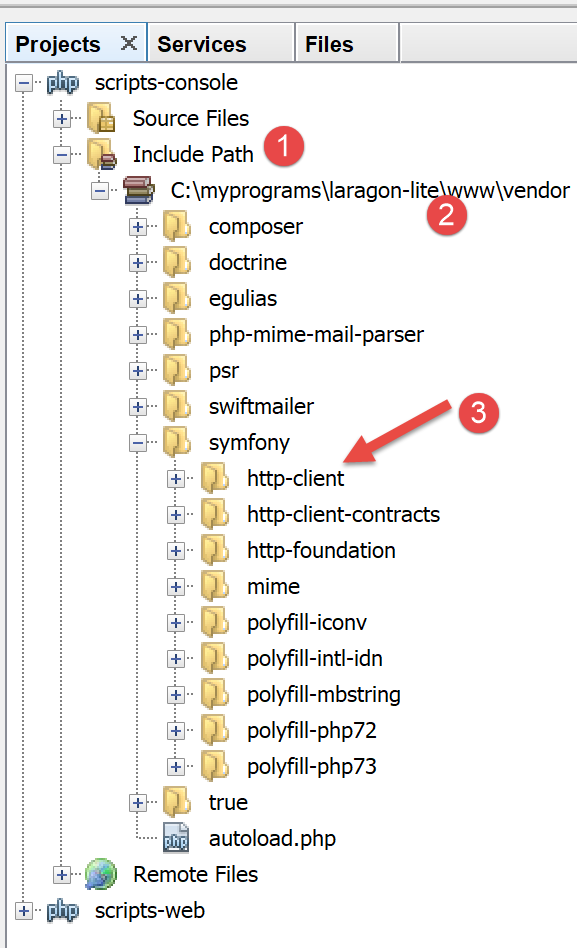
请确保 [<laragon>/www/vendor] 文件夹已包含在项目的 [Include Path] 中(参见相关章节):
完成此操作后,我们可以编写控制台脚本 [date-time-client.php]:
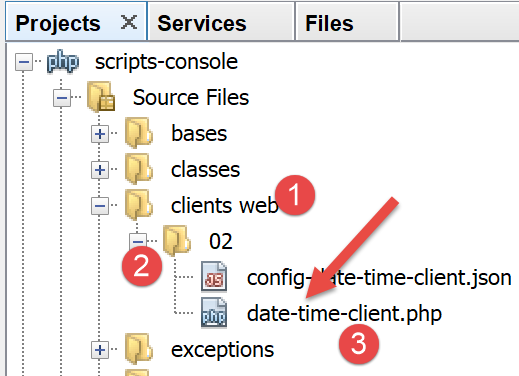
该控制台脚本 [date-time-client.php] 将使用以下 JSON 文件 [config-date-time-client.json]:
- 第 2 行:服务器脚本的 URL;
客户端脚本 [date-time-client.php] 将如下所示:
<?php

// service customer date / time
//
// error management
//ini_set("error_reporting", E_ALL & ~ E_WARNING & ~E_DEPRECATED & ~E_NOTICE);
//ini_set("display_errors", "off");
//
// dependencies
require_once 'C:/myprograms/laragon-lite/www/vendor/autoload.php';
use Symfony\Component\HttpClient\HttpClient;

// customer configuration
const CONFIG_FILE_NAME = "config-date-time-client.json";

// we retrieve the configuration
if (!file_exists(CONFIG_FILE_NAME)) {
  print "Le fichier de configuration [" . CONFIG_FILE_NAME . "] n'existe pas\n";
  exit;
}
if (!$config = \json_decode(\file_get_contents(CONFIG_FILE_NAME), true)) {
  print "Erreur lors de l'exploitation du fichier de configuration jSON [" . CONFIG_FILE_NAME . "]\n";
  exit;
}

// create a HTTP customer
$httpClient = HttpClient::create();

try {
  // query
  $response = $httpClient->request('GET', $config['url']);
  // answer status
  $statusCode = $response->getStatusCode();
  print "---Réponse avec statut : $statusCode\n";
  // we retrieve the headers
  print "---Entêtes de la réponse\n";
  $headers = $response->getHeaders();
  foreach ($headers as $type => $value) {
    print "$type: " . $value[0] . "\n";
  }
  // retrieve the body of the reply
  $content = $response->getContent();
  // we display it
  print "---Réponse du serveur : [$content]\n";
} catch (TypeError | RuntimeException $ex) {
  // error is displayed
  print "Erreur de communication avec le serveur : " . $ex->getMessage() . "\n";
  exit;
}
注释
- 第 10 行:与之前处理库的方式一样,我们加载文件 [<laragon>/www/vendor/autoload.php];
- 第 11 行:声明我们将要使用的 [HttpClient] 类;
- 第 13–24 行:从 [$config] 字典中获取脚本的配置;
- 第 27 行:创建一个 [HttpClient] 类型的对象;
- 第 31 行:使用 GET 请求 [GET URL HTTP/1.1] 向服务器脚本发送请求。此操作为异步操作。程序执行将直接跳至第 33 行,无需等待响应;
- 第 33 行:获取响应状态。该状态位于服务器返回的第一个 HTTP 头中。因此,如果该头为 [HTTP/1.1 200 OK],则响应状态为 200。此操作是阻塞的:只有当客户端从服务器接收到了完整的响应后,执行才会继续;
- 第 37 行:请求响应的 HTTP 头部;
- 第 42 行:获取服务器返回的文档:我们知道该文档是文本。
- 第 45–49 行:若发生错误,则显示错误信息;
当客户端脚本执行时(必须运行 Laragon 才能访问服务器脚本),控制台将显示以下结果:
---Réponse avec statut : 200
---Entêtes de la réponse
date: Thu, 30 May 2019 14:42:03 GMT
server: Apache/2.4.35 (Win64) OpenSSL/1.1.0i PHP/7.2.11
x-powered-by: PHP/7.2.11
content-length: 17
content-type: text/plain; charset=UTF-8
---Réponse du serveur : [30/05/19 14:42:03]
我们在第 8 行成功获取了当前日期和时间。
您可能想知道客户端脚本向服务器发送了什么。为此,我们将使用我们的通用 TCP 服务器(参见“链接”部分):
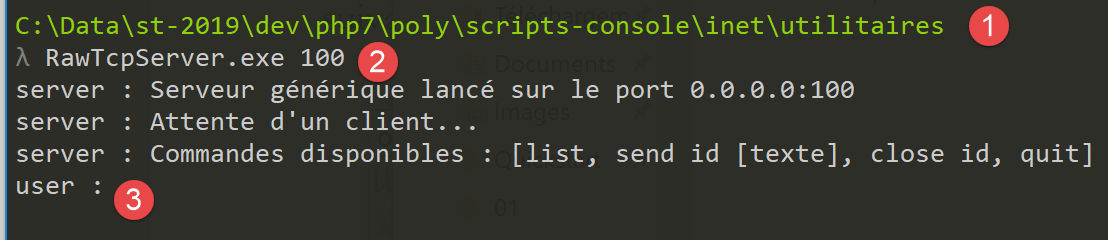
- 位于 [1] 中的 utilities 文件夹内;
- 在[2]中,TCP服务器正在100端口上运行;
- 在[3]中,正在等待通过键盘输入的命令;
我们修改脚本的配置文件 [date-time-client.php]:
{
    "url": "http://localhost:100/php7/scripts-web/02/date-time-server.php"
}
这次,客户端通过 100 端口联系服务器 [localhost]。因此,我们的通用 TCP 服务器将被调用。当我们运行控制台脚本 [date-time-client.php] 时,通用 TCP 服务器的控制台会发生如下变化:
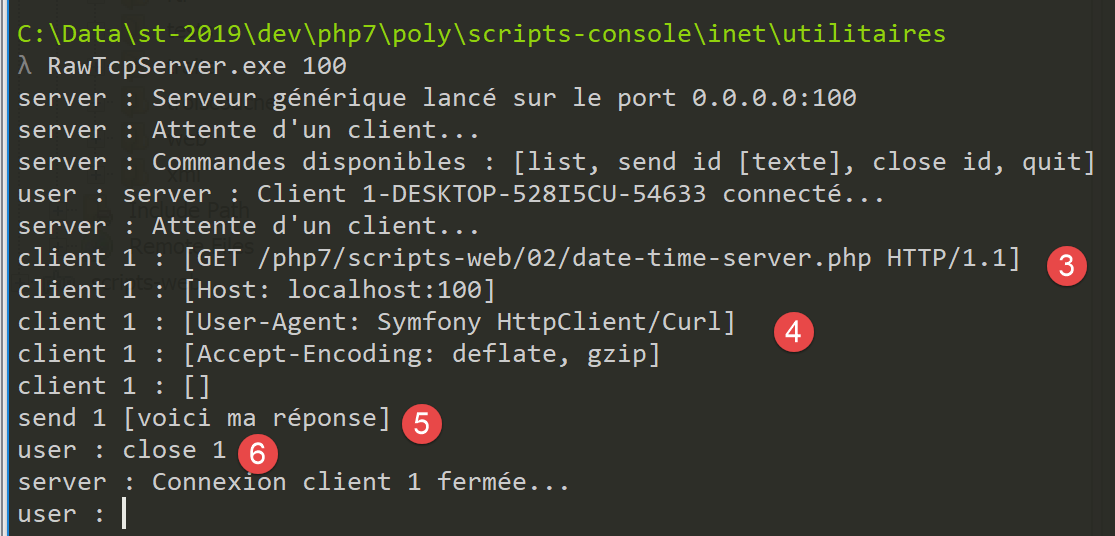
- 在 [3] 中,客户端脚本构建的 HTTP GET 请求;
- 在 [4] 中,是控制台脚本的签名;
- 在 [5] 中,服务器对客户端脚本的响应。请注意,这不是一个有效的 HTTP 响应:
- 应包含 HTTP 头部;
- 随后应有一行空行;
- 然后是发送给客户端的文本文件;
- 在 [6] 中,我们关闭与客户端脚本的连接,以便它检测到已收到完整的响应;
在客户端脚本中,控制台显示如下内容:
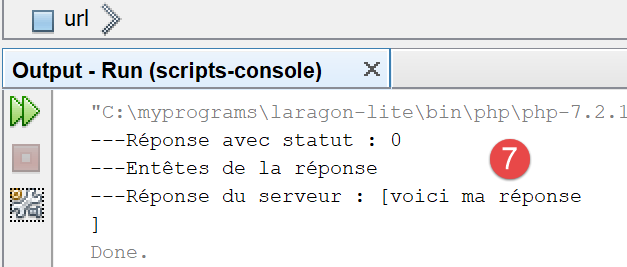
- 在 [7] 中,Symfony 客户端接收到的内容;
17.6.3. 服务器脚本 – 版本 2
默认情况下,用于编写 Web 脚本的 PHP 函数并非面向对象的。因此,在服务器端,我们不得不混合使用传统的 PHP 类和函数。为了实现更一致的编码风格,我们将使用 Symfony 框架中的 [HttpFoundation] 库。它将 Web 服务所需的所有传统 PHP 函数封装成一个由类和接口组成的系统。 该库的文档可访问 [https://symfony.com/doc/current/components/http_foundation.html](2019年5月)。
要在 Laragon 终端中安装该库,请按照以下步骤操作(参见相关章节):
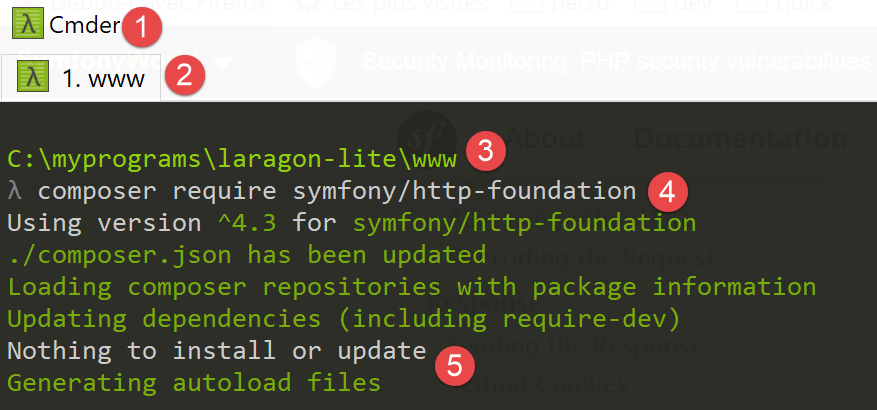
- [2-3]:确保您位于 [<laragon>/www] 文件夹中;
- [4]: 运行 [composer] 命令,这将安装 [HttpFoundation] 库;
- [5]: 在此示例中,该库已安装;
首次安装时,您应看到类似以下的控制台日志:
C:\myprograms\laragon-lite\www
? composer require symfony/http-foundation
Using version ^4.3 for symfony/http-foundation
./composer.json has been updated
Loading composer repositories with package information
Updating dependencies (including require-dev)
Package operations: 2 installs, 0 updates, 0 removals
  - Installing symfony/mime (v4.3.0): Downloading (100%)
  - Installing symfony/http-foundation (v4.3.0): Downloading (100%)
Writing lock file
Generating autoload files
Web 服务器的第二个版本 [date-time-server-2.php] 如下:
<?php

// using Symfony libraries

// dependencies
require_once 'C:/myprograms/laragon-lite/www/vendor/autoload.php';
use Symfony\Component\HttpFoundation\Response;

// we set the Content-Type header
$response=new Response();
$response->headers->set("content-type","text/plain");
$response->setCharset("utf-8");

// set the content of the response
//
// send date and time
// time: number of milliseconds since 01/01/1970
// date-time display format
// d: 2-digit day
// m: 2-digit month
// y: 2-digit year
// H: hour 0.23
// i : minutes
// s: seconds
$response->setContent(date("d/m/y H:i:s", time()));

// we send the answer
$response->send();
评论
- 第 7 行:来自 Symfony [HttpFoundation] 库的 [Response] 类负责处理对 Web 服务客户端的全部响应;
- 第 10 行:创建 [Response] 类的实例;
- 第 11 行:指定响应类型为 [text/plain];
- 第 12 行:响应内容为 UTF-8 编码的文本;
- 第 25 行:将响应正文设置为客户端请求的内容;
- 第 28 行:将响应发送给客户端;
17.6.4. 客户端脚本 – 版本 2
客户端脚本保持不变。我们仅修改其配置文件 [config-date-time-client.json]:
结果与第 1 版相同。
17.7. JSON 数据服务器
Web脚本的响应可以包含多个数据点,这些数据点可以组织成数组和对象。然后,脚本可以将这些各种元素封装在一个JSON字符串中发送,客户端将对其进行解码。
17.7.1. 服务器脚本
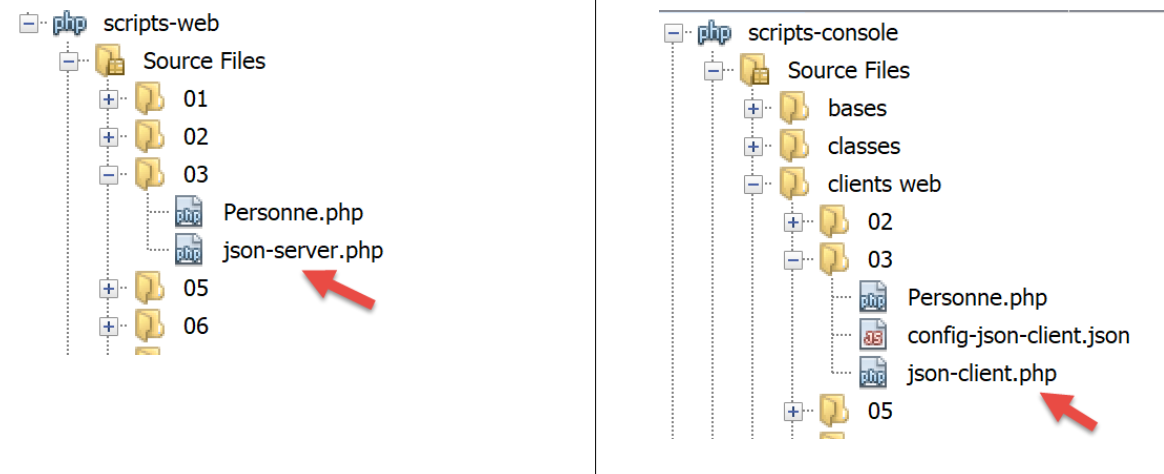
[json-server.php] 脚本使用了以下 [Person] 类:
<?php

namespace Modèles;

class Personne implements \JsonSerializable {
  // attributes
  private $nom;
  private $prénom;
  private $âge;

  // convert associative array to object [Person]
  public function setFromArray(array $assoc): Personne {
    // initialize the current object with the associative array
    foreach ($assoc as $attribute => $value) {
      $this->$attribute = $value;
    }
    // result
    return $this;
  }

  // getters and setters
  public function getNom() {
    return $this->nom;
  }

  public function getPrénom() {
    return $this->prénom;
  }

  public function setNom($nom) {
    $this->nom = $nom;
    return $this;
  }

  public function setPrénom($prénom) {
    $this->prénom = $prénom;
    return $this;
  }

  public function getÂge() {
    return $this->âge;
  }

  public function setÂge($âge) {
    $this->âge = $âge;
    return $this;
  }

  // toString
  public function __toString(): string {
    return "Personne [$this->prénom, $this->nom, $this->âge]";
  }

  // implements the JsonSerializable interface
  public function jsonSerialize(): array {
    // render an associative array with the object's attributes as keys
    // this table can then be encoded as jSON
    return get_object_vars($this);
  }

  // convert a jSON to a [Person] object
  public static function jsonUnserialize(string $json): Personne {
    // we create a person from the string jSON
    return (new Personne())->setFromArray(json_decode($json, true));
  }

}
评论
- 第 5 行:该类实现了 PHP 的 [JsonSerializable] 接口。这要求它在第 55–59 行中实现 [jsonSerialize] 方法。 该方法必须返回一个关联数组,该数组将被序列化为 JSON。在使用表达式 [json_encode($person)] 时,[json_encode] 函数会检查 [Person] 类是否实现了 [JsonSerializable] 接口。如果是,则该表达式变为 [json_encode($person→serialize())];
- 第 12–19 行:该类没有构造函数,但有一个初始化器。因此,可以使用表达式 [(new Person()) → setFromArray($array)] 来实例化 [Person] 类。初始化器可以有多种类型,而构造函数只能有一个。这些初始化器允许采用 [(new Person())→initializer(…)) 形式的各种实例化模式;
- 第 62–65 行:静态函数 [jsonUnserialize] 允许您根据其 JSON 字符串创建 [Person] 对象;
[json-server.php] 脚本如下:
<?php

// dependencies
require_once __DIR__ . "/Personne.php";
use \Modèles\Personne;
require_once 'C:/myprograms/laragon-lite/www/vendor/autoload.php';
use \Symfony\Component\HttpFoundation\Response;

// set the Content-Type header and the character library used
$response = new Response();
$response->headers->set("content-type", "application/json");
$response->setCharset("utf-8");

// create a Person object
$personne = (new Personne())->setFromArray([
  "nom" => "de la Hûche",
  "prénom" => "jean-paul",
  "âge" => 27]);
// an associative table
$assoc = ["attr1" => "value1",
  "attr2" => [
    "prenom" => "Jean-Paul",
    "nom" => "de la Hûche"
  ]
];
// the content of the response is jSON
$response->setContent(json_encode([$personne, $assoc]));

// reply sent
$response->send();
评论
- 第 4-5 行:导入 [Person] 类;
- 第 11 行:我们指定文档类型为 [application/json]。浏览器接收到此标头后,将以格式化的 JSON 字符串形式显示内容,而非纯文本;
- 第 12 行:JSON 字符串将包含 UTF-8 字符;
- 第 15-18 行:创建一个 [Person] 对象;
- 第 20–25 行:创建了一个两级关联数组;
- 第 27 行:我们将数组的 JSON 字符串发送给客户端:
- [$person] 元素将通过其 [jsonSerialize] 方法序列化为 JSON;
- [$assoc] 元素将以原生方式序列化为 JSON;
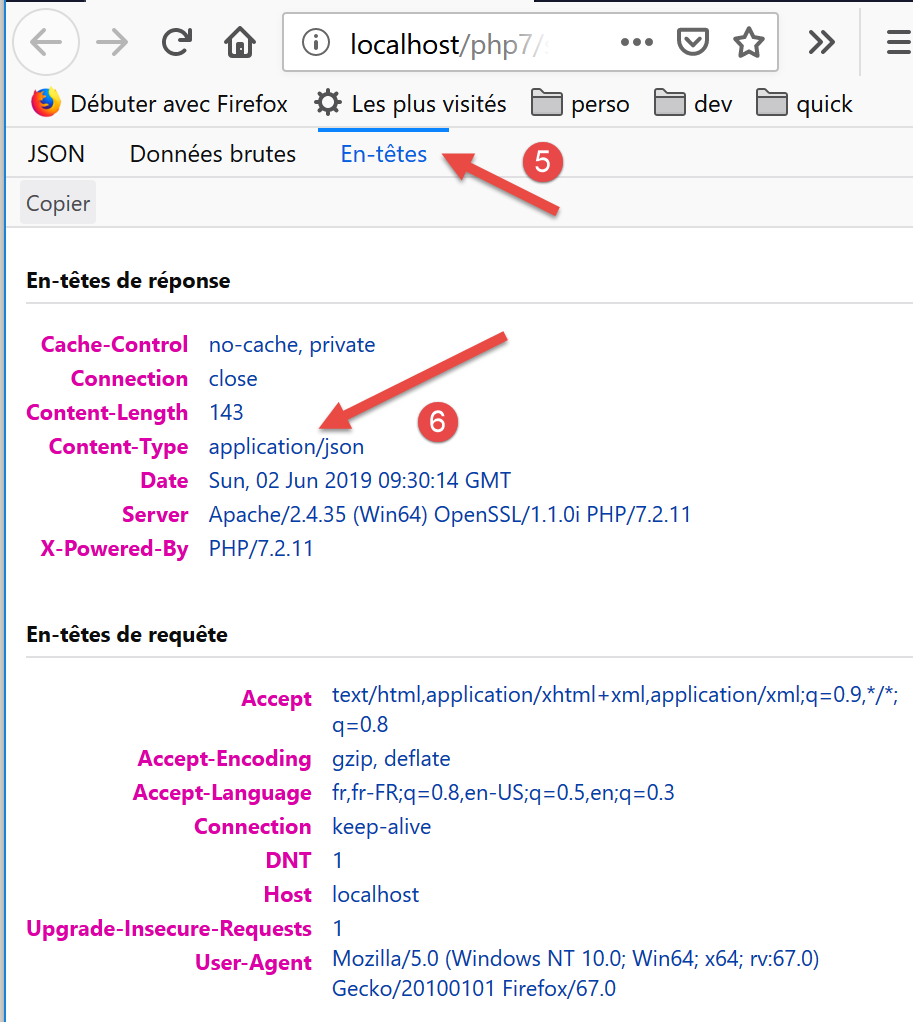
如果运行此服务器端脚本(需确保 Laragon 正在运行),浏览器中将显示以下响应:
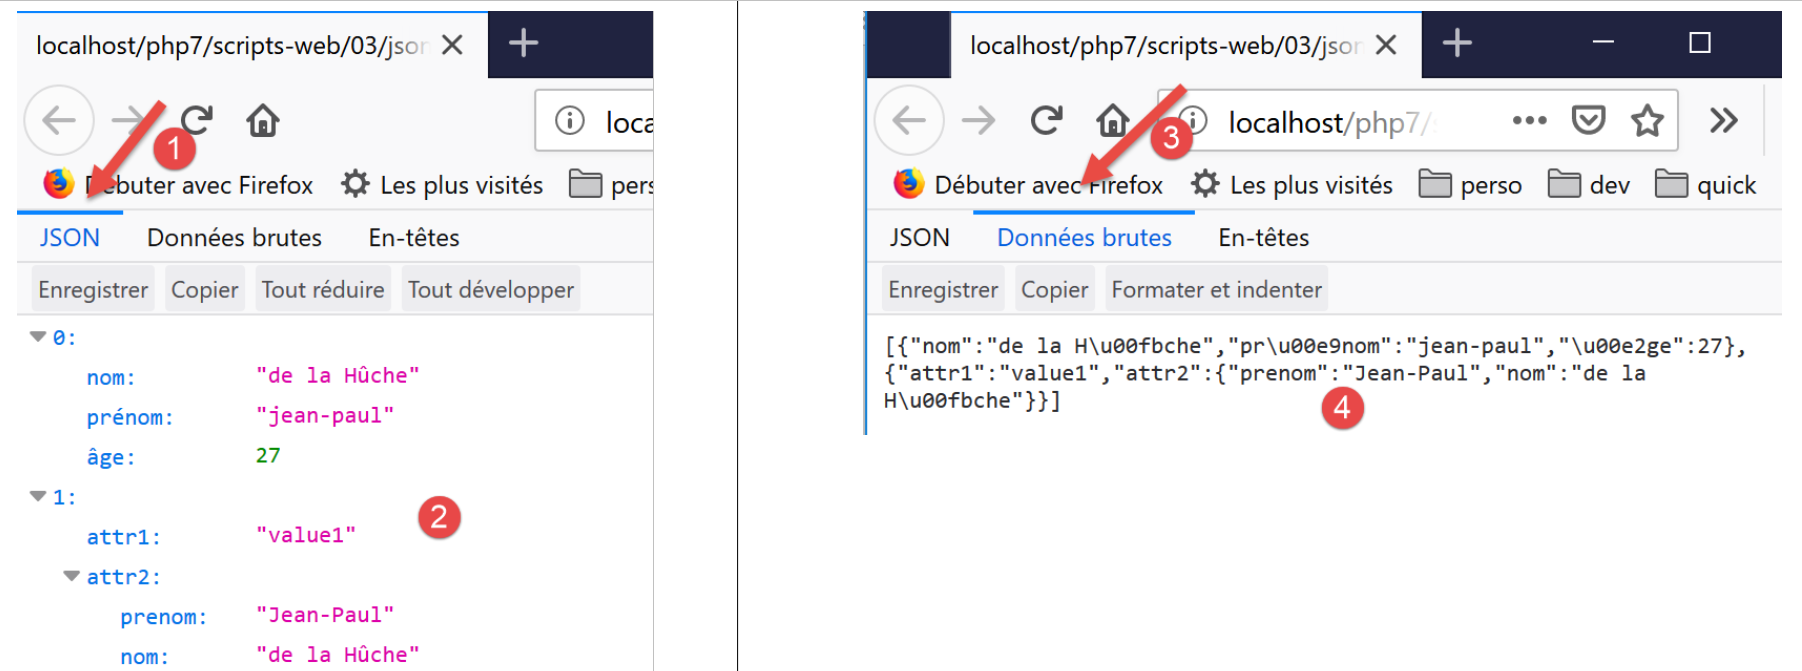
评论
- 在 [2] 中,格式化的 JSON 响应;
- 在 [4] 中,原始的 JSON 响应。请注意带重音字符的编码;
- 在[6]中,正是服务器发送的内容类型[application/json]导致浏览器以这种方式格式化输出;
17.7.2. 客户端
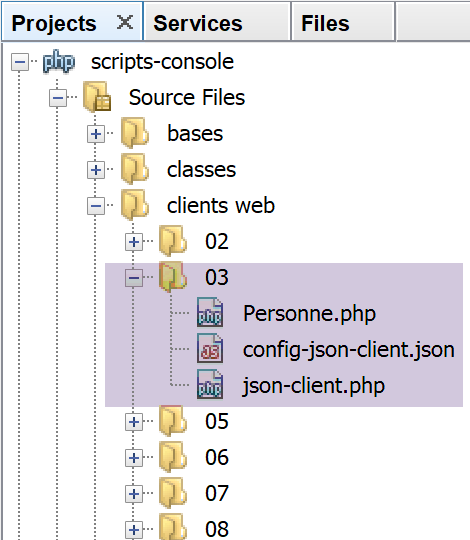
客户端 [json-client.php] 由以下 JSON 文件 [config-json-client.json] 进行配置:
脚本 [json-client.php] 如下:
<?php

// service customer jSON
//
// error management
//ini_set("error_reporting", E_ALL & ~ E_WARNING & ~E_DEPRECATED & ~E_NOTICE);
//ini_set("display_errors", "off");
//
// dependencies
require_once 'C:/myprograms/laragon-lite/www/vendor/autoload.php';
use Symfony\Component\HttpClient\HttpClient;
require_once __DIR__ . "/Personne.php";
use \Modèles\Personne;

// customer configuration
const CONFIG_FILE_NAME = "config-json-client.json";

// we retrieve the configuration
if (!file_exists(CONFIG_FILE_NAME)) {
  print "Le fichier de configuration [" . CONFIG_FILE_NAME . "] n'existe pas\n";
  exit;
}
if (!$config = \json_decode(\file_get_contents(CONFIG_FILE_NAME), true)) {
  print "Erreur lors de l'exploitation du fichier de configuration jSON [" . CONFIG_FILE_NAME . "]\n";
  exit;
}

// create a HTTP customer
$httpClient = HttpClient::create();

try {
  // query
  $response = $httpClient->request('GET', $config['url']);
  // answer status
  $statusCode = $response->getStatusCode();
  print "---Réponse avec statut : $statusCode\n";
  // we retrieve the headers
  print "---Entêtes de la réponse\n";
  $headers = $response->getHeaders();
  foreach ($headers as $type => $value) {
    print "$type: " . $value[0] . "\n";
  }
  // retrieve the jSON body of the response
  list($personne, $assoc) = json_decode($response->getContent(), true);
  // a person is instantiated from an array of attributes
  $personne = (new Personne())->setFromArray($personne);
  // server response is displayed
  print "---Réponse du serveur\n";
  print "$personne\n";
  print "tableau=" . json_encode($assoc, JSON_UNESCAPED_UNICODE) . "\n";
} catch (TypeError | RuntimeException $ex) {
  // error is displayed
  print "Erreur de communication avec le serveur : " . $ex->getMessage() . "\n";
}
评论
- 第 12-13 行:导入 [Person] 类;
- 第 30 行:创建 HTTP 客户端;
- 第 44 行:解码服务器发送的 JSON 字符串。我们知道,被编码的内容是一个包含两个关联数组的二元数组;
- 第 46 行:创建一个 [Person] 对象,以便在第 49 行显示它;
- 第 50 行:显示第二个关联数组。由于 [print] 语句无法直接显示数组,因此我们将该数组转换为 JSON 字符串。为正确显示带重音的字符,必须将第二个参数设置为 [JSON_UNESCAPED_UNICODE]。我们可以看到,带重音的字符确实已编码在 JSON 字符串中;
执行客户端脚本后,结果如下:
---Réponse avec statut : 200
---Entêtes de la réponse
date: Sun, 02 Jun 2019 09:56:29 GMT
server: Apache/2.4.35 (Win64) OpenSSL/1.1.0i PHP/7.2.11
x-powered-by: PHP/7.2.11
cache-control: no-cache, private
content-length: 143
connection: close
content-type: application/json
---Réponse du serveur
Personne [jean-paul, de la Hûche, 27]
tableau={"attr1":"value1","attr2":{"prenom":"Jean-Paul","nom":"de la Hûche"}}
第11行和第12行:带重音的字符已正确检索。
17.8. 检索 Web 服务环境变量
服务器脚本运行于其可访问的 Web 环境中。该环境存储在 $_SERVER 字典中,这是一个 PHP 全局变量。若使用 [HttpFoundation] 库,该环境位于 [Request→server] 字段中,其中 [Request] 指由 Web 脚本处理的 HTTP 请求。
17.8.1. 服务器脚本
我们正在编写一个服务器应用程序,该程序会将其执行环境发送给客户端。
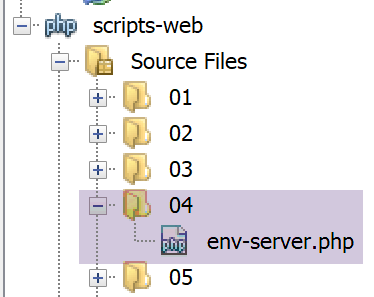
Web脚本 [env-server.php] 如下所示:
<?php

// dependencies
require_once 'C:/myprograms/laragon-lite/www/vendor/autoload.php';
use \Symfony\Component\HttpFoundation\Response;
use Symfony\Component\HttpFoundation\Request;

// we retrieve the request
$request = Request::createFromGlobals();
// we work out the answer
$response = new Response();
// response content is json utf-8
$response->headers->set("content-type", "application/json");
$response->setCharset("utf-8");
// set the jSON content of the response
$response->setContent(json_encode($request->server->all()));
// reply sent
$response->send();
- 第 9 行:我们获取 [Request] 对象,该对象封装了 Web 脚本接收到的 HTTP 请求的所有可用信息及其执行环境;
- 第 13–14 行:我们将包含 UTF-8 字符的纯文本发送给客户端;
- 第 16 行:发送给客户端的信息将是一个字符串,该字符串由 [$request→server→all()] 对象经 JSON 序列化后获得:[$request→server] 代表 Web 脚本的执行环境。它是一个 [ServerBag] 类型的对象,属于字典的一种。[$request→server→all()] 是一个真正的字典,包含 [ServerBag] 的内容;
- 第 18 行:发送信息;
如果从 NetBeans 运行此脚本,浏览器将显示以下页面:
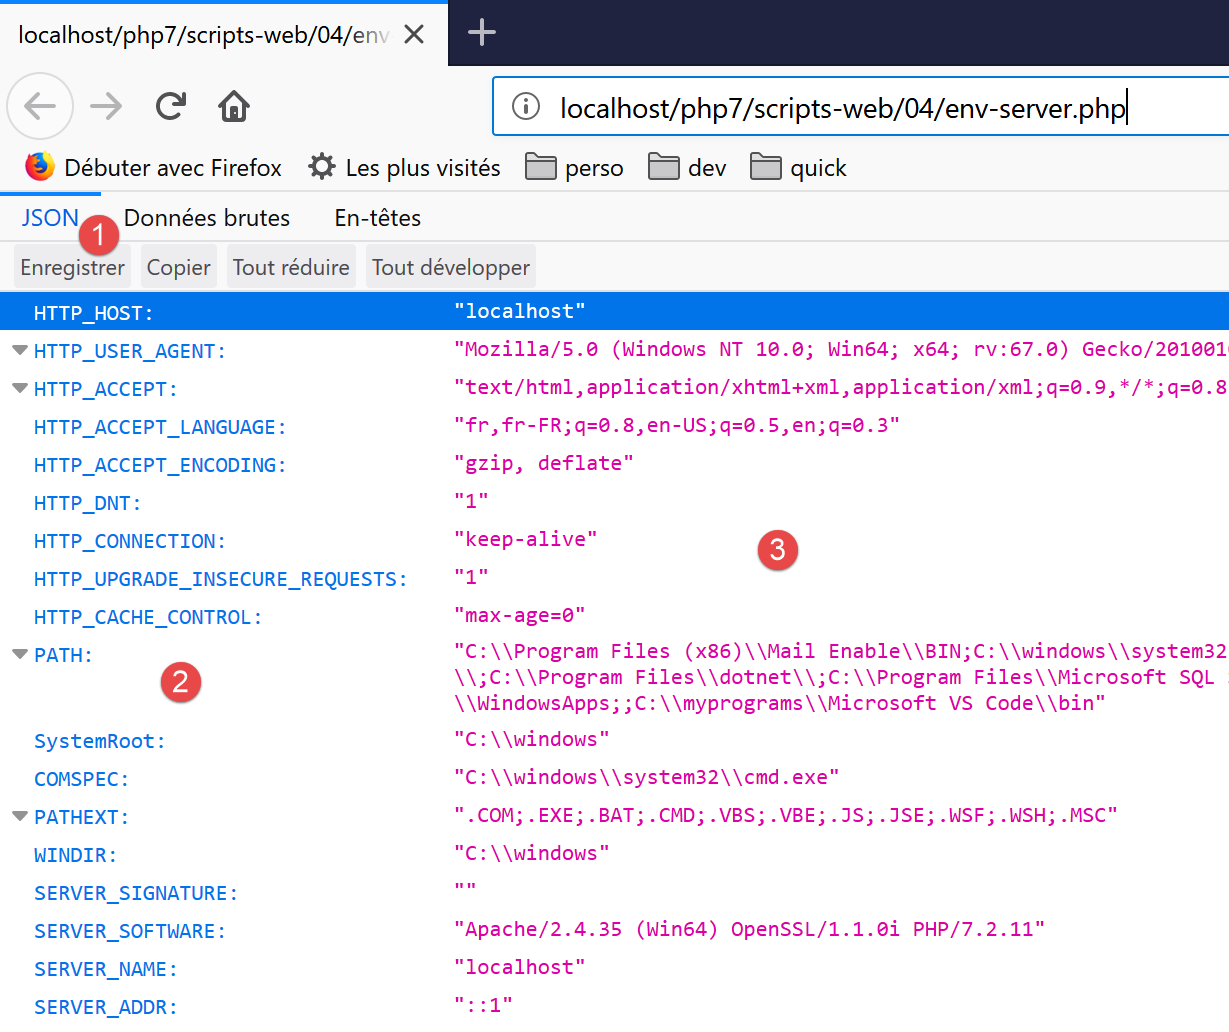
- 在 [2] 中,环境字典的各个键;
- 在 [3] 中,这些键的值;
17.8.2. 客户端脚本
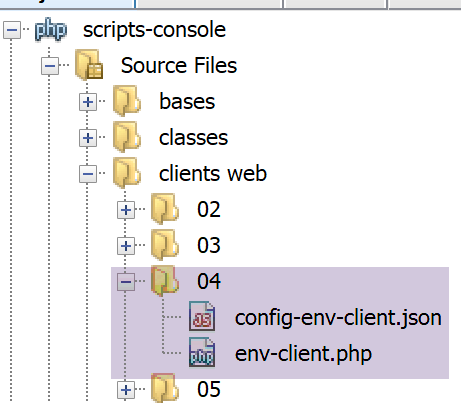
客户端脚本 [env-client.php] 由以下 JSON 文件 [config-env-client.json] 进行配置:
客户端脚本 [env-client.php] 如下:
<?php

// server script environment
//
// error management
//ini_set("error_reporting", E_ALL & ~ E_WARNING & ~E_DEPRECATED & ~E_NOTICE);
//ini_set("display_errors", "off");
//
// dependencies
require_once 'C:/myprograms/laragon-lite/www/vendor/autoload.php';
use Symfony\Component\HttpClient\HttpClient;

// customer configuration
const CONFIG_FILE_NAME = "config-env-client.json";

// we retrieve the configuration
if (!file_exists(CONFIG_FILE_NAME)) {
  print "Le fichier de configuration [" . CONFIG_FILE_NAME . "] n'existe pas\n";
  exit;
}
if (!$config = \json_decode(\file_get_contents(CONFIG_FILE_NAME), true)) {
  print "Erreur lors de l'exploitation du fichier de configuration jSON [" . CONFIG_FILE_NAME . "]\n";
  exit;
}

// create a HTTP customer
$httpClient = HttpClient::create();
try {
  // make a request to the server
  $response = $httpClient->request('GET', $config['url']);
  // answer status
  $statusCode = $response->getStatusCode();
  print "---Réponse avec statut : $statusCode\n";
  // we retrieve the headers
  print "---Entêtes de la réponse\n";
  $headers = $response->getHeaders();
  foreach ($headers as $type => $value) {
    print "$type: " . $value[0] . "\n";
  }
  // server response is displayed
  print "---Réponse du serveur\n";
  $env = json_decode($response->getContent());
  foreach ($env as $key => $value) {
    print "[$key]=>$value\n";
  }
} catch (TypeError | RuntimeException $ex) {
  // error is displayed
  print "Erreur de communication avec le serveur : " . $ex->getMessage() . "\n";
}
注释
- 第 42 行:反序列化来自服务器的 JSON 响应。这会返回一个哈希;
- 第43–45行:显示该关联数组中的所有值;
得到以下控制台输出:
---Réponse avec statut : 200
---Entêtes de la réponse
date: Sun, 02 Jun 2019 17:35:50 GMT
server: Apache/2.4.35 (Win64) OpenSSL/1.1.0i PHP/7.2.11
x-powered-by: PHP/7.2.11
cache-control: no-cache, private
content-length: 1505
connection: close
content-type: application/json
---Réponse du serveur
[HTTP_HOST]=>localhost
[HTTP_USER_AGENT]=>Symfony HttpClient/Curl
[HTTP_ACCEPT_ENCODING]=>deflate, gzip
[PATH]=>C:\Program Files (x86)\Mail Enable\BIN;C:\windows\system32;C:\windows;C:\windows\System32\Wbem;C:\windows\System32\WindowsPowerShell\v1.0\;C:\windows\System32\OpenSSH\;C:\Program Files\dotnet\;C:\Program Files\Microsoft SQL Server\130\Tools\Binn\;C:\Program Files (x86)\Mail Enable\BIN64;C:\Users\serge\AppData\Local\Microsoft\WindowsApps;;C:\myprograms\Microsoft VS Code\bin
[SystemRoot]=>C:\windows
[COMSPEC]=>C:\windows\system32\cmd.exe
[PATHEXT]=>.COM;.EXE;.BAT;.CMD;.VBS;.VBE;.JS;.JSE;.WSF;.WSH;.MSC
[WINDIR]=>C:\windows
[SERVER_SIGNATURE]=>
[SERVER_SOFTWARE]=>Apache/2.4.35 (Win64) OpenSSL/1.1.0i PHP/7.2.11
[SERVER_NAME]=>localhost
[SERVER_ADDR]=>::1
[SERVER_PORT]=>80
[REMOTE_ADDR]=>::1
[DOCUMENT_ROOT]=>C:/myprograms/laragon-lite/www
[REQUEST_SCHEME]=>http
[CONTEXT_PREFIX]=>
[CONTEXT_DOCUMENT_ROOT]=>C:/myprograms/laragon-lite/www
[SERVER_ADMIN]=>admin@example.com
[SCRIPT_FILENAME]=>C:/myprograms/laragon-lite/www/php7/scripts-web/04/env-server.php
[REMOTE_PORT]=>63744
[GATEWAY_INTERFACE]=>CGI/1.1
[SERVER_PROTOCOL]=>HTTP/1.1
[REQUEST_METHOD]=>GET
[QUERY_STRING]=>
[REQUEST_URI]=>/php7/scripts-web/04/env-server.php
[SCRIPT_NAME]=>/php7/scripts-web/04/env-server.php
[PHP_SELF]=>/php7/scripts-web/04/env-server.php
[REQUEST_TIME_FLOAT]=>1559496950.644
[REQUEST_TIME]=>1559496950
以下是部分变量的含义(适用于 Windows。在 Linux 上,这些变量会有所不同):
客户端发送的 HTTP 头部 [Host: xxx] 中的 xxx 值 | |
客户端发送的 HTTP 头部 [User_Agent: xxx] 中的值 xxx | |
客户端发送的 HTTP 标头 [Accept-Encoding: xxx] 中的值 xxx | |
服务器脚本运行所在机器上可执行文件的路径 | |
DOS命令提示符路径 | |
可执行文件扩展名 | |
Windows 安装文件夹 | |
Web 服务器签名。此处无内容。 | |
Web 服务器的类型 | |
Web 服务器主机的互联网名称 | |
Web 服务器的监听端口 | |
Web 服务器主机的 IP 地址,此处为 127.0.0.1 | |
客户端的 IP 地址。在此示例中,客户端与服务器位于同一台机器上。 | |
客户端的通信端口 | |
Web 服务器所提供文档的目录树根目录 | |
URL请求的TCP协议(http://localhost/php7/等) | |
Web 服务器管理员的电子邮件地址 | |
服务器脚本的完整路径 | |
客户端发起请求所使用的端口 | |
Web 服务器使用的 HTTP 协议版本 | |
客户端使用的 HTTP 方法。共有四种:GET、POST、PUT、DELETE | |
随 GET 请求发送的参数 /url?parameters | |
客户端请求的 URL。如果浏览器请求 URL http://machine[:port]/uri,则 REQUEST_URI 将为 uri | |
$_SERVER['SCRIPT_FILENAME'] = $_SERVER['DOCUMENT_ROOT'].$_SERVER['SCRIPT_NAME'] |
17.9. 服务器检索客户端发送的参数
17.9.1. 简介
在 HTTP 协议中,客户端有两种方法向 Web 服务器传递参数:
- 它以表单形式请求服务 URL
GET url?param1=val1¶m2=val2¶m3=val3… HTTP/1.0
其中有效值必须先进行编码,以便将某些保留字符替换为相应的十六进制值;
- 它以以下形式请求服务 URL:
POST url HTTP/1.0
然后,在发送到服务器的 HTTP 头部中,包含以下头部:
客户端发送的其余标头以空行结尾。随后,它可以以以下形式发送其数据:
其中有效值必须像 GET 方法一样预先进行编码。发送给服务器的字符数必须为 N,其中 N 是标头中声明的值
Web 服务中的 PHP 脚本用于检索客户端发送的先前 parami 参数,并从数组中获取其值:
- 对于 GET 请求,使用 $_GET["parami"];
- 对于 POST 请求,则为 $_POST["parami"];
这适用于基本的 PHP 函数。如果使用 [HttpFoundation] 库,这些参数将位于:
- 对于 GET 请求,位于 [Request]->query->get('parami');
- [Request]->request->get('parami') 用于 POST 请求;
其中 [Request] 代表 Web 脚本接收到的请求的所有信息;
17.9.2. GET 客户端 – 版本 1
客户端脚本通过以下 JSON 文件 [config-parameters-client.json] 进行配置:
- 第 1 行:GET 客户端的目标 Web 脚本 URL;
- 第 2 行:POST 客户端的目标 Web 脚本 URL;
GET 客户端向服务器发送三个参数 [last_name, first_name, age]。客户端 [parameters-get-client.php] 如下所示:
<?php

// client GET of a web server
//
// error management
//ini_set("error_reporting", E_ALL & ~ E_WARNING & ~E_DEPRECATED & ~E_NOTICE);
//ini_set("display_errors", "off");
//
// dependencies
require_once 'C:/myprograms/laragon-lite/www/vendor/autoload.php';
use Symfony\Component\HttpClient\HttpClient;

// customer configuration
const CONFIG_FILE_NAME = "config-parameters-client.json";

// we retrieve the configuration
if (!file_exists(CONFIG_FILE_NAME)) {
  print "Le fichier de configuration [" . CONFIG_FILE_NAME . "] n'existe pas\n";
  exit;
}
if (!$config = \json_decode(\file_get_contents(CONFIG_FILE_NAME), true)) {
  print "Erreur lors de l'exploitation du fichier de configuration jSON [" . CONFIG_FILE_NAME . "]\n";
  exit;
}

// create a HTTP customer
$httpClient = HttpClient::create();

try {
  // prepare the parameters
  list($prenom, $nom, $age) = array("jean-paul", "de la hûche", 45);
// information is encoded
  $parameters = "prenom=" . urlencode($prenom) .
    "&nom=" . urlencode($nom) .
    "&age=$age”;
  // query
  $response = $httpClient->request('GET', $config['url-get'] . "?$parameters");
  // answer status
  $statusCode = $response->getStatusCode();
  print "---Réponse avec statut : $statusCode\n";
  // we retrieve the headers
  print "---Entêtes de la réponse\n";
  $headers = $response->getHeaders();
  foreach ($headers as $type => $value) {
    print "$type: " . $value[0] . "\n";
  }
  // server response is displayed
  print "---Réponse du serveur [" . $response->getContent() . "]\n";
} catch (TypeError | RuntimeException $ex) {
  // error is displayed
  print "Erreur de communication avec le serveur : " . $ex->getMessage() . "\n";
}
注释
- 第 33-35 行:将参数发送至服务器的编码处理。参数 [$first_name, $last_name] 可能包含 UTF-8 字符,因此使用 [urlencode] 函数进行编码。所有非字母数字字符(由关系表达式定义)均被替换为 %xx,其中 xx 是该字符的十六进制值。空格被替换为 + 号;
- 第 37 行:请求的 URL 为 $URL?$parameters,其中 $parameters 的格式为 name=val1&firstname=val2&age=val3;
- 第 48 行:客户端将直接显示服务器的响应;
您可能好奇在参数化 GET 请求过程中服务器会接收什么。为此,我们从 Laragon 终端(参见链接部分)在本地机器的 100 端口上启动通用服务器 [RawTcpServer]:
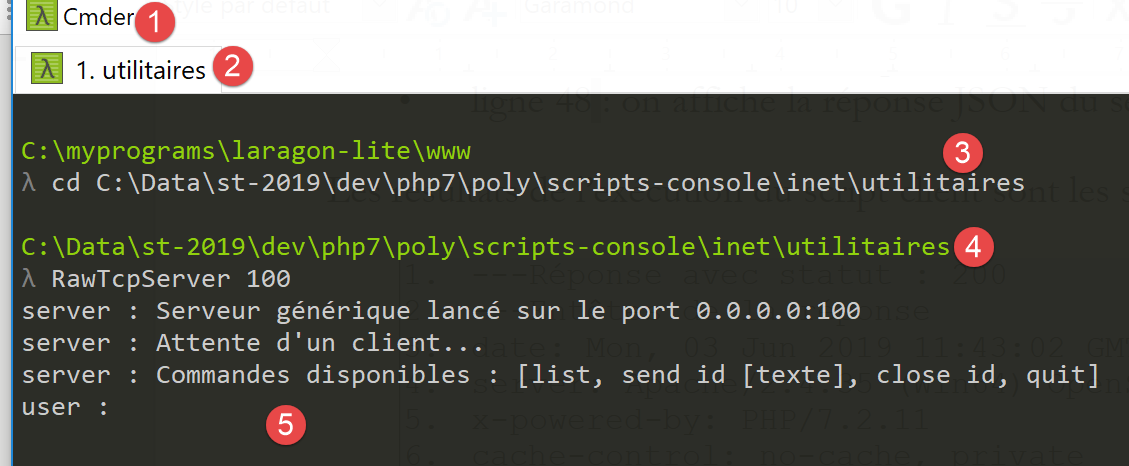
请确认在 [4] 中,您确实位于 utilities 文件夹内。
我们修改配置 GET 和 POST 客户端的 JSON 文件 [parameters-get-client.json]:
{
    "url-get": "http://localhost:100/php7/scripts-web/05/parameters-server.php",
    "url-post": "http://localhost/php7/scripts-web/05/parameters-server.php"
}
- 第 2 行:我们已更改了 Web 服务器的端口。因此,将联系 [RawTcpServer];
我们运行客户端。在 [RawTcpServer] 窗口中,我们看到以下信息:

- 在 [1] 中,显示了客户端发送的 GET 请求。我们可以清楚地看到某些字符的编码;
17.9.3. GET / POST 服务器
服务器脚本 [parameters-server.php] 如下所示:
<?php

// dependencies
require_once 'C:/myprograms/laragon-lite/www/vendor/autoload.php';
use \Symfony\Component\HttpFoundation\Response;
use Symfony\Component\HttpFoundation\Request;

// we retrieve the request
$request = Request::createFromGlobals();
// retrieve query parameters
$getParameters = $request->query->all();
$bodyParameters = $request->request->all();

// we work out the answer
$response = new Response();
// the content of the answer is utf-8 text
$response->headers->set("content-type", "application/json");
$response->setCharset("utf-8");
// response content - an array encoded in jSON
$response->setContent(json_encode([
  "method" => $request->getMethod(),
  "uri" => $request->getRequestUri(),
  "getParameters" => $getParameters,
  "bodyParameters" => $bodyParameters
    ], JSON_UNESCAPED_UNICODE));
// reply sent
$response->send();
注释
- 第 9 行:为 Web 脚本创建 [Request] 对象。该对象封装了 Web 脚本从客户端接收到的所有信息;
- 第 11 行:[Request→query] 对象的类型为 [ParameterBag],用于收集客户端发起的任何 GET 操作的参数。表达式 [Request→query→get("X")] 从 GET 参数 [name=val1&firstname=val2&age=val3] 中提取名为 X 的参数。表达式 [Request→query→all()] 提取 GET 参数的字典;
- 第 12 行:对象 [Request→request] 的类型为 [ParameterBag],包含客户端作为文档发送给服务器的参数。这些参数也被称为上传参数,因为它们属于客户端发送给服务器的文档。 表达式 [Request→request→get("X")] 从上传的参数 [last_name=val1&first_name=val2&age=val3] 中提取名为 X 的参数。表达式 [Request→request→all()] 获取上传参数的字典;
- 第 17–18 行:通知客户端将接收 UTF-8 编码的 JSON;
- 第 20–25 行:服务器向客户端返回其接收到的所有参数、客户端执行的操作类型 [GET / POST / …] 以及请求的 URI。该方法通过表达式 [$request→getMethod()] 获取。发送给客户端的文档是一个关联数组的 JSON 字符串,其中部分值的本身也是关联数组。 [JSON_UNESCAPED_UNICODE] 参数确保 Unicode 字符(例如带重音的字符)以原始形式发送,而不进行编码;
- 第 27 行:将响应发送给客户端;
执行客户端脚本将产生以下结果:
- 第 10 行:
- [method]:方法为 GET;
- [uri]:GET请求的URL编码参数显示在请求的URI中;
- [getParameters]:GET 参数数组;
- [bodyParameters]:上传参数的数组:该数组为空;
17.9.4. GET 客户端 – 版本 2
在客户端脚本的上一版本中,出于教学目的,我们手动对发送给服务器的参数进行了 URL 编码。而 [HttpClient] 对象可以自行处理此任务。以下是相应的 [parameters-get-client-2.php] 脚本:
<?php

// client GET of a web server
//
// error management
//ini_set("error_reporting", E_ALL & ~ E_WARNING & ~E_DEPRECATED & ~E_NOTICE);
//ini_set("display_errors", "off");
//
// dependencies
require_once 'C:/myprograms/laragon-lite/www/vendor/autoload.php';
use Symfony\Component\HttpClient\HttpClient;

// customer configuration
const CONFIG_FILE_NAME = "config-parameters-client.json";

// we retrieve the configuration
if (!file_exists(CONFIG_FILE_NAME)) {
  print "Le fichier de configuration [" . CONFIG_FILE_NAME . "] n'existe pas\n";
  exit;
}
if (!$config = \json_decode(\file_get_contents(CONFIG_FILE_NAME), true)) {
  print "Erreur lors de l'exploitation du fichier de configuration jSON [" . CONFIG_FILE_NAME . "]\n";
  exit;
}

// create a HTTP customer
$httpClient = HttpClient::create();
try {
  // prepare the parameters
  list($prenom, $nom, $age) = array("jean-paul", "de la hûche", 45);
  // make a request to the server
  $response = $httpClient->request('GET', $config['url-get'],
    ["query" => [
        "prenom" => $prenom,
        "nom" => $nom,
        "age" => $age
  ]]);
  // answer status
  $statusCode = $response->getStatusCode();
  print "---Réponse avec statut : $statusCode\n";
  // we retrieve the headers
  print "---Entêtes de la réponse\n";
  $headers = $response->getHeaders();
  foreach ($headers as $type => $value) {
    print "$type: " . $value[0] . "\n";
  }
  // server response is displayed
  print "---Réponse du serveur [" . $response->getContent() . "]\n";
} catch (TypeError | RuntimeException $ex) {
  // error is displayed
  print "Erreur de communication avec le serveur : " . $ex->getMessage() . "\n";
}
注释
- 第 33–37 行:向第 32 行的 GET 请求中添加参数。[HttpClient] 对象会自行处理 URL 编码;
17.9.5. POST 客户端
HTTP 客户端向 Web 服务器发送以下文本序列:HTTP 头部、空行、文档。在之前的客户端中,该序列如下:
没有文档。还有另一种发送参数的方法,称为 POST 方法。在这种情况下,发送到 Web 服务器的文本序列如下:
这一次,GET 客户端中包含在 HTTP 头中的参数,在 POST 客户端中作为头部之后发送的文档的一部分。
POST客户端脚本 [parameters-postclient.php] 如下所示:
<?php

// client POST of a web server
//
// error management
//ini_set("error_reporting", E_ALL & ~ E_WARNING & ~E_DEPRECATED & ~E_NOTICE);
//ini_set("display_errors", "off");
//
// dependencies
require_once 'C:/myprograms/laragon-lite/www/vendor/autoload.php';
use Symfony\Component\HttpClient\HttpClient;

// customer configuration
const CONFIG_FILE_NAME = "config-parameters-client.json";

// we retrieve the configuration
if (!file_exists(CONFIG_FILE_NAME)) {
  print "Le fichier de configuration [" . CONFIG_FILE_NAME . "] n'existe pas\n";
  exit;
}
if (!$config = \json_decode(\file_get_contents(CONFIG_FILE_NAME), true)) {
  print "Erreur lors de l'exploitation du fichier de configuration jSON [" . CONFIG_FILE_NAME . "]\n";
  exit;
}

// create a HTTP customer
$httpClient = HttpClient::create();
try {
  // prepare the parameters
  list($prenom, $nom, $age) = array("jean-paul", "de la hûche", 45);
  // make a request to the server
  $response = $httpClient->request('POST', $config['url-post'],
    ["body" => [
        "prenom" => $prenom,
        "nom" => $nom,
        "age" => $age
  ]]);
  // answer status
  $statusCode = $response->getStatusCode();
  print "---Réponse avec statut : $statusCode\n";
  // we retrieve the headers
  print "---Entêtes de la réponse\n";
  $headers = $response->getHeaders();
  foreach ($headers as $type => $value) {
    print "$type: " . $value[0] . "\n";
  }
  // server response is displayed
  print "---Réponse du serveur [" . $response->getContent() . "]\n";
} catch (TypeError | RuntimeException $ex) {
  // error is displayed
  print "Erreur de communication avec le serveur : " . $ex->getMessage() . "\n";
}
- 第 32 行:现在我们有一个 POST HTTP 请求;
- 第 33–37 行:POST 参数被称为 POST 请求的请求体:这是客户端发送给服务器的文档。这里发送了三个参数 [last_name, first_name, age];
- 第 48 行:我们显示服务器的 JSON 响应;
运行客户端脚本的结果如下:
---Réponse avec statut : 200
---Entêtes de la réponse
date: Mon, 03 Jun 2019 11:43:02 GMT
server: Apache/2.4.35 (Win64) OpenSSL/1.1.0i PHP/7.2.11
x-powered-by: PHP/7.2.11
cache-control: no-cache, private
content-length: 163
connection: close
content-type: application/json
---Réponse du serveur [{"method":"POST","uri":"\/php7\/scripts-web\/05\/parameters-server.php","getParameters":[],"bodyParameters":{"prenom":"jean-paul","nom":"de la hûche","age":"45"}}]
- 第 10 行:方法为 [Post],参数类型为 [bodyParameters]。如 [uri] 所示,不存在 [getParameters];
您可能好奇服务器在POST请求期间会接收什么数据。为此,我们从 Laragon 终端在本地机器的 100 端口上启动通用的 [RawTcpServer](参见相关段落):
请确认在 [4] 中,您确实位于 utilities 文件夹内。
我们修改配置 POST 客户端的 JSON 文件 [config-parameters-client.json]:
{
    "url-get": "http://localhost:100/php7/scripts-web/05/parameters-server.php",
    "url-post": "http://localhost:100/php7/scripts-web/05/parameters-server.php"
}
- 第 3 行:我们已更改了 Web 服务器的端口。因此,将联系 [RawTcpServer];
我们运行客户端。在 [RawTcpServer] 窗口中,我们看到以下信息:
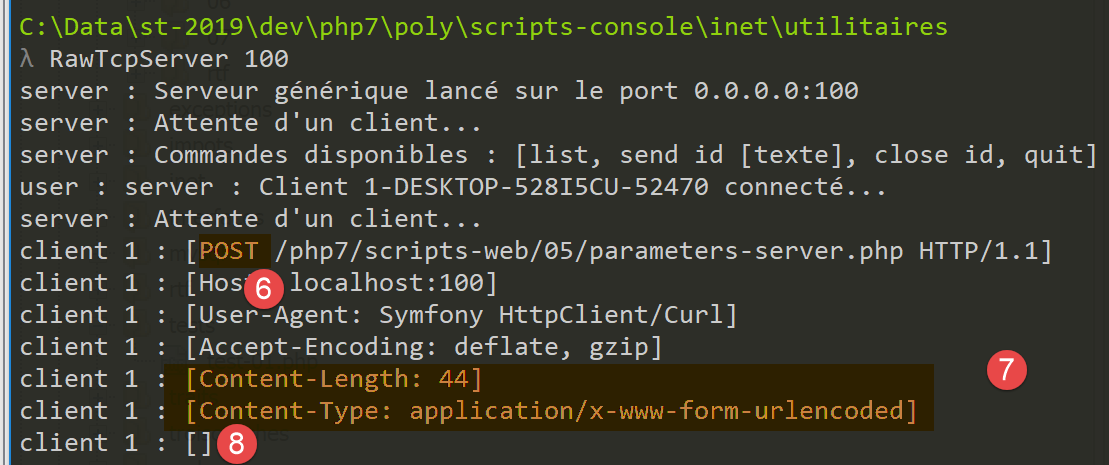
- 在 [6] 中,POST 请求;
- 在 [7] 中:HTTP 头部 [Content-Length] 指定了客户端将发送给服务器的文档的字节数。HTTP 头部 [Content-Type] 指定了该文档的性质。类型 [application/x-www-form-urlencoded] 表示 URL 编码的文本;
- 在 [8] 中,空行标志着 HTTP 头部的结束以及 44 字节文档的开始。截图中未显示的是文档本身。它是由 URL 编码的参数字符串:[first_name=jean-paul&last_name=de+la+h%C3%BBche&age=45]。读者可以验证它确实有 44 个字符;
17.9.6. 混合 POST 客户端
在 POST 请求中,您可以将 URL 中编码的参数与客户端在 HTTP 头部之后发送的文档中编码的参数混合使用。以下是一个示例 [parameters-mixte-postclient.php]:
<?php

// client POST of a web server
//
// error management
//ini_set("error_reporting", E_ALL & ~ E_WARNING & ~E_DEPRECATED & ~E_NOTICE);
//ini_set("display_errors", "off");
//
// dependencies
require_once 'C:/myprograms/laragon-lite/www/vendor/autoload.php';
use Symfony\Component\HttpClient\HttpClient;

// customer configuration
const CONFIG_FILE_NAME = "config-parameters-client.json";

// we retrieve the configuration
if (!file_exists(CONFIG_FILE_NAME)) {
  print "Le fichier de configuration [" . CONFIG_FILE_NAME . "] n'existe pas\n";
  exit;
}
if (!$config = \json_decode(\file_get_contents(CONFIG_FILE_NAME), true)) {
  print "Erreur lors de l'exploitation du fichier de configuration jSON [" . CONFIG_FILE_NAME . "]\n";
  exit;
}

// create a HTTP customer
$httpClient = HttpClient::create();
try {
  // prepare the parameters
  list($prenom, $nom, $age) = array("jean-paul", "de la hûche", 45);
  // make a request to the server
  $response = $httpClient->request('POST', $config['url-post'],
    [
      // document parameters (body)
      "body" => [
        "prenom" => $prenom,
        "nom" => $nom,
        "age" => $age
      ],
      // parameters of URL (query)
      "query" => [
        "prenom2" => $prenom,
        "nom2" => $nom,
        "age2" => $age
  ]]);
  // answer status
  $statusCode = $response->getStatusCode();
  print "---Réponse avec statut : $statusCode\n";
  // we retrieve the headers
  print "---Entêtes de la réponse\n";
  $headers = $response->getHeaders();
  foreach ($headers as $type => $value) {
    print "$type: " . $value[0] . "\n";
  }
  // server response is displayed
  print "---Réponse du serveur [" . $response->getContent() . "]\n";
} catch (TypeError | RuntimeException $ex) {
  // error is displayed
  print "Erreur de communication avec le serveur : " . $ex->getMessage() . "\n";
}
注释
- 第 32 行:一个 POST 请求;
- 第 40–45 行:URL 中的 URL 编码参数;
- 第 35–39 行:请求正文(body、document)中的 URL 编码参数;
执行后,控制台输出如下:
- 第 10 行:我们可以看到服务器成功检索到了这两种类型的参数;
17.9.7. 混合 GET 客户端
我们将尝试使用 GET 请求实现与之前相同的功能。脚本 [parameters-mixte-get-client.php] 如下:
<?php

// client POST of a web server
//
// error management
//ini_set("error_reporting", E_ALL & ~ E_WARNING & ~E_DEPRECATED & ~E_NOTICE);
//ini_set("display_errors", "off");
//
// dependencies
require_once 'C:/myprograms/laragon-lite/www/vendor/autoload.php';
use Symfony\Component\HttpClient\HttpClient;

// customer configuration
const CONFIG_FILE_NAME = "config-parameters-client.json";

// we retrieve the configuration
if (!file_exists(CONFIG_FILE_NAME)) {
  print "Le fichier de configuration [" . CONFIG_FILE_NAME . "] n'existe pas\n";
  exit;
}
if (!$config = \json_decode(\file_get_contents(CONFIG_FILE_NAME), true)) {
  print "Erreur lors de l'exploitation du fichier de configuration jSON [" . CONFIG_FILE_NAME . "]\n";
  exit;
}

// create a HTTP customer
$httpClient = HttpClient::create();
try {
  // prepare the parameters
  list($prenom, $nom, $age) = array("jean-paul", "de la hûche", 45);
  // make a request to the server
  $response = $httpClient->request('GET', $config['url-post'],
    [
      // document parameters (body)
      "body" => [
        "prenom" => $prenom,
        "nom" => $nom,
        "age" => $age
      ],
      // parameters of URL (query)
      "query" => [
        "prenom2" => $prenom,
        "nom2" => $nom,
        "age2" => $age
  ]]);
  // answer status
  $statusCode = $response->getStatusCode();
  print "---Réponse avec statut : $statusCode\n";
  // we retrieve the headers
  print "---Entêtes de la réponse\n";
  $headers = $response->getHeaders();
  foreach ($headers as $type => $value) {
    print "$type: " . $value[0] . "\n";
  }
  // server response is displayed
  print "---Réponse du serveur [" . $response->getContent() . "]\n";
} catch (TypeError | RuntimeException $ex) {
  // error is displayed
  print "Erreur de communication avec le serveur : " . $ex->getMessage() . "\n";
}
注释
- 第 32 行:一个 POST 请求;
- 第 40–45 行:URL 中的 URL 编码参数;
- 第 35–39 行:请求正文(body、document)中的 URL 编码参数;
执行后,控制台输出如下:
- 第 10 行:我们可以看到,服务器并未在客户端发送的文档中接收到任何 URL 编码的参数。查看客户端发送的 HTTP 头部时,我们发现它确实发送了一个 44 个字符的文档,但服务器并未对其进行处理;
那么,你应该选择哪种方法向服务器发送信息?
- [GET URL?param1=val1¶m2=val2&…] 方法使用带参数的 URL,该 URL 可以作为链接。这是其主要优势:用户可以将此类链接添加到书签中;
- 在其他应用场景中,您可能不希望在 URL 中显示发送给服务器的参数。例如出于安全考虑。在这种情况下,您将使用 [POST] 方法,并将 URL 编码的参数包含在发送给服务器的文档中;
17.10. Web 会话管理
在之前的客户端/服务器示例中,流程如下:
- 客户端向 Web 服务器机器的 80 端口建立连接;
- 它发送文本序列:HTTP 头部、空行、[文档];
- 作为响应,服务器发送同类型的序列;
- 服务器关闭与客户端的连接;
- 客户端关闭与服务器的连接;
如果同一客户端随后不久向 Web 服务器发出新请求,客户端与服务器之间将建立新的连接。服务器无法判断连接的客户端是否曾访问过,还是这是首次请求。在两次连接之间,服务器会“忘记”其客户端。因此,HTTP 协议被称为无状态协议。然而,服务器记住其客户端是有用的。 例如,如果应用程序是安全的,客户端会向服务器发送用户名和密码以进行身份验证。如果服务器在连接之间“忘记”了该客户端,那么客户端就必须在每次建立新连接时都重新进行身份验证,这显然是不切实际的。
为了追踪客户端,服务器采取以下做法:当客户端发出初始请求时,服务器会在响应中包含一个标识符,客户端随后必须在每次新请求中将该标识符发回。得益于这个对每个客户端都唯一的标识符,服务器能够识别客户端。随后,服务器可以为该客户端管理一个内存条目,该条目与客户端的标识符唯一关联。
从技术角度看,其工作原理如下:
- 在响应新客户端时,服务器会在响应中包含 HTTP 头部 Set-Cookie: Key=Identifier。此操作仅在首次请求时执行;
- 在后续请求中,客户端将通过 HTTP 头部 Cookie: Key=Identifier 发送其标识符,以便服务器识别它;
有人可能会疑惑,服务器是如何知道自己面对的是新客户端而非回访客户端的。这要归功于客户端HTTP头中是否存在HTTP Cookie头部。对于新客户端,该头部并不存在。
来自某个特定客户端的所有连接统称为一个会话。
17.10.1. 配置文件 [php.ini]
要使 PHP 的会话管理正常工作,必须确保其配置正确。在 Windows 系统中,其配置文件为 php.ini。根据执行环境(控制台、Web)的不同,[php.ini] 配置文件必须位于不同的目录中。要查找这些目录,请使用以下脚本:
第 4 行:phpinfo 函数提供有关正在运行脚本的 PHP 解释器的信息。特别是,它提供了正在使用的配置文件 [php.ini] 的路径。
我们已经在控制台环境中使用过此脚本(参见“链接”部分)。在 Web 环境中,我们会得到以下结果:
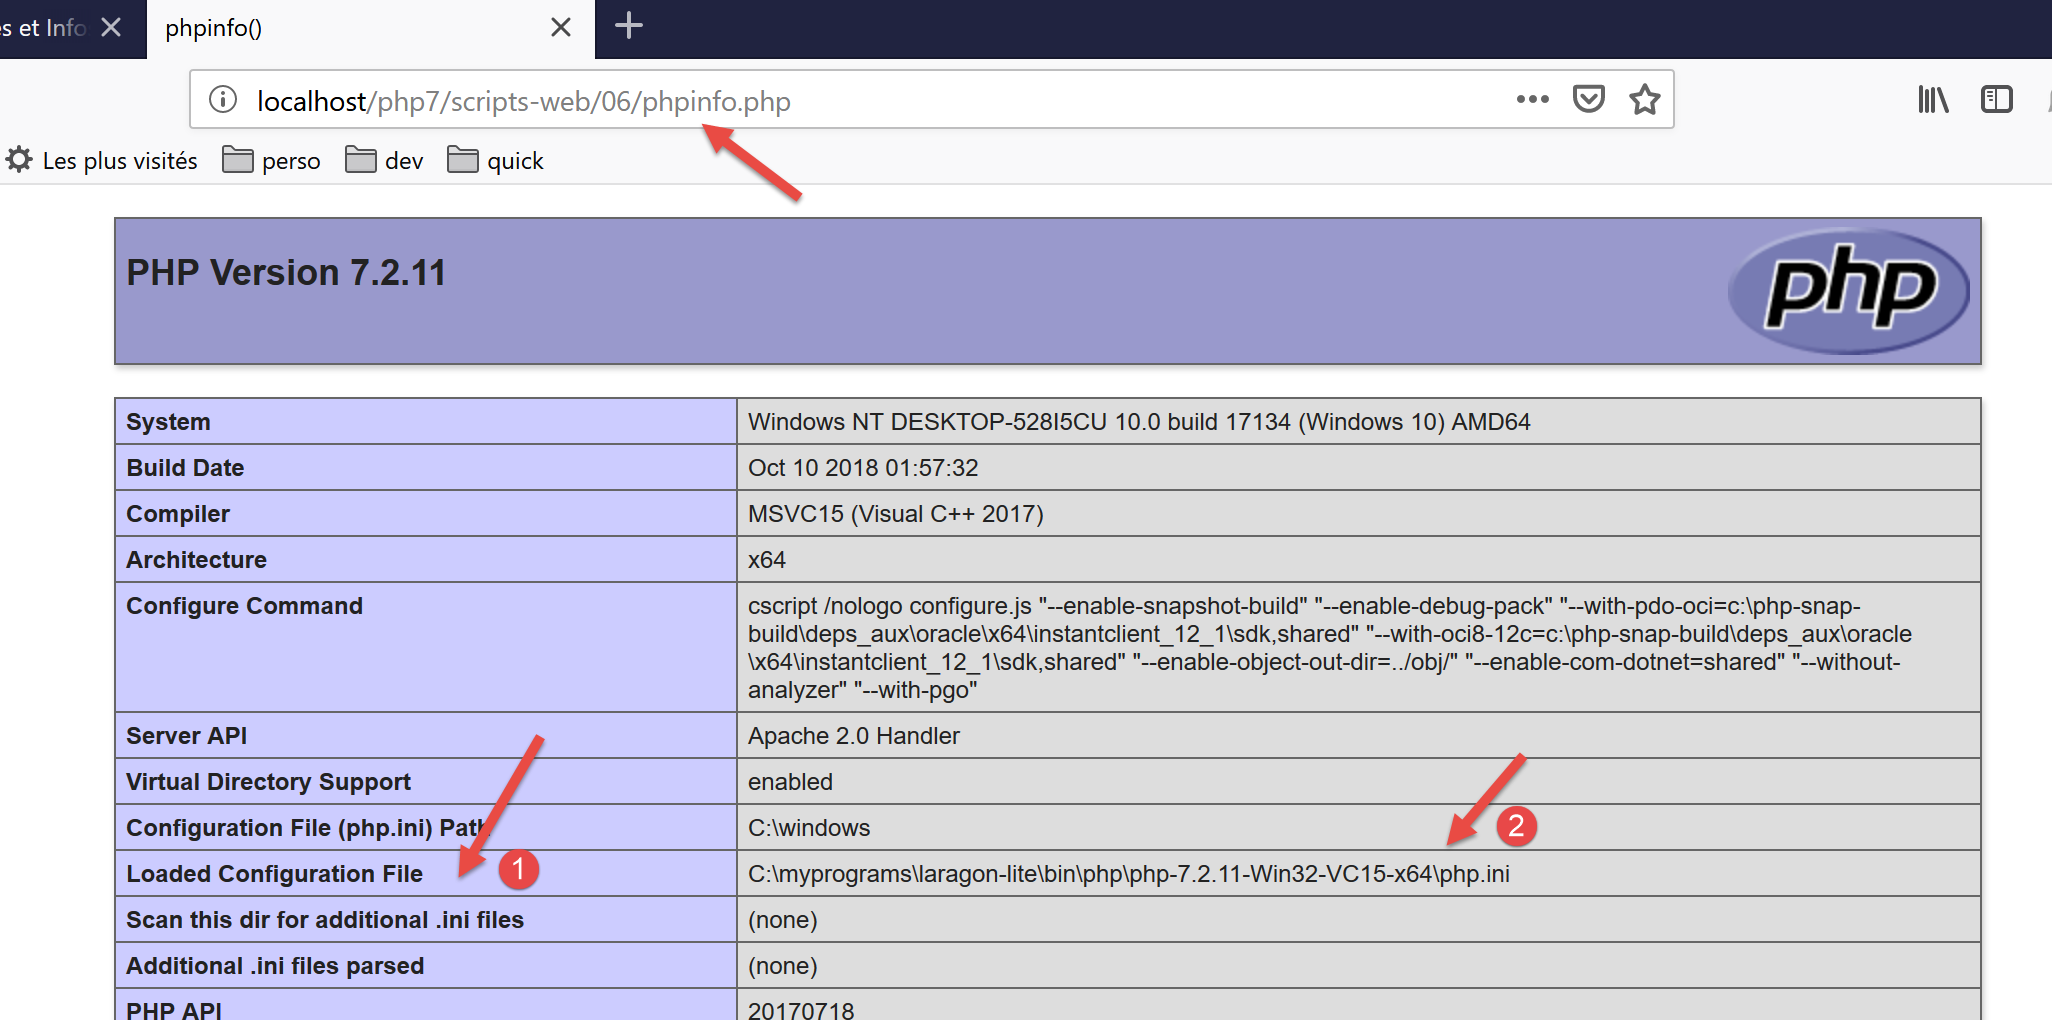
- 在 [1-2] 中,[php.ini] 文件用于配置 Web 脚本解释器。该文件包含一个 session 部分:
- 第 2 行:客户端会话数据将保存到文件中;
- 第 3 行:保存会话数据的目录。如果该目录不存在,则不会报告错误,且会话管理功能无法正常工作;
- 第 4–6 行:表示会话 ID 由 Set-Cookie 和 Cookie HTTP 头部管理;
- 第 7 行:Set-Cookie 标头将采用 Set-Cookie: PHPSESSID=session_id 的形式;
- 第 8 行:客户端会话不会自动启动。服务器脚本必须使用 session_start() 函数显式请求启动会话;
- 第 9 行:会话 Cookie 有效期直至客户端浏览器关闭;
- 第 10 行:必须发送会话 Cookie 的路径。如果 [session.cookie_path = /xxx],那么每次浏览器请求形式为 [/xxx/yyy/zzz] 的 URL 时,都必须发送该 Cookie。此处路径 [/] 表示必须为网站上的每个 URL 发送该 Cookie;
- 第 13 行:某些会话对象必须经过序列化才能存储在文件中。PHP 使用 [serialize / unserialize] 函数处理此序列化/反序列化操作;
- 第 16 行:超时时间,超过该时间后,存储在会话文件中的会话对象将被视为过期;
- 第 19 行:会话生命周期。超过此时间后,将创建新的会话,而之前会话中保存的对象将被丢失;
17.10.2. 示例 1
17.10.2.1. 服务器
对于 Web 服务而言,会话 ID 的管理是透明的。该 ID 由 Web 服务器进行管理。Web 服务通过 session_start() 函数访问客户端的会话。从那时起,Web 服务即可通过 $_SESSION 字典对客户端的会话进行读写操作。如果使用了 [HttpFoundation] 库,则可通过 [Request→getSession] 表达式访问会话。
以下代码 [session-server.php] 演示了基于会话的三计数器管理。每次收到新请求时,Web 脚本都会递增这些计数器并将结果存储在会话中,以便在下次请求时检索。
<?php
// dependencies
require_once 'C:/myprograms/laragon-lite/www/vendor/autoload.php';
use \Symfony\Component\HttpFoundation\Response;
use Symfony\Component\HttpFoundation\Request;
use Symfony\Component\HttpFoundation\Session\Session;

//
// we retrieve the request
$request = Request::createFromGlobals();
// session
$session = new Session();
$session->start();
// three counters are retrieved from the session
if ($session->has("N1")) {
  // n1 counter increment
  $session->set("N1", (int) $session->get("N1") + 1);
} else {
  // counter N1 is not in session - create it
  $session->set("N1", 0);
}
if ($session->has("N2")) {
  // n2 counter increment
  $session->set("N2", (int) $session->get("N2") + 1);
} else {
  // counter N2 is not in session - create it
  $session->set("N2", 10);
}
if ($session->has("N3")) {
  // n3 counter increment
  $session->set("N3", (int) $session->get("N3") + 1);
} else {
  // counter N3 is not in session - create it
  $session->set("N3", 100);
}
// we work out the answer
$response = new Response();
// the content of the answer is utf-8 text
$response->headers->set("content-type", "application/json");
$response->setCharset("utf-8");
// the answer will be the jSON of an array containing the three counters
$response->setContent(json_encode([
  "N1" => $session->get("N1"),
  "N2" => $session->get("N2"),
  "N3" => $session->get("N3")]));

// reply sent
$response->send();
- 第 10 行:[$request] 对象封装了 Web 脚本接收到的请求的所有信息;
- 第 12-13 行:创建并激活会话。 [Session] 对象封装了与客户端发送的会话 Cookie 相对应的会话数据。如果客户端未发送此类 Cookie,则 [Session] 中不会存储任何数据。 Web脚本将在其首次响应中包含HTTP头[Set-Cookie: PHPSESSID=xxx]。在后续请求中,客户端将发送HTTP头[Cookie: PHPSESSID=xxx],以指定其希望使用的会话内容。会话相当于客户端的内存;
- 第 15 行:我们检查会话中是否存在名为 [N1] 的键。这将是我们第一个计数器的名称。如果不存在(第 20 行),我们将它的值设为 0 并将其添加到会话中。如果存在(第 23 行),我们将:
- 从会话中检索该计数器;
- 将其值加 1;
- 将其放回会话中;
- 第 22–35 行:对另外两个计数器 N2 和 N3 执行相同操作;
- 第 36–40 行:准备一个类型为 [application/json] 的响应;
- 第 42–45 行:响应将是一个包含这三个计数器的数组的 JSON 字符串;
- 第 48 行:将响应发送给客户端;
在客户端/服务器关系中,服务器端对客户端会话的管理取决于双方——客户端和服务器:
- 服务器负责在客户端首次请求时向其发送一个标识符
- 客户端负责在每次新请求中将该标识符发回。若未发送,服务器将视其为新客户端,并为新会话生成新的标识符。
结果
我们使用网页浏览器作为客户端。默认情况下(实际上是根据配置),浏览器确实会将服务器发送给它的会话标识符发回给服务器。随着请求的发出,浏览器将接收服务器发送的三个计数器,并看到它们的值逐渐增加。
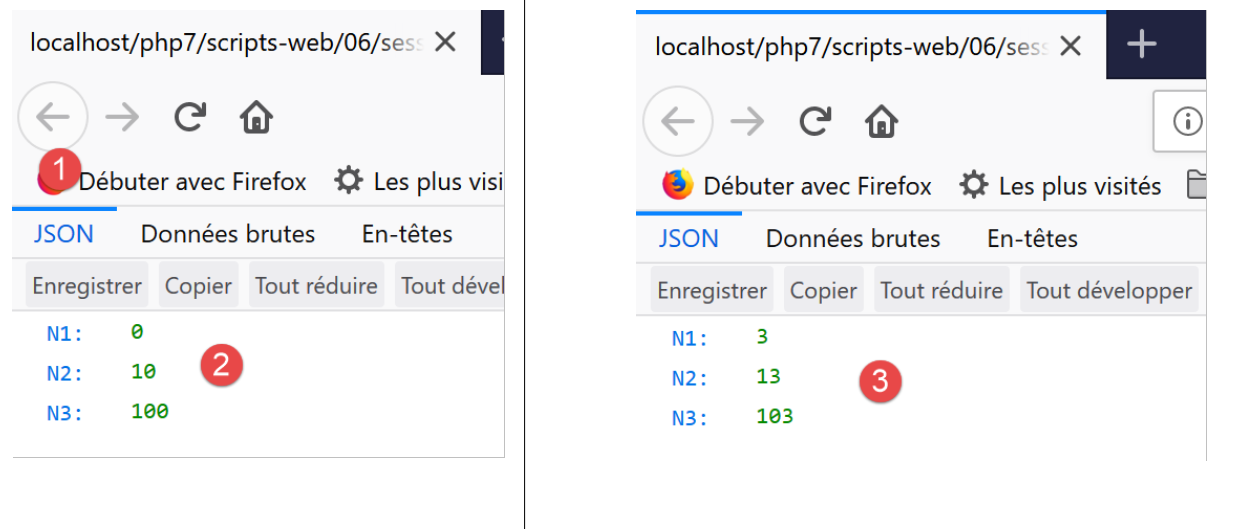
- 在[2]中,对Web服务的首次请求;
- 在[4]中,第四次请求显示计数器确实已被递增。计数器值确实在请求过程中被保存了下来;
让我们使用开发者模式查看服务器与客户端之间交换的 HTTP 头部。我们关闭 Firefox 以结束与服务器的当前会话,重新打开它,并启用开发者模式(F12)。这将清除浏览器的当前会话,使其开始一个新的会话。我们请求服务 [session-server.php]:
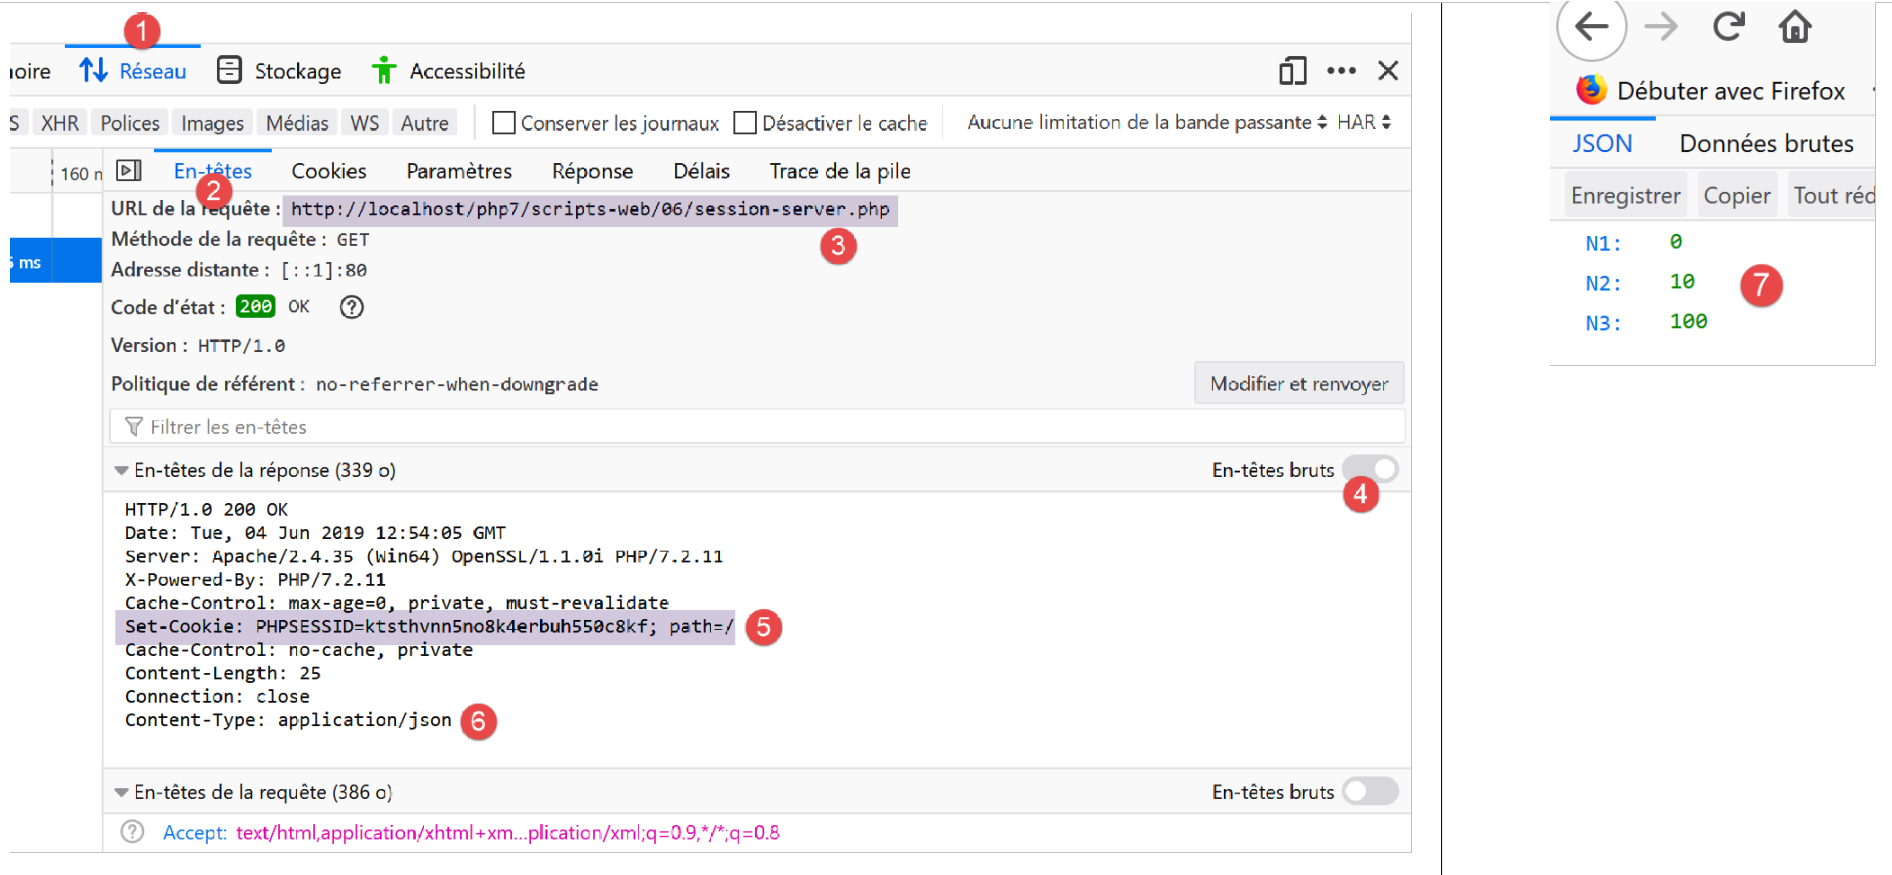
在 [5] 中,我们可以看到服务器在响应客户端首次请求时发送的会话 ID。它使用了 Set-Cookie HTTP 头部。
让我们通过在网页浏览器中刷新(F5)页面来发起一个新请求:
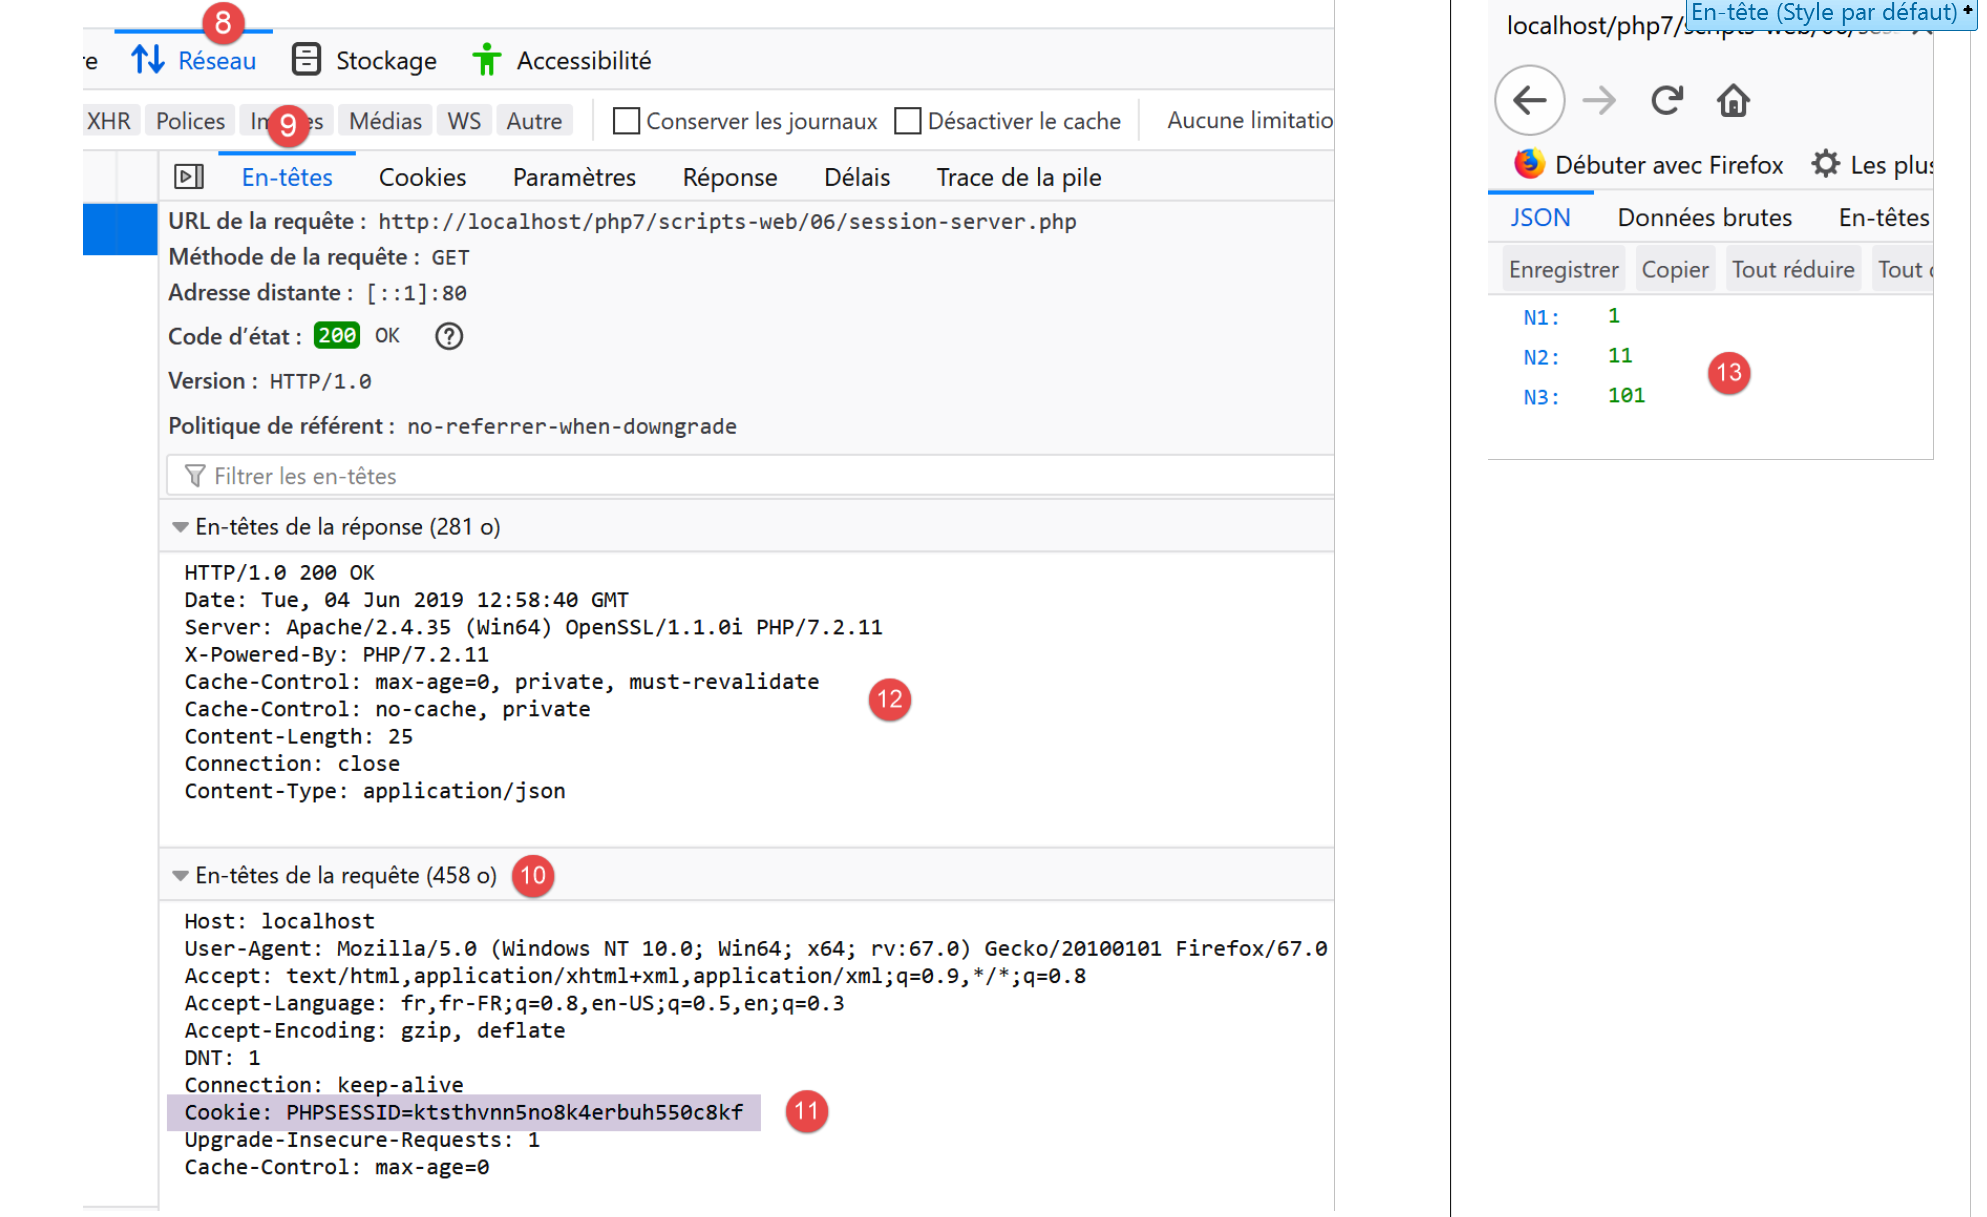
在此,我们会注意到两点:
- 在[11]中,Web浏览器会通过HTTP Cookie标头将会话ID发回。
- 在[12]中,Web服务不再在其响应中包含该标识符。现在,客户端有责任在每次请求中发送该标识符。
17.10.2.2. 客户端
接下来,我们将基于之前的服务器端脚本编写一个客户端脚本。在会话管理方面,它必须像 Web 浏览器那样工作:
- 在服务器对其首次请求的响应中,它必须找到服务器发送的会话 ID。它知道该 ID 位于 HTTP Set-Cookie 头中。
- 对于后续的每次请求,它必须将收到的标识符发回给服务器。它将通过 HTTP Cookie 头来完成这一操作。
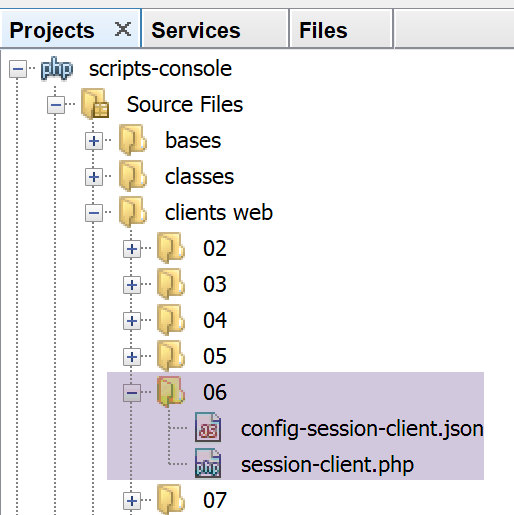
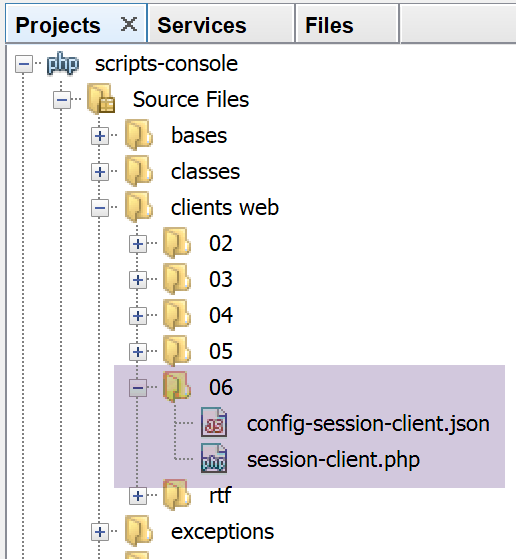
客户端 [session-client] 由以下 JSON 文件 [config-session-client.json] 进行配置:
客户端代码 [session-client] 如下:
<?php

// session management
//
// error management
//ini_set("error_reporting", E_ALL & ~ E_WARNING & ~E_DEPRECATED & ~E_NOTICE);
//ini_set("display_errors", "off");
//
// dependencies
require_once 'C:/myprograms/laragon-lite/www/vendor/autoload.php';
use Symfony\Component\HttpClient\HttpClient;

// customer configuration
const CONFIG_FILE_NAME = "config-session-client.json";

// we retrieve the configuration
if (!file_exists(CONFIG_FILE_NAME)) {
  print "Le fichier de configuration [" . CONFIG_FILE_NAME . "] n'existe pas\n";
  exit;
}
if (!$config = \json_decode(\file_get_contents(CONFIG_FILE_NAME), true)) {
  print "Erreur lors de l'exploitation du fichier de configuration jSON [" . CONFIG_FILE_NAME . "]\n";
  exit;
}

// create a HTTP customer
$httpClient = HttpClient::create();
try {
  // we'll make 10 requests
  for ($i = 0; $i < 10; $i++) {
    // make a request to the server
    if (!isset($sessionCookie)) {
      // no session
      $response = $httpClient->request('GET', $config['url']);
    } else {
      // with session
      $response = $httpClient->request('GET', $config['url'],
        ["headers" => ["Cookie" => $sessionCookie]]);
    }
    // answer status
    $statusCode = $response->getStatusCode();
    print "---Réponse avec statut : $statusCode\n";
    // we retrieve the headers
    print "---Entêtes de la réponse\n";
    $headers = $response->getHeaders();
    foreach ($headers as $type => $value) {
      print "$type: " . $value[0] . "\n";
    }
    // retrieve the session cookie if it exists
    if (isset($headers["set-cookie"])) {
      // session cookie ?
      foreach ($headers["set-cookie"] as $cookie) {
        $match = [];
        $match = preg_match("/^PHPSESSID=(.+?);/", $cookie, $champs);
        if ($match) {
          $sessionCookie = "PHPSESSID=" . $champs[1];
        }
      }
    }
  }
  // the jSON server response is displayed
  print "---Réponse du serveur : {$response->getContent()}\n";
} catch (TypeError | RuntimeException $ex) {
  // error is displayed
  print "Erreur de communication avec le serveur : " . $ex->getMessage() . "\n";
}
评论
- 第 27 行:创建 HTTP 客户端;
- 第 30 行:我们将向服务器 [session-server.php] 发送相同的请求 10 次;
- 第 32 行:变量 [$sessionCookie] 将被设置为客户端接收到的 [Set-Cookie] HTTP 头部的值;
- 第 32–34 行:如果该变量不存在,则表示会话尚未开始。此时我们发送不带 [Cookie] 头部的 [GET] 请求;
- 第 35–38 行:否则,表示会话已开始,我们将发送包含 [Cookie] 头部的 [GET] 请求。该头部的值将是 [$sessionCookie];
- 第 50 行:如果接收到的 HTTP 头部中包含 [Set-Cookie] 头部,则查找会话 Cookie;
- 第 52 行:Web 服务器可能会发送多个 [Set-Cookie] 头部。会话 Cookie 只是其中之一。在本例中,其格式为 [PHPSESSID=xxx;;];
- 第 53–57 行:使用正则表达式查找会话 Cookie;
- 第 62 行:当发送完 10 个请求后,显示来自服务器的最后一个 JSON 响应;
执行客户端脚本后,NetBeans 控制台将显示以下内容:
"C:\myprograms\laragon-lite\bin\php\php-7.2.11-Win32-VC15-x64\php.exe" "C:\Data\st-2019\dev\php7\poly\scripts-console\clients web\06\session-client.php"
---Réponse avec statut : 200
---Entêtes de la réponse
date: Tue, 04 Jun 2019 13:41:34 GMT
server: Apache/2.4.35 (Win64) OpenSSL/1.1.0i PHP/7.2.11
x-powered-by: PHP/7.2.11
cache-control: max-age=0, private, must-revalidate
set-cookie: PHPSESSID=1cerjgsgdlc35e1mkenvtltmh8; path=/
content-length: 25
connection: close
content-type: application/json
---Réponse avec statut : 200
---Entêtes de la réponse
date: Tue, 04 Jun 2019 13:41:34 GMT
server: Apache/2.4.35 (Win64) OpenSSL/1.1.0i PHP/7.2.11
x-powered-by: PHP/7.2.11
cache-control: max-age=0, private, must-revalidate
content-length: 25
connection: close
content-type: application/json
---Réponse avec statut : 200
---Entêtes de la réponse
date: Tue, 04 Jun 2019 13:41:34 GMT
server: Apache/2.4.35 (Win64) OpenSSL/1.1.0i PHP/7.2.11
x-powered-by: PHP/7.2.11
cache-control: max-age=0, private, must-revalidate
content-length: 25
connection: close
content-type: application/json
---Réponse avec statut : 200
…………………………………………………………
---Réponse avec statut : 200
---Entêtes de la réponse
date: Tue, 04 Jun 2019 13:41:34 GMT
server: Apache/2.4.35 (Win64) OpenSSL/1.1.0i PHP/7.2.11
x-powered-by: PHP/7.2.11
cache-control: max-age=0, private, must-revalidate
content-length: 25
connection: close
content-type: application/json
---Réponse du serveur : {"N1":9,"N2":19,"N3":109}
- 第 8 行:在首次响应中,服务器发送了会话 ID。在后续响应中,它不再发送该 ID;
- 第41行:三个计数器[N1, N2, N3]确实已被递增了9次。在第1次请求期间,它们被重置为零;
以下示例表明,您还可以将数组或对象的值保存到会话中。
17.10.3. 示例 2
17.10.3.1. 服务器
我们将把一个 [Person] 对象放入会话中。该类的定义如下:
<?php

namespace Modèles;

class Personne implements \JsonSerializable {
  // attributes
  private $nom;
  private $prénom;
  private $âge;

  // convert associative array to object [Person]
  public function setFromArray(array $assoc): Personne {
    // initialize the current object with the associative array
    foreach ($assoc as $attribute => $value) {
      $this->$attribute = $value;
    }
    // result
    return $this;
  }

  // getters and setters
  public function getNom() {
    return $this->nom;
  }

  public function getPrénom() {
    return $this->prénom;
  }

  public function setNom($nom) {
    $this->nom = $nom;
    return $this;
  }

  public function setPrénom($prénom) {
    $this->prénom = $prénom;
    return $this;
  }

  public function getÂge() {
    return $this->âge;
  }

  public function setÂge($âge) {
    $this->âge = $âge;
    return $this;
  }

  // toString
  public function __toString(): string {
    return "Personne [$this->prénom, $this->nom, $this->âge]";
  }

  // implements the JsonSerializable interface
  public function jsonSerialize(): array {
    // render an associative array with the object's attributes as keys
    // this table can then be encoded as jSON
    return get_object_vars($this);
  }

  // convert a jSON to a [Person] object
  public static function jsonUnserialize(string $json): Personne {
    // we create a person from the string jSON
    return (new Personne())->setFromArray(json_decode($json, true));
  }

}
服务器脚本如下:
<?php

// dependencies
require_once 'C:/myprograms/laragon-lite/www/vendor/autoload.php';
use \Symfony\Component\HttpFoundation\Response;
use \Symfony\Component\HttpFoundation\Request;
use \Symfony\Component\HttpFoundation\Session\Session;
require_once __DIR__ . "/Personne.php";
use \Modèles\Personne;

//
// retrieve the current query
$request = Request::createFromGlobals();

// session
$session = new Session();
$session->start();

// retrieve various data from the session
// table
if ($session->has("tableau")) {
  // the array is in the session - all its values are incremented
  $tableau = $session->get("tableau");
  for ($i = 0; $i < count($tableau); $i++) {
    $tableau[$i] += 1;
  }
  // put the table back in the session
  $session->set("tableau", $tableau);
} else {
  // the array is not in the session - we create it
  $tableau = [0, 10, 100];
  // we put it in the session
  $session->set("tableau", $tableau);
}
// dictionary
if ($session->has("assoc")) {
  // [assoc] is in the session - all its elements are incremented
  $assoc = $session->get("assoc");
  foreach ($assoc as $key => $value) {
    $assoc[$key] = $value + 1;
  }
  // put $assoc in the session
  $session->set("assoc", $assoc);
} else {
  // [assoc] is not in the session - we create it
  $assoc = ["un" => 0, "deux" => 10, "trois" => 100];
  // put $assoc in the session
  $session->set("assoc", $assoc);
}
// object Person
if ($session->has("personne")) {
  // [person] is in the session - his age is incremented
  $personne = $session->get("personne");
  $personne->setÂge($personne->getÂge() + 1);
} else {
  // [person] is not in the session - we create it
  $personne = (new Personne())->setFromArray(
    ["prénom" => "Léonard", "nom" => "Hûche", "âge" => 0]);
  // put $personne in the session
  $session->set("personne", $personne);
}
// we work out the answer
$response = new Response();
// the content of the response is jSON utf-8
$response->headers->set("content-type", "application/json");
$response->setCharset("utf-8");
$response->setContent(json_encode([
  "tableau" => $tableau,
  "assoc" => $assoc,
  "personne" => $personne], JSON_UNESCAPED_UNICODE));

// reply sent
$response->send();
评论
- 第 16-17 行:获取当前会话并激活它;
- 第 21-34 行:管理存储在会话中的数组 [array]。每次收到新请求时,其元素值都会增加 1;
- 第 36-49 行:管理存储在会话中的关联数组 [assoc]。每次收到新请求时,其元素值都会增加 1;
- 第 51–61 行:管理一个存储在会话中的对象 [Person]。每次收到新请求时,此人的年龄都会增加 1;
- 第 62–73 行:向客户端发送 JSON 响应:一个关联数组的 JSON 字符串;
让我们在 NetBeans 中运行此脚本。前两次请求的结果如下(在浏览器中按 F5 执行第二次请求):
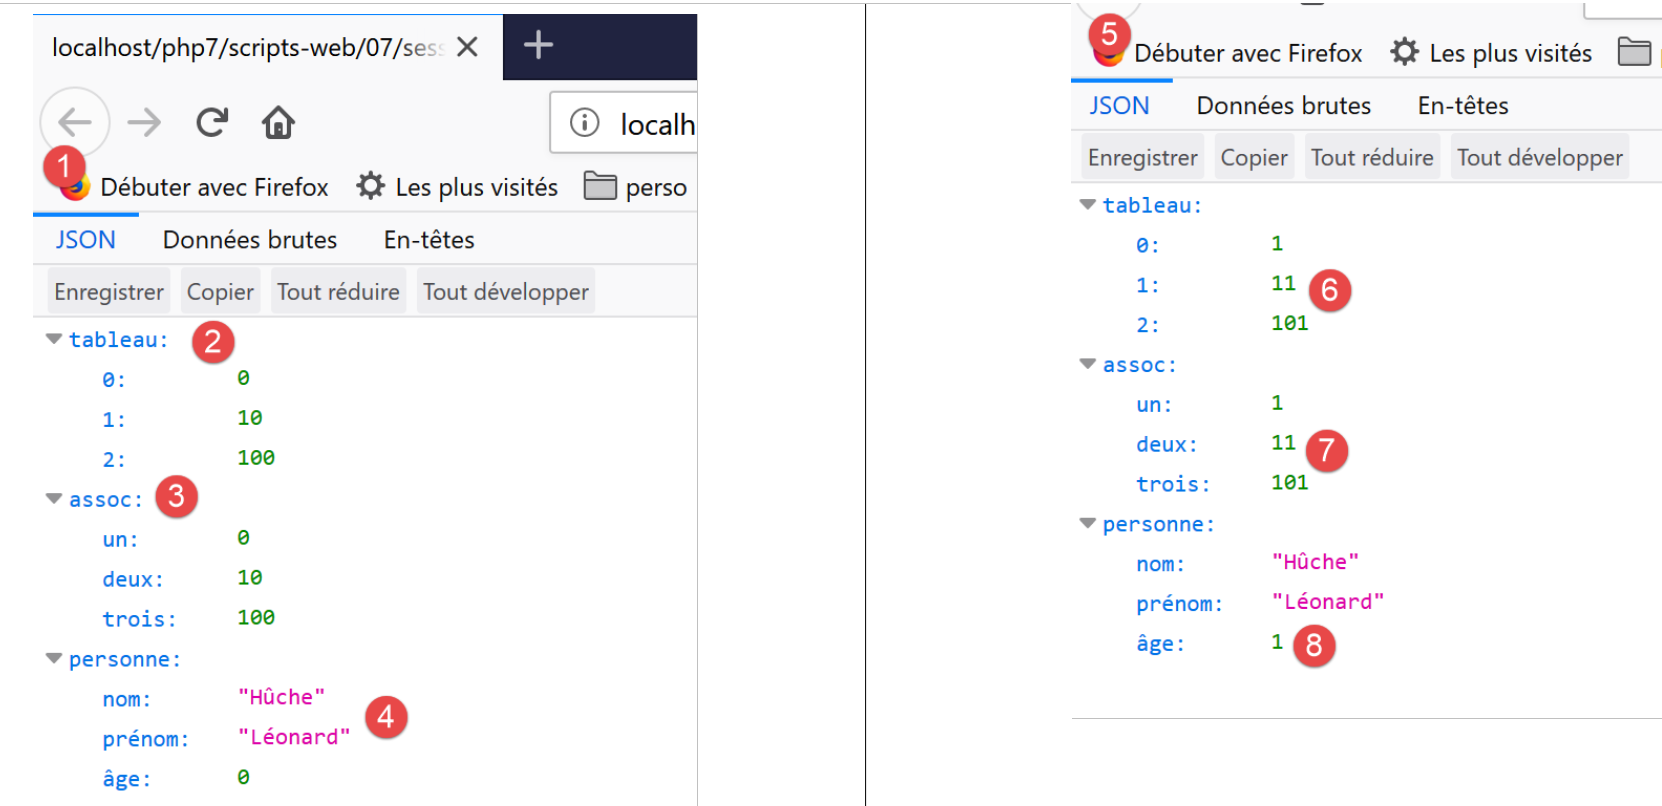
- 我们可以看到,在 [6-8] 中,所有计数器都已递增;
17.10.3.2. 客户端
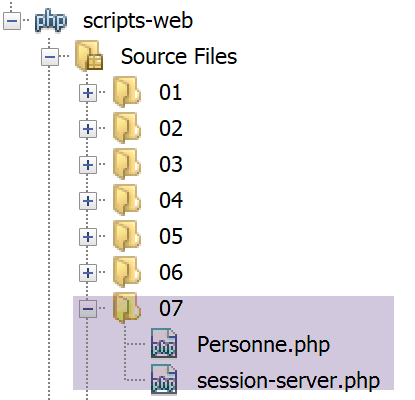
客户端与示例 1(链接部分)中的相同。我们仅修改其配置文件 [config-session-client]:
{
    "url": "http://localhost/php7/scripts-web/07/session-server.php"
}
执行后得到以下结果:
---Réponse avec statut : 200
---Entêtes de la réponse
date: Tue, 04 Jun 2019 14:25:24 GMT
server: Apache/2.4.35 (Win64) OpenSSL/1.1.0i PHP/7.2.11
x-powered-by: PHP/7.2.11
cache-control: max-age=0, private, must-revalidate
set-cookie: PHPSESSID=qbfrj8clr20mod3eriur71mao6; path=/
content-length: 119
connection: close
content-type: application/json
---Réponse avec statut : 200
………….……………………………………………………….
---Réponse avec statut : 200
---Entêtes de la réponse
date: Tue, 04 Jun 2019 14:25:24 GMT
server: Apache/2.4.35 (Win64) OpenSSL/1.1.0i PHP/7.2.11
x-powered-by: PHP/7.2.11
cache-control: max-age=0, private, must-revalidate
content-length: 119
connection: close
content-type: application/json
---Réponse du serveur : {"tableau":[9,19,109],"assoc":{"un":9,"deux":19,"trois":109},"personne":{"nom":"Hûche","prénom":"Léonard","âge":9}}
- 第 22 行,我们可以看到所有计数器都已递增;
17.11. 身份验证
接下来我们将重点探讨仅面向特定用户的 Web 服务。因此,客户端在收到响应之前必须先通过 Web 服务进行身份验证。
17.11.1. 客户端
客户端代码 [auth-client.php] 如下:
<?php

// session management
//
// error management
//ini_set("error_reporting", E_ALL & ~ E_WARNING & ~E_DEPRECATED & ~E_NOTICE);
//ini_set("display_errors", "off");
//
// dependencies
require_once 'C:/myprograms/laragon-lite/www/vendor/autoload.php';
use Symfony\Component\HttpClient\HttpClient;

// customer configuration
const CONFIG_FILE_NAME = "config-auth-client.json";

// we retrieve the configuration
if (!file_exists(CONFIG_FILE_NAME)) {
  print "Le fichier de configuration [" . CONFIG_FILE_NAME . "] n'existe pas\n";
  exit;
}
if (!$config = \json_decode(\file_get_contents(CONFIG_FILE_NAME), true)) {
  print "Erreur lors de l'exploitation du fichier de configuration jSON [" . CONFIG_FILE_NAME . "]\n";
  exit;
}

// create a HTTP customer
$httpClient = HttpClient::create([
    'auth_basic' => ['admin', 'admin'],
    // "verify_peer" => false,
    // "verify_host" => false
  ]);


try {
  // make a request to the server
  $response = $httpClient->request('GET', $config['url']);
  // answer status
  $statusCode = $response->getStatusCode();
  print "---Réponse avec statut : $statusCode\n";
  // we retrieve the headers
  print "---Entêtes de la réponse\n";
  $headers = $response->getHeaders();
  foreach ($headers as $type => $value) {
    print "$type: " . $value[0] . "\n";
  }
  // the jSON server response is displayed
  print "---Réponse du serveur : {$response->getContent()}\n";
} catch (TypeError | RuntimeException $ex) {
  // error is displayed
  print "Erreur de communication avec le serveur : " . $ex->getMessage() . "\n";
}
评论
- 第 27–31 行:我们向静态方法 [HttpClient::create] 传递了一个参数,即一个哈希;
- 第 28 行:[auth_basic] 键的值为一个包含两个元素的数组 [user, password]。客户端将使用这些元素与 Web 服务进行身份验证。[auth_basic] 键指的是一种名为 [Basic Authorization] 的身份验证类型,其名称源自客户端将发送的 HTTP 头。还有其他类型的身份验证;
- 除这段代码外,该客户端与之前的客户端完全相同;
要查看客户端发送的 HTTP 头部,我们将像之前多次做过的那样,将其连接到通用 TCP 服务器 [RawTcpServer]:
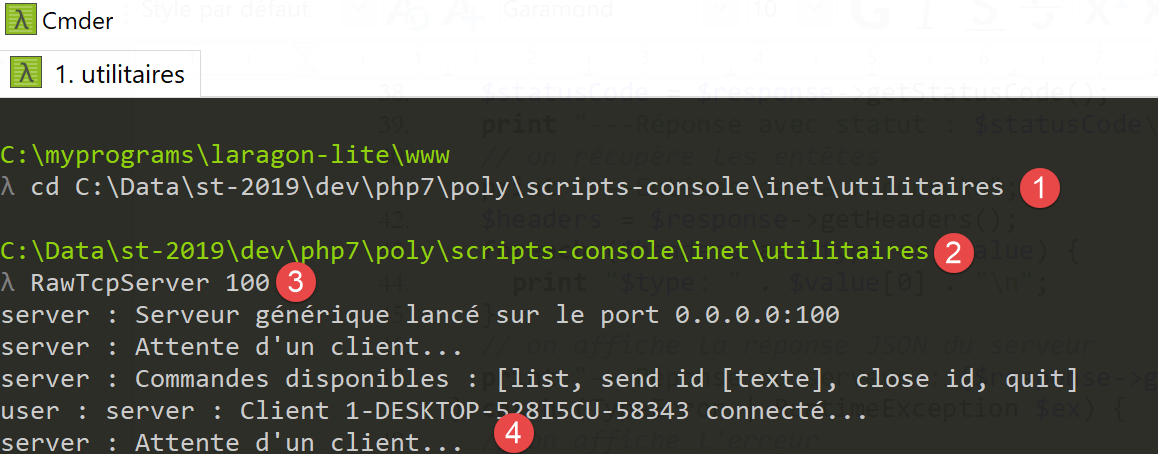
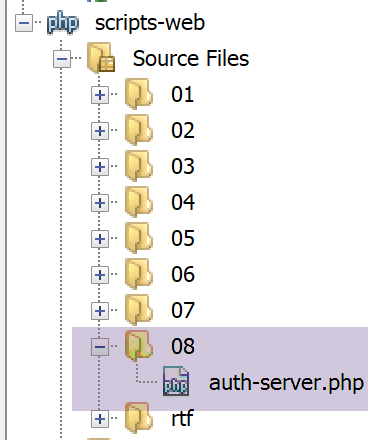
我们使用以下 [config-auth-client.json] 配置启动客户端:
{
    "url": "http://localhost:100/php7/scripts-web/08/auth-server.php"
}
随后,[RawTcpServer] 接收到了以下几行内容:
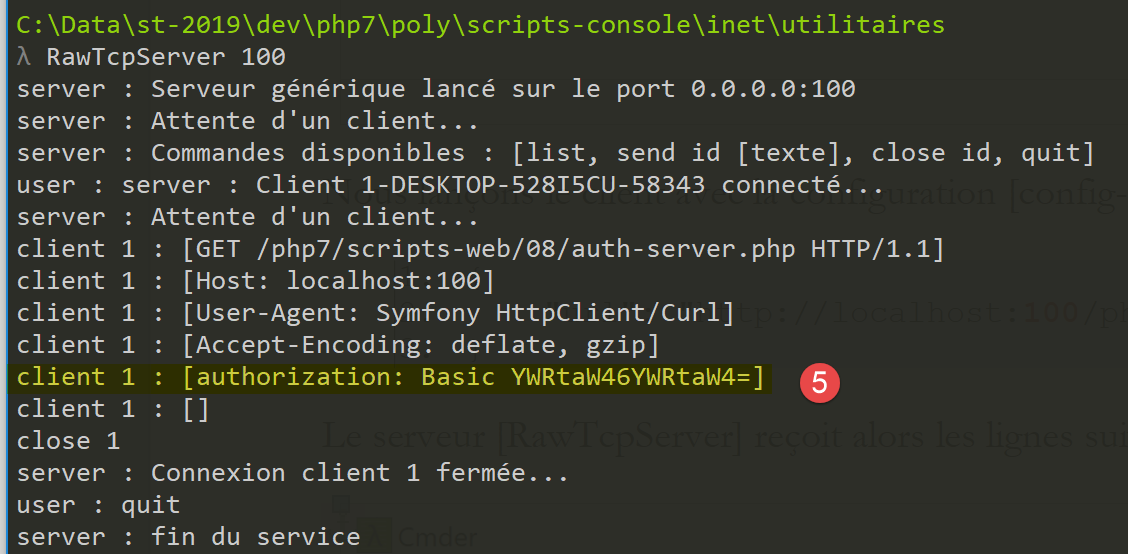
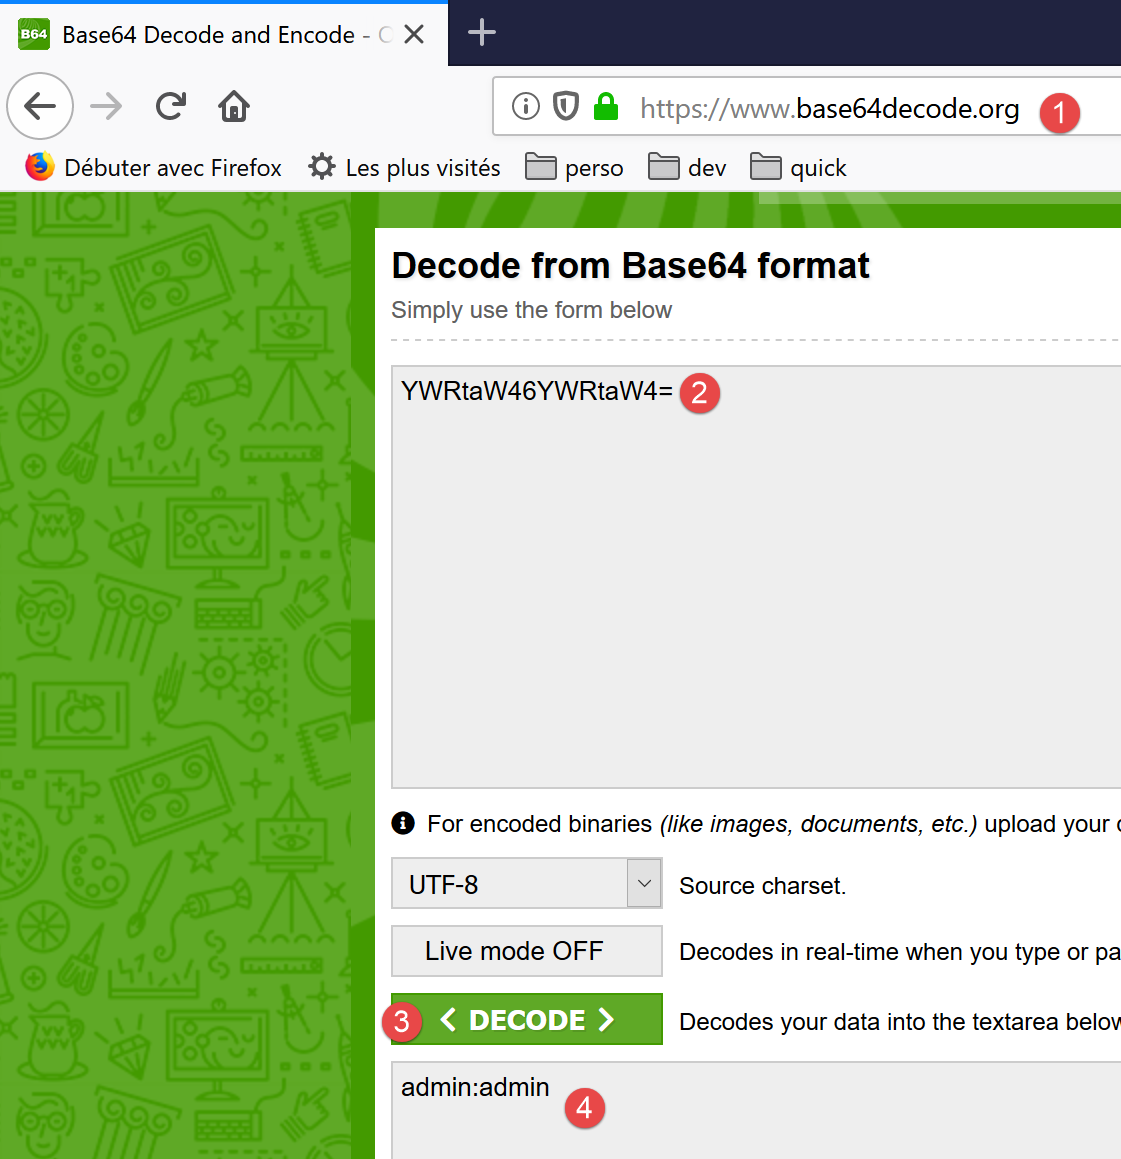
- 在 [5] 中,我们可以看到客户端发送的 [Authorization: Basic XXX] 头部。XXX 字符串是经过 Base64 编码的 [用户名:密码] 字符串;
要验证这一点,您可以在网站 [https://www.base64decode.org/] 上对接收到的字符串进行解码:
17.11.2. 服务器
[auth-server.php] 服务器代码如下:
<?php

// dependencies
require_once 'C:/myprograms/laragon-lite/www/vendor/autoload.php';
use \Symfony\Component\HttpFoundation\Response;
use \Symfony\Component\HttpFoundation\Request;

// authorized users
$users = ["admin" => "admin"];
//
// retrieve the current query
$request = Request::createFromGlobals();
// authentication
$requestUser = $request->headers->get('php-auth-user');
$requestPassword = $request->headers->get('php-auth-pw');
// does the user exist?
$trouvé = array_key_exists($requestUser, $users) && $users[$requestUser] === $requestPassword;
// answer preparation
$response = new Response();
// set the response status code
if (!$trouvé) {
  // not found - code 401
  $response->setStatusCode(Response::HTTP_UNAUTHORIZED);
  $response->headers->add(["WWW-Authenticate"=> "Basic realm=".utf8_decode("\"PHP7 par l'exemple\"")]);
} else {
  // found - code 200
  $response->setStatusCode(Response::HTTP_OK);
}
// response has no content, only HTTP headers
$response->send();
注释
- 第 9 行:授权用户,本例中为登录名 [admin] 和密码 [admin] 的单个用户;
- 第 14 行:从 [PHP-AUTH-USER] 标头中获取用户的 ID。这不是客户端发送的标头,而是由服务器的 PHP 生成的;
- 第 15 行:从 [PHP-AUTH-PW] 标头中获取用户的密码,该标头由 PHP 构建;
- 第 17 行:在授权用户列表中搜索尝试登录的用户;
- 第 23–24 行:如果未识别该用户,则向客户端发送以下内容
- 第 23 行:[401 Unauthorized] 状态码;
- 第 24 行:一个 [WWW-Authenticate: Basic realm="something"] 标头。大多数浏览器都能识别此标头,并会显示一个身份验证窗口,提示用户登录。HTTP 标头必须采用 ISO 8859-1 编码。然而,NetBeans 中的文本采用的是 UTF-8 编码。 [utf8_decode] 函数负责将 UTF-8 转换为 ISO 8859-1。在此处,该函数并非必需,因为字符串中的字符(本例中为 [PHP7])在 UTF-8 和 ISO 8859-1 编码下是相同的。包含该函数仅是为了提醒 HTTP 头所使用的编码;
- 第 25 行:如果已识别用户,则向客户端发送 [200 OK] 状态码;
现在让我们使用浏览器请求 URL [auth-server.php]:

我们可以看到浏览器显示了一个身份验证窗口。在 [2] 中,我们可以看到服务器发送的 [WWW-Authenticate] 标头值。如果查看浏览器接收到的 HTTP 标头,我们会发现以下内容:
- 第 1 行:响应状态码 [401 未授权];
- 第 6 行:HTTP 头 [WWW-Authenticate];
- 第 7 行:响应正文为空;
如果在 [3-4] 中,您输入两次 [admin],服务器的响应如下:
- 第 1 行:200 OK 响应代码;
- 第 6 行:响应正文为空;
如果在[3-4]中输入了错误的凭据,用于测试的浏览器[Firefox]会持续显示身份验证窗口,直到输入正确的凭据为止。每次与服务器进行往返通信时,都会收到相同的响应,从而触发浏览器的身份验证窗口。
让我们使用未授权用户运行客户端 [auth-client.php]。服务器的响应如下:
---Réponse avec statut : 401
---Entêtes de la réponse
Erreur de communication avec le serveur : HTTP/1.0 401 Unauthorized returned for "https://localhost/php7/scripts-web/08/auth-server.php".
- 在 [1] 中,客户端确实收到了 401 状态码;
- 而在[3]中,客户端抛出了异常。抛出异常的是Symfony的[HttpClient]:当HTTP响应状态码指示服务器端错误,且客户端试图读取服务器响应的头部或内容时,它会抛出异常。 第 3 行的信息显示,服务器返回了 [HTTP/1.0 401 Unauthorized] 状态码,表明用户未被识别;
现在让我们使用已授权用户 [‘admin’,’admin’] 运行客户端 [auth-client.php]。此时服务器的响应如下:
---Réponse avec statut : 200
---Entêtes de la réponse
date: Wed, 05 Jun 2019 10:11:02 GMT
server: Apache/2.4.35 (Win64) OpenSSL/1.1.0i PHP/7.2.11
x-powered-by: PHP/7.2.11
cache-control: no-cache, private
content-length: 0
connection: close
content-type: text/html; charset=UTF-8
---Réponse du serveur :
- 第 1 行:服务器响应 [HTTP/1.2 200 OK];
- 第7行:响应内容为空(0字节);
17.11.3. 保障客户端/服务器连接的安全
我们已经看到,为了向服务器进行身份验证,客户端会发送以下头部:
如果这条数据被间谍软件截获,它便能轻松提取出字符串 [YWRtaW46YWRtaW4=] 中通过 Base64 编码的 [用户名、密码] 凭据。因此,客户端与服务器之间的身份验证必须通过 安全连接进行。安全 URL 使用 [HTTPS] 协议,而非 HTTP 协议。 [HTTPS] 协议是在安全客户端/服务器连接中运行的 HTTP 协议。安全 URL 的形式为 [https://chemin_document]。
并非所有 Web 服务器都支持此格式的 URL。必须对其进行修改才能确保安全。Laragon 的 Apache 服务器是安全的,但默认情况下未启用 HTTPS 协议。您必须在 Laragon 菜单中启用它:
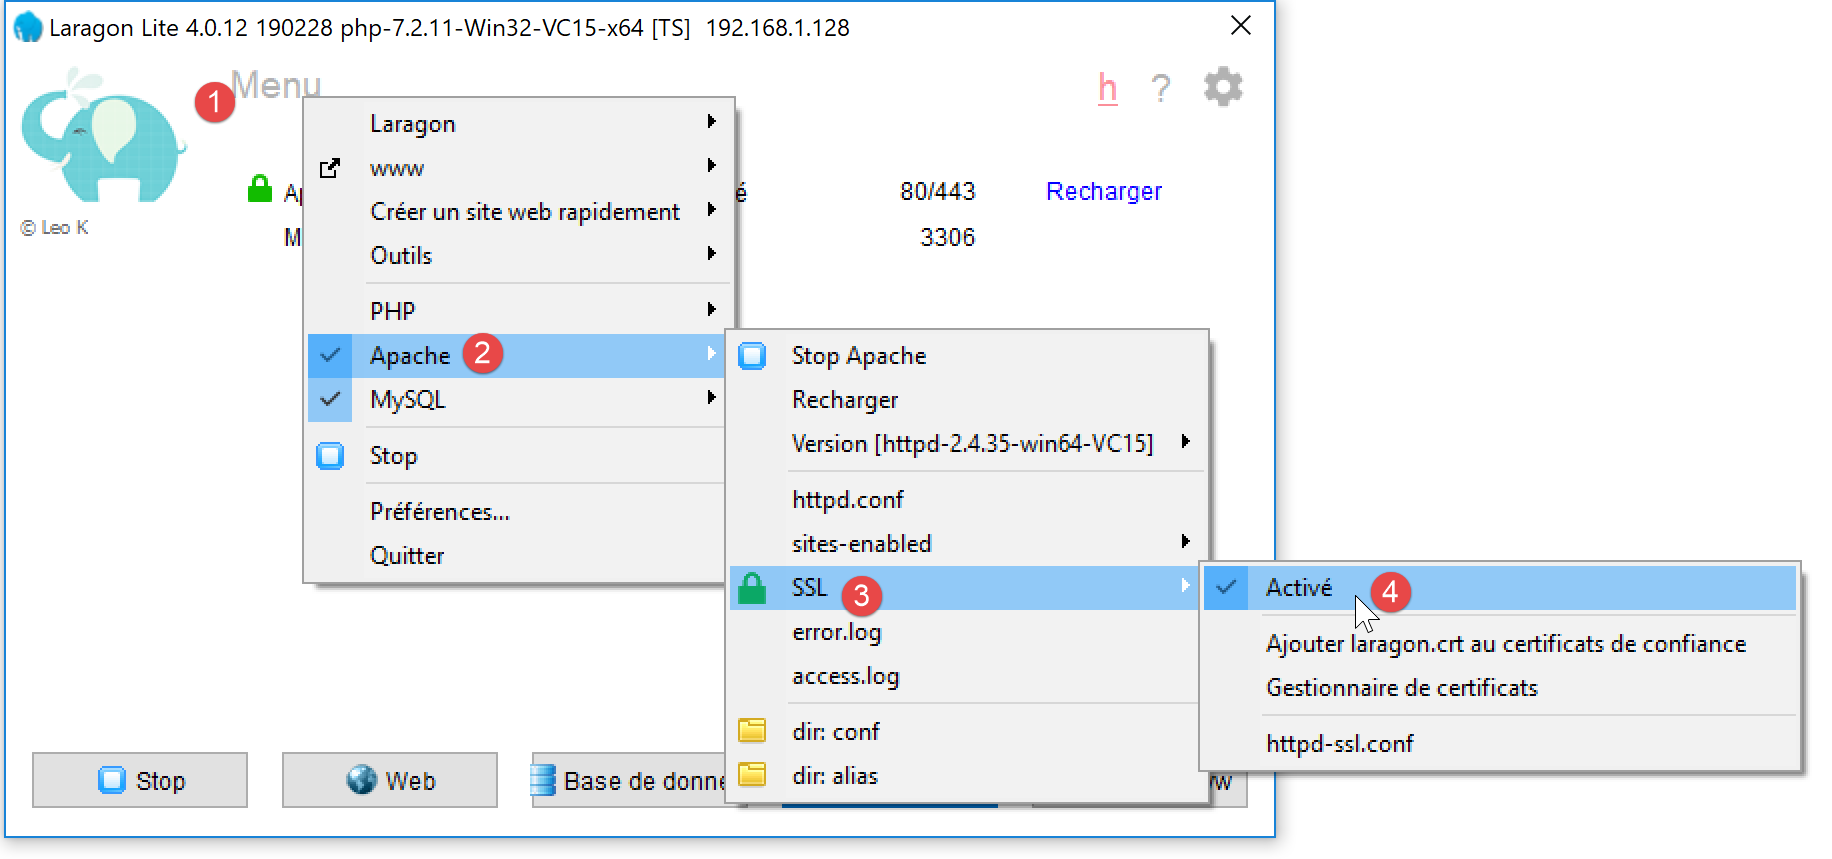
- 在 [4] 中,为 Apache 服务器启用 SSL 加密;
完成此操作后,Apache 服务器将自动重启:
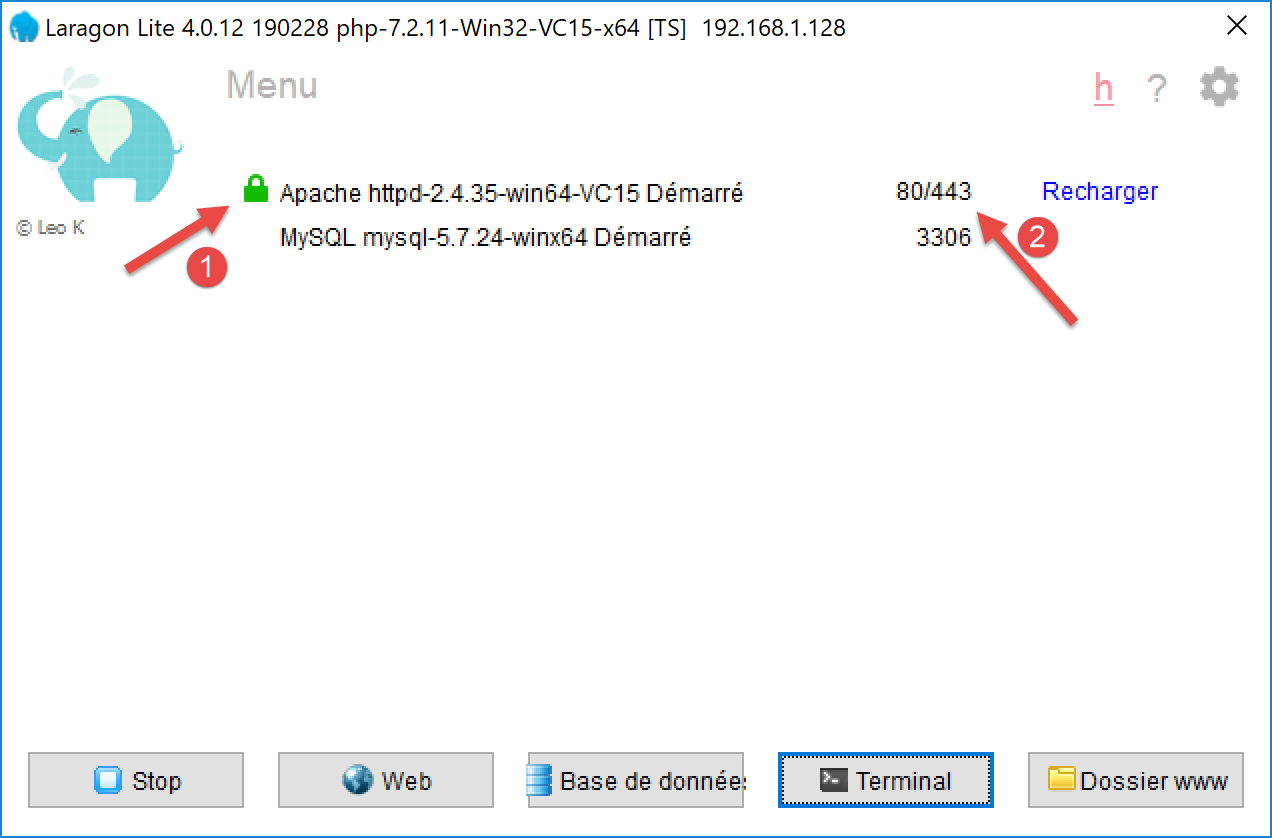
- 在 [1] 中,会出现一个绿色挂锁图标:这表示 HTTPS 协议已启用;
- 在 [2] 处,会出现一个新的服务端口,此处为 443 端口。这是安全 HTTPS 协议的服务端口;
既然我们已经拥有了一个安全的服务器,接下来让我们按以下方式修改客户端的配置文件 [config-auth-client.json]:
{
    "url": "https://localhost:443/php7/scripts-web/08/auth-server.php"
}
在[2]中,协议已更改为[https],端口更改为[443]。
现在,让我们使用授权用户 [admin, admin] 运行客户端 [auth-client.php]。控制台输出如下:
Symfony 的 [HttpClient] 抛出了异常,因为服务器发送的信任证书未被 [HttpClient] 接受。SSL 通信依赖于由官方机构签发的信任证书。当我们在 Laragon Apache 服务器上启用 HTTPS 协议时,系统为 Apache 服务器生成了一份自签名证书。自签名证书是指未经官方机构验证的证书。 Symfony 的 [HttpClient] 客户端拒绝了此自签名证书。
可以通过在 [HttpClient::create] 方法中使用选项,指示 [HttpClient] 不要验证服务器发送的证书的有效性:
// on crée un client HTTP
$httpClient = HttpClient::create([
    'auth_basic' => ['admin', 'admin'],
    "verify_peer" => false
  ]);
第 4 行指定不验证服务器证书。我们在链接部分的 [http-02.php] 脚本中已经遇到过这个问题。该脚本使用 [libcurl] 库连接到 HTTP 和 HTTPS 站点。我们当时为该库使用了以下配置:
// Initialisation d'a cURL session
  $curl = curl_init($url);
  if ($curl === FALSE) {
    // il y a eu une erreur
    return "Erreur lors de l'initialisation de la session cURL pour le site [$site]";
  }
  // options de curl
  $options = [
    // mode verbose
    CURLOPT_VERBOSE => true,
    // nouvelle connexion - pas de cache
    CURLOPT_FRESH_CONNECT => true,
    // timeout de la requête (en secondes)
    CURLOPT_TIMEOUT => $timeout,
    CURLOPT_CONNECTTIMEOUT => $timeout,
    // ne pas vérifier la validité des certificats SSL
    CURLOPT_SSL_VERIFYPEER => false,
    // suivre les redirections
    CURLOPT_FOLLOWLOCATION => true,
    // récupération du document demandé sous la forme d'a character string
    CURLOPT_RETURNTRANSFER => true
  ];

  // paramétrage de curl
curl_setopt_array($curl, $options);
第 17 行:常量 [CURLOPT_SSL_VERIFYPEER] 控制是否验证服务器发送的证书。当 PHP 配置中启用了 [curl] 扩展时(如本例所示),[HttpClient] 客户端实际上是一个 [curl] 客户端。 此时由 [HttpClient::create] 实例化的类即为 [CurlHttpClient] 类。该类中提供了 [curl] 常量,但名称有所不同:
我们已将 [CurlHttpClient] 所使用的常量用黄色标出。
如果现在使用用户 [admin, admin] 运行 [auth-client] 客户端,我们将得到以下结果:
---Réponse avec statut : 200
---Entêtes de la réponse
date: Wed, 05 Jun 2019 10:44:37 GMT
server: Apache/2.4.35 (Win64) OpenSSL/1.1.0i PHP/7.2.11
x-powered-by: PHP/7.2.11
cache-control: no-cache, private
content-length: 0
connection: close
content-type: text/html; charset=UTF-8
---Réponse du serveur :
用户身份验证成功。如果我们使用除 [admin, admin] 以外的用户运行 [auth-client] 客户端,将得到以下结果:
现在我们已经知道如何对安全服务器进行身份验证了。