23. 实践练习 – 第 12 版
在本章中,我们将编写一个遵循 MVC(模型-视图-控制器)架构的 Web 应用程序。该应用程序能够以三种格式返回响应:JSON、XML 和 HTML。与之前的内容相比,我们即将进行的操作在复杂度上有了显著提升。我们将复用迄今为止涵盖的大部分概念,并详细说明构建最终应用程序的所有步骤。
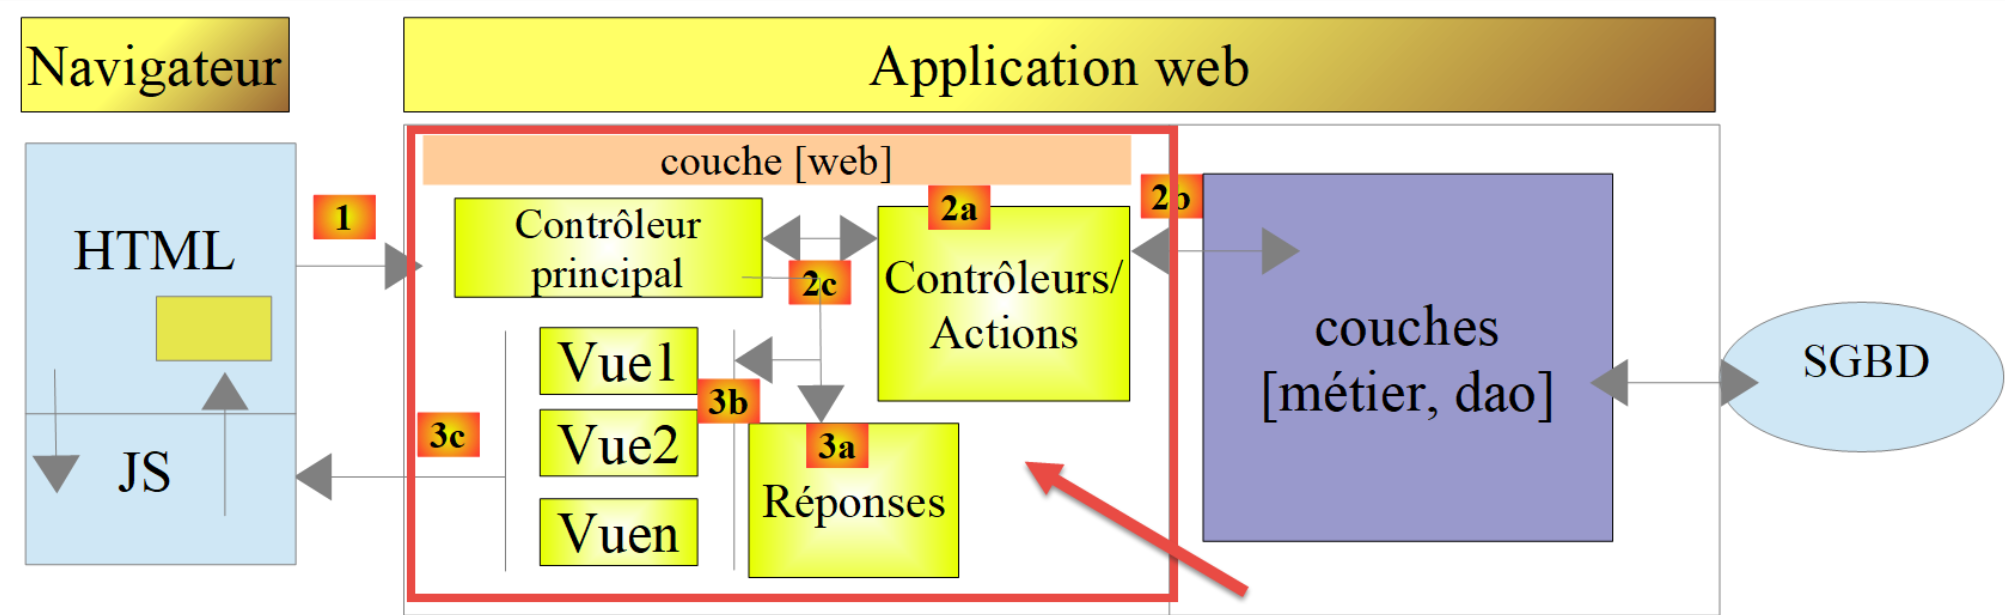
23.1. MVC 架构
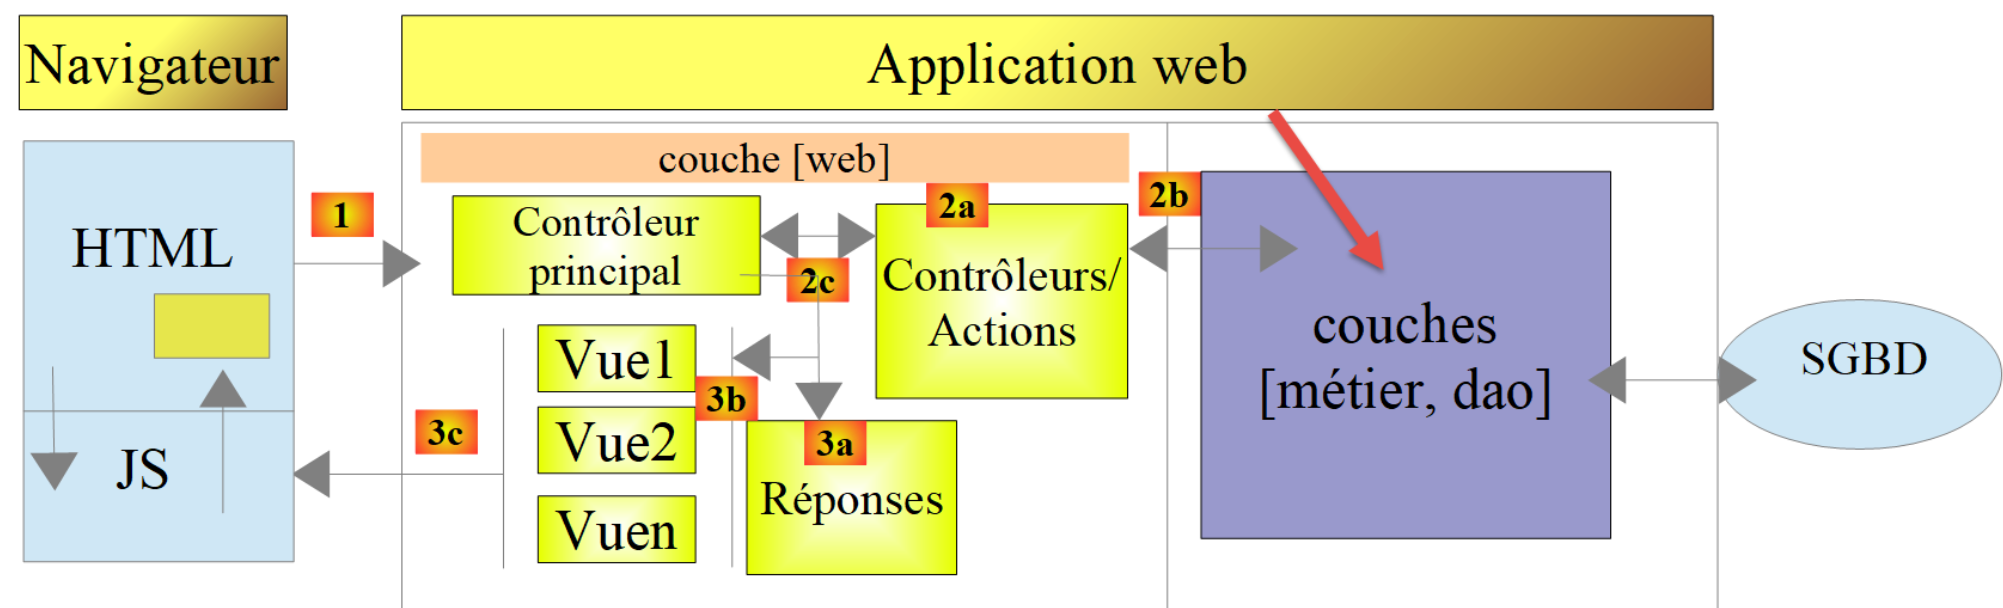
我们将按以下方式实现 MVC(模型-视图-控制器)架构模式:
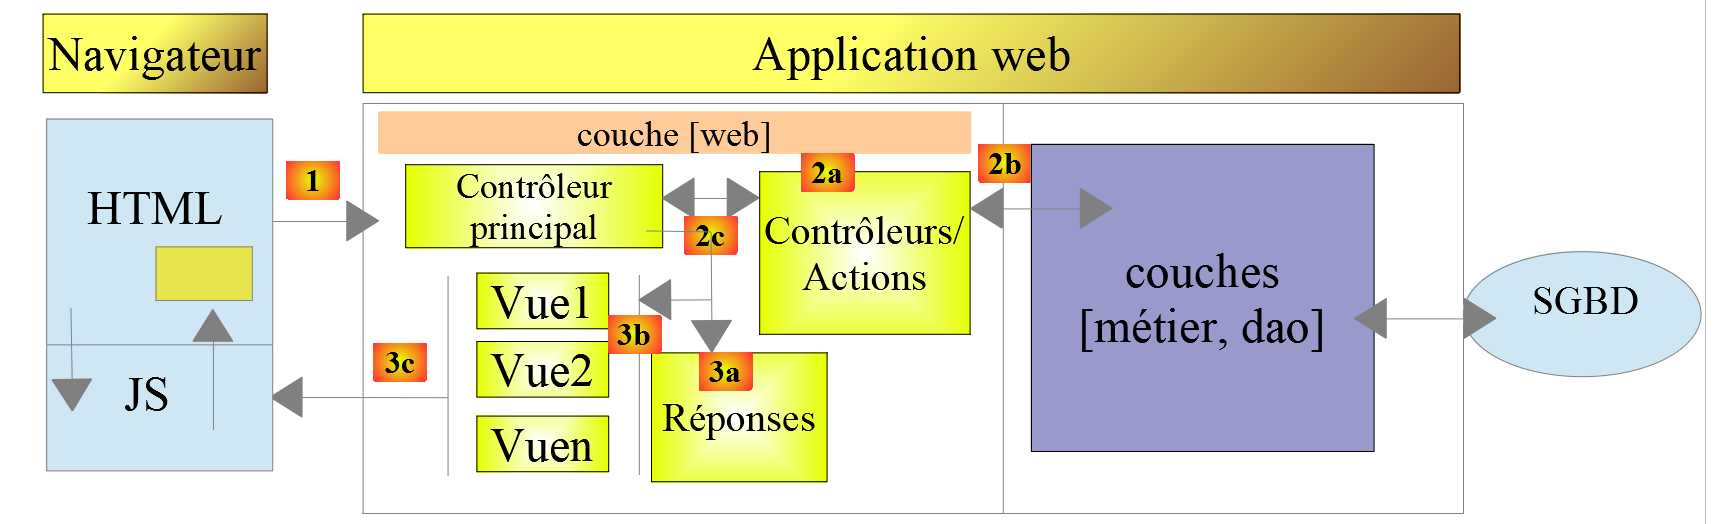
客户端请求的处理流程如下:
- 1 - 请求
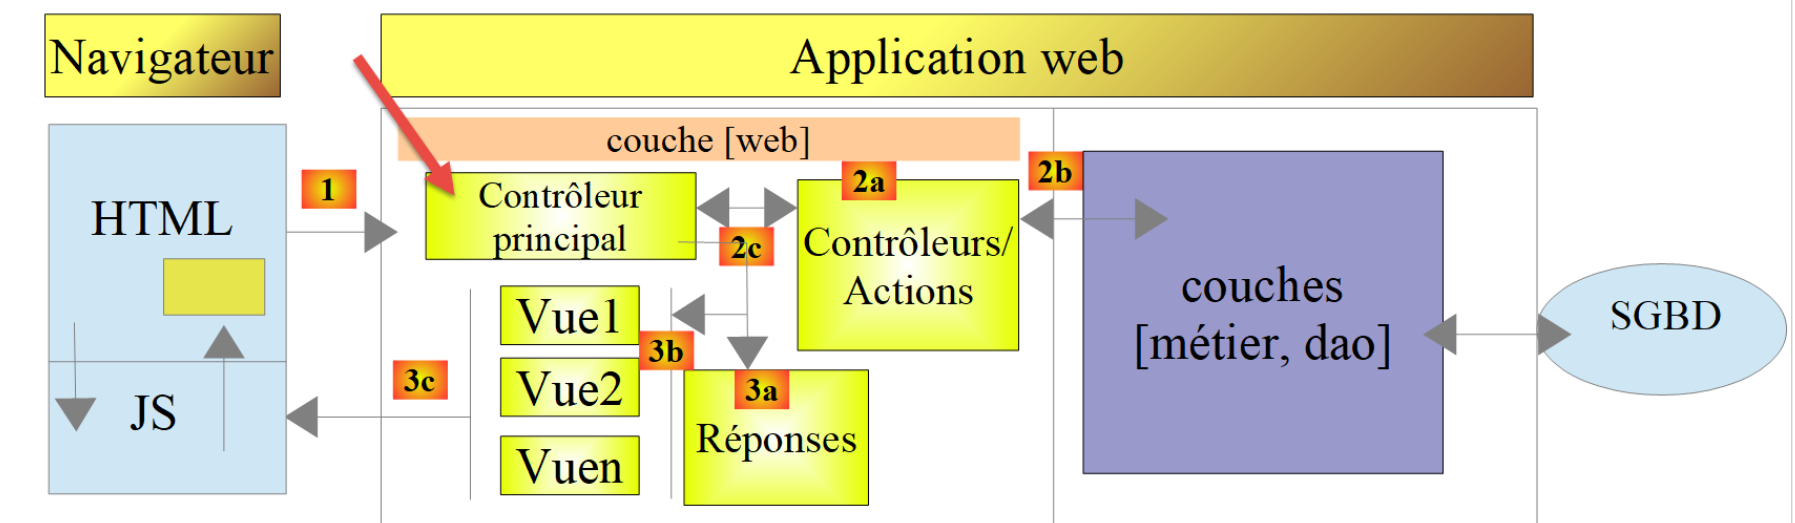
请求的 URL 将采用以下形式:http://machine:port/contexte/….?action=anAction¶m1=v1¶m2=v2&… [主控制器] 将通过配置文件将请求“路由”到正确的控制器,并定位该控制器内的正确操作。为此,它将使用 URL 中的 [action] 字段。 URL 的其余部分 [param1=v1¶m2=v2&…] 由可选参数组成,这些参数将传递给操作。此处的 MVC 中的 C 代表 [主控制器、控制器/操作] 链。如果没有控制器能处理所请求的操作,Web 服务器将响应称未找到所请求的 URL。
- 2 - 处理
- 选定的操作 [2a] 可以使用 [主控制器] 传递给它的参数。这些参数可能来自以下几个来源:
- URL 的路径 [/param1/param2/…],
- URL 参数 [param1=v1¶m2=v2],
- 浏览器随请求提交的参数;
- 在处理用户请求时,该操作可能需要调用 [业务] 层 [2b]。一旦处理完客户端的请求,可能会触发各种响应。一个典型的例子是:
- 若请求无法正确处理,则返回错误响应;
- 否则返回确认响应;
- [控制器/操作] 将连同状态码一起将其响应 [2c] 返回给主控制器。这些状态码将唯一地表示应用程序的状态。它们要么是成功码,要么是错误码;
- 选定的操作 [2a] 可以使用 [主控制器] 传递给它的参数。这些参数可能来自以下几个来源:
- 3 - 响应
- 根据客户端请求的是 JSON、XML 还是 HTML 响应,[主控制器] 将实例化 [3a] 相应的响应类型,并指示其将响应发送给客户端。主控制器将同时向其传递响应以及由已执行的 [控制器/操作] 提供的状态码;
- 如果所需的响应为 JSON 或 XML 类型,选定的响应组件将根据 [控制器/操作] 提供的数据格式化响应并发送 [3c]。能够处理此响应的客户端可以是 PHP 控制台脚本,也可以是嵌入在 HTML 页面中的 JavaScript 脚本;
- 如果所需的响应是 HTML 类型,则选定的响应将根据收到的状态码选择 [3b] 其中一个 HTML 视图 [Vuei]。 这就是 MVC 中的“V”。一个视图对应一个状态码。该视图 V 将显示已执行的 [Controller / Action] 返回的响应。它将该响应中的数据封装在 HTML、CSS 和 JavaScript 中。这些数据被称为视图模型。这就是 MVC 中的 M。客户端通常是浏览器;
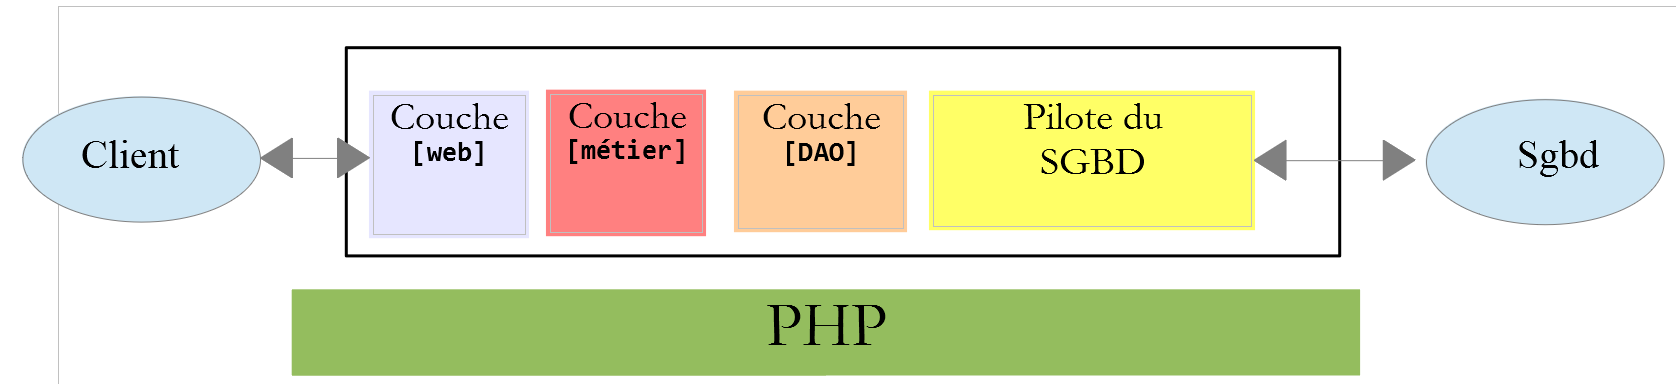
现在,让我们厘清 MVC Web 架构与分层架构之间的关系。根据模型的定义方式不同,这两个概念可能相关,也可能无关。让我们考虑一个单层 MVC Web 应用程序:
在上例中,[控制器/操作]各自包含了[业务]层和[DAO]层的部分内容。在[Web]层中,我们确实采用了MVC架构,但整个应用程序并未采用分层架构。在这里,只有一个层负责处理所有事务。
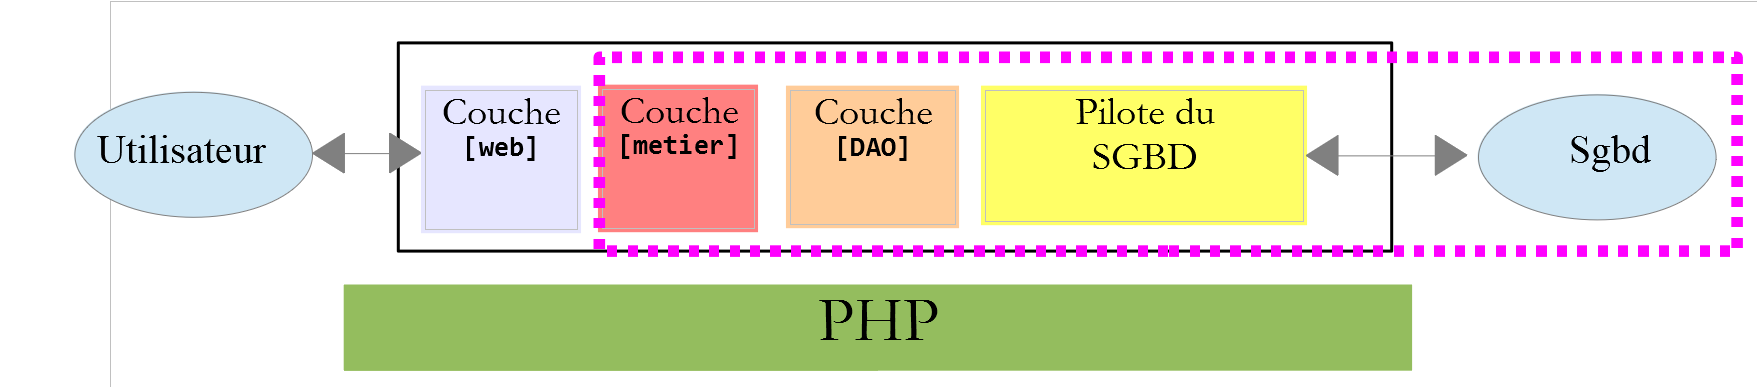
现在,让我们考虑一种多层Web架构:
[Web]层可以不遵循MVC模型来实现。这样我们就有了多层架构,但Web层并未实现MVC模型。
例如,在 .NET 环境中,上文提到的 [Web] 层可以使用 ASP.NET MVC 来实现,从而形成一个具有 MVC 风格 [Web] 层的分层架构。完成这一步后,我们可以将这个 ASP.NET MVC 层替换为经典的 ASP.NET 层(WebForms),同时保持其余部分(业务逻辑、DAO、驱动程序)不变。 这样,我们就得到了一种分层架构,其 [Web] 层不再基于 MVC。
在 MVC 中,我们曾提到 M 模型即 V 视图所呈现的数据集。关于 MVC 中 M 模型的另一种定义如下:
许多作者认为,位于[Web]层右侧的部分构成了MVC中的M模型。为避免歧义,我们可以将其称为:
- 当指代[Web]层右侧的所有内容时,称之为领域模型;
- 当指代视图 V 所显示的数据时,称之为视图模型;
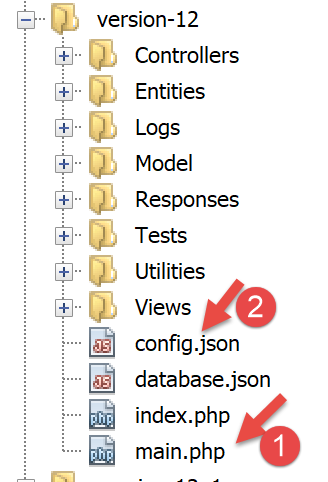
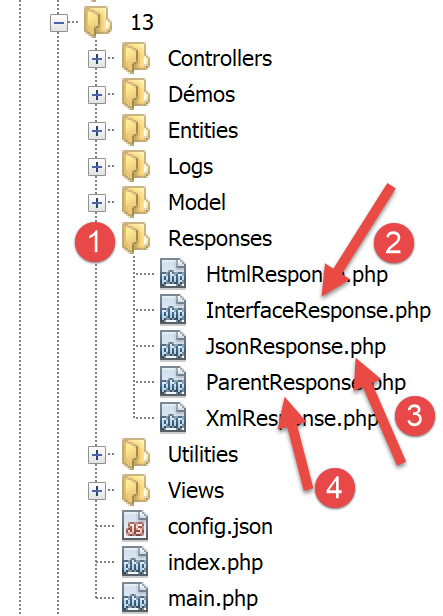
23.2. NetBeans 项目树
对于 NetBeans 项目,我们将采用一种体现 MVC 模型的架构:
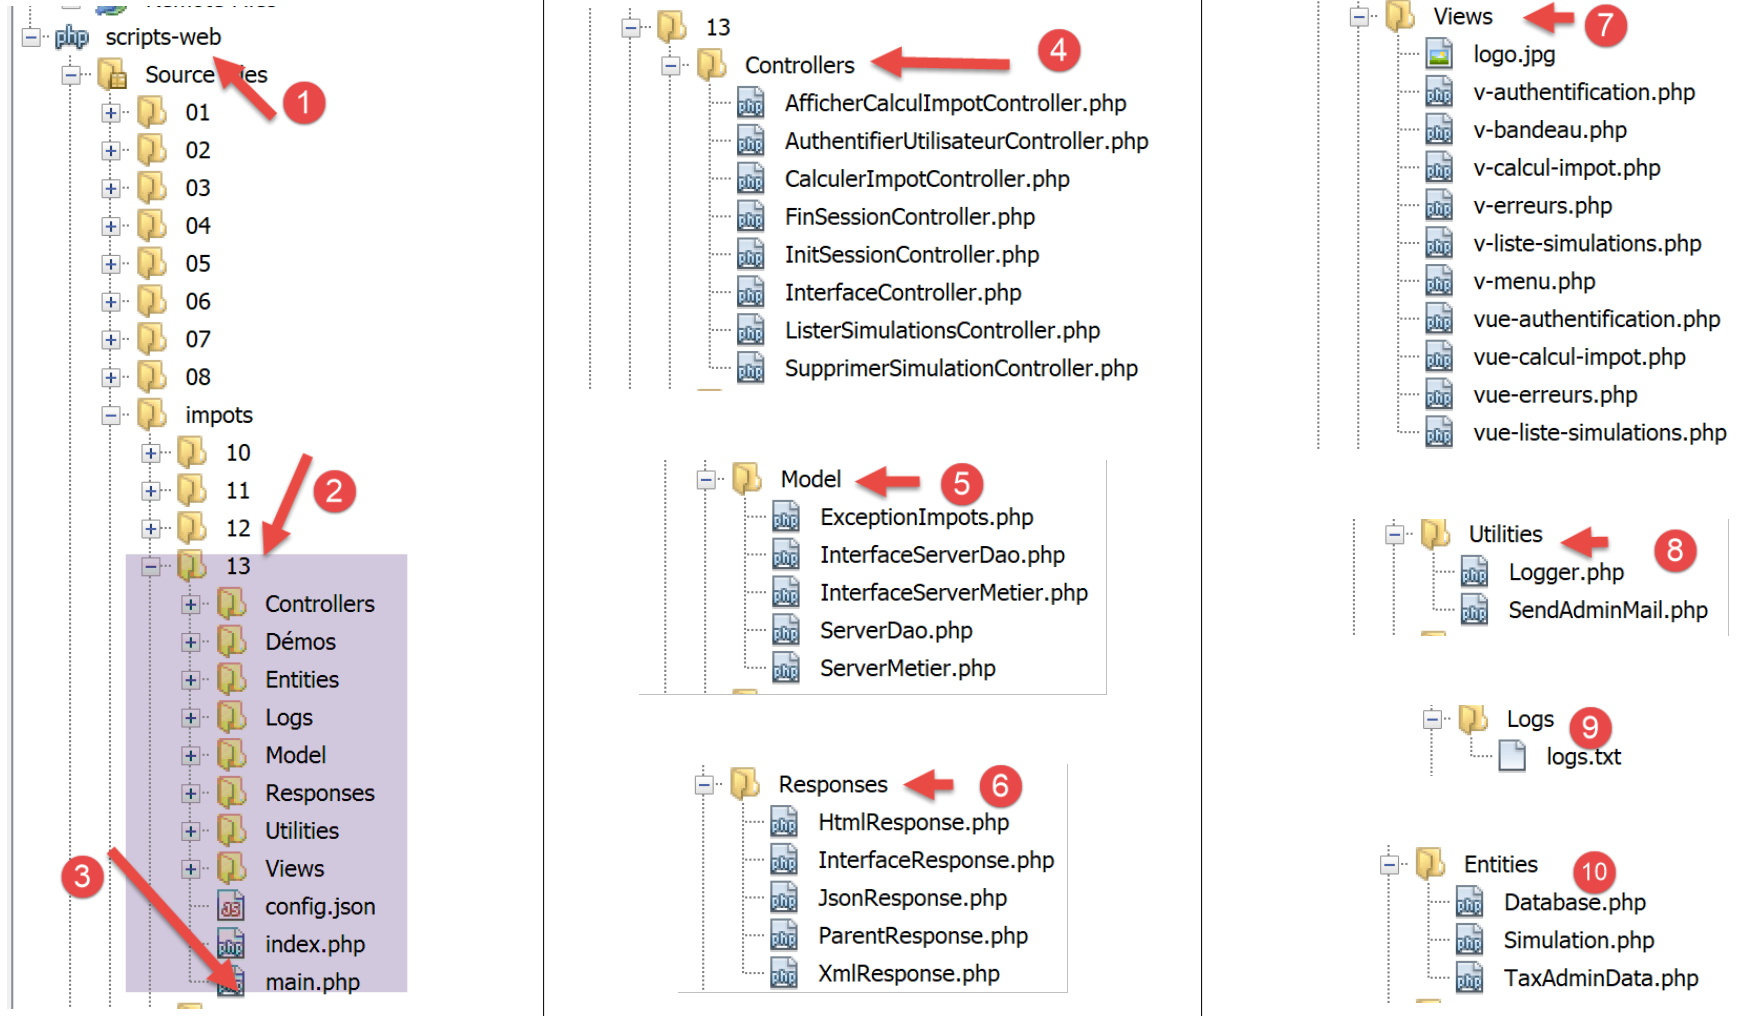
- [3]:[main.php] 是我们 MVC 模型的主控制器。它是 MVC 中的 C;
- [4]: [Controllers] 文件夹将包含次级控制器。 每个控制器处理特定的操作。该操作在 URL 中有所体现,例如 […/main.php?action=authenticate-user]。通过此操作,[主控制器] [main.php] 将选择一个 [次级控制器](本例中为 [AuthentifierUtilisateurController])来处理请求的操作。这些控制器同样属于 MVC 中的 C 部分;
- [5]: [Model] 文件夹将包含应用程序的 [业务] 和 [DAO] 层。根据之前采用的术语,这些元素代表领域模型,并且根据 MVC 中 M 的术语,可以代表 MVC 中的 M;
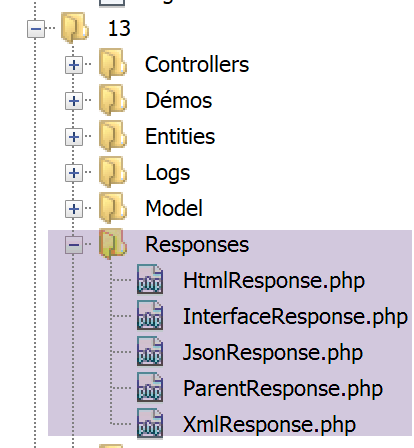
- [6]:[Responses] 文件夹包含负责向客户端发送响应的类。每种所需的响应类型对应一个类:
- [JsonResponse]:用于 JSON 响应;
- [XmlResponse]:用于 XML 响应;
- [HtmlResponse]:用于 HTML 响应;
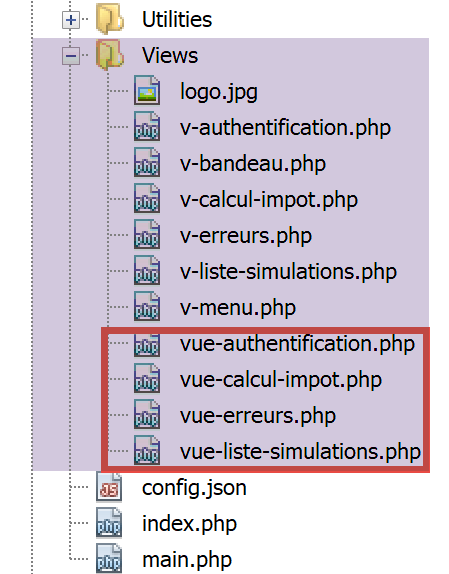
- [7]:[Views] 文件夹包含在需要 HTML 响应时的 HTML 视图。这是 MVC 中的 V。它们由 [HtmlResponse] 类调用,该类向其传递待显示的数据。这些数据即视图模型。根据 M 所采用的术语,这些数据可代表 MVC 中的 M;
- [8]: [Utilities] 文件夹包含实用程序:
- [Logger]:允许将日志记录到文本文件的类;
- [Sendmail]:用于发送电子邮件的类;
- [9]: [Logs] 文件夹包含日志文件 [logs.txt];
- [10]:[Entities] 文件夹中包含各控制器所使用的类;
利用这种目录结构,我们可以描述客户端请求的操作的处理流程:
- [main.php] [3] 接收请求;
- 在执行一些初步检查(该操作是否属于被接受的操作?)后,将其转发给负责处理此操作的二级控制器 [4];
- 二级控制器执行其任务。在此过程中,它可能需要调用 [business] 和 [DAO] 层 [5] 以及 [10] 文件夹中的实体。它将响应返回给调用它的主控制器 [main.php];
- 根据客户端请求的响应类型 [JSON, XML, HTML],主控制器 [main.php] 调用 [Responses] 文件夹 [6] 中的相应响应;
- [JsonResponse] 和 [XmlResponse] 响应分别向客户端发送 JSON 或 XML 响应;
- [HtmlResponse] 则使用 [Views] 文件夹 [7] 中的某个视图,向客户端发送 HTML 响应;
- 各个控制器均可访问 [Logger] 类(位于 [8] 文件夹中),用于将日志写入 [9] 文件夹中的日志文件。以下内容会被记录:
- 请求的操作;
- 控制器的响应。无论请求类型为何(JSON、XML、HTML),响应均以 JSON 格式记录;
- 若发生致命错误(HTTP_INTERNAL_SERVER_ERROR),主控制器 [main.php] 将通过 [8] 文件夹中的 [SendMail] 类向管理员发送电子邮件;
23.3. 应用程序操作
客户端将待执行的操作作为 URL 中的 [action] 参数 [/main.php?action=xxx] 发送至 Web 服务器。允许的操作列于配置主控制器 [main.php] 的 [config.json] 文件中:
"actions":
            {
                "init-session": "\\InitSessionController",
                "authentifier-utilisateur": "\\AuthentifierUtilisateurController",
                "calculer-impot": "\\CalculerImpotController",
                "lister-simulations": "\\ListerSimulationsController",
                "supprimer-simulation": "\\SupprimerSimulationController",
                "fin-session": "\\FinSessionController",
                "afficher-calcul-impot": "\\AfficherCalculImpotController"
},
- 第 1 行:JSON 字典中的 [actions] 键;
- 第 3–9 行:一个 [action:controller] 字典。每个操作都与负责处理它的二级控制器相关联;
- 第 3 行:[init-session]:启动税费计算模拟会话。该操作指定所需的响应类型 [JSON, XML, HTML];
- 第 4 行:设置会话类型后,客户端必须使用 [authenticate-user] 操作进行身份验证。在客户端完成身份验证之前,除 [init-session] 外,所有其他操作均被禁止;
- 第 5 行:通过身份验证后,客户端可使用 [calculate-tax] 操作执行一系列税费计算;
- 第 6 行:客户端可随时通过 [list-simulations] 操作请求查看已执行的模拟列表;
- 第 7 行:用户可通过 [delete-simulation] 操作删除其中部分模拟;
- 第 8 行:客户端通过 [end-session] 操作结束模拟会话。此后,若要继续使用该应用程序,需重新登录;
- 第 9 行:在 HTML 应用程序中,[display-tax-calculation] 操作会显示用于计算税款的表单;
23.4. Web 应用程序配置
该应用程序通过以下 JSON 文件 [config.json] 进行配置:
{
    "databaseFilename": "database.json",
    "rootDirectory": "C:/myprograms/laragon-lite/www/php7/scripts-web/impots/version-12",
    "relativeDependencies": [

        "/Entities/BaseEntity.php",
        "/Entities/Simulation.php",
        "/Entities/Database.php",
        "/Entities/TaxAdminData.php",
        "/Entities/ExceptionImpots.php",

        "/Utilities/Logger.php",
        "/Utilities/SendAdminMail.php",

        "/Model/InterfaceServerDao.php",
        "/Model/ServerDao.php",
        "/Model/ServerDaoWithSession.php",
        "/Model/InterfaceServerMetier.php",
        "/Model/ServerMetier.php",

        "/Responses/InterfaceResponse.php",
        "/Responses/ParentResponse.php",
        "/Responses/JsonResponse.php",
        "/Responses/XmlResponse.php",
        "/Responses/HtmlResponse.php",

        "/Controllers/InterfaceController.php",
        "/Controllers/InitSessionController.php",
        "/Controllers/ListerSimulationsController.php",
        "/Controllers/AuthentifierUtilisateurController.php",
        "/Controllers/CalculerImpotController.php",
        "/Controllers/SupprimerSimulationController.php",
        "/Controllers/FinSessionController.php",
        "/Controllers/AfficherCalculImpotController.php"
    ],
    "absoluteDependencies": [
        "C:/myprograms/laragon-lite/www/vendor/autoload.php",
        "C:/myprograms/laragon-lite/www/vendor/predis/predis/autoload.php"
    ],
    "users": [
        {
            "login": "admin",
            "passwd": "admin"
        }
    ],
    "adminMail": {
        "smtp-server": "localhost",
        "smtp-port": "25",
        "from": "guest@localhost",
        "to": "guest@localhost",
        "subject": "plantage du serveur de calcul d'impôts",
        "tls": "FALSE",
        "attachments": []
    },
    "logsFilename": "Logs/logs.txt",
    "actions":
            {
                "init-session": "\\InitSessionController",
                "authentifier-utilisateur": "\\AuthentifierUtilisateurController",
                "calculer-impot": "\\CalculerImpotController",
                "lister-simulations": "\\ListerSimulationsController",
                "supprimer-simulation": "\\SupprimerSimulationController",
                "fin-session": "\\FinSessionController",
                "afficher-calcul-impot": "\\AfficherCalculImpotController"
            },
    "types": {
        "json": "\\JsonResponse",
        "html": "\\HtmlResponse",
        "xml": "\\XmlResponse"
    },
    "vues": {
        "vue-authentification.php": [700, 221, 400],
        "vue-calcul-impot.php": [200, 300, 341, 350, 800],
        "vue-liste-simulations.php": [500, 600]
    },
    "vue-erreurs": "vue-erreurs.php"
}
注释
- 第 2 行:包含数据库访问配置的 JSON 文件名称;
- 第 3–39 行:项目依赖项的配置。项目目录树中的所有 PHP 脚本均在此处列出;
- 第 40–44 行:获授权使用该应用程序的用户;
- 第 46–54 行:应用程序管理员的电子邮件地址;
- 第 55 行:日志文件的路径;
- 第 56–65 行:关联 [操作 => 负责处理该操作的次级控制器];
- 第 66–70 行:映射 [响应类型 => 负责向客户端发送响应的 Response 类];
- 第 71–75 行:映射 [HTML 视图 => 导致此视图的状态码表];
- 第 76 行:每当发生异常错误时,视图 [error-view] 将在 HTML 会话中显示:
- JSON 或 XML 应用程序通常通过编程客户端进行查询。该客户端向服务器传递的参数可能缺失或错误。控制器会处理这些情况,并向客户端返回错误代码。所有可能的错误情况都必须得到处理;
- 对于 HTML 应用程序,情况略有不同。在正常使用中,Web 应用程序仅利用了 JSON 和 XML 客户端可能用例中的一小部分。举个例子:[calculate-tax] 操作期望收到三个通过 POST 请求发送的参数:[married, children, salary]。
- 如果我们有一个允许手动输入 URL 的 JSON 客户端,我们可以使用 GET 请求而不是 POST 请求来调用 [calculate-tax] 操作,或者在需要三个参数时发送一个不包含任何参数的 POST 请求等。JSON 服务器必须处理所有这些情况;
- 在 Web 应用程序中,[calculate-tax] 操作将通过 Web 表单发起请求,此时上述两种情况均不可能发生:[calculate-tax] 操作将通过包含全部三个参数 [married, children, salary] 的 POST 请求发起。其中某些参数的值可能不正确,但它们必定存在。然而,用户可以通过在浏览器中手动输入 URL 来重现某些错误。 出于安全考虑,我们必须处理这种情况;
- 每当次级控制器返回与 Web 应用程序不兼容的状态码时(即配置文件第 72–74 行中未列出的状态码),系统将显示 [error-view]。我们选择此方案是为了教学目的。 另一种可能的做法是置之不理,仅重新显示客户端浏览器中当前的视图,从而让用户觉得服务器并未响应其手动构造的 URL;
23.5. 安装工具和库
23.5.1. Postman
[Postman] 是一款用于查询 Web 应用程序各类 URL 的工具。它允许我们:
- 使用任意 URL:这些 URL 均为手动构造的;
- 使用 GET、POST、PUT、OPTIONS 等方法向 Web 服务器发送请求;
- 指定 GET 或 POST 参数;
- 设置请求的 HTTP 头部;
- 接收 JSON、XML 或 HTML 格式的响应;
- 访问响应的 HTTP 头部。这使我们能够获取服务器的完整 HTTP 响应;
由于我们是手动构建要查询的 URL,因此能够测试所有可能的错误场景,并观察服务器的反应。
[Postman] 可通过网址 [https://www.getpostman.com/downloads/] 访问。 2019年6月发布的版本为7.2。该版本存在一个缺陷:当向Web服务器连续发送请求时,[Postman 7.2]客户端不会自动返回服务器发送的Cookie,尤其是会话Cookie。为了保持会话,您必须手动将会话Cookie复制到后续请求的HTTP头中。 虽然操作并不复杂,但并不实用。这是之前版本中不存在的缺陷。意识到该缺陷后,[Postman] 团队已在名为 [Postman Canary] 的 Alpha 版本(可能不稳定)中修复了此问题,该版本可通过 URL [https://www.getpostman.com/downloads/canary] 获取。本文将使用此版本。 接下来我们将介绍安装方法。如果已有稳定版 [Postman 7.3] 或更高版本可用,建议直接下载:该漏洞很可能已被修复。
请继续安装您所选的 [Postman] 版本。安装过程中系统会提示您创建账户:此处无需此操作。[Postman] 账户用于在不同设备间同步,以便将一台设备的配置复制到另一台设备上。此处均无需这些功能。
安装完成后,[Postman] 将显示以下界面:
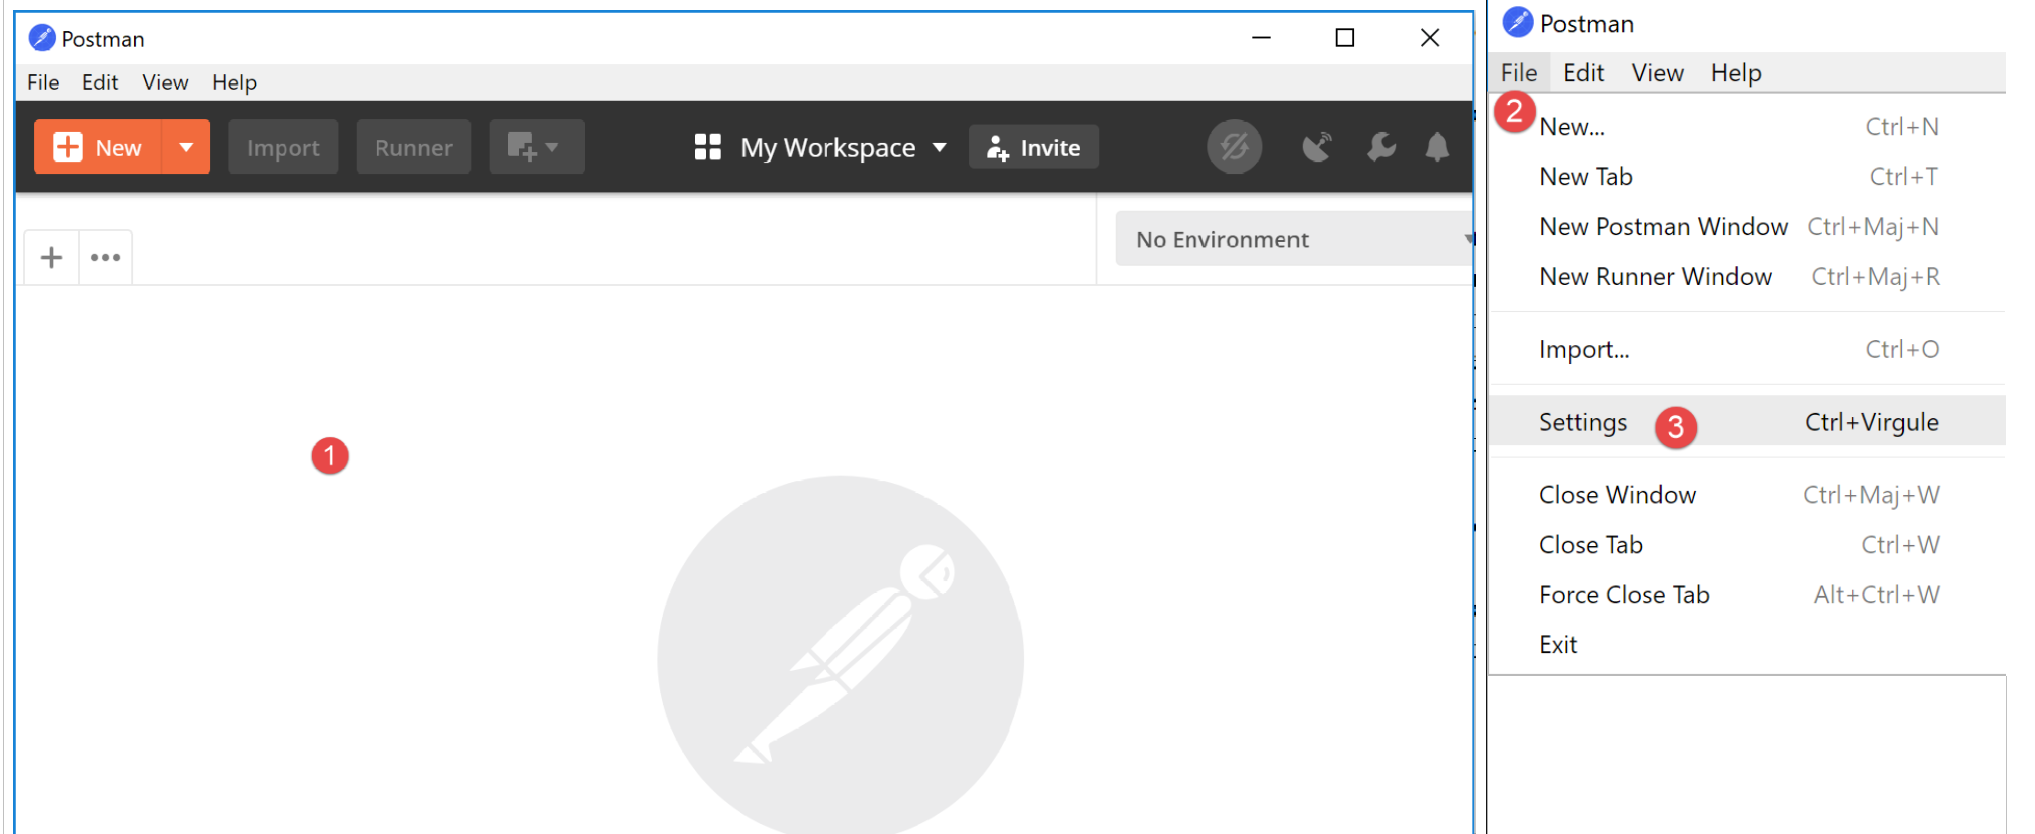
- 在 [2-3] 中,您可以访问产品设置;
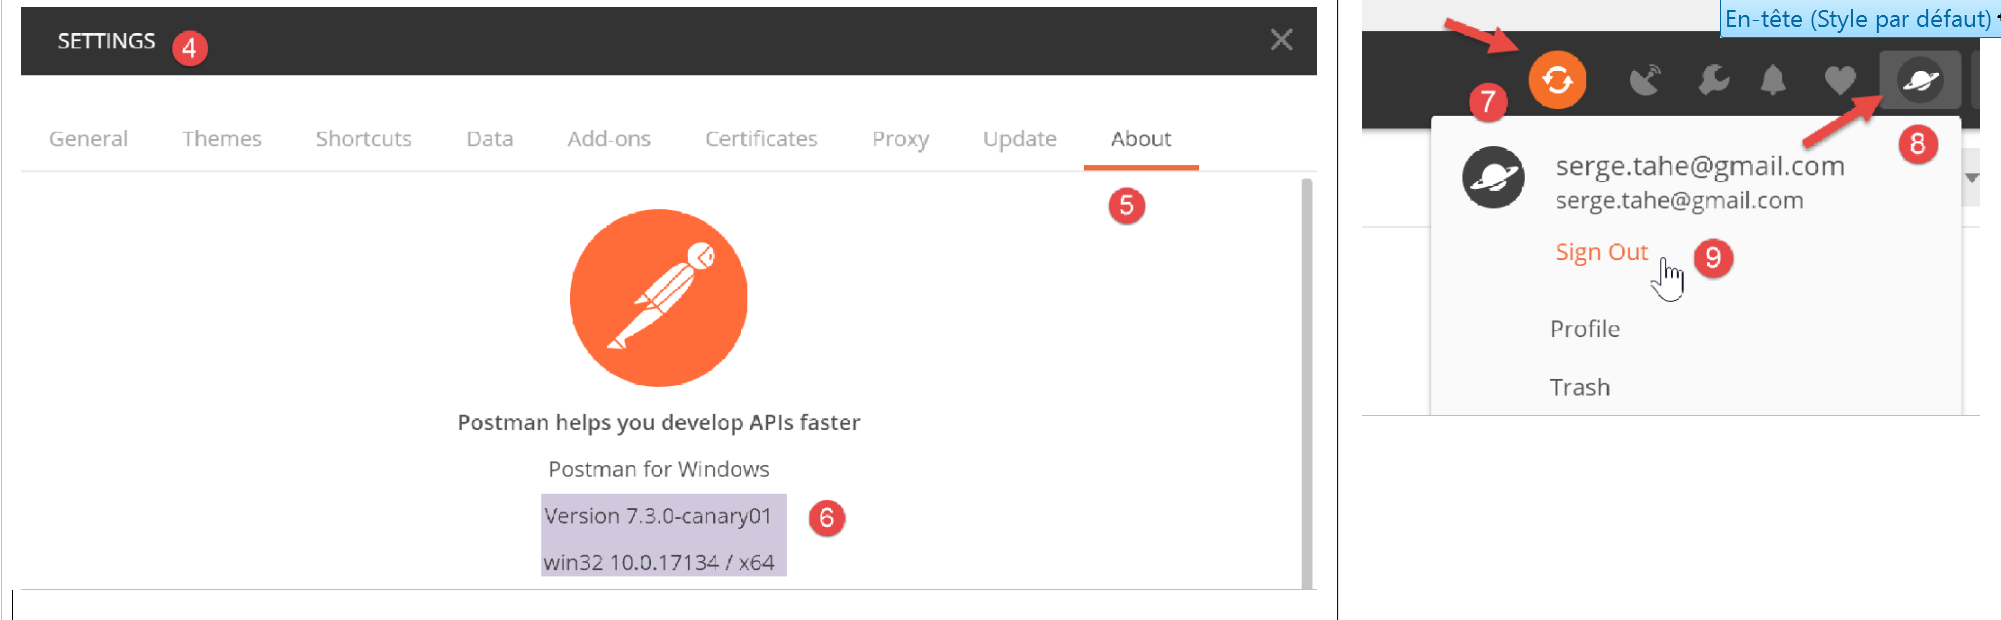
- 在 [6] 中,可查看本文档所使用的版本;
- 如果您已创建账户,您的计算机与远程 [Postman] 服务器之间会进行同步。当您对 [Postman] 项目进行修改时,出现的旋转图标 [7] 即表示正在同步。若要停止此不必要的同步,请通过 [8-9] 注销;
23.5.2. Symfony / Serializer 库
为了将对象序列化为 JSON 和 XML,我们将使用 [Symfony / Serializer] 库。它在此处具有两个优势:
- 它在序列化为 JSON 或 XML 时保持一致性:这避免了学习两个具有不同 API(应用程序编程接口)的库;
- 它原生支持将对象序列化为 JSON 或 XML,即使这些对象的属性是私有的。回想一下,在 JSON 中,要序列化一个对象,其类必须实现 [\JsonSerializable] 接口。 生成的结果是一个 JSON 字符串,其中包含一个以类属性为键的关联数组。反序列化该 JSON 字符串时,我们会获取原始的关联数组,随后必须将其转换为被序列化类的对象。而使用 [Symfony / Serializer],反序列化会立即生成被序列化类的对象。这更简单;
[Symfony / Serializer] 库的文档可通过以下网址获取:[https://symfony.com/doc/current/components/serializer.html](2019年6月)。
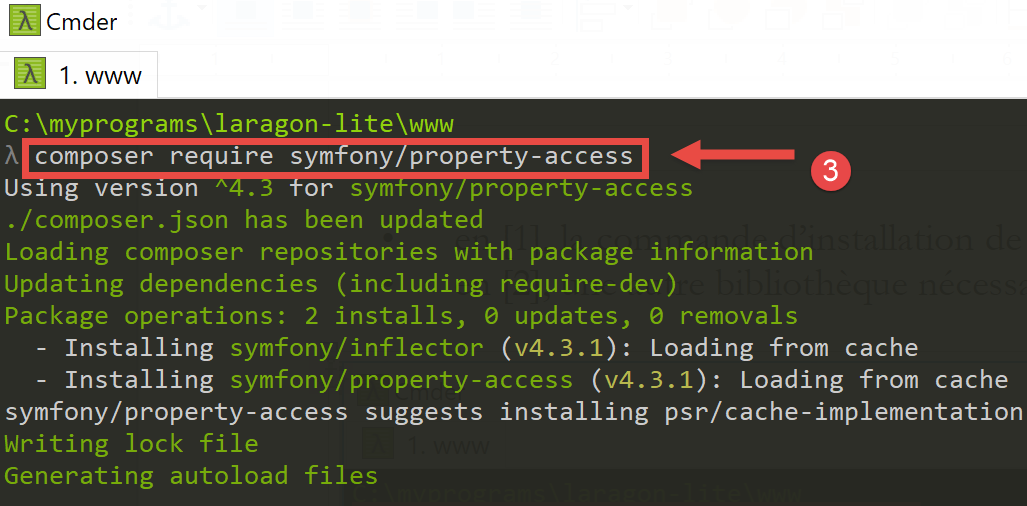
要安装此库,请打开 Laragon 终端(参见链接部分),并输入以下命令:
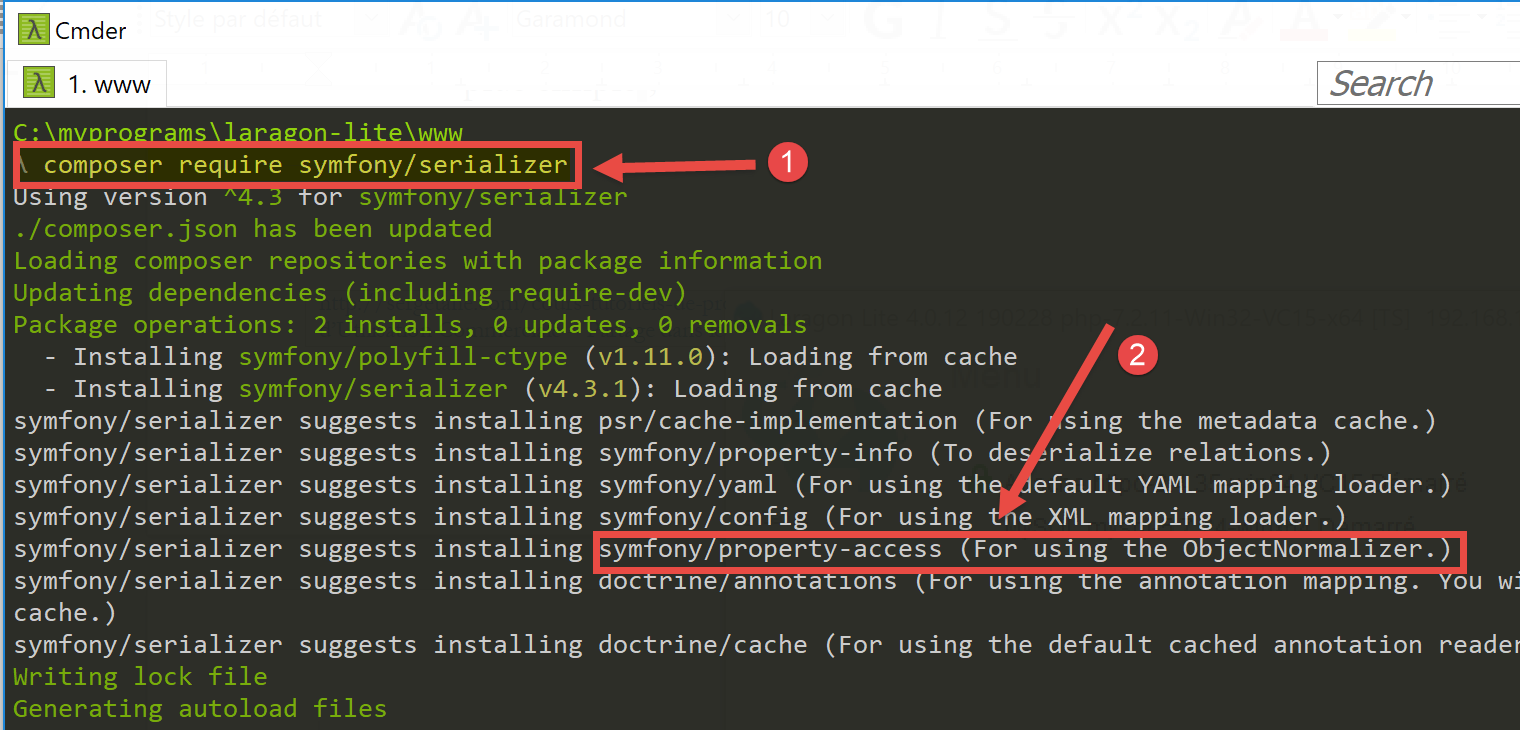
- 在 [1] 中,是安装 [symfony/serializer] 库的命令;
- 在 [2] 中,是本项目所需的另一个库:用于实现对象序列化;
23.6. 应用程序实体
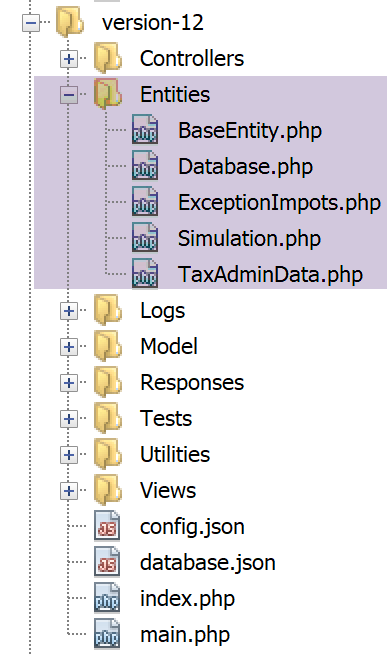
自 Web 服务 08 版起,已使用 [BaseEntity、Database、ExceptionImports、TaxAdminData] 这些实体(参见链接部分)。
将使用 [Simulation] 类来封装税务计算模拟的各个要素:
<?php

namespace Application;

class Simulation extends BaseEntity {
  // attributes of a tax calculation simulation
  protected $marié;
  protected $enfants;
  protected $salaire;
  protected $impôt;
  protected $surcôte;
  protected $décôte;
  protected $réduction;
  protected $taux;

  // getters
  public function getMarié() {
    return $this->marié;
  }

  public function getEnfants() {
    return $this->enfants;
  }

  public function getSalaire() {
    return $this->salaire;
  }

  public function getImpôt() {
    return $this->impôt;
  }

  public function getSurcôte() {
    return $this->surcôte;
  }

  public function getDécôte() {
    return $this->décôte;
  }

  public function getRéduction() {
    return $this->réduction;
  }

  public function getTaux() {
    return $this->taux;
  }

}
评论
- 第 5 行:[Simulation] 类继承自 [BaseEntity] 类,因此继承了以下方法:
- [setFromArrayOfAttributes($arrayOfAttributes)]:允许您初始化该类的属性;
- [__toString]:返回对象的 JSON 字符串;
- 第 7–14 行:模拟的属性;
- 第 16–47 行:该类的 getter 方法;
23.7. 应用程序实用工具
![]()
[Logger] 类允许您将事件记录到文本文件中。该类的详细说明请参见相关章节。
[SendAdminMail] 类允许您向应用程序管理员发送电子邮件。该类在链接的章节中有详细说明。
23.8. [business] 和 [DAO] 层
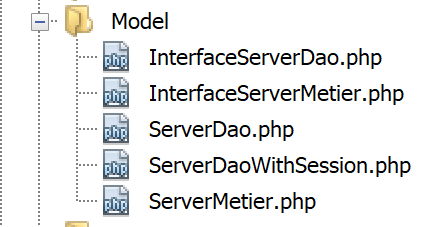
[business] 和 [DAO] 层的类与接口均归类于 [Model] 文件夹中。它们均已在之前的版本中定义并使用:
ExceptionImports | 用于处理 [DAO] 层抛出的异常的类。定义详见相关章节。 |
InterfaceServerDao | 由服务器 [DAO] 层实现的接口。定义在链接部分。 |
ServerDao | [InterfaceServerDao] 接口的实现。实现服务器的 [dao] 层。定义在链接部分。 |
ServerDaoWithSession | [InterfaceServerDao] 接口的实现。实现服务器的 [dao] 层。定义在“link”部分。 |
InterfaceServerMetier | 由服务器 [business] 层实现的接口。定义在链接部分。 |
ServerBusiness | [InterfaceMetier] 接口的实现。实现服务器的 [business] 层。定义在“link”部分。 |
当前正在开发的应用程序广泛使用了已介绍和应用的元素:
- [业务]层和[DAO]层;
- [Logger] 和 [SendAdminMail] 工具;
- [ExceptionImpots、TaxAdminData、Database] 实体;
我们将重点关注应用程序的[Web]层:
23.9. 主控制器 [main.php]
23.9.1. 简介
- [1-2]:主控制器 [main.php] [1] 由 [config.json] 文件 [2] 进行配置;
让我们回顾一下主控制器在 MVC 架构中的位置:
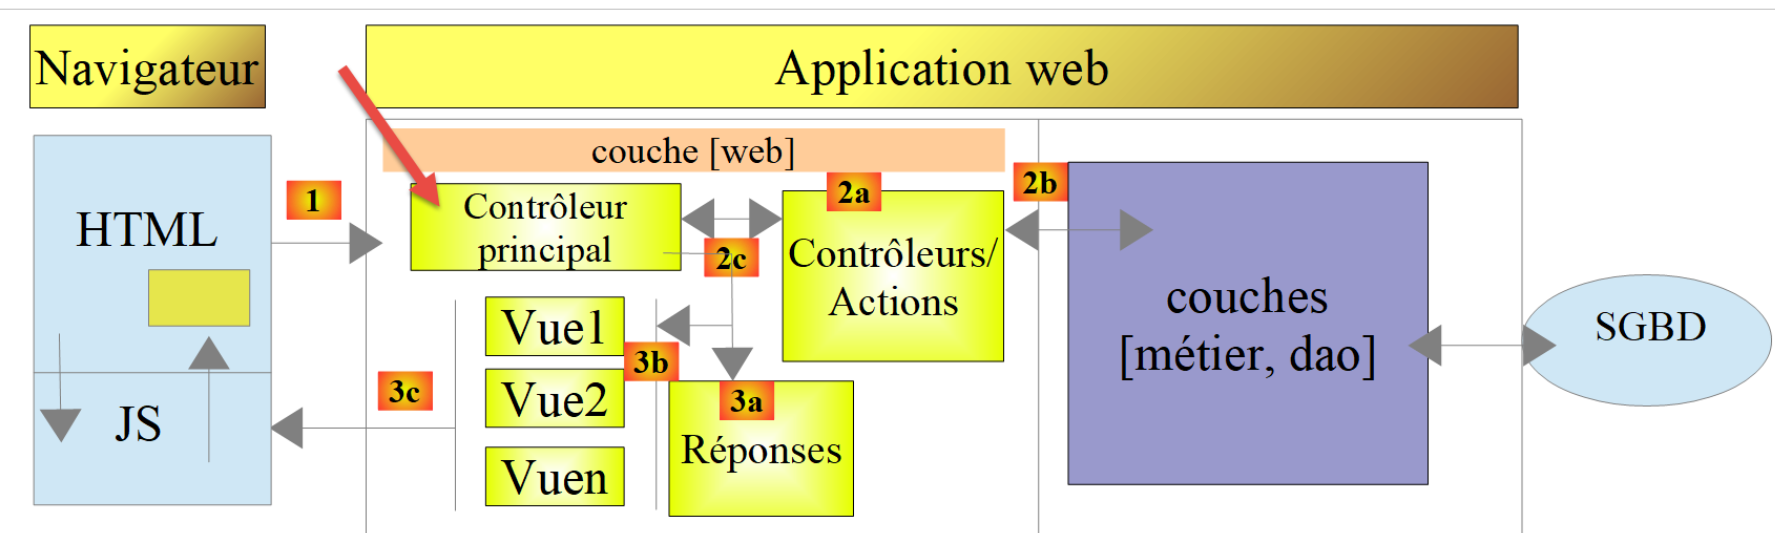
在 [1] 中,主控制器 [main.php] 是 MVC 架构中处理客户端请求的第一个组件。它承担着以下几个角色:
- 首先,它执行基本检查:
- 检查配置文件是否存在且有效;
- 加载所有项目依赖项。这相当于加载 MVC 架构中的所有组件;
- 是否指定了请求的操作?如果是,该操作是否有效?
- 如果请求的操作有效,则选择 [2a] 将处理该操作的二级控制器,并向其传递所需的信息:HTTP 请求、会话以及应用程序配置;
- 从二级控制器获取 [2c] 响应。根据客户端请求的应用程序类型(JSON、XML、HTML),选择 [3a] 负责向客户端发送响应的响应对象(JsonResponse、XmlResponse、HtmlResponse),并向其传递所需的所有信息(HTTP 请求、会话、应用程序配置、来自二级控制器的响应);
- 一旦该响应已发送 [3c],释放处理请求时可能已分配的任何资源;
23.9.2. [main.php] - 1
主控制器 [main.php] 的代码如下:
<?php
// strict adherence to declared types of function parameters
declare (strict_types=1);
// namespace
namespace Application;
// symfony dependencies
use Symfony\Component\HttpFoundation\Request;
use Symfony\Component\HttpFoundation\Response;
use Symfony\Component\HttpFoundation\Session\Session;
// error handling by PHP
//ini_set("display_errors", "0");
error_reporting(E_ALL && !E_WARNING && !E_NOTICE);
// we retrieve the configuration
$configFilename = "config.json";
$fileContents = \file_get_contents($configFilename);
$erreur = FALSE;
// mistake?
if (!$fileContents) {
// we note the error
$état = 131;
$erreur = TRUE;
$message = "Le fichier de configuration [$configFilename] n'existe pas";
}
if (!$erreur) {
// retrieve the JSON code from the configuration file in an associative array
$config = \json_decode($fileContents, true);
// mistake?
if (!$config) {
// we note the error
$erreur = TRUE;
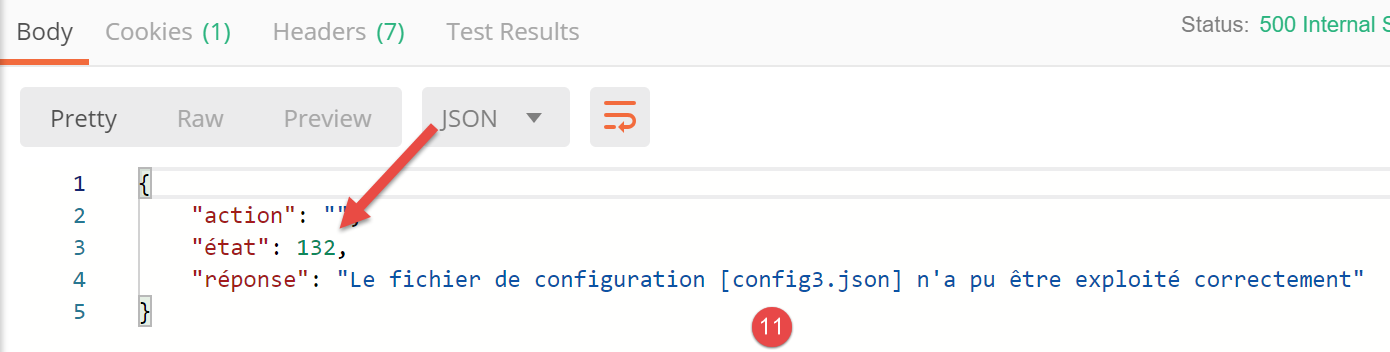
$état = 132;
$message = "Le fichier de configuration [$configFilename] n'a pu être exploité correctement";
}
}
// mistake?
if ($erreur) {
// preparation of JSON server response
// you can't use the configuration file
// symfony dependencies
require_once "C:/myprograms/laragon-lite/www/vendor/autoload.php";
// response preparation
$response = new Response();
$response->headers->set("content-type", "application/json");
$response->setCharset("utf-8");
// status code
$response->setStatusCode(Response::HTTP_INTERNAL_SERVER_ERROR);
// content
$response->setContent(json_encode(["action" => "", "état" => $état, "réponse" => $message], JSON_UNESCAPED_UNICODE));
// shipping
$response->send();
// end
exit;
}
…
注释
- 第 10–12 行:主控制器使用以下 Symfony 对象:
- [Request]:当前正在处理的 HTTP 请求;
- [Session]:Web 应用程序的会话;
- [Response]:发给客户端的 HTTP 响应;
- 第 15 行:在整个开发过程中,此行将保持注释状态:这样 PHP 错误就会包含在发送给客户端的文本流中。如果客户端是浏览器,这将允许用户查看服务器遇到的错误。这有助于调试;
- 第 16 行:报告所有错误(E_ALL),但排除警告(! E_WARNING)和非致命通知(! E_NOTICE)。例如,如果无法打开文件,PHP 会生成 [E_NOTICE] 错误。 如果第 15 行启用了错误显示,文件打开错误将出现在客户端的浏览器中。如果你忘记测试文件打开的结果,这没问题;但如果你计划进行测试,情况就不同了:此时一条 [notice] 行会使服务器对客户端的响应变得杂乱。在开发过程中,第 16 行也应注释掉:你不想遗漏任何错误;
- 第 19 行:读取配置文件;
- 第 22–27 行:如果读取操作失败,则记录错误(第 25 行),将应用程序状态设为 [131],并准备错误消息;
- 第 30 行:对配置文件中的 JSON 字符串进行解码;
- 第 32–37 行:如果解码失败,则记录错误(第 34 行),将应用程序状态设为 [132],并准备错误消息;
- 第 40–57 行:若读取配置文件时发生错误,则无法继续执行。此时,我们将为客户端准备一个 JSON 响应:
- 第 44 行:由于未读取配置文件,因此必须手动导入 [Symfony] 所需的 [autoload] 文件;
- 第 46–47 行:准备 JSON 响应;
- 第 50 行:响应的 HTTP 状态码将设置为 500 INTERNAL_SERVER_ERROR;
- 第 52 行:我们设置响应的 JSON 内容。当前所讨论的 Web 应用程序生成的所有响应都将包含三个键:
- [action]:客户端请求的操作;
- [status]:执行此操作后应用程序的状态;
- [response]:Web 服务器的响应;
- 第 54 行:将 JSON 响应发送给客户端;
23.9.3. [Postman] 测试 - 1
我们将验证当配置文件缺失或错误时服务器的行为:
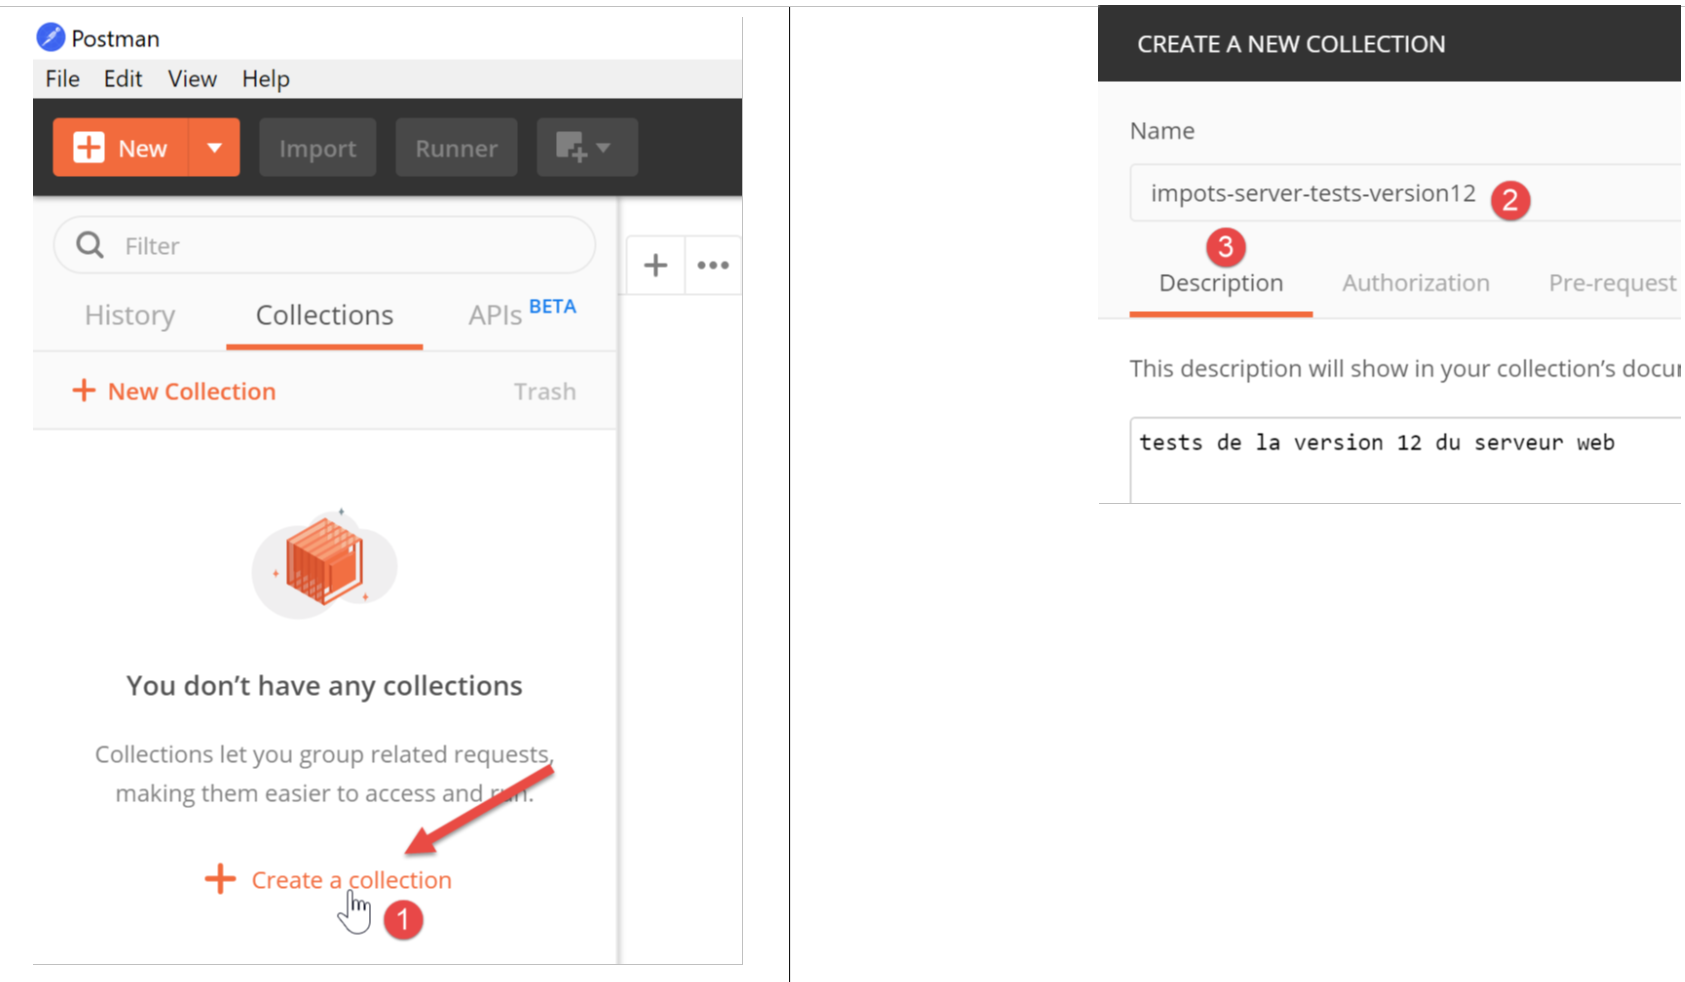
我们将把 [Postman] 客户端发送给税务服务器的各种请求整理成集合。
- 在 [1] 中,创建一个新的集合;
- 在 [2] 中,为其命名;
- 在 [3] 中,描述为可选;
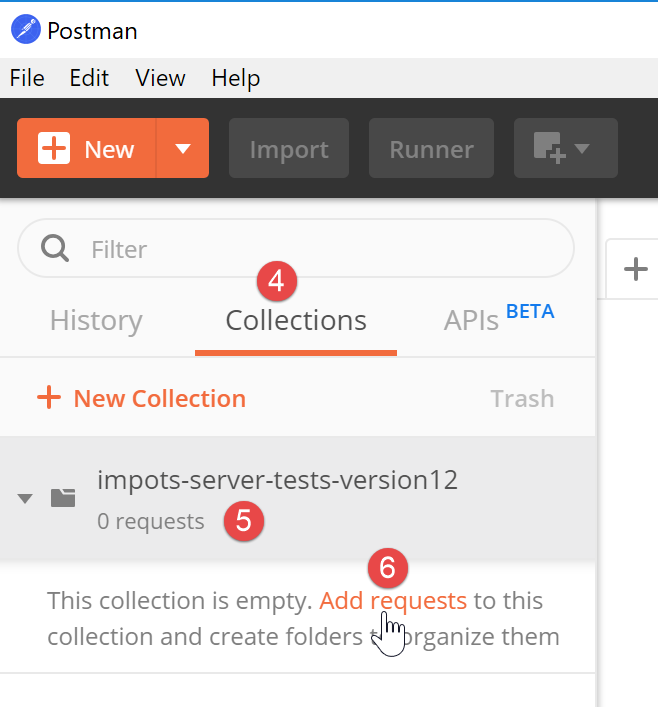
- 在集合 [4] 中,现在出现了一个名为 [impots-server-tests-version12] [5] 的集合;
- 在 [6] 中,您可以向该集合添加新的请求;
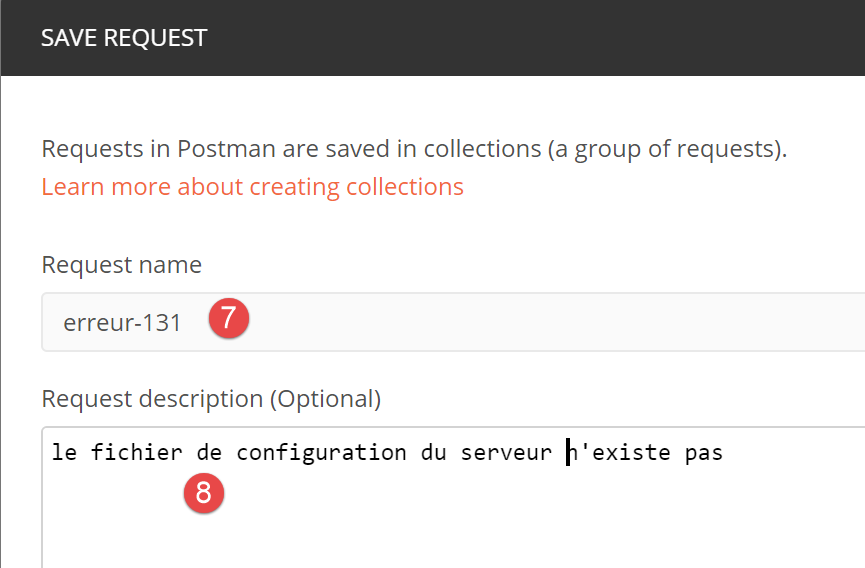
- 在 [7] 中,为查询指定了一个名称;
- 在 [8] 中,描述为可选项;
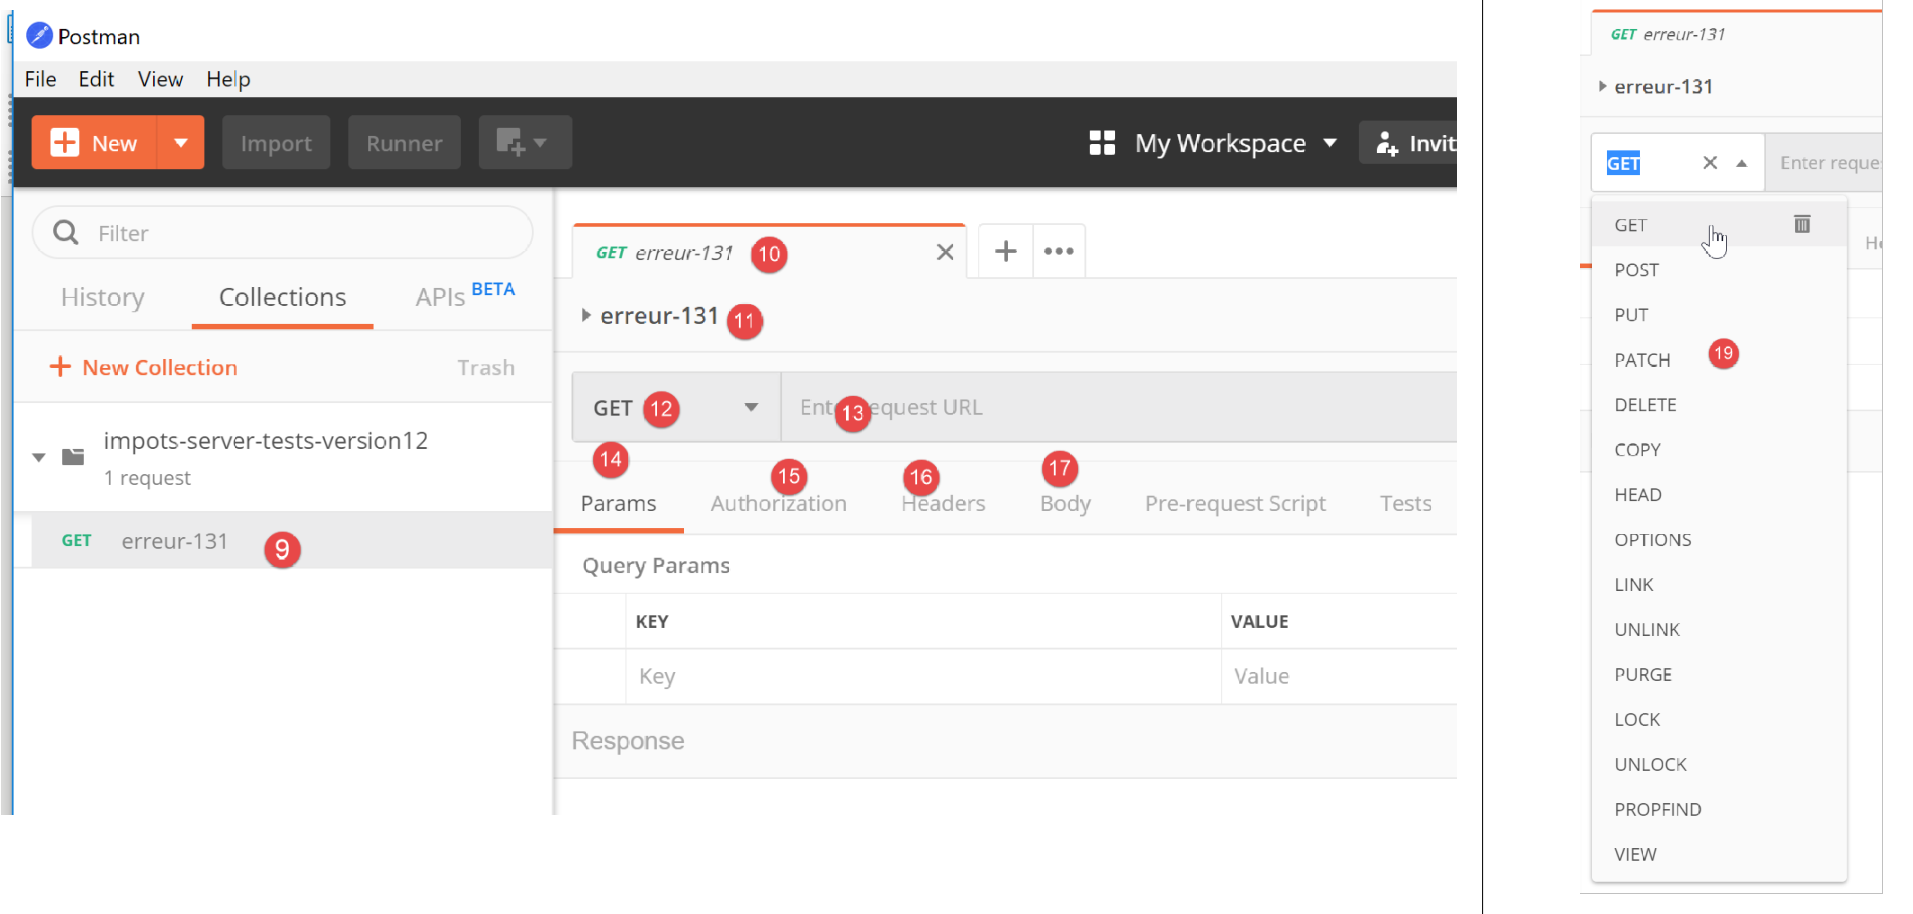
- 在 [9-11] 中,将请求添加到集合中;
- 在 [12] 中,选择请求类型;此处为 [GET] 请求。在 [19] 中,列出了可用的不同请求类型;
- 在 [13] 中,在此处输入服务器的 URL;
- 在 [14] 中,在此处输入要添加到 URL 中的参数;这些将是 GET 参数。在此处输入而非直接在 URL 中输入的优势在于,[Postman] 会自动对它们进行 URL 编码。若直接在 URL 中输入,则需自行进行 URL 编码;
- 在 [15] 中,[Authorization] 用于定义将要登录的用户。我们无需使用此选项;
- 在 [16] 中,填写将随请求发送的 HTTP 头部。部分头部会自动包含在请求中。您可以在此处添加新的头部;
- 在 [17] 中,[Body] 指的是 [POST] 操作的参数。我们需要使用此选项;
我们将进行以下测试:
- 在 [main.php] 中,我们指定配置文件为 [config2.json],该文件并不存在:
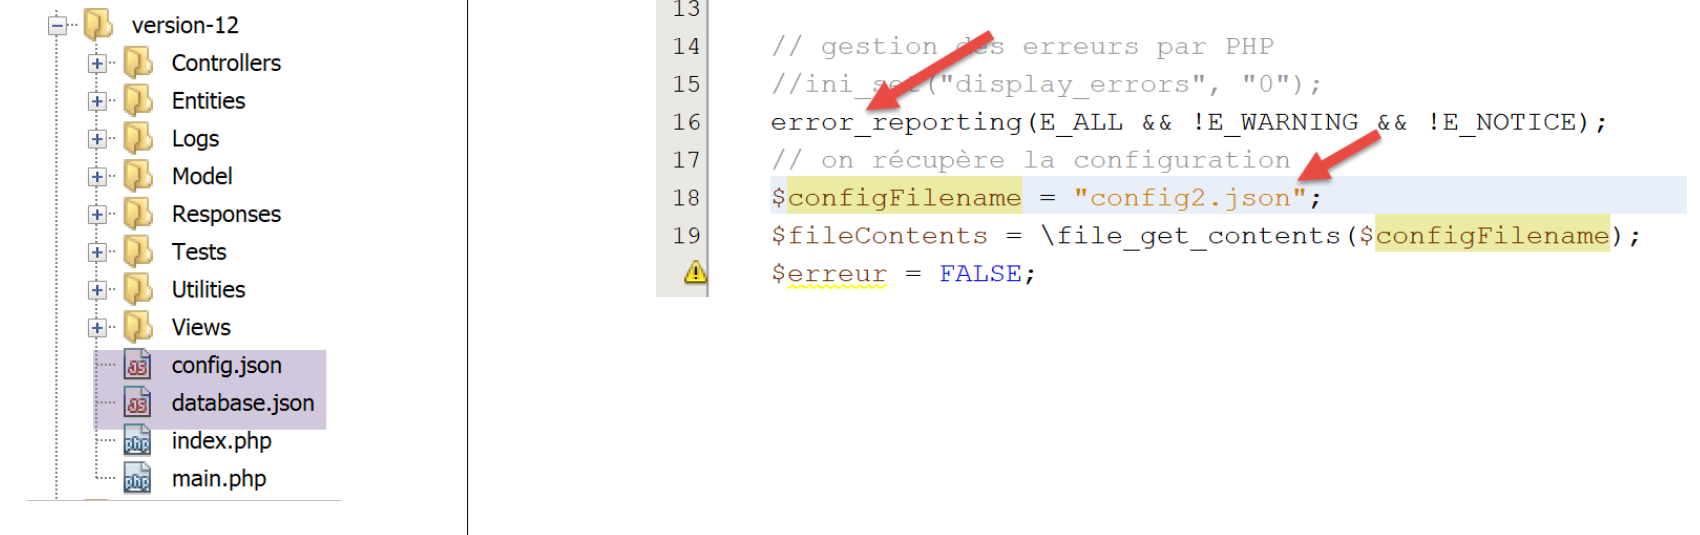
- 代码第 16 行必须取消注释;
- 第 18 行:关于配置文件名的错误;
现在打开 [Postman] [13, 20],输入税费计算 Web 服务器的 URL,并执行 [21]:
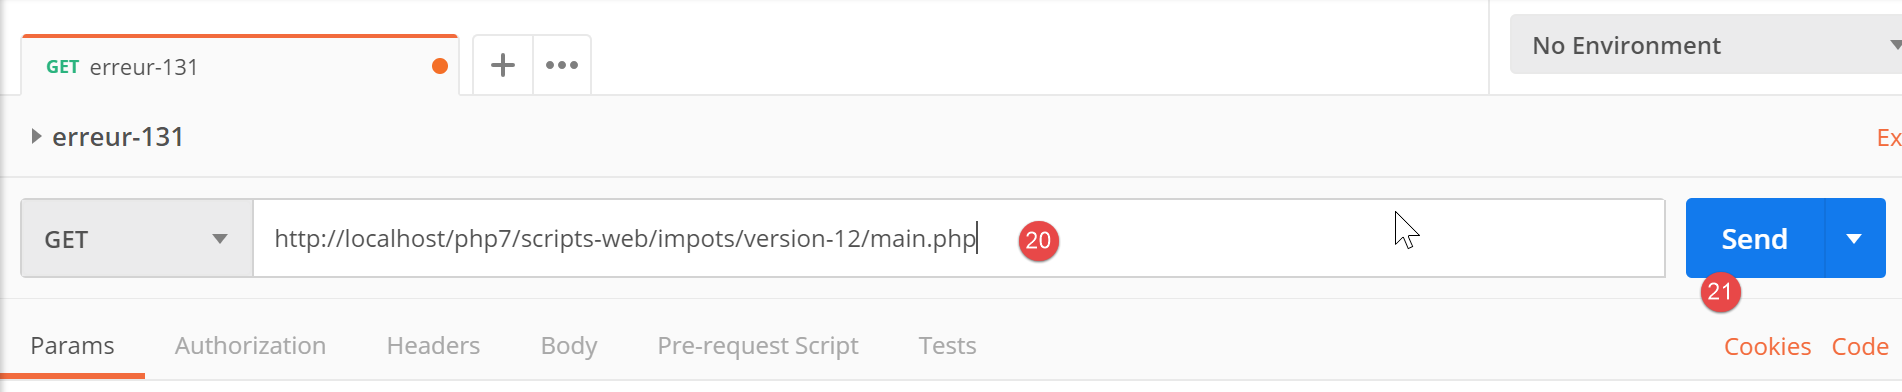
服务器返回的响应(当然,此时必须已运行 Laragon)如下:
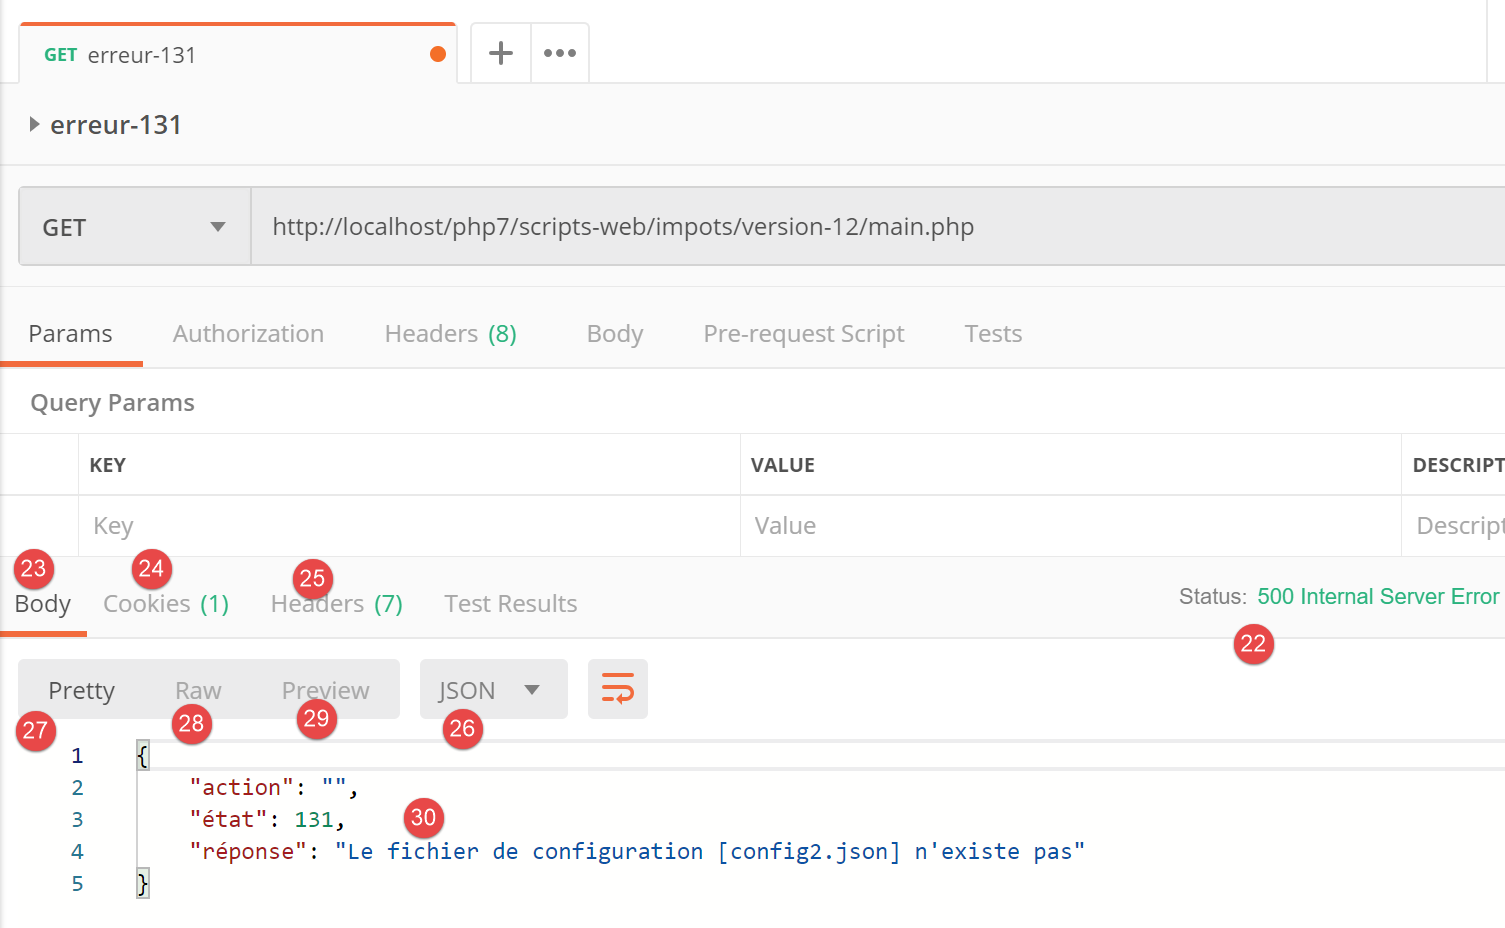
- 在 [22] 中,服务器返回了 HTTP 状态码 [500 内部服务器错误];
- 在 [23] 中,[Body] 指响应正文,即位于 HTTP 头部 [28] 之后由服务器发送的文档;
- 在 [26] 中,我们可以看到 [Postman] 接收到了一个 JSON 响应;
- 在 [27] 中,格式化的 JSON 响应;
- 在 [28] 中,未格式化的原始 JSON 响应;
- 在 [29] 中,当响应为 HTML 时会使用 [预览] 模式。[预览] 模式随后会显示接收到的页面;
- 在[30]中,显示了来自服务器的 JSON 响应。这确实就是我们所期望的响应;
在 [25] 中,服务器响应中发送的 HTTP 头部如下:

- 在 [32] 中,响应的 JSON 类型;
通过这项初步测试,我们发现:
- 可以向被测服务器发送任何类型的请求;
- 可以设置 GET 或 POST 参数;
- 能够获取完整的响应:包括 HTTP 头部以及紧随其后的文档主体 [Body];
现在,让我们进行第二次测试:
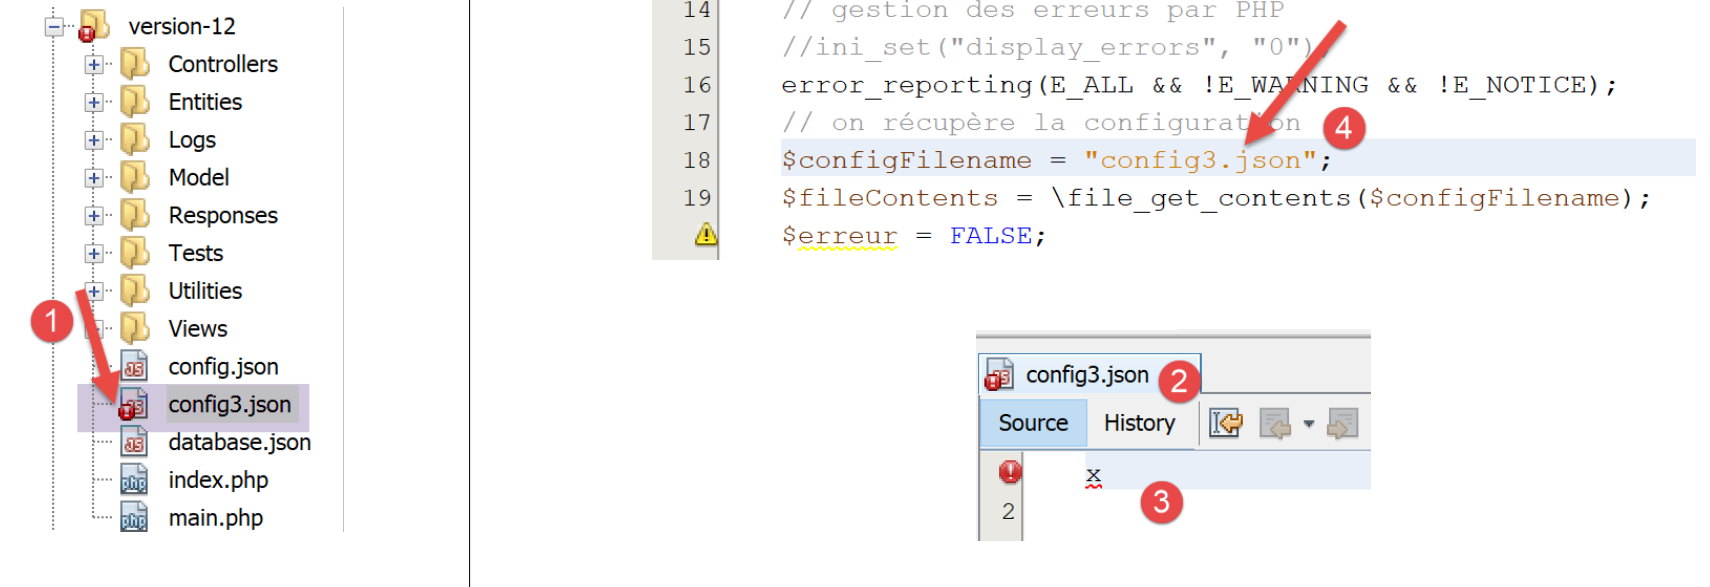
- 在 [1-3] 中,[config3.json] 文件是一个语法错误的 JSON 文件;
- 在 [4] 中,[main.php] 被配置为使用 [config3.json];
我们在 [Postman] 中添加一个新请求:
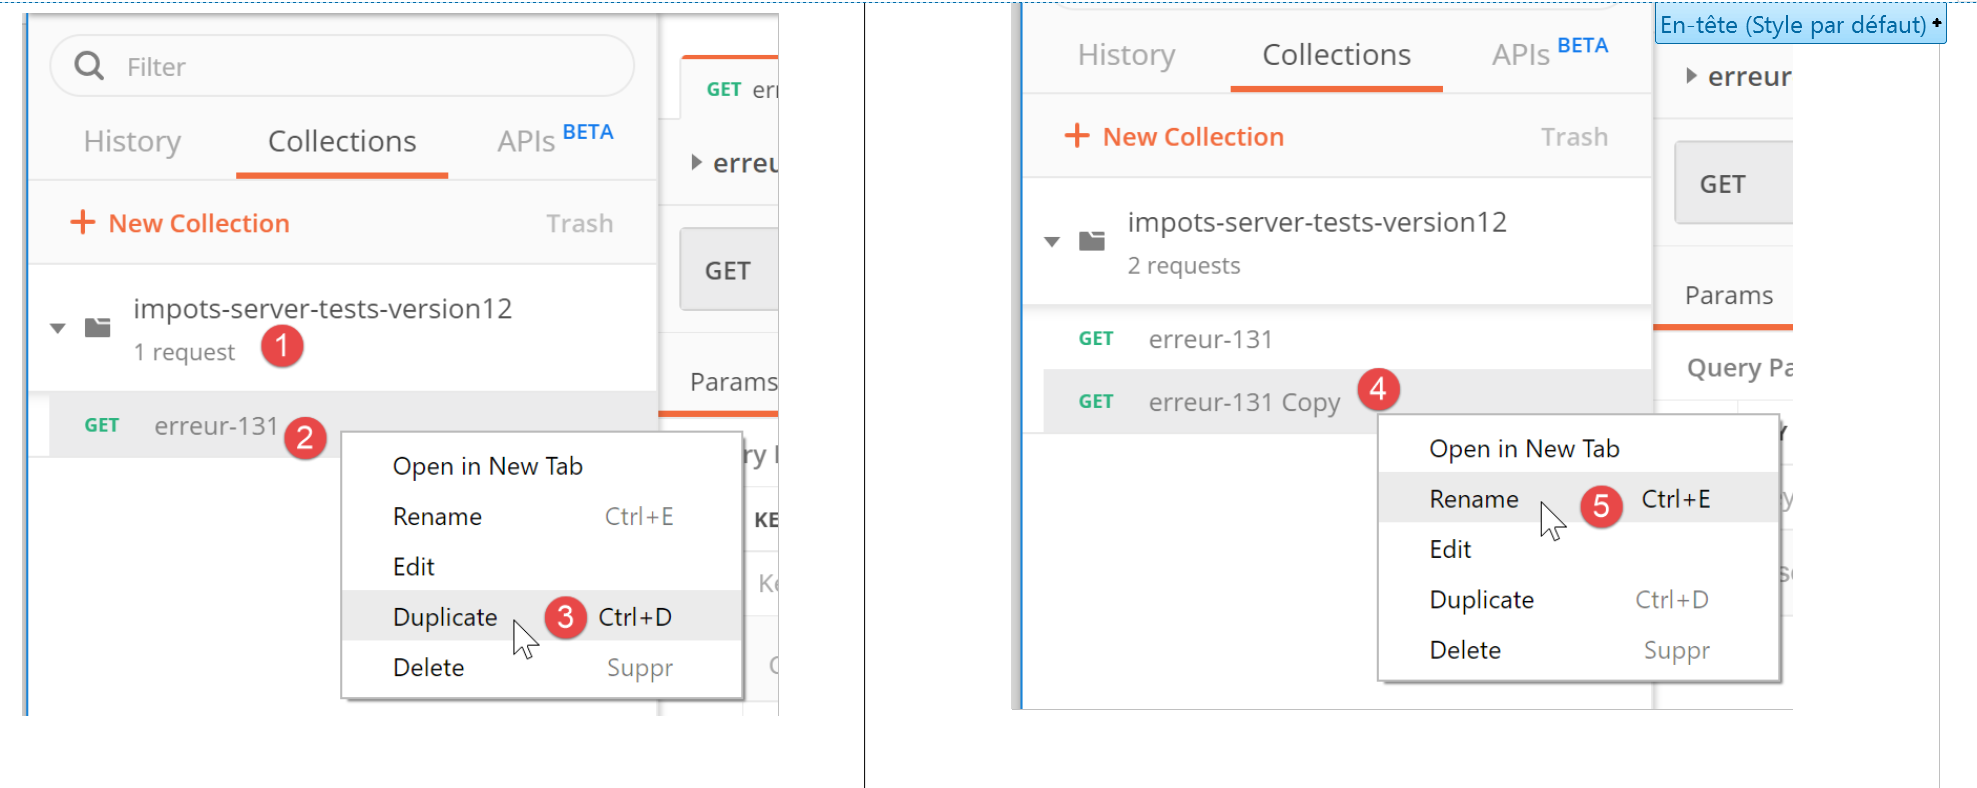
- 在 [1-3] 中,右键单击 [2] 并选择 [复制] 选项以复制请求 [2];
- 在 [4] 中,新请求有一个默认名称,我们在 [5] 中将其修改;

- 在 [6] 中,已重命名的请求;
- 在 [9-10] 中,我们发送与之前相同的 GET 请求;
- 在[11]中,服务器的JSON响应;
这里展示了如何测试税费计算 Web 服务的各项操作。
23.9.4. [main.php] – 2
我们继续分析主控制器的代码 [main.php]:
<?php

// strict adherence to declared types of function parameters
declare (strict_types=1);

// namespace
namespace Application;

// symfony dependencies
use Symfony\Component\HttpFoundation\Request;
use Symfony\Component\HttpFoundation\Response;
use Symfony\Component\HttpFoundation\Session\Session;

// error handling by PHP
//ini_set("display_errors", "0");
error_reporting(E_ALL && !E_WARNING && !E_NOTICE);
// we retrieve the configuration
$configFilename = "config.json";
…
// include the necessary script dependencies
$rootDirectory = $config["rootDirectory"];
foreach ($config["relativeDependencies"] as $dependency) {
  require_once "$rootDirectory$dependency";
}
// absolute dependencies (third-party libraries)
foreach ($config["absoluteDependencies"] as $dependency) {
  require_once "$dependency";
}

// log file creation
try {
  $logger = new Logger($config['logsFilename']);
} catch (ExceptionImpots $ex) {
  // log file could not be created - internal server error
  $état = 133;
  (new JsonResponse())->send(
    NULL, NULL, $config,
    Response::HTTP_INTERNAL_SERVER_ERROR,
    ["action" => "non déterminée", "état" => $état, "réponse" => "Le fichier de logs [{$config['logsFilename']}] n'a pu être créé"],
    []);
  // completed
  exit;
}
注释
- 第 18 行:现在我们有一个名为 [config.json] 的配置文件,该文件已存在且语法正确。我们还应验证该文件中是否包含预期的键。我们假设这是开发者常规调试流程的一部分。我们本可以将同样的推理应用到前两个错误上;
- 第 20–28 行:我们引入了 Web 项目所需的所有依赖项。我们已经多次遇到过这段代码;
- 第 31–43 行:我们尝试创建 [Logger] 对象,该对象将允许我们将事件记录到文件 [$config['logsFilename']] 中。此创建操作可能会失败;
- 第 33–43 行:处理创建 [Logger] 对象时的错误;
- 第 35 行:我们设置状态码;
- 第 36–40 行:发送 JSON 响应;
- 第 42 行:我们终止脚本;
发送给客户端的所有响应都实现了以下 [InterfaceResponse] 接口:
[InterfaceResponse] 接口的代码如下:
<?php

namespace Application;

// symfony dependencies
use Symfony\Component\HttpFoundation\Request;
use Symfony\Component\HttpFoundation\Session\Session;

interface InterfaceResponse {

  // Request $request : requête en cours de traitement
  // Session $session: the web application session
  // array $config: application configuration
  // int statusCode: HTTP response status code
  // array $content: server response
  // array $headers: HTTP headers to be added to the response
  // Logger $logger: the logger for writing logs

  public function send(
    Request $request = NULL,
    Session $session = NULL,
    array $config,
    int $statusCode,
    array $content,
    array $headers,
    Logger $logger = NULL): void;
}
- 第 19–27 行:[InterfaceResponse] 接口有一个方法 [send],用于将响应发送给客户端;
- 第 11–17 行:[send] 方法中各个参数的含义;
- 第 23–25 行:参数 [$statusCode, $content, $headers] 是应用程序二级控制器标准输出的一部分。不过,响应可能需要额外信息。因此,我们通过前三个参数(第 20–22 行)为其提供这些信息,使其能够访问有关请求、会话和配置的所有信息;
- 第 26 行:响应需要 [Logger],因为它将记录发送给客户端的响应;
[JsonResponse] 类通过以下方式实现了 [InterfaceResponse] 接口:
<?php

namespace Application;

// symfony dependencies
use Symfony\Component\Serializer\Encoder\JsonEncode;
use Symfony\Component\Serializer\Encoder\JsonEncoder;
use Symfony\Component\Serializer\Normalizer\ObjectNormalizer;
use Symfony\Component\Serializer\Serializer;
use \Symfony\Component\HttpFoundation\Request;
use \Symfony\Component\HttpFoundation\Session\Session;

class JsonResponse extends ParentResponse implements InterfaceResponse {

  // Request $request : requête en cours de traitement
  // Session $session: the web application session
  // array $config: application configuration
  // int statusCode: HTTP response status code
  // array $content: server response
  // array $headers: HTTP headers to be added to the response
  // Logger $logger: the logger for writing logs

  public function send(
    Request $request = NULL,
    Session $session = NULL,
    array $config,
    int $statusCode,
    array $content,
    array $headers,
    Logger $logger = NULL): void {

    // symfony serializer preparation
    $serializer = new Serializer(
      [
      // required for object serialization
      new ObjectNormalizer()],
      // encoder jSON
      // for options, make OU between the different options
      [new JsonEncoder(new JsonEncode([JsonEncode::OPTIONS => JSON_UNESCAPED_UNICODE]))]
    );
    // serialization jSON
    $json = $serializer->serialize($content, 'json');
    // headers
    $headers = array_merge($headers, ["content-type" => "application/json"]);
    // sending reply
    parent::sendResponse($statusCode, $json, $headers);
    // log
    if ($logger !== NULL) {
      $logger->write("réponse=$json\n");
    }
  }

}
评论
- 第 13 行:该类实现了 [InterfaceResponse] 接口;
- 第 13 行:该类继承自 [ParentResponse] 类。所有 [Response] 类型都继承自该类。正是这个父类将响应发送给客户端(第 46 行)。由于这段代码是所有 [Response] 类型共有的,因此被提取到了父类中;
- 第 33–40 行:实例化 [Symfony] 序列化器,它将把服务器响应 [$content] 转换为 JSON 字符串(第 42 行);
- 第 34–36 行:[Serializer] 构造函数的第一个参数是一个数组。其中放置了对象序列化所需的 [ObjectNormalizer] 类的实例。在本应用中,这涉及一组模拟,其中每个模拟都是 [Simulation] 类的实例;
- 第 39 行:[Serializer] 构造函数的第二个参数也是一个数组:它包含序列化过程中使用的所有编码器(XML、JSON、CSV 等);
- 第 39 行:此处仅有一个编码器,类型为 [JsonEncoder]。原本使用无参构造函数就已足够。此处向构造函数传递了一个 [JsonEncode] 参数,仅用于传递 JSON 编码选项;
- 第 39 行:[JsonEncode] 构造函数参数是一个选项数组。此处我们使用 [JSON_UNESCAPED_UNICODE] 选项,要求 JSON 字符串中的 UTF-8 字符以原生形式呈现,而非进行“转义”;
- 第 42 行:使用前面的序列化器将 HTTP 响应正文序列化为 JSON;
- 第 44 行:我们添加了告知客户端我们将发送 JSON 的 HTTP 头;
- 第 46 行:请求父类将响应发送给客户端;
- 第 48–50 行:我们记录 JSON 响应;
父类 [ParentResponse] 的代码如下:
<?php

namespace Application;

// symfony dependencies
use Symfony\Component\HttpFoundation\Response;

class ParentResponse {

  // int $statusCode: HTTP response status code
  // string $content: the body of the response to be sent
  // depending on the case, this is a jSON, XML, HTML string
  // array $headers: HTTP headers to be added to the response

  public function sendResponse(
    int $statusCode,
    string $content,
    array $headers): void {

    // preparing the server's text response
    $response = new Response();
    $response->setCharset("utf-8");
    // status code
    $response->setStatusCode($statusCode);
    // headers
    foreach ($headers as $text => $value) {
      $response->headers->set($text, $value);
    }
    // we send the answer
    $response->setContent($content);
    $response->send();
  }
}
注释
- 第 10–13 行:[send] 方法中三个参数的含义;
- 第 17 行:请注意响应正文的类型为 [string],因此已准备好发送(第 30 行);
- 第 22 行:响应将包含 UTF-8 字符;
- 第 24 行:响应的 HTTP 状态码;
- 第 26–28 行:添加调用代码提供的 HTTP 头部;
- 第 30–31 行:将响应发送给客户端;
我们已详细说明了 JSON 响应的整个生命周期。后续将不再赘述。您只需记住 [InterfaceResponse] 接口的声明:
interface InterfaceResponse {

  // Request $request : requête en cours de traitement
  // Session $session: the web application session
  // array $config: application configuration
  // int statusCode: HTTP response status code
  // array $content: server response
  // array $headers: HTTP headers to be added to the response
  // Logger $logger: the logger for writing logs

  public function send(
    Request $request = NULL,
    Session $session = NULL,
    array $config,
    int $statusCode,
    array $content,
    array $headers,
    Logger $logger = NULL): void;
}
主控制器 [main.php] 每次请求向客户端发送响应时,都必须遵循此签名。
23.9.5. 测试 [Postman] – 2
我们将 [config.json] 文件修改如下:
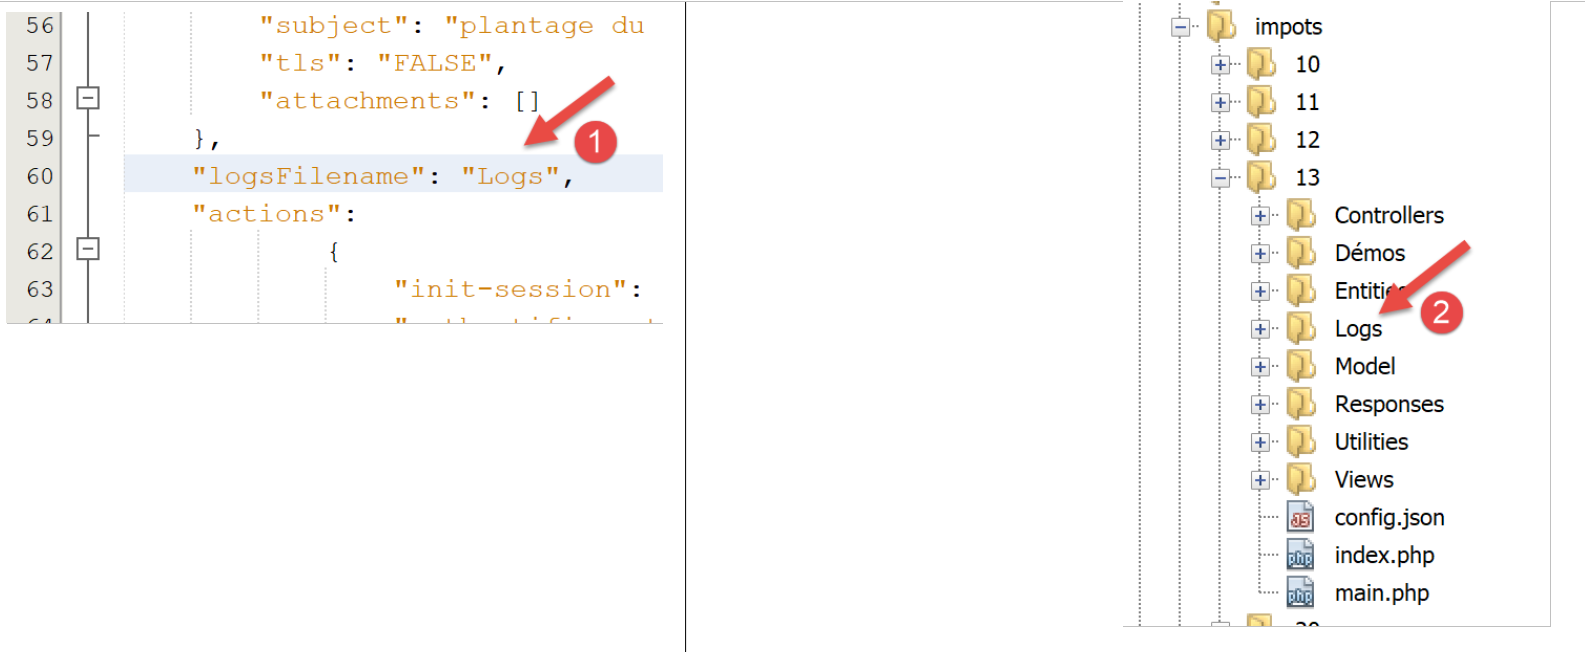
- 在 [1] 中,我们指定日志文件为 [Logs],这是一个文件夹 [2]。因此,创建 [Logs] 文件应会失败;
我们创建一个新的 [Postman] 请求 [3],命名为 [error-133]:
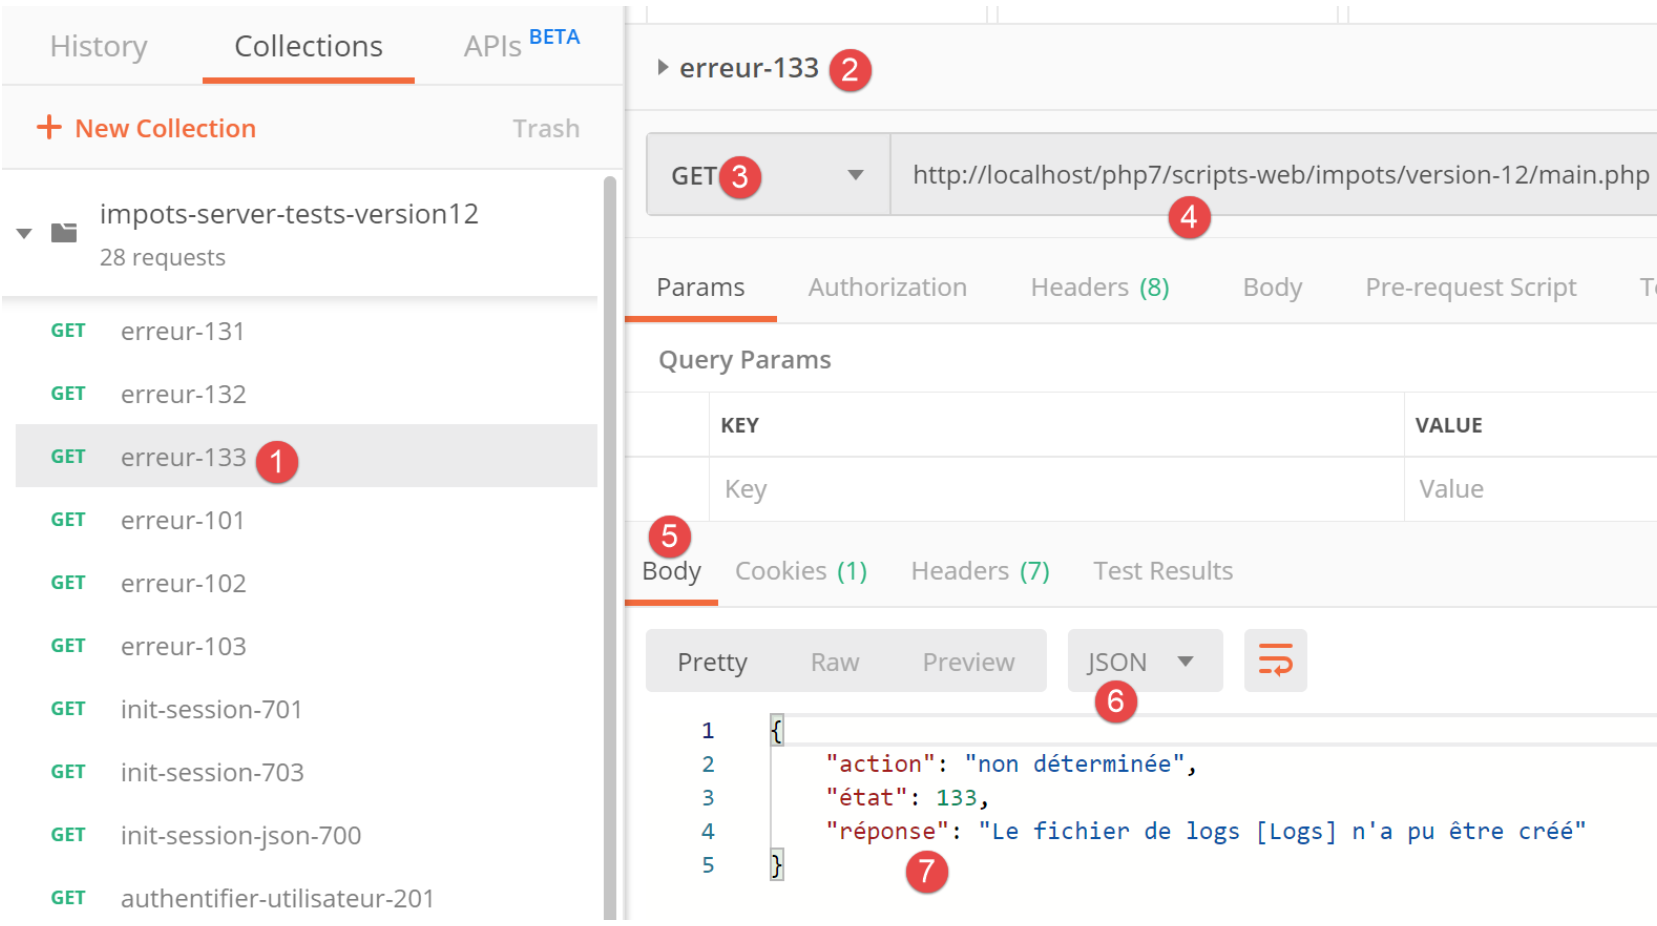
- [2-4]:我们定义了与前两次测试相同的请求;
- [5-7]:我们成功获取了预期的 JSON 响应;
23.9.6. [main.php] – 3
让我们继续查看主控制器 [main.php]:
<?php

// strict adherence to declared types of function parameters
declare (strict_types=1);

// namespace
namespace Application;

// symfony dependencies
use Symfony\Component\HttpFoundation\Request;
use Symfony\Component\HttpFoundation\Response;
use Symfony\Component\HttpFoundation\Session\Session;

// error handling by PHP
…

// log file creation
…

// 1st log
$logger->write("\n---nouvelle requête\n");
// current query
$request = Request::createFromGlobals();

// session
$session = new Session();
$session->start();
// error list
$erreurs = [];
$erreur = FALSE;
// we manage the requested action
if (!$request->query->has("action")) {
  $erreurs[] = "paramètre [action] manquant";
  $erreur = TRUE;
  $état = 101;
  $action = "";
} else {
  // memorize the action
  $action = strtolower($request->query->get("action"));
}
// we log the action
$logger->write("action [$action] demandée\n");

// does the action exist?
if (!$erreur && !array_key_exists($action, $config["actions"])) {
  $erreurs[] = "action [$action] invalide";
  $erreur = TRUE;
  $état = 102;
}

// the session type must be known before performing certain actions
if (!$erreur && !$session->has("type") && $action !== "init-session") {
  $erreurs[] = "pas de session en cours. Commencer par action [init-session]";
  $erreur = TRUE;
  $état = 103;
}

// some actions require authentication
if (!$erreur && !$session->has("user") && $action !== "authentifier-utilisateur" && $action !== "init-session") {
  $erreurs[] = "action demandée par utilisateur non authentifié";
  $erreur = TRUE;
  $état = 104;
}

// mistakes?
if ($erreurs) {
  // we prepare the answer without sending it
  $statusCode = Response::HTTP_BAD_REQUEST;
  $content = ["réponse" => $erreurs];
  $headers = [];
} else {
  // ---------------------------
  // execute the action using its controller
  $controller = __NAMESPACE__ . $config["actions"][$action];
  $logger->write("contrôleur : $controller\n");
  list($statusCode, $état, $content, $headers) = (new $controller())->execute($config, $request, $session);
}

// --------------------- we send the answer
// cas de l'erreur fatale HTTP_INTERNAL_SERVER_ERROR
// send an e-mail to the administrator if you can
if ($statusCode === Response::HTTP_INTERNAL_SERVER_ERROR && $config['adminMail'] != NULL) {
  $infosMail = $config['adminMail'];
  $infosMail['message'] = json_encode($content, JSON_UNESCAPED_UNICODE);
  $sendAdminMail = new SendAdminMail($infosMail, $logger);
  $sendAdminMail->send();
}
// the answer depends on the session type
if ($session->has("type")) {
  // the session type is in the session
  $type = $session->get("type");
} else {
  // if no type in session, then the default response is jSON
  $type = "json";
}
// we add the keys [action, state] to the controller response
$content = ["action" => $action, "état" => $état] + $content;
// instantiate the [Response] object responsible for sending the response to the client
$response = __NAMESPACE__ . $config["types"][$type]["response"];
(new $response())->send($request, $session, $config, $statusCode, $content, $headers, $logger);

// the reply has been sent - resources are released
$logger->close();
exit;
注释
- 一旦完成初始检查并确认可以继续,主控制器便专注于处理所请求的操作:它必须满足某些条件;
- 第 21 行:我们记录收到新请求的事实。此前无法执行此操作,因为我们无法确定日志文件是否有效;
- 第 23 行:我们将客户端请求中的所有信息封装到 Symfony [Request] 对象中;
- 第 26 行:我们启动一个新会话,或者如果已有会话则检索现有会话;
- 第 27 行:激活会话;
- 第 29 行:一个错误消息数组;
- 第 30 行:一个布尔值,用于在测试运行时告知是否发生了错误;
- 第 32 行:URL 中必须包含 [action] 参数,格式为 [main.php?action=someAction]。随后,[action] 参数会被纳入 [$request→query] 参数中;
- 第 33–36 行:处理 URL 中缺少 [action] 参数的情况。将错误记录到日志中,并为其分配状态码 [101];
- 第 39 行:如果 URL 中包含 [action] 参数,则将其存储;
- 第 42 行:记录操作类型;
- 第 45–49 行:若存在 [action] 参数,则必须有效。所有授权操作均定义在关联数组 [$config["actions"]] 中;
- 第 46–48 行:如果操作无效,则记录错误并分配状态码 [102];
- 第 52–56 行:当前操作为有效操作。但仍需满足其他条件。Web 应用程序提供三种响应类型(JSON、XML、HTML)。该类型由 [init-session] 操作设定。该操作将会话类型存入 [type] 键中;
- 第 52 行:在 [init-session] 操作之外,任何其他操作都必须在会话中包含 [type] 键;
- 第 53–55 行:若不满足此条件,则记录错误并赋予状态 [103];
- 第 58–63 行:在 [init-session] 和 [authenticate-user] 操作之外,所有其他操作必须在身份验证之后进行。这通过 [authenticate-user] 操作实现,该操作在身份验证成功时,会在会话中添加一个 [user] 键;
- 第 59 行:如果操作既不是 [init-session] 也不是 [authenticate-user],且会话中不存在 [user] 键,则会发生错误;
- 第 60–62 行:将错误记录到日志中,并赋予状态 [104];
- 第 66–71 行:检查数组 [$errors] 是否不为空。如果是,则表示请求的操作或其执行上下文有误;
- 第 68–70 行:准备发送给客户端的响应,但暂不发送;
- 第 68 行:HTTP 状态码;
- 第 69 行:响应正文;
- 第 70 行:要添加到响应中的头部;此处无;
- 第 73 行:我们有一个有效的操作。我们将请求其(二级)控制器进行处理;
- 第 74 行:我们构造要执行的控制器类的名称。[__NAMESPACE__] 是当前所在的命名空间,此处为 [Application](第 7 行);
- 二级控制器类的名称位于 [config.json] 文件中:
"actions":
            {
                "init-session": "\\InitSessionController",
                "authentifier-utilisateur": "\\AuthentifierUtilisateurController",
                "calculer-impot": "\\CalculerImpotController",
                "lister-simulations": "\\ListerSimulationsController",
                "supprimer-simulation": "\\SupprimerSimulationController",
                "fin-session": "\\FinSessionController",
                "afficher-calcul-impot": "\\AfficherCalculImpotController"
            },
每个操作都对应一个二级控制器。如果操作是 [authenticate-user],那么第 74 行中的变量 [$controller] 的值将是 [Application/AuthentifierUtilisateurController];
- 第 75 行:我们记录二级控制器的名称,以便在开发过程中进行验证;
- 第 76 行:执行二级控制器。稍后我们将再次讨论二级控制器;
- 第 76 行:所有二级控制器返回的结果类型均为数组:
- 数组的首个元素 [$statusCode] 是待发送响应的 HTTP 状态码;
- 第二个元素 [$state] 是控制器执行后的应用程序状态;
- 第三个元素 [$content] 是一个关联数组,仅包含一个键 [response],即要发送给客户端的响应正文;
- 第四个元素 [$headers] 是一个数组,包含要添加到发送给客户端的响应中的 HTTP 头部;
- 第 79 行:我们到达此处:
- 要么是因为发生了错误(第 68–70 行);
- 或者在执行完控制器之后(第 72–76 行);
- 无论哪种情况,用于构建客户端响应所需的元素 [$statusCode, $status, $content, $headers] 均已确定;
- 第 82–87 行:处理状态码 [500 Internal Server Error] 的特例。如果控制器设置了此状态码,则表示应用程序无法正常运行。例如,当使用的数据库管理系统(DBMS)尚未启动或不再响应时,税费计算就会出现这种情况。 此时将向应用程序管理员发送一封电子邮件以通知其情况。我们在此不对此代码进行具体说明。[SendAdminMail] 类的用法已在相关章节中介绍(参见链接部分);
- 第 89–95 行:我们确定 Web 应用程序的类型 [jSON, XML, HTML]。如果 [init-session] 操作执行成功,该类型会存储在与 [type] 键关联的会话中(第 91 行)。如果未成功,则我们为响应任意设置一个类型,即 JSON 类型(第 94 行);
- 第 97 行:[$content] 是一个数组,包含一个名为 [response] 的键及其对应的值,即要发送给客户端的响应正文。向其中添加了 [action] 和 [status] 两个键。添加 [action] 键是为了便于在 [logs.txt] 文件中追踪日志。而 [status] 键有两个作用:
- 它将使 JSON 和 XML 客户端能够了解已执行的操作将 Web 应用程序置于何种状态;
- 对于 HTML 响应,它将使我们能够选择要发送给客户端浏览器的 HTML 视图;
- 第 99 行:我们选择 [Response] 类类型来执行,以便将响应发送给客户端;
我们在上一节中已经介绍了 [JsonResponse] 类。它实现了 [InterfaceResponse] 接口,并继承了 [ParentResponse] 类。另外两个类 [XmlResponse] 和 [HtmlResponse] 也是如此。
响应类被归类在 [Responses] 文件夹中:

所有这些类都实现了 [InterfaceResponse] 接口,该接口也在链接的章节中进行了介绍:
<?php

namespace Application;

// symfony dependencies
use Symfony\Component\HttpFoundation\Request;
use Symfony\Component\HttpFoundation\Session\Session;

interface InterfaceResponse {

  // Request $request : requête en cours de traitement
  // Session $session: the web application session
  // array $config: application configuration
  // int statusCode: HTTP response status code
  // array $content: server response
  // array $headers: HTTP headers to be added to the response
  // Logger $logger: the logger for writing logs

  public function send(
    Request $request = NULL,
    Session $session = NULL,
    array $config,
    int $statusCode,
    array $content,
    array $headers,
    Logger $logger = NULL): void;
}
该接口仅有一个方法 [send],负责将响应发送给客户端。该方法包含第 11–17 行中描述的 7 个参数。[Responses] 文件夹中的所有类和接口均位于 [Application] 命名空间下(第 3 行)。
让我们回到 [main.php] 中的代码:
…
// on ajoute les clés [action, état] à la réponse du contrôleur
$content = ["action" => $action, "état" => $état] + $content;
// on instancie l'objet [Response] chargée d'envoyer la réponse au client
$response = __NAMESPACE__ . $config["types"][$type];
(new $response())->send($request, $session, $config, $statusCode, $content, $headers, $logger);

// la réponse a été envoyée - on libère les ressources
$logger->close();
exit;
- 第 5 行:我们实例化了与应用程序类型匹配的 [Response] 类。这些类在 [config.json] 文件中定义如下:
"types": {
        "json": "\\JsonResponse",
        "html": "\\HtmlResponse",
        "xml": "\\XmlResponse"
    },
- 第 5 行:类名前缀为其命名空间;
- 第 6 行:实例化 [Response] 类,并调用其 [send] 方法,传入该方法预期的 7 个参数。这些参数来自 [InterfaceResponse] 接口,所有响应类都实现了该接口。这将响应发送给客户端;
- 第 9 行:关闭日志文件;
- 第 10 行:主控制器已完成其工作;
23.9.7. [Postman] 测试 – 3
我们将针对 URL 的 [action] 参数测试各种错误情况。
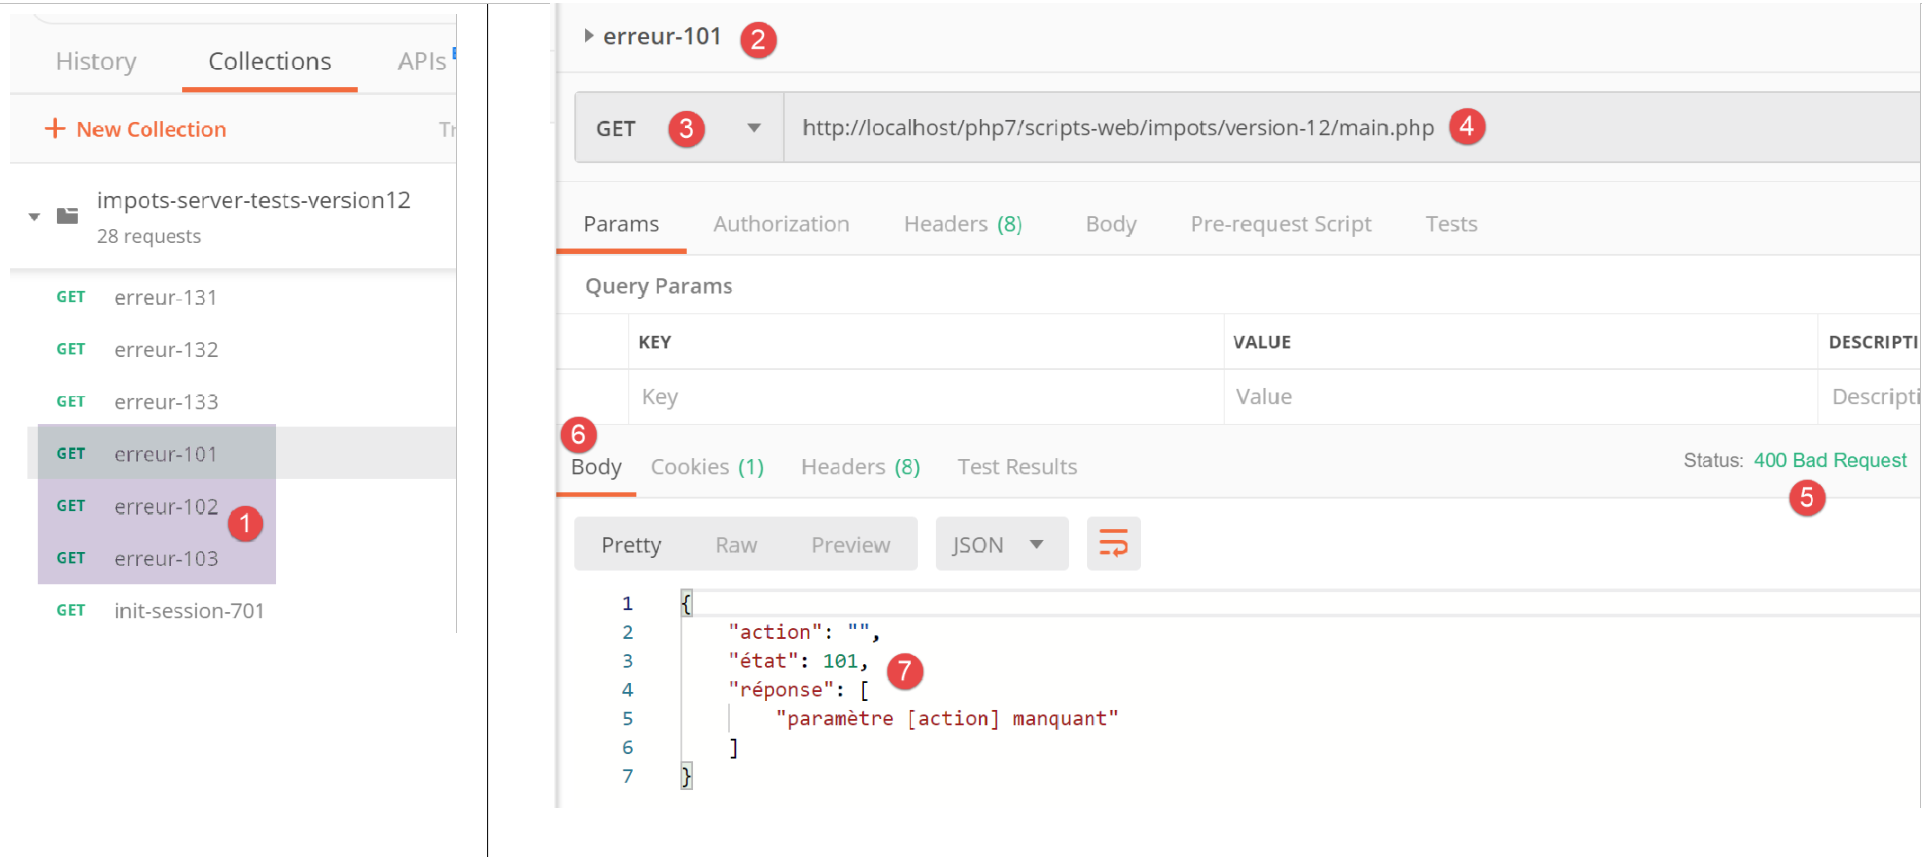
- 在 [1] 中:
- [error-101]:URL 中缺少 [action] 参数的情况;
- [error-102]:URL 中存在 [action] 参数但未被识别的情况;
- [error-103]:URL 中包含 [action] 参数且已被识别,但未定义预期的响应类型 [json, xml, html];
每个请求均已执行。我们直接呈现结果:
上文:
- 在 [2-4] 中,URL [4] 中不包含 [action] 参数的请求;
- 在 [5-7] 中,JSON 结果;
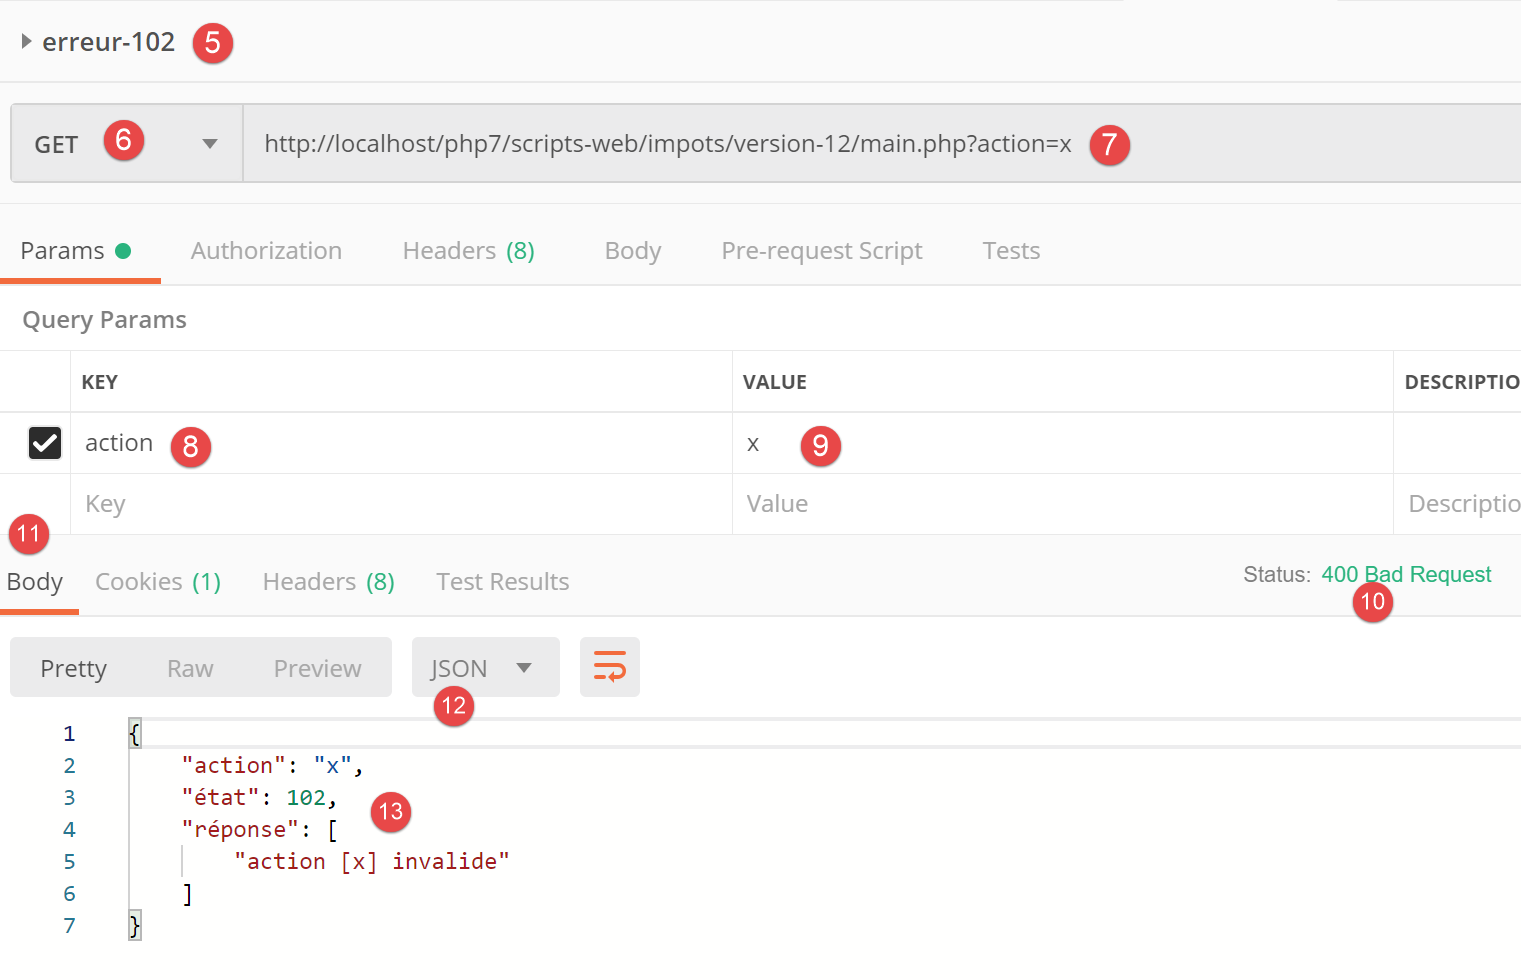
上图:
- 在 [5-9] 中,包含无效 [action] 参数的请求;
- 在 [10-13] 中,JSON 响应;
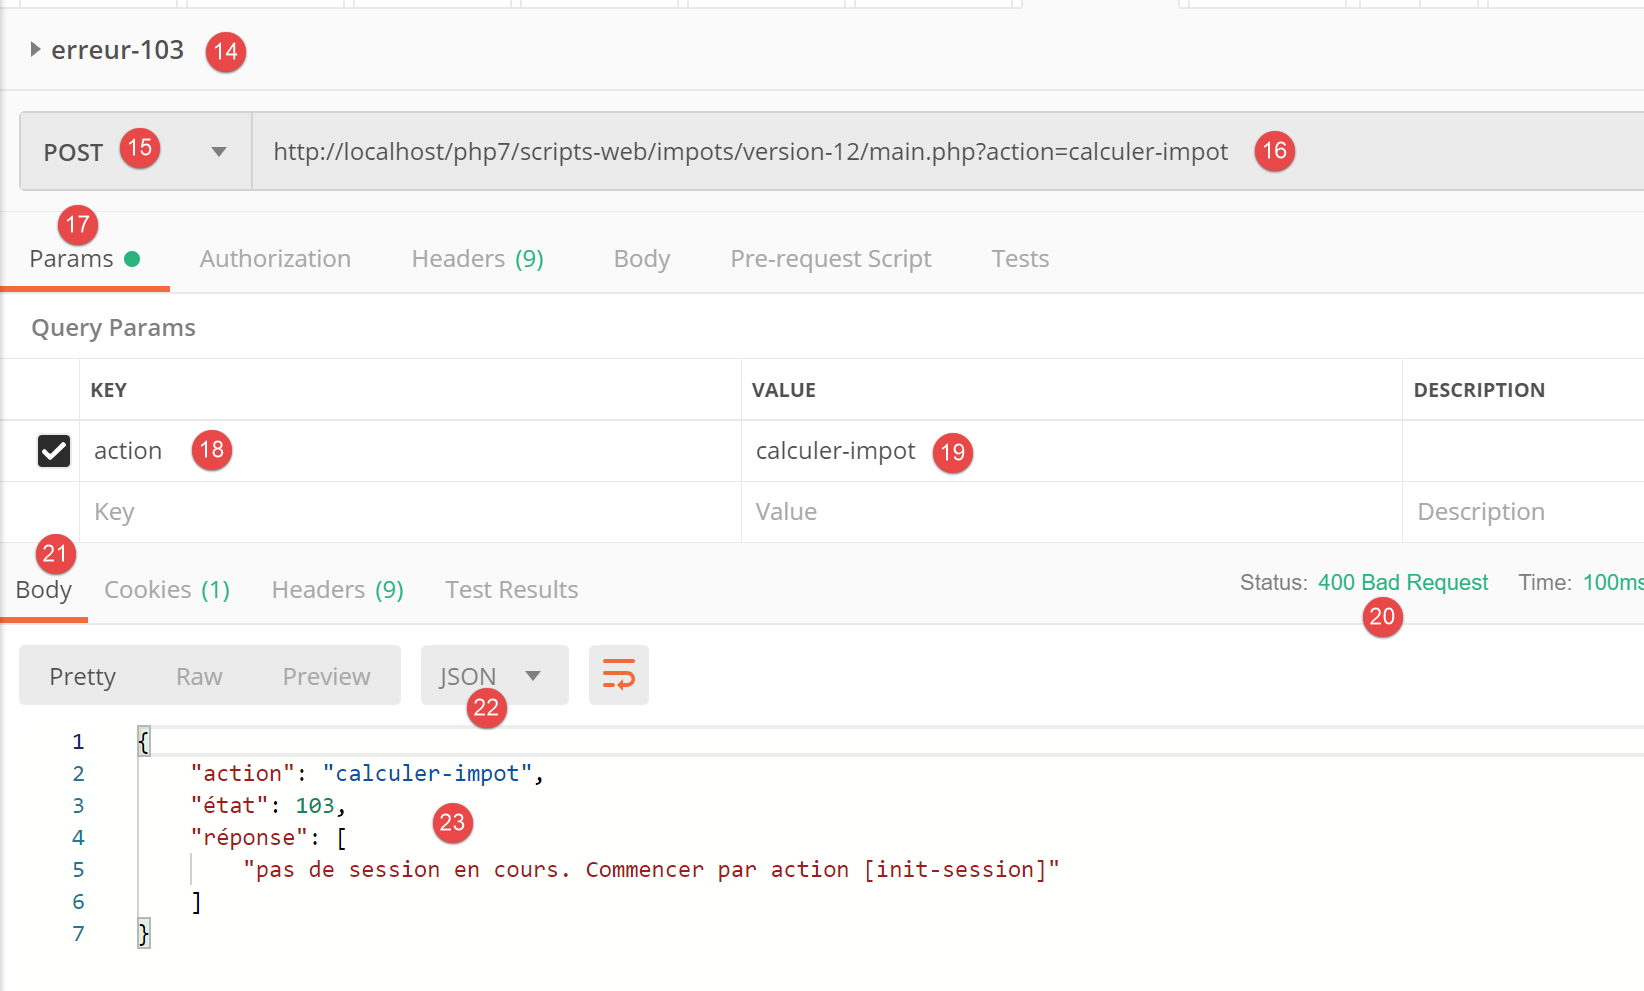
上图:
- 在 [14-19] 中,识别出操作但尚未指定类型(json、xml、html);
- 在 [20-23] 中,服务器的 JSON 响应;
23.10. 辅助控制器
每个操作由 [Controllers] 文件夹中的某个控制器执行:
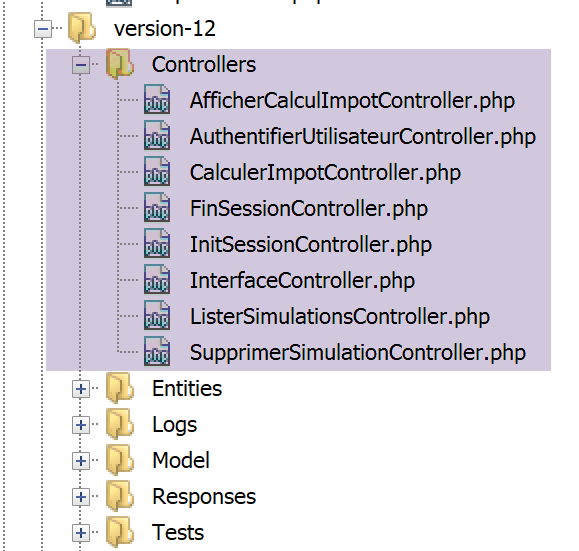

在上述应用程序的总体架构中,辅助控制器位于 [2a] 目录下。
每个控制器都实现了以下 [InterfaceController] 接口:
<?php

namespace Application;

// symfony dependencies
use Symfony\Component\HttpFoundation\Request;
use Symfony\Component\HttpFoundation\Session\Session;

interface InterfaceController {

  // $config is the application configuration
  // traitement d'une requête Request
  // session and can modify it
  // $infos is additional information specific to each controller

  // renders an array [$statusCode, $état, $content, $headers]
  public function execute(
    array $config,
    Request $request,
    Session $session,
    array $infos=NULL): array;
}
注释
- 所有二级控制器都是通过第 17 行中的 [execute] 方法执行的。我们将主控制器中的已知信息传递给该方法:
- 第 18 行:[array $config],封装了应用程序配置;
- 第 19 行:[Request $request],即当前正在处理的 HTTP 请求;
- 第 20 行:[Session $session],即 Web 应用程序的当前会话;
- 第 21 行:[array $infos=NULL],这是一个额外的信息数组,用于在方法的前三个参数不足时为控制器提供补充信息。在本应用中,该参数从未被使用过。其包含仅作为预防措施;
- 第 21 行:[execute] 方法返回数组 [$statusCode, $status, $content, $headers]
- [int $statusCode]:HTTP 响应状态码;
- [int $state]:执行结束时应用程序的状态;
- [array $content]:一个关联数组 [response=>result],其中 [result] 可以是任意类型:这是控制器生成的结果,经字符串序列化后将发送给客户端;
- [array $headers]:将包含在服务器 HTTP 响应中的 HTTP 头部列表;
每个二级控制器由主控制器中的以下代码调用:
 // on exécute l'action à l'aide de son contrôleur
 $controller = __NAMESPACE__ . $config["actions"][$action];
 list($statusCode, $état, $content, $headers) = (new $controller())->execute($config, $request, $session);
在第 3 行,我们可以看到 [execute] 方法的第四个参数 [array $infos=NULL] 并未被使用。
23.11. 操作
接下来,我们将回顾 Web 服务可能执行的各种操作:
操作 | 角色 | 执行上下文 |
init-session | 用于设置所需响应的类型(json、xml、html) | GET请求 main.php?action=init-session&type=x 可随时发送 |
authenticate-user | 授权或拒绝用户的登录 | POST 请求 main.php?action=authenticate-user 请求必须包含两个提交参数 [user, password] 仅当已知会话类型(json、xml、html)时才能发出 |
计算税款 | 执行税费计算模拟 | 向 main.php 发送 POST 请求,请求路径为 main.php?action=calculate-tax 请求必须包含三个提交参数 [married, children, salary] 仅当已知会话类型(json、xml、html)且用户已通过身份验证时才能发出 |
list-simulations | 请求查看自会话开始以来已执行的模拟列表 | GET 请求 main.php?action=list-simulations 该请求不接受任何其他参数 只有在已知会话类型(json、xml、html)且用户已通过身份验证的情况下才能发出 |
delete-simulation | 从模拟列表中删除一个模拟 | GET 请求 main.php?action=list-simulations&number=x 该请求不接受任何其他参数 仅在已知会话类型(json、xml、html)且用户已通过身份验证时才能发出 |
end-session | 结束模拟会话。 | 从技术上讲,旧的 Web 会话将被删除,并创建一个新的会话 只有在已知会话类型(json、xml、html)且用户已通过身份验证的情况下才能发出 |
所有二级控制器均按相同方式处理:
- 它们会检查参数。URL中包含的参数位于[Request→query]对象中,而通过POST请求提交的参数则位于[Request→request]对象中;
- 控制器类似于一个检查参数有效性的函数或方法。但对于控制器而言,情况要稍显复杂:
- 预期的参数可能缺失;
- 预期参数均为字符串,而函数可以指定其参数的类型。如果预期参数是数字,则必须验证该参数字符串确实是数字;
- 在验证预期参数存在且语法正确后,还必须验证它们在当前执行上下文中是否有效。该上下文存在于会话中。身份验证示例就是执行上下文的一个例子。某些操作仅应在客户端通过身份验证后才被处理。通常,会话中的某个键会指示身份验证是否已完成;
- 一旦前面的检查完成,二级控制器即可继续处理。这个参数验证过程非常重要。在应用程序生命周期的任何阶段,我们都不能接受客户端向我们发送任意数据。我们必须对应用程序的生命周期保持完全控制;
- 完成工作后,辅助控制器会返回主控制器(即调用它的控制器)所期望的数组 [$statusCode, $state, $content, $headers];
接下来我们将回顾各个控制器——换言之,即驱动 Web 应用程序生命周期的各种操作。
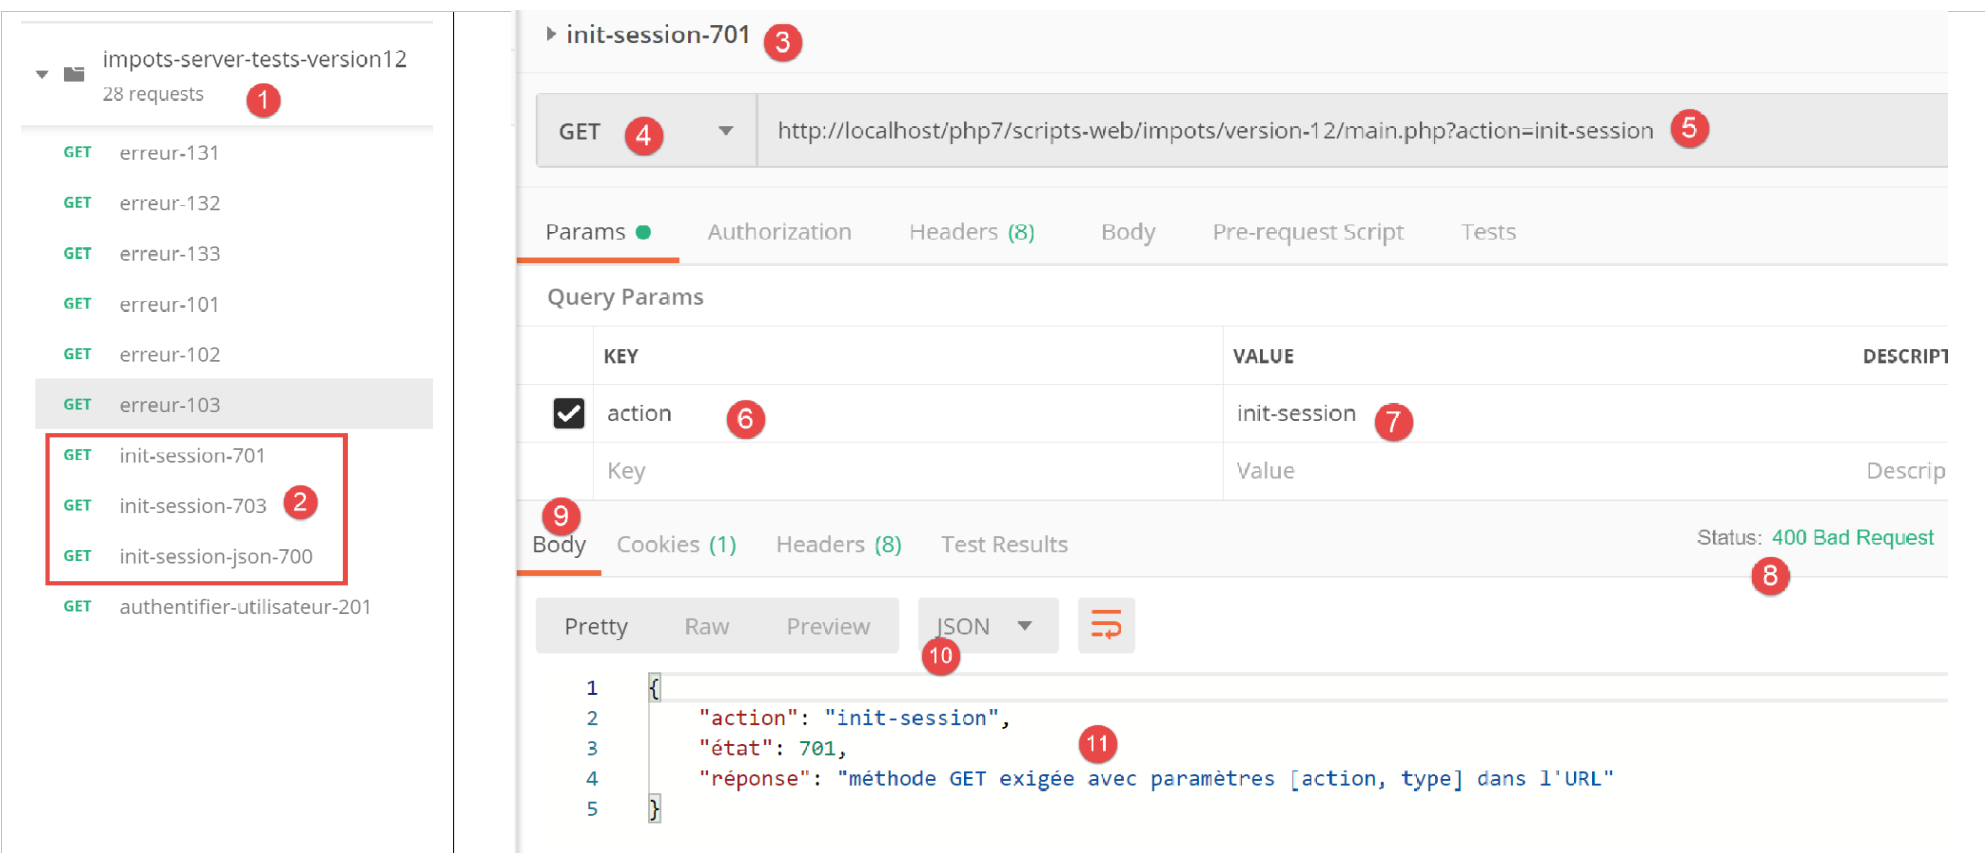
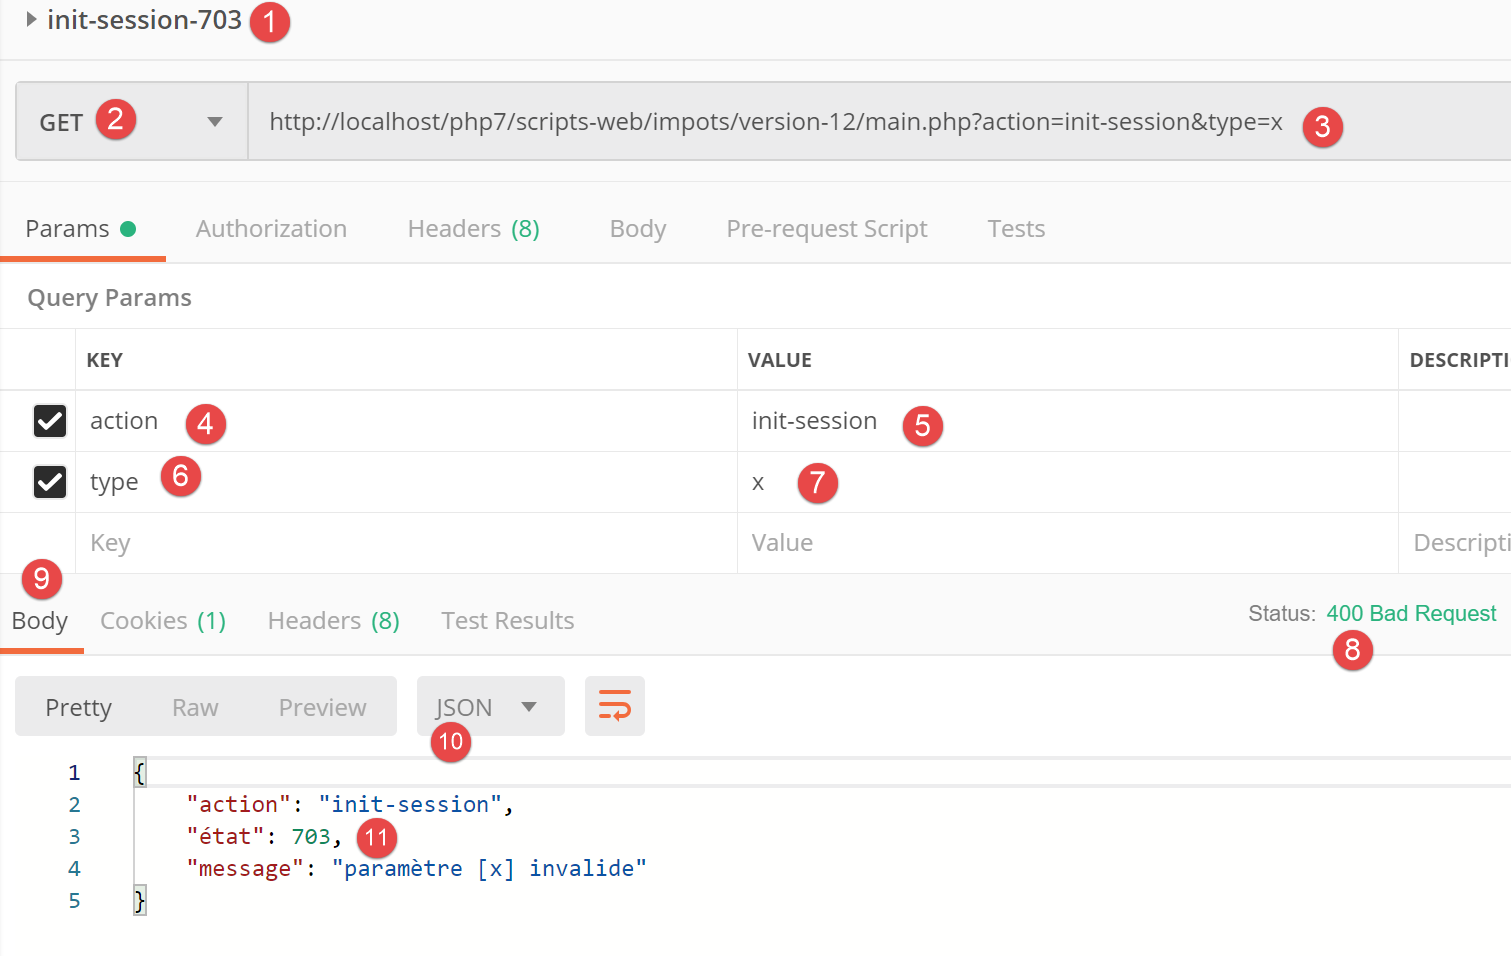
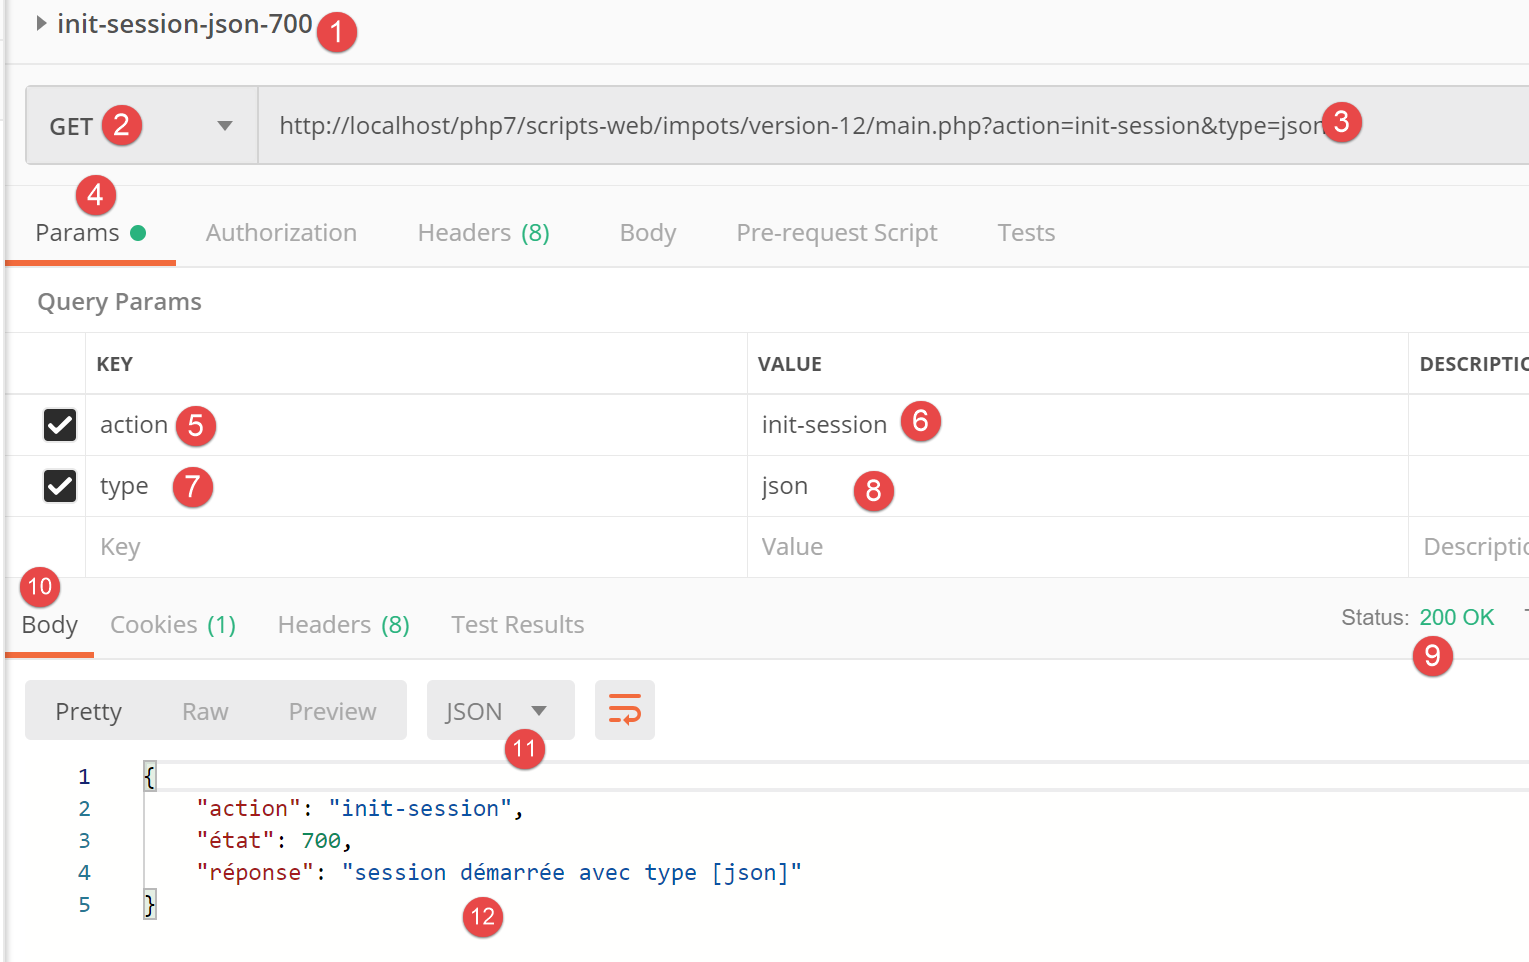
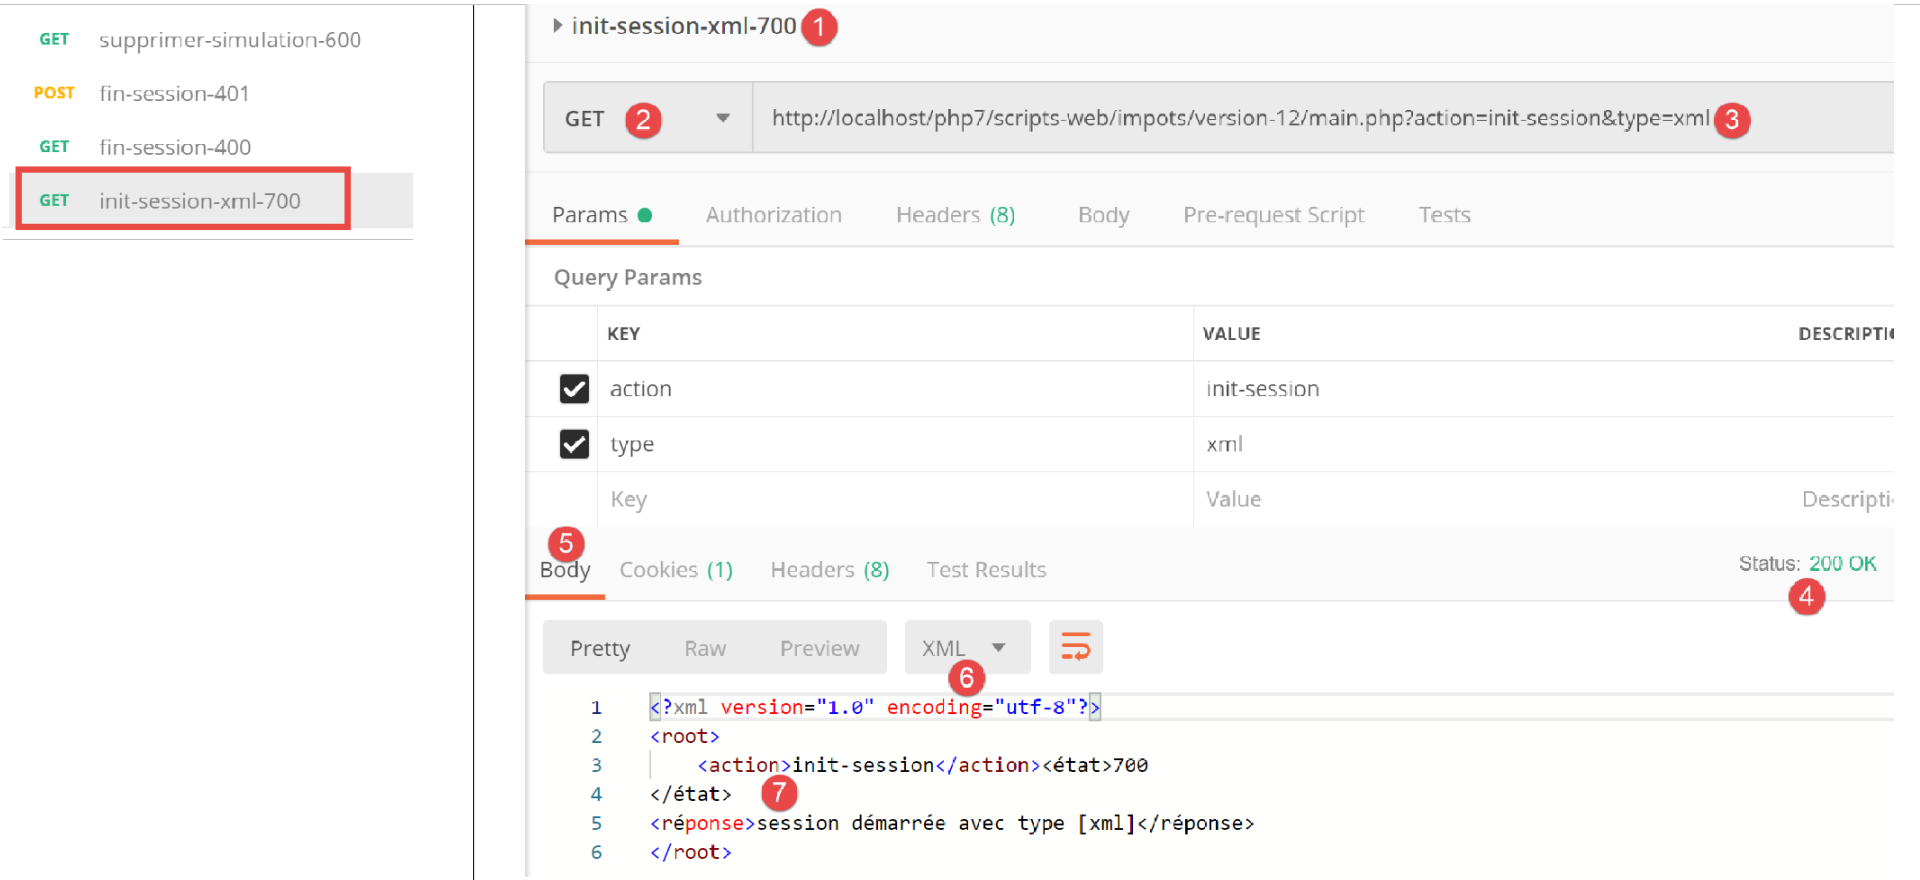
23.11.1. [init-session] 操作
[init-session] 操作由以下 [InitSessionController] 处理:
<?php

namespace Application;

// symfony dependencies
use Symfony\Component\HttpFoundation\Request;
use Symfony\Component\HttpFoundation\Response;
use Symfony\Component\HttpFoundation\Session\Session;

class InitSessionController implements InterfaceController {

  // $config is the application configuration
  // traitement d'une requête Request
  // session and can modify it
  // $infos is additional information specific to each controller

  // renders an array [$statusCode, $état, $content, $headers]
  public function execute(
    array $config,
    Request $request,
    Session $session,
    array $infos = NULL): array {

    // you must have a GET and a single parameter other than [action]
    $method = strtolower($request->getMethod());
    $erreur = $method !== "get" || $request->query->count() != 2;
    if ($erreur) {
      $état = 701;
      $message = "méthode GET exigée avec paramètres [action, type] dans l'URL";
      return [Response::HTTP_BAD_REQUEST, $état, ["réponse" => $message], []];
    }
    // retrieve the GET parameters
    $erreur = FALSE;
    // type
    if (!$request->query->has("type")) {
      $erreur = TRUE;
      $état = 702;
      $message = "paramètre [type] manquant";
    } else {
      $type = strtolower($request->query->get("type"));
    }
    // type verification
    if (!$erreur && !array_key_exists($type, $config["types"])) {
      $erreur = TRUE;
      $état = 703;
      $message = "paramètre type [$type] invalide";
    }
    // mistake?
    if ($erreur) {
      return [Response::HTTP_BAD_REQUEST, $état, ["réponse" => $message], []];
    }
    // put the session type in the session
    $session->set("type", $type);
    // message of success
    $message = "session démarrée avec type [$type]";
    $état = 700;
    return [Response::HTTP_OK, $état, ["réponse" => $message], []];
  }

}
评论
- 我们预期收到 [GET main.php?action=init-session&type=xxx] 请求
- 第 25-26 行:我们检查请求是否为带有两个 URL 参数的 GET 请求;
- 第 27–31 行:如果不符合此条件,则记录错误并将响应 [$statusCode, $status, $content, $headers] 发送给主控制器;
- 第 35-39 行:我们检查 URL 中是否包含 [type] 参数。如果不包含,则记录错误;
- 第 40 行:记录会话类型;
- 第 43–47 行:检查会话类型是否为指定值之一(json、xml、html)。若非如此,则记录错误;
- 第 49–51 行:若发生错误,则向主控制器发送结果 [$statusCode, $status, $content, $headers];
- 第 53 行:将会话类型存储在 Web 应用程序会话中;
- 第 55–57 行:控制器已完成工作。向主控制器发送成功响应 [$statusCode, $status, $content, $headers];
让我们回顾一下主控制器如何处理来自次级控制器的响应:
// erreurs ?
if ($erreurs) {
  // on prépare la réponse sans l'envoyer
  $statusCode = Response::HTTP_BAD_REQUEST;
  $content = ["réponse" => $erreurs];
  $headers = [];
} else {
  // ---------------------------
  // on exécute l'action à l'aide de son contrôleur
  $controller = __NAMESPACE__ . $config["actions"][$action];
  $logger->write("contrôleur : $controller\n");
  list($statusCode, $état, $content, $headers) = (new $controller())->execute($config, $request, $session);
}

// --------------------- on envoie la réponse
// cas de l'erreur fatale HTTP_INTERNAL_SERVER_ERROR
// on envoie un mail à l'administrateur si on peut
if ($statusCode === Response::HTTP_INTERNAL_SERVER_ERROR && $config['adminMail'] != NULL) {
  $infosMail = $config['adminMail'];
  $infosMail['message'] = json_encode($content, JSON_UNESCAPED_UNICODE);
  $sendAdminMail = new SendAdminMail($infosMail, $logger);
  $sendAdminMail->send();
}
// la réponse dépend du type de la session
if ($session->has("type")) {
  // le type de session est dans la session
  $type = $session->get("type");
} else {
  // si pas de type dans session, alors par défaut ce sera une réponse en jSON
  $type = "json";
}
// on ajoute les clés [action, état] à la réponse du contrôleur
$content = ["action" => $action, "état" => $état] + $content;
// on instancie l'objet [Response] chargée d'envoyer la réponse au client
$response = __NAMESPACE__ . $config["types"][$type]["response"];
(new $response())->send($request, $session, $config, $statusCode, $content, $headers, $logger);

// la réponse a été envoyée - on libère les ressources
$logger->close();
exit;
- 第 12 行:主控制器从辅助控制器中获取结果;
- 第 35-36 行:经过一些检查后,根据当前会话的类型(json、xml、html),通过实例化 [JsonResponse、XmlResponse、HtmlResponse] 中的一个类来发送响应;
接下来,我们将使用 [json] 类型进行 [Postman] 测试,作为模拟会话的一部分。[JsonResponse] 类的功能已在相关章节中介绍。
23.11.2. [Postman] 测试
上文:
- 在 [2] 中,新增了三个测试;
- 在 [3-7] 中,[init-session] 操作缺少 [type] 参数;
- 在 [8-11] 中,服务器的 JSON 响应;
上文:
- 在 [1-7] 中,[init-session] 操作的 [type] 参数不正确;
- 在 [8-11] 中,服务器的 JSON 响应;
上文:
- 在 [1-8] 中,具有 JSON 类型的 [init-session] 操作;
- 在 [9-12] 中,服务器的 JSON 响应;
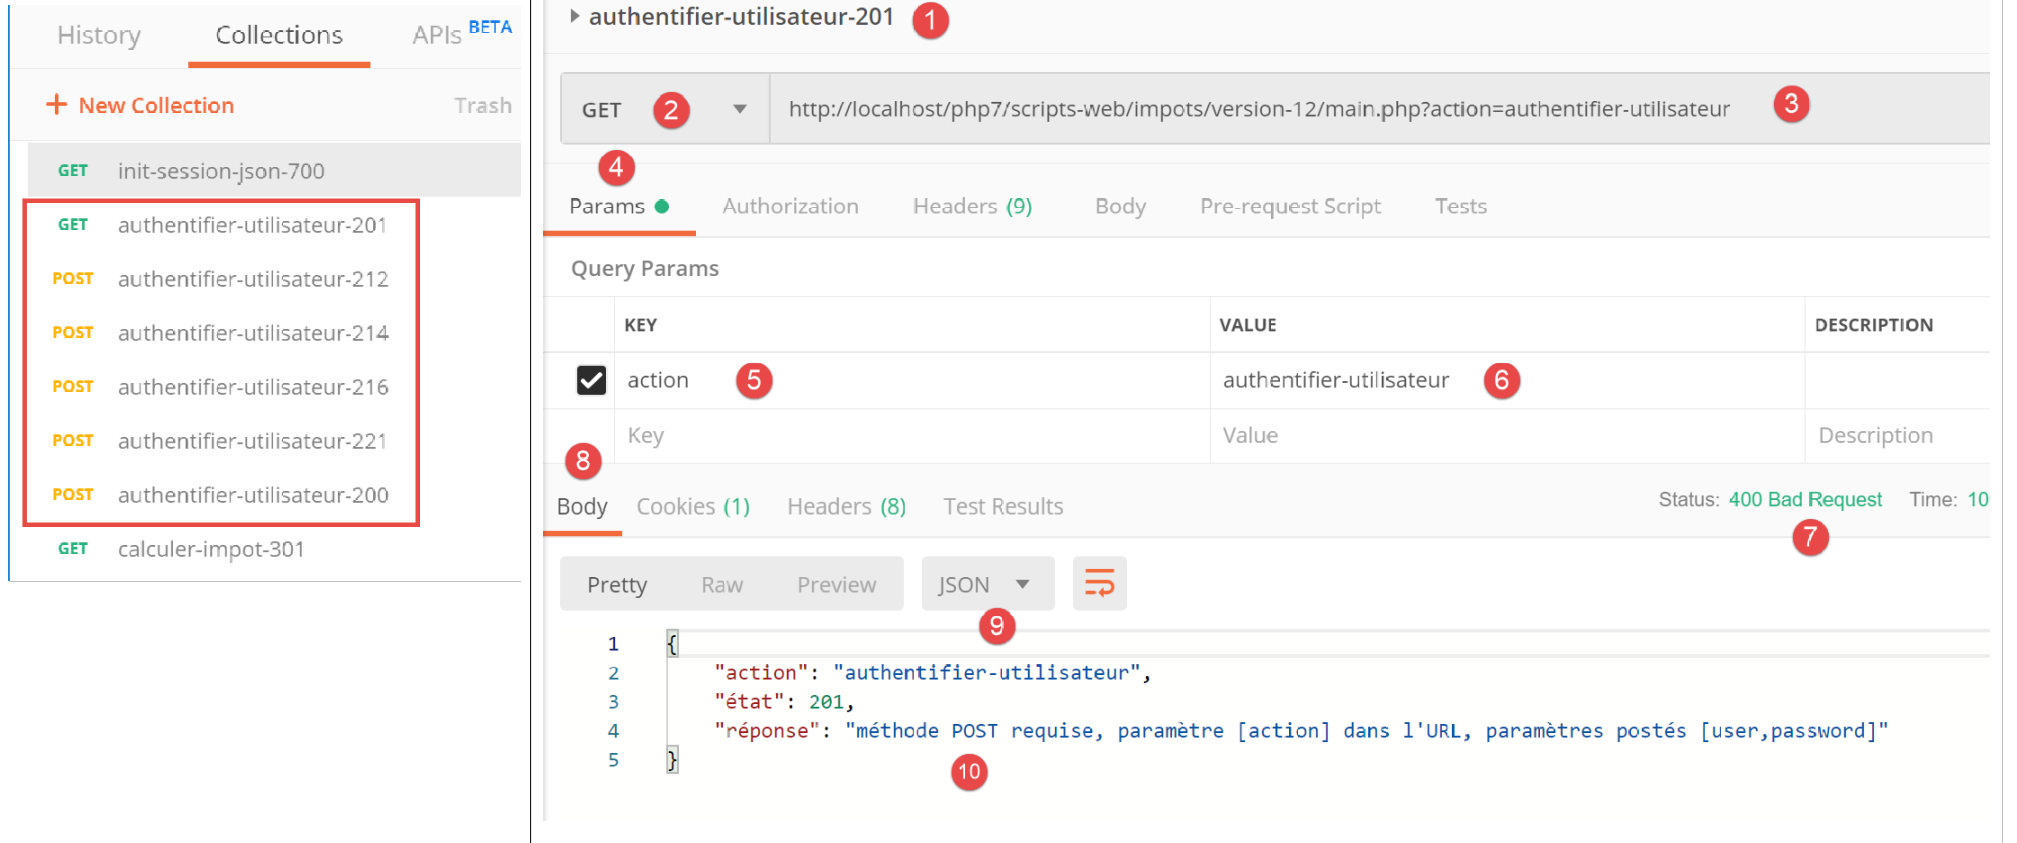
23.11.3. [authenticate-user] 操作
[authenticate-user] 操作由以下 [AuthentifierUtilisateurController] 控制器执行:
<?php

namespace Application;

// symfony dependencies
use \Symfony\Component\HttpFoundation\Response;
use \Symfony\Component\HttpFoundation\Request;
use \Symfony\Component\HttpFoundation\Session\Session;

class AuthentifierUtilisateurController implements InterfaceController {

  // $config is the application configuration
  // traitement d'une requête Request
  // session and can modify it
  // $infos is additional information specific to each controller
  // renders an array [$statusCode, $état, $content, $headers]
  public function execute(
    array $config,
    Request $request,
    Session $session,
    array $infos = NULL): array {

    // you must have a POST and a single GET parameter
    $method = strtolower($request->getMethod());
    $erreur = $method !== "post" || $request->query->count() != 1;
    if ($erreur) {
      $état = 201;
      $message = "méthode POST requise, paramètre [action] dans l'URL, paramètres postés [user,password]";
      // return the result to the main controller
      return [Response::HTTP_BAD_REQUEST, $état, ["réponse" => $message], []];
    }
    // retrieve POST parameters
    $erreurs = [];
    // user
    $état = 210;
    if (!$request->request->has("user")) {
      $état += 2;
      $erreurs[] = "paramètre [user] manquant";
    } else {
      $user = $request->request->get("user");
    }
    // password
    if (!$request->request->has("password")) {
      $état += 4;
      $erreurs[] = "paramètre [password] manquant";
    } else {
      $password = trim($request->request->get("password"));
    }
    // mistake?
    if ($erreurs) {
      // return the result to the main controller
      return [Response::HTTP_BAD_REQUEST, $état, ["réponse" => $erreurs], []];
    }
    // verification of user credentials
    // does the user exist?
    $users = $config["users"];
    $i = 0;
    $trouvé = FALSE;
    while (!$trouvé && $i < count($users)) {
      $trouvé = ($user === $users[$i]["login"] && $users[$i]["passwd"] === $password);
      $i++;
    }
    // found?
    if (!$trouvé) {
      // error message
      $message = "Echec de l'authentification [$user, $password]";
      $état = 221;
      // return the result to the main controller
      return [Response::HTTP_UNAUTHORIZED, $état, ["réponse" => $message], []];
    } else {
      // we note in the session that we have authenticated the user
      $session->set("user", TRUE);
      // message of success
      $message = "Authentification réussie [$user, $password]";
      $état = 200;
      // return the result to the main controller
      return [Response::HTTP_OK, $état, ["réponse" => $message], []];
    }
  }

}
评论
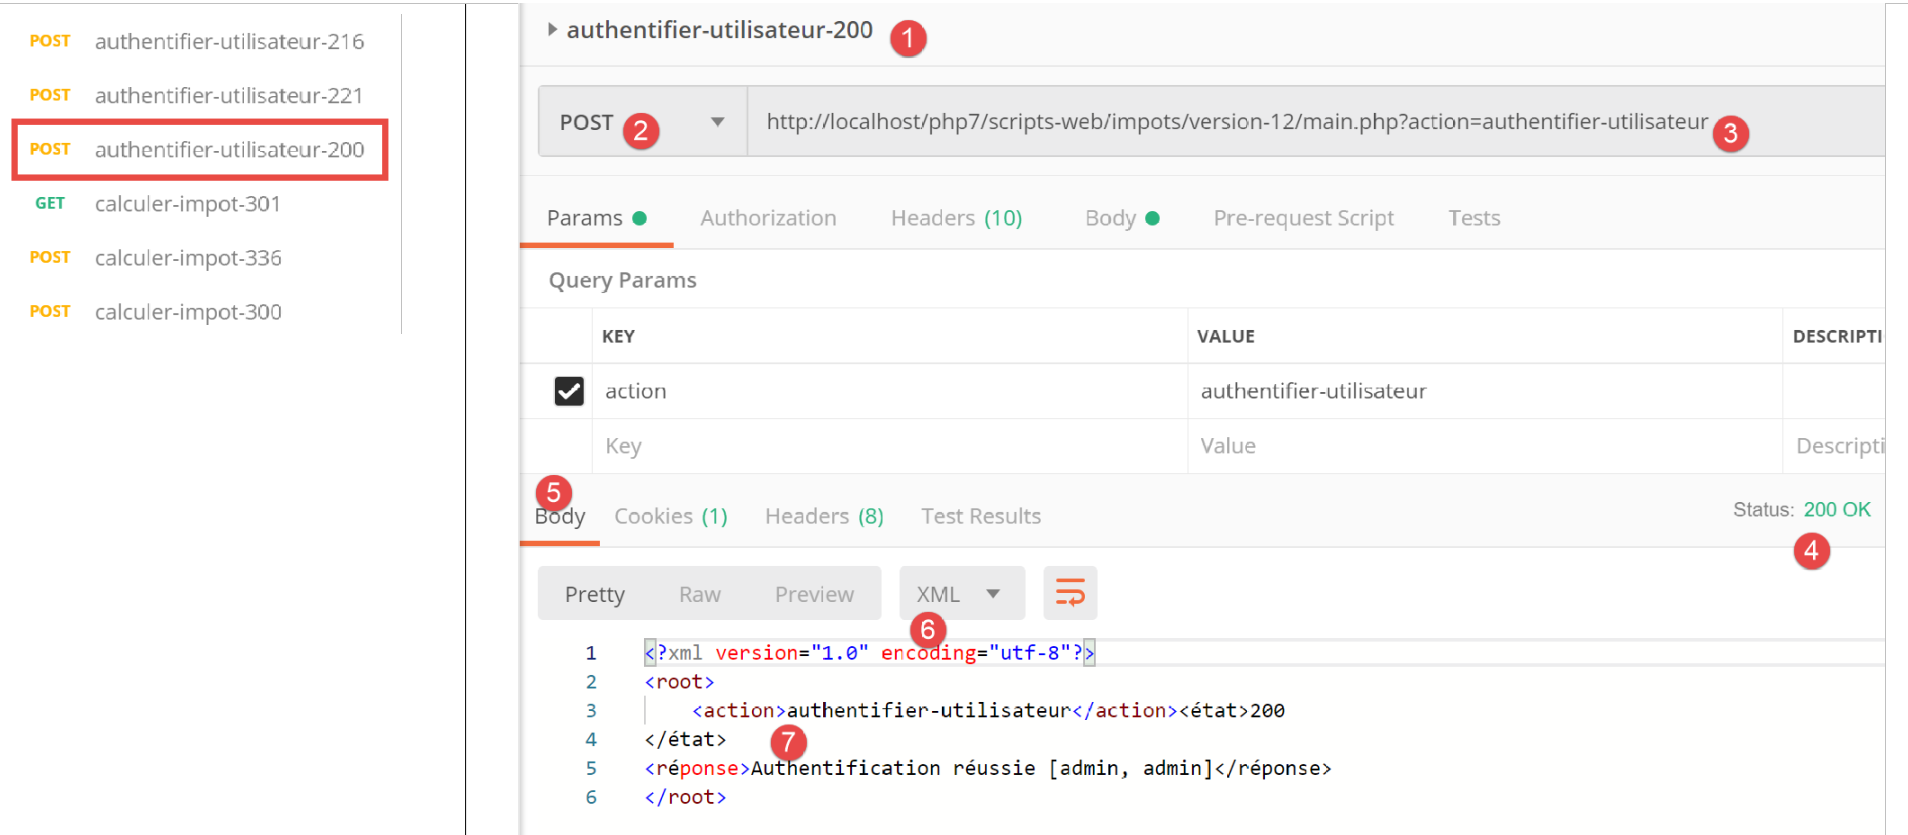
- 我们预期收到一个包含两个参数 [user, password] 的 [POST main.php?action=authentifier-utilisateur] 请求;
- 第 24–25 行:我们验证 URL 中是否包含一个参数的 POST 请求;
- 第 26–31 行:如果出现错误,我们会将其记录并向主控制器返回结果 [$statusCode, $status, $content, $headers];
- 第 36–39 行:检查提交值中是否包含 [user] 参数。若不存在,则记录错误;
- 第 43–45 行:检查提交数据中是否包含 [password] 参数。若不存在,则记录错误;
- 第 50–53 行:如果提交的值中有任何一个缺失,则向主控制器返回结果 [$statusCode, $status, $content, $headers];
- 第 56–62 行:检查检索到的 [$user,$password] 配对是否存在于配置文件中的 [$config[‘users’]] 数组中;
- 第 64–69 行:若不满足此条件,则记录错误。将 HTTP 状态码设置为 [Response::HTTP_UNAUTHORIZED],并将结果 [$statusCode, $status, $content, $headers] 返回给主控制器;
- 第 72 行:认证成功。通过设置 [user] 键在会话中记录此状态。该键的存在表示认证成功;
- 第 73–77 行:将成功结果 [$statusCode, $status, $content, $headers] 返回给主控制器;
23.11.4. [Postman] 测试
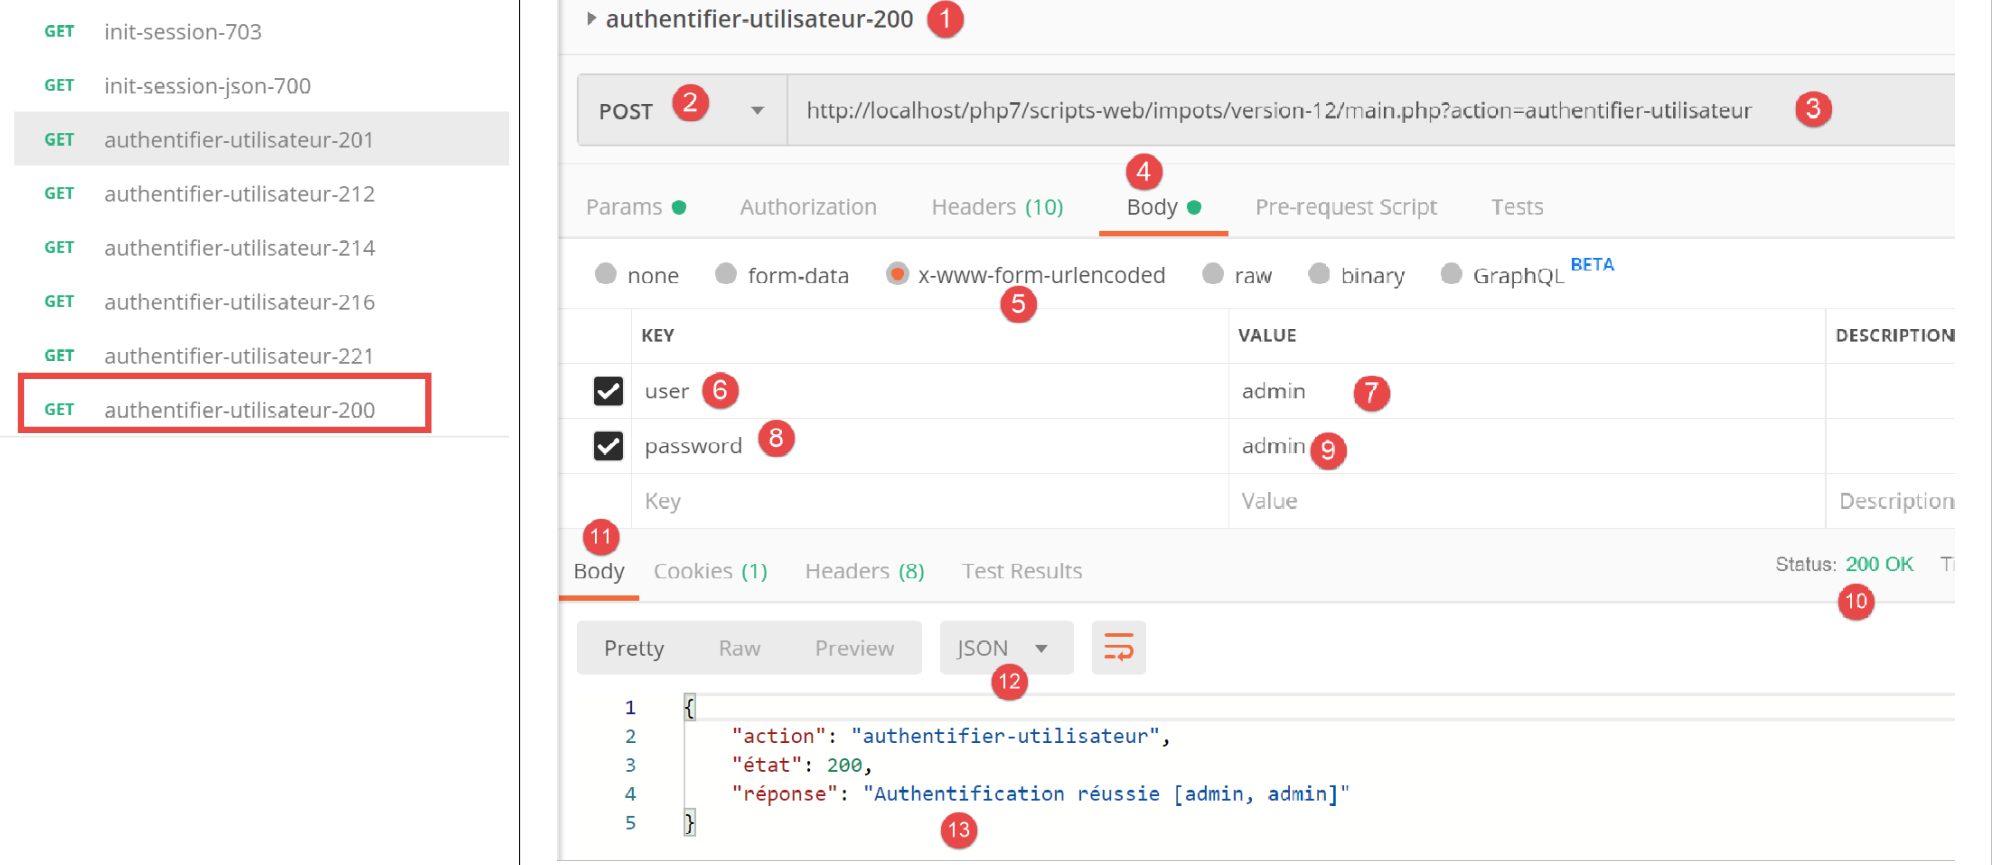
我们在 JSON 模式下对 [AuthentifierUtilisateurController] 控制器执行 [Postman] 测试;
上文:
- 在[1-6]中,[authenticate-user]操作使用了GET请求[2],而实际上需要POST请求;
- 在 [7-10] 中,服务器返回的 JSON 响应;
让我们将 [2] 处的 GET 请求替换为 POST 请求,且不在响应正文 [7] 中包含任何参数:
上文:
- 在 [1-7] 中,[7] 中发送的无参数 POST 请求;
- 在 [8-11] 中,服务器返回的 JSON 响应;
现在,让我们在请求正文中添加一个参数 [password] [4]:
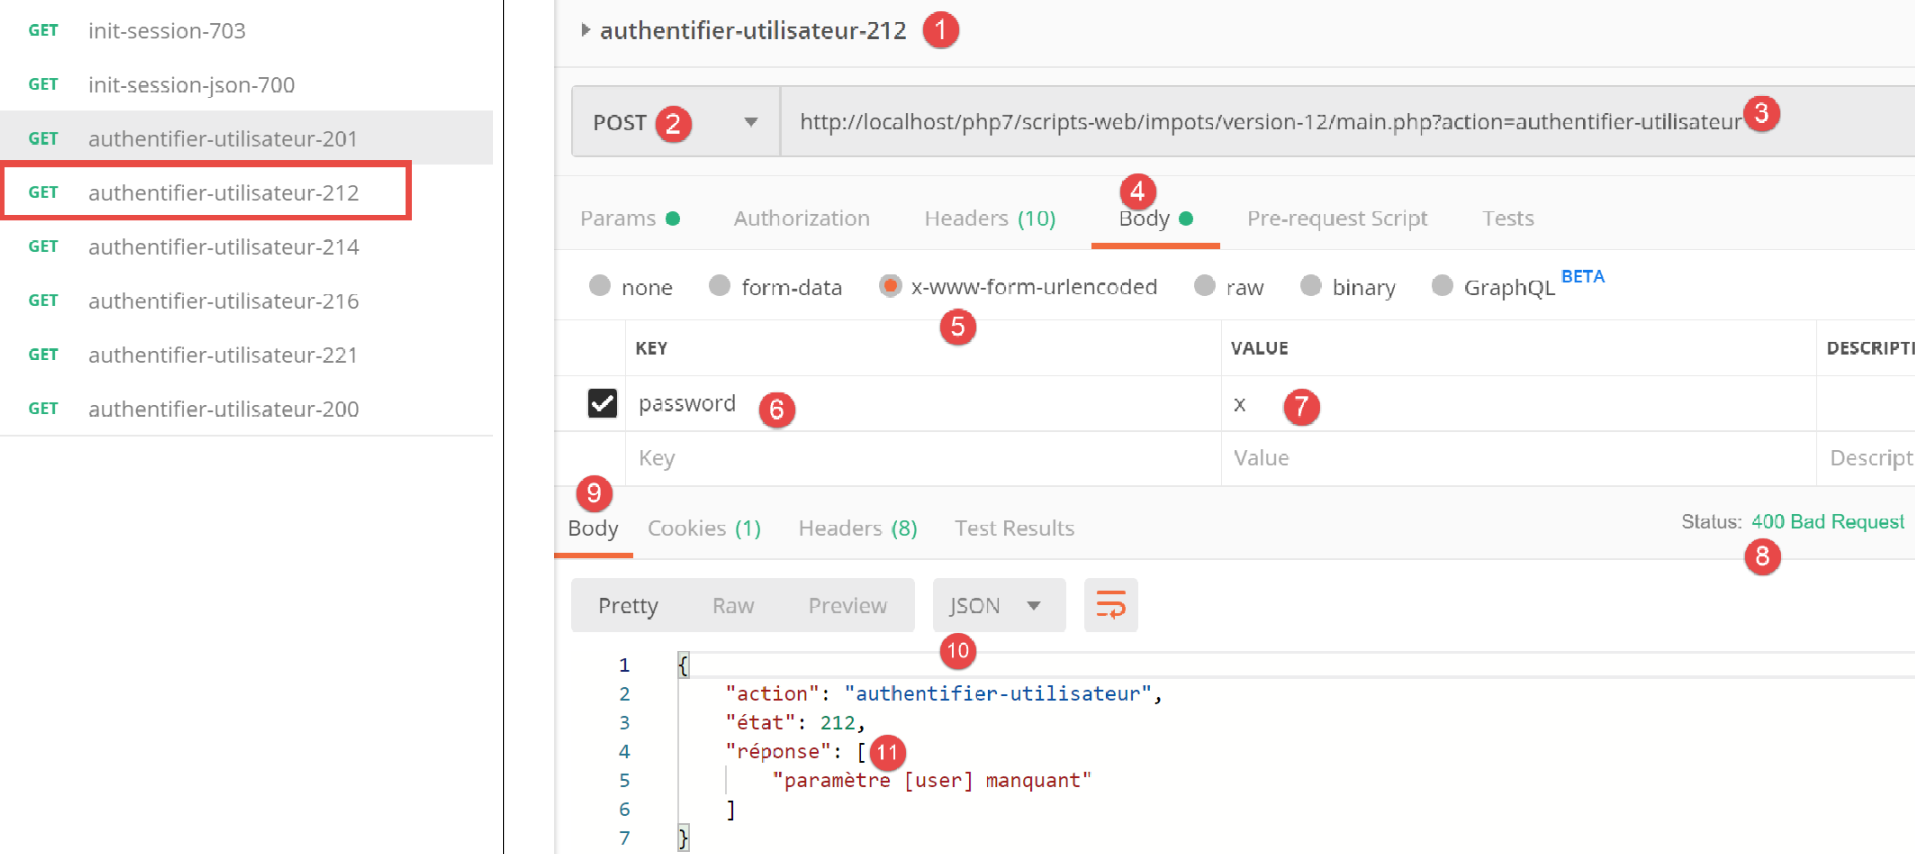
上文:
- 在 [1-6] 中,是一个带有 [password] 参数的 POST 请求 [2],该参数通过 POST 方式提交 [4-6]。POST 参数必须添加到请求正文中 [4]。向服务器提交值有多种方法。我们选择 [x-www-form-urlencoded] 方法 [5];
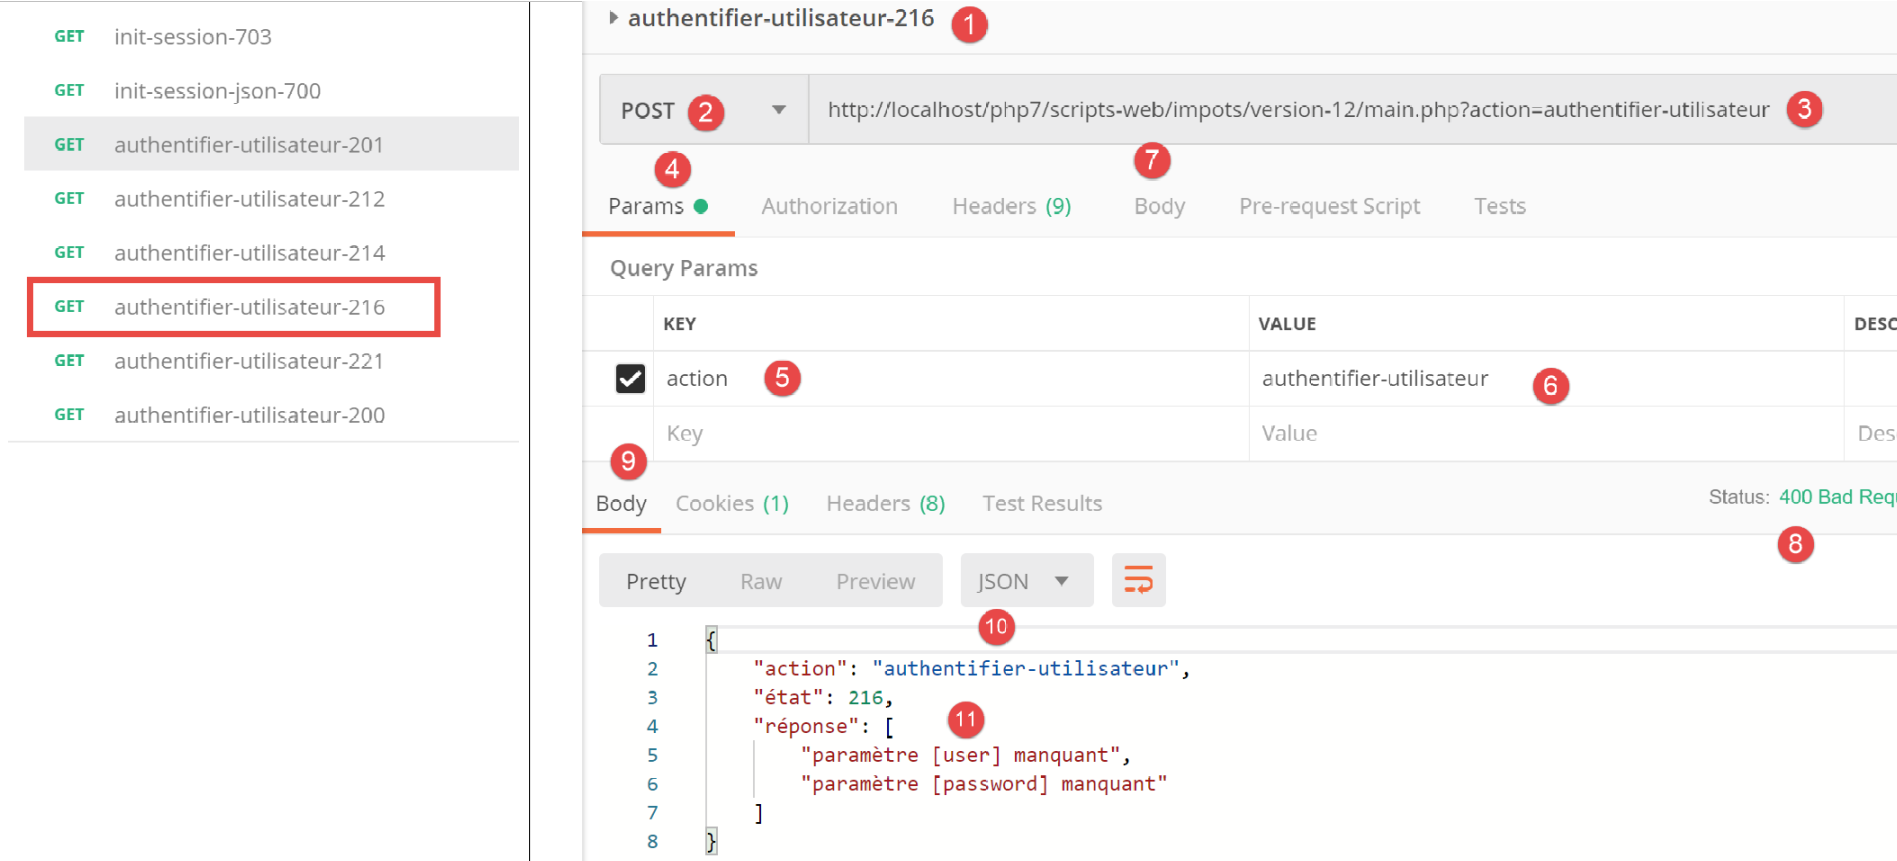
- 在 [8-10] 中,显示来自服务器的 JSON 响应;
现在,让我们定义不包含 [password] 参数的 [user] 参数:
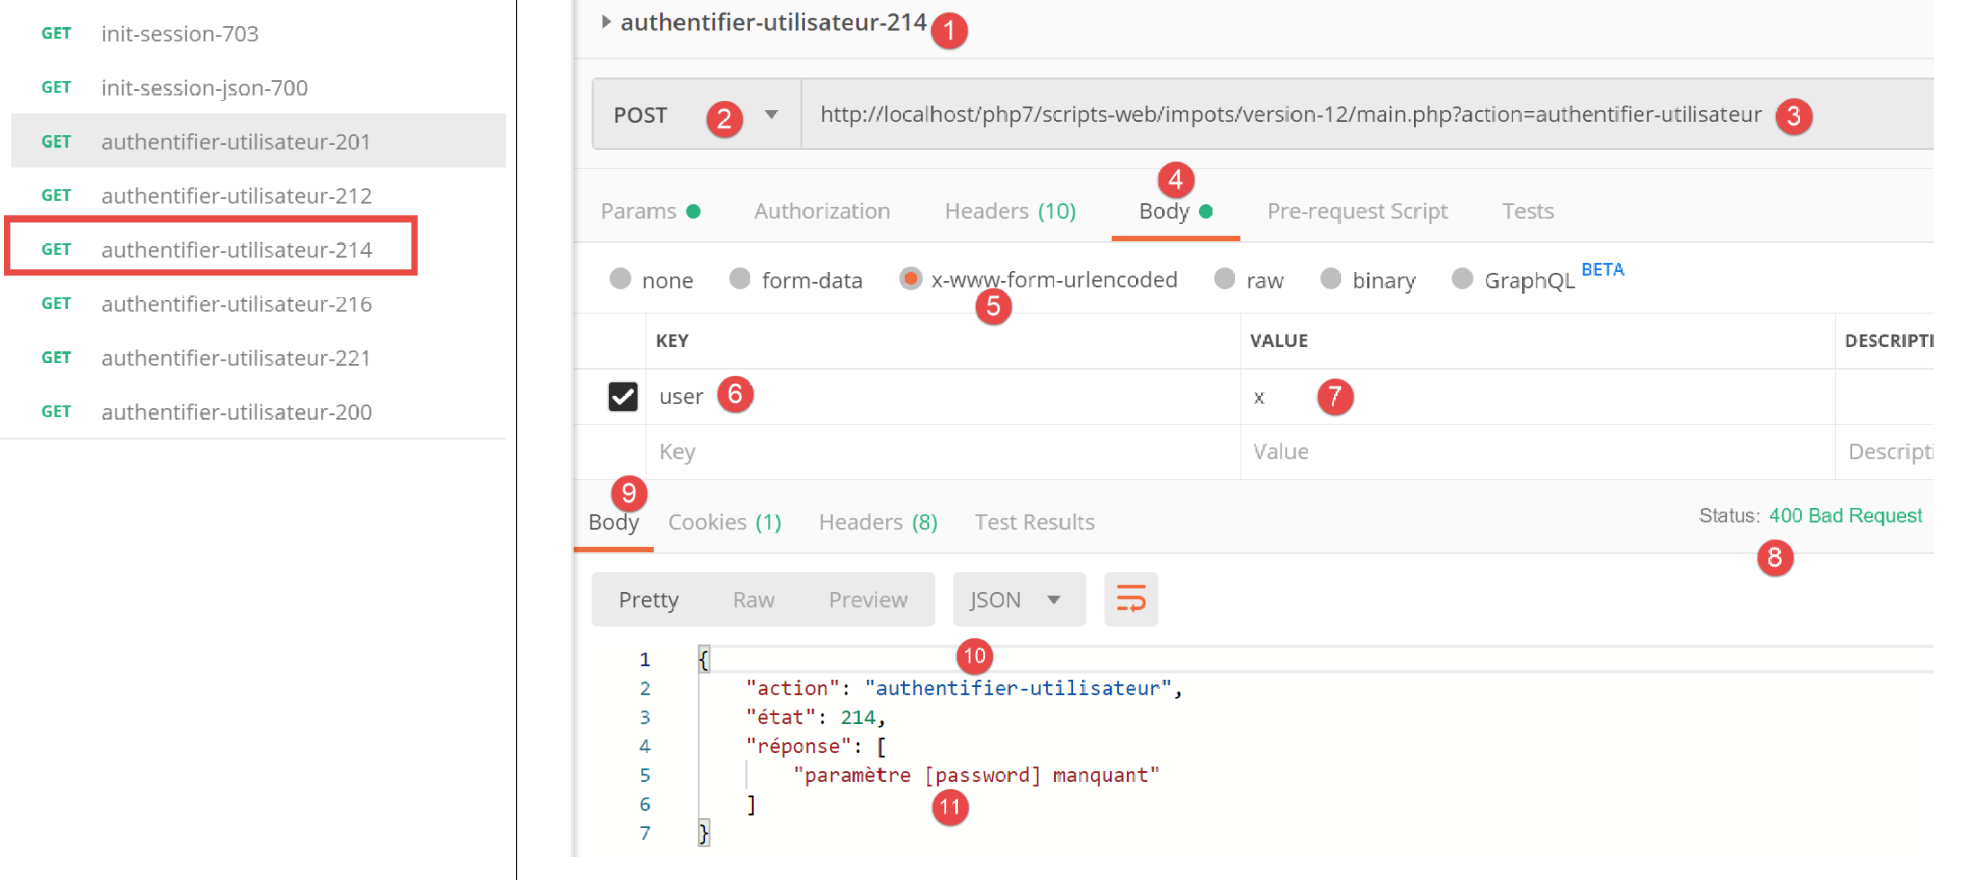
上文:
- 在 [1-7] 中,一个不包含 [password] 参数的 POST 请求 [4-7];
- 在 [8-11] 中,服务器的 JSON 响应;
现在,让我们设置两个参数 [user, password],但使用会导致认证失败的值:
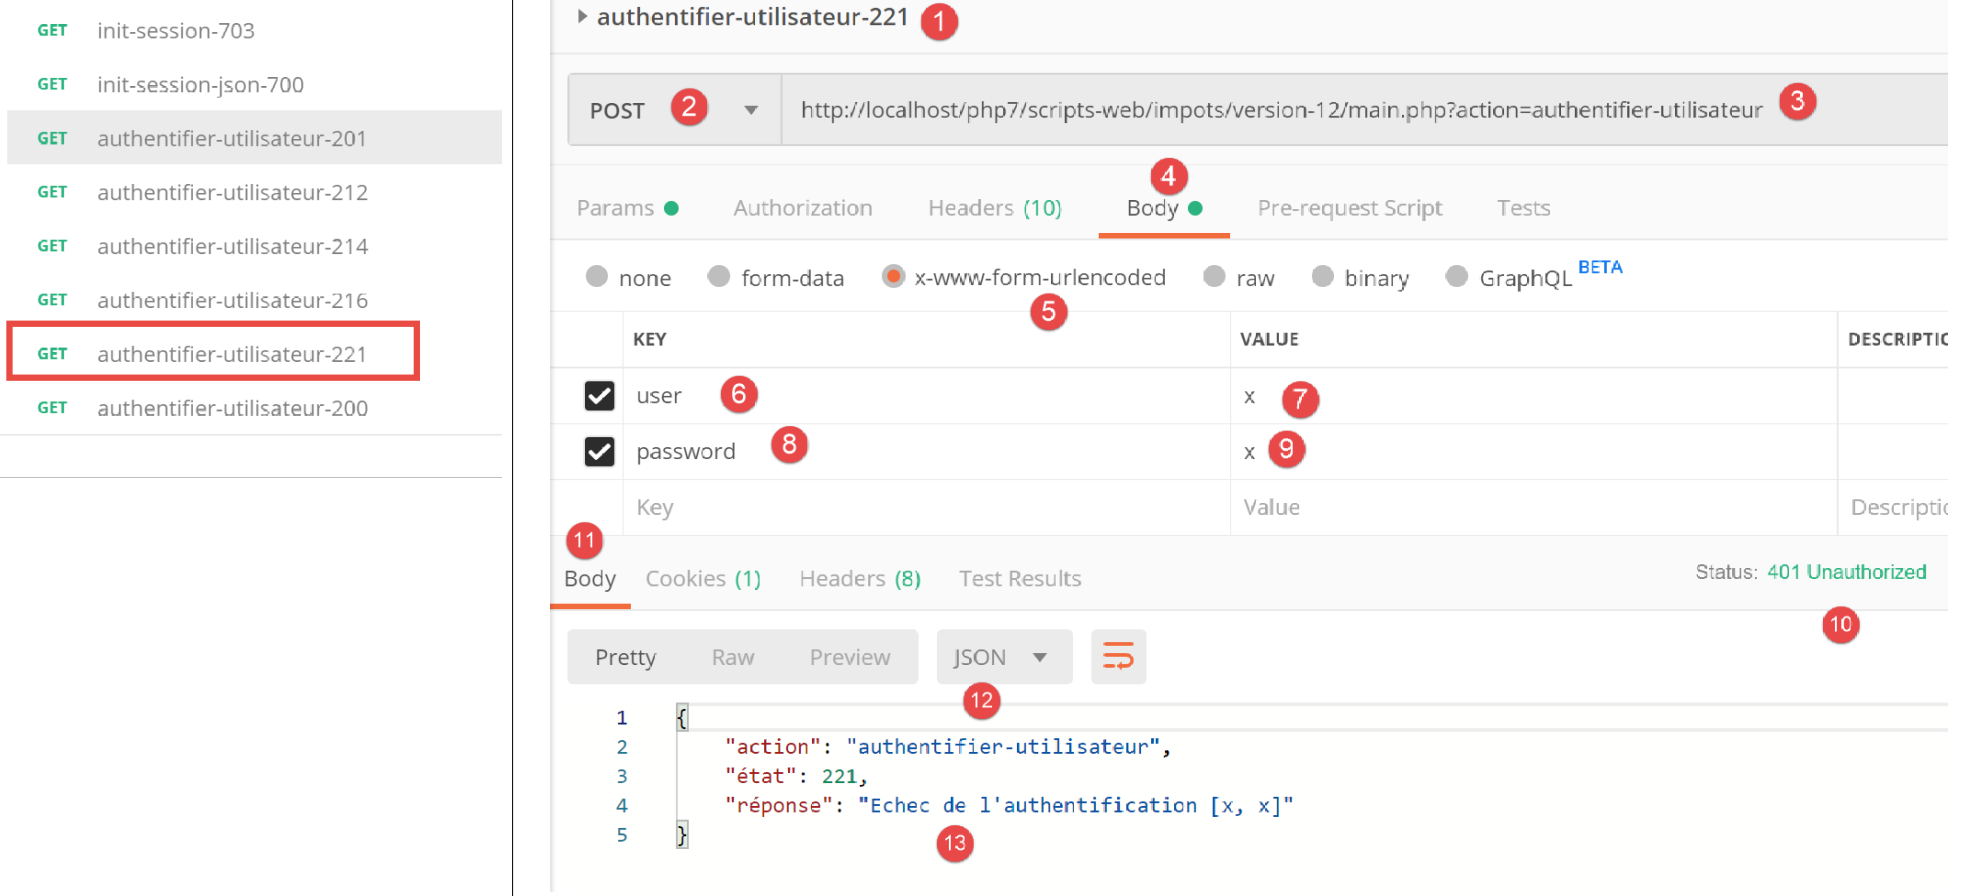
上文:
- 在 [1-9] 中,是一个包含错误 [user, password] 参数的 POST 请求;
- 在 [10-13] 中,服务器返回的 JSON 响应。请注意响应中的状态码 [401 未授权] [10];
现在是一个带有有效凭据的 POST 请求:
上文:
- 在 [1-9] 中,包含有效凭据 [6-9] 的 POST 请求 [2];
- 在 [10-13] 中,服务器返回的 JSON 响应。请注意 [10] 中的 HTTP 状态码 [200 OK];
23.11.5. [calculate-tax] 操作
[calculer-impot] 操作由以下 [CalculerImpotController] 控制器处理:
<?php
namespace Application;
// symfony dependencies
use \Symfony\Component\HttpFoundation\Response;
use \Symfony\Component\HttpFoundation\Request;
use \Symfony\Component\HttpFoundation\Session\Session;
// layer alias [dao]
use \Application\ServerDaoWithSession as ServerDaoWithRedis;
class CalculerImpotController implements InterfaceController {
// $config is the application configuration
// traitement d'une requête Request
// session and can modify it
// $infos is additional information specific to each controller
// renders an array [$statusCode, $état, $content, $headers]
public function execute(
array $config,
Request $request,
Session $session,
array $infos = NULL): array {
// you must have one GET parameter and three POST parameters
$method = strtolower($request->getMethod());
$erreur = $method !== "post" || $request->query->count() != 1;
if ($erreur) {
// we note the error
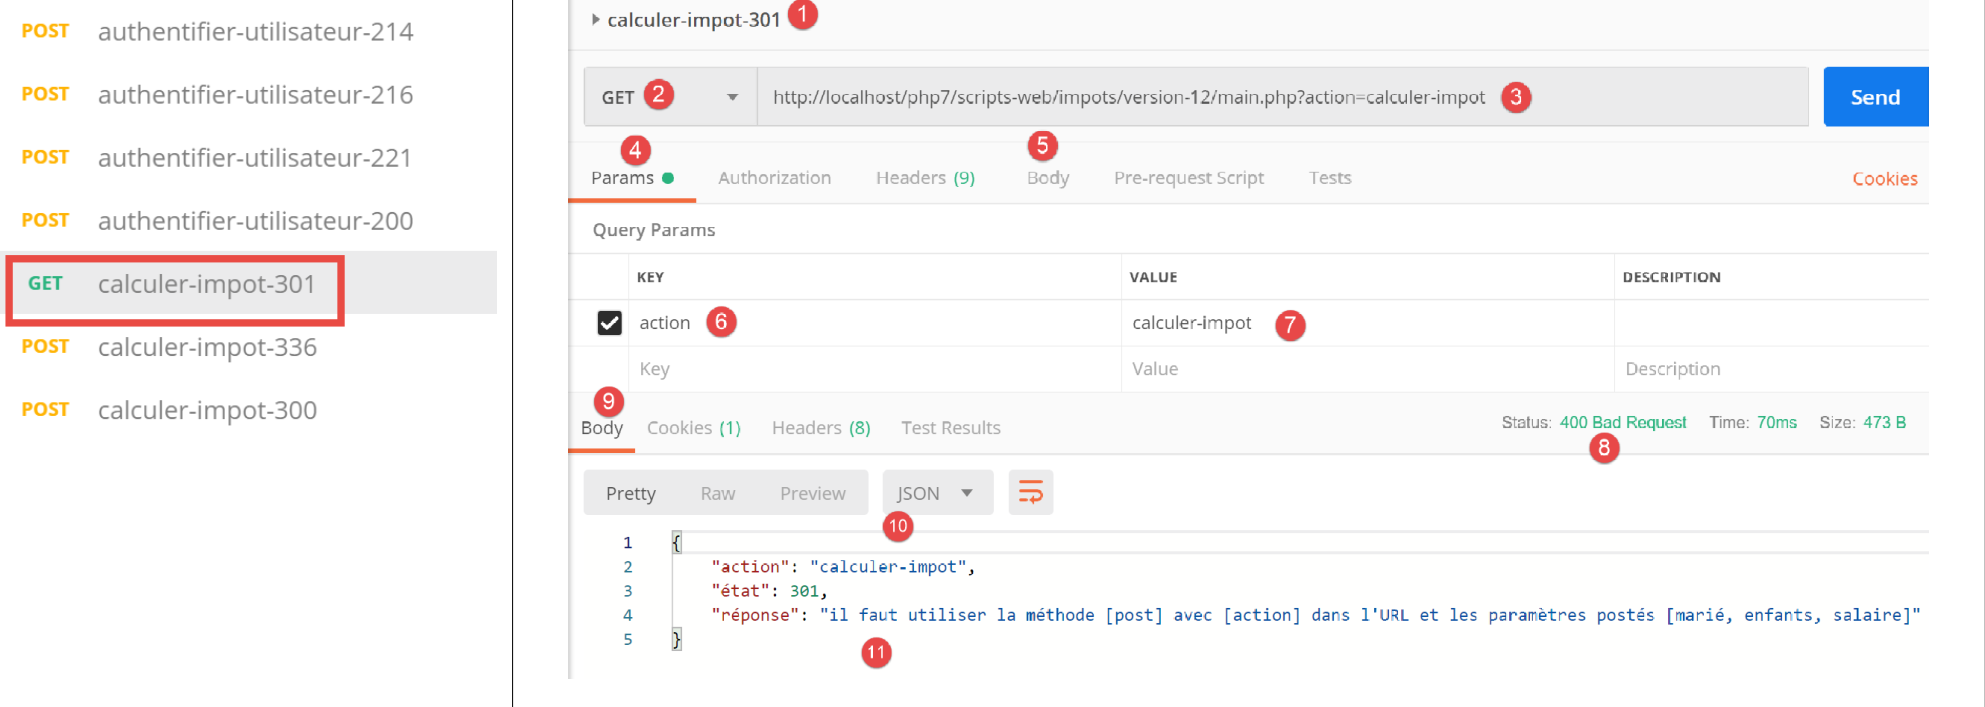
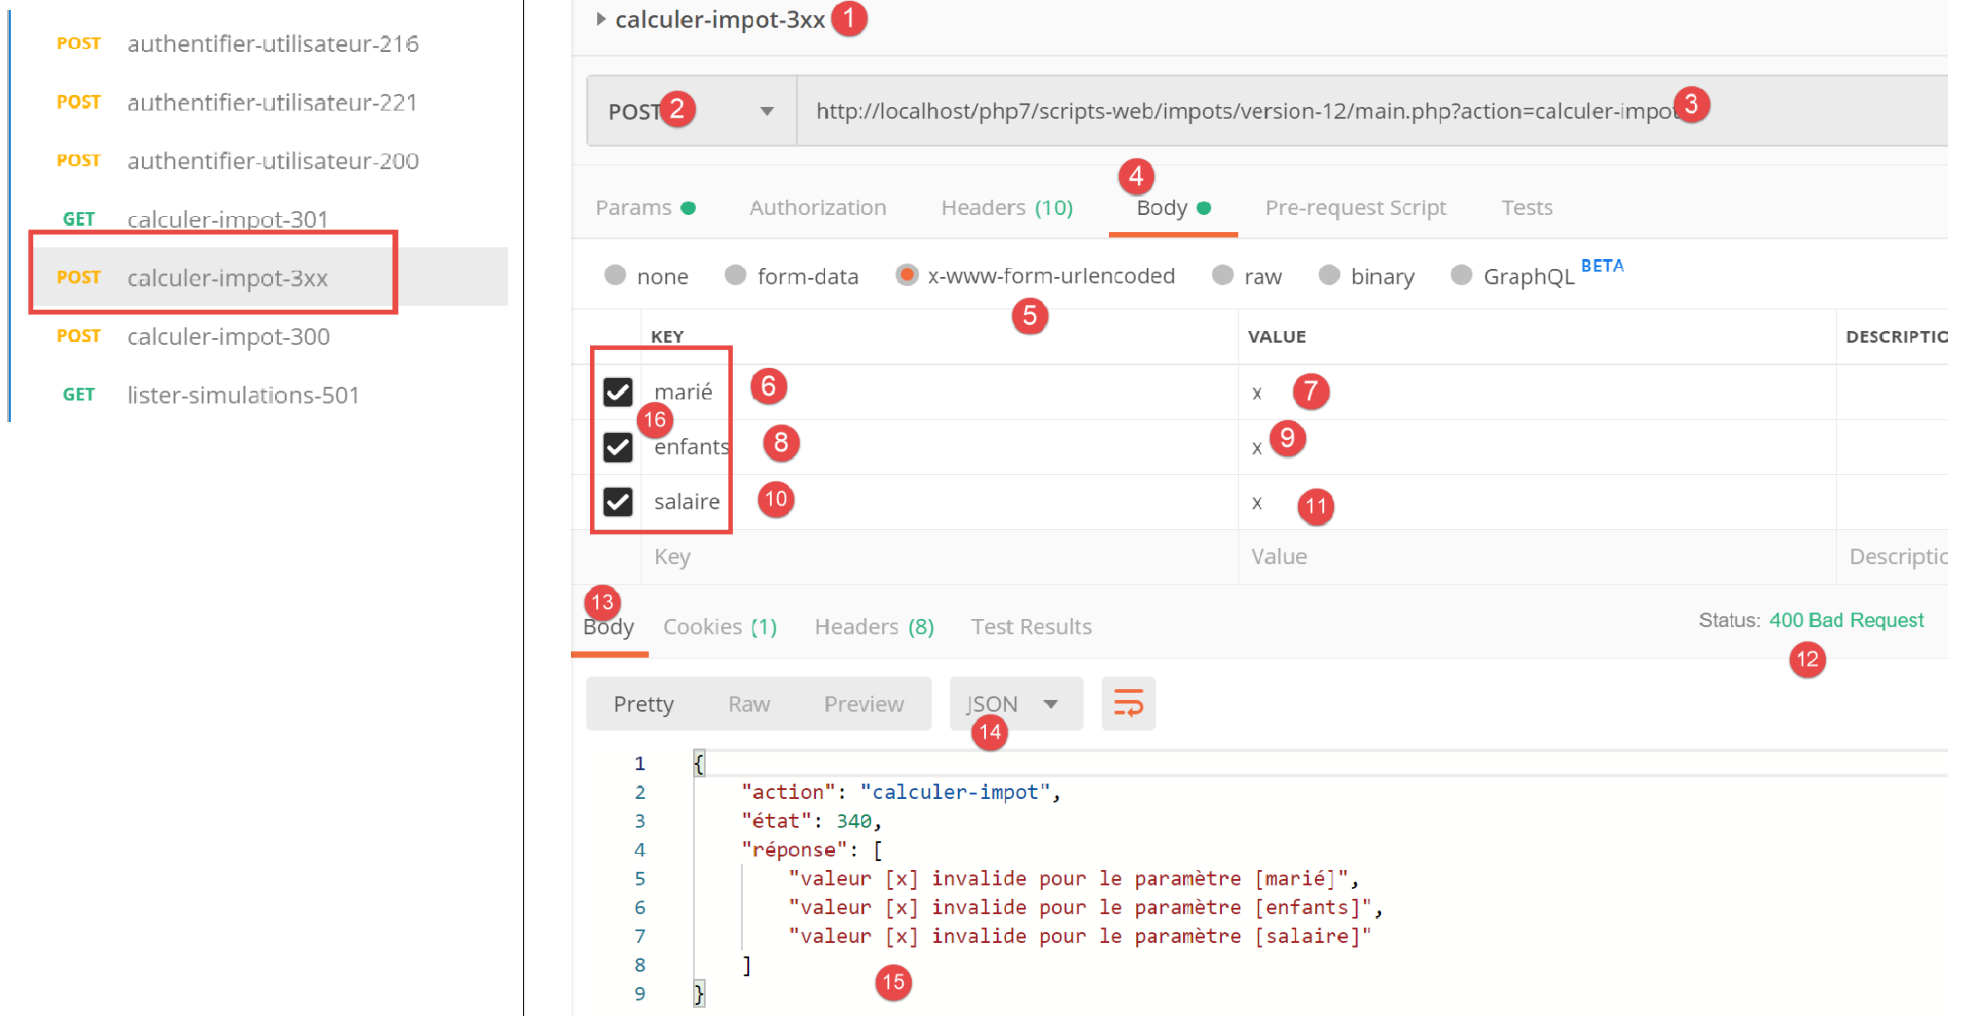
$message = "il faut utiliser la méthode [post] avec [action] dans l'URL et les paramètres postés [marié, enfants, salaire]";
$état = 301;
// return result to main controller
return [Response::HTTP_BAD_REQUEST, $état, ["réponse" => $message], []];
}
// retrieve POST parameters
$erreurs = [];
$état = 310;
// marital status
if (!$request->request->has("marié")) {
$état += 2;
$erreurs[] = "paramètre [marié] manquant";
} else {
$marié = trim(strtolower($request->request->get("marié")));
$erreur = $marié !== "oui" && $marié !== "non";
if ($erreur) {
$état += 4;
$erreurs[] = "valeur [$marié] invalide pour le paramètre [marié]";
}
}
// the number of children
if (!$request->request->has("enfants")) {
$état += 8;
$erreurs[] = "paramètre [enfants] manquant";
} else {
$enfants = trim($request->request->get("enfants"));
$erreur = !preg_match("/^\d+$/", $enfants);
if ($erreur) {
$état += 9;
$erreurs[] = "valeur [$enfants] invalide pour le paramètre [enfants]";
}
}
// we recover the annual salary
if (!$request->request->has("salaire")) {
$erreurs[] = "paramètre [salaire] manquant";
$état += 16;
} else {
$salaire = trim($request->request->get("salaire"));
$erreur = !preg_match("/^\d+$/", $salaire);
if ($erreur) {
$état += 17;
$erreurs[] = "valeur [$salaire] invalide pour le paramètre [salaire]";
}
}
// mistake?
if ($erreurs) {
// return result to main controller
return [Response::HTTP_BAD_REQUEST, $état, ["réponse" => $erreurs], []];
}
// we have everything you need to work
// Redis
\Predis\Autoloader::register();
try {
// customer [predis]
$redis = new \Predis\Client();
// connect to the server to see if it's there
$redis->connect();
} catch (\Predis\Connection\ConnectionException $ex) {
// it didn't go well
// return result with error to main controller
$état = 350;
return [Response::HTTP_INTERNAL_SERVER_ERROR, $état,
["réponse" => "[redis], " . utf8_encode($ex->getMessage())], []];
}
// we have valid parameters
// creation of the [dao] layer
if (!$redis->get("taxAdminData")) {
try {
// retrieve tax data from the database
$dao = new ServerDaoWithRedis($config["databaseFilename"], NULL);
// put the recovered data into redis
$redis->set("taxAdminData", $dao->getTaxAdminData());
} catch (\RuntimeException $ex) {
// it didn't go well
// return result with error to main controller
$état = 340;
return [Response::HTTP_INTERNAL_SERVER_ERROR, $état,
["réponse" => utf8_encode($ex->getMessage())], []];
}
} else {
// tax data are taken from the [application] scope memory
$arrayOfAttributes = \json_decode($redis->get("taxAdminData"), true);
$taxAdminData = (new TaxAdminData())->setFromArrayOfAttributes($arrayOfAttributes);
// istanciation of the [dao] layer
$dao = new ServerDaoWithRedis(NULL, $taxAdminData);
}
// creation of the [business] layer
$métier = new ServerMetier($dao);
// we have everything we need to work - tax calculation
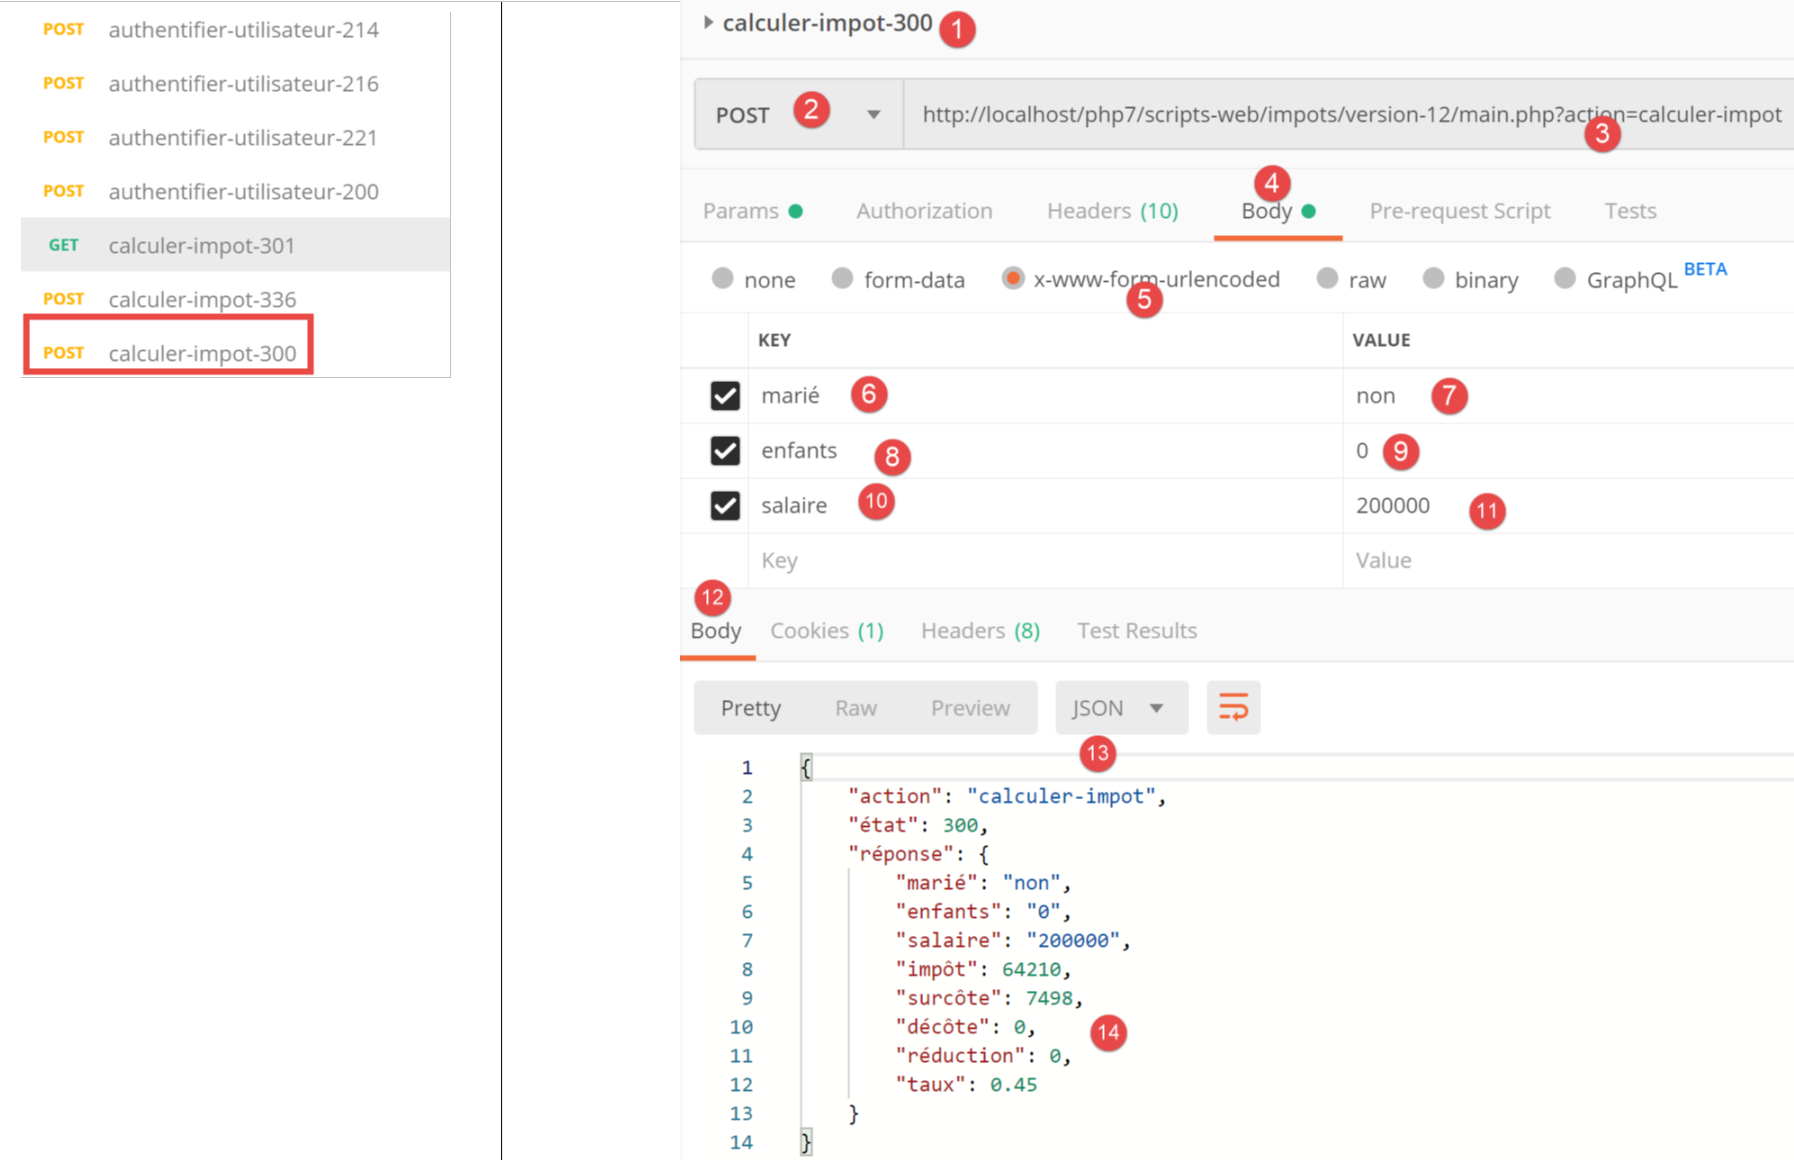
$résultat = $métier->calculerImpot($marié, (int) $enfants, (int) $salaire);
// we add the simulation just run to the session
$simulation = new Simulation();
$résultat = ["marié" => $marié, "enfants" => $enfants, "salaire" => $salaire] + $résultat;
$simulation->setFromArrayOfAttributes($résultat);
// is there a list of in-session simulations?
if (!$session->has("simulations")) {
$simulations = [];
} else {
$simulations = $session->get("simulations");
}
// add simulation to simulation list
$simulations[] = $simulation;
// simulations are put back into session
$session->set("simulations", $simulations);
// return result to main controller
$état = 300;
return [Response::HTTP_OK, $état, ["réponse" => $résultat], []];
}
}
评论
- 预期的请求为 [POST main.php?action=calculate-tax],包含三个提交的参数 [married, children, salary]:
- [married] 必须为 [yes] 或 [no];
- [children, salary] 必须是正整数或零;
- 第 26–27 行:我们验证 URL 中是否包含单个参数的 POST 请求;
- 第 28–34 行:如果不符合此条件,则向主控制器发送错误结果;
- 第 36 行:我们将错误信息累积到数组 [$errors] 中;
- 第 39–41 行:检查 [married] 参数是否存在。若不存在,则记录该错误;
- 第 43–49 行:检查 [married] 参数的值是否为 [yes] 或 [no]。若非如此,则记录错误;
- 第 51–54 行:检查 [children] 参数是否存在。若不存在,则记录错误;
- 第 55–61 行:检查 [children] 参数的值是否为正数或零。若不符合,则记录错误;
- 第 63–66 行:检查 [salary] 参数是否存在。如果不存在,则记录错误;
- 第 67–72 行:检查 [salary] 参数的值是否为正数或零。若不符合条件,则记录错误;
- 第 75–78 行:如果 [$errors] 数组不为空,则表示发生了错误。我们将错误数组包含在响应中,并将结果返回给主控制器;
- 第 80 行:参数有效。我们可以计算税额。为此,我们需要构建懂得如何执行此计算的 [dao] 和 [business] 层;
- 第 82–94 行:我们创建一个 [Redis] 客户端;
- 第 88–94 行:如果无法连接到 [Redis] 服务器,则向客户端发送 [500 Internal Server Error] 状态码;
- 第 98 行:检查 [Redis] 服务器是否存在 [taxAdminData] 键。该键代表税务管理数据。若该键不存在,则必须从数据库中检索税务数据;
- 第 101 行:当需要从数据库中检索税务数据时,构建 [dao] 层。[ServerDaoWithRedis] 类已在相关章节中进行过说明;
- 第 103 行:从数据库检索到的数据将以键 [taxAdminData] 存储在 [Redis] 中;
- 第 104–110 行:若数据库查询失败,将记录 [dao] 层返回的错误,并将其包含在发回主控制器的结果中;
- 第 109 行:[PDO] 层返回的错误消息采用 [iso-8859-1] 编码,此处将其转换为 [utf-8] 编码;
- 第 111–117 行:如果 [Redis] 存储中存在 [taxAdminData] 键,则将税务数据直接传递给 [DAO] 层的构造函数;
- 第 119 行:创建 [business] 层。关于 [ServerMetier] 类的描述请参见链接部分;
- 第 124–126 行:利用计算出的税额,创建了一个 [Simulation] 对象。[Simulation] 类封装了模拟的数据,已在链接部分中描述;
- 第 128–132 行:刚构建的模拟必须添加到已计算模拟的列表中。该列表位于会话中,除非尚未进行任何模拟;
- 第 133–136 行:将该模拟添加到模拟列表中,并将该列表返回给会话;
- 第 137–139 行:将结果返回给主控制器;
23.11.6. [Postman] 测试
我们在 JSON 模式下对 [CalculerImpotController] 控制器执行 [Postman] 测试;
上文:
- 在[1-7]中,我们发送的是[GET]请求而非[POST]请求;
- 在 [8-11] 中,服务器返回的 JSON 响应;
现在,让我们使用 [POST] 方法,尝试带或不带提交参数的情况,以及提交无效参数的情况:
上文:
- 我们发起一个 [POST] 请求 [2],其中包含无效的提交参数 [6-11] [married, children, salary]。您可以通过取消勾选 [16] 中的复选框来省略其中一个参数。这将使您能够测试不同的场景。在上图截图中,这三个参数均存在且全部无效;
- 在 [12-15] 中,显示服务器的 JSON 响应;
现在,让我们取消勾选这三个提交参数中的两个:

上文,
- 在 [5-8] 中,仅提交了 [salary] 参数,而且该参数无效;
- 在[9-11]中,是来自服务器的JSON结果;
现在让我们使用有效的参数进行税费计算:
上文:
- 在 [11-18] 中,包含有效参数 [6-8] 的请求;
- 在 [12-14] 中,服务器的 JSON 响应;
23.11.7. [lister-simulations] 操作
[lister-simulations] 操作由以下二级控制器 [ListerSimulationsController] 处理:
<?php

namespace Application;

// symfony dependencies
use \Symfony\Component\HttpFoundation\Response;
use \Symfony\Component\HttpFoundation\Request;
use \Symfony\Component\HttpFoundation\Session\Session;

class ListerSimulationsController {

  // $config is the application configuration
  // traitement d'une requête Request
  // useful session and can modify it
  // $infos is additional information specific to each controller
  // renders an array [$statusCode, $état, $content, $headers]
  public function execute(
    array $config,
    Request $request,
    Session $session,
    array $infos = NULL): array {

    // you must have a single parameter GET
    $method = strtolower($request->getMethod());
    $erreur = $method !== "get" || $request->query->count() != 1;
    if ($erreur) {
      $état = 501;
      $message = "GET requis, avec l'unique paramètre [action] dans l'URL";
      // return an error result to the main controller
      return [Response::HTTP_BAD_REQUEST, $état, ["réponse" => $message], []];
    }
    // retrieve the list of simulations in the session
    if (!$session->has("simulations")) {
      $simulations = [];
    } else {
      $simulations = $session->get("simulations");
    }
    // a successful result is returned to the main controller
    $état = 500;
    return [Response::HTTP_OK, $état, ["réponse" => $simulations], []];
  }

}
评论
- request [GET main.php?action=list-simulations];
- 第 24–25 行:我们检查是否收到一个带有单个参数的 GET 请求;
- 第 26–31 行:如果不符合此条件,则向主控制器返回错误结果;
- 第 33-37 行:若会话中存在模拟列表(第 36 行),则从中检索该列表;否则列表为空(第 34 行);
- 第 39-40 行:将模拟列表返回给主控制器;
23.11.8. 测试 [Postman]
我们将创建两个测试,一个用于错误情况,另一个用于成功情况。
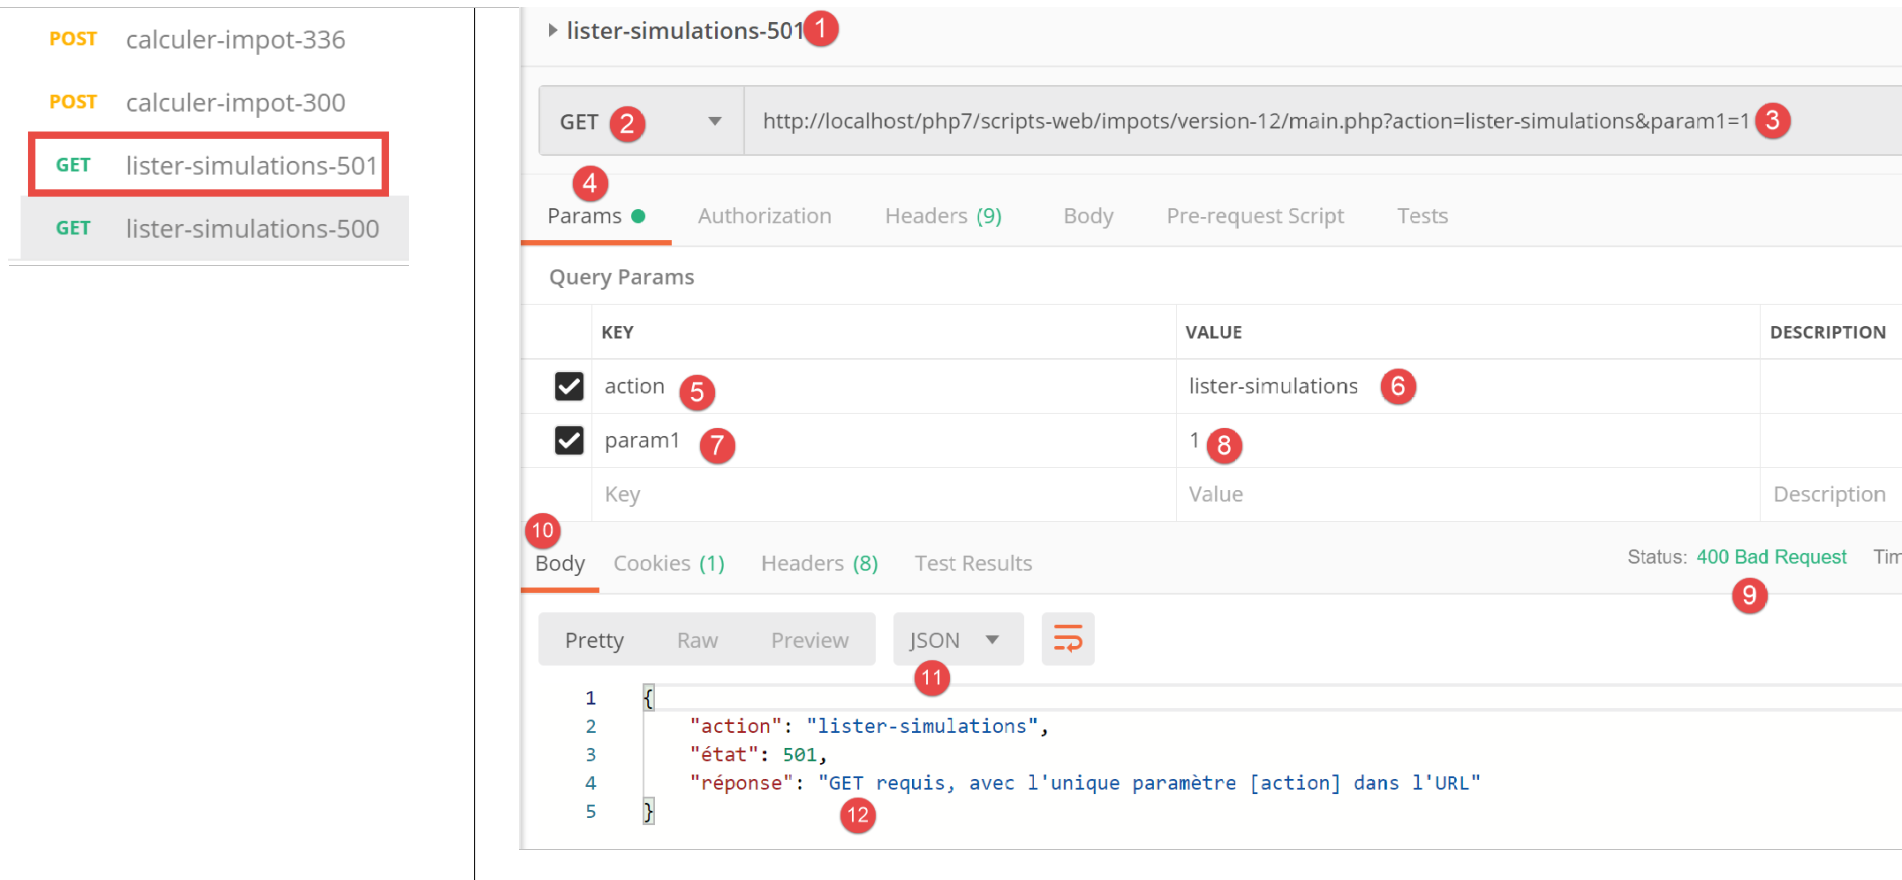
上文:
- 在 [1-8] 中,我们在 URL [3, 7-8] 中添加了一个额外参数 [param1] 并发起 [GET] 请求;
- 在 [9-12] 中,显示了服务器的 JSON 响应;
现在让我们发送一个有效的请求:
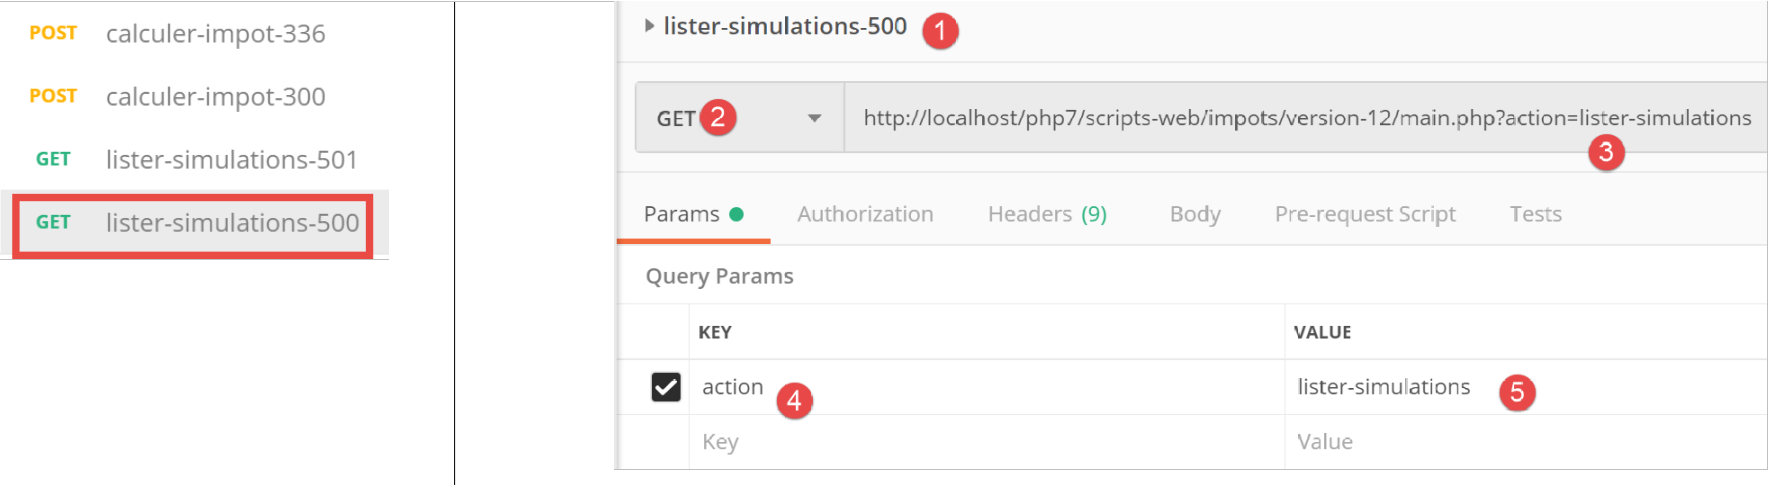
上文:
- 在 [1-5] 中,这是一个有效的请求;
该请求的结果如下:
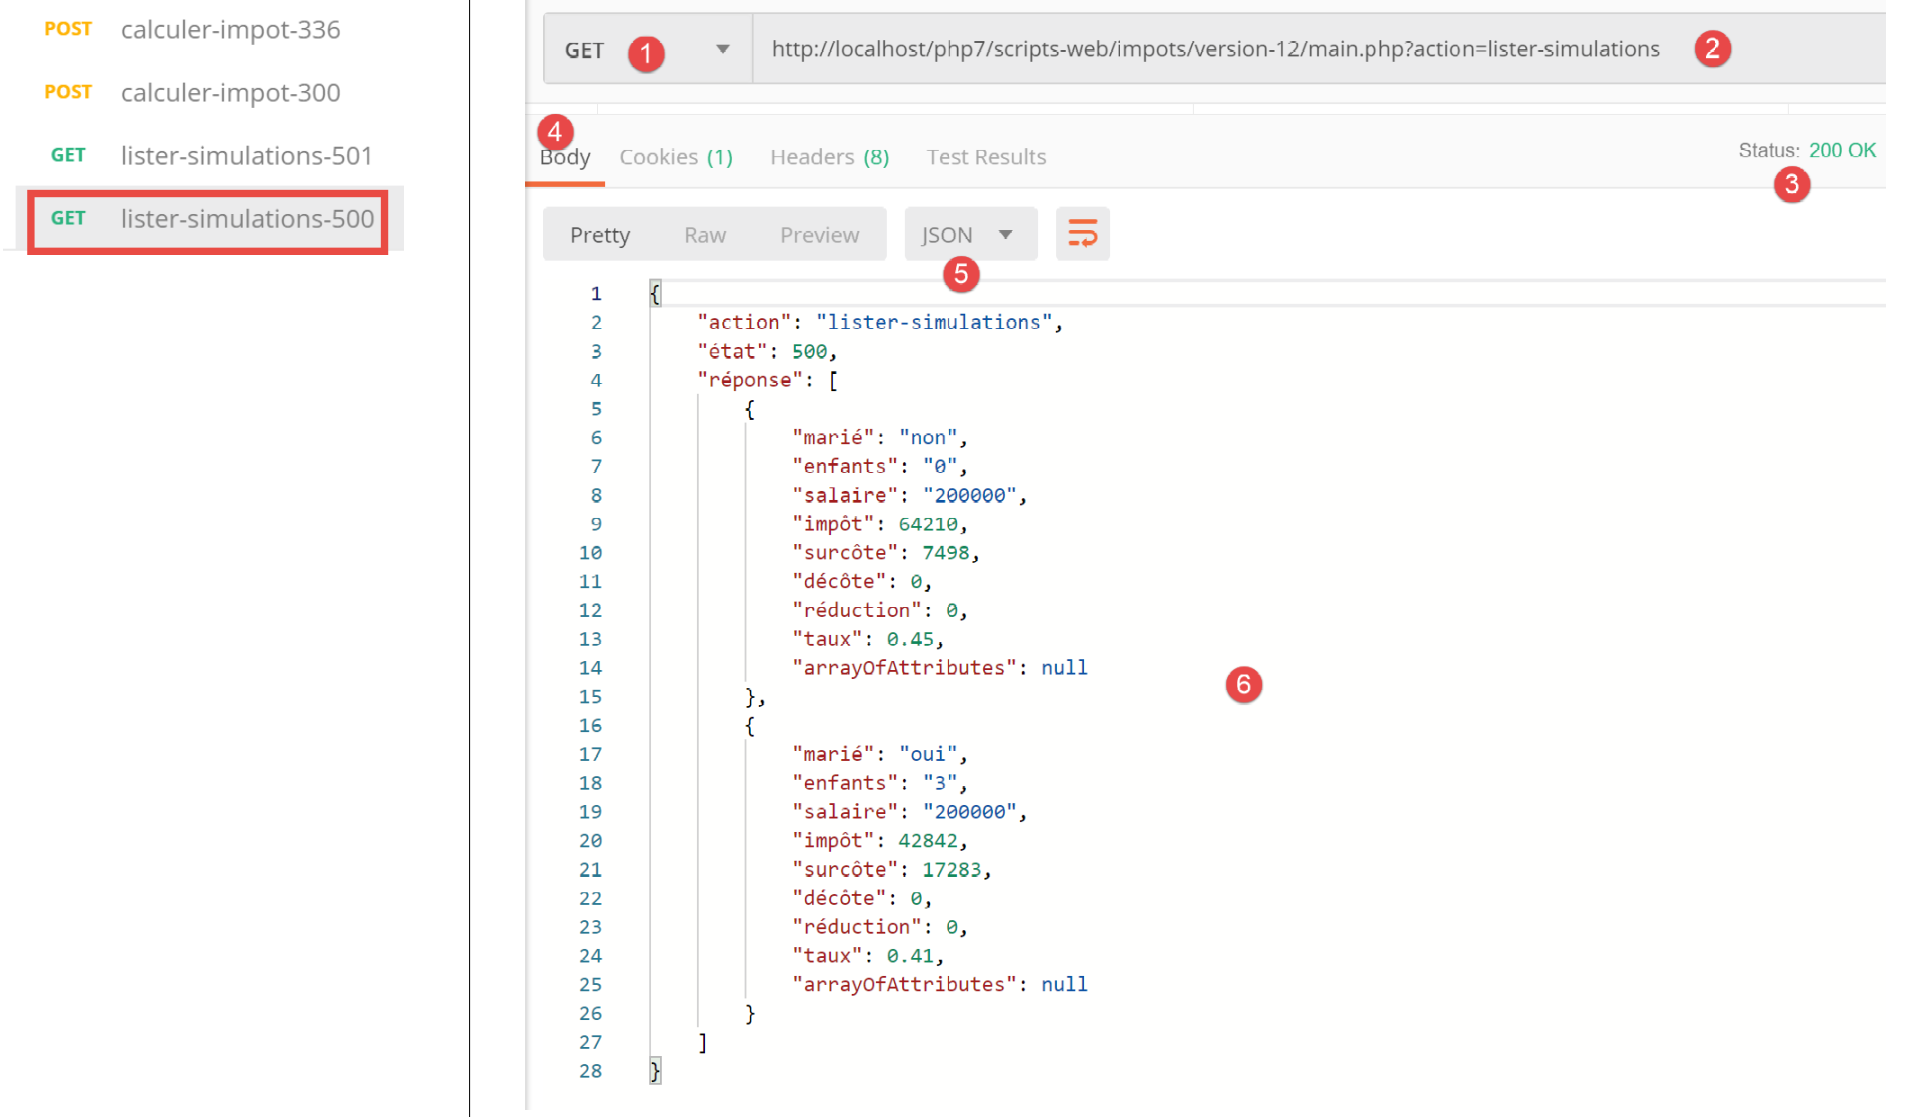
- 在 [3-6] 中,是服务器的 JSON 响应。在此测试之前,已多次运行 [Postman] [calculate-tax-300] 测试,以在服务器的 Web 会话中创建模拟数据;
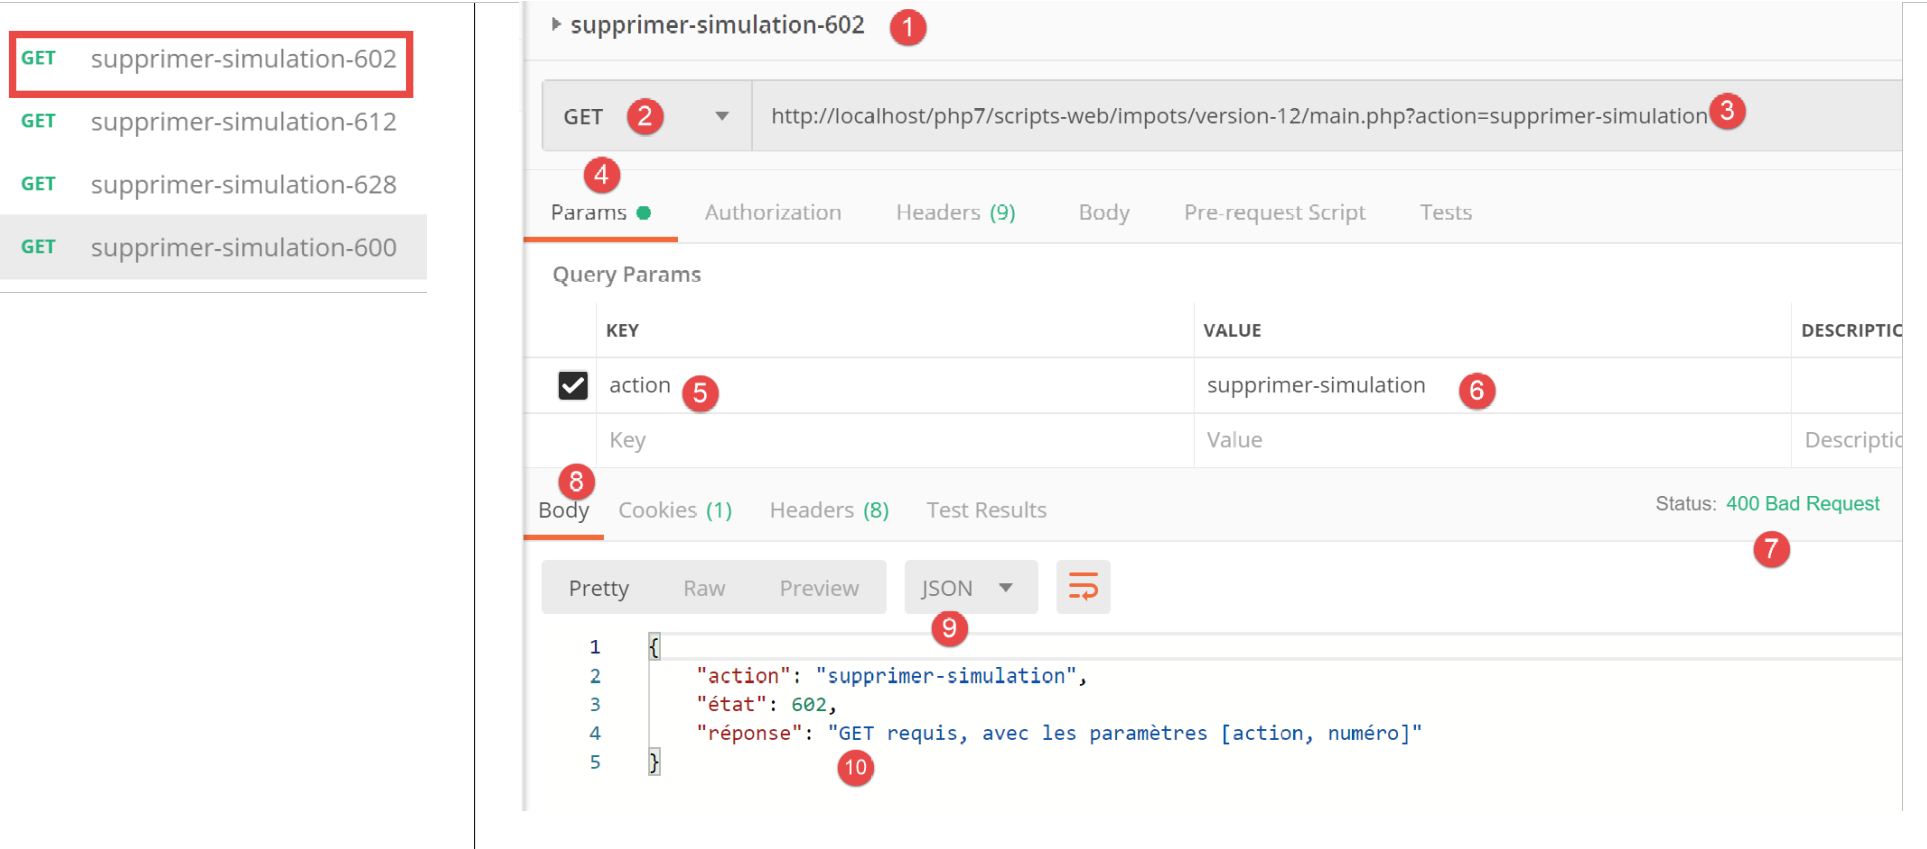
23.11.9. [delete-simulation] 操作
[delete-simulation] 操作由以下二级控制器 [DeleteSessionController] 处理:
<?php

namespace Application;

// symfony dependencies
use \Symfony\Component\HttpFoundation\Response;
use \Symfony\Component\HttpFoundation\Request;
use \Symfony\Component\HttpFoundation\Session\Session;

class SupprimerSimulationController {

  /// $config is the application configuration
  // traitement d'une requête Request
  // useful session and can modify it
  // $infos is additional information specific to each controller
  // renders an array [$statusCode, $état, $content, $headers]
  public function execute(
    array $config,
    Request $request,
    Session $session,
    array $infos = NULL): array {

    // you must have two GET parameters
    $method = strtolower($request->getMethod());
    $erreur = $method !== "get" || $request->query->count() != 2;
    $état = 600;
    if ($erreur) {
      $état += 2;
      $message = "GET requis, avec les paramètres [action, numéro]";
    }
    // parameter [number] must exist
    if (!$erreur) {
      $état += 4;
      $erreur = !$request->query->has("numéro");
      if ($erreur) {
        $message = "paramètre [numéro] manquant";
      }
    }
    // parameter [number] must be valid
    if (!$erreur) {
      $état += 8;
      $numéro = $request->query->get("numéro");
      $erreur = !preg_match("/^\d+$/", $numéro);
      if ($erreur) {
        $message = "paramètre [$numéro] invalide";
      }
    }
    // parameter [number] must be in the range [0,n-1]
    // if n is the number of simulations
    if (!$erreur) {
      $numéro = (int) $numéro;
      $erreur = !$session->has("simulations");
      if (!$erreur) {
        $simulations = $session->get("simulations");
        $erreur = $numéro < 0 || $numéro >= count($simulations);
      }
      if ($erreur) {
        $état += 16;
        $message = "la simulation n° [$numéro] n'existe pas";
      }
    }
    // mistake?
    if ($erreur) {
      // return the result to the main controller
      return [Response::HTTP_BAD_REQUEST, $état, ["réponse" => $message], []];
    }
    // delete the $numéro simulation
    unset($simulations[$numéro]);
    $simulations = array_values($simulations);
    // put the simulations back in the session
    $session->set("simulations", $simulations);
    // we return the list of simulations to the customer
    $état = 600;
    return [Response::HTTP_OK, $état, ["réponse" => $simulations], []];
  }

}
注释
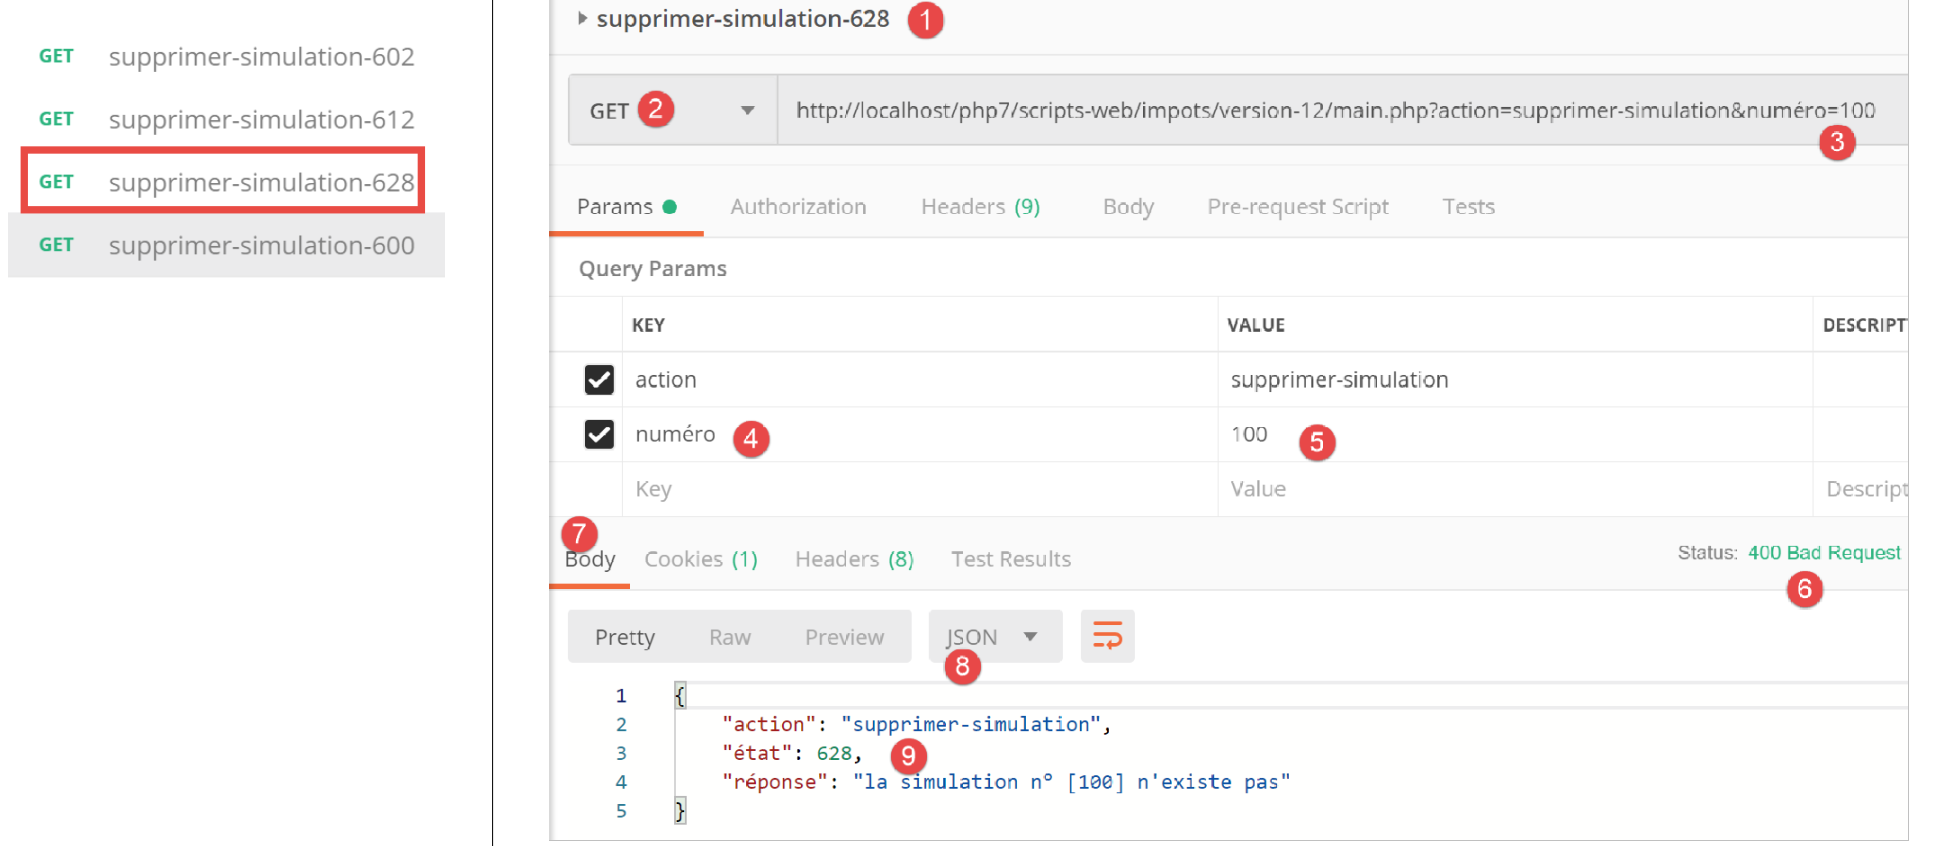
- request [GET main.php?action=delete-simulation&number=x];
- 第 24–30 行:我们检查是否收到包含两个参数的 GET 请求;
- 第 32–38 行:我们检查 URL 参数中是否存在 [number] 参数;
- 第 40–47 行:我们验证 [number] 参数的值在语法上是否正确;
- 第 50–61 行:验证模拟 #[number] 是否确实存在。有两种错误情况:
- 在会话中找不到该模拟列表(第 52 行);
- 待删除的模拟编号 [number] 在模拟列表中不存在;
- 第 63–66 行:若发生错误,将向主控制器返回错误结果;
- 第 68 行:删除模拟 #[number];
- 第 69 行:[unset] 操作不会改变列表中 [0, n-1] 的索引。为更新这些索引,我们从 [$simulations] 数组中检索值以移除缺失的仿真;
- 第 71 行:将新的模拟数组放回会话中;
- 第 73–74 行:将新的模拟列表返回给主控制器;
23.11.10. [Postman] 测试
我们将进行成功和失败测试:
上文:
- 在 [1-6] 中,不带 [number] 参数的 GET 请求;
- 在 [7-10] 中,服务器返回的 JSON 响应;
现在是一个包含语法错误的 number 的请求:

上文:
- 在 [1-5] 中,一个带有无效 [number] 参数 [3, 5] 的 GET 请求;
- 在 [6-9] 中,服务器的 JSON 响应;
现在是一个包含不存在的模拟编号的请求:
上文:
- 在 [1-5] 中,一个模拟编号为 100 的请求,该编号在模拟列表中并不存在;
- 在 [6-9] 中,服务器的 JSON 响应;
现在,我们将从列表中移除模拟 #0,即第一个模拟。首先,让我们使用 [lister-simulations-500] 请求再次获取该列表:
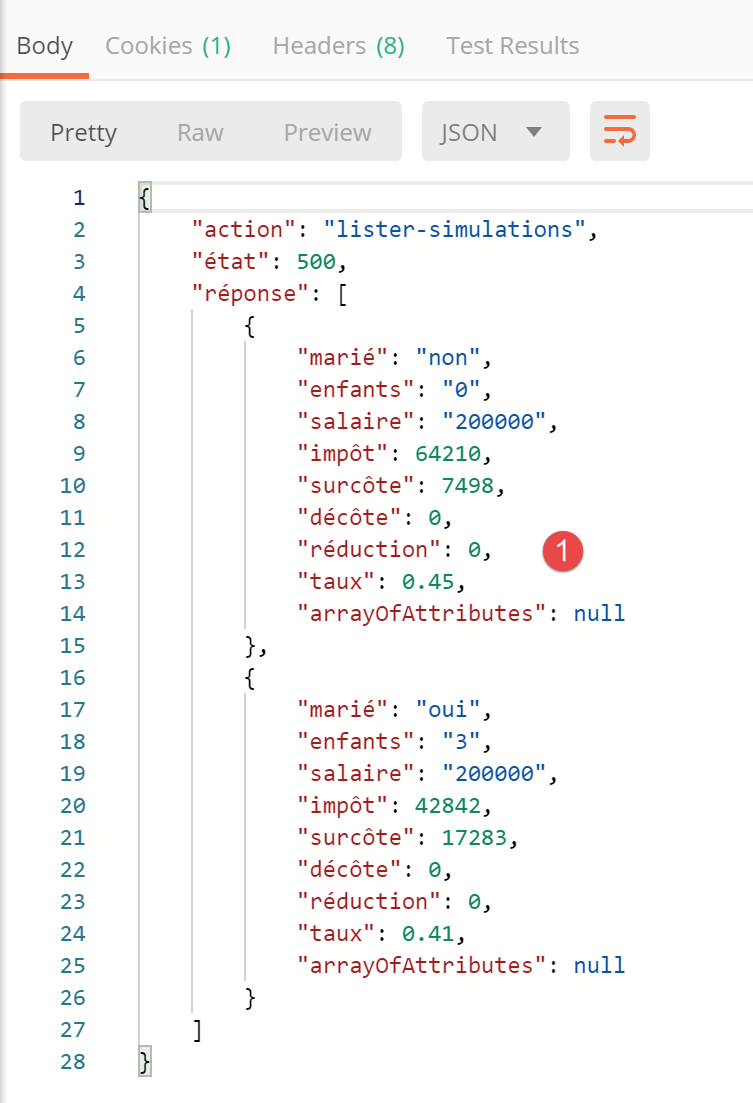
- 在 [1] 中,目前有 2 个模拟;
我们删除第一个模拟(编号 0):
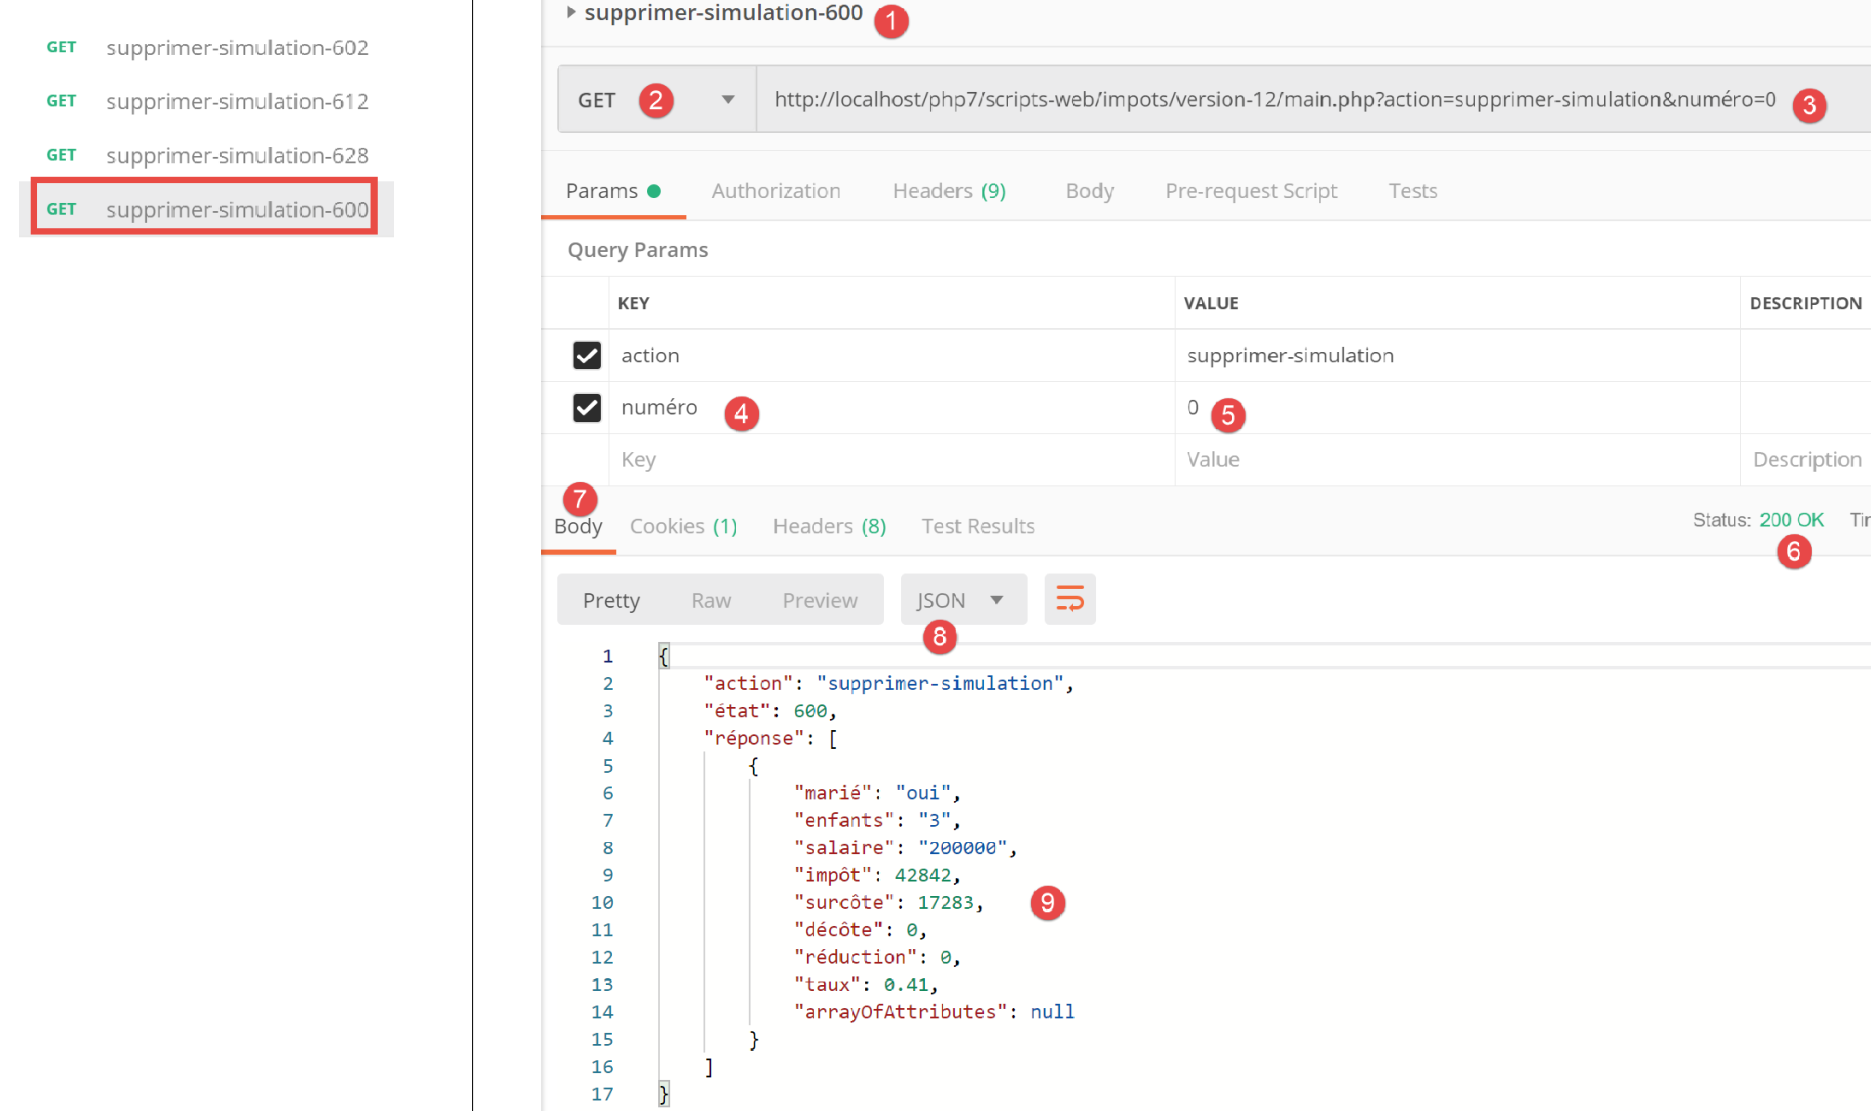
上图:
- 在 [1-5] 中,我们删除了模拟 #0 [5];
- 在 [6-9] 中,是服务器的 JSON 响应。我们可以看到模拟 #0 已被移除;
让我们重复此步骤:
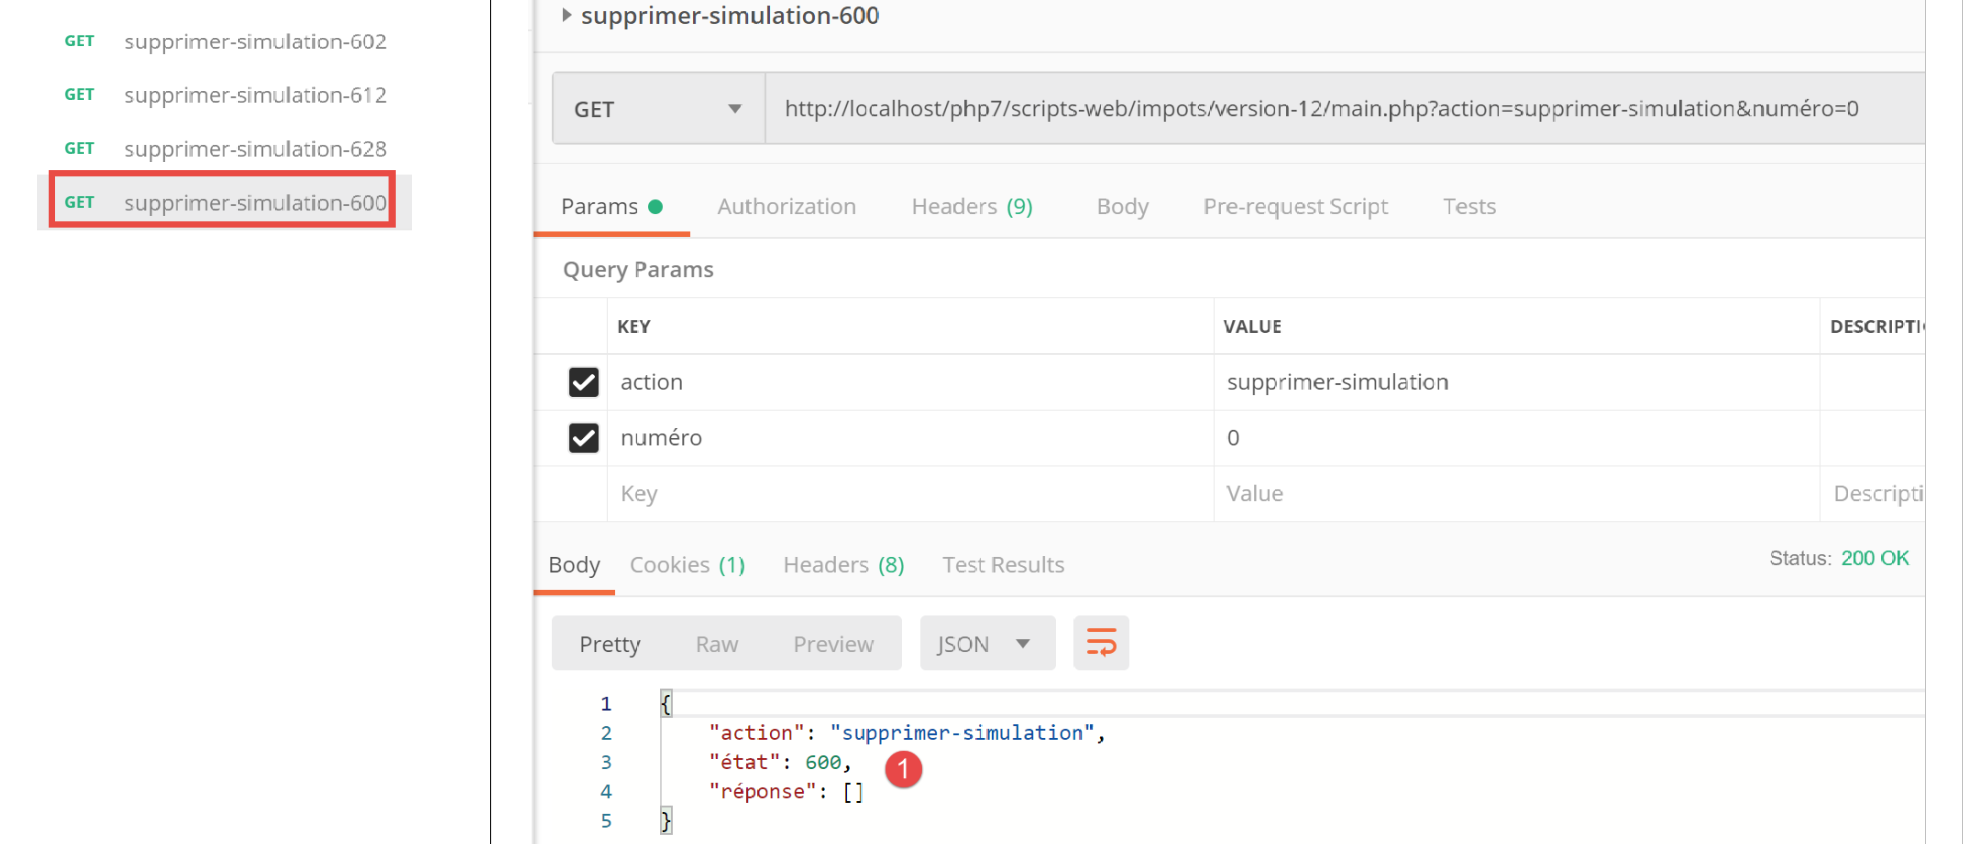
上文:
- 在 [1] 中,服务器 Web 会话中已无剩余模拟;
23.11.11. [end-session] 操作
[end-session] 操作由以下二级控制器 [FinSessionController] 处理:
<?php

namespace Application;

// symfony dependencies
use \Symfony\Component\HttpFoundation\Response;
use \Symfony\Component\HttpFoundation\Request;
use \Symfony\Component\HttpFoundation\Session\Session;

class FinSessionController implements InterfaceController {

  // $config is the application configuration
  // traitement d'une requête Request
  // session and can modify it
  // $infos is additional information specific to each controller
  // renders an array [$statusCode, $état, $content, $headers]

  public function execute(
    array $config,
    Request $request,
    Session $session,
    array $infos = NULL): array {

    // you must have a single parameter GET
    $method = strtolower($request->getMethod());
    $erreur = $method !== "get" || $request->query->count() != 1;
    // mistake?
    if ($erreur) {
      $état = 401;
      // result to main controller
      $message = "GET requis avec le seul paramètre [action] dans l'URL";
      return [Response::HTTP_BAD_REQUEST, $état, ["réponse" => $message], []];
    }

    // memorize the session type
    $type = $session->get("type");
    // the current session is invalidated
    $session->invalidate();
    // put the type back in the new session
    $session->set("type", $type);
    // reply sent
    $état = 400;
    // result to main controller
    $content = ["réponse" => "session supprimée"];
    return [Response::HTTP_OK, $état, $content, []];
  }

}
评论
- 请求 [GET main.php?action=end-session];
- 第 25–33 行:我们验证该操作为带有单个参数 [end-action] 的 GET 请求;
- 第 38 行:注销当前会话。这将删除其中存储的数据并启动一个新会话;
- 第 36 行:在结束会话之前,我们存储其类型 [json, xml, html];
- 第 40 行:将前一个会话的类型设置到新会话中。最后,我们继续使用一个包含单个键 [type] 的新会话;
- 第 44–45 行:将结果返回给主控制器;
23.11.12. 测试 [Postman]
我们将进行错误测试和成功测试:
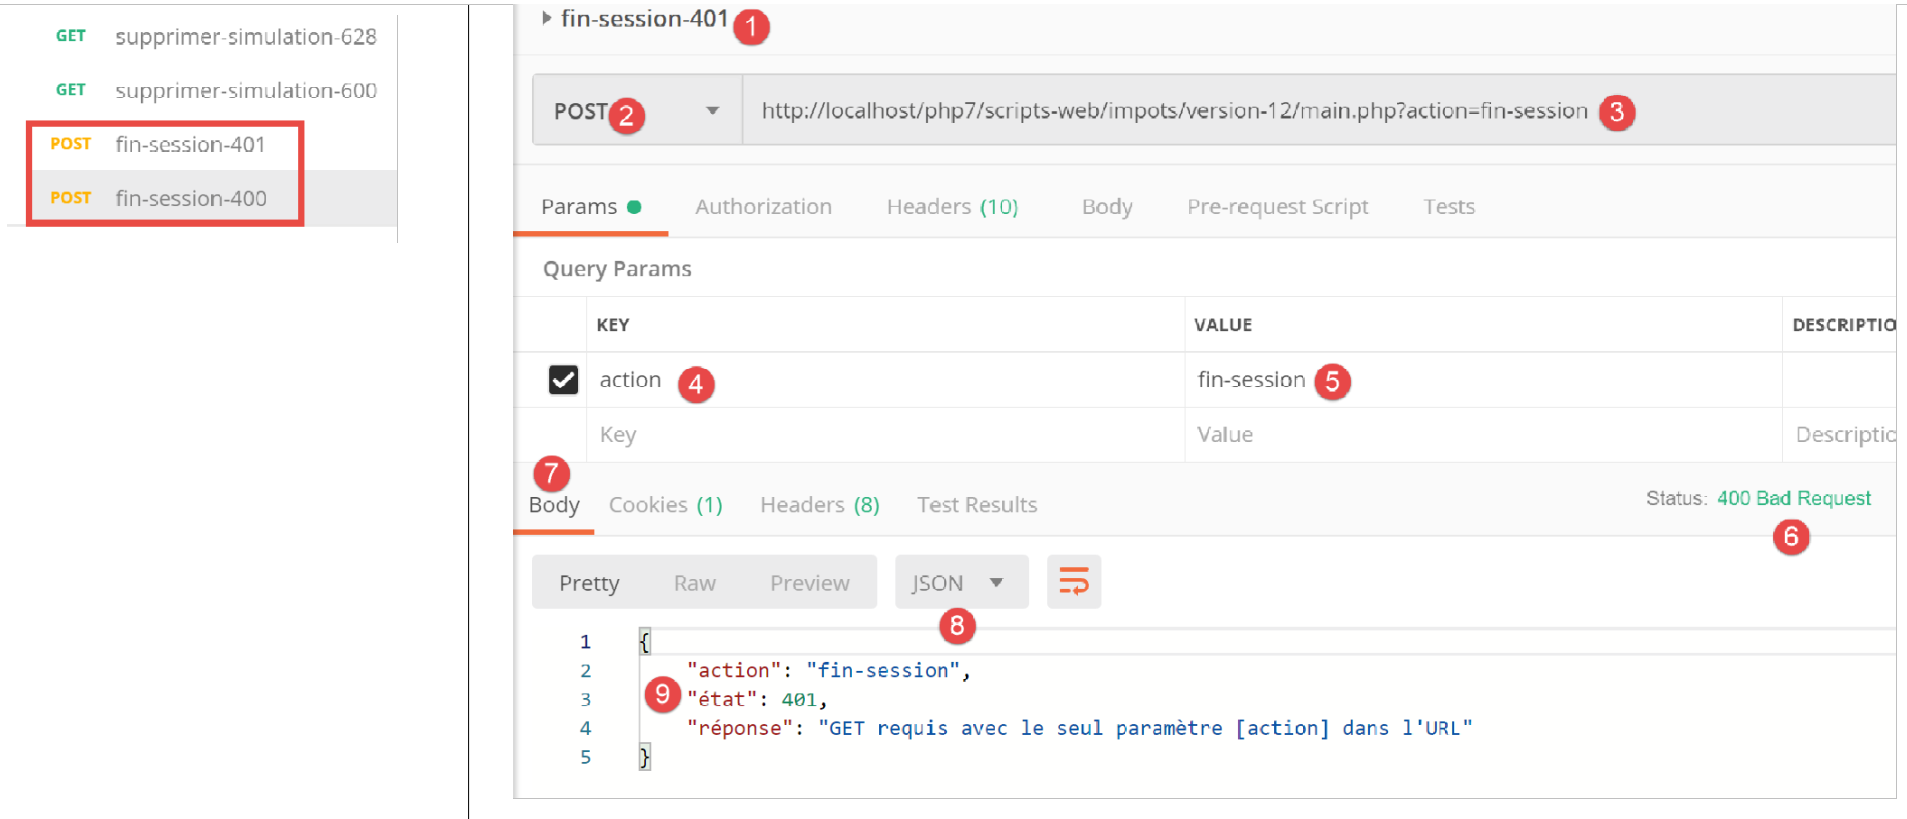
上文:
- 在 [1-5] 中,我们使用 POST [2] 请求结束会话 [5],而非预期的 GET;
- 在 [6-9] 中,服务器返回的 JSON 响应;
现在,来看一个测试成功的示例。首先,让我们查看在上次测试过程中,客户端 [Postman] 与服务器之间交换的会话 Cookie:
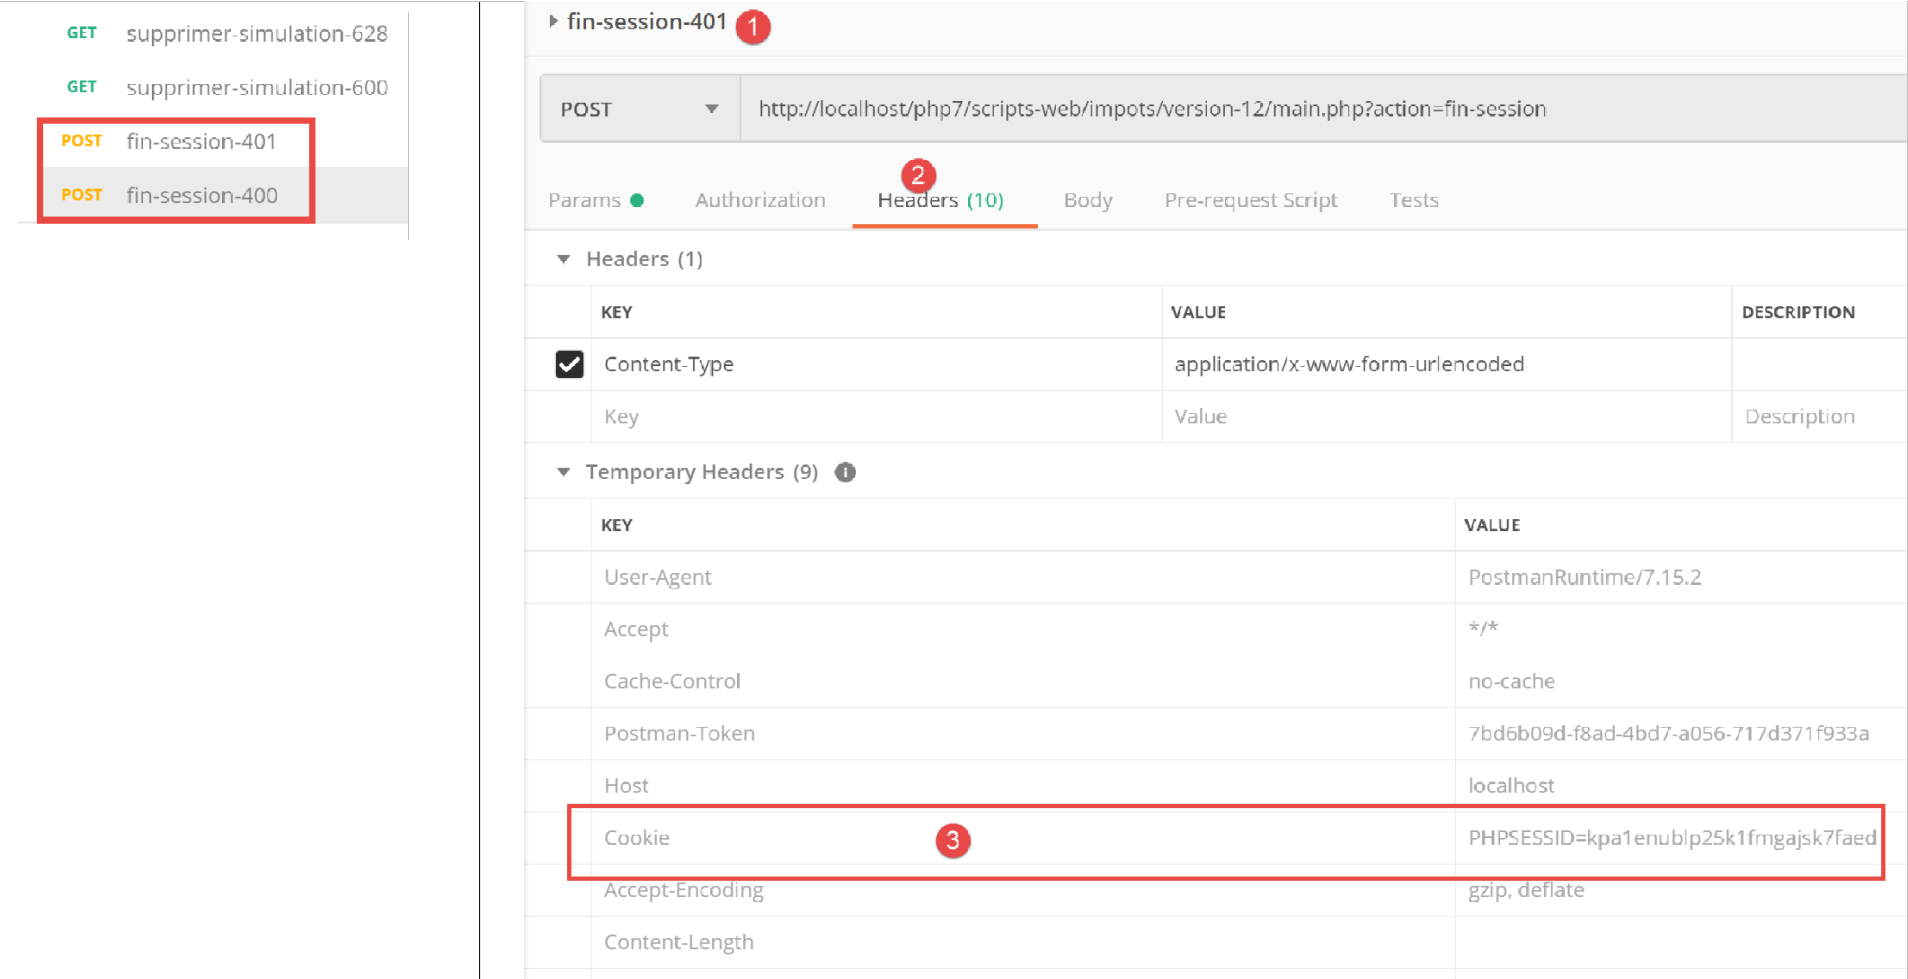
上图:
- 在[3]中,客户端[Postman]发送给服务器的会话Cookie;
现在让我们看看服务器在其响应中发送的 HTTP 头部:
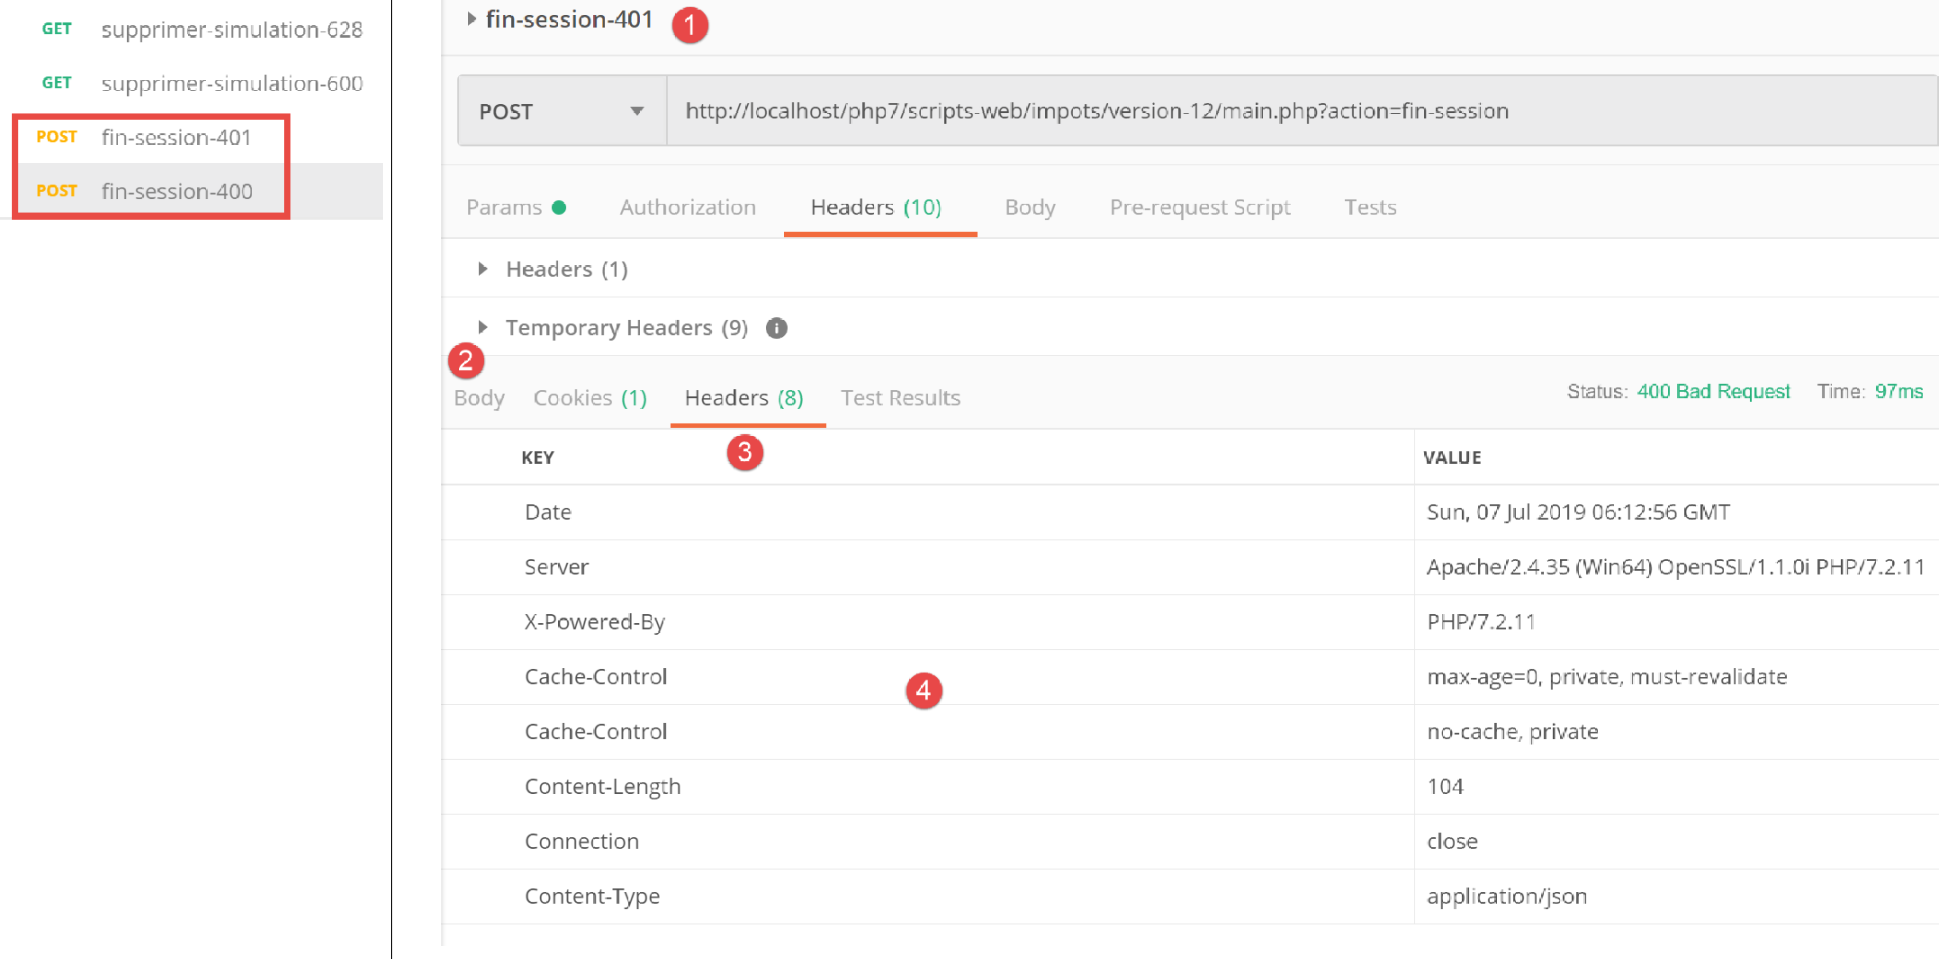
上文:
- 在[3-4]中,会话 Cookie 并未出现在服务器的响应中。这是正常的。服务器仅在开始新的 Web 会话时发送一次该 Cookie;
现在让我们执行一个有效的 [logout] 操作:
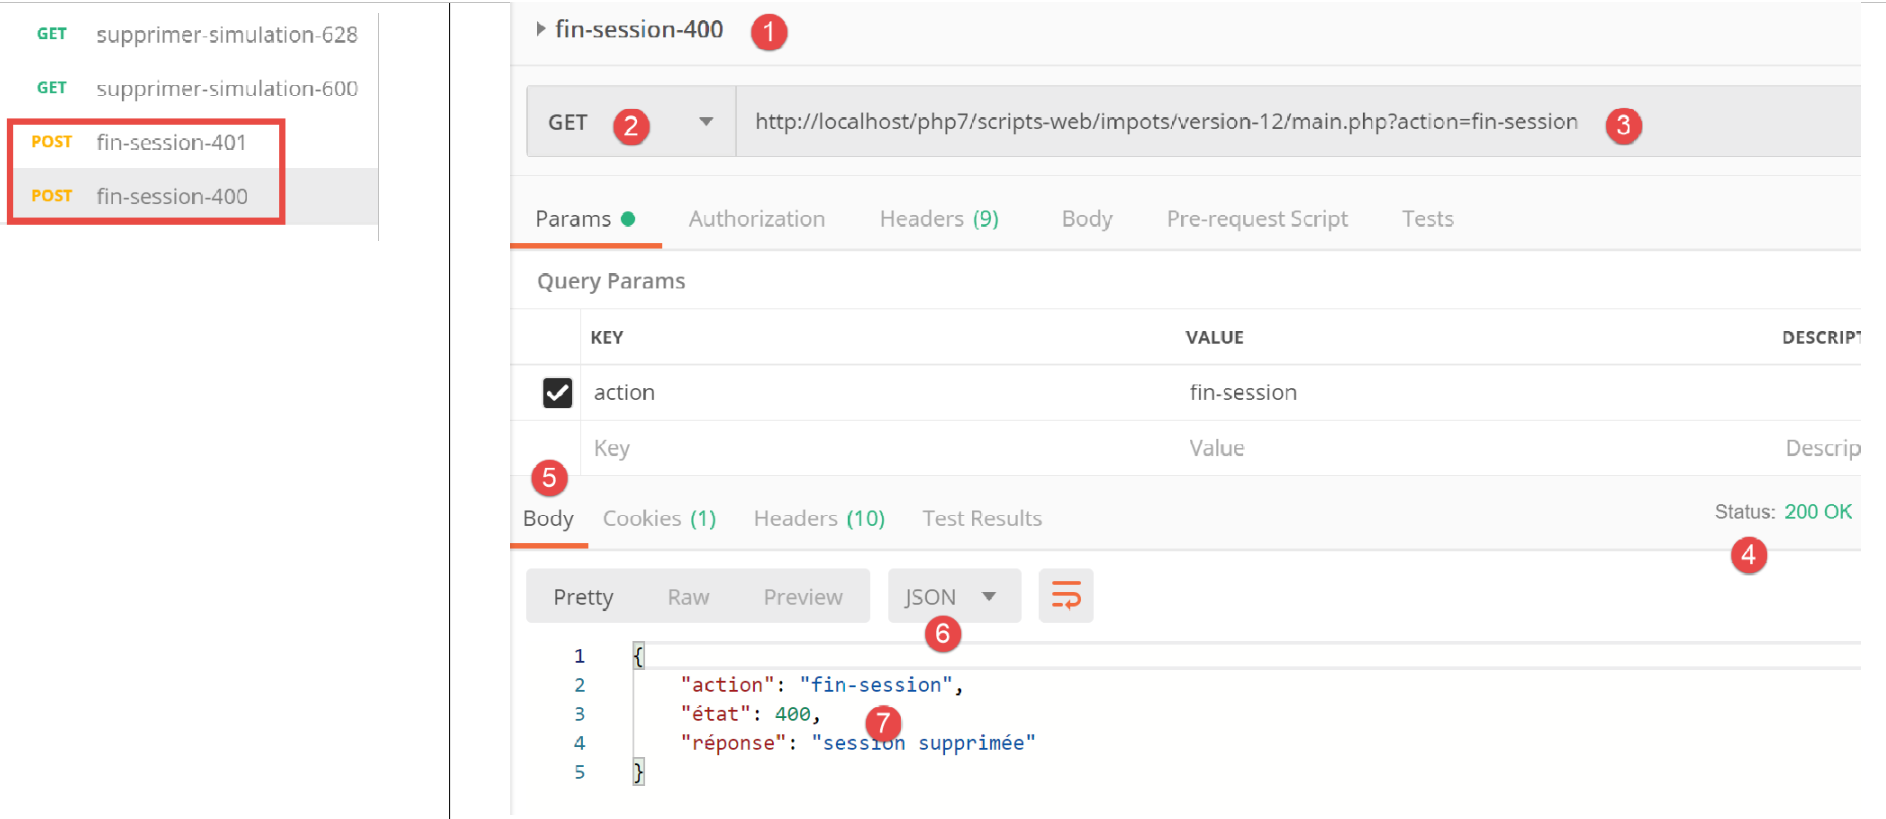
上文:
- 在 [1-3] 中,一个有效的 [end-session] 操作;
- 在 [4-7] 中,服务器的 JSON 响应;
让我们来看看服务器响应中发送的 HTTP 头部:
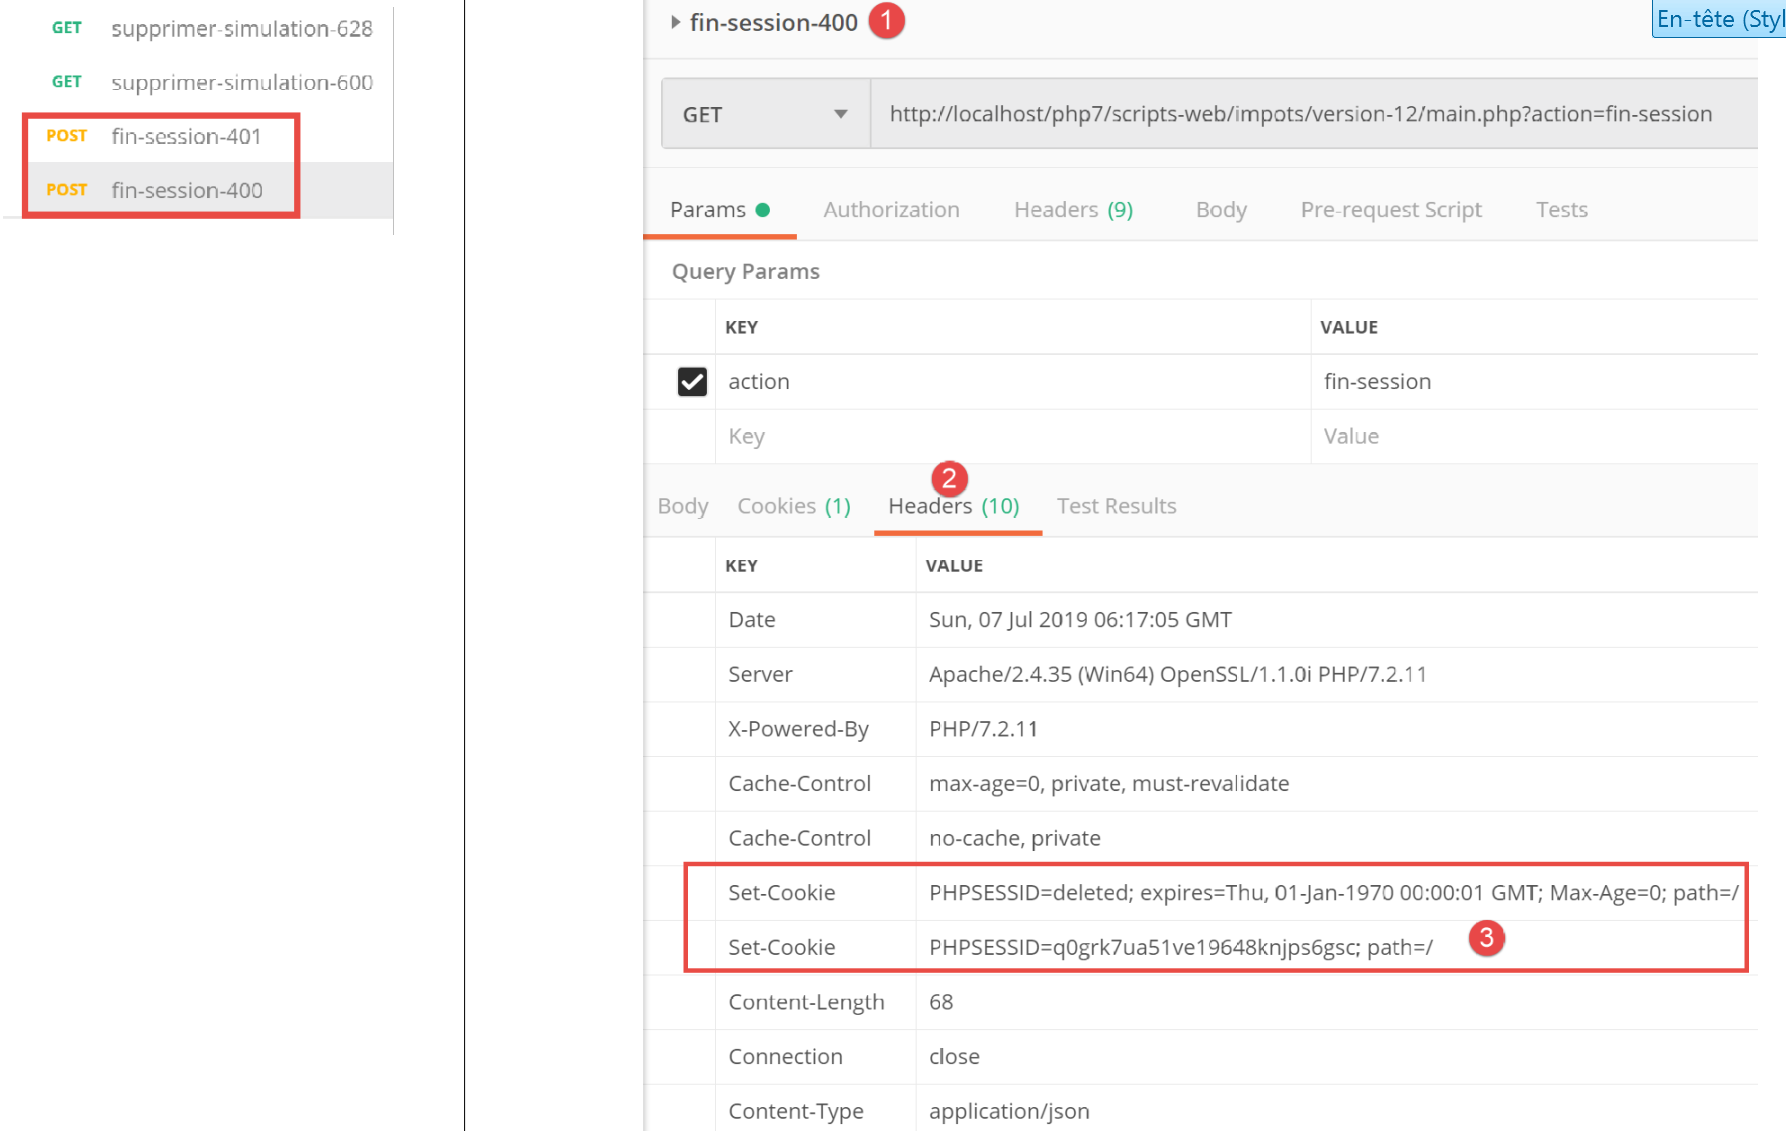
- 在 [3] 中,服务器发送了 [Set-Cookie] 标头,表明一个新的 Web 会话正在开始;
23.12. 服务器响应类型
23.12.1. 简介
让我们重新审视该应用程序的整体架构:
我们将介绍可能的响应类型 [3a]。这些类型归类在项目的 [Responses] 文件夹中:
我们在相关章节中已介绍了 [JsonResponse] 类。它实现了 [InterfaceResponse] 接口,并继承了 [ParentResponse] 类。另外两个类 [XmlResponse] 和 [HtmlResponse] 也是如此。
让我们回顾一下 [InterfaceResponse] 接口的定义:
<?php

namespace Application;

// symfony dependencies
use Symfony\Component\HttpFoundation\Request;
use Symfony\Component\HttpFoundation\Session\Session;

interface InterfaceResponse {

  // Request $request : requête en cours de traitement
  // Session $session: the web application session
  // array $config: application configuration
  // int statusCode: HTTP response status code
  // array $content: server response
  // array $headers: HTTP headers to be added to the response
  // Logger $logger: the logger for writing logs

  public function send(
    Request $request = NULL,
    Session $session = NULL,
    array $config,
    int $statusCode,
    array $content,
    array $headers,
    Logger $logger = NULL): void;
}
- 第 19–27 行:[InterfaceResponse] 接口有一个 [send] 方法,用于将响应发送给客户端;
- 第 11–17 行:[send] 方法中各个参数的含义;
- 第 23–25 行:参数 [$statusCode, $content, $headers] 是应用程序二级控制器返回的标准响应。但响应可能需要额外信息。因此,我们通过前三个参数(第 20–22 行)提供这些信息,使其能够访问有关请求、会话和配置的所有信息;
- 第 26 行:响应需要 [Logger],因为它将记录发送给客户端的响应;
现在让我们回顾一下 [ParentResponse] 类的代码,该类是这三种响应类型的父类,它抽象了它们的共同点:即向客户端实际发送文本响应:
<?php

namespace Application;

// symfony dependencies
use Symfony\Component\HttpFoundation\Response;

class ParentResponse {

  // int $statusCode: HTTP response status code
  // string $content: the body of the response to be sent
  // depending on the case, this is a jSON, XML, HTML string
  // array $headers: HTTP headers to be added to the response

  public function sendResponse(
    int $statusCode,
    string $content,
    array $headers): void {

    // preparing the server's text response
    $response = new Response();
    $response->setCharset("utf-8");
    // status code
    $response->setStatusCode($statusCode);
    // headers
    foreach ($headers as $text => $value) {
      $response->headers->set($text, $value);
    }
    // we send the answer
    $response->setContent($content);
    $response->send();
  }
}
注释
- 第 10–13 行:[send] 方法中三个参数的含义;
- 第 17 行:请注意响应正文的类型为 [string],因此已准备好发送(第 30 行);
- 第 22 行:响应将包含 UTF-8 字符;
- 第 24 行:响应的 HTTP 状态码;
- 第 26–28 行:添加调用代码提供的 HTTP 头部;
- 第 30–31 行:将响应发送给客户端;
最后,让我们回顾一下请求将响应发送给客户端的主控制器代码:
// on ajoute les clés [action, état] à la réponse du contrôleur
$content = ["action" => $action, "état" => $état] + $content;
// on instancie l'objet [Response] chargée d'envoyer la réponse au client
$response = __NAMESPACE__ . $config["types"][$type]["response"];
(new $response())->send($request, $session, $config, $statusCode, $content, $headers, $logger);

// la réponse a été envoyée - on libère les ressources
$logger->close();
exit;
- 第 4 行:我们设置要实例化的 [Response] 类的名称;
- 第 5 行:我们实例化该类,并使用 [send($request, $session, $config, $statusCode, $content, $headers, $logger)] 方法将响应发送给客户端。由于它们都实现了相同的 [InterfaceResponse] 接口,因此不同响应类型的 [send] 方法都具有相同的签名;
23.12.2. [JsonResponse] 类
该类已在相关章节中介绍过。不过,我们在此重现其代码,以便更好地突出这三个响应类的一致性:
[JsonResponse] 类通过以下方式实现了 [InterfaceResponse] 接口:
<?php

namespace Application;

// symfony dependencies
use Symfony\Component\Serializer\Encoder\JsonEncode;
use Symfony\Component\Serializer\Encoder\JsonEncoder;
use Symfony\Component\Serializer\Normalizer\ObjectNormalizer;
use Symfony\Component\Serializer\Serializer;
use \Symfony\Component\HttpFoundation\Request;
use \Symfony\Component\HttpFoundation\Session\Session;

class JsonResponse extends ParentResponse implements InterfaceResponse {

  // Request $request : requête en cours de traitement
  // Session $session: the web application session
  // array $config: application configuration
  // int statusCode: HTTP response status code
  // array $content: server response
  // array $headers: HTTP headers to be added to the response
  // Logger $logger: the logger for writing logs

  public function send(
    Request $request = NULL,
    Session $session = NULL,
    array $config,
    int $statusCode,
    array $content,
    array $headers,
    Logger $logger = NULL): void {

    // symfony serializer preparation
    $serializer = new Serializer(
      [
      // required for object serialization
      new ObjectNormalizer()],
      // encoder jSON
      // for options, make OU between the different options
      [new JsonEncoder(new JsonEncode([JsonEncode::OPTIONS => JSON_UNESCAPED_UNICODE]))]
    );
    // serialization jSON
    $json = $serializer->serialize($content, 'json');
    // headers
    $headers = array_merge($headers, ["content-type" => "application/json"]);
    // sending reply
    parent::sendResponse($statusCode, $json, $headers);
    // log
    if ($logger !== NULL) {
      $logger->write("réponse=$json\n");
    }
  }

}
评论
- 第 13 行:该类实现了 [InterfaceResponse] 接口;
- 第 13 行:该类继承自 [ParentResponse] 类。所有 [Response] 类型都继承自该类。正是这个父类将响应发送给客户端(第 46 行)。由于这段代码是所有 [Response] 类型共有的,因此被提取到了父类中;
- 第 33–40 行:实例化 [Symfony] 序列化器,它将把服务器响应 [$content] 转换为 JSON 字符串(第 42 行);
- 第 34–36 行:[Serializer] 构造函数的第一个参数是一个数组。其中放置了对象序列化所需的 [ObjectNormalizer] 类的实例。在本应用中,这涉及一组模拟,其中每个模拟都是 [Simulation] 类的实例;
- 第 39 行:[Serializer] 构造函数的第二个参数也是一个数组:我们将序列化过程中使用的所有编码器(XML、JSON、CSV 等)放入其中;
- 第 39 行:此处仅有一个编码器,类型为 [JsonEncoder]。虽然无参构造函数可能已足够,但此处我们向构造函数传递了一个 [JsonEncode] 参数,仅用于传递 JSON 编码选项;
- 第 39 行:[JsonEncode] 构造函数的参数是一个选项数组。此处我们使用 [JSON_UNESCAPED_UNICODE] 选项,要求 JSON 字符串中的 UTF-8 字符以原生形式呈现,而非进行“转义”;
- 第 42 行:使用前面的序列化器将 HTTP 响应正文序列化为 JSON;
- 第 44 行:我们添加了告知客户端我们将发送 JSON 的 HTTP 头;
- 第 46 行:请求父类将响应发送给客户端;
- 第 48–50 行:我们记录 JSON 响应;
23.12.3. [XmlResponse] 类
[XmlResponse] 类如下所示实现了 [InterfaceResponse] 接口:
<?php

namespace Application;

// symfony dependencies
use Symfony\Component\HttpFoundation\Request;
use Symfony\Component\HttpFoundation\Session\Session;
use Symfony\Component\Serializer\Encoder\JsonEncode;
use Symfony\Component\Serializer\Encoder\JsonEncoder;
use Symfony\Component\Serializer\Encoder\XmlEncoder;
use Symfony\Component\Serializer\Normalizer\ObjectNormalizer;
use Symfony\Component\Serializer\Serializer;

class XmlResponse extends ParentResponse implements InterfaceResponse {

  // Request $request : requête en cours de traitement
  // Session $session: the web application session
  // array $config: application configuration
  // int statusCode: HTTP response status code
  // array $content: server response
  // array $headers: HTTP headers to be added to the response
  // Logger $logger: the logger for writing logs

  public function send(
    Request $request = NULL,
    Session $session = NULL,
    array $config,
    int $statusCode,
    array $content,
    array $headers,
    Logger $logger = NULL): void {

    // symfony serializer preparation
    $serializer = new Serializer(
      // required for object serialization
      [new ObjectNormalizer()],
      [
      // serialization XML
      new XmlEncoder(
        [
        XmlEncoder::ROOT_NODE_NAME => 'root',
        XmlEncoder::ENCODING => 'utf-8'
        ]
      ),
      // serialization jSON
      new JsonEncoder(new JsonEncode([JsonEncode::OPTIONS => JSON_UNESCAPED_UNICODE]))
      ]
    );
    // serialization XML
    $xml = $serializer->serialize($content, 'xml');
    // headers
    $headers = array_merge($headers, ["content-type" => "application/xml"]);
    // sending reply
    parent::sendResponse($statusCode, $xml, $headers);
    // log
    if ($logger !== NULL) {
      // log in jSON
      $log = $serializer->serialize($content, 'json');
      $logger->write("réponse=$log\n");
    }
  }

}
评论
- 第 34–48 行:实例化一个 Symfony 序列化器。构造函数接受两个数组类型的参数;
- 第 36 行:第一个数组包含一个 [ObjectNormalizer] 类型的实例,用于对象序列化;
- 第 37–47 行:第二个数组包含用于序列化的编码器。可以通过同一个序列化器配置多种序列化类型;
- 第 38–44 行:XML 编码器;
- 第 41 行:设置生成的 XML 代码的根节点。其形式为 <root>[其他 XML 标签]</root>;
- 第 42 行:编码将使用 UTF-8 字符;
- 第 46 行:JSON 编码器。该编码器将用于将响应记录到 [logs.txt] 文件中,该文件采用 JSON 格式;
- 第 50 行:发送给客户端的响应正文被序列化为 XML;
- 第 52 行:我们在作为参数接收的头部(第 30 行)中添加了 HTTP 头部,告知客户端我们将发送一个 XML 文档;
- 第 54 行:父类实际将响应发送给客户端;
- 第 56–60 行:响应的 JSON 日志;
23.12.4. 测试 [Postman]
我们已经在 JSON 中进行了所有可能的错误测试。在 XML 中无需进行额外操作。我们展示两个 XML 响应的示例:
上文:
- [1-3] 中的 XML 会话启动请求;
- 在 [4-7] 中,服务器的 XML 响应;
从现在起,所有服务器响应都将采用 XML 格式。我们可以直接复用 [Postman] 中已使用的所有请求,无需进行任何修改,并且每个请求都会收到相应的 XML 响应。例如,让我们进行一次成功的身份验证:
上文:
- [1-3]中,一个有效的身份验证请求;
- 在 [4-7] 中,是服务器的 XML 响应;
23.12.5. [HtmlResponse]
当会话类型为 [html] 时,将实例化一个 [HtmlResponse] 类型的对象,用于向客户端发送响应。这将向客户端发送一个 HTML 流,该流取决于处理该操作的二级 控制器返回的状态码。此 [status=>view] 映射在 [config.json] 配置文件中定义如下:
"vues": {
        "vue-authentification.php": [700, 221, 400],
        "vue-calcul-impot.php": [200, 300, 341, 350, 800],
        "vue-liste-simulations.php": [500, 600]
    },
"vue-erreurs": "vue-erreurs.php"
此配置的含义如下:[‘视图名称’ => ‘与该视图关联的状态’]
- 第 2 行:如果二级控制器返回了数组 [700, 221, 400] 中的某个状态,则必须显示视图 [vue-authentification.php];
- 第 3 行:如果二级控制器返回数组 [200, 300, 341, 350, 800],则显示视图 [tax-calculation-view.php];
- 第 4 行:如果二级控制器返回数组 [500, 600],则显示视图 [view-simulation-list.php];
- 第 6 行:如果二级控制器返回的值不在上述任何数组中,则显示视图 [vue-erreurs.php];
视图位于项目的 [Views] 文件夹中:
[HtmlResponse] 类的代码如下:
<?php

namespace Application;

// symfony dependencies
use Symfony\Component\HttpFoundation\Request;
use Symfony\Component\HttpFoundation\Session\Session;
use Symfony\Component\Serializer\Encoder\JsonEncode;
use Symfony\Component\Serializer\Encoder\JsonEncoder;
use Symfony\Component\Serializer\Normalizer\ObjectNormalizer;
use Symfony\Component\Serializer\Serializer;

class HtmlResponse extends ParentResponse implements InterfaceResponse {

  // Request $request : requête en cours de traitement
  // Session $session: the web application session
  // array $config: application configuration
  // int statusCode: HTTP response status code
  // array $content: server response
  // array $headers: HTTP headers to be added to the response
  // Logger $logger: the logger for writing logs

  public function send(
    Request $request = NULL,
    Session $session = NULL,
    array $config,
    int $statusCode,
    array $content,
    array $headers,
    Logger $logger = NULL): void {

    // symfony serializer preparation
    $serializer = new Serializer(
      [
      // for object serialization
      new ObjectNormalizer()],
      [
      // for jSON serialization of the response log
      new JsonEncoder(new JsonEncode([JsonEncode::OPTIONS => JSON_UNESCAPED_UNICODE]))
      ]
    );
    // the HTML response depends on the status code returned by the controller
    $état = $content["état"];
    // a view corresponds to a state - look for it in the application configuration
    // view list
    $vues = array_keys($config["vues"]);
    $trouvé = false;
    $i = 0;
    // browse the list of views
    while (!$trouvé && $i < count($vues)) {
      // states associated with view n° i
      $états = $config["vues"][$vues[$i]];
      // is the state you're looking for in the states associated with view n° I?
      if (in_array($état, $états)) {
        // the view displayed will be view n° i
        $vueRéponse = $vues[$i];
        $trouvé = true;
      }
      // next view
      $i++;
    }
    // found?
    if (!$trouvé) {
      // if no view exists for the current state of the application
      // render error view
      $vueRéponse = $config["vue-erreurs"];
    }
    // retrieve the HTML view to be displayed in a character string
    ob_start();
    require __DIR__ . "/../Views/$vueRéponse";
    $html = ob_get_clean();
    // we indicate in the headers that we're going to send HTML
    $headers = array_merge($headers, ["content-type" => "text/html"]);
    // the parent class handles the actual sending of the response
    parent::sendResponse($statusCode, $html, $headers);
    // log in jSON of the response without the HTML
    if ($logger !== NULL) {
      // log in jSON of the response from the secondary controller that processed the action
      $log = $serializer->serialize($content, 'json');
      $logger->write("réponse=$log\n");
    }
  }

}
评论
- 第 32–41 行:我们实例化一个 Symfony 序列化器。这是为了处理该操作的控制器返回的 JSON 日志(第 72–82 行);
- 第 42–57 行:我们根据处理该操作的控制器返回的状态码,在应用程序配置中查找应显示的视图。该状态码存储在 [$content[‘status’]] 中(第 43 行);
- 第 42–61 行:搜索与该状态对应的视图;
- 第 62–67 行:若未找到视图,则 HTML 应用程序处于异常状态。我们将在后文中更详细地解释异常状态这一概念。在此情况下,将显示错误视图;
- 第 68–70 行:解析所选视图的 PHP 代码,并将结果存储在变量 [$html] 中(第 71 行);
- 这段代码需要稍作说明。假设选定的视图是 [vue-authentification.php],它会显示一个 Web 身份验证表单:
- 第 69 行:[ob_start] 函数启动了文档中所称的输出缓冲区。由 print、require 及类似操作写入的所有内容——这些内容通常会立即发送给客户端——会被放入输出缓冲区(ob=output buffer)中,而不会发送给客户端;
- 第 70 行:加载视图 [authentication-view.php];这是一个包含 PHP 代码的动态 HTML 视图。随后发生两件事:
- [vue-authentification.php] 视图中的 PHP 代码被加载并解释执行。其结果是一个我们将称之为 [vue-authentification.html] 的视图,该视图仅包含 HTML 代码(可能还包含 CSS 和 JavaScript),但不再包含 PHP 代码;
- 该 HTML 代码通常会被发送给客户端。实际上,PHP 解释器遇到的任何非 PHP 代码的文本都会如此处理。由于启用了输出缓冲,该 HTML 代码会被放入输出缓冲区,而不会被发送给客户端;
- 第 71 行:[ob_get_clean] 函数执行两项操作:
- 它将输出缓冲区的内容放入 [$html] 变量中,即之前存入该缓冲区的 [vue-authentification.html] 页面;
- 清空输出缓冲区。就缓冲区而言,这相当于什么也没发生。此外,客户端仍未收到任何内容;
- 第 70 行:我们当前正在执行位于 [Responses] 文件夹中的 [HtmlResponse] 类。因此,要查找视图,必须向上移动一层 [..],然后导航至 [Views] 文件夹。 [__DIR__] 是包含当前正在执行的脚本的文件夹的绝对路径;在本例中,该文件夹为 [C:/myprograms/laragon-lite/www/php7/scripts-web/imports/13/Responses];
- 第 73 行:我们在作为参数接收的 HTTP 头部(第 29 行)中添加一个头部,告知客户端我们将向其发送 HTML;
- 第 75 行:请求父类实际将响应发送给客户端;
- 第 77–81 行:将处理当前操作的二级控制器提供的响应 [$content] 以 JSON 格式记录下来;
23.12.6. 测试 [Postman]
要真正测试该会话的 HTML 模式,我们需要检查所有视图。这部分内容我们稍后再进行。接下来我们将执行以下测试:
让我们看看配置文件中的视图列表:
"vues": {
        "vue-authentification.php": [700, 221, 400],
        "vue-calcul-impot.php": [200, 300, 341, 350, 800],
        "vue-liste-simulations.php": [500, 600]
    },
    "vue-erreurs": "vue-erreurs.php"
通过检查执行的 [Postman] 测试,我们可以确定生成上述部分状态码的上下文:
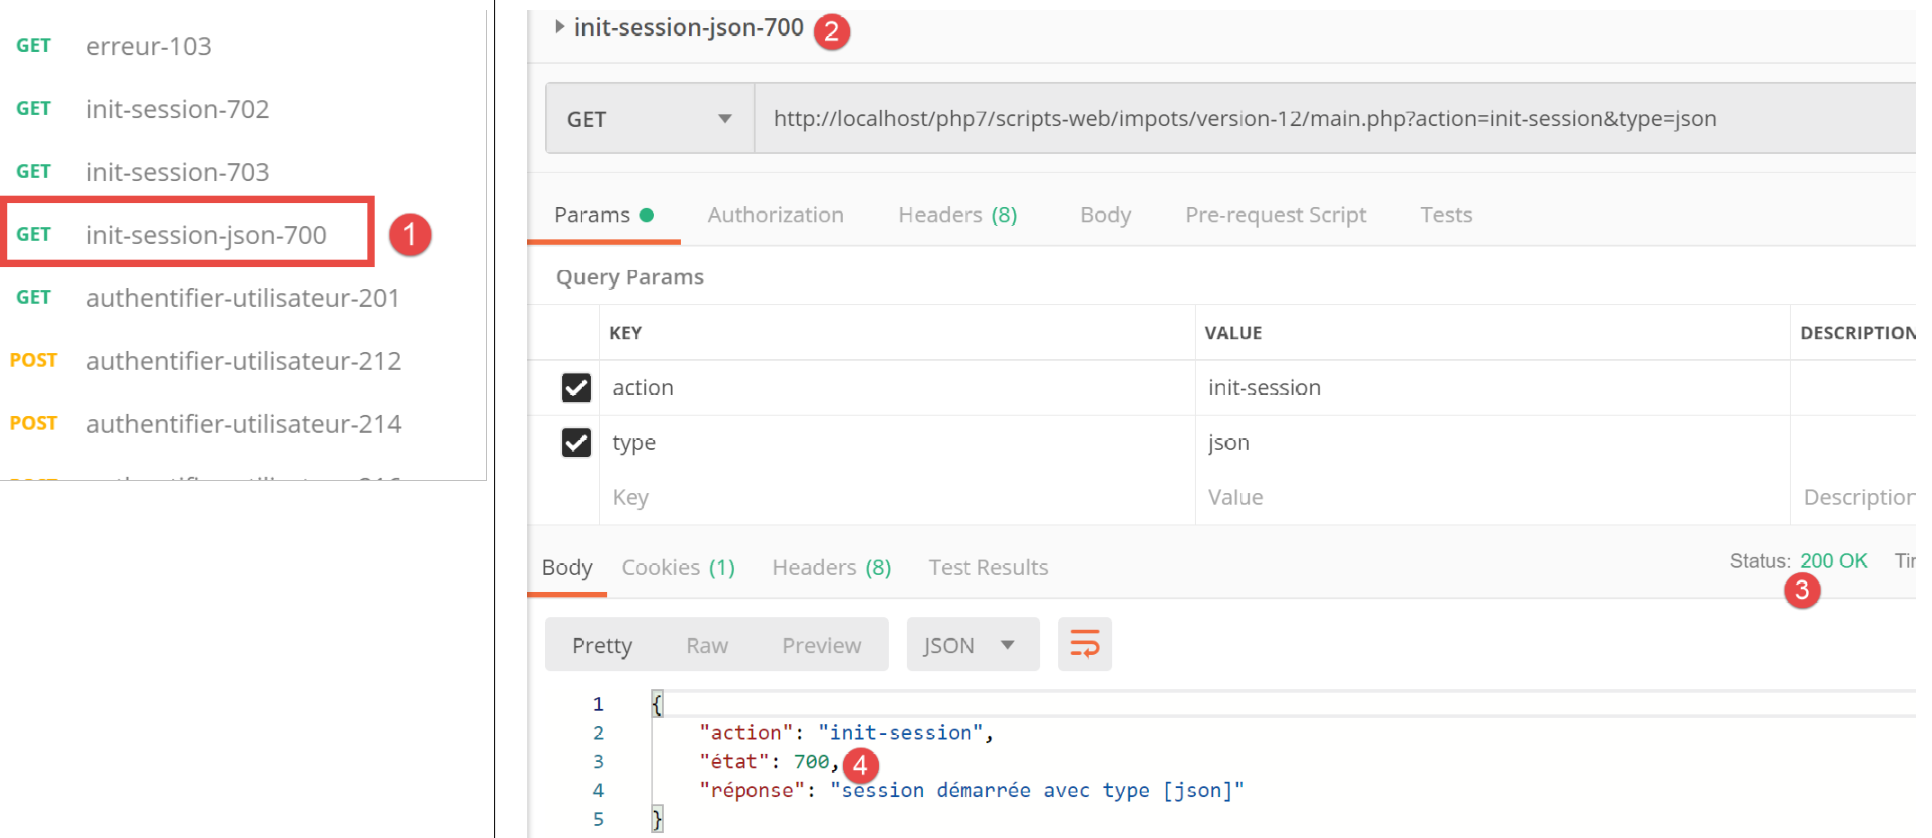
我们可以看到,状态码 [700] 对应于成功的 [init-session] 操作 [2]。上文中我们看到的是 JSON 响应,但响应格式也可能是 XML 或 HTML。本次测试将针对后者进行。根据配置文件,[vue-authentification.php] 视图构成了 HTML 响应。让我们来验证一下。
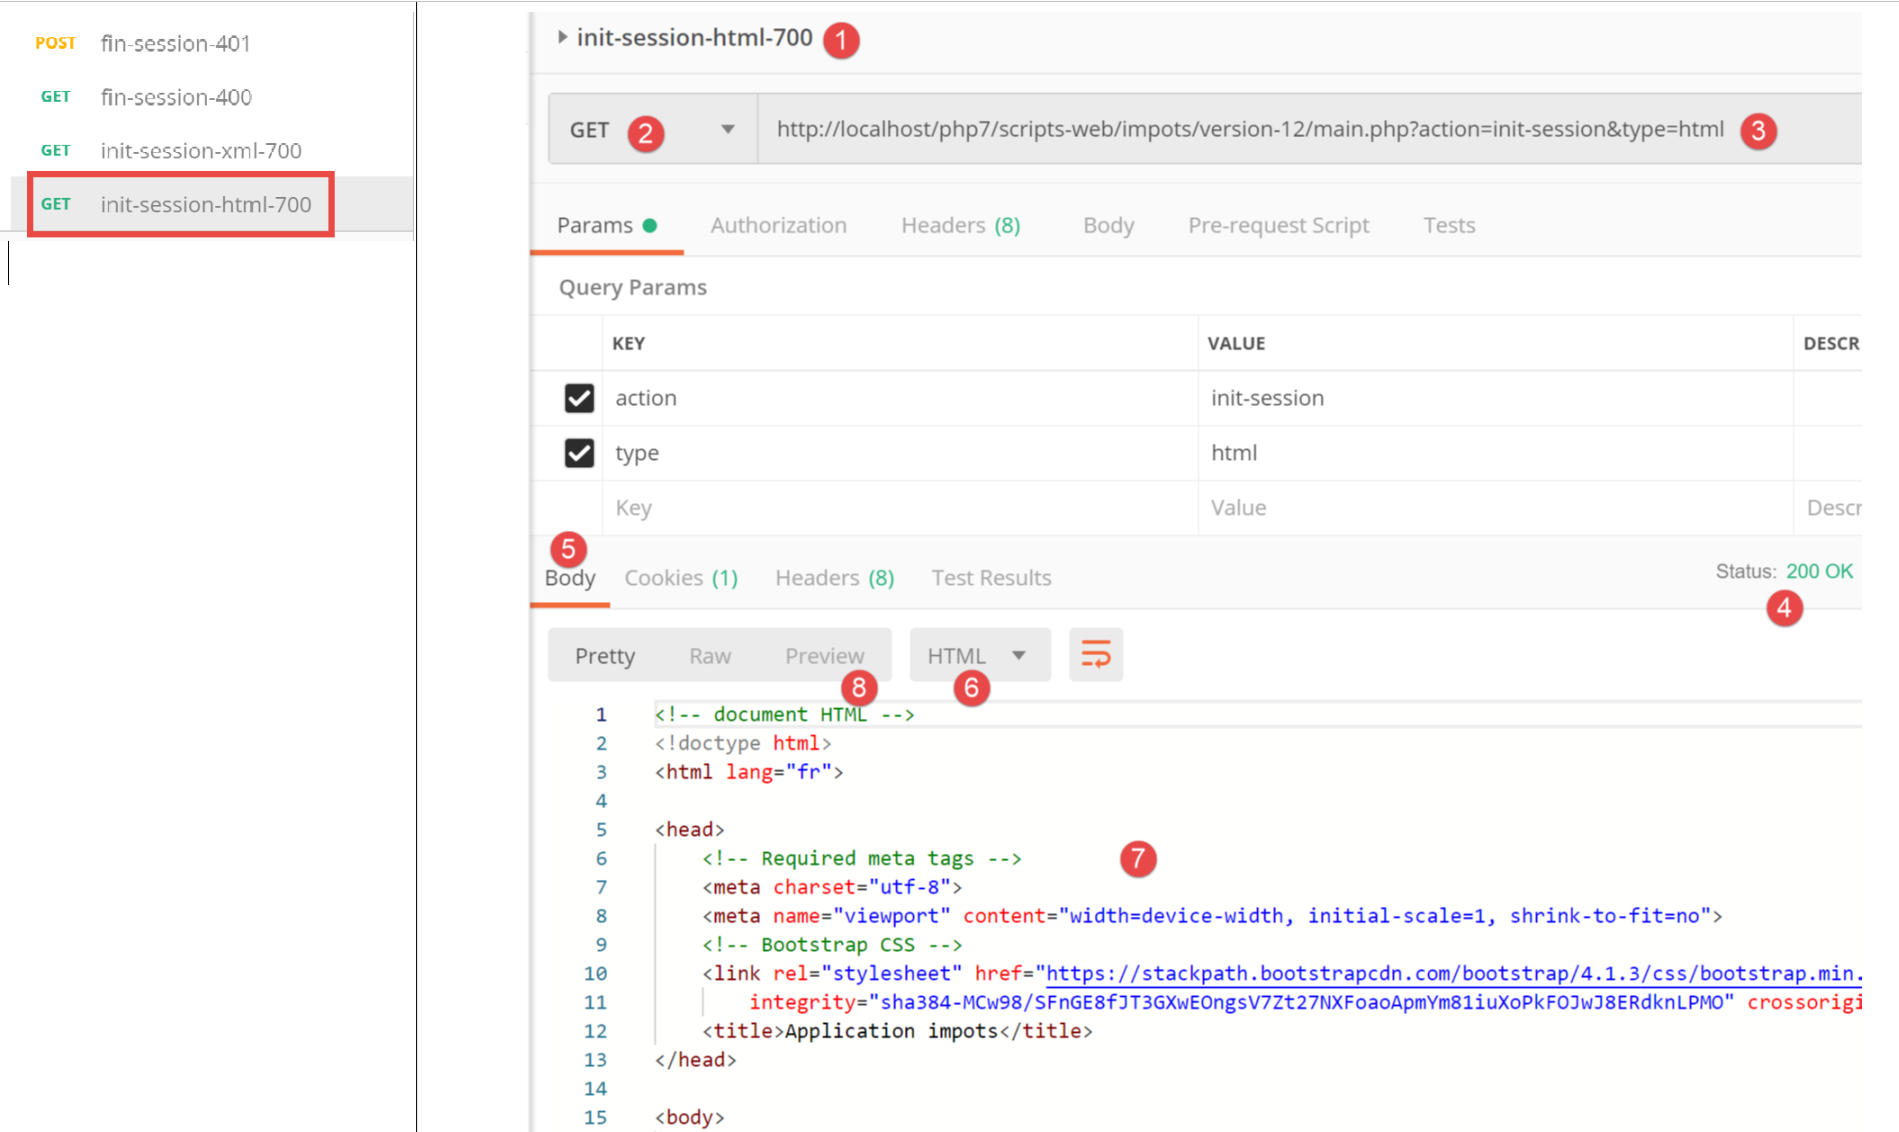
上文:
- 在 [1-3] 中,我们初始化了一个 HTML 会话。因此,我们预期会收到 HTML 响应;
- 在 [4-8] 中,显示来自服务器的 HTML 响应;
- 标签页 [8] 提供了接收到的 HTML 代码预览;
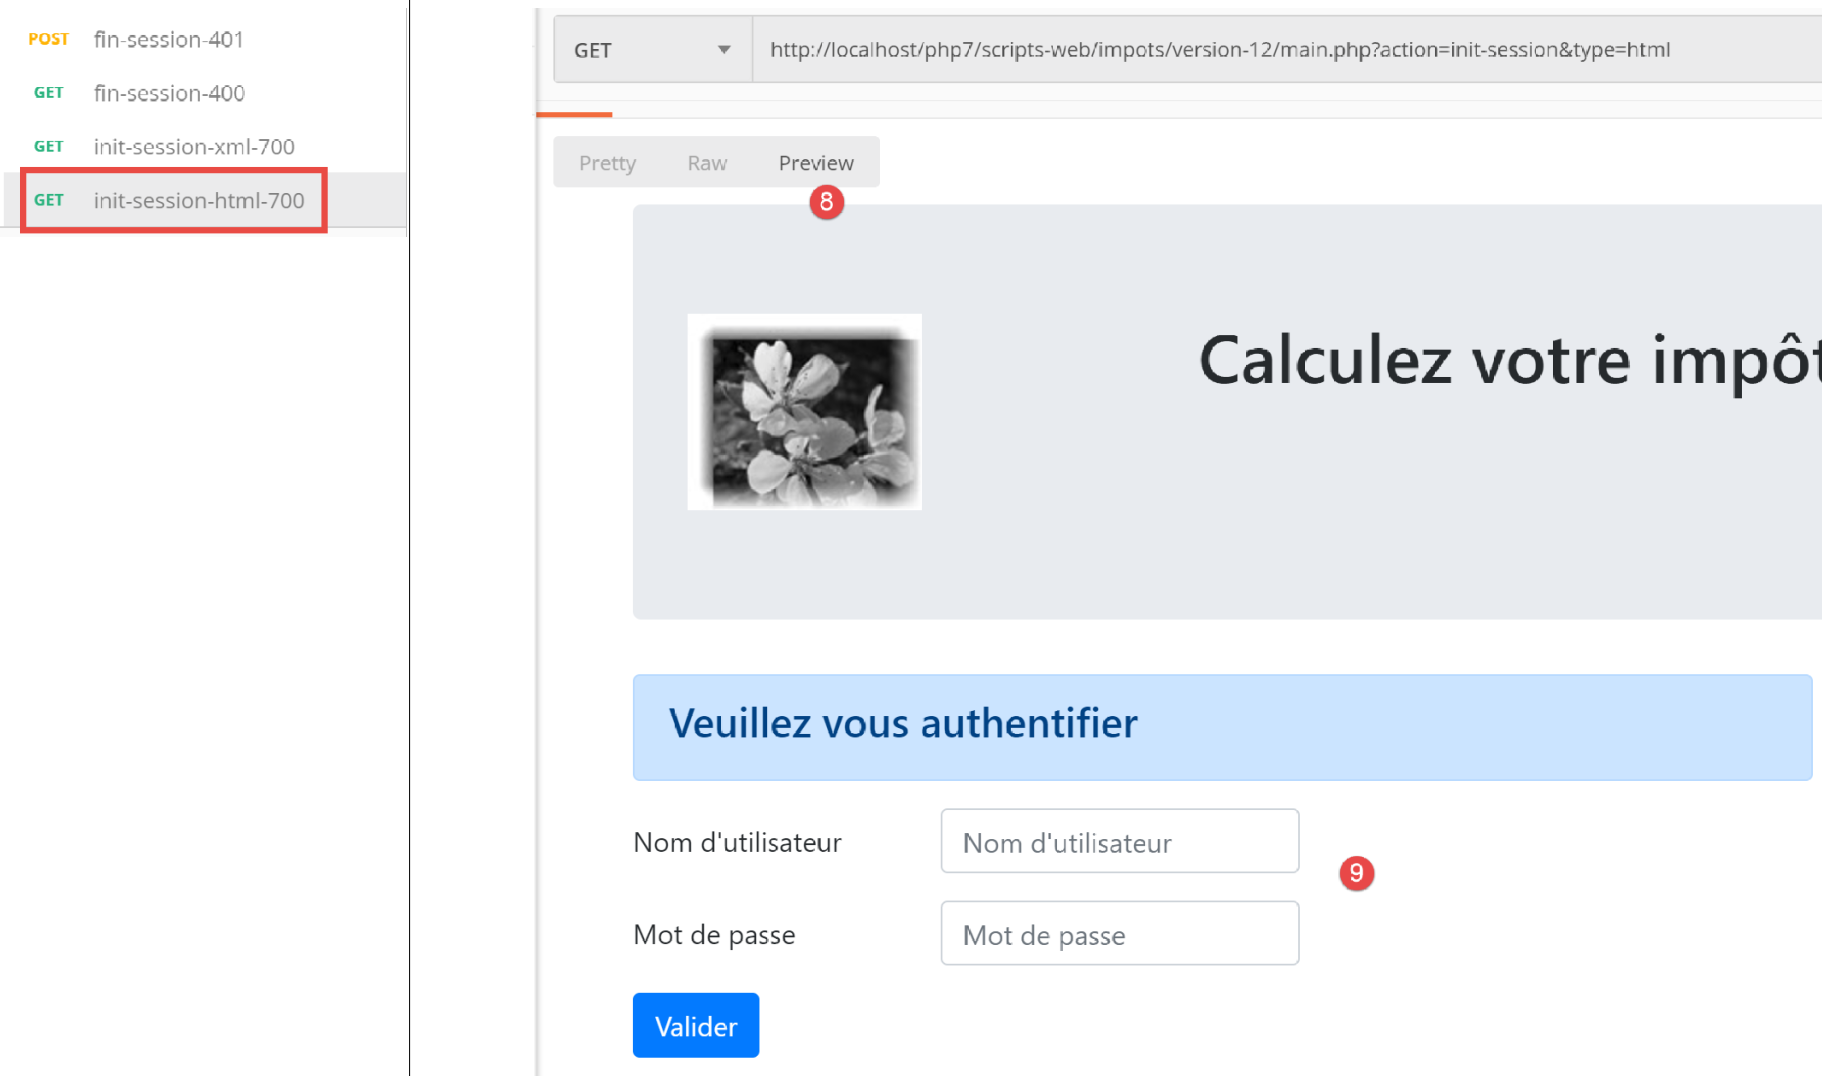
- 在 [8-9] 中,显示 HTML 视图的预览;
23.13. HTML Web 应用程序
23.13.1. 视图概述
该 HTML Web 应用程序将使用四个视图:
身份验证视图:
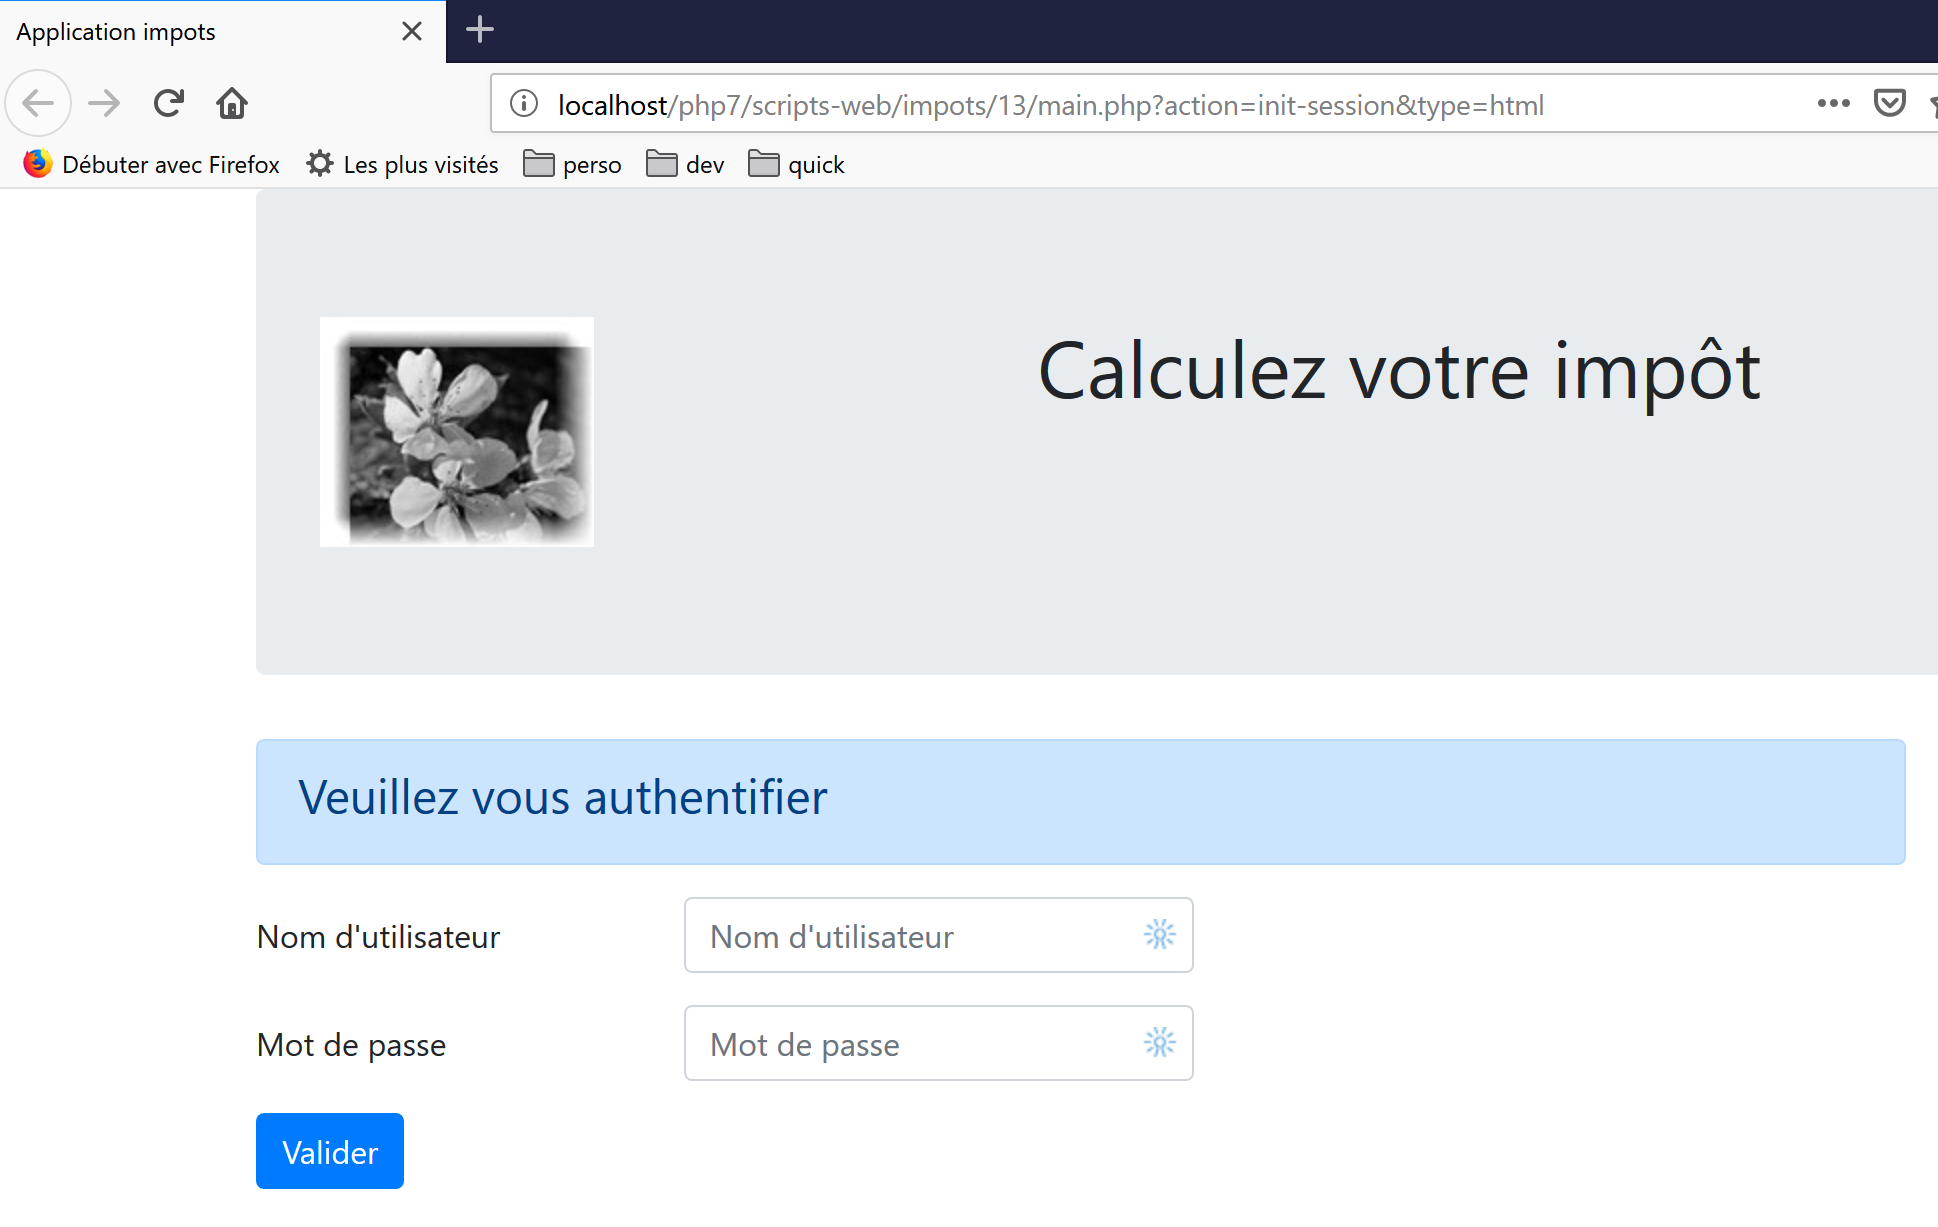
税费计算视图:
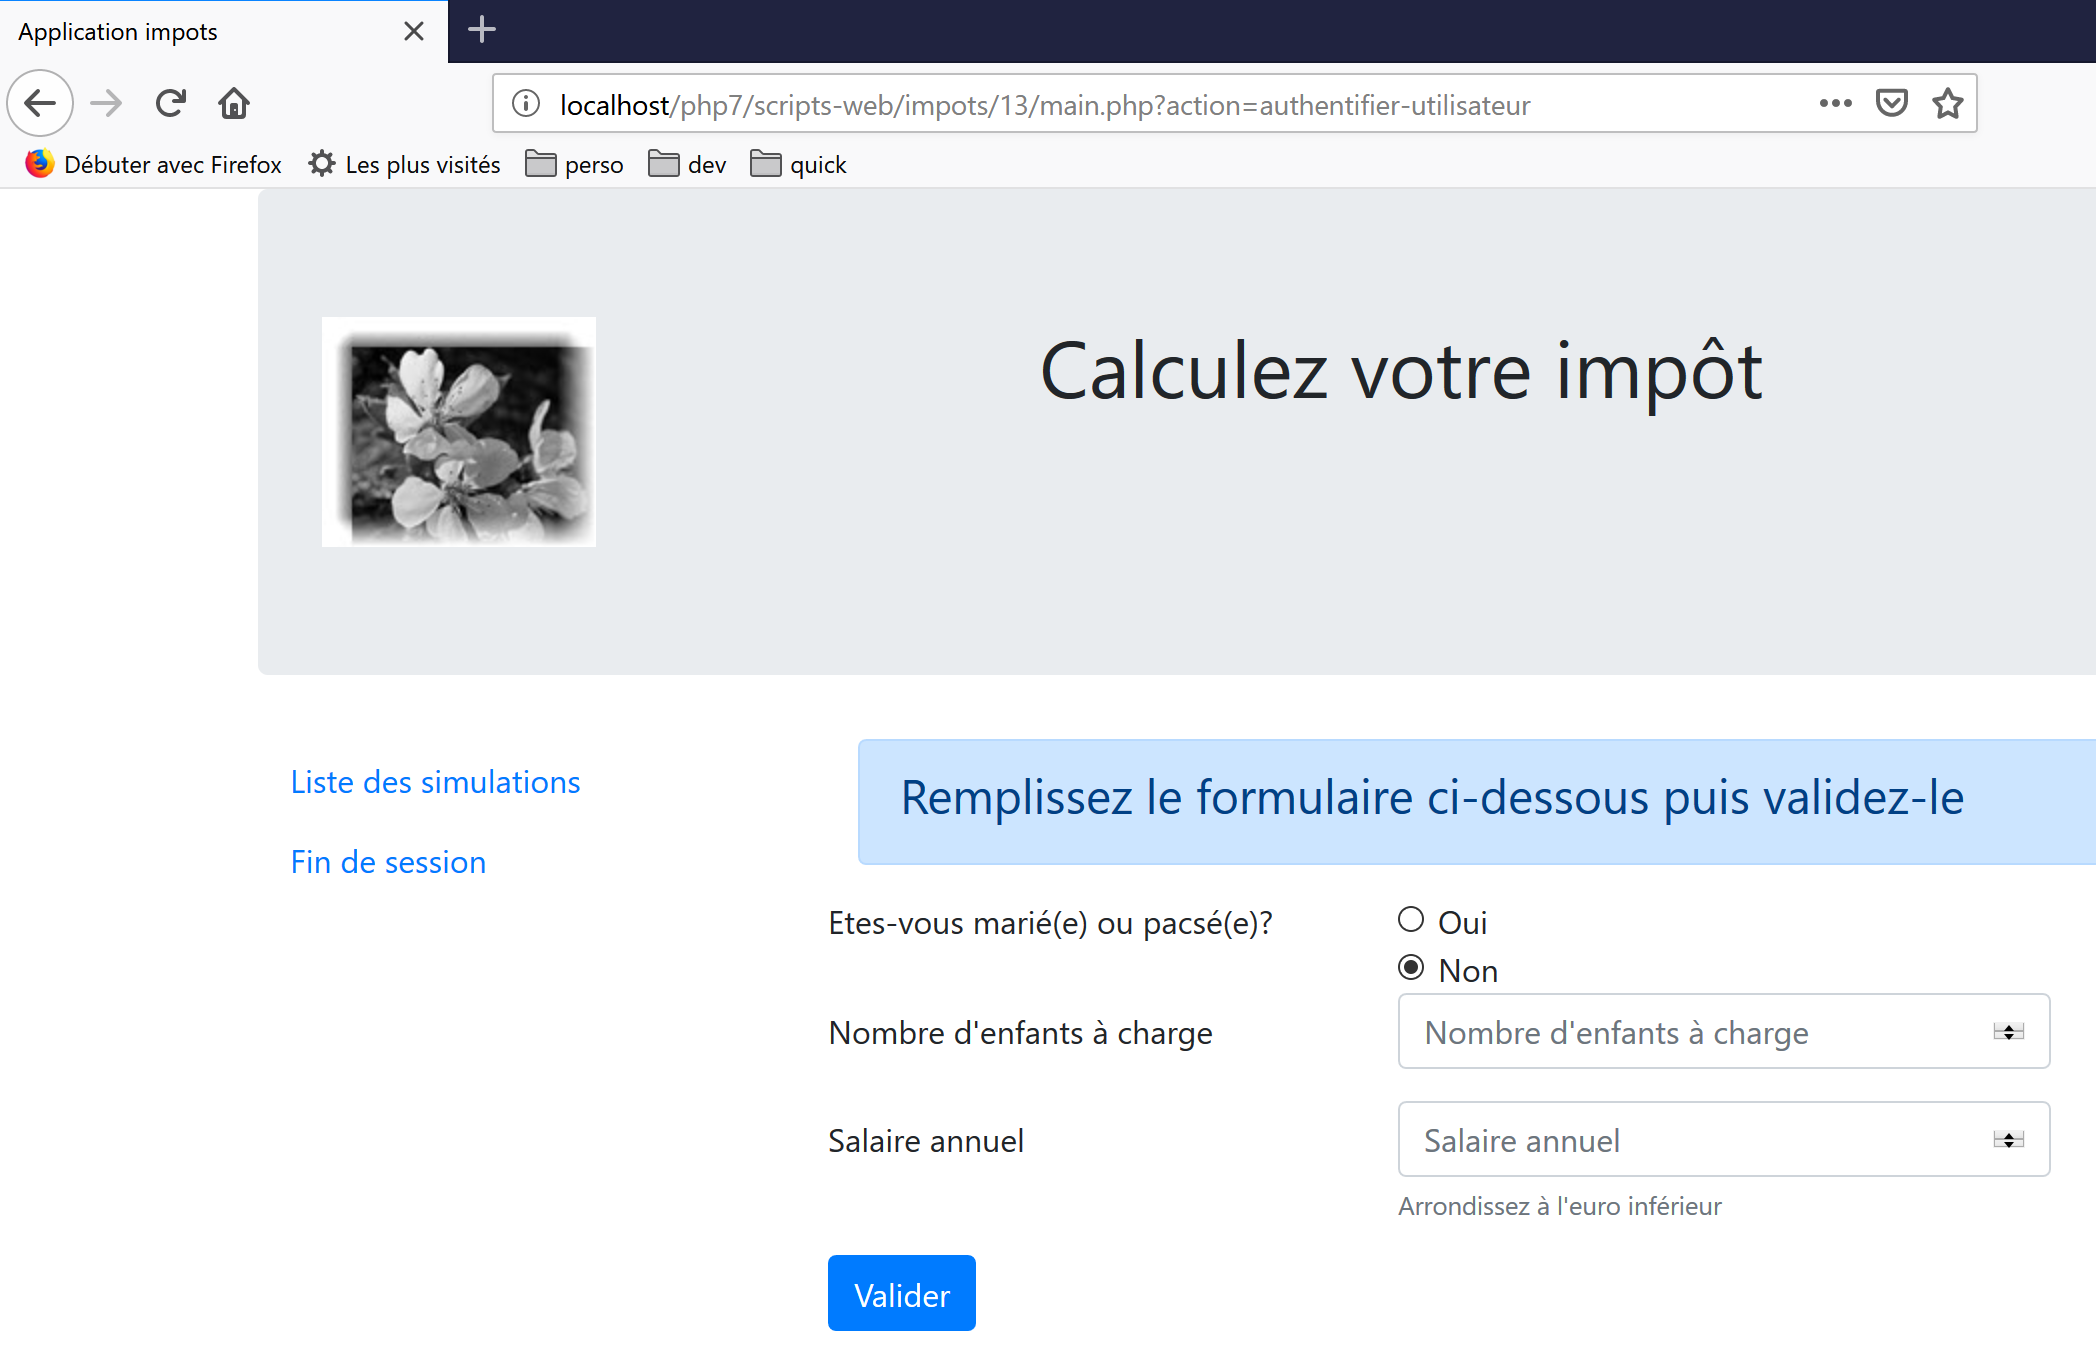
模拟列表视图:
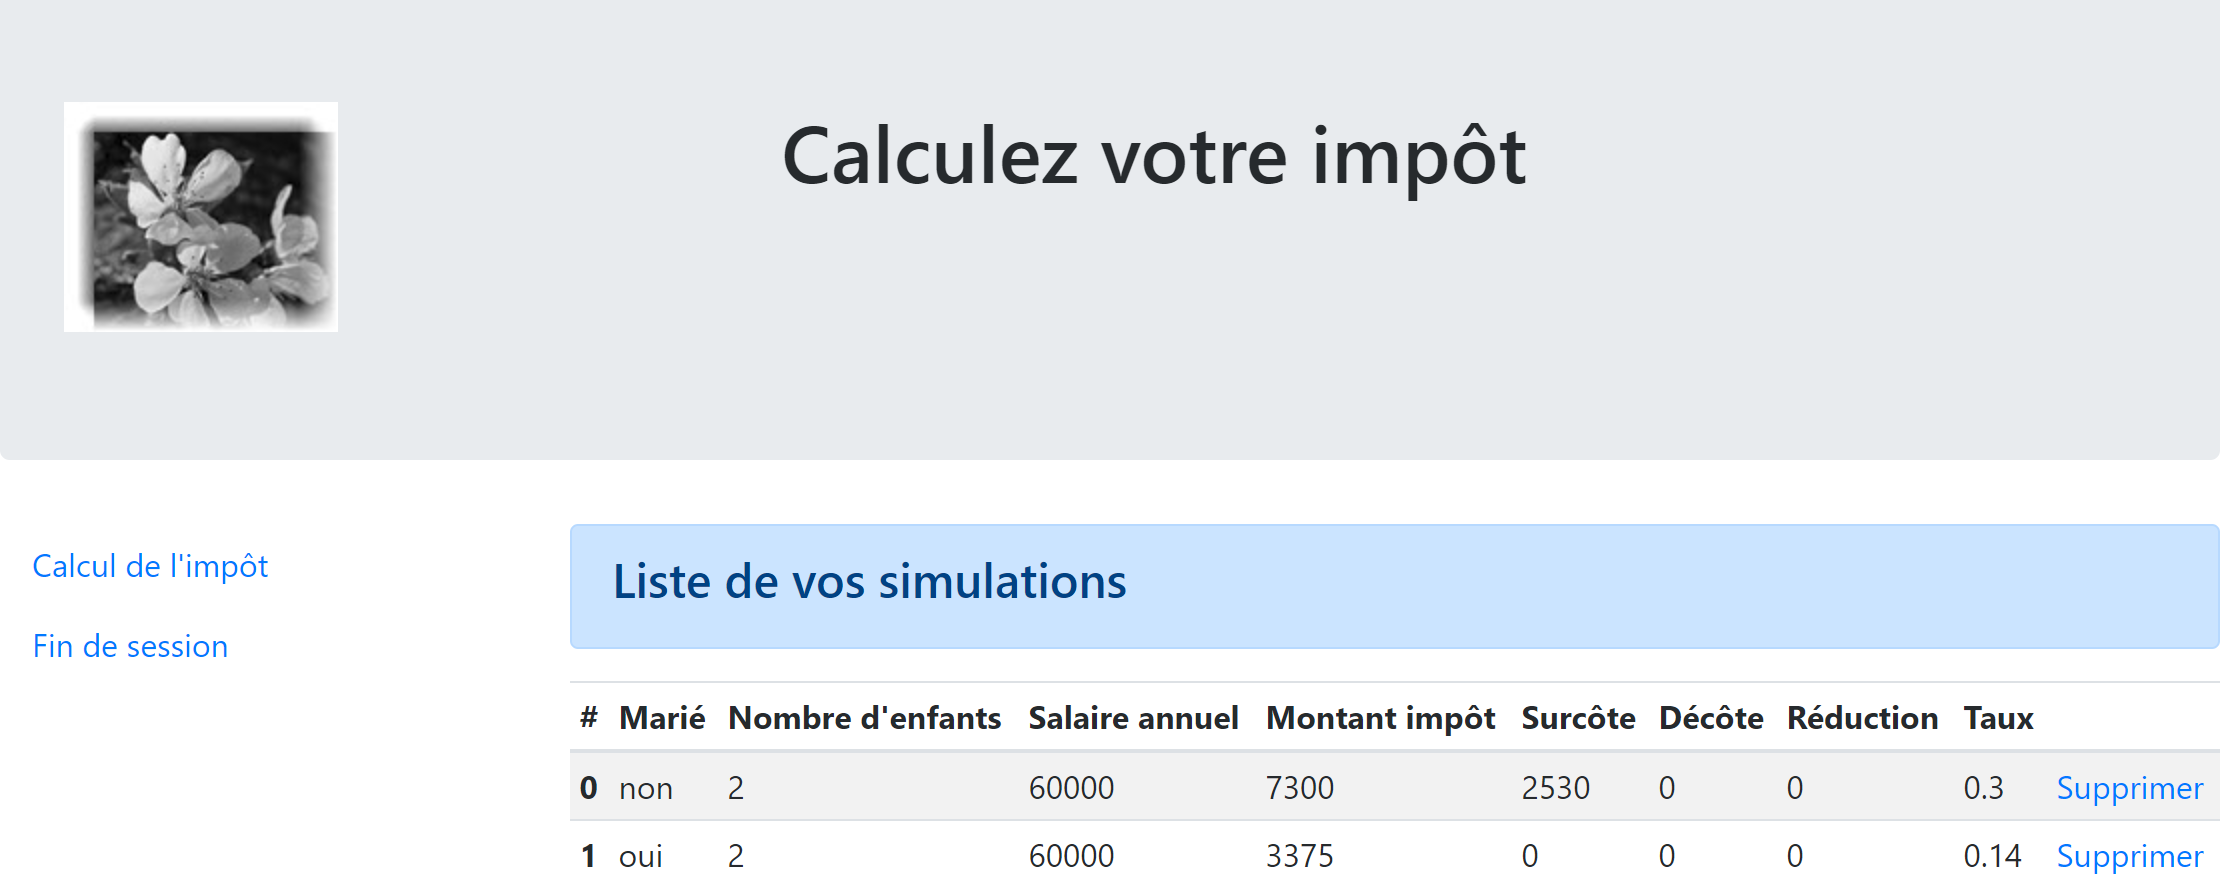
意外错误视图:
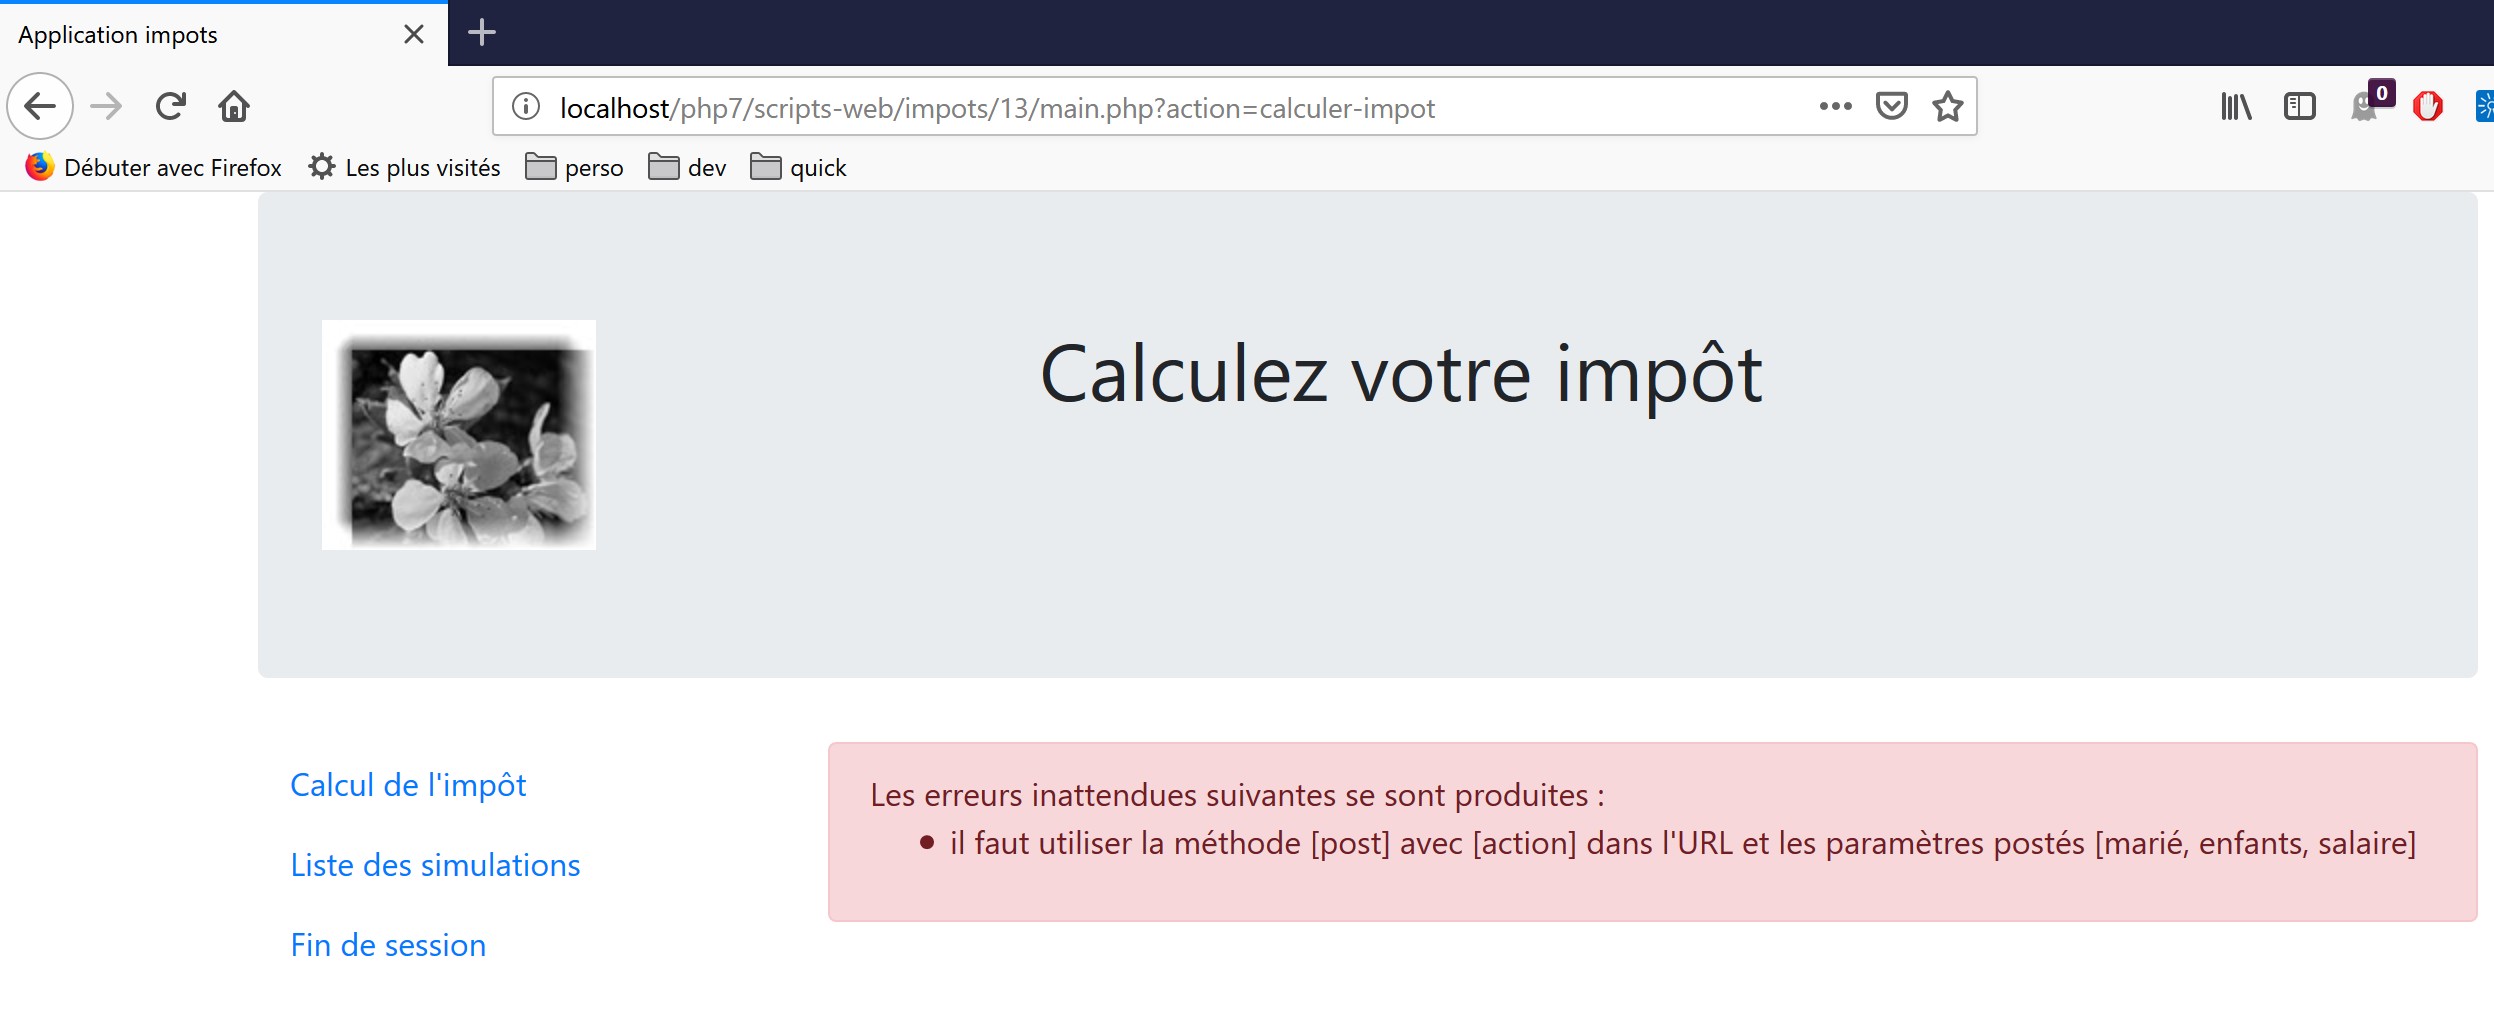
我们将逐一介绍这些视图。
23.13.2. 身份验证视图
23.13.2.1. 视图概述
身份验证视图如下:
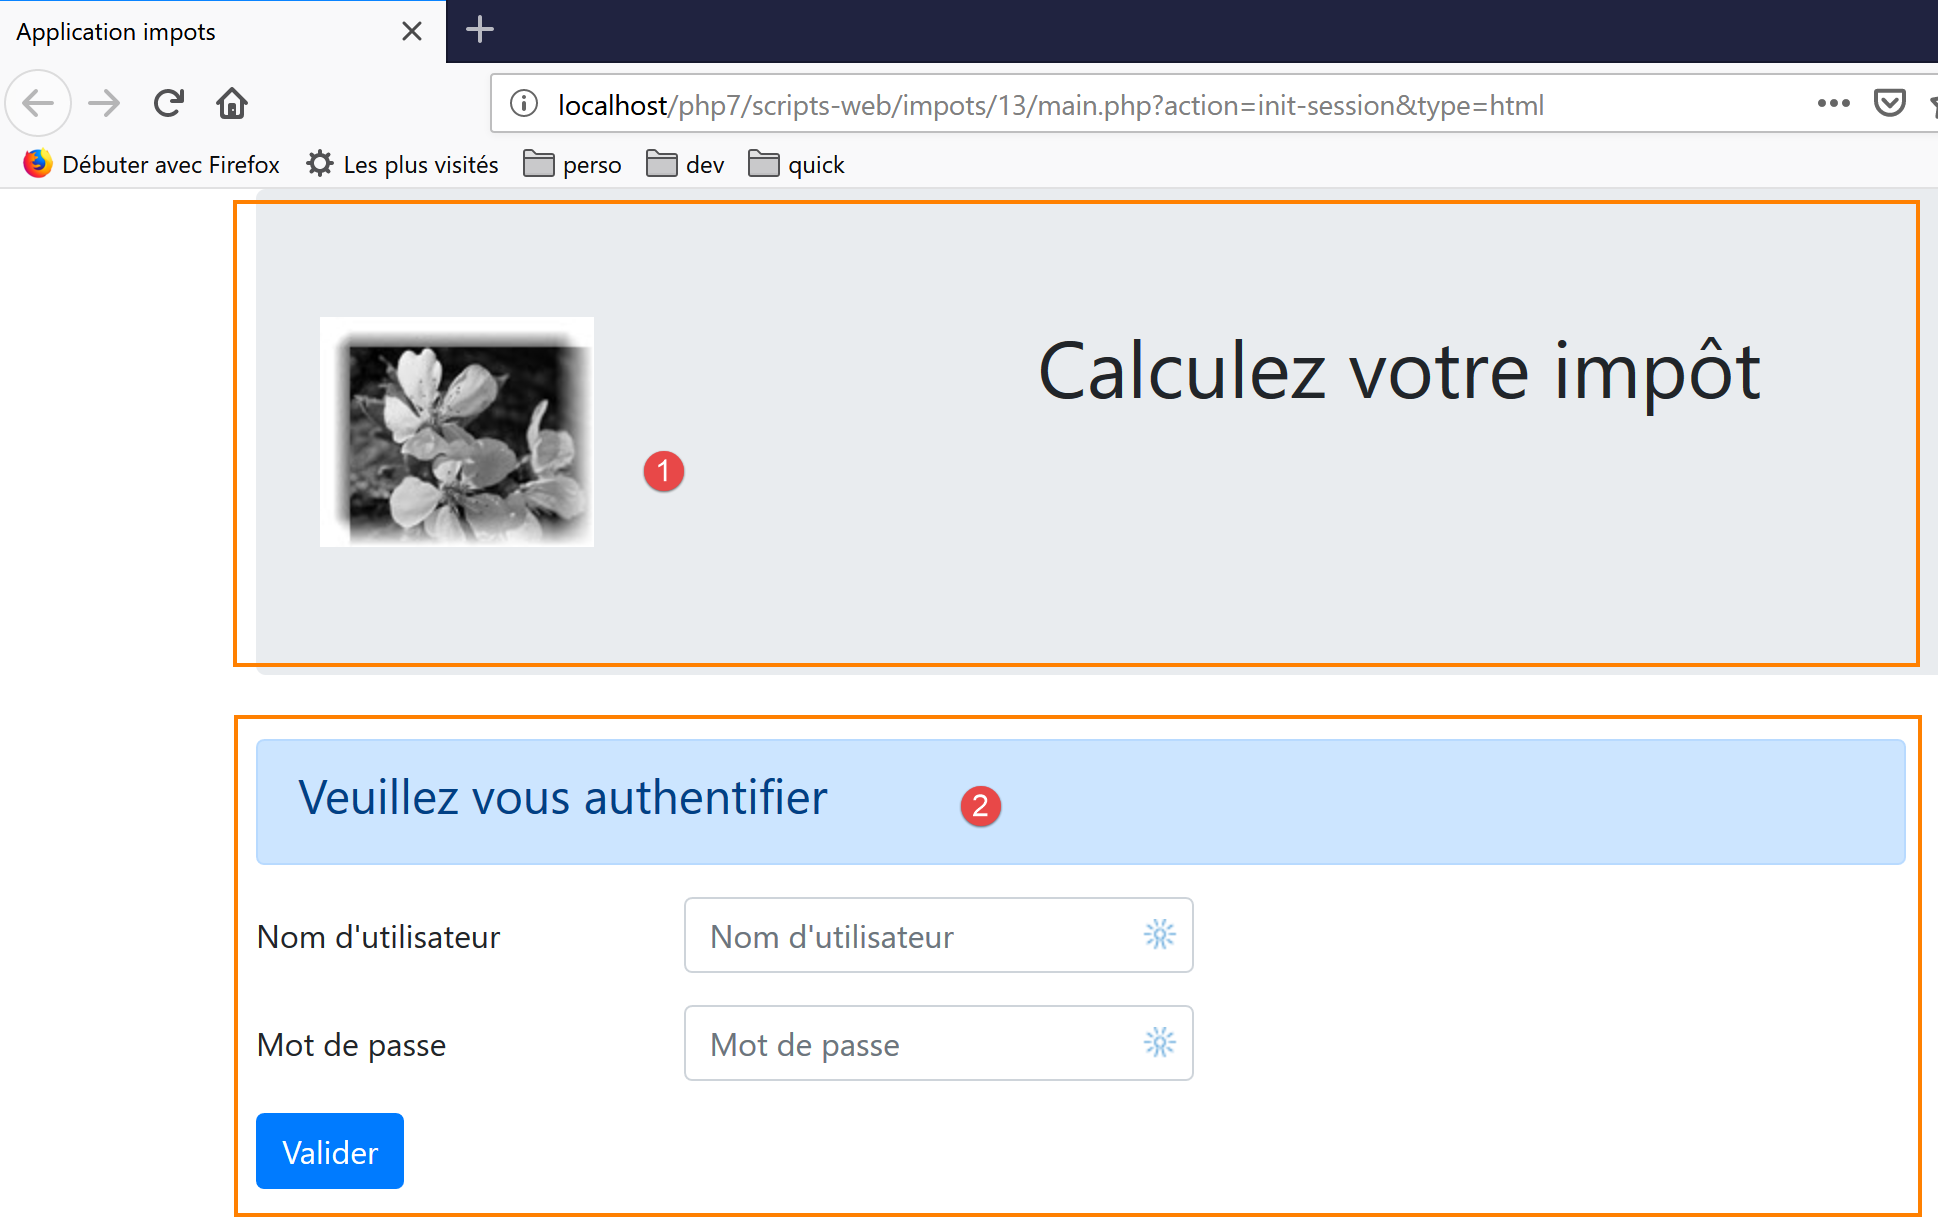
该视图由两个元素组成,我们将它们称为片段:
- 片段 [1] 由脚本 [v-banner.php] 生成;
- 片段 [2] 由脚本 [v-authentication.php] 生成;
身份验证视图由以下页面 [vue-authentication.php] 生成:
<?php
// page test data
// encapsulate paged data in $page
…
?>

<!doctype html>
<html lang="fr">
    <head>
        <!-- Required meta tags -->
        <meta charset="utf-8">
        <meta name="viewport" content="width=device-width, initial-scale=1, shrink-to-fit=no">
        <!-- Bootstrap CSS -->
        <link rel="stylesheet" href="https://stackpath.bootstrapcdn.com/bootstrap/4.1.3/css/bootstrap.min.css" integrity="sha384-MCw98/SFnGE8fJT3GXwEOngsV7Zt27NXFoaoApmYm81iuXoPkFOJwJ8ERdknLPMO" crossorigin="anonymous">
        <title>Application impots</title>
    </head>
    <body>
        <div class="container">
            <!-- bandeau sur 1 ligne et 12 colonnes -->
            <?php require "v-bandeau.php"; ?>
            <!-- formulaire d'authentification sur 9 colonnes -->
            <div class="row">
                <div class="col-md-9">
                    <?php require "v-authentification.php" ?>
                </div>
            </div>
            <?php
            // if error - displays an error alert
            if ($modèle->error) {
              print <<<EOT
            <div class="row">
                <div class="col-md-9">
                    <div class="alert alert-danger" role="alert">
                      Les erreurs suivantes se sont produites :
                      <ul>$modèle->erreurs</ul>
                    </div>
                </div>
            </div>
EOT;
            }
            ?>
        </div>
    </body>
</html>
评论
- 第 7 行:HTML 文档以此行开头;
- 第 8–44 行:HTML 页面被 <html> 和 </html> 标签所包围;
- 第 9–16 行:HTML 文档的头部(head);
- 第 11 行:<meta charset> 标签表明该文档采用 UTF-8 编码;
- 第 12 行:<meta name='viewport'> 标签设置初始视口显示方式:占据显示屏幕的整个宽度(width),保持初始大小(initial-scale),且不缩放以适应较小的屏幕(shrink-to-fit);
- 第 14 行:<link rel='stylesheet'> 标签指定了控制视口外观的 CSS 文件。此处我们使用的是 Bootstrap 4.1.3 CSS 框架 [https://getbootstrap.com/docs/4.0/getting-started/introduction/] ;
- 第 15 行:title 标签设置页面标题:
- 第 17–43 行:网页的主体内容被 body 和 /body 标签所包围;
- 第 18–42 行:<div> 标签界定了页面显示区域。视图中使用的 [class] 属性均指向 Bootstrap CSS 框架。<div class=’container’> 标签界定了 Bootstrap 容器;
- 第 20 行:我们引入了脚本 [v-banner.php]。该脚本生成页面的横幅 [1]。我们稍后将对此进行说明;
- 第 22–26 行:<div class=’row’> 标签定义了一个 Bootstrap 行。这些行由 12 个列组成;
- 第 23 行:<div class=’col-md-9’> 标签定义了一个 9 列的区域;
- 第 24 行:我们引入脚本 [v-authentification.php],该脚本用于显示页面的身份验证表单 [2]。稍后我们将对此进行说明;
- 第 27 行:<?php 标签将 PHP 代码插入到 HTML 页面中。该代码在 HTML 页面渲染之前执行,并可对其进行修改;
- 第 29 行:显示视图中的所有动态数据都将封装在类型为 [stdClass] 的 [$model] 对象中。这是任意选择。我们也可以选择关联数组来实现相同的效果;
- 第 29 行:若用户输入的凭据不正确,认证将失败。此时,认证视图将重新显示并附带一条错误信息。[$model→error] 属性用于指示是否显示该错误信息;
- 第 30–39 行:此语法会输出位于 PHP 符号 <<<EOT(第 30 行——EOT=End Of Text 可以替换为任意文本)与第 39 行 EOT 符号(必须与第 30 行使用的符号完全一致)之间的所有文本。 该符号必须写在第 39 行的第一列。位于两个 EOT 符号之间的文本中的 PHP 变量将被解析;
- 第 33–36 行:定义一个粉色背景的区域(class="alert alert-danger")(第 33 行);
- 第 34 行:文本;
- 第 35 行:HTML 标签 <ul>(无序列表)用于显示带项目符号的列表。每个列表项必须采用 <li>item</li> 的语法;
让我们注意一下此代码中需要定义的动态元素:
- [$model→error]:用于显示错误消息;
- [$template→errors]:错误消息的列表(HTML 意义上的列表);
23.13.2.2. [v-bandeau.php] 片段
[v-bandeau.php] 片段用于显示 Web 应用程序中所有视图的顶部横幅:
[v-banner.php] 片段的代码如下:
<!-- Bootstrap Jumbotron -->
<div class="jumbotron">
    <div class="row">
        <div class="col-md-4">
            <img src="<?= $logo ?>" alt="Cerisier en fleurs" />
        </div>
        <div class="col-md-8">
            <h1>
                Calculez votre impôt
            </h1>
        </div>
    </div>
</div>
评论
- 第 2–13 行:横幅被包裹在一个 Bootstrap Jumbotron 区域 [<div class="jumbotron">] 中。该 Bootstrap 类会以特定方式对显示内容进行样式设置,使其脱颖而出;
- 第 3–12 行:一个 Bootstrap 行;
- 第 4–6 行:在该行的前四列中放置了一张图片 [img];
- 第 5 行:语法 [<?= $logo ?>] 等同于语法 [<?php print $logo ?>]。换言之,[src] 属性的值将取自 PHP 变量 [$logo] 的值;
- 第 7–11 行:该行剩余的 8 个列(请记住总共有 12 个列)将用于显示文本(第 9 行),并采用大字号(<h1>,第 8–10 行);
动态元素:
- [$logo]:横幅中显示的图片 URL;
23.13.2.3. [v-authentification.php] 片段
[v-authentication.php] 片段用于显示 Web 应用程序的身份验证表单:
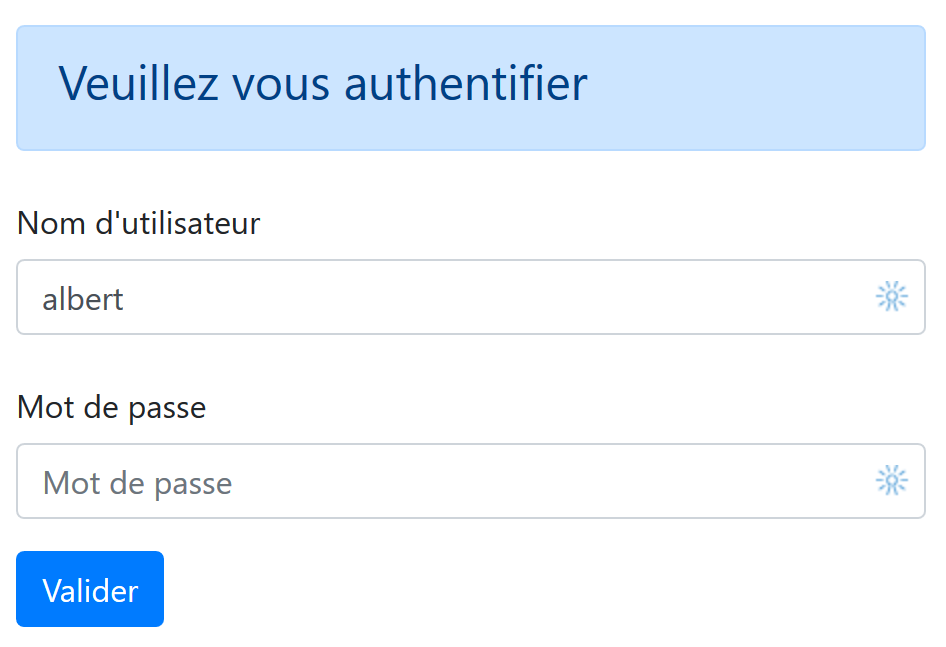
[v-authentication.php] 片段的代码如下:
<!-- form HTML - post its values with the [authenticate-user] action -->
<form method="post" action="main.php?action=authentifier-utilisateur">

    <!-- title -->
    <div class="alert alert-primary" role="alert">
        <h4>Veuillez vous authentifier</h4>
    </div>

    <!-- bootstrap form -->
    <fieldset class="form-group">
        <!-- 1st line -->
        <div class="form-group row">
            <!-- wording -->
            <label for="user" class="col-md-3 col-form-label">Nom d'utilisateur</label>
            <div class="col-md-4">
                <!-- text input field -->
                <input type="text" class="form-control" id="user" name="user"
                       placeholder="Nom d'utilisateur" value="<?= $modèle->login ?>">
            </div>
        </div>
        <!-- 2nd line -->
        <div class="form-group row">
            <!-- wording -->
            <label for="password" class="col-md-3 col-form-label">Mot de passe</label>
            <!-- text input field -->
            <div class="col-md-4">
                <input type="password" class="form-control" id="password" name="password"
                       placeholder="Mot de passe">
            </div>
        </div>
        <!-- submit] button on a 3rd line-->
        <div class="form-group row">
            <div class="col-md-2">
                <button type="submit" class="btn btn-primary">Valider</button>
            </div>
        </div>
    </fieldset>

</form>
评论
- 第 2–39 行:<form> 标签定义了一个 HTML 表单。该表单通常具有以下特征:
- 它定义了输入字段(第 17 行和第 27 行的 <input> 标签);
- 它有一个 [submit] 按钮(第 34 行),用于将输入的值发送至 [form] 标签的 [action] 属性中指定的 URL(第 2 行)。向该 URL 发起请求所使用的 HTTP 方法在 [form] 标签的 [method] 属性中指定(第 2 行);
- 在此,当用户点击 [Submit] 按钮(第 34 行)时,浏览器将通过 POST 方法(第 2 行)将表单中输入的值提交至 URL [main.php?action=authentifier-utilisateur](第 2 行);
- 提交的值即用户在第 17 行和第 27 行输入框中输入的内容。这些值将以 [user=xx&password=yy] 的格式提交。参数名称 [user, password] 对应于第 17 行和第 27 行输入框的 [name] 属性;
- 第 5–7 行:一个 Bootstrap 代码块,用于在蓝色背景上显示标题:

- 第 10–37 行:一个 Bootstrap 表单。所有表单元素随后将采用特定样式;
- 第 12–20 行:定义表单的第一行:
![]()
- 第 14 行将标签 [1] 设置为三列布局。[label] 标签的 [for] 属性将该标签与第 17 行输入字段的 [id] 属性关联起来;
- 第 15–19 行:将输入字段放置在四列布局中;
- 第 17 行:HTML [input] 标签定义了一个输入框。它具有以下几个属性:
- [type='text']:这是一个文本输入框。您可以在其中输入任意内容;
- [class='form-control']:输入字段的 Bootstrap 样式;
- [id='user']:输入字段的标识符。该标识符通常用于 CSS 和 JavaScript 代码;
- [name='user']: 输入字段的名称。用户输入的值将由浏览器以该名称提交 [user=xx];
- [placeholder='prompt']: 用户尚未输入任何内容时,输入框中显示的提示文本;
![]()
- [value='value']: 输入框出现时(即用户尚未输入任何内容时),会显示文本 'value'。此机制用于在发生错误时显示导致错误的输入内容。此处,该值将取自 PHP 变量 [$model->login];
- 第 21–30 行:密码输入字段的类似代码;
- 第 27 行:[type='password'] 创建了一个文本输入框(可输入任意内容),但输入的字符会被隐藏:
![]()
- 第 32–36 行:用于 [Submit] 按钮的第三行代码;
- 第 34 行:由于该按钮具有 [type="submit"] 属性,点击此按钮会触发浏览器将输入的值发送至服务器,如前所述。CSS 属性 [class="btn btn-primary"] 会显示一个蓝色按钮:
还有最后一点需要说明。第 2 行:[action="main.php?action=authentifier-utilisateur"] 属性定义了一个不完整的 URL(它不以 http://machine:port/chemin 开头)。 在本示例中,应用程序的所有 URL 均采用 [http://localhost/php7/scripts-web/impots/version-12/main.php?action=xx] 这种形式。认证视图可通过以下各种 URL 访问:
- [http://localhost/php7/scripts-web/impots/version-12/main.php?action=init-session&type=html];
- [http://localhost/php7/scripts-web/impots/version-12/main.php?action=authentifier-utilisateur]
这些 URL 指向位于 [http://localhost/php7/scripts-web/impots/version-12] 的文档 [main.php]。这适用于该应用程序中的所有 URL。 当提交输入的值时,参数 [action="main.php?action=authentifier-utilisateur"] 将在此路径前添加前缀。因此,这些值将被发布到 URL [http://localhost/php7/scripts-web/impots/version-12/main.php?action=authentifier-utilisateur]。
23.13.2.4. 视觉测试
在将视图集成到应用程序之前,我们可以对其进行充分的测试。此处的目的是测试其视觉效果。我们将把所有测试视图集中到项目的 [Tests] 文件夹中:
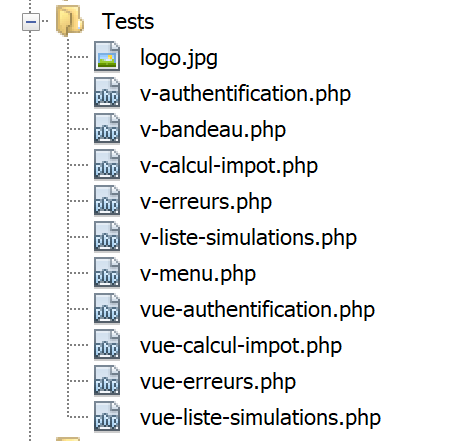
要测试视图 [vue-authentification.php],我们需要创建它将要显示的数据模型:
<?php
// page test data
//
// calculate the view model
$modèle = getModelForThisView();

function getModelForThisView(): object {
  // encapsulate paged data in $modèle
  $modèle = new \stdClass();
  // user code
  $modèle->login = "albert";
  // error list
  $modèle->error = TRUE;
  $erreurs = ["erreur1", "erreur2"];
  // build a HTML list of errors
  $content = "";
  foreach ($erreurs as $erreur) {
    $content .= "<li>$erreur</li>";
  }
  $modèle->erreurs = $content;
  // banner image
  $modèle->logo = "http://localhost/php7/scripts-web/impots/version-12/Tests/logo.jpg";
  // we render the model
  return $modèle;
}
?>

<!-- document HTML -->
<!doctype html>
<html lang="fr">
    <head>
        <!-- Required meta tags -->
        …
    </head>
    <body>
        ….
    </body>
</html>
评论
- 第 1–5 行:身份验证视图包含由 [$model] 对象控制的动态部分。该对象被称为视图模型。根据 MVC 缩写词的两种定义之一,这代表了 MVC 中的 M;
- 第 5 行:视图模型由 [getModelForThisView] 函数计算得出;
- 第 9 行:视图模型将被封装在 [stdClass] 类型中;
- 第 10–22 行:为身份验证视图的动态元素定义了测试值;
可在 NetBeans 中进行可视化测试:
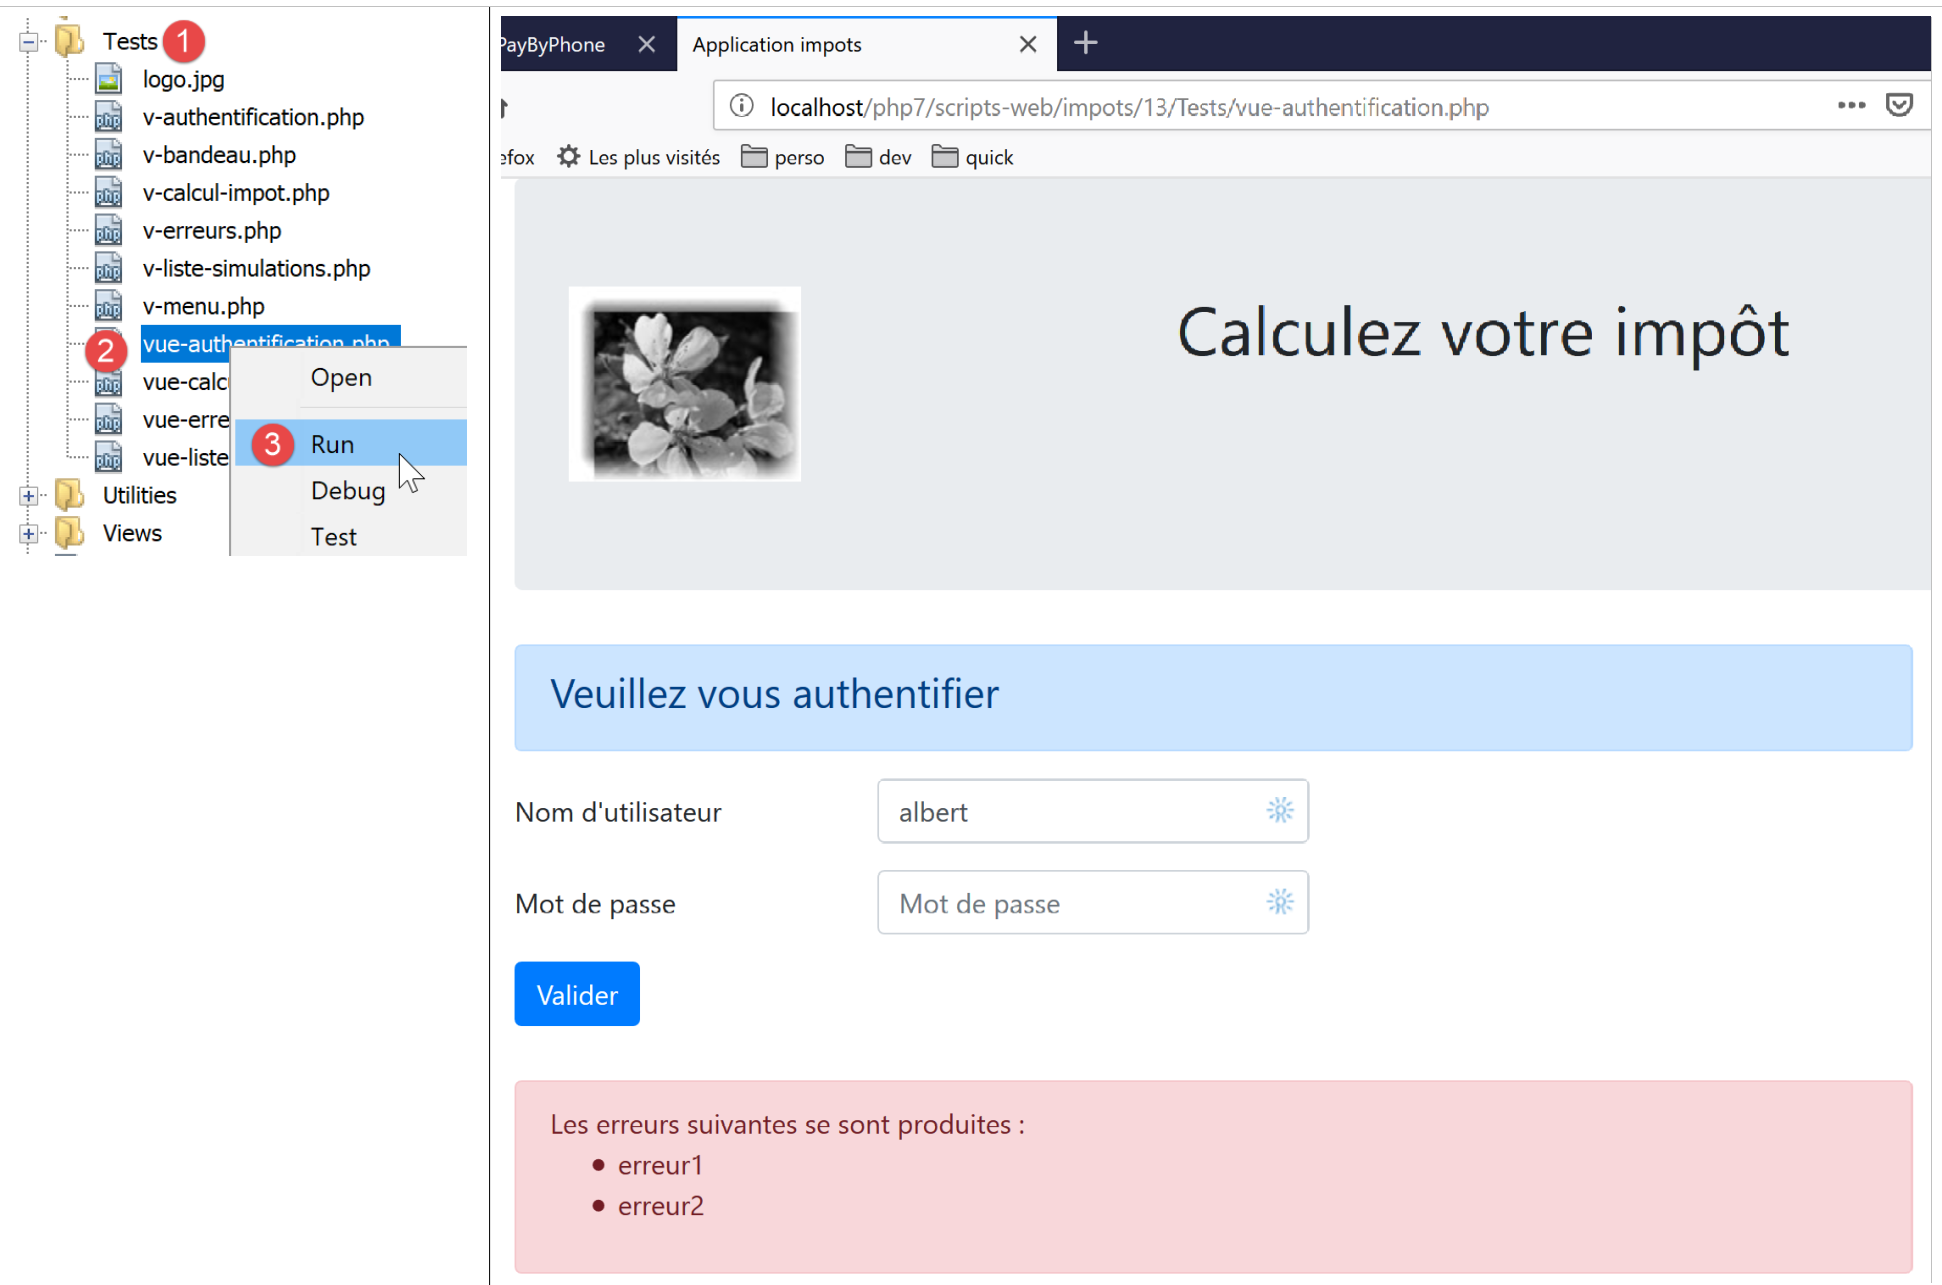
我们将持续进行这些可视化测试,直到对结果感到满意为止。
23.13.2.5. 计算视图模型
一旦确定了视图的外观,我们就可以在实际条件下计算视图模型。让我们回顾一下导致此视图的状态代码。这些代码可在配置文件中找到:
"vues": {
        "vue-authentification.php": [700, 221, 400],
        "vue-calcul-impot.php": [200, 300, 341, 350, 800],
        "vue-liste-simulations.php": [500, 600]
    },
"vue-erreurs": "vue-erreurs.php"
因此,状态码 [700, 221, 400] 会触发身份验证视图的显示。要理解这些代码的含义,我们可以参考在 JSON 应用程序上执行的 [Postman] 测试:
- [init-session-json-700]:700 是 [init-session] 操作成功后的状态码:此时会显示一个空白的身份验证表单;
- [authenticate-user-221]:221 是 [authenticate-user] 操作失败(凭据不正确)后的状态码:随后将显示身份验证表单,以便用户更正凭据;
- [end-session-400]: 400 是 [end-session] 操作成功后的状态码:随后将显示空的身份验证表单;
既然我们已经知道何时应显示认证表单,就可以在 [authentication-view.php] 中计算其模板:

计算视图模板 [vue-authentification.php] 的代码如下:
<?php
// we inherit the following variables
// Request $request : la requête en cours
// Session $session: the application session
// array $config: application configuration
// array $content: controller response
//
// symfony dependencies
use Symfony\Component\HttpFoundation\Request;
use Symfony\Component\HttpFoundation\Session\Session;

// calculate the view model
$modèle = getModelForThisView($request, $session, $config, $content);

function getModelForThisView(Request $request, Session $session, array $config, array $content): object {
  // encapsulate paged data in $modèle
  $modèle = new stdClass();
  // application status
  $état = $content["état"];
  // the model depends on the state
  switch ($état) {
    case 700:
    case 400:
      // case of empty form display
      $modèle->login = "";
      // no error to display
      $modèle->error = FALSE;
      break;
    case 221:
      // false authentication
      // the user initially entered is redisplayed
      $modèle->login = $request->request->get("user");
      // there is an error to display
      $modèle->error = TRUE;
      // list HTML of error msg - here only one
      $modèle->erreurs = "<li>Echec de l'authentification</li>";
  }
  // result
  return $modèle;
}
?>

<!-- document HTML -->
<!doctype html>
<html lang="fr">
    <head>
        …
    </head>
    <body>
        …
    </body>
</html>
评论
- 第 3–6 行:声明了从 [HtmlResponse] 类继承的变量;该类使用 [require] 来显示 [vue-authentification.php] 视图;
- 第 9–10 行:视图代码中使用的 Symfony 类;
- 第 15–40 行:[getModelForThisView] 函数负责计算视图模型;
- 第 19 行:获取处理当前操作的控制器返回的状态码;
- 第 21–37 行:模型依赖于此状态代码;
- 第 22–28 行:需要显示空白认证表单的情况;
- 第 29–37 行:认证失败的情况:显示用户输入的用户名以及一条错误信息。用户随后可以尝试再次认证;
已为横幅编写了专用模板 [v-bandeau.php]:
<?php
  // logo
  $scheme = $request->server->get('REQUEST_SCHEME'); // http
  $host = $request->server->get('SERVER_NAME'); // localhost
  $port = $request->server->get('SERVER_PORT'); // 80
  $uri = $request->server->get('REQUEST_URI'); // /php7/scripts-web/impots/version-12/main.php?action=xxx
  $champs = [];
  preg_match("/(.+)\/.+?$/", $uri, $champs);
  $root = $champs[1]; // /php7/scripts-web/impots/version-12
  $modèle->logo = "$scheme://$host:$port$root/Views/logo.jpg"; // http://localhost:80/php7/scripts-web/impots/version-12/Views/logo.jpg
?>
<!-- Bootstrap Jumbotron -->
<div class="jumbotron">
    <div class="row">
        <div class="col-md-4">
            <img src="<?= $modèle->logo ?>" alt="Cerisier en fleurs" />
        </div>
        <div class="col-md-8">
            <h1>
                Calculez votre impôt
            </h1>
        </div>
    </div>
</div>
评论
- 第 16 行使用了变量 [$template→logo],该变量是横幅徽标的 URL。与其为应用程序的四个视图分别计算该变量四次,不如将此计算纳入片段 [v-banner.php] 中;
- 第 1–11 行展示了如何利用服务器环境 [$request→server] 中的信息构建 URL [http://localhost:80/php7/scripts-web/impots/version-12/Views/logo.jpg];
23.13.2.6. 测试 [Postman]
我们已创建了返回状态码 [700, 221, 400] 的请求,这些请求会显示身份验证视图。让我们回顾一下:
- [init-session-html-700]: 700 是 [init-session] 操作成功后的状态码:随后将显示一个空的身份验证表单;
- [authenticate-user-221]: 221 是 [authenticate-user] 操作失败(凭据不正确)后的状态码:随后将显示认证表单以便修正凭据;
- [end-session-400]: 400 是 [end-session] 操作成功后的状态码:随后将显示空的身份验证表单;
只需直接复用这些代码,并检查它们是否正确显示了身份验证视图。此处仅展示两个测试:
- [init-session-html-700]:HTML 会话的开始;
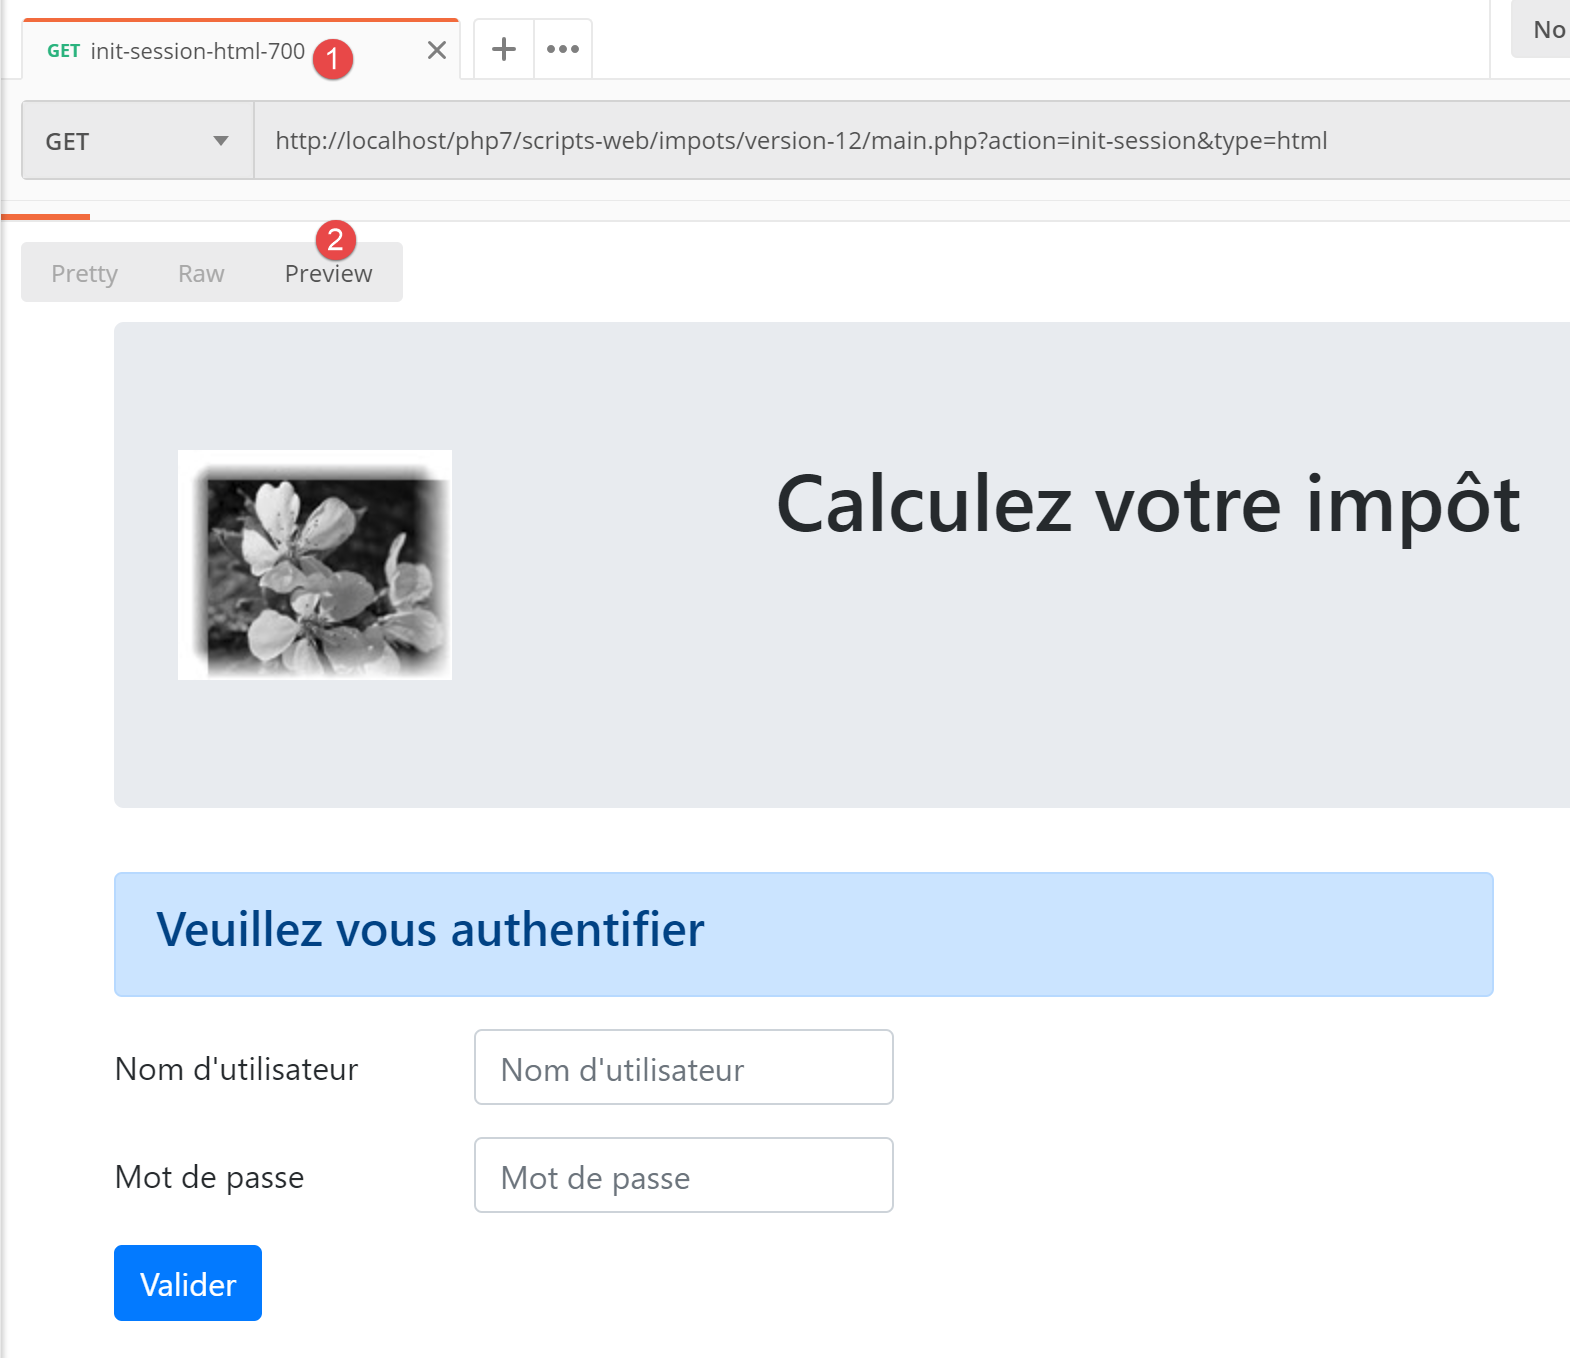
- [authenticate-user-221]:验证用户 [x, x];
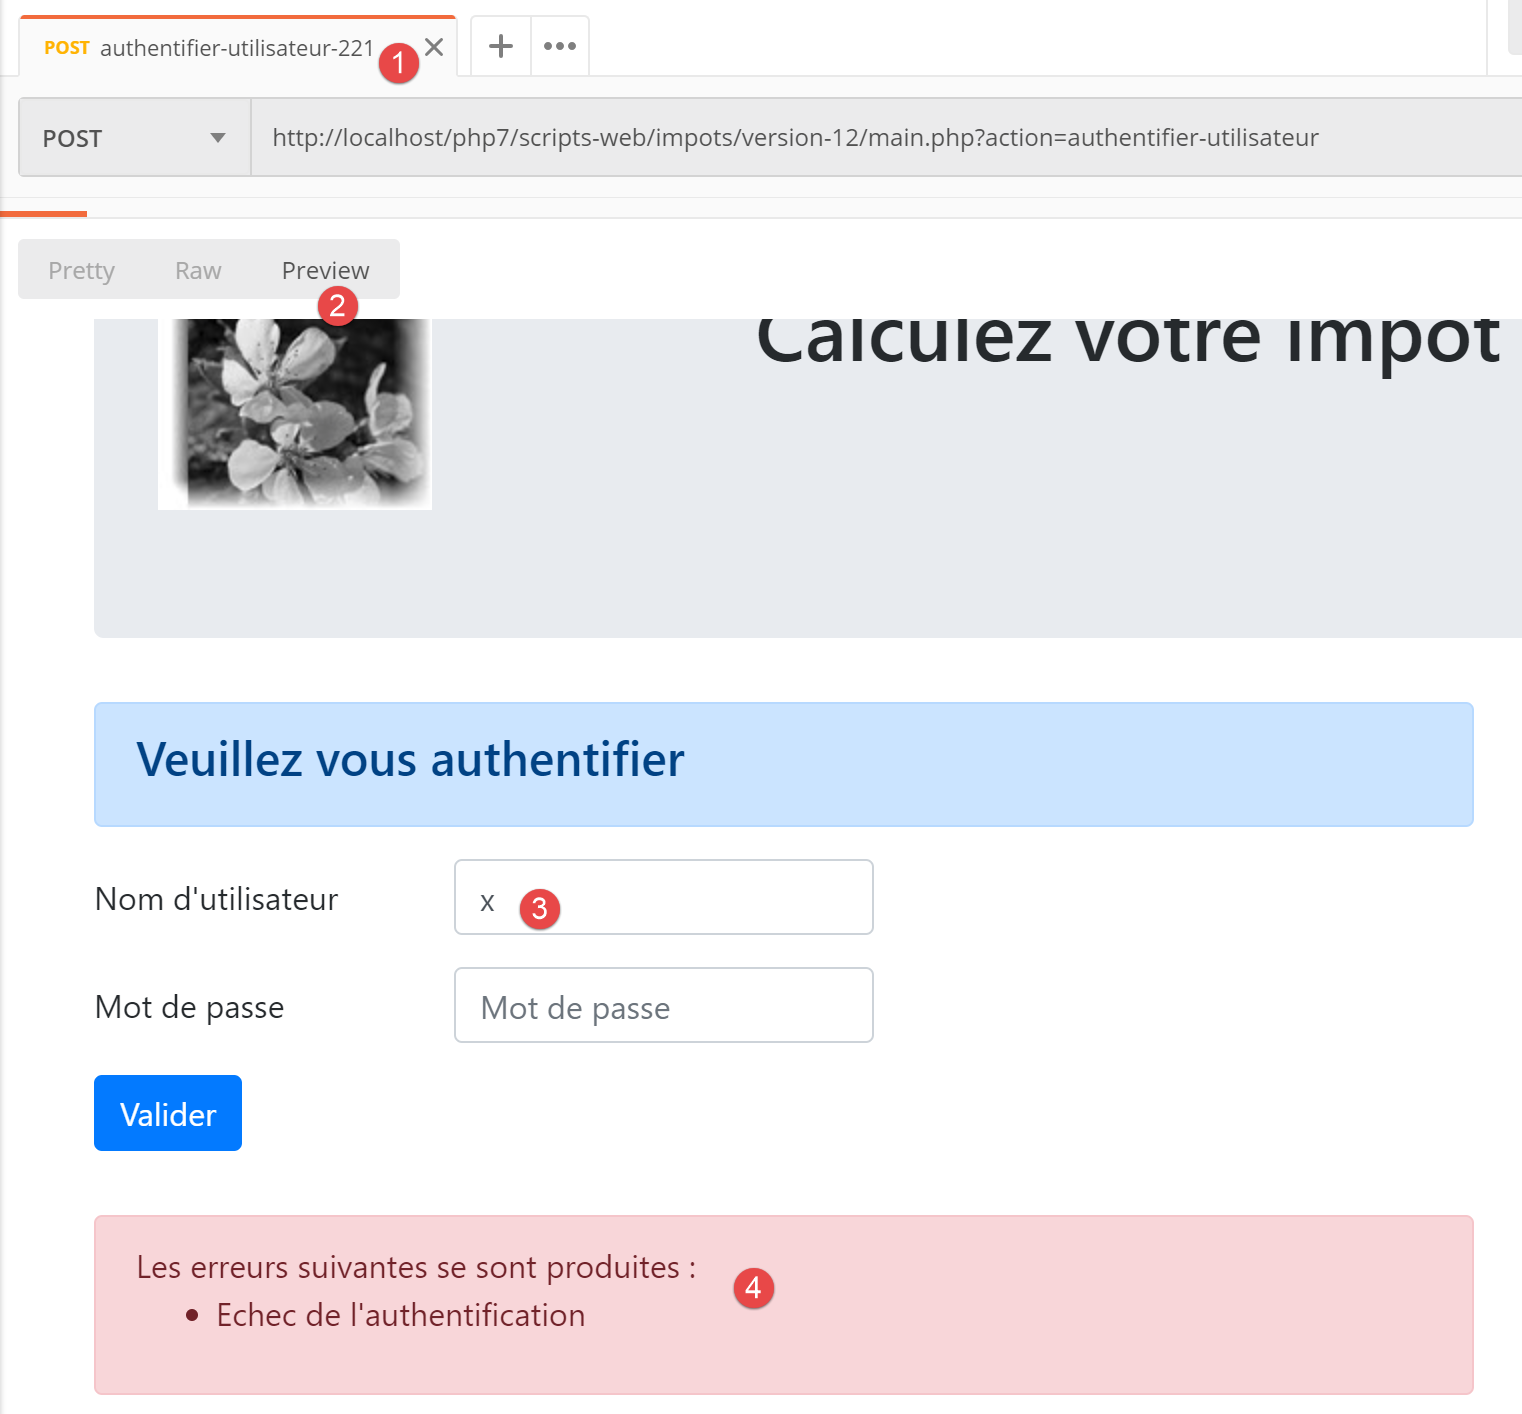
上文:
- 请求发送了字符串 [user=x&password=x];
- 在 [4] 中,显示了一条错误信息;
- 在[3]中,再次显示了错误的用户;
23.13.2.7. 结论
我们在未编写其他视图的情况下,成功测试了视图 [vue-authentification.php]。这是因为:
- 所有控制器均已编写完成;
- [Postman] 允许我们在无需视图的情况下向服务器发送请求。编写控制器时,必须意识到任何人都可以这样做。因此,必须做好处理那些视图无法允许的请求的准备。这些请求是在 [Postman] 中手动创建的。切勿先入为主地认为“此请求不可能发生”,必须进行验证;
23.13.3. 税费计算视图
23.13.3.1. 视图概述
税费计算视图如下:
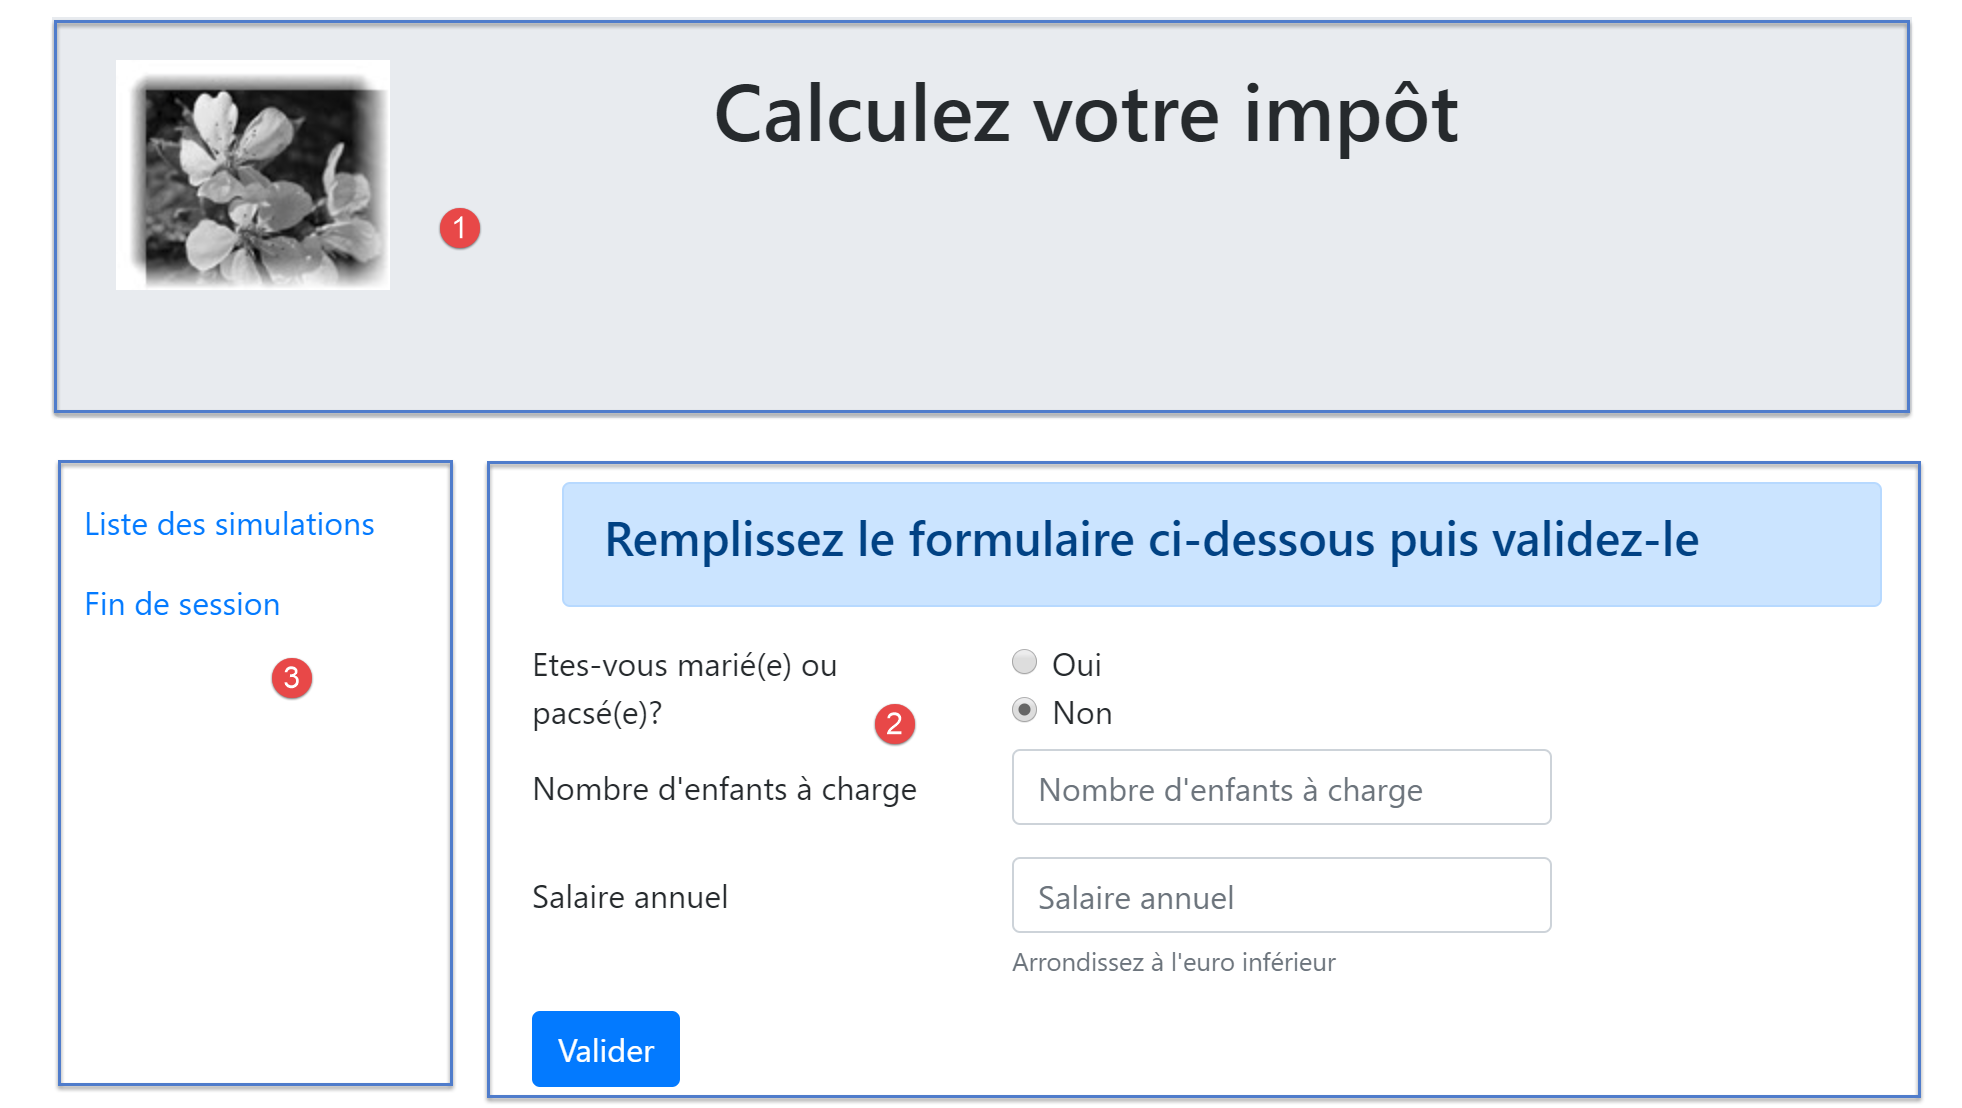
该视图包含三个部分:
- 1:顶部横幅由之前介绍过的片段 [v-bandeau.php] 生成;
- 2:由片段 [v-calcul-impot.php] 生成的税费计算表单;
- 3:由片段 [v-menu.php] 生成的包含两个链接的菜单;
税费计算视图由以下脚本 [vue-calcul-impot.php] 生成:
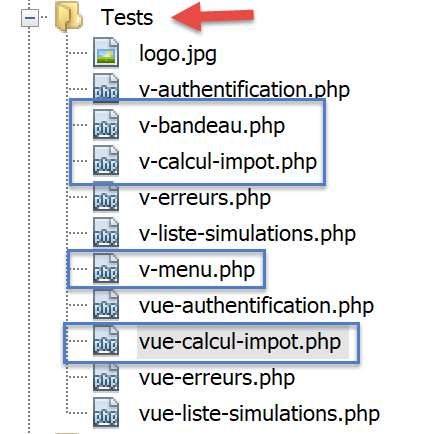
<?php
// we inherit the following variables
// Request $request : la requête en cours
// Session $session: the application session
// array $config: application configuration
// array $content: the response of the controller that processed the action
//
// symfony dependencies
use Symfony\Component\HttpFoundation\Request;
use Symfony\Component\HttpFoundation\Session\Session;

// calculate the view model
$modèle = getModelForThisView($request, $session, $config, $content);

function getModelForThisView(Request $request, Session $session, array $config, array $content): object {
  // encapsulate paged data in $modèle
  $modèle = new \stdClass();
  …
  // we render the model
  return $modèle;
}
?>
<!-- document HTML -->
<!doctype html>
<html lang="fr">
    <head>
        <!-- Required meta tags -->
        <meta charset="utf-8">
        <meta name="viewport" content="width=device-width, initial-scale=1, shrink-to-fit=no">
        <!-- Bootstrap CSS -->
        <link rel="stylesheet" href="https://stackpath.bootstrapcdn.com/bootstrap/4.1.3/css/bootstrap.min.css" integrity="sha384-MCw98/SFnGE8fJT3GXwEOngsV7Zt27NXFoaoApmYm81iuXoPkFOJwJ8ERdknLPMO" crossorigin="anonymous">
        <title>Application impots</title>
    </head>
    <body>
        <div class="container">
            <!-- bandeau -->
            <?php require "v-bandeau.php"; ?>
            <!-- ligne à deux colonnes -->
            <div class="row">
                <!-- le menu -->
                <div class="col-md-3">
                    <?php require "v-menu.php" ?>
                </div>
                <!-- le formulaire de calcul -->
                <div class="col-md-9">
                    <?php require "v-calcul-impot.php" ?>
                </div>
            </div>
            <!-- cas du succès -->
            <?php
            if ($modèle->success) {
              // a success alert is displayed
              print <<<EOT1
            <div class="row">
                <div class="col-md-3">

                </div>
                <div class="col-md-9">
                    <div class="alert alert-success" role="alert">
                        $modèle->impôt</br>
                        $modèle->décôte</br>\n
                        $modèle->réduction</br>\n
                        $modèle->surcôte</br>\n
                        $modèle->taux</br>\n
                    </div>
                </div>
            </div>
EOT1;
            }
            ?>
            <?php
            if ($modèle->error) {
              // 9-column error list
              print <<<EOT2
                <div class="row">
                  <div class="col-md-3">

                  </div>
                  <div class="col-md-9">
                      <div class="alert alert-danger" role="alert">
                        L'erreur suivante s'est produite :
                        <ul>$modèle->erreurs</ul>
                      </div>
                  </div>
                </div>
EOT2;
            }
            ?>
        </div>
    </body>
</html>
评论
- 我们仅对尚未出现的新功能进行注释;
- 第 37 行:将视图的顶部横幅包含在视图的第一行 Bootstrap 行中;
- 第 41–43 行:添加菜单,该菜单将占据视图第二行 Bootstrap 布局中的三列;
- 第 45–47 行:插入税费计算表单,该表单将占据视图第二行 Bootstrap 布局中的九个列;
- 第 51–69 行:如果税费计算成功 [$model→success=TRUE],则税费计算结果将显示在绿色框中(第 59–65 行)。 该框位于视图的第三行 Bootstrap 行(第 54 行),占据九列(第 58 行),位于三个空列(第 55–57 行)的右侧。因此,该框将紧接在税费计算表单下方;
- 第 71–87 行:如果税费计算失败 [$model→error=TRUE],则在粉色框中显示一条错误消息(第 80–83 行)。 该框架位于视图的第三行 Bootstrap 区域(第 75 行),占据 九列(第 79 行),位于三列空白区域(第 76–78 行)的右侧。因此,该框架将紧接在税费计算表单下方;
23.13.3.2. 片段 [v-calcul-impot.php]
片段 [v-calcul-impot.php] 显示了 Web 应用程序的登录表单:
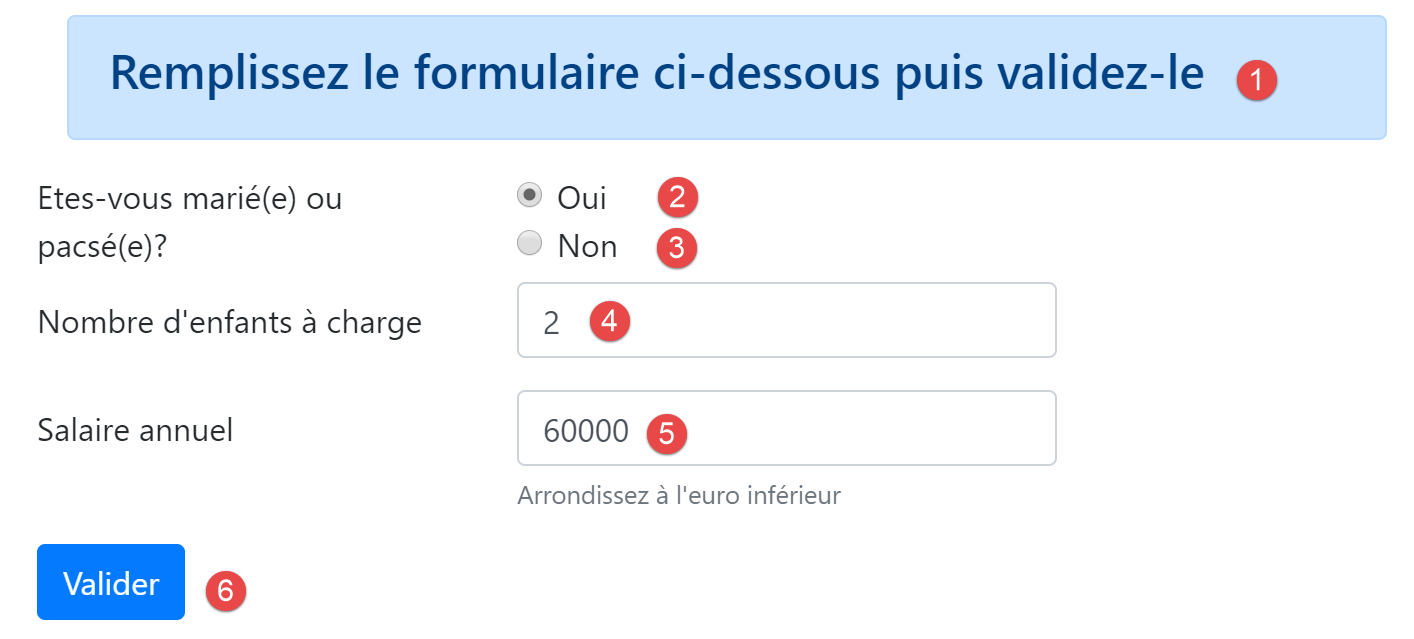
[v-calcul-impot.php]片段的代码如下:
<!-- form HTML posted -->
<form method="post" action="main.php?action=calculer-impot">
    <!-- 12-column message on blue background -->
    <div class="col-md-12">
        <div class="alert alert-primary" role="alert">
            <h4>Remplissez le formulaire ci-dessous puis validez-le</h4>
        </div>
    </div>
    <!-- form elements -->
    <fieldset class="form-group">
        <!-- first row of 9 columns -->
        <div class="row">
            <!-- 4-column wording -->
            <legend class="col-form-label col-md-4 pt-0">Etes-vous marié(e) ou pacsé(e)?</legend>
            <!-- 5-column radio buttons-->
            <div class="col-md-5">
                <div class="form-check">
                    <input class="form-check-input" type="radio" name="marié" id="gridRadios1" value="oui" <?= $modèle->checkedOui ?>>
                    <label class="form-check-label" for="gridRadios1">
                        Oui
                    </label>
                </div>
                <div class="form-check">
                    <input class="form-check-input" type="radio" name="marié" id="gridRadios2" value="non" <?= $modèle->checkedNon ?>>
                    <label class="form-check-label" for="gridRadios2">
                        Non
                    </label>
                </div>
            </div>
        </div>
        <!-- second row of 9 columns -->
        <div class="form-group row">
            <!-- 4-column wording -->
            <label for="enfants" class="col-md-4 col-form-label">Nombre d'enfants à charge</label>
            <!-- 5-column numerical entry field for number of children -->
            <div class="col-md-5">
                <input type="number" min="0" step="1" class="form-control" id="enfants" name="enfants" placeholder="Nombre d'enfants à charge" value="<?= $modèle->enfants ?>">
            </div>
        </div>
        <!-- third row of 9 columns -->
        <div class="form-group row">
            <!-- 4-column wording -->
            <label for="salaire" class="col-md-4 col-form-label">Salaire annuel</label>
            <!-- 5-column numeric input field for wages -->
            <div class="col-md-5">
                <input type="number" min="0" step="1" class="form-control" id="salaire" name="salaire" placeholder="Salaire annuel" aria-describedby="salaireHelp" value="<?= $modèle->salaire ?>">
                <small id="salaireHelp" class="form-text text-muted">Arrondissez à l'euro inférieur</small>
            </div>
        </div>
        <!-- fourth row, [submit] button on 5 columns -->
        <div class="form-group row">
            <div class="col-md-5">
                <button type="submit" class="btn btn-primary">Valider</button>
            </div>
        </div>
    </fieldset>

</form>
评论
- 第 2 行:HTML 表单将提交([method] 属性)至 URL [main.php?action=calculer-impot]([action] 属性)。提交的值将是表单中输入字段的值:
- 表单中选中单选按钮的值:
- 若选中了 [Oui] 单选按钮,则为 [marié=oui](第 16–22 行)。其中 [marié] 是第 18 行 [name] 属性的值,[oui] 是第 18 行 [value] 属性的值;
- 若选中 [No] 单选按钮,则为 [married=no](第 23–28 行)。其中 [married] 是第 24 行 [name] 属性的值,[no] 是第 24 行 [value] 属性的值;
- 第 37 行数字输入字段的值,形式为 [children=xx],其中 [children] 是第 37 行 [name] 属性的值,[xx] 是用户通过键盘输入的值;
- 第46行数字输入字段的值,形式为 [salary=xx],其中 [salary] 是第46行 [name] 属性的值,[xx] 是用户通过键盘输入的值;
- 表单中选中单选按钮的值:
最后,提交的值将呈现为 [married=xx&children=yy&salary=zz] 的形式。
- 当用户点击第53行的[提交]按钮时,将提交所输入的值;
- 第16–30行:两个单选按钮:
![]()
这两个单选按钮属于同一个单选按钮组,因为它们具有相同的 [name] 属性(第 18、24 行)。浏览器确保在单选按钮组内,任何时候都只能选中一个。因此,点击其中一个会取消之前选中的那个;
- 这些是单选按钮,是因为它们具有 [type="radio"] 属性(第 18、24 行);
- 在表单显示时(输入之前),必须选中其中一个单选按钮:要实现这一点,只需在相应的 <input type="radio"> 标签中添加 [checked=’checked’] 属性。这可以通过动态变量来实现:
- 第 18 行中的 [<?= $model->checkedYes ?>];
- 第 24 行中的 [<?= $model->checkedNo ?>];
这些变量将成为视图模板的一部分。
- 第 37 行:一个数值输入字段 [type="number"],最小值为 0 [min="0"]。在现代浏览器中,这意味着用户只能输入 >=0 的数字。在这些现代浏览器中,该输入可通过点击上下滑动的滑块来完成。 第 37 行中的 [step="1"] 属性表示滑块将以 1 为增量进行操作。因此,滑块仅接受从 0 到 n 之间、以 1 为增量的整数值。对于手动输入,这意味着带小数的数字将不被接受;
![]()
- 第 37 行:在某些屏幕上,子女输入字段必须预先填入该字段的上次输入内容。为此,我们使用 [value] 属性,该属性用于设置输入字段中显示的值。该值将是动态的,由变量 [$model→children] 生成;
- 第 46 行:关于薪资输入的说明与子女输入部分相同;
- 第 53 行:[submit] 按钮会触发将输入的值通过 POST 方式发送至 URL [main.php?action=calculer-impot];

23.13.3.3. [v-menu.php] 片段
该片段在税费计算表单左侧显示一个菜单:
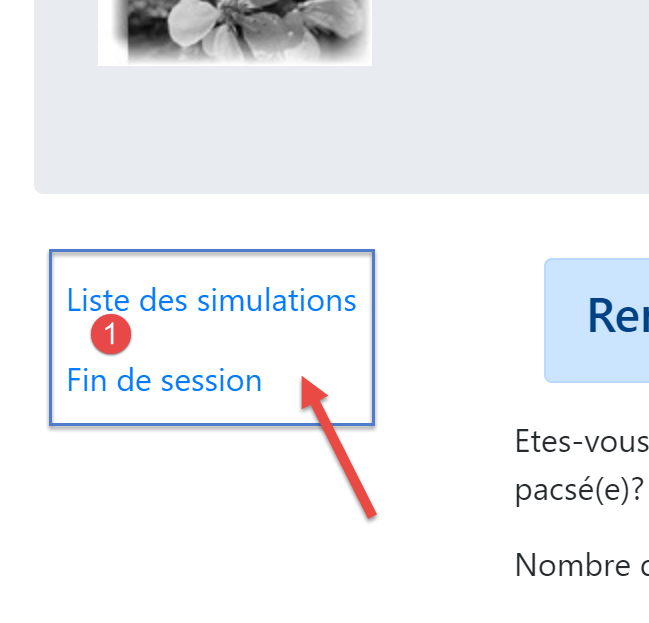
该片段的代码如下:
<!-- bootstrap menu -->
<nav class="nav flex-column">
    <?php
    // affichage d'une liste de liens HTML
    foreach($modèle->optionsMenu as $texte=>$url){
      print <<<EOT3
      <a class="nav-link" href="$url">$texte</a>
EOT3;
    }
    ?>
</nav>
评论
- 第 2–11 行:HTML 标签 [nav] 包裹着 HTML 文档中包含指向其他文档的导航链接的部分;
- 第 7 行:HTML 标签 [a] 引入了一个导航链接:
- [$url]:是用户点击 [$text] 链接时被引导到的 URL。 随后浏览器将执行 [GET $url] 操作。如果 [$url] 是相对 URL,则会在其前添加浏览器地址栏中当前显示的 URL 的根路径。因此,当浏览器的当前 URL 形式为 [http://chemin/main.php?paramètres] 时,要创建链接 [1],我们应创建如下链接:
- 第 5 行:片段模板 [$modèle→optionsMenu] 将是一个如下形式的数组:
[‘ Liste des simulations’=>’main.php?action=liste-simulations’,
‘ Fin de session’=>’main.php?action=fin-session’]
- 第 2、7 行:CSS 类 [nav, flex-column, nav-link] 是 Bootstrap 类,用于定义菜单的外观;
23.13.3.4. 视觉测试
我们将这些各种元素收集在 [Tests] 文件夹中,并为视图 [view-tax-calculation.php] 创建了一个测试模板:
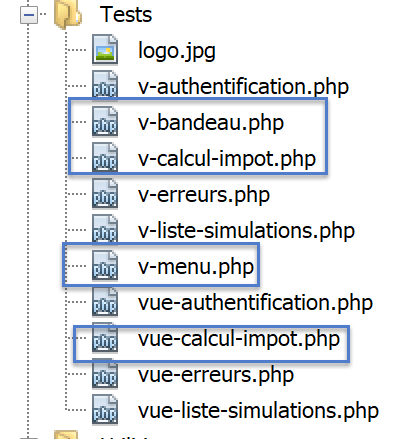
[view-tax-calculation]视图的数据模型如下:
<?php
// page test data
//
// calculate the view model
$modèle = getModelForThisView();

function getModelForThisView(): object {
  // encapsulate paged data in $modèle
  $modèle = new \stdClass();
  // form
  $modèle->checkedOui = "";
  $modèle->checkedNon = 'checked="checked"';
  $modèle->enfants = 2;
  $modèle->salaire = 300000;
  // message of success
  $modèle->success = TRUE;
  $modèle->impôt = "Montant de l'impôt : 1000 euros";
  $modèle->décôte = "Décôte : 15 euros";
  $modèle->réduction = "Réduction : 20 euros";
  $modèle->surcôte = "Surcôte : 0 euros";
  $modèle->taux = "Taux d'imposition : 14 %";
  // error message
  $modèle->error = TRUE;
  $erreurs = ["erreur1", "erreur2"];
  // build a HTML list of errors
  $content = "";
  foreach ($erreurs as $erreur) {
    $content .= "<li>$erreur</li>";
  }
  $modèle->erreurs = $content;
  // menu
  $modèle->optionsMenu = [
    'Liste des simulations' => 'main.php?action=liste-simulations',
    'Fin de session' => 'main.php?action=fin-session'];
  // banner image
  $modèle->logo = "http://localhost/php7/scripts-web/impots/version-12/Tests/logo.jpg";
  // we render the model
  return $modèle;
}

?>
<!-- document HTML -->
<!doctype html>
<html lang="fr">
    <head>
        …
    </head>
    <body>
        …
    </body>
</html>
评论
- 第 7–39 行:我们初始化视图 [vue-calcul-impot.php] 以及组件 [v-calcul-impot.php] 和 [v-menu.php] 中的所有动态部分;
我们测试视图 [vue-calcul-impot.php]:
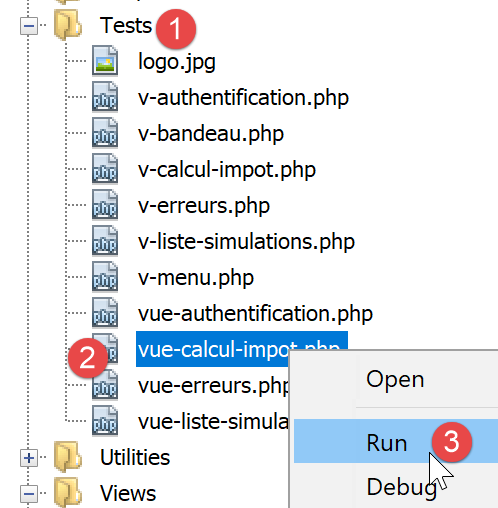
我们得到以下结果:
我们对该视图进行调整,直到对视觉效果感到满意为止。随后,我们可以将其集成到当前正在开发的 Web 应用程序中。
23.13.3.5. 计算视图模型
一旦确定了视图的外观,我们就可以在实际环境中计算视图模型。让我们回顾一下导致此视图生成的状态代码。这些代码可在配置文件中找到:
"vues": {
        "vue-authentification.php": [700, 221, 400],
        "vue-calcul-impot.php": [200, 300, 341, 350, 800],
        "vue-liste-simulations.php": [500, 600]
    },
"vue-erreurs": "vue-erreurs.php"
这些状态码 [200, 300, 341, 350, 800] 会触发身份验证视图的显示。要理解这些代码的含义,我们可以参考在 JSON 应用程序上执行的 [Postman] 测试:
- [authenticate-user-200]:200 是 [authenticate-user] 操作成功后的状态码;随后将显示空白的税费计算表单;
- [calculate-tax-300]:300 是 [calculate-tax] 操作成功后的状态码。随后将显示包含已输入数据和税额的计算表单。用户随后可以进行另一项计算;
- [end-session-400]:400 是 [end-session] 操作成功后的状态码:随后将显示空的身份验证表单;
- 当税费计算有效但因无法连接到 DBMS 而导致错误时,将返回状态码 [341];
- 状态码 [350] 表示税费计算有效,但因无法连接 [Redis] 服务器而引发错误;
- 状态码 [800] 将在后续内容中介绍。目前我们尚未遇到该情况;
- 此处假设用户使用的是现代浏览器。因此,在当前表单中,无法在输入字段 [children, salary] 中输入负数、非数字字符串或小数。若使用旧版浏览器,则可能出现此类情况。我们将把这些错误视为意外错误,并显示 [vue-erreurs] 视图;
既然已明确税费计算表单的显示条件,我们即可在 [tax-calculation-view.php] 中编写其模板:
<?php
// we inherit the following variables
// Request $request : la requête en cours
// Session $session: the application session
// array $config: application configuration
// array $content: the response of the controller that processed the action
//
// symfony dependencies
use Symfony\Component\HttpFoundation\Request;
use Symfony\Component\HttpFoundation\Session\Session;

// calculate the view model
$modèle = getModelForThisView($request, $session, $config, $content);

function getModelForThisView(Request $request, Session $session, array $config, array $content): object {
  // encapsulate paged data in $modèle
  $modèle = new \stdClass();
  // application status
  $état = $content["état"];
  // the model depends on the state
  switch ($état) {
    case 200 :
    case 800:
      // initial display of an empty form
      $modèle->success = FALSE; $modèle->errror = FALSE;
      $modèle->checkedNon = 'checked="checked"';
      $modèle->checkedOui = "";
      $modèle->enfants = "";
      $modèle->salaire = "";
      break;
    case 300:
      // successful calculation - result display
      $modèle->success = TRUE;
      $modèle->error = FALSE;
      $modèle->impôt = "Montant de l'impôt : {$content["réponse"]["impôt"]} euros";
      $modèle->décôte = "Décôte : {$content["réponse"]["décôte"]} euros";
      $modèle->réduction = "Réduction : {$content["réponse"]["réduction"]} euros";
      $modèle->surcôte = "Surcôte : {$content["réponse"]["surcôte"]} euros";
      $modèle->taux = "Taux d'imposition : " . ($content["réponse"]["taux"] * 100) . " %";
      // form restored with values entered
      $modèle->checkedOui = $request->request->get("marié") === "oui" ? 'checked="checked"' : "";
      $modèle->checkedNon = $request->request->get("marié") === "oui" ? "" : 'checked="checked"';
      $modèle->enfants = $request->request->get("enfants");
      $modèle->salaire = $request->request->get("salaire");
      break;
    case 341:
    // database HS
    case 350:
      // redis server HS
      // form restored with values entered
      $modèle->checkedOui = $request->request->get("marié") === "oui" ? 'checked="checked"' : "";
      $modèle->checkedNon = $request->request->get("marié") === "oui" ? "" : 'checked="checked"';
      $modèle->enfants = $request->request->get("enfants");
      $modèle->salaire = $request->request->get("salaire");
      // error
      $modèle->success = FALSE;
      $modèle->error = TRUE;
      $modèle->erreurs = "<li>{$content["réponse"]}</li>";
      break;
  }
  //menu
  $modèle->optionsMenu = [
    "Liste des simulations" => "main.php?action=lister-simulations",
    "Fin de session" => "main.php?action=fin-session"];
  // we render the model
  return $modèle;
}
?>
<!-- document HTML -->
<!doctype html>
<html lang="fr">
    <head>
        …
        <title>Application impots</title>
    </head>
    <body>
        …
    </body>
</html>
评论
- 第 22–30 行:显示一个空表单;
- 第 31–45 行:税费计算成功。再次显示输入的数值和税费金额;
- 第 46–59 行:因 [Redis] 或 [MySQL] 其中一台服务器不可用导致税费计算失败的情况;
- 第 62–64 行:计算两个菜单选项;
23.13.3.6. [Postman] 测试
[calculate-tax-300] 测试返回状态码 300,表示税费计算成功:
- 在 [3] 中,导致结果 [2] 的参数值;
让我们尝试一个错误情况:由于 [Redis] 服务器不可用,导致错误 [350]:
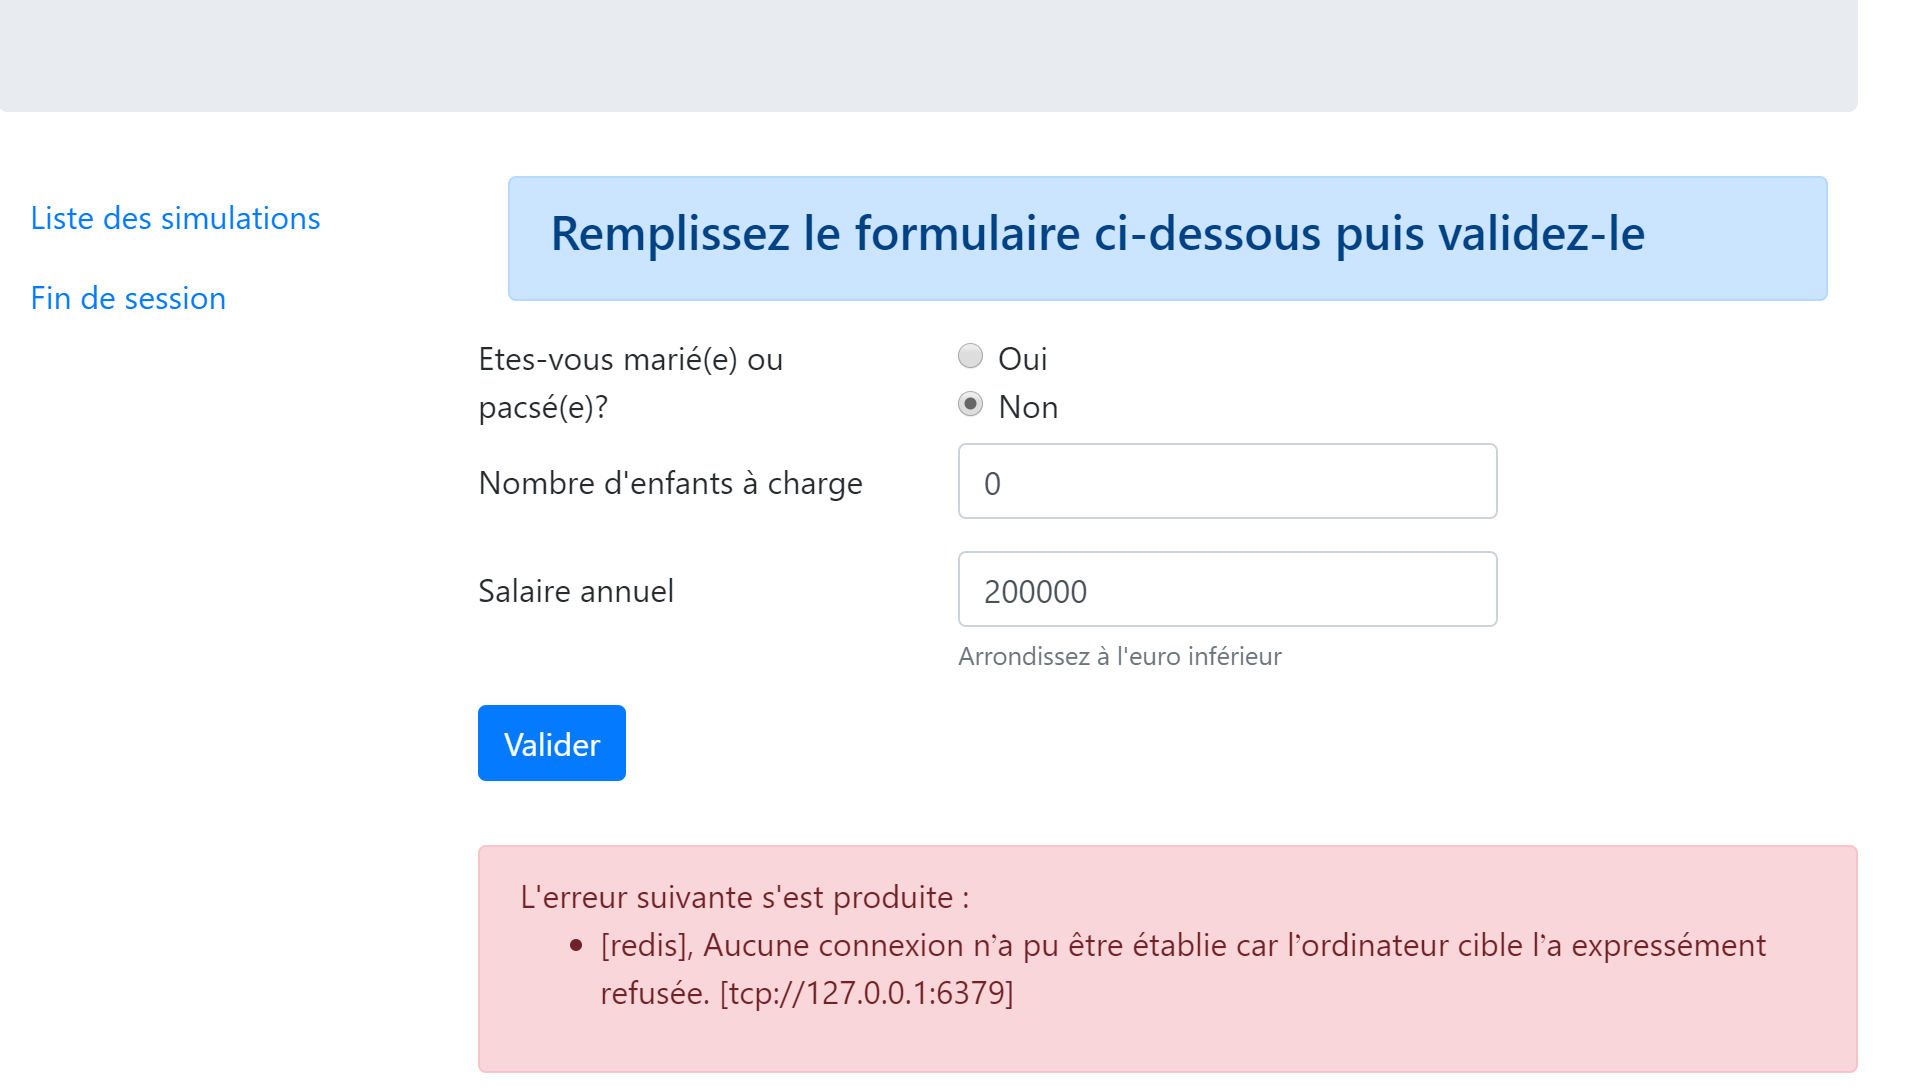
23.13.4. 模拟列表视图
23.13.4.1. 视图概述
显示模拟列表的视图如下:
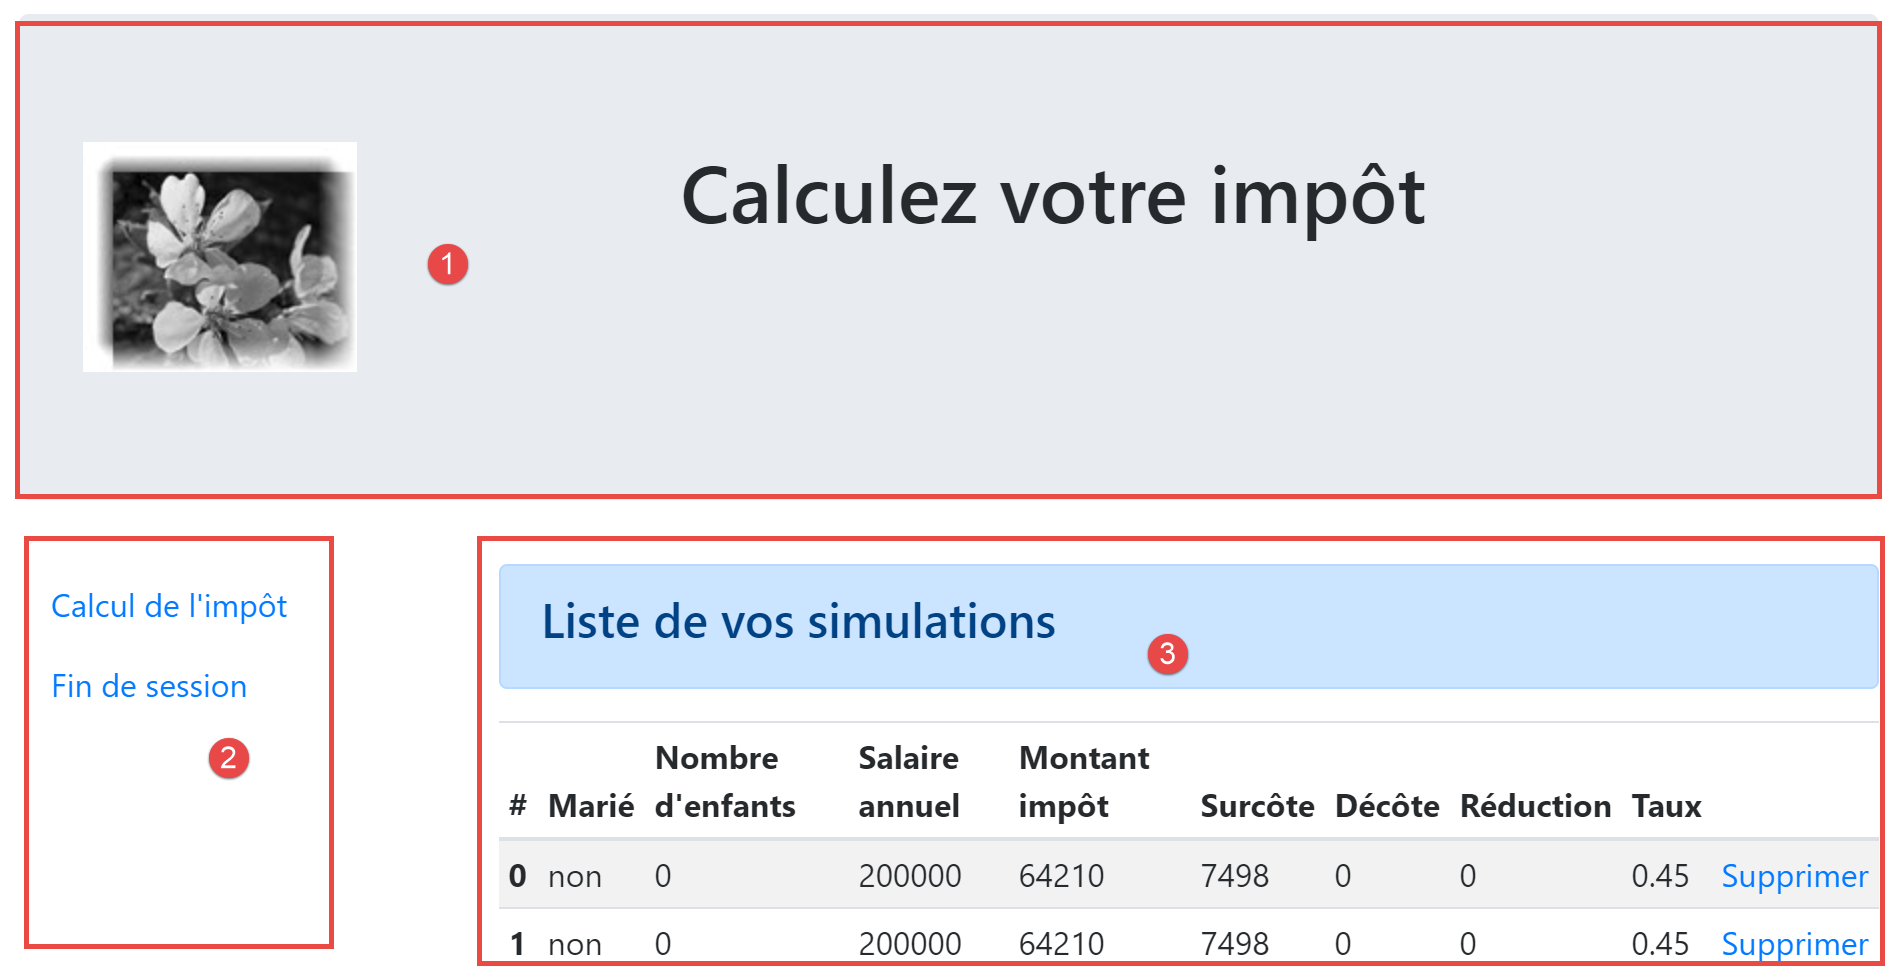
由脚本 [vue-liste-simulations] 生成的视图包含三个部分:
- 1:顶部横幅由前文已介绍的 [v-bandeau.php] 片段生成;
- 2:由片段 [v-simulation-list.php] 生成的模拟列表;
- 3:由片段 [v-menu.php] 生成的包含两个链接的菜单;
模拟视图由以下脚本 [simulation-list-view.php] 生成:
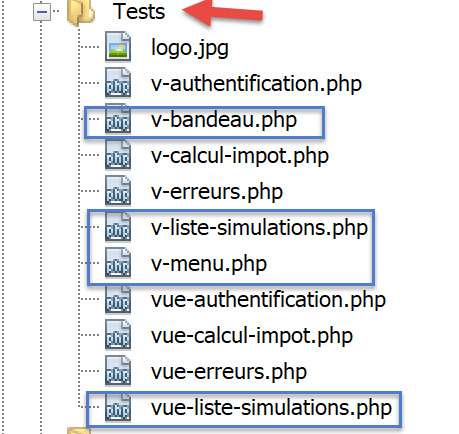
<?php

// calculate the view model
$modèle = getModelForThisView();

function getModelForThisView(Request $request, Session $session, array $config, array $content): object {
  // encapsulate paged data in $modèle
  $modèle = new \stdClass();
  …
  // we render the model
  return $modèle;
}
?>
<!-- document HTML -->
<!doctype html>
<html lang="fr">
    <head>
        <!-- Required meta tags -->
        <meta charset="utf-8">
        <meta name="viewport" content="width=device-width, initial-scale=1, shrink-to-fit=no">
        <!-- Bootstrap CSS -->
        <link rel="stylesheet" href="https://stackpath.bootstrapcdn.com/bootstrap/4.1.3/css/bootstrap.min.css" integrity="sha384-MCw98/SFnGE8fJT3GXwEOngsV7Zt27NXFoaoApmYm81iuXoPkFOJwJ8ERdknLPMO" crossorigin="anonymous">
        <title>Application impots</title>
    </head>
    <body>
        <div class="container">
            <!-- bandeau -->
            <?php require "v-bandeau.php"; ?>
            <!-- ligne à deux colonnes -->
            <div class="row">
                <!-- menu sur trois colonnes-->
                <div class="col-md-3">
                    <?php require "v-menu.php" ?>
                </div>
                <!-- liste des simulations sur 9 colonnes-->
                <div class="col-md-9">
                    <?php require "v-liste-simulations.php" ?>
                </div>
            </div>
        </div>
    </body>
</html>
评论
- 第28行:添加应用程序横幅 [1];
- 第33行:添加菜单[2]。它将以三列形式显示在横幅下方;
- 第37行:插入模拟表格 [3]。它将显示在横幅下方、菜单右侧,呈九列布局;
我们已经对该视图的三个片段中的两个进行了说明:
片段 [v-liste-simulations.php] 如下所示:
<!-- message on blue background -->
<div class="alert alert-primary" role="alert">
    <h4>Liste de vos simulations</h4>
</div>
<!-- simulation table -->
<table class="table table-sm table-hover table-striped">
    <!-- headers of the six table columns -->
    <thead>
        <tr>
            <th scope="col">#</th>
            <th scope="col">Marié</th>
            <th scope="col">Nombre d'enfants</th>
            <th scope="col">Salaire annuel</th>
            <th scope="col">Montant impôt</th>
            <th scope="col">Surcôte</th>
            <th scope="col">Décôte</th>
            <th scope="col">Réduction</th>
            <th scope="col">Taux</th>
            <th scope="col"></th>
        </tr>
    </thead>
    <!-- table body (data displayed) -->
    <tbody>
        <?php
        $i = 0;
        // on affiche chaque simulation en parcourant le tableau des simulations
        foreach ($modèle->simulations as $simulation) {
          // affichage d'une ligne du tableau avec 6 colonnes - balise <tr>
          // colonne 1 : entête ligne (n° simulation) - balise <th scope='row'>
          // colonne 2 : valeur paramètre [marié] - balise <td>
          // colonne 3 : valeur paramètre [enfants] - balise <td>
          // colonne 4 : valeur paramètre [salaire] - balise <td>
          // colonne 5 : valeur paramètre [impôt] (de l'impôt) - balise <td>
          // colonne 6 : valeur paramètre [surcôte] - balise <td>
          // colonne 7 : valeur paramètre [décôte] - balise <td>
          // colonne 8 : valeur paramètre [réduction] - balise <td>
          // colonne 9 : valeur paramètre [taux] (de l'impôt) - balise <td>
          // colonne 10 : lien de suppression de la simulation - balise <td>
          print <<<EOT
        <tr>
          <th scope="row">$i</th>
          <td>{$simulation["marié"]}</td>
          <td>{$simulation["enfants"]}</td>
          <td>{$simulation["salaire"]}</td>
          <td>{$simulation["impôt"]}</td>
          <td>{$simulation["surcôte"]}</td>
          <td>{$simulation["décôte"]}</td>
          <td>{$simulation["réduction"]}</td>
          <td>{$simulation["taux"]}</td>
          <td><a href="main.php?action=supprimer-simulation&numéro=$i">Supprimer</a></td>
        </tr>
EOT;
          $i++;
        }
        ?>
        </tr>
    </tbody>
</table>
评论
- 使用 <table> 标签创建了一个 HTML 表格(第 6 行和第 58 行);
- 表格的列标题被包含在 <thead> 标签(表格标题,第 8 行和第 21 行)中。 <tr> 标签(表格行,第 9 行和第 20 行)定义一行。第 10–15 行:<th> 标签(表格标题)定义列标题。因此共有十个。[scope="col"] 表示该标题适用于列。[scope="row"] 表示该标题适用于行;
- 第 23–57 行:<tbody> 标签包裹表格显示的数据;
- 第 40–51 行:<tr> 标签包裹表格的一行;
- 第 41 行:<th scope=’row’> 标签定义行标题;
- 第 42–50 行:每个 td 标签定义该行的一列;
- 第 27 行:模拟列表位于模型 [$model→simulations] 中,这是一个关联数组;
- 第 50 行:用于删除模拟的链接。该 URL 使用了表格第一列(第 41 行)中显示的编号;
23.13.4.2. 可视化测试
我们将这些不同元素收集在 [Tests] 文件夹中,并为视图创建了一个测试模板 [view-simulation-list.php]:
[simulation-list-view]视图的数据模型如下:
<?php
// calculate the view model
$modèle = getModelForThisView();

function getModelForThisView(): object {
  // encapsulate paged data in $modèle
  $modèle = new \stdClass();
  // put the simulations in the format expected by the page
  $modèle->simulations = [
    [
      "marié" => "oui",
      "enfants" => 2,
      "salaire" => 60000,
      "impôt" => 448,
      "décôte" => 100,
      "réduction" => 20,
      "surcôte" => 0,
      "taux" => 0.14
    ],
    [
      "marié" => "non",
      "enfants" => 2,
      "salaire" => 200000,
      "impôt" => 25600,
      "décôte" => 0,
      "réduction" => 0,
      "surcôte" => 8400,
      "taux" => 0.45
    ]
  ];
  // menu options
  $modèle->optionsMenu = [
    "Calcul de l'impôt" => "main.php?action=afficher-calcul-impot",
    "Fin de session" => "main.php?action=fin-session"];
  // banner image
  $modèle->logo = "http://localhost/php7/scripts-web/impots/version-12/Tests/logo.jpg";
  // we render the model
  return $modèle;
}
?>
<!-- document HTML -->
<!doctype html>
<html lang="fr">
    <head>
        …
    </head>
    <body>
        …
    </body>
</html>
评论
- 第9–30行:HTML表格中显示的模拟数据表;
- 第32–34行:菜单选项表;
让我们显示这个视图:
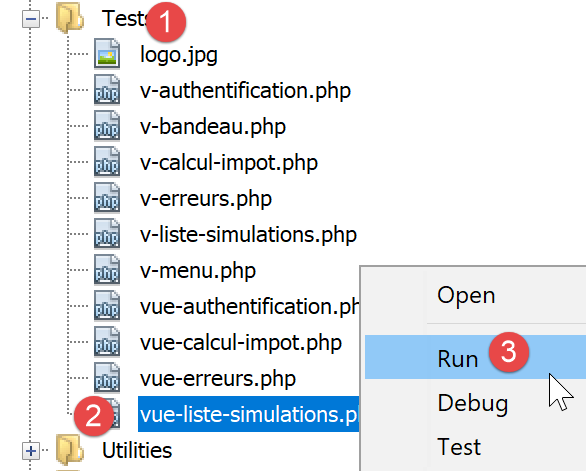
我们得到以下结果:
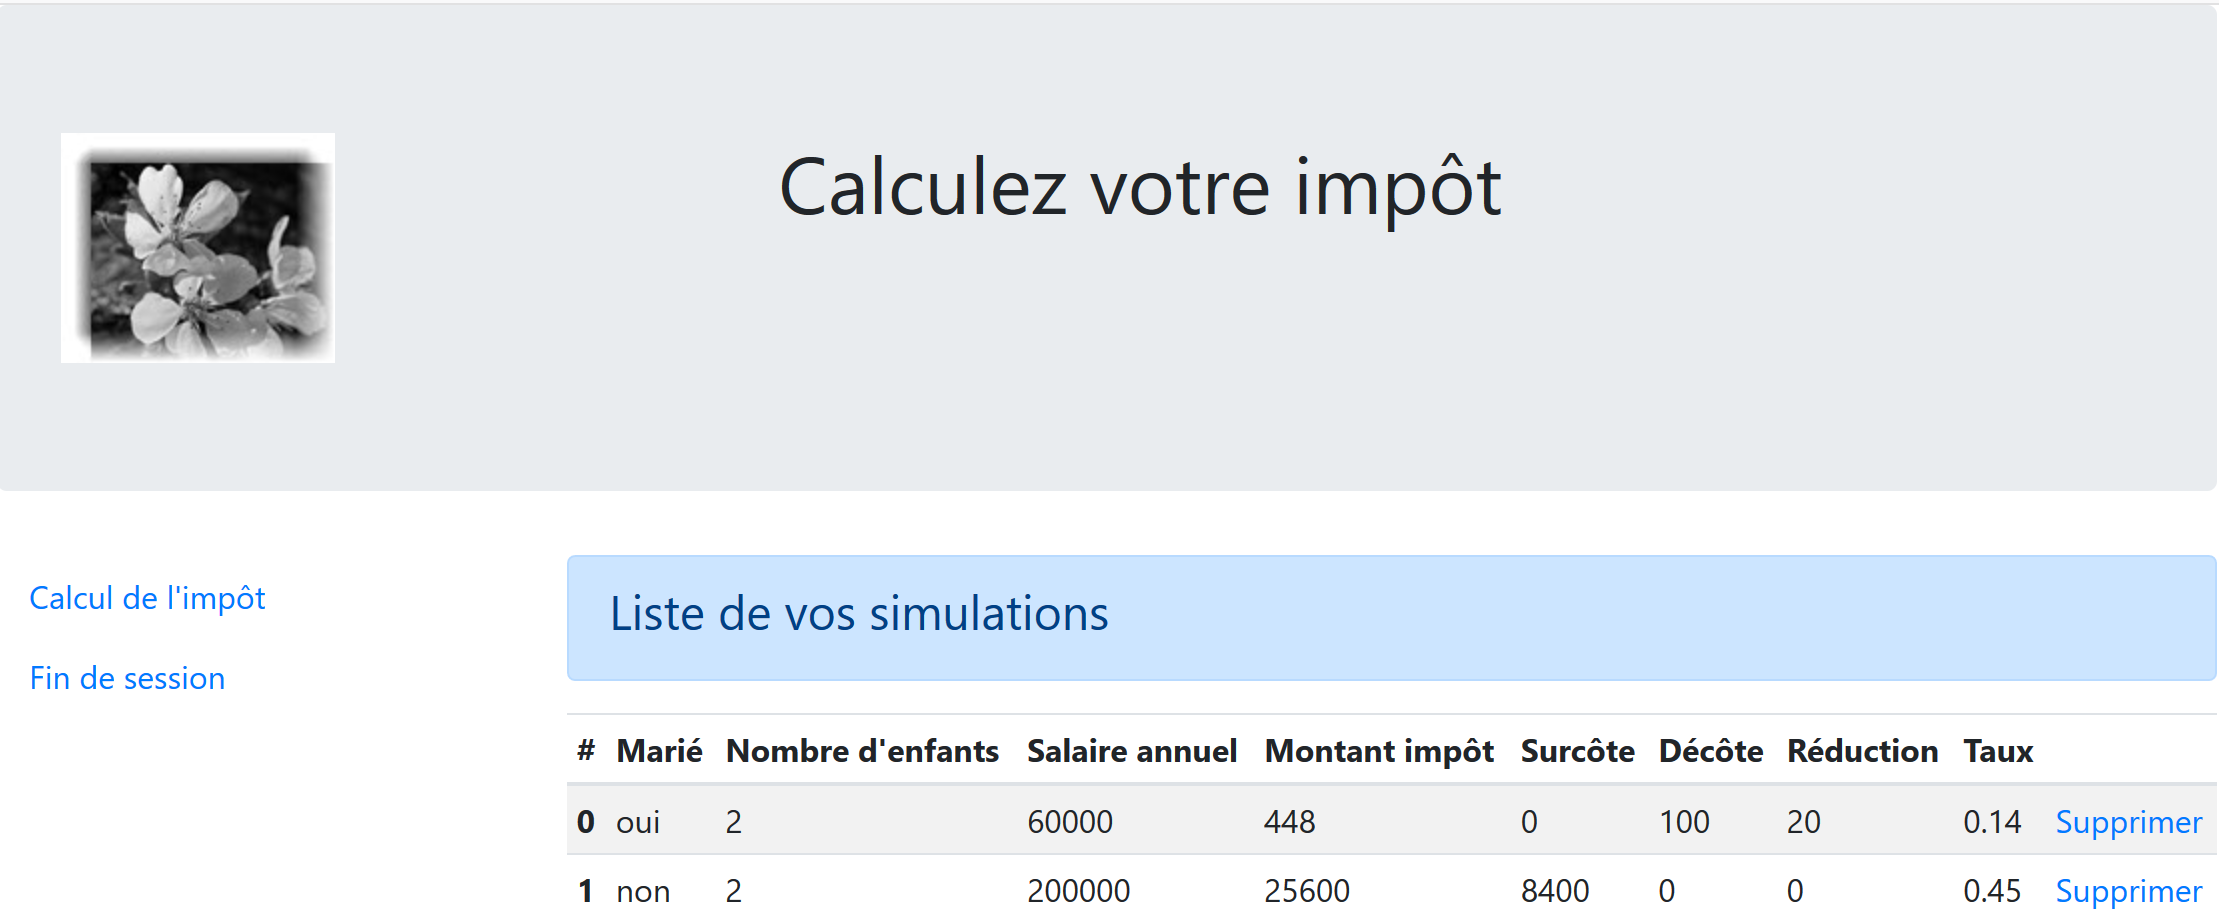
我们对该视图进行调整,直到对视觉效果感到满意为止。随后,我们可以将其集成到当前正在开发的 Web 应用程序中。
23.13.4.3. 计算视图模型
一旦确定了视图的外观,我们就可以在实际环境中计算视图模型。让我们回顾一下导致此视图生成的状态代码。这些代码可在配置文件中找到:
"vues": {
        "vue-authentification.php": [700, 221, 400],
        "vue-calcul-impot.php": [200, 300, 341, 350, 800],
        "vue-liste-simulations.php": [500, 600]
    },
"vue-erreurs": "vue-erreurs.php"
因此,显示模拟视图的是状态码 [500, 600]。要了解这些代码的含义,我们可以参考在 JSON 应用程序上执行的 [Postman] 测试:
- [list-simulations-500]:500是[list-simulations]操作成功后的状态码:随后将显示用户执行的模拟列表;
- [delete-simulation-600]:600 是 [delete-simulation] 操作成功后的状态码。随后将显示此次删除后生成的新的模拟列表;
既然我们已知模拟列表应在何时显示,便可计算其模板并在 [view-simulation-list.php] 中实现:
<?php
// we inherit the following variables
// Request $request : la requête en cours
// Session $session: the application session
// array $config: application configuration
// array $content: controller response
// no errors possible
// array $content: controller response
//
// symfony dependencies
use Symfony\Component\HttpFoundation\Request;
use Symfony\Component\HttpFoundation\Session\Session;

// calculate the view model
$modèle = getModelForThisView($request, $session, $config, $content);

function getModelForThisView(Request $request, Session $session, array $config, array $content): object {
  // encapsulate paged data in $modèle
  $modèle = new \stdClass();
  // put the simulations in the format expected by the page
  // they are found in the response of the controller that executed the action
  // as an array of objects of type [Simulation]
  $objetsSimulation = $content["réponse"];
  // each [Simulation] object will be transformed into an associative array
  $modèle->simulations = [];
  foreach ($objetsSimulation as $objetSimulation) {
    $modèle->simulations[] = [
      "marié" => $objetSimulation->getMarié(),
      "enfants" => $objetSimulation->getEnfants(),
      "salaire" => $objetSimulation->getSalaire(),
      "impôt" => $objetSimulation->getImpôt(),
      "surcôte" => $objetSimulation->getSurcôte(),
      "décôte" => $objetSimulation->getdécôte(),
      "réduction" => $objetSimulation->getRéduction(),
      "taux" => $objetSimulation->getTaux()
    ];
  }
  // menu options
  $modèle->optionsMenu = [
    "Calcul de l'impôt" => "main.php?action=afficher-calcul-impot",
    "Fin de session" => "main.php?action=fin-session"];
  // we render the model
  return $modèle;
}
?>
<!-- document HTML -->
<!doctype html>
<html lang="fr">
    <head>
        …
    </head>
    <body>
       …
    </body>
</html>
评论
- 第 26–36 行:计算片段 [v-list-simulations.php] 所使用的模板 [$template→simulations];
- 第 39–41 行:计算片段 [v-menu.php] 所使用的模板 [$template→optionsMenu];
23.13.4.4. [Postman] 测试
[list-simulations-500] 测试返回状态码 500。这对应于查看模拟的请求:
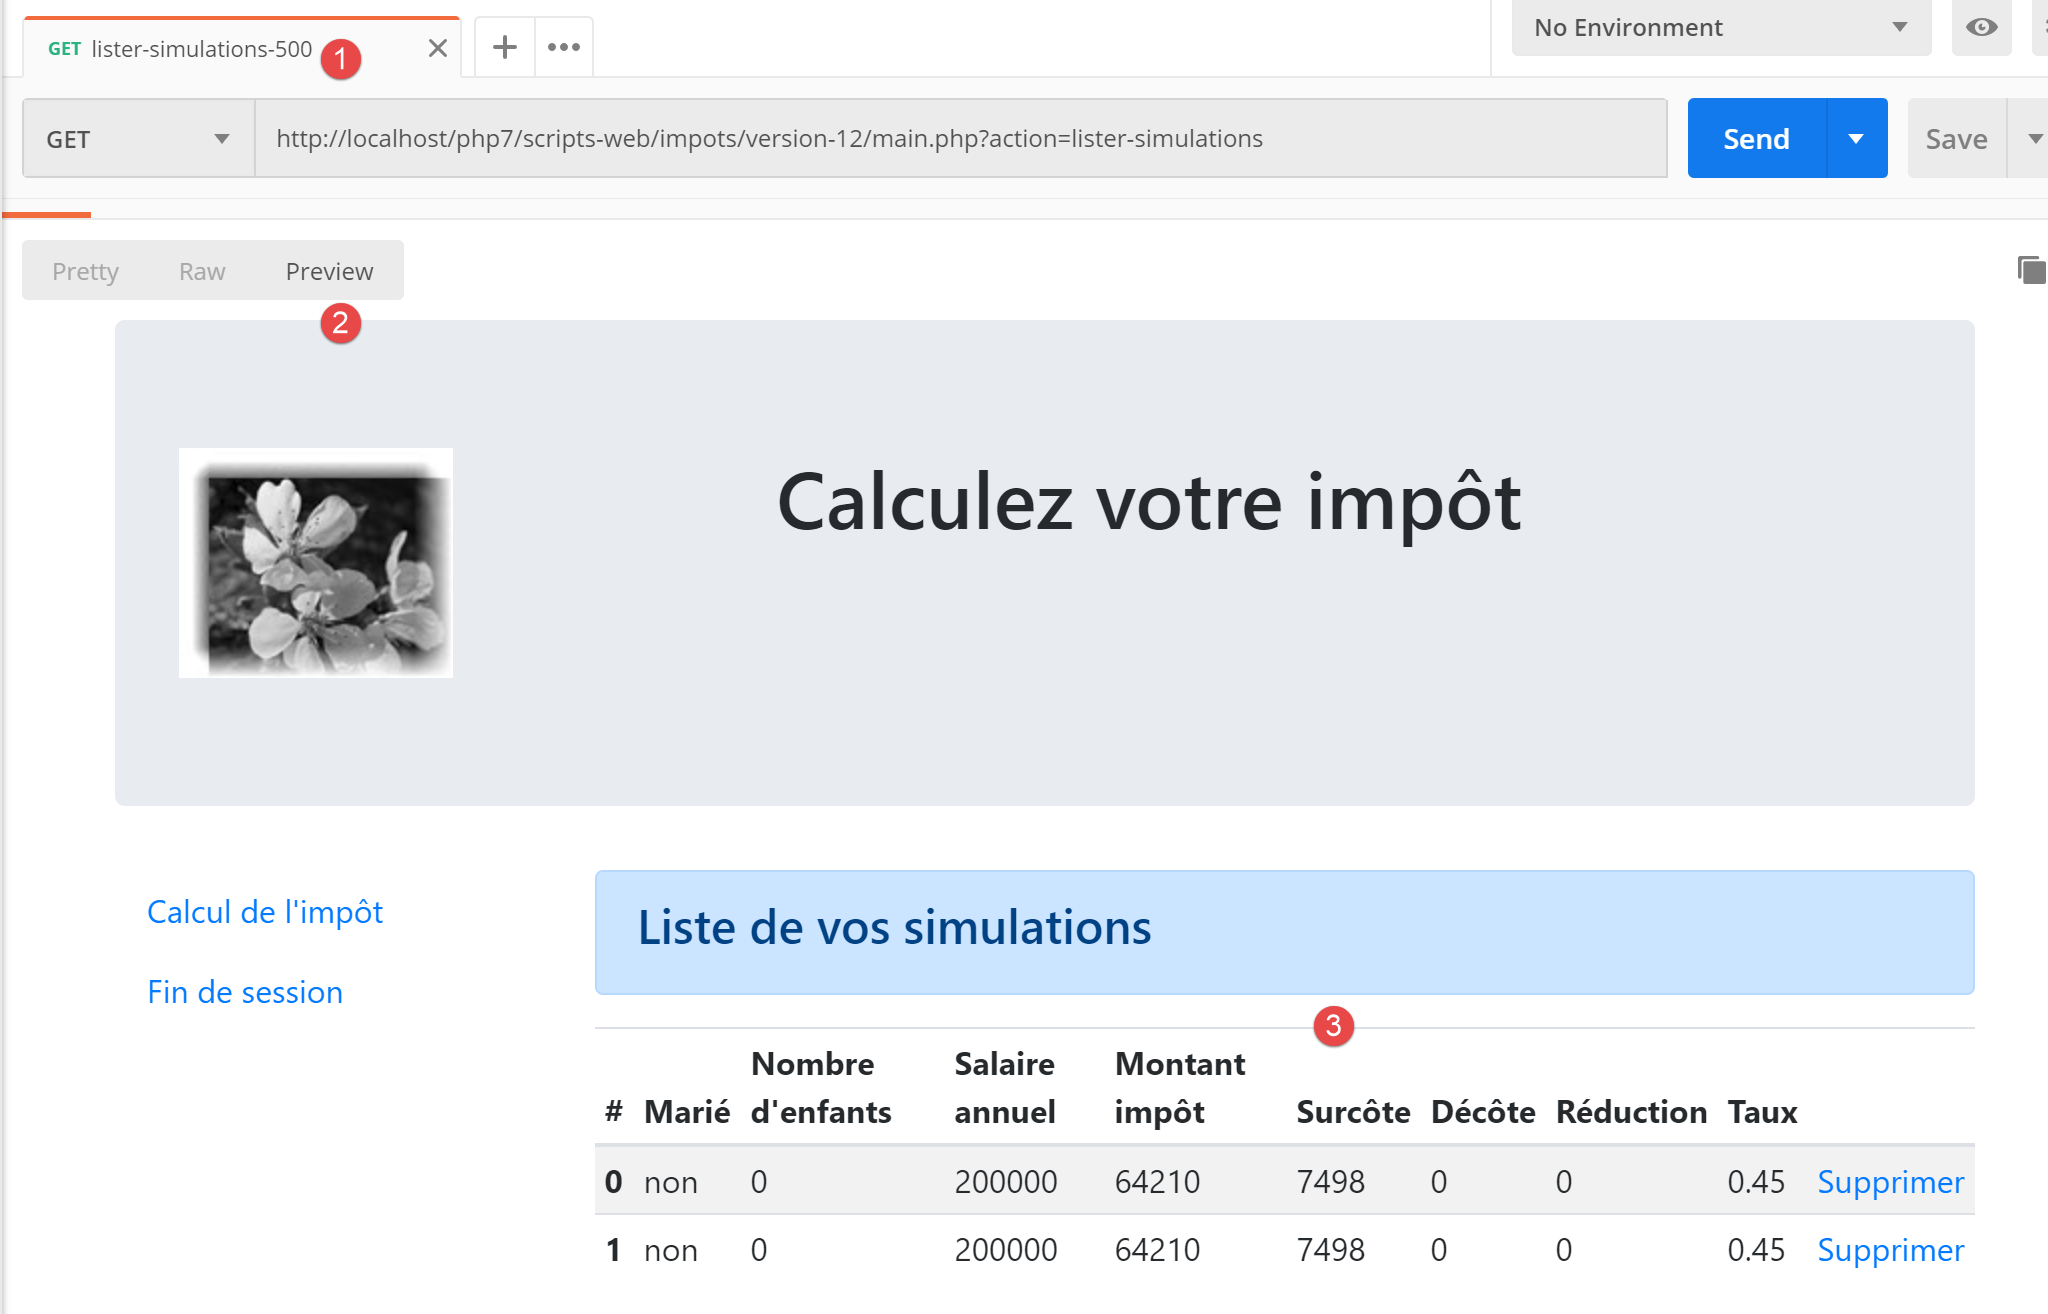
[delete-simulation-600] 测试返回 600 状态码。这对应于成功删除第 0 号模拟的情况。返回的结果是一个模拟列表,其中缺少一个模拟:
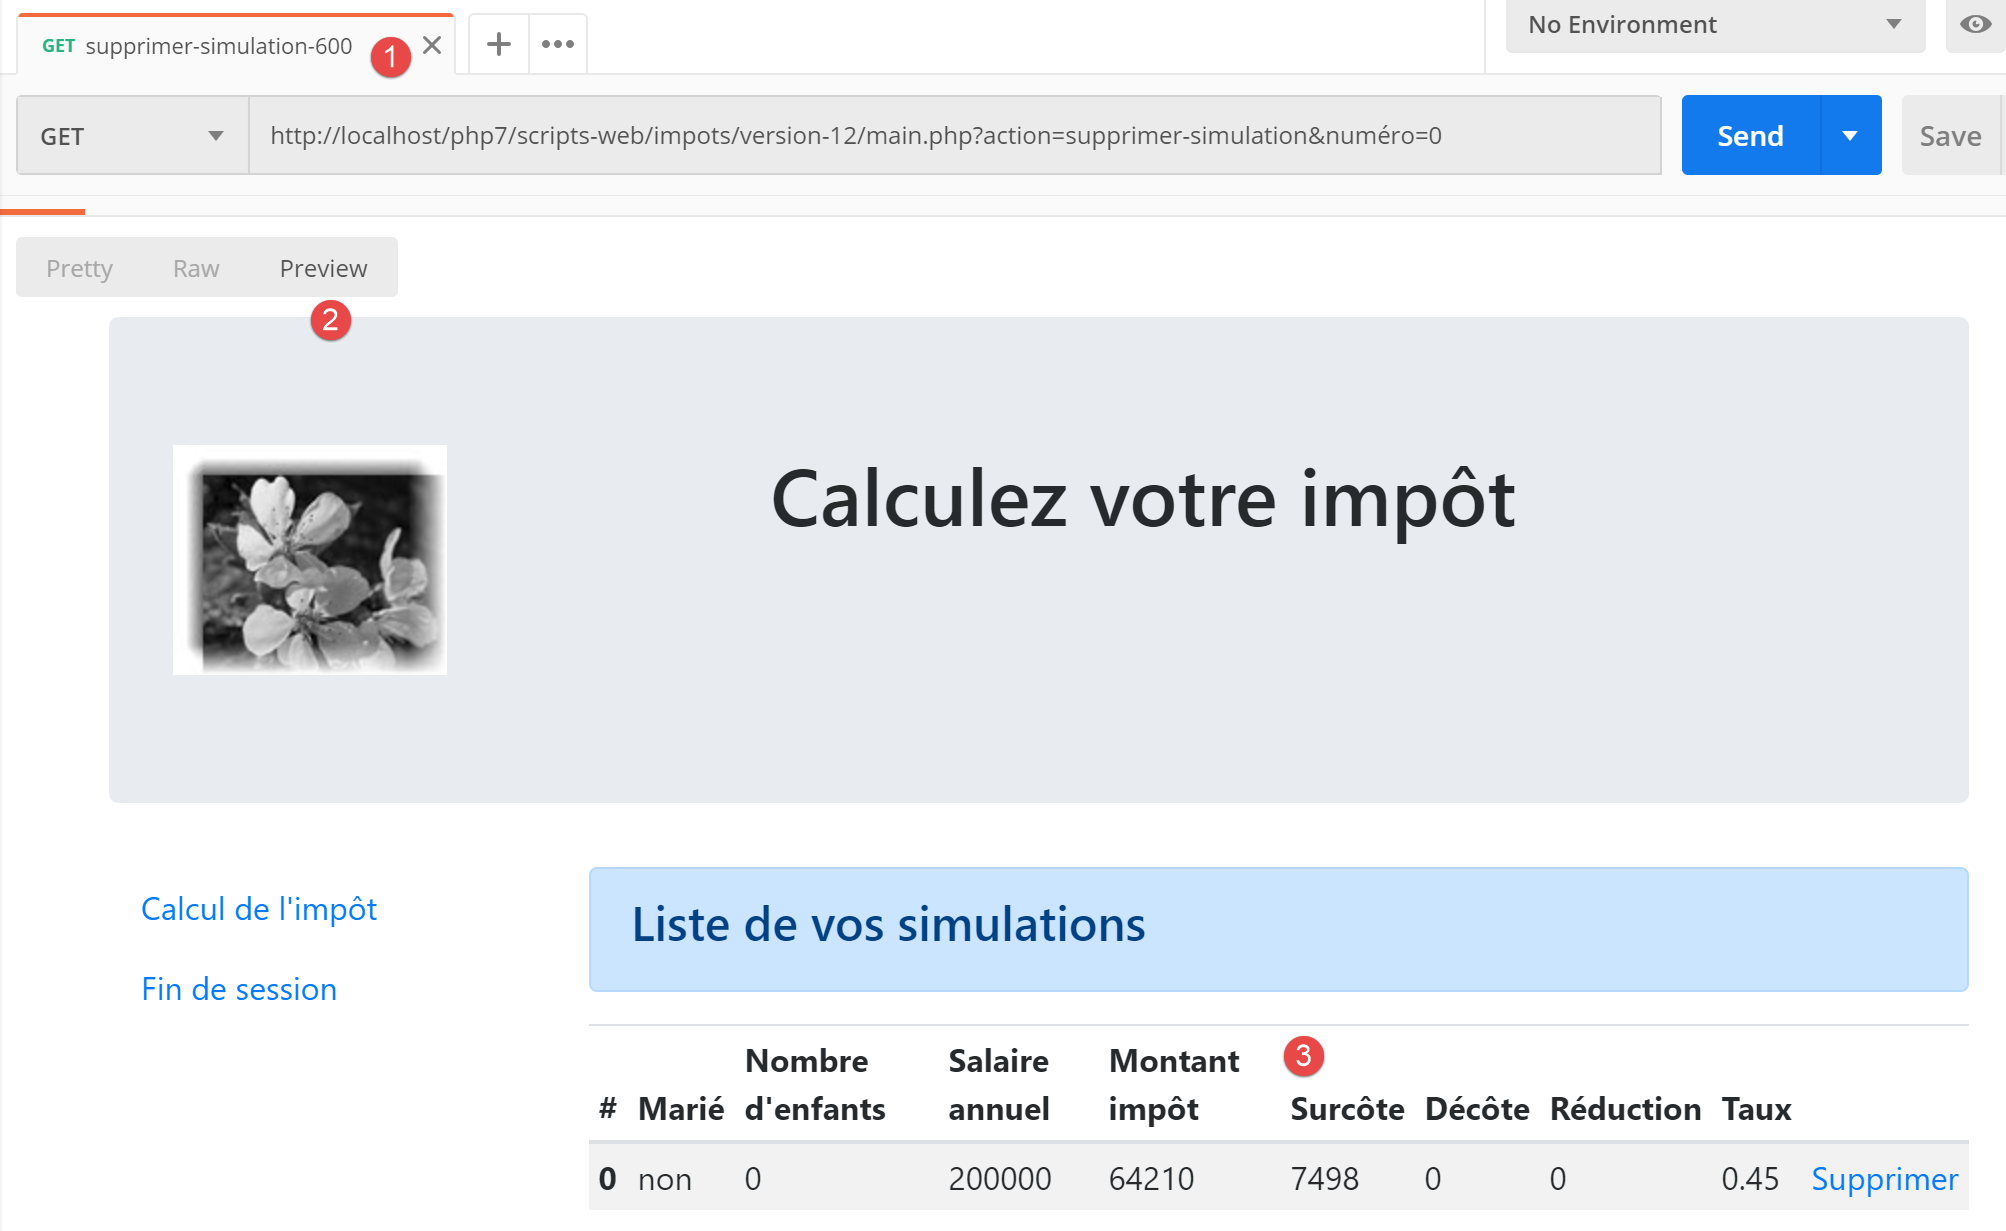
23.13.5. 查看意外错误
在此,我们将意外错误定义为在正常使用 Web 应用程序时不应发生的错误。
让我们以如下定义的 [Postman] 测试 [calculate-tax-3xx] 为例:
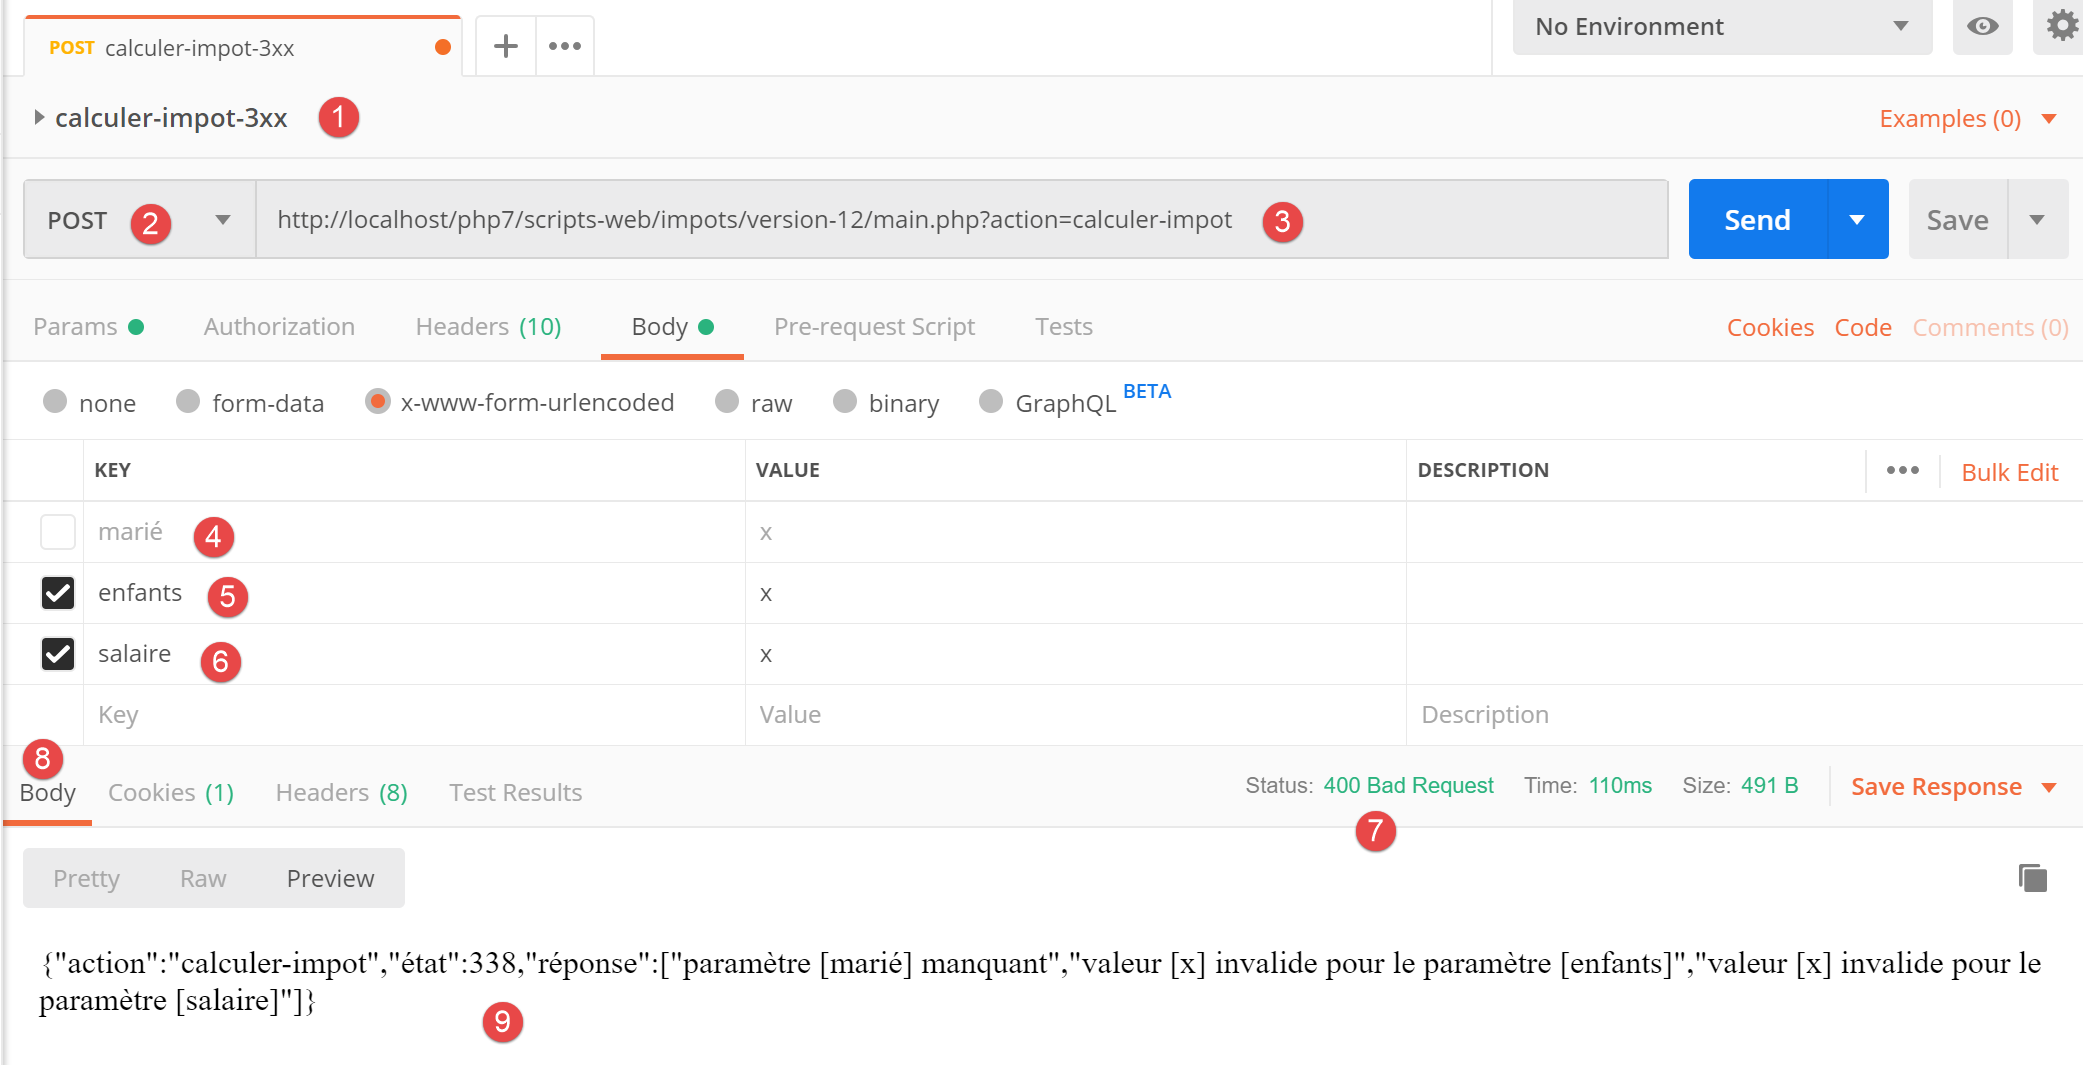
- 在 [1-3] 中,一个带有 [calculer-impot] 操作的 POST 请求;
- 在 [4-6] 中:这里我们可以为三个 POST 参数定义任意内容:
- [4]:缺少 [marié] 参数;
- [5-6]:[children, salary] 参数存在但无效;
- 在 [9] 中,这三个错误均以状态码 338 报告;
然而,在 Web 应用程序的 HTML 表单中,这种情况不会发生:
- 所有参数均已存在;
- [married] 参数(其值取自两个单选按钮的 [value] 属性)必须取值为 [yes] 或 [no] 之一;
- 在现代浏览器中,<input type='number' min='0' step='1' …> 属性确保 children 和 salary 的输入值必须是 >=0 的整数;
然而,没有任何机制能阻止用户使用 [Postman] 将上述 [calcul-impot-3xx] 测试请求发送至我们的服务器。我们已看到,我们的 Web 应用程序知道如何正确响应此请求。我们将“意外错误”定义为在 HTML 应用程序上下文中不应发生的错误。如果此类错误发生,很可能有人正在试图“入侵”该应用程序。 出于教学目的,我们决定针对此类情况显示错误页面。实际上,我们也可以直接重新显示之前发送给客户端的页面。实现方法很简单:只需将上次发送的 HTML 响应存储在会话中。一旦发生意外错误,我们就返回该响应。这样,由于显示的页面没有变化,用户会觉得服务器对他们的错误没有做出响应。
23.13.5.1. 查看演示
显示意外错误的视图如下:
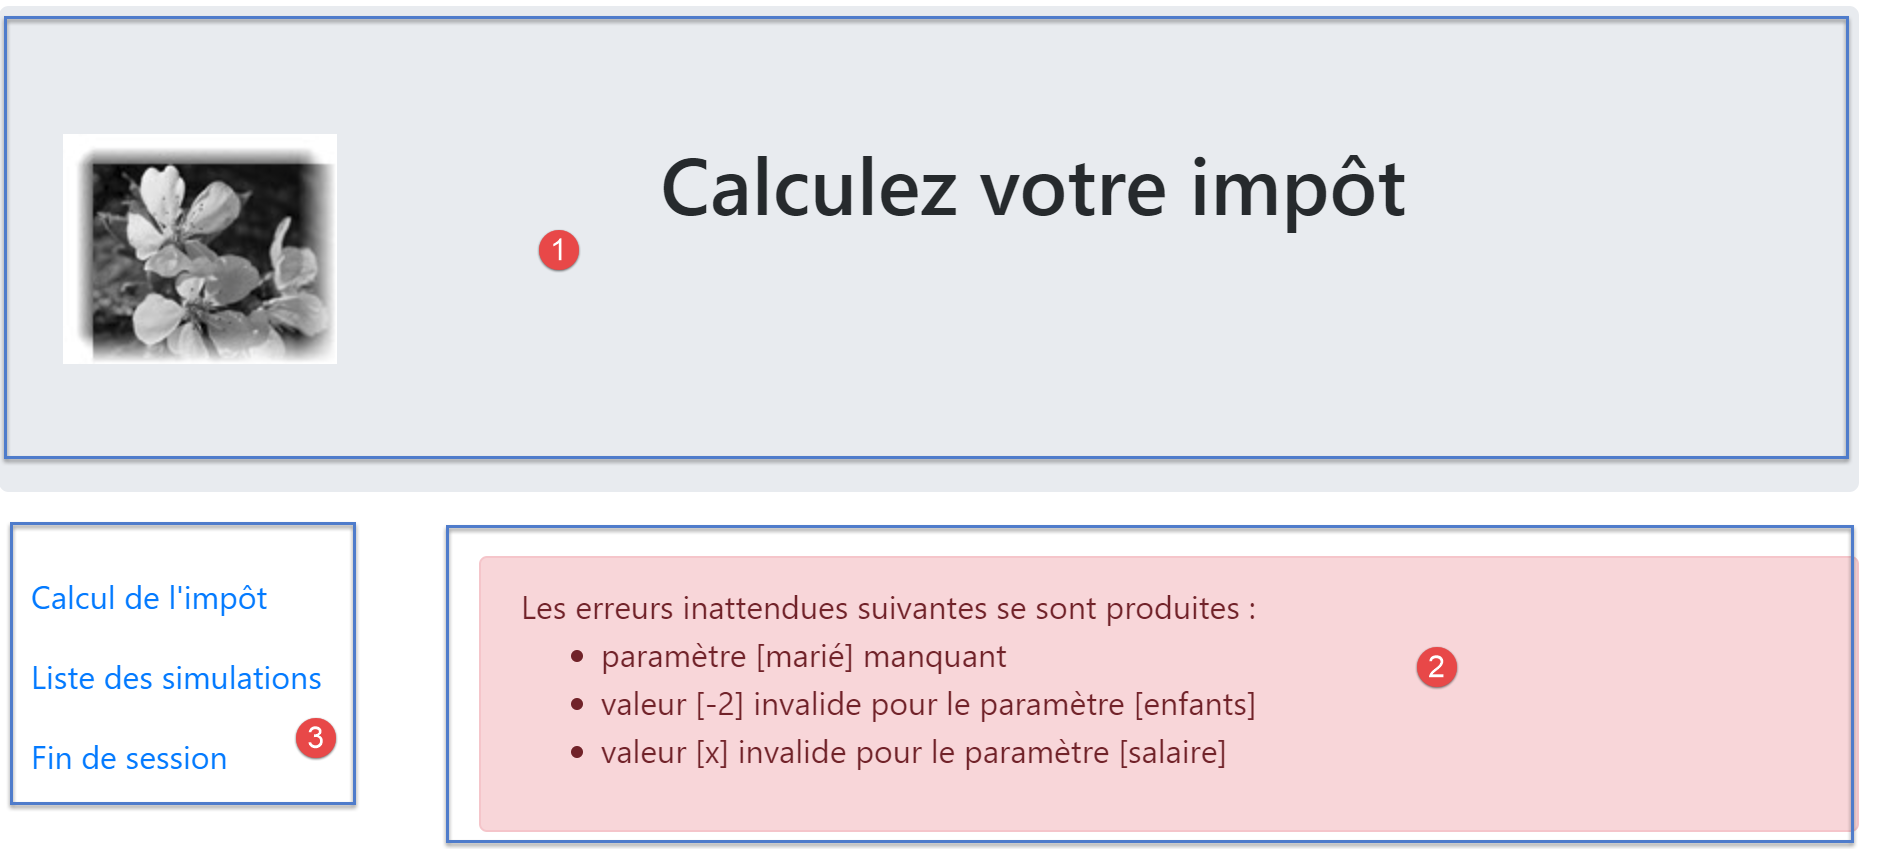
由 [vue-erreurs.php] 脚本生成的页面包含三个部分:
- 1:顶部横幅由前文已介绍的 [v-banner.php] 片段生成;
- 2:意外错误;
- 3:由片段 [v-menu.php] 生成的包含三个链接的菜单;
意外错误的视图由以下 [vue-erreurs.php] 脚本生成:
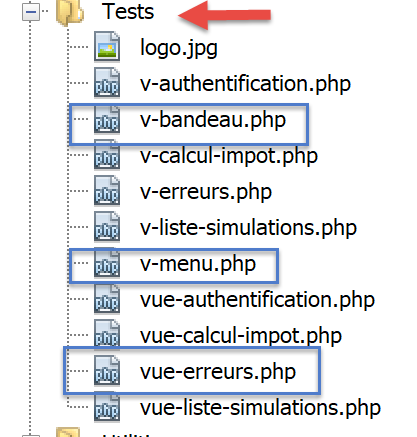
<?php
// calculate the view model
$modèle = getModelForThisView();

function getModelForThisView(): object {
  // encapsulate paged data in $modèle
  $modèle = new \stdClass();
…
  // we return the model
  return $modèle;
}
?>
<!-- document HTML -->
<!doctype html>
<html lang="fr">
    <head>
        <!-- Required meta tags -->
        <meta charset="utf-8">
        <meta name="viewport" content="width=device-width, initial-scale=1, shrink-to-fit=no">
        <!-- Bootstrap CSS -->
        <link rel="stylesheet" href="https://stackpath.bootstrapcdn.com/bootstrap/4.1.3/css/bootstrap.min.css" integrity="sha384-MCw98/SFnGE8fJT3GXwEOngsV7Zt27NXFoaoApmYm81iuXoPkFOJwJ8ERdknLPMO" crossorigin="anonymous">
        <title>Application impots</title>
    </head>
    <body>
        <div class="container">
            <!-- bandeau sur 12 colonnes -->
            <?php require "v-bandeau.php"; ?>
            <!-- ligne à deux colonnes -->
            <div class="row">
                <!-- menu sur 3 colonnes-->
                <div class="col-md-3">
                    <?php require "v-menu.php" ?>
                </div>
                <!-- liste des erreurs -->
                <div class="col-md-9">
                    <?php
                    print <<<EOT
                      <div class="alert alert-danger" role="alert">
                        Les erreurs inattendues suivantes se sont produites :
                        <ul>$modèle->erreurs</ul>
                      </div>
EOT;
                    ?>
                </div>
            </div>
        </div>
    </body>
</html>
评论
- 第27行:添加应用程序横幅 [1];
- 第 32 行:添加菜单 [2]。它将以三列形式显示在横幅下方;
- 第 34–44 行:将错误区域以九列形式显示;
- 第 37–44 行:显示意外错误的 [print] 操作;
- 第 38 行:此显示内容将出现在一个粉色背景的 Bootstrap 容器中;
- 第 39 行:介绍性文本;
- 第 40 行:<ul> 标签包裹着一个项目符号列表。该列表由 [$model->errors] 模型提供;
我们已经对该视图的两个片段进行了说明:
23.13.5.2. 视觉测试
我们将这些不同元素收集在 [Tests] 文件夹中,并为视图 [vue-erreurs.php] 创建了一个测试模板:

视图 [vue-erreurs.php] 的数据模型如下:
<?php
// calculate the view model
$modèle = getModelForThisView();

function getModelForThisView(): object {
  // encapsulate paged data in $modèle
  $modèle = new \stdClass();

  // the table of unexpected errors
  $erreurs = ["erreur1", "erreur2"];
  // build the HTML list of errors
  $modèle->erreurs = "";
  foreach ($erreurs as $erreur) {
    $modèle->erreurs .= "<li>$erreur</li>";
  }
  // menu options
  $modèle->optionsMenu = [
    "Calcul de l'impôt" => "main.php?action=afficher-calcul-impot",
    "Liste des simulations" => "main.php?action=lister-simulations",
    "Fin de session" => "main.php?action=fin-session",];
  // banner image
  $modèle->logo = "http://localhost/php7/scripts-web/impots/version-12/Tests/logo.jpg";
  // we return the model
  return $modèle;
}
?>
<!-- document HTML -->
<!doctype html>
<html lang="fr">
    <head>
        …
    </head>
    <body>
        …
    </body>
</html>
评论
- 第 9–15 行:构建 HTML 错误列表;
- 第 17–20 行:菜单选项数组;
让我们显示这个视图:
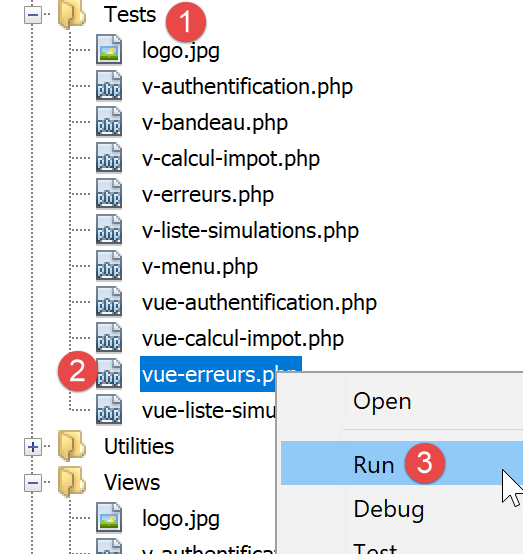
我们得到以下结果:
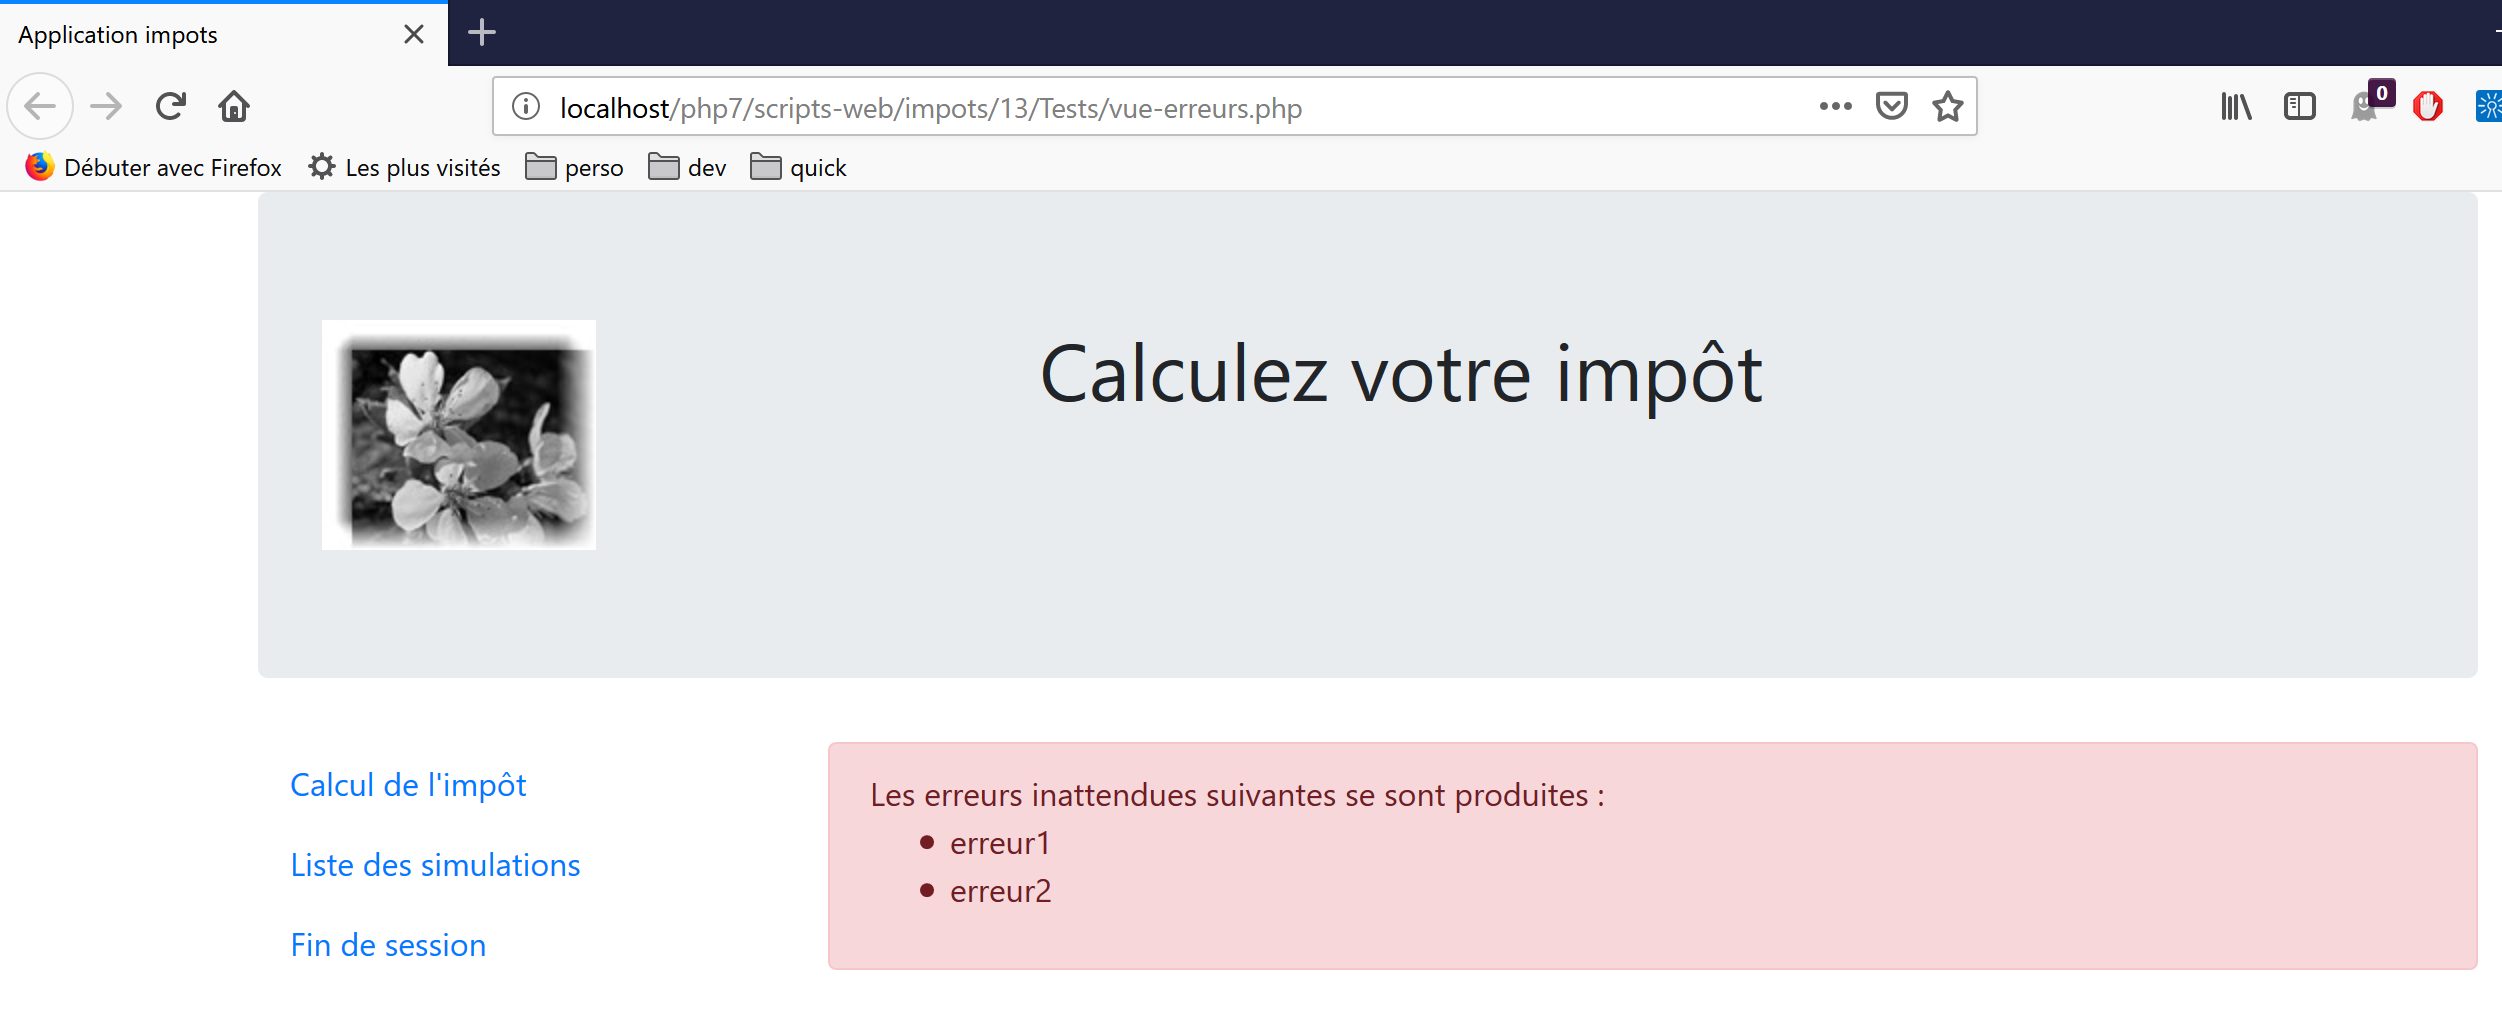
我们对该视图进行调整,直到对视觉效果感到满意为止。随后,我们可以将其集成到当前正在开发的 Web 应用程序中。
23.13.5.3. 计算视图模型
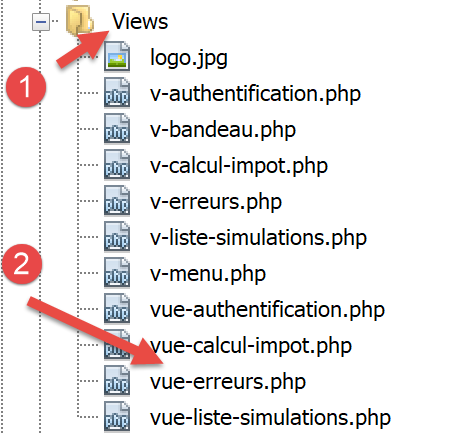
一旦确定了视图的外观,我们就可以在实际条件下计算视图模型。让我们回顾一下导致此视图的状态代码。这些代码可在配置文件中找到:
"vues": {
        "vue-authentification.php": [700, 221, 400],
        "vue-calcul-impot.php": [200, 300, 341, 350, 800],
        "vue-liste-simulations.php": [500, 600]
    },
"vue-erreurs": "vue-erreurs.php"
因此,只有第 [2–4] 行中未列出的状态码才会触发意外错误视图的显示。
用于计算视图模板 [vue-erreurs.php] 的代码如下:
<?php
// we inherit the following variables
// Request $request : la requête en cours
// Session $session: the application session
// array $config: application configuration
// array $content: controller response
//
// symfony dependencies
use Symfony\Component\HttpFoundation\Request;
use Symfony\Component\HttpFoundation\Session\Session;

// calculate the view model
$modèle = getModelForThisView($request, $session, $config, $content);

function getModelForThisView(Request $request, Session $session, array $config, array $content): object {
  // encapsulate paged data in $modèle
  $modèle = new \stdClass();

  // recover errors from the controller response
  $réponse = $content["réponse"];
  if (!is_array($réponse)) {
    // a single error message
    $erreurs = [$réponse];
  } else {
    // several error messages
    $erreurs = $réponse;
  }
  // build the HTML list of errors
  $modèle->erreurs = "";
  foreach ($erreurs as $erreur) {
    $modèle->erreurs .= "<li>$erreur</li>";
  }
  // menu options
  $modèle->optionsMenu = [
    "Calcul de l'impôt" => "main.php?action=afficher-calcul-impot",
    "Liste des simulations" => "main.php?action=lister-simulations",
    "Fin de session" => "main.php?action=fin-session",];

  // we return the model
  return $modèle;
}
?>
<!-- document HTML -->
<!doctype html>
<html lang="fr">
    <head>
        …
    </head>
    <body>
        …
    </body>
</html>
评论
- 第 19–32 行:计算视图 [view-errors.php] 所使用的模板 [$template→errors];
- 第 34–37 行:计算片段 [v-menu.php] 所使用的模板 [$template→optionsMenu];
23.13.5.4. 测试 [Postman]
[calculate-tax-3xx] 测试返回状态码 338,这并非预期的状态码。HTML 响应如下:
23.13.6. 应用程序菜单操作的实现
接下来我们将讨论菜单操作的实现。让我们回顾一下之前遇到的链接的含义
查看 | 链接 | 目标 | 角色 |
税款计算 | [模拟列表] | [main.php?action=list-simulations] | 请求模拟列表 |
[结束会话] | |||
模拟列表 | [税款计算] | [main.php?action=display-tax-calculation] | 显示税费计算视图 |
[注销] | |||
意外错误 | [税费计算] | [main.php?action=display-tax-calculation] | 显示税费计算视图 |
[模拟列表] | |||
[结束会话] |
需要注意的是,点击链接会向链接的目标发起一个 GET 请求。操作 [lister-simulations、fin-session] 是通过 GET 操作实现的,因此我们可以将其用作链接目标。当操作通过 POST 请求执行时,除非结合 JavaScript 使用,否则无法再使用链接。
从上述操作来看,[display-tax-calculation] 操作似乎尚未实现。这属于两个视图之间的导航操作:JSON 或 XML 服务器没有理由实现它,因为它们不具备视图的概念。引入这一概念的是 HTML 服务器。
因此,我们需要实现 [display-tax-calculation] 操作。这将使我们能够回顾在服务器内实现操作的流程。
首先,我们需要添加一个新的二级控制器。我们将它命名为 [AfficherCalculImpotController]:
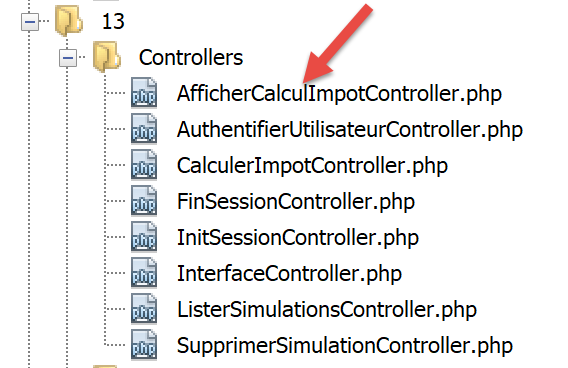
该控制器必须添加到配置文件 [config.json] 中:
{
    "databaseFilename": "database.json",
    "rootDirectory": "C:/myprograms/laragon-lite/www/php7/scripts-web/impots/version-12",
    "relativeDependencies": [

        …

        "/Controllers/InterfaceController.php",
        "/Controllers/InitSessionController.php",
        "/Controllers/ListerSimulationsController.php",
        "/Controllers/AuthentifierUtilisateurController.php",
        "/Controllers/CalculerImpotController.php",
        "/Controllers/SupprimerSimulationController.php",
        "/Controllers/FinSessionController.php",
        "/Controllers/AfficherCalculImpotController.php"
    ],
    "absoluteDependencies": [
        "C:/myprograms/laragon-lite/www/vendor/autoload.php",
        "C:/myprograms/laragon-lite/www/vendor/predis/predis/autoload.php"
    ],
    …
    "actions":
            {
                "init-session": "\\InitSessionController",
                "authentifier-utilisateur": "\\AuthentifierUtilisateurController",
                "calculer-impot": "\\CalculerImpotController",
                "lister-simulations": "\\ListerSimulationsController",
                "supprimer-simulation": "\\SupprimerSimulationController",
                "fin-session": "\\FinSessionController",
                "afficher-calcul-impot": "\\AfficherCalculImpotController"
            },
    …
    "vues": {
        "vue-authentification.php": [700, 221, 400],
        "vue-calcul-impot.php": [200, 300, 341, 350, 800],
        "vue-liste-simulations.php": [500, 600]
    },
    "vue-erreurs": "vue-erreurs.php"
}
- 第 15 行:新的控制器;
- 第 30 行:新的操作及其控制器;
- 第 35 行:新控制器将返回状态码 800。切换视图时,不应出现错误;
控制器 [AfficherCalculImpotController.php] 将如下所示:
<?php

namespace Application;

// symfony dependencies
use Symfony\Component\HttpFoundation\Request;
use Symfony\Component\HttpFoundation\Session\Session;
use Symfony\Component\HttpFoundation\Response;

class AfficherCalculImpotController implements InterfaceController {

  // $config is the application configuration
  // traitement d'une requête Request
  // session and can modify it
  // $infos is additional information specific to each controller
  // renders an array [$statusCode, $état, $content, $headers]

  public function execute(
    array $config,
    Request $request,
    Session $session,
    array $infos = NULL): array {

    // view change - just a status code to set
    return [Response::HTTP_OK, 800, ["réponse" => ""], []];
  }

}
评论
- 第 10 行:与其他辅助控制器一样,新控制器实现了 [InterfaceController] 接口;
- 视图的更改很容易实现:只需返回与目标视图关联的状态码,如上所示,此处为代码 800;
23.13.7. 实际环境测试
代码已编写完毕,并使用 [Postman] 测试了每个操作。我们仍需在实际场景中测试视图流。我们需要一种初始化 HTML 会话的方法。我们知道需要向服务器发送参数 [action=init-session&type=html]。为避免在浏览器地址栏中手动输入这些参数,我们将 [index.php] 脚本添加到应用程序中:
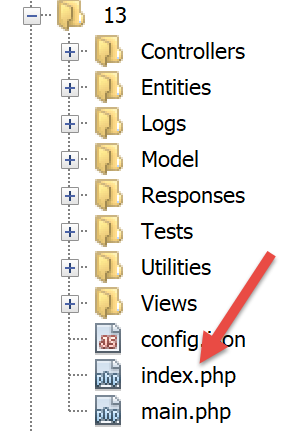
[index.php]脚本内容如下:
<?php

// redirect to [main.php] in [html] mode
header('Location: main.php?action=init-session&type=html');
- 第 4 行:[header] 是一个 PHP 函数,用于向响应中添加 HTTP 头。 HTTP 头 [Location: main.php?action=init-session&type=html] 指示客户端浏览器重定向到 [Location] 中指定的目标 URL。脚本 [index.php] 是通过 URL [http://localhost/php7/scripts-web/impots/version-12/index.php] 请求的。 当客户端浏览器收到重定向到相对 URL [main.php?action=init-session&type=html] 的指令时,它将请求绝对 URL [http://localhost/php7/scripts-web/impots/version-12/main.php?action=init-session&type=html],并启动 HTML 会话;
启动 URL 可以简化为 [http://localhost/php7/scripts-web/impots/version-12/]。如果 URL 中未指定页面,则默认使用 [index.html, index.php] 页面。因此,此处将使用 [index.php] 脚本;
让我们开始吧:接下来我们将介绍几个视图序列。
在浏览器中,我们启用开发者工具(Firefox 中按 F12),并请求启动 URL [https://localhost/php7/scripts-web/impots/version-12/]:
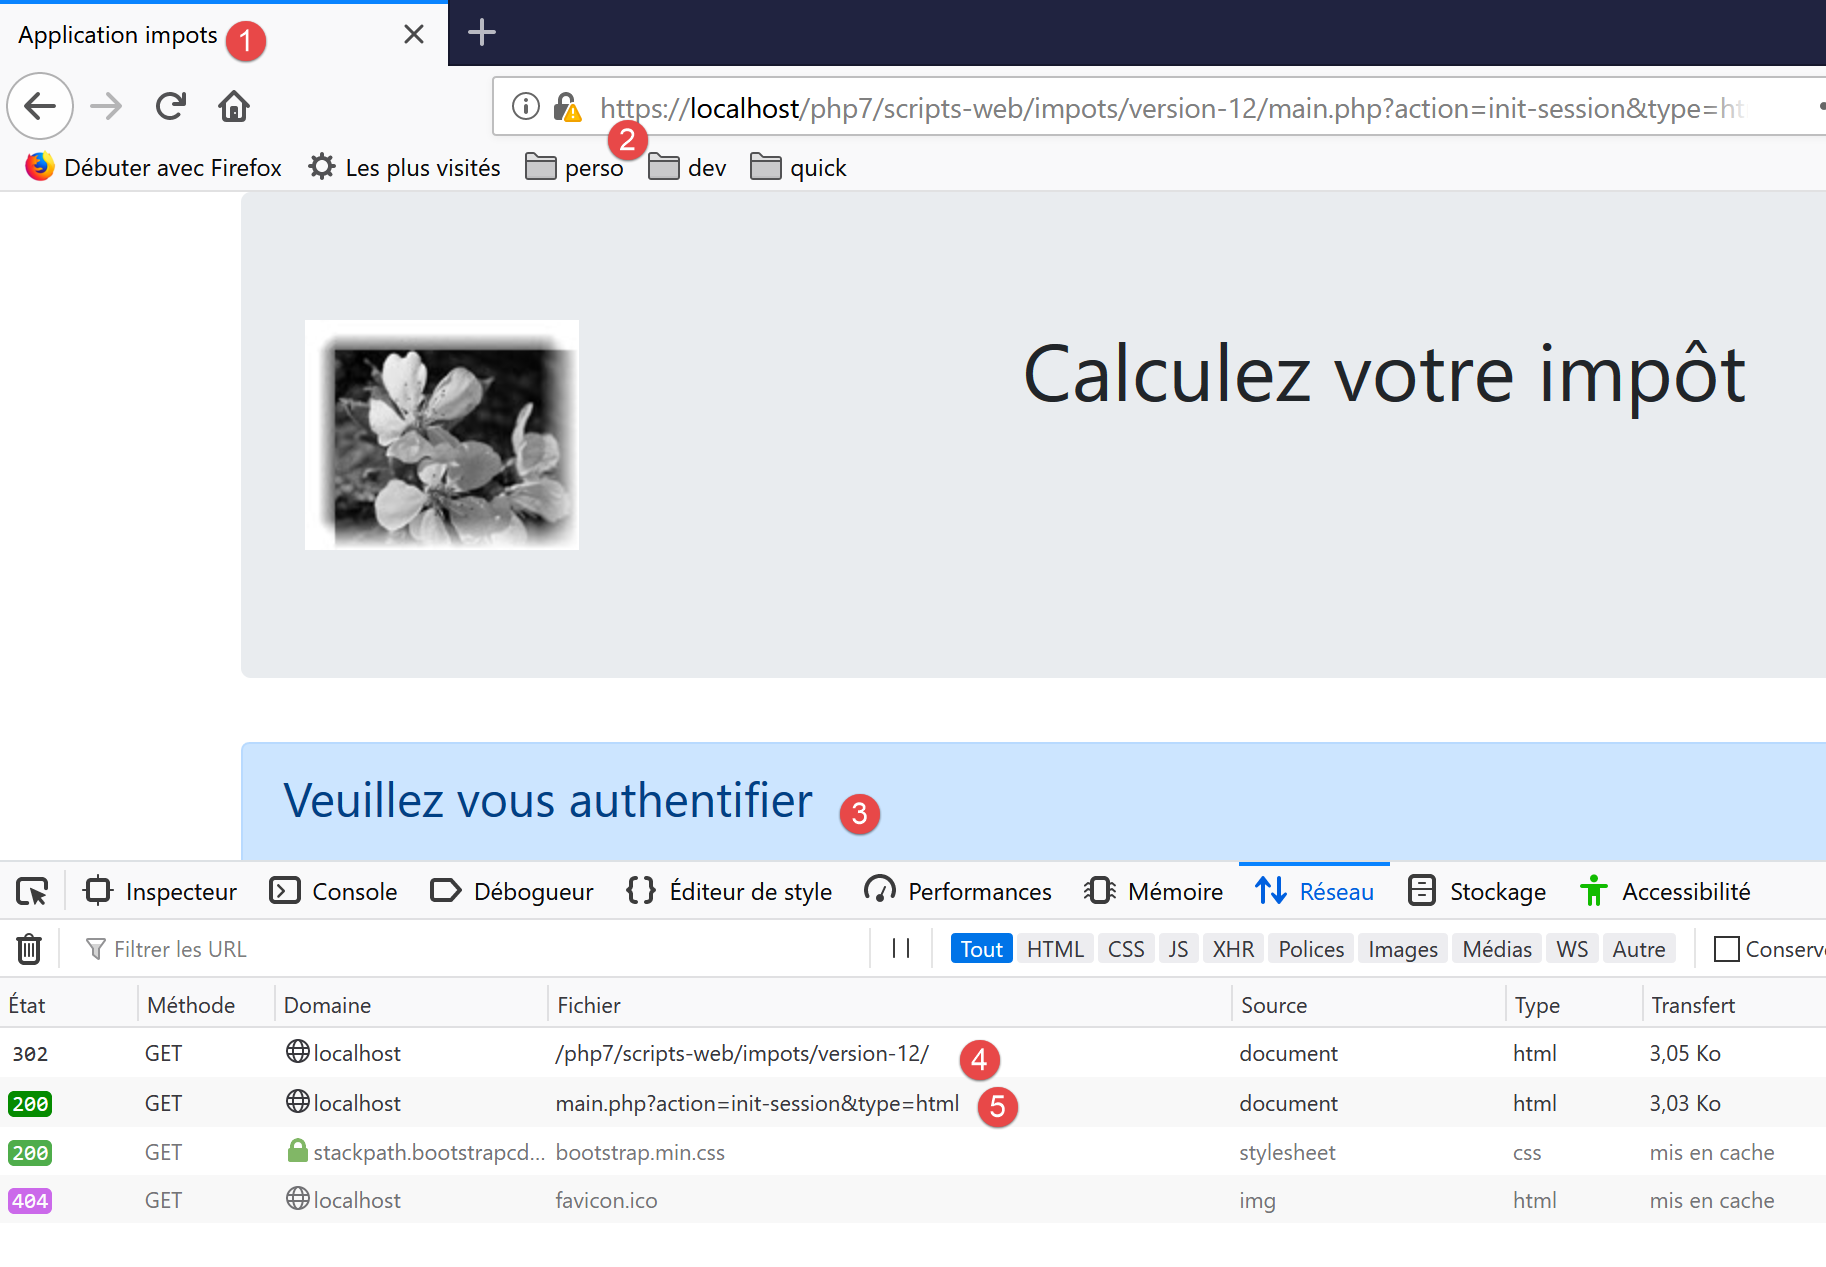
- 在 [4] 处,服务器的首次响应是一个 302 重定向:
- 在 [5] 处,向 URL [http://localhost/php7/scripts-web/impots/13/main.php?action=init-session&type=html] 发起了一个新请求;
让我们来仔细看看这个 302 重定向:
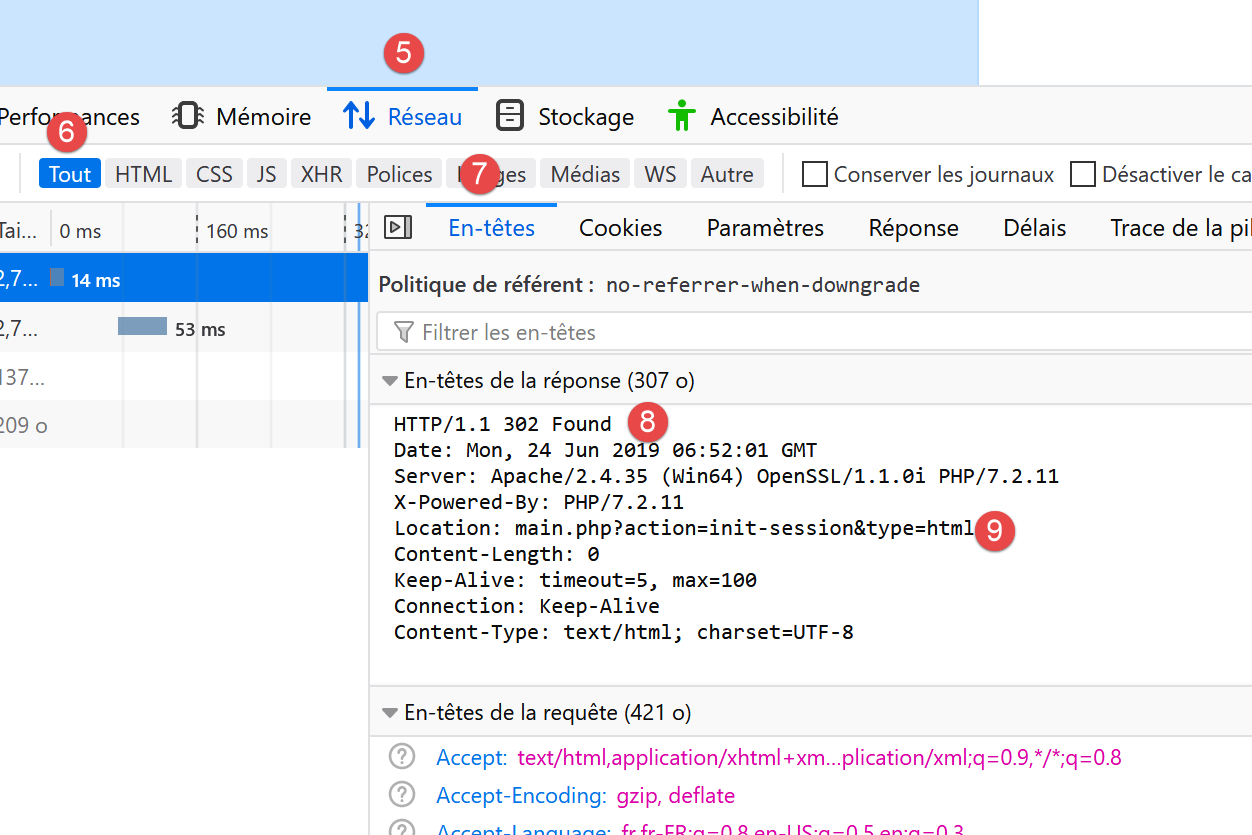
- 在 [8] 中,HTTP 状态码 [302] 是一个重定向码:它告知客户端浏览器,所请求的 URL 已移动。新 URL 在 [9] 中指定。浏览器将通过一个新的 GET 请求执行此重定向:
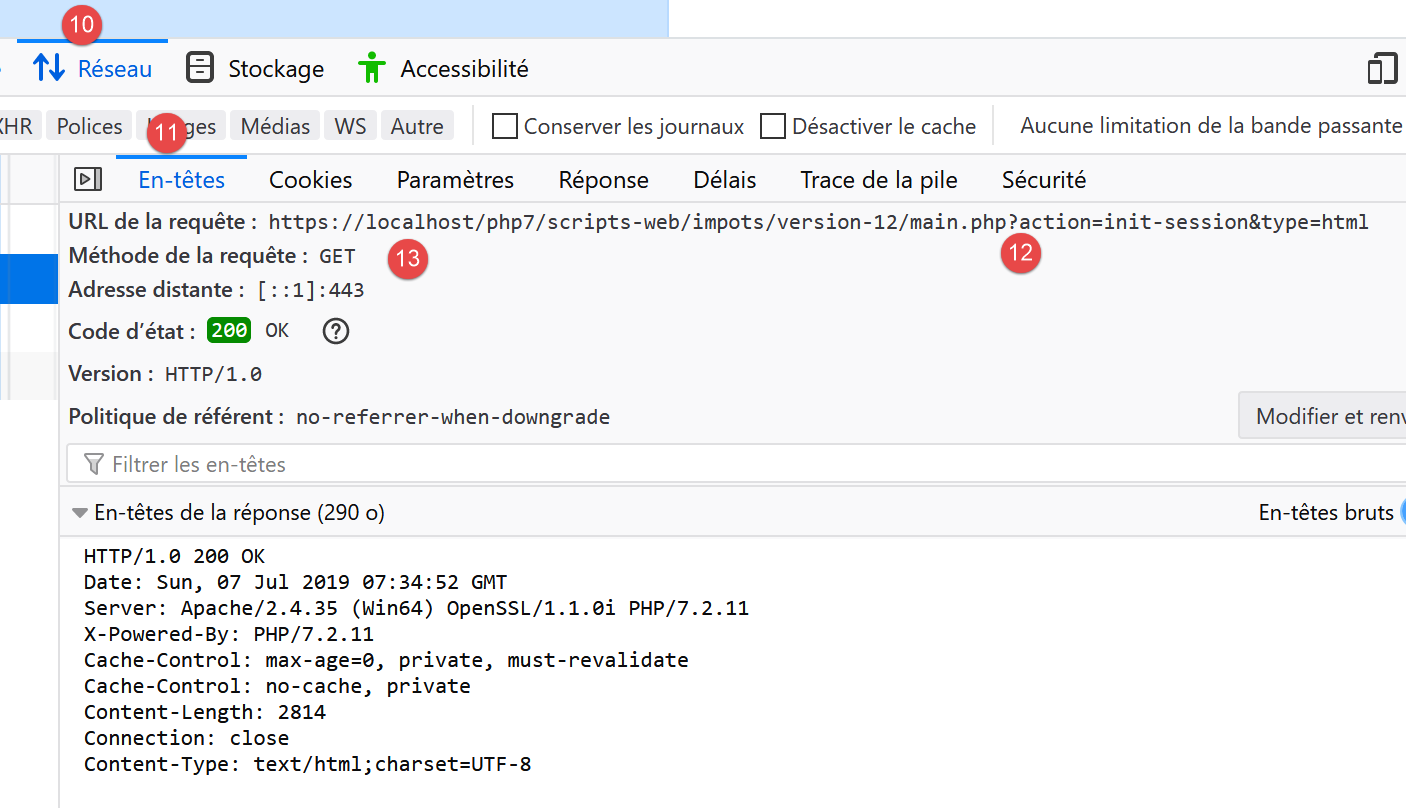
- 在 [12-13] 中,浏览器发出的新请求;
让我们填写收到的表单;
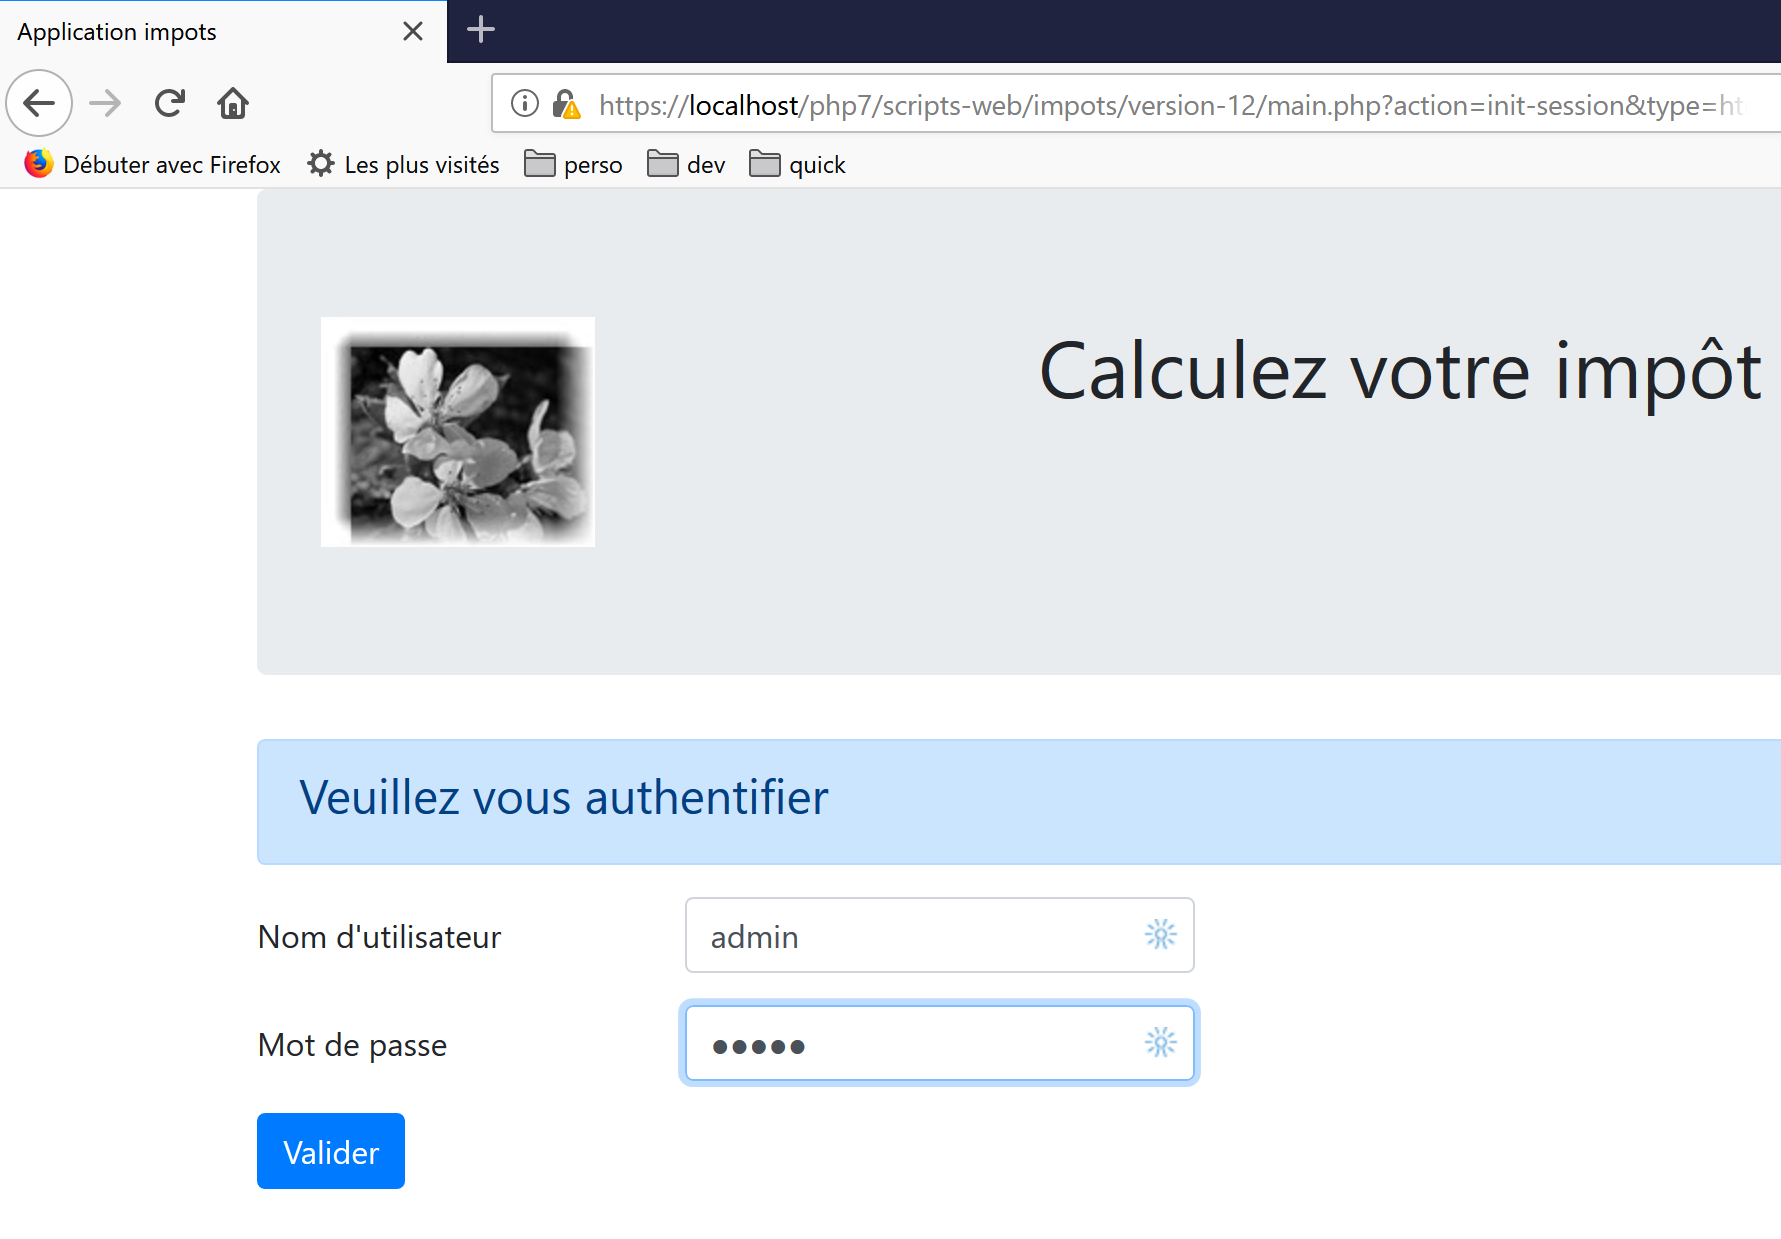
然后我们进行几次模拟:
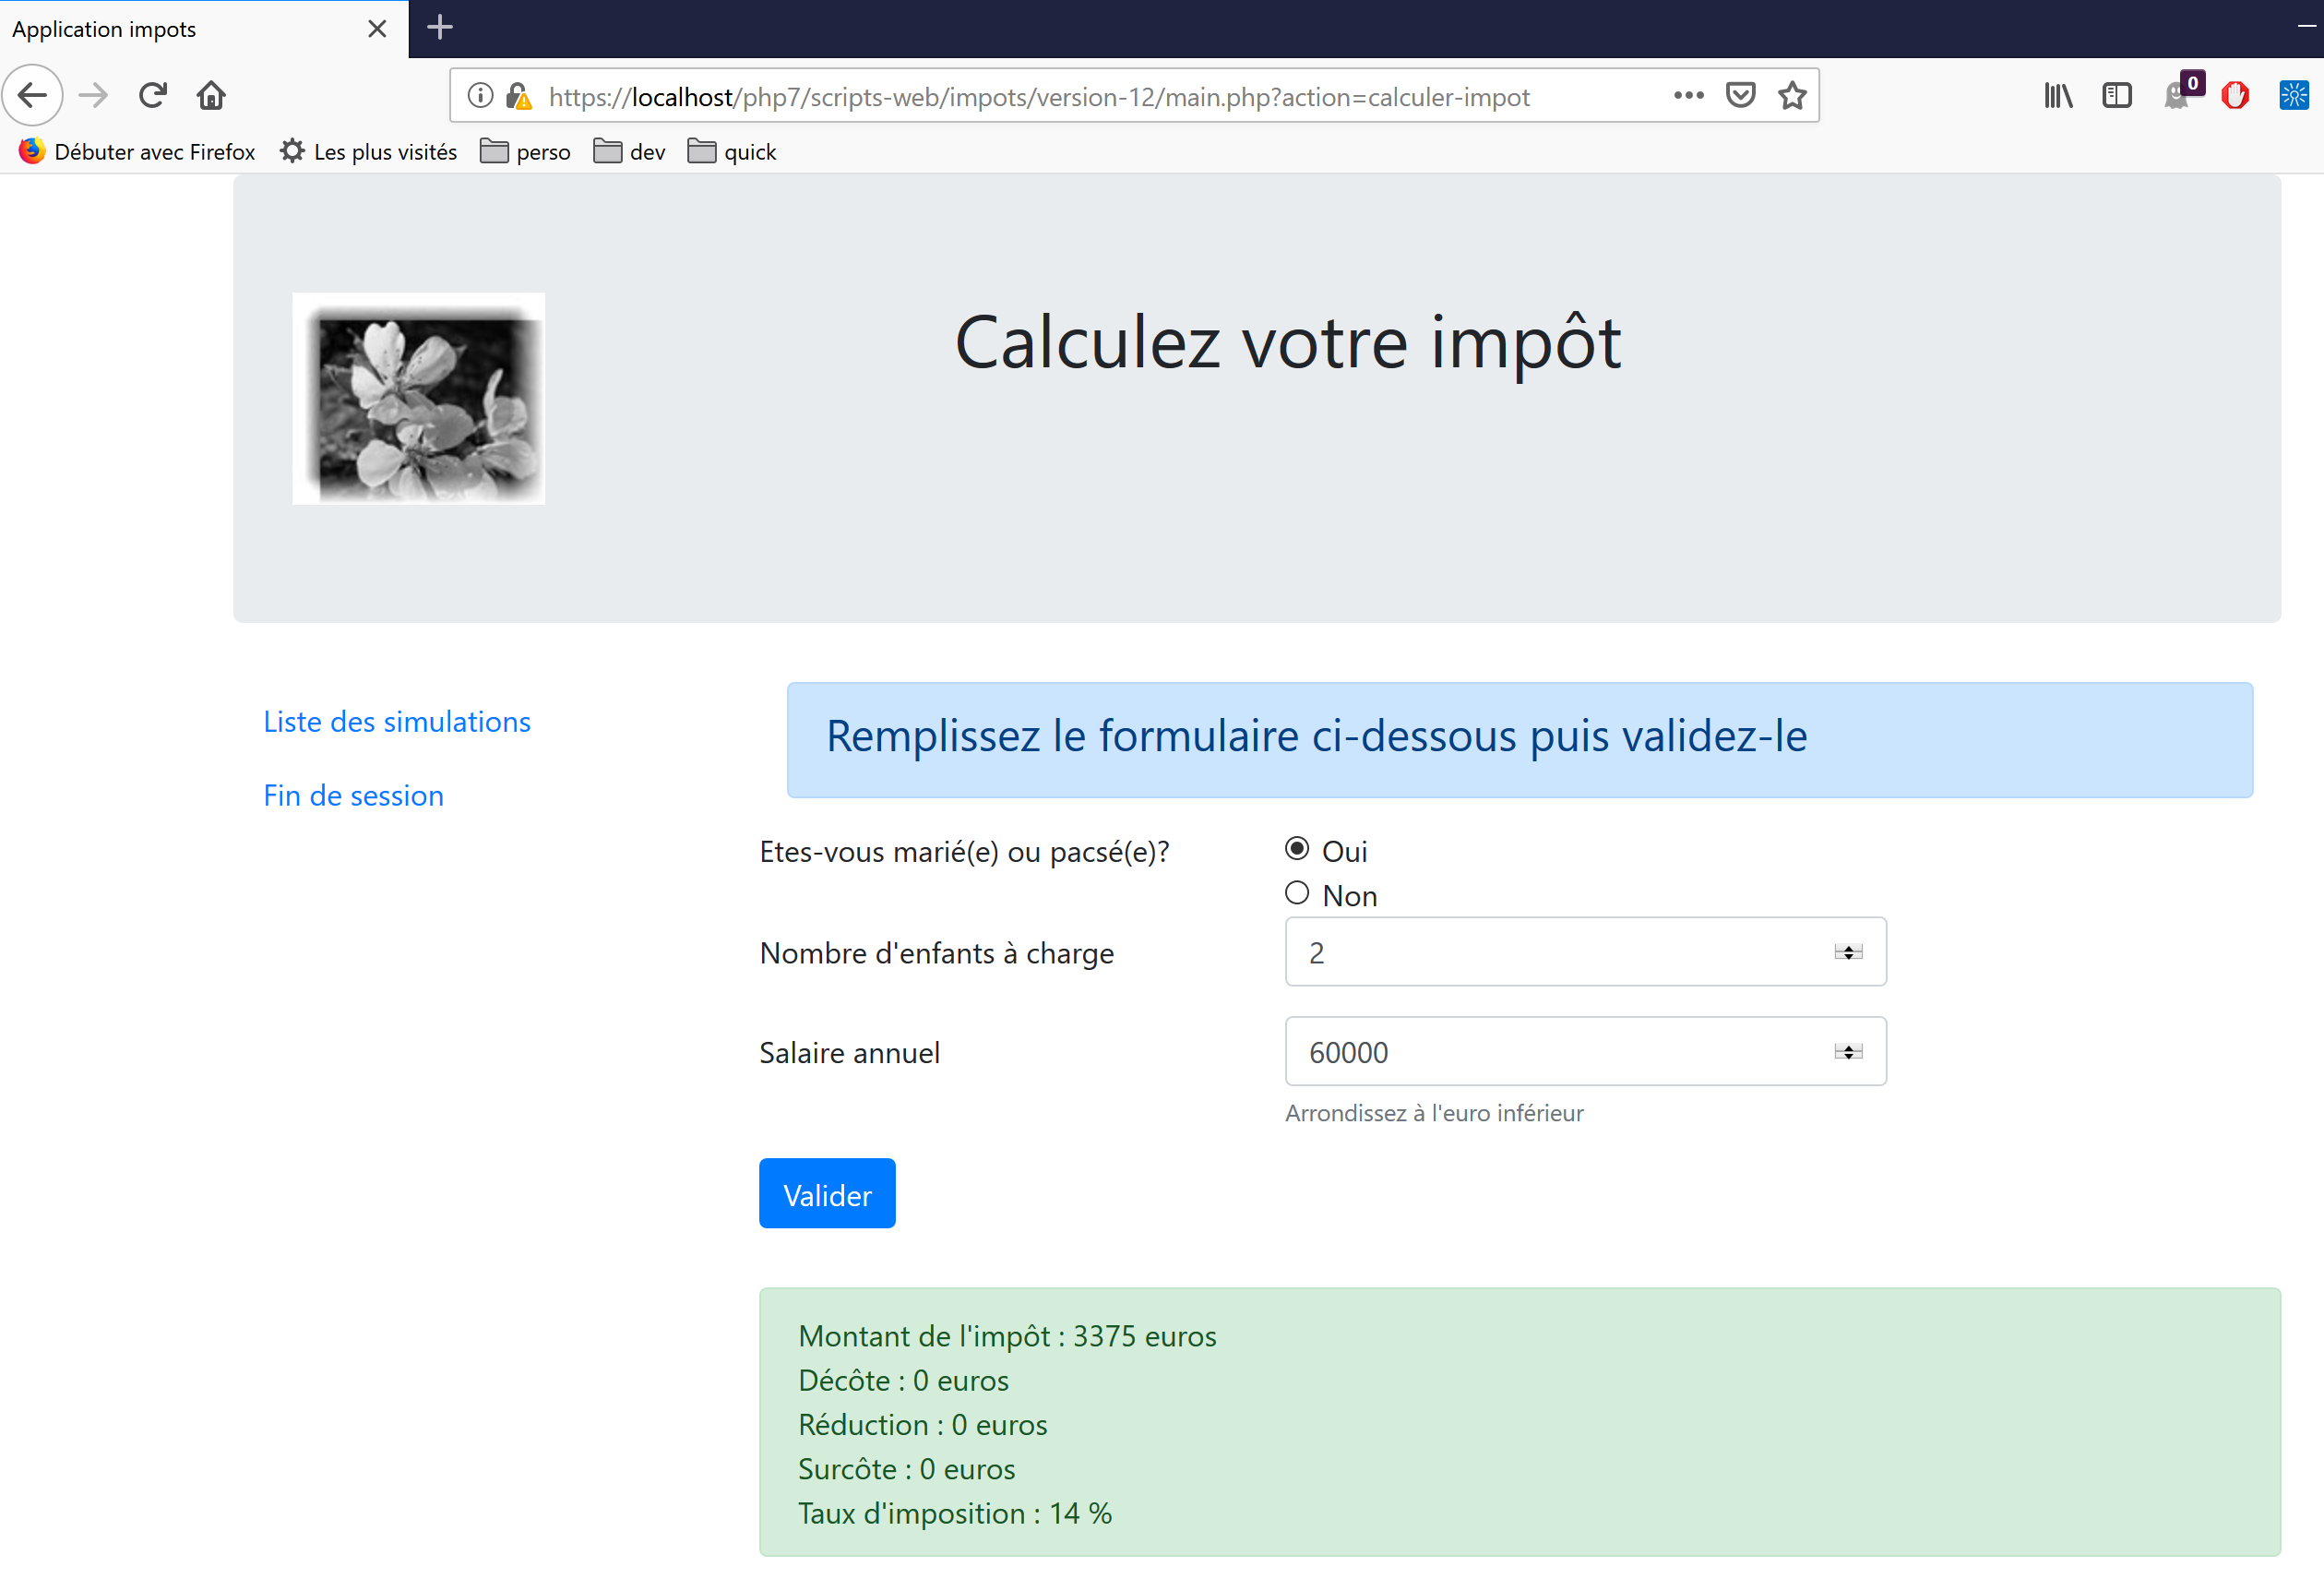

让我们查询模拟列表:

删除第一个模拟:

结束本次会话:
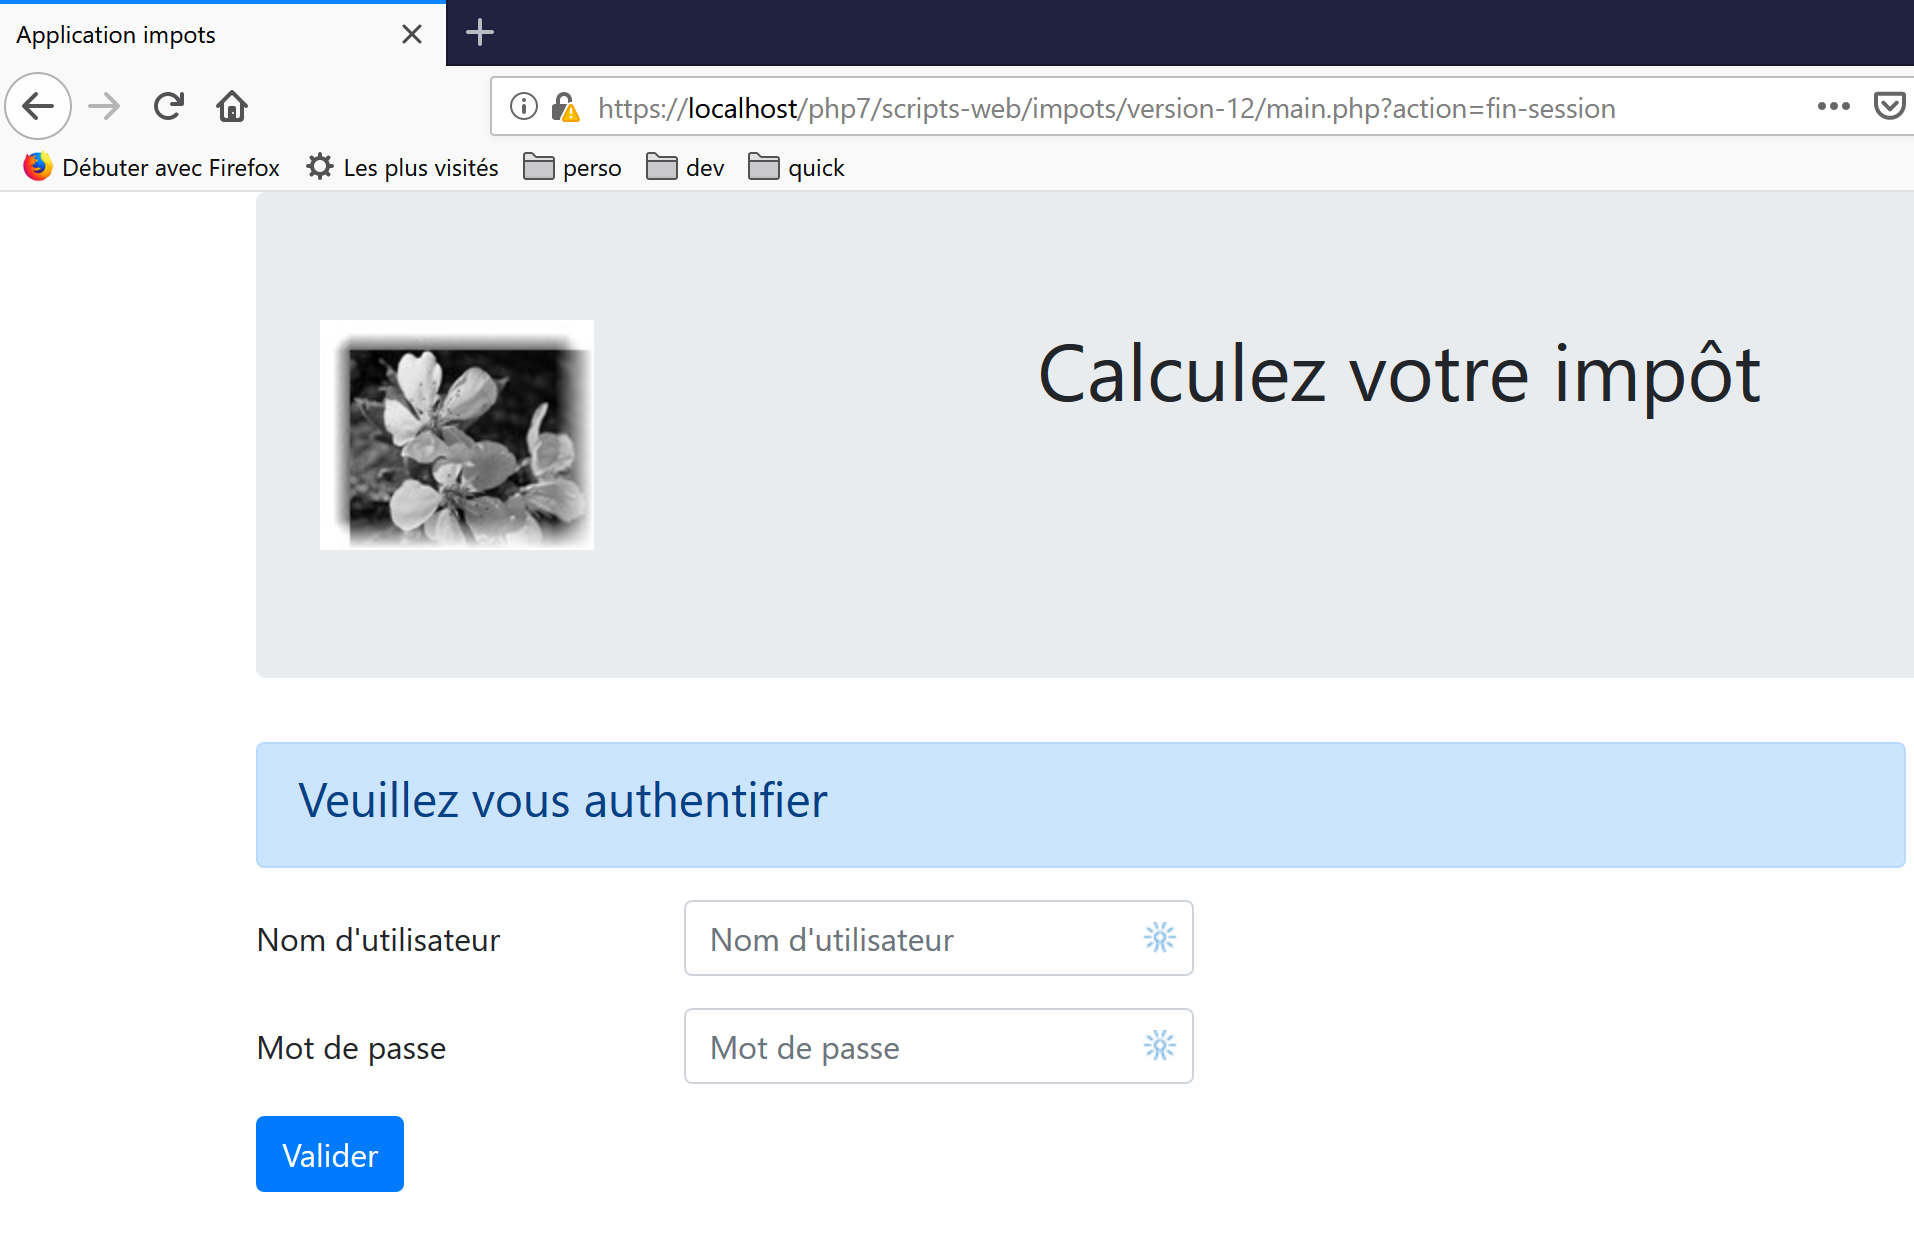
欢迎读者进行进一步测试。
23.14. jSON Web 服务客户端
23.14.1. 客户端/服务器架构
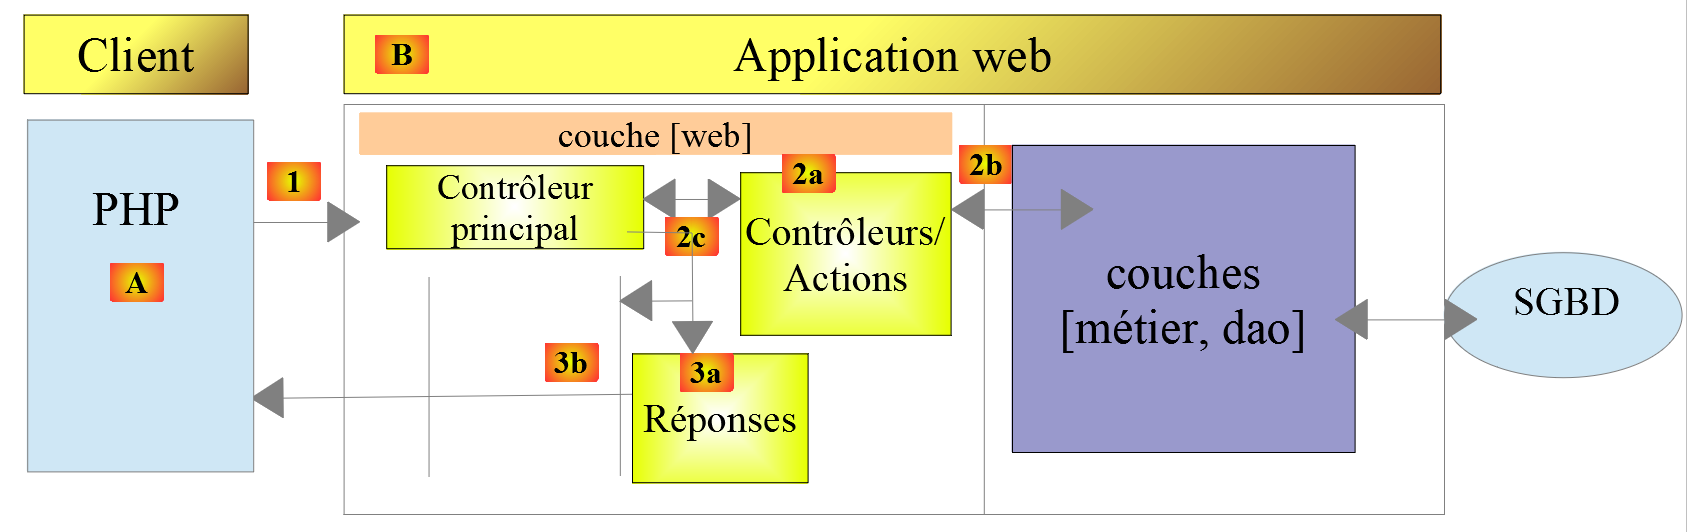
接下来我们将重点探讨 Web 服务 [B] 的 JSON 客户端 [A]。客户端 [A] 与 Web 服务 [B] 一样,具有分层结构:

该架构体现在以下代码组织中:
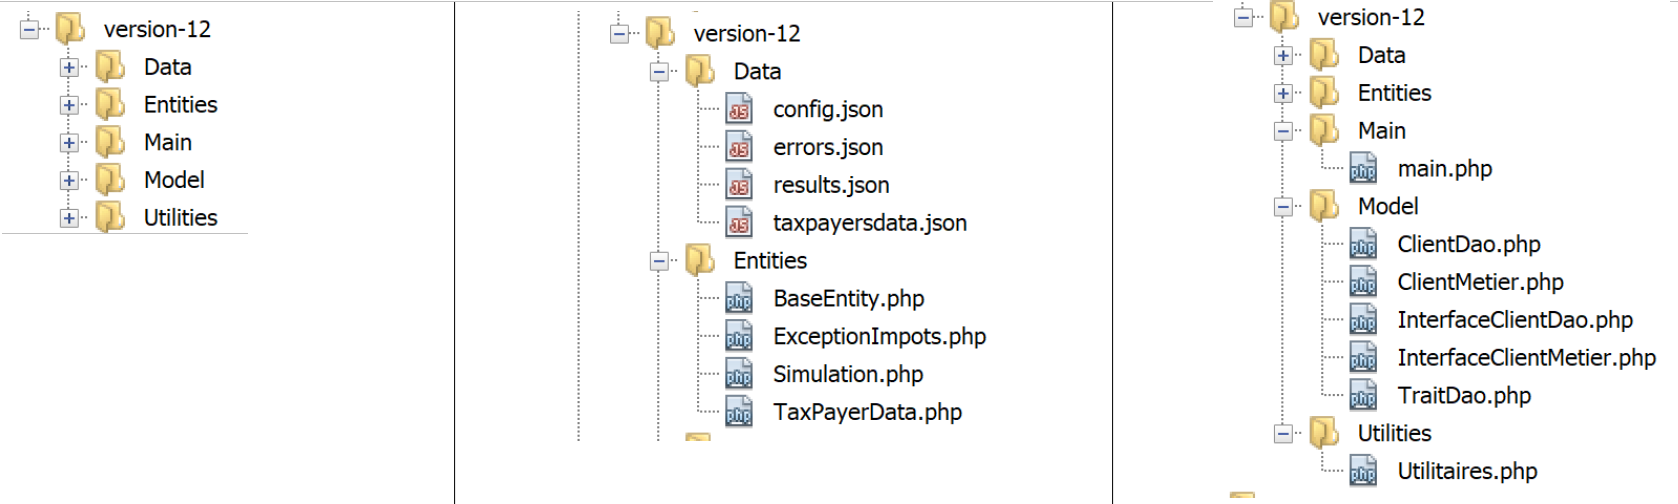
大多数类已经介绍并说明过了:
链接段落。 | |
链接段落。 | |
链接段落。 | |
段落链接。 | |
段落链接。 | |
段落链接。 |
23.14.2. [dao] 层

23.14.2.1. 接口
[dao]层的接口如下所示 [InterfaceClientDao.php]:
<?php

// namespace
namespace Application;

interface InterfaceClientDao {

  // reading taxpayer data
  public function getTaxPayersData(string $taxPayersFilename, string $errorsFilename): array;

  // calculating a taxpayer's taxes
  public function calculerImpot(string $marié, int $enfants, int $salaire): Simulation;

  // recording results
  public function saveResults(string $resultsFilename, array $simulations): void;

  // authentication
  public function authentifierUtilisateur(String $user, string $password): void;

  // list of simulations
  public function listerSimulations(): array;

  // delete a simulation
  public function supprimerSimulation(int $numéro): array;

  // start of session
  public function initSession(string $type = 'json'): void;

  // end of session
  public function finSession(): void;
}
注释
- 第 9 行:[getTaxPayersData] 方法允许您使用包含纳税人数据的 JSON 文件。该方法由 [TraitDao] 特质实现,该特质已在前文讨论过(参见链接段落);
- 第 15 行:[saveResults] 方法将多个税务计算的结果保存到 JSON 文件中。同样,该方法由已讨论过的 [TraitDao] 特质实现(参见链接段落);
- 第 12、18、21、27、30 行:针对 Web 服务接受的每个操作,都创建了一个相应的方法;
23.14.2.2. 实现
[InterfaceClientDao] 接口由以下 [ClientDao] 类实现:
<?php

namespace Application;

// dependencies
use Symfony\Component\HttpClient\HttpClient;
use Symfony\Component\HttpClient\Response\CurlResponse;

class ClientDao implements InterfaceClientDao {
  // using a Trait
  use TraitDao;
  // attributes
  private $urlServer;
  private $sessionCookie;
  private $verbose;

  // manufacturer
  public function __construct(string $urlServer, bool $verbose = TRUE) {
    $this->urlServer = $urlServer;
    $this->verbose = $verbose;
  }
…
}
评论
- 第 18–21 行:构造函数接收两个参数:
- JSON Web 服务的 URL [$urlServer];
- 一个布尔值 [$verbose],当设置为 TRUE 时,表示该类应在控制台上显示服务器的响应;
- 第 14 行:会话 Cookie。其作用已在客户端第 09 版中描述(链接段落);
- 第 11 行:该类使用了 [TraitDao] 特质,该特质实现了接口的两个方法:
- [getTaxPayersData(string $taxPayersFilename, string $errorsFilename): array];
- [function calculateTax(string $married, int $children, int $salary): Simulation];
23.14.2.2.1. 方法 [initSession]
[initSession] 方法的实现如下:
public function initSession(string $type = 'json'): void {
    // create a HTTP customer
    $httpClient = HttpClient::create();
    // make the request to the server without authentication
    $response = $httpClient->request('GET', $this->urlServer,
      ["query" => [
          "action" => "init-session",
          "type" => $type
        ],
        "verify_peer" => false
    ]);
    // the answer is retrieved
    $this->getResponse($response);
    // retrieve the session cookie
    $headers = $response->getHeaders();
    if (isset($headers["set-cookie"])) {
      // session cookie ?
      foreach ($headers["set-cookie"] as $cookie) {
        $match = [];
        $match = preg_match("/^PHPSESSID=(.+?);/", $cookie, $champs);
        if ($match) {
          $this->sessionCookie = "PHPSESSID=" . $champs[1];
        }
      }
    }
  }
由于 [init-session] 操作必须是向 Web 服务请求的第一个操作,因此 [initSession] 方法将是 [dao] 层中被调用的第一个方法。
注释
- 第 1 行:将所需的会话类型作为参数传递。如果未提供参数,将启动一个 JSON 会话;
- 第 5–11 行:向 Web 服务发出 GET 请求;
- 第 7–8 行:两个 GET 参数;
- 第 10 行:在安全通信(HTTPS)的情况下,不会验证 Web 服务发送的安全证书;
- 第 13 行:[getResponse] 方法用于获取服务器的响应,并将其作为数组返回。此处并未使用该方法的返回结果。如果 Web 服务响应的 HTTP 状态码不是 200 OK,[getResponse] 方法会抛出异常;
- 第 14–25 行:由于 [initSession] 方法是 [dao] 层中第一个被执行的方法,因此我们获取会话 Cookie,以便后续方法能将其发回 Web 服务。此代码在 09 版中已做过说明;
23.14.2.2.2. [getResponse] 方法
[getResponse] 方法负责处理 Web 服务响应:
private function getResponse(CurlResponse $response) {
    // the answer is retrieved
    $json = $response->getContent(false);
    // logs
    if ($this->verbose) {
      print "$json\n";
    }
    // retrieve response status
    $statusCode = $response->getStatusCode();
    // mistake?
    if ($statusCode !== 200) {
      // we have an error
      throw new ExceptionImpots($json);
    }
    // we give our answer
    $array = json_decode($json, true);
    return $array["réponse"];
  }
注释
- 第 1 行:该方法是私有的;
- 第 1 行:该方法的参数是类型为 [Symfony\Component\HttpClient\Response\CurlResponse] 的 Web 服务响应,即 Symfony 的响应类型,当 [HttpClient] 由 [CurlClient] 实现时,也就是由 [curl] 库实现时;
- 第 3 行:我们从服务器获取 JSON 响应。请注意,[false] 参数的作用是防止在服务器 HTTP 响应状态处于 [3xx, 4xx, 5xx] 范围内时,Symfony 抛出异常;
- 第 5–7 行:若处于 [$verbose] 模式,则在控制台显示服务器的响应;
- 第 9–14 行:如果服务器的 HTTP 响应状态码不是 200,则抛出异常,并将服务器的 JSON 响应作为错误消息;
- 第 16 行:将 JSON 字符串解码为数组;
- 第 17 行:有用信息位于 [$array["response"]] 中;
23.14.2.2.3. [authenticateUser] 方法
[authenticateUser] 方法如下:
public function authentifierUtilisateur(string $user, string $password): void {
    // create a HTTP customer
    $httpClient = HttpClient::create();
    // make a request to the server with authentication
    $response = $httpClient->request('POST', $this->urlServer,
      ["query" => [
          "action" => "authentifier-utilisateur"
        ],
        "body" => [
          "user" => $user,
          "password" => $password
        ],
        "verify_peer" => false,
        "headers" => ["Cookie" => $this->sessionCookie]
    ]);
    // the answer is retrieved
    $this->getResponse($response);
  }
注释
- 第 5 行:客户端的请求是 POST 请求;
- 第 6–8 行:URL 中的参数;
- 第 9–12 行:POST 参数;
- 第 14 行:会话 Cookie;
- 第 17 行:我们读取响应。我们知道,如果出现错误(HTTP 状态码非 200),[getResponse] 方法本身会抛出异常;
23.14.2.2.4. [calculateTax] 方法
public function calculerImpot(string $marié, int $enfants, int $salaire): Simulation {
    // create a HTTP customer
    $httpClient = HttpClient::create();
    // make the request to the server without authentication but with the session cookie
    $response = $httpClient->request('POST', $this->urlServer,
      ["query" => [
          "action" => "calculer-impot"],
        "body" => [
          "marié" => $marié,
          "enfants" => $enfants,
          "salaire" => $salaire
        ],
        "verify_peer" => false,
        "headers" => ["Cookie" => $this->sessionCookie]
    ]);
    // the answer is retrieved
    $array = $this->getResponse($response);
    return (new Simulation())->setFromArrayOfAttributes($array);
  }
评论
- 第 6–7 行:单个 URL 参数;
- 第 8–12 行:三个 POST 参数(第 5 行);
- 第 17 行:处理响应;
- 第 18 行:如果到达此处,说明 [getResponse] 方法未抛出异常。我们返回一个 [Simulation] 对象,该对象使用 [getResponse] 返回的数组进行初始化;
23.14.2.2.5. [listerSimulations] 方法
public function listerSimulations(): array {
    // create a HTTP customer
    $httpClient = HttpClient::create();
    // make the request to the server without authentication but with the session cookie
    $response = $httpClient->request('GET', $this->urlServer,
      ["query" => [
          "action" => "lister-simulations"
        ],
        "verify_peer" => false,
        "headers" => ["Cookie" => $this->sessionCookie]
    ]);
    // the answer is retrieved
    return $this->getSimulations($response);
  }
注释
- 第 5 行:GET 方法;
- 第 6–8 行:唯一的 GET 参数;
- 第 13 行:由私有方法 [getSimulations] 负责检索模拟数据;
23.14.2.2.6. [getSimulations] 方法
private function getSimulations(CurlResponse $response): array {
    // we retrieve the JSON response
    $array = $this->getResponse($response);
    // we have an array of associative objects
    // we'll turn it into an array of Simulation objects
    $simulations = [];
    foreach ($array as $simulation) {
      $simulations [] = (new Simulation())->setFromArrayOfAttributes($simulation);
    }
    // we render the Simulation object list
    return $simulations;
}
注释
- 第 3 行:我们从响应中获取数组。这是一个多维数组,其中的每个元素都具有 [Simulation] 对象的所有属性;
- 第 6 行:如果执行到这里,说明 [getResponse] 方法没有抛出异常;
- 第 6–9 行:我们使用响应来构建一个 [Simulation] 对象数组;
- 第 11 行:返回该数组;
23.14.2.2.7. [DeleteSimulation] 方法
public function supprimerSimulation(int $numéro): array {
    // create a HTTP customer
    $httpClient = HttpClient::create();
    // make the request to the server without authentication but with the session cookie
    $response = $httpClient->request('GET', $this->urlServer,
      ["query" => [
          "action" => "supprimer-simulation",
          "numéro" => $numéro
        ],
        "verify_peer" => false,
        "headers" => ["Cookie" => $this->sessionCookie]
    ]);
    // the answer is retrieved
    return $this->getSimulations($response);
  }
注释
- 第 5 行:发出一个 GET 请求;
- 第 6–9 行:两个 URL 参数;
- 第 14 行:删除操作完成后,服务器返回新的模拟数组。我们返回该数组;
23.14.2.2.8. [endSession] 方法
与 Web 服务的会话通常通过调用 [endSession] 方法结束:
public function finSession(): void {
    // create a HTTP customer
    $httpClient = HttpClient::create();
    // make the request to the server without authentication but with the session cookie
    $response = $httpClient->request('GET', $this->urlServer,
      ["query" => [
          "action" => "fin-session"
        ],
        "verify_peer" => false,
        "headers" => ["Cookie" => $this->sessionCookie]
    ]);
    // the answer is retrieved
    $this->getResponse($response);
  }
注释
- 第 5 行:我们发起一个 GET 请求;
- 第 6–8 行:唯一的 URL 参数;
- 第 13 行:读取响应。如果响应的 HTTP 状态码不是 200,则会抛出异常;
23.14.3. [业务]层

23.14.3.1. 接口
[业务]层的接口如下 [InterfaceClientMetier.php]:
<?php

// namespace
namespace Application;

interface InterfaceClientMetier {

  // calculating a taxpayer's taxes
  public function calculerImpot(string $marié, int $enfants, int $salaire): Simulation;

  // batch mode tax calculation
  public function executeBatchImpots(string $taxPayersFileName, string $resultsFilename, string $errorsFileName): void;

  // authentication
  public function authentifierUtilisateur(String $user, string $password): void;

  // list of simulations
  public function listerSimulations(): array;

  // recording results
  public function saveResults(string $resultsFilename, array $simulations): void;

  // delete a simulation
  public function supprimerSimulation(int $numéro): array;

  // start of session
  public function initSession(string $type = 'json'): void;

  // end of session
  public function finSession(): void;
}
注释
- 只有第 12 行中的 [executeBatchImports] 方法属于 [business] 层。其余所有方法都属于 [DAO] 层,由该层实现;
23.14.3.2. [ClientMetier] 类
实现 [business] 层的类如下:
<?php

namespace Application;

class ClientMetier implements InterfaceClientMetier {
  // attribute
  private $clientDao;

  // manufacturer
  public function __construct(InterfaceClientDao $clientDao) {
    $this->clientDao = $clientDao;
  }

  // tAX CALCULATION
  public function calculerImpot(string $marié, int $enfants, int $salaire): Simulation {
    return $this->clientDao->calculerImpot($marié, $enfants, $salaire);
  }

  // batch mode tax calculation
  public function executeBatchImpots(string $taxPayersFileName, string $resultsFileName, string $errorsFileName): void {
    // we let the exceptions coming from the [dao] layer flow upwards
    // retrieve taxpayer data
    $taxPayersData = $this->clientDao->getTaxPayersData($taxPayersFileName, $errorsFileName);
    // results table
    $simulations = [];
    // we exploit them
    foreach ($taxPayersData as $taxPayerData) {
      // tax calculation
      $simulations [] = $this->calculerImpot(
        $taxPayerData->getMarié(),
        $taxPayerData->getEnfants(),
        $taxPayerData->getSalaire());
    }
    // recording results
    if ($resultsFileName !== NULL) {
      $this->clientDao->saveResults($resultsFileName, $simulations);
    }
  }

  public function authentifierUtilisateur(String $user, string $password): void {
    $this->clientDao->authentifierUtilisateur($user, $password);
  }

  public function listerSimulations(): array {
    return $this->clientDao->listerSimulations();
  }

  public function saveResults(string $resultsFilename, array $simulations): void {
    $this->clientDao->saveResults($resultsFilename, $simulations);
  }

  public function supprimerSimulation(int $numéro): array {
    return $this->clientDao->supprimerSimulation($numéro);
  }

  public function finSession(): void {
    $this->clientDao->finSession();
  }

  public function initSession(string $type = 'json'): void {
    $this->clientDao->initSession($type);
  }

}
评论
- 第 10–12 行:[业务] 层在构建时需要引用 [DAO] 层;
- 第 20–38 行:只有 [executeBatchImports] 方法是 [业务] 层特有的。其他方法的实现将工作委托给 [DAO] 层中同名的方法;
- 第 23 行:我们调用 [DAO] 层,将纳税人数据以 [TaxPayerData] 对象数组的形式检索回来;
- 第 25 行:各种计算结果被累积到 [$simulations] 数组中;
- 第 27–33 行:我们计算 [$taxPayersData] 数组中每位纳税人的税款;
- 第 35–37 行:将 [$simulations] 数组中获得的结果保存到 JSON 文件中;
注:[业务]层几乎没有任何作用。我们可以考虑将其移除,并将所有内容整合到[DAO]层中。
23.14.4. 主脚本

主脚本由以下 [config.json] 文件配置:
{
    "taxPayersDataFileName": "Data/taxpayersdata.json",
    "resultsFileName": "Data/results.json",
    "errorsFileName": "Data/errors.json",
    "rootDirectory": "C:/Data/st-2019/dev/php7/poly/scripts-console/impots/version-12",
    "dependencies": [
        "/Entities/BaseEntity.php",
        "/Entities/TaxPayerData.php",
        "/Entities/Simulation.php",
        "/Entities/ExceptionImpots.php",
        "/Utilities/Utilitaires.php",
        "/Model/InterfaceClientDao.php",
        "/Model/TraitDao.php",
        "/Model/ClientDao.php",
        "/Model/InterfaceClientMetier.php",
        "/Model/ClientMetier.php"
    ],
    "absoluteDependencies": [
        "C:/myprograms/laragon-lite/www/vendor/autoload.php"
    ],
    "user": {
        "login": "admin",
        "passwd": "admin"
    },
    "urlServer": "https://localhost:443/php7/scripts-web/impots/version-12/main.php"
}
主脚本 [main.php] 如下:
<?php

// strict adherence to declared types of function parameters
declare(strict_types = 1);

// namespace
namespace Application;

// error handling by PHP
// ini_set("display_errors", "0");
//
// configuration file path
define("CONFIG_FILENAME", "../Data/config.json");

// we retrieve the configuration
$config = \json_decode(file_get_contents(CONFIG_FILENAME), true);

// include the necessary script dependencies
$rootDirectory = $config["rootDirectory"];
foreach ($config["dependencies"] as $dependency) {
  require "$rootDirectory/$dependency";
}
// absolute dependencies (third-party libraries)
foreach ($config["absoluteDependencies"] as $dependency) {
  require "$dependency";
}

// definition of constants
define("TAXPAYERSDATA_FILENAME", "$rootDirectory/{$config["taxPayersDataFileName"]}");
define("RESULTS_FILENAME", "$rootDirectory/{$config["resultsFileName"]}");
define("ERRORS_FILENAME", "$rootDirectory/{$config["errorsFileName"]}");
//
// symfony dependencies
use Symfony\Component\HttpClient\HttpClient;

// creation of the [dao] layer
$clientDao = new ClientDao($config["urlServer"]);
// creation of the [business] layer
$clientMetier = new ClientMetier($clientDao);

// tax calculation in batch mode
try {
  // session initialization
  $clientMetier->initSession('json');
  // authentication
  $clientMetier->authentifierUtilisateur($config["user"]["login"], $config["user"]["passwd"]);
  // tax calculation without saving results
  $clientMetier->executeBatchImpots(TAXPAYERSDATA_FILENAME, NULL, ERRORS_FILENAME);
  // list of simulations
  $clientMetier->listerSimulations();
  // deleting a simulation
  $simulations = $clientMetier->supprimerSimulation(1);
  // saving results
  $clientMetier->saveResults(RESULTS_FILENAME, $simulations);
  // end of session
  $clientMetier->finSession();
  // action without being authenticated - must crash
  $clientMetier->listerSimulations();
} catch (ExceptionImpots $ex) {
  // error is displayed
  print "Une erreur s'est produite : " . $ex->getMessage() . "\n";
}
// end
print "Terminé\n";
exit();
注释
- 第 12–16 行:处理配置文件 [config.json];
- 第 18–26 行:加载所有依赖项;
- 第 28–34 行:定义常量和别名;
- 第 36–39 行:构建 [dao] 和 [business] 层;
- 第 44 行:初始化 JSON 会话;
- 第 46 行:与服务器进行身份验证;
- 第 48 行:计算一系列纳税人的税款。结果不被保存(第 2 个参数设置为 NULL);
- 第 50 行:检索所有这些计算的结果;
- 第 52 行:删除模拟 #1(列表中的第二个);
- 第 54 行:保存剩余的模拟;
- 第 56 行:会话结束。这意味着会话 Cookie 已被删除;
- 第 58 行:我们请求模拟列表。由于会话 Cookie 已被删除,必须重新进行身份验证。因此,我们应收到一条异常提示,表明我们未通过身份验证;
[taxpayersdata.json] 文件内容如下:
[
    {
        "marié": "oui",
        "enfants": 2,
        "salaire": 55555
    },
    {
        "marié": "ouix",
        "enfants": "2x",
        "salaire": "55555x"
    },
    {
        "marié": "oui",
        "enfants": "2",
        "salaire": 50000
    },
    {
        "marié": "oui",
        "enfants": 3,
        "salaire": 50000
    },
    {
        "marié": "non",
        "enfants": 2,
        "salaire": 100000
    },
    {
        "marié": "non",
        "enfants": 3,
        "salaire": 100000
    },
    {
        "marié": "oui",
        "enfants": 3,
        "salaire": 100000
    },
    {
        "marié": "oui",
        "enfants": 5,
        "salaire": 100000
    },
    {
        "marié": "non",
        "enfants": 0,
        "salaire": 100000
    },
    {
        "marié": "oui",
        "enfants": 2,
        "salaire": 30000
    },
    {
        "marié": "non",
        "enfants": 0,
        "salaire": 200000
    },
    {
        "marié": "oui",
        "enfants": 3,
        "salaire": 20000
    }
]
共有12名纳税人,其中1名信息有误。因此总共有11个模拟案例。其中一个将被移除,剩下10个。
运行主脚本后,JSON文件[results.json]如下所示:
[
    {
        "marié": "oui",
        "enfants": "2",
        "salaire": "55555",
        "impôt": 2814,
        "surcôte": 0,
        "décôte": 0,
        "réduction": 0,
        "taux": 0.14
    },
    {
        "marié": "oui",
        "enfants": "3",
        "salaire": "50000",
        "impôt": 0,
        "surcôte": 0,
        "décôte": 720,
        "réduction": 0,
        "taux": 0.14
    },
    {
        "marié": "non",
        "enfants": "2",
        "salaire": "100000",
        "impôt": 19884,
        "surcôte": 4480,
        "décôte": 0,
        "réduction": 0,
        "taux": 0.41
    },
    {
        "marié": "non",
        "enfants": "3",
        "salaire": "100000",
        "impôt": 16782,
        "surcôte": 7176,
        "décôte": 0,
        "réduction": 0,
        "taux": 0.41
    },
    {
        "marié": "oui",
        "enfants": "3",
        "salaire": "100000",
        "impôt": 9200,
        "surcôte": 2180,
        "décôte": 0,
        "réduction": 0,
        "taux": 0.3
    },
    {
        "marié": "oui",
        "enfants": "5",
        "salaire": "100000",
        "impôt": 4230,
        "surcôte": 0,
        "décôte": 0,
        "réduction": 0,
        "taux": 0.14
    },
    {
        "marié": "non",
        "enfants": "0",
        "salaire": "100000",
        "impôt": 22986,
        "surcôte": 0,
        "décôte": 0,
        "réduction": 0,
        "taux": 0.41
    },
    {
        "marié": "oui",
        "enfants": "2",
        "salaire": "30000",
        "impôt": 0,
        "surcôte": 0,
        "décôte": 0,
        "réduction": 0,
        "taux": 0
    },
    {
        "marié": "non",
        "enfants": "0",
        "salaire": "200000",
        "impôt": 64210,
        "surcôte": 7498,
        "décôte": 0,
        "réduction": 0,
        "taux": 0.45
    },
    {
        "marié": "oui",
        "enfants": "3",
        "salaire": "20000",
        "impôt": 0,
        "surcôte": 0,
        "décôte": 0,
        "réduction": 0,
        "taux": 0
    }
]
确实有 10 次模拟。
JSON文件 [errors.json] 的内容如下:
{
    "numéro": 1,
    "erreurs": [
        {
            "marié": "ouix"
        },
        {
            "enfants": "2x"
        },
        {
            "salaire": "55555x"
        }
    ]
}
控制台输出如下(在详细模式下,服务器的 JSON 响应会显示在控制台上):
{"action":"init-session","état":700,"réponse":"session démarrée avec type [json]"}
{"action":"authentifier-utilisateur","état":200,"réponse":"Authentification réussie [admin, admin]"}
{"action":"calculer-impot","état":300,"réponse":{"marié":"oui","enfants":"2","salaire":"55555","impôt":2814,"surcôte":0,"décôte":0,"réduction":0,"taux":0.14}}
{"action":"calculer-impot","état":300,"réponse":{"marié":"oui","enfants":"2","salaire":"50000","impôt":1384,"surcôte":0,"décôte":384,"réduction":347,"taux":0.14}}
{"action":"calculer-impot","état":300,"réponse":{"marié":"oui","enfants":"3","salaire":"50000","impôt":0,"surcôte":0,"décôte":720,"réduction":0,"taux":0.14}}
{"action":"calculer-impot","état":300,"réponse":{"marié":"non","enfants":"2","salaire":"100000","impôt":19884,"surcôte":4480,"décôte":0,"réduction":0,"taux":0.41}}
{"action":"calculer-impot","état":300,"réponse":{"marié":"non","enfants":"3","salaire":"100000","impôt":16782,"surcôte":7176,"décôte":0,"réduction":0,"taux":0.41}}
{"action":"calculer-impot","état":300,"réponse":{"marié":"oui","enfants":"3","salaire":"100000","impôt":9200,"surcôte":2180,"décôte":0,"réduction":0,"taux":0.3}}
{"action":"calculer-impot","état":300,"réponse":{"marié":"oui","enfants":"5","salaire":"100000","impôt":4230,"surcôte":0,"décôte":0,"réduction":0,"taux":0.14}}
{"action":"calculer-impot","état":300,"réponse":{"marié":"non","enfants":"0","salaire":"100000","impôt":22986,"surcôte":0,"décôte":0,"réduction":0,"taux":0.41}}
{"action":"calculer-impot","état":300,"réponse":{"marié":"oui","enfants":"2","salaire":"30000","impôt":0,"surcôte":0,"décôte":0,"réduction":0,"taux":0}}
{"action":"calculer-impot","état":300,"réponse":{"marié":"non","enfants":"0","salaire":"200000","impôt":64210,"surcôte":7498,"décôte":0,"réduction":0,"taux":0.45}}
{"action":"calculer-impot","état":300,"réponse":{"marié":"oui","enfants":"3","salaire":"20000","impôt":0,"surcôte":0,"décôte":0,"réduction":0,"taux":0}}
{"action":"lister-simulations","état":500,"réponse":[{"marié":"oui","enfants":"2","salaire":"55555","impôt":2814,"surcôte":0,"décôte":0,"réduction":0,"taux":0.14,"arrayOfAttributes":null},{"marié":"oui","enfants":"2","salaire":"50000","impôt":1384,"surcôte":0,"décôte":384,"réduction":347,"taux":0.14,"arrayOfAttributes":null},{"marié":"oui","enfants":"3","salaire":"50000","impôt":0,"surcôte":0,"décôte":720,"réduction":0,"taux":0.14,"arrayOfAttributes":null},{"marié":"non","enfants":"2","salaire":"100000","impôt":19884,"surcôte":4480,"décôte":0,"réduction":0,"taux":0.41,"arrayOfAttributes":null},{"marié":"non","enfants":"3","salaire":"100000","impôt":16782,"surcôte":7176,"décôte":0,"réduction":0,"taux":0.41,"arrayOfAttributes":null},{"marié":"oui","enfants":"3","salaire":"100000","impôt":9200,"surcôte":2180,"décôte":0,"réduction":0,"taux":0.3,"arrayOfAttributes":null},{"marié":"oui","enfants":"5","salaire":"100000","impôt":4230,"surcôte":0,"décôte":0,"réduction":0,"taux":0.14,"arrayOfAttributes":null},{"marié":"non","enfants":"0","salaire":"100000","impôt":22986,"surcôte":0,"décôte":0,"réduction":0,"taux":0.41,"arrayOfAttributes":null},{"marié":"oui","enfants":"2","salaire":"30000","impôt":0,"surcôte":0,"décôte":0,"réduction":0,"taux":0,"arrayOfAttributes":null},{"marié":"non","enfants":"0","salaire":"200000","impôt":64210,"surcôte":7498,"décôte":0,"réduction":0,"taux":0.45,"arrayOfAttributes":null},{"marié":"oui","enfants":"3","salaire":"20000","impôt":0,"surcôte":0,"décôte":0,"réduction":0,"taux":0,"arrayOfAttributes":null}]}
{"action":"supprimer-simulation","état":600,"réponse":[{"marié":"oui","enfants":"2","salaire":"55555","impôt":2814,"surcôte":0,"décôte":0,"réduction":0,"taux":0.14,"arrayOfAttributes":null},{"marié":"oui","enfants":"3","salaire":"50000","impôt":0,"surcôte":0,"décôte":720,"réduction":0,"taux":0.14,"arrayOfAttributes":null},{"marié":"non","enfants":"2","salaire":"100000","impôt":19884,"surcôte":4480,"décôte":0,"réduction":0,"taux":0.41,"arrayOfAttributes":null},{"marié":"non","enfants":"3","salaire":"100000","impôt":16782,"surcôte":7176,"décôte":0,"réduction":0,"taux":0.41,"arrayOfAttributes":null},{"marié":"oui","enfants":"3","salaire":"100000","impôt":9200,"surcôte":2180,"décôte":0,"réduction":0,"taux":0.3,"arrayOfAttributes":null},{"marié":"oui","enfants":"5","salaire":"100000","impôt":4230,"surcôte":0,"décôte":0,"réduction":0,"taux":0.14,"arrayOfAttributes":null},{"marié":"non","enfants":"0","salaire":"100000","impôt":22986,"surcôte":0,"décôte":0,"réduction":0,"taux":0.41,"arrayOfAttributes":null},{"marié":"oui","enfants":"2","salaire":"30000","impôt":0,"surcôte":0,"décôte":0,"réduction":0,"taux":0,"arrayOfAttributes":null},{"marié":"non","enfants":"0","salaire":"200000","impôt":64210,"surcôte":7498,"décôte":0,"réduction":0,"taux":0.45,"arrayOfAttributes":null},{"marié":"oui","enfants":"3","salaire":"20000","impôt":0,"surcôte":0,"décôte":0,"réduction":0,"taux":0,"arrayOfAttributes":null}]}
{"action":"fin-session","état":400,"réponse":"session supprimée"}
{"action":"lister-simulations","état":103,"réponse":["pas de session en cours. Commencer par action [init-session]"]}
Une erreur s'est produite : {"action":"lister-simulations","état":103,"réponse":["pas de session en cours. Commencer par action [init-session]"]}
Terminé
23.14.5. 测试 [Codeception]
与之前的客户端一样,版本 12 的客户端可以使用 [Codeception] 进行测试:
客户端 [业务] 层的测试类代码与之前客户端的测试类类似:
<?php

// strict adherence to declared types of function parameters
declare (strict_types=1);

// namespace
namespace Application;

// definition of constants
define("ROOT", "C:/Data/st-2019/dev/php7/poly/scripts-console/impots/version-12");
// configuration file path
define("CONFIG_FILENAME", ROOT . "/Data/config.json");

// we retrieve the configuration
$config = \json_decode(\file_get_contents(CONFIG_FILENAME), true);

// include the necessary script dependencies
$rootDirectory = $config["rootDirectory"];
foreach ($config["dependencies"] as $dependency) {
  require "$rootDirectory$dependency";
}
// absolute dependencies (third-party libraries)
foreach ($config["absoluteDependencies"] as $dependency) {
  require "$dependency";
}
// symfony dependencies
use Symfony\Component\HttpClient\HttpClient;

// test class
class ClientDaoTest extends \Codeception\Test\Unit {
  // dao layer
  private $clientDao;

  public function __construct() {
    parent::__construct();
    // we retrieve the configuration
    $config = \json_decode(\file_get_contents(CONFIG_FILENAME), true);
    // creation of the [dao] layer
    $clientDao = new ClientDao($config["urlServer"]);
    // creation of the [business] layer
    $this->métier = new ClientMetier($clientDao);
    // session initialization
    $this->métier->initSession("json");
    // authentication
    $this->métier->authentifierUtilisateur("admin", "admin");
  }

  // tests
  public function test1() {
    $simulation = $this->métier->calculerImpot("oui", 2, 55555);
    $this->assertEqualsWithDelta(2815, $simulation->getImpôt(), 1);
    $this->assertEqualsWithDelta(0, $simulation->getSurcôte(), 1);
    $this->assertEqualsWithDelta(0, $simulation->getDécôte(), 1);
    $this->assertEqualsWithDelta(0, $simulation->getRéduction(), 1);
    $this->assertEquals(0.14, $simulation->getTaux());
  }

  public function test2() {
    ….
  }

  …
  public function test11() {
    …
  }

}
评论
- 第34–46行:请注意,测试类的构造函数会在每次测试执行前被调用;
- 第 38–41 行:构建 [dao] 和 [business] 层;
- 第 42–45 行:测试方法 [test1…, test11] 用于测试 [calculateTax] 方法。为此,必须先初始化一个 JSON 会话并完成身份验证;
测试结果如下:
还应执行许多其他测试:
- 测试 [dao] 层的各种方法;
- 测试Web服务器返回的状态码。这些状态码至关重要,因为其值决定了应显示哪个HTML页面;