14. The [SimuPaie] – version 10 application – a Flex client of a ASP.NET web service
We now present a Flex client for the ASP.NET web service from version 5. The IDE used is Flex Builder 3. A demo version of this product is available for download at URL [https://www.adobe.com/cfusion/tdrc/index.cfm?loc=fr_fr&product=flex]. Flex Builder 3 is an Eclipse-based application. Additionally, to run the Flex client, we use an Apache web server from the Wamp tool. Any Apache server will work. The browser displaying the Flex client must have at least Flash Player 9 installed.
Flex applications are unique in that they run within the browser’s Flash Player plugin. In this respect, they are similar to Ajax applications, which embed scripts in the pages sent to the browser that are then executed within the browser. A Flex application is not a web application in the usual sense: it is a client application for services delivered by web servers. In this respect, it is analogous to a desktop application that acts as a client for these same services. It differs, however, in one respect: it is initially downloaded from a web server into a browser equipped with the Flash Player plugin capable of running it.
Like a desktop application, a Flex application consists primarily of two components:
- a presentation layer: the views displayed in the browser. These views have the richness of desktop application windows. A view is described using a markup language called MXML.
- a code section that primarily handles events triggered by user actions on the view. This code can be written in MXML or in an object-oriented language called ActionScript. There are two types of events to distinguish:
- events that require communication with the web server: populating a list with data provided by a web application, sending form data to the server, etc. Flex provides a number of methods for communicating with the server in a way that is transparent to the developer. These methods are asynchronous by default: the user can continue to interact with the view while the request is being sent to the server.
- events that modify the displayed view without exchanging data with the server, such as dragging an item from a tree and dropping it into a list. This type of event is handled entirely locally within the browser.
A Flex application is often executed as follows:
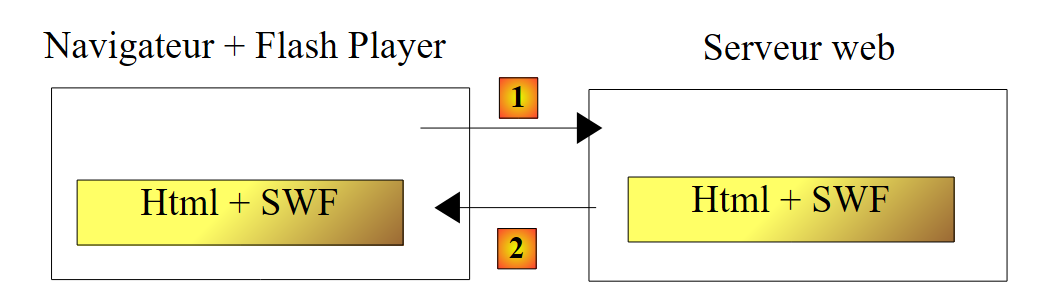 |
- in [1], a HTML page is requested
- in [2], it is sent. It includes a binary file SWF (ShockWave Flash) containing the entire Flex application: all views and their event-handling code. This file will be executed by the browser’s Flash Player plugin.
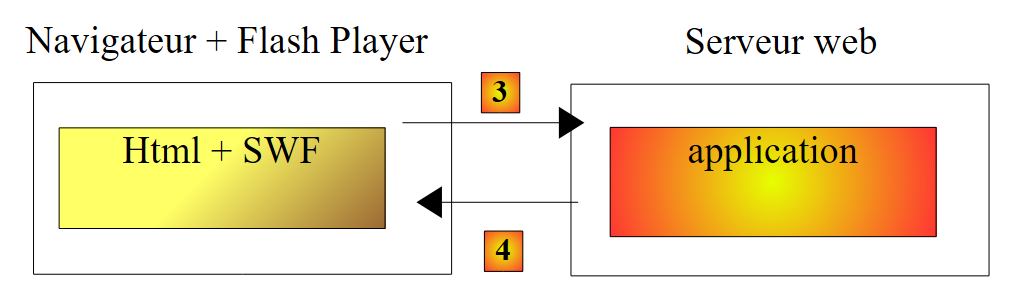 |
- The Flex client runs locally in the browser except when it needs external data. In that case, it requests it from the server [3]. It receives it in [4] in various formats: XML or binary. The application queried on the web server can be written in any language. Only the response format matters.
We have described the execution architecture of a Flex application so that the reader can understand the difference between it and that of a traditional web application, where pages do not embed code (Javascript, Flex, Silverlight, ...) that the browser would execute. In the latter, the browser is passive: it simply displays HTML pages built on the web server that sends them to it.
14.1. Client/server application architecture
The client/server architecture implemented is similar to that of versions 6 and 8:
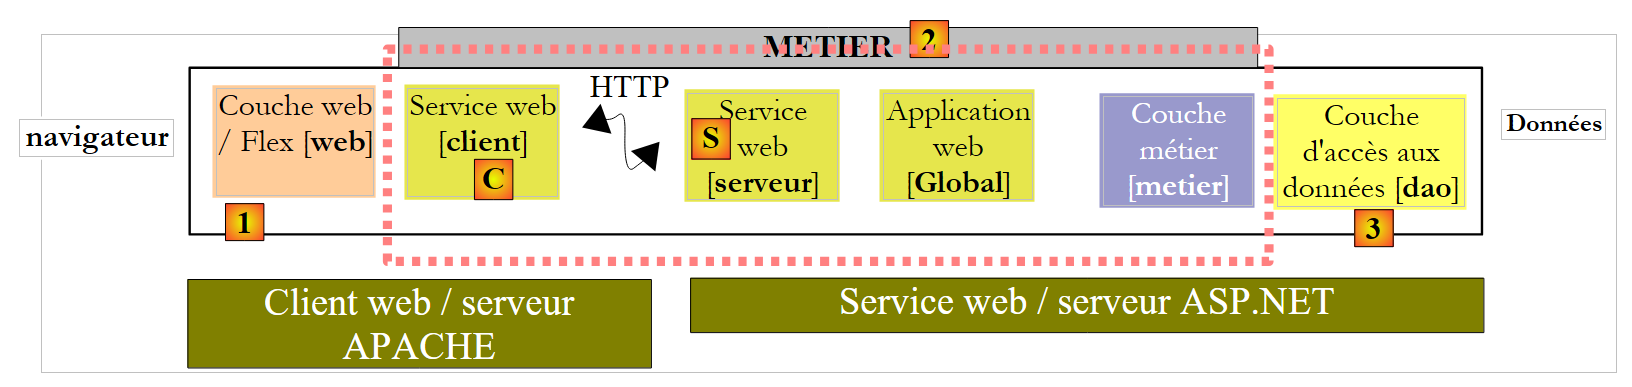 |
In [1], the ASP.NET web layer is replaced by a Flex web layer written in MXML and ActionScript. The [C] client will be generated by the IDE Flex Builder. It should be noted here that this architecture includes two web servers not shown:
- a ASP.NET web server that runs the [S] web service
- a web server APACHE that runs the web client [1]
14.2. The client’s Flex 3 project
We build the Flex client using Flex Builder 3:
 |
- In Flex Builder 3, we create a new project in [1]
- we give it a name in [2] and specify in [3] which folder to generate it in
 |
- In [4], name the main application (the one that will be executed)
- In [5], the project once generated
- In [6], the main application file MXML
- A file MXML contains a view and its event handling code. The tab [Source] [7] provides access to the file MXML. It contains <mx> tags describing the view as well as ActionScript code.
- The view can be constructed graphically using the [Design] [8] tab. The MXML tags describing the view are then automatically generated in the [Source] tab. The reverse is also true: MXML tags added directly in the [Source] tab are reflected graphically in the [Design] tab.
14.3. View No. 1
We will gradually build a web interface similar to that of version 1 (see paragraph 4). First, we will build the following interface:
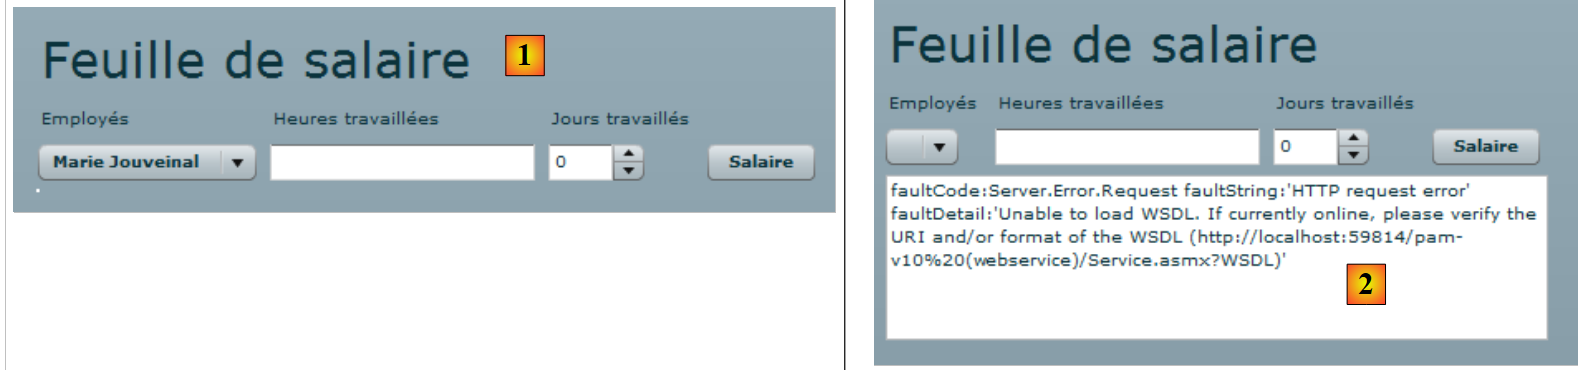 |
- in [1], the view when the connection to the web service was successful. The employee dropdown is then populated.
- In [2], the view when the connection to the web service failed. An error message is then displayed.
The client’s main file, [main.xml], is as follows:
<?xml version="1.0" encoding="utf-8"?>
<mx:Application xmlns:mx="http://www.adobe.com/2006/mxml" layout="vertical"
    creationComplete="init()">
    <mx:VBox width="100%">
        <mx:Label text="Feuille de salaire" fontSize="30"/>
        <mx:HBox>
            <mx:VBox>
                <mx:Label text="Employés"/>
                <mx:ComboBox id="cmbEmployes" dataProvider="{employes}" labelFunction="displayEmploye"/>
            </mx:VBox>
            <mx:VBox>
                <mx:Label text="Heures travaillées"/>
                <mx:TextInput id="txtHeuresTravaillees"/>
            </mx:VBox>
            <mx:VBox>
                <mx:Label text="Jours travaillés"/>
                <mx:NumericStepper id="joursTravailles" minimum="0" maximum="31" stepSize="1"/>
            </mx:VBox>
            <mx:VBox>
                <mx:Label text=""/>
                <mx:Button id="btnSalaire" label="Salaire"/>
            </mx:VBox>
        </mx:HBox>
        <mx:TextArea id="msg" minWidth="400" minHeight="100" editable="false" visible="true" enabled="true" horizontalScrollPolicy="auto" verticalScrollPolicy="auto" x="0" y="0" maxHeight="100" maxWidth="400"/>
    </mx:VBox>

    <mx:WebService ...>
        ...
    </mx:WebService>

    <mx:Script>
        <![CDATA[
...
            // data
            [Bindable]
            private var employes : ArrayCollection;

            private function init():void{
...
            }
        ]]>
    </mx:Script>
</mx:Application>
In this code, several elements should be distinguished:
- the application definition (lines 2–3)
- the description of its view (lines 4–25)
- the event handlers in the ActionScript language within the <mx:Script> tag (lines 31–42)
- the definition of the remote web service (lines 27–29)
Let’s start by commenting on the definition of the application itself and the description of its view:
- lines 2-3: define:
- the layout of the components within the view container. The layout="vertical" attribute indicates that the components will be arranged one below the other.
- the method to be executed when the view has been instantiated, c.a.d. the moment when all its components have been instantiated. The attribute creationComplete="init();" indicates that the init method on line 38 must be executed. creationComplete is one of the events that the Application class can emit.
- Lines 4–25 define the view components
- Lines 4–25: a vertical container: the components will be placed one below the other
- line 5: defines a text
- lines 6–23: a horizontal container: components will be placed horizontally within it
- Lines 7–10: a vertical container that will hold text and a drop-down list
- line 8: the text
- line 9: the drop-down list in which the list of employees will be placed. The tag dataProvider="{employees}" specifies the data source that should populate the list. Here, the list will be populated with the `employes` object defined on line 36. To be able to write `dataProvider="{employes}"`, the `employes` field must have the `[Bindable]` attribute (line 35). This attribute allows a ActionScript variable to be referenced outside the <mx:Script> tag. The employees field is of type ArrayCollection, a ActionScript type that allows for storing lists of objects, in this case a list of objects of type Employee.
- Lines 11–14: a vertical container that will hold text and an input field
- Line 12: the text
- Line 13: the input field for hours worked.
- lines 15-18: a vertical container that will hold text and a counter
- line 16: the text
- line 17: the counter for entering days worked
- Lines 19–22: a vertical container that will hold text and a button that will trigger the calculation of the salary for the person selected in the dropdown.
- Line 20: the text
- line 21: the button.
- Line 23: End of the horizontal container started on line 6
- Line 24: A text box in a component of type TextArea. It will display error messages.
- Line 25: End of the vertical container started on line 4
Lines 4–25 generate the following view in the [Design] tab:
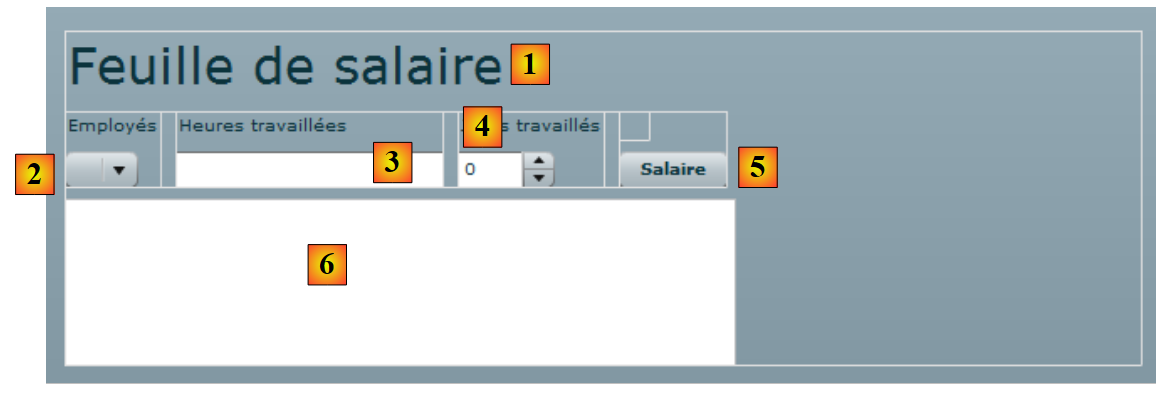 |
- [1]: was generated by the Label component on line 5
- [2]: was generated by the ComboBox component on line 9
- [3]: was generated by the TextInput component in row 13
- [4]: was generated by the NumericStepper component on line 17
- [5]: was generated by the Button component on line 21
- [6]: was generated by the TextArea component on line 24
Let’s now examine the declaration of the remote web service:
<mx:WebService id="pam"
        wsdl="http://localhost:1077/Service1.asmx?WSDL"
        fault="wsFault(event);"
        showBusyCursor="true">
        <mx:operation
            name="GetAllIdentitesEmployes"
            result="loadEmployesCompleted(event)"
            fault="loadEmployesFault(event);">
            <mx:request/>
        </mx:operation>
    </mx:WebService>
- line 1: the web service is a PAM identifier component (attribute id)
- line 2: the URI from the WSDL file of the web service (see section 9.2)
- line 3: the method to execute in case of an error during communication with the web service: the wsFault method.
- line 4: requests that an indicator be displayed to show the user that an exchange with the web service is in progress.
- Lines 5–10: one of the operations offered by the remote web service. Here, the method GetAllIdentitesEmployes.
- Line 7: The method to execute when the call to this method completes successfully, c.a.d. This occurs when the web service successfully returns the list of employees
- Line 8: The method to execute when the call to this method ends with an error.
- Line 9: The parameters for the GetAllIdentitesEmployes operation. We know that this method does not expect any parameters. Therefore, we leave the <mx:request> tag empty.
Let’s now examine the ActionScript code associated with the web service:
<mx:Script>
        <![CDATA[
            import mx.rpc.events.FaultEvent;
            import mx.collections.ArrayCollection;
            import mx.rpc.events.ResultEvent;

            // data
            [Bindable]
            private var employes : ArrayCollection;

            private function init():void{
                // note the coordinates of the message area
                msgHeight=msg.height;
                msgWidth=msg.width;
                // hide the message area
                hideMsg();
                // request to the remote web service for a simplified list of employees
                pam.GetAllIdentitesEmployes.send();
            }

            private function wsFault(event:Event):void{
                    // we report the error
                    msg.text="Service distant indisponible";
                    showMsg();
            }

            private function loadEmployesCompleted(event:ResultEvent):void{
                // employee combo filling
                employes=event.result as ArrayCollection;
            }

            private function displayEmploye(employe:Object):String{
                // employee identity
                return employe.Prenom + " " + employe.Nom;
            }

            private function loadEmployesFault(event:FaultEvent):void{
                // error msg display
                msg.text=event.fault.message;
                // form
                showMsg();
            }

    // block management
        private var msgWidth:int;
        private var msgHeight:int;

        private function hideMsg():void{
            msg.height=0;
            msg.width=0;
        }

        private function showMsg():void{
            msg.height=msgHeight;
            msg.width=msgWidth;
        }


        ]]>
    </mx:Script>
- line 11: the init method is executed when the application starts because we wrote:
<mx:Application xmlns:mx="http://www.adobe.com/2006/mxml" layout="vertical"
    creationComplete="init()">
- lines 13-14: we store the height and width of the message area. We use two methods, hideMsg (lines 48–51) and showMsg (lines 53–56), to hide or show the message area depending on whether an error occurred. The method hideMsg hides the message area by setting its height and width to 0. The method showMsg displays the message area by restoring the height and width stored in the init method.
- Line 16: The message area is hidden. Initially, there is no error.
- Line 18: The method GetAllIdentitesEmploye (line 6 of the web service) of the pam web service (line 1 of the web service) is called. The call is asynchronous. Line 7 of the web service indicates that the method loadEmployesCompleted will be executed if this asynchronous call completes successfully. Line 8 of the web service indicates that the loadEmployesFault method will be executed if this asynchronous call fails.
- Line 27: The loadEmployesCompleted method, which is executed if the web service call on line 18 completes successfully.
- Line 29: We know that the web service returns a response with the code XML. It’s helpful to refer back to that response to understand the code ActionScript:
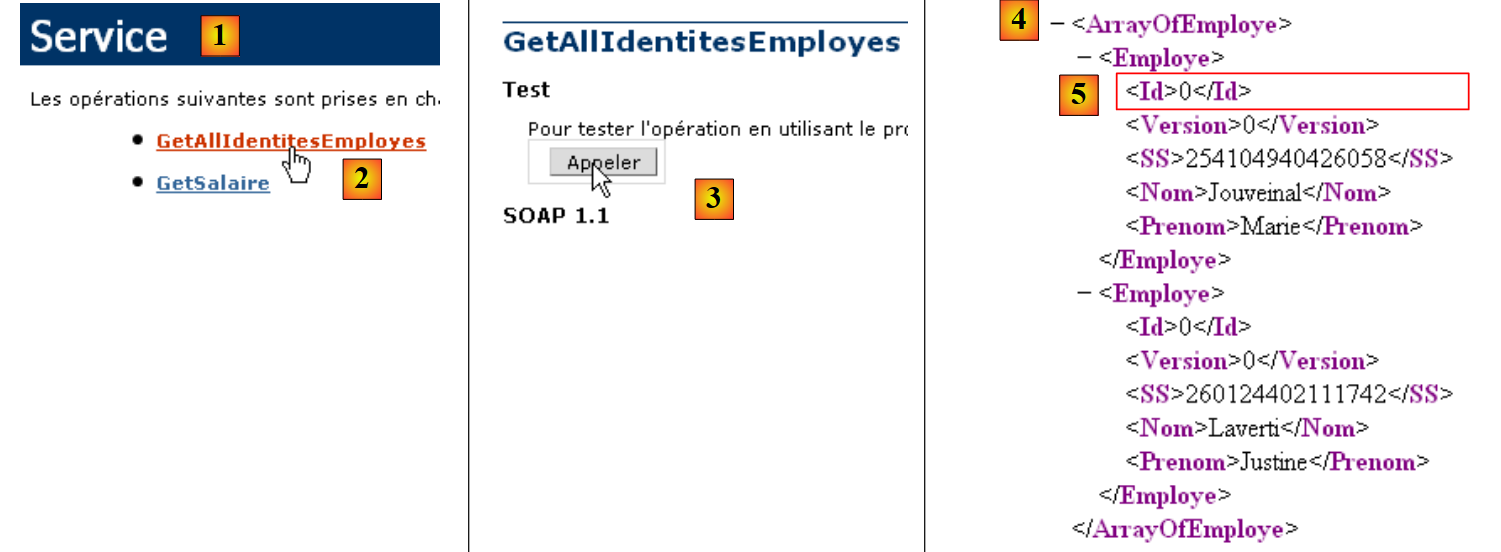 |
- in [1], the web service page [Service.asmx]
- in [2], the link to the test page for method [GetAllIdentitesEmployes]
- in [3], the test is performed. No parameters are expected.
- in [4]: the response XML contains an array of employees. For each of them, there are five pieces of information encapsulated in the tags <Id>, <Version>, <SS>, <Last Name>, <First Name>. If the response XML is placed in an employees array of type ArrayCollection:
- employes.getItemAt(i): is element number i of the array
- employes.getItemAt(i).SS: is this employee’s social security number.
- employes.getItemAt(i).Name: is the name of this employee
- ...
Let’s return to the code ActionScript:
- line 29: event.result represents the web service's response XML. The method GetAllIdentitesEmployes returns an array of employees. event.result represents this array of employees. It is placed in a variable of type ArrayCollection, a type that generally represents a collection of objects. This variable, named `employees`, is declared on line 9. Recall that this variable is the data source for the employees combo box:
<mx:ComboBox id="cmbEmployes" dataProvider="{employes}" labelFunction="displayEmploye"/>
For each employee in its data source, the combo box will call the displayEmploye method (labelFunction attribute) to display the employee. Lines 32–34 show that this method displays the employee’s first and last names.
- Line 37: The loadEmployesFault method, which is executed if the web service call on line 18 fails. event.fault.message is the error message returned by the web service.
- Line 39: This error message is placed in the message field
- Line 41: The message box is displayed.
When the application was built, its executable code is located in the [bin-debug] folder of the Flex project:
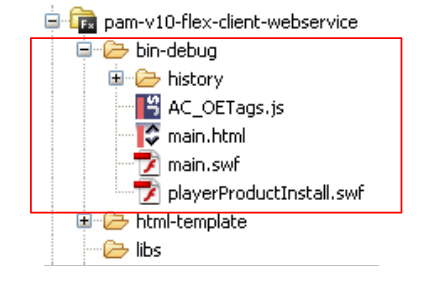 |
Above,
- the file [main.html] represents the file HTML that the browser will request from the web server to obtain the Flex client
- the file [main.swf] is the Flex client binary that will be embedded in the HTML page sent to the browser and then executed by the browser’s Flash Player plugin.
We are ready to run the Flex client. First, we need to set up the runtime environment it requires. Let’s return to the client/server architecture we tested:
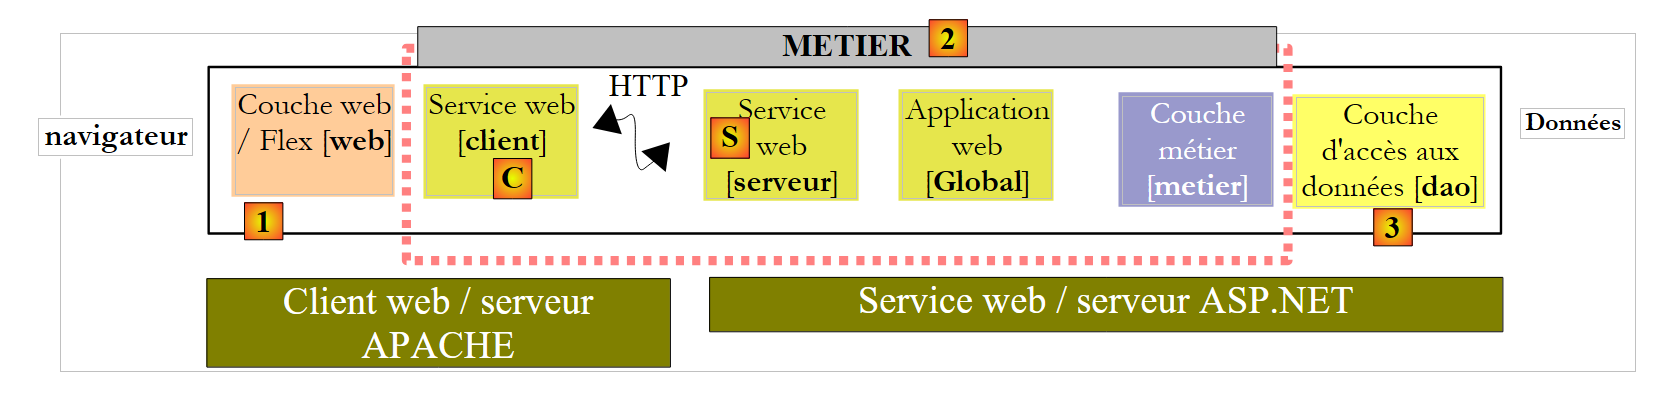 |
Server side:
- Start the ASP.NET and [S] web services
Client side:
- Start the Apache server that will serve the Flex application.
Here we are using the Wamp tool. With this tool, we can associate an alias with the [bin-debug] folder of the Flex project.
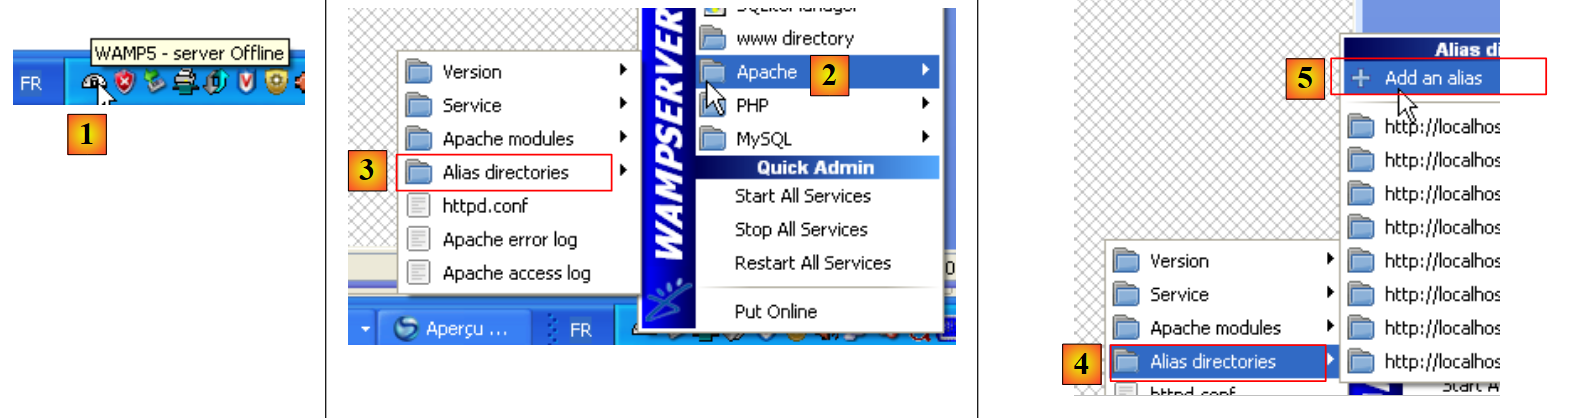 |
- The Wamp icon is at the bottom of the screen
- Left-click on the Wamp icon, select Apache option / Alias Directories [2]
- Select option [5]: Add an alias
 |
- in [6], give an alias (any name) to the web application that will be executed
- In [7], specify the root of the web application that will use this alias: this is the [bin-debug] folder of the Flex project we just built.
Let’s review the structure of the [bin-debug] folder of the Flex project:
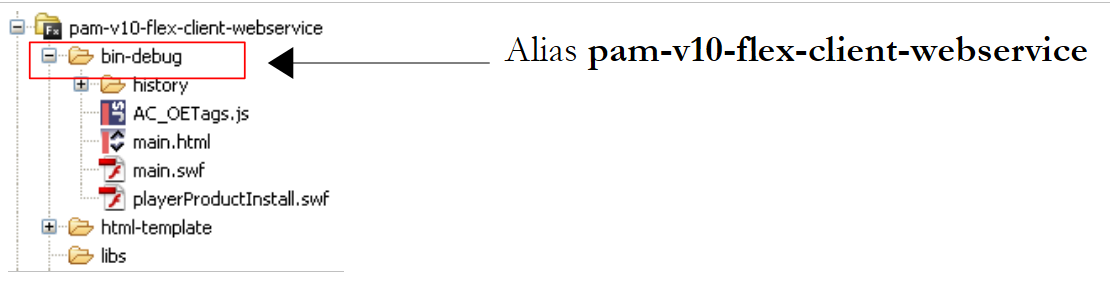 |
The file [main.html] is the HTML file of the Flex application. Thanks to the alias we just created on the [bin-debug] folder, this file will be accessed via URL [http://localhost/pam-v10-flex-client-webservice/main.html]. We open this file in a browser with the Flash Player plugin version 9 or higher:
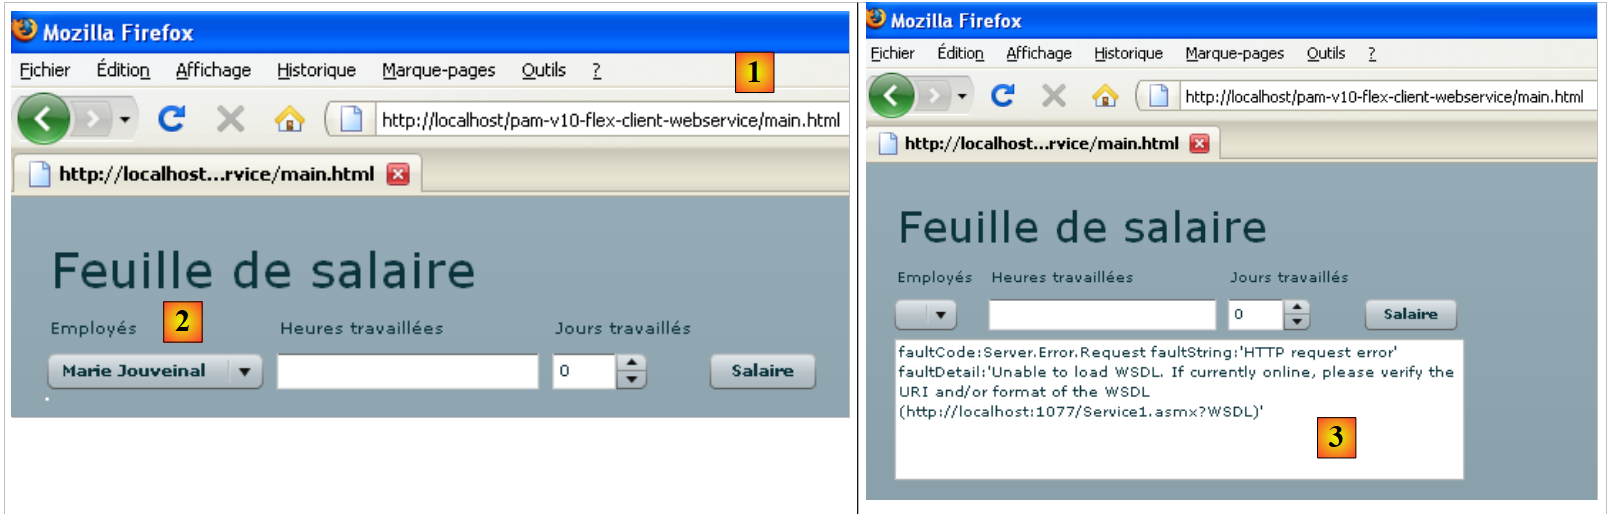 |
- in [1], the URL from the Flex application
- in [2], the employee dropdown when everything is working properly
- in [3], the result obtained when the web service is stopped
You might be curious to view the source code of the received HTML page:
- The body of the page begins on line 25. It does not contain the standard HTML but an object (line 28) of type "application/x-shockwave-flash" (line 41). This is the [main.swf] file (line 31) that can be found in the [bin-debug] folder of the Flex project. It is a large file: approximately 600 KB for this simple example.
14.4. View #2
We will add a new container of type VBox to the current view:
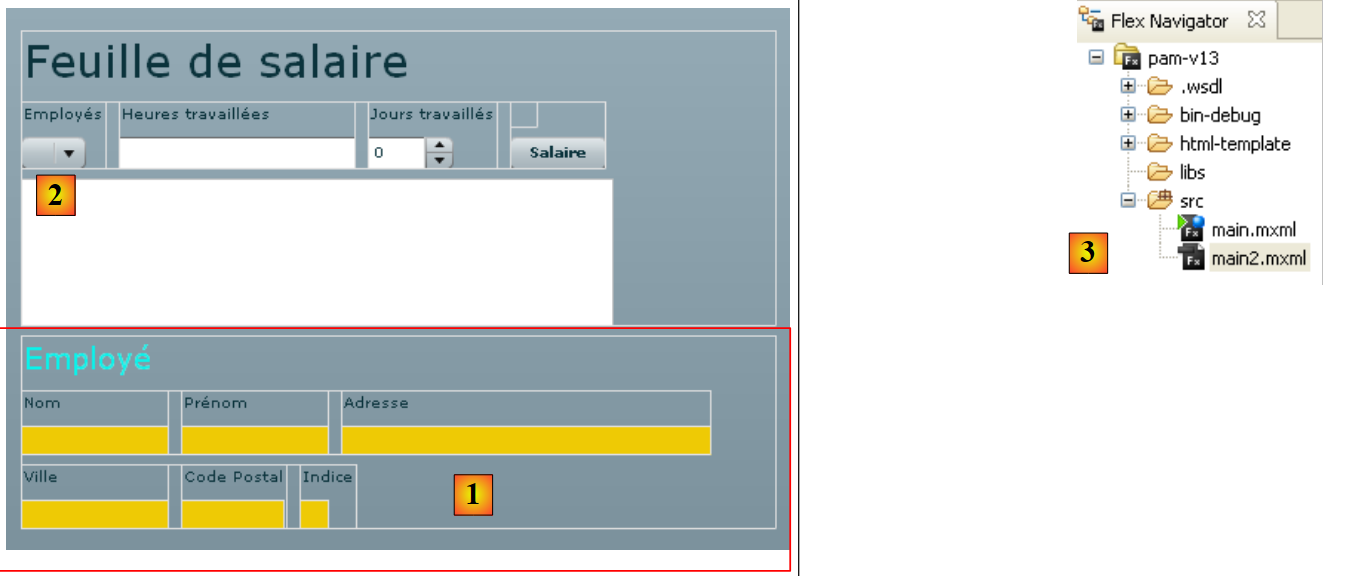 |
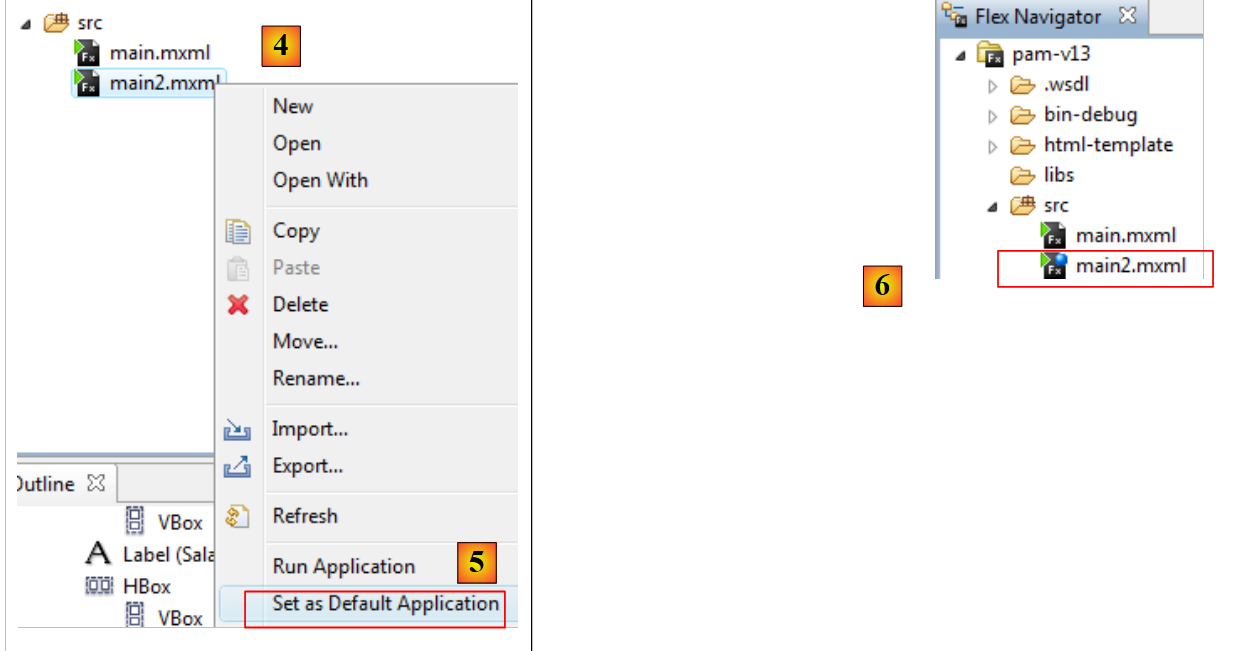 |
- In [4,5], we set [main2.mxml] as the new default application. This is the one that will now be compiled.
- In [6], the default application is indicated by a blue dot.
The [1] container will display information about the employee selected in the [2] combo box. We duplicate [main.xml] into [main2.xml] and [3] to build the new view. We will now work with [main2.xml].
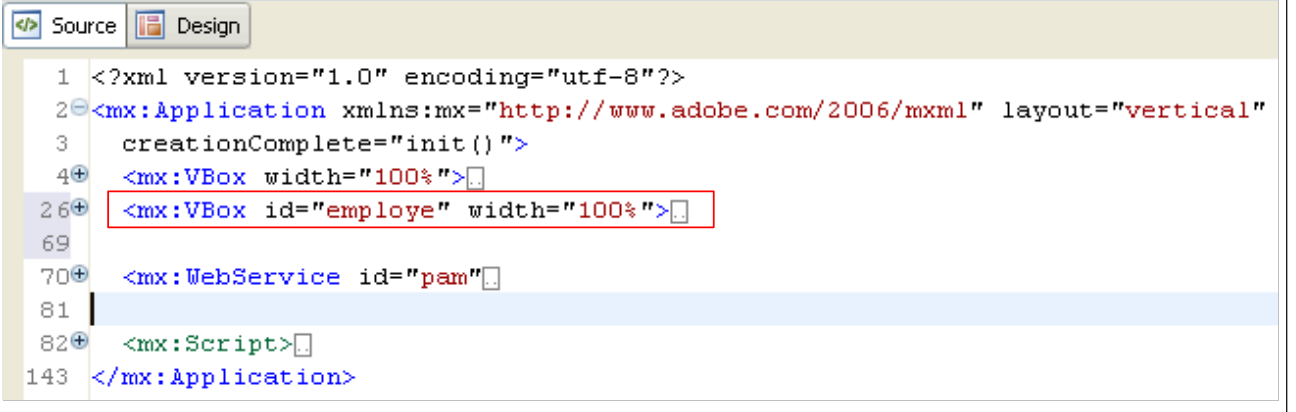 |
The change made to the previous project is the addition of the container on line 26 above, which contains the code MXML from the container [1] in the view. We give it the identifier "employe" so that we can manipulate it via code. In fact, this container must be able to be hidden or shown using the same technique previously used for the message area.
Let’s return to the view’s interface:
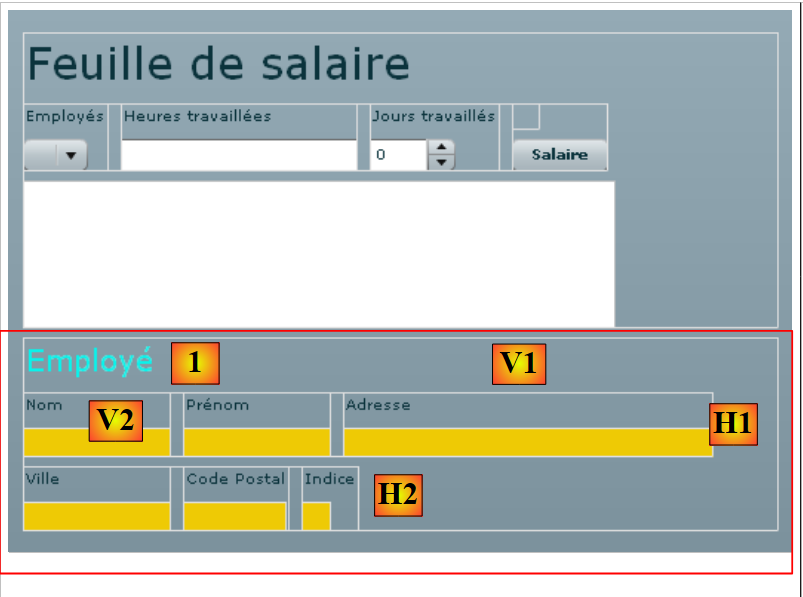 |
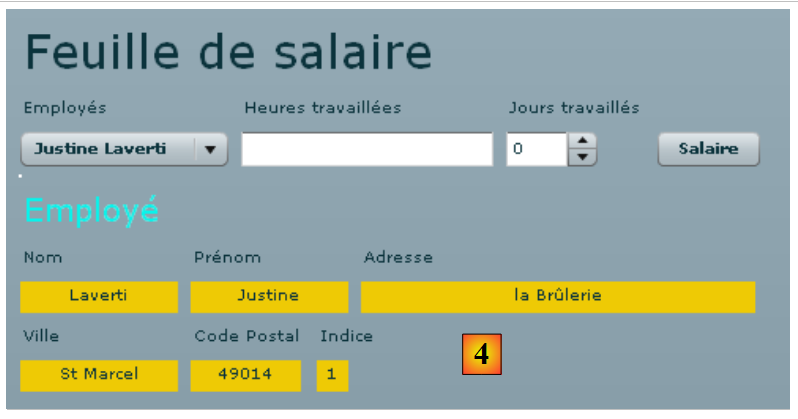
Let’s identify the different containers for the new displayed information:
- V1: vertical container for all components: the "Employee" label ([1]) and the horizontal containers ([H1] and [H2])
- H1: horizontal container for the Last Name, First Name, and Address information
- V2: vertical container for the label "Last Name" and the display of the employee's last name.
- H2: horizontal container for City, Zip Code, and Index information
The complete code for the "employe" container is as follows:
<mx:VBox id="employe" width="100%">
        <mx:Label text="Employé" fontSize="20" color="#09F3EB"/>
        <mx:HBox>
        <mx:VBox >
            <mx:Label text="Nom"/>
            <mx:VBox backgroundColor="#EECA05">
            <mx:Text id="lblNom" minWidth="100" minHeight="20" fontFamily="Verdana" textAlign="center"/>
            </mx:VBox>
        </mx:VBox>
        <mx:VBox >
            <mx:Label text="Prénom"/>
            <mx:VBox backgroundColor="#EECA05">
            <mx:Text id="lblPreNom" minWidth="100" minHeight="20" fontFamily="Verdana" textAlign="center"/>
            </mx:VBox>
        </mx:VBox>
        <mx:VBox >
            <mx:Label text="Adresse"/>
            <mx:VBox backgroundColor="#EECA05">
            <mx:Text id="lblAdresse" minWidth="250" minHeight="20" fontFamily="Verdana" textAlign="center"/>
            </mx:VBox>
        </mx:VBox>
        </mx:HBox>
        <mx:HBox>
        <mx:VBox >
            <mx:Label text="Ville"/>
            <mx:VBox backgroundColor="#EECA05">
            <mx:Text id="lblVille" minWidth="100" minHeight="20" fontFamily="Verdana" textAlign="center"/>
            </mx:VBox>
        </mx:VBox>
        <mx:VBox >
            <mx:Label text="Code Postal"/>
            <mx:VBox backgroundColor="#EECA05">
            <mx:Text id="lblCodePostal" minWidth="70" minHeight="20" fontFamily="Verdana" textAlign="center"/>
            </mx:VBox>
        </mx:VBox>
        <mx:VBox >
            <mx:Label text="Indice"/>
            <mx:VBox backgroundColor="#EECA05">
            <mx:Text id="lblIndice" minWidth="20" minHeight="20" fontFamily="Verdana" textAlign="center"/>
            </mx:VBox>
        </mx:VBox>
        </mx:HBox>
    </mx:VBox>
The code is self-explanatory. Let’s just explain the vertical container displaying the employee’s name, for example:
- lines 4–9: the vertical container
- line 5: the "Name" label
- lines 6-8: a vertical container that will display the employee's name (line 7). We want to give a different background color to the fields displaying employee information. The Text component does not offer this option (or perhaps I didn't look hard enough). You can set the background color of a container. That is why it was used here.
- Line 7: the Text component that will display the employee’s name. We set a minimum height and width for it.
We will use the "employee" container to display the information for the employee selected by the user in the employee dropdown, independently of the [Salaire] button, which will later be used to calculate the salary once all necessary information has been entered.
To handle the selection change in the "employees" combo box, its code MXML is updated as follows:
<mx:ComboBox id="cmbEmployes" dataProvider="{employes}" labelFunction="displayEmploye" change="displayInfosEmploye();"/>
The "change" event is triggered by the combo box when the user changes their selection. The handler for this event will be the method displayInfosEmploye.
Let’s review the methods exposed by the remote web service:
    // list of all employee identities
    public Employe[] GetAllIdentitesEmployes();
    // ------- salary calculation
public FeuilleSalaire GetSalaire(string ss, double heuresTravaillees, int joursTravailles);
Here, we want to display the information (last name, first name, etc.) for the employee selected in the dropdown. The web service does not expose a method to retrieve this information. However, we can use the GetSalaire method by passing the SS ID of the selected employee and 0 for hours and days worked. A redundant salary calculation will be performed, but the GetSalaire method will return a FeuilleSalaire object containing the information we need.
The current web service declaration is modified to include the definition of the GetSalaire method:
<mx:WebService id="pam"
        wsdl="http://localhost:1077/Service1.asmx?WSDL"
        fault="wsFault(event);"
        showBusyCursor="true">
        <mx:operation
            name="GetAllIdentitesEmployes"
            result="loadEmployesCompleted(event)"
            fault="loadEmployesFault(event);">
            <mx:request/>
        </mx:operation>
        <mx:operation name="GetSalaire"
            result="getSalaireCompleted(event)"
            fault="getSalaireFault(event);">
            <mx:request>
                <ss>{employes.getItemAt(cmbEmployes.selectedIndex).SS}</ss>
              <heuresTravaillees>{heuresTravaillees}</heuresTravaillees>
              <joursTravailles>{joursDeTravail}</joursTravailles>
            </mx:request>
        </mx:operation>
</mx:WebService>
- lines 11-19: the definition of the GetSalaire method of the web service
- line 12: defines the method to execute when the call to the GetSalaire method succeeds
- line 13: defines the method to execute when the call to the GetSalaire method fails
- lines 14–18: the GetSalaire method expects three parameters. They are defined within an <mx:request> tag in the form <param1>value1</param1>. The identifier param1 cannot be arbitrary. You must use the names expected by the web service:
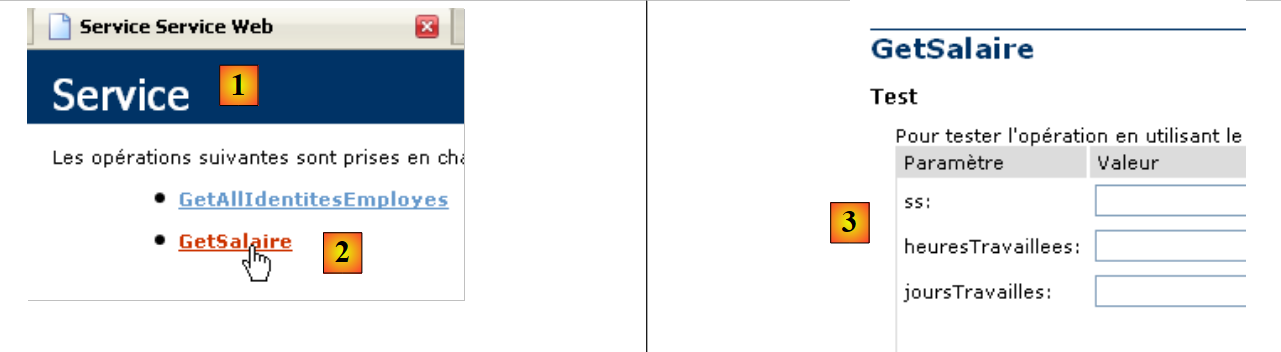 |
- in [1], the page of the [http://localhost:1077/Service1.asmx] web service
- in [2], the link to the test page for the [GetSalaire] method
- in [3], the parameters expected by the method. These are the names you must use as child tags of the <mx:request> tag.
Let’s return to the web service declaration:
        <mx:operation name="GetSalaire"
            result="getSalaireCompleted(event)"
            fault="getSalaireFault(event);">
            <mx:request>
                <ss>{employes.getItemAt(cmbEmployes.selectedIndex).SS}</ss>
              <heuresTravaillees>{heuresTravaillees}</heuresTravaillees>
              <joursTravailles>{joursDeTravail}</joursTravailles>
            </mx:request>
        </mx:operation>
- line 5: the parameter ss. Recall that when the Flex application started, the array of all employees was stored in a variable `employees` of type ArrayCollection.
- employes.getItemAt(i): is employee number i in the array
- employes.getItemAt(i).SS: is this employee’s social security number.
- cmbEmployes.selectedIndex: is the number of the item selected in the cmbemployes employee combo box.
Above, how do we know that SS is an employee's Social Security number? To determine this, we need to refer back to the response sent by the GetAllIdentitesEmployes method:
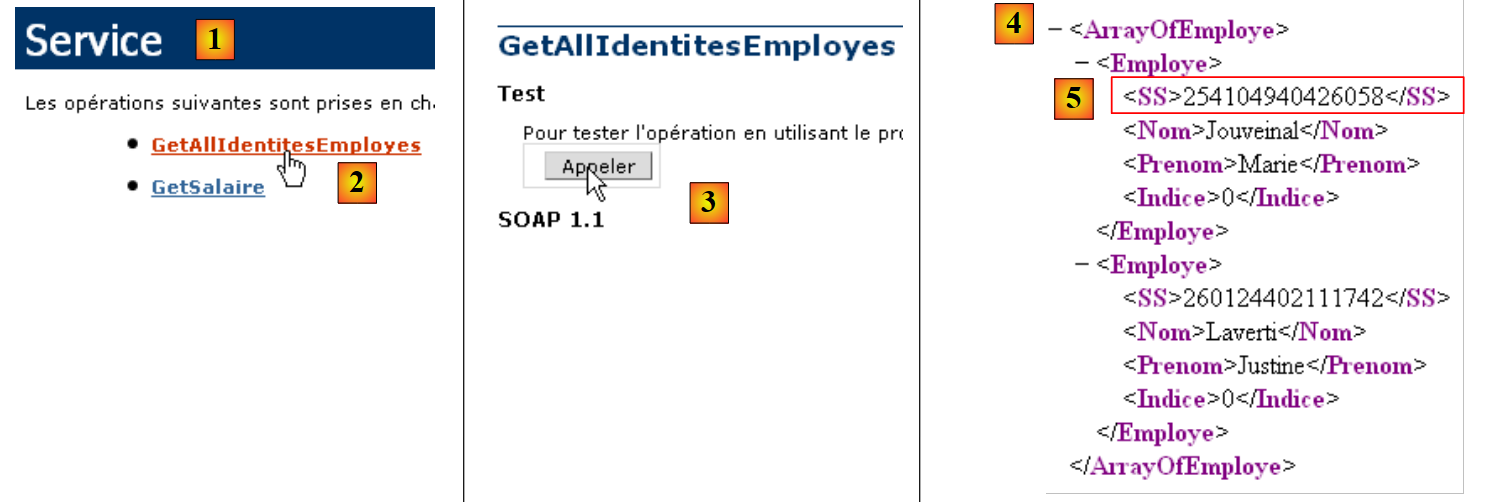 |
- in [1], the [Service.asmx] web service page
- in [2], the link to the test page for method [GetAllIdentitesEmployes]
- in [3], the test is performed. No parameters are expected.
- in [4]: the response XML contains an array of employees. This is the array that was stored in the variable `employees`. We can see in [5] that SS is indeed the tag used to contain the social security number.
Let’s conclude our review of the web service:
        <mx:operation name="GetSalaire"
            result="getSalaireCompleted(event)"
            fault="getSalaireFault(event);">
            <mx:request>
                <ss>{employes.getItemAt(cmbEmployes.selectedIndex).SS}</ss>
              <heuresTravaillees>{heuresTravaillees}</heuresTravaillees>
              <joursTravailles>{joursDeTravail}</joursTravailles>
            </mx:request>
</mx:operation>
- line 6: the number of hours worked will be provided by a variable heuresTravaillees
- line 6: the number of days worked will be provided by a variable joursDeTravail
These variables must be declared within the <mx:Script> tag using the [Bindable] attribute, which allows them to be referenced by MXML components (lines 7–10 below).
    <mx:Script>
        <![CDATA[
...
            // data
            [Bindable]
            private var employes : ArrayCollection;
            [Bindable]
            private var heuresTravaillees:Number;
            [Bindable]
            private var joursDeTravail:int;
...
</mx:Script>
The event handling code for the view changes as follows:
<mx:Script>
        <![CDATA[
            import mx.rpc.events.FaultEvent;
            import mx.collections.ArrayCollection;
            import mx.rpc.events.ResultEvent;

            // data
            [Bindable]
            private var employes : ArrayCollection;
            [Bindable]
            private var heuresTravaillees:Number;
            [Bindable]
            private var joursDeTravail:int;

            private function init():void{
                // note the height/width of # blocks
                employeHeight=employe.height;
                employeWidth=employe.width;
                // we hide certain elements
                hideEmploye();
...
            }

            private function displayInfosEmploye():void{
                // form
                hideEmploye();
                // a fictitious salary is calculated
                heuresTravaillees=0;
                joursDeTravail=0;
                pam.GetSalaire.send();
            }

            private function getSalaireCompleted(event:ResultEvent):void{
    ...
            }

            private function getSalaireFault(event:FaultEvent):void{
    ...
            }

        // vues partielles -------------------------------------------------
        private var employeHeight:int;
        private var employeWidth:int;

        private function hideEmploye():void{
            employe.height=0;
            employe.width=0;
        }

        private function showEmploye():void{
            employe.height=employeHeight;
            employe.width=employeWidth;
        }
        ]]>
    </mx:Script>
- line 15: the init method executed when the Flex application starts saves the height and width of the vertical employee container so that it can be restored (lines 50–53) after being hidden (lines 45–48).
- line 24: The displayInfosEmploye method is the method executed when the user changes their selection in the employee combo box.
- Line 26: The employee container is hidden if it was visible
- Line 30: The web service method GetSalaire is called asynchronously. We know it expects three parameters:
                <ss>{employes.getItemAt(cmbEmployes.selectedIndex).SS}</ss>
              <heuresTravaillees>{heuresTravaillees}</heuresTravaillees>
              <joursTravailles>{joursDeTravail}</joursTravailles>
- line 1: the ss parameter will be the SS number of the employee selected in the employee combo box
- line 2: the method displayInfosEmploye assigns the value 0 to the variable heuresTravaillees (line 28)
- Line 3: The method displayInfosEmploye assigns the value 0 to the variable joursDeTravail (line 29)
The method GetSalaireCompleted is executed if the web service method GetSalaire completes successfully:
private function getSalaireCompleted(event:ResultEvent):void{
                // hide error msg
                hideMsg();
                // you receive a payslip
                var feuilleSalaire:Object=event.result;
                // display
                lblNom.text=feuilleSalaire.Employe.Nom;
                lblPreNom.text=feuilleSalaire.Employe.Prenom;
                lblAdresse.text=feuilleSalaire.Employe.Adresse;
                lblVille.text=feuilleSalaire.Employe.Ville;
                lblCodePostal.text=feuilleSalaire.Employe.CodePostal;
                lblIndice.text=feuilleSalaire.Employe.Indice;
                showEmploye();
            }
- Line 3: We hide the message box in case it is displayed.
- Line 5: We retrieve the pay stub returned by the GetSalaire method
To find out exactly what the GetSalaire method returns, we go back to the web service page:
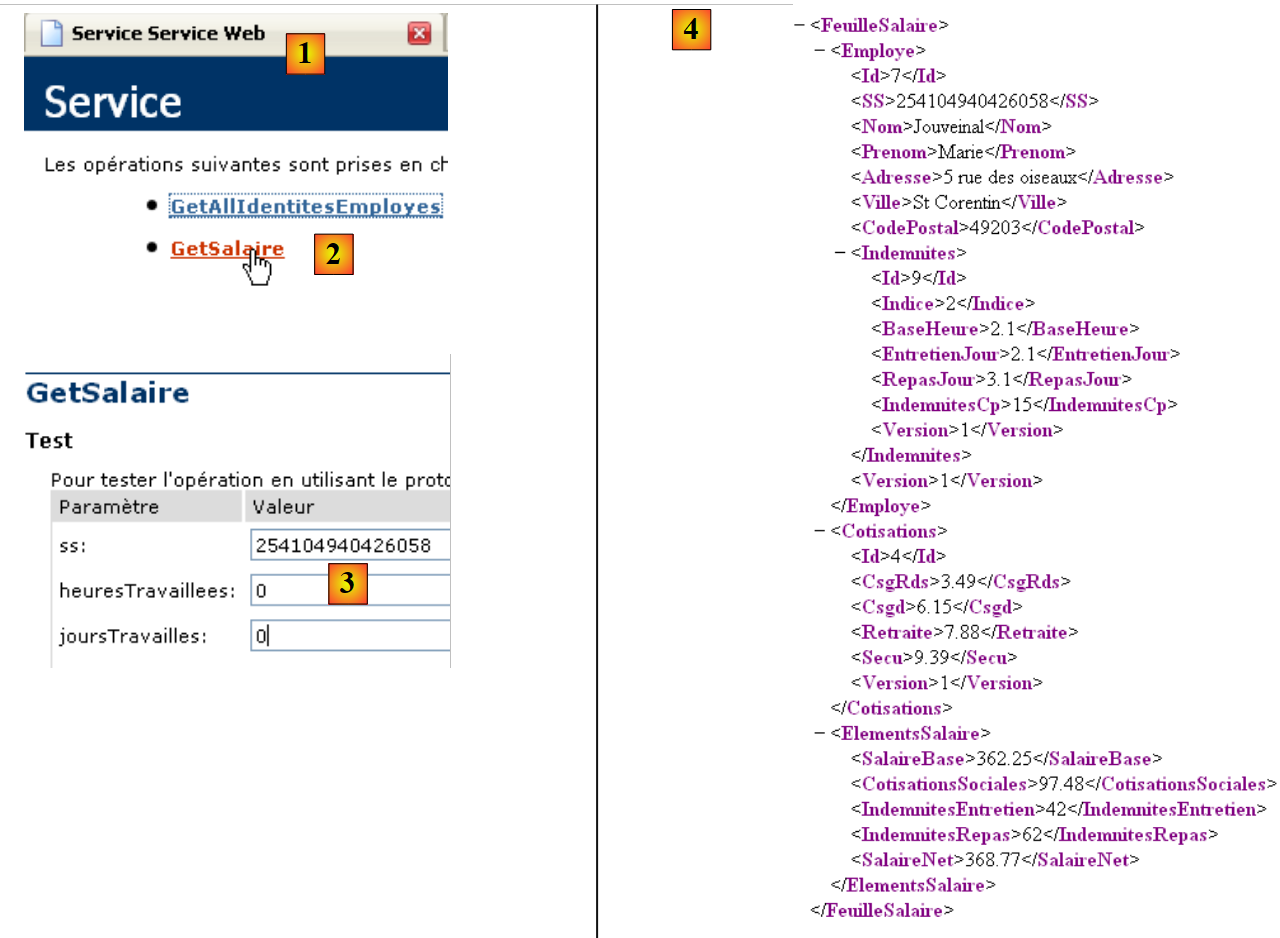 |
- in [1], the [Service.asmx] web service page
- in [2], the link leading to the test page for method [GetSalaire]
- in [3], parameters are provided
- in [4], the result XML obtained.
Let’s return to the getSalaireCompleted method:
private function getSalaireCompleted(event:ResultEvent):void{
                // hide error msg
                hideMsg();
                // you receive a payslip
                var feuilleSalaire:Object=event.result;
                // display
                lblNom.text=feuilleSalaire.Employe.Nom;
                lblPreNom.text=feuilleSalaire.Employe.Prenom;
                lblAdresse.text=feuilleSalaire.Employe.Adresse;
                lblVille.text=feuilleSalaire.Employe.Ville;
                lblCodePostal.text=feuilleSalaire.Employe.CodePostal;
                lblIndice.text=feuilleSalaire.Employe.Indemnites.Indice;
                showEmploye();
}
- Line 5: feuilleSalaire=event.result represents the flow XML [4] returned by the method GetSalaire. Based on this flow, we can see that:
- feuilleSalaire.Employe is the flow XML for an employee
- feuilleSalaire.Employe.Nom is the name of that employee
- ...
- lines 7–12: the XML feuilleSalaire flow is used to populate the various fields of the employee container.
- Line 13: The employee container is displayed.
The getSalaireFault method is executed if the GetSalaire method of the web service fails:
            private function getSalaireFault(event:FaultEvent):void{
                // error msg display
                msg.text=event.fault.message;
                // form
                showMsg();
            }
- line 3: the error message event.fault.message is placed in the message box
- line 5: the message box is displayed
This concludes the necessary modifications for this new version. When you save it and if it is syntactically correct, the executable version is generated in the [bin-debug] folder of the project:
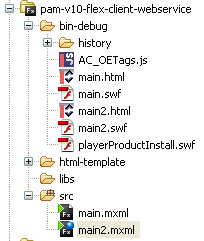 |
Above, [main2.html] is the HTML page that embeds the Flex application binary [main2.swf], which will be executed by Flash Player.
We can test this new version:
- the ASP.NET web service must be running
- the Apache server must be running for the Flex client
Assuming that the alias [pam-v10-flex-client-webservice] used in the previous version still exists, we request the URL [http://localhost/pam-v10-flex-client-webservice/main2.html] from the Apache server in a browser:
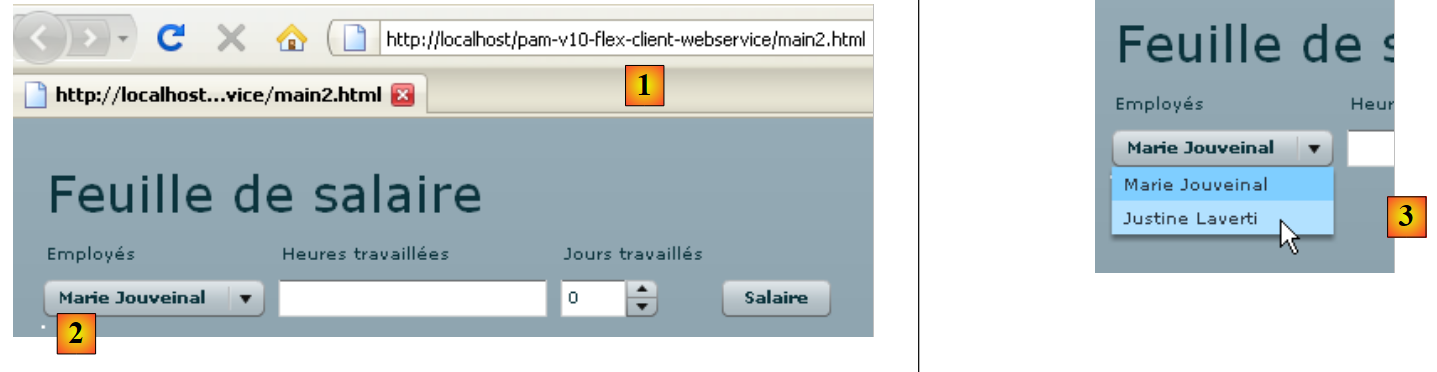 |
 |
- in [1], the requested URL
- to [2], the employee dropdown
- in [3], we change the selection in the combo box to trigger the change event
- in [4], the result obtained: Justine Laverti's record.
14.5. View #3
View No. 3 handles the form validation. Here, only the input field "txtHeuresTravaillees" is checked. As long as the form is invalid, the "btnSalaire" button will remain disabled.
To add this functionality, we duplicate [main2.mxml] into [main3.mxml]:
 |
From now on, we will work with [main3.mxml], which we will set as the default application (see this concept in section 14.4). First, we add an attribute to the "txtHeuresTravaillees" component:
<mx:TextInput id="txtHeuresTravaillees" change="validateForm(event)"/>
Every time the content of the "txtHeuresTravaillees" input field changes, the validateForm method is called. This is a local method written by the developer. In this method, we could verify that the content of the "txtHeuresTravaillees" input field is indeed a positive integer. We will proceed differently by using a validation component:
    <mx:NumberValidator id="heuresTravailleesValidator" source="{txtHeuresTravaillees}" property="text"
    precision="2" allowNegative="false"
    invalidCharError="Caractères invalides"
    precisionError="Deux chiffres au plus après la virgule"
    negativeError="Le nombre d'heures doit être positif ou nul"
    invalidFormatCharsError="Format invalide"
    required="true"
requiredFieldError="Donnée requise"/>
- line 1: The <mx:NumberValidator> component verifies that another component contains an integer or real number.
- line 1: the id attribute assigns an identifier to the component.
- line 1: source is the id of the component being validated by the NumberValidator component. Here, the "txtHeuresTravaillees" input field is being validated.
- Line 1: property is the name of the property in the source component that contains the value to be validated. Ultimately, the value source.property is validated, in this case txtHeuresTravaillees.text.
- Line 2: precision sets the maximum number of decimal places allowed. precision=0 means that the entered number is checked to ensure it is an integer.
- Line 2: allowNegative indicates whether negative numbers are allowed or not
- Line 7: required indicates whether the entry is mandatory or not.
When a validation condition is not met, an error message is displayed in a tooltip near the invalid field. By default, these messages are in English. You can define these messages yourself:
- (continued)
- invalidCharError: the error message when the text contains a character that cannot appear in a number
- precisionError: the error message when the number of decimal places is incorrect relative to the precision attribute
- negativeError: the error message when the number is negative even though the attribute allowNegative="false" is set
- requiredFieldError: the error message when no input was provided even though the attribute requiredField="true" is set
- invalidFormatCharsError: the error message when the text contains invalid characters or formatting?
Let’s go back to the "txtHeuresTravaillees" component:
<mx:TextInput id="txtHeuresTravaillees" change="validateForm(event)"/>
The validateForm method could be the following within the <mx:Script> tag:
        private function validateForm(event:Event):void
        {
            // validate hours worked
            var evt:ValidationResultEvent = heuresTravailleesValidator.validate();
            // successful validation?
            btnSalaire.enabled=evt.type==ValidationResultEvent.VALID;
}
- line 4: the "heuresTravailleesValidator" validator is executed. It returns a result of type ValidationResultEvent.
- line 6: evt.type is of type String and indicates the event type. evt.type has two possible values for the type ValidationResultEvent: "invalid" or "valid," represented by the constants ValidationResultEvent.INVALID and ValidationResultEvent.VALID. If, in line 4, the validation was successful, evt.type must have the value ValidationResultEvent.VALID. In this case, the btnSalaire button is enabled; otherwise, it is disabled.
This is sufficient to test the validity of the hours worked.
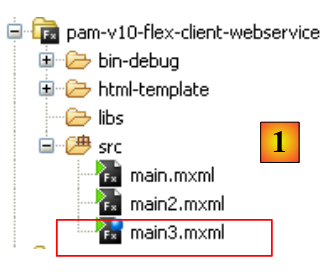
 |
Above, compiling the project produced the files [main3.html] and [main3.swf]. We open URL and [http://localhost/pam-v10-flex-client-webservice/main3.html] in a browser and check for various error cases:
 |
 |
- an incorrect field has a red border ([1, 2, 3]), while a correct field has a blue border ([4]).
- In [4], note that the [Salaire] button is active because the number of hours worked is correct.
14.6. View #4
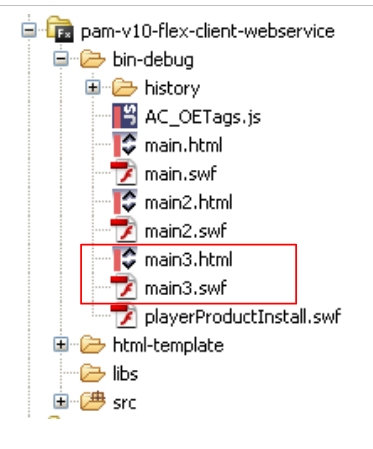
View No. 4 completes the payroll calculation form. To do this, we duplicate [main3.xml] into [main4.xml] and now work with main4, which we set as the default application (see section 14.4).
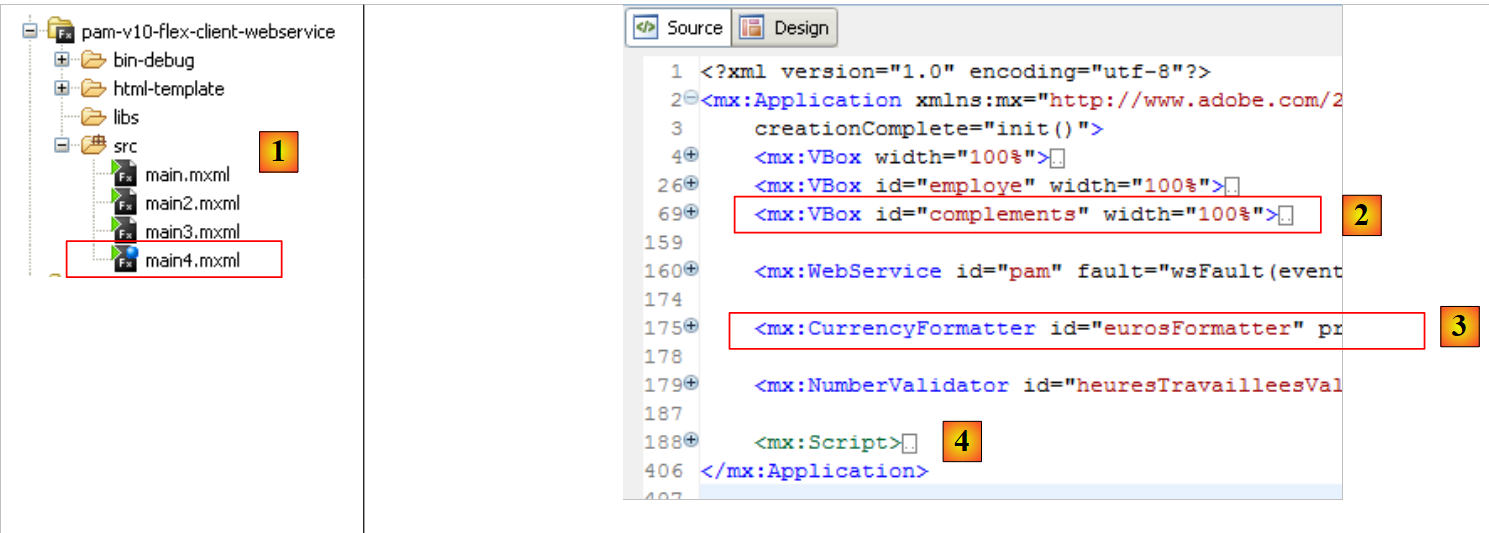 |
The changes made in [main4.xml] and [1] are as follows:
- A new vertical container has been added to the [2] view to display the employee’s salary components
- A component for formatting monetary values has been added to [3]
- The display of salary components is handled by the handler associated with the "click" event of the "btnSalaire" button.
The view changes as follows:
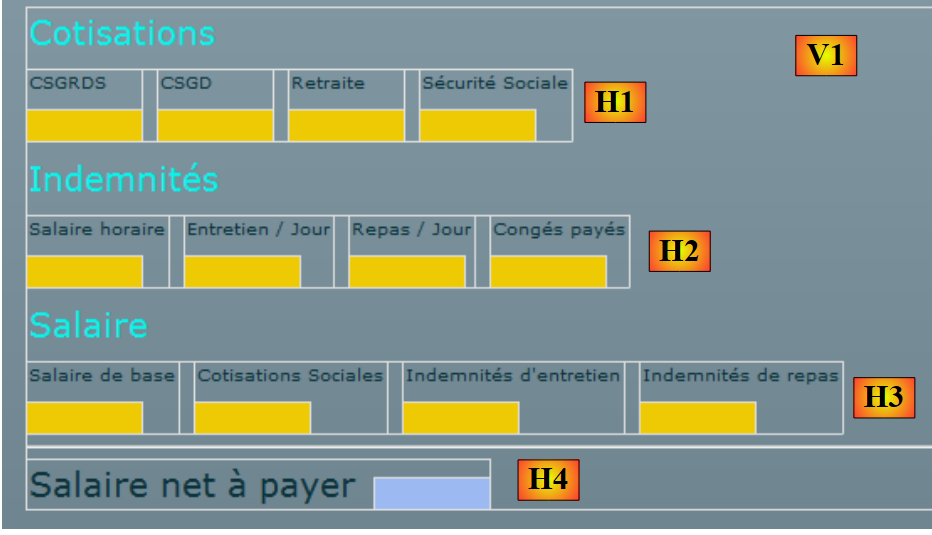 |
The new container follows the same principle as the previous one. It is a vertical container VBox [V1] containing four horizontal containers HBox [Hi]. The horizontal containers H1 through H3 are made up of vertical containers containing two labels, the second of which is itself inside a vertical container to provide a background color.
Question 1: Write the salary container. It will be referred to as complements.
Question 2: Write the methods to hide/show the complements container. Use what was done previously for the employee container as a guide.
We associate a handler with the "click" event of the "btnSalaire" button:
<mx:Button id="btnSalaire" label="Salaire" click="calculerSalaire()"/>
The calculerSalaire method is as follows:
            private function calculerSalaire():void{
                // form preparation
                affichageSalaire=true;
                msg.text="";
                // salary calculation parameters
                heuresTravaillees=Number(txtHeuresTravaillees.text);
                joursDeTravail=int(joursTravailles.value);
                // the salary is requested from the web service
                pam.GetSalaire.send();
}
- Line 3: The Boolean affichageSalaire is used to indicate whether or not to display the complements container, which displays the salary items. The getSalaireCompleted method is executed on two events:
- when the employee is changed in the employee dropdown to display their information without the salary. In this case, we set affichageSalaire=false.
- salary calculation
- line 6: the text in the txtHeuresTravaillees input field is converted to a real number.
- line 7: the value of the counter joursTravailles is converted to an integer.
- Line 9: Call the remote method GetSalaire. Note that this method expects three parameters, including the parameters heuresTravaillees and joursDeTravail initialized in lines 6 and 7. Also note that if the asynchronous call to the method GetSalaire:
- succeeds, the method getSalaireCompleted will be called
- fails, the method getSalaireFault will be called
Question 3: Complete the current method getSalaireCompleted so that it displays the employee’s salary if the button btnSalaire has been clicked.
Currently, salary items are displayed without the euro sign. You can include it in the code or use a formatter. This is what is proposed now. The formatter will be as follows:
    <mx:CurrencyFormatter id="eurosFormatter" precision="2"
        currencySymbol="€" useNegativeSign="true"
alignSymbol="right"/>
- Line 1: id is the formatter ID; precision specifies the number of decimal places to retain.
- Line 2: currencySymbol is the currency symbol to use. useNegativeSign indicates whether or not to use the minus sign for negative values.
- line 3: alignSymbol specifies where to place the currency symbol relative to the number.
This formatter is used in the script code as follows:
- eurosFormatter is the id of the formatter to use
- format is the method to call to format a number. It returns a string.
- payrollSheet.Indemnites.BaseHour is the number to be formatted.
- lblSH is the name of a Text component.
Question 4: Modify the getSalaireCompleted method so that it uses the currency formatter.