9. The application [SimuPaie] – version 5 – ASP.NET / web service
Recommended reading: reference [2], Introduction to C# 2008, Chapter 10 "Web Services"
9.1. The new application architecture
The layered architecture of the Pam application is currently as follows:
 |
We will evolve it as follows:
 |
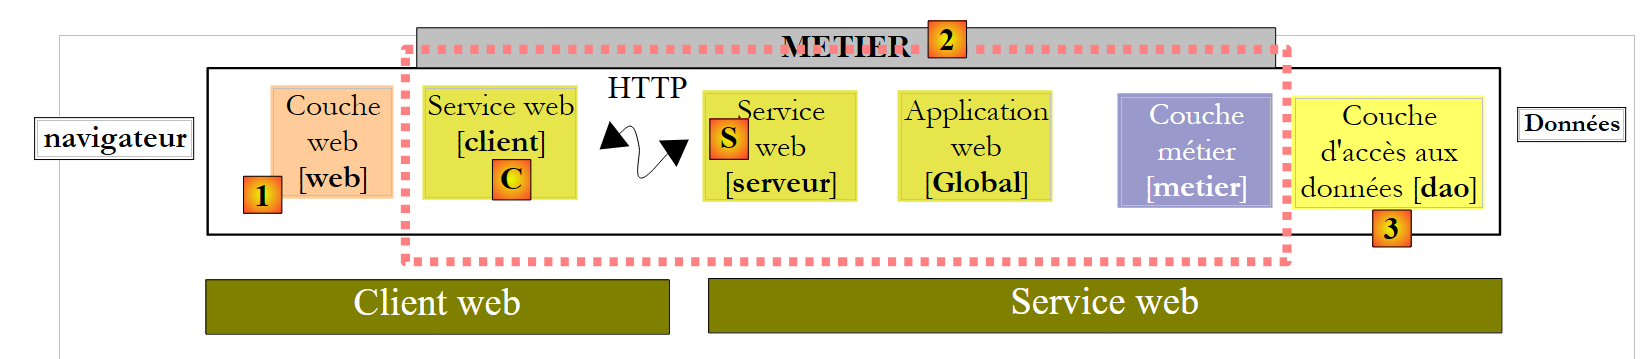
Whereas in the previous architecture, the layers [web], [metier], and [dao] ran in the same virtual machine.NET, in the new architecture, the [web] layer will run in a different virtual machine than the [metier] and [dao] layers. This will be the case, for example, if the [web] layer is on machine M1 and the [metier] and [dao] layers are on machine M2. Here we have a client/server architecture:
- the server consists of layers [metier] and [dao]. Because it is a web service, it requires web server #2 to run.
- The client consists of the [web] layer. To run, it requires web server #1.
- The client and server communicate over the Tcp / Ip network using the HTTP / SOAP protocol. To do this, two new layers must be added to the architecture:
- the [S] layer, which will be a web service. The web service receives requests from remote clients instances and uses the [metier] and [dao] layers to fulfill them. There are many ways to build a Tcp / Ip service. The advantage of the web service is twofold:
- it uses the HTTP protocol, which is allowed through corporate and government firewalls
- it uses a standard HTTP / SOAP subprotocol, implemented by many development platforms: .Net, Java, Php, Flex, ... Thus, a web service can be "consumed" (the standard term) by clients, Net, Java, Php, Flex, ...
- the [C] layer, which will act as the client for the remote web service. Its role will be to communicate with the [S] web service.
- the [S] layer, which will be a web service. The web service receives requests from remote clients instances and uses the [metier] and [dao] layers to fulfill them. There are many ways to build a Tcp / Ip service. The advantage of the web service is twofold:
This new architecture can be derived from the previous ones without much effort:
- the [metier] and [dao] layers remain unchanged
- the [web] layer evolves slightly, primarily to reference entities such as Employee, FeuilleSalaire, which have become entities of the [C] client layer. These entities are analogous to those in the [metier] or [dao] layers but belong to different namespaces.
- The server layer [S] is a class that implements the interface IPamMetier of the layer [metier]. This implementation simply calls the corresponding methods of the layer [metier]. The methods implemented by the [S] server layer will be "exposed" to remote clients instances, which will be able to call them.
- The client layer [C] will be generated by Visual Studio.
The principles of the new architecture are as follows:
- The [web] layer continues to communicate with the [metier] layer as if it were local. To do this, the [C] client layer implements theIPamMetier interface of the actual [metier] layer and presents itself to the [web] layer as a local [metier] layer. Apart from the namespace issue mentioned earlier, the [web] layer remains unchanged. This is the advantage of working in layers. If we had built a single-layer application, it would require a major overhaul.
- The [C] client layer transparently forwards the [web] layer’s requests to the remote web service [S]. It handles all aspects of "network communication." It receives a response from the remote web service, which it formats to return to the [web] layer in the format that layer expects.
- On the server side, the [S] web service receives commands from its remote clients instances. It formats them to call the methods of the IPamMetier interface of the [metier] layer. Once it has received the response from the [metier] layer, it formats it to transmit it over the network to the [C] client. The [metier] and [dao] layers do not need to be modified.
9.2. The Visual Web Developer project for the web service
We are building a new project with Visual Web Developer:
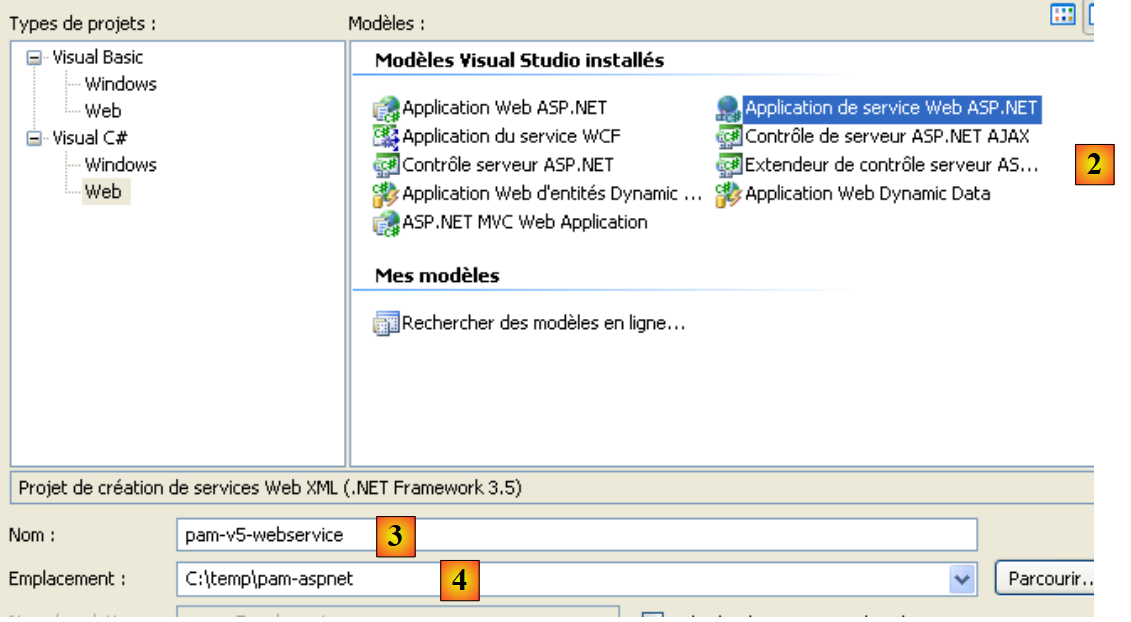 |
- in [1], we select a C# web project
- in [2], we select "Web Service Application ASP.NET"
- In [3], we name the web project
- In [4], we specify a location for this project
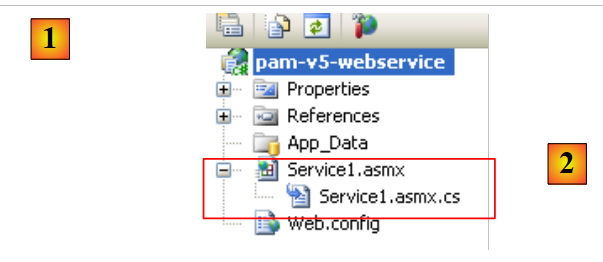 |
- The generated project is named [1]. It is a standard web project with the following details:
- We specified that the project is a "web service". A web service does not send HTML web pages to its clients clients, but rather data in XML format. Therefore, the [Default.aspx] page that is usually generated was not created.
- In [2], a [Service1.asmx] file was generated with the following content:
<%@ WebService Language="C#" CodeBehind="Service1.asmx.cs" Class="pam_v5_webservice.Service1" %>
- (continued)
- - The WebService tag indicates that [Service.asmx] is a web service
- - The CodeBehind attribute specifies the location of the source code for this web service
- - The Class attribute indicates the name of the class implementing the web service in the source code
The source code [Service.asmx.cs] for the default web service is as follows:
using System.Web.Services;

namespace pam_v5_webservice
{
  /// <summary>
  /// Service summary description1
  /// </summary>
  [WebService(Namespace = "http://tempuri.org/")]
  [WebServiceBinding(ConformsTo = WsiProfiles.BasicProfile1_1)]
  [System.ComponentModel.ToolboxItem(false)]
  // To allow this Web service to be called from a script using ASP.NET AJAX, remove the comment marks from the following line.
  // [System.Web.Script.Services.ScriptService]
  public class Service1 : System.Web.Services.WebService
  {

    [WebMethod]
    public string HelloWorld()
    {
      return "Hello World";
    }
  }
}
- line 8: the WebService annotation, which causes the Service1 class on line 13 to be exposed as a web service. A web service belongs to a namespace to prevent two web services in the world from having the same name. We will need to change this namespace later.
- line 13: the Service1 class derives from the WebService class of the .NET framework.
- Line 16: The WebMethod annotation ensures that the annotated method will be exposed to remote clients instances, which will then be able to call it.
- Lines 17–20: The HelloWorld method is a demonstration method. We will remove it later. It allows us to perform initial tests and explore Visual Studio tools as well as certain key aspects of web services.
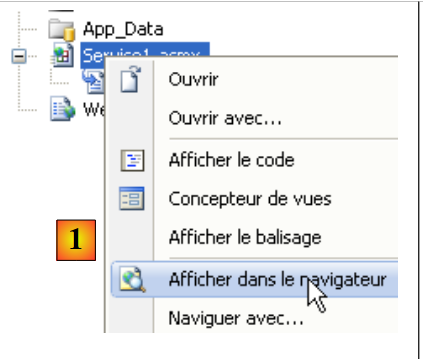 |
- In [1], we run the [Service.asmx] web service
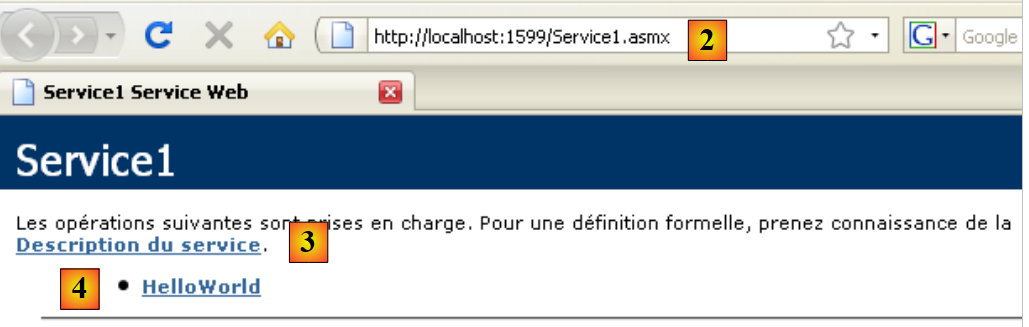 |
- VS Web Developer has started its built-in web server and is listening on a random port, in this case 1599. The Url [2] was then requested from the web server. This is a test page for the web service.
- in [3], a link that allows you to view the web service description file. This file, called WSDL (WebService Description Language) due to its suffix (.wsdl), is a XML file describing the methods exposed by the web service. It is from this WSDL file that the clients files can determine:
- the namespace of the web service
- the list of methods exposed by the web service
- the parameters expected by each of them
- the response returned by each of them
- in [4], the single method exposed by the web service .
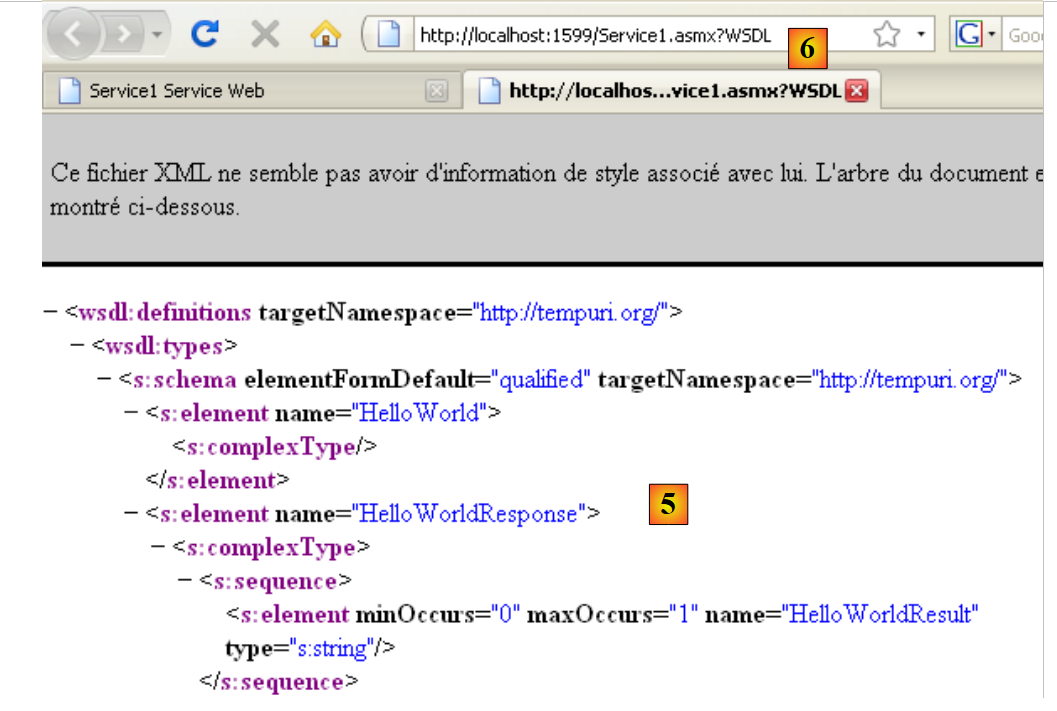 |
- in [5], the content of the WSDL file obtained via the [3] link. Note the URL [6]. Knowledge of this is required for the clients of the web service.
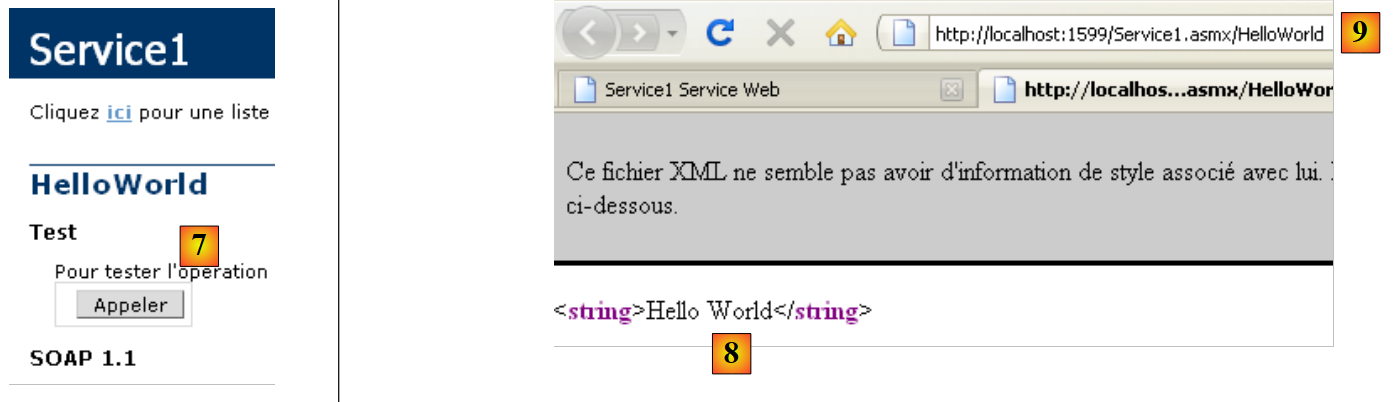 |
- In [7], the page obtained by following the link [4] allows you to call the [HelloWorld] method of the web service
- In [8], the result obtained: a response XML. Note the URL [9] of the method.
Studying the previous pages helps us understand how a web service method is called and what type of response it returns. This allows us to write clients and HTTP capable of communicating with the web service. Most modern IDE tools allow for the automatic generation of this HTTP client, thereby sparing the developer from having to write it. This is particularly the case with Visual Studio Express.
Before continuing with this project, we will change the namespace used by default when generating classes:
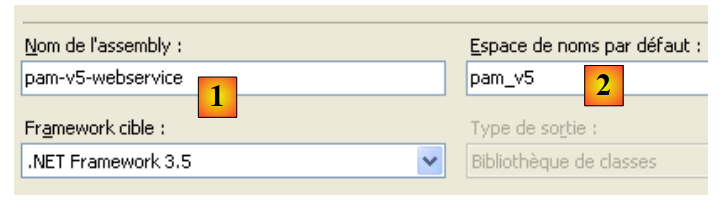 |
When we select the project properties (right-click on the project / Properties), we see the project assembly name in [1] and its default namespace in [2].
Once this is done,
- in [Service1.asmx.cs], we change the class namespace:
using System.Web.Services;

namespace pam_v5
{
...
  public class Service1 : System.Web.Services.WebService
  {
...
  }
}
- In [Service.asmx], we also change the namespace used for the [Service1] class (right-click / View Markup):
<%@ WebService Language="C#" CodeBehind="Service1.asmx.cs" Class="pam_v5.Service1" %>
Let’s return to our application’s architecture:
 |
- The [S] layer is the web service. It simply exposes the methods of the [metier] layer to remote clients clients. This is the layer we are currently building.
- The [C] layer is the HTTP client of the web service. This is the layer that the IDE instances can generate automatically.
- The [web] layer views the [C] layer as a local [metier] layer if we ensure that the [C] layer implements theinterface of the remote [metier] layer.
We see below that our web service will:
- expose the methods of the [metier] layer
- communicate with the latter, which in turn will communicate with the [dao] layer.
The project must therefore use the DLL from the [metier] and [dao] layers. It evolves as follows:
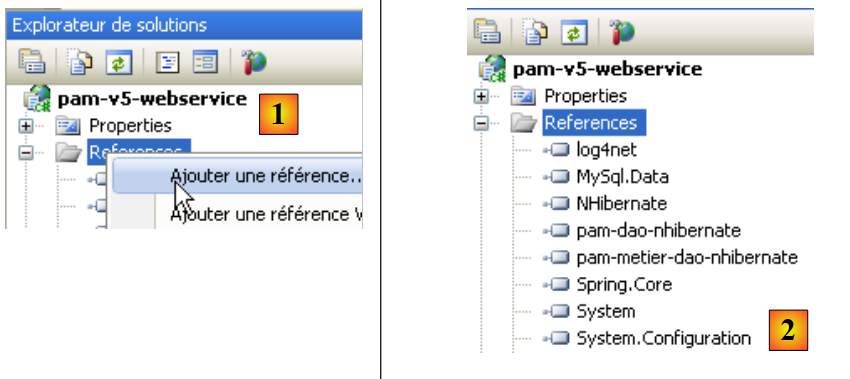 |
- In [1], references to the project are added
- In [2], the usual DLL files from the [lib] folder are selected. Care must be taken to ensure that their "Local Copy" property is set to True. The selected DLL files are those that implement the [metier] and [dao] layers with NHibernate support.
A "ASP.NET Web Service" type web application can have a global application class "Global.asax" just like a traditional "ASP.NET Web Site" application. We have seen the benefit of such a class:
- it is instantiated when the application starts and remains in memory
- it can thus store data shared by all clients instances, which is read-only. In our application, it will store the simplified list of employees, just as in the previous ones. This will avoid having to retrieve this list from the database when a customer requests it.
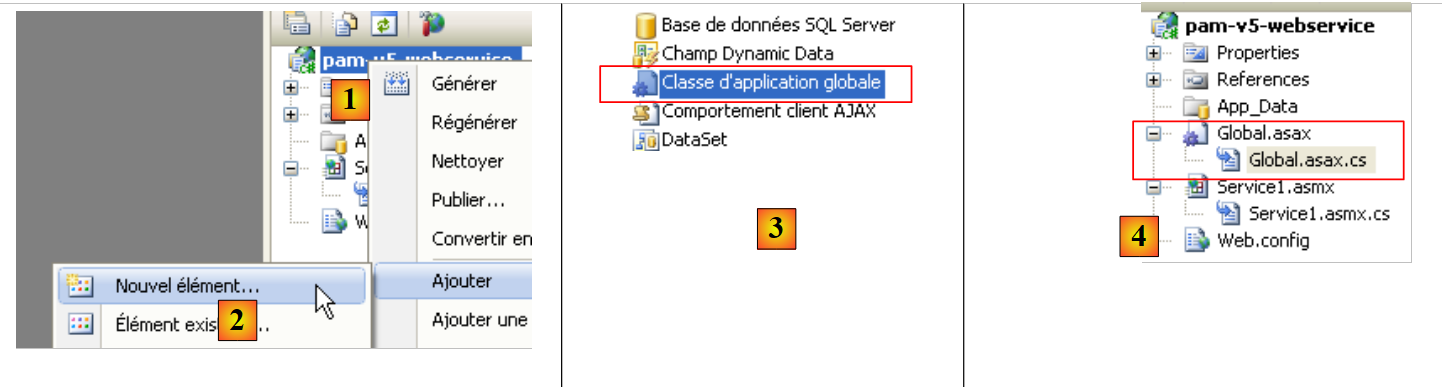 |
- In [1], right-click on the project
- In [2], select option [Ajouter un nouvel élément]
- In [3], select [Classe d'application globale]
- in [4], the file [Global.asax] has been added to the project
The contents of the file [Global.asax] are as follows:
<%@ Application Codebehind="Global.asax.cs" Inherits="pam_v5.Global" Language="C#" %>
The contents of the [Global.asax.cs] file are as follows:
using System;

namespace pam_v5
{
  public class Global : System.Web.HttpApplication
  {

    protected void Application_Start(object sender, EventArgs e)
    {

    }
...
  }
}
What do we need to do in the Application_Start method? Exactly the same thing as in the previous web applications. Let’s go back to the application architecture and place the [Global] class there:
 |
In the diagram above,
- the [Global] class is instantiated when the web service is started. It remains in memory as long as the web service is active.
- The [Global] class instantiates the [metier] and [dao] layers in its [Application_Start] method
- To improve performance, the [Global] class stores the simplified list of employees in an internal field. It will return the list of employees from this field.
- The web service is instantiated for each client request. It is destroyed after serving that request. It will not communicate directly with the [metier] layer but with the [Global] class. This class will implement the interface of the [metier] layer.
The [Global] class is similar to the one already built for previous applications:
using System;
using Pam.Dao.Entites;
using Pam.Metier.Entites;
using Pam.Metier.Service;
using Spring.Context.Support;

namespace pam_v5
{
  public class Global : System.Web.HttpApplication
  {
    // --- static application data ---
    public static Employe[] Employes;
    public static IPamMetier PamMetier = null;

    protected void Application_Start(object sender, EventArgs e)
    {
      // instantiation layer [metier]
      PamMetier = ContextRegistry.GetContext().GetObject("pammetier") as IPamMetier;
      // retrieve the simplified employee table
      Employes = PamMetier.GetAllIdentitesEmployes();
    }

    // simplified list of employees
    static public Employe[] GetAllIdentitesEmployes()
    {
      return Employes;
    }

    // employee salary
    static public FeuilleSalaire GetSalaire(string SS, double heuresTravaillées, int joursTravailles)
    {
      return PamMetier.GetSalaire(SS, heuresTravaillées, joursTravailles);
    }
  }
}
The [Global] class implements the [IPamMetier] interface, but this is not explicitly stated in the declaration:
public class Global : System.Web.HttpApplication, IPamMetier
In fact, the methods GetAllIdentitesEmployes (line 24) and GetSalaire (line 30) are static, whereas the methods of the IPamMetier interface are not. Therefore, the Global class cannot implement the IPamMetier interface. Furthermore, it is not possible to declare the methods GetAllIdentitesEmployes and GetSalaire as non-static. This is because they are accessed via the class name and not via an instance of the class.
- Line 15: The Application_Start method is similar to that of the [Global] classes discussed in previous versions. It instantiates the [metier] layer (line 18) and then initializes (line 20) the employee array from line 12.
- Line 24: The GetAllIdentitesEmployes method simply returns the employee array from line 12. This is the benefit of having stored it when the application started.
- Line 30: The GetSalaire method calls the method of the same name in the [metier] layer.
To instantiate the [metier] layer (line 18), the [Global] class uses the Spring framework. This is configured by the [Web.config] file, which is identical to that of the previous project: it configures Spring and NHibernate to instantiate the [metier] and [dao] layers of the web service.
Let’s return to the architecture of our client/server application:
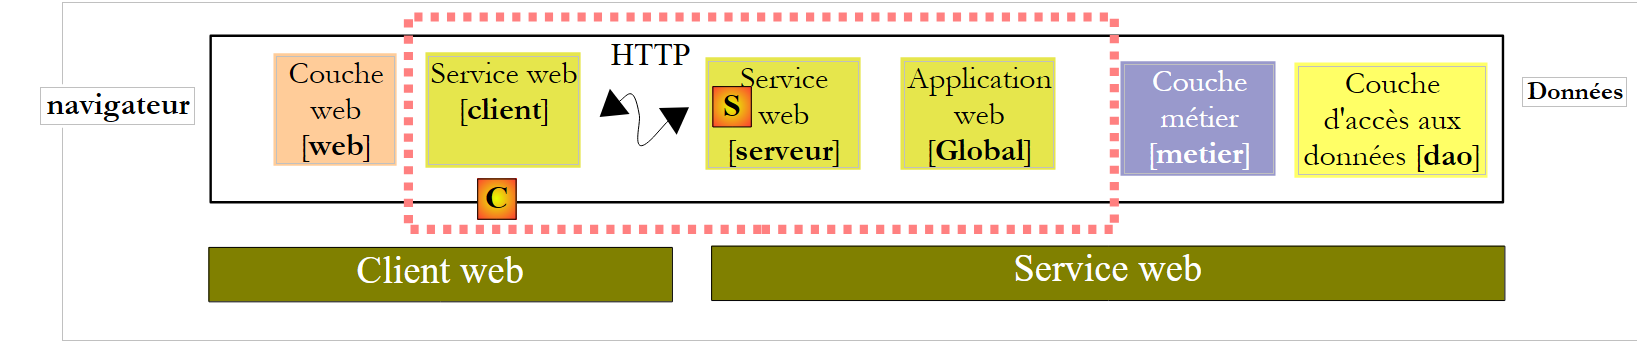 |
On the server side, all that remains is to write the [S] web service itself. If we return to the application architecture:
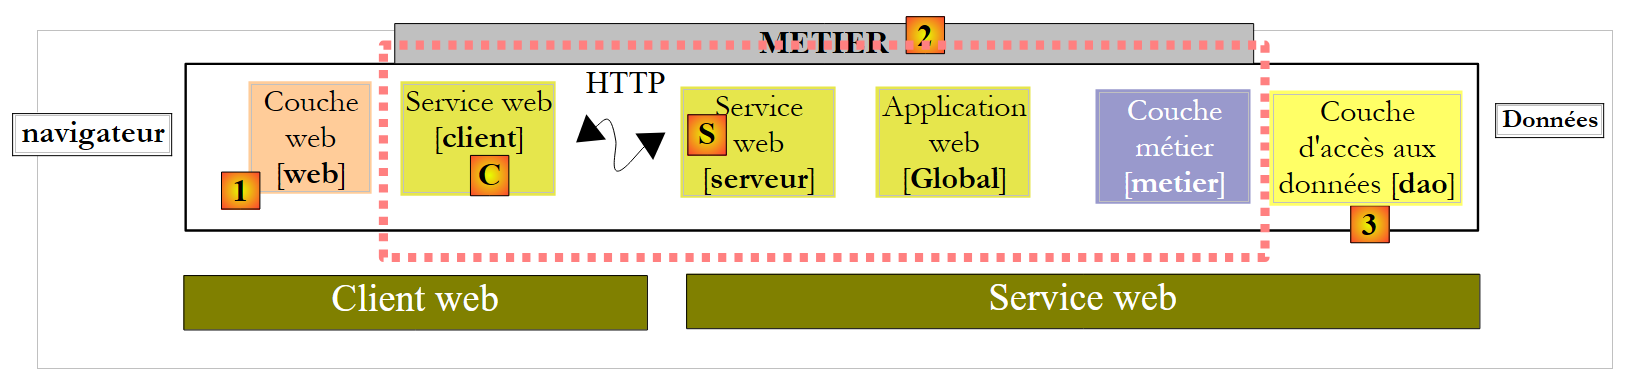 |
we see that on the server side, all layers preceding the [metier] layer implement its interface, IPamMetier. This is not mandatory, but it is a logical approach. This reasoning can be applied on the client side, to the [C] client of the [S] web service. Thus, all layers separating the [web] layer from the [metier] layer then implement the IPamMetier interface. We can thus say that we have returned to a three-tier application:
- the presentation layer [web] [1]
- the [metier] and [2] layers
- the data access layer [3]
The implementation of the web service [Service1.asmx.cs] could be as follows:
using System.Web.Services;
using Pam.Dao.Entites;
using Pam.Metier.Entites;
using Pam.Metier.Service;

namespace pam_v5
{
  [WebService(Namespace = "http://st.istia.univ-angers.fr/")]
  [WebServiceBinding(ConformsTo = WsiProfiles.BasicProfile1_1)]
  [System.ComponentModel.ToolboxItem(false)]
  public class Service1 : System.Web.Services.WebService, IPamMetier
  {

    // list of all employee identities
    [WebMethod]
    public Employe[] GetAllIdentitesEmployes()
    {
      return Global.GetAllIdentitesEmployes();
    }

    // ------- salary calculation
    [WebMethod]
    public FeuilleSalaire GetSalaire(string ss, double heuresTravaillees, int joursTravailles)
    {
      return Global.GetSalaire(ss, heuresTravaillees, joursTravailles);
    }
  }
}
- line 8: the class is annotated with the [WebService] attribute, and we name the web service namespace
- line 11: the class [Service1] inherits from the class [WebService] and implements the interface [IPamMetier]
- Lines 15 and 22: Each method of the class is annotated with the [WebMethod] attribute in order to be exposed to remote clients. By default, all public methods of a web service are exposed. The attributes in lines 15 and 22 are therefore optional here. To implement the [IPamMetier] interface, each method simply calls the method of the same name in the [Global] class.
We are ready to run the web service:
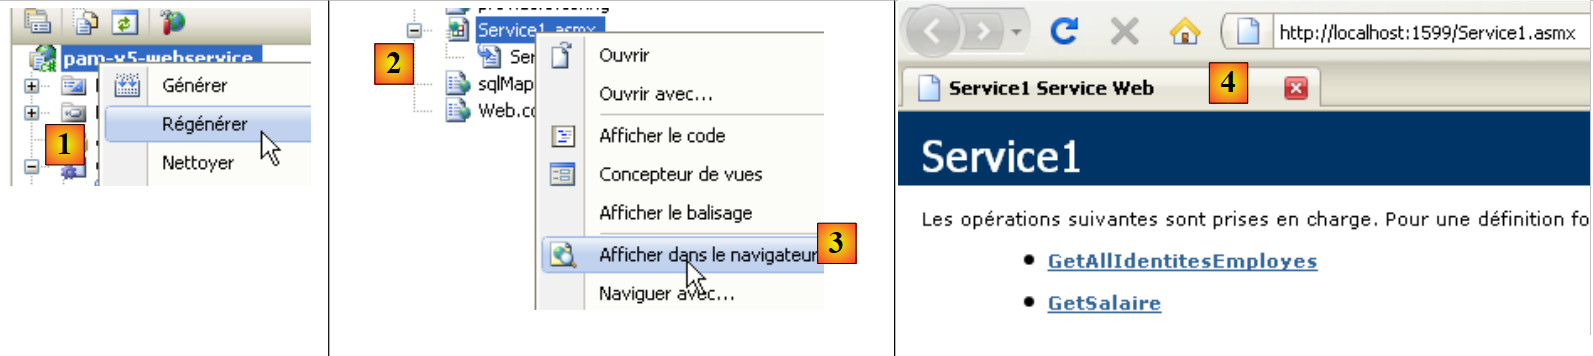 |
- In [1], the project is regenerated
- in [2], we select the [Service1.asmx] web service and display it in the [3] browser
- in [4], the displayed web page. It shows the web service methods.
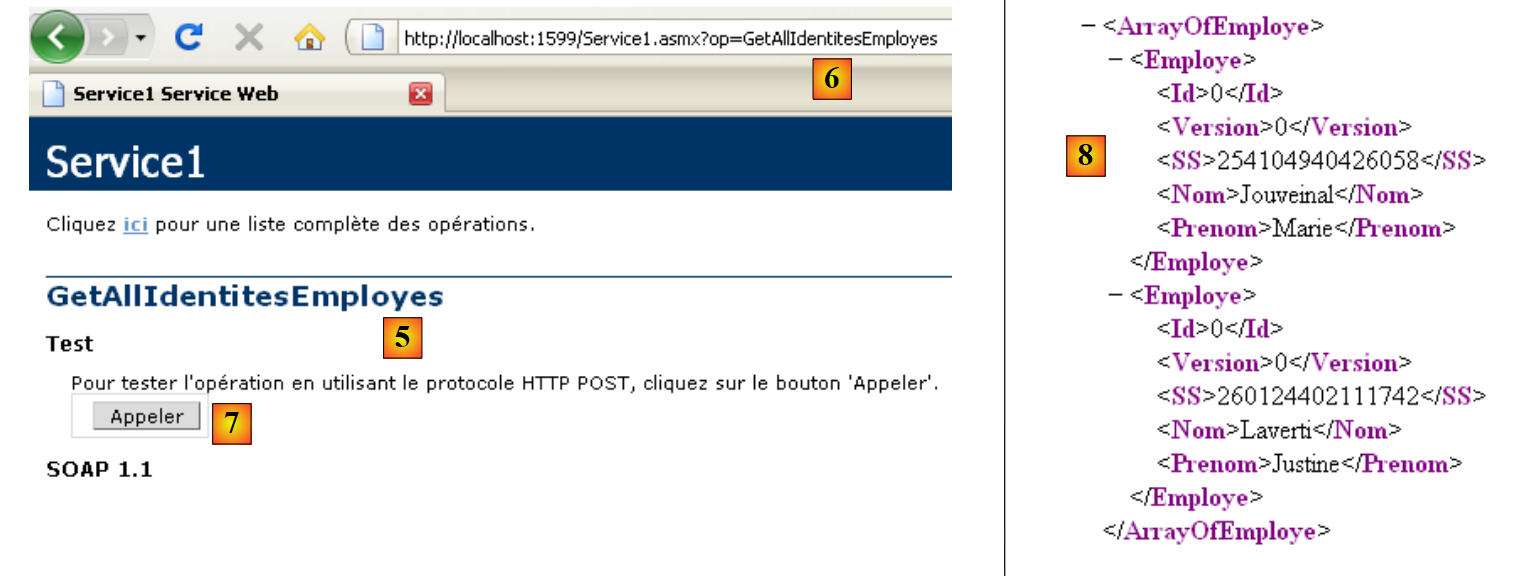 |
- In [4], we follow the link [GetAllIdentitesEmployes] and arrive at [5], the test page for this method.
- In [6], the URL for the method
- In [7], the [Appeler] button for testing the method. This method does not require any parameters.
- In [8], the result Xml returned by the web service. In this result, only the properties SS, LastName, and FirstName of the Employee objects are relevant, as the method [GetAllIdentitesEmployes] requests only these properties. However, this method returns an array of Employee objects. We can see in [8] that the numeric properties Id and Version are included in the returned Xml stream, but not the properties with a null value: Address, City, CodePostal, and Indemnites.
We have an active web service. We will now write a C# client for it. To do this, we will need the URI from the WSDL file of the web service. We obtain it from the page initially displayed when running [Service.asmx]:
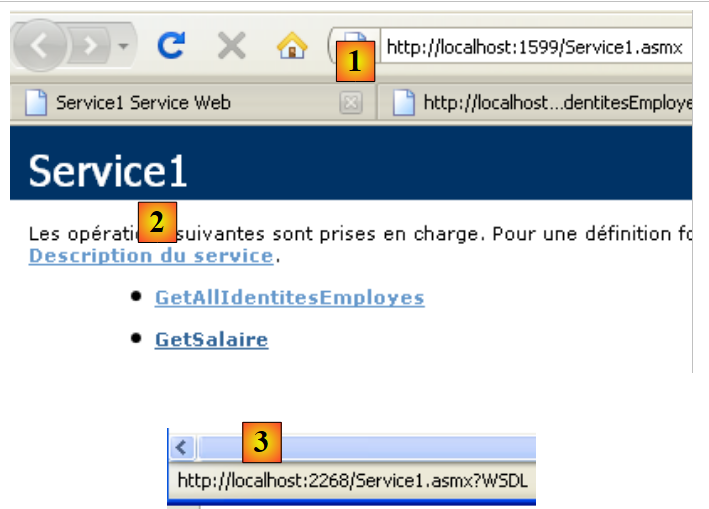 |
- in [1], the URI of the web service
- in [2], the link that leads to its file WSDL
- in [3], the value of that link
9.3. The C# project for web service client NUnit
We are creating a C# project (using Visual C#, not Visual Web Developer) for the web service client. This will be a test client named NUnit. The project will be of the "Class Library" type.
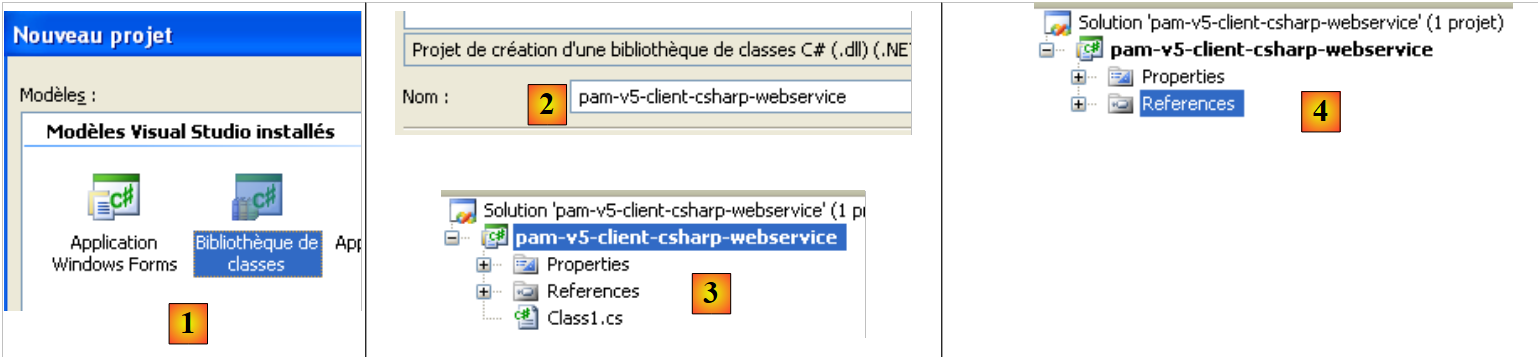 |
- In [1], we create a C# project of the "Class Library" type
- In [2], we name the project
- In [3], the project. We delete [Class1.cs].
- In [4], the new project.
 |
- In the project properties, on the [Application] [5] tab, we set the project namespace. Every class generated by IDE will be in this namespace.
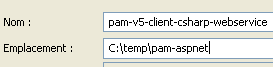
We save our new project to a location of our choice:
 |
Once this is done, we generate the remote web service client. To understand what we are about to do, we need to revisit the client/server architecture currently under construction:
 |
IDE will generate the client layer [C] from URI in the WSDL file of the [S] web service. Note that the URI from this file was noted earlier. We proceed from the " " as follows:
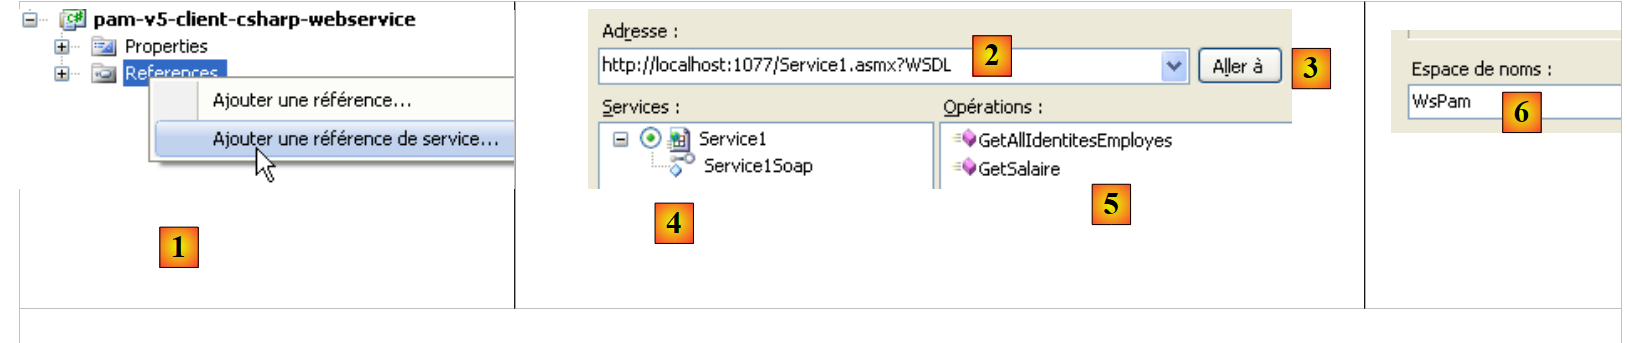 |
- In [1], right-click on the References branch and add a service reference
- In [2], specify the URL of the WSDL file for the web service noted previously. This must be launched beforehand if it is not already running.
- In [3], request discovery of the web service via its WSDL file
- in [4], the discovered web service
- in [5], the methods exposed by the web service.
- in [6], the namespace in which you want to place the classes and interfaces of the client that will be generated.
- We confirm the wizard
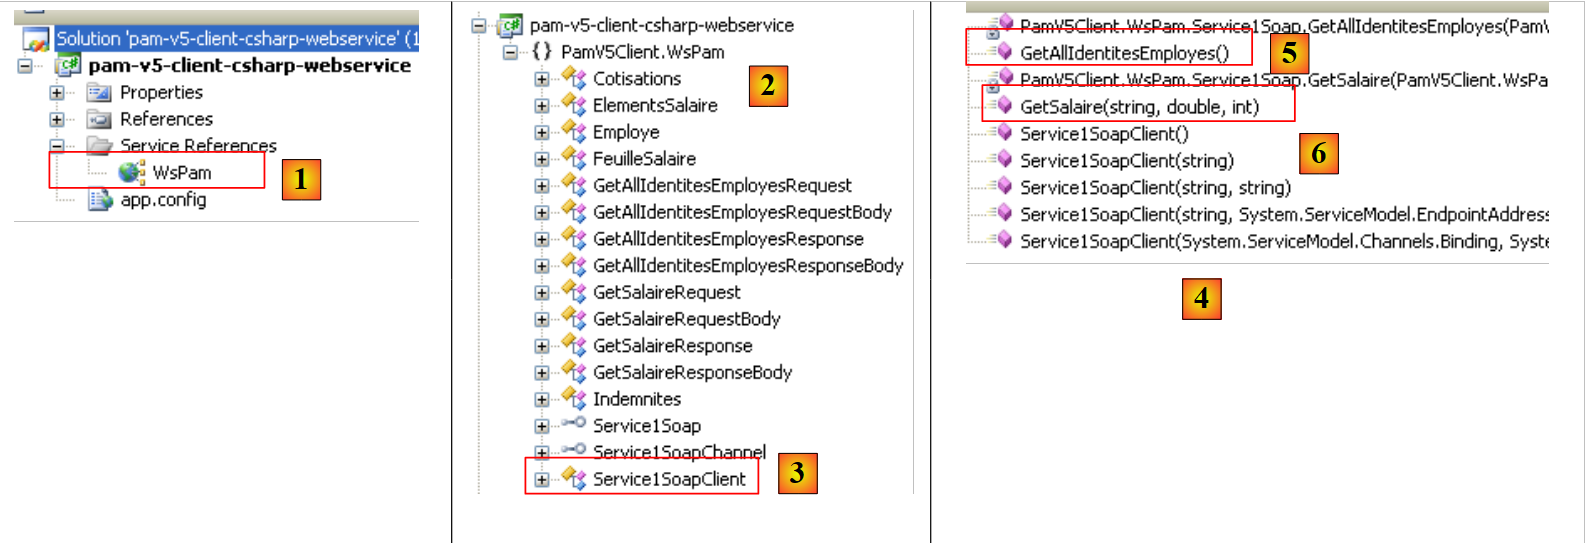 |
- in [1], the generated client c . Double-click it to view its contents.
- In [2], in the Object Explorer, the classes and interfaces of the Client.WsPam namespace are displayed. This is the namespace of the generated client.
- In [3], the class that implements the web service client.
- In [4], the methods implemented by the client [Service1SoapClient]. Here you will find the two methods of the remote web service [5] and [6].
- In [2], we find the images of the layer entities:
- [metier]: FeuilleSalaire, ElementsSalaire
- [dao]: Employee, Cotisations, Indemnites
Moving forward, keep in mind that these images of remote entities are located on the client side and in the PamV5Client.WsPam namespace.
Let’s examine the methods and properties exposed by one of them:
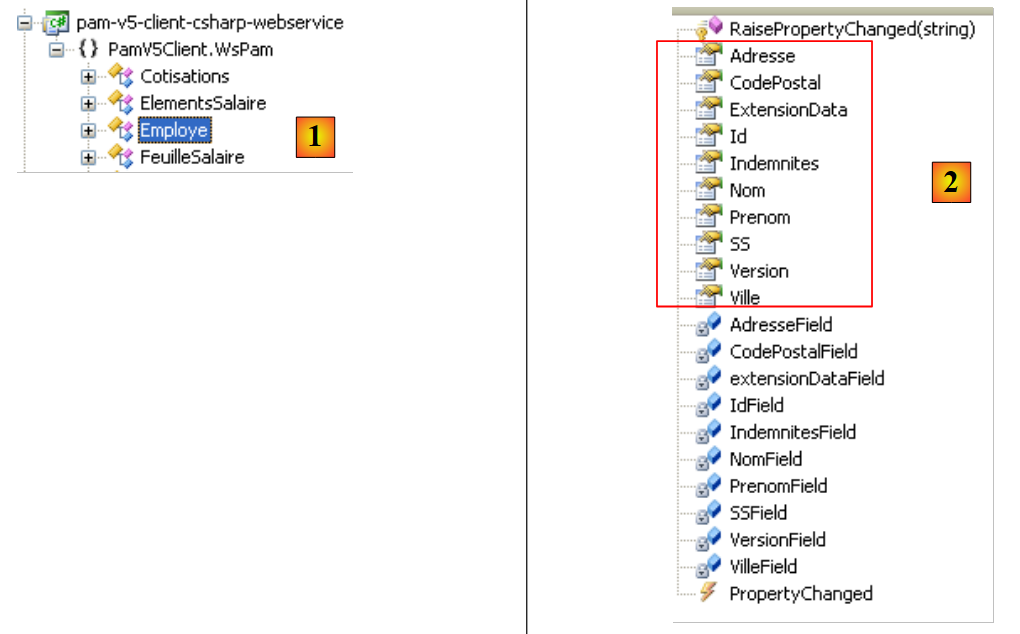 |
- In [1], we select the local class [Employe]
- In [2], we find the properties of the remote entity [Employe] as well as private fields used for the local entity’s own needs.
Let’s return to our C# application. We add a test class NUnit:
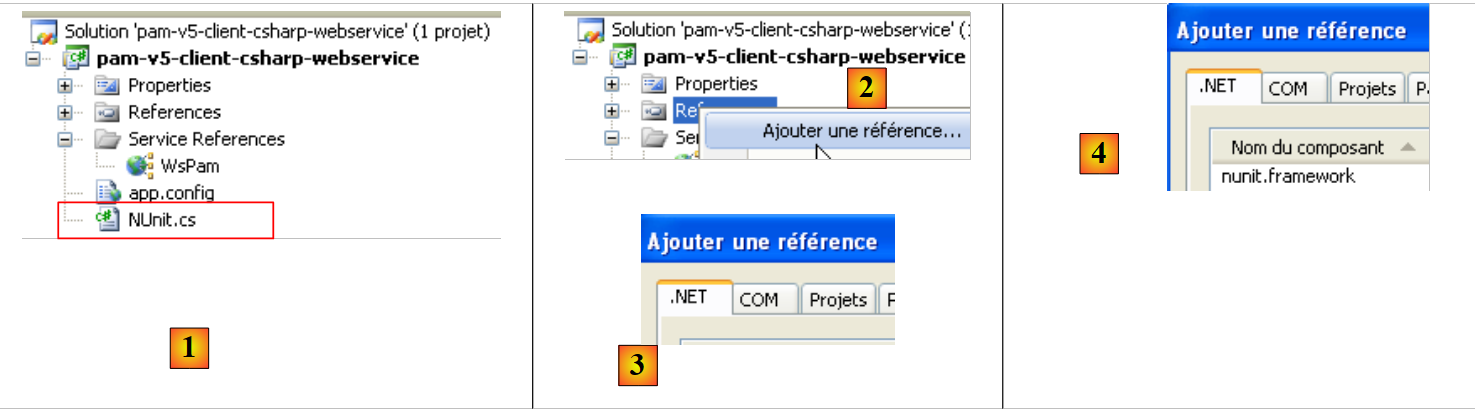 |
- in [1], the [NUnit] class has been added. The [NUnit] class will need the NUnit framework and therefore a reference to its DLL. We assume here that the NUnit framework has been installed on the machine (http://nunit.org/).
- In [2], we add a reference to the project
- in the [3] tab. In NET, which lists the DLL files saved on the computer, we select [4], DLL [nunit.framework] version 2.4.6 minimum.
In addition, we will use Spring to instantiate the local client [C] of the web service [S]:
 |
The Spring DLL reference can be added as was done with the NUnit framework if the DLL have been previously registered on the machine (http://www.springframework.net/download.html).
We proceed differently. We use the [lib] folder from previous projects, which contained the DLL files required by Spring, and we add the Spring dependency to the project:
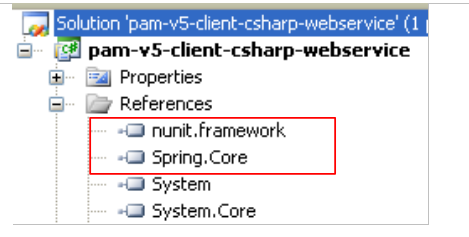 |
Let’s take a look at the architecture of the client currently under development:
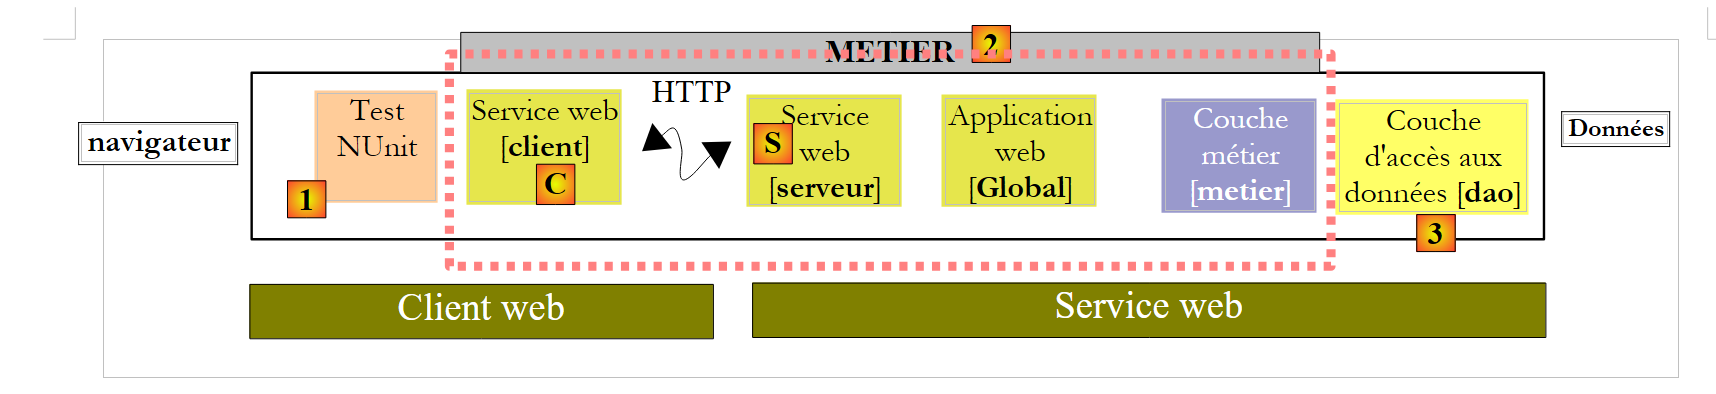 |
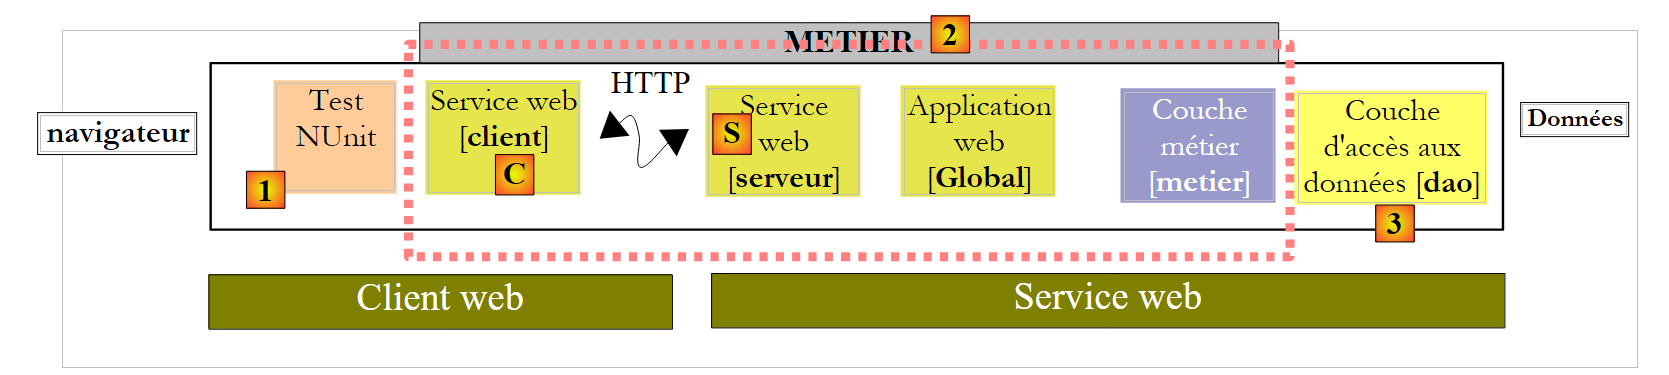
Above, we see that the [1] test client interfaces with an extended [metier] [2] layer. This layer has the same methods as the remote [metier] layer. We can therefore use the test class already encountered when testing the [metier] layer in the C# project [pam-metier-dao-nhibernate]:
using NUnit.Framework;
using Pam.Dao.Entites;
using Pam.Metier.Entites;
using Pam.Metier.Service;
using Spring.Context.Support;

namespace Pam.Metier.Tests {

    [TestFixture()]
    public class NunitTestPamMetier : AssertionHelper {

        // the [metier] layer to test
        private IPamMetier pamMetier;

        // manufacturer
        public NunitTestPamMetier() {
            // instantiation layer [dao]
            pamMetier = ContextRegistry.GetContext().GetObject("pammetier") as IPamMetier;
        }


        [Test]
        public void GetAllIdentitesEmployes() {
            // audit no. of employees
            Expect(2, EqualTo(pamMetier.GetAllIdentitesEmployes().Length));
        }

        [Test]
        public void GetSalaire1() {
            // wage sheet calculation
            FeuilleSalaire feuilleSalaire = pamMetier.GetSalaire("254104940426058", 150, 20);
            // checks
            Expect(368.77, EqualTo(feuilleSalaire.ElementsSalaire.SalaireNet).Within(1E-06));
            // non-existent employee payslip
            bool erreur = false;
            try {
                feuilleSalaire = pamMetier.GetSalaire("xx", 150, 20);
            } catch (PamException) {
                erreur = true;
            }
            Expect(erreur, True);
        }

    }
}
There are a few changes to make:
- On line 18, we instantiate the [metier] layer using the Spring framework. The class is not the same in both cases. Here, the local [metier] layer is an instance of the [PamV5Client.WsPam.Service1SoapClient] class, the class generated by IDE. Therefore, Spring is configured as follows in the [app.config] file of the C# project:
<?xml version="1.0" encoding="utf-8" ?>
<configuration>

    <configSections>
        <sectionGroup name="spring">
            <section name="context" type="Spring.Context.Support.ContextHandler, Spring.Core" />
            <section name="objects" type="Spring.Context.Support.DefaultSectionHandler, Spring.Core" />
        </sectionGroup>
    </configSections>

    <spring>
        <context>
            <resource uri="config://spring/objects" />
        </context>
        <objects xmlns="http://www.springframework.net">
            <object id="pammetier" type="PamV5Client.WsPam.Service1SoapClient, pam-v5-client-csharp-webservice"/>
        </objects>
    </spring>


    <system.serviceModel>
...
- line 16 above, the [pammetier] object is an instance of the [PamV5Client.WsPam.Service1SoapClient] class located in the [pam-v5-client-csharp-webservice] assembly. To obtain the first piece of information, simply return to the definition of the [Service1SoapClient] class in the Object Explorer (Section 9.3):
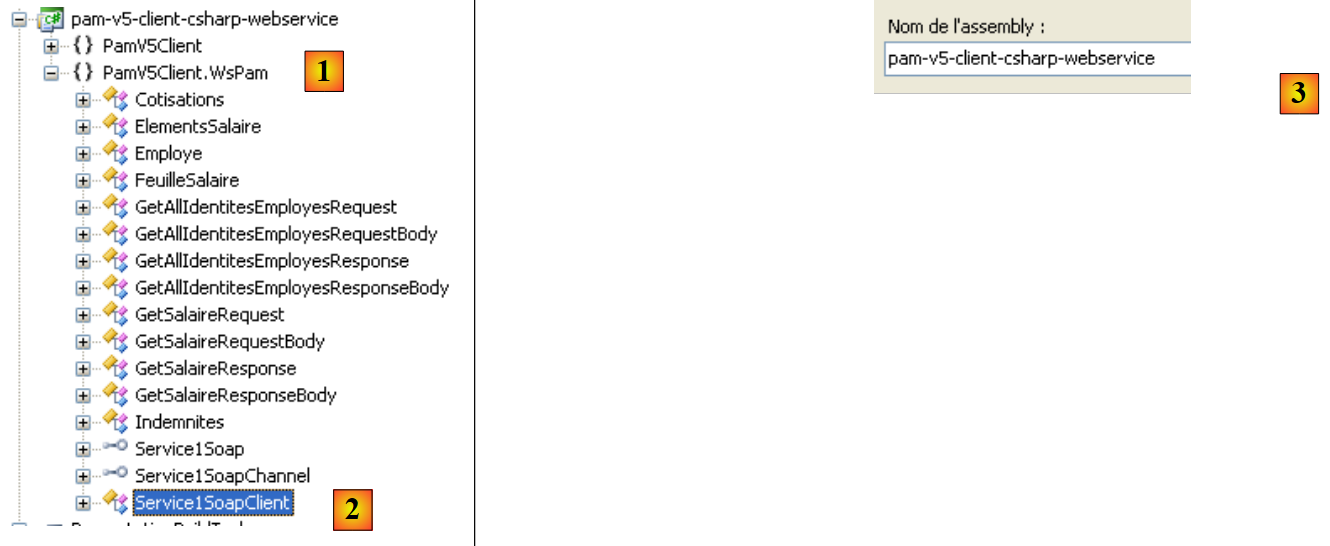 |
- in [2], the implementation class of the local layer [metier], and in [1] its namespace
- in [3], in the project properties, the assembly name, the second piece of information required to configure the Spring object [pammetier].
Let’s return to the code for instantiating the local layer [metier] in [NUnit.cs]:
        // the [metier] layer to test
        private IPamMetier pamMetier;

        // manufacturer
        public NunitTestPamMetier() {
            // instantiation layer [dao]
            pamMetier = ContextRegistry.GetContext().GetObject("pammetier") as IPamMetier;
        }
Line 7: the remote [metier] layer was of type IPamMetier. Here, the [metier] layer is of type [Service1SoapClient]:
public class Service1SoapClient : System.ServiceModel.ClientBase<Service1Soap>
We see that the Service1SoapClient class does not implement the IPamMetier interface even though it exposes methods with the same names. We must therefore write the instantiation of the local [metier] layer as follows:
        // the [metier] layer to test
        private Service1SoapClient pamMetier;

        // manufacturer
        public NunitTestPamMetier() {
            // instantiation layer [metier]
            pamMetier = ContextRegistry.GetContext().GetObject("pammetier") as Service1SoapClient;
}
Another change to make:
        [Test]
        public void GetSalaire1() {
...
            try {
                feuilleSalaire = pamMetier.GetSalaire("xx", 150, 20);
            } catch (PamException) {
                erreur = true;
            }
            Expect(erreur, True);
        }
The code above uses, on line 6, the type PamException, which does not exist on the client side. We will replace it with its parent class, the Exception type.
        [Test]
        public void GetSalaire1() {
...
            try {
                 feuilleSalaire = pamMetier.GetSalaire("xx", 150, 20);
            } catch (Exception) {
                erreur = true;
            }
            Expect(erreur, True);
        }
Finally, the imported namespaces are no longer the same:
using System;
using PamV5Client.WsPam;
using NUnit.Framework;
using Spring.Context.Support;
Once this is done, the "Class Library" project can be generated. The following DLL file is created:
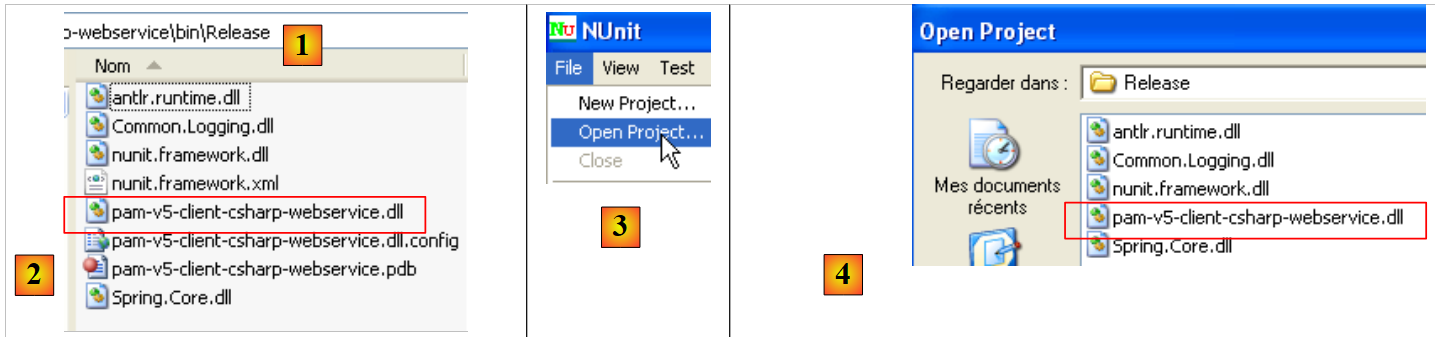 |
- in [1], the [bin/Release] folder of the C# project
- in [2], the DLL of the project.
The NUnit test is then executed by the NUnit framework (the MySQL and dbpam_nhibernate base projects must be active for the test):
- In [3] and [4], DLL [2] is loaded into the test application NUnit
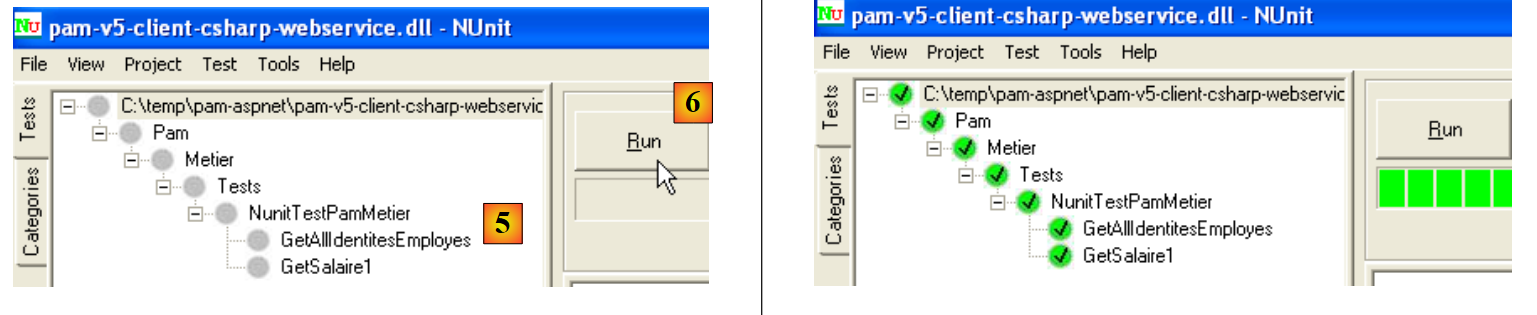 |
- In [5], the test class is selected and executed in [6]
- in [7], the results of a successful test
We now have a working web service.