11. Version 6 - Integration of the web layer into a 3-tier architecture JSF / EJB
11.1. Application Architecture
The architecture of the previous web application was as follows:
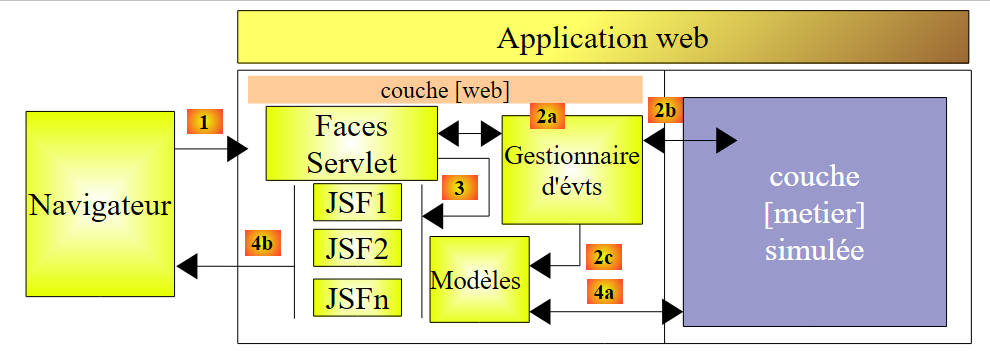 |
We are replacing the simulated [métier] layer with the [métier, DAO, jpa] layers implemented by EJB in Section 7.1:
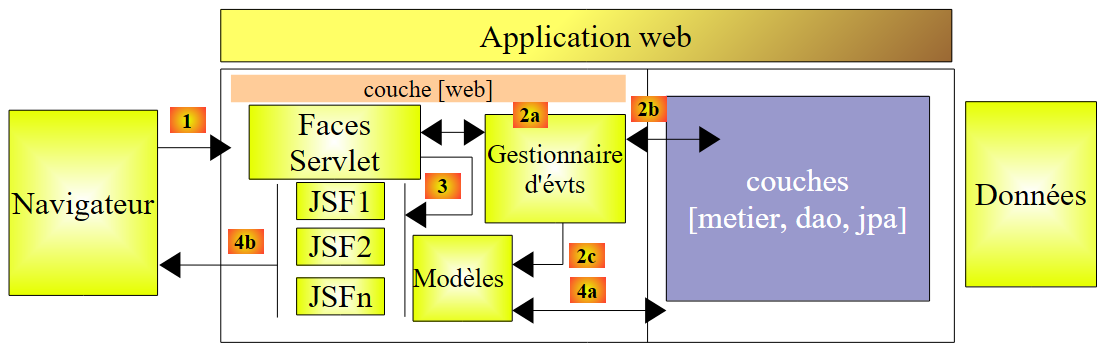 |
11.2. The Netbeans project for the web layer
The Netbeans project for Web version No. 2 is obtained by copying the previous project:
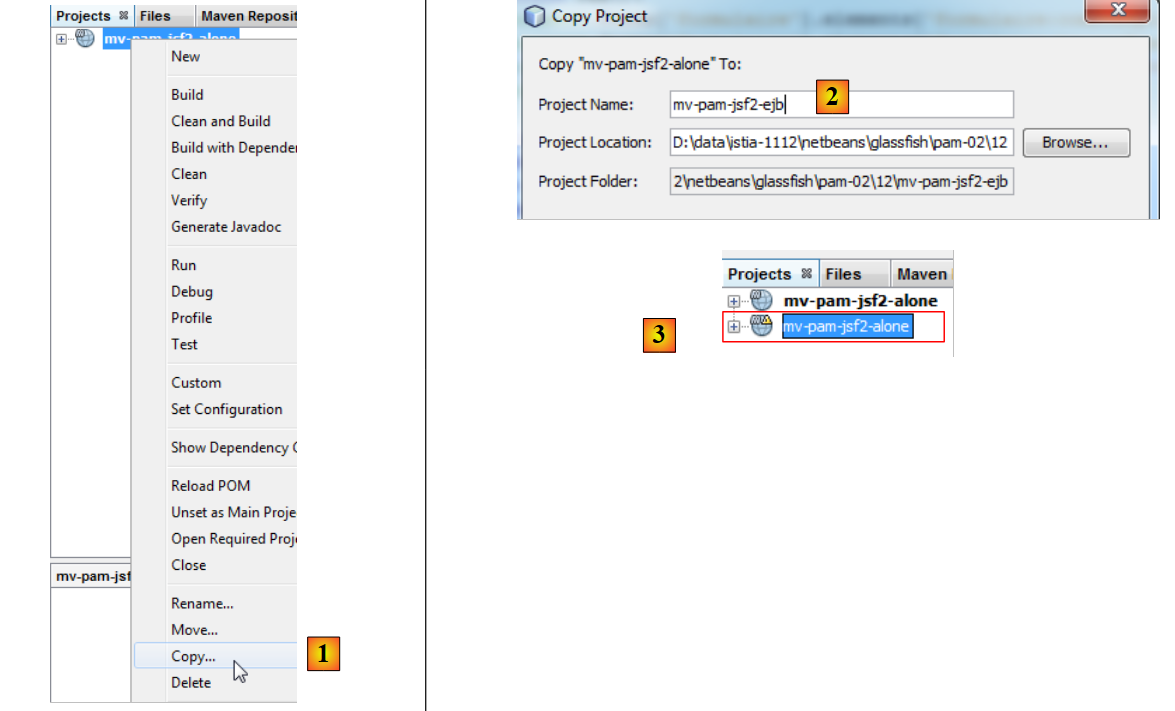 |
- [1]: copy the new project and paste it into the [Projects] tab,
- [2]: give it a name and set its folder,
- [3]: the project is created,
The new project has the same name as the old one. We change that:
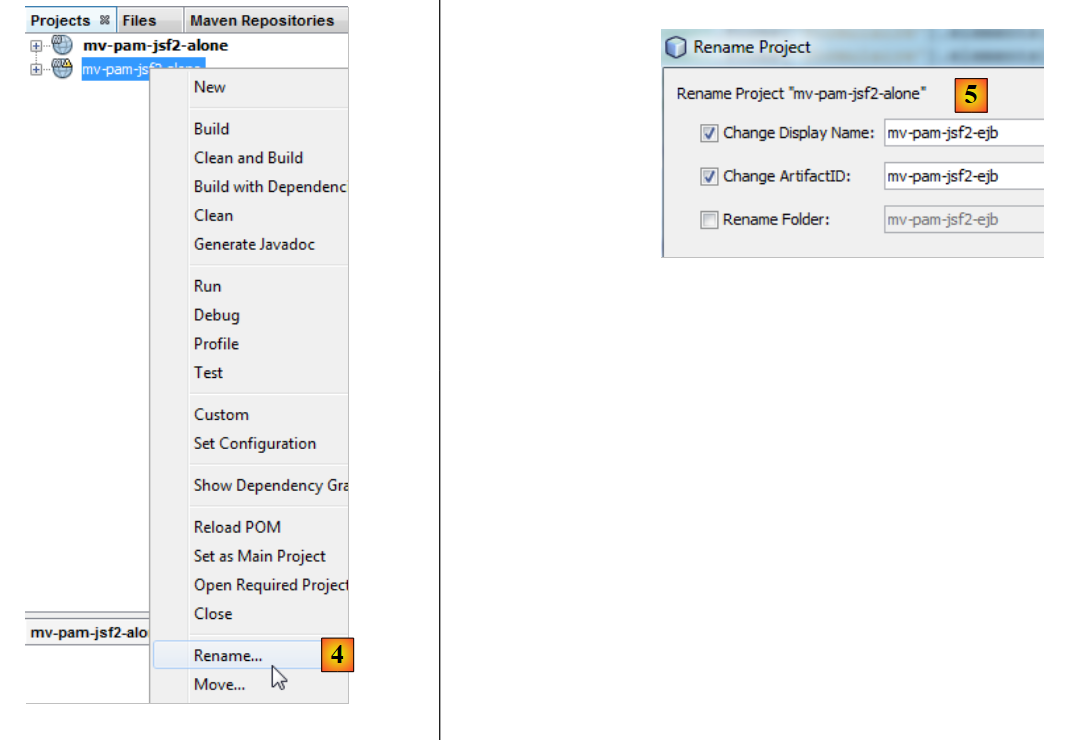 |
- [4]: we rename the project,
- [5]: we change its name as well as that of artifactID.
We have few changes to make to adapt this web layer to its new environment: the simulated [metier] layer must be replaced by the [metier, DAO, jpa] layer from the server built in Section 7.1. To do this, we do two things:
- we remove the [exception, metier, jpa] packages that were present in the previous project.
- To compensate for this removal, we add the EJB server project built in Section 7.1 to the web project’s dependencies.
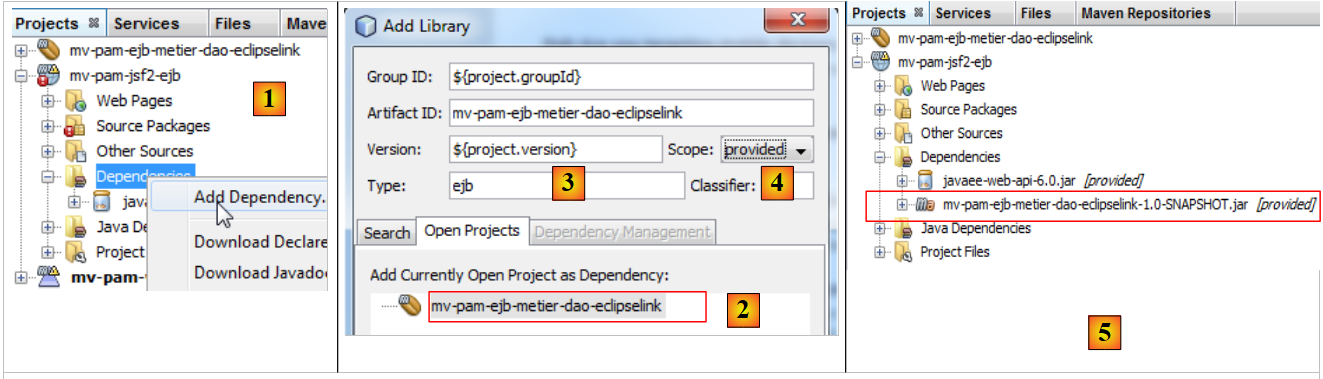 |
- In [1], we add a dependency to the project,
- in [2], we select the Maven project for the [métier] layer. In [3], specify its type, and in [4], specify its scope. The scope is set to `provided` to indicate that it will be provided to the web module by its runtime environment. We will see shortly that it will be provided by an enterprise application,
- in [5], the dependency has been added.
The [pom.xml] file is then as follows:
<dependencies>
    <dependency>
      <groupId>${project.groupId}</groupId>
      <artifactId>mv-pam-ejb-metier-dao-eclipselink</artifactId>
      <version>${project.version}</version>
      <scope>provided</scope>
      <type>ejb</type>
    </dependency>
    <dependency>
      <groupId>javax</groupId>
      <artifactId>javaee-web-api</artifactId>
      <version>6.0</version>
      <scope>provided</scope>
    </dependency>
  </dependencies>
We can now remove the packages from the [métier] layer that are no longer needed:
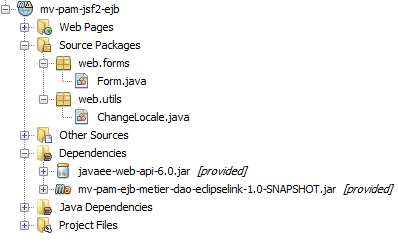 |
We also need to modify the code for the [Form.java] bean:
public class Form {

  public Form() {
  }

  // business layer
  private IMetierLocal metier=new Metier();

  // form fields
...
Line 7 instantiated the simulated [métier] layer. Now it must reference the actual [métier] layer. The previous code becomes the following:
public class Form {

  public Form() {
  }

  // business layer
  @EJB
  private IMetierLocal metier;

  // form fields
Line 7: The @EJB annotation instructs the servlet container—which will execute the web layer—to inject into the business field of layer 8, the EJB class, which implements the local interface IMetierLocal.
Why the local interface IMetierLocal rather than the interface IMetierRemote? Because the web layer and the EJB layer run in the same JVM:
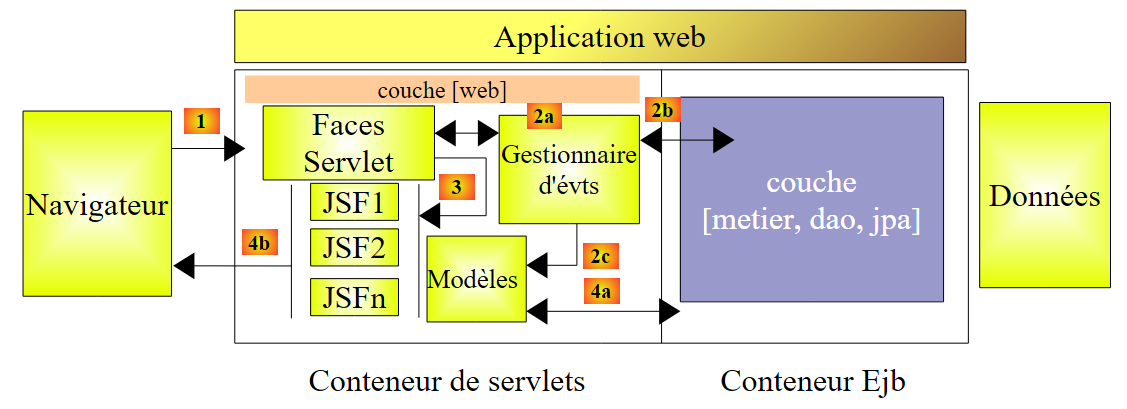 |
The classes in the servlet container can directly reference the EJB classes in the EJB container.
That’s it. Our web layer is ready. The transformation was simple because we had taken care to simulate the [métier] layer with a class that adhered to the IMetierLocal interface implemented by the actual [métier] layer.
11.3. The Netbeans project of the enterprise application
An enterprise application allows for the simultaneous deployment on an application server of an application’s [web] layer and EJB layer, in the servlet container and the EJB container, respectively.
We proceed as follows:
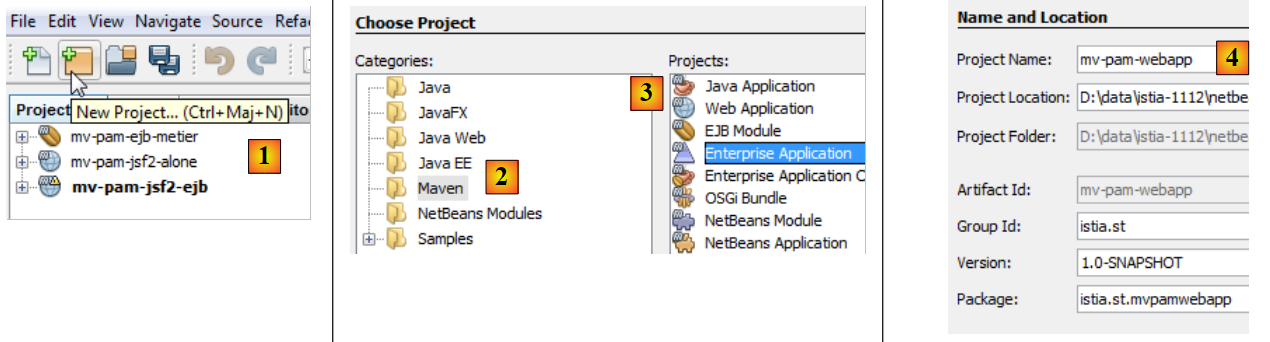 |
- In [1], create a new project
- In [2], select the category [Maven]
- In [3], select the type [Enterprise Application]
- In [4], name the project
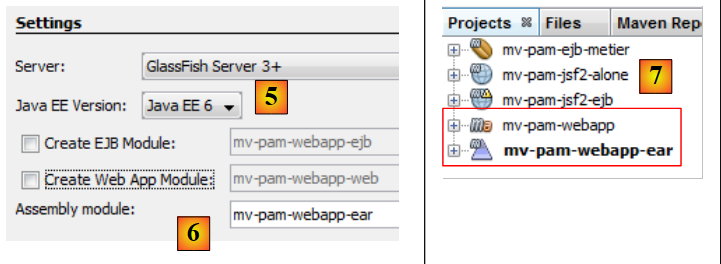 |
- In [5], we select Java EE 6
- In [6], a business project can include up to two types of modules:
- a EJB module
- a web module
You can request the creation of these two modules at the same time as the enterprise project; they will be empty initially. An enterprise project serves only to deploy the modules that are part of it. Beyond that, it is an empty shell. Here, we want to deploy:
- an existing web module [mv-pam-jsf2-alone]. Therefore, there is no need to create a new web module.
- an existing EJB module, [mv-pam-ejb-metier-dao-eclipselink]. Here, too, there is no need to create a new one.
In [6], we create an enterprise project without modules. We will add its web and EJB modules later.
- In [7], two Maven projects have been created. The enterprise project is the one with the .ear suffix. The other project is a parent Maven project of the previous one. We will not be concerned with it.
We add the web module and the EJB module to the enterprise project:
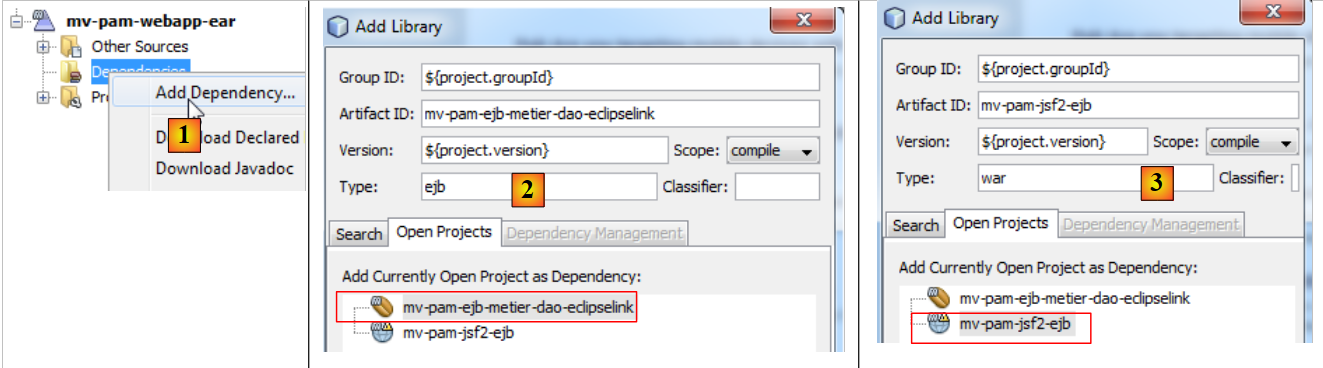 |
- in [1], added a new dependency,
- in [2], addition of the project EJB [mv-pam-ejb-metier-dao-eclipselink]. Note its EJB type,
- In [3], add the web project [mv-pam-jsf2-ejb]. Note that its type is war.
The [pom.xml] file is then as follows:
<dependencies>
        <dependency>
            <groupId>${project.groupId}</groupId>
            <artifactId>mv-pam-ejb-metier-dao-eclipselink</artifactId>
            <version>${project.version}</version>
            <type>ejb</type>
        </dependency>
        <dependency>
            <groupId>${project.groupId}</groupId>
            <artifactId>mv-pam-jsf2-ejb</artifactId>
            <version>${project.version}</version>
            <type>war</type>
        </dependency>
    </dependencies>
Before deploying the [mv-pam-webapp-ear] enterprise application, ensure that the MySQL and [dbpam_eclipselink] databases exist and are populated. Once this is done, we can deploy the [mv-pam-webapp-ear] enterprise application:
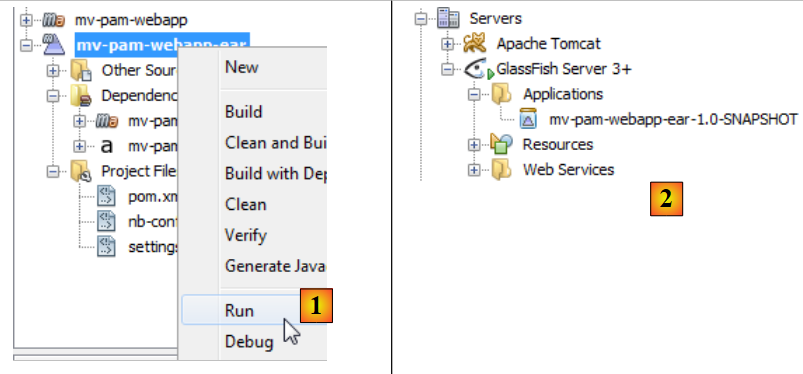 |
- In [1], the enterprise application is deployed
- In [2], the enterprise application [mv-pam-webapp-ear] has been successfully deployed.
In the browser, the following page is displayed:
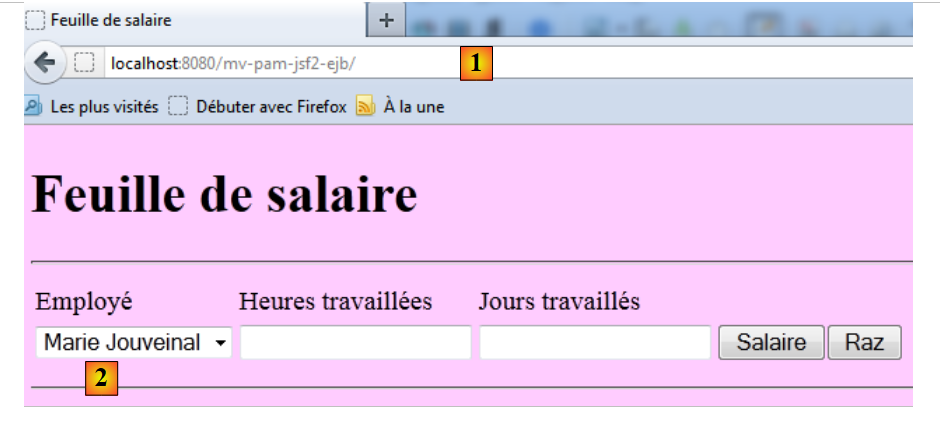 |
- In [1], the requested URL
- In [2], the list of employees has been populated with the entries from table [Employes] in the dbpam database.
The reader is invited to repeat the tests for version Web #1. Here is an example of the execution: