5. User Interface Management
5.1. Introduction
In the client-server relationship on the web, the client transmits information to the server in the form of a [param1=val1¶m2=val2&...] parameter string. In our previous examples, we most often built this string manually by requesting url of the form [http://localhost/appli? param1=val1¶m2=val2&...]. In reality, the information that the client transmits to the server comes from forms that the user has filled out. We explore the construction of these forms in this chapter. We also introduce the WebMatrix tool, which will allow us to design user interfaces. The installation of this tool is described in the appendices.
5.2. The HTML language
5.2.1. An Example
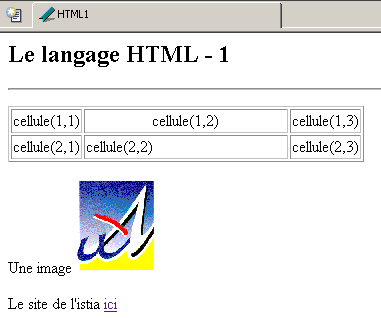
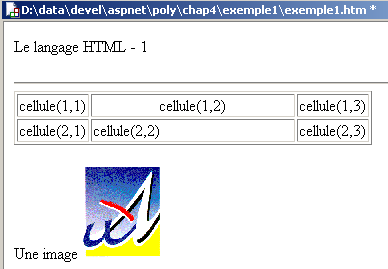
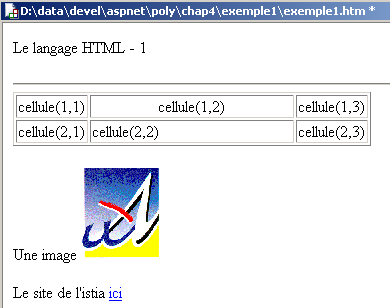
Consider the following example, created with [Web Matrix], which displays:
- a table
- an image
- a link
Let’s run [WebMatrix] and then take option and [File/New File]:
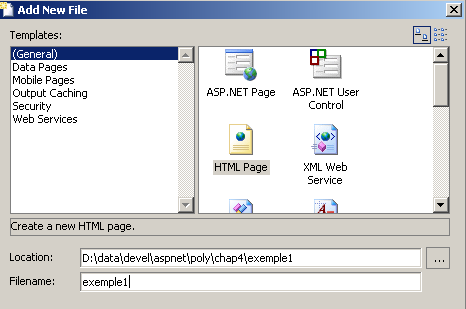
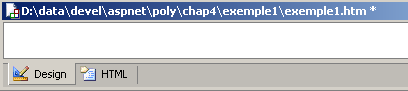
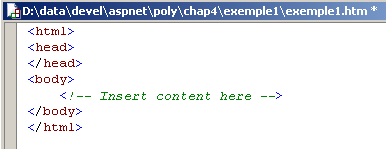
We choose to create a page named HTML. The information above will create a file named [d:\data\devel\aspnet\chap4\exemple1\exemple1.htm]. [WebMatrix] offers two options for editing this file: [Design] mode and [HTML] mode:
The [Design] mode allows you to use the HTML component palette provided by [WebMatrix]:

To insert an element from this palette, simply double-click on it and then position it in the [Design] window. The [HTML] mode allows you to build the HTML document using a text editor. To do this, you must be familiar with the syntax of the HTML language. In the [HTML] tab, a document template has been generated:
The [HTML] window is very useful for those unfamiliar with the HTML language. They build their document in the [Design] window and check the HTML code generated in the [HTML] window. In this way, they gradually master HTML and can fairly quickly work solely with the text editor without the aid of [Design] mode. We will now show how to build the HTML document presented at the beginning of this section. We are working in the [Design] window. First, we enter the first line of text directly:

- we add the [Horizontal Rule] component to the component palette:
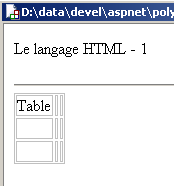
- we add the [Table] component:
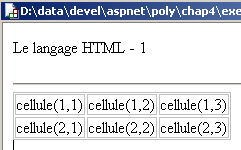
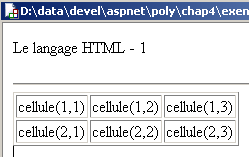
- we place the cursor in the third row of the table to delete it using option and [HTML/Edit Table/Delete Table Row]. Then we enter the expected text in each cell:
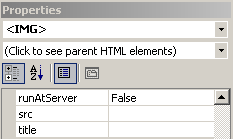
- we place the cursor in one of the table cells and examine its properties. The properties window is displayed at the bottom right of the workspace:
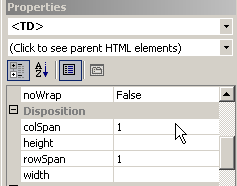
- The cell is represented by the tag <HTML>. We are therefore shown the properties of the tag <TD>. We focus on the table, which is an object containing the cell. We click on the drop-down list (click to see parent HTML elements) above to select the <TABLE> object:
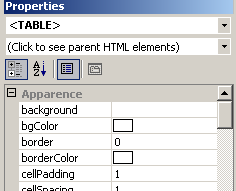
- The <TABLE> object has a [border] property that sets the width of the border surrounding the table cells. Here, we set border=1.
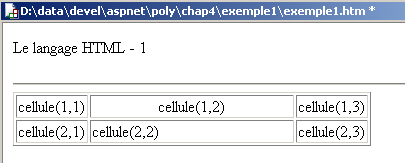
- We now edit the attributes of the <TD> object in cell (1,2) to set align=Center and width=200 (pixels). The text will be centered in the cell (align=center), and the cell will be 200 pixels wide. To see the change, you may need to select the [HTML] tab and then return to the [Design] tab:
- now we place the text that precedes the image:
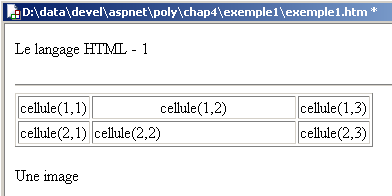
- then the image by double-clicking on the [image] component in the palette:

- We select the image to edit its properties:
- in the [src] attribute, enter the name of the file containing the image, in this case [univ01.gif]:
- we place the text preceding the link:
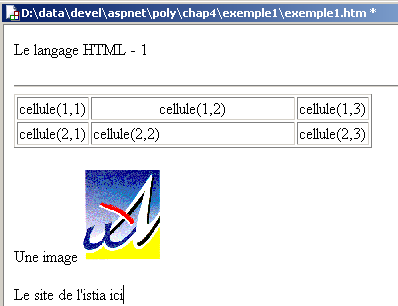
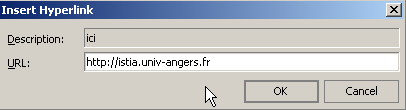
- we turn the text [ici] into a link to url [http://istia.univ-angers.fr]. To do this, we select it and then click option [HTML/Insert Hyperlink]:
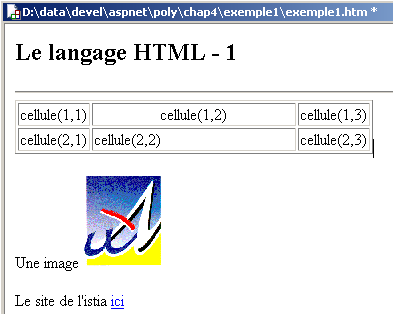
- we get the following result:
- We're almost there. Let's look at the HTML code generated in the [HTML] tab:
<html>
<head>
</head>
<body>
    <p>
        Le langage HTML - 1
    </p>
    <hr />
    <table border="1">
        <tbody>
            <tr>
                <td>
                    cellule(1,1)</td>
                <td align="middle" width="200">
                    cellule(1,2)</td>
                <td>
                    cellule(1,3)</td>
            </tr>
            <tr>
                <td>
                    cellule(2,1)</td>
                <td>
                    cellule(2,2)</td>
                <td>
                    cellule(2,3)</td>
            </tr>
        </tbody>
    </table>
    <p>
        Une image <img src="univ01.gif" />
    </p>
    <p>
        Le site de l'istia <a href="http://istia.univ-angers.fr">ici</a>
    </p>
</body>
</html>
We still have a few details to work out. First, we’d like to give our document a title. [WebMatrix] doesn’t allow us to do this in [Design] mode. In the [HTML] tab, we replace the sequence <head>..</head> with the following sequence:
Additionally, we would like the text [Le langage HTML - 1] to appear in larger font. The sequence <Hi>text</Hi> allows you to set the text size, with i ranging from 1 to 6, from largest to smallest. Here, we will use H2. The sequence
becomes:
The [Design] window reflects our changes:
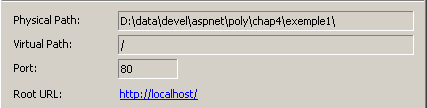
All that remains is to test it using option, [View/Start], or [F5]. [WebMatrix] requests some information to start the [Cassini] web server:
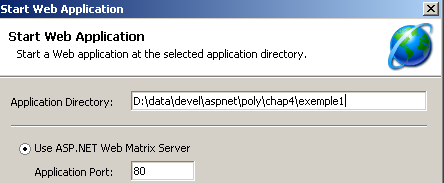
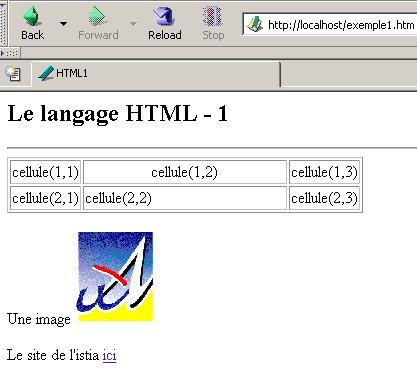
We can accept the default values. The [Cassini] server is launched and our page is displayed in a browser:
Out of curiosity, we can check which parameters were used to start [Cassini]:
We have presented the basics of building a HTML page using [WebMatrix]. The reader is invited to build other HTML pages and to check the generated HTML code each time. Gradually, you will be able to build a page without the help of [Design] mode. A HTML document generally has the following form:
The entire document is enclosed within the tags <html>...</html>. It consists of two parts:
<head>...</head>: this is the non-displayable part of the document. It provides information to the browser that will display the document. It often contains the <title>...</title> tag, which sets the text that will appear in the browser’s title bar. Other tags may be found here, notably tags defining the document’s keywords, which are then used by search engines. This section may also contain scripts, most often written in javascript or vbscript, which will be executed by the browser.
<body attributes>...</body>: this is the section that will be displayed by the browser. The HTML tags contained in this section tell the browser the "desired" visual layout for the document. Each browser will interpret these tags in its own way. Two browsers may therefore display the same web document differently. This is generally one of the headaches for web designers.
The code for the previous document was as follows:
<html>
<head>
    <title>HTML1</title>
</head>
<body>
<h2>Le langage HTML - 1
</h2>
<hr />
<table border="1">
<tbody>
<tr>
<td>
cellule(1,1)</td>
<td align="middle" width="200">
cellule(1,2)</td>
<td>
cellule(1,3)</td>
</tr>
<tr>
<td>
cellule(2,1)</td>
<td>
cellule(2,2)</td>
<td>
cellule(2,3)</td>
</tr>
</tbody>
</table>
<p>
Une image <img src="univ01.gif" />
</p>
<p>
Le site de l'istia <a href="http://istia.univ-angers.fr">ici</a>
</p>
</body>
</html>
Element | tags and examples HTML |
<title>HTML1</title> HTML1 will appear in the browser's title bar when the document is displayed | |
<hr>: displays a horizontal line | |
<table attributes>....</table>: to define the table <tr attributes>...</tr>: to define a row <td attributes>...</td>: to define a cell examples: <table border="1">...</table>: the border attribute defines the thickness of the table border <td align="center" width="200">cell(1,2)</td>: defines a cell whose content will be cell(1,2). This content will be centered horizontally (align="center"). The cell will have a width of 200 pixels (width="200") | |
<img src="univ01.gif" />: defines an image whose source file is univ01.gif on the web server (src="univ01.gif"). This link is located in a web document generated using URL http://localhost/exemple1.htm. Therefore, the browser will request URL http://localhost/univ01.gif to retrieve the image referenced here. | |
<a href="http://istia.univ-angers.fr">here</a>: makes the text here serve as a link to URL http://istia.univ-angers.fr. |
This simple example shows that to build the entire document, the browser must make two requests to the server:
http://localhost/exemple1.htm to retrieve the source of the document
http://localhost/univ01.gif to retrieve the image univ01.gif
5.2.2. Building a form
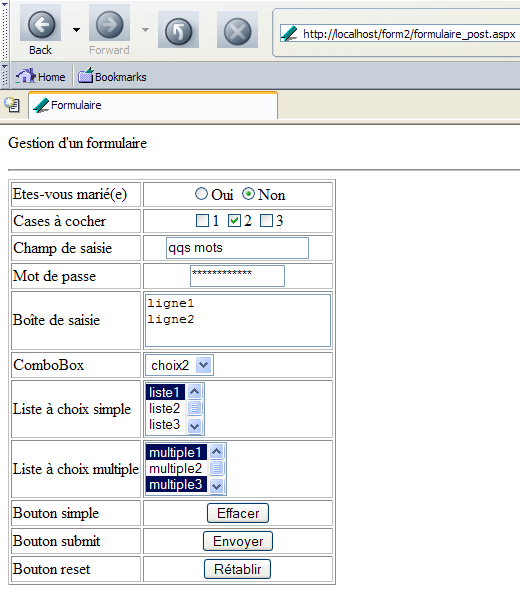
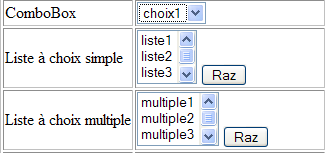
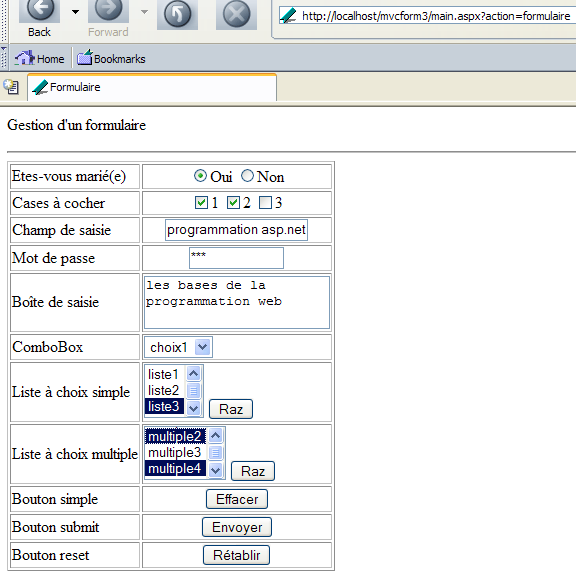
A form HTML is designed to present the user with an information entry page similar to the input forms found in Windows. The input form is sent to the browser as a HTML document. The browser displays the form to the user, who fills it out and submits it using a button with that function. The browser then transmits the entered values to the server for processing. Note that it does not send the entire form back to the server, but only the entered values. The following example shows a web form also created with WebMatrix:
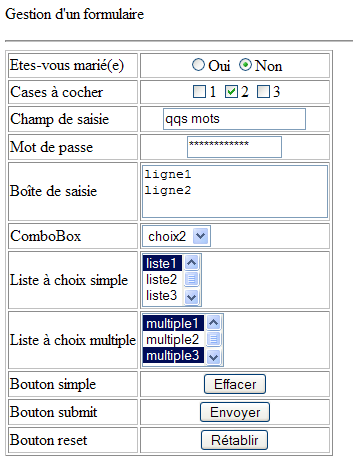
The HTML code generated by [WebMatrix] is as follows:
<html>
    <head>
        <title>Formulaire</title>
        <script language="javascript">
        function effacer(){
            alert("Vous avez cliqué sur le bouton [Effacer]");
        }
        </script>
    </head>
    <body>
        <p>
            Gestion d'a form
        </p>
        <hr />
        <form name="formulaire" method="post">
            <table border="1">
                <tr>
                    <td>
                        Etes-vous marié(e)</td>
                    <td>
                        <p align="center">
                            <input type="radio" value="oui" name="rdMarie" />Oui
                            <input type="radio" checked value="non" name="rdMarie" />Non
                        </p>
                    </td>
                </tr>
                <tr>
                    <td>
                        Cases à cocher
                    </td>
                    <td>
                        <p align="center">
                            <input type="checkbox" value="un" name="C1" />1
                            <input type="checkbox" checked value="deux" name="C2" />2
                            <input type="checkbox" value="trois" name="C3" />3
                        </p>
                    </td>
                </tr>
                <tr>
                    <td>
                        Champ de saisie</td>
                    <td>
                        <p align="center">
                            <input type="text" maxlength="30" value="qqs mots" name="txtSaisie" />
                        </p>
                    </td>
                </tr>
                <tr>
                    <td>
                        Mot de passe</td>
                    <td>
                        <p align="center">
                            <input type="password" maxlength="12" size="12" value="unMotDePasse" name="txtMdp" />
                        </p>
                    </td>
                </tr>
                <tr>
                    <td>
                        Boîte de saisie</td>
                    <td>
                        <p align="center">
                        </p>
                        <textarea name="areaSaisie">ligne1
ligne2</textarea>
                    </td>
                </tr>
                <tr>
                    <td>
                        ComboBox</td>
                    <td>
                        <p align="center">
                        </p>
                        <select name="cmbValeurs">
                            <option value="1">choix1</option>
                            <option value="2" selected>choix2</option>
                            <option value="3">choix3</option>
                        </select>
                    </td>
                </tr>
                <tr>
                    <td>
                        Liste à choix simple</td>
                    <td>
                        <p align="center">
                        </p>
                        <select size="3" name="lstSimple">
                            <option value="1" selected>liste1</option>
                            <option value="2">liste2</option>
                            <option value="3">liste3</option>
                            <option value="4">liste4</option>
                            <option value="5">liste5</option>
                        </select>
                    </td>
                </tr>
                <tr>
                    <td>
                        Liste à choix multiple</td>
                    <td>
                        <p align="center">
                        </p>
                        <select multiple size="3" name="lstMultiple">
                            <option value="1" selected>multiple1</option>
                            <option value="2">multiple2</option>
                            <option value="3" selected>multiple3</option>
                            <option value="4">multiple4</option>
                            <option value="5">multiple5</option>
                        </select>
                    </td>
                </tr>
                <tr>
                    <td>
                        Bouton simple</td>
                    <td>
                        <p align="center">
                            <input onclick="effacer()" type="button" value="Effacer" name="btnEffacer" />
                        </p>
                    </td>
                </tr>
                <tr>
                    <td>
                        Bouton submit</td>
                    <td>
                        <p align="center">
                            <input type="submit" value="Envoyer" name="btnEnvoyer" />
                        </p>
                    </td>
                </tr>
                <tr>
                    <td>
                        Bouton reset</td>
                    <td>
                        <p align="center">
                            <input type="reset" value="Rétablir" name="btnRetablir" runat="server" />
                        </p>
                    </td>
                </tr>
            </table>
            <input type="hidden" name="secret" value="uneValeur" />
        </form>
    </body>
</html>
The visual control <--> tag mapping for HTML is as follows:
Check | tag HTML |
<form name="form" method="post"> | |
<input type="text" maxlength="30" value="a few words" name="txtSaisie" /> | |
<input type="password" maxlength="12" size="12" value="unMotDePasse" name="txtMdp" /> | |
<textarea name="areaSaisie">line1 line2</textarea> | |
<input type="radio" value="yes" name="rdMarie" />Yes <input type="radio" checked value="no" name="rdMarie" />No | |
<input type="checkbox" value="one" name="C1" />1 <input type="checkbox" checked value="two" name="C2" />2 <input type="checkbox" value="three" name="C3" />3 | |
<select name="cmbValeurs"> <option value="1">choice1</option> <option value="2" selected>option2</option> <option value="3">option3</option> </select> | |
<select size="3" name="lstSimple"> <option value="1" selected>list1</option> <option value="2">list2</option> <option value="3">list3</option> <option value="4">list4</option> <option value="5">list5</option> </select> | |
<select multiple size="3" name="lstMultiple"> <option value="1" selected>multiple1</option> <option value="2">multiple2</option> <option value="3" selected>multiple3</option> <option value="4">multiple4</option> <option value="5">multiple5</option> </select> | |
<input type="hidden" name="secret" value="uneValeur" /> | |
<input type="submit" value="Submit" name="btnEnvoyer" /> | |
<input type="reset" value="Reset" name="btnRetablir" runat="server" /> | |
<input onclick="clear()" type="button" value="Clear" name="btnEffacer" /> |
Let's review these different controls.
5.2.2.1. The
<form name="form" method="post"> |
<form name="..." method="..." action="...">...</form> | |
name="frmexample": form name method="..." : method used by the browser to send the values collected in the form to the web server action="..." : URL to which the values collected in the form will be sent. A web form is enclosed within the tags <form>...</form>. The form can have a name (name="xx"). This applies to all controls found within a form. This name is useful if the web document contains scripts that need to reference form elements. The purpose of a form is to collect information entered by the user via the keyboard or mouse and send it to a web server URL. Which one? The one referenced in the action="URL" attribute. If this attribute is missing, the information will be sent to the server of the document in which the form is located. How does a web client send information (the data contained in the form) to a web server? We have covered this in detail. It can use two different methods called POST and GET. The method="method" attribute, with method set to GET or POST, in the <form> tag tells the browser which method to use to send the information collected in the form to the URL specified by the action="URL" attribute. When the method attribute is not specified, the default method is GET. |
5.2.2.2. Input field

<input type="text" maxlength="30" value="a few words" name="txtSaisie" /> <input type="password" maxlength="12" size="12" value="unMotDePasse" name="txtMdp" /> |
<input type="..." name="..." size=".." value=".."> The input tag exists for various controls. The type attribute is used to distinguish between these different controls. | |
type="text": specifies that this is a text input field type="password": the characters in the input field are replaced by asterisks (*). This is the only difference from a normal input field. This type of control is suitable for entering passwords. size="12": number of characters visible in the field—does not prevent the entry of more characters maxlength="30": sets the maximum number of characters to 30—the browser is responsible for enforcing this attribute name="txtSaisie": name of the control value="some words": text that will be displayed in the input field. |
5.2.2.3. Multi-line input field
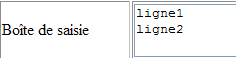
<textarea name="areaSaisie">line1 line2</textarea> |
<textarea ...>text</textarea> displays a multi-line input field with text already inside | |
rows="2": number of lines cols="'20": number of columns name="areaSaisie": control name |
5.2.2.4. Radio buttons
![]()
<input type="radio" value="yes" name="rdMarie" />Yes <input type="radio" checked value="no" name="rdMarie" />No |
<input type="radio" attribute2="value2" ..../>text displays a radio button with text next to it. | |
name="rdMarie": control name. Radio buttons with the same name form a mutually exclusive group: only one of them can be selected. value="value": value assigned to the radio button. Do not confuse this value with the text displayed next to the radio button. The text is for display purposes only. checked: if this keyword is present, the radio button is selected; otherwise, it is not. |
5.2.2.5. Checkboxes
<input type="checkbox" value="one" name="C1" />1 <input type="checkbox" checked value="two" name="C2" />2 <input type="checkbox" value="three" name="C3" />3 |
![]()
<input type="checkbox" attribute2="value2" ..../>text displays a checkbox with text next to it. | |
name="C1": control name. Checkboxes may or may not have the same name. Checkboxes with the same name form a group of associated checkboxes. value="value": value assigned to the checkbox. Do not confuse this value with the text displayed next to the radio button. The latter is for display purposes only. checked: if this keyword is present, the radio button is selected; otherwise, it is not. |
5.2.2.6. Drop-down list (combo)
<select name="cmbValeurs"> <option value="1">choice1</option> <option value="2" selected>choice2</option> <option value="3">option3</option> </select> |
![]()
<select size=".." name=".."> <option [selected="selected"] [value="valeur"]>text</option> ... </select> displays the text between the <option>...</option> tags | |
name="cmbValeurs": control name. size="1": number of visible list items. size="1" makes the list equivalent to a combo box. This is the default value if the [size] attribute is absent. selected="selected": if this keyword is present for a list item, that item appears selected in the list. In our example above, the list item choice2 appears as the selected item in the combo box when it is first displayed. value="value": sets the value to be sent to the server if the item is selected. If this attribute is missing, the text associated with the option is sent to the server. |
5.2.2.7. Single-select list
<select size="3" name="lstSimple"> <option value="1" selected>list1</option> <option value="2">list2</option> <option value="3">list3</option> <option value="4">list4</option> <option value="5">list5</option> </select> |

<select size=".." name=".."> <option [selected] [value="valeur"]>...</option> ... </select> displays the text between the <option>...</option> | |
same as for the drop-down list displaying only one item. This control differs from the previous drop-down list only in its size>1 attribute. |
5.2.2.8. Multi-select list
<select multiple size="3" name="lstMultiple"> <option value="1" selected>multiple1</option> <option value="2">multiple2</option> <option value="3" selected>multiple3</option> <option value="4">multiple4</option> <option value="5">multiple5</option> </select> |

<select size=".." name=".." multiple> <option [selected] ] [value="valeur"]>...</option> ... </select> displays the text between the tags <option>...</option> | |
multiple: allows the selection of multiple items in the list. In the example above, items list1 and list3 are both selected. |
5.2.2.9. Button
<input onclick="clear()" type="button" value="Clear" name="btnEffacer" /> |
![]()
<input type="button" value="..." name="..." onclick="clear()" ....> | |
type="button": defines a button control. There are two other button types: submit and reset. value="Clear": the text displayed on the button onclick="function()": allows you to define a function to be executed when the user clicks the button. This function is part of the scripts defined in the displayed web document. The syntax above is javascript syntax. If the scripts are written in vbscript, you would need to write onclick="function" without the parentheses. The syntax remains the same if parameters need to be passed to the function: onclick="function(val1, val2,...)" In our example, clicking the Clear button calls the following javascript clear function: The clear function displays a message: 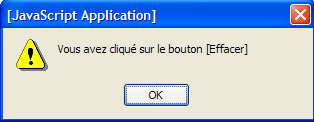 |
5.2.2.10. Button type submit
<input type="submit" value="Send" name="btnEnvoyer" /> |
![]()
<input type="submit" value="Send" name="btnEnvoyer"> | |
type="submit": defines the button as a button for sending form data to the web server. When the user clicks this button, the browser will send the form data to the URL defined in the action attribute of the <form> tag, using the method specified by the method attribute of that same tag. value="Submit": the text displayed on the button |
5.2.2.11. Reset button
<input type="reset" value="Reset" name="btnRetablir" runat="server" /> |
![]()
<input type="reset" value="Reset" name=" btnRetablir "> | |
type="reset": defines the button as a form reset button. When the user clicks this button, the browser will restore the form to the state in which it was received. value="Reset": the text displayed on the button |
5.2.2.12. Hidden field
<input type="hidden" name="secret" value="uneValeur" /> |
<input type="hidden" name="..." value="..."> | |
type="hidden": specifies that this is a hidden field. A hidden field is part of the form but is not displayed to the user. However, if the user were to ask their browser to display the source code, they would see the presence of the <input type="hidden" value="..."> tag and thus the value of the hidden field. value="aValue": value of the hidden field. What is the purpose of a hidden field? It allows the web server to retain information across a client’s requests. Consider an online shopping application. The customer purchases a first item art1 in quantity q1 on the first page of a catalog and then moves to a new page in the catalog. To remember that the customer purchased q1 items of art1, the server can place these two pieces of information in a hidden field in the web form on the new page. On this new page, the client purchases q2 units of item art2. When the data from this second form is sent to the server (submit), the server will not only receive the information (q2,art2) but also (q1,art1), which is also part of the form as a hidden field that cannot be modified by the user. The web server will then place the information (q1,art1) and (q2,art2) into a new hidden field and send a new catalog page. And so on. |
5.3. Sending form values to a web server via a browser
We already know, from the previous chapter, how a client transmits information to the server. It does so either by:
- a request HTTP GET url?param1=va1¶m2=val2&....
- a request HTT POST url followed by a document containing the parameter string param1=va1¶m2=val2&....
The browser will use one of these two methods depending on whether the [method] attribute of the [form] tag is GET or POST. This is what we will demonstrate now. The page examined previously is a static page. In order to access the HTTP headers sent by the browser requesting this document, we convert it into a dynamic page for a .NET web server (IIS or Cassini). The previous static code is placed in a file named [formulaire_get.aspx], and its content is as follows:
<%@ Page src="formulaire_get.aspx.vb" Language="vb" AutoEventWireup="false" Inherits="formulaire_get" %>
<html>
<head>
<title>Formulaire</title>
        <script language="javascript">
        function effacer(){
            alert("Vous avez cliqué sur le bouton [Effacer]");
        }
        </script>
</head>
<body>
.....
</body>
</html>
The presentation page above is associated with the [formulaire_get.aspx.vb] controller:
Public Class formulaire_get
    Inherits System.Web.UI.Page

    Private Sub Page_Init(ByVal Sender As Object, ByVal e As System.EventArgs) Handles MyBase.Init
        ' saves the current query in request.txt of the page folder
        Dim requestFileName As String = Me.MapPath(Me.TemplateSourceDirectory) + "\request.txt"
        Me.Request.SaveAs(requestFileName, True)
    End Sub
End Class
Each time the [formulaire_get.aspx] document is called, the client request will be saved to a [request.txt] file by the Page_Init procedure. We have already encountered this mode of operation, so we will not comment further on the controller.
5.3.1. Method GET
Let’s perform an initial test, where in the document’s HTML code, the FORM tag is defined as follows:
<form name="formulaire" method="get">
We place the files [formulaire_get.aspx] and [formulaire_get.aspx.vb] in a folder <application-path> and start the Cassini server with the parameters (<application-path>,/form2). We request url http://localhost/form2/formulaire_get.aspx:
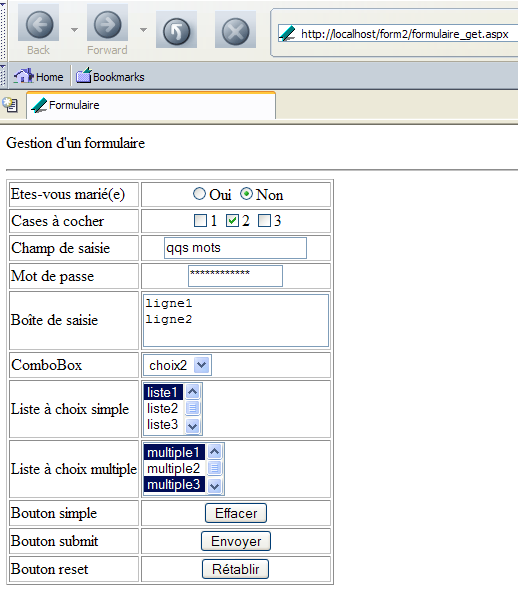
The browser has just made a request, and we know that it has been saved in the [request.txt] file. Let’s look at its contents:
GET /form2/formulaire_get.aspx HTTP/1.1
Cache-Control: max-age=0
Connection: keep-alive
Keep-Alive: 300
Accept: application/x-shockwave-flash,text/xml,application/xml,application/xhtml+xml,text/html;q=0.9,text/plain;q=0.8,image/png,image/jpeg,image/gif;q=0.2,*/*;q=0.1
Accept-Charset: ISO-8859-1,utf-8;q=0.7,*;q=0.7
Accept-Encoding: gzip,deflate
Accept-Language: en-us,en;q=0.5
Host: localhost
User-Agent: Mozilla/5.0 (Windows; U; Windows NT 5.1; en-US; rv:1.7b) Gecko/20040316
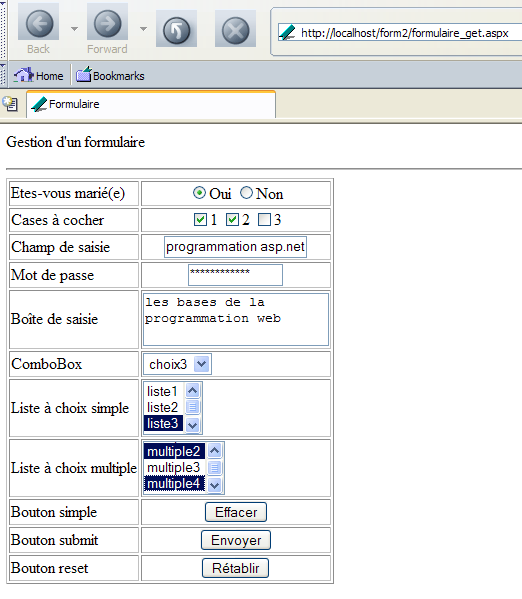
The browser used a request HTTP GET to request url [http://localhost/form2/formulaire_get.aspx]. This is always the case when the url is provided by the user. We fill out the form as follows:
We use the [Envoyer] button above. Its code is as follows:
When a button of type [Submit] is clicked, the browser sends the form parameters (the <form> tag) to the URL specified in the [action] attribute of the <form action="URL"> tag, if it exists. If this attribute does not exist, the form parameters are sent to the URL that generated the form. This is the case here. The [Envoyer] button should therefore trigger a request from the browser to the URL [http://localhost/form2/formulaire_get.aspx] with a transfer of the form parameters. Since the [formulaire_get.aspx] page stores the received request, we should be able to see how the client transferred these parameters. Let’s try it. We click the [Envoyer] button. We receive the following response from the browser:
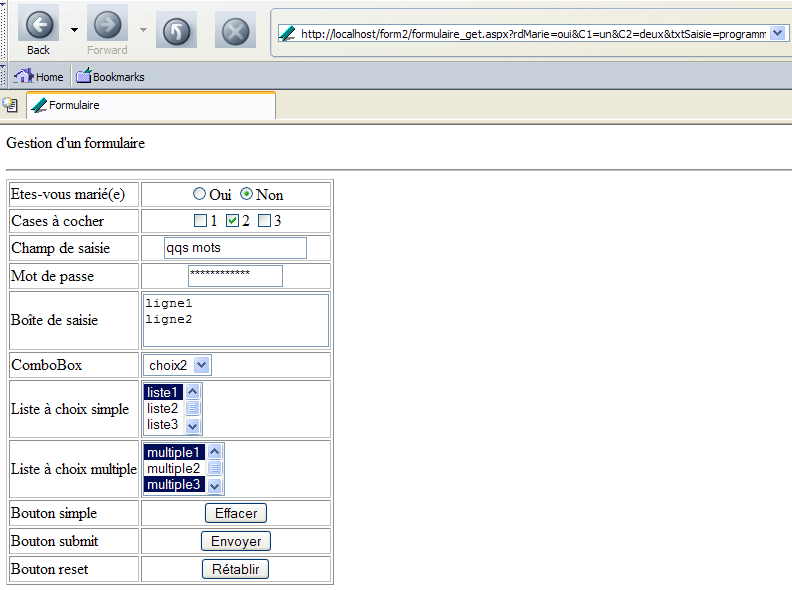
This is the initial page, but we can see that URL has changed in the browser’s [Adresse] field. It has become the following:
http://localhost/form2/formulaire_get.aspx?rdMarie=oui&C1=un&C2=deux&txtSaisie=programmation+asp.net&txtMdp=unMotDePasse&areaSaisie=les+bases+de+la%0D%0Aprogrammation+web%0D%0A&cmbValeurs=3&lstSimple=1&lstMultiple=2&lstMultiple=4&btnEnvoyer=Envoyer&secret=uneValeur
We can see that the choices made in the form are reflected in the URL file. Let’s look at the contents of the [request.txt] file, which has stored the client’s request:
GET /form2/formulaire_get.aspx?rdMarie=oui&C1=un&C2=deux&txtSaisie=programmation+asp.net&txtMdp=ceciestsecre&areaSaisie=les+bases+de+la%0D%0Aprogrammation+web%0D%0A&cmbValeurs=3&lstSimple=1&lstMultiple=2&lstMultiple=4&btnEnvoyer=Envoyer&secret=uneValeur HTTP/1.1
Connection: keep-alive
Keep-Alive: 300
Accept: application/x-shockwave-flash,text/xml,application/xml,application/xhtml+xml,text/html;q=0.9,text/plain;q=0.8,image/png,image/jpeg,image/gif;q=0.2,*/*;q=0.1
Accept-Charset: ISO-8859-1,utf-8;q=0.7,*;q=0.7
Accept-Encoding: gzip,deflate
Accept-Language: en-us,en;q=0.5
Host: localhost
Referer: http://localhost/form2/formulaire_get.aspx
User-Agent: Mozilla/5.0 (Windows; U; Windows NT 5.1; en-US; rv:1.7b) Gecko/20040316
We see a HTTP request that is quite similar to the one initially made by the browser when it requested the document without sending any parameters. There are two differences:
The form parameters have been appended to the document’s URL in the form ?param1=val1¶m2=val2&... | |
The client uses this header to indicate the URL of the document it was displaying when it made the request |
Let’s take a closer look at how the parameters were passed in the command GET URL?param1=value1¶m2=value2&... HTTP/1.1 where the parameters are the names of the web form controls and the values are the values associated with them. Below is a three-column table:
- Column 1: contains the definition of a control HTML from the example
- Column 2: shows how this control appears in a browser
- Column 3: shows the value sent to the server by the browser for the control in Column 1 in the form it takes in the GET request from the example
HTML control | Pre-validation display | returned value(s) |
<input type="radio" value="yes" name="rdMarie" />Yes <input type="radio" checked value="no" name="rdMarie" />No | - the value of the value attribute of the selected by the user. | |
<input type="checkbox" value="one" name="C1" />1 <input type="checkbox" checked value="two" name="C2" />2 <input type="checkbox" value="three" name="C3" />3 | C1=one C2=two - values of the value attributes of the checkboxes checked by the user | |
<input type="text" maxlength="30" value="some words" name="txtSaisie" /> | txtInput=asp.net+programming - text typed by the user in the . Spaces have been replaced with the + sign | |
<input type="password" maxlength="12" size="12" value="aPassword" name="txtMdp" /> | txtMdp="thisIsSecret" - text typed by the user in the . The text actually typed was "thisIsSecret". The last character was lost because the maxlength="12" limited the number of characters to 12. | |
<textarea name="areaSaisie"> line1 line2</textarea> |  | input-area=the+basics+of+ the%0D%0A web+programming - text entered by the user in the . %OD%OA is the . Spaces have been replaced with the + sign |
<select name="cmbValeurs"> <option value="1">choice1 </option> <option value="2" selected>option2 </option> <option value="3">option3 </option> </select> | cmbValues=3 - value selected by the user from the single-select list | |
<select size="3" name="lstSimple"> <option value="1" selected>list1</option> <option value="2">list2 </option> <option value="3">list3 </option> <option value="4">list4 </option> <option value="5">list5 </option> </select> | 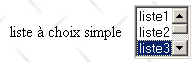 | lstSimple=3 - value selected by the user from the single-select list |
<select multiple size="3" name="lstMultiple"> <option value="1" selected>multiple1 </option> <option value="2">multiple2 </option> <option value="3" selected>multiple3 </option> <option value="4">multiple4 </option> <option value="5">multiple5 </option> </select> | 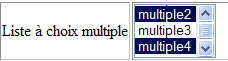 | lstMultiple=2 lstMultiple=4 - values selected by the user in the multiple-select list |
<input type="submit" value="Send" name="btnSend" /> | btnEnvoyer=Send - name and value attribute of the button used was used to send the form data to the server | |
<input type="hidden" name="secret" value="aValue" /> | secret=aValue - value attribute of the hidden field |
You might wonder what the server did with the parameters passed to it. Actually, nothing. Upon receiving the request
GET /form2/formulaire_get.aspx?rdMarie=oui&C1=un&C2=deux&txtSaisie=programmation+asp.net&txtMdp=ceciestsecre&areaSaisie=les+bases+de+la%0D%0Aprogrammation+web%0D%0A&cmbValeurs=3&lstSimple=1&lstMultiple=2&lstMultiple=4&btnEnvoyer=Envoyer&secret=uneValeur HTTP/1.1
The web server has passed the parameters to URL in the document [http://localhost/form2/formulaire_get.aspx], c.a.d. to the document we initially created. We haven’t written any code to retrieve and process the parameters the client sends us. So everything happens as if the client’s request were simply:
For this reason, in response to our [Envoyer] button, we received the same page as the one initially obtained by requesting URL and [http://localhost/form2/formulaire_get.aspx] without parameters.
5.3.2. POST Method
The HTML document is now configured so that the browser uses the POST method to send the form values to the web server. To do this, we copy the [formulaire_get.aspx] file into [formulaire_post.aspx] and modify only the <form> tag in [formulaire_post.aspx]:
<%@ Page src="formulaire_get.aspx.vb" Language="vb" AutoEventWireup="false" Inherits="formulaire_get" %>
<html>
    <head>
        ...
    </head>
    <body>
        <p>
            Gestion d'a form
        </p>
        <hr />
        <form name="formulaire" method="post">
            <table border="1">
There is no need to change the [formulaire_get.aspx.vb] controller, so we will leave it as is. We request the new document via URL [http://localhost/form2/formulaire_post.aspx], fill out the form as we did for the GET method, and submit the parameters to the server using the [Envoyer] button. We receive the following response page from the server:
We therefore get the same result as with the GET and c.a.d methods: the initial page. Note one difference: in the browser’s [Adresse] field, the transmitted parameters do not appear. Now, let’s look at the request sent by the client and stored in the [request.txt] file:
POST /form2/formulaire_post.aspx HTTP/1.1
Connection: keep-alive
Keep-Alive: 300
Content-Length: 222
Content-Type: application/x-www-form-urlencoded
Accept: application/x-shockwave-flash,text/xml,application/xml,application/xhtml+xml,text/html;q=0.9,text/plain;q=0.8,image/png,image/jpeg,image/gif;q=0.2,*/*;q=0.1
Accept-Charset: ISO-8859-1,utf-8;q=0.7,*;q=0.7
Accept-Encoding: gzip,deflate
Accept-Language: en-us,en;q=0.5
Host: localhost
Referer: http://localhost/form2/formulaire_post.aspx
User-Agent: Mozilla/5.0 (Windows; U; Windows NT 5.1; en-US; rv:1.7b) Gecko/20040316

rdMarie=oui&C1=un&C2=deux&txtSaisie=programmation+asp.net&txtMdp=ceciestsecre&areaSaisie=les+bases+de+la%0D%0Aprogrammation+web%0D%0A&cmbValeurs=3&lstSimple=3&lstMultiple=2&lstMultiple=4&btnEnvoyer=Envoyer&secret=uneValeur
New elements appear in the client's HTTP request:
The GET request has been replaced by a POST request. The parameters are no longer present in the first line of the request. We can see that they are now placed after the HTTP request, following a blank line. Their encoding is identical to that in the GET request. | |
number of characters "posted", c.a.d. The number of characters the web server must read after receiving the headers HTTP to retrieve the document sent by the client. The document in question here is the list of form values. | |
specifies the type of document the client will send after the headers HTTP. The type [application/x-www-form-urlencoded] indicates that it is a document containing form values. |
There are two methods for transmitting data to a web server: GET and POST. Is one method better than the other? We have seen that if form values were sent by the browser using the GET method, the browser displayed the requested URL in its Address field in the form URL?param1=val1¶m2=val2&.... This can be seen as either an advantage or a disadvantage:
- an advantage if you want to allow the user to add this configured URL to their bookmarks
- a disadvantage if you do not want the user to have access to certain information in the form, such as hidden fields
Going forward, we will use the POST method almost exclusively in our forms.
5.4. Server-side processing of form values
5.4.1. Overview of the example
Now that we have established the connection between the HTML tag <form method="GET/POST" ...> and the way the browser sends form values, we know how to retrieve them on the server side. The previous chapter provided the answer:
- if the method of the <form> tag is GET, the parameter values will be retrieved from the [Request.QueryString] collection
- if the method of the <form> tag is POST, the values of the "posted" parameters will be retrieved from the [Request.Form] collection. A clarification is needed here. The <form> tag can use the [action] attribute to specify the target url of the GET or the POST. This url can easily be configured whether there is a GET or a POST, in the form action="url?param1=val1¶m2=val2&..". These parameters are then added to those contained between the <form> and </form> tags, which will be transferred to the server via a GET or a POST. Because they are part of the target url, they will be retrieved in the [Request.QueryString] collection regardless of whether we are dealing with a GET or a POST.
We will now write a MVC application with two views:
- The first view is the previous form. We will call it [vue_formulaire].
- The second view is an information page listing the values entered on the first page. A link allows the user to return to the form. We will call this view [vue_confirmation].
The view [vue_formulaire] is sent to the user, who fills it out and submits it. It might look like this just before submission:
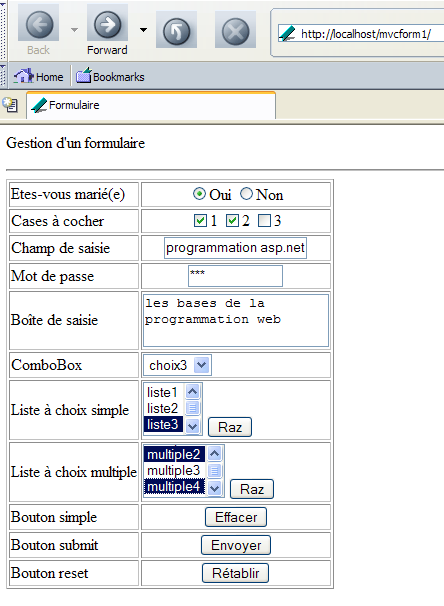
The user clicks the [Envoyer] button to submit their entries. In response, they see the following [vue_validation] view:
5.4.2. The application controller
In the previous chapter, we saw that we could assign the role of controller for a MVC application to the [global.asax] file, through which all requests from the clients files pass. We have already presented a MVC application built in this way, and here we follow the development model presented at that time. The [global.asax] file will be as follows:
It consists of a single line referencing the controller located in the [global.asax.vb] file:
Imports System
Imports System.Web
Imports System.Web.SessionState

Public Class Global
    Inherits System.Web.HttpApplication

    Sub Application_BeginRequest(ByVal sender As Object, ByVal e As EventArgs)
        ' retrieve the action to be performed
        Dim action As String
        If Request.QueryString("action") Is Nothing Then
            action = "init"
        Else
            action = Request.QueryString("action").ToString.ToLower
        End If
        ' execute the action
        Select Case action
            Case "init"
                Server.Transfer("formulaire.aspx", False)
            Case "validation"
                Server.Transfer("validation.aspx", True)
            Case Else
                Server.Transfer("formulaire.aspx", True)
        End Select
    End Sub
End Class
The controller works as follows:
- it waits in the url target for a parameter string containing the [action] parameter. If this is missing, it behaves as if [action=init] were present in the parameter string.
- Only two actions are recognized:
- init: the pre-filled form is sent to the client
- validation: the page confirming the user’s entries is delivered to the client
- If the action is not one of the above, treat it as if it were [action=init]. An error page could also be displayed.
5.4.3. Processing the init action
When the controller processes the "init" action, it must generate a pre-filled form. It is the role of the page [formulaire.aspx] to perform this task. Its code is as follows:
<HTML>
    <HEAD>
        <title>Formulaire</title>
        <script language="javascript">
        function effacer(){
            alert("Vous avez cliqué sur le bouton [Effacer]");
        }
        function raz(liste){
            liste.selectedIndex=-1
        }
        </script>
    </HEAD>
    <body>
        <p>
            Gestion d'a form
        </p>
        <hr>
        <form name="formulaire" method="post" action="?action=validation">
            <table border="1">
                <tr>
                    <td>
                        Etes-vous marié(e)</td>
                    <td>
                        <p align="center">
                            <input type="radio" value="oui" name="rdMarie">Oui <input type="radio" checked value="non" name="rdMarie">Non
                        </p>
                    </td>
                </tr>
....
                    <td>
                        <select size="3" name="lstSimple">
                            <option value="1" selected>liste1</option>
                            <option value="2">liste2</option>
                            <option value="3">liste3</option>
                            <option value="4">liste4</option>
                            <option value="5">liste5</option>
                        </select>
                        <INPUT type="button" value="Raz" name="btnRazSimple" onclick="raz(lstSimple)">
                    </td>
....
                    <td>
                        <select multiple size="3" name="lstMultiple">
                            <option value="1" selected>multiple1</option>
                            <option value="2">multiple2</option>
                            <option value="3" selected>multiple3</option>
                            <option value="4">multiple4</option>
                            <option value="5">multiple5</option>
                        </select>
                        <INPUT type="button" value="Raz" name="btnRazMultiple" onclick="raz(lstMultiple)">
                    </td>
...

            </table>
            <input type="hidden" name="secret" value="uneValeur">
        </form>
    </body>
</HTML>
We see the code HTML from the form discussed earlier, with a few differences. The code for the <form> tag has been modified:
<form name="formulaire" method="post" action="?action=validation">
- post: the values entered by the user and then sent to the server when the [submit] button is clicked will be sent using the HTTP method POST
- action: the syntax action="url" is used to specify the url to which the form values must be sent. This url may include a string of parameters in the form param1=val1¶m2=val2&... This is what is done here, where we pass the parameter [action=validation] to tell the controller what action to take. Note that this parameter string is not preceded by a web address. The browser will then send the form parameters to the address that provided the form. In our example above, this address is [http://localhost/mvcform1]. The browser will therefore make a request to [POST /mvcform1?action=validation] on the machine [localhost].
Buttons have been added to allow the user to deselect items from the [lstSimple] and [lstMultiple] lists:
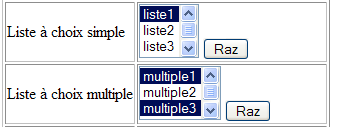
This results in the following HTML code:
                    <td>
                        <select size="3" name="lstSimple">
                            <option value="1" selected>liste1</option>
                            <option value="2">liste2</option>
                            <option value="3">liste3</option>
                            <option value="4">liste4</option>
                            <option value="5">liste5</option>
                        </select>
                        <INPUT type="button" value="Raz" name="btnRazSimple" onclick="raz(lstSimple)">
                    </td>
....
                    <td>
                        <select multiple size="3" name="lstMultiple">
                            <option value="1" selected>multiple1</option>
                            <option value="2">multiple2</option>
                            <option value="3" selected>multiple3</option>
                            <option value="4">multiple4</option>
                            <option value="5">multiple5</option>
                        </select>
                        <INPUT type="button" value="Raz" name="btnRazMultiple" onclick="raz(lstMultiple)">
                    </td>
Clicking the [Raz] button deselects all items in the list associated with it. Let’s take the example of the list [lstMultiple]. Clicking the corresponding button [Raz] triggers the execution of the function Javascript [raz(lstMultiple)]. Note that the code Javascript in a document HTML displayed by a browser is executed by that same browser and not by the server. Javascript is a very comprehensive language that allows you to give pages a dynamic appearance without server intervention. The [raz] function is as follows:
This function receives a parameter that is a Javascript object representing a HTML list. This object has properties and methods. One of its properties is [selectedIndex], whose value is the number of the first option selected in the HTML list. If there is none, this property is -1. Conversely, setting a value for this property is equivalent to selecting a new element from the list HTML, and setting it to -1 is equivalent to having no element selected. This is what is done here.
Finally, note that the presentation code [formulaire.aspx] is not accompanied by a controller [formulaire.aspx.vb]. In fact, there is no server-generated dynamic content in the document HTML, so there is no need for a controller.
5.4.4. Handling the validation action
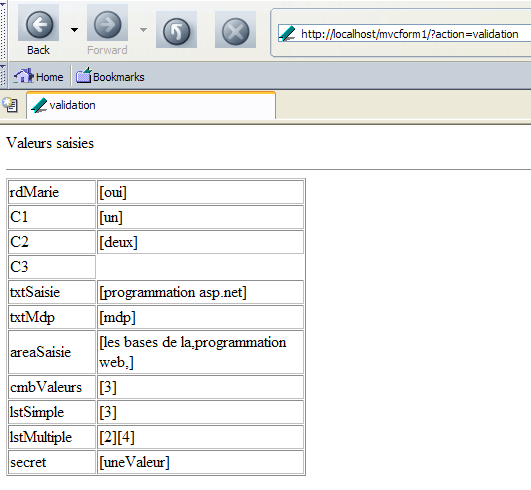
When the controller processes the "validation" action, it must generate a page listing the values entered by the user. It is the role of the [validation.aspx] page to perform this task. Visually, the page appears as follows:
Its code, HTML, is as follows:
<%@ Page src="validation.aspx.vb" Language="vb" AutoEventWireup="false" Inherits="validation" %>
<HTML>
<HEAD>
<title>validation</title>
</HEAD>
<body>
<P>Valeurs saisies</P>
<HR width="100%" SIZE="1">
<TABLE id="Table1" cellSpacing="1" cellPadding="1" width="300" border="1">
<TR>
<TD width="84">rdMarie</TD>
<TD><% =rdMarie%></TD>
</TR>
<TR>
<TD width="84">C1</TD>
<TD><%=C1%></TD>
</TR>
<TR>
<TD width="84">C2</TD>
<TD><%=C2%></TD>
</TR>
<TR>
<TD width="84">C3</TD>
<TD><%=C3%></TD>
</TR>
<TR>
<TD width="84">txtSaisie</TD>
<TD><%=txtSaisie%></TD>
</TR>
<TR>
<TD width="84">txtMdp</TD>
<TD><%=txtMdp%></TD>
</TR>
<TR>
<TD width="84">areaSaisie</TD>
<TD><%=areaSaisie%></TD>
</TR>
<TR>
<TD width="84">cmbValeurs</TD>
<TD><%=cmbValeurs%></TD>
</TR>
<TR>
<TD width="84">lstSimple</TD>
<TD><%=lstSimple%></TD>
</TR>
<TR>
<TD width="84">lstMultiple</TD>
<TD><%=lstMultiple%></TD>
</TR>
<TR>
<TD width="84">secret</TD>
<TD><%=secret%></TD>
</TR>
</TABLE>
</body>
</HTML>
The dynamic parts <%=variable%> of the document are calculated by the associated [validation.aspx.vb] controller:
Imports System.Text.RegularExpressions
Public Class validation
Inherits System.Web.UI.Page
Protected rdMarie As String
Protected C1 As String
Protected C2 As String
Protected C3 As String
Protected txtSaisie As String
Protected txtMdp As String
Protected areaSaisie As String
Protected cmbValeurs As String
Protected lstSimple As String
Protected lstMultiple As String
Protected secret As String
Protected delimiteur As New Regex("\r\n")
Private Sub Page_Load(ByVal sender As System.Object, ByVal e As System.EventArgs) Handles MyBase.Load
'retrieve posted parameters
rdMarie = getValue("rdMarie")
C1 = getValue("C1")
C2 = getValue("C2")
C3 = getValue("C3")
txtSaisie = getValue("txtSaisie")
txtMdp = getValue("txtMdp")
areaSaisie = String.Join(",", delimiteur.Split(getValue("areaSaisie")))
cmbValeurs = getValue("cmbValeurs")
lstSimple = getValue("lstSimple")
lstMultiple = getValue("lstMultiple")
secret = getValue("secret")
End Sub
Private Function getValue(ByVal champ As String) As String
' retrieves the value of field [field] from the posted request
' anything?
If Request.Form(champ) Is Nothing Then Return ""
' retrieve the value(s) of the
Dim valeurs() As String = Request.Form.GetValues(champ)
Dim valeur As String = ""
Dim i As Integer
For i = 0 To valeurs.Length - 1
valeur += "[" + valeurs(i) + "]"
Next
Return valeur
End Function
End Class
The calculation of the values to be displayed is performed in the procedure [Form_Load]. The value of a "posted" field is obtained by the function getValue(C), where C is the field name. The key points of this function are as follows:
- if C is not in the posted parameter string, then the empty string is returned as the value of C
- otherwise, the array of values for field C is obtained via [Request.Form.GetValues(C)]. These are concatenated into a character string in the form [val1][val2]...[valn] where [vali] is the i-th value of field C
The field [areaSaisie] is handled in a special way. Its value is sent by the browser in the form areaSaisie=line1\r\nline2\r\n... where \r is the character with code ASCII 13 (carriage return) and \n is the character with code ASCII 10 (line feed). The function getValue(areaSaisie) is therefore the string "line1\r\nline2\r\n...". This string is split into lines by the method [Regex.Split]. This results in an array of strings {line1,line2,...}. This array is converted into the string "line1,line2,..." by the [String.Join] method. It is this final string that will be displayed as the value of the [areaSaisie] field. The goal here was to show how to retrieve the different lines of a HTML field of type [TextArea].
5.4.5. Tests
We place all the files (global.asax, global.asax.vb, formulaire.aspx, validation.aspx, validation.aspx.vb) in a folder named <application-path>. We start the Cassini server with the parameters (<application-path>,/mvcform1). We create an empty file named [default.aspx] in the <application-path> folder, then request url and [http://localhost/mvcform1]. Since [/mvcform1] is the virtual path to a folder and not a document, the web server will display the [default.aspx] document if it exists. That is why we created it. Before displaying it, the script [global.asax] will be executed and will ultimately display the page [formulaire.aspx]. This is why the file [default.aspx] can be empty.
Suppose the validated form is as follows:
Clicking the [Envoyer] button returns the following page:
First, note the url in the response: [http://localhost/mvcform1/?action=validation]. This is the value of the action attribute in the <form> tag of the form:
<form name="formulaire" method="post" action="?action=validation">
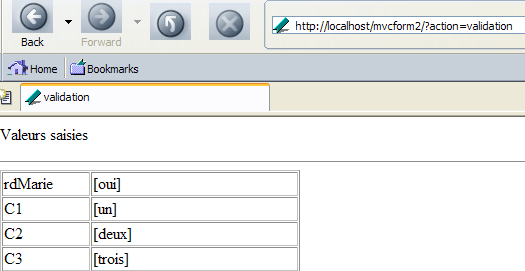
Let’s examine the values obtained for the different form fields one by one:
field | value | HTML | comments |
rdMarie | yes | <input type="radio" value="yes" name="rdMarie">Yes <input type="radio" checked value="no" name="rdMarie">No | the value obtained is the [value] attribute of the checked button |
C1 | a | <input type="checkbox" value="one" name="C1">1 | same |
C2 | two | <input type="checkbox" checked value="two" name="C2">2 | same |
C3 | <input type="checkbox" value="three" name="C3">3 | This button was not checked by the user. Its value was therefore not sent by the browser. In the code, the condition [Request.Form("C3") is Nothing] was therefore true. | |
txtSaisie | Programming asp.net | <input type="text" ... name="txtSaisie"> | The value obtained is the text present in the input field at the time of validation |
txtMdp | password | <input type="password" ...name="txtMdp"> | same |
areaSaisie | the basics of web programming | <textarea name="areaSaisie"> ...</textarea> | same |
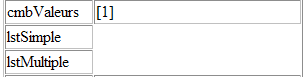
QZXW2HTMLP002197ZQX | 3 | <select name="cmbValeurs"> ... <option value="3">choice3</option> </select> | The resulting value is the [value] attribute of the selected option |
lstSimple | 3 | <select size="3" name="lstSimple"> .... <option value="3">list3</option> ... </select> | same |
lstMultiple | 2 4 | <select multiple size="3" name="lstMultiple"> ... <option value="2">multiple2 </option> ... <option value="4">multiple4 </option> ... </select> | The values obtained are those of the [value] attributes of the selected options |
secret | uneValeur | <input type="hidden" name="secret" value="aValue"> | The value obtained is the [value] attribute of the hidden field |
Now let’s look at the lists. Suppose that at the time of validation, the form’s state is as follows:
- option [choix1] is selected in comboBox
- no option is selected in the other two lists. We used the [Raz] buttons to achieve this.
Here is the page returned after validation:
When no value is selected in a list, the browser does not send a parameter for it. In the [validation.aspx.vb] code, the expressions [Request.Form("lstSimple")] and [Request.Form("lstMultiple")] are therefore equal to the constant [Nothing], hence the result shown above.
5.5. Maintaining the state of a page
5.5.1. Maintaining a page's state with a session
We duplicate the entire previous application into a new folder. We add a link to the [validation.aspx] page allowing the user to return to the form:
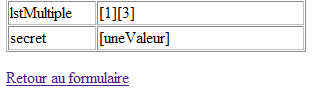
The change to be made on page [validation.aspx] is the addition of the link:
.....
<TR>
<TD width="84">secret</TD>
<TD><%=secret%></TD>
</TR>
</TABLE>
<P>
<a href="?action=formulaire">Retour au formulaire</a>
</P>
</body>
</HTML>
The [href] attribute of the link has a value of url configured with [action=formulaire] as its only parameter, allowing the server to know that it must display the form as it was when it was submitted. There is therefore a difference from the [init] action, which displays a predefined form. The url configured with [?action=formulaire] does not actually have a url. This will therefore be the same as the one that displayed the validation page. If we recall the previous study, this is the url in the application folder. The request will therefore pass through the controller. The controller must now process the [formulaire] action. The code for [global.asax.vb] is modified as follows:
Sub Application_BeginRequest(ByVal sender As Object, ByVal e As EventArgs)
' on récupère l'action à faire
Dim action As String
If Request.QueryString("action") Is Nothing Then
action = "init"
Else
action = Request.QueryString("action").ToString.ToLower
End If
' on exécute l'action
Select Case action
Case "init"
Server.Transfer("formulaire.aspx", False)
Case "validation"
Server.Transfer("validation.aspx", True)
Case "formulaire"
Server.Transfer("formulaire.aspx", True)
Case Else
Server.Transfer("formulaire.aspx", True)
End Select
End Sub
If the action is "form", we simply pass the request to the page [formulaire.aspx]. We know that this page displays a predefined form with no variable fields. Therefore, this page cannot display the form with the values it had when it was submitted. We are trying to highlight this point here. If all the application files have been placed in <application-path>, we launch Cassini with the parameters (<application-path>,/mvcform2) and then request url [http://localhost/mvcform2]. We get the following page (partial view):
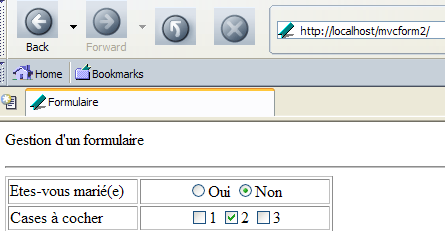
We fill out the form as follows and then submit it:

We get the following confirmation page:
We use the [Retour au formulaire] link present (but not shown) on the page above. We receive the following response from the server:

We observe that:
- the requested url does indeed have the action=form parameter as desired
- the displayed form has lost the entered values.
We know why we cannot find the entered values. If we look at the code for the [formulaire.aspx] document, we see that everything is static and that it is therefore forced to display the same page every time. It is clear that we need to make this code dynamic. It will need to display the values validated by the user. But where should these be stored?
Let’s recall the iron law of the stateless protocol HTTP:
- the url [http://localhost/mvcform2] request is made—a response is received. A TCP-IP connection was opened between the client and the server at the start of the request and closed at the end of the response.
- The user enters and then submits data. The url [http://localhost/mvcform2/?action=validation] request is sent—a response is received. A new TCP-IP connection was opened and then closed between the two partners.
- The user uses the [Retour au formulaire] link. The url [http://localhost/mvcform2/?action=formulaire] is requested—a response is received. A new TCP-IP connection was opened and then closed between the two partners.
The request-response cycles are independent of each other because each uses a new connection TCP-IP. When a client-server application uses a single connection TCP-IP for a series of exchanges, the server can identify a client via its connection. It can therefore store information that it will link to a specific connection and thus track the exchanges. When exchanges occur over different connections, the server cannot identify a client with a connection. Another method is required. We introduced one such method in the previous chapter: the session mechanism. It allows request-response cycles to store information in a [Session] object accessible to all subsequent cycles.
Now that we have a MVC application with a session, we can no longer use the [global.asax] file as a controller, as shown in the previous chapter. The role of application controller must be performed by a specific page dedicated to this purpose. Here, that will be the [main.aspx] page. We will proceed as follows:
- When the user validates their data (action=validation), the controller [main.aspx.vb] will store it in the current session before displaying the validation page.
- When the form needs to be displayed with the entered values (action=form), the controller [main.aspx.vb] will retrieve them from the session and place them in the context before displaying the form.
5.5.2. The new application controller
The application controller consists of two files, [main.aspx, main.aspx.vb]:
[main.aspx]
[main.aspx.vb]
Imports System.Collections.Specialized
Imports Microsoft.VisualBasic
Public Class main
Inherits System.Web.UI.Page
Private Sub Page_Load(ByVal sender As System.Object, ByVal e As System.EventArgs) Handles MyBase.Load
' retrieve the action to be performed
Dim action As String
If Request.QueryString("action") Is Nothing Then
action = "init"
Else
action = Request.QueryString("action").ToString.ToLower
End If
' execute the action
Select Case action
Case "init"
' the pre-filled form is displayed
Context.Items("formulaire") = initForm()
Server.Transfer("formulaire.aspx", True)
Case "validation"
' the confirmation page is displayed after saving the values posted in the session
Session.Item("formulaire") = Request.Form
Server.Transfer("validation.aspx", True)
Case "formulaire"
' displays the form with values taken from the session
Context.Items("formulaire") = Session.Item("formulaire")
Server.Transfer("formulaire.aspx", True)
Case Else
' the pre-filled form is displayed
Context.Items("formulaire") = initForm()
Server.Transfer("formulaire.aspx", True)
End Select
End Sub
Private Function initForm() As NameValueCollection
' on initialise le formulaire
Dim form As New NameValueCollection
form.Set("rdMarie", "non")
form.Set("C2", "deux")
form.Set("txtSaisie", "qqs mots")
form.Set("txtMdp", "ceciestsecret")
form.Set("areasaisie", "ligne1" + ControlChars.CrLf + "ligne2" + ControlChars.CrLf)
form.Set("cmbValeurs", "2")
form.Set("lstSimple", "1")
form.Set("lstMultiple", "1")
form.Add("lstMultiple", "3")
Return form
End Function
End Class
We see the essence of the application controller structure discussed earlier, with the following differences:
- the controller's work is performed in procedure [Form_Load]
- in the case of the [validation] action, the form values present in [Request.Form] are stored in the session associated with the "form" key. Execution is then transferred to the [validation.aspx] page, which will display these values.
- For all other actions, execution is transferred in all cases to page [formulaire.aspx]. This page expects a "form" key in its context, which will be associated with an object of type [Request.form], c.a.d, or [NameValueCollection]. This object must contain the collection of values for the form fields.
- If the action is [init] or an unrecognized action, the collection of values is constructed arbitrarily by the function [initForm].
- If the action is [formulaire], this collection is the [Request.Form] collection that was placed in the session by the [validation] action
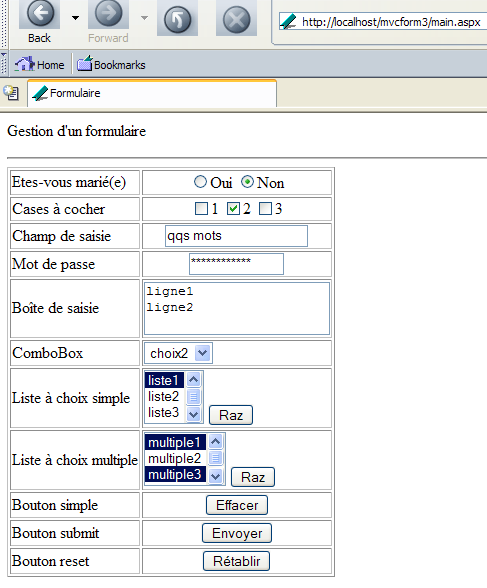
5.5.3. The new form
Because the application no longer displays the same content in the form, the form must be generated dynamically. The new page [formulaire.aspx] becomes the following:
<%@ Page src="formulaire.aspx.vb" Language="vb" AutoEventWireup="false" Inherits="formulaire" %>
<HTML>
<HEAD>
<title>Formulaire</title>
<script language="javascript">
function effacer(){
alert("Vous avez cliqué sur le bouton [Effacer]");
}
        function raz(liste){
            liste.selectedIndex=-1
        }
</script>
</HEAD>
<body>
<p>
Gestion d'a form
</p>
<hr>
<form name="formulaire" method="post" action="main.aspx?action=validation">
<table border="1">
<tr>
<td>
Etes-vous marié(e)</td>
<td>
<p align="center">
<INPUT type="radio" value="oui" name="rdMarie" <%=rdouichecked%>>Oui
<INPUT type="radio" value="non" name="rdMarie" <%=rdnonchecked%>>Non
</p>
</td>
</tr>
<TR>
<TD>Cases à cocher
</TD>
<TD>
<P align="center">
<INPUT type="checkbox" value="un" name="C1" <%=c1checked%>>1
<INPUT type="checkbox" value="deux" name="C2" <%=c2checked%>>2
<INPUT type="checkbox" value="trois" name="C3" <%=c3checked%>>3
</P>
</TD>
</TR>
<TR>
<TD>Champ de saisie</TD>
<TD>
<P align="center">
<INPUT type="text" maxLength="30" value="<%=txtSaisie%>" name="txtSaisie">
</P>
</TD>
</TR>
<tr>
<td>
Mot de passe</td>
<td>
<p align="center">
<input type="password" maxlength="12" size="12" value="<%=txtMdp%>" name="txtMdp">
</p>
</td>
</tr>
<tr>
<td>
Boîte de saisie</td>
<td>
<textarea name="areaSaisie"><%=areaSaisie%></textarea>
</td>
</tr>
<tr>
<td>
ComboBox</td>
<td>
<select name="cmbValeurs">
<%=cmbValeursOptions%>
</select>
</td>
</tr>
<tr>
<td>
Liste à choix simple</td>
<td>
<select size="3" name="lstSimple">
<%=lstSimpleOptions%>
</select>
<INPUT type="button" value="Raz" name="btnRazSimple" onclick="raz(lstSimple)">
</td>
</tr>
<tr>
<td>
Liste à choix multiple</td>
<td>
<select multiple size="3" name="lstMultiple">
<%=lstMultipleOptions%>
</select>
<INPUT type="button" value="Raz" name="btnRazMultiple" onclick="raz(lstMultiple)">
</td>
</tr>
<tr>
<td>
Bouton simple</td>
<td>
<p align="center">
<input onclick="effacer()" type="button" value="Effacer" name="btnEffacer">
</p>
</td>
</tr>
<tr>
<td>
Bouton submit</td>
<td>
<p align="center">
<input type="submit" value="Envoyer" name="btnEnvoyer">
</p>
</td>
</tr>
<tr>
<td>
Bouton reset</td>
<td>
<p align="center">
<input type="reset" value="Rétablir" name="btnRetablir" runat="server">
</p>
</td>
</tr>
</table>
<input type="hidden" name="secret" value="uneValeur">
</form>
</body>
</HTML>
Let's comment on the dynamic variables that appear in the code HTML:
variable | role |
will have the value "checked" if the radio button [oui] should be checked, otherwise the value "" | |
same for the radio button [non] | |
same for the checkbox [C1] | |
same for the checkbox [C2] | |
same for the checkbox [C3] | |
the text to be placed in the field [txtSaisie] | |
The text to be placed in the field [txtMdp] | |
the text to be placed in the [areaSaisie] field | |
the text HTML for the options in the select list [cmbValeurs] | |
the text HTML of the options in the select list [lstSimple] | |
the text HTML of the options in the select list [lstMultiple] | |
The values of these variables are calculated by the page controller [formulaire.aspx.vb]:
Imports Microsoft.VisualBasic
Imports System.Collections.Specialized

Public Class formulaire
    Inherits System.Web.UI.Page

    ' constant form fields
    Private libellésCmbValeurs() As String = {"choix1", "choix2", "choix3"}
    Private valeursCmbValeurs() As String = {"1", "2", "3"}
    Private libellésLstSimple() As String = {"liste1", "liste2", "liste3"}
    Private valeursLstSimple() As String = {"1", "2", "3"}
    Private libellésLstMultiple() As String = {"multiple1", "multiple2", "multiple3", "multiple4", "multiple5"}
    Private valeursLstMultiple() As String = {"1", "2", "3", "4", "5"}

    ' dynamic form fields
    Protected rdouichecked As String
    Protected rdnonchecked As String
    Protected c1checked As String
    Protected c2checked As String
    Protected c3checked As String
    Protected txtSaisie As String
    Protected txtMdp As String
    Protected areaSaisie As String
    Protected cmbValeursOptions As String
    Protected lstSimpleOptions As String
    Protected lstMultipleOptions As String

    Private Sub Page_Load(ByVal sender As System.Object, ByVal e As System.EventArgs) Handles MyBase.Load
        ' retrieve the previous request from the session
        Dim form As NameValueCollection
        If Not Context.Items("formulaire") Is Nothing Then
            form = Context.Items("formulaire")
        Else
            form = New NameValueCollection
        End If
        ' prepare the page to be displayed
        ' radio buttons
        rdouichecked = ""
        rdnonchecked = "checked"
        If isEqual(form("rdMarie"), "oui") Then
            rdouichecked = "checked"
            rdnonchecked = ""
        End If
        ' checkboxes
        c1checked = ""
        If isEqual(form("C1"), "un") Then c1checked = "checked"
        c2checked = ""
        If isEqual(form("C2"), "deux") Then c2checked = "checked"
        c3checked = ""
        If isEqual(form("C3"), "trois") Then c3checked = "checked"
        ' input fields
        txtSaisie = ""
        If Not form("txtSaisie") Is Nothing Then txtSaisie = form("txtSaisie").ToString
        txtMdp = ""
        If Not form("txtMdp") Is Nothing Then txtMdp = form("txtMdp").ToString
        areaSaisie = ""
        If Not form("areaSaisie") Is Nothing Then areaSaisie = form("areaSaisie").ToString
        ' lists
        Dim sélections() As String = {}
        If Not form("cmbValeurs") Is Nothing Then sélections = form.GetValues("cmbValeurs")
        cmbValeursOptions = getOptions(valeursCmbValeurs, libellésCmbValeurs, sélections)
        sélections = New String() {}
        If Not form("lstSimple") Is Nothing Then sélections = form.GetValues("lstSimple")
        lstSimpleOptions = getOptions(valeursLstSimple, libellésLstSimple, sélections)
        sélections = New String() {}
        If Not form("lstMultiple") Is Nothing Then sélections = form.GetValues("lstMultiple")
        lstMultipleOptions = getOptions(valeursLstMultiple, libellésLstMultiple, sélections)
    End Sub

    Private Function getOptions(ByRef valeurs() As String, ByRef libelles() As String, ByRef sélections() As String) As String
        ' renders HTML code for <select> tag options
        ' values: table of tag option values
        ' labels: table of tag option labels
        ' selections: options to select
        Dim iValeur As Integer
        Dim iSelection As Integer
        Dim selected As String
        Dim toString As String = ""
        ' browse the list of option values
        For iValeur = 0 To valeurs.Length - 1
            ' check whether the current value should be selected
            selected = "" : iSelection = 0
            Do While iSelection < sélections.Length And selected = ""
                If valeurs(iValeur) = sélections(iSelection) Then selected = "selected"
                iSelection += 1
            Loop
            ' we integrate the HTML code from the option
            toString += "<option " + selected + " value='" + valeurs(iValeur) + "'> " _
            + libelles(iValeur) + "</option>" + ControlChars.CrLf
        Next
        ' we return the result
        Return toString
    End Function

    Private Function isEqual(Byval champ As Object, ByVal valeur As String) As Boolean
        ' returns true if field is equal to value
        If champ Is Nothing OrElse champ.ToString <> valeur Then
            Return false
        Else
            Return true
        End If
    end function
End Class
When the [formulaire.aspx] page begins to run, it will find in its context a "form" key associated with the collection of field values it must display.
        ' retrieve the previous request from the session
        Dim form As NameValueCollection
        If Not Context.Items("formulaire") Is Nothing Then
            form = Context.Items("formulaire")
        Else
            form = New NameValueCollection
        End If
One might wonder why we check whether [Context.Items("formulaire")] exists. In fact, the controller assigns a value to this object in all cases. However, nothing prevents the client from directly requesting the page [formulaire.aspx] without going through the controller. If that were the case, the previous code would work with an empty collection of values, but there would be no "crash."
The code iterates through the collection of values it has received to calculate all the dynamic variables for the associated page HTML. Although it is long, this code is not particularly complicated, and we leave it to the reader to explore it so as not to burden this explanation. We will, however, focus on how to generate the HTML code from the three [select]-type lists. This code is generated by the following function:
    Private Function getOptions(ByRef valeurs() As String, ByRef libelles() As String, ByRef sélections() As String) As String
        ' renders HTML code for <select> tag options
        ' values: table of tag option values
        ' labels: table of tag option labels
        ' selections: options to select
        Dim iValeur As Integer
        Dim iSelection As Integer
        Dim selected As String
        Dim toString As String = ""
        ' browse the list of option values
        For iValeur = 0 To valeurs.Length - 1
            ' check whether the current value should be selected
            selected = "" : iSelection = 0
            Do While iSelection < sélections.Length And selected = ""
                If valeurs(iValeur) = sélections(iSelection) Then selected = "selected"
                iSelection += 1
            Loop
            ' we integrate the HTML code from the option
            toString += "<option " + selected + " value='" + valeurs(iValeur) + "'> " _
            + libelles(iValeur) + "</option>" + ControlChars.CrLf
        Next
        ' we return the result
        Return toString
    End Function
Note that the options for a <select> tag correspond to the following HTML code:
For each option, there are therefore three pieces of information to generate:
- the value of the option in the [value] attribute
- the text of the option between the <option> and </option> tags
- the keyword [selected] if option is to be selected from the list
To generate these three pieces of information for each option, the function [getOptions] receives three values:
- the array of option values in [valeurs]
- the array of option texts in [libelles]
- the table of values to be selected in [sélections]
5.5.4. The validation page
The validation page remains unchanged:
[validation.aspx]
<%@ Page src="validation.aspx.vb" Language="vb" AutoEventWireup="false" Inherits="validation" %>
<HTML>
    <HEAD>
        <title>validation</title>
    </HEAD>
    <body>
        <P>Valeurs saisies</P>
        <HR width="100%" SIZE="1">
        <TABLE id="Table1" cellSpacing="1" cellPadding="1" width="300" border="1">
            <TR>
                <TD width="84">rdMarie</TD>
                <TD><% =rdMarie%></TD>
            </TR>
            <TR>
                <TD width="84">C1</TD>
                <TD><%=C1%></TD>
            </TR>
            <TR>
                <TD width="84">C2</TD>
                <TD><%=C2%></TD>
            </TR>
            <TR>
                <TD width="84">C3</TD>
                <TD><%=C3%></TD>
            </TR>
            <TR>
                <TD width="84">txtSaisie</TD>
                <TD><%=txtSaisie%></TD>
            </TR>
            <TR>
                <TD width="84">txtMdp</TD>
                <TD><%=txtMdp%></TD>
            </TR>
            <TR>
                <TD width="84">areaSaisie</TD>
                <TD><%=areaSaisie%></TD>
            </TR>
            <TR>
                <TD width="84">cmbValeurs</TD>
                <TD><%=cmbValeurs%></TD>
            </TR>
            <TR>
                <TD width="84">lstSimple</TD>
                <TD><%=lstSimple%></TD>
            </TR>
            <TR>
                <TD width="84">lstMultiple</TD>
                <TD><%=lstMultiple%></TD>
            </TR>
            <TR>
                <TD width="84">secret</TD>
                <TD><%=secret%></TD>
            </TR>
        </TABLE>
        <P>
            <a href="main.aspx?action=formulaire">Retour au formulaire</a>
        </P>
    </body>
</HTML>
[validation.aspx.vb]
Imports Microsoft.VisualBasic
Imports System.Text.RegularExpressions

Public Class validation
    Inherits System.Web.UI.Page

    Protected rdMarie As String
    Protected C1 As String
    Protected C2 As String
    Protected C3 As String
    Protected txtSaisie As String
    Protected txtMdp As String
    Protected areaSaisie As String
    Protected cmbValeurs As String
    Protected lstSimple As String
    Protected lstMultiple As String
    Protected secret As String
    Protected delimiteur As New Regex("\r\n")

    Private Sub Page_Load(ByVal sender As System.Object, ByVal e As System.EventArgs) Handles MyBase.Load
        'retrieve posted parameters
        rdMarie = getValue("rdMarie")
        C1 = getValue("C1")
        C2 = getValue("C2")
        C3 = getValue("C3")
        txtSaisie = getValue("txtSaisie")
        txtMdp = getValue("txtMdp")
        areaSaisie = String.Join(",", delimiteur.Split(getValue("areaSaisie")))
        cmbValeurs = getValue("cmbValeurs")
        lstSimple = getValue("lstSimple")
        lstMultiple = getValue("lstMultiple")
        secret = getValue("secret")
        ' save them in the session
        'Session("form") = Request.Form
    End Sub

    Private Function getValue(ByVal champ As String) As String
        ' retrieves the value of field [field] from the posted request
        ' anything?
        If Request.Form(champ) Is Nothing Then Return ""
        ' retrieve the value(s) of the
        Dim valeurs() As String = Request.Form.GetValues(champ)
        Dim valeur As String = ""
        Dim i As Integer
        For i = 0 To valeurs.Length - 1
            valeur += "[" + valeurs(i) + "]"
        Next
        Return valeur
    End Function
End Class
5.5.5. Testing
The [main.aspx, main.aspx.vb,formulaire.aspx,formulaire.aspx.vb, validation.aspx, validation.aspx.vb] files are placed in <application-path> and Casini is launched with the parameters (<application-path>,/mvcform3). We then request the url and [http://localhost/mvcform3/main.aspx] files. We obtain the pre-initialized form:
We fill out the form as follows:
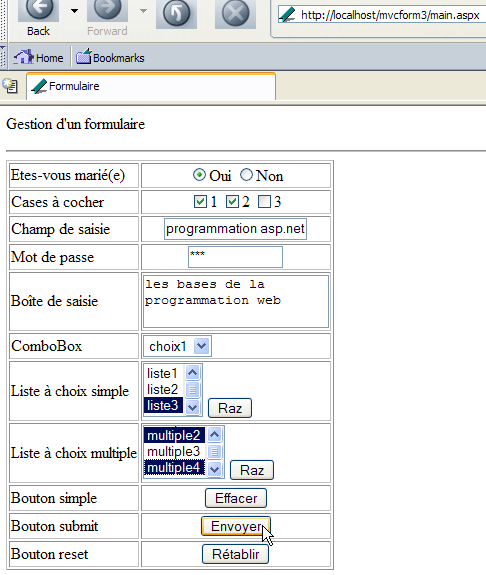
We use the [Envoyer] button above. We receive the following response from the server:
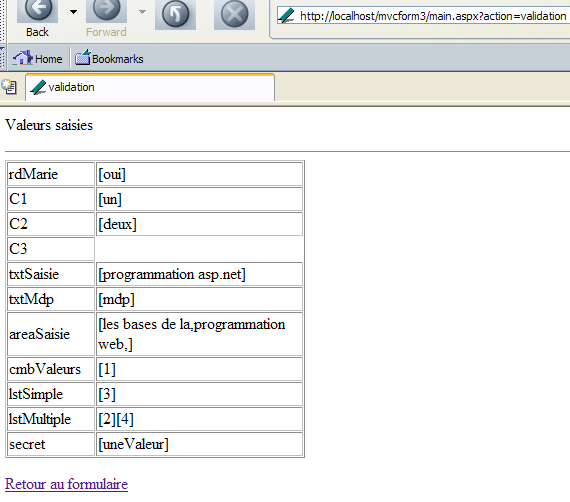
We use the [Retour au formulaire] link above to return to the form. We receive the following new response:
We see the form exactly as we submitted it.
5.5.6. Conclusion
The previous example showed us that it is possible to maintain a page’s state throughout the request-response cycles between the client and the server. However, this is not a trivial task. We will see in a later chapter that it is possible to use ASP.NET to let the server restore a page’s state on its own.