18. 税费计算服务器的 Vue.js 客户端
18.1. 架构
我们将实现一个具有以下架构的客户端/服务器应用程序:
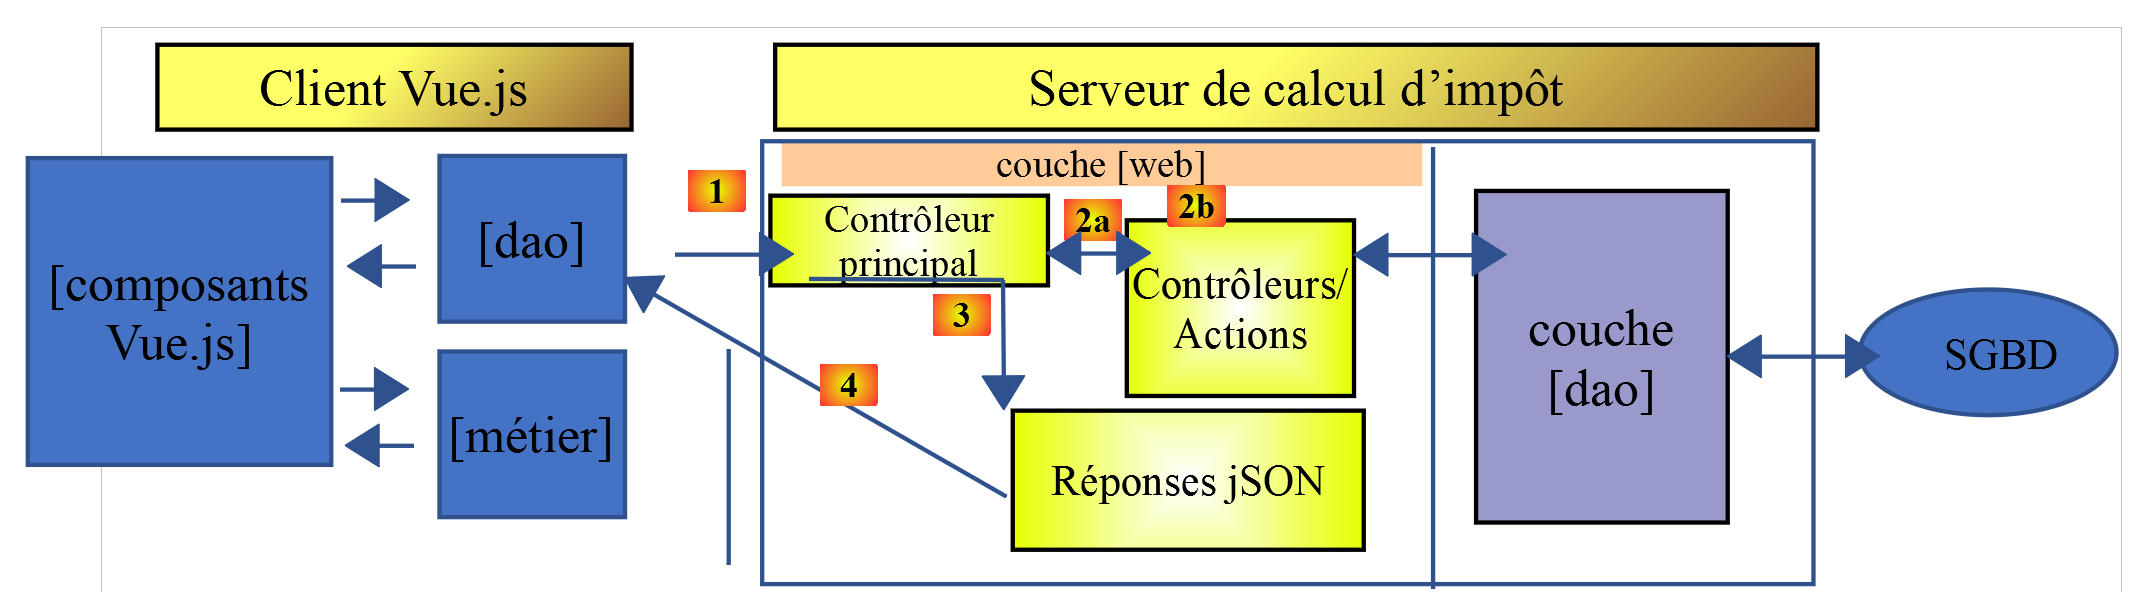
税费计算服务器将采用第 14 版,开发文档详见 |https://tahe.developpez.com/tutoriels-cours/php7|
18.2. 应用程序视图
应用程序视图 [vuejs-10] 源自税费计算服务器文档 |https://tahe.developpez.com/tutoriels-cours/php7| 的第 13 版,该文档在 HTML 模式下使用。但在本应用中,这些视图将由 JavaScript 客户端生成,而非 PHP 服务器。
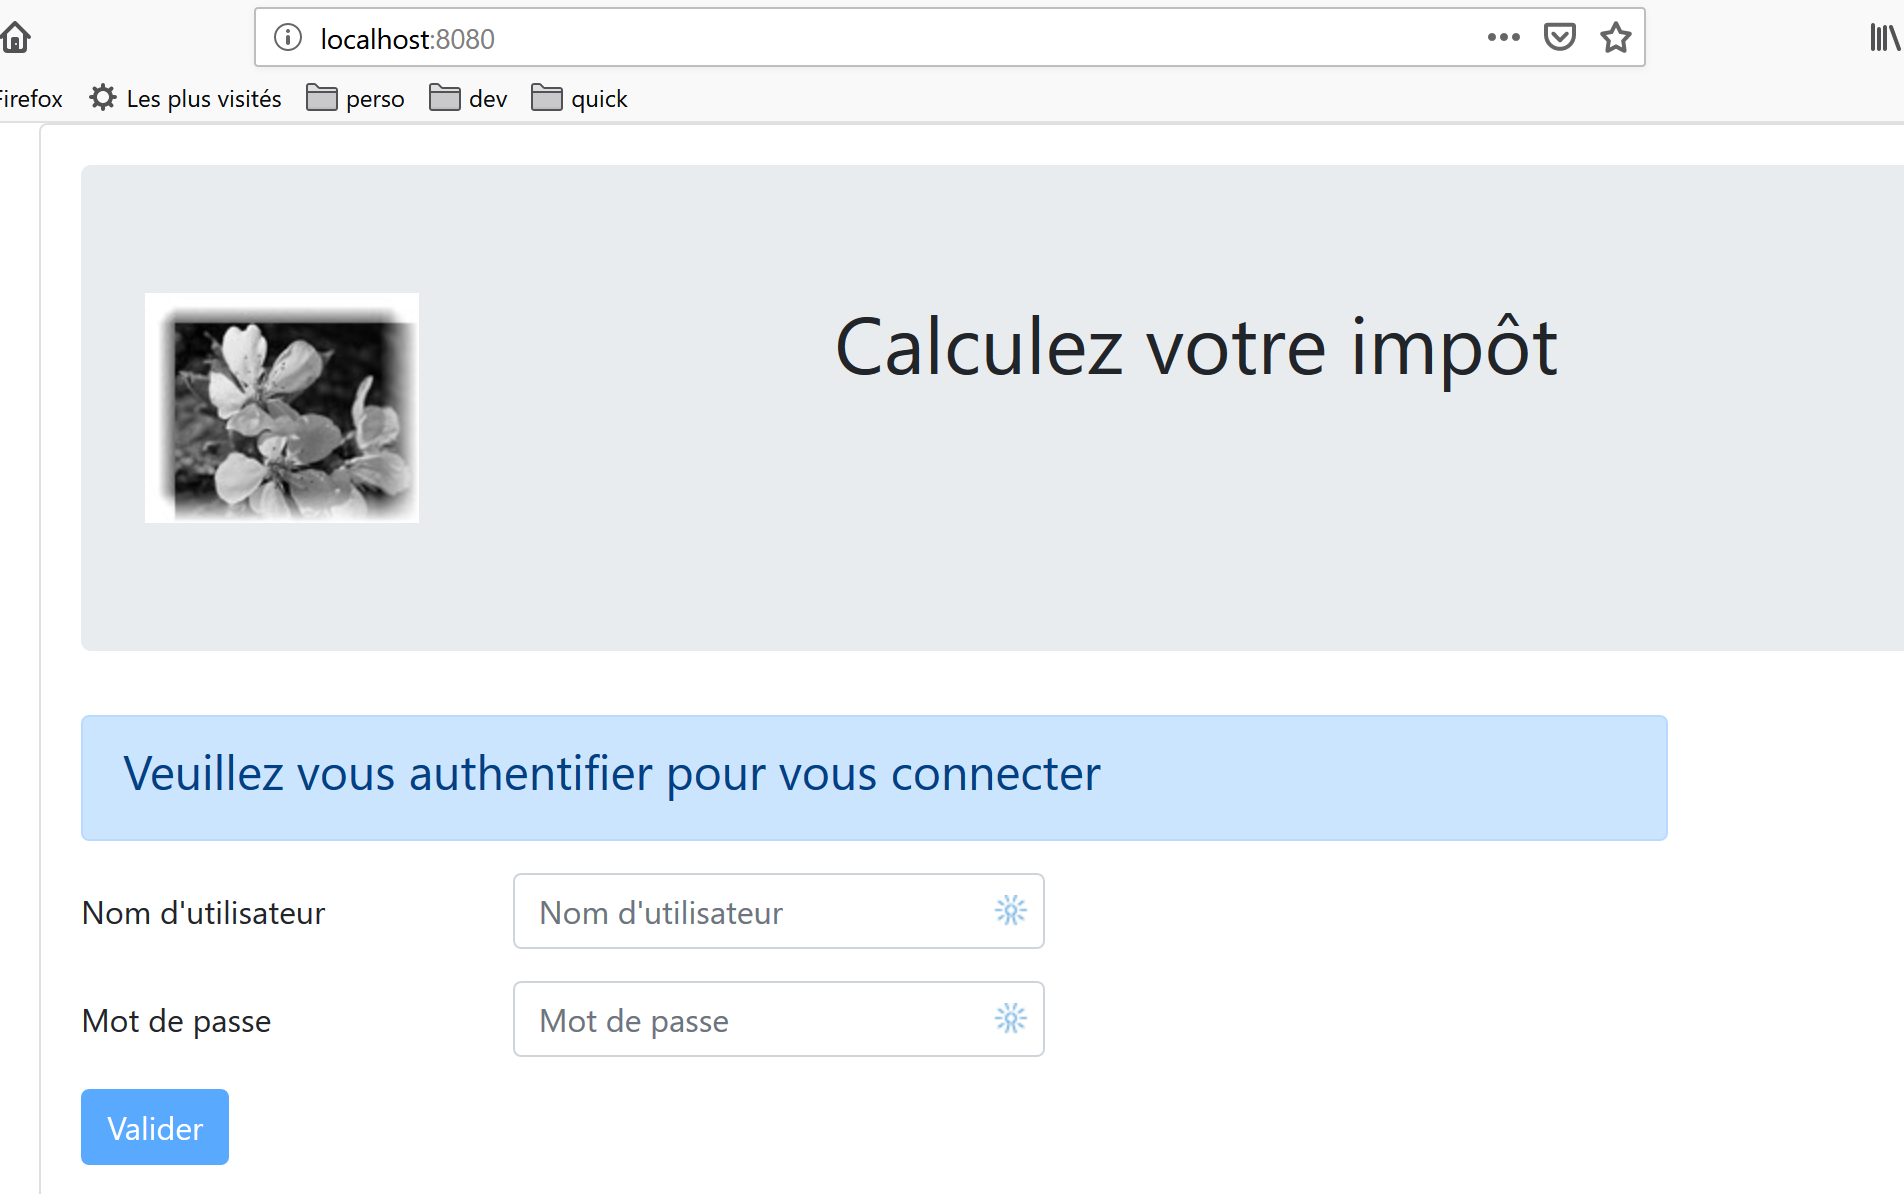
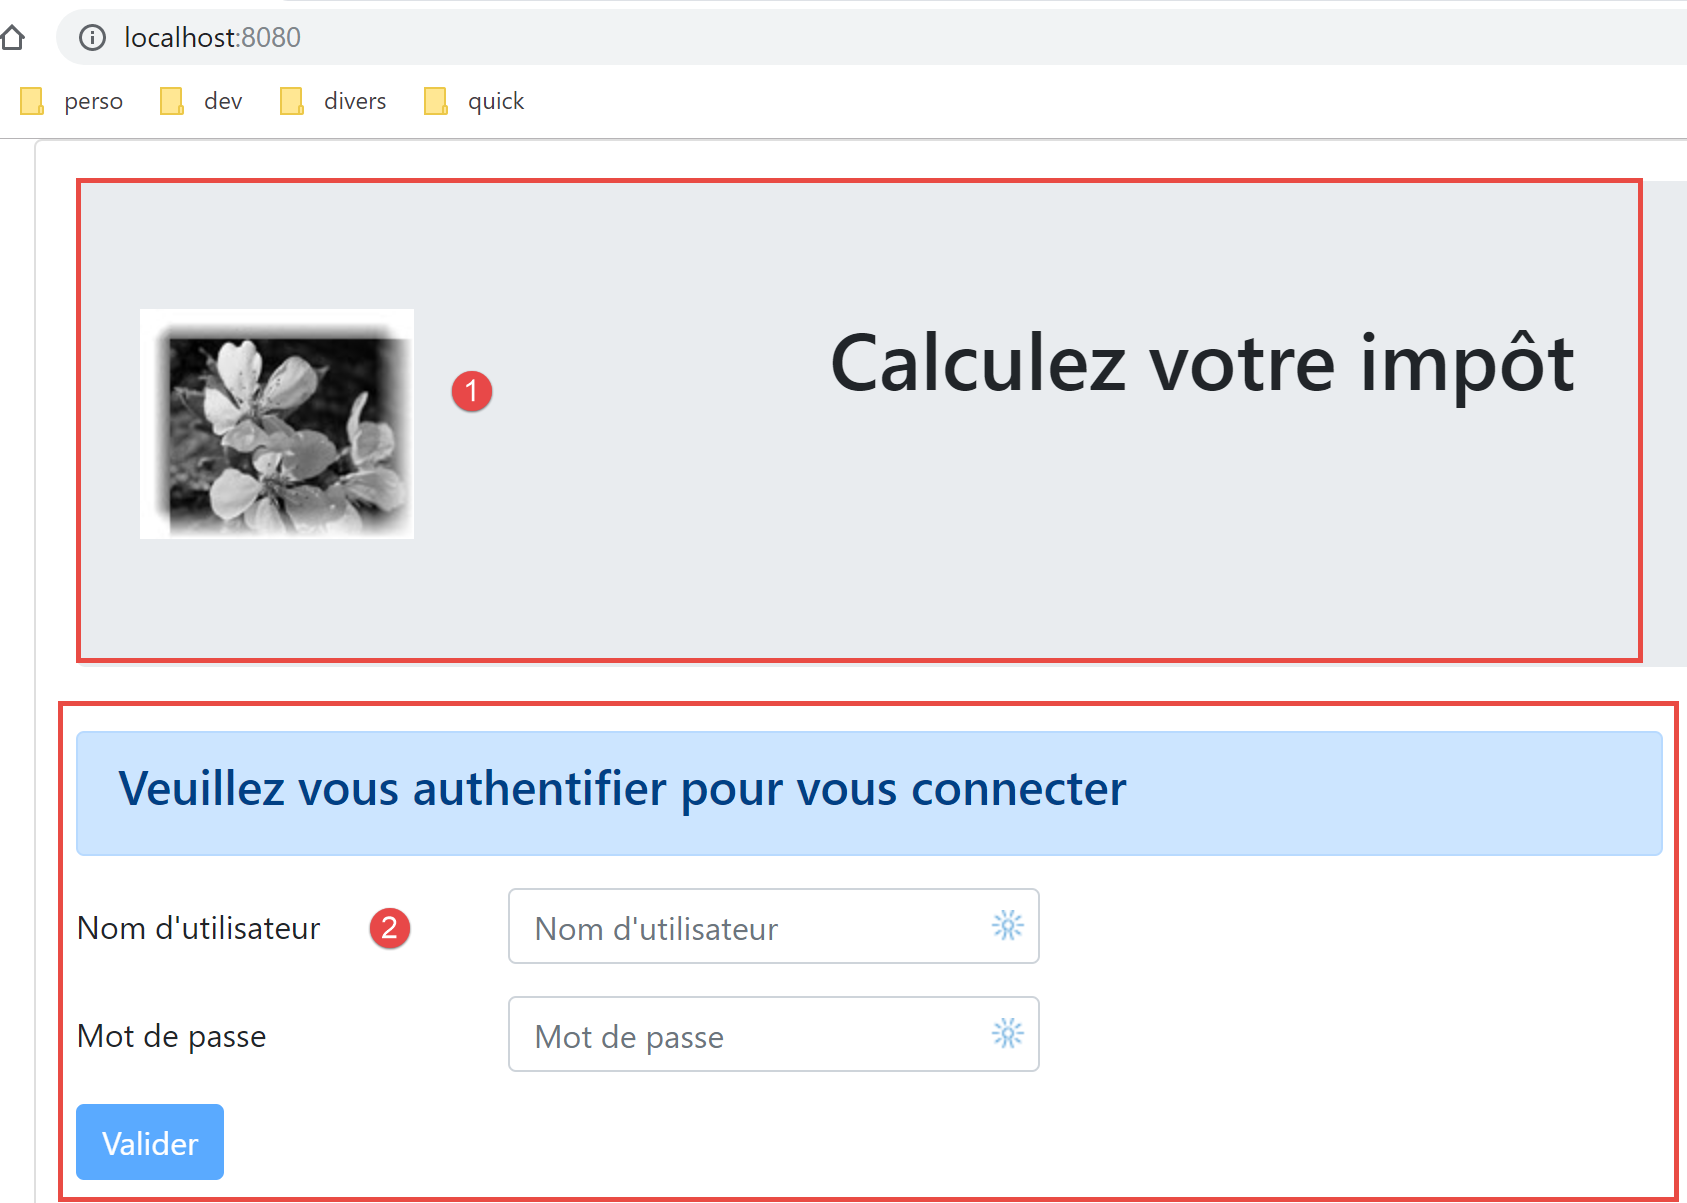
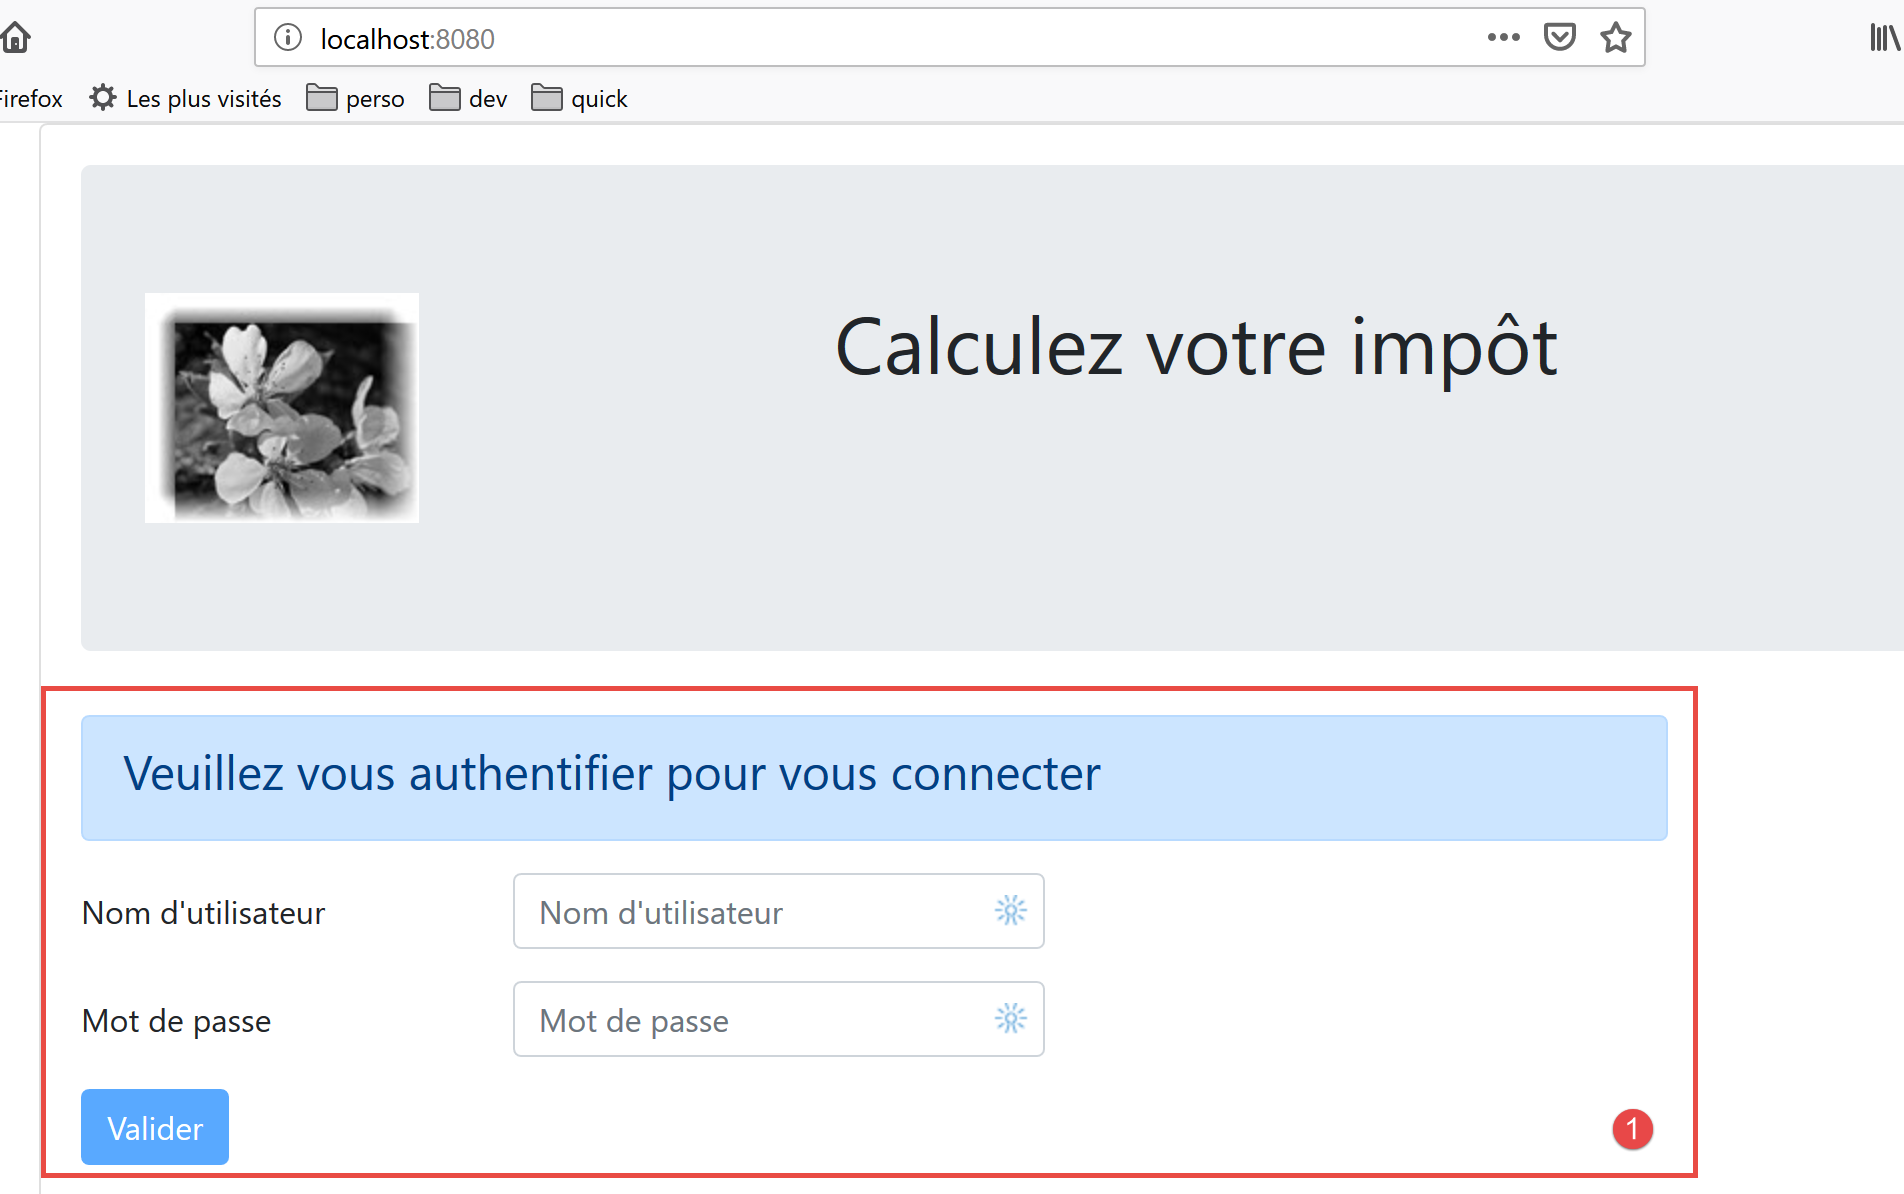
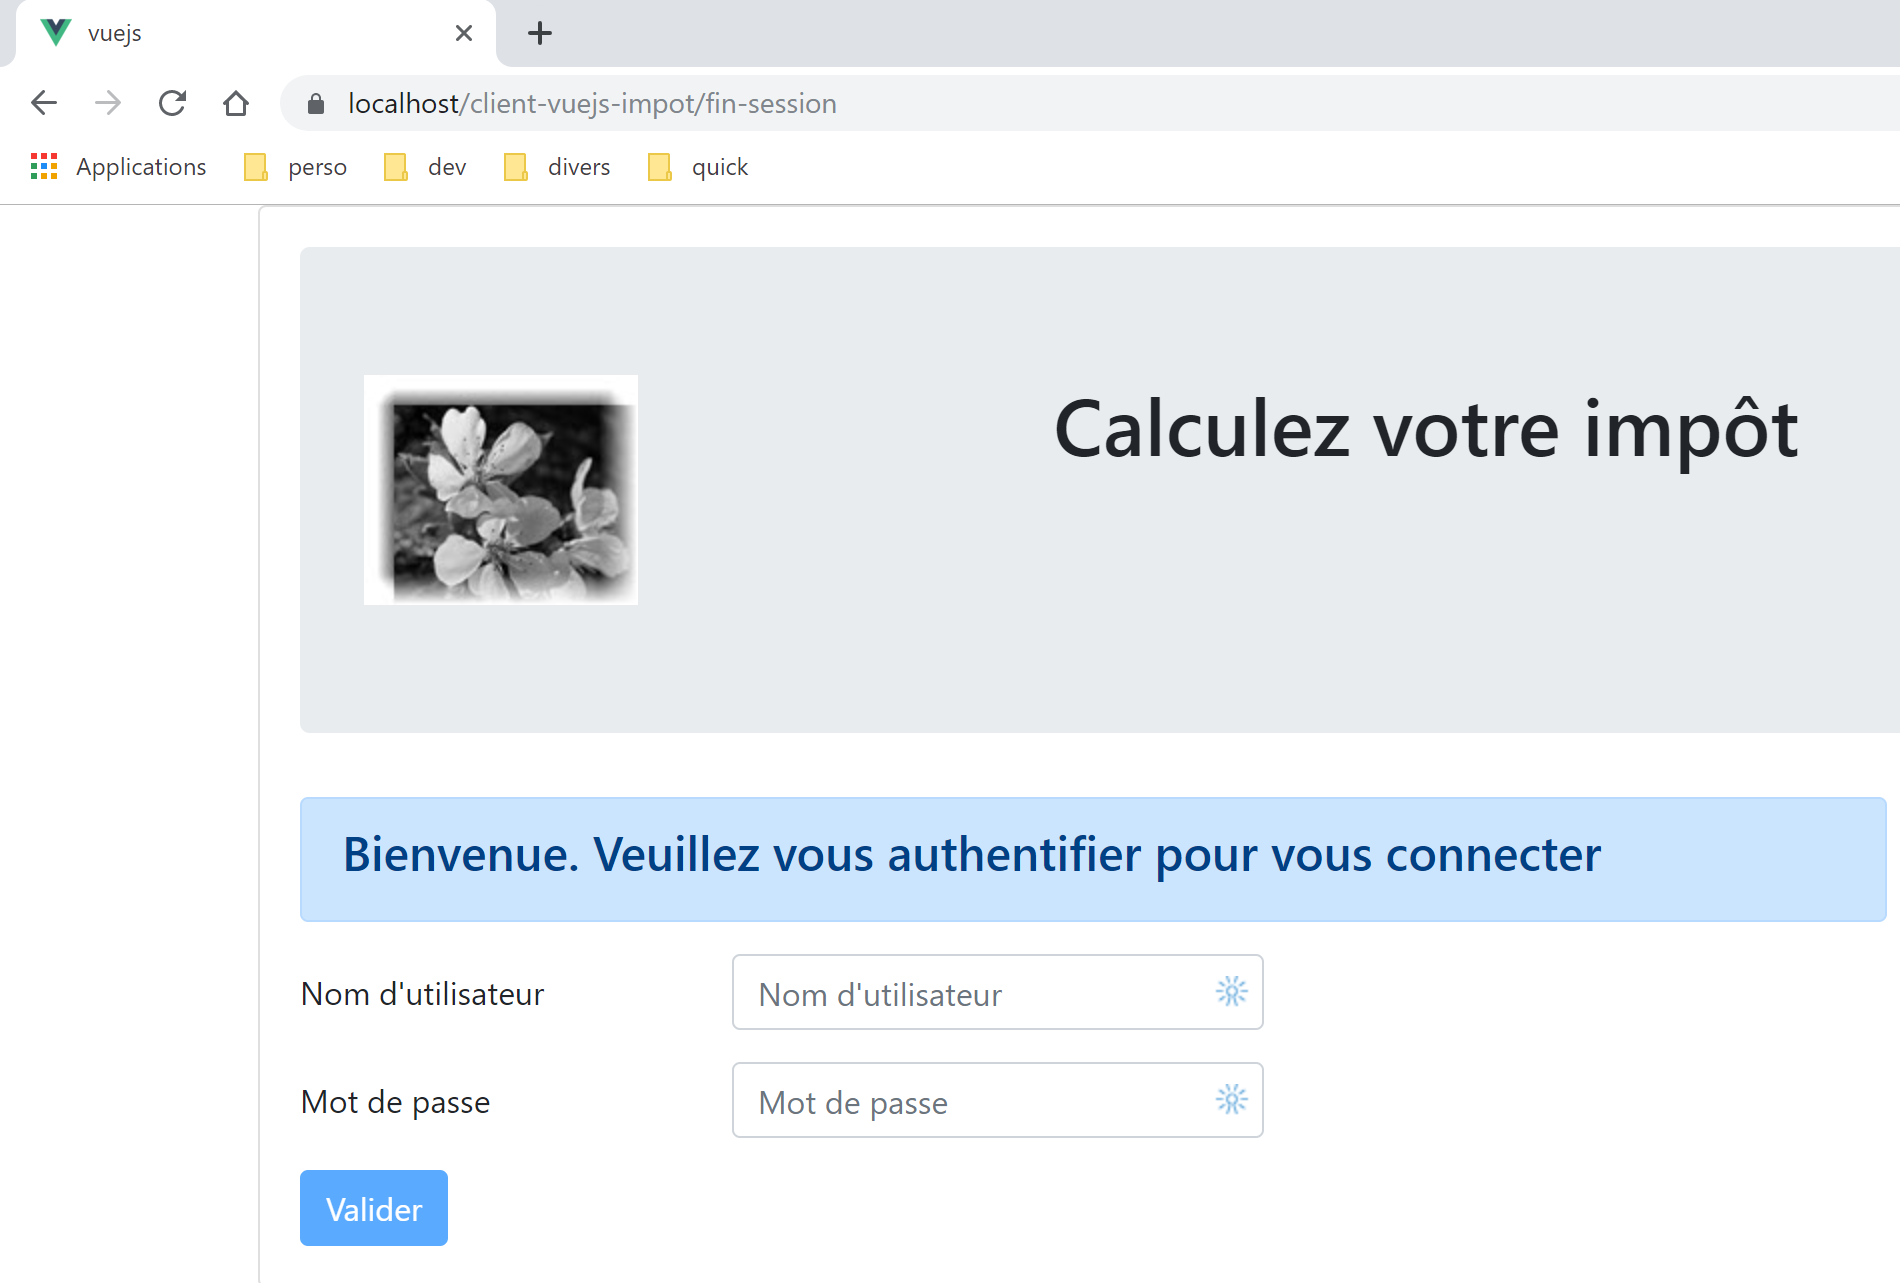
第一个视图是身份验证视图:
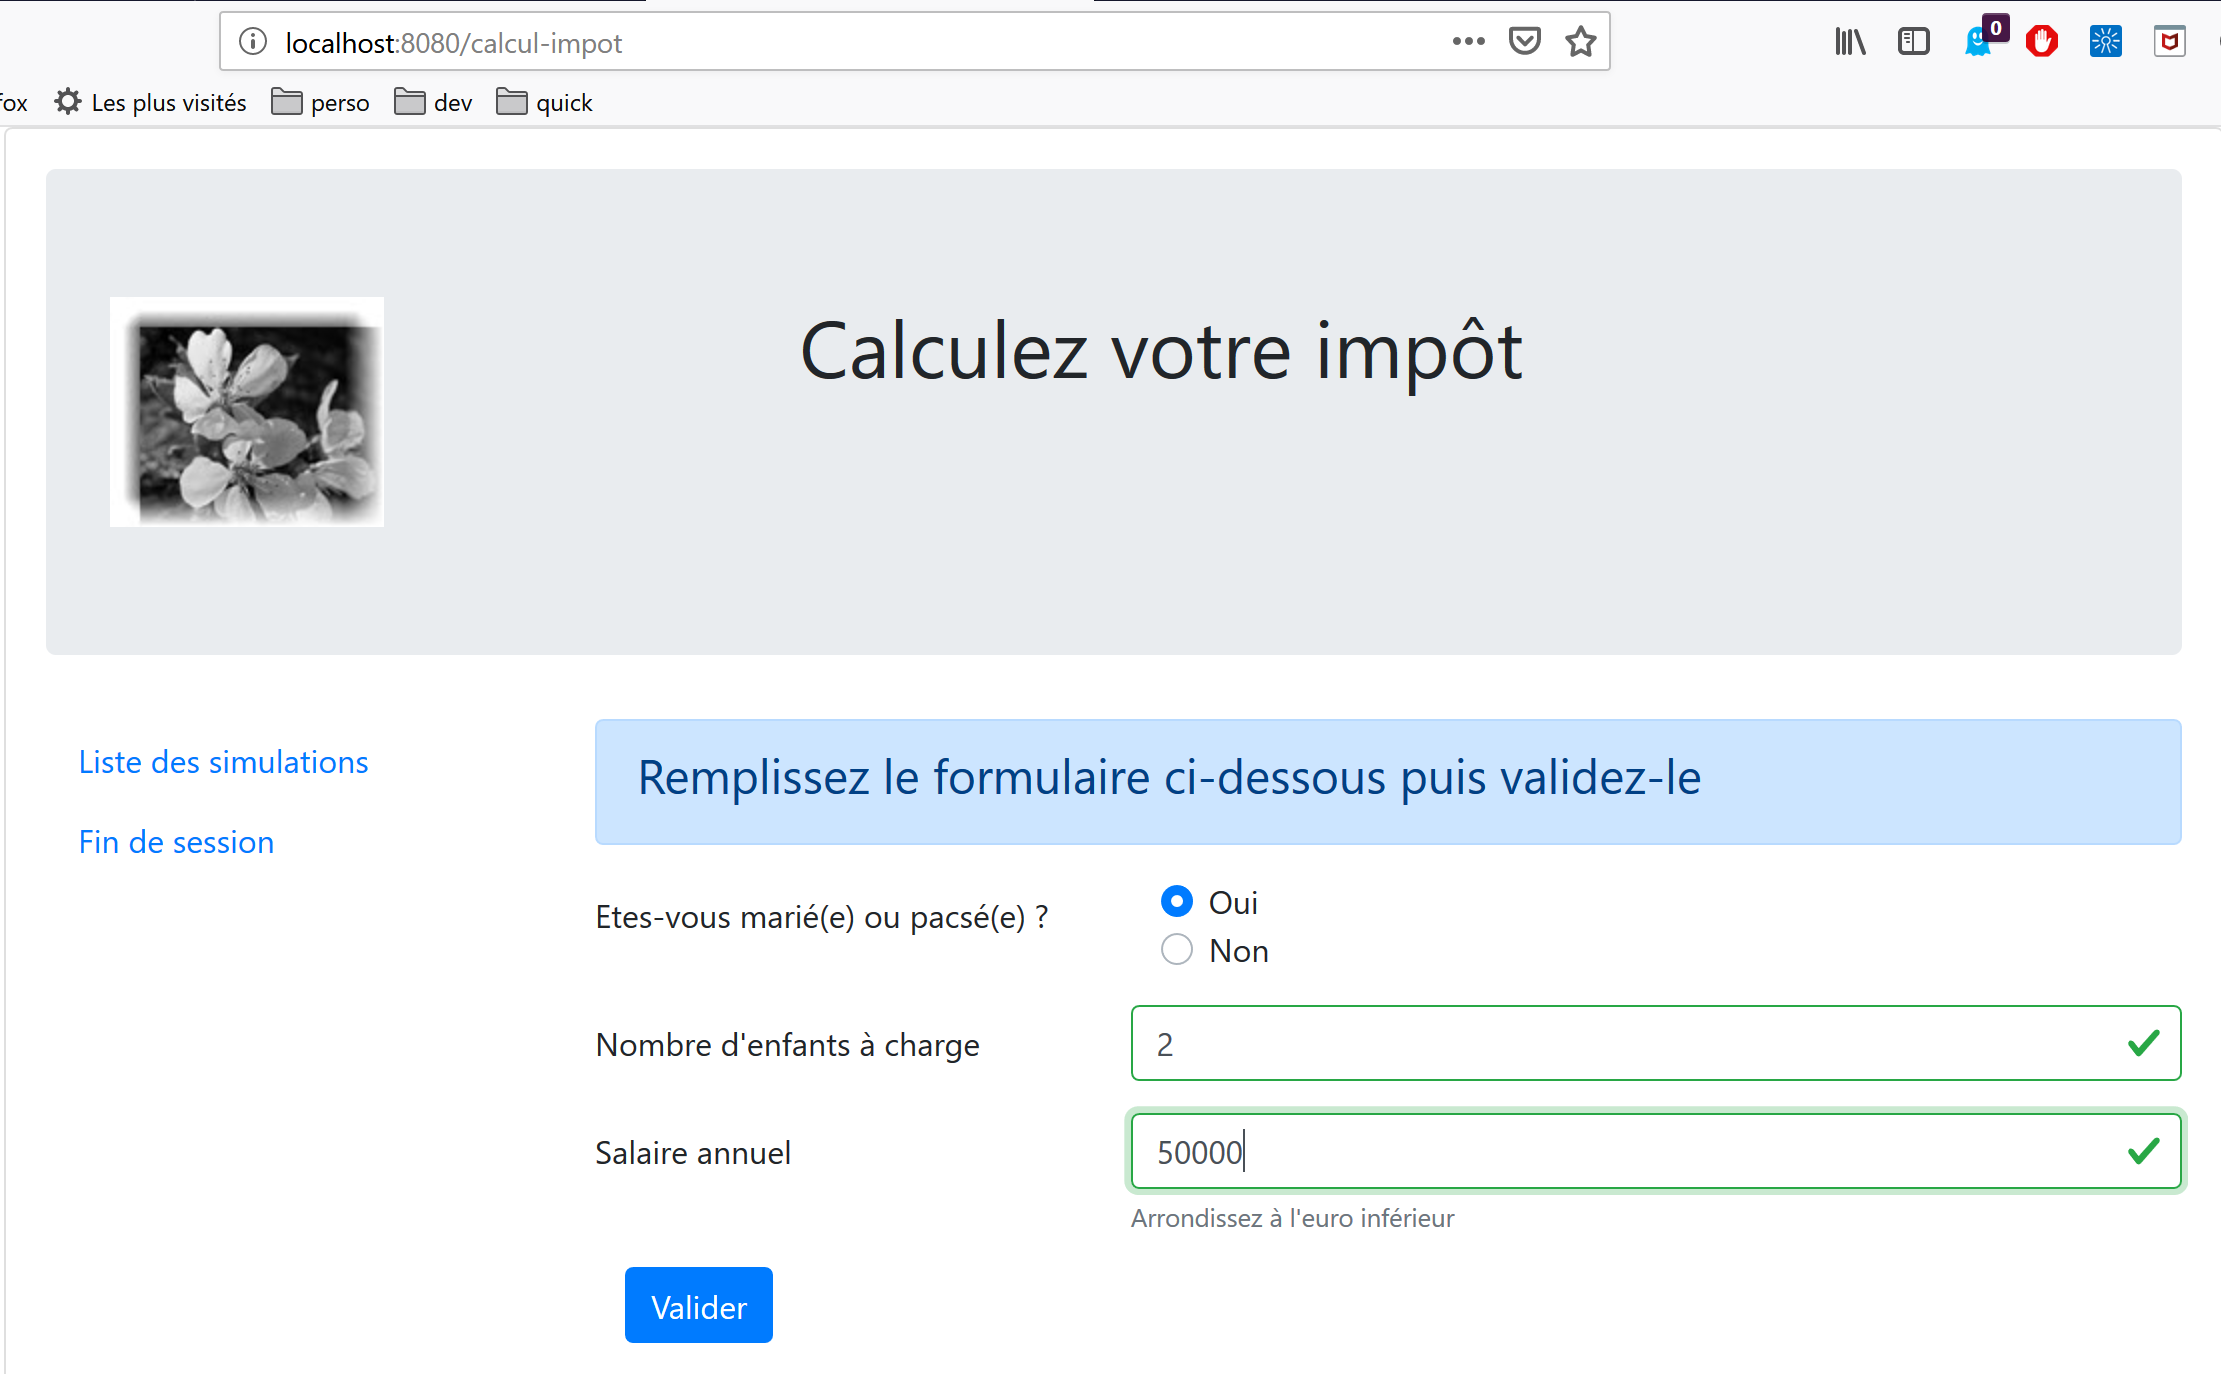
第二个视图是税费计算视图:
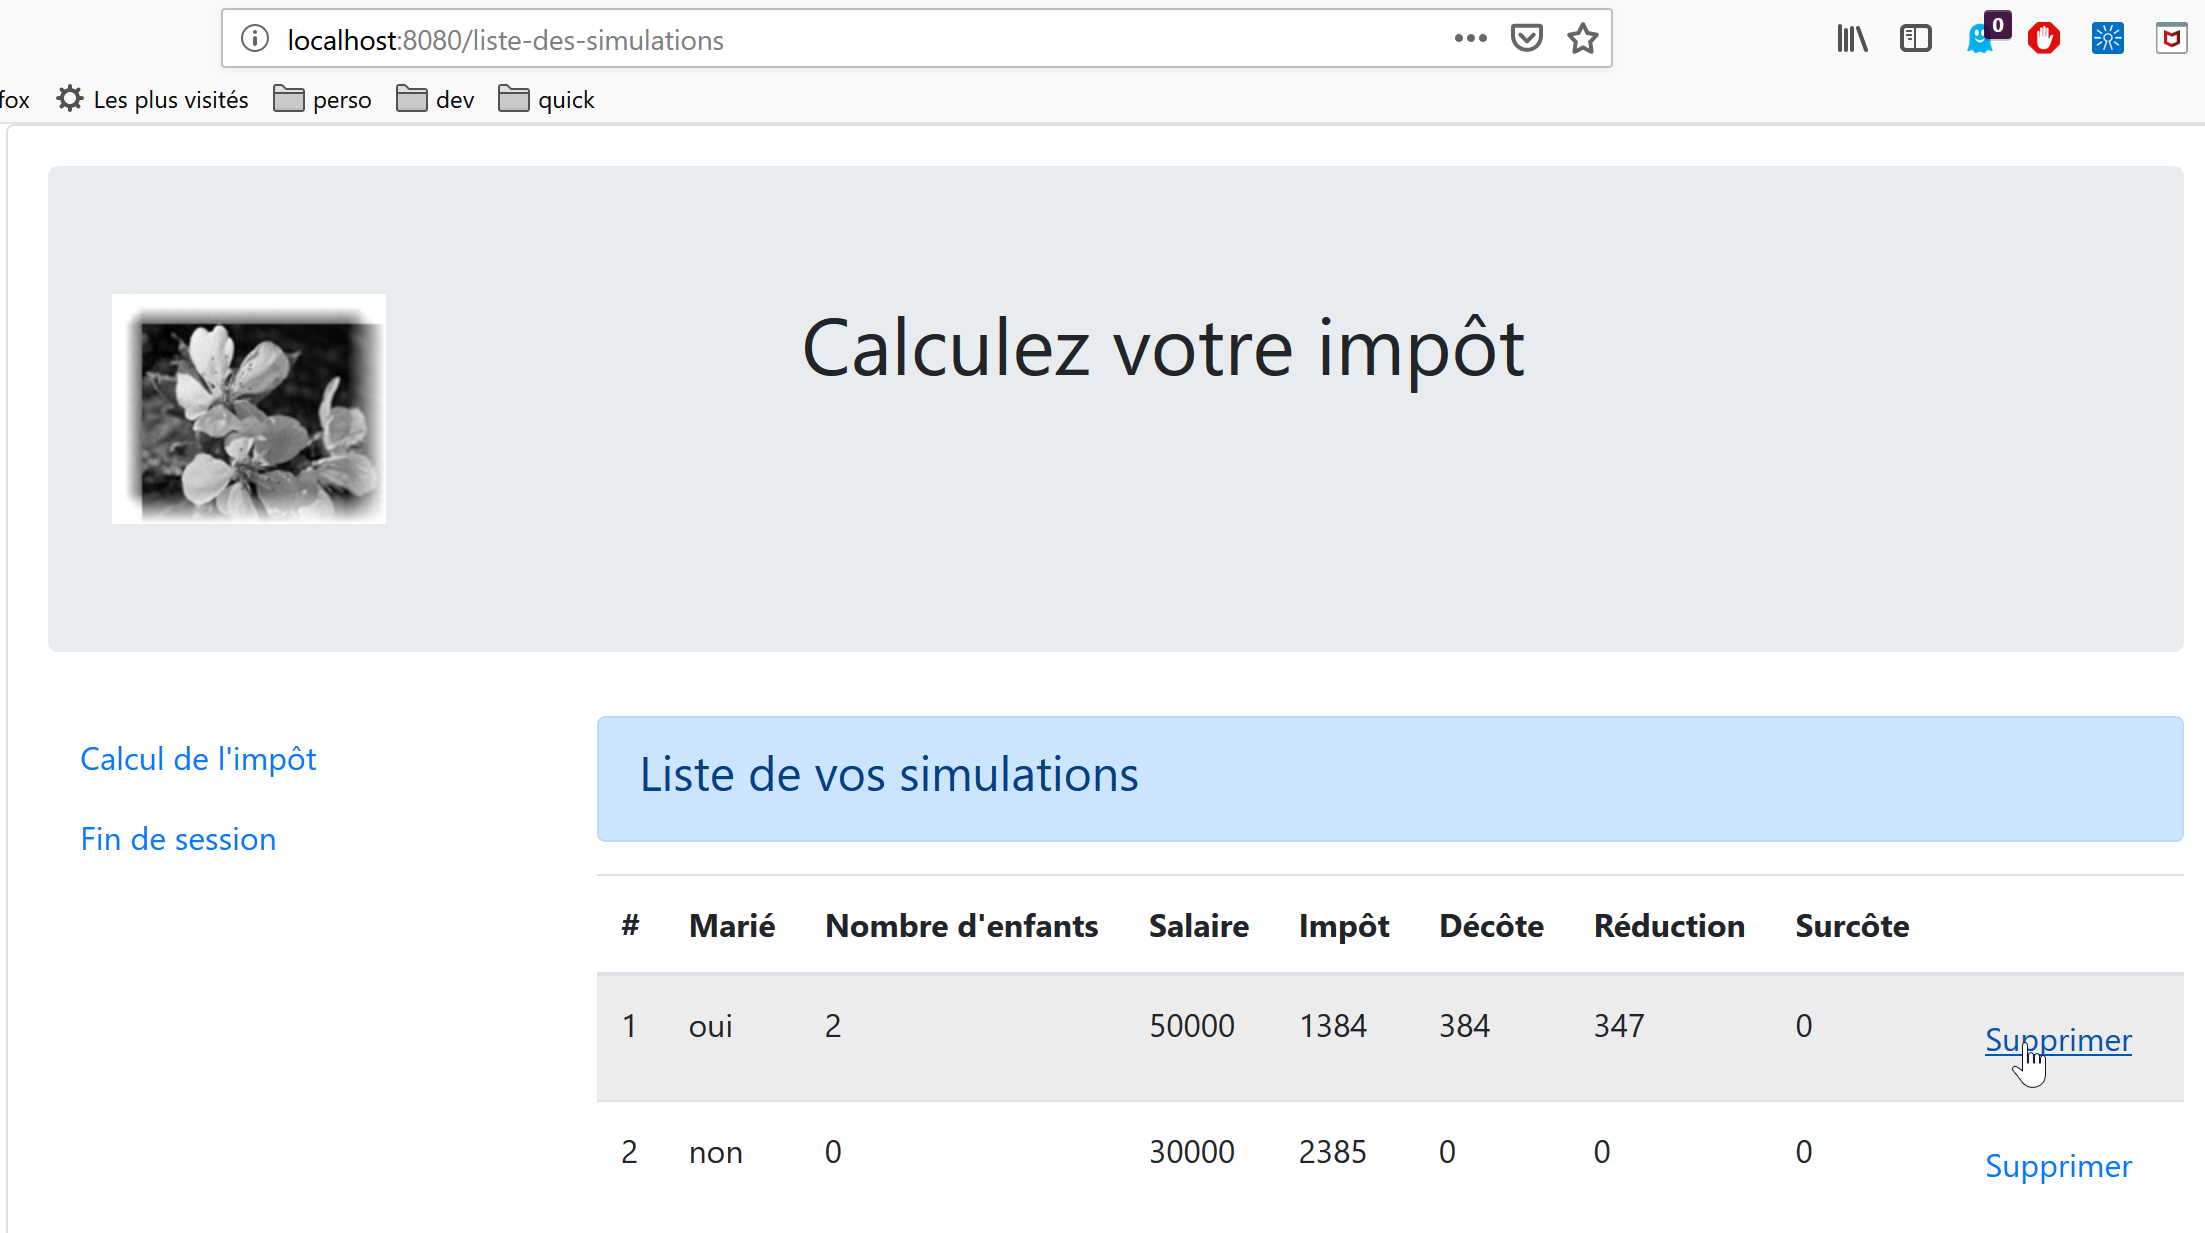
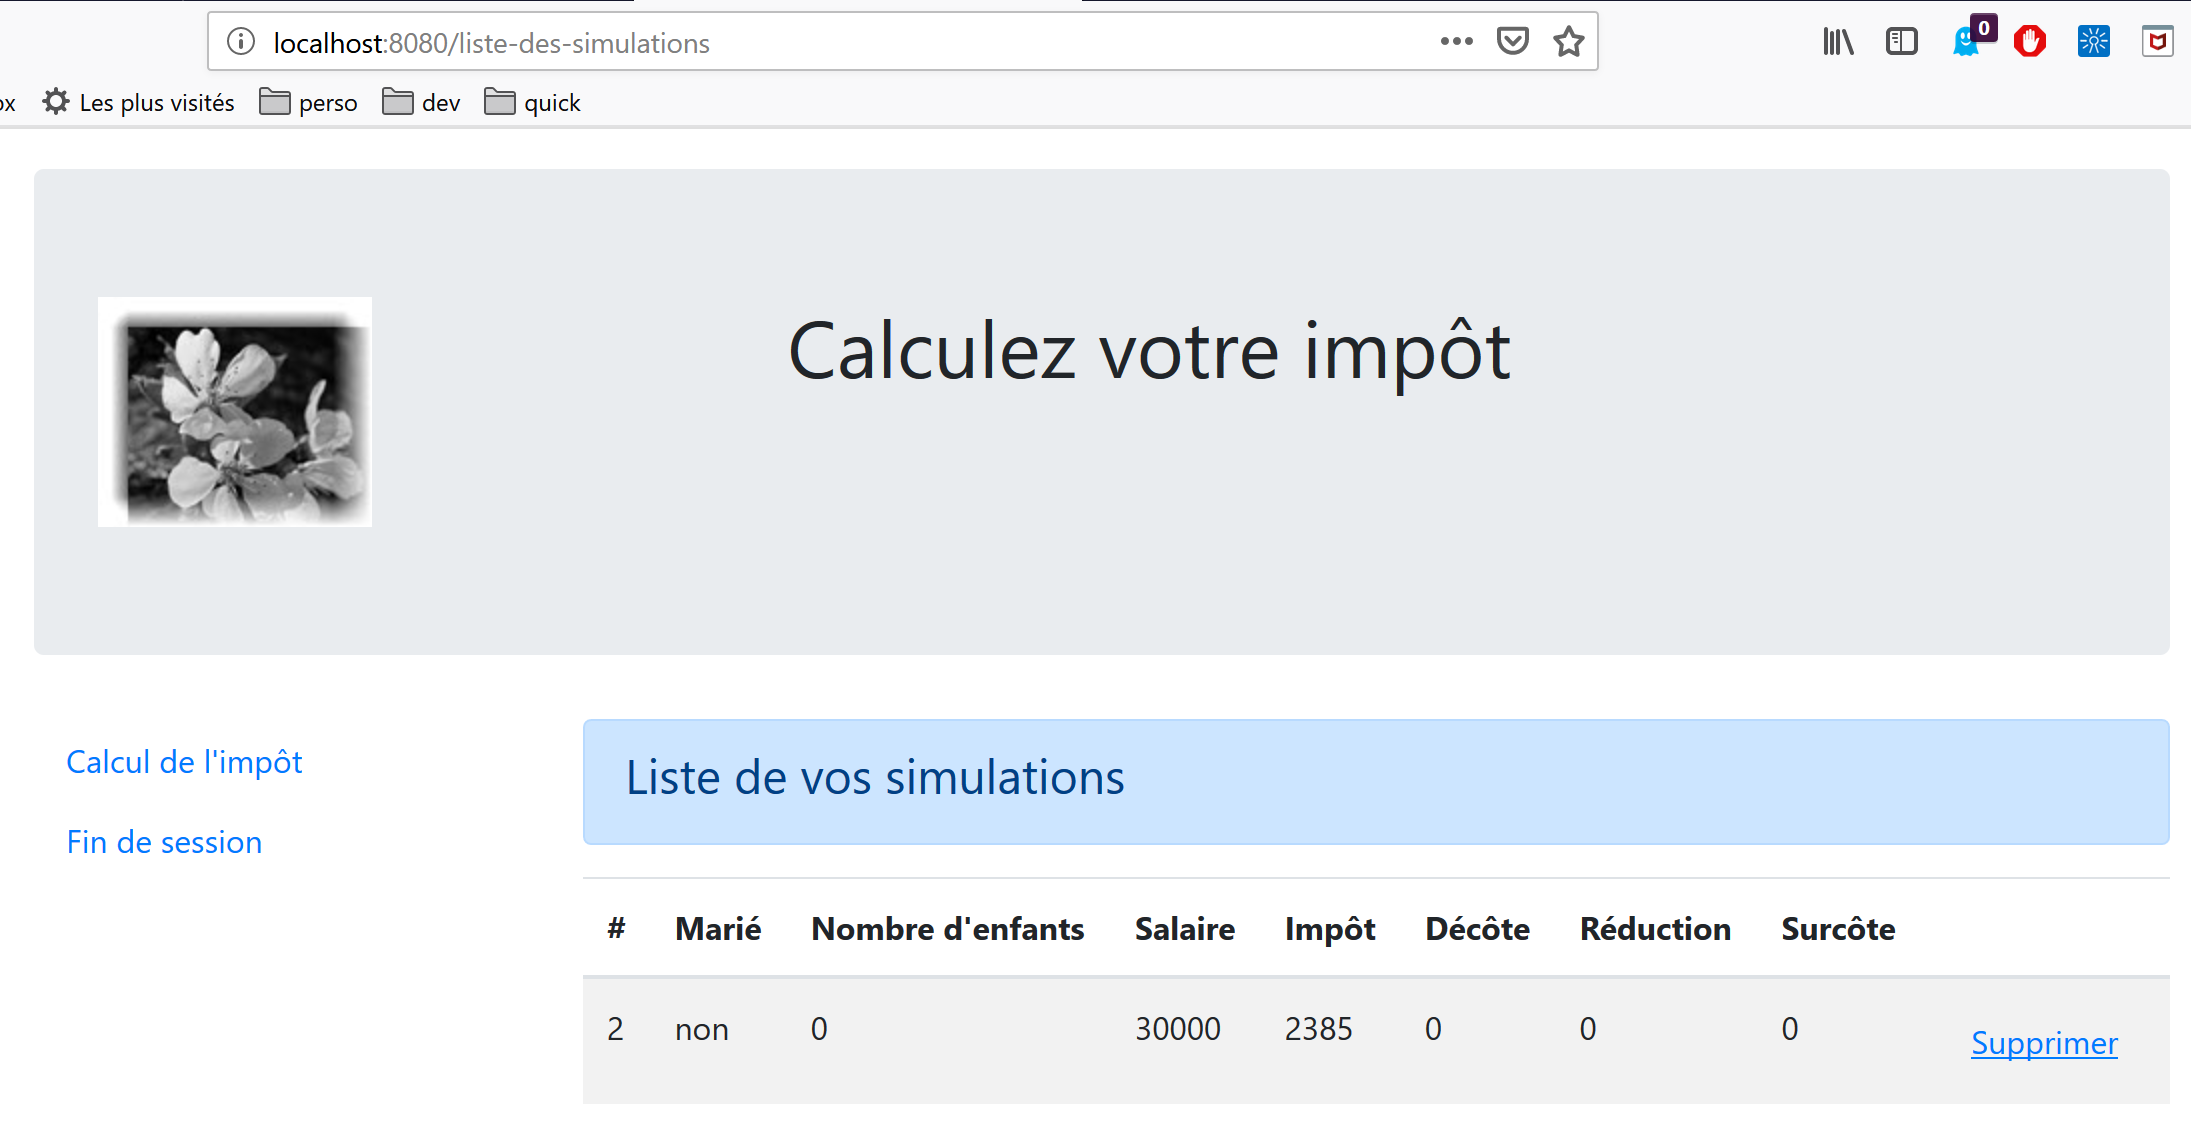
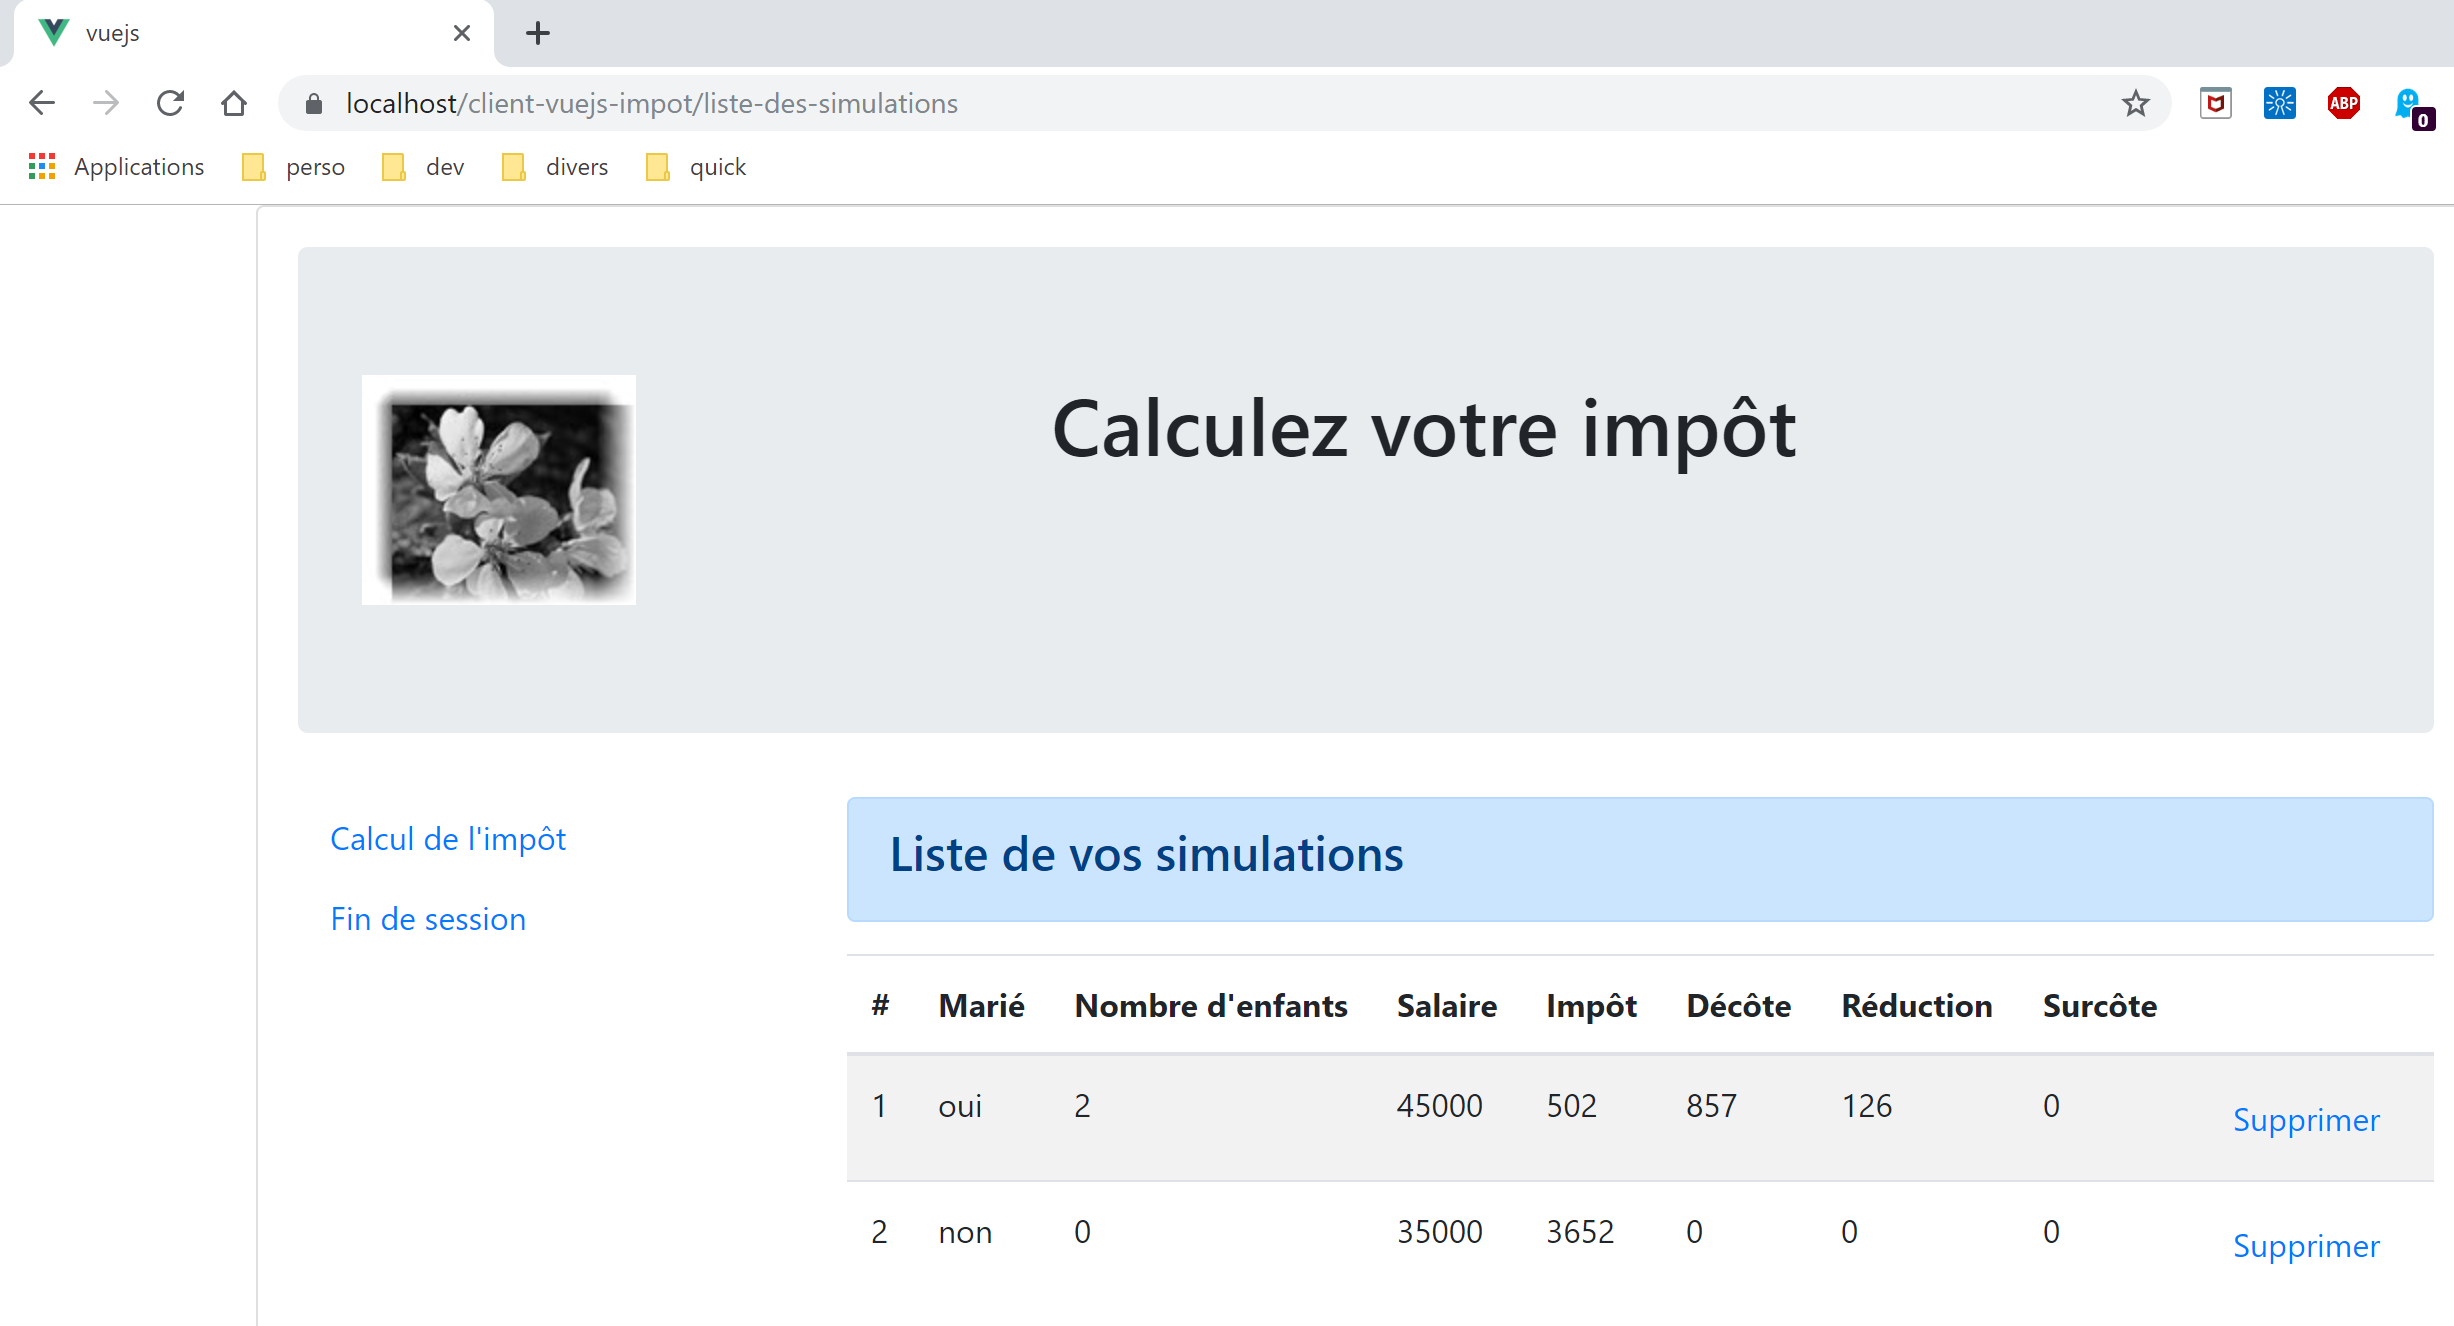
第三个视图显示用户执行的模拟列表:
上图显示您可以删除模拟#1。操作后将显示以下视图:
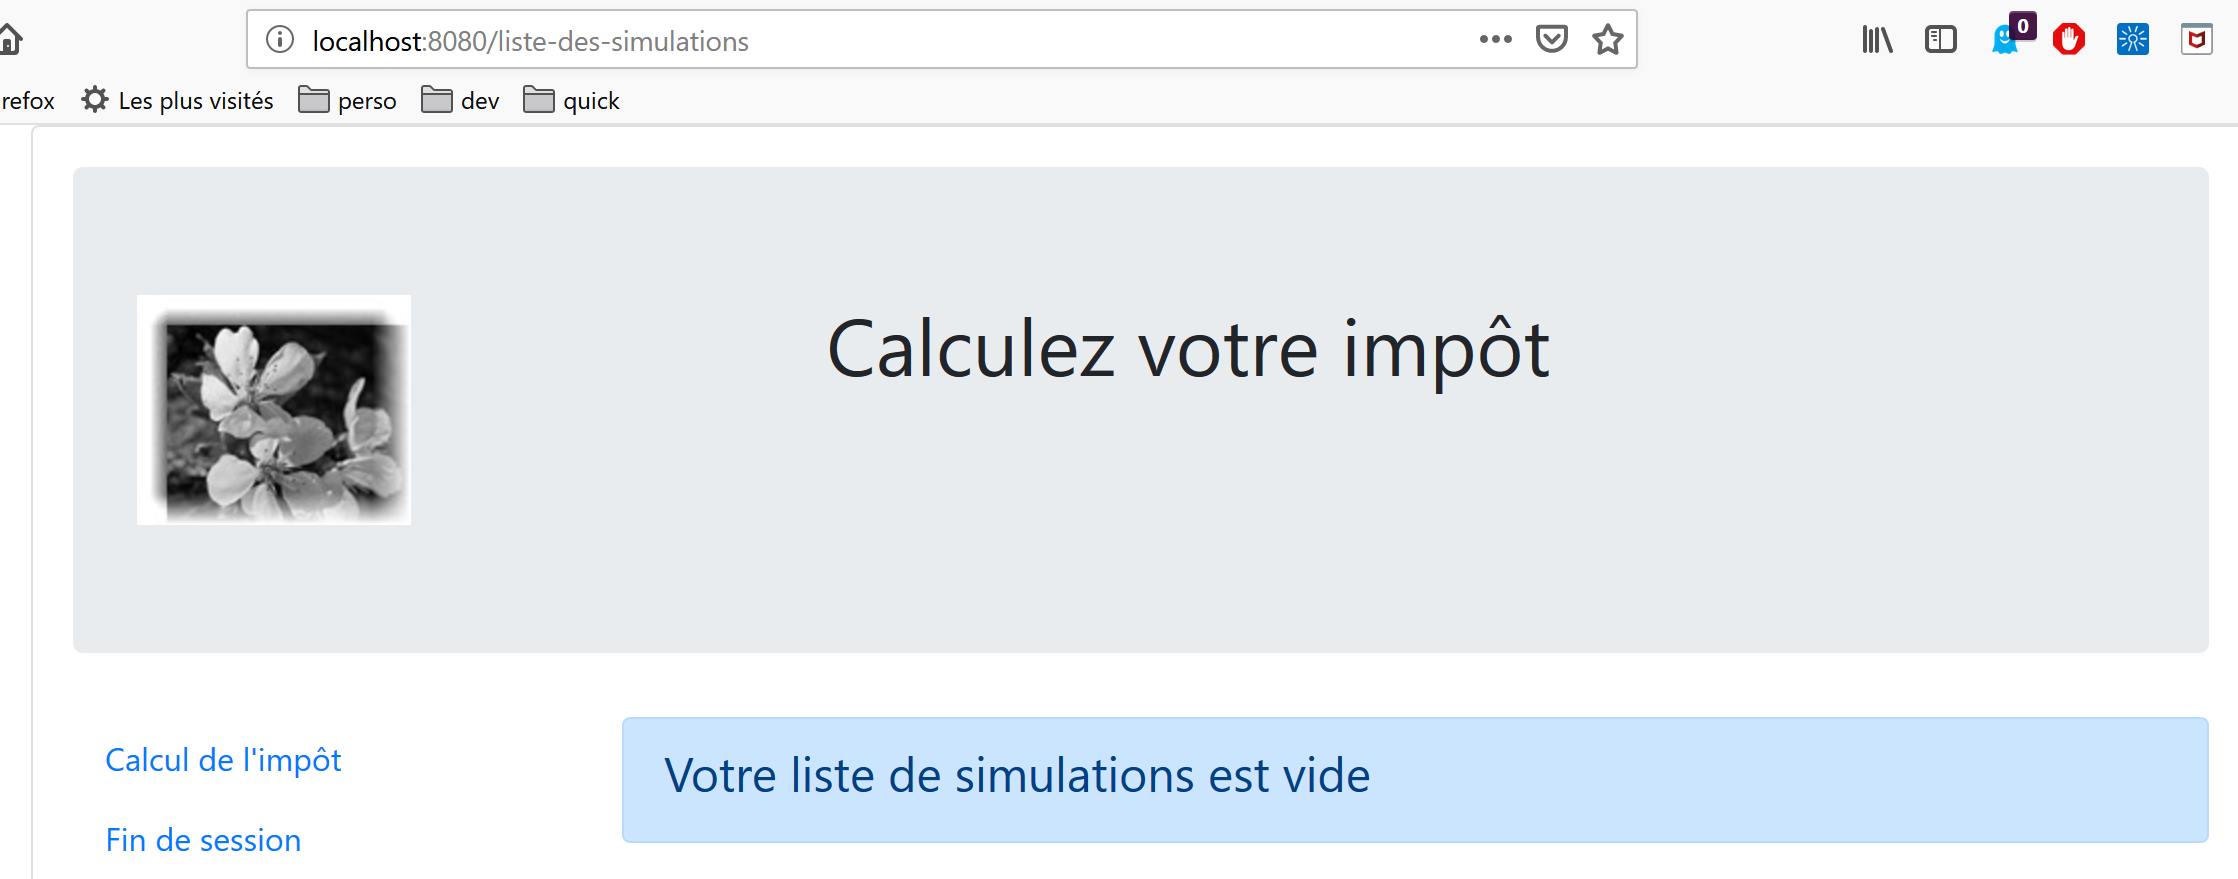
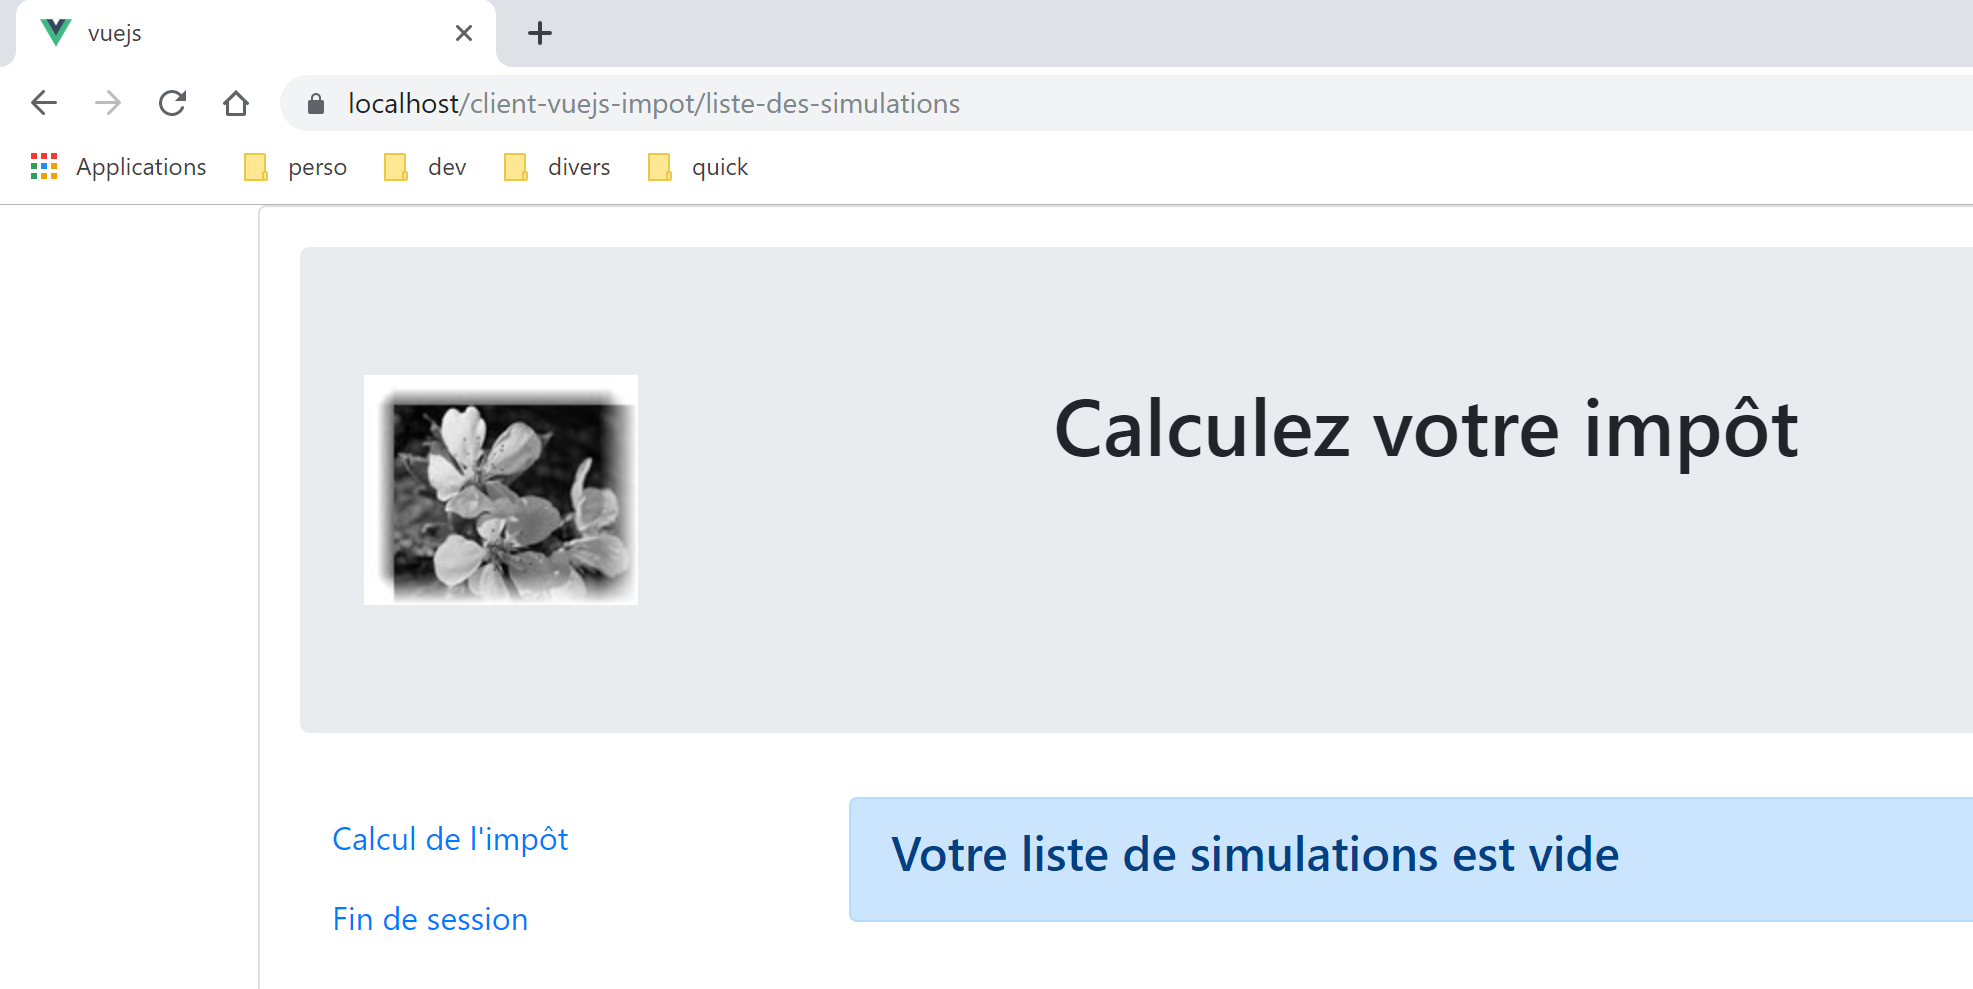
若现在删除最后一个模拟,将显示如下新视图:
18.3. 项目元素 [vuejs-20]
项目树 [vuejs-20] 如下所示:
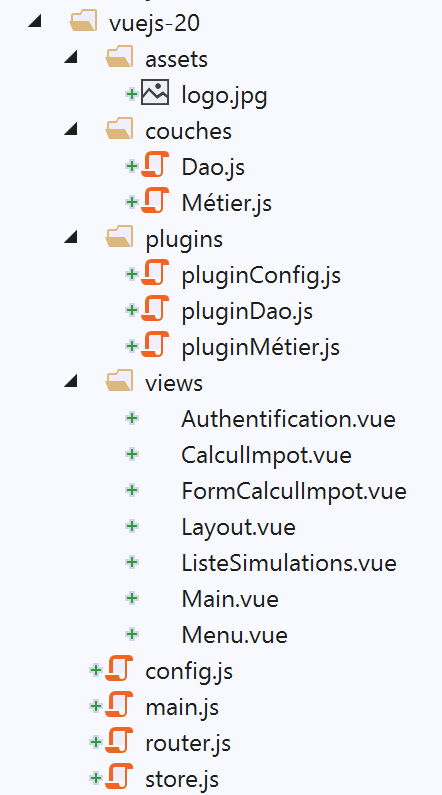
该项目的内容如下:
- [assets/logo.jpg]:项目徽标;
- [layers]:应用程序的 [business] 和 [DAO] 层;
- [plugins]:应用程序的插件;
- [views]:应用程序的视图;
- [config.js]:配置应用程序;
- [router.js]:定义应用程序的路由;
- [store.js]:[Vuex] 存储;
- [main.js]:应用程序的主脚本;
18.3.1. [业务]层和[DAO]层
18.3.1.1. [DAO] 层
[DAO] 层由 |vuejs-10| 章节中的 [Dao] 类实现
18.3.1.2. [business] 层
[business] 层由文档 |https://tahe.developpez.com/tutoriels-cours/php7| 中的 [Business] 类实现。其中已添加了以下 [setTaxAdminData] 方法:
// constructeur
  constructor(taxAdmindata) {
    // this.taxAdminData : données de l'administration fiscale
    this.taxAdminData = taxAdmindata;
  }

  // setter
  setTaxAdminData(taxAdmindata) {
    // this.taxAdminData : données de l'administration fiscale
    this.taxAdminData = taxAdmindata;
}
[setTaxAdminData] 方法的作用与构造函数相同。它的存在使得以下操作序列成为可能:
- 当您需要实例化 [Métier] 类但尚未拥有 [taxAdminData] 数据时,使用语句 [métier=new Métier()] 进行实例化;
- 随后通过 [métier.setTaxAdminData(taxAdmindata)] 操作填充其 [taxAdminData] 属性;
18.3.2. 配置文件 [config]
[config.js] 文件内容如下:
// utilisation de la bibliothèque [axios]
const axios = require('axios');
// timeout des requêtes HTTP
axios.defaults.timeout = 2000;
// la base des URL du serveur de calcul de l'impôt
// le schéma [https] pose des problèmes à Firefox parce que le serveur de calcul
// de l'impôt envoie un certificat autosigné. ok avec Chrome et Edge. Safari pas testé.
axios.defaults.baseURL = 'https://localhost/php7/scripts-web/impots/version-14';
// on va utiliser des cookies
axios.defaults.withCredentials = true;

// export de la configuration
export default {
  axios: axios
}
此配置用于 [dao] 层进行 HTTP 请求时所使用的 [axios] 库。请注意第 8 行,服务器运行在安全端口 [https] 上。
18.3.3. 插件
插件 [pluginDao, pluginMétier, pluginConfig] 旨在为 [Vue] 函数/类创建三个新属性:
- [$dao]:将包含 [Dao] 类的实例;
- [$métier]:将赋值为 [Métier] 类的实例;
- [$config]:将被设置为 [config] 配置文件导出的对象;
[pluginDao]
export default {
  install(Vue, dao) {
    // ajoute une propriété [$dao] à la classe Vue
    Object.defineProperty(Vue.prototype, '$dao', {
      // lorsque Vue.$dao est référencé, on rend le 2ième paramètre [dao]
      get: () => dao,
    })
  }
}

[pluginMétier]

export default {
  install(Vue, métier) {
    // ajoute une propriété [$métier] à la classe Vue
    Object.defineProperty(Vue.prototype, '$métier', {
      // lorsque Vue.$métier est référencé, on rend le 2ième paramètre [métier]
      get: () => métier,
    })
  }
}
[插件配置]
export default {
  install(Vue, config) {
    // ajoute une propriété [$config] à la classe vue
    Object.defineProperty(Vue.prototype, '$config', {
      // lorsque Vue.$config est référencé, on rend le 2ième paramètre [config]
      get: () => config,
    })
  }
}
18.3.4. [Vuex] 存储
[Vuex] 存储由以下 [store] 文件实现:
// plugin Vuex
import Vue from 'vue'
import Vuex from 'vuex'
Vue.use(Vuex);

// store Vuex
const store = new Vuex.Store({
  state: {
    // le tableau des simulations
    simulations: [],
    // le n° de la dernière simulation
    idSimulation: 0
  },
  mutations: {
    // suppression ligne n° index
    deleteSimulation(state, index) {
      // eslint-disable-next-line no-console
      console.log("mutation deleteSimulation");
      // on supprime la ligne n° [index]
      state.simulations.splice(index, 1);
      // eslint-disable-next-line no-console
      console.log("store simulations", state.simulations);
    },
    // ajout d'une simulation
    addSimulation(state, simulation) {
      // eslint-disable-next-line no-console
      console.log("mutation addSimulation");
      // n° de la simulation
      state.idSimulation++;
      simulation.id = state.idSimulation;
      // on ajoute la simulation au tableau des simulations
      state.simulations.push(simulation);
    },
    // nettoyage state
    clear(state) {
      state.simulations = [];
      state.idSimulation = 1;
    }
  }
});
// export de l'objet [store]
export default store;
注释
- 第 2-4 行:将 [Vuex] 插件集成到 [Vue] 框架中;
- 第 8-13 行:我们将以下元素放入 [Vuex] 存储中:
- [simulations]:用户执行过的模拟列表;
- [idSimulation]:用户最近一次执行的模拟的 ID;
请注意,该数据存储将在各个视图之间共享,且其内容具有响应式特性:当内容发生更改时,使用该数据存储的视图会自动更新。在我们的应用程序中,只有 [simulations] 元素需要具备响应式特性,而 [simulationId] 元素则不需要。出于方便起见,我们仍将该元素保留在数据存储中;
- 第 14–40 行:第 8–13 行中 [state] 对象允许的变异操作。请注意,这些操作始终将第 8–13 行中的 [state] 对象作为其第一个参数;
- 第 16 行:[deleteSimulation] 变异操作允许您通过指定 [index] 编号来删除一个模拟;
- 第 25 行:[addSimulation] 变异操作允许您向模拟数组中添加新的模拟;
- 第 35 行:[clear] 操作将重置第 8–13 行中的 [state] 对象;
18.3.5. 路由文件 [router]
路由文件如下:
// imports
import Vue from 'vue'
import VueRouter from 'vue-router'
// les vues
import Authentification from './views/Authentification'
import CalculImpot from './views/CalculImpot'
import ListeSimulations from './views/ListeSimulations'

// plugin de routage
Vue.use(VueRouter)

// les routes de l'application
const routes = [
  // authentification
  {
    path: '/', name: 'authentification', component: Authentification
  },
  // calcul de l'impôt
  {
    path: '/calcul-impot', name: 'calculImpot', component: CalculImpot
  },
  // liste des simulations
  {
    path: '/liste-des-simulations', name: 'listeSimulations', component: ListeSimulations
  },
  // fin de session
  {
    path: '/fin-session', name: 'finSession', component: Authentification
  }
]

// le routeur
const router = new VueRouter({
  // les routes
  routes,
  // le mode d'affichage des routes dans le navigateur
  mode: 'history',
})

// export du router
export default router
注释
- 第 16 行:应用程序启动时,会显示 [Authentication] 视图,因为其 URL 是根路径 [/];
- 第 20 行:当请求 URL [/tax-calculation] 时,将显示 [TaxCalculation] 视图;
- 第 24 行:当请求 URL [/simulation-list] 时,将显示 [SimulationList] 视图;
- 第 28 行:当请求 URL [/end-session] 时,显示 [Authentication] 视图;
- 第 33–38 行:创建了一个 [router] 对象,其中包含这些路由(第 35 行)以及用于 URL 管理的 [history] 模式(第 37 行);
- 第 41 行:导出此路由器;
18.3.6. 主脚本 [main.js]
[main.js] 脚本如下:
// imports
import Vue from 'vue'

// vue principale
import Main from './views/Main.vue'

// plugin [bootstrap-vue]
import BootstrapVue from 'bootstrap-vue'
Vue.use(BootstrapVue);

// CSS bootstrap
import 'bootstrap/dist/css/bootstrap.css'
import 'bootstrap-vue/dist/bootstrap-vue.css'

// routeur
import router from './router'

// plugin [config]
import config from './config';
import pluginConfig from './plugins/pluginConfig'
Vue.use(pluginConfig, config)

// instanciation couche [dao]
import Dao from './couches/Dao';
const dao = new Dao(config.axios);

// plugin [dao]
import pluginDao from './plugins/pluginDao'
Vue.use(pluginDao, dao)

// instanciation couche [métier]
import Métier from './couches/Métier';
const métier = new Métier();

// plugin [métier]
import pluginMétier from './plugins/pluginMétier'
Vue.use(pluginMétier, métier)

// store Vuex
import store from './store'

// démarrage de l'UI
new Vue({
  el: '#app',
  // le routeur
  router: router,
  // le store Vuex
  store: store,
  // la vue principale
  render: h => h(Main),
})
请注意以下几点:
- 第 18–21 行:由 [./config] 脚本导出的对象将存储在 [Vue.$config] 属性中,从而可供应用程序中的所有视图使用。在此处这样做其实没有必要,因为 [config] 对象仅由 [main] 脚本(第 25 行)使用。不过,配置通常会被多个视图所需要。 因此,我们希望遵循将其作为视图属性提供的原则;
- 第 24–25 行:[dao] 层的实例化。第 24 行导入了 [Dao] 类,并在第 25 行对其进行实例化。其构造函数将 [axios] 对象(一个配置属性)作为唯一参数;
- 第 27–29 行:将 [dao] 层作为 [$dao] 属性提供给所有视图;
- 第 31–37 行:我们对 [business] 层重复相同的操作序列。[Business] 类的构造函数将 [taxAdminData] 作为参数,该数据代表税务管理数据。目前我们尚未拥有此数据,因此第 33 行的 [business] 对象需要在后续步骤中进行初始化;
- 第 40 行:我们导入 [Vuex] 存储;
- 第 43–51 行:我们实例化主视图 [Main](第 5 行和第 50 行),并向其传递两个参数:
- 第 46 行:第 16 行定义的路由器 [router];
- 第 48 行:第 40 行定义的 [Vuex] 存储 [store];
- 在这两种情况下,属性名位于左侧,其值位于右侧。属性名 [router, store] 由 [vue-router] 和 [vuex] 框架设定。关联的值可以是任意内容;
18.4. 应用程序的视图
18.4.1. 主视图 [Main]
主视图 [Main] 的代码如下:
<!-- définition HTML de la vue -->
<template>
  <div class="container">
    <b-card>
      <!-- jumbotron -->
      <b-jumbotron>
        <b-row>
          <b-col cols="4">
            <img src="../assets/logo.jpg" alt="Cerisier en fleurs" />
          </b-col>
          <b-col cols="8">
            <h1>Calculez votre impôt</h1>
          </b-col>
        </b-row>
      </b-jumbotron>
      <!-- erreur requête HTTP -->
      <b-alert
        show
        variant="danger"
        v-if="showError"
      >L'erreur suivante s'est produite : {{error.message}}</b-alert>
      <!-- vue courante -->
      <router-view v-if="showView" @loading="mShowLoading" @error="mShowError" />
      <!-- loading -->
      <b-alert show v-if="showLoading" variant="light">
        <strong>Requête au serveur de calcul d'impôt en cours...</strong>
        <div class="spinner-border ml-auto" role="status" aria-hidden="true"></div>
      </b-alert>
    </b-card>
  </div>
</template>

<script>
export default {
  // name
  name: "app",
  // inner state
  data() {
    return {
      // controls waiting alert
      showLoading: false,
      // controls error alert
      showError: false,
      // controls the display of the current routing view
      showView: true,
      // an error message
      error: ""
    };
  },
  // event managers
  methods: {
    // asynchronous request error
    mShowError(error) {
      // eslint-disable-next-line
      console.log("Main evt error");
      // error msg is displayed
      this.error = error;
      this.showError = true;
      // hide the routed view
      this.showView = false;
      // we hide the waiting message
      this.showLoading = false;
    },
    // whether or not to display a waiting icon
    mShowLoading(value) {
      // eslint-disable-next-line
      console.log("Main evt showLoading");
      // whether or not to display the waiting alert
      this.showLoading = value;
    }
  }
};
</script>
评论
- [Main] 视图负责路由和显示视图的布局。第 23 行:
- 第 5–15 行显示第 1 区;
- 第23行显示路由视图[2];
- 第 16–19 行:仅在与税费计算服务器通信出现错误时显示的警报;
- 第25–28行:针对向服务器发出的每个HTTP请求显示加载提示;
- 所有视图均将采用此布局,因为每个路由视图由第20–24行显示。[Main]视图用于提取不同视图之间可共享的内容;
- 第 23 行:每个路由视图可触发三个事件:
- [loading]:已发送 HTTP 请求。必须显示加载提示;
- [error]:HTTP请求以错误结束。必须显示错误消息并隐藏路由视图;
- 第 38–49 行:视图的状态:
- 第 41 行:[showLoading] 控制显示 HTTP 请求正在进行中的提示信息(第 25 行);
- 第 43 行:[showError] 控制 HTTP 请求的错误消息显示(第 17–21 行);
- 第 45 行:[showView] 控制路由视图的显示(第 23 行);
- 第 53–63 行:[mShowError] 方法处理路由视图发出的 [error] 事件(第 23 行);
- 第 65–70 行:[mShowLoading] 方法处理路由视图(第 23 行)发出的 [loading] 事件;
- 第 23 行:我们将重点关注 [error] 和 [loading] 事件。只有当路由视图显示时([showView=true]),这些事件才会被拦截。这就是为什么路由视图最初会被显示(第 45 行)。只有在发生错误时,它才会被隐藏(第 60 行)。 为避免此问题,我们可以使用 [v-show] 指令代替 [v-if]。这两条指令的区别如下:
- [v-if=’false’] 通过将其从全局 HTML 中移除来隐藏受控块。此时,来自路由视图的事件将无法被拦截;
- [v-show=’false’] 通过操作 CSS 来隐藏受控块,但该块的代码仍保留在全局 HTML 中,因此可以拦截来自路由视图的事件;
18.4.2. [Layout] 视图
[Layout]视图的代码如下:
<!-- definition HTML of the routed view layout -->
<template>
  <!-- line -->
  <div>
    <b-row>
      <!-- three-column zone on the left -->
      <b-col cols="3" v-if="left">
        <slot name="left" />
      </b-col>
      <!-- nine-column zone on the right -->
      <b-col cols="9" v-if="right">
        <slot name="right" />
      </b-col>
    </b-row>
  </div>
</template>

<script>
  export default {
    // paramètres de la vue
    props: {
      // contrôle la colonne de gauche
      left: {
        type: Boolean
      },
      // contrôle la colonne de droite
      right: {
        type: Boolean
      }
    }
  };
</script>
评论
- [Layout] 视图允许您将路由视图拆分为两个区域:
- 左侧为一个 3 列的 Bootstrap 区域(第 7–9 行)。该区域将显示导航菜单(若存在);
- 右侧为一个 9 列区域(第 11–13 行)。该区域将显示路由视图提供的信息;
18.4.3. [身份验证]视图
身份验证视图如下所示:
该视图由 [Layout] 派生而来,通过移除左侧列仅显示右侧列。
其代码如下:
<!-- définition HTML de la vue -->
<template>
  <Layout :left="false" :right="true">
    <template slot="right">
      <!-- formulaire HTML - on poste ses valeurs avec l'action [authentifier-utilisateur] -->
      <b-form @submit.prevent="login">
        <!-- titre -->
        <b-alert show variant="primary">
          <h4>Bienvenue. Veuillez vous authentifier pour vous connecter</h4>
        </b-alert>
        <!-- 1ère ligne -->
        <b-form-group label="Nom d'utilisateur" label-for="user" label-cols="3">
          <!-- zone de saisie user -->
          <b-col cols="6">
            <b-form-input type="text" id="user" placeholder="Nom d'utilisateur" v-model="user" />
          </b-col>
        </b-form-group>
        <!-- 2ième ligne -->
        <b-form-group label="Mot de passe" label-for="password" label-cols="3">
          <!-- zone de saisie password -->
          <b-col cols="6">
            <b-input type="password" id="password" placeholder="Mot de passe" v-model="password" />
          </b-col>
        </b-form-group>
        <!-- 3ième ligne -->
        <b-alert
          show
          variant="danger"
          v-if="showError"
          class="mt-3"
        >L'erreur suivante s'est produite : {{message}}</b-alert>
        <!-- bouton de type [submit] sur une 3ième ligne -->
        <b-row>
          <b-col cols="2">
            <b-button variant="primary" type="submit" :disabled="!valid">Valider</b-button>
          </b-col>
        </b-row>
      </b-form>
    </template>
  </Layout>
</template>

<!-- dynamique de la vue -->
<script>
import Layout from "./Layout";
export default {
  // component status
  data() {
    return {
      // user
      user: "",
      // password
      password: "",
      // controls the display of an error msg
      showError: false,
      // the error message
      message: "",
      // session started
      sessionStarted: false
    };
  },

  // components used
  components: {
    Layout
  },

  // calculated properties
  computed: {
    // valid entries
    valid() {
      return this.user && this.password && this.sessionStarted;
    }
  },

  // event managers
  methods: {
    // ----------- authentication
    async login() {
      try {
        // start waiting
        this.$emit("loading", true);
        // blocking server authentication
        const response = await this.$dao.authentifierUtilisateur(
          this.user,
          this.password
        );
        // end of loading
        this.$emit("loading", false);
        // response analysis
        if (response.état != 200) {
          // error is displayed
          this.message = response.réponse;
          this.showError = true;
          return;
        }
        // no error
        this.showError = false;
        // --------- we now request data from the tax authorities
        // start waiting
        this.$emit("loading", true);
        // blocking request to the server
        const response2 = await this.$dao.getAdminData();
        // end of loading
        this.$emit("loading", false);
        // response analysis
        if (response2.état != 1000) {
          // error is displayed
          this.message = response2.réponse;
          this.showError = true;
          return;
        }
        // no error
        this.showError = false;
        // the received data is stored in the [business] layer
        this.$métier.setTaxAdminData(response2.réponse);
        // we move on to the tax calculation view
        this.$router.push({ name: "calculImpot" });
      } catch (error) {
        // the error is traced back to the main component
        this.$emit("error", error);
      }
    }
  },
  // life cycle: the component has just been created
  created() {
    // eslint-disable-next-line
    console.log("authentification", "created");
    // start a jSON session with the server
    // start waiting
    this.$emit("loading", true);
    // initialize the session with the server - asynchronous request
    // we use the promise rendered by the [dao] layer methods
    this.$dao
      // initialize a jSON session
      .initSession()
      // we got the answer
      .then(response => {
        // end waiting
        this.$emit("loading", false);
        // response analysis
        if (response.état != 700) {
          // error is displayed
          this.message = response.réponse;
          this.showError = true;
          return;
        }
        // the session has started
        this.sessionStarted = true;
      })
      // in case of error
      .catch(error => {
        // the error is traced back to the [Main] view
        this.$emit("error", error);
      });
  }
};
</script>
评论
- 第 3 行:[Authentication] 视图仅使用 [Layout] 的右侧列(第 3 行和第 4 行);
- 第 6–38 行:生成上图中区域 1 的 Bootstrap 表单;
- 第 6 行:当用户点击第 35 行的 [submit] 按钮时,会触发 [@submit] 事件。[prevent] 修饰符确保在 [submit] 时页面不会重新加载。我们也可以这样写:
- 一个未处理 [submit] 事件的 <b-form> 标签;
- 一个带有 [@click='login'] 事件且不带 [type='submit'] 属性的 <b-button> 标签;
这种做法同样可行。所选方案的优势在于,表单不仅可以通过点击 [Submit] 按钮提交,在输入字段中按下 [Enter] 键也能触发提交。因此,出于用户便利的考虑,此处选择了 [<b-form @submit.prevent="login">] 方案;
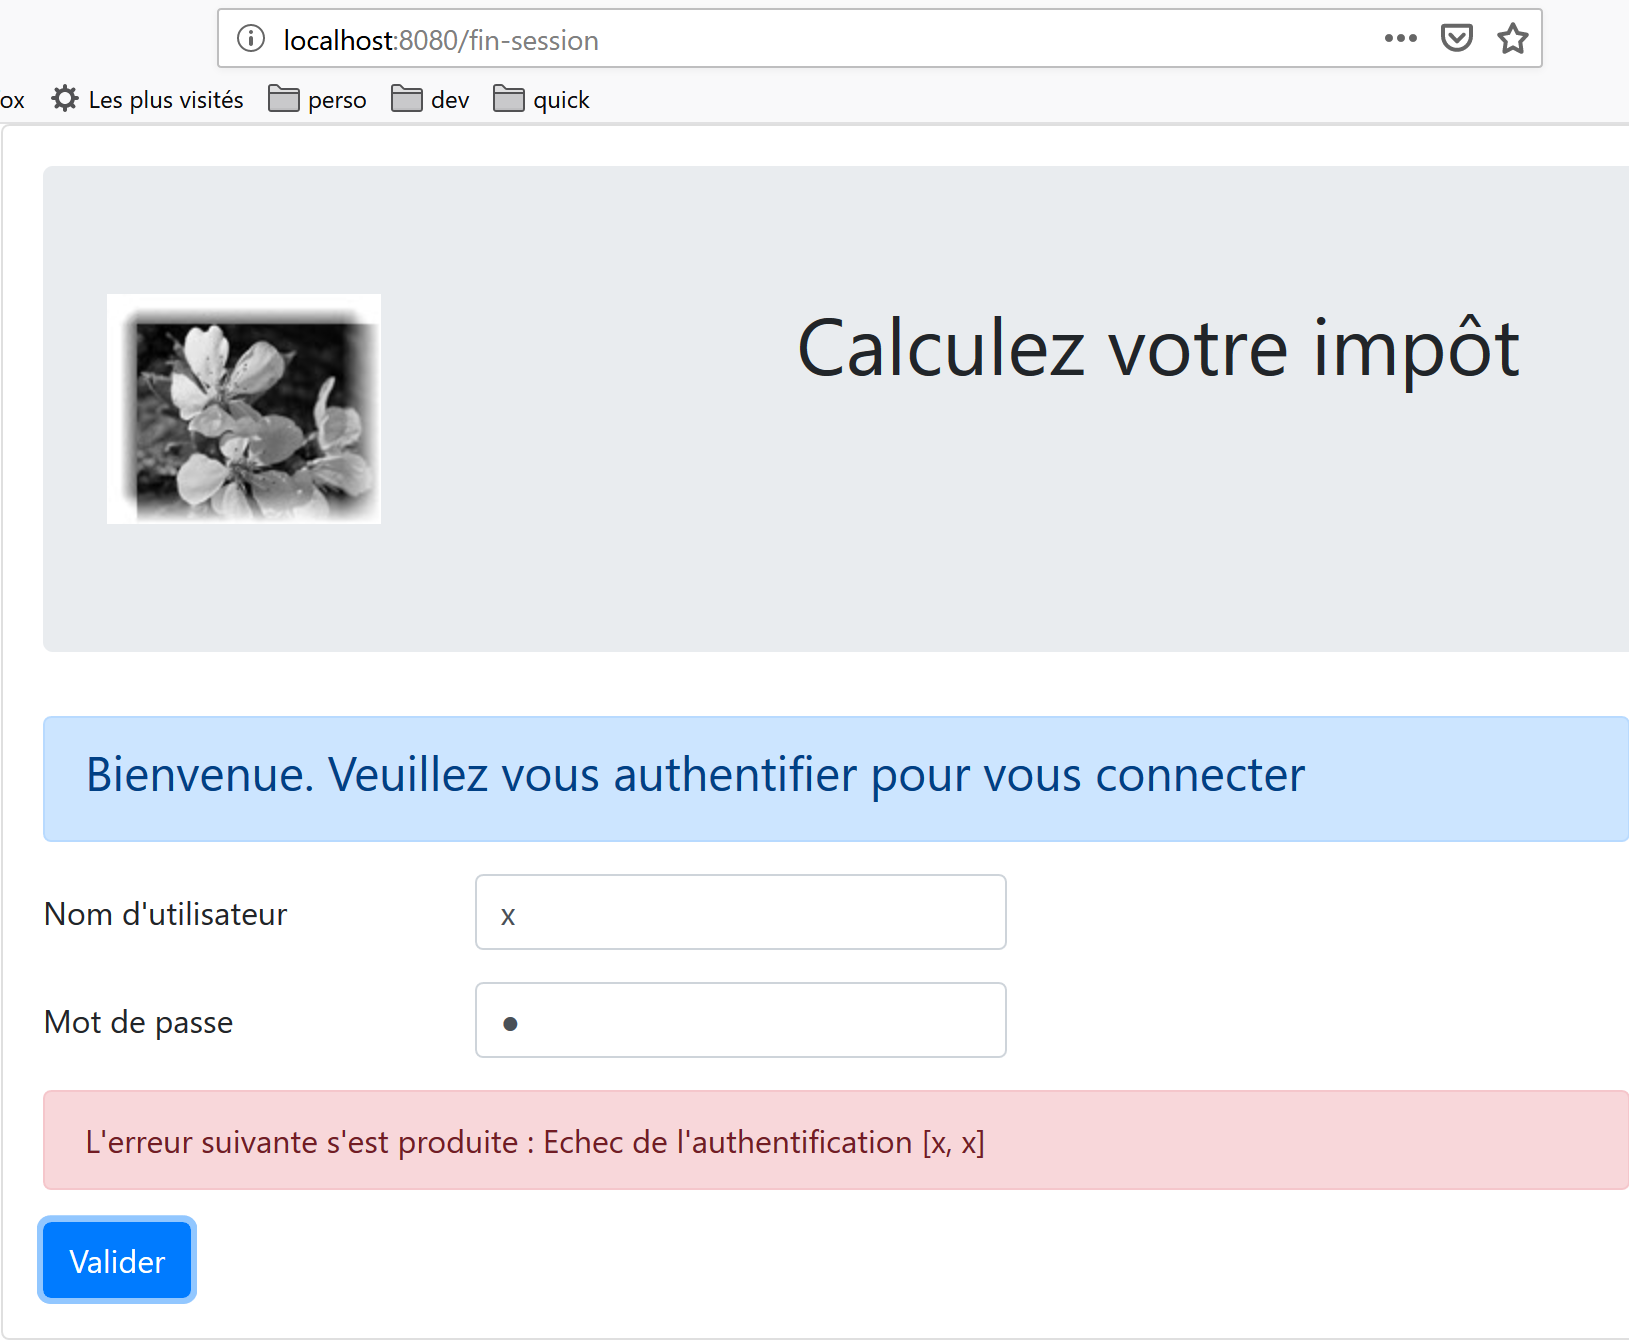
- 第 33–37 行:当服务器拒绝用户输入的凭据时弹出的提示框:
- 第 35 行:[提交] 按钮并非始终处于活动状态。其状态取决于第 71–73 行中计算生成的 [valid] 属性。当满足以下条件时,[valid] 属性为 true:
- 表单的 [user, password] 字段中有内容;
- JSON会话已启动。初始时,该会话尚未启动(第59行),因此[Validate]按钮处于不可用状态。
- 第 49–60 行:视图的状态;
- [user] 代表用户在表单 [user] 字段(第 12–17 行)中的输入。第 15 行的 [v-model] 指令在用户输入与视图的 [user] 属性之间建立了双向绑定;
- [password] 代表用户在表单 [password] 字段(第 19–24 行)中的输入。第 22 行的 [v-model] 指令在用户输入与视图的 [password] 属性之间建立了双向绑定;
- [showError] 控制(第 29 行)第 26–31 行中提示框的显示;
- [message] 是将在第 26–31 行提示框中显示的错误消息(第 31 行);
- [sessionStarted] 指示与服务器的 JSON 会话是否已启动。初始时,该属性的值为 [false](第 59 行)。 与服务器的 JSON 会话在视图生命周期的 [created] 事件中初始化(第 126–156 行)。如果服务器响应成功,则 [sessionStarted] 属性被设置为 [true](第 149 行);
- 第 126–156 行:当 [Authentication] 视图创建完成时(尽管可能尚未显示),[created] 函数会被执行。随后在后台初始化与服务器的 JSON 会话。我们知道这是与税费计算服务器进行交互的首个操作。为此,我们使用应用程序的 [dao] 层(第 134 行)。 该层中的所有方法均为异步。此处,我们使用 [$dao.initSession] 方法返回的 Promise,该方法用于与服务器初始化 JSON 会话。
- 第 138–150 行:服务器返回无错误响应时执行的代码;
- 第 142 行:我们检查响应的 [status] 属性。若操作成功,该属性必须为 [700]。否则,表示发生错误,具体原因可在 [response.response] 属性中查阅(第 144 行)。随后,我们在视图中显示错误信息(第 145 行);
- 第 149 行:我们注意到 JSON 会话已启动;
- 第 152–155 行:发生错误时执行的代码。该错误将传播至父视图 [Main],
- 将显示该错误;
- 隐藏等待提示;
- 隐藏路由视图,即 [Authentication] 视图;
- 第 79–124 行:[login] 方法处理 [Validate] 按钮的点击事件;
- 第 79 行:该方法前缀了 [async] 关键字,以便在第 84 行和第 103 行使用 [await] 关键字;
- 第 84–87 行:对 [$dao.authenticateUser(user, password)] 方法的阻塞调用。我们本可以像在 [created] 函数中那样使用 [Promise]。 我们希望丰富界面风格。由于所有 HTTP 请求都设置了 2 秒的 [timeout],因此不会阻塞用户。用户无需等待太久。此外,在服务器返回响应之前,用户无法进行任何操作,因为 [Validate] 按钮在此之前始终处于不可用状态;
- 第 91 行:税务计算服务器发送 JSON 响应,所有响应的结构均为 [{‘action’:action, ‘status’:val, ‘response’:response}]。如果 [status==200],则表示身份验证成功。否则,将显示错误消息(第 93-94 行);
- 第 98 行:隐藏之前操作产生的任何错误消息;
- 第 99–116 行:现在向服务器请求计算税款所需的税务机关数据。在 [this.$métier] 中,我们有一个 [Métier] 类的实例,由于尚未获取到这些数据,该实例目前无法执行任何操作;
- 第 103 行:通过阻塞操作向服务器请求税务机关数据;
- 第 107–112 行:分析服务器的响应。其状态值必须为 1000;否则即发生错误。若发生错误,则显示错误信息(第 109–110 行);
- 第 113–118 行:如果操作成功,我们将:
- 隐藏错误信息(第 114 行);
- 将税务机关数据传递给 [业务] 层(第 116 行);
- 显示 [CalculImpot] 视图,第 118 行。请注意,[this.$router] 指代应用程序路由器。使用 [push] 方法设置下一个路由视图。此处我们通过其 [name] 属性进行引用。我们也可以通过其 [path] 属性进行引用。该信息位于路由文件中:
// calcul de l'impôt
  {
    path: '/calcul-impot', name: 'calculImpot', component: CalculImpot
  },
- 第 119–122 行:当两个 HTTP 请求中的任一个失败(服务器未找到、超时等)时,[catch] 代码块会被触发。随后,错误会被上报给父视图 [Main],该视图将显示错误信息,隐藏加载提示,并隐藏 [Authentication] 视图;
18.4.4. [CalculImpot] 视图
[CalculImpot]视图如下:
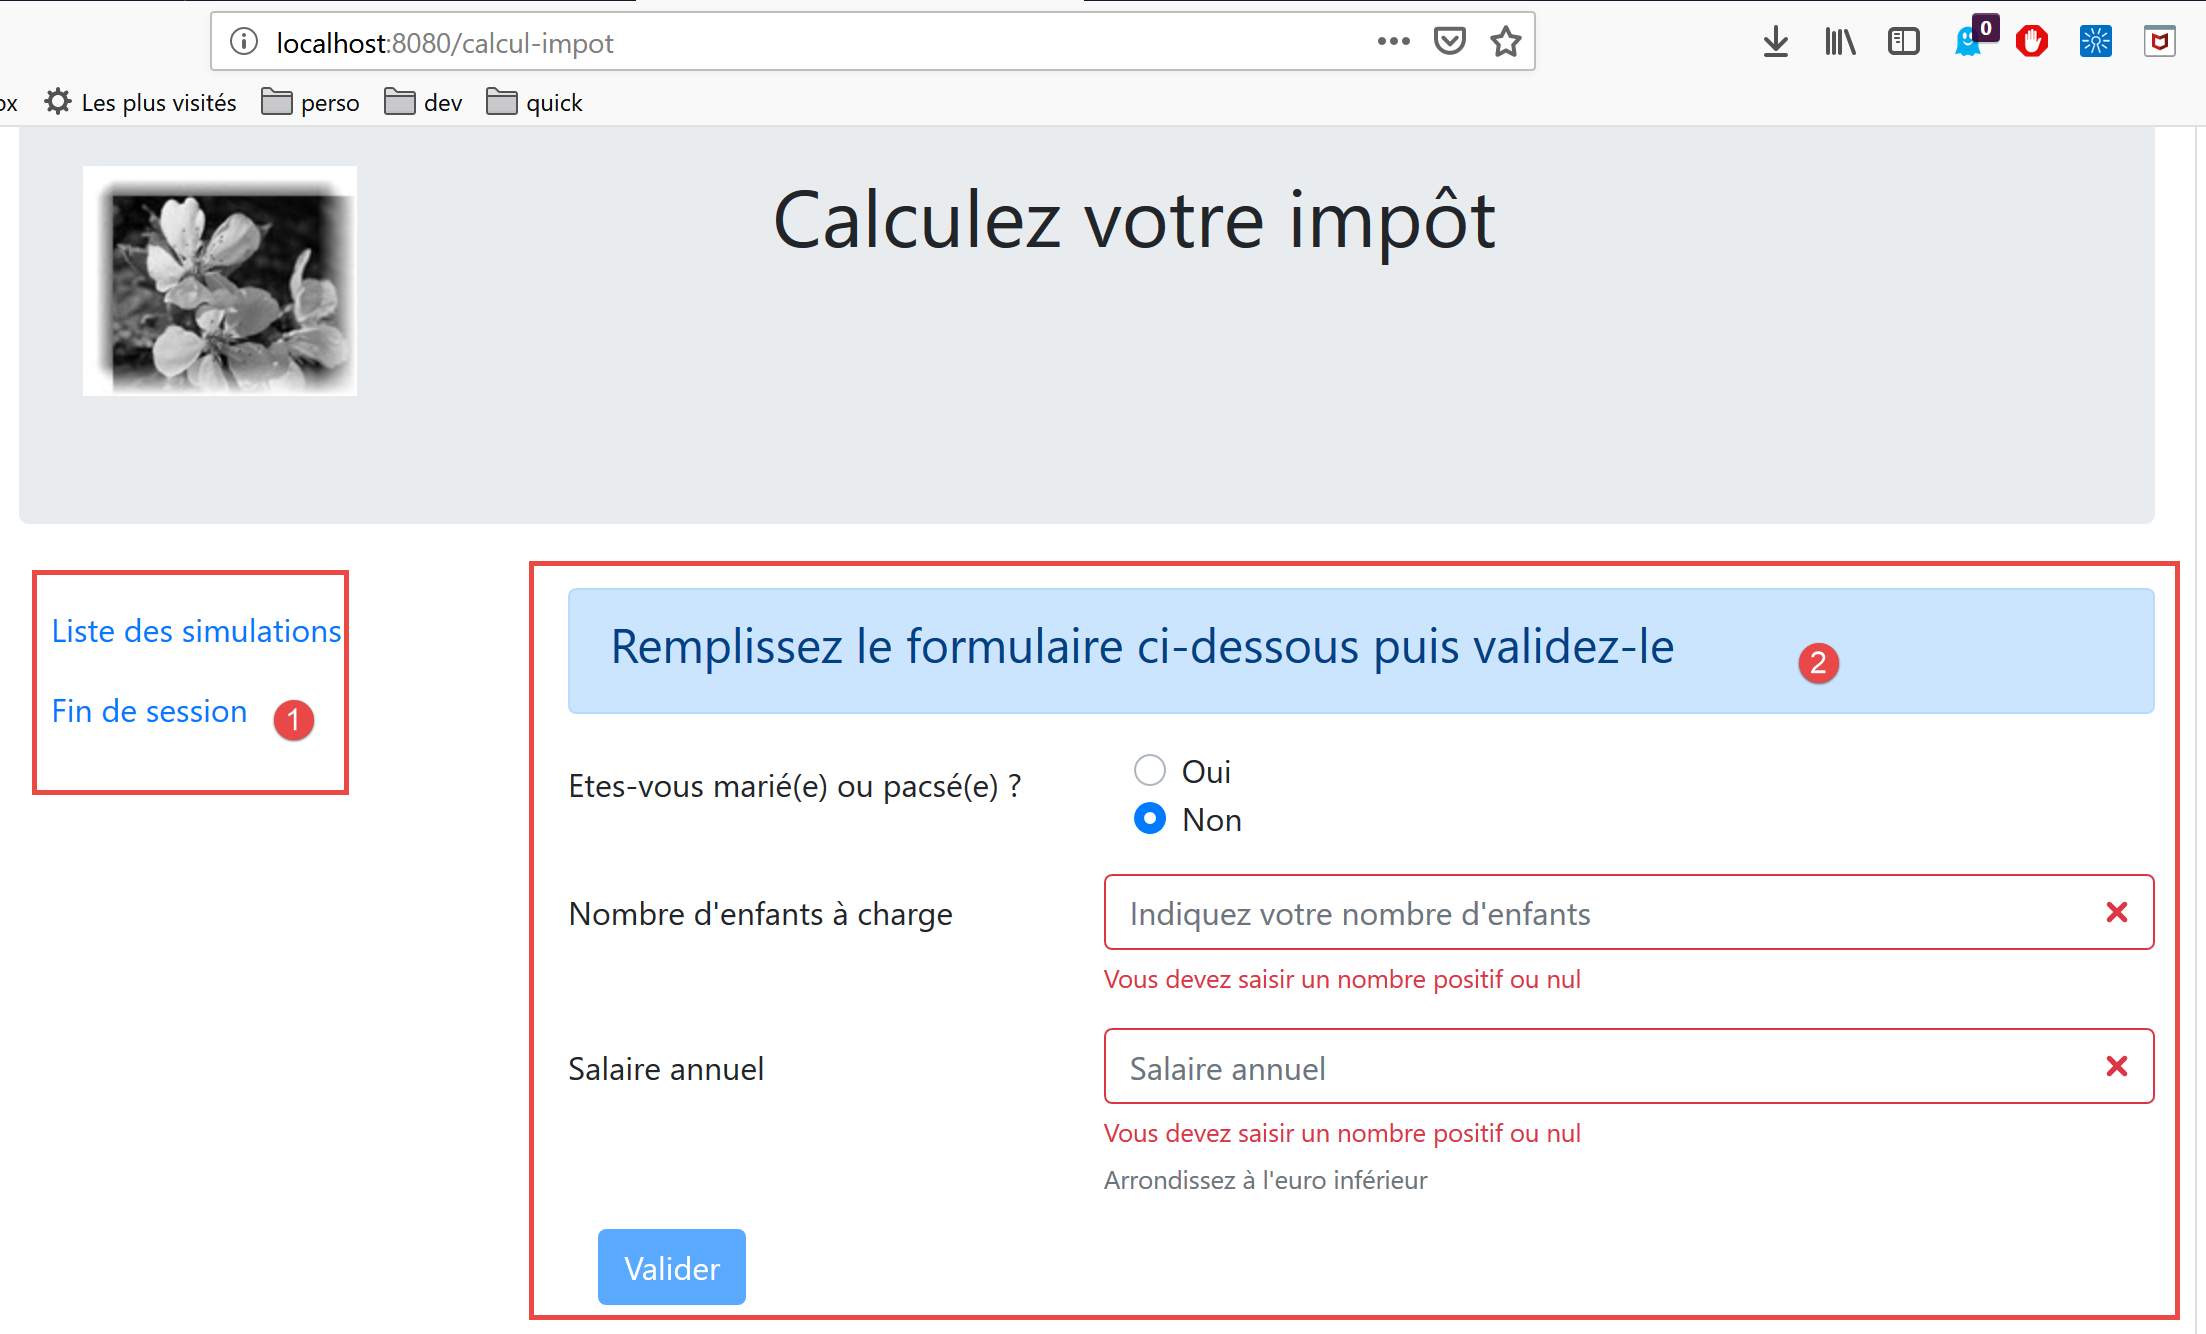
- [1]:导航菜单占据路由视图的左侧栏;
- [2]:税费计算表单占据路由视图的右侧栏;
[TaxCalculation] 视图的代码如下:
<!-- definition HTML of the view -->
<template>
  <div>
    <Layout :left="true" :right="true">
      <!-- tax calculation form on the right -->
      <FormCalculImpot slot="right" @resultatObtenu="handleResultatObtenu" />
      <!-- left-hand navigation menu -->
      <Menu slot="left" :options="options" />
    </Layout>
    <!-- display area for tax calculation results under the form -->
    <b-row v-if="résultatObtenu" class="mt-3">
      <!-- empty three-column zone -->
      <b-col cols="3" />
      <!-- nine-column zone -->
      <b-col cols="9">
        <b-alert show variant="success">
          <span v-html="résultat"></span>
        </b-alert>
      </b-col>
    </b-row>
  </div>
</template>

<script>
// imports
import FormCalculImpot from "./FormCalculImpot";
import Menu from "./Menu";
import Layout from "./Layout";

export default {
  // état interne
  data() {
    return {
      // options du menu
      options: [
        {
          text: "Liste des simulations",
          path: "/liste-des-simulations"
        },
        {
          text: "Fin de session",
          path: "/fin-session"
        }
      ],
      // résultat du calcul de l'impôt
      résultat: "",
      résultatObtenu: false
    };
  },
  // composants utilisés
  components: {
    Layout,
    FormCalculImpot,
    Menu
  },
  // méthodes de gestion des évts
  methods: {
    // résultat du calcul de l'impôt
    handleResultatObtenu(résultat) {
      // on construit le résultat en chaîne HTML
      const impôt = "Montant de l'impôt : " + résultat.impôt + " euro(s)";
      const décôte = "Décôte : " + résultat.décôte + " euro(s)";
      const réduction = "Réduction : " + résultat.réduction + " euro(s)";
      const surcôte = "Surcôte : " + résultat.surcôte + " euro(s)";
      const taux = "Taux d'imposition : " + résultat.taux;
      this.résultat =
        impôt +
        "<br/>" +
        décôte +
        "<br/>" +
        réduction +
        "<br/>" +
        surcôte +
        "<br/>" +
        taux;
      // affichage du résultat
      this.résultatObtenu = true;
      // ---- maj du store [Vuex]
      // une simulation de +
      this.$store.commit("addSimulation", résultat);
    }
  }
};
</script>
评论
- 第 4 行:此处显示了 [Layout] 的两列;
- 第 6 行:税费计算表单占据右侧列。当税费计算结果获得后,它会触发 [resultatObtenu] 事件。请注意,事件名称及其处理方法的名称中不能包含带重音的字符;
- 第 8 行:导航菜单占据左侧栏;
- 第 11–20 行:税费计算结果显示在表单下方:
- 第 11 行:仅当 [resultObtained] 属性(第 47 行)为 [true] 时,才会显示结果;
- 第 34–48 行:视图状态:
- [options]:导航菜单选项列表。该数组作为参数传递给第8行的[Menu]组件;
- [result]:税费计算的结果。该结果是一个 HTML 字符串。因此,第 17 行使用了 [v-html] 指令来显示它;
- [resultObtained]:控制结果显示的布尔值,第 11 行;
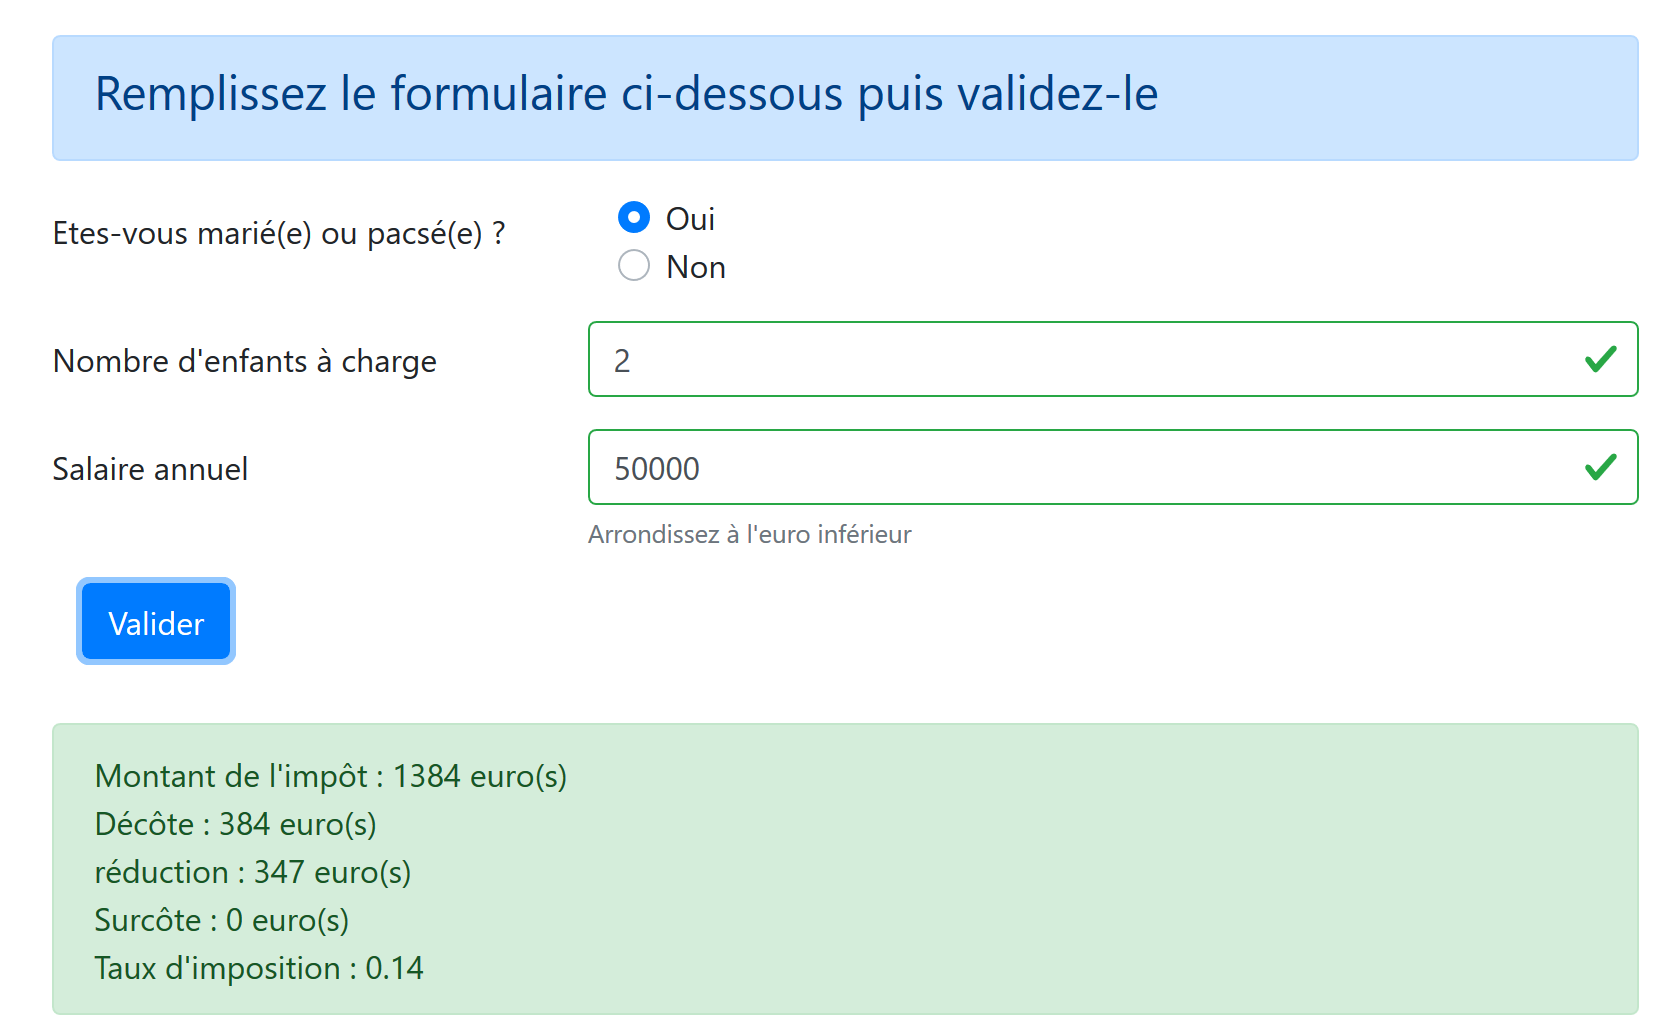
- 第 59–81 行:[handleResultatObtenu] 方法用于显示子视图 [FormCalculImpot](第 6 行)传入的税费计算结果。该结果是一个包含 [tax, discount, reduction, surcharge, rate, married, children, salary] 属性的对象;
- 第 61–75 行:将 [tax, discount, reduction, surcharge, rate] 对象插入到由模板第 17 行渲染的 HTML 文本中;
- 第 77 行:显示该结果;
- 第 80 行:调用 Vuex 存储的 [addSimulation] 方法,将 [result] 添加到存储中已有的模拟结果中;
18.4.5. 导航菜单 [Menu]
导航菜单显示在路由视图的左侧栏中:
[Menu]视图的代码如下:
<!-- definition HTML of the view -->
<template>
  <!-- bootstrap vertical menu -->
  <b-nav vertical>
    <!-- menu options -->
    <b-nav-item
      v-for="(option,index) of options"
      :key="index"
      :to="option.path"
      exact
      exact-active-class="active"
    >{{option.text}}</b-nav-item>
  </b-nav>
</template>

<script>
export default {
  // paramètres de la vue
  props: {
    options: {
      type: Array
    }
  }
};
</script>
评论
- 菜单选项由 [options] 参数提供(第 7 行、第 20–22 行);
- [options] 数组的每个元素都有一个 [text] 属性(第 12 行),即链接文本,以及一个 [path] 属性(第 9 行),即链接目标视图的路径;
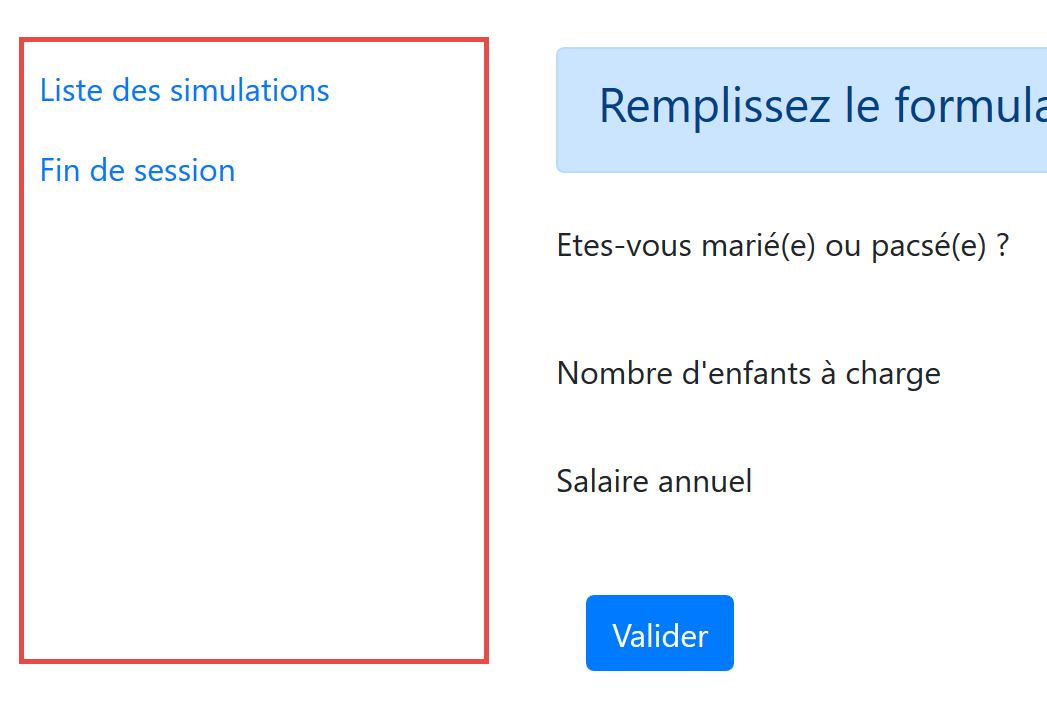
18.4.6. [FormCalculImpot]视图
该视图提供税费计算表单:
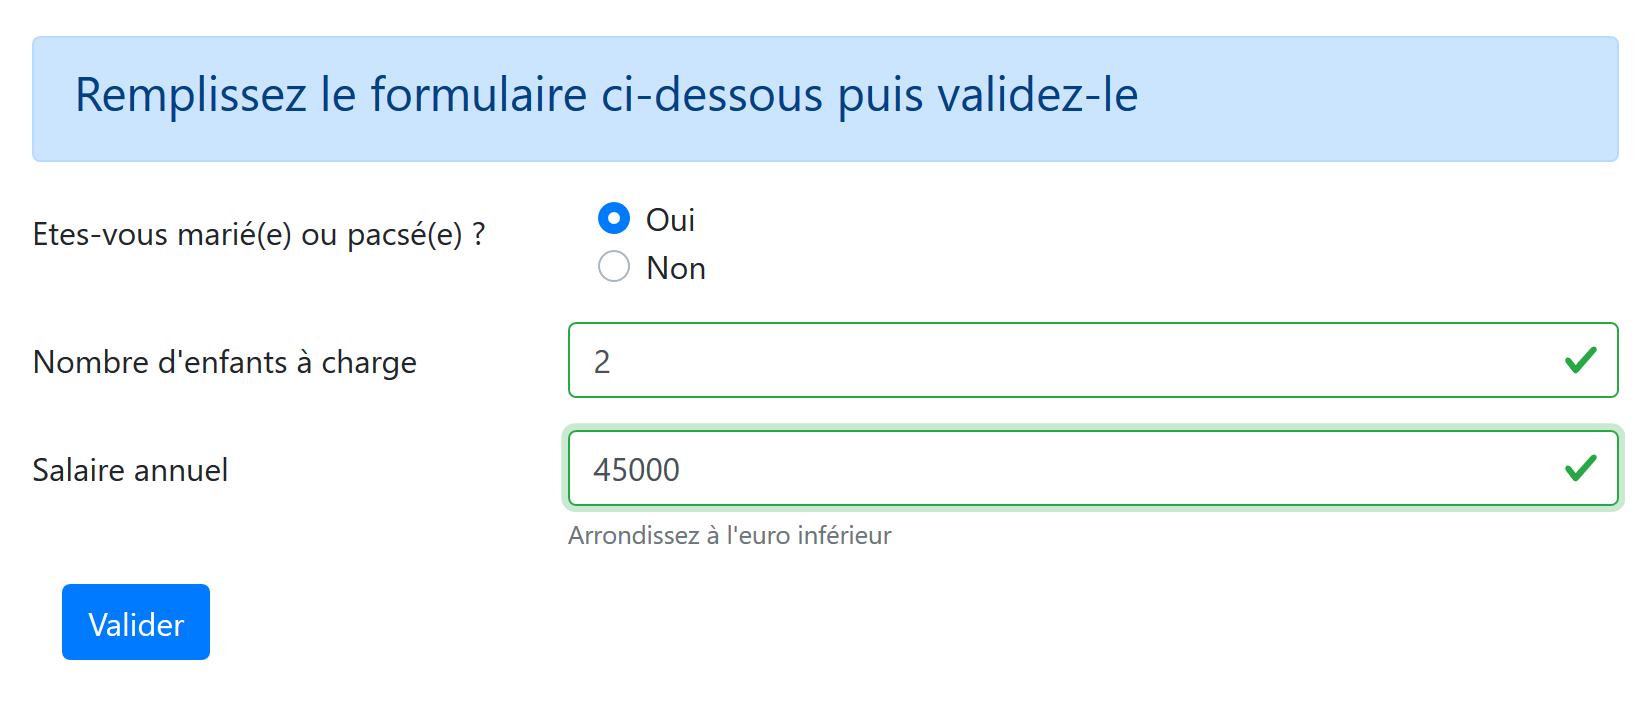
其代码如下:
  <!-- définition HTML de la vue -->
  <template>
  <!-- formulaire HTML -->
  <b-form @submit.prevent="calculerImpot" class="mb-3">
    <!-- message sur 12 colonnes sur fond bleu -->
    <b-alert show variant="primary">
      <h4>Remplissez le formulaire ci-dessous puis validez-le</h4>
    </b-alert>
    <!-- éléments du formulaire -->
    <!-- première ligne -->
    <b-form-group label="Etes-vous marié(e) ou pacsé(e) ?" label-cols="4">
      <!-- boutons radio sur 5 colonnes-->
      <b-col cols="5">
        <b-form-radio v-model="marié" value="oui">Oui</b-form-radio>
        <b-form-radio v-model="marié" value="non">Non</b-form-radio>
      </b-col>
    </b-form-group>
    <!-- deuxième ligne -->
    <b-form-group label="Nombre d'enfants à charge" label-cols="4" label-for="enfants">
      <b-input
        type="text"
        id="enfants"
        placeholder="Indiquez votre nombre d'enfants"
        v-model="enfants"
        :state="enfantsValide"
      />
      <!-- message d'erreur éventuel -->
      <b-form-invalid-feedback :state="enfantsValide">Vous devez saisir un nombre positif ou nul</b-form-invalid-feedback>
    </b-form-group>
    <!-- troisème ligne -->
    <b-form-group
      label="Salaire annuel"
      label-cols="4"
      label-for="salaire"
      description="Arrondissez à l'euro inférieur"
    >
      <b-input
        type="text"
        id="salaire"
        placeholder="Salaire annuel"
        v-model="salaire"
        :state="salaireValide"
      />
      <!-- message d'erreur éventuel -->
      <b-form-invalid-feedback :state="salaireValide">Vous devez saisir un nombre positif ou nul</b-form-invalid-feedback>
    </b-form-group>
    <!-- quatrième ligne, bouton [submit] sur 5 colonnes -->
    <b-col cols="5">
      <b-button type="submit" variant="primary" :disabled="formInvalide">Valider</b-button>
    </b-col>
  </b-form>
</template>

<!-- script -->
<script>
export default {
  // inner state
  data() {
    return {
      // married or not
      marié: "non",
      // number of children
      enfants: "",
      // annual salary
      salaire: ""
    };
  },
  // calculated internal state
  computed: {
    // form validation
    formInvalide() {
      return (
        // disabled salary
        !this.salaireValide ||
        // or disabled children
        !this.enfantsValide ||
        // or tax data not obtained
        !this.$métier.taxAdminData
      );
    },
    // salary validation
    salaireValide() {
      // must be numeric >=0
      return Boolean(this.salaire.match(/^\s*\d+\s*$/));
    },
    // child validation
    enfantsValide() {
      // must be numeric >=0
      return Boolean(this.enfants.match(/^\s*\d+\s*$/));
    }
  },
  // event manager
  methods: {
    calculerImpot() {
      // tax is calculated using the [business] layer
      const résultat = this.$métier.calculerImpot(
        this.marié,
        this.enfants,
        this.salaire
      );
      // eslint-disable-next-line
      console.log("résultat=", résultat);
      // complete the result
      résultat.marié = this.marié;
      résultat.enfants = this.enfants;
      résultat.salaire = this.salaire;
      // the [resultatObtenu] event is issued
      this.$emit("resultatObtenu", résultat);
    }
  }
};
</script>
评论
- 第4–51行:Bootstrap表单;
- 第 11–17 行:一组单选按钮及其标签;
- 第 14–15 行:<b-form-radio> 标签显示一个单选按钮:
- 第 14 行:[v-model] 指令确保当按钮被点击时,第 61 行的 [married] 属性将被设置为 [yes](属性 [value="yes"]);
- 第 15 行:[v-model] 指令确保当按钮被点击时,第 61 行上的 [married] 属性将被设置为 [no](属性 [value="no"]);
- 第 19–29 行:输入子女数量的区域:
- 第 24 行:子女数量的输入框与第 63 行的 [children] 属性相关联;
- 第 25 行:通过第 87–89 行中的计算属性 [validChildren] 验证输入的有效性;
- 第 28 行:确保若输入无效则显示错误信息;
- 第 31–45 行:年薪输入部分:
- 第 35 行:在输入框正下方显示帮助信息;
- 第 41 行:薪资输入与第 65 行的 [salary] 属性相关联;
- 第 42 行:通过第 82–85 行中的计算属性 [validSalary] 验证输入的有效性;
- 第 45 行:若输入内容无效,则显示错误信息;
- 第 48–50 行:一个 [submit] 按钮。点击此按钮或使用 [Enter] 键确认输入时,将执行 [calculateTax] 方法(第 94 行);
- 第 49 行:按钮的启用/禁用状态由第 71–80 行中的计算属性 [formInvalid] 控制;
- 第 71–80 行:若满足以下条件,表单即为有效:
- 子女数量有效;
- 工资数值有效;
- 应用程序已从服务器获取税务管理数据以计算税款。请注意,该数据存储在 [$métier.taxAdminData] 属性中。由于该数据是在视图显示的同时异步请求的,因此 [FormCalculImpot] 视图可在数据获取前显示。在此,我们确保在数据检索完成前,用户无法点击 [Validate] 按钮;
- 第 94–109 行:税费计算方法:
- 第 96–100 行:[business] 层执行此计算。这是一项同步计算。一旦 [taxAdminData] 被检索,客户端 [View] 就不再需要与服务器通信。所有操作都在本地完成。我们获得一个具有 [tax, discount, surcharge, reduction, rate] 属性的 [result] 对象;
- 第 104–106 行:将属性 [married, children, salary] 添加到结果中;
- 第 108 行:通过 [resultatObtenu] 事件将结果传递给父视图 [CalculImpot]。该视图负责显示结果;
18.4.7. [SimulationList] 视图
[SimulationList] 视图用于显示用户执行的模拟列表:
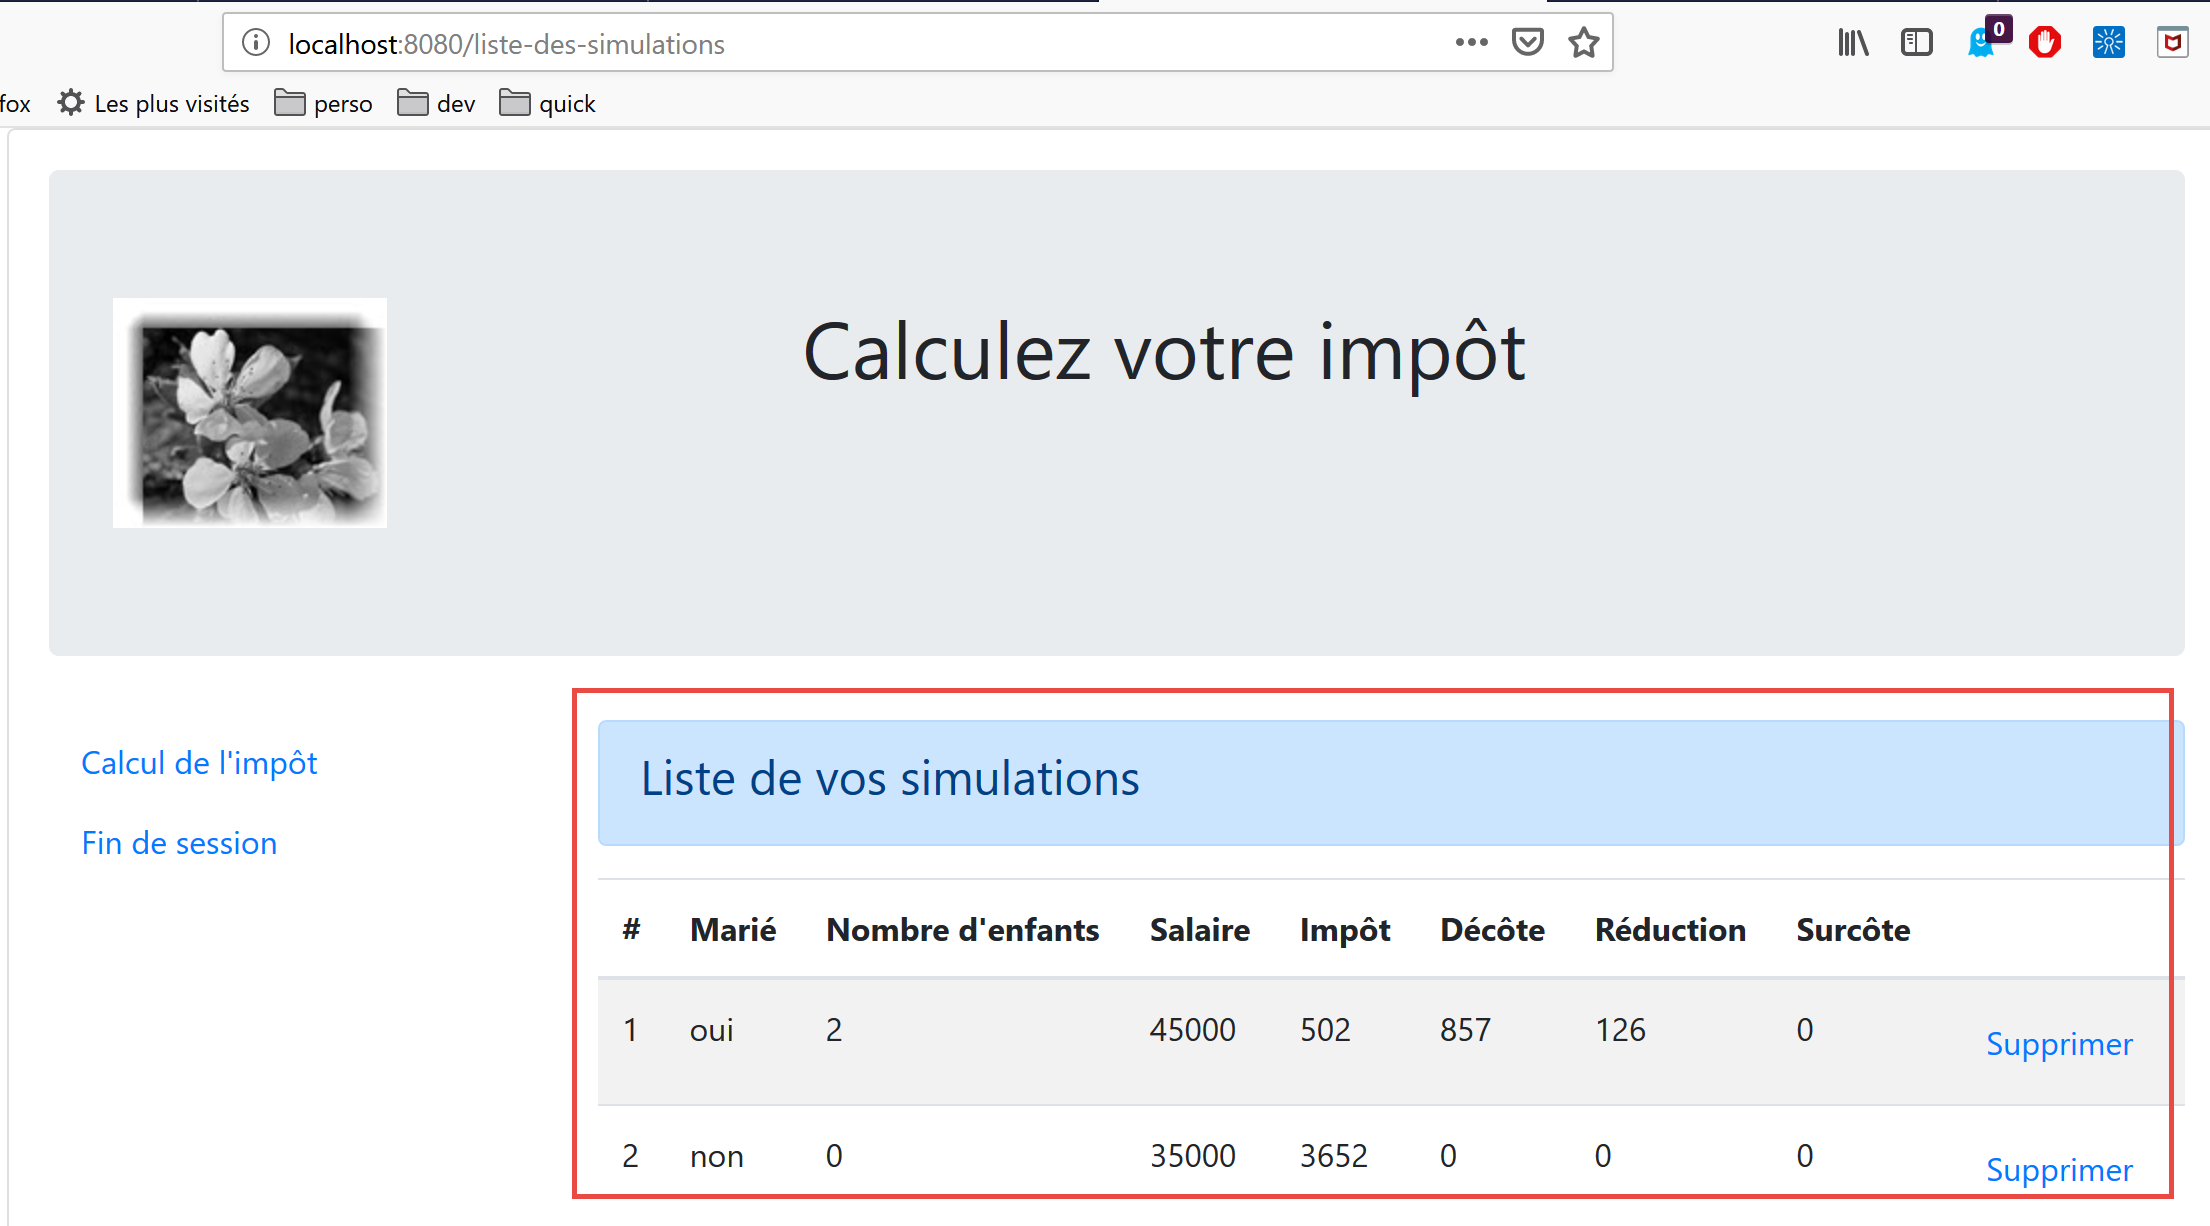
该视图的代码如下:
<!-- définition HTML de la vue -->
<template>
  <div>
    <!-- mise en page -->
    <Layout :left="true" :right="true">
      <!-- simulations dans colonne de droite -->
      <template slot="right">
        <template v-if="simulations.length==0">
          <!-- pas de simulations -->
          <b-alert show variant="primary">
            <h4>Votre liste de simulations est vide</h4>
          </b-alert>
        </template>
        <template v-if="simulations.length!=0">
          <!-- il y a des simulations -->
          <b-alert show variant="primary">
            <h4>Liste de vos simulations</h4>
          </b-alert>
          <!-- tableau des simulations -->
          <b-table striped hover responsive :items="simulations" :fields="fields">
            <template v-slot:cell(action)="data">
              <b-button variant="link" @click="supprimerSimulation(data.index)">Supprimer</b-button>
            </template>
          </b-table>
        </template>
      </template>
      <!-- menu de navigation dans colonne de gauche -->
      <Menu slot="left" :options="options" />
    </Layout>
  </div>
</template>

<script>
  // imports
  import Layout from "./Layout";
  import Menu from "./Menu";
  export default {
    // composants
    components: {
      Layout,
      Menu
    },
    // état interne
    data() {
      return {
        // options du menu de navigation
        options: [
          {
            text: "Calcul de l'impôt",
            path: "/calcul-impot"
          },
          {
            text: "Fin de session",
            path: "/fin-session"
          }
        ],
        // paramètres de la table HTML
        fields: [
          { label: "#", key: "id" },
          { label: "Marié", key: "marié" },
          { label: "Nombre d'enfants", key: "enfants" },
          { label: "Salaire", key: "salaire" },
          { label: "Impôt", key: "impôt" },
          { label: "Décôte", key: "décôte" },
          { label: "Réduction", key: "réduction" },
          { label: "Surcôte", key: "surcôte" },
          { label: "", key: "action" }
        ]
      };
    },
    // état interne calculé
    computed: {
      // liste des simulations prise dans le store Vuex
      simulations() {
        return this.$store.state.simulations;
      }
    },
    // méthodes
    methods: {
      supprimerSimulation(index) {
        // eslint-disable-next-line
        console.log("supprimerSimulation", index);
        // suppression de la simulation n° [index]
        this.$store.commit("deleteSimulation", index);
      }
    }
  };
</script>
评论
- 第 5 行:对于已路由的视图,该视图占据 [Layout] 的两列;
- 第 7–26 行:模拟内容位于右侧栏;
- 第 28 行:导航菜单位于左侧栏;
- 第 8、14、20、75 行:模拟数据来自 [Vuex] 存储 [$this.store];
- 第 8–13 行:当模拟列表为空时显示提示框;
- 第 14–25 行:当模拟列表不为空时显示 HTML 表格;
- 第 20–24 行:HTML 表格由 <b-table> 标签生成;
- 第 20 行:模拟表由第 74–76 行中的计算属性 [simulations] 提供;
- 第 20 行:HTML 表格由第 58–69 行中的计算属性 [fields] 配置。第 67 行:[action] 键列是 HTML 表格的最后一列;
- 第 21–23 行:HTML 表格最后一列的模板;
- 第 22 行:此处放置一个链接按钮。点击时将调用方法 [deleteSimulation(data.index)],其中 [data] 代表当前行(第 21 行)。[data.index] 代表该行在显示行列表中的序号;
- 第 28 行:生成导航菜单。其选项由第 47–56 行中的 [options] 属性提供;
- 第 80–85 行:处理 HTML 页面上 [Delete] 链接点击事件的方法;
- 第 84 行:调用 [Vuex] 存储的 [deleteSimulation] 方法(参见 |vuejs-15| 章节);
18.5. 运行项目
您还必须启动 [Laragon] 服务器(参见文档 |https://tahe.developpez.com/tutoriels-cours/php7|),以确保税费计算服务器处于在线状态。
18.6. 在本地服务器上部署应用程序
目前,我们的 [Vue] 客户端部署在测试服务器上,URL 为 [http://localhost:8080]。我们将把它部署到 [Laragon] 服务器上,URL 为 [http://localhost:80]。要实现这一点,需要遵循以下几个步骤。
步骤 1
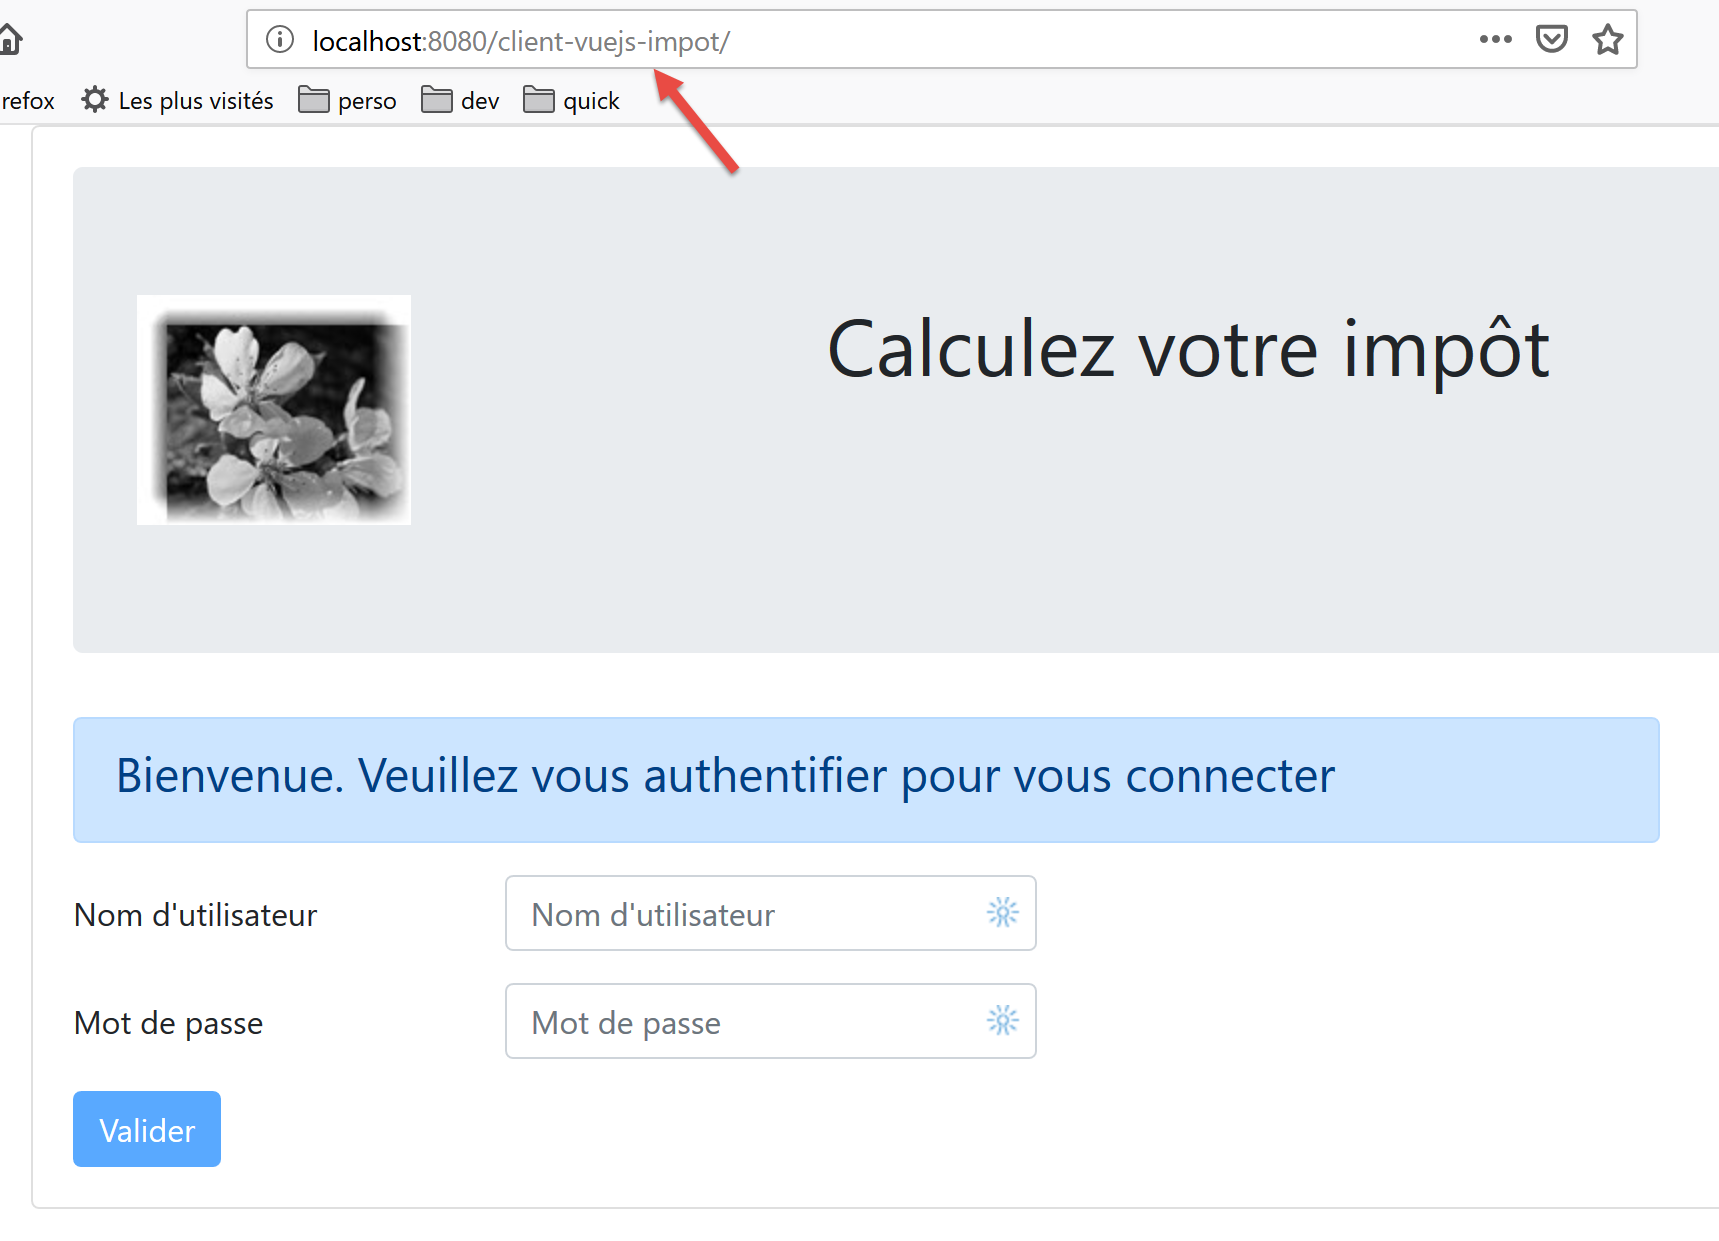
首先,我们将确保 [Vue] 客户端已部署在测试服务器上,网址为 [http://localhost:8080/client-vuejs-impot/]。
我们在当前 [VSCode] 项目的根目录下创建一个 [vue.config.js] 文件:
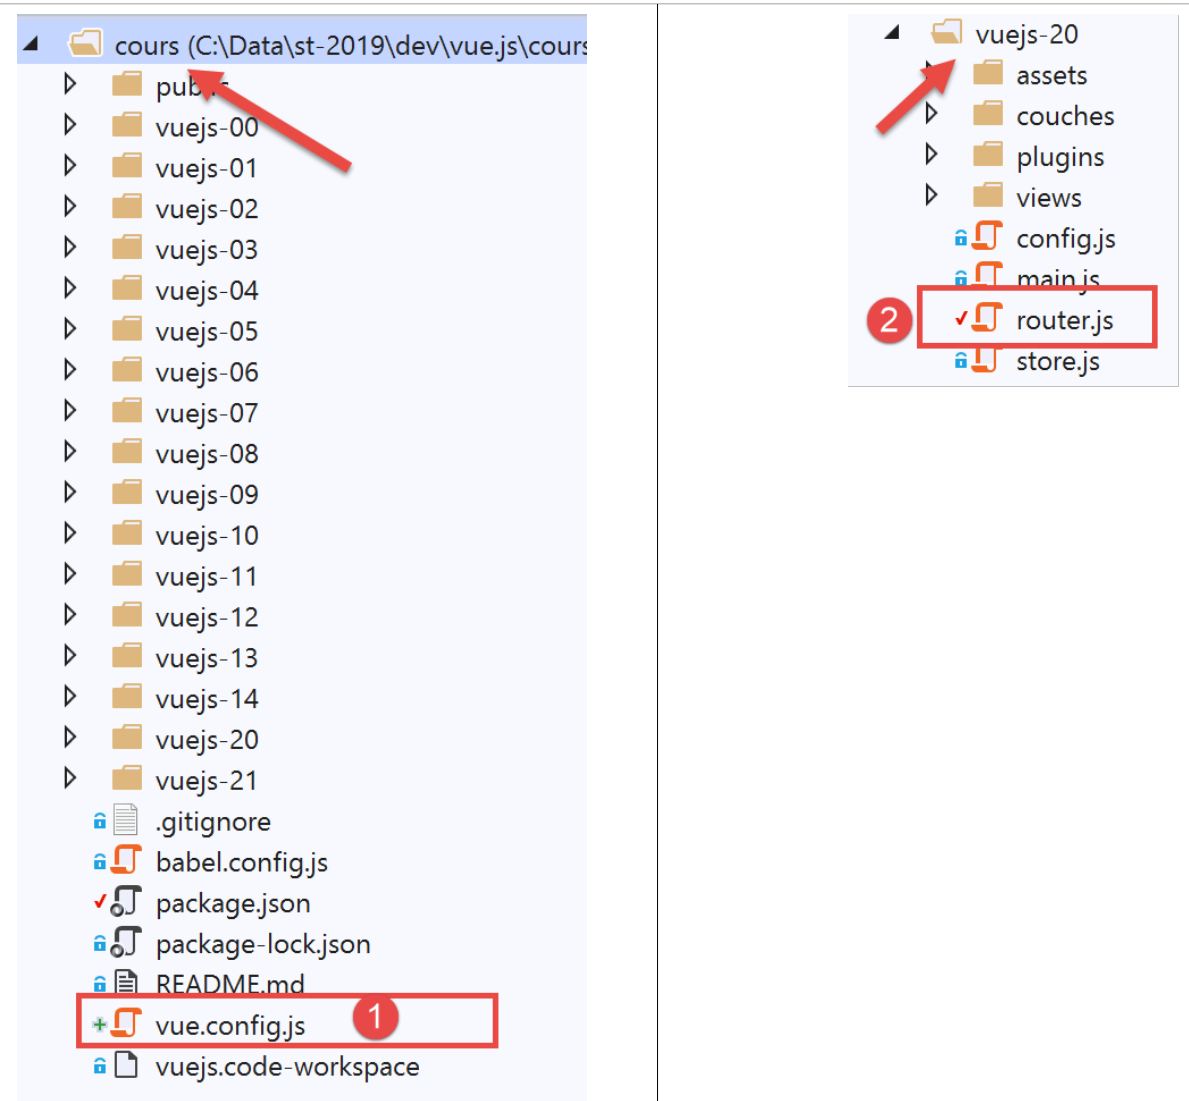
[vue.config.js] 文件 [1] 的内容如下:
// vue.config.js
module.exports = {
  // l'URL de service du client [vuejs] du serveur de calcul de l'impôt
  publicPath: '/client-vuejs-impot/'
}
我们还需要修改路由文件 [router.js] [2]:
// imports
import Vue from 'vue'
import VueRouter from 'vue-router'
// les vues
import Authentification from './views/Authentification'
import CalculImpot from './views/CalculImpot'
import ListeSimulations from './views/ListeSimulations'

// plugin de routage
Vue.use(VueRouter)

// les routes de l'application
const routes = [
  // authentification
  {
    path: '/', name: 'authentification', component: Authentification
  },
  // calcul de l'impôt
  {
    path: '/calcul-impot', name: 'calculImpot', component: CalculImpot
  },
  // liste des simulations
  {
    path: '/liste-des-simulations', name: 'listeSimulations', component: ListeSimulations
  },
  // fin de session
  {
    path: '/fin-session', name: 'finSession', component: Authentification
  }
]

// le routeur
const router = new VueRouter({
  // les routes
  routes,
  // le mode d'affichage des routes dans le navigateur
  mode: 'history',
  // l'URL de base de l'application
  base: '/client-vuejs-impot/'
})

// export du router
export default router
- 第 39 行:我们告诉路由器,第 13–30 行定义的路由路径相对于第 39 行定义的路径。例如,第 20 行中的路径 [/calcul-import] 将变为 [/client-vuejs-import/calcul-import];
然后我们可以再次测试 [vuejs-20] 项目,以验证应用程序路径的变更:
步骤 2
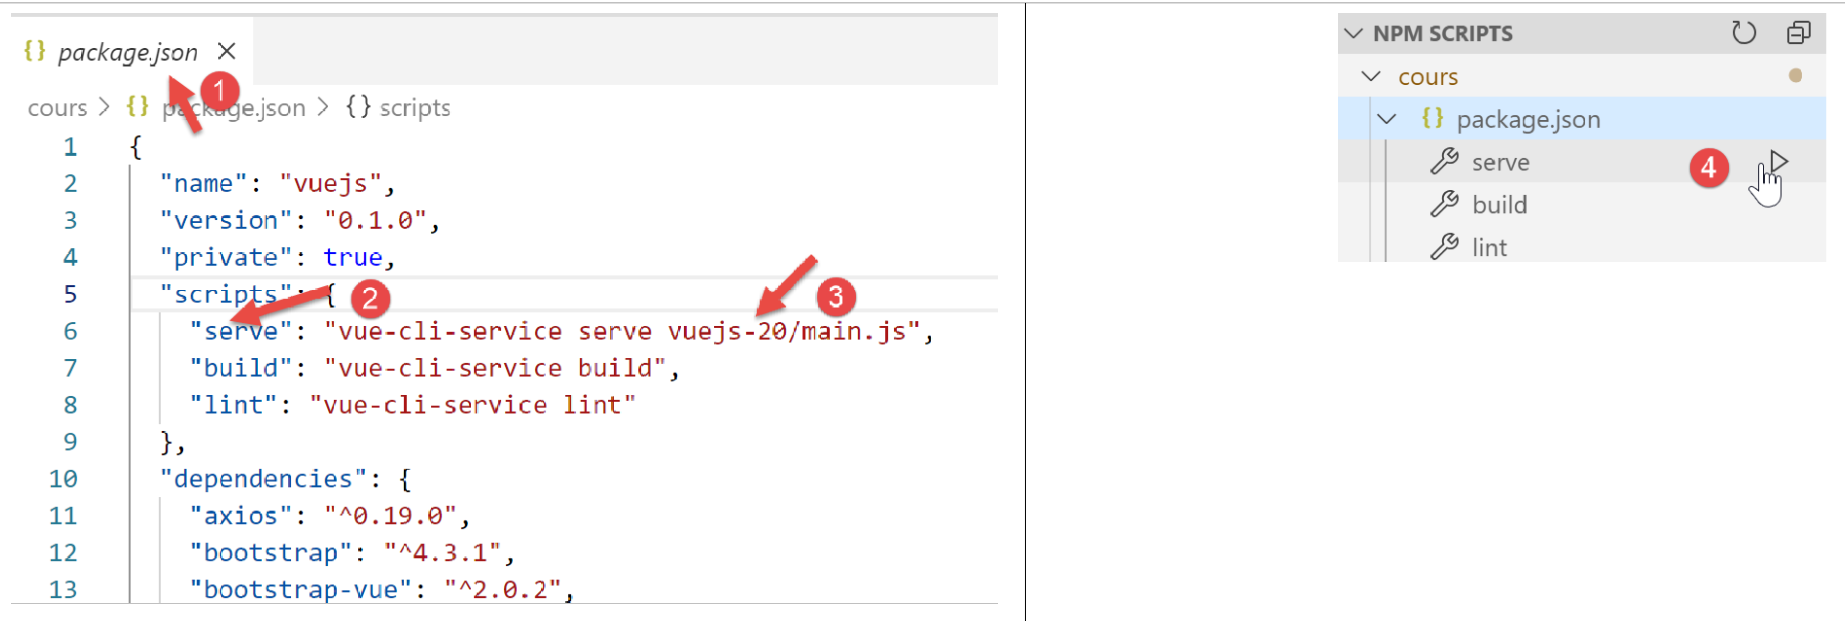
现在我们将构建 [vuejs-20] 项目的生产版本:
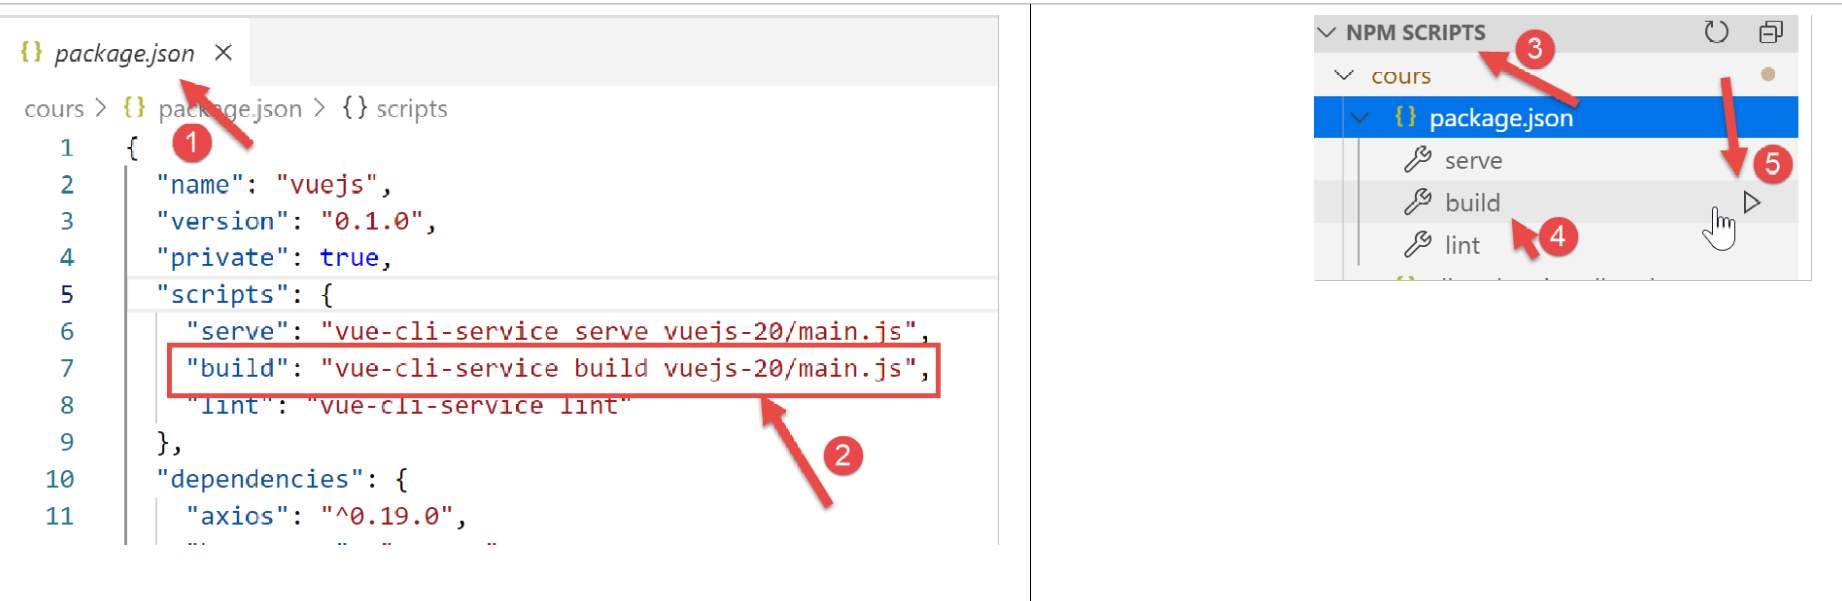
- 在 [1-2] 中,我们在 [package.json] 文件 [1] 中配置了 [build] 任务 [2];
- 在 [3-5] 中,我们运行此任务。它将构建 [vuejs-20] 项目的生产版本;
[build] 任务在 [VSCode] 终端中运行:
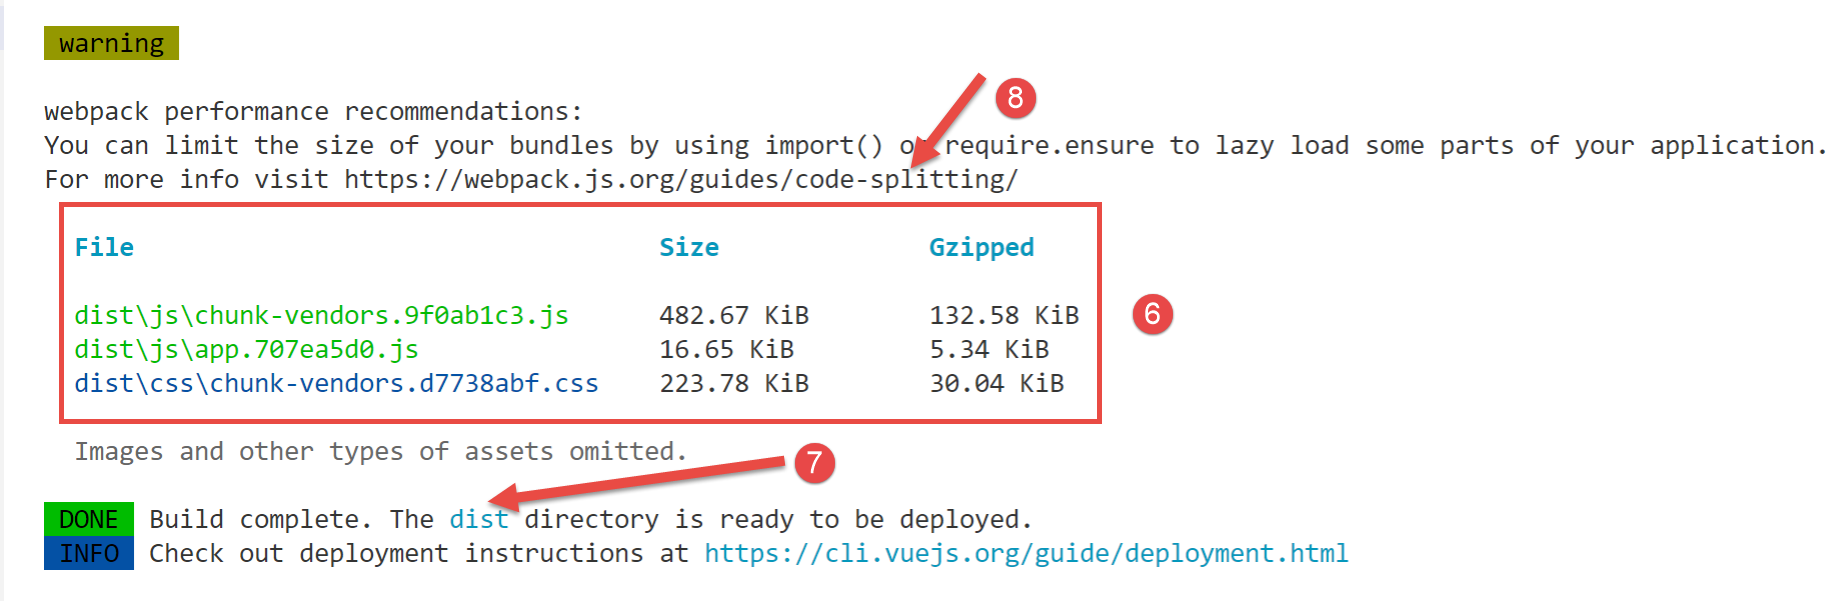
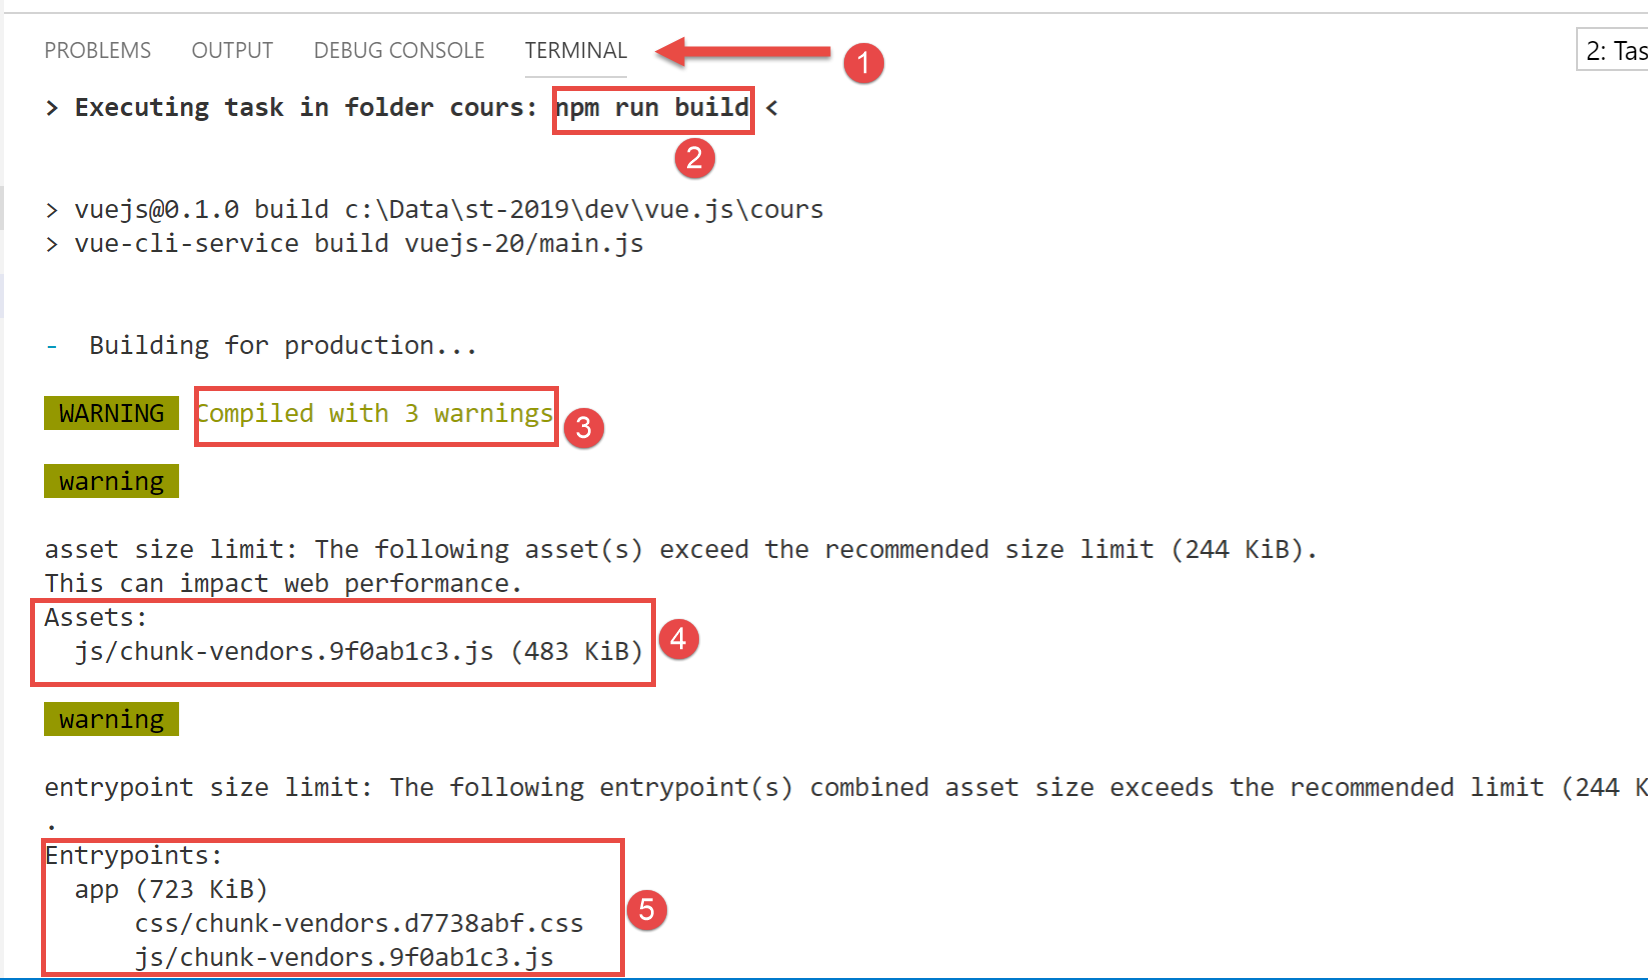
- 在 [3-6] 中,警告提示生成的代码过大,应进行拆分 [8]。这涉及代码架构优化,本文将不作讨论;
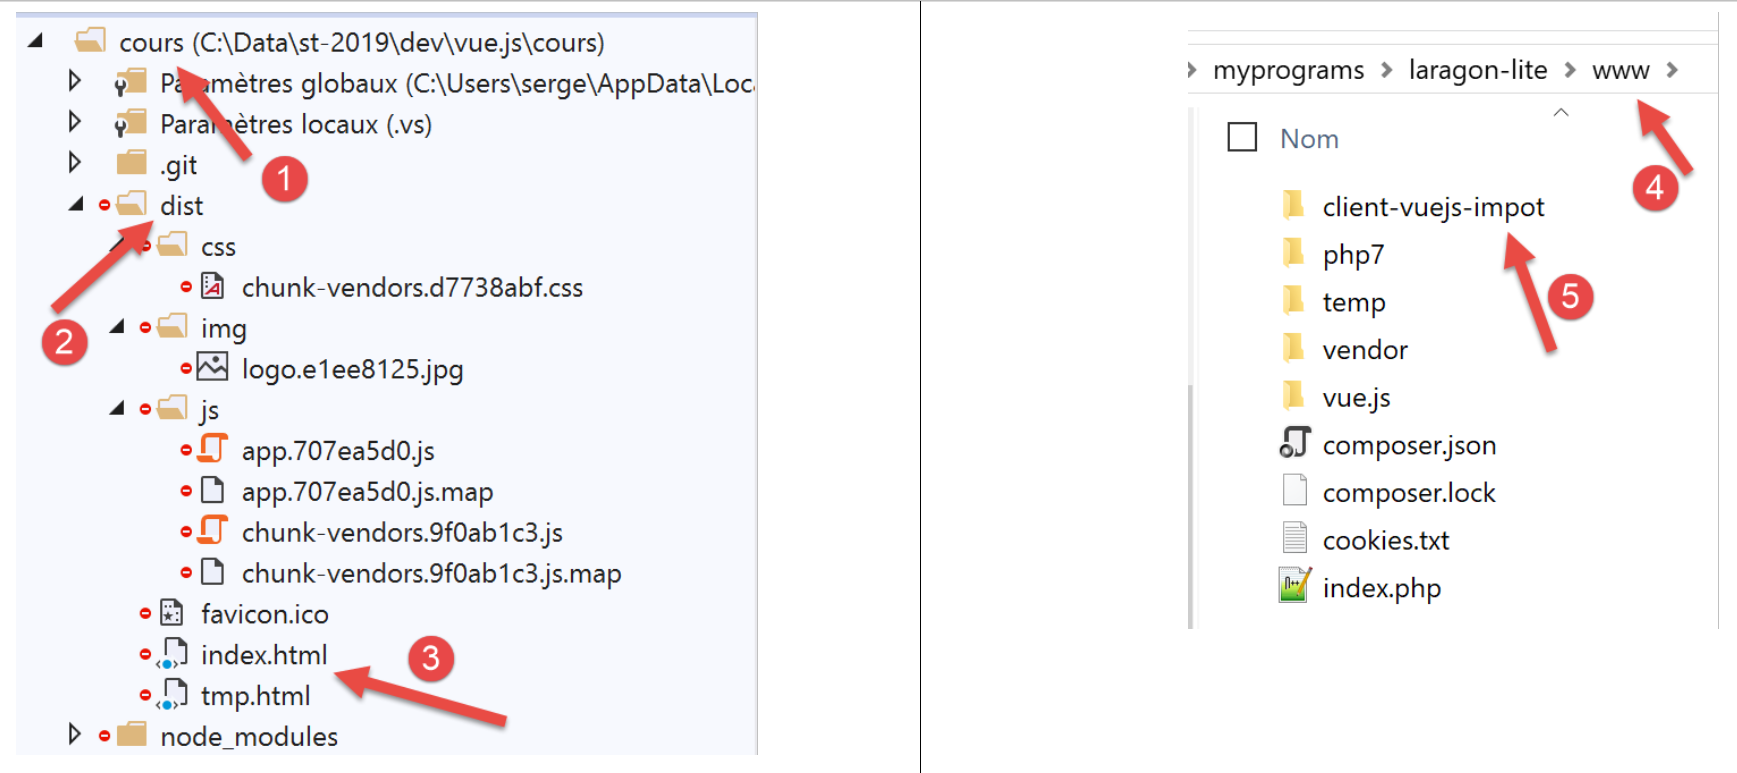
- 在 [7] 中,提示 [dist] 文件夹包含生成的生产版本:
- 在[3]中,当请求 URL [https://localhost:80/client-vue-js-impot/] 时,将使用 [index.html] 文件;
现在我们有一个静态网站,可以部署在任何服务器上。我们将把它部署在本地 Laragon 服务器上(参见文档 |https://tahe.developpez.com/tutoriels-cours/php7|)。将 [dist] 文件夹 [2] 复制到 [<laragon>/www] 文件夹 [4] 中,其中 <laragon> 是 Laragon 服务器的安装目录。 我们将该文件夹重命名为 [client-vuejs-import] [5],因为我们已将生产环境配置为通过 URL [/client-vuejs-import/] 运行。
步骤 3
我们将以下 [.htaccess] 文件添加到刚刚创建的 [client-vuejs-import] 文件夹中:
<IfModule mod_rewrite.c>
  RewriteEngine On
  RewriteBase /client-vuejs-impot/
  RewriteRule ^index\.html$ - [L]
  RewriteCond %{REQUEST_FILENAME} !-f
  RewriteCond %{REQUEST_FILENAME} !-d
  RewriteRule . /client-vuejs-impot/index.html [L]
</IfModule>
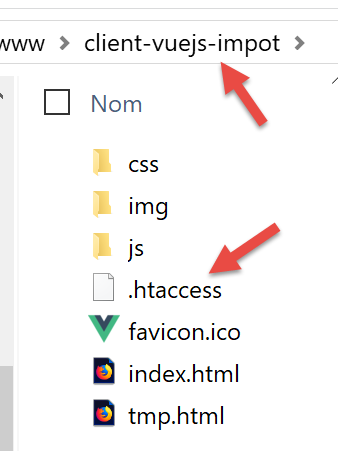
这是一个 Apache Web 服务器配置文件。如果我们不包含该文件,而是直接请求 URL [https://localhost/client-vuejs-impot/calcul-impot](而不先经过 URL [https://localhost/client-vuejs-impot/]),将会收到 404 错误。有了这个文件,我们就能成功获取 [CalculImpot] 视图。
完成上述操作后,若尚未启动 Laragon 服务器,请启动它,然后访问 URL [https://localhost/client-vuejs-impot/]:
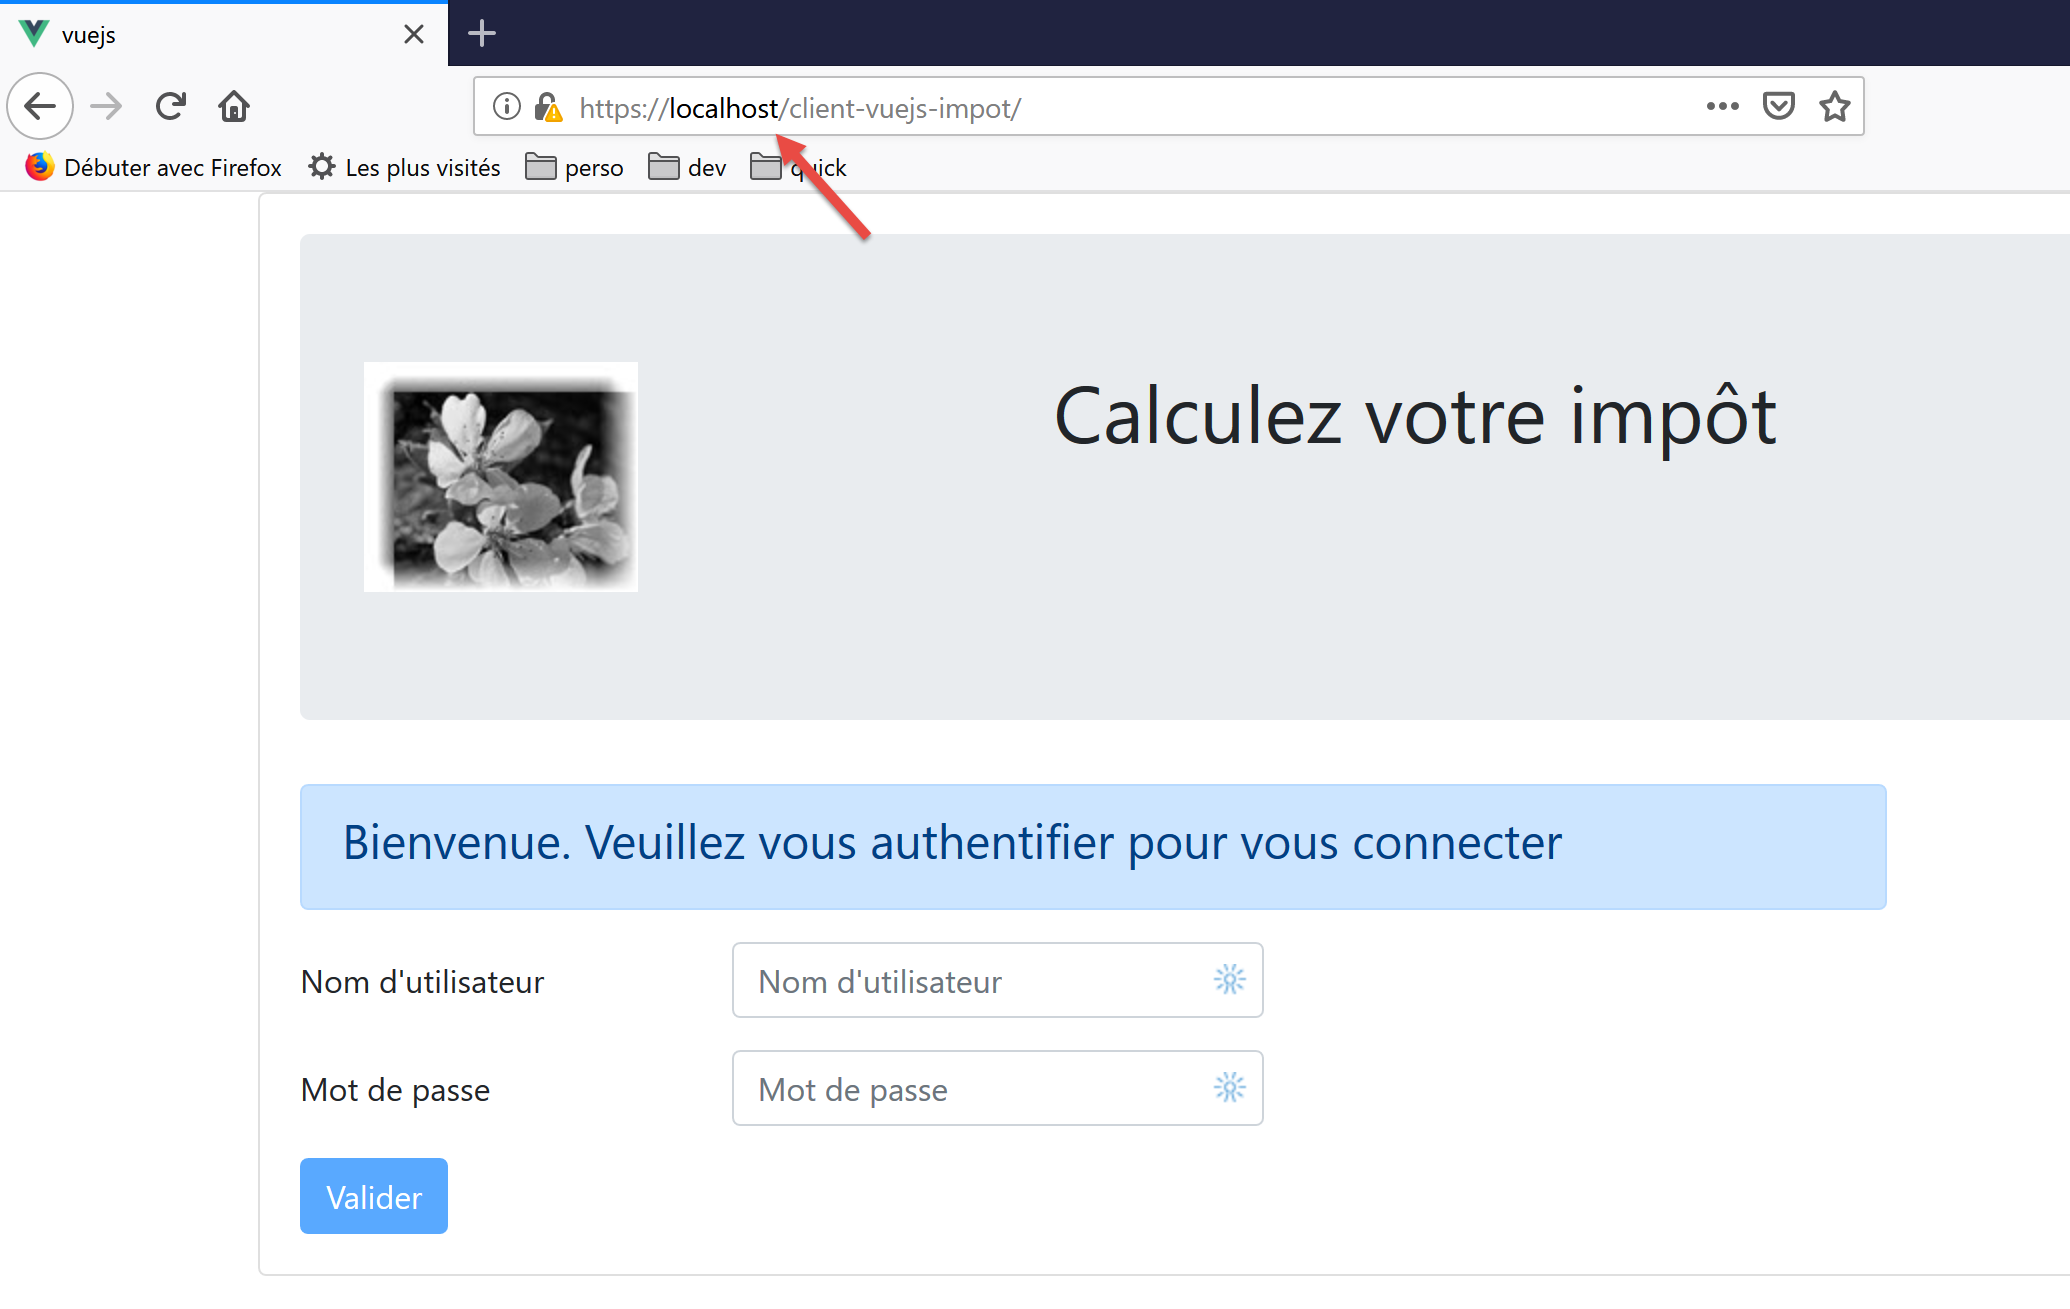
欢迎读者测试我们应用程序的正式版。
我们可以对税费计算服务器进行一项修改:即它系统性地发送给客户端的 CORS 头部。此前,这对于在 [localhost:8080] 域上运行的客户端版本是必要的。现在,由于客户端和服务器都在 [localhost:80] 域上运行,因此不再需要这些 CORS 头部。
我们修改服务器第 14 版的 [config.json] 文件:
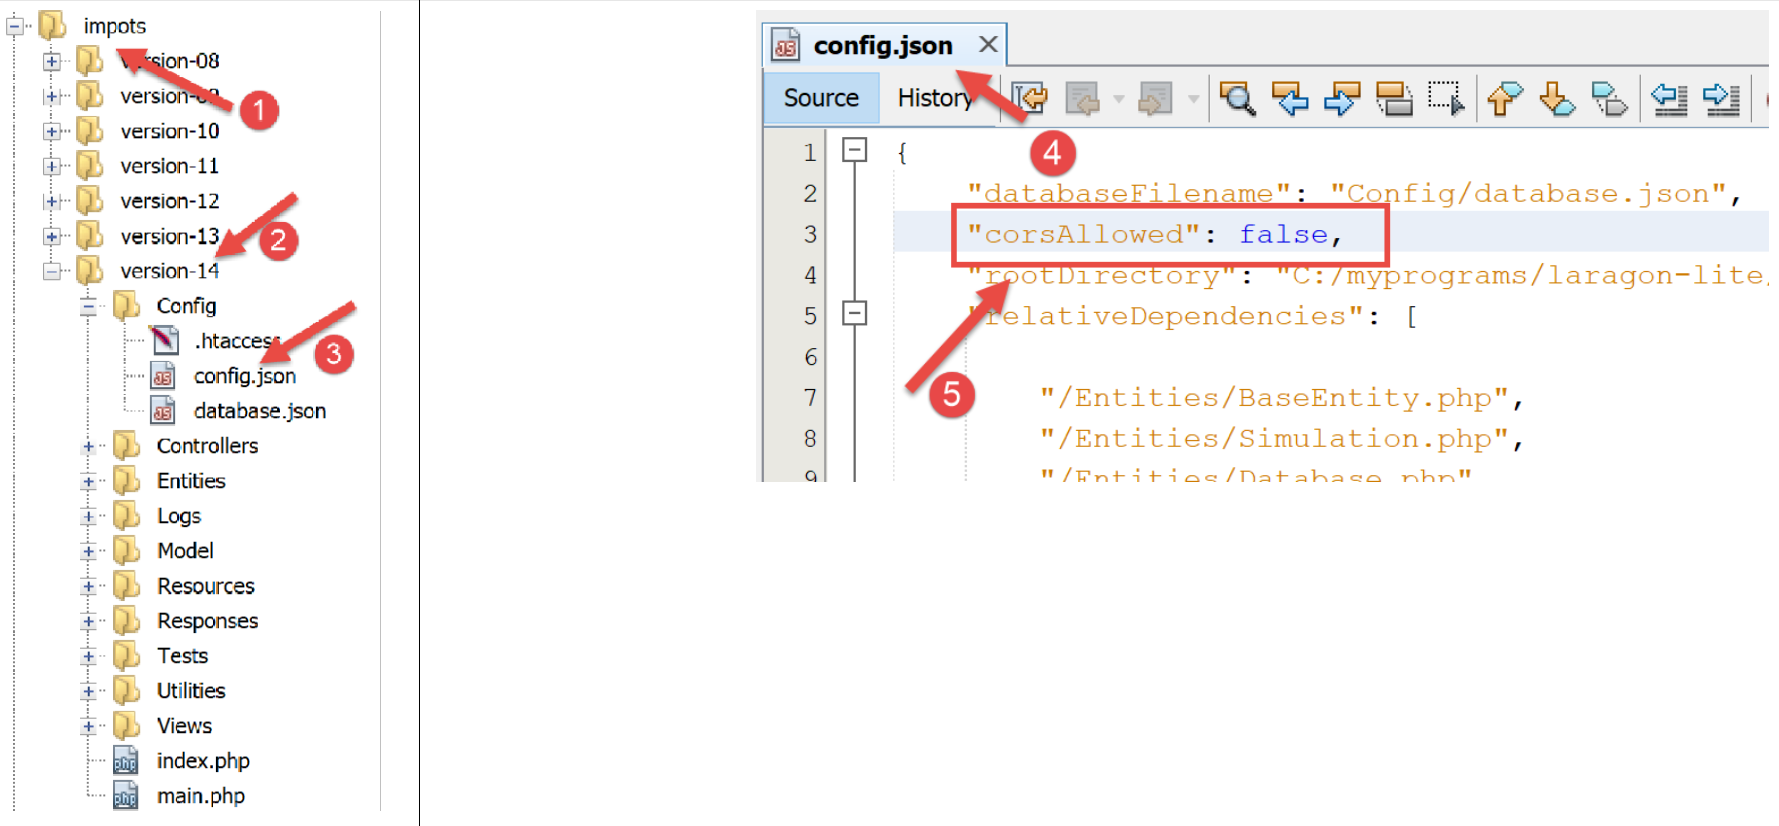
- 在 [4] 中,我们指定现在拒绝 CORS 请求;
保存此更改后,再次请求 URL [https://localhost/client-vuejs-impot/]。它应该仍然有效。
18.7. 处理手动输入的 URL
用户可能不愿使用导航菜单中的链接,而是希望手动在浏览器的地址栏中输入应用程序的 URL。例如,让我们不经过身份验证页面,直接请求 URL [https://client-vuejs-impot/calcul-impot]。黑客肯定会尝试这种方法。我们会看到以下视图:
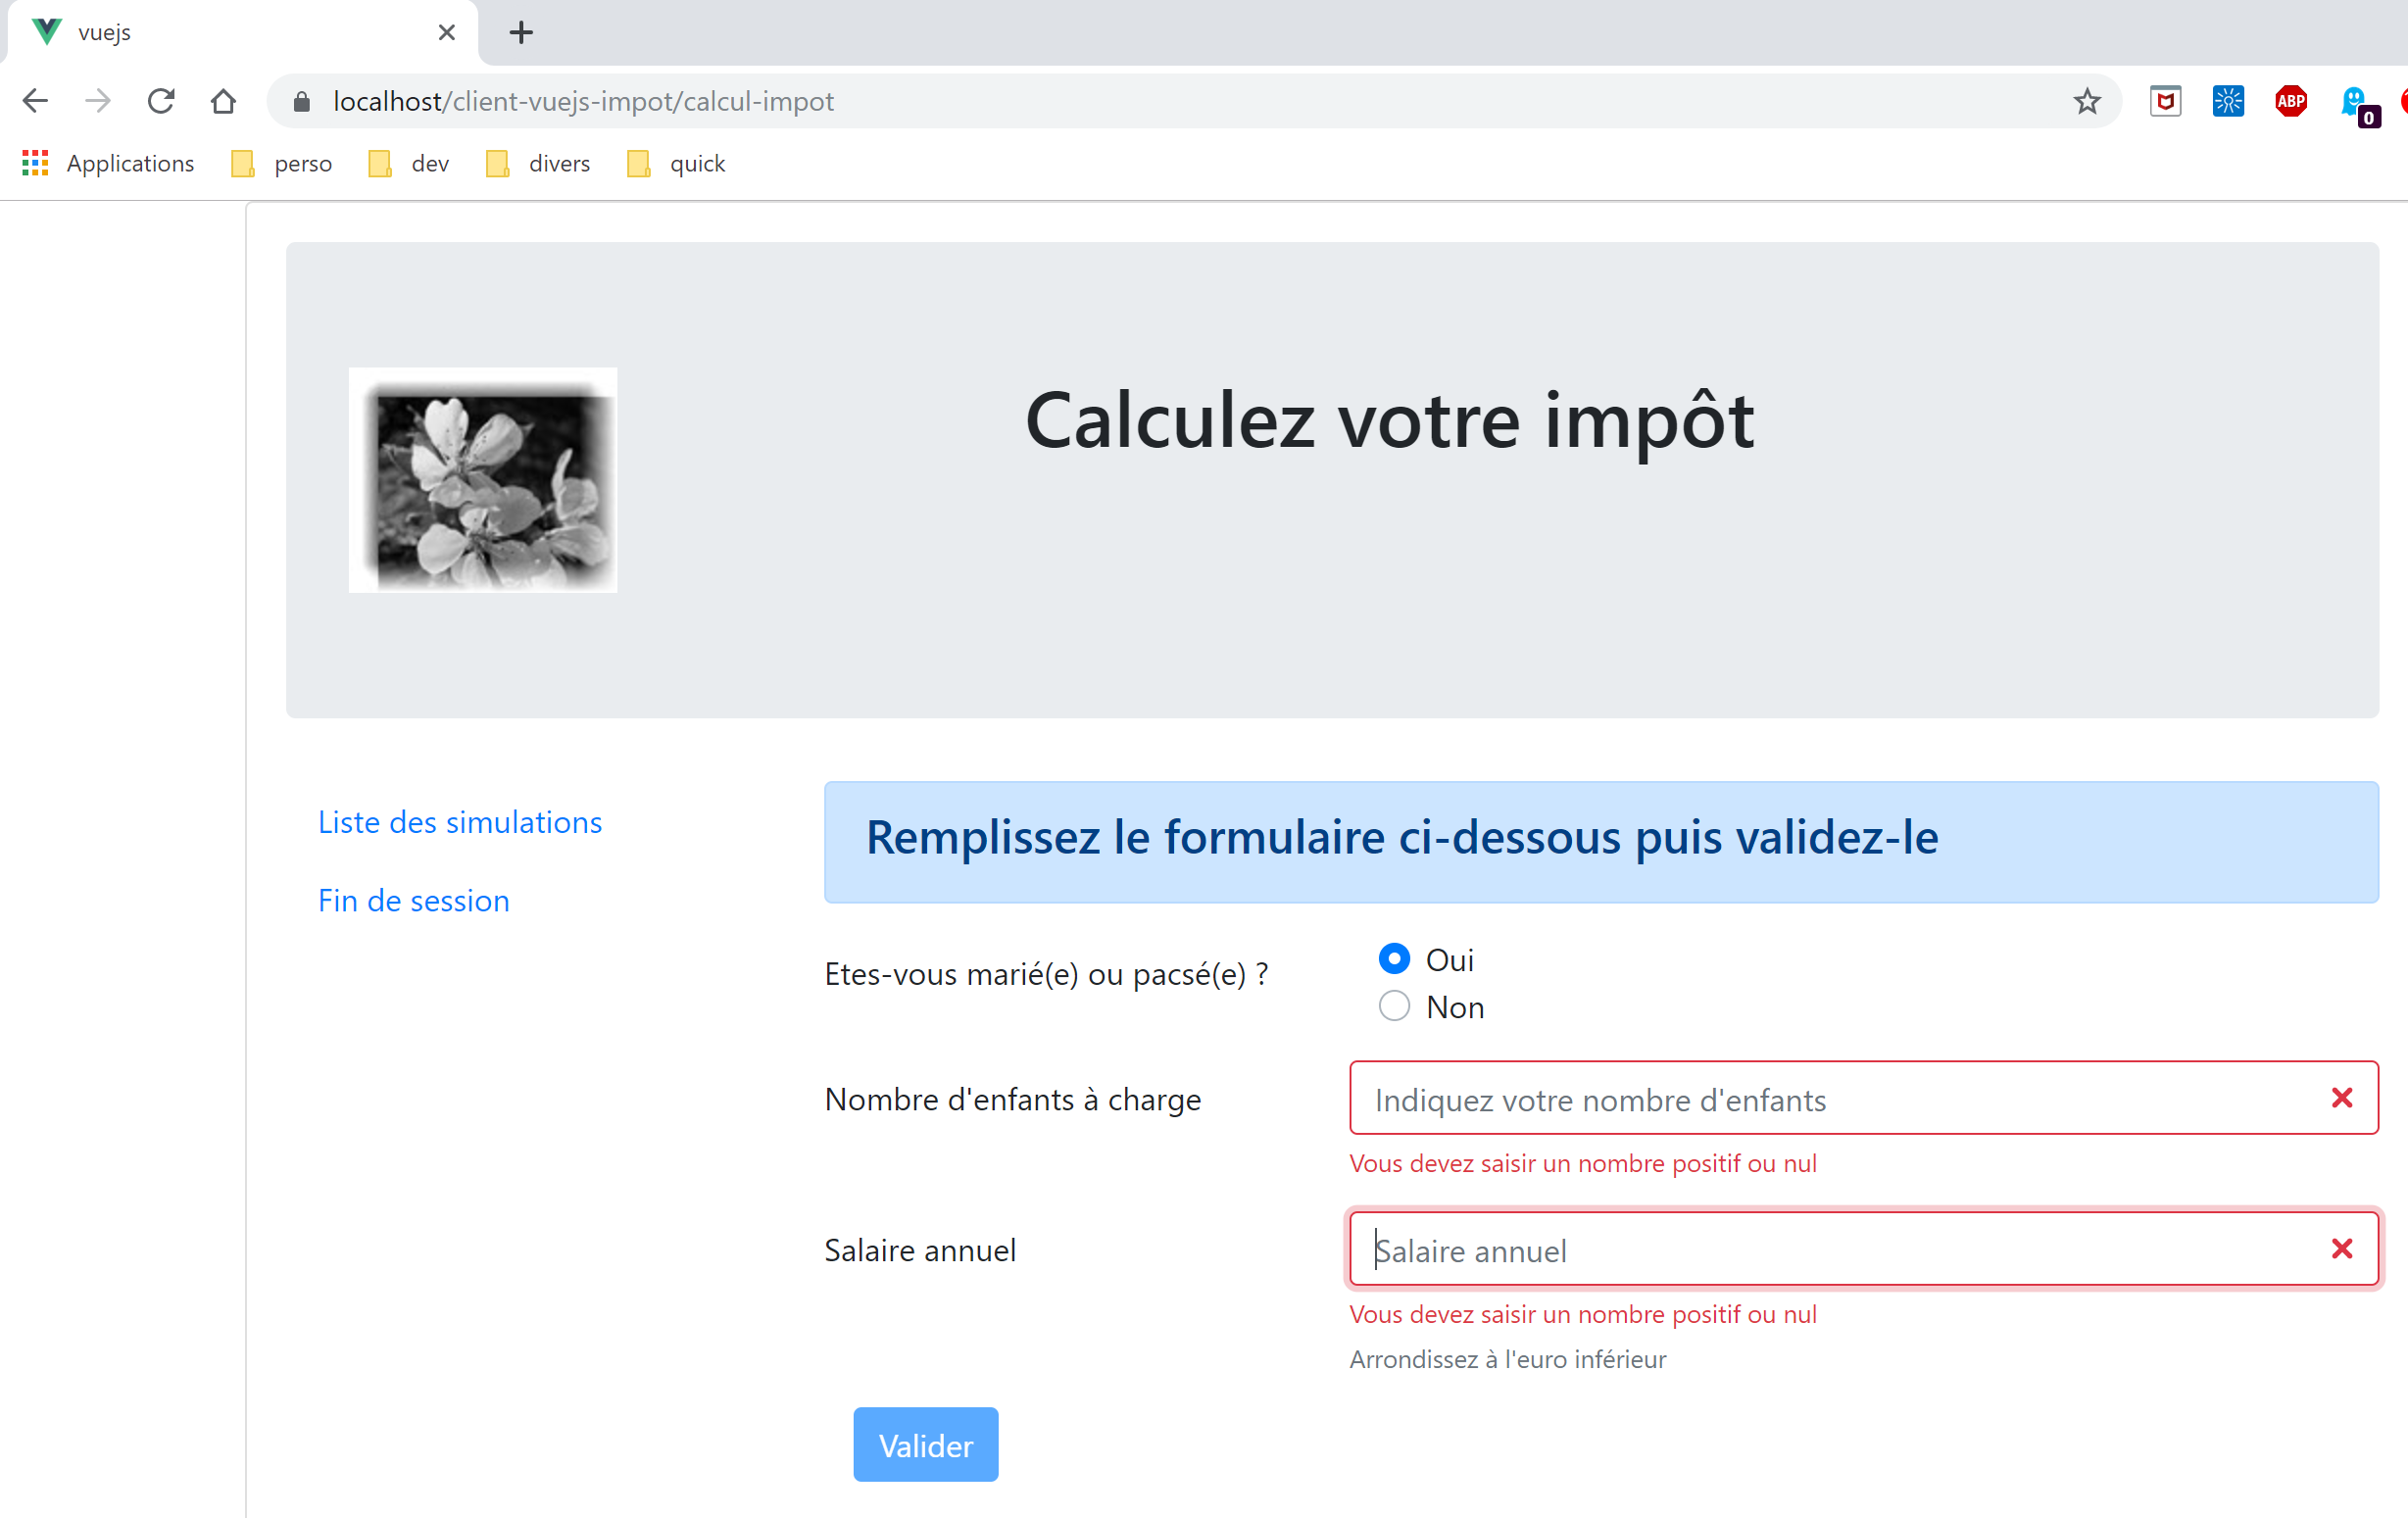
我们确实看到了税费计算视图。现在,让我们尝试填写输入字段并提交:
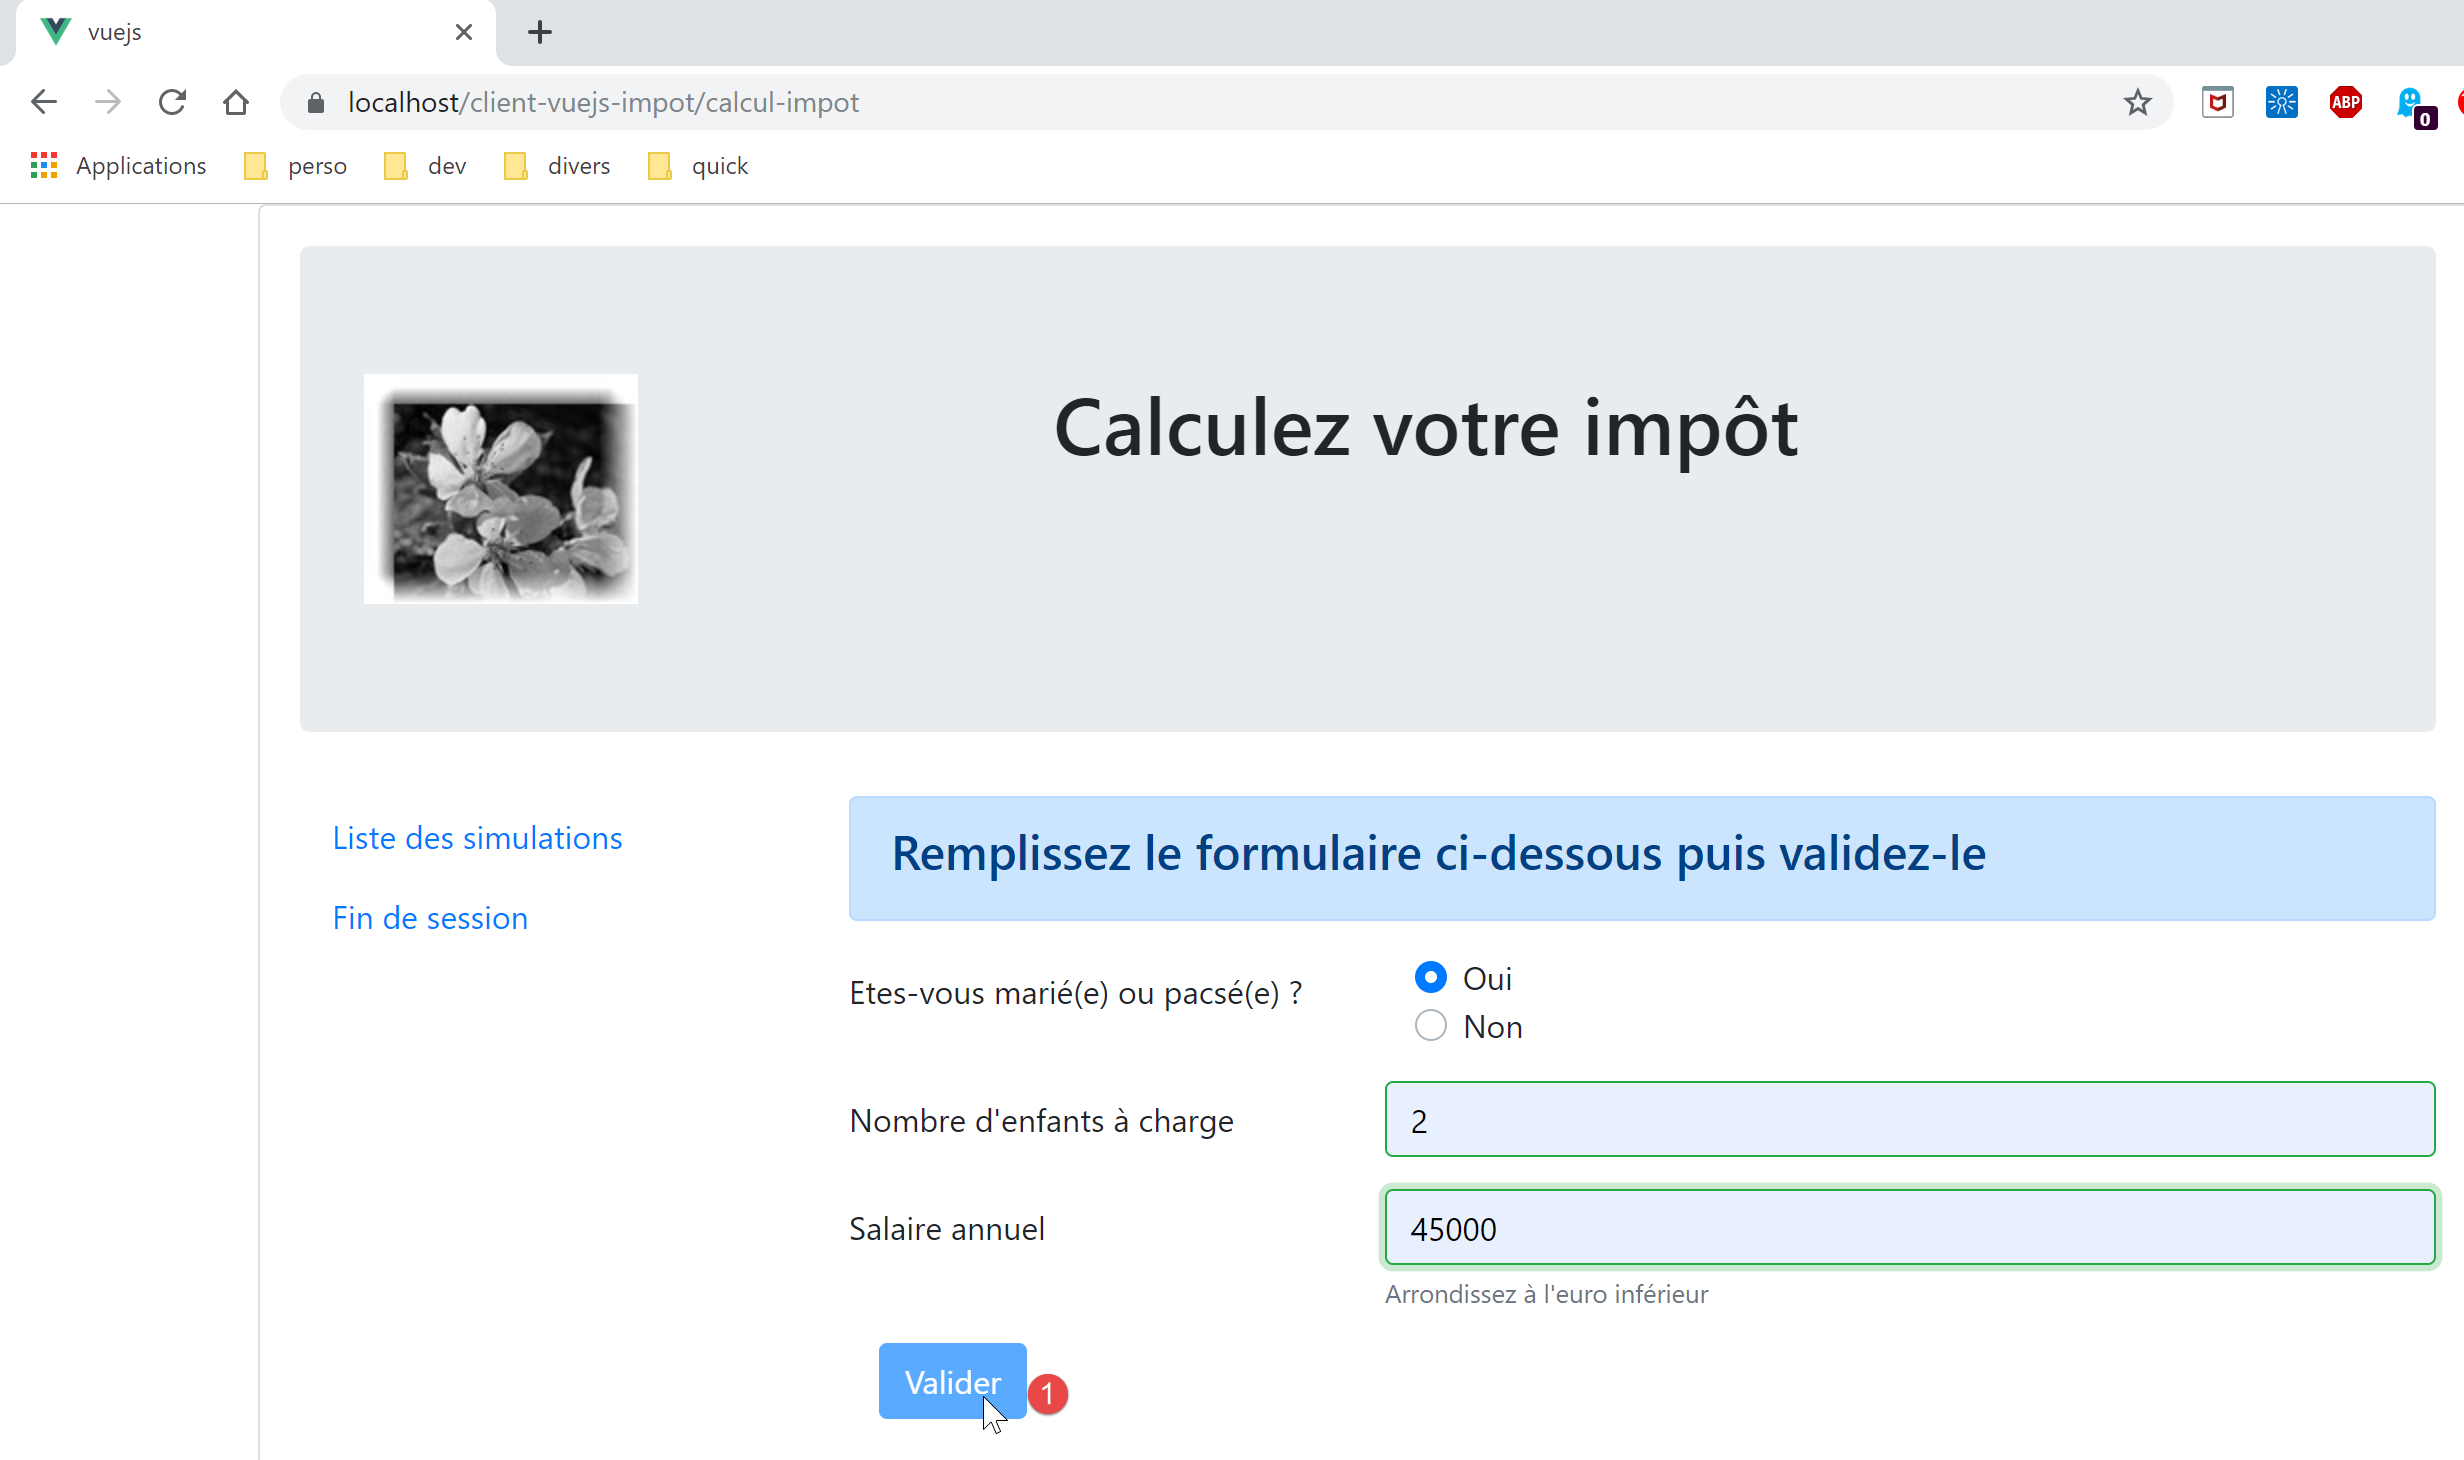
随后我们发现,即使输入内容正确,[1] [提交] 按钮仍然处于禁用状态。让我们查看 [FormCalculImpot] 视图的代码:
<b-col cols="5">
      <b-button type="submit" variant="primary" :disabled="formInvalide">Valider</b-button>
</b-col>
在第 2 行,我们可以看到其启用/禁用状态取决于 [formInvalide] 属性。这是以下计算属性:
formInvalide() {
      return (
        // salaire invalide
        !this.salaireValide ||
        // ou enfants invalide
        !this.enfantsValide ||
        // ou données fiscales pas obtenues
        !this.$métier.taxAdminData
      );
},
第 8 行表明,表单要有效,必须已获取税费数据。然而,这些数据是在 [Authentication] 视图的验证过程中获取的,而用户已“跳过”了该步骤。因此,他们将无法提交表单。如果他们能够提交,服务器会返回一条错误消息,指出他们未通过身份验证。验证必须始终在服务器端进行。 客户端验证总是可以被绕过的。只需使用像 [Postman] 这样的客户端,向服务器发送原始请求即可。
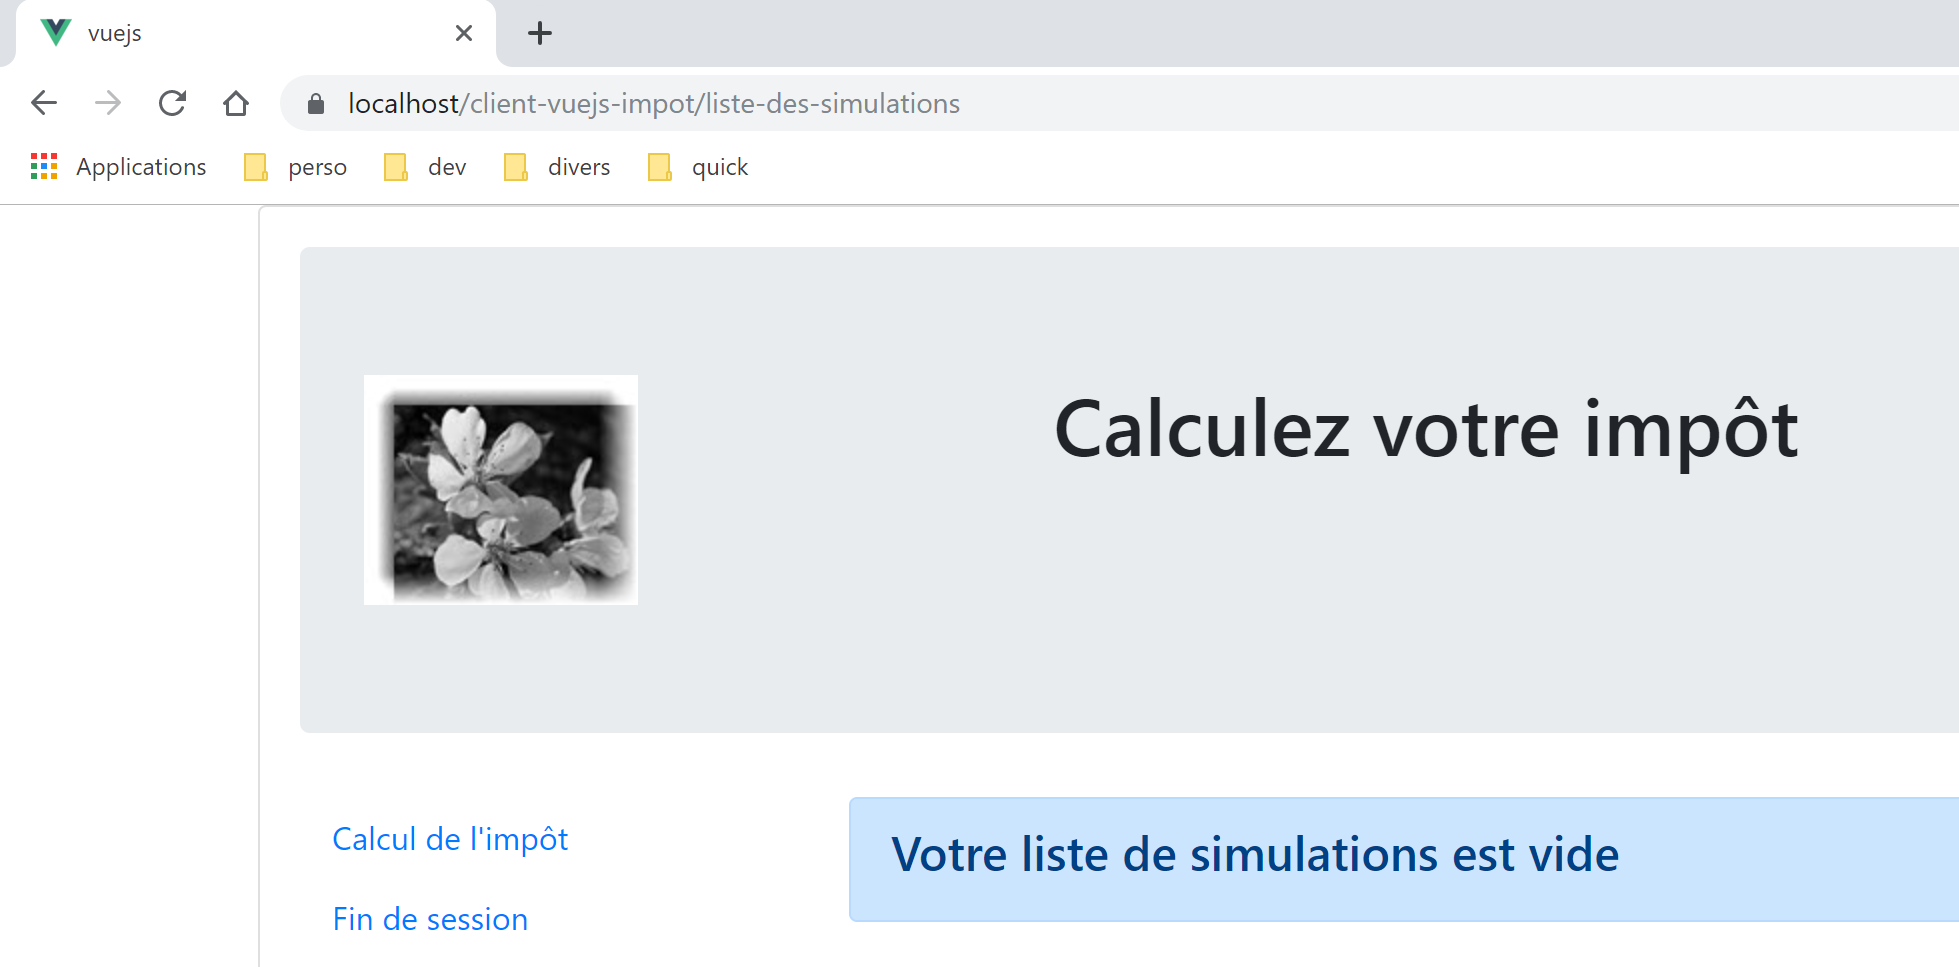
现在让我们请求 URL [https://localhost/client-vuejs-impot/liste-des-simulations]。我们会看到以下视图:
现在访问 URL [https://localhost/client-vuejs-impot/fin-session]。我们看到如下界面:
现在访问一个不存在的页面 [https://localhost/client-vuejs-impot/abcd]:
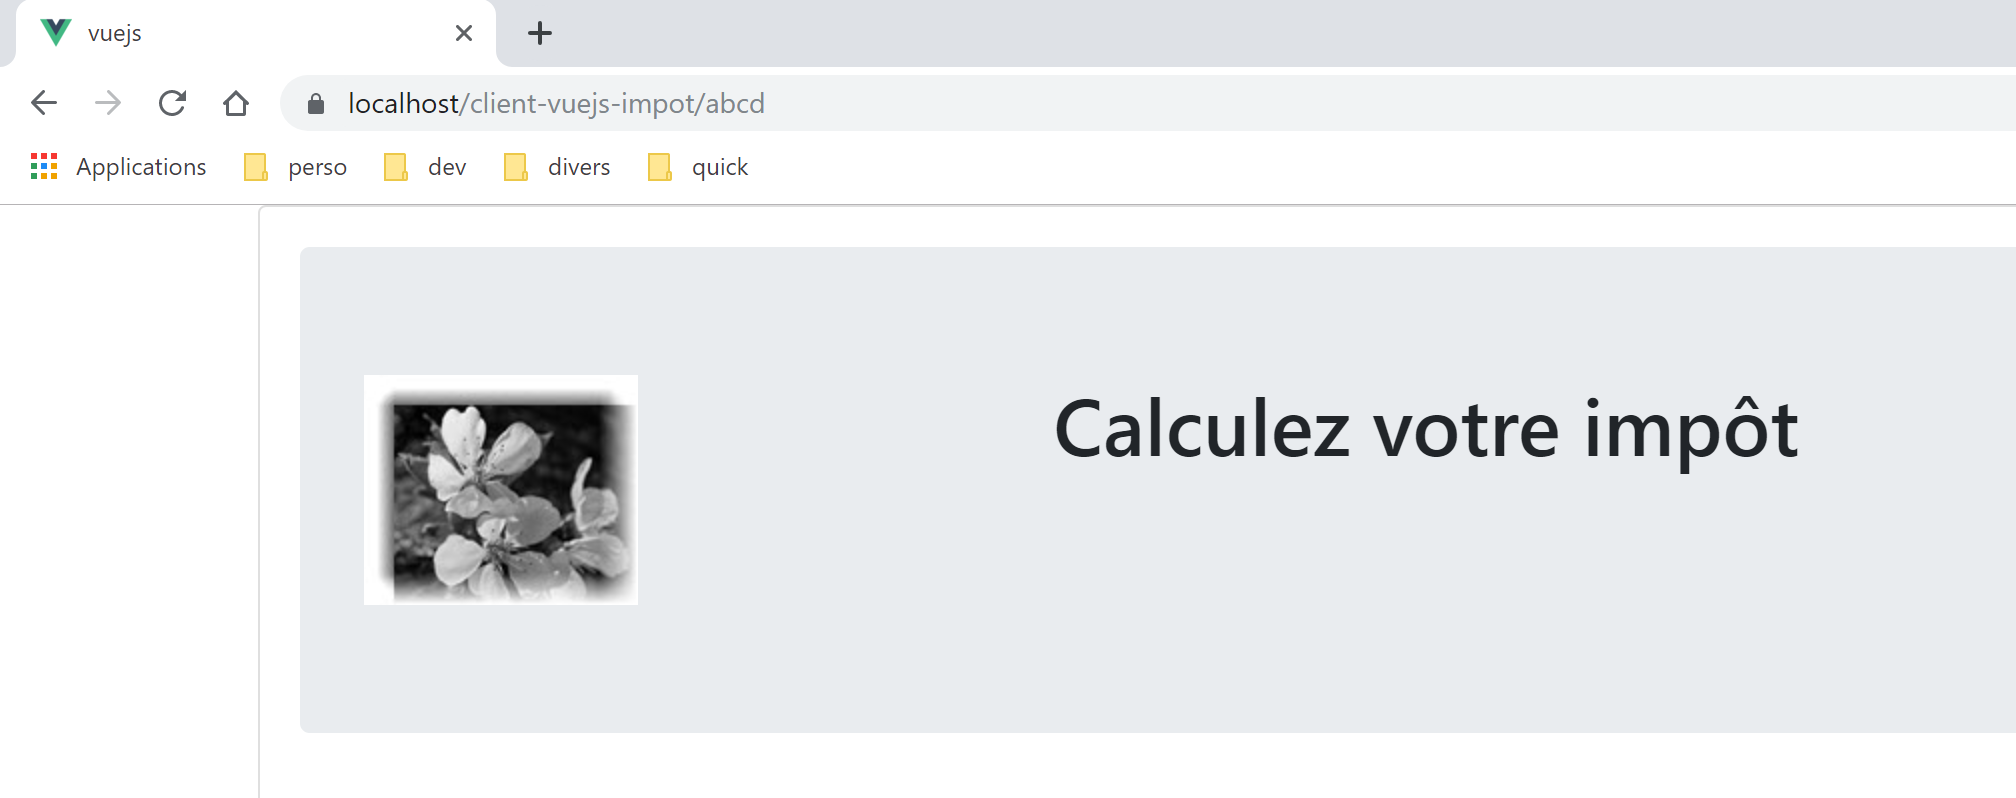
我们的应用程序对手动输入的 URL 处理得相当好。当这些 URL 被调用时,应用程序路由器会识别到它们。因此,在视图最终显示之前,我们可以进行干预。我们将在 [vuejs-21] 项目中探讨这一点。
还有一点需要考虑。假设用户已按照规则运行了几次模拟:
现在,让我们按 F5 键刷新页面:
我们做了一件不建议做的事情:手动输入 URL(按 F5 键本质上也是同样的操作)。结果,我们的模拟数据丢失了。
以下项目 [vuejs-21] 旨在引入两项改进:
- 验证用户输入的 URL;
- 即使用户输入了 URL,也能保持应用程序的状态。上文中,我们可以看到模拟列表已丢失;