4. 视图及其模型
到目前为止,操作都是自己生成响应。在 MVC 应用中,这是 视图的职责:视图是描述 HTML 页面的文件,其中为操作传给它的数据预留了占位符——即 视图的模型。我们将通过 [Handlebars] 视图引擎和 [hbs] 包来使用它,该包使其适配 [Express]。
4.1. 示例 13:第一个视图
| 13-first-view/
├── src/
│ ├── app.module.ts
│ ├── main.ts
│ └── views.controller.ts
├── views/
│ ├── index.hbs
│ └── unknown.hbs
├── nest-cli.json
└── tsconfig.json
|
[src/main.ts] 文件:
| import { NestFactory } from '@nestjs/core';
import { NestExpressApplication } from '@nestjs/platform-express';
import { join } from 'path';
import { AppModule } from './app.module';
async function bootstrap() {
// NestExpressApplication:可访问 Express 特有的方法
const app = await NestFactory.create<NestExpressApplication>(AppModule);
// 视图位于 [views] 文件夹中,在项目根目录;
// 编译后,此文件位于 dist/ 中:因此根目录是 '..'
app.setBaseViewsDir(join(__dirname, '..', 'views'));
// 视图引擎:Handlebars,由 [hbs] 包提供
app.setViewEngine('hbs');
await app.listen(3000);
console.log('Server started on http://localhost:3000');
}
bootstrap();
|
我们来逐行剖析这段代码:
- 第 2 行:[NestExpressApplication] 是基于 [Express] 的 [NestJS] 应用的类型([NestJS] 也可以使用 [Fastify] 服务器)。指定该类型后即可访问 [Express] 特有的方法:[setBaseViewsDir]、[setViewEngine]、[useStaticAssets];
- 第 8 行:该类型被传给 [NestFactory.create];
- 第 11 行:views 文件夹。[__dirname] 是当前运行文件所在的文件夹:[dist],因为当前运行的是 [dist/main.js]。因此 [views] 文件夹位于 [dist/../views];
- 第 13 行:视图引擎:[hbs]。视图就是 views 文件夹中的 [.hbs] 文件。
文件 [src/views.controller.ts]:
| import { Controller, Get, Param, Render, Res } from '@nestjs/common';
import { Response } from 'express';
@Controller()
export class ViewsController {
// @Render('index'):动作返回的对象就是视图
// views/index.hbs 的模型;NestJS 自行调用视图引擎
@Get()
@Render('index')
home(): object {
return {
title: 'My first view',
message: 'This page was built by Handlebars, on the server.',
time: new Date().toLocaleTimeString('en-US'),
};
}
// res.render(view, model):视图在动作执行期间选择
@Get('hello/:name')
hello(@Param('name') name: string, @Res() res: Response): void {
if (name === 'unknown') {
res.status(404).render('unknown', { name });
return;
}
res.render('index', {
title: `Hello ${name}`,
message: 'This time, the view was chosen by res.render.',
time: new Date().toLocaleTimeString('en-US'),
});
}
}
|
- 第 8–9 行:[@Render('index')] 指向视图 [views/index.hbs]。操作返回的对象不再是响应;它是视图的 模型;
- 第 11–15 行:模型:三个值,[title]、[message] 和 [time];
- 第 19–30 行:当视图取决于请求时,操作使用 [res.render(view, model)] ,它来自 [Express] 响应对象(由 [@Res()] 注入;参见示例 05)。这里,名称 [unknown] 会显示另一个视图,状态码为 404。
文件 [views/index.hbs]:
| <!doctype html>
<html lang="en">
<head>
<meta charset="utf-8">
<title>{{title}}</title>
</head>
<body>
<h1>{{title}}</h1>
<p>{{message}}</p>
<p>Page built at {{time}}.</p>
</body>
</html>
|
[Handlebars] 视图是一个 HTML 文件。 每个 [{{title}}] (第 5、8 行)都会被模型中相应字段的值替换。结果如下:
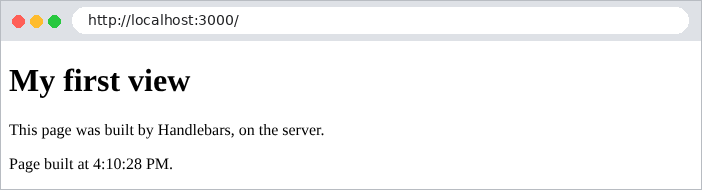
浏览器收到的页面源代码中,不再有任何 [Handlebars] 的痕迹:
| <!doctype html>
<html lang="en">
<head>
<meta charset="utf-8">
<title>My first view</title>
</head>
<body>
<h1>My first view</h1>
<p>This page was built by Handlebars, on the server.</p>
<p>Page built at 4:10:29 PM.</p>
</body>
</html>
|
URL [/hello/martin] 使用不同的模型显示同一个视图:
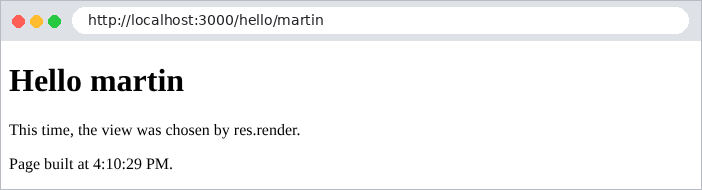
而 [/hello/unknown] 则显示另一个视图:
| curl -i http://localhost:3000/hello/unknown
|
| HTTP/1.1 404 Not Found
Content-Type: text/html; charset=utf-8
Content-Length: 164
<!doctype html>
<html lang="en">
<head>
<meta charset="utf-8">
<title>Unknown</title>
</head>
<body>
<h1>Nobody is called [unknown] here</h1>
</body>
</html>
|
4.2. 示例 14:Handlebars 语言
[Handlebars] 是一种 无逻辑的模板语言:视图中不含任何 [JavaScript] 代码,只有 [{{...}}] 表达式和少数几种 块([{{#if}}]、[{{#each}}]……)。所有计算都由操作事先完成。示例 14 对此作了演示。模型:
[src/basics.controller.ts] 文件:
| import { Controller, Get, Render } from '@nestjs/common';
@Controller()
export class BasicsController {
@Get()
@Render('basics')
basics(): object {
return {
title: 'Handlebars basics',
name: 'Martin',
html: '<b>this is HTML</b>',
loggedIn: true,
currency: '€',
products: [
{ name: 'Keyboard', price: 25, inStock: true },
{ name: 'Mouse', price: 12.5, inStock: false },
{ name: 'Screen', price: 149, inStock: true },
],
cart: [],
address: { street: '12 rue des Lilas', city: 'Angers' },
};
}
}
|
视图:
文件 [views/basics.hbs]:
| <!doctype html>
<html lang="en">
<head>
<meta charset="utf-8">
<title>{{title}}</title>
</head>
<body>
<h1>{{title}}</h1>
{{!-- 1. 显示模型的一个值 --}}
<p>1. Name: {{name}} - missing variable: [{{nonexistent}}]</p>
{{!-- 2. {{ }} 会转义 HTML,{{{ }}} 则原样插入 --}}
<p>2a. {{html}}</p>
<p>2b. {{{html}}}</p>
{{!-- 3. 条件判断 --}}
{{#if loggedIn}}
<p>3. You are logged in.</p>
{{else}}
<p>3. You are not logged in.</p>
{{/if}}
{{#unless loggedIn}}
<p>This paragraph is not displayed.</p>
{{/unless}}
{{!-- 4. 循环;在循环内部,上下文是当前项 --}}
<p>4. Our products:</p>
<ul>
{{#each products}}
<li>no. {{@index}}: {{name}}, {{price}} {{../currency}}
{{#if inStock}}(in stock){{else}}(sold out){{/if}}
{{#if @first}}- the first one{{/if}}
{{#if @last}}- the last one, seen by {{@root.name}}{{/if}}
</li>
{{/each}}
</ul>
{{!-- 5. 循环中的 {{else}}:列表为空的情况 --}}
<p>5. Your cart:
{{#each cart}}{{name}}{{else}}it is empty.{{/each}}
</p>
{{!-- 6. 切换上下文,或使用带点的路径 --}}
{{#with address}}
<p>6a. Address: {{street}}, {{city}}</p>
{{/with}}
<p>6b. City: {{address.city}}</p>
</body>
</html>
|
我们来逐行说明这段代码:
- 第 9 行:[{{!-- ... --}}] 是一个 注释 ([Handlebars] 的):它不会出现在生成的页面中(不同于 HTML 注释,如 [<!-- -->]);
- 第 10 行:模型中缺失的变量([nonexistent])会产生空字符串,而不会报错;
- 第 12–13 行:[{{html}}] 会对 HTML 中的特殊字符 进行转义([<] 变成 [<]……):文本按原样显示。[{{{html}}}] (三重花括号)则不转义直接插入:它会被解释为 HTML。三重花括号只用于 由应用生成的 HTML,绝不能用于用户输入的数据:用户可能会向页面注入 HTML,甚至 [JavaScript](即所谓的 [XSS] 攻击);
- 第 15–19 行:[{{#if}}] / [{{else}}] / [{{/if}}]:条件块。条件是模型中的一个 值 ,而不是表达式:[false]、[undefined]、[null]、['']、[0]以及空数组都为假;
- 第 20–22 行:[{{#unless}}] 与 [{{#if}}] 相反;
- 第 26–32 行:[{{#each}}] 为数组中的每个元素重复其内容。在块内部,上下文是当前元素:[{{name}}] 是当前商品的名称。还提供一些特殊变量:[@index] (从 0 开始的位置)、[@first]、[@last]。[../currency] 指向父上下文,[@root.name] 指向根模型;
- 第 36 行:[{{#each}}] 中的 [{{else}}] 处理数组为空的情况;
- 第 39–41 行:[{{#with}}] 用于切换上下文;也可以使用相对路径(第 42 行)。
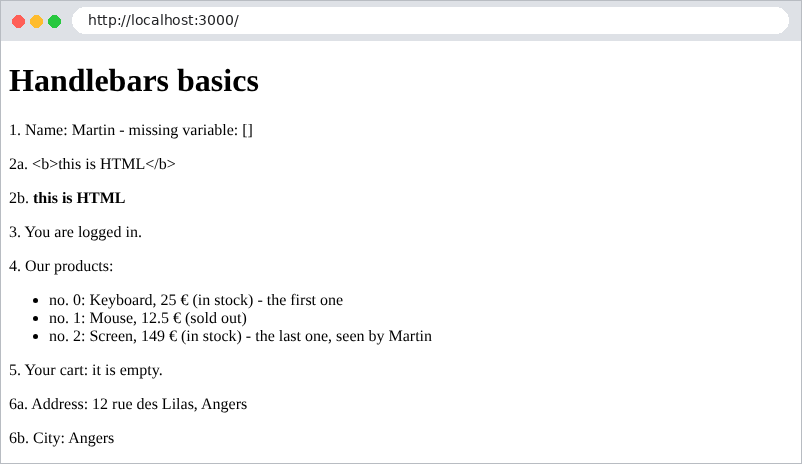
生成的 HTML 代码:
| <!doctype html>
<html lang="en">
<head>
<meta charset="utf-8">
<title>Handlebars basics</title>
</head>
<body>
<h1>Handlebars basics</h1>
<p>1. Name: Martin - missing variable: []</p>
<p>2a. <b>this is HTML</b></p>
<p>2b. <b>this is HTML</b></p>
<p>3. You are logged in.</p>
<p>4. Our products:</p>
<ul>
<li>no. 0: Keyboard, 25 €
(in stock)
- the first one
</li>
<li>no. 1: Mouse, 12.5 €
(sold out)
</li>
<li>no. 2: Screen, 149 €
(in stock)
- the last one, seen by Martin
</li>
</ul>
<p>5. Your cart:
it is empty.
</p>
<p>6a. Address: 12 rue des Lilas, Angers</p>
<p>6b. City: Angers</p>
</body>
</html>
|
请注意块留下的空行:它们对显示没有影响。
4.3. 示例 15:模板、局部模板、静态文件
站点的各个页面共用一个 模板 (页眉、导航栏、页脚)。[hbs] 的处理方式如下:如果 views 文件夹中包含名为 [layout.hbs] 的文件,每个视图都会插入到这个模板中。可复用的页面片段称为 局部视图。
| 15-layout-partials/
├── public/
│ └── css/
│ └── styles.css
├── src/
│ ├── app.module.ts
│ ├── main.ts
│ └── pages.controller.ts
├── views/
│ ├── partials/
│ │ ├── card.hbs
│ │ └── navbar.hbs
│ ├── home.hbs
│ ├── layout.hbs
│ ├── raw.hbs
│ └── team.hbs
├── nest-cli.json
└── tsconfig.json
|
文件 [src/main.ts]:
| import { NestFactory } from '@nestjs/core';
import { NestExpressApplication } from '@nestjs/platform-express';
import { NextFunction, Request, Response } from 'express';
import * as hbs from 'hbs';
import { dirname, join } from 'path';
import { AppModule } from './app.module';
const ROOT = join(__dirname, '..');
async function bootstrap() {
const app = await NestFactory.create<NestExpressApplication>(AppModule);
// 1. 静态文件:public/css/styles.css 以 /css/styles.css 提供
app.useStaticAssets(join(ROOT, 'public'));
// Bootstrap 直接从 node_modules 提供,路径为 /bootstrap/
app.useStaticAssets(join(dirname(require.resolve('bootstrap/package.json')), 'dist'), { prefix: '/bootstrap/' });
// 2. 视图;views/layout.hbs 将作为所有页面的布局
app.setBaseViewsDir(join(ROOT, 'views'));
app.setViewEngine('hbs');
// 3. 局部模板:views/partials/xxx.hbs 通过 {{> xxx}} 插入
await new Promise<void>((done) => hbs.registerPartials(join(ROOT, 'views', 'partials'), () => done()));
// 4. Express 中间件:它放入 res.locals 的内容会
// 添加到每个视图的模型中
app.use((req: Request, res: Response, next: NextFunction) => {
res.locals.path = req.path;
res.locals.year = new Date().getFullYear();
next();
});
await app.listen(3000);
console.log('Server started on http://localhost:3000');
}
bootstrap();
|
我们来逐行剖析这段代码:
- 第 14 行:[useStaticAssets] 从一个文件夹提供 静态文件 :文件 [public/css/styles.css] 通过 URL [/css/styles.css] 原样提供,不经过控制器;
- 第 16 行:CSS [Bootstrap] 框架直接从 [node_modules] 文件夹提供,使用前缀 [/bootstrap/]。[require.resolve] 会定位 [bootstrap] 包所在的文件夹,无论它安装在哪里(这里是在 [examples/node_modules]);
- 第 22 行:[views/partials] 文件夹中的文件成为局部模板文件:[partials/navbar.hbs] 通过 [{{> navbar}}] 插入到视图中。[registerPartials] 以异步方式读取该文件夹:我们要等它完成(完成时会调用作为第二个参数传入的函数)再启动服务器;
- 第 26–30 行:一个 [Express] 中间件,在每个请求之前执行。它存入 [res.locals] 的内容会 添加到每个视图的模型中。我们就是这样向所有页面提供公共信息(这里是所请求的路径和年份),而不必在每个操作中重复。
[views/layout.hbs] 文件:
| <!doctype html>
<html lang="en">
<head>
<meta charset="utf-8">
<meta name="viewport" content="width=device-width, initial-scale=1">
<title>{{title}} - My site</title>
<link rel="stylesheet" href="/bootstrap/css/bootstrap.min.css">
<link rel="stylesheet" href="/css/styles.css">
</head>
<body>
<div class="container py-3">
{{> navbar}}
{{!-- 操作所请求的视图插入到这里 --}}
{{{body}}}
<footer class="footer">Page [{{path}}] - © {{year}}</footer>
</div>
</body>
</html>
|
- 第 7–8 行:样式表,由 [useStaticAssets] 提供;
- 第 12 行:插入局部模板 [navbar];
- 第 14 行:[{{{body}}}] 是 [hbs] 插入操作所请求的视图的位置。使用三重花括号:视图来自已生成的 HTML,不能被转义;
- 第 15 行:[path] and [year] 来自 [res.locals] ([main.ts] 中的中间件)。
文件 [views/partials/navbar.hbs]:
| <nav class="navbar navbar-expand bg-light rounded mb-3 px-3">
<span class="navbar-brand">My site</span>
<div class="navbar-nav">
<a class="nav-link" href="/">Home</a>
<a class="nav-link" href="/team">Team</a>
<a class="nav-link" href="/raw">Page without layout</a>
</div>
</nav>
|
文件 [views/partials/card.hbs]:
| {{!-- 一个 Bootstrap“卡片”;参数:name、role --}}
<div class="card">
<div class="card-body">
<h5 class="card-title">{{name}}</h5>
<p class="card-text">{{role}}</p>
</div>
</div>
|
[card] 局部模板显示一个姓名和一个职位。它有两种用法:
[views/home.hbs] 文件:
| <h1>Welcome</h1>
<p>This page only contains its own content: the header, the navigation
bar and the footer come from the <code>layout.hbs</code> layout.</p>
{{> card name="A partial" role="inserted with named parameters"}}
|
第 4 行:使用 命名参数:局部模板把它们作为上下文接收;
[views/team.hbs] 文件:
| <h1>{{title}}</h1>
<div class="row g-3">
{{#each members}}
<div class="col-md-4">
{{!-- 不带参数时,局部模板接收当前上下文:即该成员 --}}
{{> card}}
</div>
{{/each}}
</div>
|
第 6 行:没有参数:局部模板接收当前上下文,这里就是循环 [{{#each}}] 中的当前团队成员。
文件 [src/pages.controller.ts]:
| import { Controller, Get, Render } from '@nestjs/common';
@Controller()
export class PagesController {
@Get()
@Render('home')
home(): object {
return { title: 'Home' };
}
@Get('team')
@Render('team')
team(): object {
return {
title: 'Our team',
members: [
{ name: 'Marie Pélissier', role: 'Director' },
{ name: 'Jacques Bromard', role: 'Developer' },
{ name: 'Philippe Jandot', role: 'Graphic designer' },
],
};
}
// layout: false:视图单独渲染,不使用公共布局
@Get('raw')
@Render('raw')
raw(): object {
return { layout: false };
}
}
|
第 25–29 行:模型中的 [layout: false] 字段指示 [hbs] 不使用模板:[raw.hbs] 视图是一个完整的 HTML 页面。我们也可以指定另一个模板([layout: 'other'])。生成的页面:
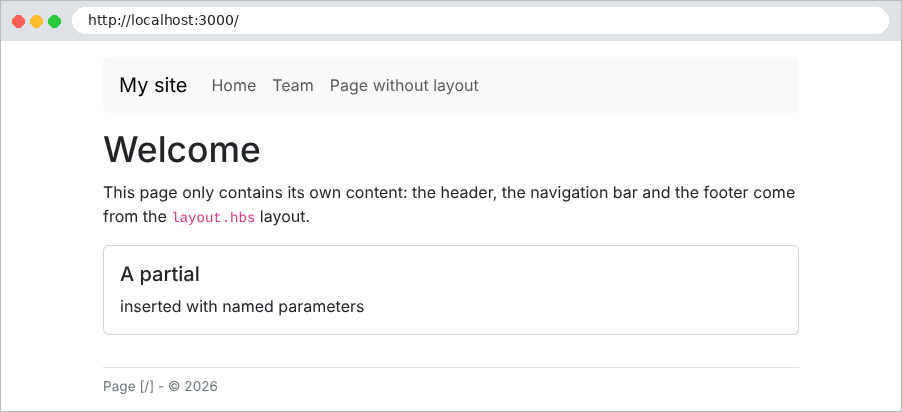
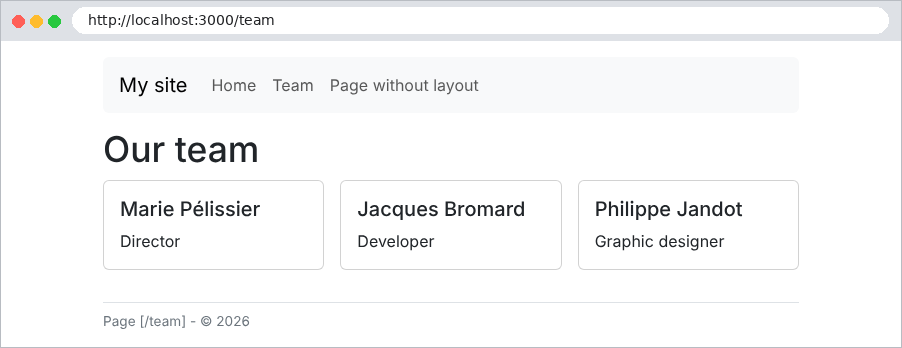

模板、局部视图和 [res.locals] 正是案例研究所使用的:一个视图([layout.hbs])、用于导航栏、消息和确认窗口的局部视图,以及准备语言和待显示消息的中间件。
4.4. 示例 16:辅助函数
辅助函数 是可以从视图中调用的 [TypeScript] 函数。它弥补了 [Handlebars] 缺乏逻辑的不足:比较两个值、格式化日期或价格、翻译文本……块 [{{#if}}] 和 [{{#each}}] 本身就是预定义的辅助函数。
[src/helpers.ts] 文件:
| import { HelperOptions } from 'handlebars';
// 'hbs' 模块没有类型声明:我们描述所用到的部分
interface Hbs {
registerHelper(name: string, fn: (...args: any[]) => unknown): void;
handlebars: { SafeString: new (html: string) => unknown; escapeExpression(text: string): string };
}
export function registerHelpers(hbs: Hbs): void {
// {{uppercase name}}:简单的辅助函数,一个参数
hbs.registerHelper('uppercase', (text: unknown) => String(text ?? '').toUpperCase());
// {{#if (eq a b)}}:作为子表达式使用,放在括号中
hbs.registerHelper('eq', (a: unknown, b: unknown) => a === b);
// {{active path '/products'}}:当前页面位于此路径之下时返回 "active"
hbs.registerHelper('active', (path: unknown, prefix: unknown) =>
typeof path === 'string' && typeof prefix === 'string' && path.startsWith(prefix) ? 'active' : '',
);
// {{money amount currency='USD'}}:辅助函数的最后一个参数始终是
// Handlebars 的 [options] 对象;options.hash 包含具名
// 参数,options.data.root 是页面的完整模型(包括 res.locals)
hbs.registerHelper('money', (amount: unknown, options: HelperOptions) => {
const currency = options.hash.currency ?? 'EUR';
const language = options.data?.root?.lang ?? 'en-US';
return new Intl.NumberFormat(language, { style: 'currency', currency: currency }).format(Number(amount));
});
// {{date when}}:按页面语言的格式显示日期
hbs.registerHelper('date', (when: unknown, options: HelperOptions) => {
const language = options.data?.root?.lang ?? 'en-US';
return new Intl.DateTimeFormat(language, { dateStyle: 'full' }).format(new Date(String(when)));
});
// {{badge stock}}:构建 HTML 的辅助函数。SafeString 告诉
// Handlebars 不要对其转义;因此由辅助函数自己
// 对插入其中的数据进行转义(escapeExpression)
hbs.registerHelper('badge', (stock: unknown) => {
const n = Number(stock);
const cssClass = n > 0 ? 'text-bg-success' : 'text-bg-danger';
const text = hbs.handlebars.escapeExpression(n > 0 ? `${n} in stock` : 'sold out');
return new hbs.handlebars.SafeString(`<span class="badge ${cssClass}">${text}</span>`);
});
}
|
我们来逐行说明这段代码:
- 第 4–7 行:[hbs] 包没有 [TypeScript] 类型声明:我们描述自己用到的那些;
- 第 11 行:[hbs.registerHelper(name, fn)] 定义一个辅助函数。在视图中,[{{uppercase name}}] 会以 [name] 的值调用该函数;
- 第 14 行:[eq] 返回一个布尔值。它被用作 子表达式,用圆括号括起来,放在另一个辅助函数中:[{{#if (eq path '/')}}];
- 第 17–19 行:[active] 在页面路径以给定前缀开头时,返回 CSS 类 [active] ;
- 第 24–28 行:辅助函数的 最后一个 参数始终是 [Handlebars] 提供的 [options] 对象。 [options.hash] 包含 命名参数 ([{{money amount currency='USD'}}]),而 [options.data.root] 包含 页面的 根模型,[res.locals] 已添加到其中。辅助函数从那里获取页面的语言,即使它是在 [{{#each}}] 内部被调用。格式化由标准对象 [Intl.NumberFormat] 完成;
- 第 31–34 行:日期采用同样的原理,使用 [Intl.DateTimeFormat];
- 第 39–44 行:一个生成 HTML 的辅助函数。默认情况下,辅助函数的输出会被转义,与任何 [{{...}}] 表达式一样。为避免这一点,它以 [SafeString] 的形式返回。这样,辅助函数就必须对插入其 HTML 的数据自行进行转义([escapeExpression])。
[src/main.ts] 文件:
| import { NestFactory } from '@nestjs/core';
import { NestExpressApplication } from '@nestjs/platform-express';
import { NextFunction, Request, Response } from 'express';
import * as hbs from 'hbs';
import { dirname, join } from 'path';
import { AppModule } from './app.module';
import { registerHelpers } from './helpers';
const ROOT = join(__dirname, '..');
async function bootstrap() {
const app = await NestFactory.create<NestExpressApplication>(AppModule);
app.useStaticAssets(join(ROOT, 'public'));
app.useStaticAssets(join(dirname(require.resolve('bootstrap/package.json')), 'dist'), { prefix: '/bootstrap/' });
app.setBaseViewsDir(join(ROOT, 'views'));
app.setViewEngine('hbs');
// 辅助函数:可在视图中调用的 TypeScript 函数
registerHelpers(hbs);
await new Promise<void>((done) => hbs.registerPartials(join(ROOT, 'views', 'partials'), () => done()));
app.use((req: Request, res: Response, next: NextFunction) => {
res.locals.path = req.path;
res.locals.lang = req.query.lang === 'fr' ? 'fr-FR' : 'en-US';
next();
});
await app.listen(3000);
console.log('Server started on http://localhost:3000');
}
bootstrap();
|
- 第 18 行:辅助函数在启动时注册;
- 第 22 行:中间件根据 URL 中的 [lang] 参数选择格式化语言(一种简便的测试方式;下一章会更好地加以说明)。
[views/partials/navbar.hbs] 文件:
| <nav class="navbar navbar-expand bg-light rounded mb-3 px-3">
<span class="navbar-brand">Helpers</span>
<div class="navbar-nav">
{{!-- 当前页面的链接获得“active”类 --}}
<a class="nav-link {{#if (eq path '/')}}active{{/if}}" href="/">Home</a>
<a class="nav-link {{active path '/products'}}" href="/products">Products</a>
</div>
</nav>
|
第 5–6 行:高亮当前页面链接的两种方式:[eq] 作为子表达式用在 [{{#if}}] 中,或使用更简洁的 [active] 辅助函数。案例研究使用 [active]。
[views/products.hbs] 文件:
| <h1>{{title}}</h1>
<table class="table table-sm w-auto">
<thead><tr><th>Product</th><th>Price</th><th>Price in dollars</th><th>Stock</th></tr></thead>
<tbody>
{{#each products}}
<tr>
<td>{{uppercase name}}</td>
<td>{{money price}}</td>
<td>{{money price currency='USD'}}</td>
<td>{{badge stock}}</td>
</tr>
{{/each}}
</tbody>
</table>
|
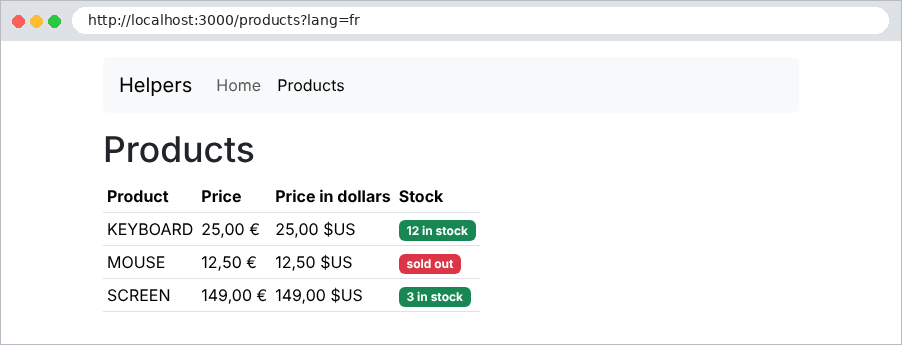
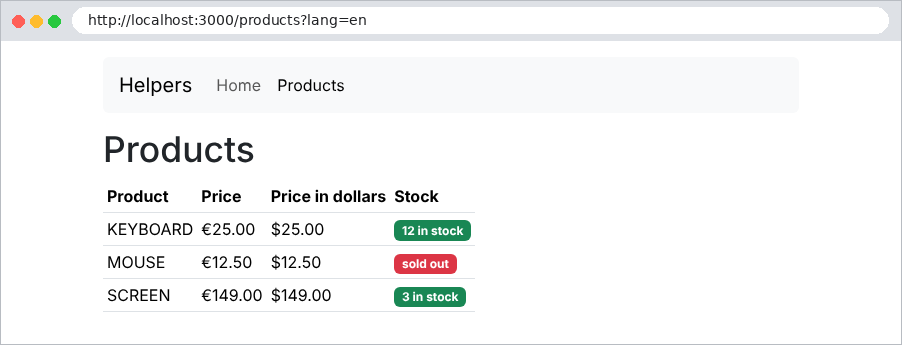
生成的页面,先是法语([?lang=fr]),然后是英语([?lang=en]):
4.5. 示例 17:GET 表单
使用 GET 方法发送的 HTML 表单会把字段放在 URL 中。这是 搜索的合适方法:它不会修改任何内容,而且生成的 URL 可以加入书签或分享。案例研究用它来选择医生和日期。
[src/books.controller.ts] 文件:
| import { Controller, Get, Query, Render } from '@nestjs/common';
interface Book {
title: string;
author: string;
genre: string;
}
const BOOKS: Book[] = [
{ title: 'Le Rouge et le Noir', author: 'Stendhal', genre: 'novel' },
{ title: 'Les Fleurs du mal', author: 'Baudelaire', genre: 'poetry' },
{ title: 'Madame Bovary', author: 'Flaubert', genre: 'novel' },
{ title: 'Alcools', author: 'Apollinaire', genre: 'poetry' },
{ title: 'Le Cid', author: 'Corneille', genre: 'drama' },
];
const GENRES = ['novel', 'poetry', 'drama'];
@Controller()
export class BooksController {
// GET /search?keyword=...&genre=...:表单及其结果
@Get(['/', 'search'])
@Render('search')
search(@Query('keyword') keyword = '', @Query('genre') genre = ''): object {
const word = keyword.trim().toLowerCase();
const results = BOOKS.filter(
(b) =>
(word === '' || b.title.toLowerCase().includes(word) || b.author.toLowerCase().includes(word)) &&
(genre === '' || b.genre === genre),
);
return { keyword, genre, genres: GENRES, results, count: results.length };
}
}
|
- 第 9–15 行:图书,保存在内存中;
- 第 21 行:一个路径数组:操作处理 [GET /] 和 [GET /search];
- 第 23 行:默认值 [TypeScript],用来替代缺失的参数(首次访问时,表单尚未提交);
- 第 24–29 行:过滤;
- 第 30 行:模型包含 已输入的值 ([keyword]、[genre]),以便表单能重新显示它们,同时还包含类别列表和结果。
文件 [views/search.hbs]:
| <h1 class="h3">Book search</h1>
{{!-- method="get":字段通过 URL 发送(?keyword=...&genre=...) --}}
<form method="get" action="/search" class="row g-2 align-items-end mb-3">
<div class="col-auto">
<label class="form-label" for="keyword">Title or author</label>
{{!-- value="{{keyword}}":字段重新显示已输入的内容 --}}
<input class="form-control" id="keyword" name="keyword" value="{{keyword}}">
</div>
<div class="col-auto">
<label class="form-label" for="genre">Genre</label>
<select class="form-select" id="genre" name="genre">
<option value="">(all)</option>
{{#each genres}}
<option value="{{this}}" {{#if (eq this ../genre)}}selected{{/if}}>{{this}}</option>
{{/each}}
</select>
</div>
<div class="col-auto">
<button class="btn btn-primary" type="submit">Search</button>
</div>
</form>
<p>{{count}} book(s) found.</p>
<ul>
{{#each results}}
<li><i>{{title}}</i>, {{author}} ({{genre}})</li>
{{/each}}
</ul>
|
- 第 3 行:[method="get"] 和 [action="/search"]:提交表单就是一个 [GET /search?keyword=...&genre=...] 请求。参数名就是每个字段的 [name] 属性;
- 第 7 行:[value] 属性重新显示输入的内容;
- 第 13–15 行:在下拉列表中,与所选类别匹配的选项会被赋予属性 [selected]。在循环中,[this] 是当前元素(一个字符串),而 [../genre] 是父模型的类别。
初次显示时,以及搜索之后:
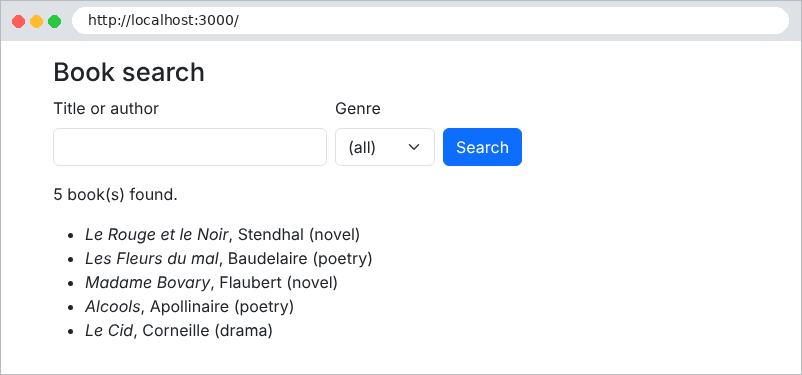
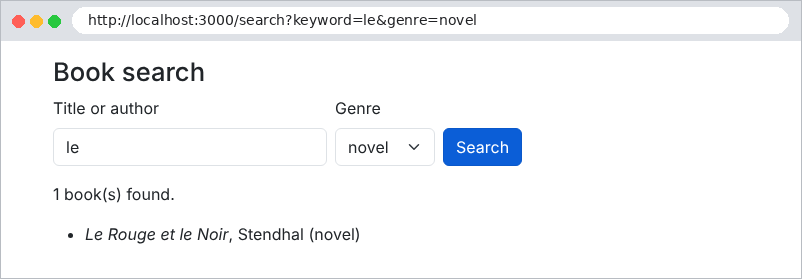
地址栏显示了发送的参数。带重音符号的字符和空格在那里被编码([%C3%A9]……):这就是 URL 编码,[NestJS] 在填充 [@Query] 之前会对其解码。
4.6. 示例 18:表单字段
示例 18 包含所有类型的 HTML 字段:文本、密码、日期、单选按钮、复选框、下拉列表、多选列表、文本框和隐藏字段。它展示了服务器如何 接收它们,以及视图如何 显示它们。
[src/lists.service.ts] 文件:
| import { Injectable } from '@nestjs/common';
// 表单提供的列表。在真实应用程序中,它们会
// 来自数据库:由于所有用户的列表都相同,我们会在启动时
// 只读取一次
@Injectable()
export class ListsService {
readonly titles = ['Mr', 'Mme', 'Melle'];
readonly countries = [
{ code: 'fr', name: 'France' },
{ code: 'be', name: 'Belgium' },
{ code: 'ch', name: 'Switzerland' },
{ code: 'ca', name: 'Canada' },
];
readonly hobbies = ['reading', 'music', 'sport', 'cinema'];
readonly languages = ['French', 'English', 'Spanish', 'German'];
}
|
表单提供的列表由一个服务提供。它们对所有用户都是相同的:只实例化一次的服务(应用作用域;参见第 6 章)是存放它们的自然位置。
文件 [src/form.controller.ts]:
| import { Body, Controller, Get, HttpCode, Post, Render } from '@nestjs/common';
import { ListsService } from './lists.service';
// 用户输入的内容,经过整理之后
interface Input {
name: string;
password: string;
comment: string;
title: string;
hobbies: string[];
country: string;
languages: string[];
birthDate: string;
token: string;
}
@Controller('form')
export class FormController {
constructor(private readonly lists: ListsService) {}
// GET:带初始值的表单
@Get()
@Render('form')
display(): object {
const initial: Input = {
name: '', password: '', comment: '', title: 'Mme', hobbies: [],
country: 'fr', languages: ['French'], birthDate: '', token: 'A7X2',
};
return this.model(initial, null);
}
// POST:接收输入的值并再次显示表单
@Post()
@HttpCode(200) // POST 默认返回 201;这里我们返回的是页面
@Render('form')
process(@Body() body: Record<string, string | string[]>): object {
const input: Input = {
name: text(body.name),
password: text(body.password),
comment: text(body.comment),
title: text(body.title),
hobbies: array(body.hobbies),
country: text(body.country),
languages: array(body.languages),
birthDate: text(body.birthDate),
token: text(body.token),
};
return this.model(input, body);
}
// 视图的模型:各个列表,每个选项根据输入被标记为
// checked / selected
private model(input: Input, received: object | null): object {
return {
input,
titles: this.lists.titles.map((t) => ({ value: t, checked: t === input.title })),
hobbies: this.lists.hobbies.map((h) => ({ value: h, checked: input.hobbies.includes(h) })),
countries: this.lists.countries.map((c) => ({ ...c, selected: c.code === input.country })),
languages: this.lists.languages.map((l) => ({ value: l, selected: input.languages.includes(l) })),
received: received ? JSON.stringify(received, null, 2) : null,
};
}
}
// 缺失的字段(未勾选的复选框等)根本不会被发送
function text(value: unknown): string {
return typeof value === 'string' ? value : '';
}
// 勾选一个值:"sport";勾选两个:["sport", "music"];都不勾选:undefined
function array(value: unknown): string[] {
if (value === undefined) return [];
return Array.isArray(value) ? value : [String(value)];
}
|
我们来逐行说明这段代码:
- 第 5–15 行:数据输入和格式化:复选框和下拉列表都是数组;
- 第 19 行:注入列表服务;
- 第 22–30 行:[GET /form] 显示带有初始值的表单;
- 第 34 行:[POST /form] 返回的是页面,而不是创建的资源:我们把 201 状态码换成 200;
- 第 37–47 行:对收到的字段重新格式化。有两种情况需要注意:缺失的字段(未选中的复选框根本不会被发送,见函数 [text],第 66–68 行),以及 多值字段,如果只有一个值,它会以字符串形式到达(函数 [array],第 71–74 行,参见示例 10);
- 第 53–62 行:视图模型。对于每个列表,操作会计算哪些选项应被选中:这样视图只需判断一个布尔值。字段 [received] 包含服务器收到的内容,用于显示。
文件 [views/form.hbs]:
| <h1 class="h3">A complete form</h1>
<form method="post" action="/form" style="max-width: 40rem">
{{!-- 隐藏字段:随表单一起发送,但不可见 --}}
<input type="hidden" name="token" value="{{input.token}}">
<div class="mb-2">
<span class="form-label me-3">Title</span>
{{#each titles}}
{{!-- 单选按钮:相同的 [name],只发送一个值 --}}
<div class="form-check form-check-inline">
<input class="form-check-input" type="radio" name="title" id="title-{{value}}"
value="{{value}}" {{#if checked}}checked{{/if}}>
<label class="form-check-label" for="title-{{value}}">{{value}}</label>
</div>
{{/each}}
</div>
<div class="row g-2 mb-2">
<div class="col">
<label class="form-label" for="name">Name</label>
<input class="form-control" type="text" id="name" name="name" value="{{input.name}}">
</div>
<div class="col">
<label class="form-label" for="password">Password</label>
{{!-- 密码绝不会在页面中回传 --}}
<input class="form-control" type="password" id="password" name="password">
</div>
<div class="col">
<label class="form-label" for="birthDate">Date of birth</label>
<input class="form-control" type="date" id="birthDate" name="birthDate" value="{{input.birthDate}}">
</div>
</div>
<div class="mb-2">
<span class="form-label me-3">Hobbies</span>
{{#each hobbies}}
{{!-- 复选框:相同的 [name],可以有多个值 --}}
<div class="form-check form-check-inline">
<input class="form-check-input" type="checkbox" name="hobbies" id="hobby-{{@index}}"
value="{{value}}" {{#if checked}}checked{{/if}}>
<label class="form-check-label" for="hobby-{{@index}}">{{value}}</label>
</div>
{{/each}}
</div>
<div class="row g-2 mb-2">
<div class="col">
<label class="form-label" for="country">Country</label>
<select class="form-select" id="country" name="country">
{{#each countries}}
<option value="{{code}}" {{#if selected}}selected{{/if}}>{{name}}</option>
{{/each}}
</select>
</div>
<div class="col">
<label class="form-label" for="languages">Spoken languages</label>
{{!-- 多选列表:可以有多个值 --}}
<select class="form-select" id="languages" name="languages" multiple size="4">
{{#each languages}}
<option value="{{value}}" {{#if selected}}selected{{/if}}>{{value}}</option>
{{/each}}
</select>
</div>
</div>
<div class="mb-2">
<label class="form-label" for="comment">Comment</label>
{{!-- 文本区域:值位于标签之间 --}}
<textarea class="form-control" id="comment" name="comment" rows="2">{{input.comment}}</textarea>
</div>
<button class="btn btn-primary" type="submit">Send</button>
</form>
{{#if received}}
<h2 class="h5 mt-3">What the server received</h2>
<pre class="bg-light p-2 border">{{received}}</pre>
{{/if}}
|
我们来逐行说明这段代码:
- 第 2 行:表单通过 POST 提交;其字段包含在请求正文中;
- 第 4 行:隐藏字段 随表单一起发送,但不显示。它用于把信息从一个页面传递到下一个页面(例如案例研究用它来保存记录的版本)。注意:用户可以修改它;
- 第 8–15 行:单选按钮 共用同一个 [name] 属性:只能选中一个,也只发送一个值。[checked] 属性用于选中该按钮;
- 第 26 行:密码 绝不 在页面中回传:该字段没有 [value] 属性;
- 第 30 行:日期字段。浏览器按用户的格式显示日期,但总是发送 [yyyy-mm-dd];
- 第 36–43 行:复选框 具有相同的 [name] 属性:每个选中的复选框都会发送它的值;因此该参数会重复出现;
- 第 49–53 行:下拉列表。所选的选项带有属性 [selected];
- 第 58–62 行:[multiple] 属性允许选择多个选项;
- 第 69 行:文本区域的值 位于 其标签之间,而不是在 [value] 属性中;
- 第 75–78 行:服务器收到的内容,显示在 [<pre>] 标签中。
初始表单,以及提交之后的表单:
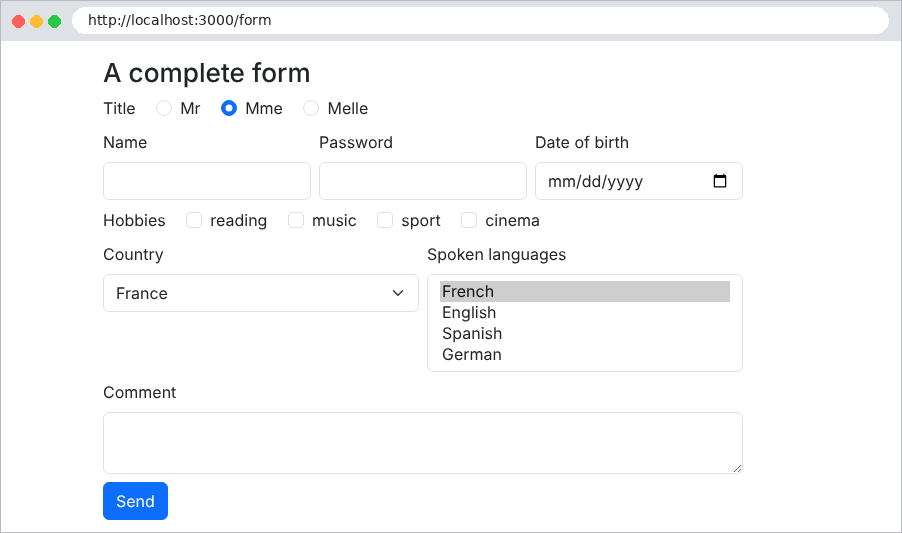
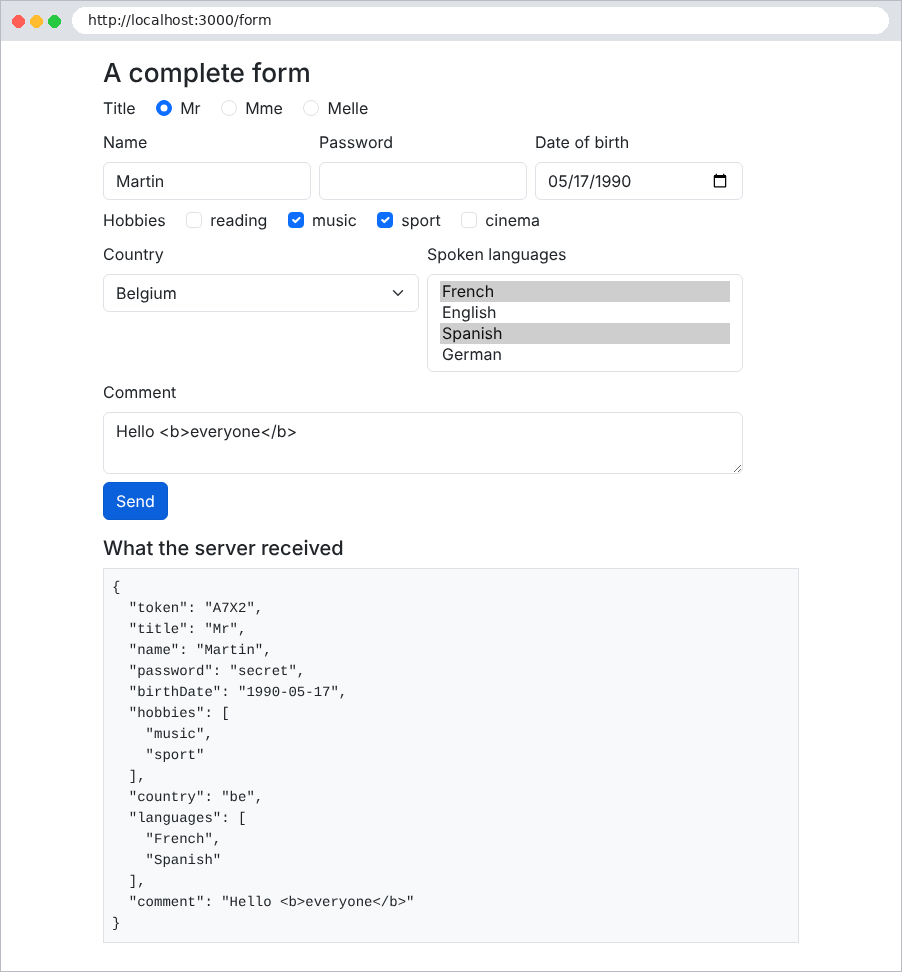
请注意,文本框把 [Hello <b>everyone</b>] 原样重新显示:得益于 [{{...}}] 的转义,输入的标签不会被解释。密码已被接收,但不会显示。使用 [curl],我们可以看到选中一个复选框时的区别:
| curl -d "token=A7X2&title=Mr&name=Martin&hobbies=sport" http://localhost:3000/form
|
| {
"token": "A7X2",
"title": "Mr",
"name": "Martin",
"hobbies": "sport"
}
|
以及选中两个复选框时:
| curl -d "token=A7X2&title=Mr&name=Martin&hobbies=sport&hobbies=music" http://localhost:3000/form
|
| {
"token": "A7X2",
"title": "Mr",
"name": "Martin",
"hobbies": [
"sport",
"music"
]
}
|
(只显示页面的 [What the server received] 部分)
4.7. 示例 19:表单验证
无效的表单必须被 重新显示,同时显示已输入的值,并在每个有错误的字段下方给出消息。示例 19 把示例 09 的技术(由操作执行验证)应用到一个注册表单上。
文件 [src/registration.dto.ts]:
| import { Transform, Type } from 'class-transformer';
import { IsEmail, IsInt, IsNotEmpty, Max, MaxLength, Min, MinLength } from 'class-validator';
// 在验证之前移除输入中多余的空格
const clean = ({ value }: { value: unknown }) => (typeof value === 'string' ? value.trim() : value);
export class RegistrationDto {
@Transform(clean)
@IsNotEmpty({ message: 'The name is required.' })
@MaxLength(20, { message: 'The name must not exceed 20 characters.' })
name: string;
@Transform(clean)
@IsEmail({}, { message: 'Invalid email address.' })
email: string;
// 来自表单的一切都是字符串:"42" -> 42
@Type(() => Number)
@IsInt({ message: 'The age must be an integer.' })
@Min(18, { message: 'You must be at least 18 years old.' })
@Max(120, { message: 'The age cannot exceed 120 years.' })
age: number;
@MinLength(6, { message: 'The password must have at least 6 characters.' })
password: string;
// "confirmation = password" 涉及两个字段:由
// 控制器负责检查
confirmation: string;
}
|
- 第 5 行:一个清理函数,由 [@Transform] 在验证 之前应用:由空格组成的姓名会被转换为空字符串,而 [@IsNotEmpty] 会拒绝它;
- 第 18–22 行:年龄先被转换为数字,然后再验证;
- 第 27–29 行:“确认密码与密码一致”这条规则涉及两个字段:装饰器看不到它,但控制器会验证它。
文件 [src/validation.ts]:
| import { ClassConstructor, plainToInstance } from 'class-transformer';
import { validate } from 'class-validator';
// 按字段列出的错误:{ name: 'The name is required.', ... }
export type Errors = Record<string, string>;
export async function validateForm<T extends object>(
cls: ClassConstructor<T>,
body: Record<string, unknown>,
): Promise<{ dto: T; errors: Errors }> {
// 1. 收到的对象 -> 类的实例(应用 @Transform / @Type)
const dto = plainToInstance(cls, body);
// 2. 检查所有约束
const violations = await validate(dto);
// 3. 保留每个无效字段的第一条消息
const errors: Errors = {};
for (const v of violations) {
errors[v.property] = Object.values(v.constraints ?? {})[0];
}
return { dto, errors };
}
|
- 第 5 行:错误按字段组织:[{ name: 'The name is required.' }],这样每条消息都可以显示在相应字段的下方;
- 第 7–10 行:该函数是 通用的:它可以验证任何表单类。它返回转换后的实例([dto])和错误;
- 第 17–19 行:一个字段可能违反多个约束;只保留第一条错误消息。
案例研究中有同样的函数([web/helpers/form.helper.ts])。
文件 [src/registration.controller.ts]:
| import { Body, Controller, Get, Post, Query, Render, Res } from '@nestjs/common';
import { Response } from 'express';
import { RegistrationDto } from './registration.dto';
import { validateForm } from './validation';
@Controller('register')
export class RegistrationController {
// ?html5=1:发送前让浏览器验证表单
@Get()
@Render('registration')
display(@Query('html5') html5?: string): object {
return { values: {}, errors: {}, html5: html5 === '1' };
}
@Post()
async register(
@Body() body: Record<string, string>,
@Query('html5') html5: string | undefined,
@Res() res: Response,
): Promise<void> {
const { dto, errors } = await validateForm(RegistrationDto, body);
// 涉及两个字段的规则
if (!errors.password && body.confirmation !== body.password) {
errors.confirmation = 'The confirmation does not match the password.';
}
if (Object.keys(errors).length > 0) {
// 再次显示表单:已输入的值(密码除外)
// 以及每个无效字段下方的消息
res.render('registration', {
values: { name: body.name, email: body.email, age: body.age },
errors,
globalError: 'The form contains errors.',
html5: html5 === '1',
});
return;
}
res.render('welcome', { name: dto.name, email: dto.email, age: dto.age });
}
}
|
- 第 9–13 行:空表单。参数 [html5] 稍后再解释;
- 第 21 行:验证每个字段;
- 第 23–25 行:然后是涉及两个字段的规则;
- 第 26–36 行:如果有错误,则重新显示表单:已输入的值(密码 除外)、按字段分组的错误,以及一条总体消息;
- 第 37 行:否则显示欢迎页面,其中的值是 经过转换的(由 [dto] 完成:年龄是数字,姓名已被清理)。
所有字段都使用同一个模板构建:由一个局部模板文件来处理。
[views/partials/field.hbs] 文件:
| {{!-- 一个输入字段;参数:name、label、type、value、error,以及
attributes = HTML5 验证属性(required、maxlength...) --}}
<div class="mb-2">
<label class="form-label" for="{{name}}">{{label}}</label>
<input class="form-control {{#if error}}is-invalid{{/if}}" id="{{name}}" name="{{name}}"
type="{{type}}" value="{{value}}" {{{attributes}}}>
{{#if error}}<div class="invalid-feedback">{{error}}</div>{{/if}}
</div>
|
- 第 5 行:[Bootstrap] [is-invalid] 类把无效字段用红色高亮显示;
- 第 6 行:HTML5 验证属性作为参数传入,并且不经转义直接插入(三重花括号):它们由开发者编写,而不是由用户输入;
- 第 7 行:错误消息,位于字段下方(类 [invalid-feedback])。
文件 [views/registration.hbs]:
| <h1 class="h3">Registration</h1>
{{#if html5}}
<p>Browser validation <b>enabled</b> - <a href="/register">disable it</a></p>
{{else}}
<p>Browser validation <b>disabled</b> - <a href="/register?html5=1">enable it</a></p>
{{/if}}
{{!-- novalidate:浏览器忽略 required、min... 等属性,并
原样发送表单;只有服务器进行验证 --}}
<form method="post" action="/register{{#if html5}}?html5=1{{/if}}" {{#unless html5}}novalidate{{/unless}}>
{{> field name="name" label="Name" type="text" value=values.name error=errors.name
attributes='required maxlength="20"'}}
{{> field name="email" label="Email address" type="email" value=values.email
error=errors.email attributes="required"}}
{{> field name="age" label="Age" type="number" value=values.age error=errors.age
attributes='required min="18" max="120"'}}
{{> field name="password" label="Password" type="password" error=errors.password
attributes='required minlength="6"'}}
{{> field name="confirmation" label="Confirmation" type="password" error=errors.confirmation
attributes="required"}}
<button class="btn btn-primary" type="submit">Register</button>
</form>
|
- 第 9 行:当 [novalidate] 属性存在时,[html5] 为 false;
- 第 10–19 行:每个字段都是对局部模板的一次调用,带有命名参数。参数可以是模型中的一个值([value=values.name])。
文件 [views/layout.hbs]:
| <!doctype html>
<html lang="en">
<head>
<meta charset="utf-8">
<title>Registration</title>
<link rel="stylesheet" href="/bootstrap/css/bootstrap.min.css">
<link rel="stylesheet" href="/css/styles.css">
</head>
<body>
<div class="container py-3" style="max-width: 36rem">
{{{body}}}
{{!-- 全局错误,位于页面底部,背景为浅粉色 --}}
{{#if globalError}}
<div class="error-area" role="alert">{{globalError}}</div>
{{/if}}
</div>
</body>
</html>
|
第 13–15 行:全局消息显示在页面 底部 ,背景为浅粉色([error-area] 类,位于 [public/css/styles.css] 中),与案例研究相同。
我们提交一个有多处错误的表单:
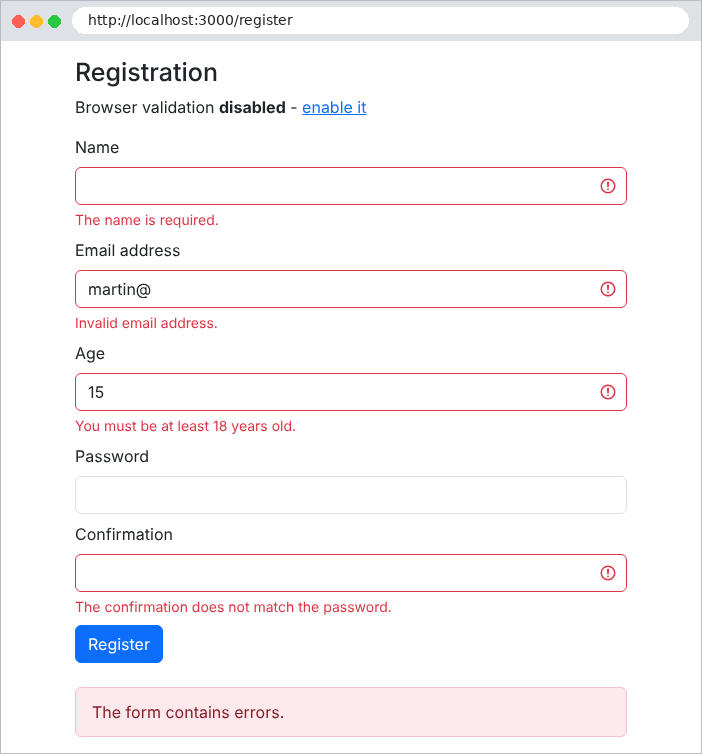
然后是填写正确的表单:
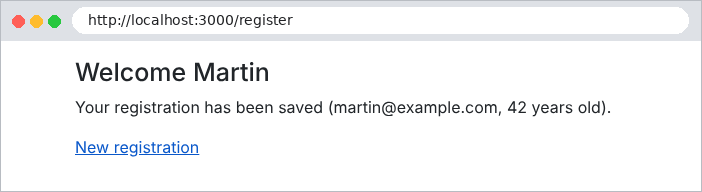
4.7.1. 浏览器验证
属性 [required]、[maxlength]、[min]、[max]、[type="email"]……指示浏览器在提交表单之前先进行验证:用户会立即通过提示框得到通知,而无需与服务器进行任何往返通信。这正是“启用它”链接([/register?html5=1])所触发的行为,它会从表单中移除 [novalidate] 属性。
这种验证只是一种 便利,而不是安全措施:只需用浏览器的开发者工具删除 [required] 属性,或者用 [curl] 发送请求,就可以绕过它。服务器端验证仍然 必不可少。这就是为什么该示例默认禁用浏览器验证:以便演示服务器的工作方式。不过,案例研究两者兼用:HTML5 属性用于方便用户,服务器端验证用于保证安全。
4.8. 示例 20:Post/Redirect/Get 模式
当 POST 表单提交成功时,操作可以直接显示一个页面。问题出在用户随后刷新该页面(F5 键)时:浏览器会 重新提交表单,操作就被执行了第二次(订单被提交两次、预约被创建两次……)。Post / Redirect / Get 模式(PRG)可以避免这个问题:成功的 POST 操作不生成页面,而是 重定向 到一个 GET 页面。重新加载该页面只会发送 GET 请求,不会产生任何影响。
还剩一个细节:GET 页面必须显示一条消息(“任务已添加”),而这条消息是由 POST 操作在 另一个请求中生成的。它通过一个短期 Cookie 传递,由下一个请求读取并删除:这就是 闪现消息。
[src/flash.ts] 文件:
| import { NextFunction, Request, Response } from 'express';
const FLASH_COOKIE = 'flash';
// 保存一条消息,由下一个页面显示,且只显示一次
export function flash(res: Response, message: string): void {
res.cookie(FLASH_COOKIE, message, { httpOnly: true, sameSite: 'lax', maxAge: 60_000 });
}
// 每次请求时:待显示的消息从 Cookie 移到 res.locals(也就是
// 移到视图的模型中),并清除该 Cookie
export function flashMiddleware(req: Request, res: Response, next: NextFunction): void {
res.locals.flash = req.cookies?.[FLASH_COOKIE] ?? null;
if (res.locals.flash) {
res.clearCookie(FLASH_COOKIE);
}
next();
}
|
- 第 6–8 行:[res.cookie(name, value, options)] 设置一个 Cookie:浏览器会在随后的每个请求中把它发回。选项:[httpOnly] (页面中的 [JavaScript] 无法读取它)、[sameSite: 'lax'] (来自其他站点的 POST 请求不会发送它)、[maxAge] (生存期:一分钟,足以完成重定向);
- 第 12–18 行:在每个请求之前执行的中间件:如有消息,则将其从 Cookie 传入 [res.locals],进而传入视图模型,并清除该 Cookie([res.clearCookie]):消息只会显示一次。
文件 [src/main.ts]:
| import { NestFactory } from '@nestjs/core';
import { NestExpressApplication } from '@nestjs/platform-express';
import * as cookieParser from 'cookie-parser';
import { dirname, join } from 'path';
import { AppModule } from './app.module';
import { flashMiddleware } from './flash';
const ROOT = join(__dirname, '..');
async function bootstrap() {
const app = await NestFactory.create<NestExpressApplication>(AppModule);
app.useStaticAssets(join(ROOT, 'public'));
app.useStaticAssets(join(dirname(require.resolve('bootstrap/package.json')), 'dist'), { prefix: '/bootstrap/' });
app.setBaseViewsDir(join(ROOT, 'views'));
app.setViewEngine('hbs');
// cookie-parser 用浏览器发送的 Cookie 填充 req.cookies
app.use(cookieParser());
// 然后由我们的中间件读取(并清除)待显示的 flash 消息
app.use(flashMiddleware);
await app.listen(3000);
console.log('Server started on http://localhost:3000');
}
bootstrap();
|
- 第 17 行:[cookie-parser] 中间件解码请求中的 [Cookie] 头,并填充 [req.cookies] 对象;
- 第 19 行:我们自己的中间件需要 [req.cookies],因此在它之后注册:中间件按注册的顺序运行。
文件 [src/tasks.controller.ts]:
| import { Body, Controller, Get, Post, Res } from '@nestjs/common';
import { Response } from 'express';
import { flash } from './flash';
import { TasksService } from './tasks.service';
@Controller('tasks')
export class TasksController {
constructor(private readonly tasks: TasksService) {}
// GET /tasks:列表和添加表单
@Get()
display(@Res() res: Response): void {
res.render('tasks', { tasks: this.tasks.list() });
}
// POST /tasks:Post / Redirect / Get 模式
@Post()
add(@Body('label') label: string | undefined, @Res() res: Response): void {
const text = (label ?? '').trim();
if (text === '' || text.length > 40) {
// 输入无效:再次显示页面,不进行重定向
res.render('tasks', {
tasks: this.tasks.list(),
label,
error: 'The label must have 1 to 40 characters.',
});
return;
}
this.tasks.add(text);
flash(res, `The task [${text}] has been added.`);
// 没有页面:重定向到 GET 页面
res.redirect('/tasks');
}
// POST /tasks/without-prg:反例(以页面响应 POST 请求)
@Post('without-prg')
addWithoutPrg(@Body('label') label: string | undefined, @Res() res: Response): void {
this.tasks.add((label ?? '').trim() || '(untitled)');
res.render('tasks', { tasks: this.tasks.list(), withoutPrg: true });
}
}
|
- 第 11–14 行:列表页面;
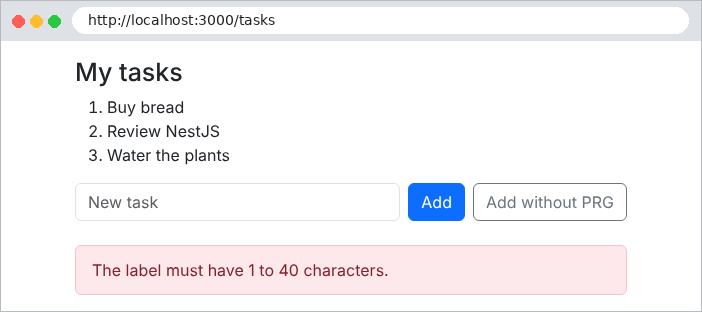
- 第 20–27 行:无效的输入:页面被 重新显示 (不重定向:必须保留输入内容和错误消息);
- 第 29–32 行:有效的输入:执行操作,设置闪现消息,然后做 302 重定向 到 GET 页面;
- 第 36–40 行:反面示例,用于对比。
文件 [views/tasks.hbs]:
| <h1 class="h3">My tasks</h1>
<ol>
{{#each tasks}}<li>{{this}}</li>{{/each}}
</ol>
<form method="post" action="/tasks" class="d-flex gap-2">
<input class="form-control" name="label" value="{{label}}" placeholder="New task">
<button class="btn btn-primary text-nowrap" type="submit">Add</button>
{{!-- formaction:此按钮将同一个表单发送到另一个地址 --}}
<button class="btn btn-outline-secondary text-nowrap" type="submit" formaction="/tasks/without-prg">Add without PRG</button>
</form>
{{#if withoutPrg}}
<p class="text-danger mt-2">Page displayed in response to a POST: press F5 and the task will be added a second time.</p>
{{/if}}
|
第 9 行:按钮的 [formaction] 属性会把表单提交到与表单的 不同的地址,即不同于 [action] 属性所指定的地址。这样表单就有了两个按钮,触发两个不同的操作。案例研究在其登录页面中使用了这种方法。
文件 [views/layout.hbs]:
| <!doctype html>
<html lang="en">
<head>
<meta charset="utf-8">
<title>Tasks</title>
<link rel="stylesheet" href="/bootstrap/css/bootstrap.min.css">
<link rel="stylesheet" href="/css/styles.css">
</head>
<body>
<div class="container py-3" style="max-width: 36rem">
{{!-- 闪现消息,位于页面顶部 --}}
{{#if flash}}
<div class="alert alert-success" role="status">{{flash}}</div>
{{/if}}
{{{body}}}
{{#if error}}
<div class="error-area" role="alert">{{error}}</div>
{{/if}}
</div>
</body>
</html>
|
闪现消息显示在页面顶部(第 12–14 行),错误消息显示在底部(第 16–18 行)。
下面是表单提交成功时 [curl] 看到的内容。[-c file] 选项保存收到的 Cookie,而 [-b file] 把它们发回:
| curl -i -c cookies.txt -b cookies.txt -d "label=Review NestJS" http://localhost:3000/tasks
|
| HTTP/1.1 302 Found
Set-Cookie: flash=The%20task%20%5BReview%20NestJS%5D%20has%20been%20added.; Max-Age=60; Path=/; Expires=Wed, 23 Sep 2026 14:24:23 GMT; HttpOnly; SameSite=Lax
Location: /tasks
Content-Type: text/plain; charset=utf-8
Content-Length: 28
Found. Redirecting to /tasks
|
响应是一个重定向,带有 Cookie [flash] (其内容已编码)。随后的请求会发送该 Cookie;响应会删除它(过期日期设在过去):
| curl -i -c cookies.txt -b cookies.txt http://localhost:3000/tasks
|
| HTTP/1.1 200 OK
Set-Cookie: flash=; Path=/; Expires=Thu, 01 Jan 1970 00:00:00 GMT
Content-Type: text/html; charset=utf-8
<!doctype html>
<html lang="en">
<head>
<meta charset="utf-8">
<title>Tasks</title>
<link rel="stylesheet" href="/bootstrap/css/bootstrap.min.css">
<link rel="stylesheet" href="/css/styles.css">
</head>
<body>
...
|
在浏览器中,添加任务之后:
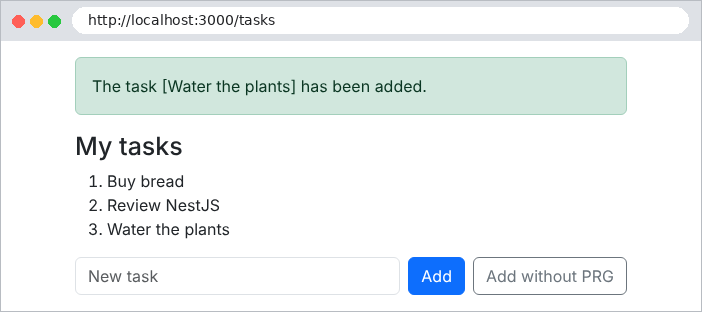
地址栏显示 [/tasks]:这就是 GET 页面。你可以放心地重新加载它;消息会消失。空输入:
以及反面示例:
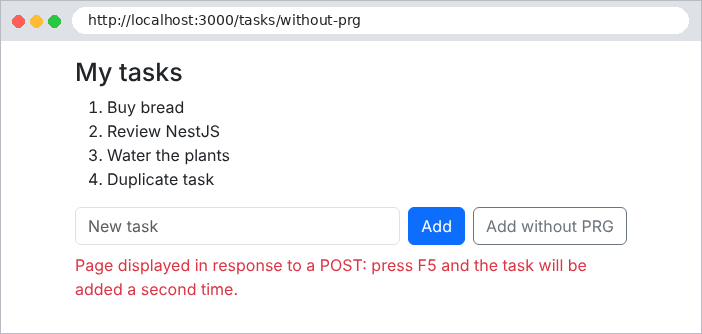
在这里,重新加载页面会触发浏览器警告(“确认重新提交表单”),然后第二次添加该任务。案例研究中的所有 POST 表单都遵循 PRG 模式。
4.9. 示例 21:链接、按钮与确认
一条简单的规则指导我们在链接和按钮之间做出选择:
- 链接 ([<a href>])会生成一个 GET 请求。GET 请求绝不能 修改任何内容:浏览器、搜索引擎和杀毒软件可能会自行跟随链接,以预加载或分析页面;
- 修改数据的操作(添加、编辑、删除、注销)是 POST 表单中的 按钮 。
示例 21 管理一个联系人列表:通过链接查看联系人,通过按钮删除它,按钮会打开一个 确认窗口。
文件 [src/contacts.controller.ts]:
| import { Body, Controller, Get, Param, ParseIntPipe, Post, Render, Res } from '@nestjs/common';
import { Response } from 'express';
import { flash } from './flash';
import { ContactsService } from './contacts.service';
@Controller('contacts')
export class ContactsController {
constructor(private readonly contacts: ContactsService) {}
// 链接(<a href>):GET 请求,不修改任何内容
@Get()
@Render('list')
list(): object {
return { contacts: this.contacts.list() };
}
@Get(':id')
@Render('details')
details(@Param('id', ParseIntPipe) id: number): object {
return { contact: this.contacts.read(id) };
}
// POST 表单中的按钮:修改数据的请求
@Post(':id')
save(
@Param('id', ParseIntPipe) id: number,
@Body() body: { name: string; phone: string },
@Res() res: Response,
): void {
const contact = this.contacts.edit(id, body.name, body.phone);
flash(res, `The contact [${contact.name}] has been modified.`);
res.redirect('/contacts');
}
// 同一个表单,另一个按钮(formaction 属性):另一个动作
@Post(':id/duplicate')
duplicate(
@Param('id', ParseIntPipe) id: number,
@Body() body: { name: string; phone: string },
@Res() res: Response,
): void {
const copy = this.contacts.add(`${body.name} (copy)`, body.phone);
flash(res, `The contact [${copy.name}] has been created.`);
res.redirect('/contacts');
}
@Post(':id/delete')
delete(@Param('id', ParseIntPipe) id: number, @Res() res: Response): void {
const contact = this.contacts.delete(id);
flash(res, `The contact [${contact.name}] has been deleted.`);
res.redirect('/contacts');
}
}
|
- 第 11–15 行和第 17–21 行:两个页面——列表页和联系人详情页。[ParseIntPipe] 转换 ID;不存在的联系人会导致 404 错误(见服务);
- 第 24–29 行:保存记录,使用 PRG;
- 第 36–41 行:复制,由同一表单上的第二个按钮触发(属性 [formaction]);
- 第 47–52 行:删除,通过 POST。
文件 [views/list.hbs]:
| <h1 class="h3">Contacts</h1>
<table class="table align-middle">
<tbody>
{{#each contacts}}
<tr>
<td>{{name}}</td>
<td>{{phone}}</td>
<td class="text-end">
{{!-- view:一个普通链接 --}}
<a class="btn btn-sm btn-outline-primary" href="/contacts/{{id}}">View</a>
{{!-- delete:一个 POST 表单,提交前需要确认 --}}
<form method="post" action="/contacts/{{id}}/delete" class="d-inline"
data-confirmation="Delete the contact {{name}}?">
<button class="btn btn-sm btn-outline-danger" type="submit">Delete</button>
</form>
</td>
</tr>
{{/each}}
</tbody>
</table>
|
- 第 10 行:view:一个链接,由 [Bootstrap] 显示为按钮;
- 第 12–15 行:delete:一个小型表单(POST),缩减为只有按钮。[data-confirmation] 属性包含提交前要询问的问题。[data-*] 属性是可选的:HTML 会忽略它们,而页面上的 [JavaScript] 可以读取它们。
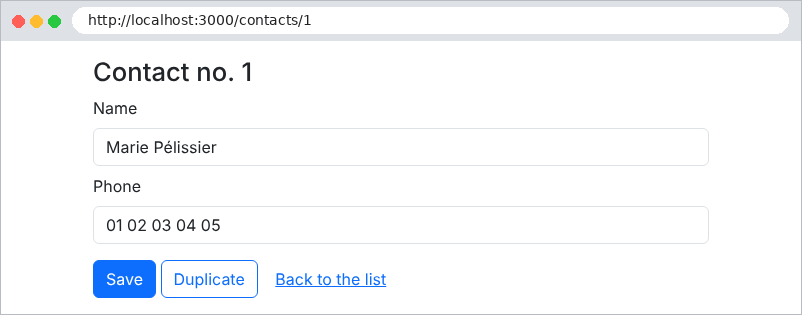
[views/details.hbs] 文件:
| <h1 class="h3">Contact no. {{contact.id}}</h1>
<form method="post" action="/contacts/{{contact.id}}">
<div class="mb-2">
<label class="form-label" for="name">Name</label>
<input class="form-control" id="name" name="name" value="{{contact.name}}">
</div>
<div class="mb-3">
<label class="form-label" for="phone">Phone</label>
<input class="form-control" id="phone" name="phone" value="{{contact.phone}}">
</div>
{{!-- 同一个表单有两个提交按钮 --}}
<button class="btn btn-primary" type="submit">Save</button>
<button class="btn btn-outline-primary" type="submit" formaction="/contacts/{{contact.id}}/duplicate">Duplicate</button>
<a class="btn btn-link" href="/contacts">Back to the list</a>
</form>
|
第 13 行:同一个表单有两个提交按钮。
4.9.1. 确认窗口
浏览器的对话框([window.confirm])无法设置样式或翻译:其按钮保持浏览器的语言。它被一个写入页面、并在需要之前保持隐藏的 [Bootstrap] 窗口取代:
[views/partials/confirmation.hbs] 文件:
| {{!-- 整个页面只有一个窗口,起初是隐藏的(d-none) --}}
<div id="confirmation-modal" class="d-none">
<div class="modal-backdrop fade show"></div>
<div class="modal fade show d-block" tabindex="-1" role="alertdialog" aria-modal="true">
<div class="modal-dialog modal-dialog-centered">
<div class="modal-content">
<div class="modal-header">
<h5 class="modal-title">Confirmation</h5>
</div>
<div class="modal-body">
<p class="mb-0" id="confirmation-modal-message"></p>
</div>
<div class="modal-footer">
<button type="button" class="btn btn-secondary" data-action="no">No, go back</button>
<button type="button" class="btn btn-danger" data-action="yes">Yes, confirm</button>
</div>
</div>
</div>
</div>
</div>
|
- 第 2 行:[d-none] 类隐藏该窗口;
- 第 3 行:灰色背景;
- 第 11 行:问题的位置;
- 第 14–15 行:两个按钮,由 [data-action] 属性标识。
一点 [JavaScript] 代码把表单与窗口连接起来:
[public/js/app.js] 文件:
| // 对带有 data-confirmation="..." 属性的表单进行确认
// 没有 JavaScript 时,这些表单会直接发送,不进行确认。
(() => {
const modal = document.getElementById('confirmation-modal');
const message = document.getElementById('confirmation-modal-message');
let pending = null; // 用户确认后要发送的表单
// 1. 拦截需要确认的表单的提交
document.querySelectorAll('form[data-confirmation]').forEach((form) => {
form.addEventListener('submit', (event) => {
event.preventDefault(); // 提交被挂起
pending = form;
message.textContent = form.dataset.confirmation;
modal.classList.remove('d-none'); // 窗口出现
});
});
// 2. 窗口的两个按钮
modal.addEventListener('click', (event) => {
const action = event.target.dataset.action;
if (action === 'yes') {
pending.submit(); // 提交,不会再次触发 'submit' 事件
} else if (action === 'no') {
modal.classList.add('d-none');
pending = null;
}
});
})();
|
- 第 3 行:代码被包裹在一个立即执行的函数中,以避免创建全局变量;
- 第 9–16 行:拦截每个带有属性 [data-confirmation] 的表单的提交。[preventDefault()] 会暂停提交;表单被保存下来,问题被放入窗口中(使用 [textContent],而不是 [innerHTML]:问题以文本形式显示,绝不会被解释为 HTML),然后显示窗口;
- 第 19–27 行:“是”会提交已缓存的表单。表单的 [submit()] 方法提交表单时 不会触发 [submit] 事件:因此不会再出现新的确认提示。“否”则隐藏窗口。
如果禁用了 [JavaScript] ,表单会直接提交而不经确认:应用仍然可以工作。这就是 渐进增强的原则:[JavaScript] 带来便利,但并非必不可少。案例研究遵循这一原则(它的 [public/js/app.js] 脚本增加了键盘处理:Esc 键、焦点)。生成的页面:
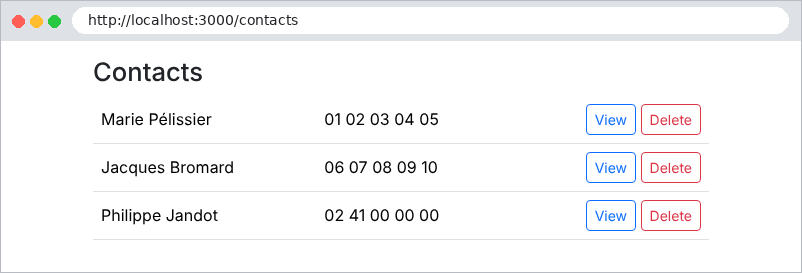
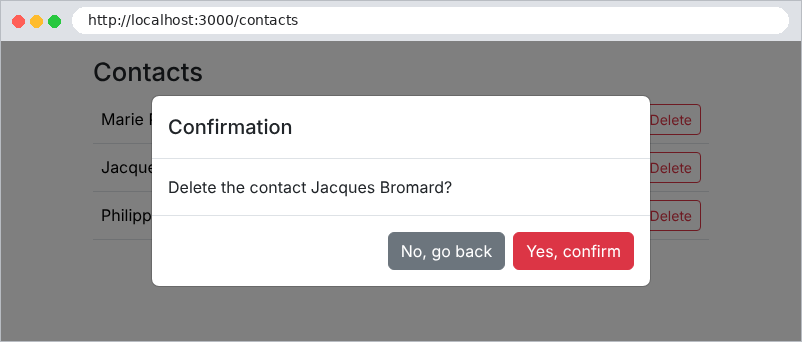
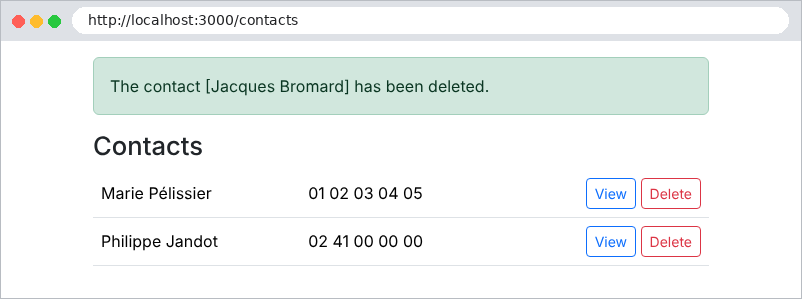
最后,我们验证删除操作无法通过 GET 请求触发:
| curl -i http://localhost:3000/contacts/3/delete
|
| HTTP/1.1 404 Not Found
Content-Type: application/json; charset=utf-8
Content-Length: 80
{"message":"Cannot GET /contacts/3/delete","error":"Not Found","statusCode":404}
|
| curl -i -X POST http://localhost:3000/contacts/3/delete
|
| HTTP/1.1 302 Found
Set-Cookie: flash=The%20contact%20%5BPhilippe%20Jandot%5D%20has%20been%20deleted.; Max-Age=60; Path=/; Expires=Wed, 23 Sep 2026 14:24:35 GMT; HttpOnly; SameSite=Lax
Location: /contacts
Content-Type: text/plain; charset=utf-8
Content-Length: 31
Found. Redirecting to /contacts
|