5. [课程]:Spring 框架入门
关键词:多层架构、Spring、依赖注入。
Spring 最初于 2004 年作为对象容器问世。此后,它已演变出多个分支:Spring MVC、Spring Data、Spring Batch 等 [http://spring.io]。在本章中,我们将仅关注对象容器。以下是几个要点:
- 一个应用程序包含多个类,其中部分类共享必须唯一存在的对象(单例)。Spring 负责创建和管理这些单例;
- Spring 将这些单例放置在一个称为“上下文”的结构中;
- 类通过名称、类型或两者结合向 Spring 请求,从而访问应用程序的单例;
- Spring 会创建单例并管理它们可能涉及的任何依赖关系:一个单例确实可能持有对一个或多个其他单例的引用。当 Spring 创建一个单例时,它也会同时创建其依赖项;
- 当基于 Spring 的应用程序启动时,它可请求 Spring 创建所有应用程序的单例。这些单例随后将在 Spring 上下文中可用;
- Spring 简化了分层架构和基于接口的编程。在简单情况下,每个层都作为单例实现,并实现一个接口。如果应用程序使用的是层接口而非其实现类,则会形成一种可扩展的架构,这使得您可以更改一个层的实现而不影响其他层,这得益于以下两个特性:
- 应用程序通过层名称获取该层的引用。Spring 向其提供的是实现该层的类的引用;
- 应用程序将此引用视为该层的接口引用,而非类引用;
单例可以通过三种方式声明,这些方式可以组合使用:
- 在 XML 文件中,
- 在特殊的配置类中;
- 通过注解在任意类中声明;
下面,我们给出三个配置示例:
- [示例-01]:在单个 XML 文件中进行集中配置;
- [示例-02]:在单个 Java 类中进行集中配置;
- [示例-03]:配置分散在多个 Java 类中;
最后一个示例 [example-04] 重点介绍了分层架构的 Spring 配置。这是最重要的示例,本文档中将始终使用该示例来配置各种架构。
这四个示例为后续内容奠定了基础:
- Spring 配置与依赖注入;
- 使用 Maven 管理项目的依赖关系;
- 使用 JUnit 测试项目;
5.1. 支持
 |  |
[support / chap-05] 文件夹中包含本章的 Eclipse 项目。
5.2. 示例-01
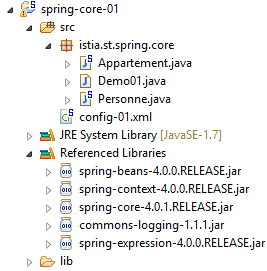
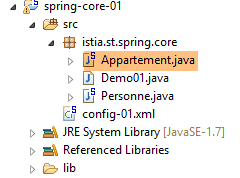
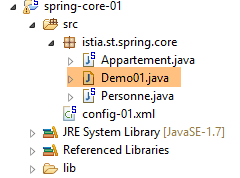
5.2.1. Eclipse 项目
 |
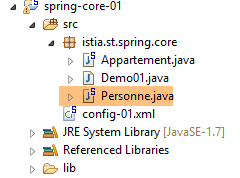
5.2.2. [Person] 类
 |
package istia.st.spring.core;

public class Personne {

    // fields
    private String nom;
    private String prenom;
    private int age;

    // manufacturers
    public Personne() {

    }

    public Personne(String nom, String prénom, int âge) {
        this.nom = nom;
        this.prenom = prénom;
        this.age = âge;
    }

    // toString
    public String toString() {
        return String.format("Personne[%s, %s,%d]", prenom, nom, age);
    }

    // getters and setters

    public String getNom() {
        return nom;
    }

    public void setNom(String nom) {
        this.nom = nom;
    }

    public String getPrenom() {
        return prenom;
    }

    public void setPrenom(String prenom) {
        this.prenom = prenom;
    }

    public int getAge() {
        return age;
    }

    public void setAge(int age) {
        this.age = age;
    }

}
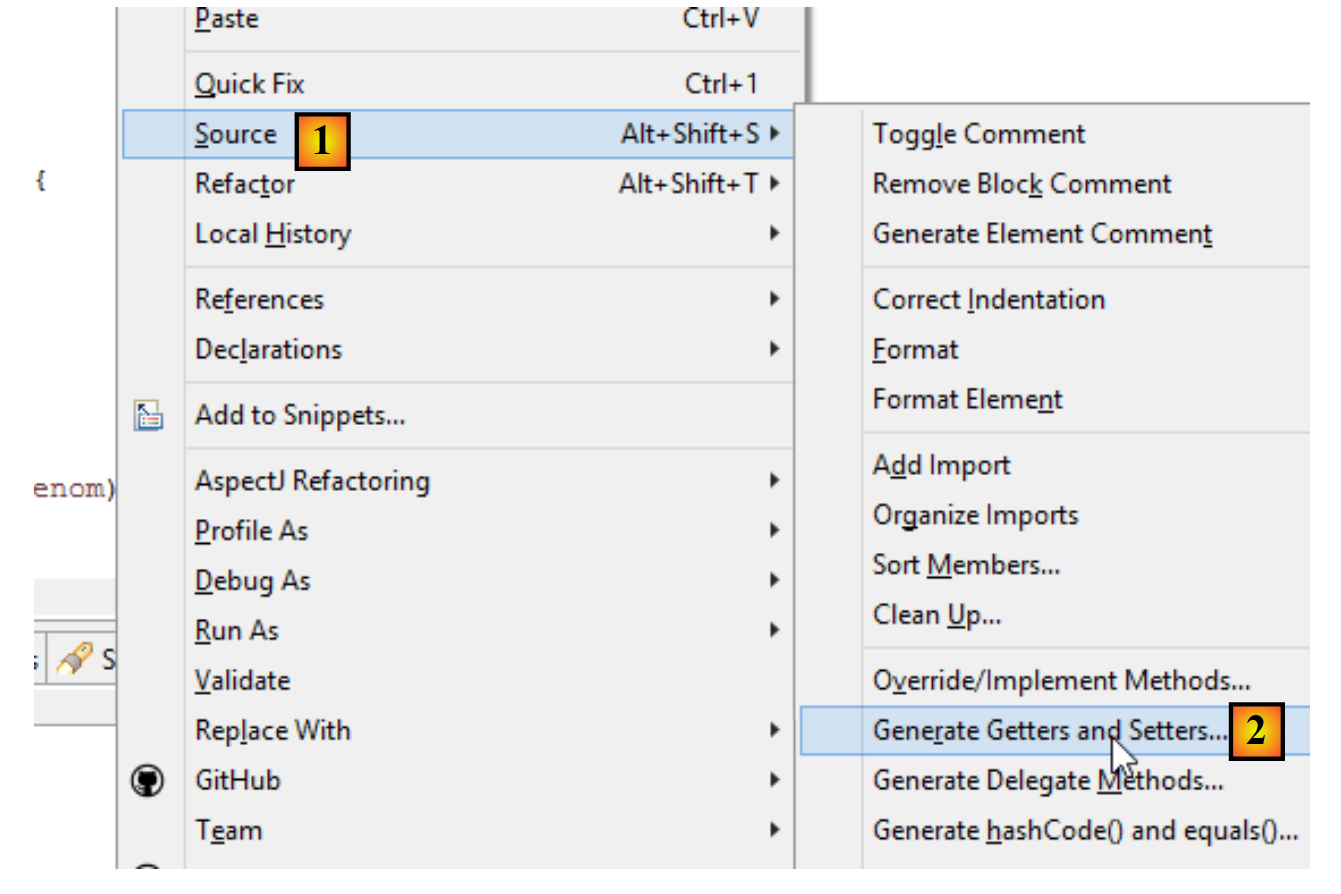
注:getter 和 setter 可以按以下方式自动生成 [1-2]:
 |
5.2.3. [Apartment] 类
 |
package istia.st.spring.core;

public class Appartement {

    // fields
    private Personne proprietaire;
    private int surface;

    // getters and setters

    public Personne getProprietaire() {
        return proprietaire;
    }

    public void setProprietaire(Personne proprietaire) {
        this.proprietaire = proprietaire;
    }

    public int getSurface() {
        return surface;
    }

    public void setSurface(int surface) {
        this.surface = surface;
    }

    // toString
    public String toString() {
        return String.format("Appartement[%s, %s]", proprietaire, surface);
    }

}
注意:该类没有显式构造函数。在这种情况下,始终存在一个无参的默认构造函数(该构造函数不执行任何操作)。当您创建构造函数时,该默认构造函数将不再隐式存在。此时,您必须显式定义它:
5.2.4. Spring 配置文件
 |
<?xml version="1.0" encoding="UTF-8"?>
<beans xmlns="http://www.springframework.org/schema/beans" xmlns:xsi="http://www.w3.org/2001/XMLSchema-instance" xmlns:util="http://www.springframework.org/schema/util"
    xsi:schemaLocation="http://www.springframework.org/schema/beans http://www.springframework.org/schema/beans/spring-beans-4.0.xsd
        http://www.springframework.org/schema/util http://www.springframework.org/schema/util/spring-util-4.0.xsd">
    <!-- Person 01 -->
    <bean id="personne_01" class="istia.st.spring.core.Personne">
        <constructor-arg index="0" value="dubois" />
        <constructor-arg index="1" value="paul" />
        <constructor-arg index="2" value="34" />
    </bean>
    <!-- Person 02 -->
    <bean id="personne_02" class="istia.st.spring.core.Personne">
        <property name="nom" value="martin" />
        <property name="prenom" value="micheline" />
        <property name="age" value="18" />
    </bean>
    <!-- a list of people -->
    <util:list id="club">
        <ref bean="personne_01" />
        <ref bean="personne_02" />
    </util:list>
    <!-- an apartment -->
    <bean id="appartement" class="istia.st.spring.core.Appartement">
        <property name="surface" value="100" />
        <property name="proprietaire" ref="personne_01" />
    </bean>
</beans>
- 第 2 行、第 27 行:单例在 <beans> 标签内定义;
- 第 6–10 行:每个单例由一个 <bean> 标签定义;
- 第 6 行:[id] 是单例的标识符。[class] 是要实例化的类的全名;
- 第 7–9 行:传递给 [Person] 类构造函数的三个参数;
- 第 12–16 行:首先使用默认构造函数 [new Person()] 创建 [Person] 类。然后,对于每个 [property] 标签,都会调用该类的 setter 方法。例如,在第 13 行,将执行 [setName("martin")] 方法。因此,必须存在 [setName] 方法。这一点非常重要,请务必记住;
- 第 18–21 行:使用 <util:list> 标签定义了一个作为列表的单例;
- 第 19 行:引用了第 6 行定义的单例 [person_01]。这就是所谓的依赖注入。可以使用两个属性来初始化单例的字段:
- [value]:用于将基本类型值(字符串、数字、日期等)赋值给字段,
- [ref]:将 Spring 对象的引用赋值给该字段;
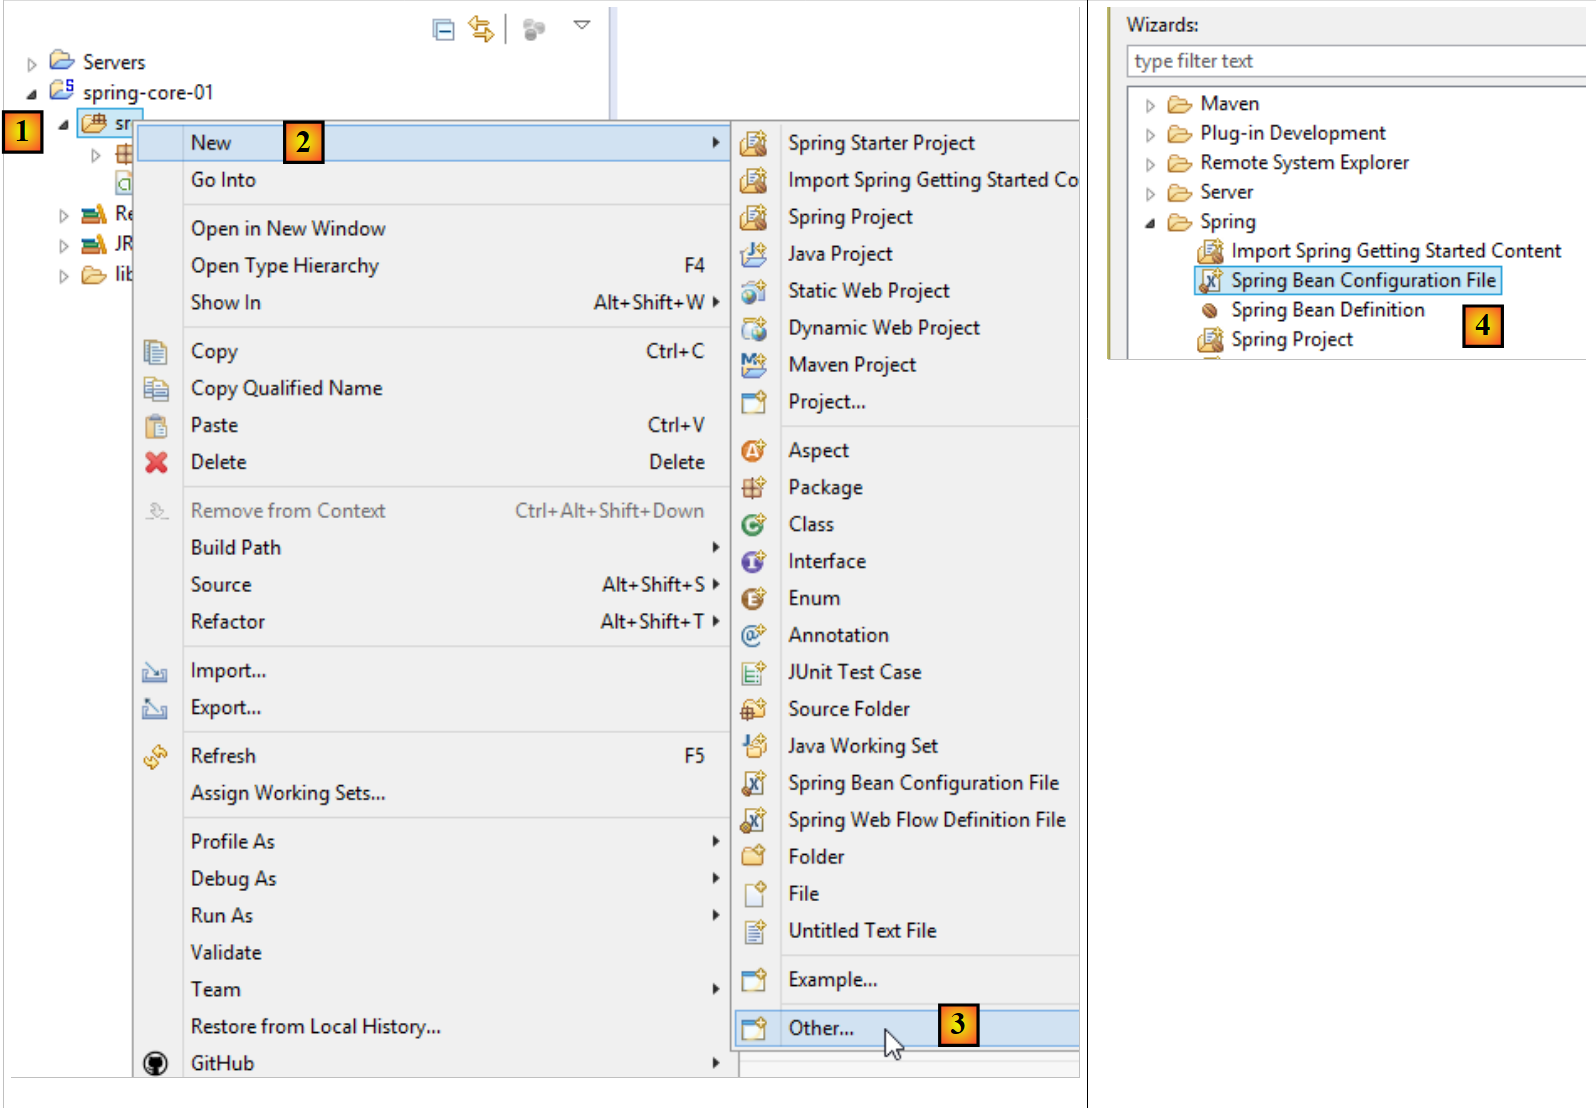
注:Spring 配置文件可按以下方式生成 [1-4]:
 |
5.2.5. 可执行类
 |
package istia.st.spring.core;

import java.util.ArrayList;
import java.util.List;

import org.springframework.context.ApplicationContext;
import org.springframework.context.support.ClassPathXmlApplicationContext;

public class Demo01 {

    @SuppressWarnings({ "unchecked", "resource" })
    public static void main(String[] args) {
        // spring context retrieval
        ApplicationContext ctx = new ClassPathXmlApplicationContext("config-01.xml");
        // beans are recovered
        Personne p01 = ctx.getBean("personne_01", Personne.class);
        Personne p02 = ctx.getBean("personne_02", Personne.class);
        List<Personne> club = ctx.getBean("club", new ArrayList<Personne>().getClass());
        Appartement appart01 = ctx.getBean(Appartement.class);
        // we display them
        System.out.println("personnes--------");
        System.out.println(p01);
        System.out.println(p02);
        System.out.println("club--------");
        for (Personne p : club) {
            System.out.println(p);
        }
        System.out.println("appartement--------");
        System.out.println(appart01);
        // recovered beans are singletons
        // they can be requested several times, but the same bean is always retrieved
        Personne p01b = ctx.getBean("personne_01", Personne.class);
        System.out.println(String.format("beans [p01,p01b] identiques ? %s", p01b == p01));
    }
}
- 第 14 行:创建 Spring 上下文。随后,[config-01.xml] 文件中定义的所有单例都会被实例化;
- 第 16 行:请求一个由 [person_01] 标识的、类型为 [Person] 的单例引用。该第二个参数是可选的,但如果省略,则返回一个类型为 [Object] 的引用,随后必须将其强制转换为类型 [Person];
- 第 19 行:我们不使用 Bean 的名称,仅使用其类型,因为 [Apartment] 类型的单例只有一个;
- 第 18 行:同时使用了目标单例的标识符和类型。由于 [new ArrayList<Person>().getClass()] 类型的单例仅有一个,因此标识符是多余的;
- 第 32–33 行:表明如果多次请求同一个单例,我们总是得到相同的引用,从而证明我们确实在处理一个单例。这一点很重要,必须理解;
注:可按以下方式生成可执行类 [1-6]:
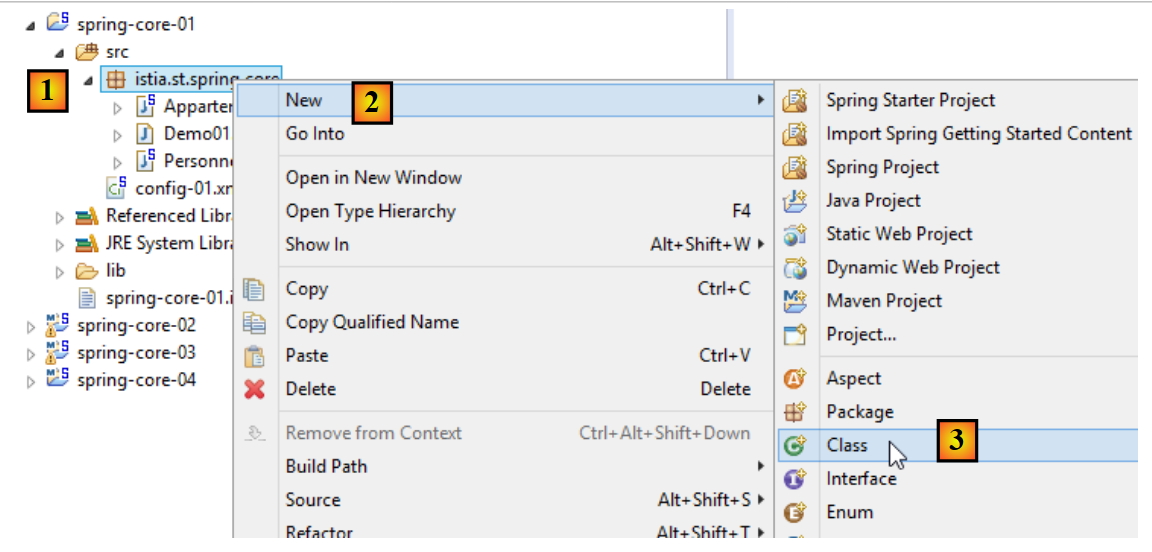 |
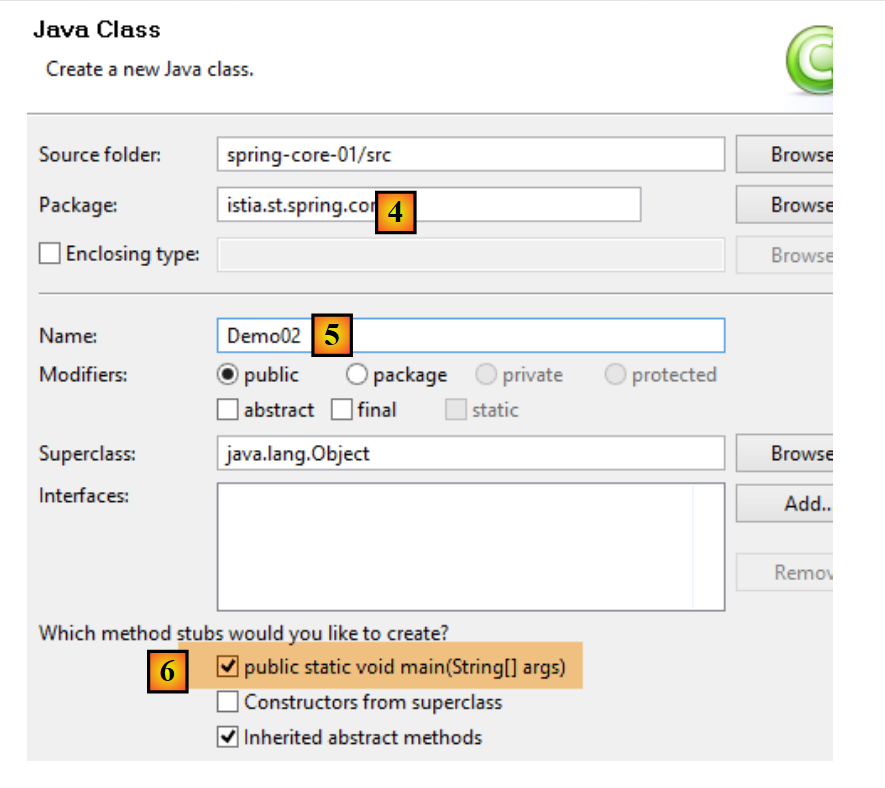 |
- 勾选 [6] 可确保生成的类包含一个静态方法 [main],从而使其可执行;
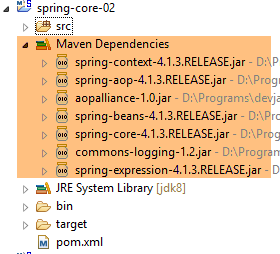
5.2.6. 项目依赖项
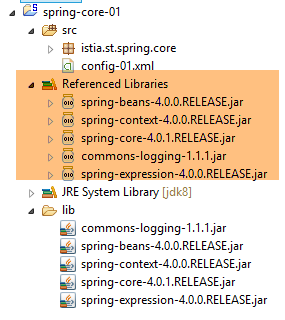 |
- Spring 依赖项:[spring-core, spring-beans, spring-context, spring-expression, commons-logging];
依赖项按以下方式添加到项目中:
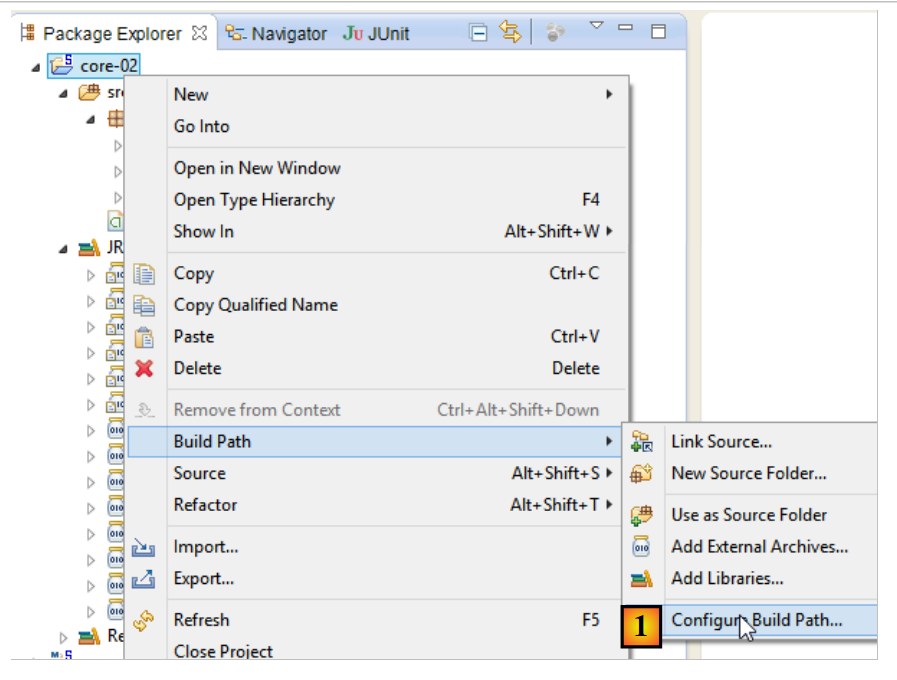 |
- 在 [1] 中:右键单击项目 / [构建设置] / [配置构建设置];
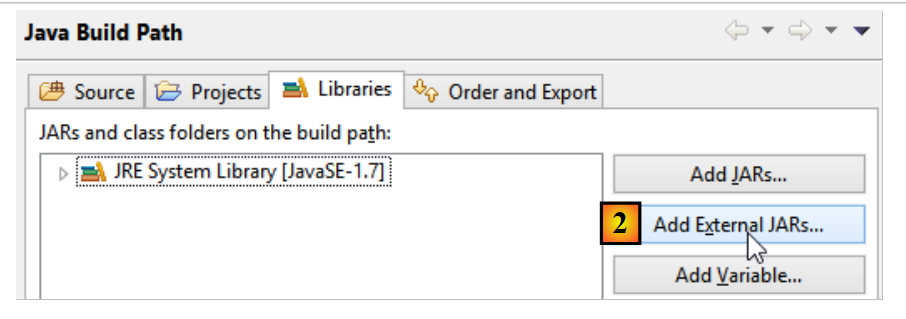 |
- 在 [2] 中:如果要添加的 JAR 文件位于项目文件夹内,请选择 [添加 JAR 文件]。否则,请选择 [添加外部 JAR 文件];
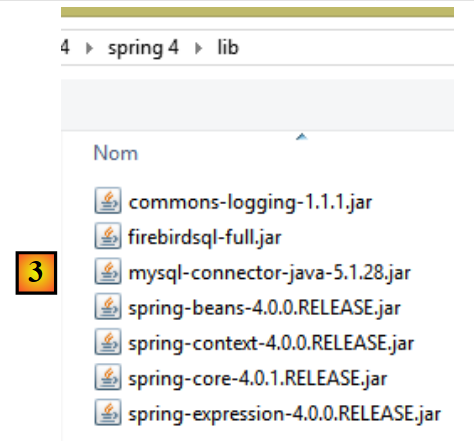 |
- 在 [3] 中,选择要添加到项目 ClassPath 中的 JAR 文件(此处,它们位于项目内的 [lib] 文件夹中);
定义:项目的 [ClassPath] 是运行该项目的 JVM(Java 虚拟机)用于查找项目所引用的类的文件夹集合。对于 Eclipse 项目,[ClassPath] 由以下元素组成:
- 项目的 [bin] 文件夹;
- 项目 [Build Path] 中的元素;
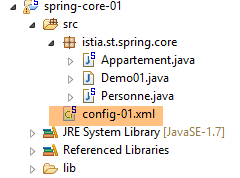
[bin] 文件夹是编译 [src] 文件夹后生成的文件夹。 因此,放置在 [src] 文件夹中的所有内容都会自动成为 [ClassPath] 的一部分(即使它不是 .java 文件)。因此,在前面的项目中,位于 [src] 文件夹中的 Spring 配置文件 [config-01.xml],将在运行时成为项目 [ClassPath] 的一部分。
5.2.7. 结果
5.3. 示例-02
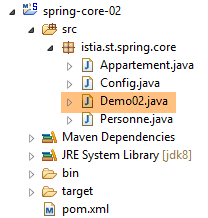
5.3.1. Eclipse 项目
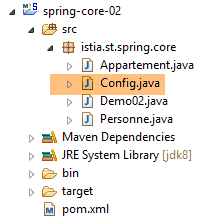 |
5.3.2. Spring 配置类
package istia.st.spring.core;

import java.util.ArrayList;
import java.util.List;

import org.springframework.context.annotation.Bean;
import org.springframework.context.annotation.Configuration;

@Configuration
public class Config {

    @Bean
    public Personne personne_01() {
        return new Personne("Paul", "Dubois", 34);
    }

    @Bean
    public Personne personne_02() {
        return new Personne("Martin", "Micheline", 18);
    }

    @Bean
    public List<Personne> club(Personne personne_01, Personne personne_02) {
        List<Personne> personnes = new ArrayList<Personne>();
        personnes.add(personne_01);
        personnes.add(personne_02);
        return personnes;
    }

    @Bean
    public Appartement appartement(Personne personne_01) {
        Appartement appartement = new Appartement();
        appartement.setSurface(200);
        appartement.setPropriétaire(personne_01);
        return appartement;
    }
}
- 第 9 行:[@Configuration] 注解是 Spring 的注解。它表示被注解的类定义了单例。这些单例通过 [@Bean] 注解进行定义。Spring 将执行所有带有 [@Bean] 注解的方法。这些方法会创建应用程序的单例;
- 第 12–15 行:定义了一个由 [person_01](即方法名)标识的单例。
- 第 23 行:参数 [person_01, person_02] 采用了单例的名称。Spring 将自动使用这些单例的引用来初始化它们。这被称为参数注入;
这种配置单例的方式比使用 XML 文件的方式更为明确。实际上,我们正在复现 Spring 基于 XML 文件所做的隐式操作。
5.3.3. 可执行类
 |
package istia.st.spring.core;

import java.util.ArrayList;
import java.util.List;

import org.springframework.context.annotation.AnnotationConfigApplicationContext;

public class Demo02 {

    @SuppressWarnings({ "unchecked", "resource" })
    public static void main(String[] args) {
        // spring context retrieval
        AnnotationConfigApplicationContext ctx = new AnnotationConfigApplicationContext(Config.class);
        // beans are recovered
        Personne p01 = ctx.getBean("personne_01", Personne.class);
        Personne p02 = ctx.getBean("personne_02", Personne.class);
        List<Personne> club = ctx.getBean("club", new ArrayList<Personne>().getClass());
        Appartement appart01 = ctx.getBean(Appartement.class);
        // we display them
        System.out.println("personnes--------");
        System.out.println(p01);
        System.out.println(p02);
        System.out.println("club--------");
        for (Personne p : club) {
            System.out.println(p);
        }
        System.out.println("appartement--------");
        System.out.println(appart01);
        // recovered beans are singletons
        // they can be requested several times, but the same bean is always retrieved
        Personne p01b = ctx.getBean("personne_01", Personne.class);
        System.out.println(String.format("beans [p01,p01b] identiques ? %s", p01b == p01));
    }
}
- 第 13 行会导致 [Config] 类中定义的所有 Bean 被实例化;
- 其余代码保持不变;
5.3.4. 项目依赖项
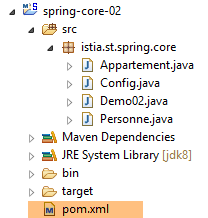 |  |
依赖项由以下 [pom.xml] 文件定义:
<project xmlns="http://maven.apache.org/POM/4.0.0" xmlns:xsi="http://www.w3.org/2001/XMLSchema-instance"
    xsi:schemaLocation="http://maven.apache.org/POM/4.0.0 http://maven.apache.org/xsd/maven-4.0.0.xsd">
    <modelVersion>4.0.0</modelVersion>
    <groupId>istia.st.spring.core</groupId>
    <artifactId>spring-core-02</artifactId>
    <version>0.0.1-SNAPSHOT</version>
    <name>spring-core-02</name>
    <description>Introduction à Spring</description>

    <properties>
        <project.build.sourceEncoding>UTF-8</project.build.sourceEncoding>
        <java.version>1.7</java.version>
    </properties>

    <dependencies>
        <!-- Spring -->
        <dependency>
            <groupId>org.springframework</groupId>
            <artifactId>spring-context</artifactId>
            <version>4.1.3.RELEASE</version>
        </dependency>
    </dependencies>
    <!-- plugins -->
    <build>
        <plugins>
            <plugin>
                <artifactId>maven-assembly-plugin</artifactId>
                <configuration>
                    <descriptorRefs>
                        <descriptorRef>jar-with-dependencies</descriptorRef>
                    </descriptorRefs>
                </configuration>
            </plugin>
            <plugin>
                <groupId>org.apache.maven.plugins</groupId>
                <artifactId>maven-surefire-plugin</artifactId>
                <version>2.18.1</version>
            </plugin>
        </plugins>
    </build>

</project>
当使用依赖关系不明的 Java 库时,手动管理项目的依赖关系会让人头疼。例如,用于管理数据库访问的 [Hibernate] 框架就有数十个依赖项。[Maven] 项目解决了这个问题。 您只需指定所需的依赖项,系统便会自动在遍布互联网的 Maven 仓库中进行搜索。如果所请求的依赖项本身还有依赖项,这些依赖项也会被自动下载。这些下载的依赖项存储在机器上的本地仓库中。如果以后另一个应用程序需要相同的依赖项,它将不会被重新下载,而是从本地仓库中检索。一个依赖项由以下元素构成:
- 第 17 行:一个 <dependency> 标签;
- 第 18 行:一个 [groupId] 属性,通常用于标识创建该依赖项的公司;
- 第 19 行:用于标识该依赖项的 [artifactId] 属性;
- 第 20 行:[version] 属性,用于标识所需的版本;
生成该项目本身将产生一个由第 4–8 行定义的 Maven 工件:
- 第 4–6 行:即我们刚才描述的 [groupId, artifactId, version] 属性;
- 第 7–8 行:为可选属性;
稍后我们将再来探讨第 24–40 行所起的作用。要将一个标准的 Eclipse 项目转换为 Maven 项目,你需要做两件事:
- 创建上文所示的 [pom.xml] 文件;
- 声明该项目现为 Maven 项目 [1-4]:
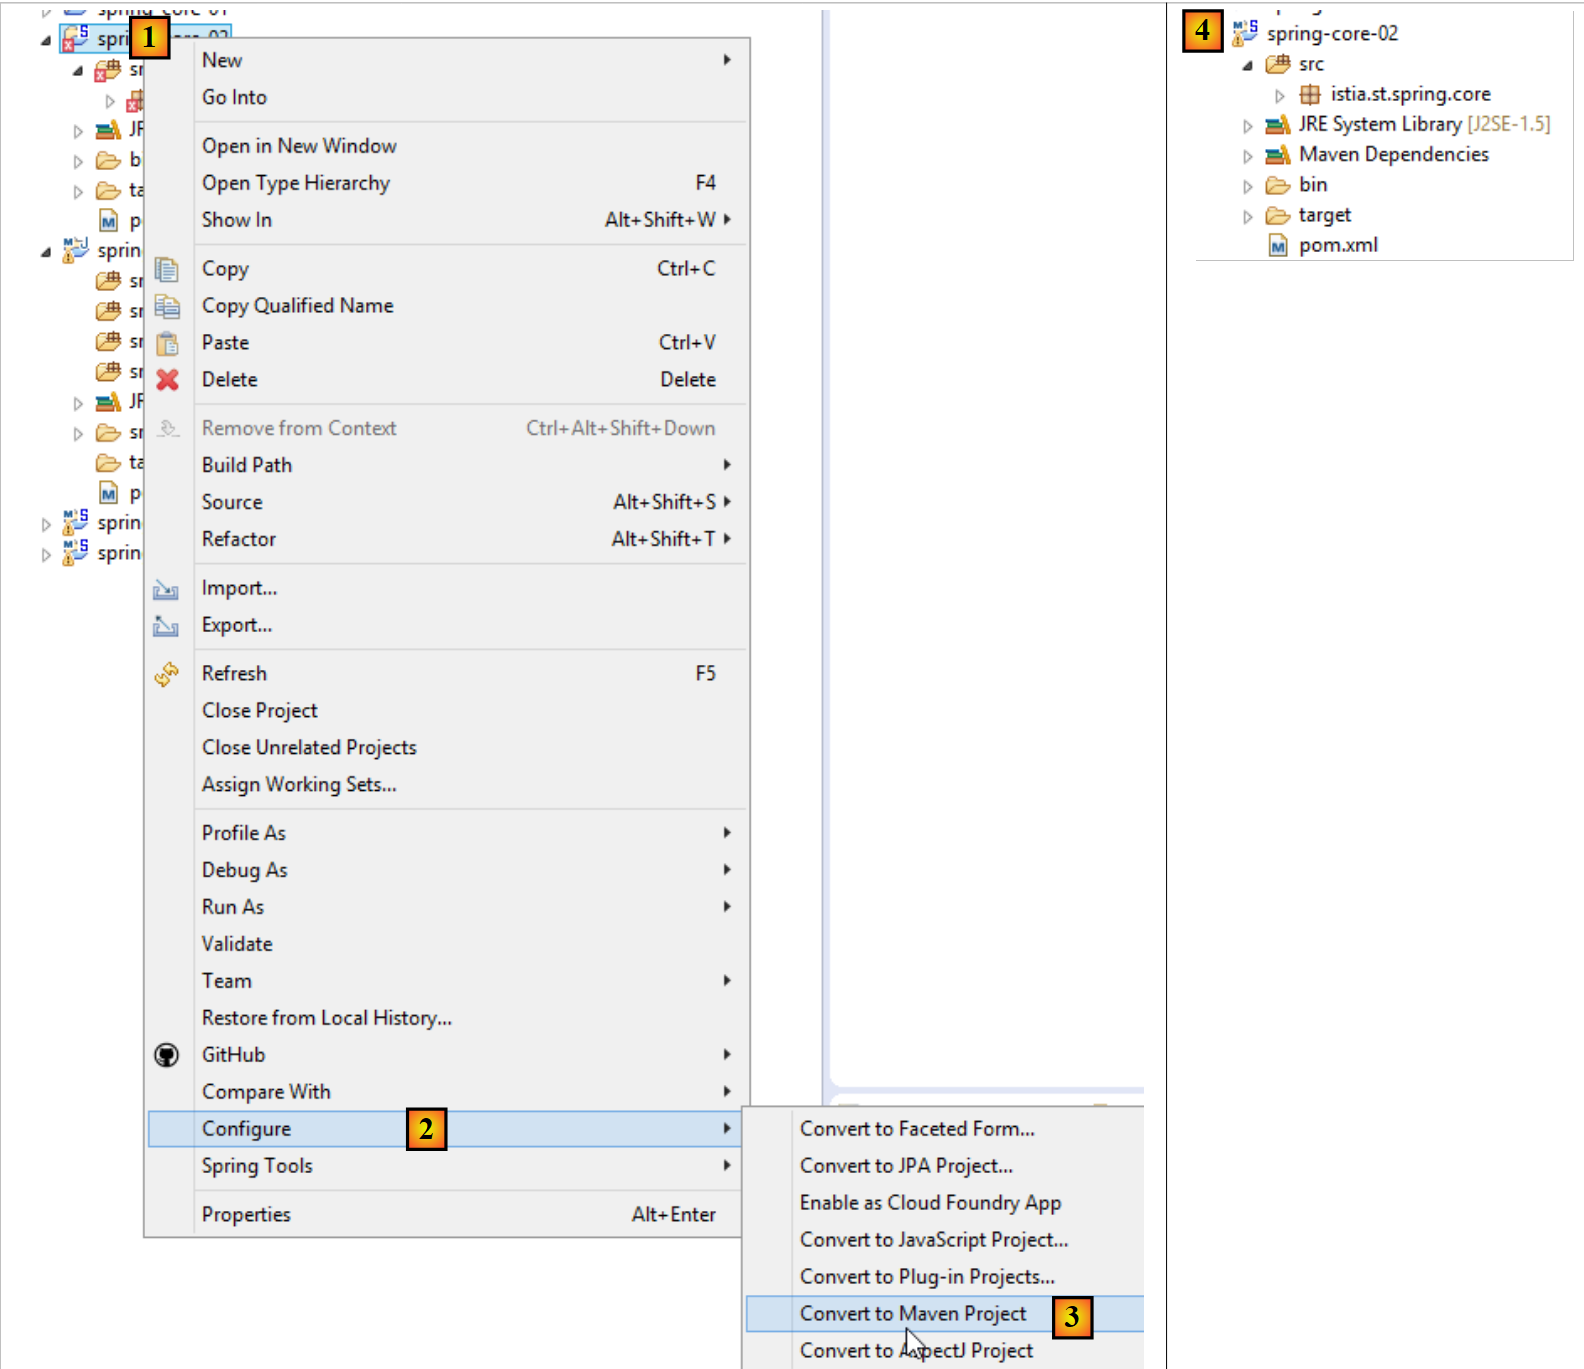 |
Maven 项目的图标以字母 M 为标志 [4]。字母 S 表示该项目包含 Spring 组件。不建议(像我们刚才那样)将 Eclipse 项目转换为 Maven 项目,因为这样会导致项目缺乏 Maven 项目应有的结构,有时可能会引发意想不到的问题。
5.3.5. 生成项目的 Maven 工件
我们将 [pom.xml] 文件第 4–6 行定义的元素称为该项目的 Maven 工件:
    <groupId>istia.st.spring.core</groupId>
    <artifactId>spring-core-02</artifactId>
<version>0.0.1-SNAPSHOT</version>
要生成此构建产物,[pom.xml] 文件中必须包含以下第 3 至 7 行:
    <build>
        <plugins>
            <plugin>
                <groupId>org.apache.maven.plugins</groupId>
                <artifactId>maven-surefire-plugin</artifactId>
                <version>2.18.1</version>
            </plugin>
        </plugins>
</build>
这些定义了能够生成项目工件的 Maven 插件。然后,我们按以下步骤进行:
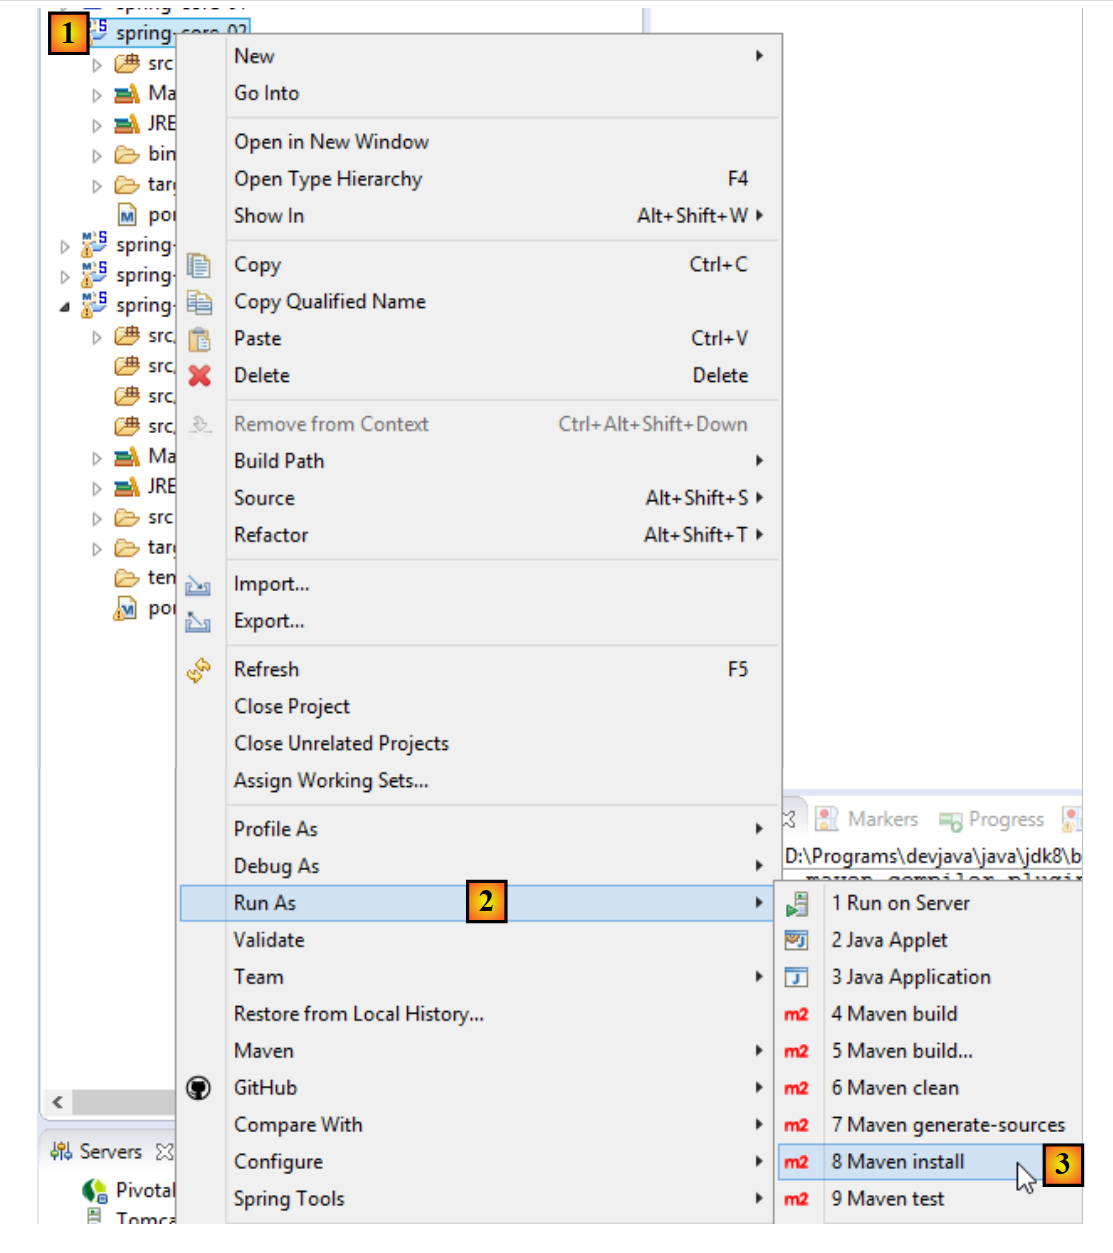 |
通过这种方式生成的工件将存入本地 Maven 仓库。其位置可在 Eclipse 配置中找到:
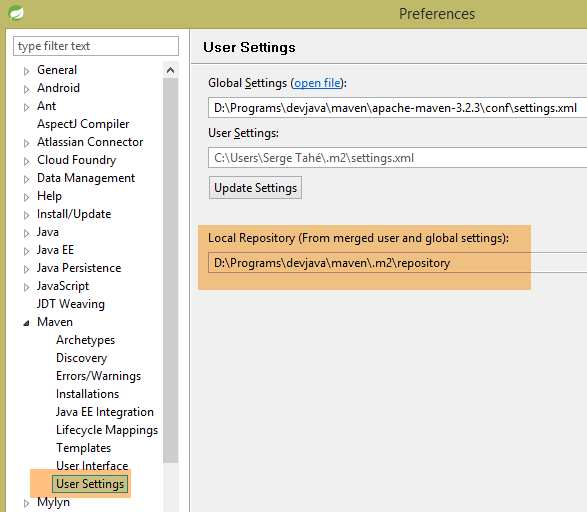 |
随后,您可以验证该 Maven 工件是否已正确安装:
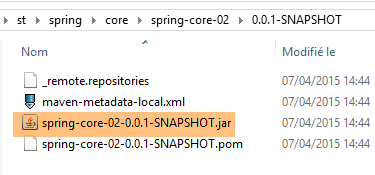 |
从现在起,另一个本地 Maven 项目可以使用此归档文件。
5.4. 示例-03
5.4.1. Eclipse 项目
这次,我们创建一个 Maven 项目 [1-8]:
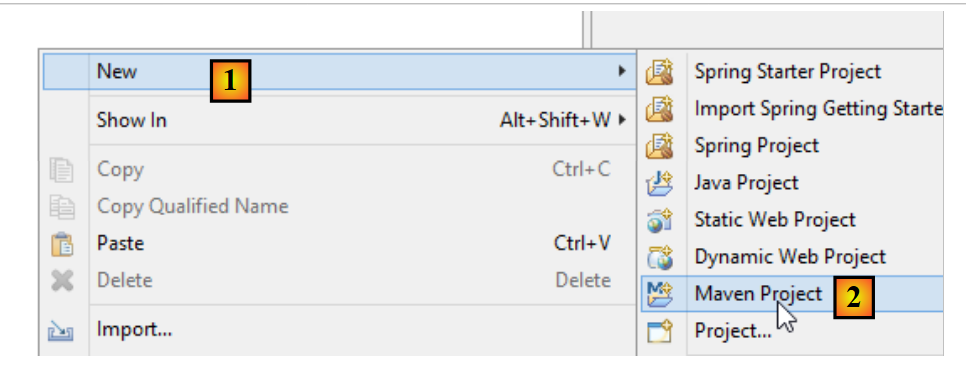 |
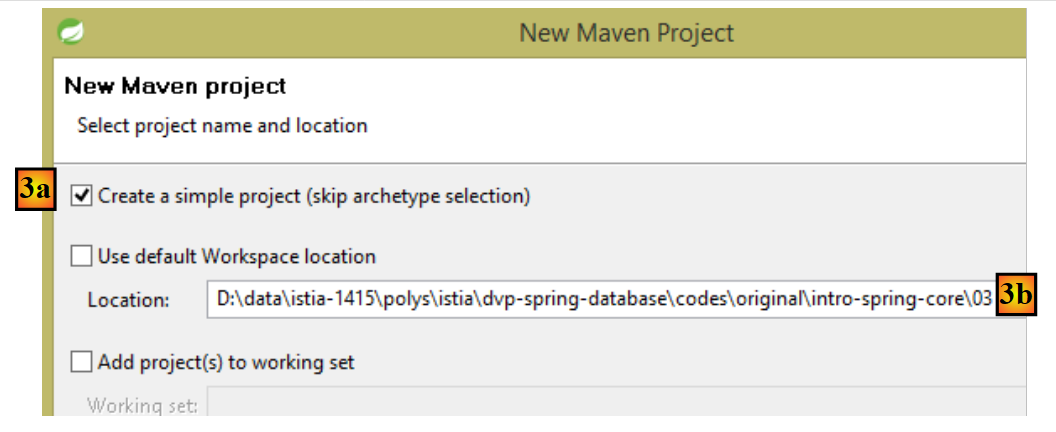 |
- 在 [3b] 中:指定一个空文件夹,项目将生成在此处;
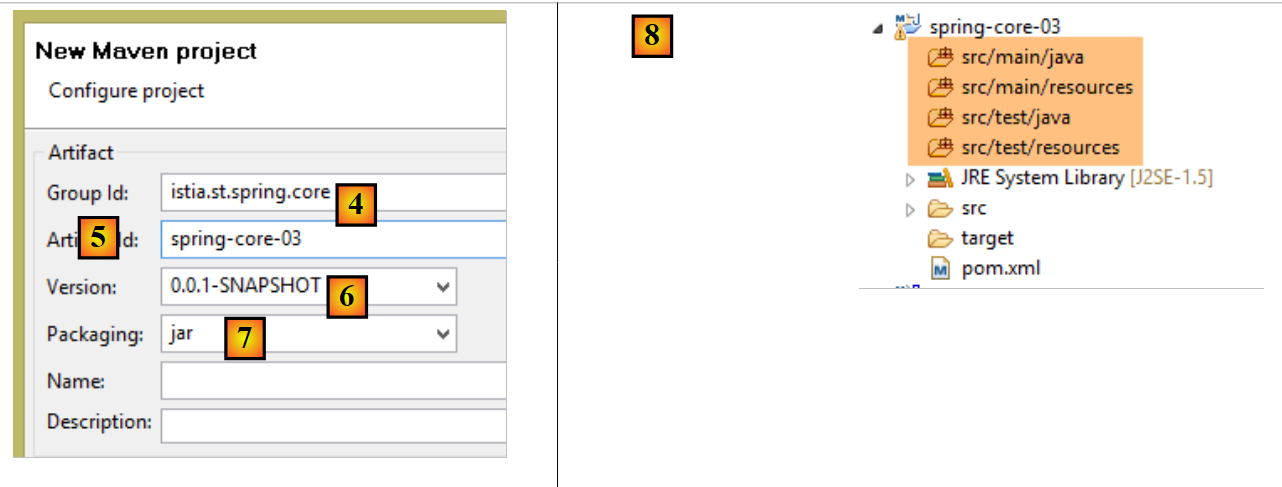 |
- 在 [4] 中:指定项目所属的 Maven 组标识符;
- 在 [5] 中:生成的 Maven 工件的名称:
- 在 [6] 中:其版本号;
- 在 [7] 中:其打包格式(其他格式包括 war、ear、apk 等);
- 在 [8] 中:由此创建的项目;
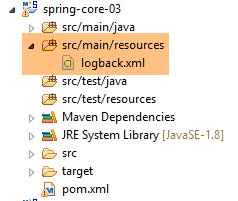
默认情况下,Maven 项目具有特定的目录结构:
- [src/main/java]:项目的源代码。这些源代码编译后的输出将放入项目的 [target/classes] 文件夹中;
- [src/main/resources]:必须位于项目类路径中但并非 Java 源文件的资源。这些资源将原样复制到项目的 [target/classes] 文件夹中;
- [src/test/java]:项目的测试源代码。这些源代码编译后的输出将放入项目的 [target/test-classes] 文件夹中。这些元素不会包含在项目的 Maven 归档中;
- [src/test/resources]:用于测试且必须位于项目类路径中,但并非 Java 源文件的资源。它们将原样复制到项目的 [target/test-classes] 文件夹中;
我们按以下方式完成该项目:
 |
5.4.2. Maven 配置
系统默认会生成一个 [pom.xml] 文件。我们对其进行如下修改:
<project xmlns="http://maven.apache.org/POM/4.0.0" xmlns:xsi="http://www.w3.org/2001/XMLSchema-instance"
    xsi:schemaLocation="http://maven.apache.org/POM/4.0.0 http://maven.apache.org/xsd/maven-4.0.0.xsd">
    <modelVersion>4.0.0</modelVersion>
    <groupId>istia.st.spring.core</groupId>
    <artifactId>spring-core-03</artifactId>
    <version>0.0.1-SNAPSHOT</version>
    <name>spring-core-03</name>
    <description>Introduction à Spring</description>

    <properties>
        <project.build.sourceEncoding>UTF-8</project.build.sourceEncoding>
        <java.version>1.8</java.version>
    </properties>

    <!-- maven parent project -->
    <parent>
        <groupId>org.springframework.boot</groupId>
        <artifactId>spring-boot-starter-parent</artifactId>
        <version>1.2.3.RELEASE</version>
    </parent>

    <dependencies>
        <!-- Spring Context -->
        <dependency>
            <groupId>org.springframework</groupId>
            <artifactId>spring-context</artifactId>
        </dependency>
        <!-- logs -->
        <dependency>
            <groupId>org.springframework.boot</groupId>
            <artifactId>spring-boot-starter-logging</artifactId>
        </dependency>

    </dependencies>

    <!-- plugins -->
    <build>
        <plugins>
            <!-- to generate the project archive with its dependencies -->
            <plugin>
                <artifactId>maven-assembly-plugin</artifactId>
                <configuration>
                    <descriptorRefs>
                        <descriptorRef>jar-with-dependencies</descriptorRef>
                    </descriptorRefs>
                </configuration>
            </plugin>
            <!-- to install the project artifact in the local Maven repository -->
            <plugin>
                <groupId>org.apache.maven.plugins</groupId>
                <artifactId>maven-surefire-plugin</artifactId>
                <version>2.18.1</version>
            </plugin>
        </plugins>
    </build>

</project>
- 第 11 行:该项目采用 UTF-8 编码;
- 第 12 行:使用 JDK 1.8 编译该项目;
- 第 16–20 行:对于使用 Spring 库的项目,使用名为 [spring-boot-starter-parent] 的父 Maven 项目会非常方便。该项目定义了各种 Spring 库及其依赖项的版本。这样就无需在 dependencies 部分中单独定义它们。 因此,在第 24–27 行中,我们无需指定 [spring-context] 的具体版本。它将采用父项目 [spring-boot-starter-parent] 所定义的版本。这种做法避免了需要担心依赖项之间潜在的版本不兼容问题。由父项目定义的依赖项彼此之间是兼容的;
- 第 29–32 行:Spring 会通过日志库向控制台输出大量信息。此处导入了该日志库;
- 第 40–47 行:一个 Maven 插件,我们稍后将讨论;
- 第 50–52 行:用于生成项目 Maven 工件的插件;
5.4.3. Spring 配置类
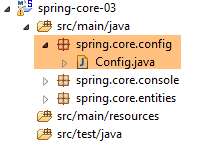 |
[Config] 类如下所示:
package istia.st.spring.core.config;

import istia.st.spring.core.entities.Personne;

import java.util.ArrayList;
import java.util.List;

import org.springframework.context.annotation.Bean;
import org.springframework.context.annotation.ComponentScan;
import org.springframework.context.annotation.Configuration;

@Configuration
@ComponentScan({ "spring.core.entities" })
public class Config {

    @Bean
    public Personne personne_01() {
        return new Personne("Paul", "Dubois", 34);
    }

    @Bean
    public Personne personne_02() {
        return new Personne("Martin", "Micheline", 18);
    }

    @Bean
    public List<Personne> club(Personne personne_01, Personne personne_02) {
        List<Personne> personnes = new ArrayList<Personne>();
        personnes.add(personne_01);
        personnes.add(personne_02);
        return personnes;
    }

    @Bean
    public int mySurface() {
        return 200;
    }
}
- 这里我们看到一段已经添加了注释的代码,其中新增了两处内容:
- 第 13 行:表明 [spring.core.entities] 包中还有其他 Bean 需要实例化,
- 第 34–37 行:一个 [mySurface] Bean;
5.4.4. [Apartment] 类
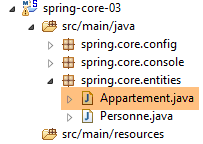 |
package spring.core.entities;

import org.springframework.beans.factory.annotation.Autowired;
import org.springframework.beans.factory.annotation.Qualifier;
import org.springframework.stereotype.Component;

@Component
public class Appartement {

    // fields injected by Spring
    @Autowired
    @Qualifier("personne_01")
    private Personne propriétaire;

    @Autowired
    @Qualifier("mySurface")
    private int surface;

    // getters and setters
    public Personne getPropriétaire() {
        return propriétaire;
    }

    public void setPropriétaire(Personne propriétaire) {
        this.propriétaire = propriétaire;
    }

    public int getSurface() {
        return surface;
    }

    public void setSurface(int surface) {
        this.surface = surface;
    }

    // toString
    public String toString() {
        return String.format("Appartement[%s, %s]", propriétaire, surface);
    }

}
- 第 7 行:[@Component] 注解告知 Spring,该类是一个单例,框架必须对其进行实例化并管理。由于我们在 [Config] 类中编写了 [@ComponentScan({ "istia.st.spring.core.entities" })],因此该单例会被找到;
- 第 11 行:请求 Spring 将其中一个单例的引用注入到字段中。这可以通过两种方式定义:
- 通过标识符(第 12、16 行),
- 若该类型仅有一个单例,则通过其类型;
5.4.5. 运行项目
运行项目后,控制台将输出以下内容:
- 第 1-3 行:Spring 会生成大量日志,多达几十行。这些日志对于调试无法正常运行的项目非常有用。当项目运行正常时,您可以按以下方式减少日志输出:
 |
在 [src/main/resources] 文件夹中,创建以下 [logback.xml] 文件:
<configuration>

  <appender name="STDOUT" class="ch.qos.logback.core.ConsoleAppender">
    <!-- encoders are  by default assigned the type
         ch.qos.logback.classic.encoder.PatternLayoutEncoder -->
    <encoder>
      <pattern>%d{HH:mm:ss.SSS} [%thread] %-5level %logger{36} - %msg%n</pattern>
    </encoder>
  </appender>

  <!-- log level control -->
  <root level="info"> <!-- info, debug, warn -->
    <appender-ref ref="STDOUT" />
  </root>
</configuration>
- 第 12 行设置了日志级别。[debug] 是一个非常详细的级别,[info] 则要简略得多;
以下是使用 [level=info] 时的结果:
现在日志中只剩下一行。
5.4.6. 生成包含其依赖项的项目归档
在上一个项目中创建的归档文件也可用于非 Maven 的 Eclipse 项目。有些项目使用大量库,要确保不遗漏任何一个可能很棘手。这就是 Maven 发挥神奇作用的地方,因为您只需指定顶级依赖项,底层依赖项就会自动添加到项目的类路径中。 当非 Maven 的 Eclipse 项目需要使用 Maven 项目的归档文件时,可以生成包含所有依赖项的 Maven 项目工件(这与前一个项目的情况不同)。为此,[pom.xml] 文件中必须包含以下第 3–10 行代码:
    <build>
        <plugins>
            <plugin>
                <artifactId>maven-assembly-plugin</artifactId>
                <configuration>
                    <descriptorRefs>
                        <descriptorRef>jar-with-dependencies</descriptorRef>
                    </descriptorRefs>
                </configuration>
            </plugin>
            <plugin>
                <groupId>org.apache.maven.plugins</groupId>
                <artifactId>maven-surefire-plugin</artifactId>
                <version>2.18.1</version>
            </plugin>
        </plugins>
</build>
这些定义了能够生成项目工件及其依赖项的 Maven 插件。接下来,请按以下步骤操作 [1-6]:
 |
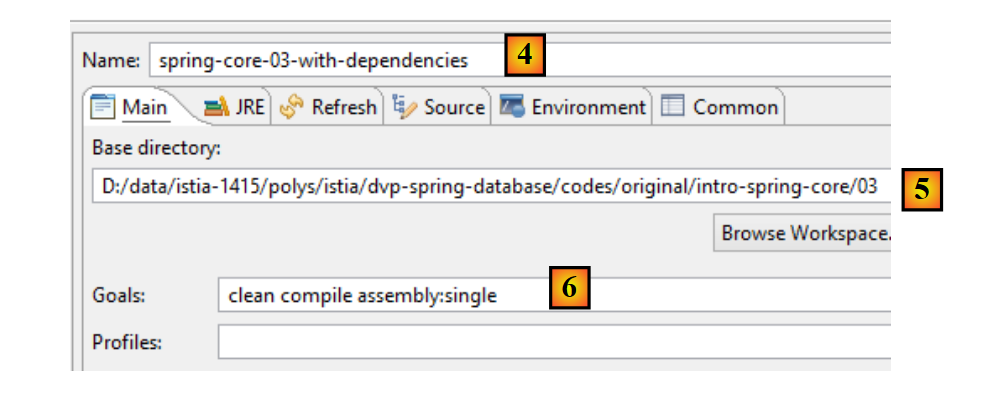 |
- [4-6] 表示一个 Maven 构建配置;
- 在 [4] 中,输入任意名称;
- 在 [5] 中,指定项目文件夹;
- 在 [6] 中,输入 Maven 目标:
- [clean]:删除项目的 [target] 文件夹;
- [compile]:编译项目。编译输出将放置在重新生成的 [target] 文件夹中;
- [assembly:single]:将项目及其依赖项的类文件打包到 [target] 文件夹中的单个 JAR 归档文件中;
执行后,得到以下结果:
 |
JAR 归档文件是一种压缩文件,可使用解压工具打开。解压上述归档文件后,将得到以下目录结构:
- 在 [8] 中,是项目依赖项的类;
- 在 [9] 中,是项目本身的类;
5.5. 示例-04
5.5.1. 目标
本示例基于文档《Spring IoC 入门》中的一个示例,该示例展示了 Spring 在配置多层架构方面的作用。在原始文档中,该示例使用了一个定义在 XML 文件中的 Spring 配置。在此,我们将使用基于 Java 类和注解的配置来实现该示例。
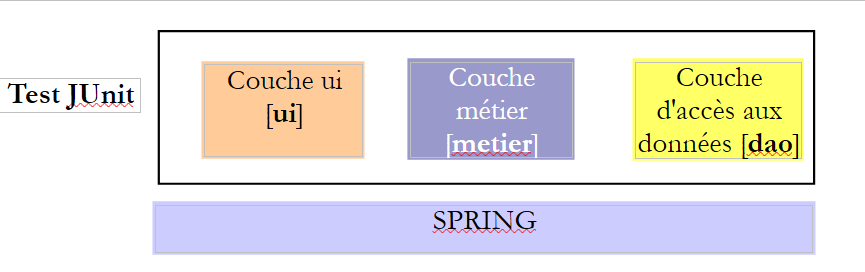
在此,我们希望为以下架构配置一个 Spring 项目:
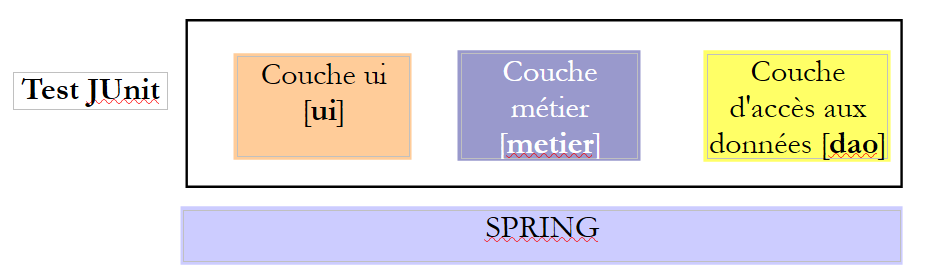 |
每个层都有一个由两个类实现的接口。我们希望演示,借助 Spring,我们可以更改一个层的实现,而对其他层的代码毫无影响。
5.5.2. Eclipse 项目
5.5.2.1. 生成
我们创建一个新的项目类型:
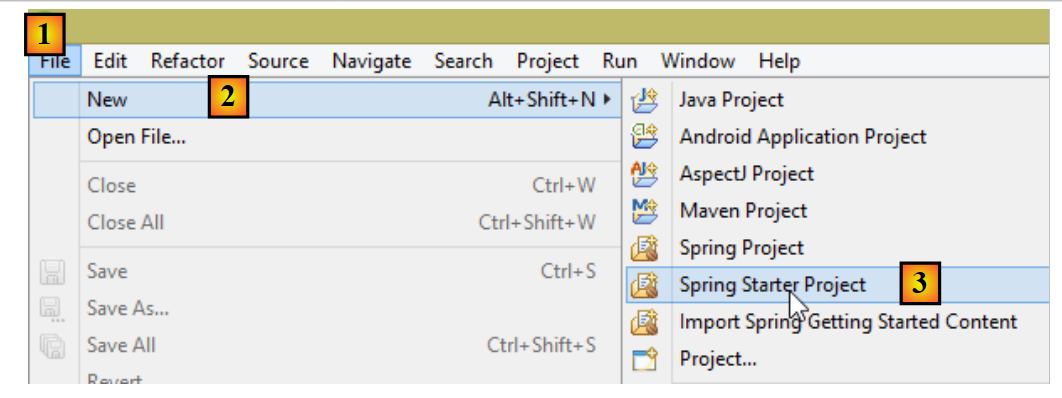 |
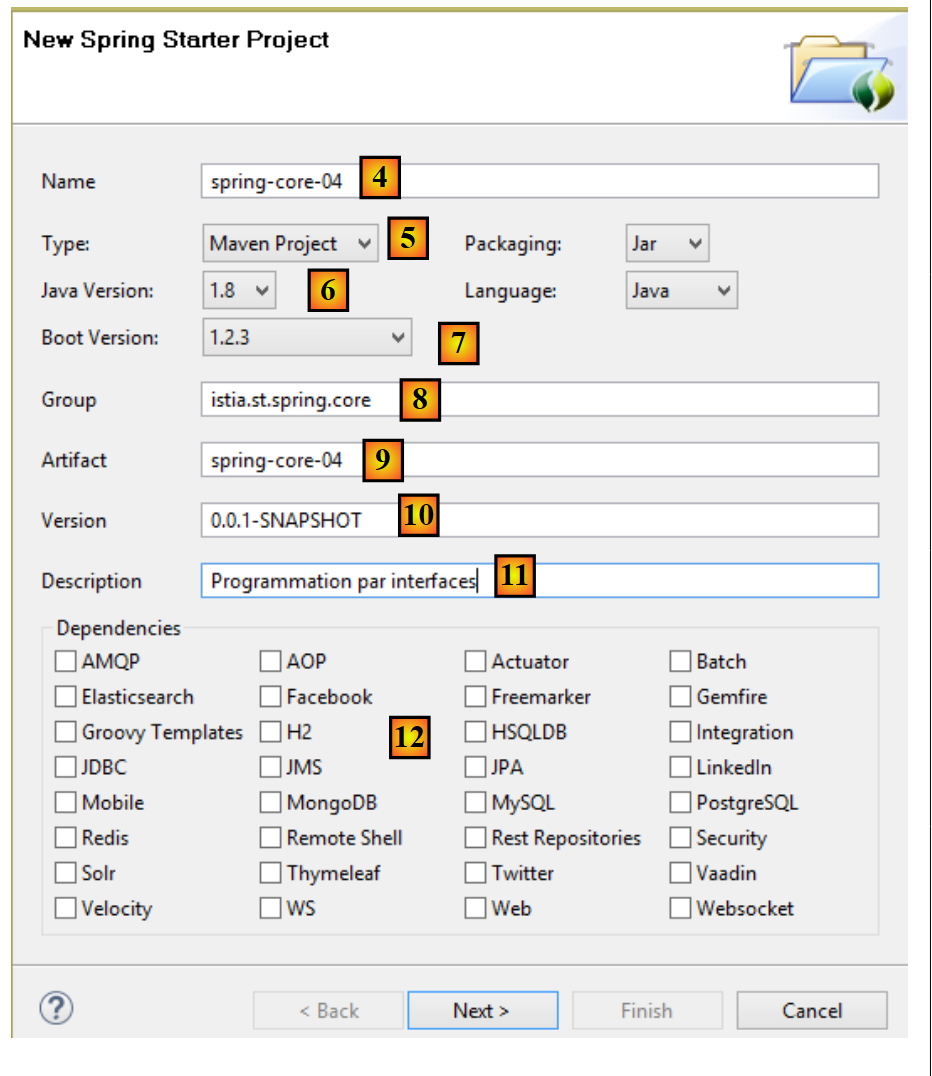 |
- 在 [4] 中,输入 Eclipse 项目的名称;
- 在 [5] 中,选择 Maven 项目;
- 在 [6] 中,选择 Java 版本 >=1.7;
- 在 [7] 中,选择建议的 Spring Boot 版本;
- [8-11] 中的信息是 Maven 相关信息;
- 在 [12] 中,您可以选择一个或多个建议的依赖项。这将向 Maven [pom.xml] 文件中添加若干依赖项;
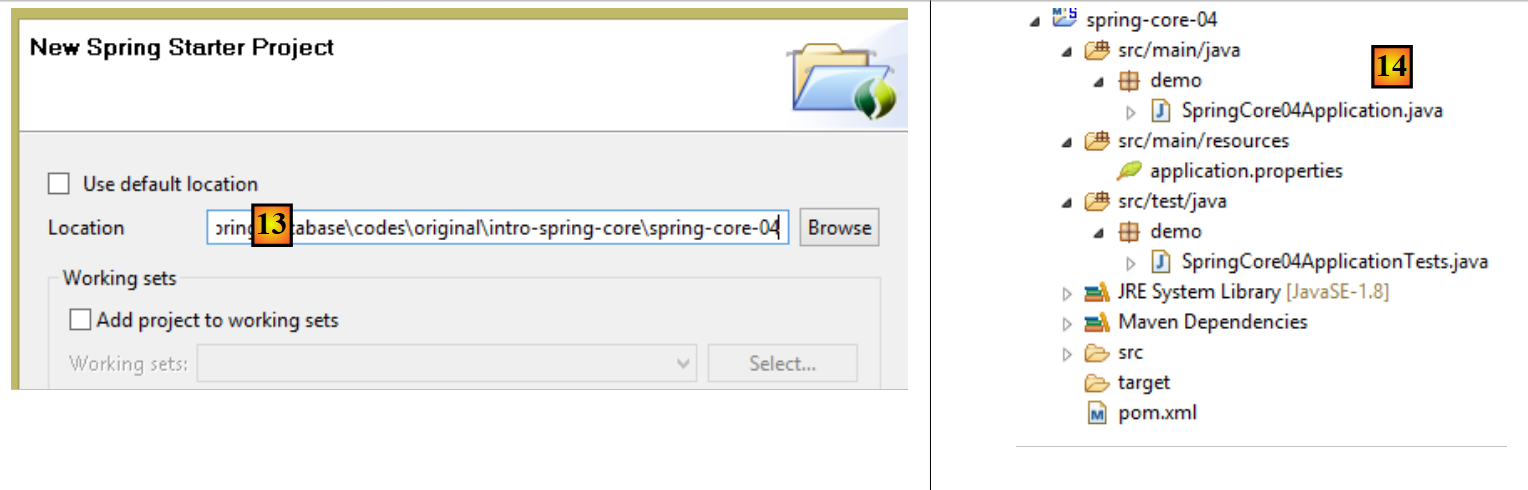 |
- 在 [13] 中,选择一个现有的空文件夹来存放该项目;
- 在 [14] 中,是生成的项目。我们将对其组件进行分解;
该项目是一个由以下 [pom.xml] 文件配置的 Maven 项目:
<?xml version="1.0" encoding="UTF-8"?>
<project xmlns="http://maven.apache.org/POM/4.0.0" xmlns:xsi="http://www.w3.org/2001/XMLSchema-instance"
    xsi:schemaLocation="http://maven.apache.org/POM/4.0.0 http://maven.apache.org/xsd/maven-4.0.0.xsd">
    <modelVersion>4.0.0</modelVersion>

    <groupId>istia.st.spring.core</groupId>
    <artifactId>spring-core-04</artifactId>
    <version>0.0.1-SNAPSHOT</version>
    <packaging>jar</packaging>

    <name>spring-core-04</name>
    <description>Programmation par interfaces</description>

    <parent>
        <groupId>org.springframework.boot</groupId>
        <artifactId>spring-boot-starter-parent</artifactId>
        <version>1.2.3.RELEASE</version>
        <relativePath/> <!-- lookup parent from repository -->
    </parent>

    <properties>
        <project.build.sourceEncoding>UTF-8</project.build.sourceEncoding>
        <start-class>demo.SpringCore04Application</start-class>
        <java.version>1.8</java.version>
    </properties>

    <dependencies>
        <dependency>
            <groupId>org.springframework.boot</groupId>
            <artifactId>spring-boot-starter</artifactId>
        </dependency>

        <dependency>
            <groupId>org.springframework.boot</groupId>
            <artifactId>spring-boot-starter-test</artifactId>
            <scope>test</scope>
        </dependency>
    </dependencies>

    <build>
        <plugins>
            <plugin>
                <groupId>org.springframework.boot</groupId>
                <artifactId>spring-boot-maven-plugin</artifactId>
            </plugin>
        </plugins>
    </build>

</project>
- 第 6–12 行:包含在项目创建向导中输入的信息;
- 第 14–19 行:父级 Maven 项目,其中定义了若干库及其版本。如果其中任何一个是项目依赖项,它们将在 [pom.xml] 文件中列出,但不包含其版本;
- 第 23 行:仅当您打算生成项目的可执行归档文件时才使用此行。否则,该行将不被使用;
- 第 28–31 行:Spring Boot 项目的最小依赖项。请注意,我们并未从复选框列表中选择任何依赖项;
- 第 33–37 行:管理与 Spring 集成的 JUnit 单元测试 [http://junit.org/] 所需的依赖项。第 36 行表明该依赖项仅用于测试。因此,它不会包含在项目归档中;
- 第 42–45 行:用于生成项目 Maven 工件的插件;
该文件提供的依赖项列表如下 [1]:
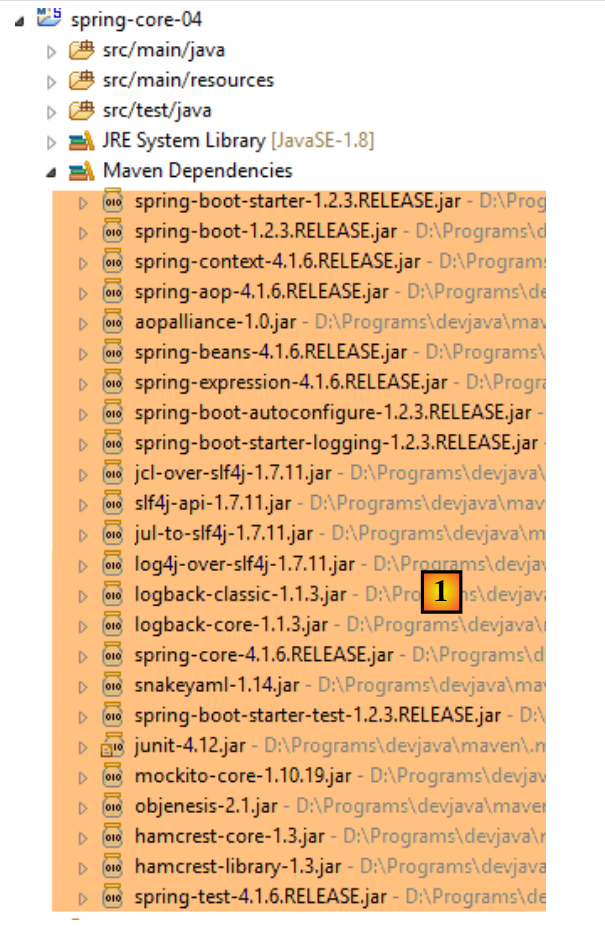 |
我们将看到,这些对于我们此处要实现的功能已经足够。
5.5.2.2. 可执行类
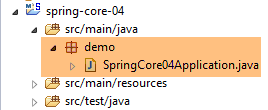 |
可执行类 [SpringCore04Application] [[2] 如下所示:
package demo;

import org.springframework.boot.SpringApplication;
import org.springframework.boot.autoconfigure.SpringBootApplication;

@SpringBootApplication
public class SpringCore04Application {

    public static void main(String[] args) {
        SpringApplication.run(SpringCore04Application.class, args);
    }
}
- 第 6 行:[@SpringBootApplication] 注解是 [@Configuration、@EnableAutoConfiguration、@ComponentScan] 这三个注解的简写形式,这意味着:
- [SpringCore04Application] 类是一个 Spring 配置类;
- 指示 Spring Boot 根据项目类路径中找到的类(本例中即 Maven 依赖项)进行配置;
- 检查当前目录(即 [SpringCore04Application] 类的所在目录)以查找其他 Spring 组件;
- 第 10 行:执行静态方法 [SpringApplication.run]。其第一个参数是 Spring 配置类,此处即 [SpringCore04Application] 类。其第二个参数是传递给 [main] 方法(第 9 行)的参数列表。 静态方法 [SpringApplication.run] 负责创建 Spring 上下文,即创建配置类中或 [@ComponentScan] 注解扫描到的目录中发现的各种 Bean。此处的 [main] 方法除此之外不做其他操作。为了使其更具实质内容,我们将对其进行如下修改:
package demo;

import org.springframework.boot.SpringApplication;
import org.springframework.boot.autoconfigure.SpringBootApplication;
import org.springframework.context.ConfigurableApplicationContext;

@SpringBootApplication
public class SpringCore04Application {

    public static void main(String[] args) {
        // spring context instantiation
        ConfigurableApplicationContext context = SpringApplication.run(SpringCore04Application.class, args);
        // context display
        System.out.println("---------------- Liste des beans Spring");
        for (String beanName : context.getBeanDefinitionNames()) {
            System.out.println(beanName);
        }
        // closing context
        context.close();
    }
}
- 第 12 行:静态方法 [SpringApplication.run] 返回其构建的 Spring 上下文;
- 第 15–17 行:显示该上下文中所有 Bean 的名称;
应用程序可通过以下方式运行 [1-3]。标准方法 [Run As Java Application] 同样有效。
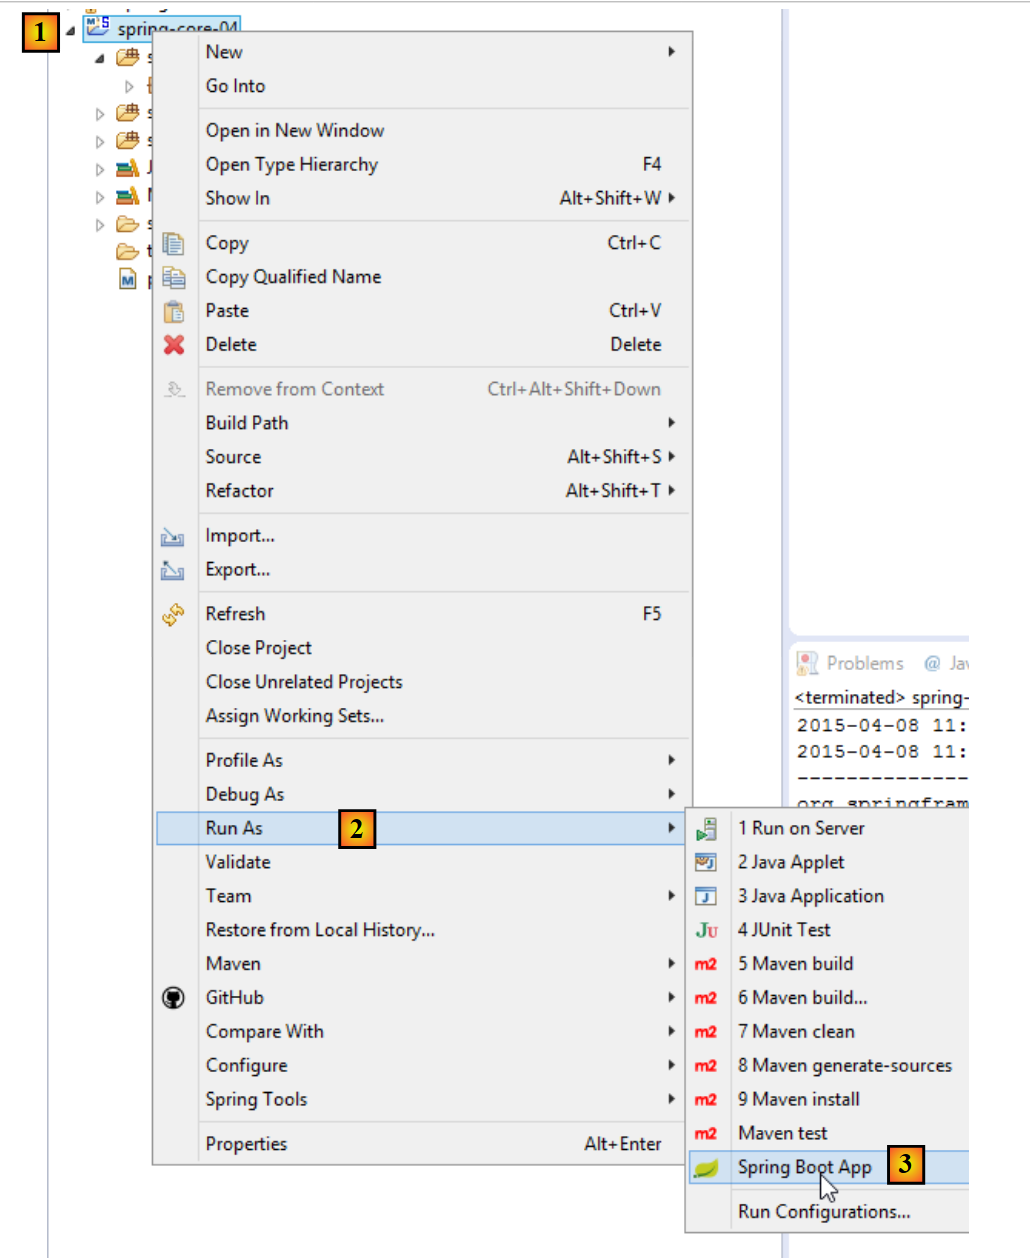 |
得到以下结果:
- 第 14–28 行:来自 Spring 上下文的 Bean。我们尚不清楚它们的作用。我们在第 18 行发现了 [springCore04Application] 这个 Bean,由于它带有 [@SpringBootApplication] 注解,因此自动成为 Spring Bean;
- 其余行均为 [INFO] 级别的 Spring 日志。如前所述,这些日志可通过放置在项目类路径中的 [logback.xml] 文件进行控制:
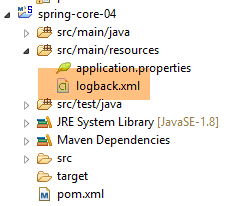 |
<configuration>

  <appender name="STDOUT" class="ch.qos.logback.core.ConsoleAppender">
    <!-- encoders are  by default assigned the type
         ch.qos.logback.classic.encoder.PatternLayoutEncoder -->
    <encoder>
      <pattern>%d{HH:mm:ss.SSS} [%thread] %-5level %logger{36} - %msg%n</pattern>
    </encoder>
  </appender>

  <!-- log level control -->
  <root level="warn"> <!-- info, debug, warn -->
    <appender-ref ref="STDOUT" />
  </root>
</configuration>
如果在上面的第 12 行中,我们将级别设置为 [warn] 而不是 [info],则会得到以下结果:
日志已消失。现在只显示[warn]级别的消息,而这里原本没有任何日志。
5.5.3. 架构各层的实现
 |
接下来我们将实现上述架构的三个层:
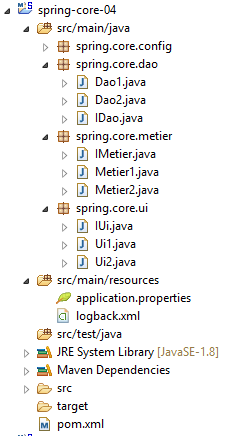 |
[DAO] 层由 [spring.core.dao] 包实现。它提供了以下 [IDao] 接口:
package spring.core.dao;

public interface IDao {

    public int doSomethingInDaoLayer(int a, int b);
}
该接口有两个实现:[Dao1] 和 [Dao2]:
package spring.core.dao;

public class Dao1 implements IDao {

    public int doSomethingInDaoLayer(int a, int b) {
        return a+b;
    }

}
package spring.core.dao;

public class Dao2 implements IDao {

    public int doSomethingInDaoLayer(int a, int b) {
        return a-b;
    }

}
[业务]层由[spring.core.business]包实现。它提供了以下[IMetier]接口:
package spring.core.metier;

public interface IMetier {

    public int doSomethingInMetierLayer(int a, int b);
}
该接口有两个实现:[Business1] 和 [Business2]:
package spring.core.metier;

import spring.core.dao.IDao;

public class Metier1 implements IMetier {

    private IDao dao;

    public int doSomethingInMetierLayer(int a, int b) {
        a++;
        b++;
        return dao.doSomethingInDaoLayer(a, b);
    }

    public void setDao(IDao dao) {
        this.dao = dao;
    }
}
package spring.core.metier;

import spring.core.dao.IDao;

public class Metier2 implements IMetier {

    private IDao dao;

    public int doSomethingInMetierLayer(int a, int b) {
        a--;
        b++;
        return dao.doSomethingInDaoLayer(a, b);
    }

    public void setDao(IDao dao) {
        this.dao = dao;
    }


}
[UI] 层由 [spring.core.ui] 包实现。它提供了以下 [IUi] 接口:
package spring.core.ui;

public interface IUi {

    public int doSomethingInUiLayer(int a, int b);
}
该接口有两个实现:[Ui1] 和 [Ui2]:
package spring.core.ui;

import spring.core.metier.IMetier;

public class Ui1 implements IUi {

    private IMetier metier;

    public int doSomethingInUiLayer(int a, int b) {
        a++;
        b++;
        return metier.doSomethingInMetierLayer(a, b);
    }

    public void setMetier(IMetier metier) {
        this.metier = metier;
    }

}
package spring.core.ui;

import spring.core.metier.IMetier;

public class Ui2 implements IUi {

    private IMetier metier;

    public int doSomethingInUiLayer(int a, int b) {
        a--;
        b++;
        return metier.doSomethingInMetierLayer(a, b);
    }

    public void setMetier(IMetier metier) {
        this.metier = metier;
    }

}
5.5.4. Spring 项目配置
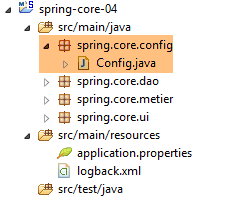 |
配置类 [Config] 如下所示:
package spring.core.config;

import org.springframework.context.annotation.Bean;
import org.springframework.context.annotation.Configuration;

import spring.core.dao.Dao1;
import spring.core.dao.Dao2;
import spring.core.dao.IDao;
import spring.core.metier.IMetier;
import spring.core.metier.Metier1;
import spring.core.metier.Metier2;
import spring.core.ui.IUi;
import spring.core.ui.Ui1;
import spring.core.ui.Ui2;

@Configuration
public class Config {

    // -------------- implementation [Ui1, Metier1, Dao1]
    @Bean
    public IDao dao1() {
        return new Dao1();
    }

    @Bean
    public IMetier metier1(IDao dao1) {
        Metier1 metier = new Metier1();
        metier.setDao(dao1);
        return metier;
    }

    @Bean
    public IUi ui1(IMetier metier1) {
        Ui1 ui = new Ui1();
        ui.setMetier(metier1);
        return ui;
    }

    // -------------- implementation [Ui2, Metier2, Dao2]
    @Bean
    public IDao dao2() {
        return new Dao2();
    }

    @Bean
    public IMetier metier2(IDao dao2) {
        Metier2 metier = new Metier2();
        metier.setDao(dao2);
        return metier;
    }

    @Bean
    public IUi ui2(IMetier metier2) {
        Ui2 ui = new Ui2();
        ui.setMetier(metier2);
        return ui;
    }
}
- 第 20–23 行:名为 [dao1](方法名)的 Bean 是类 [Dao1](第 22 行)的实例,该类被视为接口 [IDao](第 21 行)的实现。 因此,Bean [dao1] 被视为接口的实例(这种说法虽不准确但可以理解),而非类的实例。这一点非常重要。所有其他 Bean 也将是接口的实例;
- 第 25–30 行:由 [Metier1] 类实现的 [IMetier] 接口的实例;
- 第 32–37 行:由 [Ui1] 类实现的 [IUi] 接口的实例;
- 第 20–37 行:使用实例 [Ui1, Metier1, Dao1] 实现 [UI, Business, DAO] 层;
- 第 40–57 行:使用实例 [Ui2, Business2, Dao2] 实现 [UI, Business, DAO] 层;
5.5.5. 单元测试 [JUnitTest]
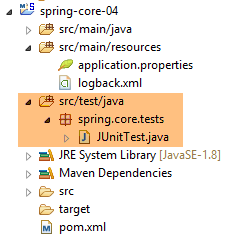 |
[JUnitTest] 类位于 Maven 项目的 [src/test/java] 目录中。该目录中的文件不会被包含在最终的项目归档中。其代码如下:
package spring.core.tests;

import org.junit.Assert;
import org.junit.Test;
import org.junit.runner.RunWith;
import org.springframework.beans.factory.annotation.Autowired;
import org.springframework.beans.factory.annotation.Qualifier;
import org.springframework.boot.test.SpringApplicationConfiguration;
import org.springframework.test.context.junit4.SpringJUnit4ClassRunner;

import spring.core.config.Config;
import spring.core.dao.IDao;
import spring.core.metier.IMetier;
import spring.core.ui.IUi;

@SpringApplicationConfiguration(classes = { Config.class })
@RunWith(SpringJUnit4ClassRunner.class)
public class JUnitTest {
...
}
- 第 16 行:[@SpringApplicationConfiguration] 注解是 Spring Boot Test 项目(第 8 行)的一部分。它是通过 [pom.xml] 文件中的以下依赖引入的:
        <dependency>
            <groupId>org.springframework.boot</groupId>
            <artifactId>spring-boot-starter</artifactId>
</dependency>
该注解的参数是用于构建测试所需 Spring 上下文的配置类列表。这里我们使用前面已经介绍过的 [Config] 配置类;
- 第 17 行:[@RunWith] 注解是 JUnit 注解(第 5 行)。其参数指定负责运行测试的类,而非默认的 JUnit 框架类。该类是一个 Spring 类(第 9 行)。它将使用测试类中存在的 Spring 注解;
完整的类如下所示
...

@SpringApplicationConfiguration(classes = { Config.class })
@RunWith(SpringJUnit4ClassRunner.class)
public class JUnitTest {

    // layer [UI]
    @Autowired
    @Qualifier("ui1")
    private IUi ui1;

    @Autowired
    @Qualifier("ui2")
    private IUi ui2;

    // business] layer
    @Autowired
    @Qualifier("metier1")
    private IMetier metier1;

    @Autowired
    @Qualifier("metier2")
    private IMetier metier2;

    // layer [dao]
    @Autowired
    @Qualifier("dao1")
    private IDao dao1;

    @Autowired
    @Qualifier("dao2")
    private IDao dao2;

    @Test
    public void testDao() {
        Assert.assertEquals(30, dao1.doSomethingInDaoLayer(10, 20));
        Assert.assertEquals(-10, dao2.doSomethingInDaoLayer(10, 20));
    }

    @Test
    public void testMetier() {
        Assert.assertEquals(32, metier1.doSomethingInMetierLayer(10, 20));
        Assert.assertEquals(-12, metier2.doSomethingInMetierLayer(10, 20));
    }

    @Test
    public void testUI() {
        Assert.assertEquals(34, ui1.doSomethingInUiLayer(10, 20));
        Assert.assertEquals(-14, ui2.doSomethingInUiLayer(10, 20));
    }

}
- 第 8–10 行:我们注入(第 8 行)名为(第 9 行)[ui1] 的 Bean。请注意,在第 10 行,我们注入的是接口实例而非类实例;
- 第 21–32 行:[Config] 类中定义的其他 Bean 也是以同样的方式注入的;
- 第 34 行:[@Test] 注解用于标记在测试期间执行的方法。其他可能的注解如下:
- [@BeforeClass]:在开始测试前执行的方法;
- [@AfterClass]:所有测试完成后执行的方法;
- [@Before]:在每次测试开始前执行的方法;
- [@After]:在每次测试结束后执行的方法;
- 第 36 行:我们验证调用 [dao1.doSomethingInDaoLayer(10, 20)] 是否返回 30。按惯例,第一个参数是预期值,第二个是实际值;
- 第 36 行:测试 [IDao] 接口的 [dao1] 实例;
- 第 37 行:测试 [IDao] 接口的 [dao2] 实例;
- 第 42 行:测试 [IMetier] 接口的 [metier1] 实例;
- 第 43 行:测试 [IMetier] 接口的 [metier2] 实例;
- 第 48 行:测试接口 [IUi] 的实例 [ui1];
- 第 36 行:测试接口 [IUi] 的实例 [ui2];
测试方法中可使用的断言如下:
- assertEquals(expression1, expression2):检查两个表达式的值是否相等。支持多种表达式类型(int、String、float、double、boolean、char、short)。如果两个表达式不相等,则抛出类型为 [AssertionFailedError] 的异常,
- assertEquals(real1, real2, delta):检查两个实数是否在误差 delta 范围内相等,即 abs(real1-real2) <= delta。例如,可以编写 assertEquals(real1, real2, 1E-6) 来验证两个值在 10⁻⁶ 误差范围内相等,
- assertEquals(message, expression1, expression2) 和 assertEquals(message, real1, real2, delta) 是允许您指定错误消息的变体,该消息将与 [assertEquals] 方法失败时抛出的 [AssertionFailedError] 异常相关联,
- assertNotNull(Object) 和 assertNotNull(message, Object):检查 Object 引用是否为空,
- assertNull(Object) 和 assertNull(message, Object):检查 Object 引用是否为空,
- assertSame(Object1, Object2) 和 assertSame(message, Object1, Object2):检查 Object1 和 Object2 引用是否指向同一个对象,
- assertNotSame(Object1, Object2) 和 assertNotSame(message, Object1, Object2):检查 Object1 和 Object2 引用是否不指向同一个对象;
要运行此测试,请按以下步骤操作:
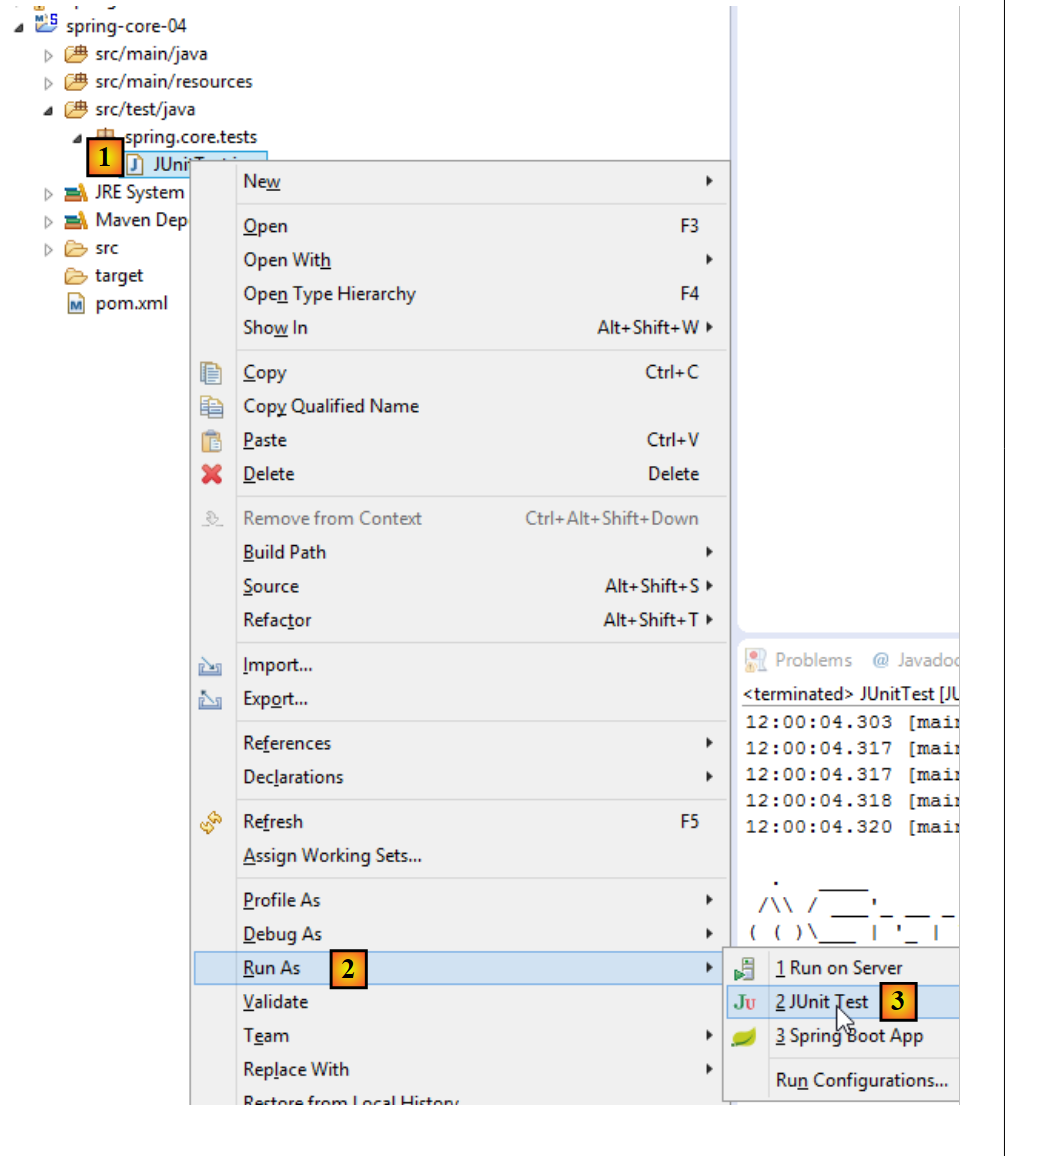 |
得到以下结果:
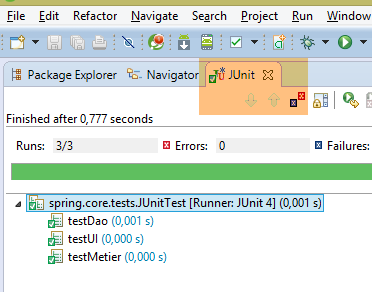 |
这里,所有测试均通过。这个示例说明了什么?它展示了Spring框架在配置分层架构时所提供的灵活性。您只需通过配置,即可选择使用[Ui1, Metier1, Dao1]或[Ui2, Metier2, Dao2]的实现方案。 因此,在之前的 JUnit 测试中,如果你仅保留 [ui1, metier1, dao1] bean 的注入,你就正在使用第一种架构。要更改架构,只需更改被注入的 bean 即可。这无需修改实现接口的各层的代码。这种编程方式被称为基于接口的编程,因为我们不使用实现各层的类的实例,而是使用其接口的实例。
5.6. 结论
- Spring 管理着单例(单实例)对象。Spring 还管理着每次向 Spring 请求实例时都会被实例化的对象。本文档也将介绍这种情况;
- 这些对象可以通过多种方式声明,且这些方式可以组合使用:
- 在 XML 文件中,
- 在带有 [@Configuration] 注解的 Java 类中,
- 在标注了 [@Component, @Service, ...] 的任何 Java 类中;
- 可以通过 [@Autowired] 注解将一个 Spring 对象注入到另一个 Spring 对象中。这被称为依赖注入(DI);
- 当与基于接口的编程范式结合使用时,Spring 对于配置分层架构非常有用;