6. [课程]:JDBC API 入门
关键词:关系型数据库、JDBC API、SQLException。
6.1. 支持
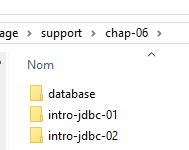 |  |  |
文件夹 [support / chap-06] 包含本章的 Eclipse 项目。
6.2. 架构
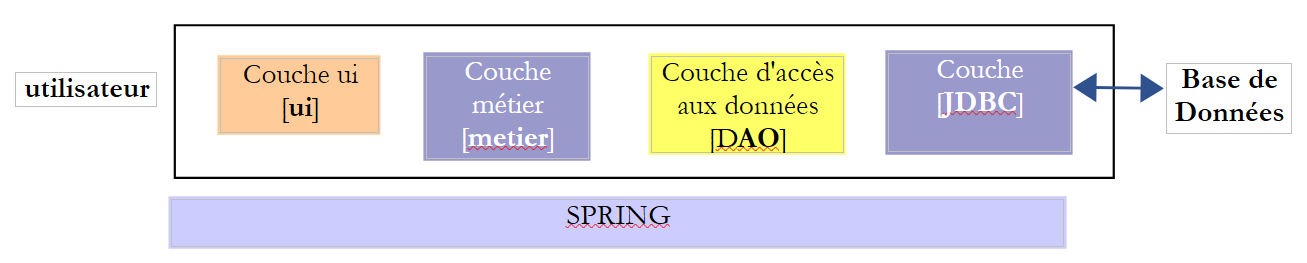 |
JDBC(Java数据库连接)层是一个通用的数据库访问接口。它始终向[DAO]层提供相同的接口。如果更换数据库管理系统(DBMS),只需更换JDBC驱动程序即可。[DAO]层保持不变。
6.3. 操作数据库的步骤
 |
在上述架构中,通过控制台程序操作数据库包括以下步骤:
- 加载数据库的 JDBC 驱动程序;
- 建立与数据库的连接;
- 在数据库上执行 SQL 语句并处理 SQL 语句的结果;
- 关闭连接;
步骤 1 仅执行一次。步骤 2–4 会反复执行。请注意,连接不会保持打开状态;一旦不再需要,它们就会立即关闭。
6.3.1. 步骤 1 - 将 JDBC 驱动程序加载到内存中
        // driver loading JDBC
        try {
            Class.forName(nom de la classe du pilote JDBC);
        } catch (ClassNotFoundException e1) {
             // handle the exception
}
第 3 行操作的目的是将数据库的 JDBC 驱动程序加载到内存中。此操作只需执行一次。不过,重复执行也不会导致错误。系统会在项目的类路径中搜索 JDBC 驱动程序类。因此,在 Eclipse 项目中,包含 JDBC 驱动程序类的 [jar] 文件必须已添加到项目的类路径中。
6.3.2. 步骤 2 - 建立连接
一旦 JDBC 驱动程序就位,我们就指示它打开与数据库的连接:
代码
package spring.jdbc;

import java.sql.Connection;
import java.sql.DriverManager;
import java.sql.PreparedStatement;
import java.sql.ResultSet;
import java.sql.SQLException;

public class IntroJdbc01 {

...
        Connection connexion = null;
        PreparedStatement ps = null;
        ResultSet rs = null;
        try {
            // opening connection
            connexion = DriverManager.getConnection(url, user, passwd);
...
        } catch (SQLException e1) {
            // we handle the exception
            ...
        } finally {
         // close connection
         if (connexion != null) {
            try {
                connexion.close();
            } catch (SQLException e2) {
                // handle the exception
                ...
            }
         }
}
- 第 3–7 行:实现 JDBC 接口的类均位于 [java.sql] 包中。 此外,一旦发生错误,它们都会抛出 [SQLException](第 19、27 行)。该异常继承自 [Exception] 类,属于所谓的“受检查异常”:必须使用 try/catch 代码块进行处理;或者,也可以选择不进行处理,并在方法签名中添加 [throws SQLException] 来表明该方法允许异常向上传播;
- 第 17 行:[DriverManager.getConnection] 是一个静态方法,接受三个参数:
- [url]:数据库 URL。这是一个字符串,具体取决于所使用的数据库。对于 MySQL,其格式为 [jdbc:mysql://localhost:3306/db_name];
- [user]:连接所有者;
- [passwd]:用户的密码;
- 第 24–30 行:必须在 [finally] 子句中关闭连接,以确保无论是否发生异常,连接都会被关闭。
6.3.3. 步骤 3 - 执行 SQL [SELECT] 语句
建立连接后,即可执行 SQL 命令。读取命令 [SELECT] 的处理方式与更新操作 [UPDATE、INSERT、DELETE] 不同。我们将从 [SELECT] SQL 命令开始讲解:
代码
Connection connexion = null;
        PreparedStatement ps = null;
        ResultSet rs = null;
        try {
            // opening connection
            connexion = DriverManager.getConnection(url, user, passwd);
            // start of transaction
            connexion.setAutoCommit(false);
            // in read-only mode
            connexion.setReadOnly(true);
            // table [PRODUITS] is read
            ps = connexion.prepareStatement("SELECT ID, NOM, CATEGORIE, PRIX, DESCRIPTION FROM PRODUITS");
            rs = ps.executeQuery();
            System.out.println("Liste des produits : ");
            while (rs.next()) {
                System.out.println(new Produit(rs.getInt(1), rs.getString(2), rs.getInt(3), rs.getDouble(4), rs.getString(5)));
            }
            // commit transaction
            connexion.commit();
        } catch (SQLException e1) {
            // we handle the exception
             doCatchException(connexion,e1);
        } finally {
            // we treat the finally
            doFinally(rs, ps, connexion);
        }

    private void doFinally(ResultSet rs, PreparedStatement ps, Connection connexion) {
....
}
- 第 8、10 行:以只读模式(第 10 行)打开事务(第 8 行)。 事务是一系列SQL语句,要么全部成功,要么全部失败。因此,在一个包含N条SQL语句的事务中,如果第(I+1)条语句失败,则之前的I条语句将被回滚。对于读取操作,事务并非必需。但是,创建只读事务可以使某些数据库管理系统(DBMS)进行特定的优化;
- 第 12 行:使用 [PreparedStatement]。通常 [PreparedStatement] 的参数用字符 ? 表示,但此处并非如此。 [PreparedStatement]是由DBMS预编译的语句。该预编译过程会产生开销,且仅执行一次。随后,DBMS会使用实际参数替换形式参数 ? 来执行该预编译语句。请注意,建议明确指定所需列,而非使用 * 符号来检索所有列。通过指定列名,可以基于它们在 SELECT 语句中的位置检索其值;
- 第 13 行:执行 [PreparedStatement]。获取一个 [ResultSet] 对象;
[ResultSet] 对象代表一张表,即一组行和列。在任何给定时刻,我们只能访问表中的一行,称为当前行。当 [ResultSet] 最初创建时,尚无当前行。我们必须执行 [ResultSet.next()] 操作才能获取它。next 方法的签名如下:
该方法尝试跳转到 [ResultSet] 的下一行,若成功则返回 true,否则返回 false。若成功,下一行将成为新的当前行。上一行将被丢弃且无法恢复。
[ResultSet] 表包含名为 labelCol1、labelCol2、... 的列,这些列名由已执行的 [SELECT] 查询指定。查询语句如下:
SELECT ID as myId, NOM as myNom, CATEGORIE as myCategorie, PRIX as myPrix, DESCRIPTION as myDescription FROM PRODUITS
- [ID] 列将被映射到 [ResultSet] 中名为 [myId] 的列;
- [NAME] 列将存入 [ResultSet] 中名为 [myName] 的列;
- ...
在上例中,标识符 [myCol] 被称为列标签。如果没有这些标签,[ResultSet] 列的名称将取决于数据库管理系统(DBMS)。当 [SELECT] 操作针对单个表时,列标签默认即为 SELECT 语句所请求的列名。问题出现在 [SELECT] 操作涉及多个表且这些表包含相同列名时,如下例所示:
SELECT PRODUITS.NOM, CATEGORIES.NOM FROM PRODUITS, CATEGORIES WHERE PRODUITS.CATEGORIE_ID=CATEGORIES.ID
假设 [PRODUCTS] 表与 [CATEGORIES] 表之间存在外键关系,表示为 [PRODUCTS].CATEGORY_ID --> [CATEGORIES].ID,且 [PRODUCTS] 和 [CATEGORIES] 表均包含 [NAME] 字段。 在这种情况下,[ResultSet] 中为 [PRODUCTS].NAME 和 [CATEGORIES].NAME 列指定的名称取决于数据库管理系统(DBMS)。为了实现跨 DBMS 的可移植性,此处必须使用列标签,因此我们将写为:
SELECT PRODUITS.NOM as p_NOM, CATEGORIES.NOM as c_NOM FROM PRODUITS, CATEGORIES WHERE PRODUITS.CATEGORIE_ID=CATEGORIES.ID
要访问 [ResultSet] 中当前行的各个字段,可使用以下方法:
用于从当前行中检索名为“labelColi”的列,即 [SELECT] 语句中带有该标签的列。 Type 指“labelColi”字段的数据类型。可使用以下 [getType] 方法:getInt、getLong、getString、getDouble、getFloat、getDate 等。除了使用列名,您还可以使用该列在已执行的 [SELECT] 查询中的位置:
其中 i 是目标列的索引(i>=1)。
- 第 15–17 行:从数据库中读取值;
- 第 19 行:事务被提交(也称为提交)。这将终止事务并释放 DBMS 为其分配的资源;
- 第 25 行:在 [finally] 代码块中释放资源。这会调用后续的 [doFinally] 方法:
private void doFinally(ResultSet rs, PreparedStatement ps, Connection connexion) {
        // closure ResultSet
        if (rs != null) {
            try {
                rs.close();
            } catch (SQLException e1) {

            }
        }
        // closure [PreparedStatement]
        if (ps != null) {
            try {
                ps.close();
            } catch (SQLException e2) {

            }
        }
        if (connexion != null) {
            try {
                // close connection
                connexion.close();
            } catch (SQLException e3) {
                 // handle the exception
            }
        }
    }
- 第 3–9 行:关闭 [ResultSet];
- 第 11–17 行:关闭 [PreparedStatement];
- 第 18–27 行:关闭连接;
第 3–17 行的关闭语句似乎是多余的,因为连接已在第 18–25 行关闭。事实上,在某些情况下它们并非多余,建议保留这些语句 [http://stackoverflow.com/questions/4507440/must-jdbc-resultsets-and-statements-be-closed-separately-although-the-connection]。
- 第 22 行:该异常由以下 [doCatchException] 方法处理:
    private static void doCatchException(Connection connexion, Throwable th) {
        // cancel transaction
        try {
            if (connexion != null) {
                connexion.rollback();
            }
        } catch (SQLException e2) {
            // handle the exception
        }
}
- 第 4–6 行:事务被回滚。这将终止事务,数据库管理系统 (DBMS) 即可释放分配给该事务的资源;
6.3.4. 步骤 3 - 执行 SQL 语句 [INSERT, UPDATE, DELETE]
SQL 语句 [INSERT、UPDATE、DELETE] 属于更新操作:它们会修改数据库,但不会返回任何行。唯一返回的信息是受更新操作影响的行数。
代码
Connection connexion = null;
        PreparedStatement ps = null;
        try {
            // ouverture connexion
            connexion = DriverManager.getConnection(url, user, passwd);
            // début transaction
            connexion.setAutoCommit(false);
            // en mode lecture / écriture
            connexion.setReadOnly(false);
            // on met à jour la table
            ps = connexion.prepareStatement("UPDATE PRODUITS SET PRIX=PRIX*1.1 WHERE CATEGORIE=?");
            // catégorie 1
            ps.setInt(1, 10);
            // exécution
            int nbLignes=ps.executeUpdate();
            // commit transaction
            connexion.commit();
        } catch (SQLException e1) {
            // on traite l'exception
            doCatchException(connexion, e1);
        } finally {
            // on traite le finally
            doFinally(null, ps, connexion);
        }
    }
- 第 9 行:该连接用于读写操作;
- 第 11 行:一个包含 1 个参数(用 ? 表示)的 [PreparedStatement]。参数可以有多个,编号从 1 开始;
- 第 13 行:将其值赋给该参数。[setType] 的第一个参数是该参数在 [PreparedStatement] 中的位置(1、2、...),第二个参数是赋给它的值。您可以使用 [setInt、setLong、setFloat、setDouble、setString、setDate、...] 等方法;
- 第 15 行:使用 [executeUpdate] 方法,而非 [executeQuery](后者专用于 SELECT 语句)。该方法返回受操作影响的行数,可能为 0。
- 第 17 行:提交事务;
6.3.5. 步骤 4 - 关闭连接
在多用户环境中,必须尽快关闭连接,因为数据库管理系统(DBMS)接受的打开连接数量是有限的。在之前的示例中,连接是在 SQL 操作的 [finally] 子句中关闭的,这样无论是否发生异常,连接都会被关闭。
6.4. 示例项目
6.4.1. 支持
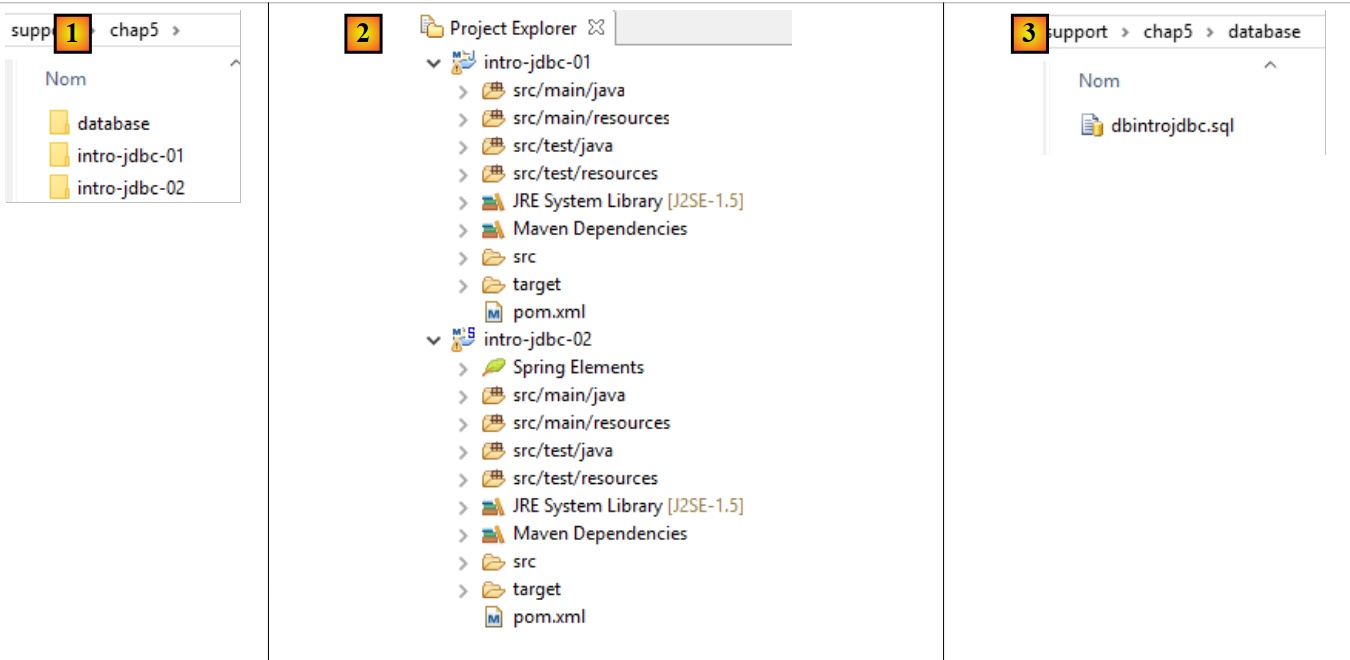 |
[support / chap5] 文件夹包含本章的 Eclipse 项目 [1, 2]。[database] 文件夹包含用于创建本章示例 MySQL 数据库的 SQL 脚本 [1, 3]。
6.4.2. 所使用的数据库
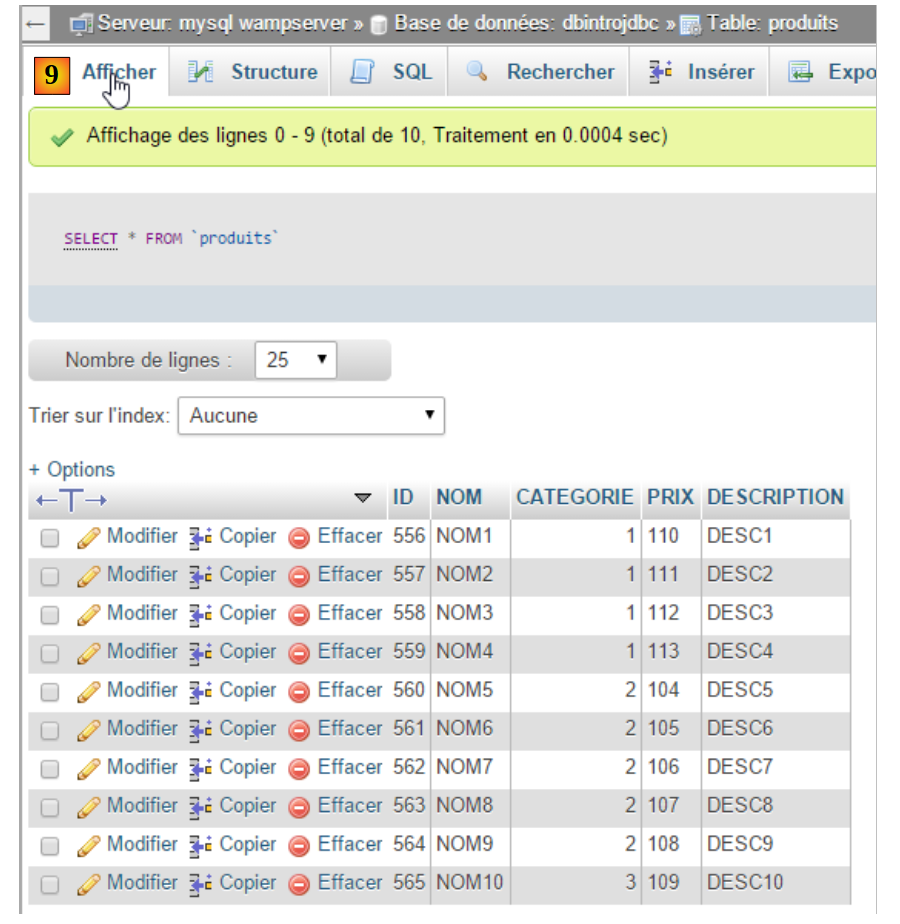
以下示例使用以下 MySQL 数据库:
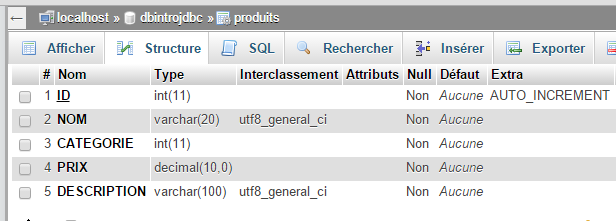 |
- [ID]:处于 AUTO_INCREMENT 模式的主键(如果未指定主键,DBMS 会自动生成);
- [NAME]: 产品名称——唯一;
- [CATEGORY]: 类别编号;
- [PRICE]:其价格;
- [DESCRIPTION]: 产品描述;
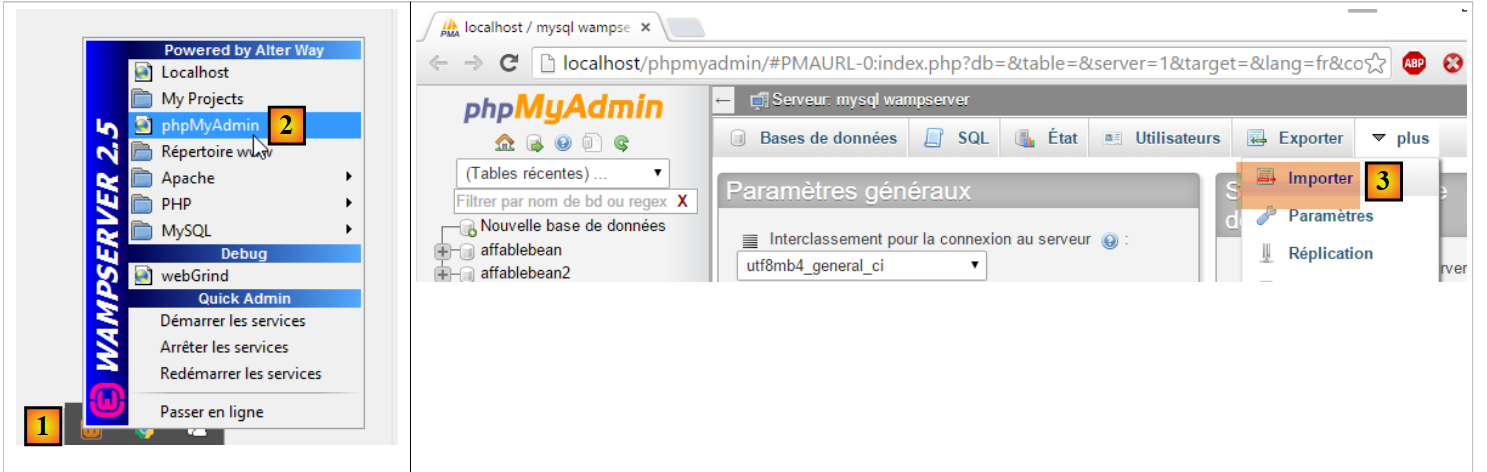
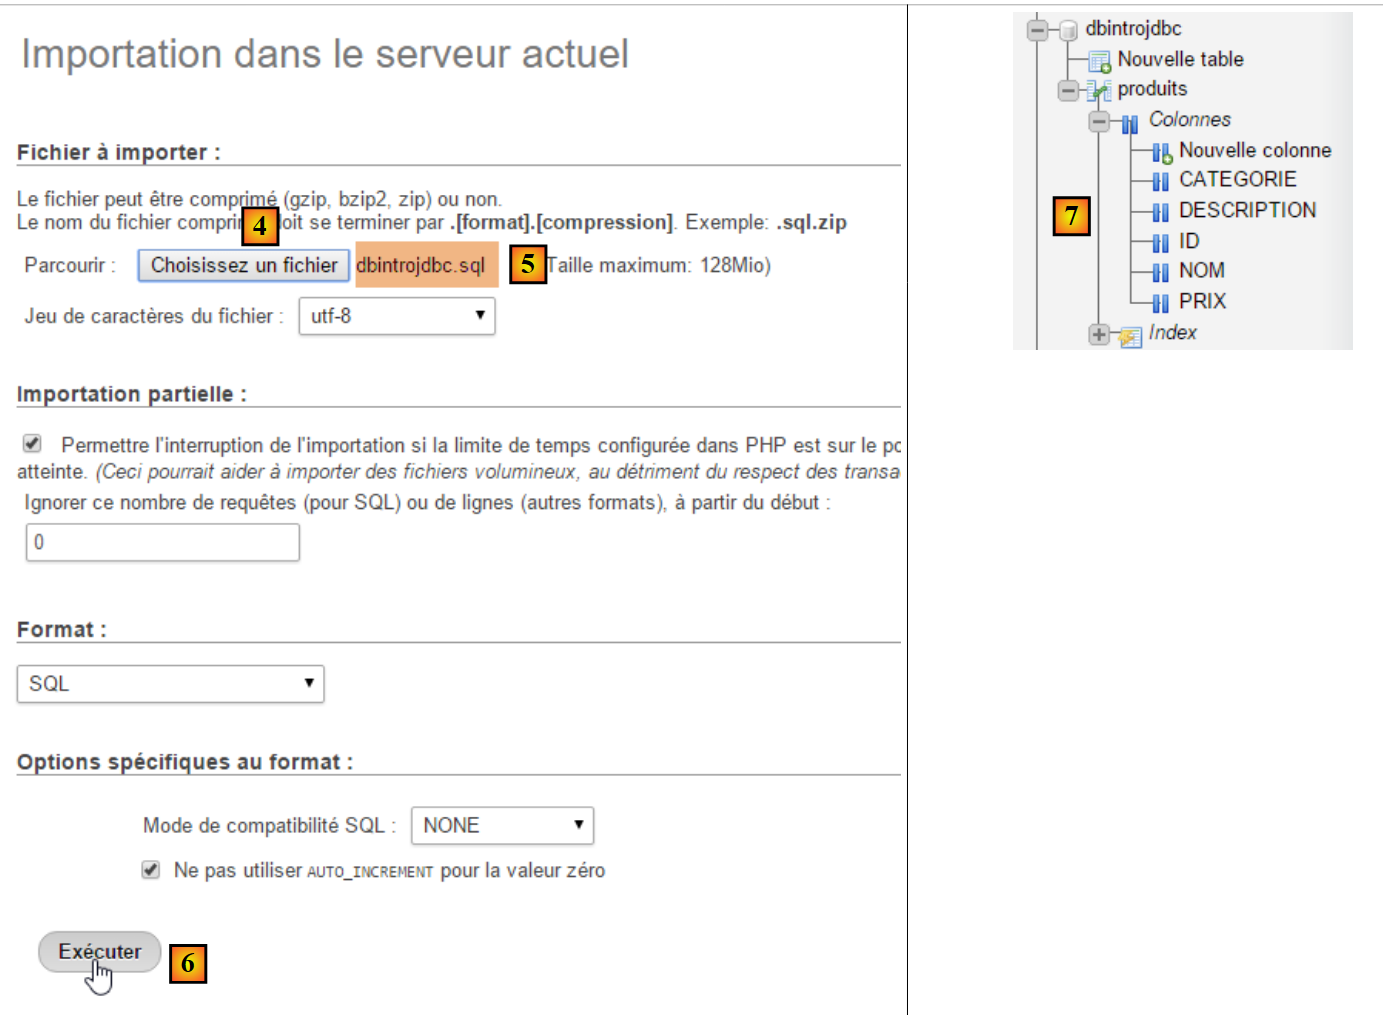
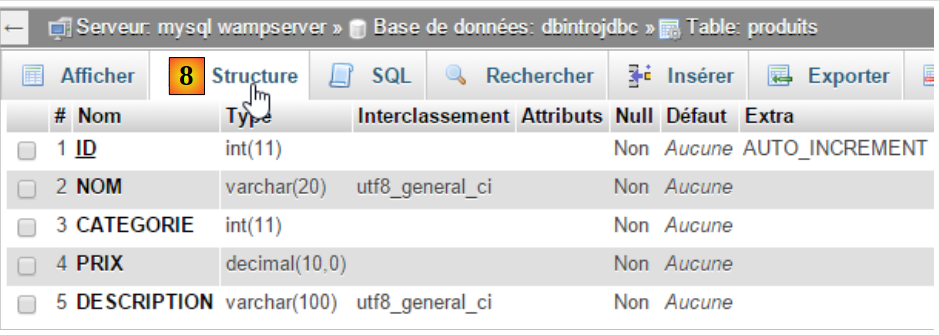
我们将使用 [WampServer] 工具按以下步骤创建该表 [1-9]:
 |
 |
 |
 |
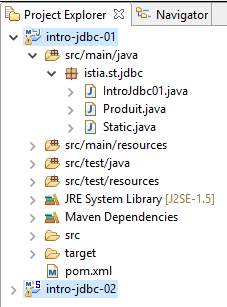
6.4.3. Eclipse 项目
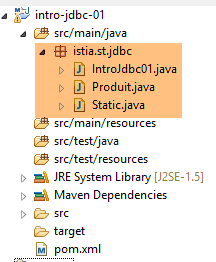 |
该项目是一个由以下 [pom.xml] 文件定义的 Maven 项目:
<project xmlns="http://maven.apache.org/POM/4.0.0" xmlns:xsi="http://www.w3.org/2001/XMLSchema-instance"
    xsi:schemaLocation="http://maven.apache.org/POM/4.0.0 http://maven.apache.org/xsd/maven-4.0.0.xsd">
    <modelVersion>4.0.0</modelVersion>
    <groupId>istia.st.jdbc</groupId>
    <artifactId>intro-jdbc-01</artifactId>
    <version>0.0.1-SNAPSHOT</version>
    <dependencies>
        <dependency>
            <groupId>mysql</groupId>
            <artifactId>mysql-connector-java</artifactId>
            <version>5.1.34</version>
        </dependency>
        <dependency>
            <groupId>com.fasterxml.jackson.core</groupId>
            <artifactId>jackson-databind</artifactId>
            <version>2.5.1</version>
        </dependency>
    </dependencies>
</project>
- 第 8–12 行:MySQL5 数据库管理系统(DBMS)的 JDBC 驱动程序;
- 第 13–17 行:一个能够处理 JSON(JavaScript 对象表示法)的库(参见第 22.6 节)。我们将使用它以 JSON 格式显示数据库中的产品;
6.4.4. Product 类
[Product] 类如下所示:
package istia.st.jdbc;

import com.fasterxml.jackson.core.JsonProcessingException;
import com.fasterxml.jackson.databind.ObjectMapper;

public class Produit {

    // fields
    private int id;
    private String nom;
    private int categorie;
    private double prix;
    private String description;

    // manufacturers
    public Produit() {

    }

    public Produit(int id, String nom, int categorie, double prix, String description) {
        this.id = id;
        this.nom = nom;
        this.categorie = categorie;
        this.prix = prix;
        this.description = description;
    }

    // getters and setters
    ...

    // to String
    public String toString() {
        try {
            return new ObjectMapper().writeValueAsString(this);
        } catch (JsonProcessingException e) {
            e.printStackTrace();
            return null;
        }
    }
}
- 第 34 行:我们使用 JSON 库来显示产品的 JSON 字符串。这将生成类似于以下内容的输出:
Liste des produits :
{"id":1,"nom":"NOM1","categorie":1,"prix":100.0,"description":"DESC1"}
{"id":2,"nom":"NOM2","categorie":1,"prix":101.0,"description":"DESC2"}
上述 [toString] 方法的优势在于,即使向类中添加或移除了字段,其 [toString] 方法仍然有效。此外,如果字段本身是对象(列表、数组、字典、用户对象),JSON 库可以进一步将其转换为 JSON 字符串;
6.4.5. [Static] 类
[Static] 类将主类中经常使用的方法集中在一起:
package istia.st.jdbc;

import java.util.ArrayList;
import java.util.List;

public class Static {

    public static List<String> getErreursFromThrowable(Throwable th) {
        // retrieve the list of exception error msgs
        List<String> erreurs = new ArrayList<String>();
        while (th != null) {
            // throwable error message
            erreurs.add(th.getMessage());
            // we move on to the cause of throwable
            th = th.getCause();
        }
        // result
        return erreurs;
    }

    public static void show(String title, List<String> messages){
        // title
        System.out.println(String.format("%s : ",title));
        // messages
        for(String message : messages){
            System.out.println(String.format("- %s",message));
        }
    }
}
- 第 8–19 行:返回一个包含错误的列表,这些错误封装在一个类型为 [Throwable] 的对象中,该类型是 [Exception] 类的超类;
- 第 21–28 行:在屏幕上显示一条消息列表;
这段代码本可以放在主类中,因为这里只有它在使用。不过,我们正在考虑更广泛的情况,即其他类可能也需要这段代码。
6.4.6. 主类的骨架
package istia.st.jdbc;

import java.sql.Connection;
import java.sql.DriverManager;
import java.sql.PreparedStatement;
import java.sql.ResultSet;
import java.sql.SQLException;

public class IntroJdbc01 {

    // constants
    final static String url = "jdbc:mysql://localhost:3306/dbIntroJdbc";
    final static String user = "root";
    final static String passwd = "";
    final static String insert = "INSERT INTO PRODUITS(ID, NOM, CATEGORIE, PRIX, DESCRIPTION) VALUES (?, ?, ?, ?, ?)";
    final static String delete = "DELETE FROM PRODUITS";
    final static String select = "SELECT ID, NOM, CATEGORIE, PRIX, DESCRIPTION FROM PRODUITS";
    final static String update = "UPDATE PRODUITS SET PRIX=PRIX*1.1 WHERE CATEGORIE=?";
    final static String insert2 = "INSERT INTO PRODUITS(ID, NOM, CATEGORIE, PRIX, DESCRIPTION) VALUES (100,'X',1,1,'x')";

    public static void main(String[] args) {
        // loading the JDBC driver from MySQL
        try {
            Class.forName("com.mysql.jdbc.Driver");
        } catch (ClassNotFoundException e1) {
            doCatchException("Pilote JDBC introuvable", null, e1);
            return;
        }
        // empty table [PRODUITS]
        delete();
        // fill it
        insert();
        // we read it
        select();
        // update
        update();
        // display
        select();
        // insertion of two identical elements
        // insertion must fail and neither element is inserted because of the transaction
        insert2();
        // we check
        select();
        // finish
        System.out.println("Travail terminé");
    }

    // product list
    private static void select() {
...
    }

    // product deletion
    public static void delete() {
...
    }

    // add products
    public static void insert() {
...
    }

    // add 2 products
    public static void insert2() {
...
    }

    // product updates
    public static void update() {
..
    }

    private static void doFinally(ResultSet rs, PreparedStatement ps, Connection connexion) {
        // closure ResultSet
        if (rs != null) {
            try {
                rs.close();
            } catch (SQLException e1) {

            }
        }
        // closure [PreparedStatement]
        if (ps != null) {
            try {
                ps.close();
            } catch (SQLException e2) {

            }
        }
        // close connection
        if (connexion != null) {
            try {
                connexion.close();
            } catch (SQLException e3) {
                // display error msg
                Static.show("Les erreurs suivantes se sont produites lors de la fermeture de la connexion",
                        Static.getErreursFromThrowable(e3));
            }
        }
    }

    private static void doCatchException(String title, Connection connexion, Throwable th) {
        // display error msg
        Static.show(title, Static.getErreursFromThrowable(th));
        // cancel transaction
        try {
            if (connexion != null) {
                connexion.rollback();
            }
        } catch (SQLException e2) {
            // display error msg
            Static.show(title, Static.getErreursFromThrowable(e2));
        }
    }
}
6.4.7. 删除 products 表中的内容
[delete] 方法用于删除表中的内容:
// product deletion
    public static void delete() {
        Connection connexion = null;
        PreparedStatement ps = null;
        try {
            // opening connection
            connexion = DriverManager.getConnection(url, user, passwd);
            // start of transaction
            connexion.setAutoCommit(false);
            // empty table [PRODUITS]
            ps = connexion.prepareStatement(delete);
            ps.executeUpdate();
            // commit transaction
            connexion.commit();
            // return to default mode
            connexion.setAutoCommit(true);
        } catch (SQLException e1) {
            // we handle the exception
            doCatchException("Les erreurs suivantes se sont produites à la suppression du contenu de la table", connexion, e1);
        } finally {
            // we treat the finally
            doFinally(null, null, connexion);
        }
    }
此示例使用了事务。事务允许您将一组 SQL 语句进行打包,这些语句要么全部成功,要么全部回滚。需要注意以下四种操作:
- 开始事务:[connection.setAutoCommit(false)];
- 成功结束事务:[connection.commit()]。此时,事务期间在数据库上执行的所有操作均被提交;
- 事务失败结束:[connection.rollback()]。此时,事务期间在数据库上执行的所有操作都会被回滚;
- 恢复到 [auto-commit] 模式(即 JDBC API 的默认模式):[connection.setAutoCommit(true)]。在此模式下,每个 SQL 语句都属于一个事务。因此,如果您执行两次插入操作,而第二次失败:
- 在 [AutoCommit=true] 模式下,第一个插入操作将保留(它已被第一次自动提交所提交);
- 在 [AutoCommit=false] 模式下,第一个插入操作会被回滚;
在我们的示例中,每当发生异常时,我们都会在 [doCatchException] 方法中回滚事务:
    private static void doCatchException(String title, Connection connexion, Throwable th) {
        // display error msg
        Static.show(title, Static.getErreursFromThrowable(th));
        // cancel transaction
        try {
            if (connexion != null) {
                connexion.rollback();
            }
        } catch (SQLException e2) {
            // display error msg
            Static.show("Erreur lors de l'annulation de la transaction", Static.getErreursFromThrowable(e2));
        }
}
6.4.8. 创建 products 表的内容
[insert] 方法用于创建表中的数据:
// add products
    public static void insert() {
        Connection connexion = null;
        PreparedStatement ps = null;
        try {
            // opening connection
            connexion = DriverManager.getConnection(url, user, passwd);
            // start of transaction
            connexion.setAutoCommit(false);
            // fill the table
            ps = connexion.prepareStatement(insert);
            for (int i = 0; i < 10; i++) {
                // preparation
                int n = i + 1;
                ps.setInt(1, n);
                ps.setString(2, String.format("NOM%s", n));
                ps.setInt(3, n / 5 + 1);
                ps.setDouble(4, 100 * (1 + (double) i / 100));
                ps.setString(5, String.format("DESC%s", n));
                // execution
                ps.executeUpdate();
            }
            // commit transaction
            connexion.commit();
            // return to default mode
            connexion.setAutoCommit(true);
        } catch (SQLException e1) {
            // we handle the exception
            doCatchException("Les erreurs suivantes se sont produites à la création du contenu de la table", connexion, e1);
        } finally {
            // we treat the finally
            doFinally(null, null, connexion);
        }
    }
6.4.9. 显示 products 表的内容
[select] 方法用于显示表的内容:
    // product list
    private static void select() {
        Connection connexion = null;
        PreparedStatement ps = null;
        ResultSet rs = null;
        try {
            // opening connection
            connexion = DriverManager.getConnection(url, user, passwd);
            // start of transaction
            connexion.setAutoCommit(false);
            // table [PRODUITS] is read
            ps = connexion.prepareStatement(select);
            rs = ps.executeQuery();
            System.out.println("Liste des produits : ");
            while (rs.next()) {
                System.out.println(new Produit(rs.getInt(1), rs.getString(2), rs.getInt(3), rs.getDouble(4), rs.getString(5)));
            }
            // commit transaction
            connexion.commit();
            // return to default mode
            connexion.setAutoCommit(true);
        } catch (SQLException e1) {
            // we handle the exception
            doCatchException("Les erreurs suivantes se sont produites à la lecture de la table", connexion, e1);
        } finally {
            // we treat the finally
            doFinally(null, null, connexion);
        }
}
6.4.10. 更新表内容
[update] 方法用于更新特定产品:
// product updates
    public static void update() {
        Connection connexion = null;
        PreparedStatement ps = null;
        try {
            // opening connection
            connexion = DriverManager.getConnection(url, user, passwd);
            // start of transaction
            connexion.setAutoCommit(false);
            // table is updated
            ps = connexion.prepareStatement(update);
            // category 1
            ps.setInt(1, 1);
            // execution
            ps.executeUpdate();
            // commit transaction
            connexion.commit();
            // return to default mode
            connexion.setAutoCommit(true);
        } catch (SQLException e1) {
            // we handle the exception
            doCatchException("Les erreurs suivantes se sont produites à la mise à jour du contenu de la table", connexion, e1);
        } finally {
            // we treat the finally
            doFinally(null, null, connexion);
        }
    }
6.4.11. 事务的作用
[insert2] 方法试图将两个主键相同的产品插入到表中,这是不被允许的。由于我们处于事务中,因此第一次插入操作将被回滚。
// add 2 pro ducts with the same primary keys
    public static void insert2() {
        Connection connexion = null;
        PreparedStatement ps = null;
        try {
            // opening connection
            connexion = DriverManager.getConnection(url, user, passwd);
            // start of transaction
            connexion.setAutoCommit(false);
            // add 1 line
            ps = connexion.prepareStatement(insert2);
            // execution
            ps.executeUpdate();
            // we add the same line a 2nd time, with the same primary key
            // the insertion must fail and neither of the two elements must be inserted because of the transaction
            ps.executeUpdate();
            // commit transaction
            connexion.commit();
            // return to default mode
            connexion.setAutoCommit(true);
        } catch (SQLException e1) {
            // we handle the exception
            doCatchException("Les erreurs suivantes se sont produites lors de l'ajout", connexion, e1);
        } finally {
            // we treat the finally
            doFinally(null, null, connexion);
        }
    }
6.4.12. 结果
执行 [main] 方法的结果如下:
6.5. 使用 [DataSource] 数据源
我们将使用 [javax.sql.DataSource] 数据源重新审视之前的应用程序:
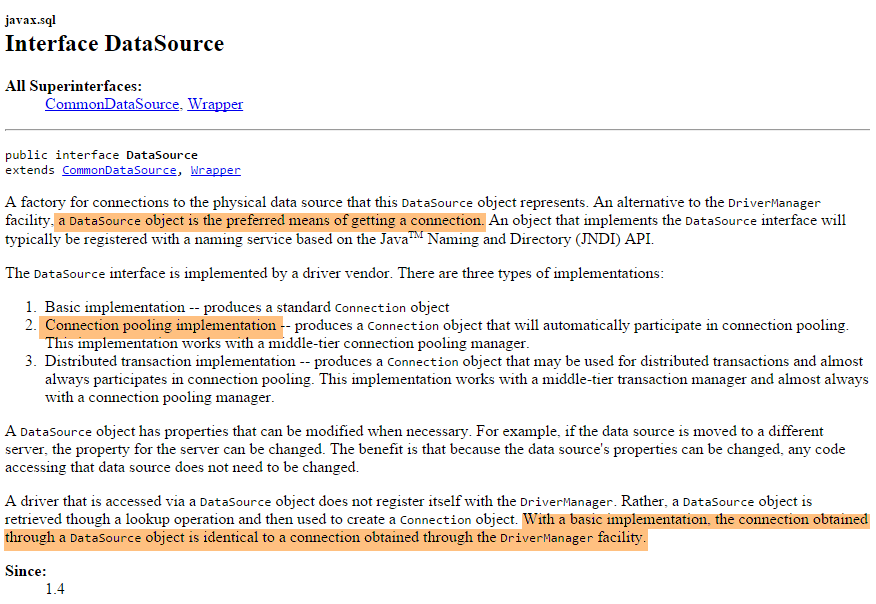
我们将使用由 [org.apache.tomcat.jdbc.pool.DataSource] 类实现的数据源。该类使用连接池,即一组已打开的连接:
- 当连接池被实例化时,会向数据库打开一定数量的连接。该数量可通过配置进行调整;
- 当 Java 代码打开连接时,该连接由连接池提供;
- 当 Java 代码关闭连接时,该连接将返回给连接池;
最终,连接仅需建立一次,从而提升了数据库访问性能。该数据源将在一个 Spring 配置类中进行定义
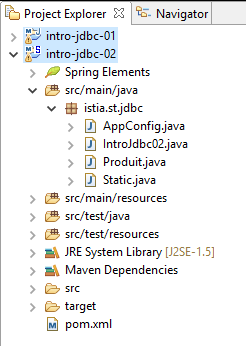
6.5.1. Eclipse 项目
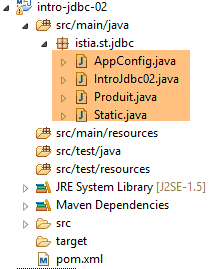 |
该项目是一个由以下 [pom.xml] 文件定义的 Maven 项目:
<project xmlns="http://maven.apache.org/POM/4.0.0" xmlns:xsi="http://www.w3.org/2001/XMLSchema-instance"
    xsi:schemaLocation="http://maven.apache.org/POM/4.0.0 http://maven.apache.org/xsd/maven-4.0.0.xsd">
    <modelVersion>4.0.0</modelVersion>
    <groupId>istia.st.jdbc</groupId>
    <artifactId>intro-jdbc-02</artifactId>
    <version>0.0.1-SNAPSHOT</version>
    <dependencies>
        <!-- MySQL -->
        <dependency>
            <groupId>mysql</groupId>
            <artifactId>mysql-connector-java</artifactId>
            <version>5.1.34</version>
        </dependency>
        <!-- library jSON -->
        <dependency>
            <groupId>com.fasterxml.jackson.core</groupId>
            <artifactId>jackson-databind</artifactId>
            <version>2.5.1</version>
        </dependency>
        <!-- Spring -->
        <dependency>
            <groupId>org.springframework</groupId>
            <artifactId>spring-context</artifactId>
            <version>4.1.3.RELEASE</version>
        </dependency>
        <!-- Tomcat Jdbc -->
        <dependency>
            <groupId>org.apache.tomcat</groupId>
            <artifactId>tomcat-jdbc</artifactId>
            <version>8.0.20</version>
        </dependency>
    </dependencies>
</project>
- 第 21–25 行:对 Spring 的依赖;
- 第 27–31 行:对提供数据源的库的依赖;
Spring 配置类 [AppConfig] 如下所示:
package istia.st.jdbc;

import org.apache.tomcat.jdbc.pool.DataSource;
import org.springframework.context.annotation.Bean;
import org.springframework.context.annotation.Configuration;

@Configuration
public class AppConfig {

    // constantes
    final static String URL = "jdbc:mysql://localhost:3306/dbIntroJdbc";
    final static String USER = "root";
    final static String PASSWD = "";
    final static String INSERT = "INSERT INTO PRODUITS(ID, NOM, CATEGORIE, PRIX, DESCRIPTION) VALUES (?, ?, ?, ?, ?)";
    final static String DELETE = "DELETE FROM PRODUITS";
    final static String SELECT = "SELECT ID, NOM, CATEGORIE, PRIX, DESCRIPTION FROM PRODUITS";
    final static String UPDATE = "UPDATE PRODUITS SET PRIX=PRIX*1.1 WHERE CATEGORIE=?";
    final static String INSERT2 = "INSERT INTO PRODUITS(ID, NOM, CATEGORIE, PRIX, DESCRIPTION) VALUES (100,'X',1,1,'x')";
    final static String DRIVER_CLASSNAME = "com.mysql.jdbc.Driver";

    @Bean
    public DataSource dataSource() {
        // source de données TomcatJdbc
        DataSource dataSource = new DataSource();
        // configuration accès JDBC
        dataSource.setDriverClassName(DRIVER_CLASSNAME);
        dataSource.setUsername(USER);
        dataSource.setPassword(PASSWD);
        dataSource.setUrl(URL);
        // une connexion ouverte initialement
        dataSource.setInitialSize(1);
        // résultat
        return dataSource;
    }
}
- 第 11–19 行:之前在 [IntroJdbc01] 中定义的常量已移至 [AppConfig];
- 第 31–34 行:定义数据源的 Spring Bean;
- 第 24 行:创建数据源,该数据源尚未配置;
- 第 26–29 行:允许数据源连接到数据库的信息;
- 第 31 行:创建一个包含 1 个连接的连接池。此处无需更多连接,因为永远不会出现多个并发连接;
6.5.2. 主类
主类 [IntroJdbc02] 如下所示:
package istia.st.jdbc;

import java.sql.Connection;
import java.sql.PreparedStatement;
import java.sql.ResultSet;
import java.sql.SQLException;

import javax.sql.DataSource;

import org.springframework.context.annotation.AnnotationConfigApplicationContext;

public class IntroJdbc02 {
    // data source
    private static DataSource dataSource;

    public static void main(String[] args) {
        // spring context retrieval
        AnnotationConfigApplicationContext ctx = new AnnotationConfigApplicationContext(AppConfig.class);
        // data source recovery
        dataSource = ctx.getBean(DataSource.class);
        // empty table [PRODUITS]
        delete();
...
        // finish
        ctx.close();
        System.out.println("Travail terminé");
    }

    // product list
    private static void select() {
        Connection connexion = null;
        PreparedStatement ps = null;
        ResultSet rs = null;
        try {
            // opening connection
            connexion = dataSource.getConnection();
            // start of transaction
            connexion.setAutoCommit(false);
...
        } catch (SQLException e1) {
            // we handle the exception
            doCatchException("Les erreurs suivantes se sont produites à la lecture de la table", connexion, e1);
        } finally {
            // we treat the finally
            doFinally(null, null, connexion);
        }
    }
...
}
- 第 14 行:数据源。请注意,其类型为 [javax.sql.DataSource],这是一个接口;
- 第 18 行:Spring 对象的实例化;
- 第 20 行:获取数据源的引用。请注意,实际使用的类从未被提及。因此,此处没有任何迹象表明正在使用 [TomcatJdbc] 的实现;
- 第 36 行:获取已打开的连接;
- 其余代码与 [IntroJdbc01] 类完全相同;
6.6. 结论
有关数据库管理的更多信息,请参阅文档 [使用 Spring 生态系统操作关系型数据库]。