5. Graphical User Interfaces
Here, we will show you how to build graphical user interfaces with JAVA. First, we will look at the base classes that allow us to build a graphical user interface. Initially, we will not use any automatic generation tools. Then we will use JBuilder, a Borland/Inprise development tool that facilitates the development of Java applications, particularly the construction of graphical user interfaces.
5.1. The Basics of Graphical User Interfaces
5.1.1. A Simple Window
Consider the following code:
// imported classes
import javax.swing.*;
import java.awt.*;

    // the form class
  public class form1 extends JFrame {

      // the manufacturer
      public form1() {
            // window title
            this.setTitle("Mon premier formulaire");
            // window dimensions
            this.setSize(new Dimension(300,100));
      }//manufacturer

      // test function
      public static void main(String[] args) {
            // the form is displayed
            new form1().setVisible(true);
      }
  }//class
Executing the previous code displays the following window:
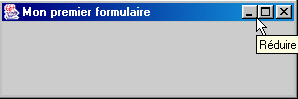
A graphical user interface generally derives from the base class JFrame:
public class form1 extends JFrame {
The base class JFrame defines a basic window with close, maximize/minimize buttons, adjustable size, etc., and handles events on these graphical objects. Here we specialize the base class by setting its title and its width (300 pixels) and height (100 pixels). This is done in its constructor:
      // the manufacturer
      public form1() {
            // window title
            this.setTitle("Mon premier formulaire");
            // window dimensions
            this.setSize(new Dimension(300,100));
      }//manufacturer
The window title is set by the setTitle method, and its dimensions by the setSize method. This method accepts as a parameter a Dimension object (width, height), where width and height are the window's width and height expressed in pixels.
The main method launches the graphical application as follows:
new form1().setVisible(true);
A form of type form1 is then created (new form1()) and displayed (setVisible(true)), then the application listens for events occurring on the form (clicks, mouse movements, etc.) and executes those that the form handles. Here, our form does not handle any events other than those handled by the base class JFrame (clicks on close buttons, maximize/minimize, window resizing, window movement, etc.).
When testing this program by running it from a DOS window using:
to execute the file form1.class, we observe that when we close the window that was displayed, we do not "regain control" of the DOS window, as if the program had not finished. This is indeed the case. The program executes as follows:
- Initially, a first execution thread is launched to execute the main method
- when this method creates the form and displays it, a second thread is created to specifically handle events related to the form
- After this creation, and in our example, the main method’s thread terminates, leaving only the GUI execution thread.
- When the window is closed, it disappears but does not interrupt the thread in which it was running
- For now, we are forced to stop this thread by pressing Ctrl-C in the DOS window from which the program was launched.
Let’s verify the existence of two separate threads: one in which the main method runs, and the other in which the GUI window runs:
// imported classes
import javax.swing.*;
import java.awt.*;
import java.io.*;

// the form class
 public class form1 extends JFrame {

// the manufacturer
 public form1() {
   // window title
   this.setTitle("Mon premier formulaire");
   // window dimensions
   this.setSize(new Dimension(300,100));
}//manufacturer

// test function
 public static void main(String[] args) {
   // follow-up
   System.out.println("Début du thread main");
   // the form is displayed
   new form1().setVisible(true);
   // follow-up
   System.out.println("Fin du thread main");
}//hand
}//class
Execution yields the following results:

We can see that the main thread has finished while the window is still displayed. Closing the window does not terminate the thread in which it was running. To stop this thread, press Ctrl-C again in the DOS window.
To conclude this example, note the imported packages:
- javax.swing for the class JFrame
- java.awt for the Dimension class
5.1.2. Handling an Event
In the previous example, we would need to handle the window closing ourselves so that when it occurs, we can stop the application, which is not currently done. To do this, we need to create an object that "listens" for events occurring on the window and detects the "window close" event. This object is called a "listener" or event handler. There are different types of handlers for the various events that can occur on the components of a graphical user interface. For the JFrame component, the listener is called WindowListener and is an interface defining the following methods (see Java documentation)
Method Summary | ||
void | windowActivated(WindowEvent e) The window becomes the active window | |
void | windowClosed(WindowEvent e) The window has been closed | |
void | windowClosing(WindowEvent e) The user or the program requested that the window be closed | |
void | windowDeactivated(WindowEvent e) The window is no longer the active window | |
void | windowDeiconified(WindowEvent e) The window switches from minimized to normal state | |
void | windowIconified(WindowEvent e) The window switches from normal state to minimized state | |
void | windowOpened(WindowEvent e) The window becomes visible for the first time | |
There are therefore seven events that can be handled. The handlers all receive as a parameter an object of type WindowEvent, which we will ignore for now. The event of interest here is the closing of the window, which must be handled by the windowClosing method. To handle this event, we can create a Windowlistener object using an anonymous class as follows:
   // creation of an event manager
   WindowListener win=new WindowListener(){
     public void windowActivated(WindowEvent e){}
     public void windowClosed(WindowEvent e){}
     public void windowClosing(WindowEvent e){System.exit(0);}
     public void windowDeactivated(WindowEvent e){}
     public void windowDeiconified(WindowEvent e){}
     public void windowIconified(WindowEvent e){}
     public void windowOpened(WindowEvent e){}
   };//definition win
Our event handler implementing the WindowListener interface must define the seven methods of this interface. Since we only want to handle window closing, we only define code for the windowClosing method. When the other events occur, we will be notified but will not take any action. What will we do when notified that the window is closing (windowClosing)? We will terminate the application:
public void windowClosing(WindowEvent e){System.exit(0);}
Here we have an object capable of handling window events in general. How do we associate it with a specific window? The JFrame class has a method addWindowListener(WindowListener win) that allows you to associate a "window" event handler with a given window. So here, in the window constructor, we will write:
   // creation of an event manager
   WindowListener win=new WindowListener(){
     public void windowActivated(WindowEvent e){}
     public void windowClosed(WindowEvent e){}
     public void windowClosing(WindowEvent e){System.exit(0);}
     public void windowDeactivated(WindowEvent e){}
     public void windowDeiconified(WindowEvent e){}
     public void windowIconified(WindowEvent e){}
     public void windowOpened(WindowEvent e){}
   };//definition win
    // this event handler will manage the events of the current window
   this.addWindowListener(win);
The complete program is as follows:
// imported classes
import javax.swing.*;
import java.awt.*;
import java.io.*;
import java.awt.event.*;

// the form class
 public class form2 extends JFrame {

// the manufacturer
 public form2() {
   // window title
   this.setTitle("Mon premier formulaire");
   // window dimensions
   this.setSize(new Dimension(300,100));
   // creation of an event manager
   WindowListener win=new WindowListener(){
     public void windowActivated(WindowEvent e){}
     public void windowClosed(WindowEvent e){}
     public void windowClosing(WindowEvent e){System.exit(0);}
     public void windowDeactivated(WindowEvent e){}
     public void windowDeiconified(WindowEvent e){}
     public void windowIconified(WindowEvent e){}
     public void windowOpened(WindowEvent e){}
   };//definition win
   // this event handler will manage the events of the current window
   this.addWindowListener(win);
}//manufacturer

// test function
 public static void main(String[] args) {
   // the form is displayed
   new form2().setVisible(true);
}//hand
}//class
The java.awt.event package contains the WindowListener interface. When we run this program and close the window that appeared, we see in the DOS window where the program was launched that the program has finished executing, which was not the case before.
In our program, creating the object responsible for handling window events is somewhat cumbersome, as we are forced to define methods even for events we do not wish to handle. In this case, instead of using the WindowListener interface, we can use the WindowAdapter class. This class implements the WindowListener interface, with seven empty methods. By deriving the class WindowAdapter and redefining only the methods that interest us, we achieve the same result as with the interface WindowListener but without needing to define the methods that do not interest us. The sequence
- defining the event handler
- associating the handler with the window
can be performed as follows in our example:
   // creation of an event manager
   WindowAdapter win=new WindowAdapter(){
     public void windowClosing(WindowEvent e){System.exit(0);}
   };//definition win
   // this event handler will manage the events of the current window
   this.addWindowListener(win);
Here we use an anonymous class that inherits from the WindowAdapter class and overrides its windowClosing method. The program then becomes:
// imported classes
import javax.swing.*;
import java.awt.*;
import java.io.*;
import java.awt.event.*;

// the form class
 public class form2 extends JFrame {

// the manufacturer
 public form2() {
   // window title
   this.setTitle("Mon premier formulaire");
   // window dimensions
   this.setSize(new Dimension(300,100));
   // creation of an event manager
   WindowAdapter win=new WindowAdapter(){
     public void windowClosing(WindowEvent e){System.exit(0);}
   };//definition win
   // this event handler will manage the events of the current window
   this.addWindowListener(win); }//manufacturer

// test function
 public static void main(String[] args) {
   // the form is displayed
   new form2().setVisible(true);
}//hand
}//class
It produces the same results as the previous program but is simpler to write.
5.1.3. A form with a button
Now let’s add a button to our window:
// imported classes
import javax.swing.*;
import java.awt.*;
import java.io.*;
import java.awt.event.*;

// the form class
 public class form3 extends JFrame {

     // a button
  JButton btnTest=null;
  Container conteneur=null;

  // the manufacturer
  public form3() {
     // window title
    this.setTitle("Formulaire avec bouton");
     // window dimensions
    this.setSize(new Dimension(300,100));
    // creation of an event manager
    WindowAdapter win=new WindowAdapter(){
     public void windowClosing(WindowEvent e){System.exit(0);}
    };//definition win
     // this event handler will manage the events of the current window
    this.addWindowListener(win);
     // retrieve the window container
    conteneur=this.getContentPane();
     // select a layout manager for components in this container
    conteneur.setLayout(new FlowLayout());
    // create a button
    btnTest=new JButton();
    // we set the wording
    btnTest.setText("Test");
    // add the button to the container
    conteneur.add(btnTest);
  }//manufacturer

  // test function
 public static void main(String[] args) {
    // the form is displayed
   new form3().setVisible(true);
}//hand
}//class
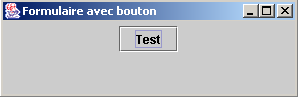
A JFrame window has a container into which graphical components (buttons, checkboxes, drop-down lists, etc.) can be placed. This container is available via the getContentPane method of the JFrame class:
  Container conteneur=null;
..........
     // retrieve the window container
    conteneur=this.getContentPane();
Any component is placed in the container using the add method of the Container class. Thus, to place component C in the previous container object, we write:
Where is this component placed in the container? There are various component layout managers named XXXLayout, where XXX corresponds, for example, to Border, Flow, etc. Each layout manager has its own specific characteristics. For example, the FlowLayout manager arranges components in a row starting at the top of the form. When a row is filled, the components are placed on the next row. To associate a layout manager with a JFrame window, use the setLayout method of the JFrame class in the following form:
Thus, in our example, to associate a handler of type FlowLayout with the window, we wrote:
     // select a layout manager for components in this container
    conteneur.setLayout(new FlowLayout());
You can choose not to use a layout manager and write:
In this case, we must specify the exact coordinates of the component within the container in the form (x,y,width,height), where (x,y) are the coordinates of the component’s top-left corner within the container. This is the method we will use most often going forward.
We now know how components are added to the container (add) and where (setLayout). We still need to know the
components that can be placed in a container. Here we place a button modeled by the javax.swing.JButton class:
  JButton btnTest=null;
..........
     // create a button
    btnTest=new JButton();
    // we set the wording
    btnTest.setText("Test");
    // add the button to the container
    conteneur.add(btnTest);
When you run this program, you get the following window:
If you resize the form above, the container’s layout manager is automatically called to reposition the components:

This is the main benefit of layout managers: maintaining a consistent layout of components as the container’s size changes. Let’s use the null layout manager to see the difference. The button is now placed in the container using the following instructions:
// select a layout manager for components in this container
conteneur.setLayout(null);
    // create a button
btnTest=new JButton();
    // we set the wording
btnTest.setText("Test");
    // determine its location and dimensions
btnTest.setBounds(10,20,100,20);
     // add the button to the container
conteneur.add(btnTest);
Here, we explicitly place the button at point (10,20) on the form and set its dimensions to 100 pixels wide and 20 pixels tall. The new window looks like this:
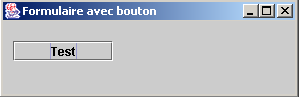
If we resize the window, the button remains in the same place.

If you click the Test button, nothing happens. This is because we haven’t yet associated an event handler with the button. To find out what types of event handlers are available for a given component, you can look in the definition of its class for methods that allow you to associate an event handler with the component. The javax.swing.JButton class derives from the javax.swing.AbstractButton class, which contains the following methods:
Method Summary | ||
void | addActionListener(ActionListener l) | |
void | addChangeListener(ChangeListener l) | |
void | addItemListener(ItemListener l) | |
Here, you need to consult the documentation to determine which event handler handles the button click. It is the ActionListener interface. This interface defines only one method:
Method Summary | ||
void | actionPerformed(ActionEvent e) | |
The method receives a ActionEvent parameter, which we will ignore for now. To handle the click on the btntest button in our program, we first associate an event handler with it:
        btnTest.addActionListener(new ActionListener()
         {
                public void actionPerformed(ActionEvent evt){
                  btnTest_clic(evt);
              }
            }//anonymous class
    );//evt manager
Here, the method actionPerformed refers to the method btnTest_clic, which we define as follows:
public void btnTest_clic(ActionEvent evt){
  // console monitoring
System.out.println("clic sur bouton");
}//btnTest_click
Every time the user clicks the Test button, a message is written to the console. This is shown by the following execution:
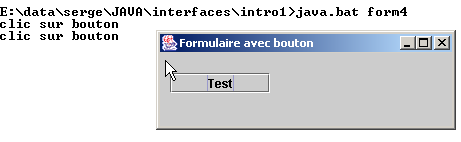
The complete program is as follows:
// imported classes
import javax.swing.*;
import java.awt.*;
import java.io.*;
import java.awt.event.*;

// the form class
 public class form4 extends JFrame {

     // a button
  JButton btnTest=null;
  Container conteneur=null;

  // the manufacturer
  public form4() {
     // window title
    this.setTitle("Formulaire avec bouton");
     // window dimensions
    this.setSize(new Dimension(300,100));
    // creation of an event manager
    WindowAdapter win=new WindowAdapter(){
     public void windowClosing(WindowEvent e){System.exit(0);}
    };//definition win
     // this event handler will manage the events of the current window
    this.addWindowListener(win);
     // retrieve the window container
    conteneur=this.getContentPane();
     // select a layout manager for components in this container
    conteneur.setLayout(null);
    // create a button
    btnTest=new JButton();
    // we set the wording
    btnTest.setText("Test");
    // determine its location and dimensions
    btnTest.setBounds(10,20,100,20);
     // we associate it with an event manager
    btnTest.addActionListener(new ActionListener()
        {
            public void actionPerformed(ActionEvent evt){
              btnTest_clic(evt);
          }
        }//anonymous class
    );//evt manager
     // add the button to the container
    conteneur.add(btnTest);
  }//manufacturer

    public void btnTest_clic(ActionEvent evt){
       // console monitoring
    System.out.println("clic sur bouton");
  }//btnTest_click

  // test function
 public static void main(String[] args) {
    // the form is displayed
   new form4().setVisible(true);
}//hand
}//class
5.1.4. Event Handlers
The main Swing components we will cover are windows (JFrame), buttons (JButton), checkboxes (JCheckBox), radio buttons (JButtonRadio), drop-down lists (JComboBox), lists (JList), sliders (JScrollBar), labels (JLabel), single-line text boxes (JTextField) or multi-line text boxes (JTextArea), menus (JMenuBar), menu items (JMenuItem).
The following tables list some event handlers and the events they are associated with.
Handler | Component(s) | Registration method | Event |
ActionListener | JButton, JCheckbox, JButtonRadio, JMenuItem | public void addActionListener(ActionListener) | Click on the button, checkbox, radio button, or menu item |
JTextField | |||
ItemListener | JComboBox, JList | public void addItemListener(ItemListener) | The selected item has changed |
InputMethodListener | JTextField, JTextArea | public void addMethodInputListener(InputMethodListener) | The text in the input field has changed or the input cursor has moved |
CaretListener | JTextField, JTextArea | public void addcaretListener(CaretListener) | The input cursor has changed position |
AdjustmentListener | JScrollBar | public void addAdjustmentListener(AdjustmentListener) | The drive value has changed |
MouseMotionListener | public void addMouseMotionListener(MouseMotionListener) | the mouse has moved | |
WindowListener | JFrame | public void addWindowlistener(WindowListener) | window event |
MouseListener | public void addMouselistener(MouseListener) | mouse events (click, entering/leaving a component's area, button pressed, release) | |
FocusListener | public void addFocuslistener(FocusListener) | focus event (gained, lost) | |
KeyListener | public void addKeylistener(KeyListener) | keyboard event (key typed, pressed, released) |
Component | Method for registering event handlers |
JButton | public void addActionListener(ActionListener) |
JCheckbox | public void addItemListener(ItemListener) |
JCheckboxMenuItem | public void addItemListener(ItemListener) |
JComboBox | public void addItemListener(ItemListener) public void addActionListener(ActionListener) |
Container | public void addContainerListener(ContainerListener) |
JComponent | public void addComponentListener(ComponentListener) public void addFocusListener(FocusListener) public void addKeyListener(KeyListener) public void addMouseListener(MouseListener) public void addMouseMotionListener(MouseMotionListener) |
JFrame | public void addWindowlistener(WindowListener) |
JList | public void addItemListener(ItemListener) |
JMenuItem | public void addActionListener(ActionListener) |
JPanel | as Container |
JScrollPane | as Container |
JScrollBar | public void addAdjustmentListener(AdjustmentListener) |
JTextComponent | public void addInputMethodListener(InputMethodListener) public void addCaretListener(CaretListener) |
JTextArea | as JTextComponent |
JTextField | as JTextComponent public void addActionListener(ActionListener) |
All components, except those of type TextXXX, are derived from the JComponent class and therefore also have the methods associated with that class.
5.1.5. Event Handler Methods
The following table lists the methods that the various event handlers must implement.
Interface | Methods |
ActionListener | public void actionPerformed(ActionEvent) |
AdjustmentListener | public void adjustmentValueChanged(AdjustmentEvent) |
ComponentListener | public void componentHidden(ComponentEvent) public void componentMoved(ComponentEvent) public void componentResized(ComponentEvent) public void componentShown(ComponentEvent) |
ContainerListener | public void componentAdded(ContainerEvent) public void componentRemoved(ContainerEvent) |
FocusListener | public void focusGained(FocusEvent) public void focusLost(FocusEvent) |
ItemListener | public void itemStateChanged(ItemEvent) |
KeyListener | public void keyPressed(KeyEvent) public void keyReleased(KeyEvent) public void keyTyped(KeyEvent) |
MouseListener | public void mouseClicked(MouseEvent) public void mouseEntered(MouseEvent) public void mouseExited(MouseEvent) public void mousePressed(MouseEvent) public void mouseReleased(MouseEvent) |
MouseMotionListener | public void mouseDragged(MouseEvent) public void mouseMoved(MouseEvent) |
TextListener | public void textValueChanged(TextEvent) |
InputmethodListener | public void InputMethodTextChanged(InputMethodEvent) public void caretPositionChanged(InputMethodEvent) |
CaretLisetner | public void caretUpdate(CaretEvent) |
WindowListener | public void windowActivated(WindowEvent) public void windowClosed(WindowEvent) public void windowClosing(WindowEvent) public void windowDeactivated(WindowEvent) public void windowDeiconified(WindowEvent) public void windowIconified(WindowEvent) public void windowOpened(WindowEvent) |
5.1.6. Adapter classes
As we saw with the WindowListener interface, there are classes named XXXAdapter that implement the XXXListener interfaces with empty methods. An event handler derived from a XXXAdapter class can then implement only a subset of the methods in the XXXListener interface—specifically, those required by the application.
Suppose we want to handle mouse clicks on a Frame component f1. We could associate an event handler with it using:
and write:
    public class gestionnaireSouris implements MouseListener{
         // we write the 5 methods of the MouseListener interface
        // mouseClicked, ..., mouseReleased)
    }// end of class
However, since we only want to handle mouse clicks, it is better to write:
public class gestionnaireSouris extends MouseAdapter{
        // we write a single method that handles mouse clicks
        public void mouseClicked(MouseEvent evt){
        …
        }
}// end of class
The following table lists the adapter classes for the various event handlers:
Event handler | Adapter |
ComponentListener | ComponentAdapter |
ContainerListener | ContainerAdapter |
FocusListener | FocusAdapter |
KeyListener | KeyAdapter |
MouseListener | MouseAdapter |
MouseMotionListener | MouseMotionAdapter |
WindowListener | WindowAdapter |
5.1.7. Conclusion
We have just presented the basic concepts of creating graphical user interfaces in Java:
- creating a window
- creating components
- associating components with the window using a layout manager
- associating event handlers with components
Now, rather than building graphical user interfaces "by hand" as we just did, we will use JBuilder, a Java development tool from Borland/Inprise in its version and supérieure.Nous versions, and we will use the components from the java.swing library currently recommended by Sun, the creator of Java.
5.2. Building a graphical user interface with JBuilder
5.2.1. Our first JBuilder project
To familiarize ourselves with JBuilder, let’s build a very simple application: an empty window.
- Launch JBuilder and select File/New Project. The first page of the wizard will then appear:
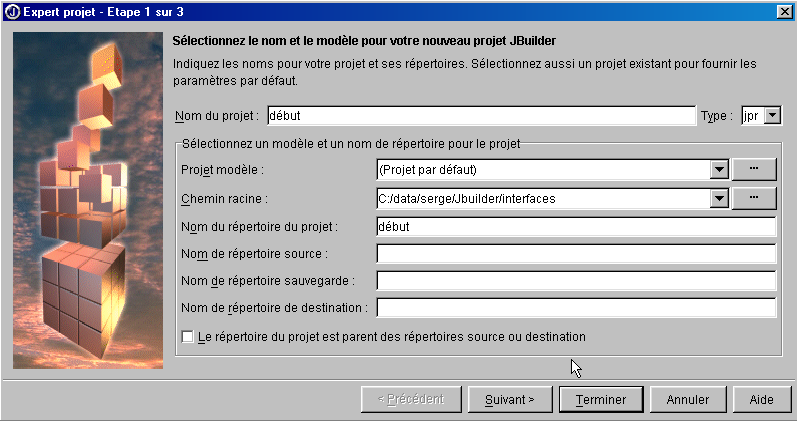
- Fill in the following fields:
Project Name | Start This will create a project file named début.jpr in the folder specified in the "Project Directory Name" field |
Root Path | Specify the folder where the project folder you are about to create will be located. |
Project directory name | Specify the name of the folder where all project files will be placed. This folder will be created under the directory specified in the "Root Path" field |
Source files (.java, .html, ...), destination files (.class, ...), and backup files may be placed in different directories. If you leave their fields blank, they will be placed in the same directory as the project.
Run [suivant]
- A screen confirms the selections from the previous step
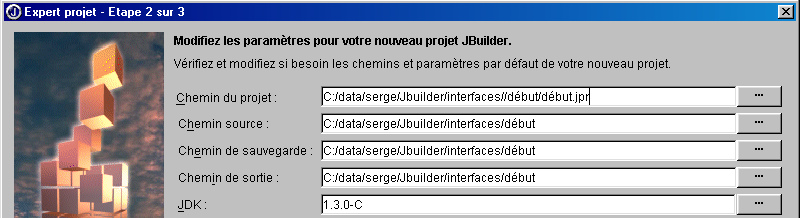
Select [suivant]
- A new screen asks you to describe your project:
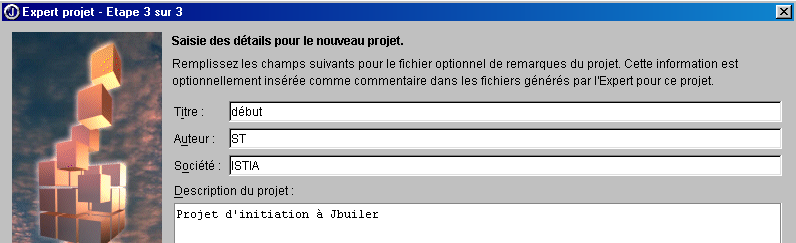
Select [terminer]
- Verify that the option View/Project option is checked. You should see your project structure in the left pane.
- Now let’s build a graphical user interface in this project. Select File/New/Application:
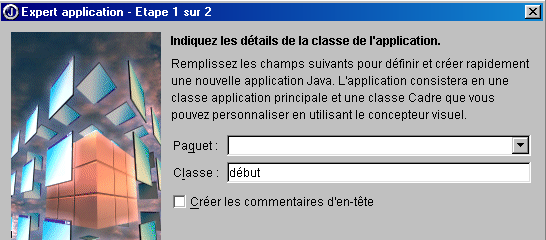
In the Class field, enter the name of the class to be created. Here, we used the same name as the project.
Click [suivant]
- The following screen appears:
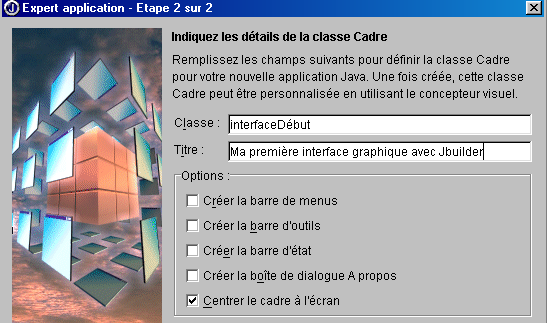
Class | interfaceDébut This is the name of the class corresponding to the window that will be created |
Title | This is the text that will appear in the window's title bar |
Note that above, we have specified that the window should be centered on the screen when the application starts.
Do [Terminer]
- This is where JBuilder comes in handy.
- It generates the .java source files for the two classes we named: the application class and the GUI class. These two files appear in the project structure in the left-hand window
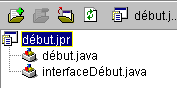
- To access the generated code for the two classes, simply double-click the corresponding .java file. We’ll return to the generated code later.
- Verify that the option View/Structure checkbox is selected. This allows you to view the structure of the currently selected class (double-click on the .java file). Here, for example, is the structure of the start class:
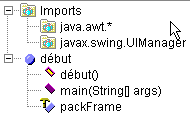
Here you can see:
-
the imported libraries (imports)
-
that there is a start() constructor
-
that there is a static method main()
-
that there is an attribute packFrame
What is the benefit of having access to a class’s structure?
-
You get an overview of it. This is useful if your class is complex.
-
You can access a method’s code by clicking on it in the class structure window. Again, this is useful if your class has hundreds of lines. You don’t have to scroll through every line to find the code you’re looking for.
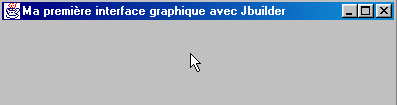
The code generated by JBuilder is already usable. Select Run/Run Project or press F9, and you’ll see the requested window:
Furthermore, it closes properly when you click the window’s close button. We have just built our first graphical user interface. We can save our project via File/Close Projects:
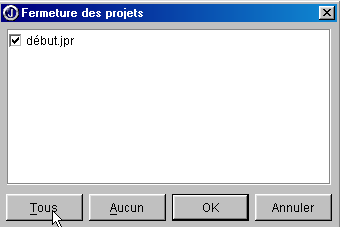
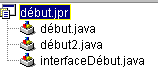
By clicking All, all projects in the window above will be selected. OK will close them. If we’re curious enough to navigate, using Windows Explorer, to our project folder (the one specified to the wizard at the start of project setup), we’ll find the following files there:
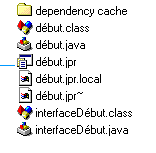
In our example, we specified that all files (.java source, .class output, .jpr~ backup) should be in the same folder as the .jpr project.
5.2.2. Files generated by JBuilder for a graphical interface
Let’s now take a look at the .java source files generated by JBuilder. It’s important to know how to read what’s generated, since most of the time we’ll need to add code to what’s already there. Let’s start by opening our project: File/Open Project and select the project début.jpr. We find the project we built earlier.
5.2.2.1. The main class
Let’s examine the début.java class by double-clicking its name in the window displaying the list of project files. We have the following code:
import javax.swing.UIManager;
import java.awt.*;

public class début {
  boolean packFrame = false;

   /**Building the application*/
  public début() {
    interfaceDébut frame = new interfaceDébut();

     //Validate frames with predefined sizes
     //Compact frames with preferred size information - e.g. from their layout
    if (packFrame) {
      frame.pack();
    }
    else {
      frame.validate();
    }
    //Center window
    Dimension screenSize = Toolkit.getDefaultToolkit().getScreenSize();
    Dimension frameSize = frame.getSize();
    if (frameSize.height > screenSize.height) {
      frameSize.height = screenSize.height;
    }
    if (frameSize.width > screenSize.width) {
      frameSize.width = screenSize.width;
    }
    frame.setLocation((screenSize.width - frameSize.width) / 2, (screenSize.height - frameSize.height) / 2);
    frame.setVisible(true);
  }
   /**Main method*/
  public static void main(String[] args) {
    try {
      UIManager.setLookAndFeel(UIManager.getSystemLookAndFeelClassName());
    }
    catch(Exception e) {
      e.printStackTrace();
    }
    new début();
  }
}
Let's comment on the generated code:
- The main function sets the appearance of the window (setLookAndFeel) and creates an instance of the début class.
- The début() constructor is then executed. It creates a frame instance of the window class (new interfaceDébut()). This instance is constructed but not displayed.
- The window is then sized according to the information available for each of the window’s components (frame.validate). It then begins its independent existence by displaying itself and responding to user input.
- The window is centered on the screen because we requested this when configuring the window with the wizard.
Let’s see what would happen if we reduced the code début.java to its bare minimum, as we did at the beginning of the chapter. Let’s create a new class. Go to File/New Class:
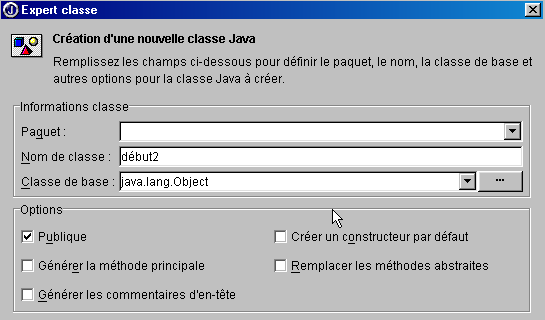
Name the new class début2 and create [Terminer]. A new file appears in the project:
The file début2.java is reduced to its simplest form:
Let’s complete the class as follows:
public class début2 {
   // main function
  public static void main(String args[]){
    // creates the
    new interfaceDébut().show();    // or new interfaceDébut.setVisible(true);
  }//hand
}//class start2
The main function creates an instance of the interfaceDébut window and displays it (show). Before running our project, we need to specify that the class containing the main function to be executed is now the début2 class. Right-click on the début.jpr project and select Properties, then the Execution tab:
21
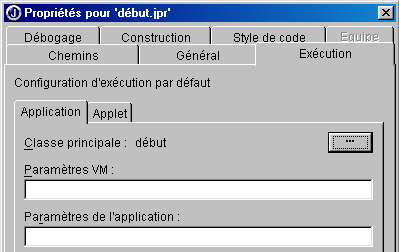
Here, it is indicated that the main class is début (1). Click the button (2) to select a different main class:
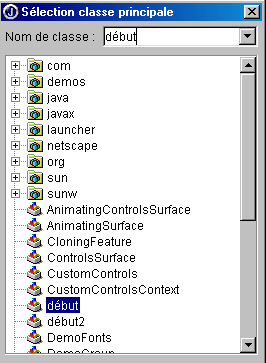
Select début2 and enter [OK].
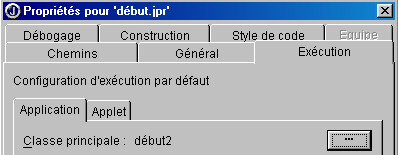
Click [OK] to confirm this choice, then run the project by selecting Run/Run Project or pressing F9. You will see the same window as with the "start" class, except that it is not centered since this was not requested here. From now on, we will no longer present the main class generated by JBuilder because it always does the same thing: create a window. From now on, we will focus on the window class.
5.2.2.2. The Window Class
Let’s now look at the code that was generated for the interfaceDébut class:
import java.awt.*;
import java.awt.event.*;
import javax.swing.*;

public class interfaceDébut extends JFrame {
  JPanel contentPane;
  BorderLayout borderLayout1 = new BorderLayout();

  /**Building the frame*/
  public interfaceDébut() {
    enableEvents(AWTEvent.WINDOW_EVENT_MASK);
    try {
      jbInit();
    }
    catch(Exception e) {
      e.printStackTrace();
    }
  }
   /**Initialize component*/
  private void jbInit() throws Exception  {
    contentPane = (JPanel) this.getContentPane();
    contentPane.setLayout(borderLayout1);
    this.setSize(new Dimension(400, 300));
    this.setTitle("Ma première interface graphique avec Jbuilder");
  }
   /**Replaced, so we can get out when the window is closed*/
  protected void processWindowEvent(WindowEvent e) {
    super.processWindowEvent(e);
    if (e.getID() == WindowEvent.WINDOW_CLOSING) {
      System.exit(0);
    }
  }
}
5.2.2.2.1. Imported libraries
These are the libraries java.awt, java.awt.event, and javax.swing. The first two were the only ones available for building graphical interfaces with early versions of Java. The javax.swing library is more recent. Here, it is required for the JFrame window type used in this example.
5.2.2.2.2. The attributes
JPanel is a container type in which components can be placed. BorderLayout is one of the layout manager types available for placing components in the container. In all our examples, we will not use a layout manager and will place the components ourselves at a specific location within the container. To do this, we will use the null layout manager.
5.2.2.2.3. The window constructor
/**Building the frame*/
public interfaceDébut() {
enableEvents(AWTEvent.WINDOW_EVENT_MASK);
try {
jbInit();
}
catch(Exception e) {
e.printStackTrace();
}
}
/**Initialize component*/
private void jbInit() throws Exception {
contentPane = (JPanel) this.getContentPane();
contentPane.setLayout(borderLayout1);
this.setSize(new Dimension(400, 300));
this.setTitle("Ma première interface graphique avec Jbuilder");
}
- The constructor first states that it will handle events on the window (enableEvents), then it calls the method jbInit.
- The container (JPanel) of the window (JFrame) is obtained (getContentPane)
- The layout manager is set (setLayout)
- The window size is set (setSize)
- The window title is set (setTitle)
5.2.2.2.4. The event handler
/**Replaced, so we can get out when the window is closed*/
protected void processWindowEvent(WindowEvent e) {
super.processWindowEvent(e);
if (e.getID() == WindowEvent.WINDOW_CLOSING) {
System.exit(0);
}
The constructor had indicated that the class would handle window events. The method processWindowEvent performs this task. It begins by passing the received WindowEvent event to its parent class (JFrame); then, if this event is the WINDOW_CLOSING event triggered by clicking the window’s close button, the application is terminated.
5.2.2.2.5. Conclusion
The code for the window class is different from the one shown in the example at the beginning of the chapter. If we were using a Java code generator other than JBuilder, we would likely have even different code. In practice, we will accept the code generated by JBuilder to build the window so that we can focus solely on writing the GUI event handlers.
5.2.3. Drawing a GUI
5.2.3.1. An example
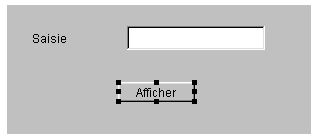
In the previous example, we didn't place any components in the window. Now let's build a window with a button, a label, and an input field:
The fields are as follows:
No. | name | type | role |
1 | lblSaisie | JLabel | a label |
2 | txtSaisie | JTextField | an input field |
3 | cmdAfficher | JButton | to display the contents of the input field in a dialog box txtSaisie |
Following the same procedure as for the previous project, build the project interface2.jpr without adding any components to the window for now.
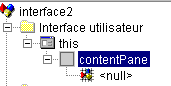
In the window above, select the interface2.java class for the window. To the right of this window is a tabbed folder:

The Source tab provides access to the source code of the interface2.java class. The Design tab allows you to visually build the window. Select this tab. You now see the window container, which will hold the components you place in it. It is currently empty. The left window shows the class structure:
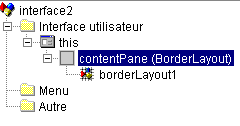
this | represents the window |
contentPane | its container, into which we will place components, as well as the layout mode for these components within the container (BorderLayout by default) |
borderLayout1 | an instance of the layout manager |
Select the this object. Its properties window then appears on the right:
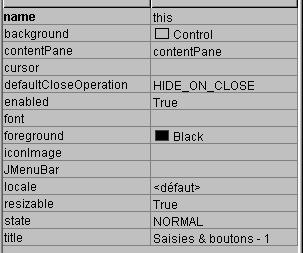
Some of these properties are worth noting:
background | to set the window's background color |
foreground | to set the color of the drawings in the window |
JMenuBar | to associate a menu with the window |
title | to give the window a title |
resizable | to set the window type |
font | to set the font for text in the window |
With the this object still selected, you can resize the container displayed on the screen by dragging the anchor points around the container:
We are now ready to drop components into the container above. Before doing so, we will change the layout manager. Select the contentPane object in the structure window:
Then, in the properties window for this object, select the layout property and choose the value null from the available options:
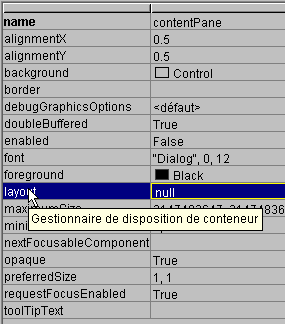
This absence of a layout manager will allow us to freely place components within the container. It is now time to select them.
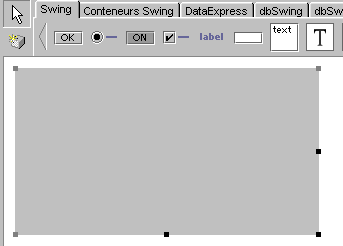
When the Design pane is selected, the components are available in a tabbed folder at the top of the design window:

To build the graphical interface, we have Swing components (1) and AWT components (2). We will use Swing components here. In the component bar above, select a JLabel component (3), a JTextField component (4), and a JButton component (5), and place them in the design window’s container.
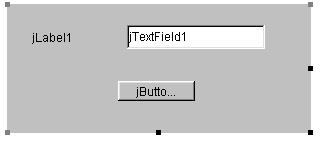
Now let’s customize each of these three components:
- the label (JLabel) jLabel1
Select the component to open its Properties window. In this window, modify the following properties: name: lblSaisie, text: Input
- the input field (JTextField) jTextfield1
Select the component to open its Properties window. In the Properties window, modify the following properties: name: txtSaisie, text: leave blank
- the button (JButton): name: cmdAfficher, text: Display
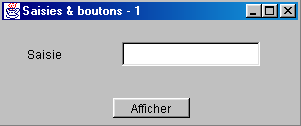
We now have the following window:
and the following structure:

We can run (F9) our project to get a first look at the window in action:
Close the window. We still need to write the procedure associated with a click on the Show button. Select the button to access its properties window. This window has two tabs: Properties and Events. Select Events.
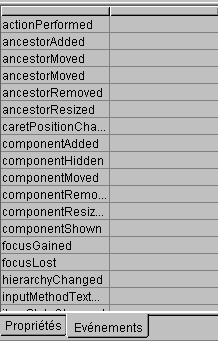
The left column of the window lists the possible events for the button. A click on a button corresponds to the event actionPerformed. The right column contains the name of the procedure called when the corresponding event occurs. Click on the cell to the right of the event actionPerformed:

JBuilder generates a default name for each event handler in the form nomComposant_nomEvénement; here, cmdAfficher_actionPerformed. You could delete the default name and enter a different one. To access the code for the cmdAfficher_actionPerformed handler, simply double-click its name above. This automatically takes you to the class’s source pane, positioned on the skeleton of the event handler’s code:
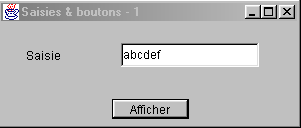
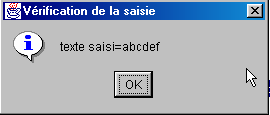
All that remains is to complete this code. Here, we want to display a dialog box containing the contents of the txtSaisie field:
void cmdAfficher_actionPerformed(ActionEvent e) {
JOptionPane.showMessageDialog(this, "texte saisi="+txtSaisie.getText(),
"Vérification de la saisie",JOptionPane.INFORMATION_MESSAGE);
}
JOptionPane is a class in the javax.swing library. It allows you to display messages accompanied by an icon or to request information from the user. Here, we use a static method of the class:

parentComponent | the "parent" container object of the dialog box: here this. |
message | an object to display. Here, the content of the input field |
title | the title of the dialog box |
messageType | the type of message to display. Determines the icon that will be displayed in the box next to the message. Possible values: INFORMATION_MESSAGE, QUESTION_MESSAGE, ERROR_MESSAGE, WARNING_MESSAGE, PLAIN_MESSAGE |
Let’s run our application (F9):
5.2.3.2. The window class code
import java.awt.*;
import java.awt.event.*;
import javax.swing.*;
import java.beans.*;
import javax.swing.event.*;
public class interface2 extends JFrame {
JPanel contentPane;
JLabel lblSaisie = new JLabel();
JTextField txtSaisie = new JTextField();
JButton cmdAfficher = new JButton();
/**Building the frame*/
public interface2() {
enableEvents(AWTEvent.WINDOW_EVENT_MASK);
try {
jbInit();
}
catch(Exception e) {
e.printStackTrace();
}
}
/**Initialize component*/
private void jbInit() throws Exception {
lblSaisie.setText("Saisie");
lblSaisie.setBounds(new Rectangle(25, 23, 71, 21));
contentPane = (JPanel) this.getContentPane();
contentPane.setLayout(null);
this.setSize(new Dimension(304, 129));
this.setTitle("Saisies & boutons - 1");
txtSaisie.setBounds(new Rectangle(120, 21, 138, 24));
cmdAfficher.setText("Afficher");
cmdAfficher.setBounds(new Rectangle(111, 77, 77, 20));
cmdAfficher.addActionListener(new java.awt.event.ActionListener() {
public void actionPerformed(ActionEvent e) {
cmdAfficher_actionPerformed(e);
}
});
contentPane.add(lblSaisie, null);
contentPane.add(txtSaisie, null);
contentPane.add(cmdAfficher, null);
}
/**Replaced, so we can get out when the window is closed*/
protected void processWindowEvent(WindowEvent e) {
super.processWindowEvent(e);
if (e.getID() == WindowEvent.WINDOW_CLOSING) {
System.exit(0);
}
}
void cmdAfficher_actionPerformed(ActionEvent e) {
JOptionPane.showMessageDialog(this, "texte saisi="+txtSaisie.getText(), "Vérification de la saisie",JOptionPane.INFORMATION_MESSAGE);
}
}
5.2.3.2.1. The attributes
JPanel contentPane;
JLabel lblSaisie = new JLabel();
JTextField txtSaisie = new JTextField();
JButton cmdAfficher = new JButton();
The container for the components of type JPanel and the three components are present.
5.2.3.2.2. The constructor
/**Building the frame*/
public interface2() {
enableEvents(AWTEvent.WINDOW_EVENT_MASK);
try {
jbInit();
}
catch(Exception e) {
e.printStackTrace();
}
}
/**Initialize component*/
private void jbInit() throws Exception {
lblSaisie.setText("Saisie");
lblSaisie.setBounds(new Rectangle(25, 23, 71, 21));
contentPane = (JPanel) this.getContentPane();
contentPane.setLayout(null);
this.setSize(new Dimension(304, 129));
this.setTitle("Saisies & boutons - 1");
txtSaisie.setBounds(new Rectangle(120, 21, 138, 24));
cmdAfficher.setText("Afficher");
cmdAfficher.setBounds(new Rectangle(111, 77, 77, 20));
cmdAfficher.addActionListener(new java.awt.event.ActionListener() {
public void actionPerformed(ActionEvent e) {
cmdAfficher_actionPerformed(e);
}
});
contentPane.add(lblSaisie, null);
contentPane.add(txtSaisie, null);
contentPane.add(cmdAfficher, null);
}
The interface2 constructor is similar to the constructor of the previous graphical interface we studied. The differences are found in the jbInit method: the window construction code depends on the components placed within it. We can reuse the code from jbInit by adding our own comments:
private void jbInit() throws Exception {
// the window itself (size, title)
this.setSize(new Dimension(304, 129));
this.setTitle("Saisies & boutons - 1");
// the component container
contentPane = (JPanel) this.getContentPane();
// no formatting manager for this container
contentPane.setLayout(null);
// label lblSaisie (label, position, size)
lblSaisie.setText("Saisie");
lblSaisie.setBounds(new Rectangle(25, 23, 71, 21));
// input field (position, size)
txtSaisie.setBounds(new Rectangle(120, 21, 138, 24));
// display button (label, position, size)
cmdAfficher.setText("Afficher");
cmdAfficher.setBounds(new Rectangle(111, 77, 77, 20));
// button event manager
cmdAfficher.addActionListener(new java.awt.event.ActionListener() {
public void actionPerformed(ActionEvent e) {
cmdAfficher_actionPerformed(e);
}
});
// add the 3 components to the container
contentPane.add(lblSaisie, null);
contentPane.add(txtSaisie, null);
contentPane.add(cmdAfficher, null);
}//jbInit
Two points are worth noting:
- this code could have been written by hand. This means that JBuilder is not required to build a graphical user interface.
- the way the event handler for the cmdAfficher button is set. The event handler for the cmdAfficher component could have been declared as cmdAfficher.addActionListener(new handler()) where handler would be a class with a public method actionPerformed responsible for handling the click on the Display button. Here, JBuilder uses an instance of an anonymous class as the handler:
new java.awt.event.ActionListener() {
public void actionPerformed(ActionEvent e) {
cmdAfficher_actionPerformed(e);
}
A new instance of the ActionListener interface is created, with its actionPerformed method defined immediately afterward. This method simply calls a method of the interface2 class. All of this is just a workaround to define the event-handling procedures for the window’s components within the same class as the window itself. We could do it differently:
which means that the method actionPerformed will be looked up in this, i.e., in the window class. This second method seems simpler, but the first has an advantage: it allows for different handlers for different buttons, whereas the second method does not. In the latter case, the single method actionPeformed must handle clicks on different buttons and therefore must first identify which button triggered the event before it can begin processing.
5.2.3.2.3. Event Handlers
We see the ones we’ve already covered:
/**Replaced, so we can get out when the window is closed*/
protected void processWindowEvent(WindowEvent e) {
super.processWindowEvent(e);
if (e.getID() == WindowEvent.WINDOW_CLOSING) {
System.exit(0);
}
}
// click on View button
void cmdAfficher_actionPerformed(ActionEvent e) {
JOptionPane.showMessageDialog(this, "texte saisi="+txtSaisie.getText(), "Vérification de la saisie",JOptionPane.INFORMATION_MESSAGE);
}
5.2.3.3. Conclusion
From the two projects studied, we can conclude that once the graphical user interface is built with JBuilder, the developer’s job is to write the event handlers for the events they want to handle for that graphical user interface.
5.2.4. Seeking Help
With Java, you often need help, particularly because of the very large number of available classes. Here are some tips for finding help on a class. Select Help/Help Topics from the menu.
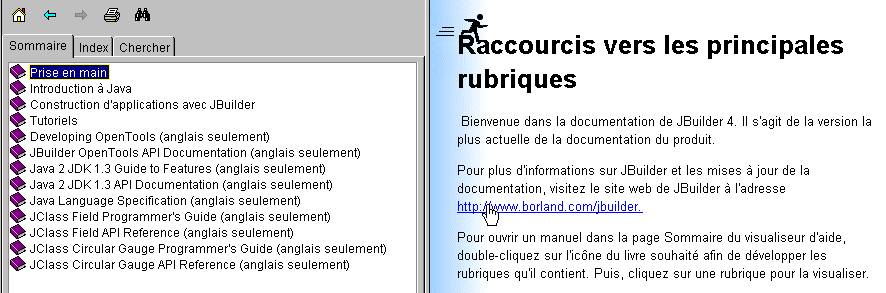
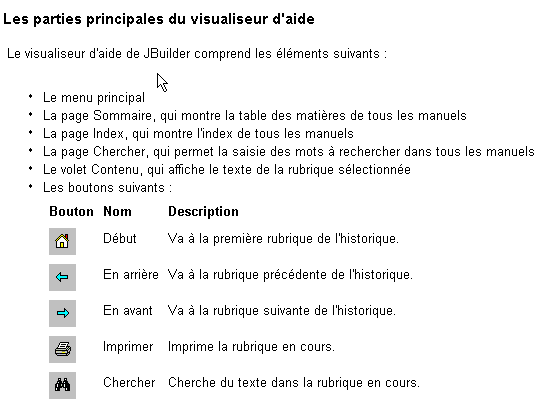
The help screen generally has two windows:
- the left one, where you enter what you’re looking for. It has three tabs: Table of Contents, Index, and Search.
- the right-hand window, which displays the search results
Help is available on how to use JBuilder Help. In JBuilder Help, select option Help/Using Help. It will then explain how to use the help system. For example, it describes the different components of the help viewer:
Let’s take a closer look at the Table of Contents and Index pages.
5.2.4.1. Help: Table of Contents
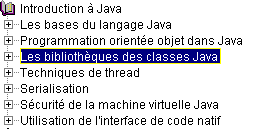
5.2.4.1.1. Table of Contents: Introduction to Java
Here you will find the basics of Java, but not only that, as shown by the list of topics covered in this option:
5.2.4.1.2. Table of Contents: Tutorials
If we select the option Tutorials in the table of contents above, the right-hand window displays a list of available tutorials:
The basic tutorials are particularly useful for getting started with JBuilder. There are many others besides those listed above, and when you want to develop an application, it can be helpful to check first if there is a tutorial that might assist you.
5.2.4.1.3. Contents: JDK
By selecting the option Java 2 JDK 1.3, you have access to all the libraries in the JDK. Generally, this isn’t the place to look if you need information about a specific class and don’t know which library it’s in. However, this option is useful if you’re interested in getting an overview of Java libraries.
5.2.4.2. Help: Index
Select the Index tab in the left pane of the Help window. This option allows you, for example, to find help on a class. Suppose, for example, that you want to know the methods of the Swing input fields JTextField. Type JTextField into the search text field:
![]()
The help will return index entries beginning with the text you typed:
All you have to do is double-click on the entry you’re interested in, in this case JTextField class. The help for this class will then appear in the right-hand window:
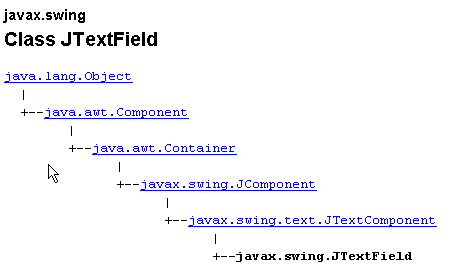
A complete description of the class is then provided.
5.2.5. Some Swing components
We will now present various applications that utilize the most common Swing components to explore their key methods and properties. For each application, we will present the graphical user interface and the relevant code, particularly that of the event handlers.
5.2.5.1. Components JLabel and JTextField
We have already encountered these two components. JLabel is a text component and JTextField is an input field component. Their two main methods are
String getText() | to retrieve the input field’s content or the label’s text |
void setText(String unTexte) | to set unTexte in the field or label |
The events typically used for JTextField are as follows:
actionPerformed | indicates that the user has confirmed (by pressing Enter) the entered text |
caretUpdate | indicates that the user has moved the input cursor |
inputMethodChanged | indicates that the user has modified the input field |
Here is an example that uses the caretUpdate event to track changes in an input field:
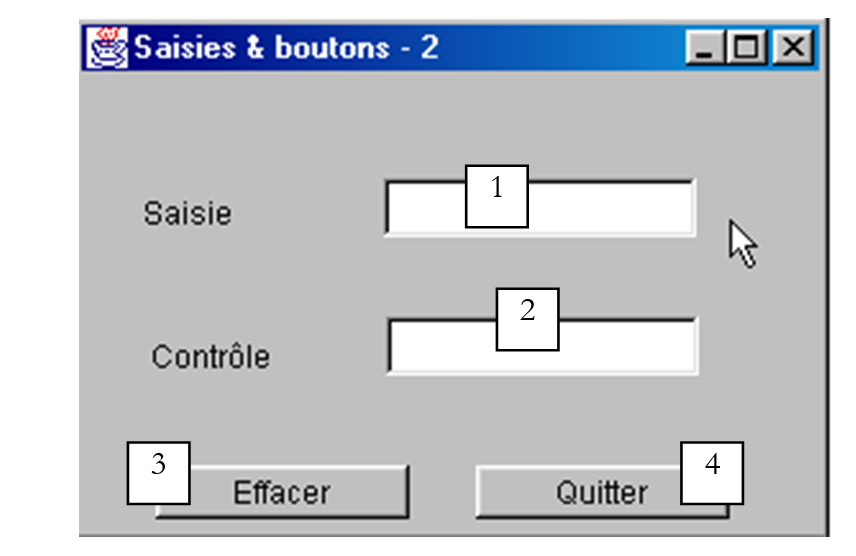
No. | type | name | role |
1 | JTextField | txtSaisie | input field |
2 | JTextField | txtControle | displays the text from 1 in real time |
3 | JButton | cmdEffacer | to clear fields 1 and 2 |
4 | JButton | cmdQuitter | to exit the application |
The relevant code for this application is as follows:
import java.awt.*;
....
public class Cadre1 extends JFrame {
JPanel contentPane;
JTextField txtSaisie = new JTextField();
JLabel jLabel1 = new JLabel();
JLabel jLabel2 = new JLabel();
JTextField txtControle = new JTextField();
JButton CmdEffacer = new JButton();
JButton CmdQuitter = new JButton();
/**Building the frame*/
public Cadre1() {
enableEvents(AWTEvent.WINDOW_EVENT_MASK);
try {
jbInit();
}
catch(Exception e) {
e.printStackTrace();
}
}
/**Initialize component*/
private void jbInit() throws Exception {
....
txtSaisie.addCaretListener(new javax.swing.event.CaretListener() {
public void caretUpdate(CaretEvent e) {
txtSaisie_caretUpdate(e);
}
});
...
CmdEffacer.addActionListener(new java.awt.event.ActionListener() {
public void actionPerformed(ActionEvent e) {
CmdEffacer_actionPerformed(e);
}
});
...
CmdQuitter.addActionListener(new java.awt.event.ActionListener() {
public void actionPerformed(ActionEvent e) {
CmdQuitter_actionPerformed(e);
}
});
....
}
/**Replaced, so we can get out when the window is closed*/
protected void processWindowEvent(WindowEvent e) {
...
}
void txtSaisie_caretUpdate(CaretEvent e) {
// the input cursor has moved
txtControle.setText(txtSaisie.getText());
}
void CmdQuitter_actionPerformed(ActionEvent e) {
// quit the application
System.exit(0);
}
void CmdEffacer_actionPerformed(ActionEvent e) {
// delete the contents of the input field
txtSaisie.setText("");
}
}
Here is an example of execution:

5.2.5.2. component JComboBox
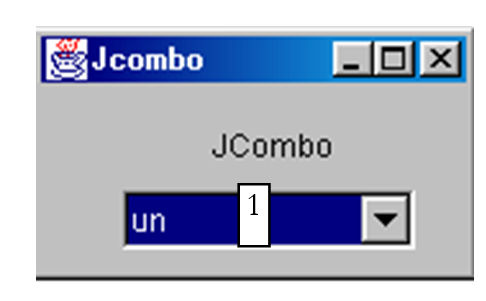
A JComboBox component is a drop-down list combined with an input field: the user can either select an item from (2) or type text into (1). By default, JComboBox components are not editable. You must explicitly call the setEditable(true) method to make them editable. To learn about the JComboBox class, type JComboBox in the help index.
The JComboBox object can be constructed in various ways:
new JComboBox() | creates an empty combo box |
new JComboBox (Object[] items) | creates a combo box containing an array of objects |
new JComboBox(Vector items) | same as above, but with a vector of objects |
It may seem surprising that a combo box can contain objects when it usually contains strings. Visually, this is indeed the case. If a JComboBox contains an object obj, it displays the string obj.toString(). Recall that every object has a toString method inherited from the Object class, which returns a string that "represents" the object.
The useful methods of the JCombobox class are as follows:
void addItem(Object unObjet) | adds an object to the combo box |
int getItemCount() | returns the number of items in the combo box |
Object getItemAt(int i) | returns object #i from the combo box |
void insertItemAt(Object unObjet, int i) | inserts unObjet at position i in the combo |
int getSelectedIndex() | returns the number of the selected item in the combo box |
Object getSelectedItem() | returns the selected object in the combo box |
void setSelectedIndex(int i) | selects element i from the combo box |
void setSelectedItem(Object unObjet) | selects the specified object from the combo box |
void removeAllItems() | clears the combo box |
void removeItemAt(int i) | removes item #i from the combo box |
void removeItem(Object unObjet) | removes the specified object from the combo box |
void setEditable(boolean val) | Makes the combo box editable (val=true) or not (val=false) |
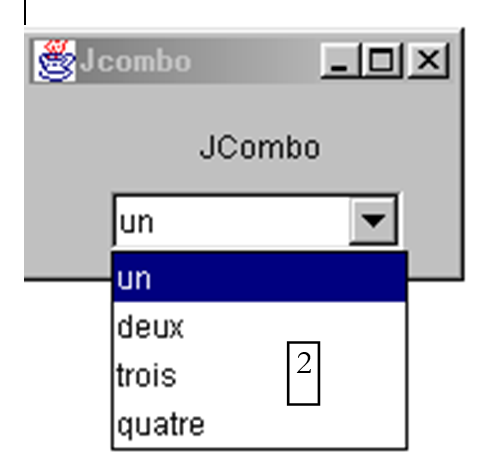
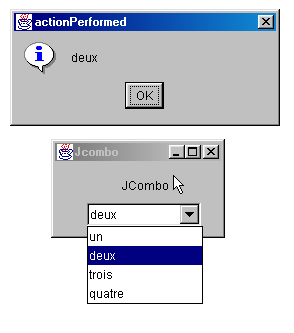
When an item is selected from the drop-down list, the actionPerformed event is triggered, which can then be used to detect a change in the combo box selection. In the following application, we use this event to display the item that was selected from the list.
We are only showing the relevant code for the window.
public class Cadre1 extends JFrame {
JPanel contentPane;
JComboBox jComboBox1 = new JComboBox();
JLabel jLabel1 = new JLabel();
/**Building the frame*/
public Cadre1() {
enableEvents(AWTEvent.WINDOW_EVENT_MASK);
try {
jbInit();
}
catch(Exception e) {
e.printStackTrace();
}
// treatment - fill the combo
String[] infos={"un","deux","trois","quatre"};
for(int i=0;i<infos.length;i++)
jComboBox1.addItem(infos[i]);
}
/**Initialize component*/
private void jbInit() throws Exception {
....
jComboBox1.addActionListener(new java.awt.event.ActionListener() {
public void actionPerformed(ActionEvent e) {
jComboBox1_actionPerformed(e);
}
});
....
}
void jComboBox1_actionPerformed(ActionEvent e) {
// a new element has been selected - it is displayed
JOptionPane.showMessageDialog(this,jComboBox1.getSelectedItem(),
"actionPerformed",JOptionPane.INFORMATION_MESSAGE);
}
}
5.2.5.3. component JList
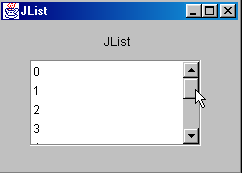
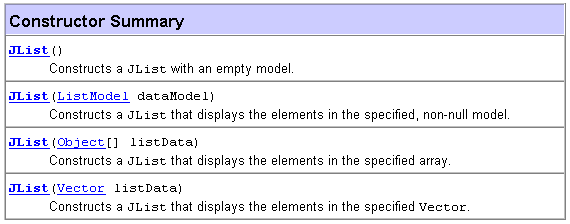
The Swing component JList is more complex than its counterpart in the AWT library. There are two important differences:
- the list's content is managed by an object separate from the list itself. Here we will use a DefaultListModel object, which functions like a Vector but also notifies the JList object whenever its content changes so that the list's visual display updates accordingly.
- The list does not scroll by default. You must place the list in a ScrollPane container, which enables scrolling.
In the source code, a list can be defined as follows:
// the vector of list values
DefaultlistModel valeurs=new DefaultListModel();
// the list itself, to which we associate the vector of its values
JList jList1 = new JList(valeurs);
// the scrolling container in which the list is placed to obtain a scrolling list
JScrollPane jScrollPane1 = new JScrollPane(jList1);
To include the list jList1 in the container jScrollPane1, the code generated by JBuilder proceeds differently:
- Declare the container in the window attributes
- then in the code of jbInit, the list is associated with the container
To add values to the JList1 list above, simply add them to its values vector:
and you will then see the following window:
How is this interface built?
- Select the JScrollPane component from the "Swing Containers" page of components and drag it into the window, resizing it to the desired dimensions
- Select a JList component from the "Swing" page of components and drop it into the JScrollPane container, where it will occupy the entire space.
The code generated by JBuilder needs to be slightly modified to produce the following code:
public class interfaceAppli extends JFrame {
JPanel contentPane;
JLabel jLabel1 = new JLabel();
DefaultListModel valeurs=new DefaultListModel();
JList jList1 = new JList(valeurs);
JScrollPane jScrollPane1 = new JScrollPane();
JLabel jLabel2 = new JLabel();
/**Building the frame*/
public interfaceAppli() {
enableEvents(AWTEvent.WINDOW_EVENT_MASK);
try {
jbInit();
}
catch(Exception e) {
e.printStackTrace();
}
// treatment
// include the list in the scrollPane
// init list
for(int i=0;i<10;i++)
valeurs.addElement(""+i);
}
/**Initialize component*/
private void jbInit() throws Exception {
....
// the jList1 list is associated with the jcrollPane1 container
jScrollPane1.getViewport().add(jList1, null);
}
/**Replaced, so we can get out when the window is closed*/
protected void processWindowEvent(WindowEvent e) {
....
}
}
Let’s now explore the main methods of the JList class by searching for JList in the help index. The JList object can be constructed in various ways:
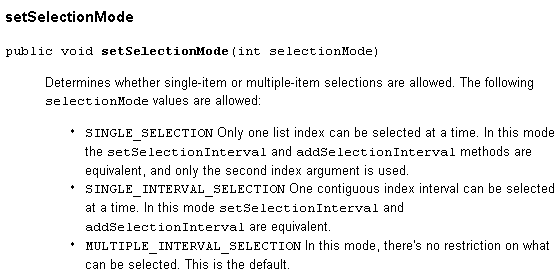
One simple method is the one we used: create an empty DefaultListModel V and then associate it with the list to be created using new JList(V). The list’s content is not managed by the JList object but by the object containing the list’s values. If the content was constructed using a DefaultListModel object based on the Vector class, the methods of the Vector class can be used to add, insert, and remove elements from the list. A list can be single-selection or multi-selection. This is determined by the setSelectionMode method:
You can determine the current selection mode using getSelectionMode:
![]()
The selected element(s) can be retrieved using the following methods:

We know how to associate a vector of values with a list using the constructor JList(DefaultListModel). Conversely, we can obtain the object DefaultListModel from a list JList by:

We now know enough to write the following application:
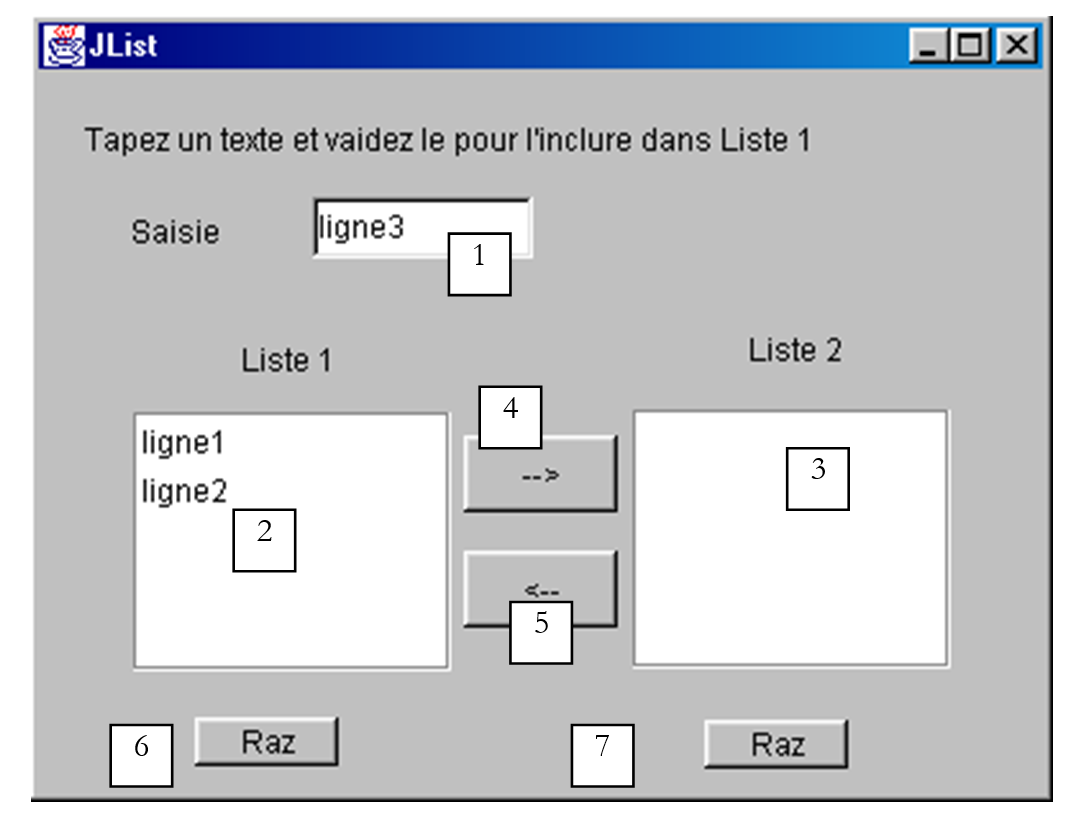
The components of this window are as follows:
No. | type | name | role |
1 | JTextField | txtSaisie | input field |
2 | JList | jList1 | list contained in a container jScrollPane1 |
3 | JList | jList2 | list contained in a container jScrollPane2 |
4 | JButton | cmd1To2 | transfers the selected items from list 1 to list 2 |
5 | JButton | cmd2To1 | does the opposite |
6 | JButton | cmdRaz1 | clear list 1 |
7 | JButton | cmdRaz2 | clears list 2 |
The user types text into field (1) and submits it. This triggers the actionPerformed event on the input field, which is used to add the entered text to list 1. Here is the code for this first function:
public class interfaceAppli extends JFrame {
JPanel contentPane;
JLabel jLabel1 = new JLabel();
JLabel jLabel2 = new JLabel();
JLabel jLabel3 = new JLabel();
JTextField txtSaisie = new JTextField();
JButton cmd1To2 = new JButton();
JButton cmd2To1 = new JButton();
DefaultListModel v1=new DefaultListModel();
DefaultListModel v2=new DefaultListModel();
JList jList1 = new JList(v1);
JList jList2 = new JList(v2);
JScrollPane jScrollPane1 = new JScrollPane();
JScrollPane jScrollPane2 = new JScrollPane();
JButton cmdRaz1 = new JButton();
JButton cmdRaz2 = new JButton();
JLabel jLabel4 = new JLabel();
/**Building the frame*/
public interfaceAppli() {
enableEvents(AWTEvent.WINDOW_EVENT_MASK);
try {
jbInit();
}
catch(Exception e) {
e.printStackTrace();
}
}//interfaceAppli
/**Initialize component*/
private void jbInit() throws Exception {
...
txtSaisie.addActionListener(new java.awt.event.ActionListener() {
public void actionPerformed(ActionEvent e) {
txtSaisie_actionPerformed(e);
}
});
...
// Jlist1 is placed in the jScrollPane1 container
jScrollPane1.getViewport().add(jList1, null);
// Jlist2 is placed in the jScrollPane2 container
jScrollPane2.getViewport().add(jList2, null);
...
}
/**Replaced, so we can get out when the window is closed*/
protected void processWindowEvent(WindowEvent e) {
...
}
void txtSaisie_actionPerformed(ActionEvent e) {
// the input text has been validated
// we recover it free of its start and end spaces
String texte=txtSaisie.getText().trim();
// if it's empty, we don't want it
if(texte.equals("")){
// error msg
JOptionPane.showMessageDialog(this,"Vous devez taper un texte",
"Erreur",JOptionPane.WARNING_MESSAGE);
// end
return;
}//if
// if it is not empty, it is added to the values in list 1
v1.addElement(texte);
// and empty the input field
txtSaisie.setText("");
}/// txtSaisie_actionperformed
}//class
The code to transfer selected items from one list to another is as follows:
void cmd1To2_actionPerformed(ActionEvent e) {
// transfer items selected in list 1 to list 2
transfert(jList1,jList2);
}//cmd1To2
void cmd2To1_actionPerformed(ActionEvent e) {
// transfer selected items in jList2 to jList1
transfert(jList2,jList1);
}//cmd2TO1
private void transfert(JList L1, JList L2){
// transfer items selected in list 1 to list 2
// retrieve the array of indices of the elements selected in L1
int[] indices=L1.getSelectedIndices();
// anything to do?
if (indices.length==0) return;
// we retrieve the values of L1
DefaultListModel v1=(DefaultListModel)L1.getModel();
// and L2
DefaultListModel v2=(DefaultListModel)L2.getModel();
for(int i=indices.length-1;i>=0;i--){
// the values selected in L1 are added to L2
v2.addElement(v1.elementAt(indices[i]));
// l1 elements copied into L2 must be deleted from L1
v1.removeElementAt(indices[i]);
}//for
}//transfer
The code associated with the Raz buttons is very simple:
void cmdRaz1_actionPerformed(ActionEvent e) {
// empty list 1
v1.removeAllElements();
}//cmd Raz1
void cmdRaz2_actionPerformed(ActionEvent e) {
// empty list 2
v2.removeAllElements();
}///cmd Raz2
5.2.5.4. Checkboxes JCheckBox, radio buttons JButtonRadio
We propose to write the following application:
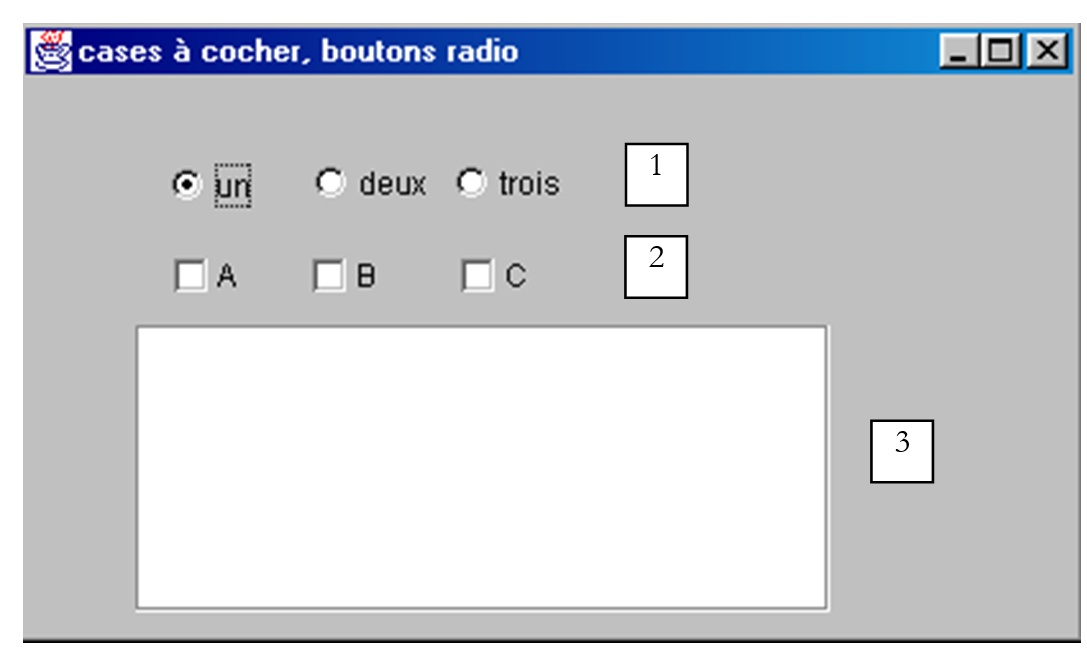
The window components are as follows:
No. | type | name | role |
1 | JButtonRadio | jButtonRadio1 jButtonRadio2 jButtonRadio3 | 3 radio buttons belonging to the group buttonGroup1 |
2 | JCheckBox | jCheckBox1 jCheckBox2 jCheckBox3 | 3 checkboxes |
3 | JList | jList1 | a list in a container jScrollPane1 |
4 | ButtonGroup | buttonGroup1 | non-visible component - used to group the 3 radio buttons so that when one of them is selected, the others are deselected. |
A group of radio buttons can be created as follows:
- Place each radio button without worrying about grouping them
- Place a Swing component ButtonGroup in the container. This component is non-visual. It therefore does not appear in the window designer. However, it appears in its structure:
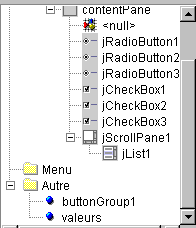
Above, in the Other branch, you can see the window’s non-visual attributes. Once a group of radio buttons has been created, you can associate each radio button with it. To do this, select the radio button’s properties:
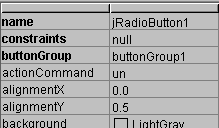
and in the radio button’s buttonGroup property, enter the name of the group to which you want to assign the radio button, in this case buttonGroup1. Repeat this step for all three radio buttons.
The main method for radio buttons and checkboxes is the isSelected() method, which indicates whether the checkbox or radio button is selected. The text associated with the component can be retrieved using getText() and set using setText(String unTexte). The checkbox/radio button can be selected using the method setSelected(boolean value).
When a radio button or checkbox is clicked, the actionPerformed event is triggered. In the following code, we use this event to track changes in the values of radio buttons and checkboxes:
public class interfaceAppli extends JFrame {
JPanel contentPane;
JRadioButton jRadioButton1 = new JRadioButton();
JRadioButton jRadioButton2 = new JRadioButton();
JRadioButton jRadioButton3 = new JRadioButton();
JCheckBox jCheckBox1 = new JCheckBox();
JCheckBox jCheckBox2 = new JCheckBox();
JCheckBox jCheckBox3 = new JCheckBox();
ButtonGroup buttonGroup1 = new ButtonGroup();
JScrollPane jScrollPane1 = new JScrollPane();
DefaultListModel valeurs=new DefaultListModel();
JList jList1 = new JList(valeurs);
/**Building the frame*/
public interfaceAppli() {
enableEvents(AWTEvent.WINDOW_EVENT_MASK);
try {
jbInit();
}
catch(Exception e) {
e.printStackTrace();
}
}
/**Initialize component*/
private void jbInit() throws Exception {
jRadioButton1.setSelected(true);
jRadioButton1.setText("un");
jRadioButton1.setBounds(new Rectangle(57, 31, 49, 23));
jRadioButton1.addActionListener(new java.awt.event.ActionListener() {
public void actionPerformed(ActionEvent e) {
afficheRadioButtons(e);
}
});
jRadioButton2.setBounds(new Rectangle(113, 30, 49, 23));
jRadioButton2.addActionListener(new java.awt.event.ActionListener() {
public void actionPerformed(ActionEvent e) {
afficheRadioButtons(e);
}
});
jRadioButton2.setText("deux");
jRadioButton3.setBounds(new Rectangle(168, 30, 49, 23));
jRadioButton3.addActionListener(new java.awt.event.ActionListener() {
public void actionPerformed(ActionEvent e) {
afficheRadioButtons(e);
}
});
jRadioButton3.setText("trois");
// radio buttons are grouped together
buttonGroup1.add(jRadioButton1);
buttonGroup1.add(jRadioButton2);
buttonGroup1.add(jRadioButton3);
// checkboxes
jCheckBox1.setText("A");
jCheckBox1.setBounds(new Rectangle(58, 69, 32, 17));
jCheckBox1.addActionListener(new java.awt.event.ActionListener() {
public void actionPerformed(ActionEvent e) {
afficheCases(e);
}
});
jCheckBox2.setBounds(new Rectangle(112, 69, 40, 17));
jCheckBox2.addActionListener(new java.awt.event.ActionListener() {
public void actionPerformed(ActionEvent e) {
afficheCases(e);
}
});
jCheckBox2.setText("B");
jCheckBox3.setText("C");
jCheckBox3.setBounds(new Rectangle(170, 69, 37, 17));
jCheckBox3.addActionListener(new java.awt.event.ActionListener() {
public void actionPerformed(ActionEvent e) {
afficheCases(e);
}
});
....
}
/**Replaced, so we can get out when the window is closed*/
protected void processWindowEvent(WindowEvent e) {
...
}
private void afficheRadioButtons(ActionEvent e){
// displays the values of the 3 radio buttons
valeurs.addElement("boutons radio=("+jRadioButton1.isSelected()+","+
jRadioButton2.isSelected()+","+jRadioButton3.isSelected()+")");
}//afficheRadioButtons
void afficheCases(ActionEvent e) {
// displays checkbox values
valeurs.addElement("cases à cocher=["+jCheckBox1.isSelected()+","+
jCheckBox2.isSelected()+","+jCheckBox3.isSelected()+")");
}//afficheCases
}//class
Here is an example of execution:

5.2.5.5. component JScrollBar
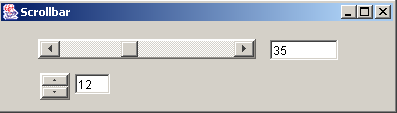
Let's create the following application:

No. | type | name | role |
1 | JScrollBar | jScrollBar1 | a horizontal variator |
2 | JScrollBar | jScrollBar2 | a vertical drive |
3 | JTextField | txtvaleurHS | displays the value of horizontal drive 1 - also allows you to set this value |
4 | JTextField | txtvaleurVS | displays the value of vertical slider 2 - also allows this value to be set |
- A JScrollBar slider allows the user to select a value within a range of integer values represented by the slider’s “track” along which a cursor moves.
- For a horizontal slider, the left end represents the minimum value of the range, the right end the maximum value, and the cursor the currently selected value. For a vertical slider, the minimum is represented by the top end, and the maximum by the bottom end. The (min,max) pair defaults to (0,100).
- Clicking on the ends of the slider changes the value by one increment (positive or negative) depending on the end clicked, referred to as unitIncrement, which defaults to 1.
- Clicking on either side of the slider changes the value by one increment (positive or negative) depending on the end clicked, referred to as blockIncrement, which defaults to 10.
- These five values (min, max, value, unitIncrement, blockIncrement) can be obtained using the methods getMinimum(), getMaximum(), getValue(), getUnitIncrement(), and getBlockIncrement(), all of which return an integer and can be set using the methods setMinimum(int min), setMaximum(int max), setValue(int val), setUnitIncrement(int uInc), setBlockIncrement (int bInc)
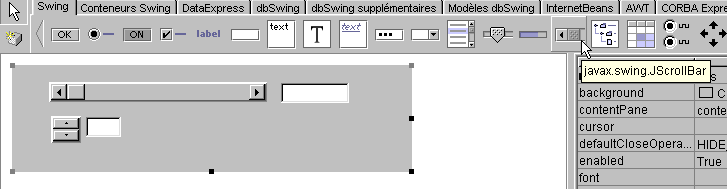
There are a few things to know when using the JScrollBar component. First, it can be found in the Swing component bar:
When you drop it onto the container, it is vertical by default. You can make it horizontal using the orientation property below:
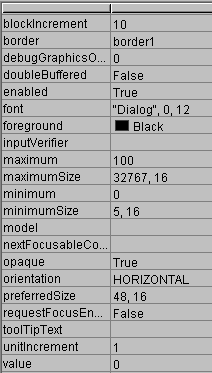
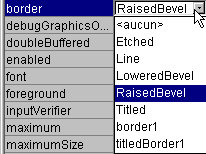
In the properties sheet above, you can see that you have access to the minimum, maximum, value, unitIncrement, and blockIncrement properties of the JScrollbar. We can therefore set these at design time. When we place a scrollbar on the container, its "scroll bar" does not appear:
We can fix this issue by adding a border to the component. This is done using its border property, which can have different values:
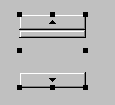
Here is an example of what RaisedBevel looks like:
![]()
When you click on the top end of a vertical slider, its value decreases. This may surprise the average user, who normally expects to see the value "increase." We resolve this issue by setting unitIncrement and blockIncrement to negative values.
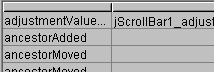
How do you track changes to a slider? When its value changes, the adjustmentValueChanged event occurs. Simply associate a procedure with this event to be notified of every change in the slider’s value.
The relevant code for our application is as follows:
....
public class cadreAppli extends JFrame {
JPanel contentPane;
JScrollBar jScrollBar1 = new JScrollBar();
Border border1;
JTextField txtValeurHS = new JTextField();
JScrollBar jScrollBar2 = new JScrollBar();
JTextField txtValeurVS = new JTextField();
TitledBorder titledBorder1;
/**Building the frame*/
public cadreAppli() {
enableEvents(AWTEvent.WINDOW_EVENT_MASK);
try {
jbInit();
}
catch(Exception e) {
e.printStackTrace();
}
}
/**Initialize component*/
private void jbInit() throws Exception {
...
// a border for scrollbars
border1 = BorderFactory.createBevelBorder(BevelBorder.RAISED,Color.white,Color.white,new Color(134, 134, 134),new Color(93, 93, 93));
// no border title
titledBorder1 = new TitledBorder("");
jScrollBar1.setOrientation(JScrollBar.HORIZONTAL);
jScrollBar1.setBorder(BorderFactory.createRaisedBevelBorder());
jScrollBar1.setAutoscrolls(true);
jScrollBar1.setBounds(new Rectangle(37, 17, 218, 20));
jScrollBar1.addAdjustmentListener(new java.awt.event.AdjustmentListener() {
public void adjustmentValueChanged(AdjustmentEvent e) {
jScrollBar1_adjustmentValueChanged(e);
}
});
txtValeurHS.addActionListener(new java.awt.event.ActionListener() {
public void actionPerformed(ActionEvent e) {
txtValeurHS_actionPerformed(e);
}
});
jScrollBar2.setBounds(new Rectangle(39, 51, 30, 27));
jScrollBar2.addAdjustmentListener(new java.awt.event.AdjustmentListener() {
public void adjustmentValueChanged(AdjustmentEvent e) {
jScrollBar2_adjustmentValueChanged(e);
}
});
jScrollBar2.setAutoscrolls(true);
jScrollBar2.setUnitIncrement(-1);
jScrollBar2.setBorder(BorderFactory.createRaisedBevelBorder());
txtValeurVS.addActionListener(new java.awt.event.ActionListener() {
public void actionPerformed(ActionEvent e) {
txtValeurVS_actionPerformed(e);
}
});
......
}
/**Replaced, so we can get out when the window is closed*/
protected void processWindowEvent(WindowEvent e) {
...
}
void jScrollBar1_adjustmentValueChanged(AdjustmentEvent e) {
// the value of scrollbar 1 has changed
txtValeurHS.setText(""+jScrollBar1.getValue());
}
void jScrollBar2_adjustmentValueChanged(AdjustmentEvent e) {
// scrollbar 2 value has changed
txtValeurVS.setText(""+jScrollBar2.getValue());
}
void txtValeurHS_actionPerformed(ActionEvent e) {
// set the horizontal scrollbar value
setValeur(jScrollBar1,txtValeurHS);
}
void txtValeurVS_actionPerformed(ActionEvent e) {
// set the vertical scrollbar value
setValeur(jScrollBar2,txtValeurVS);
}
private void setValeur(JScrollBar jS, JTextField jT){
// sets the scrollbar value jS with the field text jT
int valeur=0;
try{
valeur=Integer.parseInt(jT.getText());
jS.setValue(valeur);
}
catch (Exception e){
// error is displayed
afficher(""+e);
}//try-catch
}//setValeur
void afficher(String message){
// displays a message in a box
JOptionPane.showMessageDialog(this,message,"Menus",JOptionPane.INFORMATION_MESSAGE);
}//display
}
Here is an example of execution:
5.2.5.6. Component JTextArea
The JTextArea component is a component where you can enter multiple lines of text, unlike the JTextField component, where you can only enter one line. If this component is placed in a scrollable container (JScrollPane), you have a scrollable text input field. This type of component might be found, for example, in an email application where the text of the message to be sent would be typed into a JTextArea component. The standard methods are String and getText() to retrieve the text field’s content, and setText(String unTexte) to set unTexte in the text field, and append(String unTexte) to append unTexte to the text already present in the text field. Consider the following application:
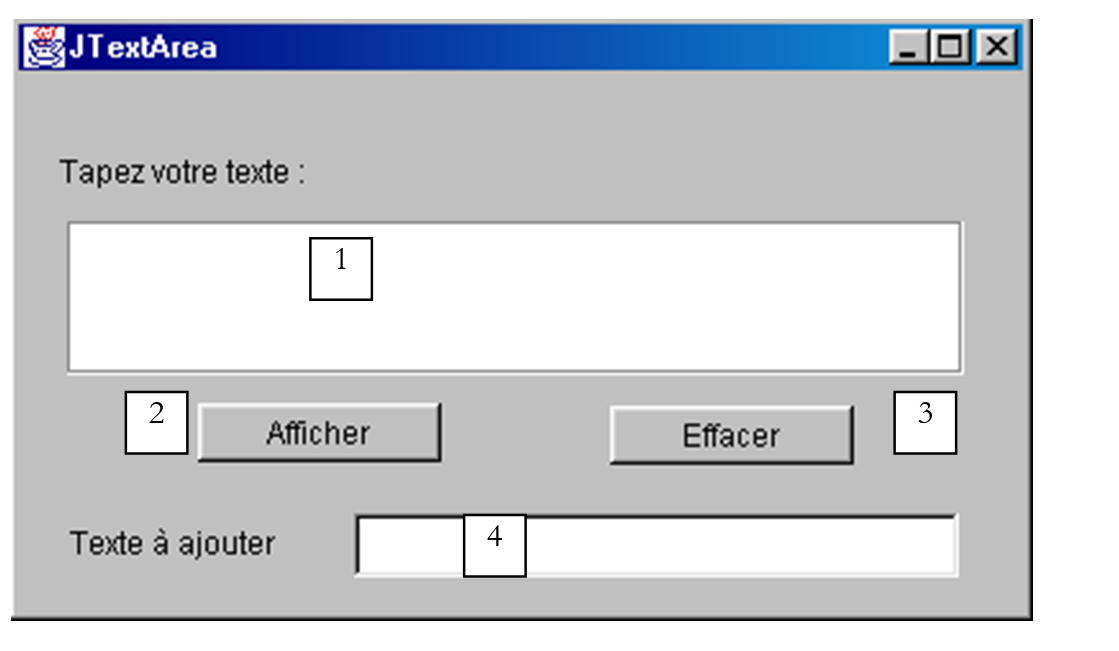
No. | type | name | role |
1 | JTextArea | txtTexte | a multi-line text box |
2 | JButton | cmdAfficher | displays the contents of 1 in a dialog box |
3 | JButton | cmdEffacer | clears the contents of 1 |
4 | JTextField | txtAjout | text added to the text in 1 when validated by pressing the Enter key. |
5 | JScrollPane | jScrollPane1 | scrolling container in which text box 1 has been placed to create a scrolling text box. |
The relevant code is as follows:
.....
public class cadreAppli extends JFrame {
JPanel contentPane;
JLabel jLabel1 = new JLabel();
JButton cmdAfficher = new JButton();
JScrollPane jScrollPane1 = new JScrollPane();
JTextArea txtTexte = new JTextArea();
JLabel jLabel2 = new JLabel();
JTextField txtAjout = new JTextField();
JButton cmdEffacer = new JButton();
/**Building the frame*/
public cadreAppli() {
enableEvents(AWTEvent.WINDOW_EVENT_MASK);
try {
jbInit();
}
catch(Exception e) {
e.printStackTrace();
}
}
/**Initialize component*/
private void jbInit() throws Exception {
cmdAfficher.addActionListener(new java.awt.event.ActionListener() {
public void actionPerformed(ActionEvent e) {
cmdAfficher_actionPerformed(e);
}
});
txtAjout.addActionListener(new java.awt.event.ActionListener() {
public void actionPerformed(ActionEvent e) {
txtAjout_actionPerformed(e);
}
});
cmdEffacer.addActionListener(new java.awt.event.ActionListener() {
public void actionPerformed(ActionEvent e) {
cmdEffacer_actionPerformed(e);
}
});
.......
jScrollPane1.getViewport().add(txtTexte, null);
}
/**Replaced, so we can get out when the window is closed*/
protected void processWindowEvent(WindowEvent e) {
........
}
void cmdAfficher_actionPerformed(ActionEvent e) {
// displays the contents of TextArea
afficher(txtTexte.getText());
}
void afficher(String message){
// displays a message in a box
JOptionPane.showMessageDialog(this,message,"Suivi",JOptionPane.INFORMATION_MESSAGE);
}// display
void cmdEffacer_actionPerformed(ActionEvent e) {
txtTexte.setText("");
}//cmdEffacer_actionPerformed
void txtAjout_actionPerformed(ActionEvent e) {
// add text
txtTexte.append(txtAjout.getText());
// raz addition
txtAjout.setText("");
}//
}
5.2.6. Mouse events
When drawing in a container, it is important to know the mouse position so that, for example, a point can be displayed when clicked. Mouse movements trigger events in the container within which the mouse is moving. Here are, for example, the events provided by JBuilder for a JPanel container:

mouseClicked | mouse click |
mouseDragged | mouse moving, left button pressed |
mouseEntered | mouse has just entered the container area |
mouseExited | The mouse has just left the container's surface |
mouseMoved | The mouse is moving |
mousePressed | Left mouse button pressed |
mouseReleased | Releasing the left mouse button |
Here is a program that helps you better understand when different mouse events occur:
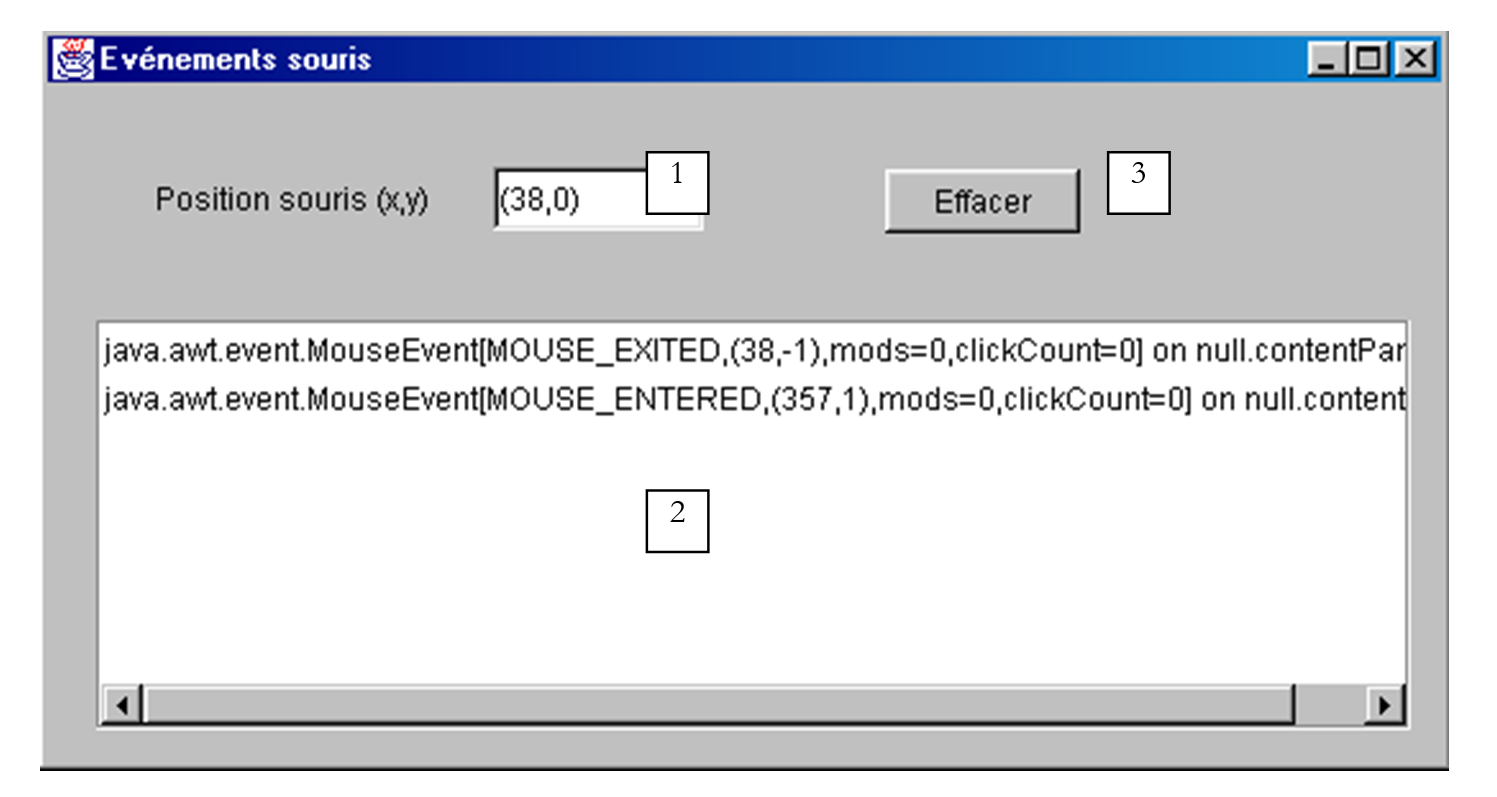
No. | type | name | role |
1 | JTextField | txtPosition | to display the mouse position in the container (possibly MouseMoved) |
2 | JList | lstAffichage | to display mouse events other than MouseMoved |
3 | JButton | cmdEffacer | to clear the contents of 2 |
When you run this program, here is what you get for a click:

Events are stacked from the top of the list. Therefore, the screenshot above shows that a click triggers three events, in the following order:
- MousePressed when the button is pressed
- MouseReleased when releasing it
- MouseClicked, which indicates that the sequence of the two previous events is considered a click. This could be a double-click. But above, the information clickCount=1 indicates that it is a single click.
Now, if you press the button, move the mouse, and release the button:
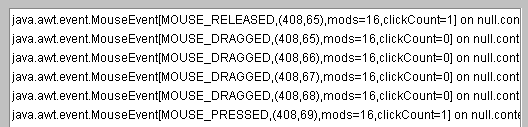
Here we see the three events:
- MousePressed when the button is initially pressed
- MouseDragged when moving the mouse with the button pressed
- MouseReleased when the button is released
In the two examples above, we see that a mouse event carries various pieces of information, including the mouse coordinates (x,y), for example (408,65) in the first line above.
If we continue in this manner, we find that the event MouseExited is triggered as soon as the mouse leaves the container or hovers over one of its components. In the latter case, the container receives the event MouseExited and the component receives the event MouseEntered. The opposite will occur when the mouse leaves the component to return to the container.
What happens when you double-click?
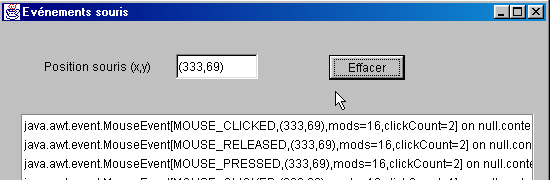
The events are exactly the same as for a single click. The only difference is that the event carries the information clickCount=2 (see above), indicating that a double-click actually occurred.
The relevant code for this application is as follows:
public class Cadre1 extends JFrame {
JPanel contentPane;
JLabel jLabel1 = new JLabel();
JTextField txtPosition = new JTextField();
JScrollPane jScrollPane1 = new JScrollPane();
DefaultListModel valeurs=new DefaultListModel();
JList lstAffichage = new JList(valeurs);
JButton cmdEffacer = new JButton();
/**Building the frame*/
public Cadre1() {
enableEvents(AWTEvent.WINDOW_EVENT_MASK);
try {
jbInit();
}
catch(Exception e) {
e.printStackTrace();
}
}
/**Initialize component*/
private void jbInit() throws Exception {
contentPane.addMouseMotionListener(new java.awt.event.MouseMotionAdapter() {
public void mouseMoved(MouseEvent e) {
contentPane_mouseMoved(e);
}
public void mouseDragged(MouseEvent e) {
contentPane_mouseDragged(e);
}
});
contentPane.addMouseListener(new java.awt.event.MouseAdapter() {
public void mouseEntered(MouseEvent e) {
contentPane_mouseEntered(e);
}
public void mouseExited(MouseEvent e) {
contentPane_mouseExited(e);
}
public void mousePressed(MouseEvent e) {
contentPane_mousePressed(e);
}
public void mouseClicked(MouseEvent e) {
contentPane_mouseClicked(e);
}
public void mouseReleased(MouseEvent e) {
contentPane_mouseReleased(e);
}
});
cmdEffacer.addActionListener(new java.awt.event.ActionListener() {
public void actionPerformed(ActionEvent e) {
cmdEffacer_actionPerformed(e);
}
});
jScrollPane1.getViewport().add(lstAffichage, null);
...............
}
/**Replaced, so we can get out when the window is closed*/
protected void processWindowEvent(WindowEvent e) {
.........
}
void contentPane_mouseMoved(MouseEvent e) {
txtPosition.setText("("+e.getX()+","+e.getY()+")");
}
void contentPane_mouseDragged(MouseEvent e) {
afficher(e);
}
void contentPane_mouseEntered(MouseEvent e) {
afficher(e);
}
void afficher(MouseEvent e){
// displays the event in the lstAffichage list
valeurs.insertElementAt(e,0);
}
void contentPane_mouseExited(MouseEvent e) {
afficher(e);
}
void contentPane_mousePressed(MouseEvent e) {
afficher(e);
}
void contentPane_mouseClicked(MouseEvent e) {
afficher(e);
}
void contentPane_mouseReleased(MouseEvent e) {
afficher(e);
}
void cmdEffacer_actionPerformed(ActionEvent e) {
// deletes the list
valeurs.removeAllElements();
}
}
5.2.7. Creating a Window with a Menu
Now let's see how to create a window with a menu using JBuilder. We will create the following window:
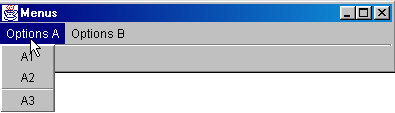

Create a new project starting with an empty window. From the "Swing Containers" component list, select the JMenuBar component (see Figure 1 below) and drag it onto the window you are designing.

Nothing appears in the design window, but the JMenuBar component appears in the structure pane of your window:
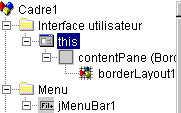
Double-click the jMenuBar1 element above to access the menu in design mode:
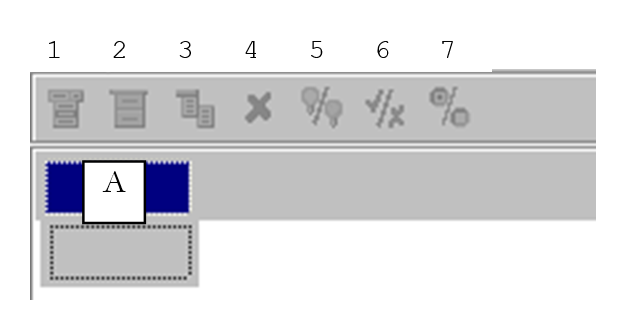
1 | Insert a menu item |
2 | Insert a separator |
3 | Insert a nested menu |
4 | delete a menu item |
5 | Disable a menu item |
6 | Checkbox menu item |
7 | Toggle the radio button |
To create your first menu item, type "Options A" in the A box above, then below in the following order: A1, A2, separator, A3, A4.
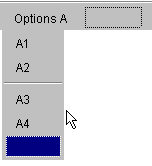
Then next to it:
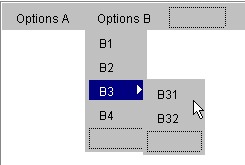
Use tool 3 to indicate that B3 is a nested submenu.
As we design the menu, the logical structure of our window evolves:
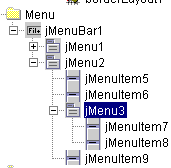
If we run our application now, we will see an empty window with no menu. We need to associate the created menu with our window. To do this, in the window structure, select the this object:
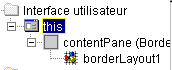
You will then have access to the properties of this:
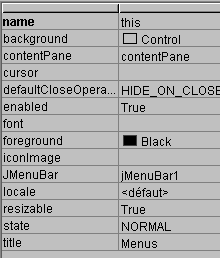
One of these is JMenuBar, which is used to set the menu that will be associated with the window. Click in the cell to the right of JMenuBar. All the menus you have created will then be displayed. Here, we will only have jMenuBar1. Select it.
Run the application (F9):

Now we have a menu, but the options do nothing yet. Menu options are treated as components: they have properties and events. In the menu structure, select option jMenuItem1:
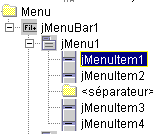
You now have access to its properties and events:
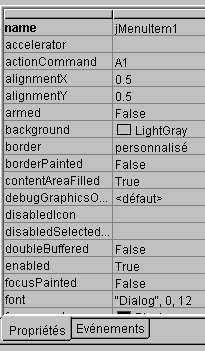
Select the events page and click on the cell to the right of the actionPerformed event: this is the event that occurs when you click on a menu item. A default handler is provided. Double-click on it to access its code:
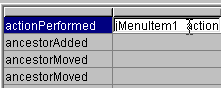
We will write the following simple code:
void jMenuItem1_actionPerformed(ActionEvent e) {
afficher("L'option A1 a été sélectionnée");
}
void afficher(String message){
// displays a message in a box
JOptionPane.showMessageDialog(this,message,"Menus",JOptionPane.INFORMATION_MESSAGE);
}//display
Run the application and select option A1 to see the following message:
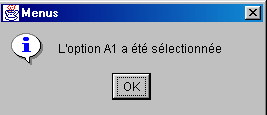
The relevant code for this application is as follows:
.....
public class Cadre1 extends JFrame {
  JPanel contentPane;
  BorderLayout borderLayout1 = new BorderLayout();
JMenuBar jMenuBar1 = new JMenuBar();
JMenu jMenu1 = new JMenu();
JMenuItem jMenuItem1 = new JMenuItem();
JMenuItem jMenuItem2 = new JMenuItem();
JMenuItem jMenuItem3 = new JMenuItem();
JMenuItem jMenuItem4 = new JMenuItem();
JMenu jMenu2 = new JMenu();
JMenuItem jMenuItem5 = new JMenuItem();
JMenuItem jMenuItem6 = new JMenuItem();
JMenu jMenu3 = new JMenu();
JMenuItem jMenuItem7 = new JMenuItem();
JMenuItem jMenuItem8 = new JMenuItem();
JMenuItem jMenuItem9 = new JMenuItem();
/**Building the frame*/
public Cadre1() {
enableEvents(AWTEvent.WINDOW_EVENT_MASK);
try {
jbInit();
}
catch(Exception e) {
e.printStackTrace();
}
}
/**Initialize component*/
private void jbInit() throws Exception {
// the window is associated with a menu
this.setJMenuBar(jMenuBar1);
jMenu1.setText("Options A");
jMenuItem1.setText("A1");
jMenuItem1.addActionListener(new java.awt.event.ActionListener() {
public void actionPerformed(ActionEvent e) {
jMenuItem1_actionPerformed(e);
}
});
jMenuItem2.setText("A2");
jMenuItem3.setText("A3");
jMenuItem4.setText("A4");
jMenu2.setText("Options B");
jMenuItem5.setText("B1");
jMenuItem6.setText("B2");
jMenu3.setText("B3");
jMenuItem7.setText("B31");
jMenuItem8.setText("B32");
jMenuItem9.setText("B4");
jMenuBar1.add(jMenu1);
jMenuBar1.add(jMenu2);
jMenu1.add(jMenuItem1);
jMenu1.add(jMenuItem2);
jMenu1.addSeparator();
jMenu1.add(jMenuItem3);
jMenu1.add(jMenuItem4);
jMenu2.add(jMenuItem5);
jMenu2.add(jMenuItem6);
jMenu2.add(jMenu3);
jMenu2.add(jMenuItem9);
jMenu3.add(jMenuItem7);
jMenu3.add(jMenuItem8);
}
/**Replaced, so we can get out when the window is closed*/
protected void processWindowEvent(WindowEvent e) {
....
}
void jMenuItem1_actionPerformed(ActionEvent e) {
afficher("L'option A1 a été sélectionnée");
}
void afficher(String message){
// displays a message in a box
JOptionPane.showMessageDialog(this,message,"Menus",JOptionPane.INFORMATION_MESSAGE);
}//display
}
5.3. Dialog boxes
5.3.1. Message boxes
We have already used the JOptionPane class to display messages. Thus, the following code:
import javax.swing.*;
public class dialog1 {
public static void main(String arg[]){
JOptionPane.showMessageDialog(null,"Un message","Titre de la boîte",JOptionPane.INFORMATION_MESSAGE);
}
}
displays the following dialog box:
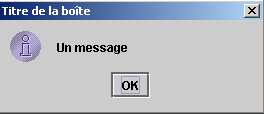
When this window is closed, it disappears, but the execution thread in which it was running is not stopped. This phenomenon does not normally occur. Dialog boxes are used within an application that, at some point, uses a System.exit(n) instruction to stop all threads. We will keep this in mind in the upcoming examples, all of which are built on the same model. Under DOS, the application can be interrupted by Ctrl-C. With JBuilder, we will use the option Run/Reset Program (Ctrl-F2) command. Furthermore, the first argument of showMessageDialog is null here. Generally, this is not the case. It is usually this, where *this* refers to the application’s main window.
5.3.2. Looks and Feels
The appearance of the box above might be different. You can configure this appearance using the javax.swing.UIManager class. When we commented on the code generated by JBuilder for our first window, we came across a statement that we didn’t dwell on:
The setLookAndFeel method of the UIManager class (UI = User Interface) allows you to set the appearance of graphical interfaces. The UIManager class has a method that allows you to determine the possible "appearances" for the interfaces:
static UIManager.LookAndFeelInfo[] | getInstalledLookAndFeels() |
The method returns an array of elements of type LookAndFeelInfo. This class has a method:
String | getClassName() |
which returns the name of the class "implementing" a given look and feel. Let's try the following program:
import javax.swing.*;
public class LookAndFeels {
// displays available looks and feels
public static void main(String[] args) {
// iste of installed look and feels
UIManager.LookAndFeelInfo[] lf=UIManager.getInstalledLookAndFeels();
// display
for(int i=0;i<lf.length;i++){
System.out.println(lf[i].getClassName());
}//for
}//hand
}//class
It produces the following results:
javax.swing.plaf.metal.MetalLookAndFeel
com.sun.java.swing.plaf.motif.MotifLookAndFeel
com.sun.java.swing.plaf.windows.WindowsLookAndFeel
There therefore appear to be three "different" looks. Let’s revisit our message display program by trying out the different possible looks:
import javax.swing.*;
public class LookAndFeel2 {
// displays available looks and feels
public static void main(String[] args) {
// list of installed look and feels
UIManager.LookAndFeelInfo[] lf=UIManager.getInstalledLookAndFeels();
// display
for(int i=0;i<lf.length;i++){
// appearance manager
try{
UIManager.setLookAndFeel(lf[i].getClassName());
}catch(Exception ex){
System.err.println(ex.getMessage());
}//catch
// message
JOptionPane.showMessageDialog(null,"Un message",lf[i].getClassName(),JOptionPane.INFORMATION_MESSAGE);
}//for
}//hand
}//class
Execution produces the following displays:
 |  |  |
corresponding from right to left to the "looks" Metal, Motif, Windows.
5.3.3. Confirmation boxes
The JOptionPane class has a method, showConfirmDialog, for displaying confirmation boxes with Yes, No, and Cancel buttons. There are several overridden showConfirmDialog methods. We will examine one of them:
static int | showConfirmDialog(Component parentComponent, Object message, String title, int optionType) |
parentComponent | the parent component of the dialog box. Often the window or the value null |
message | the message to display |
title | the title of the dialog box |
optionType | JOptionPane.YES_NO_OPTION: Yes, No buttons JOptionPane.YES_NO_CANCEL_OPTION: Yes, No, Cancel buttons |
The result returned by the method is:
JOptionPane.YES_OPTION | the user clicked Yes |
JOptionPane.NO_OPTION | The user clicked No |
JOptionPane.CANCEL_OPTION | The user clicked Cancel |
JOptionPane.CLOSED_OPTION | The user closed the dialog box |
Here is an example:
import javax.swing.*;
public class confirm1 {
public static void main(String[] args) {
// displays confirmation boxes
int réponse;
affiche(JOptionPane.showConfirmDialog(null,"Voulez-vous continuer ?","Confirmation",JOptionPane.YES_NO_OPTION));
affiche(JOptionPane.showConfirmDialog(null,"Voulez-vous continuer ?","Confirmation",JOptionPane.YES_NO_CANCEL_OPTION));
}//hand
private static void affiche(int réponse){
// indicates the type of response
switch(réponse){
case JOptionPane.YES_OPTION :
System.out.println("Oui");
break;
case JOptionPane.NO_OPTION :
System.out.println("Non");
break;
case JOptionPane.CANCEL_OPTION :
System.out.println("Annuler");
break;
case JOptionPane.CLOSED_OPTION :
System.out.println("Fermeture");
break;
}//switch
}//poster
}//class
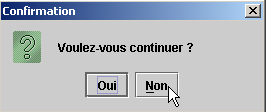 | 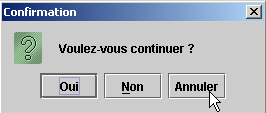 |
On the console, the messages "No" and "Cancel" are displayed.
5.3.4. Input box
The JOptionPane class also allows you to enter data using the showInputDialog method. Here again, there are several overloaded methods. We present one of them:
static String | showInputDialog(Component parentComponent, Object message, String title, int messageType) |
The arguments are the same as those encountered several times before. The method returns the string typed by the user. Here is an example:
import javax.swing.*;
public class input1 {
public static void main(String[] args) {
// input
System.out.println("Chaîne saisie ["+
JOptionPane.showInputDialog(null,"Quel est votre nom","Saisie du nom",JOptionPane.QUESTION_MESSAGE )
+ "]");
}//hand
}//class
The input dialog display:
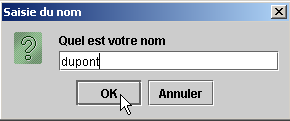
The console output:
5.4. Selection boxes
We will now look at a number of predefined selection boxes in Java 2:
JFileChooser | selection box for selecting a file in the file tree |
JColorChooser | a drop-down menu for selecting a color |
5.4.1. JFileChooser selection box
We are going to build the following application:
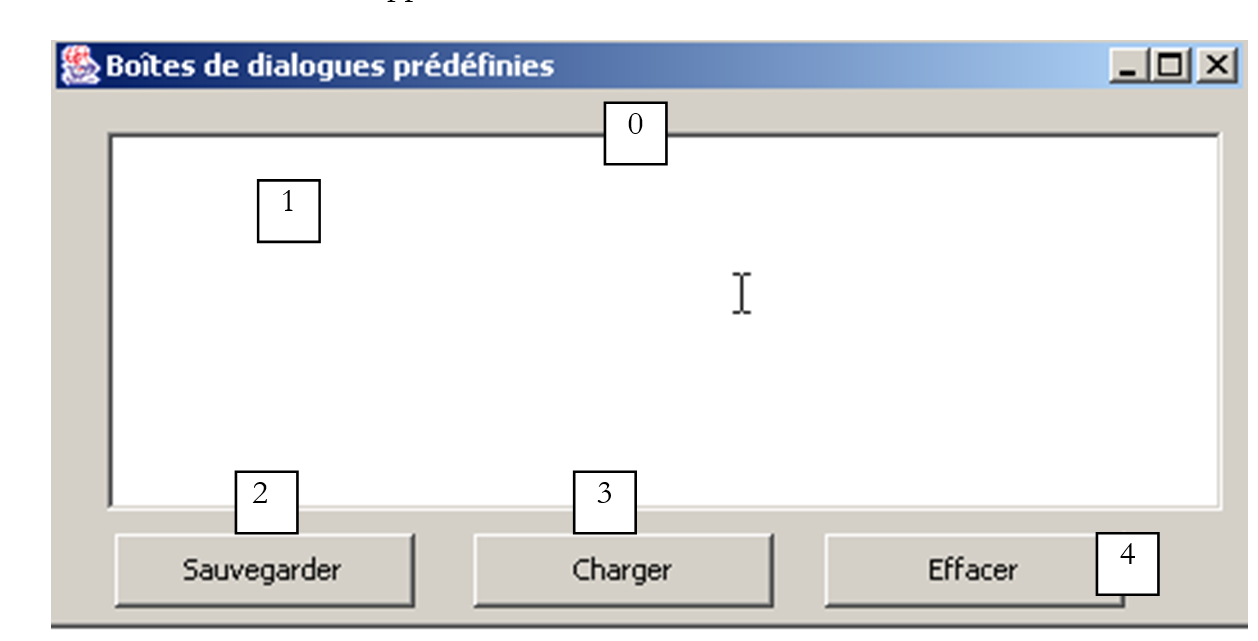
The controls are as follows:
No. | Type | Name | role |
0 | JScrollPane | jScrollPane1 | Scrollable container for text box 1 |
1 | JTextArea itself in JScrollPane | txtTexte | text typed by the user or loaded from a file |
2 | JButton | btnSauvegarder | Saves the text from 1 to a text file |
3 | JButton | btnCharger | allows you to load the contents of a text file into 1 |
4 | JButton | btnEffacer | clears the contents of 1 |
A non-visual control is used: jFileChooser1. This is taken from the JBuilder Swing container palette:

We place the component in the design window but outside the form. It appears in the list of components:
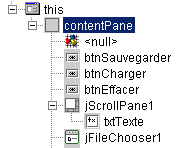
We will now provide the relevant program code to give an overview:
import java.awt.*;
import java.awt.event.*;
import javax.swing.*;
import javax.swing.filechooser.FileFilter;
import java.io.*;
public class dialogues extends JFrame {
// frame components
JPanel contentPane;
JButton btnSauvegarder = new JButton();
JButton btnCharger = new JButton();
JButton btnEffacer = new JButton();
JScrollPane jScrollPane1 = new JScrollPane();
JTextArea txtTexte = new JTextArea();
JFileChooser jFileChooser1 = new JFileChooser();
// file filters
javax.swing.filechooser.FileFilter filtreTxt = null;
//Building the frame
public dialogues() {
enableEvents(AWTEvent.WINDOW_EVENT_MASK);
try {
jbInit();
// other initializations
moreInit();
}
catch(Exception e) {
e.printStackTrace();
}
}
// moreInit
private void moreInit(){
// window construction initializations
// filter *.txt
filtreTxt = new javax.swing.filechooser.FileFilter(){
public boolean accept(File f){
// do we accept f?
return f.getName().toLowerCase().endsWith(".txt");
}//accept
public String getDescription(){
// filter description
return "Fichiers Texte (*.txt)";
}//getDescription
};
// we add the filter
jFileChooser1.addChoosableFileFilter(filtreTxt);
// we also want to filter all files
jFileChooser1.setAcceptAllFileFilterUsed(true);
// set the start directory of the FileChooser box to the current directory
jFileChooser1.setCurrentDirectory(new File("."));
}
//Initialize component
private void jbInit() throws Exception {
.......................
}
//Replaced, so we can get out when the window is closed
protected void processWindowEvent(WindowEvent e) {
......................
}
}
void btnCharger_actionPerformed(ActionEvent e) {
// file selection using a JFileChooser object
// we set the initial filter
jFileChooser1.setFileFilter(filtreTxt);
// the selection box is displayed
int returnVal = jFileChooser1.showOpenDialog(this);
// did the user choose anything?
if(returnVal == JFileChooser.APPROVE_OPTION) {
// put the file in the text field
lireFichier(jFileChooser1.getSelectedFile());
}//if
}//btnCharger_actionPerformed
// lireFichier
private void lireFichier(File fichier){
// displays the contents of the text file file in the text field
// delete the text field
txtTexte.setText("");
// some data
BufferedReader IN=null;
String ligne=null;
try{
// open file in read mode
IN=new BufferedReader(new FileReader(fichier));
// read the file line by line
while((ligne=IN.readLine())!=null){
txtTexte.append(ligne+"\n");
}//while
// close file
IN.close();
}catch(Exception ex){
// an error has occurred
txtTexte.setText(""+ex);
}//catch
}
// delete
void btnEffacer_actionPerformed(ActionEvent e) {
// delete the text box
txtTexte.setText("");
}
// save
void btnSauvegarder_actionPerformed(ActionEvent e) {
// saves the contents of the text box to a file
// we set the initial filter
jFileChooser1.setFileFilter(filtreTxt);
// the backup selection box is displayed
int returnVal = jFileChooser1.showSaveDialog(this);
// did the user choose anything?
if(returnVal == JFileChooser.APPROVE_OPTION) {
// we write the contents of the text box to file
écrireFichier(jFileChooser1.getSelectedFile());
}//if
}
// lireFichier
private void écrireFichier(File fichier){
// writes the contents of the text box to file
// some data
PrintWriter PRN=null;
try{
// open file for writing
PRN=new PrintWriter(new FileWriter(fichier));
// write the contents of the text box
PRN.print(txtTexte.getText());
// close file
PRN.close();
}catch(Exception ex){
// an error has occurred
txtTexte.setText(""+ex);
}//catch
}
We will not comment on the code for the methods btnEffacer_Click, lireFichier, and écrireFichier, as they do not introduce anything new. We will focus on the JFileChooser class and its usage. This class is complex, of the "overly complicated" variety. Here, we use only the following methods:
addChoosableFilter(FileFilter) | sets the file types available for selection |
setAcceptAllFileFilterUsed(boolean) | indicates whether the "All Files" type should be offered for selection or not |
File getSelectedFile() | the file (File) selected by the user |
int showSaveDialog() | method that displays the save dialog box. Returns a result of type int. The value jFileChooser.APPROVE_OPTION indicates that the user made a valid selection. Otherwise, the user either canceled the selection or an error occurred. |
setCurrentDirectory | to set the initial directory from which the user will begin exploring the file system |
setFileFilter(FileFilter) | to set the active filter |
The showSaveDialog method displays a selection box similar to the following:
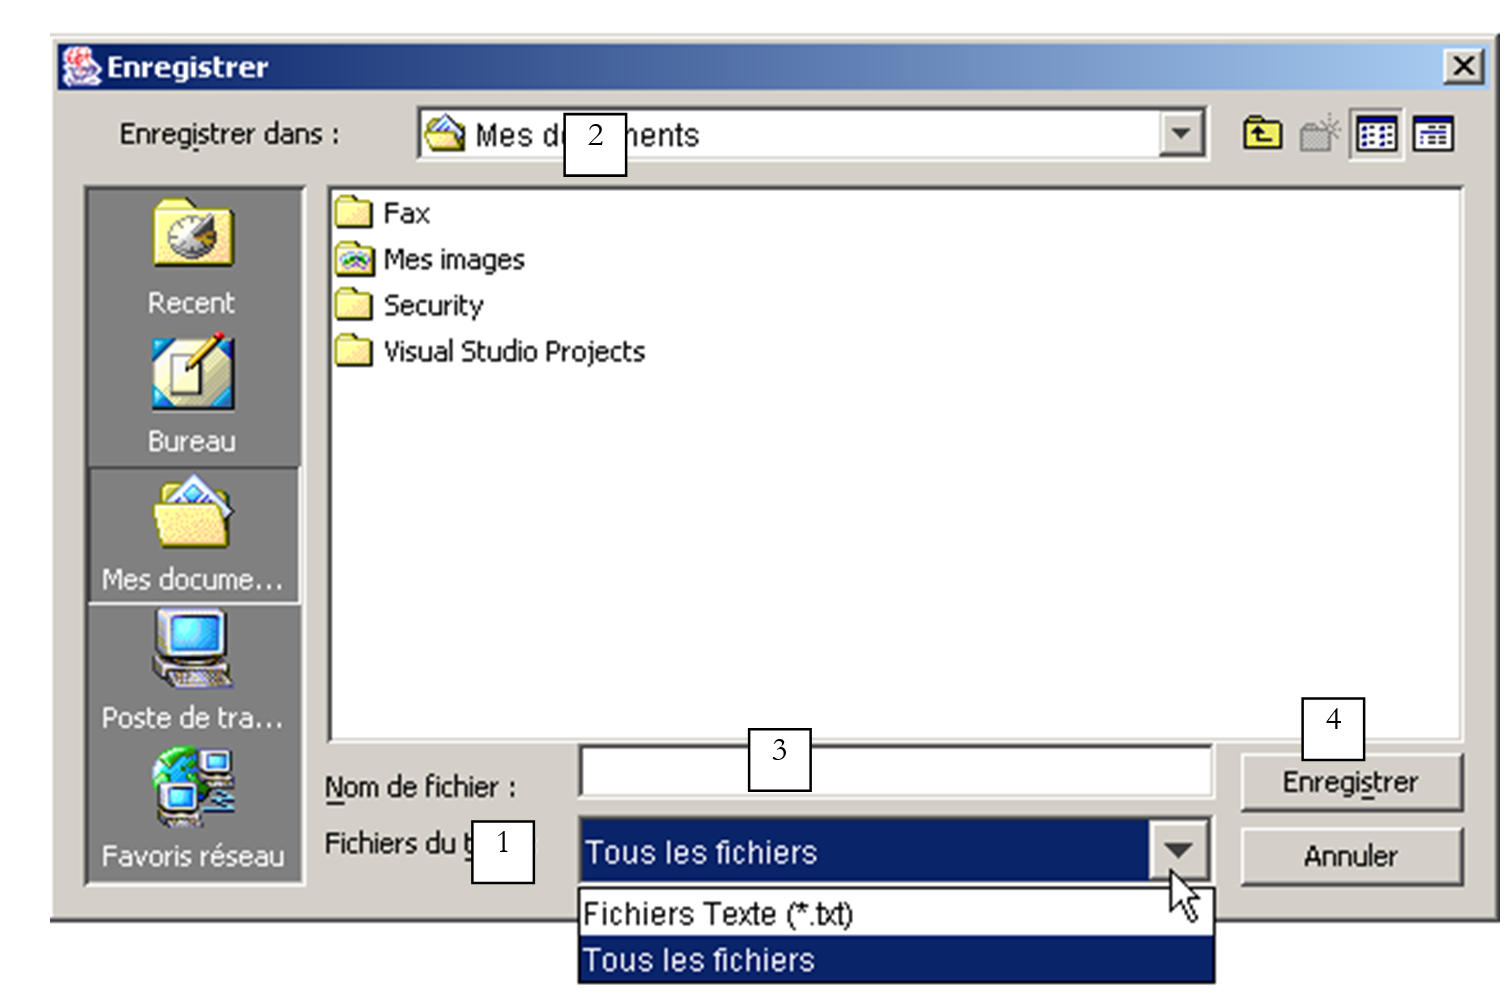
1 | drop-down list built using the addChoosableFilter method. It contains so-called selection filters represented by the FileFilter class. It is up to the developer to define these filters and add them to the list 1. |
2 | current folder, set by the setCurrentDirectory method if that method was used; otherwise, the current directory will be the "My Documents" folder in Windows or the home Directory in Unix. |
3 | The file name chosen or typed directly by the user. Will be available with the getSelectedFile() method |
4 | Save/Cancel buttons. If the Save button is clicked, the showSaveDialog method returns the result jFileChooser.APPROVE_OPTION |
How are the file filters in dropdown list 1 constructed? The filters are added to list 1 using the method:
addChoosableFilter(FileFilter) | sets the file types available for selection |
of the JFileChooser class. We still need to understand the FileFilter class. This is actually the javax.swing.filechooser.FileFilter class, which is an abstract class, c.a.d—a class that cannot be instantiated but only derived from. It is defined as follows:
FileFilter() | constructor |
boolean accept(File) | indicates whether file f belongs to the filter or not |
String getDescription() | filter description string |
Let’s take an example. We want dropdown list 1 to offer a filter for selecting *.txt files with the description "Text files (*.txt)".
- We need to create a class derived from the FileFilter class
- use the boolean accept(File f) method to return true if the name of file f ends with .txt
- use the String getDescription() method to set the description to "Text files (*.txt)"
This filter could be defined in our application as follows:
javax.swing.filechooser.FileFilter filtreTxt = new javax.swing.filechooser.FileFilter(){
public boolean accept(File f){
// do we accept f?
return f.getName().toLowerCase().endsWith(".txt");
}//accept
public String getDescription(){
// filter description
return "Fichiers Texte (*.txt)";
}//getDescription
};
This filter would be added to the list of filters for the jFileChooser1 object using the following statement:
All of this and a few other initializations are performed in the moreInit method executed when the window is created (see the complete program above). The code for the Save button is as follows:
void btnSauvegarder_actionPerformed(ActionEvent e) {
// saves the contents of the text box to a file
// we set the initial filter
jFileChooser1.setFileFilter(filtreTxt);
// the backup selection box is displayed
int returnVal = jFileChooser1.showSaveDialog(this);
// did the user choose anything?
if(returnVal == JFileChooser.APPROVE_OPTION) {
// we write the contents of the text box to file
écrireFichier(jFileChooser1.getSelectedFile());
}//if
}
The sequence of operations is as follows:
- We set the active filter to *.txt to allow the user to search primarily for this file type. The "All Files" filter is also available. It was added in procedure moreInit. We therefore have two filters.
- The save dialog box is displayed. Here we lose control, as the user uses the dialog box to select a file from the file system.
- When the user exits the selection box, we check the return value to determine whether or not to save the text box. If so, it must be saved to the file obtained via the getSelectedFile method.
The code associated with the "Upload" button is very similar to the code for the "Save" button.
void btnCharger_actionPerformed(ActionEvent e) {
// file selection using a JFileChooser object
// we set the initial filter
jFileChooser1.setFileFilter(filtreTxt);
// the selection box is displayed
int returnVal = jFileChooser1.showOpenDialog(this);
// did the user choose anything?
if(returnVal == JFileChooser.APPROVE_OPTION) {
// put the file in the text field
lireFichier(jFileChooser1.getSelectedFile());
}//if
}//btnCharger_actionPerformed
There are two differences:
- to display the file selection dialog, we use the showOpenDialog method instead of the showSaveDialog method. The displayed dialog is similar to the one displayed by the showSaveDialog method.
- If the user has successfully selected a file, the lireFichier method is called instead of the écrireFichier method.
5.4.1.1. Selection boxes JColorChooser and JFontChooser
We continue the previous example by adding two new buttons:
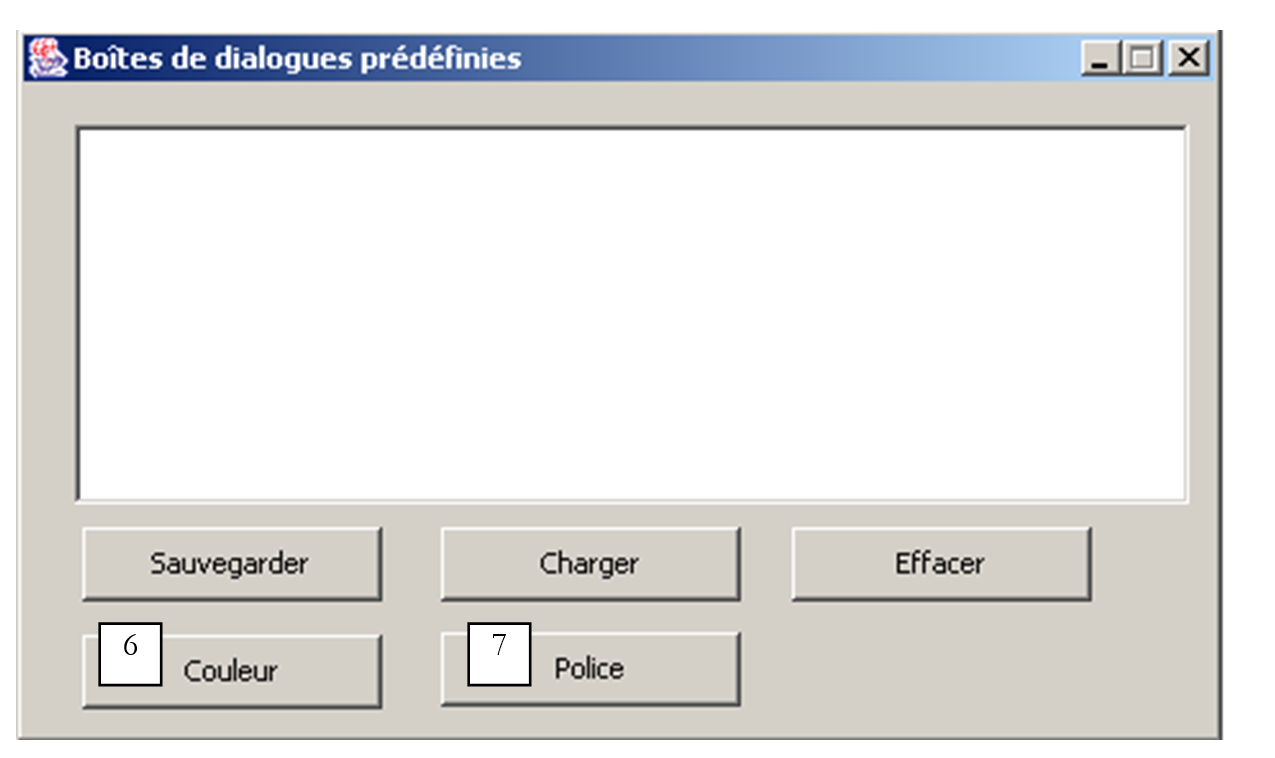
No. | type | name | role |
6 | JButton | btnCouleur | to set the font color of TextBox |
7 | JButton | btnPolice | to set the font of the TextBox |
The JColorChooser component, which displays a color picker, can be found in the list of Swing components for JBuilder:

We place this component in the design window, but outside the form. It is not visible in the form but is nevertheless present in the window’s component list:
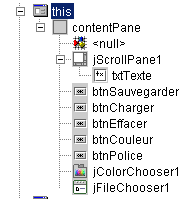
The JColorChooser class is very simple. We display the color picker using the int and showDialog methods:
static Color | showDialog(Component component, String title, Color initialColor) |
Component component | the parent component of the selection box, usually a window JFrame |
String title | the title in the selection box's title bar |
Color intialColor | the color initially selected in the color picker |
If the user selects a color, the method returns a color; otherwise, it returns null. The code associated with the Color button is as follows:
void btnCouleur_actionPerformed(ActionEvent e) {
// choice of text color using JColorChooser component
Color couleur;
if((couleur=jColorChooser1.showDialog(this,"Choix d'une couleur",Color.BLACK))!=null){
// set the color of the characters in the text box
txtTexte.setForeground(couleur);
}//if
}
The Color class is defined in java.awt.Color. Various constants are defined there, including Color.BLACK for the color black. The selection dialog displayed is as follows

Curiously enough, the Swing library does not provide a class for selecting a font. Fortunately, there are Java resources available online. By searching for the keyword "JFontChooser," which seems like a possible name for such a class, we find several. The following example will give us the opportunity to configure JBuilder to use packages not included in its initial configuration.
The downloaded package is named swingextras.jar and has been placed in the folder <jdk>\jre\lib\perso, where <jdk> refers to the installation directory of jdk used by JBuilder. It could have been placed anywhere else.
 |  |
Let’s look at the contents of the SwingExtras.jar package:
It contains the Java source code for the components included in the package. It also contains the classes themselves:
From this archive, note that the class JFontChooser is actually named com.lamatek.swingextras.JFontChooser. If you don’t want to write the full name, you’ll need to write the following at the beginning of your program:
How will the compiler and the Java Virtual Machine find this new package? In the case of direct use of JDK, this has already been explained, and the reader can find the details in the section on Java packages. Here, we detail the method to use with JBuilder. Packages are configured in the Options/Configure JDK menu:
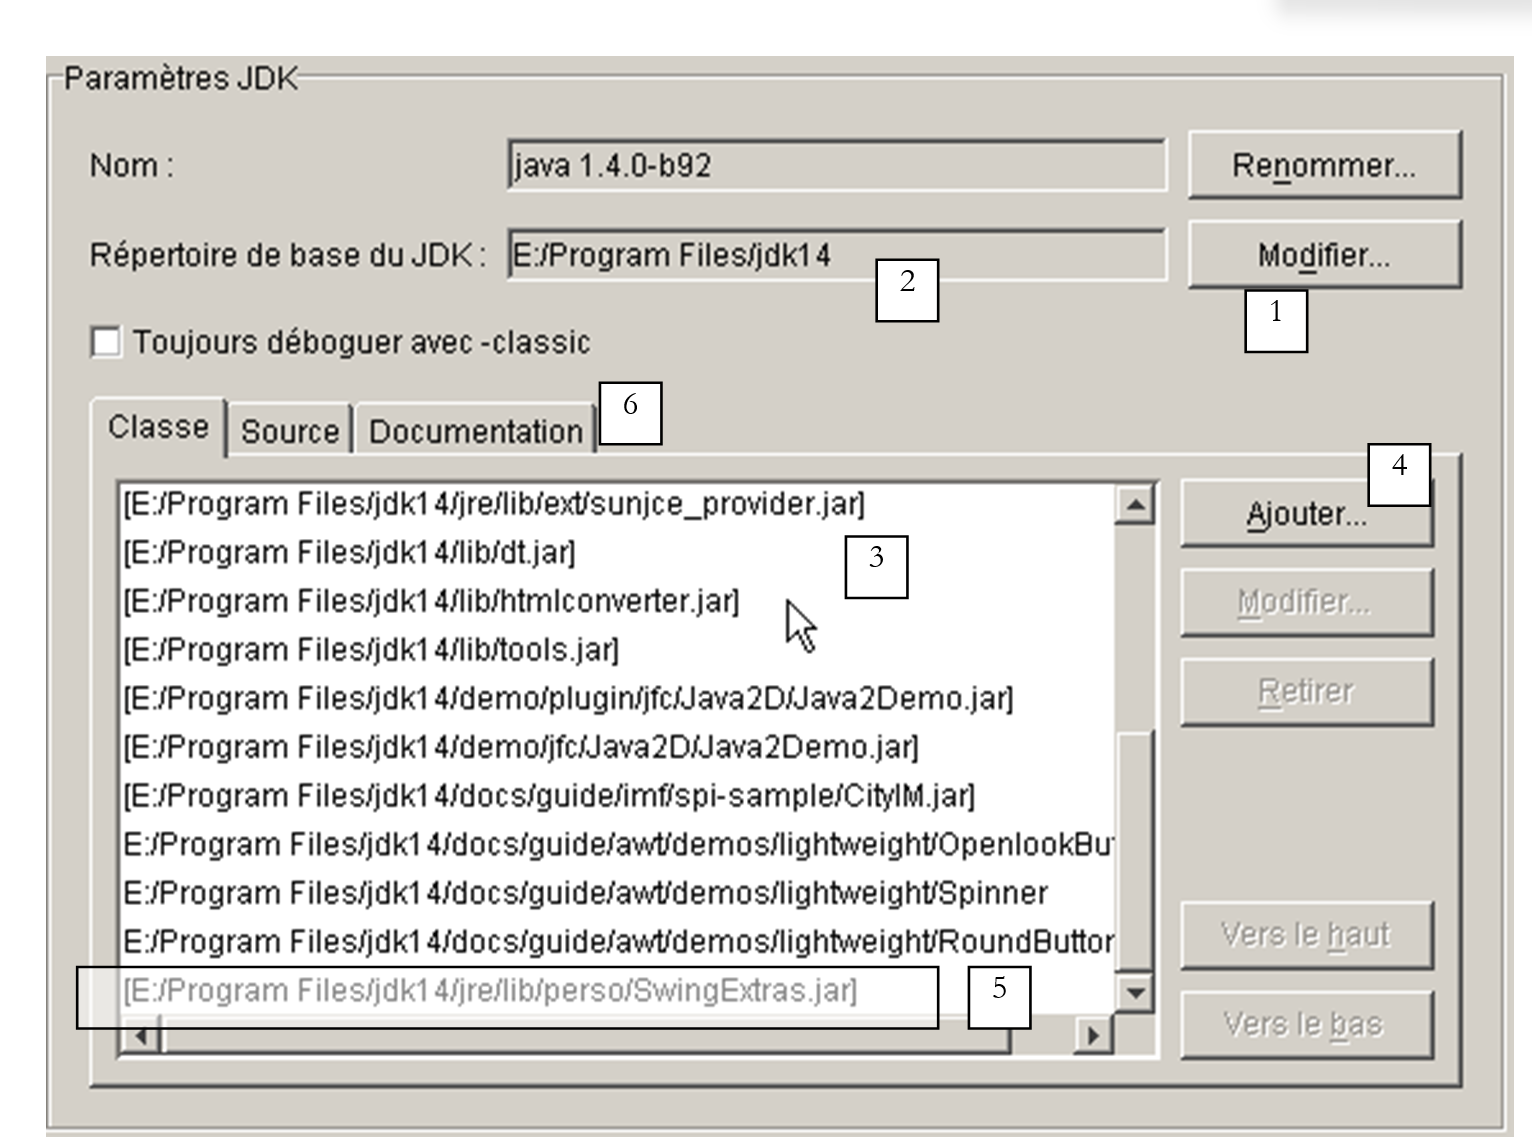
1 | The Edit button (1) allows you to tell JBuilder which JDK to use. In this example, JBuilder included JDK 1.3.1. When JDK 1.4 was released, it was installed separately from JBuilder, and the Edit button was used to instruct JBuilder to now use JDK 1.4 by specifying the latter’s installation directory |
2 | base directory of JDK currently used by JBuilder |
3 | List of Java archives (.jar) used by JBuilder. You can add others using the Add button (4) |
4 | The Add button (4) allows you to add new packages that JBuilder will use for both compiling and running programs. We used it here to add the SwingExtras.jar package (5) |
Now JBuilder is properly configured to use the JFontChooser class. However, we would need access to the definition of this class to use it correctly. The swingextras.jar archive contains html files that we could extract to use them. This is unnecessary. The Java documentation included in the .jar files is directly accessible from JBuilder. To do this, you must configure the Documentation tab (6) above. The following new window appears:
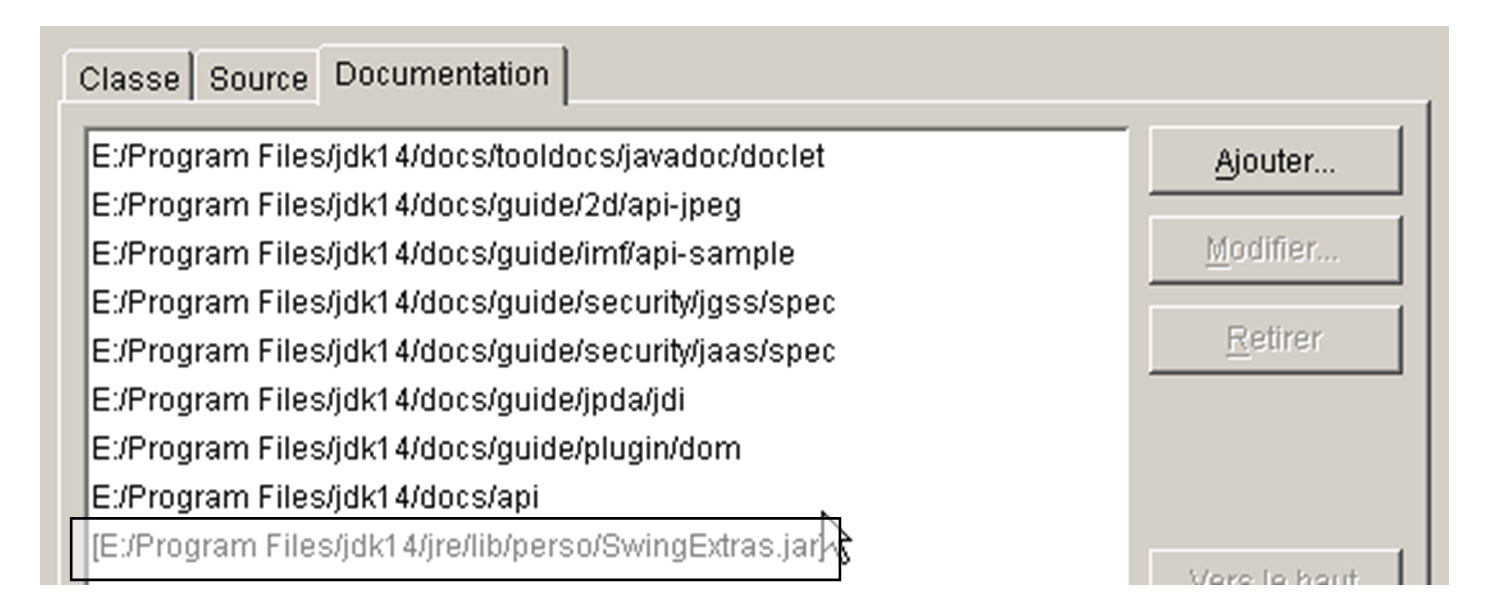
The Add button allows you to specify that the SwingExtras.jar file should be explored for documentation. Once this step is confirmed, you can see that you do indeed have access to the documentation for SwingExtras.jar. This provides several benefits:
- if you start typing the import statement
you will see that JBuilder provides assistance:

The com.lamatek package is found.
- Now, in the following program:
If you press F1 on the keyword JFontChooser, you get help on this class:
We can see in status bar 1 that it is indeed a html file from the swingextras.jar package that is being used. The example shown above is clear enough to allow us to write the code for the Font button in our application:
void btnPolice_actionPerformed(ActionEvent e) {
// choice of text font using JFontChooser component
jFontChooser1 = new JFontChooser(new Font("Arial", Font.BOLD, 12));
if (jFontChooser1.showDialog(this, "Choix d'une police") == JFontChooser.ACCEPT_OPTION) {
// change the font of the text box
txtTexte.setFont(jFontChooser1.getSelectedFont());
}//if
}
The selection dialog displayed by the showDialog method above is as follows:
5.5. The IMPOTS graphical application
We return to the IMPOTS application, which we have already covered twice. We will now add a graphical interface to it:
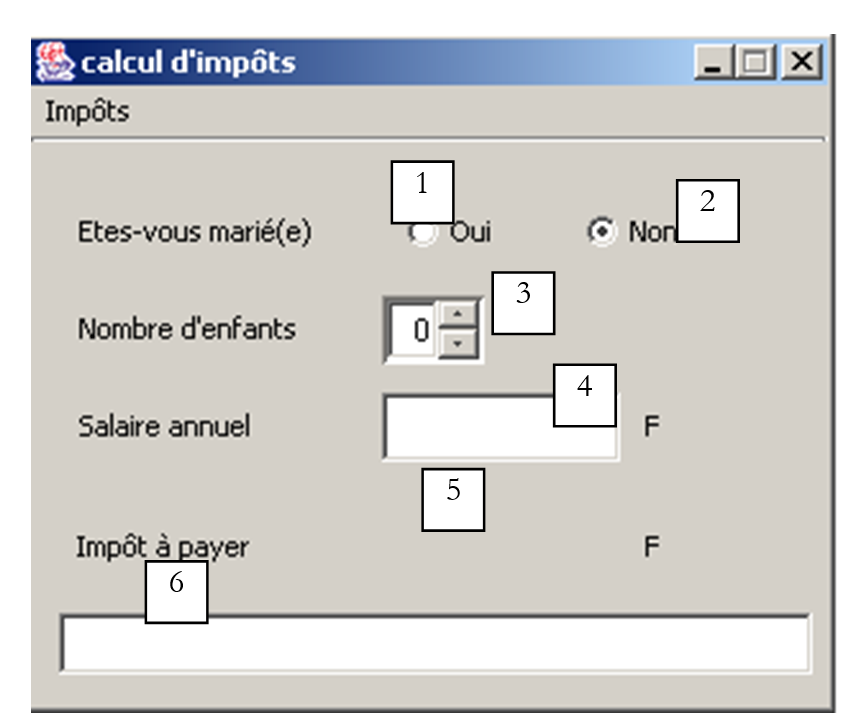
The controls are as follows
No. | type | name | role |
1 | JRadioButton | rdOui | Checked if married |
2 | JRadioButton | rdNon | Checked if not married |
3 | JSpinner | spinEnfants | number of the taxpayer's children Minimum=0, Maximum=20, Increment=1 |
4 | JTextField | txtSalaire | taxpayer's annual salary in F |
5 | JLabel | lblImpots | amount of tax due |
6 | JTextField | txtStatus | status message field - not editable |
The menu is as follows:
option main | option secondary | name | role |
Taxes | |||
Initialize | mnuInitialiser | loads the data required for the calculation from a text file | |
Calculate | mnuCalculer | calculates the tax due when all necessary data is present and correct | |
Clear | mnuEffacer | resets the form to its initial state | |
Exit | mnuQuitter | exits the application |
Operating Rules
- The Calculate menu remains disabled as long as the salary field is empty
- if, when the calculation is run, the salary turns out to be incorrect, an error is reported:
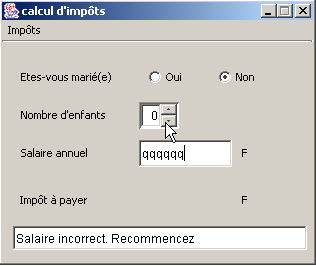
The program is shown below. It uses the *impots* class created in the chapter on classes. Some of the code automatically generated by JBuilder has not been reproduced here.
import java.awt.*;
import java.awt.event.*;
import javax.swing.*;
import javax.swing.filechooser.FileFilter;
import java.io.*;
import java.util.*;
import javax.swing.event.*;
public class frmImpots extends JFrame {
// window components
JPanel contentPane;
JMenuBar jMenuBar1 = new JMenuBar();
JMenu jMenu1 = new JMenu();
JMenuItem mnuInitialiser = new JMenuItem();
JMenuItem mnuCalculer = new JMenuItem();
JMenuItem mnuEffacer = new JMenuItem();
JMenuItem mnuQuitter = new JMenuItem();
JLabel jLabel1 = new JLabel();
JFileChooser jFileChooser1 = new JFileChooser();
JTextField txtStatus = new JTextField();
JRadioButton rdOui = new JRadioButton();
JRadioButton rdNon = new JRadioButton();
JLabel jLabel2 = new JLabel();
JLabel jLabel3 = new JLabel();
JTextField txtSalaire = new JTextField();
JLabel jLabel4 = new JLabel();
JLabel jLabel5 = new JLabel();
JLabel lblImpots = new JLabel();
JLabel jLabel7 = new JLabel();
ButtonGroup buttonGroup1 = new ButtonGroup();
JSpinner spinEnfants=null;
FileFilter filtreTxt=null;
// class attributes
double[] limites=null;
double[] coeffr=null;
double[] coeffn=null;
impots objImpots=null;
//Building the frame
public frmImpots() {
enableEvents(AWTEvent.WINDOW_EVENT_MASK);
try {
jbInit();
}
catch(Exception e) {
e.printStackTrace();
}
// other initializations
moreInit();
}
// form initialization
private void moreInit(){
// calculate menu disabled
mnuCalculer.setEnabled(false);
// inhibited input zones
txtSalaire.setEditable(false);
txtSalaire.setBackground(Color.WHITE);
// status field
txtStatus.setBackground(Color.WHITE);
// spinner Children - between 0 and 20 children
spinEnfants=new JSpinner(new SpinnerNumberModel(0,0,20,1));
spinEnfants.setBounds(new Rectangle(137,60,40,27));
contentPane.add(spinEnfants);
// filter *.txt for selection box
filtreTxt = new javax.swing.filechooser.FileFilter(){
public boolean accept(File f){
// do we accept f?
return f.getName().toLowerCase().endsWith(".txt");
}//accept
public String getDescription(){
// filter description
return "Fichiers Texte (*.txt)";
}//getDescription
};
// add the *.txt filter
jFileChooser1.addChoosableFileFilter(filtreTxt);
// we also want to filter all files
jFileChooser1.setAcceptAllFileFilterUsed(true);
// set the box's start directory FileChooser
jFileChooser1.setCurrentDirectory(new File("."));
}//moreInit
//Initialize component
private void jbInit() throws Exception {
................
}
//Replaced, so we can get out when the window is closed
protected void processWindowEvent(WindowEvent e) {
.....................
}
void mnuQuitter_actionPerformed(ActionEvent e) {
// quit the application
System.exit(0);
}
void mnuInitialiser_actionPerformed(ActionEvent e) {
// load the data file
// selected with the JFileChooser1 selection box
jFileChooser1.setFileFilter(filtreTxt);
if (jFileChooser1.showOpenDialog(this)!=JFileChooser.APPROVE_OPTION)
return;
// process the selected file
try{
// dATA READING
lireFichier(jFileChooser1.getSelectedFile());
// create impots object
objImpots=new impots(limites,coeffr,coeffn);
// confirmation
txtStatus.setText("Données chargées");
// salary can be modified
txtSalaire.setEditable(true);
// no more chgt possible
mnuInitialiser.setEnabled(false);
}catch(Exception ex){
// problem
txtStatus.setText("Erreur : " + ex.getMessage());
// end
return;
}//catch
}
private void lireFichier(File fichier) throws Exception {
// data tables
ArrayList aLimites=new ArrayList();
ArrayList aCoeffR=new ArrayList();
ArrayList aCoeffN=new ArrayList();
String[] champs=null;
// open file in read mode
BufferedReader IN=new BufferedReader(new FileReader(fichier));
// read the file line by line
// they are of the limit form coeffr coeffn
String ligne=null;
int numLigne=0; // line number courannte
while((ligne=IN.readLine())!=null){
// one more line
numLigne++;
// break down the line into fields
champs=ligne.split("\\s+");
// 3 fields?
if(champs.length!=3)
throw new Exception("ligne " + numLigne + "erronée dans fichier des données");
// we retrieve the three fields
aLimites.add(champs[0]);
aCoeffR.add(champs[1]);
aCoeffN.add(champs[2]);
}//while
// close file
IN.close();
// data transfer to bounded arrays
int n=aLimites.size();
limites=new double[n];
coeffr=new double[n];
coeffn=new double[n];
for(int i=0;i<n;i++){
limites[i]=Double.parseDouble((String)aLimites.get(i));
coeffr[i]=Double.parseDouble((String)aCoeffR.get(i));
coeffn[i]=Double.parseDouble((String)aCoeffN.get(i));
}//for
}
void mnuCalculer_actionPerformed(ActionEvent e) {
// tAX CALCULATION
// salary verification
int salaire=0;
try{
salaire=Integer.parseInt(txtSalaire.getText().trim());
if(salaire<0) throw new Exception();
}catch (Exception ex){
// error msg
txtStatus.setText("Salaire incorrect. Recommencez");
// focus on wrong field
txtSalaire.requestFocus();
// back to interface
return;
}
// no. of children
Integer InbEnfants=(Integer)spinEnfants.getValue();
// tAX CALCULATION
lblImpots.setText(""+objImpots.calculer(rdOui.isSelected(),InbEnfants.intValue(),salaire));
// delete status msg
txtStatus.setText("");
}
void txtSalaire_caretUpdate(CaretEvent e) {
// the salary has changed - update the calculate menu
mnuCalculer.setEnabled(! txtSalaire.getText().trim().equals(""));
}
void mnuEffacer_actionPerformed(ActionEvent e) {
// raz du formulaire
rdNon.setSelected(true);
spinEnfants.getModel().setValue(new Integer(0));
txtSalaire.setText("");
mnuCalculer.setEnabled(false);
lblImpots.setText("");
}
}
Here we have used a component available only starting with JDK 1.4, the JSpinner. It is an incrementor, which allows the user to set the number of children here. This Swing component was not available in the Swing component bar of JBuilder 6 used for the test. This does not prevent its use, even if things are a bit more complicated than for components available in the component bar. In fact, you cannot drop the JSpinner component onto the form during design time. You must do this at runtime. Let’s look at the code that does this:
// spinner Children - between 0 and 20 children
spinEnfants=new JSpinner(new SpinnerNumberModel(0,0,20,1));
spinEnfants.setBounds(new Rectangle(137,60,40,27));
contentPane.add(spinEnfants);
The first line creates the JSpinner component. This component can be used for various purposes, not just as an integer spinner as shown here. The argument of the JSpinner constructor here is a number incrementer model that accepts four parameters (value, min, max, increment). The component has the following form:
![]()
value | initial value displayed in the component |
min | minimum value that can be displayed in the component |
max | maximum value that can be displayed in the component |
increment | increment value of the displayed value when using the component's up/down arrows |
The component's value is obtained via its getValue method, which returns an Object type. Hence, some type casting is required to obtain the integer we need:
// no. of children
Integer InbEnfants=(Integer)spinEnfants.getValue();
// tAX CALCULATION
lblImpots.setText(""+objImpots.calculer(rdOui.isSelected(),
InbEnfants.intValue(),salaire));
Once the JSpinner component is defined, it is placed in the window:
First and foremost, the user must use the Initialize menu item option, which creates an impots object using the constructor
of the impots class. Note that this class was defined as an example in the chapter on classes. Refer to that chapter if necessary. The three arrays required by the constructor are populated from the contents of a text file in the following format:
12620.0 | 0 | 0 |
13190 | 0.05 | 631 |
15,640 | 0.1 | 1,290.5 |
24,740 | 0.15 | 2,072.5 |
31,810 | 0.2 | 3,309.5 |
39,970 | 0.25 | 4,900 |
48,360 | 0.3 | 6898.5 |
55,790 | 0.35 | 9,316.5 |
92,970 | 0.4 | 12,106 |
127,860 | 0.45 | 16,754.5 |
151,250 | 0.50 | 23,147.5 |
172,040 | 0.55 | 30,710 |
195,000 | 0.60 | 39,312 |
0 | 0.65 | 49062 |
Each line contains three numbers separated by at least one space. This text file is selected by the user using a JFileChooser component. Once the impots object has been created, all that remains is to let the user provide the three pieces of information needed: married or not, number of children, annual salary, and call the calculate method of the impots class. The operation can be repeated multiple times. The object of type impots is created only once, when using the option Initialize component.
5.6. Writing applets
5.6.1. Introduction
Once you have written an application with a graphical user interface, it is fairly easy to convert it into an applet. Stored on machine A, it can be downloaded via a web browser from machine B on the Internet. The original application is thus shared among many users, and this is the main benefit of converting an application into an applet. However, not every application can be converted in this way: to avoid causing problems for the user running an applet in their browser, the applet environment is restricted:
- an applet cannot read from or write to the user’s disk
- it can only communicate with the machine from which it was downloaded by the browser.
These are significant restrictions. They mean, for example, that an application needing to read information from a file or database must request it through a relay application located on the server from which it was downloaded.
The general structure of a simple web application is as follows:
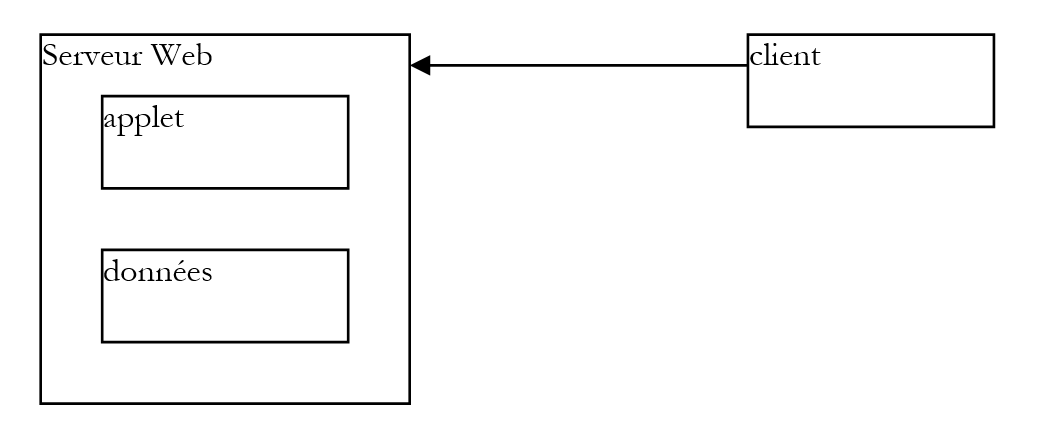
- The client requests a HTML document from the web server, typically using a browser. This document may contain an applet that will function as a standalone graphical application within the HTML document displayed by the client's browser.
- This applet will have access to data, but only to data located on the web server. It will not have access to resources on the client machine running it, nor to resources on other machines on the network other than the one from which it was downloaded.
5.6.2. The JApplet class
5.6.2.1. Definition
An application can be downloaded by a web browser if it is an instance of the java.applet.Applet class or the javax.swing.JApplet class. The latter derives from the former, which itself derives from the Panel class, which in turn derives from the Container class. Since an Applet or JApplet instance is of the Container type, it can therefore contain components (Component) such as buttons, checkboxes, lists, etc. Here are some notes on the role of the various methods:
Method | Role |
public void destroy(); | Destroys the Applet instance |
public AppletContext getAppletContext(); | retrieves the applet's execution context (the HTML document in which it is located, other applets in the same document, etc.) |
public String getAppletInfo(); | returns a string providing information about the applet |
public AudioClip getAudioClip(URL url); | loads the audio file specified by URL |
public AudioClip getAudioClip(URL url, String name); | loads the audio file specified by URL/name |
public URL getCodeBase(); | returns the URL of the applet |
public URL getDocumentBase(); | returns the URL of the document HTML containing the applet |
public Image getImage(URL url); | retrieves the image specified by URL |
public Image getImage(URL url, String name); | retrieves the image specified by URL/name |
public String getParameter(String name); | retrieves the value of the name parameter contained in the <applet> tag of the HTML document that contains the applet. |
public void init(); | This method is called by the browser when the applet is first launched |
public boolean isActive(); | applet status |
public void play(URL url); | Plays the sound file specified by URL |
public void play(URL url, String name); | Play the audio file specified by UR/name |
public void resize(Dimension d); | sets the size of the applet's frame |
public void resize(int width, int height); | same |
public final void setStub(AppletStub stub); | |
public void showStatus(String msg); | displays a message in the applet's status bar |
public void start(); | this method is called by the browser each time the document containing the applet is displayed |
public void stop(); | this method is called by the browser whenever the document containing the applet is abandoned in favor of another (user-initiated switch to URL) |
The JApplet class has introduced several improvements to the Applet class, notably the ability to contain JMenuBar and c.a.d components, as well as menus, which was not possible with the Applet class.
5.6.2.2. Running an applet: the init, start, and stop methods
When a browser loads an applet, it calls three of its methods:
init | This method is called when the applet is initially loaded. It should therefore contain the initializations required by the application. |
start | This method is called whenever the document containing the applet becomes the browser’s current document. Thus, when a user loads an applet, the init and start methods will be executed in that order. When the user leaves the document to view another one, the stop method will be executed. When the user returns to it later, the start method will be executed. |
stop | This method is called every time the user leaves the document containing the applet. |
For many applets, only the init method is necessary. The start and stop methods are only necessary if the application launches tasks (threads) that run in parallel and continuously, often without the user’s knowledge. When the user leaves the document, the visible part of the application disappears, but these background tasks continue to run. This is often unnecessary. We then take advantage of the browser’s call to the stop method to stop them. If the user returns to the document, we take advantage of the browser’s call to the start method to restart them.
Take, for example, an applet that has a clock in its graphical interface. This clock is maintained by a background task (thread). When the user leaves the applet’s page in the browser, there is no point in keeping the clock running since it has become invisible: in the applet’s stop method, we will stop the thread that manages the clock. In the start method, we restart it so that when the user returns to the applet page, they find a clock that is up to date.
5.6.3. Converting a graphical application into an applet
We assume here that this conversion is possible, meaning that it complies with applet execution restrictions. An application is launched by the *main* method of one of its classes:
Such an application is converted into an applet as follows:
import java.applet.JApplet;
…
public class application extends JApplet{
…
public void init(){
…
}
…
}// end of class
Note the following points:
- the application class now derives from the JApplet class
- the main method is replaced by the init method.
As an example, let’s revisit an application we’ve studied: list management.
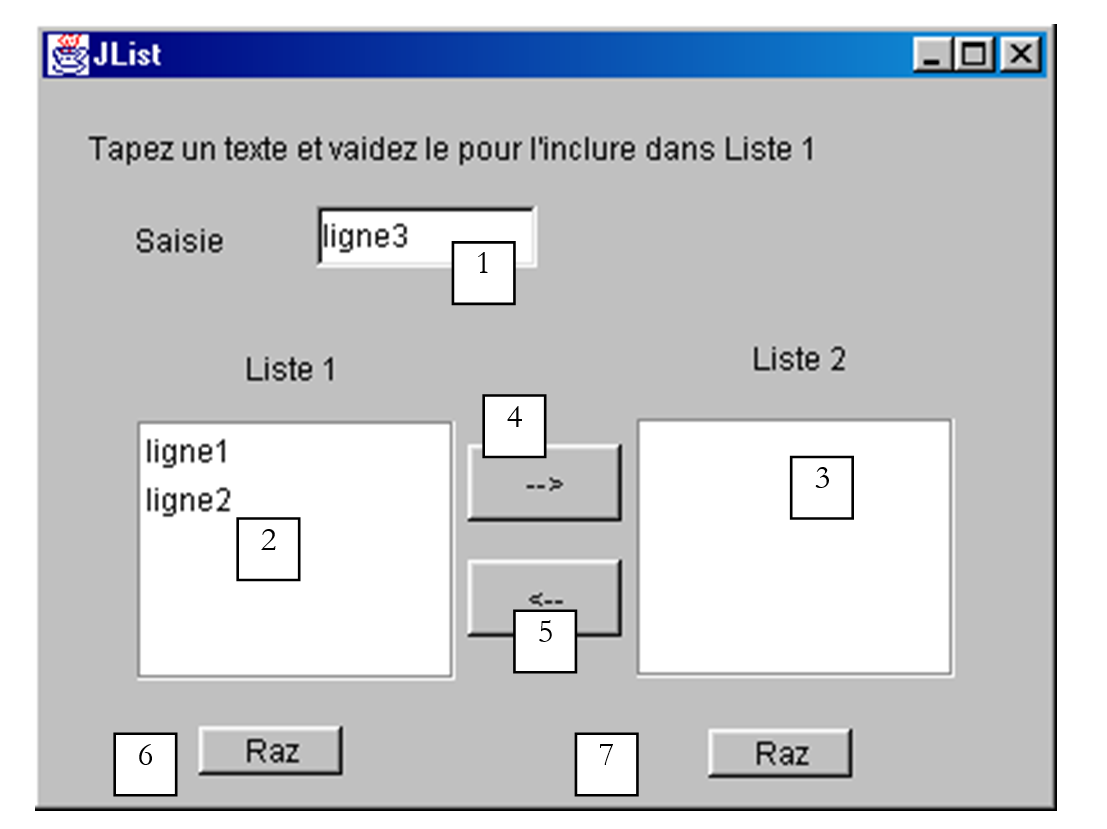
The components of this window are as follows:
No. | Type | name | role |
1 | JTextField | txtSaisie | input field |
2 | JList | jList1 | list contained in a container jScrollPane1 |
3 | JList | jList2 | list contained in a container jScrollPane2 |
4 | JButton | cmd1To2 | transfers the selected items from list 1 to list 2 |
5 | JButton | cmd2To1 | does the opposite |
6 | JButton | cmdRaz1 | clear list 1 |
7 | JButton | cmdRaz2 | clear list 2 |
The application skeleton was as follows:
public class interfaceAppli extends JFrame {
JPanel contentPane;
JLabel jLabel1 = new JLabel();
JLabel jLabel2 = new JLabel();
JLabel jLabel3 = new JLabel();
JTextField txtSaisie = new JTextField();
JButton cmd1To2 = new JButton();
JButton cmd2To1 = new JButton();
DefaultListModel v1=new DefaultListModel();
DefaultListModel v2=new DefaultListModel();
JList jList1 = new JList(v1);
JList jList2 = new JList(v2);
JScrollPane jScrollPane1 = new JScrollPane();
JScrollPane jScrollPane2 = new JScrollPane();
JButton cmdRaz1 = new JButton();
JButton cmdRaz2 = new JButton();
JLabel jLabel4 = new JLabel();
/**Building the frame*/
public interfaceAppli() {
enableEvents(AWTEvent.WINDOW_EVENT_MASK);
try {
jbInit();
}
catch(Exception e) {
e.printStackTrace();
}
}//interfaceAppli
/**Initialize component*/
private void jbInit() throws Exception {
...
txtSaisie.addActionListener(new java.awt.event.ActionListener() {
public void actionPerformed(ActionEvent e) {
txtSaisie_actionPerformed(e);
}
});
...
// Jlist1 is placed in the jScrollPane1 container
jScrollPane1.getViewport().add(jList1, null);
// Jlist2 is placed in the jScrollPane2 container
jScrollPane2.getViewport().add(jList2, null);
...
}
/**Replaced, so we can get out when the window is closed*/
protected void processWindowEvent(WindowEvent e) {
...
}
void txtSaisie_actionPerformed(ActionEvent e) {
.............
}//class
  void cmdRaz1_actionPerformed(ActionEvent e) {
    // empty list 1
    v1.removeAllElements();
  }//cmd Raz1

  void cmdRaz2_actionPerformed(ActionEvent e) {
    // empty list 2
    v2.removeAllElements();
  }///cmd Raz2
To convert the application class into an applet, proceed as follows:
- modify the previous interfaceAppli class so that it no longer extends JFrame but instead extends JApplet:
- Remove the statement that sets the title of the JFrame window. A JApplet applet does not have a title bar
- Change the constructor to an init method and, within this method, remove window event handling (WindowListener, ...). An applet is a container that cannot be resized or closed.
   /**Building the frame*/
  public init() {
    // enableEvents(AWTEvent.WINDOW_EVENT_MASK);
    try {
      jbInit();
    }
    catch(Exception e) {
      e.printStackTrace();
    }
  }//interfaceAppli
- The method processWindowEvent must be deleted or commented out
   /**Replaced, so we can get out when the window is closed*/
  //protected void processWindowEvent(WindowEvent e) {
  //  super.processWindowEvent(e);
  //  if (e.getID() == WindowEvent.WINDOW_CLOSING) {
  //    System.exit(0);
  //  }
  // }
Here is the complete applet code as an example, excluding the part automatically generated by JBuilder
import java.awt.*;
import java.awt.event.*;
import javax.swing.*;

public class interfaceAppli extends JApplet {
  JPanel contentPane;
  JLabel jLabel1 = new JLabel();
  JLabel jLabel2 = new JLabel();
  JLabel jLabel3 = new JLabel();
  JTextField txtSaisie = new JTextField();
  JButton cmd1To2 = new JButton();
  JButton cmd2To1 = new JButton();
  DefaultListModel v1=new DefaultListModel();
  DefaultListModel v2=new DefaultListModel();
  JList jList1 = new JList(v1);
  JList jList2 = new JList(v2);
  JScrollPane jScrollPane1 = new JScrollPane();
  JScrollPane jScrollPane2 = new JScrollPane();
  JButton cmdRaz1 = new JButton();
  JButton cmdRaz2 = new JButton();
  JLabel jLabel4 = new JLabel();

  /**Construire le cadre*/
  public void init() {
    // enableEvents(AWTEvent.WINDOW_EVENT_MASK);
    try {
      jbInit();
    }
    catch(Exception e) {
      e.printStackTrace();
    }
  }//interfaceAppli

  /**Initialiser le composant*/
  private void jbInit() throws Exception  {
    //setIconImage(Toolkit.getDefaultToolkit().createImage(interfaceAppli.class.getResource("[Votre icône]")));
    contentPane = (JPanel) this.getContentPane();
    contentPane.setLayout(null);
    this.setSize(new Dimension(400, 308));
    // this.setTitle("JList");
    jScrollPane1.setBounds(new Rectangle(37, 133, 124, 101));
    jScrollPane2.setBounds(new Rectangle(232, 132, 124, 101));
.............
  }

  void txtSaisie_actionPerformed(ActionEvent e) {
    // le texte de la saisie a été validé
    // on le récupère débarrassé de ses espaces de début et fin
    String texte=txtSaisie.getText().trim();
    // s'it's empty, we don't want it
    if(texte.equals("")){
      // msg d'error
      JOptionPane.showMessageDialog(this,"Vous devez taper un texte",
        "Erreur",JOptionPane.WARNING_MESSAGE);
      // fin
      return;
    }//if
    // s'it's not empty, we add it to the values in list 1
    v1.addElement(texte);
    // et on vide le champ de saisie
    txtSaisie.setText("");
  }

  void cmd1To2_actionPerformed(ActionEvent e) {
    // transfert des éléments sélectionnés dans la liste 1 vers la liste 2
    transfert(jList1,jList2);
  }//cmd1To2

  private void transfert(JList L1, JList L2){
      // transfert des éléments sélectionnés dans la liste 1 vers la liste 2
      // on récupère le tableau des indices des éléments sélectionnés dans L1
      int[] indices=L1.getSelectedIndices();
      // qq chose à faire ?
      if (indices.length==0) return;
      // on récupère les valeurs de L1
      DefaultListModel v1=(DefaultListModel)L1.getModel();
      // et celles de L2
      DefaultListModel v2=(DefaultListModel)L2.getModel();
      for(int i=indices.length-1;i>=0;i--){
        // on ajoute à L2 les valeurs sélectionnées dans L1
        v2.addElement(v1.elementAt(indices[i]));
        // les éléments de L1 copiés dans L2 doivent être supprimés de L1
        v1.removeElementAt(indices[i]);
      }//for
  }//transfert

  private void affiche(String message){
    // affiche message
      JOptionPane.showMessageDialog(this,message,
        "Suivi",JOptionPane.INFORMATION_MESSAGE);
  }// affiche

  void cmd2To1_actionPerformed(ActionEvent e) {
    // transfert des éléments sélectionnés dans jList2 vers jList1
      transfert(jList2,jList1);
  }//cmd2TO1

  void cmdRaz1_actionPerformed(ActionEvent e) {
    // vide liste 1
    v1.removeAllElements();
  }//cmd Raz1

  void cmdRaz2_actionPerformed(ActionEvent e) {
    // vide liste 2
    v2.removeAllElements();
  }//cmd Raz2

}//classe
We can compile the source code for this applet. We do so here using JDK, not JBuilder.
E:\data\serge\Jbuilder\interfaces\JApplets\1>javac.bat interfaceAppli.java

E:\data\serge\Jbuilder\interfaces\JApplets\1>dir
12/06/2002  16:40                6 148 interfaceAppli.java
12/06/2002  16:41                  527 interfaceAppli$1.class
12/06/2002  16:41                  525 interfaceAppli$2.class
12/06/2002  16:41                  525 interfaceAppli$3.class
12/06/2002  16:41                  525 interfaceAppli$4.class
12/06/2002  16:41                  525 interfaceAppli$5.class
12/06/2002  16:41                4 759 interfaceAppli.class
The application can be tested using the AppletViewer program from JDK, which allows you to run applets or a browser. To do this, you must create the document HTML appli.htm, which will contain the applet:
<html>
    <head>
        <title>listes swing</title>
    </head>
    <body>
        <applet
        code="interfaceAppli.class"
      width="400"
      height="300">
        </applet>
    </body>
</html>
This is a standard HTML document, except for the presence of the applet tag. This tag was used with three parameters:
code="interfaceAppli.class" | name of the compiled JAVA class to load in order to run the applet |
width="400" | width of the applet frame in the document |
height="300" | height of the applet frame in the document |
Once the file appli.htm has been written, it can be loaded using the appletviewer program from JDK or with a web browser. In a DOS window, type the following command in the directory containing the file appli.htm:
appletviewer appli.htm
Here, we assume that the directory of the appletviewer.exe executable is in the PATH directory of the DOS window; otherwise, you would need to specify the full path to the appletviewer.exe executable. The following window appears:
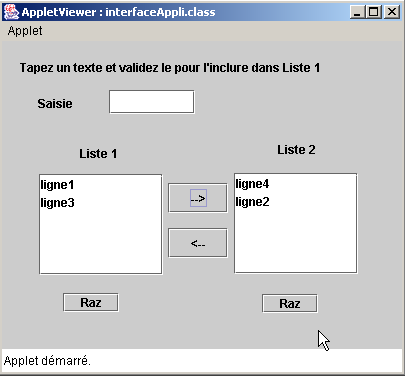
We stop the applet’s execution using the option Applet/Quit command. Now let’s test the applet with a browser. The browser must use a Java 2 Virtual Machine to display Swing components. Until recently (2001), this requirement posed a problem because Sun released JDK versions that browser vendors adopted only with significant delay. Finally, Sun resolved this issue by providing users with an application called the "Java plugin," which allows Internet Explorer and Netscape Navigator to use the very latest JRE versions produced by Sun (JRE = Java Runtime Environment). The following tests were performed using IE 5.5 with the Java 1.4 plugin.
One way to test the interfaceAppli.class applet is to load the HTML appli.htm file directly into the browser by double-clicking on it. The browser then displays the HTML page and its applet without the need for a web server:
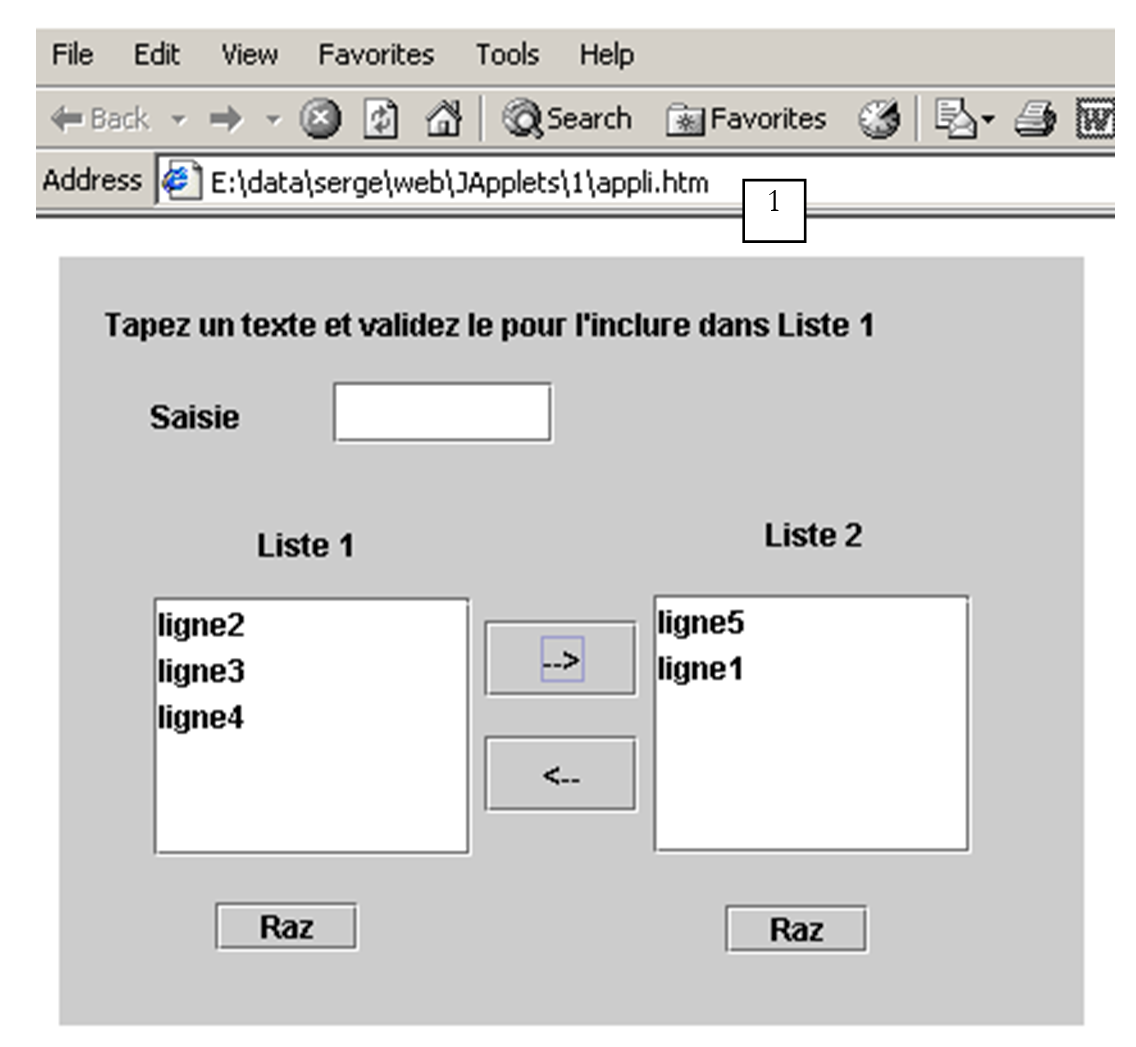
As shown in URL (1), the file was loaded directly into the browser. In the following example, the file appli.htm was requested from an Apache web server running on port 81 of the local machine:

5.6.4. The option formatting tag <applet> in a HTML document
We have seen that within a HTML document, the applet is referenced by the formatting tag <applet>. This tag can have various parameters:
<applet
    code=
    width=
    height=
    codebase=
    align=
    hspace=
    vspace=
alt=
>
    <param name1=nom1 value=val1>
    <param name2=nom2 value=val2>
    texte
>
</applet>
The parameters have the following meanings:
Parameter | Meaning |
code | required - name of the .class file to execute |
width | required - width of the applet in the document |
height | required - height … |
codebase | optional - URL of the directory containing the applet to be executed. If codebase is not specified, the applet will be searched for in the directory of the document html that references it |
align | optional - positioning (LEFT, RiGHT, CENTER) of the applet within the document |
hspace | optional - horizontal margin surrounding the applet, expressed in pixels |
vspace | optional - vertical margin surrounding the applet, expressed in pixels |
alt | optional - text displayed in place of the applet if the browser cannot load it |
param | optional - parameter passed to the applet specifying its name (name) and its value (value). The applet can retrieve the value of the parameter name1 using val1=getParameter("name1") You can use as many parameters as you want |
text | optional - will be displayed by any browser unable to run an applet, for example because it does not have a Java Virtual Machine. |
Let’s take an example to illustrate passing parameters to an applet:
<html>
    <head>
        <title>paramètres applet</title>
    </head>
    <body>
        <applet code="interfaceParams.class" width="400" height="300">
      <param name="param1" value="val1">
      <param name="param2" value="val2">
        </applet>
    </body>
</html>
The Java code for the interfaceParams applet was generated as described above. We built a JBuilder application and then made the few changes mentioned above:
import java.awt.*;
import java.awt.event.*;
import javax.swing.*;

public class interfaceParams extends JApplet {
  JPanel contentPane;
  JScrollPane jScrollPane1 = new JScrollPane();
  JLabel jLabel1 = new JLabel();
  DefaultListModel params=new DefaultListModel();
  JList lstParams = new JList(params);

  //Building the frame
  public void init() {
    // enableEvents(AWTEvent.WINDOW_EVENT_MASK);
    try {
      jbInit();
    }
    catch(Exception e) {
      e.printStackTrace();
    }
     // other initializations
    moreInit();
  }

   // initializations
  public void moreInit(){
     // displays applet parameter values
    params.addElement("nom=param1 valeur="+getParameter("param1"));
    params.addElement("nom=param2 valeur="+getParameter("param2"));
  }//more Init

   //Initialize component
  private void jbInit() throws Exception  {
............
    this.setSize(new Dimension(205, 156));
    //this.setTitle("Applet parameters");
    jScrollPane1.setBounds(new Rectangle(19, 53, 160, 73));
............
 }
}
Execution with AppletViewer:
5.6.5. Accessing remote resources from an applet
Many applications need to access information stored in files or databases. We have noted that an applet does not have access to the resources of the machine on which it runs. This is a common-sense measure. Otherwise, it would be easy to write an applet to "spy" on the hard drive of those who load it. The applet does, however, have access to the resources of the server from which it was downloaded, such as files. That is what we will look at now.
5.6.5.1. The URL class
Any Java application can read a file on a machine on the network using the java.net.URL class (URL = Uniform Resource Locator). A URL identifies a network resource, the machine on which it is located, as well as the protocol and communication port to be used to retrieve it in the form:
protocol:port//machine/file
Thus, the URL http://www.ibm.com/index.html refers to the file index.html on the machine www.ibm.com. It is accessible via the http protocol. The port is not specified: the browser will use port 80, which is the default port for the http service.
Let’s take a closer look at some of the elements of the URL class:
public URL(String spec) | creates an instance of URL from a string of the type "protocol:port//machine/file" - throws an exception if the string syntax does not match a URL |
public String getFile() | retrieves the file field from the "protocol:port//machine/file" string in URL |
public String getHost() | retrieves the machine field from the string "protocol:port//machine/file" in URL |
public String getPort() | retrieves the port field from the string "protocol:port//machine/file" in URL |
public String getProtocol() | retrieves the protocol field from the string "protocol:port//machine/file" in URL |
public URLConnection openConnection() | opens a connection to the remote machine getHost() on its port getPort() using the protocol getProtocol() in order to read the file getFile(). Throws an exception if the connection could not be opened |
public final InputStream openStream() | shortcut for openConnection().getInputStream(). Obtains an input stream from which the contents of the file getFile() can be read. Throws an exception if the stream could not be obtained |
public String toString() | displays the identity of the URL instance |
There are two methods of interest here:
- public URL(String spec) to specify the file to process
- public final InputStream openStream() to process it
5.6.5.2. A console example
We will write a Java program, without a graphical user interface, designed to display on the screen the contents of a URL file passed to it as a parameter. An example of a call could be as follows:
The program is relatively simple:
import java.net.*;             // for the URL class
import java.io.*;                // for streams

public class urlcontenu{

// displays contents of URL passed as argument
// this content must be text to be ˆtre lisible

  public static void main (String arg[]){
    // argument verification
    if(arg.length==0){
      System.err.println("Syntaxe pg url");
      System.exit(0);
    }

    try{
      // creation of URL
      URL url=new URL(arg[0]);
      // content reading
      try{
        // input stream creation
        BufferedReader is=new BufferedReader(new InputStreamReader(url.openStream()));
        try{
          // read text lines in the input stream
          String ligne;
          while((ligne=is.readLine())!=null)
            System.out.println(ligne);
        } catch (Exception e){
            System.err.println("Erreur lecture : " +e);
        }
        finally{
          try { is.close(); } catch (Exception e) {}
        }
      } catch (Exception e){
          System.err.println("Erreur openStream : " +e);
      }
    } catch (Exception e){
      System.err.println("Erreur création URL : " +e);
    }
  }// fine hand
}// end of class
After verifying that there is indeed an argument, we attempt to create a URL using it:
// creation of URL
      URL url=new URL(arg[0]);
This creation may fail if the argument does not follow the URL protocol:port//machine/file syntax. If we have a syntactically correct URL, we attempt to create an input stream from which we can read lines of text. The input stream provided by URL URL.openStream() provides a stream of type InputStream, which is a character-oriented stream: reading is done character by character, and you must form the lines yourself. To read lines of text, you must use the readLine method of the BufferedReader or DataInputStream.On classes; here, BufferedReader has been chosen. All that remains is to convert the InputStream stream from URL into a BufferedReader stream. This is done by creating an intermediate InputStreamReader stream:
BufferedReader is=new BufferedReader(new InputStreamReader(url.openStream()));
This stream creation may fail. We handle the corresponding exception. Once the stream is obtained, all that remains is to read the lines of text from it and display them on the screen.
            String ligne;
         while((ligne=is.readLine())!=null)
                System.out.println(ligne);
Again, reading may throw an exception that must be handled. Here is an example of running the program, which requires a local URL:
E:\data\serge\Jbuilder\interfaces\JApplets\3>java urlcontenu http://localhost
<html>

<head>


<title>Bienvenue dans le Serveur Web personnel</title>
</head>

<body bgcolor="#FFFFFF" link="#0080FF" vlink="#0080FF"
topmargin="0" leftmargin="0">

<table border="0" cellpadding="0" cellspacing="0" width="100%"
bgcolor="#000000">
............
                </table>
                </center></div></td>
            </tr>
        </table>
        </td>
    </tr>
</table>
</body>
</html>
5.6.5.3. A graphical example
The graphical interface will look like this:
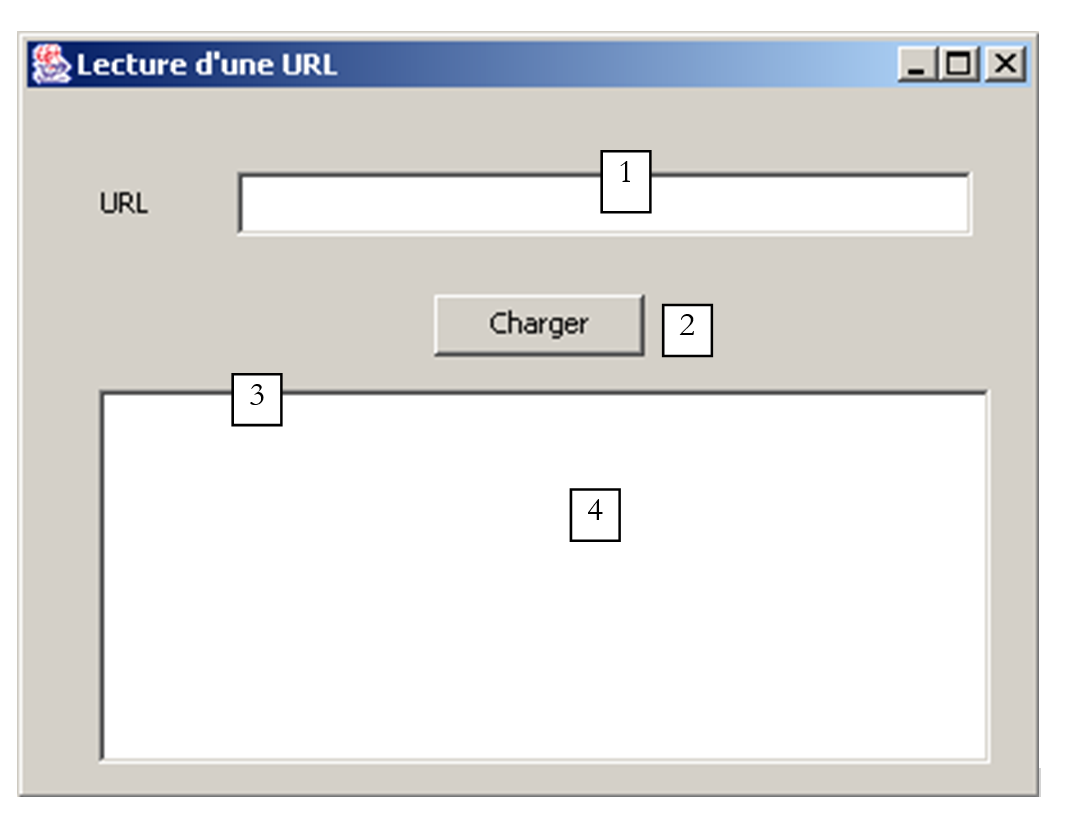
Number | Name | Type | Role |
1 | txtURL | JTextField | URL Read |
2 | btnCharger | JButton | button to start playing URL |
3 | JScrollPane1 | JScrollPane | scrolling banner |
4 | lstURL | JList | List displaying the contents of the requested URL |
Upon execution, we get a result similar to that of the console program:
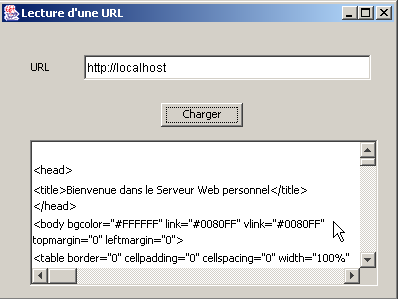
The relevant code for the application is as follows:
import java.awt.*;
import java.awt.event.*;
import javax.swing.*;
import javax.swing.event.*;
import java.net.*;
import java.io.*;

public class interfaceURL extends JFrame {
  JPanel contentPane;
  JLabel jLabel1 = new JLabel();
  JTextField txtURL = new JTextField();
  JButton btnCharger = new JButton();
  JScrollPane jScrollPane1 = new JScrollPane();
  DefaultListModel lignes=new DefaultListModel();
  JList lstURL = new JList(lignes);

  //Building the frame
  public interfaceURL() {
..............
  }

   //Initialize component
  private void jbInit() throws Exception  {
..............
  }

   //Replaced, so we can get out when the window is closed
  protected void processWindowEvent(WindowEvent e) {
...................
  }

  void txtURL_caretUpdate(CaretEvent e) {
    // sets the state of the Load button
    btnCharger.setEnabled(! txtURL.getText().trim().equals(""));
  }

  void btnCharger_actionPerformed(ActionEvent e) {
    // displays contents of URL in list
    try{
      afficherURL(txtURL.getText().trim());
    }catch(Exception ex){
       // error display
      JOptionPane.showMessageDialog(this,"Erreur : " + ex.getMessage(),"Erreur",JOptionPane.ERROR_MESSAGE);
    }//try-catch
  }

  private void afficherURL(String strURL) throws Exception {
    // displays contents of URL strURL in list
     // no exceptions are handled specifically. They are simply reassembled

     // creation of URL
    URL url=new URL(strURL);
     // input stream creation
    BufferedReader IN=new BufferedReader(new InputStreamReader(url.openStream()));
    // read text lines in the input stream
    String ligne;
    while((ligne=IN.readLine())!=null)
      lignes.addElement(ligne);
     // close reading flow
    IN.close();
  }
}
5.6.5.4. An applet
The previous graphical application is converted into an applet as has been demonstrated several times. The applet is inserted into a document HTML appliURL.htm:
<html>
  <head>
    <title>Applet lisant une URL</title>
  </head>
  <body>
    <h1>Applet lisant une URL</h1>
    <applet
      code="appletURL.class"
      width="400"
      height="300"
    >
    </applet>
  </body>
</html>
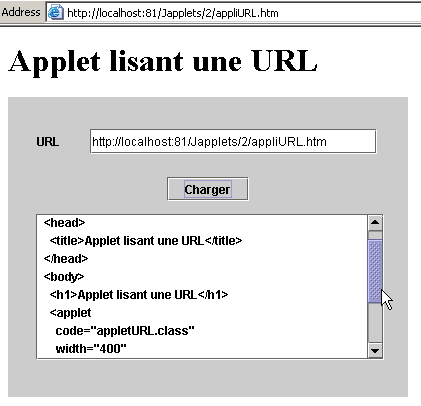
In the example above, the browser requested URL http://localhost:81/Japplets/2/appliURL.htm from an Apache web server running on port 81. The applet was then displayed in the browser. Within it, we requested the URL http://localhost:81/Japplets/2/appliURL.htm to verify that we were indeed getting the appliURL.htm file we had built. Now let’s try to load a URL that does not belong to the machine that issued the applet (here, localhost):
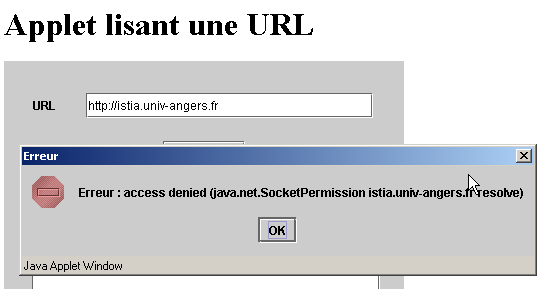
Loading the URL was denied. Here we encounter the constraint associated with applets: they can only access network resources on the machine from which they were downloaded. There is a way for the applet to bypass this restriction, which is to delegate network requests to a server program located on the machine from which it was downloaded. This program will make the network requests on behalf of the applet and send the results back to it. This is called a relay program.
5.7. The IMPOTS applet
We will now convert the graphical application IMPOTS into an applet. This is of particular interest: the application will become available to any Internet user with a browser and a Java 1.4 plugin (due to the JSpinner component). Our application thus becomes global... This modification will require a bit more than the simple graphical application --> applet conversion that has now become standard. The application uses an Initialize menu item (option) whose purpose is to read the contents of a local file. However, if we consider a web application, we see that this approach no longer works:
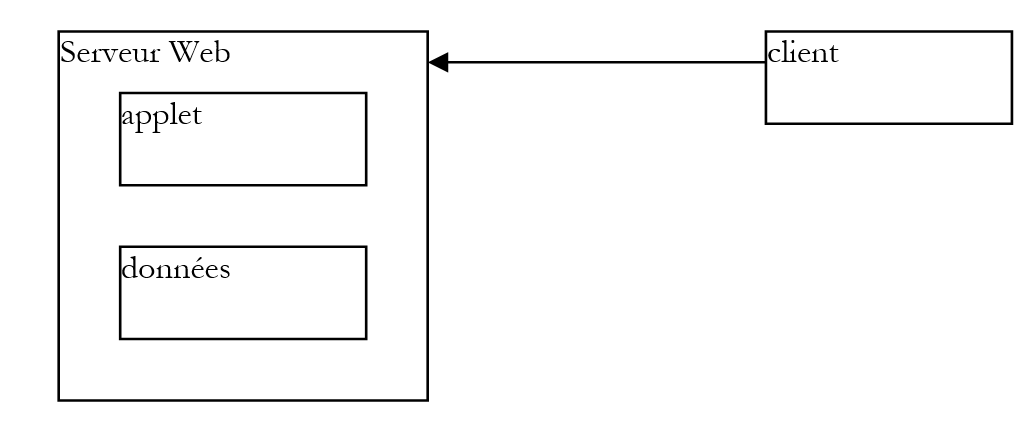
It is clear that the data defining the tax brackets will be on the web server and not on each client machine. The file to be read from the web server will be placed here in the same folder as the applet, and the option Initialize component will need to retrieve it from there. The previous examples showed how to do this. Furthermore, to select the data file locally, we had used a JFileChooser component, which is no longer needed here.
The HTML document containing the applet will be as follows:
<html>
  <head>
    <title>Applet de calcul d'taxes</title>
  </head>
  <body>
    <h2>Calcul d'taxes</h2>
    <applet
      code="appletImpots.class"
      width="320"
      height="270"
    >
<param name="data" value="impots.txt">
Note the parameter data, whose value is the name of the file containing the tax scale data. The document HTML, the class appletImpots, the impots class, and the file impots.txt are all in the same folder on the web server:
E:\data\serge\web\JApplets\impots>dir
12/06/2002  13:24                  247 impots.txt
13/06/2002  10:17                  654 appletImpots$2.class
13/06/2002  10:17                  653 appletImpots$3.class
13/06/2002  10:17                  653 appletImpots$4.class
13/06/2002  10:17                  651 appletImpots$5.class
13/06/2002  10:06                  651 appletImpots$6.class
13/06/2002  10:17                8 655 appletImpots.class
13/06/2002  10:17                  657 appletImpots$1.class
13/06/2002  10:24                  286 appletImpots.htm
13/06/2002  10:17                1 305 impots.class
The applet code is as follows (we have highlighted only the changes compared to the graphical application):
...........
import java.net.*;
import java.applet.Applet;

public class appletImpots extends JApplet {
  // window components
  JPanel contentPane;
............................

   // class attributes
  double[] limites=null;
  double[] coeffr=null;
  double[] coeffn=null;
  impots objImpots=null;
  String urlDATA=null;

  //Building the frame
  public void init() {
    //enableEvents(AWTEvent.WINDOW_EVENT_MASK);
    try {
      jbInit();
    }
    catch(Exception e) {
      e.printStackTrace();
    }
     // other initializations
    moreInit();
  }

   // form initialization
  private void moreInit(){
     // calculate menu disabled
    mnuCalculer.setEnabled(false);
................
     // retrieve the name of the tax scale file
    String nomFichier=getParameter("data");
    // mistake?
    if(nomFichier==null){
       // error msg
      txtStatus.setText("Le paramètre data de l'applet n'a pas été initialisé");
       // we block the option Initialize
      mnuInitialiser.setEnabled(false);
      // end
      return;
    }//if
     // set the URL of the data
    urlDATA=getCodeBase()+"/"+nomFichier;
  }//moreInit

   //Initialize component
  private void jbInit() throws Exception  {
...................
  }

  void mnuQuitter_actionPerformed(ActionEvent e) {
    // quit the application
    System.exit(0);
  }

  void mnuInitialiser_actionPerformed(ActionEvent e) {
    // load the data file
    try{
       // dATA READING
      lireDATA();
       // create impots object
      objImpots=new impots(limites,coeffr,coeffn);
................
  }

  private void lireDATA() throws Exception {
     // data tables
    ArrayList aLimites=new ArrayList();
    ArrayList aCoeffR=new ArrayList();
    ArrayList aCoeffN=new ArrayList();
    String[] champs=null;

     // open file in read mode
    BufferedReader IN=new BufferedReader(new InputStreamReader(new URL(urlDATA).openStream()));
    // read the file line by line
....................
  }

  void mnuCalculer_actionPerformed(ActionEvent e) {
    // tAX CALCULATION
......................
  }

  void txtSalaire_caretUpdate(CaretEvent e) {
..........
  }

  void mnuEffacer_actionPerformed(ActionEvent e) {
...............
  }
}
Here, we only comment on the changes resulting from the fact that the data file to be read is now on a remote machine rather than a local one:
The name of the URL data file to be read is obtained using the following code:
     // retrieve the name of the tax scale file
    String nomFichier=getParameter("data");
    // mistake?
    if(nomFichier==null){
       // error msg
      txtStatus.setText("Le paramètre data de l'applet n'a pas été initialisé");
       // we block the option Initialize
      mnuInitialiser.setEnabled(false);
      // end
      return;
    }//if
     // set the URL of the data
    urlDATA=getCodeBase()+"/"+nomFichier;
Remember that the file name "impots.txt" is passed in the data parameter of the applet:
The code above therefore begins by retrieving the value of the data parameter while handling any potential errors. If the URL of the HTML document containing the applet is http://localhost:81/JApplets/impots/appletImpots.htm, the URL in the file impots.txt will be http://localhost:81/JApplets/impots/impots.txt. We need to construct the name of this URL. The applet’s getCodeBase() method returns the URL of the folder from which the HTML document containing the applet was retrieved, so in our example, http://localhost:81/JApplets/impots. The following statement therefore constructs the URL for the data file:
The lireFichier() method, which reads the contents of the URL and urlData files, includes the creation of the input stream that will allow the data to be read:
     // open file in read mode
    BufferedReader IN=new BufferedReader(new InputStreamReader(new URL(urlDATA).openStream()));
From this point on, it is no longer possible to tell whether the data comes from a remote file rather than a local one. Here is an example of the applet in action:
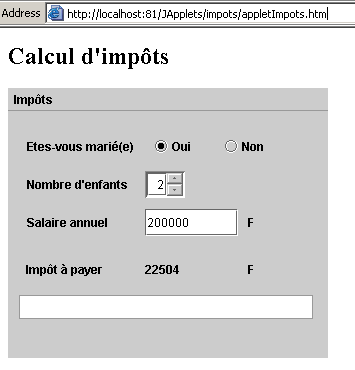
5.8. Conclusion
This chapter has provided
- an introduction to building graphical user interfaces with JBuilder
- the most common Swing components
- applet development
We will note that
- the code generated by JBuilder can be written by hand. Once this code is obtained in one way or another, a simple JDK is sufficient to execute it, and JBuilder is then no longer essential.
- using a tool such as JBuilder can lead to significant productivity gains:
- While it is possible to write the code generated by JBuilder by hand, this can be very time-consuming and offers little benefit, as the application’s logic is generally elsewhere.
- The generated code can be instructive. Reading and studying it is a good way to discover certain methods and properties of components you are using for the first time.
- JBuilder is cross-platform. You therefore retain your knowledge when switching between platforms. Being able to write programs that run on both Windows and Linux is, of course, a very important productivity factor. But this is due to Java itself and not to JBuilder.
5.9. JBuilder on Linux
All of the previous examples have been tested on Windows 98. One might wonder whether the programs written are portable as-is to Linux. Provided that the Linux machine in question has the classes used by the various programs, they are. If, for example, you have installed JBuilder on Linux, the necessary classes are already on your machine. Here is an example of what happens when one of our programs is run on the JList component with JBuilder 4 on Linux:
Below we describe the installation of JBuilder 4 Foundation on a Linux machine. Installing it on a Win9x machine poses no problems and is similar to the process described below. The installation of later versions of version is likely different, but this document may nevertheless provide some useful information.
JBuilder is available on the Inprise website at url http://www.inprise.com/jbuilder
This page contains links for Windows and Linux, among others. We will now describe the installation of JBuilder on a Linux machine running the KDE graphical interface.
When you follow the JBuilder 4 for Linux link, a form appears. Fill it out, and you will receive two files:
jb4docs_fr.tar.gz: JBuilder 4 documentation and examples
jb4fndlinux_fr.tar.gz: JBuilder 4 Foundation. This is a limited version of the commercial JBuilder 4, but it is sufficient for educational purposes.
A software activation key will be sent to you via email. It will allow you to use JBuilder 4 and will be requested upon first use. If you lose this key, you can return to the url file mentioned above and follow the link "get your activation key". We will assume from this point on that you are logged in as root and are in the directory containing the two files mentioned above. Unzip the two files:
[ls -l]
drwxr-xr-x    3 nobody   nobody       4096 oct 10  2000 docs
drwxr-xr-x    3 nobody   nobody       4096 déc  5 13:00 foundation
[ls -l foundation]
-rw-r--r-- 1 nobody nobody 1128 dec 5 13:00 deploy.txt
-rwxr-xr-x    1 nobody   nobody   69035365 déc  5 13:00 fnd_linux_install.bin
drwxr-xr-x    2 nobody   nobody       4096 déc  5 13:00 images
-rw-r--r-- 1 nobody nobody 15114 dec 5 13:00 index.html
-rw-r--r-- 1 nobody nobody 23779 Dec 5 13:00 license.txt
-rw-r--r-- 1 nobody nobody 75739 Dec 5 13:00 release_notes.html
-rw-r--r-- 1 nobody nobody 31902 Dec 5 13:00 whatsnew.html
[ls -l docs]
-rw-r--r-- 1 nobody nobody 1128 oct 10 2000 deploy.txt
-rwxr-xr-x    1 nobody   nobody   40497874 oct 10  2000 doc_install.bin
drwxr-xr-x    2 nobody   nobody       4096 oct 10  2000 images
-rw-r--r-- 1 nobody nobody 9210 oct 10 2000 index.html
-rw-r--r-- 1 nobody nobody 23779 oct 10 2000 license.txt
-rw-r--r-- 1 nobody nobody 75739 oct 10 2000 release_notes.html
-rw-r--r-- 1 nobody nobody 31902 oct 10 2000 whatsnew.html
In both generated directories, the .bin file is the installation file. Additionally, use a web browser to view the index.html file in each directory. These files provide instructions for installing both products. Let’s start by installing JBuilder Foundation:
The first installation screen appears. Many more will follow:
Confirm. An explanation screen follows:
Run [suivant].
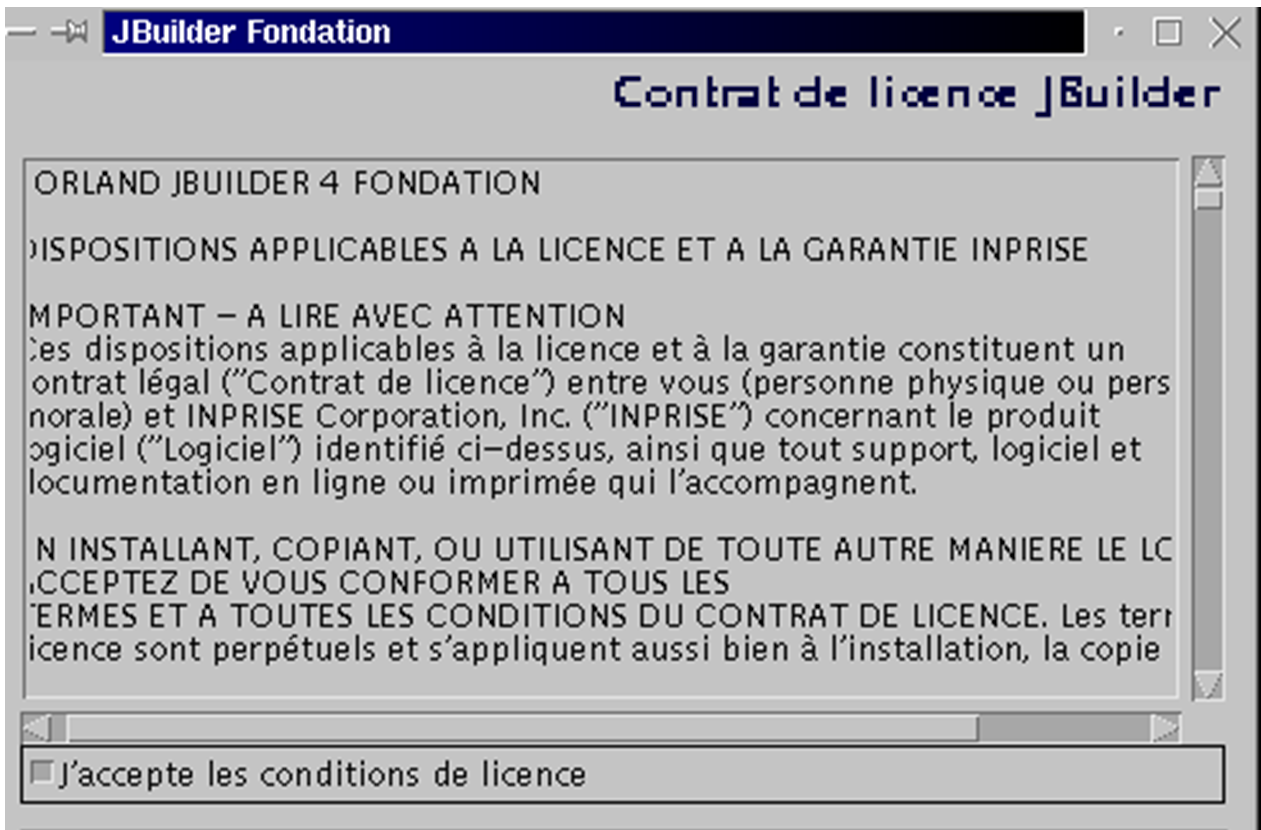
Accept the license agreement and press [suivant].
Accept the suggested location for JBuilder (make a note of it; you’ll need it later) and press [suivant]. The installation completes quickly.
We’re ready for an initial test. In KDE, launch the file manager to navigate to the JBuilder executable directory: /opt/jbuilder4/bin (if you installed JBuilder in /opt/jbuilder4):
Click on the JBuilder icon above. Since this is the first time you are using JBuilder, you will need to enter your activation key:
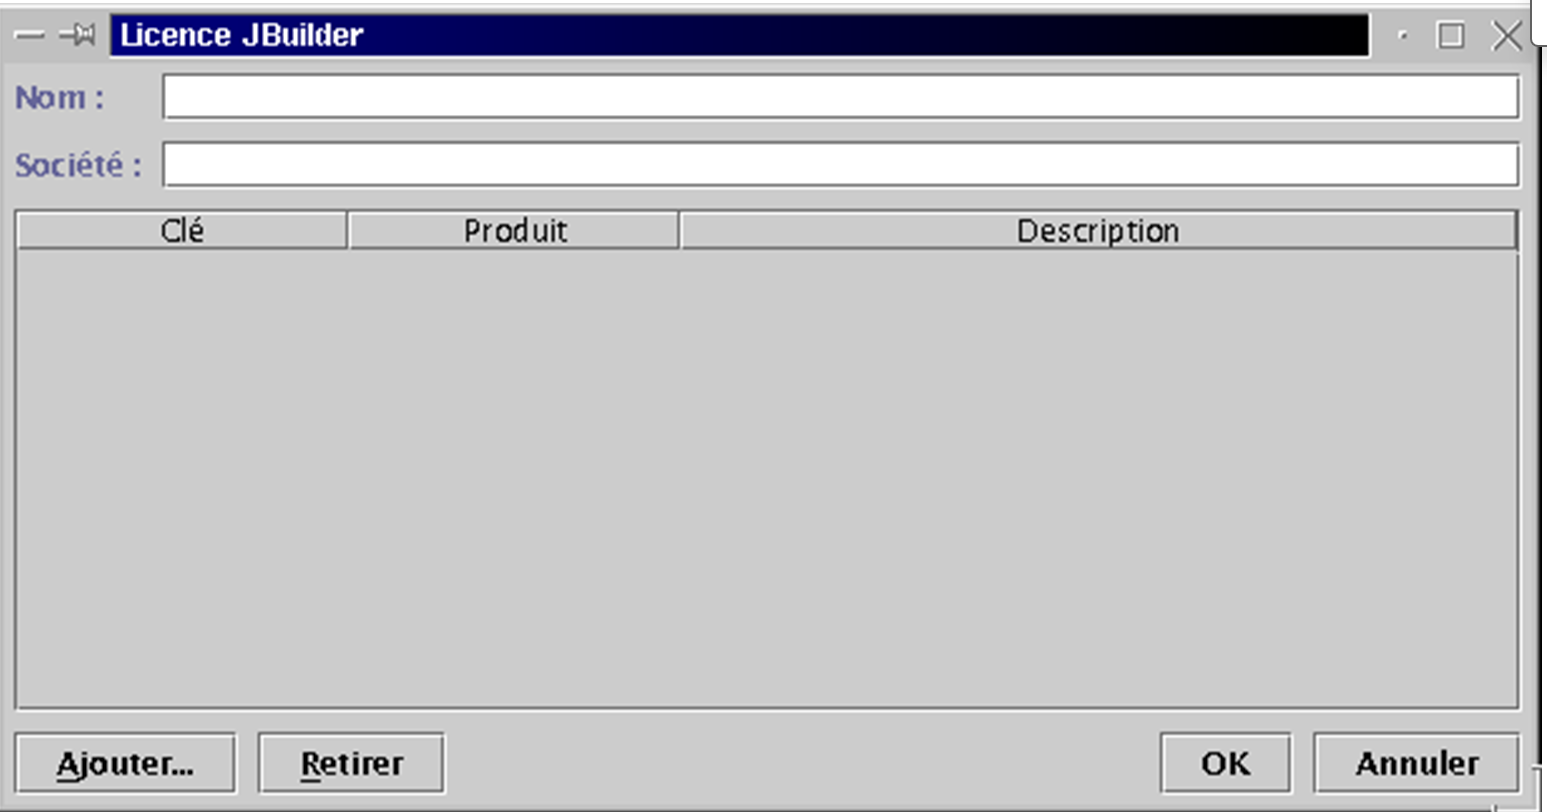
Fill in the Name and Company fields. Click [Ajouter] to enter your activation key. Remember that this key should have been sent to you by email, and if you have lost it, you can retrieve it from the url where you downloaded JBuilder 4 (see the beginning of the installation). Once your activation key is accepted, the license terms will be displayed:
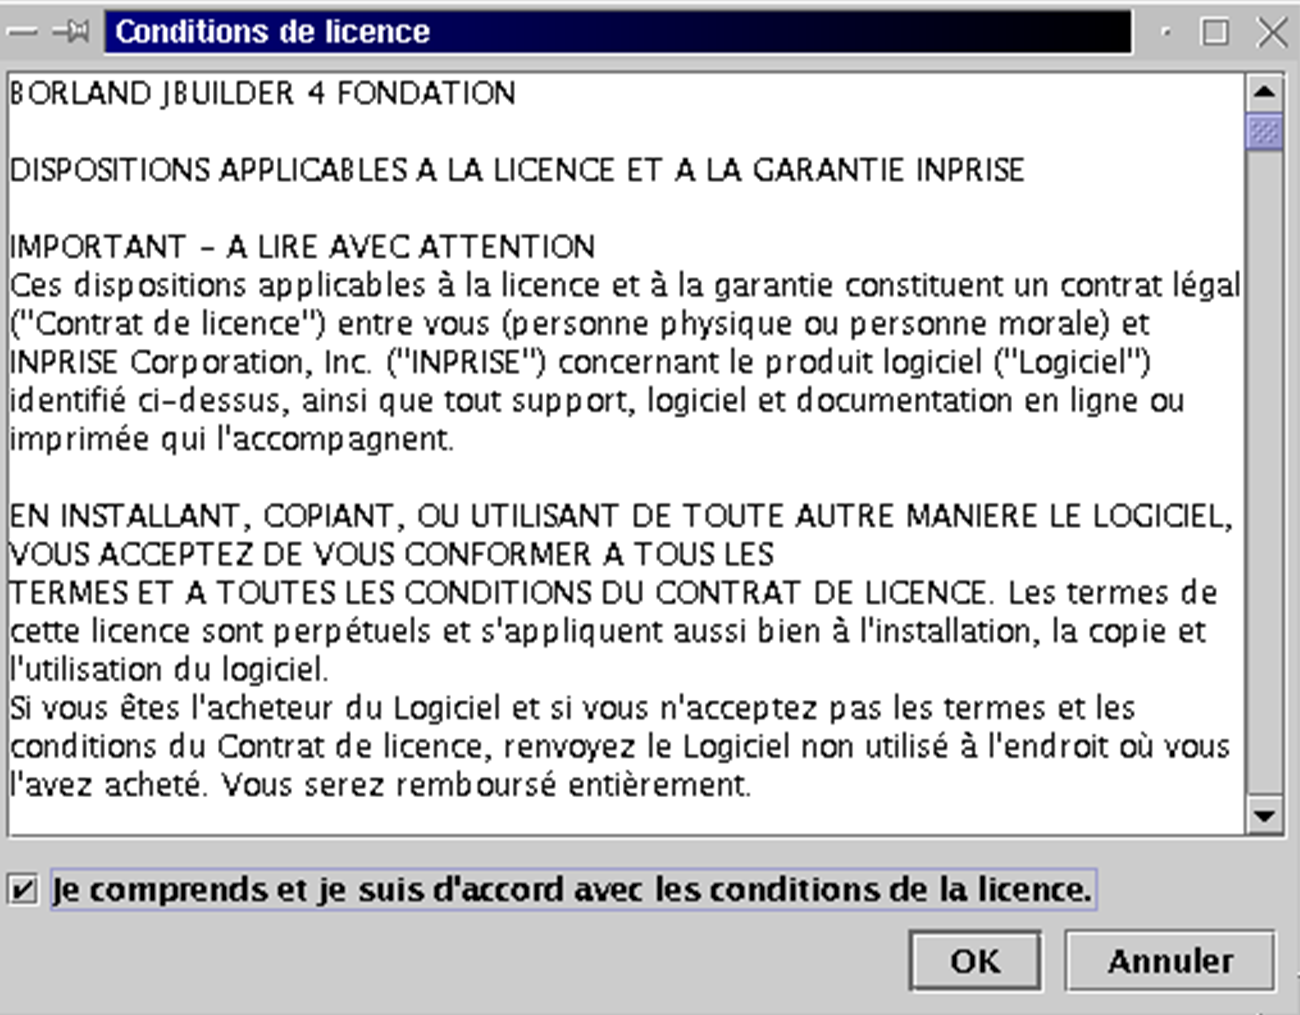
By entering OK, you return to the information entry window you saw earlier:
Press OK to complete this step, which runs only during the first execution. The JBuilder development environment will then appear:
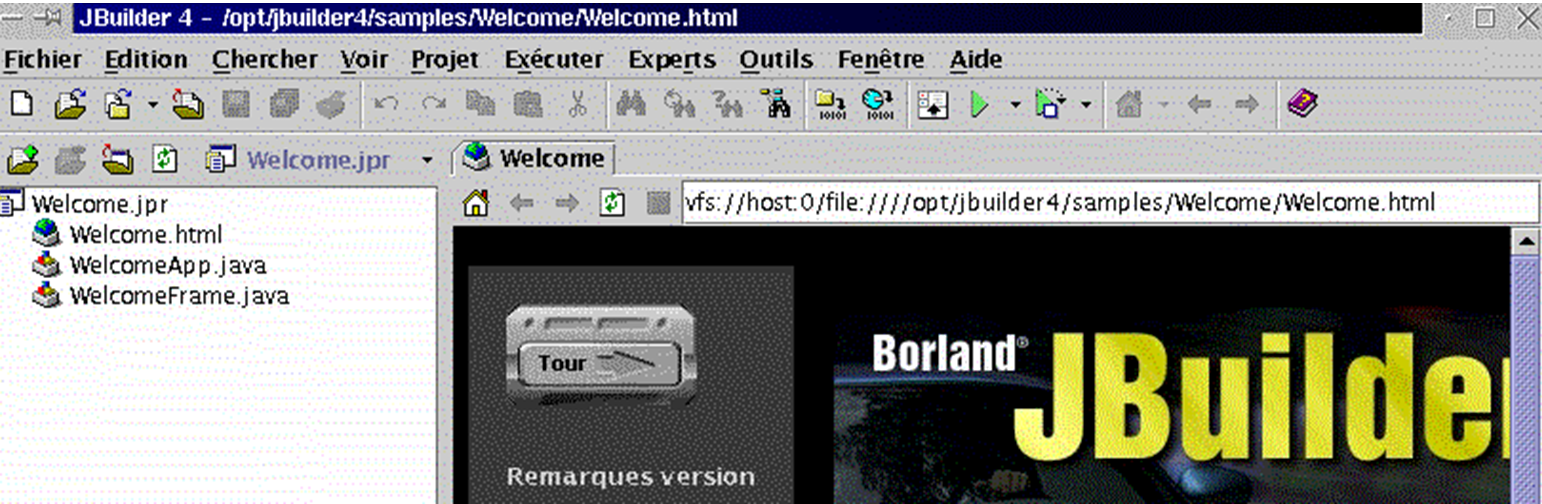
Exit JBuilder to install the documentation now. This will install a number of files that will be used in JBuilder's help system, which is currently incomplete. Return to the directory where you extracted the JBuilder tar.gz files. The installer is located in the docs directory. Navigate to it:
[cd docs]
[ls -l]
-rw-r--r-- 1 nobody nobody 1128 oct 10 2000 deploy.txt
-rwxr-xr-x    1 nobody   nobody   40497874 oct 10  2000 doc_install.bin
drwxr-xr-x    2 nobody   nobody       4096 oct 10  2000 images
-rw-r--r-- 1 nobody nobody 9210 oct 10 2000 index.html
-rw-r--r-- 1 nobody nobody 23779 oct 10 2000 license.txt
-rw-r--r-- 1 nobody nobody 75739 oct 10 2000 release_notes.html
-rw-r--r-- 1 nobody nobody 31902 oct 10 2000 whatsnew.html
The installation file is doc_install.bin, but you cannot run it immediately. If you do, the installation will fail for no apparent reason. Read the file index.html with a browser for a detailed description of the installation procedure. The installer requires a Java Virtual Machine (JVM); specifically, a program called "java," which must be located in the PATH directory on your machine. Note that PATH is a Unix variable whose value, in the form rep1:rep2:...:repn, specifies the directories (repi) to be searched for an executable. Here, the installer requests the execution of a Java program. You may have multiple versions of this program depending on the number of Java virtual machines you have installed here and there. Logically, we will use the one provided by JBuilder 4, which is located in /opt/jbuilder4/jdk1.3/bin. To add this directory to the PATH variable:
[echo $PATH]
/usr/local/sbin:/usr/sbin:/sbin:/usr/local/sbin:/usr/local/bin:/sbin:/bin:/usr/sbin:/usr/bin:/usr/X11R6/bin:/root/bin
[export PATH=/opt/jbuilder4/jdk1.3/bin/:$PATH]
[echo $PATH]
/opt/jbuilder4/jdk1.3/bin/:/usr/local/sbin:/usr/sbin:/sbin:/usr/local/sbin:/usr/local/bin:/sbin:/bin:/usr/sbin:/usr/bin:/usr/X11R6/bin:/root/bin
We can now start the documentation installation:
This is a graphical installation:

It is very similar to the one for JBuilder Foundation. Therefore, we will not go into detail here. There is one screen you must not miss:
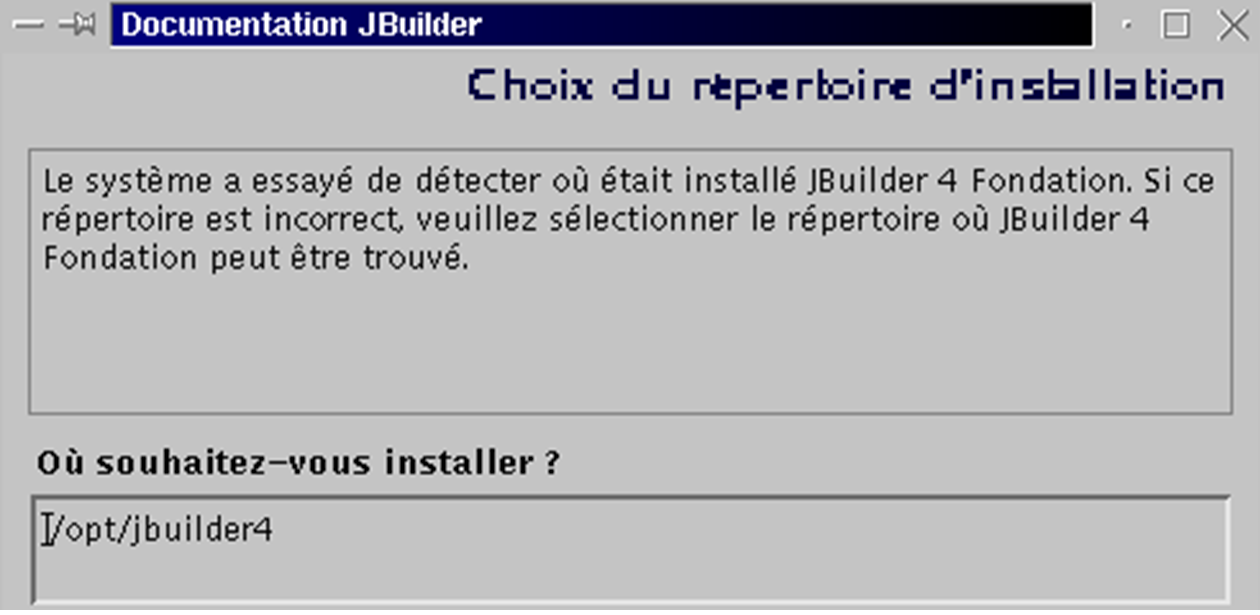
The installer should normally find the location where you installed JBuilder Foundation on its own. Therefore, do not change the default settings unless, of course, they are incorrect.
Once the documentation is installed, we are ready for a new test of JBuilder. Launch the application as shown above. Once JBuilder is open, select Help/Help Topics. In the left pane, click the Tutorials link:
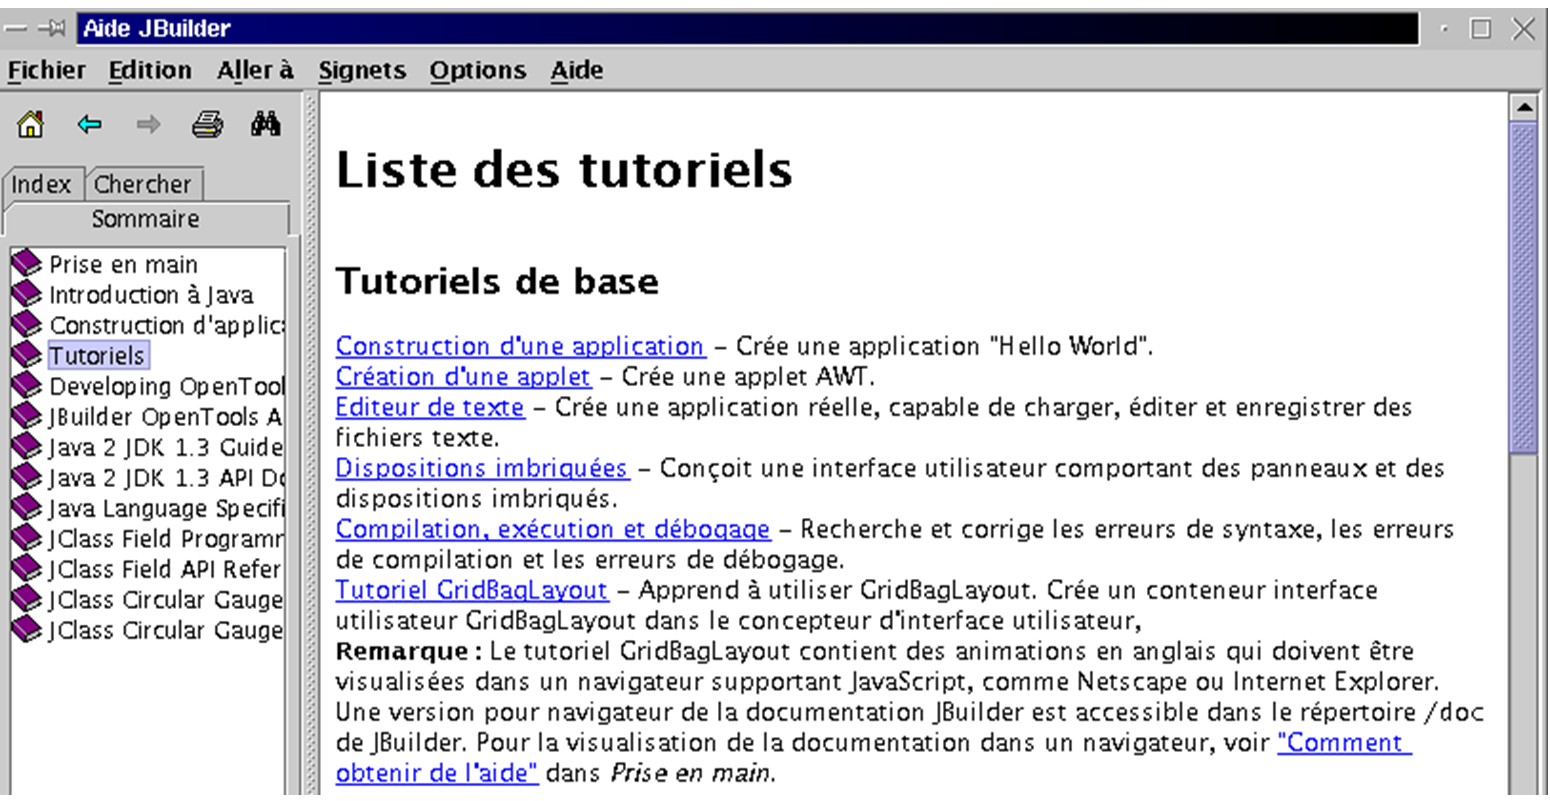
JBuilder comes with a set of tutorials that will help you get started with Java programming. Below, we followed the "Building an Application" tutorial mentioned above.

In JBuilder, select File/New Project. A wizard will present you with 3 screens:
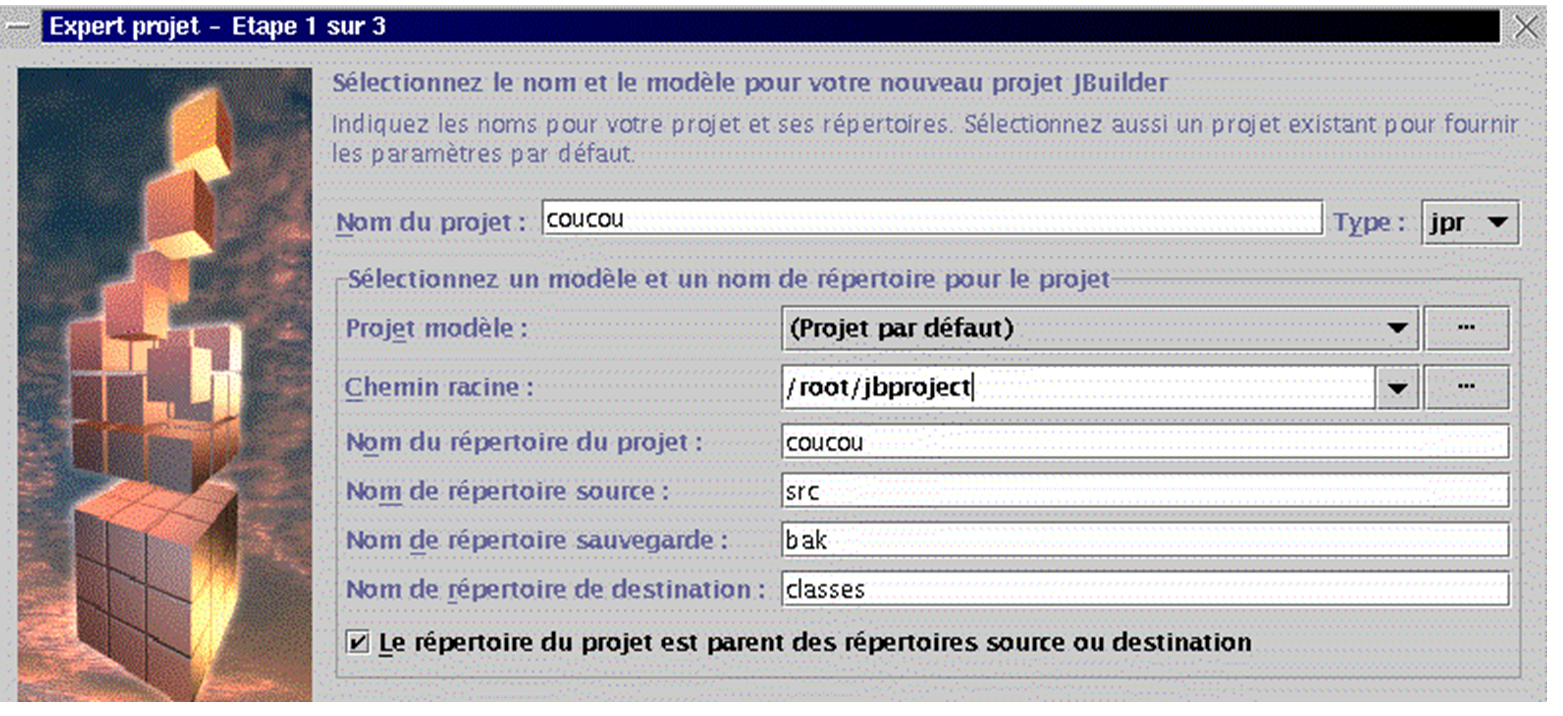
We are going to create a simple window with the title "Hello everyone". We’ll call this project coucou. The example was run as root. JBuilder then offers to group all projects into a jbproject directory within the root login directory. The coucou project will be placed in the coucou directory (Project Directory Name field) of jbproject. Enter [suivant].

This second screen is a summary of the various paths in your project. There is nothing to change. Click [suivant].
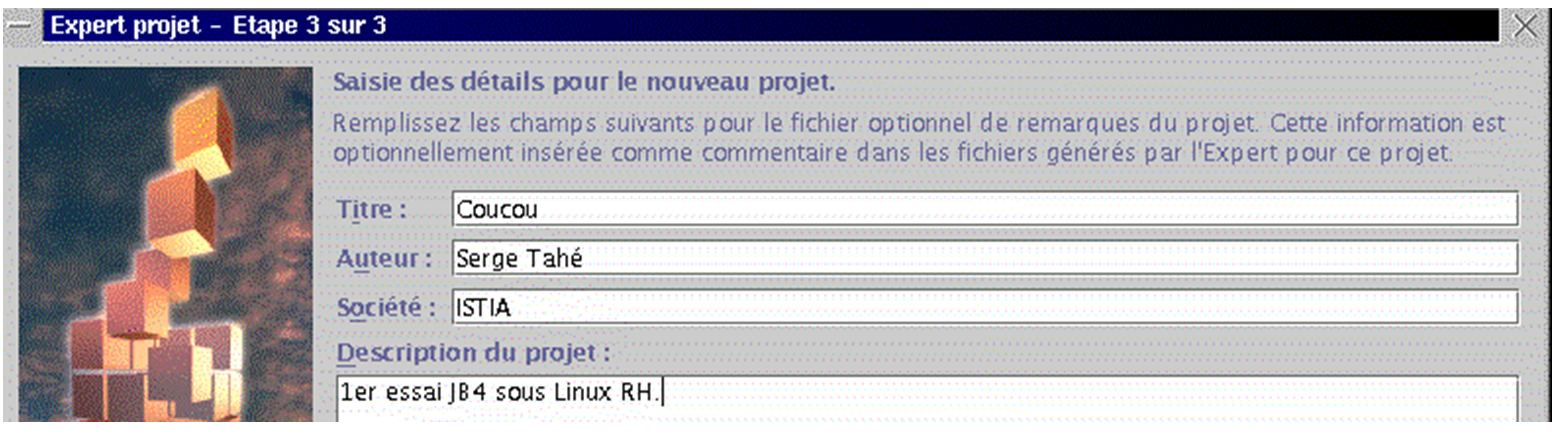
The third screen asks you to customize your project. Fill in the details and click [Terminer].
Now go to File/New:
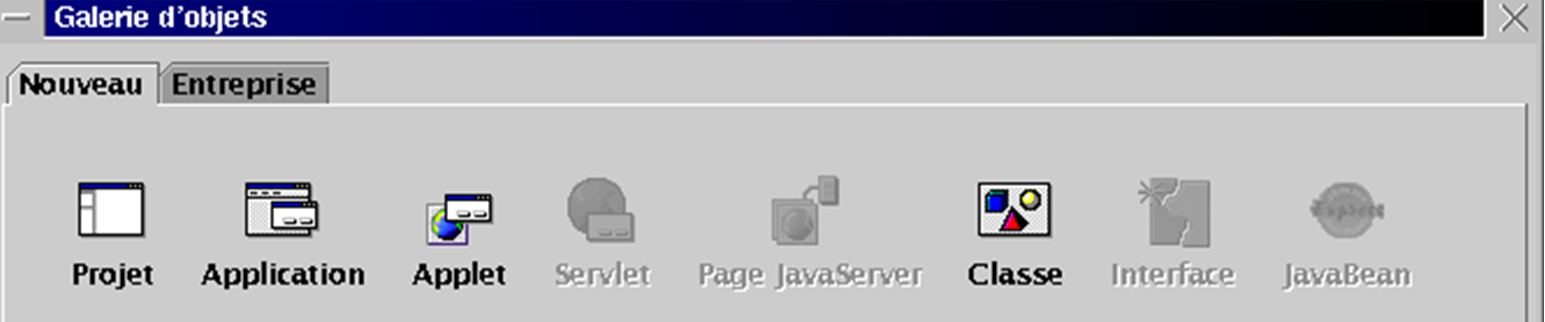
Select Application and click OK. A new wizard will display two screens:
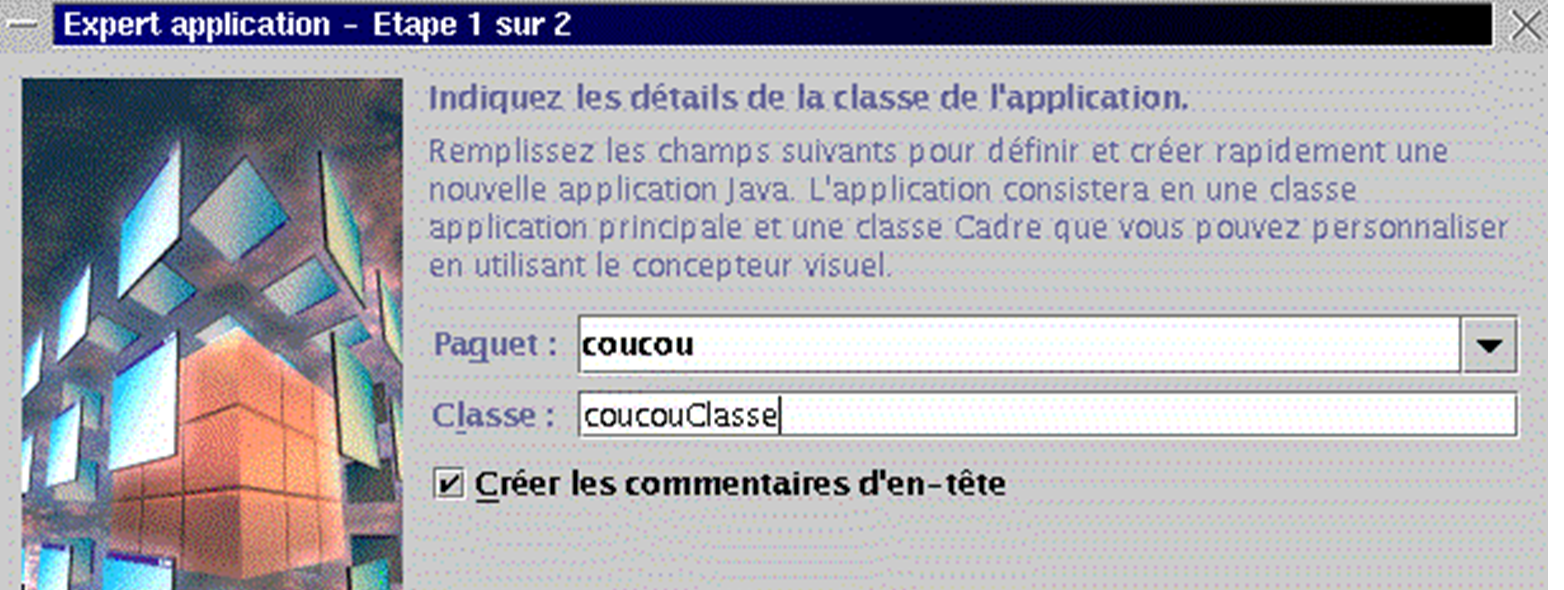
The Package field uses the project name. The Class field asks for the name to be given to the project’s main class. Use the name above and run [suivant]:
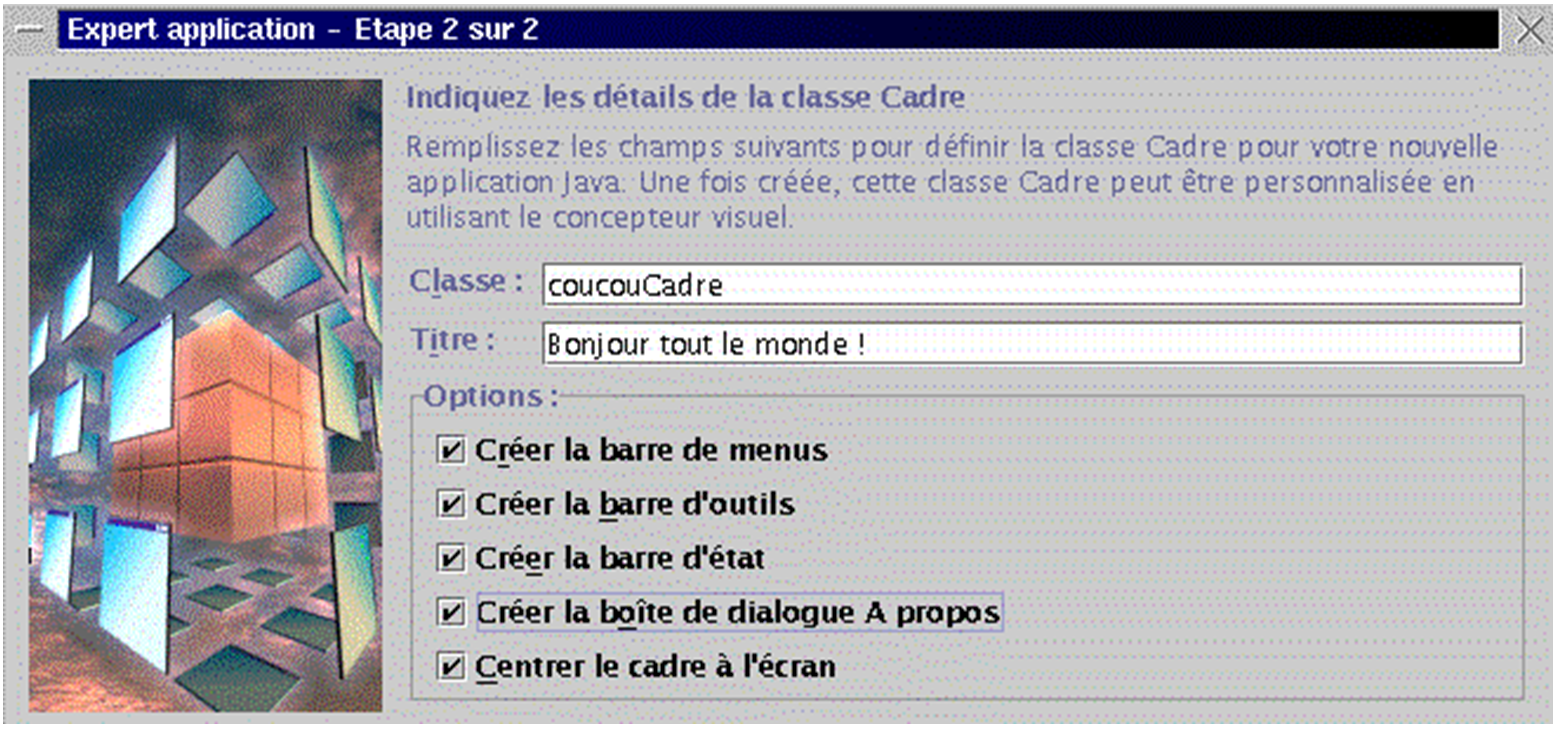
Our application includes a second Java class for the application window. Give this class a name. The Title field is the title you want to give this window. The Options pane offers options for your window. Select them all and click [Terminer]. You will then return to the JBuilder environment, which has been updated with the information you provided for your project:
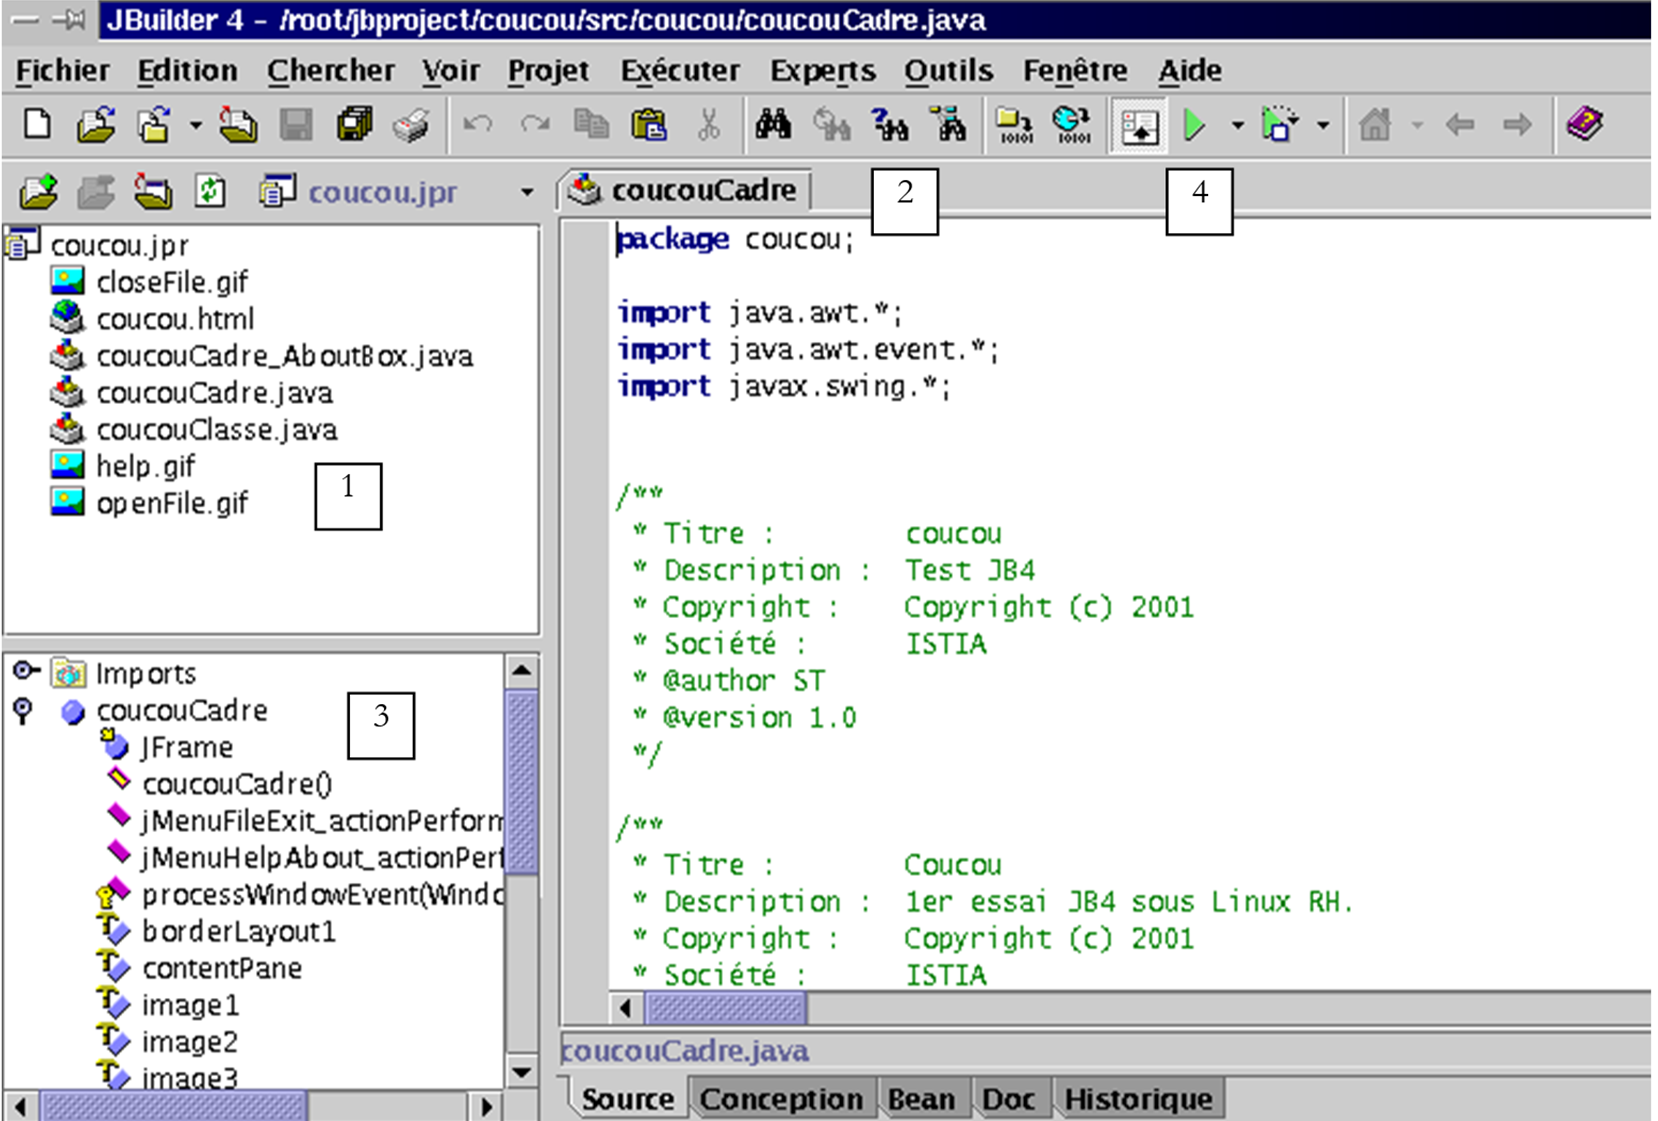
In the top-left window (1), you see the list of files that make up your project. This includes the two .java classes we just named. In the right-hand window (2), you see the Java code for the coucouCadre class. In the bottom-left window, you see the structure (classes, methods, attributes) of your project. It is ready to run. Click button 4 above, or select Run/Run Project, or press F9. You should see the following window:
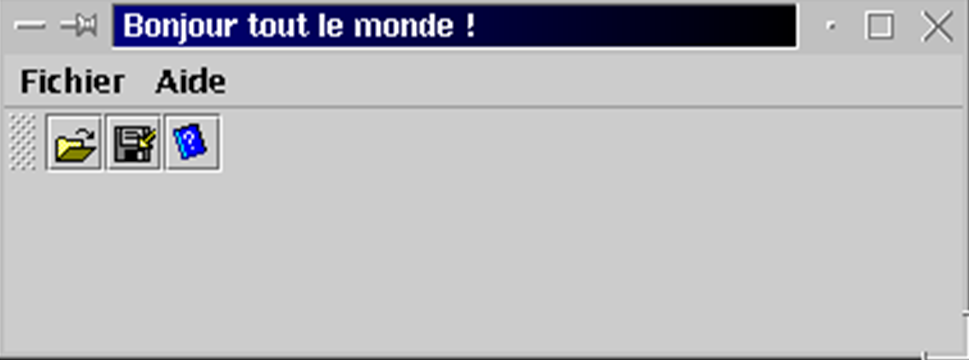
By clicking on the option Help, you should find the information you provided to the creation wizards. We won’t go any further. It’s now time to dive into the tutorials.
Before we finish, let’s just show that you can use not JBuilder and its graphical interface, but the jdk it brought with it and placed in /opt/jbuilder4/jdk1.3. Build the following essai1.java file:
import java.io.*;

public class essai1{
    public static void main(String args[]){
        System.out.println("coucou");
        System.exit(0);
    }
}
Let's compile it and run it using JBuilder's jdk: