7. Threads
7.1. Introduction
When an application is launched, it runs in an execution flow called a thread. The class that models a thread is the java.lang.Thread class, which has the following properties and methods:
returns the thread currently running | |
sets the name of the thread | |
thread name | |
indicates whether the thread is active (true) or not (false) | |
starts the execution of a thread | |
method executed automatically after the preceding start method has been executed | |
pauses the execution of a thread for n milliseconds | |
blocking operation—waits for the thread to finish before proceeding to the next instruction |
The most commonly used constructors are as follows:
creates a reference to an asynchronous task. This task is still inactive. The created task must have a run method: most often, a class derived from Thread will be used. | |
Same as above, but the Runnable object passed as a parameter implements the run method. |
Let’s look at a simple application demonstrating the existence of a main execution thread—the one in which a class’s main function runs:
// use of threads

import java.io.*;
import java.util.*;

public class thread1{
    public static void main(String[] arg)throws Exception {
                // init current thread
        Thread main=Thread.currentThread();
                // display
        System.out.println("Thread courant : " + main.getName());
                // we change the name
        main.setName("myMainThread");
                // check
        System.out.println("Thread courant : " + main.getName());

                // infinite loop
        while(true){
              // time recovery
      Calendar calendrier=Calendar.getInstance();
      String H=calendrier.get(Calendar.HOUR_OF_DAY)+":"
      +calendrier.get(Calendar.MINUTE)+":"
      +calendrier.get(Calendar.SECOND);
                        // display
            System.out.println(main.getName() + " : " +H);
                        // temporary shutdown
            Thread.sleep(1000);
        }//while
    }//hand
}//class
Screen output:
Thread courant : main
Thread courant : myMainThread
myMainThread : 15:34:9
myMainThread : 15:34:10
myMainThread : 15:34:11
myMainThread : 15:34:12
Terminer le programme de commandes (O/N) ? o
The previous example illustrates the following points:
- the main function runs correctly in a thread
- we can access this thread's properties via Thread.currentThread()
- the role of the sleep method. Here, the thread executing main sleeps for 1 second between each display.
7.2. Creating execution threads
It is possible to have applications where pieces of code execute "simultaneously" in different execution threads. When we say that threads run simultaneously, we are often using the term loosely. If the machine has only one processor, as is still often the case, the threads share this processor: they each have access to it, in turn, for a brief moment (a few milliseconds). This is what creates the illusion of parallel execution. The amount of time allocated to a thread depends on various factors, including its priority, which has a default value but can also be set programmatically. When a thread has the processor, it normally uses it for the entire time allotted to it. However, it can release it early:
- by waiting for an event (wait, join)
- by sleeping for a specified period (sleep)
- A thread T can be created in various ways
- by extending the Thread class and overriding its run method.
- by implementing the Runnable interface in a class and using the new Thread(Runnable) constructor. Runnable is an interface that defines only a single method: public void run(). The argument of the preceding constructor is therefore any class instance implementing this run method.
In the following example, threads are created using an anonymous class that extends the Thread class:
The run method here simply calls the display method.
- The execution of thread T is started by T.start(): this method belongs to the Thread class and performs a number of initializations before automatically invoking the run method of the Thread or the Runnable interface. The program executing the T.start() statement does not wait for task T to finish: it immediately proceeds to the next statement. We then have two tasks running in parallel. They often need to be able to communicate with each other to know the status of the shared work to be done. This is the problem of thread synchronization.
- Once started, the thread runs autonomously. It will stop when the run function it is executing has finished its work.
- We can wait for thread T to finish executing using T.join(). This is a blocking instruction: the program executing it is blocked until task T has finished its work. It is also a means of synchronization.
Let’s examine the following program:
// use of threads
import java.io.*;
import java.util.*;
public class thread2{
public static void main(String[] arg) {
// init current thread
Thread main=Thread.currentThread();
// give a name to the current thread
main.setName("myMainThread");
// start of hand
System.out.println("début du thread " +main.getName());
// creation of execution threads
Thread[] tâches=new Thread[5];
for(int i=0;i<tâches.length;i++){
            // create thread i
            tâches[i]=new Thread() {
          public void run() {
            affiche();
        }
      };//def tasks[i]
// set the thread name
tâches[i].setName(""+i);
// start execution of thread i
tâches[i].start();
}//for
// end of hand
System.out.println("fin du thread " +main.getName());
}//Main
public static void affiche() {
// time recovery
Calendar calendrier=Calendar.getInstance();
String H=calendrier.get(Calendar.HOUR_OF_DAY)+":"
+calendrier.get(Calendar.MINUTE)+":"
+calendrier.get(Calendar.SECOND);
// display start of execution
System.out.println("Début d'exécution de la méthode affiche dans le Thread " +
Thread.currentThread().getName()+ " : " + H);
// sleep for 1 s
try{
Thread.sleep(1000);
}catch (Exception ex){}
// time recovery
calendrier=Calendar.getInstance();
H=calendrier.get(Calendar.HOUR_OF_DAY)+":"
+calendrier.get(Calendar.MINUTE)+":"
+calendrier.get(Calendar.SECOND);
// display end of run
System.out.println("Fin d'exécution de la méthode affiche dans le Thread "
+Thread.currentThread().getName()+ " : " + H);
}// poster
}//class
The main thread, which executes the main function, creates 5 other threads responsible for executing the static display method. The results are as follows:
début du thread myMainThread
Début d'exécution de la méthode affiche dans le Thread 0 : 15:48:3
fin du thread myMainThread
Début d'exécution de la méthode affiche dans le Thread 1 : 15:48:3
Début d'exécution de la méthode affiche dans le Thread 2 : 15:48:3
Début d'exécution de la méthode affiche dans le Thread 3 : 15:48:3
Début d'exécution de la méthode affiche dans le Thread 4 : 15:48:3
Fin d'exécution de la méthode affiche dans le Thread 0 : 15:48:4
Fin d'exécution de la méthode affiche dans le Thread 1 : 15:48:4
Fin d'exécution de la méthode affiche dans le Thread 2 : 15:48:4
Fin d'exécution de la méthode affiche dans le Thread 3 : 15:48:4
Fin d'exécution de la méthode affiche dans le Thread 4 : 15:48:4
These results are very informative:
- First, we see that starting a thread’s execution is not blocking. The main method started the execution of 5 threads in parallel and finished executing before them. The operation
starts the execution of the thread tasks[i], but once this is done, execution immediately continues with the next statement without waiting for the thread to finish.
- All created threads must execute the display method. The order of execution is unpredictable. Even though in the example, the order of execution appears to follow the order in which the threads were launched, no general conclusions can be drawn from this. The operating system here has 6 threads and one processor. It will allocate the processor to these 6 threads according to its own rules.
- The results show an effect of the sleep method. In the example, thread 0 is the first to execute the display method. The start-of-execution message is displayed, then it executes the sleep method, which suspends it for 1 second. It then loses the processor, which becomes available to another thread. The example shows that thread 1 will obtain it. Thread 1 will follow the same path as the other threads. When the 1-second sleep period for thread 0 ends, its execution can resume. The system grants it the processor, and it can complete the execution of the display method.
Let’s modify our program to end the *main* method with the following instructions:
                // end of hand
        System.out.println("fin du thread " +main.getName());
        // application shutdown
    System.exit(0);
Running the new program yields:
début du thread myMainThread
Début d'exécution de la méthode affiche dans le Thread 0 : 16:5:45
Début d'exécution de la méthode affiche dans le Thread 1 : 16:5:45
Début d'exécution de la méthode affiche dans le Thread 2 : 16:5:45
Début d'exécution de la méthode affiche dans le Thread 3 : 16:5:45
fin du thread myMainThread
Début d'exécution de la méthode affiche dans le Thread 4 : 16:5:45
As soon as the main method executes the statement:
It stops all of the application's threads, not just the main thread. The main method might want to wait for the threads it created to finish executing before terminating itself. This can be done using the join method of the Thread class:
        // waiting for all threads
        for(int i=0;i<tâches.length;i++){
            // we wait for thread i
            tâches[i].join();
    }//for

                // end of hand
        System.out.println("fin du thread " +main.getName());
        // application shutdown
    System.exit(0);
This produces the following results:
début du thread myMainThread
Début d'exécution de la méthode affiche dans le Thread 0 : 16:11:9
Début d'exécution de la méthode affiche dans le Thread 1 : 16:11:9
Début d'exécution de la méthode affiche dans le Thread 2 : 16:11:9
Début d'exécution de la méthode affiche dans le Thread 3 : 16:11:9
Début d'exécution de la méthode affiche dans le Thread 4 : 16:11:9
Fin d'exécution de la méthode affiche dans le Thread 0 : 16:11:10
Fin d'exécution de la méthode affiche dans le Thread 1 : 16:11:10
Fin d'exécution de la méthode affiche dans le Thread 2 : 16:11:10
Fin d'exécution de la méthode affiche dans le Thread 3 : 16:11:10
Fin d'exécution de la méthode affiche dans le Thread 4 : 16:11:10
fin du thread myMainThread
7.3. The Benefits of Threads
Now that we have highlighted the existence of a default thread—the one that executes the Main method—and we know how to create others, let’s consider the benefits of threads for us and why we are presenting them here. There is a type of application that lends itself well to the use of threads: client-server applications on the Internet. In such an application, a server located on machine S1 responds to requests from clients located on remote machines C1, C2, ..., Cn.
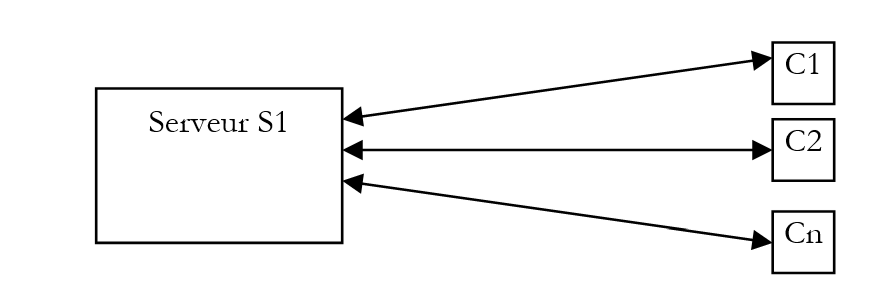
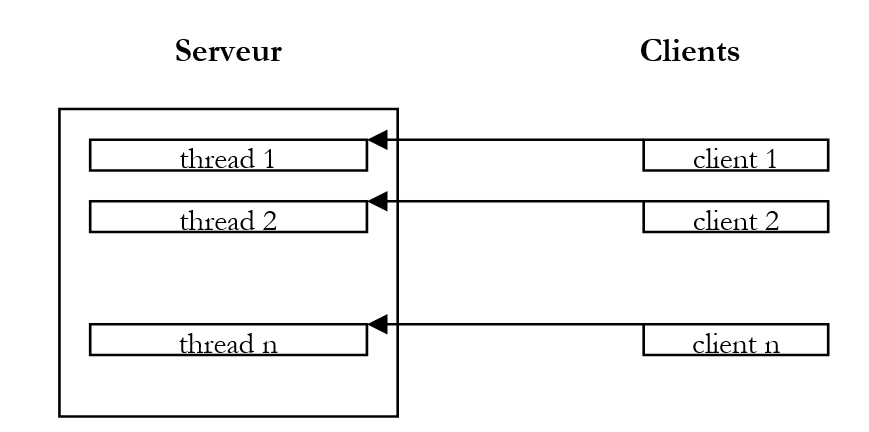
We use Internet applications that follow this pattern every day: web services, email, forum browsing, file transfers... In the diagram above, server S1 must serve clients C1, C2, ..., Cn simultaneously. If we take the example of an FTP (File Transfer Protocol) server that delivers files to its clients, we know that a file transfer can sometimes take several hours. It is, of course, out of the question for a single client to monopolize the server for such a long period. What is usually done is that the server creates as many execution threads as there are clients. Each thread is then responsible for handling a specific client. Since the processor is cyclically shared among all active threads on the machine, the server spends a little time with each client, thereby ensuring the concurrency of the service.
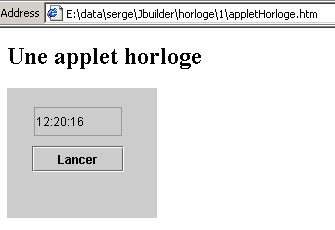
7.4. A graphical clock ap
Consider the following application, which displays a window with a clock and a button to stop or restart the clock:
 |  | 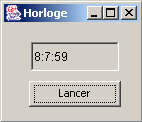 |
For the clock to run, a process must update the time every second. At the same time, events occurring in the window must be monitored: when the user clicks the "Stop" button, the clock must be stopped. Here we have two parallel and asynchronous tasks: the user can click at any time.
Consider the moment when the clock has not yet been started and the user clicks the "Start" button. This is a classic event, and one might think that a method of the thread in which the window is running could then manage the clock. However, when a method of the GUI application is running, its thread is no longer listening for GUI events. These events occur and are placed in a queue to be processed by the application once the currently running method has finished. In our clock example, the method will always be running since only clicking the "Stop" button can stop it. However, this event will only be processed once the method has finished. We’re stuck in a loop.
The solution to this problem would be that when the user clicks the "Start" button, a task is launched to manage the clock, but the application can continue to listen for events occurring in the window. We would then have two separate tasks running in parallel:
- clock management
- listening for window events
Let’s return to our graphical clock:
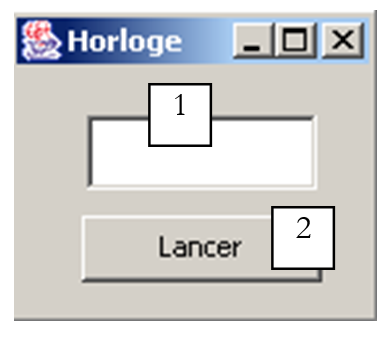 |
|
The source code for the application built with JBuilder is as follows:
import java.awt.*;
import java.awt.event.*;
import javax.swing.*;
import java.util.*;

public class interfaceHorloge extends JFrame {
  JPanel contentPane;
  JTextField txtHorloge = new JTextField();
  JButton btnGoStop = new JButton();

  // instance attributes
  boolean finHorloge=true;

    //Building the frame
  public interfaceHorloge() {
    enableEvents(AWTEvent.WINDOW_EVENT_MASK);
    try {
      jbInit();
    }
    catch(Exception e) {
      e.printStackTrace();
    }
  }

  private void runHorloge(){
    // we don't stop until we're told to stop
    while( ! finHorloge){
            // time recovery
      Calendar calendrier=Calendar.getInstance();
      String H=calendrier.get(Calendar.HOUR_OF_DAY)+":"
      +calendrier.get(Calendar.MINUTE)+":"
      +calendrier.get(Calendar.SECOND);
            // it is displayed in the T
      txtHorloge.setText(H);
            // waiting for a second
      try{
        Thread.sleep(1000);
      } catch (Exception e){
        // output with error
        System.exit(1);
      }//try
    }// while
  }// runHorloge

    //Initialize component
  private void jbInit() throws Exception  {
...................
  }

    //Replaced, so we can get out when the window is closed
  protected void processWindowEvent(WindowEvent e) {
.............
  }

  void btnGoStop_actionPerformed(ActionEvent e) {
    // start/stop clock
        // retrieve the button label
    String libellé=btnGoStop.getText();
    // launch?
    if(libellé.equals("Lancer")){
      // create the thread in which the clock will run
      Thread thHorloge=new Thread(){
        public void run(){
          runHorloge();
        }
      };//def thread
            // authorize the thread to start
      finHorloge=false;
            // change the button label
      btnGoStop.setText("Arrêter");
      // start the thread
      thHorloge.start();
      // end
      return;
    }//if
    // stop
    if(libellé.equals("Arrêter")){
      // the thread is told to stop
      finHorloge=true;
            // change the button label
      btnGoStop.setText("Lancer");
            // end
      return;
    }//if
  }
}
When the user clicks the "Start" button, a thread is created using an anonymous class:
The thread's run method calls the application's runHorloge method. Once this is done, the thread is launched:
The runHorloge method will then execute:
  private void runHorloge(){
    // we don't stop until we're told to stop
    while( ! finHorloge){
            // time recovery
      Calendar calendrier=Calendar.getInstance();
      String H=calendrier.get(Calendar.HOUR_OF_DAY)+":"
      +calendrier.get(Calendar.MINUTE)+":"
      +calendrier.get(Calendar.SECOND);
            // it is displayed in the T
      txtHorloge.setText(H);
            // waiting for a second
      try{
        Thread.sleep(1000);
      } catch (Exception e){
        // output with error
        System.exit(1);
      }//try
    }// while
  }// runHorloge
The principle of the method is as follows:
- displays the current time in the txtHorloge text box
- pauses for 1 second
- resumes step 1, having first checked the boolean variable finHorloge, which will be set to true when the user clicks the Stop button.
7.5. A Clock applet
We convert the previous graphical application into an applet using the standard method and create the following HTML document, appletHorloge.htm:
<html>
  <head>
    <title>Applet Horloge</title>
  </head>
  <body>
      <h2>Une applet horloge</h2>
    <applet
      code="appletHorloge.class"
      width="150"
      height="130"
    ></applet>
    </center>
  </body>
</html>
When we load this document directly into IE by double-clicking on it, we get the following display:
In this example, all the elements required by the applet are in the same folder:
E:\data\serge\Jbuilder\horloge\1>dir
13/06/2002  12:17                3 174 appletHorloge.class
13/06/2002  12:17                  658 appletHorloge$1.class
13/06/2002  12:17                  512 appletHorloge$2.class
13/06/2002  12:20                  245 appletHorloge.htm
Our applet can be improved. We mentioned that when the applet loads, the init method is executed, followed by the start method if it exists. Additionally, when the user leaves the page, the stop method is executed if it exists. When the user returns to the applet’s page, the start method is called again. When an applet implements visual animation threads, the applet’s start and stop methods are often used to launch and stop the threads. It is indeed unnecessary for a visual animation thread to continue running in the background while the animation is hidden.
So we add the following start and stop methods to our applet:
  public void stop(){
    // the page is hidden
        // follow-up
    System.out.println("Page stop");
        // the page is hidden - stop the thread
    finHorloge=true;
  }

  public void start(){
        // the page reappears
        // follow-up
    System.out.println("Page start");
        // restart a new clock thread if necessary
    if(btnGoStop.getText().equals("Arrêter")){
      // change the wording
      btnGoStop.setText("Lancer");
            // and act as if the user had clicked on it
      btnGoStop_actionPerformed(null);
    }//if
  }//start
Additionally, we added a check in the thread's run method to determine when it starts and stops:
  private void runHorloge(){
    // follow-up
    System.out.println("Thread horloge lancé");
    // we don't stop until we're told to stop
    while( ! finHorloge){
            // time recovery
      Calendar calendrier=Calendar.getInstance();
      String H=calendrier.get(Calendar.HOUR_OF_DAY)+":"
      +calendrier.get(Calendar.MINUTE)+":"
      +calendrier.get(Calendar.SECOND);
            // it is displayed in the T
      txtHorloge.setText(H);
            // waiting for a second
      try{
        Thread.sleep(1000);
      } catch (Exception e){
        // output with error
        return;
      }//try
    }// while
    // follow-up
    System.out.println("Thread horloge terminé");
  }// runHorloge
Now we run the applet with AppletViewer:
E:\data\serge\Jbuilder\horloge\1>appletviewer appletHorloge.htm
Page start    // applet launched - page displayed
Thread horloge lancé    // the thread is launched accordingly
Page stop    // iconized applet
Thread horloge terminé    // the thread is stopped accordingly
Page start    // applet redisplayed
Thread horloge lancé    // the thread is restarted
Thread horloge terminé    // press stop button
Thread horloge lancé    // press start button
Page stop    // icon applet
Thread horloge terminé    // thread arrested accordingly
Page start    // applet redisplay
Thread horloge lancé    // thread relaunched accordingly
With AppletViewer, the start event occurs when the AppletViewer window is visible, and the stop event occurs when it is minimized. The results above show that when the HTML document is hidden, the thread is indeed stopped if it was active.
7.6. Task Synchronization
In our previous example, there were two tasks:
- the main task represented by the application itself
- the task responsible for the clock
Coordination between the two tasks was handled by the main task, which set a boolean to stop the clock thread. We will now address the problem of concurrent access by tasks to shared resources, a problem also known as "resource sharing." To illustrate this, we will first examine an example.
7.6.1. An unsynchronized counter
Consider the following graphical interface:
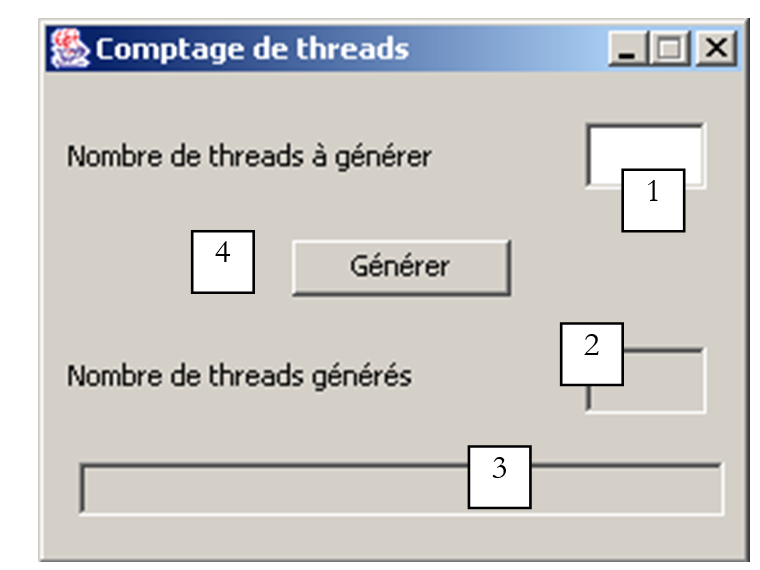
No. | type | name | role |
1 | JTextField | txtAGenerate | specifies the number of threads to generate |
2 | JTextField (non-editable) | txtGenerated | shows the number of threads generated |
3 | JTextField (non-editable) | txtStatus | provides information about errors encountered and about the application itself |
4 | JButton | btnGenerate | starts thread generation |
The application works as follows:
- the user specifies the number of threads to generate in field 1
- they start generating these threads using button 4
- the threads read the value of field 2, increment it, and display the new value. Initially, this field contains the value 0.
The generated threads share a resource: the value of field 2. Here, we aim to demonstrate the problems encountered in such a situation. Here is an example of execution:
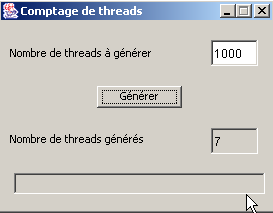
We see that we requested the generation of 1,000 threads, but only 7 were counted. The relevant code for the application is as follows:
import java.awt.*;
import java.awt.event.*;
import javax.swing.*;

public class interfaceSynchro extends JFrame {
  JPanel contentPane;
  JLabel jLabel1 = new JLabel();
  JTextField txtAGénérer = new JTextField();
  JButton btnGénérer = new JButton();
  JTextField txtStatus = new JTextField();
  JTextField txtGénérés = new JTextField();
  JLabel jLabel2 = new JLabel();

    // instance variables
    Thread[] tâches=null;   // threads
    int[] compteurs=null;   // meters

    //Building the frame
  public interfaceSynchro() {
..........
  }

    //Initialize component
  private void jbInit() throws Exception  {
......................
  }

    //Replaced, so we can get out when the window is closed
  protected void processWindowEvent(WindowEvent e) {
..................
  }

  void btnGénérer_actionPerformed(ActionEvent e) {
        //thread generation

        // read the number of threads to generate
    int nbThreads=0;
    try{
      // read the field containing the number of threads
      nbThreads=Integer.parseInt(txtAGénérer.getText().trim());
      // positive >
      if(nbThreads<=0) throw new Exception();
    }catch(Exception ex){
            //error
      txtStatus.setText("Nombre invalide");
            // we start again
      txtAGénérer.requestFocus();
      return;
    }//catch

        // initially no threads generated
    txtGénérés.setText("0");  // task cpteur at 0

        // threads are generated and launched
    tâches=new Thread[nbThreads];
    compteurs=new int[nbThreads];
    for(int i=0;i<tâches.length;i++){
      // create thread i
      tâches[i]=new Thread() {
          public void run() {
          incrémente();
        }
      };//thread i
            // define its name
      tâches[i].setName(""+i);
      // start execution
      tâches[i].start();
    }//for
  }//generate

    // increment
  private void incrémente(){
        // retrieve the thread number
    int iThread=0;
    try{
      iThread=Integer.parseInt(Thread.currentThread().getName());
    }catch(Exception ex){}
        // read the job counter value
    try{
      compteurs[iThread]=Integer.parseInt(txtGénérés.getText());
    } catch (Exception e){}
        // increment it
    compteurs[iThread]++;

        // wait 100 milliseconds - the thread will then lose the processor
    try{
      Thread.sleep(100);
    } catch (Exception e){
      System.exit(0);
    }

        // the new counter is displayed
    txtGénérés.setText("");
    txtGénérés.setText(""+compteurs[iThread]);
    // follow-up
    System.out.println("Thread " + iThread + " : " + compteurs[iThread]);
  }// increment

}// class
Let's break down the code:
- The window declares two instance variables:
The tasks array will be the array of generated threads. The counters array will be associated with the tasks array. Each task will have its own counter to retrieve the value of the txtGenerated field from the GUI.
- When the Generate button is clicked, the btnGenerate_actionPerformed method is executed.
- This method begins by retrieving the number of threads to generate. If necessary, an error is reported if this number is not valid. It then generates the requested threads, taking care to record their references in an array and assigning a number to each one. The run method of the generated threads calls the increment method of the class. All threads are started (start). The array of counters associated with the threads is also created.
- The increment method:
- reads the current value of the txtGénérés field and stores it in the counter belonging to the currently running thread
- pauses for 100 ms to intentionally idle the processor
- displays the new value in the txtGenerated field
Let’s now explain why the thread count is incorrect. Suppose there are 2 threads to generate. They execute in an unpredictable order. One of them runs first and reads the value 0 from the counter. It then sets it to 1 but does not write " " to the window: it voluntarily pauses for 100 ms. It then loses the processor, which is then given to another thread. This thread operates in the same way as the previous one: it reads the window’s counter and retrieves the 0 that is still there. It sets the counter to 1 and, like the previous one, pauses for 100 ms. The processor is then allocated back to the first thread: this thread writes the value 1 to the window’s counter and terminates. The processor is now allocated to the second thread, which also writes 1. We end up with an incorrect result.
Where does the problem come from? The second thread read an incorrect value because the first thread was interrupted before it finished its task, which was to update the counter in the window. This brings us to the concept of a critical resource and a critical section in a program:
- A critical resource is a resource that can be held by only one thread at a time. Here, the critical resource is counter 2 in the window.
- A critical section of a program is a sequence of instructions in a thread’s execution flow during which it accesses a critical resource. We must ensure that during this critical section, it is the only one with access to the resource.
7.6.2. Synchronized counting by method
In the previous example, each thread executed the window’s increment method. The increment method was declared as follows:
Now we declare it differently:
The **synchronized** keyword means that only one thread at a time can execute the increment method. Consider the following notation:
- the window object F that creates threads in btnGenerate_actionPerformed
- two threads T1 and T2 created by F
Both threads are created by F and then launched. They will therefore both execute the F.run method. Suppose T1 arrives first. It executes F.run and then F.increment, which is a synchronized method. It reads the counter value 0, increments it, and then pauses for 100 ms. The processor is then handed over to T2, which in turn executes F.run and then F.increment. At this point, it is blocked because thread T1 is currently executing F.increment, and the synchronized keyword ensures that only one thread at a time can execute F.increment. T2 then loses the processor without having been able to read the counter’s value. After 100 ms, T1 regains the processor, displays the counter value 1, exits F.incremente and then F.run, and terminates. T2 then regains the processor and can now execute F.incremente because T1 is no longer executing this method. T2 then reads the counter value 1, increments it, and pauses for 100 ms. After 100 ms, it regains the processor, displays the counter value 2, and terminates as well. This time, the value obtained is correct. Here is a tested example:
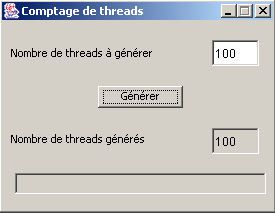
7.6.3. Counting synchronized by an object
In the previous example, access to the txtGénérés counter was synchronized by a method. If the window that creates the threads is called F, we can also say that the F.incremente method represents a resource that should only be used by a single thread at a time. It is therefore a critical resource. Synchronized access to this resource was ensured by the synchronized keyword:
One could also say that the critical resource is the object F itself. This is stricter than when the critical resource is F.increment. Indeed, in the latter case, if a thread T1 executes F.increment, a thread T2 cannot execute F.increment but can execute another method of the object F, whether it is synchronized or not. In the case where the object F itself is the critical resource, when a thread T1 executes a synchronized section of this object, every other synchronized section of the object becomes inaccessible to other threads. Thus, if thread T1 executes the synchronized method F.increment, thread T2 will not be able to execute not only F.increment but also any other synchronized section of F, even if no other thread is using it. This is therefore a more restrictive method.
Let’s assume, then, that the window becomes the critical resource. We would then write:
// increment
private void incrémente(){
// review section
synchronized(this){
// retrieve the thread number
int iThread=0;
try{
iThread=Integer.parseInt(Thread.currentThread().getName());
}catch(Exception ex){}
// read the job counter value
try{
compteurs[iThread]=Integer.parseInt(txtGénérés.getText());
} catch (Exception e){}
// increment it
compteurs[iThread]++;
// wait 100 milliseconds - the thread will then lose the processor
try{
Thread.sleep(100);
} catch (Exception e){
System.exit(0);
}
// the new counter is displayed
txtGénérés.setText("");
txtGénérés.setText(""+compteurs[iThread]);
}//synchronized
}// increment
All threads use the this window to synchronize. At runtime, we get the same correct results as before. We can actually synchronize on any object known to all threads. Here is another method, for example, that gives the same results:
    // instance variables
    Thread[] tâches=null;   // threads
    int[] compteurs=null;   // meters
Object synchro=new Object(); // a thread synchronization object
// increment
private void incrémente(){
// review section
synchronized(synchro){
..............
}//synchronized
}// increment
The window creates an Object-type object that will be used for thread synchronization. This method is better than the one that synchronizes on the this object because it is less restrictive. Here, if a thread T1 is in the synchronized section of increment and a thread T2 wants to execute another synchronized section of the same this object but synchronized by an object other than synchro, it will be able to do so.
7.6.4. Event-based synchronization
This time, we use a boolean variable canPass to indicate to a thread whether or not it can enter a critical section. A version without synchronization might look like this:
while(! peutPasser);        // on attend que peutPasser passe à vrai
peutPasser=false;            // aucun autre thread ne doit passer
section critique;            // ici le thread est tout seul
peutPasser=true;            // un autre thread peut passer dans la section critique
The first statement, where a thread loops while waiting for canPass to become true, is inefficient: the thread unnecessarily occupies the processor. This is called active waiting. We can improve the code as follows:
while(! peutPasser){        // wait for peutPasser to change to true
   Thread.sleep(100);    // off for 100 ms
}
peutPasser=false;            // no other thread may pass
section critique;            // here the thread is all alone
peutPasser=true;            // another thread can enter the critical section
The wait loop is better here: if the thread cannot pass, it sleeps for 100 ms before checking again whether it can pass or not. In the meantime, the processor will be allocated to other threads in the system.
Both of these methods are actually incorrect: they do not prevent two threads from entering the critical section at the same time. Suppose a thread T1 detects that canPass is true. It will then proceed to the next instruction where it sets canPass to false to block the other threads. However, it may very well be preempted at that moment, either because its processor time slice has expired, because a higher-priority task has requested the processor, or for some other reason. The result is that it loses the processor. It will regain it a little later. In the meantime, other tasks will obtain the processor, including perhaps a thread T2 that loops while waiting for peutPasser to become true. It too will discover that peutPasser is true (the first thread did not have time to set it to false) and will also enter the critical section. Which was not supposed to happen.
The sequence
while(! peutPasser){            // wait for peutPasser to change to true
   try{
        Thread.sleep(100);    // off for 100 ms
    } catch (Exception e) {}
}// while
peutPasser=false;                // no other thread may pass
is a critical section that must be protected by synchronization. Based on the previous example, we can write:
    synchronized(synchro){
        while(! peutPasser){            // wait for peutPasser to change to true
            try{
                Thread.sleep(100);    // off for 100 ms
            } catch (Exception e) {}
        }//while
        peutPasser=false;                // no other thread may pass
    }// synchronized
    section critique;                    // here the thread is all alone
    peutPasser=true;                    // another thread can enter the critical section
This example works correctly. We can improve it by avoiding the thread's semi-active wait while it regularly checks the value of the boolean canPass. Instead of waking up every 100 ms to check the state of canPass, it can go to sleep and request to be woken up when canPass is true. We write this as follows:
synchronized(synchro){
    if (! peutPasser) {
        try{
            synchro.wait();            // if we can't get through then we wait
        } catch (Exception e){
            …
        }
    }
    peutPasser=false;            // no other thread may pass
}// synchronized
The synchro.wait() operation can only be performed by a thread that is the current "owner" of the synchro object. Here, it is the sequence:
synchronized(synchro){
    …
}// synchronized
that ensures the thread owns the synchro object. Through the synchro.wait() operation, the thread relinquishes ownership of the synchronization lock. Why is this? Generally because it lacks the resources to continue working. So rather than blocking other threads waiting for the synchro resource, it relinquishes it and waits for the resource it lacks. In our example, it waits for the boolean canPass to become true. How will it be notified of this event? As follows:
synchronized(synchro){
    if (! peutPasser) {
        try{
            synchro.wait();            // if we can't get through then we wait
        } catch (Exception e){
            …
        }
    }
    peutPasser=false;            // no other thread may pass
}// synchronized
section critique...
synchronized(synchro){
      synchro.notify();
    }
Let’s consider the first thread to acquire the synchronization lock. Let’s call it T1. Suppose it finds the canPass boolean to be true, since it is the first thread. It then sets it to false. It then exits the critical section locked by the sync object. Another thread can then enter the critical section to check the value of canPass. It will find it false and will then wait for an event (wait). In doing so, it relinquishes ownership of the sync object. Another thread can then enter the critical section: it too will wait because canPass is false. We can therefore have multiple threads waiting for an event on the sync object.
Let’s return to thread T1, which has been granted access. It executes the critical section and then signals that another thread may now proceed. It does so with the following sequence:
synchronized(synchro){
      synchro.notify();
    }
It must first regain possession of the sync object using the synchronized statement. This shouldn’t be a problem since it’s competing with threads that, if they momentarily obtain the sync object, must release it via a wait because they find peutPasser to be false. So our thread T1 will eventually acquire ownership of the synchro object. Once this is done, it signals via the synchro.notify operation that one of the threads blocked by a synchro.wait must be woken up. It then relinquishes ownership of the sync object again, which is then given to one of the waiting threads. This thread continues its execution with the instruction following the wait that had put it on hold. In turn, it will execute the critical section and issue a synchro.notify to release another thread. And so on.
Let’s look at how this works using the counting example we’ve already studied.
  void btnGénérer_actionPerformed(ActionEvent e) {
        //thread generation

        // read the number of threads to generate
    int nbThreads=0;
    try{
      // read the field containing the number of threads
      nbThreads=Integer.parseInt(txtAGénérer.getText().trim());
      // positive >
      if(nbThreads<=0) throw new Exception();
    }catch(Exception ex){
            //error
      txtStatus.setText("Nombre invalide");
            // we start again
      txtAGénérer.requestFocus();
      return;
    }//catch

        // RAZ job counter
    txtGénérés.setText("0");  // task cpteur at 0
    // 1st thread can pass
    peutPasser=true;
        // threads are generated and launched
    tâches=new Thread[nbThreads];
    compteurs=new int[nbThreads];
    for(int i=0;i<tâches.length;i++){
      // create thread i
      tâches[i]=new Thread() {
          public void run() {
          synchronise();
        }
      };//thread i
            // define its name
      tâches[i].setName(""+i);
      // start execution
      tâches[i].start();
    }//for
  }//generate
Now, the threads no longer execute the increment method but the following synchronize method:
    // thread synchronization step
  public void synchronise(){
        // request access to the critical section
    synchronized(synchro){
      try{
        // can we get through?
        if(! peutPasser){
          System.out.println(Thread.currentThread().getName()+ " en attente");
          synchro.wait();
        }
                // we have passed - we forbid other threads to pass
        peutPasser=false;
      } catch(Exception e){
        txtStatus.setText(""+e);
                    return;
      }//try
    }// synchronized

    // review section
    System.out.println(Thread.currentThread().getName()+ " passé");
    incrémente();

        // we're done - we release any thread blocked at the entrance to the critical section
    peutPasser=true;
    System.out.println(Thread.currentThread().getName()+ " terminé");
    synchronized(synchro){
      synchro.notify();
    }// synchronized
  } // synchronize
The purpose of the synchronize method is to process threads one at a time. It uses a synchronization variable called synchro to do this. The increment method is no longer protected by the synchronized keyword:
    // increment
  private void incrémente(){
        // retrieve the thread number
    int iThread=0;
    try{
      iThread=Integer.parseInt(Thread.currentThread().getName());
    }catch(Exception ex){}
        // read the job counter value
    try{
      compteurs[iThread]=Integer.parseInt(txtGénérés.getText());
    } catch (Exception e){}
        // increment it
    compteurs[iThread]++;
        // wait 100 milliseconds - the thread will then lose the processor
    try{
      Thread.sleep(100);
    } catch (Exception e){
      System.exit(0);
    }
        // the new counter is displayed
    txtGénérés.setText("");
    txtGénérés.setText(""+compteurs[iThread]);
  }// increment
For 5 threads, the results are as follows:
0 passé
1 en attente
2 en attente
3 en attente
4 en attente
0 terminé
1 passé
1 terminé
2 passé
2 terminé
3 passé
3 terminé
4 passé
4 terminé
Let T0 through T4 be the five threads generated by the application. T0 is the first to acquire the sync lock and finds peutPasser set to true. It sets peutPasser to false and proceeds: this is the purpose of the first message sent. In all likelihood, it continues and executes the critical section, specifically the increment method. In this method, it will sleep for 100 ms (sleep). It therefore releases the processor. The processor is then granted to another thread, thread T1, which then acquires ownership of the sync object. It discovers that it cannot proceed and enters a wait state (wait). It then releases ownership of the synchro object as well as the processor. The processor is allocated to thread T2, which suffers the same fate. During the 100 ms that T0 is paused, threads T1 through T4 are therefore put on hold. This is the meaning of the 4 "waiting" messages. After 100 ms, T0 regains the processor and completes its work: this is the meaning of the "0 finished" message. It then releases one of the blocked threads and terminates. The freed processor is then assigned to an available thread: the one that has just been released. Here, it is T1. Thread T1 then enters the critical section: this is the meaning of the message "1 passed." It does what it needs to do and then pauses for 100 ms. The processor is then available for another thread, but all are waiting for an event: none of them can take the processor. After 100 ms, thread T1 reclaims the processor and terminates: this is the meaning of the message "1 finished." Threads T1 through T4 will behave the same way as T1: this is the meaning of the three series of messages: "passed," "finished."