5. TP 2 - Controlling Arduinos with an Android Tablet
We will now learn how to control an Arduino board with a tablet. The example to follow is that of the [client-android-skel] project from the course (see section 2 ).
5.1. Project Architecture
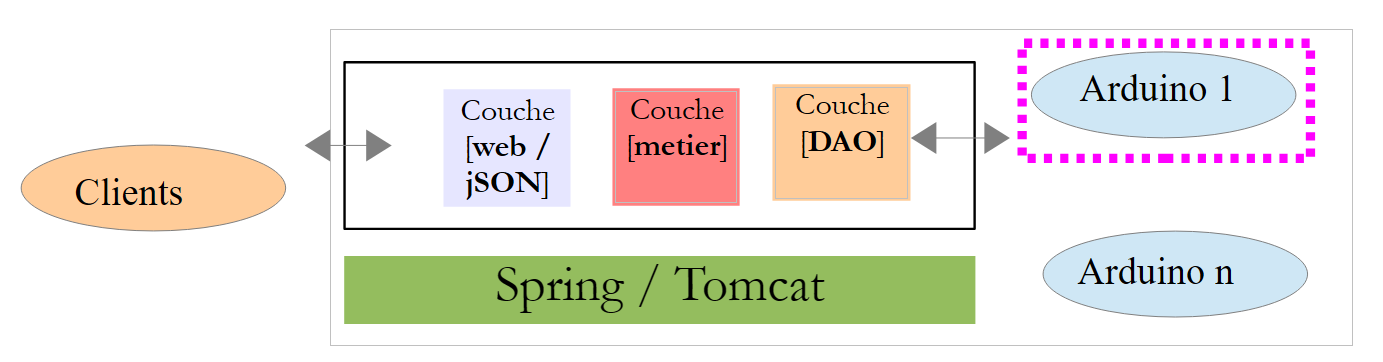
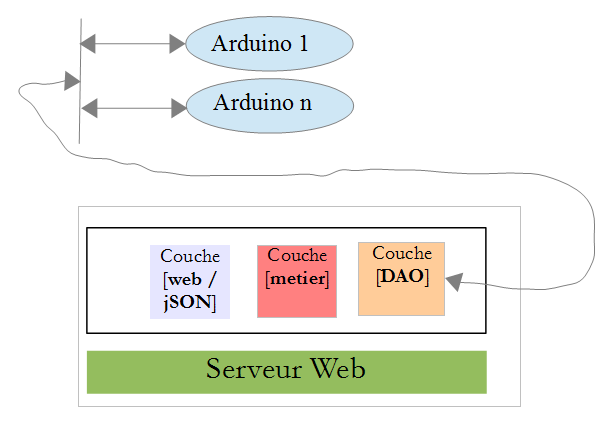
The entire project will have the following architecture:
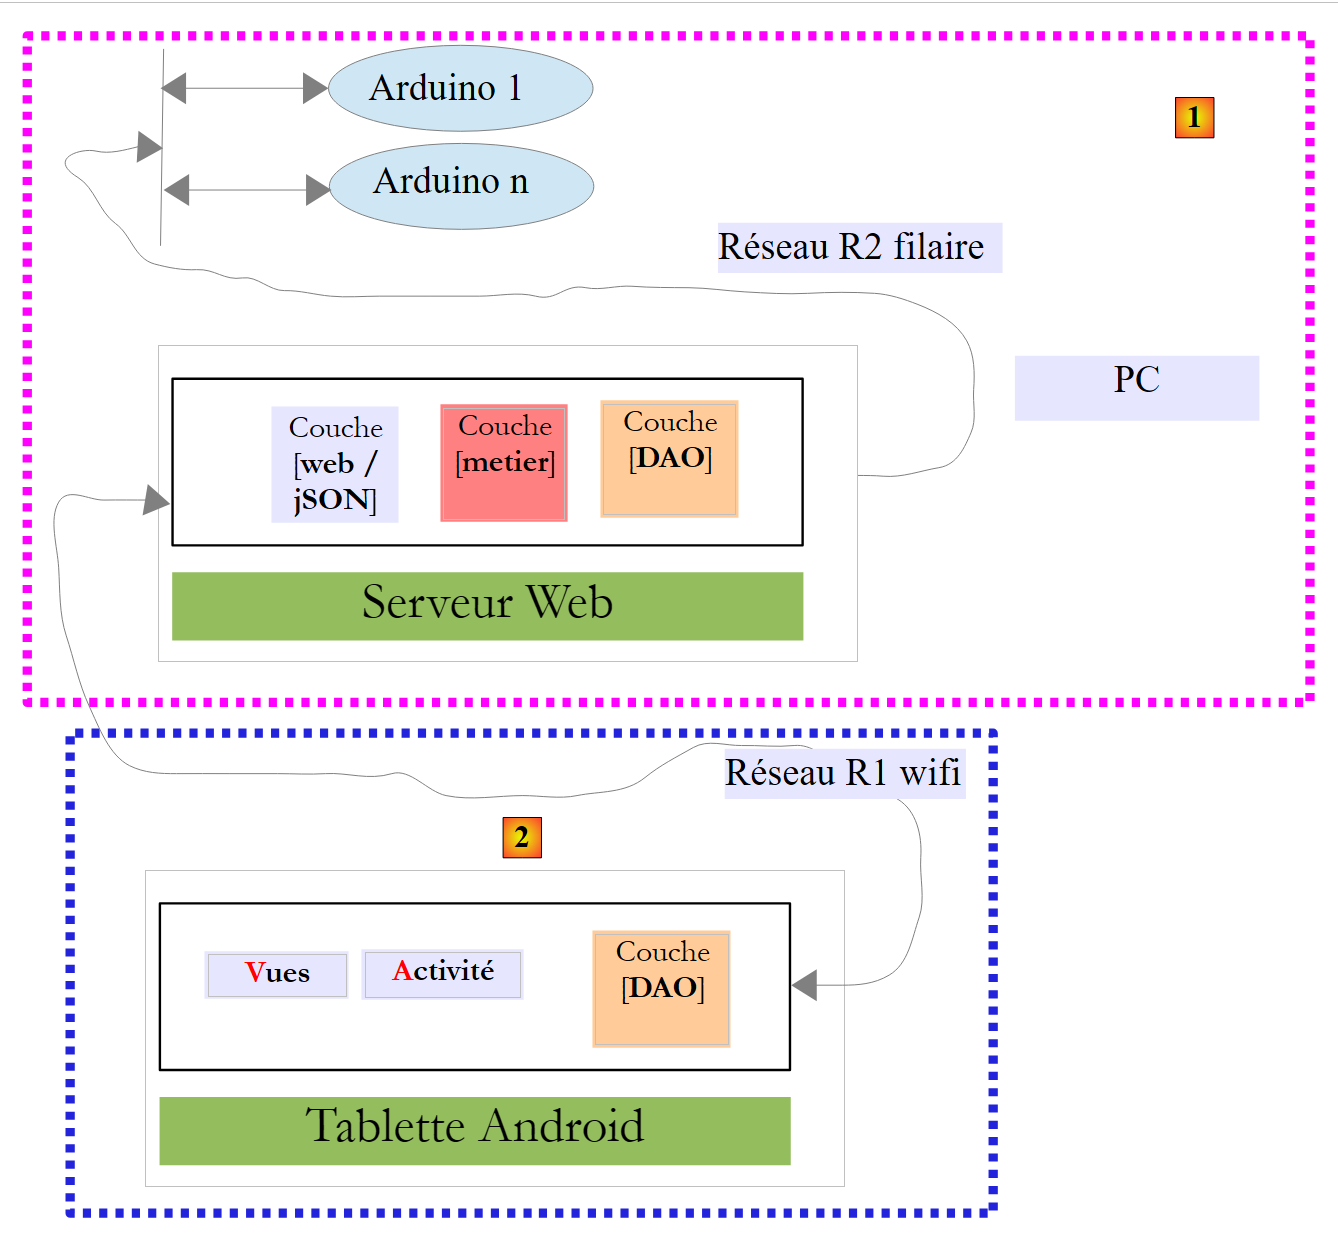 |
- the [1] module, web server / jSON, and Arduinos will be provided to you;
- you will need to build the [2] module and program the Android tablet to communicate with the web server / jSON.
5.2. Equipment
The following components are available to you:
- an Arduino with an Ethernet shield, a led, and a temperature sensor;
- a miniHub to share with another student;
- a USB cable to power the Arduino;
- two network cables to connect the Arduino and the PC to the same private network;
- an Android tablet;
5.2.1. The Arduino
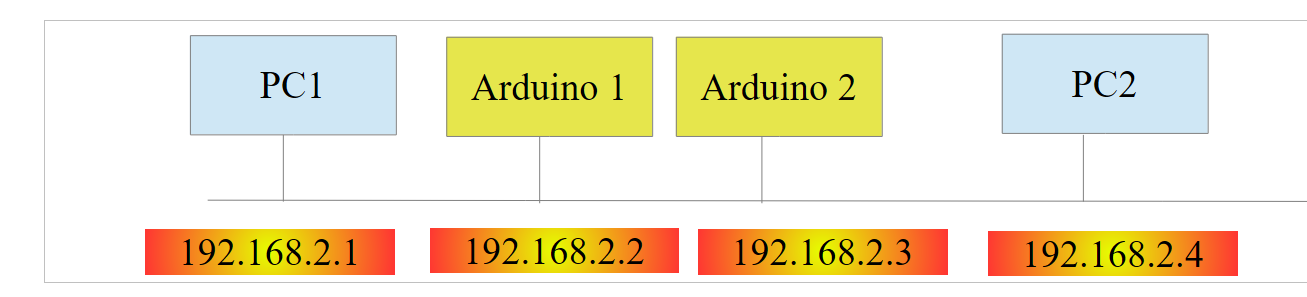 |
Here’s how to connect the various components together:
- Remove the network cable from your PC;
- Connect your PC and the Arduino using a network cable;
- The Arduino you have will already have been programmed. Its IP address will be [192.168.2.2]. In order for your PC to see the Arduino, you must assign it the address IP on the [192.168.2] network. The Arduinos have been programmed to communicate with a PC with the address IP [192.168.2.1]. Here’s how to proceed:
Go to [Panneau de configuration\Réseau et Internet\Centre Réseau et partage]:
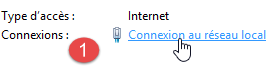
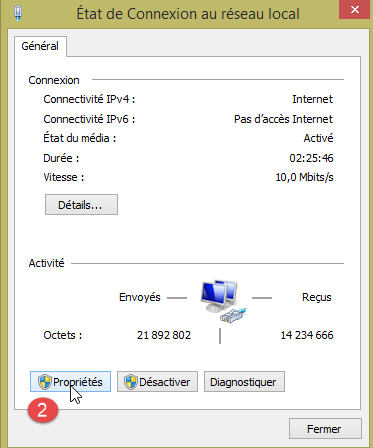
- In [1], click the [réseau local] link;
- In [2], click the [Propriétés] button on the local network;
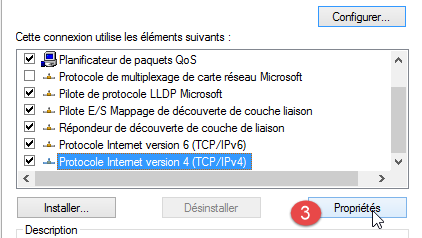
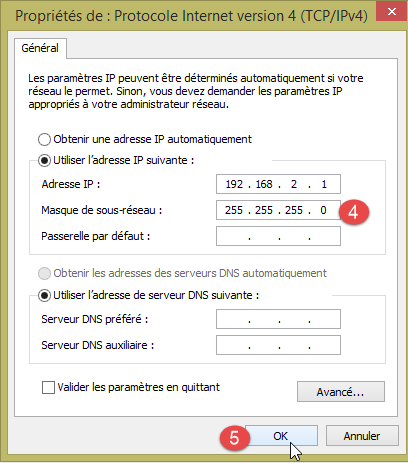
- In [3], click the [IPv4] properties of the [réseau local] card;
- In [4], assign this card the IP address IP and the subnet mask [192.168.2.1];
- in [5], click on [OK] as many times as necessary to exit the wizard.
5.2.2. The tablet
- Using your Wi-Fi key, connect your computer to the Wi-Fi network we will provide. Do the same with your tablet;
- check the Wi-Fi address of your IP by entering [ipconfig] in a DOS window. You will find an address similar to [192.168.x.y];
dos>ipconfig

Configuration IP de Windows

Carte réseau sans fil Wi-Fi :

   Suffixe DNS propre à la connexion. . . :
   Adresse IPv6 de liaison locale. . . . .: fe80::39aa:47f6:7537:f8e1%2
   Adresse IPv4. . . . . . . . . . . . . .: 192.168.1.25
   Masque de sous-réseau. . . . . . . . . : 255.255.255.0
   Passerelle par défaut. . . . . . . . . : 192.168.1.1
- Check the Wi-Fi address of your tablet. Ask your instructor for help if you don’t know how. You will find an address like IP;
- Disable your PC firewall if it is active [Panneau de configuration\Système et sécurité\Pare-feu Windows];
- In a DOS window, verify that the PC and the tablet can communicate by typing the command [ping 192.168.x.z], where [192.168.x.z] is your tablet’s address. The tablet should then respond:
dos>ping 192.168.1.26

Envoi d'a request 'Ping' 192.168.1.26 with 32 bytes of data:
Réponse de 192.168.1.26 : octets=32 temps=102 ms TTL=64
Réponse de 192.168.1.26 : octets=32 temps=134 ms TTL=64
Réponse de 192.168.1.26 : octets=32 temps=168 ms TTL=64
Réponse de 192.168.1.26 : octets=32 temps=208 ms TTL=64

Statistiques Ping pour 192.168.1.26:
    Paquets : envoyés = 4, reçus = 4, perdus = 0 (perte 0%),
Durée approximative des boucles en millisecondes :
    Minimum = 102ms, Maximum = 208ms, Moyenne = 153ms
Your system's network configuration is now complete.
5.2.3. The [Genymotion] emulator
The [Genymotion] emulator (see section 6.9 ) is a great alternative to the tablet. It is almost as fast and does not require a Wi-Fi network. We recommend using this method. You can use the tablet for the final verification of your application.
5.3. Programming Arduinos
Here we focus on writing C code for Arduinos:
 |
See
- Installing the IDE Arduino development environment (see section 6.1 );
- Using jSON libraries (Appendices, section 6.6 );
- In the Arduino IDE, test the example of a TCP server (e.g., the web server) and that of a TCP client (e.g., the Telnet client);
- the appendices on the Arduino programming environment in the section 6.1 .
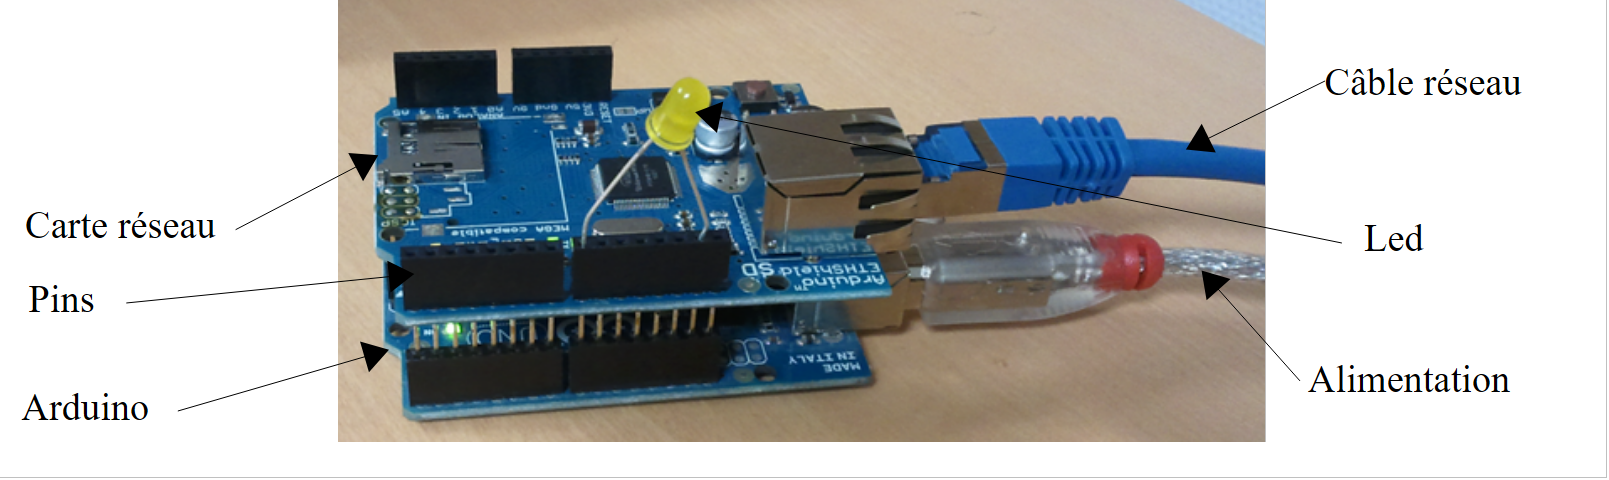 |
An Arduino is a set of pins connected to hardware. These pins are inputs or outputs. Their values are binary or analog. To control the Arduino, there are two basic operations:
- writing a binary/analog value to a pin designated by its number;
- read a binary/analog value from a pin identified by its number;
To these two basic operations, we will add a third:
- making a led blink for a certain duration and at a certain frequency. This operation can be performed by repeatedly calling the two previous basic operations. However, we will see in the tests that data exchanges between the [DAO] layer and an Arduino take on the order of a second. It is therefore not possible to make a led blink every 100 milliseconds, for example. So we will implement this blinking function on the Arduino itself.
The Arduino will operate as follows:
- Communication between the [DAO] layer and an Arduino takes place via a TCP-IP network through the exchange of text lines in jSON (JavaScript Object Notation);
- at startup, the Arduino connects to port 100 of a registration server located in the [DAO] layer. It sends a single line of text to the server:
This is a jSON string identifying the Arduino that is connecting:
- id: an Arduino identifier;
- desc: a description of what the Arduino can do. Here, we have simply specified the Arduino model;
- mac: the Arduino’s Mac address;
- port: the port number on which the Arduino will wait for commands from the [DAO] layer.
All this information is in the form of character strings except for the port, which is an integer.
- Once the Arduino has registered with the registration server, it begins listening on the port it specified to the server (102 above). It waits for jSON commands in the following format:
This is a jSON string with the following elements:
- id: a command identifier. Can be anything;
- ac: an action. There are three:
- pw (pin write) to write a value to a pin,
- pr (pin read) to read a value from a pin,
- cl (blink) to make a led blink;
- pa: the action parameters. These depend on the action.
- The Arduino always returns a response to its client. This is a string in the following format:
where
- id: the identifier of the command being responded to;
- er (error): an error code if an error occurred, 0 otherwise;
- et (status): a dictionary that is always empty except for the read command pr. The dictionary then contains the value of pin #x requested.
Here are some examples to clarify the previous specifications:
Make pin 8 of the led flash 10 times with a period of 100 milliseconds:
Command | |
Answer |
The pa parameters of the cl command are: the duration dur in milliseconds of a flash, the number nb of flashes, and the pin number of the led.
Write the binary value 1 to pin 7:
Command | |
Response |
The pa parameters of the pw command are: the write mode mod (binary or analog), the value val to be written, and the pin number. For a binary write, val is 0 or 1. For an analog write, val is in the range [0,255].
Write the analog value 120 to pin 2:
Command | |
Response |
Read the analog value from pin 0:
Command | |
Response |
The pa parameters of the pr command are: the read mode (binary or analog), and the pin number. If there is no error, the Arduino places the value of the requested pin in the "et" key of its response. Here, pin0 indicates that the value of pin 0 was requested, and 1023 is that value. In read mode, an analog value will be within the range [0, 1024].
We have presented the three commands cl, pw, and pr. One might wonder why we did not use more explicit fields in the strings jSON, such as "action" instead of "ac," "pinwrite" instead of "pw," "parameters" instead of "pa," and so on. An Arduino has very limited memory. However, the jSON strings exchanged with the Arduino contribute to memory usage. We therefore chose to shorten them as much as possible.
Let’s now look at a few error cases:
Command | |
Response |
A command was sent that is not in the format jSON. The Arduino returned error code 100.
Command | |
Response |
A pr command was sent without the pin parameter. The Arduino returned error code 302.
Command | |
Response |
We sent an unknown command pinread (it is pr). The Arduino returned error code 104.
We won’t go through any more examples. The rule is simple: the Arduino must not crash, no matter what command is sent to it. Before executing a jSON command, it verifies that the command is valid. As soon as an error occurs, the Arduino stops executing the command and returns the error string jSON to its client. Again, because memory space is limited, we return an error code rather than a full message.
The code for the program running on the Arduino is provided in the examples in this document:
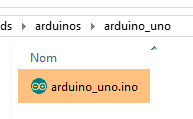
To transfer it to the Arduino:
- connect it to your PC;
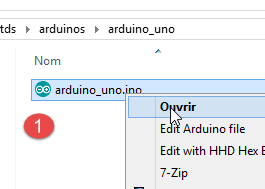
- in [1], open the [arduino_uno.ino] file. The IDE Arduino will launch and load the file;
Note: The code was originally created and tested with a IDE ARDUINO 1.5.x. Since then, other versions of the IDE have been released. The code did not work with IDE ARDUINO 1.6.x. It appears there is a backward compatibility issue between versions 1.6 and 1.5.
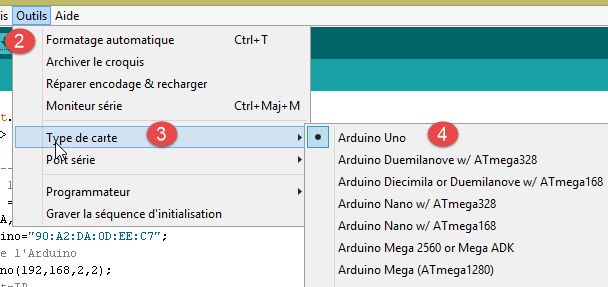
- In [2-4], specify the type of Arduino used;
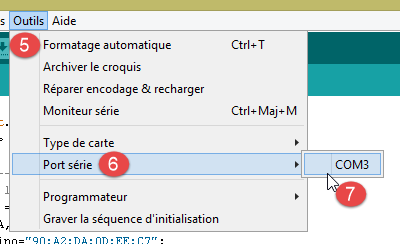
- In [5-7], specify which serial port on the PC it is connected to;
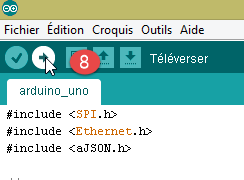
- In [8], upload the [arduino_uno] program to the Arduino;
The program code is heavily commented. Interested readers may refer to it. We simply highlight the lines of code that configure the bidirectional client/server communication between the Arduino and the PC:
#include <SPI.h>
#include <Ethernet.h>
#include <ajSON.h>

// ---------------------------------- CONFIGURATION DE L'ARDUINO UNO
// adresse MAC de l'Arduino UNO
byte macArduino[] = {
  0x90, 0xA2, 0xDA, 0x0D, 0xEE, 0xC7 };
char * strMacArduino="90:A2:DA:0D:EE:C7";
// l'adresse IP de l'Arduino
IPAddress ipArduino(192,168,2,2);
// son identifiant
char * idArduino="cuisine";
// port du serveur Arduino
int portArduino=102;
// description de l'Arduino
char * descriptionArduino="contrôle domotique";
// le serveur Arduino travaillera sur le port 102
EthernetServer server(portArduino);
// IP du serveur d'enregistrement
IPAddress ipServeurEnregistrement(192,168,2,1);
// port du serveur d'enregistrement
int portServeurEnregistrement=100;
// le client Arduino du serveur d'enregistrement
EthernetClient clientArduino;
// la commande du client
char commande[100];
// la réponse de l'Arduino
char message[100];

// initialisation
void setup() {
  // Le moniteur série permettra de suivre les échanges
  Serial.begin(9600);
  // démarrage de la connection Ethernet
  Ethernet.begin(macArduino,ipArduino);
  // mémoire disponible
  Serial.print(F("Memoire disponible : "));
  Serial.println(freeRam());
}

// boucle infinie
void loop()
{
  ...
}
- Line 8: The Arduino's address, Mac. This isn't particularly important here because the Arduino will be on a private network that includes a PC and one or more Arduinos. The Mac address simply needs to be unique on this private network. Normally, the Arduino’s network card has a sticker indicating the card’s Mac address. If this sticker is missing and you do not know the card’s Mac address, you can enter whatever you like on line 8 as long as the rule requiring the Mac address to be unique on the private network is followed;
- line 11: the card’s IP address. Again, you can enter anything of the form [192.168.2.x] and vary the x value for the different Arduinos on the private network;
- line 13: Arduino identifier. Must be unique among the identifiers of Arduinos on the same private network;
- line 15: the Arduino’s service port. You can enter whatever you like;
- line 17: the description of the Arduino’s function. You can enter whatever you want. Be careful with long strings due to the Arduino’s limited memory;
- line 21: IP address of the Arduino’s registration server on PC. Must not be modified;
- line 23: port for this logging service. Must not be modified;
5.4. The web server / jSON
5.4.1. Installation
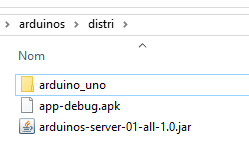
The Java binary for the web server / jSON is provided:
Open a command prompt and type the following command:
If [java.exe] is not in the PATH of the command window, you will need to type the full path to [java.exe] (usually C:\Program Files\java\...).
A DOS window will open and display logs:
- line 11: an embedded Tomcat server is launched;
- line 15: the Spring servlet [dispatcherServlet] is loaded and executed;
- line 18: URL Rest [/arduinos/blink/{idCommande}/{idArduino}/{pin}/{duree}/{nombre}] is detected;
- line 19: URL, Rest, and [/arduinos/commands/{idArduino}] are detected;
- line 20: URL Rest [/arduinos/] is detected;
- line 21: URL Rest [/arduinos/pinRead/{idCommande}/{idArduino}/{pin}/{mode}] is detected;
- line 22: URL Rest [/arduinos/pinWrite/{idCommande}/{idArduino}/{pin}/{mode}/{valeur}] is detected;
- line 26: the Arduino logging server is launched;
Connect your Arduino to the PC if you haven’t already. The PC firewall must be disabled. Then, using a browser, request the URL [http://localhost:8080/arduinos]:

You should see the ID of the connected Arduino appear. If nothing appears, try resetting the Arduino. It has a reset button for this purpose.
The web server / jSON is now installed.
5.4.2. The URL exposed by the web service / jSON
See also: [Exemple-15] project (see section 1.16.1 );
The web service / jSON has been implemented with Spring MVC and exposes the following URL:
@Controller
public class WebController {

  // business layer
  @Autowired
  private IMetier métier;

  // list of arduinos
  @RequestMapping(value = "/arduinos", method = RequestMethod.GET, produces = MediaType.APPLICATION_JSON_VALUE)
  @ResponseBody
  public String getArduinos() throws JsonProcessingException {
    ...
  }

  // flashing
  @RequestMapping(value = "/arduinos/blink/{idCommande}/{idArduino}/{pin}/{duree}/{nombre}", method = RequestMethod.GET, produces = MediaType.APPLICATION_JSON_VALUE)
  @ResponseBody
  public String faireClignoterLed(@PathVariable("idCommande") String idCommande, @PathVariable("idArduino") String idArduino, @PathVariable("pin") int pin, @PathVariable("duree") int duree, @PathVariable("nombre") int nombre) throws JsonProcessingException {
...
  }

  // order dispatch JSON
  @RequestMapping(value = "/arduinos/commands/{idArduino}", method = RequestMethod.POST, produces = MediaType.APPLICATION_JSON_VALUE, consumes = MediaType.APPLICATION_JSON_VALUE)
  @ResponseBody
  public String sendCommandesJson(@PathVariable("idArduino") String idArduino, HttpServletRequest request) throws IOException {
    ...
  }

  // pin reading
  @RequestMapping(value = "/arduinos/pinRead/{idCommande}/{idArduino}/{pin}/{mode}", method = RequestMethod.GET, produces = MediaType.APPLICATION_JSON_VALUE)
  @ResponseBody
  public String pinRead(@PathVariable("idCommande") String idCommande, @PathVariable("idArduino") String idArduino, @PathVariable("pin") int pin, @PathVariable("mode") String mode) throws JsonProcessingException {
    ....
  }

  // writing pin
  @RequestMapping(value = "/arduinos/pinWrite/{idCommande}/{idArduino}/{pin}/{mode}/{valeur}", method = RequestMethod.GET, produces = MediaType.APPLICATION_JSON_VALUE)
  @ResponseBody
  public String pinWrite(@PathVariable("idCommande") String idCommande, @PathVariable("idArduino") String idArduino, @PathVariable("pin") int pin, @PathVariable("mode") String mode, @PathVariable("valeur") int valeur) throws JsonProcessingException {
  ...
  }
}
The responses sent by the server are jSON representations of the following [Response<T>] class:
package client.android.dao.service;

import java.util.List;

public class Response<T> {

    // ----------------- properties
    // operation status
    private int status;
    // any status messages
    private List<String> messages;
    // the body of the reply
    private T body;

    // manufacturers
    public Response() {

    }

    public Response(int status, List<String> messages, T body) {
        this.status = status;
        this.messages = messages;
        this.body = body;
    }

    // getters and setters
...
}
The URL [/arduinos] sends a response of type [Response<List<Arduino>>], where [Arduino] is the following class:
package android.arduinos.entities;

import java.io.Serializable;

public class Arduino implements Serializable {
  // data
  private String id;
  private String description;
  private String mac;
  private String ip;
  private int port;

// getters and setters
...
}
- line 7: [id] is the Arduino identifier;
- line 8: its description;
- line 9: its address MAC;
- line 10: its address IP;
- line 11: the port on which it waits for commands;
The URL:
- [/arduinos/blink/{idCommande}/{idArduino}/{pin}/{duree}/{nombre}];
- [/arduinos/pinRead/{idCommande}/{idArduino}/{pin}/{mode}];
- [/arduinos/pinWrite/{idCommande}/{idArduino}/{pin}/{mode}/{valeur}];
- [/arduinos/commands/{idArduino}];
send a response of type [Response<ArduinoResponse>], where the class [ArduinoResponse] represents the standard Arduino response:
public class ArduinoResponse implements Serializable {

  private String json;
  private String id;
  private String erreur;
  private Map<String, Object> etat;

  // getters and setters
...
}
- [json]: the string jSON sent by an Arduino that could not be decoded (error case), null otherwise;
- [id]: the identifier of the command to which the Arduino is responding;
- [erreur]: an error code, 0 if OK, otherwise something else;
- [etat]: a dictionary containing the specific response to the command. It is usually empty unless the command requested the reading of a value from the Arduino, in which case that value will be placed in this dictionary;
5.4.3. Web service tests / jSON
Familiarize yourself with the web server / jSON by testing the following URL:
Here are some screenshots of what you should see:
Get the list of connected Arduinos:

The string jSON received from the web server / jSON is an object with the following fields:
- [status]: 0 indicates no error—otherwise, an error occurred;
- [messages]: a list of messages explaining the error if an error occurred:
- [body]: the list of Arduinos if no error occurred. Each Arduino is then described by an object with the following fields:
- [id]: Arduino identifier. No two Arduinos can have the same identifier;
- [description]: short description of the Arduino’s functionality;
- [mac]: Mac address of the Arduino;
- [ip]: Arduino address IP;
- [port]: port on which it waits for commands;
Make the led on pin 8 of the Arduino identified by [cuisine] blink 20 times every 100 ms:
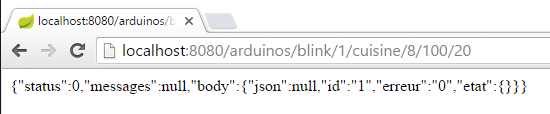
The string jSON received from the web server / jSON is an object with the following fields:
- [status]: 0 indicates that there was no error—otherwise, an error occurred;
- [messages]: a list of messages explaining the error if an error occurred:
- [body]: the Arduino's response if no error occurred:
- [id]: command identifier. This identifier is the 1 in [/blink/1]. The Arduino includes this command identifier in its response;
- [erreur]: an error number. A value other than 0 indicates an error;
- [etat]: used only for reading a pin. Its value is then the value of the pin;
- [json]: used only in the event of an error between the client and the server. Its value is the erroneous string jSON sent by the Arduino;
Analog reading from Arduino pin 0 identified by [cuisine]:

The string jSON received from the web server / jSON is similar to the previous one, with the exception of the field [etat], which represents the value of pin 0.
Binary read of pin 5 on the Arduino identified by [cuisine]:

The string jSON received from the web server / jSON is similar to the previous one.
Binary write of the value 1 to pin 8 of the Arduino identified by [cuisine]:
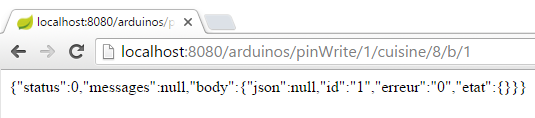
The string jSON received from the web server / jSON is similar to the previous one.
Testing URL [http://localhost:8080/arduinos/commands/cuisine] is more delicate. The method of the web server / jSON that processes this URL expects a POST request that cannot be easily simulated with a browser. To test this URL, you can use a Chrome browser with the [Advanced REST Client] extension (see the section 6.13 ):
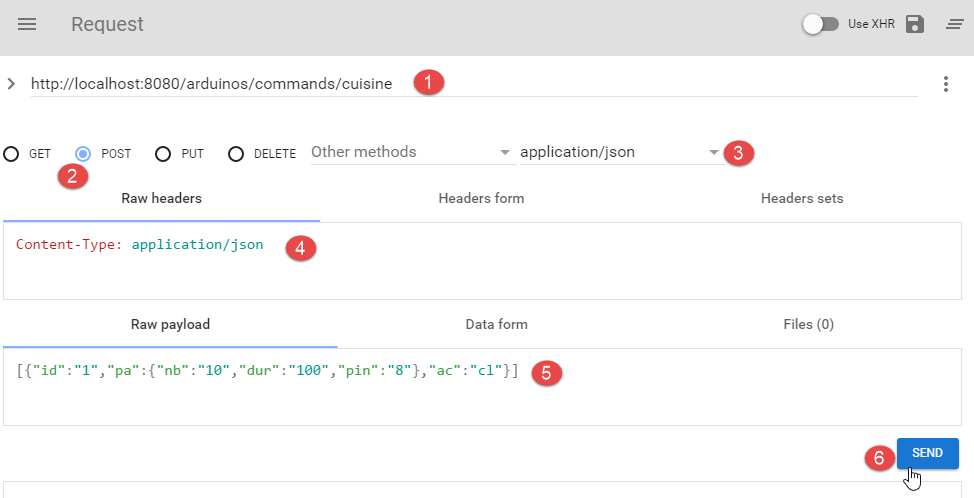
- in [1], the URL method of the web API / jSON to be tested;
- in [2], the POST method is used to send the request;
- in [3-4], the posted value is from jSON;
- in [5], the posted string is jSON. Note the square brackets that begin and end the list. Here, the list contains only one command, jSON, which causes pin 8 to blink 10 times every 100 ms;
- in [6], the request is sent;
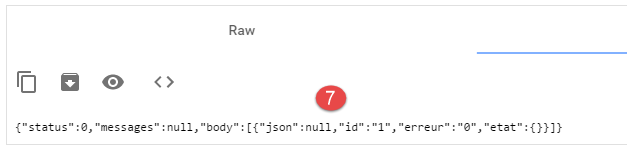
- in [7], the response jSON sent by the server. The object received an object with the two usual fields [status, messages] and a field [body] whose value is the list of Arduino responses to each of the jSON commands sent.
Let’s see what happens when we send a jSON command that is syntactically incorrect for the Arduino:
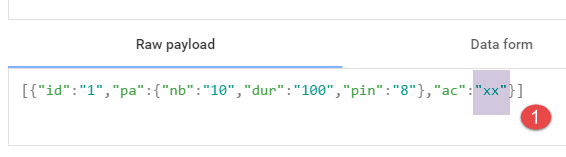
We then receive the following response:
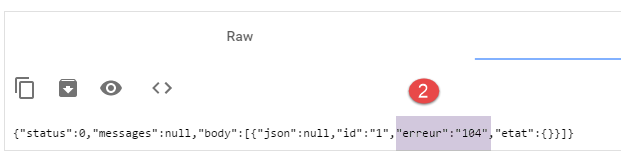
We can see that in the Arduino’s response, the error number is [104], indicating that the [xx] command was not recognized.
5.5. Android client tests
 |
The finished Android client executable is provided below:
Use the mouse to drag the [app-debug.apk] binary above onto a [GenyMotion] tablet emulator. It will then be saved and executed. Also launch the web server / jSON if you haven’t already done so. Connect the Arduino to the PC with a led attached to it. The Android client allows you to manage Arduinos remotely. It displays the following screens to the user.
The [CONFIG] tab allows you to connect to the server and retrieve the list of connected Arduinos:
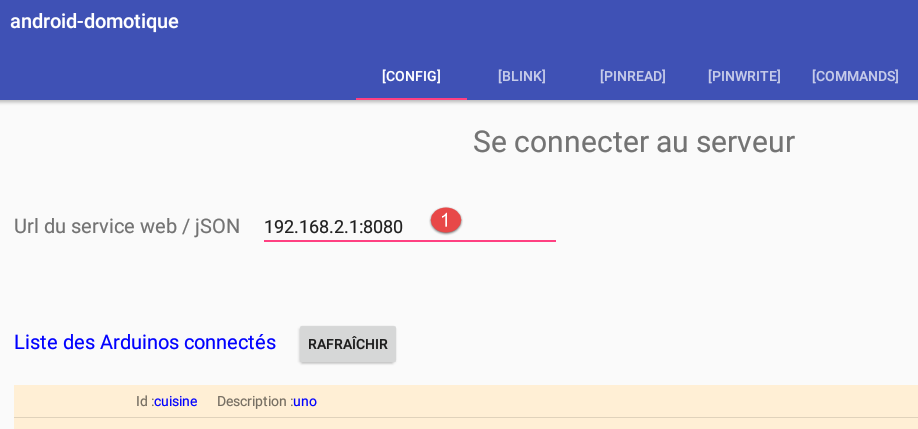
- In [1], enter the IP [192.168.2.1] address assigned to your PC (see section 5.2 ).
The [PINWRITE] tab allows you to write a value to an Arduino pin:
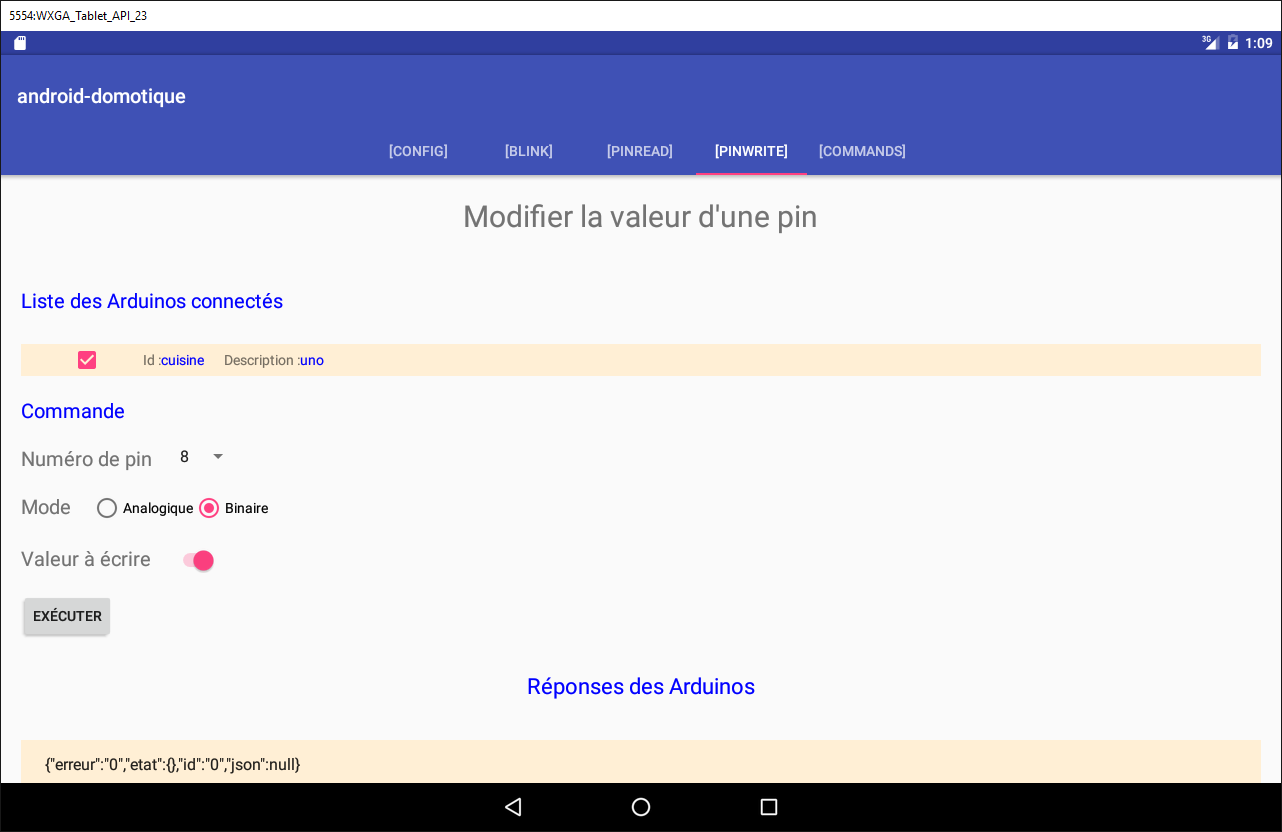
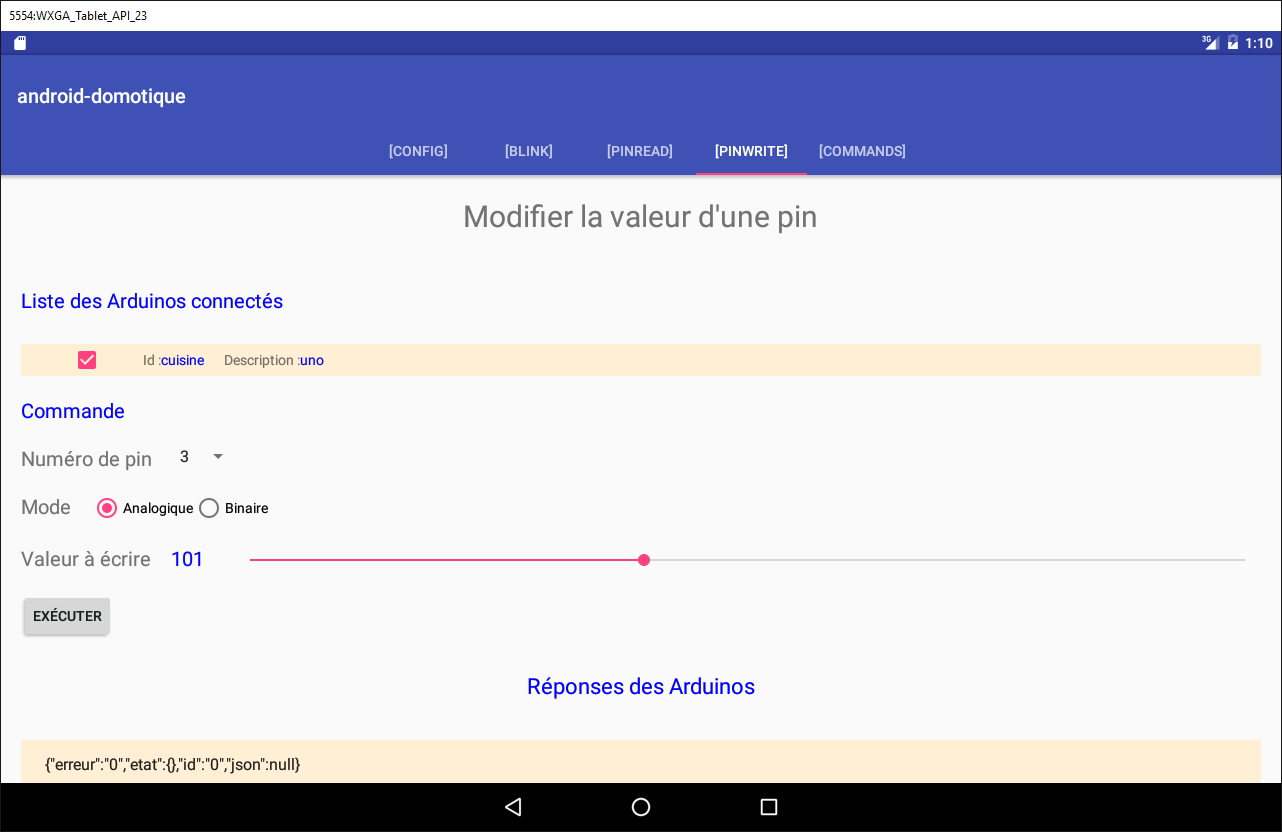
The [PINREAD] tab allows you to read the value of an Arduino pin:
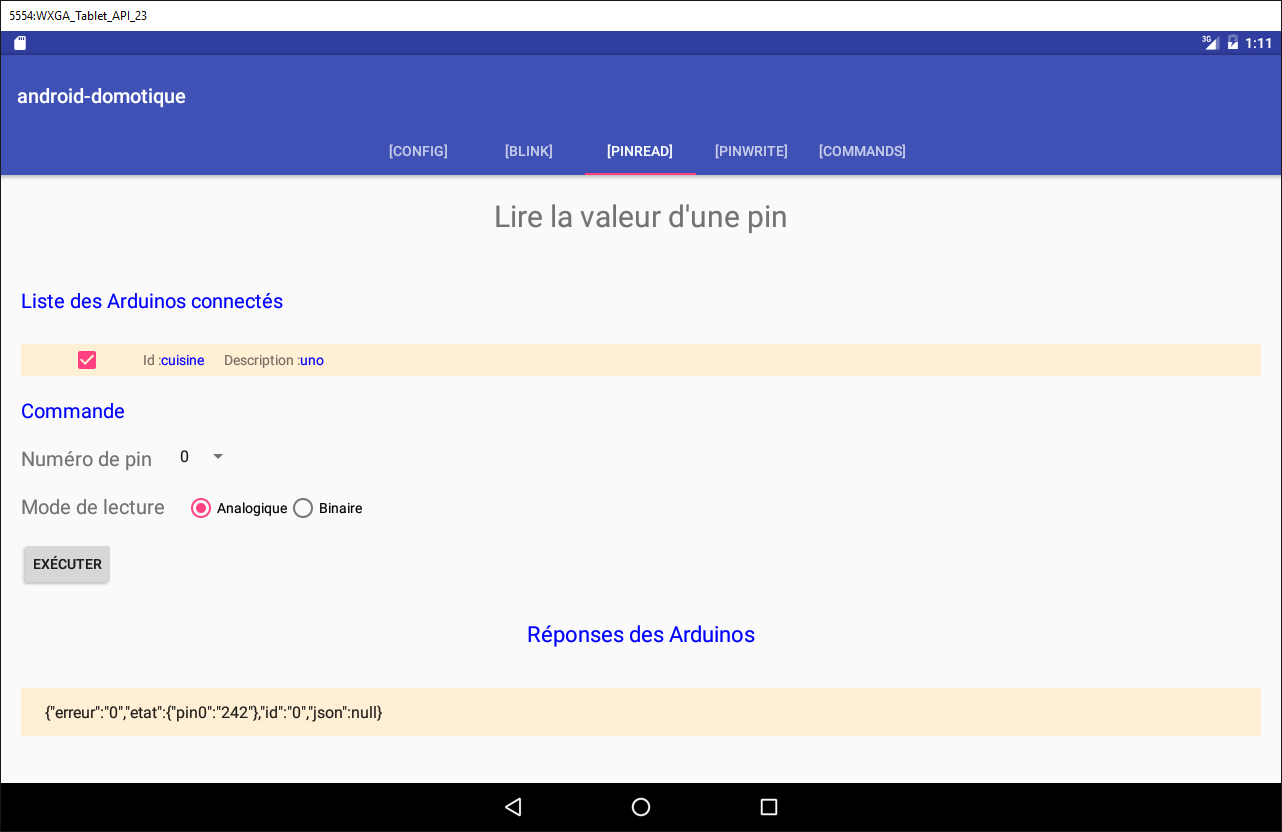
The [BLINK] tab allows you to make an Arduino LED blink:
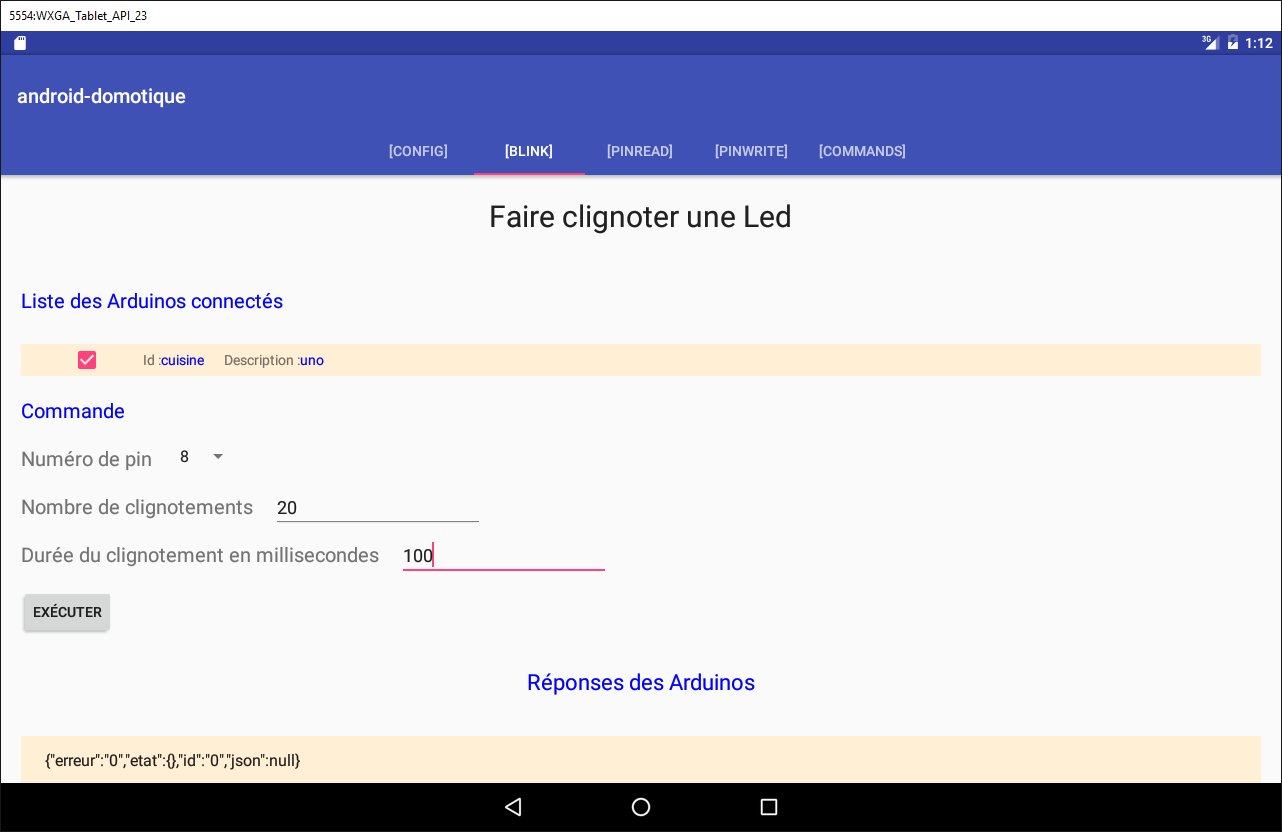
The [COMMAND] tab allows you to send a jSON command to an Arduino:
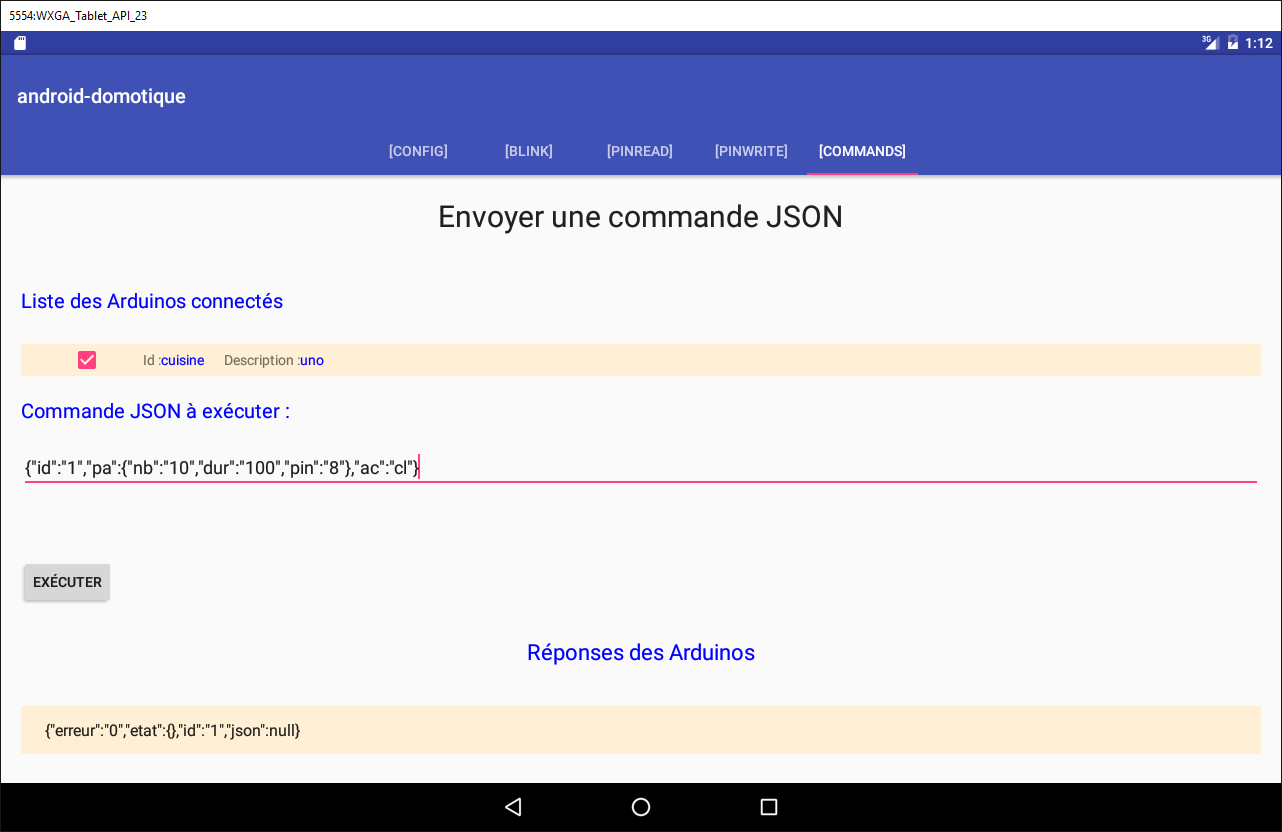
5.6. The Android client for the web service / jSON
We will now discuss writing the Android client.
5.6.1. Client architecture
The architecture of the Android client will be that of the [Exemple-15] project (see section 1.16.2 );
 |
- the [DAO] layer communicates with the web server / jSON;
The Android client must be able to control multiple Arduinos simultaneously. For example, we want to be able to make two leds modules placed on two Arduinos blink at the same time, not one after the other. Therefore, our Android client will use one asynchronous task per Arduino, and these tasks will run in parallel.
5.6.2. The client’s Android Studio project
Duplicate the [client-android-skel] project (see the section 2 ) into the [client-arduinos-01] project (if necessary, review how to duplicate a Gradle project in the section 1.15 ):
5.6.3. The five views XML
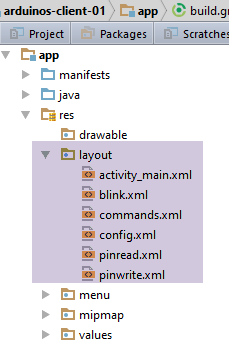
There will be five XML views:
- [blink]: to make an Arduino led blink. It is associated with the [BlinkFragment] fragment;
- [commands]: to send a jSON command to an Arduino. It is associated with the [CommandsFragment] fragment;
- [config]: to configure the URL web service / jSON and obtain the initial list of connected Arduinos. It is associated with the fragment [ConfigFragment];
- [pinread]: to read the binary or analog value of an Arduino pin. It is associated with the fragment [PinReadFragment];
- [pinwrite]: to write a binary or analog value to an Arduino pin. It is associated with the fragment [PinWriteFragment];
For now, these five views XML will all have the same empty content:
<?xml version="1.0" encoding="utf-8"?>
<ScrollView xmlns:android="http://schemas.android.com/apk/res/android"
            android:id="@+id/scrollView1"
            android:layout_width="wrap_content"
            android:layout_height="wrap_content">

  <RelativeLayout xmlns:android="http://schemas.android.com/apk/res/android"
                  android:layout_width="match_parent"
                  android:layout_height="match_parent">
  </RelativeLayout>
</ScrollView>
- The view is inside a [RelativeLayout] container (lines 7–10), which is itself contained within a [ScrollView] container (lines 2–11). This ensures that we can scroll the view if it exceeds the size of a tablet screen;
Task: Create the five XML views.
5.6.4. The Fragment Menu
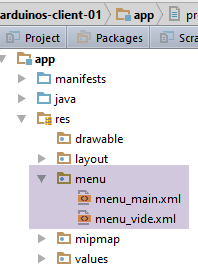
We know that the fragments of a project built with [client-android-skel] must be associated with a menu, even if it is empty. Here, the application will not have a menu. The empty menu is already in the project;
5.6.5. The five fragments of the application
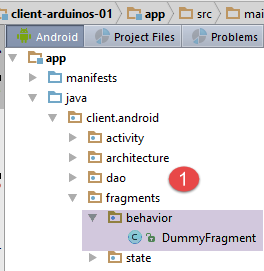
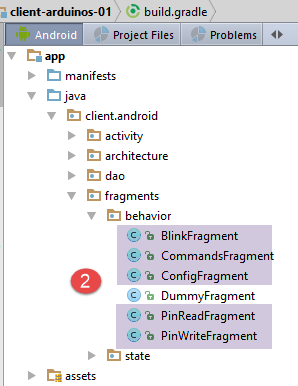
Task: Duplicate the [DummyFragment] fragment into the five fragments of the application, as shown in [2].
The fragment [ConfigFragment] has the following skeleton:
package client.android.fragments.behavior;

import client.android.R;
import client.android.architecture.core.AbstractFragment;
import client.android.architecture.custom.CoreState;
import client.android.fragments.state.DummyFragmentState;
import org.androidannotations.annotations.EFragment;
import org.androidannotations.annotations.OptionsMenu;

@EFragment
@OptionsMenu(R.menu.menu_vide)
public class ConfigFragment extends AbstractFragment {

  // fields inherited from parent class -------------------------------------------------------
...
Replace line 10 with the following line:
@EFragment(R.layout.config)
Task: Do the same for the other four fragments by adapting the [@EFragment] attribute of the class.
Fragment | View |
ConfigFragment | |
PinReadFragment | |
PinWriteFragment | |
CommandsFragment | |
BlinkFragment | |
5.6.6. Fragment states
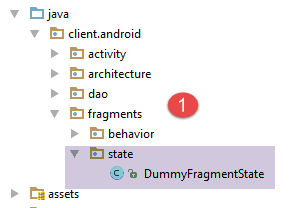
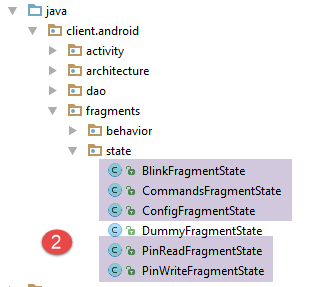
Each fragment will have a state.
Task: Duplicate the [DummyFragmentState] class five times to create the five states shown in [2].
5.6.7. Project Customization
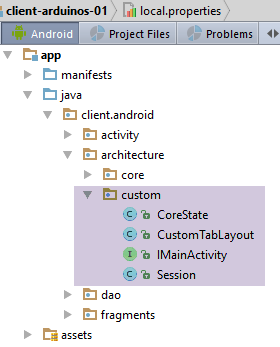
The [architecture / custom] package contains the customizable elements of the application architecture.
5.6.7.1. The [IMainActivity] interface
The [IMainActivity] interface defines what fragments can request from the activity as well as the application constants. This interface will be as follows:
package client.android.architecture.custom;

import client.android.architecture.core.ISession;
import client.android.dao.service.IDao;

public interface IMainActivity extends IDao {

  // session access
  ISession getSession();

  // change of view
  void navigateToView(int position, ISession.Action action);

  // wait management
  void beginWaiting();

  void cancelWaiting();

  // application constants -------------------------------------

  // mode debug
  boolean IS_DEBUG_ENABLED = true;

  // maximum time to wait for server response
  int TIMEOUT = 1000;

  // waiting time before executing customer request
  int DELAY = 000;

  // basic authentication
  boolean IS_BASIC_AUTHENTIFICATION_NEEDED = false;

  // fragment adjacency
  int OFF_SCREEN_PAGE_LIMIT = 1;

  // tab bar
  boolean ARE_TABS_NEEDED = true;

  // waiting image
  boolean IS_WAITING_ICON_NEEDED = true;

  // number of fragments
  int FRAGMENTS_COUNT = 5;

  // view n°s
  int VUE_CONFIG = 0;
  int VUE_BLINK = 1;
  int VUE_PINREAD = 2;
  int VUE_PINWRITE = 3;
  int VUE_COMMANDS = 4;
}
- Lines 25, 28, 31, 40: configuration of the [DAO] layer. This application queries a web server / jSON;
- Line 37: This application has tabs;
- line 43: this application has five fragments;
- Lines 46–50: the numbers of the five fragments;
- line 34: fragment adjacency. The developer can enter a value here within the range [1, FRAGMENTS_COUNT-1];
5.6.7.2. The [CoreState] class
The [CoreState] class is the parent class of the fragment states:
package client.android.architecture.custom;

import client.android.architecture.core.MenuItemState;
import client.android.fragments.state.*;
import com.fasterxml.jackson.annotation.JsonIgnoreProperties;
import com.fasterxml.jackson.annotation.JsonSubTypes;
import com.fasterxml.jackson.annotation.JsonTypeInfo;

@JsonIgnoreProperties(ignoreUnknown = true)
@JsonTypeInfo(use = JsonTypeInfo.Id.NAME, include = JsonTypeInfo.As.PROPERTY)
@JsonSubTypes({
  @JsonSubTypes.Type(value = ConfigFragmentState.class),
  @JsonSubTypes.Type(value = BlinkFragmentState.class),
  @JsonSubTypes.Type(value = PinReadFragmentState.class),
  @JsonSubTypes.Type(value = PinWriteFragmentState.class),
  @JsonSubTypes.Type(value = CommandsFragmentState.class)}
)
public class CoreState {
  // fragment visited or not
  protected boolean hasBeenVisited = false;
  // status of any fragment menu
  protected MenuItemState[] menuOptionsState;

  // getters and setters
...
}
- lines 12–16: the state classes for the five fragments must be declared here;
5.6.8. The class [MainActivity]
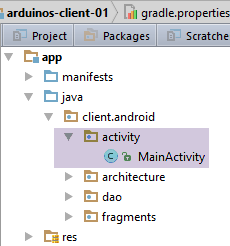
The [MainActivity] class will be as follows:
package client.android.activity;

import android.support.design.widget.TabLayout;
import android.util.Log;
import client.android.R;
import client.android.architecture.core.AbstractActivity;
import client.android.architecture.core.AbstractFragment;
import client.android.architecture.core.ISession;
import client.android.architecture.custom.IMainActivity;
import client.android.architecture.custom.Session;
import client.android.dao.entities.Arduino;
import client.android.dao.entities.ArduinoCommand;
import client.android.dao.entities.ArduinoResponse;
import client.android.dao.service.Dao;
import client.android.dao.service.IDao;
import client.android.dao.service.Response;
import client.android.fragments.behavior.*;
import org.androidannotations.annotations.Bean;
import org.androidannotations.annotations.EActivity;
import org.androidannotations.annotations.OptionsMenu;
import rx.Observable;

import java.util.List;
import java.util.Locale;

@EActivity
@OptionsMenu(R.menu.menu_main)
public class MainActivity extends AbstractActivity {

  // layer [DAO]
  @Bean(Dao.class)
  protected IDao dao;
  // session
  private Session session;

  // methods parent class -----------------------
  @Override
  protected void onCreateActivity() {
    // log
    if (IS_DEBUG_ENABLED) {
      Log.d(className, "onCreateActivity");
    }
    // session
    this.session = (Session) super.session;
    // creation of the five tabs
    for (int i = 0; i < 5; i++) {
      TabLayout.Tab newTab = tabLayout.newTab();
      newTab.setText(getFragmentTitle(i));
      tabLayout.addTab(newTab);
    }
  }

  @Override
  protected IDao getDao() {
    return dao;
  }

  @Override
  protected AbstractFragment[] getFragments() {
    return new AbstractFragment[]{new ConfigFragment_(), new BlinkFragment_(), new PinReadFragment_(), new PinWriteFragment_(), new CommandsFragment_()};
  }

  @Override
  protected CharSequence getFragmentTitle(int position) {
    Locale l = Locale.getDefault();
    switch (position) {
      case 0:
        return getString(R.string.config_titre).toUpperCase(l);
      case 1:
        return getString(R.string.blink_titre).toUpperCase(l);
      case 2:
        return getString(R.string.pinread_titre).toUpperCase(l);
      case 3:
        return getString(R.string.pinwrite_titre).toUpperCase(l);
      case 4:
        return getString(R.string.commands_titre).toUpperCase(l);
    }
    return null;
  }

  @Override
  protected void navigateOnTabSelected(int position) {
    // fragment n° position is displayed
    navigateToView(position, ISession.Action.NAVIGATION);
  }

  @Override
  protected int getFirstView() {
    return IMainActivity.VUE_CONFIG;
  }

  // implémentation IDao -----------------------------------------
}
- lines 46–50: creation of the application’s five tabs;
- line 48: the tab titles are provided by the method in lines 63-79;
- the five fragments are instantiated on line 60. Due to the AA annotations, the fragment classes are those presented previously, suffixed with an underscore;
- lines 63–79: a title is defined for each fragment. These titles will be retrieved from the file [res / values / strings.xml]
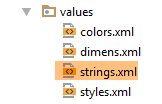
The content of [strings.xml] is as follows:
<?xml version="1.0" encoding="utf-8"?>
<resources>

  <!-- application name -->
  <string name="app_name">[arduinos-client-01]</string>
  <!-- Fragments and tabs -->
  <string name="config_titre">[Config]</string>
  <string name="blink_titre">[Blink]</string>
  <string name="pinread_titre">[PinRead]</string>
  <string name="pinwrite_titre">[PinWrite]</string>
  <string name="commands_titre">[Commands]</string>

</resources>
Task: Create the elements above and compile the project. There should be no errors.
Run the project. You should see the following view on the emulator:
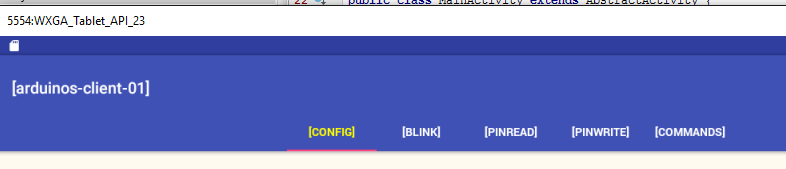
Examine the logs that accompanied the display of the first view and track the various steps that were executed. Switch between tabs and continue to follow the logs.
5.6.9. The view XML [config]
The view XML [config] will be as follows:
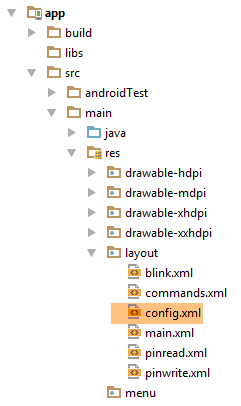
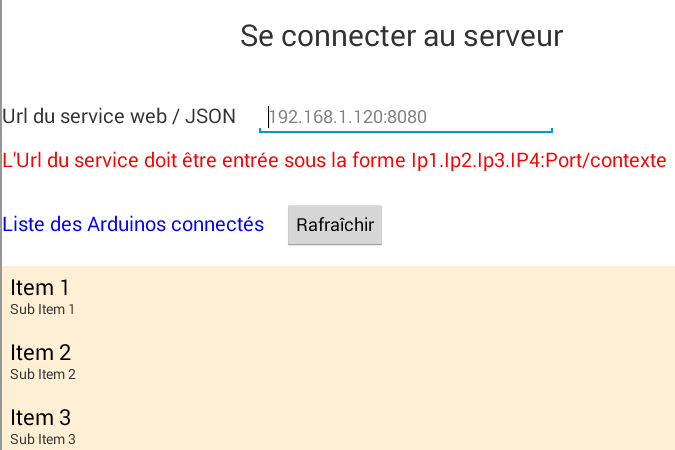
The view above is obtained with the following XML code:
<?xml version="1.0" encoding="utf-8"?>
<ScrollView xmlns:android="http://schemas.android.com/apk/res/android"
            android:id="@+id/scrollView1"
            android:layout_width="wrap_content"
            android:layout_height="wrap_content">

  <RelativeLayout
    android:layout_width="match_parent"
    android:layout_height="match_parent">

    <TextView
      android:id="@+id/txt_TitreConfig"
      android:layout_width="wrap_content"
      android:layout_height="wrap_content"
      android:layout_alignParentTop="true"
      android:layout_centerHorizontal="true"
      android:layout_marginTop="150dp"
      android:text="@string/txt_TitreConfig"
      android:textSize="@dimen/titre"/>

    <TextView
      android:id="@+id/txt_UrlServiceRest"
      android:layout_width="wrap_content"
      android:layout_height="wrap_content"
      android:layout_alignParentLeft="true"
      android:layout_below="@+id/txt_TitreConfig"
      android:layout_marginTop="50dp"
      android:text="@string/txt_UrlServiceRest"
      android:textSize="20sp"/>

    <EditText
      android:id="@+id/edt_UrlServiceRest"
      android:layout_width="300dp"
      android:layout_height="wrap_content"
      android:layout_alignBaseline="@+id/txt_UrlServiceRest"
      android:layout_alignBottom="@+id/txt_UrlServiceRest"
      android:layout_marginLeft="20dp"
      android:layout_toRightOf="@+id/txt_UrlServiceRest"
      android:ems="10"
      android:hint="@string/hint_UrlServiceRest"
      android:inputType="textUri">

      <requestFocus/>
    </EditText>

    <TextView
      android:id="@+id/txt_MsgErreurIpPort"
      android:layout_width="wrap_content"
      android:layout_height="wrap_content"
      android:layout_alignParentLeft="true"
      android:layout_below="@+id/txt_UrlServiceRest"
      android:layout_marginTop="20dp"
      android:text="@string/txt_MsgErreurUrlServiceRest"
      android:textColor="@color/red"
      android:textSize="20sp"/>

    <TextView
      android:id="@+id/txt_arduinos"
      android:layout_width="wrap_content"
      android:layout_height="wrap_content"
      android:layout_alignParentLeft="true"
      android:layout_below="@+id/txt_MsgErreurIpPort"
      android:layout_marginTop="40dp"
      android:text="@string/titre_list_arduinos"
      android:textColor="@color/blue"
      android:textSize="20sp"/>

    <Button
      android:id="@+id/btn_Rafraichir"
      android:layout_width="wrap_content"
      android:layout_height="wrap_content"
      android:layout_alignBaseline="@+id/txt_arduinos"
      android:layout_alignBottom="@+id/txt_arduinos"
      android:layout_marginLeft="20dp"
      android:layout_toRightOf="@+id/txt_arduinos"
      android:text="@string/btn_rafraichir"/>

    <Button
      android:id="@+id/btn_Annuler"
      android:layout_width="wrap_content"
      android:layout_height="wrap_content"
      android:layout_alignBaseline="@+id/txt_arduinos"
      android:layout_alignBottom="@+id/txt_arduinos"
      android:layout_marginLeft="20dp"
      android:layout_toRightOf="@+id/txt_arduinos"
      android:text="@string/btn_annuler"
      android:visibility="invisible"/>

    <ListView
      android:id="@+id/ListViewArduinos"
      android:layout_width="match_parent"
      android:layout_height="200dp"
      android:layout_alignParentLeft="true"
      android:layout_below="@+id/txt_arduinos"
      android:layout_marginTop="30dp"
      android:background="@color/wheat">
    </ListView>

  </RelativeLayout>
</ScrollView>
The view uses strings (android:text on lines 15, 25, 37, 50, 61, 73) that are defined in the file [res / values / strings]:
<?xml version="1.0" encoding="utf-8"?>
<resources>

    <string name="app_name">android-domotique</string>

    <!-- Fragments and tabs -->
    <string name="config_titre">[Config]</string>
    <string name="blink_titre">[Blink]</string>
    <string name="pinread_titre">[PinRead]</string>
    <string name="pinwrite_titre">[PinWrite]</string>
    <string name="commands_titre">[Commands]</string>

    <!-- Config -->
    <string name="txt_TitreConfig">Se connecter au serveur</string>
    <string name="txt_UrlServiceRest">Url du service web / jSON</string>
    <string name="txt_MsgErreurUrlServiceRest">L\'Url du service doit être entrée sous la forme Ip1.Ip2.Ip3.IP4:Port/contexte</string>
    <string name="hint_UrlServiceRest">ex (192.168.1.120:8080/rest)</string>
    <string name="btn_annuler">Annuler</string>
    <string name="btn_rafraichir">Rafraîchir</string>
    <string name="titre_list_arduinos">Liste des Arduinos connectés</string>

</resources>
The view uses colors (android:textColor on lines 51 and 62) defined in the file [res / values / colors]:
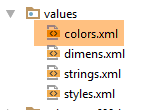
<?xml version="1.0" encoding="utf-8"?>
<resources>
  <color name="colorPrimary">#3F51B5</color>
  <color name="colorPrimaryDark">#303F9F</color>
  <color name="colorAccent">#FF4081</color>
  <color name="floral_white">#FFFAF0</color>
  <!-- app -->
  <color name="red">#FF0000</color>
  <color name="blue">#0000FF</color>
  <color name="wheat">#FFEFD5</color>
</resources>
The view uses dimensions (android:textSize on line 16) that are defined in the file [res / values / dimens]:
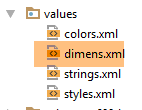
<resources>
  <!-- Default screen margins, per the Android Design guidelines. -->
  <dimen name="activity_horizontal_margin">16dp</dimen>
  <dimen name="activity_vertical_margin">16dp</dimen>
  <dimen name="fab_margin">16dp</dimen>
  <dimen name="appbar_padding_top">8dp</dimen>
  <!-- app -->
  <dimen name="titre">30dp</dimen>
</resources>
This technique has not been used for all dimensions. However, it is the recommended approach. It allows you to change dimensions in a single location.
Task: Create the elements described above.
Run your project again. You should see the following view:
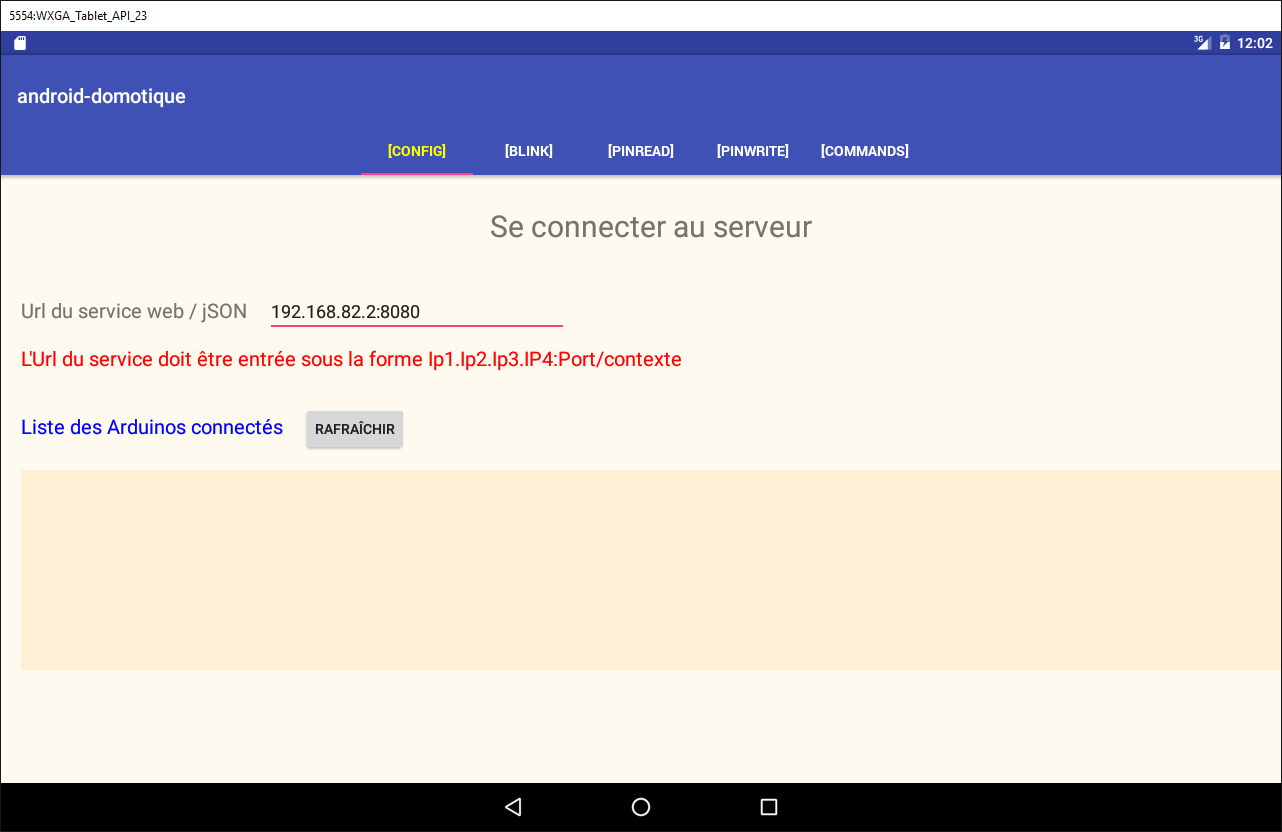
5.6.10. The fragment [ConfigFragment]
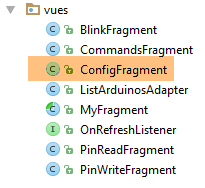 |
To handle the new view [config], the code for the fragment [ConfigFragment] changes as follows:
package client.android.fragments.behavior;

import android.view.View;
import android.widget.Button;
import android.widget.EditText;
import android.widget.ListView;
import android.widget.TextView;
import client.android.R;
import client.android.architecture.core.AbstractFragment;
import client.android.architecture.custom.CoreState;
import client.android.architecture.custom.IMainActivity;
import client.android.fragments.state.ConfigFragmentState;
import org.androidannotations.annotations.Click;
import org.androidannotations.annotations.EFragment;
import org.androidannotations.annotations.OptionsMenu;
import org.androidannotations.annotations.ViewById;

@EFragment(R.layout.config)
@OptionsMenu(R.menu.menu_vide)
public class ConfigFragment extends AbstractFragment {

  // visual interface elements
  @ViewById(R.id.btn_Rafraichir)
  protected Button btnRafraichir;
  @ViewById(R.id.btn_Annuler)
  protected Button btnAnnuler;
  @ViewById(R.id.edt_UrlServiceRest)
  protected EditText edtUrlServiceRest;
  @ViewById(R.id.txt_MsgErreurIpPort)
  protected TextView txtMsgErreurUrlServiceRest;
  @ViewById(R.id.ListViewArduinos)
  protected ListView listArduinos;

  @Click(R.id.btn_Rafraichir)
  protected void doRafraichir() {
  }

  // fragment lifecycle management -------------------------------------

  @Override
  public CoreState saveFragment() {
    return new ConfigFragmentState();
  }

  @Override
  protected int getNumView() {
    return IMainActivity.VUE_CONFIG;
  }

  @Override
  protected void initFragment(CoreState previousState) {

  }

  @Override
  protected void initView(CoreState previousState) {
    // 1st visit?
    if(previousState==null){
      txtMsgErreurUrlServiceRest.setVisibility(View.INVISIBLE);
    }
  }

  @Override
  protected void updateOnSubmit(CoreState previousState) {

  }

  @Override
  protected void updateOnRestore(CoreState previousState) {
  }

  @Override
  protected void notifyEndOfUpdates() {
    // buttons
    initButtons();
  }

  @Override
  protected void notifyEndOfTasks(boolean runningTasksHaveBeenCanceled) {
  }

  // méthodes privées --------------------------------------------

  private void initButtons() {
    // the [Execute] button replaces the [Cancel] button
    btnAnnuler.setVisibility(View.INVISIBLE);
    btnRafraichir.setVisibility(View.VISIBLE);
  }
}
- lines 23–32: the visual interface elements;
- lines 58-60: on the first visit to the fragment, the error message is hidden;
- lines 73-76: each time the fragment is displayed, the [Annuler] button is hidden (line 82) and the [Rafraîchir] button is displayed (lines 86-87). In fact, in this application, a fragment cannot be displayed while an asynchronous operation is in progress, and therefore the [Annuler] button is visible;
Task: Create the above elements.
Run this new version. The first view should now look like this:
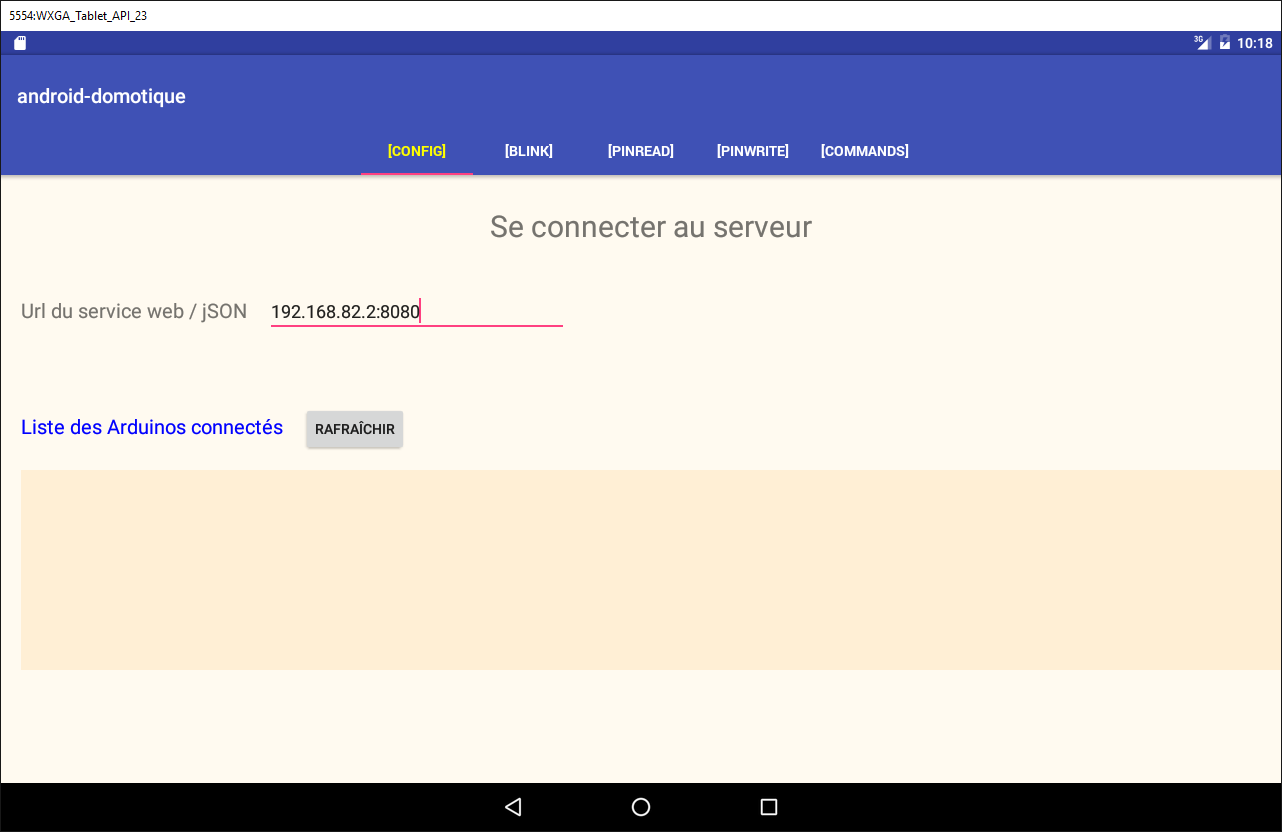
5.6.10.1. The [Rafraîchir] button
For now, we will handle the click on the [Rafraîchir] button as follows:
@Click(R.id.btn_Rafraichir)
  protected void doRafraichir() {
    // we're going to launch a task - we're preparing the wait
    beginWaiting(1);
  }

  @Click(R.id.btn_Annuler)
  protected void doAnnuler() {
    if (isDebugEnabled) {
      Log.d(className, "Annulation demandée");
    }
    // asynchronous tasks are cancelled
    cancelRunningTasks();
  }

  protected void beginWaiting(int numberOfRunningTasks) {
    // prepare to wait for tasks
    beginRunningTasks(numberOfRunningTasks);
    // the [Cancel] button replaces the [Refresh] button
    btnRafraichir.setVisibility(View.INVISIBLE);
    btnAnnuler.setVisibility(View.VISIBLE);
}
  // fragment lifecycle management -------------------------------------
...
  @Override
  protected void notifyEndOfTasks(boolean runningTasksHaveBeenCanceled) {
    // buttons in their original state
    initButtons();
  }

  // méthodes privées --------------------------------------------

  private void initButtons() {
    // the [Execute] button replaces the [Cancel] button
    btnAnnuler.setVisibility(View.INVISIBLE);
    btnRafraichir.setVisibility(View.VISIBLE);
  }
- lines 1-5: the method executed when the [Rafraîchir] button is clicked;
- line 4: the wait begins;
- line 18: we pass the number of asynchronous tasks to be launched to the parent class. The loading image will appear;
- lines 20-21: this wait will result in the [Annuler] button appearing, the [Rafraîchir] button disappearing, and the loading image appearing. Nothing else happens. However, the user can click the [Annuler] button. The method in lines 7–14 will then execute;
- line 13: the parent class is asked to cancel all tasks. The class will do so and in turn call the method in lines 25–29 to signal that all tasks are complete. The parameter [runningTasksHaveBeenCanceled] will have the value true to indicate that the tasks have been canceled;
- Lines 35–36: The [Annuler] button will disappear, while the [Rafraîchir] button will reappear.
Task: Make these changes and then run the project. Verify that the [Rafraîchir] button starts the wait and that the [Annuler] button stops it. Observe the logs.
5.6.10.2. Validating Inputs
In the previous version, we did not validate the input. To validate it, we add the following code to [ConfigFragment]:
// entered values
  private String urlServiceRest;

  @Click(R.id.btn_Rafraichir)
  protected void doRafraichir() {
    // check entries
    if (!pageValid()) {
      return;
    }
    // we're going to launch a task - we're preparing the wait
    beginWaiting(1);
  }

  // input verification
  private boolean pageValid() {
    // initially no error msg
    txtMsgErreurUrlServiceRest.setVisibility(View.INVISIBLE);
    // retrieve the Ip and the server port
    urlServiceRest = String.format("http://%s", edtUrlServiceRest.getText().toString().trim());
    // we check its validity
    try {
      URI uri = new URI(urlServiceRest);
      String host = uri.getHost();
      int port = uri.getPort();
      if (host == null || port == -1) {
        throw new Exception();
      }
    } catch (Exception ex) {
      // error msg display
      txtMsgErreurUrlServiceRest.setVisibility(View.VISIBLE);
      // back to UI
      return false;
    }
    // it's good
    return true;
  }
- line 2: the URL entered;
- lines 7-9: before doing anything, we check the validity of the entries;
- line 19: retrieve the entered URL and add the prefix [http://] to it;
- line 22: we attempt to construct a URI (Uniform Resource Identifier) object with it. If the entered URL is syntactically incorrect, an exception will be thrown;
- lines 23–27: an exception is thrown if the URI is correct but we also have [host==null] and [port==-1]. This is a possible scenario;
- line 30: an exception has occurred. The error message is displayed;
- line 32: we return [false] to indicate that the page is invalid;
- line 35: no errors occurred. We return [true] to indicate that the page is valid;
Task: Create the above elements.
Test this new version and verify that the invalid URL entries are properly flagged.
5.6.10.3. Displaying the list of Arduinos
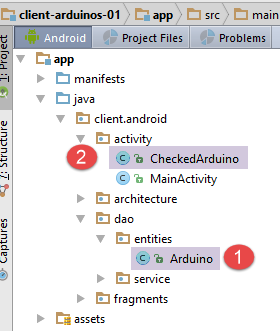
The various views will need to display the list of connected Arduinos. To do this, we will define different classes and a XML view:
- an Arduino will be represented by the [Arduino] [1] class;
- the class [CheckedArduino] [1] inherits from the class [Arduino], to which we have added a boolean to indicate whether or not the Arduino has been selected from a list;
The class [Arduino] is the one already used by the server and presented in the section 5.4.2 . It is as follows:
package android.arduinos.entities;

import java.io.Serializable;

public class Arduino implements Serializable {
  // data
  private String id;
  private String description;
  private String mac;
  private String ip;
  private int port;

// getters and setters
...
}
- line 7: [id] is the Arduino ID;
- line 8: its description;
- line 9: its address MAC;
- line 10: its address IP;
- line 11: the port on which it waits for commands;
This class corresponds to the string jSON received from the server when it is asked for the list of connected Arduinos:
The class [CheckedArduino] inherits from the class [Arduino]:
package android.arduinos.entities;

public class CheckedArduino extends Arduino {
    private static final long serialVersionUID = 1L;
    // an Arduino can be selected
    private boolean isChecked;

    // manufacturer
    public CheckedArduino(Arduino arduino, boolean isChecked) {
        // parent
        super(arduino.getId(), arduino.getDescription(), arduino.getMac(), arduino.getIp(), arduino.getPort());
        // local
        this.isChecked = isChecked;
    }

    // getters and setters
    public boolean isChecked() {
        return isChecked;
    }

    public void setChecked(boolean isChecked) {
        this.isChecked = isChecked;
    }

}
- line 3: the [CheckedArduino] class inherits from the [Arduino] class;
- line 6: we add a boolean variable that will tell us whether an Arduino has been selected from the displayed list of Arduinos;
In [ConfigFragment], we will simulate retrieving the list of connected Arduinos.
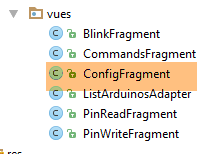
  @ViewById(R.id.ListViewArduinos)
  protected ListView listArduinos;
..
  @Click(R.id.btn_Rafraichir)
  protected void doRafraichir() {
    // check entries
    if (!pageValid()) {
      return;
    }
    // we're going to launch a task - we're preparing the wait
    beginWaiting(1);
    // we clean up the Arduinos list
    clearArduinos();
    // request the list of Arduinos running in the background
    getArduinosInBackground();
  }

  private void getArduinosInBackground() {
   ...
  }

  // raz list of Arduinos
  private void clearArduinos() {
    // create an empty list
    List<String> strings = new ArrayList<>();
    // we display it
    listArduinos.setAdapter(new ArrayAdapter<String>(activity, android.R.layout.simple_list_item_1, android.R.id.text1, strings));
}
- line 2: the ListView that displays the Arduinos connected to the server;
- line 5: the method that requests the list of connected Arduinos;
- line 11: we tell the parent class that we are going to launch an asynchronous task;
- line 12: we clear the currently displayed list of Arduinos;
- line 15: we request the list of connected Arduinos as a background task;
- lines 23–28: the method that clears the currently displayed list of Arduinos;
The [getArduinosInBackground] method is as follows:
  private void getArduinosInBackground() {
    // create a fictitious arduino list
    List<Arduino> arduinos = new ArrayList<>();
    for (int i = 0; i < 20; i++) {
      arduinos.add(new Arduino("id" + i, "desc" + i, "mac" + i, "ip" + i, i));
    }
    // we simulate a server response
    Response<List<Arduino>> response = new Response<>();
    response.setBody(arduinos);
    // we cancel the wait
    cancelWaitingTasks();
    // change the buttons
    initButtons();
    // we consume the answer
    consumeArduinosResponse(response);
}
- lines 3–6: create a list of 20 Arduinos;
- lines 8-9: we construct the response of type [Response<List<Arduino>>] (section5 ) that will encapsulate the list of Arduinos created;
- line 11: cancel the wait;
- line 13: reset the buttons to their initial state;
- line 15: we consume the response;
The [consumeArduinosResponse] method is as follows:
  // response display
  private void consumeArduinosResponse(Response<List<Arduino>> response) {
    // mistake?
    if (response.getStatus() != 0) {
      // display
      showAlert(response.getMessages());
      // back to Ui
      return;
    }
    // we create a list of [CheckedArduino]
    List<CheckedArduino> checkedArduinos = new ArrayList<>();
    for (Arduino arduino : response.getBody()) {
      checkedArduinos.add(new CheckedArduino(arduino, false));
    }
    // we display them
    showArduinos(checkedArduinos);
}
- lines 4-11: check the error code in the response sent by the server:
- line 4: if the error code is not zero;
- line 6: display the messages stored by the server in the [messages] field of the response;
- line 8: return to Ui;
- lines 11–16: if there were no errors, display the list of Arduinos received, after converting it to a List<CheckedArduino>;
The [showArduinos] method is as follows:
  private void showArduinos(List<CheckedArduino> checkedArduinos) {
    // create a list of String from the list of Arduinos
    List<String> strings = new ArrayList<>();
    for (CheckedArduino checkedArduino : checkedArduinos) {
      strings.add(checkedArduino.toString());
    }
    // we display it
    listArduinos.setAdapter(new ArrayAdapter<>(activity, android.R.layout.simple_list_item_1, android.R.id.text1, strings));
}
Task: Make the above changes and run your project.
You should see the following view when you click the [Rafraîchir] button:
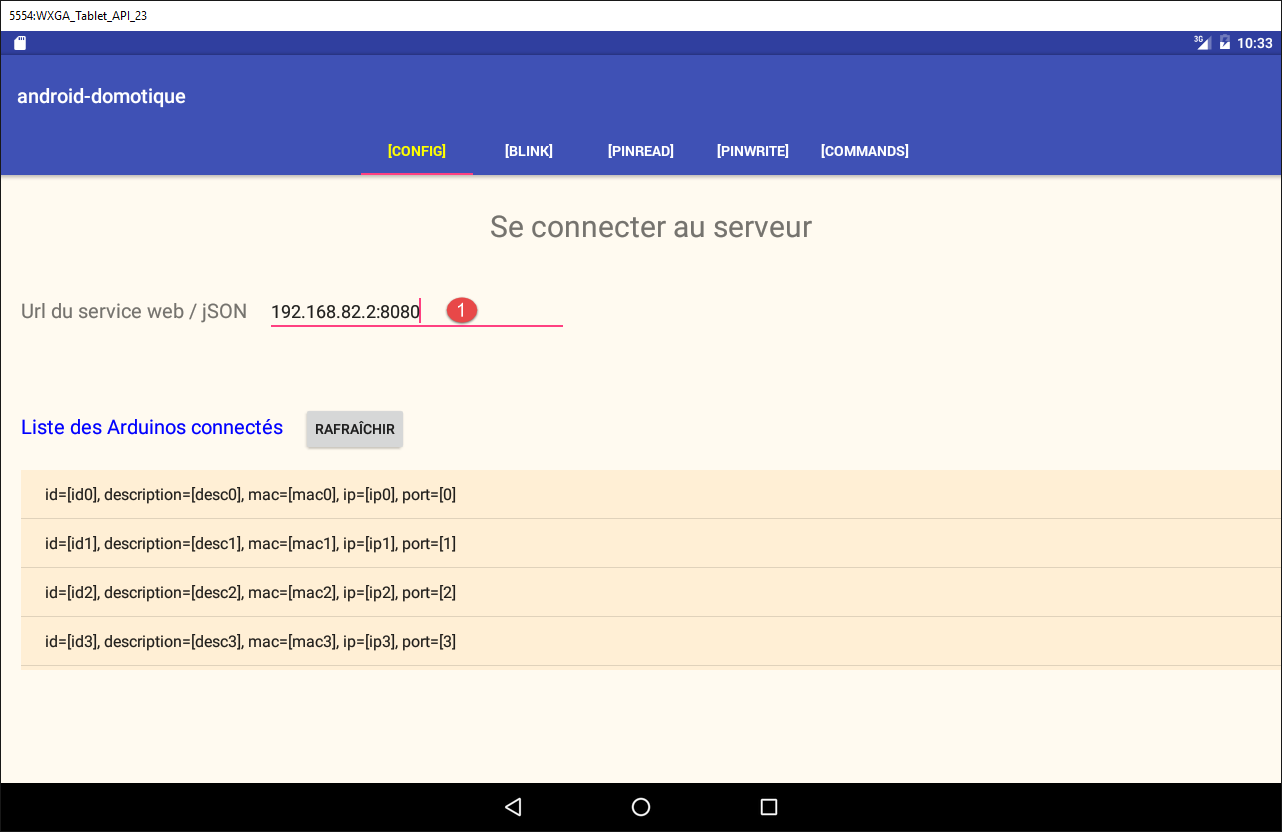
The input in [1] is not used. You can therefore enter anything as long as it follows the expected format.
5.6.10.4. A template for displaying an Arduino
Currently, connected Arduinos are displayed in the [Config] view as follows:
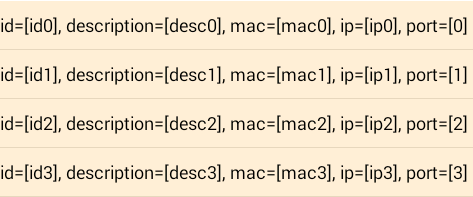
We now want to display them as follows:

- in [1], a checkbox that will allow you to select an Arduino. This checkbox will be hidden when you want to display a list of non-selectable Arduinos;
- in [2], the Arduino’s ID;
- in [3], its description;
The following builds on concepts developed in projects [exemple-19] and [exemple-19B] from the section 1.20 . Review them if necessary.
First, we create the view that will display an item from the list of Arduinos:
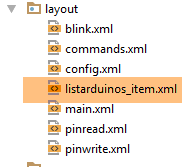
The code for the [listarduinos_item] view above is as follows:
<?xml version="1.0" encoding="utf-8"?>
<RelativeLayout xmlns:android="http://schemas.android.com/apk/res/android"
    android:id="@+id/RelativeLayout1"
    android:layout_width="match_parent"
    android:layout_height="match_parent"
    android:background="@color/wheat"
    android:orientation="vertical" >

    <CheckBox
        android:id="@+id/checkBoxArduino"
        android:layout_width="wrap_content"
        android:layout_height="wrap_content"
        android:layout_alignParentLeft="true"
        android:layout_alignParentTop="true"
        android:layout_toRightOf="@+id/txt_arduino_description" />

    <TextView
        android:id="@+id/TextView1"
        android:layout_width="wrap_content"
        android:layout_height="wrap_content"
        android:layout_alignBaseline="@+id/checkBoxArduino"
        android:layout_marginLeft="40dp"
        android:text="@string/txt_arduino_id" />

    <TextView
        android:id="@+id/txt_arduino_id"
        android:layout_width="wrap_content"
        android:layout_height="wrap_content"
        android:layout_alignBaseline="@+id/checkBoxArduino"
        android:layout_alignParentTop="true"
        android:layout_toRightOf="@+id/TextView1"
        android:text="@string/dummy"
        android:textColor="@color/blue" />

    <TextView
        android:id="@+id/TextView2"
        android:layout_width="wrap_content"
        android:layout_height="wrap_content"
        android:layout_alignBaseline="@+id/checkBoxArduino"
        android:layout_alignParentTop="true"
        android:layout_marginLeft="20dp"
        android:layout_toRightOf="@+id/txt_arduino_id"
        android:text="@string/txt_arduino_description" />

    <TextView
        android:id="@+id/txt_arduino_description"
        android:layout_width="wrap_content"
        android:layout_height="wrap_content"
        android:layout_alignBaseline="@+id/checkBoxArduino"
        android:layout_alignTop="@+id/TextView2"
        android:layout_toRightOf="@+id/TextView2"
        android:text="@string/dummy"
        android:textColor="@color/blue" />

</RelativeLayout>
- lines 9–15: the checkbox;
- lines 17-23: the text [Id : ];
- lines 25-33: the Arduino's id will be entered here;
- lines 35-43: the text [Description : ];
- lines 45-53: the Arduino description will be entered here;
This view uses text (lines 23, 32, 43) defined in [res / values / strings.xml]:
    <string name="dummy">XXXXX</string>

    <!--  listarduinos_item -->
    <string name="txt_arduino_id">Id : </string>
<string name="txt_arduino_description">Description : </string>
The view also uses a color (lines 33, 53) defined in [res / values / colors.xml]:
<?xml version="1.0" encoding="utf-8"?>
<resources>

    <color name="red">#FF0000</color>
    <color name="blue">#0000FF</color>
    <color name="wheat">#FFEFD5</color>
    <color name="floral_white">#FFFAF0</color>

</resources>
The display manager for an item in the Arduino list
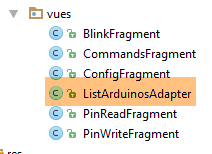
The [ListArduinosAdapter] class is the class called by [ListView] to display each item in the Arduino list. Its code is as follows:
package istia.st.android.vues;

import istia.st.android.R;
...

public class ListArduinosAdapter extends ArrayAdapter<CheckedArduino> {

    // the arduino board
    private List<CheckedArduino> arduinos;
    // execution context
    private Context context;
    // the id of the layout for displaying a line in the arduino list
    private int layoutResourceId;
    // the line may or may not contain a checkbox
    private Boolean selectable;

    // manufacturer
    public ListArduinosAdapter(Context context, int layoutResourceId, List<CheckedArduino> arduinos, Boolean selectable) {
        // parent
        super(context, layoutResourceId, arduinos);
        // memorize information
        this.arduinos = arduinos;
        this.context = context;
        this.layoutResourceId = layoutResourceId;
        this.selectable = selectable;
    }

    @Override
    public View getView(final int position, View convertView, ViewGroup parent) {
...
    }
}
- line 18: the class constructor takes four parameters: the currently running activity, the ID of the view to display for each item in the data source, the data source that populates the list, and a boolean indicating whether the checkbox associated with each Arduino should be displayed or not;
- Lines 8–15: These four pieces of information are stored locally;
Line 29: The [getView] method is responsible for generating view #[position] in [ListView] and handling its events. Its code is as follows:
@Override
    public View getView(int position, View convertView, ViewGroup parent) {
        // the current arduino
        final CheckedArduino arduino = arduinos.get(position);
        // create the current line
        View row = ((Activity) context).getLayoutInflater().inflate(layoutResourceId, parent, false);
        // retrieve references on [TextView]
        TextView txtArduinoId = (TextView) row.findViewById(R.id.txt_arduino_id);
        TextView txtArduinoDesc = (TextView) row.findViewById(R.id.txt_arduino_description);
        // fill in the line
        txtArduinoId.setText(arduino.getId());
        txtArduinoDesc.setText(arduino.getDescription());
        // the CheckBox is not always visible
        CheckBox ck = (CheckBox) row.findViewById(R.id.checkBoxArduino);
        ck.setVisibility(selectable ? View.VISIBLE : View.INVISIBLE);
        if (selectable) {
            // we assign its value
            ck.setChecked(arduino.isChecked());
            // we manage the click
            ck.setOnCheckedChangeListener(new OnCheckedChangeListener() {

                public void onCheckedChanged(CompoundButton buttonView, boolean isChecked) {
                    arduino.setChecked(isChecked);
                }
            });
        }
        // we return the line
        return row;
    }
- line 2: the first parameter is the position in the [ListView] of the line to be created. It is also the position in the locally stored list of Arduinos;
- line 4: we retrieve a reference to the Arduino that will be associated with the constructed row;
- line 6: the current row is constructed from the [listarduinos_item.xml] view;
- lines 8-9: the references to the two [TextView] are retrieved;
- lines 11-12: the two [TextView] receive their values;
- line 14: a reference to the checkbox is retrieved;
- line 15: it is made visible or not, depending on the [selectable] value initially passed to the constructor;
- line 16: if the checkbox is present;
- line 18: we assign it the value [isChecked] from the current Arduino;
- lines 20–26: Handle the click on the checkbox;
- line 23: the value of the checkbox is stored in the current Arduino;
Managing the list of Arduinos
The display of the list of Arduinos is currently handled by two methods of the [ConfigFragment] class:
- [clearArduinos]: which displays an empty list;
- [showArduinos]: which displays the list returned by the server;
These two methods work as follows:
  // raz list of Arduinos
  private void clearArduinos() {
    // an empty list is displayed
    ListArduinosAdapter adapter = new ListArduinosAdapter(getActivity(), R.layout.listarduinos_item, new ArrayList<CheckedArduino>(), false);
    listArduinos.setAdapter(adapter);
  }

  // arduinos list display
  private void showArduinos(List<CheckedArduino> checkedArduinos) {
    // display Arduinos
    ListArduinosAdapter adapter = new ListArduinosAdapter(getActivity(), R.layout.listarduinos_item, checkedArduinos, false);
    listArduinos.setAdapter(adapter);
}
Task: Make these changes and test the new app.
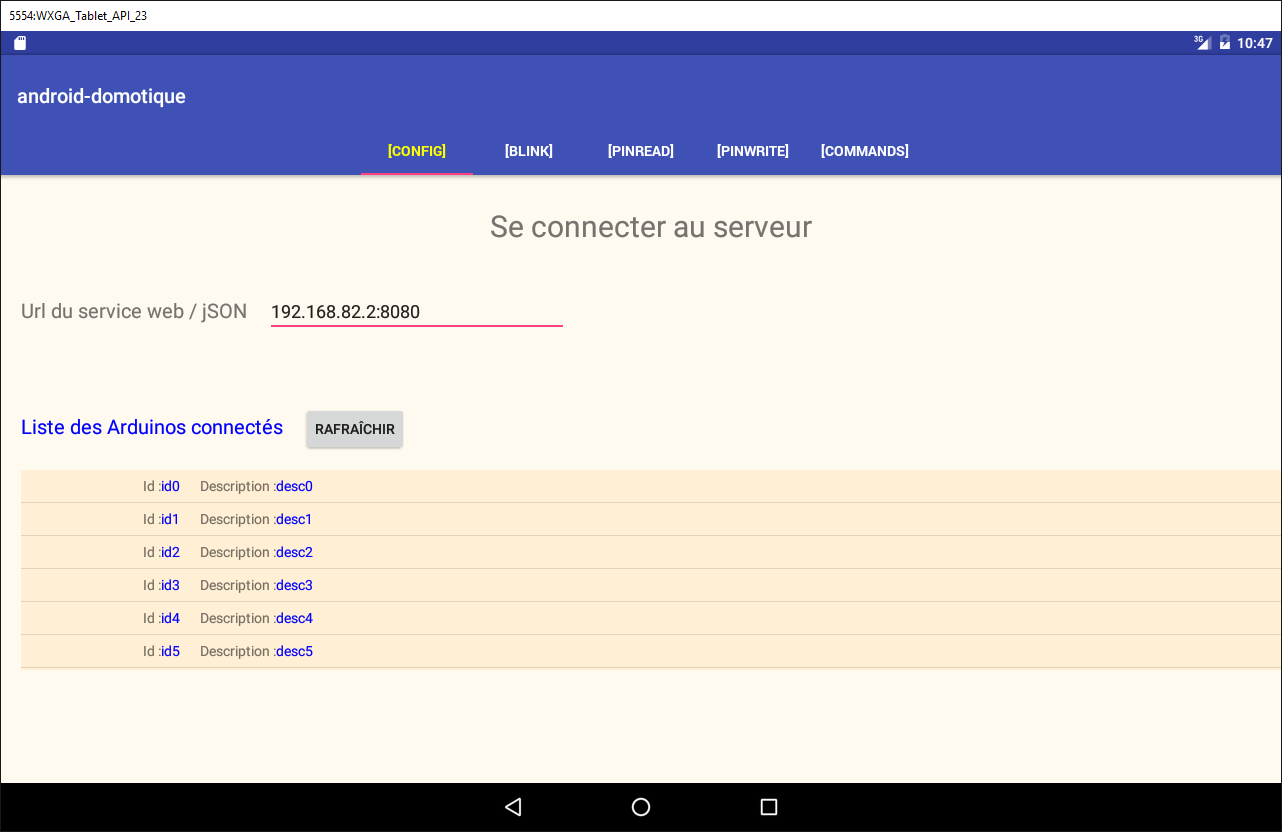
5.6.10.5. The session
The session is where we store the information shared between the fragments and the activity. The fragments all need to display the list of connected Arduinos. Therefore, an initial definition of the session will be as follows:
package client.android.architecture.custom;

import client.android.activity.CheckedArduino;
import client.android.architecture.core.AbstractSession;

import java.util.ArrayList;
import java.util.List;

public class Session extends AbstractSession {
  // data to be shared between fragments themselves and between fragments and activities
  // elements that cannot be serialized as jSON must be annotated with @JsonIgnore
  // don't forget the getters and setters required for serialization / deserialization jSON

  // the Arduinos list
  private List<CheckedArduino> checkedArduinos = new ArrayList<>();

  // getters and setters
...
}
Task: Create the previous [Session] class.
Creating this session requires us to modify the existing code as follows:
  // response display
  private void consumeArduinosResponse(Response<List<Arduino>> response) {
    // mistake?
    if (response.getStatus() != 0) {
      // display
      showAlert(response.getMessages());
      // cancellation
      doAnnuler();
      // back to Ui
      return;
    }
    // we create a list of [CheckedArduino]
    List<CheckedArduino> checkedArduinos = new ArrayList<>();
    for (Arduino arduino : response.getBody()) {
      checkedArduinos.add(new CheckedArduino(arduino, false));
    }
    // we put it in session
    session.setCheckedArduinos(checkedArduinos);
    // we display them
    showArduinos(checkedArduinos);
    // we cancel the wait
    cancelWaitingTasks();
}
- line 18: the list of Arduinos created by the previous lines is placed in the session;
5.6.10.6. Fragment state management
When the device is rotated, the view’s visual components are rendered (by default) in the state they were in when the view was designed:
- [ListView] contains the elements that the designer placed there;
- the error message is in the visible or non-visible state in which the designer placed it;
The states of the visual components at design time may or may not be appropriate when restoring a fragment. What is the case here?
- [ListView] must display the list of connected Arduinos. The value of [ListView] at design time cannot therefore be used;
- The [TextView] in the error message must be restored to the visible or non-visible state it had at the time of saving. Its value at design time may not be suitable for these two cases;
We must therefore save the state of these two components when saving the fragment’s state:
- the list of connected Arduinos;
- the visibility (shown/hidden) of the error message when entering the URL of the web service / jSON;
Since the list of Arduinos is present in the session, it will be automatically saved. The visibility of the error message will be stored in the following [ConfigFragmentState] class:
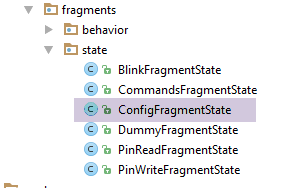
package client.android.fragments.state;

import client.android.architecture.custom.CoreState;

public class ConfigFragmentState extends CoreState {

  // visibility error message
  private boolean txtMsgErreurUrlServiceRestVisible;

  // getters and setters
...
}
Task: Create the previous class [ConfigFragmentState].
To correctly render the fragment reports, their [getNumView] and [saveFragment] methods must be modified. For example, the method for fragment [BlinkFragment] is currently as follows:
  @Override
  public CoreState saveFragment() {
    // save the fragment
    DummyFragmentState state=new DummyFragmentState();
    // ...
    return state;
    // s'il n'y a rien à sauvegarder faire [return new CoreState();] et supprimer la classe [DummyFragmentState]
  }

  @Override
  protected int getNumView() {
    // return the fragment number in the table of fragments managed by the activity (cf MainActivity)
    return 0;
}
If nothing is done, the state rendered in line 6 will be saved in element 0 (line 13) of the array CoreState[] coreStates of the class [AbstractSession] (line 5 below):
public class AbstractSession implements ISession {
  ...

  // view status
  private CoreState[] coreStates = new CoreState[0];
...
However, it must be saved in the element corresponding to fragment ID [BlinkFragment] in the fragment array defined in class [MainActivity] (line 9 below):
@EActivity
@OptionsMenu(R.menu.menu_main)
public class MainActivity extends AbstractActivity {

  ...

  @Override
  protected AbstractFragment[] getFragments() {
    return new AbstractFragment[]{new ConfigFragment_(), new BlinkFragment_(), new PinReadFragment_(), new PinWriteFragment_(), new CommandsFragment_()};
  }
The fragment IDs were defined in the [IMainActivity] interface:
public interface IMainActivity extends IDao {

  ...

  // view n°s
  int VUE_CONFIG = 0;
  int VUE_BLINK = 1;
  int VUE_PINREAD = 2;
  int VUE_PINWRITE = 3;
  int VUE_COMMANDS = 4;
}
Ultimately, the state of the fragment [BlinkFragment] will be handled correctly if we write:
  @Override
  public CoreState saveFragment() {
    // save the fragment
    DummyFragmentState state=new DummyFragmentState();
    // ...
    return state;
    // s'il n'y a rien à sauvegarder faire [return new CoreState();] et supprimer la classe [DummyFragmentState]
  }

  @Override
  protected int getNumView() {
    // return the fragment number in the table of fragments managed by the activity (cf MainActivity)
    return IMainActivity.VUE_BLINK;
}
- line 14: returns the fragment ID [BlinkFragment] from the array of fragments managed by the activity;
Furthermore, the [CoreState] class, which is the parent of the fragment states, is currently as follows (see section 5.6.7.2 ):
package client.android.architecture.custom;

import client.android.architecture.core.MenuItemState;
import client.android.fragments.state.*;
import com.fasterxml.jackson.annotation.JsonIgnoreProperties;
import com.fasterxml.jackson.annotation.JsonSubTypes;
import com.fasterxml.jackson.annotation.JsonTypeInfo;

@JsonIgnoreProperties(ignoreUnknown = true)
@JsonTypeInfo(use = JsonTypeInfo.Id.NAME, include = JsonTypeInfo.As.PROPERTY)
@JsonSubTypes({
  @JsonSubTypes.Type(value = ConfigFragmentState.class),
  @JsonSubTypes.Type(value = BlinkFragmentState.class),
  @JsonSubTypes.Type(value = PinReadFragmentState.class),
  @JsonSubTypes.Type(value = PinWriteFragmentState.class),
  @JsonSubTypes.Type(value = CommandsFragmentState.class)}
)
public class CoreState {
  // fragment visited or not
  protected boolean hasBeenVisited = false;
  // status of any fragment menu
  protected MenuItemState[] menuOptionsState;

  // getters and setters
....
}
- lines 12-16: the class [DummyFragmentState] does not appear in the list of child classes of the class [CoreState]. However, the [saveFragment] method of the [BlinkFragment] class currently returns a [ DummyFragmentState] type. If this issue is left unresolved, session serialization/deserialization will fail, and the session will not be restored, leading to an application crash;
The [saveFragment] method in the [BlinkFragment] fragment must be rewritten as follows:
  @Override
  public CoreState saveFragment() {
    // save the fragment
    BlinkFragmentState state=new BlinkFragmentState();
    // ...
    return state;
    // s'il n'y a rien à sauvegarder faire [return new CoreState();] et supprimer la classe [DummyFragmentState]
}
Task: In each fragment, modify the [getNumView] method so that it returns the fragment number, and the [saveFragment] method so that it returns an instance of the fragment state class (as shown above).
5.6.10.7. Fragment Lifecycle Management
Here we focus on the lifecycle of fragment [ConfigFragment], specifically the four methods:
- [saveFragment]: must save the fragment’s state so that it can be restored later;
- [initFragment]: which must initialize certain fields of the fragment if necessary. This method is called when the application starts and every time the device is rotated. More precisely, it is called when the fragment becomes visible after one of the two preceding events;
- [initView]: which must initialize certain view components if necessary. This method is called whenever [initFragment] has been called and when the view must be redrawn because the fragment has, at some point, moved out of the vicinity of the displayed fragment. As before, it is called when the fragment becomes visible after one of these events;
- [updateOnRestore]: which is executed after the two previous methods when the device has rotated, but also when navigation has been called. Its role is to restore the fragment’s previous state;
These methods will be as follows:
// arduinos list adapter
  private ListArduinosAdapter adapterListArduinos;

...
  // fragment lifecycle management -------------------------------------

  @Override
  public CoreState saveFragment() {
    ConfigFragmentState state = new ConfigFragmentState();
    state.setTxtMsgErreurUrlServiceRestVisible(txtMsgErreurUrlServiceRest.getVisibility() == View.VISIBLE);
    return state;
  }

  @Override
  protected void initFragment(CoreState previousState) {
    // adapter listArduinos
    adapterListArduinos = new ListArduinosAdapter(activity, R.layout.listarduinos_item, session.getCheckedArduinos(), false);

  }

  @Override
  protected void initView(CoreState previousState) {
    // link listview / adapter
    listArduinos.setAdapter(adapterListArduinos);
    // 1st visit?
    if (previousState == null) {
      // ListView empty - made by [initFragment]
      // hidden error message
      txtMsgErreurUrlServiceRest.setVisibility(View.INVISIBLE);
    } else {
      // error message visibility is restored
      ConfigFragmentState state = (ConfigFragmentState) previousState;
      txtMsgErreurUrlServiceRest.setVisibility(state.isTxtMsgErreurUrlServiceRestVisible() ? View.VISIBLE : View.INVISIBLE);
    }
  }


  @Override
  protected void updateOnSubmit(CoreState previousState) {

  }

  @Override
  protected void updateOnRestore(CoreState previousState) {
  }


  @Override
  protected void notifyEndOfUpdates() {
    // buttons
    initButtons();
}
- line 2: the ListView adapter for Arduinos. It is a global variable because it is used in different methods;
- lines 7–12: the [saveFragment] method saves the visibility of TextView txtMsgErreurUrlServiceRestVisible (line 10) to a [ConfigFragmentState] type;
- lines 14–19: the [initFragment] method initializes the adapter from line 2 with the list of Arduinos present in the session (line 17). Note that the role of [initFragment] is to initialize the fragment’s fields. Here, this initialization must be performed in all cases, whether it is the first visit (previousState==null) or not;
- line 17: we see that the adapter is linked to the data source [session.getCheckedArduinos]. This must not have the value null. For this reason, the field [session.checkedArduinos] is initialized with an empty list in the session:
  // the Arduinos list
private List<CheckedArduino> checkedArduinos = new ArrayList<>();
- lines 21–35: the [initView] method is responsible for initializing certain components of the visual interface, particularly those whose values are not retained when the device is rotated;
- line 24: the ListView for the Arduinos is associated with the adapter on line 2;
- lines 28–32: the first visit is distinguished from other visits;
- line 29: during the first visit, an empty [ListView] must be displayed. This is the case because during the first visit, the [ListView] adapter was associated with an empty list (line 17);
- line 31: the error message is hidden;
- lines 32–36: the case where this is not the first visit;
- [ListView] is already in the correct state as of line 24. There is nothing further to do;
- lines 34–35: the error message is restored to the state it was in when the fragment was last saved;
- lines 31-36: the [updateOnRestore] method must restore the fragment to its initial state. We reach the [updateOnRestore] method in two ways:
- either because the device has been rotated. In this case, all necessary initializations have been performed in [initView];
- or because the user navigates from a tab to the [Config] tab. If the fragment [Config] has left the vicinity of the displayed fragments since it was exited, the method [initView] has been executed and the fragment is already in the desired state. If the fragment [Config] has not left the set of displayed fragments since we left it, its visual components have not changed state and there is nothing to do;
We can see that the method [updateOnRestore] has nothing to do. This is sometimes the case, sometimes not. The difference lies in the method [updateOnSubmit]: if this method performs an action that renders certain initializations in [initView] unnecessary, then those initializations should be performed in the method [updateOnRestore]. Let’s take the example of a radio button with three values: V1, V2, and V3. Perhaps in the case of a navigation associated with a [SUBMIT] action, the selected radio button must always be the one with value V1. In this case, restoring the radio button’s value in the [initView] method is unnecessary, because in the case of a [SUBMIT], this value will be replaced by the one provided by the [updateOnSubmit] method. It is therefore preferable to move this restoration to the [updateOnRestore] method to avoid performing an unnecessary operation.
- lines 48–52: the [notifyEndOfUpdates] method is executed after all the previous ones;
- Line 51: The buttons are set to their initial state: button [Rafraîchir] displayed, button [Annuler] hidden:
Task: Add the previous code to [ConfigFragment], then run the application. Note that when you rotate the device, the [Config] tab retains its state (error message, list of Arduinos). Verify that the same is true when you perform a simple navigation tab [config] --> tab [Commands] --> tab [Config]. In the latter case, if you have kept a fragment adjacency of 1 in [IMainActivity], then the view of fragment [ConfigFragment] is destroyed when switching to tab [Commands] and then recreated when returning to tab [Config]. During testing, examine the logs.
5.6.10.8. Code improvement
The code for fragment [ConfigFragment] can be improved. For example, we wrote:
// arduinos list adapter
  private ListArduinosAdapter adapterListArduinos;

...

  // arduinos list display
  private void showArduinos(List<CheckedArduino> checkedArduinos) {
    // display Arduinos
    ListArduinosAdapter adapter = new ListArduinosAdapter(getActivity(), R.layout.listarduinos_item, checkedArduinos, false);
    listArduinos.setAdapter(adapter);
  }

  // raz list of Arduinos
  private void clearArduinos() {
    // an empty list is displayed
    ListArduinosAdapter adapter = new ListArduinosAdapter(getActivity(), R.layout.listarduinos_item, new ArrayList<CheckedArduino>(), false);
    listArduinos.setAdapter(adapter);
  }
- We can see that in lines 9 and 16, we are using a local variable that is disconnected from the field in line 2, even though we are trying to manipulate the same entity;
We update the code as follows:
  // arduinos list adapter
  private ListArduinosAdapter adapterListArduinos;

  @Click(R.id.btn_Rafraichir)
  protected void doRafraichir() {
  ...
  }

  private void getArduinosInBackground() {
 ...
    // it is consumed
    consumeArduinosResponse(response);
  }

  // response display
  private void consumeArduinosResponse(Response<List<Arduino>> response) {
    // mistake?
    if (response.getStatus() != 0) {
      // display
      showAlert(response.getMessages());
      // cancellation
      doAnnuler();
      // back to Ui
      return;
    }
    // we create a list of [CheckedArduino]
    List<CheckedArduino> checkedArduinos = session.getCheckedArduinos();
    checkedArduinos.clear();
    for (Arduino arduino : response.getBody()) {
      checkedArduinos.add(new CheckedArduino(arduino, false));
    }
    // we display them
    adapterListArduinos.notifyDataSetChanged();
    // we cancel the wait
    cancelWaitingTasks();
}

  @Override
  protected void initFragment(CoreState previousState) {
    // adapter listArduinos
    adapterListArduinos = new ListArduinosAdapter(activity, R.layout.listarduinos_item, session.getCheckedArduinos(), false);

  }

  @Override
  protected void initView(CoreState previousState) {
    // link listview / adapter
    listArduinos.setAdapter(adapterListArduinos);
    ...
}
- When the method on line 5 is executed, the fragment's lifecycle has been completed. Therefore:
- the adapter on line 2 has been associated with its data source (line 41);
- the [ListView] from the connected Arduinos has been connected to this adapter (line 48);
When we want to change the display of the [ListView], we need to do two things:
- change the content of the [session.checkedArduinos] data source;
- notify the adapter of this change using the [adapterListArduinos.notifyDataSetChanged()] instruction;
Note that we are changing the content of the data source, not the data source itself. If we change the data source itself, the [adapterListArduinos.notifyDataSetChanged()] operation will continue to display the old data source. We would then need to associate the adapter with the new data source.
The code is as follows:
- line 27: we retrieve the data source;
- line 28: we clear it. For this reason, we have removed the [clearArduinos] method;
- lines 29–31: we add new items to this now-empty list;
- line 33: we tell the adapter to refresh. This will refresh the display of the associated [ListView];
Task: Make these changes and verify that your application still works.
5.6.11. Communication between views
To verify communication between views, we will have all other views display the list of Arduinos obtained by the [Config] view. Let’s start with the [blink.xml] view. Whereas it previously displayed nothing, it will now display the list of connected Arduinos:
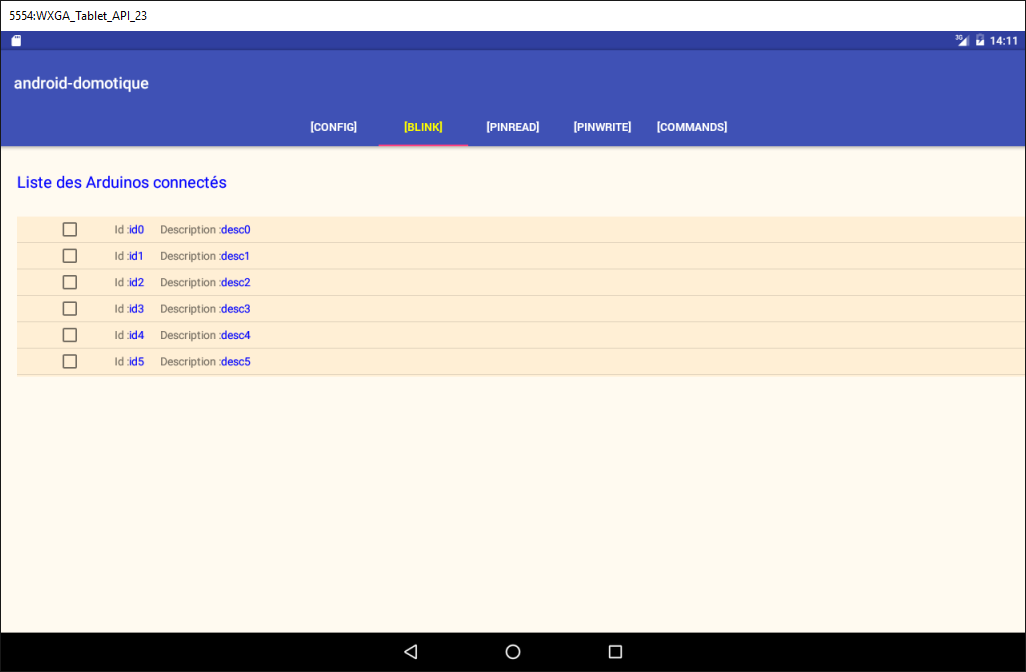
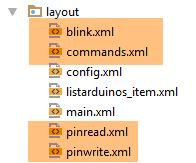
The XML code for the [blink.xml] view will be as follows:
<?xml version="1.0" encoding="utf-8"?>
<ScrollView xmlns:android="http://schemas.android.com/apk/res/android"
            android:id="@+id/scrollView1"
            android:layout_width="wrap_content"
            android:layout_height="wrap_content">

  <?xml version="1.0" encoding="utf-8"?>
  <RelativeLayout xmlns:android="http://schemas.android.com/apk/res/android"
                  xmlns:tools="http://schemas.android.com/tools"
                  android:id="@+id/RelativeLayout1"
                  android:layout_width="match_parent"
                  android:layout_height="match_parent">

    <TextView
      android:id="@+id/txt_arduinos"
      android:layout_width="wrap_content"
      android:layout_height="wrap_content"
      android:layout_alignParentLeft="true"
      android:layout_marginTop="150dp"
      android:text="@string/titre_list_arduinos"
      android:textColor="@color/blue"
      android:textSize="20sp" />

    <ListView
      android:id="@+id/ListViewArduinos"
      android:layout_width="match_parent"
      android:layout_height="200dp"
      android:layout_alignParentLeft="true"
      android:layout_below="@+id/txt_arduinos"
      android:layout_marginTop="30dp"
      android:background="@color/wheat">
    </ListView>

  </RelativeLayout>
</ScrollView>
This code was taken directly from the [config.xml] view. We simply modified the top margin on line 19.
Task: Duplicate this code in the [commands.xml, pinread.xml, pinwrite.xml] views.
The code in the [BlinkFragment] fragment associated with the [blink.xml] view has also changed:
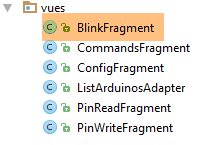
  // visual components
  @ViewById(R.id.ListViewArduinos)
  protected ListView listArduinos;

  // arduinos list adapter
  private ListArduinosAdapter adapterListArduinos;
...

  // methods imposed by the parent class -------------------------------------------------------

...
  @Override
  protected void initFragment(CoreState previousState) {
    // adapter listArduinos
    adapterListArduinos = new ListArduinosAdapter(activity, R.layout.listarduinos_item, session.getCheckedArduinos(), true);

  }

  @Override
  protected void initView(CoreState previousState) {
    // link listview / adapter
    listArduinos.setAdapter(adapterListArduinos);
  }
...
- lines 2-3: the [ListView] component for the connected Arduinos;
- Line 6: the adapter for this [ListView];
- lines 12–23: the code for the [initFragment] and [initView] methods is the same as that already used for the [ConfigFragment] fragment;
- line 15: when the fragment needs to be reset, we reset the adapter from line 2 by associating it with the list of Arduinos stored in the session. The last parameter [true] of the constructor [ListArduinosAdapter] means that we want to see a checkbox next to each Arduino;
- Line 22: When the fragment view needs to be reset, we associate the [ListView] for the connected Arduinos with the adapter on line 6;
Task: Duplicate this code in the other [CommandsFragment, PinReadFragment, PinWriteFragment] fragments. Run the application and verify that each tab now displays the list of connected Arduinos. Also verify that if you check Arduinos in one tab and navigate to another tab, they remain checked in the latter.
Note: The explanation for why the Arduinos remain checked is as follows. The [ListArduinosAdapter] class was introduced in the section 5.6.10.4 . The code related to the checkbox is as follows:
        // the current arduino
        final CheckedArduino arduino = arduinos.get(position);
...
        // the CheckBox is not always visible
        CheckBox ck = (CheckBox) row.findViewById(R.id.checkBoxArduino);
        ck.setVisibility(selectable ? View.VISIBLE : View.INVISIBLE);
        if (selectable) {
            // we assign its value
            ck.setChecked(arduino.isChecked());
            // we manage the click
            ck.setOnCheckedChangeListener(new OnCheckedChangeListener() {

                public void onCheckedChanged(CompoundButton buttonView, boolean isChecked) {
                    arduino.setChecked(isChecked);
                }
            });
}
- lines 11–15: if a checkbox is checked in tab X, the Arduino in line 2 has its [checked] property set to true (line 14);
- when switching to tab Y, the [ListView] of the Arduinos in that tab is displayed. In line 9, we see that if the Arduino on line 2 has its [checked] property set to true, then the [ck] checkbox on line 5 will be checked;
5.6.12. The [DAO] layer
 |
Note: For this section, review the implementation of the [DAO] layer in the [exemple-16B] project (see the section 2.8.3 ).
So far, we have manually generated the list of connected Arduinos. We will now request it from the web server / jSON. To do this, we will build the [DAO] layer:
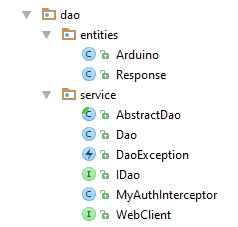
5.6.12.1. The IDao interface
The [IDao] interface of the [DAO] layer will be as follows:
package client.android.dao.service;

import client.android.dao.entities.Arduino;
import client.android.dao.entities.Response;
import rx.Observable;

import java.util.List;

public interface IDao {
  // Url of the web service
  void setUrlServiceWebJson(String url);

  // user
  void setUser(String user, String mdp);

  // customer timeout
  void setTimeout(int timeout);

  // basic authentication
  void setBasicAuthentification(boolean isBasicAuthentificationNeeded);

  // mode debug
  void setDebugMode(boolean isDebugEnabled);

  // client wait time in milliseconds before request
  void setDelay(int delay);

  // spécifique ----------------------------------------
  // list of arduinos
  Observable<Response<List<Arduino>>> getArduinos();
}
- lines 11-26: these lines are already present in the [IDao] interface of the [client-android-skel] template project;
- line 30: the [getArduinos] method returns the list of connected Arduinos as an Observable of type Observable<[Response<List<Arduino>>>];
Note that [Response<T>] is the type of all responses sent by the server in the form of a string jSON:
package client.android.dao.entities;

import java.util.List;

public class Response<T> {

    // ----------------- properties
    // operation status
    private int status;
    // any error messages
    private List<String> messages;
    // the body of the reply
    private T body;

    // manufacturers
    public Response() {

    }

    public Response(int status, List<String> messages, T body) {
        this.status = status;
        this.messages = messages;
        this.body = body;
    }

    // getters and setters
...
}
5.6.12.2. The [WebClient] interface
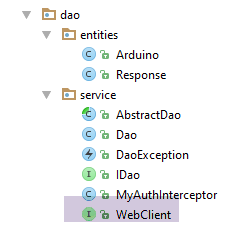
The [WebClient] interface is an interface for which the AA library provides an implementation. This interface will be as follows:
package client.android.dao.service;

import client.android.dao.entities.Arduino;
import client.android.dao.entities.Response;
import org.androidannotations.rest.spring.annotations.Get;
import org.androidannotations.rest.spring.annotations.Path;
import org.androidannotations.rest.spring.annotations.Rest;
import org.androidannotations.rest.spring.api.RestClientRootUrl;
import org.androidannotations.rest.spring.api.RestClientSupport;
import org.springframework.http.converter.json.MappingJackson2HttpMessageConverter;
import org.springframework.web.client.RestTemplate;

import java.util.List;

@Rest(converters = {MappingJackson2HttpMessageConverter.class})
public interface WebClient extends RestClientRootUrl, RestClientSupport {

  // RestTemplate
  void setRestTemplate(RestTemplate restTemplate);

  // spécifique --------------------------------------
  // list of arduinos
  @Get("/arduinos")
  Response<List<Arduino>> getArduinos();
}
- lines 15-19: these lines are included by default in the [WebClient] interface of the [client-android-skel] template project;
- line 23: the URL on the server that retrieves the list of Arduinos using a GET operation. Note that this URL is measured relative to the root URL [RestClientRootUrl] in line 16;
- Line 24: The server returns the string jSON of type [Response<List<Arduino>>]. This string jSON is automatically deserialized into the type [Response<List<Arduino>>] using the converter jSON [MappingJackson2HttpMessageConverter] from line 15;
5.6.12.3. The class [Dao]
The class [Dao] implements the interface [IDao] as follows:
package client.android.dao.service;

import android.util.Log;
import client.android.dao.entities.Arduino;
import client.android.dao.entities.Response;
import org.androidannotations.annotations.AfterInject;
import org.androidannotations.annotations.Bean;
import org.androidannotations.annotations.EBean;
import org.androidannotations.rest.spring.annotations.RestService;
import org.springframework.http.client.ClientHttpRequestInterceptor;
import org.springframework.http.client.SimpleClientHttpRequestFactory;
import org.springframework.http.converter.json.MappingJackson2HttpMessageConverter;
import org.springframework.web.client.RestTemplate;
import rx.Observable;

import java.util.ArrayList;
import java.util.List;

@EBean(scope = EBean.Scope.Singleton)
public class Dao extends AbstractDao implements IDao {

  // web service customer
  @RestService
  protected WebClient webClient;
  // safety
  @Bean
  protected MyAuthInterceptor authInterceptor;
  // on RestTemplate
  private RestTemplate restTemplate;
  // factory du RestTemplate
  private SimpleClientHttpRequestFactory factory;

  @AfterInject
  public void afterInject() {
    // log
    Log.d(className, "afterInject");
    // we build the restTemplate
    factory = new SimpleClientHttpRequestFactory();
    restTemplate = new RestTemplate(factory);
    // set the jSON converter
    restTemplate.getMessageConverters().add(new MappingJackson2HttpMessageConverter());
    // set the restTemplate of the web client
    webClient.setRestTemplate(restTemplate);
  }

  @Override
  public void setUrlServiceWebJson(String url) {
    // set the URL of the web service
    webClient.setRootUrl(url);
  }

  @Override
  public void setUser(String user, String mdp) {
    // the user is registered in the interceptor
    authInterceptor.setUser(user, mdp);
  }

  @Override
  public void setTimeout(int timeout) {
    if (isDebugEnabled) {
      Log.d(className, String.format("setTimeout thread=%s, timeout=%s", Thread.currentThread().getName(), timeout));
    }
    // factory configuration
    factory.setReadTimeout(timeout);
    factory.setConnectTimeout(timeout);
  }

  @Override
  public void setBasicAuthentification(boolean isBasicAuthentificationNeeded) {
    if (isDebugEnabled) {
      Log.d(className, String.format("setBasicAuthentification thread=%s, isBasicAuthentificationNeeded=%s", Thread.currentThread().getName(), isBasicAuthentificationNeeded));
    }
    // authentication interceptor?
    if (isBasicAuthentificationNeeded) {
      // add the authentication interceptor
      List<ClientHttpRequestInterceptor> interceptors = new ArrayList<ClientHttpRequestInterceptor>();
      interceptors.add(authInterceptor);
      restTemplate.setInterceptors(interceptors);
    }
  }

  // méthodes privées -------------------------------------------------
  private void log(String message) {
    if (isDebugEnabled) {
      Log.d(className, message);
    }
  }

  // specific IDao implementation -----------------------------------------------

  @Override
  public Observable<Response<List<Arduino>>> getArduinos() {
    // web client execution
    return getResponse(new IRequest<Response<List<Arduino>>>() {
      @Override
      public Response<List<Arduino>> getResponse() {
        return webClient.getArduinos();
      }
    });
  }
}
- lines 19–87: these lines are basic in the [Dao] class of the [client-android-skel] project;
- lines 91-100: implementation of the [getArduinos] method;
- line 94: the [getResponse] method of the parent class is called. The only parameter of this method is an instance of the [IRequest<T>] interface;
- lines 95–99: the only method of the [IRequest<T>] interface is the [T getResponse()] method;
- line 94: the type T of [IRequest<T>] must be the type T of the Observable<T> result of the method on line 92, so here, a type [Response<List<Arduino>>];
- line 97: the method [IRequest.getResponse()] delegates the work to the method [webClient.getArduinos()] that we presented. [webClient], defined on line 24, is instantiated by the AA library and is an instance of the [WebClient] interface we presented;
5.6.13. The [MainActivity] activity
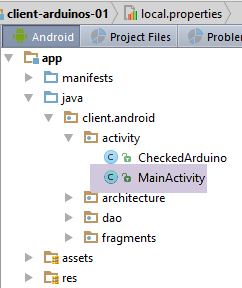
We have already introduced the [MainActivity] activity in the section 5.6.8 . It extends the [AbstractActivity] class and, as such, implements the [IMainActivity] interface, which itself extends the [IDao] interface. Whenever a method is added to the [IDao] interface, it must be implemented in the [MainActivity] class. The [IDao.getArduinos] method added to the [IDao] interface will be implemented as follows in [MainActivity]:
...
@EActivity
@OptionsMenu(R.menu.menu_main)
public class MainActivity extends AbstractActivity {

  // layer [DAO]
  @Bean(Dao.class)
  protected IDao dao;
  // session
  private Session session;

...

  // implémentation IDao -----------------------------------------
  @Override
  public Observable<Response<List<Arduino>>> getArduinos() {
    return dao.getArduinos();
  }
}
- lines 15–18: the [getArduinos] method is implemented by delegating the work to the [Dao] class, which we just introduced and to which we have a reference on line 8;
5.6.14. The [ConfigFragment] fragment revisited
In the [ConfigFragment] class, the code executed when the [Rafraîchir] button is clicked is currently as follows:
  @Click(R.id.btn_Rafraichir)
  protected void doRafraichir() {
    ...
    // request the list of Arduinos running in the background
    getArduinosInBackground();
  }

  private void getArduinosInBackground() {
    // create a fictitious arduino list
    List<Arduino> arduinos = new ArrayList<>();
    for (int i = 0; i < 20; i++) {
      arduinos.add(new Arduino("id" + i, "desc" + i, "mac" + i, "ip" + i, i));
    }
    // we simulate a server response
    Response<List<Arduino>> response = new Response<>();
    response.setBody(arduinos);
    // it is consumed
    consumeArduinosResponse(response);
  }

  // response display
  private void consumeArduinosResponse(Response<List<Arduino>> response) {
    ...
}
We need to rewrite lines 10–16, which hard-coded a response of type [Response<List<Arduino>>]. We now need to request this list from the [DAO] layer via the activity. The code becomes the following:
  @Click(R.id.btn_Rafraichir)
  protected void doRafraichir() {
    // check entries
    if (!pageValid()) {
      return;
    }
    // input is saved
    mainActivity.setUrlServiceWebJson(urlServiceRest);
    // we prepare to wait
    beginWaiting(1);
    // the asynchronous task is executed
    executeInBackground(mainActivity.getArduinos(), new Action1<Response<List<Arduino>>>() {

      @Override
      public void call(Response<List<Arduino>> response) {
        // we consume the answer
        consumeArduinosResponse(response);
      }
    });
}
- Line 8: The root of the web service / URL / jSON entered by the user is passed to the [DAO] layer via the activity. This will be the root URL of the [WebClient] interface (see section 5.6.12.2 );
- line 10: the parent class is notified that an asynchronous task is about to be launched;
- lines 12–19: launch of the asynchronous task that will return the list of Arduinos connected to the server;
- line 12: call the [executeInBackground] method of the parent class. This method expects two parameters:
- line 12: the process to be observed. This process is provided here by the [mainActivity.getArduinos()] method;
- lines 12–19: an instance of the [Action1<T>] interface, where type T is the type provided by the process, here a [Response<List<Arduino>>] type;
- lines 14–18: the method called when the asynchronous task returns its result of type [Response<List<Arduino>>];
- line 17: the received response is passed to the previously written [consumeArduinosResponse] method;
Task: Start the server as described in the section 5.4 . Connect one or more Arduinos to the PC on which the server was started. Then launch the Android client and verify that you can successfully retrieve the list of connected Arduinos. Observe the logs.
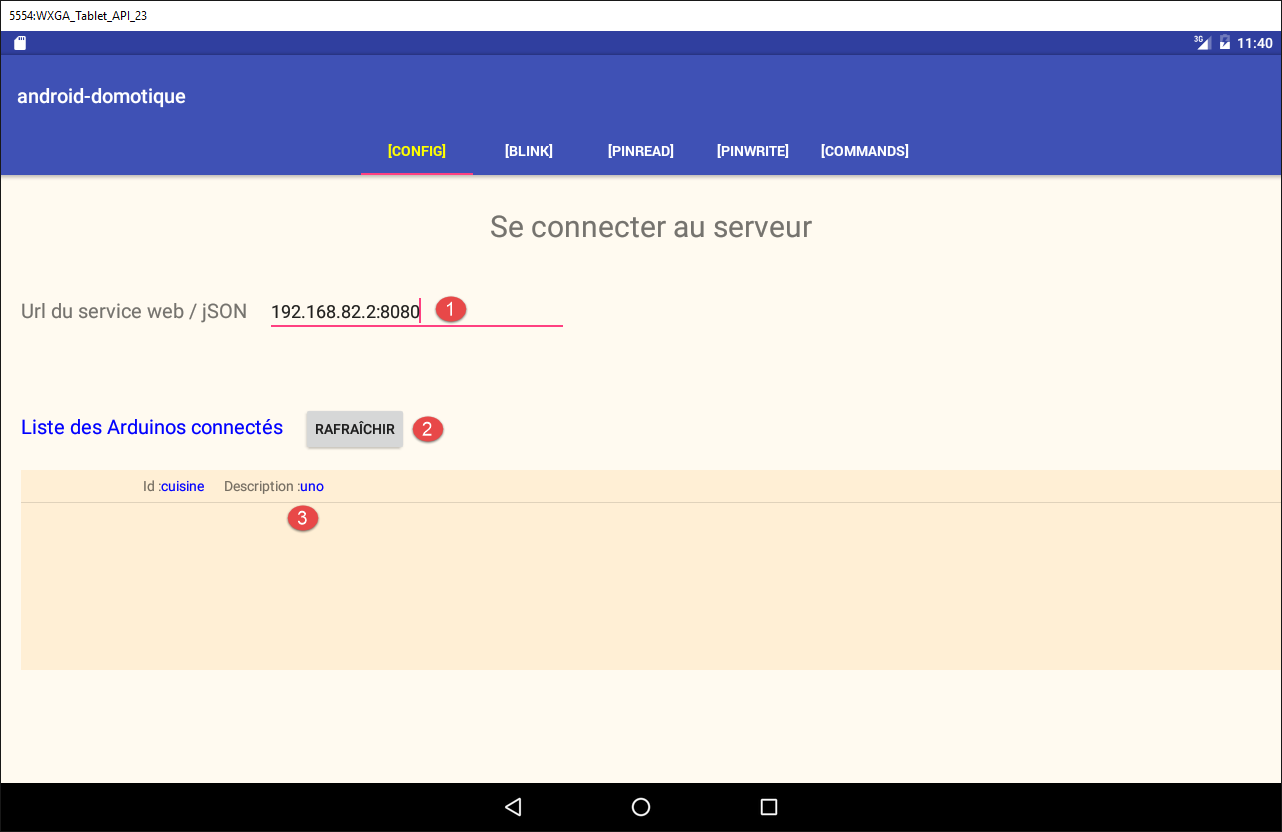
- Type the URL address shown in [1]. This is one of your server’s IP addresses;
- click the [2] button;
- You should see a list of connected Arduinos in [3];
Verify that this list also appears in the other tabs.
5.7. Task
Following the same procedure as above for the [Config] view, create and then test the other four views of the application one by one: [Blink], [PinRead], [PinWrite], and [Commands].
The views to be created were presented in section 5.5 .
For each view, you must:
- draw the view XML (see section 5.6.9 );
- construct the associated fragment (see section 5.6.10 );
- add a method to the [WebClient] interface (see section 5.6.12.2 );
- add a method to the [IDao] interface (see section 5.6.12.2 );
- add a method to the [Dao] class (see section 5.6.12.3 );
- add a method to the [MainActivity] activity (see section 5.6.13 );
- write the fragment's event handlers (see section 5.6.14 );
- test and monitor the logs;
Note 1: The example to follow is the [Exemple-16B] project from the course (see section 2.8.3 ).
Note 2: The URL to be queried and the type of their responses were presented in the section 5.4.2 .
Note 3:
The [CommandsFragment] class sends a list containing a single command to be executed by one or more Arduinos. This command will be encapsulated in the following [ArduinoCommand] class:
package android.arduinos.dao;

import java.util.Map;

public class ArduinoCommand {

  // data
  private String id;
  private String ac;
  private Map<String, Object> pa;

  // manufacturers
  public ArduinoCommand() {

  }

  public ArduinoCommand(String id, String ac, Map<String, Object> pa) {
    this.id = id;
    this.ac = ac;
    this.pa = pa;
  }

  // getters and setters
...
}
In the [WebClient] interface, the method for executing this list of a command will be as follows:
  // order dispatch JSON
  @Post("/arduinos/commands/{idArduino}")
Response<List<ArduinoResponse>> sendCommands(@Body List<ArduinoCommand> commands, @Path String idArduino);
- line 2: URL is requested with a HTTP POST order;
- line 3: the posted value must have the annotation [@Body];
Note 4: It is recommended to proceed as follows:
- only move on to the next view once the current view has been created and tested;
- do not manage the state of the views until you have a functional application under normal conditions. Then, for each view, rotate the device through different states of the view and note the lost information. This is the information that must be saved and then restored. Next, verify navigation: when you leave a tab and return to it later, it should be in the same state as when you left it;