1. Learning Android Programming
The PDF version of the document is available |HERE|.
The examples in the document are available |HERE|.
1.1. Introduction
1.1.1. Contents
This document is a rewrite of several existing documents:
- Introduction to Android Tablet Programming with Examples;
- Controlling an Arduino with an Android Tablet;
- Introduction to Android Tablet Programming Through Examples - version 2
and introduces the following new features:
- Document 1 presented an architecture called AVAT (Activity-Views-Actions-Tasks) to facilitate asynchronous programming in an Android application. In this document, the standard RxJava library is used to manage asynchronous actions;
- Document 2 used IDE Eclipse with an Android plugin. This document uses Android Studio;
- Document 3 is reproduced as is;
- Document 4 used the [Android Annotations] library (AA) with the IDE, Intellij, and IDEA Community Edition. This document includes the entirety of Document 4 with the following differences:
- IDE is now Android Studio;
- the build system is Gradle for all client or server projects (in Document 4, Maven was sometimes used);
- asynchronous programming is implemented using the RxJava library (in Document 4, the AA library was used);
- this document explores areas not covered, or only briefly covered, in previous documents:
- the concept of fragment adjacency;
- saving/restoring the activity and its fragments;
- the fragment lifecycle;
Finally, it presents the skeleton of an Android client communicating with a web service / jSON in which a large number of elements commonly found in this type of clients are factored out. This framework is used in all examples starting from Chapter 2. This is the truly innovative part of the document.
The following examples are presented:
Type | |
Importing an existing Android project | |
A basic Android project | |
A basic [Android Annotations] project | |
Views and events | |
Navigation between views | |
Navigation by tabs | |
Using the [Android Annotations] library with Gradle | |
Managing fragments in an Android app | |
Navigation between views revisited | |
Two-layer architecture | |
Client/server architecture | |
Managing Asynchrony with RxJava | |
Data Entry Components | |
Using a View Template | |
The ListView component | |
Using a Menu | |
Using a parent class for fragments | |
Saving and restoring the state of the activity and fragments | |
Weather client | |
Skeleton of an Android client communicating with a web service / jSON. It factors in a large number of elements that are commonly found in this type of clients Android application. | |
Appointment Management for a Medical Practice | |
Practical Exercise - Basic Payroll Management | |
Practical Exercise - Controlling Arduino Boards |
This document was used in the final year of the IstiA engineering program at the University of Angers [istia.univ-angers.fr]. This explains the text’s occasionally somewhat unusual tone. The two application exercises are texts from TP for which only the broad outlines of the solution are provided. The reader is expected to construct the solution.
The source code for the examples is available |ICI|. To run these examples, you must follow the procedure in the section 6.12 .
This document is an introductory guide to Android programming. It is not intended to be exhaustive. It is primarily aimed at beginners.
The reference site for Android programming is at URL [http://developer.android.com/guide/components/index.html]. That is where you should go to get an overview of Android programming.
1.1.2. Prerequisites
A good command of the Java language is required to get the most out of this document.
1.1.3. Tools Used
The following examples have been tested in the following environment:
- Windows 10 Pro 64-bit machine;
- JDK 1.8;
- Android SDK API 23;
- Android Studio, version 2.1;
- Emulator Genymotion, version 2.6.0;
To follow this document, you must install:
- JDK (see section 6.8 );
- the Android emulator manager Genymotion (see section 6.9 );
- the Maven dependency manager (see section 6.10 );
- IDE [Android Studio] (see section 6.11 );
1.2. Example-01: Importing an Android example
1.2.1. Creating the project
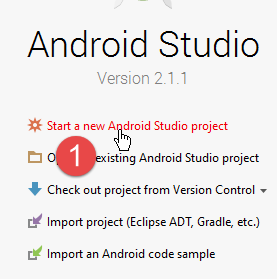
Let’s create our first Android project using Android Studio. First, create an empty folder named [exemples] where all our projects will be stored:
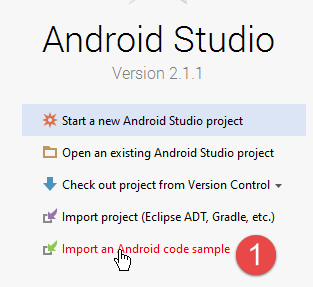
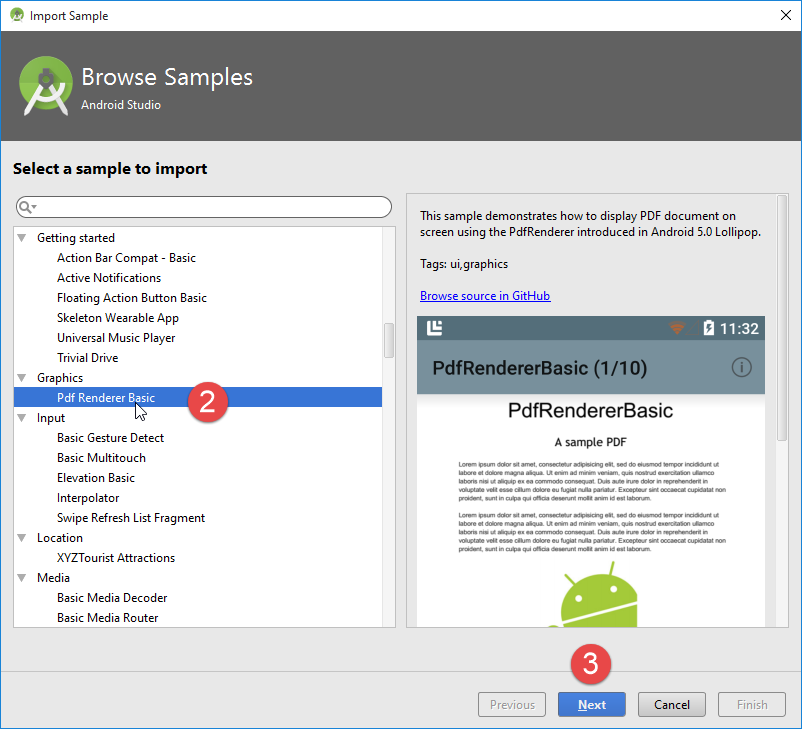
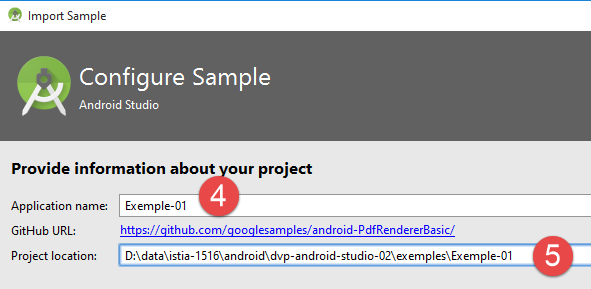
then create a project with Android Studio. We will first import one of the examples included with IDE [1-5]:
Importing the project may result in errors due to a mismatch between the environment used when the project was created and the one used here to run it. This is an opportunity to see how to resolve this type of error. Here, we have the following error:

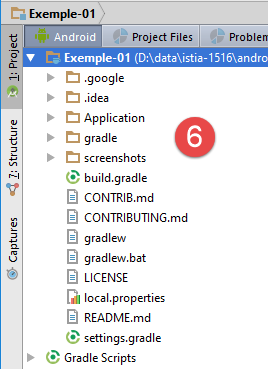
The imported project is configured by the following file: [build.gradle] [2]:
buildscript {
    repositories {
        jcenter()
    }
    dependencies {
        classpath 'com.android.tools.build:gradle:2.1.0'
    }
}

apply plugin: 'com.android.application'

repositories {
    jcenter()
}

dependencies {
    compile "com.android.support:support-v4:23.3.0"
    compile "com.android.support:support-v13:23.3.0"
    compile "com.android.support:cardview-v7:23.3.0"
}

// The sample build uses multiple directories to
// keep boilerplate and common code separate from
// the main sample code.
List<String> dirs = [
    'main', // main sample code; look here for the interesting stuff.
    'common',   // components that are reused by multiple samples
    'template'] // boilerplate code that is generated by the sample template process

android {
    compileSdkVersion 21
    buildToolsVersion "23.0.3"
    defaultConfig {
        minSdkVersion 21
        targetSdkVersion 21
    }
    compileOptions {
        sourceCompatibility JavaVersion.VERSION_1_7
        targetCompatibility JavaVersion.VERSION_1_7
    }
    sourceSets {
        main {
            dirs.each { dir ->
                java.srcDirs "src/${dir}/java"
                res.srcDirs "src/${dir}/res"
            }
        }
        androidTest.setRoot('tests')
        androidTest.java.srcDirs = ['tests/src']
    }

    aaptOptions {
        noCompress "pdf"
    }
}
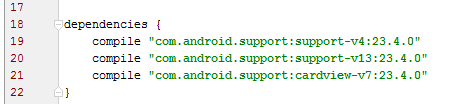
- The reported error is due to lines 31, 34–35: we do not have SDK 21. We replace this version with the version 23 that we have.
In the [build.gradle] file, Android Studio makes suggestions as shown below:
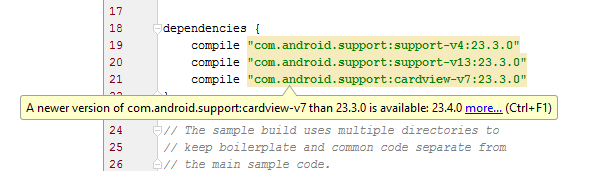
To accept the suggestions, click [alt-entrée] on the suggestion:
You may also encounter an error regarding the Gradle version:
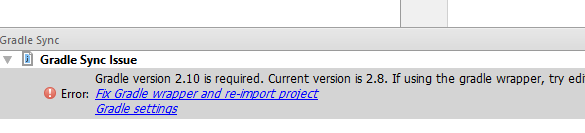
This error stems from a mismatch between the Gradle version requested by the project’s [build.gradle] file (line 6 of 2.10 below):
buildscript {
    repositories {
        jcenter()
    }
    dependencies {
        classpath 'com.android.tools.build:gradle:2.1.0'
    }
}
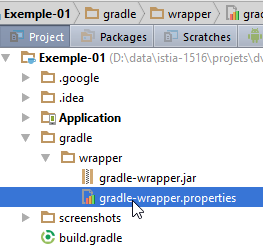
and the one listed in the [<projet>/gradle/wrapper/gradle-wrapper.properties] file:
#Wed Apr 10 15:27:10 PDT 2013
distributionBase=GRADLE_USER_HOME
distributionPath=wrapper/dists
zipStoreBase=GRADLE_USER_HOME
zipStorePath=wrapper/dists
distributionUrl=https\://services.gradle.org/distributions/gradle-2.8-all.zip
In line 6 above, replace 2.8 with 2.10.
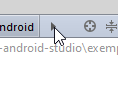
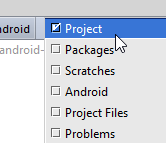
To access the file [<projet>/gradle/wrapper/gradle-wrapper.properties], use the project perspective:
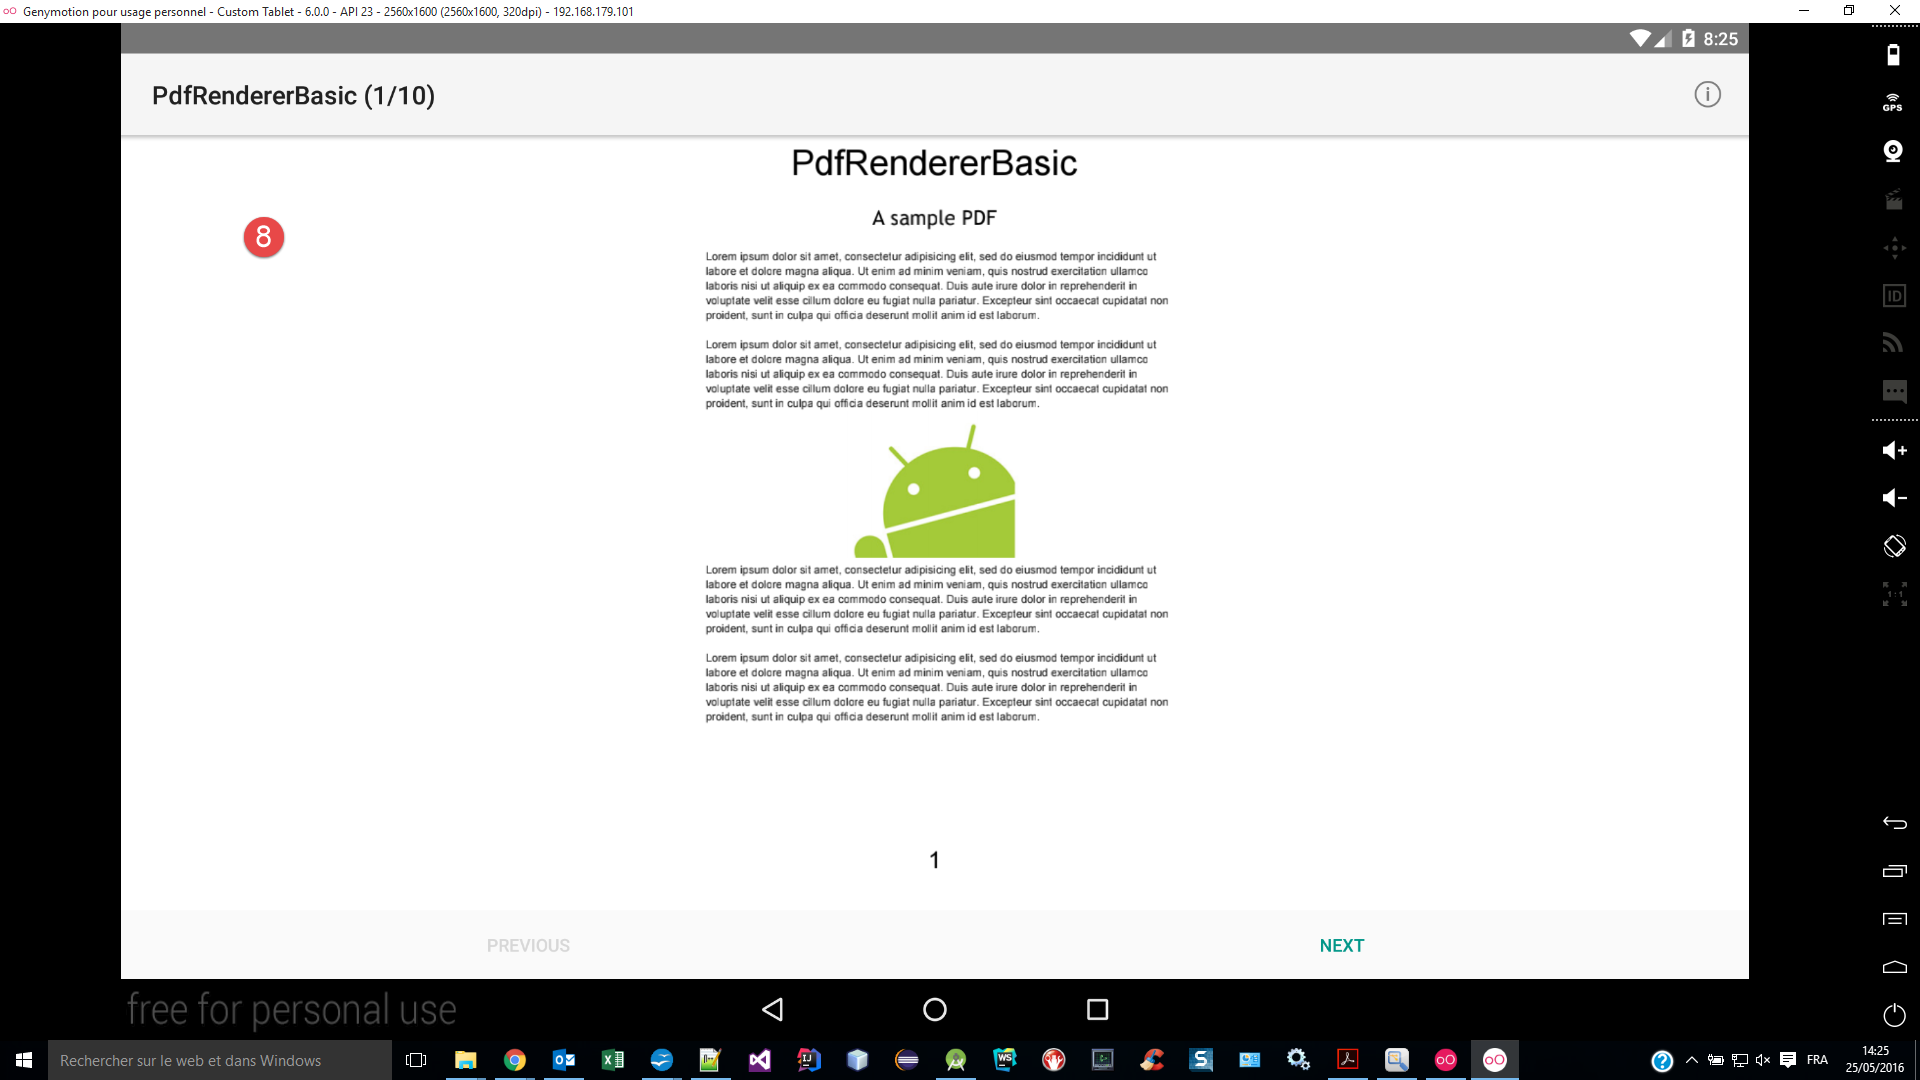
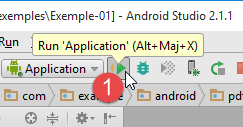
Once this has been corrected, you can compile the [1] application, launch the Genymotion and [2] emulators, and then run the [3] project:

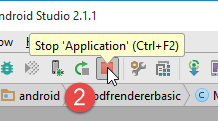
Let’s stop the application:

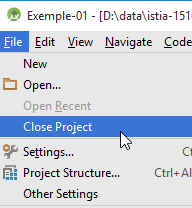
We can now close the project. We’re going to create a new one.
1.2.2. A few notes on IDE
1.2.2.1. Views
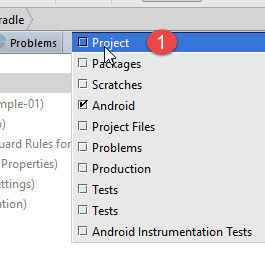
IDE Android Studio (AS) offers different views for working with a project. We will mainly use two:
- the [Android] [1] view:
- the [Project] [4] perspective;
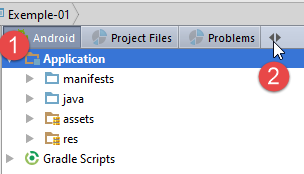
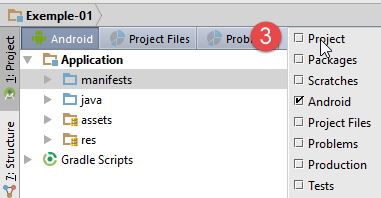
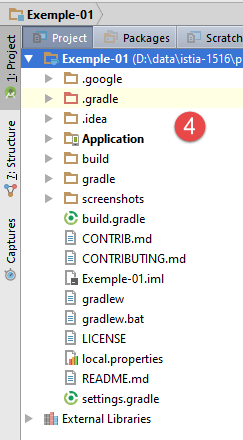
Most of the time, we will work with the [Android] perspective. When we duplicate a project into another, we will need the [Project] perspective.
1.2.2.2. Run Management
There are several ways to run, stop, or rerun a AS project. First, there are the buttons on the toolbar:
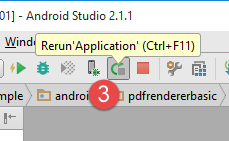
The [Rerun] [3] button stops the execution of the [2] project and then restarts it [1].
1.2.2.3. Cache Management
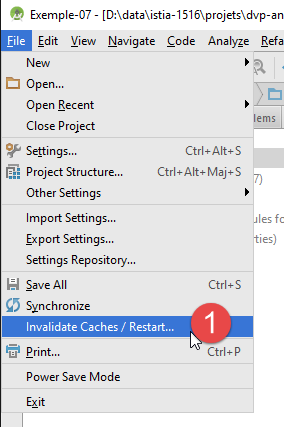
Android Studio maintains a cache of the projects it manages to make the IDE as responsive as possible. With the version Android 2.1 (May 2016) update, this cache often did not reflect the code changes you had just made. In this case, you must invalidate this cache:
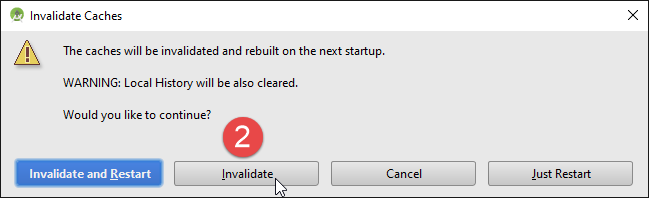
With Android 2.1 (May 2016), the previous operation had to be performed numerous times, and sometimes that was not enough to resolve the detected issue. The solution was to disable the [Instant Run] technology:
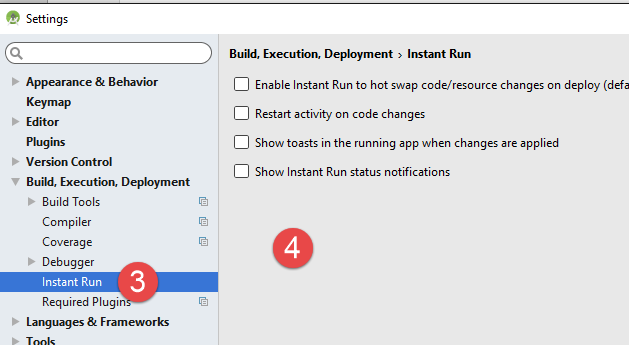
- in [3-4], everything was disabled;
In all subsequent tests, we worked with this cache configuration and encountered no issues.
1.2.2.4. Log Management
When running a project, logs are displayed in the Android monitor:
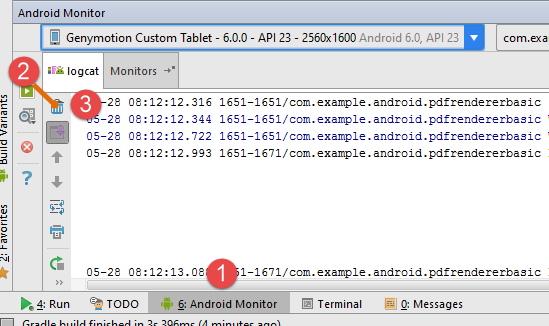
In the [Android Monitor] [1] tab, logs are displayed in the [logcat] [2] tab. The [3] button allows you to clear the logs. This button is useful when you want to view the logs for a specific action:
- clear the logs;
- on the Android device, perform the action for which you want the logs;
- the logs that appear are those related to the performed action;
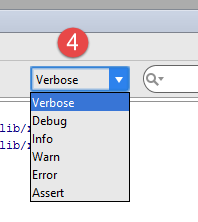
There are several log levels: [4]. By default, [Verbose] mode is selected. This means that logs from all levels are displayed. With [4], you can select a specific level.
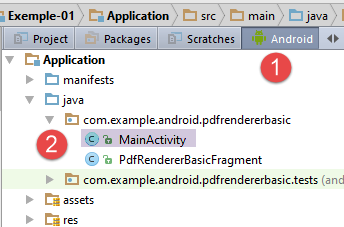
Logs are very useful for determining at which points during a project’s execution certain methods are executed. We will use them frequently. Let’s look at the code for the [MainActivity] class in the [Exemple-01] project:
package com.example.android.pdfrendererbasic;

import android.app.Activity;
import android.app.AlertDialog;
import android.os.Bundle;
import android.view.Menu;
import android.view.MenuItem;

public class MainActivity extends Activity {

    public static final String FRAGMENT_PDF_RENDERER_BASIC = "pdf_renderer_basic";

    @Override
    protected void onCreate(Bundle savedInstanceState) {
        super.onCreate(savedInstanceState);
        setContentView(R.layout.activity_main_real);
        if (savedInstanceState == null) {
            getFragmentManager().beginTransaction()
                    .add(R.id.container, new PdfRendererBasicFragment(),
                            FRAGMENT_PDF_RENDERER_BASIC)
                    .commit();
        }
    }

    @Override
    public boolean onCreateOptionsMenu(Menu menu) {
        getMenuInflater().inflate(R.menu.main, menu);
        return true;
    }

    @Override
    public boolean onOptionsItemSelected(MenuItem item) {
        switch (item.getItemId()) {
            case R.id.action_info:
                new AlertDialog.Builder(this)
                        .setMessage(R.string.intro_message)
                        .setPositiveButton(android.R.string.ok, null)
                        .show();
                return true;
        }
        return super.onOptionsItemSelected(item);
    }
}
Above, the methods [onCreate, ligne 14] and [onCreateOptionsMenu, ligne 26] are methods of the parent class [Activity] (line 9). They are called at different points in the application lifecycle. Sometimes they are executed multiple times. Even when reading the documentation, it is sometimes difficult to tell whether such a lifecycle method will execute before or after a method we have written ourselves. However, this information is often important to know. We can then add logs as shown below:
public class MainActivity extends Activity {

  public static final String FRAGMENT_PDF_RENDERER_BASIC = "pdf_renderer_basic";

  @Override
  protected void onCreate(Bundle savedInstanceState) {
    Log.d("MainActivity","onCreate");
    super.onCreate(savedInstanceState);
    ...
  }

  @Override
  public boolean onCreateOptionsMenu(Menu menu) {
    Log.d("MainActivity","onCreateOptionsMenu");
    getMenuInflater().inflate(R.menu.main, menu);
   ...
  }

  @Override
  public boolean onOptionsItemSelected(MenuItem item) {
    Log.d("MainActivity","onOptionsItemSelected");
    switch (item.getItemId()) {
      ...
  }
}
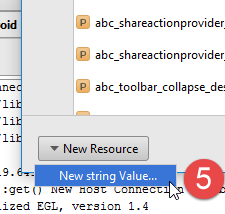
- Lines 7, 14, and 21 use the [Log] class. This class allows you to write logs to the Android console [logcat]. Logs are classified into various levels (info, warning, debug, verbose, error). [Log.d] displays logs of level [debug]. Its first argument is the source of the log message. Indeed, various sources can send messages to the log console. This first argument is used to distinguish between them. The second argument is the message to be written to the log console;
If we run the [Exemple-01] project again, we get the following logs:
05-28 08:37:12.709 23881-23881/com.example.android.pdfrendererbasic D/MainActivity: onCreate
05-28 08:37:12.778 23881-23923/com.example.android.pdfrendererbasic D/OpenGLRenderer: Use EGL_SWAP_BEHAVIOR_PRESERVED: true

                                                                                      [ 05-28 08:37:12.781 23881:23881 D/         ]
                                                                                      HostConnection::get() New Host ...
05-28 08:37:12.967 23881-23881/com.example.android.pdfrendererbasic D/MainActivity: onCreateOptionsMenu
We can see that the [onCreate] method, which creates the Android activity, is executed before the [onCreateOptionsMenu] method, which creates the app menu.
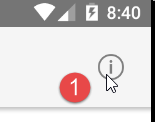
Now, if we click on the option menu item in the Android emulator [1]:
the following log is added to the log console:
05-28 08:41:22.881 23881-23881/com.example.android.pdfrendererbasic D/MainActivity: onOptionsItemSelected
In the following sections, we will frequently add log statements to the Android code. Most of the time, we will not comment on them. They are included simply to encourage the reader to check the log console in order to gradually understand the lifecycle of an Android application.
1.2.2.5. Managing the [Genymotion] emulator
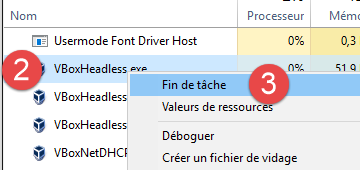
Sometimes, the Genymotion emulator crashes and cannot be restarted. This is because Virtualbox processes are still running in the Task Manager. Open the Task Manager [Ctrl-Alt-Supp] and delete all Virtualbox tasks present:

Once this is done, restart the emulator from Android Studio.
1.2.2.6. Managing the created APK binary
Compiling the project produces a binary with the suffix .apk:
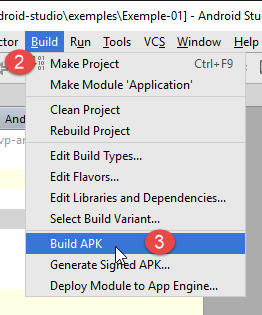
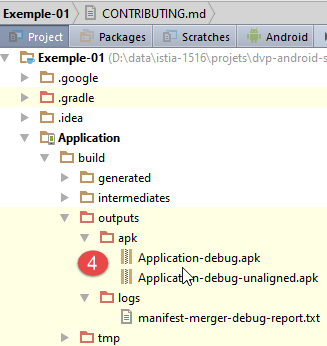
There are two versions: one named [debug] and the other named [debug-unaligned]. You should use the first one; the other is an intermediate version file. The .pak binary file generated by [4] can be transferred directly to an emulator or an Android device. To transfer it to an emulator, simply drag and drop it onto the emulator using the mouse.
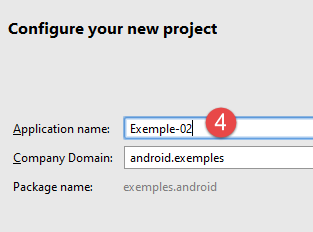
1.3. Example-02: A Basic Android Project
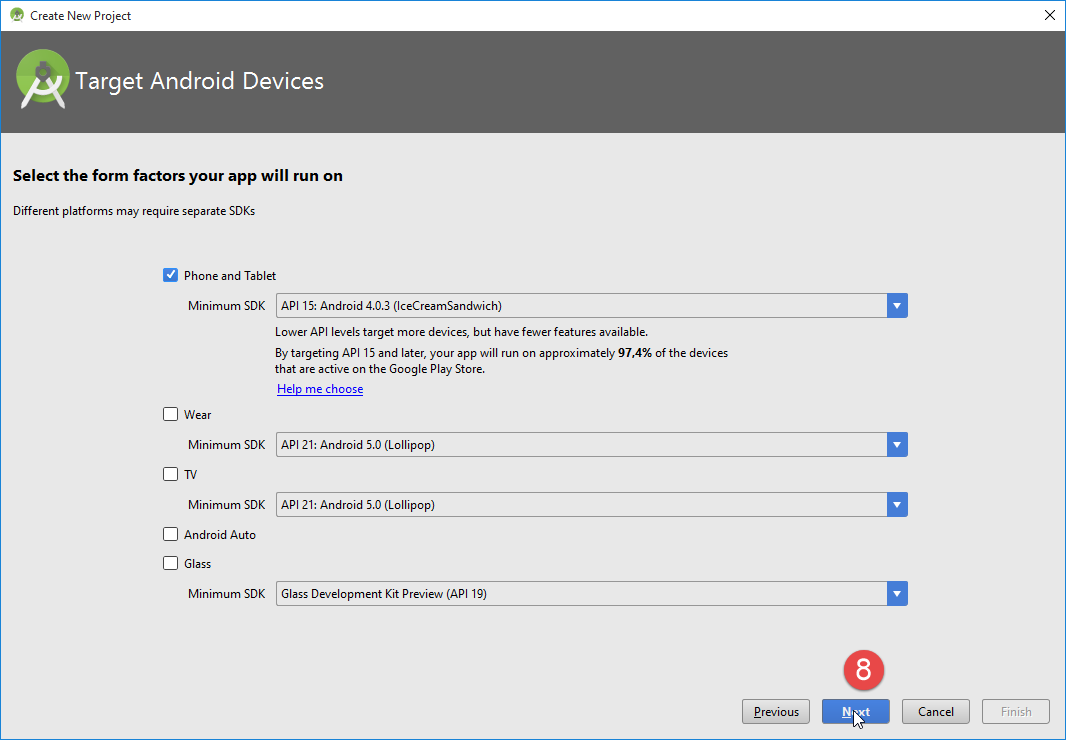
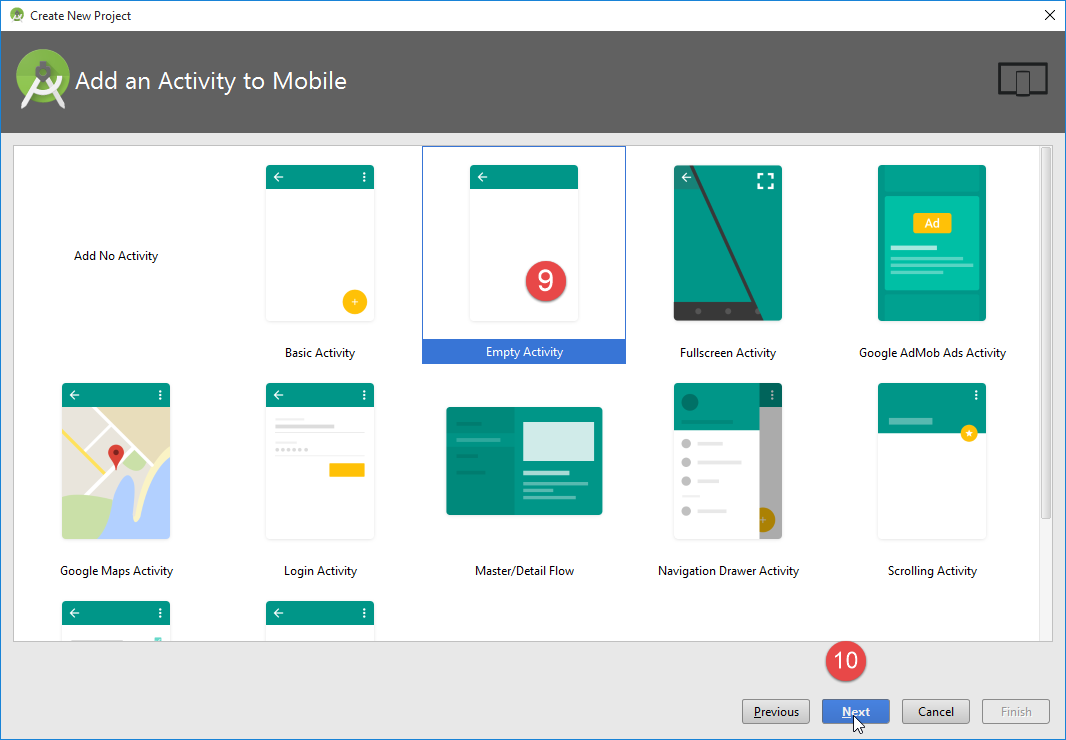
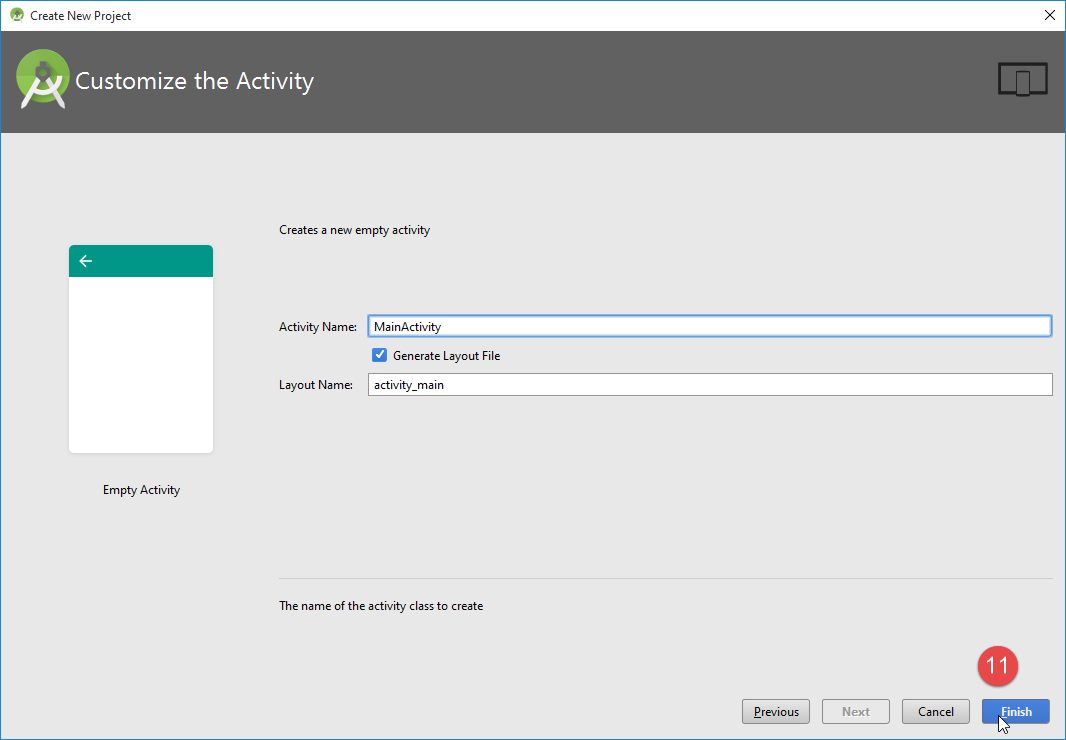
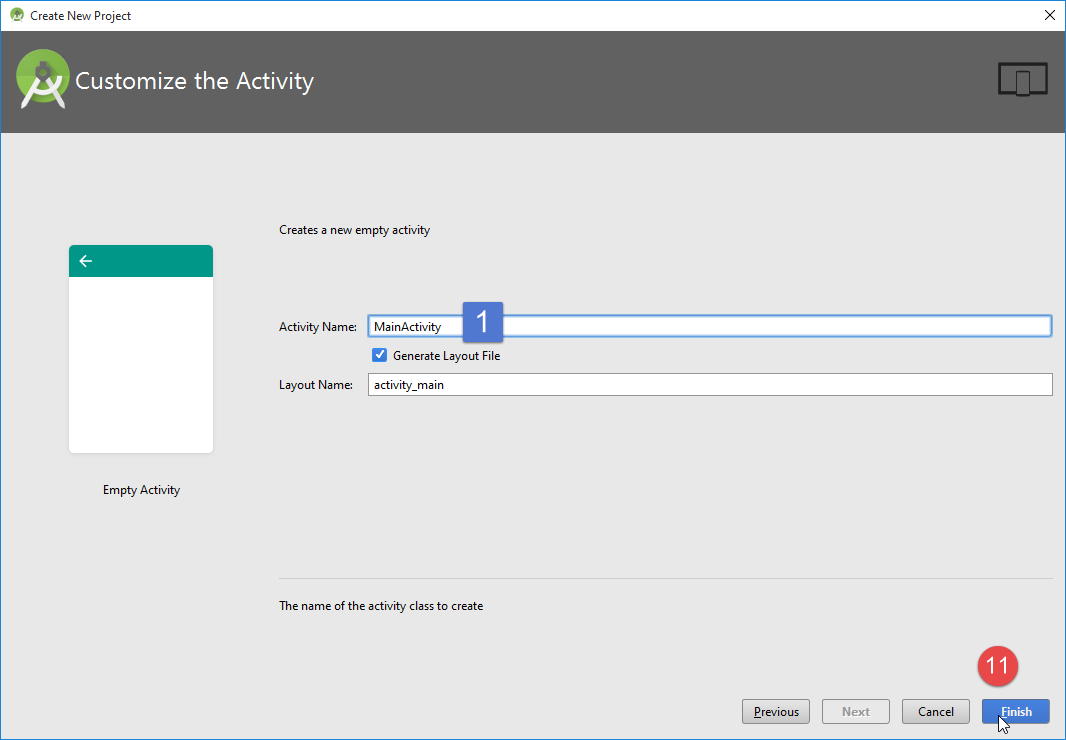
Let’s create a new Android project [1-12] using Android Studio:
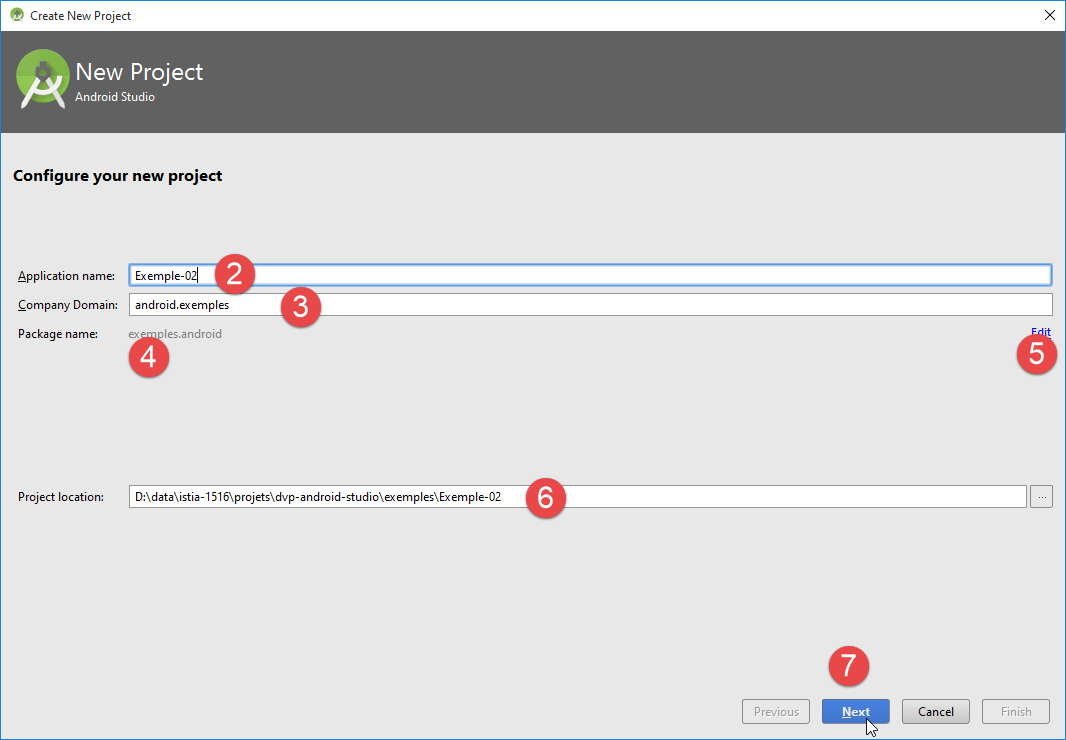
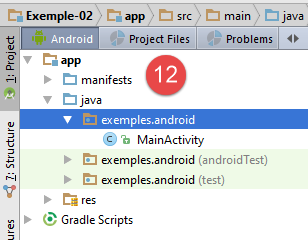
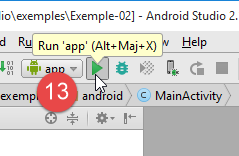
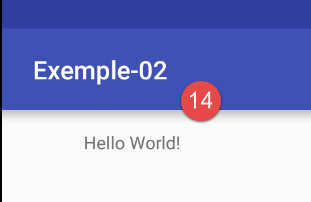
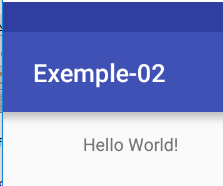
In [13], the application is run. This results in the [14] screen being displayed on the Genymotion emulator.
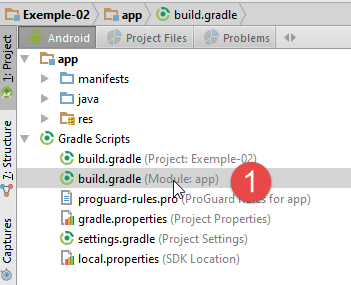
1.3.1. Gradle Configuration
The created project is configured by the following [build.gradle] file:
apply plugin: 'com.android.application'

android {
  compileSdkVersion 23
  buildToolsVersion "23.0.3"
  defaultConfig {
    applicationId "exemples.android"
    minSdkVersion 15
    targetSdkVersion 23
    versionCode 1
    versionName "1.0"
  }

  buildTypes {
    release {
      minifyEnabled false
      proguardFiles getDefaultProguardFile('proguard-android.txt'), 'proguard-rules.pro'
    }
  }
}

dependencies {
  compile fileTree(dir: 'libs', include: ['*.jar'])
  testCompile 'junit:junit:4.12'
  compile 'com.android.support:appcompat-v7:23.4.0'
}
This file was generated by IDE using its configuration settings. It is a minimal file that we will gradually expand.
- lines 3–12: the characteristics of the Android application;
- lines 22–25: its dependencies. This is where we will primarily make changes based on the examples studied;
1.3.2. The application manifest
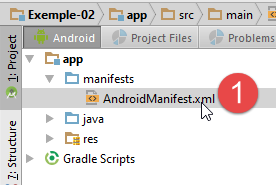
The [AndroidManifest.xml] [1] file defines the characteristics of the Android application binary. Its content is as follows:
<?xml version="1.0" encoding="utf-8"?>
<manifest xmlns:android="http://schemas.android.com/apk/res/android"
          package="exemples.android">
  <application
    android:allowBackup="true"
    android:icon="@mipmap/ic_launcher"
    android:label="@string/app_name"
    android:supportsRtl="true"
    android:theme="@style/AppTheme">
    <activity android:name=".MainActivity">
      <intent-filter>
        <action android:name="android.intent.action.MAIN"/>
        <category android:name="android.intent.category.LAUNCHER"/>
      </intent-filter>
    </activity>
  </application>
</manifest>
- line 3: the Android project package name;
- line 10: the activity name;
These two pieces of information come from the entries made when the project was created:
- line 3 of the manifest (package) comes from the entry [4] above. A number of classes are automatically generated in this package;
- line 10 of the manifest (activity name) comes from the entry [1] above;
Let’s return to the manifest:
<?xml version="1.0" encoding="utf-8"?>
<manifest xmlns:android="http://schemas.android.com/apk/res/android"
          package="exemples.android">
  <application
    android:allowBackup="true"
    android:icon="@mipmap/ic_launcher"
    android:label="@string/app_name"
    android:supportsRtl="true"
    android:theme="@style/AppTheme">
    <activity android:name=".MainActivity">
      <intent-filter>
        <action android:name="android.intent.action.MAIN"/>
        <category android:name="android.intent.category.LAUNCHER"/>
      </intent-filter>
    </activity>
  </application>
</manifest>
- Line 10: The application's main activity. It references the [1] class above;
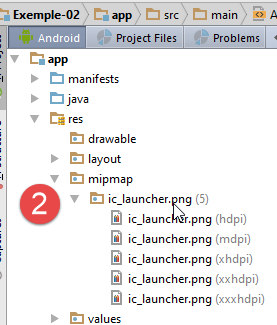
- line 6: the application icon [2]. It can be changed;
- line 7: the application label. It is located in the [strings.xml] [3] file:
<resources>
  <string name="app_name">Exemple-02</string>
</resources>
The [strings.xml] file contains the strings used by the application. Line 2: the application name comes from the entry made when building the [4] project:
- line 10: an activity tag. An Android application can have multiple activities;
- line 12: the activity is designated as the main activity;
- line 13: and it must appear in the list of applications that can be launched on the Android device.
1.3.3. The main activity
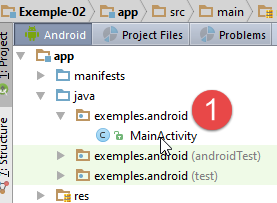
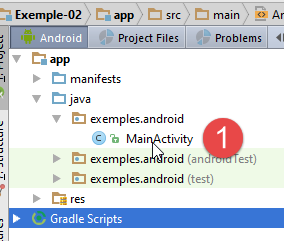
An Android application is based on one or more activities. Here, an activity named [1] has been generated: [MainActivity]. An activity can display one or more views depending on its type. The generated class [MainActivity] is as follows:
package exemples.android;

import android.support.v7.app.AppCompatActivity;
import android.os.Bundle;

public class MainActivity extends AppCompatActivity {

  @Override
  protected void onCreate(Bundle savedInstanceState) {
    super.onCreate(savedInstanceState);
    setContentView(R.layout.activity_main);
  }
}
- line 6: the [MyActivity] class extends the Android [AppCompatActivity] class. This will be the case for all future activities;
- line 9: the [onCreate] method is executed when the activity is created. This occurs before the view associated with the activity is displayed;
- line 10: the [onCreate] method of the parent class is called. This must always be done;
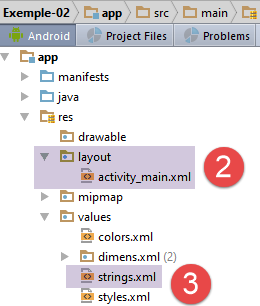
- line 11: the file [activity_main.xml] [2] is the view associated with the activity. The definition XML of this view is as follows:
<?xml version="1.0" encoding="utf-8"?>
<RelativeLayout
  xmlns:android="http://schemas.android.com/apk/res/android"
  xmlns:tools="http://schemas.android.com/tools"
  android:layout_width="match_parent"
  android:layout_height="match_parent"
  android:paddingLeft="@dimen/activity_horizontal_margin"
  android:paddingRight="@dimen/activity_horizontal_margin"
  android:paddingTop="@dimen/activity_vertical_margin"
  android:paddingBottom="@dimen/activity_vertical_margin"
  tools:context="exemples.android.MainActivity">

  <TextView
    android:text="Hello World!"
    android:layout_width="wrap_content"
    android:layout_height="wrap_content"/>
</RelativeLayout>
- lines b-k: the layout manager. The default type is [RelativeLayout]. In this type of container, components are positioned relative to one another (to the right of, to the left of, below, above);
- lines m-p: a [TextView] component used to display text;
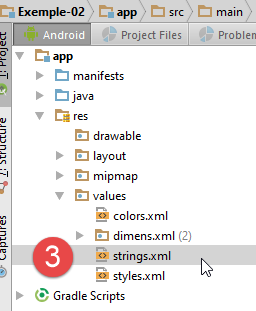
- line n: the displayed text. It is not recommended to hardcode text in views. It is preferable to move this text to the file [res/values/strings.xml] [3]:
The displayed text will therefore be [Hello World!]. Where will it be displayed? The [RelativeLayout] container will fill the screen. The [TextView], which is its sole element, will be displayed at the top left of this container, and thus at the top left of the screen;
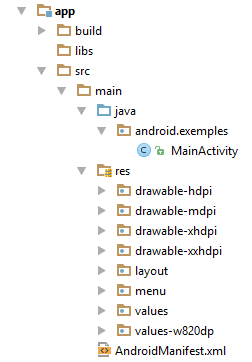
What does [R.layout.activity_main] line 11 mean? Every Android resource (views, fragments, components, etc.) is assigned an identifier. Thus, a view named [V.xml] located in the [res / layout] folder will be identified as [R.layout.V]. R is a class generated in the [app / build / generated] [1-3] folder:
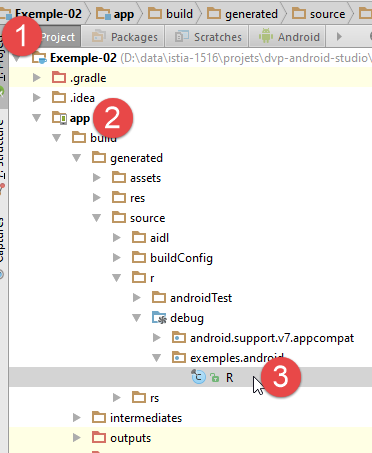
The class [R] is as follows:
...............
    public static final class string {
        public static final int abc_action_bar_home_description=0x7f060000;
        public static final int abc_action_bar_home_description_format=0x7f060001;
        public static final int abc_action_bar_home_subtitle_description_format=0x7f060002;
        ...
        public static final int app_name=0x7f060014;
    }

    public static final class layout {
        public static final int abc_action_bar_title_item=0x7f040000;
        public static final int abc_action_bar_up_container=0x7f040001;
...
        public static final int activity_main=0x7f040019;
...
    }

    public static final class mipmap {
        public static final int ic_launcher=0x7f030000;
}
- line 14: the attribute [R.layout.activity_main] is the identifier for the view [res / layout / activity_main.xml];
- line 7: the attribute [R.string.app_name] is the identifier for the string [app_name] in the file [res / values / string.xml]:
- line 19: the attribute [R.mipmap.ic_launcher] is the identifier for the image [res / mipmap / ic_launcher];
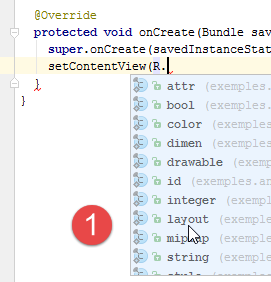
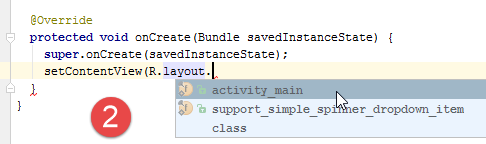
So, keep in mind that when we reference [R.layout.activity_main] in the code, we are referencing an attribute of the [R] class. IDE helps us identify the different elements of this class:
1.3.4. Running the Application
To run an Android application, we need to create a run configuration:
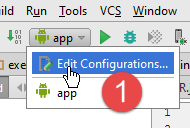
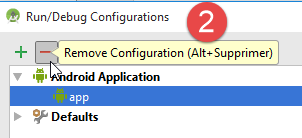
- In [1], select [Edit Configurations];
- the project was created with a [app] configuration, which we will delete ([2]) to recreate it;
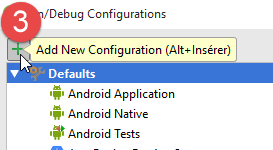
- In [3], create a new execution configuration;
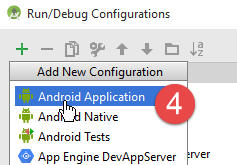
- In [4], select [Android Application];
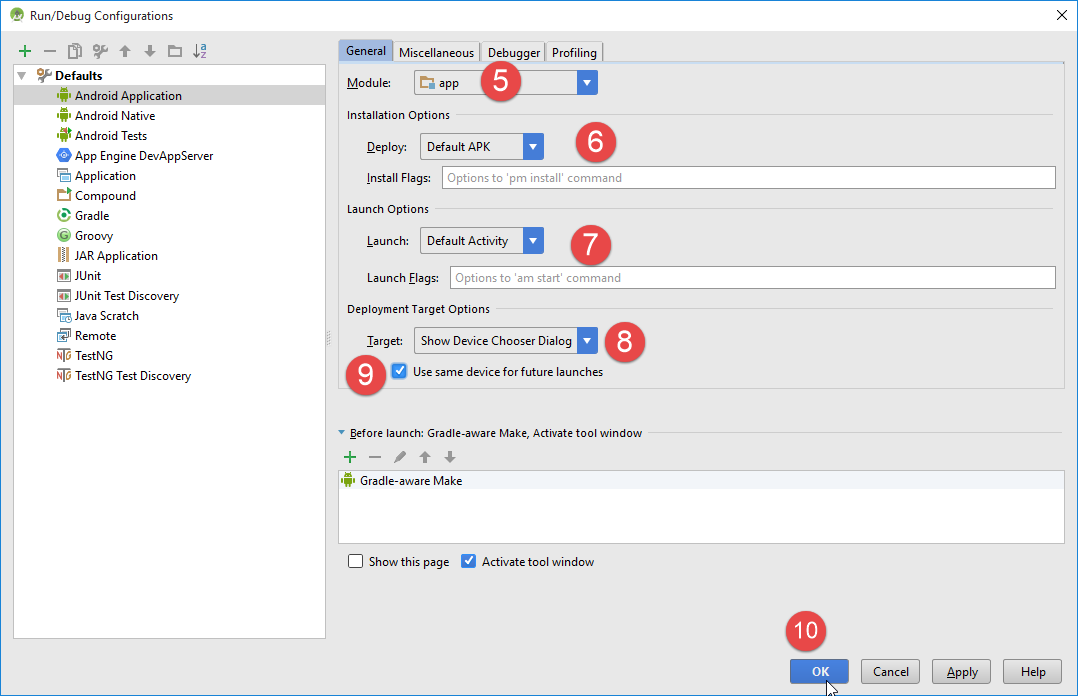
- in [5], select the [app] module from the drop-down list;
- In [6-8], keep the default values;
- in [7], the default activity is the one defined in the [AndroidManifest.xml] file (line 1 below):
    <activity android:name=".MainActivity">
      <intent-filter>
        <action android:name="android.intent.action.MAIN"/>

        <category android:name="android.intent.category.LAUNCHER"/>
      </intent-filter>
</activity>
- In [8], select [Show Chooser Dialog], which allows you to choose the device on which the application will run (emulator, tablet);
- In [9], specify that this choice should be saved;
- confirm the configuration;
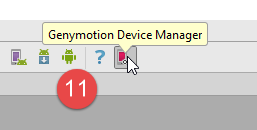
- In [11], launch the [Genymotion] emulator manager (see section 6.9 );
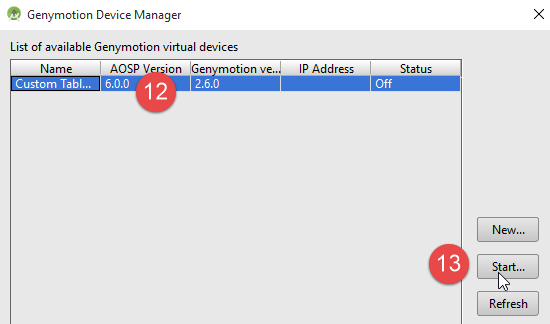
- In [12], select a tablet emulator and launch [13];
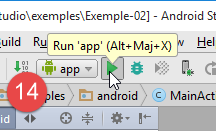
- in [14], run the execution configuration [app];
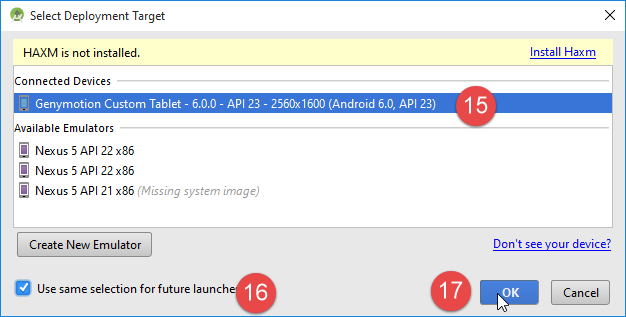
- In [15], the runtime device selection form is displayed. Only one option is available here: the [Genymotion] emulator launched previously;
After a short while, the software emulator displays the following view:
1.3.5. The lifecycle of an activity
Let’s take another look at the code for the [MainActivity] activity:
package exemples.android;

import android.support.v7.app.AppCompatActivity;
import android.os.Bundle;

public class MainActivity extends AppCompatActivity {

  @Override
  protected void onCreate(Bundle savedInstanceState) {
    super.onCreate(savedInstanceState);
    setContentView(R.layout.activity_main);
  }
}
The [onCreate] method in lines 8–12 is one of the methods that can be called during an activity’s lifecycle. The Android documentation lists these methods:
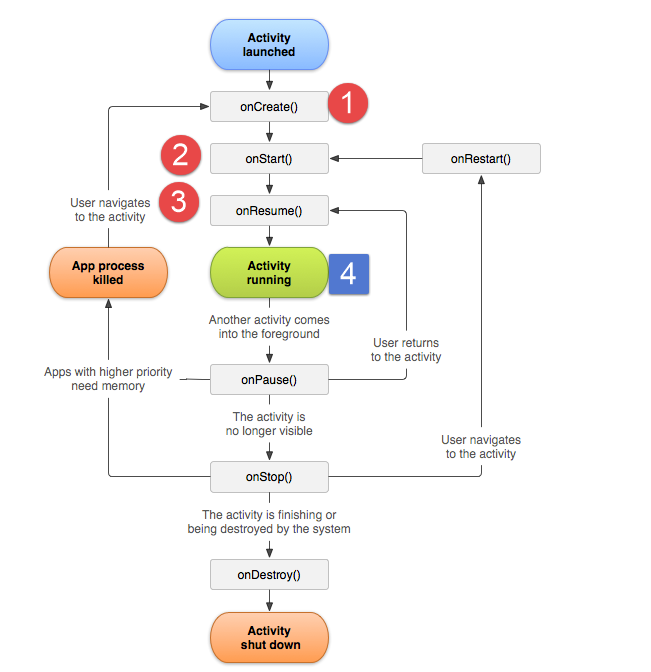
- [1]: The [onCreate] method is called when the activity starts. It is in this method that the activity is associated with a view and the references to its components are retrieved;
- [2-3]: The [onStart, onResume] methods are then called. We can see that the [onResume] method is the last method to be executed before reaching the [4] state of the currently running activity;
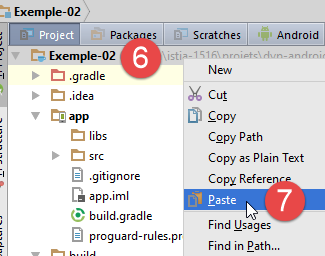
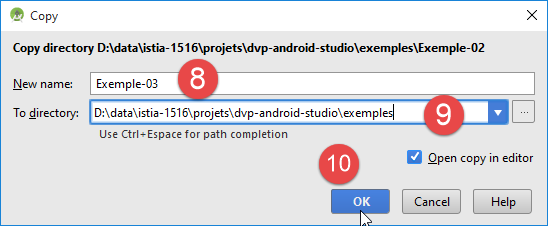
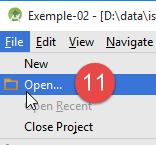
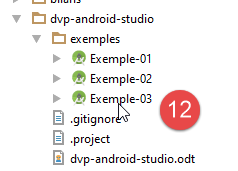
1.4. Example-03: Rewriting the [Exemple-02] project using the [Android Annotations] library
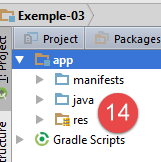
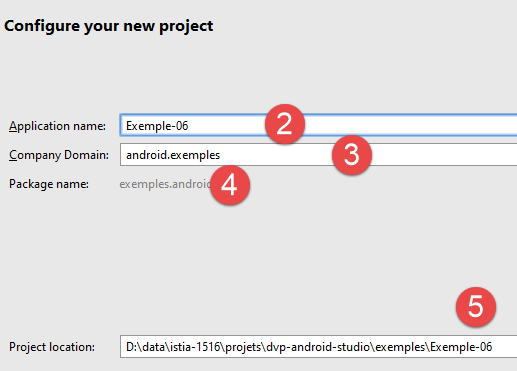
We will now introduce the [Android Annotations] library, which simplifies the development of Android applications. To do this, duplicate the [Exemple-02] example into [Exemple-03] by following the procedure in [1-16].

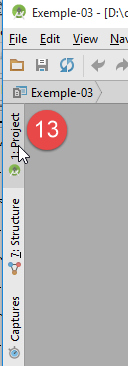
- In [1], switch to the [Project] view to see the entire Android project;

Note: Between [14] and [15], we switched from a [Android] view to a [Project] view (see section 1.2.2.1 ).
We then modify the file [res / values / strings.xml] [17]:
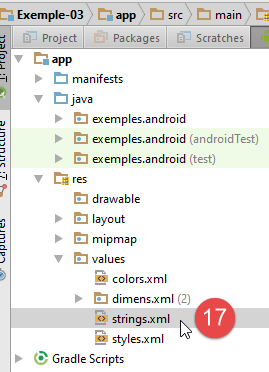
The file [strings.xml] is modified as follows:
<resources>
  <string name="app_name">Exemple-03</string>
</resources>
Now, we run the new application, which has inherited the entire configuration from [Exemple-02]:
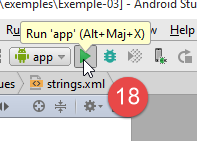
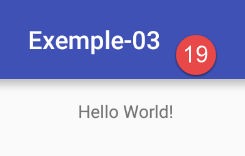
In [19], we get the same result as with [Exemple-02] but with a new name.
We will now introduce the [Android Annotations] library, which we will call AA for convenience. This library introduces new classes for annotating Android source code. These annotations will be used by a processor that will create new Java classes in the module; these classes will participate in the module’s compilation just like the classes written by the developer. This results in the following build chain:
 |
First, we will add dependencies on the annotation compiler AA (the processor mentioned above) to the file [build.gradle]:
def AAVersion = '4.0.0'

dependencies {
  apt "org.androidannotations:androidannotations:$AAVersion"
  compile "org.androidannotations:androidannotations-api:$AAVersion"
  compile 'com.android.support:appcompat-v7:23.4.0'
  compile fileTree(dir: 'libs', include: ['*.jar'])
}
- Lines 4–5 add the two dependencies that make up the AA library;
The [build.gradle] file is modified again to use a plugin called [android-apt], which modifies the compilation process into two steps:
- processing of Android annotations, which creates new classes;
- compilation of all classes in the project;
buildscript {
  repositories {
    mavenCentral()
  }

  dependencies {
    // Since Android's Gradle plugin 0.11, you have to use android-apt >= 1.3
    classpath 'com.neenbedankt.gradle.plugins:android-apt:1.8'
  }
}

apply plugin: 'com.android.application'
apply plugin: 'android-apt'
- line 8: version from the [android-apt] plugin, which will be searched for in the central Maven repository (line 3);
- line 13: activation of this plugin;
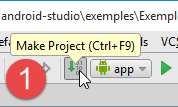
At this point, verify that the [app] run configuration still works.
We will now introduce a first annotation from the AA library into the [MainActivity] class:
The [MainActivity] class currently looks like this:
package exemples.android;

import android.support.v7.app.AppCompatActivity;
import android.os.Bundle;

public class MainActivity extends AppCompatActivity {

  @Override
  protected void onCreate(Bundle savedInstanceState) {
    super.onCreate(savedInstanceState);
    setContentView(R.layout.activity_main);
  }
}
We have already explained this code in the section 1.3.3 . We modify it as follows:
package exemples.android;

import android.os.Bundle;
import android.support.v7.app.AppCompatActivity;
import org.androidannotations.annotations.EActivity;

@EActivity(R.layout.activity_main)
public class MainActivity extends AppCompatActivity {

  @Override
  protected void onCreate(Bundle savedInstanceState) {
    super.onCreate(savedInstanceState);
  }
}
- line 7: the annotation [@EActivity] is an annotation AA (line 3). Its parameter is the view associated with the activity;
This annotation will generate a [MainActivity_] class derived from the [MainActivity] class, and it is this class that will be the actual activity. We must therefore modify the [AndroidManifest.xml] project manifest as follows:
<?xml version="1.0" encoding="utf-8"?>
<manifest xmlns:android="http://schemas.android.com/apk/res/android"
          package="exemples.android">

  <application
    android:allowBackup="true"
    android:icon="@mipmap/ic_launcher"
    android:label="@string/app_name"
    android:supportsRtl="true"
    android:theme="@style/AppTheme">
    <activity android:name=".MainActivity_">
      <intent-filter>
        <action android:name="android.intent.action.MAIN"/>

        <category android:name="android.intent.category.LAUNCHER"/>
      </intent-filter>
    </activity>
  </application>

</manifest>
- line 11: the new activity;
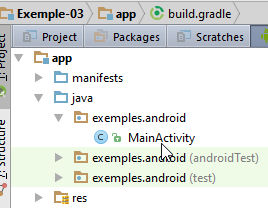
With that done, we can compile the [1] project:
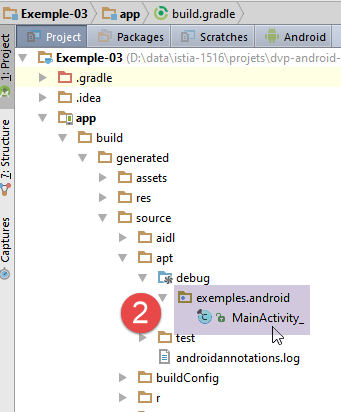
- in [2], we see the generated class [MainActivity_] in the [app / build / generated / source / apt / debug] folder;
The generated class [MainActivity_] is as follows:
//
// DO NOT EDIT THIS FILE.
// Generated using AndroidAnnotations 4.0.0.
//
// You can create a larger work that contains this file and distribute that work under terms of your choice.
//


package exemples.android;

import android.app.Activity;
import android.content.Context;
import android.os.Build.VERSION;
import android.os.Build.VERSION_CODES;
import android.os.Bundle;
import android.support.v4.app.ActivityCompat;
import android.view.View;
import android.view.ViewGroup.LayoutParams;
import org.androidannotations.api.builder.ActivityIntentBuilder;
import org.androidannotations.api.builder.PostActivityStarter;
import org.androidannotations.api.view.HasViews;
import org.androidannotations.api.view.OnViewChangedNotifier;

public final class MainActivity_
    extends MainActivity
    implements HasViews
{
    private final OnViewChangedNotifier onViewChangedNotifier_ = new OnViewChangedNotifier();

    @Override
    public void onCreate(Bundle savedInstanceState) {
        OnViewChangedNotifier previousNotifier = OnViewChangedNotifier.replaceNotifier(onViewChangedNotifier_);
        init_(savedInstanceState);
        super.onCreate(savedInstanceState);
        OnViewChangedNotifier.replaceNotifier(previousNotifier);
        setContentView(R.layout.activity_main);
    }
...
- lines 24-25: the [MainActivity_] class extends the [MainActivity] class;
We will not attempt to explain the code of the classes generated by AA. They handle the complexity that the annotations seek to hide. However, it can sometimes be helpful to examine it when you want to understand how the annotations you use are "translated."
We can now run the [app] configuration again. We get the same result as before. We will now use this project as a starting point and duplicate it to introduce the key concepts of Android programming.
1.5. Example-04: Views and Events
1.5.1. Creating the Project
We will follow the procedure described for duplicating [Exemple-02] into [Exemple-03] in the section “ 1.4 ”:
We:
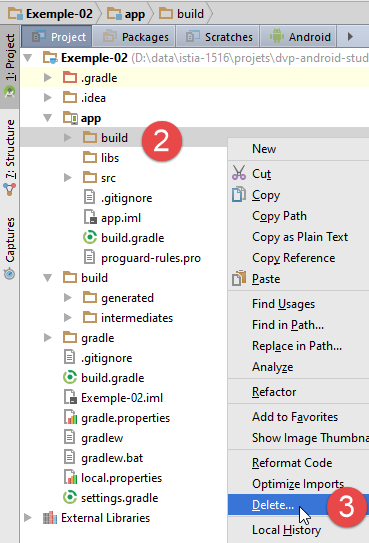
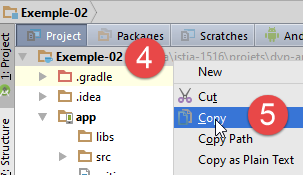
- duplicate the project [Exemple-03] into [Exemple-04] (after deleting the folder [app / build] from [Exemple-03]);
- load the [Exemple-04] project;
- rename the project in the [app / res / values / strings.xml] file (Android view);
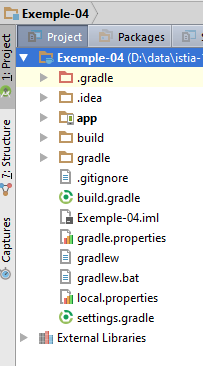
- delete the file [Exemple-04 / Exemple-04.iml] (Project view);
- compile and then run the project;
1.5.2. Building a view
We will now use the graphical editor to modify the view displayed by the [Exemple-04] project:
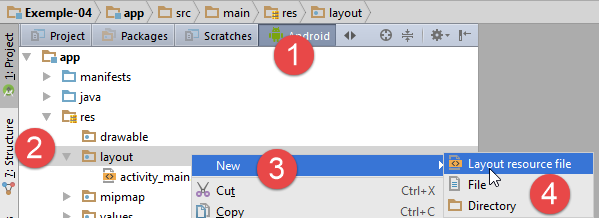
- in [1-4], create a new view named XML;
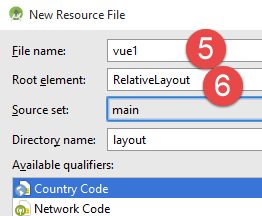
- In [5], name the view;
- In [6], specify the root tag for the view. Here, we choose a container named [RelativeLayout]. Within this component container, the components are positioned relative to one another: "to the right of," "to the left of," "below," "above";

The file [vue1.xml] generated from [7] is as follows:
<?xml version="1.0" encoding="utf-8"?>
<RelativeLayout xmlns:android="http://schemas.android.com/apk/res/android"
                android:layout_width="match_parent"
                android:layout_height="match_parent">

</RelativeLayout>
- line 2: an empty [RelativeLayout] container that will occupy the entire width of the tablet (line 3) and its entire height (line 4);
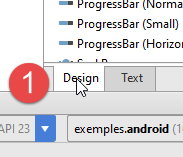
- In [1], select the [Design] tab in the displayed [vue1.xml] view;
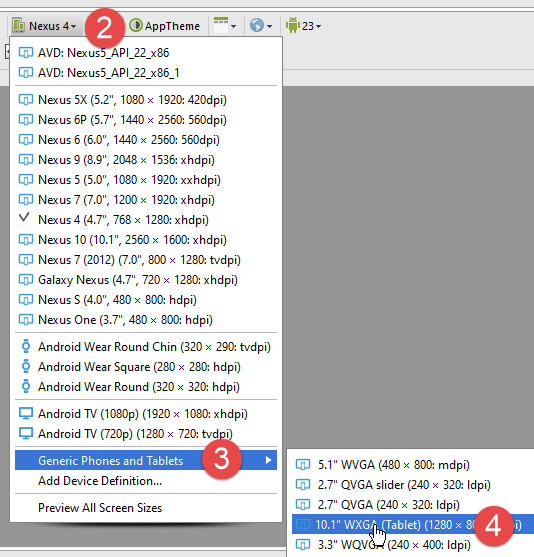
- In [2-4], switch to tablet mode;
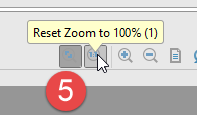
- In [5], set the tablet to scale 1;
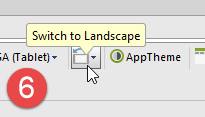
- In [6], select 'landscape' mode for the tablet;
- The screenshot [7] summarizes the choices made.
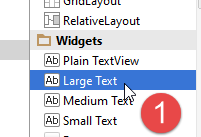
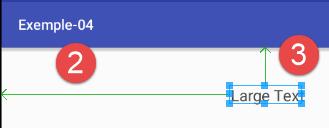
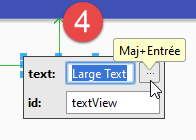
- In [1], take a [Large Text] and drag it onto the view [2];
- In [3], double-click the component;
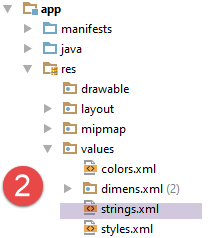
- In [4], edit the displayed text. Rather than hard-coding it in the XML view, we will externalize it to the [res / values / string.xml] file
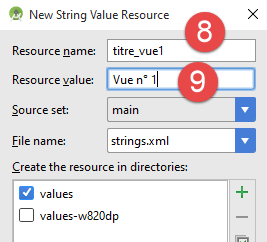
- In [5], add a new value to the file [strings.xml];
- in [8], we assign an identifier to the string;
- In [9], we assign the value to the string;
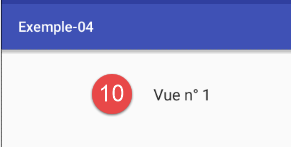
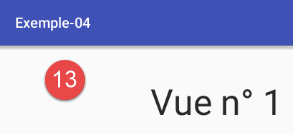
- in [10], the new view after validating the previous step;
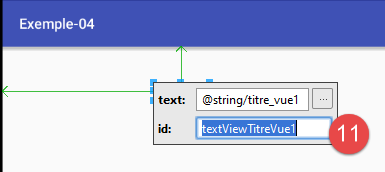
- after double-clicking the component, we change its identifier to [11];
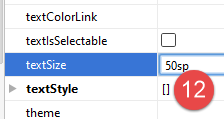
- in [12], in the component properties, we change the font size to [50sp];
- to [13], the new view;
The file [vue1.xml] has changed as follows:
<?xml version="1.0" encoding="utf-8"?>
<RelativeLayout xmlns:android="http://schemas.android.com/apk/res/android"
                android:layout_width="match_parent"
                android:layout_height="match_parent">

  <TextView
    android:layout_width="wrap_content"
    android:layout_height="wrap_content"
    android:textAppearance="?android:attr/textAppearanceLarge"
    android:text="@string/titre_vue1"
    android:id="@+id/textViewTitreVue1"
    android:layout_marginLeft="213dp" android:layout_marginStart="213dp"
    android:layout_marginTop="50dp" android:layout_alignParentTop="true" android:layout_alignParentLeft="true"
    android:layout_alignParentStart="true" android:textSize="50sp"/>
</RelativeLayout>
- The changes made in the graphical interface are on lines 10, 11, and 14. The other attributes of [TextView] are default values or result from the component’s positioning in the view;
- lines 7–8: the component’s height and width match those of the text it contains (wrap_content);
- line 13: the top of the component is aligned with the top of the view (line 13), 50 pixels below (line 13);
- line 12: the left side of the component is aligned with the left side of the view (line 13), 213 pixels to the right (line 12);
In general, the exact sizes of the left, right, top, and bottom margins will be set directly in XML.
Following the same procedure, create the following view [1]:
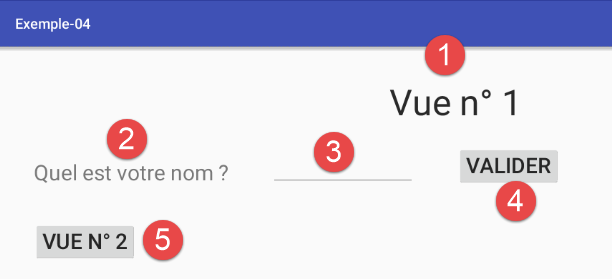
The components are as follows:
Positioning components relative to one another can be frustrating, as the graphical editor’s behavior is sometimes unpredictable. It may be better to use the components’ properties:
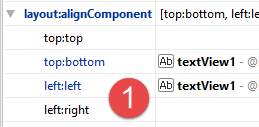
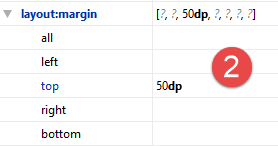
The [textView1] component must be placed 50 pixels below the title and 50 pixels from the left edge of the container:
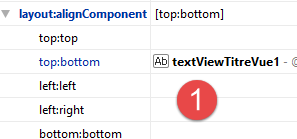
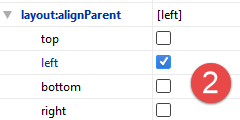
- in [1], the top edge of the component is aligned with the bottom edge of component [textViewTitreVue1] at a distance of 50 pixels ([3]);
- in [2], the left edge of the component is aligned with the left edge of the container at a distance of 50 pixels from [3] (left);
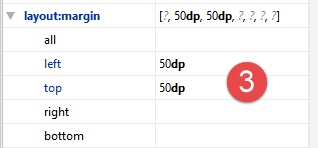
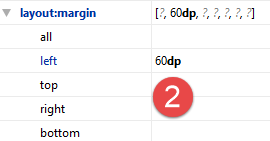
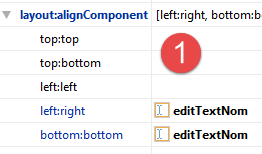
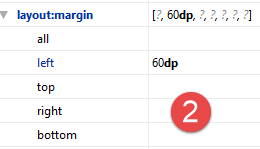
The component [editTextNom] must be placed 60 pixels to the right of the component [textView1] and aligned at the bottom with that same component;
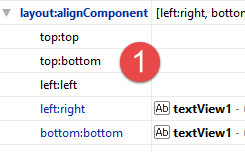
- In [1], the left edge of the component is aligned with the right edge of the [textView1] component at a distance of 60 pixels [2] (left). It is aligned with the bottom edge (bottom:bottom) of the [textView1] component [1];
The [buttonValider] component must be placed 60 pixels to the right of the [editTextNom] component and aligned at the bottom with that same component;
- In [1], the left edge of the component is aligned with the right edge of the [editTextNom] component at a distance of 60 pixels from [2] (left). It is aligned with the bottom edge of the component (bottom:bottom) [editTextNom] [1];
The [buttonVue2] component must be placed 50 pixels below the [textView1] component and aligned to the left of that same component;
- In [1], the left edge of the component is aligned with the left edge of the [textView1] component and is positioned below (top:bottom) at a distance of 50 pixels from [2] (top);
The generated file XML is as follows:
<?xml version="1.0" encoding="utf-8"?>

<RelativeLayout xmlns:android="http://schemas.android.com/apk/res/android"
                android:layout_width="match_parent"
                android:layout_height="match_parent">

  <TextView
    android:layout_width="wrap_content"
    android:layout_height="wrap_content"
    android:textAppearance="?android:attr/textAppearanceLarge"
    android:text="@string/titre_vue1"
    android:id="@+id/textViewTitreVue1"
    android:layout_marginTop="49dp"
    android:textSize="50sp"
    android:layout_gravity="center|left"
    android:layout_alignParentTop="true"
    android:layout_centerHorizontal="true"/>

  <TextView
    android:layout_width="wrap_content"
    android:layout_height="wrap_content"
    android:text="@string/txt_nom"
    android:id="@+id/textView1"
    android:layout_below="@+id/textViewTitreVue1"
    android:layout_alignParentLeft="true"
    android:layout_marginLeft="50dp"
    android:layout_marginTop="50dp"
    android:textSize="30sp"/>

  <EditText
    android:layout_width="wrap_content"
    android:layout_height="wrap_content"
    android:id="@+id/editTextNom"
    android:minWidth="200dp"
    android:layout_toRightOf="@+id/textView1"
    android:layout_marginLeft="60dp"
    android:layout_alignBottom="@+id/textView1"
    android:inputType="textCapCharacters"/>

  <Button
    android:layout_width="wrap_content"
    android:layout_height="wrap_content"
    android:text="@string/btn_valider"
    android:id="@+id/buttonValider"
    android:layout_alignBottom="@+id/editTextNom"
    android:layout_toRightOf="@+id/editTextNom"
    android:textSize="30sp"
    android:layout_marginLeft="60dp"/>

  <Button
    android:layout_width="wrap_content"
    android:layout_height="wrap_content"
    android:text="@string/btn_vue2"
    android:id="@+id/buttonVue2"
    android:layout_below="@+id/textView1"
    android:layout_alignLeft="@+id/textView1"
    android:layout_marginTop="50dp"
    android:textSize="30sp"/>

</RelativeLayout>
This contains everything that was done graphically. Another way to create a view is to edit this file directly. Once you get used to it, this can be faster than using the graphical editor.
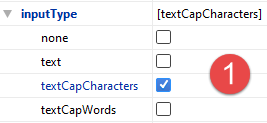
- In line 38, there is information that we haven’t shown. It is provided via the properties of the [editTextNom] [1] component:
All text comes from the following [strings.xml] [2] file:
<resources>
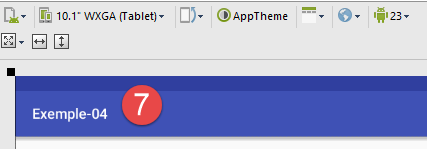
<string name="app_name">Exemple-04</string>
<string name="titre_vue1">Vue n° 1</string>
<string name="txt_nom">Quel est votre nom ?</string>
<string name="btn_valider">Valider</string>
<string name="btn_vue2">Vue n° 2</string>
</resources>
Now, let's modify the [MainActivity] activity so that this view is displayed when the app starts:
package exemples.android;

import android.os.Bundle;
import android.support.v7.app.AppCompatActivity;
import org.androidannotations.annotations.EActivity;

@EActivity(R.layout.vue1)
public class MainActivity extends AppCompatActivity {

  @Override
  protected void onCreate(Bundle savedInstanceState) {
    super.onCreate(savedInstanceState);
  }
}
- Line 7: The [vue1.xml] view is now displayed by the activity;
Modify the [AndroidManifest.xml] file as follows:
<?xml version="1.0" encoding="utf-8"?>
<manifest xmlns:android="http://schemas.android.com/apk/res/android"
          package="exemples.android">
  <application
    android:allowBackup="true"
    android:icon="@mipmap/ic_launcher"
    android:label="@string/app_name"
    android:supportsRtl="true"
    android:theme="@style/AppTheme">
    <activity
      android:name=".MainActivity_"
      android:windowSoftInputMode="stateHidden">
      <intent-filter>
        <action android:name="android.intent.action.MAIN"/>
        <category android:name="android.intent.category.LAUNCHER"/>
      </intent-filter>
    </activity>
  </application>
</manifest>
- Line 12: This configuration line prevents the keyboard from appearing when the [vue1] view is displayed. This is because the view has an input field that has focus when the view is displayed. By default, this focus causes the virtual keyboard to appear;
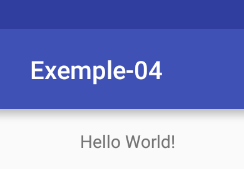
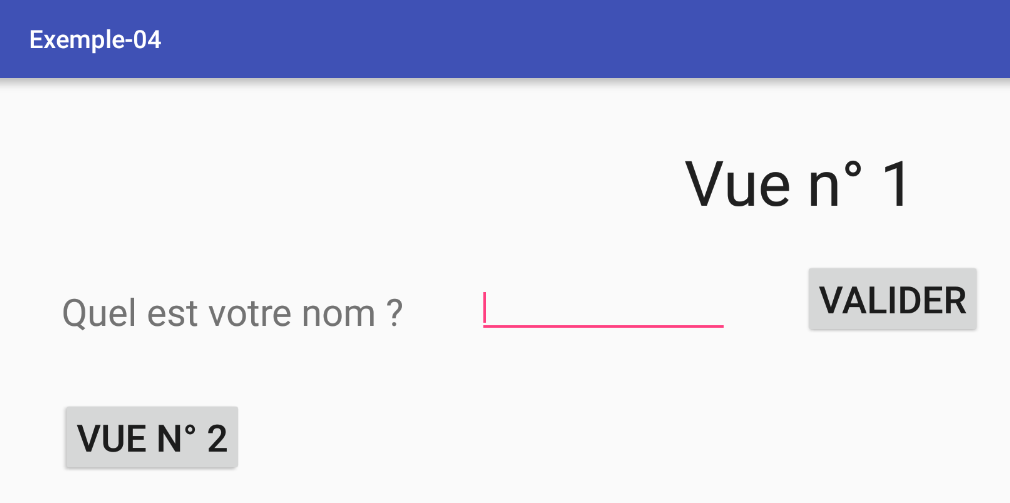
Run the application and verify that the [vue1.xml] view is indeed displayed:
1.5.3. Event Handling
Now let’s handle the click on the [Valider] button in the [Vue1] view:
The code for [MainActivity] changes as follows:
package exemples.android;
import android.os.Bundle;
import android.support.v7.app.AppCompatActivity;
import android.util.Log;
import android.widget.EditText;
import android.widget.Toast;
import org.androidannotations.annotations.AfterViews;
import org.androidannotations.annotations.Click;
import org.androidannotations.annotations.EActivity;
import org.androidannotations.annotations.ViewById;
@EActivity(R.layout.vue1)
public class MainActivity extends AppCompatActivity {
// visual interface elements
@ViewById(R.id.editTextNom)
protected EditText editTextNom;
@Override
protected void onCreate(Bundle savedInstanceState) {
Log.d("MainActivity","onCreate");
super.onCreate(savedInstanceState);
}
@AfterViews
protected void afterViews(){
Log.d("MainActivity","afterViews");
}
// event manager
@Click(R.id.buttonValider)
protected void doValider() {
// the name entered is displayed
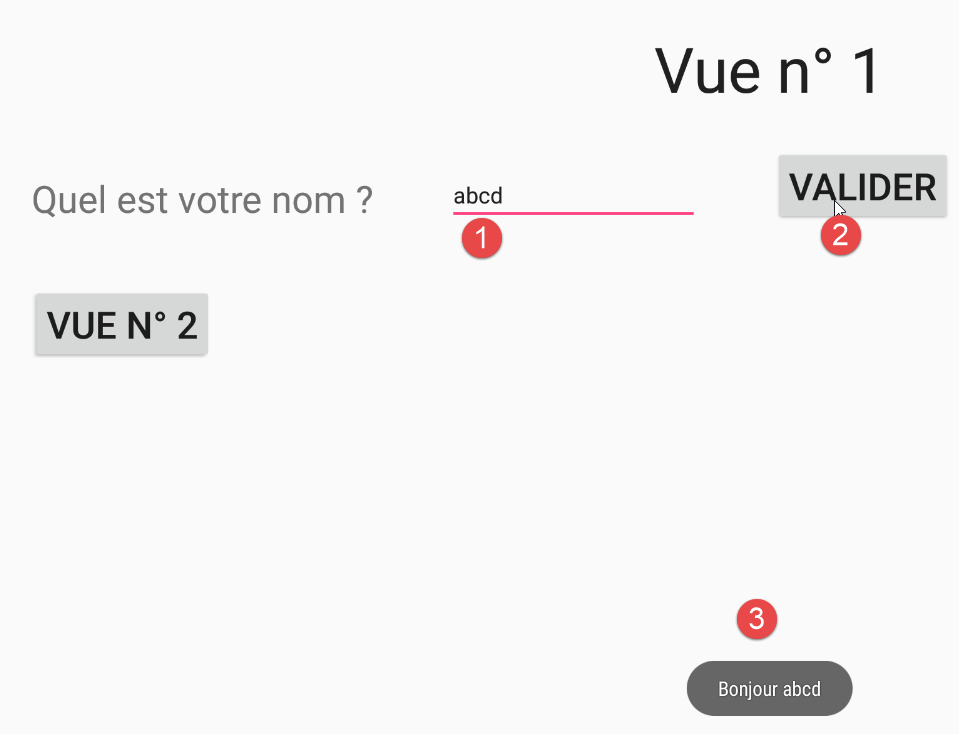
Toast.makeText(this, String.format("Bonjour %s", editTextNom.getText().toString()), Toast.LENGTH_LONG).show();
}
}
- Lines 17-18: We associate the field [protected EditText editTextNom] with the component with ID [R.id.editTextNom] in the visual interface. The field associated with the component must be accessible in the derived class [MainActivity_] and for this reason cannot be of scope [private]. The field identified by [R.id.editTextNom] comes from the view [vue1.xml]:
  <EditText
    android:layout_width="wrap_content"
    android:layout_height="wrap_content"
    android:id="@+id/editTextNom"
    android:minWidth="200dp"
    android:layout_toRightOf="@+id/textView1"
    android:layout_marginLeft="60dp"
    android:layout_alignBottom="@+id/textView1"
    android:inputType="textCapCharacters"/>
Note: Do not use accented characters in the identifiers [id]. AA does not handle them correctly.
- Line 32: The annotation [@Click(R.id.buttonValider)] designates the method that handles the 'Click' event on the button with ID [R.id.buttonValider]. This ID also comes from the view [vue1.xml]:
  <Button
    android:layout_width="wrap_content"
    android:layout_height="wrap_content"
    android:text="@string/btn_valider"
    android:id="@+id/buttonValider"
    android:layout_alignBottom="@+id/editTextNom"
    android:layout_toRightOf="@+id/editTextNom"
    android:textSize="30sp"
    android:layout_marginLeft="60dp"/>
- line 35: displays the entered name:
- Toast.makeText(...).show(): displays text on the screen,
- the firstparameter of makeText is the activity,
- the second parameter is the text to be displayed in the dialog box that will be displayed by makeText,
- the third parameter is the lifetime of the displayed box: Toast.LENGTH_LONG or Toast.LENGTH_SHORT;
- line 26, the annotation [@AfterViews] annotates the method to be executed when all fields annotated by [@ViewById] are initialized. It is important to know when these fields are initialized. For example, can we use the reference from line 18 in the [onCreate] method? To answer this question, we have added logs;
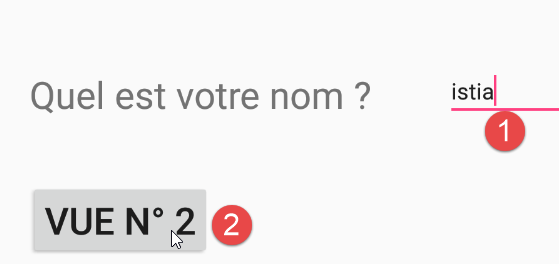
Run the [Exemple-04] project and verify that something happens when you click the [Valider] button. We get the following logs:
We conclude that when the [onCreate] method executes, the fields annotated by [@ViewById] have not yet been initialized. Again, the beginner reader is encouraged to place this type of log in the methods that manage the application lifecycle.
1.6. Example-05: navigation between views
In the previous project, the [Vue n° 2] button was not utilized. We propose to utilize it by creating a second view and demonstrating how to navigate between views. There are several ways to solve this problem. The approach proposed here is to associate each view with an activity. Another method is to have a single [AppCompatActivity] activity that displays [Fragment] views. This will be the method used in future applications.
1.6.1. Creating the Project
We duplicate the [Exemple-04] project into [Exemple-05]. To do this, follow the procedure described for duplicating [Exemple-02] into [Exemple-03] in the section “ 1.4 ” and reproduced in the section “ 1.5 ”.
1.6.2. Adding a second activity
To manage a second view, we will create a second activity. This activity will manage view #2. Here, we are using a “one view = one activity” model. Other models are possible.
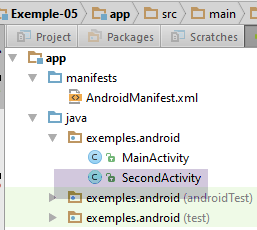
123

- In [1-4], create a new activity;

- in [5], the name of the class that will be generated;
- In [6], the name of the view (vue2.xml) associated with the new activity;
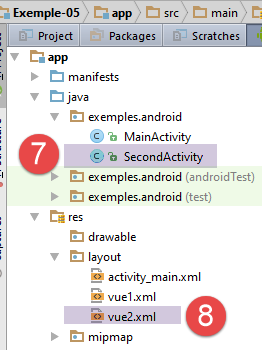
- in [7-8], the files affected by the previous configuration;
The [SecondActivity] activity is as follows:
package exemples.android;

import android.support.v7.app.AppCompatActivity;
import android.os.Bundle;

public class SecondActivity extends AppCompatActivity {

  @Override
  protected void onCreate(Bundle savedInstanceState) {
    super.onCreate(savedInstanceState);
    setContentView(R.layout.vue2);
  }
}
- Line 11: The activity is associated with the view [vue2.xml];
The [vue2.xml] view is as follows:
<?xml version="1.0" encoding="utf-8"?>
<RelativeLayout
  xmlns:android="http://schemas.android.com/apk/res/android"
  xmlns:tools="http://schemas.android.com/tools"
  android:layout_width="match_parent"
  android:layout_height="match_parent"
  android:paddingLeft="@dimen/activity_horizontal_margin"
  android:paddingRight="@dimen/activity_horizontal_margin"
  android:paddingTop="@dimen/activity_vertical_margin"
  android:paddingBottom="@dimen/activity_vertical_margin"
  tools:context="exemples.android.SecondActivity">

</RelativeLayout>
This is currently an empty view with a layout manager of type [RelativeLayout] (line 2). On line 11, we can see that it has been associated with the new activity.
The manifest for the Android module [AndroidManifest.xml] has changed as follows:
<?xml version="1.0" encoding="utf-8"?>
<manifest xmlns:android="http://schemas.android.com/apk/res/android"
          package="exemples.android">

  <application
    android:allowBackup="true"
    android:icon="@mipmap/ic_launcher"
    android:label="@string/app_name"
    android:supportsRtl="true"
    android:theme="@style/AppTheme">
    <activity
      android:name=".MainActivity_"
      android:windowSoftInputMode="stateHidden">
      <intent-filter>
        <action android:name="android.intent.action.MAIN"/>

        <category android:name="android.intent.category.LAUNCHER"/>
      </intent-filter>
    </activity>
    <activity android:name=".SecondActivity">
    </activity>
  </application>

</manifest>
Line 20, a second activity has been registered.
1.6.3. Navigation from view #1 to view #2
Let’s return to the code for the [MainActivity] class, which displays view #1. The transition to view #2 is not currently handled:

We handle it as follows:
  // navigate to view no. 2
  @Click(R.id.buttonVue2)
  protected void navigateToView2() {
    // navigate to view no. 2 by passing it the name entered in view no. 1
    // create an Intent
    Intent intent = new Intent();
    // we associate this Intent with an activity
    intent.setClass(this, SecondActivity.class);
    // we associate information with this Intent
    intent.putExtra("NOM", editTextNom.getText().toString().trim());
    // we launch the [SecondActivity] type activity by passing it the Intent
    startActivity(intent);
}
- lines 2-3: the [navigateToView2] method handles the 'click' on the button identified by [R.id.buttonVue2] defined in the [vue1.xml] view:
  <Button
    android:layout_width="wrap_content"
    android:layout_height="wrap_content"
    android:text="@string/btn_vue2"
    android:id="@+id/buttonVue2"
    android:layout_below="@+id/textView1"
    android:layout_alignLeft="@+id/textView1"
    android:layout_marginTop="50dp"
android:textSize="30sp"/>
The comments describe the steps to follow for the view change:
- line 6: create an object of type [Intent]. This object will specify both the activity to launch and the information to pass to it;
- line 8: associate the Intent with an activity, in this case an activity of type [SecondActivity], which will be responsible for displaying view #2. Remember that the [MainActivity] activity displays view #1. So we have one view = one activity. We will need to define the type [SecondActivity];
- line 10: optionally, enter information into the [Intent] object. This information is intended for the [SecondActivity] activity that will be launched. The parameters for [Intent.putExtra] are (Key Object, Value Object). Note that the method [EditText.getText()], which returns the text entered in the input field, does not return a type [String] but a type [Editable]. You must use the [toString] method to retrieve the entered text;
- Line 12: Launch the activity defined by the [Intent] object.
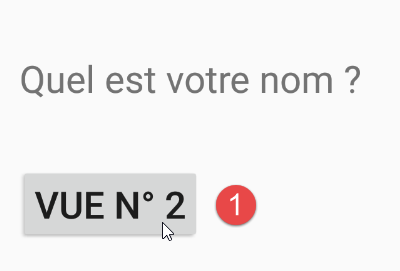
Run the [Exemple-05] project and verify that you get view #2 (empty for now):
1.6.4. Building View No. 2
- In [1-2], we delete view [main.xml], which is no longer needed, then we modify view [vue2.xml] as follows:
The components are as follows:
The file XML [vue2.xml] is as follows:
<?xml version="1.0" encoding="utf-8"?>
<RelativeLayout
  xmlns:android="http://schemas.android.com/apk/res/android"
  xmlns:tools="http://schemas.android.com/tools"
  android:layout_width="match_parent"
  android:layout_height="match_parent"
  android:paddingLeft="@dimen/activity_horizontal_margin"
  android:paddingRight="@dimen/activity_horizontal_margin"
  android:paddingTop="@dimen/activity_vertical_margin"
  android:paddingBottom="@dimen/activity_vertical_margin"
  tools:context="exemples.android.SecondActivity">


  <TextView
    android:layout_width="wrap_content"
    android:layout_height="wrap_content"
    android:textAppearance="?android:attr/textAppearanceLarge"
    android:text="@string/titre_vue2"
    android:id="@+id/textViewTitreVue2"
    android:layout_marginTop="50dp"
    android:textSize="50sp"
    android:layout_gravity="center|left"
    android:layout_alignParentTop="true"
    android:layout_centerHorizontal="true"/>

  <TextView
    android:layout_width="wrap_content"
    android:layout_height="wrap_content"
    android:id="@+id/textViewBonjour"
    android:layout_centerVertical="true"
    android:layout_alignParentLeft="true"
    android:layout_below="@+id/textViewTitreVue2"
    android:layout_marginTop="50dp"
    android:layout_marginLeft="50dp"
    android:textSize="30sp"
    android:text="Bonjour !"
    android:textColor="#ffffb91b"/>

  <Button
    android:layout_width="wrap_content"
    android:layout_height="wrap_content"
    android:text="@string/btn_vue1"
    android:id="@+id/buttonVue1"
    android:layout_marginTop="50dp"
    android:textSize="30sp"
    android:layout_alignLeft="@+id/textViewBonjour"
    android:layout_below="@+id/textViewBonjour"/>

</RelativeLayout>
Run the [Exemple-05] project and verify that you see the new view when you click the [Vue n° 2] button.
1.6.5. The [SecondActivity] activity
In [MainActivity], we wrote the following code:
    // navigate to view no. 2
    protected void navigateToView2() {
        // navigate to view no. 2 by passing it the name entered in view no. 1
        // create an Intent
        Intent intent = new Intent();
        // we associate this Intent with an activity
        intent.setClass(this, SecondActivity.class);
        // we associate information with this Intent
        intent.putExtra("NOM", edtNom.getText().toString().trim());
        // we launch the [SecondActivity] type activity by passing it the Intent
        startActivity(intent);
}
In line 9, we included information for [SecondActivity] that was not used. We are now using it, and this is done in the code for [SecondActivity]:
The code for [SecondActivity] evolves as follows:
package exemples.android;

import android.content.Intent;
import android.support.v7.app.AppCompatActivity;
import android.os.Bundle;
import android.widget.TextView;
import org.androidannotations.annotations.AfterViews;
import org.androidannotations.annotations.EActivity;
import org.androidannotations.annotations.ViewById;

@EActivity(R.layout.vue2)
public class SecondActivity extends AppCompatActivity {

  // visual interface components
  @ViewById
  protected TextView textViewBonjour;

  @Override
  protected void onCreate(Bundle savedInstanceState) {
    super.onCreate(savedInstanceState);
  }

  @AfterViews
  protected void afterViews() {
    // recover intent if it exists
    Intent intent = getIntent();
    if (intent != null) {
      Bundle extras = intent.getExtras();
      if (extras != null) {
        // we retrieve the name
        String nom = extras.getString("NOM");
        if (nom != null) {
          // we display it
          textViewBonjour.setText(String.format("Bonjour %s !", nom));
        }
      }
    }
  }

}
- line 11: the annotation [@EActivity] is used to indicate that the class [SecondActivity] is an activity associated with the view [vue2.xml];
- lines 15–16: a reference is retrieved for the [TextView] component identified by [R.id.textViewBonjour]. Here, [@ViewById(R.id.textViewBonjour)] has not been written. In this case, AA assumes that the component identifier is identical to the annotated field, in this case the field [textViewBonjour];
- line 23: the annotation [@AfterViews] annotates a method that must be executed after the fields annotated by [@ViewById] have been initialized. In the [OnCreate] method (line 19), these fields cannot be used because they have not yet been initialized. In the [Exemple-05] project, we switch from one activity to another, and it was not initially clear whether the annotated method [@AfterViews] would be executed once during the initial instantiation of the activity or every time the activity is started. Tests showed that the second hypothesis was correct;
- line 26: the class [AppCompatActivity] has a method [getIntent] that returns the object [Intent] associated with the activity;
- line 28: the method [Intent.getExtras] returns a type [Bundle], which is a kind of dictionary containing the information associated with the activity’s object [Intent];
- line 31: the name stored in the activity's [Intent] object is retrieved;
- line 34: it is displayed.
Reminder: fields annotated with the annotation [@ViewById] must not contain accented characters.
Let’s go back to the [SecondActivity] class. Because we wrote:
@EActivity(R.layout.vue2)
public class SecondActivity extends AppCompatActivity {
AA will generate a class [SecondActivity_] derived from [SecondActivity], and this class will be the actual activity. This leads us to make changes in:
[MainActivity]
  // navigate to view no. 2
  @Click(R.id.buttonVue2)
  protected void navigateToView2() {
..
    // we associate this Intent with an activity
    intent.setClass(this, SecondActivity_.class);
    ...
}
- On line 6, replace [SecondActivity] with [SecondActivity_];
[AndroidManifest.xml]
<?xml version="1.0" encoding="utf-8"?>
<manifest xmlns:android="http://schemas.android.com/apk/res/android"
          package="exemples.android">

  <application
    android:allowBackup="true"
    android:icon="@mipmap/ic_launcher"
    android:label="@string/app_name"
    android:supportsRtl="true"
    android:theme="@style/AppTheme">
    <activity
      android:name=".MainActivity_"
      android:windowSoftInputMode="stateHidden">
      <intent-filter>
        <action android:name="android.intent.action.MAIN"/>

        <category android:name="android.intent.category.LAUNCHER"/>
      </intent-filter>
    </activity>
    <activity android:name=".SecondActivity_">
    </activity>
  </application>

</manifest>
- On line 20, replace [SecondActivity] with [SecondActivity_];
Test this new version. Type a name in view #1 and verify that view #2 displays it correctly.

1.6.6. Navigation from view #2 to view #1
To navigate from view #2 to view #1, we will follow the procedure seen previously:
- place the code from navigation into the [SecondActivity] activity that displays View #2;
- write the [@AfterViews] method in the [MainActivity] activity that displays view #1;
The code for [SecondActivity] changes as follows:
  @Click(R.id.buttonVue1)
  protected void navigateToView1() {
    // we create an Intent for activity [MainActivity]
    Intent intent1 = new Intent();
    intent1.setClass(this, MainActivity_.class);
    // retrieve the Intent of the current activity [SecondActivity]
    Intent intent2 = getIntent();
    if (intent2 != null) {
      Bundle extras2 = intent2.getExtras();
      if (extras2 != null) {
        // we put the name in the Intent of [MainActivity]
        intent1.putExtra("NOM", extras2.getString("NOM"));
      }
      // launch [MainActivity]
      startActivity(intent1);
    }
}
- lines 1-2: associate the [navigateToView1] method with the click on the [btn_vue1] button;
- line 4: create a new [Intent];
- line 5: associated with the [MainActivity_] activity;
- line 7: retrieve the Intent associated with [SecondActivity];
- line 9: retrieve the information from this Intent;
- line 12: the key [NOM] is retrieved from [intent2] to be placed in [intent1] with the same associated value;
- line 15: the [MainActivity_] activity is launched.
In the code for [MainActivity], the following [@AfterViews] method is added:
  @AfterViews
  protected void afterViews() {
    // recover intent if it exists
    Intent intent = getIntent();
    if (intent != null) {
      Bundle extras = intent.getExtras();
      if (extras != null) {
        // we retrieve the name
        String nom = extras.getString("NOM");
        if (nom != null) {
          // we display it
          editTextNom.setText(nom);
        }
      }
    }
}
Make these changes and test your app. Now, when you return from View 2 to View 1, the name you originally entered should be displayed, which was not the case until now.

1.6.7. Activity Lifecycle
In the section 1.3.5 , we presented the lifecycle of an activity. Here we have two activities, and we switch between them during execution. These activities contain two methods whose call order relative to each other is unclear: [onCreate] and [afterViews]. It is important to know this. To do so, we add logs to both activities:
So in the [MainActivity] class, we write:
  // manufacturer
  public MainActivity() {
    Log.d("MainActivity", "constructor");
  }

  @Override
  protected void onCreate(Bundle savedInstanceState) {
    Log.d("MainActivity", "onCreate");
    ...
  }

  @AfterViews
  protected void afterViews() {
    Log.d("MainActivity", "afterViews");
    ...
    }
}
- lines 2–4: we want to know if the [MainActivity] class is instantiated once or multiple times;
- line 8: we want to know if the method [onCreate] is called once or multiple times;
- line 14: we want to know if the method [afterViews] is called once or multiple times;
We do exactly the same in the [SecondActivity] class.
When the application starts, we get the following logs:
The methods [onCreate, afterViews] of the first activity were executed in this order. When clicking the [Vue n° 2] button, the new logs are as follows:
The methods [onCreate, afterViews] of the second activity were executed in this order. When clicking the [Vue n° 1] button, the new logs are as follows:
The [MainActivity] class is therefore instantiated again. When you click the [Vue n° 2] button, the new logs are as follows:
The [SecondActivity] class is therefore instantiated again.
Both activities are therefore systematically recreated whenever the activity is changed.
We will now explore an architecture with a single activity capable of managing multiple views called fragments. The activity and the views will be instantiated only once, unlike the previous method where an activity could be instantiated multiple times.
1.7. Example-06: navigation with tabs
Here we will explore tabbed interfaces. The example is complex but introduces all the elements we will use later: single activity, fragment manager (views), fragment container, navigation between fragments. The concept of tabs differs from that of fragments and is secondary to what we want to demonstrate in this example.
1.7.1. Creating the project
We create a new project:

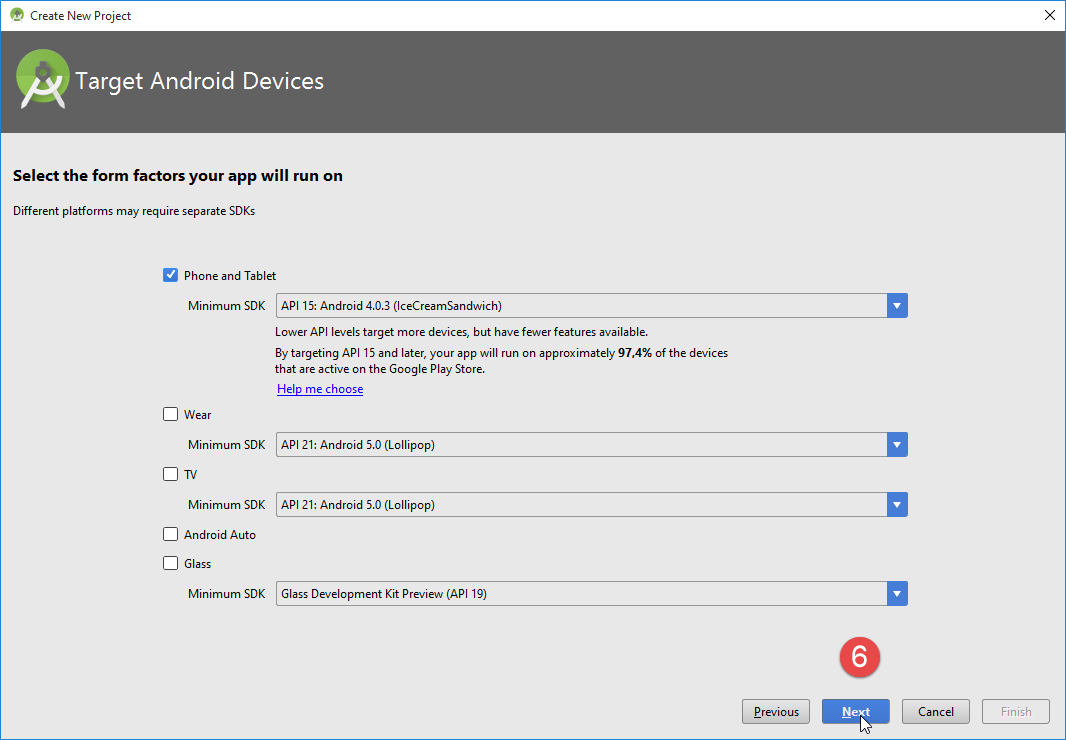
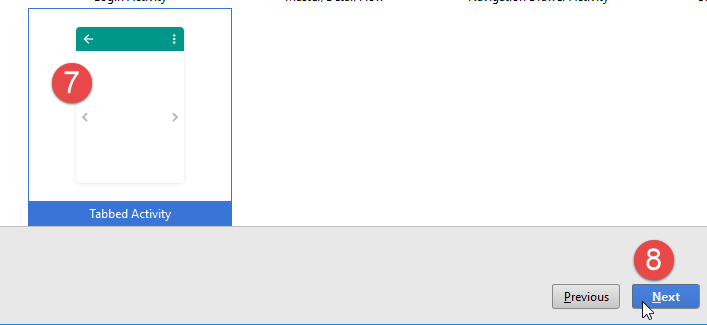
- in [7], we select a tabbed activity (Tabbed Activity);
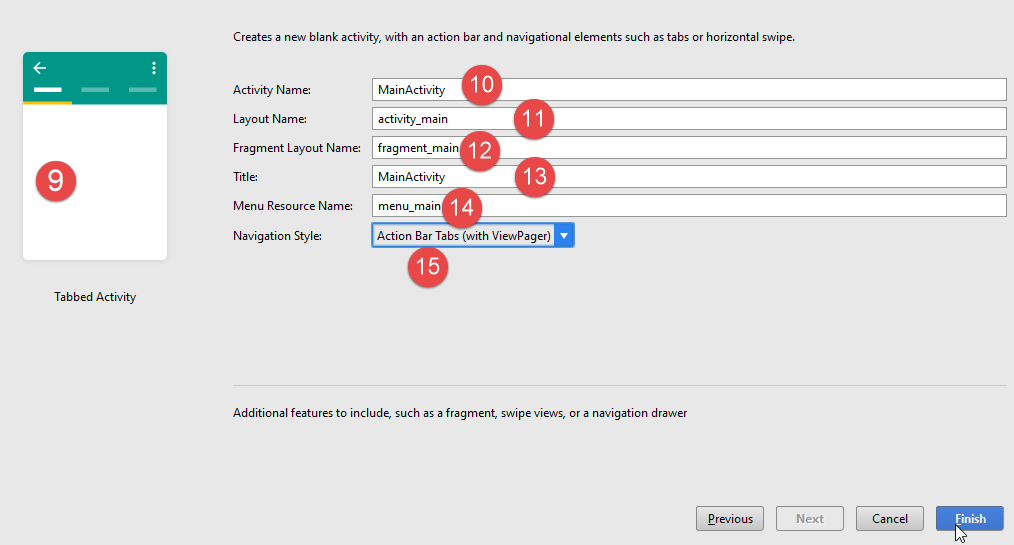
- in [10-14], we keep the default values;
- In [15], select tabs with a title bar;
The resulting project is as follows:
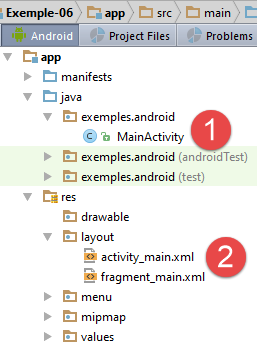
- In [1], the activity;
- In [2], the views;
A runtime configuration named [app], after the module, was automatically created: [2b]:

You can run it. A window with three tabs will then appear: [3-6]:
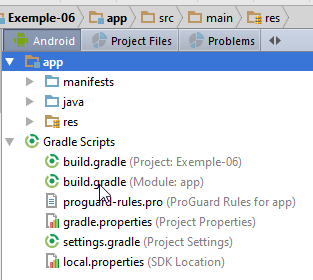
1.7.2. Gradle Configuration
The [Exemple-06] project was generated with the following [build.gradle] file:
apply plugin: 'com.android.application'

android {
  compileSdkVersion 23
  buildToolsVersion "23.0.3"
  defaultConfig {
    applicationId "exemples.android"
    minSdkVersion 15
    targetSdkVersion 23
    versionCode 1
    versionName "1.0"
  }
  buildTypes {
    release {
      minifyEnabled false
      proguardFiles getDefaultProguardFile('proguard-android.txt'), 'proguard-rules.pro'
    }
  }
}

dependencies {
  compile fileTree(dir: 'libs', include: ['*.jar'])
  testCompile 'junit:junit:4.12'
  compile 'com.android.support:appcompat-v7:23.4.0'
  compile 'com.android.support:design:23.4.0'
}
There is a new element compared to what we have seen before: line 25. This library is required for the new components used by the generated application.
1.7.3. The [activity_main] view
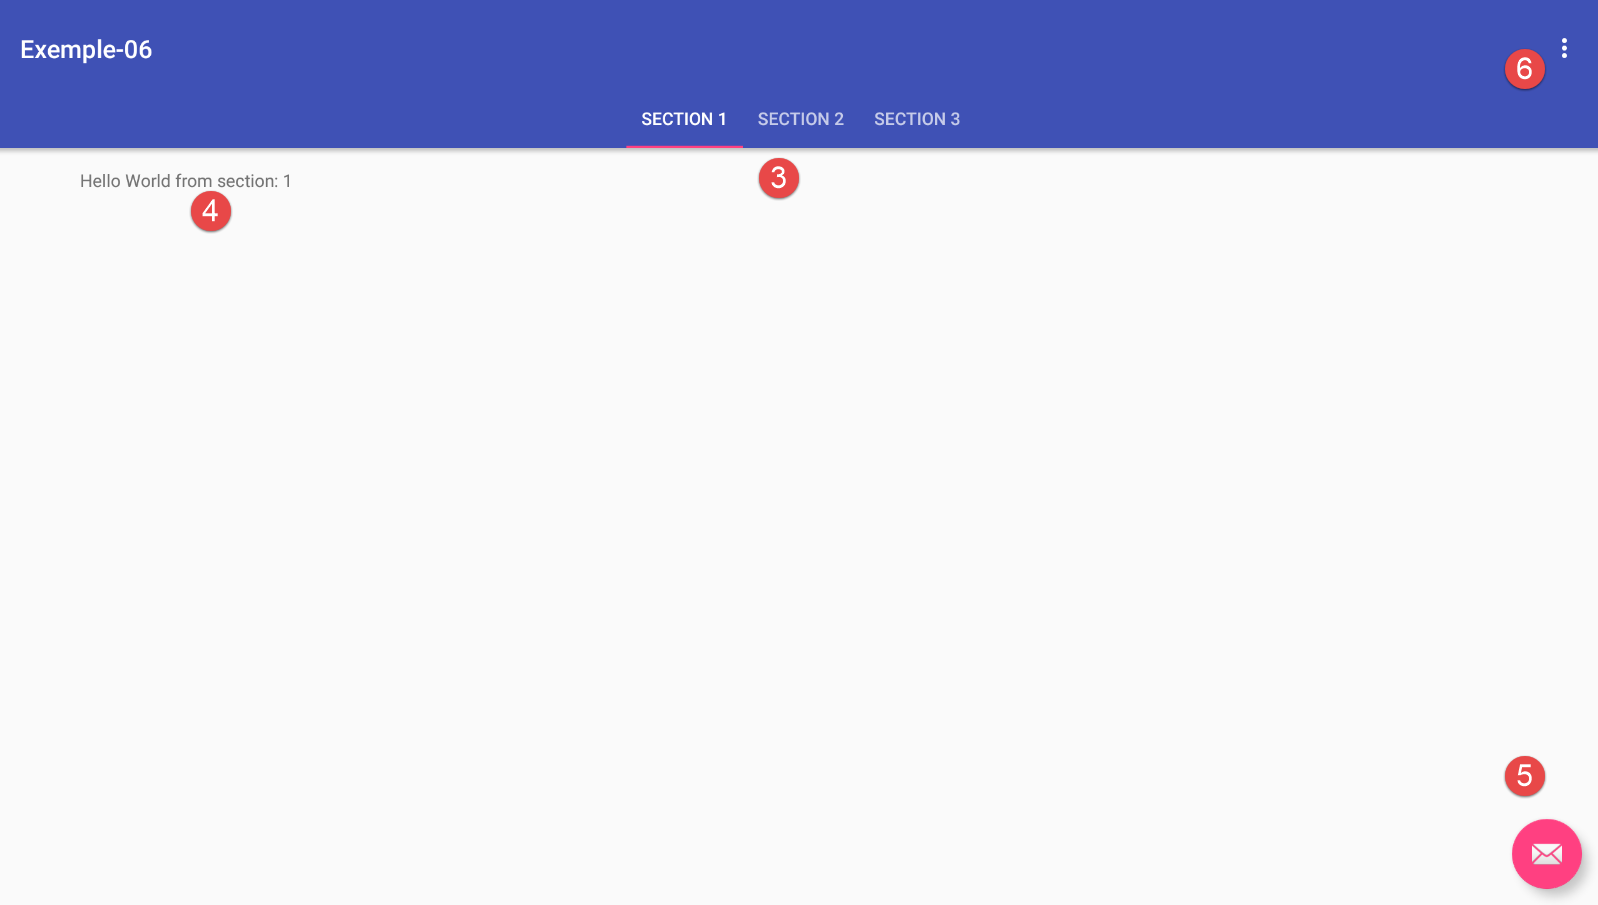
The [activity_main] view is the view associated with the [MainActivity] activity of the project. In [design] mode, the view is as follows:
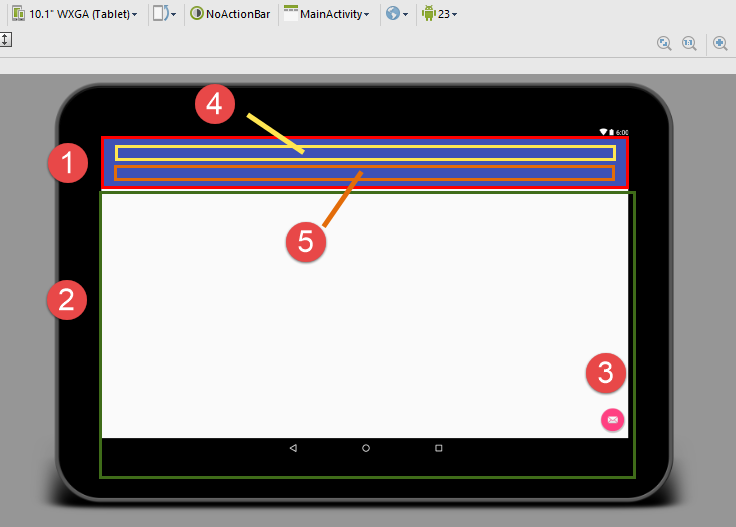
It contains the following components:
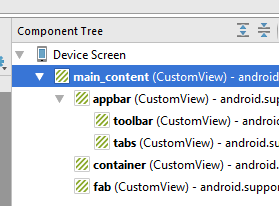
- [main_content] is the entire view;
- [appbar] (red box, 1) is the application bar. It contains two components:
- [toolbar] (yellow box 4) is the toolbar;
- [tabs] (orange box 5) is the tab title bar;
- [container] (green box, 2) can hold various fragments. A fragment is a view. Thus, the same activity will be able to display multiple views (fragments) in this container;
- [fab] (component 3) is called a floating component;
In [text] mode, the code is as follows:
<?xml version="1.0" encoding="utf-8"?>
<android.support.design.widget.CoordinatorLayout xmlns:android="http://schemas.android.com/apk/res/android"
                                                 xmlns:tools="http://schemas.android.com/tools"
                                                 xmlns:app="http://schemas.android.com/apk/res-auto"
                                                 android:id="@+id/main_content"
                                                 android:layout_width="match_parent"
                                                 android:layout_height="match_parent"
                                                 android:fitsSystemWindows="true"
                                                 tools:context="exemples.android.MainActivity">

  <android.support.design.widget.AppBarLayout
    android:id="@+id/appbar"
    android:layout_width="match_parent"
    android:layout_height="wrap_content"
    android:paddingTop="@dimen/appbar_padding_top"
    android:theme="@style/AppTheme.AppBarOverlay">

    <android.support.v7.widget.Toolbar
      android:id="@+id/toolbar"
      android:layout_width="match_parent"
      android:layout_height="?attr/actionBarSize"
      android:background="?attr/colorPrimary"
      app:popupTheme="@style/AppTheme.PopupOverlay"
      app:layout_scrollFlags="scroll|enterAlways">

    </android.support.v7.widget.Toolbar>

    <android.support.design.widget.TabLayout
      android:id="@+id/tabs"
      android:layout_width="match_parent"
      android:layout_height="wrap_content"/>

  </android.support.design.widget.AppBarLayout>

  <android.support.v4.view.ViewPager
    android:id="@+id/container"
    android:layout_width="match_parent"
    android:layout_height="match_parent"
    app:layout_behavior="@string/appbar_scrolling_view_behavior"/>

  <android.support.design.widget.FloatingActionButton
    android:id="@+id/fab"
    android:layout_width="wrap_content"
    android:layout_height="wrap_content"
    android:layout_gravity="end|bottom"
    android:layout_margin="@dimen/fab_margin"
    android:src="@android:drawable/ic_dialog_email"/>

</android.support.design.widget.CoordinatorLayout>
We see the elements described earlier:
- lines 2–49: the definition of the [main_content] component (line 5), which constitutes the entire view. We can see that it is a layout (component layout manager) of type [CoordinatorLayout] (line 2);
- lines 11–33: the [appbar] container (line 12). This is a layout of type [AppBarLayout] (line 11);
- lines 18–24: the component [toolbar] (line 19) of type [Toolbar] (line 18);
- lines 28–31: the container [tabs] (line 29). This is a layout of type [TabLayout] (line 28). It will display the tab titles;
- lines 35–39: the [container] component (line 36). This container displays the different views of the activity;
- lines 41–47: the [fab] component (line 42) of type [FloatingActionButton] (line 41). This is a clickable button. By default, it is positioned at the bottom right of the full view;
We will not attempt to understand the meaning of all the attributes of these components. We will use them as they are. It is through experience—and often in [design] mode—that we discover their roles. In this mode, we find that the components have dozens of attributes. Generally, only some are initialized, while the others retain a default value.
Let’s clarify a few points, however. Most of the values configuring the different views are gathered in the [res / values] folder:

These values are referenced on lines 15–16, 23, 39, and 46 of the [activity_main.xml] file. Let’s take an example:
- line 15:
android:paddingTop="@dimen/appbar_padding_top"
The annotation [@dimen] refers to the file [res / values / dimens.xml]:
<resources>
  <!-- Default screen margins, per the Android Design guidelines. -->
  <dimen name="activity_horizontal_margin">16dp</dimen>
  <dimen name="activity_vertical_margin">16dp</dimen>
  <dimen name="fab_margin">16dp</dimen>
  <dimen name="appbar_padding_top">8dp</dimen>
</resources>
Line 15 of the file [activity_main.xml] refers to line (f) above;
Similarly, the annotation:
- [@string] refers to the resource file [res / values / strings.xml];
- [@color] refers to the resource file [res / values / colors.xml];
- [@style] refers to the resource file [res / values / styles.xml];
1.7.4. The activity
The code generated for the activity matches the view described above: it is complex. We will analyze it in several steps.
1.7.4.1. Managing fragments and tabs
The code for [MainActivity] related to fragments and tabs is as follows:
package exemples.android;

import android.support.design.widget.TabLayout;
import android.support.design.widget.FloatingActionButton;
import android.support.design.widget.Snackbar;
import android.support.v7.app.AppCompatActivity;
import android.support.v7.widget.Toolbar;

import android.support.v4.app.Fragment;
import android.support.v4.app.FragmentManager;
import android.support.v4.app.FragmentPagerAdapter;
import android.support.v4.view.ViewPager;
import android.os.Bundle;
import android.view.LayoutInflater;
import android.view.Menu;
import android.view.MenuItem;
import android.view.View;
import android.view.ViewGroup;

import android.widget.TextView;

public class MainActivity extends AppCompatActivity {

  // the fragment manager
  private SectionsPagerAdapter mSectionsPagerAdapter;

  // the fragment container
  private ViewPager mViewPager;

  @Override
  protected void onCreate(Bundle savedInstanceState) {
      // parent
    super.onCreate(savedInstanceState);
    // view
    setContentView(R.layout.activity_main);
    // toolbar
    Toolbar toolbar = (Toolbar) findViewById(R.id.toolbar);
    setSupportActionBar(toolbar);
    // the fragment manager
    mSectionsPagerAdapter = new SectionsPagerAdapter(getSupportFragmentManager());

    // the fragment container is associated with the fragment manager
    // i.e. fragment no. i in the fragment container is fragment no. i issued by the fragment manager
    mViewPager = (ViewPager) findViewById(R.id.container);
    mViewPager.setAdapter(mSectionsPagerAdapter);
    // the tab bar is also associated with the fragment container
    // i.e. tab n° i displays fragment n° i of the container
    TabLayout tabLayout = (TabLayout) findViewById(R.id.tabs);
    tabLayout.setupWithViewPager(mViewPager);
   }


  // a fragment
  public static class PlaceholderFragment extends Fragment {
 ...
  }

  // the fragment manager
  // it is used to request fragments to be displayed in the main view
  // must define methods [getItem] and [getCount] - the others are optional
  public class SectionsPagerAdapter extends FragmentPagerAdapter {
...
  }
}
- line 28: Android provides a view container of type [android.support.v4.view.ViewPager] (line 12). This container must be provided with a view or fragment manager. The developer is responsible for providing it;
- line 25: the fragment handler used in this example. Its implementation is on lines 61–63;
- line 31: the method executed when the activity is created;
- line 35: the view [activity_main.xml] is associated with the activity;
- line 37: the reference to the [toolbar] component of the view is retrieved via its identifier;
- line 38: this toolbar becomes the activity’s action bar (an Android concept);
- line 40: the fragment manager is instantiated. The constructor parameter is the Android class [android.support.v4.app.FragmentManager] (line 10);
- line 44: the reference to the fragment container is retrieved from the [activity_main.xml] view via its ID;
- line 45: the fragment manager is linked to the fragment container. This means that when the fragment container is asked to display fragment #i, it will request it from the fragment manager;
- line 48: a reference to the tab bar is retrieved via its identifier;
- line 49: the tab manager is associated with the fragment container. This means that when tab #i is clicked, the container will display fragment #i. The association between the tab manager and the fragment container eliminates the need for tab management. Thus, we do not need to define an event handler for clicking on a tab. The association with the fragment container provides this by default. We will see an example where there are more fragments than tabs. In this case, we do not make this association.
The fragment handler [SectionsPagerAdapter] is as follows:
// the fragment manager
  // it is used to request fragments to be displayed in the main view
  // must define methods [getItem] and [getCount] - the others are optional
  public class SectionsPagerAdapter extends FragmentPagerAdapter {

    public SectionsPagerAdapter(FragmentManager fm) {
      super(fm);
    }

    // fragment n° position
    @Override
    public Fragment getItem(int position) {
      // instantiate a fragment [PlaceHolder] and render it
      return PlaceholderFragment.newInstance(position + 1);
    }

    // makes the number of fragments managed
    @Override
    public int getCount() {
      return 3;
    }

    // optional - gives a title to managed fragments
    @Override
    public CharSequence getPageTitle(int position) {
      switch (position) {
        case 0:
          return "SECTION 1";
        case 1:
          return "SECTION 2";
        case 2:
          return "SECTION 3";
      }
      return null;
    }
  }
}
- The fragments displayed by an app depend on the app itself. The fragment manager is defined by the developer;
- line 5: the fragment manager extends the Android class [android.support.v4.app.FragmentPagerAdapter]. The constructor is required. We must define at least the following two methods:
- int getCount(): returns the number of fragments to manage;
- Fragment getItem(i): returns fragment #i;
The method CharSequence getPageTitle(i), which returns the title of fragment #i, is optional. Because the tab manager has been linked to the fragment manager, the title of tab #i will be the title of fragment #i. Thus, the titles in lines 27–33 will be the tab titles;
- lines 18–21: getCount returns the number of managed fragments, in this case three;
- lines 11–15: getItem(i) returns fragment #i. Here, all fragments will be identical, of the type [PlaceholderFragment];
- lines 24–35: getPageTitle(int i) returns the title of fragment no. i;
1.7.4.2. The displayed fragments
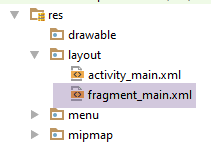
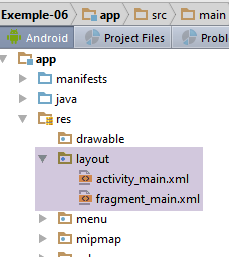
The activity’s fragments are all of the same type here and are all associated with the following view: XML [fragment_main]:
<RelativeLayout xmlns:android="http://schemas.android.com/apk/res/android"
                xmlns:tools="http://schemas.android.com/tools"
                android:layout_width="match_parent"
                android:layout_height="match_parent"
                android:paddingLeft="@dimen/activity_horizontal_margin"
                android:paddingRight="@dimen/activity_horizontal_margin"
                android:paddingTop="@dimen/activity_vertical_margin"
                android:paddingBottom="@dimen/activity_vertical_margin"
                tools:context="exemples.android.MainActivity$PlaceholderFragment">

  <TextView
    android:id="@+id/section_label"
    android:layout_width="wrap_content"
    android:layout_height="wrap_content"/>

</RelativeLayout>
- lines 1-16: a layout of type [RelativeLayout];
- lines 11-14: the single component of the view (fragment): a [TextView] identified by [section_label];
In [MainActivity], the managed fragments are of the following [PlaceholderFragment] type:
// a fragment
  public static class PlaceholderFragment extends Fragment {
      // a text displayed in the fragment
    private static final String ARG_SECTION_NUMBER = "section_number";

    public PlaceholderFragment() {
    }

    // renders a fragment with one piece of information: the fragment number passed as a parameter
    public static PlaceholderFragment newInstance(int sectionNumber) {
        // fragment
      PlaceholderFragment fragment = new PlaceholderFragment();
      // on-board info
      Bundle args = new Bundle();
      args.putInt(ARG_SECTION_NUMBER, sectionNumber);
      fragment.setArguments(args);
      // result
      return fragment;
    }

    @Override
    public View onCreateView(LayoutInflater inflater, ViewGroup container,
                             Bundle savedInstanceState) {
        // view [fragment_main] is instantiated
      View rootView = inflater.inflate(R.layout.fragment_main, container, false);
      // the [TextView] is found
      TextView textView = (TextView) rootView.findViewById(R.id.section_label);
      // its content is modified
      textView.setText(getString(R.string.section_format, getArguments().getInt(ARG_SECTION_NUMBER)));
      // we return the view
      return rootView;
    }
  }
- line 2: the [PlaceholderFragment] class extends the Android [Fragment] class. This is generally always the case;
- line 2: the [PlaceholderFragment] class is static. Its [newInstance] method (line 10) allows you to obtain instances of type [PlaceholderFragment];
- lines 10–19: the method [newInstance] creates and returns an object of type [PlaceholderFragment];
- lines 14–16: the fragment is created with an argument;
A fragment must define the [onCreateView] method on line 22. This method must return the view associated with the fragment.
- line 25: the view [fragment_main.xml] is associated with the fragment;
- line 27: this view contains a [TextView] component whose reference is retrieved via its identifier;
- line 29: text is displayed in [TextView];
- [getString] is a method of the parent class [AppCompatActivity];
- The first argument is a component number. [R.string.section_format] refers to the component number identified by [section_format] in the file [res / values / strings.xml] (line 4 below):
<div class="odt-code-rich" data-linenums="true" style="counter-reset: odtline 0;"><pre><code class="language-python">
<span class="odt-code-line"><span class="odt-code-line-content"><span style="color:#008080"><</span><span style="color:#3f7f7f">resources</span><span style="color:#008080">></span></span></span>
<span class="odt-code-line"><span class="odt-code-line-content"><span style="color:#000000"> </span><span style="color:#008080"><</span><span style="color:#3f7f7f">string</span> <span style="color:#7f007f">name</span><span style="color:#000000">=</span><span style="font-style:italic;color:#2a00ff">"app_name"</span><span style="color:#008080">></span><span style="color:#000000">Exemple-06</span><span style="color:#008080"></</span><span style="color:#3f7f7f">string</span><span style="color:#008080">></span></span></span>
<span class="odt-code-line"><span class="odt-code-line-content"><span style="color:#000000"> </span><span style="color:#008080"><</span><span style="color:#3f7f7f">string</span> <span style="color:#7f007f">name</span><span style="color:#000000">=</span><span style="font-style:italic;color:#2a00ff">"action_settings"</span><span style="color:#008080">></span><span style="color:#000000">Settings</span><span style="color:#008080"></</span><span style="color:#3f7f7f">string</span><span style="color:#008080">></span></span></span>
<span class="odt-code-line"><span class="odt-code-line-content"><span style="color:#000000"> </span><span style="color:#008080"><</span><span style="color:#3f7f7f">string</span> <span style="color:#7f007f">name</span><span style="color:#000000">=</span><span style="font-style:italic;color:#2a00ff">"section_format"</span><span style="color:#008080">></span><span style="color:#000000">Hello World from section: %1$d</span><span style="color:#008080"></</span><span style="color:#3f7f7f">string</span><span style="color:#008080">></span></span></span>
<span class="odt-code-line"><span class="odt-code-line-content"><span style="color:#008080"></</span><span style="color:#3f7f7f">resources</span><span style="color:#008080">></span></span></span>
</code></pre></div>
- (continued)
- line (d) above %1$d indicates that argument #1 (%1) must be formatted as an integer ($d);
- the second argument of [getString] is the value to be assigned to argument $1 in line (d) above;
- [getArguments] provides the bundle reference for the fragment’s arguments. It is important to note here that each argument was created with the following bundle (lines f–h):
<div class="odt-code-rich" data-linenums="true" style="counter-reset: odtline 0;"><pre><code class="language-java">
<span class="odt-code-line"><span class="odt-code-line-content">    <span style="color:#000000">// renders a fragment with one piece of information: the fragment number passed as a parameter</span></span></span>
<span class="odt-code-line"><span class="odt-code-line-content"><span style="color:#000000">    </span><span style="font-weight:bold;color:#7f0055">public</span><span style="color:#000000"> </span><span style="font-weight:bold;color:#7f0055">static</span><span style="color:#000000"> PlaceholderFragment newInstance(</span><span style="font-weight:bold;color:#7f0055">int</span><span style="color:#000000"> sectionNumber) {</span></span></span>
<span class="odt-code-line"><span class="odt-code-line-content">        <span style="color:#000000">// fragment</span></span></span>
<span class="odt-code-line"><span class="odt-code-line-content"><span style="color:#000000">      PlaceholderFragment fragment = </span><span style="font-weight:bold;color:#7f0055">new</span><span style="color:#000000"> PlaceholderFragment();</span></span></span>
<span class="odt-code-line"><span class="odt-code-line-content">      <span style="color:#000000">// on-board info</span></span></span>
<span class="odt-code-line"><span class="odt-code-line-content"><span style="color:#000000">      Bundle args = </span><span style="font-weight:bold;color:#7f0055">new</span><span style="color:#000000"> Bundle();</span></span></span>
<span class="odt-code-line"><span class="odt-code-line-content">      args.putInt(ARG_SECTION_NUMBER, sectionNumber);</span></span>
<span class="odt-code-line"><span class="odt-code-line-content">      fragment.setArguments(args);</span></span>
<span class="odt-code-line"><span class="odt-code-line-content">      <span style="color:#000000">// result</span></span></span>
<span class="odt-code-line"><span class="odt-code-line-content"><span style="color:#000000">      </span><span style="font-weight:bold;color:#7f0055">return</span><span style="color:#000000"> fragment;</span></span></span>
<span class="odt-code-line"><span class="odt-code-line-content">}</span></span>
</code></pre></div>
- (continued)
- getArguments().getInt(ARG_SECTION_NUMBER) will therefore return the value [sectionNumber] from lines (g) and (b) above;
- line 31: we return the view thus created;
1.7.4.3. Menu Management
In the generated application, there is a menu:
The contents of the file [menu_main.xml] are as follows:
<menu xmlns:android="http://schemas.android.com/apk/res/android"
      xmlns:app="http://schemas.android.com/apk/res-auto"
      xmlns:tools="http://schemas.android.com/tools"
      tools:context="exemples.android.MainActivity">
  <item android:id="@+id/action_settings"
        android:title="@string/action_settings"
        android:orderInCategory="100"
        app:showAsAction="never"/>
</menu>
- lines 1–9: the menu;
- lines 5-8: a menu item identified by [action_settings] (line 5);
- line 6: the label for the menu item option. It is found in the file [res / values / strings.xml] (line (c) below:
<resources>
  <string name="app_name">Exemple-06</string>
  <string name="action_settings">Settings</string>
  <string name="section_format">Hello World from section: %1$d</string>
</resources>
The code above corresponds to the following visual (the menu is at the top right of the Android runtime window):
This menu is handled as follows in the [MainActivity] activity:
  @Override
  public boolean onCreateOptionsMenu(Menu menu) {
    // Inflate the menu; this adds items to the action bar if it is present.
    getMenuInflater().inflate(R.menu.menu_main, menu);
    return true;
  }

  @Override
  public boolean onOptionsItemSelected(MenuItem item) {
    // Handle action bar item clicks here. The action bar will
    // automatically handle clicks on the Home/Up button, so long
    // as you specify a parent activity in AndroidManifest.xml.
    int id = item.getItemId();

    //noinspection SimplifiableIfStatement
    if (id == R.id.action_settings) {
      return true;
    }

    return super.onOptionsItemSelected(item);
}
- lines 1–6: this method is called when the system is ready to create the application menu. The input parameter [Menu menu] is an empty menu that does not yet have any options;
- line 4: the file [res / menu / menu_main.xml] is used. The [Menu menu] object passed as a parameter is assigned the menu options defined in this file;
- line 5: it is indicated that the menu has been created;
- lines 8–21: the [onOptionsItemSelected] method is executed as soon as a option in the menu is clicked;
- line 13: the reference of the clicked menu option;
- lines 16–18: if the clicked option is the option with identifier [action_settings], nothing is done and it is indicated that the event has been handled (line 17);
- line 20: the event is passed to the parent class;
To better see what happens with this menu, we add logs to the previous code:
  @Override
  public boolean onCreateOptionsMenu(Menu menu) {
    Log.d("menu", "création menu en cours");
    // Inflate the menu; this adds items to the action bar if it is present.
    getMenuInflater().inflate(R.menu.menu_main, menu);
    return true;
  }

  @Override
  public boolean onOptionsItemSelected(MenuItem item) {
    Log.d("menu", "onOptionsItemSelected");
    // Handle action bar item clicks here. The action bar will
    // automatically handle clicks on the Home/Up button, so long
    // as you specify a parent activity in AndroidManifest.xml.
    int id = item.getItemId();

    //noinspection SimplifiableIfStatement
    if (id == R.id.action_settings) {
      Log.d("menu", "action_settings selected");
      return true;
    }
    // parent
    return super.onOptionsItemSelected(item);
}
1.7.4.4. The floating button
The generated view has a floating button:
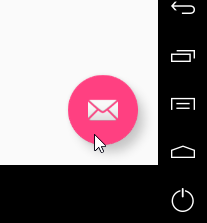
This component is defined in the main view [activity-main.xml]:
  <android.support.design.widget.FloatingActionButton
    android:id="@+id/fab"
    android:layout_width="wrap_content"
    android:layout_height="wrap_content"
    android:layout_gravity="end|bottom"
    android:layout_margin="@dimen/fab_margin"
android:src="@android:drawable/ic_dialog_email"/>
Line 7 references an image provided by Android support, that of an envelope.
This component is handled in the [MainActivity] class as follows:
    // floating button
    FloatingActionButton fab = (FloatingActionButton) findViewById(R.id.fab);
    fab.setOnClickListener(new View.OnClickListener() {
      @Override
      public void onClick(View view) {
        Snackbar.make(view, "Replace with your own action", Snackbar.LENGTH_LONG)
          .setAction("Action", null).show();
      }
});
- line 2: retrieve the reference to the floating button in the view associated with the activity (activity_main);
- lines 3–9: we associate a handler with it to handle clicks on it;
- line 6: the [Snackbar] class allows you to display ephemeral messages on the view using its [Snackbar.make] method. The first argument is a view from which [Snackbar] will search for a parent view in which to display the message. Here, [view] is the view of the clicked envelope (line 5). The parent view that will be found is the [activity_main] view. The second argument is the message to display. The third argument is the display duration (SHORT or LONG);
- line 7: you can click on the displayed message to trigger an action. Here, no action is associated with clicking the message. Finally, the [show] method displays the message;
Clicking the floating button produces the following visual result:
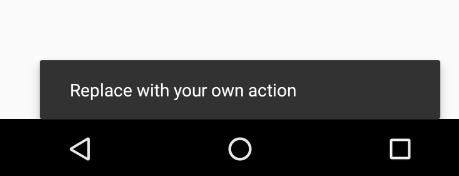
1.7.5. Project Execution
Now that we have explained the details of the generated code, we can better understand how it runs:
When you click on tab #i, fragment #i is displayed in the view container. This is evident from the text displayed in [4]. You can also see that you can switch between tabs by swiping the view to the right or left with the mouse. We will see that this behavior can be controlled.
When you click on the option menu item in [6], you get the following logs:
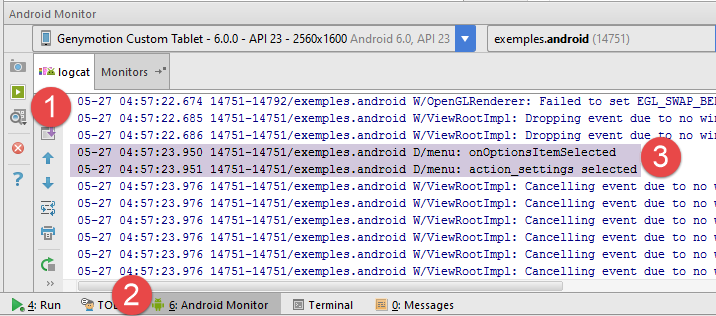
1.7.6. Fragment lifecycle
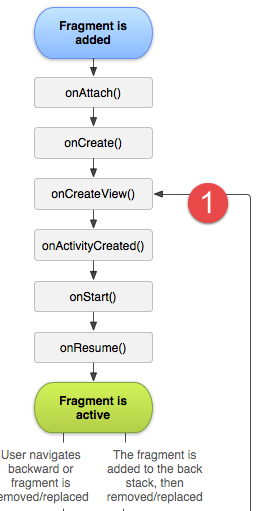
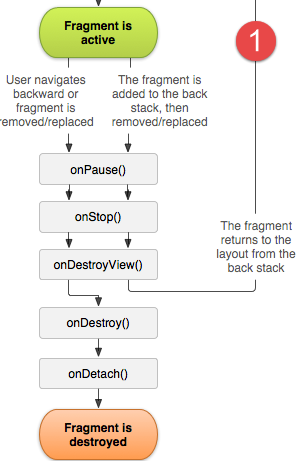
- In [1], we see that the [onCreateView] method and the following ones are executed when the fragment is first displayed and every time the activity needs to redraw it;
To track the lifecycle of the activity and fragments, we add the following logs to the code of [MainActivity]:
// manufacturer
  public MainActivity(){
    Log.d("MainActivity","constructor");
  }

  @Override
  protected void onCreate(Bundle savedInstanceState) {
    Log.d("MainActivity","onCreate");
      // parent
    super.onCreate(savedInstanceState);
...
  }

  // a fragment
  public static class PlaceholderFragment extends Fragment {
    // a text displayed in the fragment
    private static final String ARG_SECTION_NUMBER = "section_number";

    public PlaceholderFragment() {
      Log.d("PlaceholderFragment", "constructor");
    }

    // renders a fragment with one piece of information: the fragment number passed as a parameter
    public static PlaceholderFragment newInstance(int sectionNumber) {
      Log.d("PlaceholderFragment", String.format("newInstance %s", sectionNumber));
      // fragment
      PlaceholderFragment fragment = new PlaceholderFragment();
      ...
    }

    @Override
    public View onCreateView(LayoutInflater inflater, ViewGroup container,
                             Bundle savedInstanceState) {
      Log.d("PlaceholderFragment", String.format("newInstance %s", getArguments().getInt(ARG_SECTION_NUMBER)));
      ...
    }
  }


}
We run the project again. The first logs are as follows:
- line 1: creating the activity;
- line 2: execution of its method [onCreate];
- lines 3-4: instantiating fragment #1;
- lines 5-6: instantiating fragment #2;
- line 7: initializing fragment #2;
- line 8: initialization of fragment #1;
- line 9: creation of the activity menu;
Here, it is important to recall the code responsible for creating the fragments:
  // the fragment manager
  // it is used to request fragments to be displayed in the main view
  // must define methods [getItem] and [getCount] - the others are optional
  public class SectionsPagerAdapter extends FragmentPagerAdapter {

    public SectionsPagerAdapter(FragmentManager fm) {
      super(fm);
    }

    // fragment n° position
    @Override
    public Fragment getItem(int position) {
      // instantiate a fragment [PlaceHolder] and render it
      return PlaceholderFragment.newInstance(position + 1);
    }
...
- lines 11-15: a fragment is instantiated by [newInstance] whenever the fragment container requests one;
The logs above show that the first two fragments have been instantiated and initialized.
Now, let’s click on tab #2. The new logs are as follows:
- lines 1-3: fragment #3 is instantiated and initialized. Remember that fragment #2 is the one being displayed;
Now, let’s click on tab #3. There are no logs here. This is likely because fragment #3, which is to be displayed, had already been instantiated. Now, let’s return to tab #1. The logs are as follows:
Fragment #1 is not instantiated again, but its method [onCreateView] is executed again. This behavior occurs for the other two fragments as well.
From these logs, we can conclude that:
- the activity was instantiated and then initialized once;
- each fragment was instantiated once;
- the [onCreateView] method of each fragment was executed multiple times;
What you need to know—and what the logs confirm—is that by default, when fragment #i is displayed, fragments i-1 and i+1 are instantiated, if they are not already. This explains, for example, why at startup, when fragment #1 needs to be displayed, fragments 1 and 2 are the ones that have been instantiated and initialized. What the logs also show is that the [getItem(i)] method is called only once, even if fragment #i is displayed multiple times. Thus, it appears that the fragment container [ViewPager], which is supposed to display fragment #i, requests it once from the fragment manager [SectionsPagerAdapter]. After that, it does not request it again and continues to use the one it obtained.
Finally, the logs provide information about the fragments’ method [onCreateView]:
- at startup, fragments 1 and 2 were instantiated and their [onCreateView] method executed;
- when switching from fragment 1 to fragment 2, fragment 2’s [onCreateView] method is not re-executed. Therefore, it cannot be used to update fragment 2. However, the user may have performed an operation with fragment 1 whose result should be displayed by fragment 2. We see that the [onCreateView] method cannot be used to update fragment 2. Another solution must be found;
1.8. Example-07: Example-06 rewritten using the [AA] library
1.8.1. Creating the project
We will duplicate the [Exemple-06] project into [Exemple-07] to add Android annotations to the latter. To do this, follow the procedure in the section 1.4 . We obtain the following result:
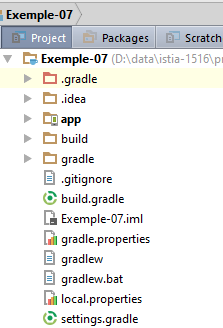
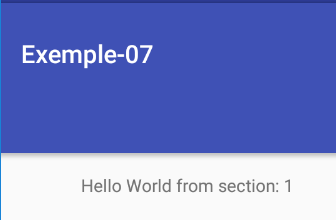
1.8.2. Gradle Configuration
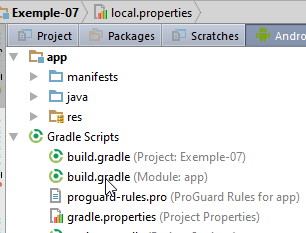
We update the [build.gradle] file as follows:
buildscript {
  repositories {
    mavenCentral()
  }
  dependencies {
    // Since Android's Gradle plugin 0.11, you have to use android-apt >= 1.3
    classpath 'com.neenbedankt.gradle.plugins:android-apt:1.8'
  }
}

apply plugin: 'com.android.application'
apply plugin: 'android-apt'

android {
  compileSdkVersion 23
  buildToolsVersion "23.0.3"
  defaultConfig {
    applicationId "exemples.android"
    minSdkVersion 15
    targetSdkVersion 23
    versionCode 1
    versionName "1.0"
  }
  buildTypes {
    release {
      minifyEnabled false
      proguardFiles getDefaultProguardFile('proguard-android.txt'), 'proguard-rules.pro'
    }
  }
}

def AAVersion = '4.0.0'
dependencies {
  apt "org.androidannotations:androidannotations:$AAVersion"
  compile "org.androidannotations:androidannotations-api:$AAVersion"
  compile 'com.android.support:appcompat-v7:23.4.0'
  compile 'com.android.support:design:23.4.0'
  compile fileTree(dir: 'libs', include: ['*.jar'])
  testCompile 'junit:junit:4.12'
}
We have added the configuration required to use the [Android Annotations] library (see section 1.4 ).
1.8.3. Adding the first AA annotations
We will create AA annotations in [MainActivity]:
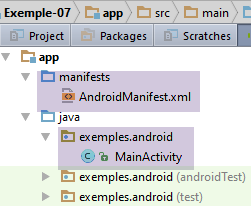
The [MainActivity] class changes as follows:
@EActivity(R.layout.activity_main)
public class MainActivity extends AppCompatActivity {

  // the fragment manager
  private SectionsPagerAdapter mSectionsPagerAdapter;

  // the fragment container
  @ViewById(R.id.container)
  protected MyPager mViewPager;
  // the tab manager
  @ViewById(R.id.tabs)
  protected TabLayout tabLayout;
  // the floating button
  @ViewById(R.id.fab)
  protected FloatingActionButton fab;


  // manufacturer
  public MainActivity() {
    Log.d("MainActivity", "constructor");
  }

  @AfterViews
  protected void afterViews() {
    Log.d("MainActivity", "afterViews");

    // toolbar
    Toolbar toolbar = (Toolbar) findViewById(R.id.toolbar);
    setSupportActionBar(toolbar);

    // the fragment manager
    mSectionsPagerAdapter = new SectionsPagerAdapter(getSupportFragmentManager());

    // the fragment container is associated with the fragment manager
    // i.e. fragment no. i in the fragment container is fragment no. i issued by the fragment manager
    mViewPager.setAdapter(mSectionsPagerAdapter);

    // the tab bar is also associated with the fragment container
    // i.e. tab n° i displays fragment n° i of the container
    tabLayout.setupWithViewPager(mViewPager);

    // floating button
    fab.setOnClickListener(new View.OnClickListener() {
      @Override
      public void onClick(View view) {
        Snackbar.make(view, "Replace with your own action", Snackbar.LENGTH_LONG)
          .setAction("Action", null).show();
      }
    });
  }
- line 1: the annotation [@EActivity] makes [MainActivity] a class managed by AA. Its parameter [R.layout.activity_main] is the identifier of the view [activity_main.xml] associated with the activity;
- lines 11-12: the component identified by [R.id.tabs] is injected into the field [tabLayout]. This is the tab manager;
- lines 14–15: The component identified by [R.id.fab] is injected into the field [fab]. This is the floating button;
- lines 23–50: the code that was previously in the [onCreate] method is moved to a method with an arbitrary name but annotated by [@AfterViews] (line 23). In the method annotated in this way, we can be sure that all visual interface components annotated by [@ViewById] have been initialized;
- we have also added logs to view the activity’s lifecycle;
Recall that the annotation [@EActivity] will generate a class [MainActivity_], which will be the actual activity of the project. Therefore, the file [AndroidManifest.xml] must be modified as follows:
<?xml version="1.0" encoding="utf-8"?>
<manifest xmlns:android="http://schemas.android.com/apk/res/android"
          package="exemples.android">

  <application
    android:allowBackup="true"
    android:icon="@mipmap/ic_launcher"
    android:label="@string/app_name"
    android:supportsRtl="true"
    android:theme="@style/AppTheme">
    <activity
      android:name=".MainActivity_"
      android:label="@string/app_name"
      android:theme="@style/AppTheme.NoActionBar">
      <intent-filter>
        <action android:name="android.intent.action.MAIN"/>

        <category android:name="android.intent.category.LAUNCHER"/>
      </intent-filter>
    </activity>
  </application>

</manifest>
- Line 12: the new activity.
At this point, run the project again and verify that you still get the interface with tabs.
1.8.4. Rewriting the fragments
We will review the project’s fragment management. For now, the [PlaceholderFragment] class is a static internal class of the [MainActivity] activity. We will return to a more common use case, where fragments are defined in external classes. Additionally, we are introducing the AA annotations for fragments.
The [Exemple-07] project evolves as follows:

Above, we see the class [PlaceholderFragment], which has been moved outside the class [MainActivity]. It is rewritten as follows:
package exemples.android;

import android.os.Bundle;
import android.support.v4.app.Fragment;
import android.util.Log;
import android.view.LayoutInflater;
import android.view.View;
import android.view.ViewGroup;
import android.widget.TextView;
import org.androidannotations.annotations.AfterViews;
import org.androidannotations.annotations.EFragment;
import org.androidannotations.annotations.ViewById;

// a fragment is a view displayed by a fragment container
@EFragment(R.layout.fragment_main)
public class PlaceholderFragment extends Fragment {

  // visual interface component
  @ViewById(R.id.section_label)
  protected TextView textViewInfo;

  // fragment no
  private static final String ARG_SECTION_NUMBER = "section_number";

  // manufacturer
  public PlaceholderFragment() {
    Log.d("PlaceholderFragment", "constructor");
  }

  @AfterViews
  protected void afterViews() {
    Log.d("PlaceholderFragment", String.format("afterViews %s", getArguments().getInt(ARG_SECTION_NUMBER)));
  }


  @Override
  public View onCreateView(LayoutInflater inflater, ViewGroup container,
                           Bundle savedInstanceState) {
    Log.d("PlaceholderFragment", String.format("onCreateView %s", getArguments().getInt(ARG_SECTION_NUMBER)));
    return super.onCreateView(inflater, container, savedInstanceState);
  }

  @Override
  public void onResume() {
    Log.d("PlaceholderFragment", String.format("onResume %s", getArguments().getInt(ARG_SECTION_NUMBER)));
    // parent
    super.onResume();
    // display
    if (textViewInfo != null) {
      Log.d("PlaceholderFragment", String.format("onResume setText %s", getArguments().getInt(ARG_SECTION_NUMBER)));
      textViewInfo.setText(getString(R.string.section_format, getArguments().getInt(ARG_SECTION_NUMBER)));
    }
  }
}
- line 15: the fragment is annotated with the annotation [@EFragment], whose parameter is the identifier of the view XML associated with the fragment, in this case the view [fragment_main.xml];
- lines 19–20: insert into the [textViewInfo] field the reference of the [fragment_main.xml] component identified by [R.id.section_label], which is of type [TextView] (line (l) below):
<RelativeLayout xmlns:android="http://schemas.android.com/apk/res/android"
                xmlns:tools="http://schemas.android.com/tools"
                android:layout_width="match_parent"
                android:layout_height="match_parent"
                android:paddingLeft="@dimen/activity_horizontal_margin"
                android:paddingRight="@dimen/activity_horizontal_margin"
                android:paddingTop="@dimen/activity_vertical_margin"
                android:paddingBottom="@dimen/activity_vertical_margin"
                tools:context="exemples.android.MainActivity$PlaceholderFragment">

  <TextView
    android:id="@+id/section_label"
    android:layout_width="wrap_content"
    android:layout_height="wrap_content"/>

</RelativeLayout>
- lines 42–52: The [onResume] method is executed before the view associated with the fragment is displayed. It can be used to update the user interface that will be displayed;
- line 47: you must call the method of the same name in the parent class;
- line 49: there is uncertainty as to whether the [onResume] method can be executed before the field on line 20 is initialized. The logs set up to track the fragment’s lifecycle will tell us. For now, as a precaution, we perform a null check;
- line 51: we update the information in the [textViewInfo] field with the integer argument passed to the fragment during its creation;
The [MainActivity] class loses its internal [PlaceholderFragment] class and sees its fragment manager evolve as follows:
public class SectionsPagerAdapter extends FragmentPagerAdapter {

    // fragments
    private Fragment[] fragments;
    // number of fragments
    private static final int FRAGMENTS_COUNT = 3;
    // fragment no
    private static final String ARG_SECTION_NUMBER = "section_number";

    // manufacturer
    public SectionsPagerAdapter(FragmentManager fm) {
      // parent
      super(fm);
      // initialization of fragment table
      fragments = new Fragment[FRAGMENTS_COUNT];
      for (int i = 0; i < fragments.length; i++) {
        // create a fragment
        fragments[i] = new PlaceholderFragment_();
        // you can pass arguments to the
        Bundle args = new Bundle();
        args.putInt(ARG_SECTION_NUMBER, i + 1);
        fragments[i].setArguments(args);
      }
    }

    // fragment n° position
    @Override
    public Fragment getItem(int position) {
        Log.d("MainActivity", String.format("getItem[%s]", position));
      return fragments[position];
    }

    // makes the number of fragments managed
    @Override
    public int getCount() {
      return fragments.length;
    }

    // optional - gives a title to managed fragments
    @Override
    public CharSequence getPageTitle(int position) {
      return String.format("Onglet n° %s", (position + 1));
    }
  }
- line 4: the fragments are placed in an array;
- lines 16–23: the fragment array is initialized in the constructor. They are of type [PlaceholderFragment_] (line 18) and not [PlaceholderFragment]. The [PlaceholderFragment] class has in fact been annotated with a AA annotation and will give rise to a [PlaceholderFragment_] class derived from [PlaceholderFragment], and it is this class that the activity must use. Each created fragment is passed an integer argument that will be displayed by the fragment;
- lines 42–45: we have changed the fragment titles. Since these are also the tab titles, we should see a change in the tab bar;
Let’s compile [Make] and [1] into this project:
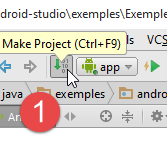
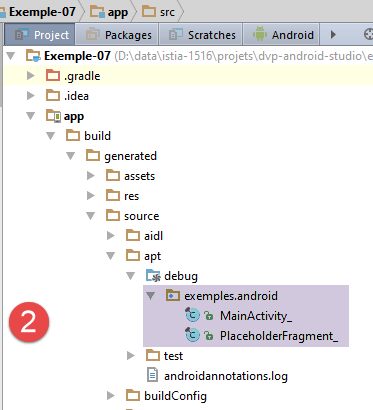
- in [2], we see that the classes generated by the AA library are located in the [app / build / generated / source / apt / debug] folder (you must be in the [Project] perspective to see [2]);
Run the [Exemple-07] project and verify that it still works.
1.8.5. Reviewing the logs
When the application is launched, the logs are as follows:
- line 1: building the single activity;
- line 2: activity method [afterViews]: its fields annotated by [@ViewById] are initialized;
- lines 3–5: construction of the three fragments;
- lines 6-7: the fragment container [ViewPager] requests the first two fragments;
- lines 8-9: methods of fragment 2;
- lines 10-11: methods of fragment 1;
- lines 12-13: method [onResume] of fragment 1;
- lines 14-15: method [onResume] of fragment 2;
- line 16: creation of the activity menu;
Note that this answers a question raised earlier: the method [onResume] from fragment 1, for example (line 12), executes after the method [afterViews] from the fragment (line 11). Therefore, when the [onResume] method executes, it can use the fields annotated by [@ViewById]. We can now write the [onResume] method as follows:
  @Override
  public void onResume() {
    Log.d("PlaceholderFragment", String.format("onResume %s", getArguments().getInt(ARG_SECTION_NUMBER)));
    // parent
    super.onResume();
    // display
    textViewInfo.setText(getString(R.string.section_format, getArguments().getInt(ARG_SECTION_NUMBER)));
}
Now let's switch from tab 1 to tab 2. The new logs are as follows:
- line 1: the fragment container [ViewPager] requests fragment #3;
- lines 2-3: methods of fragment #3. Recall that this fragment was instantiated when the application started;
- lines 4-5: the [onResume] method of fragment #3 is executed. Note that fragment #2 is currently displayed;
Now let’s switch from tab 2 to tab 3. There is no log. Therefore, none of the [onCreateView, afterViews, onResume] methods of fragment #3 are executed. It correctly displays the text [Hello World from section:3] solely because this text had already been created in the previous step when displaying fragment #2. Recall that at that step, the method [onResume] from fragment #3 had been executed. We can see here that, just like the [onCreateView] method, the [onResume] method cannot be used to update fragment 3. If it had been necessary to change the text displayed by the fragment, neither of these two methods could have done so.
Now, let’s return from tab #3 to tab #1. The logs are as follows:
We can see that all methods in fragment 1 have been executed. We can see that the method getItem was not called. As mentioned, this method is called only once for each fragment;
Now, let’s switch from tab 1 to the adjacent tab 2. We get the following logs:
Surprising, isn’t it? All methods of fragment #3 are re-executed.
To understand these phenomena, remember that by default, when the fragment container displays fragment i, it initializes fragments i-1, i, and i+1. Let’s review the logs in light of this information.
First, the logs when the app starts:
Because the fragment container will display fragment 1, fragments 1 and 2 are initialized (lines 8–15).
We now switch from tab 1 to tab 2:
Because the fragment container will display fragment 2, fragments 1, 2, and 3 must be initialized. Fragments 1 and 2 have already been initialized in the previous step. Fragment 3 is initialized in lines 2–5.
We switch from tab 2 to tab 3. There are no logs. Because the fragment container will display fragment 3, fragments 2 and 3 must be initialized. However, since the previous step, they already are. What we don’t see here is that fragment 1, which is not adjacent to fragment 3, loses its state, which is not retained in memory.
We switch from tab 3 to tab 1. The logs are as follows:
Because the fragment container will display fragment 1, fragment 2 must also be initialized. It has been initialized since the previous step. In that same step, the state of fragment 1 was lost. It is therefore reset in lines 1–4. What we don’t see here is that fragment 3, which is not adjacent to fragment 1, loses its state, which is then not retained in memory.
When switching from tab 1 to the adjacent tab 2, we get the following logs:
Because the fragment container will display fragment 2, fragments 1, 2, and 3 must be initialized. Fragments 1 and 2 have already been initialized in the previous step. Fragment 3 is initialized in lines 1–4.
What have we learned?
- that the default fragment management is very specific and you need to understand it if you don’t want to pull your hair out. You can change this management mode, and we’ll do that a little later;
- that with this default handling, none of the [onCreateView, onResume] methods can be used to update the fragment that will be displayed because we cannot be sure they will be executed;
1.8.6. onDestroyView
The [onDestroyView] method is part of the fragment lifecycle (see section 1.7.6 ):
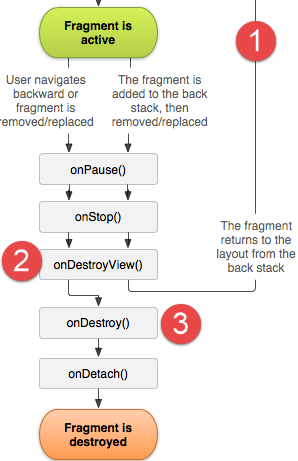
We can see that in a fragment’s lifecycle:
- the [onCreateView] method can be executed multiple times;
- before returning to the [onCreateView] method later, there is necessarily a call to the [onDestroyView] and [2] methods;
We will insert these methods into the fragments to better track their lifecycle. The fragment code becomes the following:
package exemples.android;

import android.os.Bundle;
import android.support.v4.app.Fragment;
import android.util.Log;
import android.view.LayoutInflater;
import android.view.View;
import android.view.ViewGroup;
import android.widget.TextView;
import org.androidannotations.annotations.AfterViews;
import org.androidannotations.annotations.EFragment;
import org.androidannotations.annotations.ViewById;

// a fragment is a view displayed by a fragment container
@EFragment(R.layout.fragment_main)
public class PlaceholderFragment extends Fragment {

...

  @Override
  public void onDestroyView() {
    // log
    Log.d("PlaceholderFragment", String.format("onDestroyView %s", getArguments().getInt(ARG_SECTION_NUMBER)));
    // parent
    super.onDestroyView();
  }

}
Let's run the app. The first logs are as follows:
- line 1: building the single activity;
- line 2: [afterViews] method of the activity: its fields annotated by [@ViewById] are initialized;
- lines 3–5: construction of the three fragments;
- lines 6-7: the fragment container [ViewPager] requests the first two fragments;
- lines 8-9: the view for fragment 2 is created (not necessarily made visible);
- lines 10-11: the view for fragment 1 is created (not necessarily made visible);
- lines 12–13: method [onResume] of fragment 1;
- lines 14-15: method [onResume] of fragment 2;
- line 16: creation of the activity menu;
Let’s switch from tab 1 to tab 3:
06-03 02:50:02.685 2346-2346/exemples.android D/MainActivity: getItem[2]
06-03 02:50:02.685 2346-2346/exemples.android D/PlaceholderFragment: onCreateView 3
06-03 02:50:02.686 2346-2346/exemples.android D/PlaceholderFragment: afterViews 3
06-03 02:50:02.686 2346-2346/exemples.android D/PlaceholderFragment: onResume 3
06-03 02:50:02.686 2346-2346/exemples.android D/PlaceholderFragment: onResume setText 3
06-03 02:50:03.024 2346-2346/exemples.android D/PlaceholderFragment: onDestroyView 1
- line 1: the fragment container requests the 3rd fragment;
- lines 2-3: the view for fragment 3 is created (not necessarily displayed);
- lines 4-5: fragment 3’s [onResume] method is executed;
- line 6: fragment 1’s [onDestroyView] method is executed. This means that when the user returns to fragment 1 or an adjacent fragment, this fragment’s lifecycle will be re-executed;
Returning from tab 3 to tab 1:
06-03 02:53:46.255 2346-2346/exemples.android D/PlaceholderFragment: onCreateView 1
06-03 02:53:46.256 2346-2346/exemples.android D/PlaceholderFragment: afterViews 1
06-03 02:53:46.256 2346-2346/exemples.android D/PlaceholderFragment: onResume 1
06-03 02:53:46.256 2346-2346/exemples.android D/PlaceholderFragment: onResume setText 1
06-03 02:53:46.604 2346-2346/exemples.android D/PlaceholderFragment: onDestroyView 3
- lines 1-4: the lifecycle of fragment 1 is re-executed because it underwent a [onDestroyView];
- line 5: fragment 3’s [onDestroyView] method is now executed. Again, when the user returns to fragment 3 or an adjacent fragment, this fragment’s lifecycle will be re-executed;
1.8.7. setUserVisibleHint
The [onCreateView] method of the lifecycle instantiates the view associated with the fragment but does not necessarily make it visible. That is what we will look at now. The [Fragment.setUserVisibleHint] method is executed every time the fragment’s visibility changes. We add this method to the fragment’s code:
package exemples.android;

....

// a fragment is a view displayed by a fragment container
@EFragment(R.layout.fragment_main)
public class PlaceholderFragment extends Fragment {

  // visual interface component
  @ViewById(R.id.section_label)
  protected TextView textViewInfo;

  ...

  @Override
  public void setUserVisibleHint(boolean isVisibleToUser) {
    // log
    Log.d("PlaceholderFragment", String.format("setUserVisibleHint %s isVisibleToUser=%s", getArguments().getInt(ARG_SECTION_NUMBER), isVisibleToUser));
  }
}
At startup, the logs are as follows:
06-03 03:06:13.263 20586-20586/exemples.android D/MainActivity: constructor
06-03 03:06:13.291 20586-20586/exemples.android D/MainActivity: afterViews
06-03 03:06:13.324 20586-20586/exemples.android D/PlaceholderFragment: constructor
06-03 03:06:13.324 20586-20586/exemples.android D/PlaceholderFragment: constructor
06-03 03:06:13.329 20586-20586/exemples.android D/PlaceholderFragment: constructor
06-03 03:06:13.504 20586-20586/exemples.android D/MainActivity: getItem[0]
06-03 03:06:13.504 20586-20586/exemples.android D/PlaceholderFragment: setUserVisibleHint 1 isVisibleToUser=false
06-03 03:06:13.504 20586-20586/exemples.android D/MainActivity: getItem[1]
06-03 03:06:13.504 20586-20586/exemples.android D/PlaceholderFragment: setUserVisibleHint 2 isVisibleToUser=false
06-03 03:06:13.504 20586-20586/exemples.android D/PlaceholderFragment: setUserVisibleHint 1 isVisibleToUser=true
06-03 03:06:13.511 20586-20586/exemples.android D/PlaceholderFragment: onCreateView 1
06-03 03:06:13.519 20586-20586/exemples.android D/PlaceholderFragment: afterViews 1
06-03 03:06:13.519 20586-20586/exemples.android D/PlaceholderFragment: onResume 1
06-03 03:06:13.519 20586-20586/exemples.android D/PlaceholderFragment: onResume setText 1
06-03 03:06:13.520 20586-20586/exemples.android D/PlaceholderFragment: onCreateView 2
06-03 03:06:13.527 20586-20586/exemples.android D/PlaceholderFragment: afterViews 2
06-03 03:06:13.527 20586-20586/exemples.android D/PlaceholderFragment: onResume 2
06-03 03:06:13.527 20586-20586/exemples.android D/PlaceholderFragment: onResume setText 2
06-03 03:06:15.075 20586-20586/exemples.android D/menu: création menu en cours
- The logs for lines 7, 9–10 show that only Fragment 1 becomes visible. We can also see that it becomes visible before its [onCreateView] method is executed;
Let’s switch from tab 1 to tab 2:
06-03 03:10:15.215 20586-20586/exemples.android D/MainActivity: getItem[2]
06-03 03:10:15.215 20586-20586/exemples.android D/PlaceholderFragment: setUserVisibleHint 3 isVisibleToUser=false
06-03 03:10:15.215 20586-20586/exemples.android D/PlaceholderFragment: setUserVisibleHint 1 isVisibleToUser=false
06-03 03:10:15.215 20586-20586/exemples.android D/PlaceholderFragment: setUserVisibleHint 2 isVisibleToUser=true
06-03 03:10:15.215 20586-20586/exemples.android D/PlaceholderFragment: onCreateView 3
06-03 03:10:15.215 20586-20586/exemples.android D/PlaceholderFragment: afterViews 3
06-03 03:10:15.216 20586-20586/exemples.android D/PlaceholderFragment: onResume 3
06-03 03:10:15.216 20586-20586/exemples.android D/PlaceholderFragment: onResume setText 3
- Fragment 1 is hidden (line 3), Fragment 2 is displayed (line 4);
Let’s switch from tab 2 to tab 3:
06-03 03:12:06.238 20586-20586/exemples.android D/PlaceholderFragment: setUserVisibleHint 2 isVisibleToUser=false
06-03 03:12:06.238 20586-20586/exemples.android D/PlaceholderFragment: setUserVisibleHint 3 isVisibleToUser=true
06-03 03:12:06.239 20586-20586/exemples.android D/PlaceholderFragment: onDestroyView 1
- Fragment 2 is hidden (line 1), Fragment 3 is displayed (line 2);
Let's go back to tab 1:
06-03 03:13:10.427 20586-20586/exemples.android D/PlaceholderFragment: setUserVisibleHint 1 isVisibleToUser=false
06-03 03:13:10.427 20586-20586/exemples.android D/PlaceholderFragment: setUserVisibleHint 3 isVisibleToUser=false
06-03 03:13:10.427 20586-20586/exemples.android D/PlaceholderFragment: setUserVisibleHint 1 isVisibleToUser=true
06-03 03:13:10.427 20586-20586/exemples.android D/PlaceholderFragment: onCreateView 1
06-03 03:13:10.427 20586-20586/exemples.android D/PlaceholderFragment: afterViews 1
06-03 03:13:10.427 20586-20586/exemples.android D/PlaceholderFragment: onResume 1
06-03 03:13:10.427 20586-20586/exemples.android D/PlaceholderFragment: onResume setText 1
06-03 03:13:10.789 20586-20586/exemples.android D/PlaceholderFragment: onDestroyView 3
- Fragment 3 is hidden (line 2), Fragment 1 is displayed (line 3);
What have we learned?
- The [setUserVisibleHint] method is executed once with the [isVisibleToUser] property set to true, for the fragment that is about to be displayed;
- It is not possible to determine when this method will be executed in relation to the fragment's lifecycle. Thus, for fragment 1, the method [setUserVisibleHint, true] was executed before the method [onCreateView] at the beginning of this fragment’s lifecycle, whereas for fragments 2 and 3, the opposite occurred;
1.8.8. setOffscreenPageLimit
The previous logs show that when the fragment container [ViewPager] is about to display fragment No. i, it executes, if not already done, the lifecycle of the adjacent fragments i-1 and i+1. This behavior can be controlled by the method [ViewPager].setOffscreenPageLimit:
With the above instruction,
- when the fragment container [ViewPager] is about to display fragment #i, it executes, if not already done, the lifecycle of the adjacent fragments in the range [i-n, i+n];
- if fragment j is then displayed:
- the same phenomenon occurs for the adjacent fragments in the interval [j-n, j+n];
- the fragments initialized in step 1 that are no longer in the [j-n, j+n] adjacency of the new fragment may then undergo a [onDestroyView] operation. However, I have observed in other applications, notably the one in the chapter 3 , that this was not always the case;
We modify the [MainActivity.afterViews] method as follows:
  @AfterViews
  protected void afterViews() {
    Log.d("MainActivity", "afterViews");

    // toolbar
    Toolbar toolbar = (Toolbar) findViewById(R.id.toolbar);
    setSupportActionBar(toolbar);

    // the fragment manager
    mSectionsPagerAdapter = new SectionsPagerAdapter(getSupportFragmentManager());

    // the fragment container is associated with the fragment manager
    // i.e. fragment no. i in the fragment container is fragment no. i issued by the fragment manager
    mViewPager.setAdapter(mSectionsPagerAdapter);

    // inhibit swiping between fragments
    mViewPager.setSwipeEnabled(false);

    // fragment offset
    mViewPager.setOffscreenPageLimit(mSectionsPagerAdapter.getCount() - 1);

    // the tab bar is also associated with the fragment container
    // i.e. tab n° i displays fragment n° i of the container
    tabLayout.setupWithViewPager(mViewPager);

    // floating button
    fab.setOnClickListener(new View.OnClickListener() {
      @Override
      public void onClick(View view) {
        Snackbar.make(view, "Replace with your own action", Snackbar.LENGTH_LONG)
          .setAction("Action", null).show();
      }
    });
}
- Line 20: We set the number of adjacent fragments to initialize to the total number of fragments minus one. Thus, at startup, when the fragment container displays fragment #1, it will simultaneously initialize fragments 2, 3, ..., n where n = 1 + mSectionsPagerAdapter.getCount() - 1=mSectionsPagerAdapter.getCount()). These are therefore all the fragments that will be initialized. When the display window moves to another fragment, the fragment container:
- will discover that all fragments adjacent to the new fragment are already initialized and will therefore not initialize them;
- since the new fragment’s adjacency also covers all fragments, none will be “deinitialized” by the fragment container;
In total, we should see all fragments instantiated and initialized when the application starts and then never again. This is what we will now verify by examining the logs.
At startup, we have the following logs:
- lines 4-6: construction of the three fragments;
- lines 7, 9, 11: the fragment container requests the three fragments. In the previous version, it requested two;
- lines 14-25: the lifecycle of the three fragments runs;
Now let’s switch from tab 1 to tab 2:
Let's switch from tab 2 to tab 3:
Then from tab 3 to tab 1:
The logs confirm the theory. All fragments were instantiated and initialized at startup. After that, their lifecycle methods are no longer executed. This is a very predictable behavior of fragments, which makes them much easier to use.
What we want to find is a way to update a fragment that is about to be displayed, regardless of the fragment adjacency chosen by the developer. The logs have shown us two things:
- the [setUserVisibleHint, true] method is always executed for the fragment that is about to be displayed, but not for the others;
- this event can occur before or after the fragment’s lifecycle. This depends on the fragment adjacency chosen by the developer. This is a problem because if the lifecycle has not yet occurred, it means the fragment cannot be updated by the [setUserVisibleHint, true] method;
The logs at application startup when the fragment adjacency was 1 were as follows:
06-03 03:06:13.263 20586-20586/exemples.android D/MainActivity: constructor
06-03 03:06:13.291 20586-20586/exemples.android D/MainActivity: afterViews
06-03 03:06:13.324 20586-20586/exemples.android D/PlaceholderFragment: constructor
06-03 03:06:13.324 20586-20586/exemples.android D/PlaceholderFragment: constructor
06-03 03:06:13.329 20586-20586/exemples.android D/PlaceholderFragment: constructor
06-03 03:06:13.504 20586-20586/exemples.android D/MainActivity: getItem[0]
06-03 03:06:13.504 20586-20586/exemples.android D/PlaceholderFragment: setUserVisibleHint 1 isVisibleToUser=false
06-03 03:06:13.504 20586-20586/exemples.android D/MainActivity: getItem[1]
06-03 03:06:13.504 20586-20586/exemples.android D/PlaceholderFragment: setUserVisibleHint 2 isVisibleToUser=false
06-03 03:06:13.504 20586-20586/exemples.android D/PlaceholderFragment: setUserVisibleHint 1 isVisibleToUser=true
06-03 03:06:13.511 20586-20586/exemples.android D/PlaceholderFragment: onCreateView 1
06-03 03:06:13.519 20586-20586/exemples.android D/PlaceholderFragment: afterViews 1
06-03 03:06:13.519 20586-20586/exemples.android D/PlaceholderFragment: onResume 1
06-03 03:06:13.519 20586-20586/exemples.android D/PlaceholderFragment: onResume setText 1
06-03 03:06:13.520 20586-20586/exemples.android D/PlaceholderFragment: onCreateView 2
06-03 03:06:13.527 20586-20586/exemples.android D/PlaceholderFragment: afterViews 2
06-03 03:06:13.527 20586-20586/exemples.android D/PlaceholderFragment: onResume 2
06-03 03:06:13.527 20586-20586/exemples.android D/PlaceholderFragment: onResume setText 2
06-03 03:06:15.075 20586-20586/exemples.android D/menu: création menu en cours
- We can see that when fragment 1 becomes visible, its view has not yet been created. Therefore, we cannot interact with it. This can be done during the fragment’s lifecycle, for example in the methods [onCreateView] (line 11) or [onResume] (lines 13–14). Since we are using the annotations AA, we normally do not need to write the method [onCreateView]. Therefore, the method [onResume] seems to be the most suitable here for updating fragment 1;
When we switched from tab 1 to tab 2, the logs were as follows:
06-03 03:10:15.215 20586-20586/exemples.android D/MainActivity: getItem[2]
06-03 03:10:15.215 20586-20586/exemples.android D/PlaceholderFragment: setUserVisibleHint 3 isVisibleToUser=false
06-03 03:10:15.215 20586-20586/exemples.android D/PlaceholderFragment: setUserVisibleHint 1 isVisibleToUser=false
06-03 03:10:15.215 20586-20586/exemples.android D/PlaceholderFragment: setUserVisibleHint 2 isVisibleToUser=true
06-03 03:10:15.215 20586-20586/exemples.android D/PlaceholderFragment: onCreateView 3
06-03 03:10:15.215 20586-20586/exemples.android D/PlaceholderFragment: afterViews 3
06-03 03:10:15.216 20586-20586/exemples.android D/PlaceholderFragment: onResume 3
06-03 03:10:15.216 20586-20586/exemples.android D/PlaceholderFragment: onResume setText 3
This time, we only have the [setUserVisibleHint, true] method on line 4 to update fragment 2;
When we switched from tab 2 to tab 3, the logs were as follows:
06-03 03:12:06.238 20586-20586/exemples.android D/PlaceholderFragment: setUserVisibleHint 2 isVisibleToUser=false
06-03 03:12:06.238 20586-20586/exemples.android D/PlaceholderFragment: setUserVisibleHint 3 isVisibleToUser=true
06-03 03:12:06.239 20586-20586/exemples.android D/PlaceholderFragment: onDestroyView 1
Here, we only have the [setUserVisibleHint, true] method on line 2 to update fragment 3;
When we switched from tab 3 to tab 1, the logs were as follows:
06-03 03:13:10.427 20586-20586/exemples.android D/PlaceholderFragment: setUserVisibleHint 1 isVisibleToUser=false
06-03 03:13:10.427 20586-20586/exemples.android D/PlaceholderFragment: setUserVisibleHint 3 isVisibleToUser=false
06-03 03:13:10.427 20586-20586/exemples.android D/PlaceholderFragment: setUserVisibleHint 1 isVisibleToUser=true
06-03 03:13:10.427 20586-20586/exemples.android D/PlaceholderFragment: onCreateView 1
06-03 03:13:10.427 20586-20586/exemples.android D/PlaceholderFragment: afterViews 1
06-03 03:13:10.427 20586-20586/exemples.android D/PlaceholderFragment: onResume 1
06-03 03:13:10.427 20586-20586/exemples.android D/PlaceholderFragment: onResume setText 1
06-03 03:13:10.789 20586-20586/exemples.android D/PlaceholderFragment: onDestroyView 3
Here, you must use the [onResume] method of fragment 1 (lines 6–7) to update fragment 1.
So in this example, we see that to update a fragment that will be displayed, we have two methods available: [setUserVisibleHint] and [onResume].
We will implement this solution in a new project where each fragment must display the number of times it has been displayed, which we will call a visit. We will therefore need to update its display each time it is displayed. This is indeed the problem we are trying to solve.
First, let’s examine the final stage in the life cycle of an activity or fragment: the stage where it is destroyed. The system may decide to remove an activity if other activities with higher priority require resources that are currently unavailable. To free up these resources, the system will take the initiative to remove certain activities. The [onDestroy] method of the activity and fragments will then be called.
1.8.9. OnDestroy
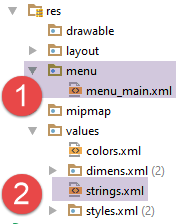
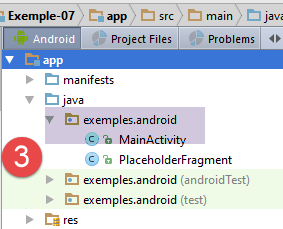
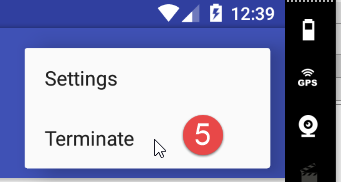
We will allow the user to delete the activity using a option menu item in [5]. To do this, we add a new menu item to the [menu_main.xml] file:
<menu xmlns:android="http://schemas.android.com/apk/res/android"
      xmlns:app="http://schemas.android.com/apk/res-auto"
      xmlns:tools="http://schemas.android.com/tools"
      tools:context="exemples.android.MainActivity">
  <item android:id="@+id/action_settings"
        android:title="@string/action_settings"
        android:orderInCategory="100"
        app:showAsAction="never"/>
  <item android:id="@+id/action_terminate"
        android:title="@string/action_terminate"
        android:orderInCategory="100"
        app:showAsAction="never"/>
</menu>
We simply copy and paste from the first menu option and adapt the result (lines 9 and 10). The label for this new option is added to the [strings.xml] [2] file:
<resources>
  <string name="app_name">Exemple-07</string>
  <string name="action_settings">Settings</string>
  <string name="action_terminate">Terminate</string>
  <string name="section_format">Hello World from section: %1$d</string>
</resources>
Finally, in the [MainActivity] class, we handle the click on the option [Terminate]:
  @Override
  public boolean onOptionsItemSelected(MenuItem item) {
    Log.d("menu", "onOptionsItemSelected");
    // Handle action bar item clicks here. The action bar will
    // automatically handle clicks on the Home/Up button, so long
    // as you specify a parent activity in AndroidManifest.xml.
    int id = item.getItemId();

    //noinspection SimplifiableIfStatement
    if (id == R.id.action_settings) {
      Log.d("menu", "action_settings selected");
      return true;
    }
    if (id == R.id.action_terminate) {
      Log.d("menu", "action_terminate selected");
      //we finish the activity
      finish();
      return true;
    }
    // parent
    return super.onOptionsItemSelected(item);
}
- lines 14–19: copy and paste lines 10–13 and adapt the code to the new option;
- line 17: the activity is terminated by a software action;
Now let’s run this new version, and as soon as the first view is displayed, click on the option menu item in [Terminate]. The logs are then as follows:
- lines 1-2: click on option [Terminate];
- line 4: the [onDestroy] method of the activity is called;
- lines 4-5: the [onDestroyView] method of fragment 1 is called, followed by its [onDestroy] method;
- lines 6–9: this operation is repeated for the other two fragments;
Note that the [onDestroy] method of the activity and fragments is called when the activity is about to be deleted by the system, the developer, or the user. This method can be used to save information—for example, locally on the tablet—so that it can be retrieved when the user restarts the application.
1.9. Example-08: Updating a fragment with variable fragment adjacency
1.9.1. Creating the project
Duplicate the project [Exemple-07] into [Exemple-08]. To do this, follow the procedure described for duplicating [Exemple-02] into [Exemple-03] in the section 1.4 .
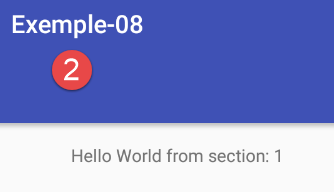
1.9.2. Rewriting fragment [PlaceholderFragment]
The new code for the fragment [PlaceholderFragment] is as follows. It works regardless of the adjacency assigned to the fragments (1, partial, total):
package exemples.android;

import android.support.v4.app.Fragment;
import android.util.Log;
import android.widget.TextView;
import org.androidannotations.annotations.AfterViews;
import org.androidannotations.annotations.EFragment;
import org.androidannotations.annotations.ViewById;

// a fragment is a view displayed by a fragment container
@EFragment(R.layout.fragment_main)
public class PlaceholderFragment extends Fragment {

  // visual interface component
  @ViewById(R.id.section_label)
  protected TextView textViewInfo;
  // data
  private boolean afterViewsDone = false;
  private boolean initDone = false;
  private String text;
  private boolean isVisibleToUser = false;
  private boolean updateDone = false;
  private int numVisit = 0;

  // fragment no
  private static final String ARG_SECTION_NUMBER = "section_number";

  // manufacturer
  public PlaceholderFragment() {
    Log.d("PlaceholderFragment", "constructor");
  }


  @AfterViews
  protected void afterViews() {
    // memory
    afterViewsDone = true;
    // log
    Log.d("PlaceholderFragment", String.format("afterViews %s %s", getArguments().getInt(ARG_SECTION_NUMBER), getInfos()));
    if (!initDone) {
      // initial text
      text = getString(R.string.section_format, getArguments().getInt(ARG_SECTION_NUMBER));
      // init done
      initDone = true;
    }
    // current text display
    textViewInfo.setText(text);
  }


  @Override
  public void setUserVisibleHint(boolean isVisibleToUser) {
...
  }

  @Override
  public void onDestroyView() {
...
  }

  @Override
  public void onResume() {
...
  }

  // update fragment
  public void update() {
    // the work to be done depends on the visit number
    if (numVisit > 1) {
      // log
      Log.d("PlaceholderFragment", String.format("update %s : %s", getArguments().getInt(ARG_SECTION_NUMBER), getInfos()));
      // modified text
      textViewInfo.setText(String.format("%s update(%s)", text, (numVisit - 1)));
    }
  }

  // local info for logs
  private String getInfos() {
    return String.format("numVisit=%s, afterViewsDone=%s, isVisibleToUser=%s, initDone=%s, updateDone=%s", numVisit, afterViewsDone, isVisibleToUser, initDone, updateDone);
  }
}
- lines 34-48: the method [@AfterViews] may be executed multiple times. We used to use it to initialize the fragment’s text (line 42). We still do this, but to ensure it happens only once, we manage a boolean [initDone] (line 44) to indicate that the initialization has been completed and does not need to be repeated;
- lines 56–59: we introduce the method [onDestroyView] to note that the next time the fragment is re-displayed, its lifecycle will be re-executed;
- The logs showed that two methods can be executed after the [@AfterViews] method: the [setUserVisibleHint] and [onResume] methods. The [onResume] method is executed only when the fragment's lifecycle is executed. The [setUserVisibleHint] method, however, is not always executed after the [@AfterViews] method. The logs have shown that at least one of the two is executed after the [@AfterViews] method. The logs have never shown that both could be executed together after the [@AfterViews] method. It is either one or the other. As a precaution, we will set a boolean [updateDone] when an update has been made;
The methods [setUserVisibleHint] and [onResume] are as follows:
  // data
  private boolean afterViewsDone = false;
  private boolean initDone = false;
  private String text;
  private boolean isVisibleToUser = false;
  private boolean updateDone = false;
  private int numVisit = 0;

@Override
  public void setUserVisibleHint(boolean isVisibleToUser) {
    // parent
    super.setUserVisibleHint(isVisibleToUser);
    // memory
    this.isVisibleToUser = isVisibleToUser;
    // log
    Log.d("PlaceholderFragment", String.format("setUserVisibleHint %s : %s", getArguments().getInt(ARG_SECTION_NUMBER), getInfos()));
    // number of visits
    if (isVisibleToUser) {
      // increment
      numVisit++;
      // update fragment
      if (afterViewsDone && !updateDone) {
        update();
        updateDone = true;
      }
    } else {
      // the fragment will be hidden
      updateDone = false;
    }
  }

  @Override
  public void onResume() {
    // parent
    super.onResume();
    // log
    Log.d("PlaceholderFragment", String.format("onResume %s : %s", getArguments().getInt(ARG_SECTION_NUMBER), getInfos()));
    // update
    if (isVisibleToUser && !updateDone) {
      update();
      updateDone = true;
    }
}
- line 14: the fragment's visibility status is stored;
- lines 22–25: if the fragment is visible and the method [@AfterViews] has been executed, the method [update] is executed and the boolean [updateDone] is set to true;
- lines 26–28: if the fragment is going to be hidden, the boolean [updateDone] is set back to false. We need an event to reset the [updateDone] boolean—which is set to true as soon as the [update] method is called—back to false so that new updates can be made. We use the fact that the fragment is no longer visible to do this. When it becomes visible again, the fragment must be updated once more;
- lines 32–42: the logs show that, depending on the adjacency chosen for the fragments, the [onResume] method may execute even though the fragment is not visible. If it is not visible, we do not perform the update (line 39) and, as we did for [setMenuVisibility], we manage the boolean [updateDone].
Finally, the [onDestroyView] method is as follows:
  @Override
  public void onDestroyView() {
    // parent
    super.onDestroyView();
    // indicator update
    afterViewsDone = false;
    // log
    Log.d("PlaceholderFragment", String.format("onDestroyView %s : %s", getArguments().getInt(ARG_SECTION_NUMBER), getInfos()));
}
The [onDestroyView] method is executed when a fragment's lifecycle ends. Another lifecycle may resume later.
- Line 6: The [onDestroyView] method removes any link to the view attached to the fragment. It will be recreated during the fragment’s next lifecycle. For now, we need to set the [afterViews] boolean to false to indicate that the link to the view no longer exists;
We will run the application with 5 fragments having an adjacency of 2. The changes are made in [MainActivity]:
    // number of fragments
  private final int FRAGMENTS_COUNT = 5;
  // fragment adjacency
  private final int OFF_SCREEN_PAGE_LIMIT=2;


  // the fragment manager
  private SectionsPagerAdapter mSectionsPagerAdapter;

   @AfterViews
  protected void afterViews() {
    Log.d("MainActivity", "afterViews");

    ....

    // fragment offset
    mViewPager.setOffscreenPageLimit(OFF_SCREEN_PAGE_LIMIT);

...
}
The startup logs are as follows:
05-31 06:23:07.015 32551-32551/exemples.android D/MainActivity: constructor
05-31 06:23:07.041 32551-32551/exemples.android D/MainActivity: afterViews
05-31 06:23:07.050 32551-32551/exemples.android D/PlaceholderFragment: constructor
05-31 06:23:07.053 32551-32551/exemples.android D/PlaceholderFragment: constructor
05-31 06:23:07.053 32551-32551/exemples.android D/PlaceholderFragment: constructor
05-31 06:23:07.053 32551-32551/exemples.android D/PlaceholderFragment: constructor
05-31 06:23:07.053 32551-32551/exemples.android D/PlaceholderFragment: constructor
05-31 06:23:07.278 32551-32551/exemples.android D/MainActivity: getItem[0]
05-31 06:23:07.278 32551-32551/exemples.android D/PlaceholderFragment: setUserVisibleHint 1 : numVisit=0, afterViewsDone=false, isVisibleToUser=false, initDone=false, updateDone=false
05-31 06:23:07.278 32551-32551/exemples.android D/MainActivity: getItem[1]
05-31 06:23:07.278 32551-32551/exemples.android D/PlaceholderFragment: setUserVisibleHint 2 : numVisit=0, afterViewsDone=false, isVisibleToUser=false, initDone=false, updateDone=false
05-31 06:23:07.278 32551-32551/exemples.android D/MainActivity: getItem[2]
05-31 06:23:07.278 32551-32551/exemples.android D/PlaceholderFragment: setUserVisibleHint 3 : numVisit=0, afterViewsDone=false, isVisibleToUser=false, initDone=false, updateDone=false
05-31 06:23:07.278 32551-32551/exemples.android D/PlaceholderFragment: setUserVisibleHint 1 : numVisit=0, afterViewsDone=false, isVisibleToUser=true, initDone=false, updateDone=false
05-31 06:23:07.280 32551-32551/exemples.android D/PlaceholderFragment: afterViews 2 numVisit=0, afterViewsDone=true, isVisibleToUser=false, initDone=false, updateDone=false
05-31 06:23:07.291 32551-32551/exemples.android D/PlaceholderFragment: afterViews 3 numVisit=0, afterViewsDone=true, isVisibleToUser=false, initDone=false, updateDone=false
05-31 06:23:07.294 32551-32551/exemples.android D/PlaceholderFragment: afterViews 1 numVisit=1, afterViewsDone=true, isVisibleToUser=true, initDone=false, updateDone=false
05-31 06:23:07.295 32551-32551/exemples.android D/PlaceholderFragment: onResume 1 : numVisit=1, afterViewsDone=true, isVisibleToUser=true, initDone=true, updateDone=false
05-31 06:23:07.295 32551-32551/exemples.android D/PlaceholderFragment: onResume 2 : numVisit=0, afterViewsDone=true, isVisibleToUser=false, initDone=true, updateDone=false
05-31 06:23:07.295 32551-32551/exemples.android D/PlaceholderFragment: onResume 3 : numVisit=0, afterViewsDone=true, isVisibleToUser=false, initDone=true, updateDone=false
05-31 06:23:07.798 32551-32551/exemples.android D/menu: création menu en cours
- lines 8, 10, 12: the fragment container requests all fragments adjacent to fragment 1;
- lines 9, 11, 13: the [setUserVisibleHint] method of these fragments is executed with [visibleToUser] set to false;
- line 14: the [setUserVisibleHint] method of fragment 1 is executed with [visibleToUser] set to true;
- lines 15–17: the [afterViews] method of the 3 adjacent segments is called. We thus see here a case where this method is called after a fragment has become visible (fragment 1, line 14);
- lines 18–20: the [onResume] method of the 3 adjacent segments is called;
We switch from tab 1 to tab 2:
05-31 06:52:36.132 32551-32551/exemples.android D/MainActivity: getItem[3]
05-31 06:52:36.132 32551-32551/exemples.android D/PlaceholderFragment: setUserVisibleHint 4 : numVisit=0, afterViewsDone=false, isVisibleToUser=false, initDone=false, updateDone=false
05-31 06:52:36.132 32551-32551/exemples.android D/PlaceholderFragment: setUserVisibleHint 1 : numVisit=1, afterViewsDone=true, isVisibleToUser=false, initDone=true, updateDone=true
05-31 06:52:36.132 32551-32551/exemples.android D/PlaceholderFragment: setUserVisibleHint 2 : numVisit=0, afterViewsDone=true, isVisibleToUser=true, initDone=true, updateDone=false
05-31 06:52:36.134 32551-32551/exemples.android D/PlaceholderFragment: afterViews 4 numVisit=0, afterViewsDone=true, isVisibleToUser=false, initDone=false, updateDone=false
05-31 06:52:36.134 32551-32551/exemples.android D/PlaceholderFragment: onResume 4 : numVisit=0, afterViewsDone=true, isVisibleToUser=false, initDone=true, updateDone=false
- because the fragment adjacency is shifted one position to the right, fragment 4 is claimed by the fragment container;
- line 2: the [setUserVisibleHint] method of fragment 4 is called with [visibleToUser] set to false;
- line 3: the [setUserVisibleHint] method of fragment 1 is called with [visibleToUser] set to false. This is because fragment 1 is now hidden;
- line 4: the [setUserVisibleHint] method of fragment 2 is called with [visibleToUser] set to true. Fragment 2 is now visible;
- Lines 5–6: The lifecycle of fragment 4 continues;
We switch from tab 2 to tab 3:
05-31 06:58:16.228 32551-32551/exemples.android D/MainActivity: getItem[4]
05-31 06:58:16.228 32551-32551/exemples.android D/PlaceholderFragment: setUserVisibleHint 5 : numVisit=0, afterViewsDone=false, isVisibleToUser=false, initDone=false, updateDone=false
05-31 06:58:16.228 32551-32551/exemples.android D/PlaceholderFragment: setUserVisibleHint 2 : numVisit=1, afterViewsDone=true, isVisibleToUser=false, initDone=true, updateDone=true
05-31 06:58:16.228 32551-32551/exemples.android D/PlaceholderFragment: setUserVisibleHint 3 : numVisit=0, afterViewsDone=true, isVisibleToUser=true, initDone=true, updateDone=false
05-31 06:58:16.229 32551-32551/exemples.android D/PlaceholderFragment: afterViews 5 numVisit=0, afterViewsDone=true, isVisibleToUser=false, initDone=false, updateDone=false
05-31 06:58:16.229 32551-32551/exemples.android D/PlaceholderFragment: onResume 5 : numVisit=0, afterViewsDone=true, isVisibleToUser=false, initDone=true, updateDone=false
- because the fragment adjacency is shifted one position to the right, fragment 5 is claimed by the fragment container;
- line 2: the [setUserVisibleHint] method of fragment 5 is called with [visibleToUser] set to false;
- Line 3: The [setUserVisibleHint] method in fragment 2 is called with [visibleToUser] set to false. This is because fragment 2 is now hidden;
- Line 4: The [setUserVisibleHint] method of fragment 3 is called with [visibleToUser] set to true. Fragment 3 is now visible;
- Lines 5–6: The lifecycle of fragment 5 continues;
We switch from tab 3 to tab 4:
05-31 07:00:17.762 32551-32551/exemples.android D/PlaceholderFragment: setUserVisibleHint 3 : numVisit=1, afterViewsDone=true, isVisibleToUser=false, initDone=true, updateDone=true
05-31 07:00:17.762 32551-32551/exemples.android D/PlaceholderFragment: setUserVisibleHint 4 : numVisit=0, afterViewsDone=true, isVisibleToUser=true, initDone=true, updateDone=false
05-31 07:00:17.762 32551-32551/exemples.android D/PlaceholderFragment: onDestroyView 1 : numVisit=1, afterViewsDone=false, isVisibleToUser=false, initDone=true, updateDone=false
- line 1: fragment 3 is now hidden;
- line 2: fragment 4 is now visible. Note that fragment 4’s lifecycle is not executed. This was already done two steps earlier;
- line 3: fragment 1 leaves the vicinity of the displayed fragment 4. Its [onDestroyView] method is executed. The next time it is displayed, its [onCreateView, afterViews, onResume] view cycle will be re-executed;
We move from tab 4 to tab 5:
05-31 07:04:19.004 32551-32551/exemples.android D/PlaceholderFragment: setUserVisibleHint 4 : numVisit=1, afterViewsDone=true, isVisibleToUser=false, initDone=true, updateDone=true
05-31 07:04:19.004 32551-32551/exemples.android D/PlaceholderFragment: setUserVisibleHint 5 : numVisit=0, afterViewsDone=true, isVisibleToUser=true, initDone=true, updateDone=false
05-31 07:04:19.004 32551-32551/exemples.android D/PlaceholderFragment: onDestroyView 2 : numVisit=1, afterViewsDone=false, isVisibleToUser=false, initDone=true, updateDone=false
- line 1: fragment 4 is now hidden;
- line 2: fragment 5 is now visible. Note that the fragment 5 lifecycle is not executed. This was already done two steps earlier;
- line 3: fragment 2 leaves the vicinity of the displayed fragment 5. Its method [onDestroyView] is executed;
We switch from tab 5 to tab 1:
05-31 07:06:17.246 32551-32551/exemples.android D/PlaceholderFragment: setUserVisibleHint 1 : numVisit=1, afterViewsDone=false, isVisibleToUser=false, initDone=true, updateDone=false
05-31 07:06:17.246 32551-32551/exemples.android D/PlaceholderFragment: setUserVisibleHint 2 : numVisit=1, afterViewsDone=false, isVisibleToUser=false, initDone=true, updateDone=false
05-31 07:06:17.246 32551-32551/exemples.android D/PlaceholderFragment: setUserVisibleHint 5 : numVisit=1, afterViewsDone=true, isVisibleToUser=false, initDone=true, updateDone=true
05-31 07:06:17.246 32551-32551/exemples.android D/PlaceholderFragment: setUserVisibleHint 1 : numVisit=1, afterViewsDone=false, isVisibleToUser=true, initDone=true, updateDone=false
05-31 07:06:17.246 32551-32551/exemples.android D/PlaceholderFragment: afterViews 1 numVisit=2, afterViewsDone=true, isVisibleToUser=true, initDone=true, updateDone=false
05-31 07:06:17.246 32551-32551/exemples.android D/PlaceholderFragment: onResume 1 : numVisit=2, afterViewsDone=true, isVisibleToUser=true, initDone=true, updateDone=false
05-31 07:06:17.247 32551-32551/exemples.android D/PlaceholderFragment: update 1 : numVisit=2, afterViewsDone=true, isVisibleToUser=true, initDone=true, updateDone=false
05-31 07:06:17.247 32551-32551/exemples.android D/PlaceholderFragment: afterViews 2 numVisit=1, afterViewsDone=true, isVisibleToUser=false, initDone=true, updateDone=false
05-31 07:06:17.247 32551-32551/exemples.android D/PlaceholderFragment: onResume 2 : numVisit=1, afterViewsDone=true, isVisibleToUser=false, initDone=true, updateDone=false
05-31 07:06:17.819 32551-32551/exemples.android D/PlaceholderFragment: onDestroyView 4 : numVisit=1, afterViewsDone=false, isVisibleToUser=false, initDone=true, updateDone=false
05-31 07:06:17.819 32551-32551/exemples.android D/PlaceholderFragment: onDestroyView 5 : numVisit=1, afterViewsDone=false, isVisibleToUser=false, initDone=true, updateDone=false
- lines 1, 4, 5, 6: the fragment 1 lifecycle is re-executed. This is because it lost its connection to its view;
- lines 2, 5, 8, 9: for the same reason, the fragment 2 lifecycle is re-executed;
- lines 10–11: fragments 4 and 5 are removed from the adjacency of the displayed fragment;
- line 7: fragment 1 is updated;
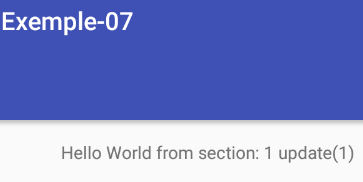
The logs never showed that the methods [setUserVisibleHint] and [onResume] both attempted to update the fragment. It is either one or the other. The reader is invited to conduct further tests and monitor the logs to fully understand the concepts of fragment adjacency and lifecycle.
Now, let’s assume full adjacency and run the same tests.
In [MainActivity]:
  // number of fragments
  private final int FRAGMENTS_COUNT = 5;
  // fragment adjacency
private final int OFF_SCREEN_PAGE_LIMIT = FRAGMENTS_COUNT - 1;
The startup logs are as follows:
05-31 07:34:44.717 28908-28908/exemples.android D/MainActivity: constructor
05-31 07:34:44.844 28908-28908/exemples.android D/MainActivity: afterViews
05-31 07:34:44.887 28908-28908/exemples.android D/PlaceholderFragment: constructor
05-31 07:34:44.887 28908-28908/exemples.android D/PlaceholderFragment: constructor
05-31 07:34:44.887 28908-28908/exemples.android D/PlaceholderFragment: constructor
05-31 07:34:44.887 28908-28908/exemples.android D/PlaceholderFragment: constructor
05-31 07:34:44.887 28908-28908/exemples.android D/PlaceholderFragment: constructor
05-31 07:34:45.201 28908-28908/exemples.android D/MainActivity: getItem[0]
05-31 07:34:45.201 28908-28908/exemples.android D/PlaceholderFragment: setUserVisibleHint 1 : numVisit=0, afterViewsDone=false, isVisibleToUser=false, initDone=false, updateDone=false
05-31 07:34:45.201 28908-28908/exemples.android D/MainActivity: getItem[1]
05-31 07:34:45.204 28908-28908/exemples.android D/PlaceholderFragment: setUserVisibleHint 2 : numVisit=0, afterViewsDone=false, isVisibleToUser=false, initDone=false, updateDone=false
05-31 07:34:45.204 28908-28908/exemples.android D/MainActivity: getItem[2]
05-31 07:34:45.204 28908-28908/exemples.android D/PlaceholderFragment: setUserVisibleHint 3 : numVisit=0, afterViewsDone=false, isVisibleToUser=false, initDone=false, updateDone=false
05-31 07:34:45.204 28908-28908/exemples.android D/MainActivity: getItem[3]
05-31 07:34:45.204 28908-28908/exemples.android D/PlaceholderFragment: setUserVisibleHint 4 : numVisit=0, afterViewsDone=false, isVisibleToUser=false, initDone=false, updateDone=false
05-31 07:34:45.205 28908-28908/exemples.android D/MainActivity: getItem[4]
05-31 07:34:45.205 28908-28908/exemples.android D/PlaceholderFragment: setUserVisibleHint 5 : numVisit=0, afterViewsDone=false, isVisibleToUser=false, initDone=false, updateDone=false
05-31 07:34:45.205 28908-28908/exemples.android D/PlaceholderFragment: setUserVisibleHint 1 : numVisit=0, afterViewsDone=false, isVisibleToUser=true, initDone=false, updateDone=false
05-31 07:34:45.207 28908-28908/exemples.android D/PlaceholderFragment: afterViews 2 numVisit=0, afterViewsDone=true, isVisibleToUser=false, initDone=false, updateDone=false
05-31 07:34:45.208 28908-28908/exemples.android D/PlaceholderFragment: afterViews 3 numVisit=0, afterViewsDone=true, isVisibleToUser=false, initDone=false, updateDone=false
05-31 07:34:45.208 28908-28908/exemples.android D/PlaceholderFragment: afterViews 4 numVisit=0, afterViewsDone=true, isVisibleToUser=false, initDone=false, updateDone=false
05-31 07:34:45.209 28908-28908/exemples.android D/PlaceholderFragment: afterViews 5 numVisit=0, afterViewsDone=true, isVisibleToUser=false, initDone=false, updateDone=false
05-31 07:34:45.210 28908-28908/exemples.android D/PlaceholderFragment: afterViews 1 numVisit=1, afterViewsDone=true, isVisibleToUser=true, initDone=false, updateDone=false
05-31 07:34:45.210 28908-28908/exemples.android D/PlaceholderFragment: onResume 1 : numVisit=1, afterViewsDone=true, isVisibleToUser=true, initDone=true, updateDone=false
05-31 07:34:45.210 28908-28908/exemples.android D/PlaceholderFragment: onResume 2 : numVisit=0, afterViewsDone=true, isVisibleToUser=false, initDone=true, updateDone=false
05-31 07:34:45.210 28908-28908/exemples.android D/PlaceholderFragment: onResume 3 : numVisit=0, afterViewsDone=true, isVisibleToUser=false, initDone=true, updateDone=false
05-31 07:34:45.210 28908-28908/exemples.android D/PlaceholderFragment: onResume 4 : numVisit=0, afterViewsDone=true, isVisibleToUser=false, initDone=true, updateDone=false
05-31 07:34:45.210 28908-28908/exemples.android D/PlaceholderFragment: onResume 5 : numVisit=0, afterViewsDone=true, isVisibleToUser=false, initDone=true, updateDone=false
05-31 07:34:46.548 28908-28908/exemples.android D/menu: création menu en cours
- The logs show that the lifecycle of the 5 fragments is being executed;
- Fragment 1 is displayed on line 18;
We switch from tab 1 to tab 2:
05-31 07:38:27.780 28908-28908/exemples.android D/PlaceholderFragment: setUserVisibleHint 1 : numVisit=1, afterViewsDone=true, isVisibleToUser=false, initDone=true, updateDone=true
05-31 07:38:27.780 28908-28908/exemples.android D/PlaceholderFragment: setUserVisibleHint 2 : numVisit=0, afterViewsDone=true, isVisibleToUser=true, initDone=true, updateDone=false
- line 1: fragment 1 is hidden;
- line 2: fragment 2 is displayed;
We switch from tab 2 to tab 3:
05-31 07:39:33.059 28908-28908/exemples.android D/PlaceholderFragment: setUserVisibleHint 2 : numVisit=1, afterViewsDone=true, isVisibleToUser=false, initDone=true, updateDone=true
05-31 07:39:33.059 28908-28908/exemples.android D/PlaceholderFragment: setUserVisibleHint 3 : numVisit=0, afterViewsDone=true, isVisibleToUser=true, initDone=true, updateDone=false
- line 1: fragment 2 is hidden;
- line 2: fragment 3 is displayed;
We switch from tab 3 to tab 4:
05-31 07:40:30.362 28908-28908/exemples.android D/PlaceholderFragment: setUserVisibleHint 3 : numVisit=1, afterViewsDone=true, isVisibleToUser=false, initDone=true, updateDone=true
05-31 07:40:30.362 28908-28908/exemples.android D/PlaceholderFragment: setUserVisibleHint 4 : numVisit=0, afterViewsDone=true, isVisibleToUser=true, initDone=true, updateDone=false
- line 1: fragment 3 is hidden;
- line 2: fragment 4 is displayed;
We switch from tab 4 to tab 5:
05-31 07:41:23.479 28908-28908/exemples.android D/PlaceholderFragment: setUserVisibleHint 4 : numVisit=1, afterViewsDone=true, isVisibleToUser=false, initDone=true, updateDone=true
05-31 07:41:23.479 28908-28908/exemples.android D/PlaceholderFragment: setUserVisibleHint 5 : numVisit=0, afterViewsDone=true, isVisibleToUser=true, initDone=true, updateDone=false
- line 1: fragment 4 is hidden;
- line 2: fragment 5 is displayed;
We switch from tab 5 to tab 1:
05-31 07:42:22.549 28908-28908/exemples.android D/PlaceholderFragment: setUserVisibleHint 5 : numVisit=1, afterViewsDone=true, isVisibleToUser=false, initDone=true, updateDone=true
05-31 07:42:22.549 28908-28908/exemples.android D/PlaceholderFragment: setUserVisibleHint 1 : numVisit=1, afterViewsDone=true, isVisibleToUser=true, initDone=true, updateDone=false
05-31 07:42:22.549 28908-28908/exemples.android D/PlaceholderFragment: update 1 : numVisit=2, afterViewsDone=true, isVisibleToUser=true, initDone=true, updateDone=false
- Line 1: Fragment 5 is hidden;
- line 2: fragment 1 is displayed;
- line 3: fragment 1 is updated;
Switching from tab 1 to tab 4:
05-31 07:44:13.129 28908-28908/exemples.android D/PlaceholderFragment: setUserVisibleHint 1 : numVisit=2, afterViewsDone=true, isVisibleToUser=false, initDone=true, updateDone=true
05-31 07:44:13.129 28908-28908/exemples.android D/PlaceholderFragment: setUserVisibleHint 4 : numVisit=1, afterViewsDone=true, isVisibleToUser=true, initDone=true, updateDone=false
05-31 07:44:13.129 28908-28908/exemples.android D/PlaceholderFragment: update 4 : numVisit=2, afterViewsDone=true, isVisibleToUser=true, initDone=true, updateDone=false
- line 1: fragment 1 is hidden;
- line 2: fragment 4 is displayed;
- line 3: fragment 4 is updated;
We can see that with full adjacency, the behavior of the fragments is much more predictable.
Now, let’s set the adjacency to zero and see what happens. The [MainActivity] class evolves as follows:
  // number of fragments
  private final int FRAGMENTS_COUNT = 5;
  // fragment adjacency
private final int OFF_SCREEN_PAGE_LIMIT = 0;
The startup logs are as follows:
06-01 03:11:52.068 5679-5679/exemples.android D/MainActivity: constructor
06-01 03:11:52.353 5679-5679/exemples.android D/MainActivity: afterViews
06-01 03:11:52.433 5679-5679/exemples.android D/PlaceholderFragment: constructor
06-01 03:11:52.433 5679-5679/exemples.android D/PlaceholderFragment: constructor
06-01 03:11:52.434 5679-5679/exemples.android D/PlaceholderFragment: constructor
06-01 03:11:52.434 5679-5679/exemples.android D/PlaceholderFragment: constructor
06-01 03:11:52.434 5679-5679/exemples.android D/PlaceholderFragment: constructor
06-01 03:11:52.566 5679-5679/exemples.android D/MainActivity: getItem[0]
06-01 03:11:52.566 5679-5679/exemples.android D/PlaceholderFragment: setUserVisibleHint 1 : numVisit=0, afterViewsDone=false, isVisibleToUser=false, initDone=false, updateDone=false
06-01 03:11:52.566 5679-5679/exemples.android D/MainActivity: getItem[1]
06-01 03:11:52.566 5679-5679/exemples.android D/PlaceholderFragment: setUserVisibleHint 2 : numVisit=0, afterViewsDone=false, isVisibleToUser=false, initDone=false, updateDone=false
06-01 03:11:52.566 5679-5679/exemples.android D/PlaceholderFragment: setUserVisibleHint 1 : numVisit=0, afterViewsDone=false, isVisibleToUser=true, initDone=false, updateDone=false
06-01 03:11:52.571 5679-5679/exemples.android D/PlaceholderFragment: afterViews 2 numVisit=0, afterViewsDone=true, isVisibleToUser=false, initDone=false, updateDone=false
06-01 03:11:52.574 5679-5679/exemples.android D/PlaceholderFragment: afterViews 1 numVisit=1, afterViewsDone=true, isVisibleToUser=true, initDone=false, updateDone=false
06-01 03:11:52.574 5679-5679/exemples.android D/PlaceholderFragment: onResume 1 : numVisit=1, afterViewsDone=true, isVisibleToUser=true, initDone=true, updateDone=false
06-01 03:11:52.574 5679-5679/exemples.android D/PlaceholderFragment: onResume 2 : numVisit=0, afterViewsDone=true, isVisibleToUser=false, initDone=true, updateDone=false
06-01 03:11:54.597 5679-5679/exemples.android D/menu: création menu en cours
- Lines 8 and 10 show that the fragment container has requested 2 fragments, numbers 1 and 2. Everything therefore behaves as if there were an adjacency of 1. The adjacency of 0 has therefore been ignored.
1.9.3. Inter-fragment communication
In the previous architecture, we have one activity and n fragments. The user interacts with the various fragments. These interactions modify the application’s state. Here, the application’s state refers to all the information it stores throughout its entire lifecycle. The following problem then arises:
- when the user interacts with fragment i, the application transitions from state E1 to state E2;
- a user action on fragment i causes fragment j to be displayed;
- how do we update fragment j with the application’s current state E2;
From previous examples, we know how to update fragment j. But where do we find the application’s state E2 to update it?
There are different solutions to this problem. We have seen one: fragment i can pass the application’s state E2 to fragment j via arguments. We encountered this method in the [MainActivity] class when creating the fragments:
      for (int i = 0; i < fragments.length; i++) {
        // create a fragment
        fragments[i] = new PlaceholderFragment_();
        // you can pass arguments to the
        Bundle args = new Bundle();
        args.putInt(ARG_SECTION_NUMBER, i + 1);
        fragments[i].setArguments(args);
}
This solution isn’t immediately usable here. In fact, when the user clicks on tab j, which will display fragment j, our code isn’t called. Only system code is executed. We’ll see in a future project how to intercept a tab click, but for now we’ll take a different approach.
We have discussed application state: the set of data managed by the application over time. Here, the application consists of an activity and n fragments, all of which are instantiated once when the application starts and whose lifetime matches that of the application. Therefore, any one of these elements—or a combination of several—can serve as a candidate for storing the application state. Each fragment has access, via the [Fragment.getActivity()] method, to the activity that created it. Since all fragments have access to the activity, it seems natural to store the application state within it.
However, the result of the [Fragment.getActivity()] method depends on when it is called in the lifecycle. We illustrate this point by adding some logs to the [PlaceholderFragment] class:
  // update fragment
  public void update() {
    Log.d("PlaceholderFragment", String.format("update %s : %s", getArguments().getInt(ARG_SECTION_NUMBER), getInfos()));
    // the work to be done depends on the visit number
    if (numVisit > 1) {
      // log
      Log.d("PlaceholderFragment", String.format("update %s : %s", getArguments().getInt(ARG_SECTION_NUMBER), getInfos()));
      // modified text
      textViewInfo.setText(String.format("%s update(%s)", text, (numVisit - 1)));
    }
  }

  // local info for logs
  private String getInfos() {
    return String.format("numVisit=%s, afterViewsDone=%s, isVisibleToUser=%s, initDone=%s, updateDone=%s, getActivity()==null:%s",
      numVisit, afterViewsDone, isVisibleToUser, initDone, updateDone, getActivity() == null);
}
- lines 14-16: the [getInfos] method displays part of the app's status;
We launch the app with a fragment adjacency of 2. The logs at app startup:
06-01 03:26:13.769 10931-10931/exemples.android D/MainActivity: constructor
06-01 03:26:13.856 10931-10931/exemples.android D/MainActivity: afterViews
06-01 03:26:13.864 10931-10931/exemples.android D/PlaceholderFragment: constructor
06-01 03:26:13.864 10931-10931/exemples.android D/PlaceholderFragment: constructor
06-01 03:26:13.864 10931-10931/exemples.android D/PlaceholderFragment: constructor
06-01 03:26:13.864 10931-10931/exemples.android D/PlaceholderFragment: constructor
06-01 03:26:13.864 10931-10931/exemples.android D/PlaceholderFragment: constructor
06-01 03:26:14.535 10931-10931/exemples.android D/MainActivity: getItem[0]
06-01 03:26:14.538 10931-10931/exemples.android D/PlaceholderFragment: setUserVisibleHint 1 : numVisit=0, afterViewsDone=false, isVisibleToUser=false, initDone=false, updateDone=false, getActivity()==null:true
06-01 03:26:14.538 10931-10931/exemples.android D/MainActivity: getItem[1]
06-01 03:26:14.538 10931-10931/exemples.android D/PlaceholderFragment: setUserVisibleHint 2 : numVisit=0, afterViewsDone=false, isVisibleToUser=false, initDone=false, updateDone=false, getActivity()==null:true
06-01 03:26:14.538 10931-10931/exemples.android D/MainActivity: getItem[2]
06-01 03:26:14.538 10931-10931/exemples.android D/PlaceholderFragment: setUserVisibleHint 3 : numVisit=0, afterViewsDone=false, isVisibleToUser=false, initDone=false, updateDone=false, getActivity()==null:true
06-01 03:26:14.538 10931-10931/exemples.android D/PlaceholderFragment: setUserVisibleHint 1 : numVisit=0, afterViewsDone=false, isVisibleToUser=true, initDone=false, updateDone=false, getActivity()==null:false
06-01 03:26:14.541 10931-10931/exemples.android D/PlaceholderFragment: afterViews 2 numVisit=0, afterViewsDone=true, isVisibleToUser=false, initDone=false, updateDone=false, getActivity()==null:false
06-01 03:26:14.545 10931-10931/exemples.android D/PlaceholderFragment: afterViews 3 numVisit=0, afterViewsDone=true, isVisibleToUser=false, initDone=false, updateDone=false, getActivity()==null:false
06-01 03:26:14.547 10931-10931/exemples.android D/PlaceholderFragment: afterViews 1 numVisit=1, afterViewsDone=true, isVisibleToUser=true, initDone=false, updateDone=false, getActivity()==null:false
06-01 03:26:14.547 10931-10931/exemples.android D/PlaceholderFragment: onResume 1 : numVisit=1, afterViewsDone=true, isVisibleToUser=true, initDone=true, updateDone=false, getActivity()==null:false
06-01 03:26:14.547 10931-10931/exemples.android D/PlaceholderFragment: update 1 : numVisit=1, afterViewsDone=true, isVisibleToUser=true, initDone=true, updateDone=false, getActivity()==null:false
06-01 03:26:14.547 10931-10931/exemples.android D/PlaceholderFragment: onResume 2 : numVisit=0, afterViewsDone=true, isVisibleToUser=false, initDone=true, updateDone=false, getActivity()==null:false
06-01 03:26:14.547 10931-10931/exemples.android D/PlaceholderFragment: onResume 3 : numVisit=0, afterViewsDone=true, isVisibleToUser=false, initDone=true, updateDone=false, getActivity()==null:false
06-01 03:26:15.967 10931-10931/exemples.android D/menu: création menu en cours
- lines 9, 10, 13, 14: we see that in the [setUserVisibleHint] methods, we have [getActivity()==null] if the fragment is not yet visible (isVisibleToUser==false);
- line 19: we see that when the execution flow reaches the [update] method of fragment 1, the [getActivity] method successfully renders the activity;
When fragment adjacency is set to 4 (full adjacency), the logs are as follows:
06-01 03:35:23.553 2814-2814/exemples.android D/MainActivity: constructor
06-01 03:35:23.751 2814-2819/exemples.android I/art: Ignoring second debugger -- accepting and dropping
06-01 03:35:23.900 2814-2814/exemples.android D/MainActivity: afterViews
06-01 03:35:23.991 2814-2814/exemples.android D/PlaceholderFragment: constructor
06-01 03:35:23.991 2814-2814/exemples.android D/PlaceholderFragment: constructor
06-01 03:35:23.991 2814-2814/exemples.android D/PlaceholderFragment: constructor
06-01 03:35:23.991 2814-2814/exemples.android D/PlaceholderFragment: constructor
06-01 03:35:24.002 2814-2814/exemples.android D/PlaceholderFragment: constructor
06-01 03:35:24.207 2814-2814/exemples.android D/MainActivity: getItem[0]
06-01 03:35:24.207 2814-2814/exemples.android D/PlaceholderFragment: setUserVisibleHint 1 : numVisit=0, afterViewsDone=false, isVisibleToUser=false, initDone=false, updateDone=false, getActivity()==null:true
06-01 03:35:24.207 2814-2814/exemples.android D/MainActivity: getItem[1]
06-01 03:35:24.207 2814-2814/exemples.android D/PlaceholderFragment: setUserVisibleHint 2 : numVisit=0, afterViewsDone=false, isVisibleToUser=false, initDone=false, updateDone=false, getActivity()==null:true
06-01 03:35:24.207 2814-2814/exemples.android D/MainActivity: getItem[2]
06-01 03:35:24.207 2814-2814/exemples.android D/PlaceholderFragment: setUserVisibleHint 3 : numVisit=0, afterViewsDone=false, isVisibleToUser=false, initDone=false, updateDone=false, getActivity()==null:true
06-01 03:35:24.207 2814-2814/exemples.android D/MainActivity: getItem[3]
06-01 03:35:24.207 2814-2814/exemples.android D/PlaceholderFragment: setUserVisibleHint 4 : numVisit=0, afterViewsDone=false, isVisibleToUser=false, initDone=false, updateDone=false, getActivity()==null:true
06-01 03:35:24.207 2814-2814/exemples.android D/MainActivity: getItem[4]
06-01 03:35:24.207 2814-2814/exemples.android D/PlaceholderFragment: setUserVisibleHint 5 : numVisit=0, afterViewsDone=false, isVisibleToUser=false, initDone=false, updateDone=false, getActivity()==null:true
06-01 03:35:24.207 2814-2814/exemples.android D/PlaceholderFragment: setUserVisibleHint 1 : numVisit=0, afterViewsDone=false, isVisibleToUser=true, initDone=false, updateDone=false, getActivity()==null:false
06-01 03:35:24.210 2814-2814/exemples.android D/PlaceholderFragment: afterViews 2 numVisit=0, afterViewsDone=true, isVisibleToUser=false, initDone=false, updateDone=false, getActivity()==null:false
06-01 03:35:24.211 2814-2814/exemples.android D/PlaceholderFragment: afterViews 3 numVisit=0, afterViewsDone=true, isVisibleToUser=false, initDone=false, updateDone=false, getActivity()==null:false
06-01 03:35:24.214 2814-2814/exemples.android D/PlaceholderFragment: afterViews 4 numVisit=0, afterViewsDone=true, isVisibleToUser=false, initDone=false, updateDone=false, getActivity()==null:false
06-01 03:35:24.215 2814-2814/exemples.android D/PlaceholderFragment: afterViews 5 numVisit=0, afterViewsDone=true, isVisibleToUser=false, initDone=false, updateDone=false, getActivity()==null:false
06-01 03:35:24.215 2814-2814/exemples.android D/PlaceholderFragment: afterViews 1 numVisit=1, afterViewsDone=true, isVisibleToUser=true, initDone=false, updateDone=false, getActivity()==null:false
06-01 03:35:24.215 2814-2814/exemples.android D/PlaceholderFragment: onResume 1 : numVisit=1, afterViewsDone=true, isVisibleToUser=true, initDone=true, updateDone=false, getActivity()==null:false
06-01 03:35:24.215 2814-2814/exemples.android D/PlaceholderFragment: update 1 : numVisit=1, afterViewsDone=true, isVisibleToUser=true, initDone=true, updateDone=false, getActivity()==null:false
06-01 03:35:24.216 2814-2814/exemples.android D/PlaceholderFragment: onResume 2 : numVisit=0, afterViewsDone=true, isVisibleToUser=false, initDone=true, updateDone=false, getActivity()==null:false
06-01 03:35:24.216 2814-2814/exemples.android D/PlaceholderFragment: onResume 3 : numVisit=0, afterViewsDone=true, isVisibleToUser=false, initDone=true, updateDone=false, getActivity()==null:false
06-01 03:35:24.216 2814-2814/exemples.android D/PlaceholderFragment: onResume 4 : numVisit=0, afterViewsDone=true, isVisibleToUser=false, initDone=true, updateDone=false, getActivity()==null:false
06-01 03:35:24.216 2814-2814/exemples.android D/PlaceholderFragment: onResume 5 : numVisit=0, afterViewsDone=true, isVisibleToUser=false, initDone=true, updateDone=false, getActivity()==null:false
06-01 03:35:26.602 2814-2814/exemples.android D/menu: création menu en cours
We get the same results. We can conclude that as soon as the fragment is visible, the [getActivity] method returns the fragment’s activity. We also note that when execution reaches the [update] method of the fragment that is about to be displayed, the [getActivity] method does indeed return a value.
To illustrate inter-fragment communication, we are building a new project.
1.10. Example-09: Inter-fragment communication, swipe, and scrolling
1.10.1. Creating the project
Duplicate project [Exemple-07] as [Exemple-08]. To do this, follow the procedure described for duplicating [Exemple-02] as [Exemple-03] in the section 1.4 .
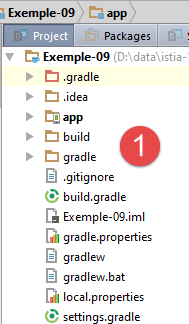
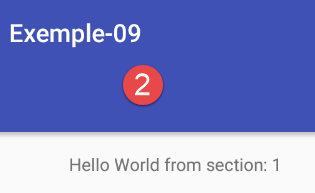
1.10.2. The session
In this new project, we want the fragments to display the total number of fragments viewed by the user. To do this, we need to maintain a counter that is accessible to all fragments. We will call the object that encapsulates the data shared by the fragments a "session." This terminology comes from web development, where data to be shared across different views requested by the same user is placed in a session. Encapsulating the information shared by the different fragments into a single object makes the code more readable.
The [Session] class will be as follows:
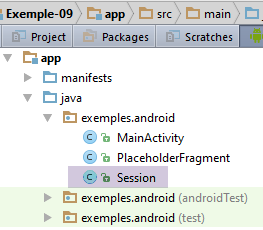
package exemples.android;

import org.androidannotations.annotations.EBean;

@EBean(scope = EBean.Scope.Singleton)
public class Session {
  // number of fragments visited
  private int numVisit;

  // getters and setters

  public int getNumVisit() {
    return numVisit;
  }

  public void setNumVisit(int numVisit) {
    this.numVisit = numVisit;
  }
}
- line 8: the session will encapsulate the number of fragments visited;
- line 5: the annotation [EBean] is a AA annotation. The attribute [scope] specifies the scope (or lifetime) of the class thus annotated. Here, the [scope = EBean.Scope.Singleton] attribute makes the [Session] class a singleton: it will be instantiated once and only once when the application starts. A reference to a class annotated with [EBean] can then be injected into another class. This is the concept of dependency injection;
1.10.3. The [MainActivity] activity
The [MainActivity] activity evolves as follows:
@EActivity(R.layout.activity_main)
public class MainActivity extends AppCompatActivity {

  ...

  // injection session
  @Bean(Session.class)
  protected Session session;

  // number of fragments
  private final int FRAGMENTS_COUNT = 5;
  // fragment adjacency
  private final int OFF_SCREEN_PAGE_LIMIT = 2;

    @AfterInject
  protected void afterInject(){
    Log.d("MainActivity", "afterInject");

    // session initialization
    session.setNumVisit(0);
  }

...
- lines 7-8: injection of the reference to the session singleton using the [@Bean] annotation. The annotation’s parameter is the class of the bean to be injected. The field annotated in this way cannot have the scope [private];
- line 15: the [@AfterInject] annotation is used to designate a method to be called once all injections for the class have been completed. Thus, when entering the [afterInject] method on line 16, the reference from line 8 has been initialized;
- line 20: the visit counter is reset to zero;
1.10.4. The fragment [PlaceholderFragment]
The fragment [PlaceholderFragment] evolves as follows:
@EFragment(R.layout.fragment_main)
public class PlaceholderFragment extends Fragment {

....

  // session
  protected Session session;

  @Override
  public void setUserVisibleHint(boolean isVisibleToUser) {
    // parent
    super.setUserVisibleHint(isVisibleToUser);
    // memory
    this.isVisibleToUser = isVisibleToUser;
    // log
    Log.d("PlaceholderFragment", String.format("setUserVisibleHint %s : %s", getArguments().getInt(ARG_SECTION_NUMBER), getInfos()));
    // number of visits
    if (isVisibleToUser) {
      // update fragment
      if (afterViewsDone && !updateDone) {
        update();
        updateDone = true;
      }
    } else {
      // the fragment will be hidden
      updateDone = false;
    }
  }

  // update fragment
  public void update() {
    // log
    Log.d("PlaceholderFragment", String.format("update %s : %s", getArguments().getInt(ARG_SECTION_NUMBER), getInfos()));
    // session
    if (session == null) {
      session = ((MainActivity) getActivity()).getSession();
    }
    // increment visit no
    numVisit = session.getNumVisit();
    numVisit++;
    session.setNumVisit(numVisit);
    // modified text
    textViewInfo.setText(String.format("%s, visite %s", text, numVisit));
  }
- line 7: the session;
- lines 35–37: We know that when we enter the [update] method, the [getActivity] method correctly renders the activity. We take this opportunity to retrieve the session and store it locally (line 36);
- lines 39–41: To increment the visit number, we retrieve it from the session. We could have placed this code in the [setUserVisibleHint] method starting at line 19, since we know that the [getActivity] method then returns the activity. Here, we decide not to assign a specific role to this method and to move the fragment-specific code to the [update] method, which is designed for that purpose;
- line 43: displays the visit number;
When running this application with 5 fragments and a 2-fragment adjacency, the first logs are as follows:
05-31 08:38:47.305 20114-20114/exemples.android D/MainActivity: constructor
05-31 08:38:47.307 20114-20114/exemples.android D/MainActivity: afterInject
05-31 08:38:47.351 20114-20114/exemples.android D/MainActivity: afterViews
05-31 08:38:47.354 20114-20114/exemples.android D/PlaceholderFragment: constructor
05-31 08:38:47.354 20114-20114/exemples.android D/PlaceholderFragment: constructor
05-31 08:38:47.354 20114-20114/exemples.android D/PlaceholderFragment: constructor
05-31 08:38:47.354 20114-20114/exemples.android D/PlaceholderFragment: constructor
05-31 08:38:47.354 20114-20114/exemples.android D/PlaceholderFragment: constructor
...
- Lines 2-3: We can see that the activity’s [afterInject] method is executed before its [afterViews] method;
Readers are invited to test this new application.
1.10.5. Disabling Swipe
In the previous application, when you swipe the Android emulator with the mouse to the left or right, the current view is replaced by the view on the right or left, as appropriate. This default behavior is not always desirable. We will learn how to disable view swiping (swipe).
Let’s return to the main view XML:
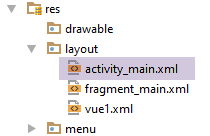
In the view’s code, we find the fragment container’s code:
  <android.support.v4.view.ViewPager
    android:id="@+id/container"
    android:layout_width="match_parent"
    android:layout_height="match_parent"
app:layout_behavior="@string/appbar_scrolling_view_behavior"/>
Line 1 specifies the class that manages the activity's pages. This class is found in the [MainActivity] activity:
import android.support.v4.view.ViewPager;
...

@EActivity(R.layout.activity_main)
public class MainActivity extends AppCompatActivity {

  // the fragment manager
  private SectionsPagerAdapter mSectionsPagerAdapter;

  // the fragment container
  @ViewById(R.id.container)
  protected ViewPager mViewPager;
...
Line 12: The fragment container is of type [android.support.v4.view.ViewPager] (line 1). To disable swiping, we need to extend this class as follows:
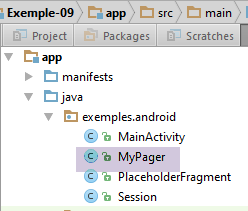
package exemples.android;

import android.content.Context;
import android.support.v4.view.ViewPager;
import android.util.AttributeSet;
import android.view.MotionEvent;

public class MyPager extends ViewPager {

  // swipe control
  private boolean isSwipeEnabled;

  // manufacturers
  public MyPager(Context context) {
    super(context);
  }

  public MyPager(Context context, AttributeSet attrs) {
    super(context, attrs);
  }

  // methods to be redefined to manage swiping
  @Override
  public boolean onInterceptTouchEvent(MotionEvent event) {
    // swipe authorized?
    if (isSwipeEnabled) {
      return super.onInterceptTouchEvent(event);
    } else {
      return false;
    }
  }

  @Override
  public boolean onTouchEvent(MotionEvent event) {
    // swipe authorized?
    if (isSwipeEnabled) {
      return super.onTouchEvent(event);
    } else {
      return false;
    }
  }

  // setter
  public void setSwipeEnabled(boolean isSwipeEnabled) {
    this.isSwipeEnabled = isSwipeEnabled;
  }

}
- line 8: the [MyPager] class extends the Android [ViewPager] class (line 4);
- When a hand swipe occurs, the event handlers in lines 24 and 34 can be called. Both return a boolean. They simply need to return the boolean [false] to disable swiping;
- Line 11: the boolean used to indicate whether or not to accept the hand swipe.
Once this is done, we must now use our new page handler. This is done in the view XML [activity_main.xml] and in the main activity [MainActivity]. In [activity_main.xml], we write:
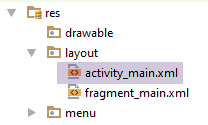
  <exemples.android.MyPager
    android:id="@+id/container"
    android:layout_width="match_parent"
    android:layout_height="match_parent"
app:layout_behavior="@string/appbar_scrolling_view_behavior"/>
Line 1: We use the new class. In [MainActivity], the code changes as follows:
package exemples.android;

...
@EActivity(R.layout.activity_main)
public class MainActivity extends AppCompatActivity {

  // the fragment manager
  private SectionsPagerAdapter mSectionsPagerAdapter;

  // the fragment container
  @ViewById(R.id.container)
  protected MyPager mViewPager;

  @AfterViews
  protected void afterViews() {
    Log.d("MainActivity", "afterViews");
...
    // the fragment container is associated with the fragment manager
    // i.e. fragment no. i in the fragment container is fragment no. i issued by the fragment manager
    mViewPager.setAdapter(mSectionsPagerAdapter);

    // inhibit swiping between fragments
    mViewPager.setSwipeEnabled(false);
    // the tab bar is also associated with the fragment container
...
- line 12: the page manager now has the type [MyPager];
- line 23: enable or disable swiping
Test this new version. Enable or disable swiping and observe the difference in how the views behave when you drag them left or right with the mouse. In all future applications, swiping will be disabled. We won’t mention it again.
1.10.6. Disable scrolling between fragments
Let’s continue with an improvement to the tab manager. When switching from tab 1 to tab 4, the two intermediate tabs 2 and 3 scroll by. In Android jargon, this is called smoothScrolling. This behavior can become annoying if there are many tabs. It can be disabled by adding the following code to the fragment manager [MyPager]:
// swipe control
  private boolean isSwipeEnabled;
  // controls scrolling
  private boolean isScrollingEnabled;

 ...
  // scrolling
  @Override
  public void setCurrentItem(int position){
    super.setCurrentItem(position,isScrollingEnabled);
  }

  // setters
...

  public void setScrollingEnabled(boolean scrollingEnabled) {
    isScrollingEnabled = scrollingEnabled;
  }
Because the tab manager has been associated with the fragment manager [MyPager], when tab #i is clicked, fragment #i is displayed by the fragment container using the [setCurrentItem] method above (line 9). [position] is the number of the fragment to be displayed;
- Line 10: The [setCurrentItem] method of the parent class is called. The second argument to [false] specifies an immediate transition between the old and new fragments (no scrolling), while the second argument to [true] specifies a transition with scrolling. Here, the second argument is the value of the field on line 4, a field that the developer can set using the method on lines 16–18;
If you want to disable scrolling, the [MainActivity] class will be as follows:
...
    // fragment offset
    mViewPager.setOffscreenPageLimit(OFF_SCREEN_PAGE_LIMIT);

    // inhibit swiping between fragments
    mViewPager.setSwipeEnabled(false);

    // no scrolling
    mViewPager.setScrollingEnabled(false);
...
Run the project again and verify that there is no longer any scrolling between tabs 1 and 4, for example. From here on, we will always disable scrolling. We won’t revisit this.
1.10.7. A New Fragment
In our example, all fragments are of the same type, [PlaceHolderFragment]. We will now learn how to create a new fragment and display it.
First, let’s copy the [vue1.xml] view from the [Exemple-04] project into the [Exemple-09] [1] project:
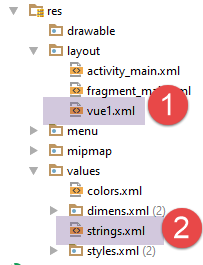
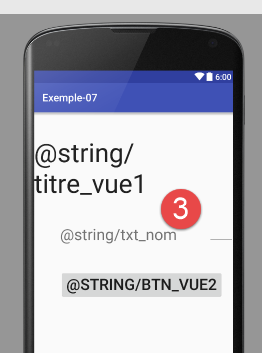
- in [1], the view [vue1.xml];
- in [3], the view contains errors due to missing text in the file [res/values/strings.xml];
In [2], the missing text is added by taking it from the [res/values/strings.xml] file in the [Exemple-04] project
<resources>
  <string name="app_name">Exemple-07</string>
  <string name="action_settings">Settings</string>
  <string name="section_format">Hello World from section: %1$d</string>
  <!-- view 1 -->
  <string name="titre_vue1">Vue n° 1</string>
  <string name="txt_nom">Quel est votre nom ?</string>
  <string name="btn_valider">Valider</string>
  <string name="btn_vue2">Vue n° 2</string>
</resources>
- Above, we added lines 6–9;
Now, we create the class [Vue1Fragment], which will be the fragment responsible for displaying the view [vue1.xml]:
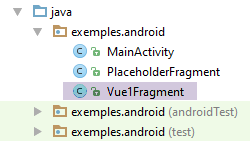
The [Vue1Fragment] class will be as follows:
package exemples.android;

import android.support.v4.app.Fragment;
import android.widget.EditText;
import android.widget.Toast;
import org.androidannotations.annotations.Click;
import org.androidannotations.annotations.EFragment;
import org.androidannotations.annotations.ViewById;

@EFragment(R.layout.vue1)
public class Vue1Fragment extends Fragment {

  // visual interface elements
  @ViewById(R.id.editTextNom)
  protected EditText editTextNom;

  // event manager
  @Click(R.id.buttonValider)
  protected void doValider() {
    // the name entered is displayed
    Toast.makeText(getActivity(), String.format("Bonjour %s", editTextNom.getText().toString()), Toast.LENGTH_LONG).show();
  }
}
- line 10: the annotation [@EFragment] means that the fragment used by the activity will actually be the class [Vue1Fragment_]. Keep this in mind. The fragment is associated with the view [vue1.xml];
- lines 14–15: the component identified by [R.id.editTextNom] is injected into the [editTextNom] field on line 15;
- lines 18–20: the method [doValider] handles the 'click' event on the button identified by [R.id.buttonValider];
- line 21: the first parameter of [Toast.makeText] is of type [Activity]. The [Fragment.getActivity()] method retrieves the activity in which the fragment is located. This is [MainActivity], since in this architecture, we have only one activity that displays different views or fragments;
In the [MainActivity] class, the fragment manager evolves as follows:
public class SectionsPagerAdapter extends FragmentPagerAdapter {

    // fragments
    private Fragment[] fragments;
    // fragment no
    private static final String ARG_SECTION_NUMBER = "section_number";

    // manufacturer
    public SectionsPagerAdapter(FragmentManager fm) {
      // parent
      super(fm);
      // initialization of fragment table
      fragments = new Fragment[FRAGMENTS_COUNT];
      for (int i = 0; i < fragments.length - 1; i++) {
        // create a fragment
        fragments[i] = new PlaceholderFragment_();
        // you can pass arguments to the
        Bundle args = new Bundle();
        args.putInt(ARG_SECTION_NUMBER, i + 1);
        fragments[i].setArguments(args);
      }
      // a fragment of +
      fragments[fragments.length - 1] = new Vue1Fragment_();
    }

 ...
  }
- line 13: there is [FRAGMENTS_COUNT] fragments: [FRAGMENTS_COUNT-1] fragments of type [PlaceholderFragment] (lines 14-21) and a fragment of type [Vue1Fragment_], line 23 (note the underscore);
Compile and then run the [Exemple-09] project. Tab 5 should be different:
1.10.8. Derive all fragments from the same abstract class
The new fragment [Vue1Fragment] also needs to update itself when it is displayed. To do this, we will need to create code similar to that created for the fragment [PlaceholderFragment]. To avoid repetition, we will factor out what can be into an abstract class that all fragments in the application will inherit from.
To do this, we create a new project.
1.11. Example-10: Deriving all fragments from an abstract class
1.11.1. Creating the project
We duplicate the [Exemple-09] project into [Exemple-10]:

1.11.2. debug mode management
We add the option to the project to display or hide the logs for mode debug. To do this, we add a static constant to the [MainActivity] class:
  // mode debug
public static final boolean IS_DEBUG_ENABLED = false;
1.11.3. The abstract parent class of all fragments
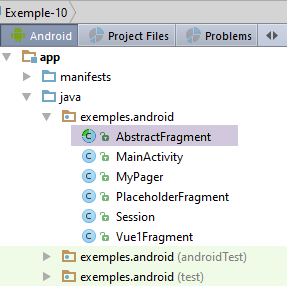
The [AbstractFragment] class is as follows:
package exemples.android;

import android.app.Activity;
import android.support.v4.app.Fragment;
import android.util.Log;

public abstract class AbstractFragment extends Fragment {

  // private data
  private boolean isVisibleToUser = false;
  private boolean updateDone = false;
  private String className;

  // data accessible to daughter classes
  protected boolean afterViewsDone = false;
  protected boolean isDebugEnabled = true;

  // activity
  protected MainActivity activity;

  // session
  protected Session session;

  // manufacturer
  public AbstractFragment() {
    // init
    isDebugEnabled = MainActivity.IS_DEBUG_ENABLED;
    className = getClass().getSimpleName();
    // log
    if (isDebugEnabled) {
      Log.d("AbstractFragment", String.format("constructor %s", className));
    }
  }

  @Override
  public void setUserVisibleHint(boolean isVisibleToUser) {
    // parent
    super.setUserVisibleHint(isVisibleToUser);
    ...
  }

  @Override
  public void onDestroyView() {
    // parent
    super.onDestroyView();
    ...
  }

  @Override
  public void onResume() {
    // parent
    super.onResume();
    ...
  }

  // local news
  protected String getParentInfos() {
    return String.format("className=%s, isVisibleToUser=%s, updateDone=%s, afterViewsDone=%s", className, isVisibleToUser, updateDone, afterViewsDone);
  }

  // update fragment
  protected void update() {
    ...
    // the daughter class is asked to update itself
    updateFragment();
  }

  protected abstract void updateFragment();
}
- Line 7: The [AbstractFragment] class extends the Android [Fragment] class;
- every fragment must be able to update itself. This is why the parent class [AbstractFragment] requires its child classes to have a method [updateFragment] (line 68) that it calls (line 65);
- line 19: the class will store a reference to the application’s activity;
- line 22: the class will store a reference to the session where the data shared by the fragments and the activity is collected;
- lines 25–33: the constructor of the abstract class;
- line 27: creation of a copy of the constant [MainActivity.IS_DEBUG_ENABLED] in the field on line 16;
- line 28: the name of the instantiated class is stored, i.e., the name of a child class;
- lines 15–22: these fields have the attribute [protected] so that child classes can access them. Note that the child classes are unaware of the existence of the Booleans [isVisibleToUser] and [updateDone] (lines 10–11);
- line 57: the method [getParentInfos] has the attribute [protected] so that child classes can call it;
The [setUserVisibleHint, onDestroyView, onResume] methods remain the same as they were in the [PlaceholderFragment] class from the previous project:
@Override
  public void setUserVisibleHint(boolean isVisibleToUser) {
    // parent
    super.setUserVisibleHint(isVisibleToUser);
    // memory
    this.isVisibleToUser = isVisibleToUser;
    // log
    if (isDebugEnabled) {
      Log.d("AbstractFragment", String.format("setUserVisibleHint : %s", getParentInfos()));
    }
    // when the fragment becomes visible
    if (isVisibleToUser) {
      // update fragment
      if (afterViewsDone && !updateDone) {
        update();
        updateDone = true;
      }
    } else {
      // we leave the fragment
      updateDone = false;
    }
  }

  @Override
  public void onDestroyView() {
    // parent
    super.onDestroyView();
    // indicator update
    afterViewsDone = false;
    // log
    if (isDebugEnabled) {
      Log.d("AbstractFragment", String.format("onDestroyView : %s", getParentInfos()));
    }
  }

  @Override
  public void onResume() {
    // parent
    super.onResume();
    // log
    if (isDebugEnabled) {
      Log.d("AbstractFragment", String.format("onResume : %s", getParentInfos()));
    }
    if (isVisibleToUser) {
      // update
      if (!updateDone) {
        update();
        updateDone = true;
      }
    }
  }
The [update] method is as follows:
  // update fragment
  protected void update() {
    // recover activity and session
    if (activity == null) {
      Activity activity = getActivity();
      if (activity != null) {
        this.activity = (MainActivity) activity;
        this.session = this.activity.getSession();
      }
    }
    // the daughter class is asked to update itself
    updateFragment();
}
According to the code above, when a fragment’s [update] method executes, the fragment is visible. This is important because it means that the [Fragment.getActivity] method then returns a reference to the application’s activity (see section 1.10.8 ), which subsequently provides access to the session.
- lines 4–10: the activity and session are initialized if they have not already been initialized;
- Line 12: The [updateFragment] method of the child class is called. When this method executes, the fields [activity] and [session] to which it has access have already been initialized;
1.11.4. The [PlaceholderFragment] class
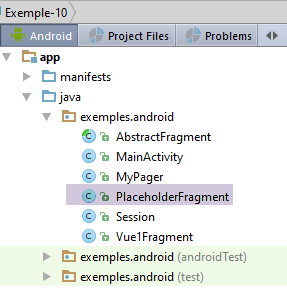
The [PlaceholderFragment] class evolves as follows:
package exemples.android;

import android.support.v4.app.Fragment;
import android.util.Log;
import android.widget.TextView;
import org.androidannotations.annotations.*;

// a fragment is a view displayed by a fragment container
@EFragment(R.layout.fragment_main)
public class PlaceholderFragment extends AbstractFragment {

  // visual interface component
  @ViewById(R.id.section_label)
  protected TextView textViewInfo;

  // data
  private boolean initDone;

  // data
  private String text;
  private int numVisit;

  // fragment no
  private static final String ARG_SECTION_NUMBER = "section_number";

  // manufacturer
  public PlaceholderFragment() {
    super();
    // log
    if (isDebugEnabled) {
      Log.d("PlaceholderFragment", "constructor");
    }
  }


  @AfterViews
  protected void afterViews() {
    // memory
    afterViewsDone = true;
 ...
  }

  // update fragment
  public void updateFragment() {
  ...
  }

}
- Line 10: The [PlaceholderFragment] class extends the [AbstractFragment] class. With this architecture, writing a fragment involves:
- writing the [@AfterViews] method, which is used to initialize the fragment during its first lifecycle or to reset it if a [onDestroyView] has occurred previously. Line 39 is required to properly manage the fragment’s lifecycle;
- writing the [updateFragment] method, which will update the fragment just before it is displayed. This method can use the session of its parent class;
- Write the fragment's event handlers. This is what we will do in future projects;
The methods [@AfterViews] and [updateFragment] remain the same as they were in the previous project:
@AfterViews
  protected void afterViews() {
    // memory
    afterViewsDone = true;
    // log
    if (isDebugEnabled) {
      Log.d("PlaceholderFragment", String.format("afterViews %s - %s - %s", getArguments().getInt(ARG_SECTION_NUMBER), getParentInfos(), getLocalInfos()));
    }
    if (!initDone) {
      // initial text
      text = getString(R.string.section_format, getArguments().getInt(ARG_SECTION_NUMBER));
      // init done
      initDone = true;
    }
    // current text display
    textViewInfo.setText(text);
  }

  // update fragment
  public void updateFragment() {
    // log
    if (isDebugEnabled) {
      Log.d("PlaceholderFragment", String.format("update %s - %s - %s", getArguments().getInt(ARG_SECTION_NUMBER), getParentInfos(), getLocalInfos()));
    }
    // increment visit no
    numVisit = session.getNumVisit();
    numVisit++;
    session.setNumVisit(numVisit);
    // modified text
    textViewInfo.setText(String.format("%s, visite %s", text, numVisit));
  }

  // local info for logs
  protected String getLocalInfos() {
    return String.format("numVisit=%s, initDone=%s, getActivity()==null:%s",
      numVisit, initDone, getActivity() == null);
  }
- lines 7 and 23: in the logs, we display information from the parent class using the inherited method [getParentInfos];
1.11.5. The [Vue1Fragment] class
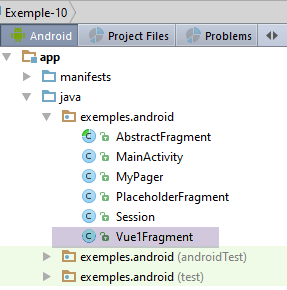
The [Vue1Fragment] class has the same structure as the [PlaceholderFragment] class:
package exemples.android;

import android.util.Log;
import android.widget.EditText;
import android.widget.Toast;
import org.androidannotations.annotations.*;

@EFragment(R.layout.vue1)
public class Vue1Fragment extends AbstractFragment {

  // visual interface elements
  @ViewById(R.id.editTextNom)
  protected EditText editTextNom;

  // data
  private int numVisit;

  @AfterViews
  protected void afterViews() {
    // memory
    afterViewsDone = true;
    // log
    if (isDebugEnabled) {
      Log.d("Vue1Fragment", String.format("afterViews %s - %s", getParentInfos(), getLocalInfos()));
    }
  }

  // event manager
  @Click(R.id.buttonValider)
  protected void doValider() {
    // the name entered is displayed
    Toast.makeText(getActivity(), String.format("Bonjour %s", editTextNom.getText().toString()), Toast.LENGTH_LONG).show();
  }

  // local info for logs
  protected String getLocalInfos() {
    return String.format("numVisit=%s", numVisit);
  }

  // update fragment
  @Override
  protected void updateFragment() {
    // increment visit no
    numVisit = session.getNumVisit();
    numVisit++;
    session.setNumVisit(numVisit);
    // the visit number is displayed
    Toast.makeText(getActivity(), String.format("Visite n° %s", numVisit), Toast.LENGTH_SHORT).show();
  }
}
- line 9: the class [Vue1Fragment] extends the class [AbstractFragment];
- lines 18–26: the [@AfterViews] method has nothing interesting to do. It must still be written to set the boolean [afterViewsDone] to true, as this information is used by the parent class;
- lines 42–49: the [updateFragment] method consists of displaying a short message showing the visit number (line 48) and incrementing this number in the session (lines 44–46);
Readers are invited to test this new project.
We will use this architecture in all future projects:
- one activity and n fragments;
- all fragments extend the [AbstractFragment] class;
- data to be shared between fragments and between fragments and the activity is placed in the [Session] class;
1.11.6. Tab/Fragment Association
In the [MainActivity] class, which manages the tabs, the following is written:
// the tab bar is also associated with the fragment container
// i.e. tab n° i displays fragment n° i of the container
tabLayout.setupWithViewPager(mViewPager);
Line 3 associates the tab manager with the fragment container. We have seen one consequence of this association: when the user clicks on tab #i, the fragment container displays fragment #i. We have not seen the reverse: when the fragment container is asked to display fragment #i, tab #i is automatically selected.
To illustrate this behavior, we will add the options [Fragment 1, Fragment 2, ...] to the current menu. When the user clicks on option or [Fragment i], the fragment container will be asked to display fragment #i. We will then see whether tab #i has been selected or not.
This step begins with a change to the application menu:
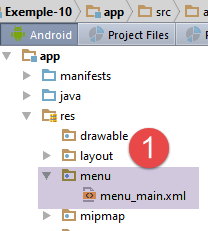
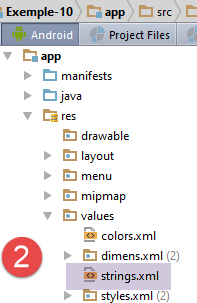
The content of the [res / menu / menu_main.xml] file changes as follows:
<menu xmlns:android="http://schemas.android.com/apk/res/android"
      xmlns:app="http://schemas.android.com/apk/res-auto"
      xmlns:tools="http://schemas.android.com/tools"
      tools:context="exemples.android.MainActivity">
  <item android:id="@+id/action_settings"
        android:title="@string/action_settings"
        android:orderInCategory="100"
        app:showAsAction="never"/>
  <item android:id="@+id/fragment1"
        android:title="@string/fragment1"
        android:orderInCategory="100"
        app:showAsAction="never"/>
  <item android:id="@+id/fragment2"
        android:title="@string/fragment2"
        android:orderInCategory="100"
        app:showAsAction="never"/>
  <item android:id="@+id/fragment3"
        android:title="@string/fragment3"
        android:orderInCategory="100"
        app:showAsAction="never"/>
  <item android:id="@+id/fragment4"
        android:title="@string/fragment4"
        android:orderInCategory="100"
        app:showAsAction="never"/>
  <item android:id="@+id/fragment5"
        android:title="@string/fragment5"
        android:orderInCategory="100"
        app:showAsAction="never"/>
</menu>
- lines 9–28: the five new menu options;
- the option labels (lines 10, 14, 18, 22, 26) are defined in the file [res / values / strings.xml] [2]:
<resources>
  <string name="app_name">Exemple-10</string>
  <string name="action_settings">Settings</string>
  <string name="section_format">Hello World from section: %1$d</string>
  <!-- view 1 -->
  <string name="titre_vue1">Vue n° 1</string>
  <string name="txt_nom">Quel est votre nom ?</string>
  <string name="btn_valider">Valider</string>
  <string name="btn_vue2">Vue n° 2</string>
  <!-- menu -->
  <string name="fragment1">Fragment 1</string>
  <string name="fragment2">Fragment 2</string>
  <string name="fragment3">Fragment 3</string>
  <string name="fragment4">Fragment 4</string>
  <string name="fragment5">Fragment 5</string>
</resources>
The visual result is as follows:
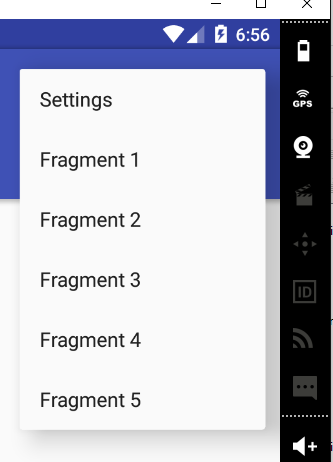
Click handling for these menu options is handled in the [MainActivity] class:
@Override
  public boolean onOptionsItemSelected(MenuItem item) {
    // log
    if (IS_DEBUG_ENABLED) {
      Log.d("menu", "onOptionsItemSelected");
    }
    // processing menu options
    int id = item.getItemId();
    switch (id) {
      case R.id.action_settings: {
        if (IS_DEBUG_ENABLED) {
          Log.d("menu", "action_settings selected");
        }
        break;
      }
      case R.id.fragment1: {
        showFragment(0);
        break;
      }
      case R.id.fragment2: {
        showFragment(1);
        break;
      }
      case R.id.fragment3: {
        showFragment(2);
        break;
      }
      case R.id.fragment4: {
        showFragment(3);
        break;
      }
      case R.id.fragment5: {
        showFragment(4);
        break;
      }
    }
    // item processed
    return true;
  }

  private void showFragment(int i) {
    if (i < FRAGMENTS_COUNT && mViewPager.getCurrentItem() != i) {
      // change the displayed fragment
      mViewPager.setCurrentItem(i);
    }
  }
- line 2: the [onOptionsItemSelected] method is called when one of the menu options is clicked;
- line 8: the ID of the clicked option is retrieved;
- lines 9–36: the different cases are handled by a switch statement;
- lines 16–36: clicking on option [Fragment i] calls the [showFragment(i-1)] method in lines 41–45;
- line 43: the fragment container is asked to display the requested fragment;
- line 42: we first verify that this is possible (condition 1) and that it is necessary (condition 2);
The reader is invited to test this new version. We observe that when we request the display of fragment #i, it is indeed displayed and tab #i is itself selected.
Now that we've seen how tabs and fragments work together, let's look at another scenario: one where tab management is separate from fragment management. This is the case, for example, when there are fewer tabs than fragments. To illustrate this new use case, we'll create a new project.
1.12. Example 11: Tabs Separated from Fragments
1.12.1. Creating the project
We duplicate the [Exemple-10] project into [Exemple-11]:
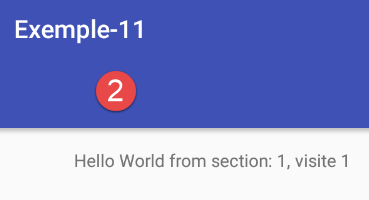
1.12.2. Objectives
The new application will have two tabs:
- The first tab will always display fragment [Vue1];
- the second tab will display a fragment selected from the menu;
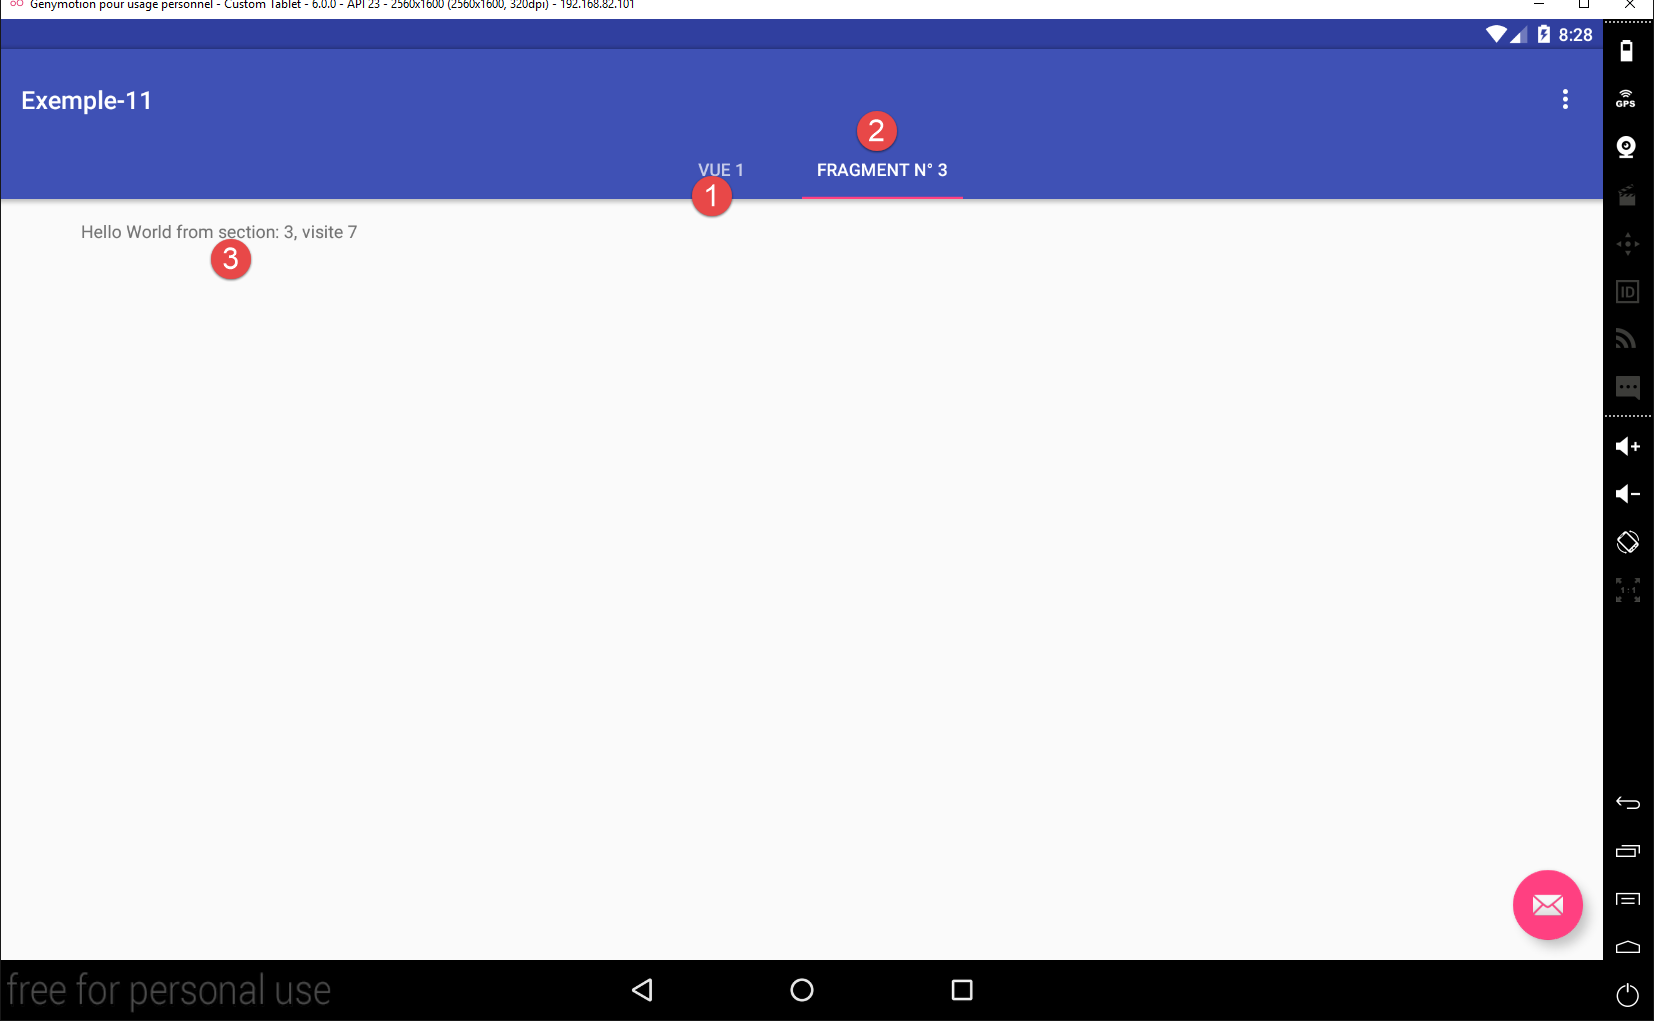
- in [1], the fragment [Vue1];
- in [2], the fragment of type [PlaceholderFragment] selected by the user;
- in [3], we continue to count visits;
1.12.3. The session
The new session will be as follows:
package exemples.android;

import org.androidannotations.annotations.EBean;

@EBean(scope = EBean.Scope.Singleton)
public class Session {
  // number of fragments visited
  private int numVisit;
  // n° fragment type [PlaceholderFragment] displayed in second tab
  private int numFragment;

  // getters and setters
...
}
- Line 10: We will handle tab clicks ourselves. When a tab is clicked, we must restore the fragment that was displayed the last time it was selected. The field [numFragment] will store the fragment number for tab #2, a number in [0, Fragments_COUNT-2]. When tab #2 is clicked, we will retrieve the fragment number to display from the session;
1.12.4. The menu
The [res / menu / menu_main.xml] menu changes as follows:
<menu xmlns:android="http://schemas.android.com/apk/res/android"
      xmlns:app="http://schemas.android.com/apk/res-auto"
      xmlns:tools="http://schemas.android.com/tools"
      tools:context="exemples.android.MainActivity">
  <item android:id="@+id/action_settings"
        android:title="@string/action_settings"
        android:orderInCategory="100"
        app:showAsAction="never"/>
  <item android:id="@+id/fragment1"
        android:title="@string/fragment1"
        android:orderInCategory="100"
        app:showAsAction="never"/>
  <item android:id="@+id/fragment2"
        android:title="@string/fragment2"
        android:orderInCategory="100"
        app:showAsAction="never"/>
  <item android:id="@+id/fragment3"
        android:title="@string/fragment3"
        android:orderInCategory="100"
        app:showAsAction="never"/>
  <item android:id="@+id/fragment4"
        android:title="@string/fragment4"
        android:orderInCategory="100"
        app:showAsAction="never"/>
</menu>
Tab #2 will display one of the four fragments from lines 9–24. The fifth fragment is fragment [Vue1Fragment], which will always be displayed in tab #1.
1.12.5. The [MainActivity] class
The [MainActivity] class must now manage the tabs and the navigation class between them, which it did not do until now. Its code changes as follows:
  // the tab manager
  @ViewById(R.id.tabs)
  protected TabLayout tabLayout;
...
@AfterViews
  protected void afterViews() {
    // log
    if (IS_DEBUG_ENABLED) {
      Log.d("MainActivity", "afterViews");
    }
    ...

    // no scrolling
    mViewPager.setScrollingEnabled(false);

    // view1 display
    mViewPager.setCurrentItem(FRAGMENTS_COUNT - 1);

    // at the start there is only one tab
    TabLayout.Tab tab = tabLayout.newTab();
    tab.setText("Vue 1");
    tabLayout.addTab(tab);

    // event manager
    tabLayout.setOnTabSelectedListener(new TabLayout.OnTabSelectedListener() {
      @Override
      public void onTabSelected(TabLayout.Tab tab) {
        // a tab has been selected - change the fragment displayed by the fragment container
        ...
      }

      @Override
      public void onTabUnselected(TabLayout.Tab tab) {

      }

      @Override
      public void onTabReselected(TabLayout.Tab tab) {

      }
    });

...

}
- line 17: the first fragment displayed by the fragment container will be the [Vue1Fragment] fragment. By design, this will be the last fragment in the container;
- lines 20–22: because we haven’t established an association between tabs and the fragment container, we have to manage the tabs ourselves. Initially, the [tabLayout] tab bar on line 3 has no tabs;
- line 20: we create the first tab;
- line 21: we give it a title. In the previous examples, the tab titles were the same as the fragment titles. That is no longer the case. Consequently, we remove the [getPageTitle] method from the fragment manager. We no longer need it:
    // optional - gives a title to managed fragments
    @Override
    public CharSequence getPageTitle(int position) {
      return String.format("Onglet n° %s", (position + 1));
}
- line 22: the created tab is added to the tab bar. Our tab bar now has a tab. What does this tab display? It is important to understand that tabs and fragments are two separate concepts. The fragment displayed is always the one chosen by the fragment container. If you switch tabs and do not ask the container to change the displayed fragment, nothing happens: the same fragment is still displayed, but the selected tab has changed. So here, the displayed fragment is the one chosen line 17: the fragment [Vue1Fragment];
- lines 26–30: the method to write to handle the user’s tab change;
The [onTabSelected] method in lines 26–30 is triggered whenever a tab is changed (if the user clicks on a tab that is already selected, nothing happens). Its code is as follows:
      @Override
      public void onTabSelected(TabLayout.Tab tab) {
        if (IS_DEBUG_ENABLED) {
          Log.d("onglets", "onTabSelected");
        }
        // a tab has been selected - change the fragment displayed by the fragment container
        // miter position
        int position = tab.getPosition();
        // fragment number to display
        int numFragment;
        switch (position) {
          case 0:
            // fragment no. [Vue1Fragment]
            numFragment = FRAGMENTS_COUNT - 1;
            break;
          default:
            // fragment no. [PlaceholderFragment]
            numFragment = session.getNumFragment();
        }
        // fragment display
        mViewPager.setCurrentItem(numFragment);
}
- Line 8: We retrieve the position of the tab that was clicked. Here, we will get a value of 0 or 1;
- lines 12–15: if the first tab was clicked, we prepare to display the fragment [Vue1Fragment];
- lines 16–18: in other cases (tab #2 clicked), we prepare to redisplay the fragment that was displayed the last time tab #2 was selected. Its number had then been stored in the application session;
- line 21: the fragment container is instructed to display the desired fragment;
Now let’s look at how the menu options are handled (still in [MainActivity]):
  @Override
  public boolean onOptionsItemSelected(MenuItem item) {
    // log
    if (IS_DEBUG_ENABLED) {
      Log.d("menu", "onOptionsItemSelected");
    }
    // processing menu options
    int id = item.getItemId();
    switch (id) {
      case R.id.action_settings: {
        if (IS_DEBUG_ENABLED) {
          Log.d("menu", "action_settings selected");
        }
        break;
      }
      case R.id.fragment1: {
        showFragment(0);
        break;
      }
      case R.id.fragment2: {
        showFragment(1);
        break;
      }
      case R.id.fragment3: {
        showFragment(2);
        break;
      }
      case R.id.fragment4: {
        showFragment(3);
        break;
      }
    }
    // item processed
    return true;
}
- lines 16–31: handling the 4 menu options. Each handler calls the [showFragment] method with the number of the fragment to display;
The [showFragment] method is as follows:
  // tab n° 2
  private TabLayout.Tab tab2 = null;

  private void showFragment(int i) {
    if (i < FRAGMENTS_COUNT && mViewPager.getCurrentItem() != i) {
      // if the 2nd tab doesn't yet exist, we create it
      if (tab2 == null) {
        tab2 = tabLayout.newTab();
        tabLayout.addTab(tab2);
      }
      // set the title of the second tab
      tab2.setText(String.format("Fragment n° %s", (i + 1)));
      // change the displayed fragment
      mViewPager.setCurrentItem(i);
      // the fragment number displayed is set to session
      session.setNumFragment(i);
      // tab 2 is selected - does nothing if already selected
      tab2.select();
    }
}
- Remember that when the app starts, there is only one tab;
- line 2: a reference to tab #2, initially null;
- line 5: the display conditions have not changed from the previous version;
- lines 7–10: if tab #2 does not yet exist, it is created (line 8) and added to the tab bar (line 9);
- line 12: the number of the fragment to be displayed is placed in the title of the second tab, with numbering starting at 1;
- line 14: the desired fragment is displayed;
- line 16: its number is stored in the session;
- line 18: tab #2 is selected. If it was already selected, nothing will happen: the [onTabSelected] method will not be executed. If it was not already selected, the [onTabSelected] method will be triggered. This method then instructs the fragment container to display the fragment already displayed in line 14. A simple check in the [onTabSelected] method prevents this scenario:
        // display fragment only if necessary
        if (numFragment != mViewPager.getCurrentItem()) {
          mViewPager.setCurrentItem(numFragment);
}
Readers are invited to test this new version.
1.12.6. Improvements
We now have a solid understanding of fragments, their lifecycle, the concept of fragment adjacency, and their relationship with the tab bar. We also have a robust architecture that has just passed the test in Example 11:
- one activity and n fragments;
- all fragments extend the [AbstractFragment] class;
- the data to be shared between fragments and between fragments and the activity is placed in the [Session] class;
In a new project, we will specify the relationships between the activity and fragments by adding an interface.
1.13. Example 12: Defining the relationships between the activity and fragments
In this example, we want to define the minimum relationships between the activity and fragments. To do this, we will use:
- an interface [IMainActivity] that defines what fragments can request from the activity;
- an abstract class [AbstractFragment] that will define the state and methods that every fragment should have;
1.13.1. Creating the project
We duplicate the [Exemple-11] project into [Exemple-12] by following the procedure in the section 1.4 . We obtain the following result:

1.13.2. The [IMainActivity] interface
From the previous examples, it appears that fragments need access to the session instantiated by the activity. Furthermore, though not visible in these examples, it is foreseeable that fragment event handlers sometimes end with a view change. We will ask the activity to perform this change. The [IMainActivity] interface could then be as follows:
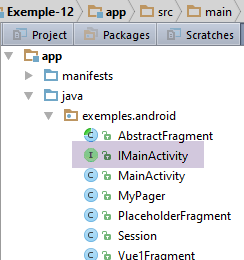
package exemples.android;

public interface IMainActivity {

  // session access
  Session getSession();

  // change of view
  void navigateToView(int position);

  // mode debug
  boolean IS_DEBUG_ENABLED = true;
}
In line 12, note the presence of a constant that was previously in the [MainActivity] class. We want to reduce the coupling between the fragments and the activity and limit it to a coupling between [AbstractFragment] and [IMainActivity]. The activity can then be named something other than [MainActivity]. Since the constant [IS_DEBUG_ENABLED] is used in the fragments, it is moved to the interface [IMainActivity].
1.13.3. The abstract class [AbstractFragment]
The abstract class [AbstractFragment] changes very little:
  // data accessible to daughter classes
  protected boolean afterViewsDone = false;
  final protected boolean isDebugEnabled = IMainActivity.IS_DEBUG_ENABLED;

  // activity
  protected IMainActivity mainActivity;
  protected Activity activity;

...
  // update fragment
  protected void update() {
    // recover activity and session
    if (mainActivity == null) {
      this.activity = getActivity();
      if (this.activity != null) {
        this.mainActivity = (IMainActivity) activity;
        this.session = this.mainActivity.getSession();
      }
    }
    // the daughter class is asked to update itself
    updateFragment();
}
- lines 6 and 7: we maintain two types of references to the activity:
- line 6: a reference to the activity implementing the [IMainActivity] interface;
- line 7: a reference to the activity inheriting from the Android class [Activity]. This is the case for every activity;
These two references naturally point to the same object. However, this object is viewed as two different types. This will prevent type casting at runtime;
- line 14: we retrieve a reference to the activity using the method [getActivity];
- line 15: if this reference is non-null, then we can access the session;
- lines 16–17: we store the activity as implementing the [IMainActivity] interface and the session;
1.13.4. Modification of the fragment handler
The fragment handler [SectionsPagerAdapter] in the [MainActivity] class is modified in one place: instead of handling fragments of type [Fragment], it now handles fragments of type [AbstractFragment]:
  public class SectionsPagerAdapter extends FragmentPagerAdapter {

    // fragments
    private AbstractFragment[] fragments;
    // fragment no
    private static final String ARG_SECTION_NUMBER = "section_number";

    // manufacturer
    public SectionsPagerAdapter(FragmentManager fm) {
      // parent
      super(fm);
      // initialization of fragment table
      fragments = new AbstractFragment[FRAGMENTS_COUNT];
      for (int i = 0; i < fragments.length - 1; i++) {
        ...
      }
      // a fragment of +
      fragments[fragments.length - 1] = new Vue1Fragment_();
    }

    // fragment n° position
    @Override
    public AbstractFragment getItem(int position) {
      ...
    }

    // makes the number of fragments managed
    @Override
    public int getCount() {
      ...
    }
}
1.13.5. Modification of the [MainActivity] class
The [MainActivity] class must implement the [IMainActivity] interface:
@EActivity(R.layout.activity_main)
public class MainActivity extends AppCompatActivity implements IMainActivity{

...
  // injection session
  @Bean(Session.class)
  protected Session session;
...
  // getter session
  public Session getSession() {
    return session;
  }

  @Override
  public void navigateToView(int position) {
    // the position view is displayed
    if(mViewPager.getCurrentItem()!=position){
      // fragment display
      mViewPager.setCurrentItem(position);
    }
  }
- lines 10–12: the method [getSession] already existed;
- lines 15–22: the method [navigateToView] displays fragment #[position];
- line 17: checks if there is anything to do;
- line 19: fragment #[position] is displayed;
At this point, run the application. It should work.
1.13.6. Modification of fragment display in [MainActivity]
Currently, class [MainActivity] displays a fragment using the statement:
    // view1 display
mViewPager.setCurrentItem(FRAGMENTS_COUNT - 1);
Since the [navigateToView] method does the same thing, we replace this type of statement everywhere (2 locations) with:
Then run the application. It should still work.
1.13.7. Conclusion
From now on, we will always use the previous architecture:
- an activity implementing the [IMainActivity] interface;
- fragments extending the [AbstractFragment] class, which requires them to implement the [updateFragment] method. These must also have a [@AfterViews] method in which they set the [afterViewsDone] boolean to true;
- a session encapsulating the data to be shared between fragments and the activity;
1.14. Example-13: Example-05 with fragments
In the [Exemple-05] project, we introduced the navigation between views. It was previously a navigation between activities: 1 view = 1 activity. Here, we propose having a single activity with multiple views of the type [AbstractFragment].
1.14.1. Creating the project
We duplicate the previous project [Exemple-12] into [Exemple-13] by following the procedure in the section 1.4 . We obtain the following result:
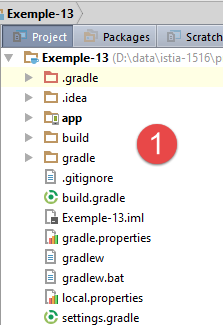
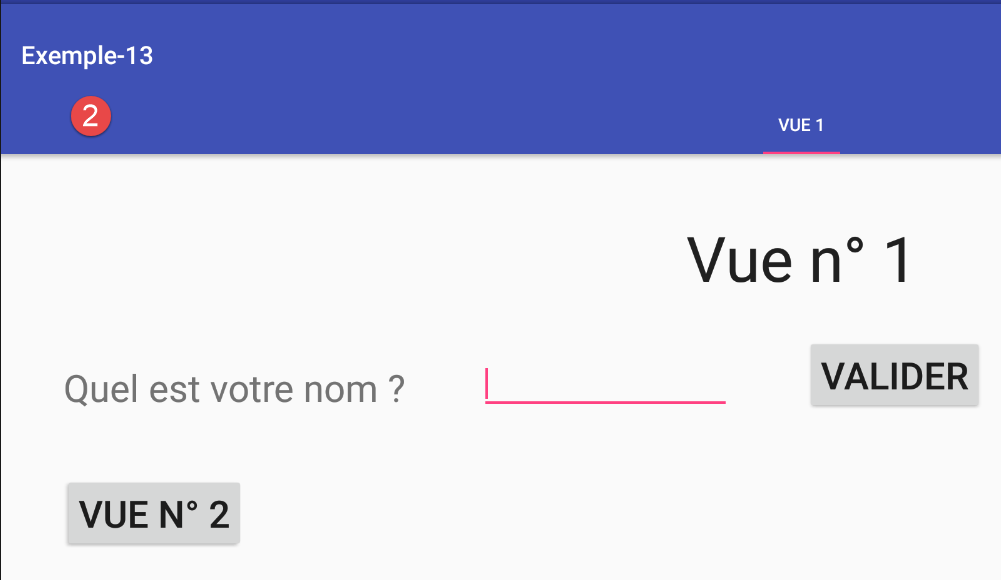
1.14.2. Project Structure
We will begin using packages to organize the code. For now, we can distinguish two distinct areas:
- activity management;
- fragment management;
We create two packages for them, [exemples.android.activity] and [exemples.android.fragments]:
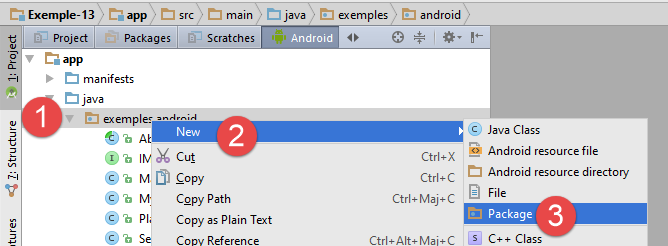
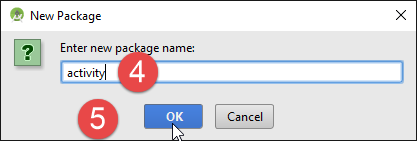
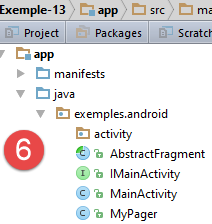
We do the same to create the [exemples.android.fragments] package:
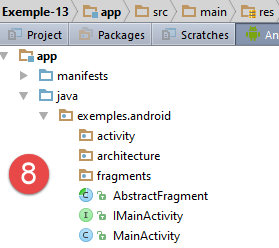
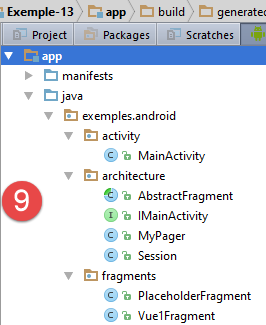
In [8], we create a third package called [architecture], into which we will place the [IMainActivity, AbstractFragment, Session, MyPager] entities, which are the building blocks of our application’s architecture. This serves as a reminder that we have made a specific architectural choice. Next, move the existing project elements as indicated in [9]. Each move must be confirmed by clicking the [Refactor] button.
At this point, compile the application. We have the following errors in [MainActivity:
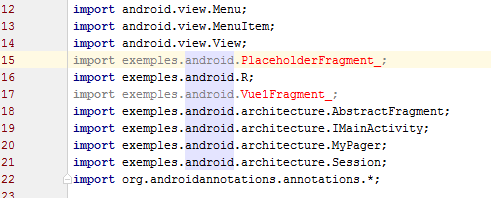
When moving classes to packages, Android Studio made the necessary changes to the application code (lines 18–21, for example). The classes referenced in lines 15 and 17 were not moved. They are generated by the Android Annotations library. For these classes, you must change the imports manually. These lines therefore become:
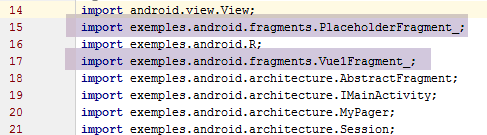
Once this is done, there are no more compilation errors. Run the application. The following error then appears:
java.lang.RuntimeException: Unable to instantiate activity ComponentInfo{exemples.android/exemples.android.MainActivity_}:
This error stems from the application manifest:
<?xml version="1.0" encoding="utf-8"?>
<manifest xmlns:android="http://schemas.android.com/apk/res/android"
          package="exemples.android">

  <application
    android:allowBackup="true"
    android:icon="@mipmap/ic_launcher"
    android:label="@string/app_name"
    android:supportsRtl="true"
    android:theme="@style/AppTheme">
    <activity
      android:name=".MainActivity_"
      android:label="@string/app_name"
      android:theme="@style/AppTheme.NoActionBar">
      <intent-filter>
        <action android:name="android.intent.action.MAIN"/>

        <category android:name="android.intent.category.LAUNCHER"/>
      </intent-filter>
    </activity>
  </application>

</manifest>
Lines 3 and 12 specify that the designated activity is [exemples.android.MainActivity_]. However, since the activity has been moved to the [activity] package, line 12 must now be:
android:name=".activity.MainActivity_"
Note the . before [activity]. Once again, Android Studio was unable to update the manifest because it references an Android Annotations class that has not been moved. Using the AA library therefore comes with a number of issues.
1.14.3. Cleaning up the project
In the new project:
- there are no more tabs, floating buttons, or menus;
- the [PlaceholderFragment] fragments disappear. The application will manage two fragments: [Vue1Fragment], which we already have, and [Vue2Fragment], which we will need to create;
- the session is no longer the same;
1.14.3.1. Cleaning up fragments
Delete the [PlaceHolderFragment] and [1] classes:

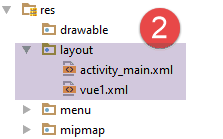
Similarly, delete the view [res / layout / fragment_main.xml] associated with this fragment [2].
1.14.3.2. Cleaning up the session
The session is currently as follows:
package exemples.android.architecture;

import org.androidannotations.annotations.EBean;

@EBean(scope = EBean.Scope.Singleton)
public class Session {
  // number of fragments visited
  private int numVisit;
  // n° fragment type [PlaceholderFragment] displayed in second tab
  private int numFragment;

  // getters and setters

  public int getNumVisit() {
    return numVisit;
  }

  public void setNumVisit(int numVisit) {
    this.numVisit = numVisit;
  }

  public int getNumFragment() {
    return numFragment;
  }

  public void setNumFragment(int numFragment) {
    this.numFragment = numFragment;
  }
}
We do not retain anything from this session.
Compile the project. The lines causing errors are those that used the session content. Remove them. In the [Vue1Fragment] class, we also remove the [numVisit] variable from the code, which becomes the following:
package exemples.android.fragments;

import android.util.Log;
import android.widget.EditText;
import android.widget.Toast;
import exemples.android.R;
import exemples.android.architecture.AbstractFragment;
import org.androidannotations.annotations.AfterViews;
import org.androidannotations.annotations.Click;
import org.androidannotations.annotations.EFragment;
import org.androidannotations.annotations.ViewById;

@EFragment(R.layout.vue1)
public class Vue1Fragment extends AbstractFragment {

  // visual interface elements
  @ViewById(R.id.editTextNom)
  protected EditText editTextNom;

  @AfterViews
  protected void afterViews() {
    // memory
    afterViewsDone = true;
    // log
    if (isDebugEnabled) {
      Log.d("Vue1Fragment", String.format("afterViews %s", getParentInfos()));
    }
  }

  // event manager
  @Click(R.id.buttonValider)
  protected void doValider() {
    // the name entered is displayed
    Toast.makeText(getActivity(), String.format("Bonjour %s", editTextNom.getText().toString()), Toast.LENGTH_LONG).show();
  }


  // update fragment
  @Override
  protected void updateFragment() {
  }
}
1.14.3.3. Removing the tabs, floating button, and menu
The tabs and floating button are removed in two places:
- in the [res / layout / activity-main.xml] view, which defines these elements and their placement in the view;
- in the code for activity [MainActivity];
The menu is also removed in two places:
- in the [res / menu / menu-main.xml] view, which defines the menu options;
- in the code of activity [MainActivity];
The code for the [res / layout / activity-main.xml] view is currently as follows:
<?xml version="1.0" encoding="utf-8"?>
<android.support.design.widget.CoordinatorLayout xmlns:android="http://schemas.android.com/apk/res/android"
                                                 xmlns:tools="http://schemas.android.com/tools"
                                                 xmlns:app="http://schemas.android.com/apk/res-auto"
                                                 android:id="@+id/main_content"
                                                 android:layout_width="match_parent"
                                                 android:layout_height="match_parent"
                                                 android:fitsSystemWindows="true"
                                                 tools:context=".activity.MainActivity">

  <android.support.design.widget.AppBarLayout
    android:id="@+id/appbar"
    android:layout_width="match_parent"
    android:layout_height="wrap_content"
    android:paddingTop="@dimen/appbar_padding_top"
    android:theme="@style/AppTheme.AppBarOverlay">

    <android.support.v7.widget.Toolbar
      android:id="@+id/toolbar"
      android:layout_width="match_parent"
      android:layout_height="?attr/actionBarSize"
      android:background="?attr/colorPrimary"
      app:popupTheme="@style/AppTheme.PopupOverlay"
      app:layout_scrollFlags="scroll|enterAlways">

    </android.support.v7.widget.Toolbar>

    <android.support.design.widget.TabLayout
      android:id="@+id/tabs"
      android:layout_width="match_parent"
      android:layout_height="wrap_content"/>

  </android.support.design.widget.AppBarLayout>

  <exemples.android.architecture.MyPager
    android:id="@+id/container"
    android:layout_width="match_parent"
    android:layout_height="match_parent"
    app:layout_behavior="@string/appbar_scrolling_view_behavior"/>

  <android.support.design.widget.FloatingActionButton
    android:id="@+id/fab"
    android:layout_width="wrap_content"
    android:layout_height="wrap_content"
    android:layout_gravity="end|bottom"
    android:layout_margin="@dimen/fab_margin"
    android:src="@android:drawable/ic_dialog_email"/>

</android.support.design.widget.CoordinatorLayout>
- Remove lines [28-31, 41-47];
- We also remove the toolbar from lines 18–24;
The code for the [res / menu / menu_main.xml] menu is currently as follows:
<menu xmlns:android="http://schemas.android.com/apk/res/android"
      xmlns:app="http://schemas.android.com/apk/res-auto"
      xmlns:tools="http://schemas.android.com/tools"
      tools:context=".activity.MainActivity">
  <item android:id="@+id/action_settings"
        android:title="@string/action_settings"
        android:orderInCategory="100"
        app:showAsAction="never"/>
  <item android:id="@+id/fragment1"
        android:title="@string/fragment1"
        android:orderInCategory="100"
        app:showAsAction="never"/>
  <item android:id="@+id/fragment2"
        android:title="@string/fragment2"
        android:orderInCategory="100"
        app:showAsAction="never"/>
  <item android:id="@+id/fragment3"
        android:title="@string/fragment3"
        android:orderInCategory="100"
        app:showAsAction="never"/>
  <item android:id="@+id/fragment4"
        android:title="@string/fragment4"
        android:orderInCategory="100"
        app:showAsAction="never"/>
</menu>
- We will remove lines 9–24. This leaves a option that we will not use. This is simply to provide an example of a option menu declaration that we can reproduce by copying and pasting;
In the [MainActivity] class, we remove everything that refers to tabs, the floating button, the toolbar, and the menu. The easiest way to find these references is to remove their declarations:
  // the tab manager
  @ViewById(R.id.tabs)
  protected TabLayout tabLayout;
  // the floating button
  @ViewById(R.id.fab)
protected FloatingActionButton fab;
and recompile the app. The lines with errors are the ones that reference the missing elements. Delete all of these lines. Also, modify the fragment manager so that it no longer references the [PlaceholderFragment] fragment that we deleted:
  public class SectionsPagerAdapter extends FragmentPagerAdapter {

    // fragments
    private AbstractFragment[] fragments;

    // manufacturer
    public SectionsPagerAdapter(FragmentManager fm) {
      // parent
      super(fm);
    }

    // fragment n° position
    @Override
    public AbstractFragment getItem(int position) {
      // log
      if (IS_DEBUG_ENABLED) {
        Log.d("SectionsPagerAdapter", String.format("getItem[%s]", position));
      }
      return fragments[position];
    }

    // makes the number of fragments managed
    @Override
    public int getCount() {
      return fragments.length;
    }
}
- lines 7–10: we removed all fragment generation;
At this point, there should no longer be any compilation errors. In the [MainActivity] class, we have arrived at the following intermediate code:
package exemples.android.activity;

import android.os.Bundle;
import android.support.v4.app.FragmentManager;
import android.support.v4.app.FragmentPagerAdapter;
import android.support.v7.app.AppCompatActivity;
import android.util.Log;
import exemples.android.R;
import exemples.android.architecture.AbstractFragment;
import exemples.android.architecture.IMainActivity;
import exemples.android.architecture.MyPager;
import exemples.android.architecture.Session;
import exemples.android.fragments.Vue1Fragment_;
import org.androidannotations.annotations.*;

@EActivity(R.layout.activity_main)
public class MainActivity extends AppCompatActivity implements IMainActivity {

  // the fragment container
  @ViewById(R.id.container)
  protected MyPager mViewPager;
// the toolbar
@ViewById(R.id.toolbar)
protected Toolbar toolbar;

  // injection session
  @Bean(Session.class)
  protected Session session;

  // number of fragments
  private final int FRAGMENTS_COUNT = 5;
  // fragment adjacency
  private final int OFF_SCREEN_PAGE_LIMIT = 2;

  // mode debug
  public static final boolean IS_DEBUG_ENABLED = true;

  // the fragment manager
  private SectionsPagerAdapter mSectionsPagerAdapter;

  // manufacturer
  public MainActivity() {
    // log
    if (IS_DEBUG_ENABLED) {
      Log.d("MainActivity", "constructor");
    }
  }

  @AfterViews
  protected void afterViews() {
    // log
    if (IS_DEBUG_ENABLED) {
      Log.d("MainActivity", "afterViews");
    }

    // toolbar - this is where the application name is displayed
    setSupportActionBar(toolbar);

    // the fragment manager
    mSectionsPagerAdapter = new SectionsPagerAdapter(getSupportFragmentManager());

    // the fragment container is associated with the fragment manager
    // i.e. fragment no. i in the fragment container is fragment no. i issued by the fragment manager
    mViewPager.setAdapter(mSectionsPagerAdapter);

    // fragment offset
    mViewPager.setOffscreenPageLimit(OFF_SCREEN_PAGE_LIMIT);

    // inhibit swiping between fragments
    mViewPager.setSwipeEnabled(false);

    // no scrolling
    mViewPager.setScrollingEnabled(false);

    // view1 display
    navigateToView(FRAGMENTS_COUNT - 1);

  }

  @AfterInject
  protected void afterInject() {
    // log
    if (IS_DEBUG_ENABLED) {
      Log.d("MainActivity", "afterInject");
    }
  }

  // getter session
  public Session getSession() {
    return session;
  }

  @Override
  public void navigateToView(int position) {
    // the position view is displayed
    if (mViewPager.getCurrentItem() != position) {
      // fragment display
      mViewPager.setCurrentItem(position);
    }
  }

  // the fragment manager
  // it is used to request fragments to be displayed in the main view
  // must define methods [getItem] and [getCount] - the others are optional
  public class SectionsPagerAdapter extends FragmentPagerAdapter {

    // fragments
    private AbstractFragment[] fragments;

    // manufacturer
    public SectionsPagerAdapter(FragmentManager fm) {
      // parent
      super(fm);
    }

    // fragment n° position
    @Override
    public AbstractFragment getItem(int position) {
      // log
      if (IS_DEBUG_ENABLED) {
        Log.d("SectionsPagerAdapter", String.format("getItem[%s]", position));
      }
      return fragments[position];
    }

    // makes the number of fragments managed
    @Override
    public int getCount() {
      return fragments.length;
    }
  }
}
There are a few more changes to make:
- delete line 31, which is no longer needed;
- line 33: set the fragment adjacency to 1;
- line 76: navigate to view 0. This will be the first one displayed;
- line 108: initialize the array with the fragment [Vue1Fragment_]:
    // fragments
private AbstractFragment[] fragments = new AbstractFragment[]{new Vue1Fragment_()};
So we only have one fragment. Run the application. You should get the following result:
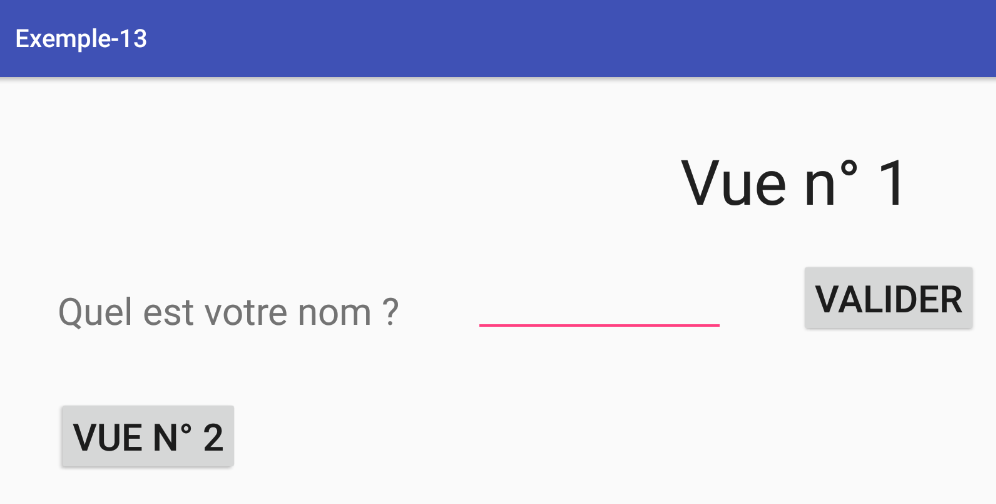
The [Valider] button should work.
1.14.4. Creating fragments and associated views
The application will have two views, those from the [Exemple-05] project. We already have the [vue1.xml] view in the current project. We will now duplicate [vue2.xml] from [Exemple-05] to [Exemple-12] (open both projects and copy and paste between them).
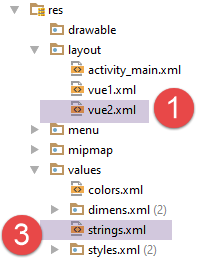
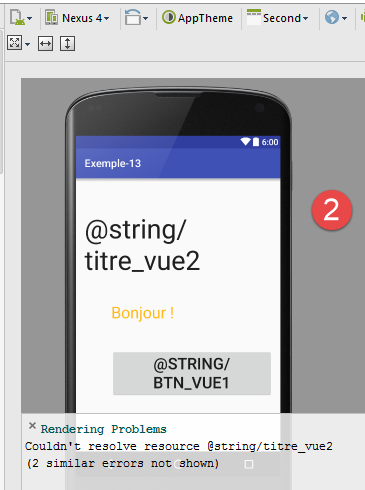
- This creates [1], the new view. When we try to edit it, errors appear in [2]. We need to modify the file [strings.xml] and [3] to add the strings referenced by this new view:
<resources>
<string name="app_name">Exemple-13</string>
<string name="action_settings">Settings</string>
<string name="section_format">Hello World from section: %1$d</string>
<!-- view 1 -->
<string name="titre_vue1">Vue n° 1</string>
<string name="txt_nom">Quel est votre nom ?</string>
<string name="btn_valider">Valider</string>
<!-- view 2 -->
<string name="btn_vue2">Vue n° 2</string>
<string name="titre_vue2">Vue n° 2</string>
<string name="btn_vue1">Vue n° 1</string>
</resources>
We duplicate the class [Vue1Fragment] into [Vue2Fragment]:

and we modify the copied code as follows:
package exemples.android.fragments;
import android.util.Log;
import exemples.android.R;
import exemples.android.architecture.AbstractFragment;
import org.androidannotations.annotations.AfterViews;
import org.androidannotations.annotations.EFragment;
@EFragment(R.layout.vue2)
public class Vue2Fragment extends AbstractFragment {
@AfterViews
protected void afterViews() {
// memory
afterViewsDone = true;
// log
if (isDebugEnabled) {
Log.d("Vue2Fragment", String.format("afterViews %s", getParentInfos()));
}
}
// update fragment
@Override
protected void updateFragment() {
}
}
- line 9: the fragment is associated with the view [res / layout / vue2.xml];
- line 10: the class extends the abstract class [AbstractFragment];
- lines 12–20: the required method [@AfterViews];
- lines 23–25: the required method [updateFragment];
1.14.5. Implementation of the fragments and the navigation between them
The activity will now manage two fragments. Its [SectionsPagerAdapter] class evolves as follows:
public class SectionsPagerAdapter extends FragmentPagerAdapter {
// fragments
private AbstractFragment[] fragments = new AbstractFragment[]{new Vue1Fragment_(), new Vue2Fragment_()};
...
}
The [IMainActivity] interface handles navigation between views using its navigation method. We will handle the click on the [Vue n° 2] button of the [Vue1Fragment] fragment:
package exemples.android.fragments;
import android.util.Log;
import android.widget.EditText;
import android.widget.Toast;
import exemples.android.R;
import exemples.android.architecture.AbstractFragment;
import org.androidannotations.annotations.AfterViews;
import org.androidannotations.annotations.Click;
import org.androidannotations.annotations.EFragment;
import org.androidannotations.annotations.ViewById;
@EFragment(R.layout.vue1)
public class Vue1Fragment extends AbstractFragment {
// visual interface elements
@ViewById(R.id.editTextNom)
protected EditText editTextNom;
@AfterViews
protected void afterViews() {
// memory
afterViewsDone = true;
// log
if (isDebugEnabled) {
Log.d("Vue1Fragment", String.format("afterViews %s", getParentInfos()));
}
}
// event managers ----------------------------------
@Click(R.id.buttonValider)
protected void doValider() {
// the name entered is displayed
Toast.makeText(activity, String.format("Bonjour %s", editTextNom.getText().toString()), Toast.LENGTH_LONG).show();
}
@Click(R.id.buttonVue2)
protected void showVue2() {
mainActivity.navigateToView(1);
}
// update fragment
@Override
protected void updateFragment() {
}
}
- lines 37–40: the [showVue2] method handles the 'click' event on the [Vue n° 2] button;
- line 39: navigation is performed using the activity's [navigateToView] method. Note that the activity has been stored in the parent class as:
// activity
protected IMainActivity mainActivity;
and that this activity has already been initialized when entering any event handler.
- line 34: the statement uses the [activity] variable from the parent class, which is a reference to the activity as an instance of the Android type [Activity];
protected Activity activity;
We find similar code for the fragment [Vue2Fragment]:
package exemples.android.fragments;
import android.util.Log;
import exemples.android.R;
import exemples.android.architecture.AbstractFragment;
import org.androidannotations.annotations.AfterViews;
import org.androidannotations.annotations.Click;
import org.androidannotations.annotations.EFragment;
@EFragment(R.layout.vue2)
public class Vue2Fragment extends AbstractFragment {
@AfterViews
protected void afterViews() {
// memory
afterViewsDone = true;
// log
if (isDebugEnabled) {
Log.d("Vue2Fragment", String.format("afterViews %s", getParentInfos()));
}
}
// gestionnaires d'évts ----------------------------------------------
@Click(R.id.buttonVue1)
protected void showVue1() {
mainActivity.navigateToView(0);
}
// update fragment
@Override
protected void updateFragment() {
}
}
- Lines 24–27: The [showVue1] method handles the 'click' event on the [Vue n° 1] button;
Run the project and verify that the navigation view transition works.
1.14.6. Session Definition
The application works as follows:
- Enter a name in view #1;
- Display this name in view #2;
To allow View 1 to pass the entered name to View 2, we will use the following session:
package exemples.android.architecture;
import org.androidannotations.annotations.EBean;
@EBean(scope = EBean.Scope.Singleton)
public class Session {
// name
private String nom;
// getters and setters
...
}
- line 8: the entered name;
The [MainActivity] class will initialize the session as follows:
// injection session
@Bean(Session.class)
protected Session session;
...
@AfterInject
protected void afterInject() {
// log
if (IS_DEBUG_ENABLED) {
Log.d("MainActivity", "afterInject");
}
// init session
session.setNom("");
}
1.14.7. Final fragment code
In the [Vue1Fragment] fragment, we modify the code for the click handler on the [Valider] button:
package exemples.android.fragments;
import android.util.Log;
import android.widget.EditText;
import android.widget.Toast;
import exemples.android.R;
import exemples.android.architecture.AbstractFragment;
import org.androidannotations.annotations.AfterViews;
import org.androidannotations.annotations.Click;
import org.androidannotations.annotations.EFragment;
import org.androidannotations.annotations.ViewById;
@EFragment(R.layout.vue1)
public class Vue1Fragment extends AbstractFragment {
// visual interface elements
@ViewById(R.id.editTextNom)
protected EditText editTextNom;
...
// event managers ----------------------------------
@Click(R.id.buttonValider)
protected void doValider() {
// memorizes the name entered
String nom = editTextNom.getText().toString();
// we display it
Toast.makeText(activity, nom, Toast.LENGTH_LONG).show();
}
@Click(R.id.buttonVue2)
protected void showVue2() {
// enter the name entered in the session
session.setNom(editTextNom.getText().toString());
// navigate to view no. 2
mainActivity.navigateToView(1);
}
// update fragment
@Override
protected void updateFragment() {
}
}
- lines: 31-37: handle the click on the [Vue n° 2] button;
- line 34: before navigating to view #2, we store the entered name in the session so that the new view can access it;
The [Vue2Fragment] view evolves as follows:
package exemples.android.fragments;
import android.util.Log;
import android.widget.TextView;
import exemples.android.R;
import exemples.android.architecture.AbstractFragment;
import org.androidannotations.annotations.AfterViews;
import org.androidannotations.annotations.Click;
import org.androidannotations.annotations.EFragment;
import org.androidannotations.annotations.ViewById;
@EFragment(R.layout.vue2)
public class Vue2Fragment extends AbstractFragment {
// visual interface components
@ViewById(R.id.textViewBonjour)
protected TextView textViewBonjour;
@AfterViews
protected void afterViews() {
// memory
afterViewsDone = true;
// log
if (isDebugEnabled) {
Log.d("Vue2Fragment", String.format("afterViews %s", getParentInfos()));
}
}
// gestionnaires d'évts ----------------------------------------------
@Click(R.id.buttonVue1)
protected void showVue1() {
mainActivity.navigateToView(0);
}
// update fragment
@Override
protected void updateFragment() {
// retrieve the name entered in the session
String nom = session.getNom();
// we display it
textViewBonjour.setText(String.format("Bonjour %s !", nom));
}
}
When view #2 is displayed, the name entered in view #1 must be displayed. We know that immediately after it is displayed, its method [updateFragment] will be executed. It is therefore in this method (lines 36–42) that we can place the code to display the name.
- lines 16–17: declaration of the view’s sole visual component;
- line 39: the name entered in view #1 is retrieved from the session;
- line 41: the label [textViewBonjour] is modified;
Run the project and verify that it works.
1.14.8. Fragment Lifecycle Management
In the fragment [Vue1Fragment], the method [@AfterViews] is as follows:
@AfterViews
protected void afterViews() {
// memory
afterViewsDone = true;
// log
if (isDebugEnabled) {
Log.d("Vue1Fragment", String.format("afterViews %s", getParentInfos()));
}
}
This method is incomplete. In fact, we must always account for the case where the fragment is recycled after a [onDestroyView] operation. In this case, the view of fragment 1 is regenerated, and any name that may have been entered previously will disappear from the view. We don’t want that. Currently, the entered name remains displayed because the adjacency of Fragment 1 causes the [Vue1Fragment] fragment lifecycle to be executed only once. However, it is preferable to account for the case where the fragment is recycled.
There are several ways to solve this problem:
- we can take advantage of the fact that the method [update] is executed systematically every time the fragment is displayed to update the entered name;
- you can perform this update only when the [@AfterViews] method is re-executed. We are taking the latter approach;
We modify the code for [Vue1Fragment] as follows:
// visual interface elements
@ViewById(R.id.editTextNom)
protected EditText editTextNom;
// data
private String nom;
@AfterViews
protected void afterViews() {
// memory
afterViewsDone = true;
// log
if (isDebugEnabled) {
Log.d("Vue1Fragment", String.format("afterViews %s", getParentInfos()));
}
// on (ré)initialise le texte affiché
editTextNom.setText(nom);
}
// event managers ----------------------------------
...
@Click(R.id.buttonVue2)
protected void showVue2() {
// the name entered is noted so that it can be retrieved if the fragment is recycled
nom = editTextNom.getText().toString();
// enter the name entered in the session
session.setNom(nom);
// navigate to view no. 2
activity.navigateToView(1);
}
- line 27: as we are about to leave view 1 for view 2, we store the entered name;
- line 17: each time the fragment's lifecycle is executed, the last name entered is displayed again;
For fragment [Vue2Fragment], the existing code is sufficient:
// visual interface components
@ViewById(R.id.textViewBonjour)
protected TextView textViewBonjour;
@AfterViews
protected void afterViews() {
// memory
afterViewsDone = true;
// log
if (isDebugEnabled) {
Log.d("Vue2Fragment", String.format("afterViews %s", getParentInfos()));
}
}
// update fragment
@Override
protected void updateFragment() {
// retrieve the name entered in the session
String nom = session.getNom();
// we display it
textViewBonjour.setText(String.format("Bonjour %s !", nom));
}
- The only visual component of the view (line 3) is updated every time the view is displayed (line 21). The method [@AfterViews] therefore has nothing to add;
1.14.9. Conclusion
At this point, we have once again demonstrated the relevance of our architecture:
- an activity implementing the [IMainActivity] interface;
- fragments extending the [AbstractFragment] class, which requires them to implement the [updateFragment] method. These must also have a [@AfterViews] method in which they set the [afterViewsDone] boolean to true;
- a session encapsulating the data to be shared between fragments and the activity;
1.15. Example 14: A Two-Layer Architecture
We will build a single-view application with the following architecture:
 |
1.15.1. Creating the project
We duplicate the previous project [Exemple-12] into [Exemple-13] by following the procedure in the section 1.4 . We obtain the following result:
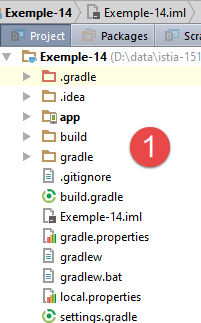
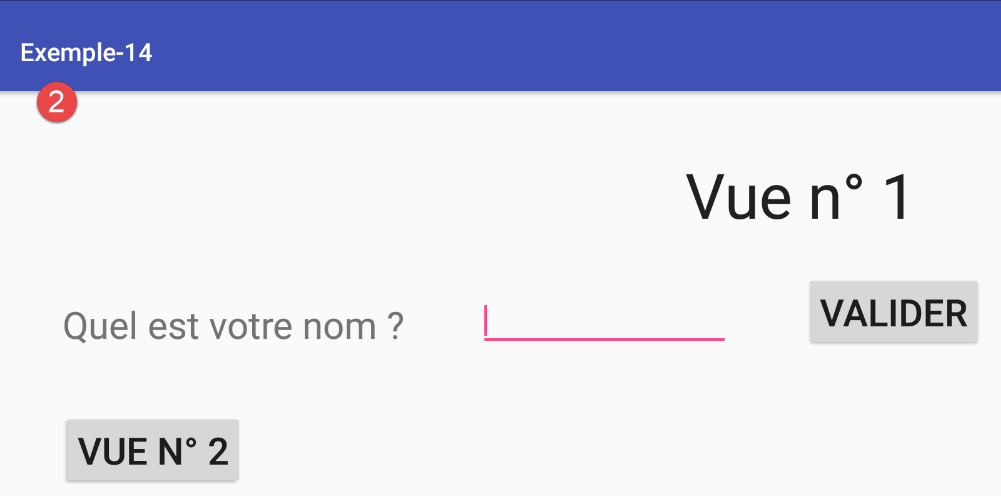
1.15.2. The view [vue1]
The application will have only one view, [vue1.xml]. Therefore, we delete the other view, [vue2.xml], along with its associated fragment:
Compile the application. Errors appear in [MainActivity]:
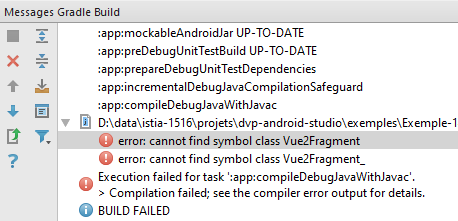
Fix line 4 below in the fragment handler [SectionsPagerAdapter]
public class SectionsPagerAdapter extends FragmentPagerAdapter {
// fragments
private AbstractFragment[] fragments = new AbstractFragment[]{new Vue1Fragment_(), new Vue2Fragment_()};
...
Line 4 above becomes:
// fragments
private AbstractFragment[] fragments = new AbstractFragment[]{new Vue1Fragment_()};
Remove the now-unnecessary [Ctrl-Shift-O] imports. There should no longer be any compilation errors. Run the project: view #1 should appear. We will now modify it.
We will create the view [vue1.xml], which will generate random numbers:
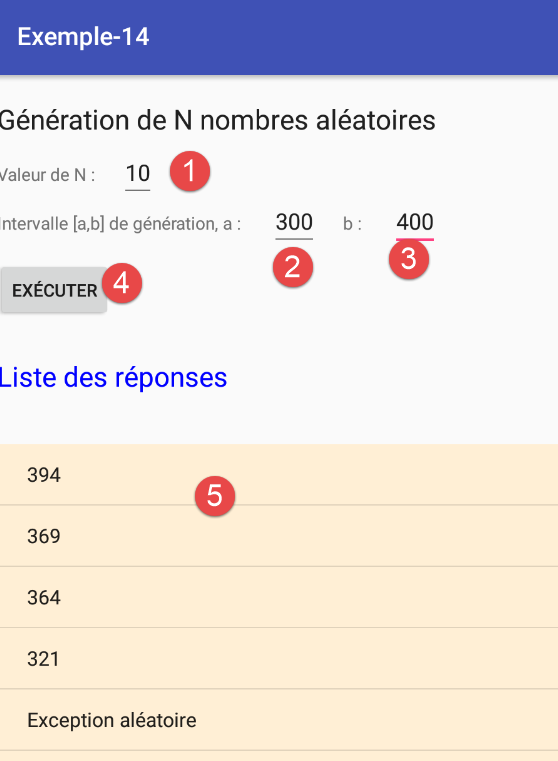
Its components are as follows:
Its code XML is as follows:
<?xml version="1.0" encoding="utf-8"?>
<RelativeLayout xmlns:android="http://schemas.android.com/apk/res/android"
xmlns:tools="http://schemas.android.com/tools"
android:id="@+id/RelativeLayout1"
android:layout_width="match_parent"
android:layout_height="match_parent"
android:layout_marginLeft="20dp"
android:orientation="vertical" >
<TextView
android:id="@+id/txt_Titre2"
android:layout_width="wrap_content"
android:layout_height="wrap_content"
android:layout_marginTop="20dp"
android:text="@string/aleas"
android:textAppearance="?android:attr/textAppearanceLarge" />
<TextView
android:id="@+id/txt_nbaleas"
android:layout_width="wrap_content"
android:layout_height="wrap_content"
android:layout_below="@+id/txt_Titre2"
android:layout_marginTop="20dp"
android:text="@string/txt_nbaleas" />
<EditText
android:id="@+id/edt_nbaleas"
android:layout_width="wrap_content"
android:layout_height="wrap_content"
android:layout_alignBaseline="@+id/txt_nbaleas"
android:layout_marginLeft="20dp"
android:layout_toRightOf="@+id/txt_nbaleas"
android:inputType="number" />
<TextView
android:id="@+id/txt_errorNbAleas"
android:layout_width="wrap_content"
android:layout_height="wrap_content"
android:layout_alignBaseline="@+id/edt_nbaleas"
android:layout_marginLeft="20dp"
android:layout_toRightOf="@+id/edt_nbaleas"
android:text="@string/txt_errorNbAleas"
android:textColor="@color/red" />
<TextView
android:id="@+id/txt_a"
android:layout_width="wrap_content"
android:layout_height="wrap_content"
android:layout_below="@+id/txt_nbaleas"
android:layout_marginTop="20dp"
android:text="@string/txt_a" />
<EditText
android:id="@+id/edt_a"
android:layout_width="wrap_content"
android:layout_height="wrap_content"
android:layout_alignBaseline="@+id/txt_a"
android:layout_marginLeft="20dp"
android:layout_toRightOf="@+id/txt_a"
android:inputType="number" />
<TextView
android:id="@+id/txt_b"
android:layout_width="wrap_content"
android:layout_height="wrap_content"
android:layout_alignBaseline="@+id/txt_a"
android:layout_marginLeft="20dp"
android:layout_toRightOf="@+id/edt_a"
android:text="@string/txt_b" />
<EditText
android:id="@+id/edt_b"
android:layout_width="wrap_content"
android:layout_height="wrap_content"
android:layout_alignBaseline="@+id/txt_a"
android:layout_marginLeft="20dp"
android:layout_toRightOf="@+id/txt_b"
android:inputType="number" />
<TextView
android:id="@+id/txt_errorIntervalle"
android:layout_width="wrap_content"
android:layout_height="wrap_content"
android:layout_alignBaseline="@+id/edt_b"
android:layout_marginLeft="20dp"
android:layout_toRightOf="@+id/edt_b"
android:text="@string/txt_errorIntervalle"
android:textColor="@color/red" />
<Button
android:id="@+id/btn_Executer"
android:layout_width="wrap_content"
android:layout_height="wrap_content"
android:layout_alignParentLeft="true"
android:layout_below="@+id/txt_a"
android:layout_marginTop="20dp"
android:text="@string/btn_executer" />
<TextView
android:id="@+id/txt_Reponses"
android:layout_width="wrap_content"
android:layout_height="wrap_content"
android:layout_below="@+id/btn_Executer"
android:layout_marginTop="30dp"
android:text="@string/list_reponses"
android:textAppearance="?android:attr/textAppearanceLarge"
android:textColor="@color/blue" />
<ListView
android:id="@+id/lst_reponses"
android:layout_width="match_parent"
android:layout_height="match_parent"
android:layout_alignParentLeft="true"
android:layout_below="@+id/txt_Reponses"
android:layout_marginTop="40dp"
android:background="@color/wheat"
android:clickable="true"
tools:listitem="@android:layout/simple_list_item_1" >
</ListView>
</RelativeLayout>
The previous view uses labels defined in the [res / values / strings.xml] file:
<resources>
<string name="app_name">Exemple-14</string>
<string name="action_settings">Settings</string>
<string name="section_format">Hello World from section: %1$d</string>
<!-- view 1 -->
<string name="titre_vue1">Vue n° 1</string>
<string name="list_reponses">Liste des réponses</string>
<string name="btn_executer">Exécuter</string>
<string name="aleas">Génération de N nombres aléatoires</string>
<string name="txt_nbaleas">Valeur de N :</string>
<string name="txt_a">"Intervalle [a,b] de génération, a : "</string>
<string name="txt_b">"b : "</string>
<string name="txt_dummy">Dummy</string>
<string name="txt_errorNbAleas">Tapez un nombre entier >=1</string>
<string name="txt_errorIntervalle">Les bornes de l\'interval must be integer and b>=a</string>
</resources>
The colors used in [vue1.xml] are defined in the [res / values / colors.xml] file:
<?xml version="1.0" encoding="utf-8"?>
<resources>
<color name="colorPrimary">#3F51B5</color>
<color name="colorPrimaryDark">#303F9F</color>
<color name="colorAccent">#FF4081</color>
<!-- colors applied -->
<color name="red">#FF0000</color>
<color name="blue">#0000FF</color>
<color name="wheat">#FFEFD5</color>
<color name="floral_white">#FFFAF0</color>
</resources>
1.15.3. The session
Since there is only one fragment here, there is no need to handle inter-fragment communication. The session will therefore be empty:
package exemples.android.architecture;
import org.androidannotations.annotations.EBean;
@EBean(scope = EBean.Scope.Singleton)
public class Session {
}
At this point, compile the application. Errors will appear on the lines that used elements from the now-empty session. Remove these lines and verify that the compilation no longer produces errors.
1.15.4. The [Vue1Fragment] fragment
We modify the existing fragment [Vue1Fragment] as follows:
package exemples.android.fragments;
import android.util.Log;
import android.view.View;
import android.widget.ArrayAdapter;
import android.widget.EditText;
import android.widget.ListView;
import android.widget.TextView;
import exemples.android.R;
import exemples.android.architecture.AbstractFragment;
import org.androidannotations.annotations.AfterViews;
import org.androidannotations.annotations.Click;
import org.androidannotations.annotations.EFragment;
import org.androidannotations.annotations.ViewById;
import java.util.ArrayList;
import java.util.List;
@EFragment(R.layout.vue1)
public class Vue1Fragment extends AbstractFragment {
// visual interface elements
@ViewById(R.id.lst_reponses)
protected ListView listReponses;
@ViewById(R.id.edt_nbaleas)
protected EditText edtNbAleas;
@ViewById(R.id.edt_a)
protected EditText edtA;
@ViewById(R.id.edt_b)
protected EditText edtB;
@ViewById(R.id.txt_errorNbAleas)
protected TextView txtErrorAleas;
@ViewById(R.id.txt_errorIntervalle)
protected TextView txtErrorIntervalle;
// list of order responses
private List<String> reponses = new ArrayList<>();
// adapter for listview
private ArrayAdapter<String> adapterReponses;
// seizures
private int nbAleas;
private int a;
private int b;
@AfterViews
protected void afterViews() {
// memory
afterViewsDone = true;
// log
if (isDebugEnabled) {
Log.d("Vue1Fragment", String.format("afterViews %s", getParentInfos()));
}
// hide error messages
txtErrorAleas.setVisibility(View.INVISIBLE);
txtErrorIntervalle.setVisibility(View.INVISIBLE);
}
@Click(R.id.btn_Executer)
void doExecuter() {
// hide any previous error messages
txtErrorAleas.setVisibility(View.INVISIBLE);
txtErrorIntervalle.setVisibility(View.INVISIBLE);
// test the validity of entries
if (!isPageValid()) {
return;
}
}
// check the validity of the data entered
private boolean isPageValid() {
...
}
@Override
protected void updateFragment() {
// log
if (isDebugEnabled) {
Log.d("Vue1Fragment", String.format("updateFragment %s", getParentInfos()));
}
}
}
- There is only one fragment here whose lifecycle will be executed only once, at application startup. For this reason, the methods [@AfterViews] (lines 46–57) and [udateFragment] (lines 75–81) will be executed only once when the application starts;
- lines 55–56: the two error messages in the view (shown below) are hidden by [1-2];
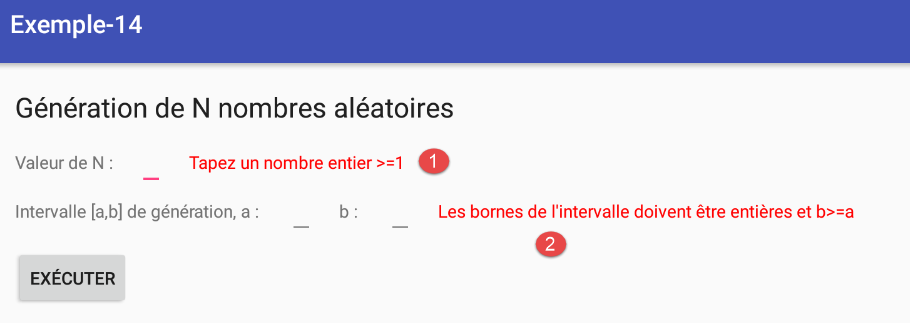
- lines 59-60: the method executed when the button is clicked [Exécuter];
- lines 71-73: we validate the input;
The method [isPageValid] is as follows:
// seizures
private int nbAleas;
private int a;
private int b;
...
// check the validity of the data entered
private boolean isPageValid() {
// enter the number of random numbers
nbAleas = 0;
Boolean erreur;
int nbErreurs = 0;
try {
nbAleas = Integer.parseInt(edtNbAleas.getText().toString());
erreur = (nbAleas < 1);
} catch (Exception ex) {
erreur = true;
}
// mistake?
if (erreur) {
nbErreurs++;
txtErrorAleas.setVisibility(View.VISIBLE);
}
// enter a
a = 0;
erreur = false;
try {
a = Integer.parseInt(edtA.getText().toString());
} catch (Exception ex) {
erreur = true;
}
// mistake?
if (erreur) {
nbErreurs++;
txtErrorIntervalle.setVisibility(View.VISIBLE);
}
// b input
b = 0;
erreur = false;
try {
b = Integer.parseInt(edtB.getText().toString());
erreur = b < a;
} catch (Exception ex) {
erreur = true;
}
// mistake?
if (erreur) {
nbErreurs++;
txtErrorIntervalle.setVisibility(View.VISIBLE);
}
// return
return (nbErreurs == 0);
}
- lines 2–4: these three fields are initialized by the [isPageValid] method. Additionally, this method returns true if all entries are valid, and false otherwise. If any entries are invalid, the associated error messages are displayed;
At this point, the application is executable. Verify the operation of the [isPageValid] method by entering incorrect data.
1.15.5. The [métier] layer
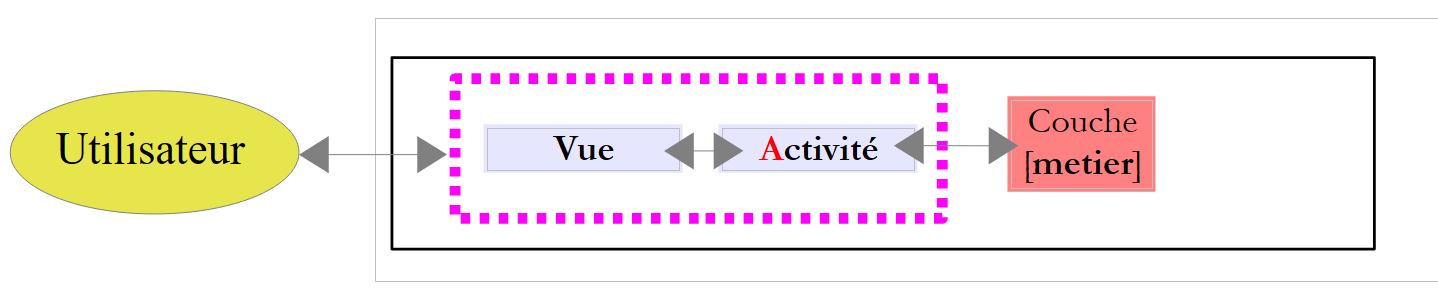 |
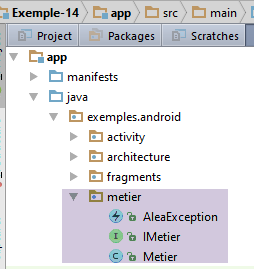
The [métier] layer has the following [IMetier] interface:
package exemples.android.metier;
import java.util.List;
public interface IMetier {
List<Object> getAleas(int a, int b, int n);
}
The [getAleas(a,b,n)] method normally returns n random integers in the range [a,b]. It is also designed to throw an exception one out of every three times, and this exception is also included in the results returned by the method. Ultimately, the method returns a list of objects of type [Exception] or [Integer].
The [Metier] implementation of this interface is as follows:
package exemples.android.metier;
import org.androidannotations.annotations.EBean;
import java.util.ArrayList;
import java.util.List;
import java.util.Random;
@EBean(scope = EBean.Scope.Singleton)
public class Metier implements IMetier {
public List<Object> getAleas(int a, int b, int n) {
// object list
List<Object> réponses = new ArrayList<Object>();
// some checks
if (n < 1) {
réponses.add(new AleaException("Le nombre d'entier aléatoires demandé doit être supérieur ou égal à 1"));
}
if (a < 0) {
réponses.add(new AleaException("Le nombre a de l'intervalle [a,b] doit être supérieur à 0"));
}
if (b < 0) {
réponses.add(new AleaException("Le nombre b de l'intervalle [a,b] doit être supérieur à 0"));
}
if (a >= b) {
réponses.add(new AleaException("Dans l'intervalle [a,b], on doit avoir a< b"));
}
// mistake?
if (réponses.size() != 0) {
return réponses;
}
// random numbers are generated
Random random = new Random();
for (int i = 0; i < n; i++) {
// generate a random exception 1 time / 3
int nombre = random.nextInt(3);
if (nombre == 0) {
réponses.add(new AleaException("Exception aléatoire"));
} else {
// otherwise a random number is returned between two bounds [a,b]
réponses.add(Integer.valueOf(a + random.nextInt(b - a + 1)));
}
}
// result
return réponses;
}
}
- Line 9: The annotation AA [@EBean] is applied to the class [Metier] so that references to it can be injected into the layer [Présentation]. The attribute (scope = EBean.Scope.Singleton) ensures that the [Metier] class will be instantiated only once. Therefore, the same reference is always injected if it is injected multiple times into the [Présentation] layer;
- the rest of the code is standard;
The type [AleaException] used by the class [Metier] is as follows:
package exemples.android.metier;
public class AleaException extends RuntimeException {
private static final long serialVersionUID = 1L;
public AleaException() {
}
public AleaException(String detailMessage) {
super(detailMessage);
}
public AleaException(Throwable throwable) {
super(throwable);
}
public AleaException(String detailMessage, Throwable throwable) {
super(detailMessage, throwable);
}
}
- line 3: the [AleaException] class extends the system class [RuntimeException], which makes it an unchecked exception: it does not need to be handled in a try/catch block, nor does it need to be included in method signatures;
1.15.6. The [MainActivity] activity revisited
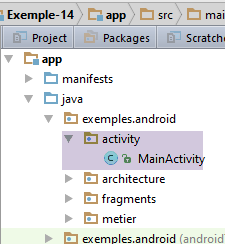
The activity will implement the [IMetier] interface of the [métier] layer. As a result, the fragment/view will interact only with the activity.
The [MainActivity] activity already implements the [IMainActivity] interface. To have it also implement the [IMetier] interface, you can:
- add the interface [IMetier] to the interfaces implemented by the activity;
- ensure that the [IMainActivity] interface itself extends the [IMetier] interface. This is the approach we are taking;
The [IMainActivity] interface becomes the following:
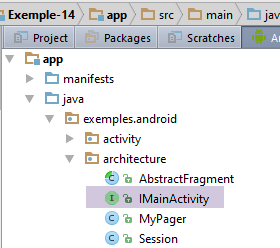
package exemples.android.architecture;
import exemples.android.metier.IMetier;
public interface IMainActivity extends IMetier {
// session access
Session getSession();
// change of view
void navigateToView(int position);
// mode debug
public static final boolean IS_DEBUG_ENABLED = true;
}
- line 5: the [IMainActivity] interface extends the [IMetier] interface
The [MainActivity] class evolves as follows:
@EActivity(R.layout.activity_main)
public class MainActivity extends AppCompatActivity implements IMainActivity {
...
// injection session
@Bean(Session.class)
protected Session session;
// injection molding
@Bean(Metier.class)
protected IMetier metier;
...
// implémentation IMetier --------------------------------------------------------------------
@Override
public List<Object> getAleas(int a, int b, int n) {
return metier.getAleas(a, b, n);
}
- lines 11-12: the [métier] layer is injected into the activity. To do this, we use the annotation AA [@Bean], whose parameter is the class bearing the annotation AA [@EBean];
- line 2: the activity implements the [IMainActivity] interface and therefore the [IMetier] interface of the [métier] layer;
- lines 16–19: implementation of the single method of the [IMetier] interface. We simply delegate the call to the [métier] layer;
1.15.7. The [Vue1Fragment] fragment revisited
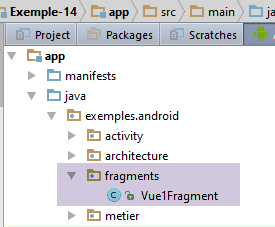
The code for the [Vue1Fragment] class evolves as follows:
package exemples.android.fragments;
import android.util.Log;
import android.view.View;
import android.widget.ArrayAdapter;
import android.widget.EditText;
import android.widget.ListView;
import android.widget.TextView;
import exemples.android.R;
import exemples.android.architecture.AbstractFragment;
import org.androidannotations.annotations.AfterViews;
import org.androidannotations.annotations.Click;
import org.androidannotations.annotations.EFragment;
import org.androidannotations.annotations.ViewById;
import java.util.ArrayList;
import java.util.List;
@EFragment(R.layout.vue1)
public class Vue1Fragment extends AbstractFragment {
// visual interface elements
@ViewById(R.id.lst_reponses)
protected ListView listReponses;
@ViewById(R.id.edt_nbaleas)
protected EditText edtNbAleas;
@ViewById(R.id.edt_a)
protected EditText edtA;
@ViewById(R.id.edt_b)
protected EditText edtB;
@ViewById(R.id.txt_errorNbAleas)
protected TextView txtErrorAleas;
@ViewById(R.id.txt_errorIntervalle)
protected TextView txtErrorIntervalle;
// list of order responses
private List<String> reponses = new ArrayList<>();
// adapter for listview
private ArrayAdapter<String> adapterReponses;
// seizures
private int nbAleas;
private int a;
private int b;
@AfterViews
protected void afterViews() {
...
}
@Click(R.id.btn_Executer)
void doExecuter() {
...
}
// check the validity of the data entered
private boolean isPageValid() {
...
}
@Override
protected void updateFragment() {
// log
if (isDebugEnabled) {
Log.d("Vue1Fragment", String.format("updateFragment %s", getParentInfos()));
}
// will only be executed once when the application is started
// create the ListView adapter - this requires the [activity] variable to have been initialized
adapterReponses=new ArrayAdapter<>(activity, android.R.layout.simple_list_item_1, android.R.id.text1, reponses);
listReponses.setAdapter(adapterReponses);
}
}
- lines 69-70: Set the adapter for the [ListView] component;
The [ListView] component is used to display a list of items. It does this using a [ListAdapter] adapter, which is itself connected to the data source that must feed the [ListView]. To define the adapter for a [ListView], the following [ListView.setAdapter] method is available:
public void setAdapter (ListAdapter adapter)
[ListAdapter] is an interface. The [ArrayAdapter] class is a class that implements this interface. The constructor used on line 69 above is as follows:
- [context] is the activity that displays the [ListView];
- [resource] is the integer identifying the view used to display an element of [ListView]. This view can have any level of complexity. The developer builds it according to their needs;
- [textViewResourceId] is the integer identifying a [TextView] component within the [resource] view. The displayed string will be rendered by this component;
- [objects]: the list of objects displayed by [ListView]. The [toString] method of the objects is used to display the object in [TextView], identified by [textViewResourceId], in the view identified by [resource].
The developer’s task is to create the view [resource] that will display each element of [ListView]. For the simple case where we only want to display a single string of characters, as here, Android provides the view identified by [android.R.layout.simple_list_item_1]. This contains a component [TextView] identified by [android.R.id.text1]. This is the method used on line 69 to create the adapter for [ListView]. This adapter only needs to be defined once. To allow for its reuse, it has been defined as an instance variable of the class (line 39). Let’s look again at line 69:
adapterReponses=new ArrayAdapter<>(activity, android.R.layout.simple_list_item_1, android.R.id.text1, reponses);
The first parameter of the [ArrayAdapter] constructor is the activity obtained in a fragment by [getActivity] and stored here in the [activity] variable of the parent class. This field does not always have a value. Thus, the logs show that when the method [@AfterViews] is entered, it has not yet been initialized, and therefore lines 69–70 cannot be placed in this method. In the [updateFragment] method, this is possible because we know that when this method is executed, [activity!=null] is necessarily present. The adapter is associated here with the [reponses] data source defined on line 37;
The [doExecuter] method handles the click on the [Exécuter] button. Its code is as follows:
@Click(R.id.btn_Executer)
void doExecuter() {
// hide any previous error messages
txtErrorAleas.setVisibility(View.INVISIBLE);
txtErrorIntervalle.setVisibility(View.INVISIBLE);
// delete previous answers
reponses.clear();
adapterReponses.notifyDataSetChanged();
// test the validity of entries
if (!isPageValid()) {
return;
}
// we ask for the random numbers in the activity
List<Object> data = mainActivity.getAleas(a, b, nbAleas);
// a list of String is created from this data
for (Object o : data) {
if (o instanceof Exception) {
reponses.add(((Exception) o).getMessage());
} else {
reponses.add(o.toString());
}
}
// refresh listview
adapterReponses.notifyDataSetChanged();
}
- lines 7-8: we want to clear ListView. To do this, we clear the data source [reponses] and ask the adapter associated with ListView to refresh;
- lines 10–12: Before executing the requested action, we verify that the entered values are correct;
- line 14: the list of random numbers is requested from the activity. A list of objects is returned, where each object is of type [Integer] or [AleaException];
- lines 16–22: using the list of objects obtained, the [reponses] data source displayed by ListView is updated;
- line 24: the ListView adapter is instructed to refresh;
1.15.8. Execution
Run the project and verify that it works correctly.
1.16. Example-15: Client/Server Architecture
We are addressing a common architecture for an Android application, one in which the Android application communicates with remote web services. We will now have the following architecture:
 |
We have added a [DAO] layer to the Android application to communicate with the remote server. It will communicate with the server that generates the random numbers displayed by the Android tablet. This server will have the following two-layer architecture:
 |
The clientss query certain URLs in the [web / jSON] layer and receive a text response in jSON (JavaScript Object Notation). Here, our web service will process a single URL of type [/a/b], which will return a random number within the range [a,b]. We will describe the application in the following order:
The server
- its [métier] layer;
- its [web / jSON] service implemented with Spring MVC;
The client
- its [DAO] layer. There will be no [métier] layer;
1.16.1. The server [web / jSON]
We want to build the following architecture:
 |
1.16.1.1. Project creation
We will build the web service using the Spring ecosystem [http://spring.io/]. We go to the site [http://start.spring.io/] (June 2016), which will allow us to generate a Gradle project with the dependencies necessary for our project, which is not an Android project and for the construction of which Android Studio offers no assistance:
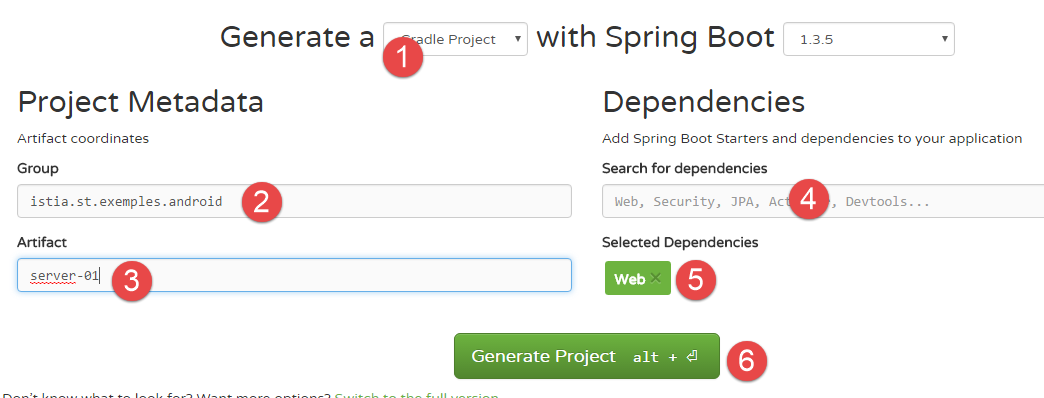
- in [1]: choose a Gradle project;
- in [2-3]: the characteristics of the jar dependency generated by the project (see below);
- in [4]: select the web dependency [5] so that the binaries required for our web service are available;
- in [6]: generate the project. A ZIP file of a Gradle skeleton project is then generated and made available for download;
What should be included in [2-3]? We have already used Gradle dependencies. For example, the one from the previous project was as follows:
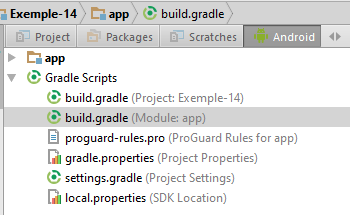
buildscript {
repositories {
mavenCentral()
}
dependencies {
// Since Android's Gradle plugin 0.11, you have to use android-apt >= 1.3
classpath 'com.neenbedankt.gradle.plugins:android-apt:1.8'
}
}
apply plugin: 'com.android.application'
apply plugin: 'android-apt'
android {
compileSdkVersion 23
...
}
def AAVersion = '4.0.0'
dependencies {
apt "org.androidannotations:androidannotations:$AAVersion"
compile "org.androidannotations:androidannotations-api:$AAVersion"
compile 'com.android.support:appcompat-v7:23.4.0'
compile 'com.android.support:design:23.4.0'
compile fileTree(dir: 'libs', include: ['*.jar'])
testCompile 'junit:junit:4.12'
}
- Line 22: A dependency is listed as [groupId:artifactId:version]. What is requested on the form on the [http://start.spring.io/] website:
- in [2] is [groupId];
- in [3] is [artifactId];
Unzip the above ZIP file into the folder containing the other projects:
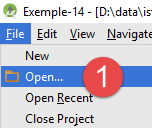
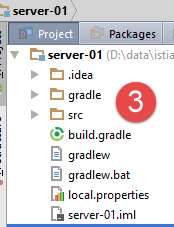
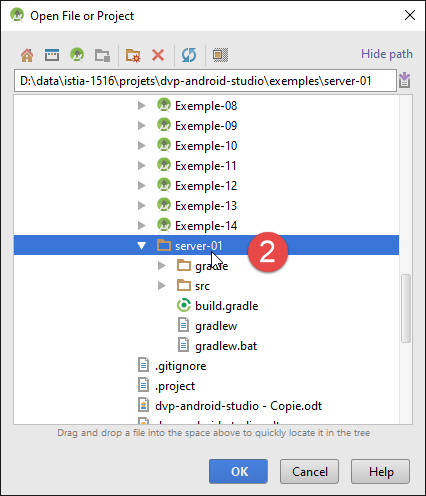
Using Android Studio, open the Gradle project [server-01] [1-2]. The opened project is [3] (Project view).
1.16.1.2. Gradle Configuration

The generated Gradle file (June 2016) is as follows:
buildscript {
ext {
springBootVersion = '1.3.5.RELEASE'
}
repositories {
mavenCentral()
}
dependencies {
classpath("org.springframework.boot:spring-boot-gradle-plugin:${springBootVersion}")
}
}
apply plugin: 'java'
apply plugin: 'eclipse'
apply plugin: 'spring-boot'
jar {
baseName = 'server-01'
version = '0.0.1-SNAPSHOT'
}
sourceCompatibility = 1.8
targetCompatibility = 1.8
repositories {
mavenCentral()
}
dependencies {
compile('org.springframework.boot:spring-boot-starter-web')
testCompile('org.springframework.boot:spring-boot-starter-test')
}
eclipse {
classpath {
containers.remove('org.eclipse.jdt.launching.JRE_CONTAINER')
containers 'org.eclipse.jdt.launching.JRE_CONTAINER/org.eclipse.jdt.internal.debug.ui.launcher.StandardVMType/JavaSE-1.8'
}
}
- Lines 14 and 34–38 are for the IDE Eclipse plugin. We remove them;
- Lines 1–11 and 15 are used to add a plugin called [spring-boot] to our Gradle project. Spring Boot is a project in the Spring ecosystem [http://projects.spring.io/spring-boot/]. This plugin defines the versions of the dependencies most commonly used with Spring. This allows us to omit specifying their versions (lines 30 and 31). The version is then the one defined by the version Spring Boot being used (line 3);
- lines 22–23: the Java version to use, in this case version 1.8;
- lines 25–27: the binary repositories to use for downloading dependencies;
- line 26: specifies the central Maven repository. This is currently the largest open-source binary repository available;
- lines 29–32: the dependencies required for the project:
- line 30: this dependency includes all the binaries needed to build a Spring web service;
- line 31: this dependency includes all the binaries needed for testing, particularly for the JUnit tests;
- A [compile] dependency indicates that the dependency is required to compile the project. A [testCompile] dependency indicates that the dependency is required only for running tests. It is therefore not included in the project binary;
We perform an initial cleanup of the Gradle file:
// spring boot
buildscript {
ext {
springBootVersion = '1.3.5.RELEASE'
}
repositories {
mavenCentral()
}
dependencies {
classpath("org.springframework.boot:spring-boot-gradle-plugin:${springBootVersion}")
}
}
// plugins
apply plugin: 'java'
apply plugin: 'spring-boot'
// project binary
jar {
baseName = 'server-01'
version = '0.0.1-SNAPSHOT'
}
// java versions
sourceCompatibility = 1.8
targetCompatibility = 1.8
// maven repositories
repositories {
mavenLocal()
mavenCentral()
}
// dependencies
dependencies {
compile('org.springframework.boot:spring-boot-starter-web')
testCompile('org.springframework.boot:spring-boot-starter-test')
}
- line 30: we have added the local Maven repository for the development machine. This is created when Maven is installed (see section 6.10 ). If the requested dependency is already in the local Maven repository, it will not be fetched from the central Maven repository;
- lines 19–22: a Gradle task to generate the project binary. We will use it to see what is being done;
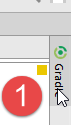
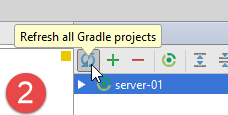
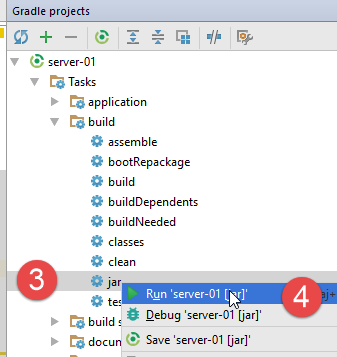
- In [1-4], execute the [jar] task defined in the [build.gradle] file ([1] is located at the top right and next to IDE);
The previous operation creates the project archive jar and places it in the [build / libs] folder [5]:
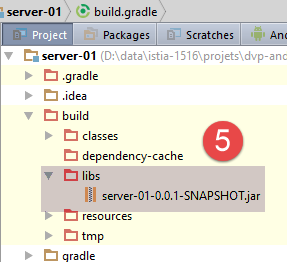
The archive name is derived directly from the information provided for task [jar] in file [build.gradle] (lines 19–22).
All of the project's dependencies can be viewed as follows:
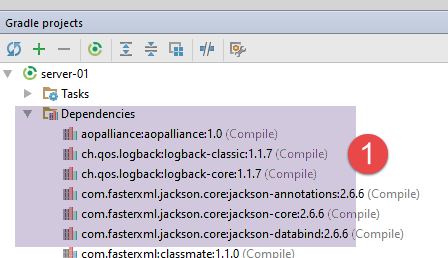
In [1], we can see that the single dependency of the [compile('org.springframework.boot:spring-boot-starter-web')] project brought with it dozens of binaries. Spring Boot for the web has included the dependencies that a Spring web application MVC will likely need. This means that some may be unnecessary. Spring Boot is ideal for a tutorial:
- it includes the dependencies we’ll likely need;
- it includes an embedded Tomcat server, which saves us from having to deploy the application on an external web server;
You can find many examples using Spring Boot on the Spring ecosystem website [http://spring.io/guides].
We will now complete the [build.gradle] file as follows:
// spring boot
...
// dependencies
dependencies {
compile('org.springframework.boot:spring-boot-starter-web')
testCompile('org.springframework.boot:spring-boot-starter-test')
}
// plugin to create a Maven-compliant binary in the local Maven repository
apply plugin: 'maven-publish'
publishing {
publications {
maven(MavenPublication) {
groupId 'istia.st.exemples.android'
artifactId 'server-01'
version '0.0.1-SNAPSHOT'
from components.java
}
}
repositories {
maven {
// change to point to your repo, e.g. http://my.org/repo
url 'file://D:\\maven'
}
}
}
- line 10: we import a Gradle plugin called [maven-publish] that allows us to publish the project binary to a Maven repository in accordance with Maven standards;
- line 11: a Gradle task named [publishing];
- lines 14–15: the characteristics of the Maven binary to be created;
- line 23: the Maven repository to which it will be published, in this case a local Maven repository;
Adding the [maven-publish] plugin has created new tasks in the Gradle project:
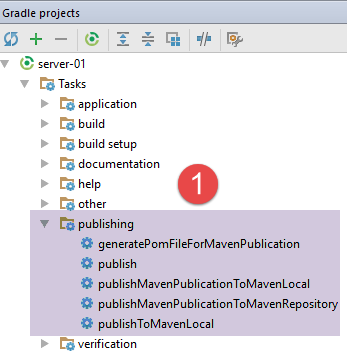
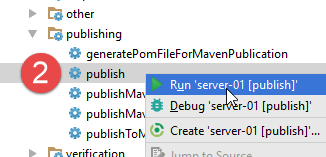
If, in [2], you run the [publish] task, the project binary is created and installed in the folder specified on line 23 of the [build.gradle] file:
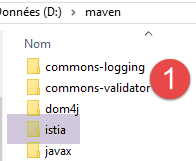

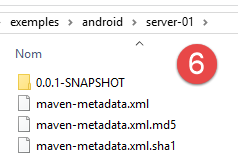
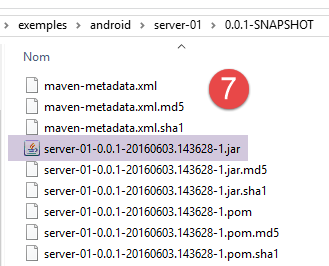
The task [jar] generates the project binary. This binary does not include its dependencies and is therefore not executable. It is possible to generate a binary that includes all its dependencies and is executable. To do this, we add the following code to the file [build.gradle]:
// create a binary with all its dependencies
version = '1.0'
task fatJar(type: Jar) {
manifest {
attributes 'Implementation-Title': 'Gradle Quickstart', 'Implementation-Version': version
attributes 'Main-Class': 'istia.st.exemples.android.Server01Application
}
baseName = project.name + '-all'
from { configurations.compile.collect { it.isDirectory() ? it : zipTree(it) } }
with jar
}
- Line 6: You must enter the full name of the project's executable class:
The code for this class will be as follows:
package istia.st.exemples.android;
import org.springframework.boot.SpringApplication;
import org.springframework.boot.autoconfigure.EnableAutoConfiguration;
import org.springframework.boot.autoconfigure.SpringBootApplication;
@SpringBootApplication
public class Server01Application {
public static void main(String[] args) {
System.out.println("Server01Application running");
//SpringApplication.run(Server01Application.class, args);
}
}
Refresh the Gradle project and then run the [fatJar] task:
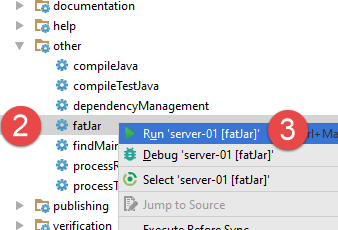
The binary is generated in the [build / libs] folder and can be executed [1-7]:
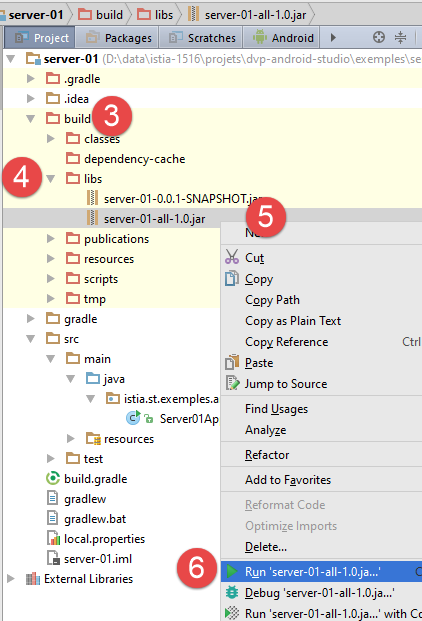
1.16.1.3. Project Configuration
The Gradle configuration is not sufficient. We also need to configure the project. Since this is not an Android project generated by IDE, this configuration—which we have not done until now—must be performed here.
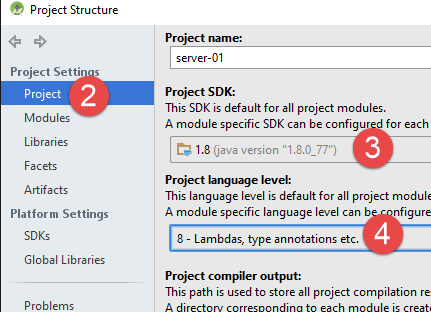
- In [3-4]: use JDK 1.8;
To compile the project, the button available for Android projects is no longer present. We will use a option from the [1-2] menu:
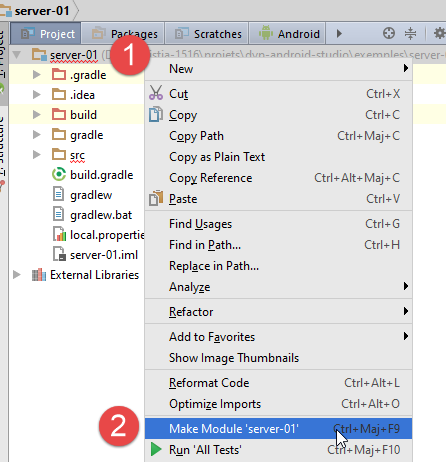
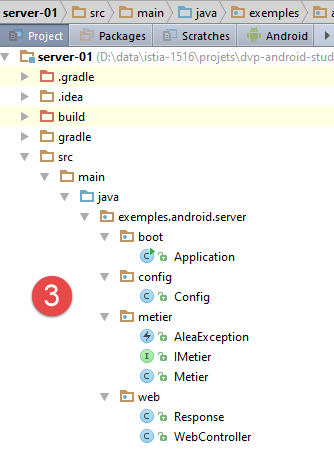
Next, the reader is prompted to create the following project. We will comment on the final code of the [3] project.
1.16.1.4. The [métier] layer
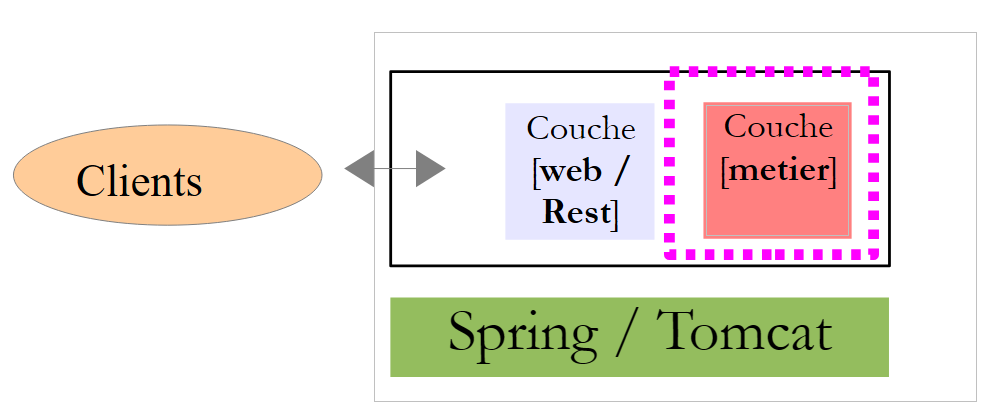 |
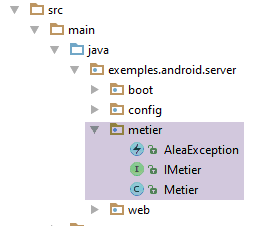 |
The [métier] layer follows the same approach as the [métier] layer from the previous example. It will have the following [IMetier] interface:
package exemples.android.server.metier;
public interface IMetier {
// random number in [a,b]
int getAlea(int a, int b);
}
- line 5: the method that generates 1 random number in [a,b]
The code for the [Metier] class implementing this interface is as follows:
package exemples.android.server.metier;
import org.springframework.stereotype.Service;
import java.util.Date;
import java.util.Random;
@Service
public class Metier implements IMetier {
@Override
public int getAlea(int a, int b) {
// some checks
if (a < 0) {
throw new AleaException("Le nombre a de l'intervalle [a,b] doit être supérieur à 0", 2);
}
if (b < 0) {
throw new AleaException("Le nombre b de l'intervalle [a,b] doit être supérieur à 0", 3);
}
if (a >= b) {
throw new AleaException("Dans l'intervalle [a,b], on doit avoir a< b", 4);
}
// result generation
Random random=new Random();
random.setSeed(new Date().getTime());
return a + random.nextInt(b - a + 1);
}
}
We won’t comment on the class: it is similar to the one in the previous example, except that it does not throw exceptions randomly. Note the Spring annotation [@Service] on line 8, which causes Spring to instantiate the class as a single instance (singleton) and make its reference available to other Spring components. Other Spring annotations could have been used here to achieve the same effect. Spring components have default names that can be specified as an attribute of the annotation used. Without this attribute, as shown here, the Spring component takes the name of the class with its first character lowercase. Thus, here, the Spring component is named [metier] by default;
The [Metier] class throws exceptions of type [AleaException]:
package exemples.android.server.metier;
public class AleaException extends RuntimeException {
// error code
private int code;
// manufacturers
public AleaException() {
}
public AleaException(String detailMessage, int code) {
super(detailMessage);
this.code = code;
}
public AleaException(Throwable throwable, int code) {
super(throwable);
this.code = code;
}
public AleaException(String detailMessage, Throwable throwable, int code) {
super(detailMessage, throwable);
this.code = code;
}
// getters and setters
....
}
- line 3: [AleaException] extends the [RuntimeException] class. It is therefore an unchecked exception (no need to handle it with a try/catch);
- line 6: an error code is added to the [RuntimeException] class;
1.16.1.5. The web service / jSON
|
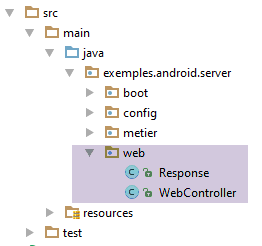
The web service / jSON is implemented by Spring MVC. Spring MVC implements the so-called MVC architecture pattern (Model–View–Controller) as follows:
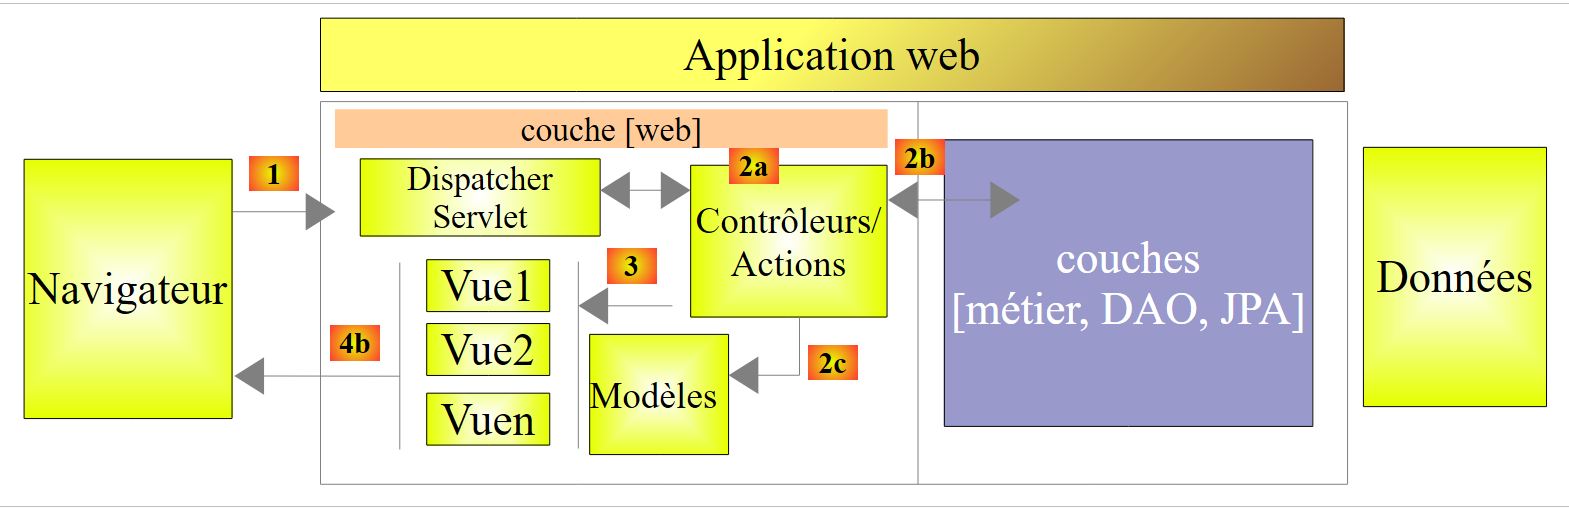 |
The processing of a client request proceeds as follows:
- request - the requested URLs are of the form http://machine:port/context/Action/param1/param2/....?p1=v1&p2=v2&... [Dispatcher Servlet] is the Spring class that processes incoming URL requests. It "routes" the URL to the action that must process it. These actions are methods of specific classes called [Contrôleurs]. The C in MVC is here the string [Dispatcher Servlet, Contrôleur, Action]. If no action has been configured to handle the incoming URL, the [Dispatcher Servlet] servlet will respond that the requested URL was not found (404 error NOT FOUND);
- processing
- the selected action can use the parami parameters that the [Dispatcher Servlet] servlet passed to it. These may come from several sources:
- the path [/param1/param2/...] of URL,
- the [p1=v1&p2=v2] parameters of the URL,
- from parameters posted by the browser with its request;
- when processing the user’s request, the action may require the [metier] or [2b] layer. Once the client’s request has been processed, it may trigger various responses. A classic example is:
- an error page if the request could not be processed correctly
- a confirmation page otherwise
- the action instructs a specific view to be displayed [3]. This view will display data known as the view model. This is the M in MVC. The action will create this M template [2c] and request that a view V be displayed [3];
- response—the selected view V uses the model M constructed by the action to initialize the dynamic parts of the response HTML that it must send to the client, then sends this response.
For a web service / jSON, the previous architecture is slightly modified:
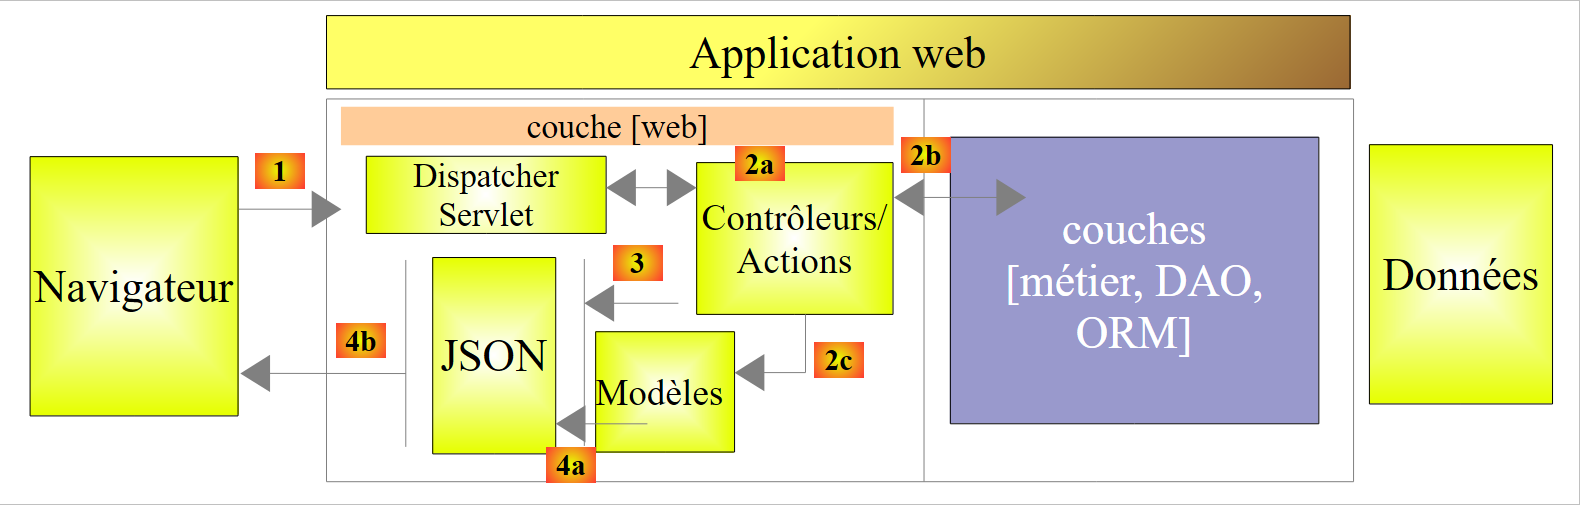 |
- in [4a], the model, which is a Java class, is converted into a string jSON by a library jSON;
- in [4b], this string jSON is sent to the browser;
An example of serializing a Java object into the string jSON and deserializing a string jSON into a Java object is presented in the appendices to the section 6.14 .
Let’s return to the [web] layer of our application:
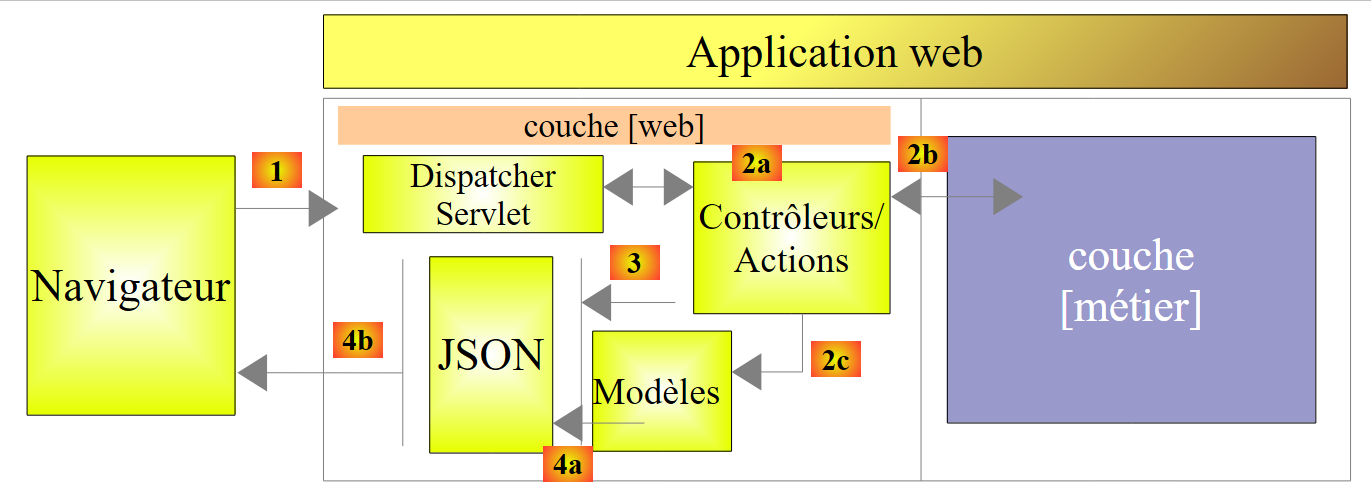 |
In our application, there is only one controller:
The web service /jSON will send its clients a response of type [Response] as follows:
package exemples.android.server.web;
import java.util.List;
public class Response<T> {
// ----------------- properties
// operation status
private int status;
// any error messages
private List<String> messages;
// the body of the reply
private T body;
// manufacturers
public Response() {
}
public Response(int status, List<String> messages, T body) {
this.status = status;
this.messages = messages;
this.body = body;
}
// getters and setters
...
}
- line 13: the field [T body] is the response expected by the client. We decided to use a generic response of type T here, rather than the Integer type of the expected random number. We want to be able to reuse this class in other situations. While processing the client’s request, the server may encounter an issue, which is then summarized in the other two fields;
- line 8: a status code (0 if no error);
- line 9: if status!=0, a list of error messages, usually those from the exception stack if an exception occurred, null if there are no errors;
The [WebController] controller is as follows:
package exemples.android.server.web;
import com.fasterxml.jackson.core.JsonProcessingException;
import com.fasterxml.jackson.databind.ObjectMapper;
import exemples.android.server.metier.AleaException;
import exemples.android.server.metier.IMetier;
import org.springframework.beans.factory.annotation.Autowired;
import org.springframework.stereotype.Controller;
import org.springframework.web.bind.annotation.PathVariable;
import org.springframework.web.bind.annotation.RequestMapping;
import org.springframework.web.bind.annotation.RequestMethod;
import org.springframework.web.bind.annotation.ResponseBody;
import java.util.ArrayList;
import java.util.List;
@Controller
public class WebController {
// business layer
@Autowired
private IMetier metier;
// mapper JSON
@Autowired
private ObjectMapper mapper;
// random numbers
@RequestMapping(value = "/{a}/{b}", method = RequestMethod.GET, produces = "application/json; charset=UTF-8")
@ResponseBody
public String getAlea(@PathVariable("a") int a, @PathVariable("b") int b) throws JsonProcessingException {
// the answer
Response<Integer> response = new Response<>();
// we use the business layer
try {
response.setBody(metier.getAlea(a, b));
response.setStatus(0);
} catch (AleaException e) {
response.setStatus(e.getCode());
response.setMessages(getMessagesFromException(e));
}
// we return the answer
return mapper.writeValueAsString(response);
}
private List<String> getMessagesFromException(Throwable e) {
// message list
List<String> messages = new ArrayList<String>();
// browse the exception stack
Throwable th = e;
while (th != null) {
messages.add(e.getMessage());
th = th.getCause();
}
// we return the result
return messages;
}
}
- line 17: the [@Controller] annotation indicates that the class is a MVC controller whose methods handle requests for certain URL in the web application;
- lines 21–22: the [@Autowired] annotation instructs Spring to inject a component of type [IMetier] into the field. This will be the previous [Metier] class. Because we have applied the [@Service] annotation to it, it is treated as a Spring component;
- Lines 24–25: We do the same with a jSON mapper that we will define later. Our web service will send its response as a string jSON. This mapper will handle the serialization of the response into jSON;
- Line 30: the method that generates the random number. Its name is irrelevant. When it runs, its parameters have been initialized by Spring MVC. We will see how. Furthermore, if it executes, it is because the web server received a request for the URL on line 28;
- line 28: the annotation [@RequestMapping] defines certain properties of the annotated method:
- [value]: the URL accepted by the method;
- [method]: the HTTP accepted by the method. There are primarily two: GET and POST. The [POST] method is used when the client wants to attach a document to its HTTP request;
- [produces]: sets one of the headers of the HTTP response that will be sent to the client. Here, among the HTTP headers sent with the client’s response, one will inform the client that the response is being sent in the form of a jSON string. This header is not mandatory. It is provided to the client for informational purposes if the client is expecting responses that may take various forms;
- [consumes]: is not present here. It is used to specify the HTTP headers that must accompany the client’s HTTP request for it to be accepted;
- Line 29: The annotation [@ResponseBody] indicates that the result produced by the method must be sent to the client. Without this annotation, the method’s response is treated as a key used to select the page HTML to be sent to the client. In a web service / jSON, there are no HTML pages;
- line 28: the processed URL is of the form /{a}/{b} where {x} represents a variable. The variables {a} and {b} are assigned to the method parameters on line 30. This is done via the @PathVariable("x") annotation. Note that {a} and {b} are components of a URL and are therefore of type String. The conversion from String to the parameter type may fail. Spring MVC then throws an exception. To summarize: if I request URL /100/200 using a browser, the getAlea method on line 30 will execute with the integer parameters a=100, b=200;
- line 36: the [métier] layer is asked for a random number in the range [a,b]. Recall that the method [metier].getAlea may throw an exception;
- line 37: no error;
- line 39: error code;
- line 40: the list of response messages is that of the exception stack (lines 46–57). Here, we know that the stack contains only one exception, but we wanted to demonstrate a more generic method;
- line 43: the response of type [Response<Integer>] is returned as a string jSON;
1.16.1.6. Spring Project Configuration
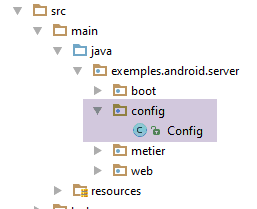
There are various ways to configure Spring:
- using XML files;
- with Java code;
- using a combination of both;
We choose to configure our web application using Java code. The following [Config] class handles this configuration:
package exemples.android.server.config;
import com.fasterxml.jackson.databind.ObjectMapper;
import org.springframework.boot.context.embedded.EmbeddedServletContainerFactory;
import org.springframework.boot.context.embedded.ServletRegistrationBean;
import org.springframework.boot.context.embedded.tomcat.TomcatEmbeddedServletContainerFactory;
import org.springframework.context.annotation.Bean;
import org.springframework.context.annotation.ComponentScan;
import org.springframework.web.servlet.DispatcherServlet;
import org.springframework.web.servlet.config.annotation.EnableWebMvc;
@ComponentScan(basePackages = { "exemples.android.server.metier", "exemples.android.server.web" })
@EnableWebMvc
public class Config {
// web configuration ------------------------------------
@Bean
public DispatcherServlet dispatcherServlet() {
DispatcherServlet servlet = new DispatcherServlet();
return servlet;
}
@Bean
public ServletRegistrationBean servletRegistrationBean(DispatcherServlet dispatcherServlet) {
return new ServletRegistrationBean(dispatcherServlet, "/*");
}
@Bean
public EmbeddedServletContainerFactory embeddedServletContainerFactory() {
return new TomcatEmbeddedServletContainerFactory("", 8080);
}
// mapper jSON
@Bean
public ObjectMapper jsonMapper() {
return new ObjectMapper();
}
}
- Line 12: We tell Spring in which packages it will find the two components it needs to manage:
- the component [Metier] annotated with [@Service] in the package [exemples.android.server.metier];
- the [WebController] component annotated with [@Controller] in the [exemples.android.server.web] package;
- line 13: the annotation [@EnableWebMvc] allows Spring Boot to automatically perform a number of standard configurations for a Spring application MVC. This reduces the developer’s workload;
- Lines 16, 22, 27, and 33: The [@Bean] annotation also defines Spring components (beans) in the same way as the two annotations encountered (@Service, @Controller). Here, the [@Bean] annotation annotates a method rather than a class, and the result of the method is the Spring component. In the absence of a naming attribute within the [@Bean] annotation, the Spring component created takes the name of the annotated method;
- lines 16–20: define the [dispatcherServlet] bean. This is a predefined Spring name (MVC) that defines the application’s front controller (MVC), an object through which all requests from clients pass and which dispatches them (hence its name) to the various [@Controller] in the Spring application MVC;
- line 18: the [dispatcherServlet] bean is an instance of the [DispatcherServlet] class provided by Spring MVC;
- lines 22–25: the bean [servletRegistrationBean] is used to define which URL are accepted by the application. On line 24, all URL are accepted;
- lines 27-30: the [embeddedServletContainerFactory] bean is used to define the embedded server in the project dependencies that will host the web application. Line 29 specifies that this is a Tomcat server and that it will run on port 8080. By default, the binaries for this web server are provided by the [org.springframework.boot:spring-boot-starter-web] dependency in the Gradle file;
1.16.1.7. Executing the Web Service / jSON
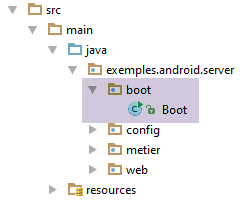
The project runs from the following executable class [Boot]:
package exemples.android.server.boot;
import exemples.android.server.config.Config;
import org.springframework.boot.SpringApplication;
public class Boot {
public static void main(String[] args) {
// application execution
SpringApplication.run(Config.class, args);
}
}
- The class [Boot] is an executable class (lines 7–10);
- line 9: the static method [SpringApplication.run] is a method of [spring Boot] (line 4) that will launch the application. Its first parameter is the Java class that configures the project. Here, that is the [Config] class we just described. The second parameter is the array of arguments passed to the [main] method (line 7);
The web application can be launched in various ways, including the following:
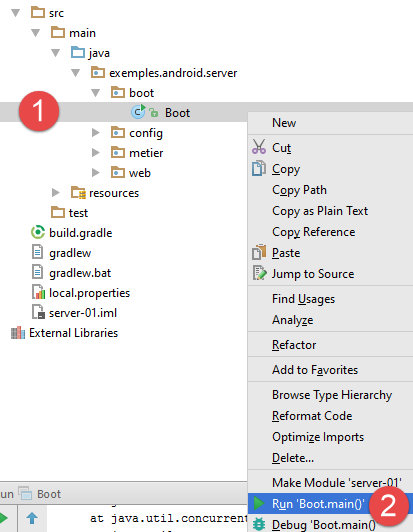
A number of logs then appear in the console:
- lines 12-14: the Tomcat embedded server is launched;
- lines 15-19: the Spring servlet [DispatcherServlet] is loaded and configured;
- line 20: the web server's URL [/{a}/{b}] is detected;
Now, let's open a browser and test the URL endpoint of the /jSON web service:
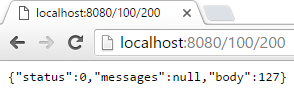


Each time, we get the representation jSON of an object of type [Response<Integer>].
Instead of using a standard browser, let’s now use the [Advanced Rest Client] extension for the Chrome browser (see appendices, section 6.13 ):
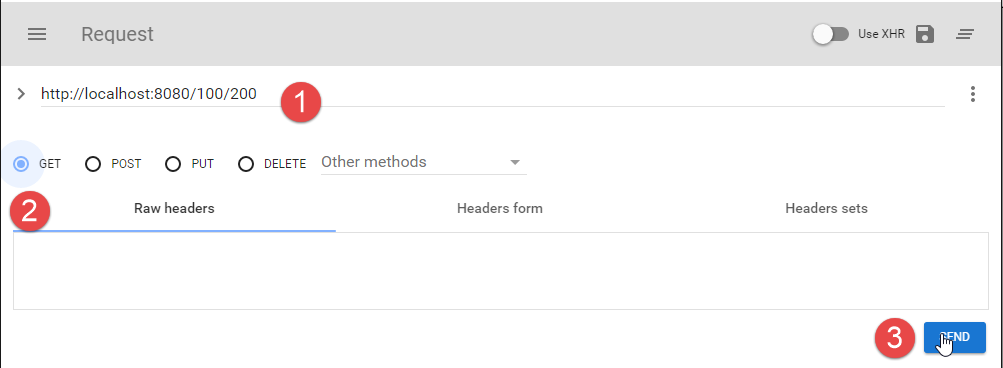
- in [1], the requested URL;
- in [2], using a GET;
- in [3], the request is sent;
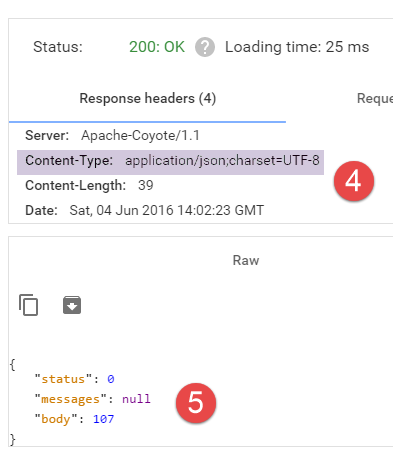
- in [4], the headers HTTP from the server's response. Note that this indicates that the sent document is a string jSON;
- in [5], the received string jSON;
1.16.1.8. Generating the project’s executable
In the section 1.16.1.2 , we showed how to configure the Gradle file to generate an executable for the application with all its dependencies. Adapted to the current application, this configuration becomes the following:
// create a binary with all its dependencies
version = '1.0'
task fatJar(type: Jar) {
manifest {
attributes 'Implementation-Title': 'Gradle Quickstart', 'Implementation-Version': version
attributes 'Main-Class': 'exemples.android.server.boot.Boot
}
baseName = project.name + '-all'
from { configurations.compile.collect { it.isDirectory() ? it : zipTree(it) } }
with jar
}
To generate this executable, proceed as follows [1-5]:

To run it, stop the web service if it is running [1], then run the archive [2-4]:
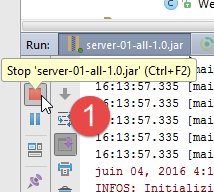
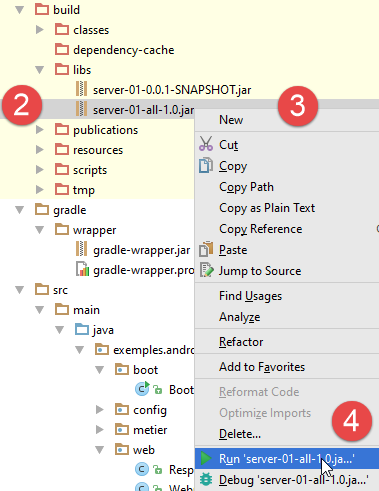
Open a browser and request the URL [localhost:8080/100/200]. You should get the same results as before.
1.16.1.9. Log Management
When you run the executable archive, you will notice that the logs are different from those generated when running the project from IDE. The logs are in [DEBUG] mode:
...
09:32:03.741 [main] DEBUG org.springframework.core.env.PropertySourcesPropertyResolver - Searching for key 'spring.liveBeansView.mbeanDomain' in [servletConfigInitParams]
09:32:03.742 [main] DEBUG org.springframework.core.env.PropertySourcesPropertyResolver - Searching for key 'spring.liveBeansView.mbeanDomain' in [servletContextInitParams]
09:32:03.742 [main] DEBUG org.springframework.core.env.PropertySourcesPropertyResolver - Searching for key 'spring.liveBeansView.mbeanDomain' in [systemProperties]
09:32:03.742 [main] DEBUG org.springframework.core.env.PropertySourcesPropertyResolver - Searching for key 'spring.liveBeansView.mbeanDomain' in [systemEnvironment]
09:32:03.742 [main] DEBUG org.springframework.core.env.PropertySourcesPropertyResolver - Could not find key 'spring.liveBeansView.mbeanDomain' in any property source. Returning [null]
juin 07, 2016 9:32:03 AM org.apache.coyote.AbstractProtocol init
INFOS: Initializing ProtocolHandler ["http-nio-8080"]
juin 07, 2016 9:32:03 AM org.apache.coyote.AbstractProtocol start
INFOS: Starting ProtocolHandler ["http-nio-8080"]
juin 07, 2016 9:32:03 AM org.apache.tomcat.util.net.NioSelectorPool getSharedSelector
INFOS: Using a shared selector for servlet write/read
09:32:03.810 [main] INFO org.springframework.boot.context.embedded.tomcat.TomcatEmbeddedServletContainer - Tomcat started on port(s): 8080 (http)
09:32:03.813 [main] INFO exemples.android.server.boot.Boot - Started Boot in 1.984 seconds (JVM running for 2.206)
You can manage the log level by adding a [logback.xml] file to the [resources] folder of the project:
This file could have the following content:
<configuration>
<appender name="STDOUT" class="ch.qos.logback.core.ConsoleAppender">
<!-- encoders are by default assigned the type
ch.qos.logback.classic.encoder.PatternLayoutEncoder -->
<encoder>
<pattern>%d{HH:mm:ss.SSS} [%thread] %-5level %logger{36} - %msg%n</pattern>
</encoder>
</appender>
<!-- log level control -->
<root level="info"> <!-- info, debug, warn -->
<appender-ref ref="STDOUT" />
</root>
</configuration>
The log level is controlled on line 12. If we now rebuild the executable archive and run it, we only get logs of level [info]:
...
09:36:52.433 [main] INFO o.h.validator.internal.util.Version - HV000001: Hibernate Validator 5.2.4.Final
09:36:52.762 [main] INFO o.s.w.s.m.m.a.RequestMappingHandlerAdapter - Looking for @ControllerAdvice: org.springframework.boot.context.embedded.AnnotationConfigEmbeddedWebApplicationContext@7085bdee: startup date [Tue Jun 07 09:36:51 CEST 2016]; root of context hierarchy
09:36:52.811 [main] INFO o.s.w.s.m.m.a.RequestMappingHandlerMapping - Mapped "{[/{a}/{b}],methods=[GET],produces=[application/json;charset=UTF-8]}" onto public java.lang.String exemples.android.server.web.WebController.getAlea(int,int) throws com.fasterxml.jackson.core.JsonProcessingException
juin 07, 2016 9:36:52 AM org.apache.coyote.AbstractProtocol init
INFOS: Initializing ProtocolHandler ["http-nio-8080"]
juin 07, 2016 9:36:52 AM org.apache.coyote.AbstractProtocol start
INFOS: Starting ProtocolHandler ["http-nio-8080"]
juin 07, 2016 9:36:52 AM org.apache.tomcat.util.net.NioSelectorPool getSharedSelector
INFOS: Using a shared selector for servlet write/read
09:36:52.923 [main] INFO o.s.b.c.e.t.TomcatEmbeddedServletContainer - Tomcat started on port(s): 8080 (http)
09:36:52.926 [main] INFO exemples.android.server.boot.Boot - Started Boot in 1.865 seconds (JVM running for 2.203)
1.16.2. The Android client for the web server / jSON
The Android client will have the following architecture:
 |
The client will have two components:
- a [Présentation] layer (view+activity) similar to the one we studied in the [Exemple-14] example;
- the [DAO] layer, which communicates with the [web / jSON] service we examined earlier.
1.16.2.1. Creating the project
We duplicate the previous project [Exemple-14] into [Exemple-15] by following the procedure in the section 1.4 . We obtain the following result:
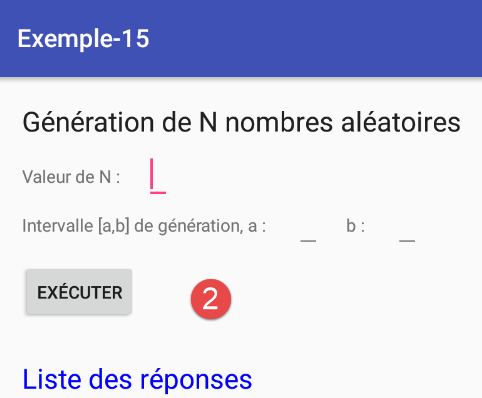
Next, the reader is invited to create the following project.
1.16.2.2. Gradle Configuration
The [build.gradle] file is as follows:
buildscript {
repositories {
mavenCentral()
}
dependencies {
// Since Android's Gradle plugin 0.11, you have to use android-apt >= 1.3
classpath 'com.neenbedankt.gradle.plugins:android-apt:1.8'
}
}
apply plugin: 'com.android.application'
apply plugin: 'android-apt'
android {
compileSdkVersion 23
buildToolsVersion "23.0.3"
defaultConfig {
applicationId "exemples.android"
minSdkVersion 15
targetSdkVersion 23
versionCode 1
versionName "1.0"
}
buildTypes {
release {
minifyEnabled false
proguardFiles getDefaultProguardFile('proguard-android.txt'), 'proguard-rules.pro'
}
}
// packaging options needed to produce the APK
packagingOptions {
exclude 'META-INF/ASL2.0'
exclude 'META-INF/NOTICE'
exclude 'META-INF/LICENSE'
exclude 'META-INF/notice.txt'
exclude 'META-INF/license.txt'
}
}
def AAVersion = '4.0.0'
dependencies {
apt "org.androidannotations:androidannotations:$AAVersion"
compile "org.androidannotations:androidannotations-api:$AAVersion"
apt "org.androidannotations:rest-spring:$AAVersion"
compile "org.androidannotations:rest-spring-api:$AAVersion"
compile 'com.android.support:appcompat-v7:23.4.0'
compile 'com.android.support:design:23.4.0'
compile 'org.springframework.android:spring-android-rest-template:2.0.0.M3'
compile 'com.fasterxml.jackson.core:jackson-databind:2.7.4'
compile fileTree(include: ['*.jar'], dir: 'libs')
testCompile 'junit:junit:4.12'
}
repositories {
maven {
url 'https://repo.spring.io/libs-milestone'
}
}
We will only comment on what has not already been covered:
- lines 46-47: insertion of a AA plugin. The [rest-spring-api] plugin allows client/server communication to be delegated to the AA library;
- line 50: the [spring-android-rest-template] library is the library used by AA to handle client/server communication. version [2.0.0.M3] is a so-called 'milestone' version that is not found in the usual Maven repositories. Therefore, on lines 56–59, you must specify the repository to use (line 58) to locate the library;
- line 51: a jSON library;
- lines 33–39: without this property, errors occur when generating the APK binary for the project;
1.16.2.3. The Android application manifest
The [AndroidManifest.xml] file needs to be updated. By default, Internet access is disabled. It must be enabled using a special directive:
<?xml version="1.0" encoding="utf-8"?>
<manifest xmlns:android="http://schemas.android.com/apk/res/android"
package="exemples.android">
<uses-permission android:name="android.permission.INTERNET"/>
<application
android:allowBackup="true"
android:icon="@mipmap/ic_launcher"
android:label="@string/app_name"
android:supportsRtl="true"
android:theme="@style/AppTheme">
<activity
android:name=".activity.MainActivity_"
android:label="@string/app_name"
android:windowSoftInputMode="stateHidden"
android:theme="@style/AppTheme.NoActionBar">
<intent-filter>
<action android:name="android.intent.action.MAIN"/>
<category android:name="android.intent.category.LAUNCHER"/>
</intent-filter>
</activity>
</application>
</manifest>
- line 5: Internet access is allowed;
1.16.2.4. The [DAO] layer
 |
1.16.2.4.1. The [IDao] interface of the [DAO] layer
The interface of the [DAO] layer will be as follows:
package exemples.android.dao;
public interface IDao {
// random number
int getAlea(int a, int b);
// URL of the web service
void setUrlServiceWebJson(String url);
// max wait time (ms) for server response
void setTimeout(int timeout);
// client wait time in milliseconds before request
void setDelay(int delay);
}
- line 6: the web service method / jSON to obtain a random number within the range [a,b] of this web service;
- line 9: the URL of the web service / jSON for generating random numbers;
- line 12: we set a maximum timeout to wait for the server's response;
- line 15: we want to set a timeout before executing the request to the server, to give the user time to cancel their request;
1.16.2.4.2. The [WebClient] interface
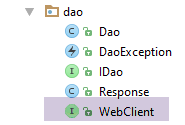
The [WebClient] interface handles communication with the web service. Its code is as follows:
package exemples.android.dao;
import org.androidannotations.rest.spring.annotations.Get;
import org.androidannotations.rest.spring.annotations.Path;
import org.androidannotations.rest.spring.annotations.Rest;
import org.androidannotations.rest.spring.api.RestClientRootUrl;
import org.androidannotations.rest.spring.api.RestClientSupport;
import org.springframework.http.converter.StringHttpMessageConverter;
import org.springframework.http.converter.json.MappingJackson2HttpMessageConverter;
@Rest(converters = {MappingJackson2HttpMessageConverter.class})
public interface WebClient extends RestClientRootUrl, RestClientSupport {
// 1 random number in the range [a,b]
@Get("/{a}/{b}")
Response<Integer> getAlea(@Path("a") int a, @Path("b") int b);
}
- Line 12: [WebClient] is an interface that the AA library will implement itself based on the annotations we add to it. This interface must implement the calls to URL exposed by the web service / jSON:
// random number
@RequestMapping(value = "/{a}/{b}", method = RequestMethod.GET, produces = "application/json; charset=UTF-8")
@ResponseBody
public String getAlea(@PathVariable("a") int a, @PathVariable("b") int b) throws JsonProcessingException {
- line 11: the annotation [@Rest] is a AA annotation. The value of the [converters] attribute is an array of converters. Here, the [MappingJackson2HttpMessageConverter.class] converter ensures that when the server sends a jSON string, it is automatically deserialized. Thus, we see in line (d) that URL returns a type String, which is actually a string jSON (line b). Using this information and the expected type on line 16, the client’s [WebClient] instance will deserialize the string it receives into a [Response<Integer>] type;
- line 15: a AA annotation indicating that URL must be called with a HTTP method GET. The parameter of the annotation [@Get] is the format of the URL expected by the web service. Simply copy the [value] parameter from the [@RequestMapping] annotation (line b) of the called method into the [WebController] controller on the server. The curly braces {} enclose the parameters of URL that must be included in the method parameters on line 16. The [@Path("a") int a] syntax causes the [a] method parameter to be assigned the value {a} from URL. When the parameter of URL and that of the method have the same name, as here, we can write it more simply as [@Path int a];
In the case of a request HTTP POST, the call method would have the following signature:
@Post("/{a}/{b}")
Response<Integer> getAlea(@Body T body, @Path("a") int a, @Path("b") int b);
The [@Body] annotation designates the posted value. This will be automatically serialized to jSON. On the server side, we will have the following signature:
// random numbers
@RequestMapping(value = "/{a}/{b}", method = RequestMethod.POST, consumes = "application/json; charset=UTF-8", produces = "application/json; charset=UTF-8")
@ResponseBody
public String getAlea(@PathVariable("a") int a, @PathVariable("b") int b, @RequestBody T body) {
- line 2: we specify that we expect a request HTTP POST and that the body of this request (posted object) must be transmitted as a string jSON (consumes attribute);
- line 4: the posted value will be retrieved in the method’s [@RequestBody T body] parameter;
Let’s return to the code for the [WebClient] class:
@Rest(converters = {MappingJackson2HttpMessageConverter.class})
public interface WebClient extends RestClientRootUrl, RestClientSupport {
- We need to be able to specify the URL of the web service to contact. This is achieved by extending the [RestClientRootUrl] interface provided by AA. This interface exposes a [setRootUrl(urlServiceWeb] method that allows us to set the URL of the web service to contact;
- Furthermore, we want to control the call to the web service because we want to limit the response wait time. To do this, we extend the [RestClientSupport] interface, which exposes the [setRestTemplate] method that will allow us to:
- create the [RestTemplate] object ourselves, which is used to manage client/server exchanges;
- configure this object to set the maximum response timeout;
1.16.2.4.3. The [Response] class
The [getAlea] method of the [IDao] interface returns a response of type [Response] as follows:
package exemples.android.dao;
import java.util.List;
public class Response<T> {
// ----------------- properties
// operation status
private int status;
// any error messages
private List<String> messages;
// the body of the reply
private T body;
// manufacturers
public Response() {
}
public Response(int status, List<String> messages, T body) {
this.status = status;
this.messages = messages;
this.body = body;
}
// getters and setters
...
}
This is the [Response] class already used on the server side (see the section 1.16.1.5 ). In fact, from a programming perspective, it is as if the client’s [DAO] layer were communicating directly with the web service’s [WebController] controller:
 |
Network communication between client and server, as well as the serialization/deserialization of Java objects on the client side, are transparent to the programmer.
1.16.2.4.4. Implementation of the [DAO] layer
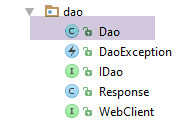
The [IDao] interface is implemented with the following [Dao] class:
package exemples.android.dao;
import com.fasterxml.jackson.databind.ObjectMapper;
import exemples.android.architecture.Utils;
import org.androidannotations.annotations.EBean;
import org.androidannotations.rest.spring.annotations.RestService;
import org.springframework.http.client.HttpComponentsClientHttpRequestFactory;
import org.springframework.http.client.SimpleClientHttpRequestFactory;
import org.springframework.http.converter.json.MappingJackson2HttpMessageConverter;
import org.springframework.web.client.RestTemplate;
import java.util.ArrayList;
import java.util.List;
@EBean
public class Dao implements IDao {
// service customer REST
@RestService
protected WebClient webClient;
// mapper jSON
private ObjectMapper mapper = new ObjectMapper();
// timeout before request execution
private int delay;
// interface IDao -------------------------------------------------------------------
@Override
public int getAlea(int a, int b) {
...
}
@Override
public void setUrlServiceWebJson(String urlServiceWebJson) {
...
}
@Override
public void setTimeout(int timeout) {
...
}
@Override
public void setDelay(int delay) {
this.delay = delay;
}
}
- line 15: we annotate the [Dao] class with the [@EBean] annotation to turn it into a AA bean that we can inject elsewhere;
- lines 19–20: we inject the implementation of the [WebClient] interface that we described. The [@RestService] annotation handles this injection;
- the other methods implement the [IDao] interface (lines 27–46);
Method [setTimeout]
The [setTimeout] method is as follows:
@Override
public void setTimeout(int timeout) {
// set the client request timeout REST
SimpleClientHttpRequestFactory factory = new SimpleClientHttpRequestFactory();
factory.setReadTimeout(timeout);
factory.setConnectTimeout(timeout);
// we build the restTemplate
RestTemplate restTemplate = new RestTemplate(factory);
// set the jSON converter
restTemplate.getMessageConverters().add(new MappingJackson2HttpMessageConverter());
// set the restTemplate of the web client
webClient.setRestTemplate(restTemplate);
}
- The [WebClient] interface will be implemented by a AA class using the Gradle dependency [org.springframework.android:spring-android-rest-template]. [spring-android-rest-template] implements the client's interaction with the web server / jSON using a class of type [RestTemplate];
- line 4: the [SimpleClientHttpRequestFactory] class is provided by the [spring-android-rest-template] dependency. It will allow us to set the maximum timeout for the server response (lines 5–6);
- line 8: we construct the object of type [RestTemplate], which will serve as the communication interface with the web service. We pass the [factory] object that was just constructed as a parameter to it;
- line 10: the client/server dialogue can take various forms. Exchanges occur via text lines, and we must tell the [RestTemplate] object what to do with this text line. To do this, we provide it with converters—classes capable of processing text lines. The choice of converter is generally made via the HTTP headers that accompany the text line. Here, we know that we are receiving only text lines in the jSON format. Furthermore, as we saw in the section , the server sent the header HTTP:
Content-Type: application/json;charset=UTF-8
Line 10: the only converter for [RestTemplate] will be a jSON converter implemented using the [Jackson] library. There is a peculiarity regarding these converters: AA requires us to include it in the annotation of the [WebClient] web client as well:
@Rest(converters = {MappingJacksonHttpMessageConverter.class})
public interface WebClient extends RestClientRootUrl, RestClientSupport {
Line 1: We are required to specify a converter even though we are already specifying it programmatically.
- Line 12: The [RestTemplate] object constructed in this way is injected into the implementation of the [WebClient] interface, and it is this object that will handle the client/server communication;
Method [getAlea]
The [getAlea] method is as follows:
@Override
public int getAlea(int a, int b) {
// service execution
Response<Integer> info;
DaoException ex;
try {
// waiting
waitSomeTime(delay);
// service execution
info = webClient.getAlea(a, b);
int status = info.getStatus();
if (status == 0) {
// we return the result
return info.getBody();
} else {
// we note the exception
ex = new DaoException(mapper.writeValueAsString(info.getMessages()), status);
}
} catch (JsonProcessingException | RuntimeException e) {
// we note the exception
ex = new DaoException(e, 100);
}
// we launch the exception
throw ex;
}
...
// private methods -------------------
private void waitSomeTime(int delay) {
try {
Thread.sleep(delay);
} catch (InterruptedException e) {
e.printStackTrace();
}
}
- line 8: wait for [delay] milliseconds;
- line 10: we simply call the method with the same signature in the class implementing the [WebClient] interface;
- line 11: we analyze the response received from the server by examining its [status];
- lines 12–14: if there was no server-side error (status=0), then we return the method’s result;
- line 17: if there was a server-side error (status!=0), then an exception is prepared without being thrown. The server has sent a list of error messages. We create an exception with, as its sole message, the string jSON from the server’s message list;
- lines 19–22: other exception cases;
- line 24: when we reach this point, an exception has necessarily occurred. So we throw it;
The [DaoException] exception used by this code is as follows:
package exemples.android.dao;
import java.util.ArrayList;
import java.util.List;
public class DaoException extends RuntimeException {
// error code
private int code;
// manufacturers
public DaoException() {
}
public DaoException(String detailMessage, int code) {
super(detailMessage);
this.code = code;
}
public DaoException(Throwable throwable, int code) {
super(throwable);
this.code = code;
}
// getters and setters
...
}
- line 6: the exception [DaoException] is an unhandled exception;
Method [setUrlServiceWebJson]
The [setUrlServiceWebJson] method is as follows:
@Override
public void setUrlServiceWebJson(String urlServiceWebJson) {
// we set the URL of the REST service
webClient.setRootUrl(urlServiceWebJson);
}
- Line 4: Set the URL of the web service using the [setRootUrl] method of the [WebClient] interface. This method exists because this interface extends the [RestClientRootUrl] interface;
1.16.2.5. The [architecture] package
The [architecture] package contains the elements that structure the application:
 |
 |
1.16.2.5.1. The [IMainActivity] interface
The [IMainActivity] interface lists the methods that the application's activity must implement:
package exemples.android.architecture;
import exemples.android.dao.IDao;
public interface IMainActivity extends IDao {
// session access
Session getSession();
// change of view
void navigateToView(int position);
// waiting
void beginWaiting();
void cancelWaiting();
// mode debug
boolean IS_DEBUG_ENABLED = true;
// response time
int TIMEOUT = 1000;
// fragment adjacency
int OFF_SCREEN_PAGE_LIMIT = 1;
}
- line 5: the [IMainActivity] interface extends the [IDao] interface;
- lines 13–16: to the methods already present in the previous examples (lines 7–11), we have added two methods to manage the application’s loading image (lines 14, 16);
- line 21: we set a maximum timeout for the server response to 1 second;
1.16.2.5.2. The [Utils] class
We have grouped static utility methods in the [Utils] class that can be called from various locations within the application architecture:
package exemples.android.architecture;
import java.util.ArrayList;
import java.util.List;
public class Utils {
// exception message list - version 1
static public List<String> getMessagesFromException(Throwable ex) {
// create a list of error msgs from the exception stack
List<String> messages = new ArrayList<>();
Throwable th = ex;
while (th != null) {
messages.add(th.getMessage());
th = th.getCause();
}
return messages;
}
// exception message list - version 2
static public String getMessagesForAlert(Throwable th) {
// build the text to be displayed
StringBuilder texte = new StringBuilder();
List<String> messages = getMessagesFromException(th);
int n = messages.size();
for (String message : messages) {
texte.append(String.format("%s : %s\n", n, message));
n--;
}
// result
return texte.toString();
}
}
- lines 9–18: creates a list of error messages contained in a Throwable;
- lines 21-32: uses the previous method to construct, from the list of messages obtained, the text to be displayed in an Android alert message;
- lines 27-28: the messages are numbered. The smallest number (1) corresponds to the initial exception, and the largest number to the most recent exception in the exception stack;
1.16.2.5.3. The abstract class [AbstractFragment]
The [AbstractFragment] class serves two purposes:
- to ensure that the [updateFragments] method of the child classes is always called when the fragment is displayed, and only once;
- to factor out the state and methods of the child classes that can be factored out;
It is purpose 2 that leads us to place the operations for managing the placeholder image in this class: all fragments in an asynchronous Android application must handle this type of issue:
// wait management
protected void beginWaiting() {
// we set the hourglass
mainActivity.beginWaiting();
}
protected void cancelWaiting() {
// the hourglass is removed
mainActivity.cancelWaiting();
}
1.16.2.6. The view
 |
1.16.2.6.1. The [vue1.xml] view
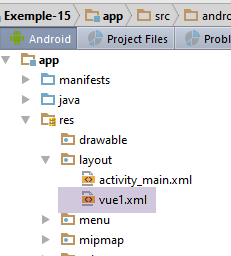
Compared to the previous example, the [vue1.xml] view changes as follows:
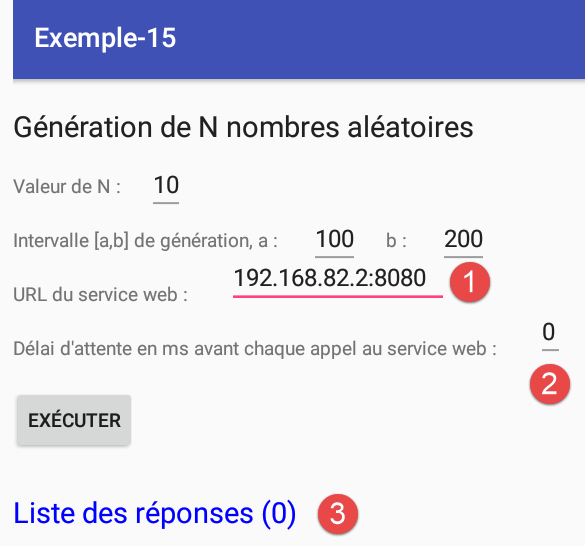
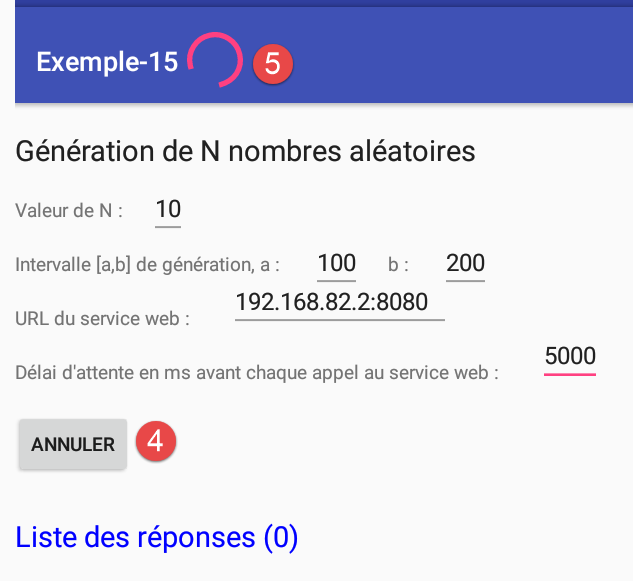
- In [1], the user must specify the URL of the web service as well as the timeout [2] before each call to the web service;
- in [3], responses are counted;
- In [4], the user can cancel their request;
- in [5], a waiting indicator is displayed when numbers are requested. It clears when all numbers have been received or the operation has been canceled;
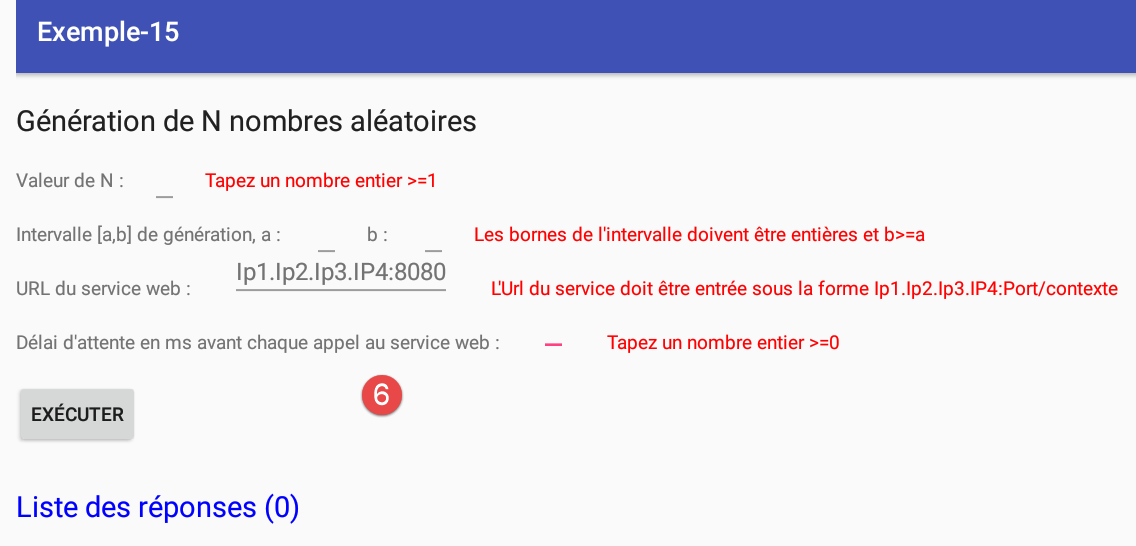
- In [6], the validity of the entries is checked;
The reader is invited to load the file [vue1.xml] from the examples. For the rest of this section, we provide the IDs of the new components:
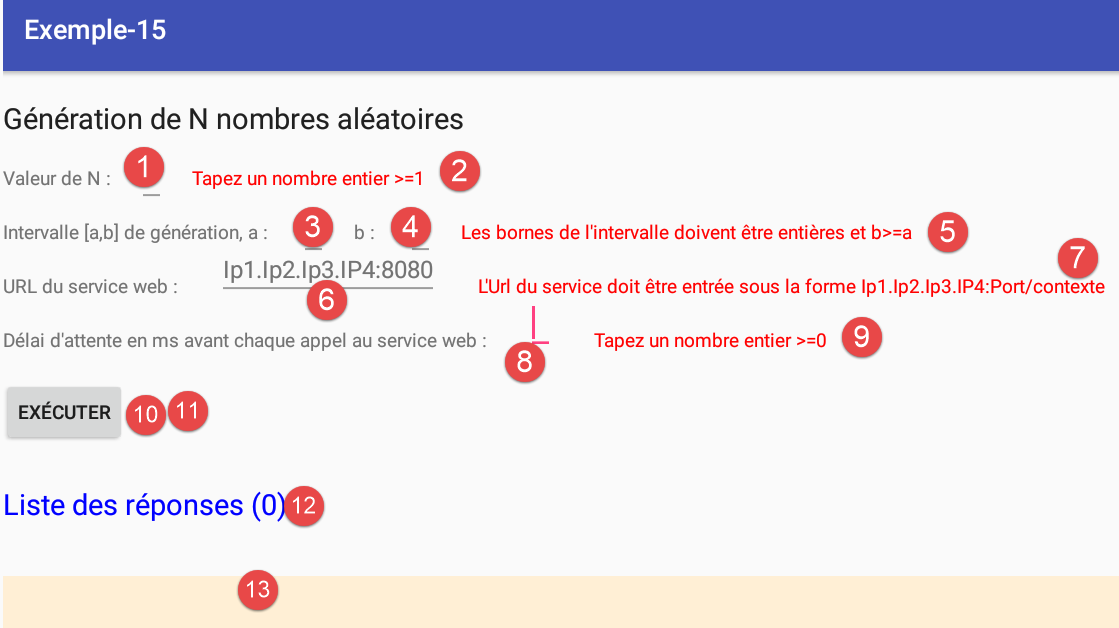
The [10-11] buttons are physically on top of each other. At any given time, only one of the two will be visible.
1.16.2.6.2. The fragment [Vue1Fragment]
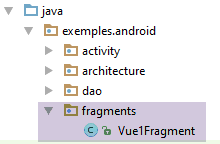
The skeleton of the fragment [Vue1Fragment] is as follows:
package exemples.android.fragments;
import android.app.AlertDialog;
import android.support.annotation.*;
import android.support.v4.app.Fragment;
import android.view.View;
import android.widget.*;
import exemples.android.R;
import exemples.android.architecture.AbstractFragment;
import exemples.android.architecture.Utils;
import org.androidannotations.annotations.*;
import org.androidannotations.annotations.UiThread;
import org.androidannotations.api.BackgroundExecutor;
import java.net.URI;
import java.net.URISyntaxException;
import java.util.ArrayList;
import java.util.List;
@EFragment(R.layout.vue1)
public class Vue1Fragment extends AbstractFragment {
// visual interface elements
@ViewById(R.id.editTextUrlServiceWeb)
EditText edtUrlServiceRest;
@ViewById(R.id.textViewErreurUrl)
TextView txtMsgErreurUrlServiceWeb;
@ViewById(R.id.editTextDelay)
EditText edtDelay;
@ViewById(R.id.textViewErreurDelay)
TextView textViewErreurDelay;
@ViewById(R.id.lst_reponses)
ListView listReponses;
@ViewById(R.id.txt_Reponses)
TextView infoReponses;
@ViewById(R.id.edt_nbaleas)
EditText edtNbAleas;
@ViewById(R.id.edt_a)
EditText edtA;
@ViewById(R.id.edt_b)
EditText edtB;
@ViewById(R.id.txt_errorNbAleas)
TextView txtErrorAleas;
@ViewById(R.id.txt_errorIntervalle)
TextView txtErrorIntervalle;
@ViewById(R.id.btn_Executer)
Button btnExecuter;
@ViewById(R.id.btn_Annuler)
Button btnAnnuler;
...
// local data
private List<String> reponses;
private ArrayAdapter<String> adapterReponses;
@AfterViews
void afterViews() {
// memory
afterViewsDone=true;
// initially no error messages
txtErrorAleas.setVisibility(View.INVISIBLE);
txtErrorIntervalle.setVisibility(View.INVISIBLE);
txtMsgErreurUrlServiceWeb.setVisibility(View.INVISIBLE);
textViewErreurDelay.setVisibility(View.INVISIBLE);
// hidden [Cancel] button
btnAnnuler.setVisibility(View.INVISIBLE);
btnExecuter.setVisibility(View.VISIBLE);
// list of answers
reponses = new ArrayList<>();
}
...
- lines 24–49: references to the components of the [vue1.xml] view (line 20);
- lines 55-69: the [@AfterViews] method executed when the references in lines 24-49 were initialized;
- line 58: don’t forget this—it’s necessary for the fragment’s lifecycle;
- lines 60–63: error messages are hidden;
- lines 65-66: the [Annuler] button (line 65) is hidden and the [Exécuter] button (line 66) is displayed. Note that they are physically on top of each other;
- line 68: the field in line 52 will contain the list of character strings to be displayed by the ListView method in the responses;
Immediately after the [@AfterViews] method, the following [updateFragment] method will be executed:
@Override
protected void updateFragment() {
// create the response list adapter
adapterReponses = new ArrayAdapter<>(activity, android.R.layout.simple_list_item_1, android.R.id.text1, reponses);
listReponses.setAdapter(adapterReponses);
}
- lines 4-5: create the adapter for the ListView response list. It is stored in an instance variable so it is available to other methods in the class;
Clicking the [Exécuter] button triggers the execution of the following method:
// seizures
private int nbAleas;
private int a;
private int b;
private String urlServiceWebJson;
private int delay;
// local data
private int nbInfos;
private List<String> reponses;
private ArrayAdapter<String> adapterReponses;
private boolean hasBeenCanceled;
@Click(R.id.btn_Executer)
protected void doExecuter() {
// delete previous answers
reponses.clear();
adapterReponses.notifyDataSetChanged();
hasBeenCanceled = false;
// reset the response counter to 0
nbInfos = 0;
infoReponses.setText(String.format("Liste des réponses (%s)", nbInfos));
// test the validity of entries
if (!isPageValid()) {
return;
}
// activity initialization
mainActivity.setUrlServiceWebJson(urlServiceWebJson);
mainActivity.setDelay(delay);
// we ask for the random numbers
for (int i = 0; i < nbAleas; i++) {
getAlea(a, b);
}
// we start waiting
beginWaiting();
}
@Background(id = "alea")
void getAlea(int a, int b) {
// do as little as possible here
// in any case no display - these must be done in the UiThead
try {
// the result is displayed in the UiThread
showInfo(mainActivity.getAlea(a, b));
} catch (RuntimeException e) {
// the exception is displayed in the UiThread
showAlert(e);
}
}
- lines 17-18: we clear the previous list of responses from the server. To do this, on line 17, we empty the [reponses] data source associated with the ListView adapter;
- line 19: a Boolean variable that will tell us whether or not the user canceled their request;
- lines 21–22: we display a counter set to zero for the number of responses;
- lines 24–26: We retrieve the entries from the [2-6] lines and verify their validity. If any of them is invalid, the method is aborted (line 25) and the user is returned to the visual interface;
- lines 28-29: if all entered data is valid, then the URL of the web service (line 28) is passed to the activity, along with the wait time before each call to the service (line 29). This information is required by the [DAO] layer, and it should be noted that it is the activity that communicates with this layer;
- lines 31–33: random numbers are requested one by one from the [getAlea] method on line 39;
- line 38: the [getAlea] method is annotated with the annotation AA [@Background], which means it will be executed in a different thread (execution flow, process) than the one in which the visual interface runs. It is mandatory to execute any internet call in a thread different from that of the visual interface. Thus, at any given time, there may be several threads:
- the one that displays the visual interface UI (User Interface) and handles its events,
- the [nbAleas] threads, each of which requests a random number from the web service. These threads are launched asynchronously: the UI thread launches a [getAlea] thread (line 32) that requests a random number from the web service and does not wait for it to finish. It will be notified of completion via an event. Thus, the [nbAleas] threads will be launched in parallel. It is possible to configure the application so that it launches only one thread at a time. In that case, there is a queue of threads to be executed;
Line 38: the parameter [id] assigns a name to the generated thread. Here, the [nbAleas] threads all have the same name, [alea]. This will allow us to cancel them all at the same time. This parameter is optional if thread cancellation is not handled;
- Line 44: The activity’s [getAlea] method is called. It will therefore be executed in a separate thread from that of UI. This method will make the call to the web service and will not wait for the response. It will be notified later via an event that the response is available. At this point, on line 44, the [showInfo] method will be called with the received response as a parameter;
- lines 45–47: executing the web request may throw an exception. We then request that the exception’s error messages be displayed in an alert message;
- Line 35: We wait for the results:
- a loading indicator will be displayed;
- the [Annuler] button will replace the [Exécuter] button. Because the launched threads are asynchronous, the UI thread does not wait for them, and line 35 is executed before they finish. Once the [beginWaiting] method has finished, UI can once again respond to user input, such as a click on the [Annuler] button. If the launched threads had been synchronous, line 35 would only be reached once all threads had finished. Canceling them would then no longer make sense;
The [showInfo] method is as follows:
@UiThread
protected void showInfo(int alea) {
if (!hasBeenCanceled) {
// one more piece of information
nbInfos++;
infoReponses.setText(String.format("Liste des réponses (%s)", nbInfos));
// are we done?
if (nbInfos == nbAleas) {
// we end the wait
cancelWaiting();
}
// we add the information to the list of answers
reponses.add(0, String.valueOf(alea));
// we display the answers
adapterReponses.notifyDataSetChanged();
}
}
- The [showInfo] method is called within the [getAlea] thread annotated by [@Background]. This method will update the UI visual interface. It can only do this by being executed within the UI thread. This is the meaning of the [@UiThread] annotation on line 1;
- line 2: the method receives a random number;
- line 3: the body of the method is executed only if the user has not canceled their request;
- lines 5-6: the response counter is incremented and displayed;
- lines 8–11: if all expected responses have been received, the wait is terminated (end of the wait signal; the [Exécuter] button replaces the [Annuler] button);
- lines 12-15: add the received random number to the list of responses displayed by the [ListView listReponses] component and refresh it;
The [showAlert] method is as follows:
@UiThread
protected void showAlert(Throwable th) {
if (!hasBeenCanceled) {
// we cancel everything
doAnnuler();
// we display it
new AlertDialog.Builder(activity).setTitle("Des erreurs se sont produites").setMessage(Utils.getMessagesForAlert(th)).setNeutralButton("Fermer", null).show();
}
}
The logic is similar to that of the [showInfo] method:
- line 1: the [@UiThread] annotation is required;
- line 2: the method receives the exception that occurred;
- line 3: the method is executed only if the user has not canceled their request;
- line 5: the user’s request is canceled as if they had clicked the [Annuler] button themselves;
- line 7: the alert is displayed using the Android class [AlertDialog]:
- [activity]: is the [Activity]-type activity stored in the parent class [AbstractFragment];
- [setTitle]: sets the title of the alert window [1];
- [setMessage]: sets the message displayed by the alert window [2];
- [setNeutral]: sets the button that closes the alert window [3];
- [show]: requests the display of the alert window;
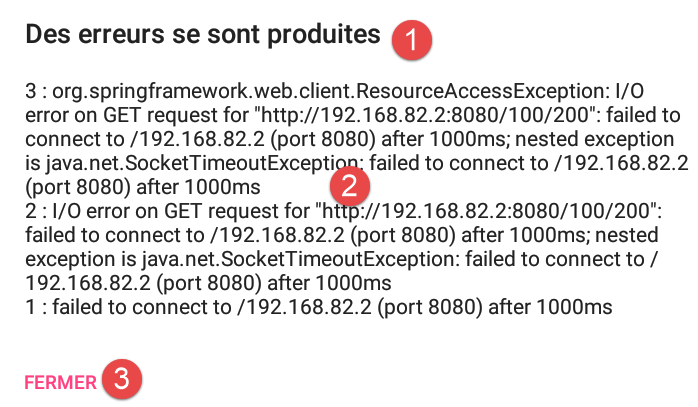
Clicking the [Annuler] button is handled with the following method:
@Click(R.id.btn_Annuler)
protected void doAnnuler() {
// memory
hasBeenCanceled=true;
// the asynchronous task is cancelled
BackgroundExecutor.cancelAll("alea", true);
// end of wait
cancelWaiting();
}
- line 4: note that the user has canceled their request;
- line 6: cancels all tasks identified by the string [alea]. The second parameter, [true], means that these tasks must be canceled even if they have already been launched. The identifier [alea] is the one used to qualify the [getAlea] method in the fragment (line 1 below):
@Background(id = "alea")
void getAlea(int a, int b) {
...
}
Note: It turned out that line 6 of the code in the [doAnnuler] method was not working correctly. That is why we added the boolean [hasBeenCanceled]. In fact, in the event of an exception (server down), the alert window would appear n times if n random numbers had been requested.
1.16.2.7. The [MainActivity] activity
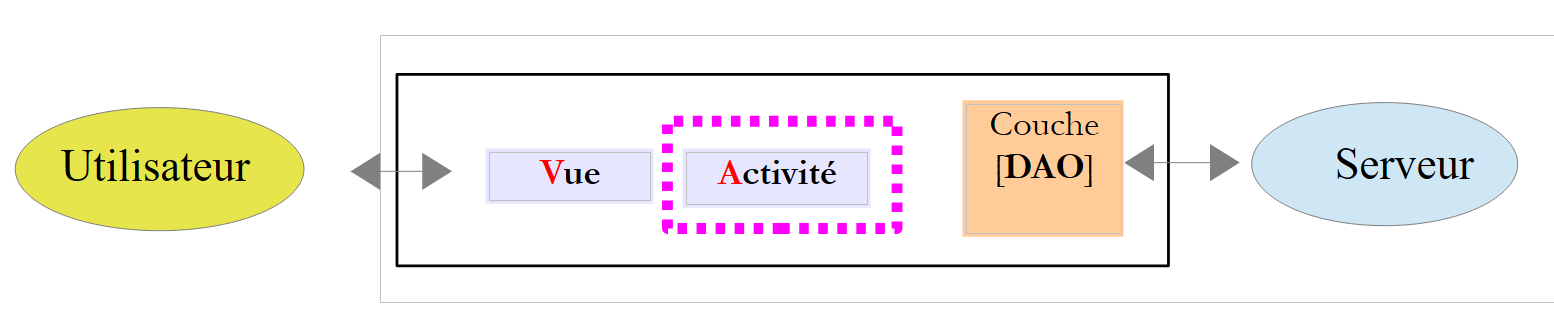 |
1.16.2.7.1. The [activity-main.xml] view
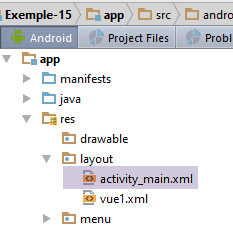
Compared to the previous example, we have added a loading image to the view associated with activity [MainActivity]:
...
<android.support.design.widget.AppBarLayout
android:id="@+id/appbar"
android:layout_width="match_parent"
android:layout_height="wrap_content"
android:paddingTop="@dimen/appbar_padding_top"
android:theme="@style/AppTheme.AppBarOverlay">
<android.support.v7.widget.Toolbar
android:id="@+id/toolbar"
android:layout_width="match_parent"
android:layout_height="?attr/actionBarSize"
android:background="?attr/colorPrimary"
app:popupTheme="@style/AppTheme.PopupOverlay"
app:layout_scrollFlags="scroll|enterAlways">
<!-- waiting image -->
<ProgressBar
android:id="@+id/loadingPanel"
android:layout_width="wrap_content"
android:layout_height="wrap_content"
android:indeterminate="true"/>
</android.support.v7.widget.Toolbar>
<!-- waiting image -->
</android.support.design.widget.AppBarLayout>
...
- lines 17-21: the placeholder image;
1.16.2.7.2. The [MainActivity] activity
The [MainActivity] activity has changed little from what it was in [Exemple-14]. First, the [DAO] layer is injected into it:
// injection dao
@Bean(Dao.class)
protected IDao dao;
...
@AfterInject
protected void afterInject() {
// log
if (IS_DEBUG_ENABLED) {
Log.d("MainActivity", "afterInject");
}
// set the [DAO] layer
setTimeout(TIMEOUT);
}
- lines 2-3: injection of the [DAO] layer via a AA annotation;
- lines 5-13: code executed after this injection;
- line 12: set the timeout for the [DAO] layer
Furthermore, the [MainActivity] activity must implement the [IMainActivity] interface, which itself extends the [IDao] interface:
// implémentation IMainActivity --------------------------------------------------------------------
@Override
public void navigateToView(int position) {
// the position view is displayed
if (mViewPager.getCurrentItem() != position) {
// fragment display
mViewPager.setCurrentItem(position);
}
}
// hold image management
public void cancelWaiting() {
loadingPanel.setVisibility(View.INVISIBLE);
}
public void beginWaiting() {
loadingPanel.setVisibility(View.VISIBLE);
}
// implémentation IDao --------------------------------------------------------------------
@Override
public int getAlea(int a, int b) {
// execution
return dao.getAlea(a, b);
}
@Override
public void setDelay(int delay) {
dao.setDelay(delay);
}
@Override
public void setUrlServiceWebJson(String url) {
dao.setUrlServiceWebJson(url);
}
@Override
public void setTimeout(int timeout) {
dao.setTimeout(timeout);
}
1.16.2.8. Running the project
Start the web service (see section 1.16.1.7 ) and then launch the Android client:
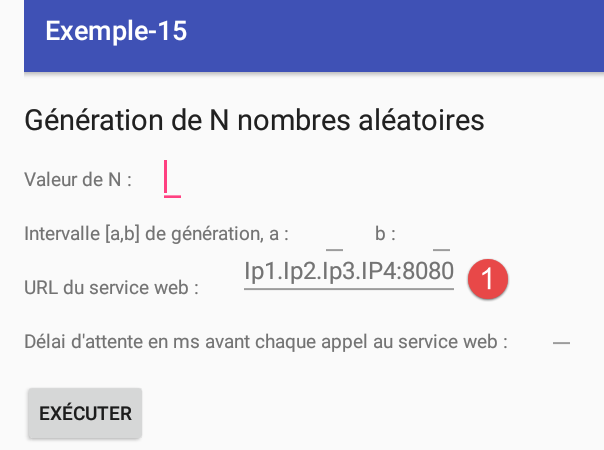
To find out what to enter in [1], follow these steps. Open a command prompt and type the following command:
C:\Program Files\Console2>ipconfig
Configuration IP de Windows
Carte réseau sans fil Connexion au réseau local* 3 :
Statut du média. . . . . . . . . . . . : Média déconnecté
Suffixe DNS propre à la connexion. . . :
Carte Ethernet VirtualBox Host-Only Network :
Suffixe DNS propre à la connexion. . . :
Adresse IPv6 de liaison locale. . . . .: fe80::e481:1583:cd2a:c47%27
Adresse IPv4. . . . . . . . . . . . . .: 192.168.82.2
Masque de sous-réseau. . . . . . . . . : 255.255.255.0
Passerelle par défaut. . . . . . . . . :
Carte Ethernet VirtualBox Host-Only Network #2 :
Suffixe DNS propre à la connexion. . . :
Adresse IPv6 de liaison locale. . . . .: fe80::8191:14ad:407d:b840%54
Adresse IPv4. . . . . . . . . . . . . .: 192.168.64.2
Masque de sous-réseau. . . . . . . . . : 255.255.255.0
Passerelle par défaut. . . . . . . . . :
Carte Ethernet Ethernet :
Suffixe DNS propre à la connexion. . . : ad.univ-angers.fr
Adresse IPv6 de liaison locale. . . . .: fe80::d972:ad53:3b8a:263f%28
Adresse IPv4. . . . . . . . . . . . . .: 172.19.81.34
Masque de sous-réseau. . . . . . . . . : 255.255.0.0
Passerelle par défaut. . . . . . . . . : 172.19.0.254
Carte réseau sans fil Wi-Fi :
Statut du média. . . . . . . . . . . . : Média déconnecté
Suffixe DNS propre à la connexion. . . : uang ad.univ-angers.fr univ-angers.fr
If you have installed [GenyMotion], the VirtualBox virtual machine has added IP addresses to your computer (lines 10 and 18). These addresses are particularly useful because they are not blocked by the Windows firewall. Line 30 provides the IP address for your computer on a local network. To use this address, you generally need to disable the Windows firewall. If you are connected to a Wi-Fi network, use the Wi-Fi address and, again, disable the firewall if you have one.
Test the application in the following cases:
- 100 random numbers in the range [1000, 2000] without a timeout;
- 2000 random numbers in the range [10000, 20000] without a timeout, and cancel the wait before generation is complete;
- 5 random numbers in the range [100, 200] with a wait time of 5000 ms, and cancel the wait before generation completes;
1.16.2.9. Cancelation Handling
To track what happens when the user requests cancellation or when cancellation is triggered by an exception, we add the following method to the [IDao] interface (see section 1.16.2.4.1 ):
package exemples.android.dao;
public interface IDao {
...
// mode debug
void setDebugMode(boolean isDebugEnabled);
}
In the [Dao] class, we add the following code:
// mode debug
private boolean isDebugEnabled;
// class name
private String className;
..
// manufacturer
public Dao() {
// class name
className = getClass().getSimpleName();
}
...
// interface IDao -------------------------------------------------------------------
@Override
public int getAlea(int a, int b) {
// log
if (isDebugEnabled) {
Log.d(String.format("%s", className), String.format("getAlea [%s, %s] en cours", a, b));
}
// service execution
Response<Integer> info;
...
@Override
public void setDebugMode(boolean isDebugEnabled) {
this.isDebugEnabled = isDebugEnabled;
}
- line 9: we note the class name;
- lines 16–18: we write a log entry every time the [getAlea] method is called;
Additionally, in the [Vue1Fragment] fragment, we add the following logs:
@UiThread
protected void showInfo(int alea) {
// log
if (isDebugEnabled) {
Log.d(String.format("%s", className), String.format("showInfo(%s)", alea));
}
....
}
@UiThread
protected void showAlert(Throwable th) {
// log
if (isDebugEnabled) {
Log.d(String.format("%s", className), "Exception reçue");
}
...
}
}
@Click(R.id.btn_Annuler)
protected void doAnnuler() {
// log
if (isDebugEnabled) {
Log.d(String.format("%s", className), "Annulation demandée");
}
...
}
Every time the [Vue1Fragment] fragment receives information from the [DAO] layer, a log is generated. Additionally, when the [doAnnuler] method is called, the event is logged.
Test 1
We request 5 numbers even though the server has not been started. We get the following logs:
- lines 1–5: the [getAlea] method of the [Dao] class is called five times. Note that these are asynchronous calls made by the [VueFragment] fragment, and that the fragment does not wait for the result of its call;
- line 7: the first request HTTP has been made, and the fragment [VueFragment] has received its first exception;
- line 8: it then requests the cancellation of all requests;
- lines 9–12: however, we see that it receives the following four exceptions. Therefore, the asynchronous requests that were pending have all been executed;
Test 2
Now, let’s start the server and request 5 numbers with a 5-second delay, then click on [Annuler] before the delay ends. The logs are as follows:
- lines 1-5: the [getAlea] method of the [Dao] class is called five times;
- line 7: the user requested that the requests be canceled;
- line 8: we see that [Vue1_Fragment] receives 5 values. Once again, the pending asynchronous requests have all been executed;
This is why we had to handle a boolean [hasBeenCanceled] to avoid displaying anything when a cancellation had been requested. In the cancellation code:
@Click(R.id.btn_Annuler)
protected void doAnnuler() {
// log
if (isDebugEnabled) {
Log.d(String.format("%s", className), "Annulation demandée");
}
// memory
hasBeenCanceled = true;
// the asynchronous task is cancelled
BackgroundExecutor.cancelAll("alea",true);
// end of wait
cancelWaiting();
}
The code on line 10 does not do what is expected. This may be because the asynchronous tasks share the same method annotated with [@Background]:
@Background(id = "alea")
void getAlea(int a, int b) {
...
}
1.17. Example-16: Handling Asynchrony with RxAndroid
We will now manage the asynchrony required for Android applications using a library called RxJava [http://reactivex.io/] and its derivative version for the Android environment [RxAndroid]. To do this, we will use the [Introduction à RxJava. Application aux environnements Swing et Android] course.
1.17.1. Creating the project
We duplicate the [Exemple-1] project into [Exemple-16]:
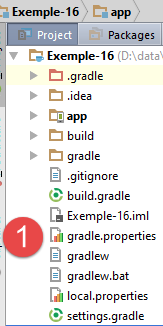
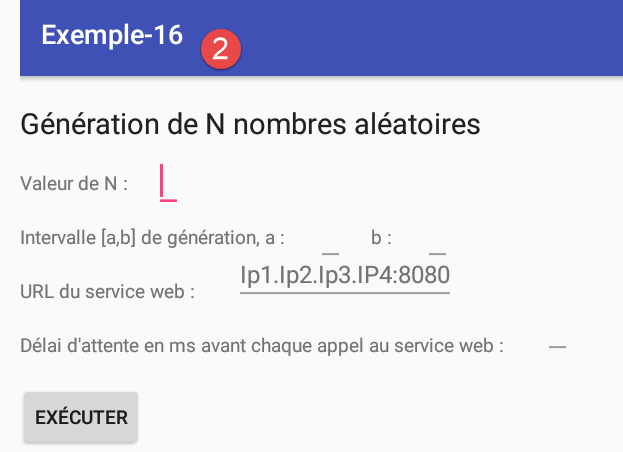
1.17.2. Gradle configuration
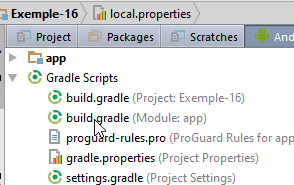
In [build.gradle], we add the dependency on the [RxAndroid] library:
dependencies {
...
compile 'io.reactivex:rxandroid:1.2.0'
}
1.17.3. The [DAO] layer
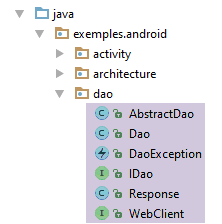
1.17.4. The [IDao] interface
The [IDao] interface becomes the following:
package exemples.android.dao;
import rx.Observable;
public interface IDao {
// random number
Observable<Integer> getAlea(int a, int b);
// URL of the web service
void setUrlServiceWebJson(String url);
// max wait time (ms) for server response
void setTimeout(int timeout);
// client wait time in milliseconds before request
void setDelay(int delay);
// mode debug
void setDebugMode(boolean isDebugEnabled);
}
- line 8: the [getAlea] method now returns a [Observable] type from the RxJava library (line 3). The principle is as follows:
A stream of elements of type Observable<T> is observed by one or more subscribers (observers, consumers) of type Subscriber<T>. The RxJava library allows the Observable<T> stream to run in thread T1 and its Subscriber<T> observer in thread T2 without the developer having to worry about managing the lifecycle of these threads or naturally difficult issues, such as data sharing between threads and thread synchronization to execute a global task. It therefore facilitates asynchronous programming.
1.17.5. The [AbstractDao] class
We will derive the [Dao] class from the following [AbstractDao] class:
package exemples.android.dao;
import com.fasterxml.jackson.core.JsonProcessingException;
import com.fasterxml.jackson.databind.ObjectMapper;
import rx.Observable;
import rx.Subscriber;
public abstract class AbstractDao {
// mapper jSON
private ObjectMapper mapper = new ObjectMapper();
// méthodes protégées ----------------------------------------------------------
// generic interface
protected interface IRequest<T> {
Response<T> getResponse();
}
// generic request
protected <T> Observable<T> getResponse(final IRequest<T> request) {
// service execution
return rx.Observable.create(new rx.Observable.OnSubscribe<T>() {
@Override
public void call(Subscriber<? super T> subscriber) {
DaoException ex = null;
// service execution
try {
// make the synchronous request and forward the response to the subscriber
Response<T> response = request.getResponse();
// mistake?
int status = response.getStatus();
if (status != 0) {
// we note the exception
ex = new DaoException(mapper.writeValueAsString(response.getMessages()), status);
} else {
// we issue the answer
subscriber.onNext(response.getBody());
// we signal the end of the observable
subscriber.onCompleted();
}
} catch (JsonProcessingException | RuntimeException e) {
// we note the exception
ex = new DaoException(e, 100);
}
// exception?
if (ex != null) {
// we issue the exception
subscriber.onError(ex);
}
}
});
}
}
- The class [AbstractDao] has as its main element a generic method [getResponse], which is used to obtain from the server a type [Response<T>] where T is the type of the result desired by the client HTTP (here Integer);
- line 20: the sole parameter of the generic method [getResponse] is an instance of the generic interface [IRequest<T>] from lines 15–17. This interface has only one method, [getResponse], and it is this method that provides the desired response [Response<T>];
- thanks to the two preceding elements, the class [AbstractDao] can serve as a parent class for any client layer [Dao] of a server sending responses of type [Response<T>];
- line 20: the generic method [getResponse] returns a type [Observable<T>] that represents the result actually expected by the client HTTP (here, a type Observable<Integer>);
- lines 22–51: the static method [rx.Observable.create] creates a type [Observable];
- Line 22: The only parameter of this method is an instance of type [rx.Observable.OnSubscribe<T>], an interface that has the following methods:
- [onNext(T element)]: allows an element of type T to be sent to an observer;
- [onError(Throwable th)]: allows an exception to be emitted to an observer;
- [onCompleted]: allows the end of emissions to be indicated to an observer;
A type [Observable<T>] is subject to certain constraints:
- it emits its elements using the [onNext(T element)] method;
- the [onCompleted] method must be called exactly once as soon as there are no more elements to send to the observer;
- the [onCompleted] method is not called if the [onError(Throwable th)] method has been called;
In our example:
- The observer will be the fragment [Vue1Fragment]. It is this fragment that consumes the elements emitted by [Observable<T>] (element or exception);
- the created type [Observable<T>] will emit only a single element (line 37);
- line 29: makes a synchronous HTTP request to the server and obtains the type [Response<T>]. This HTTP request is handled by the [IRequest] type passed as a parameter to the generic method [getResponse];
- line 31: the response status is retrieved;
- lines 32–34: if this status indicates an error, an exception is prepared;
- lines 36–39: if the status is not an error, the response actually expected by the client is sent (line 37), and the observer is informed that there will be no further responses (line 39);
- lines 41–44: if the request HTTP results in an exception, log it;
- lines 46–49: if the exception [ex] is not null, then it is sent to the observer. There is no need here to call the [onCompleted] method to indicate to the observer that there will be no further element emissions. This is implicit;
The key takeaway from these explanations is that:
- the generic method [<T> Observable<T> getResponse(final IRequest<T> request)] returns a type [Observable<T>] that emits either an element of type T or an exception;
- this method accepts as its sole parameter a type [IRequest<T>], whose sole method [getResponse()] performs the access HTTP, which returns the type [Response<T>];
1.17.6. The [Dao] class
The [Dao] class evolves as follows:
@EBean
public class Dao extends AbstractDao implements IDao {
// service customer REST
@RestService
protected WebClient webClient;
// timeout before request execution
private int delay;
// mode debug
private boolean isDebugEnabled;
// class name
private String className;
// manufacturer
public Dao() {
// class name
className = getClass().getSimpleName();
}
// interface IDao -------------------------------------------------------------------
@Override
public Observable<Integer> getAlea(final int a, final int b) {
// log
if (isDebugEnabled) {
Log.d(String.format("%s", className), String.format("getAlea [%s, %s] en cours", a, b));
}
// web client execution
return getResponse(new IRequest<Integer>() {
@Override
public Response<Integer> getResponse() {
// waiting
waitSomeTime(delay);
// synchronous HTTP call
return webClient.getAlea(a, b);
}
});
}
...
- line 2: the class [Dao] extends the class [AbstractDao];
- line 24: the method [getAlea] now returns a type [Observable<Integer>];
- line 30: call to the generic method [getResponse] of the parent class. It is passed a parameter of type [IRequest<Integer>];
- lines 32–37: implementation of the [IRequest<Integer>] interface;
- line 36: the HTTP request is made via the AA and [webClient] interfaces, as was done previously. We know that we will retrieve a type [Response<Integer>], which is indeed the type that the method [IRequest<Integer>.getReponse()] must return;
- line 36: here we use a property called closure: the ability to encapsulate values external to an instance within it when it is created, in this case the values of [a, b] from line 24. This is what allows the [IRequest<Integer>.getReponse()] method to have no parameters. These values have been hardcoded into the body of the method. And where we would normally change the method’s parameters (a,b) -> (x,y), here we create a new instance of [IRequest<Integer>] that encapsulates the values of x and y;
1.17.7. The [MainActivity] class
The [MainActivity] class, which implements the [IDao] interface, evolves as follows:
// implémentation IDao --------------------------------------------------------------------
@Override
public Observable<Integer> getAlea(int a, int b) {
// execution
return dao.getAlea(a, b);
}
1.17.8. The [Vue1Fragment] class
The [Vue1Fragment] class evolves as follows:
@Click(R.id.btn_Executer)
protected void doExecuter() {
// delete previous answers
reponses.clear();
adapterReponses.notifyDataSetChanged();
hasBeenCanceled = false;
// reset the response counter to 0
nbInfos = 0;
infoReponses.setText(String.format("Liste des réponses (%s)", nbInfos));
// test the validity of entries
if (!isPageValid()) {
return;
}
// activity initialization
mainActivity.setUrlServiceWebJson(urlServiceWebJson);
mainActivity.setDelay(delay);
// we ask for the random numbers
getAleasInBackground(a, b);
// we start waiting
beginWaiting();
}
- line 18: request random numbers from the [getAleasInBackground] method, named as such because the numbers will be requested in a different thread from that of Ui;
private int nbReponses = 0;
// subscriptions to observables
private List<Subscription> abonnements;
// annotation [Background] unnecessary
void getAleasInBackground(int a, int b) {
// initially no response and no subscriptions
nbReponses = 0;
abonnements.clear();
// prepare the observable
Observable<Integer> response = Observable.empty();
// merge the results of the various HTTP calls
// they are executed on an I/O thread
for (int i = 0; i < nbAleas; i++) {
response = response.mergeWith(mainActivity.getAlea(a, b).subscribeOn(Schedulers.io()));
}
// the cumulative observable will be observed on the UI thread
response = response.observeOn(AndroidSchedulers.mainThread());
try {
// the observable is executed
abonnements.add(response.subscribe(new Action1<Integer>() {
@Override
public void call(Integer alea) {
// we add the information to the list of answers
showInfo(alea);
}
}, new Action1<Throwable>() {
@Override
public void call(Throwable th) {
// error message
showAlert(th);
// end waiting
doAnnuler();
}
}, new Action0() {
@Override
public void call() {
// end waiting
cancelWaiting();
}
}));
} catch (RuntimeException e) {
// the exception is displayed in the UiThread
showAlert(e);
}
}
- line 3: an observable has subscribers. The link between a subscriber and the process it observes is called a subscription. Here we will have only one observed process and one subscriber. We will therefore have only one subscription. For the sake of principle, we act as if we could have multiple processes observed by different observers, which would result in multiple subscriptions;
- lines 11–18: we configure the observed process (observable). It is important to understand that this is only configuration: the process is not executed;
- line 11: we start with an empty observable, an observable that emits nothing;
- lines 14–16: to this empty observable, we add the [nbAleas] observables, which will be the [nbAleas] queries that will return HTTP random numbers;
- line 15: as before, random number #i is requested from the [MainActivity] class. It is important to understand that, at this point, no HTTP request has been executed yet. The [mainActivity.getAlea(a, b)] method is executed and returns a [Observable<Integer>] type. This is a process that will be observed once it is launched;
- Line 15: The [subscribeOn(Schedulers.io())] method requests that the process be executed (when it is) on an I/O thread. The RxJava library offers different types of threads. The I/O thread is suitable for HTTP calls;
- Line 15: Observable #i is merged with the initial observable from line 11: since the [nbAleas] observables each emit one element, we create an observable that will emit [nbAleas] elements. This is the one that will be observed. This observable emits the notification [onCompleted] when all the observables that compose it have emitted their own notification [onCompleted]. This will save us from having to count the responses, as we did in the previous version, to determine if we have received all the expected numbers;
- line 18: by this point, we have configured an observable that is the composition of [nbAleas] observables, each running on an I/O thread;
- line 18: the [observeOn(AndroidSchedulers.mainThread())] method is used to specify on which thread the values emitted by the observable should be observed. Here, the [AndroidSchedulers.mainThread())] thread belongs to the RxAndroid library and not to RxJava. It refers to the thread of Ui, also known as the loop event. This point is important: in an Android application, modifying a component of Ui can only be done in the Ui thread; otherwise, an exception occurs;
- lines 19–45: now that the process to be observed has been configured, it is executed;
- line 21: the [Observable.subscribe] operation launches the execution of the observed process. This operation will launch the previously configured [nbAleas] asynchronous processes. The results of these will be automatically made available to the observer on the Ui thread;
- we recall that the observable emits three types of events:
- [onNext]: when it emits an element;
- [onError]: when it encounters an exception;
- [onCompleted]: when it signals that it will no longer emit events;
The [Observable.subscribe] method takes three [Action1<Integer>, Action1<Throwable>, Action0] objects as parameters, whose [call] methods are used to handle each of these three events;
- lines 21–27: the first parameter of type [Action1<Integer>] is used to handle the [onNext] event. Its method [call] receives the element that was emitted by the observable (line 23);
- line 25: we reuse the [showInfo] method from the previous example;
- lines 27–35: the second parameter of type [Action1<Throwable>] is used to handle the event [onError]. Its method [call] receives the exception that was thrown by the observable (line 29);
- line 31: we reuse the [showAlert] method from the previous example;
- line 33: we initiate the procedure to cancel the user’s request. This involves canceling all observables that are currently running;
- lines 35–41: the third parameter of type [Action0] is used to handle the [onCompleted] event. Its method [call] takes no parameters;
- line 39: the wait is canceled;
The [showInfo] method evolves as follows:
// annotation [UiThread] unnecessary
protected void showInfo(int alea) {
// log
if (isDebugEnabled) {
Log.d(String.format("%s", className), String.format("showInfo(%s)", alea));
}
if (!hasBeenCanceled) {
// one more piece of information
nbInfos++;
infoReponses.setText(String.format("Liste des réponses (%s)", nbInfos));
// we add the information to the list of answers
reponses.add(0, String.valueOf(alea));
// display answers
adapterReponses.notifyDataSetChanged();
}
}
The method has two changes:
- line 1: we have removed the annotation AA [@UiThread];
- we no longer count the responses to determine whether or not to stop waiting. It is now the observable’s [onCompleted] event that provides this information;
The [showAlert] method changes as follows:
// annotation [UiThread] unnecessary
protected void showAlert(Throwable th) {
// log
if (isDebugEnabled) {
Log.d(String.format("%s", className), "Exception reçue");
}
if (!hasBeenCanceled) {
// we cancel everything
doAnnuler();
// we display it
new AlertDialog.Builder(activity).setTitle("Des erreurs se sont produites").setMessage(Utils.getMessagesForAlert(th)).setNeutralButton("Fermer", null).show();
}
}
- The only change is on line 1: we removed the annotation AA [@UiThread];
Finally, the [doAnnuler] method changes as follows:
@Click(R.id.btn_Annuler)
protected void doAnnuler() {
// log
if (isDebugEnabled) {
Log.d(String.format("%s", className), "Annulation demandée");
}
// memory
hasBeenCanceled = true;
// asynchronous tasks are cancelled
if (abonnements != null) {
for (Subscription abonnement : abonnements) {
abonnement.unsubscribe();
}
}
// end of wait
cancelWaiting();
}
- line 12: cancels a subscription and thus the observation of the associated process;
1.17.9. Execution
Launch the web service (section 1.16.1.7 ), launch the Android client, and repeat the tests you performed with the previous example (section 1.16.2.8 ).
1.17.10. Handling Cancellation
We repeat the same tests as for the previous example (section 1.16.2.9 ).
Test 1
We request 5 numbers even though the server has not been launched. We get the following logs:
After line 7, there are no more logs, which shows that the observer (Vue1Fragment) is no longer receiving notifications from the observed process.
Test 2
Now, let’s start the server and request 5 numbers with a 5-second delay, then click on [Annuler] before the delay ends. The logs are as follows:
After line 6, there are no more logs, which shows that the observer (Vue1Fragment) is no longer receiving notifications from the observed process.
This is the expected behavior of a cancellation. We can therefore remove the boolean [hasBeenCanceled] from the [Vue1Fragment] code that we introduced in the previous example because the cancellation was not behaving as expected.
The fact that the observer no longer receives notifications after the observable is canceled does not mean that the HTTP requests themselves are canceled. To see this, we modify the [Dao] class as follows:
@Override
public Observable<Integer> getAlea(final int a, final int b) {
// log
if (isDebugEnabled) {
Log.d(String.format("%s", className), String.format("getAlea [%s, %s] en cours", a, b));
}
// web client execution
return getResponse(new IRequest<Integer>() {
@Override
public Response<Integer> getResponse() {
// waiting
waitSomeTime(delay);
// synchronous HTTP call
Response<Integer> response= webClient.getAlea(a, b);
if (isDebugEnabled) {
try {
Log.d(String.format("%s", className), String.format("response [%s]", new ObjectMapper().writeValueAsString(response)));
} catch (JsonProcessingException e) {
Log.d(String.format("%s", className),"erreur désérialisation jSON");
}
}
return response;
}
});
}
- lines 15–21: we log the result of the HTTP query from line 14;
The logs for test #2 are as follows:
- lines 1-5: the 5 requests were made;
- line 6: the user canceled;
- lines 7-11: we successfully receive the responses for the five requests HTTP. However, due to the cancellation of the observable, these elements are not transmitted to the observer;
1.17.11. Conclusion
In the remainder of this document, client/server applications will be implemented using the RxAndroid library rather than the AA library for the following reasons:
- RxAndroid can be used in an Android application that does not use AA;
- RxAndroid does more than just facilitate asynchronous operations. It offers a wide range of methods for creating a new observable from another. These methods have no equivalent in AA;
- as soon as you want to derive a class annotated with AA, such as a fragment, you encounter serious problems. You are then forced to abandon AA and use solution 1 for asynchronous programming;
Readers interested in learning more about the capabilities of the RxAndroid library should refer to document [Introduction à RxJava. Application aux environnements Swing et Android]. This document uses RxAndroid without the AA library.
1.18. Example 17: Data Entry Components
We will create a new project to demonstrate some common components used in data entry forms.
1.18.1. Creating the project
We duplicate the [Exemple-13] project into [Exemple-17]:
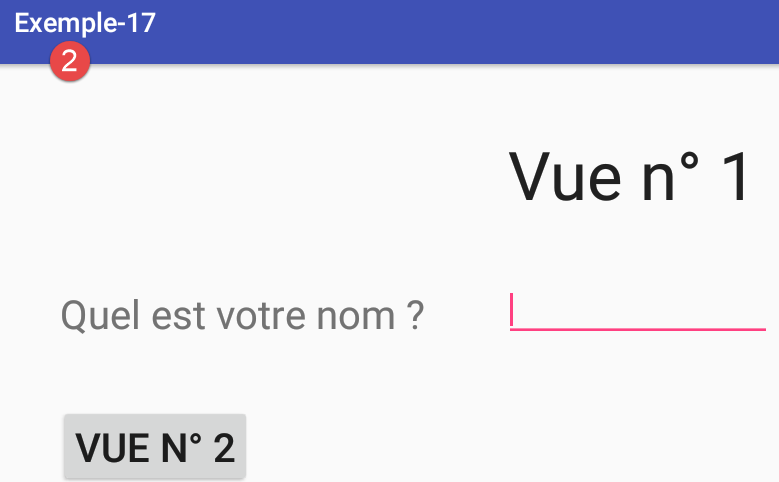
The new project will have only one view, [vue1.xml]. Therefore, we delete the view [vue2.xml] and its associated fragments [Vue2Fragment] and [2]. We are incorporating this change into the fragment manager for [Mainactivity]:
// our fragment manager to be redefined for each application
// must define the following methods: getItem, getCount, getPageTitle
public class SectionsPagerAdapter extends FragmentPagerAdapter {
// fragments
private final Fragment[] fragments = {new Vue1Fragment_()};
....
}
Rerun the project. It should display view #1 as before. We will work from this project.
1.18.2. The XML view of the form
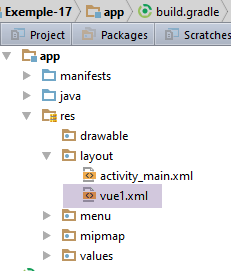
The view generated by the file [vue1.xml] is as follows:
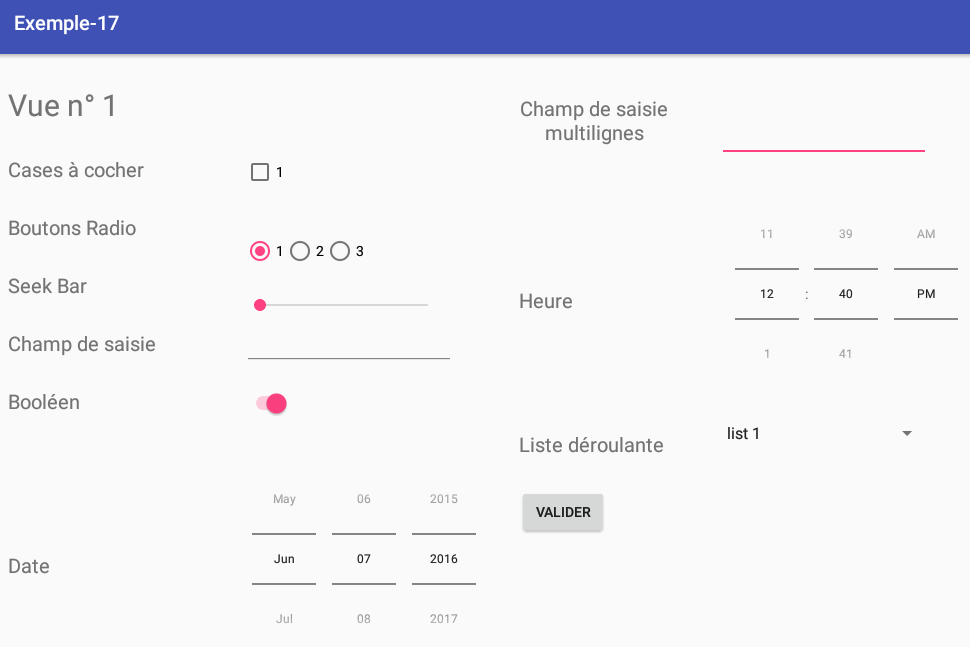
The text XML of the view is as follows:
<?xml version="1.0" encoding="utf-8"?>
<ScrollView xmlns:android="http://schemas.android.com/apk/res/android"
android:layout_width="match_parent"
android:layout_height="match_parent"
android:layout_marginBottom="30dp">
<RelativeLayout
android:layout_width="match_parent"
android:layout_height="wrap_content">
<TextView
android:id="@+id/textViewFormulaireTitre"
android:layout_width="wrap_content"
android:layout_height="wrap_content"
android:layout_alignParentLeft="true"
android:layout_alignParentTop="true"
android:layout_marginLeft="10dp"
android:layout_marginTop="30dp"
android:text="@string/titre_vue1"
android:textSize="30sp"/>
<Button
android:id="@+id/formulaireButtonValider"
android:layout_width="wrap_content"
android:layout_height="wrap_content"
android:layout_alignLeft="@+id/TextViewFormulaireCombo"
android:layout_below="@+id/TextViewFormulaireCombo"
android:layout_marginTop="30dp"
android:text="@string/formulaire_valider"/>
<TextView
android:id="@+id/textViewFormulaireCheckBox"
android:layout_width="wrap_content"
android:layout_height="wrap_content"
android:layout_alignLeft="@+id/textViewFormulaireTitre"
android:layout_below="@+id/textViewFormulaireTitre"
android:layout_marginTop="30dp"
android:text="@string/formulaire_checkbox"
android:textSize="20sp"/>
<TextView
android:id="@+id/textViewFormulaireRadioButton"
android:layout_width="wrap_content"
android:layout_height="wrap_content"
android:layout_alignLeft="@+id/textViewFormulaireCheckBox"
android:layout_below="@+id/textViewFormulaireCheckBox"
android:layout_marginTop="30dp"
android:text="@string/formulaire_radioButton"
android:textSize="20sp"/>
<TextView
android:id="@+id/textViewFormulaireSeekBar"
android:layout_width="wrap_content"
android:layout_height="wrap_content"
android:layout_alignLeft="@+id/textViewFormulaireRadioButton"
android:layout_below="@+id/textViewFormulaireRadioButton"
android:layout_marginTop="30dp"
android:text="@string/formulaire_seekBar"
android:textSize="20sp"/>
<TextView
android:id="@+id/textViewFormulaireEdtText"
android:layout_width="wrap_content"
android:layout_height="wrap_content"
android:layout_alignLeft="@+id/textViewFormulaireSeekBar"
android:layout_below="@+id/textViewFormulaireSeekBar"
android:layout_marginTop="30dp"
android:text="@string/formulaire_saisie"
android:textSize="20sp"/>
<TextView
android:id="@+id/textViewFormulaireBool"
android:layout_width="wrap_content"
android:layout_height="wrap_content"
android:layout_alignLeft="@+id/textViewFormulaireEdtText"
android:layout_below="@+id/textViewFormulaireEdtText"
android:layout_marginTop="30dp"
android:text="@string/formulaire_bool"
android:textSize="20sp"/>
<TextView
android:id="@+id/textViewFormulaireDate"
android:layout_width="wrap_content"
android:layout_height="200dp"
android:layout_alignLeft="@+id/textViewFormulaireBool"
android:layout_below="@+id/textViewFormulaireBool"
android:layout_marginTop="50dp"
android:gravity="center"
android:text="@string/formulaire_date"
android:textSize="20sp"/>
<TextView
android:id="@+id/textViewFormulaireMultilignes"
android:layout_width="150dp"
android:layout_height="100dp"
android:gravity="center"
android:layout_alignBaseline="@+id/textViewFormulaireTitre"
android:layout_alignParentTop="true"
android:layout_marginLeft="400dp"
android:layout_toRightOf="@+id/textViewFormulaireTitre"
android:text="@string/formulaire_multilignes"
android:textSize="20sp"/>
<TextView
android:id="@+id/textViewFormulaireTime"
android:layout_width="wrap_content"
android:layout_height="200dp"
android:gravity="center"
android:layout_alignLeft="@+id/textViewFormulaireMultilignes"
android:layout_below="@+id/textViewFormulaireMultilignes"
android:layout_marginTop="30dp"
android:text="@string/formulaire_time"
android:textSize="20sp"/>
<TextView
android:id="@+id/TextViewFormulaireCombo"
android:layout_width="wrap_content"
android:layout_height="wrap_content"
android:layout_alignLeft="@+id/textViewFormulaireTime"
android:layout_below="@+id/textViewFormulaireTime"
android:layout_marginTop="30dp"
android:text="@string/formulaire_combo"
android:textSize="20sp"/>
<CheckBox
android:id="@+id/formulaireCheckBox1"
android:layout_width="wrap_content"
android:layout_height="wrap_content"
android:layout_alignBaseline="@+id/textViewFormulaireCheckBox"
android:layout_marginLeft="100dp"
android:layout_toRightOf="@+id/textViewFormulaireCheckBox"
android:text="@string/formulaire_checkbox1"/>
<RadioGroup
android:id="@+id/formulaireRadioGroup"
android:layout_width="wrap_content"
android:layout_height="wrap_content"
android:layout_alignBaseline="@+id/textViewFormulaireRadioButton"
android:layout_alignLeft="@+id/formulaireCheckBox1"
android:orientation="horizontal">
<RadioButton
android:id="@+id/formulaireRadioButton1"
android:layout_width="wrap_content"
android:layout_height="wrap_content"
android:text="@string/formulaire_radiobutton1"/>
<RadioButton
android:id="@+id/formulaireRadioButton2"
android:layout_width="wrap_content"
android:layout_height="wrap_content"
android:text="@string/formulaire_radionbutton2"/>
<RadioButton
android:id="@+id/formulaireRadionButton3"
android:layout_width="wrap_content"
android:layout_height="wrap_content"
android:text="@string/formulaire_radiobutton3"/>
</RadioGroup>
<SeekBar
android:id="@+id/formulaireSeekBar"
android:layout_width="200dp"
android:layout_height="wrap_content"
android:layout_alignBaseline="@+id/textViewFormulaireSeekBar"
android:layout_alignLeft="@+id/formulaireCheckBox1"/>
<EditText
android:id="@+id/formulaireEditText1"
android:layout_width="wrap_content"
android:layout_height="wrap_content"
android:layout_alignBaseline="@+id/textViewFormulaireEdtText"
android:layout_alignLeft="@+id/formulaireCheckBox1"
android:ems="10"
android:inputType="text">
</EditText>
<Switch
android:id="@+id/formulaireSwitch1"
android:layout_width="wrap_content"
android:layout_height="wrap_content"
android:layout_alignBaseline="@+id/textViewFormulaireBool"
android:layout_alignLeft="@+id/formulaireCheckBox1"
android:text="@string/formulaire_switch"
android:textOff="Non"
android:textOn="Oui"/>
<TimePicker
android:id="@+id/formulaireTimePicker1"
android:layout_width="wrap_content"
android:layout_height="wrap_content"
android:layout_alignBottom="@+id/textViewFormulaireTime"
android:layout_alignLeft="@+id/formulaireEditTextMultiLignes"
android:timePickerMode="spinner"
/>
<EditText
android:id="@+id/formulaireEditTextMultiLignes"
android:layout_width="wrap_content"
android:layout_height="100dp"
android:layout_alignBaseline="@+id/textViewFormulaireMultilignes"
android:layout_alignBottom="@+id/textViewFormulaireMultilignes"
android:layout_marginLeft="50dp"
android:layout_toRightOf="@+id/textViewFormulaireMultilignes"
android:ems="10"
android:inputType="textMultiLine">
</EditText>
<Spinner
android:id="@+id/formulaireDropDownList"
android:layout_width="200dp"
android:layout_height="50dp"
android:layout_alignBottom="@+id/TextViewFormulaireCombo"
android:layout_alignLeft="@+id/formulaireEditTextMultiLignes">
</Spinner>
<DatePicker
android:id="@+id/formulaireDatePicker1"
android:layout_width="wrap_content"
android:layout_height="wrap_content"
android:layout_alignBottom="@+id/textViewFormulaireDate"
android:layout_alignLeft="@+id/formulaireCheckBox1"
android:datePickerMode="spinner"
android:calendarViewShown="false">
</DatePicker>
<TextView
android:id="@+id/textViewSeekBarValue"
android:layout_width="30dp"
android:layout_height="wrap_content"
android:layout_alignBaseline="@+id/textViewFormulaireSeekBar"
android:layout_marginLeft="30dp"
android:layout_toRightOf="@+id/formulaireSeekBar"
android:text=""/>
</RelativeLayout>
The main components of the form are as follows:
| |
| |
| |
| |
| |
| |
| 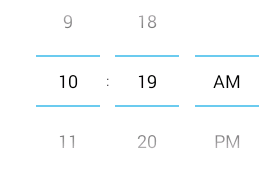 |
|  |
| 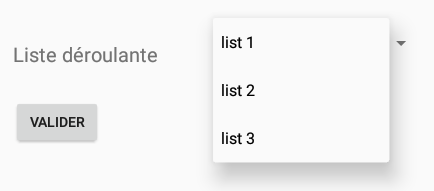 |
| 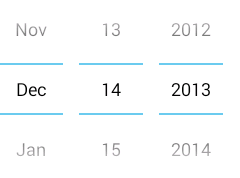 |
|
1.18.3. The form's strings
The form strings are defined in the following [res / values / strings.xml] file:
<resources>
<string name="app_name">Exemple-17</string>
<string name="action_settings">Settings</string>
<string name="section_format">Hello World from section: %1$d</string>
<!-- view 1 -->
<string name="titre_vue1">Vue n° 1</string>
<string name="formulaire_checkbox">Cases à cocher</string>
<string name="formulaire_radioButton">Boutons Radio</string>
<string name="formulaire_seekBar">Seek Bar</string>
<string name="formulaire_saisie">Champ de saisie</string>
<string name="formulaire_bool">Booléen</string>
<string name="formulaire_date">Date</string>
<string name="formulaire_time">Heure</string>
<string name="formulaire_multilignes">Champ de saisie multilignes</string>
<string name="formulaire_listview">Liste</string>
<string name="formulaire_combo">Liste déroulante</string>
<string name="formulaire_checkbox1">1</string>
<string name="formulaire_checkbox2">2</string>
<string name="formulaire_radiobutton1">1</string>
<string name="formulaire_radionbutton2">2</string>
<string name="formulaire_radiobutton3">3</string>
<string name="formulaire_switch"></string>
<string name="formulaire_valider">Valider</string>
</resources>
1.18.4. The form fragment
The [Vue1Fragment] class is as follows:
package exemples.android.fragments;
import android.annotation.SuppressLint;
import android.app.AlertDialog;
import android.widget.*;
import android.widget.SeekBar.OnSeekBarChangeListener;
import exemples.android.R;
import exemples.android.architecture.AbstractFragment;
import org.androidannotations.annotations.AfterViews;
import org.androidannotations.annotations.Click;
import org.androidannotations.annotations.EFragment;
import org.androidannotations.annotations.ViewById;
import java.util.ArrayList;
import java.util.List;
// a fragment is a view displayed by a fragment container
@EFragment(R.layout.vue1)
public class Vue1Fragment extends AbstractFragment {
// the fields of the view displayed by the fragment
@ViewById(R.id.formulaireDropDownList)
Spinner dropDownList;
@ViewById(R.id.formulaireButtonValider)
Button buttonValider;
@ViewById(R.id.formulaireCheckBox1)
CheckBox checkBox1;
@ViewById(R.id.formulaireRadioGroup)
RadioGroup radioGroup;
@ViewById(R.id.formulaireSeekBar)
SeekBar seekBar;
@ViewById(R.id.formulaireEditText1)
EditText saisie;
@ViewById(R.id.formulaireSwitch1)
Switch switch1;
@ViewById(R.id.formulaireDatePicker1)
DatePicker datePicker1;
@ViewById(R.id.formulaireTimePicker1)
TimePicker timePicker1;
@ViewById(R.id.formulaireEditTextMultiLignes)
EditText multiLignes;
@ViewById(R.id.formulaireRadioButton1)
RadioButton radioButton1;
@ViewById(R.id.formulaireRadioButton2)
RadioButton radioButton2;
@ViewById(R.id.formulaireRadionButton3)
RadioButton radioButton3;
@ViewById(R.id.textViewSeekBarValue)
TextView seekBarValue;
// drop-down list
private List<String> list;
private ArrayAdapter<String> dataAdapter;
@AfterViews
void afterViews() {
// check the first button
radioButton1.setChecked(true);
// the calendar
datePicker1.setCalendarViewShown(false);
// on seekBar
seekBar.setMax(100);
seekBar.setOnSeekBarChangeListener(new OnSeekBarChangeListener() {
public void onStopTrackingTouch(SeekBar seekBar) {
}
public void onStartTrackingTouch(SeekBar seekBar) {
}
public void onProgressChanged(SeekBar seekBar, int progress, boolean fromUser) {
seekBarValue.setText(String.valueOf(progress));
}
});
// the drop-down list
list = new ArrayList<>();
list.add("list 1");
list.add("list 2");
list.add("list 3");
}
@SuppressLint("DefaultLocale")
@Click(R.id.formulaireButtonValider)
protected void doValider() {
...
}
@Override
protected void updateFragment() {
// initialize drop-down list adapter
dataAdapter = new ArrayAdapter<>(activity, android.R.layout.simple_spinner_item, list);
dataAdapter.setDropDownViewResource(android.R.layout.simple_spinner_dropdown_item);
dropDownList.setAdapter(dataAdapter);
}
}
- lines 22–49: retrieve the references for all components of the form XML [vue1] (line 18);
- line 58: the [setChecked] method allows you to select a radio button or a checkbox;
- line 60: by default, the [DatePicker] component displays both a date input field and a calendar. Line 60 removes the calendar;
- line 62: [SeekBar].setMax() sets the maximum value of the slider. The minimum value is 0;
- lines 63–74: the slider events are handled. For each change made by the user, the slider value is displayed in the [TextView] from line 49;
- line 71: the parameter [progress] represents the slider value;
- lines 76–79: a list of [String] values that will be associated with the drop-down list;
- line 90: the [updateFragment] method of the fragment. When executed, the [activity] variable of the parent class has been initialized;
- line 92: the [list] data source is associated with the drop-down list adapter;
- lines 93–94: The [dataAdapter] adapter is associated with the [dropDownList] drop-down list;
- line 84: the [doValider] method is associated with a click on the [Valider] button;
The [doValider] method is designed to display the values entered by the user. Its code is as follows:
@Click(R.id.formulaireButtonValider)
protected void doValider() {
// list of messages to display
List<String> messages = new ArrayList<>();
// checkbox
boolean isChecked = checkBox1.isChecked();
messages.add(String.format("CheckBox1 [checked=%s]", isChecked));
// radio buttons
int id = radioGroup.getCheckedRadioButtonId();
String radioGroupText = id == -1 ? "" : ((RadioButton) activity.findViewById(id)).getText().toString();
messages.add(String.format("RadioGroup [checked=%s]", radioGroupText));
// on SeekBar
int progress = seekBar.getProgress();
messages.add(String.format("SeekBar [value=%d]", progress));
// the input field
String texte = String.valueOf(saisie.getText());
messages.add(String.format("Saisie simple [value=%s]", texte));
// the switch
boolean état = switch1.isChecked();
messages.add(String.format("Switch [value=%s]", état));
// the date
int an = datePicker1.getYear();
int mois = datePicker1.getMonth() + 1;
int jour = datePicker1.getDayOfMonth();
messages.add(String.format("Date [%d, %d, %d]", jour, mois, an));
// multi-line text
String lignes = String.valueOf(multiLignes.getText());
messages.add(String.format("Saisie multi-lignes [value=%s]", lignes));
// by the hour
int heure = timePicker1.getHour();
int minutes = timePicker1.getMinute();
messages.add(String.format("Heure [%d, %d]", heure, minutes));
// drop-down list
int position = dropDownList.getSelectedItemPosition();
String selectedItem = String.valueOf(dropDownList.getSelectedItem());
messages.add(String.format("DropDownList [position=%d, item=%s]", position, selectedItem));
// display
doAfficher(messages);
}
- line 4: the entered values will be collected in a list of messages;
- line 6: the method [CheckBox].isCkecked() determines whether a checkbox is checked or not;
- line 9: the method [RadioGroup].getCheckedButtonId() returns the id of the radio button that was checked, or -1 if none was checked;
- Line 10: The code [activity.findViewById(id)] retrieves the selected radio button and returns its label;
- Line 13: The method [SeekBar].getProgress() retrieves the value of a slider;
- line 19: the method [Switch].isChecked() determines whether a switch is On (true) or Off (false);
- line 22: the method [DatePicker].getYear() retrieves the selected year using a [DatePicker] object;
- line 23: the method [DatePicker].getMonth() returns the selected month using a [DatePicker] object within the [0,11] range;
- line 24: the method [DatePicker].getDayOfMonh() returns the selected day of the month with an object [DatePicker] within the range [1,31];
- line 30: the method [TimePicker].getHour() returns the selected hour with an object [TimePicker];
- line 31: the method [TimePicker].getMinute() returns the selected minutes using an object [TimePicker];
- line 34: the method [Spinner].getSelectedItemPosition() returns the position of the selected item in a drop-down list;
- line 35: the method [Spinner].getSelectedItem() retrieves the selected object from a drop-down list;
The method [doAfficher], which displays the list of entered values, is as follows:
private void doAfficher(List<String> messages) {
// poster text is created
StringBuilder texte = new StringBuilder();
for (String message : messages) {
texte.append(String.format("%s\n", message));
}
// we display it
new AlertDialog.Builder(activité).setTitle("Valeurs saisies").setMessage(texte).setNeutralButton("Fermer", null).show();
}
- line 1: the method receives a list of messages to display;
- lines 3–6: a [StringBuilder] object is constructed from these messages. For string concatenation, the [StringBuilder] type is more efficient than the [String] type;
- line 8: a dialog box displays the text from line 3:
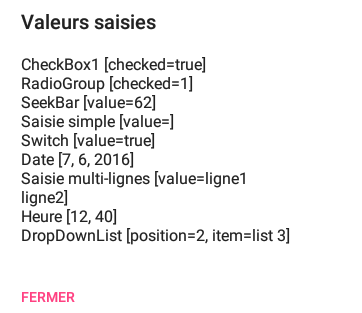
1.18.5. Running the project
Run the project and test the various input components.
1.19. Example-18: Using a view template
1.19.1. Creating the project
We create a new project, [Exemple-18], by copying the project [Exemple-13].
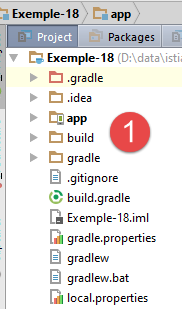

1.19.2. The view template
We want to take the two views from the project and include them in a template:
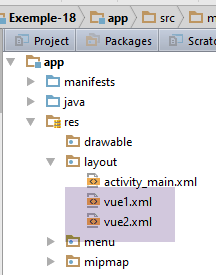
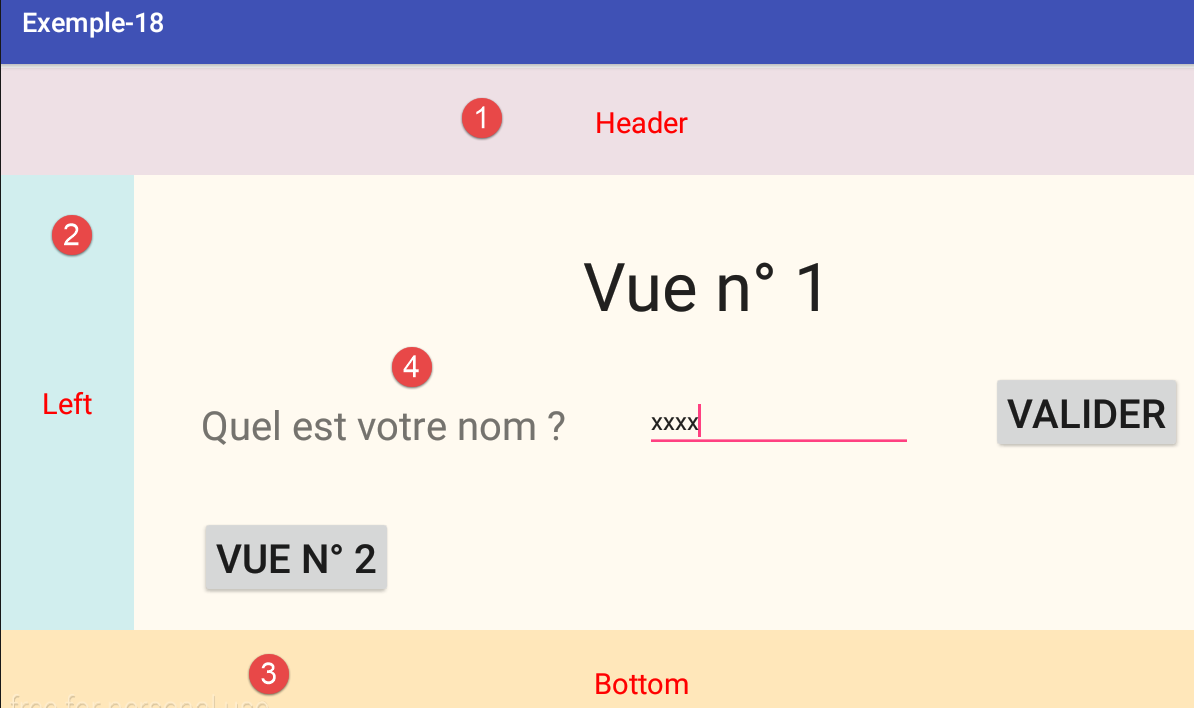
Each of the two views will be structured in the same way:
- in [1], a header;
- in [2], a left column that could contain links;
- in [3], a footer;
- in [4], the content.
This is achieved by modifying the activity's base view [activity_main.xml];
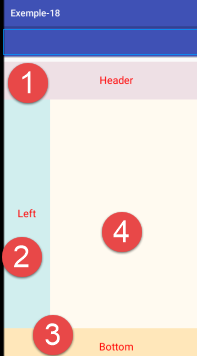
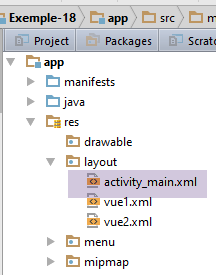
The code XML for view [main] is as follows:
<?xml version="1.0" encoding="utf-8"?>
<android.support.design.widget.CoordinatorLayout xmlns:android="http://schemas.android.com/apk/res/android"
xmlns:tools="http://schemas.android.com/tools"
xmlns:app="http://schemas.android.com/apk/res-auto"
android:id="@+id/main_content"
android:layout_width="match_parent"
android:layout_height="match_parent"
android:fitsSystemWindows="true"
tools:context=".activity.MainActivity">
<android.support.design.widget.AppBarLayout
android:id="@+id/appbar"
android:layout_width="match_parent"
android:layout_height="wrap_content"
android:paddingTop="@dimen/appbar_padding_top"
android:theme="@style/AppTheme.AppBarOverlay">
<android.support.v7.widget.Toolbar
android:id="@+id/toolbar"
android:layout_width="match_parent"
android:layout_height="?attr/actionBarSize"
android:background="?attr/colorPrimary"
app:popupTheme="@style/AppTheme.PopupOverlay"
app:layout_scrollFlags="scroll|enterAlways">
</android.support.v7.widget.Toolbar>
</android.support.design.widget.AppBarLayout>
<LinearLayout xmlns:android="http://schemas.android.com/apk/res/android"
xmlns:tools="http://schemas.android.com/tools"
android:layout_width="match_parent"
android:layout_height="match_parent"
android:gravity="center"
android:layout_marginTop="75dp"
android:orientation="vertical">
<LinearLayout
android:id="@+id/header"
android:layout_width="match_parent"
android:layout_height="100dp"
android:layout_weight="0.1"
android:background="@color/lavenderblushh2">
<TextView
android:id="@+id/textViewHeader"
android:layout_width="match_parent"
android:layout_height="wrap_content"
android:layout_gravity="center"
android:gravity="center_horizontal"
android:text="@string/txt_header"
android:textAppearance="?android:attr/textAppearanceLarge"
android:textColor="@color/red"/>
</LinearLayout>
<LinearLayout
android:layout_width="match_parent"
android:layout_height="fill_parent"
android:layout_weight="0.8"
android:orientation="horizontal">
<LinearLayout
android:id="@+id/left"
android:layout_width="100dp"
android:layout_height="match_parent"
android:background="@color/lightcyan2">
<TextView
android:id="@+id/txt_left"
android:layout_width="fill_parent"
android:layout_height="fill_parent"
android:gravity="center_vertical|center_horizontal"
android:text="@string/txt_left"
android:textAppearance="?android:attr/textAppearanceLarge"
android:textColor="@color/red"/>
</LinearLayout>
<exemples.android.architecture.MyPager
android:id="@+id/container"
android:layout_width="match_parent"
android:layout_height="match_parent"
android:background="@color/floral_white"
app:layout_behavior="@string/appbar_scrolling_view_behavior"/>
</LinearLayout>
<LinearLayout
android:id="@+id/bottom"
android:layout_width="match_parent"
android:layout_height="100dp"
android:layout_weight="0.1"
android:background="@color/wheat1">
<TextView
android:id="@+id/textViewBottom"
android:layout_width="fill_parent"
android:layout_height="fill_parent"
android:gravity="center_vertical|center_horizontal"
android:text="@string/txt_bottom"
android:textAppearance="?android:attr/textAppearanceLarge"
android:textColor="@color/red"/>
</LinearLayout>
</LinearLayout>
</android.support.design.widget.CoordinatorLayout>
- The header [1] is obtained from lines 38–54;
- the left sidebar [2] is obtained from lines 56–84;
- the footer [3] is obtained from lines 86–101;
- the content [4] is obtained from lines 78–84;
The view XML [main] uses information found in the files [res / values / colors.xml] and [res / values / strings.xml]:
The file [colors.xml] is as follows:
<?xml version="1.0" encoding="utf-8"?>
<resources>
<color name="red">#FF0000</color>
<color name="blue">#0000FF</color>
<color name="wheat">#FFEFD5</color>
<color name="floral_white">#FFFAF0</color>
<color name="lavenderblushh2">#EEE0E5</color>
<color name="lightcyan2">#D1EEEE</color>
<color name="wheat1">#FFE7BA</color>
</resources>
and the [strings.xml] file as follows:
<?xml version="1.0" encoding="utf-8"?>
<resources>
<string name="app_name">exemple-12</string>
<string name="action_settings">Settings</string>
<string name="titre_vue1">Vue n° 1</string>
<string name="textView_nom">Quel est votre nom :</string>
<string name="btn_Valider">Validez</string>
<string name="btn_vue2">Vue n° 2</string>
<string name="titre_vue2">Vue n° 2</string>
<string name="btn_vue1">Vue n° 1</string>
<string name="textView_bonjour">"Bonjour "</string>
<string name="txt_header">Header</string>
<string name="txt_left">Left</string>
<string name="txt_bottom">Bottom</string>
</resources>
Create a runtime context for this project and run it.
1.20. Example-19: The [ListView] component
The [ListView] component allows you to repeat a specific view for each item in a list. The repeated view can be of any complexity, ranging from a simple string to a view that allows you to enter information for each item in the list. We will create the following [ListView]:
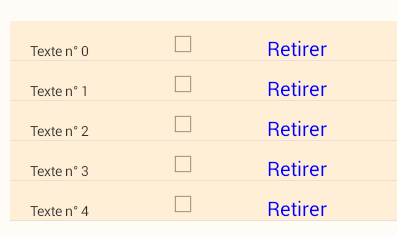
Each view in the list has three components:
- an information [TextView];
- a [CheckBox];
- a clickable [TextView];
1.20.1. Creating the project
We create a new project [Exemple-19] by copying the project [Exemple-18].
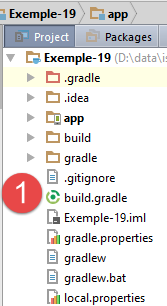
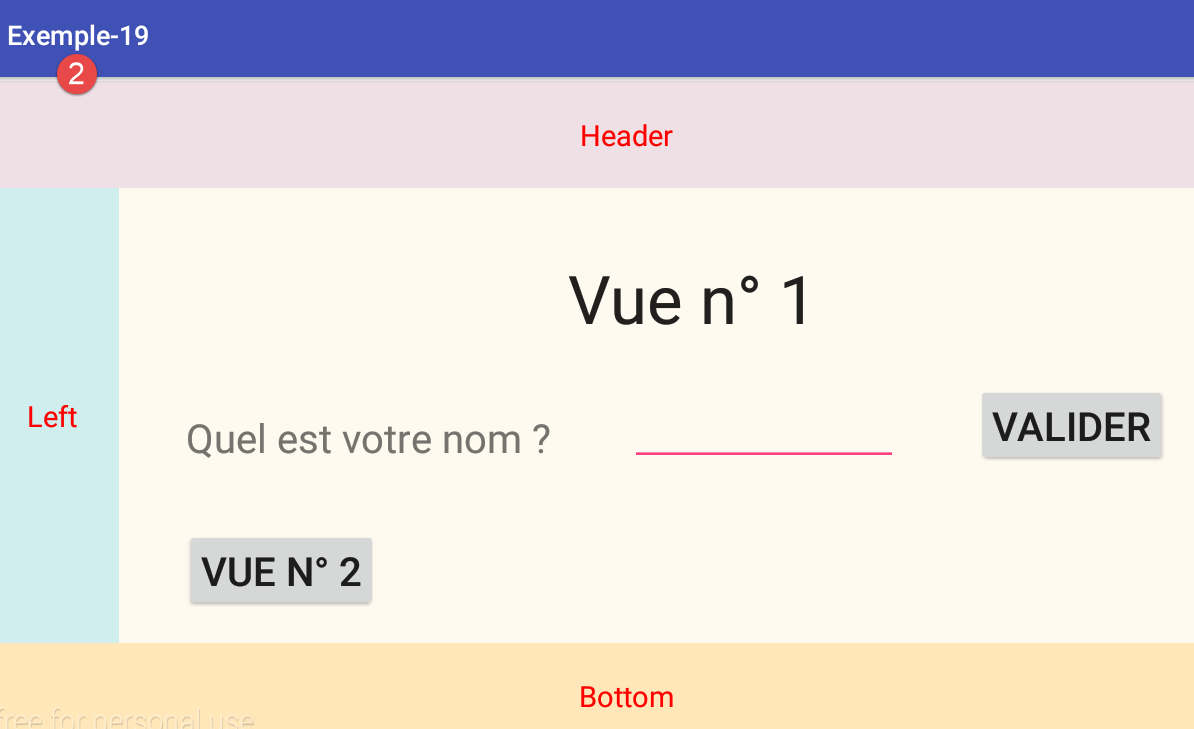
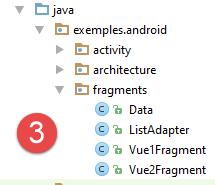
We will proceed with the project as outlined in [3].
1.20.2. The session

The session stores data shared between the activity and fragments:
package exemples.android.architecture;
import org.androidannotations.annotations.EBean;
import java.util.ArrayList;
import java.util.List;
@EBean(scope = EBean.Scope.Singleton)
public class Session {
// a list of data
private List<Data> liste=new ArrayList<>();
// getters and setters
...
}
- line 11: the data list used by both views;
The [Data] class is as follows:
package exemples.android.architecture;
public class Data {
// data
private String texte;
private boolean isChecked;
// manufacturer
public Data(String texte, boolean isCkecked) {
this.texte = texte;
this.isChecked = isCkecked;
}
// getters and setters
...
}
- line 6: the text that will populate the first [TextView] of each item in the list;
- line 7: the Boolean that will be used to check or uncheck the [checkBox] for each item in the list;
1.20.3. The [MainActivity] activity
The code for the [@AfterInject] method becomes the following:
// injection session
@Bean(Session.class)
protected Session session;
...
@AfterInject
protected void afterInject() {
// log
if (IS_DEBUG_ENABLED) {
Log.d("MainActivity", "afterInject");
}
// create a list of data
List<Data> liste = session.getListe();
for (int i = 0; i < 20; i++) {
liste.add(new Data("Texte n° " + i, false));
}
}
- lines 12-15: initialization of the list of data present in the session;
1.20.4. The initial view [Vue1]
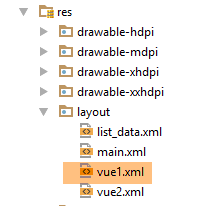
The view XML [vue1.xml] displays the area [1] above. Its code is as follows:
<?xml version="1.0" encoding="utf-8"?>
<RelativeLayout xmlns:android="http://schemas.android.com/apk/res/android"
android:layout_width="match_parent"
android:layout_height="match_parent" >
<TextView
android:id="@+id/textView_titre"
android:layout_width="wrap_content"
android:layout_height="wrap_content"
android:layout_alignParentLeft="true"
android:layout_alignParentTop="true"
android:layout_marginLeft="30dp"
android:layout_marginTop="20dp"
android:text="@string/titre_vue1"
android:textSize="50sp" />
<Button
android:id="@+id/button_vue2"
android:layout_width="wrap_content"
android:layout_height="wrap_content"
android:layout_alignLeft="@+id/textView_titre"
android:layout_below="@+id/textView_titre"
android:layout_marginTop="50dp"
android:text="@string/btn_vue2" />
<ListView
android:id="@+id/listView1"
android:layout_width="600dp"
android:layout_height="200dp"
android:layout_alignParentLeft="true"
android:layout_below="@+id/button_vue2"
android:layout_marginLeft="30dp"
android:layout_marginTop="50dp" >
</ListView>
</RelativeLayout>
- lines 7-16: the [TextView] and [2] components;
- lines 27-35: the [ListView] [4] component;
- lines 18-25: the [Button] and [3] components;
1.20.5. The view repeated by [ListView]
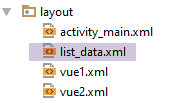
![]()
The view repeated by [ListView] is the following [list_data] view:
<?xml version="1.0" encoding="utf-8"?>
<RelativeLayout xmlns:android="http://schemas.android.com/apk/res/android"
android:id="@+id/RelativeLayout1"
android:layout_width="match_parent"
android:layout_height="match_parent"
android:background="@color/wheat" >
<TextView
android:id="@+id/txt_Libellé"
android:layout_width="100dp"
android:layout_height="wrap_content"
android:layout_marginLeft="20dp"
android:layout_marginTop="20dp"
android:text="@string/txt_dummy" />
<CheckBox
android:id="@+id/checkBox1"
android:layout_width="wrap_content"
android:layout_height="wrap_content"
android:layout_alignBottom="@+id/txt_Libellé"
android:layout_marginLeft="37dp"
android:layout_toRightOf="@+id/txt_Libellé"
android:text="@string/txt_dummy" />
<TextView
android:id="@+id/textViewRetirer"
android:layout_width="wrap_content"
android:layout_height="wrap_content"
android:layout_alignBaseline="@+id/txt_Libellé"
android:layout_alignBottom="@+id/txt_Libellé"
android:layout_marginLeft="68dp"
android:layout_toRightOf="@+id/checkBox1"
android:text="@string/txt_retirer"
android:textColor="@color/blue"
android:textSize="20sp" />
</RelativeLayout>
- lines 8-14: the [TextView] [1] component;
- lines 16-23: the [CheckBox] [2] component;
- lines 25-35: the [TextView] [3] component;
1.20.6. The fragment [Vue1Fragment]
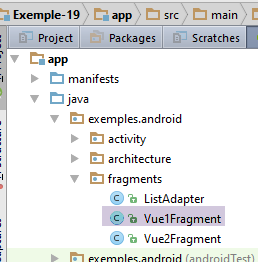
The fragment [Vue1Fragment] manages the view XML [vue1]. Its code is as follows:
package exemples.android.fragments;
import android.view.View;
import android.widget.ListView;
import exemples.android.R;
import exemples.android.architecture.AbstractFragment;
import exemples.android.architecture.Data;
import org.androidannotations.annotations.AfterViews;
import org.androidannotations.annotations.Click;
import org.androidannotations.annotations.EFragment;
import org.androidannotations.annotations.ViewById;
import java.util.List;
@EFragment(R.layout.vue1)
public class Vue1Fragment extends AbstractFragment {
// the fields of the view displayed by the fragment
@ViewById(R.id.listView1)
protected ListView listView;
// list adapter
private ListAdapter adapter;
// init done
private boolean initDone = false;
@AfterViews
void afterViews() {
// memory
afterViewsDone = true;
}
@Click(R.id.button_vue2)
void navigateToView2() {
// navigate to view 2
mainActivity.navigateToView(1);
}
public void doRetirer(int position) {
...
}
@Override
protected void updateFragment() {
if (!initDone) {
// associate data with [ListView]
adapter = new ListAdapter(activity, R.layout.list_data, session.getListe(), this);
initDone = true;
}
// if the fragment has been (re)generated - in this case the ListView must be reconnected to its adapter
listView.setAdapter(adapter);
// if other fragments have changed the data source - in this case, refresh the ListView
adapter.notifyDataSetChanged();
}
}
- line 15: the view XML [vue1] is associated with the fragment;
- lines 26–30: the [@AfterViews] method does nothing. However, it is necessary to set the [afterViewsDone] variable to true because it is used by the parent class [AbstractFragment];
- lines 42–53: the [updateFragment] method, which is called every time the fragment becomes visible. The method was written here as if the fragment could leave the adjacency of the displayed fragment and thus reset its lifecycle. This is not the case here, but it would be if the application were to have 3 fragments with an adjacency of 1;
- line 44: the [ListView] adapter only needs to be initialized once;
- line 46: we associate a [ListView] with an adapter of type [ListAdapter]. We will build this class. It derives from the [ArrayAdapter] class, which we have already used to associate data with a [ListView]. We pass various pieces of information to the [ListAdapter] constructor:
- a reference to the current activity,
- the identifier of the view that will be instantiated for each item in the list,
- a data source to populate the list,
- a reference to the fragment. This will be used to handle a click on a [Retirer] link in the [ListView] via the [doRetirer] method on line 38;
- line 50: the adapter is associated with [ListView]. At the same time, the data source [listes] is associated with [ListView]. This operation will be performed here every time view #1 is displayed. In reality, it would only need to be performed when the [@AfterViews] method has been executed. Here, the statement is executed too often. We need a Boolean variable that would tell us that the [@AfterViews] method has just been executed and that, therefore, [ListView] must be reassociated with its adapter;
- Line 52: We refresh [ListView]. In this example, this serves no purpose because only view #1 can modify the data source of [ListView]. Consider a more general case where view #2 could also change the data source of [ListView]. We will encounter such examples later in this document. In this case, when switching from view #2 to view #1, the [ListView] in view #1 must be refreshed;
1.20.7. The [ListAdapter] adapter of [ListView]
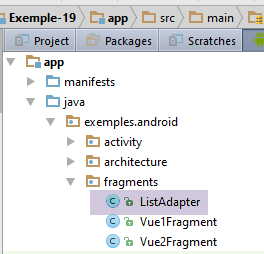
![]()
The [ListAdapter] class
- configures the data source for the [ListView];
- manages the display of the various elements of [ListView];
- manages the events for these elements;
Its code is as follows:
package exemples.android.fragments;
import java.util.List;
...
public class ListAdapter extends ArrayAdapter<Data> {
// execution context
private Context context;
// the id of the display layout of a list line
private int layoutResourceId;
// list data
private List<Data> data;
// the fragment that displays the [ListView]
private Vue1Fragment fragment;
// the adapter
final ListAdapter adapter = this;
// manufacturer
public ListAdapter(Context context, int layoutResourceId, List<Data> data, Vue1Fragment fragment) {
super(context, layoutResourceId, data);
// memorize information
this.context = context;
this.layoutResourceId = layoutResourceId;
this.data = data;
this.fragment = fragment;
}
@Override
public View getView(final int position, View convertView, ViewGroup parent) {
...
}
}
- line 5: the class [ListAdapter] extends the class [ArrayAdapter];
- line 19: the constructor;
- line 20: don’t forget to call the constructor of the parent class [ArrayAdapter] with the first three parameters;
- lines 22–25: we store the constructor’s information;
- line 29: the method [getView] will be called repeatedly by [ListView] to generate the view of element No. [position]. The returned result [View] is a reference to the created view.
The code for the [getView] method is as follows:
@Override
public View getView(final int position, View convertView, ViewGroup parent) {
// create the current ListView line
View row = ((Activity) context).getLayoutInflater().inflate(layoutResourceId, parent, false);
// the text
TextView textView = (TextView) row.findViewById(R.id.txt_Libellé);
textView.setText(data.get(position).getTexte());
// the checkbox
CheckBox checkBox = (CheckBox) row.findViewById(R.id.checkBox1);
checkBox.setChecked(data.get(position).isChecked());
// the [Remove] link
TextView txtRetirer = (TextView) row.findViewById(R.id.textViewRetirer);
txtRetirer.setOnClickListener(new OnClickListener() {
public void onClick(View v) {
fragment.doRetirer(position);
}
});
// manage the click on the checkbox
checkBox.setOnCheckedChangeListener(new OnCheckedChangeListener() {
public void onCheckedChanged(CompoundButton buttonView, boolean isChecked) {
data.get(position).setChecked(isChecked);
}
});
// we return the line
return row;
}
- line 2: the method receives three parameters. We will only use the first one;
- line 4: we create the view for element #[position]. This is the view [list_data], for which id was passed as the second parameter to the constructor. Next, we retrieve the references of the components in the view we just instantiated;
- line 6: we retrieve the reference for [TextView] No. 1;
- line 7: we assign it text from the data source that was passed as the third parameter to the constructor;
- line 9: we retrieve the reference of [CheckBox] #2;
- line 10: check or uncheck it using a value from the [ListView] data source;
- line 12: retrieve the reference for [TextView] #3;
- lines 13–18: handle the click on the [Retirer] link;
- line 16: the method [Vue1Fragment].doRetirer will handle this click. It seems more logical to have this event handled by the fragment that displays [ListView]. It has an overview that the [ListAdapter] class does not have. The reference to the [Vue1Fragment] fragment was passed as the fourth parameter to the class constructor;
- lines 20–25: we handle the click on the checkbox. The action performed on it is reflected in the data it displays. This is for the following reason. [ListView] is a list that displays only a portion of its elements. Thus, an element in the list is sometimes hidden, sometimes displayed. When element #i needs to be displayed, the [getView] method from line 2 above is called for position #i. Line 10 will recalculate the state of the checkbox based on the data it is linked to. It must therefore store the state of the checkbox over time;
1.20.8. Removing an item from the list
Clicking the [Retirer] link is handled in the [Vue1Fragment] fragment by the following [doRetirer] method:
public void doRetirer(int position) {
// remove element n° [position] from the list
List<Data> liste = mainActivity.getListe();
liste.remove(position);
// note the scroll position to return to it
// read
// [http://stackoverflow.com/questions/3014089/maintain-save-restore-scroll-position-when-returning-to-a-listview]
// position of 1st element fully visible or not
int firstPosition = listView.getFirstVisiblePosition();
// y offset of this element relative to the top of the ListView
// measures the height of any hidden part
View v = listView.getChildAt(0);
int top = (v == null) ? 0 : v.getTop();
// refresh the [ListView]
adapter.notifyDataSetChanged();
// we position ourselves at the right spot on the ListView
listView.setSelectionFromTop(firstPosition, top);
}
- line 1: retrieve the position in [ListView] of the [Retirer] link that was clicked;
- line 3: retrieve the data list;
- line 4: remove the element with ID [position];
- line 15: we refresh [ListView]. Without this, nothing changes visually.
- Lines 5–13, 17: a rather complex process. Without it, the following happens:
- [ListView] displays lines 15–18 of the data list,
- line 16 is deleted,
- line 15 above resets it completely, and the [ListView] then displays lines 0–3 of the data list;
With the lines above, the deletion occurs and [ListView] remains positioned on the line following the deleted line.
1.20.9. The view XML [Vue2]
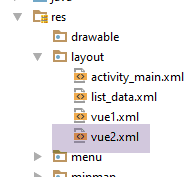
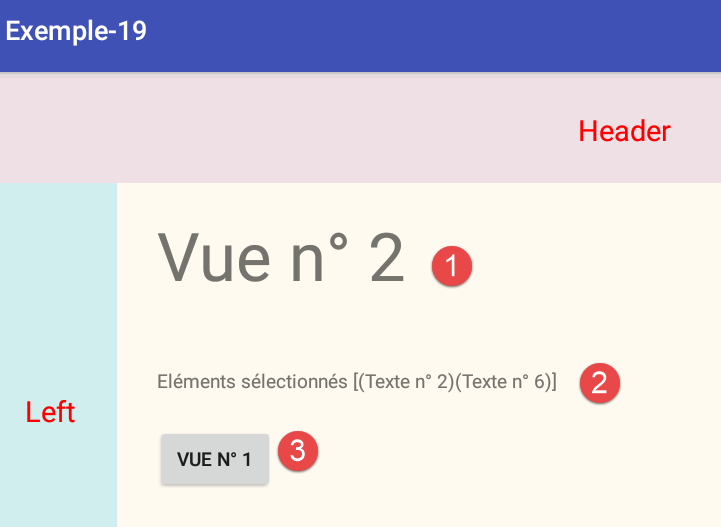
The code for view XML is as follows:
<?xml version="1.0" encoding="utf-8"?>
<RelativeLayout xmlns:android="http://schemas.android.com/apk/res/android"
android:layout_width="match_parent"
android:layout_height="match_parent" >
<TextView
android:id="@+id/textView_titre"
android:layout_width="wrap_content"
android:layout_height="wrap_content"
android:layout_alignParentLeft="true"
android:layout_alignParentTop="true"
android:layout_marginLeft="30dp"
android:layout_marginTop="20dp"
android:text="@string/titre_vue2"
android:textSize="50sp" />
<Button
android:id="@+id/button_vue1"
android:layout_width="wrap_content"
android:layout_height="wrap_content"
android:layout_below="@+id/textViewResultats"
android:layout_marginTop="25dp"
android:layout_alignLeft="@+id/textView_titre"
android:text="@string/btn_vue1" />
<TextView
android:id="@+id/textViewResultats"
android:layout_width="wrap_content"
android:layout_height="wrap_content"
android:layout_below="@+id/textView_titre"
android:layout_marginTop="50dp"
android:layout_alignLeft="@+id/textView_titre"
android:text="" />
</RelativeLayout>
- lines 6–15: component [TextView] #1;
- lines 26-33: component [TextView] No. 2;
- lines 17-24: component [Button] No. 3;
1.20.10. The fragment [Vue2Fragment]
123
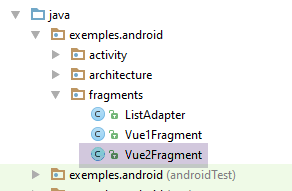
The fragment [Vue2Fragment] manages the view XML [vue2]. Its code is as follows:
package exemples.android.fragments;
import android.widget.TextView;
import exemples.android.R;
import exemples.android.architecture.AbstractFragment;
import exemples.android.architecture.Data;
import org.androidannotations.annotations.AfterViews;
import org.androidannotations.annotations.Click;
import org.androidannotations.annotations.EFragment;
import org.androidannotations.annotations.ViewById;
@EFragment(R.layout.vue2)
public class Vue2Fragment extends AbstractFragment {
// fields of view
@ViewById(R.id.textViewResultats)
TextView txtResultats;
@AfterViews
void initFragment(){
// memory
afterViewsDone=true;
}
@Click(R.id.button_vue1)
void navigateToView1() {
// navigate to view 1
mainActivity.navigateToView(0);
}
@Override
protected void updateFragment() {
// displays list items selected in view 1
StringBuilder texte = new StringBuilder("Eléments sélectionnés [");
for (Data data : mainActivity.getListe()) {
if (data.isChecked()) {
texte.append(String.format("(%s)", data.getTexte()));
}
}
texte.append("]");
txtResultats.setText(texte);
}
}
The important code is in the [updateFragment] method on line 32:
- line 34: the text to be displayed in [TextView] #2 is calculated;
- lines 35–39: we iterate through the list of data displayed by [ListView]. It is stored in the activity;
- line 36: if data entry No. i has been checked, the associated label is added to a [StringBuilder] type;
- line 41: the [TextView] displays the calculated text;
1.20.11. Execution
Create a run configuration for this project and run it.
1.20.12. Improvement
In the previous example, we used a data source List<Data> where the [Data] class was as follows:
package exemples.android.fragments;
public class Data {
// data
private String texte;
private boolean isChecked;
// manufacturer
public Data(String texte, boolean isCkecked) {
this.texte = texte;
this.isChecked = isCkecked;
}
...
}
In line 7, we used a Boolean variable to manage the checkbox for the elements in [ListView]. Often, the [ListView] needs to display data that can be selected by checking a box, even though the data source element does not have a Boolean field corresponding to that box. In this case, you can proceed as follows:
The [Data] class becomes the following:
package exemples.android.fragments;
public class Data {
// data
private String texte;
// manufacturer
public Data(String texte) {
this.texte = texte;
}
// getters and setters
...
}
We create a class [CheckedData] derived from the previous one:
package exemples.android.fragments;
public class CheckedData extends Data {
// checked item
private boolean isChecked;
// manufacturer
public CheckedData(String text, boolean isChecked) {
// parent
super(text);
// local
this.isChecked = isChecked;
}
// getters and setters
...
}
Then simply replace everywhere in the code (MainActivity, ListAdapter, Vue1Fragment, Vue2Fragment), the type [Data] with the type [CheckedData]. For example, in [MainActivity]:
@AfterInject
protected void afterInject() {
// log
if (IS_DEBUG_ENABLED) {
Log.d("MainActivity", "afterInject");
}
// create a list of data
List<CheckedData> liste = session.getListe();
for (int i = 0; i < 20; i++) {
liste.add(new CheckedData("Texte n° " + i, false));
}
}
The project for this version is provided to you under the name [Exemple-19B].
1.21. Example-20: Using a menu
1.21.1. Creating the project
We duplicate the [Exemple-19B] project into the [Exemple-20] project:
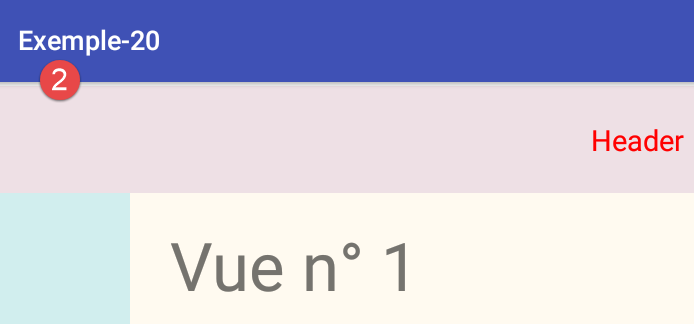
3
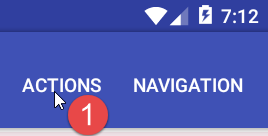
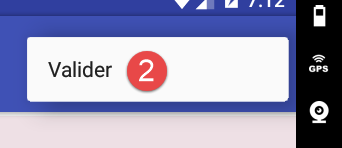
We will remove the buttons from views 1 and 2 and replace them with menu options in [1-2].
1.21.2. The XML menu definition
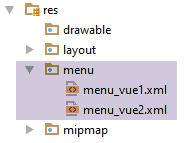
The [res / menu / menu_vue1] file defines the menu for view #1:
<menu xmlns:android="http://schemas.android.com/apk/res/android"
xmlns:app="http://schemas.android.com/apk/res-auto"
xmlns:tools="http://schemas.android.com/tools"
tools:context=".activity.MainActivity">
<item
android:id="@+id/menuOptions"
app:showAsAction="ifRoom"
android:title="@string/menuOptions">
<menu>
<item
android:id="@+id/actionCacherMontrerTout"
android:title="@string/actionCacherMontrerTout"/>
<item
android:id="@+id/actionCacherMontrerActions"
android:title="@string/actionCacherMontrerActions"/>
<item
android:id="@+id/actionCacherMontrerActionsValider"
android:title="@string/actionCacherMontrerActionsValider"/>
</menu>
</item>
<item
android:id="@+id/menuActions"
app:showAsAction="ifRoom"
android:title="@string/menuActions">
<menu>
<item
android:id="@+id/actionValider"
android:title="@string/actionValider"/>
</menu>
</item>
<item
android:id="@+id/menuNavigation"
app:showAsAction="ifRoom"
android:title="@string/menuNavigation">
<menu>
<item
android:id="@+id/navigationVue2"
android:title="@string/navigationVue2"/>
</menu>
</item>
</menu>
Menu items are defined by the following information:
- android:id: the element's identifier;
- android:title: the item's label;
- app:showsAsAction: indicates whether the menu item can be placed in the activity’s action bar. [ifRoom] indicates that the item should be placed in the action bar if there is space for it;
- A menu item option can itself be a submenu (tag <menu>, lines 25, 29);
The [res / menu / menu_vue2] file defines the menu for view #2:
<menu xmlns:android="http://schemas.android.com/apk/res/android"
xmlns:app="http://schemas.android.com/apk/res-auto"
xmlns:tools="http://schemas.android.com/tools"
tools:context=".activity.MainActivity">
<item
android:id="@+id/menuNavigation"
app:showAsAction="ifRoom"
android:title="@string/menuNavigation">
<menu>
<item
android:id="@+id/navigationVue1"
android:title="@string/navigationVue1"/>
</menu>
</item>
</menu>
1.21.3. Menu management in the abstract class [AbstractFragment]
We will factor out menu management into the parent class [AbstractFragment] for both views:
package exemples.android.architecture;
import android.app.Activity;
import android.support.v4.app.Fragment;
import android.util.Log;
import android.view.Menu;
import android.view.MenuInflater;
import android.view.MenuItem;
import java.util.ArrayList;
import java.util.List;
public abstract class AbstractFragment extends Fragment {
// data accessible to daughter classes
final protected boolean isDebugEnabled = IMainActivity.IS_DEBUG_ENABLED;
protected String className;
// activity
protected IMainActivity mainActivity;
protected Activity activity;
// session
protected Session session;
// menu
private Menu menu;
private int[] menuOptions;
private boolean initDone;
// manufacturer
public AbstractFragment() {
// init
className = getClass().getSimpleName();
// log
if (isDebugEnabled) {
Log.d("AbstractFragment", String.format("constructor %s", className));
}
}
@Override
public void onCreateOptionsMenu(Menu menu, MenuInflater inflater) {
// memory
this.menu = menu;
// log
if (isDebugEnabled) {
Log.d(className, String.format("création menu en cours"));
}
// retrieve # menu options if not already done
if (!initDone) {
// retrieve the # menu options
List<Integer> menuOptionsIds = new ArrayList<>();
getMenuOptions(menu, menuOptionsIds);
// transfer the list of options to a table
menuOptions = new int[menuOptionsIds.size()];
for (int i = 0; i < menuOptions.length; i++) {
menuOptions[i] = menuOptionsIds.get(i);
}
// activity
this.activity = getActivity();
this.mainActivity = (IMainActivity) activity;
this.session = this.mainActivity.getSession();
// memory
initDone = true;
}
// the girl fragment is asked to stand
updateFragment();
}
private void getMenuOptions(Menu menu, List<Integer> menuOptionsIds) {
...
}
// display menu options -----------------------------------
protected void setAllMenuOptions(boolean isVisible) {
....
}
protected void setMenuOptions(MenuItemState[] menuItemStates) {
...
}
// update girl class
protected abstract void updateFragment();
}
- line 42: the logs show that the [onCreateOptionsMenu] method is called every time the fragment is displayed. It is called very late, specifically after the [updateFragment] method has been called. This suggests that it could be used to update the fragment. That is what we will do here (line 63);
- line 42: the method has two parameters:
- [menu]: which is an empty menu;
- [inflater]: a tool that allows you to create the menu from its initial description. We won’t use this option here because we’ll use a AA annotation that will do it for us;
- line 44: we store the menu. We will need it later;
- lines 52–53: we store the identifiers of all menu items in the array on line 28;
- lines 55–57: The logs show that when the [onCreateOptionsMenu] method is called, the [Fragment.getActivity()] method returns the activity associated with the fragment;
- line 55: we store the activity as an instance of the Android class [Activity];
- line 56: we store the activity as an instance of the [IMainActivity] interface;
- line 57: we store the session;
- line 59: we note that the class has already been initialized so we don’t have to do it again (line 50);
- line 63: we ask the child fragment to update itself. This is possible because the fragment is both visible and associated with its view and its menu;
The method [getMenuOptions], which retrieves the IDs of menu items, is as follows:
private void getMenuOptions(Menu menu, List<Integer> menuOptionsIds) {
// scroll through all menu items
for (int i = 0; i < menu.size(); i++) {
// item n° i
MenuItem menuItem = menu.getItem(i);
menuOptionsIds.add(menuItem.getItemId());
// if item n° i is a sub-menu, then start again
if (menuItem.hasSubMenu()) {
// recursivity
getMenuOptions(menuItem.getSubMenu(), menuOptionsIds);
}
}
}
The [setAllMenuOptions] method allows you to hide or show all menu options;
protected void setAllMenuOptions(boolean isVisible) {
// update all menu options
for (int menuItemId : menuOptions) {
menu.findItem(menuItemId).setVisible(isVisible);
}
}
The [setMenuOptions] method allows you to hide or show certain menu options;
protected void setMenuOptions(MenuItemState[] menuItemStates) {
// update certain menu options
for (MenuItemState menuItemState : menuItemStates) {
menu.findItem(menuItemState.getMenuItemId()).setVisible(menuItemState.isVisible());
}
}
The [MenuItemState] class is as follows:
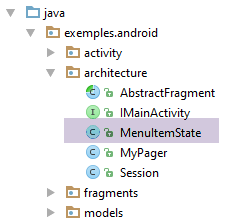
package exemples.android.architecture;
public class MenuItemState {
// menu option identifier
private int menuItemId;
// option visibility
private boolean isVisible;
// manufacturers
public MenuItemState() {
}
public MenuItemState(int menuItemId, boolean isVisible) {
this.menuItemId = menuItemId;
this.isVisible = isVisible;
}
// getters and setters
...
}
1.21.4. Menu management in the [Vue1Fragment] fragment
The [Vue1Fragment] class becomes the following:
@EFragment(R.layout.vue1)
@OptionsMenu(R.menu.menu_vue1)
public class Vue1Fragment extends AbstractFragment {
...
@OptionsItem(R.id.navigationVue2)
void navigateToView2() {
// navigate to view 2
mainActivity.navigateToView(1);
}
@OptionsItem(R.id.actionValider)
void valider() {
// a message is displayed
Toast.makeText(activity, "Valider", Toast.LENGTH_SHORT).show();
}
private boolean actionCacherMontrerTout = true;
@OptionsItem(R.id.actionCacherMontrerTout)
void cacherMontrerTout() {
// we change state
actionCacherMontrerTout = !actionCacherMontrerTout;
setMenuOptions(new MenuItemState[]{new MenuItemState(R.id.menuNavigation, actionCacherMontrerTout), new MenuItemState(R.id.menuActions, actionCacherMontrerTout)});
}
private boolean actionCacherMontrerActions = true;
@OptionsItem(R.id.actionCacherMontrerActions)
void actionCacherMontrerActions() {
// we change state
actionCacherMontrerActions = !actionCacherMontrerActions;
setMenuOptions(new MenuItemState[]{new MenuItemState(R.id.menuActions, actionCacherMontrerActions)});
}
private boolean actionCacherMontrerActionsValider = true;
@OptionsItem(R.id.actionCacherMontrerActionsValider)
void actionCacherMontrerActionsValider() {
// we change state
actionCacherMontrerActionsValider = !actionCacherMontrerActionsValider;
setMenuOptions(new MenuItemState[]{new MenuItemState(R.id.menuActions, true), new MenuItemState(R.id.actionValider, actionCacherMontrerActionsValider)});
}
...
@Override
protected void updateFragment() {
....
// update the menu
//setMenuOptions(...)
}
}
- line 2: the [res / menu / menu_vue1.xml] menu is associated with the fragment;
- line 48: when the [updateFragment] method is executed, the menu can also be updated to reflect the fragment’s new state;
- line 7: the annotation [@OptionsItem(R.id.navigationVue2)] annotates the method that must be executed when the option menu item in the [Navigation / Vue 2] menu is clicked;
- lines 19–25: to hide a menu branch, simply hide its root option;
- line 24: the root options are shown or hidden;
- line 40: to show a option in a menu branch, you must not only show it but also all the options encountered when moving up from the option leaf to the menu root;
1.21.5. Menu management in fragment [Vue2Fragment]
Similar code can be found in the fragment of view #2:
package exemples.android.fragments;
import android.widget.TextView;
import exemples.android.R;
import exemples.android.architecture.AbstractFragment;
import exemples.android.models.CheckedData;
import org.androidannotations.annotations.*;
@EFragment(R.layout.vue2)
@OptionsMenu(R.menu.menu_vue2)
public class Vue2Fragment extends AbstractFragment {
// fields of view
@ViewById(R.id.textViewResultats)
TextView txtResultats;
@OptionsItem(R.id.navigationVue1)
void navigateToView1() {
// navigate to view 1
mainActivity.navigateToView(0);
}
@Override
protected void updateFragment() {
// displays list items selected in view 1
StringBuilder texte = new StringBuilder("Eléments sélectionnés [");
for (CheckedData data : session.getListe()) {
if (data.isChecked()) {
texte.append(String.format("(%s)", data.getTexte()));
}
}
texte.append("]");
txtResultats.setText(texte);
// update the menu
// setMenuOptions(...)
}
}
- line 35: display the option [Navigation / Vue 1];
- lines 17-20: when clicking on option [Navigation / Vue1], we call the [navigateToView1] method;
1.21.6. Execution
Create a runtime context for this project and run it.
1.22. Example-21: Refactoring the abstract class [AbstractFragment]
The previous example showed us that when the fragment has a menu, its method [onCreateOptionsMenu] is a good place to ask the fragment to update itself:
- it is called exactly once when the fragment is about to be displayed;
- when it is called, the fragment’s associations with its activity, view, and menu are established;
To demonstrate this, we’ll revisit Example 12, which has many fragments whose adjacency can be modified. In that example, the fragments did not have a menu. We’ll associate an empty menu with them.
1.22.1. Creating the project
We duplicate the [Exemple-12] project into the [Exemple-21] project:
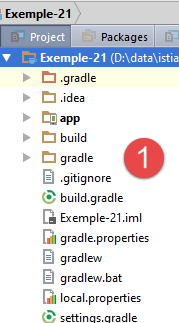
1.22.2. The fragment menu
The menu added for the fragments will be empty:
<menu xmlns:android="http://schemas.android.com/apk/res/android"
xmlns:app="http://schemas.android.com/apk/res-auto"
xmlns:tools="http://schemas.android.com/tools"
tools:context="exemples.android.MainActivity">
</menu>
What you need to understand here is that the activity already has its own menu [menu_main]:
<menu xmlns:android="http://schemas.android.com/apk/res/android"
xmlns:app="http://schemas.android.com/apk/res-auto"
xmlns:tools="http://schemas.android.com/tools"
tools:context="exemples.android.MainActivity">
<item android:id="@+id/action_settings"
android:title="@string/action_settings"
android:orderInCategory="100"
app:showAsAction="never"/>
<item android:id="@+id/fragment1"
android:title="@string/fragment1"
android:orderInCategory="100"
app:showAsAction="never"/>
<item android:id="@+id/fragment2"
android:title="@string/fragment2"
android:orderInCategory="100"
app:showAsAction="never"/>
<item android:id="@+id/fragment3"
android:title="@string/fragment3"
android:orderInCategory="100"
app:showAsAction="never"/>
<item android:id="@+id/fragment4"
android:title="@string/fragment4"
android:orderInCategory="100"
app:showAsAction="never"/>
</menu>
When an activity already has a menu, the menu associated with the fragments is added to the activity's menu: you therefore have the options from both menus. Here, the fragments menu will be empty. So you will only see the activity's menu.
1.22.3. The fragments
We reuse the abstract class [AbstractFragment] from the previous example (see section 1.21.3 ). We associate the menu [menu_fragment] with the two fragments:
@EFragment(R.layout.fragment_main)
@OptionsMenu(R.menu.menu_fragment)
public class PlaceholderFragment extends AbstractFragment {
@EFragment(R.layout.vue1)
@OptionsMenu(R.menu.menu_fragment)
public class Vue1Fragment extends AbstractFragment {
In the two fragments [PlaceholderFragment] and [Vue1Fragment], we remove any references to the old abstract class [AbstractFragment].
1.22.4. Execution
Run the application and verify that it works. Monitor the logs to see when the [onCreateOptionsMenu] method of the [AbstractFragment] class is executed. It is now this method that calls the [updateFragment] method of the child fragments.
1.23. Example-22: Saving/Restoring the Activity and Fragment State
1.23.1. The Problem
Here we address the issue of rotating the Android device (portrait <--> landscape). To illustrate this, we’ll revisit the previous Example 21:
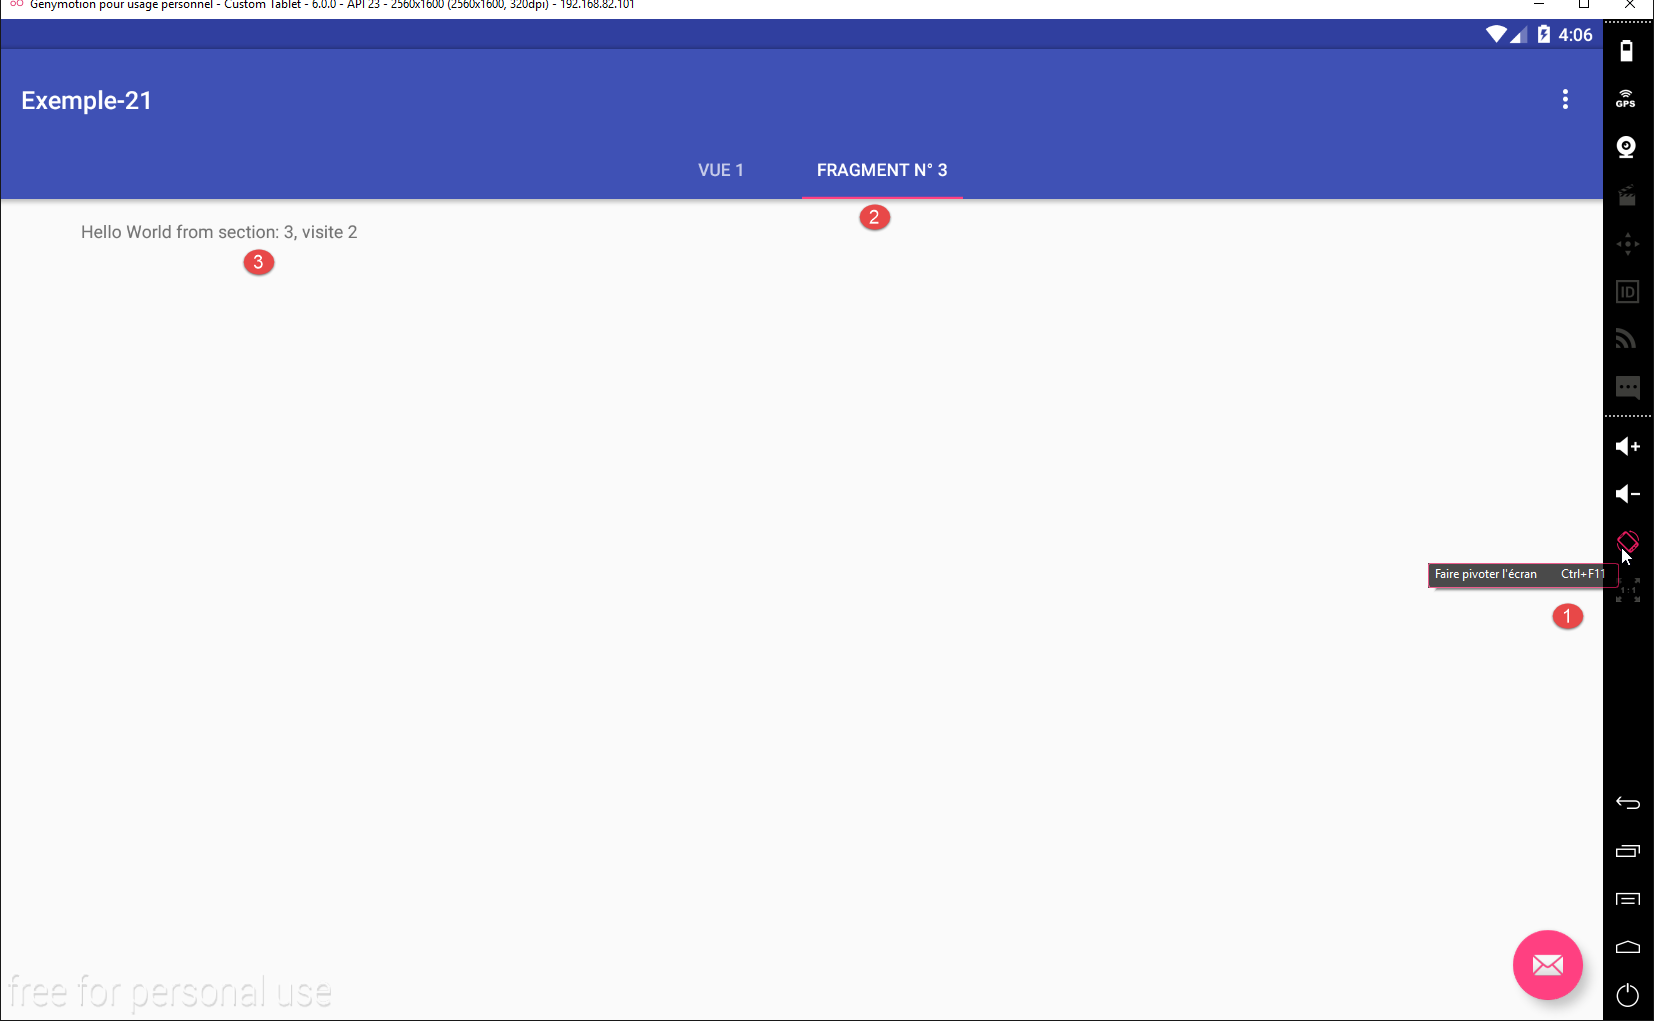
If we rotate the [1] device, we get the following new view:
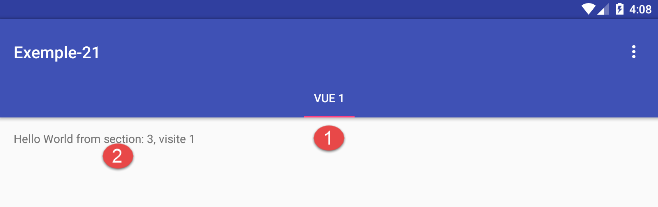
We can see that:
- in [1], the [Fragment n° 3] tab has disappeared;
- in [2], the displayed text is indeed that of fragment #3, but the visit counter is incorrect;
During this rotation, the logs are as follows:
- line 1: we can see that the activity is completely rebuilt;
- lines 3–7: the same applies to the five fragments managed by the activity;
- line 21: fragment #3 is about to be displayed. We see that before incrementing, the visit count is 0;
We can then explain the result obtained after rotation as follows:
- The class [MainActivity] initially creates a tab bar with a single tab labeled [Vue 1]. This is the tab that is visible;
- After the device rotates, the page manager [mViewPager] redisplays the same fragment, in this case fragment #3. It is important to remember here that tabs and fragments are distinct concepts and have different lifecycles. The method [updateFragment] of fragment #3 will execute:
public void updateFragment() {
// log
if (isDebugEnabled) {
Log.d("PlaceholderFragment", String.format("update %s - %s - %s", getArguments().getInt(ARG_SECTION_NUMBER), className, getLocalInfos()));
}
// increment visit no
numVisit = session.getNumVisit();
numVisit++;
session.setNumVisit(numVisit);
// modified text
textViewInfo.setText(String.format("%s, visite %s", text, numVisit));
}
- Line 7: The current visit number is read from the session. However, the session—like everything else—has been reset, and the visit number has been reset to zero. This explains the result displayed in fragment #3;
1.23.2. Methods for saving/restoring the activity and fragments
1.23.2.1. Solution 1: Manual save
When the device is rotated, two methods of the activity are called:
// backup / restore management ------------------------------------
@Override
protected void onSaveInstanceState(Bundle outState) {
// parent
super.onSaveInstanceState(outState);
// backup activity status
// ....
}
@Override
protected void onCreate(Bundle savedInstanceState) {
// parent
super.onCreate(savedInstanceState);
// restoring activity
// ...
}
- lines 2-8: The [onSaveInstanceState] method is called by the system during rotation. This is where the activity state can be saved. If nothing is done, nothing is saved. The activity state must be saved in the [Bundle outState] parameter passed to the method. The [Bundle] class resembles a dictionary. It has the [putString, putInt, putLong, putBoolean, putChar, ...] method with two parameters: void putT(String key, T value);
- lines 10–16: the [onCreate] method is called when the activity is created. If the activity’s state has been saved, this save is passed to it in the [Bundle savedInstanceState] parameter. To retrieve the saved values, methods such as [getString, getInt, getLong, geBoolean, getChar, ...] with a single parameter are available: T getT(String key);
Fragments use these same two methods to save their state.
We will use this information to save and restore the state of Example 21. To do this, we duplicate the project [Exemple-21] into [Exemple-22].
1.23.2.2. Solution 2: Automatic backup
The Android documentation states that when the device is rotated, you can prevent a fragment from being destroyed by using the following instruction: [Fragment].setRetainInstance(true). Several articles on [StackOverflow] recommend using this instruction only for fragments without a visual interface [http://stackoverflow.com/questions/11182180/understanding-fragments-setretaininstanceboolean, http://stackoverflow.com/questions/12640316/further-understanding-setretaininstancetrue, http://stackoverflow.com/questions/21203948/setretaininstancetrue-in-oncreate-fragment-in-android]. I tested this instruction on two examples: Example-17 (paragraph 1.18 —an application with one fragment that displays a form) and Example-21 (paragraph 1.22 —an application with five fragments). In both cases, applying this single instruction to all fragments of the application proved insufficient to correctly restore the view displayed when the device is rotated. Rather than building two models, one based on [setRetainInstance(true)] and another based on [setRetainInstance(false)] (which is the default), I decided to follow the recommendations of [StackOverflow] and keep the default value of false for the [setRetainInstance(boolean )] method. The instruction: [Fragment].setRetainInstance(true) was never used in the remainder of this document.
1.23.3. The method for saving/restoring the [Exemple-22] project
The [Exemple-22] project evolves as follows:
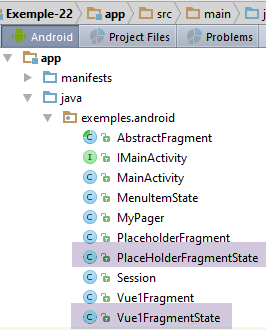
Two new classes appear:
- [PlaceHolderFragmentState], which will store the state of a fragment of type [PlaceHolderFragment];
- [Vue1FragmentState], which will store the state of a fragment of type [Vue1Fragment];
These classes are as follows:
package exemples.android;
public class Vue1FragmentState {
// status Vue1Fragment
private boolean hasBeenVisited=false;
// getters and setters
...
}
- line 5: the boolean [hasBeenVisited] is true if the fragment [Vue1Fragment] has been visited (displayed) at least once. This field was created for the example because the fragment [Vue1Fragment] has nothing to save;
The [PlaceHolderFragmentState] class is as follows:
package exemples.android;
public class PlaceHolderFragmentState {
// whether visited or not
private boolean hasBeenVisited;
// display text
private String text;
// getters and setters
...
}
- line 5: we see the boolean [hasBeenVisited];
- line 7: the text displayed by the fragment at the moment it needs to be saved. We saw that this text was lost during rotation;
The state of the fragments will be stored in the session, and the activity will be responsible for saving and restoring this session. The session evolves as follows:
package exemples.android;
import com.fasterxml.jackson.annotation.JsonIgnore;
import org.androidannotations.annotations.EBean;
@EBean(scope = EBean.Scope.Singleton)
public class Session {
// number of fragments visited
private int numVisit;
// n° fragment type [PlaceholderFragment] displayed in the second tab
private int numFragment = -1;
// selected tab no
private int selectedTab = 0;
// n° current view
private int currentView;
// fragment backups ---------------
private Vue1FragmentState vue1FragmentState;
private PlaceHolderFragmentState[] placeHolderFragmentStates = new PlaceHolderFragmentState[IMainActivity.FRAGMENTS_COUNT - 1];
// manufacturer
public Session() {
for (int i = 0; i < placeHolderFragmentStates.length; i++) {
placeHolderFragmentStates[i] = new PlaceHolderFragmentState();
}
vue1FragmentState = new Vue1FragmentState();
}
// getters and setters
...
}
- line 18: the state of the fragment [Vue1Fragment];
- line 19: the state of fragments of type [PlaceHolderFragment];
- lines 22–27: in the session constructor, the fields from lines 18 and 19 are initialized;
- lines 12–15: two new fields appear:
- line 13: the number of the last selected tab;
- line 15: the number of the last fragment displayed;
The activity saves/restores the session as follows:
// backup / restore management ----------------------------
@Override
protected void onSaveInstanceState(Bundle outState) {
// parent
super.onSaveInstanceState(outState);
// save session
try {
outState.putString("session", jsonMapper.writeValueAsString(session));
} catch (JsonProcessingException e) {
e.printStackTrace();
}
// log
if (IS_DEBUG_ENABLED) {
try {
Log.d(className, String.format("onSaveInstanceState session=%s", jsonMapper.writeValueAsString(session)));
} catch (JsonProcessingException e) {
e.printStackTrace();
}
}
}
@Override
protected void onCreate(Bundle savedInstanceState) {
// parent
super.onCreate(savedInstanceState);
if (savedInstanceState != null) {
// session recovery
try {
session = jsonMapper.readValue(savedInstanceState.getString("session"), new TypeReference<Session>() {
});
} catch (IOException e) {
e.printStackTrace();
}
// log
if (IS_DEBUG_ENABLED) {
try {
Log.d(className, String.format("onCreate session=%s", jsonMapper.writeValueAsString(session)));
} catch (JsonProcessingException e) {
e.printStackTrace();
}
}
}
}
- line 8: the session is saved as the string jSON;
- line 29: restore the session from its string jSON;
To manage the saving/restoring of fragments, the abstract class [AbstractFragment] evolves as follows:
// backup / restore management -----------------------------------------------
@Override
public void setUserVisibleHint(boolean isVisibleToUser) {
// parent
super.setUserVisibleHint(isVisibleToUser);
// backup?
if (this.isVisibleToUser && !isVisibleToUser && !saveFragmentDone) {
// the fragment will be hidden - save it
saveFragment();
saveFragmentDone = true;
}
// memory
this.isVisibleToUser = isVisibleToUser;
}
@Override
public void onActivityCreated(Bundle savedInstanceState) {
// parent
super.onActivityCreated(savedInstanceState);
// log
if (isDebugEnabled) {
Log.d(className, "onActivityCreated");
}
// the fragment must be restored
fragmentHasToBeInitialized = true;
}
@Override
public void onSaveInstanceState(final Bundle outState) {
// log
if (isDebugEnabled) {
Log.d(className, "onSaveInstanceState");
}
// parent
super.onSaveInstanceState(outState);
// save fragment only if visible
if (isVisibleToUser && !saveFragmentDone) {
saveFragment();
saveFragmentDone = true;
}
}
// girls' classes
protected abstract void updateFragment();
protected abstract void saveFragment();
- We decide to save the state of the fragments in the session at two points:
- lines 2–14: when the fragment changes from visible to hidden;
- lines 29–42: when the system indicates that the fragment needs to be saved and the fragment is visible (line 38);
This mechanism prevents saving more often than necessary. Indeed, since we saved the state of fragment i when it changed from visible to hidden, when fragment j is displayed and a rotation occurs, there is no need to save fragment i again. If it has not been redisplayed since its last save, then its state has not changed. Only the state of fragment j needs to be saved. This mechanism also has another advantage: it is not only during a device rotation that we need to save a fragment’s state. There is also the case of pure navigation transitions between fragments, for example in a tabbed system. In such cases, we want to restore a fragment to the state it was in when it was last displayed. This state may have partially disappeared if the fragment was at some point removed from the vicinity of the displayed fragments. The fragment is then not fully reconstructed, but its associated view is. The save made when the fragment became hidden will be used to restore the last state of this view;
- lines 10, 40: to avoid making two successive saves, the Boolean [saveFragmentDone] is used to indicate that a save has been made;
- lines 9, 39: the child fragment is asked to save its state. The method [saveFragment] is abstract (line 47). It is therefore up to the child classes to implement it;
- lines 16–26: the method [onActivityCreated] is used to set the Boolean [fragmentHasToBeInitialized] to true. This is because the child fragment must know that it needs to completely reset the fragment’s state from a state it will find in the session;
Still in the [AbstractFragment] class, the [onCreateOptionsMenu] method changes as follows:
// fragment update
@Override
public void onCreateOptionsMenu(Menu menu, MenuInflater inflater) {
// memory
this.menu = menu;
// log
if (isDebugEnabled) {
Log.d(className, String.format("création menu en cours"));
}
...
// the girl fragment is asked to update itself
updateFragment();
// backup to do
saveFragmentDone = false;
}
- line 14: we saw that the boolean [saveFragmentDone] was set to true when a save was performed. At some point, it must be reset to false. When the child fragment’s [updateFragment] method (line 12) is executed, the fragment becomes visible. However, it is when a fragment is visible that it must be saved—specifically, at the moment it transitions from the visible state to the hidden state. We then set the boolean [saveFragmentDone] to false so that the save can take place;
1.23.4. Saving the fragment [Vue1Fragment]
Fragments are saved in the [saveFragment] method called by the parent class [AbstractFragment]:
// save fragment status
@Override
public void saveFragment() {
// log
if (isDebugEnabled) {
Log.d(className, String.format("saveFragment 1 %s - %s", className, getLocalInfos()));
}
// save fragment status in session
Vue1FragmentState state = new Vue1FragmentState();
state.setHasBeenVisited(true);
session.setVue1FragmentState(state);
// log
if (isDebugEnabled) {
try {
Log.d(className, String.format("saveFragment 2 state=%s", jsonMapper.writeValueAsString(state)));
} catch (JsonProcessingException e) {
e.printStackTrace();
}
}
}
- lines 9–11: saving the fragment’s state in the session. When the [saveFragment] method is called, the fragment is visible. Therefore, the boolean [hasBeenVisited] must be set to true (line 10);
1.23.5. Saving the [PlaceHolderFragment] fragment
Fragments are saved in the [saveFragment] method called by the parent class [AbstractFragment]:
@Override
public void saveFragment() {
// save fragment state in session
PlaceHolderFragmentState state = new PlaceHolderFragmentState();
state.setText(textViewInfo.getText().toString());
state.setHasBeenVisited(true);
session.getPlaceHolderFragmentStates()[getArguments().getInt(ARG_SECTION_NUMBER) - 1] = state;
// log
if (isDebugEnabled) {
try {
Log.d(className, String.format("saveFragment state=%s", jsonMapper.writeValueAsString(state)));
} catch (JsonProcessingException e) {
e.printStackTrace();
}
}
}
- lines 4–7: saves the fragment’s state to the session;
- line 5: the text currently displayed by [TextView] textViewInfo is saved;
- line 6: the fragment's Boolean [hasBeenVisited] is set to true;
- line 7: the fragment's state is stored in the session in the array [placeHolderFragmentStates]. The index of the element to be initialized is the fragment's section number minus one;
1.23.6. Restoring fragment [Vue1Fragment]
Fragments are restored in the [updateFragment] method:
@Override
protected void updateFragment() {
// log
if (isDebugEnabled) {
Log.d(className, String.format("updateFragment 1 %s - %s", className, getLocalInfos()));
}
// restoration?
if (fragmentHasToBeInitialized) {
// restoration condition
hasBeenVisited = session.getVue1FragmentState().isHasBeenVisited();
fragmentHasToBeInitialized = false;
}
// log
if (isDebugEnabled) {
Log.d(className, String.format("updateFragment 2 %s - %s", className, getLocalInfos()));
}
// navigation ?
boolean navigation = session.getCurrentView() != IMainActivity.FRAGMENTS_COUNT - 1;
if (navigation) {
// increment visit no
numVisit = session.getNumVisit();
numVisit++;
session.setNumVisit(numVisit);
// the visit number is displayed
Toast.makeText(activity, String.format("Visite n° %s", numVisit), Toast.LENGTH_SHORT).show();
}
// change n° current view
session.setCurrentView(IMainActivity.FRAGMENTS_COUNT - 1);
}
- Lines 8–12: Restoring the fragment’s state. The boolean [fragmentHasToBeInitialized] was initialized by the parent class [AbstractFragment]. When it is true, the fragment has just been reconstructed and must be reset. This is where that happens. In this specific example, there is nothing to do. We have simply shown that we can retrieve the value of the boolean [hasBeenVisited] from the fragment’s saved state (line 10);
- line 11: don’t forget to set [fragmentHasToBeInitialized] back to false, so that when we return to this fragment later without the device having rotated, we don’t perform an unnecessary initialization of the fragment;
- lines 18–26: increment the visit counter. Here, there is a challenge: when restoring the fragment, we do not want to increment this counter. We need to distinguish here between:
- a simple navigation that takes the user back to the [Vue 1] tab;
- a refresh when the user rotates their device while the [Vue 1] tab is displayed;
We distinguish between these two cases using the view number stored in the session. This number is that of the last view displayed (line 28).
- Line 18: navigation is displayed instead of a restore if the number of the last view differs from that of the current view;
- Lines 21–25: Increment the visit counter and display it;
1.23.7. Restoration of fragment [PlaceHolderFragment]
Fragments are restored in the [updateFragment] method:
// data
private String text;
private int numVisit;
private String newText;
private boolean hasBeenVisited = false;
private ObjectMapper jsonMapper = new ObjectMapper();
...
public void updateFragment() {
// log
if (isDebugEnabled) {
Log.d("PlaceholderFragment", String.format("update %s - %s - %s", getArguments().getInt(ARG_SECTION_NUMBER), className, getLocalInfos()));
}
// which fragment is it?
int numSection = getArguments().getInt(ARG_SECTION_NUMBER);
int numView = numSection - 1;
// does the fragment need to be initialized?
if (fragmentHasToBeInitialized) {
// initial text
text = getString(R.string.section_format, numSection);
fragmentHasToBeInitialized = false;
}
// navigation ?
boolean navigation = session.getCurrentView() != numView;
if (navigation) {
// increment visit no
numVisit = session.getNumVisit();
numVisit++;
session.setNumVisit(numVisit);
// modified text
newText = String.format("%s, visite %s", text, numVisit);
} else {
// we are dealing with a restoration
PlaceHolderFragmentState state = session.getPlaceHolderFragmentStates()[numView];
newText = state.getText();
}
// text display
textViewInfo.setText(newText);
// current view
session.setCurrentView(numView);
}
- lines 15-16: we determine the number of the view we are currently updating;
- lines 18-22: case where the fragment is in a save/restore cycle after a device orientation change. It must be restored here. This generally involves restoring certain fields of the fragment;
- line 20: the field [text] on line 2 must contain the initial text displayed by the fragment: [Hello world from section i]. It must be regenerated here;
- line 21: note that the fragment has been initialized;
- lines 24–36: as previously noted for the fragment [Vue1Fragment], the visit counter must not be incremented during a restore. As before, we must distinguish between navigation and the restore;
- lines 32–36: restoration case;
- line 34: the state of the fragment before the device rotation is retrieved from the session;
- line 35: the text that was displayed at that time is retrieved;
- line 38: this text is displayed again;
- line 40: the number of the new view displayed is noted in the session;
1.23.8. Tab Management
The previous sections did not address tab management. However, we observed an issue in Example 21 during device rotation: only the first tab, [Vue 1], was retained. The second tab was lost.
We resolve this issue in the [MainActivity] class as follows:
@AfterViews
protected void afterViews() {
// log
if (IS_DEBUG_ENABLED) {
Log.d(className, "afterViews");
}
// toolbar
Toolbar toolbar = (Toolbar) findViewById(R.id.toolbar);
setSupportActionBar(toolbar);
...
// 1st tab
TabLayout.Tab tab = tabLayout.newTab();
tab.setText("Vue 1");
tabLayout.addTab(tab);
// 2nd tab ?
int numFragment = session.getNumFragment();
if (numFragment != -1) {
TabLayout.Tab tab2 = tabLayout.newTab();
tab2.setText(String.format("Fragment n° %s", (numFragment + 1)));
tabLayout.addTab(tab2);
}
// which tab to select?
tabLayout.getTabAt(session.getSelectedTab()).select();
...
}
- lines 14–16: creation of the first tab;
- lines 18-23: creation of the second tab. To determine whether to create it, we check the session for the fragment ID displayed in tab 2. If this ID is not -1 (its initial value), then the second tab is created. At this point, we have two tabs, with the first one selected by default;
- line 26: we retrieve from the session the number of the tab that was selected before the save/restore and reselect it. If the field [selectedTab] has not yet been initialized by the code, its initial value of 0 is then used;