3. 组件
到目前为止,每个示例都只用一个组件 [App.vue] 就能容纳。真实的应用包含几十个组件:导航栏、表单、窗口……每个组件都是界面中 自包含的一部分(有自己的 HTML、代码和样式),并且 可复用。本章展示组件如何组合在一起并相互通信。
3.1. 示例 07:组件及其 props
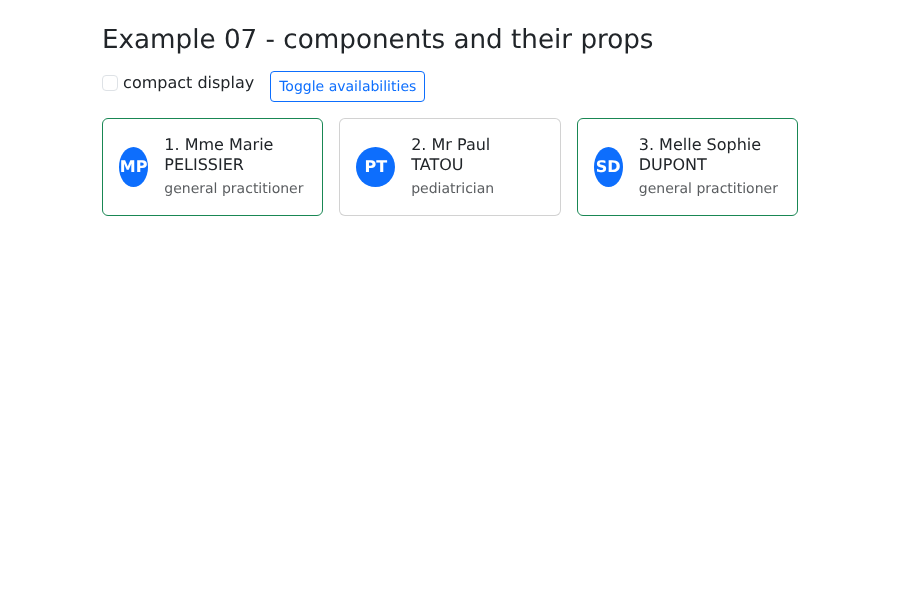
该示例为每位医生显示一张卡片。卡片是一个组件 [DoctorCard.vue],由其父组件 [App.vue] 使用三次。
医生类型由两个组件共用,位于一个普通的 [TypeScript] 文件中:
| // 父组件(App.vue)和子组件(DoctorCard.vue)共用的数据类型
export interface Doctor {
id: number;
title: string;
firstName: string;
lastName: string;
specialty: string;
available: boolean;
}
|
子组件:
| <!--
=========================================================================
07-components/src/components/DoctorCard.vue - a CHILD component
-------------------------------------------------------------------------
It receives its data from its parent through PROPS (properties), declared
with defineProps. The TypeScript type of the props is checked at
compile time: <DoctorCard :doctor="42"> would be rejected.
Golden rule: a component NEVER MODIFIES its props. The data
flows down from the parent to the child ("one-way data flow"); to
request a change, the child emits an event (see example 08).
=========================================================================
-->
<script setup lang="ts">
import { computed } from 'vue';
import type { Doctor } from '../doctor';
// withDefaults:可选 props(?)的默认值
const props = withDefaults(
defineProps<{
doctor: Doctor;
rank: number;
compact?: boolean;
}>(),
{ compact: false },
);
// 基于某个 prop 的 computed:如果父组件改变该 prop,就会重新计算
const initials = computed(() => `${props.doctor.firstName[0]}${props.doctor.lastName[0]}`);
</script>
<template>
<div class="card h-100" :class="{ 'border-success': doctor.available }">
<div class="card-body d-flex gap-3 align-items-center">
<div class="initials">{{ initials }}</div>
<div>
<!-- 在模板中,props 直接按名称使用 -->
<h2 class="h6 mb-1">{{ rank }}. {{ doctor.title }} {{ doctor.firstName }} {{ doctor.lastName }}</h2>
<p v-if="!compact" class="mb-0 text-muted small">{{ doctor.specialty }}</p>
</div>
</div>
</div>
</template>
<style scoped>
.initials {
width: 2.5rem;
height: 2.5rem;
border-radius: 50%;
display: flex;
align-items: center;
justify-content: center;
background: #0d6efd;
color: white;
font-weight: bold;
}
</style>
|
- 第 16 行:[import type] 只导入一个 类型:这个导入在生成的 [JavaScript] 中不会留下任何内容;
- 第 19–26 行:[defineProps<{...}>()] 声明组件的 props——即它从父组件接收的数据——以及它们的类型。后面带 [?] 的 prop 是可选的;[withDefaults] 为它提供默认值。[defineProps] 无需导入:它是由 [.vue] 文件编译器识别的“宏”;
- 第 29 行:在脚本中,通过 [props] 对象读取 props。[computed] 会跟踪 props:如果父组件更换了分配的医生,首字母缩写会被重新计算;
- 第 38 行:在模板中,props 直接按名称使用;
- 第 39 行:一个 prop 可以改变显示效果。
父组件:
| <!--
=========================================================================
07-components/src/App.vue - the PARENT component
-------------------------------------------------------------------------
It imports the DoctorCard component and uses it as a new
HTML tag, <DoctorCard>, as many times as needed: a component
is a REUSABLE piece of interface, with its own data, its
template and its style.
=========================================================================
-->
<script setup lang="ts">
import { ref } from 'vue';
// 在 <script setup> 中,导入的组件可以立即在模板中使用
import DoctorCard from './components/DoctorCard.vue';
import type { Doctor } from './doctor';
const doctors = ref<Doctor[]>([
{ id: 1, title: 'Mme', firstName: 'Marie', lastName: 'PELISSIER', specialty: 'general practitioner', available: true },
{ id: 2, title: 'Mr', firstName: 'Paul', lastName: 'TATOU', specialty: 'pediatrician', available: false },
{ id: 3, title: 'Melle', firstName: 'Sophie', lastName: 'DUPONT', specialty: 'general practitioner', available: true },
]);
const compact = ref(false);
// 父组件修改它自己的数据:相关的子组件会自行更新
function toggleAvailability(): void {
for (const m of doctors.value) {
m.available = !m.available;
}
}
</script>
<template>
<div class="container py-4">
<h1 class="h3 mb-3">Example 07 - components and their props</h1>
<div class="d-flex gap-3 mb-3">
<label class="form-check-label"><input v-model="compact" type="checkbox" class="form-check-input"> compact display</label>
<button class="btn btn-sm btn-outline-primary" @click="toggleAvailability">Toggle availabilities</button>
</div>
<div class="row g-3">
<div v-for="(m, i) in doctors" :key="m.id" class="col-md-4">
<!-- :doctor="m" passes the OBJECT m (an expression);
compact, without a colon, would pass the STRING "compact" -->
<DoctorCard :doctor="m" :rank="i + 1" :compact="compact" />
</div>
</div>
</div>
</template>
|
- 第 14 行:在 [<script setup>] 中,导入的组件可以立即在模板中使用,就像一个新标签;
- 第 43 行:每张卡片接收 它自己的 医生。[:doctor="m"] (带冒号)传递表达式 [m] 的 值;没有冒号时,传递的会是字符串 ["m"],而 [TypeScript] 在这里会拒绝它。组件标签名使用 [PascalCase] 书写,以便与 HTML 标签区分;
- 第 25–29 行:父组件修改它自己的数据;受影响的卡片随之更新。
黄金法则:组件 绝不修改自己的 props。数据 从父组件流向子组件([one-way data flow]):数据归父组件所有。要请求修改,子组件触发一个事件,由父组件处理:这就是下一个示例的主题。
3.2. 示例 08:组件事件与 v-model
3.2.1. 触发事件
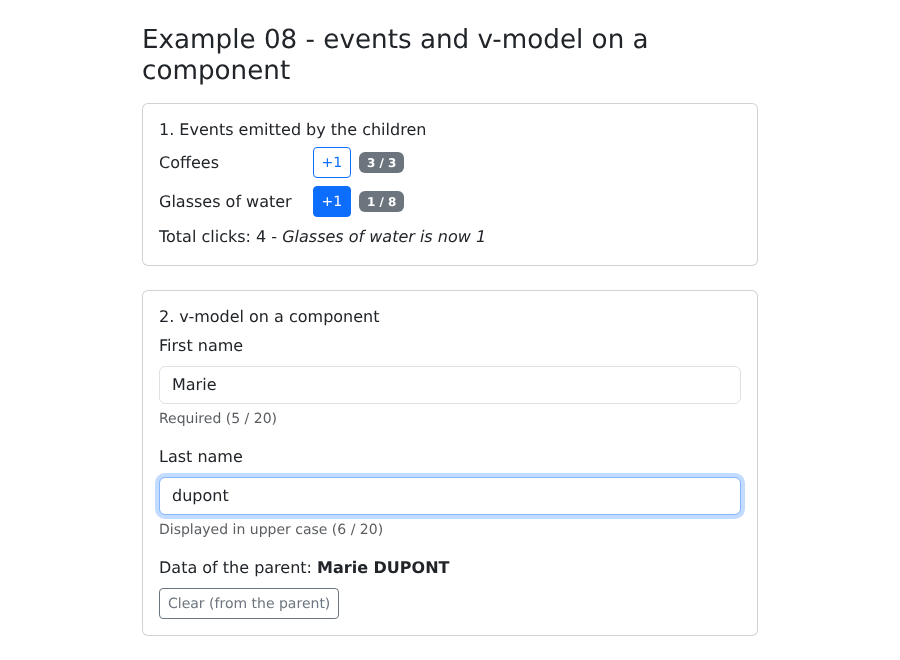
每当按钮被点击时,[Counter] 组件都会通知其父组件:
| <!--
=========================================================================
08-component-events/src/components/Counter.vue
-------------------------------------------------------------------------
A child that NOTIFIES its parent: defineEmits declares the events
it can emit, with the type of their data. The parent listens to them
like HTML events: <Counter @change="..." @limit="...">.
=========================================================================
-->
<script setup lang="ts">
import { ref } from 'vue';
const props = defineProps<{ label: string; max: number }>();
// 两个事件:'change'(带新值)和 'limit'(不带数据)
const emit = defineEmits<{
change: [value: number];
limit: [];
}>();
const value = ref(0);
function plus(): void {
if (value.value >= props.max) {
emit('limit');
return;
}
value.value++;
emit('change', value.value);
}
</script>
<template>
<div class="d-flex align-items-center gap-2 mb-2">
<span class="w-25">{{ label }}</span>
<button class="btn btn-sm btn-outline-primary" @click="plus">+1</button>
<span class="badge text-bg-secondary">{{ value }} / {{ max }}</span>
</div>
</template>
|
- 第 16–19 行:[defineEmits] 声明组件可以触发的事件及其数据类型:[change] 携带一个数字,[limit] 不携带任何数据;
- 第 25 和 29 行:触发事件。[TypeScript] 会检查事件名及其数据类型;
- 第 21 行:子组件可以拥有自己的状态:[value] 属于它自己,而不属于父组件。
3.2.2. 组件上的 v-model
组件 [TextField] 是一个“自定义”表单字段:包含标签、字段本身、提示信息和字符计数器。我们希望能对它使用 [v-model],就像对普通的 [<input>] 那样:
| <!--
=========================================================================
08-component-events/src/components/TextField.vue
-------------------------------------------------------------------------
A "home-made" form field (label + field + help + character
counter) that accepts v-model, like an ordinary <input>:
<TextField v-model="lastName" label="Last name" :max="20" />
defineModel() creates a ref linked to the parent's v-model: READING it gives the
parent's value, WRITING it emits the 'update:modelValue' event, which the
parent handles by updating its data. The data thus remains
the property of the parent.
=========================================================================
-->
<script setup lang="ts">
import { useId } from 'vue';
const model = defineModel<string>({ required: true });
defineProps<{ label: string; max: number; help?: string }>();
// 每个实例一个唯一标识符,用来关联 <label for> 和 <input id>
const id = useId();
</script>
<template>
<div class="mb-3">
<label class="form-label" :for="id">{{ label }}</label>
<!-- v-model="model":原生字段与 defineModel 的 ref 相关联 -->
<input :id="id" v-model="model" class="form-control" :maxlength="max" :class="{ 'is-invalid': model.length === max }">
<div class="form-text">{{ help }} ({{ model.length }} / {{ max }})</div>
</div>
</template>
|
- 第 18 行:[defineModel] 创建一个与父组件的 [ref] 相关联的 [v-model]。读取它会返回父组件的值;写入它会触发 [update:modelValue] 事件,父组件通过修改它自己的数据来处理该事件。组件上的 [v-model="lastName"] 只是 [modelValue] 属性和该事件的简写:数据仍然属于父组件;
- 第 22 行:[useId()] 为每个组件实例提供唯一标识符:页面上的两个 [TextField] 实例不会有相同的 [id],每个 [<label for>] 都会正确指向它自己的字段;
- 第 29 行:原生字段与来自 [ref] 的 [defineModel] 相关联。
3.2.3. 父组件
| <!--
=========================================================================
08-component-events/src/App.vue - the parent listens to its children
-------------------------------------------------------------------------
Two ways for a child to pass information up:
1. emitting an event, which the parent listens to with @ (Counter);
2. v-model on a component (TextField): a shortcut for the prop
modelValue + the event update:modelValue.
=========================================================================
-->
<script setup lang="ts">
import { computed, ref } from 'vue';
import Counter from './components/Counter.vue';
import TextField from './components/TextField.vue';
const total = ref(0);
const message = ref('');
const firstName = ref('Marie');
const lastName = ref('PELISSIER');
const fullName = computed(() => `${firstName.value} ${lastName.value.toUpperCase()}`);
// 'change' 事件的处理函数:它接收发出的数据
function onChange(label: string, value: number): void {
total.value++;
message.value = `${label} is now ${value}`;
}
</script>
<template>
<div class="container py-4" style="max-width: 640px">
<h1 class="h3 mb-3">Example 08 - events and v-model on a component</h1>
<div class="card p-3 mb-4">
<h2 class="h6">1. Events emitted by the children</h2>
<Counter label="Coffees" :max="3" @change="(v) => onChange('Coffees', v)" @limit="message = 'No more than 3 coffees!'" />
<Counter label="Glasses of water" :max="8" @change="(v) => onChange(`Glasses of water`, v)" @limit="message = 'Enough drinking.'" />
<p class="mb-0">Total clicks: {{ total }} - <em>{{ message }}</em></p>
</div>
<div class="card p-3">
<h2 class="h6">2. v-model on a component</h2>
<TextField v-model="firstName" label="First name" :max="20" help="Required" />
<TextField v-model="lastName" label="Last name" :max="20" help="Displayed in upper case" />
<p class="mb-0">Data of the parent: <strong>{{ fullName }}</strong></p>
<button class="btn btn-sm btn-outline-secondary mt-2 align-self-start" @click="firstName = ''; lastName = ''">Clear (from the parent)</button>
</div>
</div>
</template>
|
- 第 35 行:父组件使用 [@] 监听子组件的事件,就像监听 HTML 事件一样。箭头函数 [(v) => onChange('Coffees', v)] 接收事件数据;[@limit] 执行单条指令;
- 第 42 行:组件上的 [v-model] ;
- 第 45 行:当父组件清空它的数据时,各字段随之更新:这种关联是双向的。
3.3. 示例 09:模板与插槽
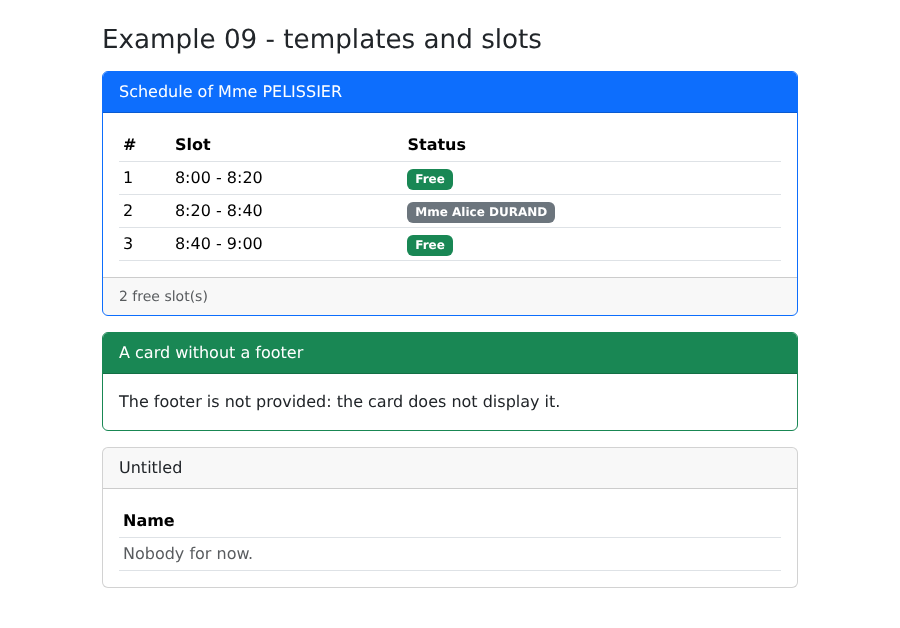
props 传递 数据;插槽 传递 内容:来自 HTML 的内容,或其他组件。[Card] 组件设定外框(边框、页眉、页脚),而它的父组件决定其中放什么:
| <!--
=========================================================================
09-slots/src/components/Card.vue - a reusable TEMPLATE
-------------------------------------------------------------------------
Props pass DATA; slots pass CONTENT
(HTML, other components). Card sets the frame (border, header,
footer), the parent provides what goes inside:
- <slot /> the default slot: the "main" content;
- <slot name="header"> a named slot, filled by <template #header>;
- the text placed BETWEEN <slot> and </slot> is displayed if the parent
provides nothing (default content).
It is the client-side equivalent of the layout.hbs template and its {{{body}}}
in the NestJS course.
=========================================================================
-->
<script setup lang="ts">
defineProps<{ color?: 'primary' | 'success' | 'danger' }>();
</script>
<template>
<div class="card mb-3" :class="color ? `border-${color}` : ''">
<div class="card-header" :class="color ? `text-bg-${color}` : ''">
<slot name="header">Untitled</slot>
</div>
<div class="card-body">
<slot />
</div>
<!-- $slots.footer:父组件提供了页脚吗?如果没有,就没有空的 <div> -->
<div v-if="$slots.footer" class="card-footer text-muted small">
<slot name="footer" />
</div>
</div>
</template>
|
- 第 23 行:一个 具名插槽;如果父组件没有提供任何内容,则显示 [<slot>] 与 [</slot>] 之间的文本;
- 第 26 行:默认插槽:“主要”内容;
- 第 29 行:[$slots] 指明父组件填充了哪些插槽:没有页脚时,就不会有空的 [<div>]。
这相当于 [NestJS] 课程中的 [layout.hbs] 模板及其 [{{{body}}}] 在客户端的对应物。
第二个组件 [DataTable]可以显示任意类型的行:
| <!--
=========================================================================
09-slots/src/components/DataTable.vue - a GENERIC table, with a "scoped" slot
-------------------------------------------------------------------------
generic="T": a generic component, like a generic TypeScript
class - it displays rows of any type T.
The table knows how to iterate over the rows, but not how to display a
row: it PASSES each row to its slot (<slot name="row" :row="l">),
and it is the parent that says what to do with it (<template #row="{ row }">).
This is called a "scoped" slot: the content provided by the parent uses
data that belongs to the child.
=========================================================================
-->
<script setup lang="ts" generic="T extends { id: number }">
defineProps<{ rows: T[]; columns: string[] }>();
</script>
<template>
<table class="table table-sm align-middle mb-0">
<thead>
<tr><th v-for="c in columns" :key="c">{{ c }}</th></tr>
</thead>
<tbody>
<tr v-for="(l, i) in rows" :key="l.id">
<slot name="row" :row="l" :index="i" />
</tr>
<tr v-if="rows.length === 0">
<td :colspan="columns.length" class="text-muted"><slot name="empty">No data.</slot></td>
</tr>
</tbody>
</table>
</template>
|
- 第 15 行:一个 泛型组件,类似于 [TypeScript] 的泛型类:[T] 是行的类型,对它只要求一个属性:[id](用作 [v-for] 的 key);
- 第 26 行:该数组知道如何遍历各行,但不知道如何显示一行。它把每一行 传给 它的插槽,由父组件来显示。这称为“作用域”插槽:父组件提供的内容使用属于子组件的数据。
父组件:
| <!--
=========================================================================
09-slots/src/App.vue - using the Card and DataTable templates
=========================================================================
-->
<script setup lang="ts">
import { ref } from 'vue';
import Card from './components/Card.vue';
import DataTable from './components/DataTable.vue';
interface Slot {
id: number;
time: string;
patient: string | null;
}
const slots = ref<Slot[]>([
{ id: 1, time: '8:00 - 8:20', patient: null },
{ id: 2, time: '8:20 - 8:40', patient: 'Mme Alice DURAND' },
{ id: 3, time: '8:40 - 9:00', patient: null },
]);
</script>
<template>
<div class="container py-4" style="max-width: 720px">
<h1 class="h3 mb-3">Example 09 - templates and slots</h1>
<!-- #header 是 v-slot:header 的简写形式 -->
<Card color="primary">
<template #header>Schedule of Mme PELISSIER</template>
<!-- 默认插槽:所有不在 <template #...> 中的内容 -->
<DataTable :rows="slots" :columns="['#', 'Slot', 'Status']">
<!-- 我们取得由 DataTable 传递的数据:{ row, index } -->
<template #row="{ row, index }">
<td>{{ index + 1 }}</td>
<td>{{ row.time }}</td>
<td>
<span v-if="row.patient" class="badge text-bg-secondary">{{ row.patient }}</span>
<span v-else class="badge text-bg-success">Free</span>
</td>
</template>
</DataTable>
<template #footer>{{ slots.filter((c) => c.patient === null).length }} free slot(s)</template>
</Card>
<Card color="success">
<template #header>A card without a footer</template>
<p class="mb-0">The footer is not provided: the card does not display it.</p>
</Card>
<Card>
<!-- 没有提供页眉:使用插槽的默认内容“Untitled” -->
<DataTable :rows="[]" :columns="['Name']">
<template #empty>Nobody for now.</template>
</DataTable>
</Card>
</div>
</template>
|
- 第 30 行:[<template #header>]([v-slot:header] 的简写)填充名为 [header] 的插槽;
- 第 32 行:任何不在 [<template #...>] 中的内容都进入默认插槽;
- 第 34 行:取回通过该数组传递的数据。多亏了泛型组件,[TypeScript] 知道 [row] 是一个 [Slot];
- 第 51 行:没有页眉的卡片:显示默认内容“Untitled”。
3.4. 示例 10:组件的生命周期
组件会被创建、显示、更新,然后被移除。[Vue.js] 允许在每个阶段执行代码。[Clock] 组件:
| <!--
=========================================================================
10-lifecycle/src/components/Clock.vue
-------------------------------------------------------------------------
The lifecycle of a component:
1. setup : the code of <script setup> runs (creation);
2. onMounted : the component is DISPLAYED, its HTML elements exist;
3. onUpdated : its display has just been updated;
4. onUnmounted: the component has been REMOVED from the page.
A clock starts a timer (setInterval) when displayed... and must
absolutely stop it when it disappears: otherwise the timer
would keep running for nothing (memory leak).
=========================================================================
-->
<script setup lang="ts">
import { onMounted, onUnmounted, ref } from 'vue';
const emit = defineEmits<{ log: [message: string] }>();
const time = ref(new Date().toLocaleTimeString());
let timer: number | undefined;
emit('log', 'Clock: setup (creation)');
onMounted(() => {
emit('log', 'Clock: onMounted - starting the timer');
timer = window.setInterval(() => {
time.value = new Date().toLocaleTimeString();
}, 1000);
});
onUnmounted(() => {
window.clearInterval(timer);
emit('log', 'Clock: onUnmounted - timer stopped');
});
</script>
<template>
<div class="display-6 font-monospace">{{ time }}</div>
</template>
|
- 第 23 行:[<script setup>] 中的代码在组件 被创建时运行一次;
- 第 25–30 行:[onMounted]:组件已被 显示,其 HTML 元素已经存在。此时启动定时器;
- 第 32–35 行:[onUnmounted]:组件已从页面中 移除。必须停止定时器;否则它会继续为一个已不存在的组件运行(即“内存泄漏”)。
父组件:
| <!--
=========================================================================
10-lifecycle/src/App.vue
-------------------------------------------------------------------------
- v-if on <Clock>: checking / unchecking the box creates / destroys the
component (onMounted / onUnmounted, see Clock.vue);
- a "template ref": ref="field" gives access to the HTML <input> element
itself, once the component is displayed (to give it the focus);
- watch with { immediate: true }: executed right away, then on each
change;
- nextTick: waiting for Vue to have updated the page.
=========================================================================
-->
<script setup lang="ts">
import { nextTick, onMounted, ref, useTemplateRef, watch } from 'vue';
import Clock from './components/Clock.vue';
const withClock = ref(true);
const log = ref<string[]>([]);
const search = ref('');
const showSearch = ref(false);
// 模板中的 <input ref="field"> 元素(在它被显示之前为 null)
const field = useTemplateRef<HTMLInputElement>('field');
function trace(message: string): void {
log.value.push(`${new Date().toLocaleTimeString()} ${message}`);
}
onMounted(() => trace('App: onMounted'));
watch(
search,
(value) => {
document.title = value ? `Search: ${value}` : 'Example 10';
},
{ immediate: true },
);
async function openSearch(): Promise<void> {
showSearch.value = true;
// 此时,<input> 还不存在:Vue 会稍后更新页面。
// nextTick() 会等待这次更新。
await nextTick();
field.value?.focus();
}
</script>
<template>
<div class="container py-4" style="max-width: 720px">
<h1 class="h3 mb-3">Example 10 - the lifecycle of a component</h1>
<div class="card p-3 mb-3">
<label class="form-check-label mb-2">
<input v-model="withClock" type="checkbox" class="form-check-input"> show the clock
</label>
<Clock v-if="withClock" @log="trace" />
</div>
<div class="card p-3 mb-3">
<button v-if="!showSearch" class="btn btn-outline-primary align-self-start" @click="openSearch">
Search...
</button>
<input v-else ref="field" v-model="search" class="form-control" placeholder="the tab title follows what you type">
</div>
<h2 class="h6">Log</h2>
<ol class="small">
<li v-for="(line, i) in log" :key="i">{{ line }}</li>
</ol>
</div>
</template>
|
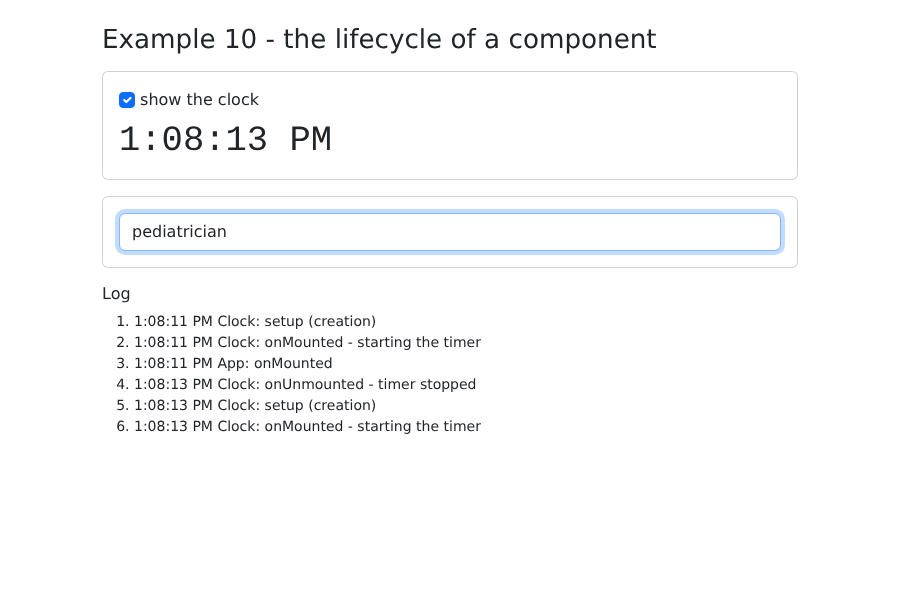
- 第 57 行:勾选和取消勾选复选框会创建和销毁时钟:日志依次显示 [setup]、[onMounted]、[onUnmounted];
- 第 24 行:一个 模板引用:[ref="field"] 属性作用于 [<input>] 元素,可用来访问 HTML 元素本身。在该元素尚未显示时,它等于 [null] ;
- 第 32–37 行:带有 [watch] 选项 [{ immediate: true }] 的侦听器会立即运行,之后在每次变化时运行:输入文本时,标签页标题随之更新;
- 第 40–45 行:在 [showSearch.value = true] 之后,该字段还不存在:[Vue.js] 会批量处理页面更新,并稍后再执行。[await nextTick()] 会等待这次更新;之后才能把焦点交给该字段。
3.5. 示例 11:组合式函数、provide 和 inject
如何在组件之间共享 逻辑?在服务器端,[NestJS] 把服务注入到控制器中。[Vue.js] 则有它的 组合式函数:简单的函数,名称以 [use] 开头,把响应式状态及其配套代码组合在一起。
| // =========================================================================
// 11-composables/src/composables/useClock.ts - 一个组合式函数
// -------------------------------------------------------------------------
// 组合式函数是一个简单的函数,按惯例其名称以“use”开头,
// 它把一个响应式状态和与之配套的逻辑组合在一起
// (这里是:定时器、它的启动和停止)。每个调用它的
// 组件都会得到它自己的时钟,而无需复制代码。
//
// 这是 Vue.js 在组件之间共享逻辑的方式——在服务器端,
// 这个角色由 NestJS 的服务承担。
// =========================================================================
import { onMounted, onUnmounted, ref, type Ref } from 'vue';
export function useClock(periodMs = 1000): { now: Ref<Date> } {
const now = ref(new Date());
let timer: number | undefined;
// 生命周期钩子会绑定到调用该组合式函数的组件上
onMounted(() => {
timer = window.setInterval(() => (now.value = new Date()), periodMs);
});
onUnmounted(() => window.clearInterval(timer));
return { now };
}
|
- 第 15 行:该函数返回一个包含 [ref] [now] 的对象;
- 第 20–22 行:在组合式函数中调用的生命周期函数,会绑定到 调用 该组合式函数的组件上:每个组件有自己的定时器,组件被销毁时它就会停止。
第二个组合式函数,不涉及生命周期:
| // =========================================================================
// 11-composables/src/composables/useCart.ts
// -------------------------------------------------------------------------
// 第二个组合式函数,不涉及生命周期:一个购物车(条目列表、
// 合计、添加、移除)。每次调用 useCart() 都会创建一个新的
// 购物车:调用它的两个组件各自拥有自己的购物车。
// (要让整个应用共享同一个购物车,请见下面的 provide / inject
// 以及示例 15 中的 Pinia。)
// =========================================================================
import { computed, ref } from 'vue';
export interface Item {
label: string;
price: number;
}
export function useCart() {
const items = ref<Item[]>([]);
const total = computed(() => items.value.reduce((sum, a) => sum + a.price, 0));
function add(item: Item): void {
items.value.push(item);
}
function remove(index: number): void {
items.value.splice(index, 1);
}
return { items, total, add, remove };
}
// useCart 返回内容的类型:对 provide / inject 很有用
export type Cart = ReturnType<typeof useCart>;
|
- 第 19 行:每次调用 [useCart()] 都会创建一个新的购物车;
- 第 33 行:[useCart] 所返回内容的类型,由 [TypeScript] 推断得出。
要让多个组件共享同一个购物车,我们使用 [provide] 和 [inject],这是依赖注入的一种形式:
| // =========================================================================
// 11-composables/src/keys.ts - provide / inject 的键
// -------------------------------------------------------------------------
// provide(key, value):一个组件把一个值提供给
// 它的所有后代组件,无论层级多深;
// inject(key):后代组件取得该值——无需中间的
// 组件一层层通过 props 传递。
// 这是依赖注入的一种形式,就像 NestJS 中一样。
//
// InjectionKey<T>(带类型的 Symbol)保证 inject() 返回
// 类型正确的值。
// =========================================================================
import type { InjectionKey } from 'vue';
import type { Cart } from './composables/useCart';
export const CART_KEY: InjectionKey<Cart> = Symbol('cart');
|
- 第 17 行:提供购物车时使用的键:一个 [Symbol] (唯一值),由 [InjectionKey<Cart>] 指定类型,从而使 [inject] 返回类型正确的对象。
根组件创建购物车并提供它:
| <!--
=========================================================================
11-composables/src/App.vue
-------------------------------------------------------------------------
- useClock(): App has its clock (1 s), CartSummary its own (5 s);
- useCart() + provide: App creates ONE cart and provides it to all its
descendants; Catalog and CartSummary inject it and therefore
share the same one.
=========================================================================
-->
<script setup lang="ts">
import { provide } from 'vue';
import { useClock } from './composables/useClock';
import { useCart } from './composables/useCart';
import { CART_KEY } from './keys';
import Catalog from './components/Catalog.vue';
import CartSummary from './components/CartSummary.vue';
const { now } = useClock();
provide(CART_KEY, useCart());
</script>
<template>
<div class="container py-4" style="max-width: 720px">
<h1 class="h3 mb-3">Example 11 - composables and provide / inject</h1>
<p class="text-muted">Clock of App: {{ now.toLocaleTimeString() }}</p>
<div class="row g-3">
<div class="col-md-6"><Catalog /></div>
<div class="col-md-6"><CartSummary /></div>
</div>
</div>
</template>
|
- 第 19 行:App 有它自己的时钟,每秒刷新一次;
- 第 20 行:应用把一个购物车提供给它的所有后代组件,无论层级多深,都无需一层层通过 props 传递。
两个后代组件注入它:
| <!--
11-composables/src/components/Catalog.vue - a descendant that INJECTS the cart
-->
<script setup lang="ts">
import { inject } from 'vue';
import { CART_KEY } from '../keys';
import type { Item } from '../composables/useCart';
// 由 App.vue 提供(provide)的购物车;如果缺失,则抛出明确的错误
const cart = inject(CART_KEY);
if (!cart) {
throw new Error('Catalog must be placed under a component that provides the cart');
}
const catalog: Item[] = [
{ label: 'Consultation', price: 30 },
{ label: 'Vaccine', price: 12.5 },
{ label: 'Certificate', price: 5 },
];
</script>
<template>
<ul class="list-group">
<li v-for="a in catalog" :key="a.label" class="list-group-item d-flex justify-content-between align-items-center">
{{ a.label }} (€{{ a.price }})
<button class="btn btn-sm btn-outline-primary" @click="cart.add(a)">Add</button>
</li>
</ul>
</template>
|
- 第 10 行:取得由祖先组件提供的购物车;如果没有任何祖先组件提供它,[inject] 会返回 [undefined] :这时会通过一个明确的错误来提示。
| <!--
11-composables/src/components/CartSummary.vue - another descendant, the SAME cart
-->
<script setup lang="ts">
import { inject } from 'vue';
import { CART_KEY } from '../keys';
import { useClock } from '../composables/useClock';
const cart = inject(CART_KEY)!;
// 这个组件有它自己的时钟,每 5 秒刷新一次
const { now } = useClock(5000);
</script>
<!-- cart.items.value: in a template, Vue only "unwraps" (implicit
.value) the TOP-LEVEL refs of the script, like now.
The refs stored INSIDE an object (cart.items) are written with .value -->
<template>
<div class="card p-3">
<h2 class="h6">Cart ({{ cart.items.value.length }} item(s)) - {{ now.toLocaleTimeString() }}</h2>
<ul class="mb-2">
<li v-for="(a, i) in cart.items.value" :key="i">
{{ a.label }} <a href="#" @click.prevent="cart.remove(i)">remove</a>
</li>
</ul>
<strong>Total: €{{ cart.total.value }}</strong>
</div>
</template>
|
- 第 9 行:同样的注入;[!] 向 [TypeScript] 确认该值存在;
- 第 11 行:该组件有它自己的时钟,每 5 秒刷新一次;
- 第 19 行:在模板中,[Vue.js] 只会自动“解包”脚本中顶层的 [ref] 元素。存放在对象内部([cart.items])的 [ref] 要写成 [.value]。
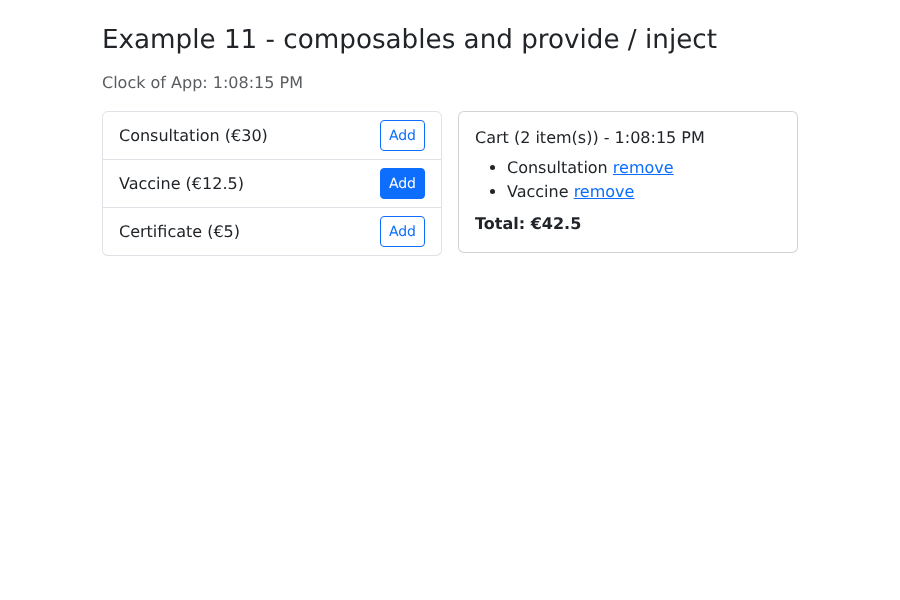
两个组件显示的是同一个购物车;两个时钟各自按自己的节奏运行:
3.6. 示例 12:可复用的确认窗口
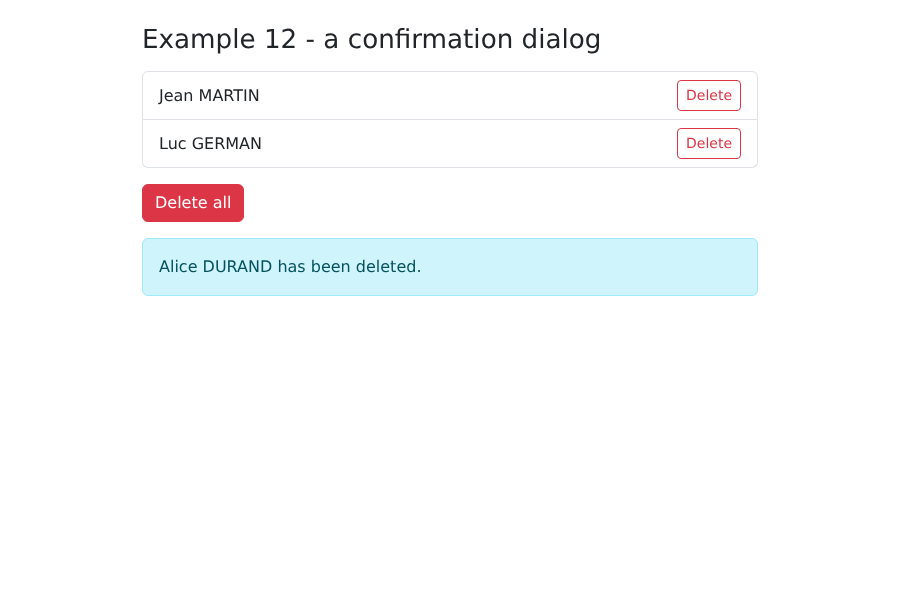
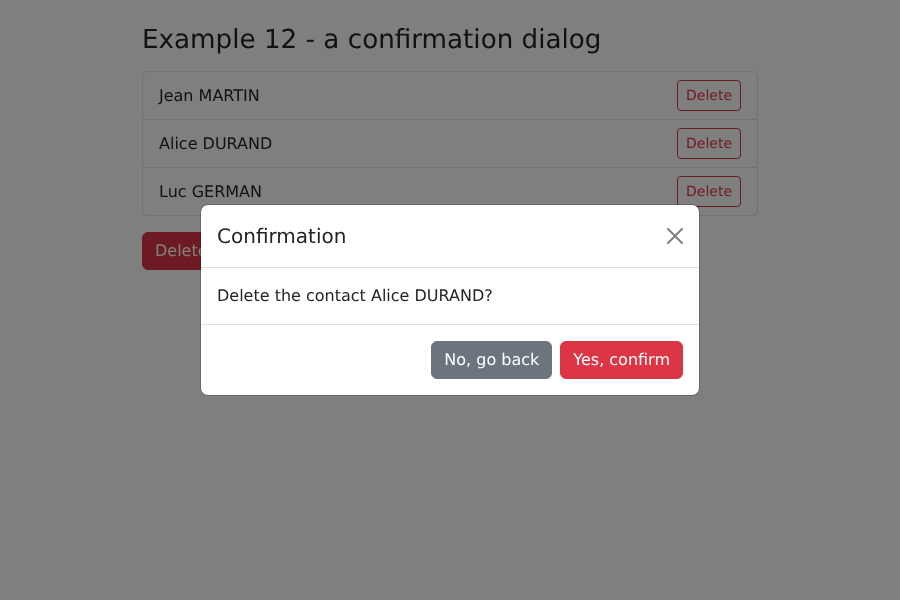
在删除某个条目之前,系统会询问“你确定吗?”浏览器函数 [window.confirm()] 虽然存在,但它的对话框无法设置样式,其按钮也无法翻译。我们用一个由组合式函数控制的 [Bootstrap] 窗口来替代它。这是 [NestJS] 课程中示例 21 的 [Vue.js] 版本。
| // =========================================================================
// 12-confirmation/src/composables/useConfirmation.ts
// -------------------------------------------------------------------------
// “你确定吗?”:window.confirm() 虽然存在,但它既不能
// 设置样式,其按钮也无法翻译。我们用一个由这个组合式函数驱动的 Bootstrap
// 对话框(ConfirmDialog.vue)来替代它。
//
// 诀窍在于:confirm(message) 返回一个 Promise,在用户作出回答时
// 兑现为 true(是)或 false(否)。这样,调用方的代码
// 就能像使用 window.confirm 一样简单地编写:
//
// if (await confirm('Delete this doctor?')) { ... }
//
// 状态(显示的消息、回答时要调用的函数)声明在函数
// 外部:因此它在整个应用中是唯一的。一个
// 对话框,只在 App.vue 中放置一次,就服务于所有组件。
// =========================================================================
import { readonly, ref } from 'vue';
const message = ref<string | null>(null); // null:对话框关闭
let answer: ((yes: boolean) => void) | null = null;
export function useConfirmation() {
function confirm(text: string): Promise<boolean> {
message.value = text;
return new Promise<boolean>((resolve) => {
answer = resolve;
});
}
function respond(yes: boolean): void {
message.value = null;
answer?.(yes);
answer = null;
}
// readonly:组件只能读取消息,只有这个组合式函数才能修改它
return { message: readonly(message), confirm, respond };
}
|
- 第 21 和 22 行:状态声明在函数 [useConfirmation] 的外部,位于模块级别。因此它在整个应用中是 唯一的:一个窗口服务于所有组件;
- 第 25–30 行:[confirm] 打开窗口(通过给消息赋值),并返回一个 Promise。它把该 Promise 的 [resolve] 函数存放在 [answer] 中:在用户作出回应之前,这个 Promise 不会被兑现;
- 第 32–35 行:用户的回应会关闭窗口,并把 Promise 兑现为 [true] 或 [false];
- 第 39 行:组件可以读取该消息,但不能修改它。
窗口:
| <!--
=========================================================================
12-confirmation/src/components/ConfirmDialog.vue
-------------------------------------------------------------------------
The modal dialog, placed ONCE in App.vue.
- <Teleport to="body">: its HTML is inserted at the end of <body>, outside
the component tree - a modal dialog must go
above everything, wherever it is declared;
- same Bootstrap classes as a real modal (.modal, .modal-backdrop),
displayed "hard-coded" (show d-block): no need for Bootstrap's JavaScript;
- keyboard: Escape = No; the focus is placed on the "No" button (the
least dangerous choice) on opening.
=========================================================================
-->
<script setup lang="ts">
import { nextTick, onUnmounted, useTemplateRef, watch } from 'vue';
import { useConfirmation } from '../composables/useConfirmation';
const { message, respond } = useConfirmation();
const noButton = useTemplateRef<HTMLButtonElement>('noButton');
function onKeydown(e: KeyboardEvent): void {
if (e.key === 'Escape') {
respond(false);
}
}
// 打开时:焦点放在“否”上,并监听 Escape 键;关闭时:停止监听
watch(message, async (value) => {
if (value !== null) {
document.addEventListener('keydown', onKeydown);
await nextTick();
noButton.value?.focus();
} else {
document.removeEventListener('keydown', onKeydown);
}
});
onUnmounted(() => document.removeEventListener('keydown', onKeydown));
</script>
<template>
<Teleport to="body">
<template v-if="message !== null">
<div class="modal-backdrop fade show"></div>
<div class="modal fade show d-block" tabindex="-1" role="alertdialog" aria-modal="true" @click.self="respond(false)">
<div class="modal-dialog modal-dialog-centered">
<div class="modal-content">
<div class="modal-header">
<h5 class="modal-title">Confirmation</h5>
<button type="button" class="btn-close" aria-label="Close" @click="respond(false)"></button>
</div>
<div class="modal-body">
<p class="mb-0">{{ message }}</p>
</div>
<div class="modal-footer">
<button ref="noButton" type="button" class="btn btn-secondary" @click="respond(false)">No, go back</button>
<button type="button" class="btn btn-danger" @click="respond(true)">Yes, confirm</button>
</div>
</div>
</div>
</div>
</template>
</Teleport>
</template>
|
- 第 42 行:窗口的 HTML 被插入到 [<body>] 的末尾,位于组件树之外:模态窗口必须压过其他一切,无论它声明在哪里;
- 第 45 行:模态窗口的 [Bootstrap] 类,以“硬编码”方式显示([show d-block]):无需 [JavaScript] (来自 [Bootstrap]);
- 第 45 行:修饰符 [.self]:只有点击元素本身(阴影区域),而不是点击包含它的窗口,才会触发“否”的回应;
- 第 29–37 行:打开时,程序监听 Esc 键,并把焦点设置到“否”按钮上(这是最安全的选项:意外按下 Enter 不会删除任何内容);关闭时,程序停止监听键盘输入。
使用它的组件:
| <!--
=========================================================================
12-confirmation/src/App.vue - using the confirmation dialog
-------------------------------------------------------------------------
Same page as example 21 of the NestJS course (links, buttons, confirmation),
but without any round trip to a server.
=========================================================================
-->
<script setup lang="ts">
import { ref } from 'vue';
import ConfirmDialog from './components/ConfirmDialog.vue';
import { useConfirmation } from './composables/useConfirmation';
interface Contact {
id: number;
name: string;
}
const contacts = ref<Contact[]>([
{ id: 1, name: 'Jean MARTIN' },
{ id: 2, name: 'Alice DURAND' },
{ id: 3, name: 'Luc GERMAN' },
]);
const message = ref('');
const { confirm } = useConfirmation();
// 一个 async 函数:它会“等待”用户的回答
async function remove(c: Contact): Promise<void> {
if (!(await confirm(`Delete the contact ${c.name}?`))) {
message.value = 'Deletion cancelled.';
return;
}
contacts.value = contacts.value.filter((x) => x.id !== c.id);
message.value = `${c.name} has been deleted.`;
}
async function removeAll(): Promise<void> {
if (await confirm(`Delete the ${contacts.value.length} contacts?`)) {
contacts.value = [];
message.value = 'All the contacts have been deleted.';
}
}
</script>
<template>
<div class="container py-4" style="max-width: 640px">
<h1 class="h3 mb-3">Example 12 - a confirmation dialog</h1>
<ul class="list-group mb-3">
<li v-for="c in contacts" :key="c.id" class="list-group-item d-flex justify-content-between align-items-center">
{{ c.name }}
<button class="btn btn-sm btn-outline-danger" @click="remove(c)">Delete</button>
</li>
<li v-if="contacts.length === 0" class="list-group-item text-muted">No contacts.</li>
</ul>
<button class="btn btn-danger" :disabled="contacts.length === 0" @click="removeAll">Delete all</button>
<p v-if="message" class="alert alert-info mt-3">{{ message }}</p>
</div>
<!-- 对话框,在整个应用中只有一个 -->
<ConfirmDialog />
</template>
|
- 第 29 行:多亏了 Promise,代码写起来和使用 [window.confirm] 一样简单:[async] 函数会“等待”用户的回应;
- 第 59 行:该窗口,在整个应用中只创建一次。
点击“Yes, confirm”之后: