7. 使用 C# 和 VS.NET 开发图形界面
7.1. 图形用户界面的基础
7.1.1. 首个项目
让我们构建一个“Windows应用程序”类型的第一个项目:
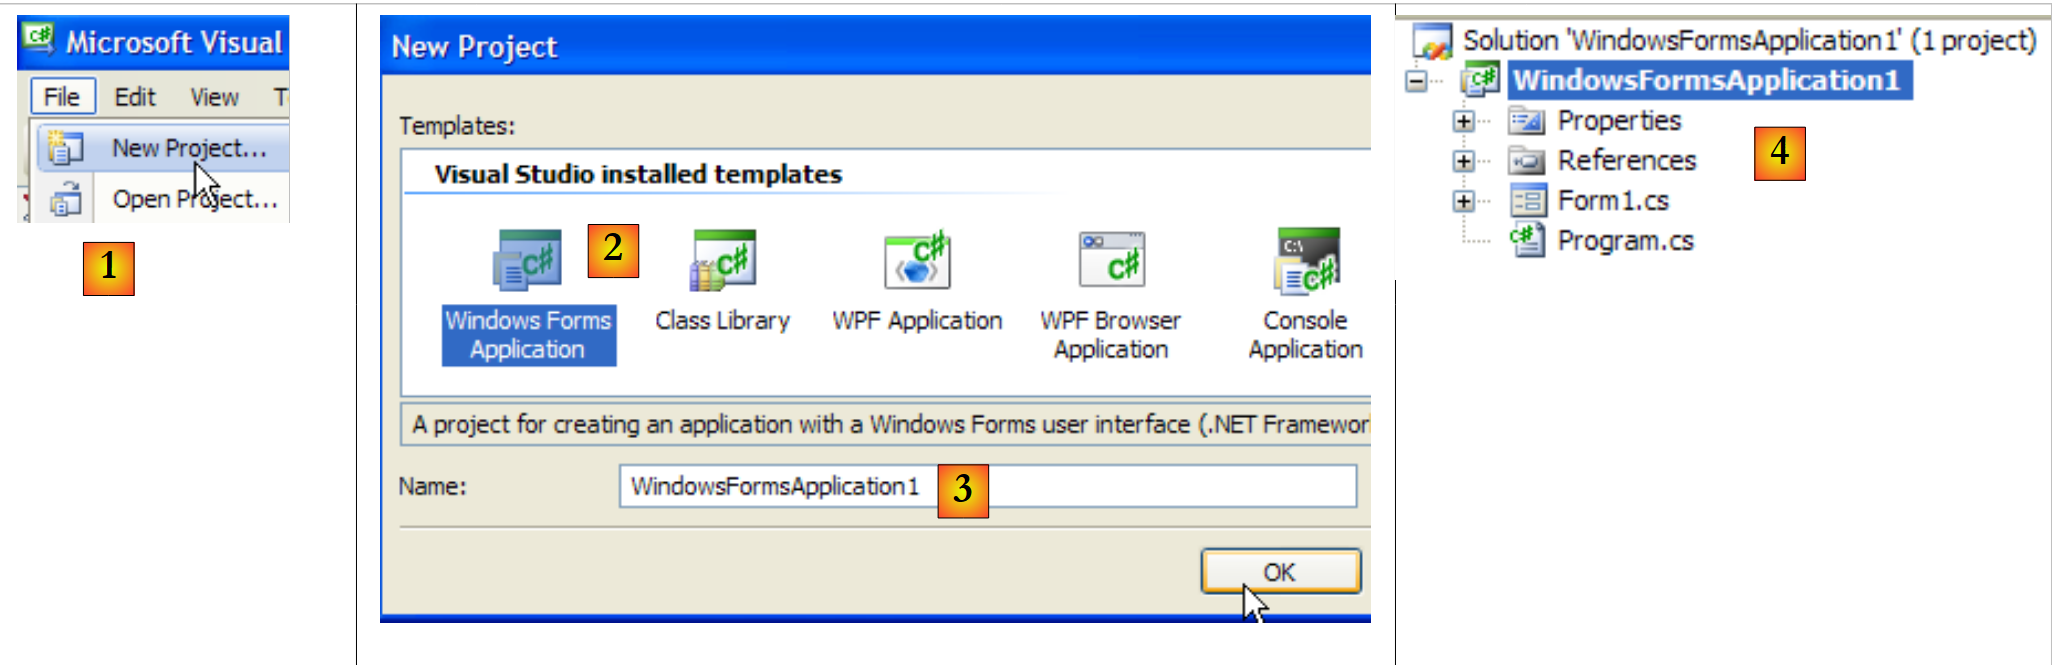 |
- [1]:创建新项目
- [2]:类型为 Windows 应用程序
- [3]:项目名称目前并不重要
- [4]:项目已创建
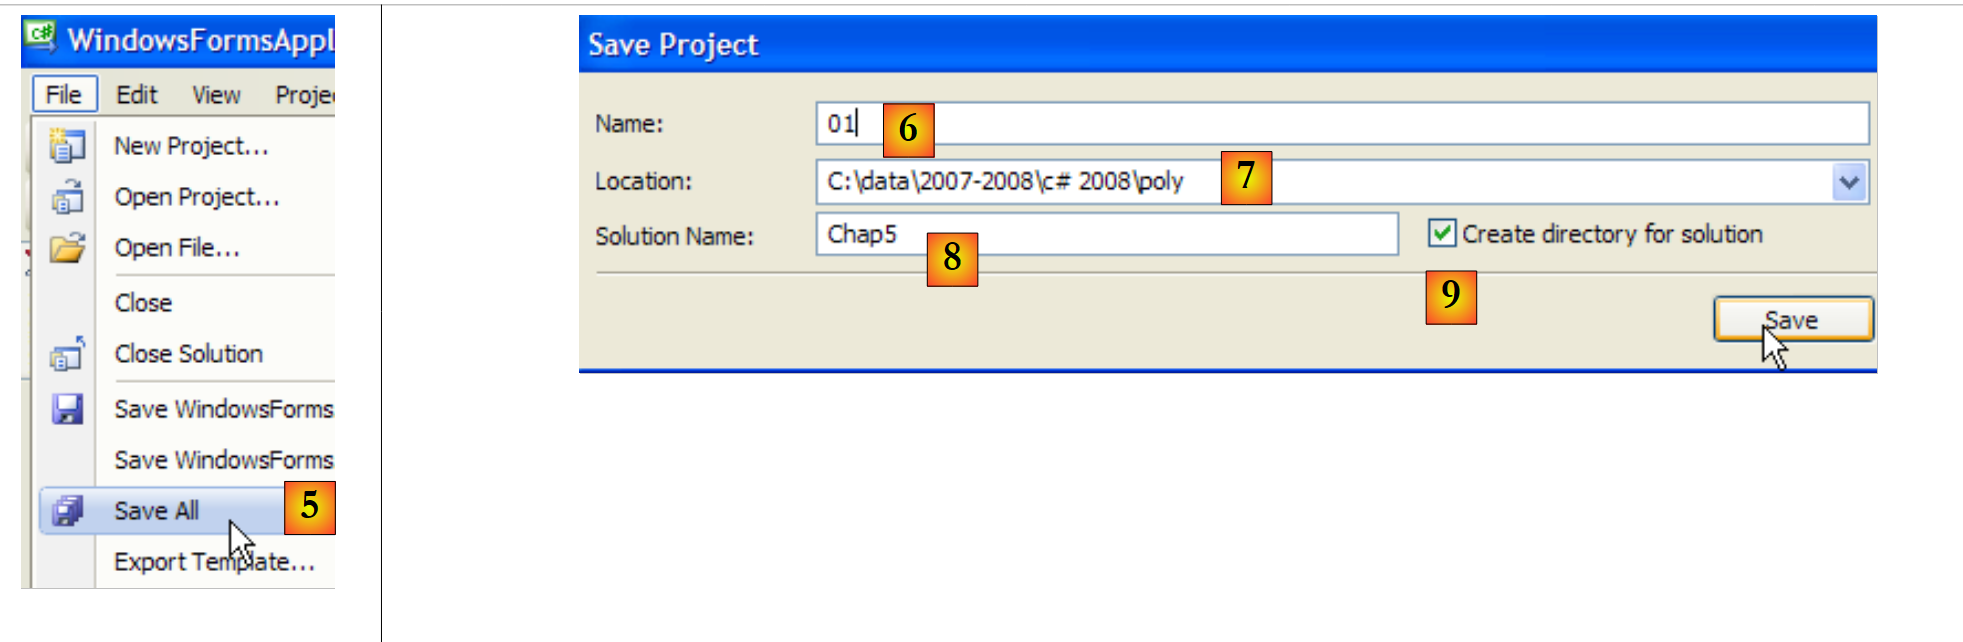 |
- [5]:保存当前解决方案
- [6]:项目名称
- [7]:解决方案文件夹
- [8]:解决方案名称
- [9]:将为 [Chap5] 解决方案创建一个文件夹。该解决方案中的项目将位于子文件夹中。
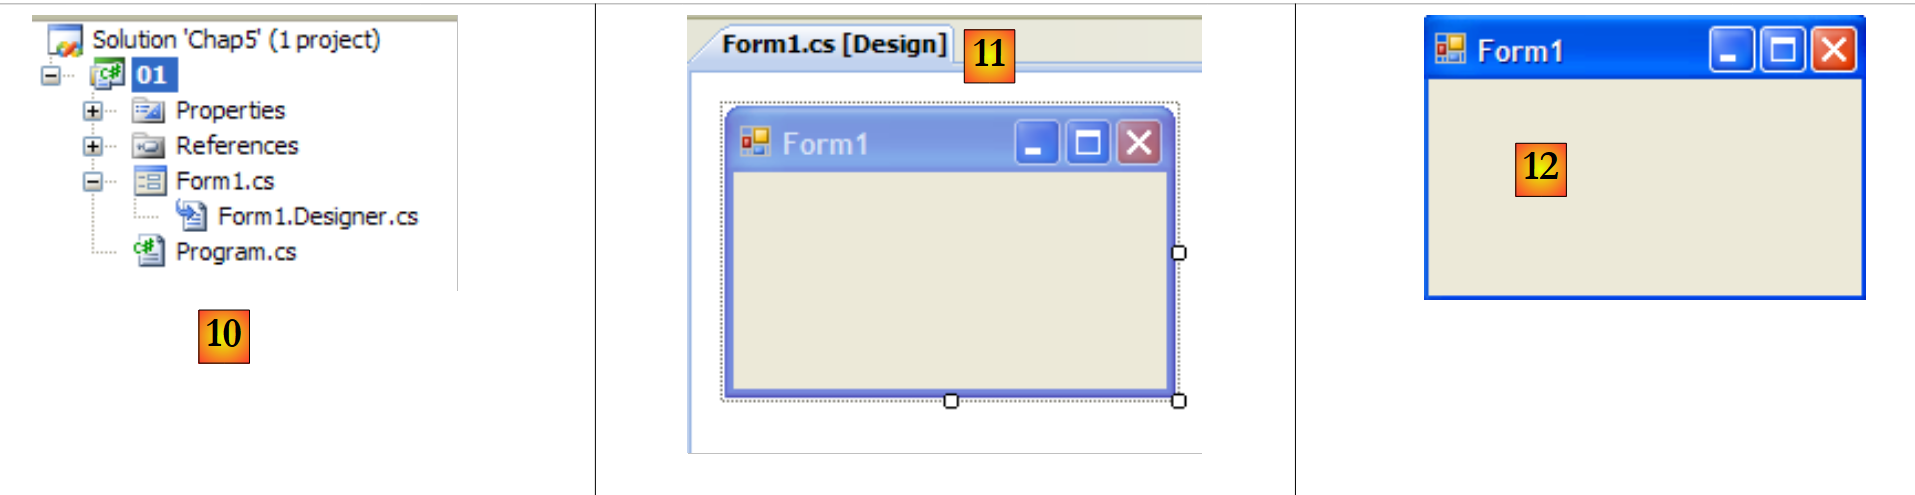 |
- [10]:位于解决方案 [Chap5] 中的项目 [01]:
- [Program.cs] 是该项目的类
- [Form1.cs] 是负责管理 [11] 窗口行为的源文件
- [Form1.Designer.cs] 是将封装 [11] 窗口组件信息的源文件
- [11]:处于“设计”模式的 [Form1.cs] 文件
- [12]:生成的应用程序可通过 (Ctrl-F5) 执行。此时将显示窗口 [Form1]。该窗口可移动、调整大小并关闭。至此,我们已具备图形窗口的基本要素。
主类 [Program.cs] 如下所示:
using System;
using System.Windows.Forms;

namespace Chap5 {
    static class Program {
        /// <summary>
        /// 应用程序的主入口点。
        /// </summary>
        [STAThread]
        static void Main() {
            Application.EnableVisualStyles();
            Application.SetCompatibleTextRenderingDefault(false);
            Application.Run(new Form1());
        }
    }
}
- 第 2 行:包含表单的应用程序使用命名空间 System.Windows.Forms。
- 第4行:初始命名空间已重命名为Chap5。
- 第 10 行:在运行项目(Ctrl-F5)时,将执行方法 [Main]。
- 第 11-13 行:类 Application 属于命名空间 System.Windows.Forms。它包含用于启动/停止 Windows 图形应用程序的静态方法。
- 第 11 行:可选 - 用于为表单上放置的控件设置不同的视觉样式
- 第 12 行:可选 - 设置控件文本的渲染引擎:GDI+(true),GDI(false)
- 第 13 行:[Main] 方法中唯一必不可少的一行:实例化表单类 [Form1],并要求其执行。
源文件 [Form1.cs] 如下:
using System;
using System.Windows.Forms;

namespace Chap5 {
    public partial class Form1 : Form {
        public Form1() {
            InitializeComponent();
        }
    }
}
- 第 5 行:类 Form1 继承自类 [System.Windows.Forms.Form],后者是所有窗口的父类。 关键字 partial 表示该类是部分类,可由其他源文件进行补充。本例中正是如此,类 Form1 被拆分为两个文件:
- [Form1.cs]:其中包含表单的行为逻辑,特别是其事件处理程序
- [Form1.Designer.cs]:包含表单组件及其属性。该文件的特殊之处在于,每当用户在 [conception] 模式下修改窗口时,它都会被重新生成。
- 第6-8行:Form1类的构造函数
- 第7行:调用了方法InitializeComponent。可以看出,该方法在[Form1.cs]中并不存在,而是在[Form1.Designer.cs]中定义的。
源文件 [Form1.Designer.cs] 内容如下:
namespace Chap5 {
    partial class Form1 {
        /// <summary>
        /// 必需的设计器变量。
        /// </summary>
        private System.ComponentModel.IContainer components = null;

        /// <summary>
        /// 清理所有正在使用的资源。
        /// </summary>
        /// <param name="disposing">如果应释放托管资源,则为 true;否则为 false。</param>
        protected override void Dispose(bool disposing) {
            if (disposing && (components != null)) {
                components.Dispose();
            }
            base.Dispose(disposing);
        }

        #Windows Form Designer 生成的代码

        /// <summary>
        /// 设计器支持所需的必备方法——请勿修改
        /// 请勿使用代码编辑器修改此方法的内容。
        /// </summary>
        private void InitializeComponent() {
            this.SuspendLayout();
            //
            // Form1
            //
            this.AutoScaleDimensions = new System.Drawing.SizeF(6F, 13F);
            this.AutoScaleMode = System.Windows.Forms.AutoScaleMode.Font;
            this.ClientSize = new System.Drawing.Size(196, 98);
            this.Name = "Form1";
            this.Text = "Form1";
            this.ResumeLayout(false);

        }

         #endregion

    }
}
- 第 2 行:这仍然是类 Form1。请注意,不再需要重复说明它继承自类 Form。
- 第 25-37 行:由类 [Form1] 的构造函数调用的方法 InitializeComponent。该方法将创建并初始化表单的所有组件。在 [conception] 模式下,每当表单发生更改时,该方法都会被重新生成。 为界定该表单,创建了一个名为 région 的部分(第 19-39 行)。开发人员不应在此区域添加代码:这些代码将在下次重新生成时被覆盖。
起初,最好先不要关注 [Form1.Designer.cs] 中的代码。该代码是自动生成的,它是开发人员在 [conception] 模式下所做选择的 C# 语言实现。让我们来看一个简单的示例:
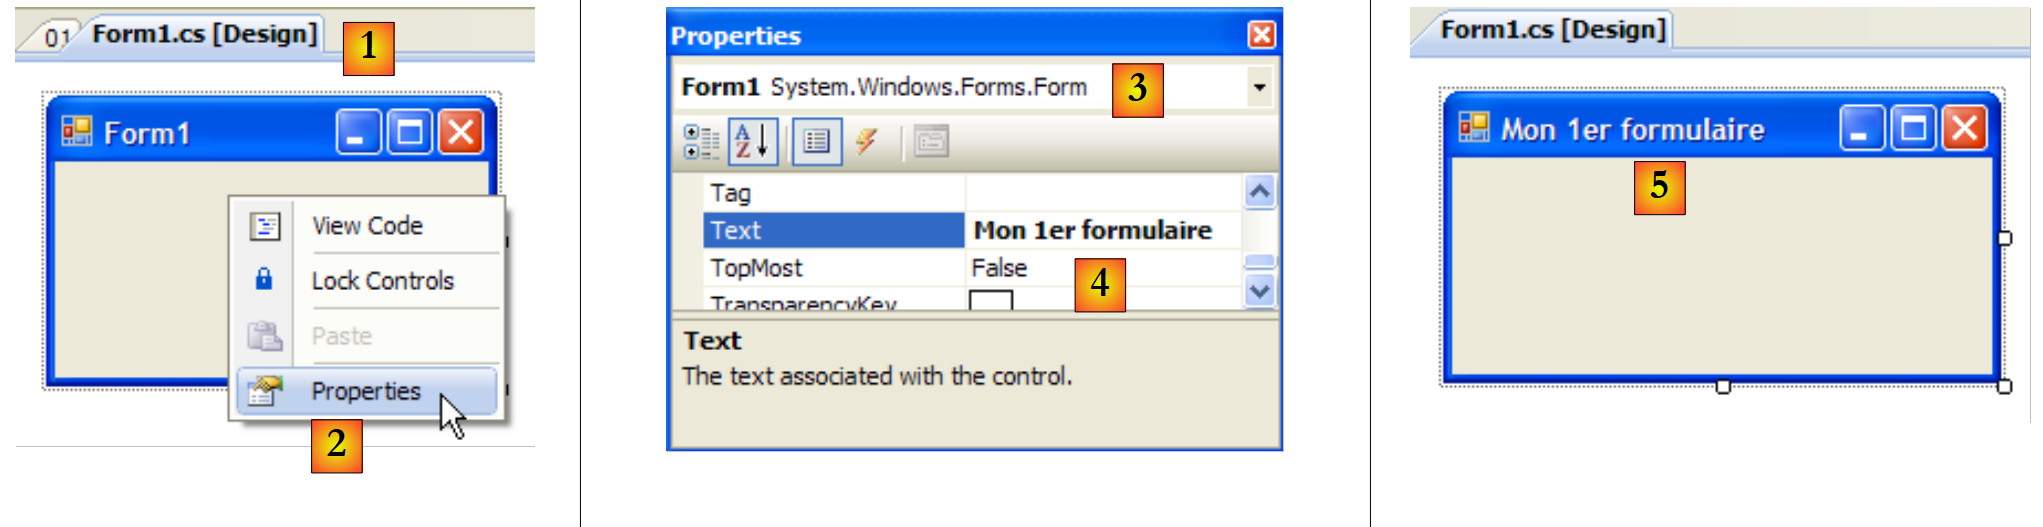 |
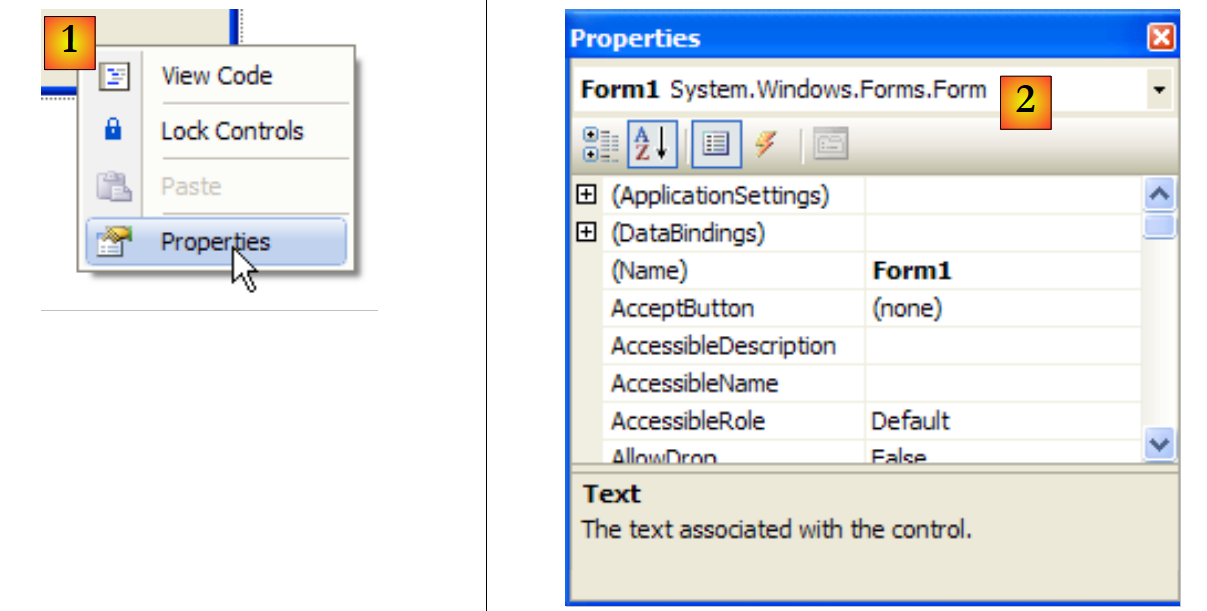
- [1]:双击文件 [Form1.cs] 选择 [conception] 模式
- [2]:右键单击表单并选择 [Properties]
- [3]:[Form1]的属性窗口
- [4]:属性 [Text] 代表窗口标题
- [5]:[Text]属性的更改在[conception]模式下以及源代码中均已生效 [Form1.Designer.cs]:
        private void InitializeComponent() {
            this.SuspendLayout();
...
            this.Text = "Mon 1er formulaire";
...
}
7.1.2. 第二个项目
7.1.2.1. 表单
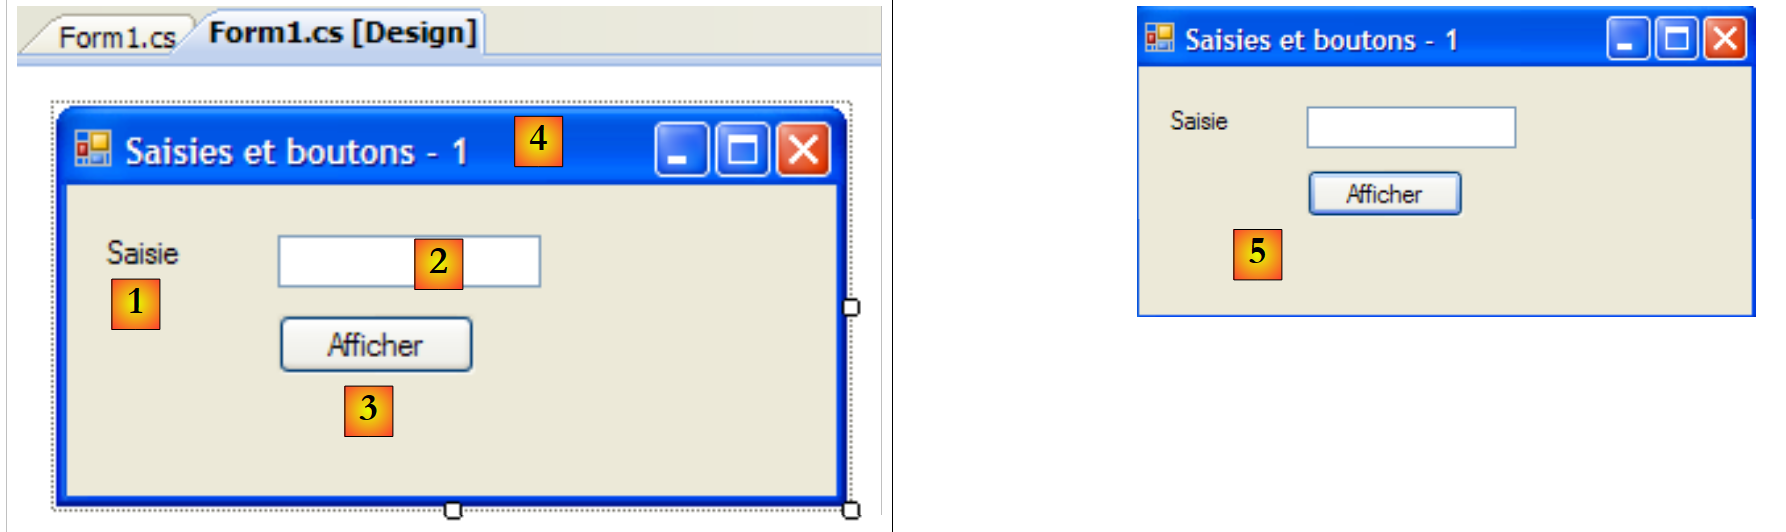
我们开始一个名为 02 的新项目。为此,我们遵循之前说明的流程来创建项目。要创建的窗口如下:
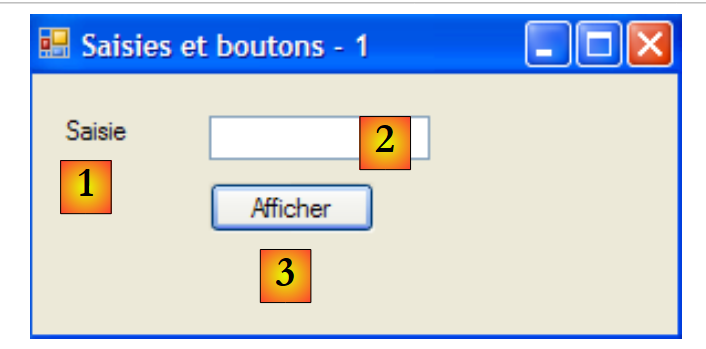 |
表单的组件如下:
编号 | 名称 | 类型 | 作用 |
1 | labelSaisie | 标签 | 名称 |
2 | textBoxSaisie | TextBox | 输入框 |
3 | buttonAfficher | 按钮 | 用于在对话框中显示输入框的内容textBoxSaisie |
可以按照以下步骤构建此窗口:
 |
- [1]:在表单上任意非控件区域右键单击,并选择选项 [Properties]
- [2]:窗口的属性表将显示在 Visual Studio 的右下角
表单属性中需注意的包括:
用于设置窗口的背景颜色 | |
用于设置窗口中图形或文本的颜色 | |
为窗口关联菜单 | |
为窗口设置标题 | |
用于设置窗口类型 | |
用于设置窗口中文字的字体 | |
用于设置窗口名称 |
在此,我们设置属性 Text 和 Name:
输入框和按钮 - 1 | |
frmSaisiesBoutons |
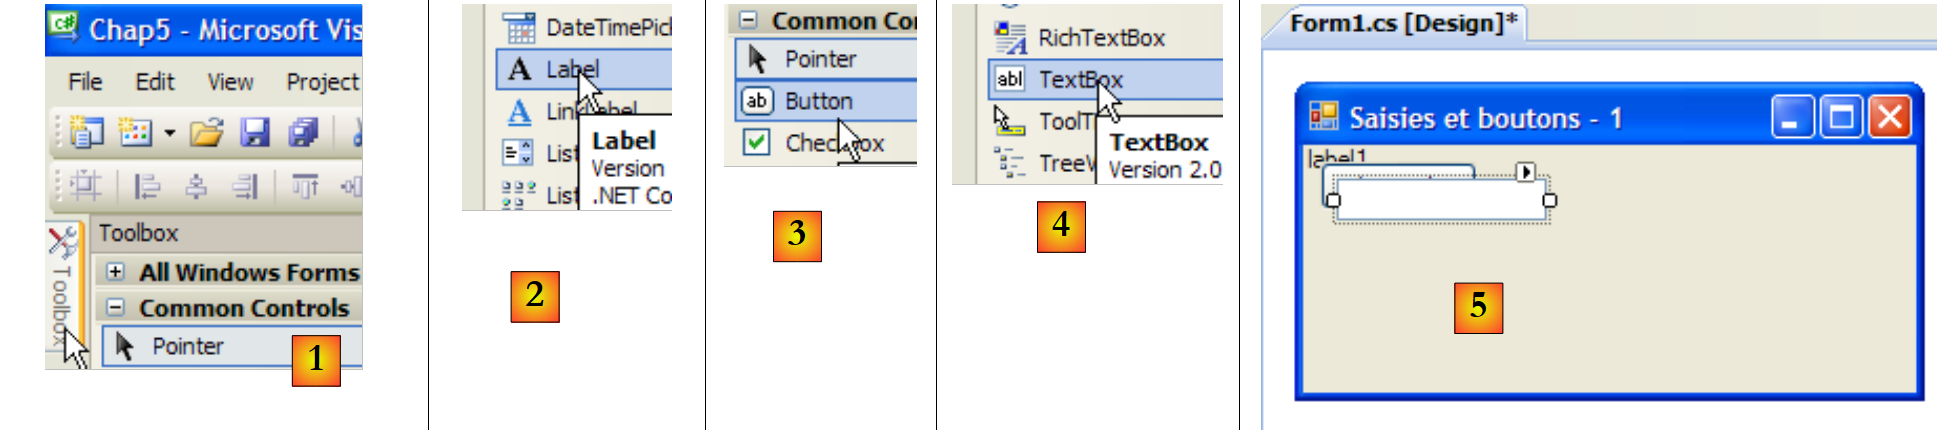 |
- [1]:从 Visual Studio 提供的工具箱中选择 [Common Controls] 工具箱
- [2, 3, 4]:依次双击组件 [Label]、[Button] 和 [TextBox]
- [5]:这三个组件已位于窗体上
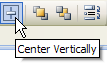
要正确对齐和调整组件大小,可以使用工具栏中的控件:
 | |||||||||
格式设置的原理如下:
- 选择需要一起格式化的各个组件(在点击选择组件时按住Ctrl键)
- 选择所需的格式类型:
- (续)
- Align选项可将组件对齐至顶部、底部、左侧、右侧或中间
- “Make Same Size”选项可使组件具有相同的高度或宽度
- “Horizontal Spacing”选项可将组件水平对齐,并保持相同宽度的间距。同理,“Vertical Spacing”选项用于垂直对齐。
- 选项 Center 可将组件在窗口中水平居中(Horizontally)或垂直居中(Vertically)
放置好组件后,我们需要设置其属性。为此,请右键单击组件并选择选项 Properties:
 |
- [1]:选中该组件以打开其属性窗口。在该窗口中,修改以下属性:name:labelSaisie,text:Saisie
- [2]:按同样方法操作:name:textBoxSaisie,text:留空
- [3]:name:buttonAfficher,text:Afficher
- [4]:窗口本身:name:frmSaisiesBoutons,text:输入框和按钮 - 1
- [5]:运行(Ctrl-F5)该项目,以初步预览窗口的运行效果。
在 [conception] 模式下完成的操作已转换为 [Form1.Designer.cs] 中的代码:
namespace Chap5 {
    partial class frmSaisiesBoutons {
...
        private System.ComponentModel.IContainer components = null;
...
        private void InitializeComponent() {
            this.labelSaisie = new System.Windows.Forms.Label();
            this.buttonAfficher = new System.Windows.Forms.Button();
            this.textBoxSaisie = new System.Windows.Forms.TextBox();
            this.SuspendLayout();
            //
            // labelSaisie
            //
            this.labelSaisie.AutoSize = true;
            this.labelSaisie.Location = new System.Drawing.Point(12, 19);
            this.labelSaisie.Name = "labelSaisie";
            this.labelSaisie.Size = new System.Drawing.Size(35, 13);
            this.labelSaisie.TabIndex = 0;
            this.labelSaisie.Text = "Saisie";
            //
            // buttonAfficher
            //
            this.buttonAfficher.Location = new System.Drawing.Point(80, 49);
            this.buttonAfficher.Name = "buttonAfficher";
            this.buttonAfficher.Size = new System.Drawing.Size(75, 23);
            this.buttonAfficher.TabIndex = 1;
            this.buttonAfficher.Text = "Afficher";
            this.buttonAfficher.UseVisualStyleBackColor = true;
            this.buttonAfficher.Click += new System.EventHandler(this.buttonAfficher_Click);
            //
            // textBoxSaisie
            //
            this.textBoxSaisie.Location = new System.Drawing.Point(80, 19);
            this.textBoxSaisie.Name = "textBoxSaisie";
            this.textBoxSaisie.Size = new System.Drawing.Size(100, 20);
            this.textBoxSaisie.TabIndex = 2;
            //
            // frmSaisiesBoutons
            //
            this.AutoScaleDimensions = new System.Drawing.SizeF(6F, 13F);
            this.AutoScaleMode = System.Windows.Forms.AutoScaleMode.Font;
            this.ClientSize = new System.Drawing.Size(292, 118);
            this.Controls.Add(this.textBoxSaisie);
            this.Controls.Add(this.buttonAfficher);
            this.Controls.Add(this.labelSaisie);
            this.Name = "frmSaisiesBoutons";
            this.Text = "Saisies et boutons - 1";
            this.ResumeLayout(false);
            this.PerformLayout();

        }

        private System.Windows.Forms.Label labelSaisie;
        private System.Windows.Forms.Button buttonAfficher;
        private System.Windows.Forms.TextBox textBoxSaisie;

    }
}
- 第53-55行:这三个组件生成了[Form1]类中的三个私有字段。请注意,这些字段的名称即为[conception]模式下赋予组件的名称。第2行中的表单(即该类本身)也是如此。
- 第7-9行:创建了三个类型为[Label]、[TextBox]和[Button]的对象。视觉组件正是通过这些对象进行管理的。
- 第14-19行:配置标签labelSaisie
- 第 23-29 行:配置按钮 buttonAfficher
- 第 33-36 行:配置输入字段 textBoxSaisie
- 第40-47行:配置表单frmSaisiesBoutons。请注意第43-45行中向表单添加组件的方法。
该代码通俗易懂。因此,无需使用 [conception] 模式,即可通过代码构建表单。 Visual Studio 的 MSDN 文档中提供了大量此类示例。掌握此代码后,即可在运行时创建表单:例如,动态创建一个用于更新数据库表的表单,该表的结构仅在运行时才被发现。
接下来我们需要编写处理 Afficher 按钮点击事件的程序。选中该按钮以打开其属性窗口。该窗口包含多个选项卡:
 |
- [1]:按字母顺序排列的属性列表
- [2]:与控件相关的事件
控件的属性和事件可按类别或按字母顺序访问:
- [3]:按类别排列的属性或事件
- [4]:按字母顺序排列的属性或事件
Events 选项卡在 Catégories 模式下针对 buttonAfficher 按钮的设置如下:
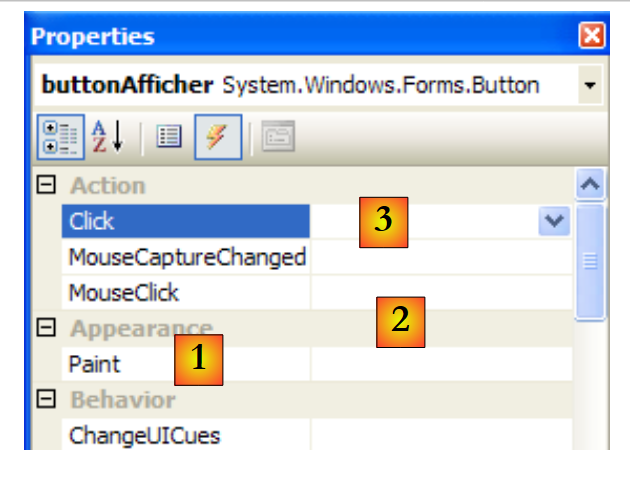 |
- [1]:窗口左侧列出了该按钮可能发生的事件。单击按钮对应事件 Click。
- [2]:右侧列包含在发生相应事件时调用的过程名称。
- [3]: 如果双击事件 Click 的单元格,系统将自动跳转到代码窗口,以便在按钮上编写事件处理程序 Click:
using System;
using System.Windows.Forms;

namespace Chap5 {
    public partial class frmSaisiesBoutons : Form {
        public frmSaisiesBoutons() {
            InitializeComponent();
        }

        private void buttonAfficher_Click(object sender, EventArgs e) {

        }
    }
}
- 第 10-12 行:名为 buttonAfficher 的按钮上 Click 事件处理程序的骨架。请注意以下几点:
- 方法的命名遵循 nomDuComposant_NomEvénement 模式
- 该方法为私有方法。它接收两个参数:
- sender:是触发该事件的对象。如果该过程是在点击按钮 buttonAfficher 后执行的,则 sender 将等于 buttonAfficher。 可以设想,过程 buttonAfficher_Click 是从另一个过程调用的。此时,该过程可以自由地将任意选定的对象 sender 作为第一个参数传入。
- EventArgs:一个包含事件信息的对象。对于事件 Click,它不包含任何内容。对于与鼠标移动相关的事件,其中将包含鼠标的 (X,Y) 坐标。
- 此处我们将不使用这些参数。
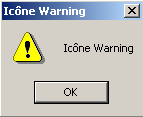
编写事件处理程序就是完善前面的代码框架。在此,我们希望弹出一个对话框,其中显示字段 textBoxSaisie 的内容(如果该字段不为空),否则显示错误信息 [1]:
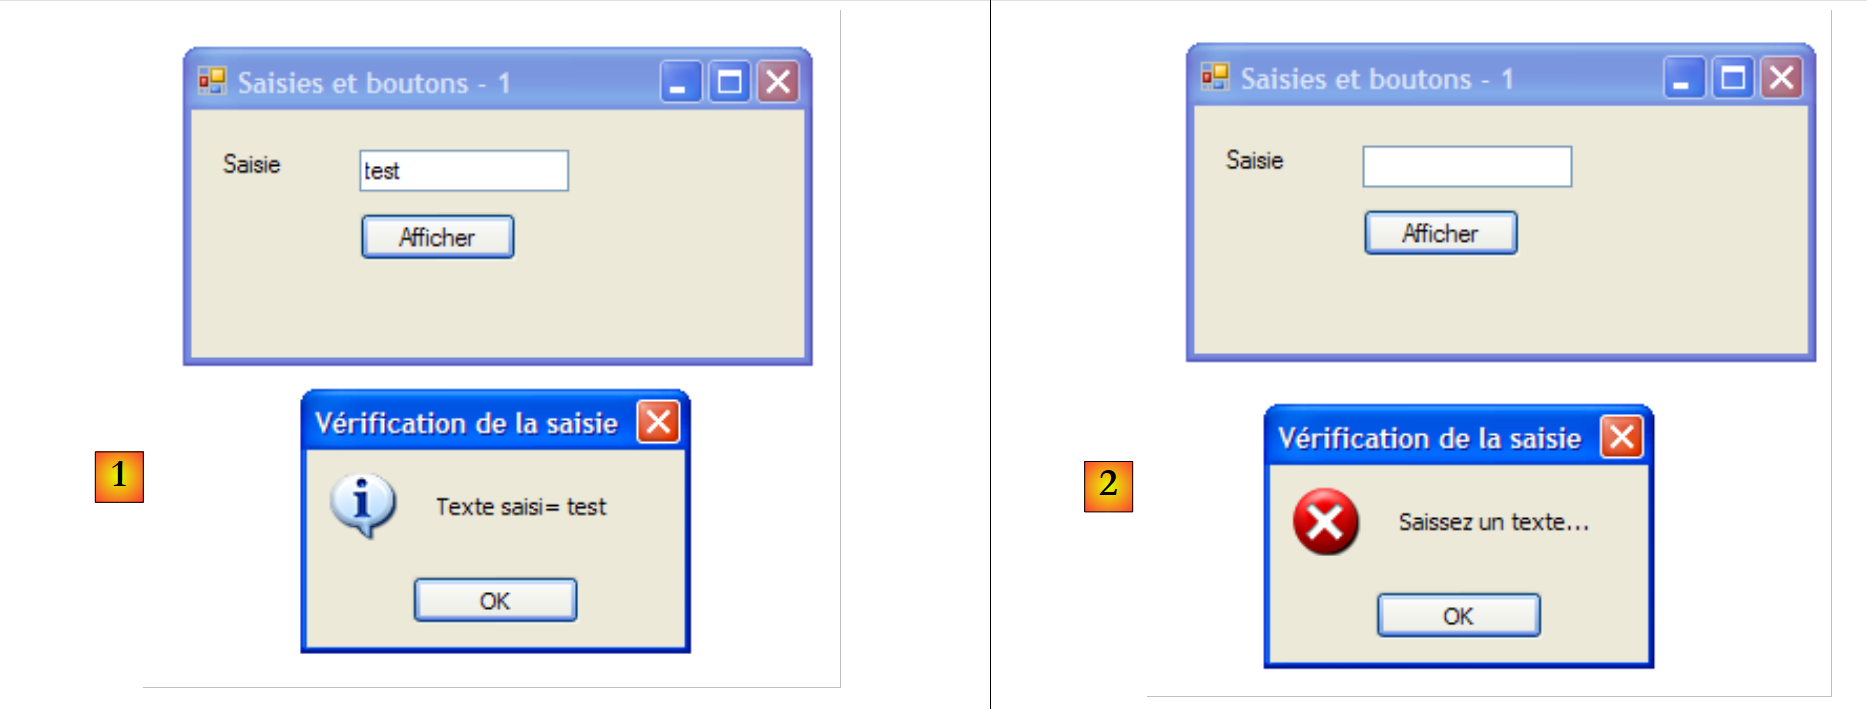 |
实现此功能的代码可能如下:
private void buttonAfficher_Click(object sender, EventArgs e) {
// 显示在TextBox中输入的文本 textboxSaisie
string texte = textBoxSaisie.Text.Trim();
if (texte.Length != 0) {
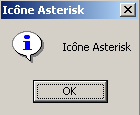
MessageBox.Show("Texte saisi= " + texte, "Vérification de la saisie", MessageBoxButtons.OK, MessageBoxIcon.Information);
} else {
MessageBox.Show("Saissez un texte...", "Vérification de la saisie", MessageBoxButtons.OK, MessageBoxIcon.Error);
}
类 MessageBox 用于在窗口中显示消息。此处我们使用了以下方法 Show:
public static DialogResult Show(string text, string caption, MessageBoxButtons buttons, MessageBoxIcon icon);
配合
为待显示的消息 | |
窗口标题 | |
窗口中的按钮 | |
窗口中的图标 |
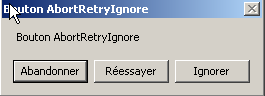
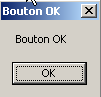
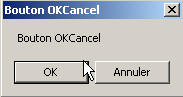
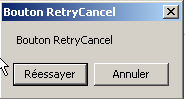
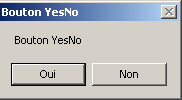
参数 buttons 的取值范围包括以下常量(如上文第 7 行所示,均以 MessageBoxButtons 为前缀):
按钮 | |
 | |
 | |
 | |
 | |
 | |
 |
参数 icon 的取值范围包括以下常量(如第 10 行所示,均以 MessageBoxIcon 为前缀):
 | 同上 停止 | ||
同上 警告 | 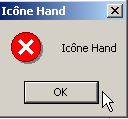 | ||
同上 Asterisk | 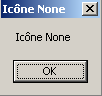 | ||
 | 同上 Hand | ||
 |
方法 Show 是一个静态方法,返回类型为 [System.Windows.Forms.DialogResult] 的枚举结果:
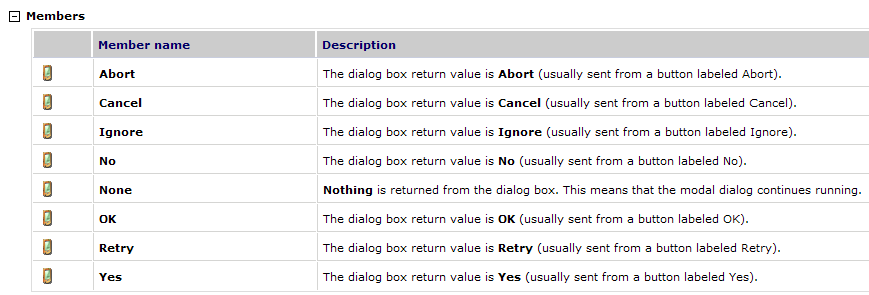
若要了解用户点击了哪个按钮来关闭类型为 MessageBox 的窗口,可编写如下代码:
7.1.2.2. 与事件处理相关的代码
除了我们编写的 buttonAfficher_Click 函数外,Visual Studio 还在 [Form1.Designer.cs] 的 InitializeComponents 方法中(该方法用于创建和初始化表单组件)生成了以下代码行:
this.buttonAfficher.Click += new System.EventHandler(this.buttonAfficher_Click);
Click 是 Button 和 [1, 2, 3] 类的事件:
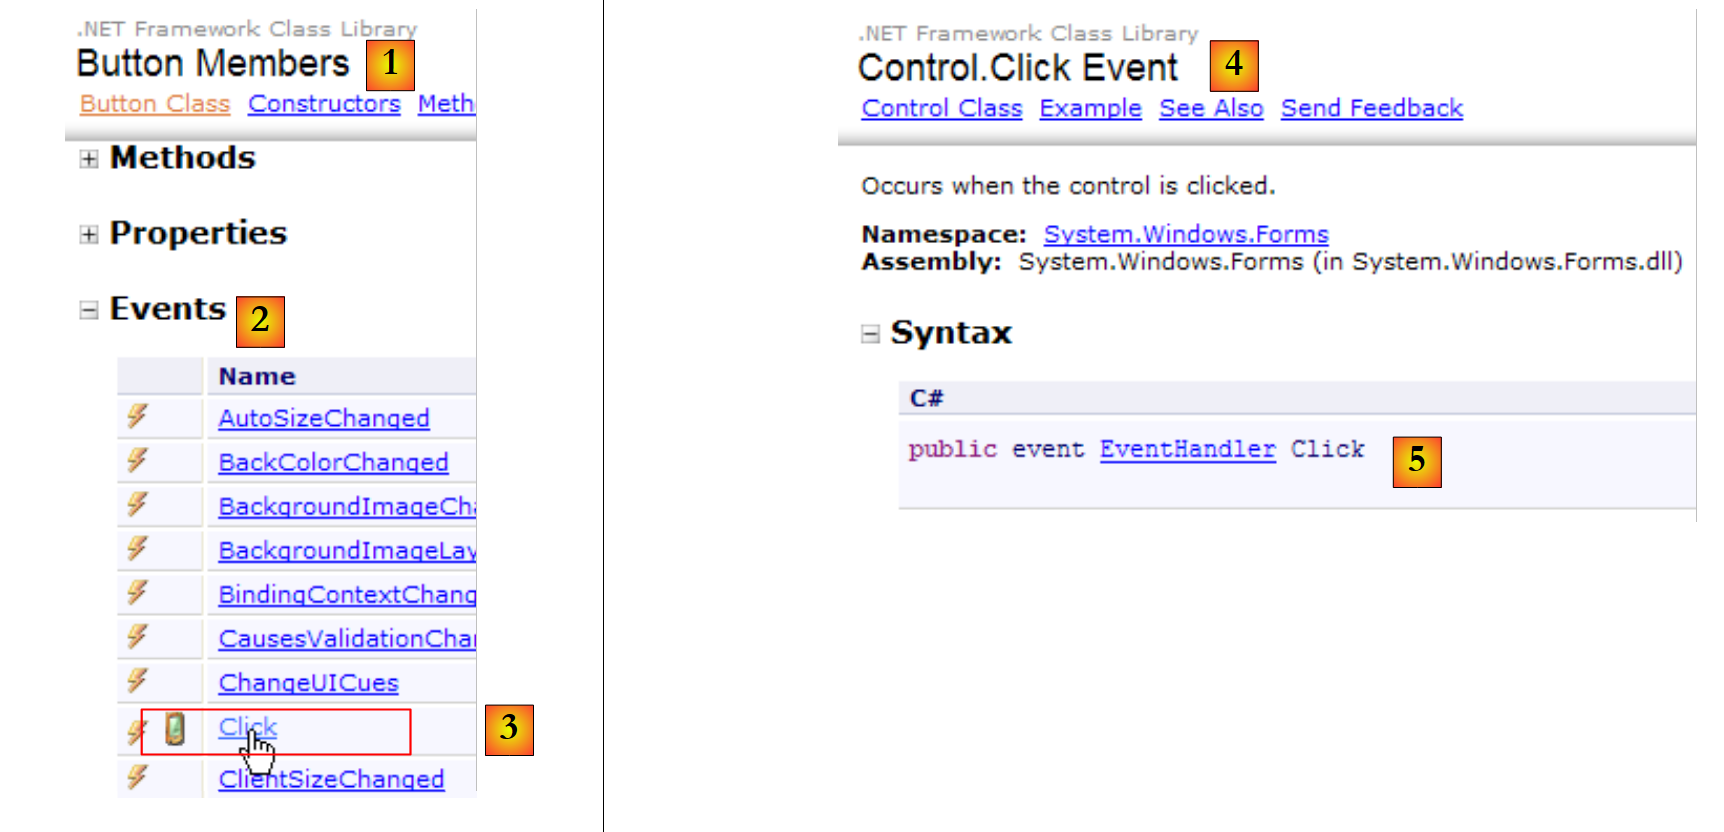 |
- [5]:事件声明 [Control.Click] [4]。 由此可见,Click事件并非[Button]类所独有。它属于[Control]类,即[Button]类的父类。
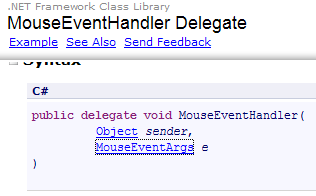
- EventHandler 是一个称为“委托”的方法原型(模板)。我们稍后会再讨论这一点。
- event 是一个关键字,用于限制 delegate 的功能。EventHandler: delegate 对象的功能比 event 对象更丰富。
delegate EventHandler 的定义如下:
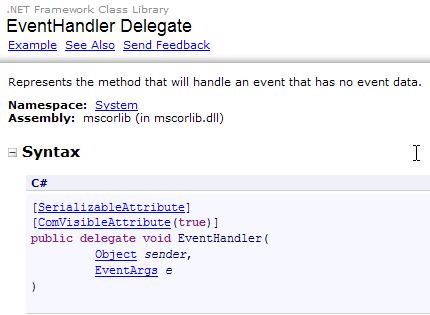 |
delegate EventHandler 表示一种方法模板:
- 其第一个参数为 Object 类型
- 第二个参数类型为 EventArgs
- 不返回任何结果
由 Visual Studio 生成的 buttonAfficher 按钮点击处理方法即属于此类:
private void buttonAfficher_Click(object sender, EventArgs e);
因此,方法 buttonAfficher_Click 对应于由类型 EventHandler 定义的原型。要创建类型为 EventHandler 的对象,请按以下步骤操作:
EventHandler evtHandler=new EventHandler(méthode correspondant au prototype défini par le type EventHandler);
由于方法 buttonAfficher_Click 对应于类型 EventHandler 定义的原型,因此可以写为:
类型为 delegate 的变量实际上是 delegate 类型方法的引用列表。 若要向上述变量 evtHandler 添加新方法 M,应使用以下语法:
即使 evtHandler 是一个空列表,也可以使用 += 语法。
让我们回到 [InitializeComponent] 这一行,它向 buttonAfficher 对象的 Click 事件添加了一个事件处理程序:
this.buttonAfficher.Click += new System.EventHandler(this.buttonAfficher_Click);
该语句将一个类型为 EventHandler 的方法添加到字段 buttonAfficher.Click 的方法列表中。每当在组件 buttonAfficher 上检测到事件 Click 时,这些方法都会被调用。 通常只有一个方法,它被称为“事件处理程序”。
让我们回顾一下 EventHandler 的签名:
private delegate void EventHandler(object sender, EventArgs e);
delegate 的第二个参数是一个 EventArgs 类型的对象,或其派生类的对象。EventArgs 类型非常通用,实际上并未提供关于已发生事件的任何信息。 对于按钮点击,这已足够。对于表单上的鼠标移动,则会产生一个 MouseMove 事件,该事件属于由以下定义的 [Form] 类:
delegate MouseEventHandler 的定义如下:
 |
这是一个签名为 void f (object, MouseEventArgs) 的委托函数。类 MouseEventArgs 由以下内容定义:
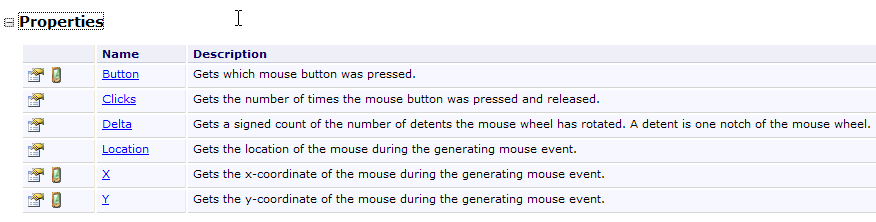 |
类 MouseEventArgs 的功能比类 EventArgs 更丰富。例如,我们可以获取事件发生时鼠标的 X 和 Y 坐标。
7.1.2.3. Conclusion
通过研究这两个项目,我们可以得出结论:一旦使用 Visual Studio 构建了图形用户界面,开发人员的主要工作就是编写用于管理该图形用户界面的事件处理程序。Visual Studio 会自动生成代码。这些代码可能比较复杂,初学者可以先忽略。日后,研究这些代码有助于更好地理解表单的创建和管理。
7.2. 基础组件
接下来,我们将介绍若干应用示例,这些示例运用了最常用的组件,旨在帮助大家了解这些组件的主要方法和属性。对于每个应用,我们将展示其图形用户界面以及关键代码,主要是事件处理程序的代码。
7.2.1. Form表单
首先介绍一个不可或缺的组件——表单,其他组件均放置于此。我们之前已介绍过其部分基本属性。本文将重点探讨表单中的几个重要事件。
表单正在加载中 | |
表单正在关闭 | |
表单已关闭 |
事件 Load 甚至在表单显示之前就已发生。事件 Closing 发生在表单正在关闭时。此时仍可通过编程方式阻止该关闭操作。
我们构建一个名为 Form1 的无组件表单:
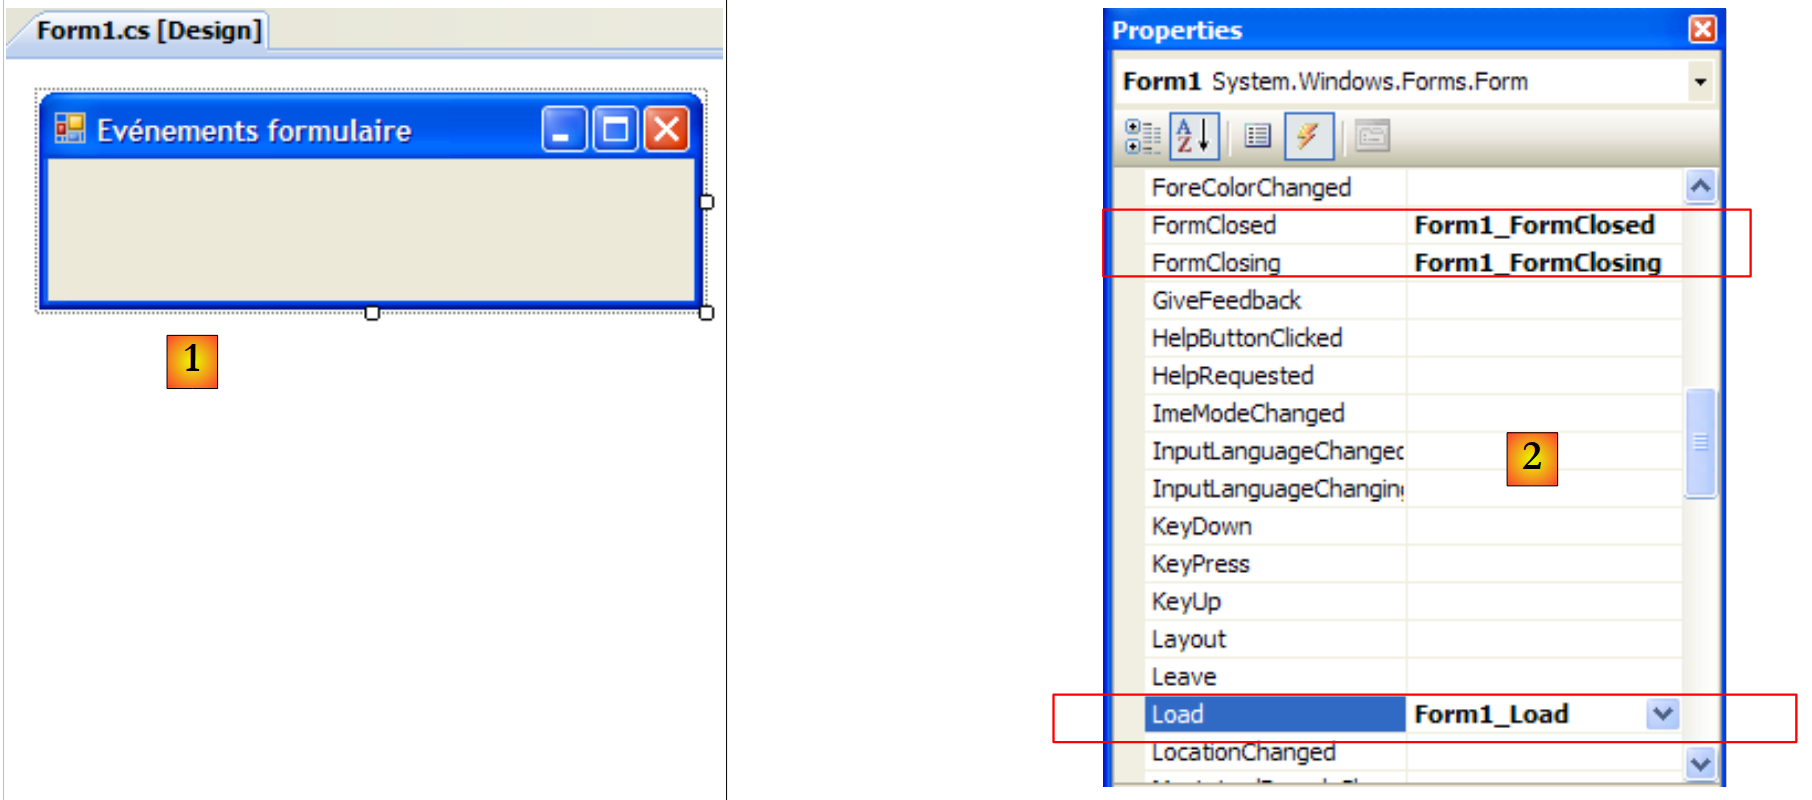 |
- [1]:表单
- [2]:处理的三个事件
[Form1.cs]的代码如下:
using System;
using System.Windows.Forms;
namespace Chap5 {
public partial class Form1 : Form {
public Form1() {
InitializeComponent();
}
private void Form1_Load(object sender, EventArgs e) {
// 表单初始加载
MessageBox.Show("Evt Load", "Load");
}
private void Form1_FormClosing(object sender, FormClosingEventArgs e) {
// 表单正在关闭
MessageBox.Show("Evt FormClosing", "FormClosing");
// 正在请求确认
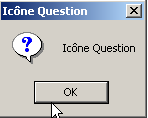
DialogResult réponse = MessageBox.Show("Voulez-vous vraiment quitter l'application", "Closing", MessageBoxButtons.YesNo, MessageBoxIcon.Question);
if (réponse == DialogResult.No)
e.Cancel = true;
}
private void Form1_FormClosed(object sender, FormClosedEventArgs e) {
// 表单即将关闭
MessageBox.Show("Evt FormClosed", "FormClosed");
}
}
}
我们使用函数 MessageBox 来接收各种事件的通知。
第 10 行:Load 事件将在 应用程序启动时触发,此时表单尚未显示: | 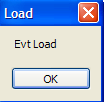 |
第 15 行:当 用户关闭窗口时触发。 | 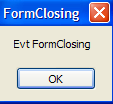 |
第19行:此时我们会询问用户是否真的要退出 应用程序: | 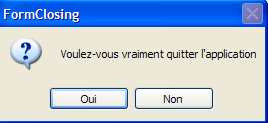 |
第20行:如果用户回答“否”,我们将 CancelEventArgs 事件的属性,该属性是方法接收的 。如果我们将该属性设置为 False,则 将不会发生,否则将照常进行。此时 FormClosed 事件将随之触发: | 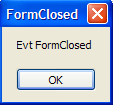 |
7.2.2. 标签控件和输入框 TextBox
我们之前已经遇到过这两个组件。Label是一个文本组件,而TextBox是一个输入字段组件。 它们的主要属性是 Text,该属性表示输入字段的内容或标签文本。该属性支持读写操作。
通常用于 TextBox 的事件是 TextChanged,该事件表示用户已修改输入字段。以下是一个使用 TextChanged 事件来跟踪输入字段变化的示例:
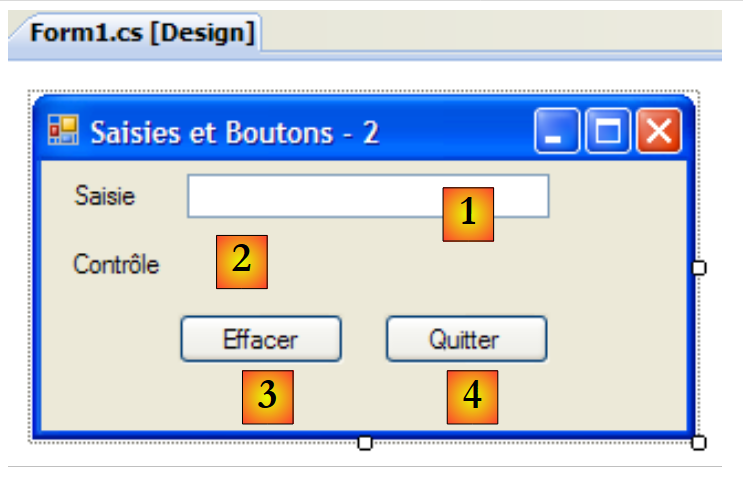 |
编号 | 类型 | 名称 | 角色 |
1 | TextBox | textBoxSaisie | 输入字段 |
2 | 标签 | labelControle | 实时显示1的文本 AutoSize=False, Text=(无) |
3 | 按钮 | buttonEffacer | 用于清除字段 1 和 2 |
4 | 按钮 | buttonQuitter | 用于退出应用程序 |
该应用程序的代码如下:
using System.Windows.Forms;

namespace Chap5 {
    public partial class Form1 : Form {
        public Form1() {
            InitializeComponent();
        }

        private void textBoxSaisie_TextChanged(object sender, System.EventArgs e) {
            // TextBox 的内容已更改 - 将其复制到标签 labelControle
            labelControle.Text = textBoxSaisie.Text;
        }

        private void buttonEffacer_Click(object sender, System.EventArgs e) {
            // 清空输入框内容
            textBoxSaisie.Text = "";
        }

        private void buttonQuitter_Click(object sender, System.EventArgs e) {
            // 点击“退出”按钮 - 退出应用程序
            Application.Exit();
        }

        private void Form1_Shown(object sender, System.EventArgs e) {
            // 将焦点移至输入框
            textBoxSaisie.Focus();
        }
    }
}
- 第 24 行:当表单显示时,会触发 [Form].Shown 事件
- 第26行:此时将焦点(用于输入)置于组件 textBoxSaisie 上
- 第 9 行:每当 TextBox 组件的内容发生变化时,都会触发 [TextBox].TextChanged 事件
- 第 11 行:将组件 [TextBox] 的内容复制到组件 [Label] 中
- 第 14 行:处理对按钮 [Effacer] 的点击
- 第 16 行:将空字符串放入组件 [TextBox]
- 第 19 行:处理对按钮 [Quitter] 的点击
- 第 21 行:用于停止正在运行的应用程序。需要注意的是,对象 Application 用于在 [Form1.cs] 的 [Main] 方法中启动应用程序:
        static void Main() {
            Application.EnableVisualStyles();
            Application.SetCompatibleTextRenderingDefault(false);
            Application.Run(new Form1());
}
以下示例使用了一个多行 TextBox:
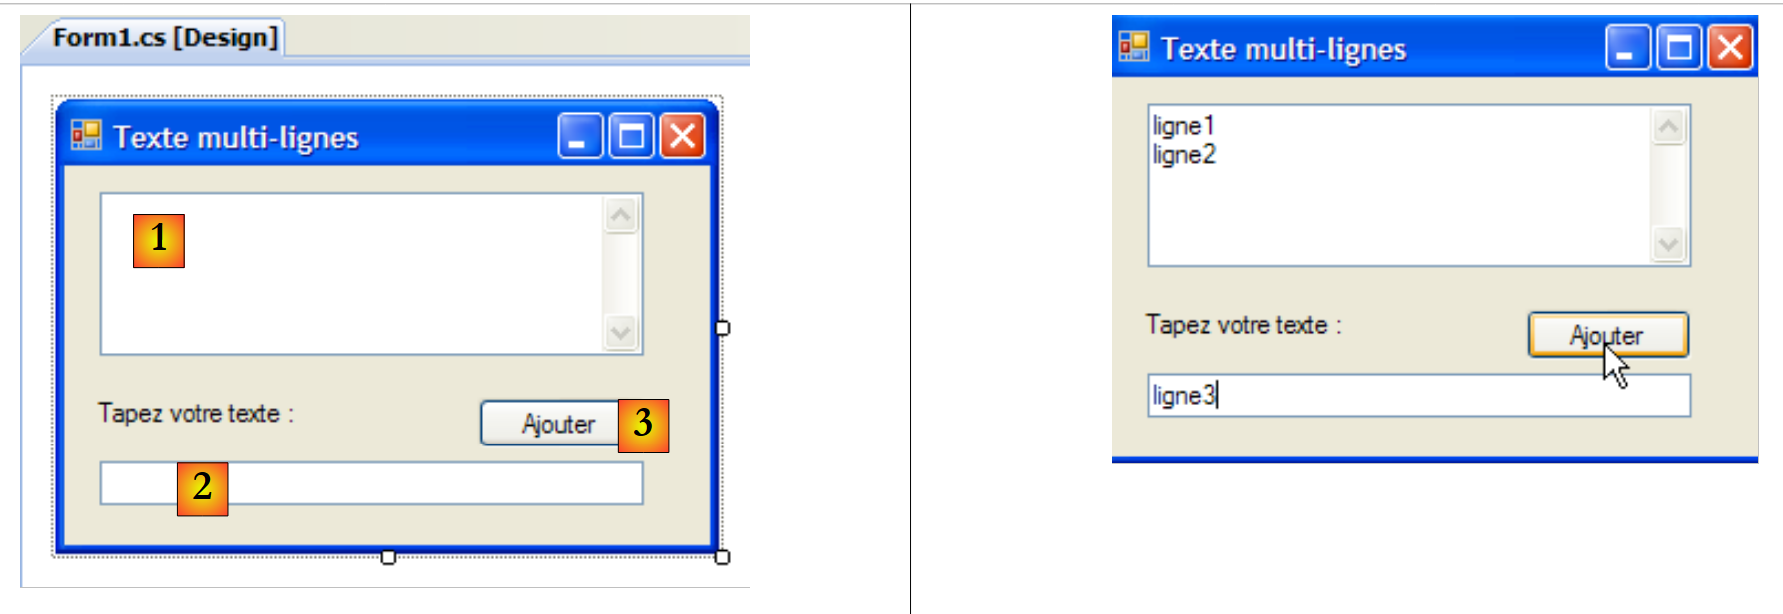 |
控件列表如下:
编号 | 类型 | 名称 | 作用 |
1 | TextBox | textBoxLignes | 多行输入框 多行=true, 滚动条=两边, 接受回车=true, 接受Tab键=true |
2 | TextBox | textBoxLigne | 单行输入框 |
3 | 按钮 | buttonAjouter | 将内容从第2行添加到第1行 |
要使 TextBox 成为多行控件,需设置以下控件属性:
以支持多行文本 | |
用于设置控件是否显示滚动条(Horizontal、Vertical、Both)或不显示(None) | |
若为 true,按回车键将换行 | |
若为 true,Tab 键将在文本中生成制表符 |
该应用程序允许直接在 [1] 中输入行,或通过 [2] 和 [3] 添加行。
应用程序的代码如下:
using System.Windows.Forms;
using System;

namespace Chap5 {
    public partial class Form1 : Form {
        public Form1() {
            InitializeComponent();
        }

        private void buttonAjouter_Click(object sender, System.EventArgs e) {
            // 将 textBoxLigne 的内容添加到 textBoxLignes 中
            textBoxLignes.Text += textBoxLigne.Text+Environment.NewLine;
            textBoxLigne.Text = "";
        }

        private void Form1_Shown(object sender, EventArgs e) {
            // 将焦点移至输入字段
            textBoxLigne.Focus();
        }
    }
}
- 第 18 行:当表单显示时(例如 Shown),将焦点置于输入字段 textBoxLigne
- 第 10 行:处理对按钮 [Ajouter] 的点击
- 第 12 行:将输入字段 textBoxLigne 的文本添加到输入字段 textBoxLignes 的文本中,并随后换行。
- 第 13 行:清空输入字段 textBoxLigne
7.2.3. 下拉列表 ComboBox
我们创建以下表单:
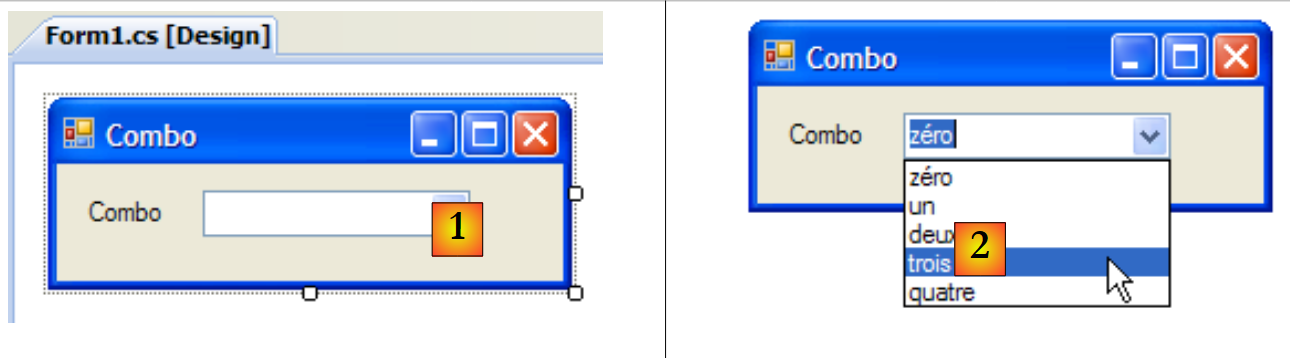 |
编号 | 类型 | 名称 | 角色 |
1 | ComboBox | comboNombres | 包含字符串 DropDownStyle=DropDownList |
ComboBox 组件是一个带有输入框的下拉列表:用户既可以在 (2) 中选择一个项目,也可以在 (1) 中输入文本。 ComboBox 组件有三种类型,由属性 DropDownStyle 确定:
带编辑区的非下拉列表 | |
带编辑区的下拉列表 | |
无编辑区域的下拉列表 |
默认情况下,ComboBox 的类型为 DropDown。
类 ComboBox 仅有一个构造函数:
创建一个空下拉列表 |
ComboBox 的元素可在 Items 属性中获取:
这是一个索引属性,Items[i] 表示下拉列表的第 i 个元素。该属性为只读。
假设 C 是一个下拉列表,C.Items 是其元素列表。我们有以下属性:
下拉列表的元素数量 | |
下拉列表的第 i 个选项 | |
将对象 o 添加为下拉列表的最后一个项目 | |
将一组对象添加到下拉列表末尾 | |
将对象 o 添加到下拉列表的第 i 个位置 | |
从下拉列表中移除第 i 个元素 | |
从下拉列表中移除对象 o | |
删除下拉列表中的所有项目 | |
将对象 o 置于下拉列表的第 i 位 | |
所选元素的索引 | |
所选元素 | |
所选元素的显示文本 | |
所选元素的显示文本 |
令人惊讶的是,下拉列表虽然视觉上显示的是字符串,却可以包含对象。如果一个 ComboBox 包含一个 obj 对象,它将显示字符串 obj.ToString()。 需要注意的是,每个对象都继承了来自 object 类的 ToString 方法,该方法会返回一个“代表”该对象的字符串。
在组合框 C 中选中的 Item 元素是 C.SelectedItem 或 C.Items[C.SelectedIndex],其中 C.SelectedIndex 是 ,该编号从第一个元素的 0 开始。选中的文本可通过多种方式获取:C.SelectedItem.Text、C.Text
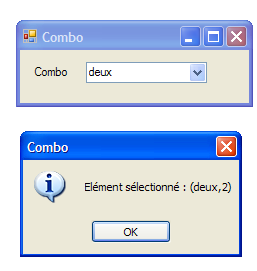
在下拉列表中选择元素时会触发事件 SelectedIndexChanged,该事件可用于监听下拉列表中选项的变更。在下面的应用程序中,我们利用此事件来显示列表中被选中的元素。
 |
应用程序的代码如下:
using System.Windows.Forms;

namespace Chap5 {
    public partial class Form1 : Form {
        private int previousSelectedIndex=0;

        public Form1() {
            InitializeComponent();
            // 填充下拉列表
            comboBoxNombres.Items.AddRange(new string[] { "zéro", "un", "deux", "trois", "quatre" });
            // 选择第 0 个元素
            comboBoxNombres.SelectedIndex = 0;
        }

        private void comboBoxNombres_SelectedIndexChanged(object sender, System.EventArgs e) {
            int newSelectedIndex = comboBoxNombres.SelectedIndex;
            if (newSelectedIndex != previousSelectedIndex) {
                // 选中的元素已更改 - 显示该元素
                MessageBox.Show(string.Format("Elément sélectionné : ({0},{1})", comboBoxNombres.Text, newSelectedIndex), "Combo", MessageBoxButtons.OK, MessageBoxIcon.Information);
                // 记录新索引
                previousSelectedIndex = newSelectedIndex;
            }
        }
    }
}
- 第 5 行:previousSelectedIndex 记录下拉列表中最后选中的索引
- 第 10 行:使用字符串数组填充下拉列表
- 第12行:选中第一个项目
- 第 15 行:每次用户从下拉列表中选择一个元素时执行的方法。与事件名称可能让人产生的误解不同,即使所选元素与上一个相同,该事件也会触发。
- 第 16 行:记录所选项的索引
- 第 17 行:如果它与上一个不同
- 第19行:显示所选项的编号和文本
- 第 21 行:记录新索引
7.2.4. 组件 ListBox
我们计划构建以下界面:
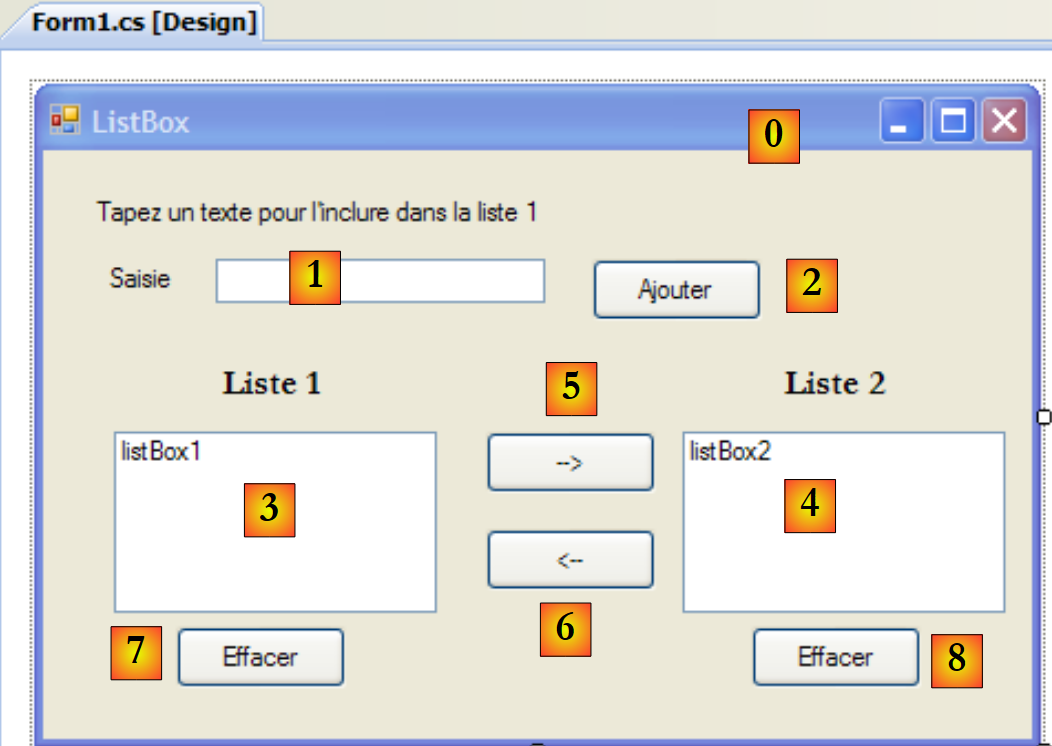 |
该窗口的组件如下:
编号 | 类型 | 名称 | 作用/属性 |
0 | 表单 | Form1 | 表单 FormBorderStyle=FixedSingle(不可调整大小的边框) |
1 | TextBox | textBoxSaisie | 输入框 |
2 | 按钮 | buttonAjouter | 用于将输入字段 [1] 的内容添加到列表 [3] 中的按钮 |
3 | ListBox | listBox1 | 列表 1 SelectionMode=MultiExtended: |
4 | ListBox | listBox2 | 列表 2 SelectionMode=MultiSimple: |
5 | 按钮 | button1vers2 | 将列表 1 中选中的项目转移到列表 2 |
6 | 按钮 | button2vers1 | 执行相反操作 |
7 | Button | buttonEffacer1 | 清空列表 1 |
8 | 按钮 | buttonEffacer2 | 清空列表 2 |
ListBox 组件的元素选择模式由其 SelectionMode 属性定义:
只能选择一个元素 | |
支持多选:按住 SHIFT 键并点击某个元素,将选中范围从先前选中的元素扩展至当前元素。 | |
支持多选:单击鼠标或按空格键可选中/取消选中一个元素。 |
- 用户在字段 1 中输入文本。通过按钮 Ajouter (2) 将其添加到列表 1 中。此时,输入字段 (1) 被清空,用户可以添加新项目。
- 用户可通过在任一列表中选中待转移的项目,并点击相应的转移按钮 5 或 6,将项目从一个列表转移到另一个列表。被转移的项目将添加到目标列表的末尾,并从源列表中移除。
- 用户可以双击列表 1 中的某个项目。该项目将被转移到输入框中以便修改,并从列表 1 中移除。
按钮的启用状态遵循以下规则:
- 仅当输入框中存在非空文本时,Ajouter按钮才会点亮
- 仅当列表 1 中选中了某个项目时,将列表 1 传输到列表 2 的按钮 [5] 才会亮起
- 仅当列表 2 中选中了某个项目时,将列表 2 传输到列表 1 的按钮 [6] 才会点亮
- 仅当待清除的列表中包含项目时,用于清除列表1和列表2的按钮[7]和[8]才会点亮。
在上述条件下,应用程序启动时所有按钮均应处于熄灭状态。此时需将按钮的 Enabled 属性设置为 false。 这可以在设计时完成,这样会自动在方法 InitializeComponent 中生成相应的代码;或者像下面这样在构造函数中自行实现:
        public Form1() {
            InitializeComponent();
            // --- 补充初始化 ---
            // 禁用若干按钮
            buttonAjouter.Enabled = false;
            button1vers2.Enabled = false;
            button2vers1.Enabled = false;
            buttonEffacer1.Enabled = false;
            buttonEffacer2.Enabled = false;
}
按钮 Ajouter 的状态由输入字段的内容控制。通过事件 TextChanged,我们可以跟踪该内容的变更:
        private void textBoxSaisie_TextChanged(object sender, System.EventArgs e) {
            // textBoxSaisie 的内容已更改
            // “添加”按钮仅在输入内容不为空时才处于激活状态
            buttonAjouter.Enabled = textBoxSaisie.Text.Trim() != "";
        }
传输按钮的状态取决于其所控制的列表中是否选中了某个项目:
        private void listBox1_SelectedIndexChanged(object sender, System.EventArgs e) {
            // 已选中一个元素
            // 启用“从1转至2”按钮
            button1vers2.Enabled = true;
        }

        private void listBox2_SelectedIndexChanged(object sender, System.EventArgs e) {
            // 已选中一个元素
            // 启用从2转至1的按钮
            button2vers1.Enabled = true;
}
点击按钮 Ajouter 时触发的代码如下:
        private void buttonAjouter_Click(object sender, System.EventArgs e) {
            // 向列表1中添加新元素
            listBox1.Items.Add(textBoxSaisie.Text.Trim());
            // 清空输入内容
            textBoxSaisie.Text = "";
            // 列表1不为空
            buttonEffacer1.Enabled = true;
            // 焦点返回输入框
            textBoxSaisie.Focus();
}
值得注意的是 Focus 方法,它允许将“焦点”置于表单控件上。点击 Effacer 按钮的关联代码如下:
        private void buttonEffacer1_Click(object sender, System.EventArgs e) {
            // 清空列表 1
            listBox1.Items.Clear();
            // “清除”按钮
            buttonEffacer1.Enabled = false;
        }

        private void buttonEffacer2_Click(object sender, System.EventArgs e) {
            // 清空列表 2
            listBox2.Items.Clear();
            // “清除”按钮
            buttonEffacer2.Enabled = false;
}
将选定列表中的元素转移到另一个列表的代码:
        private void button1vers2_Click(object sender, System.EventArgs e) {
            // 将列表 1 中选中的项目转移到列表 2
            transfert(listBox1, button1vers2, buttonEffacer1, listBox2, button2vers1, buttonEffacer2);
        }

        private void button2vers1_Click(object sender, System.EventArgs e) {
            // 将列表 2 中选中的项目转移到列表 1
            transfert(listBox2, button2vers1, buttonEffacer2, listBox1, button1vers2, buttonEffacer1);
        }
上述两种方法均将选定项从一个列表转移到另一个列表的任务委托给同一个名为“transfer”的私有方法:
        // 转移
        private void transfert(ListBox l1, Button button1vers2, Button buttonEffacer1, ListBox l2, Button button2vers1, Button buttonEffacer2) {
            // 将列表 l1 中选中的项目转移到列表 l2
            for (int i = l1.SelectedIndices.Count - 1; i >= 0; i--) {
                // 所选元素的索引
                int index = l1.SelectedIndices[i];
                // 添加到 l2
                l2.Items.Add(l1.Items[index]);
                // 从 l1 中删除
                l1.Items.RemoveAt(index);
            }
            // “清除”按钮
            buttonEffacer2.Enabled = l2.Items.Count != 0;
            buttonEffacer1.Enabled = l1.Items.Count != 0;
            // 转移按钮
            button1vers2.Enabled = false;
}
- 第 b 行:transfer 方法接收六个参数:
- 对包含所选元素的列表的引用,此处称为 l1。在应用程序运行时,l1 要么是 listBox1,要么是 listBox2。在转移过程 buttonXversY_Click 的第 3 行和第 8 行中可以看到调用示例。
- 指向与列表 l1 关联的传输按钮的引用。例如,如果 l1 为 listBox2,则该引用为 button2vers1(参见第 8 行调用)
- 列表 l1 的清除按钮的引用。例如,如果 l1 是 listBox1,则该引用为 buttonEffacer1(参见第 3 行调用)
- 其余三个引用类似,但指向列表 l2。
- 第 d 行:集合 [ListBox].SelectedIndices 表示在组件 [ListBox] 中选定元素的索引。这是一个集合:
- [ListBox].SelectedIndices.Count 是该集合中的元素数量
- [ListBox].SelectedIndices[i] 是该集合中的第 i 个元素
我们以反向顺序遍历集合:从集合的末尾开始,最终到达开头。我们将解释原因。
- f 行:列表 l1 中所选元素的索引
- 第 h 行:该元素被添加到列表 l2 中
- 第 j 行:并从列表 l1 中删除。由于已被删除,该元素不再被选中。第 d 行中的集合 l1.SelectedIndices 将被重新计算。它将丢失刚刚被删除的元素。该元素之后的所有元素的编号都将从 n 变为 n-1。
- 如果第 (d) 行的循环是递增的,且刚刚处理了编号为 0 的元素,那么接下来它将处理编号为 1 的元素。然而,在删除编号为 0 的元素之前,原本编号为 1 的元素,此时将变为编号为 0。因此,该元素将被循环忽略。
- 如果第(d)行的循环是递减的,且刚处理完编号为 n 的元素,接下来它将处理编号为 n-1 的元素。在删除编号为 n 的元素后,编号为 n-1 的元素编号不会改变。因此,它将在下一个循环迭代中被处理。
- 第 m-n 行:按钮 [Effacer] 的状态取决于相关列表中是否存在元素
- 第 p 行:列表 l2 已无选中项:关闭其传输按钮。
7.2.5. 复选框 CheckBox,单选按钮 ButtonRadio
我们计划编写以下应用程序:
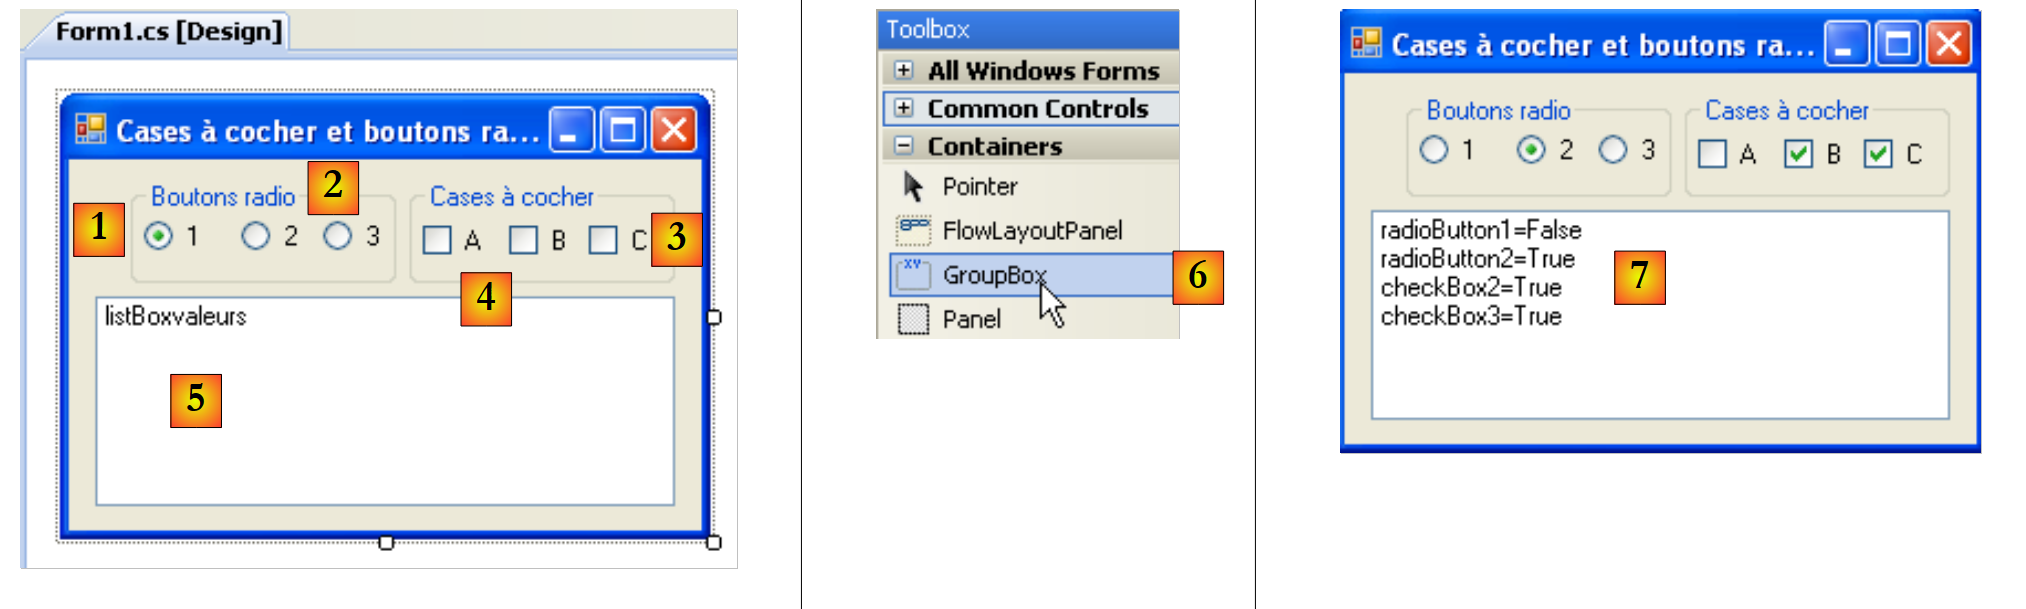 |
窗口的组件如下:
编号 | 类型 | 名称 | 作用 |
1 | GroupBox 参见 [6] | groupBox1 | 一个组件容器。可以在其中放置其他组件。 Text=单选按钮 |
2 | RadioButton | radioButton1 radioButton2 radioButton3 | 3 个单选按钮 - radioButton1 具有属性 Checked=True 和属性 Text=1 - radioButton2 的属性 Text=2- radioButton3 的属性 Text=3 位于同一容器(此处为 GroupBox)中的单选按钮彼此互斥:其中仅有一个处于选中状态。 |
3 | GroupBox | groupBox2 | |
4 | CheckBox | checkBox1 checkBox2 checkBox3 | 3 个复选框。chechBox1 具有属性 Checked=True 和属性 Text=A - chechBox2 的属性为 Text=B- chechBox3 的属性为 Text=C |
5 | ListBox | listBoxValeurs | 一个列表,会在发生任何变化时立即显示单选按钮和复选框的值。 |
6 | 显示 GroupBox 容器的位置 |
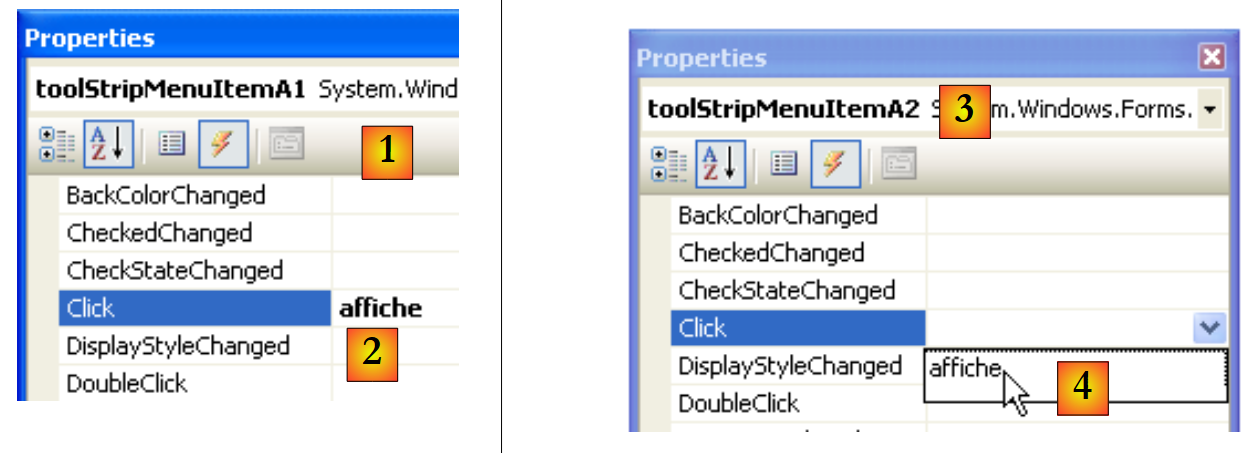
对于这六个控件,我们需要关注的事件是 CheckChanged 事件,该事件表示复选框或单选按钮的状态发生了变化。这两种情况下的状态均由布尔属性 Checked 表示,当该属性为 true 时,表示控件已被选中。 在此,我们将仅使用一个方法来处理这六个 CheckChanged 事件,即 affiche 方法。 为了让六个 CheckChanged 事件由同一个 affiche 方法处理,可以按以下步骤操作:
选择组件 radioButton1,右键单击以访问其属性:
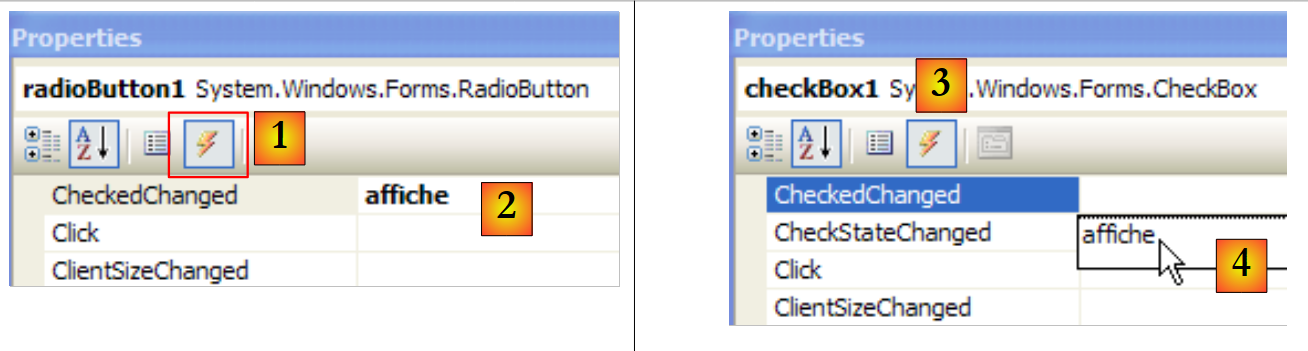 |
在“événements [1]”选项卡中,将方法 affiche [2] 关联到事件 CheckChanged。 这意味着希望点击选项 A1 时,由名为 affiche 的方法进行处理。Visual Studio 会在代码窗口中自动生成方法 affiche:
private void affiche(object sender, EventArgs e) {
        }
方法 affiche 属于 EventHandler 类型。
对于其余五个组件,操作方式相同。例如,我们选择 CheckBox1 选项及其事件 [3]。 在事件 Click 旁边,有一个下拉列表 [4],其中列出了能够处理该事件的现有方法。此处仅有一个方法 affiche.,我们选择它。对所有其他组件重复此过程。
在方法 InitializeComponent 中已生成代码。方法 affiche 被声明为以下六个事件 CheckedChanged 的处理程序,具体如下:
this.radioButton1.CheckedChanged += new System.EventHandler(this.affiche);
this.radioButton2.CheckedChanged += new System.EventHandler(this.affiche);
this.radioButton3.CheckedChanged += new System.EventHandler(this.affiche);
this.checkBox1.CheckedChanged += new System.EventHandler(this.affiche);
this.checkBox2.CheckedChanged += new System.EventHandler(this.affiche);
this.checkBox3.CheckedChanged += new System.EventHandler(this.affiche);
方法 affiche 的实现如下:
        private void affiche(object sender, System.EventArgs e) {
            // 显示单选按钮或复选框的状态
            // 这是复选框吗?
            if (sender is CheckBox) {
                CheckBox chk = (CheckBox)sender;
                listBoxvaleurs.Items.Add(chk.Name + "=" + chk.Checked);
            }
            // 这是单选按钮吗?
            if (sender is RadioButton) {
                RadioButton rdb = (RadioButton)sender;
                listBoxvaleurs.Items.Add(rdb.Name + "=" + rdb.Checked);
            }
}
语法
if (sender is CheckBox) {
可用于验证对象 sender 是否属于类型 CheckBox。随后,我们可以将其转换为确切的类型 sender。 方法 affiche 会将触发事件的组件名称及其属性值 Checked 写入列表 listBoxValeurs。 在执行 [7] 时,可以看到单击单选按钮会触发两个事件 CheckChanged:一个是旧的复选框状态变为“未选中”,另一个是新的复选框状态变为“已选中”。
7.2.6. ScrollBar 控件
调光器有多种类型: 水平调节器(HscrollBar), 垂直变速器(VscrollBar), 增量器(NumericUpDown)。 |
让我们实现以下应用程序:
 |
编号 | 类型 | 名称 | 角色 |
1 | hScrollBar | hScrollBar1 | 水平变速器 |
2 | hScrollBar | hScrollBar2 | 一个水平调节器,其变化与调节器1同步 |
3 | 标签 | labelValeurHS1 | 显示水平调节器的数值 |
4 | NumericUpDown | numericUpDown2 | 用于设定调节器2的数值 |
ScrollBar 滑块允许用户在由滑块“带”所表示的整数值范围内选择一个值,光标会在该“带”上移动。滑块的值可在其 Value 属性中获取。
- 对于水平滑块,左端代表范围的最小值,右端代表最大值,滑块指针代表当前选定的值。对于垂直滑块,顶端代表最小值,底端代表最大值。这些值由Minimum和Maximum属性表示,默认值分别为0和100。
- 点击滑块两端会使数值按点击端(默认值为1)的增量(正或负)发生变化,该增量参数名为SmallChange。
- 在滑块两侧点击会使数值以一个增量(正或负)变化,具体取决于点击的端点,该端点名为 LargeChange,默认值为 10。
- 当点击垂直滑块的上端时,其数值会减小。这可能会让普通用户感到意外,因为他们通常会预期数值“上升”。通过将属性 SmallChange 和 LargeChange 设置为负值,可以解决此问题
- 这五个属性(Value、Minimum、Maximum、SmallChange、LargeChange)支持读写操作。
- 变频器的主要事件是指示值发生变化的事件:Scroll事件。
一个名为 NumericUpDown 的组件位于变频器附近:它同样具有属性 Minimum、Maximum 和 Value,默认值分别为 0、100、0。 但在此处,属性 Value 显示在作为控件组成部分的输入框中。用户可以自行修改该值,除非将控件的属性 ReadOnly 设置为 true。 增量值由属性 Increment 确定,默认值为 1。组件 NumericUpDown 的主要事件是值发生变化时的通知事件:ValueChanged
应用程序代码如下:
using System.Windows.Forms;

namespace Chap5 {
    public partial class Form1 : Form {
        public Form1() {
            InitializeComponent();
            // 设置调速器 1 的参数
            hScrollBar1.Value = 7;
            hScrollBar1.Minimum = 1;
            hScrollBar1.Maximum = 130;
            hScrollBar1.LargeChange = 11;
            hScrollBar1.SmallChange = 1;
            // 将变频器2的参数设置为与变频器1相同
            hScrollBar2.Value = hScrollBar1.Value;
            hScrollBar2.Minimum = hScrollBar1.Minimum;
            hScrollBar2.Maximum = hScrollBar1.Maximum;
            hScrollBar2.LargeChange = hScrollBar1.LargeChange;
            hScrollBar2.SmallChange = hScrollBar1.SmallChange;
            // 增量器亦同
            numericUpDown2.Value = hScrollBar1.Value;
            numericUpDown2.Minimum = hScrollBar1.Minimum;
            numericUpDown2.Maximum = hScrollBar1.Maximum;
            numericUpDown2.Increment = hScrollBar1.SmallChange;

            // 将变频器1的数值赋给标签
            labelValeurHS1.Text = hScrollBar1.Value.ToString();
        }

        private void hScrollBar1_Scroll(object sender, ScrollEventArgs e) {
            // 变频器1的数值发生变化
            // 将其值同步到变频器2和标签
            hScrollBar2.Value = hScrollBar1.Value;
            labelValeurHS1.Text = hScrollBar1.Value.ToString();
        }

        private void numericUpDown2_ValueChanged(object sender, System.EventArgs e) {
            // 计数器值已更改
            // 设定变频器2的值
            hScrollBar2.Value = (int)numericUpDown2.Value;
        }
    }
}
7.3. 鼠标事件
在容器中绘图时,了解鼠标位置非常重要,例如在点击时显示一个点。鼠标的移动会在其移动的容器中触发事件。
 |
- [1]:鼠标在表单或控件上移动时触发的事件
- [2]:拖放操作(Drag'nDrop)时触发的事件
鼠标刚进入控件区域 | |
鼠标刚刚离开控件区域 | |
鼠标在控制区域内移动 | |
点击鼠标左键 | |
释放鼠标左键 | |
用户将对象拖放到控件上 | |
用户拖拽对象进入控件区域 | |
用户拖拽对象离开控件区域 | |
用户拖动对象时鼠标指针移至控件区域上方 |
以下是一个应用程序,可帮助您更好地理解各种鼠标事件在何时发生:
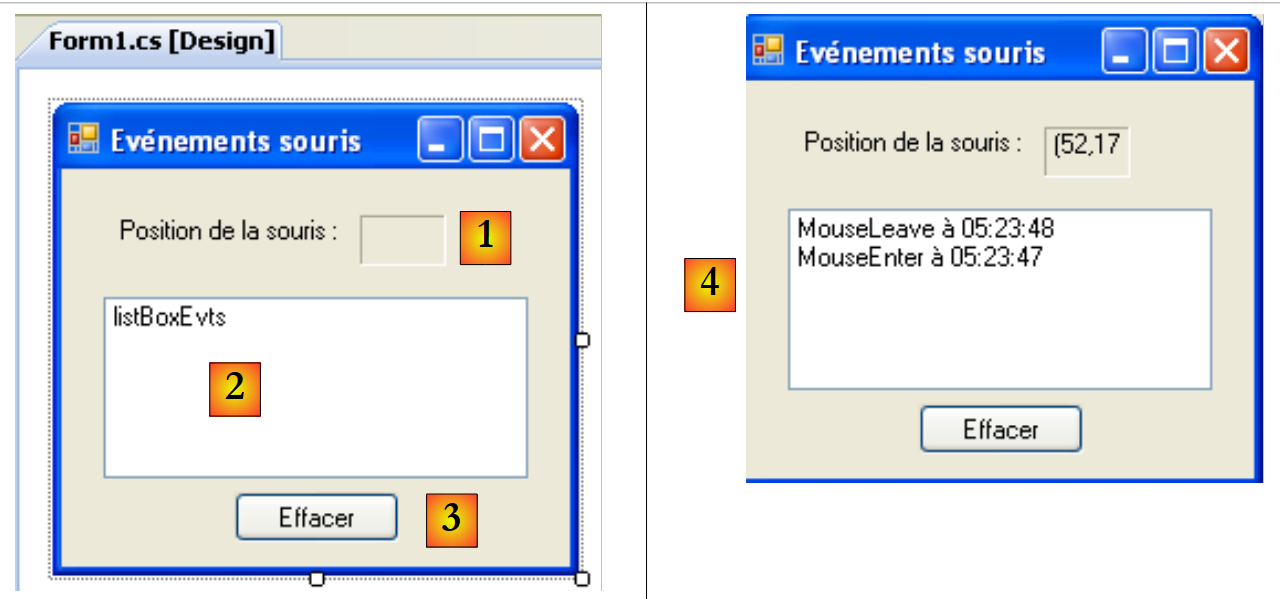 |
编号 | 类型 | 名称 | 作用 |
1 | 标签 | lblPositionSouris | 用于显示鼠标在表单1、列表2或按钮3中的位置 |
2 | ListBox | listBoxEvts | 用于显示除 MouseMove 以外的鼠标事件 |
3 | 按钮 | buttonEffacer | 用于清除 2 的内容 |
为了跟踪鼠标在三个控件上的移动,我们只需编写一个事件处理程序,即 affiche:
 |
affiche 过程的代码如下:
        private void affiche(object sender, MouseEventArgs e) {
            // 鼠标移动 - 显示其坐标 (X,Y)
            labelPositionSouris.Text = "(" + e.X + "," + e.Y + ")";
}
每当鼠标进入某个控件的区域时,其坐标系就会发生变化。其原点 (0,0) 位于当前所在控件的左上角。因此,在运行时,当鼠标从表单移动到按钮上时,可以清楚地看到坐标的变化。 为了更直观地观察这些鼠标作用域的变化,可以使用控件的 Cursor [1] 属性:
 |
该属性用于在鼠标进入控件区域时固定光标形状。 因此在本例中,我们将表单本身([2])的指针设置为“默认”样式,列表2([3])设置为“手”样式,按钮3([4])设置为“十字”样式。
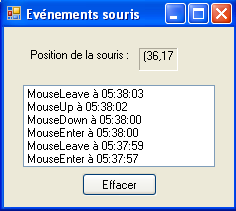
此外,为了检测鼠标在列表2上的进出,我们处理该列表的事件MouseEnter和MouseLeave:
        private void listBoxEvts_MouseEnter(object sender, System.EventArgs e) {
            // 触发事件
            listBoxEvts.Items.Insert(0, string.Format("MouseEnter à {0:hh:mm:ss}",DateTime.Now));
        }

        private void listBoxEvts_MouseLeave(object sender, EventArgs e) {
            // 触发事件
            listBoxEvts.Items.Insert(0, string.Format("MouseLeave à {0:hh:mm:ss}", DateTime.Now));
}
为了处理表单上的点击事件,我们需要处理事件 MouseDown 和 MouseUp:
        private void listBoxEvts_MouseDown(object sender, MouseEventArgs e) {
            // 触发事件
            listBoxEvts.Items.Insert(0, string.Format("MouseDown à {0:hh:mm:ss}", DateTime.Now));
        }

        private void listBoxEvts_MouseUp(object sender, MouseEventArgs e) {
            // 触发事件
            listBoxEvts.Items.Insert(0, string.Format("MouseUp à {0:hh:mm:ss}", DateTime.Now));
}
- 第 3 行和第 8 行:消息被放置在 ListBox 的首位,以便列表中最新发生的事件排在最前面。
 |
最后,Effacer按钮点击处理程序的代码:
        private void buttonEffacer_Click(object sender, EventArgs e) {
            listBoxEvts.Items.Clear();
}
7.4. 创建带菜单的窗口
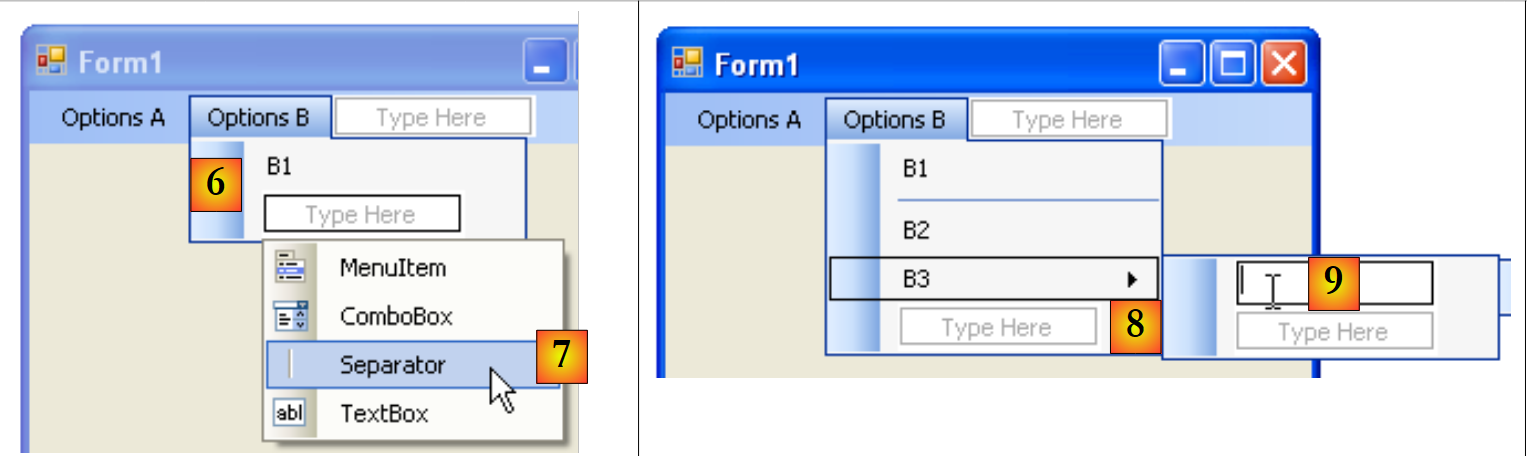
现在让我们看看如何创建带菜单的窗口。我们将创建以下窗口:
 |
要创建菜单,请在“菜单与工具栏”栏中选择组件“MenuStrip”:
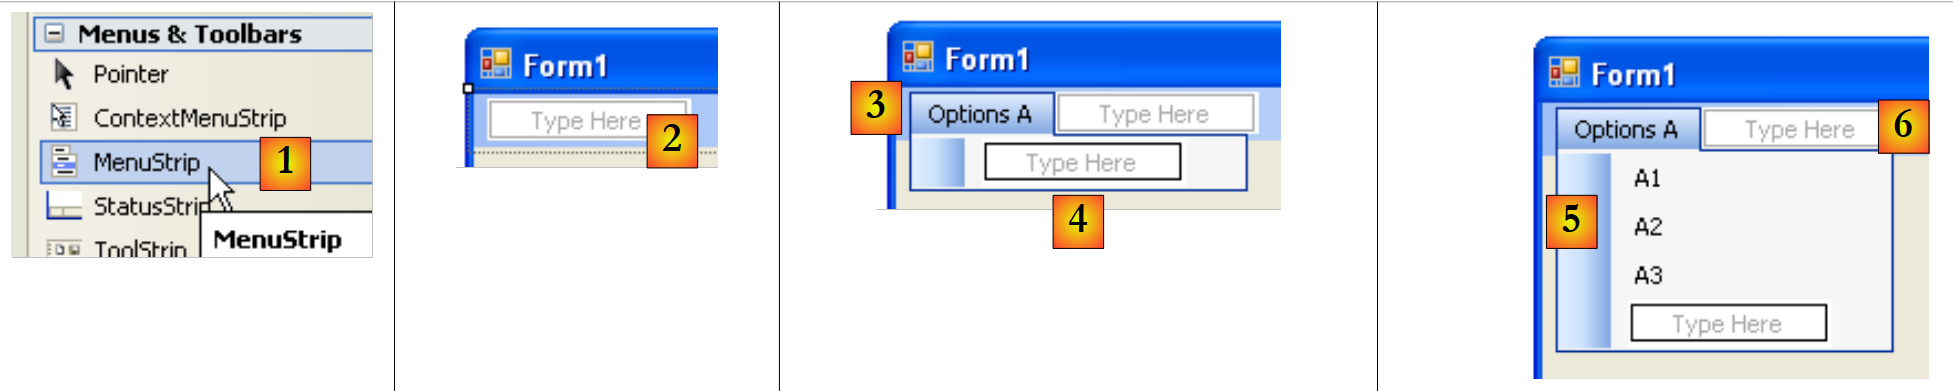 |
- [1]:选择组件 [MenuStrip]
- [2]:此时表单上将生成一个菜单,其中包含标有“在此输入”的空白框。只需在此输入菜单的各项选项即可。
- [3]:已输入“选项 A”的标签。接下来输入 [4] 的标签。
- [5]:选项 A 的名称已输入完毕。接下来输入 [6] 的名称
 |
- [6]:第一个选项B
- [7]:在 B1 下方添加分隔符。该分隔符可在标有“Type Here”的下拉列表中选择
- [8]:要创建子菜单,请使用箭头 [8],并在 [9] 中输入子菜单内容
接下来需要为表单的各个组件命名:
 |
编号 | 类型 | 名称 | 作用 |
1 | 标签 | labelStatut | 用于显示所点击菜单选项的文本 |
2 | toolStripMenuItem | toolStripMenuItemOptionsA toolStripMenuItemA1 toolStripMenuItemA2 toolStripMenuItemA3 | 主选项“选项 A”下的子选项 |
3 | toolStripMenuItem | toolStripMenuItemOptionsB toolStripMenuItemB1 toolStripMenuItemB2 toolStripMenuItemB3 | 主选项“选项 B”下的子选项 |
4 | toolStripMenuItem | toolStripMenuItemB31 toolStripMenuItemB32 | 主菜单项“B3”下的子菜单项 |
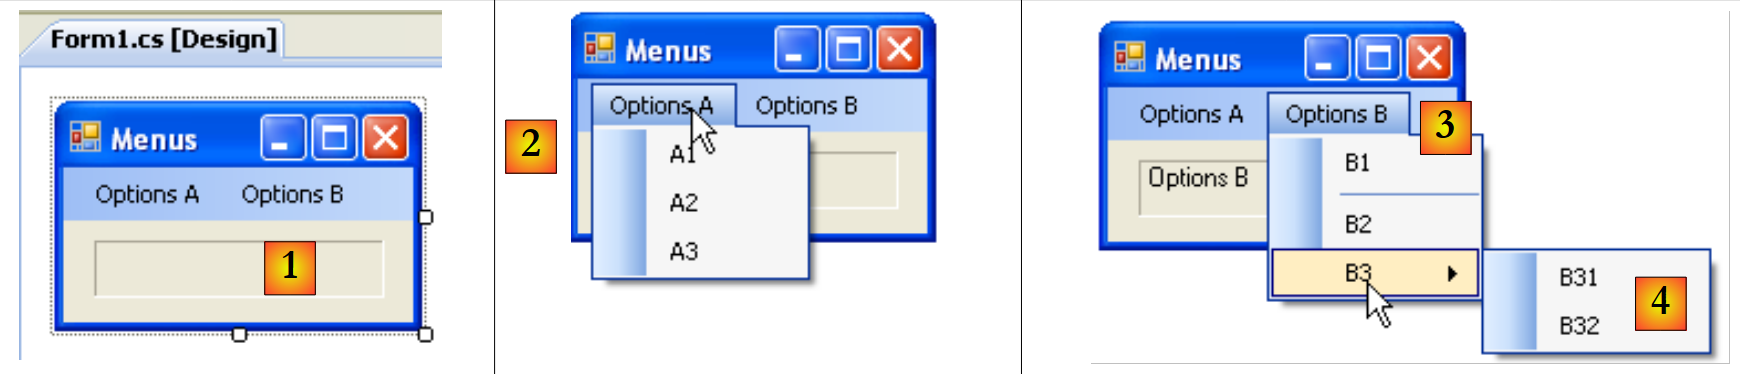
菜单选项与其他视觉组件一样属于控件,具有属性与事件。例如,菜单选项 A1 的属性如下:
 |
本示例中使用了两个属性:
菜单控件的名称 | |
菜单选项的名称 |
在菜单结构中,选择选项 A1 并右键单击以访问控件属性:
 |
在 événements [1] 选项卡中,将方法 affiche [2] 与事件 Click 关联。 这意味着希望点击 A1 选项时,由名为 affiche 的方法进行处理。Visual Studio 会在代码窗口中自动生成 affiche 方法:
private void affiche(object sender, EventArgs e) {
        }
在此方法中,我们只需在标签 labelStatut 中显示被点击的菜单选项的属性 Text:
private void affiche(object sender, EventArgs e) {
            // 在 TextBox 中显示所选子菜单的名称
            labelStatut.Text = ((ToolStripMenuItem)sender).Text;
}
事件 sender 的源类型为 object。 菜单选项的类型为 ToolStripMenuItem,因此必须将 object 转换为 ToolStripMenuItem。
对于所有菜单选项,我们将点击处理程序设置为方法 affiche [3,4]。
运行应用程序并选择一个菜单项:
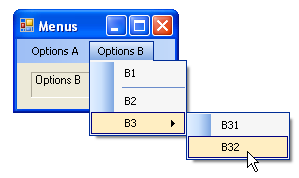 | 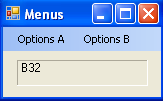 |
7.5. 非视觉组件
现在我们关注一些非视觉组件:它们在设计时会被使用,但在运行时不可见。
7.5.1. 对话框 OpenFileDialog 和 SaveFileDialog
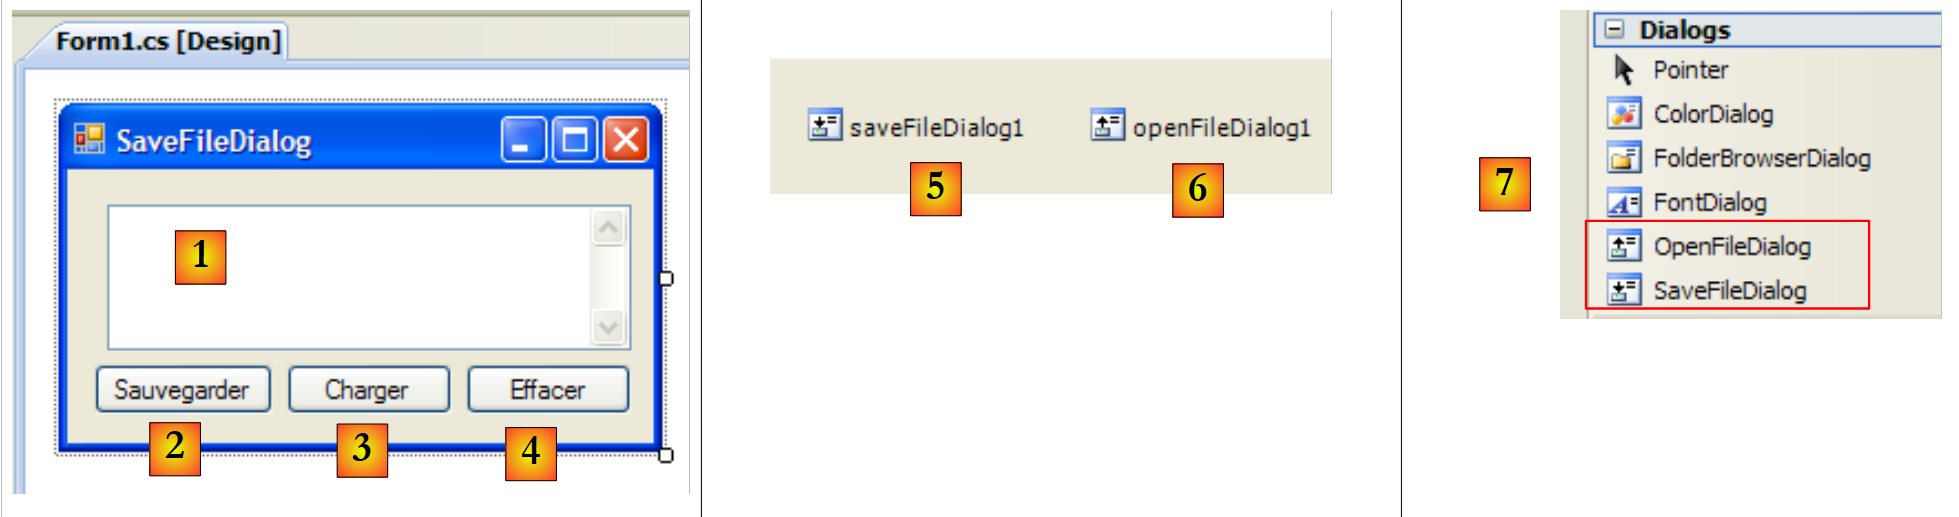
我们将构建以下应用程序:
 |
控件如下:
编号 | 类型 | 名称 | 作用 |
1 | TextBox | TextBoxLignes | 用户输入或从文件加载的文本 MultiLine=True, ScrollBars=Both, AccepReturn=True, AcceptTab=True |
2 | 按钮 | buttonSauvegarder | 允许将 [1] 中的文本保存到文本文件中 |
3 | 按钮 | buttonCharger | 用于将文本文件的内容加载到 [1] 中 |
4 | 按钮 | buttonEffacer | 清除 [1] 的内容 |
5 | SaveFileDialog | saveFileDialog1 | 用于选择[1]备份文件名称和位置的组件。该组件从[7]工具栏中拖出,直接放置在表单上。此时它会被保存,但不会在表单上占用空间。这是一个非可视化组件。 |
6 | OpenFileDialog | openFileDialog1 | 用于选择要加载文件的组件 [1]。 |
与按钮 Effacer 关联的代码很简单:
        private void buttonEffacer_Click(object sender, EventArgs e) {
            // 将空字符串放入 TexBox
            textBoxLignes.Text = "";
}
我们将使用 SaveFileDialog 类的以下属性和方法:
字段 | 类型 | 作用 |
Propriété | 对话框中文件类型下拉列表中提供的文件类型 | |
Propriété | 上表中默认提供的文件类型编号。从0开始。 | |
Propriété | 最初用于保存文件的文件夹 | |
Propriété | 用户指定的备份文件名 | |
Méthode | 显示备份对话框的方法。返回类型为 DialogResult。 |
方法 ShowDialog 会显示如下所示的对话框:
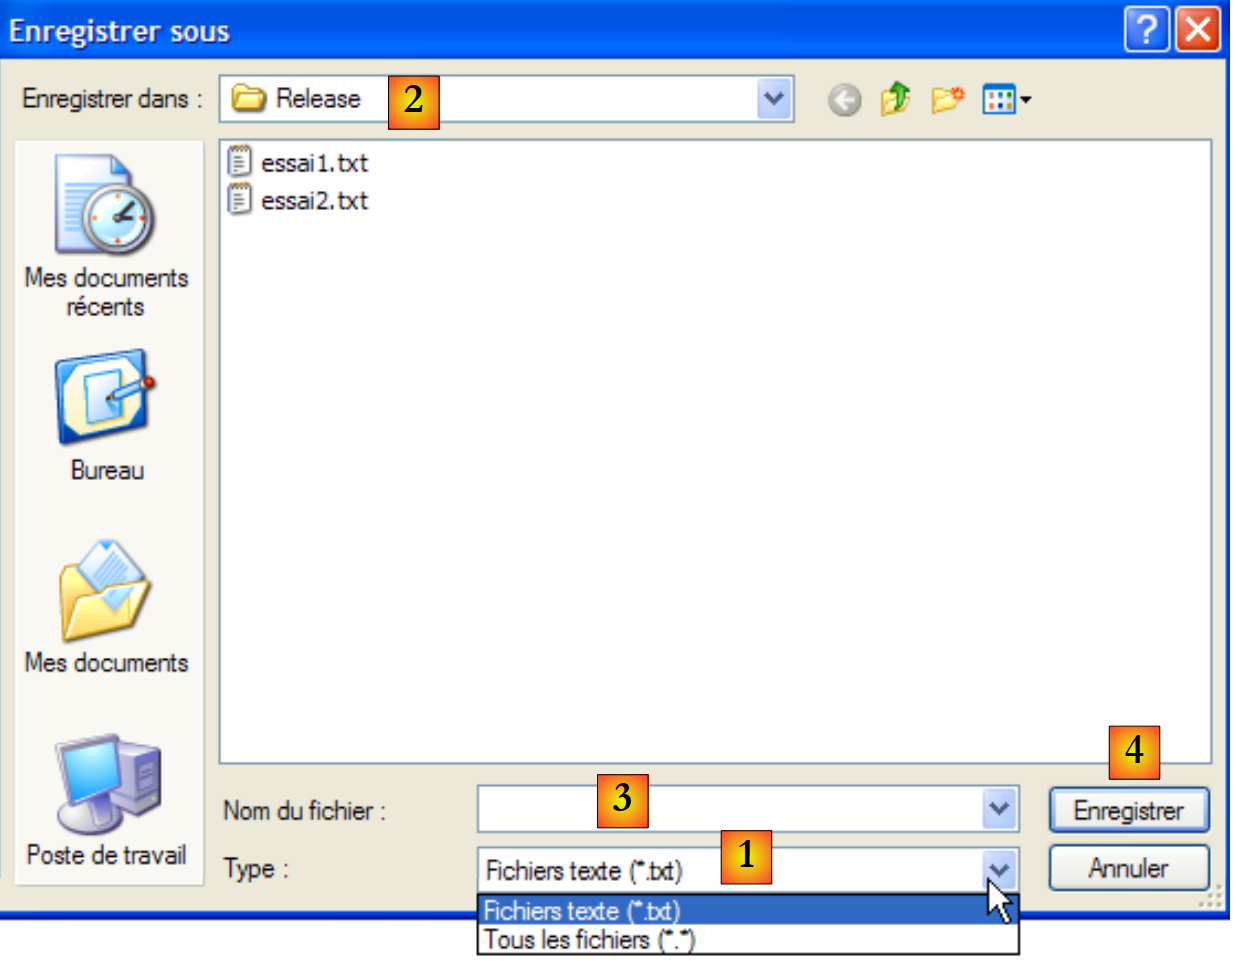 |
基于 Filter 属性构建的下拉列表。默认提供的文件类型由 FilterIndex 确定 | |
当前文件夹,若该属性已填写,则由 InitialDirectory 确定 | |
用户选择或直接输入的文件名。该名称将存储在属性 FileName 中 | |
“保存/取消”按钮。若使用按钮 Enregistrer,则函数 ShowDialog 返回结果 DialogResult.OK |
保存过程可编写如下:
private void buttonSauvegarder_Click(object sender, System.EventArgs e) {
            // 将输入框内容保存到文本文件中
            // 配置对话框 savefileDialog1
            saveFileDialog1.InitialDirectory = Application.ExecutablePath;
            saveFileDialog1.Filter = "Fichiers texte (*.txt)|*.txt|Tous les fichiers (*.*)|*.*";
            saveFileDialog1.FilterIndex = 0;
            // 显示对话框并获取其结果
            if (saveFileDialog1.ShowDialog() == DialogResult.OK) {
                // 获取文件名
                string nomFichier = saveFileDialog1.FileName;
                StreamWriter fichier = null;
                try {
                    // 以写入模式打开文件
                    fichier = new StreamWriter(nomFichier);
                    // 向其中写入文本
                    fichier.Write(textBoxLignes.Text);
                } catch (Exception ex) {
                    // 问题
                    MessageBox.Show("Problème à l'écriture du fichier (" +
                    ex.Message + ")", "Erreur", MessageBoxButtons.OK, MessageBoxIcon.Error);
                    return;
                } finally {
                    // 关闭文件
                    if (fichier != null) {
                        fichier.Dispose();
                    }
                }
            }
        }
- 第 4 行:将初始文件夹(InitialDirectory)设置为包含应用程序可执行文件的文件夹(Application.ExecutablePath)。
- 第5行:指定要显示的文件类型。请注意过滤器的语法:filtre1|filtre2|..|filtren,其中过滤器i= 文本|文件模板。 在此,用户可在 *.txt 和 *.* 文件之间进行选择。
- 第 6 行:设定首先向用户显示的文件类型。此处索引 0 表示 *.txt 文件。
- 第 8 行:显示对话框并获取其结果。 在对话框显示期间,用户无法访问主表单(即模态对话框)。用户设定要保存的文件名,并通过按钮 Enregistrer、Annuler, 或直接关闭对话框来退出。 只有当用户使用按钮 Enregistrer 退出对话框时,方法 ShowDialog 的返回值才为 DialogResult.OK。
- 完成上述操作后,待创建文件的名称现已存储在对象 saveFileDialog1 的属性 FileName 中。 此时便回归到常规的文本文件创建流程。将 TextBox 的内容写入该文件:textBoxLignes.Text,同时处理可能发生的异常。
类 OpenFileDialog 与类 SaveFileDialog 非常相似。我们将使用与之前相同的方法和属性。方法 ShowDialog 会显示一个类似于下图的对话框:
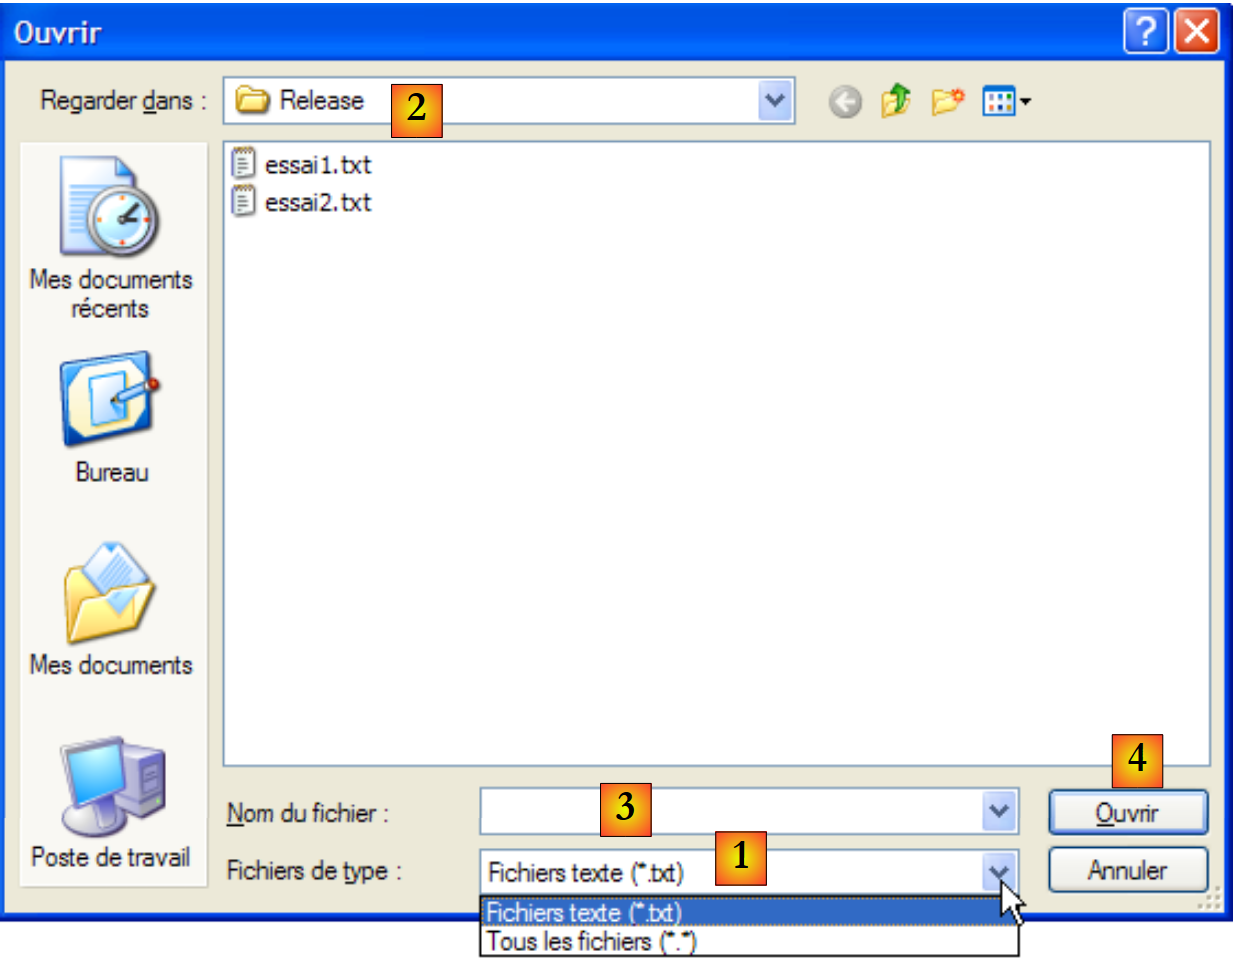 |
基于 Filter 属性构建的下拉列表。默认提供的文件类型由 FilterIndex 确定 | |
当前文件夹,若该属性已填写,则由 InitialDirectory 确定 | |
用户选择或直接输入的文件名。该名称将存储在属性 FileName 中 | |
“打开/取消”按钮。如果使用按钮 Ouvrir,则函数 ShowDialog 会返回结果 DialogResult.OK |
文本文件的加载过程可编写如下:
private void buttonCharger_Click(object sender, EventArgs e) {
            // 将文本文件加载到输入框中
            // 配置对话框 openfileDialog1
            openFileDialog1.InitialDirectory = Application.ExecutablePath;
            openFileDialog1.Filter = "Fichiers texte (*.txt)|*.txt|Tous les fichiers (*.*)|*.*";
            openFileDialog1.FilterIndex = 0;
            // 显示对话框并获取其结果
            if (openFileDialog1.ShowDialog() == DialogResult.OK) {
                // 获取文件名
                string nomFichier = openFileDialog1.FileName;
                StreamReader fichier = null;
                try {
                    // 以只读模式打开文件
                    fichier = new StreamReader(nomFichier);
                    // 读取整个文件并将其放入 TextBox
                    textBoxLignes.Text = fichier.ReadToEnd();
                } catch (Exception ex) {
                    // 问题
                    MessageBox.Show("Problème à la lecture du fichier (" +
                    ex.Message + ")", "Erreur", MessageBoxButtons.OK, MessageBoxIcon.Error);
                    return;
                } finally {
                    // 关闭文件
                    if (fichier != null) {
                        fichier.Dispose();
                    }
                }//最后
            }//如果
        }
- 第 4 行:将初始文件夹(InitialDirectory)设置为包含应用程序可执行文件的文件夹(Application.ExecutablePath)。
- 第5行:指定要显示的文件类型。请注意过滤器的语法:filtre1|filtre2|..|filtren,其中过滤器i= 文本|文件模板。 在此,用户可在 *.txt 和 *.* 文件之间进行选择。
- 第 6 行:设定首先向用户显示的文件类型。此处索引 0 表示 *.txt 文件。
- 第 8 行:显示对话框并获取其结果。 在对话框显示期间,用户无法访问主表单(即模态对话框)。用户设定要保存的文件名,并通过按钮 Ouvrir、按钮 Annuler, 或直接关闭对话框来退出。 只有当用户使用按钮 Enregistrer 退出对话框时,方法 ShowDialog 的返回值才为 DialogResult.OK。
- 完成上述操作后,待创建文件的名称现已存储在 openFileDialog1 对象的 FileName 属性中。此时,程序将回归到常规的文本文件读取流程。请注意第 16 行,该方法用于读取整个文件。
7.5.2. 对话框 FontColor 和 ColorDialog
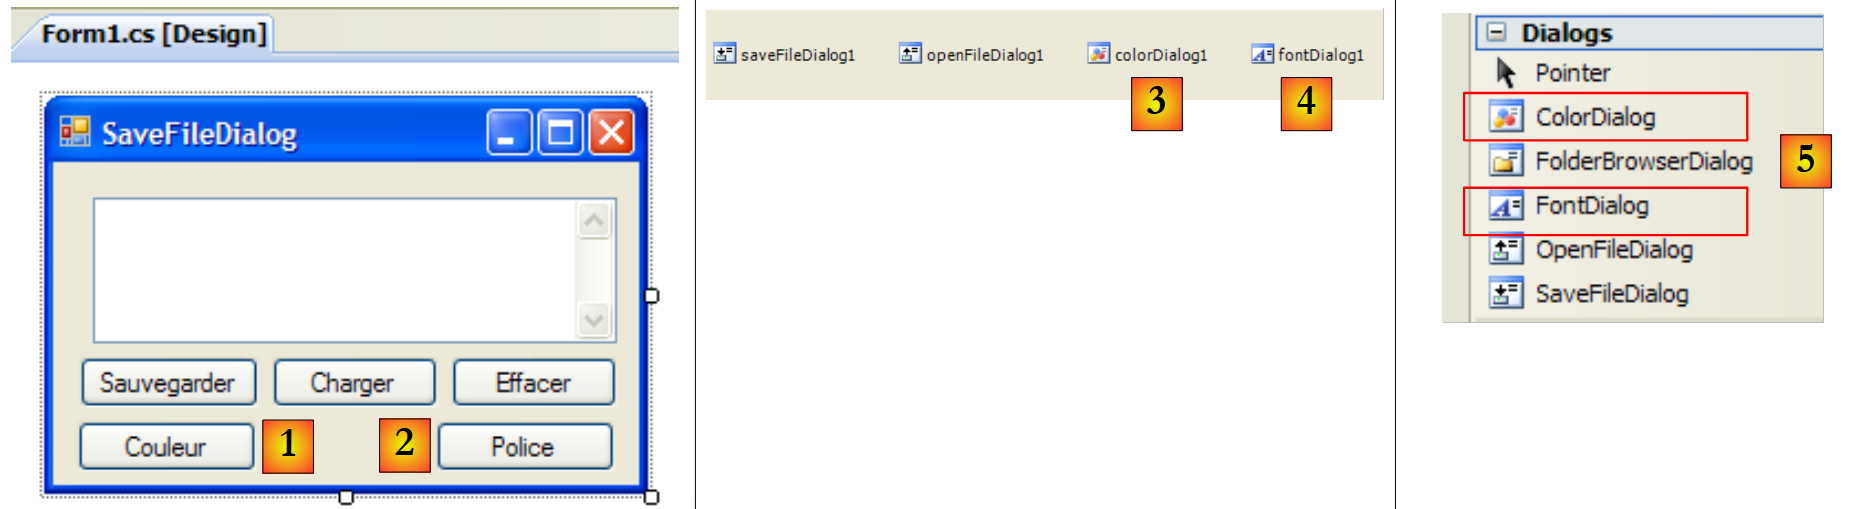
我们继续上一个示例,并添加两个新按钮和两个新的非视觉控件:
 |
6
7
编号 | 类型 | 名称 | 角色 |
1 | 按钮 | buttonCouleur | 用于设置 TextBox 的字符颜色 |
2 | 按钮 | buttonPolice | 用于设置 TextBox 的字体 |
3 | ColorDialog | colorDialog1 | 用于选择颜色的组件——取自工具箱 [5]。 |
4 | FontDialog | colorDialog1 | 用于选择字体的组件——取自工具箱 [5]。 |
类 FontDialog 和 ColorDialog 具有一个方法 ShowDialog,该方法与类 OpenFileDialog 和 SaveFileDialog 类中的 ShowDialog 方法。
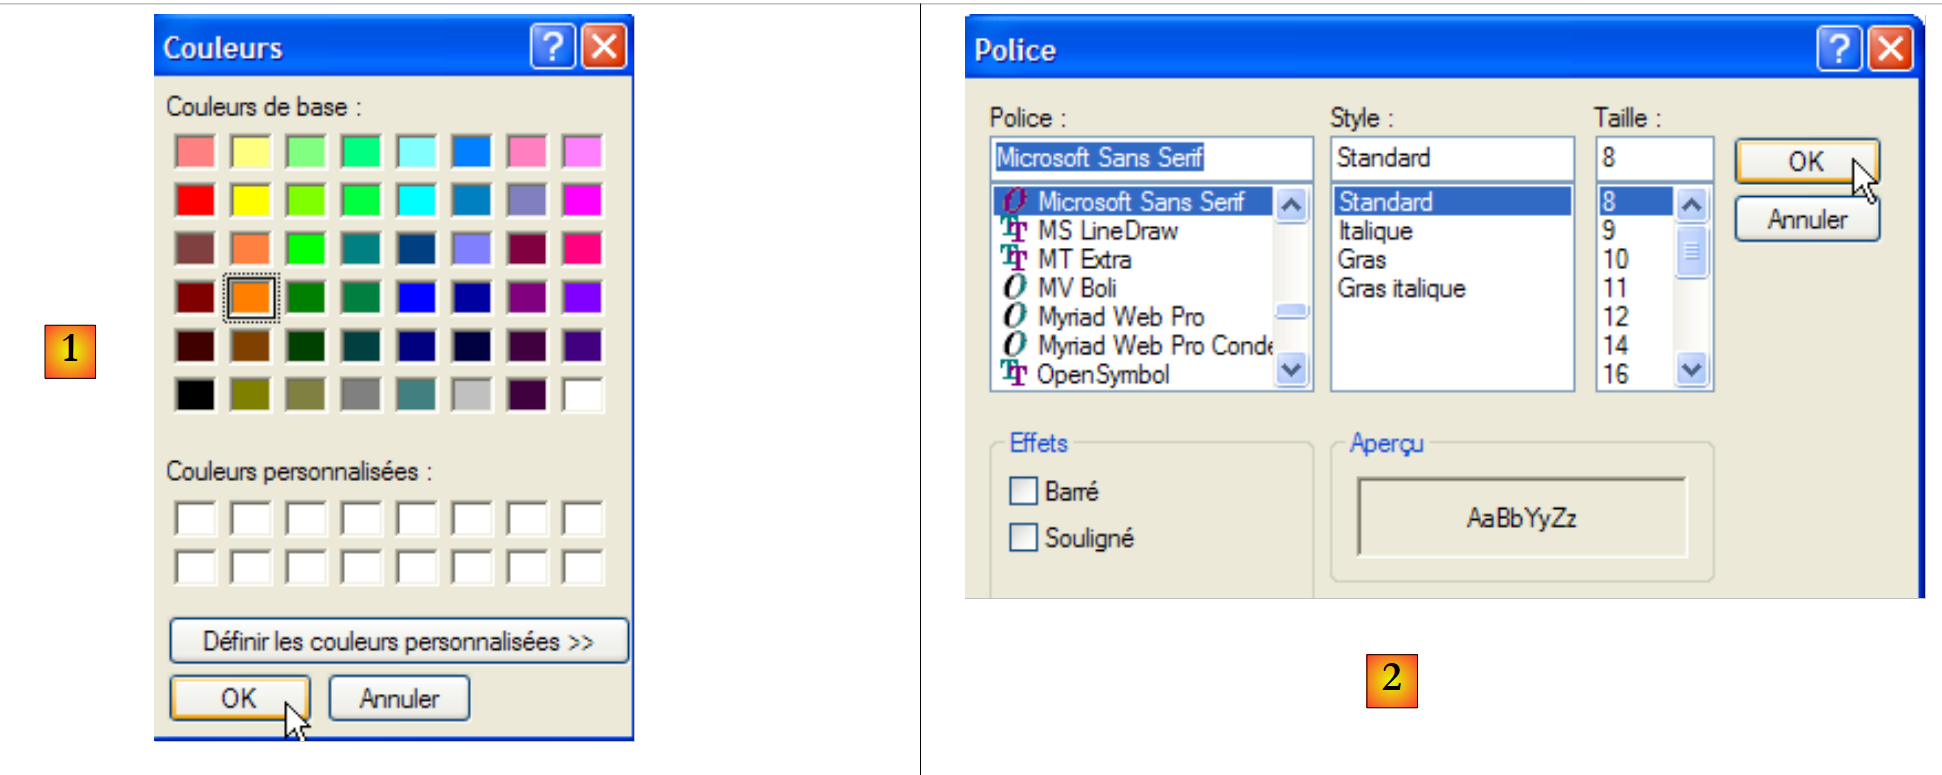 |
ColorDialog 类的 ShowDialog 方法允许选择一种颜色 [1]。 FontDialog 类的该方法允许选择字体 [2]:
- [1]:如果用户通过 OK 按钮退出对话框, 则方法 ShowDialog 的结果为 DialogResult.OK,所选颜色存储在所用对象 ColorDialog 的属性 Color 中。
- [2]:如果用户通过按钮 OK 关闭对话框, 则方法 ShowDialog 的结果为 DialogResult.OK,且所选字体存储在所用对象 FontDialog 的属性 Font 中。
现在我们有了处理 Couleur 和 Police 按钮点击的元素:
        private void buttonCouleur_Click(object sender, EventArgs e) {// 选择文本颜色
            if (colorDialog1.ShowDialog() == DialogResult.OK) {
                // 更改 TextBox 的 Forecolor 属性
                textBoxLignes.ForeColor = colorDialog1.Color;
            }//if
        }

        private void buttonPolice_Click(object sender, EventArgs e) {
            // 选择字体
            if (fontDialog1.ShowDialog() == DialogResult.OK) {
                // 更改 TextBox 的 Font 属性
                textBoxLignes.Font = fontDialog1.Font;
}
- 行 [4]:TextBox 组件的属性 [ForeColor] 指定了 [Color] 类型字符的颜色。 此处该颜色是用户在 [ColorDialog] 类型的对话框中选择的颜色。
- 第 [12] 行: TextBox 组件的 [Font] 属性指定了 TextBox 字符的 [Font] 类型字体。 此处,该字体即用户在 [FontDialog] 类型对话框中选择的字体。
7.5.3. 定时器
在此,我们将编写以下应用程序:
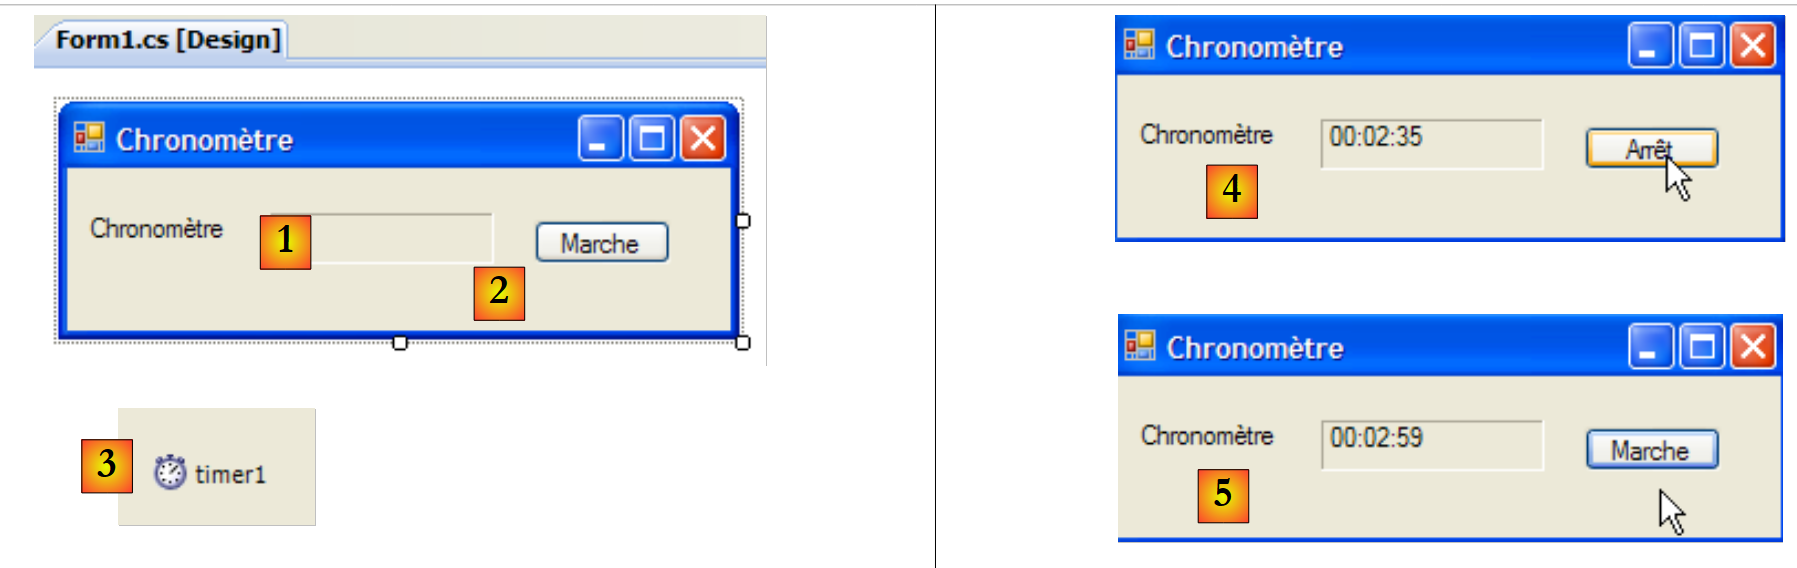 |
编号 | 类型 | 名称 | 角色 |
1 | 标签 | labelChrono | 显示计时器 |
2 | 按钮 | buttonArretMarche | 计时器停止/开始按钮 |
3 | 计时器 | timer1 | 此组件每秒触发一次事件 |
在 [4] 中,我们看到计时器正在运行;在 [5] 中,计时器已停止。
为了每秒更新标签 LabelChrono 的内容,我们需要一个每秒生成事件的组件,我们可以拦截该事件来更新计时器的显示。 该组件即 Timer [1],可在工具箱 Components [2] 中找到:
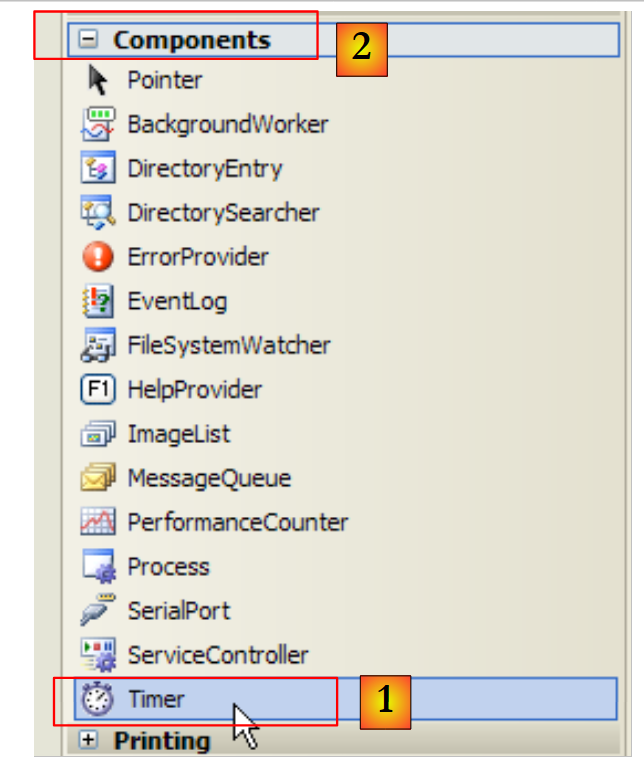 |
此处使用的 Timer 组件属性如下:
触发 Tick 事件所需的毫秒数。 | |
在 Interval 毫秒后触发的事件 | |
将定时器设为活动状态(true)或非活动状态(false) |
在本例中,定时器名为 timer1,且 timer1.Interval 被设置为 1000 毫秒(1 秒)。因此,事件 Tick 将每秒触发一次。 点击“停止/启动”按钮将由以下过程 buttonArretMarche_Click 处理:
using System;
using System.Windows.Forms;

namespace Chap5 {
    public partial class Form1 : Form {
        public Form1() {
            InitializeComponent();
        }

        // 实例变量
        private DateTime début = DateTime.Now;
...
        private void buttonArretMarche_Click(object sender, EventArgs e) {
            // 停止还是运行?
            if (buttonArretMarche.Text == "Marche") {
                // 记录开始时间
                début = DateTime.Now;
                // 显示
                labelChrono.Text = "00:00:00";
                // 启动计时器
                timer1.Enabled = true;
                // 更改按钮标签
                buttonArretMarche.Text = "Arrêt";
                // 结束
                return;
            }//
            if (buttonArretMarche.Text == "Arrêt") {
                // 停止计时器
                timer1.Enabled = false;
                // 更改按钮标签
                buttonArretMarche.Text = "Marche";
                // 结束
                return;
            }
        }

    }
}
- 第 13 行:处理“停止/启动”按钮点击的程序。
- 第 15 行:"停止/启动"按钮的标签要么是"停止",要么是"启动"。因此必须对该标签进行判断以确定后续操作。
- 第 17 行:若为“运行”,则将开始时间记录在变量 début 中,该变量是表单对象的全局变量(第 11 行)
- 第 19 行:初始化标签 LabelChrono 的内容
- 第 21 行:启动计时器(Enabled=true)
- 第23行:按钮标签变为“停止”。
- 第 27 行:若为“停止”
- 第 29 行:停止计时器(Enabled=false)
- 第 31 行:将按钮标签更改为“启动”。
接下来我们需要处理 Tick 对象上的 Tick 事件,该事件每秒触发一次:
private void timer1_Tick(object sender, EventArgs e) {
            // 已过去一秒
            DateTime maintenant = DateTime.Now;
            TimeSpan durée = maintenant - début;
            // 更新计时器
            labelChrono.Text = durée.Hours.ToString("d2") + ":" + durée.Minutes.ToString("d2") + ":" + durée.Seconds.ToString("d2");
        }
- 第3行:记录当前时间
- 第4行:计算自计时器启动时刻起经过的时间。结果是一个类型为TimeSpan的对象,该对象表示一段时长。
- 第6行:该值需以 hh:mm:ss 的形式在计时器中显示。为此,我们使用 Hours、Minutes、 Seconds,它们分别代表所显示时长的小时、分钟和秒,并采用 ToString("d2") 格式进行显示,以实现两位数显示。
7.6. 示例应用程序—— 第6版
我们继续探讨示例应用程序 IMPOTS。其最新版本已在第 6.4 节中进行过分析。该应用程序采用以下三层架构:
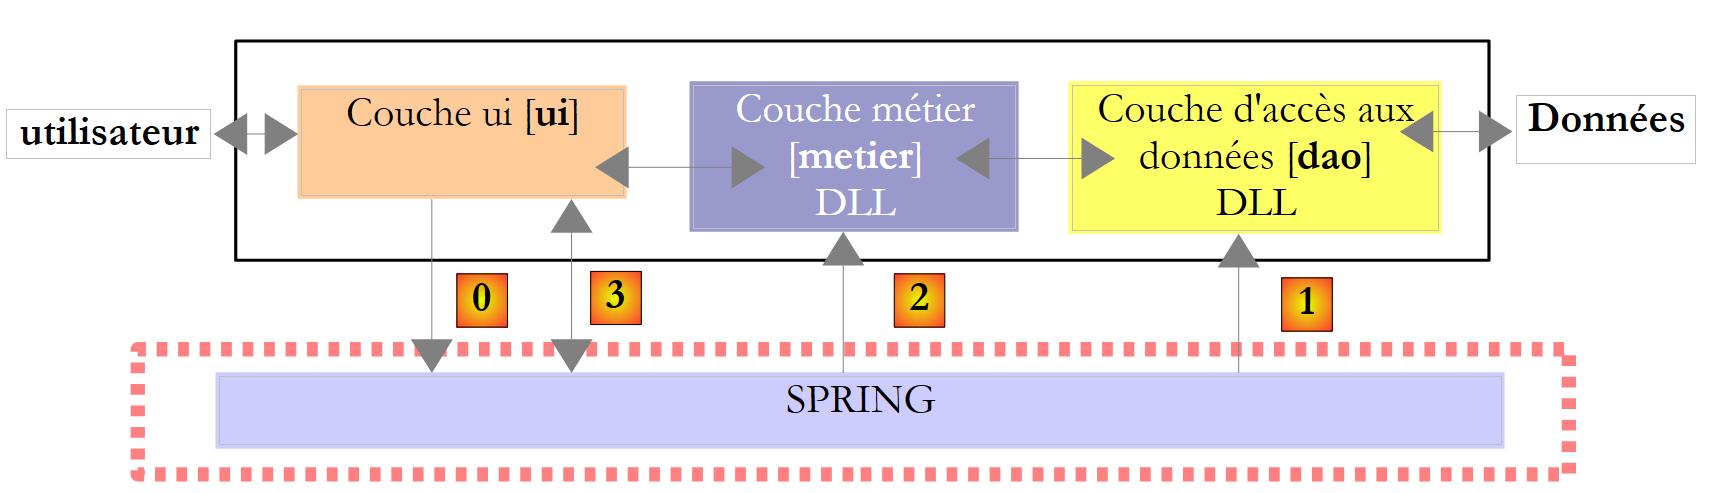 |
- [metier] 和 [dao] 层被封装在 DLL 中
- [ui]层即为[console]层
- 层的实例化和在应用程序中的集成由 Spring 负责。
在新版本中,[ui] 层将由以下图形界面实现:
 |
7.6.1. Visual Studio 解决方案
Visual Studio 解决方案由以下组件构成:
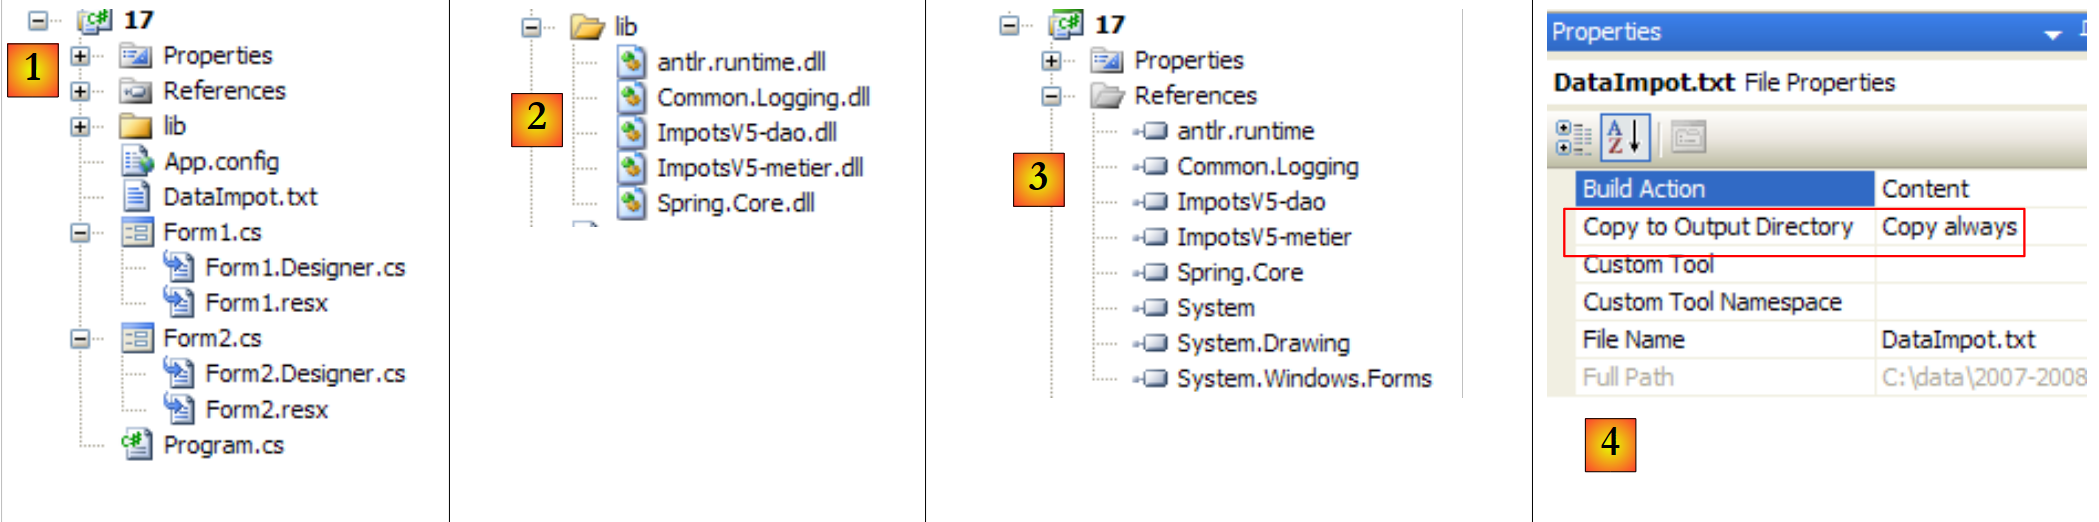 |
- [1]:该项目包含以下组件:
- [Program.cs]:启动应用程序的类
- [Form1.cs]:第一个窗体的类
- [Form2]:第二个表单的类
- [lib](在 [2] 中详细说明):其中包含该项目所需的所有 DLL:
- [ImpotsV5-dao.dll]:第6.4.3节生成的[dao]层对应的DLL;
- [ImpotsV5-metier.dll]:第6.4.4节中生成的[dao]图层的DLL;
- [Spring.Core.dll]、[Common.Logging.dll]、[antlr.runtime.dll]:上一版本中已使用的 Spring 的 DLL(参见第 6.4.6 节)。
- [references](在[3]中详细说明):项目引用。为[lib]文件夹中的每个DLL文件分别添加了一个引用
- [App.config]:项目配置文件。该文件与第6.4.6节所述的上一版本完全一致;
- [DataImpot.txt]:税率档次配置文件,已配置为自动复制到项目运行文件夹中 [4]
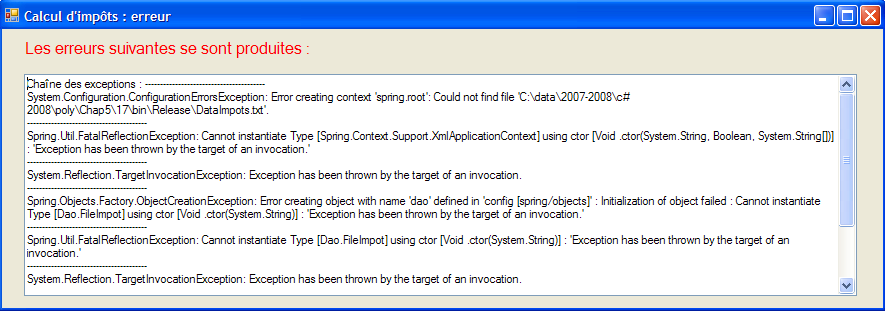
表单 [Form1] 是用于输入前述税款计算参数([A])的表单。表单 [Form2] 和 [B] 用于显示错误信息:
 |
7.6.2. 类 [Program.cs]
类 [Program.cs] 用于启动应用程序。其代码如下:
using System;
using System.Windows.Forms;
using Spring.Context;
using Spring.Context.Support;
using Metier;
using System.Text;

namespace Chap5 {
    static class Program {
        /// <summary>
        /// 应用程序的主入口点。
        /// </summary>
        [STAThread]
        static void Main() {
            // 由 Vs 生成的代码
            Application.EnableVisualStyles();
            Application.SetCompatibleTextRenderingDefault(false);

            // --------------- 开发者代码
            // [metier] 和 [dao] 层实例化
            IApplicationContext ctx = null;
            Exception ex = null;
            IImpotMetier metier = null;
            try {
                // Spring 上下文
                ctx = ContextRegistry.GetContext();
                // 请求 [metier] 层的引用
                metier = (IImpotMetier)ctx.GetObject("metier");
            } catch (Exception e1) {
                // 异常记录
                ex = e1;
            }
            // 待显示表单
            Form form = null;
            // 是否发生异常?
            if (ex != null) {
                // 是 - 创建待显示的错误消息
                StringBuilder msgErreur = new StringBuilder(String.Format("Chaîne des exceptions : {0}{1}", "".PadLeft(40, '-'), Environment.NewLine));
                Exception e = ex;
                while (e != null) {
                    msgErreur.Append(String.Format("{0}: {1}{2}", e.GetType().FullName, e.Message, Environment.NewLine));
                    msgErreur.Append(String.Format("{0}{1}", "".PadLeft(40, '-'), Environment.NewLine));
                    e = e.InnerException;
                }
                // 创建错误窗口,并将待显示的错误信息传递给该窗口
                Form2 form2 = new Form2();
                form2.MsgErreur = msgErreur.ToString();
                // 这将是待显示的窗口
                form = form2;
            } else {
                // 一切顺利
                // 创建图形界面 [Form1],并将引用传递给 [metier] 层
                Form1 form1 = new Form1();
                form1.Metier = metier;
                // 这将是待显示的窗口
                form = form1;
            }
            // 显示窗口
            Application.Run(form);
        }
    }
}
Visual Studio生成的代码从第19行开始进行了补充。该应用程序使用以下[App.config]文件:
<?xml version="1.0" encoding="utf-8" ?>
<configuration>

    <configSections>
        <sectionGroup name="spring">
            <section name="context" type="Spring.Context.Support.ContextHandler, Spring.Core" />
            <section name="objects" type="Spring.Context.Support.DefaultSectionHandler, Spring.Core" />
        </sectionGroup>
    </configSections>

    <spring>
        <context>
            <resource uri="config://spring/objects" />
        </context>
        <objects xmlns="http://www.springframework.net">
            <object name="dao" type="Dao.FileImpot, ImpotsV5-dao">
                <constructor-arg index="0" value="DataImpot.txt"/>
            </object>
            <object name="metier" type="Metier.ImpotMetier, ImpotsV5-metier">
                <constructor-arg index="0" ref="dao"/>
            </object>
        </objects>
    </spring>
</configuration>
- 第 24-32 行:调用前面的 [App.config] 文件,以实例化 [metier] 和 [dao] 层
- 第26行:利用文件[App.config]
- 第28行:获取图层[metier]的引用
- 第 31 行:记录可能出现的异常
- 第 34 行:引用 form 将指定要显示的表单(form1 或 form2)
- 第 36-50 行:如果发生了异常,则准备显示类型为 [Form2] 的表单
- 第 38-44 行:构建待显示的错误消息。该消息由异常链中各异常的错误消息拼接而成。
- 第 46 行:创建一个类型为 [Form2] 的表单。
- 第 47 行:我们稍后将看到,该表单有一个名为 MsgErreur 的公共属性,即待显示的错误消息:
public string MsgErreur { private get; set; }
我们为该属性赋值。
- 第 49 行:初始化了表示要显示的窗口的引用 form。 请注意此处的多态性机制。form2 并非 [Form] 类型,而是 [Form2] 类型,后者是 [Form] 的派生类型。
- 第 50-57 行:未发生异常。正在准备显示一个类型为 [Form1] 的表单。
- 第 53 行:创建了一个类型为 [Form1] 的表单。
- 第54行:我们稍后将看到,该表单有一个名为Metier的公共属性,该属性是[metier]层的引用:
public IImpotMetier Metier { private get; set; }
我们为该属性赋值。
- 第56行:初始化了引用form,该引用指定了要显示的窗口。 这里再次体现了多态性的应用。form1 并非 [Form] 类型,而是 [Form1] 类型,后者是 [Form] 的派生类型。
- 第 59 行:显示由 form 引用的窗口。
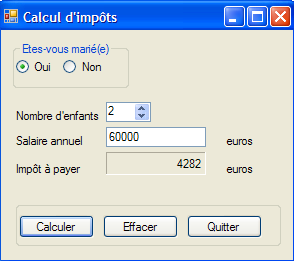
7.6.3. 表单 [Form1]
在 [conception] 模式下,表单 [Form1] 如下所示:
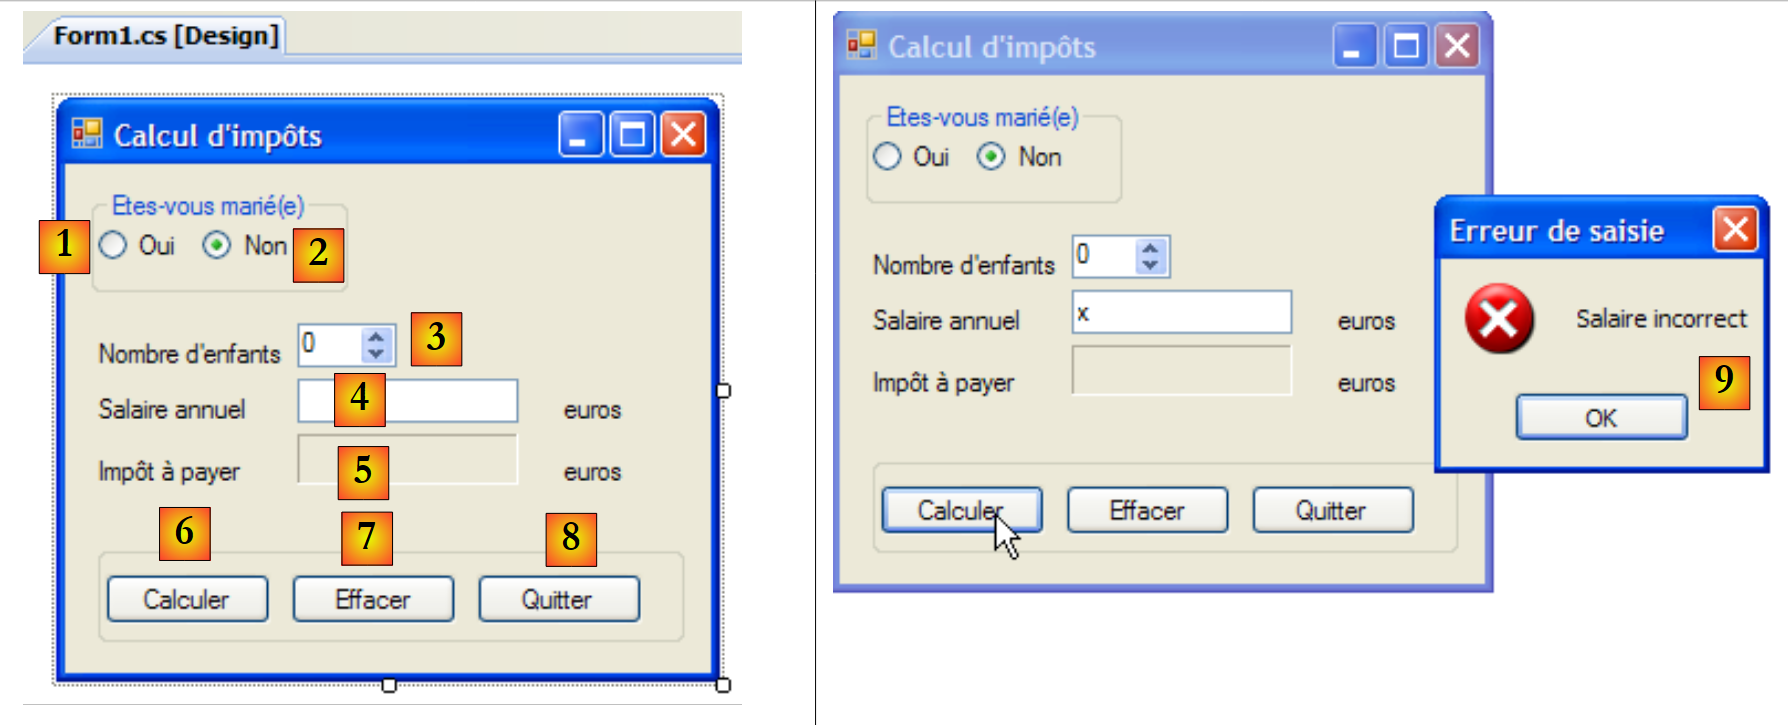 |
控件如下
编号 | 类型 | 名称 | 角色 |
0 | GroupBox | groupBox1 | Text=您已婚吗 |
1 | RadioButton | radioButtonOui | 已婚请勾选 |
2 | RadioButton | radioButtonNon | 未婚时勾选 Checked=True |
3 | NumericUpDown | numericUpDownEnfants | 纳税人的子女数量 最小值=0,最大值=20,增量=1 |
4 | TextBox | textSalaire | 纳税人年薪(欧元) |
5 | 标签 | labelImpot | 应缴税额 BorderStyle=Fixed3D |
6 | Button | buttonCalculer | 开始计算税款 |
7 | 按钮 | buttonEffacer | 将表单恢复至加载时的状态 |
8 | 按钮 | buttonQuitter | 用于退出应用程序 |
表单操作规则
- 只要工资字段为空,按钮 Calculer 便保持不可用
- 如果启动计算后发现工资有误,将报告错误 [9]
该类的代码如下:
using System.Windows.Forms;
using Metier;
using System;

namespace Chap5 {
    public partial class Form1 : Form {
        // [métier] 层
        public IImpotMetier Metier { private get; set; }

        public Form1() {
            InitializeComponent();
        }

        private void buttonCalculer_Click(object sender, System.EventArgs e) {
            // 工资是否正确
            int salaire;
            bool ok=int.TryParse(textSalaire.Text.Trim(), out salaire);
            if (! ok  || salaire < 0) {
                // 错误信息
                MessageBox.Show("Salaire incorrect", "Erreur de saisie", MessageBoxButtons.OK, MessageBoxIcon.Error);
                // 返回错误字段
                textSalaire.Focus();
                // 选择输入字段中的文本
                textSalaire.SelectAll();
                // 返回输入界面
                return;
            }
            // 工资正确 - 可以计算税款
            labelImpot.Text = Metier.CalculerImpot(radioButtonOui.Checked, (int)numericUpDownEnfants.Value, salaire).ToString();
        }

        private void buttonQuitter_Click(object sender, System.EventArgs e) {
            Environment.Exit(0);
        }

        private void buttonEffacer_Click(object sender, System.EventArgs e) {
            // 清空表单
            labelImpot.Text = "";
            numericUpDownEnfants.Value = 0;
            textSalaire.Text = "";
            radioButtonNon.Checked = true;
        }

        private void textSalaire_TextChanged(object sender, EventArgs e) {
            // 按钮状态 [Calculer]
            buttonCalculer.Enabled=textSalaire.Text.Trim()!="";
        }

    }
}
我们仅对重要部分进行说明:
- 第 [8] 行: 公共属性 Metier,它允许启动类 [Program.cs] 将对层 [metier] 的引用注入到 [Form1] 中。
- 第 [14] 行:税额计算过程
- 第 15-27 行:验证工资的有效性(一个整数 >=0)。
- 第 29 行:使用 [metier] 层中的 [CalculerImpot] 方法计算税款。 值得注意的是,通过将 [metier] 层封装在 DLL 中,该操作得以简化。
7.6.4. 表单 [Form2]
在 [conception] 模式下,表单 [Form2] 如下所示:
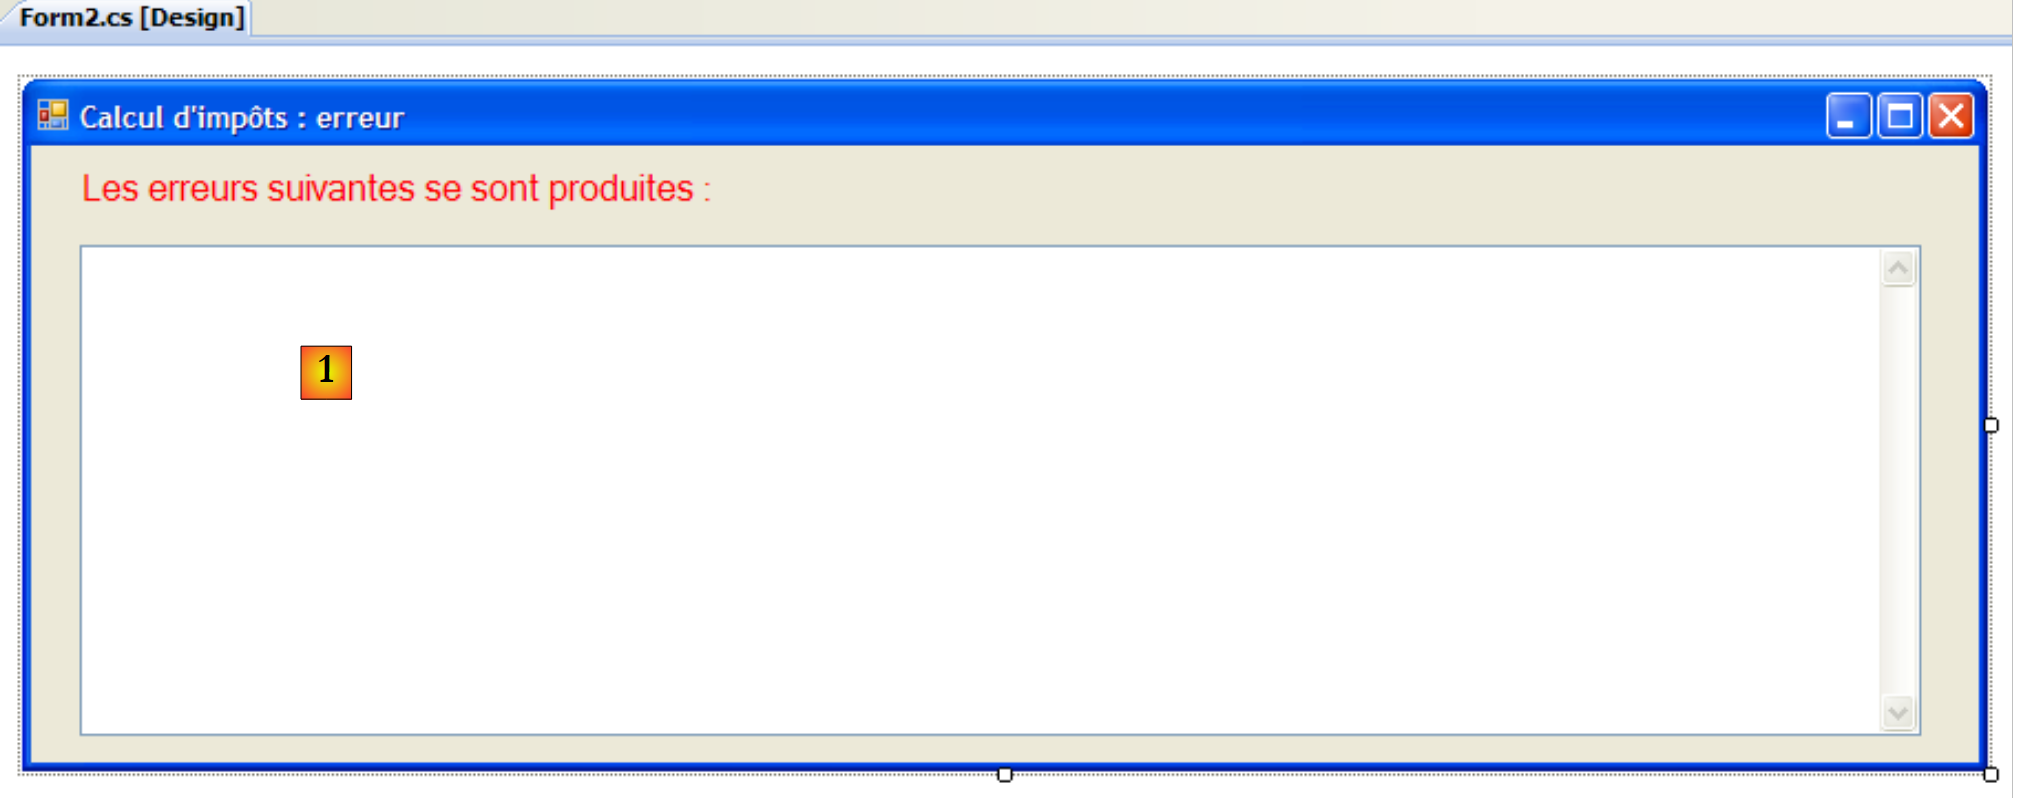 |
控件如下
编号 | 类型 | 名称 | 角色 |
1 | TextBox | textBoxErreur | 多行=True,滚动条=两边 |
该类的代码如下:
using System.Windows.Forms;

namespace Chap5 {
    public partial class Form2 : Form {
        // 错误信息
        public string MsgErreur { private get; set; }

        public Form2() {
            InitializeComponent();
        }

        private void Form2_Load(object sender, System.EventArgs e) {
            // 显示错误信息
            textBoxErreur.Text = MsgErreur;
            // 取消选中所有文本
            textBoxErreur.Select(0, 0);
        }
    }
}
- 第 6 行:公共属性 MsgErreur,它允许启动类 [Program.cs] 将要显示的错误消息注入到 [Form2] 中。 该消息在处理事件 Load 时显示(第 12-16 行)。
- 第14行:将错误消息放入TextBox
- 第 16 行:取消前一步操作中选中的内容。[TextBox].Select(起始位置,长度) 会从第 début 个字符开始,选中(高亮显示)longueur 个字符。 [TextBox].Select(0,0) 相当于取消选中所有文本。
7.6.5. 结论
让我们回顾一下所使用的三层架构:
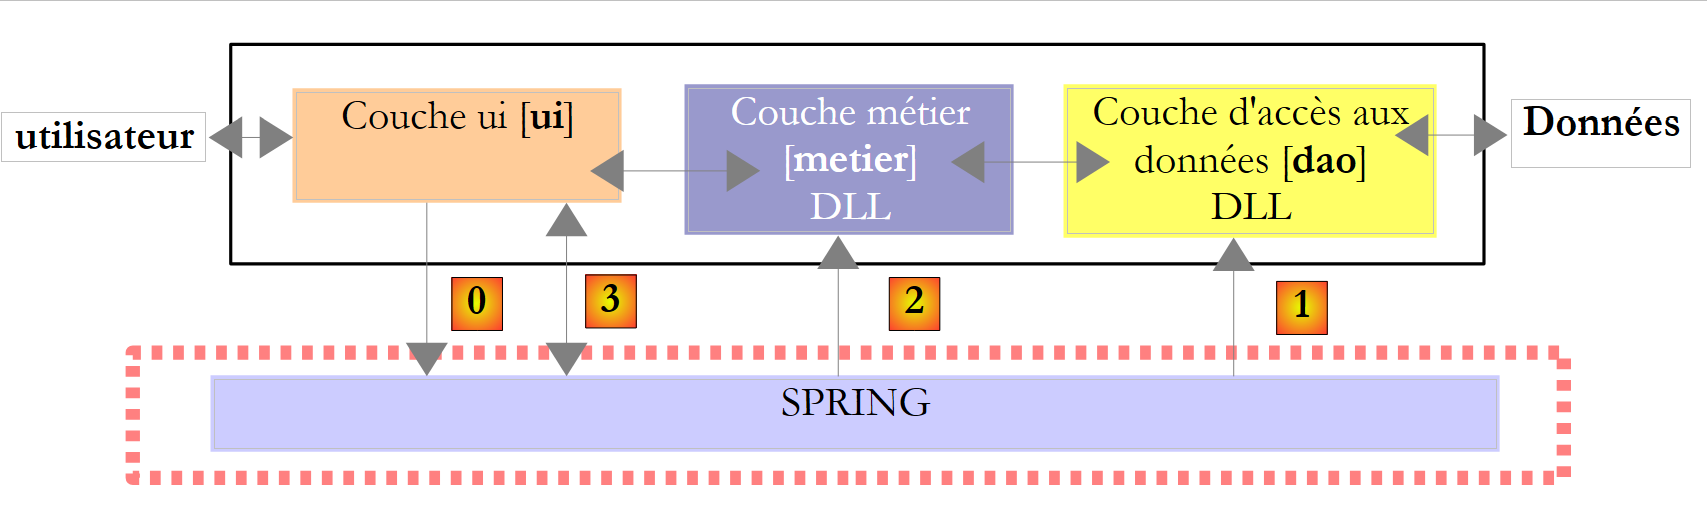 |
这种架构使我们能够用图形化实现替换现有 [ui] 层的控制台实现,同时无需更改 [metier] 和 [dao] 层。 我们得以专注于 [ui] 层,而无需担心对其他层可能产生的影响。这正是三层架构的主要优势所在。 稍后我们将看到另一个示例:当前利用文本文件数据的 [dao] 层将被替换为利用数据库数据的 [dao] 层。 届时我们将看到,这一变更不会对 [ui] 和 [metier] 层产生任何影响。