6. 三层架构
6.1. Introduction
让我们回顾一下最新版本的税款计算应用程序:
using System;

namespace Chap3 {
    class Program {
        static void Main() {
            // 交互式所得税计算程序
            // 用户通过键盘输入三项数据:已婚 nbEnfants 工资
            // 程序随后显示应缴税额
...

            // 创建一个对象 IImpot
            IImpot impot = null;
            try {
                // 创建对象 IImpot
                impot = new FileImpot("DataImpotInvalide.txt");
            } catch (FileImpotException e) {
                // 显示错误
...
                // 程序停止
                Environment.Exit(1);
            }
            // 无限循环
            while (true) {
                // 请求输入税额计算参数
                Console.Write("Paramètres du calcul de l'Impot au format : Marié (o/n) NbEnfants Salaire ou rien pour arrêter :");
                string paramètres = Console.ReadLine().Trim();
...
                // 参数正确 - 正在计算税款
                Console.WriteLine("Impot=" + impot.calculer(marié == "o", nbEnfants, salaire) + " euros");
                // 下一位纳税人
            }//while
        }
    }
}
之前的解决方案包含编程中的经典处理:
- 从文件、数据库等中读取存储的数据,第12-21行
- 与用户的交互,第26行(数据输入)和第29行(数据显示)
- 业务算法的应用,第29行
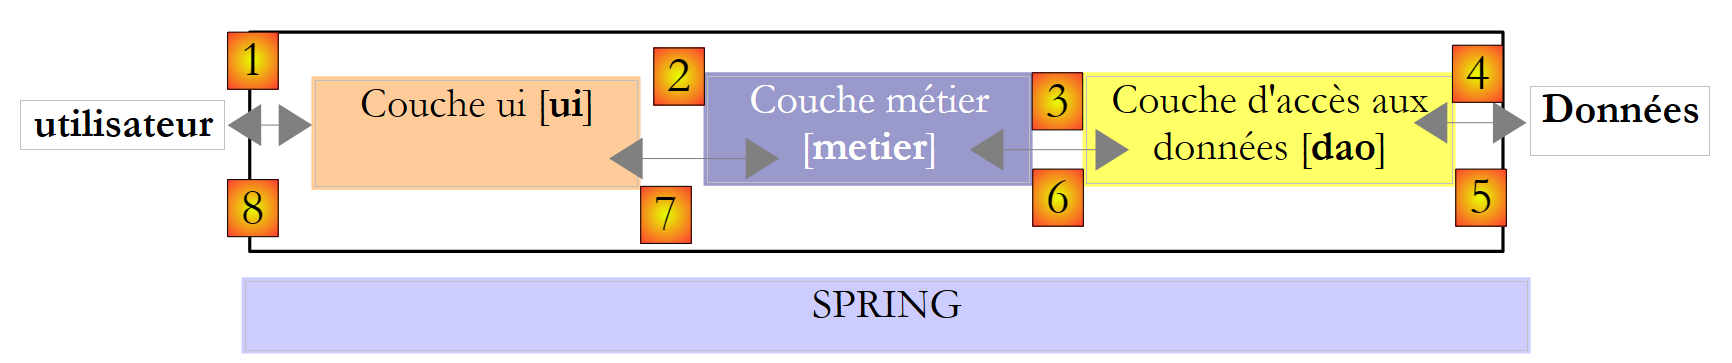
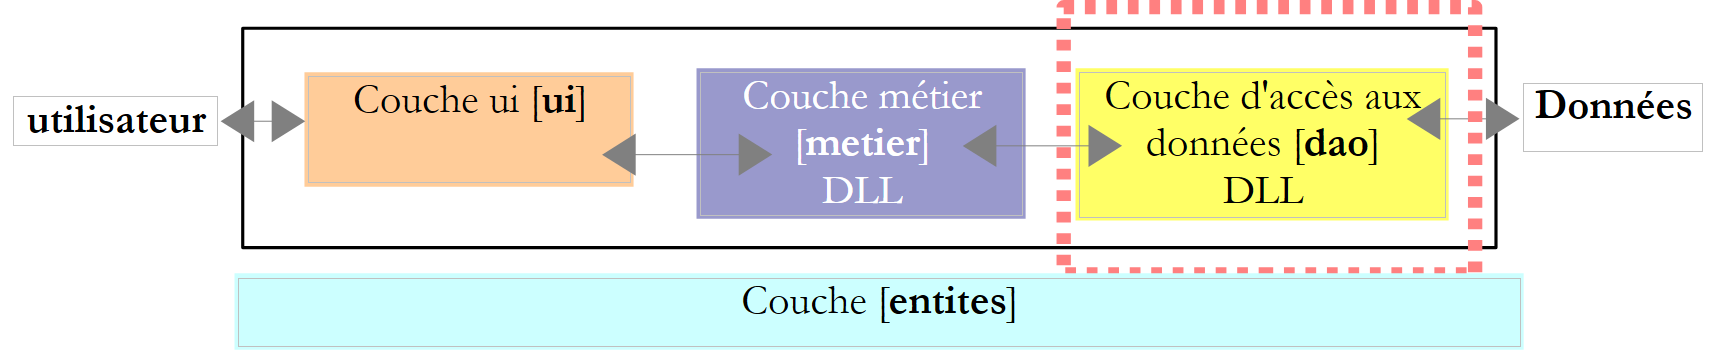
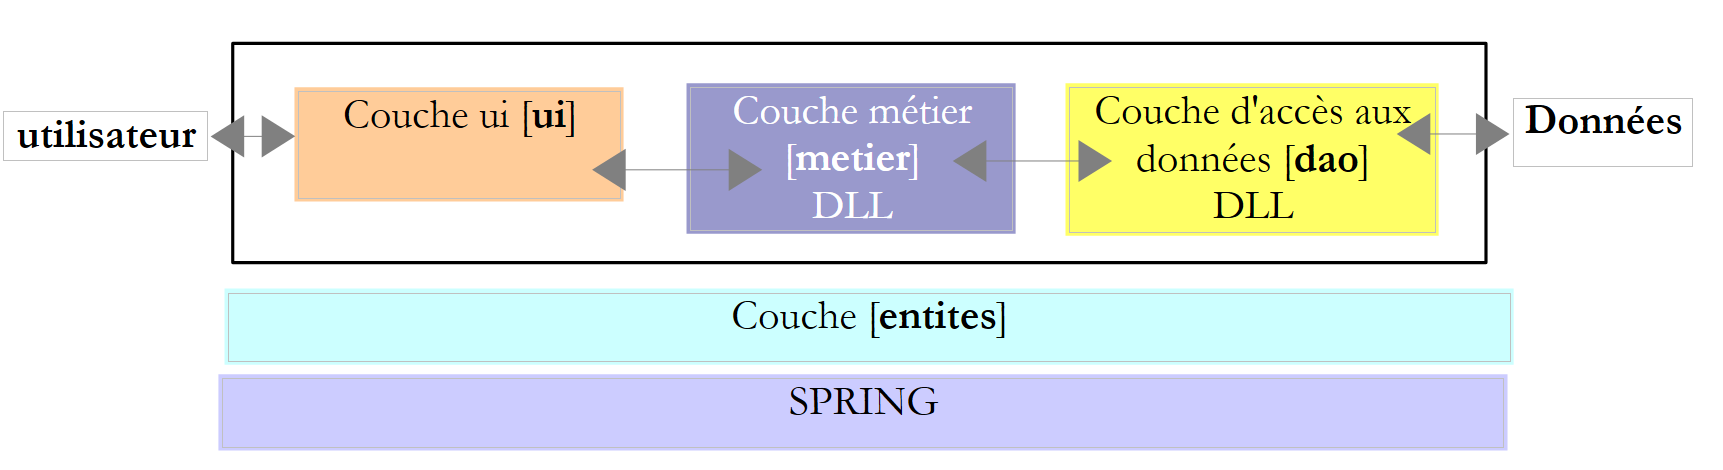
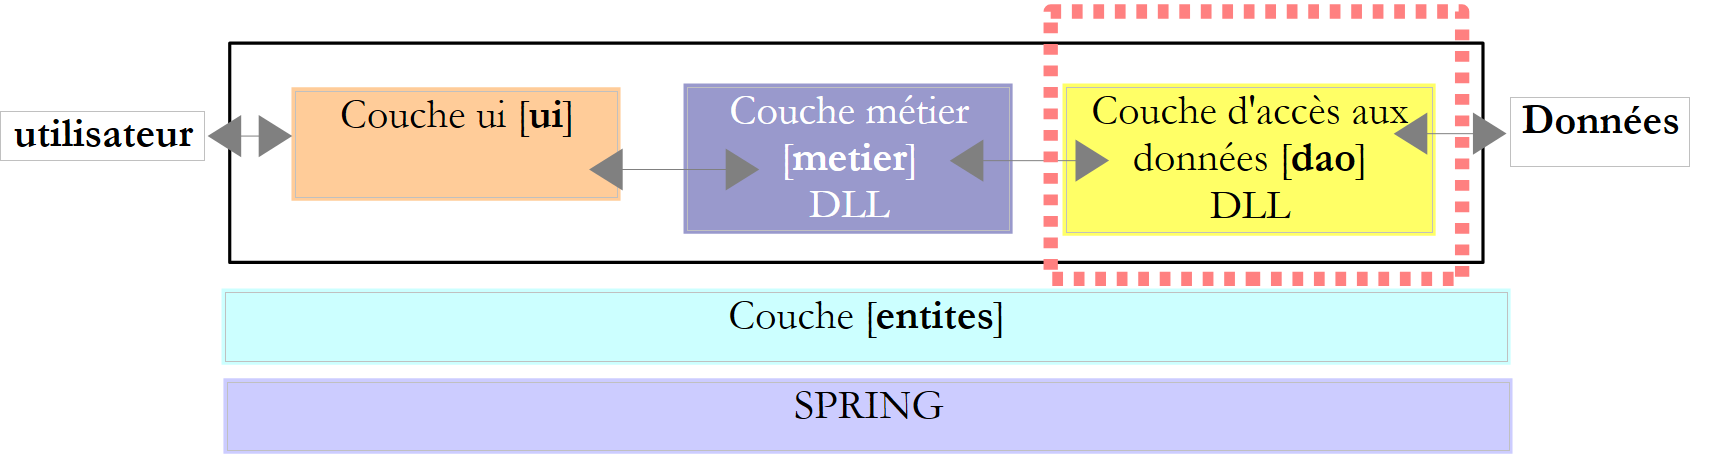
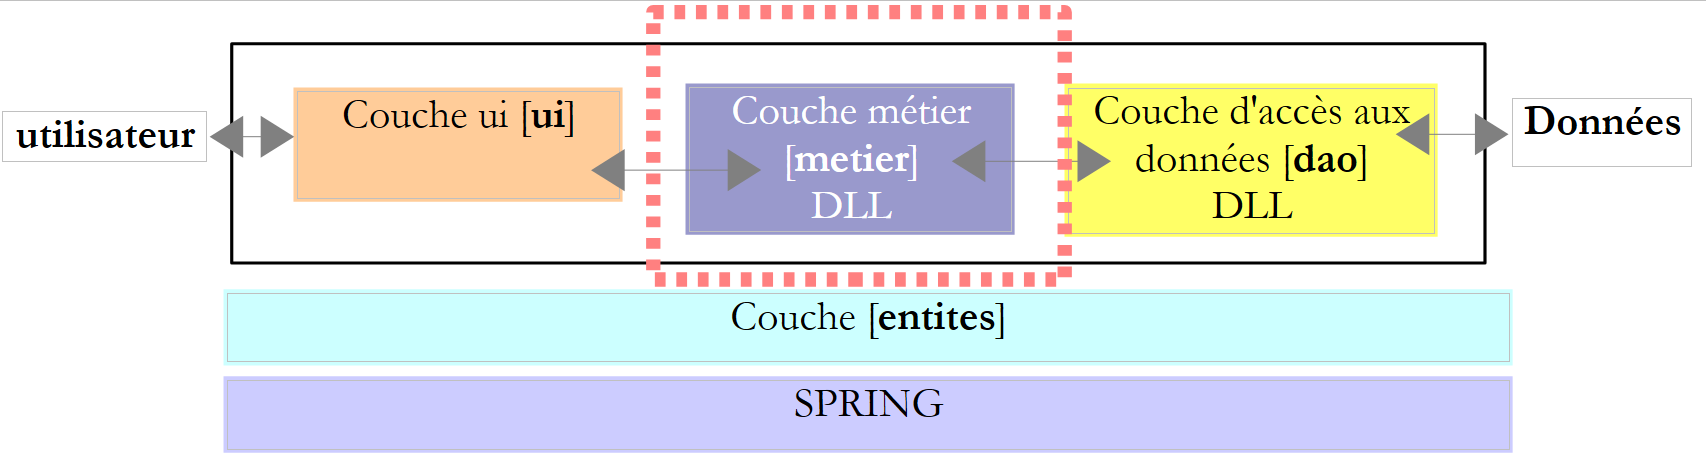
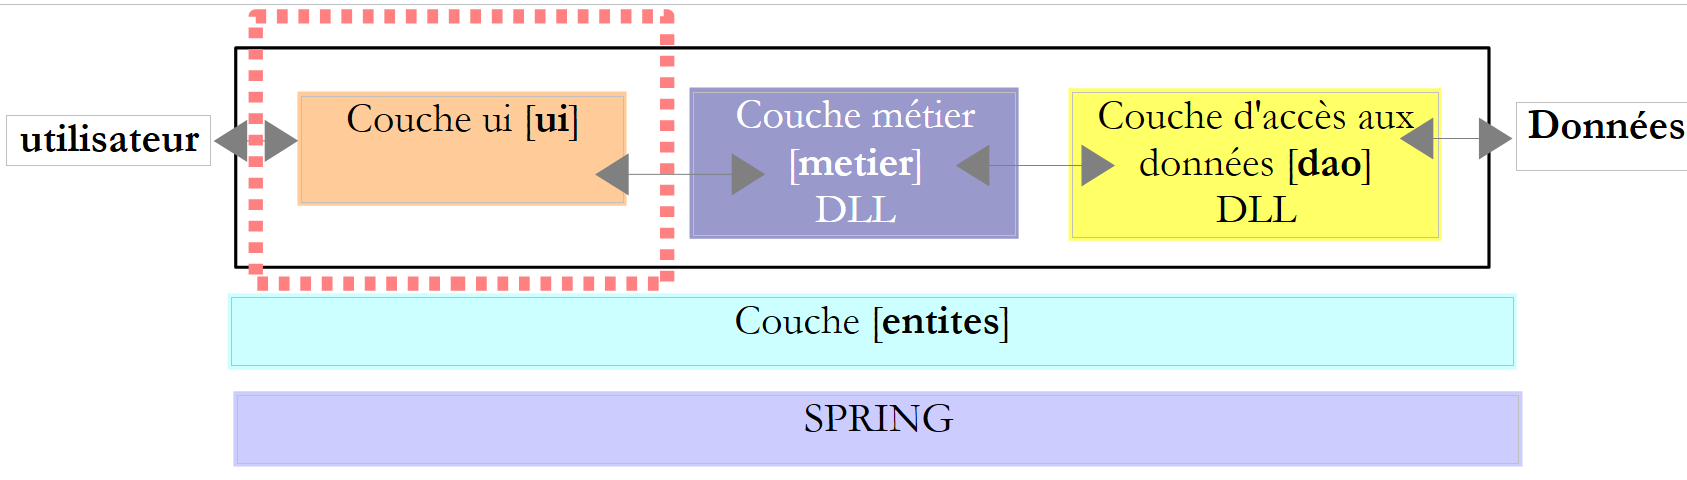
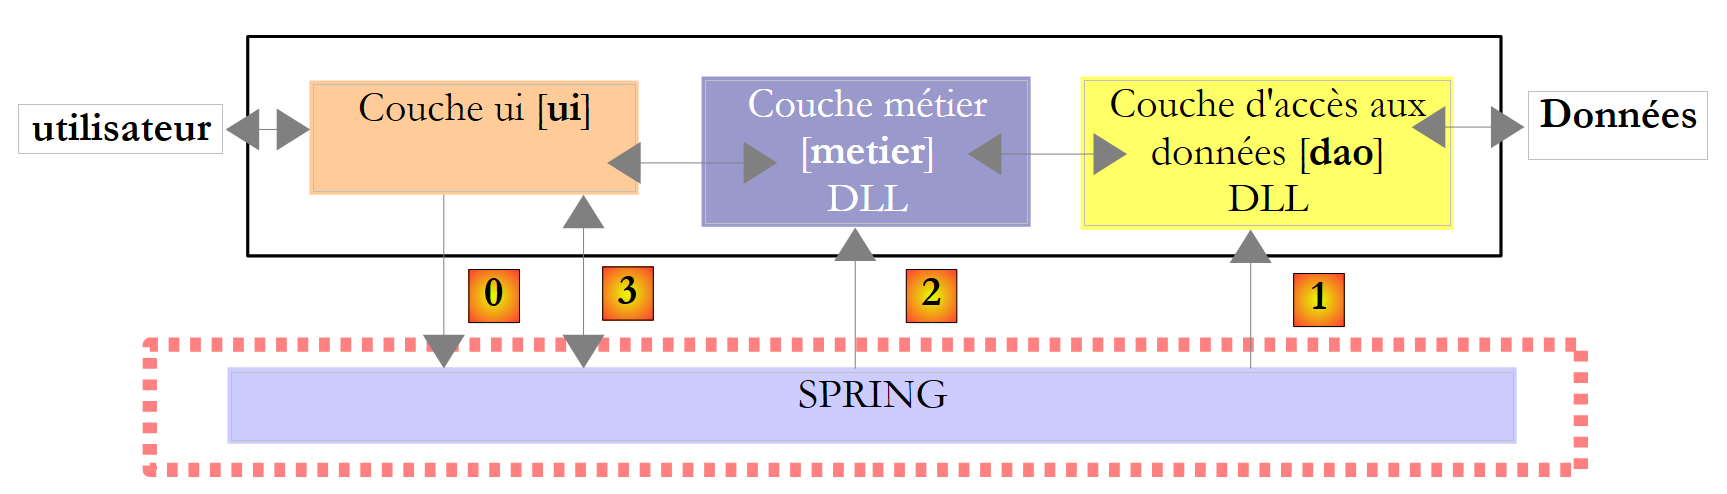
实践表明,将这些不同的处理逻辑分离到不同的类中,可以提高应用程序的可维护性。如此结构化的应用程序架构如下:
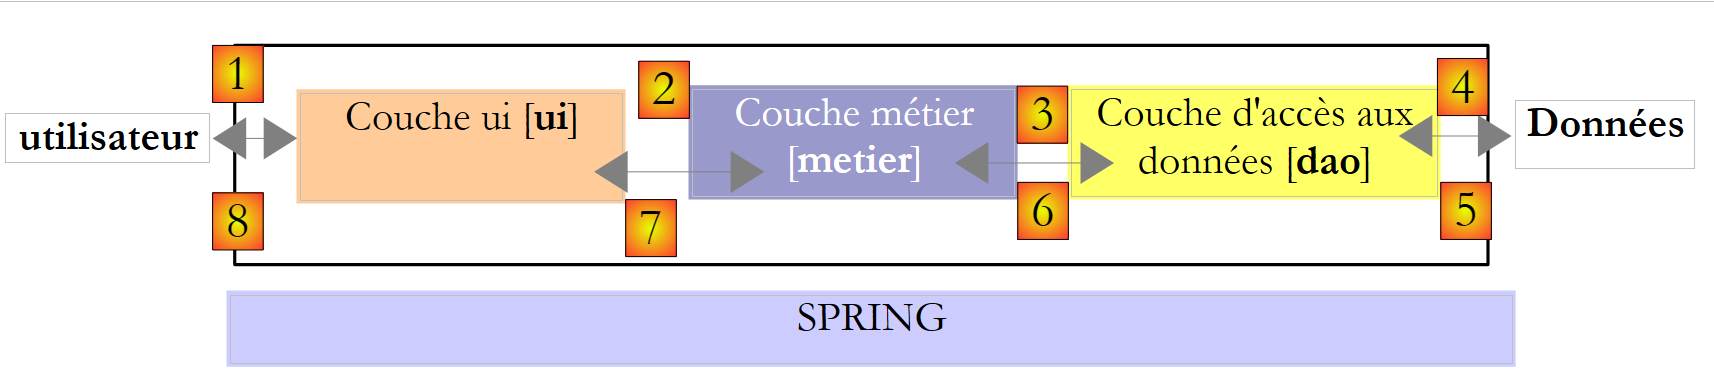 |
这种架构被称为“三层架构”,源自英语“three-tier architecture”。“三层”一词通常指每层位于不同机器上的架构。当三层位于同一台机器上时,该架构即成为“三层架构”。
- [metier]层包含应用程序的业务规则。对于我们的税款计算应用程序而言,这些规则用于计算纳税人的应纳税额。该层需要数据才能运行:
- 税率区间(该数据每年都会更新)
- 纳税人的子女数量、婚姻状况及年收入
在上图中,数据可来自两个来源:
- 数据访问层([dao],即 DAO = 数据访问对象),用于获取已存储在文件或数据库中的数据。例如,税率区间数据可能就属于此类,这与应用程序的上一版本处理方式一致。
- 用户界面层([ui],其中UI代表用户界面),用于处理用户输入或向用户显示的数据。此处可能涉及纳税人的子女数量、婚姻状况及年薪等信息
- 总体而言,[dao]层负责访问持久化数据(文件、数据库)或非持久化数据(网络、传感器等)。
- 而 [ui] 层则负责与用户(如有)的交互。
- 通过使用接口,这三层被设计为相互独立。
我们将重新审视已多次探讨过的 [Impots] 应用程序,并为其构建三层架构。 为此,我们将依次研究 [ui, metier, dao] 的各层,首先从负责持久化数据的 [dao] 层开始。
在此之前,我们需要定义[Impots]应用程序各层的接口。
6.2. [Impots] 应用程序的接口
需要提醒的是,接口定义了一组方法签名。实现该接口的类为这些方法提供了具体实现。
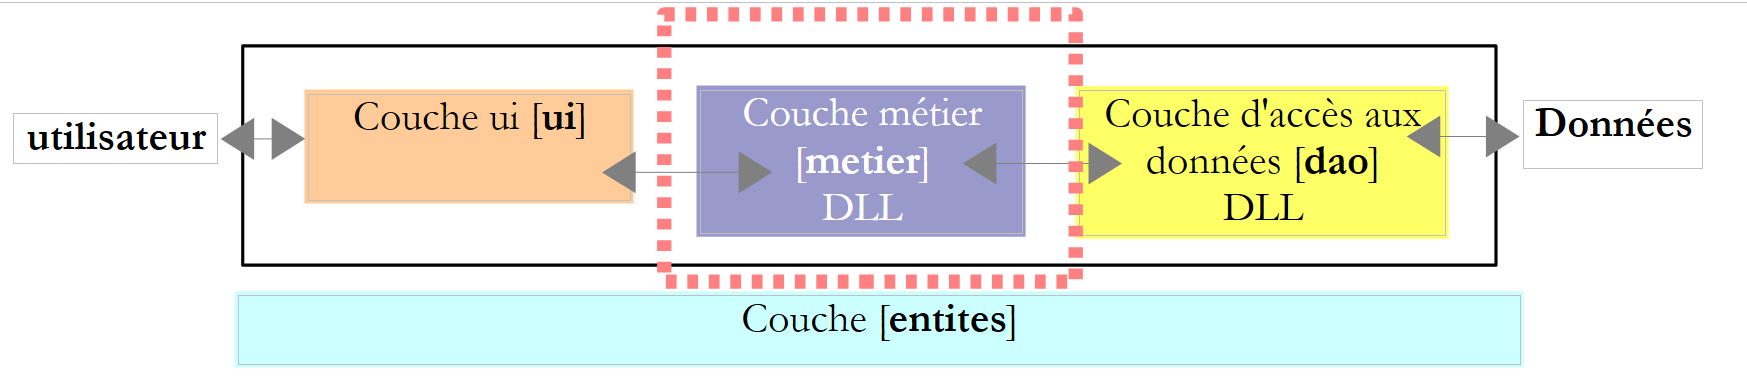
让我们回到应用程序的三层架构:
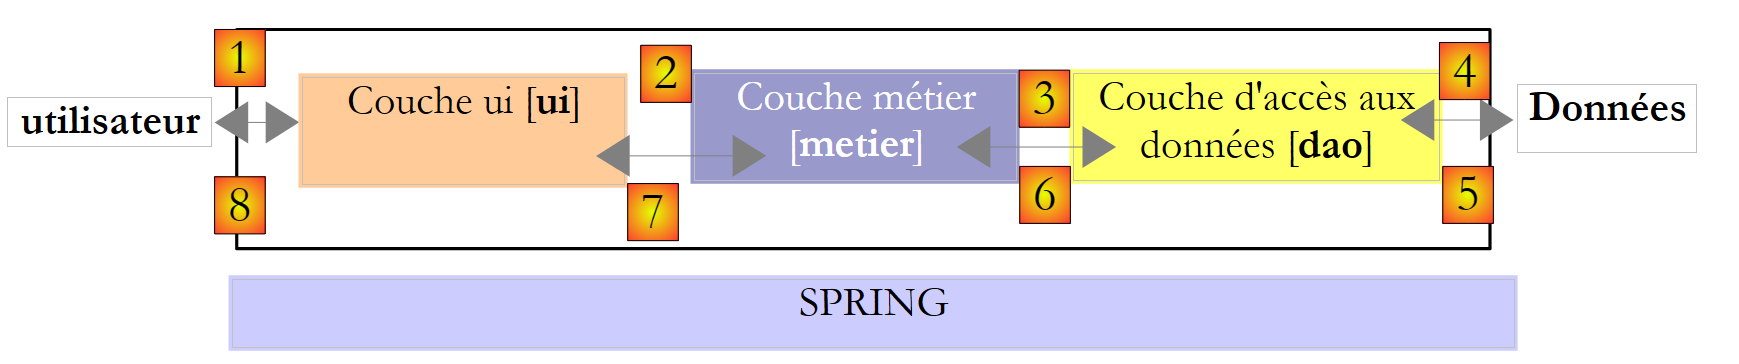 |
在此类架构中,通常由用户发起操作。用户通过 [1] 发出请求,并收到 [8] 的响应。这被称为请求-响应循环。以计算纳税人的税款为例,该过程需要多个步骤:
- [ui]层需要向用户询问子女数量、婚姻状况及年薪。这就是上文提到的[1]操作。
- 完成上述步骤后,[ui]层将请求业务层进行税款计算。为此,它会将从用户处接收到的数据传输给业务层。这就是操作[2]。
- [metier]层需要某些信息来完成其工作:即税率区间。它将通过路径[3, 4, 5, 6]向[dao]层请求这些信息。 [3] 是初始请求,而 [6] 是对此请求的响应。
- 在获取所需的所有数据后,[metier]层计算税额。
- [metier] 层现在可以响应 [ui] 层在 (b) 中发出的请求。这就是路径 [7]。
- [ui]层将对这些结果进行格式化处理,然后呈现给用户。这就是路径[8]。
- 可以设想用户进行税务模拟并希望保存这些结果。为此,他将使用路径 [1-8]。
从上述描述中可以看出,一个层会使用其右侧层的资源,但绝不会使用其左侧层的资源。让我们考虑两个相邻的层:
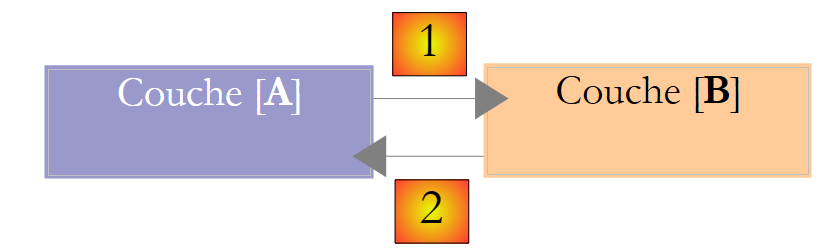 |
[A]层向[B]层发起请求。 在最简单的情况下,一个层由一个类实现。应用程序会随着时间推移而演变。因此,层 [B] 可能具有不同的实现类 [B1, B2, ...]。 如果 [B] 层是 [dao] 层,那么后者可能有一个初始实现 [B1],该实现从文件中读取数据。几年后,我们可能希望将数据存入数据库。 此时,我们将构建第二个实现类 [B2]。 如果在最初的应用程序中,[A]层直接与[B1]类进行交互,那么我们就不得不部分重写[A]层的代码。 例如,假设我们在 [A] 层中编写了如下内容:
- 第 1 行:创建 [B1] 类的实例
- 第 3 行:向该实例请求数据
如果假设新的实现类 [B2] 使用的方法签名与类 [B1] 相同,则需要将所有 [B1] 改为 [B2]。 这属于非常理想的情况,但若未注意这些方法签名,这种情况发生的概率相当低。 实际上,[B1] 和 [B2] 这两个类通常不具备相同的方法签名,因此 [A] 层的大部分内容往往需要完全重写。
若在 [A] 和 [B] 层之间添加一个接口,即可改善这一情况。 这意味着将 [B] 层向 [A] 层提供的方法签名固定在接口中。因此,之前的架构图变为如下所示:
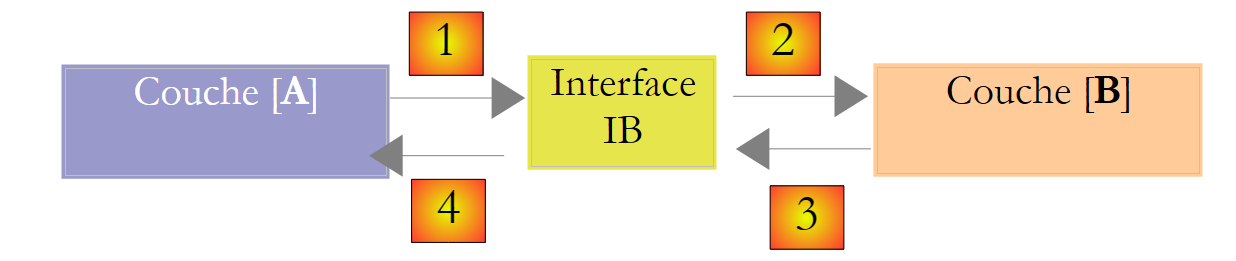 |
[A]层现在不再直接与[B]层通信,而是通过其接口[IB]进行通信。因此,在[A]层的代码中, [B] 层的实现类 [Bi] 仅在实现 [IB] 接口时出现一次。 这样一来,代码中使用的是接口 [IB] 而非其实现类。上述代码变为如下形式:
- 第 1 行:通过实例化类 [B1],创建了一个实现接口 [IB] 的实例 [ib]
- 第 3 行:向 [ib] 实例请求数据
现在,如果将 [B] 层的 [B1] 实现替换为 [B2] 实现,且这两个实现都遵循相同的 [IB] 接口, 那么只需修改 [A] 层的第 1 行,其他行均无需修改。这本身就是一大优势,足以证明在两个层之间系统地使用接口是合理的。
我们还可以更进一步,使 [A] 层完全独立于 [B] 层。在上面的代码中,第 1 行存在问题,因为它硬编码引用了 [B1] 类。 理想情况下,[A]层应能使用[IB]接口的实现,而无需指定具体类名。这将与我们上文的架构图保持一致。 我们可以看到,[A]层面向[IB]接口,且无法理解它为何需要知道实现该接口的类名。这一细节对[A]层而言毫无用处。
Spring框架(http://www.springframework.org)可实现这一效果。上述架构演变如下:
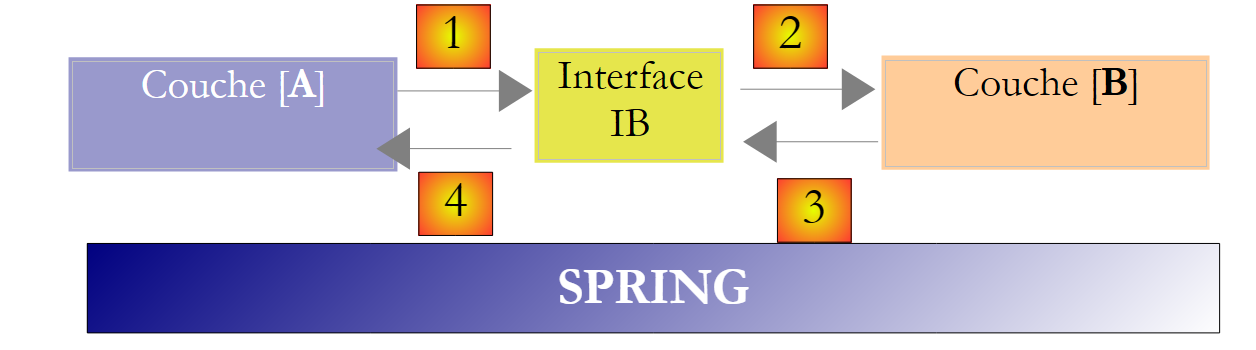 |
横向层 [Spring] 将使某一层能够通过配置获取其右侧层的引用,而无需知道该层的实现类名称。 该名称将保存在配置文件中,而非 C# 代码中。因此,[A] 层的 C# 代码形式如下:
- 第 1 行:一个 [ib] 实例,该实例实现了 [B] 层中的 [IB] 接口。该实例由 Spring 根据配置文件中的信息创建。Spring 将负责创建:
- 实现 [B] 层的 [b] 实例
- 实现 [A] 层的 [a] 实例。该实例将被初始化。 上文中的 [ib] 字段将接收实现 [B] 层的对象的引用 [b]
- 第 3 行:向 [ib] 实例请求数据
现在可以看到,B层的实现类[B1]在[A]层的代码中完全未出现。 当实现类 [B1] 被新的实现类 [B2] 替换时,类 [A] 的代码将保持不变。 我们只需修改 Spring 的配置文件,将实例化对象从 [B1] 更改为 [B2]。
Spring与C#接口的结合通过实现各层之间的隔离,为应用程序的维护带来了决定性的改进。我们将采用这一方案来开发应用程序的新版本[Impots]。
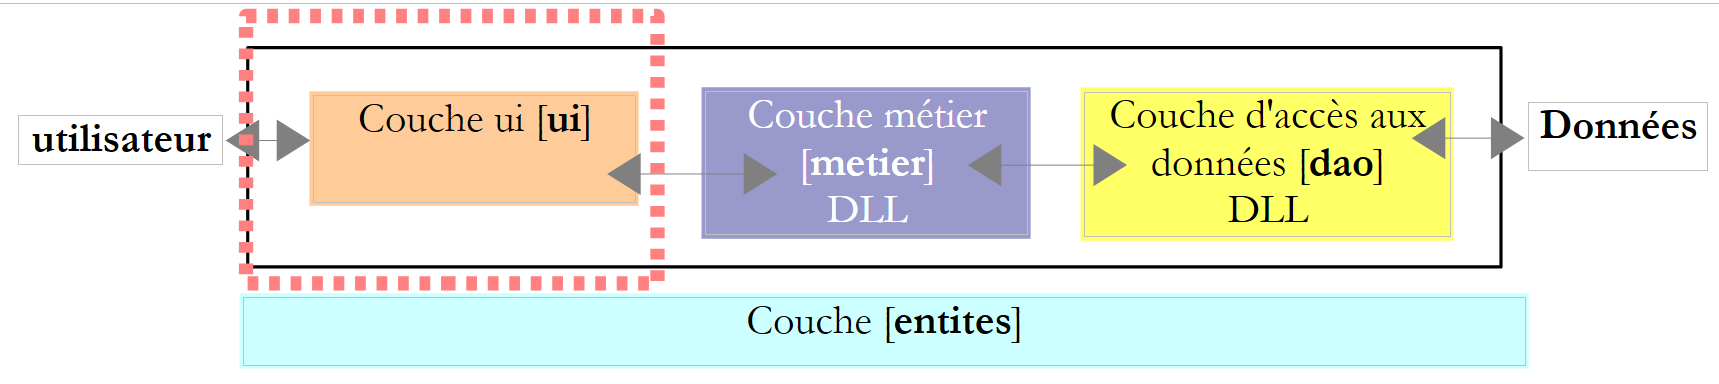
让我们回到应用程序的三层架构:
 |
在简单情况下,我们可以从 [metier] 层开始,以此探索应用程序的接口。该层运行时需要数据:
- 这些数据可能已存在于文件、数据库中,或通过网络获取。它们由 [dao] 层提供。
- 尚未可用。此时由 [ui] 层提供,该层从应用程序用户处获取数据。
[dao]层应向[metier]层提供哪些接口?这两个层之间可能存在哪些交互?[dao]层应向[metier]层提供以下数据:
- 税率区间
在我们的应用程序中,[dao]层利用现有数据,但不创建新数据。[dao]层的接口定义可能如下:
using Entites;

namespace Dao {
    public interface IImpotDao {
        // 税率区间
        TrancheImpot[] TranchesImpot{get;}
    }
}
- 第 3 行:[dao] 层将位于 [Dao] 命名空间中
- 第 6 行:接口 IImpotDao 定义了属性 TranchesImpot,该属性将向层 [métier] 提供税率区间。
- 第 1 行:导入定义结构 TrancheImpot 的命名空间:
namespace Entites {
    // 一个税率区间
    public struct TrancheImpot {
        public decimal Limite { get; set; }
        public decimal CoeffR { get; set; }
        public decimal CoeffN { get; set; }
    }
}
让我们回到应用程序的三层架构:
 |
[metier]层应向[ui]层提供何种接口?回顾这两层之间的交互:
- [ui]层向用户询问子女数量、婚姻状况和年薪。这就是上文提到的[1]操作。
- 完成上述操作后,[ui]层将请求业务层进行座位计算。为此,它将向业务层传输从用户处接收到的数据。这就是操作[2]。
[metier]层的接口定义可能如下:
namespace Metier {
    interface IImpotMetier {
        int CalculerImpot(bool marié, int nbEnfants, int salaire);
    }
}
- 第 1 行:将所有与 [metier] 层相关的内容放入 [Metier] 命名空间中。
- 第2行:接口IImpotMetier仅定义了一个方法:该方法用于根据纳税人的婚姻状况、子女数量和年薪来计算其应缴税额。
我们将研究该分层架构的第一个实现方案。
6.3. 示例应用程序 - 版本 4
6.3.1. Visual Studio 项目
Visual Studio 项目如下:
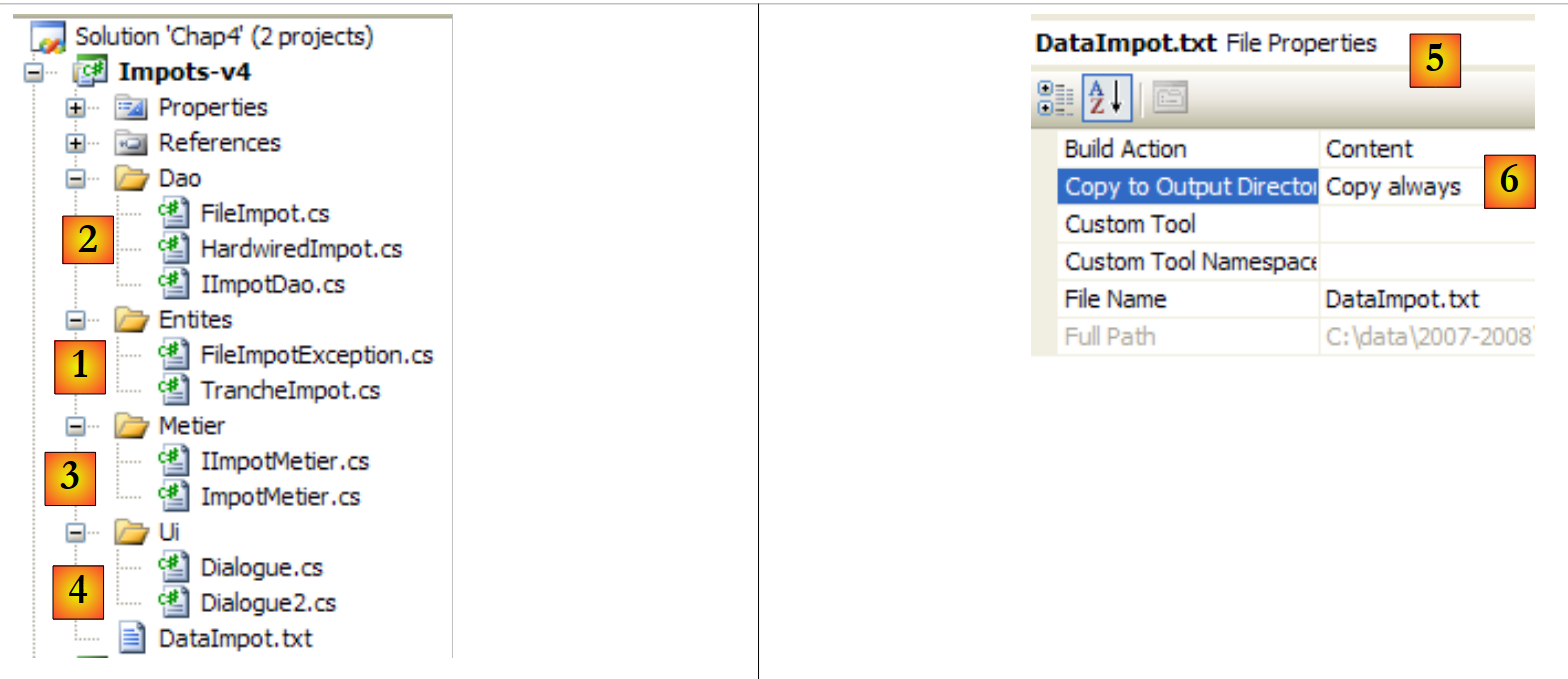 |
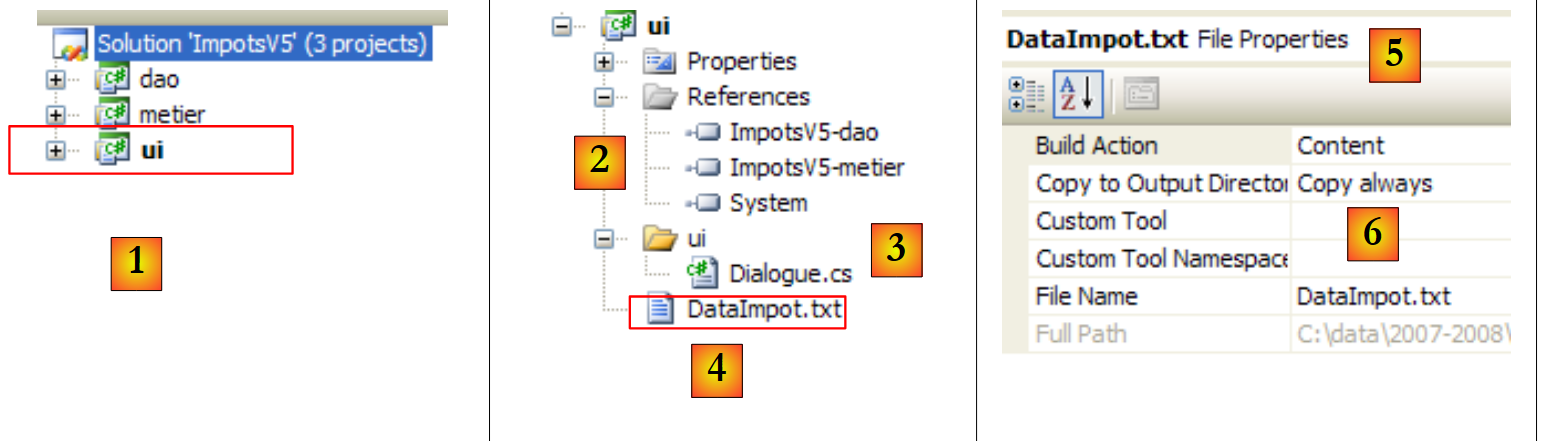
- [1]:文件夹 [Entites] 包含跨层对象[ui, metier, dao]:结构 TrancheImpot,异常 FileImpotException。
- [2]:文件夹 [Dao] 包含 [dao] 层的类和接口。 我们将使用 IImpotDao 接口的两个实现:第 4.10 节中讨论的 HardwiredImpot 类,以及第 5.8 节中讨论的 FileImpot。
- [3]:文件夹 [Metier] 包含 [metier] 层的类和接口
- [4]:文件夹 [Ui] 包含 [ui] 层的类
- [5]:文件 [DataImpot.txt] 包含 [dao] 层实现 FileImpot 所使用的税率区间。 [6] 已配置为自动复制到项目的运行文件夹中。
6.3.2. 应用程序的组件
让我们回顾一下应用程序的三层架构:
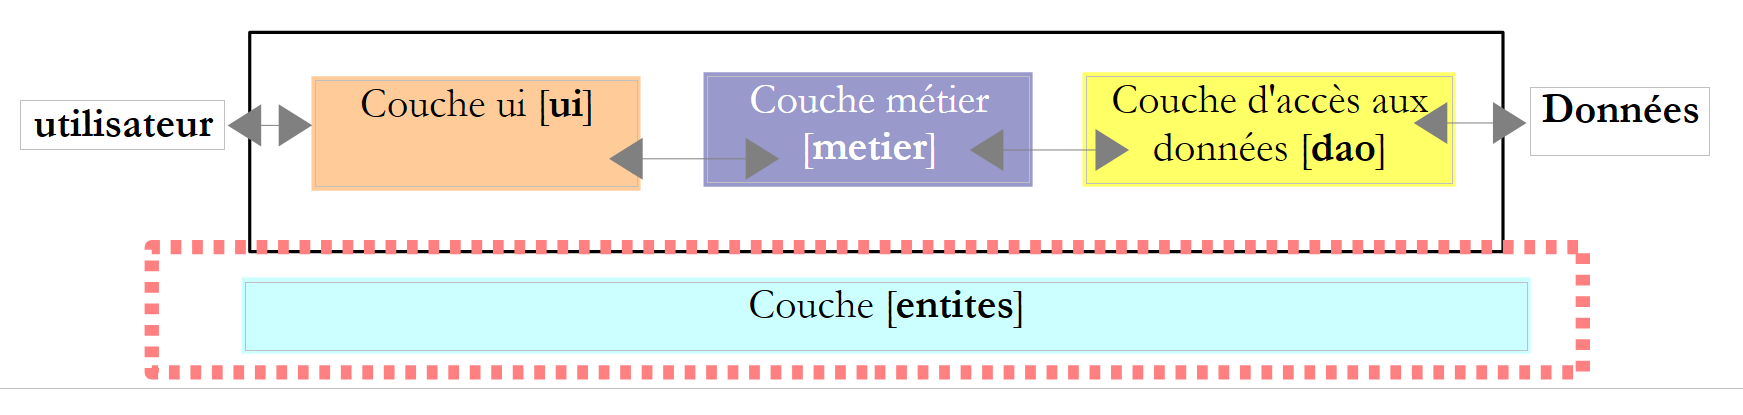 |
我们将跨层的类称为 entités。通常,封装 [dao] 层数据的类和结构都属于这一类。这些实体通常向上延伸至 [ui] 层。
应用程序的实体如下:
结构 TrancheImpot
namespace Entites {
    // 一个税率档次
    public struct TrancheImpot {
        public decimal Limite { get; set; }
        public decimal CoeffR { get; set; }
        public decimal CoeffN { get; set; }
    }
}
L' 异常 FileImpotException
using System;

namespace Entites {
    public class FileImpotException : Exception {
        // 错误代码
        [Flags]
        public enum CodeErreurs { Acces = 1, Ligne = 2, Champ1 = 4, Champ2 = 8, Champ3 = 16 };

        // 错误代码
        public CodeErreurs Code { get; set; }

        // 制造商
        public FileImpotException() {
        }
        public FileImpotException(string message)
            : base(message) {
        }
        public FileImpotException(string message, Exception e)
            : base(message, e) {
        }
    }
}
注:只有当 [dao] 层由 FileImpot 类实现时,FileImpotException 类才有用。
6.3.3. [dao] 层
 |
回顾 [dao] 层的接口:
using Entites;

namespace Dao {
    public interface IImpotDao {
        // 税率区间
        TrancheImpot[] TranchesImpot{get;}
    }
}
我们将通过两种不同的方式实现该接口。
首先使用第 4.10 节中讨论的 HardwiredImpot 类:
using System;
using Entites;

namespace Dao {
    public class HardwiredImpot : IImpotDao {

        // 计算税款所需的数据表
        decimal[] limites = { 4962M, 8382M, 14753M, 23888M, 38868M, 47932M, 0M };
        decimal[] coeffR = { 0M, 0.068M, 0.191M, 0.283M, 0.374M, 0.426M, 0.481M };
        decimal[] coeffN = { 0M, 291.09M, 1322.92M, 2668.39M, 4846.98M, 6883.66M, 9505.54M };
        // 税率区间
        public TrancheImpot[] TranchesImpot { get; private set; }

        // 生成器
        public HardwiredImpot() {
            // 创建税率区间表
            TranchesImpot = new TrancheImpot[limites.Length];
            // 数据填充
            for (int i = 0; i < TranchesImpot.Length; i++) {
                TranchesImpot[i] = new TrancheImpot { Limite = limites[i], CoeffR = coeffR[i], CoeffN = coeffN[i] };
            }
        }
    }// 类
}// 命名空间
- 第 5 行:类 HardwiredImpot 实现了接口 IImpotDao
- 第 12 行:实现了接口 IImpotDao 的属性 TranchesImpot。 该属性为自动属性。它实现了接口 IImpotDao 中属性 TranchesImpot 的方法 get。 此外,我们还声明了一个私有方法 set(即该类内部方法),以便第 15-22 行中的构造函数能够初始化税率区间数组。
接口 IImpotDao 也将由第 5.8 节中讨论的类 FileImpot 实现:
using System;
using System.Collections.Generic;
using System.IO;
using System.Text.RegularExpressions;
using Entites;

namespace Dao {
    class FileImpot : IImpotDao {

        // 数据文件
        public string FileName { get; set; }

        // 税率区间
        public TrancheImpot[] TranchesImpot { get; private set; }

        // 构造函数
        public FileImpot(string fileName) {
            // 保存文件名
            FileName = fileName;
            // 数据
            List<TrancheImpot> listTranchesImpot = new List<TrancheImpot>();
            int numLigne = 1;
            // 异常
            FileImpotException fe = null;
            // 逐行读取文件 fileName 的内容
            Regex pattern = new Regex(@"s*:\s*");
            // 起初没有错误
            FileImpotException.CodeErreurs code = 0;
            try {
                using (StreamReader input = new StreamReader(FileName)) {
                    while (!input.EndOfStream && code == 0) {
                        // 当前行
                        string ligne = input.ReadLine().Trim();
                        // 忽略空行
                        if (ligne == "")
                            continue;
                        // 行被拆分为三个字段,由以下符号分隔:
                        string[] champsLigne = pattern.Split(ligne);
                        // 是否有 3 个字段?
                        if (champsLigne.Length != 3) {
                            code = FileImpotException.CodeErreurs.Ligne;
                        }
                        // 3个字段的转换
                        decimal limite = 0, coeffR = 0, coeffN = 0;
                        if (code == 0) {
                            if (!Decimal.TryParse(champsLigne[0], out limite))
                                code = FileImpotException.CodeErreurs.Champ1;
                            if (!Decimal.TryParse(champsLigne[1], out coeffR))
                                code |= FileImpotException.CodeErreurs.Champ2;
                            if (!Decimal.TryParse(champsLigne[2], out coeffN))
                                code |= FileImpotException.CodeErreurs.Champ3;
                            ;
                        }
                        // 错误?
                        if (code != 0) {
                            // 记录错误
                            fe = new FileImpotException(String.Format("Ligne n° {0} incorrecte", numLigne)) { Code = code };
                        } else {
                            // 记录新的税率区间
                            listTranchesImpot.Add(new TrancheImpot() { Limite = limite, CoeffR = coeffR, CoeffN = coeffN });
                            // 下一行
                            numLigne++;
                        }
                    }
                }
            } catch (Exception e) {
                // 记录错误
                fe = new FileImpotException(String.Format("Erreur lors de la lecture du fichier {0}", FileName), e) { Code = FileImpotException.CodeErreurs.Acces };
            }
            // 是否需要报告错误?
            if (fe != null) {
                // 触发异常
                throw fe;
            } else {
                // 将列表 listImpot 放入数组 tranchesImpot
                TranchesImpot = listTranchesImpot.ToArray();
            }
        }
    }
}
- 该代码已在第5.8节中进行过探讨。
- 第 14 行:接口 IImpotDao 的方法 TranchesImpot
- 第76行:在类构造函数中初始化税率区间,依据构造函数在第17行接收到的文件名称。
6.3.4. [metier]层
 |
回顾一下该层的接口:
namespace Metier {
    public interface IImpotMetier {
        int CalculerImpot(bool marié, int nbEnfants, int salaire);
    }
}
该接口的实现 ImpotMetier 如下:
using Entites;
using Dao;

namespace Metier {
    public class ImpotMetier : IImpotMetier {

        // 层 [dao]
        private IImpotDao Dao { get; set; }

        // 税率区间
        private TrancheImpot[] tranchesImpot;

        // 开发商
        public ImpotMetier(IImpotDao dao) {
            // 存储
            Dao = dao;
            // 税率区间
            tranchesImpot = dao.TranchesImpot;
        }

        // 税额计算
        public int CalculerImpot(bool marié, int nbEnfants, int salaire) {
            // 份额数量计算
            decimal nbParts;
            if (marié)
                nbParts = (decimal)nbEnfants / 2 + 2;
            else
                nbParts = (decimal)nbEnfants / 2 + 1;
            if (nbEnfants >= 3)
                nbParts += 0.5M;
            // 应税收入与家庭商计算
            decimal revenu = 0.72M * salaire;
            decimal QF = revenu / nbParts;
            // 税额计算
            tranchesImpot[tranchesImpot.Length - 1].Limite = QF + 1;
            int i = 0;
            while (QF > tranchesImpot[i].Limite)
                i++;
            // 返回结果
            return (int)(revenu * tranchesImpot[i].CoeffR - nbParts * tranchesImpot[i].CoeffN);
        }//计算
    }//分类

}
- 第 5 行:类 [Metier] 实现了接口 [IImpotMetier]。
- 第 14-19 行:[metier] 层必须与 [dao] 层协作。因此,它必须持有对实现 IImpotDao 接口的对象的引用。 这就是为什么该引用被作为参数传递给构造函数。
- 第 16 行:对 [dao] 层的引用存储在第 8 行的私有字段中
- 第18行:基于该引用,构造函数请求税率区间表,并将该表的引用存储在第8行的私有属性中。
- 第22-41行:实现接口IImpotMetier中的方法CalculerImpot。该实现使用了由构造函数初始化的税率区间表。
6.3.5. [ui] 层
 |
第 2 版和第 3 版的用户对话类非常相似。第 2 版的类如下:
using System;

namespace Chap2 {
    public class Program {
        static void Main() {
...

            // 创建对象IImpot
            IImpot impot = new HardwiredImpot();

            // 无限循环
            while (true) {
...
            }//while
        }
    }
}
而第 3 版的类如下:
using System;

namespace Chap3 {
    public class Program {
        static void Main() {
...

            // 创建对象 IImpot
            IImpot impot = null;
            try {
                // 创建对象 IImpot
                impot = new FileImpot("DataImpotInvalide.txt");
            } catch (FileImpotException e) {
                // 显示错误
                string msg = e.InnerException == null ? null : String.Format(", Exception d'origine : {0}", e.InnerException.Message);
                Console.WriteLine("L'erreur suivante s'est produite : [Code={0},Message={1}{2}]", e.Code, e.Message, msg == null ? "" : msg);
                // 程序停止
                Environment.Exit(1);
            }
            // 无限循环
            while (true) {
...
            }//while
        }
    }
}
唯一的变化在于实例化用于计算税款的 IImpot 类型对象的方式。此处该对象对应于我们的 [métier] 层。
对于使用类 HardwiredImpot 实现的 [dao],对话框类如下:
using System;
using Metier;
using Dao;
using Entites;

namespace Ui {
    public class Dialogue2 {
        static void Main() {
...

            // 创建图层 [metier et dao]
            IImpotMetier metier = new ImpotMetier(new HardwiredImpot());

            // 无限循环
            while (true) {
...
                // 参数正确 - 计算税款
                Console.WriteLine("Impot=" + metier.CalculerImpot(marié == "o", nbEnfants, salaire) + " euros");
                // 下一位纳税人
            }//while
        }
    }
}
- 第 12 行:实例化 [dao] 和 [metier] 层。需注意,[metier] 层需要 [dao] 层。
- 第 18 行:使用 [metier] 层计算税款
对于使用类 FileImpot 实现的 [dao],对话类如下:
using System;
using Metier;
using Dao;
using Entites;

namespace Ui {
    public class Dialogue {
        static void Main() {
...
            // 创建图层[metier et dao]
            IImpotMetier metier = null;
            try {
        // 创建图层 [metier]
                metier = new ImpotMetier(new FileImpot("DataImpot.txt"));
            } catch (FileImpotException e) {
                // 显示错误
                string msg = e.InnerException == null ? null : String.Format(", Exception d'origine : {0}", e.InnerException.Message);
                Console.WriteLine("L'erreur suivante s'est produite : [Code={0},Message={1}{2}]", e.Code, e.Message, msg == null ? "" : msg);
                // 程序停止
                Environment.Exit(1);
            }
            // 无限循环
            while (true) {
...
                // 参数正确 - 正在计算税款
                Console.WriteLine("Impot=" + metier.CalculerImpot(marié == "o", nbEnfants, salaire) + " euros");
                // 下一位纳税人
            }//while
        }
    }
}
- 第 11-21 行:实例化 [dao] 和 [metier] 层。由于 [dao] 层的实例化可能引发异常,因此对此进行了异常处理
- 第 26 行:使用 [metier] 层计算税款,与上一版本相同
6.3.6. 结论
分层架构和接口的使用为我们的应用程序带来了一定的灵活性。这一点尤其体现在 [ui] 层实例化 [dao] 和 [métier] 层的方式上:
        // 创建图层 [metier et dao]
IImpotMetier metier = new ImpotMetier(new HardwiredImpot());
在一种情况下,以及:
// 创建图层 [metier et dao]
            IImpotMetier metier = null;
            try {
        // 创建图层 [metier]
                metier = new ImpotMetier(new FileImpot("DataImpot.txt"));
            } catch (FileImpotException e) {
                // 显示错误
                string msg = e.InnerException == null ? null : String.Format(", Exception d'origine : {0}", e.InnerException.Message);
                Console.WriteLine("L'erreur suivante s'est produite : [Code={0},Message={1}{2}]", e.Code, e.Message, msg == null ? "" : msg);
                // 程序停止
                Environment.Exit(1);
            }
。除情况 2 中的异常处理外,两个应用程序中 [dao] 和 [metier] 层的实例化方式是相似的。 一旦 [dao] 和 [metier] 层被实例化,[ui] 层的代码在两种情况下是相同的。 这是因为 [métier] 层是通过其接口 IImpotMetier 进行操作的,而不是通过该接口的实现类。 在不更改应用程序中 [metier] 或 [dao] 层接口的情况下,修改这些层,最终仍只需修改 [ui] 层中上述几行代码即可。
该架构带来的灵活性还体现在 [métier] 层的实现上:
using Entites;
using Dao;

namespace Metier {
    public class ImpotMetier : IImpotMetier {

        // 图层 [dao]
        private IImpotDao Dao { get; set; }

        // 税率区间
        private TrancheImpot[] tranchesImpot;

        // 建筑商
        public ImpotMetier(IImpotDao dao) {
            // 存储
            Dao = dao;
            // 税率区间
            tranchesImpot = dao.TranchesImpot;
        }

        // 税额计算
        public int CalculerImpot(bool marié, int nbEnfants, int salaire) {
...
        }//计算
    }//分类

}
第14行可见,[métier]层是通过引用[dao]层的接口构建的。 因此,修改后者的实现对 [métier] 层没有任何影响。正因如此,我们唯一的 [métier] 层实现才能在无需修改的情况下,与两个不同的 [dao] 层实现协同工作。
6.4. 示例应用—— 第5版
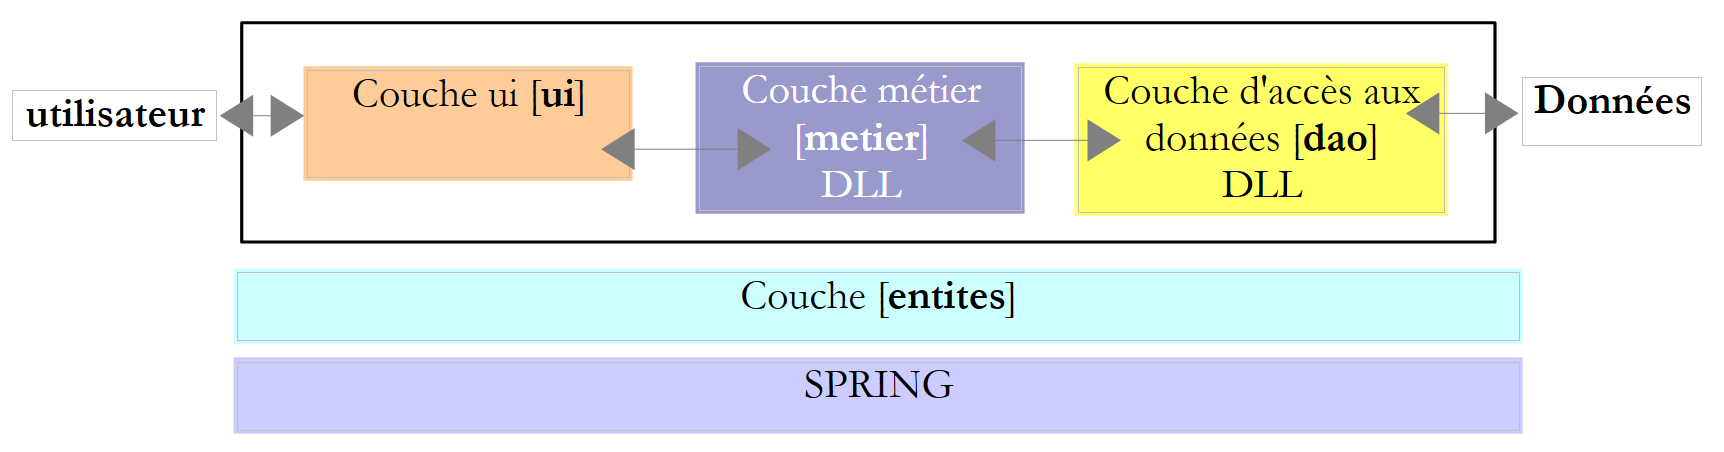 |
此新版本基于前一版本,并进行了以下修改:
- [métier] 和 [dao] 这两个层均被封装在 DLL 中,并通过单元测试框架 NUnit 进行了测试。
- 各层的集成由 Spring 框架负责
在大型项目中,通常有多名开发人员共同参与同一项目。分层架构有助于这种协作模式:由于各层之间通过明确定义的接口进行通信,因此负责某一层开发的开发人员无需关注其他层开发人员的工作。只要所有人都遵守接口规范即可。
如上所述,在测试 [métier] 层时,该层的开发人员将需要 [dao] 层的实现。 只要该层尚未完成,他就可以使用 [dao] 层的模拟实现,只要该实现符合 IImpotDao 接口即可。 这也是分层架构的一大优势:[dao]层的延迟不会阻碍[métier]层的测试。 [dao] 层的模拟实现还具有另一个优势:通常比真正的 [dao] 层更容易实现,后者可能需要启动 SGBD、建立网络连接等。
当 [dao] 层开发完成并经过测试后,将以 DLL 的形式(而非源代码)提供给 [métier] 层的开发人员。 最终,应用程序通常以 .exe 可执行文件(来自 [ui] 层)和 .dll 类库(其他层)的形式交付。
6.4.1. NUnit
迄今为止,我们对各类应用程序进行的测试主要依赖于目视检查。 我们仅确认屏幕显示结果是否符合预期。当需要执行大量测试时,这种方法便难以奏效。毕竟人会感到疲劳,且随着一天的推移,其执行测试的能力也会逐渐减弱。因此,测试必须实现自动化,并力求无需任何人工干预。
应用程序会随着时间的推移而不断演进。每次更新后,都必须验证应用程序是否出现“退化”,c.a.d,即它是否仍能通过最初编写时所进行的正常运行测试。这些测试被称为“回归测试”。对于规模稍大的应用程序,可能需要进行数百次测试。 实际上,我们会测试应用程序中每个类的每个方法。这被称为单元测试。如果这些测试未实现自动化,可能会占用大量开发人员的时间。
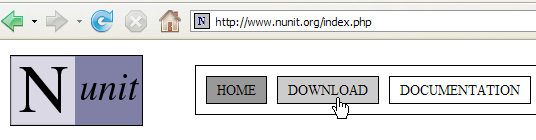
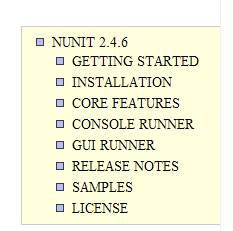
为此开发了多种测试自动化工具,其中一款名为 NUnit。该工具可在 [http://www.nunit.org] 网站上获取:
 | 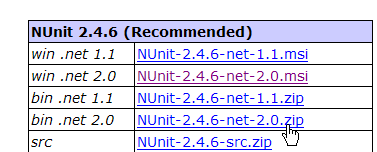 |
本文档(2008年3月)使用的是上述2.4.6版本。安装后,桌面会生成一个名为[1]的图标:
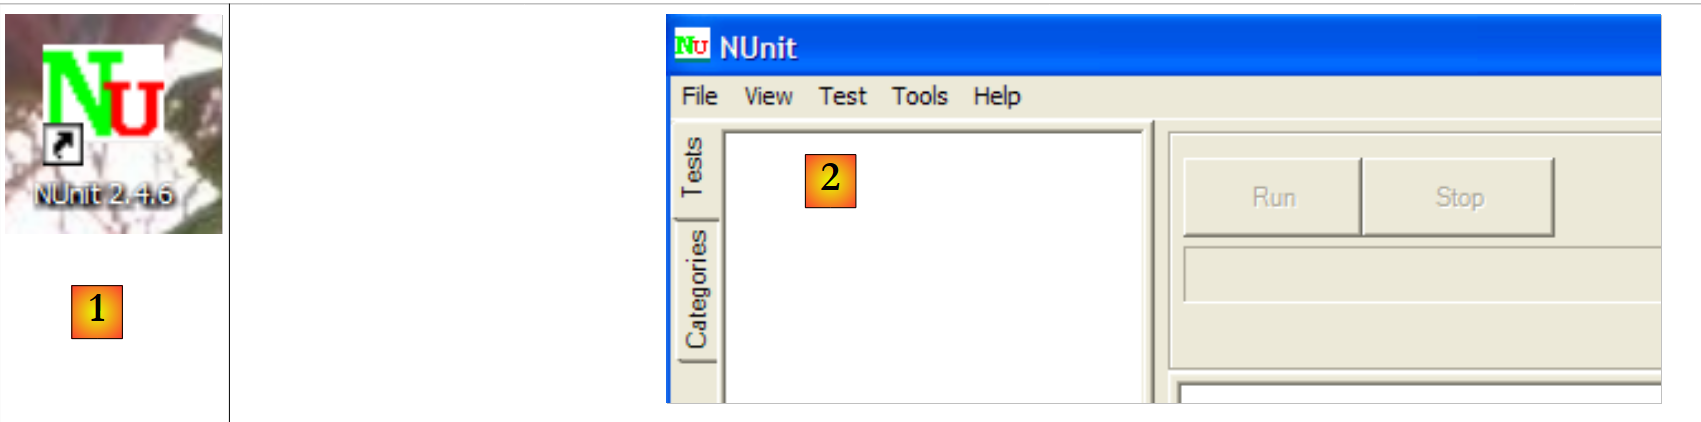 |
双击图标 [1] 将启动 NUnit [2] 的图形界面。 但这对测试自动化毫无帮助,因为我们又回到了目视检查:测试人员需要核对图形界面中显示的测试结果。 不过,测试也可以通过批处理工具执行,并将结果保存到 XML 文件中。开发团队采用的就是这种方法:测试在夜间运行,开发人员次日早晨即可获得结果。
让我们通过一个示例来探讨 NUnit 测试的原理。首先,创建一个新的 C# 控制台应用程序项目:
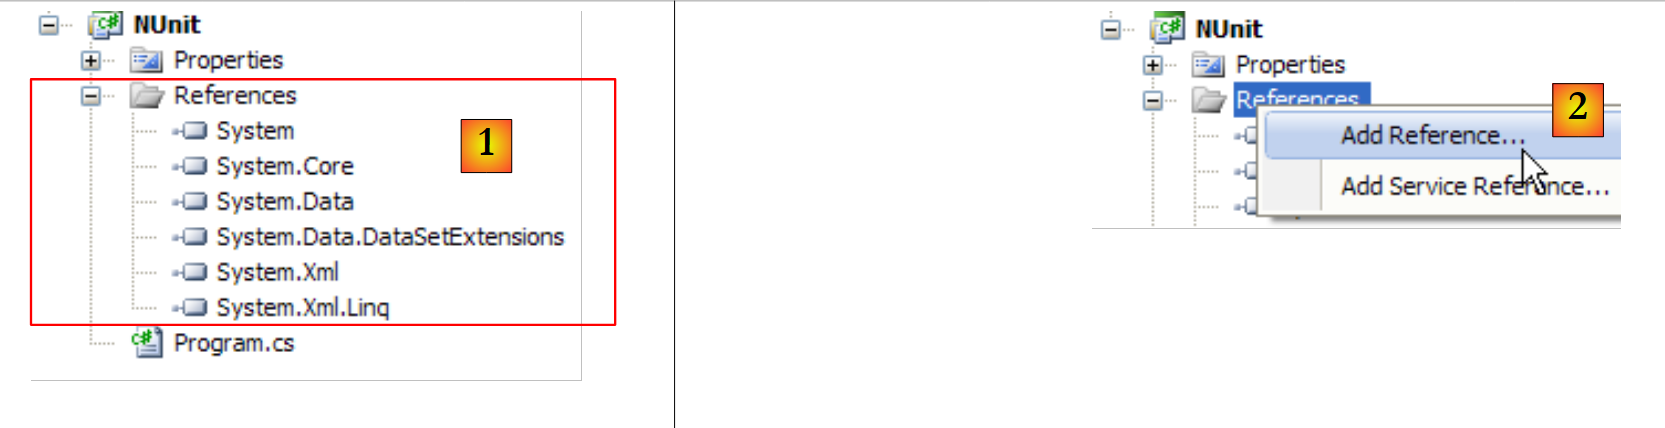 |
在[1]中,可以看到该项目的références。这些引用是包含项目所用类和接口的DLL。 [1]中列出的内容默认包含在每个新的C#项目中。为了能够使用NUnit框架的类和接口,我们需要向项目中添加一个新的引用。
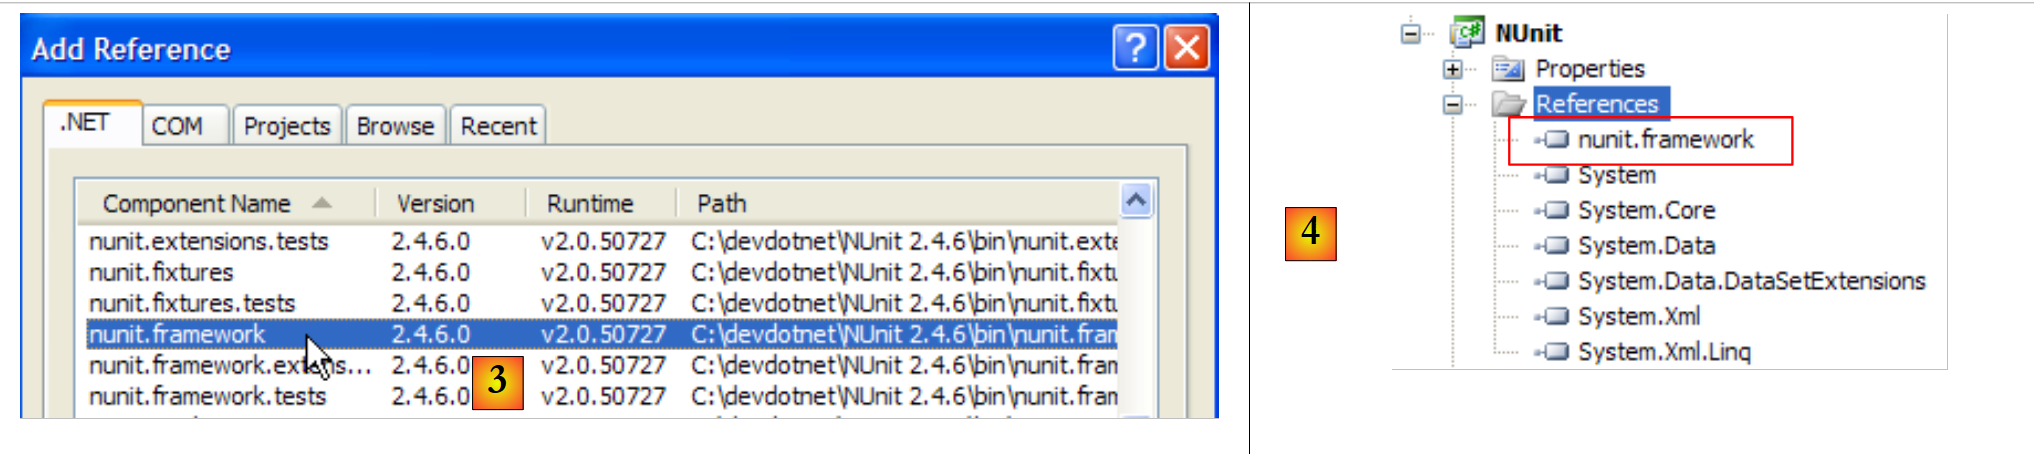 |
在上述 .NET 选项卡中,我们选择 [nunit.framework] 组件。上述 [nunit.*] 组件并非 .NET 环境中的默认组件。 它们是通过之前安装的 NUnit 框架引入的。一旦引用添加成功,它就会以 [4] 的形式出现在项目的引用列表中。
在生成应用程序之前,项目的 [bin/Release] 文件夹是空的。生成后(F6),可以看到 [bin/Release] 文件夹不再是空的:
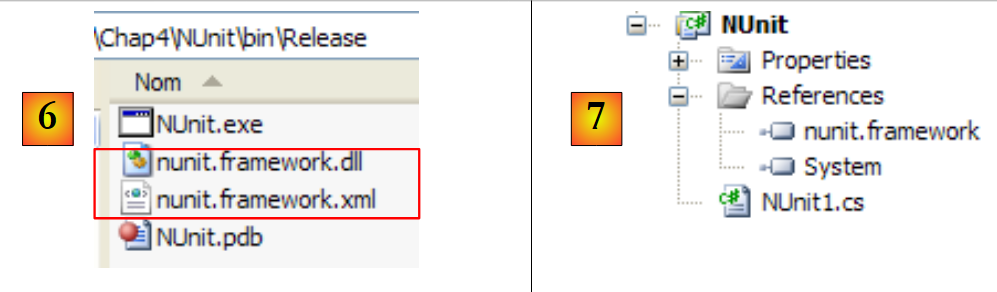 |
在 [6] 中,可以看到 DLL 和 [nunit.framework.dll] 的存在。 正是添加了 [nunit.framework] 引用,才导致该 DLL 被复制到运行文件夹中。 该文件夹正是 CLR(通用语言运行时)和 NET 将要扫描的文件夹之一,以查找项目引用的类和接口。
让我们构建第一个测试类 NUnit。为此,我们先删除默认生成的类 [Program.cs],然后向项目中添加一个新类 [Nunit1.cs]。 同时,我们还删除了多余的引用 [7]。
测试类 NUnit1 将如下所示:
using System;
using NUnit.Framework;

namespace NUnit {
    [TestFixture]
    public class NUnit1 {
        public NUnit1() {
            Console.WriteLine("constructeur");
        }
        [SetUp]
        public void avant() {
            Console.WriteLine("Setup");
        }
        [TearDown]
        public void après() {
            Console.WriteLine("TearDown");
        }
        [Test]
        public void t1() {
            Console.WriteLine("test1");
            Assert.AreEqual(1, 1);
        }
        [Test]
        public void t2() {
            Console.WriteLine("test2");
            Assert.AreEqual(1, 2, "1 n'est pas égal à 2");
        }
    }
}
- 第 6 行:类 NUnit1 必须是 public 的。Visual Studio 默认不会生成 public 关键字,需要手动添加。
- 第 5 行:[TestFixture] 属性是 NUnit 属性。它表明该类是一个测试类。
- 第 7-9 行:构造函数。此处仅用于在屏幕上输出消息。我们需要观察其何时被调用。
- 第 10 行:[SetUp] 属性定义了一个在每次单元测试之前执行的方法。
- 第 14 行:属性 [TearDown] 定义了一个在每次单元测试后执行的方法。
- 第 18 行:属性 [Test] 定义了一个测试方法。 对于每个标注了 [Test] 属性的方法,标注了 [SetUp] 的方法将在测试前执行,而标注了 [TearDown] 的方法将在测试后执行。
- 第 21 行:由框架 NUnit 定义的 [Assert.*] 方法之一。其中包括以下 [Assert] 方法:
- [Assert.AreEqual(expression1, expression2)]:验证两个表达式的值是否相等。支持多种表达式类型(int、string、float、double、decimal 等)。若两个表达式不相等,则抛出异常。
- [Assert.AreEqual(réel1, réel2, delta)]:验证两个实数是否在误差 delta 范围内相等,即 c.a.d abs(实数1 - 实数2) <= delta。例如,可以使用 [Assert.AreEqual(réel1, réel2, 1E-6)] 来验证两个值是否在误差 10⁻⁶ 范围内相等。
- [Assert.AreEqual(expression1, expression2, message)] 和 [Assert.AreEqual(réel1, réel2, delta, message)] 是用于指定当方法 [Assert.AreEqual] 失败时,与抛出的异常关联的错误消息的变体。
- [Assert.IsNotNull(object)] 和 [Assert.IsNotNull(object, message)]:验证 object 不为 null。
- [Assert.IsNull(object)] 和 [Assert.IsNull(object, message)]:检查 object 是否为 null。
- [Assert.IsTrue(expression)] 和 [Assert.IsTrue(expression, message)]:验证表达式是否等于 true。
- [Assert.IsFalse(expression)] 和 [Assert.IsFalse(expression, message)]:验证表达式是否等于 false。
- [Assert.AreSame(object1, object2)] 和 [Assert.AreSame(object1, object2, message)]:验证引用 object1 和 object2 是否指向同一个对象。
- [Assert.AreNotSame(object1, object2)] 和 [Assert.AreNotSame(object1, object2, message)]:验证引用 object1 和 object2 是否不指向同一个对象。
- 第 21 行:断言应通过
- 第 26 行:断言应失败
让我们配置该项目,使其生成 DLL 文件而非 .exe 可执行文件:
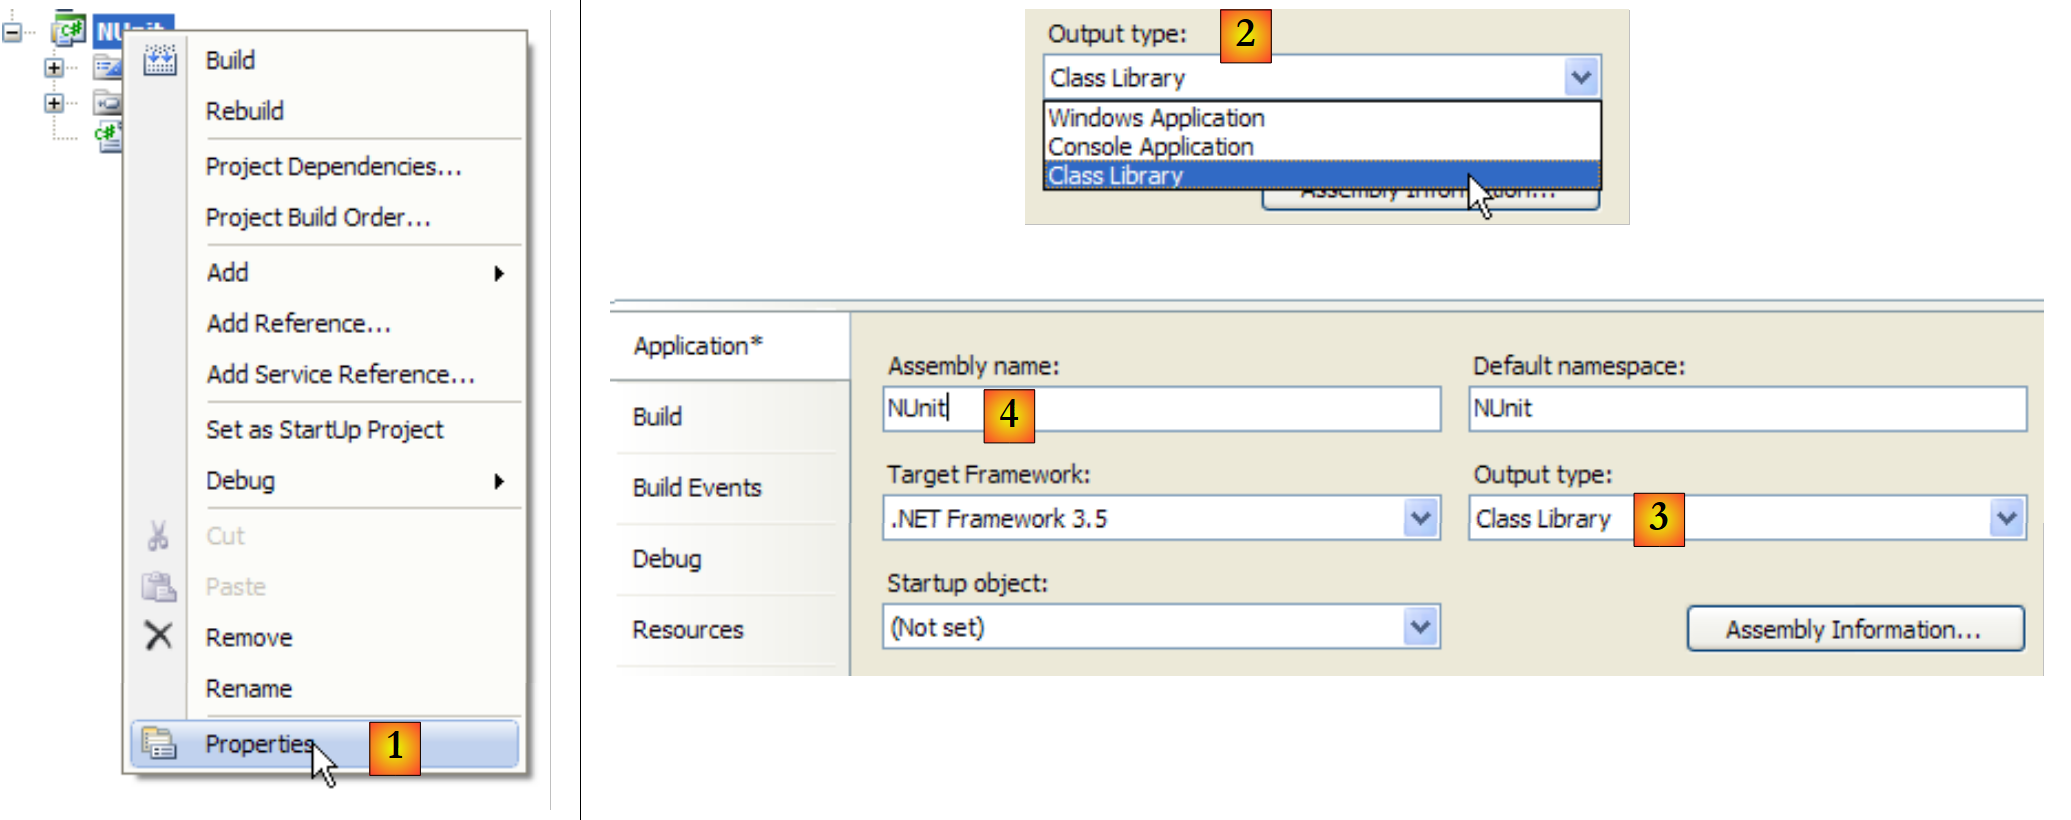 |
- 在 [1] 中:项目属性
- 在 [2, 3] 中:项目类型选择 [Class Library](类库)
- 在 [4] 中:项目生成将产生一个名为 DLL(程序集)的文件,其名称为 [Nunit.dll]
现在,我们使用 NUnit 来运行测试类:
 |
- 在 [1] 中:打开项目 NUnit
- 在 [2, 3] 中:加载由 C# 项目生成生成的 DLL bin/Release/Nunit.dll
- 在 [4] 中:已加载 DLL
- 在 [5] 中:测试树
- 在 [6] 中:正在执行
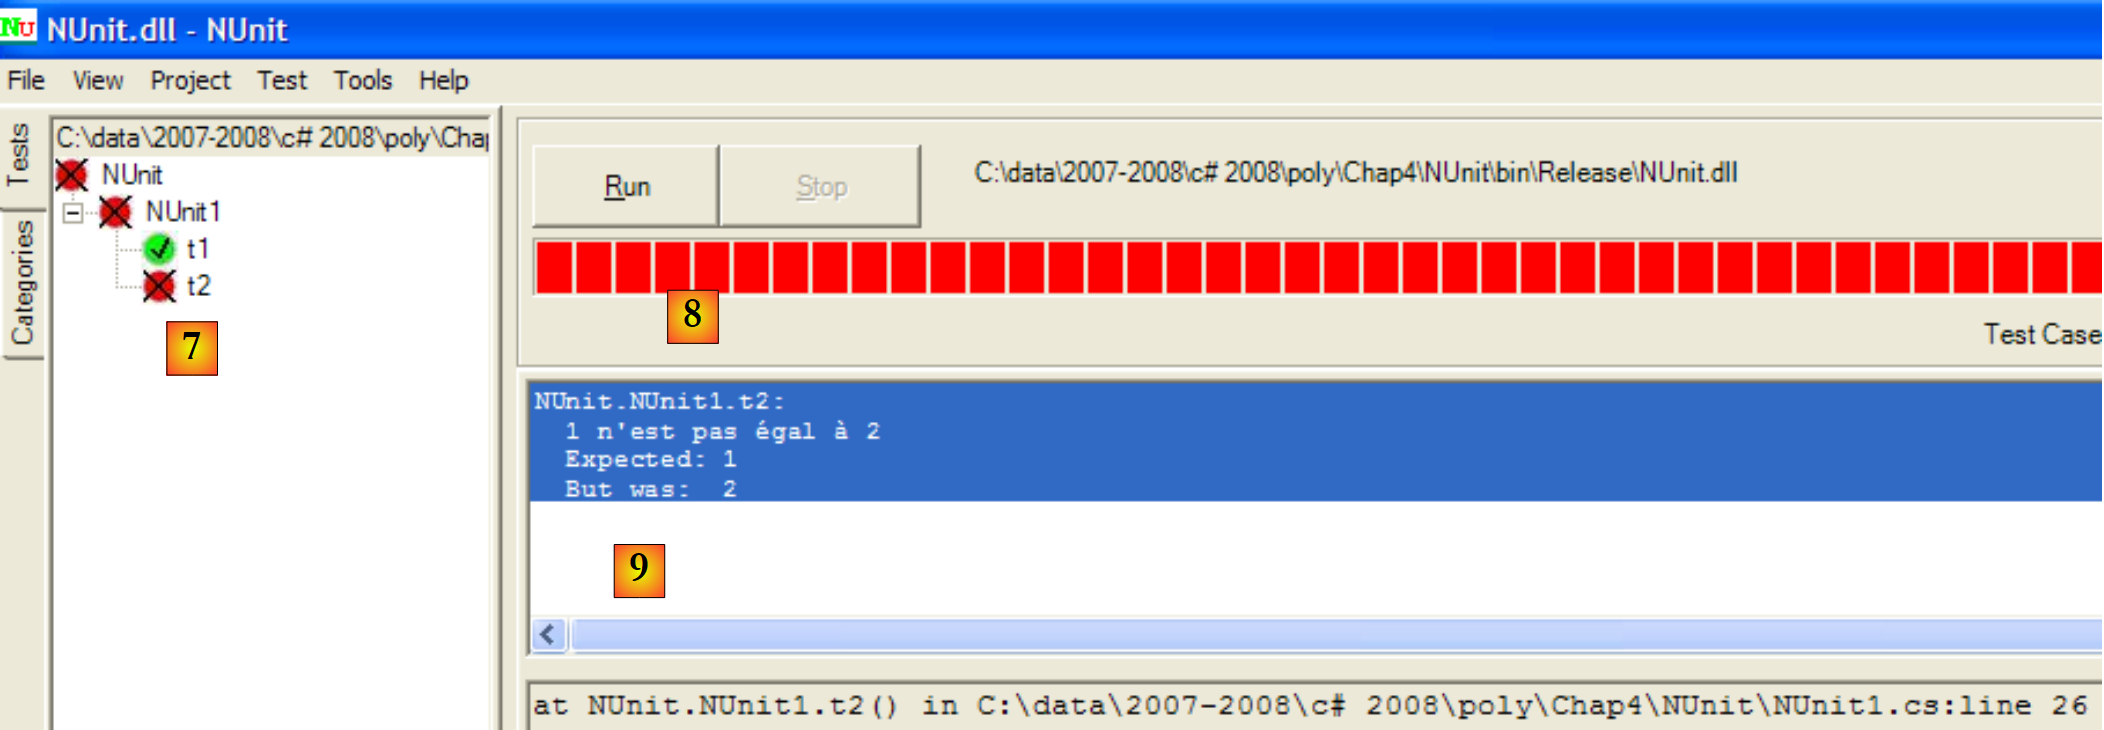 |
- 在 [7]:结果:t1 通过,t2 失败
- 在 [8] 中:红色条形图表示测试类整体失败
- 在 [9] 中:与失败测试相关的错误信息
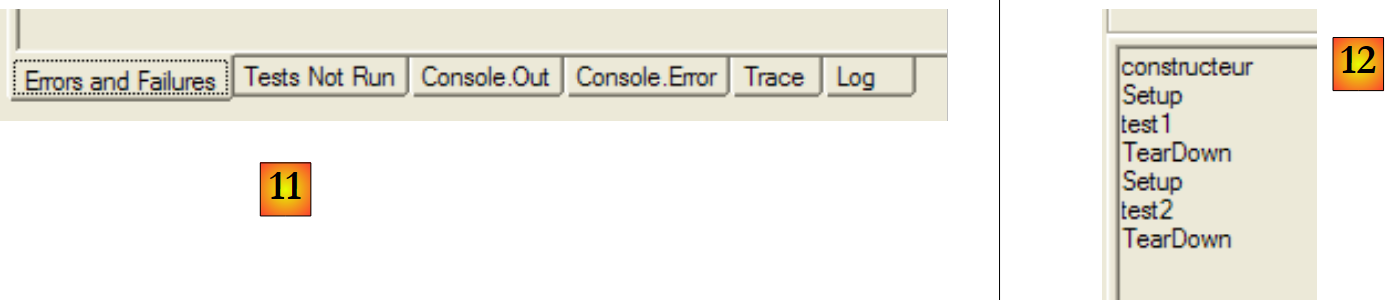 |
- 在 [11] 中:结果窗口的各个选项卡
- 在 [12] 中:[Console.Out] 选项卡。其中显示:
- 构造函数仅被执行了一次
- 方法 [SetUp] 在两次测试之前均被执行
- 方法 [TearDown] 在两次测试之后各执行了一次
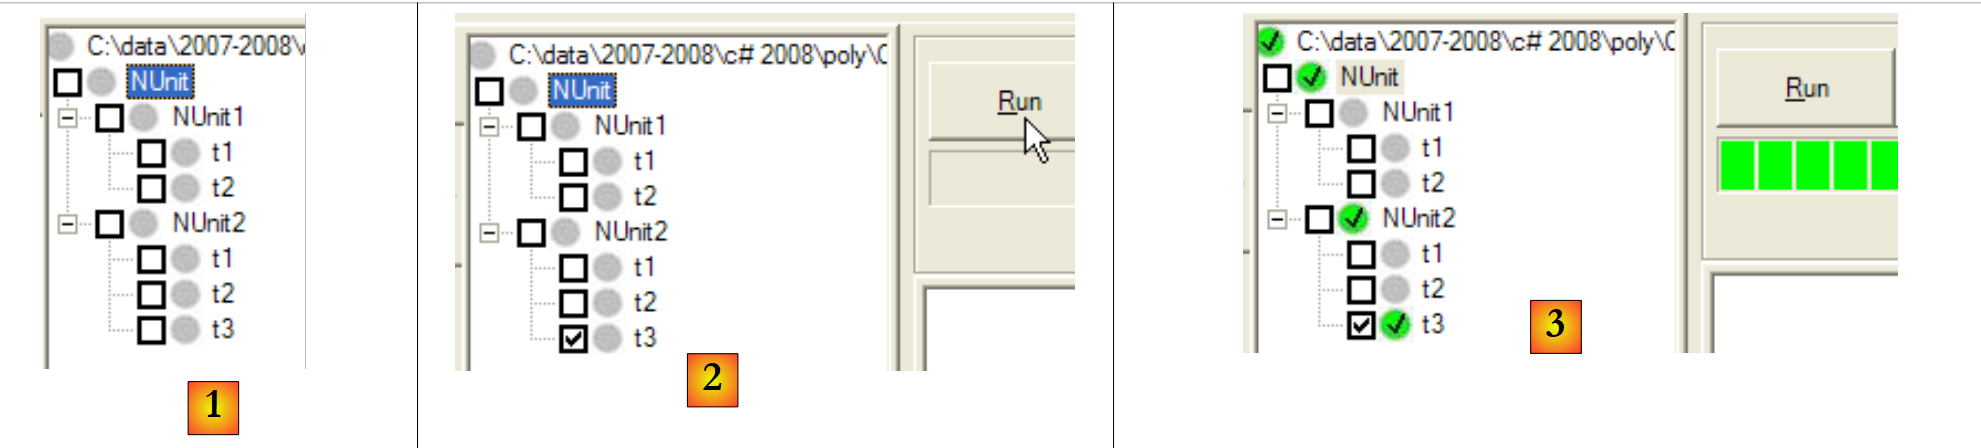
可以指定要测试的方法:
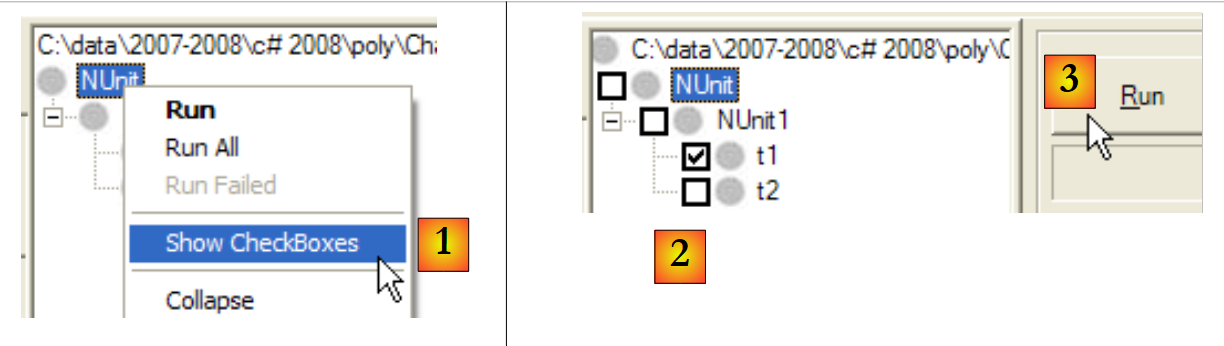 |
- 在 [1] 中:要求在每个测试旁边显示一个复选框
- 在 [2] 中:勾选要执行的测试
- 在 [3] 中:执行这些测试
要修正错误,只需修改 C# 项目并重新生成即可。NUnit 会检测到其正在测试的 DLL 已发生变更,并自动加载新版本。随后只需重新运行测试即可。
让我们来看以下这个新的测试类:
using System;
using NUnit.Framework;

namespace NUnit {
    [TestFixture]
    public class NUnit2 : AssertionHelper {
        public NUnit2() {
            Console.WriteLine("constructeur");
        }
        [SetUp]
        public void avant() {
            Console.WriteLine("Setup");
        }
        [TearDown]
        public void après() {
            Console.WriteLine("TearDown");
        }
        [Test]
        public void t1() {
            Console.WriteLine("test1");
            Expect(1, EqualTo(1));
        }
        [Test]
        public void t2() {
            Console.WriteLine("test2");
            Expect(1, EqualTo(2), "1 n'est pas égal à 2");
        }
    }
}
从 NUnit 的 2.4 版本开始,新增了第 21 行和第 26 行所示的新语法。为此,测试类必须继承自 AssertionHelper 类(第 6 行)。
新旧语法之间的对应关系(非穷尽)如下:
在类 NUnit2 中添加以下测试:
        [Test]
        public void t3() {
            bool vrai = true, faux = false;
            Expect(vrai, True);
            Expect(faux, False);
            Object obj1 = new Object(), obj2 = null, obj3=obj1;
            Expect(obj1, Not.Null);
            Expect(obj2, Null);
            Expect(obj3, SameAs(obj1));
            double d1 = 4.1, d2 = 6.4, d3 = d1;
            Expect(d1, EqualTo(d3).Within(1e-6));
            Expect(d1, Not.EqualTo(d2));
}
如果生成(F6)C# 项目中的新 DLL,则 NUnit 项目将变为如下所示:
 |
- 在 [1] 中:新测试类 [NUnit2] 已被自动检测
- 在 [2] 中:正在执行 NUnit2 的 t3 测试
- 在 [3] 中:测试 t3 已通过
如需进一步了解 NUnit,请参阅 NUnit 的帮助文档:
 |  |
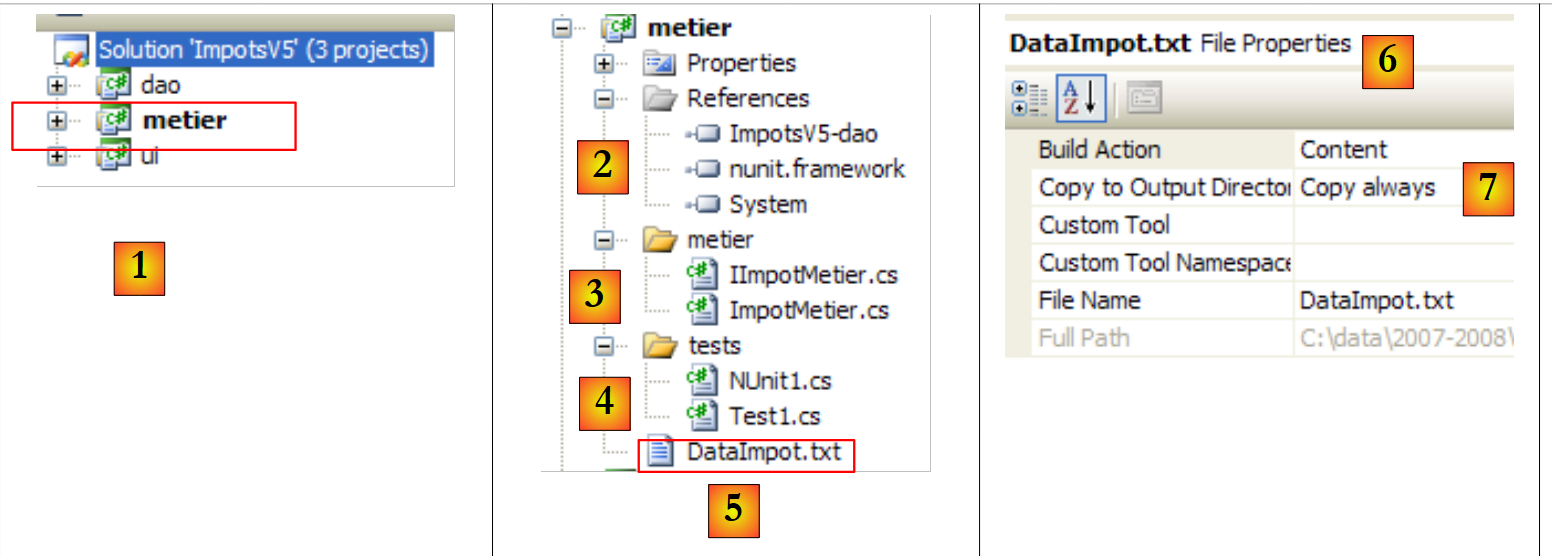
6.4.2. Visual Studio 解决方案
 |
我们将逐步构建以下 Visual Studio 解决方案:
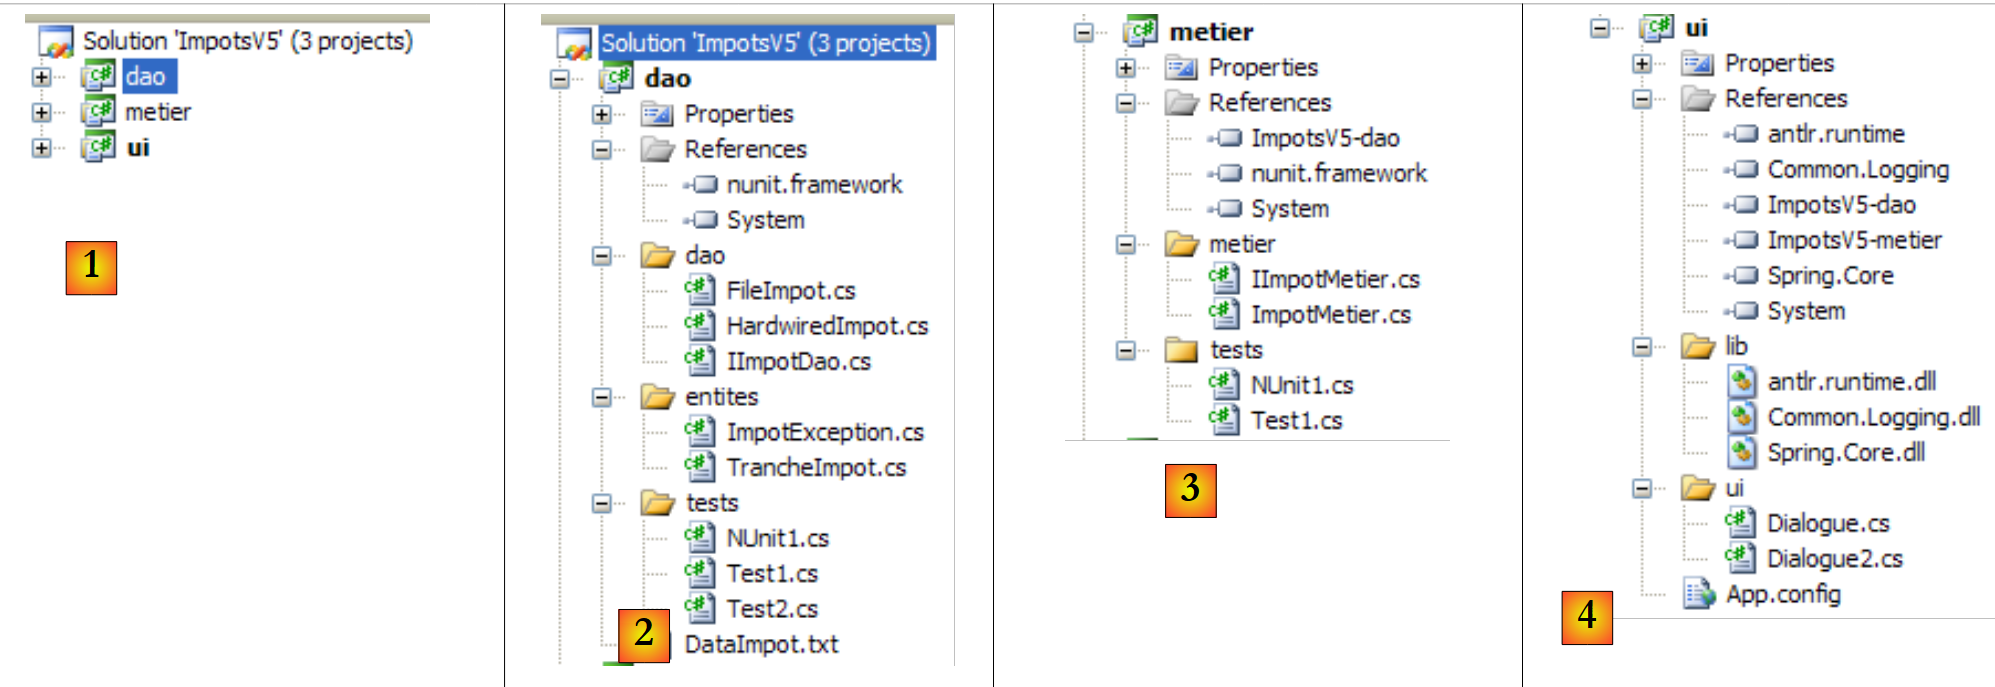 |
- 在 [1] 中:ImpotsV5 解决方案由三个项目组成,每个项目对应应用程序的三个层之一
- 在 [2] 中:[dao] 层的 [dao] 项目
- 在 [3] 中:[metier] 层的项目 [metier]
- 生成 [4]:来自 [ui] 层的项目 [ui]
ImpotsV5 解决方案可按以下方式构建:
1 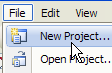 | 234 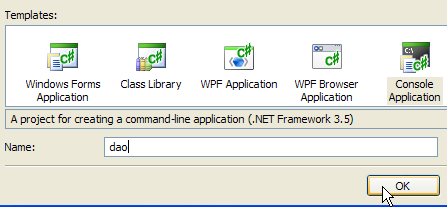 | 5 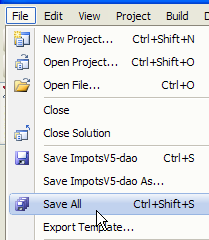 |
- 在 [1] 中:创建一个新项目
- 在 [2] 中:选择一个控制台应用程序
- 在 [3] 中:调用项目 [dao]
- 在 [4] 中:创建项目
- 在 [5] 中:项目创建完成后,将其保存
 |
- 在 [6] 中:保留项目名称 [dao]
- 在 [7] 中:指定一个文件夹来保存项目及其解决方案
- 在 [8] 中:为解决方案命名
- 在 [9] 中:指定解决方案应拥有独立文件夹
- 在 [10] 中:保存项目及其解决方案
- 在 [11] 中:项目 [dao] 位于其解决方案 ImpotsV5 中
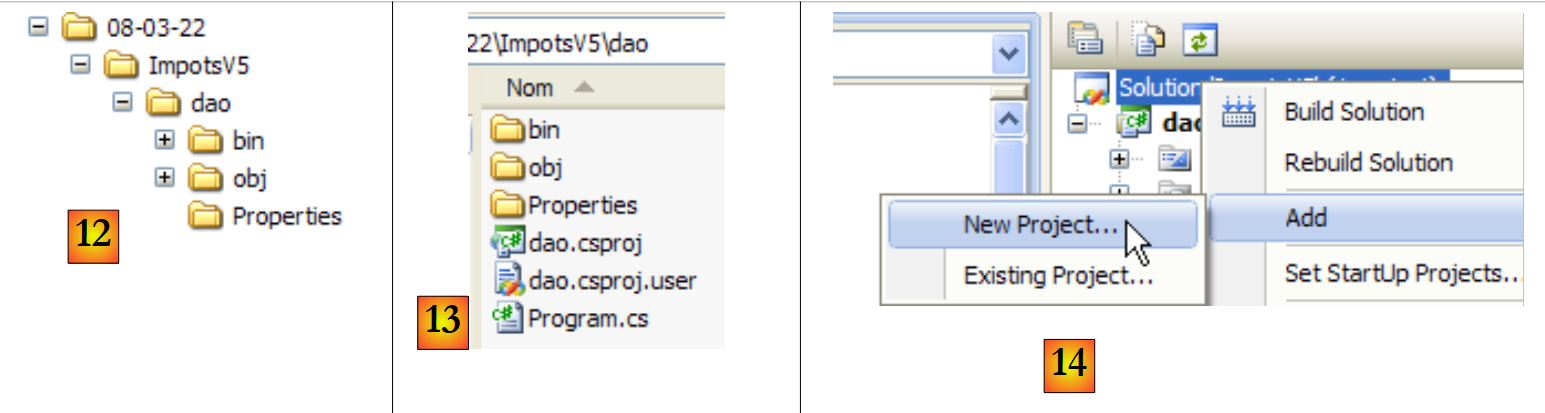 |
- 在 [12] 中:解决方案 ImpotsV5 的文件夹。它包含文件夹 [dao] 中的文件夹 [dao]。
- 在 [13] 中:[dao] 文件夹的内容
- 在 [14] 中:向解决方案 ImpotsV5 中添加一个新项目
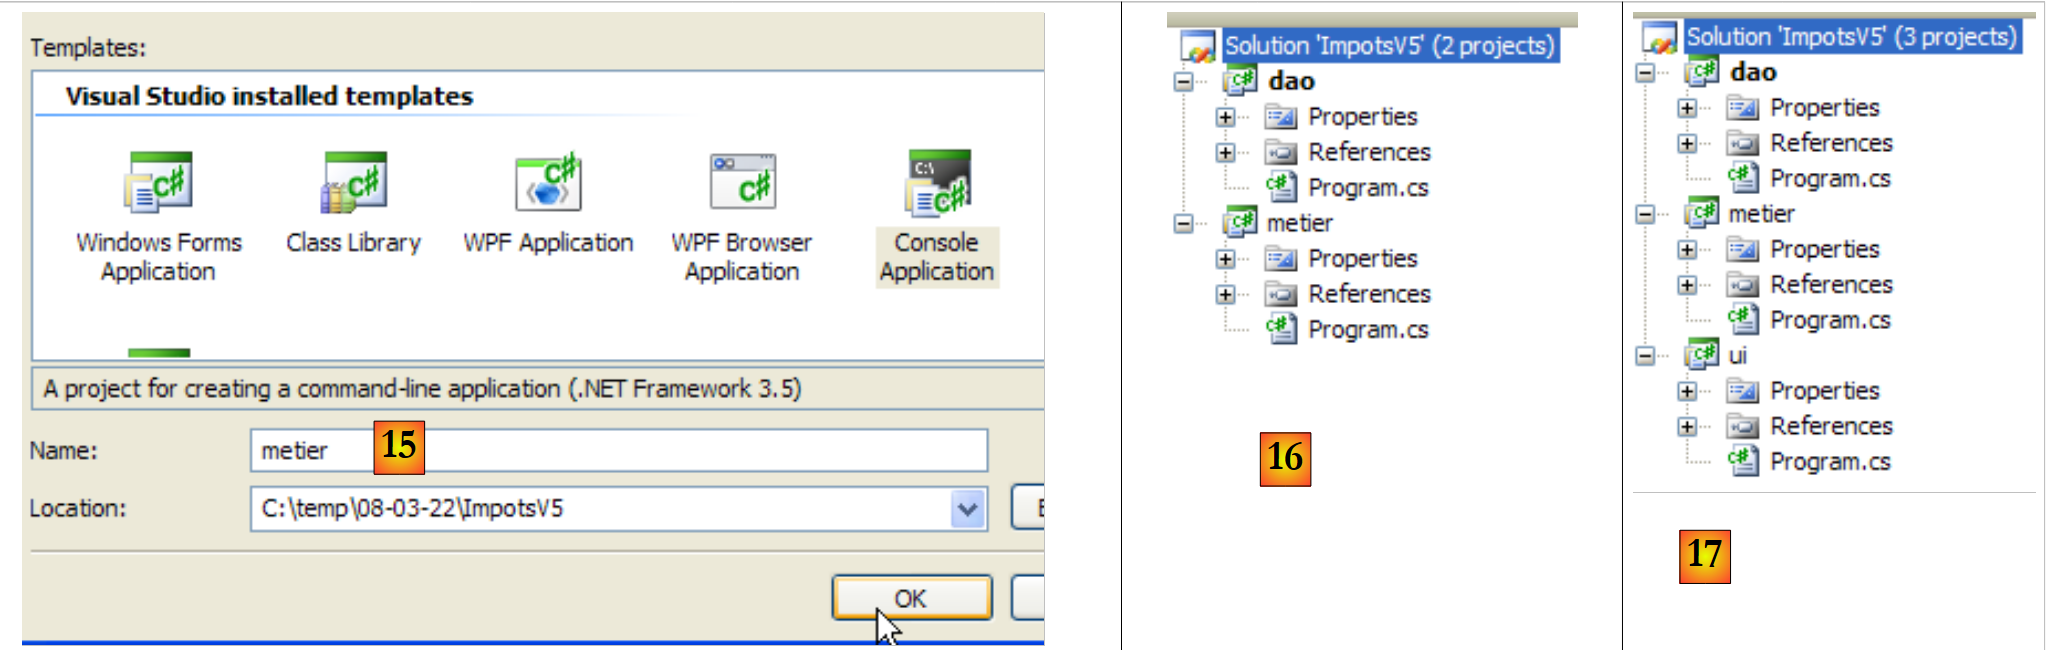 |
- 在 [15] 中:新项目名为 [metier]
- 在 [16] 中:包含两个项目的解决方案
- 在 [17] 中:添加了第三个项目 [ui] 后的解决方案
 |
- 在 [18] 中:解决方案文件夹及三个项目的文件夹
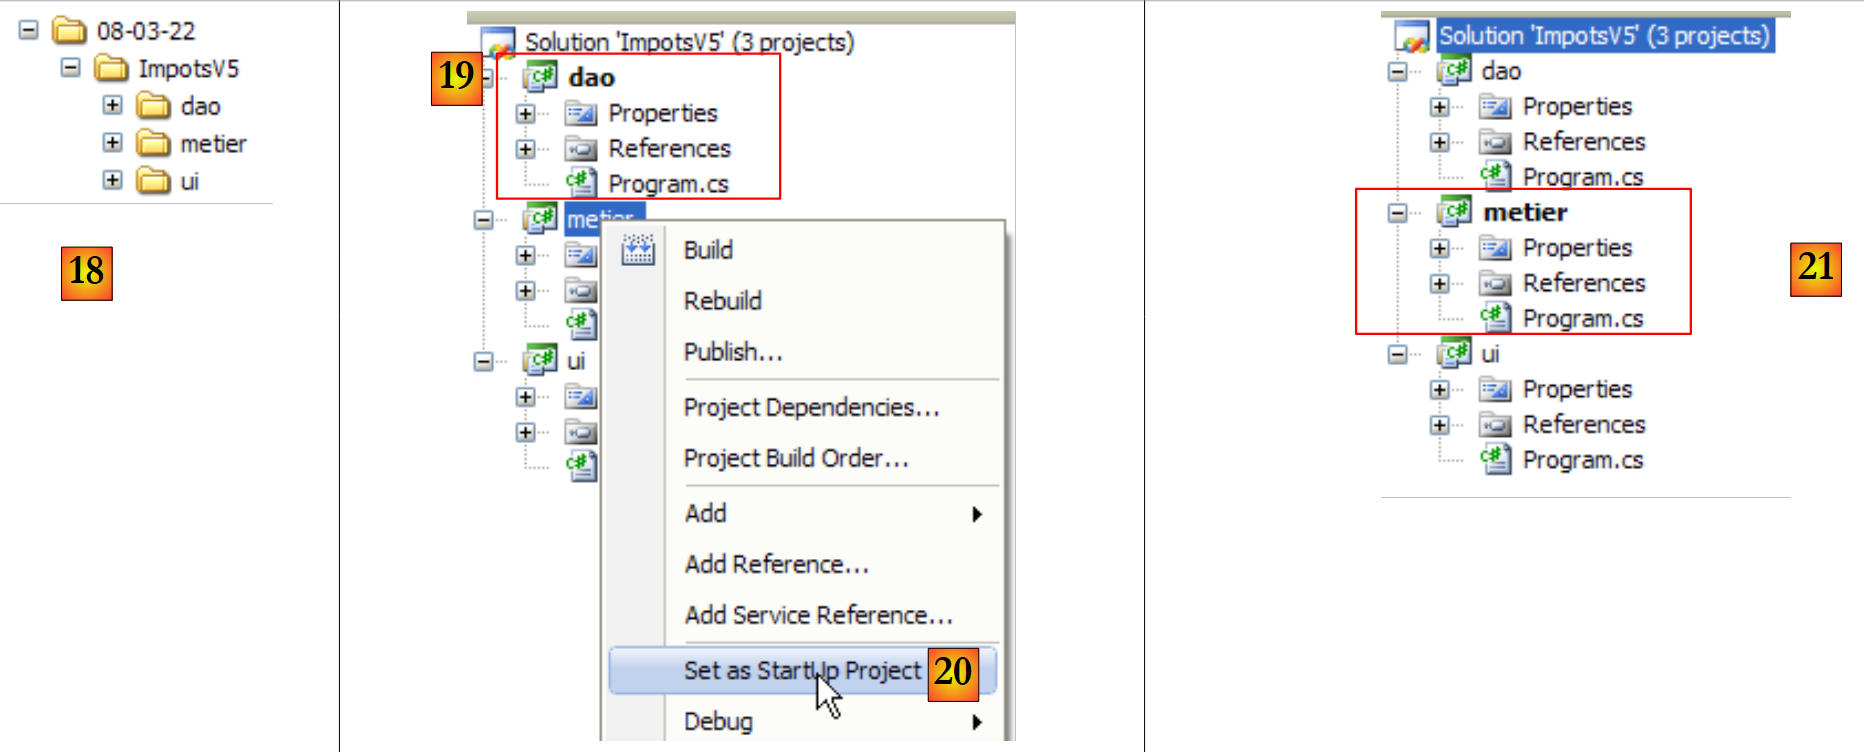
- 当通过 (Ctrl+F5) 运行解决方案时,将执行当前活动项目。生成 (F6) 解决方案时也是如此。 在解决方案中,活动项目的名称以粗体显示为 [19]。
- 在 [20] 中:若要将解决方案的当前项目
- 在 [21] 中:项目 [metier] 现已成为解决方案中的活动项目
6.4.3. [dao] 层
 |
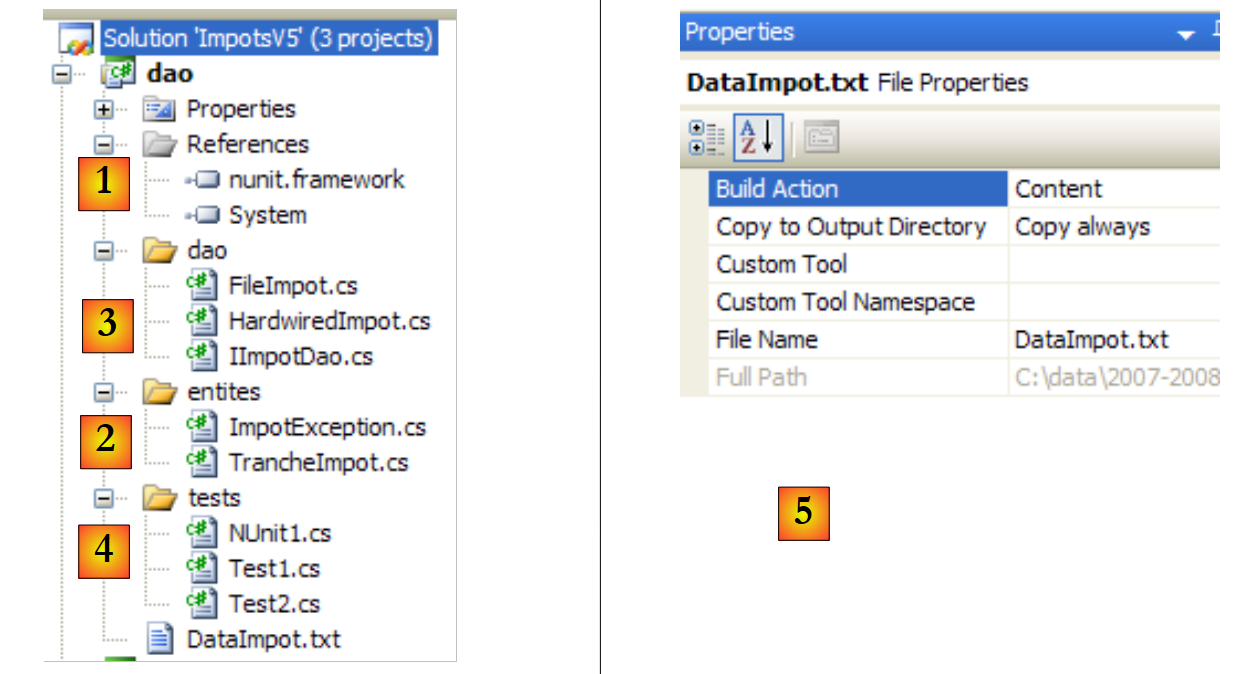 |
项目引用(参见项目中的 [1])
添加测试所需的引用 [nunit.framework][NUnit]
实体(参见项目中的 [2])
类 [TrancheImpot] 属于旧版本。将旧版本的类 [FileImpotException] 重命名为 [ImpotException],以使其更具通用性,并避免将其与特定的 [dao] 层相关联:
using System;

namespace Entites {
    public class ImpotException : Exception {

        // 错误代码
        public int Code { get; set; }

        // 制造商
        public ImpotException() {
        }
        public ImpotException(string message)
            : base(message) {
        }
        public ImpotException(string message, Exception e)
            : base(message, e) {
        }
    }
}
[dao] 层(参见项目中的 [3])
接口 [IImpotDao] 与上一版本相同。类 [HardwiredImpot] 亦是如此。 类 [FileImpot] 已更新,以适应异常 [FileImpotException] 更改为 [ImpotException] 的情况:
...

namespace Dao {
    public class FileImpot : IImpotDao {

        // 错误代码
        [Flags]
        public enum CodeErreurs { Acces = 1, Ligne = 2, Champ1 = 4, Champ2 = 8, Champ3 = 16 };

...

        // 构造函数
        public FileImpot(string fileName) {
            // 保存文件名
            FileName = fileName;
...
            // 起初没有错误
            CodeErreurs code = 0;
            try {
                using (StreamReader input = new StreamReader(FileName)) {
                    while (!input.EndOfStream && code == 0) {
...
                        // 错误?
                        if (code != 0) {
                            // 记录错误
                            fe = new ImpotException(String.Format("Ligne n° {0} incorrecte", numLigne)) { Code = (int)code };
                        } else {
...
                        }
                    }
                }
            } catch (Exception e) {
                // 记录错误
                fe = new ImpotException(String.Format("Erreur lors de la lecture du fichier {0}", FileName), e) { Code = (int)CodeErreurs.Acces };
            }
            // 需要报告错误?
...
        }
    }
}
- 第 8 行:原先位于类 [FileImpotException] 中的错误代码已迁移至类 [FileImpot]。这些实际上是 [IImpotDao] 接口此实现特有的错误代码。
- 第26行和第34行:封装错误时,现在使用的是[ImpotException]类,而非[FileImpotException]类。
测试类 [Test1](参见项目中的 [4])
类 [Test1] 仅负责在屏幕上显示税率区间:
using System;
using Dao;
using Entites;

namespace Tests {
    class Test1 {
        static void Main() {

            // 创建图层 [dao]
            IImpotDao dao = null;
            try {
                // 创建图层 [dao]
                dao = new FileImpot("DataImpot.txt");
            } catch (ImpotException e) {
                // 显示错误
                string msg = e.InnerException == null ? null : String.Format(", Exception d'origine : {0}", e.InnerException.Message);
                Console.WriteLine("L'erreur suivante s'est produite : [Code={0},Message={1}{2}]", e.Code, e.Message, msg == null ? "" : msg);
                // 程序停止
                Environment.Exit(1);
            }
            // 显示税率区间
            TrancheImpot[] tranchesImpot = dao.TranchesImpot;
            foreach (TrancheImpot t in tranchesImpot) {
                Console.WriteLine("{0}:{1}:{2}", t.Limite, t.CoeffR, t.CoeffN);
            }
        }
    }
}
- 第 13 行:[dao] 层由类 [FileImpot] 实现
- 第 14 行:处理可能发生的 [ImpotException] 类型的异常。
测试所需的文件 [DataImpot.txt] 会自动复制到项目的运行文件夹中(参见项目中的 [5])。 项目 [dao] 将包含多个包含方法 [Main] 的类。因此,当用户通过 Ctrl-F5 请求执行项目时,必须显式指定要执行的类:
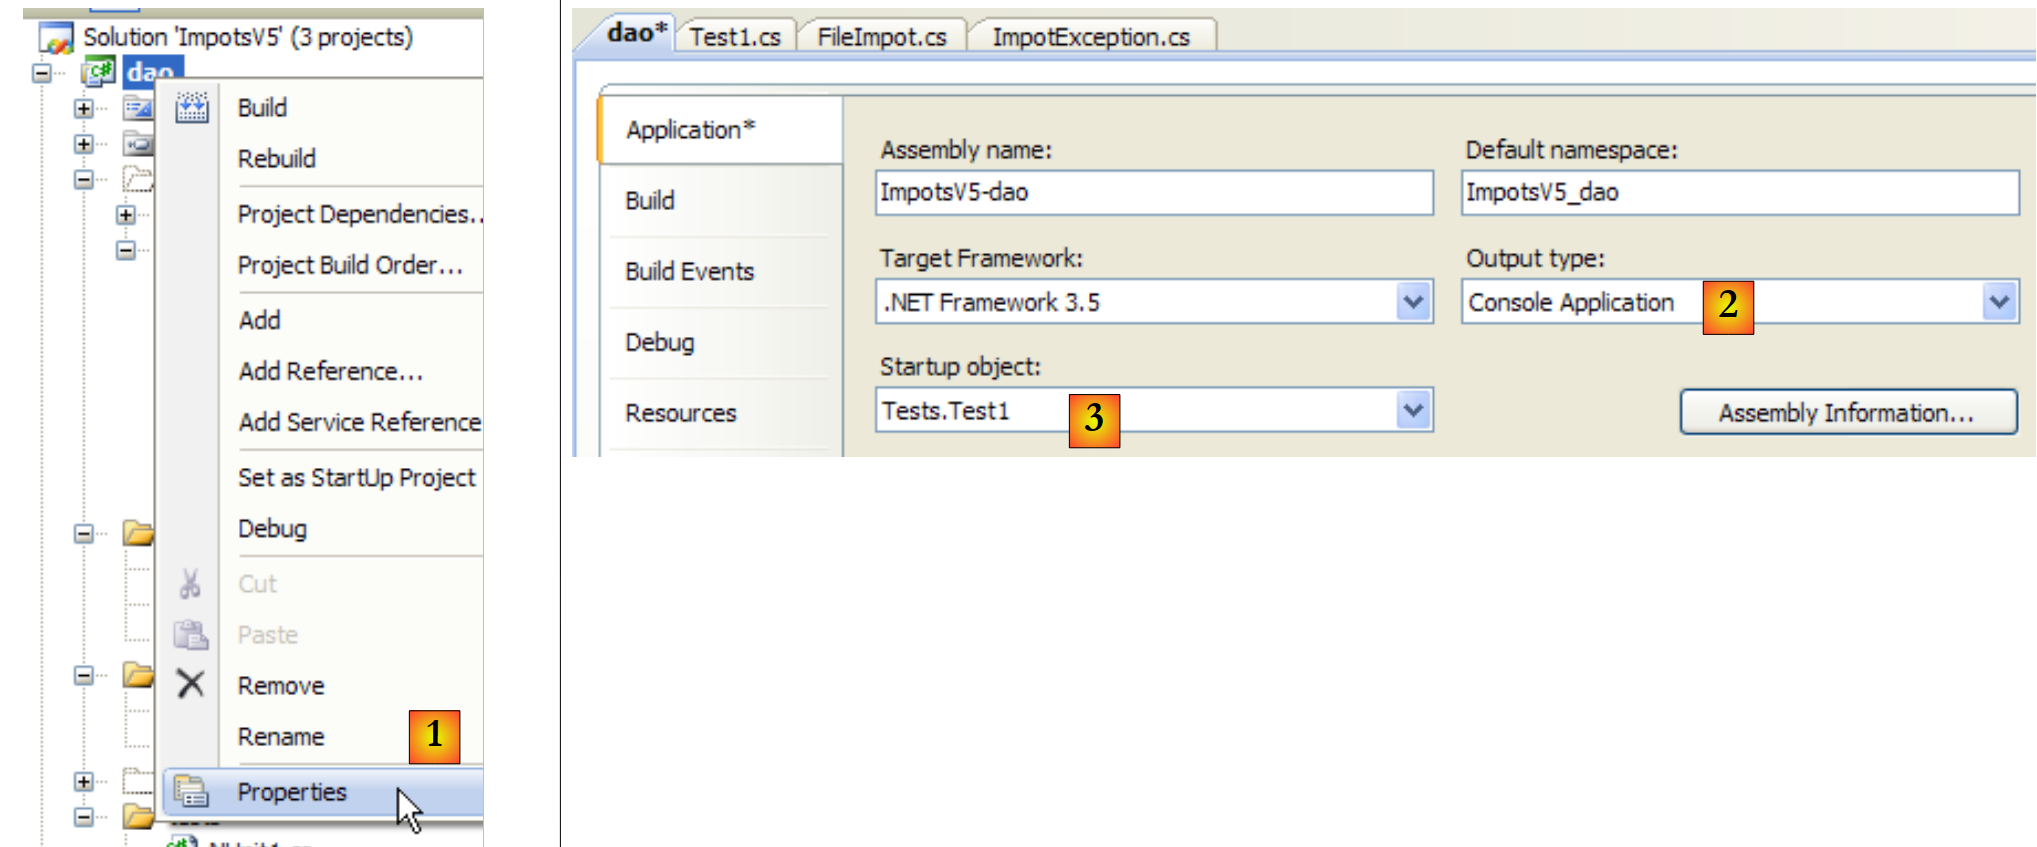 |
- 在 [1] 中:访问项目属性
- 在 [2] 中:指定为控制台应用程序
- 在 [3] 中:指定要执行的类
执行上述类 [Test1] 后,结果如下:
4962:0:0
8382:0,068:291,09
14753:0,191:1322,92
23888:0,283:2668,39
38868:0,374:4846,98
47932:0,426:6883,66
0:0,481:9505,54
测试 [Test2](参见项目中的 [4])
类 [Test2] 与类 [Test1] 功能相同,通过使用类 [HardwiredImpot] 来实现 [dao] 层。 [Test1] 的第 13 行被替换为以下内容:
dao = new HardwiredImpot();
项目已修改,现执行类 [Test2]:
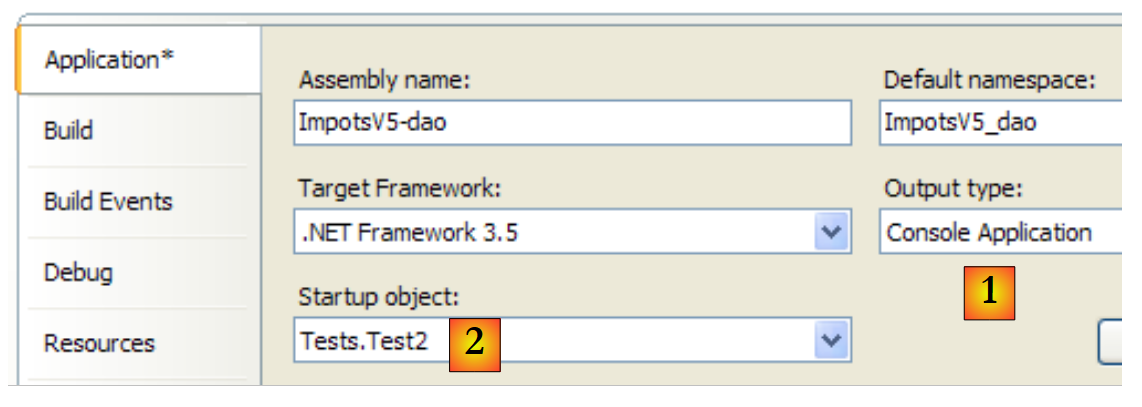 |
屏幕输出结果与之前相同。
测试 NUnit [NUnit1](参见项目中的 [4])
单元测试 [NUnit1] 如下:
using System;
using Dao;
using Entites;
using NUnit.Framework;

namespace Tests {
    [TestFixture]
    public class NUnit1 : AssertionHelper{
        // 待测试的图层 [dao]
        private IImpotDao dao;

        // 生成器
        public NUnit1() {
            // 初始化层 [dao]
            dao = new FileImpot("DataImpot.txt");
        }

        // 测试
        [Test]
        public void ShowTranchesImpot(){
            // 显示税率区间
            TrancheImpot[] tranchesImpot = dao.TranchesImpot;
            foreach (TrancheImpot t in tranchesImpot) {
                Console.WriteLine("{0}:{1}:{2}", t.Limite, t.CoeffR, t.CoeffN);
            }
            // 一些测试
            Expect(tranchesImpot.Length,EqualTo(7));
            Expect(tranchesImpot[2].Limite,EqualTo(14753));
            Expect(tranchesImpot[2].CoeffR, EqualTo(0.191));
            Expect(tranchesImpot[2].CoeffN, EqualTo(1322.92));
        }
    }
}
- 该测试类继承自类 [AssertionHelper],从而能够调用静态方法 Expect(第 27-30 行)。
- 第 10 行:对 [dao] 层的引用
- 第13-16行:构造函数使用类[FileImpot]实例化层[dao]
- 第 19-20 行:测试方法
- 第22行:从[dao]层获取税率区间数组
- 第23-25行:按之前的方式显示这些数据。在真正的单元测试中,这种显示本不该出现。此处,此显示仅出于教学目的。
- 第27行:验证是否确实有7个税率区间
- 第28-30行:验证第2个税级的数值
要执行此单元测试,项目类型必须为 [Class Library]:
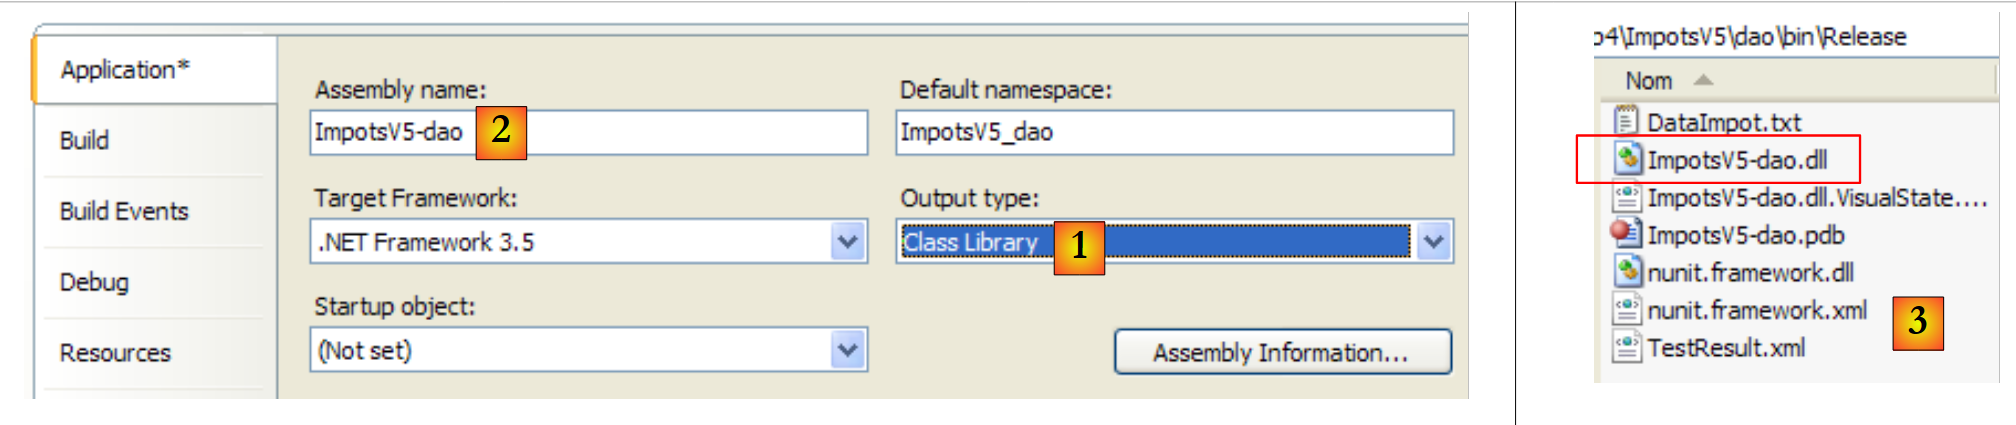 |
- 在 [1] 中:项目类型已更改
- 变为 [2]:生成的 DLL 将命名为 [ImpotsV5-dao.dll]
- 在 [3] 中:项目生成(F6)后,[dao/bin/Release] 文件夹中包含 DLL 和 [ImpotsV5-dao.dll]
随后,DLL [ImpotsV5-dao.dll] 被加载到 NUnit 框架中并执行:
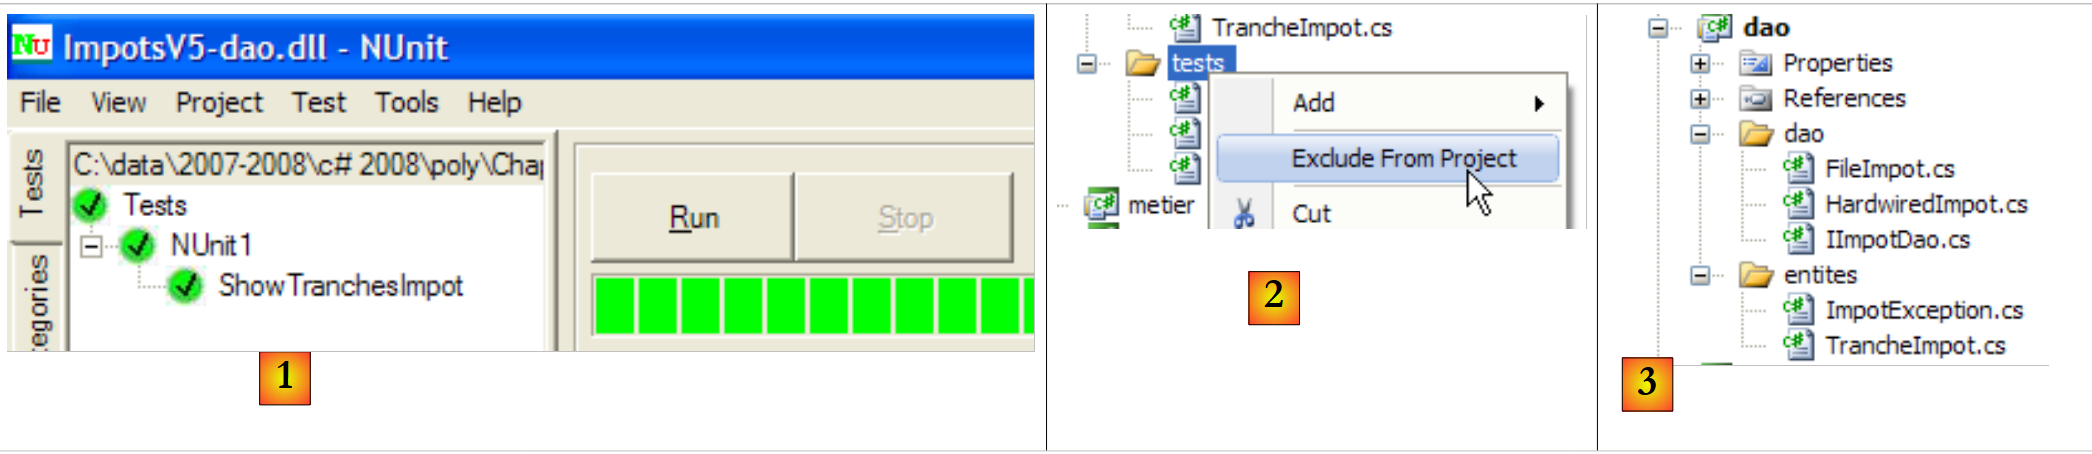 |
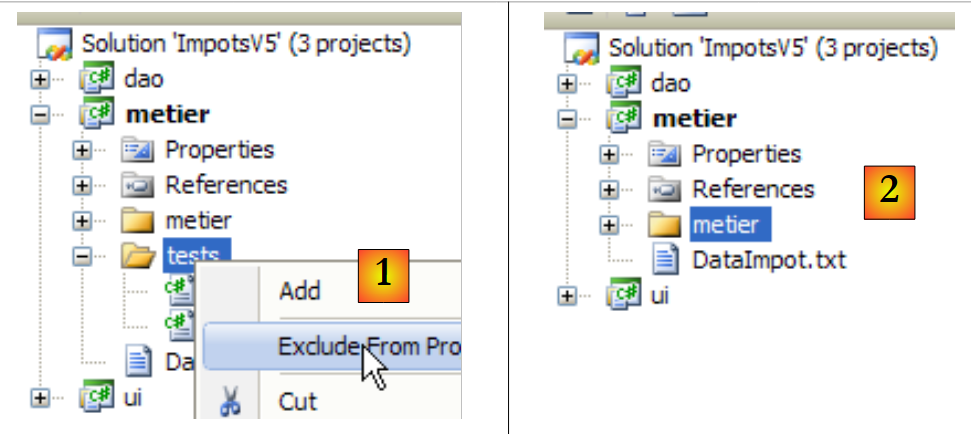
- 在 [1] 中:测试已通过。我们现在认为 [dao] 层已投入运行。其 DLL 包含项目中的所有类,包括测试类。这些测试类已无用武之地。 我们将重建 DLL 以排除其中的测试类。
- 生成 [2]:将 [tests] 文件夹从项目中移除
- 生成 [3]:新项目。该项目由 F6 重新生成,以生成新的 DLL。
6.4.4. [metier] 层
 |
 |
- 在 [1] 中,项目 [metier] 已成为解决方案的
- 在 [2] 中:项目引用
- 在 [3] 中:[metier] 层
- 在 [4] 中:测试类
- 在 [5] 中:已配置的税率区间文件 [DataImpot.txt],该文件将通过 [6] 自动复制到项目运行文件夹 [7] 中
项目引用(参见项目中的 [2])
与项目 [dao] 类似,为测试 [NUnit] 添加了必要的引用 [nunit.framework]。 层 [metier] 需要层 [dao]。因此,它需要引用该层中的 DLL。操作步骤如下:
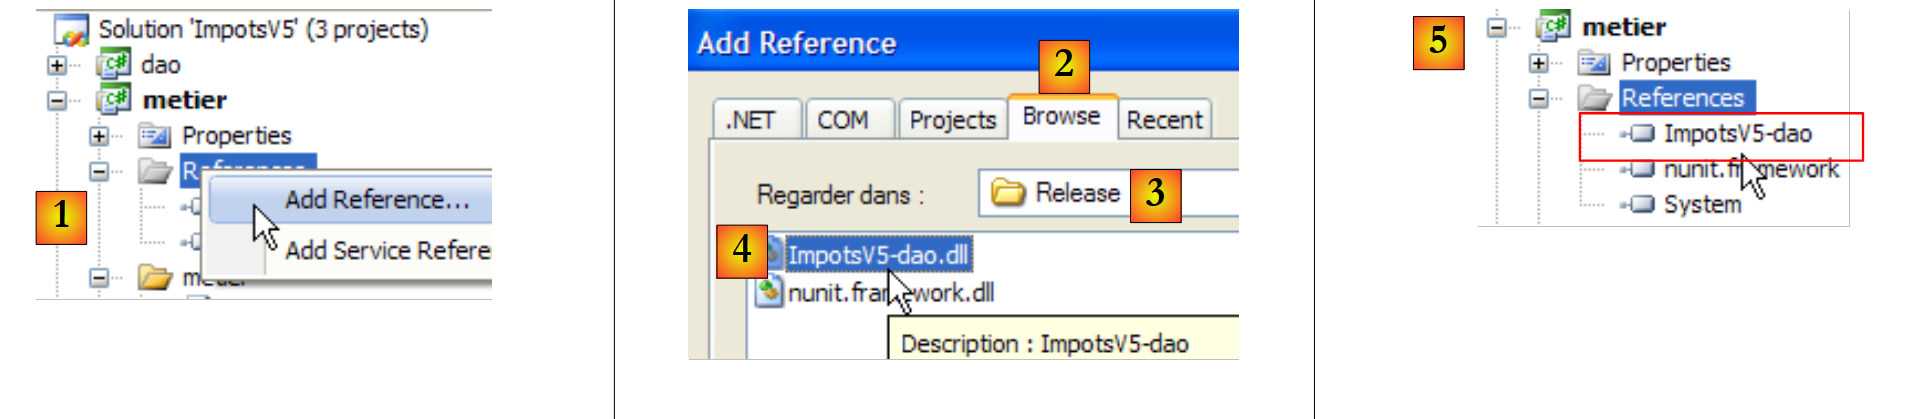 |
- 在 [1] 中:向项目 [metier] 的引用中添加一个新引用
- 在 [2] 中:选择 [Browse] 选项卡
- 在 [3] 中:选择文件夹 [dao/bin/Release]
- 在 [4] 中:选择在项目 [dao] 中生成的 DLL [ImpotsV5-dao.dll]
- 在 [5] 中:新的参考编号
图层 [metier](参见项目中的 [3])
[IImpotMetier] 接口与上一版本相同。[ImpotMetier] 类亦是如此。
测试 [Test1](参见项目中的 [4])
类 [Test1] 仅执行一些薪资计算:
using System;
using Dao;
using Entites;
using Metier;

namespace Tests {
    class Test1 {
        static void Main() {

            // 创建图层 [metier]
            IImpotMetier metier = null;
            try {
                // 创建图层 [metier]
                metier = new ImpotMetier(new FileImpot("DataImpot.txt"));
            } catch (ImpotException e) {
                // 显示错误
                string msg = e.InnerException == null ? null : String.Format(", Exception d'origine : {0}", e.InnerException.Message);
                Console.WriteLine("L'erreur suivante s'est produite : [Code={0},Message={1}{2}]", e.Code, e.Message, msg == null ? "" : msg);
                // 程序停止
                Environment.Exit(1);
            }
            // 计算若干税款
            Console.WriteLine(String.Format("Impot(true,2,60000)={0} euros", metier.CalculerImpot(true, 2, 60000)));
            Console.WriteLine(String.Format("Impot(false,3,60000)={0} euros", metier.CalculerImpot(false, 3, 60000)));
            Console.WriteLine(String.Format("Impot(false,3,60000)={0} euros", metier.CalculerImpot(false, 3, 6000)));
            Console.WriteLine(String.Format("Impot(false,3,60000)={0} euros", metier.CalculerImpot(false, 3, 600000)));
        }
    }
}
- 第14行:创建[metier]和[dao]层。[dao]层由[FileImpot]类实现
- 第 12-21 行:处理可能出现的 [ImpotException] 类型异常
- 第 23-26 行:重复调用接口 [IImpotMetier] 中的唯一方法 CalculerImpot。
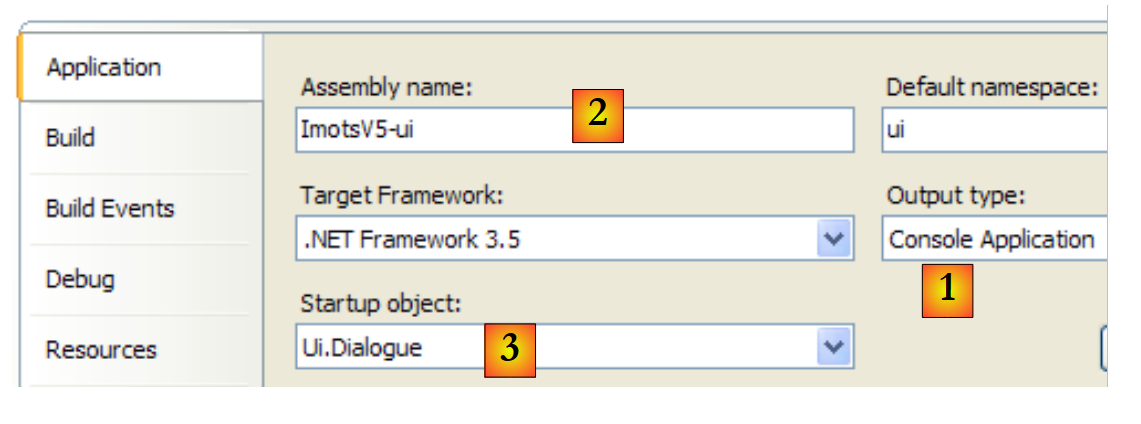
项目 [metier] 的配置如下:
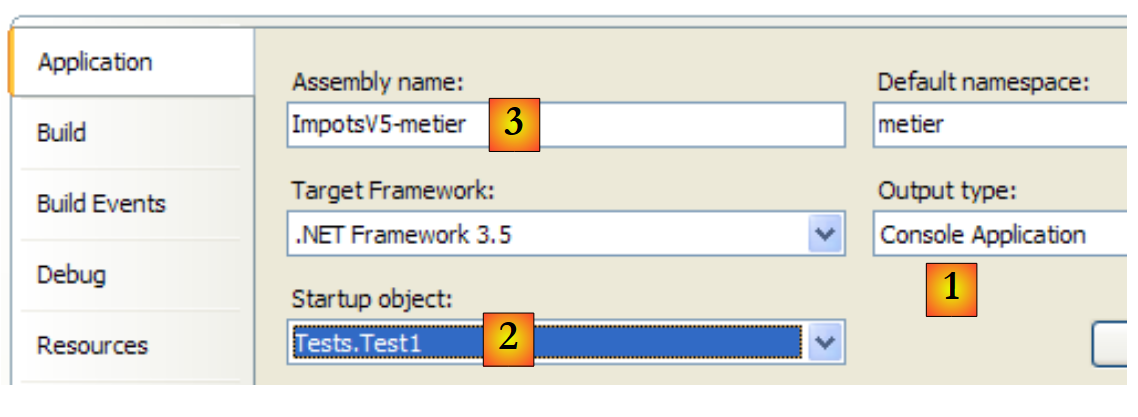 |
- [1]:该项目为控制台应用程序类型
- [2]:执行类为 [Test1]
- [3]:项目生成将产生可执行文件 [ImpotsV5-metier.exe]
运行该项目将得到以下结果:
测试用例 [NUnit1](参见项目中的 [4])
单元测试类 [NUnit1] 采用了前面的四个计算,并验证了其结果:
using Dao;
using Metier;
using NUnit.Framework;

namespace Tests {
    [TestFixture]
    public class NUnit1:AssertionHelper {
        // 待测试图层 [metier]
        private IImpotMetier metier;

        // 制造商
        public NUnit1() {
            // 初始化图层 [metier]
            metier = new ImpotMetier(new FileImpot("DataImpot.txt"));
        }

        // 测试
        [Test]
        public void CalculsImpot(){
            // 显示税率区间
            Expect(metier.CalculerImpot(true, 2, 60000), EqualTo(4282));
            Expect(metier.CalculerImpot(false, 3, 60000), EqualTo(4282));
            Expect(metier.CalculerImpot(false, 3, 6000), EqualTo(0));
            Expect(metier.CalculerImpot(false, 3, 600000), EqualTo(179275));
        }
    }
}
- 第 14 行:创建 [metier] 和 [dao] 层。[dao] 层由 [FileImpot] 类实现
- 第21-24行:反复调用接口[IImpotMetier]中的唯一方法CalculerImpot,并验证结果。
项目 [metier] 现已配置如下:
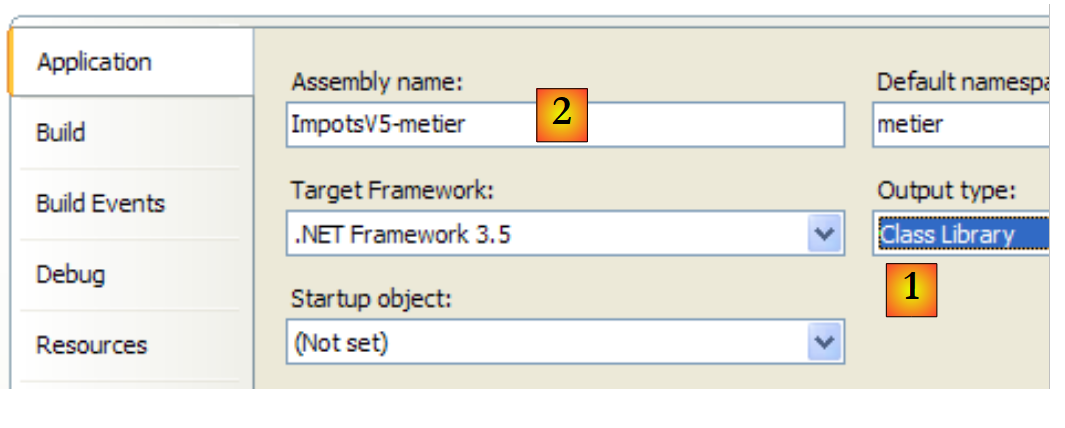 |
- [1]:该项目类型为“类库”
- [2]:生成该项目将产生 DLL [ImpotsV5-metier.dll]
项目已生成(F6)。随后,生成的DLL、[ImpotsV5-metier.dll]和 被加载到NUnit中并进行测试:
 |
如上所示,测试已成功通过。我们现将 [metier] 层视为已投入运行。其 DLL 包含项目中的所有类,其中包括测试类。这些测试类已无用武之地。 我们将重建 DLL 以排除其中的测试类。
 |
- 生成 [1]:文件夹 [tests] 已从项目中排除
- 生成 [2]:新项目。该项目由 F6 重新生成,以生成新的 DLL。
6.4.5. 图层 [ui]
 |
 |
- 生成 [1] 时,项目 [ui] 已成为解决方案中的活动项目
- 在 [2] 中:项目引用
- 在 [3] 中:图层 [ui]
- 在 [4] 中:税级文件 [DataImpot.txt],已配置为自动复制到项目 [6] 的运行文件夹中
项目引用(参见项目中的 [2])
图层 [ui] 需要图层 [metier] 和 [dao] 才能完成其税额计算。因此,它需要引用这两个图层的 DLL。 操作步骤与[metier]层所示相同
主类 [Dialogue.cs](参见项目中的 [3])
类 [Dialogue.cs] 属于上一版本。
测试
项目 [ui] 的配置如下:
 |
- [1]:该项目为“控制台应用程序”类型
- [2]:项目生成将产生可执行文件 [ImpotsV5-ui.exe]
- [3]:将被执行的类
一个运行示例(Ctrl+F5)如下:
Paramètres du calcul de l'Impot au format : Marié (o/n) NbEnfants Salaire ou rien pour arrêter :o 2 60000
Impot=4282 euros
6.4.6. [Spring] 层
让我们回到 [Dialogue.cs] 中的代码,该代码创建了 [dao] 和 [metier] 层:
// 创建图层 [metier et dao]
            IImpotMetier metier = null;
            try {
        // 创建图层 [metier]
                metier = new ImpotMetier(new FileImpot("DataImpot.txt"));
            } catch (ImpotException e) {
                // 显示错误
...
                // 程序停止
                Environment.Exit(1);
            }
第 5 行通过显式指定两个层的实现类名称,创建了 [dao] 和 [metier] 层:FileImpot 对应 [dao] 层, ImpotMetier 对应于 [metier] 层。如果某一层使用新类进行实现,则第 5 行将被修改。例如:
metier = new ImpotMetier(new HardwiredImpot());
除了这一变更外,应用程序不会发生任何变化,因为每一层都是通过接口与下一层进行通信的。只要接口保持不变,层与层之间的通信方式也不会改变。 Spring框架让我们在层独立性方面更进一步,它允许我们将实现不同层的类名外部化到一个配置文件中。因此,更改某一层级的实现就等同于修改一个配置文件。这对应用程序的代码没有任何影响。
 |
上文中,[ui] 层将请求 Spring 实例化 [0]根据配置文件中的信息,实例化 [dao]、[1] 以及 [metier]、[2] 这几层。 随后,[ui] 层将向 Spring [3] 请求 [metier] 层的引用:
            // 创建图层 [metier et dao]
            IImpotMetier metier = null;
            try {
                // Spring 上下文
                IApplicationContext ctx = ContextRegistry.GetContext();
                // 请求图层引用 [metier]
                metier = (IImpotMetier)ctx.GetObject("metier");
            } catch (Exception e1) {
...
}
- 第 5 行:Spring 实例化 [dao] 和 [metier] 层
- 第 7 行:获取 [metier] 层的引用。需要注意的是,[ui] 层曾持有该引用,但未提供实现 [metier] 层的类名。
Spring框架有两个版本:Java版和.NET版。截至2008年3月,.NET版可通过以下网址获取:[http://www.springframework.net/]:
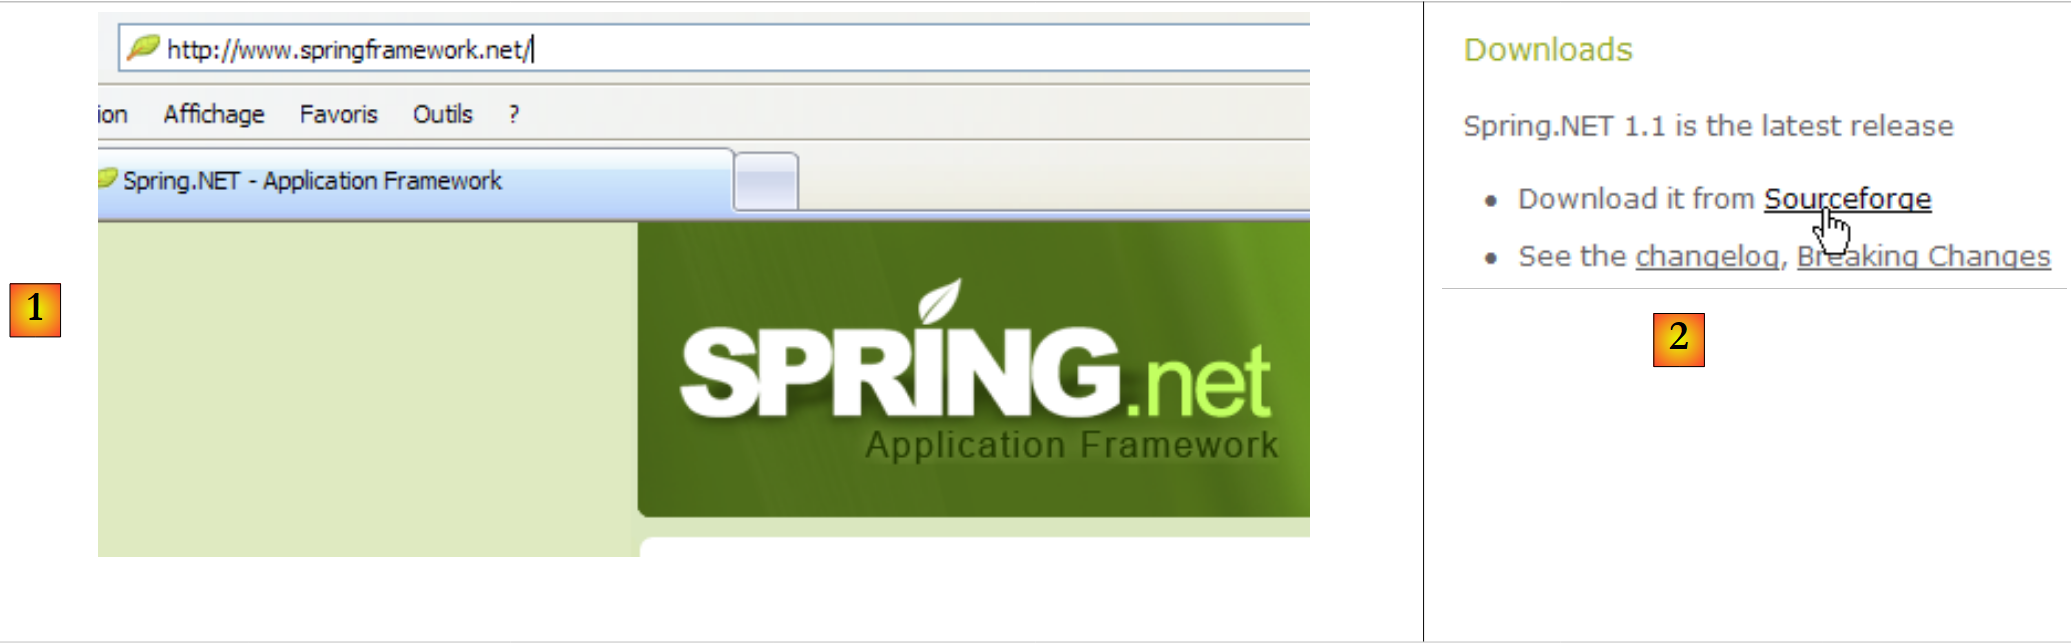 |
- 在 [1] 中:[Spring.net] 的网站
- 在 [2]:下载页面
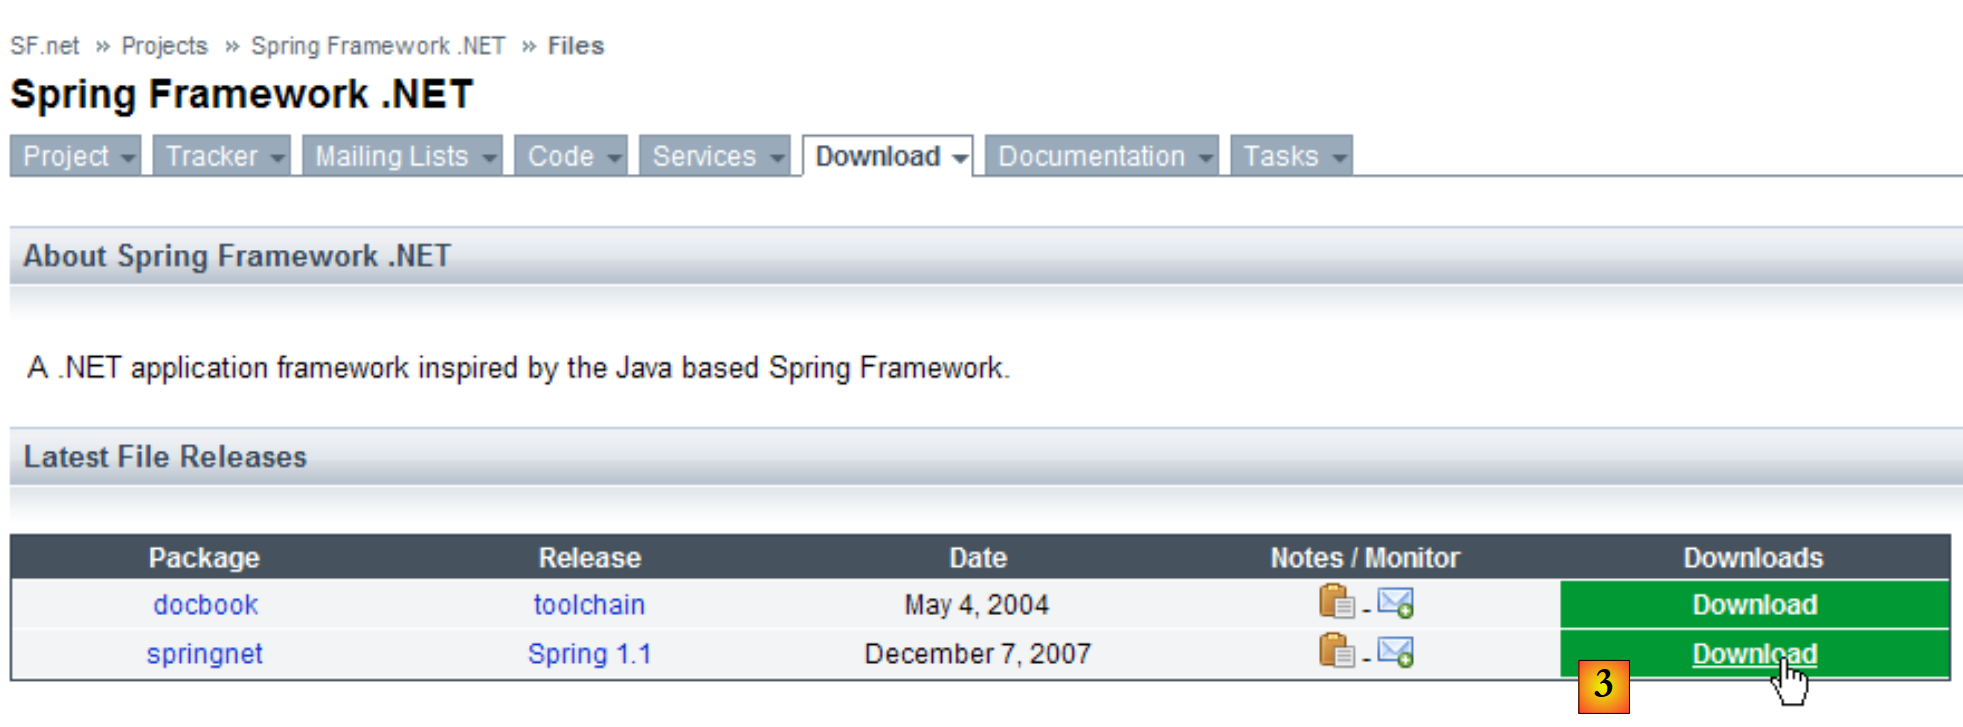 |
- 在 [3]:下载 Spring 1.1(2008年3月)
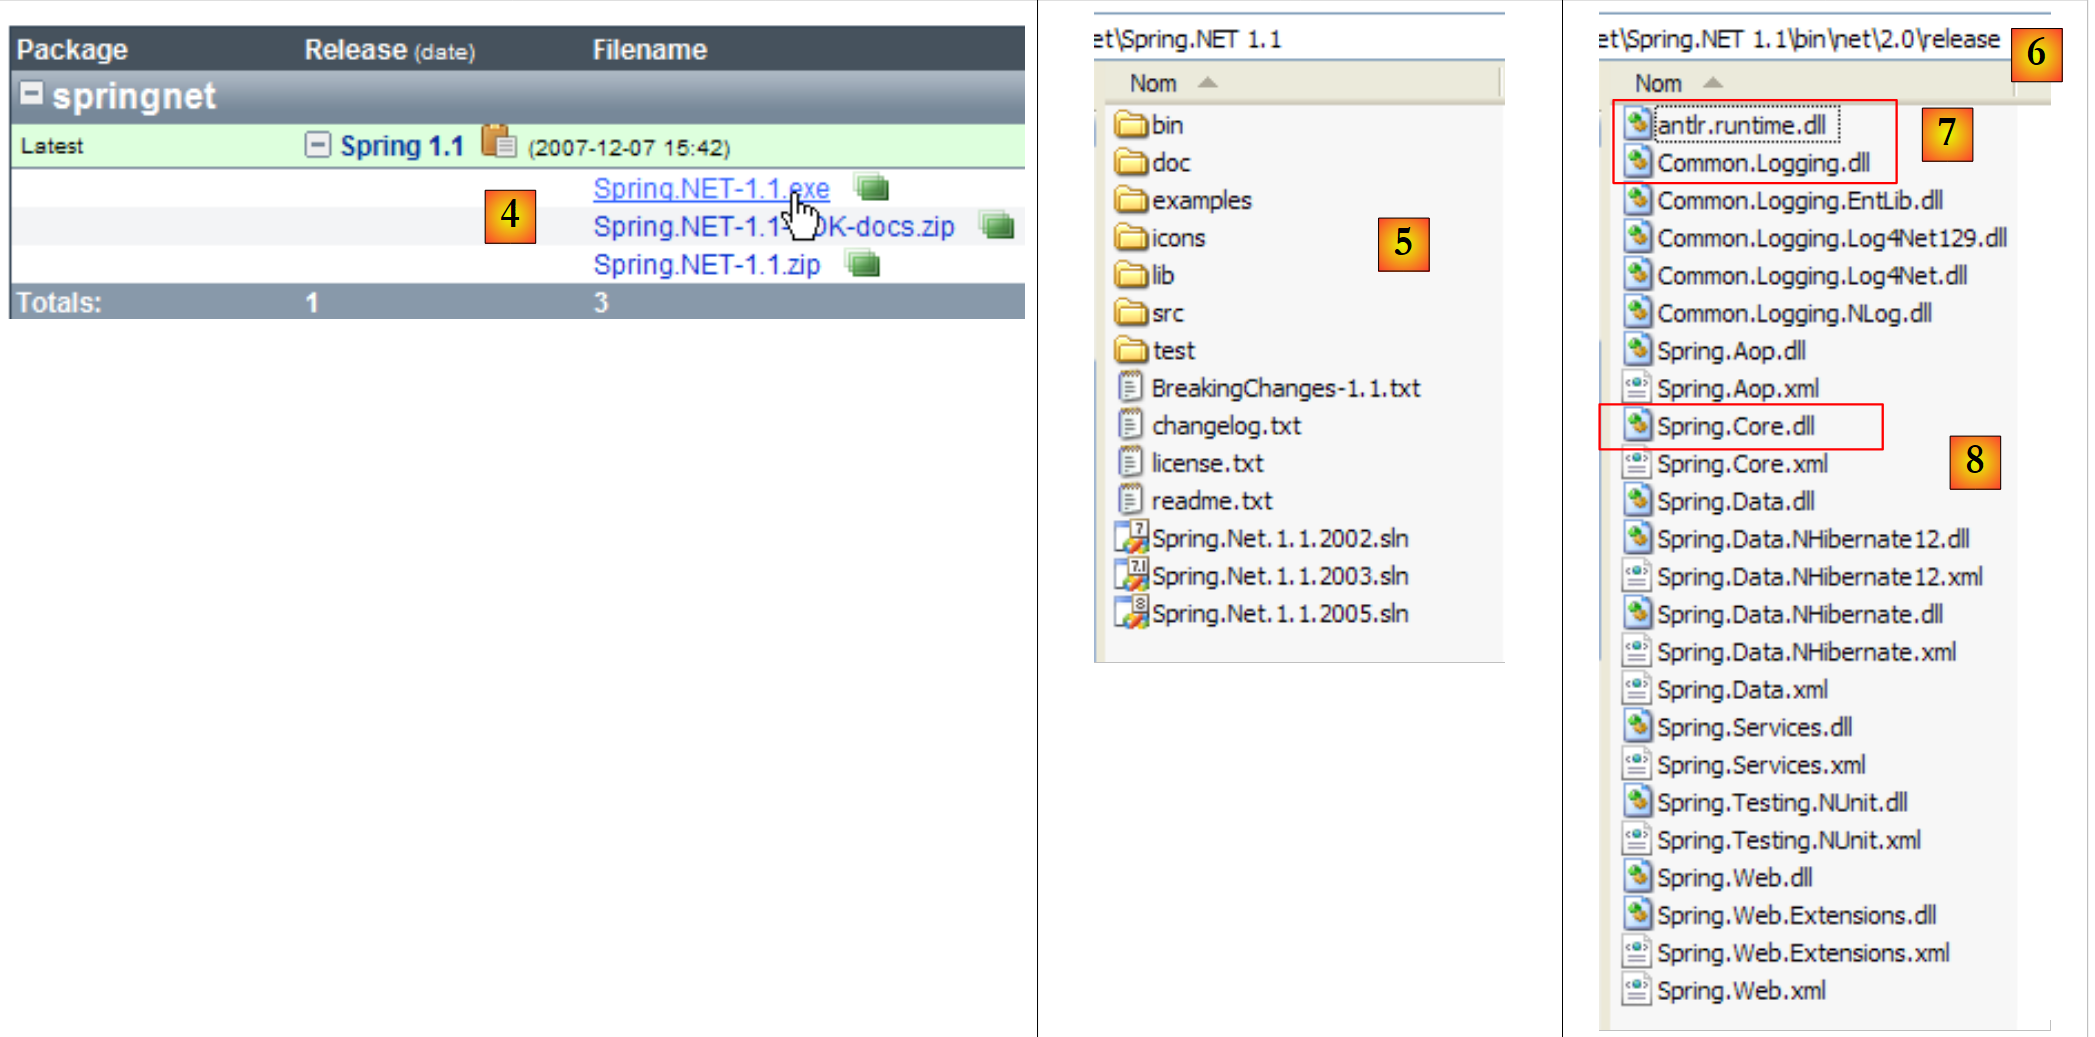 |
- 转换为 [4]:下载 .exe 版本并安装
- 在 [5] 中:安装生成的文件夹
- 在 [6] 中:文件夹 [bin/net/2.0/release] 包含适用于 Visual Studio 2.0 或更高版本项目的 Spring DLL 文件。 Spring 是一个功能丰富的框架。我们在此将使用 Spring 的某个特性来管理应用程序中各层的集成,该特性被称为 IoC:控制反转(Inversion of Control),或称 DI:依赖注入(Dependency Injection)。 Spring 提供了用于访问数据库的库(如 NHibernate),以及用于生成和运行 Web 服务、Web 应用程序等的库……
- 管理应用程序中各层集成所需的DLL包括DLL、[7]和[8]。
我们将这三个 DLL 存储在项目中的一个名为 [lib] 的文件夹中:
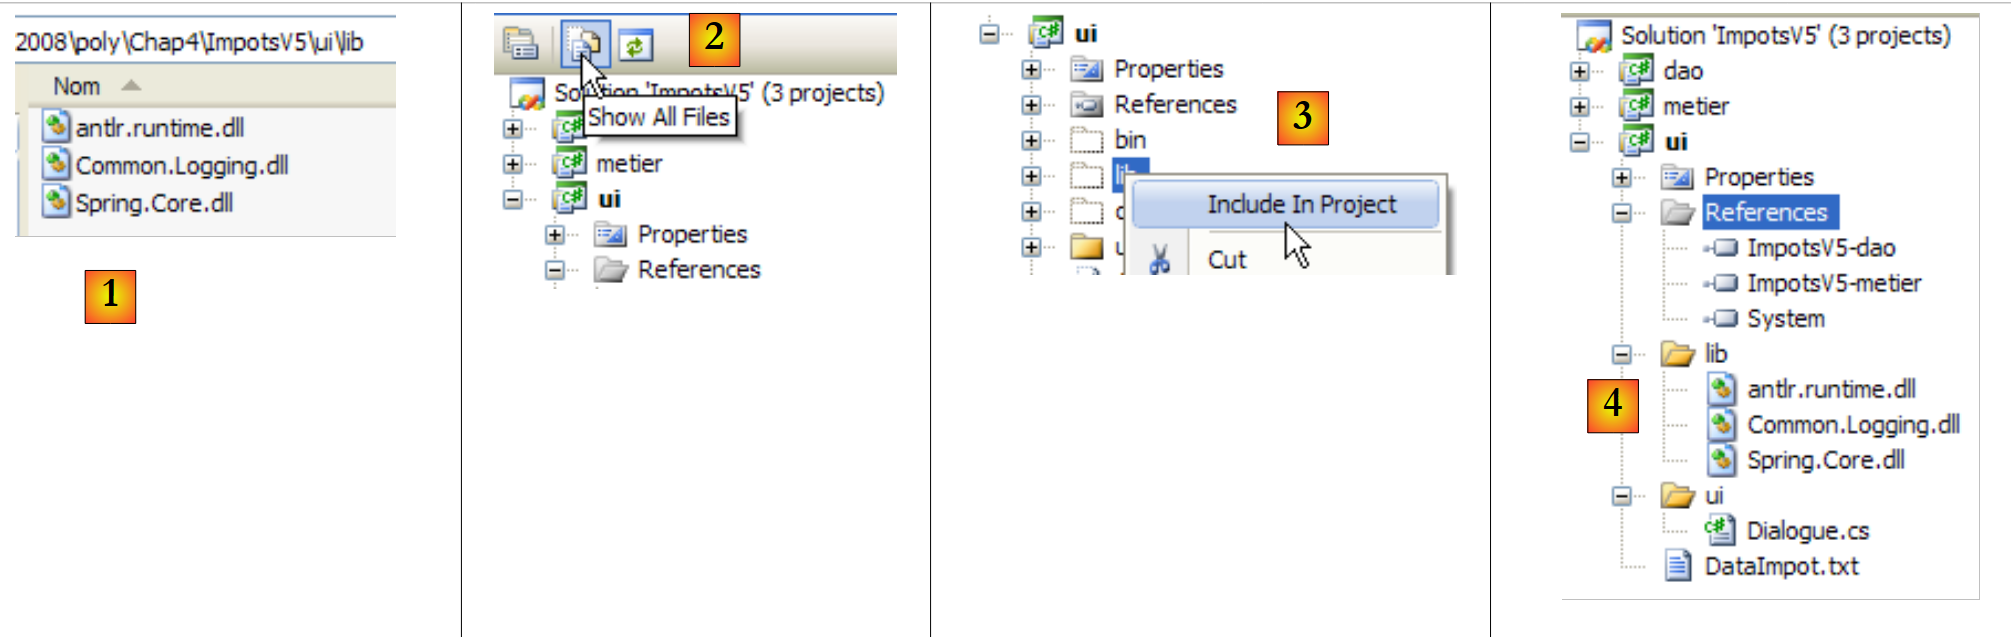 |
- [1]:使用Windows资源管理器将这三个DLL文件放置在[lib]文件夹中
- [2]:在项目 [ui] 中,显示所有文件
- [3]:文件夹 [ui/lib] 现已可见。将其纳入项目
- [4]:文件夹 [ui/lib] 已成为项目的一部分
创建文件夹 [lib] 并非绝对必要。引用可直接在 [bin/net/2.0/release] 文件夹下的三个 DLL 文件中创建,该文件夹位于 [Spring.net] 之下。 不过,创建文件夹 [lib] 使得可以在未安装 [Spring.net] 的计算机上开发应用程序,从而降低对现有开发环境的依赖。
我们在项目 [ui] 中添加了对三个新 DLL 的引用:
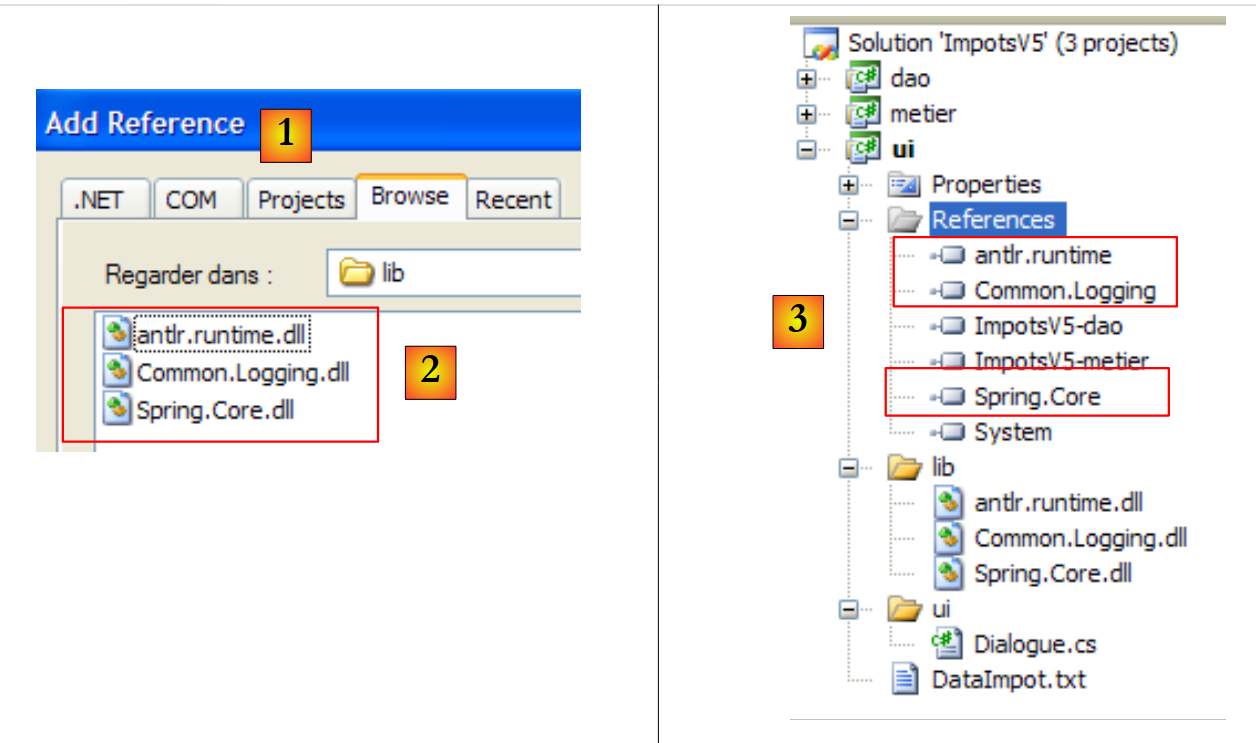 |
- [1]:在文件夹 [lib] 中创建指向三个 DLL 的引用 [2]
- [3]:这三个 DLL 文件属于该项目的引用
让我们回到应用程序架构的概览:
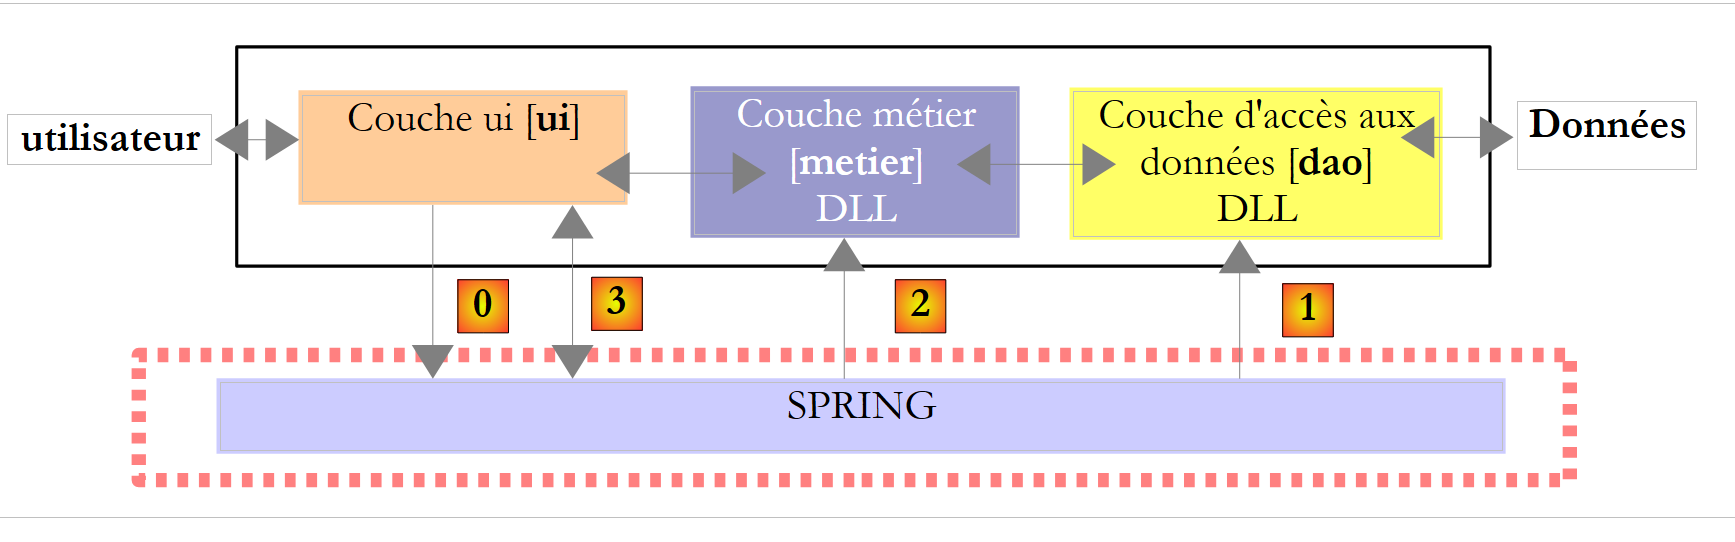 |
在上图中,[ui]层将请求Spring根据配置文件中的信息,实例化 [dao]、[1] 以及 [metier]、[2] 这几层。 随后,[ui] 层将向 Spring [3] 层请求 [metier] 层的引用。这在 [ui] 层中将体现为以下代码:
            // 创建层 [metier et dao]
            IImpotMetier metier = null;
            try {
                // Spring 上下文
                IApplicationContext ctx = ContextRegistry.GetContext();
                // 请求 [metier] 层上的引用
                metier = (IImpotMetier)ctx.GetObject("metier");
            } catch (Exception e1) {
...
}
- 第 5 行:Spring 实例化 [dao] 和 [metier] 层
- 第 7 行:获取 [metier] 层的引用。
上文中的 [5] 行利用了 Visual Studio 项目中的配置文件 [App.config]。 在 C# 项目中,该文件用于配置应用程序。因此,[App.config] 并非 Spring 的概念,而是 Spring 所利用的 Visual Studio 概念。Spring 还能利用除 [App.config] 以外的其他配置文件。因此,此处介绍的解决方案并非唯一可选方案。
让我们使用 Visual Studio 向导创建 [App.config] 文件:
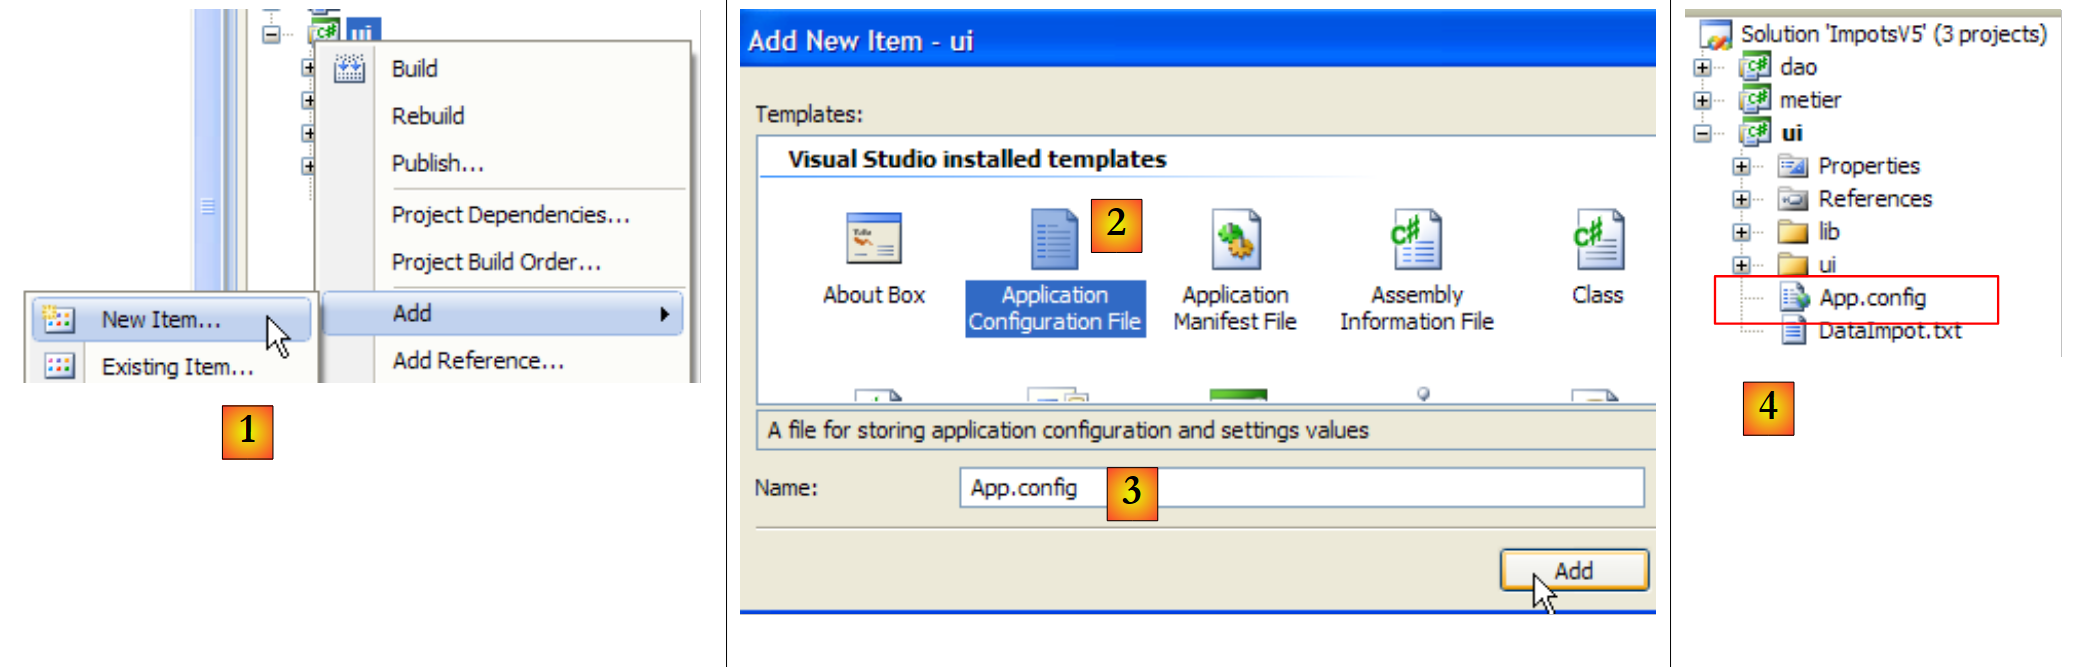 |
- 在 [1] 中:向项目添加新项
- 在 [2] 中:选择“应用程序配置文件”
- 在 [3] 中:[App.config] 是该配置文件的默认名称
- 在 [4] 中:文件 [App.config] 已添加到项目中
文件 [App.config] 的内容如下:
<?xml version="1.0" encoding="utf-8" ?>
<configuration>
</configuration>
[App.config] 是一个XML文件。项目配置位于<configuration>标签之间。Spring所需的配置如下:
<?xml version="1.0" encoding="utf-8" ?>
<configuration>

    <configSections>
        <sectionGroup name="spring">
            <section name="context" type="Spring.Context.Support.ContextHandler, Spring.Core" />
            <section name="objects" type="Spring.Context.Support.DefaultSectionHandler, Spring.Core" />
        </sectionGroup>
    </configSections>

    <spring>
        <context>
            <resource uri="config://spring/objects" />
        </context>
        <objects xmlns="http://www.springframework.net">
            <object name="dao" type="Dao.FileImpot, ImpotsV5-dao">
                <constructor-arg index="0" value="DataImpot.txt"/>
            </object>
            <object name="metier" type="Metier.ImpotMetier, ImpotsV5-metier">
                <constructor-arg index="0" ref="dao"/>
            </object>
        </objects>
    </spring>
</configuration>
- 第 11-23 行:由 <spring> 标签界定的部分称为 <spring> 部分组。在 [App.config] 中可以创建任意数量的部分组。
- 一个章节组包含多个章节:本例即为如此:
- 第 12-14 行:<spring/context> 部分
- 第 15-22 行:<spring/objects> 部分
- 第 4-9 行:<configSections> 区域定义了 [App.config] 中现有章节组的处理程序(handlers)列表。
- 第 5-8 行:定义了 <spring> 组(name="spring")中各节的处理程序列表。
- 第 6 行:<spring> 组中 <context> 节的处理程序:
- name:所管理节点的名称
- type:管理该节的类名,格式为 NomClasse、NomDLL。
- <spring> 组的 <context> 部分由类 [Spring.Context.Support.ContextHandler] 管理,该类可在 DLL 和 [Spring.Core.dll] 中找到
- 第 7 行:<spring> 组中 <objects> 部分的管理器
第 4-9 行是 [App.config] 文件中使用 Spring 时的标准内容。我们只需将其从一个项目复制到另一个项目即可。
- 第12-14行:定义<spring/context>部分。
- 第13行:<resource>标签用于指定Spring需实例化类所对应的配置文件位置。这些类可以像此处一样位于[App.config]中,但也可能位于其他配置文件中。这些类的路径通过<resource>标签的uri属性指定:
- <resource uri="config://spring/objects"> 表示待实例化的类列表位于文件 [App.config](config:)的 //spring/objects 部分,即 <spring> 标签内的 <objects> 标签中。
- <resource uri="file://spring-config.xml"> 表示待实例化的类列表位于文件 [spring-config.xml] 中。该文件应放置在项目的运行文件夹(bin/Release 或 bin/Debug)中。 最简单的方法是将其与 [DataImpot.txt] 文件一样,放置在项目根目录下,并使用 [Copy to output directory=always] 属性。
第 12-14 行是 [App.config] 文件中使用 Spring 时的标准内容。只需将它们从一个项目复制到另一个项目即可。
- 第15-22行:定义待实例化的类。此部分用于进行应用程序的特定配置。<objects>标签界定了待实例化类定义的范围。
- 第 16-18 行:定义 [dao] 层的实例化类
- 第16行:Spring实例化的每个对象都由一个<object>标签表示。该标签有一个name属性,即实例化对象的名称。应用程序正是通过该属性向Spring请求引用:“给我一个名为dao的对象的引用”。 type 属性以 NomClasse、NomDLL 的形式定义待实例化的类。 因此,第 16 行定义了一个名为“dao”的对象,它是位于 DLL 中的“Dao.FileImpot”类的实例。 需要注意的是,这里给出了类的完整名称(包括命名空间),且 DLL 的名称中未明确指定 .dll 后缀。
在 Spring 中,可以通过两种方式实例化类:
- 通过向特定构造函数传递参数:第 16-18 行即采用了此方法。
- 通过不带参数的默认构造函数。此时对象将通过其公共属性进行初始化:<object> 标签下会包含 <property> 子标签来初始化这些属性。此处未提供此类示例。
- (续)
- 第 16 行:实例化的类是 FileImpot 类。该类具有以下构造函数:
public FileImpot(string fileName);
构造函数的参数通过 <constructor-arg> 标签进行定义。
- 第 17 行:定义构造函数的第一个也是唯一的参数。index 属性表示构造函数参数的编号,value 属性表示其值:<constructor-arg index="i" value="valuei"/>
- 第19-21行:定义了用于[metier]层的实例化类:位于DLL [ImpotsV5-metier.dll]中的[Metier.ImpotMetier]类。
- 第 19 行:实例化的类是 ImpotMetier。该类具有以下构造函数:
public ImpotMetier(IImpotDao dao);
- (续)
- 第 20 行:定义构造函数的第一个也是唯一的参数。上文中,构造函数的参数 dao 是一个对象引用。 在此情况下,在 <constructor-arg> 标签中使用 ref 属性,而非用于 [dao] 层面的 value 属性:<constructor-arg index="i" ref="refi"/>。 在上述构造函数中,参数 dao 代表 [dao] 层上的一个实例。该实例由配置文件的第 16-18 行定义。因此,在第 20 行中:
<constructor-arg index="0" ref="dao"/>
ref="dao" 代表由第 16-18 行定义的 Spring 对象 "dao"。
简而言之,文件 [App.config]:
- 通过 FileImpot 类实例化 [dao] 层,该类接收 DataImpot.txt 作为参数(第 16-18 行)。生成的对象名为“dao”
- 通过类 ImpotMetier 实例化 [metier] 层,该类接收前一个“dao”对象作为参数(第 19-21 行)。
接下来,我们只需在 [ui] 层中使用该 Spring 配置文件即可。 为此,我们将类 [Dialogue.cs] 复制为 [Dialogue2.cs],并将后者设为项目 [ui] 的主类:
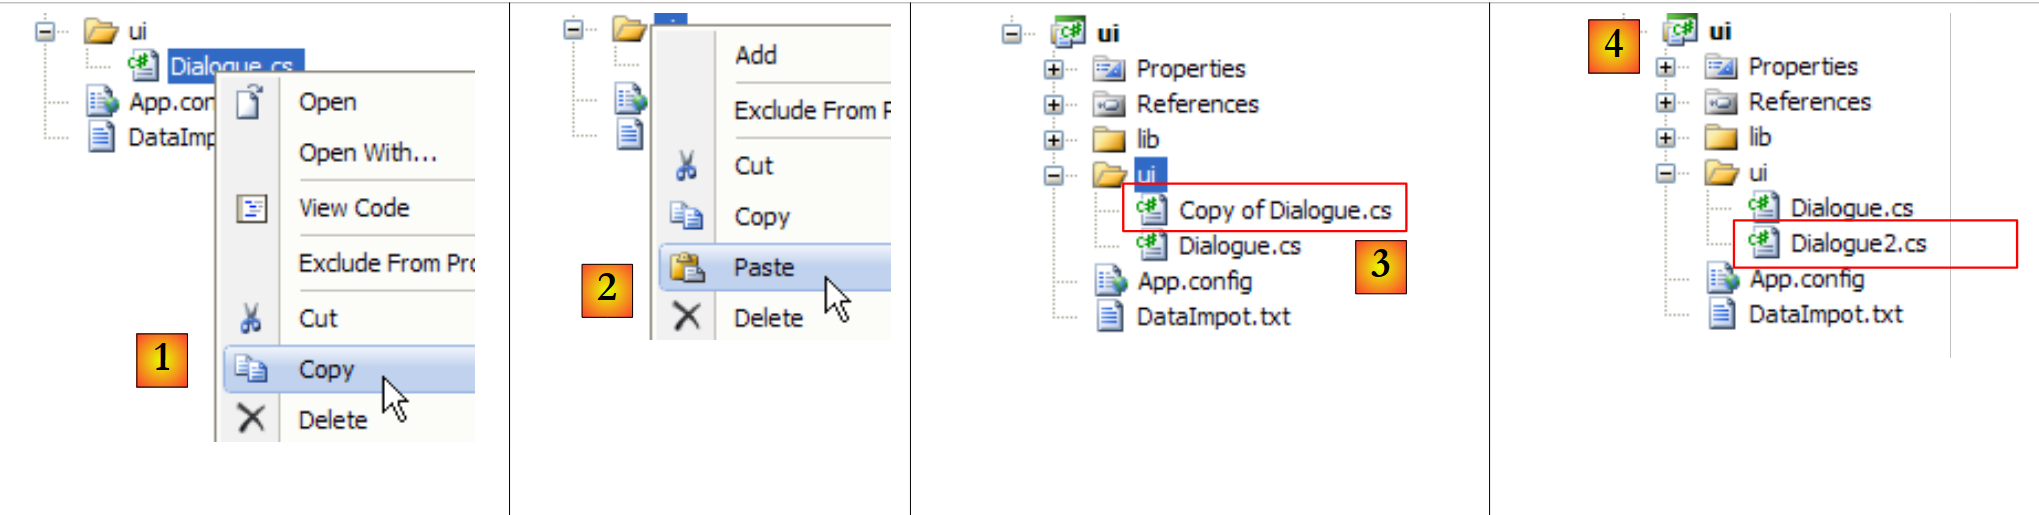 |
- 为 [1]:复制自 [Dialogue.cs]
- 为 [2]:合并
- 为 [3]:[Dialogue.cs] 的副本
- 在 [4] 中:重命名为 [Dialogue2.cs]
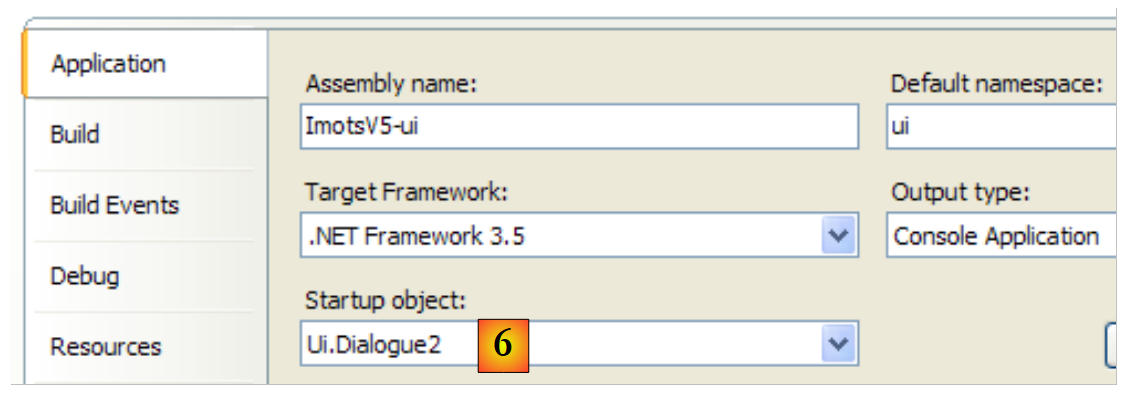 |
- 转换为 [6]:将 [Dialogue2.cs] 设为项目 [ui] 的主类。
以下是 [Dialogue.cs] 的代码:
            // 创建图层 [metier et dao]
            IImpotMetier metier = null;
            try {
        // 创建图层 [metier]
                metier = new ImpotMetier(new FileImpot("DataImpot.txt"));
            } catch (ImpotException e) {
                // 显示错误
                string msg = e.InnerException == null ? null : String.Format(", Exception d'origine : {0}", e.InnerException.Message);
                Console.WriteLine("L'erreur suivante s'est produite : [Code={0},Message={1}{2}]", e.Code, e.Message, msg == null ? "" : msg);
                // 程序停止
                Environment.Exit(1);
            }
            // 无限循环
            while (true) {
...
在 [Dialogue2.cs] 中变为:
            // 创建图层 [metier et dao]
            IApplicationContext ctx = null;
            try {
                // Spring 上下文
                ctx = ContextRegistry.GetContext();
            } catch (Exception e1) {
                // 显示错误
                Console.WriteLine("Chaîne des exceptions : \n{0}", "".PadLeft(40, '-'));
                Exception e = e1;
                while (e != null) {
                    Console.WriteLine("{0}: {1}", e.GetType().FullName, e.Message);
                    Console.WriteLine("".PadLeft(40, '-'));
                    e = e.InnerException;
                }
                // 程序停止
                Environment.Exit(1);
            }
            // 查询图层 [metier] 的引用
            IImpotMetier metier = (IImpotMetier)ctx.GetObject("metier");
            // 无限循环
            while (true) {
....................................
- 第2行:IApplicationContext 提供了对 Spring 实例化所有对象的访问权限。该对象被称为应用程序的 Spring 上下文,或简称为应用程序上下文。目前,该上下文尚未初始化。后续的 try/catch 语句将负责完成初始化。
- 第 5 行:读取并应用 [App.config] 中的 Spring 配置。此操作完成后,若未发生异常,则 <objects> 部分中的所有对象均已实例化:
- Spring对象“dao”是[dao]层上的一个实例
- Spring对象“metier”是[metier]层上的一个实例
- 第 19 行:类 [Dialogue2.cs] 需要 [metier] 层上的一个引用。该引用从应用程序上下文中获取。 对象 IApplicationContext 通过名称(Spring 配置中 <object> 标签的 name 属性)访问 Spring 对象。返回的引用是泛型类型 Object 的引用。 我们需要将返回的引用转换为正确的类型,此处即 [metier] 层的接口类型:IImpotMetier。
如果一切顺利,在第19行之后,[Dialogue2.cs]将持有对[metier]层的引用。第21行及之后的代码即为之前已探讨过的[Dialogue.cs]类的代码。
- 第6-17行:处理在Spring配置文件解析无法完成时触发的异常。这可能由多种原因导致:配置文件本身语法错误,或者无法实例化某个配置对象。 在本例中,若在项目的运行目录中找不到 [App.config] 第 17 行中的 DataImpot.txt 文件,则会出现后一种情况。
第 6 行抛出的异常是一个异常链,其中每个异常都有两个属性:
- Message:与该异常相关的错误消息
- InnerException:异常链中前一个异常
第 10-14 行的循环会以“异常类及其关联消息”的形式显示链中的所有异常。
当使用有效的配置文件运行项目 [ui] 时,将获得常规结果:
Paramètres du calcul de l'Impot au format : Marié (o/n) NbEnfants Salaire ou rien pour arrêter :o 2 60000
Impot=4282 euros
当使用不存在的 [DataImpotInexistant.txt] 文件运行 [ui] 项目时,
            <object name="dao" type="Dao.FileImpot, ImpotsV5-dao">
                <constructor-arg index="0" value="DataImpotInexistant.txt"/>
            </object>
将得到以下结果:
- 第 17 行:原始的 [FileNotFoundException] 类型异常
- 第 15 行:[dao] 层将该异常封装为 [Entites.ImpotException] 类型
- 第 9 行:Spring 抛出的异常,因为它无法成功实例化名为“dao”的对象。在创建该对象的过程中,此前已发生了另外两个异常:即第 11 行和第 13 行的异常。
- 由于无法创建“dao”对象,因此无法创建应用程序上下文。这就是第5行异常的含义。此前,第7行还发生过另一个异常。
- 第3行:最高级别的异常,即链条中的最后一个异常:报告了一个配置错误。
综上所述,我们需记住:最深层的异常(此处为第17行)通常最具决定性。但需注意,Spring保留了第17行的错误信息,并将其上报至第3行的最高层级异常,以便在最高层级获取错误的根本原因。
Spring 本身就值得写一本书。我们在此仅是略微触及了这个主题。您可以通过 Spring 安装目录中的文档 [spring-net-reference.pdf] 进行深入学习:
 |
此外,还可阅读 [http://tahe.developpez.com/dotnet/springioc],这是一份基于 VB.NET 背景的 Spring 教程。