2. Firebird Tutorial
Before covering the basics of the SQL language, we will show the reader how to install Firebird SGBD as well as the IB-Expert graphical client.
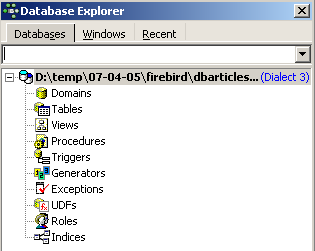
2.1. Where can I find Firebird?
The main Firebird website is . The downloads page offers the following links (April 2005):
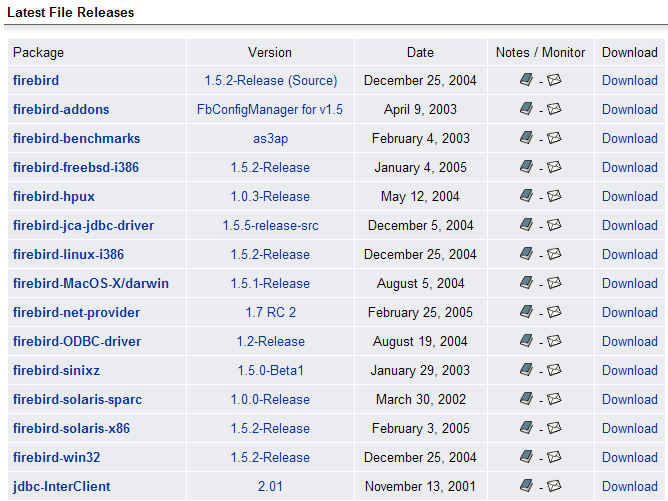
You will need to download the following files:
SGBD for Windows | |
a class library for .NET applications that allows access to Firebird without using a driver. | |
the Firebird ODBC driver |
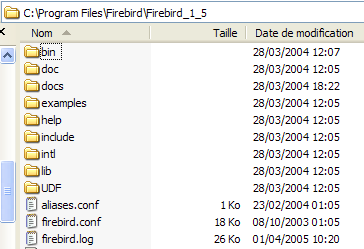
Install these components. SGBD is installed in a folder with contents similar to the following:
 |
The binaries are in the [bin] folder:
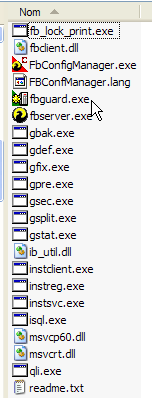 |
allows you to start/stop the SGBD | |
command-line client for managing databases |
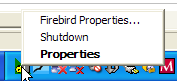
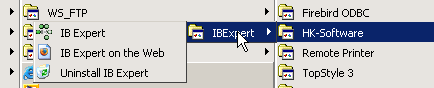
Note that by default, the administrator of SGBD is named [SYSDBA] and the password is [masterkey]. Menus have been installed in [Démarrer]:

The option [Firebird Guardian] allows you to start/stop the SGBD. After startup, the SGBD icon remains in the Windows taskbar:
 |
To create and manage Firebird databases using the [isql.exe] command-line client, you must read the documentation included with the product in the [doc] folder.
2.2. Firebird documentation
Documentation on Firebird and the SQL language can be found on the Firebird website (January 2006):
Various manuals are available in English:
to get started with FB | |
To understand the error codes returned by FB |
Training manuals for the SQL language are also available:
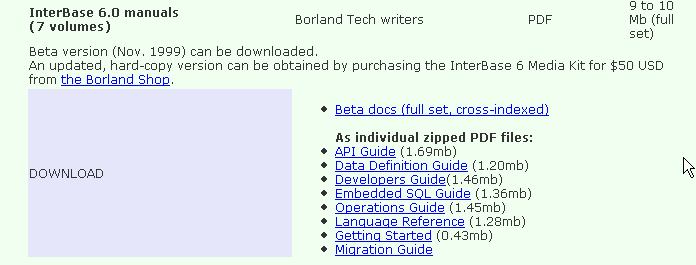
to learn how to create tables, which data types are supported, ... | |
the reference guide for learning SQL with Firebird |
A quick way to work with Firebird and learn the SQL language is to use a graphical client. One such client is IB-Expert, described in the following section.
2.3. Working with SGBD Firebird using IB- Expert
The main IB-Expert website is [http://www.ibexpert.com/]. The downloads page offers the following links:
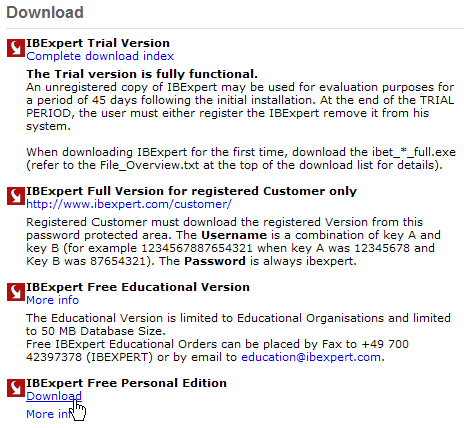
Select the free version version. Once downloaded and installed, you will have a folder similar to the following:
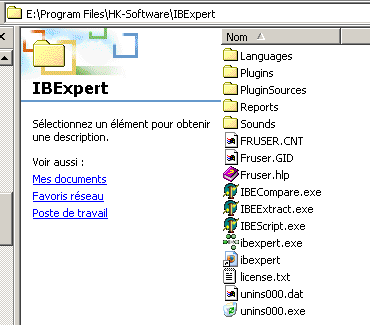
The executable is [ibexpert.exe]. A shortcut is normally available in the [Démarrer] menu:
Once launched, IBExpert displays the following window:

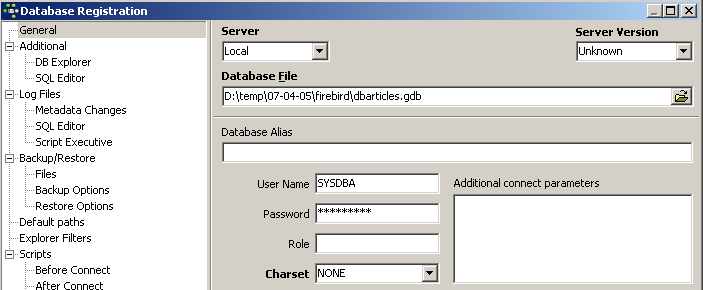
Let’s use option [Database/Create Database] to create a database:
can be [local] or [remote]. Here, our server is on the same machine as [IBExpert]. We therefore choose [local] | |
Use the [dossier]-style button in the dropdown to select the database file. Firebird stores the entire database in a single file. This is one of its key advantages. You can transfer the database from one machine to another simply by copying the file. The suffix [.gdb] is added automatically. | |
SYSDBA is the default administrator for current Firebird distributions | |
masterkey is the password for the administrator SYSDBA in current Firebird distributions | |
the SQL dialect to use | |
if this box is checked, IBExpert will display a link to the database after it has been created |
If, when clicking the [OK] creation button, you receive the following warning:
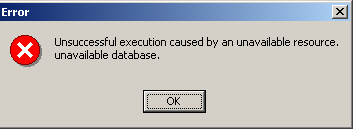
it means you haven’t started Firebird. Start it. A new window will appear:
Character set to use. Although the screenshot above does not show any information, it is recommended to select the [ISO-8859-1] character set from the drop-down list, which allows the use of accented Latin characters. |
[IBExpert] is capable of handling various SGBD versions derived from Interbase. Select the version version of Firebird that you have installed: |
Once this new window is validated by [Register], you get the following result:
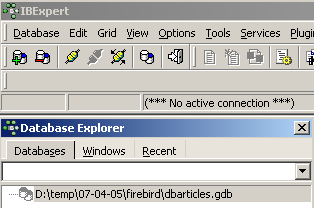
To access the created database, simply double-click on its link. IBExpert then displays a tree structure providing access to the database properties:
2.4. Creating a data table
Let’s create a table. Right-click on [Tables] (see window above) and select option [New Table]. This opens the table properties definition window:
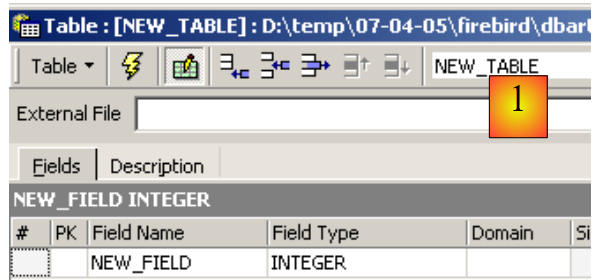 |
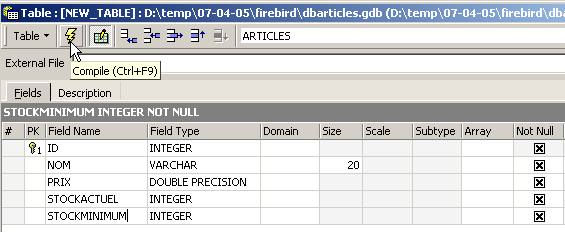
Let’s start by naming the table [ARTICLES] using the [1] input field:
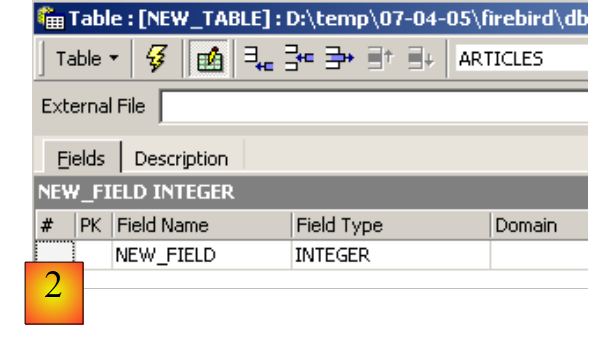 |
Use the [2] input field to define a primary key [ID]:
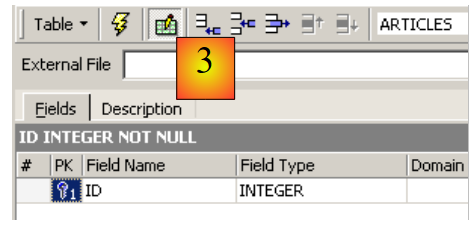 |
A field is made a primary key by double-clicking the [PK] (Primary Key) field. Let’s add fields using the button above [3]:
Until we have "compiled" our definition, the table is not created. Use the [Compile] button above to finalize the table definition. IBExpert prepares the SQL queries to generate the table and asks for confirmation:
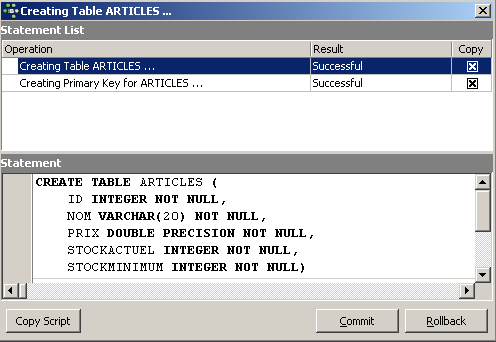
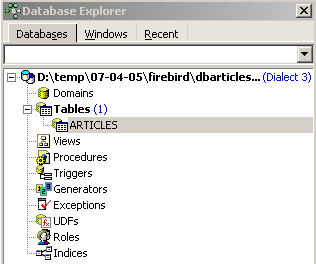
Interestingly, IBExpert displays the SQL queries it has executed. This allows you to learn both the SQL language and the potentially proprietary SQL dialect used. The [Commit] button validates the current transaction, while [Rollback] cancels it. Here, we accept it using [Commit]. Once this is done, IBExpert adds the created table to our database tree:
By double-clicking on the table, we can access its properties:
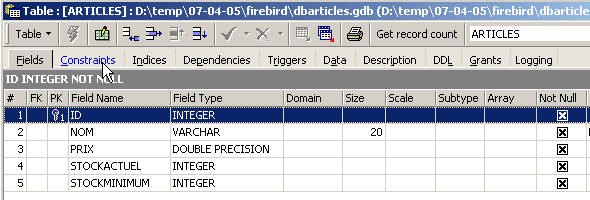
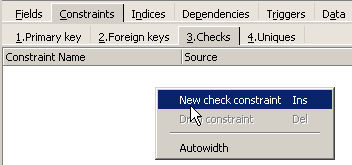
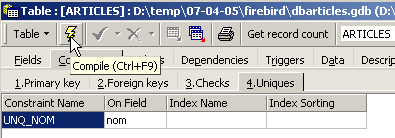
The [Constraints] panel allows us to add new integrity constraints to the table. Let’s open it:

We see the primary key constraint we created. We can add other constraints:
- foreign keys [Foreign Keys]
- field integrity constraints [Checks]
- field uniqueness constraints [Uniques]
Let’s specify that:
- the fields [ID, PRIX, STOCKACTUEL, STOKMINIMUM] must be >0
- the field [NOM] must be non-empty and unique
Open the [Checks] panel and right-click in its constraint definition area to add a new constraint:
Let’s define the desired constraints:
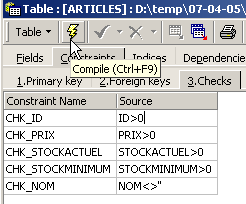
Note above that the [NOM<>''] constraint uses two apostrophes, not quotation marks. Compile these constraints using the [Compile] button above:
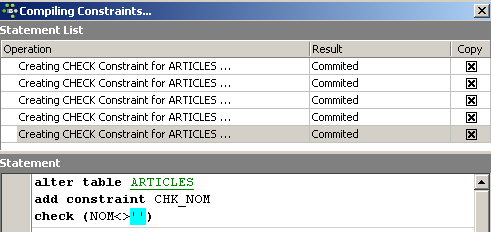
Once again, IBExpert demonstrates its educational value by listing the SQL queries it has executed. Let’s now move on to the [Constraints/Uniques] panel to specify that the name must be unique. This means that the same name cannot appear twice in the table.
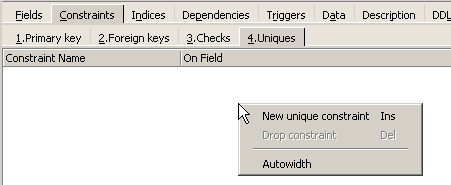
Let’s define the constraint:
Then let’s compile it. Once that’s done, open the [DDL] panel (Data Definition Language) for the [ARTICLES] table:

This panel displays the table generation code SQL, including all its constraints. You can save this code in a script to run it later:
SET SQL DIALECT 3;
SET NAMES NONE;
CREATE TABLE ARTICLES (
    ID            INTEGER NOT NULL,
    NOM           VARCHAR(20) NOT NULL,
    PRIX          DOUBLE PRECISION NOT NULL,
    STOCKACTUEL   INTEGER NOT NULL,
    STOCKMINIMUM  INTEGER NOT NULL
);
ALTER TABLE ARTICLES ADD CONSTRAINT CHK_ID check (ID>0);
ALTER TABLE ARTICLES ADD CONSTRAINT CHK_PRIX check (PRIX>0);
ALTER TABLE ARTICLES ADD CONSTRAINT CHK_STOCKACTUEL check (STOCKACTUEL>0);
ALTER TABLE ARTICLES ADD CONSTRAINT CHK_STOCKMINIMUM check (STOCKMINIMUM>0);
ALTER TABLE ARTICLES ADD CONSTRAINT CHK_NOM check (NOM<>'');
ALTER TABLE ARTICLES ADD CONSTRAINT UNQ_NOM UNIQUE (NOM);
ALTER TABLE ARTICLES ADD CONSTRAINT PK_ARTICLES PRIMARY KEY (ID);
2.5. Inserting data into a table
It is now time to enter data into the [ARTICLES] table. To do this, use its [Data] panel:
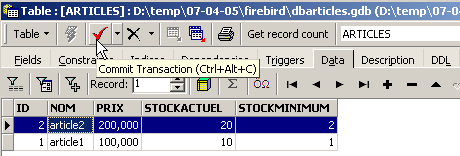
Data is entered by double-clicking the input fields in each row of the table. A new row is added using the [+] button, and a row is deleted using the [-] button. These operations are performed within a transaction that is committed using the [Commit Transaction] button (see above). Without this commit, the data will be lost.
2.6. The SQL editor for [IB-Expert]
The SQL language (Structured Query Language) allows a user to:
- create tables by specifying the type of data they will store and the constraints that this data must satisfy
- insert data into them
- modify certain data
- delete other data
- use the content to retrieve information
- ...
IBExpert allows a user to perform operations 1 through 4 graphically. We have just seen this. When the database contains many tables, each with hundreds of rows, we need information that is difficult to obtain visually. Suppose, for example, that an online store has thousands of customers per month. All purchases are recorded in a database. After six months, it is discovered that product “X” is defective. The store wants to contact everyone who purchased it so they can return the product for a free exchange. How can the addresses of these buyers be found?
- You could manually search through all the tables to find these buyers. That would take a few hours.
- We can issue a query SQL that will return a list of these people in a matter of seconds
The SQL language is useful whenever
- the amount of data in the tables is large
- there are many tables linked together
- the information to be retrieved is spread across multiple tables
- ...
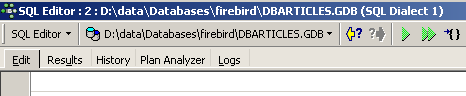
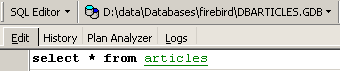
We now present the SQL editor from IBExpert. This editor is accessible via option, [Tools/SQL Editor], or [F12]:

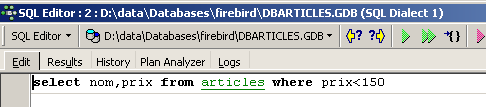
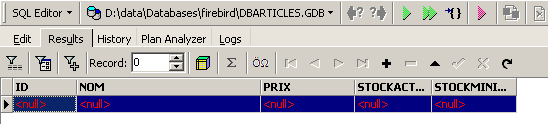
This gives you access to an advanced query editor (SQL) where you can experiment with queries. Let’s enter a query:
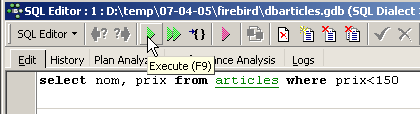
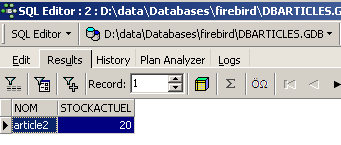
We execute the query SQL using the button above. We obtain the following result:
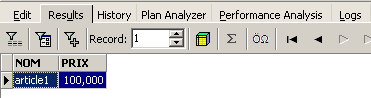
Above, the [Results] tab displays the result table for the SQL [Select] command. To issue a new command SQL, simply return to the [Edit] tab. You will then see the SQL command that was executed.
![]()
Several buttons on the toolbar are useful:
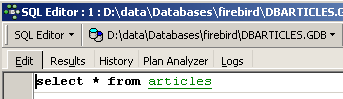
- the [New Query] button allows you to move to a new query SQL:

This brings up a blank editing page:
You can then type a new command SQL:

and execute it:
Let’s return to the [Edit] tab. The various SQL orders issued are stored by [IB-xpert]. The [Previous Query] button allows you to return to a previously issued SQL order:

You are then returned to the previous request:
The [Next Query] button allows you to go to the next SQL order:

You will then see the next order, SQL, in the list of saved orders SQL:

The [Delete Query] button allows you to delete an order SQL from the list of saved orders:

The [Clear Current Query] button clears the editor's contents for the displayed SQL order:

The [Commit] button allows you to permanently save the changes made to the database:

The [RollBack] button allows you to undo the changes made to the database since the last [Commit]. If no [Commit] has been performed since connecting to the database, then the changes made since that connection are undone.

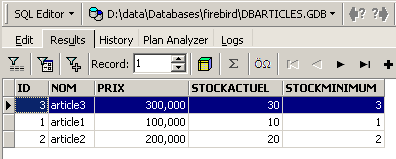
Let’s look at an example. Let’s insert a new row into the table:
![]()
The SQL command is executed, but nothing is displayed. We do not know if the insertion took place. To find out, let’s execute the SQL command following [New Query]:
We get the following result:
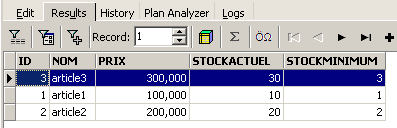
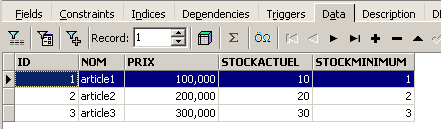
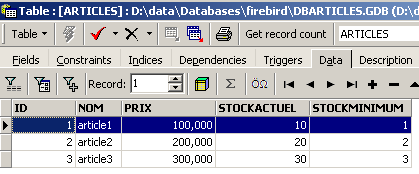
The row has therefore been successfully inserted. Let’s now examine the table’s contents in another way. Double-click on the table [ARTICLES] in the database explorer:
We get the following table:

The arrow button above allows you to refresh the table. After refreshing, the table above does not change. It appears that the new row has not been inserted. Let’s return to the SQL editor (F12) and then validate the SQL command issued with the [Commit] button:

Once this is done, let’s return to the [ARTICLES] table. We can see that nothing has changed even when using the [Refresh] button:
Above, let’s open the [Fields] tab and then return to the [Data] tab. This time, the inserted row appears correctly:
When the execution of the various SQL commands begins, the editor opens what is called a transaction on the database. The changes made by these SQL commands from the SQL editor will only be visible as long as you remain in the same SQL editor (you can open multiple instances). It is as if the SQL editor were working not on the actual database but on its own copy. In reality, this is not exactly how it works, but this analogy can help us understand the concept of a transaction. All changes made to the copy during a transaction will only be visible in the actual database once they have been committed by a [Commit Transaction]. The current transaction is then completed, and a new transaction begins.
Changes made during a transaction can be rolled back using a command called [Rollback]. Let’s try the following experiment. Start a new transaction (simply run [Commit] on the current transaction) with the following command SQL:

Let’s execute this command, which deletes all rows from table [ARTICLES], and then execute [New Query], the new command SQL:
We get the following result:
All rows have been deleted. Remember that this was done on a copy of the [ARTICLES] table. To verify this, double-click on the [ARTICLES] table below:
and view the [Data] tab:
Even if you use the [Refresh] button or switch to the [Fields] tab and then back to the [Data] tab, the content above remains unchanged. This has been explained. We are in another transaction that is working on its own copy. Now let’s return to the SQL editor (F12) and use the [RollBack] button to undo the line deletions that were made:

We are asked for confirmation:
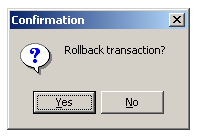
Let’s confirm. The SQL editor confirms that the changes have been undone:
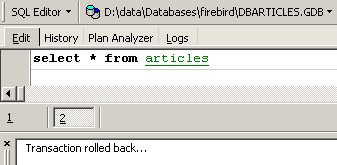
Let’s rerun the SQL query above to verify. The rows that had been deleted are now back:
Operation [Rollback] has restored the copy on which editor SQL is working to the state it was in at the start of the transaction.