1. Introduction
The PDF version of the document is available |HERE|.
The examples in the document are available |HERE|.
Here, we propose to introduce two frameworks using a client/server example:
- AngularJS used for the client. For simplicity, it will be referred to as Angular hereafter;
- Spring 4 used for the server. For simplicity, it will be referred to as Spring hereafter;
Understanding this document requires certain prerequisites:
- an intermediate level of Java EE;
- knowledge of JPA (Java Persistence Api), which will be used to access a database;
- knowledge of at least one previous version of Spring to understand the framework’s philosophy;
- experience using Maven to configure Java projects;
- a basic understanding of HTTP interactions in a web application;
- common tags in the HTML language;
- a basic understanding of the Javascript language;
Other necessary knowledge will be introduced and explained as the case study progresses.
This document is not a course and is incomplete in many respects. To learn more about the two frameworks, you can use the following references:
- [ref1]: the book "Pro AngularJS" written by Adam Freeman and published by Apress. It is an excellent book. The source code for the examples in this book is available for free at URL [http://www.apress.com/downloadable/download/sample/sample_id/1527/];
- [ref2]: the official Angular documentation JS [https://docs.angularjs.org/guide]
- [ref3]: the book "Spring Data" from O'Reilly [http://shop.oreilly.com/product/0636920024767.do], which explains how to use the framework [Spring Data] to access data, whether from relational databases or not (NoSQL);
- [ref4]: the book "Pro Spring 3" published by Apress. This is the predecessor to Spring 4, but the main concepts are already there;
- [ref5]: the Spring 4 reference documentation [http://docs.spring.io/spring/docs/current/spring-framework-reference/pdf/spring-framework-reference.pdf].
The sources that informed this document are those cited above, plus the indispensable [http://stackoverflow.com/] for the numerous debugging sessions.
1.1. The Application Architecture
The application under consideration will have the following architecture:
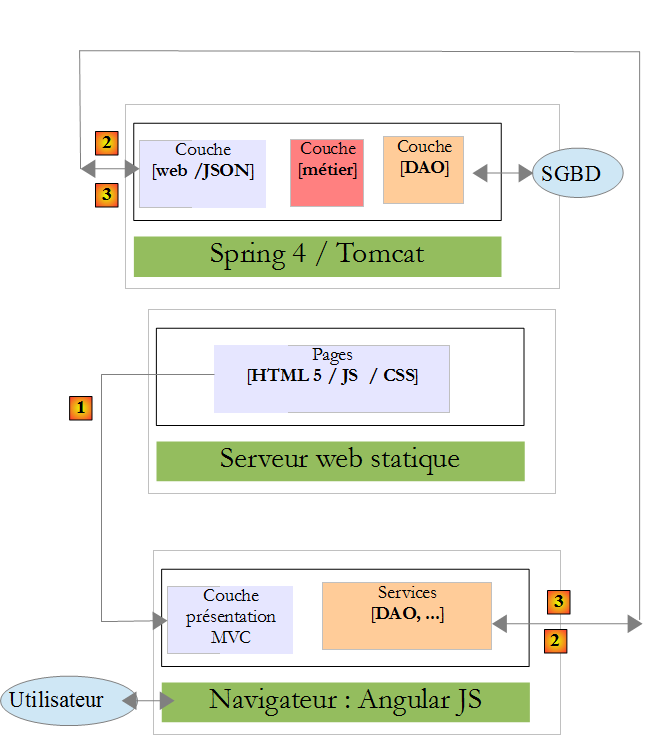
- In [1], a web server delivers static pages to a browser. These pages contain a AngularJS application built on the MVC model (Model–View–Controller). The model here encompasses both the views and the domain, represented here by the [Services] layer;
- The user will interact with the views displayed in the browser. Their actions will sometimes require a request to the Spring 4 server [2]. The server will process the request and return a response JSON (JavaScript Object Notation) [3]. This response will be used to update the view displayed to the user.
1.2. Tools Used
In this document, the following development tools are used:
- Spring Tool Suite for the Spring server: available for free download;
- WebStorm for the Angular client: a one-month evaluation version is available for free download;
- Wampserver for MySQL 5 database management: available for free download;
The installation of these and other tools is described in Section 6.
1.3. Application Features
The sample code is available |HERE| as a downloadable ZIP file.
 |  |
- The server is contained in the [rdvmedecins-metier-dao-v2] and [rdvmedecins-webapi-v3] folders;
- the client is contained in the [rdvmedecins-angular-v2] folder;
- The script SQL for generating the database MySQL5 is in the folder [database];
1.3.1. Creating the database
To test the application, we first create the database using the SQL and [dbrdvmedecins.sql] scripts. We use the [PhpMyAdmin] tool from WampServer:
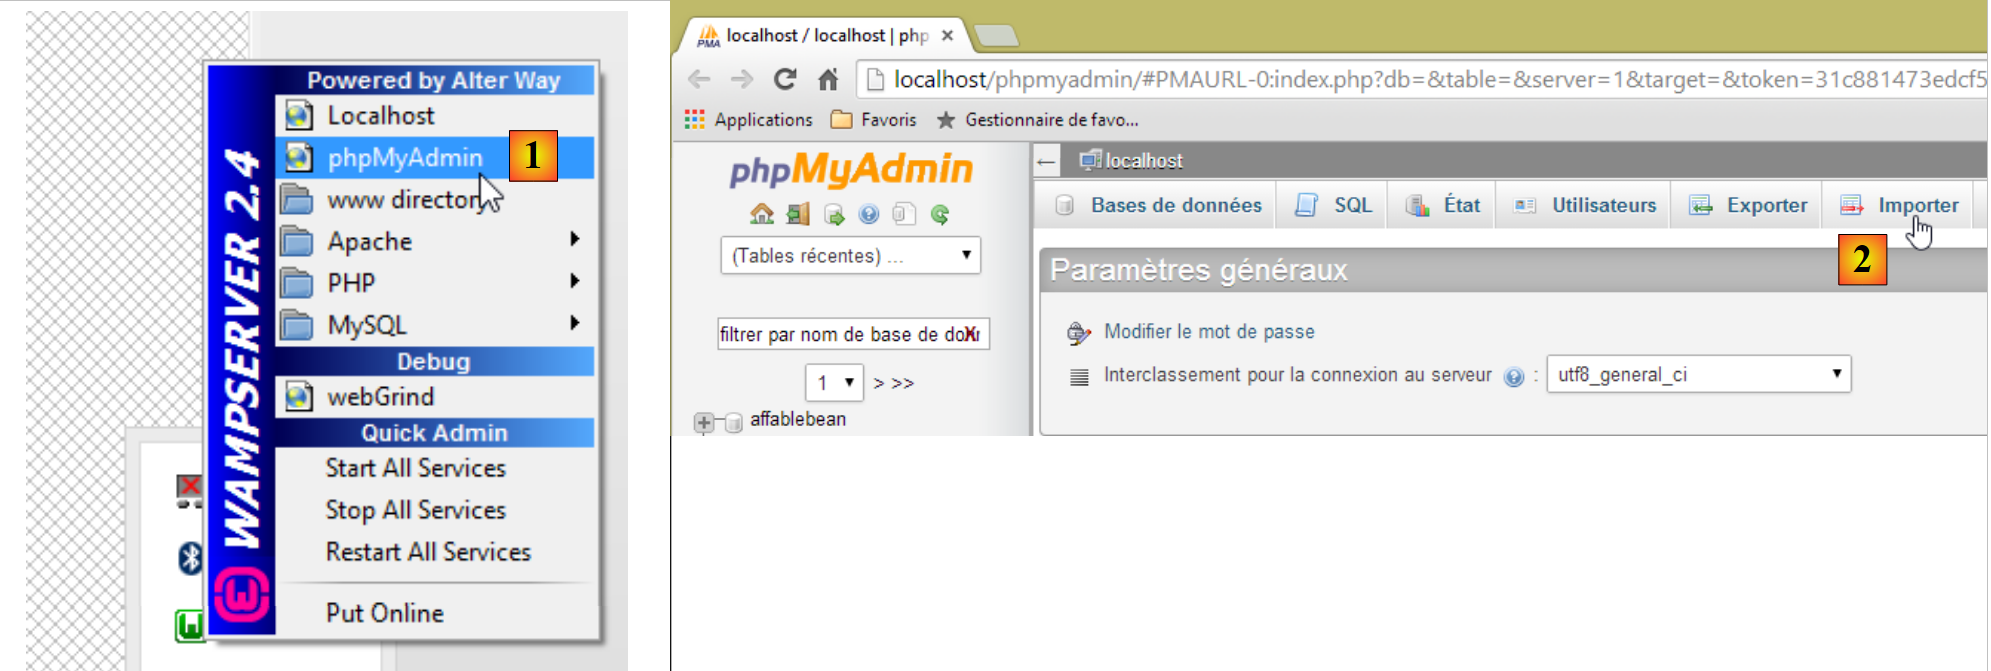 |
- In [1], we select the [phpMyAdmin] tool from WampServer;
- in [2], we choose option from [Importer];
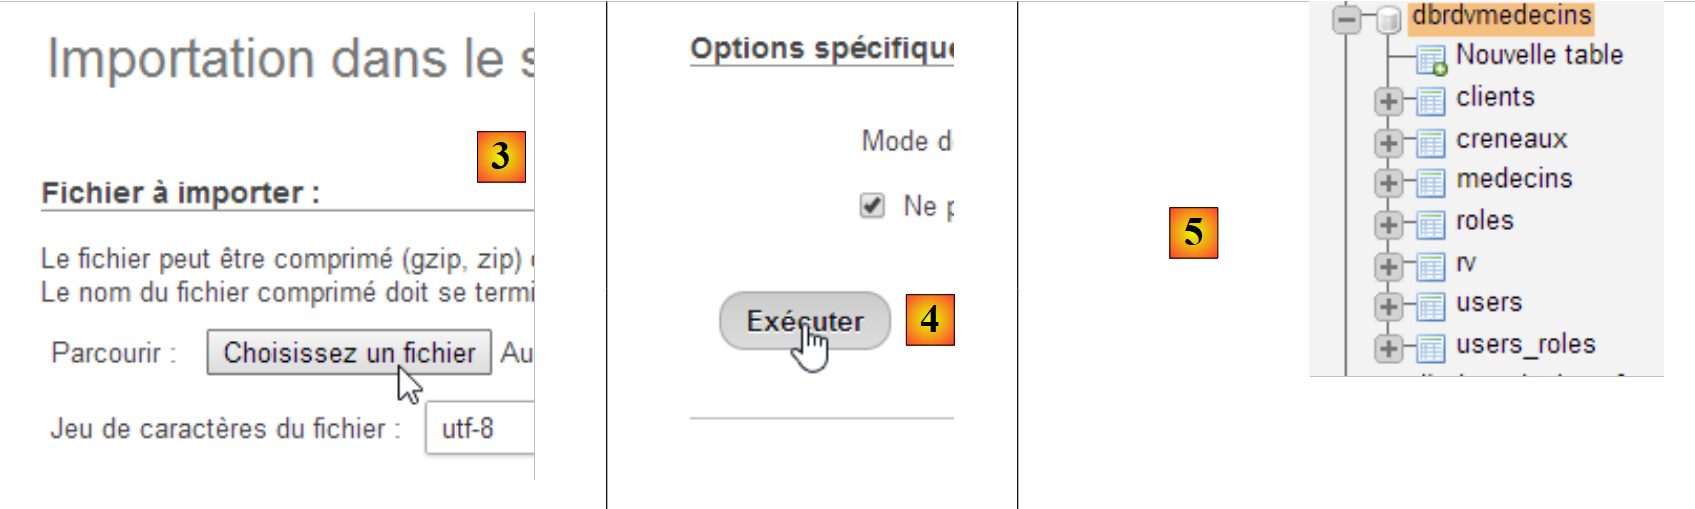 |
- In [3], select the file [database/dbrdvmedecins.sql];
- in [4], we run it;
- in [5], the database is created.
1.3.2. Web server deployment / JSON
Using Spring Tool Suite (STS), import the two Spring 4 server Maven projects:
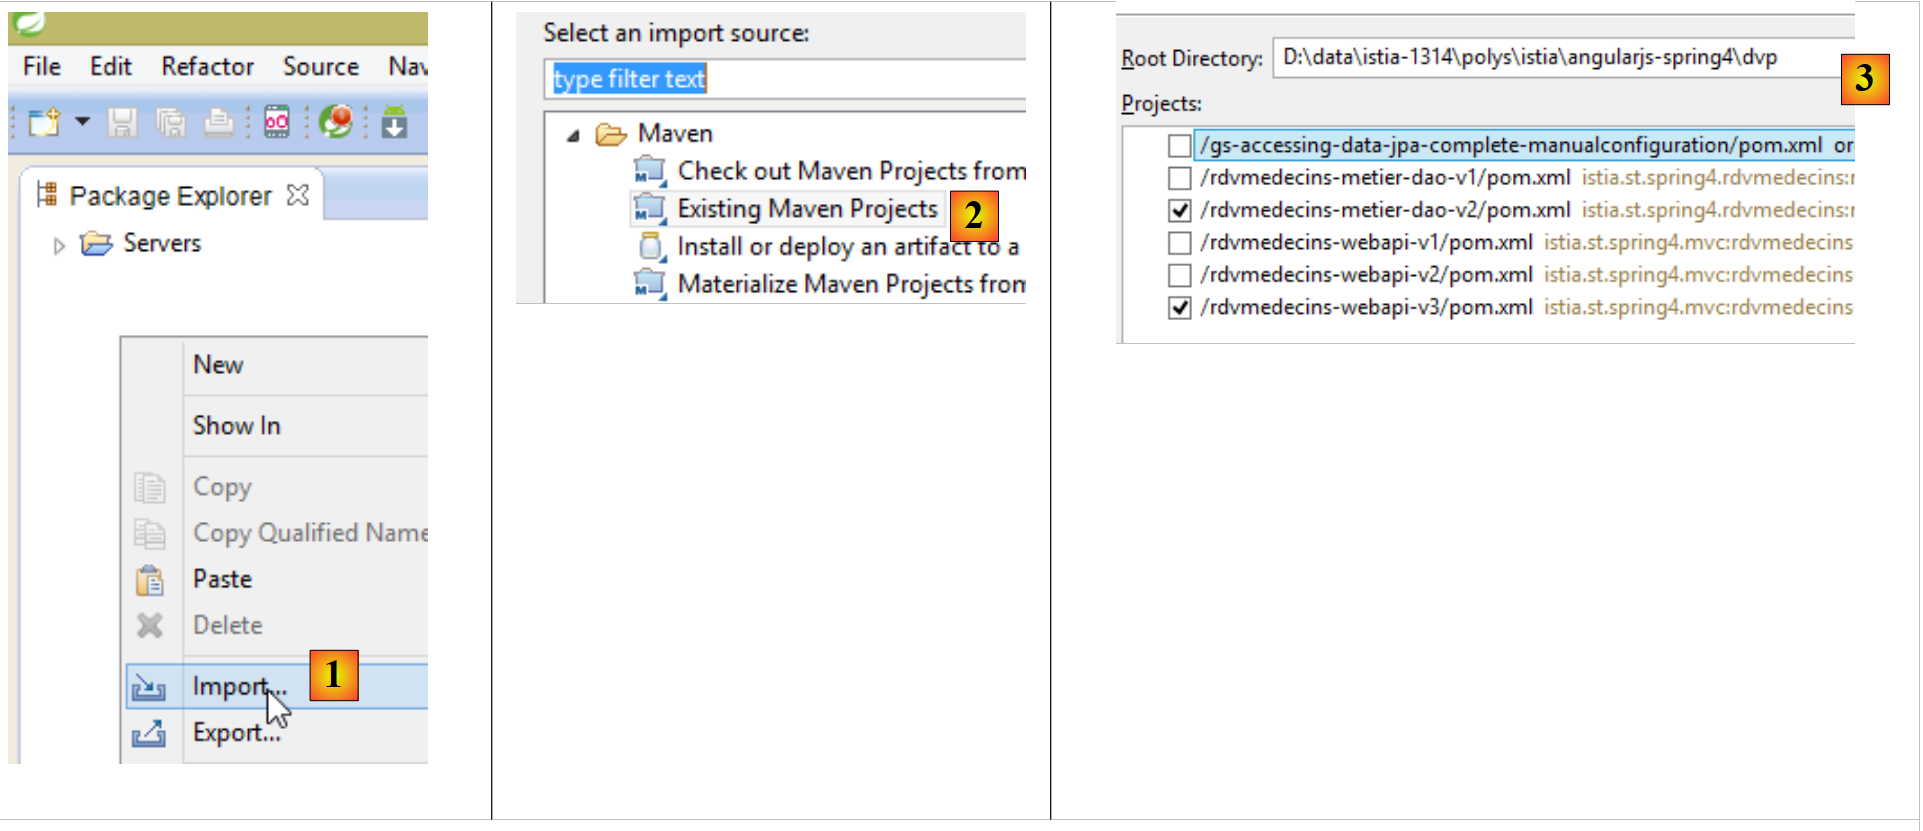 |
- in [1] and [2], we import Maven projects;
- In [3], we specify the parent folder for the two projects to be imported;
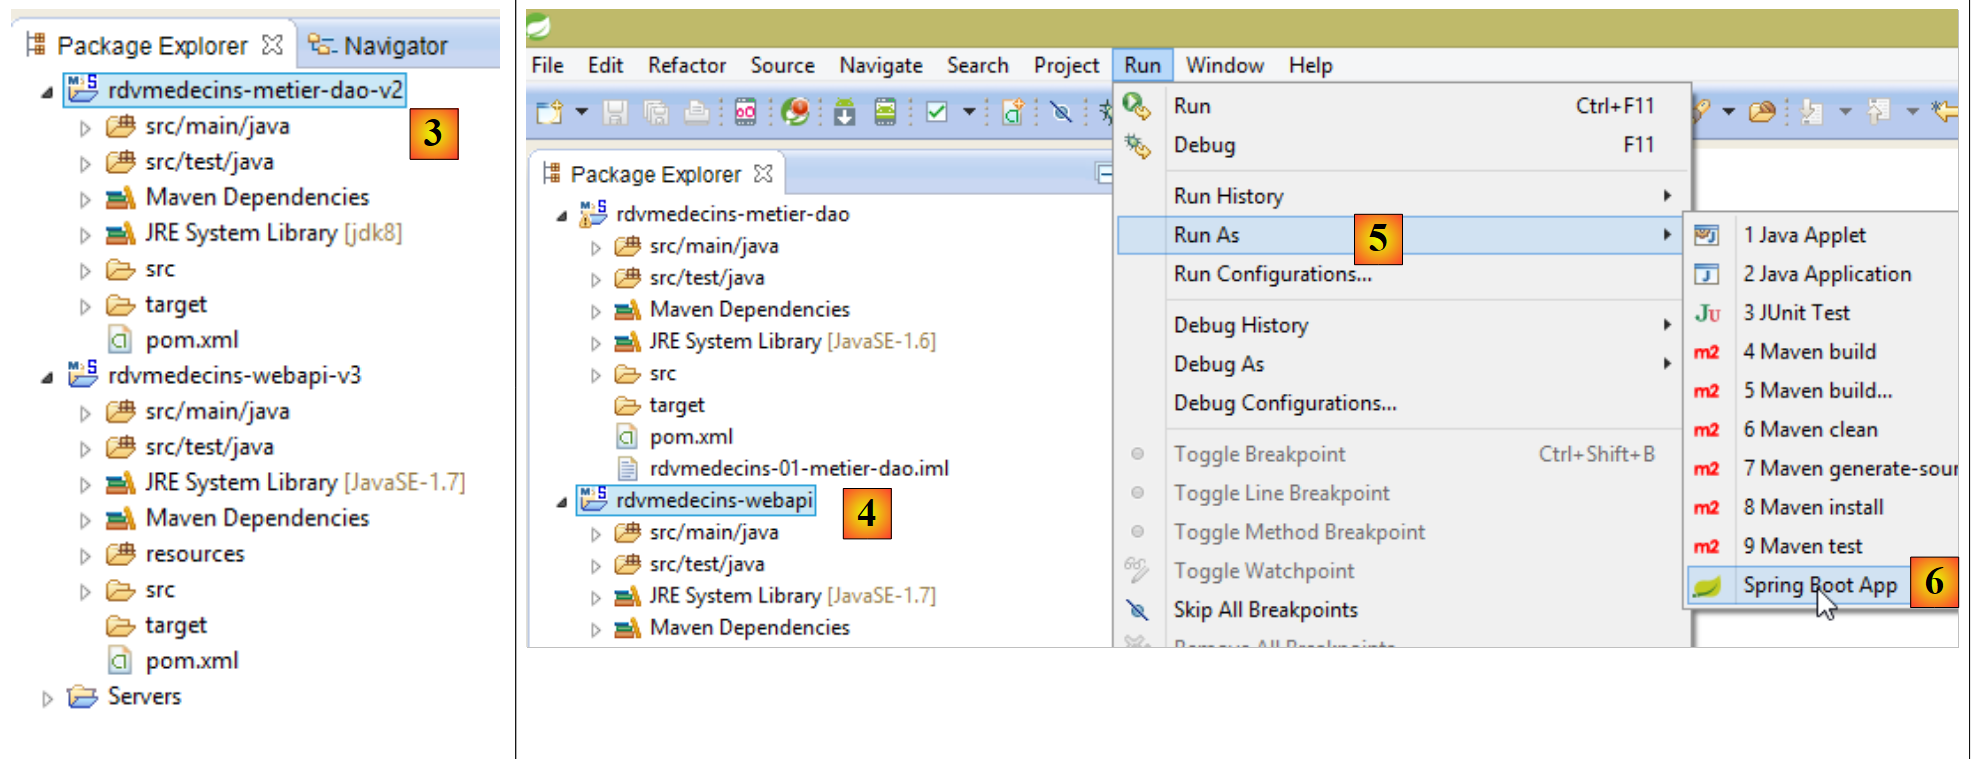 |
- In [3], the imported projects. The projects may contain errors. Each of them must use a compiler >=1.7:
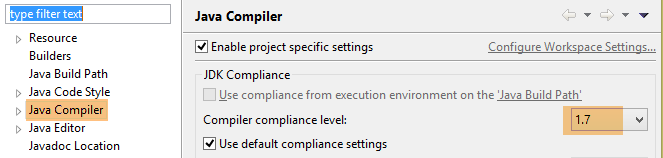 |
Therefore, a JVM version >=1.7 is required:
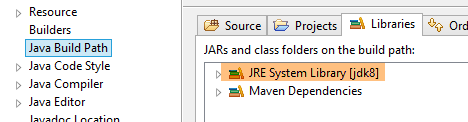 |
Once there are no more errors in JVM, you can run the [rdvmedecins-webapi-v3] project:
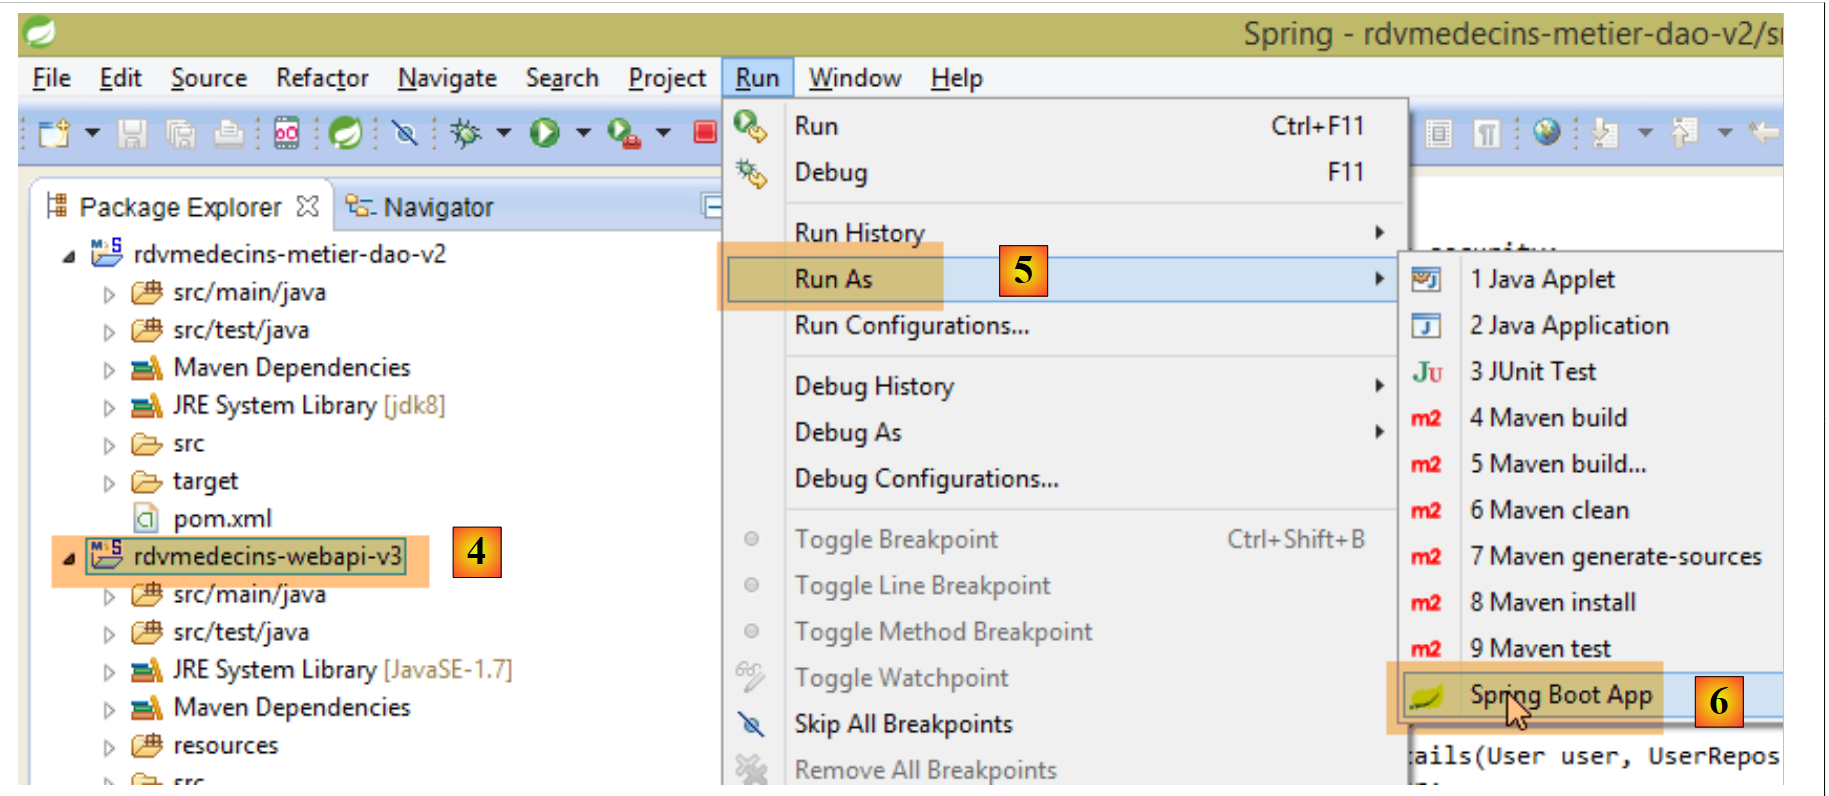 |
- In [4], [5], and [6], we run the [rdvmedecins-webapi-v3] project as a Spring Boot application;
We then obtain the following logs in the STS console:
- Lines 13-14: The application has started on a Tomcat server.
1.3.3. Implementing the Angular client
We open the [rdvmedecins-angular-v2] folder with WebStorm:
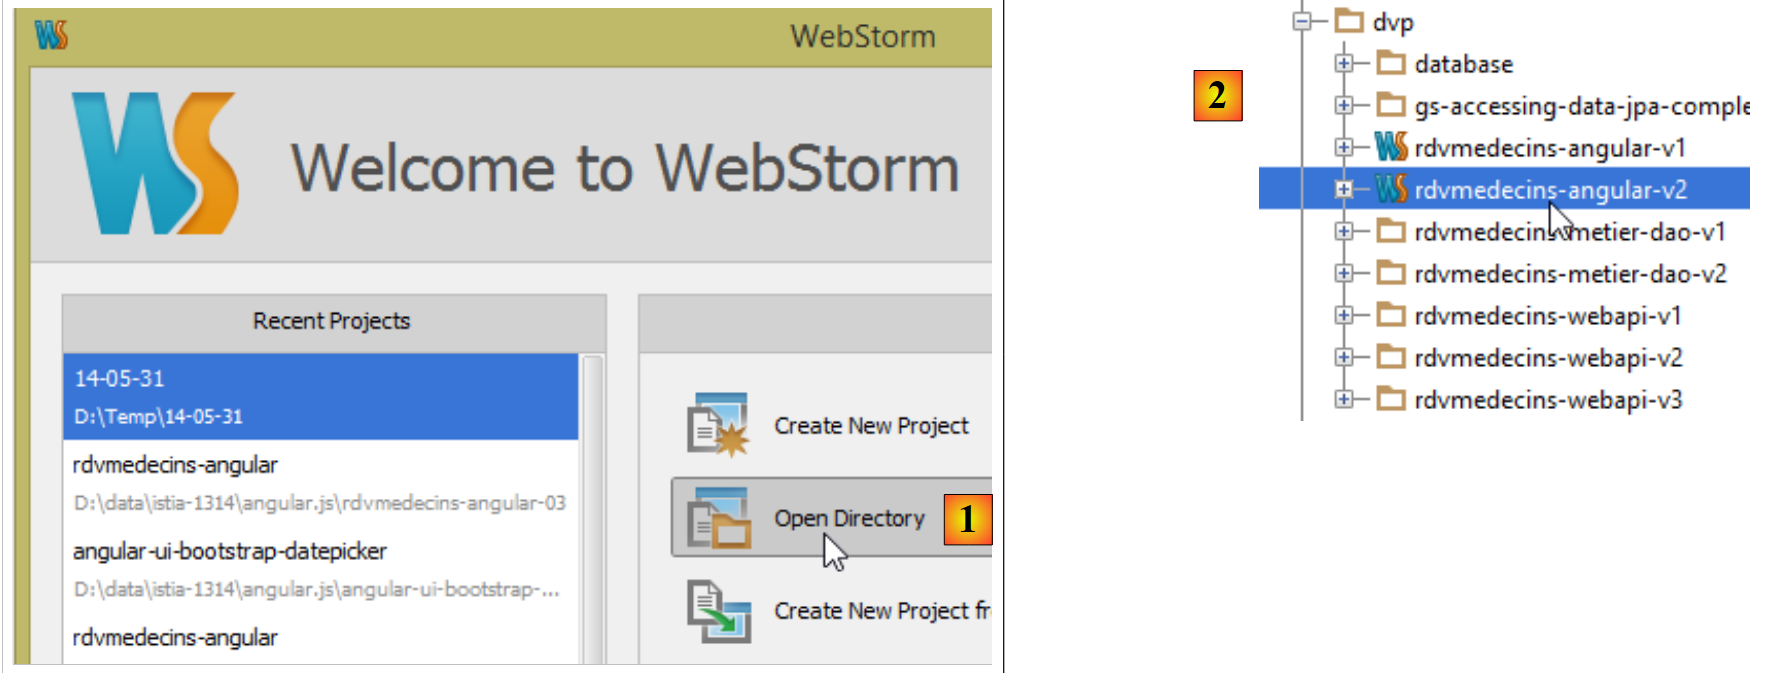 |
- In [1], select option and [Open Directory];
- In [2], select the [rdvmedecins-angular-v2] folder;
 |
- in [3], the folder tree;
- in [4], select the application's main page [app.html];
- in [5], open it in a modern browser;
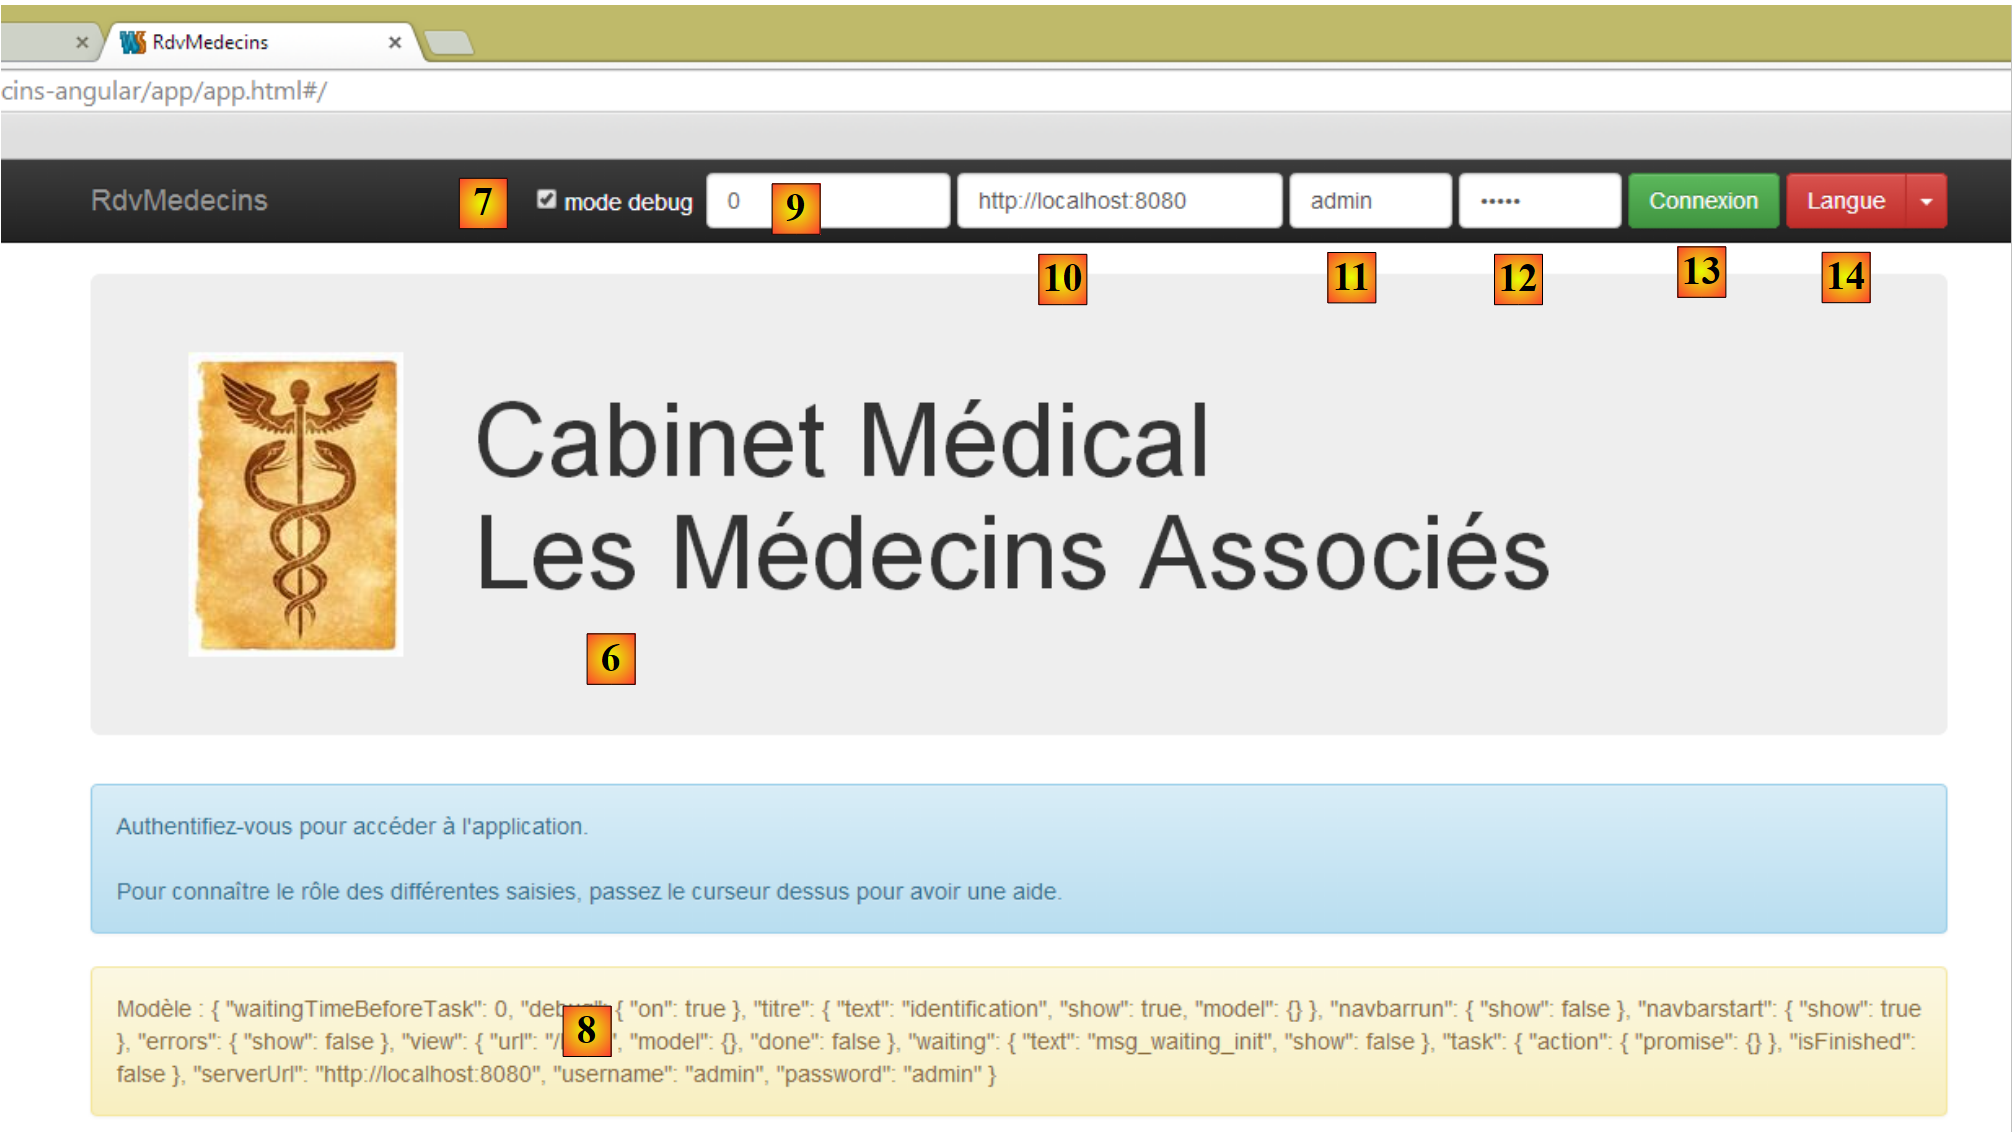 |
- in [6], the application's login page. This is an appointment scheduling application for doctors. This application has already been covered in the document Introduction to JSF2, Primefaces, and Primefaces mobile frameworks;
- in [7], a checkbox that enables or disables [debug] mode. The latter is characterized by the presence of the [8] frame, which displays the current view template;
- in [9], an artificial wait time in milliseconds. It defaults to 0 (no wait). If N is the value of this wait time, any user action will be executed after a wait time of N milliseconds. This allows you to see the wait management implemented by the application;
- in [10], the URL of the Spring 4 server. Following the previous explanation, this is [http://localhost:8080];
- in [11] and [12], the username and password of the user who wants to use the application. There are two users: admin/admin (login/password) with a role (ADMIN) and user/user with a role (USER). Only the role ADMIN has permission to use the application. The role USER is only there to show what the server responds with in this use case;
- in [13], the button that allows you to connect to the server;
- in [14], the application language. There are two: French (default) and English.
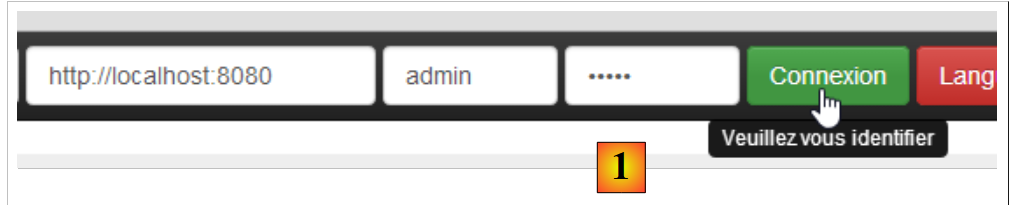 |
- in [1], you log in;
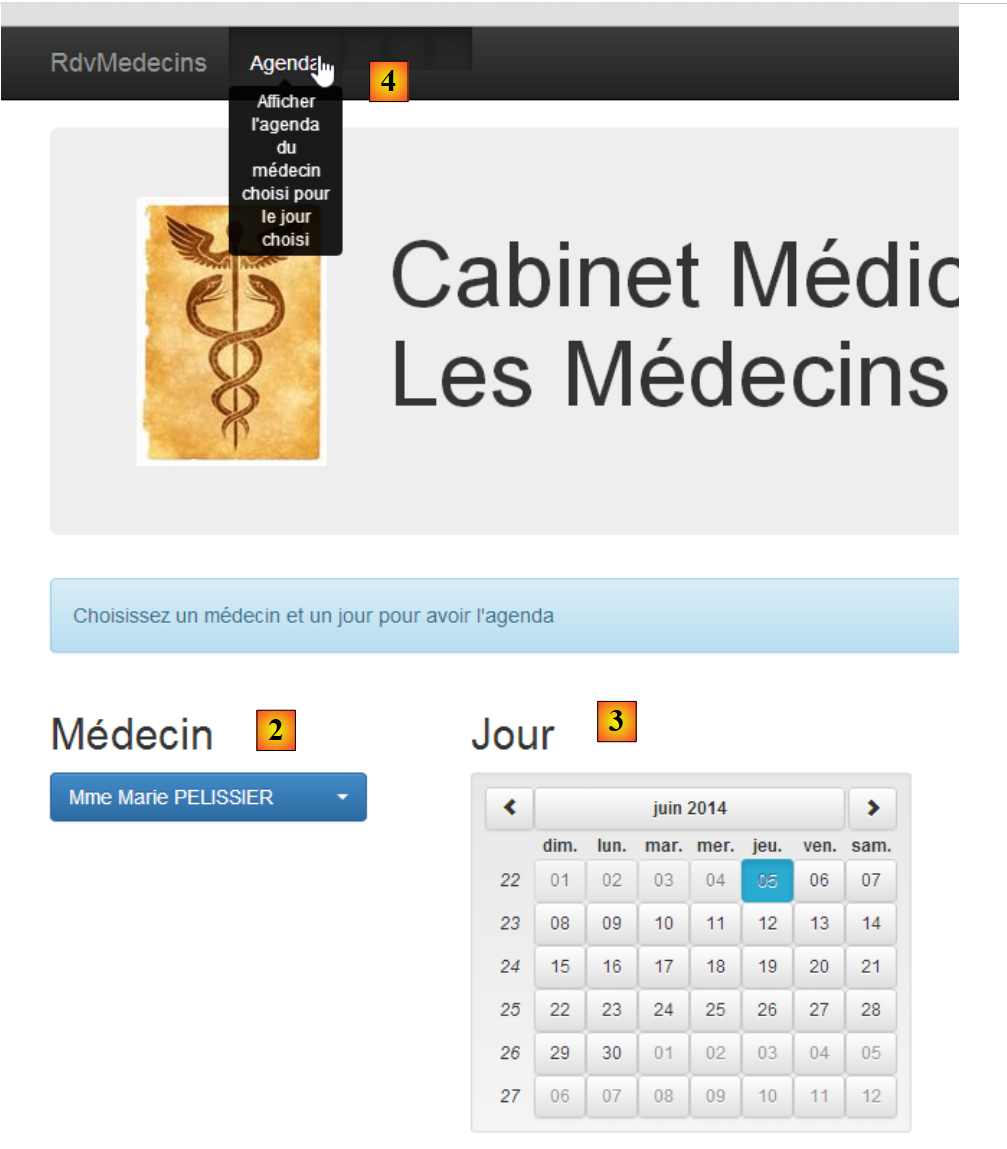 |
- Once logged in, you can choose the doctor with whom you want an appointment [2] and the date of the appointment [3];
- you request to view the schedule of the selected doctor for the chosen day;
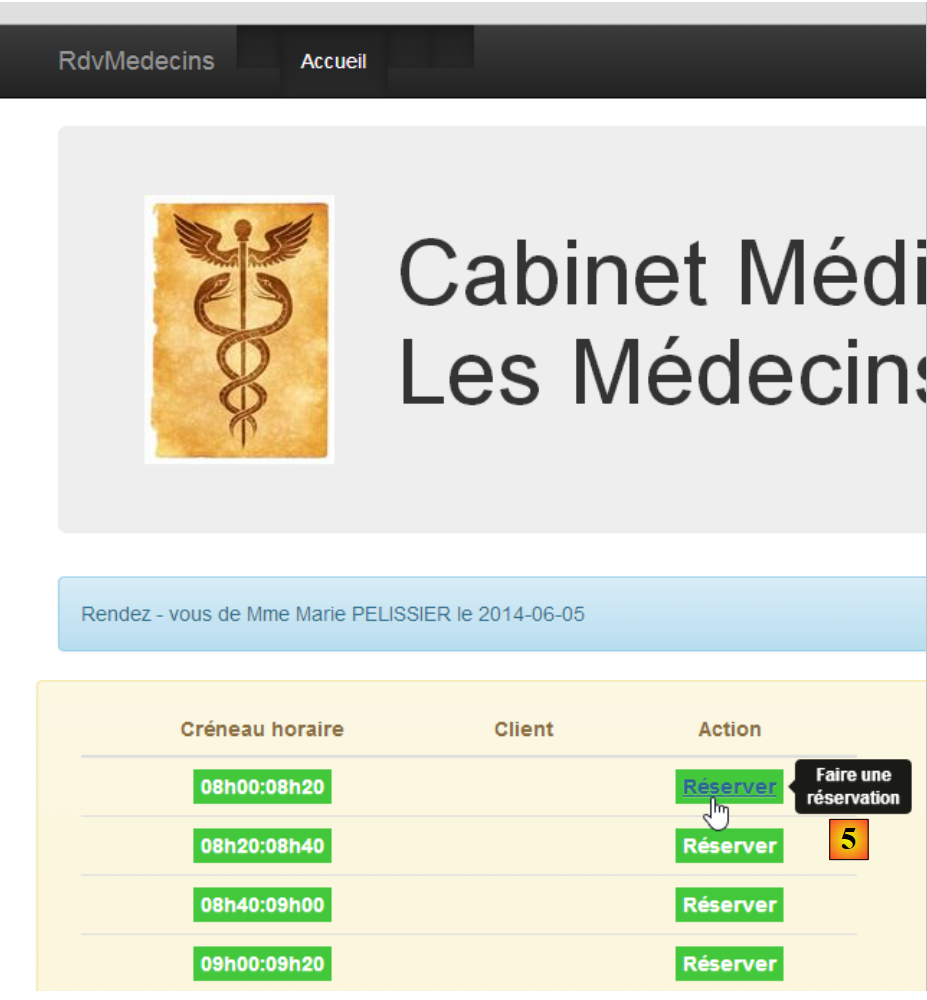 |
- once the doctor’s schedule is obtained, you can book a time slot;
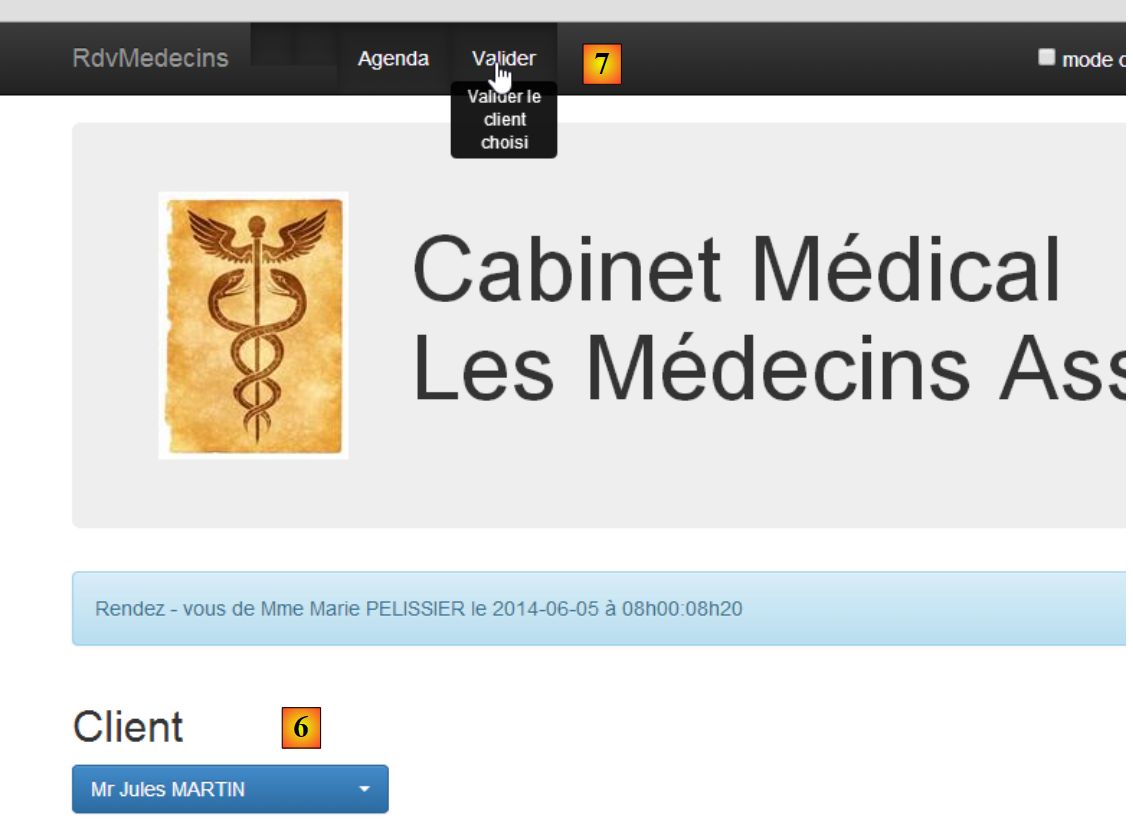 |
- in [6], you select the patient for the appointment and confirm this selection in [7];
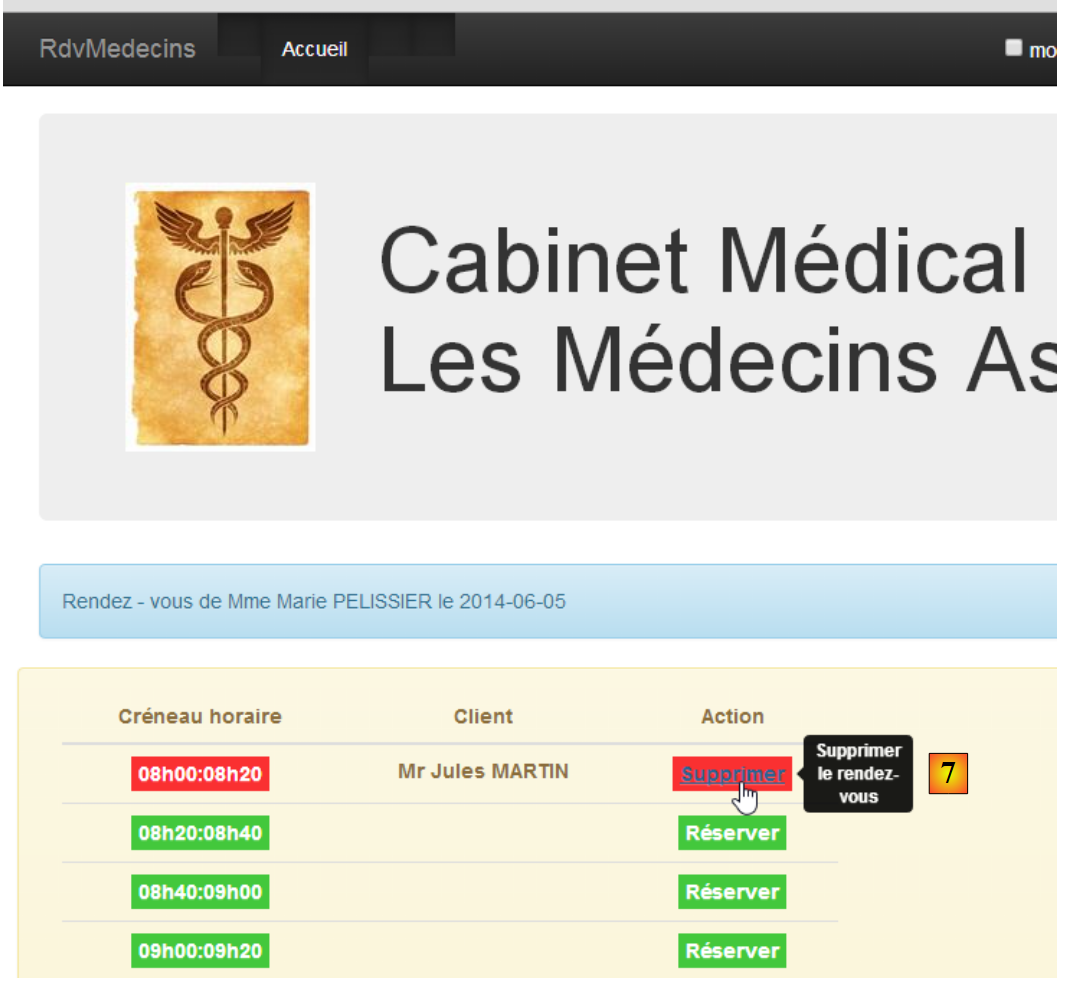 |
Once the appointment is confirmed, you are automatically returned to agenda, where the new appointment is now listed. This appointment can be deleted later in [7].
The main features have been described. They are simple. Those not described are functions in navigation to return to a previous view. Let’s finish with language management:
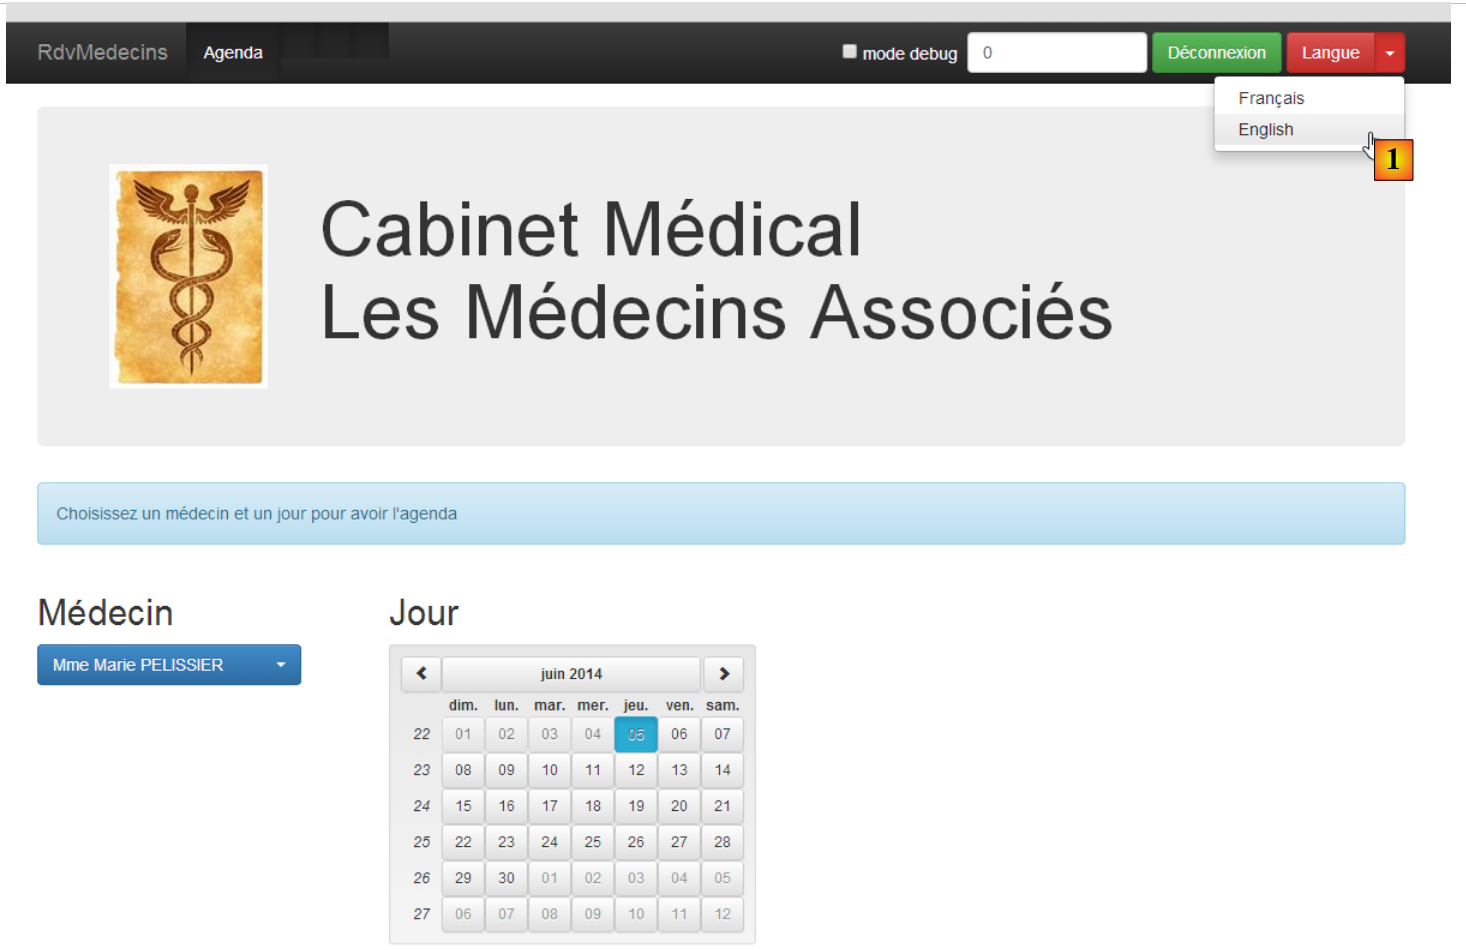 |
- in [1], you switch from French to English;
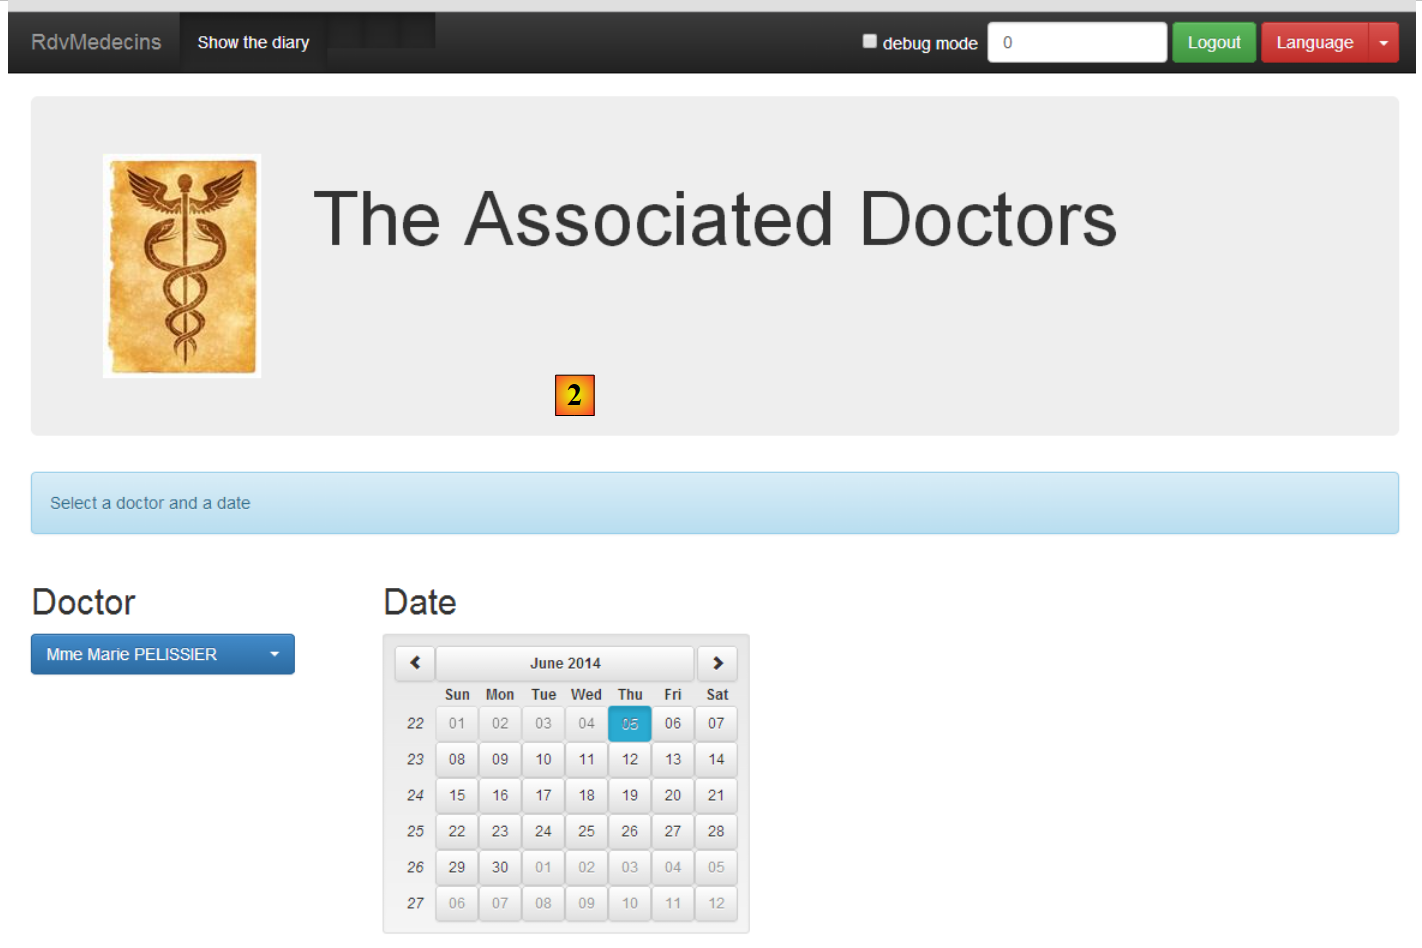 |
- in [2], the view switches to English, including the calendar;