8. The [SimuPaie] application – version 4 – ASP.NET / multi-view / single-page
Recommended reading: reference [1], Web Development with ASP.NET 1.1, sections:
-
Server components and application controllers
-
Examples of MVC applications with ASP server components
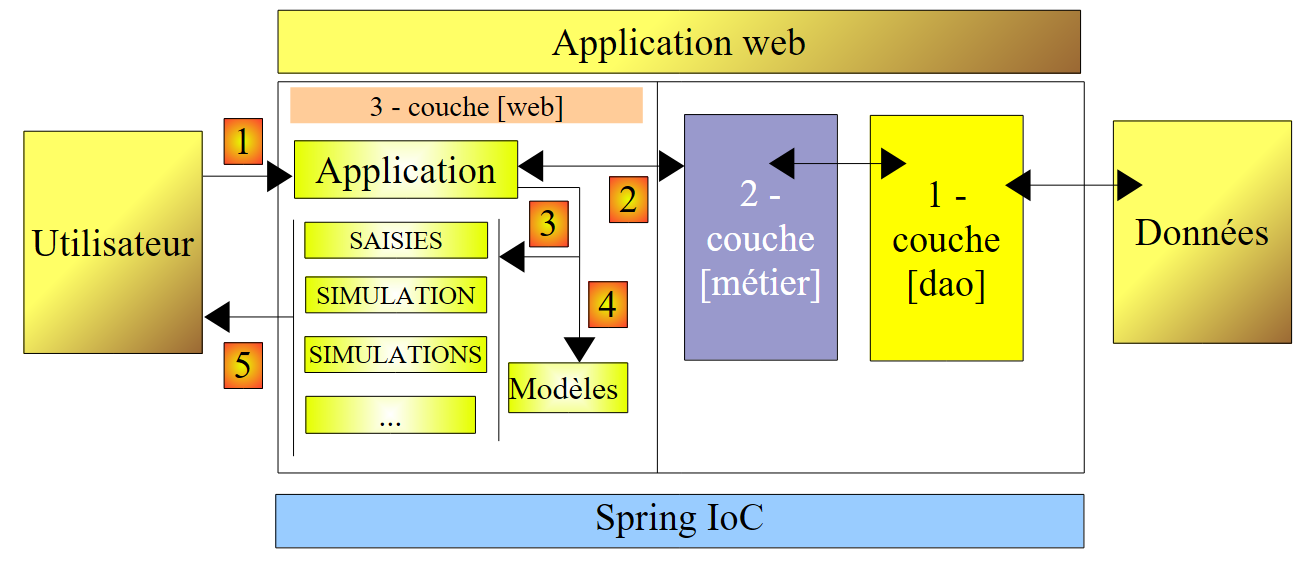
We will now examine a derivative version of the three-tier ASP.NET application discussed previously, which adds new features. The architecture of our application evolves as follows:
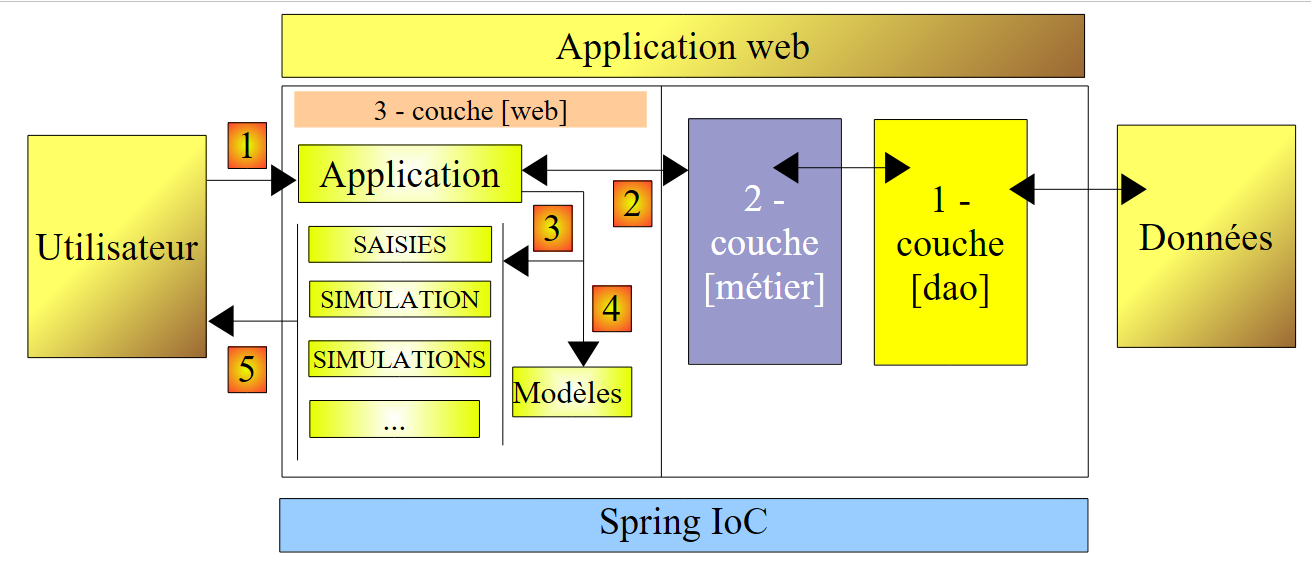 |
The processing of a client request proceeds as follows:
- The client makes a request to the application.
- The application processes this request. To do so, it may need assistance from the [business] layer, which itself may need the [DAO] layer if data needs to be exchanged with the database. The application receives a response from the [business] layer.
- Based on this response, it selects (3) the view (= the response) to send to the client, providing it (4) with the information (the model) it needs.
- The response is sent to the client (5)
This is a web architecture known as MVC (Model–View–Controller):
- [Application] is the controller. It handles all client requests.
- [Inputs, Simulation, Simulations, ...] are the views. A view in .NET is standard ASP/HTML code that contains components that need to be initialized. The values that must be provided to these components form the view’s model.
Here, we will implement the MVC design pattern as follows:
- the views will be [View] components within a single page [Default.aspx]
- the controller is then the [Default.aspx.cs] code for this single page.
Only basic applications can support this MVC implementation. In fact, with each request, all components of the [Default.aspx] page are instantiated, meaning all views. When sending the response, one of them is selected by the application’s control code simply by making the corresponding [View] component visible and hiding the others. If the application has many views, the [Default.aspx] page will have many components, and the cost of instantiating them can become prohibitive. Furthermore, the page’s [Design] mode may become unmanageable due to having too many views. This type of architecture is suitable for applications with few views and developed by a single person. When it can be adopted, it allows for the development of an MVC architecture very simply. This is what we will explore in this new version.
8.1. The application's views
The different views presented to the user will be as follows:
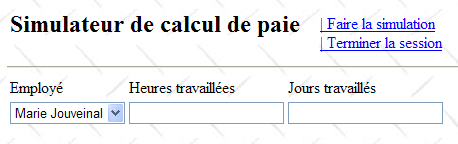
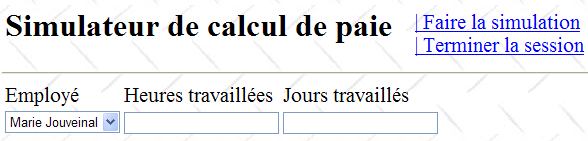
- the [VueSaisies] view, which displays the simulation form
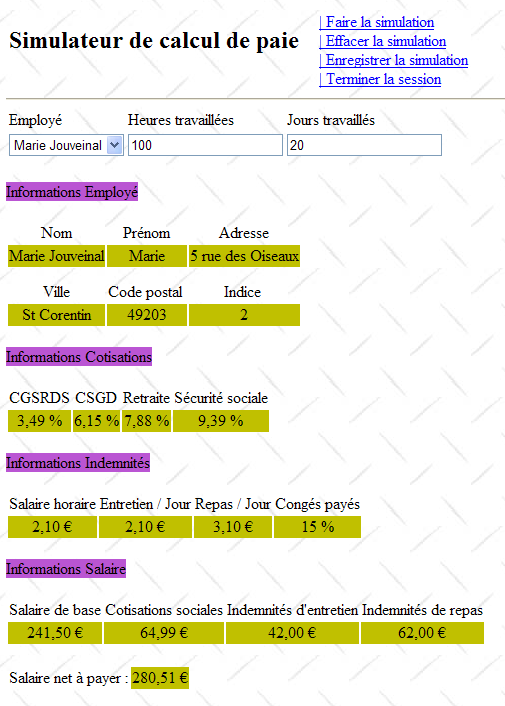
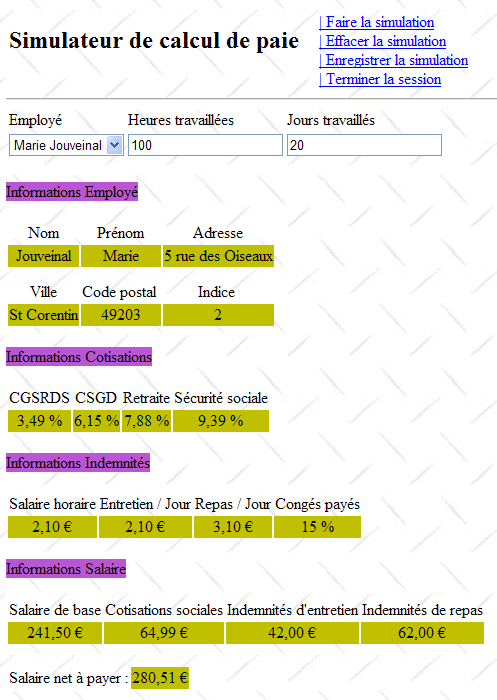
- the [VueSimulation] view used to display the detailed results of the simulation:
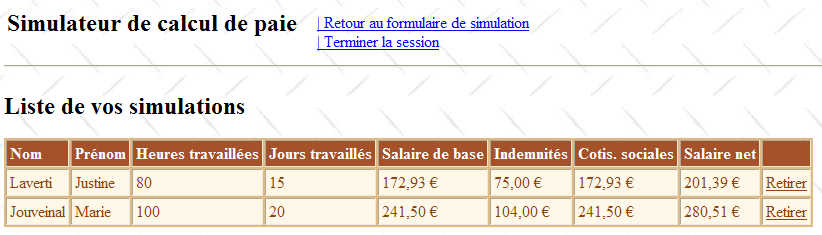
- the [VueSimulations] view, which lists the simulations performed by the client
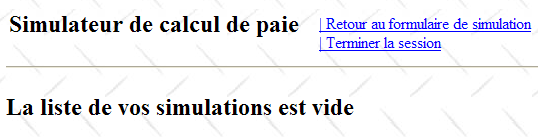
- the [EmptySimulationsView], which indicates that the client has no simulations or no more simulations:
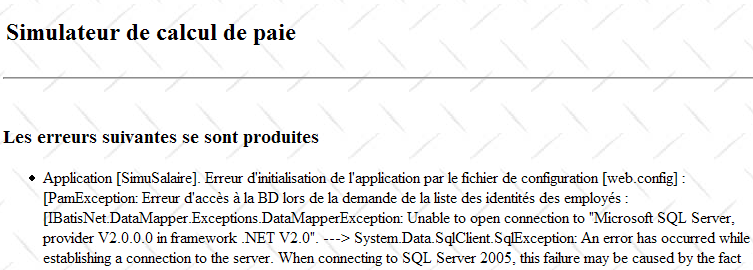
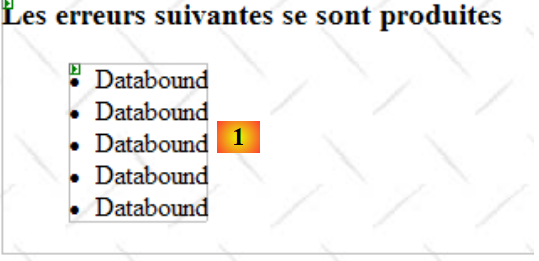
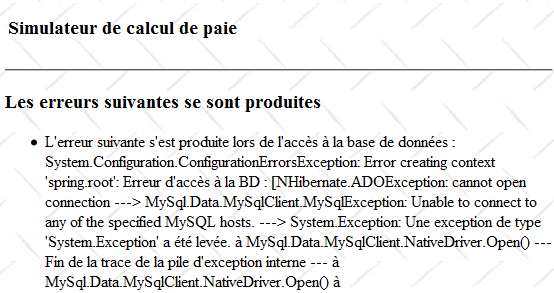
- the [ErrorView] view, which indicates one or more errors:
8.2. The Visual Web Developer project for the [web] layer
The Visual Web Developer project for the [web] layer is as follows:
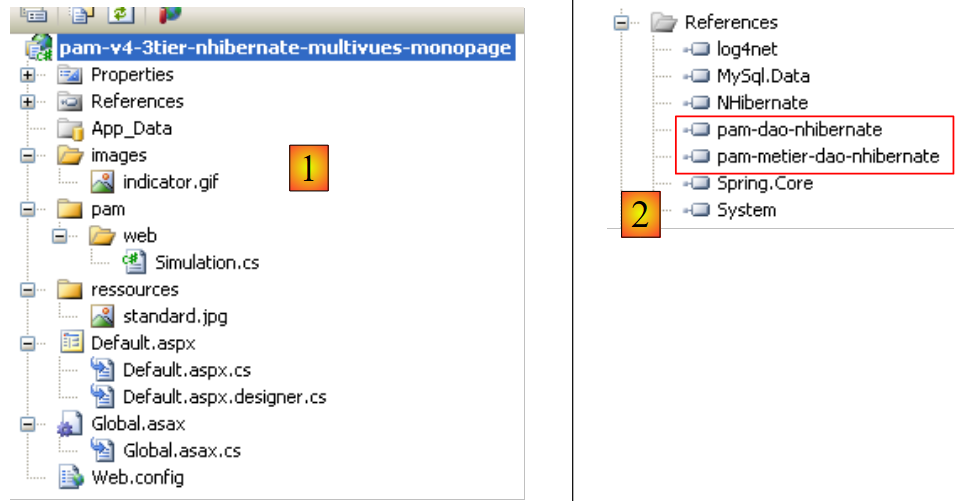 |
- in [1] we find:
- the application's configuration file [Web.config] – is identical to that of the previous application.
- the [Global.cs] file that handles the web application's events, in this case its startup – is identical to that of the previous application, except that it also handles the startup of the user session.
- the application's [Default.aspx] form – contains the application's various views.
- In [2] are the project references – they are identical to those of the previous version
8.3. The [Global.cs] file
The [Global.cs] file, which handles the web application's events, is identical to that of the previous application, except that it also handles the start of the user session:
Global.cs
using System;
using System.Web;
using Pam.Dao.Entites;
using Pam.Metier.Service;
using Spring.Context.Support;
using System.Collections.Generic;
using istia.st.pam.web;

namespace pam_v4
{
    public class Global : HttpApplication
    {

        // --- static application data ---
        public static Employe[] Employes;
        public static string Msg = string.Empty;
        public static bool Erreur = false;
        public static IPamMetier PamMetier = null;

        // application startup
        public void Application_Start(object sender, EventArgs e)
        {
...
        }

        // start user session
        public void Session_Start(object sender, EventArgs e)
        {
            // put an empty simulation list in the session
            Session["simulations"] = new List<Simulation>();
        }

    }
}
- Lines 27–34: We handle the start of the session. We will place the list of simulations performed by the user into this session.
- line 30: An empty list of simulations is created. A simulation is an object of type [Simulation], which we will describe in detail shortly.
- line 31: the list of simulations is placed in the session associated with the "simulations" key
8.4. The [Simulation] class
An object of type [Simulation] is used to encapsulate a row of the simulation table:
Its code is as follows:
namespace Pam.Web
{

    public class Simulation
    {
        // simulation data
        public string Nom { get; set; }
        public string Prenom { get; set; }
        public double HeuresTravaillees { get; set; }
        public int JoursTravailles { get; set; }
        public double SalaireBase { get; set; }
        public double Indemnites { get; set; }
        public double CotisationsSociales { get; set; }
        public double SalaireNet { get; set; }

        // manufacturers
        public Simulation()
        {

        }

        public Simulation(string nom, string prenom, double heuresTravailllees, int joursTravailles, double salaireBase, double indemnites, double cotisationsSociales, double salaireNet)
        {
            {
                this.Nom = nom;
                this.Prenom = prenom;
                this.HeuresTravaillees = heuresTravailllees;
                this.JoursTravailles = joursTravailles;
                this.SalaireBase = salaireBase;
                this.Indemnites = indemnites;
                this.CotisationsSociales = cotisationsSociales;
                this.SalaireNet = salaireNet;
            }
        }
    }
}
The fields of the class correspond to the columns of the simulation table.
8.5. The [Default.aspx] page
8.5.1. Overview
The [Default.aspx] page contains several [View] components, one for each view. Its skeleton is as follows:
<%@ Page Language="C#" AutoEventWireup="true" CodeFile="Default.aspx.cs" Inherits="pam_v4.PagePam" %>
<!DOCTYPE html PUBLIC "-//W3C//DTD XHTML 1.0 Transitional//EN" "http://www.w3.org/TR/xhtml1/DTD/xhtml1-transitional.dtd">
<html xmlns="http://www.w3.org/1999/xhtml">
<head id="Head1" runat="server">
<title>Simulateur de paie</title>
</head>
<body background="ressources/standard.jpg">
<form id="form1" runat="server">
<asp:ScriptManager ID="ScriptManager1" runat="server" EnablePartialRendering="true" />
<asp:UpdatePanel runat="server" ID="UpdatePanelPam" UpdateMode="Conditional">
<ContentTemplate>
<table>
<tr>
<td>
<h2>
Simulateur de calcul de paie</h2>
</td>
<td>
<label>
 </label>
<asp:UpdateProgress ID="UpdateProgress1" runat="server">
<ProgressTemplate>
<img src="images/indicator.gif" />
<asp:Label ID="Label5" runat="server" BackColor="#FF8000"
EnableViewState="False" Text="Calcul en cours. Patientez ....">
</asp:Label>
</ProgressTemplate>
</asp:UpdateProgress>
</td>
<td>
<asp:LinkButton ID="LinkButtonFaireSimulation" runat="server"
CausesValidation="False" OnClick="LinkButtonFaireSimulation_Click">
| Faire la simulation<br /></asp:LinkButton>
<asp:LinkButton ID="LinkButtonEffacerSimulation" runat="server"
CausesValidation="False" OnClick="LinkButtonEffacerSimulation_Click">
| Effacer la simulation<br /></asp:LinkButton>
<asp:LinkButton ID="LinkButtonVoirSimulations" runat="server"
CausesValidation="False" OnClick="LinkButtonVoirSimulations_Click">
| Voir les simulations<br /></asp:LinkButton>
<asp:LinkButton ID="LinkButtonFormulaireSimulation" runat="server"
CausesValidation="False" OnClick="LinkButtonFormulaireSimulation_Click">
| Retour au formulaire de simulation<br /></asp:LinkButton>
<asp:LinkButton ID="LinkButtonEnregistrerSimulation" runat="server"
CausesValidation="False" OnClick="LinkButtonEnregistrerSimulation_Click">
| Enregistrer la simulation<br /></asp:LinkButton>
<asp:LinkButton ID="LinkButtonTerminerSession" runat="server"
CausesValidation="False" OnClick="LinkButtonTerminerSession_Click">
| Terminer la session<br /></asp:LinkButton>
</td>
</table>
<hr />
<asp:MultiView ID="Vues1" ActiveViewIndex="0" runat="server">
<asp:View ID="VueSaisies" runat="server">
...
</asp:View>
</asp:MultiView>
<asp:MultiView ID="Vues2" runat="server">
<asp:View ID="VueSimulation" runat="server">
...
</asp:View>
<asp:View ID="VueSimulations" runat="server">
...
</asp:View>
<asp:View ID="VueSimulationsVides" runat="server">
...
</asp:View>
<asp:View ID="VueErreurs" runat="server">
...
</asp:View>
</asp:MultiView>
</ContentTemplate>
</asp:UpdatePanel>
</form>
</body>
</html>
- Line 10: the tag for enabling Ajax extensions
- lines 11–73: the UpdatePanel container updated by Ajax calls
- lines 12–72: the content of the UpdatePanel
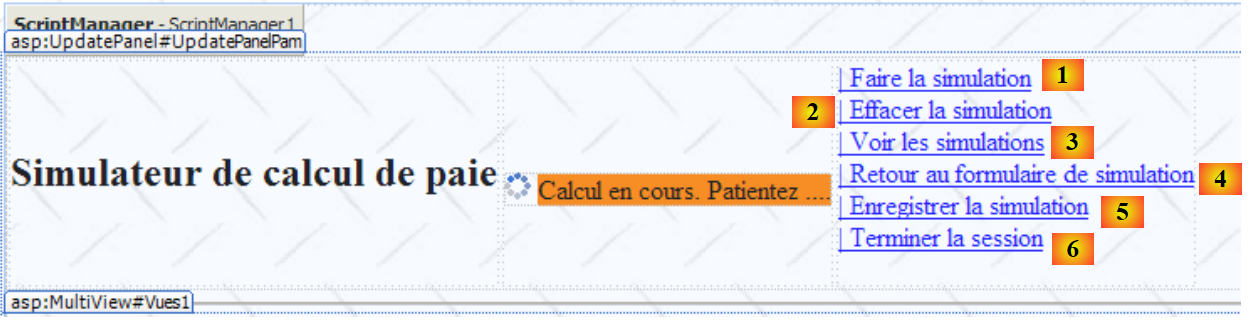
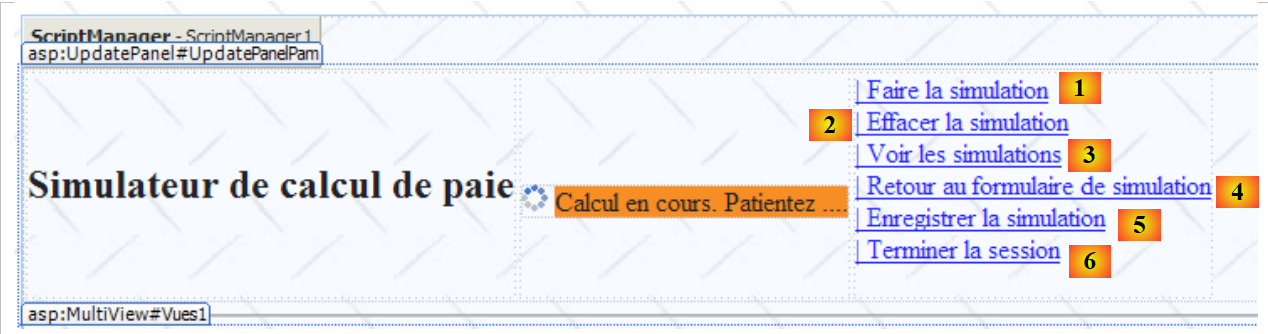
- lines 13–52: the header that will appear in every view. It presents the user with a list of possible actions in the form of a list of links.
- line 33: Note the CausesValidation="False" attribute, which ensures that the page validators will not be executed implicitly when the link is clicked. When this attribute is omitted, its default value is True. Page validation can be performed explicitly in the server-side code using the Page.Validate operation.
- Lines 53–57: A [MultiView] component with a single view [VueSaisies]. For this reason, the view number to display has been hardcoded in line 53: ActiveViewIndex="0"
- Lines 53–67: a [MultiView] component with four views: the [VueSimulation] view (lines 59–61), the [VueSimulations] view (lines 62–64), the [VueSimulationsVides] view (lines 65–67), and the [VueErreurs] view (lines 68–70). A [MultiView] component displays only one view at a time. To display view #i of the Vues2 component, write the following code:
8.5.2. The en header
The header consists of the following components:
 |
No. | Type | Name | Role |
LinkButton | LinkButtonRunSimulation | requests the simulation calculation | |
LinkButton | LinkButtonClearSimulation | clears the input form | |
LinkButton | LinkButtonViewSimulations | displays the list of simulations already performed | |
LinkButton | LinkButtonSimulationForm | returns to the input form | |
LinkButton | LinkButtonSaveSimulation | saves the current simulation to the simulation list | |
LinkButton | LinkButtonEndSession | ends the current session |
8.5.3. The [ Saisies] view
The [View] component named [VueSaisies] is as follows:
 |
No. | Type | Name | Role |
DropDownList | EmployeeComboBox | Contains the list of employee names | |
TextBox | TextBoxHours | Number of hours worked – actual number | |
TextBox | TextBoxDays | Number of days worked – integer | |
RequiredFieldValidator | RequiredFieldValidatorHours | checks that field [2] [TextBoxHours] is not empty | |
RegularExpressionValidator | RegularExpressionValidatorHours | checks that the [2] [TextBoxHours] field is a real number >=0 | |
RequiredFieldValidator | RequiredFieldValidatorDays | checks that the [3] [TextBoxDays] field is not empty | |
RegularExpressionValidator | RegularExpressionValidatorDays | checks that the [3] [TextBoxDays] field is an integer >=0 |
8.5.4. The [Simulati on] view
The [View] component named [SimulationView] is as follows:
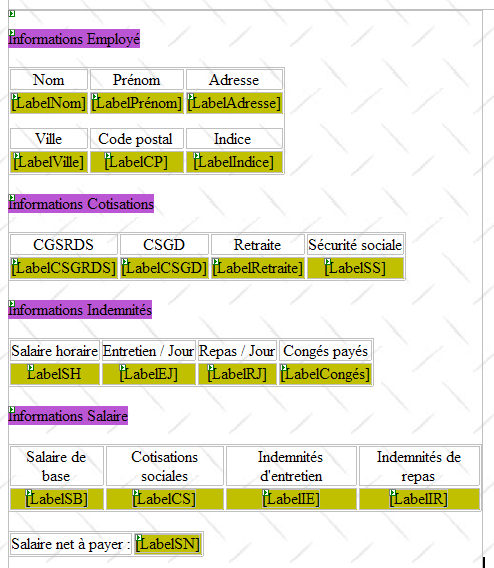
It consists solely of [Label] components whose IDs are listed above.
8.5.5. The [Simu lations] view
The [View] component named [SimulationView] is as follows:
 |
No. | Type | Name | Role |
GridView | GridViewSimulations | Contains the list of simulations |
The properties of the [GridViewSimulations] component have been defined as follows:
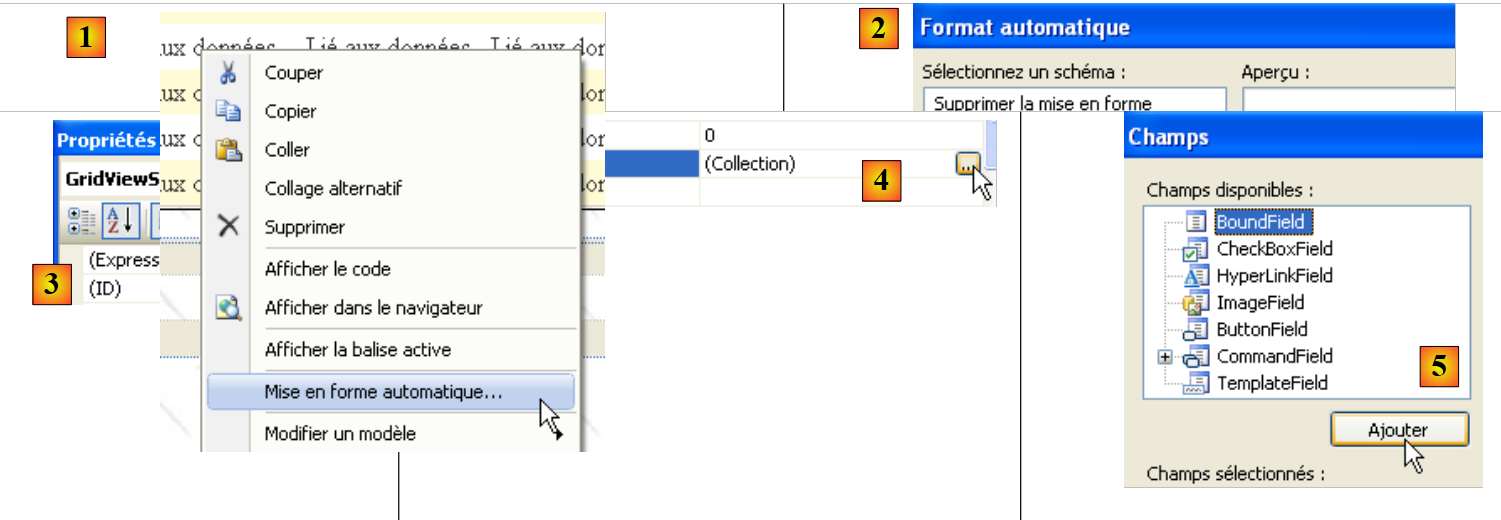 |
- in [1]: right-click on the [GridView] / [AutoFormat] option
- in [2]: choose a display type for the [GridView]
 |
- in [3]: select the [GridView] properties
- in [4]: edit the [GridView] columns
- in [5]: add a [BoundField] column that will be bound to one of the public properties of the object to be displayed in the [GridView] row. The object displayed here will be a [Simulation] object.
 |
- in [6]: enter the column title
- in [7]: specify the name of the property of the [Simulation] class that will be associated with this column.
- [DataFormatString] specifies how the values displayed in the column should be formatted.
The columns of the [GridViewSimulations] component have the following properties:
No. | Properties |
Type: BoundField, HeaderText: Name, DataField: Name | |
Type: BoundField, HeaderText: Last Name, DataField: Last Name | |
Type: BoundField, HeaderText: Hours Worked, DataField: HoursWorked | |
Type: BoundField, HeaderText: Days worked, DataField: DaysWorked | |
Type: BoundField, HeaderText: Base Salary, DataField: BaseSalary, DataFormatString: {0:C} (currency format, C=Currency) – will display the euro symbol. | |
Type: BoundField, HeaderText: Allowances, DataField: Indemnites, DataFormatString: {0:C} | |
Type: BoundField, HeaderText: Social Security Contributions, DataField: SocialSecurityContributions, DataFormatString: {0:C} | |
Type: BoundField, HeaderText: Net Salary, DataField: NetSalary, DataFormatString: {0:C} |
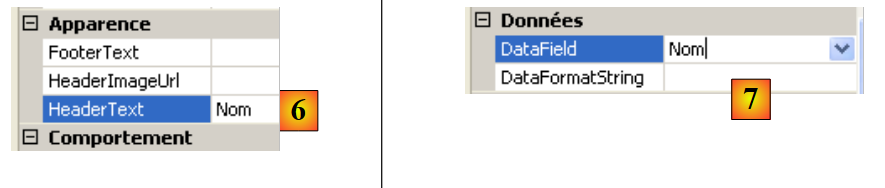
Note that the [DataField] must correspond to an existing property of the [Simulation] class. At the end of this phase, all columns of type [BoundField] have been created:
 |
- in [1]: the columns created for the [GridView]
- in [2]: automatic column generation must be disabled when the developer defines them manually, as we just did.
We still need to create the [Remove] link column:

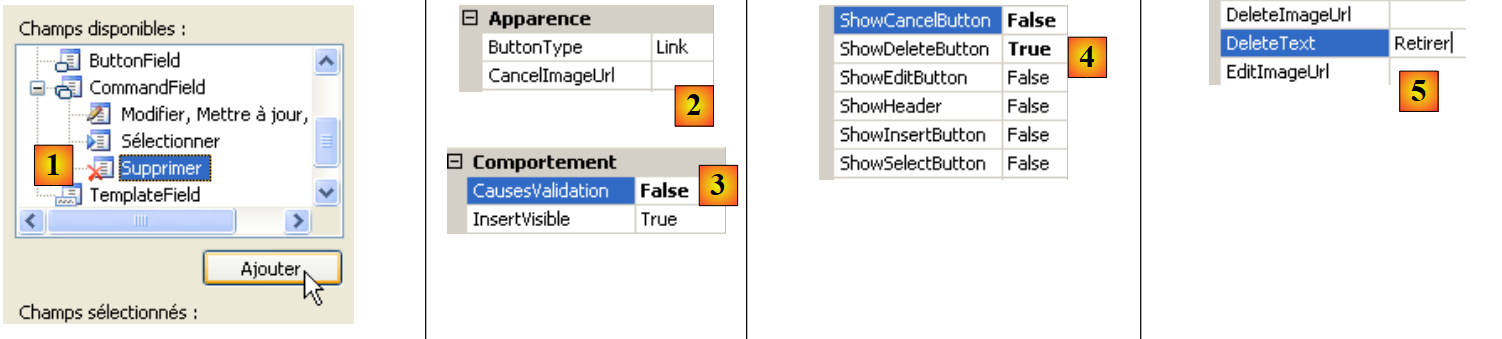 |
- in [1]: add a column of type [CommandField / Delete]
- in [2]: ButtonType=Link to have a link in the column rather than a button
- in [3]: CausesValidation=False; clicking the link will not trigger any validation checks that may be present on the page. Indeed, deleting a simulation does not require any data validation.
- in [4]: only the delete link will be visible.
- in [5]: the text of this link
8.5.6. The [Simulation sVides] view
The [View] component named [VueSimulationsVides] simply contains text:
8.5.7. The [E rrors] view
The [View] component named [VueErreurs] is as follows:
 |
No. | Type | Name | Role |
Repeater | RptErrors | displays a list of error messages |
The [Repeater] component allows you to repeat ASP.NET/HTML code for each object in a data source, typically a collection. This code is defined directly in the page's ASP.NET source code:
                <asp:Repeater ID="RptErreurs" runat="server">
                    <ItemTemplate>
                        <li>
                            <%# Container.DataItem %>
                        </li>
                    </ItemTemplate>
</asp:Repeater>
- Line 2: <ItemTemplate> defines the code that will be repeated for each item in the data source.
- Line 4: displays the value of the Container.DataItem expression, which refers to the current element in the data source. Since this element is an object, the ToString method of that object is used to include it in the page’s HTML output. Our collection of objects will be a List(Of String) collection containing error messages. Lines 3–5 will include <li>Message</li> sequences in the page’s HTML output.
8.6. The controller [Default.aspx.cs]
8.6.1. Overview
Let’s return to the application’s MVC architecture:
 |
- [Default.aspx.cs], which is the code for the single page [Default.aspx], is the application controller.
- [Global] is the [HttpApplication] object that initializes the application and has a reference to the [business] layer.
The skeleton of the [Default.aspx.cs] controller code is as follows:
using System.Collections.Generic;
...

public partial class PagePam : Page
{

    private void setVues(bool boolVues1, bool boolVues2, int index)
    {
        // display the requested views
        // boolVues1 : true if Vues1 multi-view is to be visible
        // boolVues1 : true if the Vues2 multiview is to be visible
        // index: index of the Vues2 view to be displayed
...
    }

    private void setMenu(bool boolFaireSimulation, bool boolEnregistrerSimulation, bool boolEffacerSimulation, bool boolFormulaireSimulation, bool boolVoirSimulations, bool boolTerminerSession)
    {
        // set menu options
        // each Boolean is assigned to the Visible property of the corresponding link
...
    }

    // page loading
    protected void Page_Load(object sender, System.EventArgs e)
    {
        // initial request processing
        if (!IsPostBack)
        {
...
        }
    }

    protected void LinkButtonFaireSimulation_Click(object sender, System.EventArgs e)
    {
...
    }

    protected void LinkButtonEffacerSimulation_Click(object sender, System.EventArgs e)
    {
....
    }

    protected void LinkButtonVoirSimulations_Click(object sender, System.EventArgs e)
    {
...
    }

    protected void LinkButtonEnregistrerSimulation_Click(object sender, System.EventArgs e)
    {
...
    }

    protected void LinkButtonTerminerSession_Click(object sender, System.EventArgs e)
    {
...
    }

    protected void LinkButtonFormulaireSimulation_Click(object sender, System.EventArgs e)
    {
...
    }


    protected void GridViewSimulations_RowDeleting(object sender, GridViewDeleteEventArgs e)
    {
...
    }
}
In response to the user's initial request (GET), only the Load event in lines 24–31 is handled. For subsequent requests (POST) made via the menu links, two events are handled:
- the Load event (lines 24–31), but the Boolean check for Page.IsPostback (line 27) ensures that nothing happens.
- the event associated with the link that was clicked:
 |
- lines 33–36: handle the click on link [1]
- lines 38–41: handle the click on link [2]
- lines 43-46: handle the click on link [3]
- lines 58-61: handle the click on link [4]
- lines 48–51: handle the click on link [5]
- lines 53-56: handle clicking on link [6]
To factor out frequently recurring code sequences, two internal methods have been created:
- setVues, lines 7–14: sets the view(s) to display
- setMenu, lines 16–21: sets the menu options to display
8.6.2. The Load event
Recommended reading: Reference [1], Web Development with ASP.NET 1.1:
- the section on the [Repeater] component and data binding.
The first view presented to the user is that of the empty form:
Initializing the application requires access to a data source, which may fail. In this case, the first page displayed is an error page:
The [Load] event is handled in a similar way to previous ASP.NET versions:
    // page loading
    protected void Page_Load(object sender, System.EventArgs e)
    {
        // initial request processing
        if (!IsPostBack)
        {
            // initialization errors?
            if (Global.Erreur)
            {
                // display view [errors]
...
                // menu positioning
                ...
                return;
            }
            // loading employee names into the combo
...
            // menu positioning
...
            // view display [input]
 ...
        }
}
Question: Complete the code above
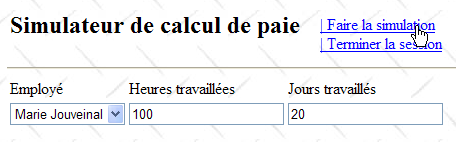
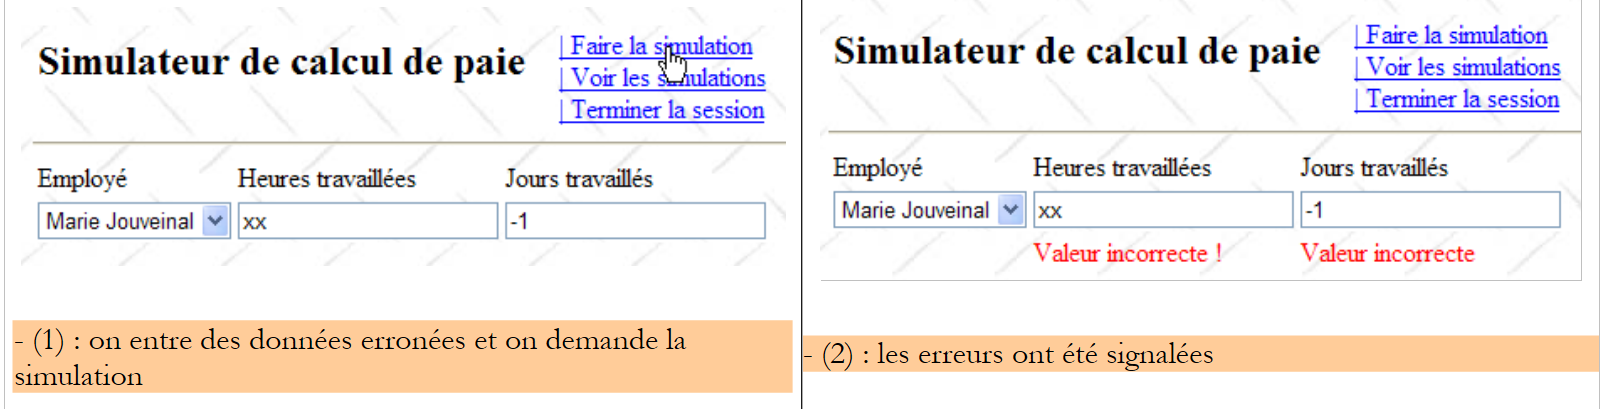
8.6.3. Action: Run the simulation
In the following, screen (1) is the user’s request, and screen (2) is the response sent to the user by the web application. From the home screen, the user can start a simulation:
 |
The procedure that handles this action might look like the following:
    protected void LinkButtonFaireSimulation_Click(object sender, System.EventArgs e)
    {
        // wage calculation
        // valid page?
        Page.Validate();
        if (!Page.IsValid)
        {
            // view display [input]
            ...
            return;
        }
        // the page is validated - inputs are retrieved
        double HeuresTravaillées = ...;
        int JoursTravaillés = ...;
        // we calculate the employee's salary
        FeuilleSalaire feuillesalaire;
        try
        {
            feuillesalaire = ...
        }
        catch (PamException ex)
        {
            // display view [errors]
...
            return;
        }
        // put the result in the session
        Session["simulation"] = ...
        // displaying results
...
        // display views [entry, employee, salary]
        ...
        // menu display
        ...
}
Question: Complete the code above
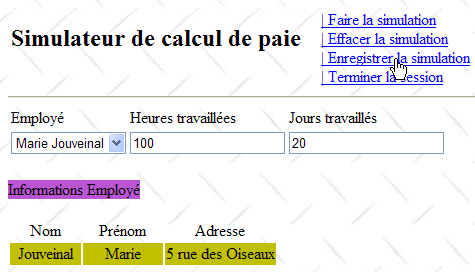
8.6.4. Action: Save the simulation
Once the simulation is complete, the user can request to save it:
 |
The procedure that handles this action might look like the following:
    protected void LinkButtonEnregistrerSimulation_Click(object sender, System.EventArgs e)
    {
        // save the current simulation in the list of simulations in the session
        ...
        // the [simulations] view is displayed
        ...
}
Question: Complete the code above
8.6.5. Action: Return to the simulation form
Recommended reading: reference [1], [Web Development with ASP.NET 1.1]: the role of the hidden field _VIEWSTATE
Once the list of simulations is displayed, the user can request to return to the simulation form:
 |
Note that screen (2) displays the form as it was entered. It is important to remember here that these different views belong to the same page. Between requests, the values of the controls are preserved by the ViewState mechanism if these controls have their EnableViewState property set to true.
The procedure that handles this action might look like the following:
    protected void LinkButtonFormulaireSimulation_Click(object sender, System.EventArgs e)
    {
        // view display [input]
        ...
        // menu positioning
        ...
}
Question: Complete the code above
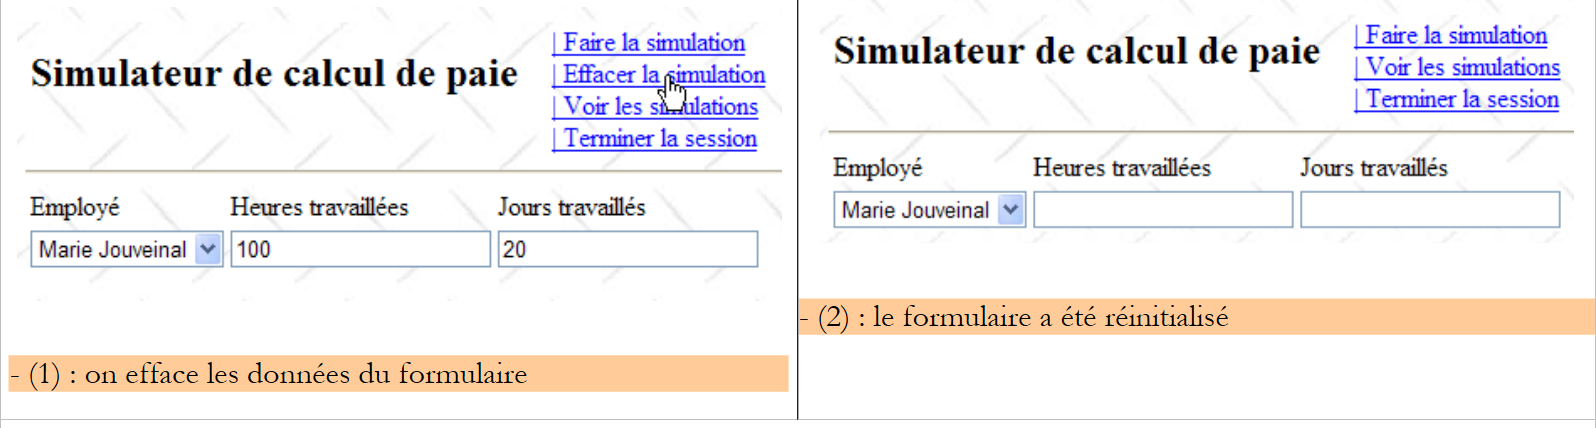
8.6.6. Action: Clear the simulation
Once back at the simulation form, the user can request to clear the current entries:
 |
The procedure that handles this action might look like the following:
    protected void LinkButtonEffacerSimulation_Click(object sender, System.EventArgs e)
    {
        // RAZ of the form
        ...
}
Question: Complete the code above
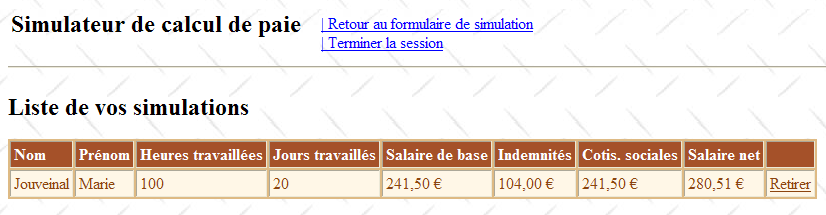
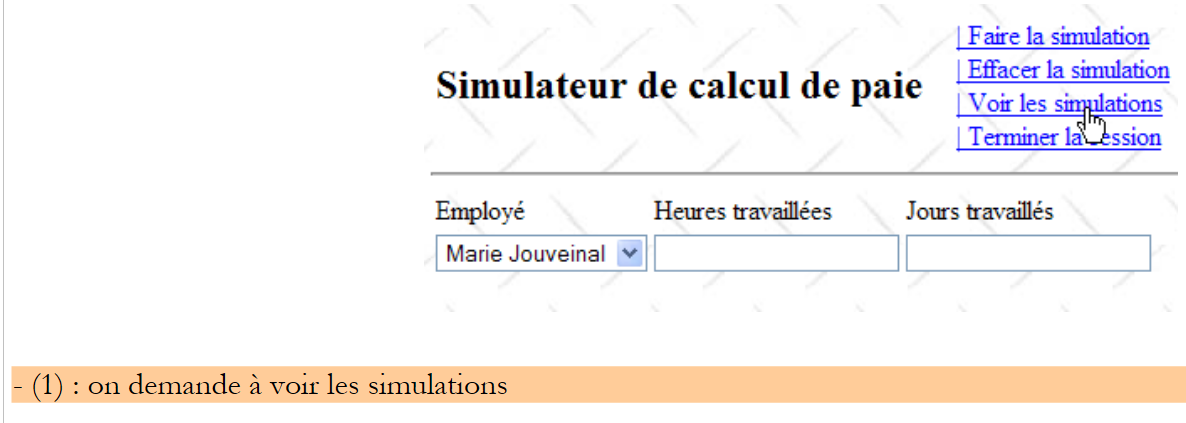
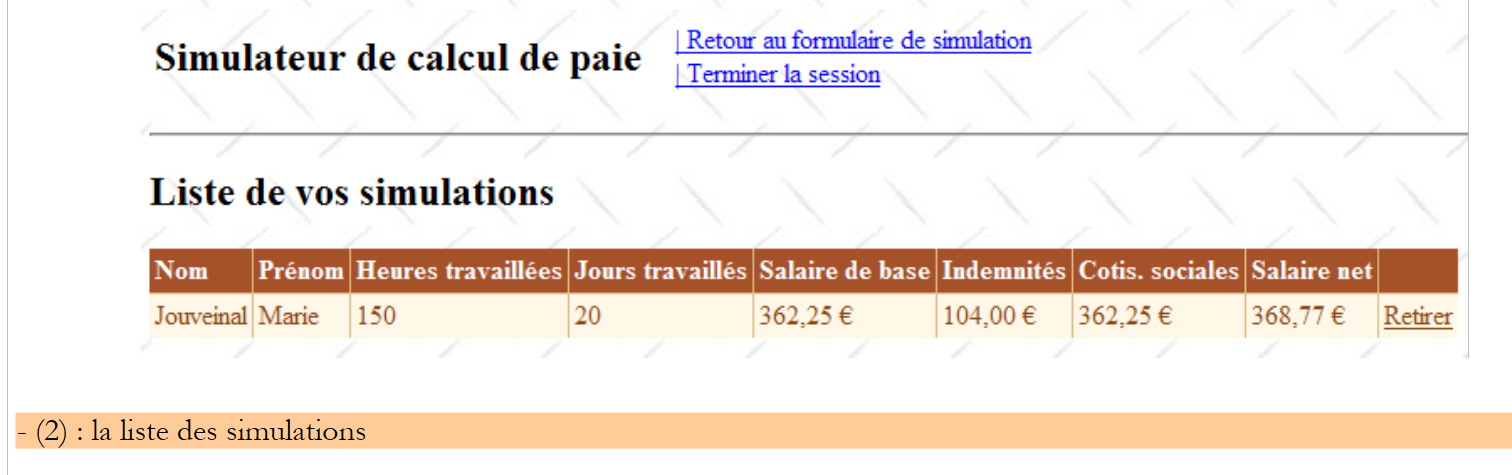
8.6.7. Action: View simulations
The user can request to view the simulations they have already created:
 |
 |
The procedure that handles this action might look like the following:
protected void LinkButtonVoirSimulations_Click(object sender, System.EventArgs e)
    {
        // simulations are retrieved from the
        ...
        // are there any simulations?
        if (...)
        {
            // view [simulations] visible
...
        }
        else
        {
            // view [SimulationsVides]
            ...
        }
        // set the menu
        ...
    }
Question: Complete the code above
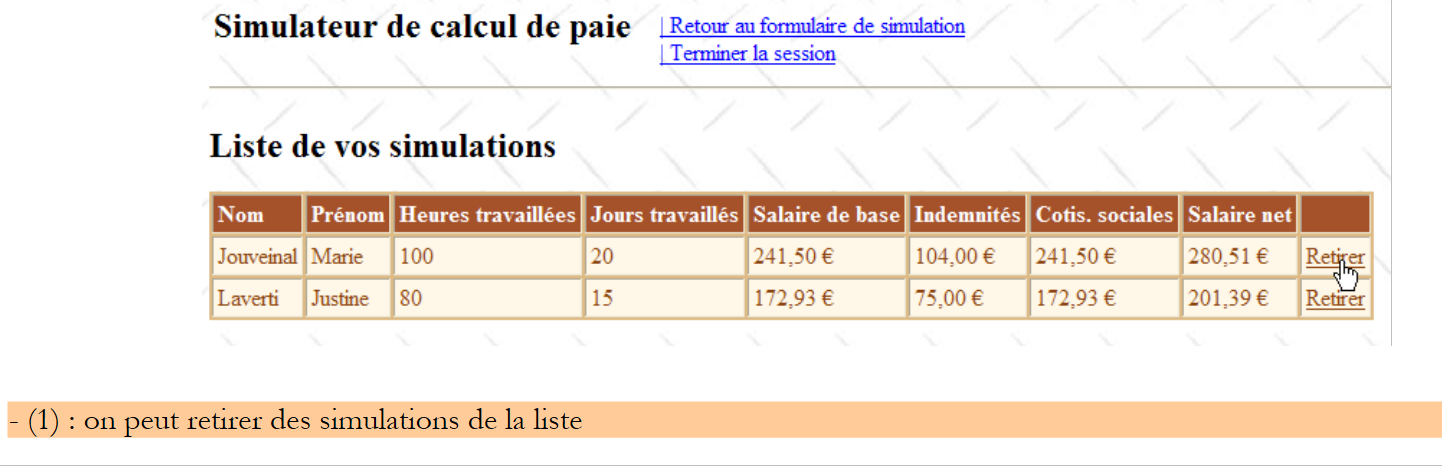
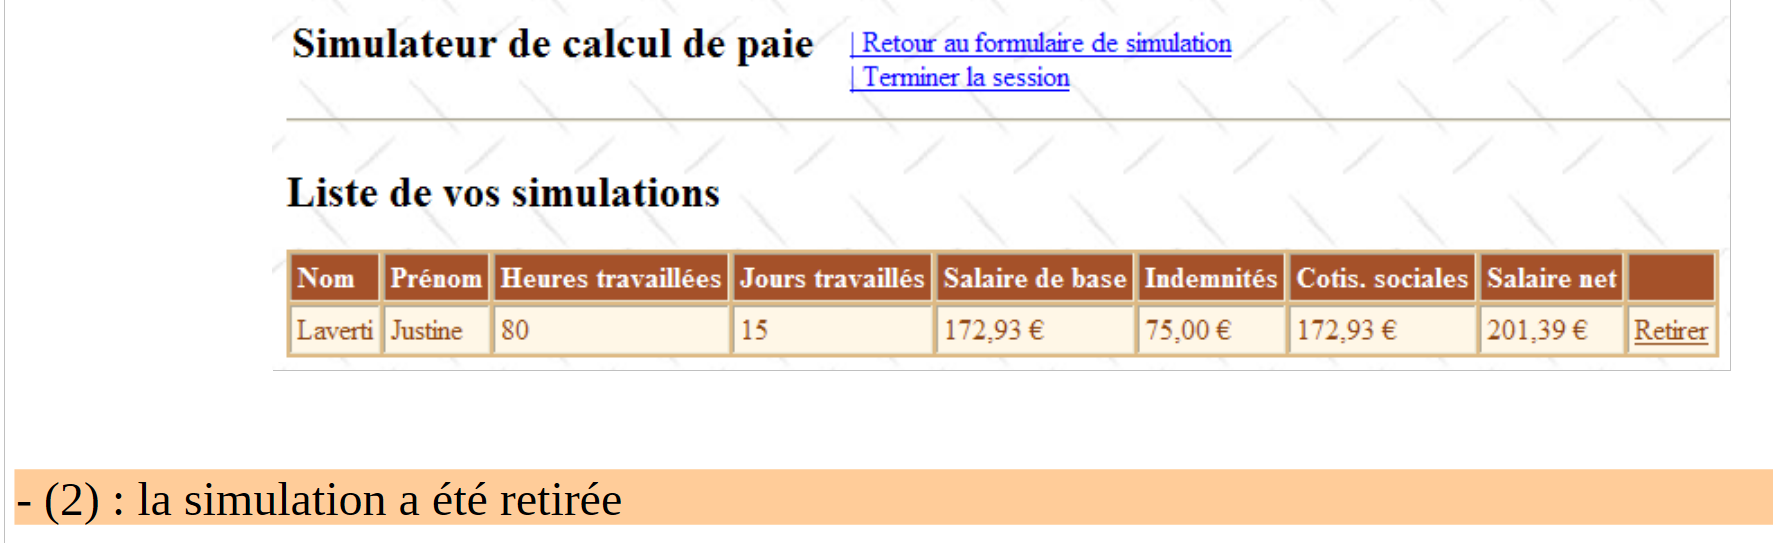
8.6.8. Action: Delete a simulation
The user can request to delete a simulation:
 |
 |
The procedure [GridViewSimulations_RowDeleting] that handles this action might look like the following:
    protected void GridViewSimulations_RowDeleting(object sender, GridViewDeleteEventArgs e)
    {
        // simulations are retrieved from the
        ...
        // delete the designated simulation (e.RowIndex is the number of the deleted line)
        ...
        // are there any simulations left?
        if (...)
        {
            // fill in the GridView
 ...
        }
        else
        {
            // view [SimulationsVides]
            ...
        }
}
Question: Complete the code above
8.6.9. Action: End session
The user can request to end their simulation session. This discards the session's contents and displays an empty form:
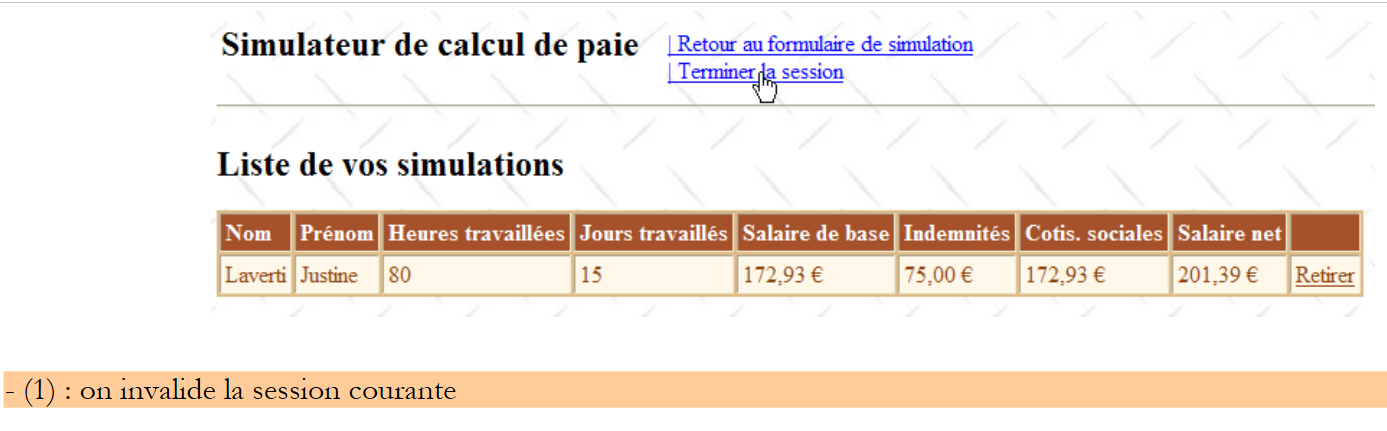 |
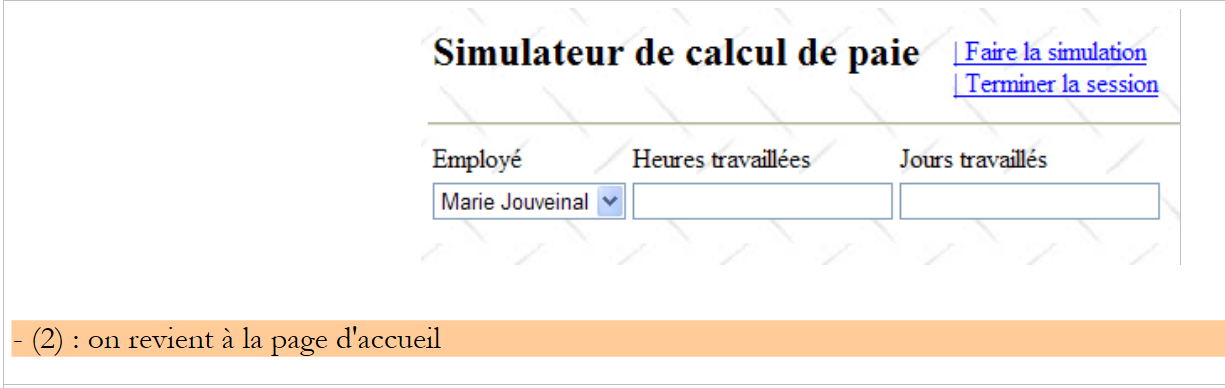 |
The procedure that handles this action might look like the following:
    protected void LinkButtonTerminerSession_Click(object sender, System.EventArgs e)
    {
        // quit session
        ...
        // display [entries] view
        ...
        // menu positioning
        ...
}
Question: Complete the code above
Practical exercise: Implement the previous web application on your machine. Add Ajax functionality to it.