2. Java Server Faces
We will now introduce the Java Server Faces framework. We will be using version 2, but the examples primarily demonstrate features of version 1. We will cover only the features of version 2 that are necessary for the sample application that follows.
2.1. The Role of JSF in a Web Application
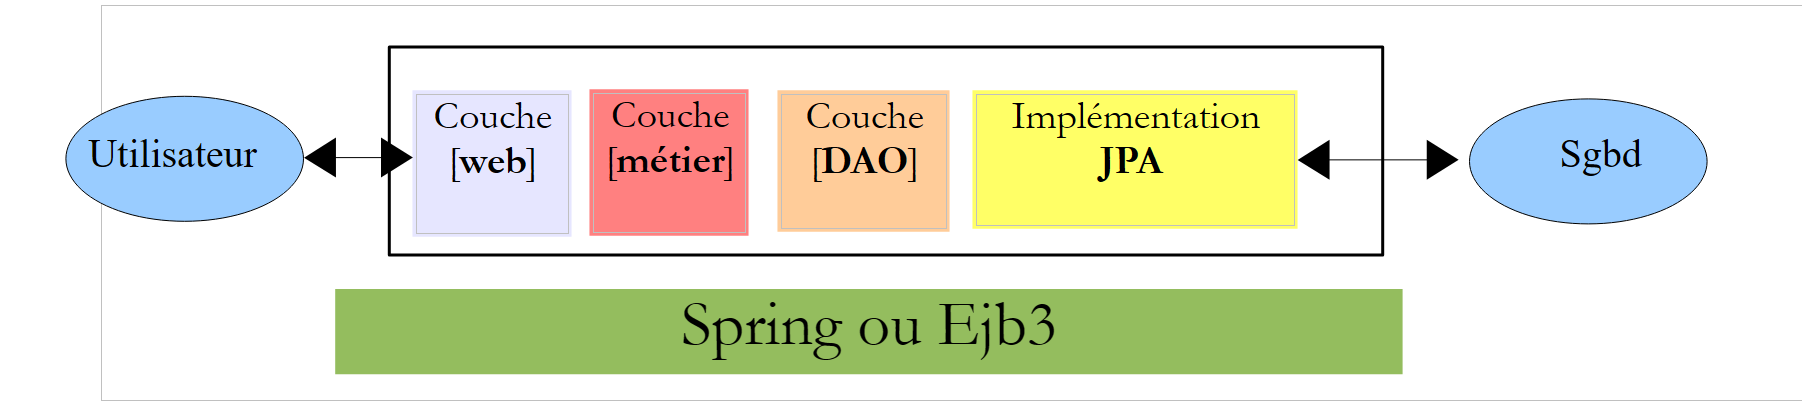
First, let’s situate JSF within the development of a web application. Most often, it will be built on a multi-layer architecture such as the following:
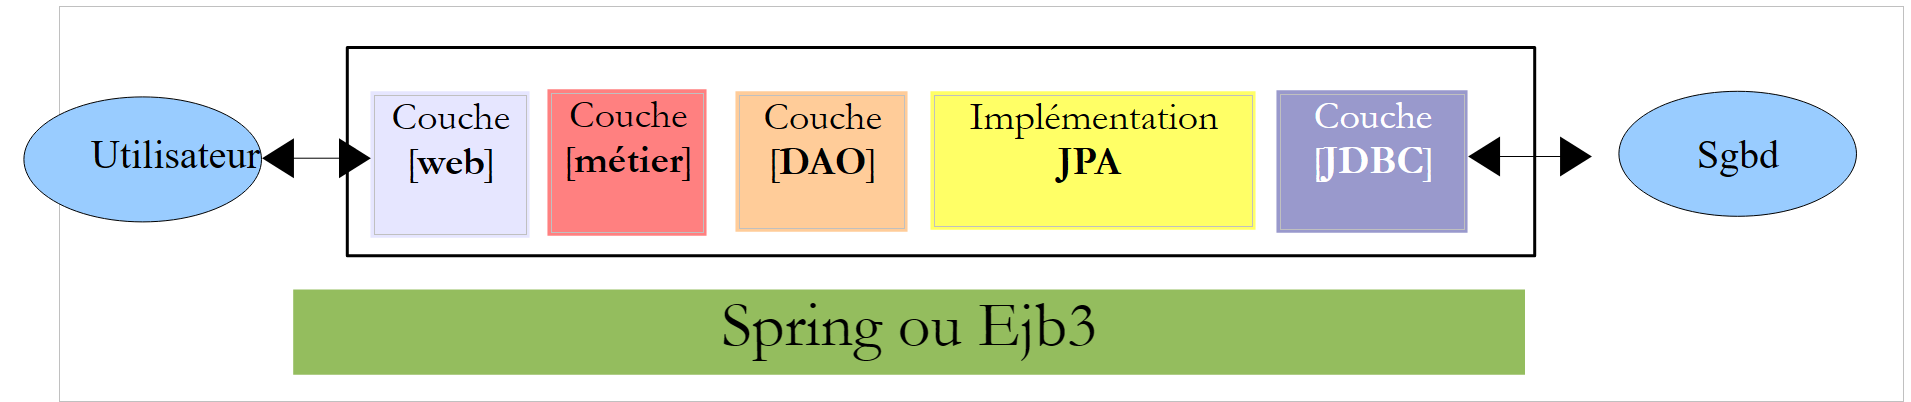 |
- The [web] layer is the layer in contact with the web application user. The user interacts with the web application through web pages viewed in a browser. It is in this layer that JSF is located, and only in this layer,
- The [métier] layer implements the application’s business rules, such as calculating a salary or an invoice. This layer uses data from the user via the [web] layer and from the DBMS via the [DAO] layer,
- the [DAO] layer (Data Access Objects), the [jpa] layer (Java Persistence Api), and the JDBC driver manage access to DBMS data. The [jpa] layer serves as an ORM (Object Relational Mapper). It bridges the objects handled by the [DAO] layer and the rows and columns of data in a relational database,
- and the integration of these layers can be achieved using a Spring container or an EJB (Enterprise Java Bean).
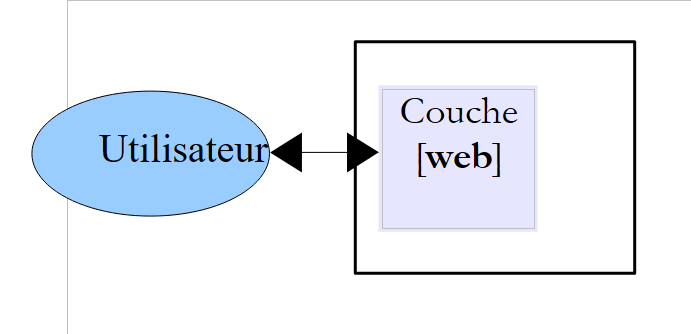
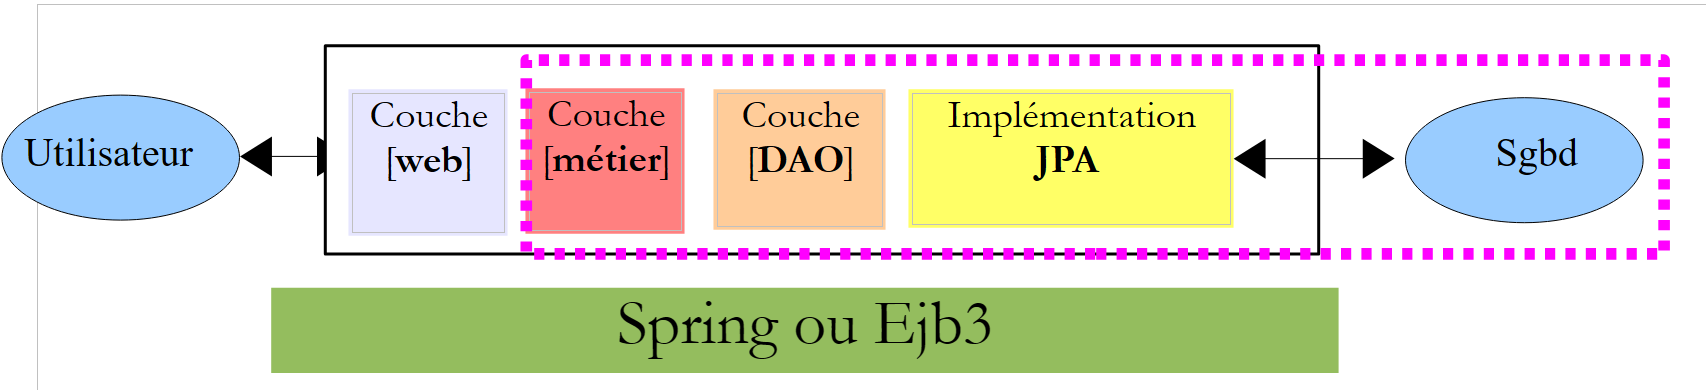
The examples provided below to illustrate JSF will use only a single layer, the [web] layer:
 |
Once the fundamentals of JSF have been mastered, we will build multi-layer Java EE applications.
2.2. The MVC development model of JSF
JSF implements the so-called MVC architectural pattern (Model–View–Controller) as follows:
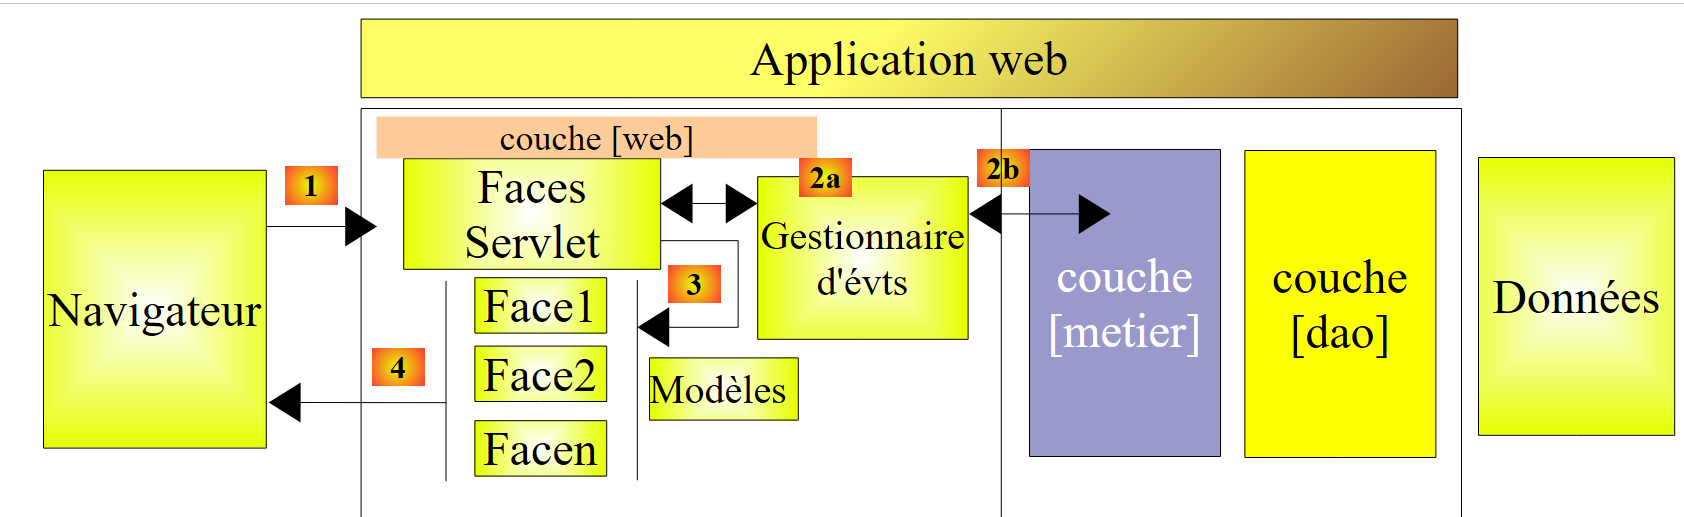 |
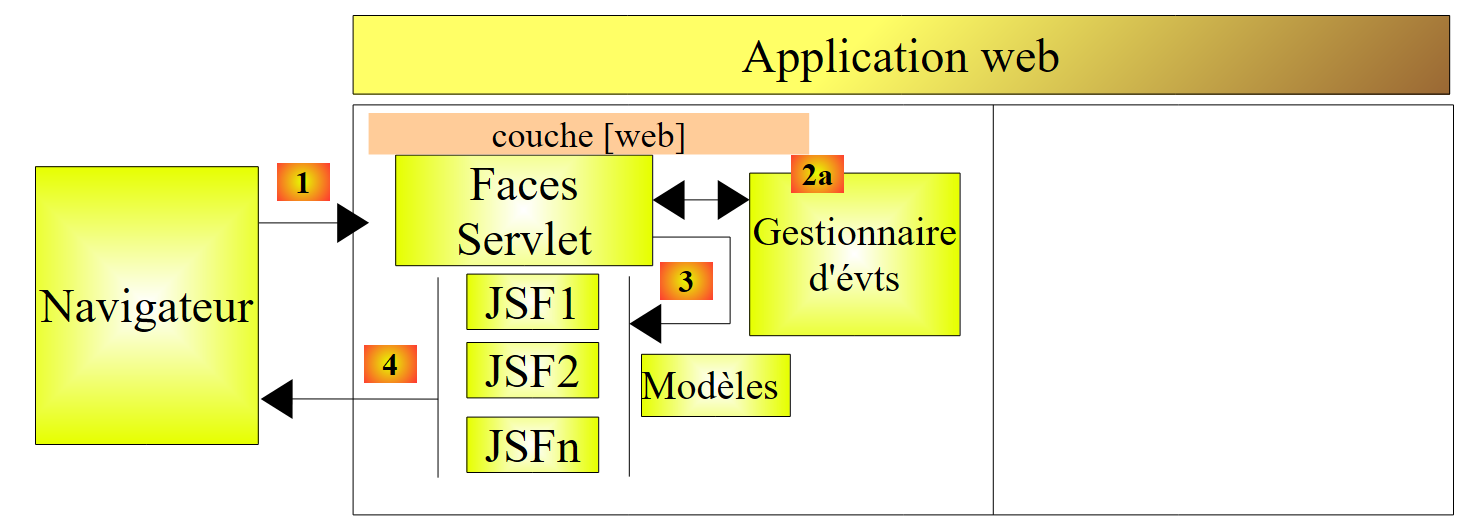
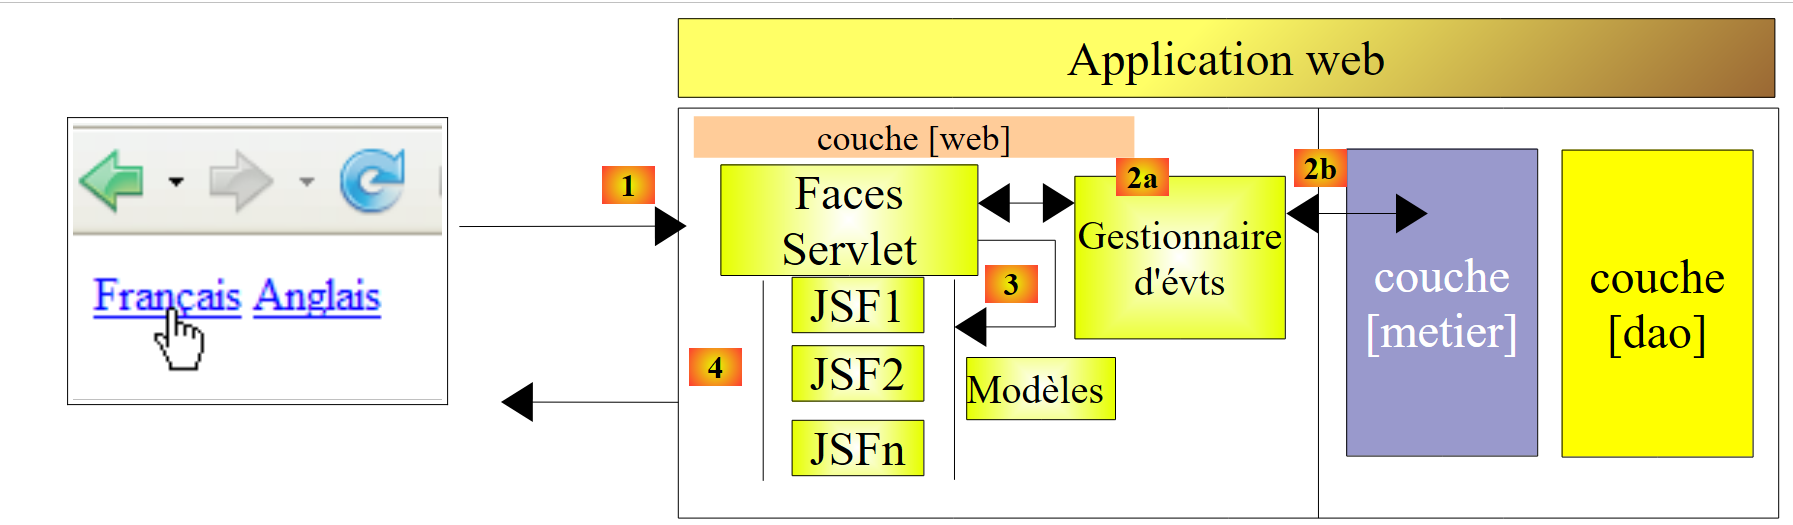
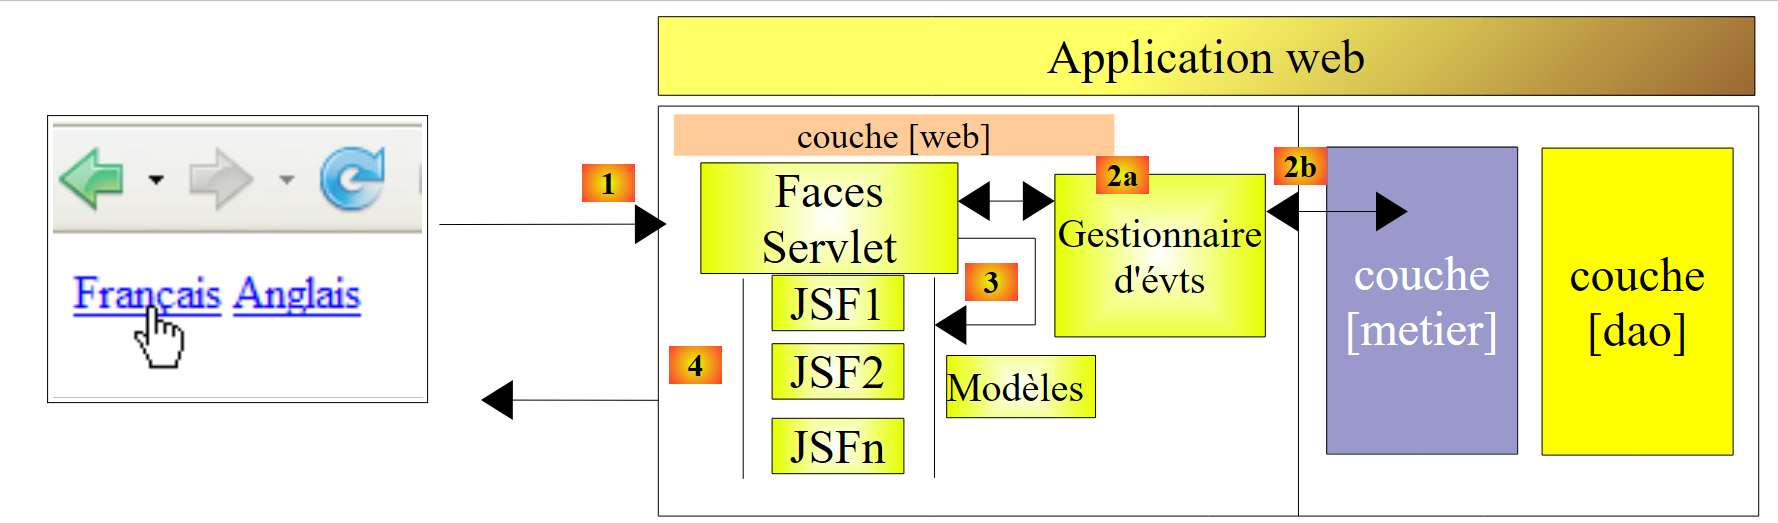
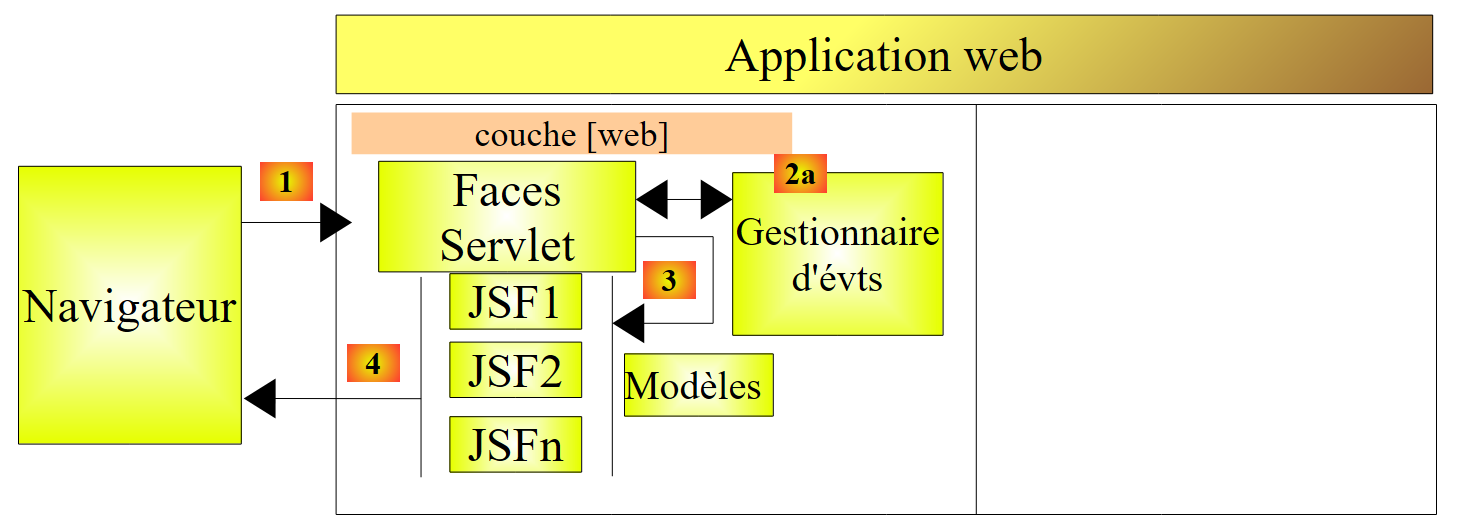
This architecture implements the MVC Design Pattern (Model, View, Controller). The processing of a client request proceeds in the following four steps:
- request – the client browser sends a request to the [Faces Servlet] controller. This controller handles all requests from the clients components. It serves as the application’s entry point. This is the C in MVC,
- processing - the C controller processes this request. To do so, it is assisted by event handlers specific to the written application [2a]. These handlers may require assistance from the business layer [2b]. Once the client request has been processed, it may trigger various responses. A classic example is:
- an error page if the request could not be processed correctly;
- a confirmation page otherwise,
- navigation - the controller selects the response (= view) to send to the client. Selecting the response to send to the client involves several steps:
- selecting the Facelet that will generate the response. This is called the view V, the V in MVC. This choice generally depends on the result of executing the action requested by the user;
- providing this Facelet with the data it needs to generate this response. In fact, this data most often contains information calculated by the controller. This information forms what is called the view’s model M, the M in MVC,
Step 3 therefore consists of selecting a view V and constructing the model M required for it.
- Response - The controller C instructs the selected Facelet to render itself. The Facelet uses the model M prepared by the controller C to initialize the dynamic parts of the response it must send to the client. The exact form of this response can vary: it can be a HTML stream, PDF, Excel, ...
In a JSF project:
- the C controller is the [javax.faces.webapp.FacesServlet] servlet. This is found in the [javaee.jar] library,
- the V views are implemented by pages using Facelets technology,
- the M models and event handlers are implemented by Java classes often called "backing beans" or simply beans.
Now, let’s clarify the relationship between the MVC web architecture and layered architecture. These are two different concepts that are sometimes confused. Consider a single-layer JSF web application:
 |
If we implement the [web] layer with JSF, we will indeed have a MVC web architecture but not a multi-layer architecture. Here, the [web] layer will handle everything: presentation, business logic, and data access. With JSF, the beans will do this work.
Now, let’s consider a multi-layer web architecture:
 |
The [web] layer can be implemented without a framework and without following the MVC model. We then indeed have a multi-layer architecture, but the web layer does not implement the MVC model.
In MVC, we stated that the M model corresponds to view V, c.a.d—the set of data displayed by view V. Another definition of the M model for MVC is often given:
 |
Many authors consider that what is to the right of the [web] layer forms the M model of MVC. To avoid ambiguity, we will refer to:
- the domain model when referring to everything to the right of the [web] layer,
- the view model when referring to the data displayed by a view V.
Hereinafter, the term "M model" will refer exclusively to the model of a view V.
2.3. Example mv-jsf2-01: the elements of a JSF project
The first examples will be limited to the single web layer implemented with JSF 2:
 |
Once the basics have been covered, we will examine more complex examples with multi-layer architectures.
2.3.1. Project Generation
We generate our first project JSF2 using Netbeans 7.
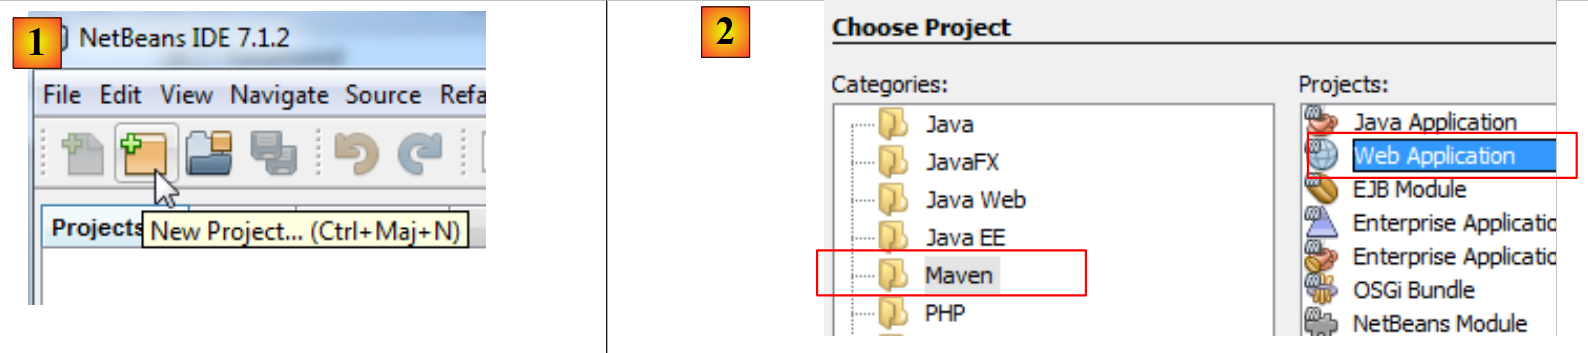 |
- In [1], create a new project,
- in [2], select the category [Maven] and the project type [Web Application],
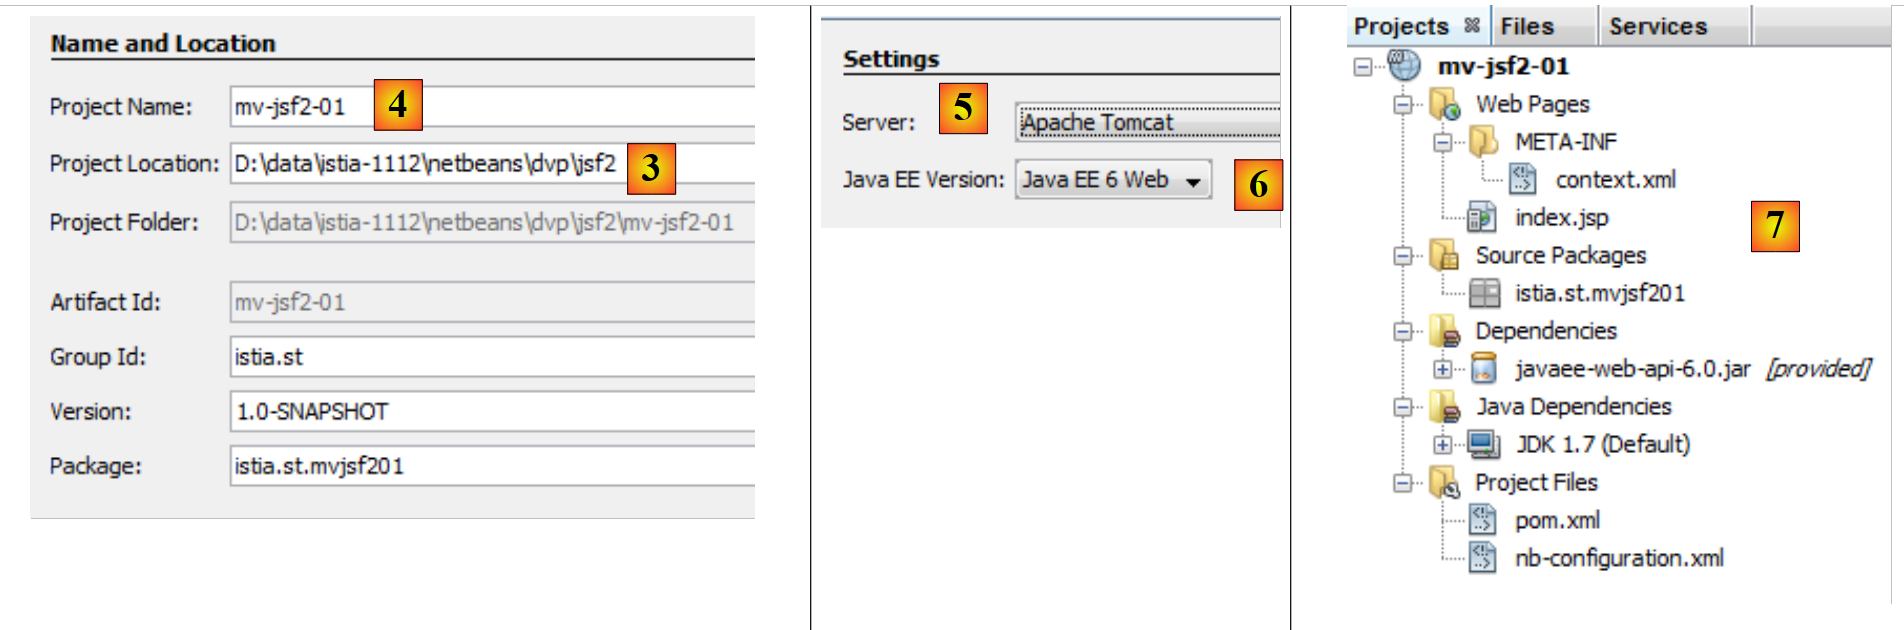 |
- in [3], specify the parent folder for the new project folder,
- in [4], name the project,
- in [5], select a server. With Netbeans 7, you can choose between the Apache Tomcat and Glassfish servers. The difference between the two is that Glassfish supports EJB (Enterprise Java Bean) and Tomcat does not. Our JSF examples will not use EJB. So here, we can choose any server;
- in [6], we choose the version Java EE 6 Web,
- in [7], the generated project.
Let’s examine the project components and explain the role of each.
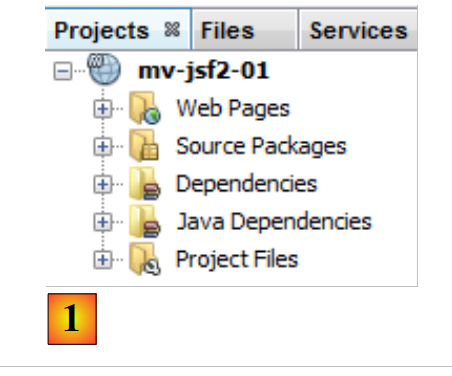 |
- in [1]: the different branches of the project:
- [Web Pages]: will contain the web pages (.xhtml, .jsp, .html), resources (images, various documents), the web layer configuration, and the JSF framework configuration;
- [Source packages]: the project’s Java classes;
- [Dependencies]: the .jar archives required by the project and managed by the Maven framework;
- [Java Dependencies]: the .jar archives required by the project and not managed by the Maven framework;
- [Project Files]: Maven configuration file and Netbeans,
 |
- in [2]: the [Web Pages] branch,
It contains the following [index.jsp] page:
<%@page contentType="text/html" pageEncoding="UTF-8"%>
<!DOCTYPE HTML PUBLIC "-//W3C//DTD HTML 4.01 Transitional//EN"
   "http://www.w3.org/TR/HTML4/loose.dtd">

<html>
    <head>
        <meta http-equiv="Content-Type" content="text/html; charset=UTF-8">
        <title>JSP Page</title>
    </head>
    <body>
        <h1>Hello World!</h1>
    </body>
</html>
This is a web page that displays the string 'Hello World' in large font.
The file [META-INF/context.xml] is as follows:
<?xml version="1.0" encoding="UTF-8"?>
<Context antiJARLocking="true" path="/mv-jsf2-01"/>
Line 2 indicates that the application context (or its name) is /mv-jsf2-01. This means that the project's web pages will be requested via a URL URL in the form http://machine:port/mv-jsf2-01/page. The context is by default the name of the project. We will not need to modify this file.
 |
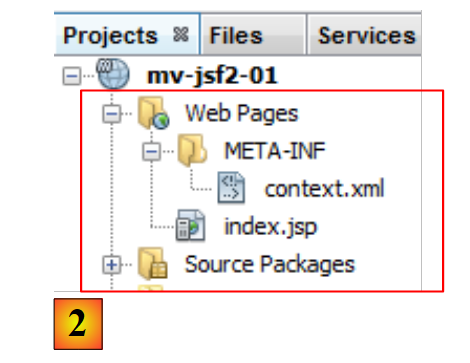
- In [3], the [Source Packages] branch,
This branch contains the source code for the project’s Java classes. Here we have no classes. Netbeans generated a default package that can be deleted [4].
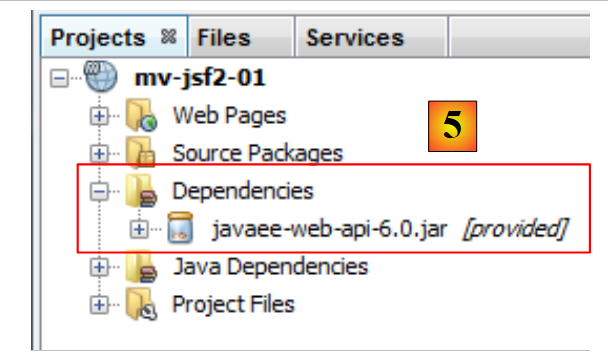 |
- In [5], the [Dependencies] branch,
This branch displays all the libraries required by the project and managed by Maven. All the libraries listed here will be automatically downloaded by Maven. This is why a Maven project requires Internet access. The downloaded libraries will be stored locally. If another project needs a library that is already present locally, it will not be downloaded. We will see that this list of libraries, as well as the repositories where they can be found, are defined in the Maven project configuration file.
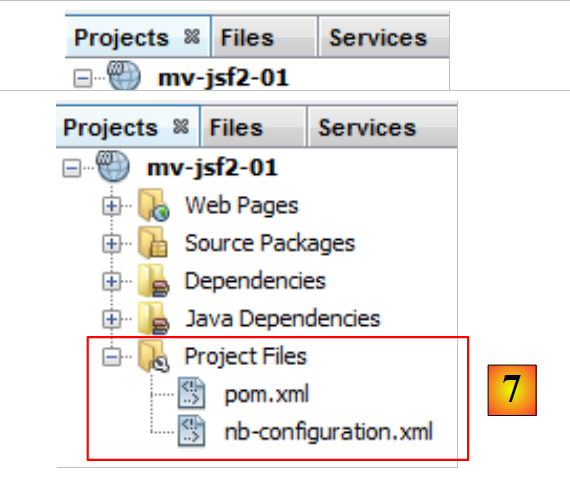 |
- in [6], the libraries required for the project and not managed by Maven,
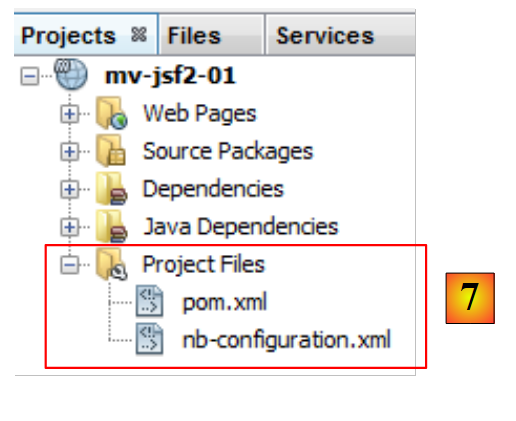 |
- in [7], the Maven project configuration files:
- [nb-configuration.xml] is the configuration file for Netbeans. We will not be concerned with it.
- [pom.xml]: the Maven configuration file. POM stands for Project Object Model. We may sometimes need to edit this file directly.
The generated [pom.xml] file is as follows:
<project xmlns="http://maven.apache.org/POM/4.0.0" xmlns:xsi="http://www.w3.org/2001/XMLSchema-instance"
         xsi:schemaLocation="http://maven.apache.org/POM/4.0.0 http://maven.apache.org/xsd/maven-4.0.0.xsd">
  <modelVersion>4.0.0</modelVersion>

  <groupId>istia.st</groupId>
  <artifactId>mv-jsf2-01</artifactId>
  <version>1.0-SNAPSHOT</version>
  <packaging>war</packaging>

  <name>mv-jsf2-01</name>

  <properties>
    <endorsed.dir>${project.build.directory}/endorsed</endorsed.dir>
    <project.build.sourceEncoding>UTF-8</project.build.sourceEncoding>
  </properties>

  <dependencies>
    <dependency>
      <groupId>javax</groupId>
      <artifactId>javaee-web-api</artifactId>
      <version>6.0</version>
      <scope>provided</scope>
    </dependency>
  </dependencies>

  <build>
    <plugins>
      <plugin>
        <groupId>org.apache.maven.plugins</groupId>
        <artifactId>maven-compiler-plugin</artifactId>
        <version>2.3.2</version>
        <configuration>
          <source>1.6</source>
          <target>1.6</target>
          <compilerArguments>
            <endorseddirs>${endorsed.dir}</endorseddirs>
          </compilerArguments>
        </configuration>
      </plugin>
      <plugin>
        <groupId>org.apache.maven.plugins</groupId>
        <artifactId>maven-war-plugin</artifactId>
        <version>2.1.1</version>
        <configuration>
          <failOnMissingWebXml>false</failOnMissingWebXml>
        </configuration>
      </plugin>
      <plugin>
        <groupId>org.apache.maven.plugins</groupId>
        <artifactId>maven-dependency-plugin</artifactId>
        <version>2.1</version>
        <executions>
          <execution>
            <phase>validate</phase>
            <goals>
              <goal>copy</goal>
            </goals>
            <configuration>
              <outputDirectory>${endorsed.dir}</outputDirectory>
              <silent>true</silent>
              <artifactItems>
                <artifactItem>
                  <groupId>javax</groupId>
                  <artifactId>javaee-endorsed-api</artifactId>
                  <version>6.0</version>
                  <type>jar</type>
                </artifactItem>
              </artifactItems>
            </configuration>
          </execution>
        </executions>
      </plugin>
    </plugins>
  </build>

</project>
- Lines 5–8 define the Java artifact that will be created by the Maven project. This information comes from the wizard used when creating the project:
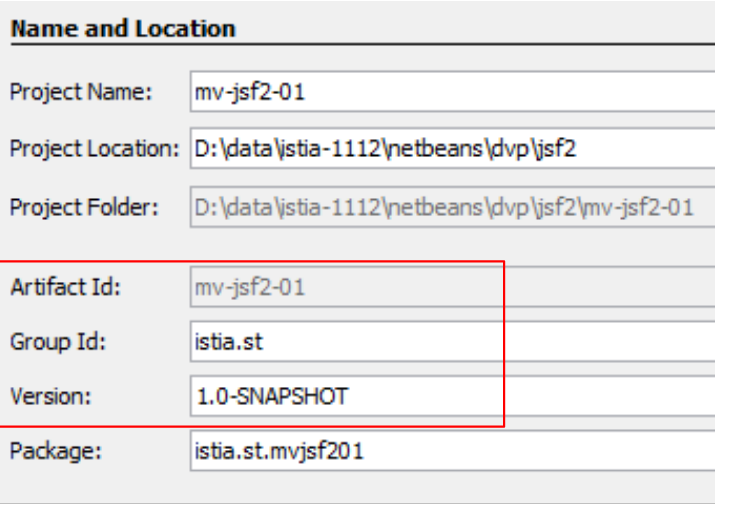 |
A Maven artifact is defined by four properties:
- [groupId]: information that resembles a package name. Thus, the Spring framework libraries have groupId=org.springframework, those of the JSF framework have groupId=javax.faces,
- [artifactId]: the name of the Maven object. In the [org.springframework] group, we thus find the following artifactId entries: spring-context, spring-core, spring-beans, ... In the [javax.faces] group, we find the artifactId jsf-api,
- [version]: version number of the Maven artifact. Thus, the artifact org.springframework.spring-core has the following versions: 2.5.4, 2.5.5, 2.5.6, 2.5.6.SECO1, ...
- [packaging]: the format of the artifact, most often war or jar.
Our Maven project will therefore generate a [war] (line 8) in the group [istia.st] (line 5), named [mv-jsf2-01] (line 6) and version [1.0-SNAPSHOT] (line 7). These four pieces of information must uniquely identify a Maven artifact.
Lines 17–24 list the Maven project’s dependencies, i.e., the list of libraries required by the project. Each library is defined by four pieces of information (groupId, artifactId, version, packaging). When the packaging information is missing, as it is here, the jar packaging is used. We add another piece of information, scope, which determines at which stages of the project lifecycle the library is needed. The default value is compile, indicating that the library is required for both compilation and execution. The value provided means that the library is required during compilation but not during execution. Here, at runtime, it will be provided by the Tomcat 7 server.
2.3.2. Running the project
We run the project:
 |
In [1], the Maven project is executed. The Tomcat server is then started if it was not already running. A browser is also launched, and the URL page from the project context is requested. Since no document is requested, the page index.html, index.jsp, index.xhtml is then used if it exists. Here, it will be the page [index.jsp].
2.3.3. The file system of a Maven project
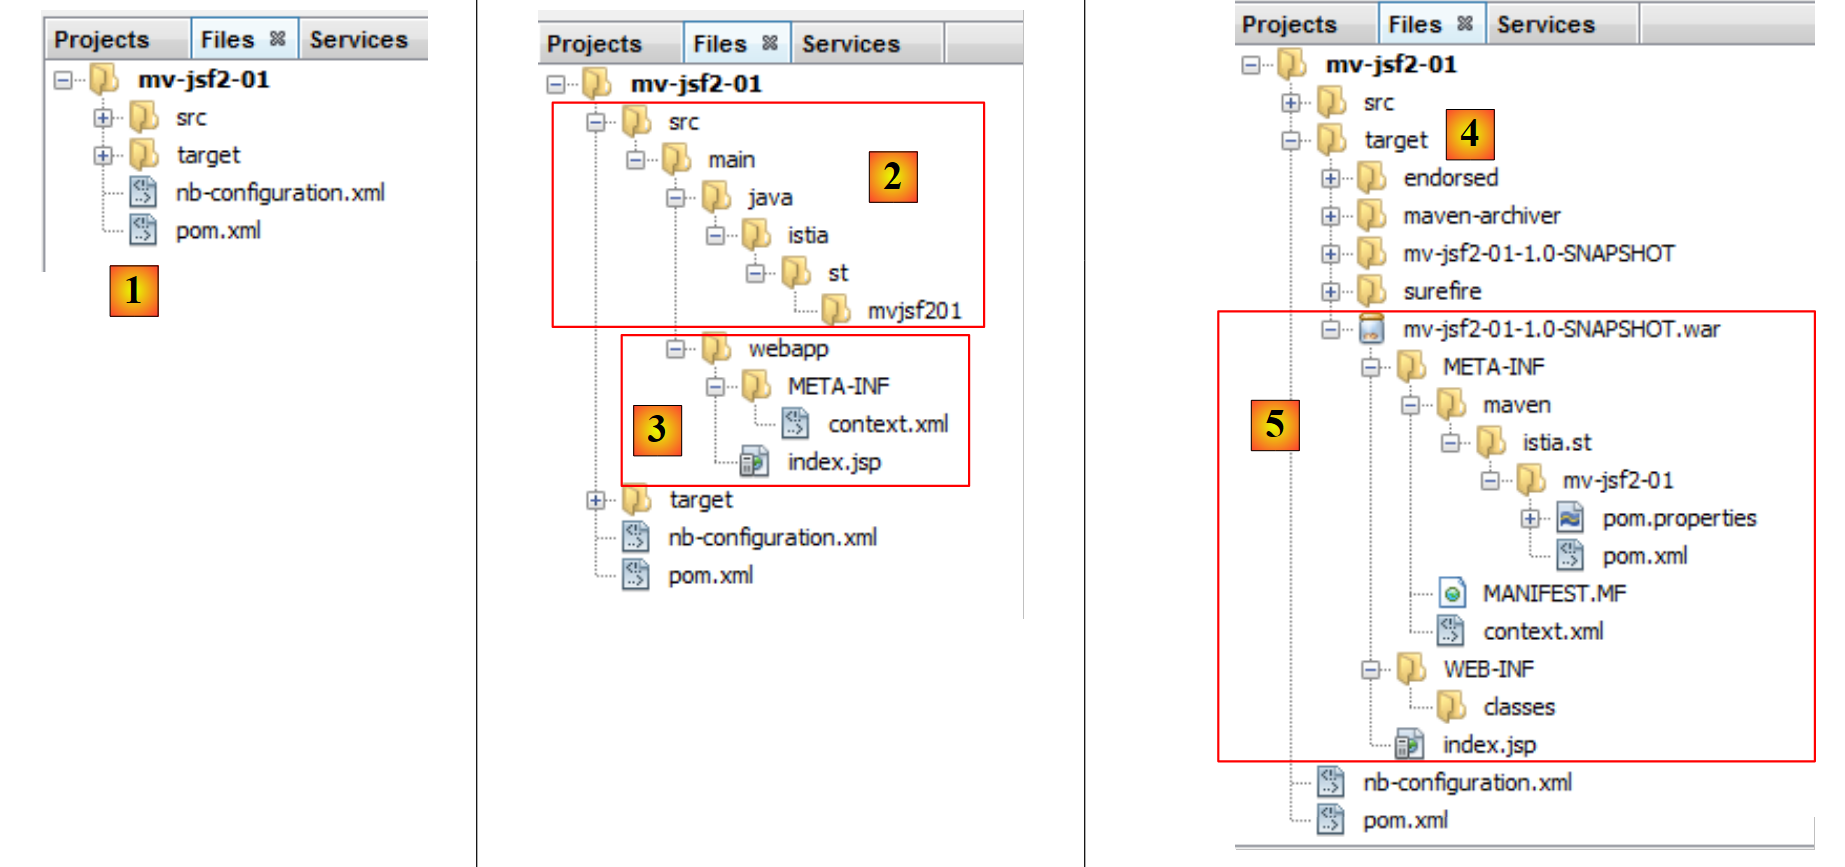 |
- [1]: the project’s file system is in the [Files] tab,
- [2]: the Java sources are in the [src / main / java] folder,
- [3]: the web pages are in the [src / main / webapp] folder,
- [4]: the [target] folder is created by the project build,
- [5]: here, the project build created an archive named [mv-jsf2-01-1.0-SNAPSHOT.war]. It is this archive that was executed by the Tomcat server.
2.3.4. Configuring a project for JSF
Our current project is not a JSF project. It is missing the JSF framework libraries. To make the current project a JSF project, proceed as follows:
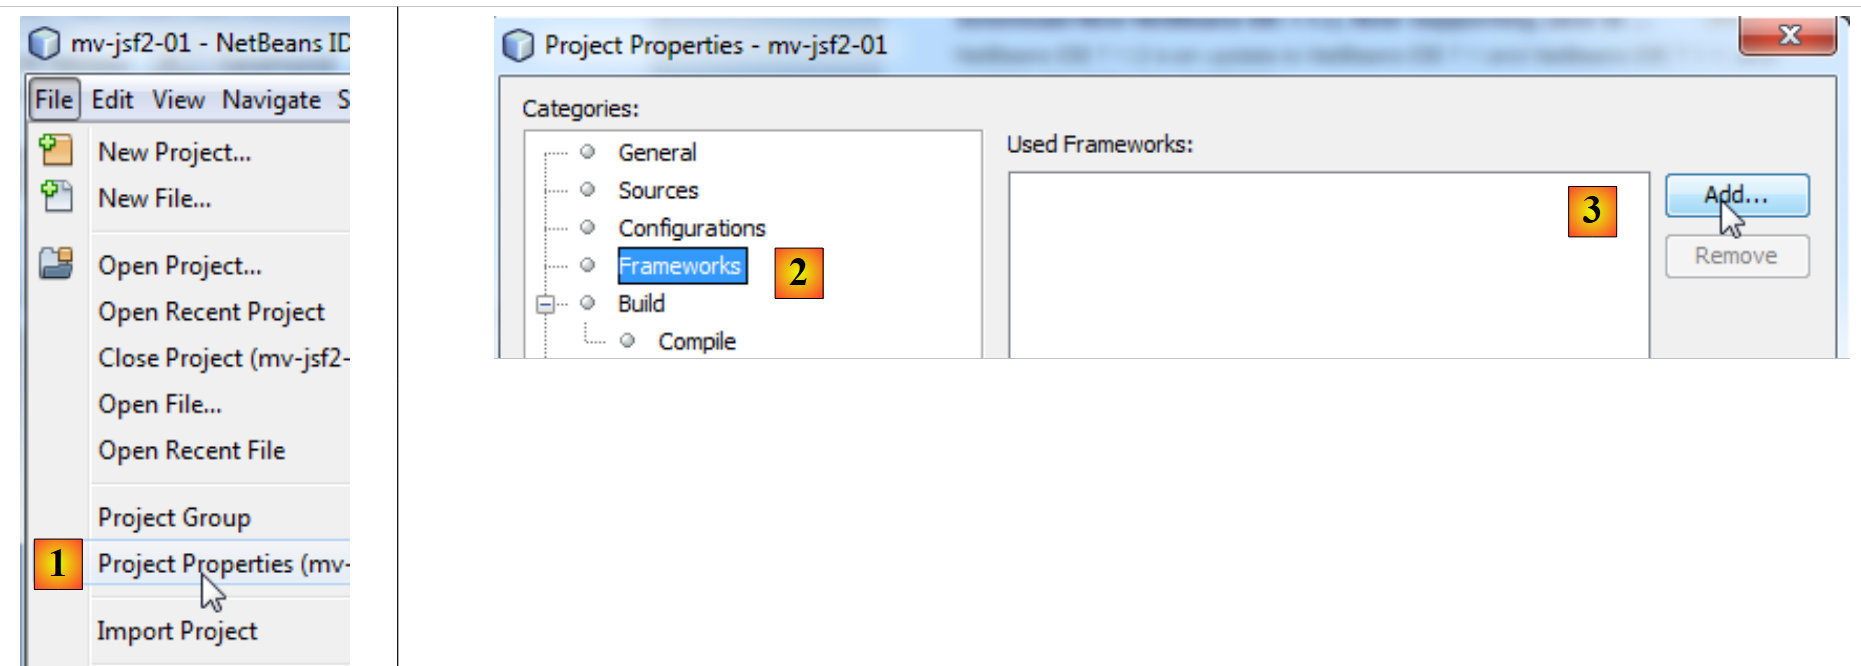 |
- In [1], access the project properties,
- in [2], select the [Frameworks] category,
- In [3], add a framework,
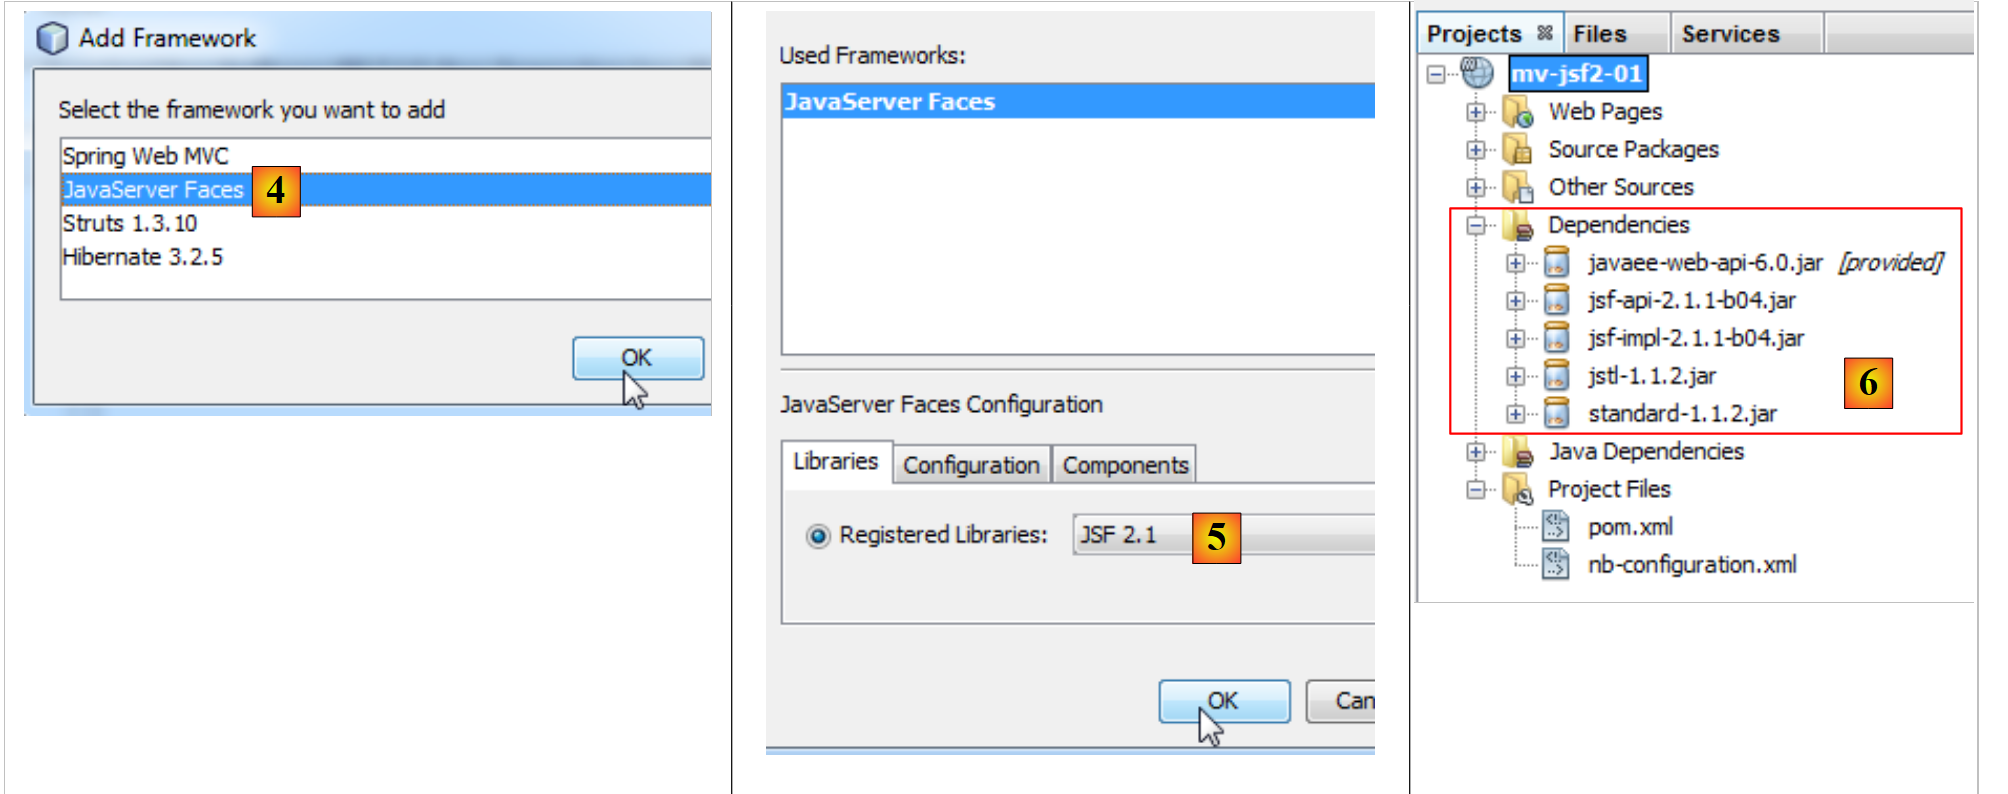 |
- In [4], select Java Server Faces,
- In [5], Netbeans offers us version 2.1 of the framework (version). We accept it,
- in [6], the project is then enhanced with new dependencies.
The [pom.xml] file has been updated to reflect this new configuration:
<project xmlns="http://maven.apache.org/POM/4.0.0" xmlns:xsi="http://www.w3.org/2001/XMLSchema-instance"
         xsi:schemaLocation="http://maven.apache.org/POM/4.0.0 http://maven.apache.org/xsd/maven-4.0.0.xsd">
  <modelVersion>4.0.0</modelVersion>

  <groupId>istia.st</groupId>
  <artifactId>mv-jsf2-01</artifactId>
  <version>1.0-SNAPSHOT</version>
  <packaging>war</packaging>

  <name>mv-jsf2-01</name>

  ...
  <dependencies>
    <dependency>
      <groupId>com.sun.faces</groupId>
      <artifactId>jsf-api</artifactId>
      <version>2.1.1-b04</version>
    </dependency>
    <dependency>
      <groupId>com.sun.faces</groupId>
      <artifactId>jsf-impl</artifactId>
      <version>2.1.1-b04</version>
    </dependency>
    <dependency>
      <groupId>javax.servlet</groupId>
      <artifactId>jstl</artifactId>
      <version>1.1.2</version>
    </dependency>
    <dependency>
      <groupId>taglibs</groupId>
      <artifactId>standard</artifactId>
      <version>1.1.2</version>
    </dependency>
    <dependency>
      <groupId>javax</groupId>
      <artifactId>javaee-web-api</artifactId>
      <version>6.0</version>
      <scope>provided</scope>
    </dependency>
  </dependencies>

  <build>
    ...
  </build>
  <repositories>
    <repository>
      <URL>http://download.java.net/maven/2/</URL>
      <id>jsf20</id>
      <layout>default</layout>
      <name>Repository for library Library[jsf20]</name>
    </repository>
    <repository>
      <URL>http://repo1.maven.org/maven2/</URL>
      <id>jstl11</id>
      <layout>default</layout>
      <name>Repository for library Library[jstl11]</name>
    </repository>
  </repositories>
</project>
Lines 14–33: new dependencies have been added. Maven downloads them automatically. It retrieves them from what are called repositories. The Central Repository is used automatically. Additional repositories can be added using the <repository> tag. Here, two repositories have been added:
- lines 46–51: a repository for the JSF 2 library,
- lines 52–57: a repository for the JSTL 1.1 library.
The project has also been enhanced with a new web page:
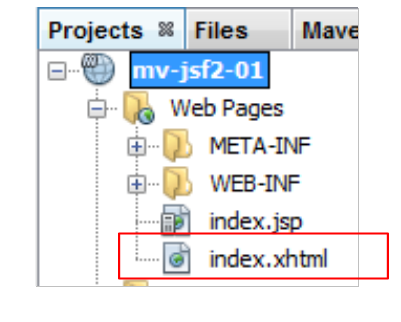 |
The [index.HTML] page is as follows:
<?xml version='1.0' encoding='UTF-8' ?>
<!DOCTYPE HTML PUBLIC "-//W3C//DTD XHTML 1.0 Transitional//EN" "http://www.w3.org/TR/xhtml1/DTD/xhtml1-transitional.dtd">
<html xmlns="http://www.w3.org/1999/xhtml"
      xmlns:h="http://java.sun.com/jsf/html">
  <h:head>
    <title>Facelet Title</title>
  </h:head>
  <h:body>
    Hello from Facelets
  </h:body>
</html>
Here we have a XML file (line 1). It contains the tags from HTML but in the XML format. This is called XHTML. The technology used to create web pages with JSF 2 is called Facelets. Therefore, the XHTML page is sometimes referred to as a Facelet page.
Lines 3–4 define the <html> tag with XML namespaces (xmlns=XML Name Space).
- Line 3 defines the main namespace http://www.w3.org/1999/xhtml,
- line 4 defines the namespace http://java.sun.com/jsf/html for the HTML tags. These tags will be prefixed with h: as indicated by xmlns:h. These tags are found on lines 5, 7, 8, and 10.
Upon encountering a namespace declaration, the web server will search the [META-INF] directories in the application’s classpath for files with the .tld suffix (TagLib Definition). Here, it will find them in the [jsf-impl.jar] and [1,2] archives:
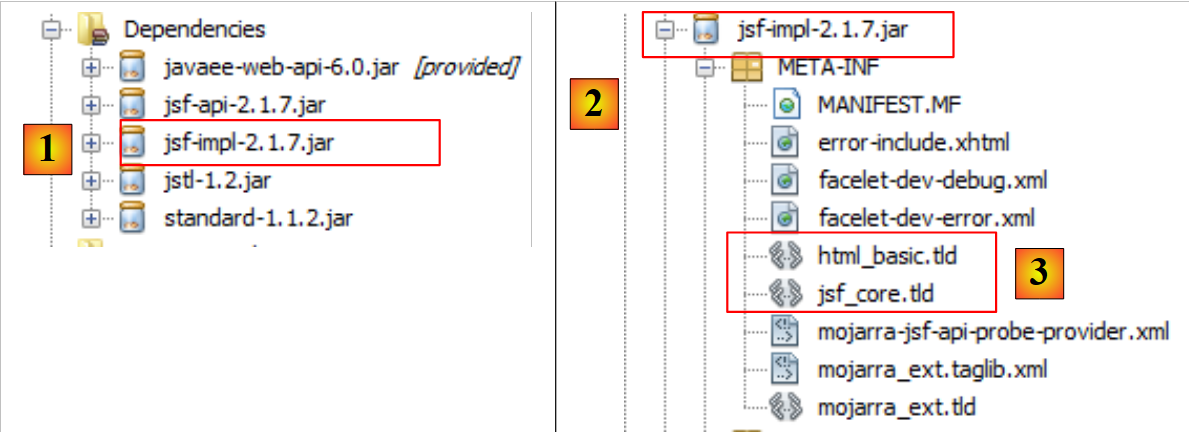 |
Let’s examine the [3] and [HTML_basic.tld] files:
- on line 19, the uri from the tag library,
- on line 16, its short name.
The definitions for the various <h:xx> tags can be found in this file. These tags are managed by Java classes that are also located in the [jsf-impl.jar] artifact.
Let’s return to our JSF project. It has been expanded with a new branch:
 |
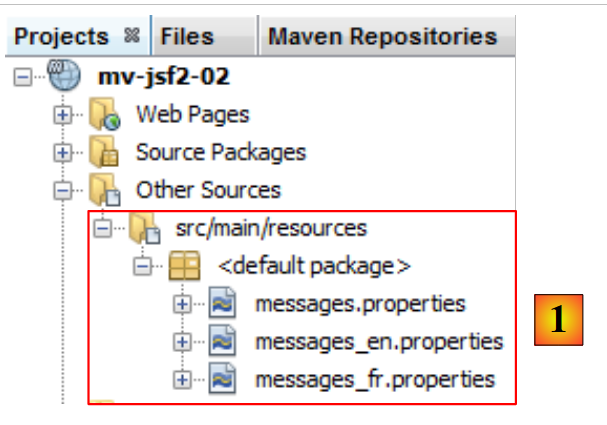
The [Other Sources] [1] branch contains the files that must be in the project’s classpath and that are not Java code. This applies to the message files in JSF. We have seen that without adding the JSF framework to the project, this branch is missing. To create it, simply create the [src / main / resources] [3] folder in the [Files] [2] tab.
Finally, a new folder has appeared in the [Web Pages] branch:
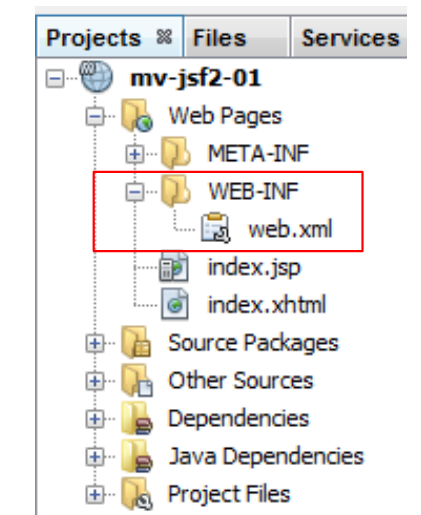 |
The [WEB-INF] folder was created, containing the file [web.xml] . This file configures the web application:
<?xml version="1.0" encoding="UTF-8"?>
<web-app version="3.0" xmlns="http://java.sun.com/xml/ns/javaee" xmlns:xsi="http://www.w3.org/2001/XMLSchema-instance" xsi:schemaLocation="http://java.sun.com/xml/ns/javaee http://java.sun.com/xml/ns/javaee/web-app_3_0.xsd">
    <context-param>
        <param-name>javax.faces.PROJECT_STAGE</param-name>
        <param-value>Development</param-value>
    </context-param>
    <servlet>
        <servlet-name>Faces Servlet</servlet-name>
        <servlet-class>javax.faces.webapp.FacesServlet</servlet-class>
        <load-on-startup>1</load-on-startup>
    </servlet>
    <servlet-mapping>
        <servlet-name>Faces Servlet</servlet-name>
        <URL-pattern>/faces/*</URL-pattern>
    </servlet-mapping>
    <session-config>
        <session-timeout>
            30
        </session-timeout>
    </session-config>
    <welcome-file-list>
        <welcome-file>faces/index.xhtml</welcome-file>
    </welcome-file-list>
</web-app>
- Lines 7–10 define a servlet, c.a.d, a Java class capable of handling requests from clients. A JSF application works as follows:
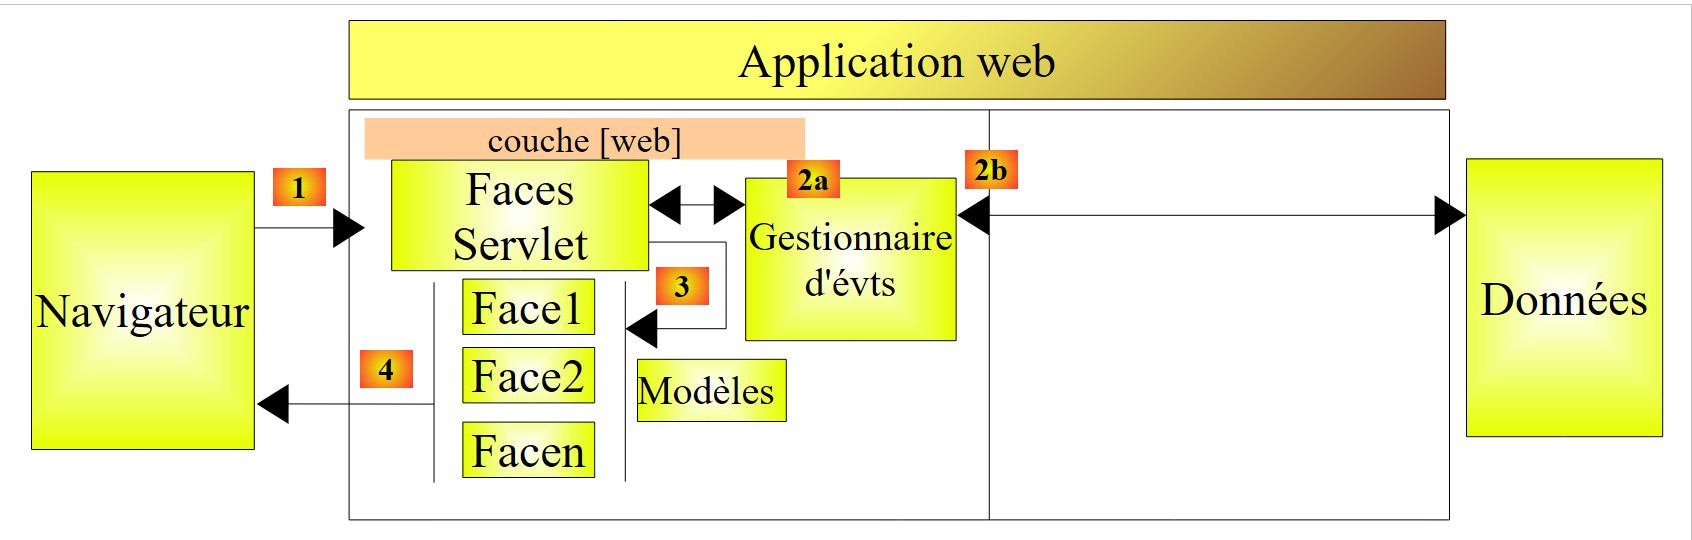
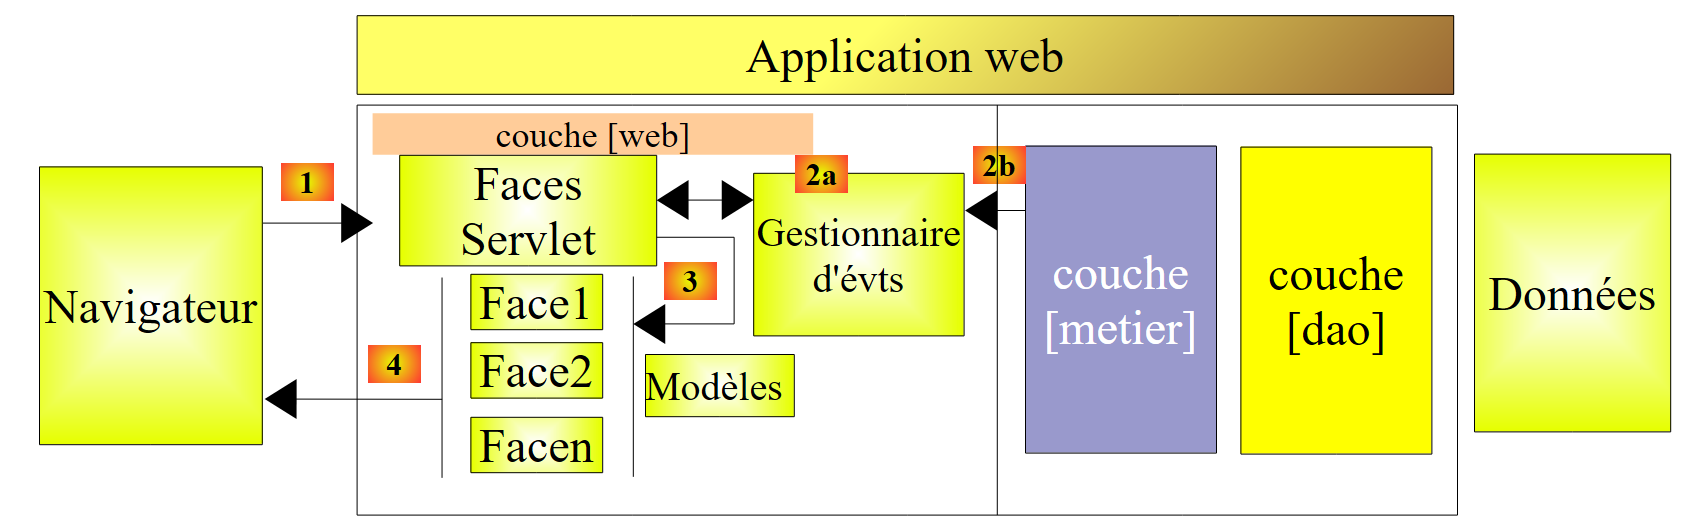 |
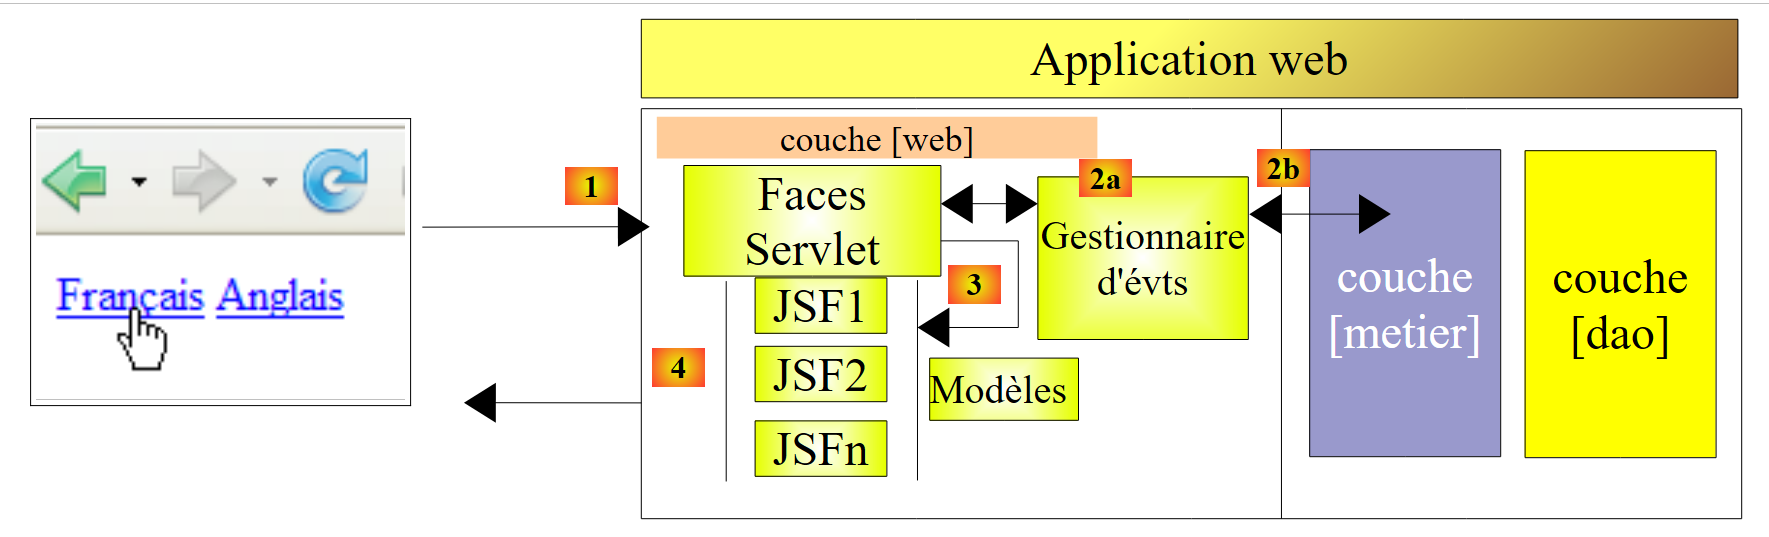
This architecture implements the MVC Design Pattern (Model, View, Controller). We reiterate what has already been written above. The processing of a client request proceeds according to the following four steps:
1 - request - the client browser sends a request to the [Faces Servlet] controller. This controller handles all requests from the clients components. It serves as the application’s entry point. This is the C in MVC,
2 - processing - the C controller processes this request. To do so, it is assisted by event handlers specific to the written application [2a]. These handlers may require assistance from the business layer [2b]. Once the client request has been processed, it may trigger various responses. A classic example is:
- an error page if the request could not be processed correctly;
- a confirmation page otherwise,
3 - navigation - the controller selects the response (= view) to send to the client. Selecting the response to send to the client involves several steps:
- selecting the Facelet that will generate the response. This is called the view V, the V in MVC. This choice generally depends on the result of executing the action requested by the user;
- providing this Facelet with the data it needs to generate this response. In fact, this data most often contains information calculated by the controller. This information forms what is called the view’s model M, the M in MVC,
Step 3 therefore consists of selecting a view V and constructing the model M required for it.
4 - response - the controller C instructs the selected Facelet to render itself. The Facelet uses the M model prepared by the controller C to initialize the dynamic parts of the response it must send to the client. The exact form of this response can vary: it can be a HTML feed, PDF, Excel, ...
In a JSF project:
- the C controller is the [javax.faces.webapp.FacesServlet] servlet,
- the V views are implemented by pages using Facelets technology,
- the M models and event handlers are implemented by Java classes often called "backing beans" or simply Beans.
Let’s take a look at the contents of the [web.xml] file:
<?xml version="1.0" encoding="UTF-8"?>
<web-app version="3.0" xmlns="http://java.sun.com/xml/ns/javaee" xmlns:xsi="http://www.w3.org/2001/XMLSchema-instance" xsi:schemaLocation="http://java.sun.com/xml/ns/javaee http://java.sun.com/xml/ns/javaee/web-app_3_0.xsd">
    <context-param>
        <param-name>javax.faces.PROJECT_STAGE</param-name>
        <param-value>Development</param-value>
    </context-param>
    <servlet>
        <servlet-name>Faces Servlet</servlet-name>
        <servlet-class>javax.faces.webapp.FacesServlet</servlet-class>
        <load-on-startup>1</load-on-startup>
    </servlet>
    <servlet-mapping>
        <servlet-name>Faces Servlet</servlet-name>
        <URL-pattern>/faces/*</URL-pattern>
    </servlet-mapping>
    <session-config>
        <session-timeout>
            30
        </session-timeout>
    </session-config>
    <welcome-file-list>
        <welcome-file>faces/index.xhtml</welcome-file>
    </welcome-file-list>
</web-app>
- Lines 12–15: The <servlet-mapping> tag is used to associate a servlet with a URL request sent by the client browser. Here, it is specified that URL files of the form [/faces/*] must be processed by the servlet named [Faces Servlet]. This servlet is defined in lines 7–10. Since there are no other <servlet-mapping> tags in the file, this means that the [Faces Servlet] servlet will only handle URL requests of the form [/faces/*]. We have seen that the application context is named [/mv-jsf2-01]. The URL files of the clients files processed by the [Faces Servlet] servlet will therefore be in the form [http://machine:port/mv-jsf2-01/faces/*]. The .html and .jsp pages will be processed by default by the servlet container itself, not by a specific servlet. This is because the servlet container knows how to handle them,
- lines 7–10: define the [Faces Servlet] servlet. Since all accepted URL requests are directed to it, it is the C controller for the MVC model,
- line 10: indicates that the servlet must be loaded into memory as soon as the web server starts. By default, a servlet is loaded only upon receipt of the first request made to it,
- Lines 3–6: define a parameter for the [Faces Servlet] servlet. The parameter javax.faces.PROJECT_STAGE defines the stage of the project being executed. In the Development stage, the [Faces Servlet] servlet displays error messages useful for debugging. In the Production stage, these messages are no longer displayed,
- lines 17–19: session duration in minutes. A client interacts with the application through a series of request/response cycles. Each cycle uses its own TCP-IP connection, which is created anew for each cycle. Therefore, if a client C makes two requests, D1 and D2, the server S has no way of knowing that the two requests belong to the same client C. The server S does not have the client’s memory. This is due to the HTTP protocol used (HyperText Transport Protocol): the client communicates with the server through a series of client-request/server-response cycles, each using a new TCP-IP connection. This is referred to as a stateless protocol. In other protocols, such as FTP (File Transfer Protocol), client C uses the same connection for the duration of its interaction with server S. A connection is therefore tied to a specific client. Server S always knows who it is dealing with. In order to recognize that a request belongs to a given client, the web server can use session management:
- when a client makes its first request, server S sends the expected response plus a token, a random string of characters unique to that client;
- with each subsequent request, client C sends the token it received back to server S, thereby allowing server S to recognize it.
The application can now ask the server to store information associated with a specific client. This is referred to as a client session. Line 18 indicates that a session’s lifetime is 30 minutes. This means that if a client C does not make a new request for 30 minutes, their session is terminated and the information it contained is lost. Upon their next request, everything will proceed as if they were a new client, and a new session will begin,
- Lines 21–23: the list of pages to display when the user requests the context without specifying a page, for example, [http://machine:port/mv-jsf2-01]. In this case, the web server (not the servlet) checks whether the application has defined a <welcome-file-list> tag. If so, it displays the first page found in the list. If that page does not exist, it displays the second page, and so on until an existing page is found. Here, when the client requests URL [http://machine:port/mv-jsf2-01], it is URL [http://machine:port/mv-jsf2-01/index.xhtml] that will be served.
2.3.5. Run the project
When the new project is run, the result displayed in the browser is as follows:
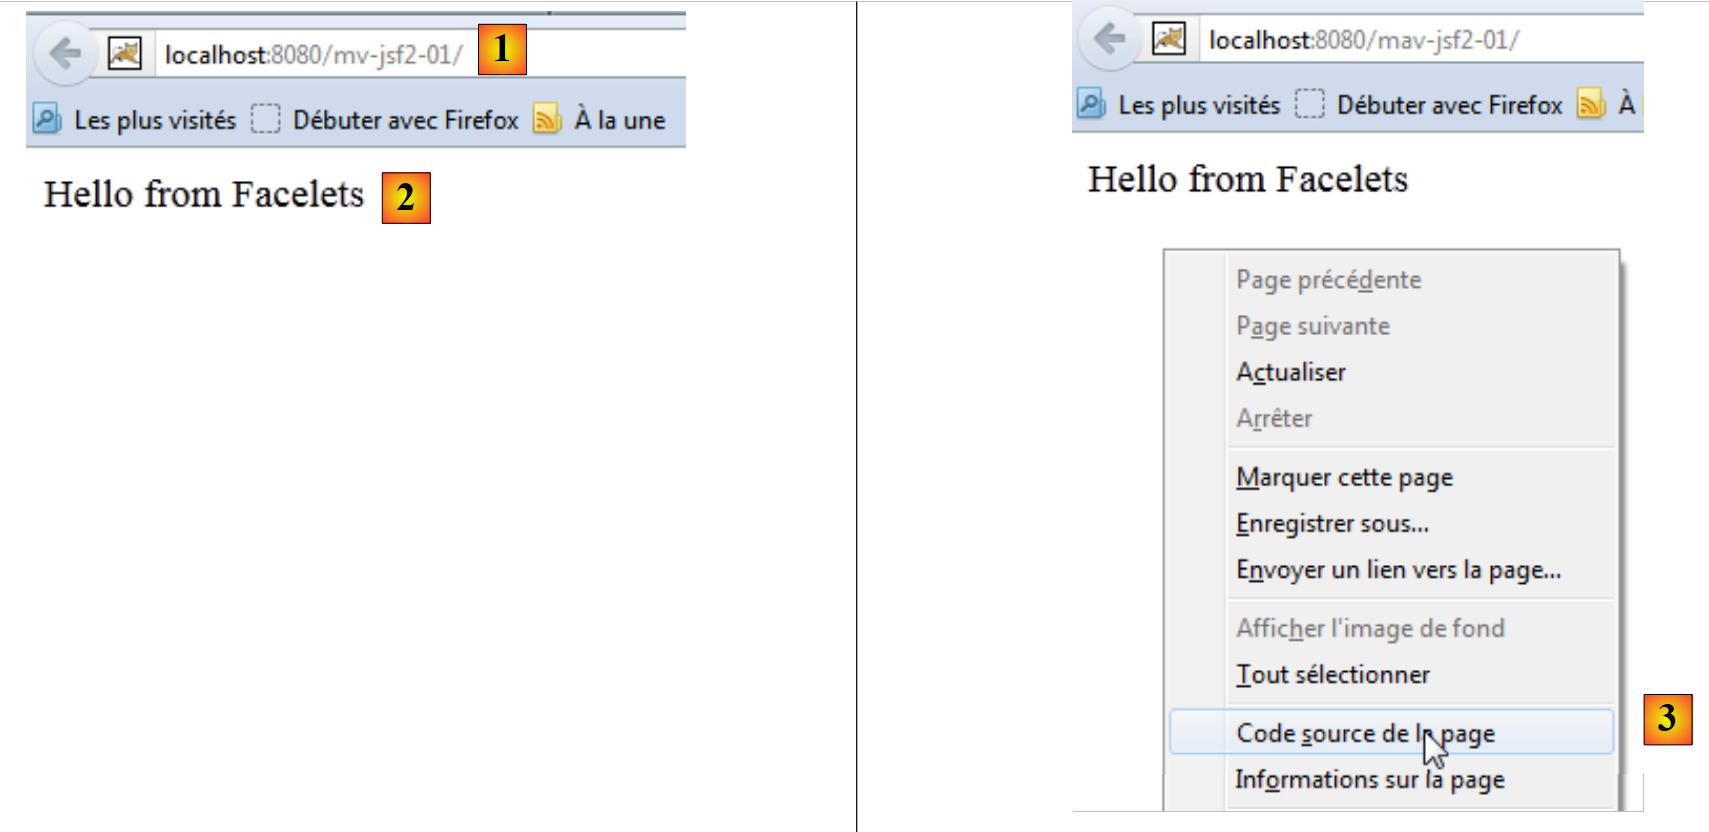 |
- In [1], the context was requested without specifying a document,
- in [2], as explained, the welcome page (welcome-file) [index.xhtml] is served.
You might be curious to look at the received source code [3]:
We received HTML. All <h:xx> tags from index.xhtml have been translated into their HTML counterparts.
2.3.6. The Local Maven Repository
We mentioned that Maven downloads the dependencies required for the project and stores them locally. You can explore this local repository:
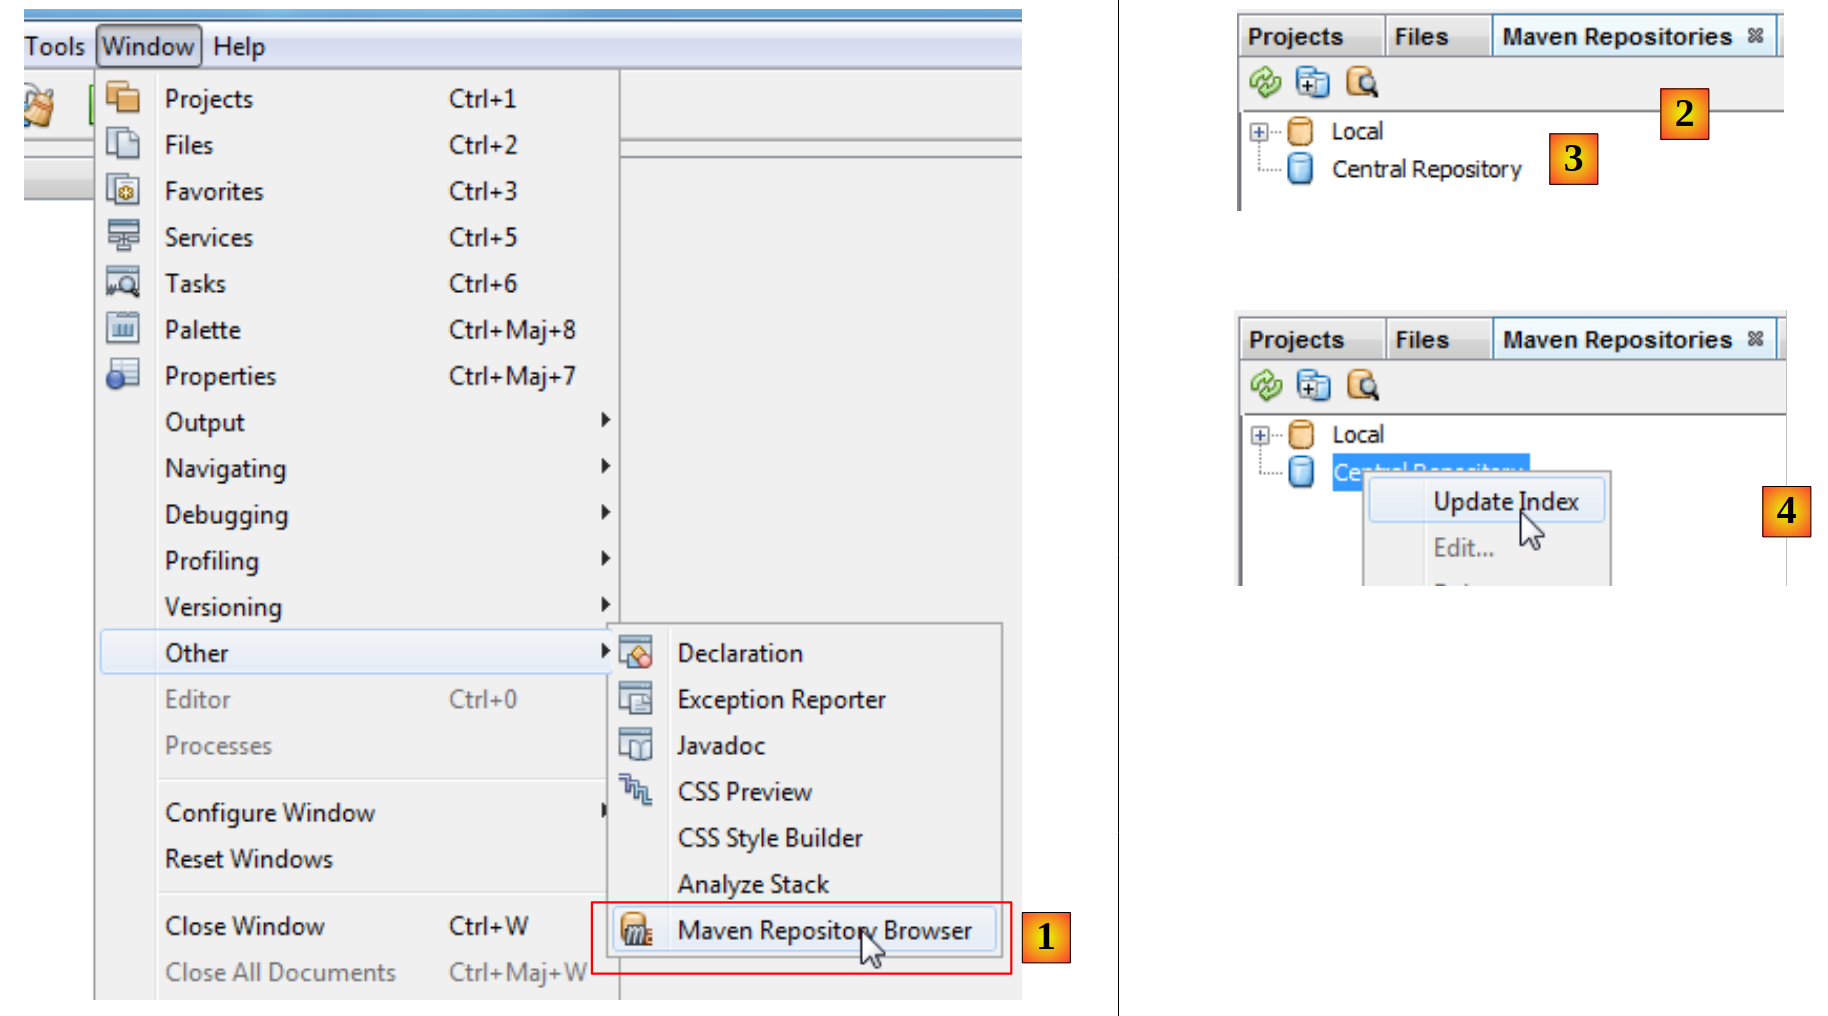 |
- In [1], select option [Window / Other / Maven Repository Browser],
- in [2], a [Maven Repositories] tab opens,
- in [3], it contains two branches, one for the local repository, the other for the central repository. The latter is enormous. To view its contents, you must update its index [4]. This update takes several tens of minutes.
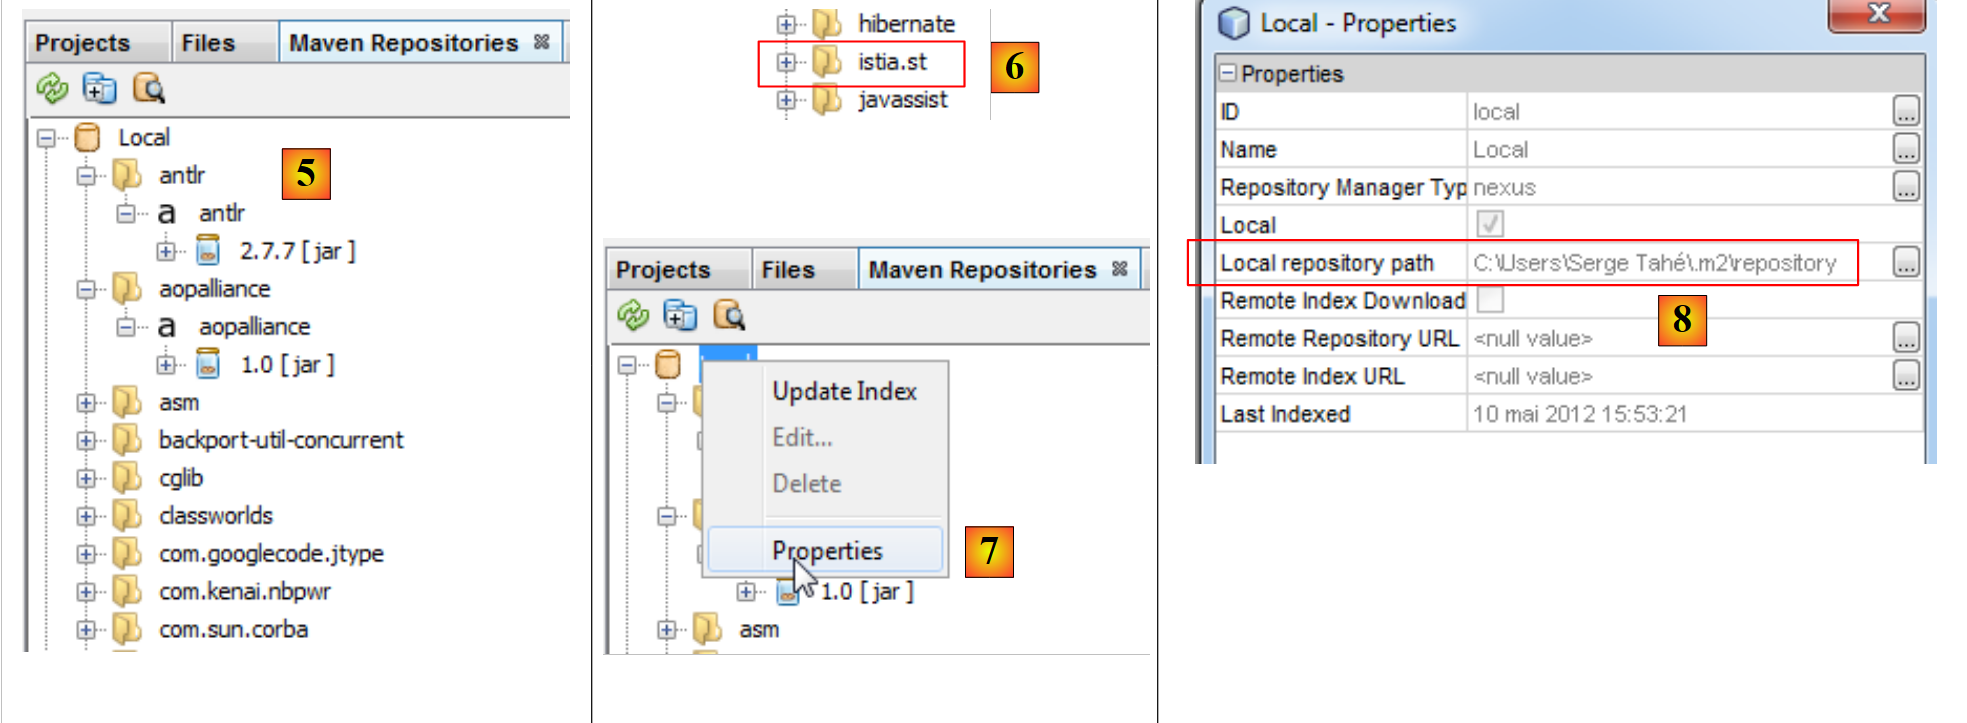 |
- In [5], the libraries from the local repository,
- in [6], there is a branch [istia.st] that corresponds to [groupId] in our project,
- in [7], we access the local repository properties,
- In [8], we have the path to the local repository. It is useful to know this because sometimes (rarely) Maven no longer uses the latest version of the project. We make changes and notice that they aren’t being applied. We can then manually delete the local repository branch corresponding to our [groupId]. This forces Maven to recreate the branch from the project’s latest version.
2.3.7. Searching for an artifact with Maven
Now let’s learn how to search for an artifact with Maven. Let’s start with the list of current dependencies in the [pom.xml] file:
<project xmlns="http://maven.apache.org/POM/4.0.0" xmlns:xsi="http://www.w3.org/2001/XMLSchema-instance"
         xsi:schemaLocation="http://maven.apache.org/POM/4.0.0 http://maven.apache.org/xsd/maven-4.0.0.xsd">
  <modelVersion>4.0.0</modelVersion>

  <groupId>istia.st</groupId>
  <artifactId>mv-jsf2-01</artifactId>
  <version>1.0-SNAPSHOT</version>
  <packaging>war</packaging>

  <name>mv-jsf2-01</name>

  ...
  <dependencies>
    <dependency>
      <groupId>com.sun.faces</groupId>
      <artifactId>jsf-api</artifactId>
      <version>2.1.1-b04</version>
    </dependency>
    <dependency>
      <groupId>com.sun.faces</groupId>
      <artifactId>jsf-impl</artifactId>
      <version>2.1.1-b04</version>
    </dependency>
    <dependency>
      <groupId>javax.servlet</groupId>
      <artifactId>jstl</artifactId>
      <version>1.1.2</version>
    </dependency>
    <dependency>
      <groupId>taglibs</groupId>
      <artifactId>standard</artifactId>
      <version>1.1.2</version>
    </dependency>
    <dependency>
      <groupId>javax</groupId>
      <artifactId>javaee-web-api</artifactId>
      <version>6.0</version>
      <scope>provided</scope>
    </dependency>
  </dependencies>

  <build>
    ...
  </build>
  <repositories>
    <repository>
      <url>http://download.java.net/maven/2/</url>
      <id>jsf20</id>
      <layout>default</layout>
      <name>Repository for library Library[jsf20]</name>
    </repository>
    <repository>
      <url>http://repo1.maven.org/maven2/</url>
      <id>jstl11</id>
      <layout>default</layout>
      <name>Repository for library Library[jstl11]</name>
    </repository>
  </repositories>
</project>
Lines 13–40 define dependencies, and lines 45–58 specify the repositories where they can be found, in addition to the central repository, which is always used. We will modify the dependencies to use the libraries in their most recent version, version.
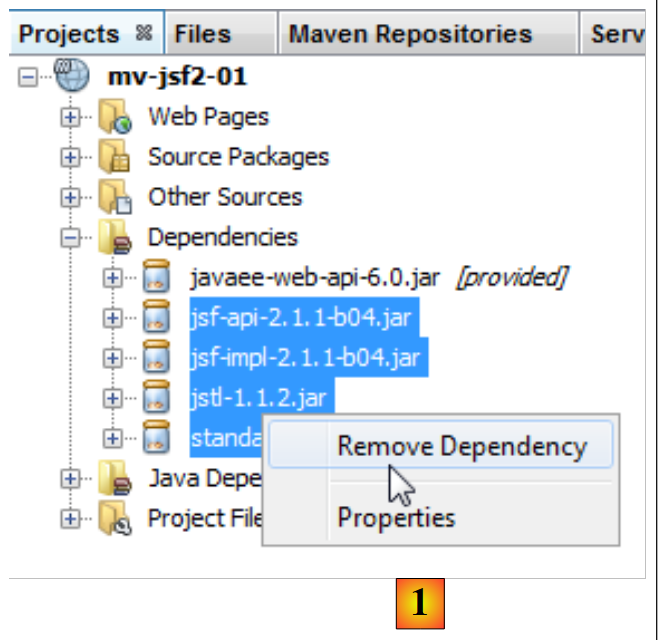 |
First, we remove the current [1] dependencies. The [pom.xml] file is then modified:
<project xmlns="http://maven.apache.org/POM/4.0.0" xmlns:xsi="http://www.w3.org/2001/XMLSchema-instance"
         xsi:schemaLocation="http://maven.apache.org/POM/4.0.0 http://maven.apache.org/xsd/maven-4.0.0.xsd">
    <modelVersion>4.0.0</modelVersion>
...
    <dependencies>
        <dependency>
            <groupId>javax</groupId>
            <artifactId>javaee-web-api</artifactId>
            <version>6.0</version>
            <scope>provided</scope>
        </dependency>
    </dependencies>
...
    <repositories>
        <repository>
            <url>http://download.java.net/maven/2/</url>
            <id>jsf20</id>
            <layout>default</layout>
            <name>Repository for library Library[jsf20]</name>
        </repository>
        <repository>
            <url>http://repo1.maven.org/maven2/</url>
            <id>jstl11</id>
            <layout>default</layout>
            <name>Repository for library Library[jstl11]</name>
        </repository>
    </repositories>
</project>
Lines 5–12: The removed dependencies no longer appear in [pom.xml]. Now, let’s search for them in the Maven repositories.
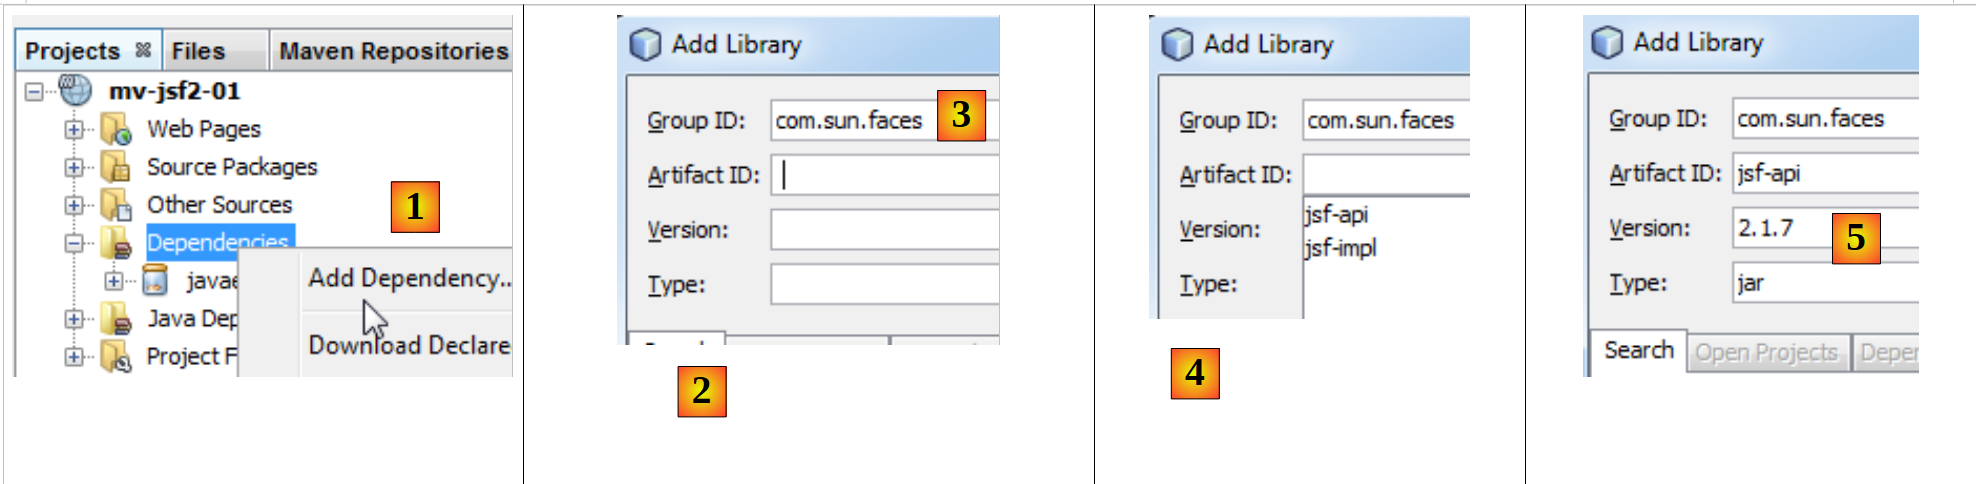 |
- In [1], we add a dependency to the project;
- in [2], we must specify information about the artifact being searched for (groupId, artifactId, version, packaging (Type), and scope). We start by specifying [groupId] [3],
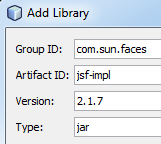
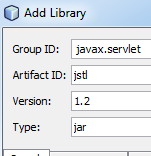
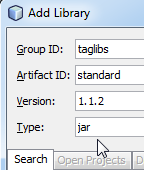
- in [4], we type [espace] to display the list of possible artifacts. Here, [jsf-api] and [jsf-impl]. We select [jsf-api],
- then [5]; following the same procedure, we select the most recent version. The packaging type is jar.
We proceed in this manner for all artifacts:
 |  |  |  |
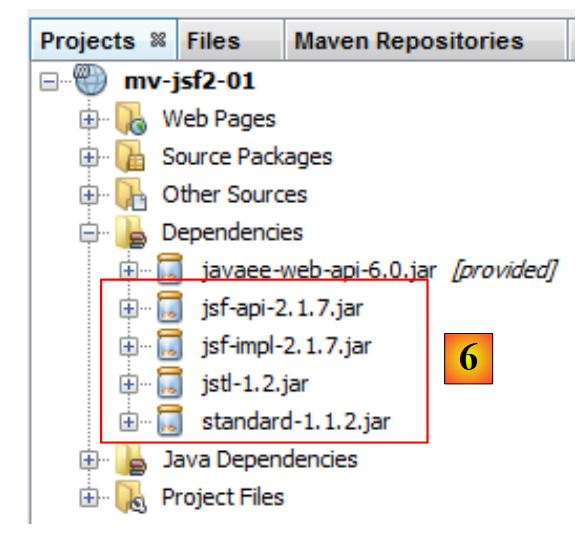 |
In [6], the added dependencies appear in the project. The [pom.xml] file reflects these changes:
<dependencies>
        <dependency>
            <groupId>com.sun.faces</groupId>
            <artifactId>jsf-api</artifactId>
            <version>2.1.7</version>
            <type>jar</type>
        </dependency>
        <dependency>
            <groupId>com.sun.faces</groupId>
            <artifactId>jsf-impl</artifactId>
            <version>2.1.7</version>
            <type>jar</type>
        </dependency>
        <dependency>
            <groupId>javax.servlet</groupId>
            <artifactId>jstl</artifactId>
            <version>1.2</version>
            <type>jar</type>
        </dependency>
        <dependency>
            <groupId>taglibs</groupId>
            <artifactId>standard</artifactId>
            <version>1.1.2</version>
            <type>jar</type>
        </dependency>
        <dependency>
            <groupId>javax</groupId>
            <artifactId>javaee-web-api</artifactId>
            <version>6.0</version>
            <scope>provided</scope>
        </dependency>
    </dependencies>
Now suppose we don’t know the artifact ID of the desired artifact. For example, we want to use Hibernate as an ORM (Object Relational Mapper), and that’s all we know. We can then go to the [http://mvnrepository.com/] website:
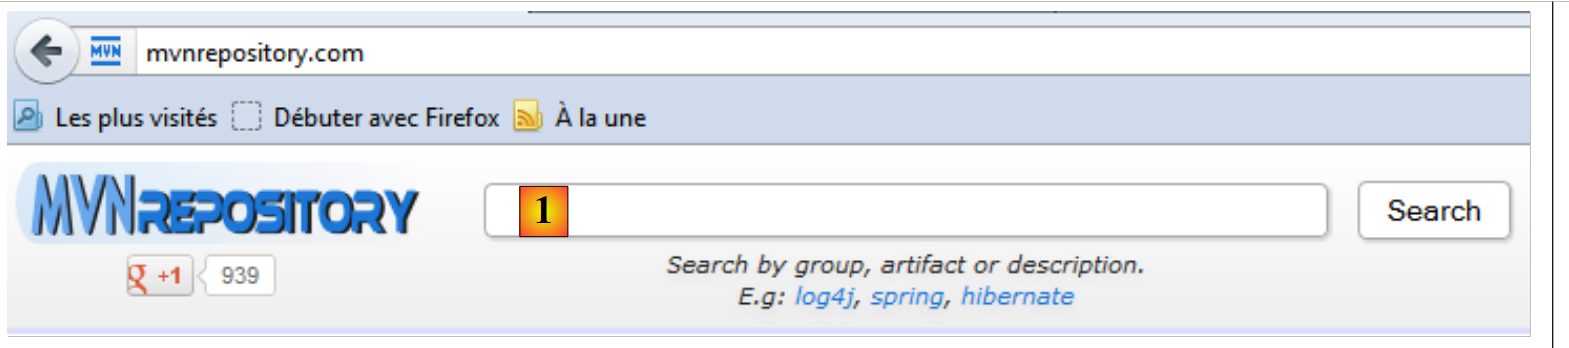 |
In [1], you can enter keywords. Type in "hibernate" and run the search.
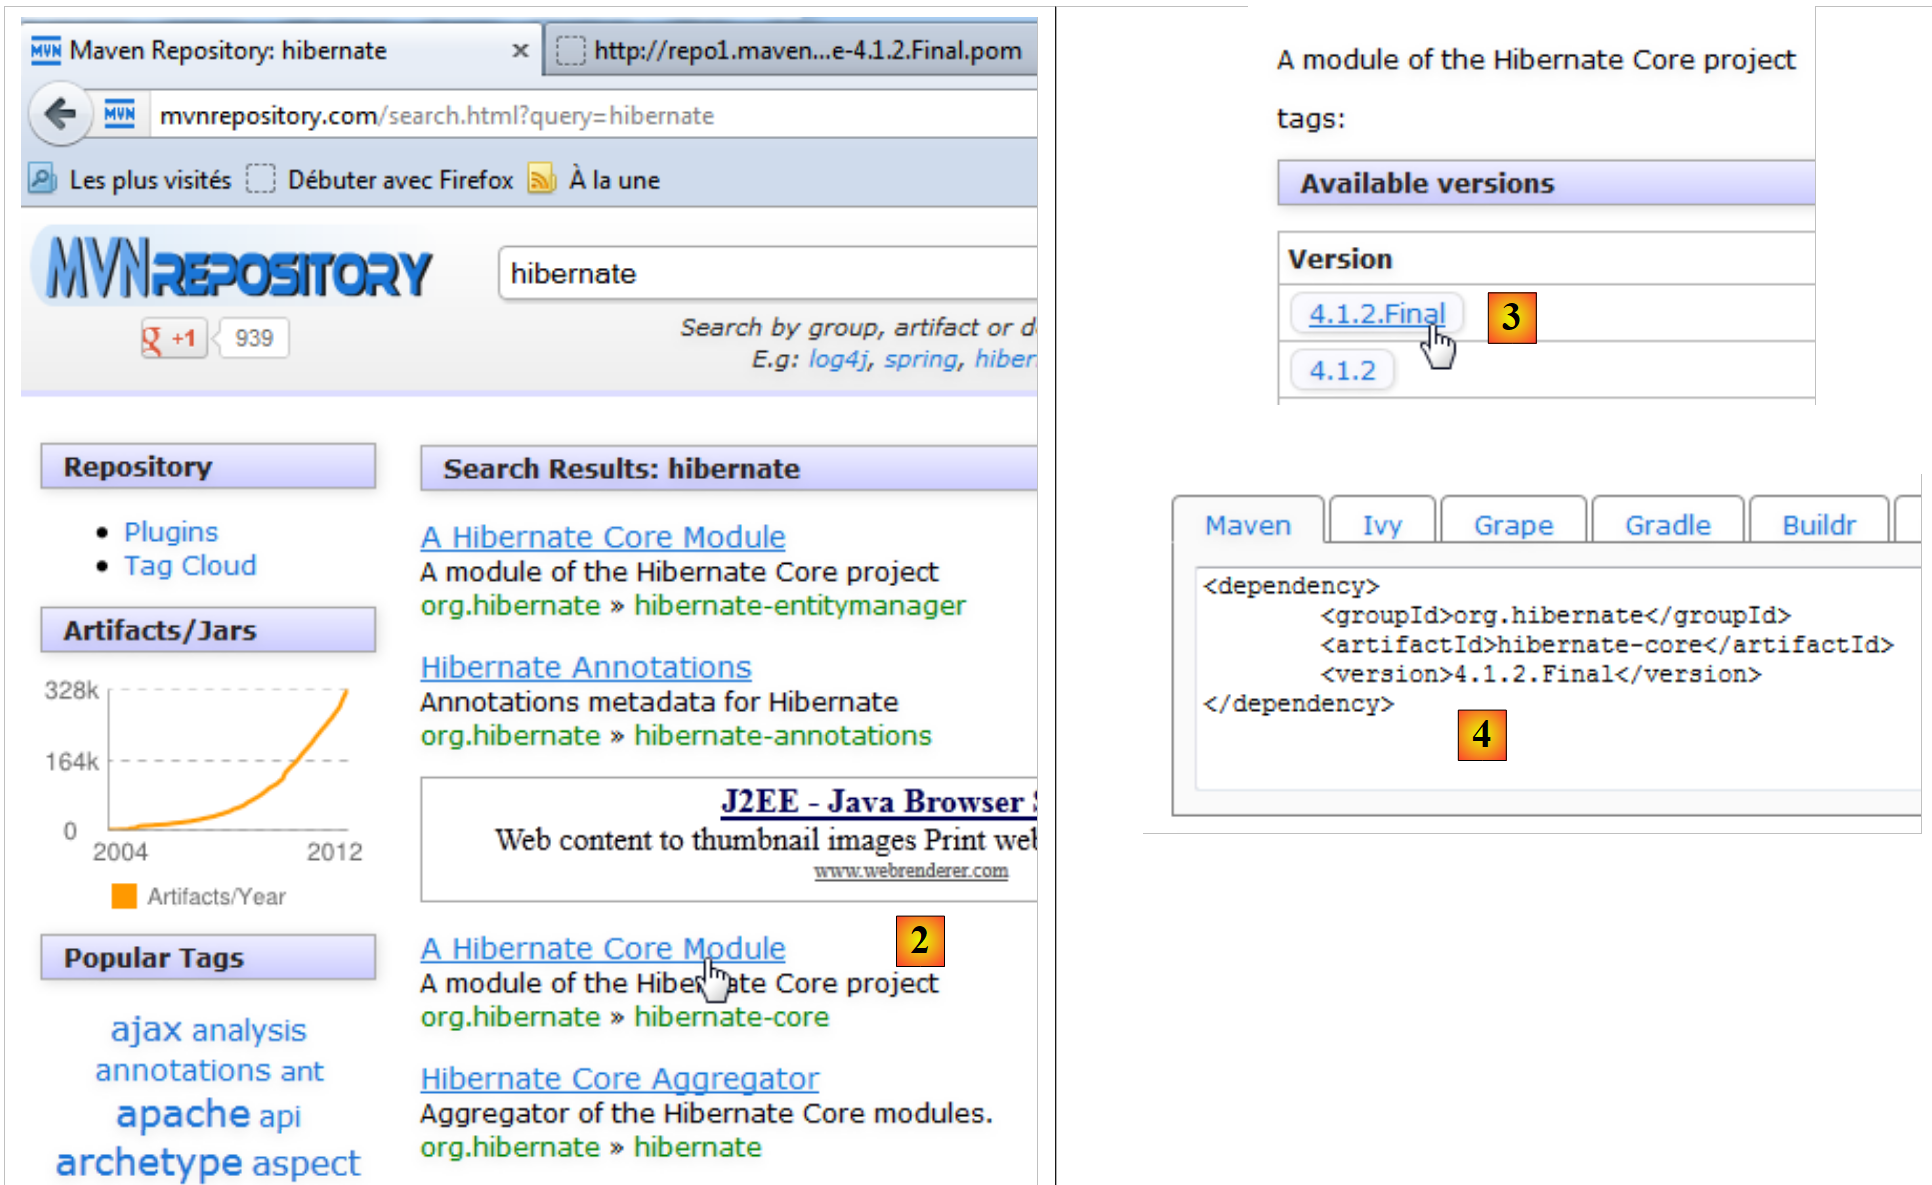 |
- In [2], let’s choose the [groupId], org.hibernate, and [artifactId] “hibernate-core”,
- in [3], let’s choose version 4.1.2-Final,
- in [4], we get the Maven code to paste into the [pom.xml] file. We do so.
<dependencies>
    <dependency>
      <groupId>org.hibernate</groupId>
      <artifactId>hibernate-core</artifactId>
      <version>4.1.2.Final</version>
    </dependency>
    <dependency>
      <groupId>com.sun.faces</groupId>
      <artifactId>jsf-api</artifactId>
      <version>2.1.7</version>
      <type>jar</type>
    </dependency>
    ...
  </dependencies>
We save the file [pom.xml]. Maven then begins downloading the new dependencies. The project evolves as follows:
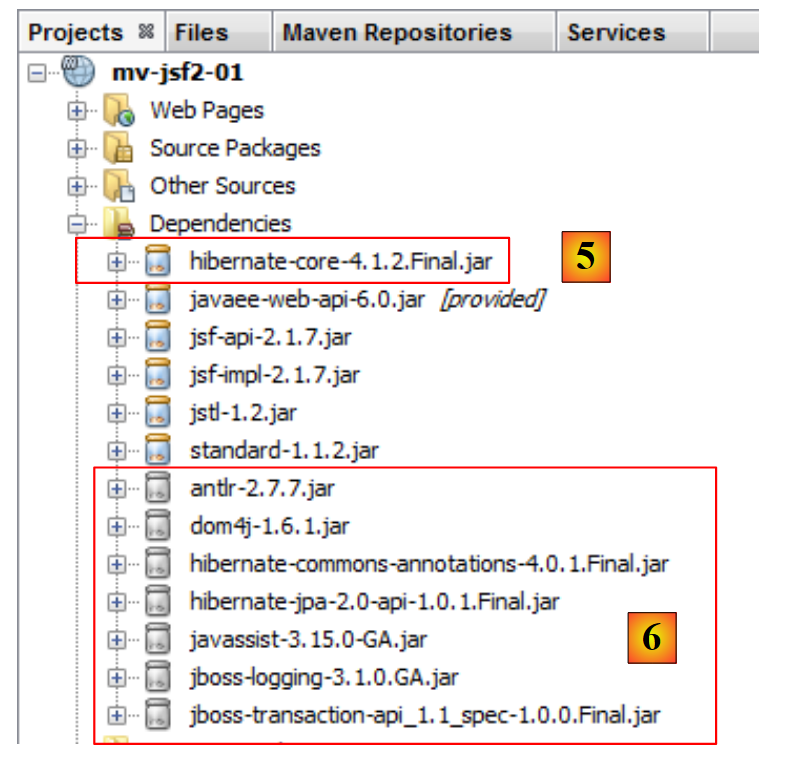 |
- in [5], the dependency [hibernate-core-4.1.2-Final]. In the repository where it was found, this [artifactId] is also described by a file named [pom.xml]. This file was read, and Maven discovered that [artifactId] had dependencies. It downloads those as well. It will do this for every downloaded [artifactId]. Ultimately, [6] contains dependencies that we did not request directly. They are indicated by an icon different from that of the main [artifactId].
In this document, we use Maven primarily for this feature. This saves us from having to know all the dependencies of a library we want to use. We let Maven manage them. Furthermore, by sharing a [pom.xml] file among developers, we ensure that every developer is using the same libraries.
In the examples that follow, we will simply provide the [pom.xml] file used. The reader need only use it to replicate the conditions described in the document. Furthermore, Maven projects are supported by the major Java IDEs (Eclipse, IntelliJ IDEA, Visual Studio, JDeveloper). Readers can therefore use their favorite IDE to test the examples.
2.4. Example mv-jsf2-02: event handler – internationalization - navigation between pages
2.4.1. The application
The application is as follows:
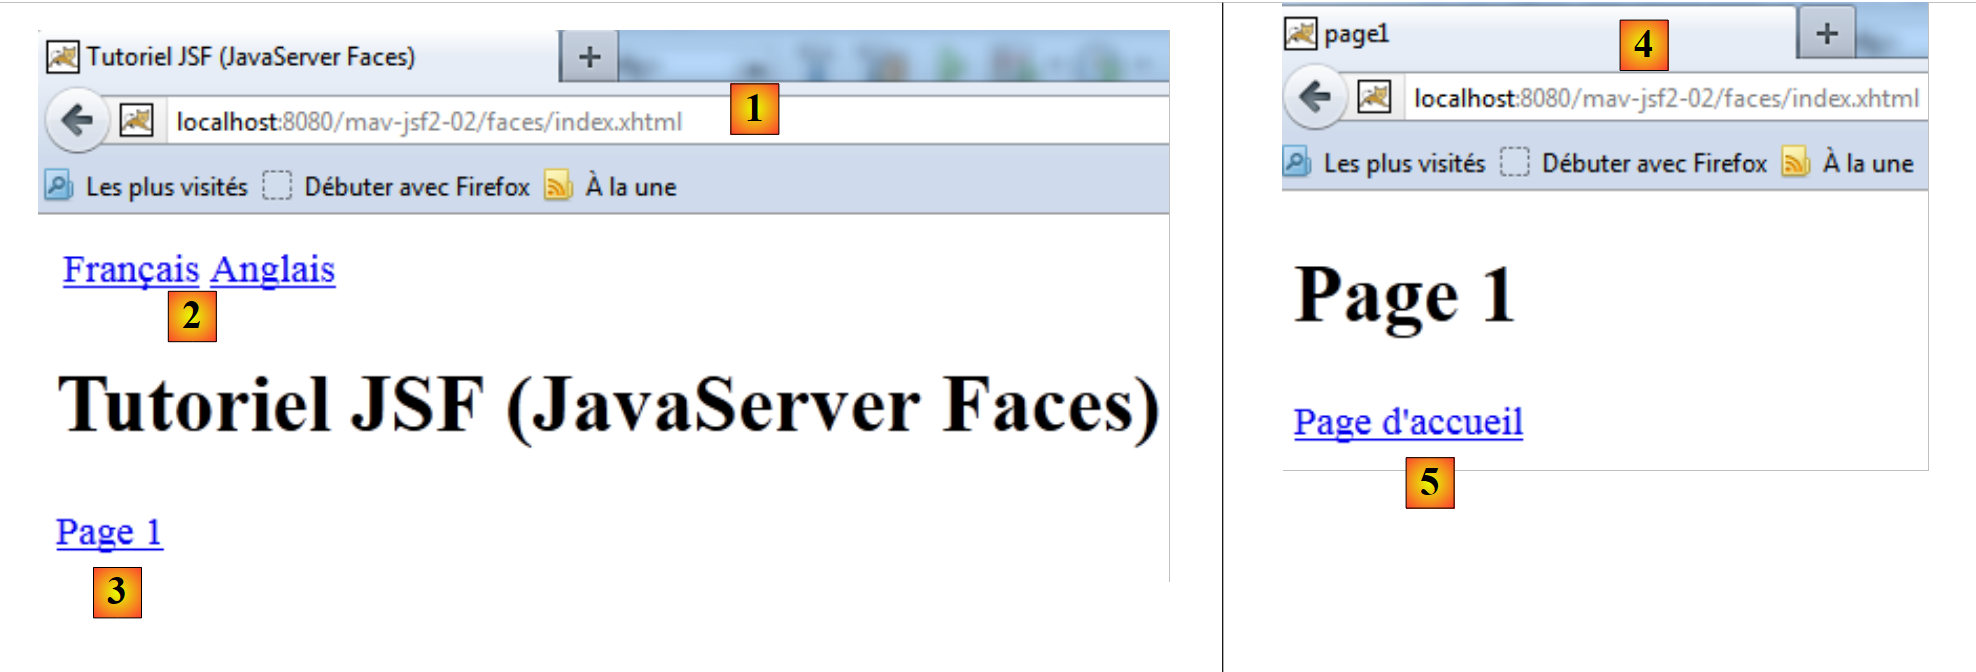 |
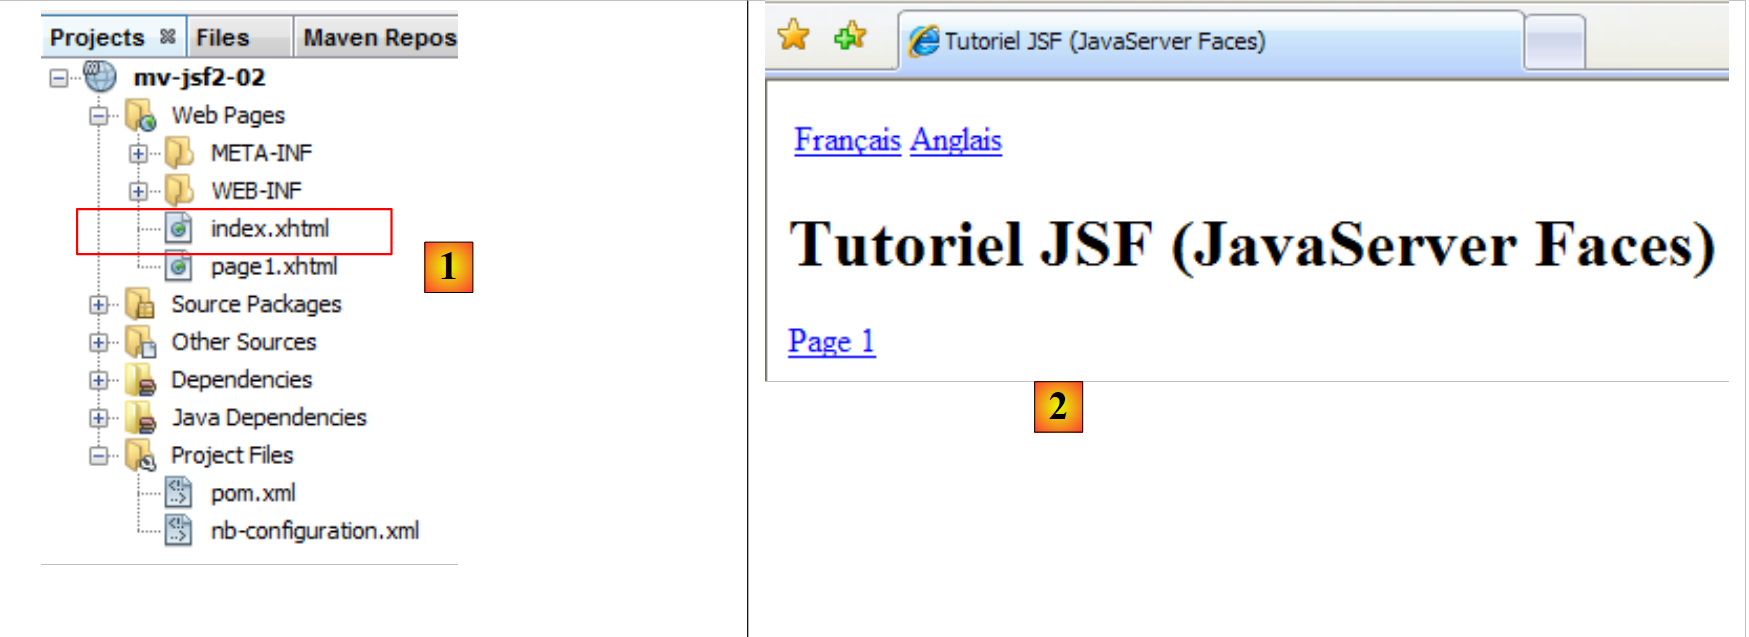
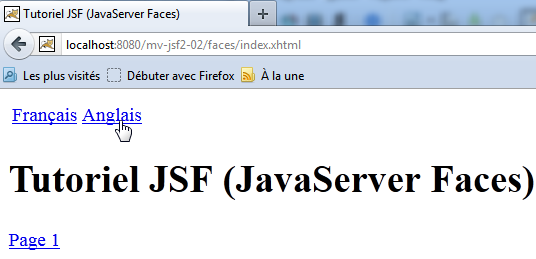
- in [1], the application's home page,
- in [2], two links to change the language of the application pages,
- in [3], a link from navigation to another page,
- when you click on [3], the page [4] is displayed,
- the link [5] takes you back to the home page.
 |
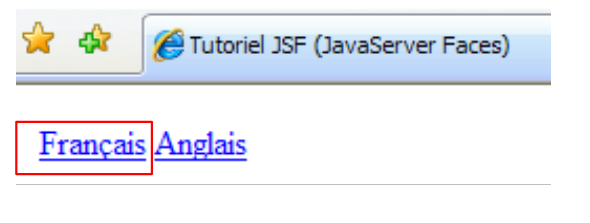
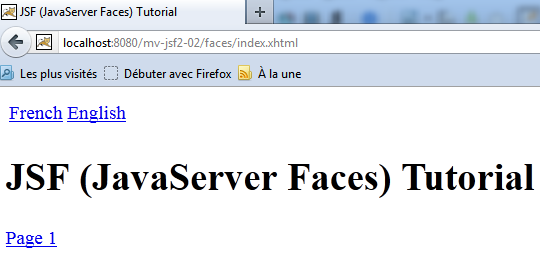
- On the [1] homepage, the [2] links allow you to change the language,
- on [3], the English home page.
2.4.2. The Netbeans project
We will generate a new web project as explained in section 2.3.1. We will name it mv-jsf2-02:
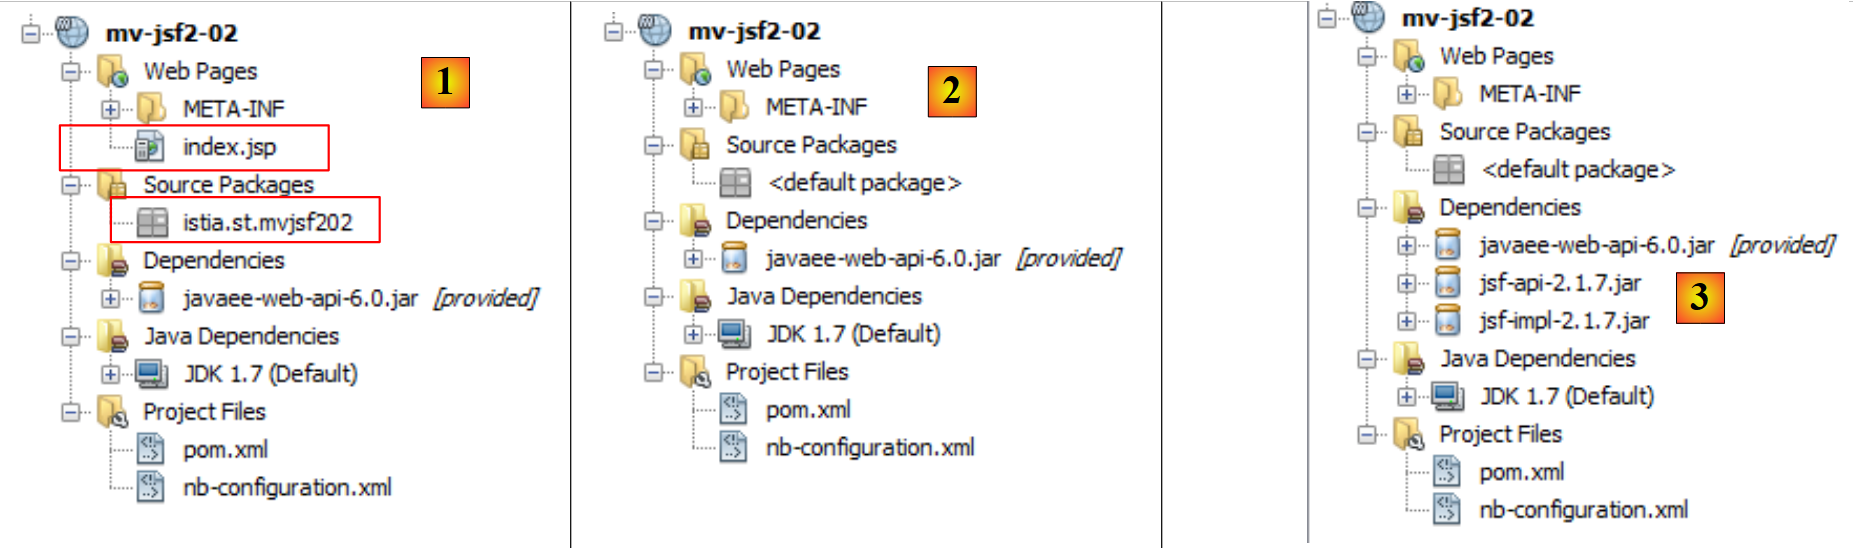 |
- in [1], the generated project,
- in [2], we removed the [istia.st.mvjsf202] package and the [index.jsp] file,
- in [3], we added Maven dependencies using the following [pom.xml] file:
<dependencies>
        <dependency>
            <groupId>com.sun.faces</groupId>
            <artifactId>jsf-api</artifactId>
            <version>2.1.7</version>
        </dependency>
        <dependency>
            <groupId>com.sun.faces</groupId>
            <artifactId>jsf-impl</artifactId>
            <version>2.1.7</version>
        </dependency>
        <dependency>
            <groupId>javax</groupId>
            <artifactId>javaee-web-api</artifactId>
            <version>6.0</version>
            <scope>provided</scope>
        </dependency>
    </dependencies>
The added dependencies are those of the JSF framework. Simply copy the lines above into the [pom.xml] file to replace the old dependencies.
 |
- In [4, 5]: create a folder named [src / main / resources] in the [Files] tab,
- in [6], within the [Projects] tab, this created the [Other Sources] branch.
We now have a project named JSF. In it, we will create different types of files:
- web pages in XHTML format,
- Java classes,
- message files,
- the project configuration file JSF.
Let’s see how to create each type of file:
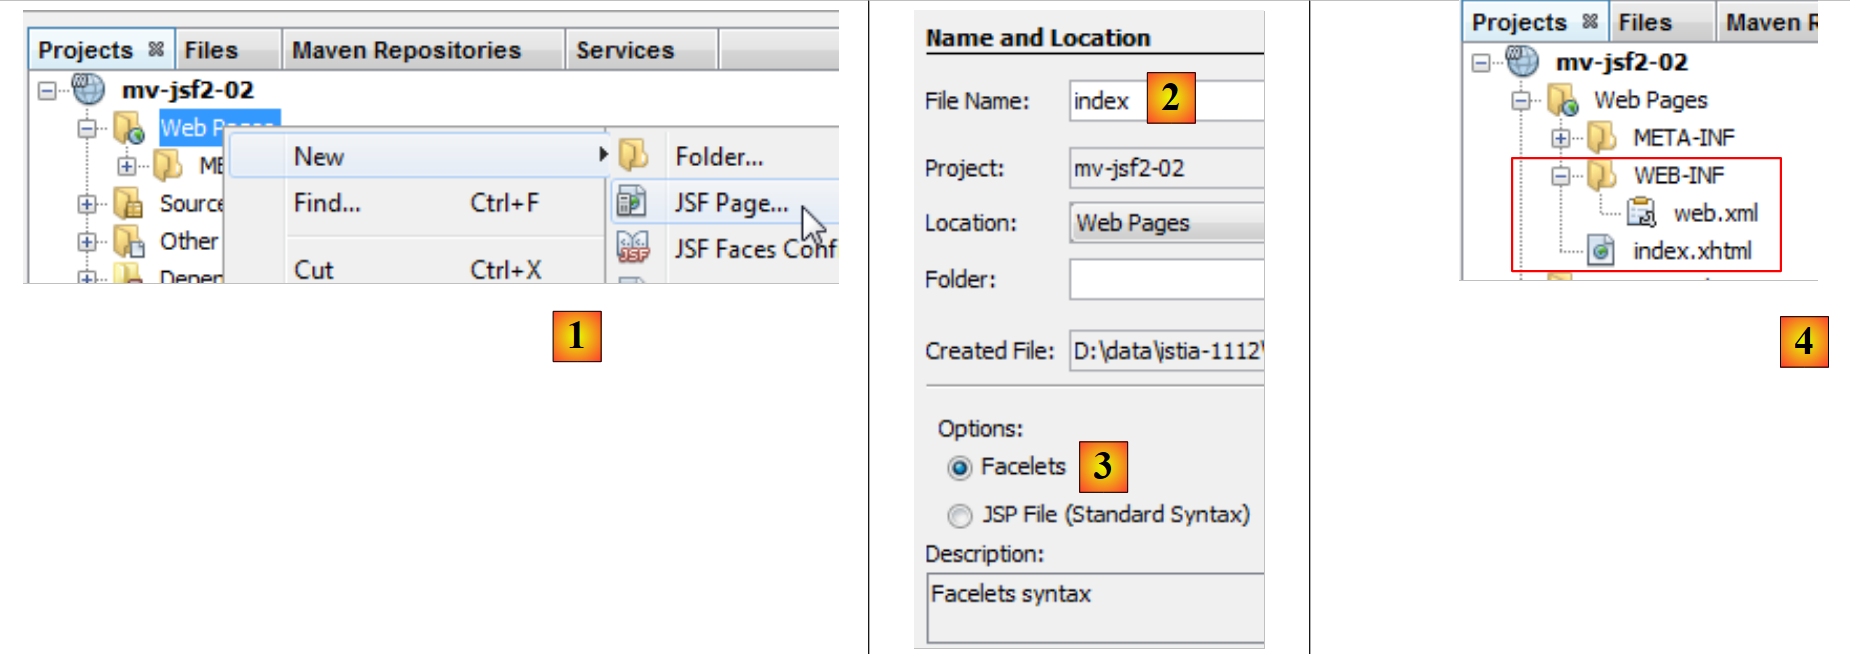 |
- in [1], we create a page JSF
- in [2], we create a [index.xhtml] page in [Facelets] format [3],
- in [4], two files were created: [index.xhtml] and [WEB-INF / web.xml].
The file [web.xml] configures the application JSF. It is as follows:
<?xml version="1.0" encoding="UTF-8"?>
<web-app version="3.0" xmlns="http://java.sun.com/xml/ns/javaee" xmlns:xsi="http://www.w3.org/2001/XMLSchema-instance" xsi:schemaLocation="http://java.sun.com/xml/ns/javaee http://java.sun.com/xml/ns/javaee/web-app_3_0.xsd">
    <context-param>
        <param-name>javax.faces.PROJECT_STAGE</param-name>
        <param-value>Development</param-value>
    </context-param>
    <servlet>
        <servlet-name>Faces Servlet</servlet-name>
        <servlet-class>javax.faces.webapp.FacesServlet</servlet-class>
        <load-on-startup>1</load-on-startup>
    </servlet>
    <servlet-mapping>
        <servlet-name>Faces Servlet</servlet-name>
        <URL-pattern>/faces/*</URL-pattern>
    </servlet-mapping>
    <session-config>
        <session-timeout>
            30
        </session-timeout>
    </session-config>
    <welcome-file-list>
        <welcome-file>faces/index.xhtml</welcome-file>
    </welcome-file-list>
</web-app>
We have already discussed this file in section 2.3.4. Let’s review its main properties:
- all files of the type faces/* are processed by the [javax.faces.webapp.FacesServlet] servlet,
- the [index.xhtml] page is the application’s home page.
The [index.xhtml] file created is as follows:
<?xml version='1.0' encoding='UTF-8' ?>
<!DOCTYPE HTML PUBLIC "-//W3C//DTD XHTML 1.0 Transitional//EN" "http://www.w3.org/TR/xhtml1/DTD/xhtml1-transitional.dtd">
<html xmlns="http://www.w3.org/1999/xhtml"
      xmlns:h="http://java.sun.com/jsf/html">
  <h:head>
    <title>Facelet Title</title>
  </h:head>
  <h:body>
    Hello from Facelets
  </h:body>
</html>
We have already encountered this file in Section 2.3.4.
Now let's create a Java class:
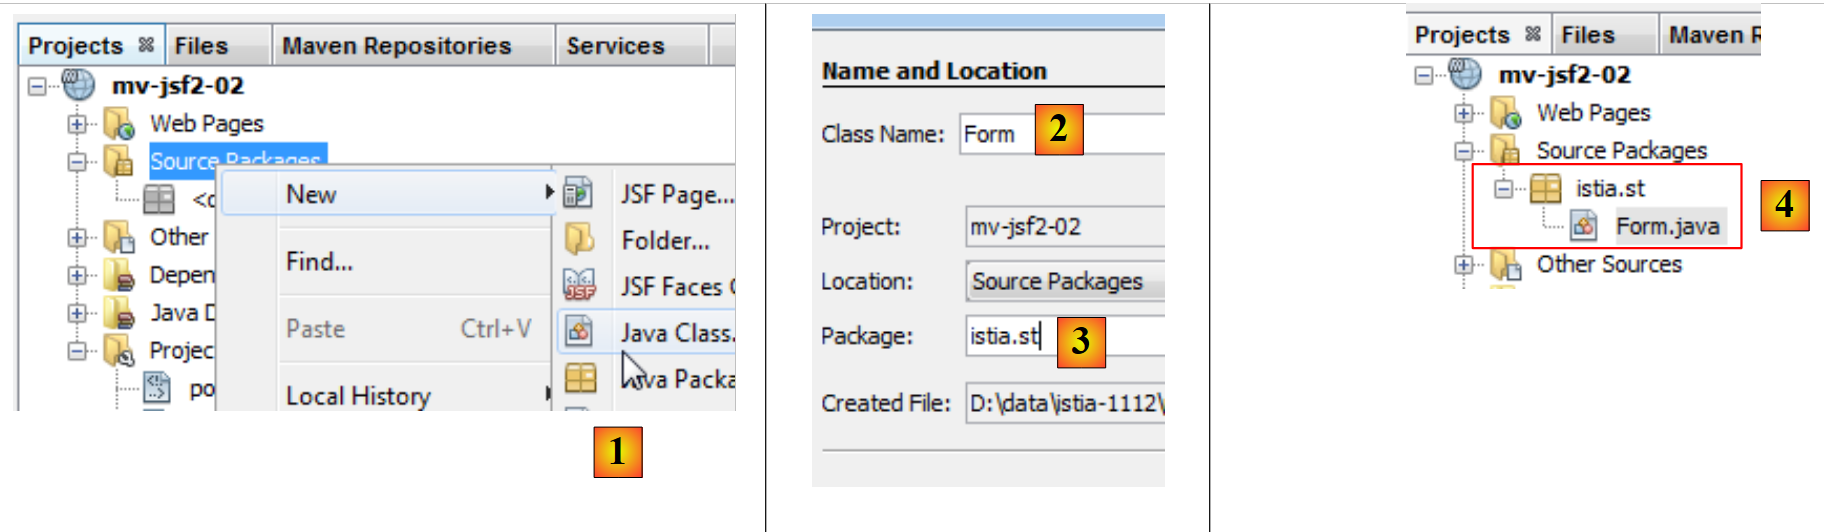 |
- in [1], we create a Java class in the [Source Packages] branch,
- in [2], we give it a name and place it in a package [3],
- In [4], the created class appears in the project.
The code for the created class is a class skeleton:
/*
 * To change this template, choose Tools | Templates
 * and open the template in the editor.
 */
package istia.st;

/**
 *
 * @author Serge Tahé
 */
public class Form {

}
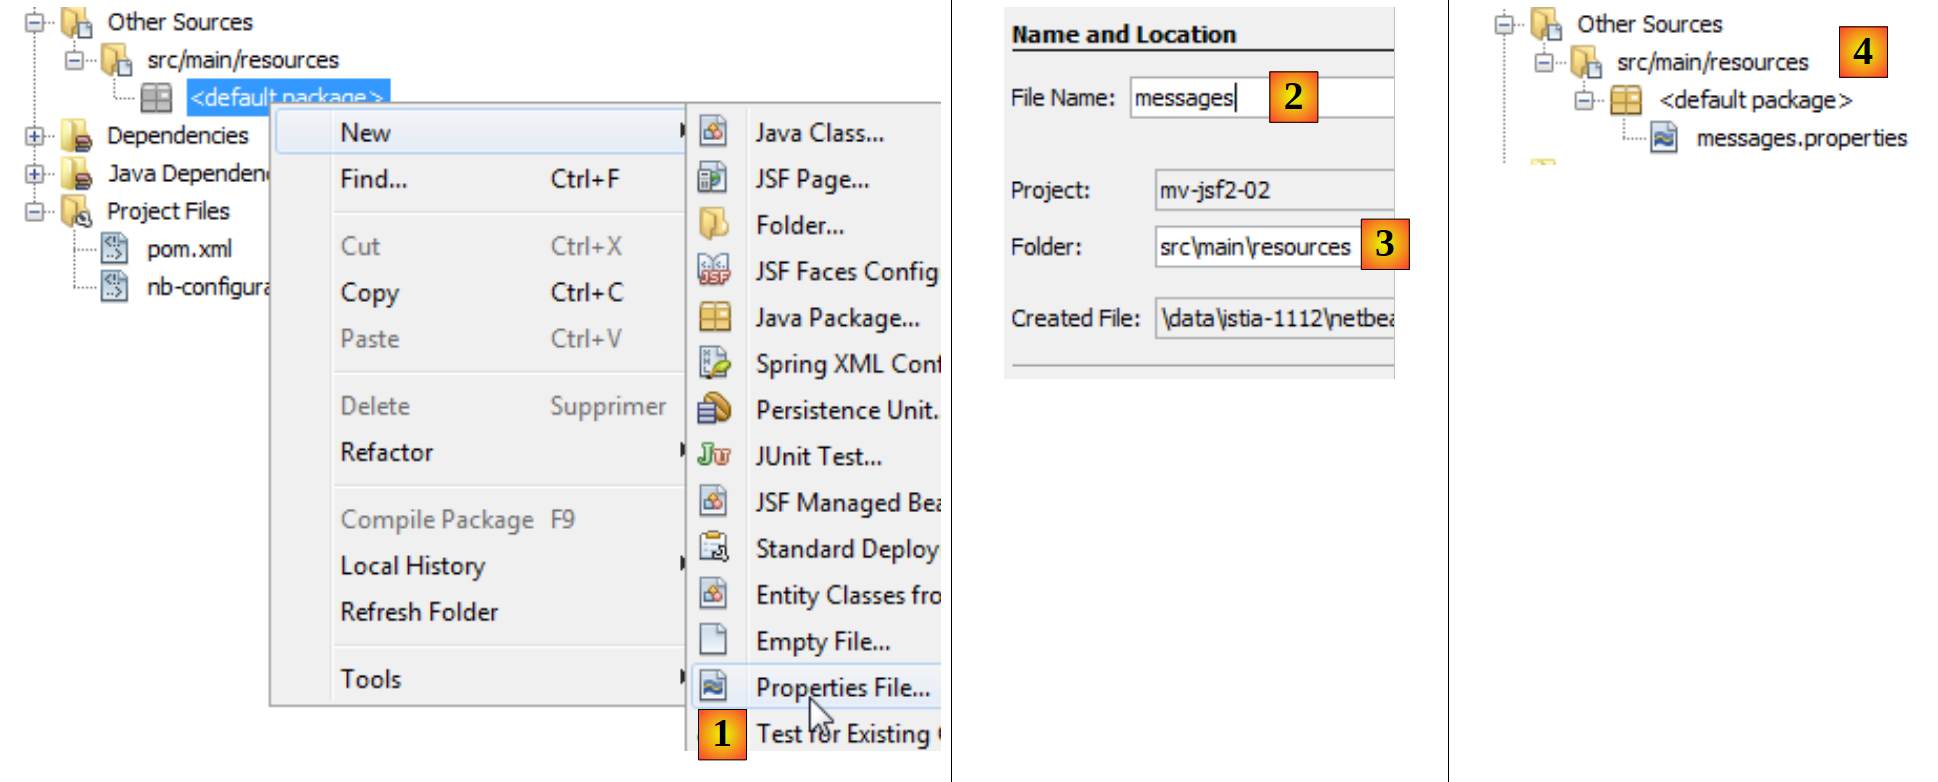
Finally, let's create a message file:
- in [1], create a file named [Properties],
- in [2], we specify the file name, and in [3] its folder,
- in [4], the file [messages.properties] has been created.
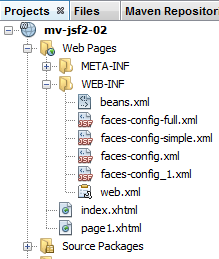
Sometimes, it is necessary to create the file [WEB-INF/faces-config.xml] to configure the project JSF. This file was required with JSF 1. It is optional with JSF 2. However, it is necessary if the JSF site is internationalized. This will be the case later on. So now we will show you how to create this configuration file.
 |
- In [1], we create the configuration file JSF,
- in [2], we specify its name, and in [3] its folder,
- in [4], the file is created.
The created [faces-config.xml] file is as follows:
<?xml version='1.0' encoding='UTF-8'?>

<!-- =========== FULL CONFIGURATION FILE ================================== -->

<faces-config version="2.0"
    xmlns="http://java.sun.com/xml/ns/javaee"
    xmlns:xsi="http://www.w3.org/2001/XMLSchema-instance"
    xsi:schemaLocation="http://java.sun.com/xml/ns/javaee http://java.sun.com/xml/ns/javaee/web-facesconfig_2_0.xsd">


</faces-config>
The root tag is <faces-config>. The body of this tag is empty. We will need to fill it in.
We now have all the elements needed to create a JSF project. In the examples that follow, we present the complete JSF project and then detail its elements one by one. We now present a project to explain the concepts:
- form event handling,
- internationalization of pages on a JSF site,
- inter-page navigation in navigation.
The [mv-jsf2-02] project is as follows. The reader can find it on the examples site (see section 1.2).
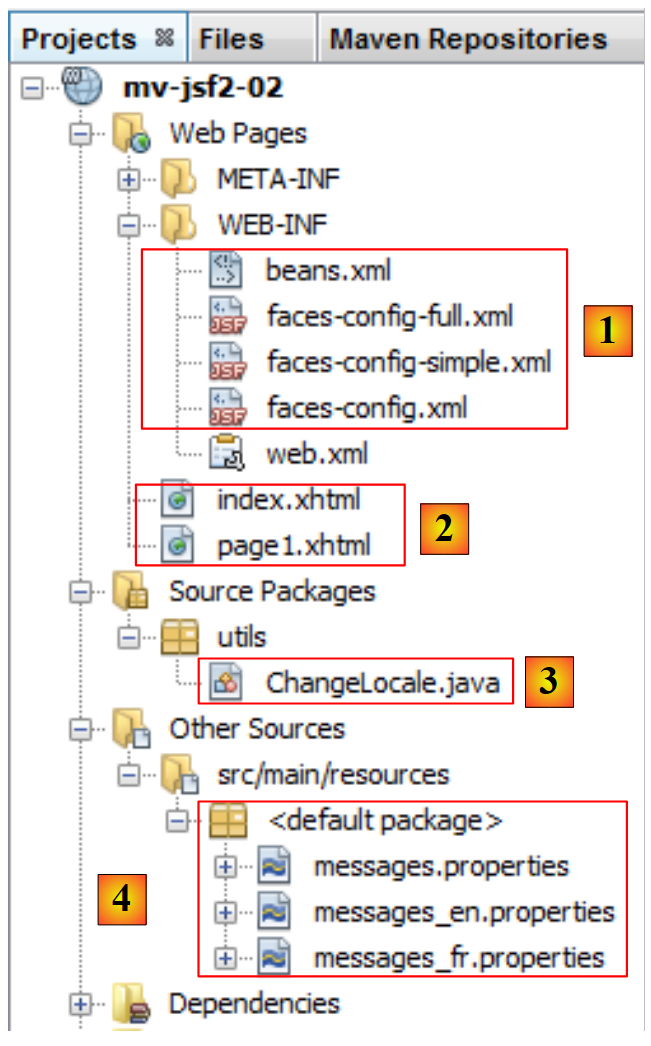 |
- in [1], the configuration files of the JSF project,
- in [2], the project’s JSF pages,
- in [3], the single Java class,
- into [4], the message files.
2.4.3. The page [index.xhtml]
The file [index.xhtml] [1] sends the page [2] to the client browser:
 |
The code that generates this page is as follows:
<?xml version='1.0' encoding='UTF-8' ?>
<!DOCTYPE HTML PUBLIC "-//W3C//DTD XHTML 1.0 Transitional//EN" "http://www.w3.org/TR/xhtml1/DTD/xhtml1-transitional.dtd">
<html xmlns="http://www.w3.org/1999/xhtml"
      xmlns:h="http://java.sun.com/jsf/html"
      xmlns:f="http://java.sun.com/jsf/core">
  <f:view locale="#{changeLocale.locale}">
    <head>
      ...
    </head>
    <body>
      ....
    </body>
  </f:view>
</html>
- lines 7-9: the namespaces/tag libraries used by the page. Tags prefixed with h are HTML tags, while tags prefixed with f are specific to JSF,
- line 10: the <f:view> tag is used to delimit the code that the JSF engine must process, where the <f:xx> tags appear. The locale attribute allows you to specify a display language for the page. Here, we will use two: English and French. The value of the locale attribute is expressed as a EL (Expression Language) expression #{expression}. The form of the expression can vary. We will most often express it in the form bean['clé'] or bean.champ. In our examples, bean will be either a Java class or a message file. With JSF 1, these beans had to be declared in the [faces-config.xml] file. With JSF 2, this is no longer mandatory for Java classes. You can now use annotations that make a Java class a bean recognized by JSF 2. The message file must be declared in the configuration file [faces-config.xml].
2.4.4. The [changeLocale] bean
In the expression EL #{changeLocale.locale}:
- changeLocale is the name of a bean, in this case the Java class ChangeLocale,
- locale is a field of the ChangeLocale class. The expression is evaluated by [ChangeLocale].getLocale(). In general, the expression #{bean.champ} is evaluated as [Bean].getChamp(), where [Bean] is an instance of the Java class named bean and getChamp is the getter associated with the bean’s field.
The ChangeLocale class is as follows:
package utils;

import java.io.Serializable;
import javax.faces.bean.ManagedBean;
import javax.enterprise.context.SessionScoped;

@ManagedBean
@SessionScoped
public class ChangeLocale implements Serializable{
  // page locale
  private String locale="fr";

  public ChangeLocale() {
  }

  ...
  public String getLocale() {
    return locale;
  }

}
- line 11: the locale field,
- line 17: its getter,
- line 7: the annotation ManagedBean makes the Java class ChangeLocale a bean recognized by JSF. A bean is identified by a name. This can be set by the name attribute of the annotation: @ManagedBean(name= "xx "). If the name attribute is absent, the class name is used with its first character lowercased. The name of the ChangeLocale bean is therefore changeLocale. Note that the annotation ManagedBean belongs to the package javax.faces.bean.ManagedBean and not to the package javax.annotations.ManagedBean.
- Line 8: The annotation SessionScoped defines the bean’s scope. There are several. We will commonly use the following three:
- RequestScoped: The bean’s lifetime is that of the browser request/server response cycle. If this bean is needed again to process a new request from the same browser or another, it will be instantiated again,
- SessionScoped: The bean’s lifetime is that of a specific client’s session. The bean is initially created to handle one of that client’s requests. It then remains in memory within that client’s session. Such a bean typically stores data specific to a given client. It will be destroyed when the client’s session is destroyed,
- ApplicationScoped: The bean’s lifetime is that of the application itself. A bean with this lifetime is most often shared by all clients instances in the application. It is generally initialized at the start of the application.
These annotations exist in two packages: javax.enterprise.context.SessionScoped (JSF 2) and javax.faces.bean.SessionScoped (JSF 1). Here, we are using the JSF 2 package. This requires us to create the [WEB-INF / beans.xml] file:
 |
This file is automatically generated by Netbeans when importing the [javax.enterprise.context.SessionScoped] package. Its content is as follows:
<?xml version="1.0" encoding="UTF-8"?>
<beans xmlns="http://java.sun.com/xml/ns/javaee"
       xmlns:xsi="http://www.w3.org/2001/XMLSchema-instance"
       xsi:schemaLocation="http://java.sun.com/xml/ns/javaee http://java.sun.com/xml/ns/javaee/beans_1_0.xsd">
</beans>
Apart from the root <beans> tag, the file is empty. That is sufficient. Only its presence is required.
Finally, note that the [ChangeLocale] class implements the [Serializable] interface. This is mandatory for Session-scoped beans that the web server may need to serialize into files. We will return to the [ChangeLocale] bean later.
2.4.5. The message file
Let’s return to the [index.xhtml] file:
<?xml version='1.0' encoding='UTF-8' ?>
<!DOCTYPE HTML PUBLIC "-//W3C//DTD XHTML 1.0 Transitional//EN" "http://www.w3.org/TR/xhtml1/DTD/xhtml1-transitional.dtd">
<html xmlns="http://www.w3.org/1999/xhtml"
      xmlns:h="http://java.sun.com/jsf/html"
      xmlns:f="http://java.sun.com/jsf/core">
  <f:view locale="#{changeLocale.locale}">
    <head>
      <title><h:outputText value="#{msg['welcome.titre']}" /></title>
    </head>
    <body>
    ...
    </body>
  </f:view>
</html>
- line 8: the <h:outputText> tag displays the value of a EL expression #{msg['welcome.titre']} of the form #{bean['champ']}. bean is either the name of a Java class or that of a message file. Here, it is the name of a message file. The latter must be declared in the configuration file [faces-config.xml]. The msg bean is declared as follows:
<?xml version='1.0' encoding='UTF-8'?>

<!-- =========== FULL CONFIGURATION FILE ================================== -->

<faces-config version="2.0"
              xmlns="http://java.sun.com/xml/ns/javaee"
              xmlns:xsi="http://www.w3.org/2001/XMLSchema-instance"
              xsi:schemaLocation="http://java.sun.com/xml/ns/javaee http://java.sun.com/xml/ns/javaee/web-facesconfig_2_0.xsd">


  <application>
    <resource-bundle>
      <base-name>
        messages
      </base-name>
      <var>msg</var>
    </resource-bundle>
  </application>
</faces-config>
- lines 11-18: the <application> tag is used to configure the JSF application,
- lines 12–17: the <resource-bundle> tag is used to define resources for the application, in this case a message file,
- lines 13–15: the <base-name> tag defines the name of the message file,
- line 14: the file will be named messages[_CodeLangue][_CodePays].properties. The <base-name> tag defines only the first part of the name. The rest is implied. There may be multiple message files, one per language:
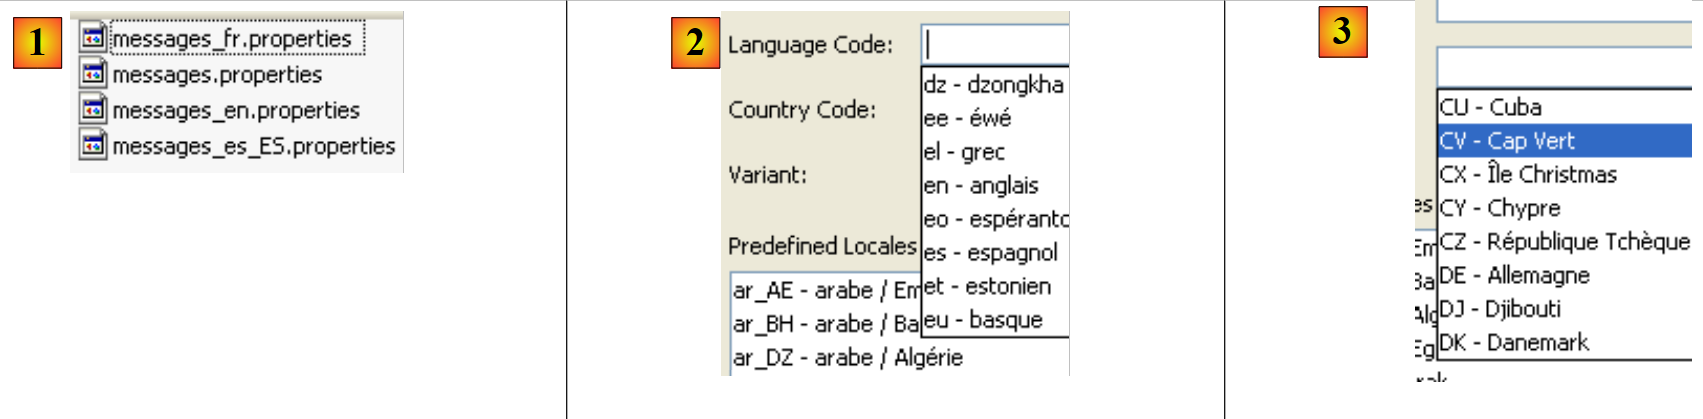 |
- in [1], there are four message files corresponding to the base message name defined in [faces-config.xml],
- messages_fr.properties: contains messages in French (code fr);
- messages_en.properties: contains messages in English (code en);
- messages_es_ES.properties: contains messages in Spanish (code es) from Spain (code ES). There are other variants of Spanish, such as that of Bolivia (es_BO);
- messages.properties: is used by the server when the language of the machine on which it is running has no associated message file. It would be used, for example, if the application were running on a machine in Germany where the default language is German (de). Since there is no [messages_de.properties] file, the application would use the [messages.properties] file,
- in [2]: language codes are subject to an international standard,
- to [3]: the same applies to country codes.
The name of the message file is defined on line 14. It will be searched for in the project’s classpath. If it is inside a package, the package must be defined on line 14, for example ressources.messages, if the file [messages.properties] is located in the [ressources] folder of the Classpath. Since the name on line 14 does not include a package, the file [messages.properties] must be placed at the root of the [src / main / resources] folder:
 |
In [1], on the [Projects] tab of the Netbeans project, the file [messages.properties] is displayed as a list of the different message versions defined. The versions are identified by a sequence of one to three [codeLangue_codePays_codeVariante] codes. In [1], only the code [codeLangue] was used: en for English, fr for French. Each version is stored in a separate file in the file system.
In our example, the French message file [messages_fr.properties] will contain the following:
welcome.titre=Tutoriel JSF (JavaServer Faces)
welcome.langue1=Fran\u00e7ais
welcome.langue2=Anglais
welcome.page1=Page 1
page1.titre=page1
page1.entete=Page 1
page1.welcome=Page d'home
The file [messages_en.properties] will be as follows:
welcome.titre=JSF (JavaServer Faces) Tutorial
welcome.langue1=French
welcome.langue2=English
welcome.page1=Page 1
page1.titre=page1
page1.entete=Page 1
page1.welcome=Welcome page
The file [messages.properties] is identical to the file [messages_en.properties]. Ultimately, the client browser will have the choice between pages in French and pages in English.
Let’s return to the file [faces-config.xml], which declares the message file:
...

  <application>
    <resource-bundle>
      <base-name>
        messages
      </base-name>
      <var>msg</var>
    </resource-bundle>
  </application>
</faces-config>
Line 8 indicates that a line in the message file will be referenced by the identifier msg in the JSF pages. This identifier is used in the [index.xhtml] file examined:
<?xml version='1.0' encoding='UTF-8' ?>
<!DOCTYPE HTML PUBLIC "-//W3C//DTD XHTML 1.0 Transitional//EN" "http://www.w3.org/TR/xhtml1/DTD/xhtml1-transitional.dtd">
<html xmlns="http://www.w3.org/1999/xhtml"
      xmlns:h="http://java.sun.com/jsf/html"
      xmlns:f="http://java.sun.com/jsf/core">
  <f:view locale="#{changeLocale.locale}">
    <head>
      <title><h:outputText value="#{msg['welcome.titre']}" /></title>
    </head>
    <body>
      ...
    </body>
  </f:view>
</html>
The <h:outputText> tag on line 8 will display the message value (presence of the msg identifier) for key welcome.titre. This message is searched for and found in the [messages.properties] file for the currently active language. For example, for French:
welcome.titre=Tutoriel JSF (JavaServer Faces)
A message is in the form key=value. Line 8 of the file [index.xhtml] becomes the following after evaluating the expression #{msg['welcome.titre']}:
<title><h:outputText value="Tutoriel JSF (JavaServer Faces)" /></title>
This message file mechanism makes it easy to change the language of the pages in a JSF project. This is referred to as project internationalization, or more commonly by its abbreviation i18n, because the word "internationalization" starts with "i" and ends with "n," and there are 18 letters between the "i" and the "n."
2.4.6. The form
Let’s continue exploring the contents of the [index.xhtml] file:
<?xml version='1.0' encoding='UTF-8' ?>
<!DOCTYPE HTML PUBLIC "-//W3C//DTD XHTML 1.0 Transitional//EN" "http://www.w3.org/TR/xhtml1/DTD/xhtml1-transitional.dtd">
<html xmlns="http://www.w3.org/1999/xhtml"
      xmlns:h="http://java.sun.com/jsf/html"
      xmlns:f="http://java.sun.com/jsf/core">
  <f:view locale="#{changeLocale.locale}">
    <head>
      <title><h:outputText value="#{msg['welcome.titre']}" /></title>
    </head>
    <body>
      <h:form id="formulaire">
        <h:panelGrid columns="2">
          <h:commandLink value="#{msg['welcome.langue1']}" action="#{changeLocale.setFrenchLocale}"/>
          <h:commandLink value="#{msg['welcome.langue2']}" action="#{changeLocale.setEnglishLocale}"/>
        </h:panelGrid>
        <h1><h:outputText value="#{msg['welcome.titre']}" /></h1>
        <h:commandLink value="#{msg['welcome.page1']}" action="page1"/>
      </h:form>
    </body>
  </f:view>
</html>
- lines 11-18: the <h:form> tag introduces a form. A form generally consists of:
- input field tags (text, radio buttons, checkboxes, dropdown lists, etc.);
- form validation tags (buttons, links). It is via a button or a link that the user sends their input to the server, which will process it,
Any JSF tag can be identified by a id attribute. Most of the time, this attribute is optional, and that is what has been done for most of the JSF tags used here. Nevertheless, this attribute is useful in certain cases. Line 17: the form is identified by the id form. In this example, the id of the form will not be used and could have been omitted.
- Lines 18–21: The <h:panelGrid> tag defines a two-column table here. It generates the <table> tag,
- the form has three links that trigger its processing, on lines 19, 20, and 23. The <h:commandLink> tag has at least two attributes:
- value: the text of the link;
- action: either a C string or the reference to a method that, upon execution, returns the C string. This C string can be:
- either the name of a JSF page in the project,
- or a name defined in the navigation rules of the [faces-config.xml] file and associated with a JSF page in the project;
In both cases, the page JSF is displayed once the action defined by the action attribute has been executed.
Let’s examine the mechanics of form processing using the link in line 13 as an example:
<h:commandLink value="#{msg['welcome.langue1']}" action="#{changeLocale.setFrenchLocale}"/>}"/>
First, the message file is used to replace the expression #{msg['welcome.langue1']} with its value. After evaluation, the tag becomes:
<h:commandLink value="Français" action="#{changeLocale.setFrenchLocale}"/>}"/>
The translation HTML of this tag JSF will be as follows:
<a href="#" onclick="mojarra.jsfcljs(document.getElementById('formulaire'),{'formulaire:j_idt8':'formulaire:j_idt8'},'');return false">Français</a>
which will result in the following visual appearance:
 |
Note the onclick attribute of the HTML tag <a>. When the user clicks on the [Français] link, the Javascript code will be executed. This code is embedded in the page received by the browser, and it is the browser that executes it. The Javascript code is widely used in JSF and AJAX (Asynchronous Javascript and Xml). Its primary purpose is generally to improve the usability and responsiveness of web applications. It is most often generated automatically by software tools, so there is usually no need to understand it. However, sometimes a developer may need to add Javascript code to their JSF pages. In such cases, knowledge of Javascript is necessary.
There is no need here to understand the Javascript code generated for the JSF <h:commandLink> tag. However, two points are worth noting:
- the code Javascript uses the form identifier we assigned to the tag JSF <h:form>,
- JSF generates automatic identifiers for all tags where the id attribute has not been defined. An example of this can be seen here: j_idt8. Assigning a clear identifier to tags makes it easier to understand the generated code if necessary. This is particularly the case when the developer must add Javascript code that manipulates the page’s components. In that case, they need to know the id identifiers of those components.
What will happen when the user clicks the [Français] link on the page above? Let’s consider the architecture of a JSF application:
 |
The [Faces Servlet] controller will receive the request from the client browser in the following HTTP format:
- lines 1-2: the browser requests URL [http://localhost:8080/mv-jsf2-02/faces/index.xhtml]. It always works this way: entries made in a JSF form initially obtained with the URL URLFormulaire are sent to this same URL. The browser has two ways to send the entered values: GET and POST. With the GET method, the entered values are sent by the browser in the requested URL. In the example above, the browser could have sent the following first line:
GET /mv-jsf2-02/faces/index.xhtml?formulaire=formulaire&javax.faces.ViewState=-9139703055324497810%3A8197824608762605653&formulaire%3Aj_idt8=formulaire%3Aj_idt8 HTTP/1.1
Using the POST method here, the browser sends the entered values to the server via line 6.
- line 3: specifies the encoding format of the form values,
- line 4: specifies the size in bytes of line 6,
- line 5: empty line indicating the end of the HTTP headers and the start of the 126 bytes of form values,
- line 6: the form values in the format element1=value1&element2=value2& ..., the encoding format defined by line 3. In this encoding format, certain characters are replaced by their hexadecimal values. This is the case in the last element:
formulaire=formulaire&javax.faces.ViewState=...&formulaire%3Aj_idt8=formulaire%3Aj_idt8
where %3A represents the colon character. Thus, the string form:j_idt8=form:j_idt8 is sent to the server. You may recall that we have already encountered the identifier j_idt8 when we examined the code HTML generated for the tag
<h:commandLink value="#{msg['welcome.langue1']}" action="#{changeLocale.setFrenchLocale}"/>
It was automatically generated by JSF. What matters here is that the presence of this identifier in the string of values sent by the client browser allows JSF to know that the link [Français] was clicked. It will then use the action attribute above to decide how to process the received string. The action="#{changeLocale.setFrenchLocale}" attribute tells JSF that the client’s request must be processed by the [setFrenchLocale] method of an object named changeLocale. Recall that this bean was defined by annotations in the Java class [ChangeLocale]:
@ManagedBean
@SessionScoped
public class ChangeLocale implements Serializable{
The name of a bean is defined by the name attribute of the @ManagedBean annotation. If this attribute is absent, the class name is used as the bean name with the first character lowercased.
Let’s return to the browser request:
 |
and to the <h:commandLink> tag that generated the [Français] link we clicked on:
<h:commandLink value="#{msg['welcome.langue1']}" action="#{changeLocale.setFrenchLocale}"/>
The controller will forward the browser request to the event handler defined by the action attribute of the <h:commandLink> tag. The event handler M referenced by the action attribute of a <h:commandLink> command must have the following signature:
- it does not receive any parameters. We will see that it can nevertheless access the client request;
- it must return a result C of type String. This character string C can be:
- either the name of a JSF page in the project;
- either a name defined in the rules of the navigation file and associated with a page in the project;
- or a null pointer, if the client browser is not supposed to change pages,
In the JSF architecture above, the controller [Faces Servlet] will use the C string returned by the event handler and, if necessary, its configuration file [faces-config.xml] to determine which page JSF it should send in response to the client [4].
In the tag
<h:commandLink value="#{msg['welcome.langue1']}" action="#{changeLocale.setFrenchLocale}"/>
the event handler for the click on the link [Français] is the method [changeLocale.setFrenchLocale], where changeLocale is an instance of the class [utils.ChangeLocale] , which we have already discussed:
package utils;

import java.io.Serializable;
import javax.enterprise.context.SessionScoped;
import javax.faces.bean.ManagedBean;

@ManagedBean
@SessionScoped
public class ChangeLocale implements Serializable{
  // page locale
  private String locale="fr";

  public ChangeLocale() {
  }

  public String setFrenchLocale(){
    locale="fr";
    return null;
  }

  public String setEnglishLocale(){
    locale="en";
    return null;
  }

  public String getLocale() {
    return locale;
  }
}
The setFrenchLocale method does indeed have the signature of event handlers. Remember that the event handler must process the client request. Since it does not receive any parameters, how can it access the request? There are several ways to do this:
- The bean B that contains the event handler for page JSF P is also often the one that contains the model M for that page. This means that bean B contains fields that will be initialized with the values entered on page P. This will be done by controller [Faces Servlet] before the event handler of bean B is called. This handler will therefore have access, via the fields of bean B to which it belongs, to the values entered by the client in the form and will be able to process them.
- The static method [FacesContext.getCurrentInstance()] of type [FacesContext] provides access to the execution context of the current request JSF, which is an object of type [FacesContext]. The request execution context obtained in this way allows access to the parameters posted to the server by the client browser using the following method:
If the parameters posted (POST) by the client browser are as follows:
the getRequestParameterMap() method will return the following dictionary:
key | value |
form | form |
javax.faces.ViewState | ... |
form:j_id_id21 | form:j_id_id21 |
In the tag
<h:commandLink value="#{msg['welcome.langue1']}" action="#{changeLocale.setFrenchLocale}"/>
what is expected of the locale.setFrenchLocale event handler? We want it to set the language used by the application. In Java terminology, this is called "localizing" the application. This localization is used by the <f:view> tag on the JSF [index.xhtml] page:
  <f:view locale="#{changeLocale.locale}">
    ...
</f:view>
To set the page language to French, simply set the **locale attribute to **fr**. To set it to English, set it to **en. The value of the **locale attribute is obtained using the expression *[ChangeLocale].getLocale()*. This expression returns the value of the locale field of the [ChangeLocale] class. From this, we derive the code for the [ChangeLocale].setFrenchLocale() method, which is responsible for switching the pages to French:
  public String setFrenchLocale(){
    locale="fr";
    return null;
}
We explained that an event handler must return a C string that will be used by [Faces Servlet] to find the JSF page to send in response to the client browser. If the page to be returned is the same as the one currently being processed, the event handler can simply return the value null. This is what is done here on line 3: we want to return the same page [index.xhtml] but in a different language.
Let’s return to the request processing architecture:
 |
The event handler changeLocale.setFrenchLocale was executed and returned the value null to the controller [Faces Servlet]. The controller will therefore re-display the page [index.xhtml]. Let’s take another look at it:
<?xml version='1.0' encoding='UTF-8' ?>
<!DOCTYPE HTML PUBLIC "-//W3C//DTD XHTML 1.0 Transitional//EN" "http://www.w3.org/TR/xhtml1/DTD/xhtml1-transitional.dtd">
<html xmlns="http://www.w3.org/1999/xhtml"
      xmlns:h="http://java.sun.com/jsf/html"
      xmlns:f="http://java.sun.com/jsf/core">
  <f:view locale="#{changeLocale.locale}">
    <head>
      <title><h:outputText value="#{msg['welcome.titre']}" /></title>
    </head>
    <body>
      <h:form id="formulaire">
        <h:panelGrid columns="2">
          <h:commandLink value="#{msg['welcome.langue1']}" action="#{changeLocale.setFrenchLocale}"/>
          <h:commandLink value="#{msg['welcome.langue2']}" action="#{changeLocale.setEnglishLocale}"/>
        </h:panelGrid>
        <h1><h:outputText value="#{msg['welcome.titre']}" /></h1>
        <h:commandLink value="#{msg['welcome.page1']}" action="page1"/>
      </h:form>
    </body>
  </f:view>
</html>
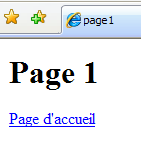
Each time a value of type #{msg['...']} is evaluated, one of the [messages.properties] message files is used. The one used is the one that corresponds to the page's "localization" (line 6). Since the changeLocale.setFrenchLocale event handler sets this locale to fr, the [messages_fr.properties] file will be used. Clicking the [Anglais] link (line 14) will change the locale to en (see method changeLocale.setEnglishLocale). The [messages_en.properties] file will then be used, and the page will appear in English:
 |  |
Every time the [index.xhtml] page is displayed, the <f:view> tag is executed:
<f:view locale="#{changeLocale.locale}">
and therefore the method [ChangeLocale].getLocale() is re-executed. Since we have given our bean the Session scope:
@ManagedBean
@SessionScoped
public class ChangeLocale implements Serializable{
the localization performed during a request is retained for subsequent requests.
There is one last element of the [index.xhtml] page to examine:
<?xml version='1.0' encoding='UTF-8' ?>
<!DOCTYPE HTML PUBLIC "-//W3C//DTD XHTML 1.0 Transitional//EN" "http://www.w3.org/TR/xhtml1/DTD/xhtml1-transitional.dtd">
<html xmlns="http://www.w3.org/1999/xhtml"
      xmlns:h="http://java.sun.com/jsf/html"
      xmlns:f="http://java.sun.com/jsf/core">
  <f:view locale="#{changeLocale.locale}">
    <head>
      <title><h:outputText value="#{msg['welcome.titre']}" /></title>
    </head>
    <body>
      <h:form id="formulaire">
        <h:panelGrid columns="2">
          <h:commandLink value="#{msg['welcome.langue1']}" action="#{changeLocale.setFrenchLocale}"/>
          <h:commandLink value="#{msg['welcome.langue2']}" action="#{changeLocale.setEnglishLocale}"/>
        </h:panelGrid>
        <h1><h:outputText value="#{msg['welcome.titre']}" /></h1>
        <h:commandLink value="#{msg['welcome.page1']}" action="page1"/>
      </h:form>
    </body>
  </f:view>
</html>
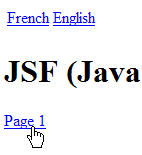
The <h:commandLink> tag on line 17 has an action attribute set to a string. In this case, no event handler is called to process the page. We are immediately redirected to the page [page1.xhtml]. Let’s examine how the application works in this use case:
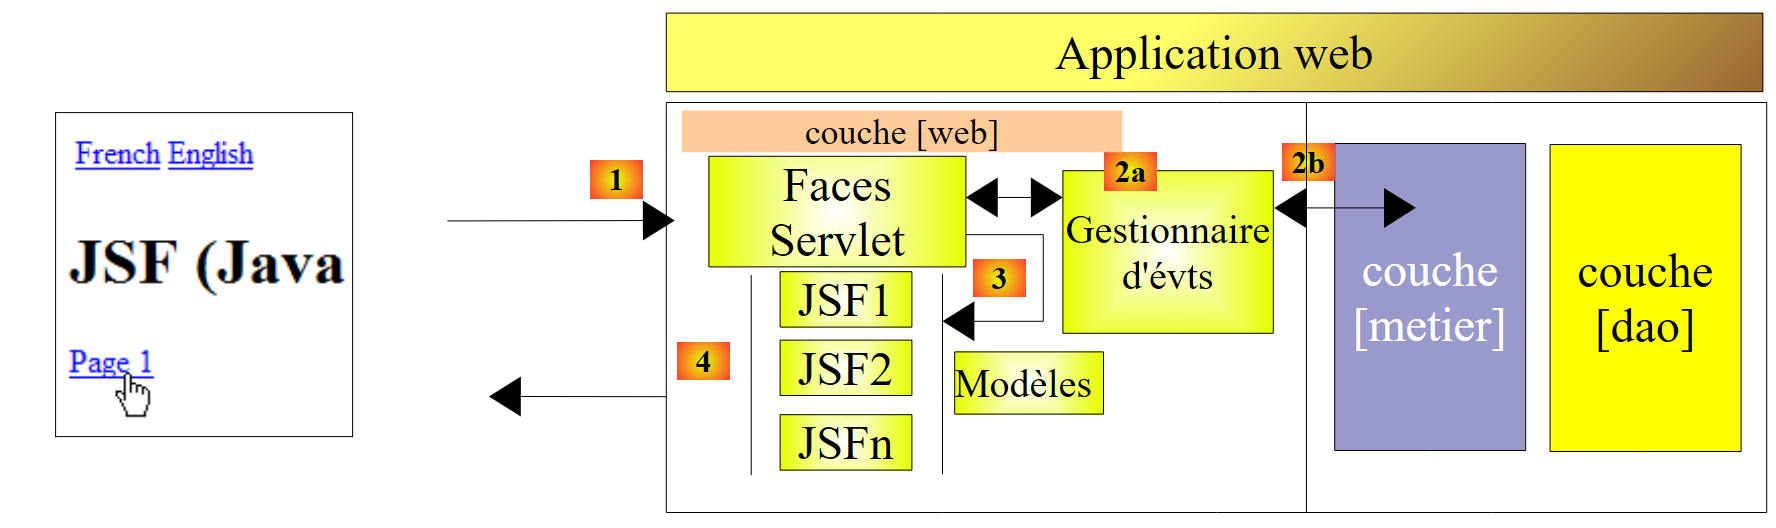 |
The user clicks the link [Page 1]. The form is submitted to the controller [Faces Servlet]. The controller recognizes from the request it receives that the link [Page 1] has been clicked. It examines the corresponding tag:
<h:commandLink value="#{msg['welcome.page1']}" action="page1"/>
There is no event handler associated with the link. The controller [Faces Servlet] immediately proceeds to step [3] above and displays the page [page1.xhtml]:
 | 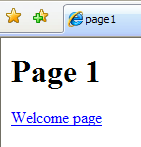 |
2.4.7. The JSF page [page1.xhtml]
The page [page1.xhtml] sends the following stream to the client browser:
 |
The code that generates this page is as follows:
<?xml version='1.0' encoding='UTF-8' ?>
<!DOCTYPE HTML PUBLIC "-//W3C//DTD XHTML 1.0 Transitional//EN" "http://www.w3.org/TR/xhtml1/DTD/xhtml1-transitional.dtd">
<html xmlns="http://www.w3.org/1999/xhtml"
      xmlns:h="http://java.sun.com/jsf/html"
      xmlns:f="http://java.sun.com/jsf/core">
  <f:view locale="#{changeLocale.locale}">
    <head>
      <title><h:outputText value="#{msg['page1.titre']}"/></title>
    </head>
    <body>
      <h1><h:outputText value="#{msg['page1.entete']}"/></h1>
      <h:form>
        <h:commandLink value="#{msg['page1.welcome']}" action="index"/>
      </h:form>
    </body>
  </f:view>
</html>
There is nothing on this page that has not already been explained. The reader should match the code JSF with the page sent to the client browser. The link back to the home page:
<h:commandLink value="#{msg['page1.welcome']}" action="index"/>
will display the page [index.xhtml].
2.4.8. Running the project
Our project is now complete. We can build it (Clean and Build):
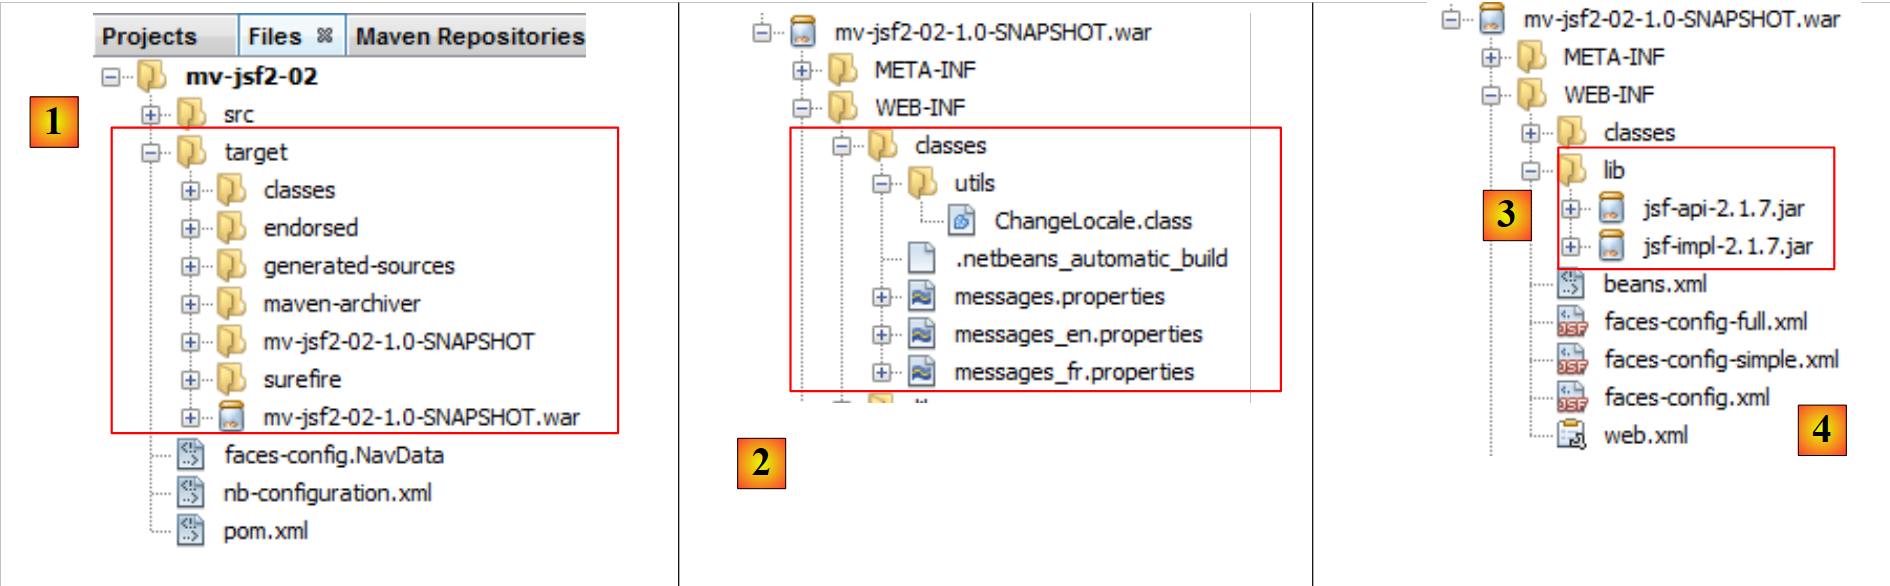 |
- Building the project creates the [target] folder in the [Files] tab. Inside this folder, you will find the [mv-jsf2-02-1.0-SNAPSHOT.war] project archive. It is this archive that is deployed to the server,
- in [WEB-INF / classes] and [2], you will find the compiled classes from the project’s [Source Packages] folder as well as the files that were in the [Other Sources] branch—in this case, the message files,
- in [WEB-INF / lib] [3], you will find the project libraries,
- at the root of [WEB-INF] and [4], you will find the project configuration files,
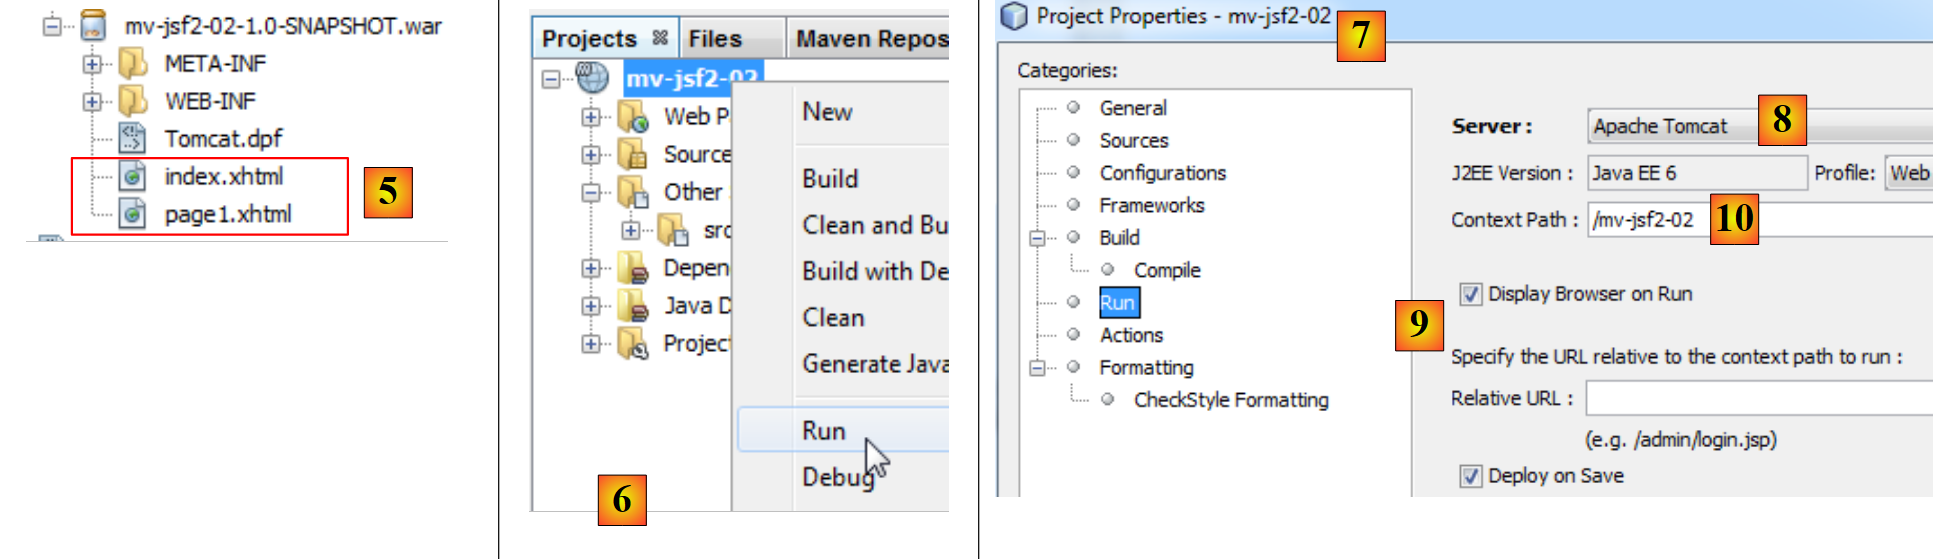 |
- at the root of the archive [5], you will find the pages JSF that were in the [Web Pages] branch of the project,
- once the project is built, it can be run [6]. It will be run according to its runtime configuration [7],
- the Tomcat server will be started if it was not already running ([8]),
- the archive [mv-jsf2-02-1.0-SNAPSHOT.war] will be uploaded to the server. This is called deploying the project to the application server,
- in [9], a browser is requested to be launched at runtime. The browser will request the application context [10], c.a.d. URL [http://localhost:8080/mv-jsf2-02]. According to the rules in the [web.xml] file (see page 44), the [faces/index.xhtml] file will be served to the client browser. Since URL is of the form [/faces/*], it will be processed by the [Faces Servlet] controller (see [web.xml] on page 44). This controller will process the page and send the following HTML stream:
 |
- The [Faces Servlet] controller will then process the events that occur from this page.
2.4.9. The configuration file [faces-config.xml]
We used the following [faces-config.xml] file:
<?xml version='1.0' encoding='UTF-8'?>

<!-- =========== FULL CONFIGURATION FILE ================================== -->

<faces-config version="2.0"
              xmlns="http://java.sun.com/xml/ns/javaee"
              xmlns:xsi="http://www.w3.org/2001/XMLSchema-instance"
              xsi:schemaLocation="http://java.sun.com/xml/ns/javaee http://java.sun.com/xml/ns/javaee/web-facesconfig_2_0.xsd">


  <application>
    <resource-bundle>
      <base-name>
        messages
      </base-name>
      <var>msg</var>
    </resource-bundle>
  </application>
</faces-config>
This is the minimal file for an internationalized JSF 2 application. Here, we have utilized new features of JSF 2 compared to JSF 1:
- declare beans and their scope using the annotations @ManagedBean, @RequestScoped, @SessionScoped, @ApplicationScoped,
- navigate between pages using the page names XHTML (without their xhtml suffix) as keys navigation.
You may choose not to use these options and declare these elements of the JSF project in [faces-config.xml] as in JSF 1. In this case, the [faces-config.xml] file could look like this:
<?xml version='1.0' encoding='UTF-8'?>

<!-- =========== FULL CONFIGURATION FILE ================================== -->

<faces-config version="2.0"
              xmlns="http://java.sun.com/xml/ns/javaee"
              xmlns:xsi="http://www.w3.org/2001/XMLSchema-instance"
              xsi:schemaLocation="http://java.sun.com/xml/ns/javaee http://java.sun.com/xml/ns/javaee/web-facesconfig_2_0.xsd">
<!-- application -->
  <application>
    <resource-bundle>
      <base-name>
        messages
      </base-name>
      <var>msg</var>
    </resource-bundle>
  </application>

  <!-- managed beans -->
  <managed-bean>
    <managed-bean-name>changeLocale</managed-bean-name>
    <managed-bean-class>utils.ChangeLocale</managed-bean-class>
    <managed-bean-scope>session</managed-bean-scope>
  </managed-bean>

   <!-- navigation -->
  <navigation-rule>
    <description/>
    <from-view-id>/index.xhtml</from-view-id>
    <navigation-case>
      <from-outcome>p1</from-outcome>
      <to-view-id>/page1.xhtml</to-view-id>
    </navigation-case>
  </navigation-rule>

  <navigation-rule>
    <description/>
    <from-view-id>/page1.xhtml</from-view-id>
    <navigation-case>
      <from-outcome>welcome</from-outcome>
      <to-view-id>/index.xhtml</to-view-id>
    </navigation-case>
  </navigation-rule>


</faces-config>
- lines 20–24: declaration of the changeLocale bean:
- line 21: bean name;
- line 22: full name of the class associated with the bean;
- line 23: scope of the bean. Possible values are request, session, application,
- lines 27-34: declaration of a rule for navigation:
- line 28: the rule can be described. Here, we have not done so;
- line 29: the page from which navigation begins (starting point);
- lines 30–33: a navigation instance. There may be several;
- line 31: the key for navigation;
- line 32: the page being navigated to.
The rules for navigation can be displayed in a more visual way. When editing the [faces-config.xml] file, you can use the [PageFlow] tab:
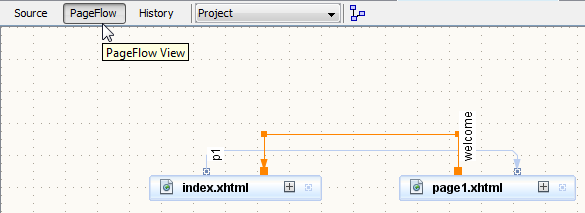 |
Suppose we are using the previous [faces-config.xml] file. How would our application change?
- In the [ChangeLocale] class, the @ManagedBean and @SessionScoped annotations would disappear since the bean is now declared in [faces-config],
- the navigation from [index.xhtml] to [page1.xhtml] via a link would become:
<h:commandLink value="#{msg['welcome.page1']}" action="p1"/>
The action attribute is assigned the key p1 from navigation, defined in [faces-config],
- the navigation from [page1.xhtml] to [index.xhtml] via a link would become:
<h:commandLink value="#{msg['page1.welcome']}" action="welcome"/>
The action attribute is assigned the key "welcome" from navigation, defined in [faces-config],
- the methods setFrenchLocale and setEnglishLocale, which must return a key from navigation, do not need to be modified because they previously returned null to indicate that the user remained on the same page.
2.4.10. Conclusion
Let’s revisit the Netbeans project we wrote:
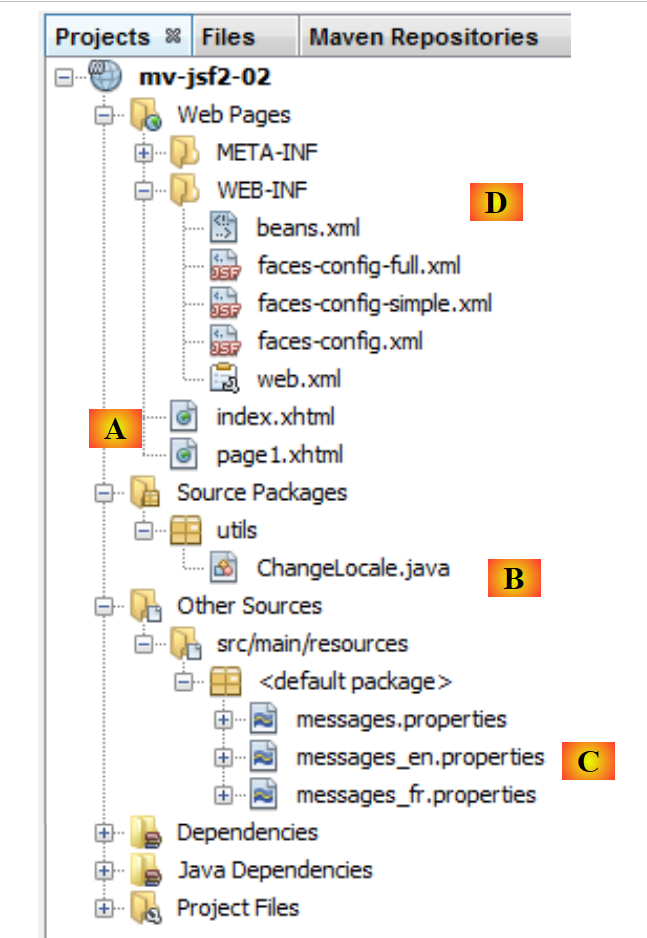 |
This project follows the following architecture:
 |
In each JSF project, we will find the following elements:
- JSF and [A] pages that are sent [4] to browsers clients by the controller [Faces Servlet] [3],
- message files [C] that allow the language of the pages to be changed JSF,
- Java classes [B] that handle events occurring on the client browser [2a, 2b] and/or serve as templates for the pages JSF [3]. Most often, the [métier] and [DAO] layers are developed and tested separately. The [web] layer is then tested with a dummy [métier] layer. If the [métier] and [DAO] layers are available, we usually work with their .jar archives.
- [D] configuration files are used to link these various elements together. The [web.xml] file was described on page 44 and will rarely be modified. The same applies to [faces-config], where we will always use the simplified version.
2.5. Example mv-jsf2-03: input form - JSF components
From now on, we will no longer show the project’s construction. We present ready-made projects and explain how they work. The reader can download all the examples from the website for this document (see section 1.2).
2.5.1. The Application
The application has a single view:
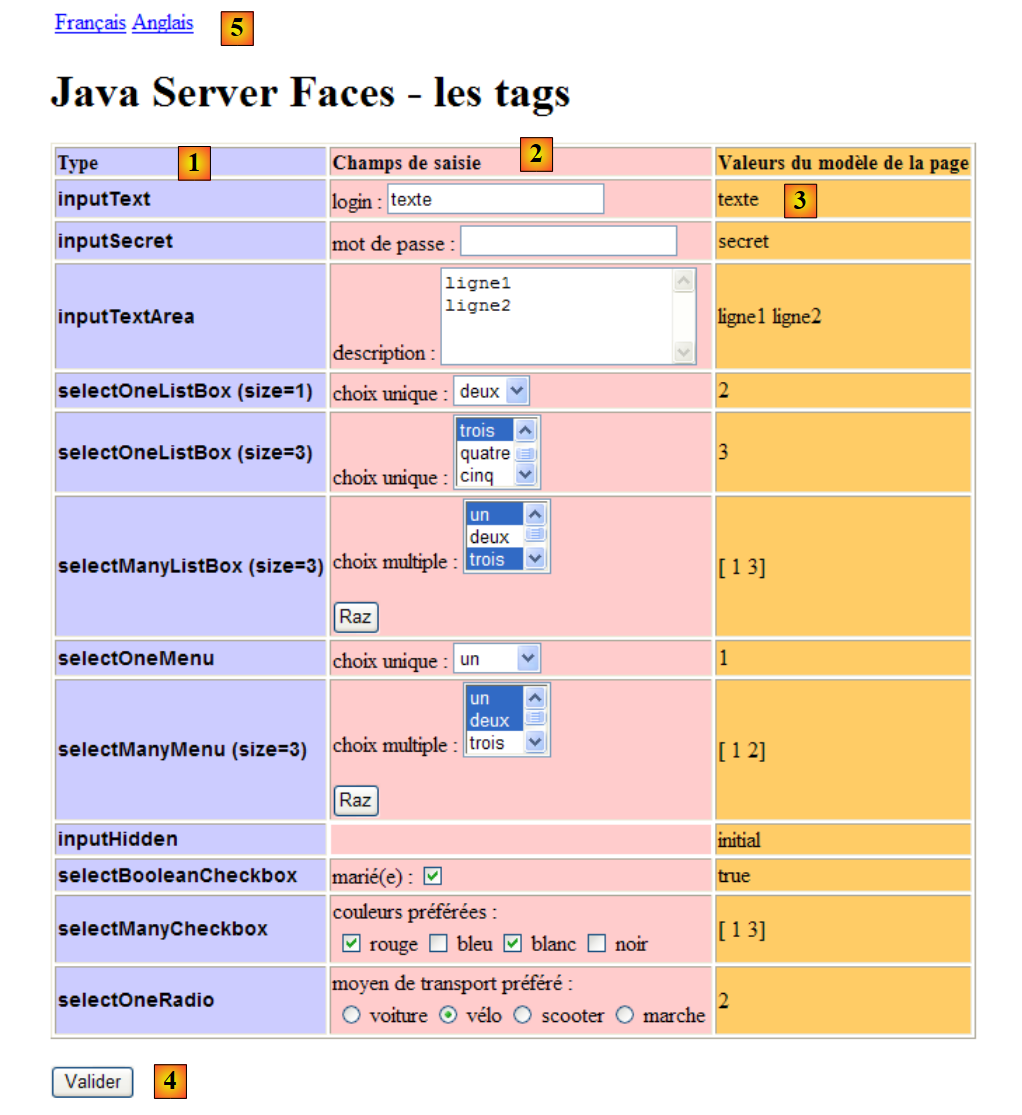 |
The application presents the main JSF components that can be used in an input form:
- the [1] column indicates the name of the JSF / HTML tag used,
- the [2] column provides an example of data entry for each of the tags encountered,
- the [3] column displays the values of the bean serving as the page template,
- the entries made in [2] are validated by the [4] button. This validation simply updates the page’s model bean. The same page is then returned. Therefore, after validation, the [3] column displays the new values of the model bean, allowing the user to verify the impact of their entries on the page model.
2.5.2. The Netbeans project
The application’s Netbeans project is as follows:
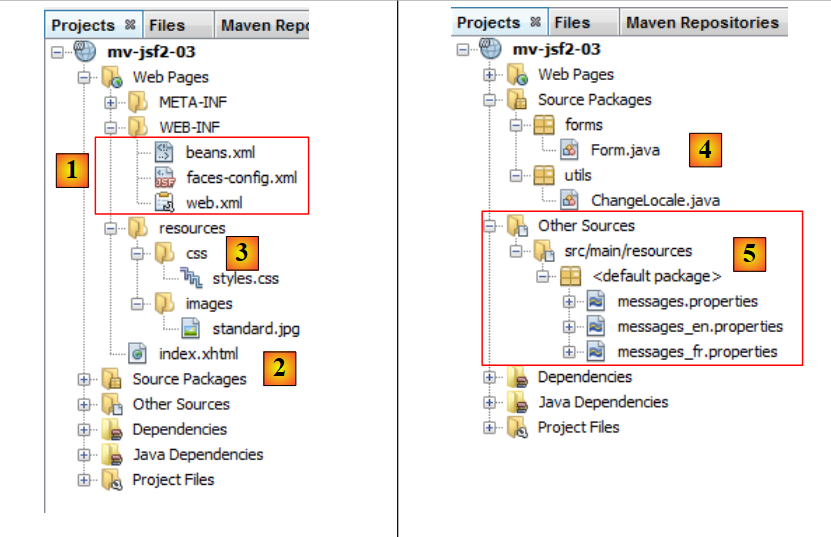 |
- in [1], the configuration files for the JSF project,
- in [2], the project’s single page: index.xhtml,
- in [3], a stylesheet [styles.css] to configure the appearance of the page [index.xhtml]
- to [4], the project's Java classes,
- to [5], the application message file in two languages: French and English.
2.5.3. The file [pom.xml]
We are only listing the dependencies:
    <dependencies>
        <dependency>
            <groupId>com.sun.faces</groupId>
            <artifactId>jsf-api</artifactId>
            <version>2.1.7</version>
        </dependency>
        <dependency>
            <groupId>com.sun.faces</groupId>
            <artifactId>jsf-impl</artifactId>
            <version>2.1.7</version>
        </dependency>
        <dependency>
            <groupId>javax</groupId>
            <artifactId>javaee-web-api</artifactId>
            <version>6.0</version>
            <scope>provided</scope>
        </dependency>
</dependencies>
These are the dependencies required for a JSF project. In the examples that follow, this file will only be shown when it changes.
2.5.4. The [web.xml] file
The [web.xml] file has been configured so that the [index.xhtml] page is the project's home page:
<?xml version="1.0" encoding="UTF-8"?>
<web-app version="3.0" xmlns="http://java.sun.com/xml/ns/javaee" xmlns:xsi="http://www.w3.org/2001/XMLSchema-instance" xsi:schemaLocation="http://java.sun.com/xml/ns/javaee http://java.sun.com/xml/ns/javaee/web-app_3_0.xsd">
  <context-param>
    <param-name>javax.faces.STATE_SAVING_METHOD</param-name>
    <param-value>client</param-value>
  </context-param>
  <context-param>
    <param-name>javax.faces.PROJECT_STAGE</param-name>
    <param-value>Development</param-value>
  </context-param>
  <context-param>
    <param-name>javax.faces.FACELETS_SKIP_COMMENTS</param-name>
    <param-value>true</param-value>
  </context-param>
  <servlet>
    <servlet-name>Faces Servlet</servlet-name>
    <servlet-class>javax.faces.webapp.FacesServlet</servlet-class>
    <load-on-startup>1</load-on-startup>
  </servlet>
  <servlet-mapping>
    <servlet-name>Faces Servlet</servlet-name>
    <url-pattern>/faces/*</url-pattern>
  </servlet-mapping>
  <session-config>
    <session-timeout>
      30
    </session-timeout>
  </session-config>
  <welcome-file-list>
    <welcome-file>faces/index.xhtml</welcome-file>
  </welcome-file-list>
</web-app>
- line 30: the page [index.xhtml] is the home page,
- lines 11–14: a parameter for the [Faces Servlet] servlet. It requests that comments in a facelet such as:
<!-- languages -->
be ignored. Without this parameter, the comments cause issues that are difficult to understand,
- lines 3–6: a parameter for the [Faces Servlet] servlet, which will be explained a little later.
2.5.5. The file [faces-config.xml]
The [faces-config.xml] file for the application is as follows:
<?xml version='1.0' encoding='UTF-8'?>

<!-- =========== FULL CONFIGURATION FILE ================================== -->

<faces-config version="2.0"
              xmlns="http://java.sun.com/xml/ns/javaee"
              xmlns:xsi="http://www.w3.org/2001/XMLSchema-instance"
              xsi:schemaLocation="http://java.sun.com/xml/ns/javaee http://java.sun.com/xml/ns/javaee/web-facesconfig_2_0.xsd">

  <application>
    <resource-bundle>
      <base-name>
        messages
      </base-name>
      <var>msg</var>
    </resource-bundle>
  </application>
</faces-config>
- Lines 11–16: configure the application’s message file.
2.5.6. The message file [messages.properties]
The message files (see [5] in the project screenshot) are as follows:
[messages_fr.properties]
form.langue1=Fran\u00e7ais
form.langue2=Anglais
form.titre=Java Server Faces - les tags
form.headerCol1=Type
form.headerCol2=Champs de saisie
form.headerCol3=Valeurs du modèle de la page
form.loginPrompt=login :
form.passwdPrompt=mot de passe :
form.descPrompt=description :
form.selectOneListBox1Prompt=choix unique :
form.selectOneListBox2Prompt=choix unique :
form.selectManyListBoxPrompt=choix multiple :
form.selectOneMenuPrompt=choix unique :
form.selectManyMenuPrompt=choix multiple :
form.selectBooleanCheckboxPrompt=marié(e) :
form.selectManyCheckboxPrompt=couleurs préférées :
form.selectOneRadioPrompt=moyen de transport préféré :
form.submitText=Valider
form.buttonRazText=Raz
These messages are displayed in the following locations on the page:
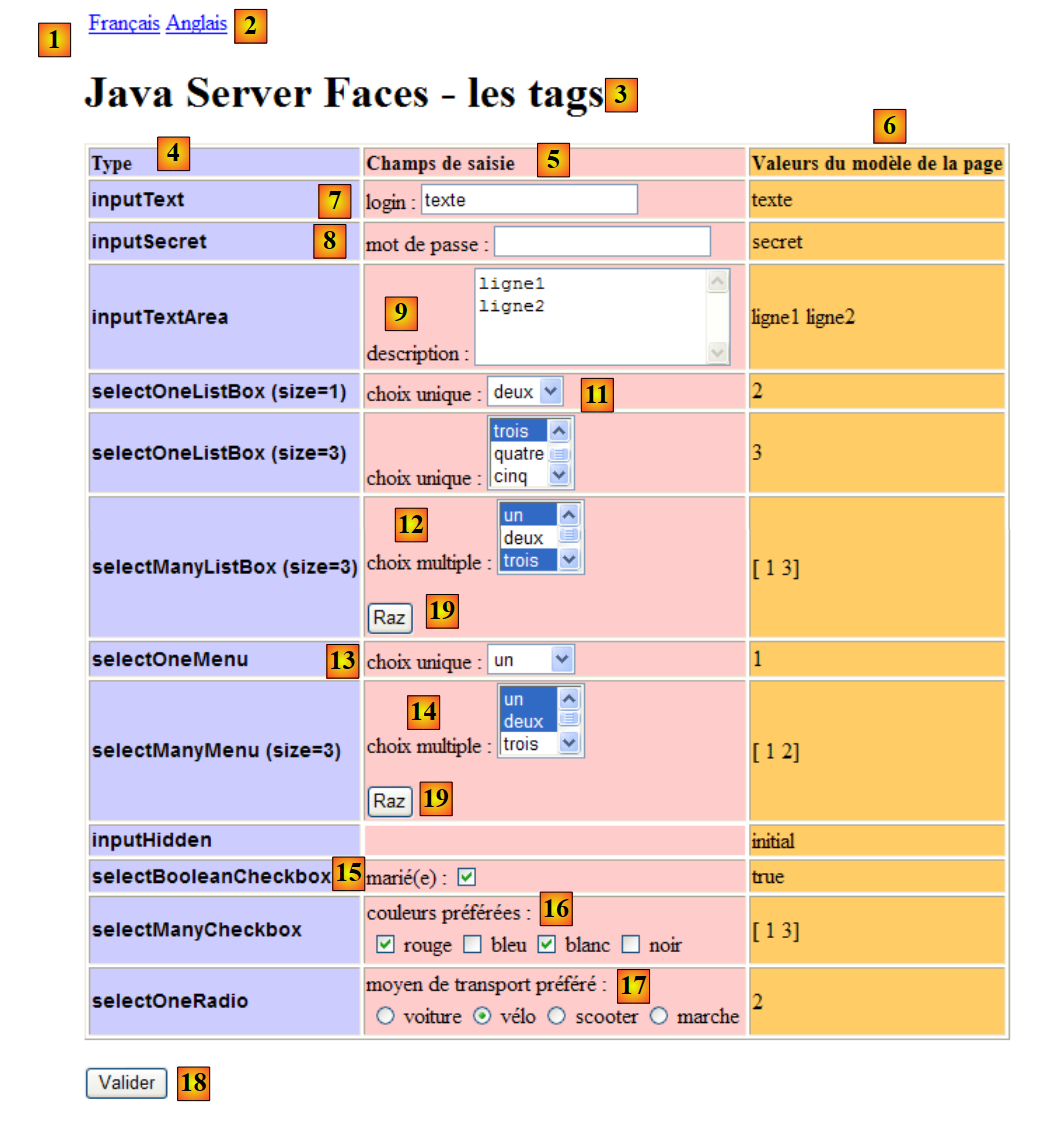 |
The English version for the messages is as follows:
[messages_en.properties]
form.langue1=French
form.langue2=English
form.titre=Java Server Faces - the tags
form.headerCol1=Input Type
form.headerCol2=Input Fields
form.headerCol3=Page Model Values
form.loginPrompt=login :
form.passwdPrompt=password :
form.descPrompt=description :
form.selectOneListBox1Prompt=unique choice :
form.selectOneListBox2Prompt=unique choice :
form.selectManyListBoxPrompt=multiple choice :
form.selectOneMenuPrompt=unique choice :
form.selectManyMenuPrompt=multiple choice :
form.selectBooleanCheckboxPrompt=married :
form.selectManyCheckboxPrompt=preferred colors :
form.selectOneRadioPrompt=preferred transport means :
form.submitText=Submit
form.buttonRazText=Reset
2.5.7. The [Form.java] model for the [index.xhtml] page
 |
In the project above, the [Form.java] class will serve as a model or backing bean for the JSF and [index.xhtml] pages. Let’s illustrate this concept of a model with an example from the [index.xhtml] page:
<!-- line 1 -->
          <h:outputText value="inputText"  styleClass="info"/>
          <h:panelGroup>
            <h:outputText value="#{msg['form.loginPrompt']}"/>
            <h:inputText id="inputText" value="#{form.inputText}"/>
          </h:panelGroup>
          <h:outputText value="#{form.inputText}"/>
Upon the initial request for page [index.xhtml], the code above generates row 2 of the input table:
 |
Row 2 displays field [1], rows 3–6 display field [2], and row 7 displays field [3].
Lines 5 and 7 use an expression EL that involves the form bean defined in the [Form.java] class as follows:
package forms;

import javax.enterprise.context.RequestScoped;
import javax.faces.bean.ManagedBean;


@ManagedBean
@RequestScoped
public class Form {
- Line 7 defines an unnamed bean. This will therefore be the name of the class starting with a lowercase letter: form,
- The bean has request scope. This means that in a client request/server response cycle, it is instantiated when the request needs it and destroyed when the response to the client has been returned.
In the code below from page [index.xhtml]:
<!-- line 1 -->
          <h:outputText value="inputText"  styleClass="info"/>
          <h:panelGroup>
            <h:outputText value="#{msg['form.loginPrompt']}"/>
            <h:inputText id="inputText" value="#{form.inputText}"/>
          </h:panelGroup>
<h:outputText value="#{form.inputText}"/>
Lines 5 and 7 use the value inputText from the form bean. To understand the links between a page P and its template M, we must return to the client request/server response cycle that characterizes a web application:
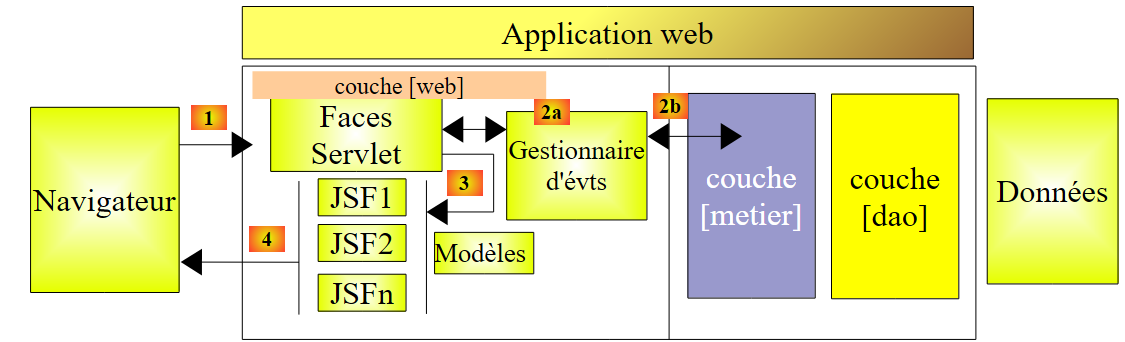 |
We must distinguish between the case where page P is sent as a response to the browser (step 4)—for example, during the initial request for the page—and the case where the user triggers an event on page P, which is then handled by the [Faces Servlet] controller (step 1).
These two cases can be distinguished by looking at them from the browser’s perspective:
- during the initial request for the page, the browser performs an operation GET on the page’s URL,
- when submitting the values entered on the page, the browser performs a POST operation on the page’s URL.
In both cases, the same URL is requested. Depending on the nature of the browser’s GET or POST request, the processing of the request will differ.
[cas 1 – demande initiale de la page P]
The browser requests the URL for the page with a GET. The [Faces Servlet] controller will proceed directly to the [4] response rendering step, and the [index.xhtml] page will be sent to the client. The JSF controller will instruct each tag on the page to render. Let’s take the example from line 5 of the [index.xhtml] code:
<h:inputText id="inputText" value="#{form.inputText}"/>
The JSF tag <h:inputText value="value"/> generates the HTML tag <input type="text" value="value"/>. The class responsible for processing this tag encounters the expression #{form.inputText}, which it must evaluate:
- if the form bean does not yet exist, it is created by instantiating the forms.Form class,
- the expression #{form.inputText} is evaluated by calling the method form.getInputText(),
- The text <input id="form:inputText" type="text" name="form:inputText" value="text" /> is inserted into the HTML stream that will be sent to the client, assuming that the form.getInputText() method returned the string "text". JSF will also assign a name (name) to the HTML component placed in the flow. This name is constructed from the identifiers id of the analyzed component JSF and those of its parent components, in this case the tag <h:form id="form"/>.
Note that if, in a page P, the expression #{M.champ} is used, where M is the model bean of page P, this bean must have the public method getChamp(). The type returned by this method must be convertible to type String. A common model M is as follows:
where T is a type that can be converted to type String, possibly using a toString method.
Still regarding the display of page P, the processing of the line:
<h:outputText value="#{form.inputText}"/>
will be similar, and the following HTML flow will be created:
Internally within the server, page P is represented as a component tree, mirroring the tag tree of the page sent to the client. We will refer to this tree as the page view or . This state is stored. It can be stored in two ways depending on a configuration made in the application’s [web.xml] file:
<web-app ...>
...
  <context-param>
    <param-name>javax.faces.STATE_SAVING_METHOD</param-name>
    <param-value>client</param-value>
  </context-param>
  <servlet>
    <servlet-name>Faces Servlet</servlet-name>
    <servlet-class>javax.faces.webapp.FacesServlet</servlet-class>
    <load-on-startup>1</load-on-startup>
  </servlet>
...
</web-app>
Lines 7–11 define the [Faces Servlet] controller. This controller can be configured using various <context-param> tags, including the one in lines 3–6, which specifies that the state of a page must be saved on the client (the browser). The other possible value, on line 5, is "server" to indicate saving on the server. This is the default value.
When a page’s state is saved on the client, the JSF controller adds a hidden field to every HTML page it sends, whose value is the page’s current state. This hidden field has the following form:
<input type="hidden" name="javax.faces.ViewState" id="javax.faces.ViewState" value="H4sIAAAAAAAAANV...Bnoz8dqAAA=" />
Its value represents, in encoded form, the state of the page sent to the client. It is important to understand that this hidden field is part of the page’s form and will therefore be included in the values posted by the browser when the form is submitted. Using this hidden field, the JSF controller is able to restore the view as it was sent to the client.
When a page’s state is saved on the server, the state of the page sent to the client is saved in the client’s session. When the client browser posts the values entered in the form, it will also send its session token. Using this token, the JSF controller will retrieve the state of the page sent to the client and restore it.
The state of a JSF page may require several hundred bytes to be encoded. Since this state is maintained for each user of the application, memory issues may arise if there are a large number of users. For this reason, we have chosen here to save the page state on the client (see [web.xml], section 2.5.4, page 66).
[cas 2 – traitement de la page P]
 |
We are at step [1] above, where the controller [Faces Servlet] will receive a request POST from the client browser to which it previously sent the page [index.xhtml]. We are dealing with the processing of a page event. Several steps will take place before the event can even be processed in [2a]. The processing cycle for a POST request by the JSF controller is as follows:

- In [A], the view initially sent to the client browser is reconstructed using the hidden field javax.faces.ViewState. Here, the page components are restored to the values they had in the sent page. Our inputText component reverts to its "text" value,
- in [B], the values posted by the client browser are used to update the view components. Thus, if in the HTML input field named inputText, the user typed "jean," the value "jean" replaces the value "text." The view now reflects the page as modified by the user, rather than as it was sent to the browser,
- in [C], the posted values are verified. Suppose the preceding component inputText is an age input field. The entered value must be an integer. The values posted by the browser are always of type String. Their final type in the M model associated with page P may be entirely different. There is then a conversion from a String type to another type T. This conversion may fail. In this case, the request/response cycle is terminated, and the page P constructed as [B] is sent back to the client browser with error messages if the author of page P has provided them. Note that the user sees the page exactly as they entered it, without any effort on the developer’s part. In another technology, such as JSP, the developer must manually reconstruct page P using the values entered by the user. The value of a component may also undergo a validation process. Still using the example of the inputText component, which is an age input field, the entered value must not only be an integer but an integer within a specific range [1,N]. If the entered value passes the conversion step, it may not pass the validation step. In this case as well, the request/response cycle is complete, and the page P rendered as [B] is sent back to the client browser,
- in [D], if all components of page P pass the conversion and validation steps, their values will be assigned to the M model of page P. If the value of the input field generated from the following tag:
<h:inputText value="#{form.inputText}"/>
is "jean", then this value will be assigned to the form template of page P by executing the code form.setInputText("jean"). Note that in the M template of page P, the private fields of M that store the value of an input field in P must have a set method,
- once the M model of page P has been updated with the posted values, the event that triggered the POST of page P can be processed. This is step [E]. Note that if the handler for this event belongs to bean M, it has access to the values from form P that have been stored in the fields of that same bean.
- Step [E] will return a key from navigation to the controller JSF. In our examples, this will always be the name of the page XHTML to be displayed, without the .xhtml suffix. This is step [F]. Another way to do this is to return a key of navigation, which will be looked up in the file [faces-config.xml]. We have described this case.
From the above, we can conclude that:
- a page P displays the fields C of its template M using the methods [M].getC(),
- the fields C of template M for a page P are initialized with the values entered on page P using the methods [M].setC(entry). During this step, conversion and validation processes may occur that could fail. In this case, the event that triggered the POST for page P is not processed, and the page is sent back to the client exactly as the client entered it.
The [Form.java] template for page [index.xhtml] will be as follows:
package forms;

import javax.enterprise.context.RequestScoped;
import javax.faces.bean.ManagedBean;


@ManagedBean
@RequestScoped
public class Form {

  /** Creates a new instance of Form */
  public Form() {
  }

  // form fields
  private String inputText="texte";
  private String inputSecret="secret";
  private String inputTextArea="ligne1\nligne2\n";
  private String selectOneListBox1="2";
  private String selectOneListBox2="3";
  private String[] selectManyListBox=new String[]{"1","3"};
  private String selectOneMenu="1";
  private String[] selectManyMenu=new String[]{"1","2"};
  private String inputHidden="initial";
  private boolean selectBooleanCheckbox=true;
  private String[] selectManyCheckbox=new String[]{"1","3"};
  private String selectOneRadio="2";

  // events
  public String submit(){
    return null;
  }

  // getters and setters
  ...
}
The fields in lines 16–27 are used in the following parts of the form:
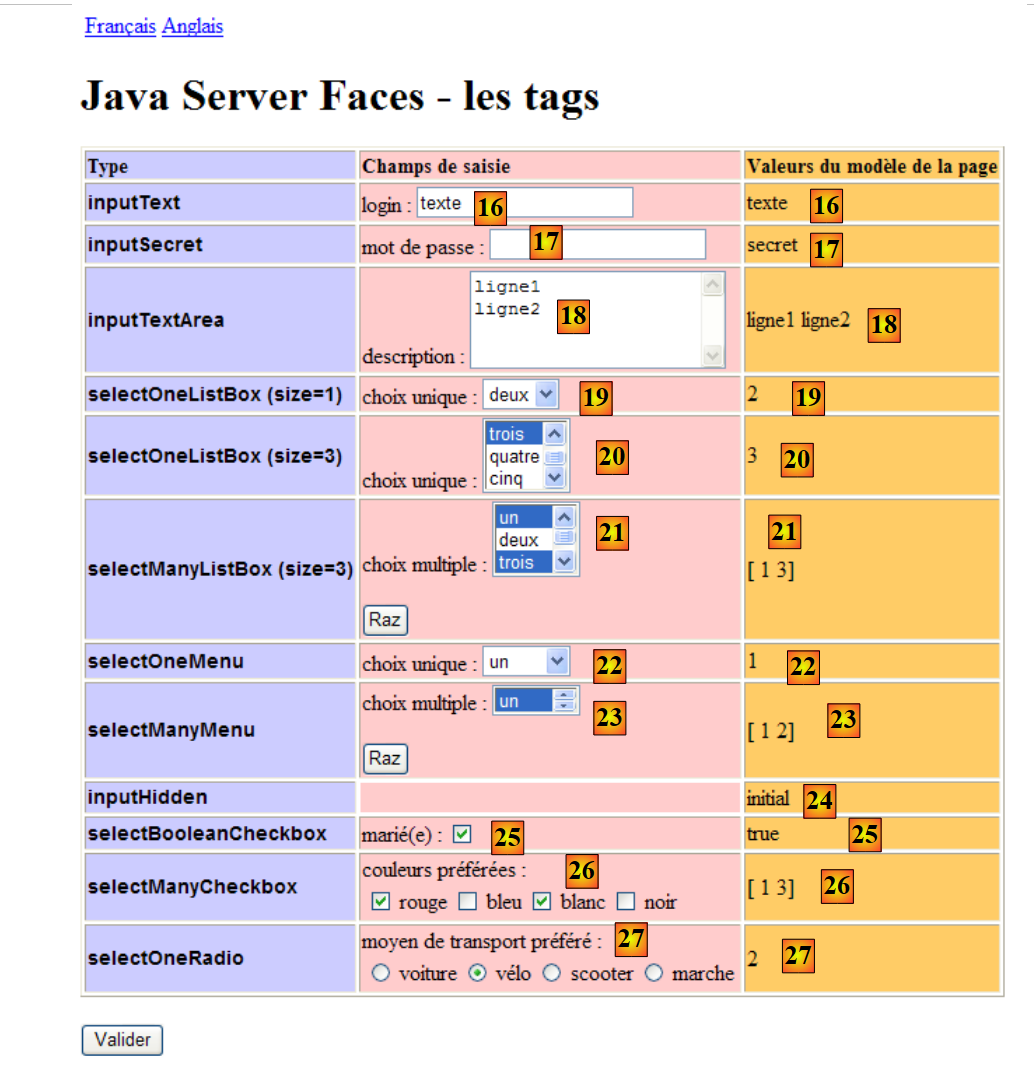 |
2.5.8. The page [index.xhtml]
The page [index.xhtml] that generates the previous view is as follows:
<?xml version='1.0' encoding='UTF-8' ?>
<!DOCTYPE html PUBLIC "-//W3C//DTD XHTML 1.0 Transitional//EN" "http://www.w3.org/TR/xhtml1/DTD/xhtml1-transitional.dtd">
<html xmlns="http://www.w3.org/1999/xhtml"
      xmlns:h="http://java.sun.com/jsf/html"
      xmlns:f="http://java.sun.com/jsf/core">

  <f:view locale="#{changeLocale.locale}">
    <h:head>
      <title>JSF</title>
      <h:outputStylesheet library="css" name="styles.css"/>
    </h:head>
    <h:body style="background-image: url('${request.contextPath}/resources/images/standard.jpg');">
      <h:form id="formulaire">
        <!-- languages -->
        <h:panelGrid columns="2">
          <h:commandLink value="#{msg['form.langue1']}" action="#{changeLocale.setFrenchLocale}"/>
          <h:commandLink value="#{msg['form.langue2']}" action="#{changeLocale.setEnglishLocale}"/>
        </h:panelGrid>
        <h1><h:outputText value="#{msg['form.titre']}"/></h1>
        <h:panelGrid columnClasses="col1,col2,col3" columns="3" border="1">
          <!-- headers -->
          <h:outputText value="#{msg['form.headerCol1']}" styleClass="entete"/>
          <h:outputText value="#{msg['form.headerCol2']}" styleClass="entete"/>
          <h:outputText value="#{msg['form.headerCol3']}" styleClass="entete"/>
          <!-- line 1 -->
          ...
          <!-- line 2 -->
          ...
          <!-- line 3 -->
          ...
          <!-- line 4 -->
          ...
          <!-- line 5 -->
          ...
          <!-- line 6 -->
          ...
          <!-- line 7 -->
          ...
          <!-- line 8 -->
          ...
          <!-- line 9 -->
          ...
          <!-- line 10 -->
          ...
          <!-- line 11 -->
          ...
          <!-- line 12 -->
          ...
        </h:panelGrid>
        <p>
          <h:commandButton type="submit" id="submit" value="#{msg['form.submitText']}"/>
        </p>
      </h:form>
    </h:body>
  </f:view>
</html>
We will examine the main components of this page one by one. Note the general structure of a JSF form:
<?xml version='1.0' encoding='UTF-8' ?>
<!DOCTYPE html PUBLIC "-//W3C//DTD XHTML 1.0 Transitional//EN" "http://www.w3.org/TR/xhtml1/DTD/xhtml1-transitional.dtd">
<html xmlns="http://www.w3.org/1999/xhtml"
      xmlns:h="http://java.sun.com/jsf/html"
      xmlns:f="http://java.sun.com/jsf/core">

  <f:view ...>
    <h:head>
      ...
    </h:head>
    <h:body ...>
      <h:form id="formulaire">
        ...
        <h:commandButton type="submit" id="submit" value="#{msg['form.submitText']}"/>
        ...
      </h:form>
    </h:body>
  </f:view>
</html>
Form components must be inside an <h:form> tag (lines 12–16). The <f:view> tag (lines 7–18) is required if the application is internationalized. Additionally, a form must have a way to be submitted (POST), often a link or a button as shown in line 14. It can also be submitted by various events (changing a selection in a list, changing the active field, typing a character in an input field, etc.).
2.5.9. The form’s style
To make the columns in the form table more readable, the form includes a stylesheet:
  <f:view locale="#{changeLocale.locale}">
    <h:head>
      <title>JSF</title>
      <h:outputStylesheet library="css" name="styles.css"/>
</h:head>
- Line 4: The page's stylesheet is defined within the <head> tag, using the following tag:
<h:outputStylesheet library="css" name="styles.css"/>
The style sheet will be searched for in the [resources] folder:
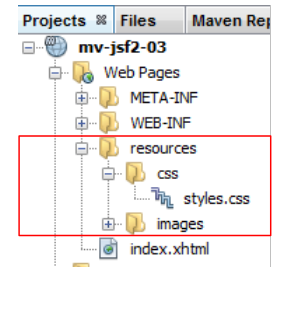 |
In the tag:
<h:outputStylesheet library="css" name="styles.css"/>
- library is the name of the folder containing the stylesheet,
- name is the name of the stylesheet.
Let’s look at an example of how this stylesheet is used:
<h:panelGrid columnClasses="col1,col2,col3" columns="3" border="1">
The <h:panelGrid columns="3"/> tag defines a three-column table. The columnClasses attribute is used to style these columns. The values col1,col2,col3 of the columnClasses attribute specify the respective styles for columns 1, 2, and 3 of the table. These styles are looked up in the page's style sheet:
.info{
   font-family: Arial,Helvetica,sans-serif;
   font-size: 14px;
   font-weight: bold
}

.col1{
   background-color: #ccccff
}

.col2{
   background-color: #ffcccc
}

.col3{
   background-color: #ffcc66
}

.entete{
   font-family: 'Times New Roman',Times,serif;
   font-size: 14px;
   font-weight: bold
}
- lines 7–9: the style named col1,
- lines 11-13: the style named col2,
- lines 15–17: the style named col3,
These three styles define the background color of each column.
- lines 19-23: the "entete" style is used to define the style of the text in the first row of the table:
          <!-- headers -->
          <h:outputText value="#{msg['form.headerCol1']}" styleClass="entete"/>
          <h:outputText value="#{msg['form.headerCol2']}" styleClass="entete"/>
          <h:outputText value="#{msg['form.headerCol3']}" styleClass="entete"/>
- Lines 1–5: The "info" style is used to define the style of the text in the first column of the table:
          <!-- line 1 -->
          <h:outputText value="inputText"  styleClass="info"/>
We won’t dwell on the use of style sheets, as they alone deserve a book and, moreover, their development is often entrusted to specialists. Nevertheless, we chose to use a minimalist one to remind readers that their use is essential.
Now let’s look at how the page’s background image was defined:
<h:body style="background-image: url('${request.contextPath}/resources/images/standard.jpg');">
The background image is set by the style attribute of the <h:body> tag. This attribute allows you to set style elements. The background image is located in the [resources/images/standard.jpg] folder:
 |
This image is obtained via the URL [/mv-jsf2-03/resources/images/standard.jpg]. We could therefore write:
<h:body style="background-image: url('mv-jsf2-03/resources/images/standard.jpg');">
/mv-jsf2-03 is the application context. This context is set by the web server administrator and may therefore change. This context can be obtained using the expression EL ${request.contextPath}. Therefore, we prefer the following style attribute:
style="background-image: url('${request.contextPath}/resources/images/standard.jpg');"
which will be valid regardless of the context.
2.5.10. The two client request/server response cycles of a form
Let’s revisit what was already explained in section 2.5.7 in a general case and apply it to the form under consideration. This form will be tested in the standard JSF environment:
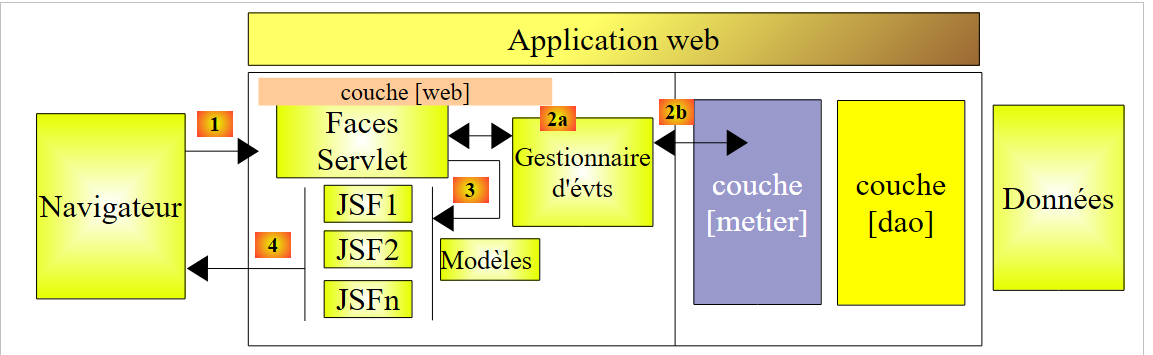 |
Here, there will be no event handlers or [métier] layer. The [2x] steps will therefore not exist. We will distinguish between the case where form F is initially requested by the browser and the case where the user triggers an event in form F, which is then handled by the [Faces Servlet] controller. There are two distinct client request/server response cycles.
- The first, corresponding to the initial page request, is triggered by a GET operation from the browser on the form’s URL,
- the second, corresponding to the submission of the values entered on the page, is triggered by a POST operation on this same URL.
Depending on the nature of the browser request (GET or POST), the controller [Faces Servlet] processes the request differently.
[cas 1 – demande initiale du formulaire F]
The browser requests the URL of the page with a GET. The [Faces Servlet] controller will proceed directly to the [4] step of rendering the response. The [index.xhtml] form will be initialized by its [Form.java] template and sent to the client, who receives the following view:
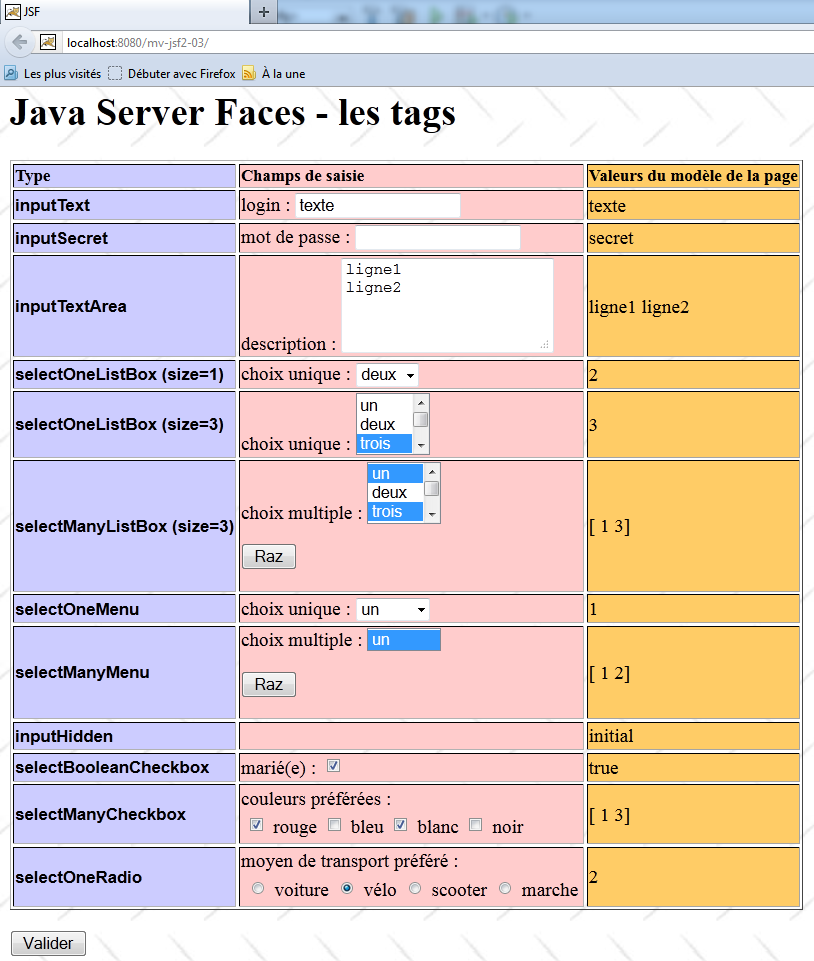
The client/server exchanges for HTTP are as follows:
Client request HTTP:
Line 1 shows the browser's GET.
Server response HTTP:
Not shown here, line 7 is followed by a blank line and the form's code HTML. It is this code that the browser interprets and displays.
[cas 2 – traitement des valeurs saisies dans le formulaire F]
The user fills out the form and submits it using the [Valider] button. The browser then requests the form's URL with a POST. The [Faces Servlet] controller processes this request, updates the [Form.java] template of the [index.xhtml] form, and returns the [index.xhtml] form updated by this new template. Let’s examine this cycle using an example:
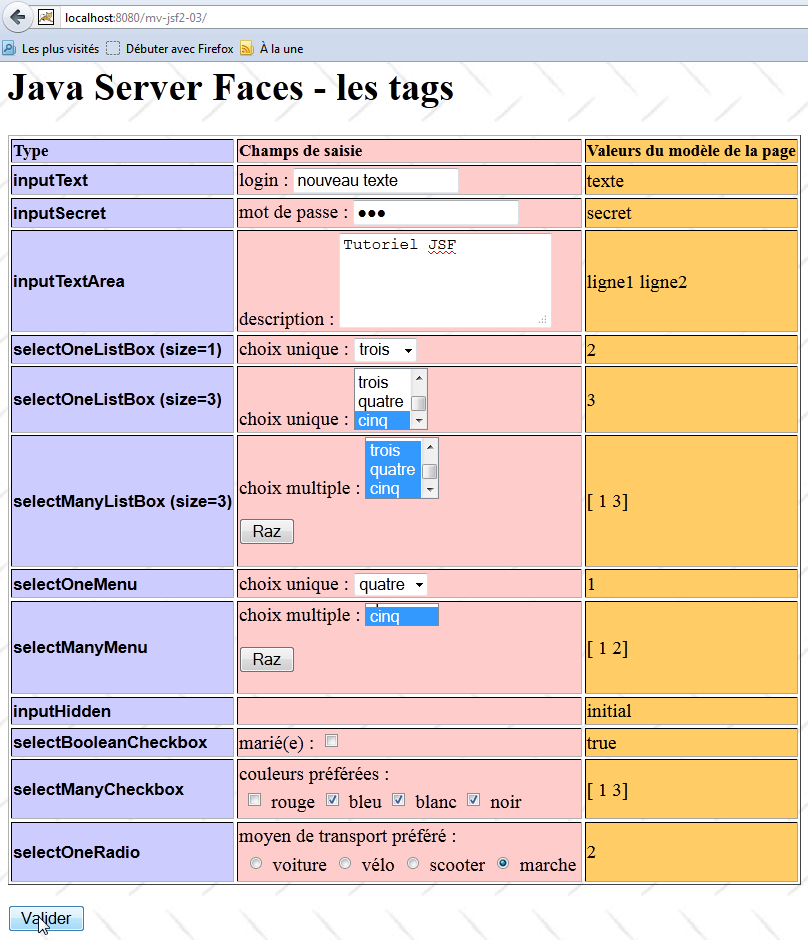
Above, the user has entered their data and validated it. In response, they receive the following view:
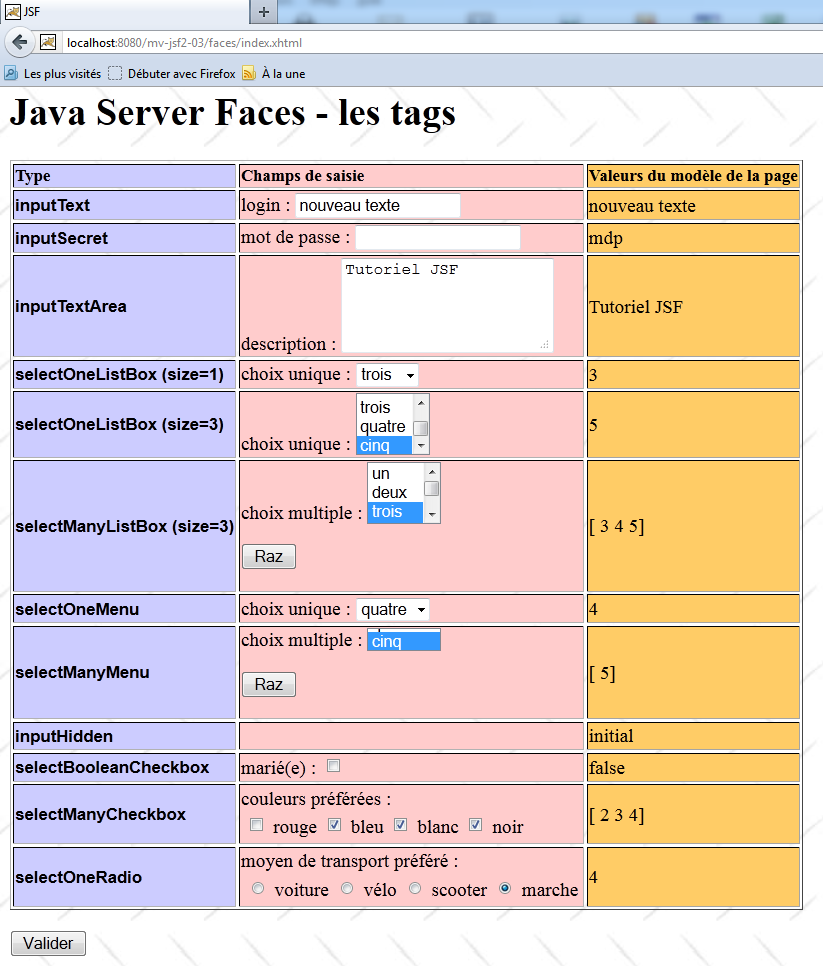
The client/server exchanges for HTTP are as follows in this instance:
Client request HTTP:
On line 1, the POST generated by the browser. On line 14, the values entered by the user. For example, you can see the text entered in the input field:
In line 14, the hidden field javax.faces.ViewState was posted. This field represents, in encoded form, the state of the form as it was initially sent to the browser during its initial GET request.
Server response:
Not shown here, line 6 is followed by a blank line and the code HTML of the form updated by its new template derived from POST.
We will now examine the various components of this form.
2.5.11. <h:inputText> tag
The <h:inputText> tag generates a HTML <input type="text" ...> tag.
Consider the following code:
          <!-- line 1 -->
          <h:outputText value="inputText"  styleClass="info"/>
          <h:panelGroup>
            <h:outputText value="#{msg['form.loginPrompt']}"/>
            <h:inputText id="inputText" value="#{form.inputText}"/>
          </h:panelGroup>
<h:outputText value="#{form.inputText}"/>
and its template [Form.java]:
  private String inputText="texte";

  public String getInputText() {
    return inputText;
  }

  public void setInputText(String inputText) {
    this.inputText = inputText;
}
When the page [index.html] is requested for the first time, the resulting page is as follows:
- line 2 of the XHTML code generates [1],
- the <h:panelGroup> tag (lines 3–6) allows multiple elements to be grouped into a single cell of the table generated by the <h:panelGrid> tag on line 20 of the page’s complete code (see section 2.5.8). The text [2] is generated by line 4. The input field [3] is generated by line [5]. Here, the method getInputText from [Form.java] (lines 3–5 of the Java code) was used to generate the text of the input field,
- line 7 of the XHTML code generates [4]. Once again, the getInputText method from [Form.java] is used to generate the text [4].
The HTML stream generated by the XHTML page is as follows:
<tr>
<td class="col1"><span class="info">inputText</span></td>
<td class="col2">login : <input id="formulaire:inputText" type="text" name="formulaire:inputText" value="texte" /></td>
<td class="col3">texte</td>
</tr>
The tags HTML <tr> and <td> are generated by the tag <h:panelGrid> used to generate the form table.
Now, below, let’s enter a value in the [1] input field and submit the form using the [Valider] [2] button. We receive the [3, 4] page in response:
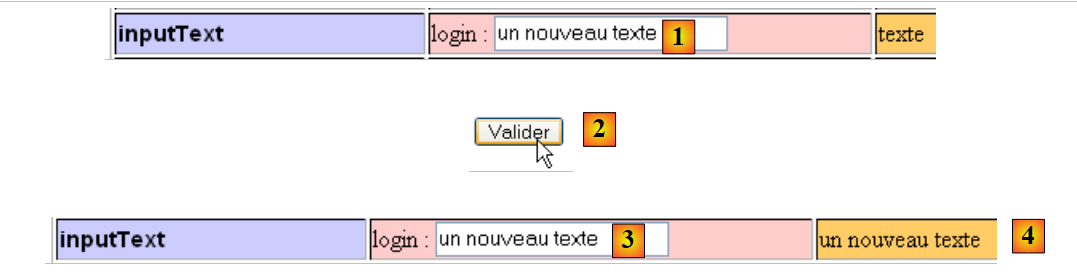 |
The value of the [1] field is posted as follows:
In [2], the form is submitted using the following button:
<h:commandButton id="submit" type="submit" value="#{msg['form.submitText']}"/>
The <h:commandButton> tag has no action attribute. In this case, no event handler is invoked and no navigation rule is applied. After processing, the same page is returned. Let’s review its processing cycle:
- in [A], page P is restored as it was sent. This means that the component in id inputText is restored with its initial value "text",
- in [B], the values posted by the browser (entered by the user) are assigned to the components of page P. Here, the component of id inputText receives the value "new text",
- in [C], conversions and validations take place. Here, there are none. In model M, the field associated with the component of id inputText is as follows:
private String inputText="texte";
Since the entered values are of type String, no conversion is required. Furthermore, no validation rules have been created. We will create them later.
- In [D], the entered values are assigned to the model. The inputText field of [Form.java] receives the value "new text",
- in [E], nothing happens because no event handler has been associated with the [Valider] button.
- In [F], page P is sent to the client again because the [Valider] button has no action attribute. The following lines of [index.xhtml] are then executed:
          <!-- line 1 -->
          <h:outputText value="inputText"  styleClass="info"/>
          <h:panelGroup>
            <h:outputText value="#{msg['form.loginPrompt']}"/>
            <h:inputText id="inputText" value="#{form.inputText}"/>
          </h:panelGroup>
<h:outputText value="#{form.inputText}"/>
Lines 5 and 7 use the value of the inputText field in the template, which is now "new text". This results in the following display:
2.5.12. <h:inputSecret> tag
The <h:inputSecret> tag generates a HTML <input type="password" ...>. This is an input field similar to that of the <h:JSF> tag, except that each character typed by the user is visually replaced by an asterisk (*).
Consider the following code:
          <!-- line 2 -->
          <h:outputText value="inputSecret"  styleClass="info"/>
          <h:panelGroup>
            <h:outputText value="#{msg['form.passwdPrompt']}"/>
            <h:inputSecret id="inputSecret" value="#{form.inputSecret}"/>
          </h:panelGroup>
<h:outputText value="#{form.inputSecret}"/>
and its template in [Form.java]:
private String inputSecret="secret";
When the [index.xhtml] page is requested for the first time, the resulting page is as follows:
- Line 2 of the XHTML code generates [1]
- The text [2] is generated by line 4. The input field [3] is generated by line [5]. Normally, the method getInputSecret of [Form.java] should have been used to generate the text of the input field. There is an exception when the field is of type "password". The <h:inputSecret> tag is used only to read an entry, not to display it.
- Line 7 of the XHTML code generates [4]. Here, the getInputSecret method of [Form.java] was used to generate the text [4] (see line 1 of the Java code).
The HTML stream generated by the XHTML page is as follows:
<tr>
<td class="col1"><span class="info">inputSecret</span></td>
<td class="col2">mot de passe : <input id="formulaire:inputSecret" type="password" name="formulaire:inputSecret" value="" /></td>
<td class="col3">secret</td>
</tr>
- Line 3: The HTML <input type="password" .../> tag generated by the JSF <h:inputSecret> tag
Now, below, let’s enter a value in the [1] input field and submit the form using the [Valider] [2] button. We receive the [3] page in response:
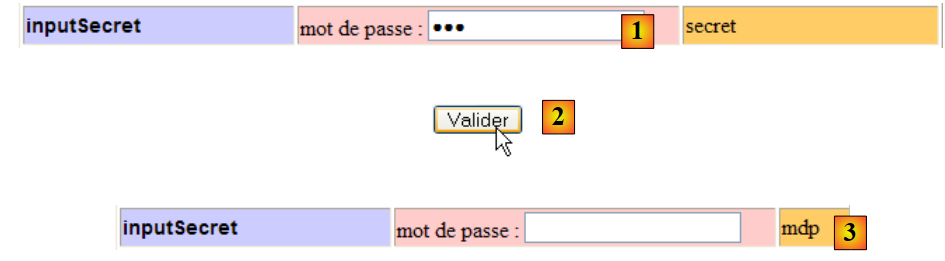 |
The value of the [1] field is posted as follows:
Validating the form via [2] caused the [Form.java] model to be updated with the entry [1]. The field inputSecret in [Form.java] then received the value mdp. Because the form [index.xhtml] has not defined any rules for navigation, nor any event handlers, it is redisplayed after its template is updated. We then return to the view displayed upon the initial request for the [index.xhtml] page, where only the inputSecret field in the template has changed its value to [3].
2.5.13. <h:inputTextArea> tag
The <h:inputTextArea> tag generates a HTML <textarea ...>text</textarea> tag. This is an input field similar to that of the <h:inputText> tag, except that here, you can type multiple lines of text.
Consider the following code:
          <!-- line 3 -->
          <h:outputText value="inputTextArea" styleClass="info"/>
          <h:panelGroup>
            <h:outputText value="#{msg['form.descPrompt']}"/>
            <h:inputTextarea id="inputTextArea" value="#{form.inputTextArea}" rows="4"/>
          </h:panelGroup>
<h:outputText value="#{form.inputTextArea}"/>
and its template in [Form.java]:
private String inputTextArea="ligne1\nligne2\n";
When the [index.xhtml] page is requested for the first time, the resulting page is as follows:
 |
- line 2 of the XHTML code generates [1],
- the text [2] is generated by line 4. The input field [3] is generated by line [5]. Its content was generated by calling the getInputTextArea method of the model, which returned the value defined in line 1 of the Java code above,
- line 7 of the XHTML code generates [4]. Here, the getInputTextArea method of [Form.java] was used again. The string "line1\nline2" contained line breaks \n. They are still there. But when inserted into a HTML stream, they are displayed as spaces by browsers. The HTML tag <textarea>, which displays [3], correctly interprets the line breaks.
The HTML feed generated by the XHTML page is as follows:
<tr>
<td class="col1"><span class="info">inputTextArea</span></td>
<td class="col2">description : <textarea id="formulaire:inputTextArea" name="formulaire:inputTextArea" rows="4">ligne1
ligne2
</textarea></td>
<td class="col3">ligne1
ligne2
</td>
</tr>
- lines 3-5: the tag HTML <textarea>...</textarea> generated by the tag JSF <h:inputTextArea>
Now, below, let’s enter a value in the [1] input field and submit the form using the [Valider] [2] button. We receive the [3] page in response:
 |
The value of the [1] field that was submitted is as follows:
The form validation by [2] caused the [Form.java] model to be updated by the entry [1]. The field textArea in [Form.java] then received the value "Tutorial JSF\npart1". Re-displaying [index.xhtml] shows that the textArea field of the template has indeed been updated to [3].
2.5.14. <h:selectOneListBox> tag
The <h:selectOneListBox> tag generates a HTML tag <select>...</select>. Visually, it generates a drop-down list or a list with a scrollbar.
Consider the following code:
<!-- line 4 -->
          <h:outputText value="selectOneListBox (size=1)" styleClass="info"/>
          <h:panelGroup>
            <h:outputText value="#{msg['form.selectOneListBox1Prompt']}"/>
            <h:selectOneListbox id="selectOneListBox1" value="#{form.selectOneListBox1}" size="1">
              <f:selectItem itemValue="1" itemLabel="un"/>
              <f:selectItem itemValue="2" itemLabel="deux"/>
              <f:selectItem itemValue="3" itemLabel="trois"/>
            </h:selectOneListbox>
          </h:panelGroup>
          <h:outputText value="#{form.selectOneListBox1}"/>
and its template in [Form.java]:
private String selectOneListBox1="2";
When the [index.xhtml] page is requested for the first time, the resulting page is as follows:
 |
- Line 2 of the XHTML code generates [1]
- The text [2] is generated by line 4. The drop-down list [3] is generated by lines [5-9]. It is the value of the size="1" attribute that causes the list to display only one item. If this attribute is missing, the default value of the size attribute is 1. The list items were generated by the <f:selectItem> tags in lines 6–8. These tags have the following syntax:
<f:selectItem itemValue="valeur" itemLabel="texte"/>
The value of the itemLabel attribute is what is displayed in the list. The value of the itemValue attribute is the value of the element. This is the value that will be sent to the [Faces Servlet] controller if the element is selected from the drop-down list.
The item displayed in [3] was determined by calling the getSelectOneListBox1() method (line 5). The result "2" obtained (line 1 of the Java code) caused the item on line 7 of the drop-down list to be displayed, because its itemValue attribute is "2";
- line 11 of the XHTML code generates [4]. Here, the getSelectOneListBox1 method of [Form.java] was used again.
The HTML flow generated by the XHTML page is as follows:
<tr>
<td class="col1"><span class="info">selectOneListBox (size=1)</span></td>
<td class="col2">choix unique : <select id="formulaire:selectOneListBox1" name="formulaire:selectOneListBox1" size="1">
    <option value="1">un</option>
    <option value="2" selected="selected">deux</option>
    <option value="3">trois</option>
</select></td>
<td class="col3">2</td>
</tr>
- lines 3 and 7: the HTML <select ...>...</select> tag generated by the JSF <h:selectOneListBox> tag,
- lines 4–6: the HTML <option ...> ... </option> generated by the tags JSF <f:selectItem>,
- line 5: the fact that the element with value="2" is selected in the list results in the presence of the selected="selected" attribute.
Now, below, let’s select a new value from the list and submit the form using the button. We receive the following page in response:
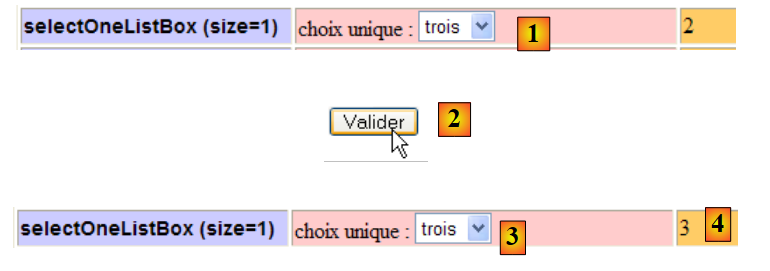 |
The value of the [1] field submitted is as follows:
Validating the form via [2] caused the [Form.java] template to be updated by the entry [1]. The element HTML
<option value="3">trois</option>
was selected. The browser sent the string "3" as the value of the JSF component that generated the drop-down list:
<h:selectOneListbox id="selectOneListBox1" value="#{form.selectOneListBox1}" size="1">
The JSF controller will use the setSelectOneListBox1("3") method to update the drop-down list model. Also, after this update, the field in the [Form.java] model
private String selectOneListBox1;
now contains the value "3".
When the page [index.xhtml] is redisplayed after processing, this value causes the display shown above ([3,4]):
- it determines which item in the drop-down list should be displayed ([3]),
- the value of the selectOneListBox1 field is displayed in [4].
Let’s consider a variant of the <h:selectOneListBox> tag:
<!-- line 5 -->
          <h:outputText value="selectOneListBox (size=3)" styleClass="info"/>
          <h:panelGroup>
            <h:outputText value="#{msg['form.selectOneListBox2Prompt']}"/>
            <h:selectOneListbox id="selectOneListBox2" value="#{form.selectOneListBox2}" size="3">
              <f:selectItem itemValue="1" itemLabel="un"/>
              <f:selectItem itemValue="2" itemLabel="deux"/>
              <f:selectItem itemValue="3" itemLabel="trois"/>
              <f:selectItem itemValue="4" itemLabel="quatre"/>
              <f:selectItem itemValue="5" itemLabel="cinq"/>
            </h:selectOneListbox>
          </h:panelGroup>
          <h:outputText value="#{form.selectOneListBox2}"/>
The template in [Form.java] for the <h:selectOneListBox> tag on line 5 is as follows:
private String selectOneListBox2="3";
When the page [index.xhtml] is requested for the first time, the resulting page is as follows:
 |
- Line 2 of the code XHTML generates [1],
- the text [2] is generated by line 4. The list with a scrollbar, [3], is generated by the lines in [5-11]. It is the value of the size="3" attribute that results in a list with a scrollbar rather than a drop-down list. The list items were generated by the <f:selectItem> tags in lines 6–8,
The selected item in [3] was determined by calling the getSelectOneListBox2() method (line 5). The result "3" obtained (line 1 of the Java code) caused the item on line 8 of the list to be displayed, because its itemValue attribute is set to "3",
- line 13 of the XHTML code generates [4]. Here, the getSelectOneListBox2 method of [Form.java] was used again.
The HTML flow generated by the XHTML page is as follows:
<tr>
<td class="col1"><span class="info">selectOneListBox (size=3)</span></td>
<td class="col2">choix unique : <select id="formulaire:selectOneListBox2" name="formulaire:selectOneListBox2" size="3">
    <option value="1">un</option>
    <option value="2">deux</option>
    <option value="3" selected="selected">trois</option>
    <option value="4">quatre</option>
    <option value="5">cinq</option>
</select></td>
<td class="col3">3</td>
</tr>
- Line 6: The fact that the element with value="3" is selected in the list is indicated by the presence of the selected="selected" attribute.
Now, below, let’s select a new value from the list and submit the form using the button. We receive the following page in response:
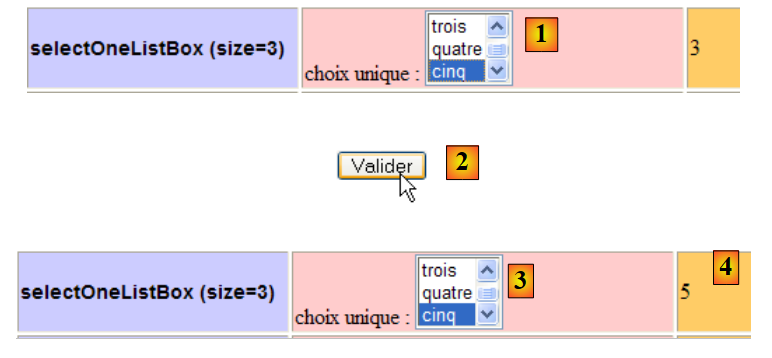 |
The value posted for the [1] field is as follows:
Validating the form via [2] caused the [Form.java] template to be updated by the entry [1]. The element HTML
<option value="5">cinq</option>
was selected. The browser sent the string "5" as the value of the JSF component that generated the drop-down list:
<h:selectOneListbox id="selectOneListBox2" value="#{form.selectOneListBox2}" size="3">
The JSF controller will use the setSelectOneListBox2("5") method to update the list model. Also, after this update, the
private String selectOneListBox2;
now contains the value "5".
When the [index.xhtml] page is re-displayed after processing, this value causes the [3,4] display shown above:
- it determines which list item should be selected ([3]),
- the value of the field selectOneListBox2 is displayed in [4].
2.5.15. <h:selectManyListBox> tag
The <h:selectmanyListBox> tag generates a <select multiple="multiple">...</select> tag that allows the user to select multiple items from a list.
Consider the following code:
<!-- line 6 -->
          <h:outputText value="selectManyListBox (size=3)"  styleClass="info"/>
          <h:panelGroup>
            <h:outputText value="#{msg['form.selectManyListBoxPrompt']}"/>
            <h:selectManyListbox id="selectManyListBox" value="#{form.selectManyListBox}" size="3">
              <f:selectItem itemValue="1" itemLabel="un"/>
              <f:selectItem itemValue="2" itemLabel="deux"/>
              <f:selectItem itemValue="3" itemLabel="trois"/>
              <f:selectItem itemValue="4" itemLabel="quatre"/>
              <f:selectItem itemValue="5" itemLabel="cinq"/>
            </h:selectManyListbox>
            <p><input type="button" value="#{msg['form.buttonRazText']}" onclick="this.form['formulaire:selectManyListBox'].selectedIndex=-1;" /></p>
          </h:panelGroup>
          <h:outputText value="#{form.selectManyListBoxValue}"/>
and its template in [Form.java]:
private String[] selectManyListBox=new String[]{"1","3"};
When the [index.xhtml] page is requested for the first time, the resulting page is as follows:
 |
- Line 2 of the XHTML code generates [1]
- The text [2] is generated by line 4. The list [3] is generated by lines [5-11]. The attribute size="3" causes the list to display three of these elements at any given time. The elements selected in the list were determined by calling the getSelectManyListBox() method (line 5) of the Java model. The resulting {"1","3"} (line 1 of the Java code) is an array of elements of type String. Each of these elements is used to select one of the items in the list. Here, the items in lines 6 and 10 whose itemValue attribute is in the array {"1","3"} will be selected. This is what [3] shows.
- Line 14 of the code XHTML generates [4]. Here, the method getSelectManyListBox of the Java model of the list is not called, but rather the following method getSelectManyListBoxValue:
private String[] selectManyListBox=new String[]{"1","3"};
  ...
  // getters and setters

  public String getSelectManyListBoxValue(){
    return getValue(selectManyListBox);
  }

  private String getValue(String[] chaines){
    String value="[";
    for(String chaine : chaines){
      value+=" "+chaine;
    }
    return value+"]";
  }
If we had called the getSelectManyListBox method, we would have obtained an array of String. To include this element in the HTML stream, the controller would have called its toString method. However, for an array, this method only returns its "hashcode" and not the list of its elements as we desire. Therefore, we use the getSelectManyListBoxValue method above to obtain a string representing the array’s contents,
- line 12 of the XHTML code generates the [5] button. When this button is clicked, the Javascript code in the onclick attribute is executed. It will be embedded within the HTML page, which will be generated by the JSF code. To understand this, we need to know the exact nature of that page.
The HTML feed generated by the XHTML page is as follows:
<tr>
<td class="col1"><span class="info">selectManyListBox (size=3)</span></td>
<td class="col2">choix multiple : <select id="formulaire:selectManyListBox" name="formulaire:selectManyListBox" multiple="multiple" size="3">
    <option value="1" selected="selected">un</option>
    <option value="2">deux</option>
    <option value="3" selected="selected">trois</option>
    <option value="4">quatre</option>
    <option value="5">cinq</option>
</select>
            <p><input type="button" value="Raz" onclick="this.form['formulaire:selectManyListBox'].selectedIndex=-1;" /></p>
          </td>
<td class="col3">[ 1 3]</td>
</tr>
- lines 3 and 9: the HTML <select multiple="multiple"...>...</select> tag generated by the JSF <h:selectManyListBox> tag. It is the presence of the multiple attribute that indicates that this is a multiple-select list,
- and the fact that the list model is the array String {"1","3"} means that the list items on lines 4 (value="1") and 6 (value="3") have the selected="selected" attribute,
- line 10: when the [Raz] button is clicked, the code Javascript in the onclick attribute is executed. The page is represented in the browser by an object tree often called DOM (Document Object Model). Each object in the tree is accessible to the code via its attribute. The list on line 3 of the code above is called form:selectManyListBox. The form itself can be referred to in various ways. Here, it is referred to using the notation this.form, where `this` refers to the button [Raz] and this.form refers to the form in which this button is located. The list form:selectManyListBox is located in this same form. Therefore, the notation this.form['formulaire:selectManyListBox'] refers to the location of the list in the form’s component tree. The object representing a list has an attribute selectedIndex whose value is the number of the selected item in the list. This number starts at 0 to denote the first item in the list. The value -1 indicates that no item is selected in the list. The code Javascript, which sets the value -1 for the attribute selectedIndex, deselects all items in the list, if any.
Now, below, let’s select new values from the list (to select multiple items in the list, hold down the Ctrl key while clicking) and submit the form using the [Valider] [2] button. We receive the following page in response:
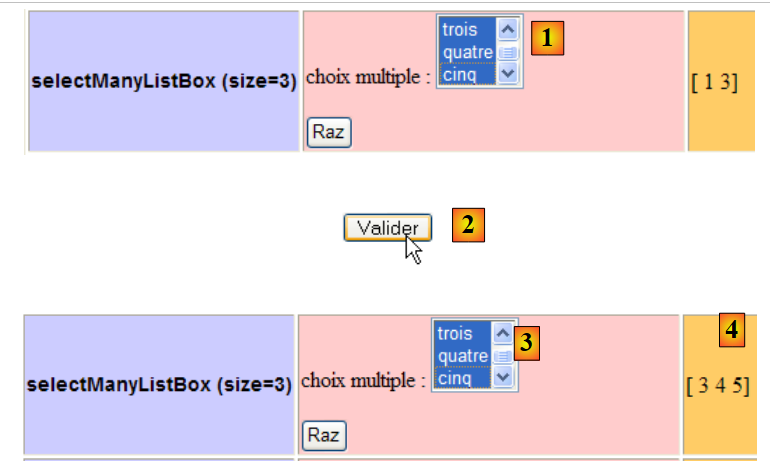 |
The value of the [1] field submitted is as follows:
The validation of the form by [2] caused the [Form.java] model to be updated by the entry [1]. The elements HTML
    <option value="3">trois</option>
    <option value="4">quatre</option>
    <option value="5">cinq</option>
were selected. The browser sent the three strings "3", "4", "5" as values for the JSF component that generated the drop-down list:
<h:selectManyListbox id="selectManyListBox" value="#{form.selectManyListBox}" size="3">
The setSelectManyListBox method of the model will be used to update this model with the values sent by the browser:
  private String[] selectManyListBox;
....
  public void setSelectManyListBox(String[] selectManyListBox) {
    this.selectManyListBox = selectManyListBox;
}
In line 3, we see that the method parameter is an array of String. Here, it will be the array {"3","4","5"}. After this update, the field
private String[] selectManyListBox;
now contains the array {"3","4","5"}.
When the [index.xhtml] page is re-displayed after processing, this value causes the [3,4] display shown above:
- it determines which list items should be selected ([3]),
- the value of the selectManyListBox field is displayed in [4].
2.5.16. <h:selectOneMenu> tag
The <h:selectOneMenu> tag is identical to the <h:selectOneListBox size="1"> tag. In the example, the executed code JSF is as follows:
<!-- line 7 -->
          <h:outputText value="selectOneMenu" styleClass="info"/>
          <h:panelGroup>
            <h:outputText value="#{msg['form.selectOneMenuPrompt']}"/>
            <h:selectOneMenu id="selectOneMenu" value="#{form.selectOneMenu}">
              <f:selectItem itemValue="1" itemLabel="un"/>
              <f:selectItem itemValue="2" itemLabel="deux"/>
              <f:selectItem itemValue="3" itemLabel="trois"/>
              <f:selectItem itemValue="4" itemLabel="quatre"/>
              <f:selectItem itemValue="5" itemLabel="cinq"/>
            </h:selectOneMenu>
          </h:panelGroup>
          <h:outputText value="#{form.selectOneMenu}"/>
The template for the <h:selectOneMenu> tag in [Form.java] is as follows:
private String selectOneMenu="1";
Upon the initial request for the [index.xhtml] page, the preceding code generates the view:
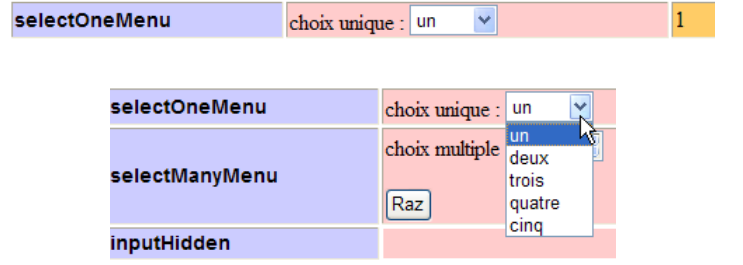 |
An example of execution might be as follows:
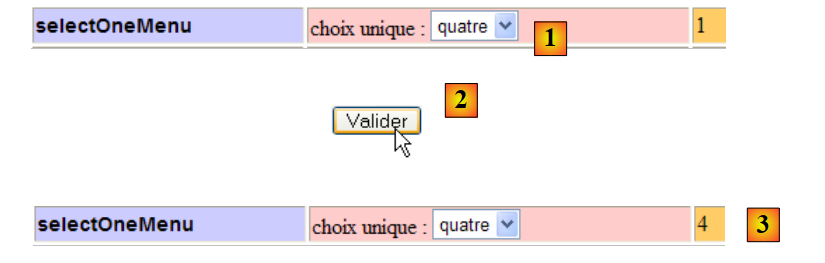 |
The value posted for the [1] field is as follows:
2.5.17. <h:selectManyMenu> tag
The <h:selectManyMenu> tag is identical to the <h:selectManyListBox size="1"> tag. The JSF code executed in the example is as follows:
<!-- line 8 -->
          <h:outputText value="selectManyMenu" styleClass="info"/>
          <h:panelGroup>
            <h:outputText value="#{msg['form.selectManyMenuPrompt']}" styleClass="prompt" />
            <h:selectManyMenu id="selectManyMenu" value="#{form.selectManyMenu}" >
              <f:selectItem itemValue="1" itemLabel="un"/>
              <f:selectItem itemValue="2" itemLabel="deux"/>
              <f:selectItem itemValue="3" itemLabel="trois"/>
              <f:selectItem itemValue="4" itemLabel="quatre"/>
              <f:selectItem itemValue="5" itemLabel="cinq"/>
            </h:selectManyMenu>
            <p><input type="button" value="#{msg['form.buttonRazText']}" onclick="this.form['formulaire:selectManyMenu'].selectedIndex=-1;" /></p>
          </h:panelGroup>
          <h:outputText value="#{form.selectManyMenuValue}" styleClass="prompt"/>
The template for the <h:selectManyMenu> tag in [Form.java] is as follows:
private String[] selectManyMenu=new String[]{"1","2"};
Upon the initial request for the [index.xhtml] page, the preceding code generates the page:
 |
The list [1] contains the texts "one", ..., "five" with the items "one" and "two" selected. The generated code HTML is as follows:
<tr>
<td class="col1"><span class="info">selectManyMenu</span></td>
<td class="col2"><span class="prompt">choix multiple : </span><select id="formulaire:selectManyMenu" name="formulaire:selectManyMenu" multiple="multiple" size="1">
    <option value="1" selected="selected">un</option>
    <option value="2" selected="selected">deux</option>
    <option value="3">trois</option>
    <option value="4">quatre</option>
    <option value="5">cinq</option>
</select>


            <p><input type="button" value="Raz" onclick="this.form['formulaire:selectManyMenu'].selectedIndex=-1;" /></p>
          </td>
<td class="col3"><span class="prompt">[ 1 2]</span></td>
</tr>
As shown above in lines 4 and 5, the elements "one" and "two" are selected (presence of the selected attribute).
It is difficult to provide a screenshot of an example of this in action because the selected items cannot be shown in the menu. Readers are invited to try this themselves (to select multiple items in the list, hold down the Ctrl key while clicking).
2.5.18. <h:inputHidden> tag
The <h:inputHidden> tag has no visual representation. It is used solely to insert a <input type="hidden" value="..."/> tag into the page’s HTML flow. When included within a <h:form> tag, their values are part of the data sent to the server when the form is submitted. Because these are form fields that the user cannot see, they are called hidden fields. The purpose of these fields is to preserve data between the different request/response cycles of the same client:
- the client requests a form F. The server sends it and places information I in a hidden field C, in the form <h:inputHidden id="C" value="I"/>,
- when the client has filled out form F and submits it to the server, the value I of field C is sent back to the server. The server can then retrieve the information I that it had stored on the page. This creates a memory between the two request/response cycles,
- JSF uses this technique itself. The information I that it stores in form F is the value of all its components. It uses the following hidden field for this purpose:
<input type="hidden" name="javax.faces.ViewState" id="javax.faces.ViewState" value="H4sIAAAAAAAAANV...8PswawAA" />
The hidden field is named javax.faces.ViewState, and its value is a string that represents, in encoded form, the value of all the components on the page sent to the client. When the client sends the page back after entering data into the form, the hidden field javax.faces.ViewState is sent back along with the entered values. This is what allows the JSF controller to reconstruct the page as it was originally sent. This mechanism was explained on page 72.
The code JSF from the example is as follows:
<!-- line 9 -->
          <h:outputText value="inputHidden"  styleClass="info"/>
          <h:inputHidden id="inputHidden" value="#{form.inputHidden}"/>
          <h:outputText value="#{form.inputHidden}"/>
The template for the <h:inputHidden> tag in [Form.java] is as follows:
private String inputHidden="initial";
This results in the following display when the page [index.xhtml] is first requested:
- Line 2 generates [1], line 4 generates [2]. Line 3 does not generate any visual elements.
The generated HTML code is as follows:
<tr>
<td class="col1"><span class="info">inputHidden</span></td>
<td class="col2"><input id="formulaire:inputHidden" type="hidden" name="formulaire:inputHidden" value="initial" /></td>
<td class="col3">initial</td>
</tr>
When the form is submitted, the value "initial" of the field named form:inputHidden on line 3 will be posted along with the other values in the form. The field
private String inputHidden;
will be updated with this value, which is the one it already had initially. This value will be included in the new page sent back to the client. We therefore always get the screenshot above.
The value posted for the hidden field is as follows:
2.5.19. <h:selectBooleanCheckBox> tag
The <h:selectBooleanCheckBox> tag generates a HTML <input type="checkbox" ...> tag.
Consider the following JSF code:
<!-- line 10 -->
  <h:outputText value="selectBooleanCheckbox" styleClass="info"/>
  <h:panelGroup>
    <h:outputText value="#{msg['form.selectBooleanCheckboxPrompt']}" styleClass="prompt" />
    <h:selectBooleanCheckbox id="selectBooleanCheckbox" value="#{form.selectBooleanCheckbox}"/>
  </h:panelGroup>
  <h:outputText value="#{form.selectBooleanCheckbox}"/>
The template for the <h:selectBooleanCheckbox> tag on line 5 above in [Form.java] is as follows:
private boolean selectBooleanCheckbox=true;
When the page [index.xhtml] is requested for the first time, the resulting page is as follows:
 |
- Line 2 of the code XHTML generates [1],
- the text [2] is generated by line 4. The checkbox [3] is generated by line [5]. Here, the method getSelectBooleanCheckbox from [Form.java] was used to check or uncheck the checkbox. Since the method returns a boolean value of true (see Java code), the checkbox was checked,
- line 7 of the XHTML code generates [4]. Once again, the getSelectBooleanCheckbox method from [Form.java] is used to generate the text [4].
The HTML stream generated by the previous JSF code is as follows:
<tr>
<td class="col1"><span class="info">selectBooleanCheckbox</span></td>
<td class="col2"><span class="prompt">marié(e) : </span>
<input id="formulaire:selectBooleanCheckbox" type="checkbox" name="formulaire:selectBooleanCheckbox" checked="checked" /></td>
<td class="col3">true</td>
</tr>
In [4], we see the tag HTML <input type="checkbox"> that was generated. The value "true" of the associated model caused the attribute checked="checked" to be added to the tag. This causes the checkbox to be checked.
Now, below, let’s uncheck the [1] checkbox, submit the [2] form, and look at the result obtained [3, 4]:
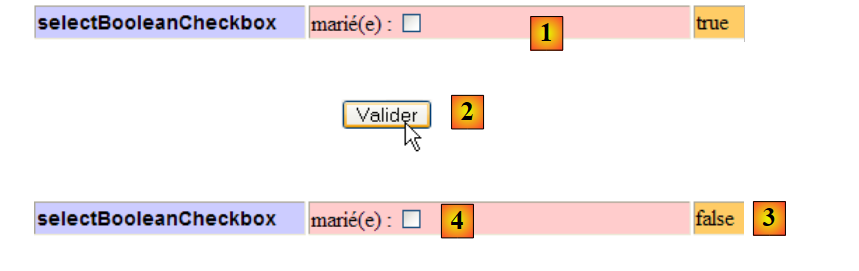 |
Because the checkbox is unchecked, no value is posted for the [1] field.
Validating the form via [2] caused the [Form.java] template to be updated by the entry [1]. The field selectBooleanCheckbox in [Form.java] was then assigned the value false. The re-display of [index.xhtml] shows that the selectBooleanCheckbox field of the template was indeed updated to [3] and [4]. It is worth noting here that it is thanks to the hidden field javax.faces.ViewState that JSF was able to determine that the initially checked checkbox had been unchecked by the user. Indeed, the value of an unchecked checkbox is not included in the values posted by the browser. Thanks to the component tree stored in the hidden field javax.faces.ViewState, JSF determines that there was a checkbox named "selectBooleanCheckbox" in the form and that its value is not included in the values posted by the client browser. It can conclude that it was unchecked in the posted form, which allows it to assign the Boolean value false to the associated Java model:
private boolean selectBooleanCheckbox;
2.5.20. <h:selectManyCheckBox> tag
The <h:selectManyCheckBox> tag generates a group of checkboxes and therefore several <input type="checkbox" ...>. This tag is the counterpart to the <h:selectManyListBox> tag, except that the items to be selected are presented as adjacent checkboxes rather than as a list. What was said about the <h:selectManyListBox> tag remains valid here.
Consider the following JSF code:
          <!-- line 11 -->
          <h:outputText value="selectManyCheckbox" styleClass="info"/>
          <h:panelGroup>
            <h:outputText value="#{msg['form.selectManyCheckboxPrompt']}" styleClass="prompt" />
            <h:selectManyCheckbox id="selectManyCheckbox" value="#{form.selectManyCheckbox}">
              <f:selectItem itemValue="1" itemLabel="rouge"/>
              <f:selectItem itemValue="2" itemLabel="bleu"/>
              <f:selectItem itemValue="3" itemLabel="blanc"/>
              <f:selectItem itemValue="4" itemLabel="noir"/>
            </h:selectManyCheckbox>
          </h:panelGroup>
<h:outputText value="#{form.selectManyCheckboxValue}"/>
The template for the <h:selectManyCheckbox> tag in line 5 above in [Form.java] is as follows:
private String[] selectManyCheckbox=new String[]{"1","3"};
When the page [index.xhtml] is requested for the first time, the resulting page is as follows:
 |
- Line 2 of the code XHTML generates [1],
- the text [2] is generated by line 4. The checkboxes [3] are generated by lines 5–10. For each of them:
- the itemLabel attribute defines the text displayed next to the checkbox;
- the itemvalue attribute defines the value that will be posted to the server if the checkbox is checked,
The model for the four checkboxes is the following Java field:
private String[] selectManyCheckbox=new String[]{"1","3"};
This array defines:
- which checkboxes should be checked when the page is displayed. This is done via their value, c.a.d, and their field, itemValue. In the example above, the checkboxes with values in the array {"1","3"} will be checked. This is what is shown in the screenshot above;
- when the page is submitted, the selectManyCheckbox template receives the array of values for the checkboxes the user has checked. This is what we will see shortly;
- line 12 of the XHTML code generates [4]. It is the following getSelectManyCheckboxValue method that generated [4]:
  public String getSelectManyCheckboxValue(){
    return getValue(getSelectManyCheckbox());
  }

  private String getValue(String[] chaines){
    String value="[";
    for(String chaine : chaines){
      value+=" "+chaine;
    }
    return value+"]";
}
The HTML flow generated by the previous JSF code is as follows:
    <tr>
<td>
<input name="formulaire:selectManyCheckbox" id="formulaire:selectManyCheckbox:0" value="1" type="checkbox" checked="checked" /><label for="formulaire:selectManyCheckbox:0"> rouge</label></td>
<td>
<input name="formulaire:selectManyCheckbox" id="formulaire:selectManyCheckbox:1" value="2" type="checkbox" /><label for="formulaire:selectManyCheckbox:1"> bleu</label></td>
<td>
<input name="formulaire:selectManyCheckbox" id="formulaire:selectManyCheckbox:2" value="3" type="checkbox" checked="checked" /><label for="formulaire:selectManyCheckbox:2"> blanc</label></td>
<td>
<input name="formulaire:selectManyCheckbox" id="formulaire:selectManyCheckbox:3" value="4" type="checkbox" /><label for="formulaire:selectManyCheckbox:3"> noir</label></td>
    </tr>
</table></td>
<td class="col3">[ 1 3]</td>
</tr>
Four HTML <input type="checkbox" ...> tags were generated. The tags on lines 3 and 7 have the attribute checked="checked", which causes them to appear checked. Note that they all have the same attribute name="form:selectManyCheckbox", meaning the four HTML fields have the same name. If the checkboxes in rows 5 and 9 are checked by the user, the browser will send the values of the four checkboxes in the following format:
and the template for the four checkboxes
private String[] selectManyCheckbox=new String[]{"1","3"};
will receive the array {"2","4"}.
Let's check it below. In [1], we make the change; in [2], we submit the form. In [3], the result is:
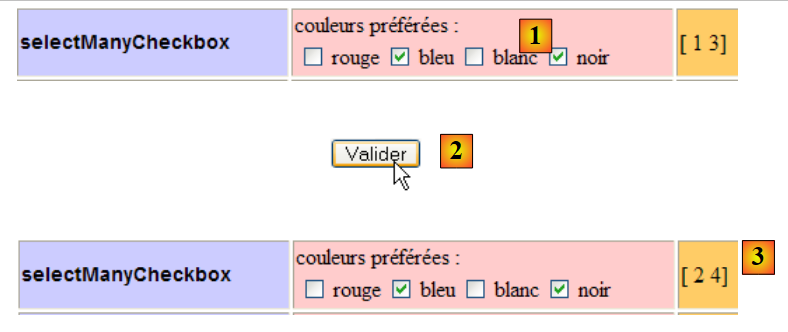 |
The values posted for the [1] fields are as follows:
2.5.21. <h:selectOneRadio> tag
The <h:selectOneRadio> tag generates a group of mutually exclusive radio buttons.
Consider the following JSF code:
<!-- line 12 -->
          <h:outputText value="selectOneRadio" styleClass="info"/>
          <h:panelGroup>
            <h:outputText value="#{msg['form.selectOneRadioPrompt']}" />
            <h:selectOneRadio id="selectOneRadio" value="#{form.selectOneRadio}">
              <f:selectItem itemValue="1" itemLabel="voiture"/>
              <f:selectItem itemValue="2" itemLabel="vélo"/>
              <f:selectItem itemValue="3" itemLabel="scooter"/>
              <f:selectItem itemValue="4" itemLabel="marche"/>
            </h:selectOneRadio>
          </h:panelGroup>
          <h:outputText value="#{form.selectOneRadio}"/>
The template for the <h:selectOneRadio> tag in line 5 above is as follows in [Form.java]:
private String selectOneRadio="2";
When the [index.xhtml] page is requested for the first time, the resulting view is as follows:
 |
- line 2 of the XHTML code generates [1],
- the text [2] is generated by line 4. The radio buttons [3] are generated by lines 5–10. For each of them:
- the itemLabel attribute defines the text displayed next to the radio button;
- The `itemvalue` attribute defines the value that will be submitted to the server if the checkbox is checked,
The model for the four radio buttons is the following Java field:
private String selectOneRadio="2";
This template defines:
- which radio button should be selected when the page is displayed. This is done via their value, c.a.d. their field itemValue. In the example above, the radio button with the value "2" will be selected. This is what is shown in the screenshot above;
- when the page is submitted, the template selectOneRadio receives the value of the radio button that was selected. This is what we will see shortly;
- line 12 of the XHTML code generates [4].
The HTML feed generated by the preceding JSF code is as follows:
<tr>
<td class="col1"><span class="info">selectOneRadio</span></td>
<td class="col2">moyen de transport préféré : <table id="formulaire:selectOneRadio">
<tr>
<td>
<input type="radio" name="formulaire:selectOneRadio" id="formulaire:selectOneRadio:0" value="1" /><label for="formulaire:selectOneRadio:0"> voiture</label></td>
<td>
<input type="radio" checked="checked" name="formulaire:selectOneRadio" id="formulaire:selectOneRadio:1" value="2" /><label for="formulaire:selectOneRadio:1"> vélo</label></td>
<td>
<input type="radio" name="formulaire:selectOneRadio" id="formulaire:selectOneRadio:2" value="3" /><label for="formulaire:selectOneRadio:2"> scooter</label></td>
<td>
<input type="radio" name="formulaire:selectOneRadio" id="formulaire:selectOneRadio:3" value="4" /><label for="formulaire:selectOneRadio:3"> marche</label></td>
</tr>
Four HTML <input type="radio" ...> tags were generated. The tag on line 8 has the attribute checked="checked", which causes the corresponding radio button to appear checked. Note that the tags all have the same attribute name="form:selectOneRadio", meaning the four fields HTML have the same name. This is the condition for having a group of mutually exclusive radio buttons: when one is selected, the others are not.
Below, in [1], we select one of the radio buttons; in [2], we submit the form; in [3], the result obtained:
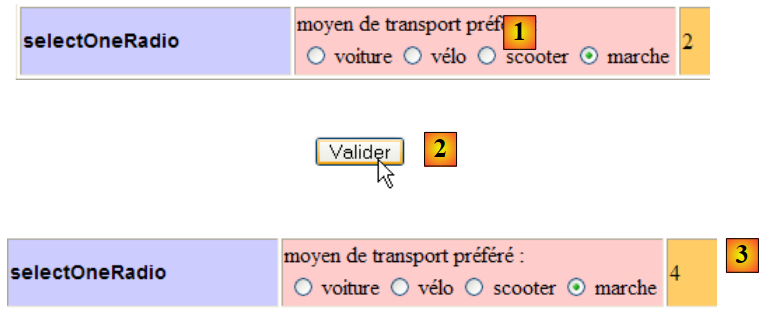 |
The value posted for the [1] field is as follows:
2.6. Example mv-jsf2-04: dynamic lists
2.6.1. The application
The application is the same as before:
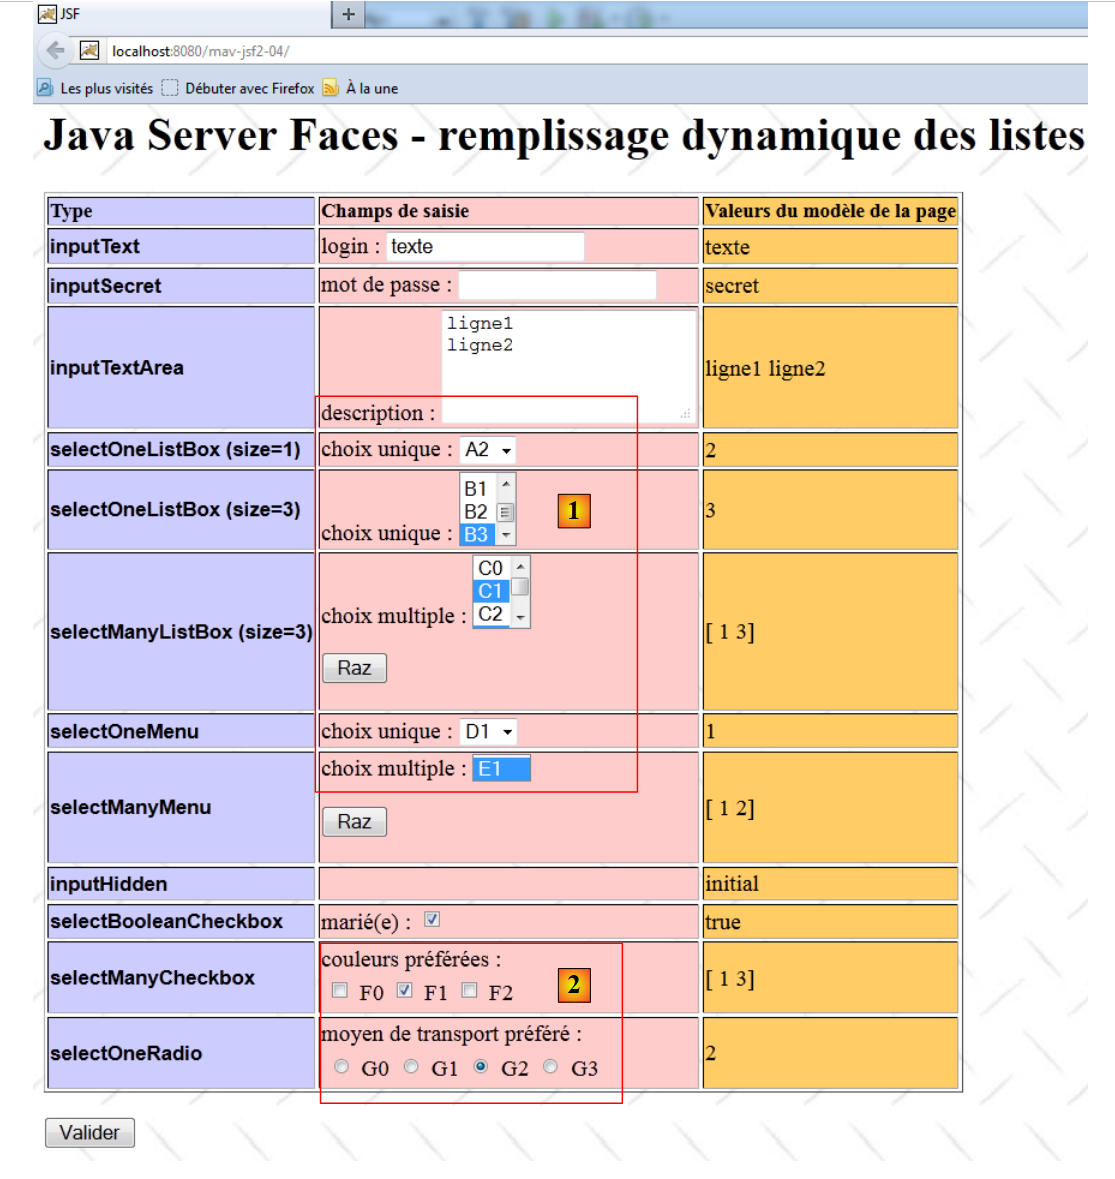 |
The only changes relate to how the list items for fields [1] and [2] are generated. Here, they are generated dynamically by Java code, whereas in the previous version they were hard-coded in the JSF page.
2.6.2. The Netbeans project
The Netbeans project for the application is as follows:
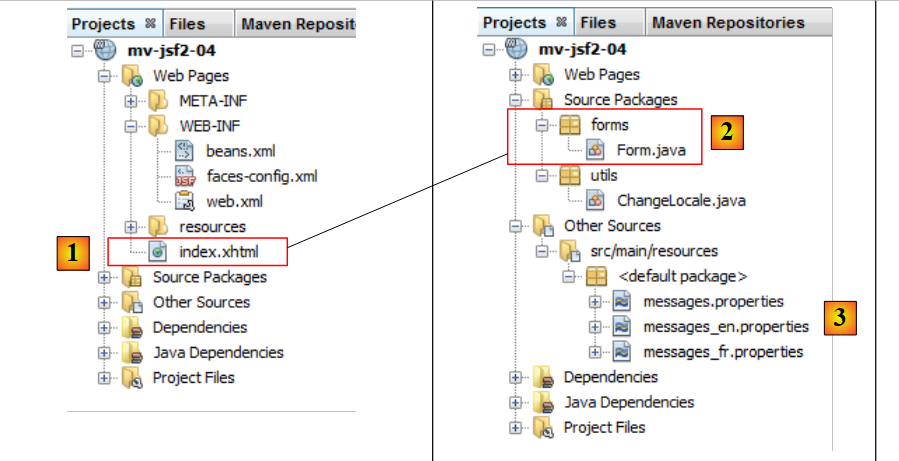 |
The [mv-jsf2-04] project is identical to the [mv-jsf2-03] project, with the following differences:
- In [1], on the JSF page, the list items will no longer be hard-coded in the code,
- In [2], the template for the page JSF [1] will be modified,
- in [3], one of the messages will be modified.
2.6.3. The page [index.xhtml] and its template [Form.java]
The page JSF [index.xhtml] becomes the following:
<?xml version='1.0' encoding='UTF-8' ?>
<!DOCTYPE html PUBLIC "-//W3C//DTD XHTML 1.0 Transitional//EN" "http://www.w3.org/TR/xhtml1/DTD/xhtml1-transitional.dtd">
<html xmlns="http://www.w3.org/1999/xhtml"
      xmlns:h="http://java.sun.com/jsf/html"
      xmlns:f="http://java.sun.com/jsf/core">

  <f:view locale="#{changeLocale.locale}">
    <h:head>
      <title>JSF</title>
      <h:outputStylesheet library="css" name="styles.css"/>
    </h:head>
    <h:body style="background-image: url('${request.contextPath}/resources/images/standard.jpg');">
      <h:form id="formulaire">
        <!-- languages -->
        <h:panelGrid columns="2">
          <h:commandLink value="#{msg['form.langue1']}" action="#{changeLocale.setFrenchLocale}"/>
          <h:commandLink value="#{msg['form.langue2']}" action="#{changeLocale.setEnglishLocale}"/>
        </h:panelGrid>
        <h1><h:outputText value="#{msg['form.titre']}"/></h1>
        <h:panelGrid columnClasses="col1,col2,col3" columns="3" border="1">
...
          <!-- line 4 -->
          <h:outputText value="selectOneListBox (size=1)" styleClass="info"/>
          <h:panelGroup>
            <h:outputText value="#{msg['form.selectOneListBox1Prompt']}"/>
            <h:selectOneListbox id="selectOneListBox1" value="#{form.selectOneListBox1}" size="1">
              <f:selectItems value="#{form.selectOneListbox1Items}"/>
            </h:selectOneListbox>
          </h:panelGroup>
          <h:outputText value="#{form.selectOneListBox1}"/>
          <!-- line 5 -->
          <h:outputText value="selectOneListBox (size=3)" styleClass="info"/>
          <h:panelGroup>
            <h:outputText value="#{msg['form.selectOneListBox2Prompt']}"/>
            <h:selectOneListbox id="selectOneListBox2" value="#{form.selectOneListBox2}" size="3">
              <f:selectItems value="#{form.selectOneListbox2Items}"/>
            </h:selectOneListbox>
          </h:panelGroup>
          <h:outputText value="#{form.selectOneListBox2}"/>
          <!-- line 6 -->
          <h:outputText value="selectManyListBox (size=3)"  styleClass="info"/>
          <h:panelGroup>
            <h:outputText value="#{msg['form.selectManyListBoxPrompt']}"/>
            <h:selectManyListbox id="selectManyListBox" value="#{form.selectManyListBox}" size="3">
              <f:selectItems value="#{form.selectManyListBoxItems}"/>
            </h:selectManyListbox>
            <p><input type="button" value="#{msg['form.buttonRazText']}" onclick="this.form['formulaire:selectManyListBox'].selectedIndex=-1;" /></p>
          </h:panelGroup>
          <h:outputText value="#{form.selectManyListBoxValue}"/>
          <!-- line 7 -->
          <h:outputText value="selectOneMenu" styleClass="info"/>
          <h:panelGroup>
            <h:outputText value="#{msg['form.selectOneMenuPrompt']}"/>
            <h:selectOneMenu id="selectOneMenu" value="#{form.selectOneMenu}">
              <f:selectItems value="#{form.selectOneMenuItems}"/>
            </h:selectOneMenu>
          </h:panelGroup>
          <h:outputText value="#{form.selectOneMenu}"/>
          <!-- line 8 -->
          <h:outputText value="selectManyMenu" styleClass="info"/>
          <h:panelGroup>
            <h:outputText value="#{msg['form.selectManyMenuPrompt']}" styleClass="prompt" />
            <h:selectManyMenu id="selectManyMenu" value="#{form.selectManyMenu}" >
              <f:selectItems value="#{form.selectManyMenuItems}"/>
            </h:selectManyMenu>
            <p><input type="button" value="#{msg['form.buttonRazText']}" onclick="this.form['formulaire:selectManyMenu'].selectedIndex=-1;" /></p>
          </h:panelGroup>
          <h:outputText value="#{form.selectManyMenuValue}" styleClass="prompt"/>
...
          <!-- line 11 -->
          <h:outputText value="selectManyCheckbox" styleClass="info"/>
          <h:panelGroup>
            <h:outputText value="#{msg['form.selectManyCheckboxPrompt']}" styleClass="prompt" />
            <h:selectManyCheckbox id="selectManyCheckbox" value="#{form.selectManyCheckbox}">
              <f:selectItems value="#{form.selectManyCheckboxItems}"/>
            </h:selectManyCheckbox>
          </h:panelGroup>
          <h:outputText value="#{form.selectManyCheckboxValue}"/>
          <!-- line 12 -->
          <h:outputText value="selectOneRadio" styleClass="info"/>
          <h:panelGroup>
            <h:outputText value="#{msg['form.selectOneRadioPrompt']}" />
            <h:selectOneRadio id="selectOneRadio" value="#{form.selectOneRadio}">
              <f:selectItems value="#{form.selectOneRadioItems}"/>
            </h:selectOneRadio>
          </h:panelGroup>
          <h:outputText value="#{form.selectOneRadio}"/>
        </h:panelGrid>
        <p>
          <h:commandButton type="submit" id="submit" value="#{msg['form.submitText']}"/>
        </p>
      </h:form>
    </h:body>
  </f:view>
</html>
The changes made are shown in lines 26–28. Where previously we had the code:
<h:selectOneListbox id="selectOneListBox1" value="#{form.selectOneListBox1}" size="1">
              <f:selectItem itemValue="1" itemLabel="un"/>
              <f:selectItem itemValue="2" itemLabel="deux"/>
              <f:selectItem itemValue="3" itemLabel="trois"/>
</h:selectOneListbox>
We now have this:
<h:selectOneListbox id="selectOneListBox1" value="#{form.selectOneListBox1}" size="1">
              <f:selectItems value="#{form.selectOneListbox1Items}"/>
</h:selectOneListbox>
The three <f:selectItem> tags in lines 2–4 have been replaced by the single <f:selectItems> tag in line b. This tag has a value attribute whose value is a collection of elements of type javax.faces.model.SelectItem. Above, the value of the value attribute is obtained by calling the following [form].getSelectOneListbox1Items method:
  public SelectItem[] getSelectOneListbox1Items() {
    return getItems("A",3);
  }

  private SelectItem[] getItems(String label, int qte) {
    SelectItem[] items=new SelectItem[qte];
    for(int i=0;i<qte;i++){
      items[i]=new SelectItem(i,label+i);
    }
    return items;
}
- In line 1, the method getSelectOneListbox1Items returns an array of elements of type javax.faces.model.SelectItem constructed by the private method getItems in line 5. Note that the getSelectOneListbox1Items method is not the getter for a private field selectOneListBox1Items,
- The class javax.faces.model.SelectItem has various constructors.
We use line 8 of the getItems method, the constructor SelectItem(Object value, String label), which corresponds to the JSF tag
<f:selectItem itemValue="value" labelValue="label"/>
- Lines 5–10: The method getItems(String label, int qte) constructs an array of qte elements of type SelectItem, where element i is obtained by the constructor SelectItem(i, label+i).
The code JSF
<h:selectOneListbox id="selectOneListBox1" value="#{form.selectOneListBox1}" size="1">
              <f:selectItems value="#{form.selectOneListbox1Items}"/>
</h:selectOneListbox>
then becomes functionally equivalent to the following JSF code:
<h:selectOneListbox id="selectOneListBox1" value="#{form.selectOneListBox1}" size="1">
              <f:selectItem itemValue="0" itemLabel="A0"/>
              <f:selectItem itemValue="1" itemLabel="A1"/>
              <f:selectItem itemValue="2" itemLabel="A2"/>
</h:selectOneListbox>
The same applies to all other lists on page JSF. The following new methods are thus found in template [Form.java]:
  public SelectItem[] getSelectOneListbox1Items() {
    return getItems("A",3);
  }

  public SelectItem[] getSelectOneListbox2Items() {
    return getItems("B",4);
  }

  public SelectItem[] getSelectManyListBoxItems() {
    return getItems("C",5);
  }

  public SelectItem[] getSelectOneMenuItems() {
    return getItems("D",3);
  }

  public SelectItem[] getSelectManyMenuItems() {
   return getItems("E",4);
   }

  public SelectItem[] getSelectManyCheckboxItems() {
   return getItems("F",3);
   }

  public SelectItem[] getSelectOneRadioItems() {
   return getItems("G",4);
   }

  private SelectItem[] getItems(String label, int qte) {
    SelectItem[] items=new SelectItem[qte];
    for(int i=0;i<qte;i++){
      items[i]=new SelectItem(i,label+i);
    }
    return items;
}
2.6.4. The message file
Only one message is modified:
[messages_fr.properties]
form.titre=Java Server Faces - remplissage dynamique des listes
[messages_en.properties]
form.titre=Java Server Faces - dynamic filling of lists of elements
2.6.5. Tests
Readers are invited to test this new version.
Most often, the dynamic elements of a form are the results of business logic or come from a database:
 |
Let’s examine the initial request for the page JSF [index.xhtml] via a GET from the browser:
- the page JSF is requested [1],
- the controller [Faces Servlet] requests its display in [3]. The JSF engine that processes the page calls the [Form.java] model of that page, for example the getSelectOneListBox1Items method. This method could very well return an array of elements of type SelectItem, based on information stored in a database. To do this, it would call upon the [métier] and [2b] layers.
2.7. Example mv-jsf2-05: navigation – session – exception handling
2.7.1. The application
The application is the same as before, except that the form now takes the form of a multi-page wizard:
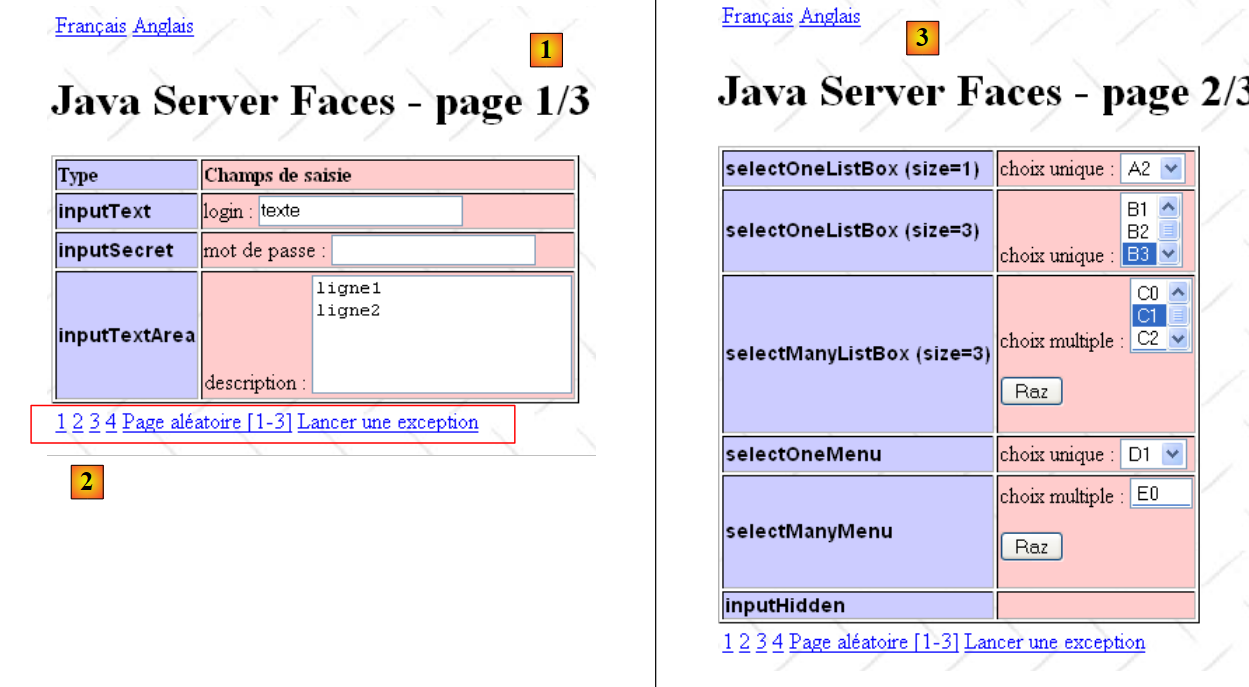 |
- in [1], page 1 of the form—can also be accessed via link 1 in [2]
- in [2], a group of 5 links.
- in [3], page 2 of the form accessed via link 2 in [2]
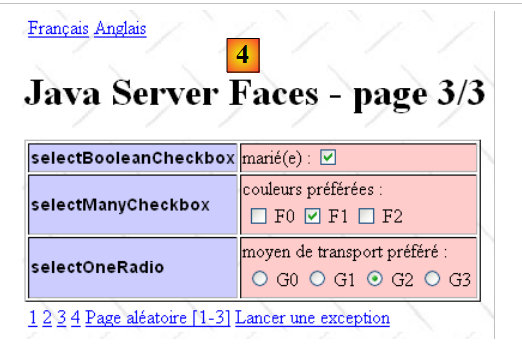 |
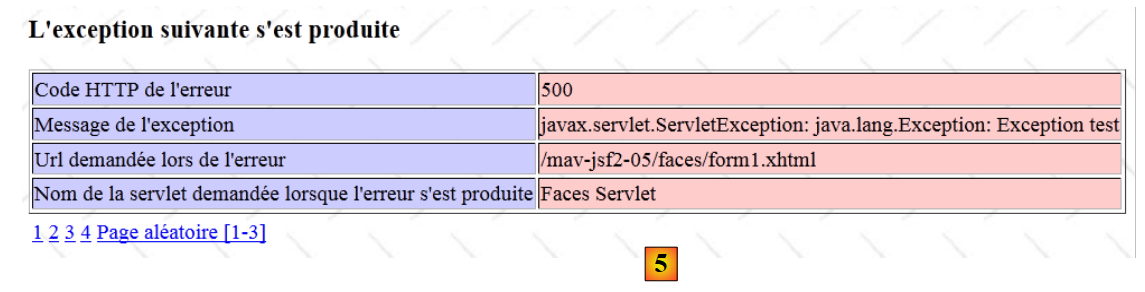 |
- in [4], page 3 of the form accessed via link 3 in [2]
- in [5], the page accessed via the "Raise an exception" link from [2]
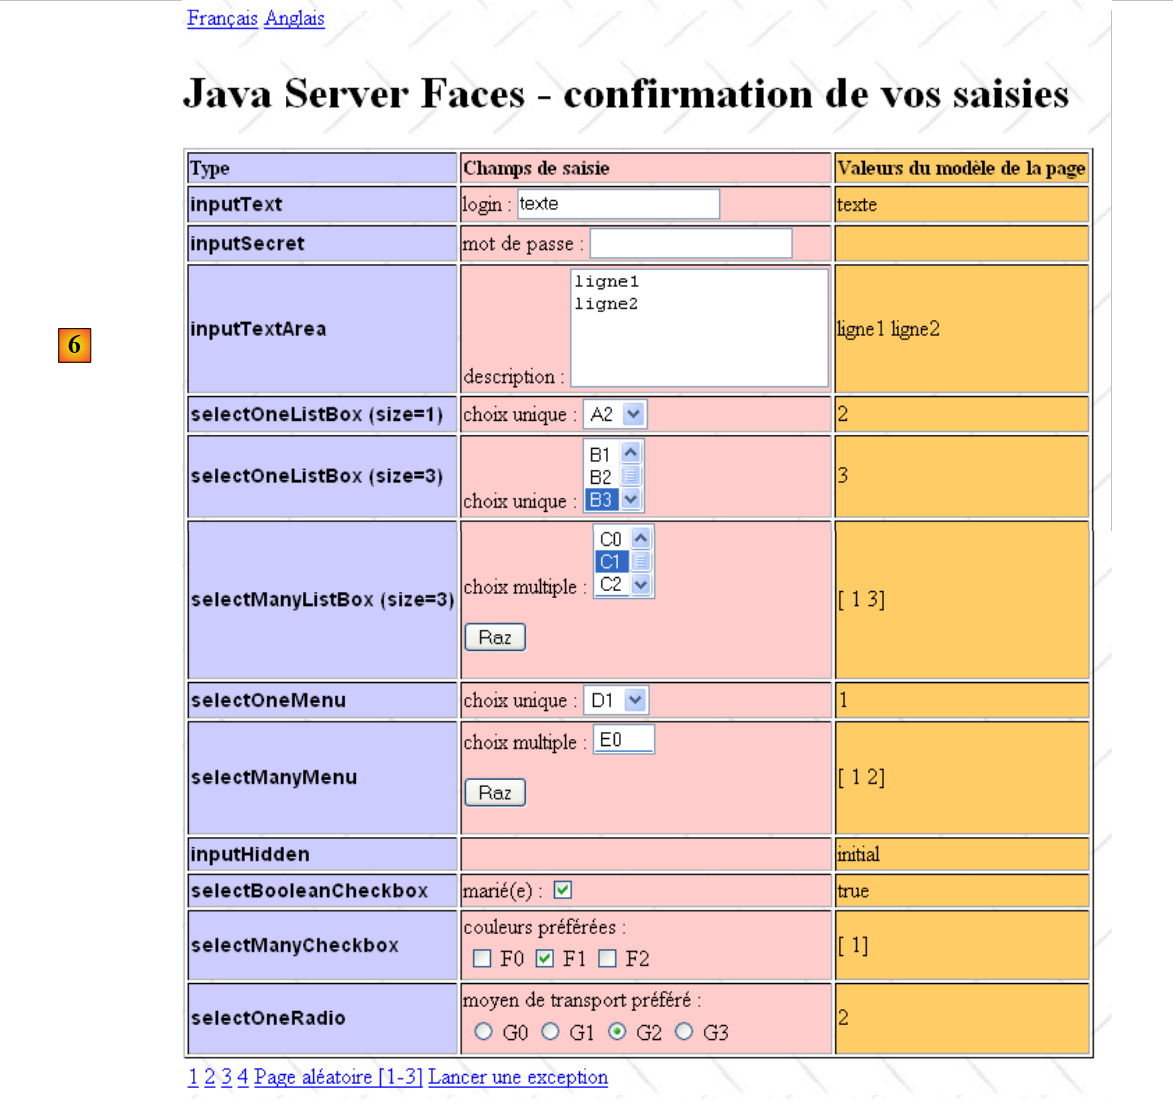 |
- to [6], the page accessed via link 4 of [2]. It summarizes the entries made on pages 1 through 3.
2.7.2. The Netbeans project
The Netbeans project for the application is as follows:
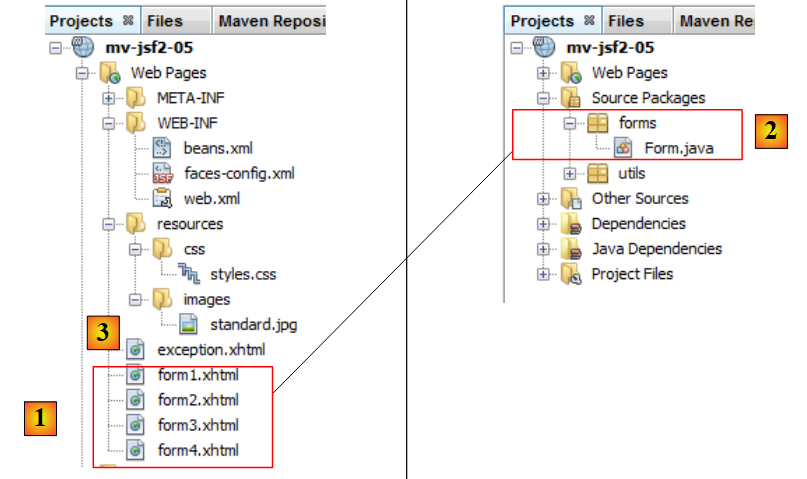 |
The [mv-jsf2-05] project introduces two new features:
- In [1], the page JSF [index.xhtml] is split into three pages, [form1.xhtml, form2.xhtml, form3.xhtml], across which the entries have been distributed. The page [form4.xhtml] is a copy of the page [index.xhtml] from the previous project. In [2], the class [Form.java] remains unchanged. It will serve as a template for the four preceding pages JSF,
- in [3], a page named [exception.xhtml] is added: it will be used when an exception occurs in the application.
2.7.3. The [form.xhtml] pages and their template [Form.java]
2.7.3.1. The code for the XHTML pages
The JSF [form1.xhtml] page is as follows:
<?xml version='1.0' encoding='UTF-8' ?>
<!DOCTYPE html PUBLIC "-//W3C//DTD XHTML 1.0 Transitional//EN" "http://www.w3.org/TR/xhtml1/DTD/xhtml1-transitional.dtd">

<html xmlns="http://www.w3.org/1999/xhtml"
      xmlns:h="http://java.sun.com/jsf/html"
      xmlns:f="http://java.sun.com/jsf/core">
  <f:view locale="#{changeLocale.locale}">
    <h:head>
      <title>JSF</title>
      <h:outputStylesheet library="css" name="styles.css"/>
    </h:head>
    <h:body style="background-image: url('${request.contextPath}/resources/images/standard.jpg');">
    <h:form id="formulaire">
        <!-- links -->
        <h:panelGrid columns="2">
          <h:commandLink value="#{msg['form.langue1']}" action="#{changeLocale.setFrenchLocale}"/>
          <h:commandLink value="#{msg['form.langue2']}" action="#{changeLocale.setEnglishLocale}"/>
        </h:panelGrid>
        <h1><h:outputText value="#{msg['form1.titre']}"/></h1>
        <h:panelGrid columnClasses="col1,col2" columns="2" border="1">
          <h:outputText value="#{msg['form.headerCol1']}" styleClass="entete"/>
          <h:outputText value="#{msg['form.headerCol2']}" styleClass="entete"/>
          <!-- line 1 -->
          <h:outputText value="inputText"  styleClass="info"/>
          <h:panelGroup>
            <h:outputText value="#{msg['form.loginPrompt']}"/>
            <h:inputText id="inputText" value="#{form.inputText}"/>
          </h:panelGroup>
          <!-- line 2 -->
          <h:outputText value="inputSecret"  styleClass="info"/>
          <h:panelGroup>
            <h:outputText value="#{msg['form.passwdPrompt']}"/>
            <h:inputSecret id="inputSecret" value="#{form.inputSecret}"/>
          </h:panelGroup>
          <!-- line 3 -->
          <h:outputText value="inputTextArea" styleClass="info"/>
          <h:panelGroup>
            <h:outputText value="#{msg['form.descPrompt']}"/>
            <h:inputTextarea id="inputTextArea" value="#{form.inputTextArea}" rows="4"/>
          </h:panelGroup>
        </h:panelGrid>
        <!-- links -->
        <h:panelGrid columns="6">
          <h:commandLink value="1" action="form1"/>
          <h:commandLink value="2" action="#{form.doAction2}"/>
          <h:commandLink value="3" action="form3"/>
          <h:commandLink value="4" action="#{form.doAction4}"/>
          <h:commandLink value="#{msg['form.pagealeatoireLink']}" action="#{form.doAlea}"/>
          <h:commandLink value="#{msg['form.exceptionLink']}" action="#{form.throwException}"/>
        </h:panelGrid>
      </h:form>
      </h:body>
  </f:view>
</html>
and corresponds to the following display:
 |
Note the following points:
- line 16: the table, which previously had three columns, now has only two. Column 3, which displayed the model values, has been removed. [form4.xhtml] will display them instead,
- lines 40–46: a table of six links. The links on lines 44 and 46 have a static navigation: their action attribute is hard-coded. The other links have a dynamic navigation: their action attribute points to a method in the form bean responsible for returning the navigation key. The methods referenced in [Form.java] are as follows:
// events
  public String doAction2(){
    return "form2";
  }

  public String doAction4(){
    return "form4";
  }

  public String doAlea(){
    // a random number between 1 and 3
    int i=1+(int)(3*Math.random());
    // return the key of navigation
    return "form"+i;
  }

  public String throwException() throws java.lang.Exception{
    throw new Exception("Exception test");
}
For now, we will ignore the throwException method on line 17. We will return to it later. The methods doAction2 and doAction4 simply return the key from navigation without performing any processing. We could just as easily have written:
<h:commandLink value="1" action="form1"/>
          <h:commandLink value="2" action="form2"/>
          <h:commandLink value="3" action="form3"/>
          <h:commandLink value="4" action="form4"/>
          <h:commandLink value="#{msg['form.pagealeatoireLink']}" action="#{form.doAlea}"/>
          <h:commandLink value="#{msg['form.exceptionLink']}" action="#{form.throwException}"/>
The doAlea method generates a random key for navigation, which takes its value from the set {"form1","form2","form3"}.
The code for the [form2.xhtml, form3.xhtml, form3.xhtml] pages is similar to that of the [form1.xhtml] page.
2.7.3.2. Lifetime of the [Form.java] template for the [form*.xhtml] pages
Consider the following sequence of actions:
 |
- In [1], fill out page 1 and proceed to page 3,
- in [2], we fill out page 3 and return to page 1,
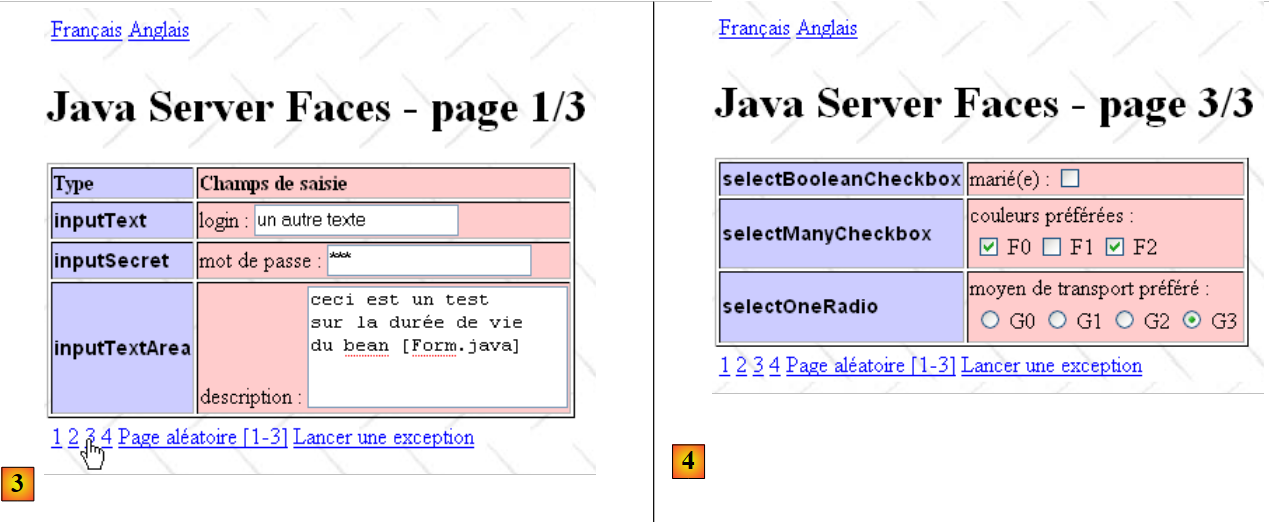 |
- in [3], page 1 is restored as it was entered. We then return to page 3,
- in [4], page 3 is found exactly as it was entered.
The mechanism of the hidden field [javax.faces.ViewState] is not sufficient to explain this phenomenon.
When switching from [1] to [2], several steps occur:
- the template [Form.java] is updated with POST from [form1.jsp]. Notably, the field inputText receives the value "another text",
- the "form3" key in navigation causes [form3.xhtml] to be displayed. The ViewState embedded in [form3.xhtml] reflects the state of only the components of [form3.xhtml], not those of [form1.xhtml].
When transitioning from [2] to [3]:
- the [Form.java] model is updated with the POST from [form3.xhtml]. If the [Form.java] template has reached the end of its lifecycle, a brand-new [Form.java] object is created before being updated from [form3.xhtml] to POST. In this case, the inputText field of the template reverts to its default value:
private String inputText="texte";
and keeps it: in fact, in POST from [form3.xhtml], nothing updates the inputText field, which is part of the [form1.xhtml] template and not that of [form3.xhtml],
- the key for navigation, "form1", causes [form1.xhtml] to be displayed. The page displays its template. In our case, the login input field linked to the inputText template will display "text" and not the value "another text" entered in [1]. For the inputText field to retain the value entered in [1], the lifetime of the [Form.java] template must be set to "session" rather than "request." In this case,
- upon completion of POST from [form1.xhtml], the template will be placed in the client’s session. The field inputText will have the value "another text",
- when POST runs from [form3.xhtml], the template will be retrieved from this session and updated by POST running from [form3.xhtml]. The inputText field will not be updated by this POST but will retain the value "other text" acquired at the end of POST from [form1.xhtml] [1].
The declaration of the [Form.java] bean is therefore as follows:
package forms;

import javax.enterprise.context.SessionScoped;
import javax.faces.bean.ManagedBean;
import javax.faces.model.SelectItem;

@ManagedBean
@SessionScoped
public class Form {
Line 8 gives the bean a session scope.
2.7.4. Exception Handling
Let’s revisit the general architecture of a JSF application:
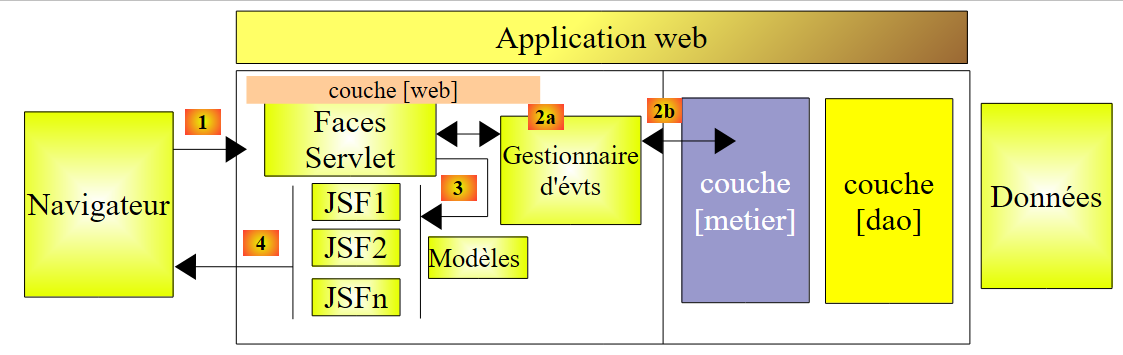 |
What happens when an event handler or a model catches an exception originating from the business layer, such as an unexpected disconnection from a database?
- [2a] event handlers can intercept any exception propagated from the [métier] layer and return a navigation key to the [Faces Servlet] controller, directing it to aspecific to the exception,
- For templates, this solution is not viable because when they are called ([3,4]), we are in the rendering phase of a specific page (XHTML) and no longer in the selection phase. How can we change pages while we are in the rendering phase of one of them? A simple solution, though not always suitable, is to ignore the exception, which will then propagate up to the servlet container running the application. The container can be configured to display a specific page when an exception reaches it. This solution is always viable, and we will examine it now.
2.7.4.1. Configuring the Web Application for Exception Handling
Configuring a web application for exception handling is done in its [web.xml] file:
<?xml version="1.0" encoding="UTF-8"?>
<web-app version="3.0" xmlns="http://java.sun.com/xml/ns/javaee" xmlns:xsi="http://www.w3.org/2001/XMLSchema-instance" xsi:schemaLocation="http://java.sun.com/xml/ns/javaee http://java.sun.com/xml/ns/javaee/web-app_3_0.xsd">
  <context-param>
    <param-name>javax.faces.STATE_SAVING_METHOD</param-name>
    <param-value>client</param-value>
  </context-param>
  <context-param>
    <param-name>javax.faces.PROJECT_STAGE</param-name>
    <param-value>Development</param-value>
  </context-param>
  <context-param>
    <param-name>javax.faces.FACELETS_SKIP_COMMENTS</param-name>
    <param-value>true</param-value>
  </context-param>
  <servlet>
    <servlet-name>Faces Servlet</servlet-name>
    <servlet-class>javax.faces.webapp.FacesServlet</servlet-class>
    <load-on-startup>1</load-on-startup>
  </servlet>
  <servlet-mapping>
    <servlet-name>Faces Servlet</servlet-name>
    <url-pattern>/faces/*</url-pattern>
  </servlet-mapping>
  <session-config>
    <session-timeout>
      30
    </session-timeout>
  </session-config>
  <welcome-file-list>
    <welcome-file>faces/form1.xhtml</welcome-file>
  </welcome-file-list>
  <error-page>
    <error-code>500</error-code>
    <location>/faces/exception.xhtml</location>
  </error-page>
  <error-page>
    <exception-type>java.lang.Exception</exception-type>
    <location>/faces/exception.xhtml</location>
  </error-page>
</web-app>
Lines 32–39 contain the definition of two error pages. You can have as many <error-page> tags as needed. The <location> tag specifies the page to display in case of an error. The error type associated with the page can be defined in two ways:
- using the <exception-type> tag, which defines the Java type of the handled exception. Thus, the <error-page> tag in lines 36–39 indicates that if the servlet container catches an exception of type [java.lang.Exception] or a derived type (line 37) during application execution, then it must display the page [/faces/exception.xhtml] (line 38). By using the most generic exception type, [java.lang.Exception], here, we ensure that all exceptions are handled,
- using the <error-code> tag (line 33), which defines an error code HTTP. For example, if a browser requests URL [http://machine:port/contexte/P] and page P does not exist in the application context, the application does not intervene in the response. The servlet container generates this response by sending a default error page. The first line of the response’s HTTP stream contains a 404 error code indicating that the requested page P does not exist. You may want to generate a response that, for example, follows the application’s style guide or provides links to resolve the issue. In this case, use a <error-page> tag with a <error-code>404</error-code> tag.
Above, the HTTP code for error 500 is the code returned in the event of an application "crash." This is the code that would be returned if an exception were propagated up to the servlet container. The two <error-page> tags on lines 28–35 are therefore likely redundant. We included both to illustrate the two ways to handle an error.
2.7.4.2. Simulating the exception
An exception is artificially triggered by the link [Lancer une exception]:
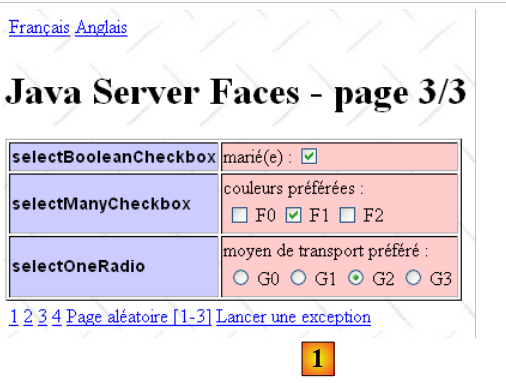 |
 |
Clicking the link [Lancer une exception] [1] causes the page [2] to be displayed.
In the code for the [formx.xhtml] pages, the [Lancer une exception] link is generated as follows:
<!-- links -->
        <h:panelGrid columns="6">
          <h:commandLink value="1" action="form1"/>
...
          <h:commandLink value="#{msg['form.exceptionLink']}" action="#{form.throwException}"/>
        </h:panelGrid>
Line 5 shows that when the link is clicked, the method [form].throwException will be executed. It is as follows:
  public String throwException() throws java.lang.Exception{
    throw new Exception("Exception test");
}
Here, an exception of type [java.lang.Exception] is thrown. It will propagate up to the servlet container, which will then display the page [/faces/exception.xhtml].
2.7.4.3. Information related to an exception
When an exception is propagated to the servlet container, the container displays the corresponding error page by passing information about the exception to it. This information is added as new attributes to the request currently being processed. The browser’s request and the response it will receive are encapsulated in Java objects of type [HttpServletRequest request] and [HttpServletResponse response]. These objects are available at all stages of processing the browser’s request.
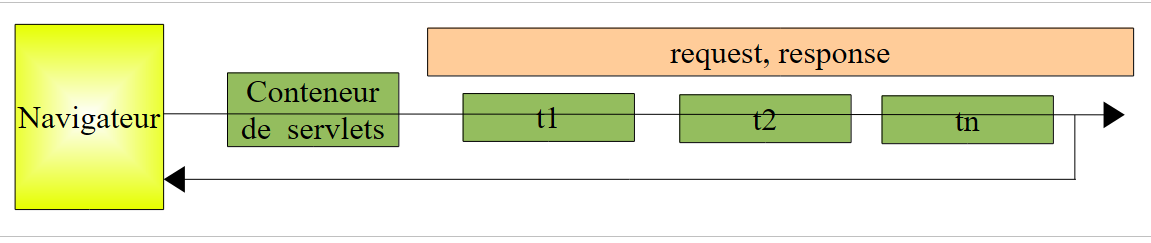 |
Upon receiving the HTTP request from the browser, the servlet container encapsulates it in the Java object [HttpServletRequest request] and creates the object [HttpServletResponse response], which will be used to generate the response. This object notably contains the channel TCP-IP to be used for the response stream HTTP. All layers t1, t2, ..., tn involved in processing the request object have access to these two objects. Each of them can access the elements of the initial request and prepare the response by enriching the response object. A localization layer, for example, can set the localization of the response using the response.setLocale(Locale l) method.
The various layers ti can pass information to one another via the request object. This object has an attribute dictionary, which is empty upon creation, that can be populated by successive processing layers. These layers can place information necessary for the next processing layer into the attributes of the request object. There are two methods for managing the attributes of the request object:
- void setAttribute(String s, Object o), which allows adding an object o identified by the string s to the attributes,
- Object getAttribute(String s), which retrieves the attribute o identified by the string s.
When an exception is propagated up to the servlet container, the container sets the following attributes in the request being processed:
key | value |
the error code HTTP that will be returned to the client | |
the Java type of the exception along with the error message. | |
the URL requested when the exception occurred | |
the servlet that was processing the request when the exception occurred |
We will use these request attributes on the [exception.xhtml] page to display them.
2.7.4.4. The error page [exception.xhtml]
Its content is as follows:
<?xml version='1.0' encoding='UTF-8' ?>
<!DOCTYPE html PUBLIC "-//W3C//DTD XHTML 1.0 Transitional//EN" "http://www.w3.org/TR/xhtml1/DTD/xhtml1-transitional.dtd">

<html xmlns="http://www.w3.org/1999/xhtml"
      xmlns:h="http://java.sun.com/jsf/html"
      xmlns:f="http://java.sun.com/jsf/core">
  <f:view locale="#{changeLocale.locale}">
    <h:head>
      <title>JSF</title>
      <h:outputStylesheet library="css" name="styles.css"/>
    </h:head>
    <h:body style="background-image: url('${request.contextPath}/resources/images/standard.jpg');">
      <h:form id="formulaire">
        <h3><h:outputText value="#{msg['exception.header']}"/></h3>
        <h:panelGrid columnClasses="col1,col2" columns="2" border="1">
          <h:outputText value="#{msg['exception.httpCode']}"/>
          <h:outputText value="#{requestScope['javax.servlet.error.status_code']}"/>
          <h:outputText value="#{msg['exception.message']}"/>
          <h:outputText value="#{requestScope['javax.servlet.error.exception']}"/>
          <h:outputText value="#{msg['exception.requestUri']}"/>
          <h:outputText value="#{requestScope['javax.servlet.error.request_uri']}"/>
          <h:outputText value="#{msg['exception.servletName']}"/>
          <h:outputText value="#{requestScope['javax.servlet.error.servlet_name']}"/>
        </h:panelGrid>
        <!-- links -->
        <h:panelGrid columns="6">
          <h:commandLink value="1" action="form1"/>
          <h:commandLink value="2" action="#{form.doAction2}"/>
          <h:commandLink value="3" action="form3"/>
          <h:commandLink value="4" action="#{form.doAction4}"/>
          <h:commandLink value="#{msg['form.pagealeatoireLink']}" action="#{form.doAlea}"/>
        </h:panelGrid>
      </h:form>
    </h:body>
  </f:view>
</html>
2.7.4.4.1. Expressions on the exception page
In the client request processing chain, page XHTML is normally the last link in the chain:
 |
All elements in the chain are Java classes, including the page XHTML. This page is converted into a servlet by the servlet container, c.a.d, into a standard Java class. More specifically, the page XHTML is converted into Java code that runs within the following method:
public void _jspService(HttpServletRequest request, HttpServletResponse response)
throws java.io.IOException, ServletException {

JspFactory _jspxFactory = null;
PageContext pageContext = null;
HTTPSession session = null;
ServletContext application = null;
ServletConfig config = null;
JspWriter out = null;
Object page = this;
JspWriter _jspx_out = null;
PageContext _jspx_page_context = null;
...
...code de la page XHTML
Starting on line 14, you will find the Java code for the XHTML page. This code will have a number of objects initialized by the _jspService method, line 1 above:
- line 1: HttpServletRequest request: the request currently being processed,
- line 1: HttpServletResponse response: the response that will be sent to the client,
- line 7: ServletContext application: an object representing the web application itself. Like the request object, the application object can have attributes. These are shared by all requests across all clients instances. They are generally read-only attributes,
- line 6: HTTPSession session: represents the client’s session. Like the request and application objects, the session object can have attributes. These are shared by all requests from the same client,
- line 9: JspWriter out: a write stream to the client browser. This object is useful for debugging a XHTML page. Anything written via out.println(text) will be displayed in the client browser.
When writing #{expression} in the JSF page, expression can be the key of an attribute of the request, session, or application objects mentioned above. The corresponding attribute is searched for successively in these three objects. Thus, #{key} is evaluated as follows:
- request.getAttribute(key)
- session.getAttribute(key)
- application.getAttribute(key)
As soon as a non-null value is found, the evaluation of #{key} stops. You may want to be more specific by indicating the context in which the attribute should be searched:
- #{requestScope['clé']} to search for the attribute in the request object,
- #{sessionScope['clé']} to search for the attribute in the session object,
- #{applicationScope['clé']} to search for the attribute in the application object.
This is what was done on page [exception.xhtml], page 116. The attributes used are as follows:
key | domain | value |
request | See section 2.7.4.3. | |
same | same | |
same | same | |
same | same |
The various messages required for the JSF and [exception.xhtml] pages have been added to the existing message files:
[messages_fr.properties]
exception.header=L'the following exception occurred
exception.httpCode=Code HTTP de l'error
exception.message=Message de l'exception
exception.requestUri=URL demandée lors de l'error
exception.servletName=Nom de la servlet demandée lorsque l'error occurred
[messages_en.properties]
exception.header=The following error occurred
exception.httpCode=HTTP error code
exception.message=Exception message
exception.requestUri=URL requested when error occurred
exception.servletName=Servlet requested when error occurred
2.8. Example mv-jsf2-06: Validation and conversion of user input
2.8.1. The application
The application displays an input form. Upon validation, the same form is returned as a response, along with any error messages if the input was found to be incorrect.
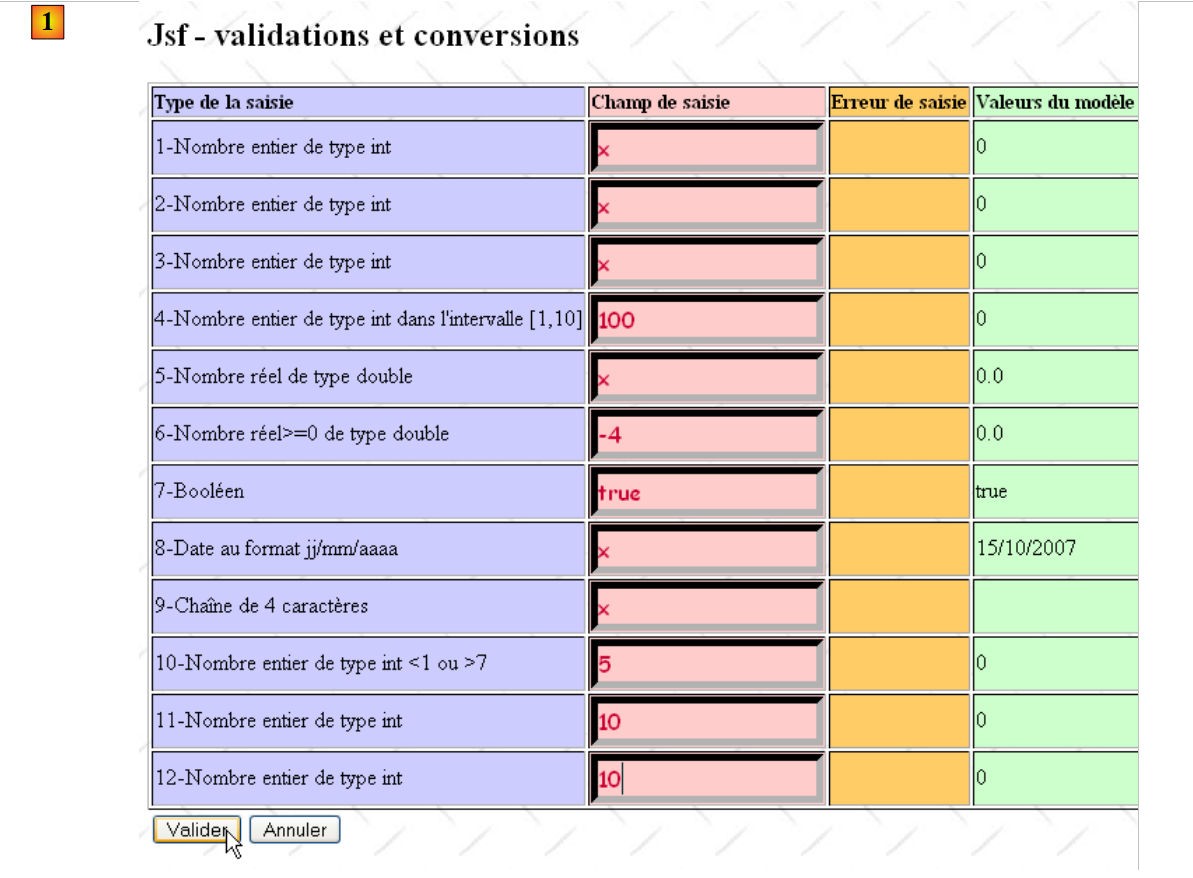 |
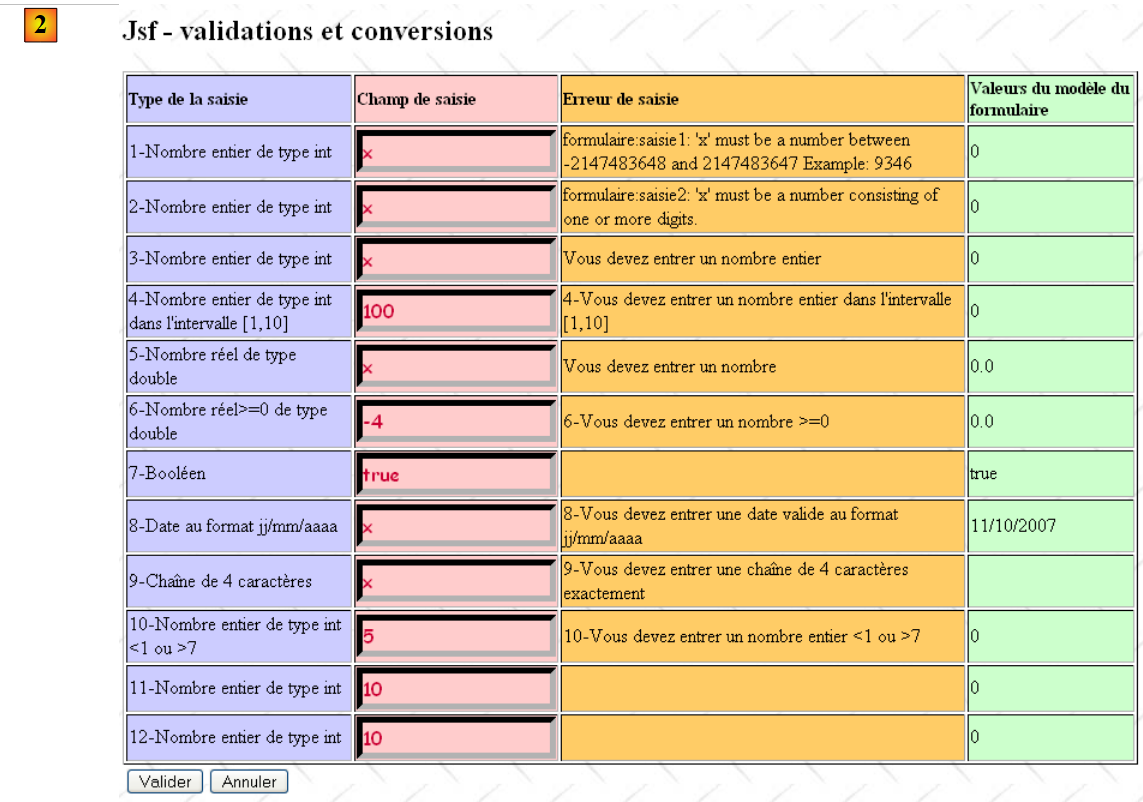 |
2.8.2. The Netbeans project
The application’s Netbeans project is as follows:
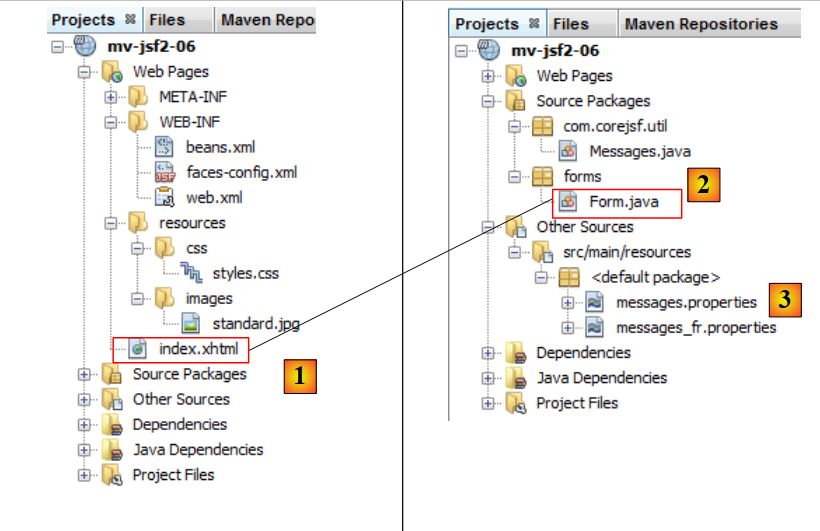 |
The [mv-jsf2-06] project is again based on a single page [index.html] [1] and its template [Form.java] [2]. It continues to use messages from [messages.properties] but only in French [3]. The language-switching option is not available.
2.8.3. The application environment
Here we provide the contents of the files that configure the application without giving specific explanations. These files help to better understand what follows.
[faces-config.xml]
<?xml version='1.0' encoding='UTF-8'?>

<!-- =========== FULL CONFIGURATION FILE ================================== -->

<faces-config version="2.0"
              xmlns="http://java.sun.com/xml/ns/javaee"
              xmlns:xsi="http://www.w3.org/2001/XMLSchema-instance"
              xsi:schemaLocation="http://java.sun.com/xml/ns/javaee http://java.sun.com/xml/ns/javaee/web-facesconfig_2_0.xsd">

  <application>
    <resource-bundle>
      <base-name>
        messages
      </base-name>
      <var>msg</var>
    </resource-bundle>
    <message-bundle>messages</message-bundle>
  </application>
</faces-config>
Line 17 is new. It will be explained later.
The message file [messages_fr.properties]
form.titre=Jsf - validations et conversions
saisie1.prompt=1-Nombre entier de type int
saisie2.prompt=2-Nombre entier de type int
saisie3.prompt=3-Nombre entier de type int
data.required=Vous devez entrer une donn\u00e9e
integer.required=Vous devez entrer un nombre entier
saisie4.prompt=4-Nombre entier de type int dans l'interval [1,10]
saisie4.error=4-Vous devez entrer un nombre entier dans l'interval [1,10]
saisie5.prompt=5-Nombre r\u00e9el de type double
double.required=Vous devez entrer un nombre
saisie6.prompt=6-Nombre r\u00e9el>=0  de type double
saisie6.error=6-Vous devez entrer un nombre >=0
saisie7.prompt=7-Bool\u00e9en
saisie7.error=7-Vous devez entrer un bool\u00e9en
saisie8.prompt=8-Date au format jj/mm/aaaa
saisie8.error=8-Vous devez entrer une date valide au format jj/mm/aaaa
date.required=Vous devez entrer une date
saisie9.prompt=9-Cha\u00eene de 4 caract\u00e8res
saisie9.error=9-Vous devez entrer une cha\u00eene de 4 caract\u00e8res exactement
saisie9B.prompt=9B-Heure au format hh:mm
saisie9B.error=La cha\u00eene saisie ne respecte pas le format hh:mm
submit=Valider
cancel=Annuler
saisie.type=Type de la saisie
saisie.champ=Champ de saisie
saisie.erreur=Erreur de saisie
bean.valeur=Valeurs du mod\u00e8le du formulaire
saisie10.prompt=10-Nombre entier de type int <1 ou >7
saisie10.incorrecte=10-Saisie n\u00b0 10 incorrecte
saisie10.incorrecte_detail=10-Vous devez entrer un nombre entier <1 ou >7
saisies11et12.incorrectes=La propri\u00e9t\u00e9 saisie11+saisie12=10 n'is not v\u00e9rifi\u00e9e
saisies11et12.incorrectes_detail=La propri\u00e9t\u00e9 saisie11+saisie12=10 n'is not v\u00e9rifi\u00e9e
saisie11.prompt=11-Nombre entier de type int
saisie12.prompt=12-Nombre entier de type int
error.sign="!"
error.sign_detail="!"
The [styles.css] style sheet is as follows:
.info{
   font-family: Arial,Helvetica,sans-serif;
   font-size: 14px;
   font-weight: bold
}

.col1{
   background-color: #ccccff
}

.col2{
   background-color: #ffcccc
}

.col3{
   background-color: #ffcc66
}

.col4{
   background-color: #ccffcc
}

.error{
   color: #ff0000
}

.saisie{
   background-color: #ffcccc;
   border-color: #000000;
   border-width: 5px;
   color: #cc0033;
   font-family: cursive;
   font-size: 16px
}

.entete{
   font-family: 'Times New Roman',Times,serif;
   font-size: 14px;
   font-weight: bold
}
2.8.4. The page [index.xhtml] and its template [Form.java]
The page [index.xhtml] is as follows:
<?xml version='1.0' encoding='UTF-8' ?>
<!DOCTYPE html PUBLIC "-//W3C//DTD XHTML 1.0 Transitional//EN" "http://www.w3.org/TR/xhtml1/DTD/xhtml1-transitional.dtd">

<html xmlns="http://www.w3.org/1999/xhtml"
      xmlns:h="http://java.sun.com/jsf/html"
      xmlns:f="http://java.sun.com/jsf/core">
  <h:head>
    <title>JSF</title>
    <h:outputStylesheet library="css" name="styles.css"/>
  </h:head>
  <h:body style="background-image: url('${request.contextPath}/resources/images/standard.jpg');">
    <h2><h:outputText value="#{msg['form.titre']}"/></h2>
    <h:form id="formulaire">
      <h:messages globalOnly="true" />
      <h:panelGrid columns="4" columnClasses="col1,col2,col3,col4" border="1">
        <!-- line 1 -->
        <h:outputText value="#{msg['saisie.type']}" styleClass="entete"/>
        <h:outputText value="#{msg['saisie.champ']}" styleClass="entete"/>
        <h:outputText value="#{msg['saisie.erreur']}" styleClass="entete"/>
        <h:outputText value="#{msg['bean.valeur']}" styleClass="entete"/>
        <!-- line 2 -->
        <h:outputText value="#{msg['saisie1.prompt']}"/>
        <h:inputText id="saisie1" value="#{form.saisie1}" styleClass="saisie"/>
        <h:message for="saisie1" styleClass="error"/>
        <h:outputText value="#{form.saisie1}"/>
        <!-- line 3 -->
        <h:outputText value="#{msg['saisie2.prompt']}" />
        <h:inputText id="saisie2" value="#{form.saisie2}"  styleClass="saisie"/>
        <h:message for="saisie2" showSummary="true" showDetail="false" styleClass="error"/>
        <h:outputText value="#{form.saisie2}"/>
        <!-- line 4 -->
        <h:outputText value="#{msg['saisie3.prompt']}" />
        <h:inputText id="saisie3" value="#{form.saisie3}"  styleClass="saisie" required="true" requiredMessage="#{msg['data.required']}" converterMessage="#{msg['integer.required']}"/>
        <h:message for="saisie3" styleClass="error"/>
        <h:outputText value="#{form.saisie3}"/>
        <!-- line 5 -->
        <h:outputText value="#{msg['saisie4.prompt']}" />
        <h:inputText id="saisie4" value="#{form.saisie4}"  styleClass="saisie" required="true" requiredMessage="#{msg['data.required']}" converterMessage="#{msg['integer.required']}" validatorMessage="#{msg['saisie4.error']}">
          <f:validateLongRange minimum="1" maximum="10" />
        </h:inputText>
        <h:message for="saisie4" styleClass="error"/>
        <h:outputText value="#{form.saisie4}"/>
        <!-- line 6 -->
        ...
        <!-- line 7 -->
        ...
        <!-- line 8 -->
        ...
        <!-- line 9 -->
        ...
        <!-- line 10 -->
        ...
        <!-- line 11 -->
        ...
        <!-- line 12 -->
        ...
        <!-- line 13 -->
        ...
      </h:panelGrid>
      <!-- control buttons -->
      <h:panelGrid columns="2">
        <h:commandButton value="#{msg['submit']}" action="#{form.submit}"/>
        <h:commandButton value="#{msg['cancel']}" immediate="true" action="#{form.cancel}"/>
      </h:panelGrid>
    </h:form>
  </h:body>
</html>
The main new feature is the use of tags:
- to display error messages <h:messages> (line 14), <h:message> (lines 24, 29, 34),
- which enforce validation constraints on input <f:validateLongRange> (line 39), <f:validateDoubleRange>, <f:validateLength>, <f:validateRegex>,
- which define a converter between the input and its template as <f:convertDateTime>.
The template for this page is the following [Form.java] class:
package forms;

import com.corejsf.util.Messages;
import java.util.Date;
import javax.enterprise.context.RequestScoped;
import javax.faces.application.FacesMessage;
import javax.faces.bean.ManagedBean;
import javax.faces.component.UIComponent;
import javax.faces.context.FacesContext;
import javax.faces.validator.ValidatorException;

@ManagedBean
@RequestScoped
public class Form {

public Form() {
}
// foreclosures
private Integer saisie1 = 0;
private Integer saisie2 = 0;
private Integer saisie3 = 0;
private Integer saisie4 = 0;
private Double saisie5 = 0.0;
private Double saisie6 = 0.0;
private Boolean saisie7 = true;
private Date saisie8 = new Date();
private String saisie9 = "";
private Integer saisie10 = 0;
private Integer saisie11 = 0;
private Integer saisie12 = 0;
private String errorSaisie11 = "";
private String errorSaisie12 = "";

// actions
public String submit() {
...
}

public String cancel() {
...
}

// validators
public void validateSaisie10(FacesContext context, UIComponent component, Object value) {
...
}
// getters and setters
...
}
The new feature here is that the model fields are no longer exclusively of type String but of various types.
2.8.5. The different form entries
We will now examine the different form inputs one by one.
2.8.5.1. Entries 1 through 4: entering an integer
The [index.xhtml] page displays entry 1 in the following format:
<!-- line 2 -->
        <h:outputText value="#{msg['saisie1.prompt']}"/>
        <h:inputText id="saisie1" value="#{form.saisie1}" styleClass="saisie"/>
        <h:message for="saisie1" styleClass="error"/>
        <h:outputText value="#{form.saisie1}"/>
The template form.saisie1 is defined as follows in [Form.java]:
private Integer saisie1 = 0;
In a GET browser, the page [index.xhtml] associated with its template [Form.java] visually produces the following:
- line 2 produces [1],
- line 3 produces [2],
- line 4 produces [3],
- line 5 produces [4].
Suppose the following entry is made and then validated:
 |
The result returned in the form by the application is then:
 |
- [1], the incorrect entry,
- in [2], the error message indicating it,
- in [3], we see that the value of the Integer field "entered1" in the model has not changed.
Let’s explain what happened. To do this, let’s return to the processing cycle of a page JSF:
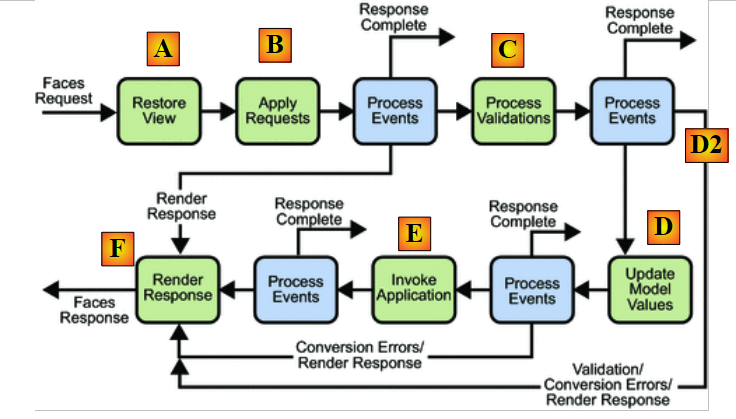 |
We examine this cycle for the component:
<h:inputText id="saisie1" value="#{form.saisie1}" styleClass="saisie"/>
and its model:
private Integer saisie1 = 0;
- In [A], the [index.xhtml] page sent during the browser’s GET is restored. In [A], the page is as the user received it. The component id="saisie1" reverts to its initial value "0",
- in [B], the page components receive the values posted by the browser. In [B], the page is as the user entered and validated it. The component id="saisie1" receives the posted value "x",
- in [C], if the page contains explicit validators and converters, these are executed. Implicit converters are also executed if the type of the field associated with the component is not of type String. This is the case here, where the field form.saisie1 is of type Integer. JSF will attempt to convert the value "x" of the component id="saisie1" to an Integer type. This will cause an error that will stop the [A-F] processing cycle. This error will be associated with the id="saisie1" component. Via [D2], we then proceed directly to the response rendering phase. The same page [index.xhtml] is returned;
- the [D] phase only occurs if all components of a page have passed the conversion/validation phase. It is in this phase that the value of the id="saisie1" component will be assigned to its form.saisie1 template.
If the [C] phase fails, the page is re-displayed and the following code is executed again:
<!-- line 2 -->
        <h:outputText value="#{msg['saisie1.prompt']}"/>
        <h:inputText id="saisie1" value="#{form.saisie1}" styleClass="saisie"/>
        <h:message for="saisie1" styleClass="error"/>
<h:outputText value="#{form.saisie1}"/>
 |
The message displayed in [2] comes from line 4 of [index.xhtml]. The <h:message for="idComposant"/> tag displays the error message associated with the component specified by the for attribute, if an error occurs. The message displayed in [2] is standard and is located in the [javax/faces/Messages.properties] file within the [jsf-api.jar] archive:
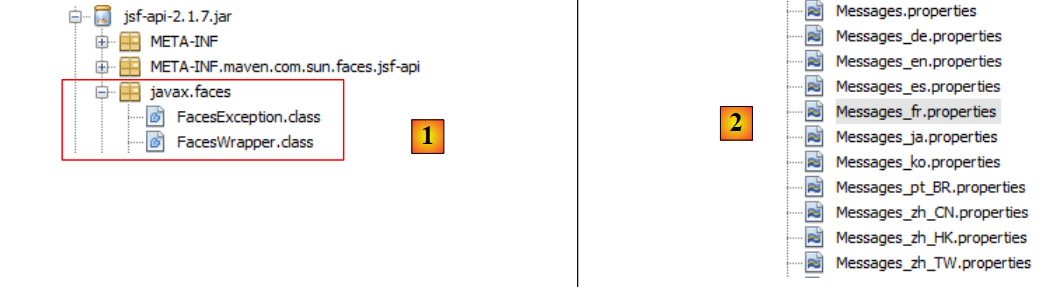 |
In [2], we can see that the message file exists in several variants. Let’s examine the contents of [Messages_fr.properties]:
The file contains messages divided into categories:
- errors on a component, line 3,
- conversion errors between a component and its model, line 12
- validation errors when validators are present on the page, line 23.
The error that occurred on the id="saisie1" component is a conversion error from a String type to an Integer type. The associated error message is the one on line 18 of the message file.
javax.faces.converter.IntegerConverter.INTEGER_detail={2} : «{0}» doit être un nombre compris entre -2147483648 et 2147483647. Exemple : {1}
The error message that was displayed is reproduced below:
 |
We can see in the message:
- the {2} parameter has been replaced by the ID of the component for which the conversion error occurred,
- the parameter {0} has been replaced by the entry made in [1] for the component,
- the parameter {1} has been replaced by the number 9346.
Most component-related messages have two versions: a summary version (version) and a detailed version (version). This is the case for lines 16–18:
The message with the key _detail (line 2) is the so-called detailed message. The other is the so-called summary message. The <h:message> tag displays the detailed message by default. This behavior can be changed using the showSummary and showDetail attributes. This is what is done for the id input2 component:
        <!-- line 3 -->
        <h:outputText value="#{msg['saisie2.prompt']}" />
        <h:inputText id="saisie2" value="#{form.saisie2}"  styleClass="saisie"/>
        <h:message for="saisie2" showSummary="true" showDetail="false" styleClass="error"/>
<h:outputText value="#{form.saisie2}"/>
Line 2: The saisie2 component is linked to the following field: form.saisie2
private Integer saisie2 = 0;
The result obtained is as follows:
 |
- in [1], the detailed message; in [2], the summary message.
The <h:messages> tag displays all summarized error messages from all components, as well as error messages not linked to a component, in the form of a list. Here again, attributes can change this default behavior:
- showDetail: true / false to enable or disable detailed messages,
- showSummary: true / false to request or not request summarized messages,
- globalOnly: true / false to specify whether to display only error messages not associated with components. Such a message could, for example, be created by the developer.
The error message associated with a conversion can be changed in various ways. First, you can instruct the application to use a different message file. This change is made in [faces-config.xml]:
<faces-config ...">
  <application>
    <resource-bundle>
      <base-name>
        messages
      </base-name>
      <var>msg</var>
    </resource-bundle>
    <message-bundle>messages</message-bundle>
  </application>
...
</faces-config>
Lines 3–8 define a message file, but this is not the one used by the <h:message> and <h:messages> tags. You must use the <message-bundle> tag on line 9 to define it. Line 9 tells the <h:message(s)> tags that the file [messages.properties] must be parsed before the file [javax.faces.Messages.properties]. So if we add the following lines to the file [messages_fr.properties]:
# conversions
javax.faces.converter.IntegerConverter.INTEGER=erreur
javax.faces.converter.IntegerConverter.INTEGER_detail=erreur d\u00e9taill\u00e9e
the error returned for the input1 and input2 components becomes:

Another way to modify the conversion error message is to use the component’s converterMessage attribute as shown below for the input3 component:
        <!-- line 4 -->
        <h:outputText value="#{msg['saisie3.prompt']}" />
        <h:inputText id="saisie3" value="#{form.saisie3}"  styleClass="saisie" required="true" requiredMessage="#{msg['data.required']}" converterMessage="#{msg['integer.required']}"/>
        <h:message for="saisie3" styleClass="error"/>
<h:outputText value="#{form.saisie3}"/>
The saisie3 component is linked to the following form.saisie3 field:
private Integer saisie3 = 0;
- line 3, the converterMessage attribute explicitly sets the message to display in the event of a conversion error,
- line 3, the required="true" attribute indicates that the field is required. The field cannot be left empty. A field is considered empty if it contains no characters or if it contains a sequence of spaces. Here again, there is a default message in [javax.faces.Messages.properties]:
The requiredMessage attribute allows you to replace this default message. If the [messages.properties] file contains the following messages:
...
data.required=Vous devez entrer une donnée
integer.required=Vous devez entrer un nombre entier
we can get the following result:
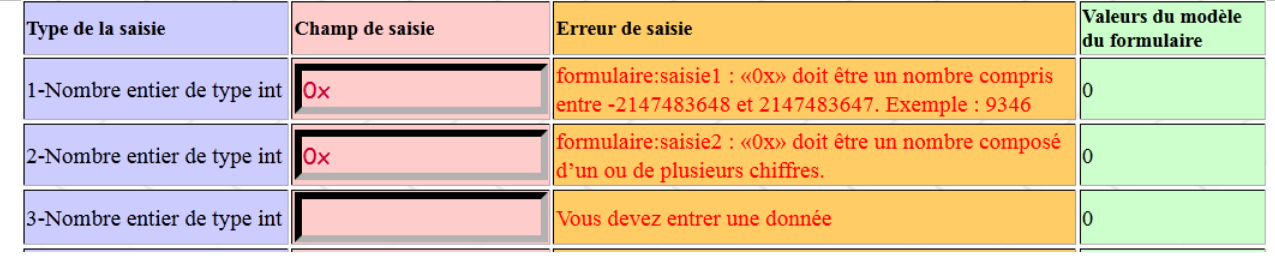 |
or this one:
 |
Verifying that an entry is indeed an integer is not always sufficient. Sometimes it is necessary to verify that the entered number falls within a given range. In such cases, a validator is used. Entry #4 provides an example. Its code in [index.xhtml] is as follows:
        <!-- line 5 -->
        <h:outputText value="#{msg['saisie4.prompt']}" />
        <h:inputText id="saisie4" value="#{form.saisie4}"  styleClass="saisie" required="true" requiredMessage="#{msg['data.required']}" converterMessage="#{msg['integer.required']}" validatorMessage="#{msg['saisie4.error']}">
          <f:validateLongRange minimum="1" maximum="10" />
        </h:inputText>
        <h:message for="saisie4" styleClass="error"/>
<h:outputText value="#{form.saisie4}"/>
Line 3, the saisie4 component is linked to the following form.saisie4 model:
private Integer saisie4 = 0;
Lines 3–5: The <h:inputText> tag has a child tag, <f:validateLongRange>, which accepts two optional attributes: minimum and maximum. This tag, also known as a validator, allows you to apply a constraint to the input value: it must not only be an integer, but an integer within the range [minimum, maximum] if both the minimum and maximum attributes are present; greater than or equal to minimum if only the minimum attribute is present; and less than or equal to maximum if only the maximum attribute is present. The <f:validateLongRange> validator has default error messages in [javax.faces.Messages.properties]:
Again, it is possible to replace these messages with others. There is an attribute, validatorMessage, that allows you to define a specific message for the component. Thus, with the following code:
        <h:inputText id="saisie4" value="#{form.saisie4}"  styleClass="saisie" required="true" requiredMessage="#{msg['data.required']}" converterMessage="#{msg['integer.required']}" validatorMessage="#{msg['saisie4.error']}">
          <f:validateLongRange minimum="1" maximum="10" />
</h:inputText>
and the following message in [messages.properties]:
the following result is obtained:
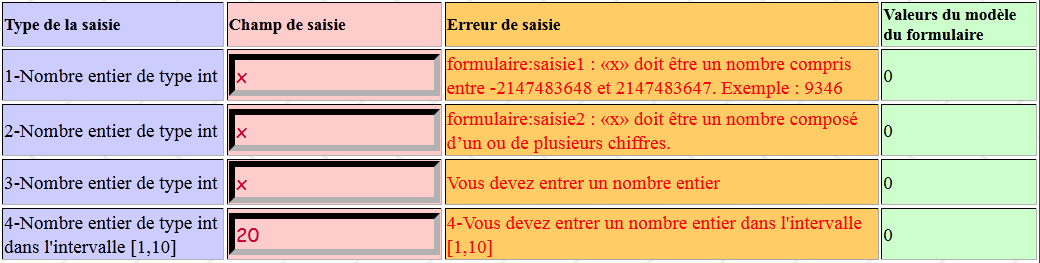
2.8.5.2. Inputs 5 and 6: Entering a real number
The entry of real numbers follows rules similar to those for entering integers. The code XHTML for entries 5 and 6 is as follows:
<!-- line 6 -->
        <h:outputText value="#{msg['saisie5.prompt']}" />
        <h:inputText id="saisie5" value="#{form.saisie5}"  styleClass="saisie" required="true" requiredMessage="#{msg['data.required']}" converterMessage="#{msg['double.required']}"/>
        <h:message for="saisie5" styleClass="error"/>
        <h:outputText value="#{form.saisie5}"/>
        <!-- line 7 -->
        <h:outputText value="#{msg['saisie6.prompt']}"/>
        <h:inputText id="saisie6" value="#{form.saisie6}"  styleClass="saisie" required="true" requiredMessage="#{msg['data.required']}" converterMessage="#{msg['double.required']}" validatorMessage="#{msg['saisie6.error']}">
          <f:validateDoubleRange minimum="0.0"/>
        </h:inputText>
        <h:message for="saisie6" styleClass="error"/>
        <h:outputText value="#{form.saisie6}"/>
Elements of the [Form.java] model related to the saisie5 and saisie6 components:
  private Double saisie5 = 0.0;
  private Double saisie6 = 0.0;
Error messages associated with the converters and validators for the saisie5 and saisie6 components in [messages.properties]:
double.required=Vous devez entrer un nombre
saisie6.error=6-Vous devez entrer un nombre >=0
Here is an example of execution:

2.8.5.3. Input 7: Entering a Boolean
A Boolean should normally be entered using a checkbox. If entered using an input field, the string "true" is converted to the Boolean value true, and any other string is converted to the Boolean value false.
The XHTML code from the example:
<!-- line 8 -->
        <h:outputText value="#{msg['saisie7.prompt']}"/>
        <h:inputText id="saisie7" value="#{form.saisie7}"  styleClass="saisie" required="true" requiredMessage="#{msg['data.required']}" converterMessage="#{msg['double.required']}"/>
        <h:message for="saisie7" styleClass="error"/>
        <h:outputText value="#{form.saisie7}"/>
The saisie7 component template:
private Boolean saisie7 = true;
Here is an example of an input and its response:
 |
In [1], the entered value. Upon conversion, this "x" string becomes the Boolean false. This is shown by [2]. The value [3] of the model has not changed. It only changes when all conversions and validations on the page have succeeded. This was not the case in this example.
2.8.5.4. Entry 8: Entering a date
In the example, a date is entered using the following code: XHTML:
<!-- line 9 -->
        <h:outputText value="#{msg['saisie8.prompt']}"/>
        <h:inputText id="saisie8" value="#{form.saisie8}"  styleClass="saisie" required="true" requiredMessage="#{msg['date.required']}" converterMessage="#{msg['saisie8.error']}">
          <f:convertDateTime pattern="dd/MM/yyyy"/>
        </h:inputText>
        <h:message for="saisie8" styleClass="error"/>
        <h:outputText value="#{form.saisie8}">
          <f:convertDateTime pattern="dd/MM/yyyy"/>
        </h:outputText>
The saisie8 component on line 3 uses a java.lang.String <--> java.util.Date converter. The form.saisie8 template associated with the saisie8 component is as follows:
private Date saisie8 = new Date();
The component defined by lines 7–9 also uses a converter, but only in the direction java.util.Date --> java.lang.String.
The <f:convertDateTime> converter supports various attributes, including the pattern attribute, which specifies the format of the string to be converted into a date or the format in which a date should be displayed.
When the [index.xhtml] page is first requested, the previous line 8 is displayed as follows:
The fields [1] and [2] both display the value of the form.saisie8 template:
private Date saisie8 = new Date();
where entry8 takes the value of the current date. The converter used in both cases to display the date is as follows:
<f:convertDateTime pattern="dd/MM/yyyy"/>
where dd (day) denotes the day number, MM (Month) the month number, and yyyy (year) the year. In [1], the converter is used for the reverse conversion from java.lang.String --> java.util.Date. The entered date must therefore follow the format "dd/MM/yyyy" to be valid.
There are default messages for invalid dates in [javax.faces.Messages.properties]:
which can be replaced with your own messages. For example:
<h:inputText id="saisie8" value="#{form.saisie8}"  styleClass="saisie" required="true" requiredMessage="#{msg['date.required']}" converterMessage="#{msg['saisie8.error']}">
  <f:convertDateTime pattern="dd/MM/yyyy"/>
</h:inputText>
the message displayed in the event of a conversion error will be the message with the key saisie8.error, as follows:
saisie8.error=8-Vous devez entrer une date valide au format jj/mm/aaaa
Here is an example:
![]()
2.8.5.5. Input 9: Entering a string with a restricted length
Entry 9 shows how to enforce a character count within a specified range for an entered string:
<!-- line 10 -->
        <h:outputText value="#{msg['saisie9.prompt']}"/>
        <h:inputText id="saisie9" value="#{form.saisie9}"  styleClass="saisie" required="true" requiredMessage="#{msg['data.required']}" validatorMessage="#{msg['saisie9.error']}">
          <f:validateLength minimum="4" maximum="4"/>
        </h:inputText>
        <h:message for="saisie9" styleClass="error"/>
        <h:outputText value="#{form.saisie9}"/>
Line 4: The validator <f:validateLength minimum="4" maximum="4"/> requires the entered string to have exactly 4 characters. You can use only one of the attributes: minimum for a minimum number of characters, maximum for a maximum number.
The form.saisie9 template for the saisie9 component on line 3 is as follows:
private String saisie9 = "";
There are default error messages for this type of validation:
which can be replaced using the validatorMessage attribute as shown in line 3 above. The message for the key saisie9.error is as follows:
saisie9.error=9-Vous devez entrer une chaîne de 4 caractères exactement
Here is an example of execution:
![]()
2.8.5.6. Input 9B: Entering a string that must conform to a pattern
Input 9B shows how to require that an entered string have a number of characters within a range:
<!-- line 10B -->
        <h:outputText value="#{msg['saisie9B.prompt']}"/>
        <h:inputText id="saisie9B" value="#{form.saisie9B}"  styleClass="saisie" required="true" requiredMessage="#{msg['data.required']}" validatorMessage="#{msg['saisie9B.error']}">
          <f:validateRegex pattern="^\s*\d{2}:\d{2}\s*$"/>
        </h:inputText>
        <h:message for="saisie9B" styleClass="error"/>
        <h:outputText value="#{form.saisie9B}"/>
Line 4: The validator <f:validateRegex pattern="^\s*\d{2}:\d{2}\s*$"/> requires the entered string to match a regular expression pattern, in this case: a sequence of 0 or more spaces, 2 digits, the colon (:), 2 digits, a sequence of 0 or more spaces.
The pattern form.saisie9B for the saisie9B component in line 3 is as follows:
private String saisie9B;
There are default error messages for this type of validation:
which can be replaced using the attribute validatorMessage as in line 3 above. The message for key saisie9.error is as follows:
saisie9B.error=La cha\u00eene saisie ne respecte pas le format hh:mm
Here is an example of execution:
![]()
2.8.5.7. Entry 10: Write a specific validation method
To summarize: JSF allows you to verify, among the entered values, the validity of numbers (integers, real numbers), dates, string lengths, and the compliance of an entry with a regular expression. JSF allows you to add your own validators and converters to the existing ones. This topic is not covered here, but you can read [ref2] for further details.
Here we present another method: one that validates entered data using a method from the form model. Here is an example:
<!-- line 11 -->
        <h:outputText value="#{msg['saisie10.prompt']}"/>
        <h:inputText id="saisie10" value="#{form.saisie10}"  styleClass="saisie" required="true" requiredMessage="#{msg['data.required']}" validator="#{form.validateSaisie10}"/>
        <h:message for="saisie10" styleClass="error"/>
        <h:outputText value="#{form.saisie10}"/>
The form.saisie10 template associated with the saisie10 component in line 3 is as follows:
private Integer saisie10 = 0;
We want the entered number to be <1 or >7. We cannot verify this using the basic validators of JSF. We therefore write our own validation method for the saisie10 component. We specify this using the validator attribute of the component to be validated:
<h:inputText id="saisie10" value="#{form.saisie10}" styleClass="saisie" required="true" requiredMessage="#{msg['data.required']}" validator="#{form.validateSaisie10}"/>
The saisie10 component is validated by the form.validateSaisie10 method. This method is as follows:
  public void validateSaisie10(FacesContext context, UIComponent component, Object value) {
    int saisie = (Integer) value;
    if (!(saisie < 1 || saisie > 7)) {
      FacesMessage message = Messages.getMessage(null, "saisie10.incorrecte", null);
      message.setSeverity(FacesMessage.SEVERITY_ERROR);
      throw new ValidatorException(message);
    }
}
The signature of a validation method must be that of line 1:
- FacesContext context: page execution context—provides access to various information, including the HttpServletRequest request and HttpServletResponse response objects,
- UIComponent component: the component to be validated. The <h:inputText> tag is represented by a UIInput-type component derived from UIComponent. Here, it is this UIInput component that is received as the second parameter,
- Object value: the entered value to be validated, converted to the model’s type. It is important to understand here that if the conversion from String to the model’s type fails, then the validation method is not executed. When the validateSaisie10 method is called, it means that the conversion from String to Integer was successful. The third parameter is then of type Integer.
- Line 2: The entered value is converted to type int,
- Line 3: Check that the entered value is less than 1 or greater than 7. If so, validation is complete. If not, the validator must report the error by throwing a ValidatorException exception.
The ValidatorException class has two constructors:
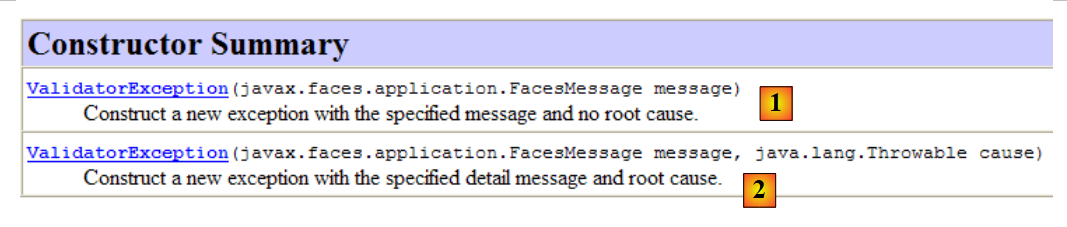 |
- the [1] constructor takes an error message of type FacesMessage as a parameter. This message type is the one displayed by the <h:messages> and <h:message> tags,
- the [2] constructor also allows you to encapsulate the cause of the error, which is of type Throwable or a subclass thereof.
We need to construct a message of type FacesMessage. This class has several constructors:
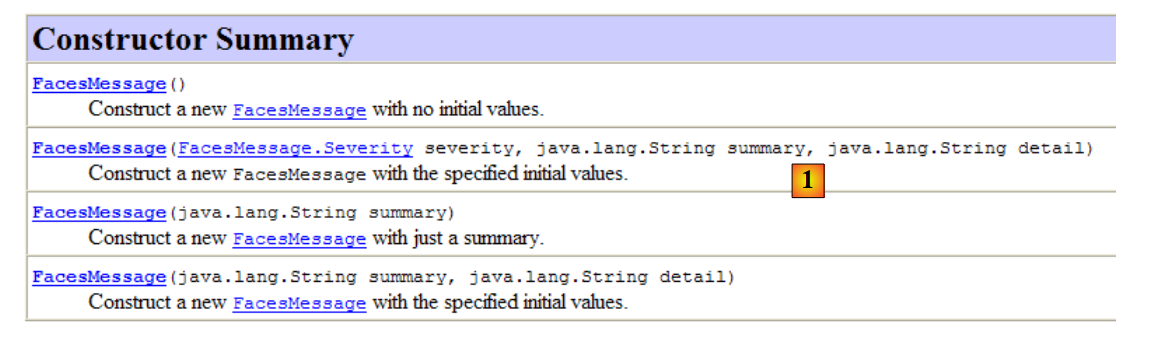 |
The [1] constructor defines the properties of a FacesMessage object:
- FacesMessage.Severity severity: a severity level taken from the following enumeration: SEVERITY_ERROR, SEVERITY_FATAL, SEVERITY_INFO, SEVERITY_WARN,
- String summary: the summarized version of the error message—is displayed by the tags <h:message showSummary="true"> and <h:messages>,
- String detail: the detailed version of the error message (version) is displayed using the <h:message> and <h:messages showDetail="true"> tags.
Any of the constructors can be used; missing parameters can be set later using set methods.
The [1] constructor does not allow you to specify a message that would be in an internationalized message file. This is obviously a shame. David Geary and Cay Horstmann address this shortcoming in their book "Core JavaServer Faces" with the utility class com.corejsf.util.Messages. This is the class used in line 4 of the Java code to create the error message. It contains only static methods, including the getMessage method used in line 4:
public static FacesMessage getMessage(String bundleName, String resourceId, Object[] params)
The getMessage method accepts three parameters:
- String bundleName: the name of a message file without its .properties suffix but with its package name. Here, our first parameter could be messages to refer to the file [messages.properties]. Before using the file specified by the first parameter, getMessage attempts to use the application’s message file, if one exists. Thus, if in [faces-config.xml] a message file has been declared with the tag:
  <application>
...
    <message-bundle>messages</message-bundle>
</application>
you can pass null as the first parameter to the getMessage method. This is what was done here (see [web.xm], page 120),
- String resourceId: the key of the message to be processed in the message file. We have seen that a message can have both a summarized version and a detailed version. resourceId is the identifier for the summarized version. The detailed version will be automatically retrieved using the key resourceId_detail. Thus, we will have two messages in [messages.properties] for the error on entry #10:
saisie10.incorrecte=10-Saisie n° 10 incorrecte
saisie10.incorrecte_detail=10-Vous devez entrer un nombre entier <1 ou >7
The message of type FacesMessage generated by the method Messages.getMessage includes both the summary and detailed versions if they were found. Both versions must be present; otherwise, an exception of type [NullPointerException] is thrown,
- Object[] params: the actual parameters of the message if it has formal parameters {0}, {1}, ... These formal parameters will be replaced by the elements of the params array.
Let’s return to the code for the validation method of the saisie10 component:
  public void validateSaisie10(FacesContext context, UIComponent component, Object value) {
    int saisie = (Integer) value;
    if (!(saisie < 1 || saisie > 7)) {
      FacesMessage message = Messages.getMessage(null, "saisie10.incorrecte", null);
      message.setSeverity(FacesMessage.SEVERITY_ERROR);
      throw new ValidatorException(message);
    }
}
- In [4], the message of type FacesMessage is created using the static method Messages.getMessage,
- in [5], the message severity level is set,
- in [6], an exception of type ValidatorException is thrown with the message constructed previously. The validation method was called by the following XHTML code:
<!-- line 11 -->
        <h:outputText value="#{msg['saisie10.prompt']}"/>
        <h:inputText id="saisie10" value="#{form.saisie10}"  styleClass="saisie" required="true" requiredMessage="#{msg['data.required']}" validator="#{form.validateSaisie10}"/>
        <h:message for="saisie10" styleClass="error"/>
<h:outputText value="#{form.saisie10}"/>
Line 3: The validation method is executed for the id input10 component. Therefore, the error message generated by the validateSaisie10 method is associated with this component and is thus displayed by line 4 (for="saisie10" attribute). The detailed version is displayed by default by the <h:message> tag.
Here is an example of execution:
![]()
2.8.5.8. Entries 11 and 12: Validating a Group of Components
So far, the validation methods we’ve encountered have only validated a single component. What if the desired validation involves multiple components? That’s what we’ll look at now. In the form:

we want entries 11 and 12 to be two integers whose sum equals 10.
The code JSF will be as follows:
<!-- line 12 -->
        <h:outputText value="#{msg['saisie11.prompt']}"/>
        <h:inputText id="saisie11" value="#{form.saisie11}"  styleClass="saisie" required="true" requiredMessage="#{msg['data.required']}" converterMessage="#{msg['integer.required']}"/>
        <h:panelGroup>
          <h:message for="saisie11" styleClass="error"/>
          <h:outputText value="#{form.errorSaisie11}" styleClass="error"/>
        </h:panelGroup>
        <h:outputText value="#{form.saisie11}"/>
        <!-- line 13 -->
        <h:outputText value="#{msg['saisie12.prompt']}"/>
        <h:inputText id="saisie12" value="#{form.saisie12}" styleClass="saisie" required="true" requiredMessage="#{msg['data.required']}" converterMessage="#{msg['integer.required']}"/>
        <h:panelGroup>
          <h:message for="saisie12" styleClass="error"/>
          <h:outputText value="#{form.errorSaisie12}" styleClass="error"/>
        </h:panelGroup>
        <h:outputText value="#{form.saisie12}"/>
and the associated model:
  private Integer saisie11 = 0;
  private Integer saisie12 = 0;
  private String errorSaisie11 = "";
private String errorSaisie12 = "";
In line 3 of the JSF code, we use the techniques already presented to verify that the value entered for the input11 component is indeed an integer. The same applies, on line 11, to the input12 component. To verify that input11 + input12 = 10, we could build a specific validator. This is the preferred solution. Again, we will refer to [ref2] to discover it. Here, we are taking a different approach.
The page [index.xhtml] is validated by a button [Valider], whose code JSF is as follows:
<!-- control buttons -->
      <h:panelGrid columns="2">
        <h:commandButton value="#{msg['submit']}" action="#{form.submit}"/>
        ...
      </h:panelGrid>
where the message msg['submit'] is as follows:
submit=Valider
As seen in line 3, the method form.submit will be executed to handle the click on the [Valider] button. It is as follows:
  // actions
  public String submit() {
    // latest validations
    validateForm();
    // we return the same form
    return null;
  }

  // global validations
  private void validateForm() {
    if ((saisie11 + saisie12) != 10) {
...
}
It is important to understand that when the submit method runs:
- all form validators and converters have been executed and passed,
- the fields in the [Form.java] template have received the values posted by the client.
In fact, let’s return to the processing cycle of a POST JSF:
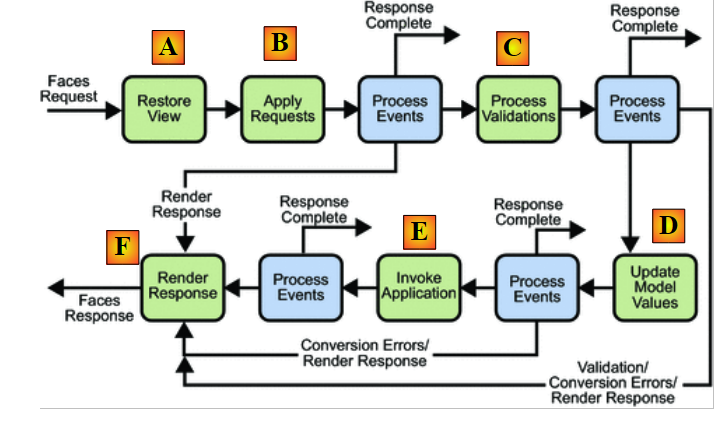 |
The submit method is an event handler. It handles the click event on the [Valider] button. Like all event handlers, it runs in the [E] phase, once all validators and converters have been executed and succeeded ([C]) and the model has been updated with the posted values ([D]). Therefore, we no longer need to throw exceptions of type [ValidatorException] as we did previously. We will simply return the form with error messages:
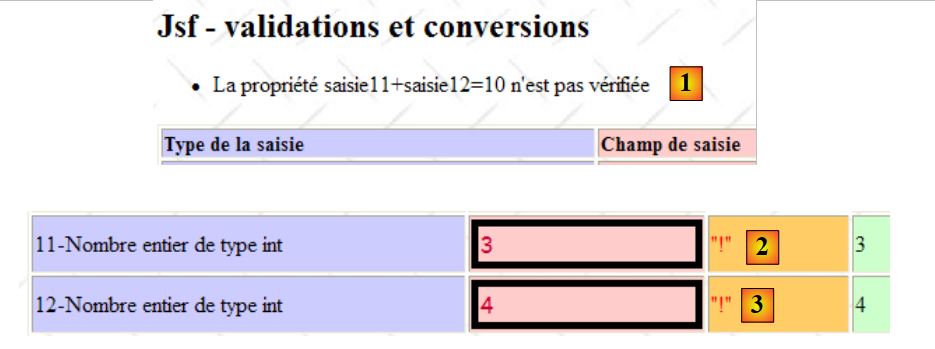 |
In [1], we will alert the user, and in [2] and [3], we will set an error flag. In the code JSF, the message [1] will be obtained as follows:
<h:form id="formulaire">
      <h:messages globalOnly="true" />
      <h:panelGrid columns="4" columnClasses="col1,col2,col3,col4" border="1">
        <!-- line 1 -->
        ...
On line 2, the <h:messages> tag displays by default the version summary of error messages for all incorrect entries in form components as well as all error messages not related to components. The attribute globalOnly="true" limits the display to the latter.
The messages [2] and [3] are displayed with simple <h:outputText> tags:
<!-- line 12 -->
        <h:outputText value="#{msg['saisie11.prompt']}"/>
        <h:inputText id="saisie11" value="#{form.saisie11}"  styleClass="saisie" required="true" requiredMessage="#{msg['data.required']}" converterMessage="#{msg['integer.required']}"/>
        <h:panelGroup>
          <h:message for="saisie11" styleClass="error"/>
          <h:outputText value="#{form.errorSaisie11}" styleClass="error"/>
        </h:panelGroup>
        <h:outputText value="#{form.saisie11}"/>
        <!-- line 13 -->
        ...
          <h:outputText value="#{form.errorSaisie12}" styleClass="error"/>
        ...
Lines 4–7: The input11 component has two possible error messages:
- one indicating an incorrect conversion or missing data. This message, generated by JSF itself, will be contained in a FacesMessage type and displayed by the <h:message> tag on line 5,
- the one we will generate if entry11 + entry12 does not equal 10. It will be displayed by line 6. The error message will be contained in the form.errorSaisie11 template.
The two messages correspond to errors that cannot occur at the same time. The check for input11 + input12 = 10 is performed in the submit method, which runs only if there are no remaining errors in the form. When it runs, the entry11 component will have been checked and its template form.saise11 will have received its value. The message on line 5 will no longer be displayed. Conversely, if the message on line 5 is displayed, then at least one error remains in the form and the submit method will not run. The message on line 6 will not be displayed. To ensure that the two possible error messages are in the same column of the table, they have been grouped within an <h:panelGroup> tag (lines 4 and 7).
The submit method is as follows:
  // actions
  public String submit() {
    // latest validations
    validateForm();
    // we return the same form
    return null;
  }

  // global validations
  private void validateForm() {
    if ((saisie11 + saisie12) != 10) {
      // global msg
      FacesMessage message = Messages.getMessage(null, "saisies11et12.incorrectes", null);
      message.setSeverity(FacesMessage.SEVERITY_ERROR);
      FacesContext context = FacesContext.getCurrentInstance();
      context.addMessage(null, message);
      // field-related msg
      message = Messages.getMessage(null, "error.sign", null);
      setErrorSaisie11(message.getSummary());
      setErrorSaisie12(message.getSummary());
    } else {
      setErrorSaisie11("");
      setErrorSaisie12("");
    }
}
- line 4: the method submit calls the method validateForm to perform the final validations,
- line 11: checks if input11 + input12 = 10,
- if not, lines 13–14, a message of type FacesMessage is created with the message from id saisies11et12.incorrectes. This is as follows:
- The message thus constructed is added (lines 15–16) to the application’s list of error messages. This message is not linked to a specific component. It is a global application message. It will be displayed by the <h:messages globalOnly="true"/> tag shown above,
- line 18: a new message of type FacesMessage is created with the message id error.sign. This is as follows:
error.sign="!"
We noted that the static method [Messages.getMessage] constructs a message of type FacesMessage with a summarized version and a detailed version if they exist. Here, only the summarized version of the message error.sign exists. We obtain the summarized version of a message m via m.getSummary(). Lines 19 and 20: the summary version of the message error.sign is placed in the errorSaisie11 and errorSaisie12 fields of the template. They will be displayed by the following JSF tags:
          <h:outputText value="#{form.saisie11}"/>
          ...
          <h:outputText value="#{form.saisie12}"/>
- lines 22-23: if the condition `entry11 + entry12 = 10` is true, then the two fields `errorSaisie11` and `errorSaisie12` in the template are cleared so that any previous error message is removed. It is important to note here that the form is retained between requests in the client’s session.
Here is an example of execution:
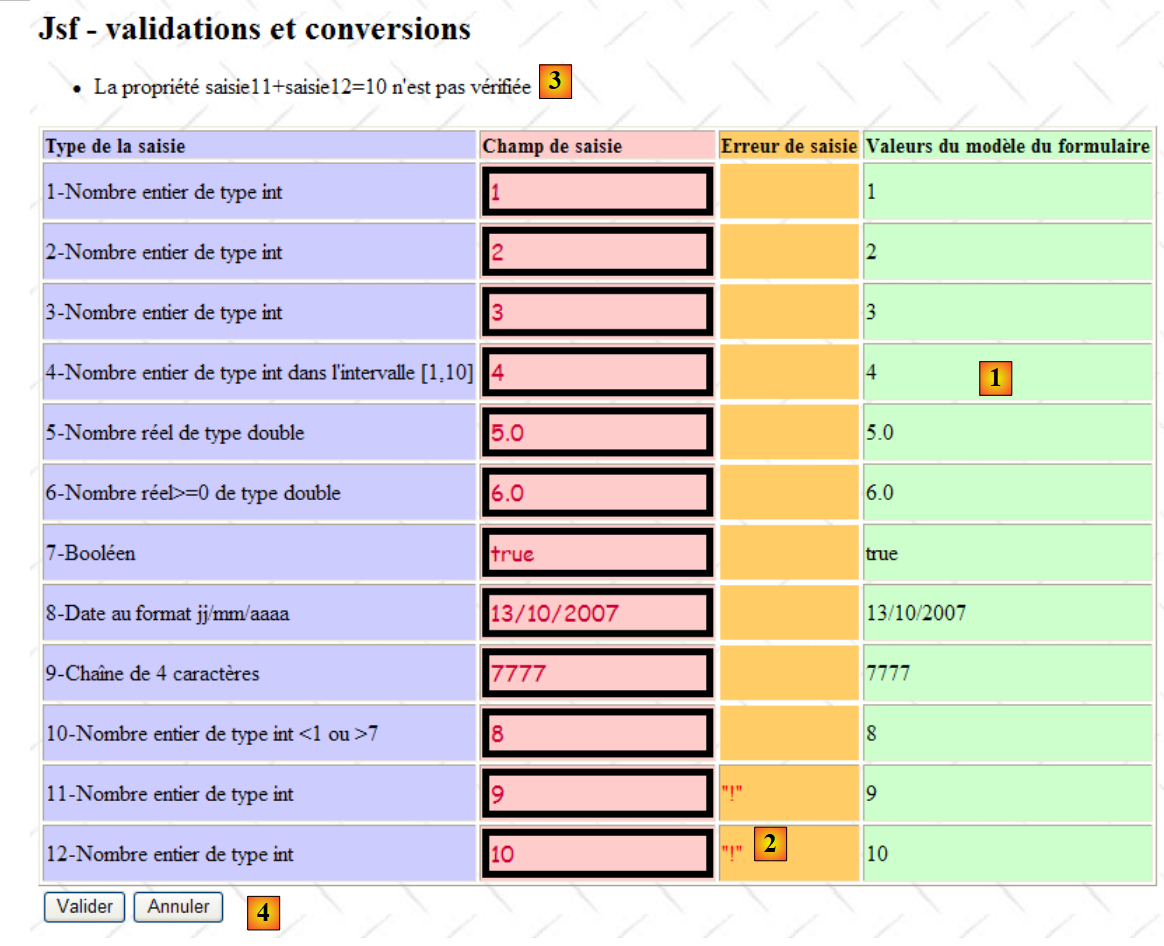 |
Note in the [1] column that the form has received the posted values, indicating that all validation and conversion operations between the posted values and the form were successful. The event handler form.submit, which handles the click on the [Valider] button, was thus able to execute. It is this event handler that generated the messages displayed in [2] and [3]. We can see that the model was updated even though the form was rejected and sent back to the client. One might want the template not to be updated in such a case. Indeed, assuming the user cancels the update using the [Annuler] or [4] button, it will not be possible to return to the initial template unless it has been saved.
2.8.5.9. POST for a form without input validation
Consider the form above and suppose that the user, not realizing their errors, wants to abandon the form entry. They will then use the [Annuler] button generated by the following JSF code:
<!-- control buttons -->
      <h:panelGrid columns="2">
        <h:commandButton value="#{msg['submit']}" action="#{form.submit}"/>
        <h:commandButton value="#{msg['cancel']}" immediate="true" action="#{form.cancel}"/>
      </h:panelGrid>
Line 4, the message msg['cancel'] is as follows:
cancel=Annuler
The method form.cancel associated with the button [Annuler] will only be executed if the form is valid. This is what we demonstrated for the form.submit method associated with the [Valider] button. If the user wants to cancel the form submission, there is of course no need to check the validity of their entries. This result is achieved using the immediate="true" attribute, which instructs JSF to execute the form.cancel method without going through the validation and conversion phase. Let’s return to the processing cycle of POST JSF:
 |
The events of the action components <h:commandButton> and <h:commandLink> with the attribute immediate="true" are processed in the [C] phase, then the JSF cycle proceeds directly to the [E] response rendering phase.
The form.cancel method is as follows:
  public String cancel() {
    saisie1 = 0;
    saisie2 = 0;
    saisie3 = 0;
    saisie4 = 0;
    saisie5 = 0.0;
    saisie6 = 0.0;
    saisie7 = true;
    saisie8 = new Date();
    saisie9 = "";
    saisie10 = 0;
    return null;
}
If you use the [Annuler] button in the previous form, you get the following page in return:
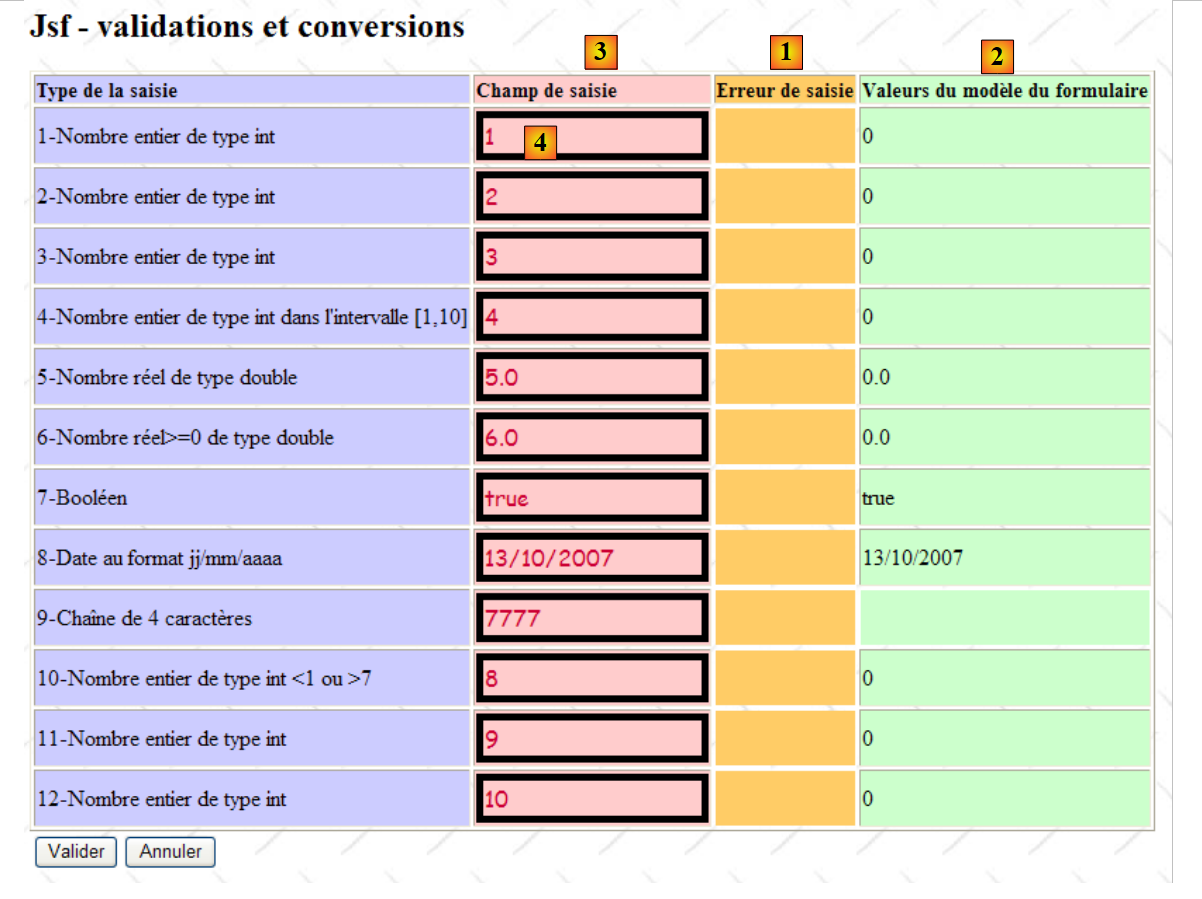 |
- the form is displayed again because the event handler form.cancel sets the key of navigation to null. The page [index.xhtml] is therefore returned,
- the template [Form.java] was modified by the method form.cancel. This is reflected in the column [2], which displays this template,
- while the [3] column reflects the posted value for the components.
Let’s go back to the code JSF for the input1 component [4];
          <!-- line 1 -->
          <h:outputText value="#{msg['saisie1.prompt']}"/>
          <h:inputText id="saisie1" value="#{form.saisie1}" styleClass="saisie"/>
          <h:message for="saisie1" styleClass="error"/>
<h:outputText value="#{form.saisie1}"/>
Line 4: The value of the saisie1 component is linked to the form.saisie1 template. This results in several things:
- during a GET from [index.xhtml], the input1 component will display the value of the form.saisie1 template,
- during a POST from [index.xhtml], the posted value for the input1 component is assigned to the form.saisie1 template only if all form validations and conversions succeed. Regardless of whether the template has been updated by the posted values, if the form is returned at the end of POST, the components display the value that was posted and not the value of the template associated with them. This is shown in the screenshot above, where the [2] and [3] columns do not have the same values.
2.9. Example mv-jsf2-07: events related to the state change of JSF components
2.9.1. The application
The application shows an example of POST implemented without using a button or a link. The form is as follows:
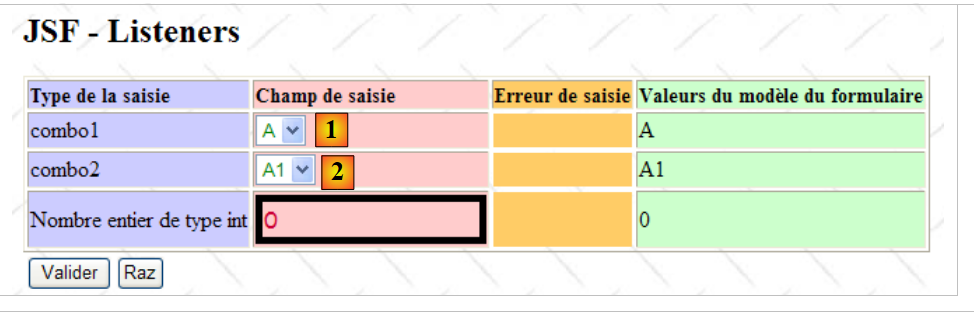 |
The content of combo2 [2] is linked to the element selected in combo1 [1]. When the selection in [1] is changed, a POST of the form is executed, during which the content of combo2 is modified to reflect the item selected in [1], and then the form is returned. During this POST, no validation is performed.
2.9.2. The Netbeans project
The Netbeans project for the application is as follows:
 |
There is a single [index.xhtml] form with its [Form.java] template.
2.9.3. The application environment
The message file [messages_fr.properties]:
app.titre=intro-07
app.titre2=JSF - Listeners
combo1.prompt=combo1
combo2.prompt=combo2
saisie1.prompt=Nombre entier de type int
submit=Valider
raz=Raz
data.required=Donnée requise
integer.required=Entrez un nombre entier
saisie.type=Type de la saisie
saisie.champ=Champ de saisie
saisie.erreur=Erreur de saisie
bean.valeur=Valeurs du modèle du formulaire
The [styles.css] style sheet:
.info{
   font-family: Arial,Helvetica,sans-serif;
   font-size: 14px;
   font-weight: bold
}

.col1{
   background-color: #ccccff
}

.col2{
   background-color: #ffcccc
}

.col3{
   background-color: #ffcc66
}

.col4{
   background-color: #ccffcc
}

.error{
   color: #ff0000
}

.saisie{
   background-color: #ffcccc;
   border-color: #000000;
   border-width: 5px;
   color: #cc0033;
   font-family: cursive;
   font-size: 16px
}

.combo{
  color: green;
}

.entete{
   font-family: 'Times New Roman',Times,serif;
   font-size: 14px;
   font-weight: bold
}
2.9.4. Form [index.xhtml]
Form [index.xhtml] is as follows:
<?xml version='1.0' encoding='UTF-8' ?>
<!DOCTYPE html PUBLIC "-//W3C//DTD XHTML 1.0 Transitional//EN" "http://www.w3.org/TR/xhtml1/DTD/xhtml1-transitional.dtd">

<html xmlns="http://www.w3.org/1999/xhtml"
      xmlns:h="http://java.sun.com/jsf/html"
      xmlns:f="http://java.sun.com/jsf/core">
  <h:head>
    <title>JSF</title>
    <h:outputStylesheet library="css" name="styles.css"/>
    ...
  </h:head>
  <h:body style="background-image: url('${request.contextPath}/resources/images/standard.jpg');">
    <h2><h:outputText value="#{msg['app.titre2']}"/></h2>
    <h:form id="formulaire">
      <h:messages globalOnly="true"/>
      <h:panelGrid columns="4" border="1" columnClasses="col1,col2,col3,col4">
        <!-- headers -->
        <h:outputText value="#{msg['saisie.type']}" styleClass="entete"/>
        <h:outputText value="#{msg['saisie.champ']}" styleClass="entete"/>
        <h:outputText value="#{msg['saisie.erreur']}" styleClass="entete"/>
        <h:outputText value="#{msg['bean.valeur']}" styleClass="entete"/>
        <!-- line 1 -->
        <h:outputText value="#{msg['combo1.prompt']}"/>
        <h:selectOneMenu id="combo1" value="#{form.combo1}" immediate="true" onchange="submit();" valueChangeListener="#{form.combo1ChangeListener}" styleClass="combo">
          <f:selectItems value="#{form.combo1Items}"/>
        </h:selectOneMenu>
        <h:panelGroup></h:panelGroup>
        <h:outputText value="#{form.combo1}"/>
        <!-- line 2 -->
        <h:outputText value="#{msg['combo2.prompt']}"/>
        <h:selectOneMenu id="combo2" value="#{form.combo2}" styleClass="combo">
          <f:selectItems value="#{form.combo2Items}"/>
        </h:selectOneMenu>
        <h:panelGroup></h:panelGroup>
        <h:outputText value="#{form.combo2}"/>
        <!-- line 3 -->
        <h:outputText value="#{msg['saisie1.prompt']}"/>
        <h:inputText id="saisie1" value="#{form.saisie1}" required="true" requiredMessage="#{msg['data.required']}" styleClass="saisie" converterMessage="#{msg['integer.required']}"/>
        <h:message for="saisie1" styleClass="error"/>
        <h:outputText value="#{form.saisie1}"/>
      </h:panelGrid>
      <!-- control buttons -->
      <h:panelGrid columns="2" border="0">
        <h:commandButton value="#{msg['submit']}"/>
        ...
      </h:panelGrid>
    </h:form>
  </h:body>
</html>
The new feature is in the code for combo1, lines 24–26. New attributes appear:
- onchange: attribute HTML - declares a function or code Javascript that must be executed when the selected item in combo1 changes. Here, the code Javascript submit() submits the form to the server,
- valueChangeListener: JSF attribute - declares the name of the method to be executed on the server side when the selected item in combo1 changes. In total, two methods are executed: one on the client side, the other on the server side,
- immediate=true: attribute JSF - sets the timing for when the server-side event handler should be executed: after the form has been reconstructed as the user entered it but before the input validation checks. The goal here is to populate the combo2 list based on the item selected in the combo1 list, even if there are invalid entries elsewhere in the form. Here is an example:
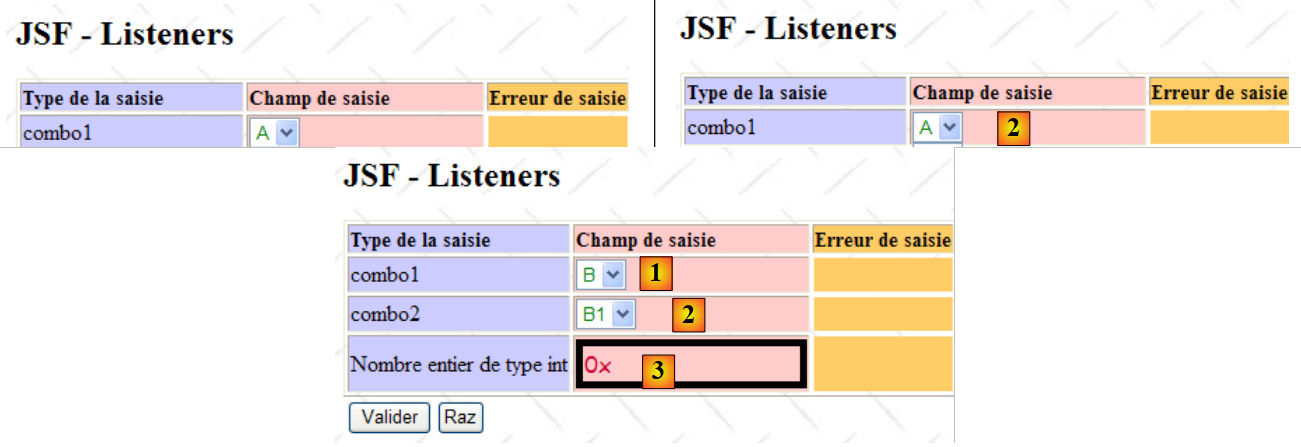 |
- in [1], an initial entry,
- in [2], we change the selected item in combo1 from A to B.
The result is as follows:
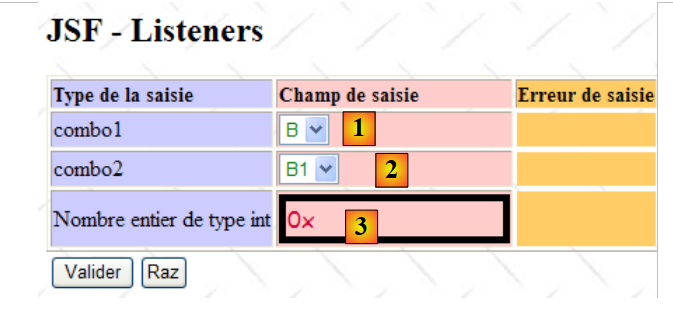 |
POST has been executed. The content of combo2 ([2]) was adjusted to match the selected item in combo1 ([1]), even though the entry ([3]) was incorrect. It was the immediate=true attribute that caused the form.combo1ChangeListener method to be executed before the validity checks. Without this attribute, it would not have been executed because the processing cycle would have stopped at the validity checks due to the error in [3].
The messages associated with the form are as follows in [messages.properties]:
app.titre=intro-07
app.titre2=JSF - Listeners
combo1.prompt=combo1
combo2.prompt=combo2
saisie1.prompt=Nombre entier de type int
submit=Valider
raz=Raz
data.required=Donnée requise
integer.required=Entrez un nombre entier
saisie.type=Type de la saisie
saisie.champ=Champ de saisie
saisie.erreur=Erreur de saisie
bean.valeur=Valeurs du modèle du formulaire
The lifetime of [Form.java] is set to request:
package forms;

...

@ManagedBean
@RequestScoped
public class Form {
Line 6: We set the bean's scope to request.
2.9.5. The [Form.java] template
The [Form.java] template is as follows:
package forms;

import java.util.logging.Logger;
import javax.enterprise.context.RequestScoped;
import javax.faces.bean.ManagedBean;
import javax.faces.context.FacesContext;
import javax.faces.event.ValueChangeEvent;
import javax.faces.model.SelectItem;

@ManagedBean
@RequestScoped
public class Form {

  public Form() {
  }

// form fields
  private String combo1="A";
  private String combo2="A1";
  private Integer saisie1=0;

  // working fields
  final private String[] combo1Labels={"A","B","C"};
  private String combo1Label="A";
  private static final Logger logger=Logger.getLogger("forms.Form");

  // methods
  public SelectItem[] getCombo1Items(){
    // init combo1
    SelectItem[] combo1Items=new SelectItem[combo1Labels.length];
    for(int i=0;i<combo1Labels.length;i++){
      combo1Items[i]=new SelectItem(combo1Labels[i],combo1Labels[i]);
    }
    return combo1Items;
  }

  public SelectItem[] getCombo2Items(){
    // init combo2 as a function of combo1
    SelectItem[] combo2Items=new SelectItem[5];
    for(int i=1;i<=combo2Items.length;i++){
      combo2Items[i-1]=new SelectItem(combo1Label+i,combo1Label+i);
    }
    return combo2Items;
  }

  // listeners
  public void combo1ChangeListener(ValueChangeEvent event){
    // follow-up
    logger.info("combo1ChangeListener");
    // retrieve the posted value of combo1
    combo1Label=(String)event.getNewValue();
    // we return the answer because we want to short-circuit the validations
    FacesContext.getCurrentInstance().renderResponse();
  }

  public String raz(){
    // follow-up
    logger.info("raz");
    // raz du formulaire
    combo1Label="A";
    combo1="A";
    combo2="A1";
    saisie1=0;
    return null;
  }

// getters - setters
  ...
}
Let's link the [index.xhtml] form to its [Form.java] template:
The combo1 list is generated by the following JSF code:
        <h:selectOneMenu id="combo1" value="#{form.combo1}" immediate="true" onchange="submit();" valueChangeListener="#{form.combo1ChangeListener}" styleClass="combo">
          <f:selectItems value="#{form.combo1Items}"/>
</h:selectOneMenu>
It obtains its elements via the getCombo1Items method of its model (line 2). This method is defined in lines 28–35 of the Java code. It generates a list of three elements {"A", "B", "C"}.
The combo2 list is generated by the following JSF code:
        <h:selectOneMenu id="combo2" value="#{form.combo2}" styleClass="combo">
          <f:selectItems value="#{form.combo2Items}"/>
</h:selectOneMenu>
It obtains its items via the getCombo2Items method of its model (line 2). This method is defined in lines 37–44 of the Java code. It generates a list of five items {"X1", "X2", "X3",X4","X5"} where X is the combo1Label element from line 16. Therefore, when the form is initially generated, the combo2 list contains the elements {"A1","A2","A3","A4","A5"}.
When the user changes the selected item in the combo1 list,
- the onchange="submit();" event will be handled by the client browser. The form will then be submitted to the server,
- and on the server side, JSF will detect that the combo1 component has changed its value. The combo1ChangeListener method in lines 47–54 will be executed. A method of type ValueChangeListener receives an object of type javax.faces.event.ValueChangeEvent as a parameter. This object allows you to retrieve the old and new values of the component that has changed using the following methods:

Here, the component is the combo1 list of type UISelectOne. Its value is of type String.
- Line 51 of the Java template: the new value of combo1 is stored in combo1Label, which is used to generate the elements of the combo2 list,
- line 53: the response is returned. It is important to note here that the combo1ChangeListener handler is executed with the attribute immediate="true". It is therefore executed after the phase in which the page component tree has been updated with the posted values and before the validation process for the posted values. However, we want to bypass this validation process because the combo2 list must be updated even if there are still invalid entries elsewhere in the form. We therefore request that the response be sent immediately without going through the data validation phase.
- The form will be sent back exactly as it was entered. However, the elements in combo1 and combo2 are not posted values. They will be regenerated by calling the methods getCombo1Items and getCombo2Items. The latter method will then use the new value from combo1Label set by combo1ChangeListener, and the items in the combo2 list will change.
2.9.6. The [Raz] button
We want to use the [Raz] button to reset the form to its initial state, as shown below:
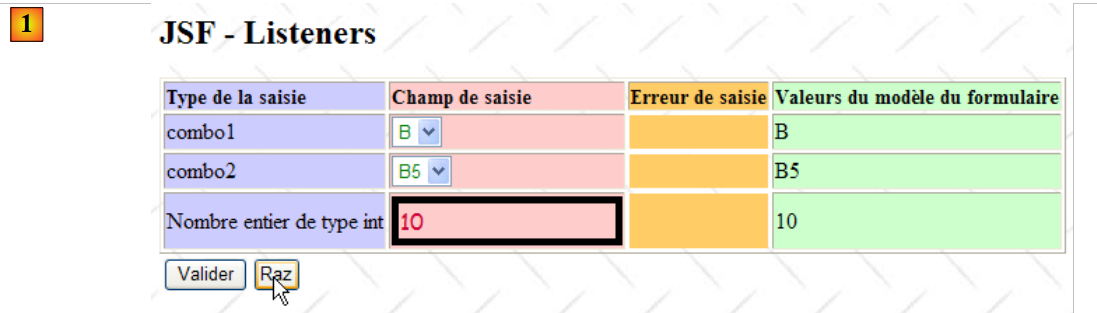 |
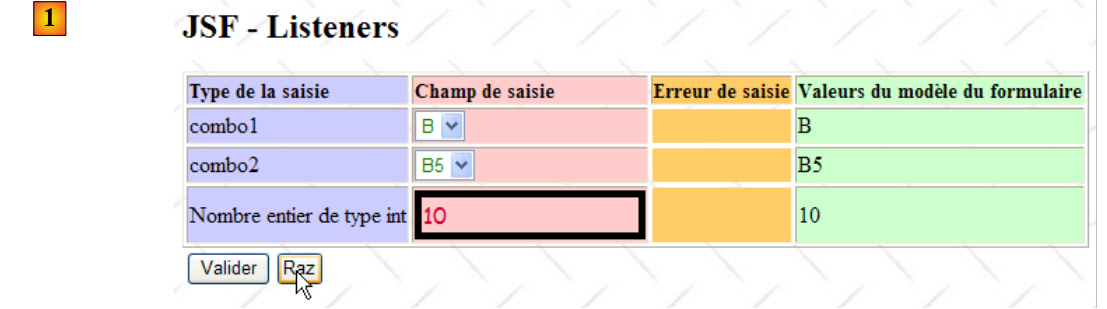 |
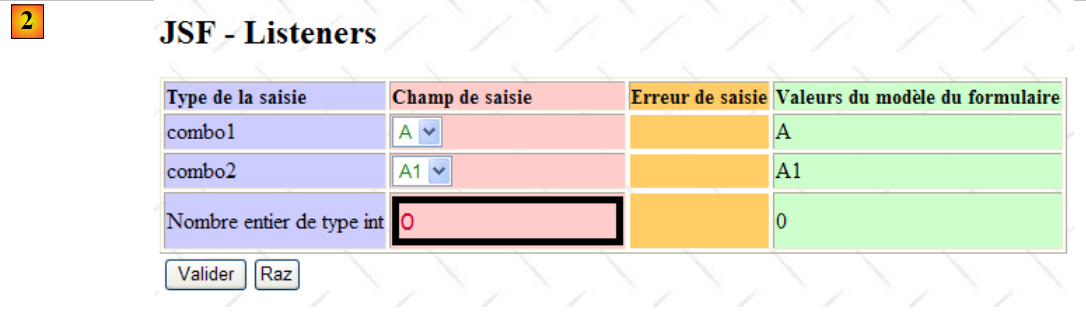 |
In [1], the form before the POST of the [Raz] button; in [2], the result of POST.
Although functionally simple, handling this use case proves to be quite complex. We can try various solutions, including the one used for the [Annuler] button in the previous example:
<h:commandButton value="#{msg['raz']}" immediate="true" action="#{form.raz}"/>
where the form.raz method is as follows:
  public String raz(){
    // raz du formulaire
    combo1Label="A";
    combo1="A";
    combo2="A1";
    saisie1=0;
    return null;
}
The result obtained by the [Raz] button in the previous example is as follows:
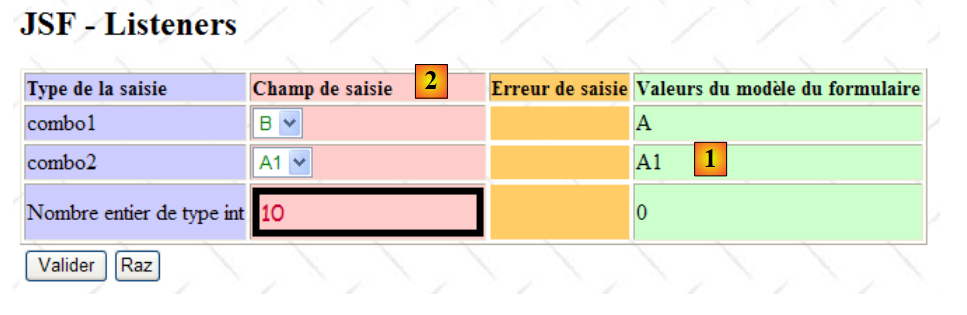 |
The [1] column shows that the form.raz method was executed. However, the [1] column continues to display the posted values:
- for combo1, the posted value was "B". This element is therefore selected in the list,
- for combo2, the posted value was "B5". Due to the execution of form.raz, the elements {"B1", ..., "B5"} of combo2 were changed to {"A1", ..., "A5"}. The element "B5" no longer exists and therefore cannot be selected. The first element in the list is then displayed,
- for entry1, the posted value was 10.
This is the normal behavior with the immediate="true" attribute. To get a different result, you must submit the values you want to see in the new form even if the user has entered different values. This is achieved with a little Javascript client-side code. The form becomes the following:
<script language="javascript">
  function raz(){
    document.forms['formulaire'].elements['formulaire:combo1'].value="A";
    document.forms['formulaire'].elements['formulaire:combo2'].value="A1";
    document.forms['formulaire'].elements['formulaire:saisie1'].value=0;
    //document.forms['formulaire'].submit();
  }
</script>
...
<h:commandButton value="#{msg['raz']}" onclick='raz()' immediate="true" action="#{form.raz}"/>
- line 10, the onclick='raz()' attribute instructs the system to execute the Javascript raz function when the user clicks the [Raz] button,
- Line 3: The value "A" is assigned to the HTML element named 'form:combo1'. The various elements on line 3 are as follows:
- document: page displayed by the browser,
- document.forms: set of forms in the document,
- document.forms['formulaire']: the form with the attribute name="form",
- documents.forms['formulaire'].elements: set of form elements with the attribute name="form",
- document.forms['formulaire'].elements['formulaire:combo1']: form element with the attribute name="form:combo1"
- document.forms['formulaire'].elements['formulaire:combo1'].value: value that will be submitted by the form element with the attribute name="form:combo1".
To find out the name attributes of the various elements on the page displayed by the browser, you can view its source code (shown below with IE7):
 |
<form id="formulaire" name="formulaire" ...>
...
<select id="formulaire:combo1" name="formulaire:combo1" ...>
With this explained, we can see that in the Javascript code of the raz function:
- line 3 ensures that the value posted for the combo1 component will be the string A,
- line 4 ensures that the value posted for the combo2 component will be the string A1,
- line 5 ensures that the value posted for the saisie1 component will be the string 0.
Once this is done, the form’s POST, associated with any button of type <h:commandButton> (line 10), will be triggered. The form.raz method will be executed, and the form will be returned as it was posted. The following result is then obtained:
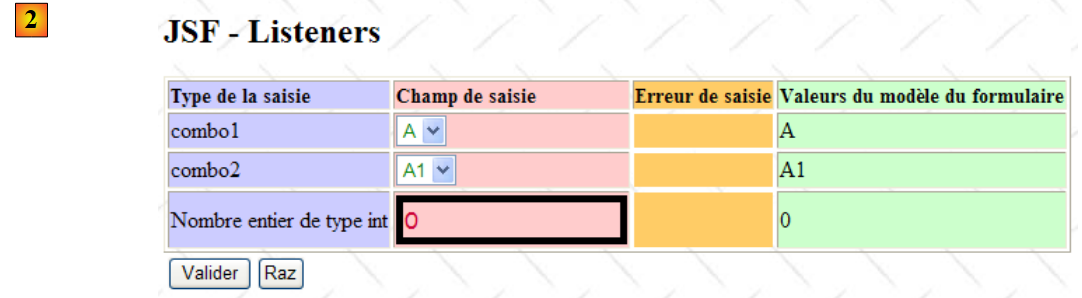 |
This result hides a lot of information. The values "A", "A1", and "0" from the combo1, combo2, and saisie1 components are posted to the server. Suppose the previous value of combo1 was "B". In that case, there is a change in the value of the combo1 component, and the form.combo1ChangeListener method should also be executed. We have two event handlers with the attribute immediate="true". Will both of them be executed? If so, in what order? Only one? If so, which one?
To find out more, we create logs in the application:
package forms;

import java.util.logging.Logger;
...
public class Form {

...
// form fields
  private String combo1="A";
  private String combo2="A1";
  private Integer saisie1=0;

  // working fields
  final private String[] combo1Labels={"A","B","C"};
  private String combo1Label="A";
  private static final Logger logger=Logger.getLogger("forms.Form");

  // listener
  public void combo1ChangeListener(ValueChangeEvent event){
    // follow-up
    logger.info("combo1ChangeListener");
    // retrieve the posted value of combo1
    combo1Label=(String)event.getNewValue();
    // we return the answer because we want to short-circuit the validations
    FacesContext.getCurrentInstance().renderResponse();
  }

  public String raz(){
    // follow-up
    logger.info("raz");
    // raz du formulaire
    combo1Label="A";
    combo1="A";
    combo2="A1";
    saisie1=0;
    return null;
  }
...
}
- line 16: a log generator is created. The parameter of getLogger allows us to differentiate the origins of the logs. Here, the logger is called forms.Form,
- line 21: the entry into the method combo1ChangeListener is logged,
- Line 30: The entry into the raz method is logged.
What logs are generated by the [Raz] button or by changing the value of combo1? Let’s consider various cases:
- We use the [Raz] button while the selected item in combo1 is "A". "A" is therefore the last value of the combo1 component. We have seen that the [Raz] button executes a Javascript function that posts the value "A" for the combo1 component. The combo1 component therefore does not change its value. The logs then show that only the form.raz method is executed:
- We use the [Raz] button even though the selected item in combo1 is not "A". The combo1 component therefore changes its value: its last value was not "A", and the [Raz] button will set it to "A". The logs then show that two methods are executed. In order: combo1ChangeListener, reset:
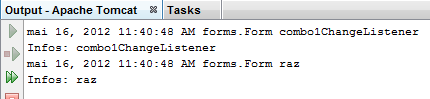 |
- we change the value of combo1 without using the [Raz] button. The logs show that only the combo1ChangeListener method is executed:
 |
2.10. Example mv-jsf2-08: the <h:dataTable> tag
2.10.1. The application
The application displays a list of people with the option to delete them:
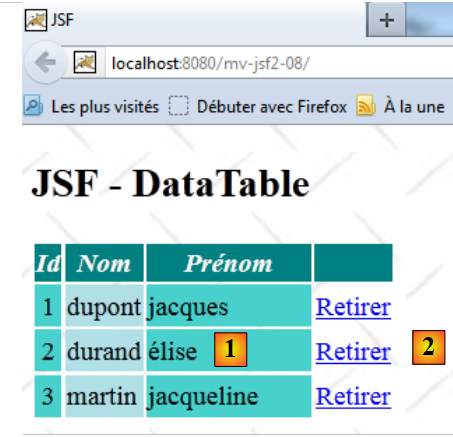 |
- in [1], a list of people,
- in [2], the links that allow you to delete them.
2.10.2. The Netbeans project
The Netbeans project for the application is as follows:
 |
There is a single form [index.xhtml] with its template [Form.java].
2.10.3. The application environment
The configuration file [faces-config.xml]:
<?xml version='1.0' encoding='UTF-8'?>

<!-- =========== FULL CONFIGURATION FILE ================================== -->

<faces-config version="2.0"
              xmlns="http://java.sun.com/xml/ns/javaee"
              xmlns:xsi="http://www.w3.org/2001/XMLSchema-instance"
              xsi:schemaLocation="http://java.sun.com/xml/ns/javaee http://java.sun.com/xml/ns/javaee/web-facesconfig_2_0.xsd">

  <application>
    <resource-bundle>
      <base-name>
        messages
      </base-name>
      <var>msg</var>
    </resource-bundle>
    <message-bundle>messages</message-bundle>
  </application>
</faces-config>
The message file [messages_fr.properties]:
app.titre=intro-08
app.titre2=JSF - DataTable
submit=Valider
personnes.headers.id=Id
personnes.headers.nom=Nom
personnes.headers.prenom=Pr\u00e9nom
The [styles.css] stylesheet:
.headers {
   text-align: center;
   font-style: italic;
   color: Snow;
   background: Teal;
}

.id {
   height: 25px;
   text-align: center;
   background: MediumTurquoise;
}

.nom {
   text-align: left;
   background: PowderBlue;
}
.prenom {
   width: 6em;
   text-align: left;
   color: Black;
   background: MediumTurquoise;
}
2.10.4. Form [index.xhtml] and its template [Form.java]
Here is the view associated with page [index.xhtml]:
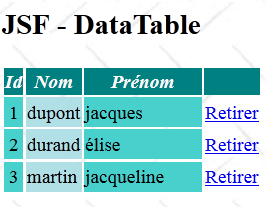 |
The [index.xhtml] form is as follows:
<?xml version='1.0' encoding='UTF-8' ?>
<!DOCTYPE html PUBLIC "-//W3C//DTD XHTML 1.0 Transitional//EN" "http://www.w3.org/TR/xhtml1/DTD/xhtml1-transitional.dtd">

<html xmlns="http://www.w3.org/1999/xhtml"
      xmlns:h="http://java.sun.com/jsf/html"
      xmlns:f="http://java.sun.com/jsf/core">
  <h:head>
    <title>JSF</title>
    <h:outputStylesheet library="css" name="styles.css"/>
  </h:head>
  <h:body style="background-image: url('${request.contextPath}/resources/images/standard.jpg');">
    <h2><h:outputText value="#{msg['app.titre2']}"/></h2>
    <h:form id="formulaire">
      <h:dataTable value="#{form.personnes}" var="personne" headerClass="headers" columnClasses="id,nom,prenom">
  ........................
      </h:dataTable>
    </h:form>
  </h:body>
</html>
On line 14, the <h:dataTable> tag uses the #{form.personnes} field as its data source. It is as follows:
private List<Person> people;
The [Personne] class is as follows:
package forms;

public class Personne {
  // data
  private int id;
  private String nom;
  private String prénom;

  // manufacturers
  public Personne(){

  }

  public Personne(int id, String nom, String prénom){
    this.id=id;
    this.nom=nom;
    this.prénom=prénom;
  }

  // toString
  public String toString(){
    return String.format("Personne[%d,%s,%s]", id,nom,prénom);
  }

  // getter and setters
...
}
Let's go back to the content of the <h:dataTable> tag:
<h:dataTable value="#{form.personnes}" var="personne" headerClass="headers" columnClasses="id,nom,prenom">
...
</h:dataTable>
- The var="person" attribute sets the name of the variable representing the current person within the <h:datatable> tag,
- the attribute headerClass="headers" sets the style of the table column headers,
- the attribute columnClasses="...." sets the style of each column in the table.
Let’s examine one of the table’s columns and see how it is constructed:
|
The code for the Id column is as follows:
<h:dataTable value="#{form.personnes}" var="personne" headerClass="headers" columnClasses="id,nom,prenom">
        <h:column>
          <f:facet name="header">
            <h:outputText value="#{msg['personnes.headers.id']}"/>
          </f:facet>
          <h:outputText value="#{personne.id}"/>
        </h:column>
        ...
      </h:dataTable>

lignes 3-5 : la balise <f:facet name="header"> définit le titre de la colonne,
ligne 4 : le titre de la colonne est pris dans le fichier des messages,
ligne 6 : personne fait référence à l'var attribute of the <h:dataTable ...> tag (line 1). We therefore write the id of the current person.


<h:dataTable value="#{form.personnes}" var="personne" headerClass="headers" columnClasses="id,nom,prenom">
        <h:column>
          <f:facet name="header">
            <h:outputText value="#{msg['personnes.headers.id']}"/>
          </f:facet>
          <h:outputText value="#{personne.id}"/>
        </h:column>
        <h:column>
          <f:facet name="header">
            <h:outputText value="#{msg['personnes.headers.nom']}"/>
          </f:facet>
          <h:outputText value="#{personne.nom}"/>
        </h:column>
        <h:column>
          <f:facet name="header">
            <h:outputText value="#{msg['personnes.headers.prenom']}"/>
          </f:facet>
          <h:outputText value="#{personne.prénom}"/>
        </h:column>
...
      </h:dataTable>
- lines 3–7: the id column of the table,
- lines 8–13: the "last name" column of the table,
- lines 14–19: the "first name" column of the table.
Now, let’s examine the [Retirer] links column:
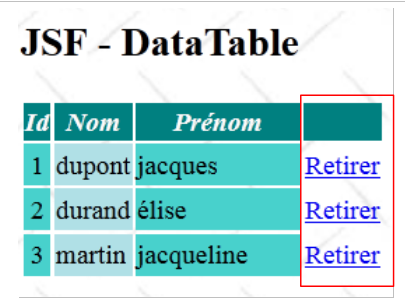 |
This column is generated by the following code:
<h:dataTable value="#{form.personnes}" var="personne" headerClass="headers" columnClasses="id,nom,prenom">
...
        <h:column>
          <h:commandLink value="Retirer" action="#{form.retirerPersonne}">
            <f:setPropertyActionListener target="#{form.personneId}" value="#{personne.id}"/>
          </h:commandLink>
        </h:column>
      </h:dataTable>
The link [Retirer] is generated by lines 4–6. When the link is clicked, the method [Form].retirerPersonne will be executed. It’s time to examine the [Form.java] class:
package forms;

import java.util.ArrayList;
import java.util.List;
import javax.enterprise.context.RequestScoped;
import javax.faces.bean.ManagedBean;
import javax.faces.bean.SessionScoped;

@ManagedBean
@SessionScoped
public class Form {

  // model
  private List<Personne> personnes;
  private int personneId;

  // manufacturer
  public Form() {
    // initialization of the list of persons
    personnes = new ArrayList<Personne>();
    personnes.add(new Personne(1, "dupont", "jacques"));
    personnes.add(new Personne(2, "durand", "élise"));
    personnes.add(new Personne(3, "martin", "jacqueline"));
  }

  public String retirerPersonne() {
    // search for the selected person
    int i = 0;
    for (Personne personne : personnes) {
      // current person = selected person?
      if (personne.getId() == personneId) {
        // delete the current person from the list
        personnes.remove(i);
        // we're done
        break;
      } else {
        // next person
        i++;
      }
    }
    // we test on the same page
    return null;
  }

  // getters and setters
...
}
- lines 18–24: the constructor initializes the list of people from line 14,
- Line 10: Because this list must persist across requests, the bean's scope is the session.
When the [retirerPersonne] method on line 26 is executed, the field on line 15 has been initialized by the id of the person whose [Retirer] link was clicked:
          <h:commandLink value="Retirer" action="#{form.retirerPersonne}">
            <f:setPropertyActionListener target="#{form.personneId}" value="#{personne.id}"/>
</h:commandLink>
The <f:setPropertyActionListener> tag allows information to be transferred to the model. Here, the value of the value attribute is copied into the model field identified by the target attribute. Thus, the id of the current person—the one to be removed from the list of people—is copied into the [Form].personneId field via that field’s getter. This is done before the method referenced by the action attribute in line 1 is executed.
Lines 26–43: The method [supprimerPersonne] removes the person whose id is equal to personneId.
2.11. Example mv-jsf2-09: Layout of a JSF application
2.11.1. The application
The application demonstrates how to layout a JSF application with two views:
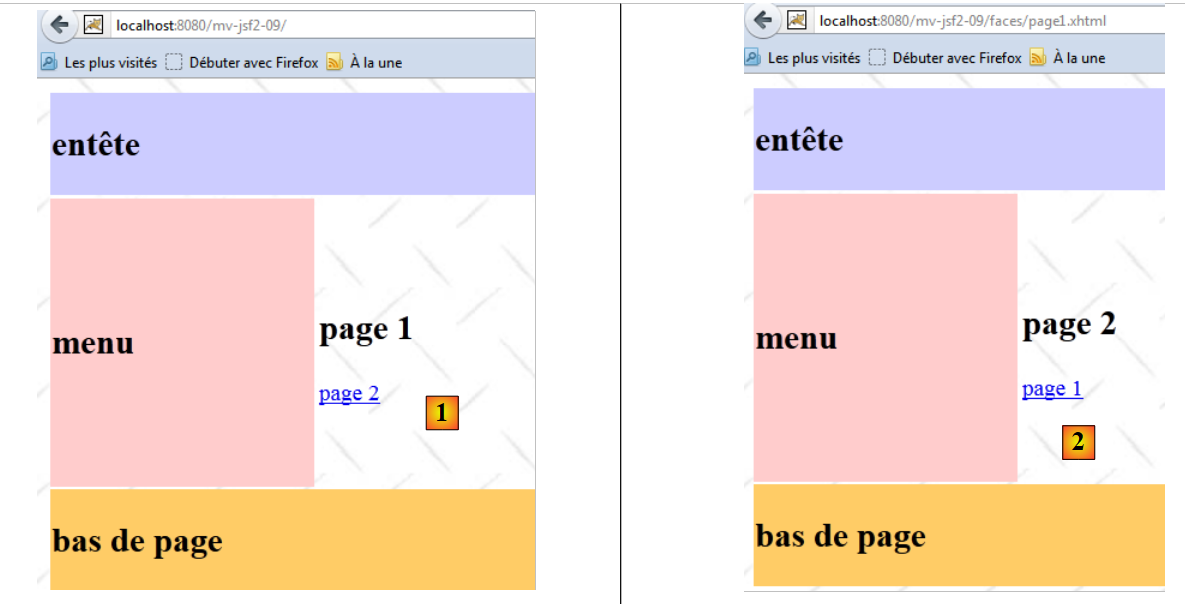 |
The application has two views:
- in [1], page 1,
- in [2], page 2.
You can navigate between the two pages. What we want to show here is that pages 1 and 2 share a common layout, as shown in the screenshots above.
2.11.2. The Netbeans project
The application’s Netbeans project is as follows:
 |
The application contains only XHTML pages. There is no associated Java template.
2.11.3. The [layout.xhtml] page
The [layout.xhtml] page defines the layout of the application's pages:
<?xml version='1.0' encoding='UTF-8' ?>
<!DOCTYPE html PUBLIC "-//W3C//DTD XHTML 1.0 Transitional//EN" "http://www.w3.org/TR/xhtml1/DTD/xhtml1-transitional.dtd">

<html xmlns="http://www.w3.org/1999/xhtml"
      xmlns:h="http://java.sun.com/jsf/html"
      xmlns:f="http://java.sun.com/jsf/core"
      xmlns:ui="http://java.sun.com/jsf/facelets">
  <h:head>
    <title>JSF</title>
    <h:outputStylesheet library="css" name="styles.css"/>
  </h:head>
  <h:body style="background-image: url('${request.contextPath}/resources/images/standard.jpg');">
    <h:form id="formulaire">
      <table style="width: 400px">
        <tr>
          <td colspan="2" bgcolor="#ccccff">
            <ui:include src="entete.xhtml"/>
          </td>
        </tr>
        <tr style="height: 200px">
          <td bgcolor="#ffcccc">
            <ui:include src="menu.xhtml"/>
          </td>
          <td>
            <ui:insert name="contenu" >
              <h2>Contenu</h2>
            </ui:insert>
          </td>
        </tr>
        <tr bgcolor="#ffcc66">
          <td colspan="2">
            <ui:include src="basdepage.xhtml"/>
          </td>
        </tr>
      </table>
    </h:form>
  </h:body>
</html>
Line 7 introduces a new namespace, ui. This namespace contains the tags used to format the pages of an application. The tags in this namespace are used on lines 17, 22, 25, and 32.
The page [layout.xhtml] displays information in a table HTML (line 14). You can request this page using a browser:
 |
- in [1], the requested URL.
The [2] field was generated by the following XHTML code:
  <h:body style="background-image: url('${request.contextPath}/resources/images/standard.jpg');">
    <h:form id="formulaire">
      <table style="width: 400px">
        <tr>
          <td colspan="2" bgcolor="#ccccff">
            <ui:include src="entete.xhtml"/>
          </td>
        </tr>
...
      </table>
    </h:form>
</h:body>
The <ui:include> tag on line 6 allows you to include an external XHTML code in the page. The [entete.xhtml] file is as follows:
<?xml version='1.0' encoding='UTF-8' ?>
<!DOCTYPE html PUBLIC "-//W3C//DTD XHTML 1.0 Transitional//EN" "http://www.w3.org/TR/xhtml1/DTD/xhtml1-transitional.dtd">
<html xmlns="http://www.w3.org/1999/xhtml"
      xmlns:h="http://java.sun.com/jsf/html">
  <body>
    <h2>entête</h2>
  </body>
</html>
All the code from lines 3–8 will be inserted into [layout.xhtml]. Thus, the tags <html> and <body> will be inserted within a <td> tag. This does not cause any errors. Therefore, the pages included via <ui:include> are complete XHTML pages. Visually, only line 6 will have an effect. The tags <html> and <body> are present for syntactic reasons.
The [3] area was generated by the following XHTML code:
<h:form id="formulaire">
      <table style="width: 400px">
        <tr style="height: 200px">
          <td bgcolor="#ffcccc">
            <ui:include src="menu.xhtml"/>
          </td>
...
        </tr>
...
      </table>
    </h:form>
The <ui:include> tag on line 5 includes the following [menu.xhtml] file:
<?xml version='1.0' encoding='UTF-8' ?>
<!DOCTYPE html PUBLIC "-//W3C//DTD XHTML 1.0 Transitional//EN" "http://www.w3.org/TR/xhtml1/DTD/xhtml1-transitional.dtd">
<html xmlns="http://www.w3.org/1999/xhtml"
      xmlns:h="http://java.sun.com/jsf/html">
  <body>
    <h2>menu</h2>
  </body>
</html>
The [4] zone was generated by the following XHTML code:
<h:form id="formulaire">
      <table style="width: 400px">
...
        <tr bgcolor="#ffcc66">
          <td colspan="2">
            <ui:include src="basdepage.xhtml"/>
          </td>
        </tr>
      </table>
    </h:form>
The <ui:include> tag on line 6 includes the following [basdepage.xhtml] file:
<?xml version='1.0' encoding='UTF-8' ?>
<!DOCTYPE html PUBLIC "-//W3C//DTD XHTML 1.0 Transitional//EN" "http://www.w3.org/TR/xhtml1/DTD/xhtml1-transitional.dtd">
<html xmlns="http://www.w3.org/1999/xhtml"
      xmlns:h="http://java.sun.com/jsf/html">
  <body>
    <h2>bas de page</h2>
  </body>
</html>
The [5] zone was generated by the following XHTML code:
    <h:form id="formulaire">
...
          <td>
            <ui:insert name="contenu" >
              <h2>Contenu</h2>
            </ui:insert>
          </td>
 ...
      </table>
</h:form>
The <ui:insert> tag on line 5 defines a field called content. This is a field that can hold variable content. We will see how. When we requested the page [layout.xhtml], no content was defined for the area called "content." In this case, the content of the <ui:insert> tag in lines 4–6 is used. Line 5 is therefore displayed.
2.11.4. The page [page1.xhtml]
The page [layout.xhtml] is not intended to be viewed. It serves as a template for the pages [page1.xhtml] and [page2.xhtml]. This is referred to as a page template. The page [page1.xhtml] is as follows:
<?xml version='1.0' encoding='UTF-8' ?>
<!DOCTYPE html PUBLIC "-//W3C//DTD XHTML 1.0 Transitional//EN" "http://www.w3.org/TR/xhtml1/DTD/xhtml1-transitional.dtd">
<html xmlns="http://www.w3.org/1999/xhtml"
      xmlns:h="http://java.sun.com/jsf/html"
      xmlns:f="http://java.sun.com/jsf/core"
      xmlns:ui="http://java.sun.com/jsf/facelets">
  <ui:composition template="layout.xhtml">
    <ui:define name="contenu">
      <h2>page 1</h2>
      <h:commandLink value="page 2" action="page2"/>
    </ui:define>
  </ui:composition>
</html>
- line 6, the namespace ui is used;
- line 7, we specify that the page is associated with the [layout.xhtml] template using a <ui:composition> tag,
- line 8: this association ensures that each <ui:define> tag will be associated with a <ui:insert> tag from the template being used, in this case [layout.xhtml]. The link is established via the name attribute of both tags. They must be identical.
The displayed page is [layout.xhtml], where the content of each <ui:insert> tag is replaced by the content of the <ui:define> tag from the requested page. Here, it is as if the displayed page were:
<?xml version='1.0' encoding='UTF-8' ?>
<!DOCTYPE html PUBLIC "-//W3C//DTD XHTML 1.0 Transitional//EN" "http://www.w3.org/TR/xhtml1/DTD/xhtml1-transitional.dtd">

<html xmlns="http://www.w3.org/1999/xhtml"
      xmlns:h="http://java.sun.com/jsf/html"
      xmlns:f="http://java.sun.com/jsf/core"
      xmlns:ui="http://java.sun.com/jsf/facelets">
  <h:head>
    <title>JSF</title>
    <h:outputStylesheet library="css" name="styles.css"/>
  </h:head>
  <h:body style="background-image: url('${request.contextPath}/resources/images/standard.jpg');">
    <h:form id="formulaire">
      <table style="width: 400px">
        <tr>
          <td colspan="2" bgcolor="#ccccff">
            <ui:include src="entete.xhtml"/>
          </td>
        </tr>
        <tr style="height: 200px">
          <td bgcolor="#ffcccc">
            <ui:include src="menu.xhtml"/>
          </td>
          <td>
              <h2>page 1</h2>
              <h:commandLink value="page 2" action="page2"/>
          </td>
        </tr>
        <tr bgcolor="#ffcc66">
          <td colspan="2">
            <ui:include src="basdepage.xhtml"/>
          </td>
        </tr>
      </table>
    </h:form>
  </h:body>
</html>
Lines 25–26 of [page1.xhtml] were inserted in place of the <ui:insert> tag from [layout.xml].
The page [page2.xhtml] is similar to [page1.xhtml]:
<?xml version='1.0' encoding='UTF-8' ?>
<!DOCTYPE html PUBLIC "-//W3C//DTD XHTML 1.0 Transitional//EN" "http://www.w3.org/TR/xhtml1/DTD/xhtml1-transitional.dtd">
<html xmlns="http://www.w3.org/1999/xhtml"
      xmlns:h="http://java.sun.com/jsf/html"
      xmlns:f="http://java.sun.com/jsf/core"
      xmlns:ui="http://java.sun.com/jsf/facelets">
  <ui:composition template="layout.xhtml">
    <ui:define name="contenu">
      <h2>page 2</h2>
      <h:commandLink value="page 1" action="page1"/>
    </ui:define>
  </ui:composition>
</html>
2.12. Conclusion
The study just conducted on JSF 2 is far from exhaustive. However, it is sufficient to understand the examples that follow. For further details, refer to [ref2].
2.13. Testing with Eclipse
Let’s show how to test Maven projects with the SpringSource Tool Suite:
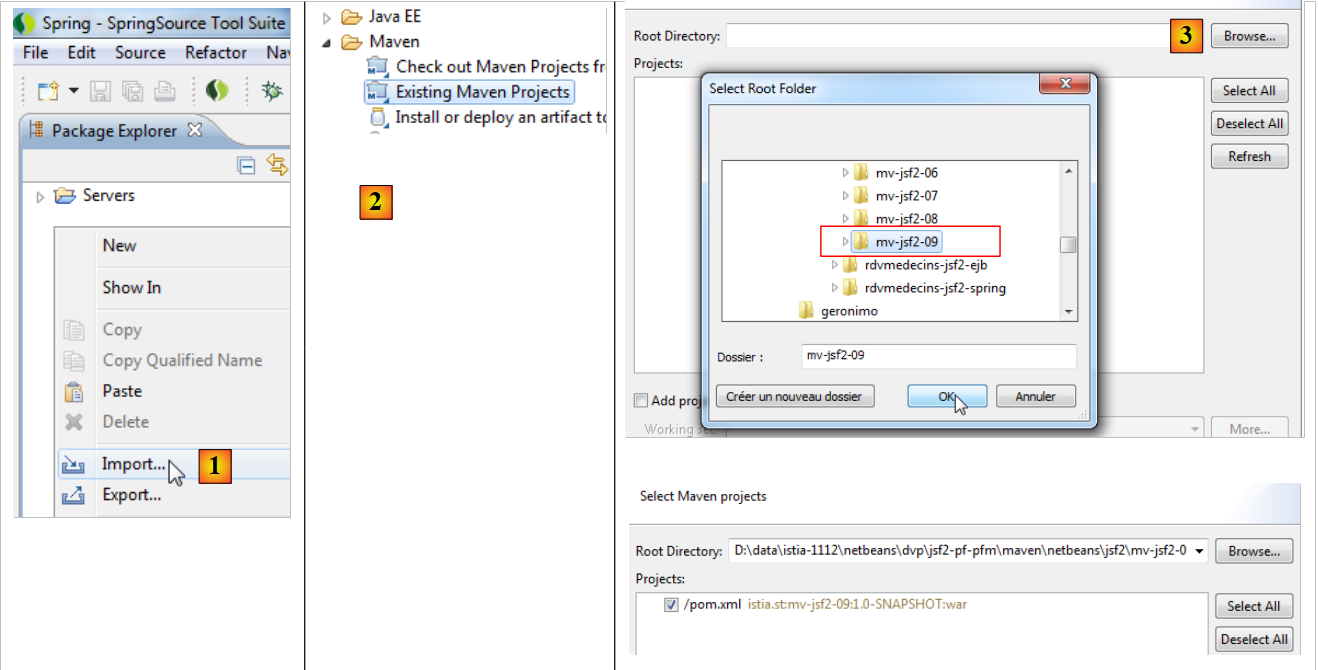 |
- In [1], import a Maven project [2], which you select using the [3] button. Here, we use the Maven project [mv-jsf2-09] for Eclipse
- in [4], the imported project has been correctly recognized as a Maven project [5],
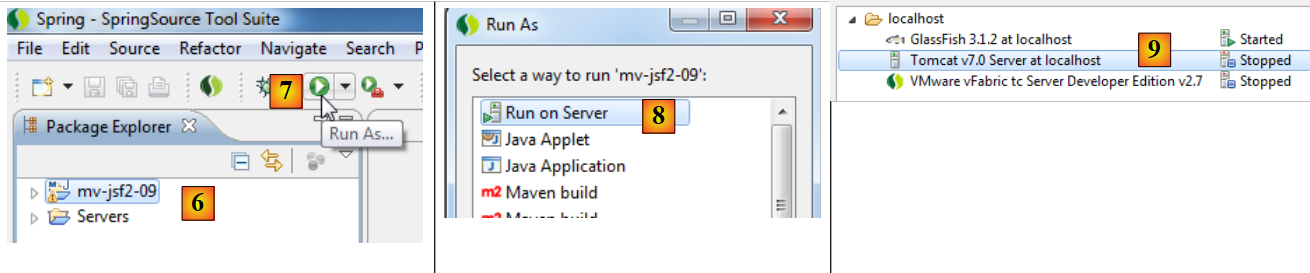 |
- in [6], the project imported into the project explorer,
- in [7], it is running on a Tomcat server [8],
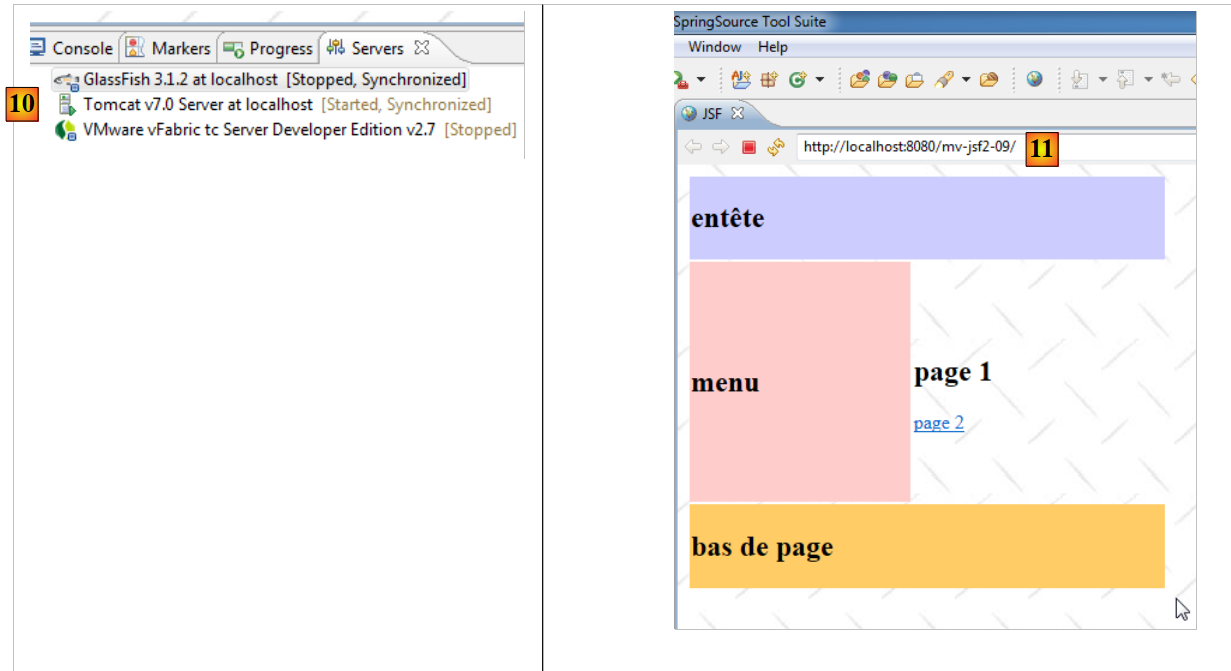 |
- in [10], Tomcat 7 was launched,
- in [11], the [mv-jsf2-09] [11] project home page is displayed in a browser within Eclipse.