1. Introduction
1.1. Overview
The PDF for this document is |HERE|.
The examples in this document are available |HERE|.
Here, we propose to introduce, using examples
- the Java Server Faces 2 framework (JSF2),
- the PrimeFaces component library for JSF2, for desktop and mobile applications.
This document is primarily intended for students and developers interested in the PrimeFaces and [http://www.primefaces.org] component libraries. This framework offers dozens of AJAX-enabled [http://www.primefaces.org/showcase/ui/home.jsf] components that allow you to build web applications with a look and feel similar to that of desktop applications. Primefaces is based on JSF2, hence the need to first introduce this framework. Primefaces also offers specific components for mobile devices. We will present these as well.
To illustrate our point, we will build an appointment scheduling application in different environments:
- a classic web application using JSF2 / EJB3 / JPA technologies on a Glassfish 3.1 server,
- the same application with AJAX support, using PrimeFaces technology,
- and finally, a mobile version using PrimeFaces Mobile technology.
Each time a version is built, we will deploy it to a JSF2 / Spring / JPA environment on a Tomcat 7 server. We will therefore build six Java applications EE.
This document presents only what is necessary to build these applications. Therefore, one should not look for completeness here. It is not to be found. Nor is this a collection of best practices. Seasoned developers may find that they would have done things differently. I simply hope that this document is not a collection of bad practices either.
For further information on JSF2 and PrimeFaces, you can use the following reference s:
- [ref1]: Java EE5 Tutorial [http://java.sun.com/javaee/5/docs/tutorial/doc/index.HTML], the Sun reference for learning Java EE5. Read the section on II [Web Tier] to learn about web technology, particularly JSF. The examples from the tutorial can be downloaded. They come in the form of Netbeans projects that can be loaded and run,
- [ref2]: Core JavaServer Faces by David Geary and Cay S. Horstmann, third edition, published by McGraw-Hill,
- [ref3]: the PrimeFaces documentation,
- [ref4]: the documentation for PrimeFaces Mobile: [http://primefaces.googlecode.com/files/primefaces_mobile_users_guide_0_9_2.pdf].
We will occasionally refer to [ref2] to let the reader know that they can explore a topic in greater depth with this book.
This document has been written to be accessible to as wide an audience as possible. The prerequisites for understanding it are as follows:
- knowledge of the Java language,
- basic knowledge of Java development EE.
All the resources necessary to meet these prerequisites can be found on the [http://developpez.com] website. Some of them can be found on the [http://tahe.developpez.com] website:
- [ref5]: Introduction to Web Programming in Java (September 2002): covers the basics of web programming in Java: servlets and pages JSP,
- [ref6]: The Basics of Web Development in Java (May 2006) []: recommends developing web applications using three-tier architectures, where the web tier implements the Model-View-Controller (MVC) design pattern.
- [ref7]: Introduction to Java 5 (June 2010). This document introduces Java 1 and the Java 5 features.
- [ref8]: Java Persistence in Practice (June 2007). This document introduces data persistence with JPA (Java Persistence API).
- [ref9]: Building a Java Web Service EE Using Netbeans and the Glassfish Server (January 2009). This document discusses the process of building a web service. The sample application discussed in this document is taken from [ref9].
1.2. The example
The examples in this document are available at URL HERE in the form of Maven projects for both Netbeans and Eclipse:
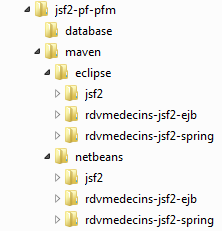 |
To import a project into Netbeans:
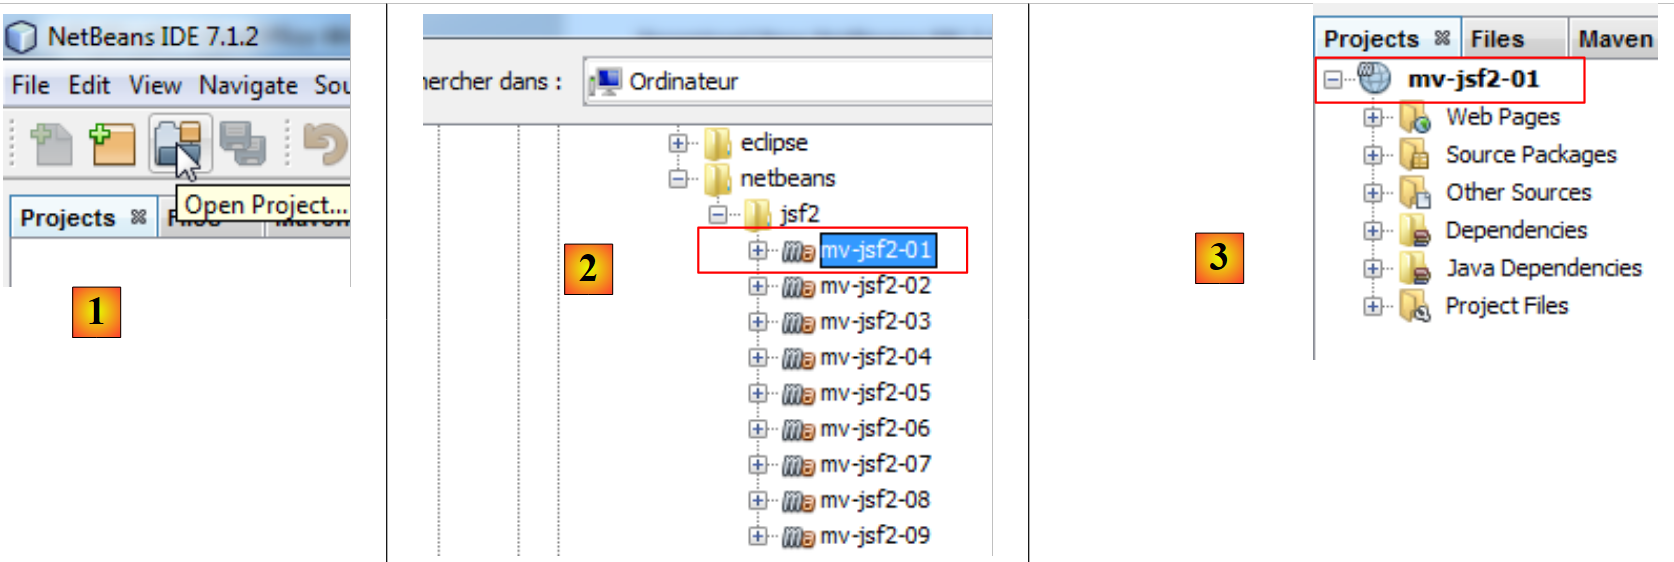 |
- In [1], open a project,
- in [2], select the project to open in the file system,
- in [3], it is opened.
With Eclipse,
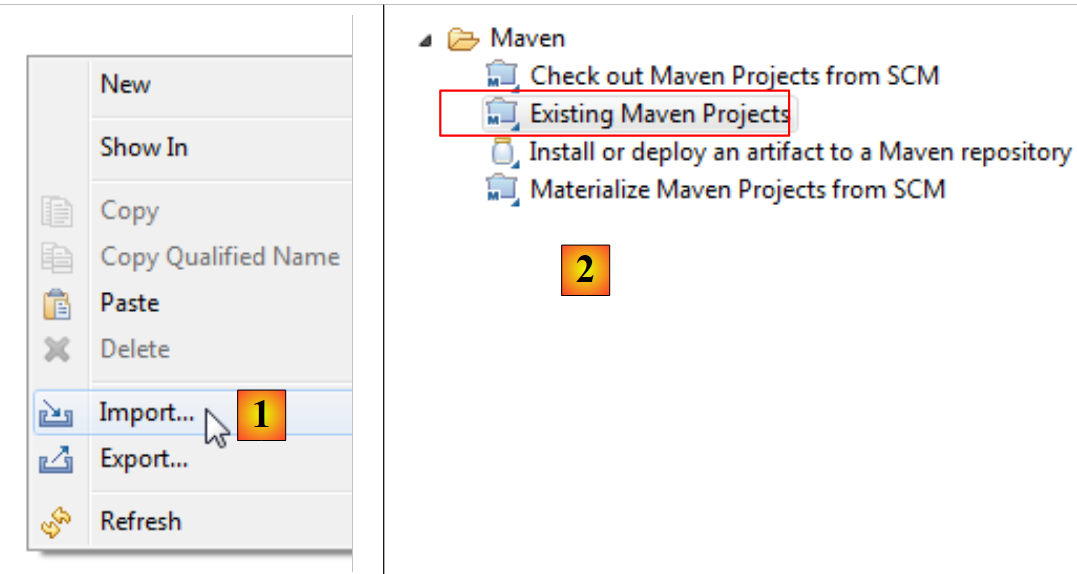 |
- in [1], a project is imported,
- in [2], the project is an existing Maven project,
 |
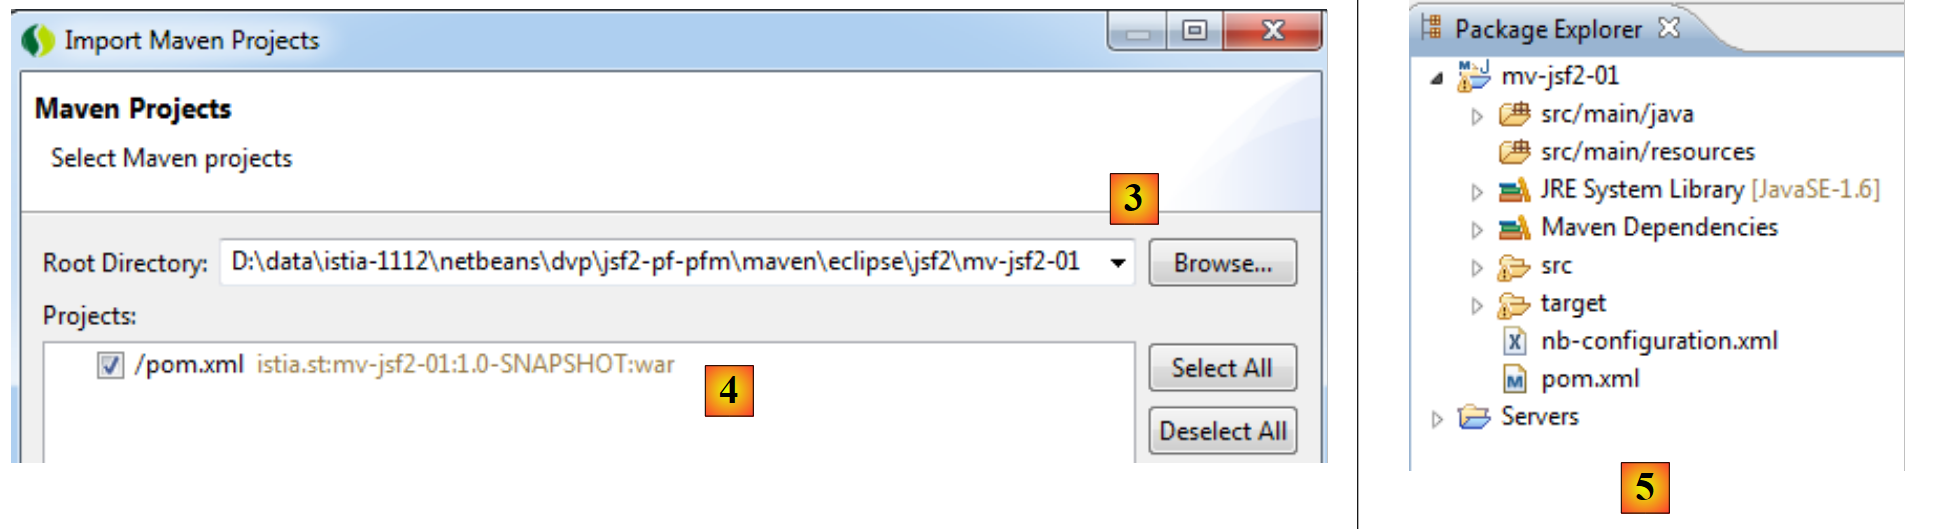 |
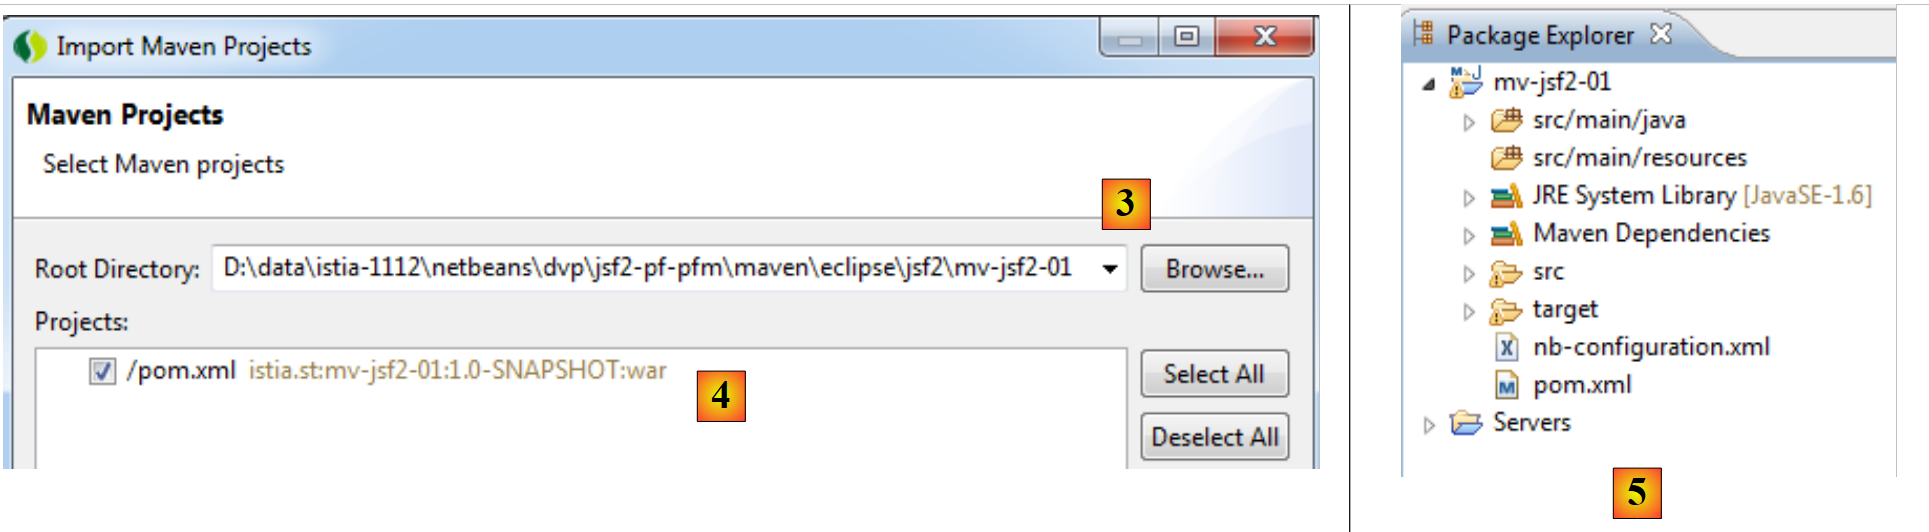
- in [3]: it is selected in the file system,
- in [4]: Eclipse recognizes it as a Maven project,
- in [5], the imported project.
1.3. Tools used
Moving forward, we are using (May 2012):
- IDE (Integrated Development Environment) Netbeans 7.1.2 available on URL [http://www.netbeans.org],
- IDE Eclipse Indigo [http://www.eclipse.org/] in its customized form SpringSource Tool Suite (STS) [http://www.springsource.com/developer/sts],
- PrimeFaces in its version 3.2 version available at URL [http://primefaces.org/],
- PrimeFaces Mobile in its version 0.9.2 available at URL [http://primefaces.org/],
- WampServer for SGBD, MySQL, and [http://www.wampserver.com/].
1.3.1. Installation of IDE Netbeans
Here we describe the installation of Netbeans 7.1.2, available for URL and [http://netbeans.org/downloads/].
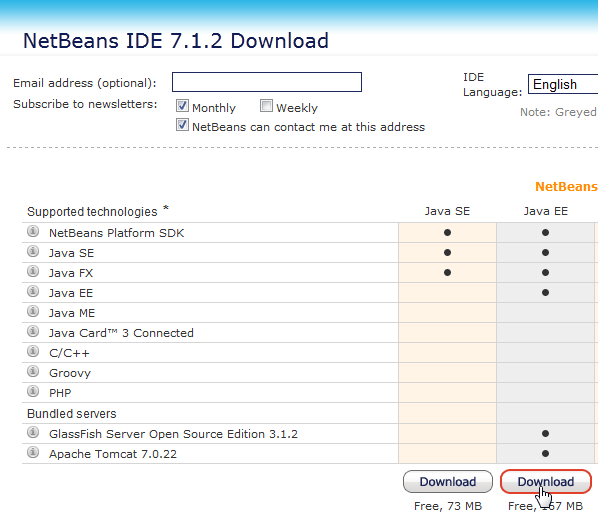 |
We can use the version Java EE with both Glassfish 3.1.2 and Apache Tomcat 7.0.22 servers. The first allows for the development of Java applications EE with EJB3 (Enterprise Java Bean), and the other for Java applications EE without EJB. We will then replace the EJBs with the Spring framework.
Once the Netbeans installer has been downloaded, run it. To do this, you must have JDK (Java Development Kit) [http://www.oracle.com/technetwork/java/javase/overview/index.HTML]. In addition to Netbeans 7.1.2, we will install:
- the JUnit framework for unit testing,
- the Glassfish 3.1.2 server,
- the Tomcat 7.0.22 server.
Once the installation is complete, launch Netbeans:
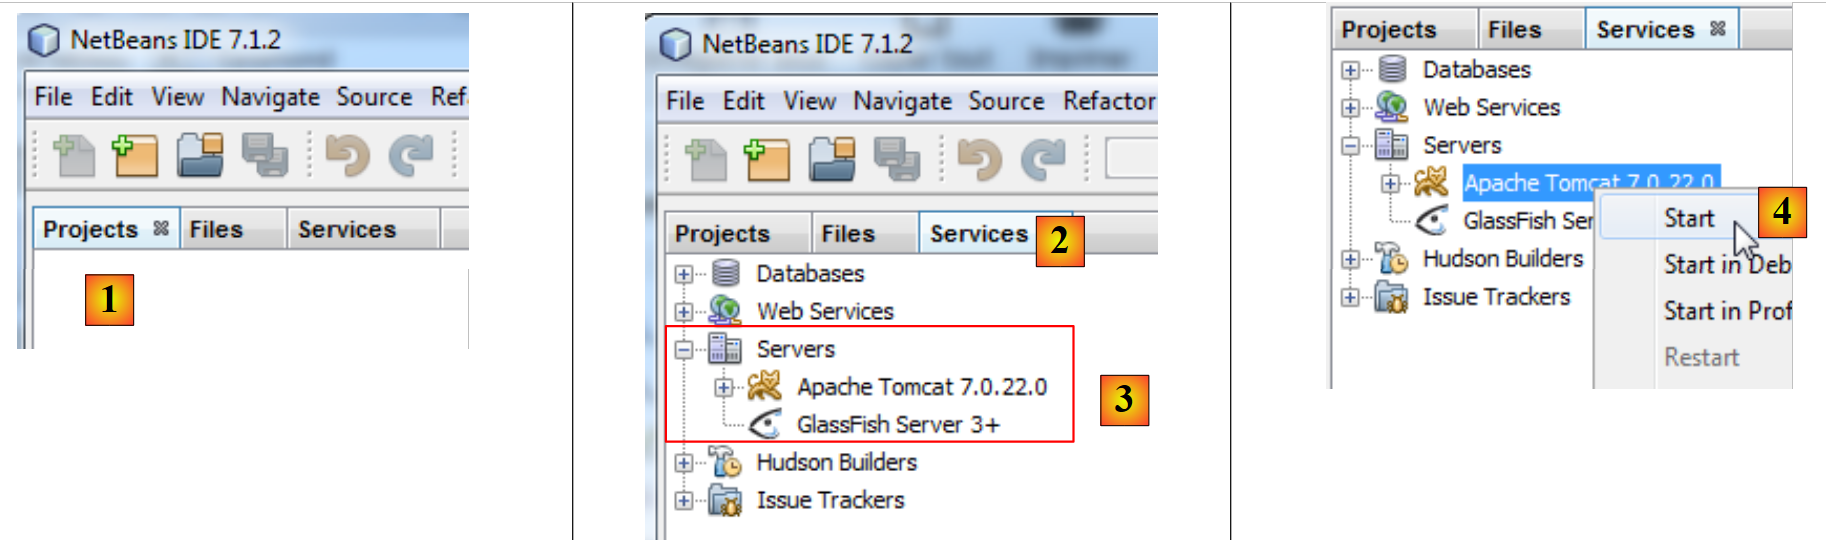 |
- in [1], Netbeans 7.1.2 with three tabs:
- the [Projects] tab displays the open Netbeans projects;
- the [Files] tab displays the various files that make up the open Netbeans projects;
- the [Services] tab groups together a number of tools used by the Netbeans projects;
- In [2], the [Services] tab is activated, and in [3], the [Servers] branch is activated;
- in [4], we start the Tomcat server to verify that it is installed correctly,
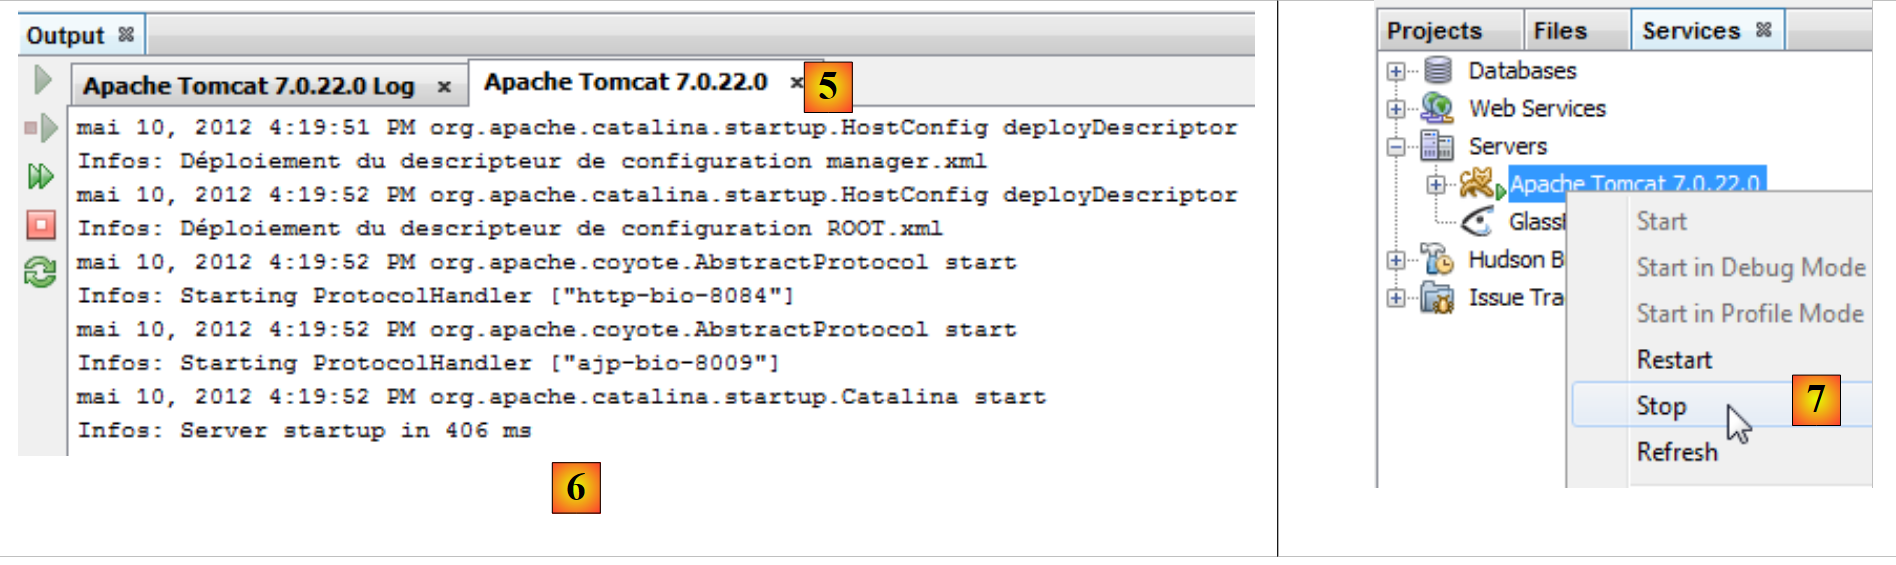 |
- In [6], in the [Apache Tomcat] and [5] tabs, you can verify that the server started correctly,
- In [7], stop the Tomcat server,
Proceed in the same way to verify the correct installation of the Glassfish server 3.1.2:
 |
- In [8], start the server Glassfish,
- In [9], verify that it started correctly,
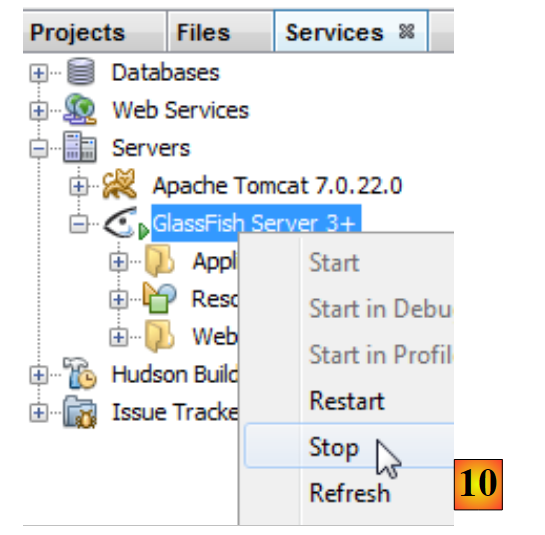 |
- in [10], we stop it.
We now have an operational IDE. We can begin building projects. Depending on these projects, we will need to explore various features of IDE.
We will now install the IDE Eclipse environment and, within it, register the two servers—Tomcat 7 and Glassfish 3.1.2—that we just downloaded. To do this, we need to know the installation directories for these two servers. This information can be found in the properties of these two servers:
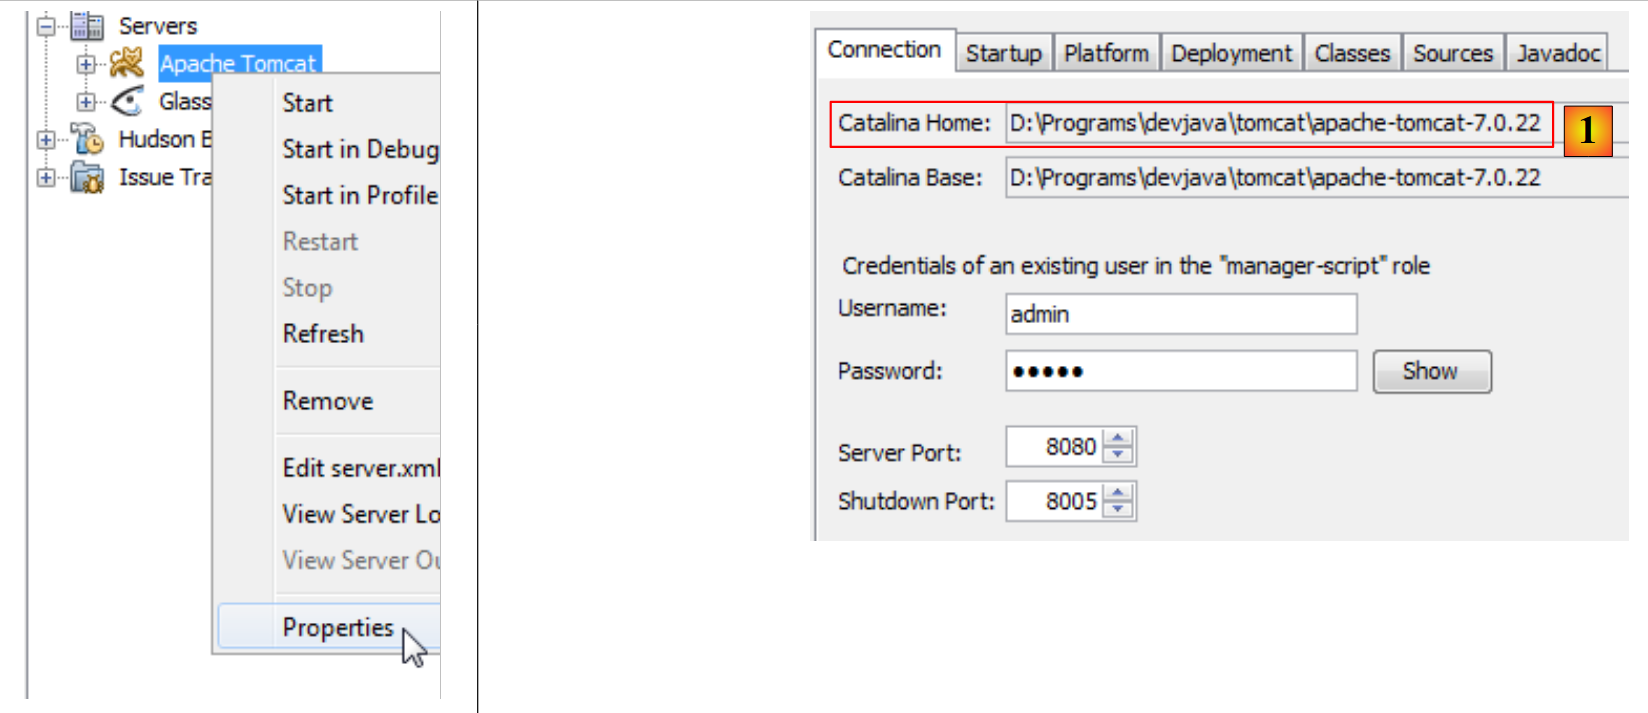 |
- in [1], the installation folder for Tomcat 7,
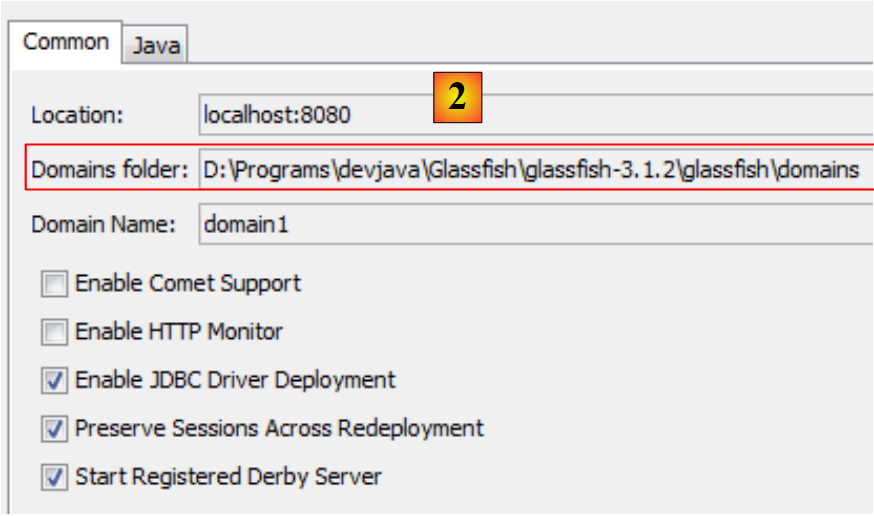 |
- In [2], the domain folder of the Glassfish server. In the Glassfish entry in Eclipse, you need to provide only the following information: [D:\Programs\devjava\Glassfish\glassfish-3.1.2\glassfish].
1.3.2. Installing IDE Eclipse
Although Eclipse is not the IDE used in this document, we will nevertheless describe its installation. This is because the examples in the document are also provided as Maven projects for Eclipse. Eclipse does not come with Maven pre-installed. You must install a plugin to do this. Rather than installing a bare-bones Eclipse, we will install the SpringSource Tool Suite [http://www.springsource.com/developer/sts], an Eclipse pre-equipped with numerous plugins related to the Spring framework as well as a pre-installed Maven configuration.
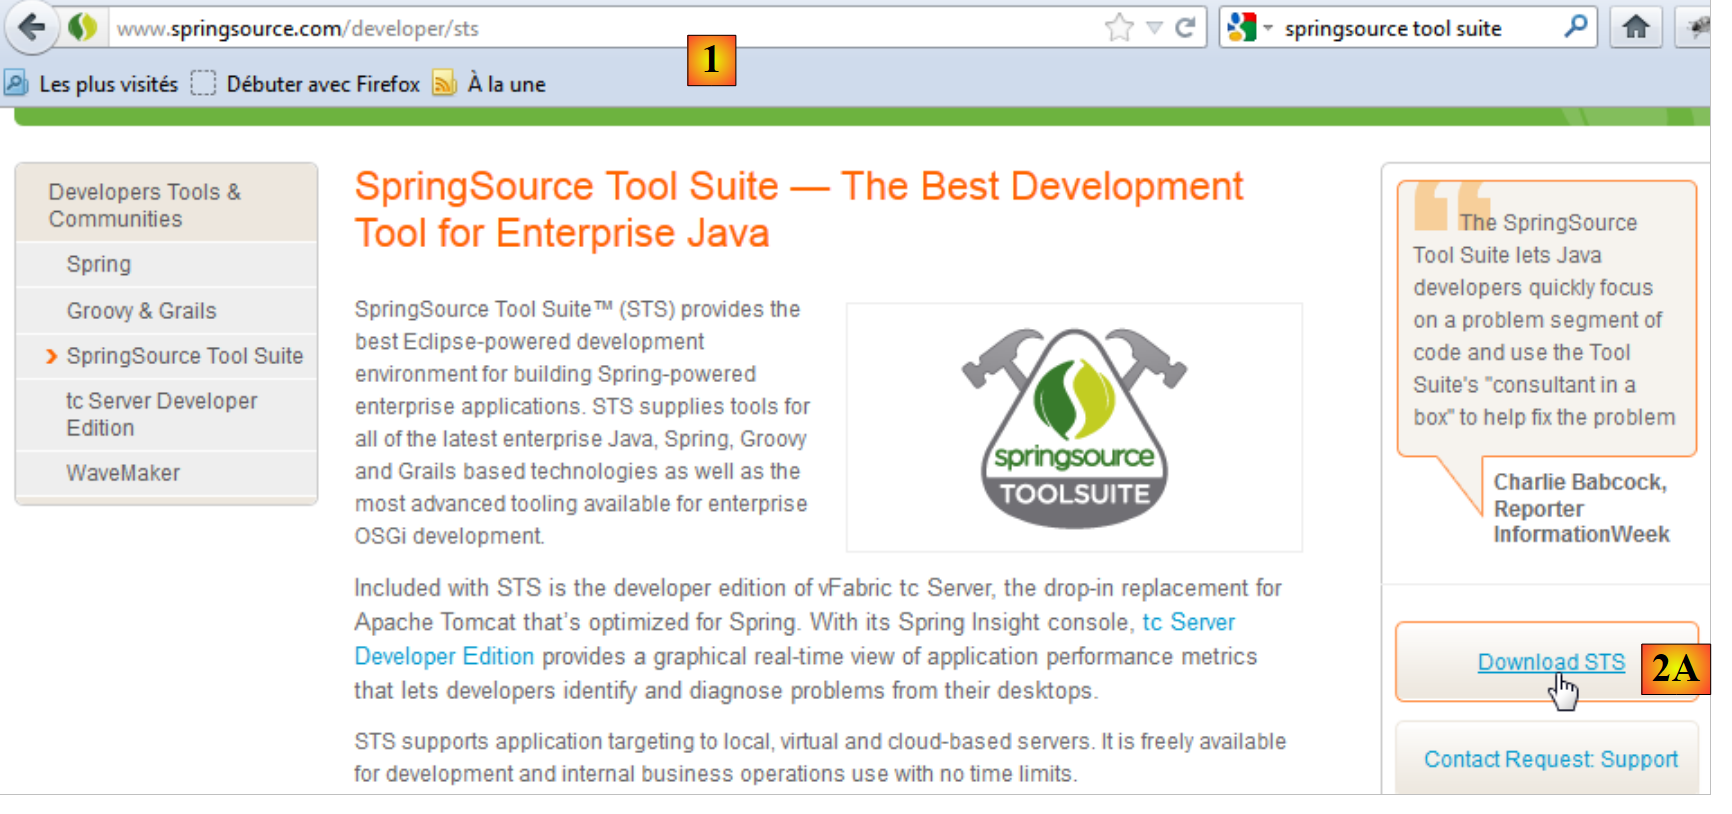 |
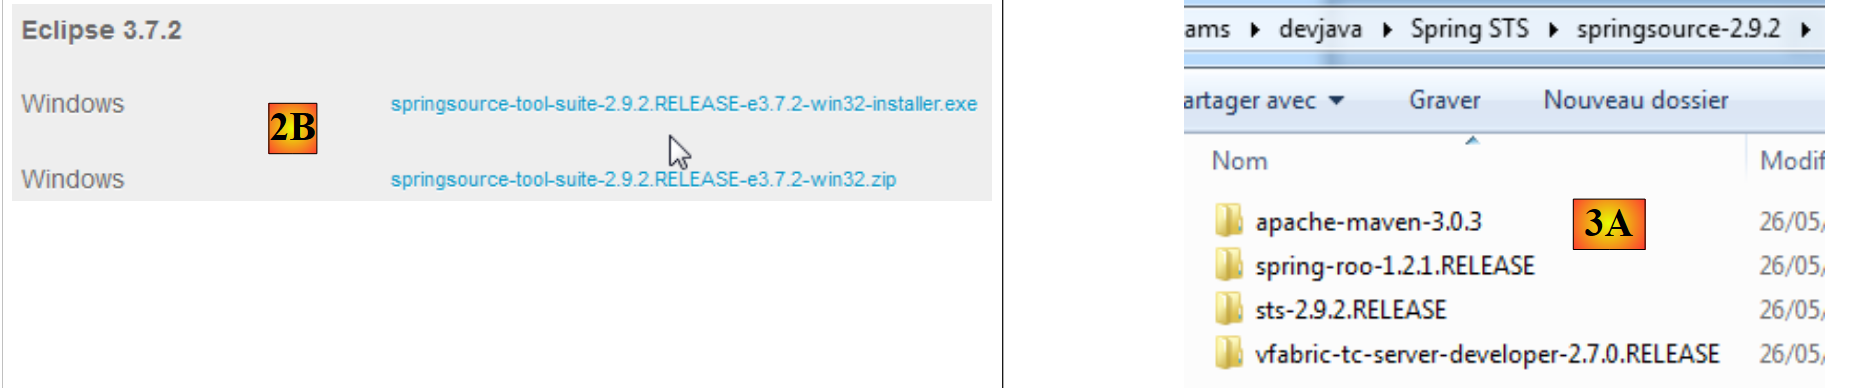
- Go to the SpringSource Tool Suite (STS) website [1], to download the current version of version from STS [2A] [2B],
 |
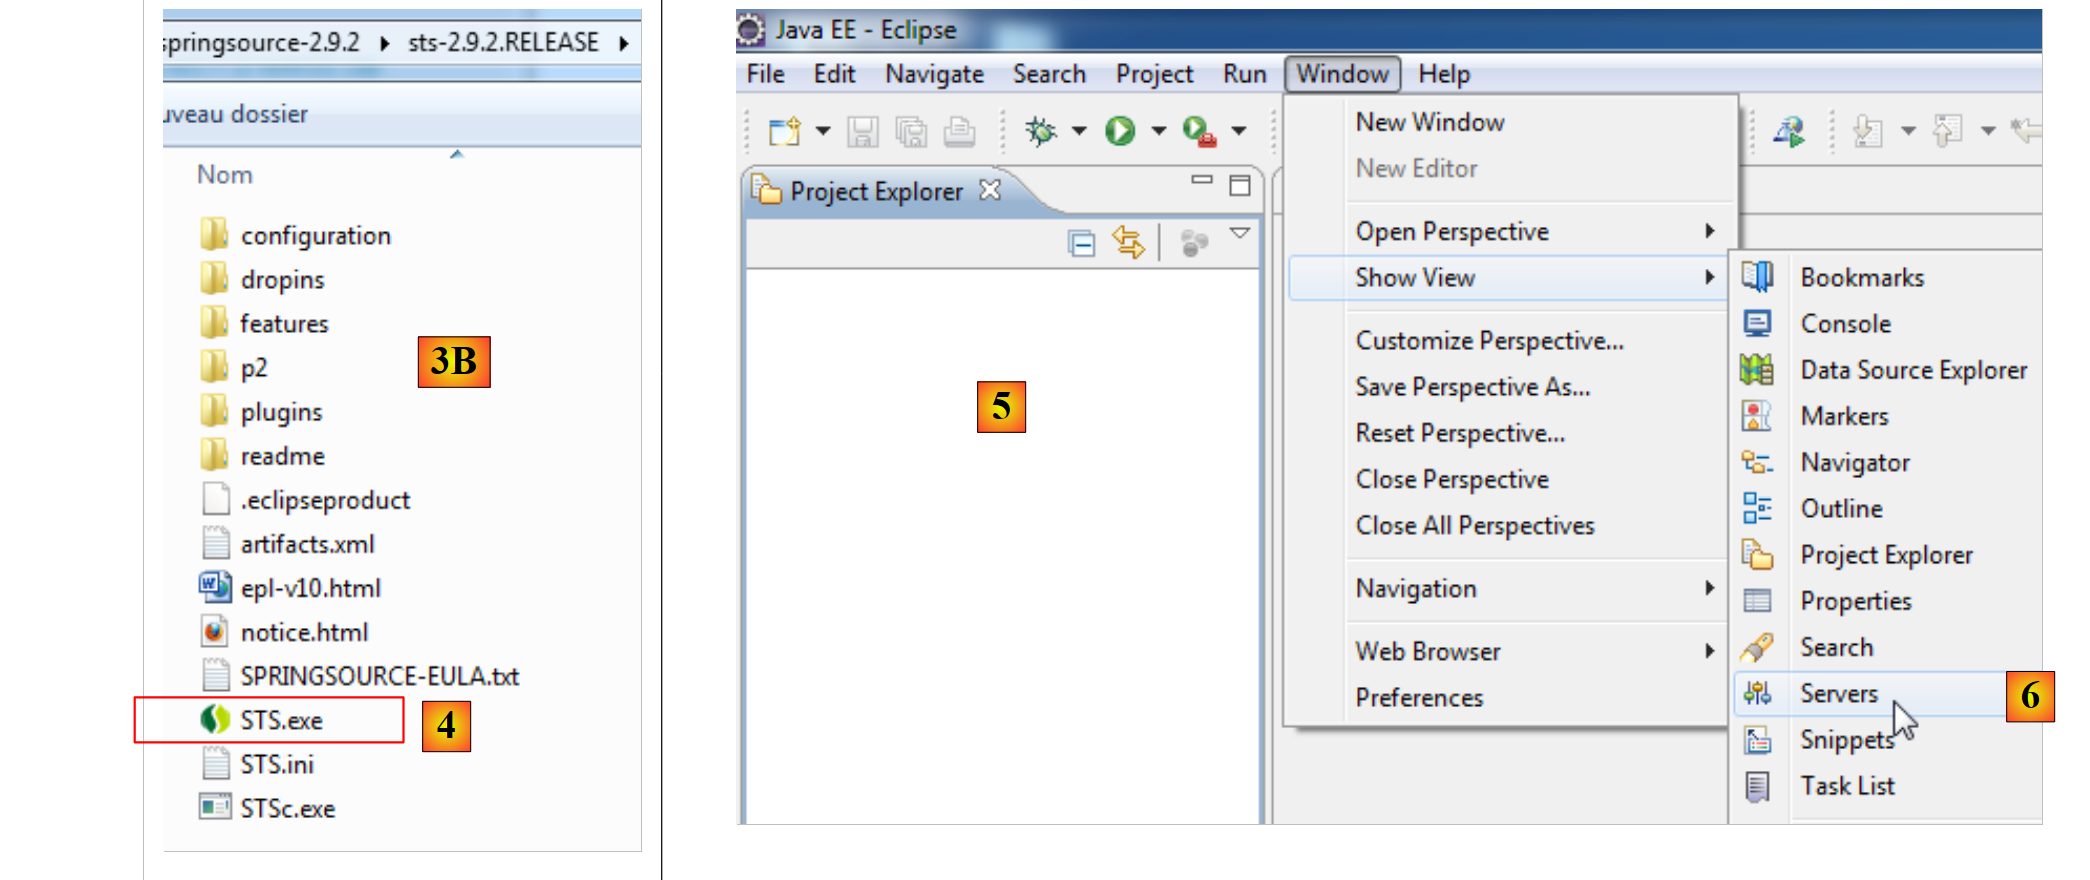 |
- the downloaded file is an installer that creates the [3A] [3B] file tree. In [4], launch the executable,
- in [5], the IDE work window appears after closing the welcome window. In [6], the application servers window is displayed,
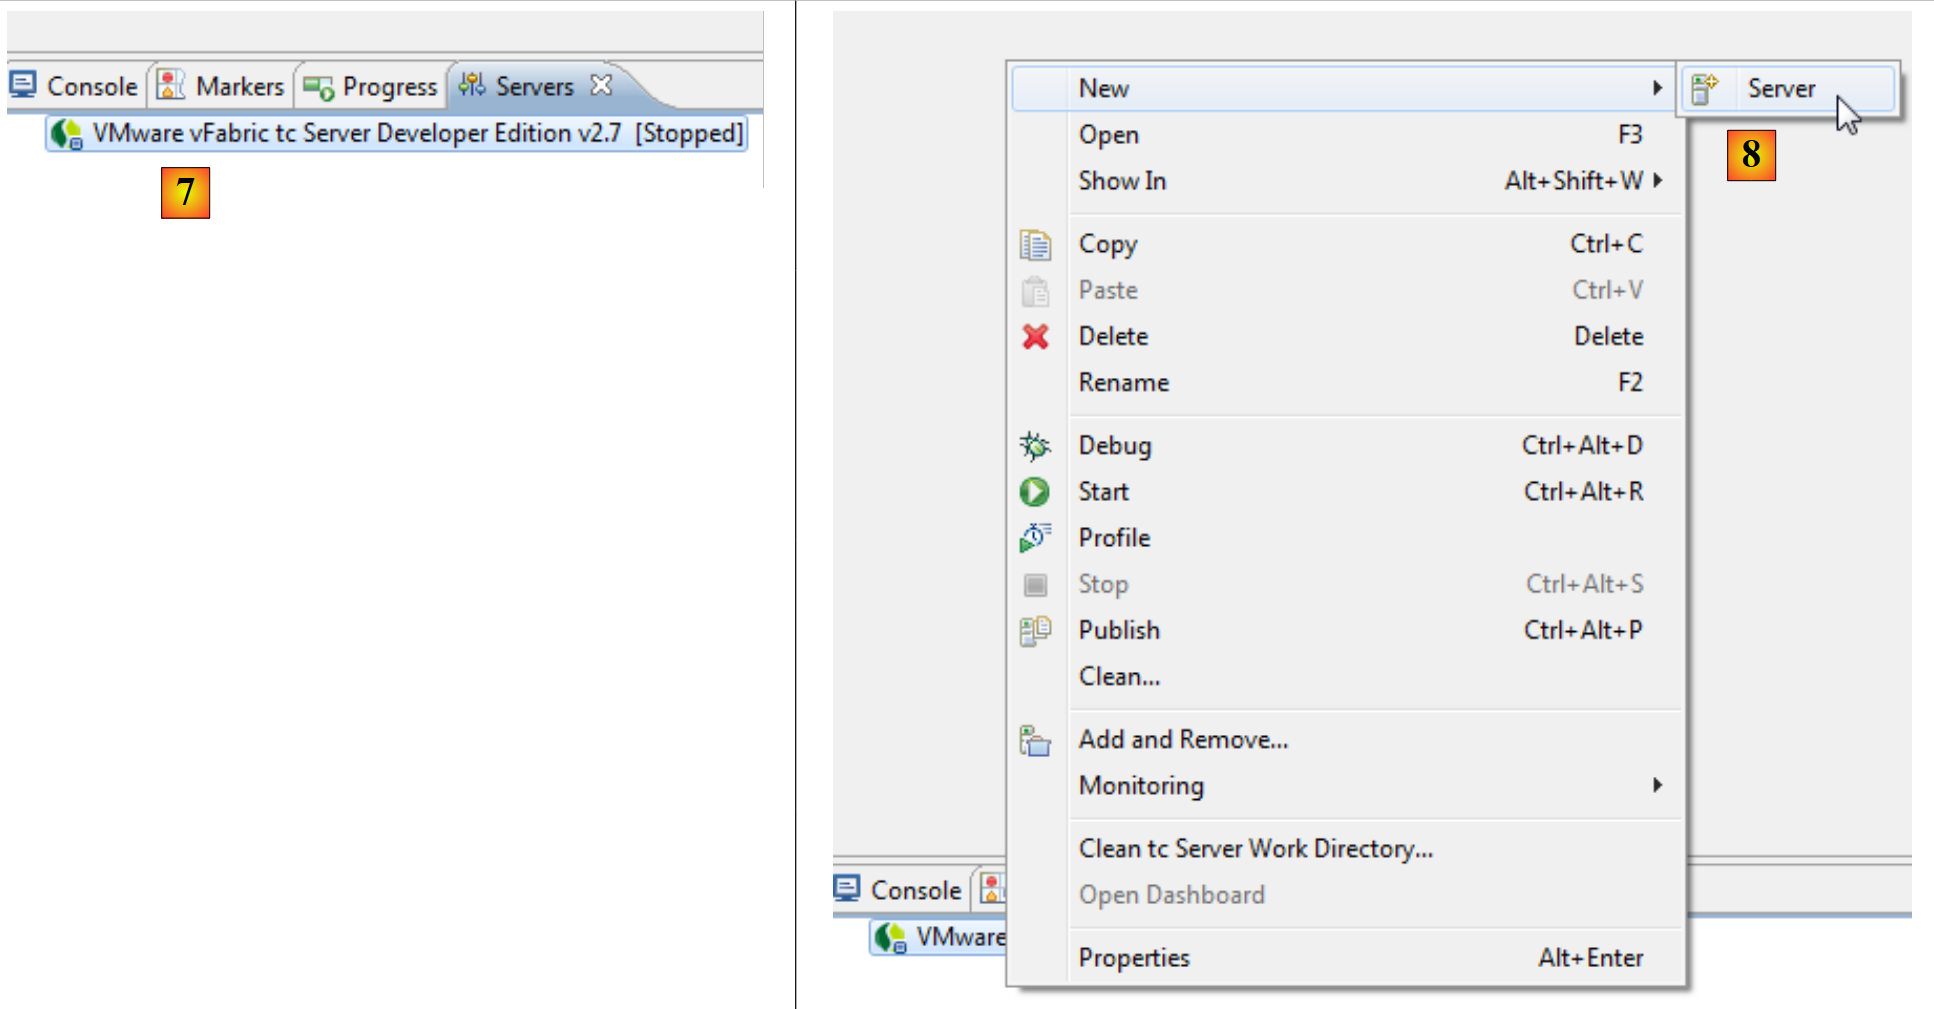 |
- in [7], the servers window. A server is registered. It is a VMware server that we will not use. In [8], we call up the wizard for adding a new server,
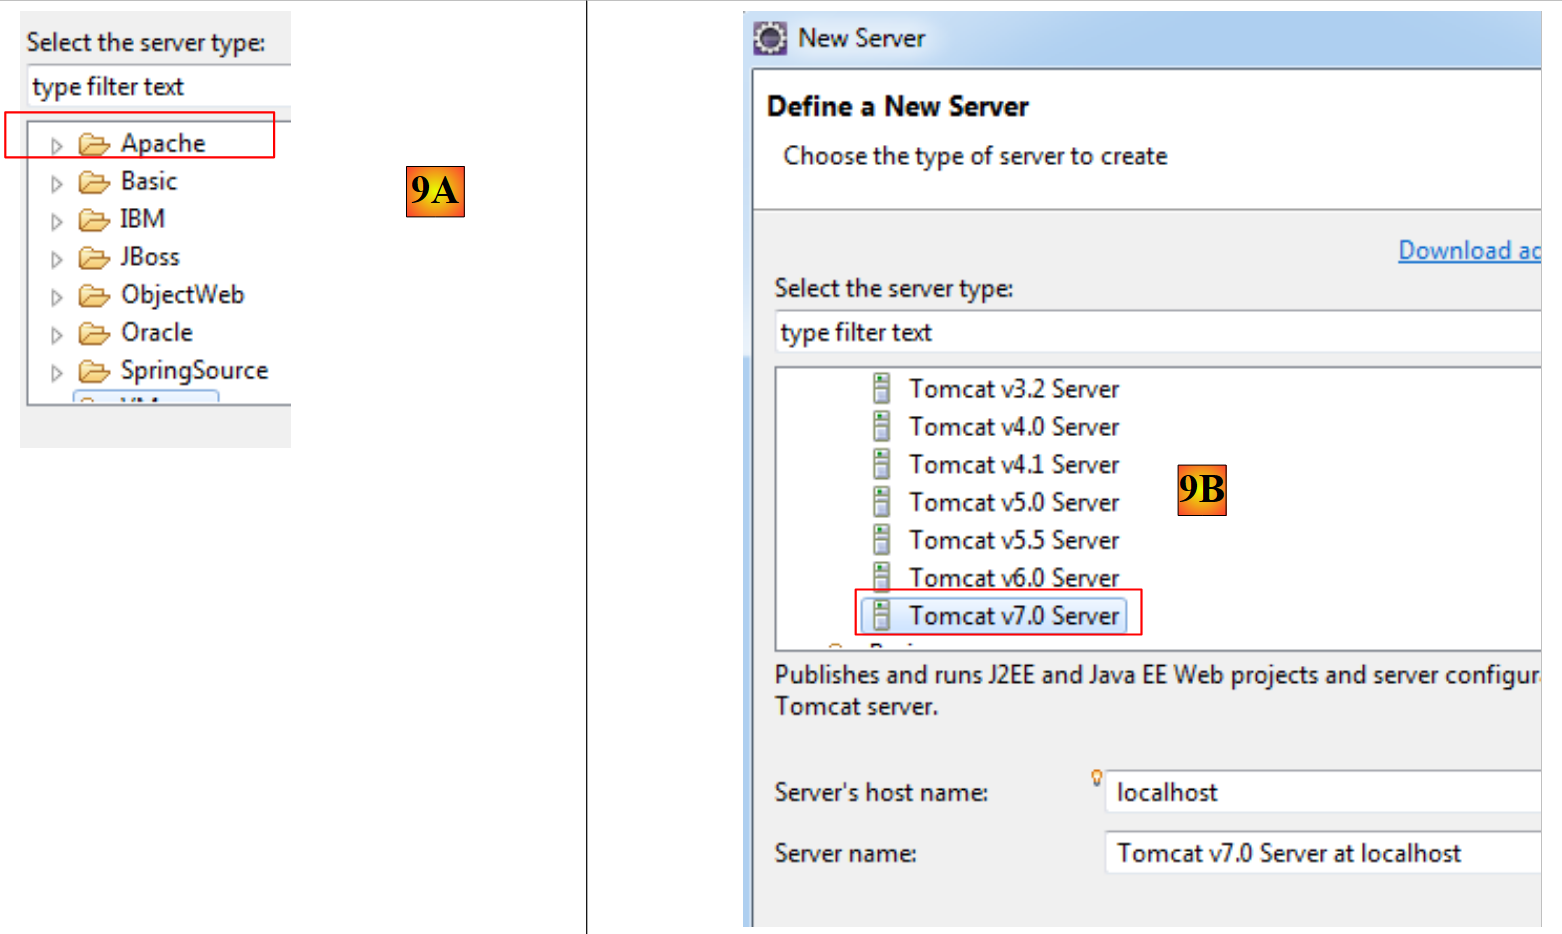 |
- in [9A], various servers are offered to us. We choose to install an Apache Tomcat 7 server [9B],
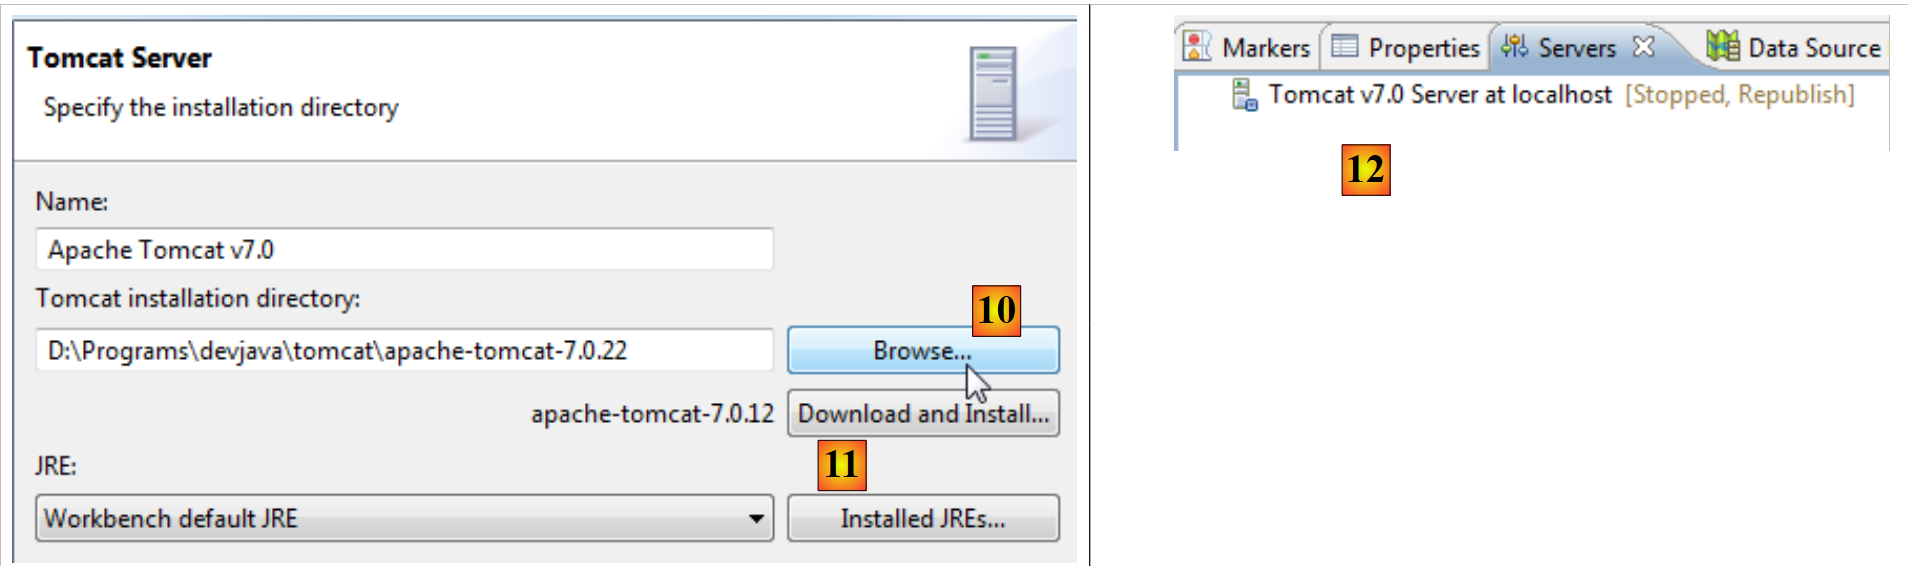 |
- in [10], we specify the installation folder for the Tomcat 7 server installed with Netbeans. If you do not have a Tomcat server, use the button [11],
- in [12], the Tomcat server appears in the [Servers] window,
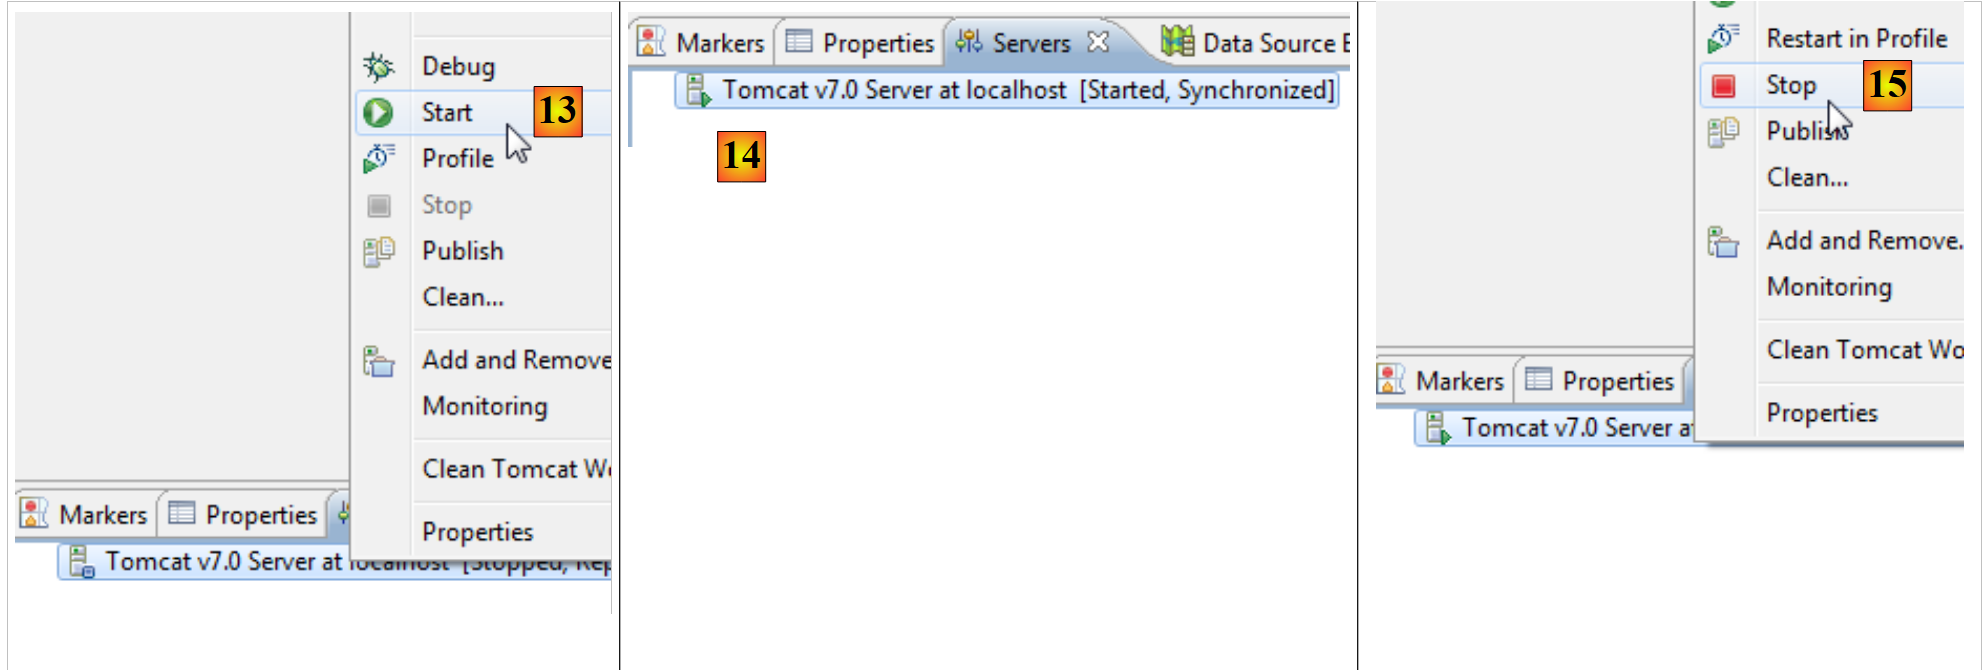 |
- in [13], we start the server,
- in [14], it is running,
- in [15], we stop it.
In the [Console] window, we get the following Tomcat logs if everything goes well:
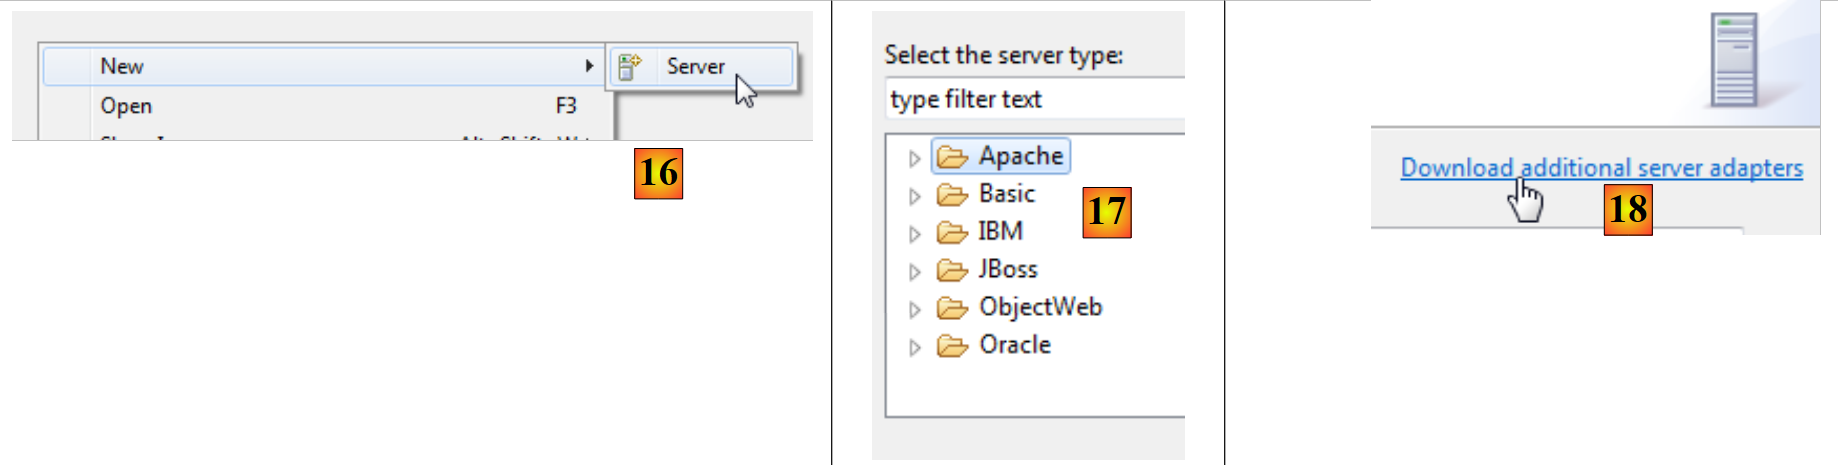 |
- Still in the [Servers] window, a new server [16] is added,
- in [17], the Glassfish server is not offered,
- in this case, use the link [18],
 |
- in [19], we choose to add an adapter for the server Glassfish,
- which is downloaded, and back in the [Servers] window, we add a new server,
- this time in [21], the Glassfish servers are suggested,
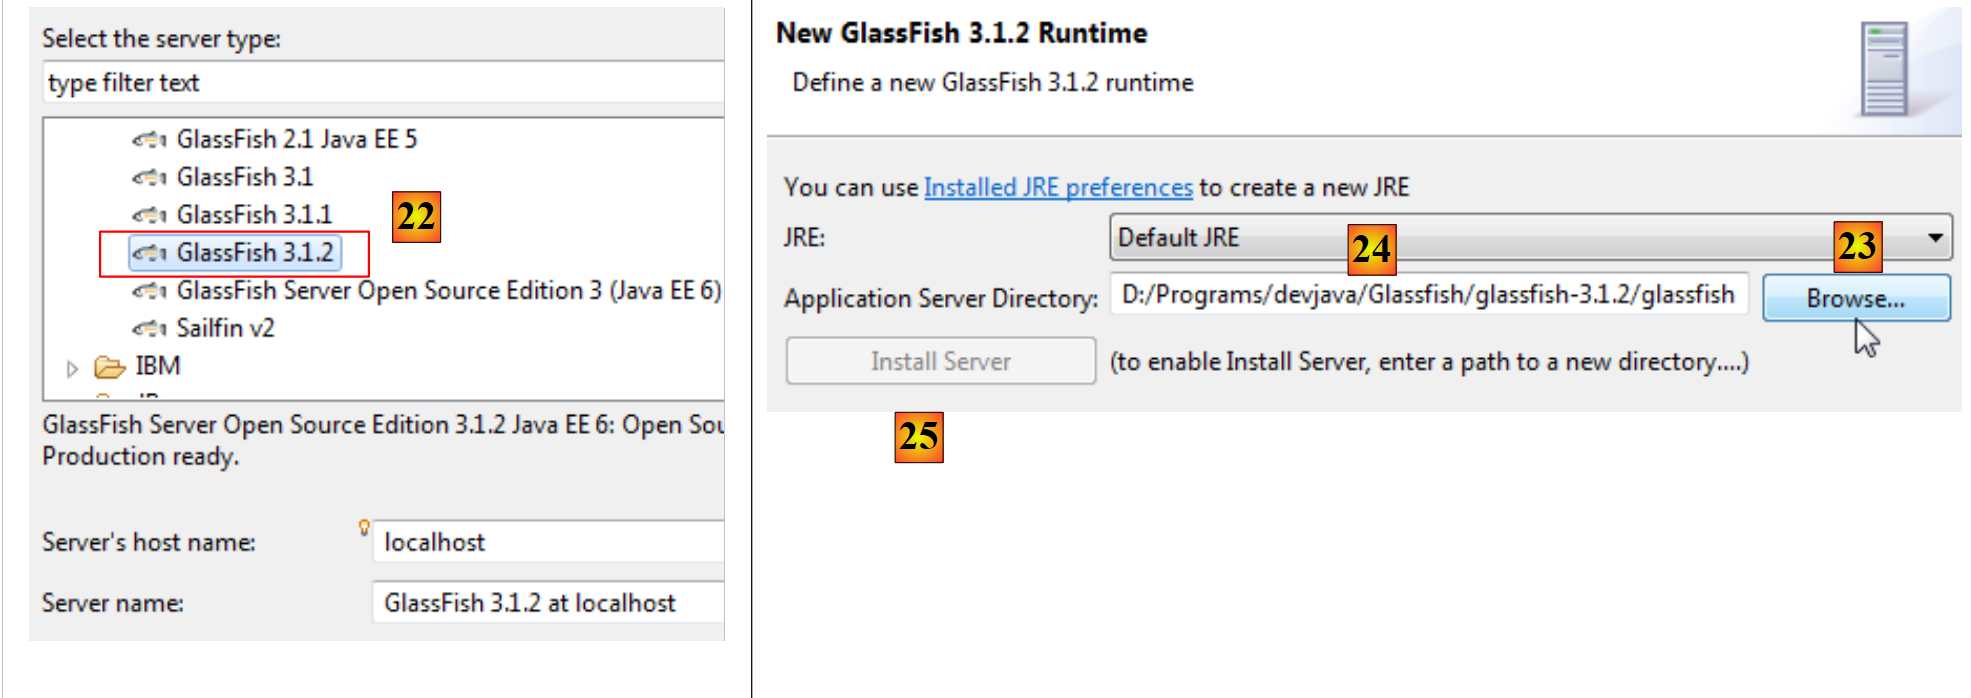 |
- in [22], select the Glassfish 3.1.2 server downloaded with Netbeans,
- in [23], specify the installation folder for Glassfish 3.1.2 (pay attention to the path indicated in [24]),
- if you do not have a Glassfish server, use the [25] button,
 |
- in [26], the wizard asks for the Glassfish server administrator password. For a first installation, this is normally adminadmin,
- when the wizard is finished, in the [Servers] window, the Glassfish server appears [27],
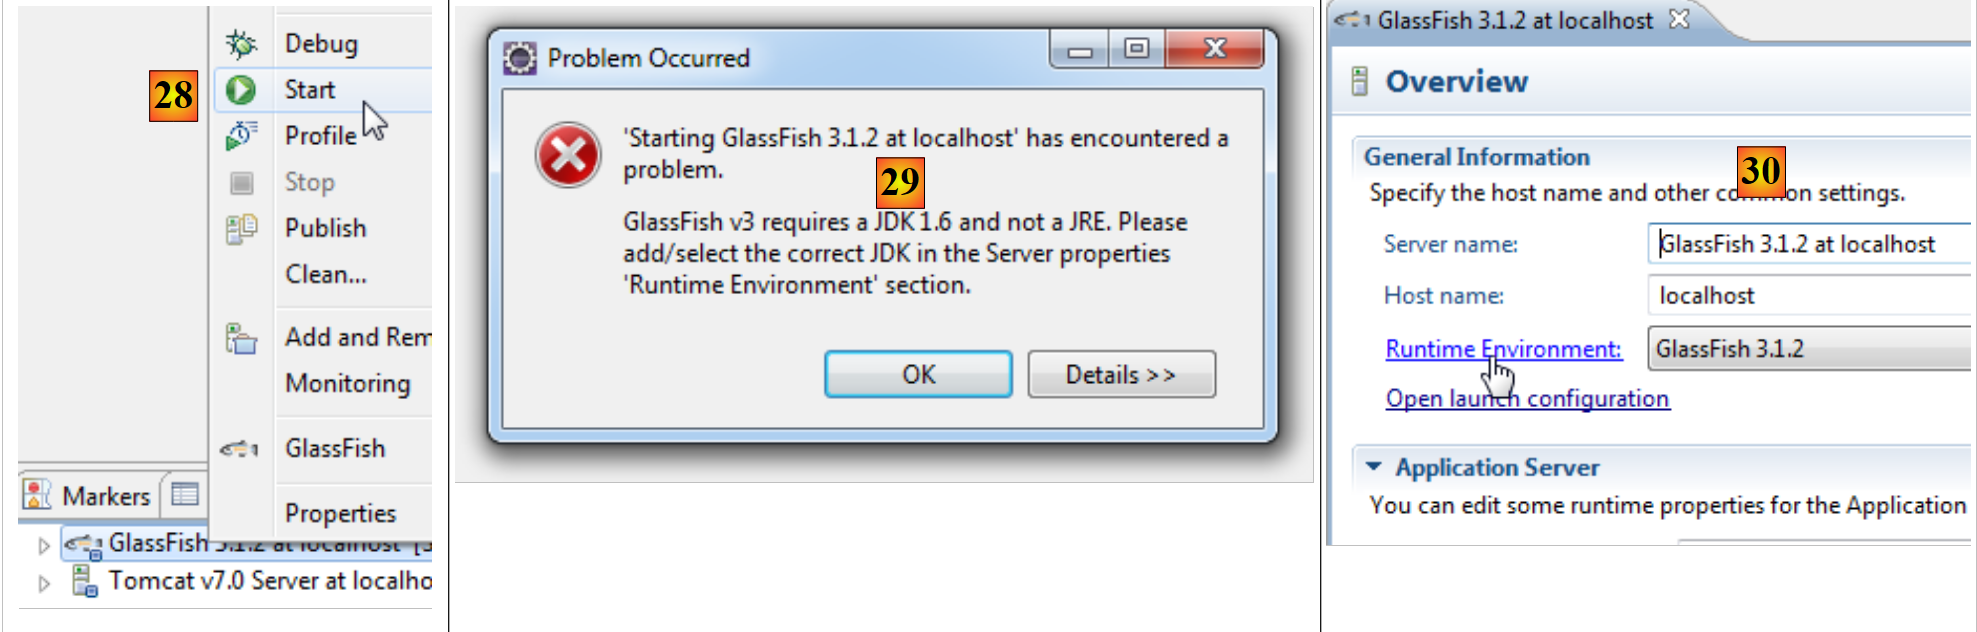 |
- in [28], we launch it,
- in [29], a problem may occur. This depends on the information provided during installation. Glassfish requires JDK (Java Development Kit) and not JRE (Java Runtime Environment),
- to access the properties of the Glassfish server, double-click on it in the [Servers] window,
- which opens the [20] window, where you follow the [Runtime Environment] link,
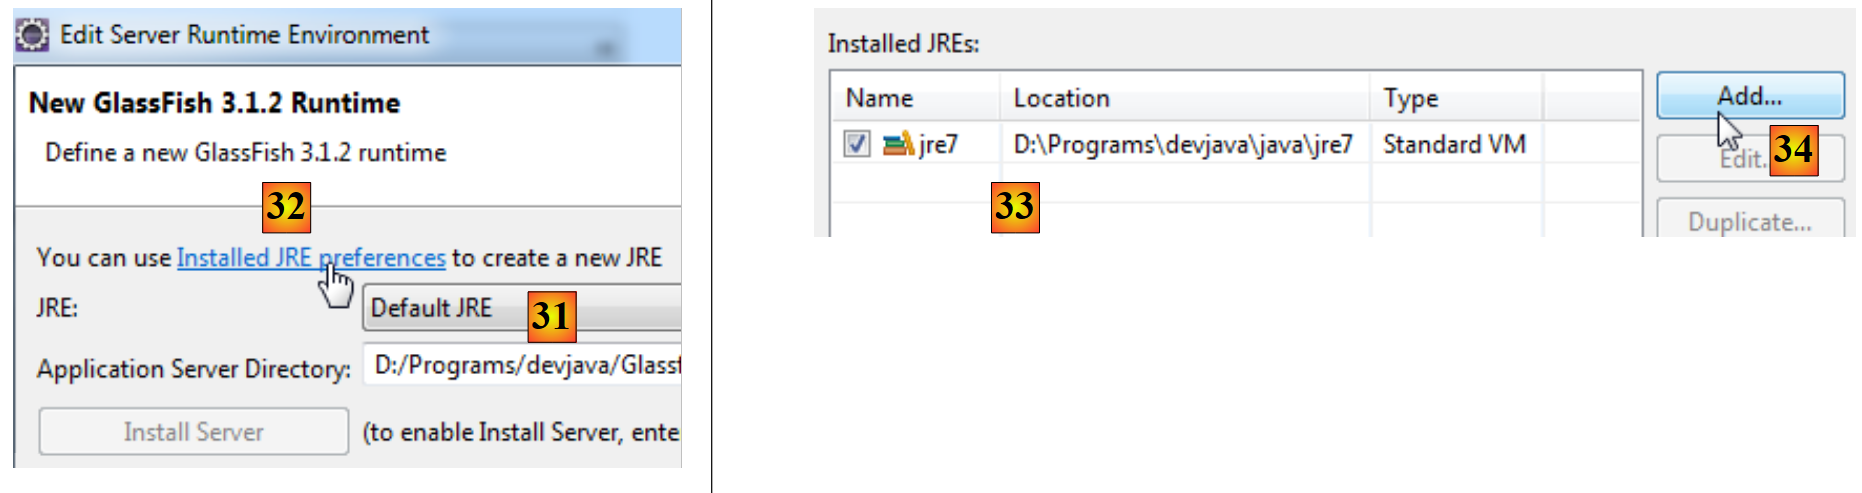 |
- in [31], replace the default JRE with a JDK. To do this, use the link [32],
- in [33], the JREs installed on the machine,
- in [34], we add another one,
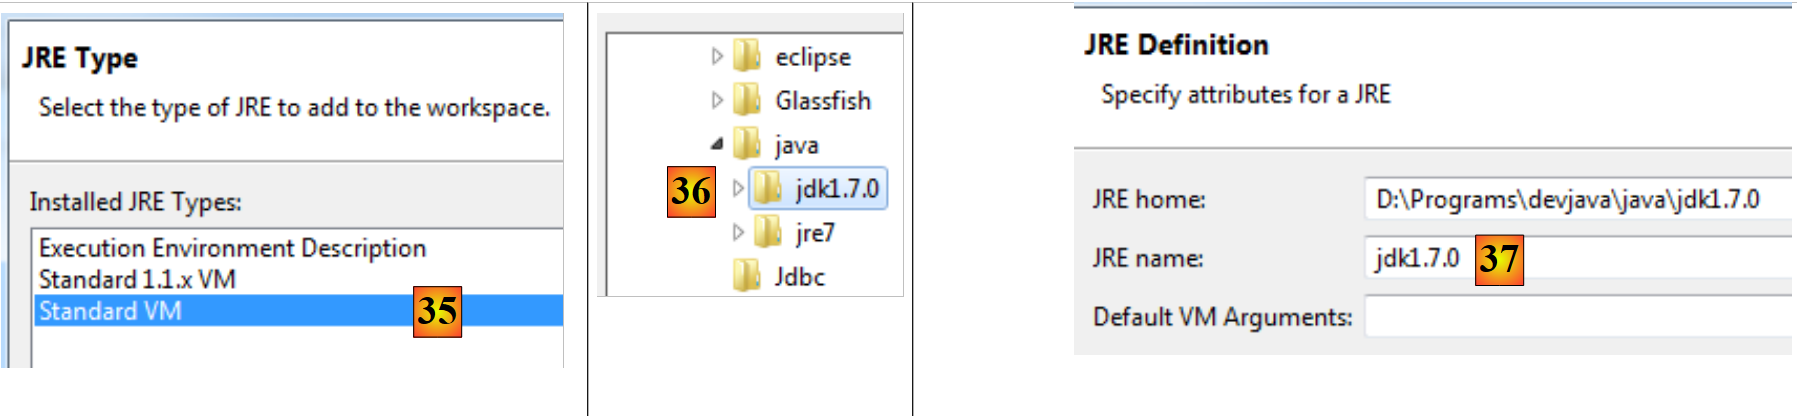 |
- in [35], select [Standard VM] (Virtual Machine),
- in [36], select a JDK (>=1.6),
- in [37], the name given to the new JRE,
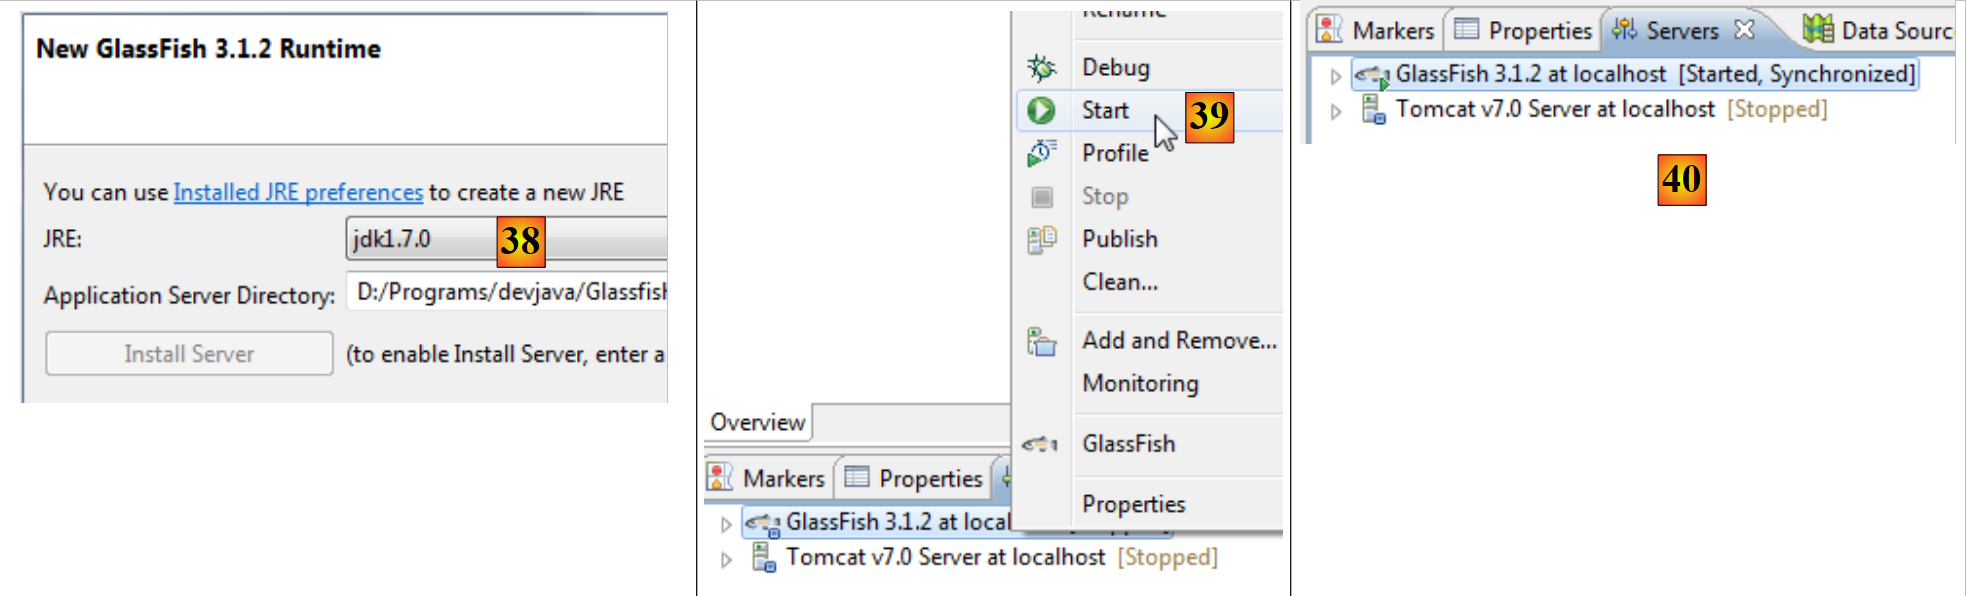 |
- After switching from JRE to Glassfish, we select the new JRE, which was previously designated as [38],
- once the configuration wizard is complete, we restart [Glassfish] [39],
- to [40], it is launched,
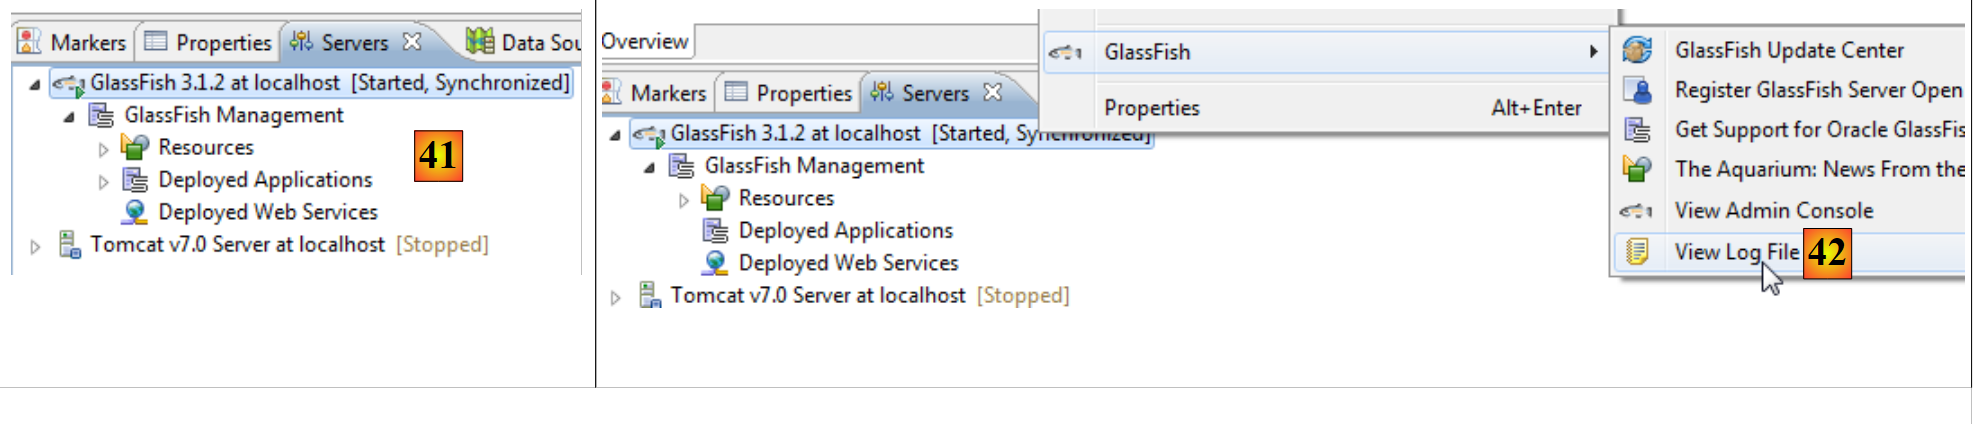 |
- in [41], the server directory structure,
- in [42], access the logs for Glassfish:
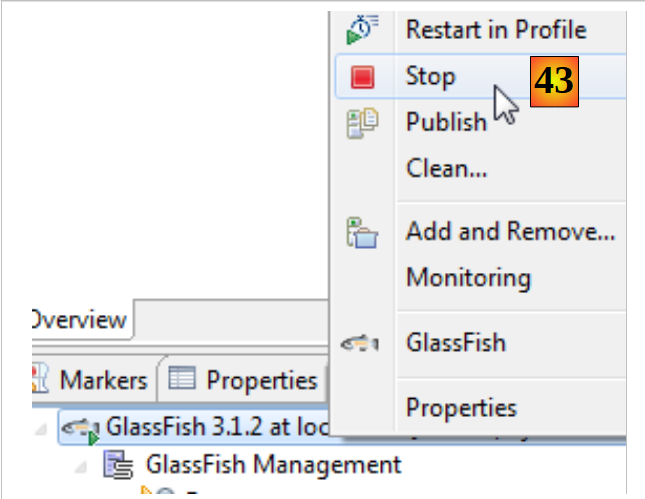 |
- In [43], we are stopping the Glassfish server.
1.3.3. Installation of [WampServer]
[WampServer] is a software package for developing on PHP / MySQL / Apache on a Windows machine. We will use it only for SGBD MySQL.
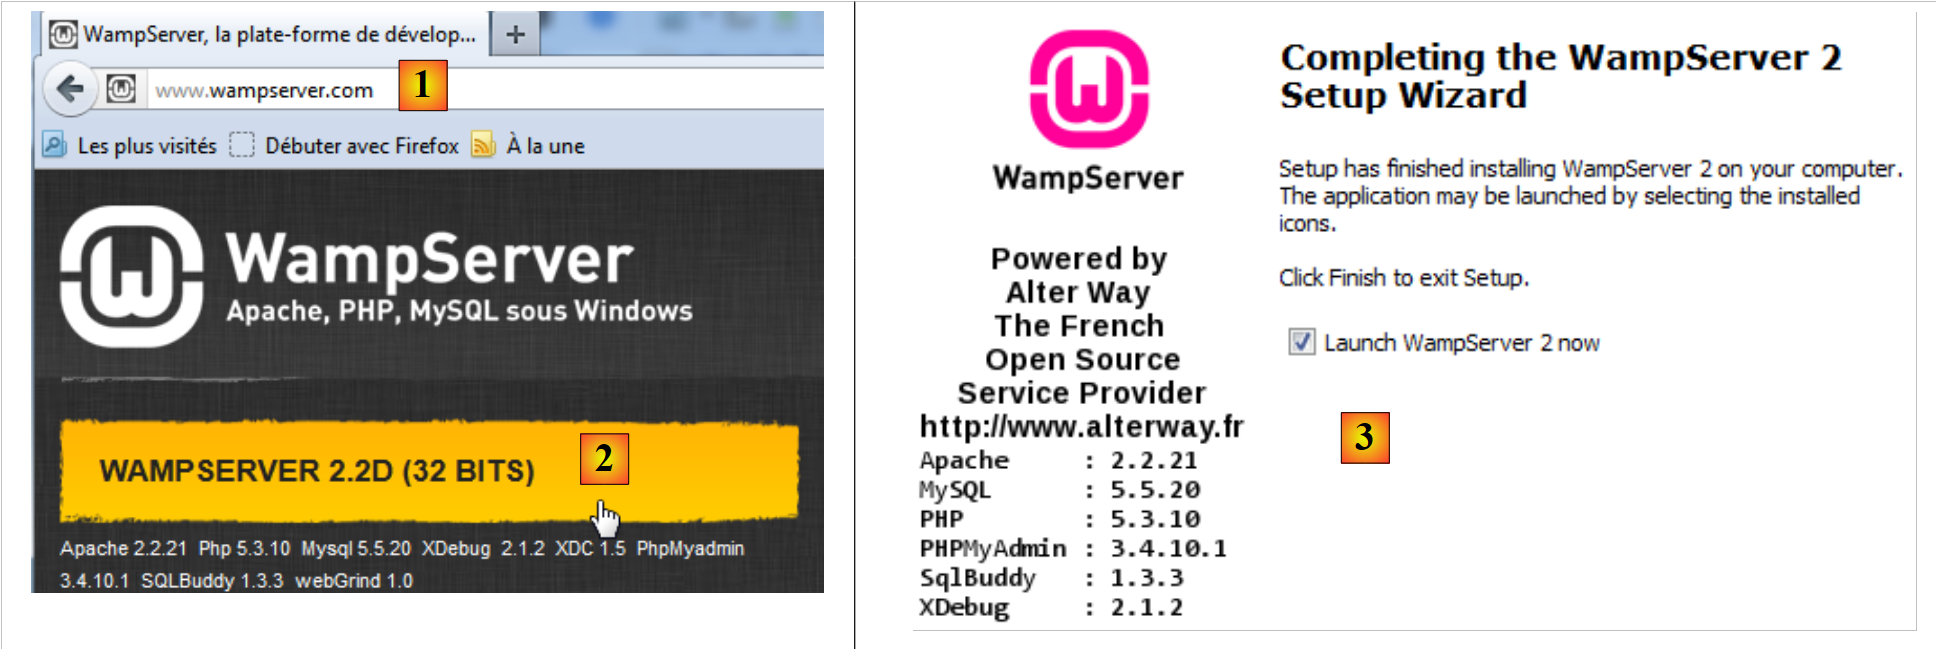 |
- On the [WampServer] [1] website, select the appropriate version [2],
- The downloaded executable is an installer. Various pieces of information are requested during installation. They do not concern MySQL. You can therefore ignore them. The [3] window appears at the end of the installation. Launch [WampServer],
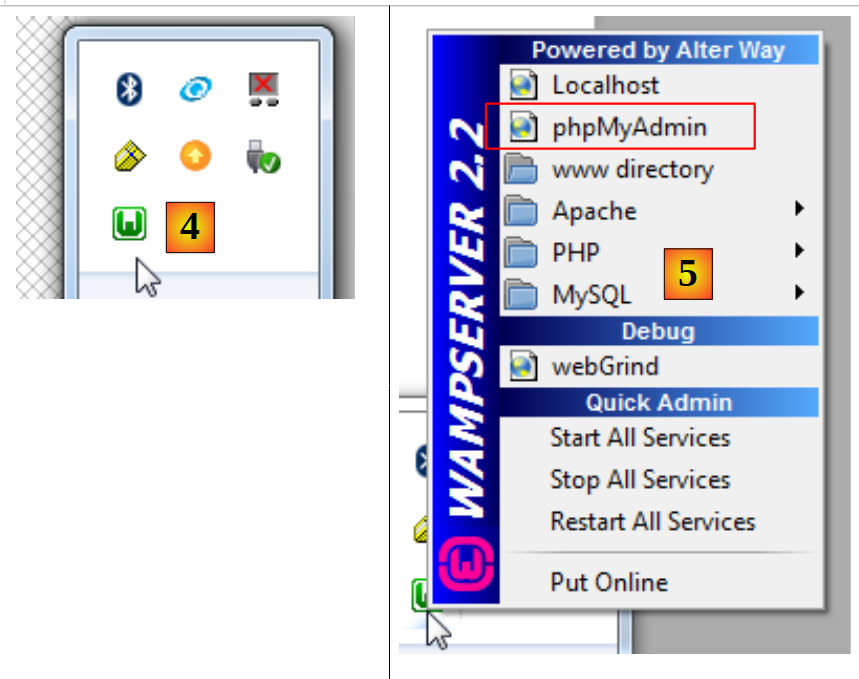 |
- in [4], the [WampServer] icon is installed in the taskbar at the bottom right of the screen [4],
- and when you click on it, the [5] menu appears. It allows you to manage the Apache server and the SGBD MySQL. To manage the server, use the option [PhpPmyAdmin],
- which brings up the window shown below.
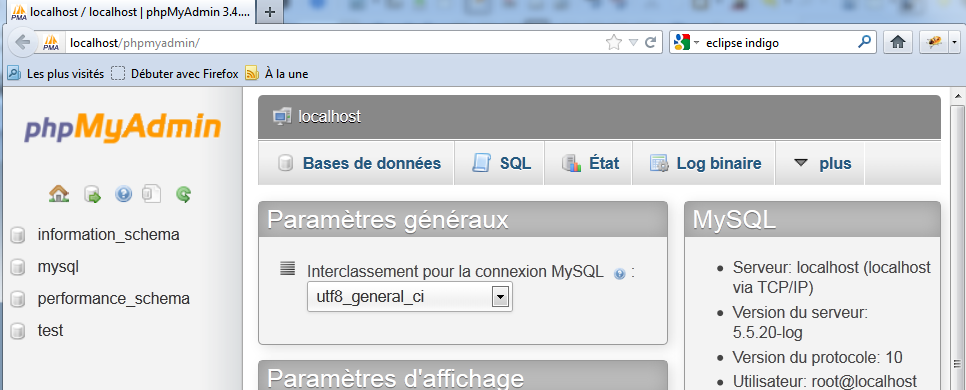
We will provide few details on using [PhpMyAdmin]. We will simply show how to use it to create the database for the example application in this tutorial.