5. TypeScript 的 HTTP 功能
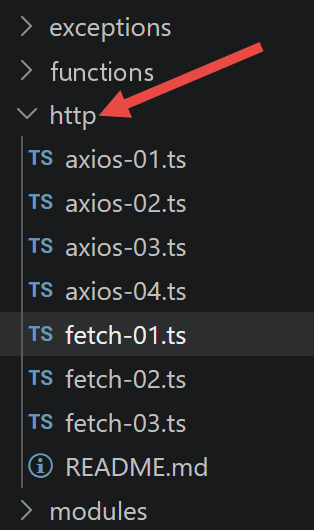
这里我们介绍在 TypeScript 中发起 HTTP 请求的两种方式:自 Node 18 起原生提供的 [fetch] 函数,以及第三方库 [axios]。本章的脚本位于项目的 [http] 文件夹中。
5.1. 选择 HTTP 工具
2019 年,fetch 尚未被 node.js 实现,原始文档推荐使用 node-fetch 包。自 Node 18(2022 年)起,[fetch] 已成为一个 原生全局函数,由 WHATWG Fetch 标准规范化——不再需要导入。
[axios] 仍然是一个有趣的库:它同时兼容 node.js 和浏览器,并提供稍微更丰富的 API(拦截器、自动 JSON 序列化、标准化的错误处理)。我们使用同一个示例来介绍两者,以表明编码方式是相似的。
5.2. 税款计算服务器
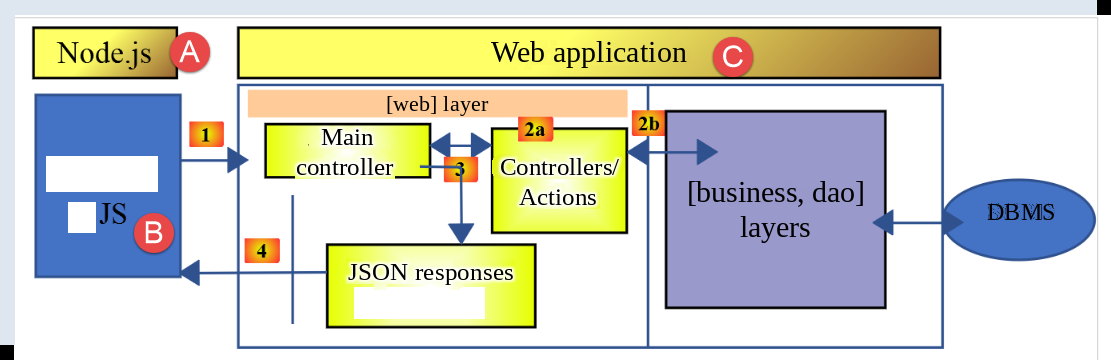
本章与后面的章节一样,都以前面安装的 NestJS 服务器为对象。测试架构如下:
在 [A-B] 中,由 [node.js] 执行的 JavaScript 代码将通过 [1] 向 Web 应用程序 [C] 发送请求。Web 应用程序将返回 jSON 响应(4)。客户端 JavaScript 代码可以组织成 [UI, business, dao] 层(UI:用户界面)。我们将在后面这样做。要运行以下脚本,您的 NestJS 服务器必须处于运行状态。
5.3. 脚本 [fetch-01]
该脚本使用 [fetch] 来与税款计算服务器初始化一个 JSON 会话:
| 'use strict';
// [2026 update] in 2019, you had to install the [node-fetch] package to have
// the [fetch] function on the node side. Since Node 18 (2022), [fetch] is a native global
// function, standardized by the "WHATWG Fetch standard": no need to import it anymore.
// imports
import qs from 'qs';
import { sprintf } from 'sprintf-js';
import moment from 'moment';
// base URL of the tax-calculation server
const baseUrl: string = 'http://localhost:3000/main.php?';
// init session
async function initSession(): Promise<any> {
// [2026 update] the native [fetch] does not know the [timeout] option.
// to limit the waiting time, we give it a [signal] produced by
// [AbortSignal.timeout(ms)] (available since Node 17.3): after this delay,
// the request is automatically cancelled and [fetch] throws an error.
const options: RequestInit = {
method: "GET",
signal: AbortSignal.timeout(2000)
};
// execution of the HTTP request [get /main.php?action=init-session&type=json]
let fetchStart: moment.Moment | undefined;
try {
// asynchronous request - [fetch] returns a promise
fetchStart = moment(Date.now());
const response = await fetch(baseUrl + qs.stringify({
action: 'init-session',
type: 'json'
}), options);
// [response] is the whole HTTP response of the server (HTTP headers + the response itself)
// we display this response to see its structure
console.log(sprintf("fetch response formatted as json,=%j, %s", response, time(fetchStart)));
console.log("fetch response in javascript=", response);
// we can access the HTTP headers
console.log("response headers=", response.headers);
// if the response is of type application / json, the server's json response is obtained with the asynchronous function [response.json()]
// in this case the calling code gets a [Promise] object
// [await] makes it possible to get the server's [json] response rather than its promise
const jsonStart = moment(Date.now());
const object = await response.json();
console.log(sprintf("json response=%j, type=%s, %s", object, typeof (object), time(jsonStart)));
return object;
// if the response is of type text / plain, the server's text response is obtained with [response.text()]
// in this case the calling code gets a [Promise] object
// [await] makes it possible to get the server's [text] response rather than its promise
// const text = await response.text();
// console.log("text response=", text);
// return text;
} catch (error: any) {
// we are here because the server sent an error code [404 Not Found, ...] with an empty body - we display the error to see its structure
// or because the [fetch] client threw an exception (network unreachable, ...)
// we display the structure of the error
console.log(sprintf("fetch error in json=%j, %s", error, time(fetchStart)));
console.log("fetch error in javascript=", typeof (error), error);
// we throw the error msg received
throw error.message;
}
}
// the main function executes the asynchronous function [initSession]
async function main(): Promise<void> {
try {
console.log("HTTP request to the server in progress ---------------------------------------------");
const response = await initSession();
console.log("success ---------------------------------------------");
console.log("response=", response, typeof (response))
} catch (error) {
console.log("error ---------------------------------------------");
console.log("error=", error, typeof (error));
}
}
// test
main();
// utility displaying time and duration
function time(start?: moment.Moment): string {
// time of the current moment
const now = moment(Date.now());
// time formatting
let result = "time=" + now.format("HH:mm:ss:SSS");
// should a duration be calculated?
if (start) {
const duration = now.valueOf() - start.valueOf();
const milliseconds = duration % 1000;
const seconds = Math.floor(duration / 1000);
// time + duration formatting
result = result + sprintf(", duration= %s second(s) and %s milliseconds", seconds, milliseconds);
}
// result
return result;
}
|
- 第 3–5 行:[2026 年更新] ——注释说明
fetch 现在是原生的,这与 2019 年不同;
- 第 13 行:这一行很重要。它指定了脚本将查询的 URL 的头部。它将由各种参数补充。这里,我们使用了在 “安装 NestJS 服务器”一节中定义的配置;
- 第 22 行:AbortSignal.timeout(2000) ——取代了 timeout 选项,该选项出现在 node-fetch 中(原生 fetch中不存在):如果请求耗时超过 2 秒,它会被自动取消;
- 第 29 行:fetch(URL, options) ——语法仍是标准 fetch 的语法:一个 URL,以及一个选项对象(方法、取消信号等);
- 第 30–31 行:发起一个 jSON 会话;
- 第 36 行:显示服务器的整个响应;
- 第 38 行:显示响应头;
- 第 43 行:await response.json() ——从响应中提取 JSON 主体;这本身是一个异步操作(响应 可能是仍在接收中的流);
- 第 52 行:
fetch 只有在 HTTP 请求失败时才会抛出异常 (网络不可达、超时等)。如果收到了响应,即使带有错误代码(400、500 等),fetch 也不会抛出异常:响应照常可用,见第 38 行。
执行结果:
| HTTP request to the server in progress ---------------------------------------------
fetch response formatted as json,={}, time=12:36:31:319, duration= 0 second(s) and 93 milliseconds
fetch response in javascript= Response {
status: 200,
statusText: 'OK',
headers: Headers {
date: 'Sun, 06 Sep 2026 10:36:31 GMT',
server: 'Apache/2.4.66 (Win64) OpenSSL/3.0.18 PHP/8.3.30',
'x-powered-by': 'PHP/8.3.30',
'cache-control': 'max-age=0, private, must-revalidate, no-cache, private',
'set-cookie': 'PHPSESSID=9u1rb9euj0m6f18efm7b5m952t; path=/',
'content-length': '84',
connection: 'close',
'content-type': 'application/json'
},
body: ReadableStream { locked: false, state: 'readable', supportsBYOB: true },
bodyUsed: false,
ok: true,
redirected: false,
type: 'basic',
url: 'http://localhost/main.php?action=init-session&type=json'
}
response headers= Headers {
date: 'Sun, 06 Sep 2026 10:36:31 GMT',
server: 'Apache/2.4.66 (Win64) OpenSSL/3.0.18 PHP/8.3.30',
'x-powered-by': 'PHP/8.3.30',
'cache-control': 'max-age=0, private, must-revalidate, no-cache, private',
'set-cookie': 'PHPSESSID=9u1rb9euj0m6f18efm7b5m952t; path=/',
'content-length': '84',
connection: 'close',
'content-type': 'application/json'
}
json response={"action":"init-session","status":700,"response":"session started with type [json]"}, type=object, time=12:36:31:323, duration= 0 second(s) and 2 milliseconds
success ---------------------------------------------
response= {
action: 'init-session',
status: 700,
response: 'session started with type [json]'
} object
|
- 第 3–22 行:服务器的整个响应;
- 第 4 行: 200 状态码表示服务器能够处理所请求的 URL。这一点显示在第 21 行。我们已经用 Postman 客户端使用过这个 URL;
- 第 23–32 行:响应头。它们提供了关于随后响应的信息。例如,在第 29 行,服务器表明该响应长 84 个字符;
- 第 28 行:服务器发送了一个会话 Cookie。这使客户端可以在服务器上保有一块称为 会话的内存空间。它由 Web 服务器管理。在收到这个会话 Cookie 之后——它实际上就是客户端在服务器端的标识符——客户端必须在每次新请求中把它发回。请注意这个会话 Cookie 的格式。我们稍后会在一个 TypeScript 客户端中检索它。
- 第 33 行:服务器的 jSON 响应;
5.4. 脚本 [fetch-02]
该脚本重用了 fetch-01 ,同时去掉了日常使用中不必要的所有演示细节:
| 'use strict';
// [2026 年更新] [fetch] 现在是 node 的原生全局函数
// (自 Node 18 起):不再需要像 2019 年那样导入 [node-fetch] 包。
// 导入
import qs from 'qs';
// 税额计算服务器的基础 URL
const baseUrl: string = 'http://localhost:3000/main.php?';
// 初始化会话
async function initSession(): Promise<any> {
// HTTP 请求 [get /main.php?action=init-session&type=json] 的选项
// [AbortSignal.timeout(ms)] 取代了原生 fetch 上并不存在的 [timeout] 选项
const options: RequestInit = {
method: "GET",
signal: AbortSignal.timeout(2000)
};
// 执行 HTTP 请求 [get /main.php?action=init-session&type=json]
const response = await fetch(baseUrl + qs.stringify({
action: 'init-session',
type: 'json'
}), options);
// 以 jSON 格式收到的结果
return await response.json();
}
// main 函数执行异步函数 [initSession]
async function main(): Promise<void> {
try {
console.log("HTTP request to the server in progress ---------------------------------------------");
const response = await initSession();
console.log("success ---------------------------------------------");
console.log("response=", response)
} catch (error: any) {
console.log("error ---------------------------------------------");
console.log("error=", error.message);
}
}
// 测试
main();
|
执行结果:
| HTTP request to the server in progress ---------------------------------------------
success ---------------------------------------------
response= {
action: 'init-session',
status: 700,
response: 'session started with type [json]'
}
|
5.5. 脚本 [axios-01]
同样的示例,使用 [axios]:
| 'use strict';
import axios, { AxiosInstance, AxiosRequestConfig } from 'axios';
// axios 默认配置
axios.defaults.timeout = 2000;
axios.defaults.baseURL = 'http://localhost:3000/';
// 初始化会话
async function initSession(axios: AxiosInstance): Promise<any> {
// HTTP 请求 [get /main.php?action=init-session&type=json] 的选项
const options: AxiosRequestConfig = {
// [TypeScript 更新] 就类型而言,axios.request() 只接受一个
// 配置参数:因此 URL 必须放在 [options.url] 中,
// 而不是作为 request() 单独的第 1 个参数
url: 'main.php',
method: "GET",
// URL 参数
params: {
action: 'init-session',
type: 'x'
}
};
// 执行 HTTP 请求 [get /main.php?action=init-session&type=json]
try {
// 异步请求
const response = await axios.request(options);
// response 是服务器的完整 HTTP 响应(HTTP 头 + 响应本身)
// 我们显示这个响应以查看其结构
// console.log("axios response=", response);
// 服务器的响应在 [response.data] 中
return response.data;
} catch (error: any) {
// 我们来到这里,是因为服务器发送了一个错误码 [404 Not Found、500 Internal Server Error 等]
// [error] 参数是一个异常实例——它可以有多种形式
// 我们显示它以查看其结构
// console.log("axios error=", typeof (error), error);
if (error.response) {
// 服务器在 HTTP 状态中报告了错误,但它同时也发送了一个响应
// 该响应位于 [error.response.data] 中
// 我们知道服务器发送的 jSON 响应具有 {action, status, response} 结构
// 并且在出错的情况下,错误消息位于 [response] 中
return error.response.data;
} else {
// 我们抛出该错误
throw error;
}
}
}
// main 函数执行异步函数 [initSession]
async function main(): Promise<void> {
try {
console.log("HTTP request to the server in progress ---------------------------------------------");
const response = await initSession(axios);
console.log("success ---------------------------------------------");
console.log("response=", response, typeof (response))
} catch (error: any) {
console.log("error ---------------------------------------------");
console.log("error=", error.message);
}
}
// 测试
main();
|
- URL 查询由第 6、15、19 和 20 行的信息构建而成;
- 第 26 行:axios.request(options) ——与
fetch 不同,URL 和选项被归并到单个配置对象中(第 11 行);
- 第 37 行:error.response ——如果服务器作出了响应(即使带有错误代码),Axios 会把这个响应放在 error.response中,可以在
catch 块 中访问它——与 fetch 不同,只要状态码不是成功(2xx),Axios 就总会抛出异常;
- 第 31 行:成功的响应位于 response.data 中——axios 会自动提取 JSON;无需像 await response.json() 在 fetch 中那样另行调用。
执行结果:
| HTTP request to the server in progress ---------------------------------------------
success ---------------------------------------------
response= {
action: 'init-session',
status: 700,
response: 'session started with type [json]'
} object
|
5.6. 脚本 [axios-03] —— 身份验证
该脚本链接了两个请求:init-session,然后是 authenticate-user ,使用 **[POST],请求体由 **[qs] 库编码:
| 'use strict';
import axios, { AxiosInstance, AxiosRequestConfig } from 'axios';
import qs from 'qs'
// axios 配置
axios.defaults.timeout = 2000;
axios.defaults.baseURL = 'http://localhost:3000/';
// 初始化会话
async function initSession(axios: AxiosInstance): Promise<any> {
// HTTP 请求 [get /main.php?action=init-session&type=json] 的选项
const options: AxiosRequestConfig = {
// [TypeScript 更新] URL 包含在 [options.url] 中(带类型的 axios.request() 只接受一个参数)
url: 'main.php',
method: "GET",
// URL 参数
params: {
action: 'init-session',
type: 'json'
}
};
try {
// 执行 HTTP 请求 [get /main.php?action=init-session&type=json]
const response = await axios.request(options);
// 服务器的响应在 [response.data] 中
return response.data;
} catch (error: any) {
// 服务器响应
if (error.response) {
// jSON 响应位于 [error.response.data] 中
return error.response.data;
} else {
// 我们重新抛出该错误
throw error;
}
}
}
async function authenticateUser(axios: AxiosInstance, user: string, password: string): Promise<any> {
// HTTP 请求 [post /main.php?action=authenticate-user] 的选项
const options: AxiosRequestConfig = {
// [TypeScript 更新] URL 包含在 [options.url] 中
url: 'main.php',
method: "POST",
headers: {
'Content-type': 'application/x-www-form-urlencoded',
},
// POST 请求体
data: qs.stringify({
user: user,
password: password
}),
// URL 参数
params: {
action: 'authenticate-user'
}
};
try {
// 执行 HTTP 请求 [post /main.php?action=authenticate-user]
const response = await axios.request(options);
// 服务器的响应在 [response.data] 中
return response.data;
} catch (error: any) {
// 服务器响应
if (error.response) {
// jSON 响应位于 [error.response.data] 中
return error.response.data;
} else {
// 我们重新抛出该错误
throw error;
}
}
}
// main 函数逐个执行这些异步函数
async function main(): Promise<void> {
try {
// init-session
console.log("init-session action in progress ---------------------------------------------");
const response1 = await initSession(axios);
console.log("success ---------------------------------------------");
console.log("response=", response1);
// authenticate-user
console.log("authenticate-user action in progress ---------------------------------------------");
const response2 = await authenticateUser(axios, 'admin', 'admin');
console.log("success ---------------------------------------------");
console.log("response=", response2)
} catch (error) {
console.log("error ---------------------------------------------");
console.log("error=", error);
}
}
// 测试
main();
|
- 第 42–53 行:POST 请求发送其参数(user, password),编码为 application/x-www-form-urlencoded,通过 qs.stringify(...) 放入 options.data;
- 第 55–57 行:该 URL([post /main.php?action=authenticate-user])也带有一个参数;
- 两个函数在 依次
main 中(一个接一个地被 await )执行(第 81、86 行):只有第一个成功了,第二个才有意义,因为它依赖于 init-session 设置的会话 Cookie。
执行结果:
| init-session action in progress ---------------------------------------------
success ---------------------------------------------
response= {
action: 'init-session',
status: 700,
response: 'session started with type [json]'
}
authenticate-user action in progress ---------------------------------------------
success ---------------------------------------------
response= {
action: 'authenticate-user',
status: 103,
response: [ 'no session in progress. Start with action [init-session]' ]
}
|
- 第 10–14 行:操作 [authenticate-user] 失败了。原因如下:
- 操作 [init-session] 没有把会话 Cookie 发送给服务器。这是客户端在服务器端的标识符。由于它没有发送这个标识符,服务器并不认识该客户端。服务器在其响应中附带了一个会话 Cookie。这是在告诉客户端:“这是你今后请求所用的标识符”;
- 但操作 [authenticate-user] 同样没有把会话 Cookie 发送给服务器。这是因为 [init-session] 没有花时间把它存起来。因此服务器不认识该客户端,也不知道它之前发起过 jSON 会话,并把这一点告知了客户端;
解决这个问题的办法是管理服务器发送的会话 Cookie:
- 向服务器发出的第一个请求必须存储服务器发送的会话 Cookie;
- 后续请求必须检索这个会话 Cookie,并将其发送给服务器以进行身份验证;
5.7. 脚本 [axios-04] —— 会话 Cookie 管理
代码与之前相同,但增加了一个函数 [getRemoteData] 来管理会话 Cookie:
| 'use strict';
import axios, { AxiosInstance, AxiosRequestConfig, AxiosResponse } from 'axios';
import qs from 'qs'
// axios configuration
axios.defaults.timeout = 2000;
axios.defaults.baseURL = 'http://localhost:3000/';
// session cookie
const sessionCookieName: string = "connect.sid";
let sessionCookie: string = '';
// init session
async function initSession(axios: AxiosInstance): Promise<any> {
// options of the HHTP request [get /main.php?action=init-session&type=json]
const options: AxiosRequestConfig = {
// [TypeScript update] URL included in [options.url]
url: 'main.php',
method: "GET",
// URL parameters
params: {
action: 'init-session',
type: 'json'
}
};
// execution of the HTTP request
return await getRemoteData(axios, options);
}
async function authenticateUser(axios: AxiosInstance, user: string, password: string): Promise<any> {
// options of the HHTP request [post /main.php?action=authenticate-user]
const options: AxiosRequestConfig = {
// [TypeScript update] URL included in [options.url]
url: 'main.php',
method: "POST",
headers: {
'Content-type': 'application/x-www-form-urlencoded',
},
// POST body
data: qs.stringify({
user: user,
password: password
}),
// URL parameters
params: {
action: 'authenticate-user'
}
};
// execution of the HTTP request
return await getRemoteData(axios, options);
}
async function getRemoteData(axios: AxiosInstance, options: AxiosRequestConfig): Promise<any> {
// for the session cookie
if (!options.headers) {
options.headers = {} as any;
}
(options.headers as any).Cookie = sessionCookie;
// execution of the HTTP request
let response: AxiosResponse;
try {
// asynchronous request
response = await axios.request(options);
} catch (error: any) {
// the [error] parameter is an exception instance - it can take various forms
if (error.response) {
// the server's response is in [error.response]
response = error.response;
} else {
// we rethrow the error
throw error;
}
}
// response is the whole HTTP response of the server (HTTP headers + the response itself)
// we retrieve the session cookie if it exists
const setCookie = response.headers['set-cookie'];
if (setCookie) {
// setCookie is an array
// we look for the session cookie in this array
let found = false;
let i = 0;
while (!found && i < setCookie.length) {
// we look for the session cookie
const results = RegExp('^(' + sessionCookieName + '.+?);').exec(setCookie[i]);
if (results) {
// we store the session cookie
// eslint-disable-next-line require-atomic-updates
sessionCookie = results[1];
// found it
found = true;
} else {
// next element
i++;
}
}
}
// the server's response is in [response.data]
return response.data;
}
// the main function executes the asynchronous functions one by one
async function main(): Promise<void> {
try {
// init-session
console.log("init-session action in progress ----------------");
const response1 = await initSession(axios);
console.log("success --------------------------");
console.log("response=", response1);
// authenticate-user
console.log("authenticate-user action in progress ---------");
const response2 = await authenticateUser(axios, 'admin', 'admin');
console.log("success -------------------");
console.log("response=", response2)
} catch (error: any) {
console.log("error ------------------");
console.log("error=", error.message);
}
}
// test
main();
|
该脚本将 initSession 和 authenticateUser 围绕一个公共函数 [getRemoteData] 进行了重构,该函数显式处理会话 Cookie(这里是 connect.sid,见第 10 行)——这至关重要,因为服务器将身份验证和模拟与 HTTP 会话关联起来:
- 第 10 行:要查找的会话 Cookie 的名称。它取决于所使用的 Web 服务器。本课程使用的 NestJS 服务器使用名为 [connect.sid] 的会话 Cookie;
- 第 53 行:[getRemoteData] 函数负责发送请求并接收服务器的响应,同时还负责管理会话 Cookie。它接受两个参数:
- [AxiosInstance] 对象,负责处理 HTTP Axios 请求的通用机制。该对象及其他对象通过第 2 行的导入获得;
- [AxiosRequestConfig] 对象,用于定义某个具体请求的选项;
- 第 54–58 行:[options.headers] 设置将发送给服务器的 HTTP 请求的请求头。如果存在会话 Cookie,就必须把它放入该请求头中,第 58 行完成的正是这项工作。第一个请求完成后,[getRemoteData] 会把该 Cookie 存入第 11 行定义的全局变量。在第一个请求期间,该变量的值是一个空字符串;对于后续请求,它就是服务器在响应第一个请求时发送的会话 Cookie 字符串。
- 第 63 行:执行 HTTP 请求;
- 第 76 行:检查响应头中是否有“set-cookie”行。只有当客户端之前的请求头中没有包含“Cookie”行时,才会出现这一行。当服务器收到客户端发来的、包含“Cookie”行的 HTTP 请求时,就不会再发送会话 Cookie,因为它知道客户端已经拥有该 Cookie。客户端需要在每个新请求中重新发送它,这正是第 58 行所做的事;
- 第 77 行:如果服务器发送了 [Set-Cookie] 头,就必须取出其内容。该头可能包含多个形如 [cookie_name=value] 的 Cookie。第 77–95 行在脚本执行期间只会执行一次。如前所述,对于已使用同一会话 Cookie 完成身份验证的请求,服务器不会在响应中再次发送会话 Cookie;
- 第 84 行:我们明确查找名称已在第 10 行中存储的那个 Cookie;
- 第 88 行:如果找到了,就把它存入第 11 行定义的全局变量;
这一机制保证了:
- 会话 Cookie 从第一个 HTTP 请求的响应中取得;
- 此后它会被系统地随每个新请求发送给服务器,使服务器能够识别其客户端;
执行代码:
执行结果:
| init-session action in progress ----------------
success --------------------------
response= {
action: 'init-session',
status: 700,
response: 'session started with type [json]'
}
authenticate-user action in progress ---------
success -------------------
response= {
action: 'authenticate-user',
status: 200,
response: 'Authentication successful [admin, admin]'
}
|
5.8. 脚本 [fetch-03] —— 取消请求
[2019 年以来的新增内容] 该脚本演示了 取消 fetch 请求机制的两种用法,该机制自 Node 18 起原生可用:
| 'use strict';
// ========================================================================
// [2019 年以来的新内容] 原生 fetch + 取消 HTTP 请求
// ========================================================================
// [fetch] 自 Node 18 起为全局函数:不再需要 [node-fetch] 包,
// 该包在 2019 年用于 fetch-01.js/fetch-02.js(参见这两个文件中
// 新增的 [2026 年更新] 注释)
// 税额计算服务器的基础 URL(参见 http/README.md)
// 与 axios-01.js 一样,本脚本假定课程的 PHP 服务器正在本机
// 运行:否则请求会因“fetch failed”而失败,这是正常的
const baseUrl: string = 'http://localhost:3000/main.php';
// 示例 1:借助 AbortSignal.timeout() 设置最大延迟的请求
async function requestWithMaximumDelay(): Promise<void> {
console.log("--- request with AbortSignal.timeout ---");
try {
const response = await fetch(baseUrl + '?action=init-session&type=json', {
// 超过 2 秒后,请求会被自动取消
signal: AbortSignal.timeout(2000)
});
const data = await response.json();
console.log("response =", data);
} catch (error: any) {
// 如果超过了延迟,
// 根据情况 [error.name] 为 "TimeoutError" 或 "AbortError"
console.log("error.name =", error.name, ", message =", error.message);
}
}
// 示例 2:手动取消请求,例如因为
// 用户改变了主意(例如:他们在搜索框中重新输入)
async function manuallyCancellableRequest(): Promise<void> {
console.log("--- manually cancelled request ---");
const controller = new AbortController();
// 我们安排在 500 毫秒后进行一次“业务”取消
// (在真实的应用中,这可能是例如点击“取消”按钮)
setTimeout(() => {
console.log("manual cancellation triggered");
controller.abort();
}, 10);
try {
const response = await fetch(baseUrl + '?action=init-session&type=json', {
signal: controller.signal
});
const data = await response.json();
console.log("response =", data);
} catch (error: any) {
console.log("error.name =", error.name, ", message =", error.message);
}
}
async function main(): Promise<void> {
await requestWithMaximumDelay();
await manuallyCancellableRequest();
}
main();
|
- [AbortSignal.timeout(ms)]:如果请求超过指定的超时时间,则自动取消请求——这是在 fetch-01 脚本中已经见过的模式;
- [AbortController]:允许 手动 取消,可由任何应用程序事件触发(此处用 setTimeout 来模拟,例如点击“取消”按钮,或在搜索框中输入新文本从而使上一个请求失效)。
执行结果:
| --- request with AbortSignal.timeout ---
response = {
action: 'init-session',
status: 700,
response: 'session started with type [json]'
}
--- manually cancelled request ---
manual cancellation triggered
error.name = AbortError , message = This operation was aborted
|
- 第 2–6 行:第一个请求正常完成;
- 第 8–9 行:第二个请求因为为其设置的超时时间非常短(10 ms,见代码第 43 行)而被取消;