6. 税款计算服务的 HTTP 客户端
6.1. 简介
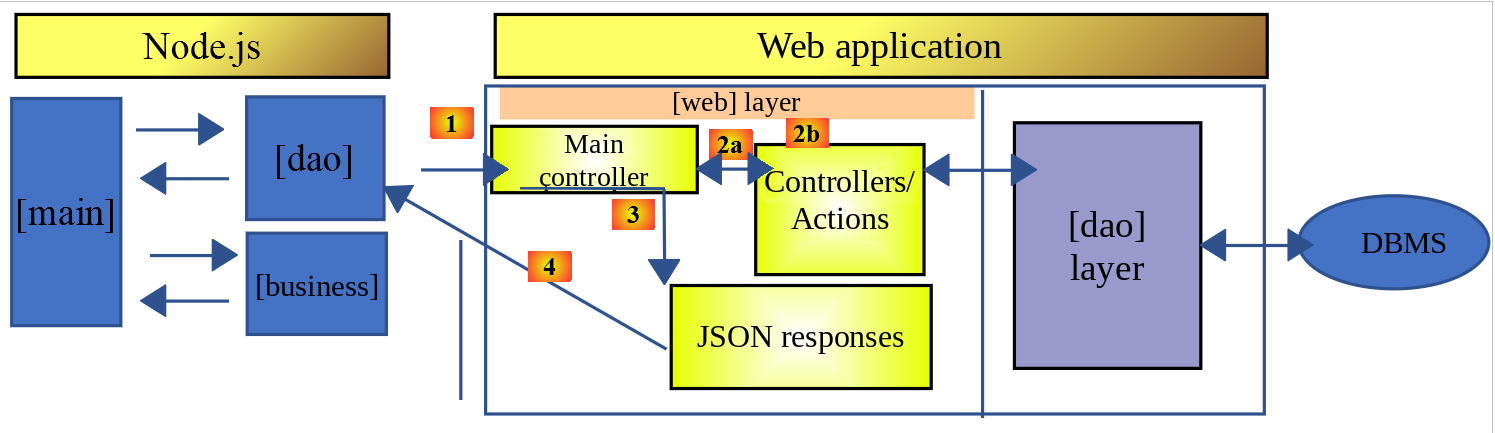
在本节中,我们将为 [node.js] 编写一个客户端,访问在 “安装 NestJS 服务器”一章中搭建的税款计算服务。客户端/服务器架构如下:
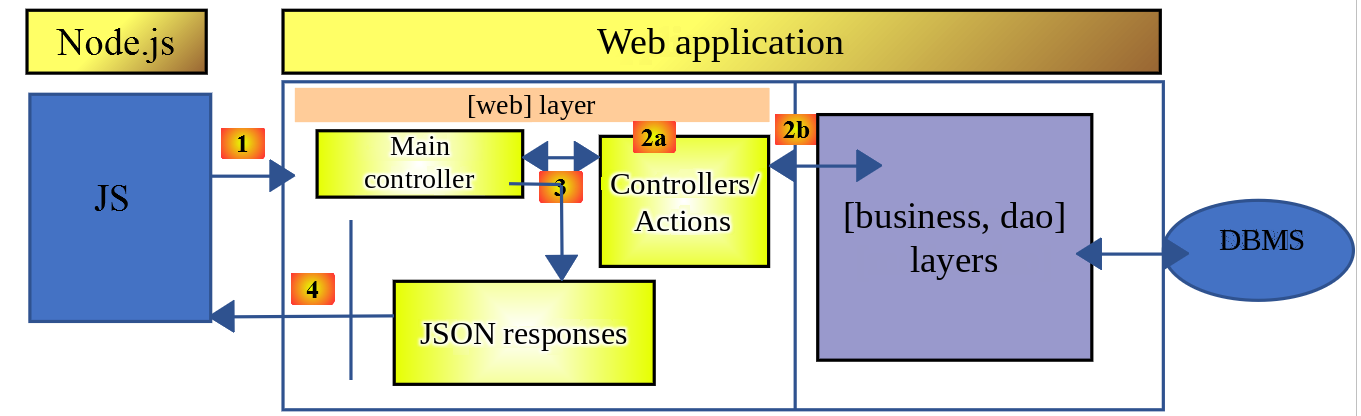
我们将研究客户端的两个版本:
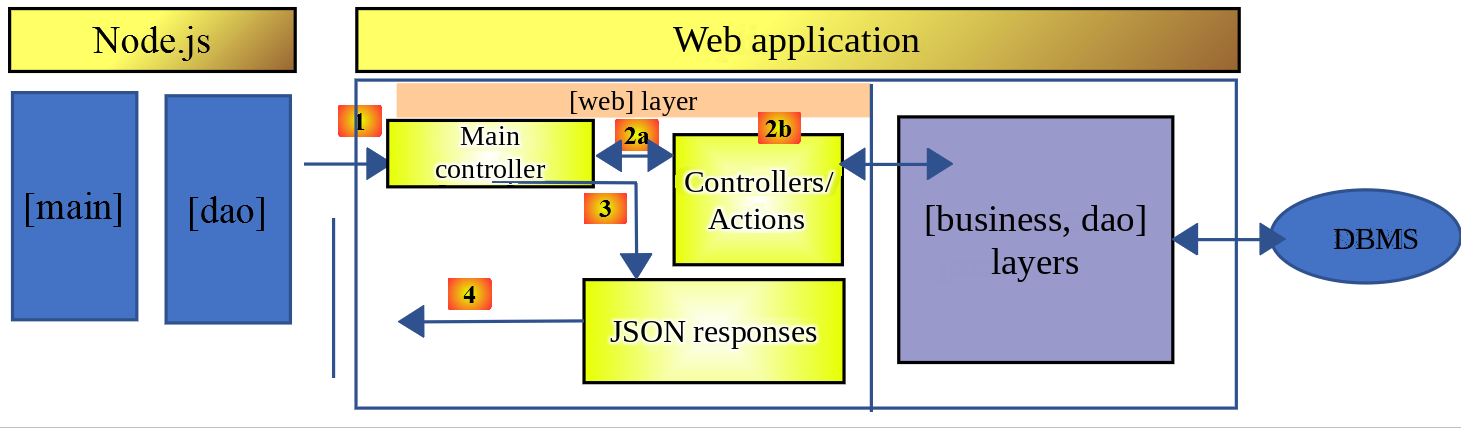
- 客户端版本 1 将采用如下分层结构:[main, dao]:
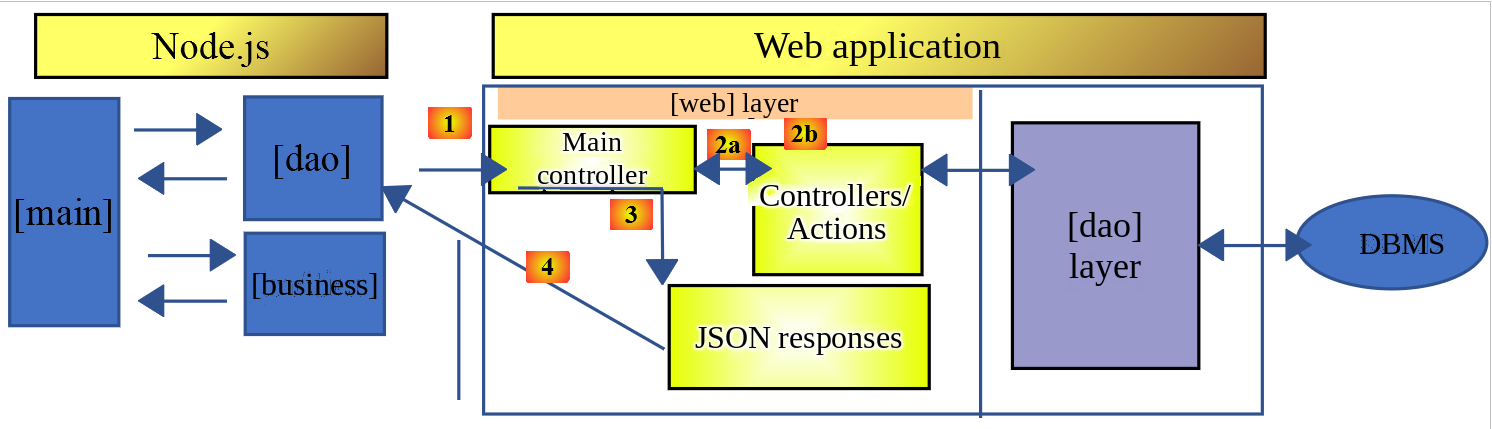
- 客户端版本 2 将采用如下结构:[main, business, dao]。服务器端的 [business] 层 将被转移到客户端:
6.2. HTTP 客户端 1
如前所述,HTTP 客户端 1 实现了如下客户端/服务器架构:
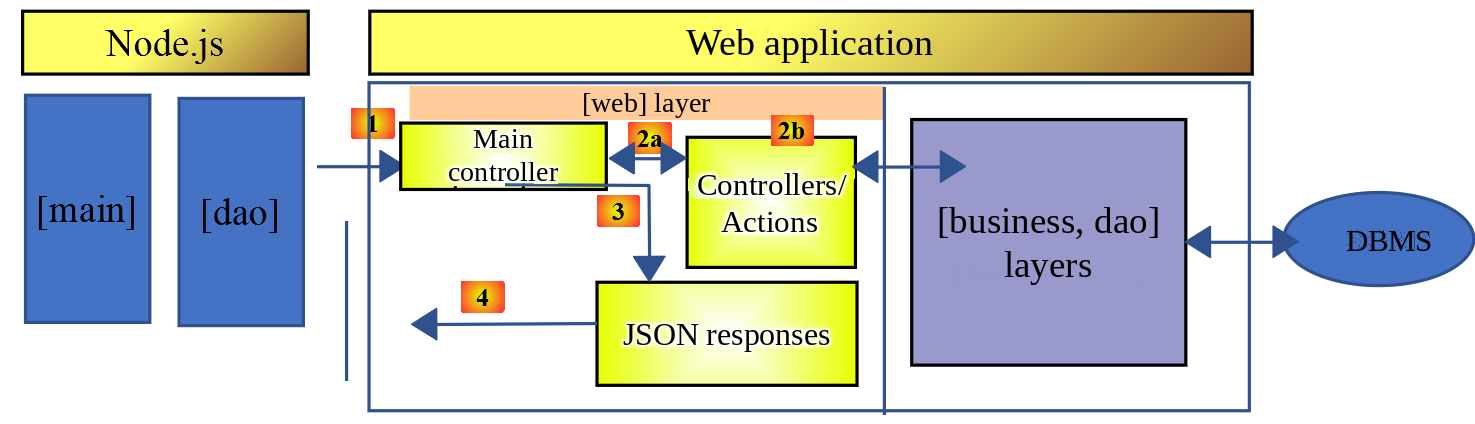
我们将实现:
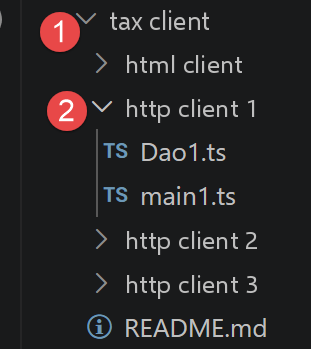
- 将 [dao] 层实现为一个类;
- 将 [main] 层实现为使用该类的脚本;
6.2.1. [dao] 层
[dao] 层将由如下类实现,[Dao1.ts]:
1 2 3 4 5 6 7 8 9 10 11 12 13 14 15 16 17 18 19 20 21 22 23 24 25 26 27 28 29 30 31 32 33 34 35 36 37 38 39 40 41 42 43 44 45 46 47 48 49 50 51 52 53 54 55 56 57 58 59 60 61 62 63 64 65 66 67 68 69 70 71 72 73 74 75 76 77 78 79 80 81 82 83 84 85 86 87 88 89 90 91 92 93 94 95 96 97 98 99 100 101 102 103 104 105 106 107 108 109 110 111 112 113 114 115 116 117 118 119 120 121 122 123 124 125 126 127 128 129 130 131 132 133 134 135 136 137 138 139 140 141 142 143 144 145 146 147 148 149 150 151 152 153 154 155 156 157 158 159 160 161 162 163 164 165 166 167 168 169 170 171 172 | |
- 这里我们应用在 TypeScript 的 HTTP 函数一章中学到的内容;
- 第 14–20 行:类的构造函数。该类将有三个属性:
- [axios]:用于发起 HTTP 请求的 [axios] 对象,由调用方代码传入;
- [sessionCookieName]:根据服务器的不同,会话 Cookie 可能有不同的名称。这里是 [PHPSESSID];
- [sessionCookie]:由服务器发送并由客户端保存的会话 Cookie;
- 第 62–85 行:异步函数 [calculateTax] 发出请求 [post /main.php?action=calculate-tax] ,并提交参数 [married, children, salary]。它把服务器传回的 jSON 字符串作为 JavaScript 对象返回;
- 第 88–102 行:异步函数 [listSimulations] 发出请求 [get /main.php?action=list-simulations]。它把服务器发送的 jSON 字符串作为 JavaScript 对象返回;
- 第 105–120 行:异步函数 [deleteSimulation] 发出请求 [get /main.php?action=delete-simulation&number=index]。它把服务器发送的 jSON 字符串作为 JavaScript 对象返回;
- 第 132 行:使用 [this.axios] 这种写法,是因为传给构造函数的 [axios] 对象被存放在 [this.axios] 属性中(第 9 行);
- 第 172 行:导出 [Dao1] 类以便使用;
6.2.2. [main1] 脚本
该脚本通过 Dao1 类依次调用服务器:会话初始化、身份验证、三次税款计算(并行)、模拟列表,以及删除其中一条模拟:
说明
- 第 3 行:导入 [axios] 库;
- 第 5 行:导入 [Dao] 类;
- 第 9 行:与服务器通信的 [main] 函数是异步的;
- 第 11–12 行:将发送给服务器的 HTTP 请求的默认配置:
- 第 9 行:[timeout] 超时时间为 2 秒;
- 第 10 行:所有 URL 请求都以税款计算服务器的基础 URL(http://localhost:3000)为前缀;
- 第 14 行 :构建 [Dao] 层。现在可以使用它了;
- 第 48–50 行:[log] 函数用于以格式化的方式显示 JavaScript 对象的 jSON 字符串:纵向排列,缩进两个空格(第 3 个参数);
- 第 17–20 行:初始化 jSON 会话;
- 第 21–24 行:身份验证;
- 第 25–32 行:并行请求三次税款计算。借助 [await Promise.all],执行会一直阻塞,直到三个结果全部获得;
- 第 33–36 行:模拟列表;
- 第 37–40 行:删除一条模拟;
- 第 41–44 行:处理可能出现的异常;
执行结果如下:
执行结果:
1 2 3 4 5 6 7 8 9 10 11 12 13 14 15 16 17 18 19 20 21 22 23 24 25 26 27 28 29 30 31 32 33 34 35 36 37 38 39 40 41 42 43 44 45 46 47 48 49 50 51 52 53 54 55 56 57 58 59 60 61 62 63 64 65 66 67 68 69 70 71 72 73 74 75 76 77 78 79 80 81 82 83 84 85 86 87 88 89 90 91 92 93 94 95 96 97 98 99 100 101 102 103 104 105 106 107 108 109 110 111 112 113 114 115 116 117 118 119 120 121 | |
6.3. HTTP 客户端 2
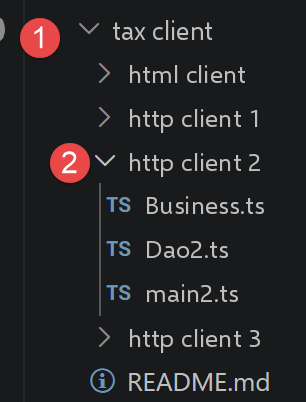
HTTP 客户端 2 的架构如下:
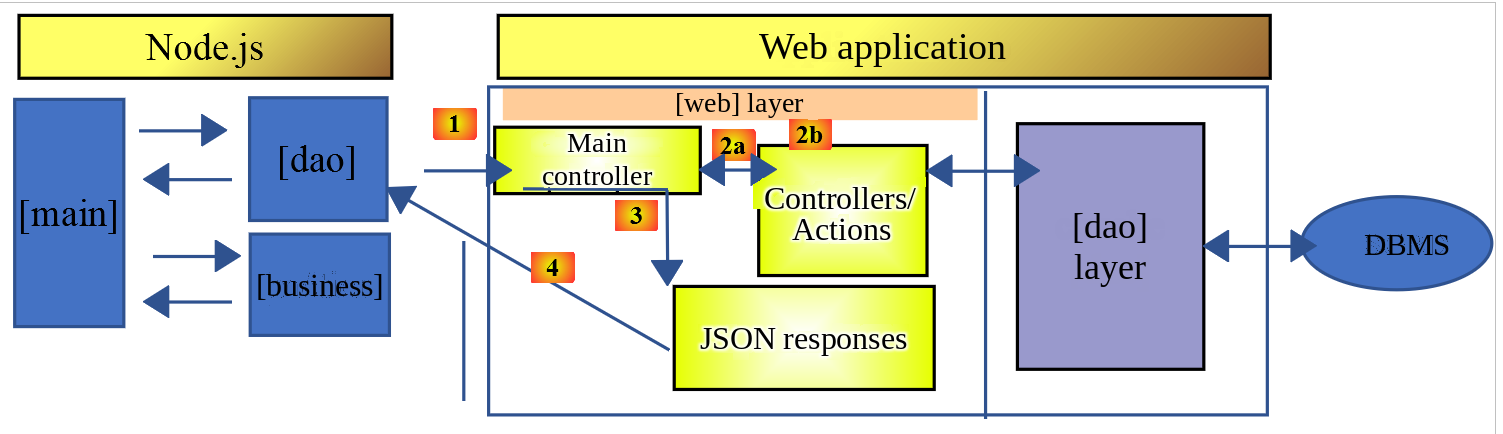
[business] 层已从服务器移到 JavaScript 客户端。这里,[main] 层要到达 [dao] 层,不再需要经过 [business] 层。我们把这两个层用作各司其职的专业模块:
- 每当需要服务器上的数据时,[main] 层就通过 [dao] 层获取;
- [main] 层请求 [business] 层执行税款计算;
- [business] 层独立于 [dao] 层,从不调用它;
6.3.1. [Business] 类
税款计算逻辑与 “通过示例介绍 PHP7 语言”课程中的 PHP 类非常相似——这里不再详述,我们只关注它到 TypeScript 的转换:
1 2 3 4 5 6 7 8 9 10 11 12 13 14 15 16 17 18 19 20 21 22 23 24 25 26 27 28 29 30 31 32 33 34 35 36 37 38 39 40 41 42 43 44 45 46 47 48 49 50 51 52 53 54 55 56 57 58 59 60 61 62 63 64 65 66 67 68 69 70 71 72 73 74 75 76 77 78 79 80 81 82 83 84 85 86 87 88 89 90 91 92 93 94 95 96 97 98 99 100 101 102 103 104 105 106 107 108 109 110 111 112 113 114 115 116 117 118 119 120 121 122 123 124 125 126 127 128 129 130 131 132 133 134 135 136 137 138 139 140 141 142 143 144 145 146 147 148 149 150 151 152 153 154 155 156 157 158 159 160 161 162 163 164 165 166 167 168 169 170 171 172 173 174 175 176 177 178 179 180 181 182 183 184 185 186 187 188 189 190 191 | |
- 第 8 行:taxAdminData: any ——税务服务器发送的数据(税率、档次等)的确切结构没有文档说明,因此我们有意对这个类型保持灵活,而不是对一个不确定的接口做出猜测;
- 在第 191 行导出 [Business] 类;
6.3.2. [Dao2] 类
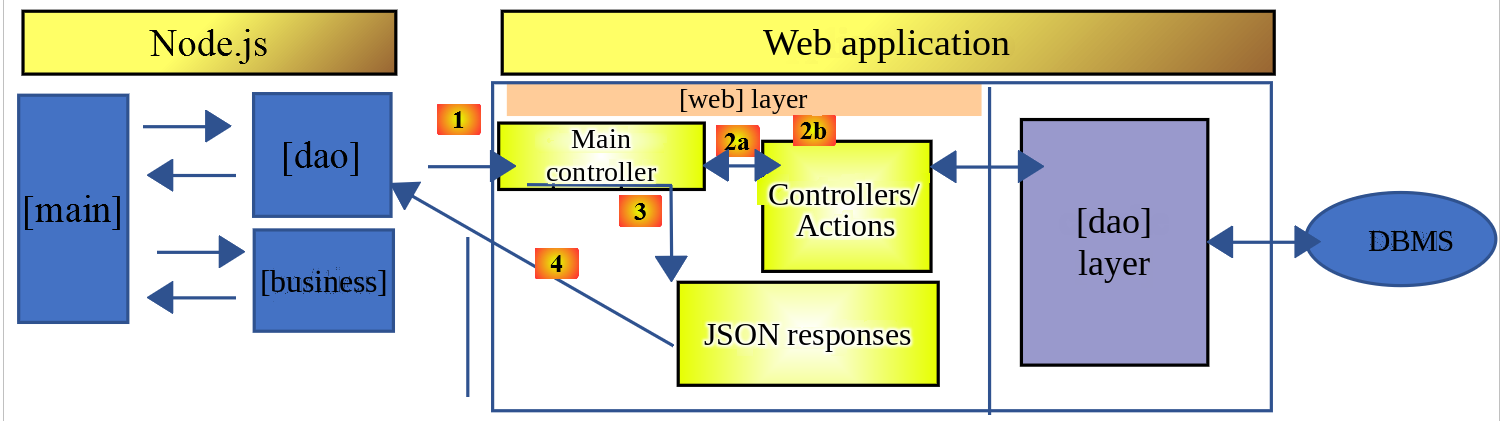
[Dao2] 类按如下方式实现上述 JavaScript 客户端的 [dao] 层:
1 2 3 4 5 6 7 8 9 10 11 12 13 14 15 16 17 18 19 20 21 22 23 24 25 26 27 28 29 30 31 32 33 34 35 36 37 38 39 40 41 42 43 44 45 46 47 48 49 50 51 52 53 54 55 56 57 58 59 60 61 62 63 64 65 66 67 68 69 70 71 72 73 74 75 76 77 78 79 80 81 82 83 84 85 86 87 88 89 90 91 92 93 94 95 96 97 98 99 100 101 102 103 104 105 106 107 108 109 110 111 112 113 114 115 116 117 118 119 120 121 122 123 124 125 | |
说明
- [Dao2] 类只实现了对税款计算服务器的三种可能请求:
- [init-session] (第 21–35 行):初始化 jSON 会话;
- [authenticate-user] (第 37–57 行):进行身份验证;
- [get-admindata] (第 59–73 行):获取税务机关的数据,使税款计算可以在客户端完成;
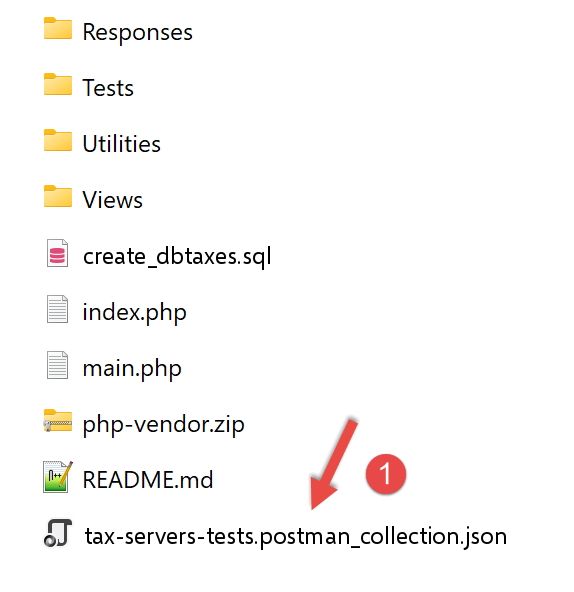
现在我们使用 Postman(参见“Postman 测试”一节)来演示 [get-admindata] 动作的工作方式。如果尚未导入,请把 HTTP 请求集合导入(Ctrl-O)到 Postman 中,该集合存放在 [php_server] 文件夹内的 [tax-servers-tests.postman_collection.json] 文件中:
 | 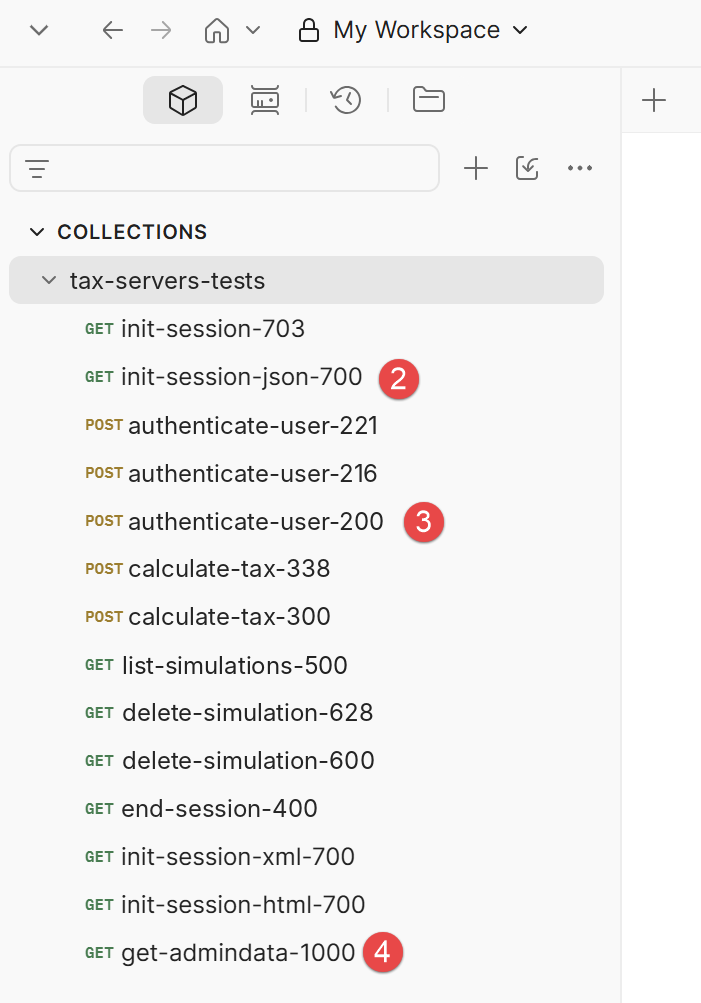 |
然后按顺序执行上面列出的三个 [2-4] 请求。
请求 [4] 如下:
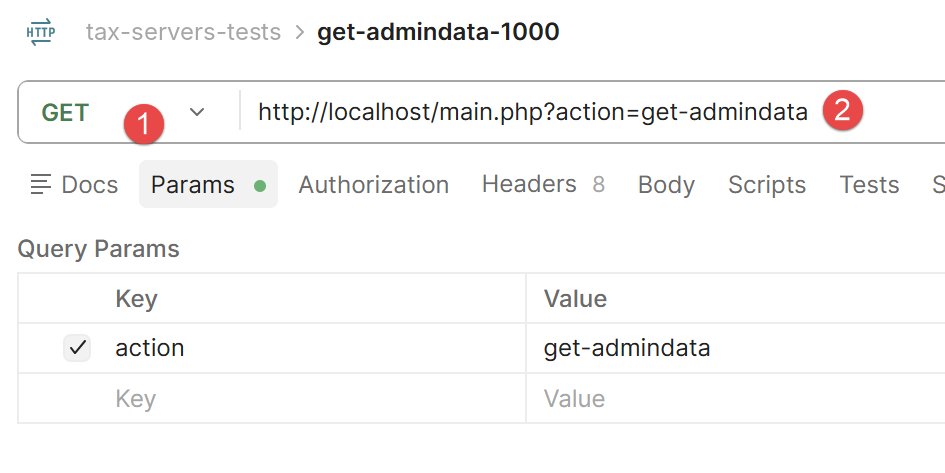 |
该请求的结果如下:
两个数据库表的内容都以 jSON 的形式提供。
6.3.3. 脚本 [main2]
该脚本初始化会话、进行身份验证、获取税务数据,然后通过 本地 business 层执行税款计算——这些计算不再涉及服务器:
- 第 30 行:taxAdminData = response.response ——税务数据只从服务器接收一次,之后在本地被所有计算复用;
- 第 39 行:const business = new Business(taxAdminData) ——用这些数据实例化业务层,此后不再发出任何网络请求;
- 第 44–46 行:三次税款计算现在是 同步的,直接在浏览器或 node.js 中执行,无需经过服务器。
执行结果:
1 2 3 4 5 6 7 8 9 10 11 12 13 14 15 16 17 18 19 20 21 22 23 24 25 26 27 28 29 30 31 32 33 34 35 36 37 38 39 40 41 42 43 44 45 46 47 48 49 50 51 52 53 54 55 56 57 58 59 60 61 62 63 64 65 66 67 68 69 70 71 72 73 74 75 76 77 78 79 80 81 82 83 84 85 86 87 88 89 90 91 92 93 94 95 96 97 98 99 100 101 102 103 104 105 106 107 | |
6.4. HTTP 客户端 3
 |
在本节中,我们 [HTTP client 2] 应用程序按如下架构 在浏览器中 运行:
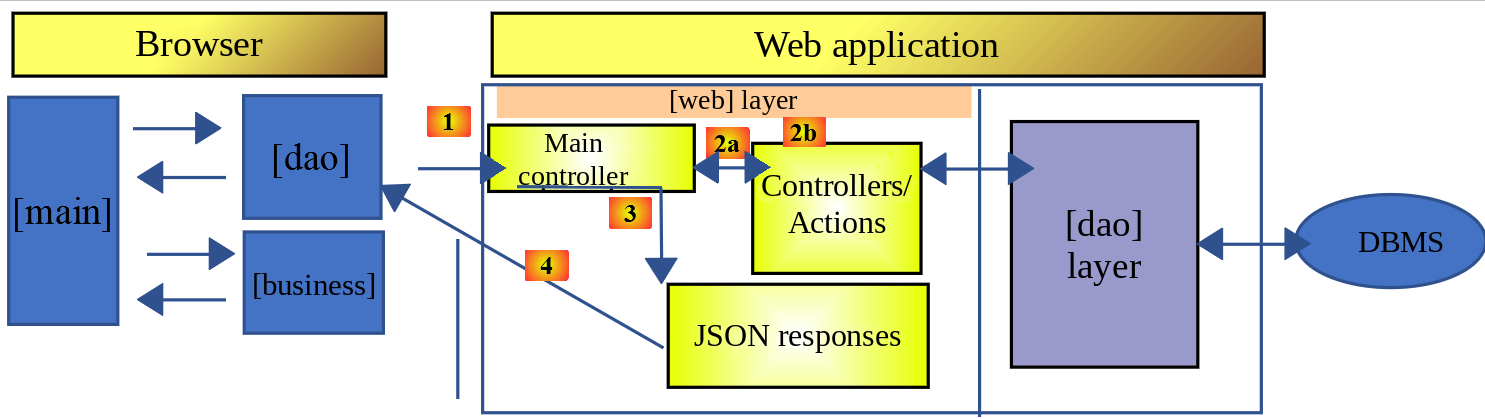
[node.js] 通过 tsx 原生执行 TypeScript,而浏览器并非如此:需要一个工具来 编译 TypeScript 为 JavaScript,然后 把所有内容打包 成一个可供 HTML 页面使用的文件。这就是 [webpack] 的作用。
注意:上面描述的 [1] 操作将是由 HTML 页面上的 JavaScript 代码生成的 HTTP 请求。稍后我们会看到,这个 HTML 页面是通过 URL [http://localhost:8080](或 8081)获得的,由 [webpack] 启动的内部服务器提供。而税款计算服务器是一个 NestJS 应用程序,地址为 [http://localhost:3000](参见 安装 NestJS 服务器)。因此,这里有两个相互通信的 Web 应用程序,它们都通过 [http://localhost] 访问,但端口不同。我们说它们位于不同的域。两个 Web 应用程序之间这种跨 域的请求是受到控制的。默认情况下,如果客户端与服务器不同源(即 [http://localhost:3000]),NestJS 服务器会拒绝来自 Web 客户端的请求。不过,可以配置 NestJS 服务器接受这些所谓的“跨域”请求,这里已经这样做了,所以下面展示的 JavaScript 客户端能够正常工作。您可以在 “案例研究:NestJS 中的税款计算服务器”一章中查看 NestJS 服务器的配置,该章说明了如何配置它以接受跨域请求。
6.4.1. 2019 年以来工具集的变化
原始文档(2019 年)使用 [babel-loader] 把 ES6 代码转译为兼容旧版浏览器的 ES5。由于我们的项目现在用 TypeScript 编写,因此用 [ts-loader] 取代 babel-loader ,它原生支持 TypeScript 语法(类型、接口等)——而 Babel 会完全忽略这些语法。
该项目的 [webpack.config.js] 文件(文件夹 tax client/http client 3)用于配置 [webpack] 模块:
- 第 36 行:entry: "./src/index.ts" ——Webpack 从该文件开始,跟踪其所有导入来构建最终的包;
- 第 42–44 行:resolve: { extensions: [".ts", ".js"] } ——告诉 Webpack 即使导入中没有指定扩展名,也要解析 .ts 文件;
- 第 48–56 行:把 .ts 文件(位于 src 文件夹中)与 [ts-loader] 加载器关联的规则——它直接取代了上面提到的 babel-loader 。
[./src/index.ts] 文件的内容如下:
请记住,这段 JavaScript 代码将在浏览器中执行。因此,上一行不会写到终端,而是写到运行该代码的浏览器的控制台中。
该子项目中的文件 [package.json] 如下。它有自己的脚本和依赖项(ts-loader、TypeScript,以及 core-js 和 regenerator-runtime,它们是确保与旧版浏览器兼容的 polyfill):
- 第 12–20 行:项目开发(编译)期间所需的依赖项;
-
第 21–26 行:项目运行时所需的依赖项;
-
第 17 行:[webpack]:总调度器。[webpack] 负责把 TypeScript 代码转译为 ES5,然后把所有生成的文件打包成一个文件;
- 第 18 行:[webpack-cli]:[webpack] 所必需;
- 第 13 行:[@webpack-cli/init]:用于配置 [webpack];
- 第 19 行:[webpack-dev-server]:提供一个开发用 Web 服务器,默认运行在 8080 或 8081 端口。当源文件被修改时,[webpack-dev-server] 会自动重新加载 Web 应用程序;
6.4.2. 编译并运行项目
文件 [package.json] 定义了三个任务,[npm]:
这些任务会被 [VSCode] 识别,并提供运行入口。把鼠标悬停在第 3 行的“build”任务上:
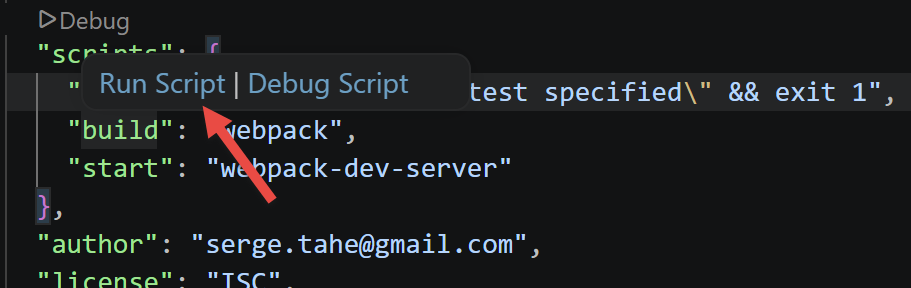 |
只需点击 [Run Script] 即可运行所选任务。您也可以输入以下命令:
该命令需在包含 [package.json] 文件的文件夹中的终端里输入。
[build] 任务会在 VSCode 项目中创建一个名为 [dist] 的文件夹 (1):
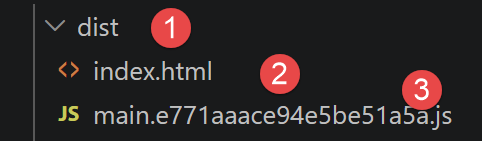 |
- 在 [3] 中:项目被编译为 [dist/main.hash.js],并创建了一个名为 [dist/index.html] 的页面 (2);
生成的页面 [index.html] 如下:
因此,这个页面只是简单地封装了由 [main.hash.js] 生成的文件 [webpack]。
项目通过任务 [start] 来执行:
然后页面 [dist/index.html] 被加载到一个服务器上(它是 [webpack] 套件的一部分),该服务器运行在本机的 8080 或 8081 端口,并由本机的默认浏览器显示:
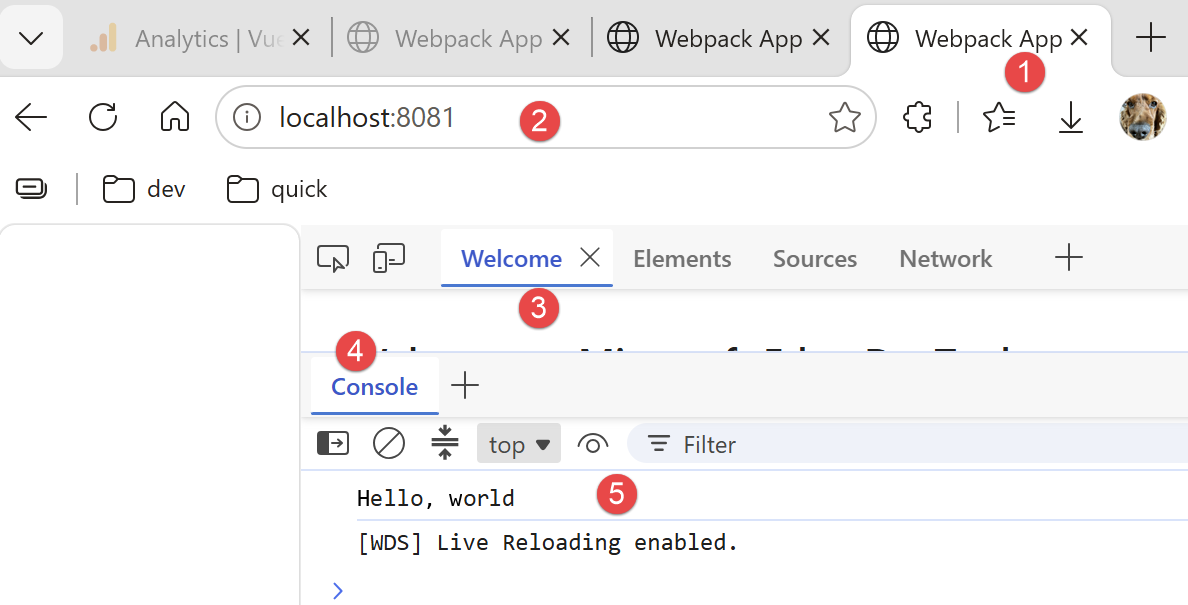 |
- 在 [2] 中:[webpack] Web 服务器的服务端口;
- 在 [3-4] 中:浏览器开发者工具的 [console] 选项卡,这里是 Microsoft Edge(按 F12 打开);
- 在 [5] 中:执行文件 [src/index.ts] 的结果。回想一下,该文件的内容如下:
现在,把 [index.ts] 中的内容改成如下一行:
并保存文件。无需重新编译,系统会自动生成一个名为 [index.html] 的新文件,并且这个新文件 [index.html] 会被加载到浏览器中:
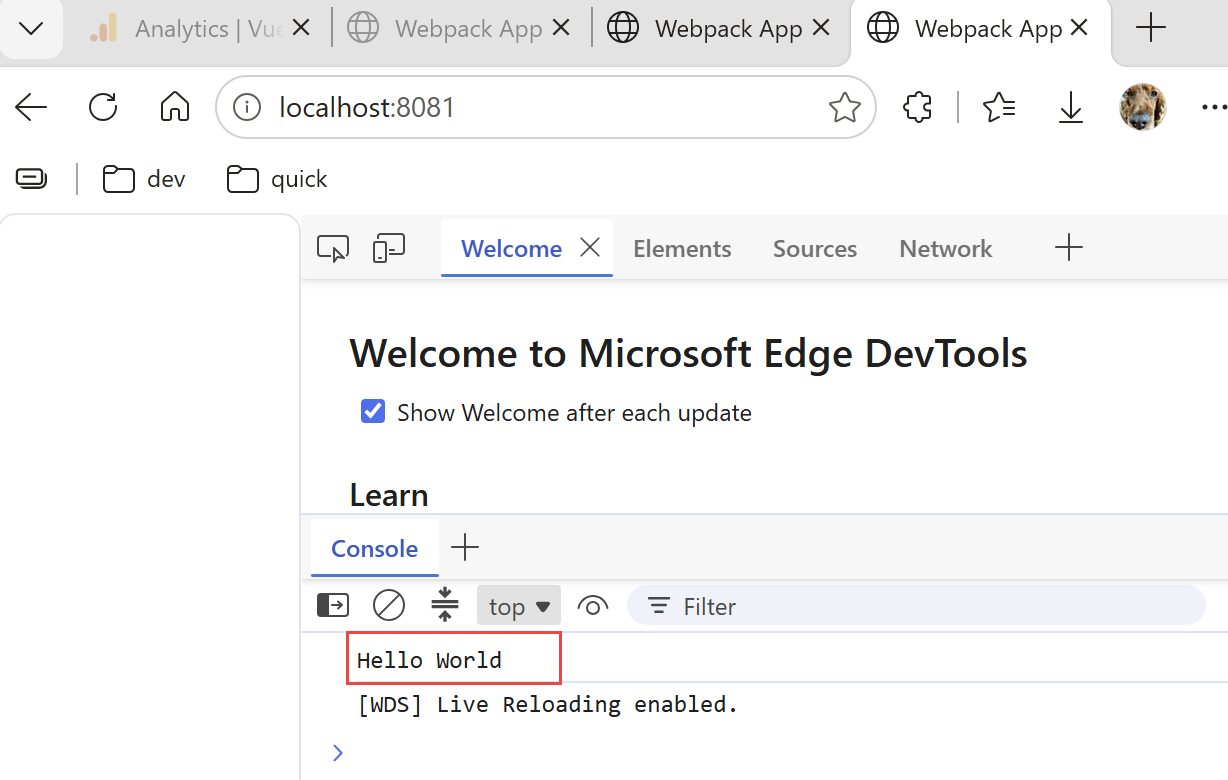 |
在运行 [build] 任务之前不需要先运行 [start] 任务:后者会先编译项目,但不会把编译输出存放在 [dist] 文件夹中。要验证这一点,只需删除该文件夹,您会看到任务 [start] 在不创建 [dist] 文件夹的情况下编译并运行项目。它似乎把输出 [index.html, main.hash.js] 存放在 [webpack-dev-server] 专用的文件夹中。这种行为足以满足我们的测试。
当开发服务器运行时,任何已保存的项目文件修改都会触发重新编译。因此,我们禁用 [Auto Save] 模式,即 [VSCode] 的自动保存。这是因为我们不希望在项目文件中每输入一个字符就触发一次重新编译,只希望在保存修改时才重新编译:
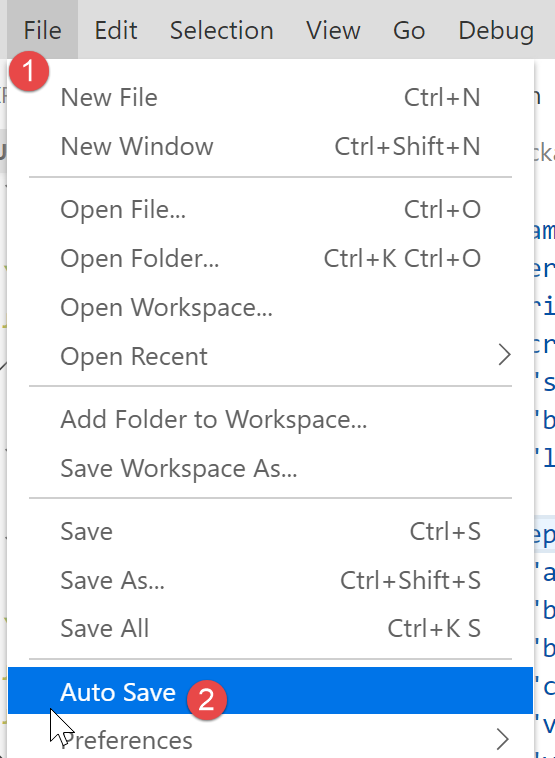
- 在 [2] 中,不得勾选 [Auto Save] 选项;
6.4.3. 测试税款计算服务器的 JavaScript Web 客户端
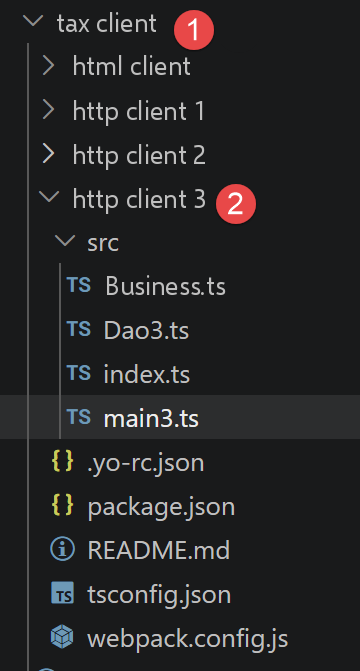
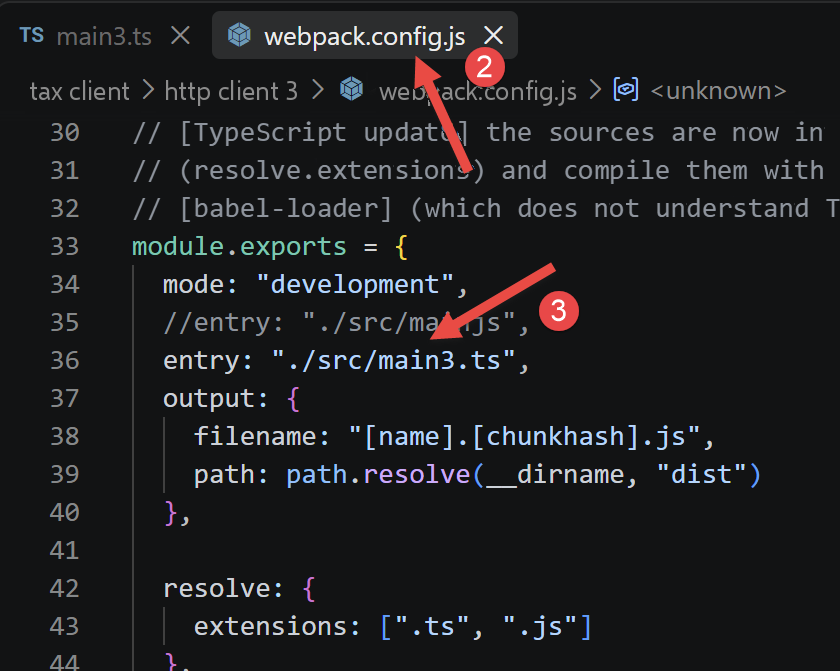
要测试税款计算服务器的 JavaScript Web 客户端,必须在文件 [webpack.config.js] [2-3] 中把 [main3.ts] [1] 指定为项目入口点:
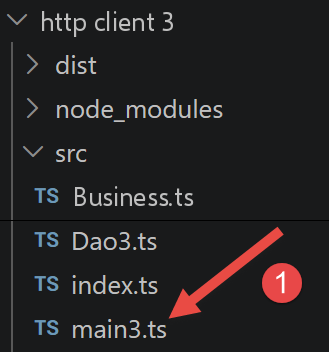 |  |
- 在 [1] 中是脚本 [main3.ts];
- 在 [2-3] 中是 [webpack] 配置文件中需要修改的入口 [entry];
6.4.3.1. [main3] 脚本
该脚本使用 main2.ts (上一章)的内容,并针对浏览器做了调整(导入 polyfill):
- 第 3–4 行:import "core-js/stable" 和 import "regenerator-runtime/runtime" ——这些是 polyfill,使编译后的代码能在尚未原生实现所有最新语言特性的浏览器中运行;
- 第 15 行:axios.defaults.withCredentials = true ——在浏览器中这是必需的,这样会话 Cookie 才会在请求之间自动传递,而在之前的版本中这是由代码手动完成的(node.js 不支持浏览器 Cookie)。
6.4.3.2. [Dao3] 类
由于会话 Cookie 现在由 [axios] 模块管理,我们可以从 [Dao] 类中删除对该 Cookie 的处理:
在这段代码中,不再有任何 Cookie 处理。
6.4.3.3. 编译与执行
package.json 文件定义了两个 npm 任务:
- [npm run build] ——编译项目;生成的文件放在 dist/ (一个 main.<hash>.js 文件,以及一个 index.html 文件,后者通过 html-webpack-plugin自动引入前者);
- [npm start] ——启动 webpack-dev-server:编译项目 并 通过 http://localhost:8080 提供服务,每次保存源文件时页面都会自动重新加载。
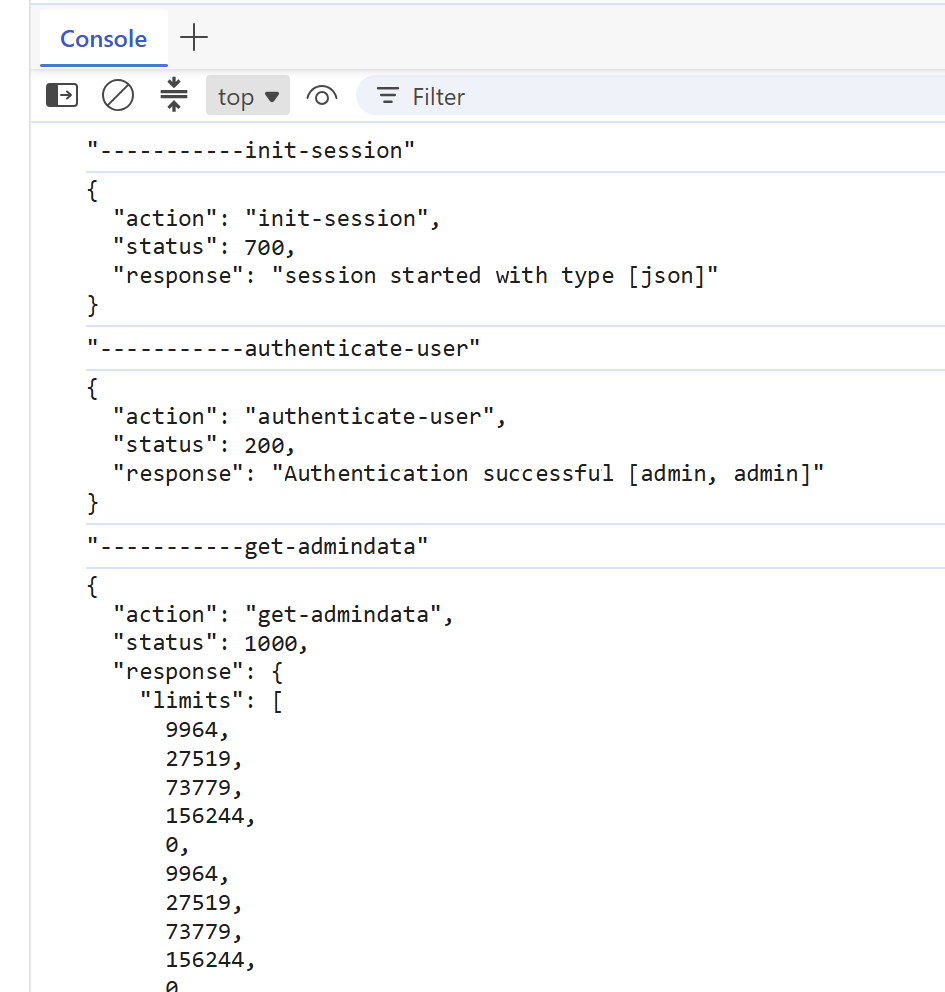
我们运行这两个任务。浏览器中 [console] 页面(按 F12 打开)的结果如下:
 |
6.5. HTML 客户端
 |
前面几节仅在控制台模式下使用 [http client 3] 客户端:[main3.ts] 脚本与服务器通信,然后用 console.log 显示结果,浏览器中没有任何可见页面。现在我们将构建一个真正的图形客户端,带有各个界面(身份验证、税款计算、模拟列表)。
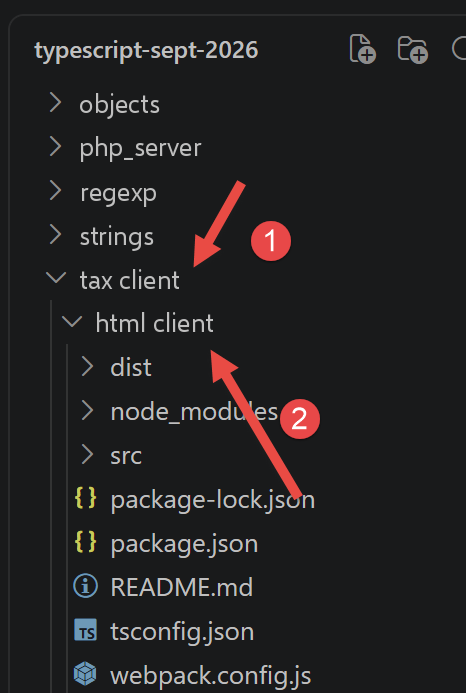
我们从 [http client 3] 客户端项目开始(文件与 [package.json] 和 [tsconfig.json] 相同),并 不加修改地 复用两个现有文件:[Dao3.ts] ([dao] 层)和 [Business.ts]([business] 层),已在介绍 [main3.ts] 时讨论过。我们只需添加:
- 一个名为 [src/index.html] 的文件,它充当页面的模板(页头、CSS 样式、视图显示区域);
- 一个新文件 [Views.ts],直接在 JavaScript 中构造 HTML 元素(表单、表格、错误消息),其本身从不调用服务器;
- 一个新文件 [AppHtml.ts],即应用程序控制器:它协调 [dao] 和 [business] 层,然后指示 [views] 层显示结果;
- 对 [webpack.config.js] 做的一处小改动,使项目用新的 HTML 模板编译这个新的入口点。
因此,[dao] / [business] / [views] / 控制器这四者,完全复现了本课程已经讲过的分层架构:用于访问服务器的 [dao] 层、用于应用逻辑(税款计算)的 [business] 层,以及负责编排的主脚本(这里是 [AppHtml] 类)。真正全新的只有 [views] 层:它用浏览器输出取代了控制台输出。
6.5.1. 解决方案架构
这个 HTML 客户端的工作方式与 [main3.ts] 完全相同,这是一个关键的设计选择:它只为三个动作调用服务器(PHP),而且始终是这三个:init-session、authenticate-user 和 get-admindata。不过,服务器(PHP)的代码表明,它自己也能够计算税款并把模拟结果保存在其会话中(这就是在 calculate-tax、list-simulations 和 delete-simulation 这些动作中所做的事情,它们位于 [Controllers] 文件夹中)——但这个客户端并不使用它们。
原因很简单:一旦通过 仅一次 调用 get-admindata取回税务数据(税率、档次等),借助 [Business] 类,计算税款所需的一切就都已经在浏览器中了。每次模拟都向服务器请求计算,会带来本可避免的网络往返;同样,由于每个计算出的模拟结果都会立即存放在浏览器中,再向服务器请求列表(list-simulations)也不会带来任何价值。因此,这个客户端尽可能减少对服务器的请求——这正是 [main3.ts] 中已经实现的原则:
- [dao] 层([Dao3.ts])保持不变:前面已介绍的三个方法(initSession、authenticateUser、getAdminData)已经足够,不再向其中添加任何方法;
- 身份验证成功后,立即 一次性调用 getAdminData,并用其结果构造一个 Business 对象(new Business(taxAdminData)),该对象在整个工作会话期间一直保留;
- 此后每次税款计算都直接调用 business.calculateTax(married, children, salary)——这是一个在浏览器中执行的普通 JavaScript 函数,不涉及任何网络调用;
- 计算出的模拟结果存放在一个简单的 JavaScript 数组中,由控制器保存在内存里——每次计算执行一次 push ,每次删除执行一次 splice ,与 [main3.ts] 使用语句 simulations.push(...) 和 simulations.splice(1, 1) 的做法完全一致。
与 [main3.ts] 有一点细微差别:business.calculateTax 方法只返回它所计算出的值(tax、surcharge、discount、reduction、rate),而不返回用户输入的参数(married、children、salary)。[main3.ts] 不需要这些参数,因为它只是使用 console.log;但我们的视图 [模拟列表] 必须在表格中显示这三个参数,因此控制器在保存结果之前,会把它们附加到结果上(我们将在 [AppHtml.ts] 的代码中看到这一点)。
最后,[结束会话] 视图也不再调用服务器:它只是丢弃 [Business] 对象和模拟列表,然后重新显示身份验证界面。请记住,仍在使用的三个服务器动作的响应始终具有相同的格式,我们已经在 [main3.ts] 中见过:一个 JSON 对象 { action, status, response },其中 response 要么包含所请求的结果(成功时),要么包含错误消息——根据相关 PHP 控制器的不同,可能是字符串或字符串数组。
6.5.1.1. HTML 模板:[src/index.html] 文件
使用 [webpack] 项目配合 [html-webpack-plugin] (这里就是如此;参见 [webpack.config.js] 文件)可以从一个现成的 HTML 页面开始——即“模板”——插件会自动把加载已编译包的 <script> 标签插入其中。到目前为止,这个项目没有模板:[html-webpack-plugin] 生成的是一个最简的、空的、没有样式的 HTML 页面。现在我们提供一个模板:文件 [src/index.html],它包含:
- 一个 <style> 块,包含应用程序的全部格式设置(页头、菜单、表单、表格、错误和结果消息);
- 唯一的一个 <div id="app"></div> 标签:这是模板中唯一“可见”的 HTML 元素——页面的其余部分(页头、表单、表格等)将由 [Views] 类在 JavaScript 中动态生成,并放入这个标签内。
1 2 3 4 5 6 7 8 9 10 11 12 13 14 15 16 17 18 19 20 21 22 23 24 25 26 27 28 29 30 31 32 33 34 35 36 37 38 39 40 41 42 43 44 45 46 47 48 49 50 51 52 53 54 55 56 57 58 59 60 61 62 63 64 65 66 67 68 69 70 71 72 73 74 75 76 77 78 79 80 81 82 83 84 85 86 87 88 89 90 91 92 93 94 95 96 97 98 99 100 101 102 103 104 105 106 107 108 109 110 111 112 113 114 115 116 117 118 119 120 121 122 123 124 125 126 127 128 129 130 131 132 133 134 135 136 137 138 139 140 141 142 143 144 145 146 147 148 149 150 151 152 153 154 155 156 157 158 159 160 161 162 163 164 165 166 167 168 169 170 171 172 173 174 175 176 177 178 179 180 181 182 183 184 185 186 187 188 189 190 191 192 193 194 195 196 197 198 199 200 201 202 203 204 205 206 207 208 209 210 211 212 213 214 215 216 | |
这是一个标准的 HTML/CSS 文件——这里没有任何 TypeScript 特有的内容——但由于本课程面向初学者,我们还是详细过一遍最重要的几点:
CSS 变量(第 7–16 行):
- 代码块 :root { --name: value; ... } 声明了 CSS 变量(也称为“自定义属性”):--light-blue、--light-green等;
- 随后在样式表的其余部分通过 var(...) 函数复用它们,例如第 40 行的 background: var(--banner-grey); ;
- 好处:只需在文件顶部修改一次颜色,就能改变它在所有使用处的效果,而不必在整个文件中逐个查找颜色代码。
整体结构(第 29–87 行):
- #app (第 29 行)限制应用程序的宽度并添加边框;
- .banner (第 36 行)使用
display: flex让徽标和标题并排显示; - .page-body(第 56 行)把页面的其余部分划分为两个弹性列:左边是 .menu (第 61 行,固定宽度 160 像素),右边是 .content (第 80 行,宽度可变);.content.full-width 类(第 85 行)会隐藏菜单列,用于不需要菜单的登录视图。
被 [views] 层复用的类(第 90–210 行):
- .section-title (第 90 行):浅蓝色方框,用于标题“请进行身份验证”“请填写下面的表单,然后提交”和“您的模拟列表”;
- .field-row (第 99 行):表单的一行(标签 + 输入字段);
- .result (第 152 行):浅绿色方框,用于显示税款计算的结果;
- .error (第 161 行):浅红色方框,用于显示服务器返回的错误消息;
- table.simulations (第 171 行):“模拟列表”视图中表格的格式设置,带有蓝色的 “删除” 链接(规则 table.simulations a.delete,第 196 行)。
这些类都可以在 [Views] 类的代码中找到(className = '...' 或 classList.add('...'))——正是这个类用 JavaScript 创建 HTML 元素,并为它们应用这些 CSS 类。
6.5.1.2. 修改后的 [webpack.config.js] 配置
[webpack.config.js] 文件在本章前面已经完整展示过。只需做两处小改动,就能让它编译这个新的图形客户端,而不是 [main3.ts] 测试脚本:
- 第 4 行:entry: "./src/AppHtml.ts" 取代 entry: "./src/main3.ts"——新的控制器现在充当包的入口点;旧值作为注释保留在紧接其下的位置(第 5–8 行),以便在需要时轻松切换回测试脚本;
- 第 21–23 行:new HtmlWebpackPlugin({ template: ... }) 取代 new HtmlWebpackPlugin() (不带参数)——我们明确指示它使用我们的模板 [src/index.html] ,而不是生成一个空的 HTML 页面。
6.5.1.3. [dao] 层和 [business] 层:两个未经修改而被复用的文件
文件 [Dao3.ts] 在这里 没有修改:本章前面已介绍的三个方法(initSession、authenticateUser、getAdminData,以及工具方法 getRemoteData)恰好满足这个图形客户端的需要——不再添加任何方法。
[Business.ts] 同样没有修改:它还是同一个 [Business] 类,其方法 calculateTax(married, children, salary)已经在讨论 [main3.ts] ([HTTP 客户端 2] 一节)时完整介绍过。不过,这个图形客户端是本章中第一个真正把该计算的结果 显示 在屏幕上而不只是记录日志的客户端——这是一个验证紧随其后介绍的 [views] 层能否正确格式化这些结果的机会。
6.5.1.4. [views] 层:[Views.ts] 文件
这是该客户端中最长的文件,但一旦理解了它的原理,也是最容易理解的:[Views] 类不进行 任何 网络调用——它甚至不知道 PHP 服务器的存在。它唯一的作用,是使用 DOM 的函数(document.createElement、appendChild、classList……),在模板的 <div id="app"> 标签内构造应用程序三个界面的 HTML 元素。
当用户点击按钮或链接(“提交”“删除”“结束会话”等)时,[Views] 类同样不知道该如何处理这次点击:它只是调用控制器提供的回调函数——由控制器 [AppHtml.ts](稍后介绍)来决定接下来做什么(调用服务器、切换视图等)。正是这种解耦使 [Views.ts] 能够独立于 [dao] 层。
'use strict';

// -----------------------------------------------------------------------
// 构造应用程序的各个视图(DOM)——参照
// 文档 [web_application_views.odt] 中的截图:
//   - 身份验证视图
//   - 税款计算视图(表单 + 结果)
//   - 模拟列表视图
// 该模块不进行任何网络调用:它构建 DOM,并把
// 用户的操作(提交、删除、菜单链接)委托给
// 由 [App] 控制器提供的回调函数。
// -----------------------------------------------------------------------

// 通用装饰图案(不是原 PHP 服务器的照片,我们
// 没有它):如有需要,可替换为 [Resources/] 中的真实徽标
const LOGO_SVG = `
<svg width="60" height="60" viewBox="0 0 60 60" xmlns="http://www.w3.org/2000/svg">
  <circle cx="30" cy="30" r="29" fill="#eef1ec" stroke="#ccc" />
  <g fill="none" stroke="#8a9a7a" stroke-width="2">
    <path d="M30 46 C30 32 22 28 17 19" />
    <path d="M30 46 C30 30 39 26 44 17" />
    <path d="M30 46 C30 37 30 30 30 21" />
  </g>
  <g fill="#b9c9a6">
    <circle cx="17" cy="19" r="4.5" />
    <circle cx="44" cy="17" r="4.5" />
    <circle cx="30" cy="19" r="4.5" />
  </g>
</svg>`;

// 服务器返回的税款计算结果(参见 [Simulation.php])
export interface Simulation {
  married: string;
  children: number;
  salary: number;
  tax: number;
  surcharge: number;
  discount: number;
  reduction: number;
  rate: number;
}

// [身份验证] 视图的回调
export interface AuthenticationCallbacks {
  onSubmit: (user: string, password: string) => void;
}

// [计算] 视图的回调
export interface CalculationCallbacks {
  onSubmit: (married: string, children: number, salary: number) => void;
  onList: () => void;
  onEndSession: () => void;
}

// [列表] 视图的回调
export interface ListCallbacks {
  onDelete: (number: number) => void;
  onCalculation: () => void;
  onEndSession: () => void;
}

class Views {

  private banner: HTMLElement;
  private menu: HTMLElement;
  private content: HTMLElement;

  // builds the fixed structure of the page (banner + menu/content area)
  // inside the [root] element
  constructor(private root: HTMLElement) {
    this.root.innerHTML = '';

    this.banner = document.createElement('div');
    this.banner.className = 'banner';
    const logo = document.createElement('div');
    logo.className = 'logo';
    logo.innerHTML = LOGO_SVG;
    const title = document.createElement('h1');
    title.textContent = 'Calculate your tax';
    this.banner.appendChild(logo);
    this.banner.appendChild(title);

    const body = document.createElement('div');
    body.className = 'page-body';
    this.menu = document.createElement('div');
    this.menu.className = 'menu';
    this.content = document.createElement('div');
    this.content.className = 'content';
    body.appendChild(this.menu);
    body.appendChild(this.content);

    this.root.appendChild(this.banner);
    this.root.appendChild(body);
  }

  // --------------------------------------------------------------------
  // DOM construction tools
  // --------------------------------------------------------------------

  private clearMenu(): void {
    this.menu.innerHTML = '';
    this.menu.style.display = 'none';
    this.content.classList.add('full-width');
  }

  private menuLink(text: string, onClick: () => void): HTMLAnchorElement {
    const a = document.createElement('a');
    a.textContent = text;
    a.addEventListener('click', onClick);
    return a;
  }

  private showMenu(links: HTMLAnchorElement[]): void {
    this.menu.innerHTML = '';
    this.menu.style.display = '';
    this.content.classList.remove('full-width');
    links.forEach(link => this.menu.appendChild(link));
  }

  private errorBanner(message?: string): HTMLElement | null {
    if (!message) {
      return null;
    }
    const div = document.createElement('div');
    div.className = 'error';
    div.textContent = message;
    return div;
  }

  // a form row [label + text/password/number field]
  private fieldRow(
    labelText: string,
    type: 'text' | 'password' | 'number',
    initialValue: string,
    help?: string
  ): { row: HTMLElement; input: HTMLInputElement } {
    const row = document.createElement('div');
    row.className = 'field-row';
    const label = document.createElement('label');
    label.textContent = labelText;
    const field = document.createElement('div');
    field.className = 'field';
    const input = document.createElement('input');
    input.type = type;
    input.value = initialValue;
    if (type === 'number') {
      input.min = '0';
    }
    field.appendChild(input);
    if (help) {
      const div = document.createElement('div');
      div.className = 'help';
      div.textContent = help;
      field.appendChild(div);
    }
    row.appendChild(label);
    row.appendChild(field);
    return { row, input };
  }

  // --------------------------------------------------------------------
  // [authentication] view
  // --------------------------------------------------------------------
  authenticationView(error: string | undefined, callbacks: AuthenticationCallbacks): void {
    this.clearMenu();
    this.content.innerHTML = '';

    const title = document.createElement('div');
    title.className = 'section-title';
    title.textContent = 'Please authenticate';
    this.content.appendChild(title);

    const banner = this.errorBanner(error);
    if (banner) {
      this.content.appendChild(banner);
    }

    const userField = this.fieldRow("User name", 'text', 'admin');
    const passwordField = this.fieldRow('Password', 'password', '');
    this.content.appendChild(userField.row);
    this.content.appendChild(passwordField.row);

    const button = document.createElement('button');
    button.textContent = 'Submit';
    button.addEventListener('click', () => {
      callbacks.onSubmit(userField.input.value.trim(), passwordField.input.value);
    });
    this.content.appendChild(button);
  }

  // --------------------------------------------------------------------
  // [tax calculation] view
  // --------------------------------------------------------------------
  calculationView(
    result: Simulation | undefined,
    error: string | undefined,
    callbacks: CalculationCallbacks
  ): void {
    this.showMenu([
      this.menuLink('List of simulations', callbacks.onList),
      this.menuLink('End of session', callbacks.onEndSession)
    ]);

    this.content.innerHTML = '';

    const title = document.createElement('div');
    title.className = 'section-title';
    title.textContent = 'Fill in the form below and then submit it';
    this.content.appendChild(title);

    const banner = this.errorBanner(error);
    if (banner) {
      this.content.appendChild(banner);
    }

    // row of the [married] radios
    const marriedRow = document.createElement('div');
    marriedRow.className = 'field-row';
    const marriedLabel = document.createElement('label');
    marriedLabel.textContent = 'Are you married or in a civil partnership?';
    const marriedField = document.createElement('div');
    marriedField.className = 'field radios';

    const radioYes = document.createElement('input');
    radioYes.type = 'radio';
    radioYes.name = 'married';
    radioYes.value = 'yes';
    radioYes.checked = true;
    const labelYes = document.createElement('label');
    labelYes.appendChild(radioYes);
    labelYes.appendChild(document.createTextNode(' Yes'));

    const radioNo = document.createElement('input');
    radioNo.type = 'radio';
    radioNo.name = 'married';
    radioNo.value = 'no';
    const labelNo = document.createElement('label');
    labelNo.appendChild(radioNo);
    labelNo.appendChild(document.createTextNode(' No'));

    marriedField.appendChild(labelYes);
    marriedField.appendChild(labelNo);
    marriedRow.appendChild(marriedLabel);
    marriedRow.appendChild(marriedField);
    this.content.appendChild(marriedRow);

    const childrenField = this.fieldRow("Number of dependent children", 'number', '0');
    this.content.appendChild(childrenField.row);

    const salaryField = this.fieldRow('Annual salary', 'number', '', "Round down to the nearest euro");
    this.content.appendChild(salaryField.row);

    const button = document.createElement('button');
    button.textContent = 'Submit';
    button.addEventListener('click', () => {
      const married = radioYes.checked ? 'yes' : 'no';
      const children = parseInt(childrenField.input.value, 10) || 0;
      const salary = parseInt(salaryField.input.value, 10) || 0;
      callbacks.onSubmit(married, children, salary);
    });
    this.content.appendChild(button);

    // result of the last simulation (green box), if there is one
    if (result) {
      const box = document.createElement('div');
      box.className = 'result';
      const ratePercent = Math.round(result.rate * 100);
      box.innerHTML =
        `Tax amount: ${result.tax} euros<br>` +
        `Discount: ${result.discount} euros<br>` +
        `Reduction: ${result.reduction} euros<br>` +
        `Surcharge: ${result.surcharge} euros<br>` +
        `Tax rate: ${ratePercent} %`;
      this.content.appendChild(box);
    }
  }

  // --------------------------------------------------------------------
  // [list of simulations] view
  // --------------------------------------------------------------------
  listView(
    simulations: Simulation[],
    error: string | undefined,
    callbacks: ListCallbacks
  ): void {
    this.showMenu([
      this.menuLink("Tax calculation", callbacks.onCalculation),
      this.menuLink('End of session', callbacks.onEndSession)
    ]);

    this.content.innerHTML = '';

    const title = document.createElement('div');
    title.className = 'section-title';
    title.textContent = 'List of your simulations';
    this.content.appendChild(title);

    const banner = this.errorBanner(error);
    if (banner) {
      this.content.appendChild(banner);
    }

    if (simulations.length === 0) {
      const empty = document.createElement('div');
      empty.className = 'simulations-empty';
      empty.textContent = 'No simulation recorded.';
      this.content.appendChild(empty);
      return;
    }

    const table = document.createElement('table');
    table.className = 'simulations';
    const thead = document.createElement('thead');
    thead.innerHTML =
      '<tr><th>#</th><th>Married</th><th>Number of children</th><th>Annual salary</th>' +
      '<th>Tax amount</th><th>Surcharge</th><th>Discount</th><th>Reduction</th><th>Rate</th><th></th></tr>';
    table.appendChild(thead);

    const tbody = document.createElement('tbody');
    simulations.forEach((simulation, number) => {
      const tr = document.createElement('tr');
      const ratePercent = Math.round(simulation.rate * 100);
      tr.innerHTML =
        `<td>${number}</td>` +
        `<td>${simulation.married}</td>` +
        `<td>${simulation.children}</td>` +
        `<td>${simulation.salary}</td>` +
        `<td>${simulation.tax}</td>` +
        `<td>${simulation.surcharge}</td>` +
        `<td>${simulation.discount}</td>` +
        `<td>${simulation.reduction}</td>` +
        `<td>${ratePercent} %</td>`;
      const tdDelete = document.createElement('td');
      const deleteLink = document.createElement('a');
      deleteLink.className = 'delete';
      deleteLink.textContent = 'Delete';
      deleteLink.addEventListener('click', () => callbacks.onDelete(number));
      tdDelete.appendChild(deleteLink);
      tr.appendChild(tdDelete);
      tbody.appendChild(tr);
    });
    table.appendChild(tbody);
    this.content.appendChild(table);
  }
}

// 导出该类
export default Views;
徽标和 TypeScript 接口(第 1 至 60 行):
- 第 16–29 行:LOGO_SVG 是一个多行字符串(由反引号 \ \ 界定,即“模板字符串”),包含一个小的通用矢量图形(SVG),用来代替原 PHP 服务器的图片,该图片未随 TypeScript 项目提供;
- 第 32 至 41 行:Simulation 接口描述了服务器返回的模拟的格式——它所包含的字段名与 PHP 和 [Simulation.php] 类中的完全相同(married、children、salary、tax、surcharge, discount, reduction, rate);
- 第 44 至 60 行:三个 Callbacks... 接口分别描述了每个视图中控制器必须提供的回调函数(例如 onSubmit,在用户点击“提交”按钮时调用)。
构造函数(第 62–94 行):
- 第 70 行:构造函数接收根 HTML 元素(root,即模板中的 <div id="app"> 标签)——参数前的
private关键字是一种简写,它会自动创建一个root属性,而无需编写this.root = root;; - 第 73 至 81 行:构造横幅(div.banner),其中包含徽标和标题 <h1>Calculate your tax</h1> ;
- 第 83 至 90 行:构造页面主体(div.page-body),它始终包含两个字段:this.menu 和 this.content——它们是对象的属性(第 64–66 行),保存在内存中,以便每次切换视图时清空并重新填充;
- 第 92 和 93 行:最后把页头和主体添加到页面的根元素中。
私有工具方法(第 96–159 行):
- clearMenu (第 100–104 行):隐藏菜单列,并为内容区域添加 full-width CSS 类——供没有菜单的身份验证视图使用;
- menuLink (第 106–111 行):创建一个带有文本和点击回调函数的 <a> 链接——这是一个小型工厂方法,被复用来构建每个菜单链接(“模拟列表”“结束会话”等);
- showMenu (第 113–118 行):显示菜单列,并把作为参数接收的链接放入其中(一个已通过 menuLink 构建好的链接数组);
- errorBanner (第 120–128 行):如果提供了错误消息,就创建红色的错误框(CSS 类 error),否则不返回任何内容(null);
- fieldRow (第 130–159 行):文件中使用最频繁的工厂方法——它构造完整的表单行(标签 + 输入字段,可带帮助文本),并同时返回完整的行(line)和单独的输入字段(input),以便调用者随后读取用户输入的值。
authenticationView 方法(第 161–189 行):
- 第 165 和 166 行:视图总是先清空上一个视图的菜单和内容;
- 第 168 至 171 行:蓝色方框“请进行身份验证”;
- 第 173 至 176 行:错误横幅,仅当
error不为空时才显示(即只在身份验证尝试失败之后); - 第 178 至 181 行:两个表单字段,使用 fieldRow 构建;
- 第 183 至 188 行:“提交”按钮;它的点击处理程序(第 185 至 187 行)使用两个输入字段的内容调用 callbacks.onSubmit(...) ——这个类所做的仅此而已:它既不验证也不自行发送任何内容,只是转交用户输入的内容。
calculationView 方法(第 191–276 行):
- 第 199 至 202 行:与上一个视图不同,这个视图显示一个菜单,其中有“模拟列表”和“结束会话”链接;
- 第 217 至 245 行:创建“是”/“否”两个单选按钮(“您是否已婚或处于民事伴侣关系?”)——比其他字段稍长,因为单选按钮没有像 fieldRow 那样的通用生成器;
- 第 247 至 251 行:“受抚养子女数”和“年薪”字段,使用 fieldRow 构建;
- 第 253 至 261 行:“提交”按钮;它的点击处理程序读取单选按钮的状态和两个数值字段的内容(使用 parseInt,因为 HTML 字段的值始终是字符串),然后调用 callbacks.onSubmit(married, children, salary);
- 第 264 至 275 行:如果返回了 result (即计算成功之后),就创建绿色方框,并填入模拟中的五项信息;result.rate 是 0 到 1 之间的数(例如 0.14),第 267 行把它转换为四舍五入的百分数(14)用于显示。
listView 方法(第 278–344 行):
- 第 286 至 289 行:该视图的菜单提供“税款计算”(用于返回)和“结束会话”;
- 第 303 至 309 行:列表为空的特殊情况——显示一条简单的消息(“没有已记录的模拟。”),方法到此结束(return),不再构造表格;
- 第 311 至 317 行:构造表头(<thead>),模拟中的每个字段对应一列,外加最后一个用于“删除”链接的空列;
- 第 319 至 341 行:为每个模拟构造一个表格行(<tr>),使用 simulations.forEach(...) ——该函数的第二个参数 “number”自动就是该模拟在数组中的索引(从 0 开始),这正是 “delete-simulation” 服务器动作所期望的编号;
- 第 333 至 339 行:每一行的“删除”链接;它的点击处理程序(第 337 行)使用相应行的编号调用 callbacks.onDelete(number) 。
6.5.1.5. 控制器:[AppHtml.ts] 文件
这是应用程序的编排者:它承担了 main() 函数在 **[main3.ts] 中扮演的角色,但采用类的形式,每个视图对应一个方法。它现在协调两个层:[dao] (服务器)和 [business] (计算),然后指示 [views]** 层显示结果或错误消息:
// 导入
import axios from 'axios';
import "core-js/stable";
import "regenerator-runtime/runtime";

// 导入
import Dao from './Dao3';
import Business from './Business';
import Views, { Simulation } from './Views';

// -----------------------------------------------------------------------
// HTML 应用程序的控制器:编排对服务器的调用
// ([dao] 层)、计算([business] 层)以及视图的显示
// ([views] 层)。
//
// 与 [main3.ts] 一样,该客户端只为三个动作调用 PHP 服务器:
// [init-session]、[authenticate-user] 和 [get-admindata]。
// 一旦用 [get-admindata] 取回税务数据(税率、上限……),
// 就由 [business] 层([Business] 类,与 [main3.ts] 使用的是同一个
// [Business.ts] 文件)在浏览器中计算税款,
// 无需任何新的网络调用。模拟列表同样
// 只保存在浏览器中(数组 [this.simulations]),
// 与 [main3.ts] 使用其本地数组 [simulations] 的做法完全一样
// (参见 `simulations.push(...)` 和 `simulations.splice(...)`)。
// -----------------------------------------------------------------------
class AppHtml {

  private dao: Dao;
  private views: Views;
  // [business] layer: only exists once the tax data has been retrieved
  // (after a successful authentication) - see [initBusiness]
  private business?: Business;
  // list of the simulations already calculated, kept in the browser
  private simulations: Simulation[] = [];

  constructor() {
    // axios configuration - identical to [main3.ts]
    axios.defaults.timeout = 5000;
    axios.defaults.baseURL = 'http://localhost/';
    axios.defaults.withCredentials = true;
    // [dao] and [views] layers
    this.dao = new Dao(axios);
    this.views = new Views(document.getElementById('app')!);
  }

  // entry point of the application
  async start(): Promise<void> {
    try {
      // init session - mandatory before any other action (see [main.php])
      const response = await this.dao.initSession();
      if (response.status !== 700) {
        this.views.authenticationView(this.formatError(response.response), {
          onSubmit: (user, password) => this.authenticate(user, password)
        });
        return;
      }
    } catch (error: any) {
      this.views.authenticationView(
        "Unable to contact the server (" + error.message + ")",
        { onSubmit: (user, password) => this.authenticate(user, password) }
      );
      return;
    }
    // session initialized: we display the authentication
    this.showAuthentication();
  }

  // --------------------------------------------------------------------
  // [authentication] view
  // --------------------------------------------------------------------
  private showAuthentication(error?: string): void {
    this.views.authenticationView(error, {
      onSubmit: (user, password) => this.authenticate(user, password)
    });
  }

  private async authenticate(user: string, password: string): Promise<void> {
    try {
      const response = await this.dao.authenticateUser(user, password);
      if (response.status === 200) {
        // successful authentication: as in [main3.ts], we now retrieve,
        // once and for all, the tax data
        // needed by the [business] layer
        await this.initBusiness();
      } else {
        // failure (wrong login/password, or missing parameters)
        this.showAuthentication(this.formatError(response.response));
      }
    } catch (error: any) {
      this.showAuthentication("Unable to contact the server (" + error.message + ")");
    }
  }

  // retrieves the tax administration data and instantiates the
  // [business] layer with this data - a single server call for the whole session,
  // exactly like [main3.ts]
  private async initBusiness(): Promise<void> {
    try {
      const response = await this.dao.getAdminData();
      if (response.status === 1000) {
        this.business = new Business(response.response);
        // new work session: we start again from an empty list
        this.simulations = [];
        this.showCalculation();
      } else {
        this.showAuthentication(this.formatError(response.response));
      }
    } catch (error: any) {
      this.showAuthentication("Unable to contact the server (" + error.message + ")");
    }
  }

  // --------------------------------------------------------------------
  // [tax calculation] view
  // --------------------------------------------------------------------
  private showCalculation(result?: Simulation, error?: string): void {
    this.views.calculationView(result, error, {
      onSubmit: (married, children, salary) => this.calculate(married, children, salary),
      onList: () => this.showList(),
      onEndSession: () => this.endSession()
    });
  }

  // tax calculation done entirely in the browser ([business] layer):
  // no call to the server, unlike the first version of this client
  private calculate(married: string, children: number, salary: number): void {
    // this.business has necessarily been initialized: we only reach the
    // [calculation] view after [initBusiness]
    const result = this.business!.calculateTax(married, children, salary);
    // the result returned by [business.calculateTax] only contains the
    // calculated values (tax, surcharge, discount, reduction, rate): we add to it
    // the parameters entered by the user, so that they can be
    // displayed again in the list of simulations
    const simulation: Simulation = { married: married, children: children, salary: salary, ...result };
    // storage in the browser (like `simulations.push(...)` in [main3.ts])
    this.simulations.push(simulation);
    this.showCalculation(simulation);
  }

  // --------------------------------------------------------------------
  // [list of simulations] view
  // --------------------------------------------------------------------
  // no more server calls here: the list is already entirely in
  // [this.simulations]
  private showList(error?: string): void {
    this.views.listView(this.simulations, error, {
      onDelete: (number) => this.deleteSimulation(number),
      onCalculation: () => this.showCalculation(),
      onEndSession: () => this.endSession()
    });
  }

  private deleteSimulation(number: number): void {
    // local deletion from the array [this.simulations], like
    // `simulations.splice(1, 1)` in [main3.ts] - still no server call
    this.simulations.splice(number, 1);
    this.showList();
  }

  // --------------------------------------------------------------------
  // end of session
  // --------------------------------------------------------------------
  private endSession(): void {
    // end of session on the client side only: we forget the [business] layer
    // (and therefore the tax data) and the simulations already calculated, then we
    // go back to the authentication screen. This client does not need to
    // call the server for this.
    this.business = undefined;
    this.simulations = [];
    this.showAuthentication();
  }

  // --------------------------------------------------------------------
  // formats the [response] field of an error response from the server,
  // which is either a string or an array of strings (see PHP controllers)
  // --------------------------------------------------------------------
  private formatError(response: unknown): string {
    if (Array.isArray(response)) {
      return response.join(' ; ');
    }
    return String(response);
  }
}

// 执行
window.addEventListener('DOMContentLoaded', () => {
  new AppHtml().start();
});
头部注释(第 11–25 行):
- 它概括了这个控制器的全部思路,正如前面所解释的:只使用三个服务器动作;计算由浏览器中的 [business] 层执行;模拟列表是保存在客户端的一个简单数组——在文件顶部写这样的注释是一个值得养成的好习惯:它能让读者在深入代码细节之前,立即对整体有个概览。
类的字段和构造函数(第 26–44 行):
- 第 28 和 29 行:DAO 和 views,在该客户端的第一个版本中就已存在;
- 第 30–32 行:新增的 business 字段,类型为 Business——问号(?)使它成为 可选字段:在用户完成身份验证之前,该属性还没有值(为 undefined);
- 第 33 和 34 行:新增的 “simulations” 字段;该数组(初始为空,= [])取代了原来对服务器的调用 “list-simulations” 和 “delete-simulation”;
- 第 38 至 40 行:[axios] 的配置,与 [main3.ts] 中的相同——特别是 withCredentials = true,它对于让会话 Cookie 随每个请求一起发送至关重要;
- 第 42 和 43 行:实例化 [dao] 层和 [views] 层,与之前相同。
入口点 **start (第 47 至 66 行):**
- 第 50 行:应用程序所做的第一件事就是调用
init-session,任何其他动作之前都必须先调用它(参见 PHP 文件 [main.php],在会话初始化之前它会阻止任何动作): - 第 51 至 56 行:如果失败(状态不是 700),则仍然显示身份验证视图,并附上服务器返回的错误消息;
- 第 57 至 63 行:
catch块处理服务器完全无法访问的情况(服务器宕机、URL 无效等)——这是网络错误,不同于服务器返回的普通错误响应; - 第 65 行:如果一切顺利,最终显示不带错误消息的身份验证视图——在这个阶段,该方法与上一版本保持一致。
身份验证视图以及 [business] 层的初始化(第 71–111 行):
- showAuthentication (第 71–75 行):没有变化;它只是指示 [views] 层显示该视图,并通过 onSubmit 把
authenticate方法作为回调; - authenticate (第 77–92 行):调用 dao.authenticateUser(user, password);如果状态为 200,则不再像以前那样直接显示计算视图,而是改为调用 this.initBusiness() (第 84 行),这是一个新方法;如果失败,则重新显示带有错误消息的身份验证视图(第 87 行),这部分没有变化;
- initBusiness (第 97–111 行),一个新方法:它调用 dao.getAdminData()——这是整个文件中唯一向服务器请求该动作的地方,且只请求一次;如果状态为 1000,就用收到的数据创建 Business 对象(第 101 行,new Business(response.response)),重置模拟数组(第 103 行——一次新的身份验证对应一次新的工作会话),最后显示计算视图(第 104 行)。
税款计算视图(第 116–138 行):
- showCalculation (第 116–122 行):没有变化——调用时可以带 结果,也可以不带:对于空表单(首次访问或从列表返回)不带结果,在成功计算之后立即显示时带结果;
- calculate (第 126–138 行):这是变化最大的方法。它不再是 异步的 ,也不再包含网络 try/catch 块,因为它不再调用服务器;第 129 行,this.business!.calculateTax(married, children, salary) 直接计算出结果——感叹号(!)告诉 TypeScript,我们确信
business已经初始化(只有在 initBusiness 之后才能到达这个视图);第 130 至 134 行:由于这个结果不包含输入的参数,因此使用展开运算符 ...result 把参数附加到结果上,以构造完整的 simulation 对象;第 136 行,this.simulations.push(simulation) 把这个新的模拟存入浏览器端的数组;第 137 行,最后用这个结果重新绘制视图。
模拟列表视图(第 145 至 158 行):
- showList (第 145–151 行):不再调用服务器——它直接把已在内存中的数组 this.simulations 传给 [views] 层;
- deleteSimulation(第 153–158 行):第 156 行,this.simulations.splice(number, 1) 直接从浏览器端的数组中取出该模拟——与 simulations.splice(1, 1) 指令在 [main3.ts] 中完全等价——然后在第 157 行重新显示(已更新的)列表。
结束会话和入口点(第 163–189 行):
- endSession(第 163–171 行):它不再调用 dao.endSession() (该方法已从 [Dao3.ts] 中移除)——它只是丢弃 [business] 层(第 168 行,this.business = undefined)和模拟列表(第 169 行,this.simulations = []),然后重新显示身份验证界面(第 170 行);与该客户端的其余部分一样,结束会话因此不再需要任何网络请求;
- formatError (第 177–182 行):没有变化——服务器错误(PHP)的 response 字段有时是字符串,有时是字符串数组(取决于控制器);该方法总是把消息归并为单个字符串,以便直接显示;
- 第 186–188 行:脚本的入口点位于类之外,保持不变——DOMContentLoaded 确保在创建控制器并调用 start() 之前,HTML 页面已完全加载;对于这个图形界面客户端,它相当于
main();调用,位于 [main3.ts] 的末尾。
6.5.1.6. 编译与执行
编译和执行与上一节完全相同([npm run build] 或 [npm start]):只有 [webpack.config.js] 中的入口点发生了变化。下面是得到的三个界面,请与开头提供的 [web_application_views.odt] 文档中的截图作比较:
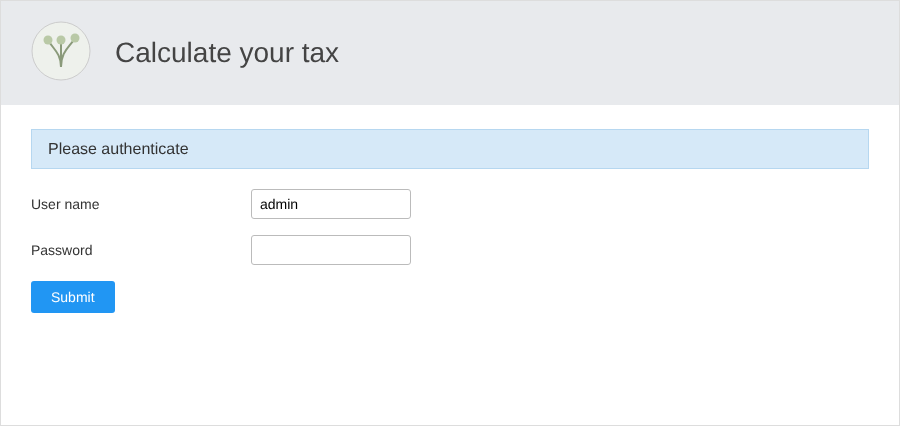
身份验证界面:为方便起见,用户名预先填入了“admin”;如果身份验证失败,错误消息会显示在表单上方。
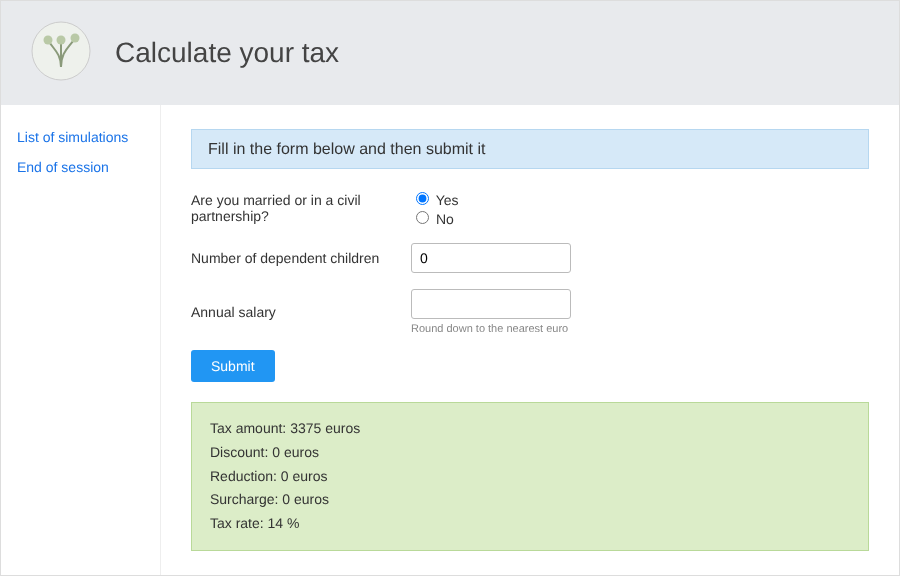
税款计算界面,提交第一个表单之后:绿色方框显示由 [business] 层在浏览器中计算出的结果(tax、discount、reduction、surcharge、rate,这里已转换为百分数)。
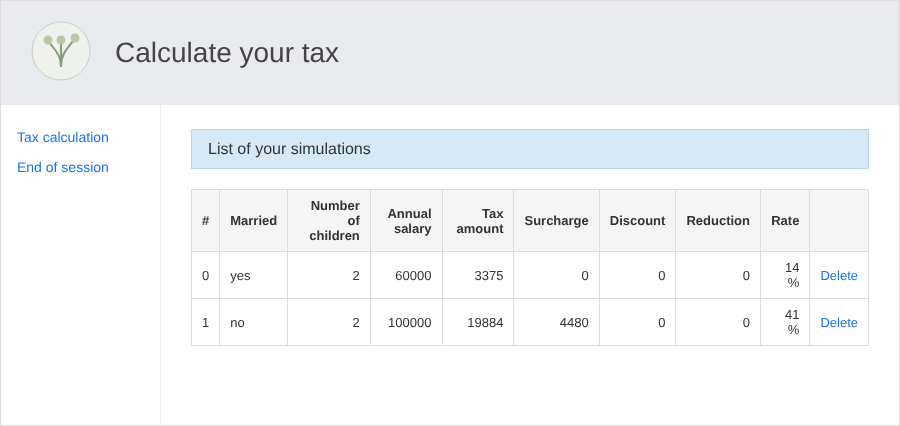
通过点击“模拟列表”链接进入的“您的模拟列表”界面:每一行对应一个存放在浏览器端 [this.simulations] 数组中的模拟,并带有它的“删除”链接。
五个视图如下:身份验证、带结果的计算、模拟列表、删除模拟 (重新显示更新后的列表)以及 结束会话 (返回身份验证界面)——除了三个动作之外,全程从不向 PHP 服务器发出任何请求:init-session、authenticate-user、和 get-admindata。
6.6. 结论
本章展示了同一个业务逻辑基础(DAO 层和 business 层)如何既能从命令行运行(node.js,“HTTP 客户端 1”和“HTTP 客户端 2”两章),也能在浏览器中运行(“HTTP 客户端 3”一章),只需借助合适的编译工具——这里是 webpack 和 ts-loader。这个 TypeScript 基础是现代前端框架(React、Vue、Angular……)的起点,它们都建立在相同的构建块之上:模块、类、async/await,以及为浏览器把它们组装起来的构建工具。