8. 身份验证与授权
每个请求都会引出两个不同的问题:
- 用户是谁?这是身份验证:用户已经用用户名和密码表明了身份,之后的每个请求都必须证明它来自该用户;
- 用户是否有权限访问此页面?这是授权:在案例研究中,只有角色为 ADMIN 的用户才能管理医生和客户。
由于服务器是无状态的(第 6 章),身份证明必须随每个请求一起提供。这里使用 JWT 令牌 ([JSON Web Token]):登录后,服务器生成一个包含用户身份的令牌,并用密钥对其签名。令牌存储在 Cookie 中;浏览器在每个请求中将其发回;服务器验证签名。用户可以读取自己的令牌,但无法修改它:任何修改都会使签名失效。
[ASP.NET Core] 清楚地区分了这两个问题:
- 身份验证由中间件([UseAuthentication])和一个身份验证方案负责:这里是由 [JwtBearer] 方案,它由 [NuGet] [Microsoft.AspNetCore.Authentication.JwtBearer] 包提供。对每个请求,它查找令牌、验证令牌,并由此得出用户,即 [HttpContext.User];
- 授权由 [[Authorize]] 特性处理,并由 [UseAuthorization] 中间件验证:它将操作的要求与已知的用户信息进行比较。
本章的示例使用两个 [NuGet] 包:[Microsoft.AspNetCore.Authentication.JwtBearer] 和 [BCrypt.Net-Next] (密码哈希)。它们在项目文件中声明;命令 [dotnet build] (或 [dotnet run])会在首次编译时从 nuget.org 下载它们:因此需要连接互联网。
8.1. 示例 25:登录、令牌、受保护页面
| 25-jwt/
├── Auth/
│ ├── AuthService.cs
│ └── UsersService.cs
├── Controllers/
│ ├── AuthController.cs
│ └── ProfileController.cs
├── Views/
│ ├── Auth/
│ │ └── Login.cshtml
│ ├── Profile/
│ │ └── Profile.cshtml
│ ├── Shared/
│ │ └── _Layout.cshtml
│ ├── _ViewImports.cshtml
│ └── _ViewStart.cshtml
├── appsettings.json
├── Example25.csproj
└── Program.cs
|
文件 [Example25.csproj]:
| <Project Sdk="Microsoft.NET.Sdk.Web">
<ItemGroup>
<!-- JWT 令牌身份验证(令牌验证) -->
<PackageReference Include="Microsoft.AspNetCore.Authentication.JwtBearer" Version="10.0.0" />
<!-- 密码哈希(bcrypt) -->
<PackageReference Include="BCrypt.Net-Next" Version="4.0.3" />
</ItemGroup>
</Project>
|
- 第 5–7 行:所使用的 [NuGet] 包及其版本。所有示例共有的元素([.NET] 的版本等)位于 [Directory.Build.props] 文件中,该文件在 [examples] 文件夹中。
文件 [appsettings.json]:
| {
"Logging": {
"LogLevel": {
"Default": "Information",
"Microsoft.AspNetCore": "Warning"
}
},
"AllowedHosts": "*",
"Jwt": {
"Secret": "a-secret-key-of-at-least-32-characters-for-example-25",
"DurationMinutes": 60
}
}
|
- 第 9–11 行:应用程序专用的配置节:用于签名令牌的密钥及令牌的生存期。任何知道密钥的人都可以生成有效的令牌:在生产环境中,密钥不存储在项目文件中,而是由环境变量([Jwt__Secret])或机密保管库提供。所使用的算法(HMAC-SHA256)要求密钥至少为 32 字节。
文件 [Auth/UsersService.cs]:
| namespace Example25.Auth;
public record User(string Login, string Name, string Role, string PasswordHash);
// 用户,在内存中(下一章会把它们放入数据库)
public class UsersService
{
private readonly List<User> users =
[
// 密码绝不保存,只保存其哈希
Create("marie", "Marie Pélissier", "USER", "marie"),
Create("admin", "Administrator", "ADMIN", "admin"),
];
public User? Find(string login) =>
users.Find(u => u.Login == login);
// bcrypt,成本为 10:2^10 轮计算,故意设计得很慢
private static User Create(string login, string name, string role, string password) =>
new(login, name, role, BCrypt.Net.BCrypt.HashPassword(password, 10));
}
|
- 第 3 行:一个用户及其角色;
- 第 10–12 行:密码从不存储;只保留它的哈希——由单向函数计算出的指纹。可以验证某个密码是否与指纹匹配,但无法从指纹恢复出密码;
- 第 19–20 行:[BCrypt.Net.BCrypt.HashPassword(password, 10)] 使用 [bcrypt] 算法计算哈希。其中的 10 表示“成本”:[bcrypt] 故意设计得很慢(2¹⁰ 个计算轮次),以阻止他人尝试数百万个密码。同一密码的两次哈希结果是不同的(因为加入了随机“盐”):由 [BCrypt.Verify] 负责验证它们。
文件 [Auth/AuthService.cs]:
| using System.Text;
using Microsoft.IdentityModel.JsonWebTokens;
using Microsoft.IdentityModel.Tokens;
namespace Example25.Auth;
public class AuthService(UsersService users, IConfiguration configuration)
{
// 承载令牌的 Cookie 的名称
public const string Cookie = "token";
// 用于签名令牌的密钥,从 appsettings.json 读取(Jwt 节)
public static SymmetricSecurityKey Key(IConfiguration configuration) =>
new(Encoding.UTF8.GetBytes(configuration["Jwt:Secret"]!));
// 登录名未知或密码错误时为 null
public User? Validate(string? login, string? password)
{
var user = users.Find(login ?? "");
if (user is null || password is null)
{
return null;
}
return BCrypt.Net.BCrypt.Verify(password, user.PasswordHash) ? user : null;
}
// 用户的 JWT 令牌,用密钥签名
public string CreateToken(User user)
{
var descriptor = new SecurityTokenDescriptor
{
// 令牌的内容:“声明”(claims,关于用户的陈述)
Claims = new Dictionary<string, object>
{
["sub"] = user.Login,
["name"] = user.Name,
["role"] = user.Role,
},
Expires = DateTime.UtcNow.AddMinutes(configuration.GetValue<int>("Jwt:DurationMinutes")),
SigningCredentials = new SigningCredentials(Key(configuration), SecurityAlgorithms.HmacSha256),
};
return new JsonWebTokenHandler().CreateToken(descriptor);
}
}
|
让我们分析这段代码:
- 第 10 行:携带令牌的 Cookie 的名称;
- 第 13–14 行:签名密钥,由 [appsettings.json] 中的文本生成。[IConfiguration] 提供对配置的访问;["Jwt:Secret"] 指的是 [Secret] 属性,位于 [Jwt] 节中。签名和验证令牌使用同一个密钥(对称算法);
- 第 17–24 行:验证用户名和密码;
- 第 33–37 行:令牌的内容,即声明 (关于用户的陈述)。[sub] ([subject])是用户标识符的惯用名称。我们放入页面所需的信息(姓名、角色),这样就不必在每个请求中都查询数据库;
- 第 39 行:令牌的过期时间;
- 第 40 行:签名密钥和算法;
- 第 42 行:类 [JsonWebTokenHandler] (包 [Microsoft.IdentityModel.JsonWebTokens],由 [JwtBearer] 提供)生成已签名的令牌。
文件 [Program.cs]:
| using System.Text.Encodings.Web;
using System.Text.Unicode;
using Example25.Auth;
using Microsoft.AspNetCore.Authentication.JwtBearer;
using Microsoft.Extensions.FileProviders;
using Microsoft.IdentityModel.Tokens;
var builder = WebApplication.CreateBuilder(args);
builder.Services.AddControllersWithViews();
builder.Services.AddSingleton(HtmlEncoder.Create(UnicodeRanges.All));
builder.Services.AddSingleton<UsersService>();
builder.Services.AddSingleton<AuthService>();
// 身份验证:JWT 令牌,每个请求都会验证
builder.Services
.AddAuthentication(JwtBearerDefaults.AuthenticationScheme)
.AddJwtBearer(options =>
{
options.MapInboundClaims = false; // 保持声明名称不变("sub"、"role"……)
options.TokenValidationParameters = new TokenValidationParameters
{
ValidateIssuerSigningKey = true,
IssuerSigningKey = AuthService.Key(builder.Configuration), // 签名必须是我们自己的
ValidateLifetime = true, // 令牌不得过期
ValidateIssuer = false,
ValidateAudience = false,
NameClaimType = "name", // User.Identity.Name
RoleClaimType = "role", // [Authorize(Roles = ...)]、User.IsInRole(...)
};
options.Events = new JwtBearerEvents
{
// 1. 令牌从 Cookie 中读取(而不是从 Authorization 标头)
OnMessageReceived = context =>
{
context.Token = context.Request.Cookies[AuthService.Cookie];
return Task.CompletedTask;
},
// 2. 没有有效令牌就访问受保护页面:转到登录页面
OnChallenge = context =>
{
context.HandleResponse(); // 我们自己构建响应(不返回 401)
context.Response.Redirect("/login");
return Task.CompletedTask;
},
};
});
builder.Services.AddAuthorization();
var app = builder.Build();
app.UseStaticFiles(new StaticFileOptions
{
FileProvider = new PhysicalFileProvider(Path.GetFullPath(Path.Combine(builder.Environment.ContentRootPath, "..", "common", "bootstrap"))),
RequestPath = "/bootstrap",
});
app.UseAuthentication(); // 是谁?-> HttpContext.User
app.UseAuthorization(); // 是否允许?-> [Authorize]
app.MapControllers();
app.Run();
|
让我们对这段代码做些说明:
- 第 16–17 行:我们声明 [JwtBearer] 身份验证方案,并将其设为默认方案;
- 第 19 行:默认情况下,[JwtBearer] 会使用继承自 Microsoft 技术的长名称来重命名某些声明([role] 会变成 [http://schemas.microsoft.com/ws/2008/06/identity/claims/role])。我们保留令牌中的名称;
- 第 20–26 行:对每个令牌执行的检查:签名(使用我们的密钥)和过期时间。我们的令牌既没有指定颁发者([issuer])也没有指定接收者([audience]),因此不对它们进行验证;
- 第 27–28 行:哪个声明包含用户名([User.Identity.Name]),哪个声明包含其角色([[Authorize(Roles = ...)]]、[User.IsInRole(...)]);
- 第 33–36 行:事件 来自 [JwtBearer] ,可用于自定义其行为。默认情况下,它在请求的 [Authorization: Bearer ...] 头中查找令牌:[JavaScript] 客户端或移动应用就是这样工作的。浏览器不会自行添加该头:因此令牌从 Cookie 中获取;
- 第 39–42 行:当请求受保护的页面而没有有效令牌时,就会发生质询 。默认情况下,响应是没有内容的 401 错误:这对 [JavaScript] 客户端有用,但会让用户困惑。这里将用户重定向到登录页面。[HandleResponse()] 告诉 [JwtBearer] 响应已被处理;
- 第 56–57 行:两个中间件,按此顺序:先确定用户是谁,再验证其权限。
文件 [Controllers/AuthController.cs]:
| using Example25.Auth;
using Microsoft.AspNetCore.Mvc;
namespace Example25.Controllers;
public class AuthController(AuthService auth, IConfiguration configuration) : Controller
{
[HttpGet("/")]
public IActionResult Home() => Redirect("/profile");
[HttpGet("login")]
public IActionResult Form() => View("Login");
[HttpPost("login")]
public IActionResult Login(string? login, string? password)
{
var user = auth.Validate(login, password);
if (user is null)
{
// 故意含糊的消息:我们不说明是登录名还是密码有误
ViewData["Error"] = "Incorrect login or password.";
ViewData["Login"] = login;
return View("Login");
}
// 令牌放在页面 JavaScript 无法读取的 Cookie 中
Response.Cookies.Append(AuthService.Cookie, auth.CreateToken(user), new CookieOptions
{
HttpOnly = true,
SameSite = SameSiteMode.Lax,
MaxAge = TimeSpan.FromMinutes(configuration.GetValue<int>("Jwt:DurationMinutes")),
});
return Redirect("/profile");
}
// 退出登录会改变用户的状态:因此使用 POST
[HttpPost("logout")]
public IActionResult Logout()
{
Response.Cookies.Delete(AuthService.Cookie);
return Redirect("/login");
}
}
|
让我们对这段代码做些说明:
- 第 14–23 行:登录。如果登录失败,则重新显示表单,并给出刻意含糊的消息:如果说“此登录名不存在”,就会帮助攻击者找到有效的登录名;
- 第 26–32 行:如果成功,令牌存储在 [HttpOnly] Cookie 中;页面的 [JavaScript] 无法读取它,这样即使页面上执行了恶意脚本,令牌也受到保护。[SameSite = Lax]:从其他站点发送的 POST 请求不会带上该 Cookie,这可以防范请求伪造([CSRF])。Cookie 的生存期与令牌的生存期一致;
- 第 36–40 行:注销会删除 Cookie([Cookies.Delete])。这是一个 POST:它会改变用户的状态(见示例 21)。
文件 [Controllers/ProfileController.cs]:
| using Microsoft.AspNetCore.Authorization;
using Microsoft.AspNetCore.Mvc;
namespace Example25.Controllers;
// [Authorize]:仅限已通过身份验证的用户
[Authorize]
public class ProfileController : Controller
{
[HttpGet("profile")]
public IActionResult Profile()
{
// User:由令牌验证身份的用户(HttpContext.User)
return View(User.Claims.Select(c => (c.Type, c.Value)).ToList());
}
}
|
- 第 7 行:设置在控制器上的 [[Authorize]] 特性将其所有操作限制为已通过身份验证的用户。这是一个授权过滤器(见第 7 章)。没有有效令牌时,它会触发质询,结果是重定向到 [/login];
- 第 14 行:[User] (请求的 [HttpContext.User] )是 [JwtBearer] 根据令牌确立的用户。[User.Claims] 是其声明列表;它被转换为供视图使用的(类型,值)对列表。
文件 [Views/Profile/Profile.cshtml]:
| @model List<(string Type, string Value)>
<h1 class="h3">Hello @User.Identity!.Name</h1>
<p>Your role: <b>@(User.IsInRole("ADMIN") ? "administrator" : "user")</b>.</p>
<p>The content of your token:</p>
<table class="table table-sm w-auto">
@foreach (var (type, value) in Model)
{
<tr><td><code>@type</code></td><td>@value</td></tr>
}
</table>
@* logging out: a POST form reduced to its button *@
<form method="post" action="/logout">
<button class="btn btn-outline-secondary" type="submit">Log out</button>
</form>
|
- 第 2 行:属性 [User] 在视图中也可以访问。名称是声明 [name] (参见 [NameClaimType]);
- 第 3 行:[IsInRole] 测试声明 [role] (参见 [RoleClaimType]);
- 第 6 行:循环将每一对解构为两个变量;
- 第 12 行:通过 POST 表单注销。
文件 [Views/Auth/Login.cshtml]:
| <h1 class="h3">Login</h1>
<form method="post" action="/login">
<div class="mb-2">
<label class="form-label" for="login">Login</label>
<input class="form-control" id="login" name="login" value="@ViewData["Login"]" required>
</div>
<div class="mb-3">
<label class="form-label" for="password">Password</label>
<input class="form-control" type="password" id="password" name="password" required>
</div>
<button class="btn btn-primary" type="submit">Log in</button>
</form>
@if (ViewData["Error"] is string error)
{
<div class="alert alert-danger mt-3">@error</div>
}
<p class="text-muted small mt-3">Test accounts (password = login): marie (USER), admin (ADMIN).</p>
|
8.1.1. 执行
没有 Cookie 时,受保护的页面会重定向到登录页面:
| curl -i http://localhost:5000/profile
|
| HTTP/1.1 302 Found
Content-Length: 0
Location: /login
|
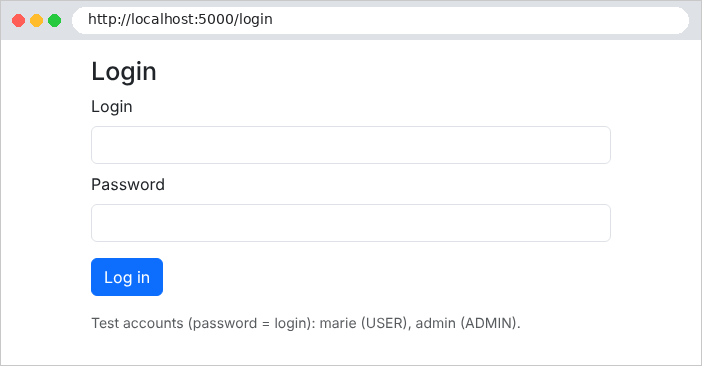
密码错误:
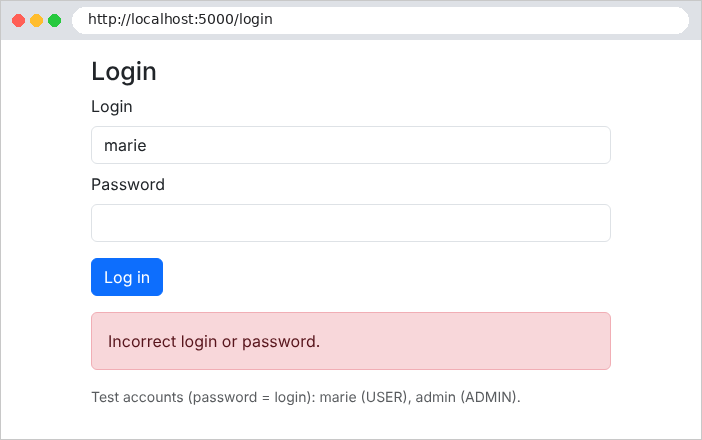
登录成功,由 [curl] 看到的情形:
| curl -i -c cookies.txt -d "login=marie&password=marie" http://localhost:5000/login
|
| HTTP/1.1 302 Found
Content-Length: 0
Location: /profile
Set-Cookie: token=eyJhbGciOiJIUzI1NiIsInR5cCI6IkpXVCJ9.eyJleHAiOjE3OTAzMzU1MzgsInN1YiI6Im1hcmllIiwibmFtZSI6Ik1hcmllIFDDqWxpc3NpZXIiLCJyb2xlIjoiVVNFUiIsImlhdCI6MTc5MDMzMTkzOCwibmJmIjoxNzkwMzMxOTM4fQ.uAKi5OB-jReuSrQR12_AWdiLR1l6ZLORBYSfHwg99xk; max-age=3600; path=/; samesite=lax; httponly
|
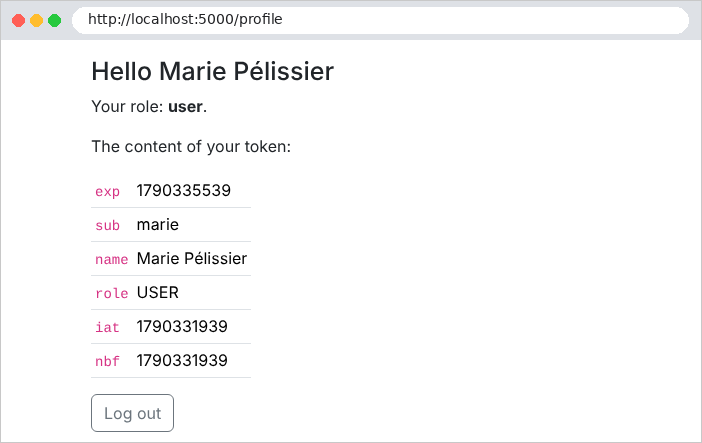
令牌由三部分组成,以句点分隔:头部、内容和签名。前两部分只是用 [base64url] 编码。解码后的头部:
| {"alg":"HS256","typ":"JWT"}
|
(签名算法和令牌类型)。解码后的内容:
| {
"exp": 1790335538,
"sub": "marie",
"name": "Marie Pélissier",
"role": "USER",
"iat": 1790331938,
"nbf": 1790331938
}
|
我们看到 [CreateToken] 生成的声明,外加 [JsonWebTokenHandler] 添加的三个字段:[exp] (过期时间)、[iat]([issued at],创建时间)和 [nbf] ([not before],令牌开始生效的时间),均以自 1970 年 1 月 1 日起的秒数表示。令牌没有加密:它不包含任何机密信息。在浏览器中,URL 为 http://localhost:5000/profile:
现在我们尝试修改令牌,让自己获得角色 ADMIN:解码内容,将 [USER] 替换为 [ADMIN],再重新编码……但没有密钥,我们无法重新计算签名:
| curl -i -b "token=eyJhbGciOi...(modified content)...(old signature)" http://localhost:5000/profile
|
| HTTP/1.1 302 Found
Content-Length: 0
Location: /login
|
签名与内容不再匹配:令牌被拒绝,用户未通过身份验证,[[Authorize]] 将其重定向到登录页面。注销:
| curl -i -b cookies.txt -X POST http://localhost:5000/logout
|
| HTTP/1.1 302 Found
Content-Length: 0
Location: /login
Set-Cookie: token=; expires=Thu, 01 Jan 1970 00:00:00 GMT; path=/
|
服务器通过将 Cookie 重置为空值并设置已过期的过期时间来删除它。
8.2. 示例 26:角色
示例 26 基于示例 25,增加了一个仅限角色 ADMIN 访问的页面。使用 [ASP.NET Core],几乎无需编写什么:角色是令牌中的一个声明,而 [[Authorize]] 知道如何验证它。文件 [Controllers/AdminController.cs]:
| using Microsoft.AspNetCore.Authorization;
using Microsoft.AspNetCore.Mvc;
namespace Example26.Controllers;
// 整个控制器仅限 ADMIN 角色:必须已通过身份验证
// 并且 "role" 声明等于 "ADMIN"(见 Program.cs 中的 RoleClaimType)
[Authorize(Roles = "ADMIN")]
public class AdminController : Controller
{
[HttpGet("admin")]
public IActionResult Admin() => View();
}
|
- 第 8 行:整个控制器仅限角色 ADMIN 使用。过滤器首先检查用户是否已通过身份验证(如果没有:质询,即登录页面),然后检查用户是否具有所要求的角色(如果没有:403 响应,“拒绝访问”)。[Roles = "ADMIN,DOCTOR"] 则会接受这两种角色中的任意一种。
文件 [Program.cs] 只多了一行:
| var app = builder.Build();
// 403(角色不足)、404……:一个错误页面
app.UseStatusCodePagesWithReExecute("/error/{0}");
app.UseStaticFiles(new StaticFileOptions
{
FileProvider = new PhysicalFileProvider(Path.GetFullPath(Path.Combine(builder.Environment.ContentRootPath, "..", "common", "bootstrap"))),
RequestPath = "/bootstrap",
});
app.UseAuthentication(); // 是谁?-> HttpContext.User
app.UseAuthorization(); // 是否允许?-> [Authorize]
app.MapControllers();
app.Run();
|
- 第 4 行:403 响应没有内容;它由 [ErrorController] 控制器渲染为页面(见示例 24)。
用户 [marie] (角色 USER)试图从其个人资料页面打开管理页面:
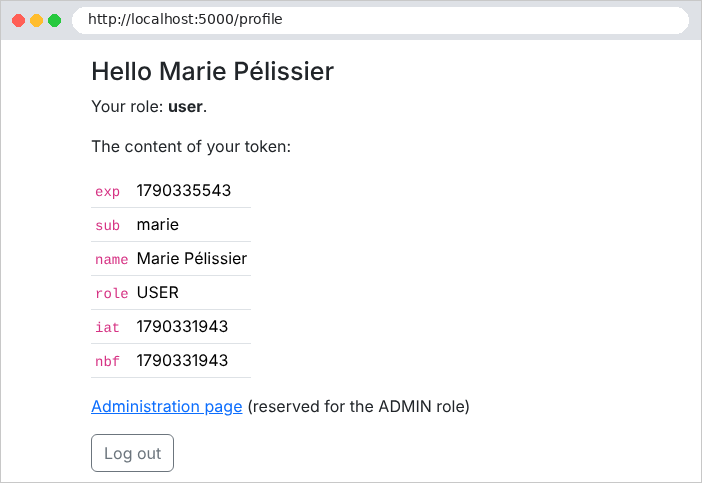
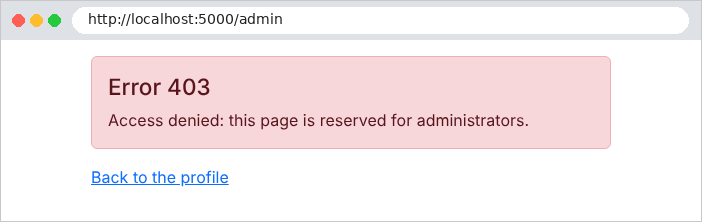
[admin] 进行同样的尝试:
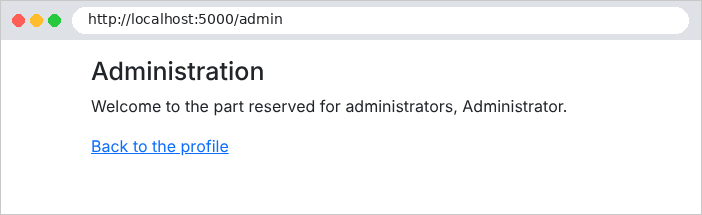
使用 [curl],我们看到 403 错误:
| curl -i -c cookies.txt -d "login=marie&password=marie" http://localhost:5000/login
curl -i -b cookies.txt http://localhost:5000/admin
|
| HTTP/1.1 403 Forbidden
Content-Type: text/html; charset=utf-8
<!doctype html>
<html lang="en">
<head>
<meta charset="utf-8">
<title>Authentication</title>
<link rel="stylesheet" href="/bootstrap/css/bootstrap.min.css">
</head>
<body>
<div class="container py-3" style="max-width: 34rem">
<div class="alert alert-danger">
<h1 class="h4">Error 403</h1>
<p class="mb-0">Access denied: this page is reserved for administrators.</p>
</div>
<p><a href="/profile">Back to the profile</a></p>
</div>
</body>
</html>
|
案例研究有三种角色(ADMIN、DOCTOR、USER),并且恰好使用这些特性:所有页面控制器上使用 [[Authorize]] ,医生和客户管理使用 [[Authorize(Roles = "ADMIN")]] ,患者区域使用 [[Authorize(Roles = "USER")]] 。403 页面在那里是经过翻译的。
8.3. 示例 27:验证码与尝试次数限制
登录页面会吸引机器人:这类程序会尝试成千上万种登录名/密码组合。有两项互补的防护措施:
- 验证码:一幅由扭曲字符组成的图像,人类很容易辨认,而简单的机器人无法破译;
- 尝试次数限制:失败几次之后,该 IP 地址会被封锁一段时间。
示例 27 在示例 25 的基础上增加了这两项防护措施。文件 [Auth/CaptchaService.cs]:
| using System.Collections.Concurrent;
namespace Example27.Auth;
// 验证码:其标识符及其图像(SVG)
public record Captcha(string Id, string Svg);
// 单例:待处理的验证码由服务器保存在内存中
public class CaptchaService
{
private static readonly TimeSpan Lifetime = TimeSpan.FromMinutes(10);
// 标识符 -> (期望答案,过期时间)。
// ConcurrentDictionary:可供多个同时发生的请求使用的字典
private readonly ConcurrentDictionary<string, (string Text, DateTime Expires)> pending = new();
public Captcha Generate()
{
var text = CaptchaDrawing.RandomText(5);
var id = Guid.NewGuid().ToString(); // 随机标识符,无法猜测
pending[id] = (text, DateTime.UtcNow + Lifetime);
return new Captcha(id, CaptchaDrawing.Svg(text));
}
// 无论如何验证码都会被消耗:一张图像只能使用一次
public bool Check(string? id, string? input)
{
if (id is null || input is null || !pending.TryRemove(id, out var expected))
{
return false;
}
return expected.Expires > DateTime.UtcNow
&& string.Equals(expected.Text, input.Trim(), StringComparison.OrdinalIgnoreCase);
}
}
|
让我们分析这段代码:
- 第 15 行:预期的答案由服务器以随机标识符为键存储。页面只包含图像和标识符:答案从不离开服务器。该服务是单例,由并发请求使用:[ConcurrentDictionary] 是专为此目的设计的字典;
- 第 17–22 行:随机选取一个五个字符的文本字符串,存储起来,并绘制成图像。绘制由类 [CaptchaDrawing] (文件 [Auth/CaptchaDrawing.cs],取自案例研究,并逐行加以注释)负责:每个字符是一组线条,经过放大、倾斜和随机扭曲,图像再由三条曲线加以模糊。容易混淆的字符(0 和 O、1、I 和 L)被排除在外;
- 第 26–33 行:验证过程会消耗验证码([TryRemove] 将其从字典中移除):一幅图像只能使用一次;机器人无法重复使用它已经找到的答案。大小写不影响结果。
文件 [Auth/LimiterService.cs]:
| namespace Example27.Auth;
// 单例:统计每个 IP 地址的登录失败次数
public class LimiterService
{
private const int MaxFailures = 3;
private static readonly TimeSpan BlockDuration = TimeSpan.FromMinutes(1);
private class Counter
{
public int Failures;
public DateTime BlockedUntil;
}
private readonly Dictionary<string, Counter> counters = [];
private readonly Lock padlock = new(); // 多个同时发生的请求:一次只允许一个访问
// 剩余的封锁秒数(0:未被封锁)
public int BlockedSeconds(string ip)
{
lock (padlock)
{
if (!counters.TryGetValue(ip, out var c)) return 0;
var remaining = c.BlockedUntil - DateTime.UtcNow;
return remaining > TimeSpan.Zero ? (int)Math.Ceiling(remaining.TotalSeconds) : 0;
}
}
public void Failure(string ip)
{
lock (padlock)
{
if (!counters.TryGetValue(ip, out var c))
{
c = new Counter();
counters[ip] = c;
}
c.Failures++;
if (c.Failures >= MaxFailures)
{
c.BlockedUntil = DateTime.UtcNow + BlockDuration;
c.Failures = 0; // 封锁结束后,从零重新开始
}
}
}
public void Success(string ip)
{
lock (padlock)
{
counters.Remove(ip);
}
}
}
|
- 第 6–7 行:三次失败的尝试会将该 IP 地址封锁一分钟;
- 第 16 行:计数器字典由所有请求共享。指令 [lock (padlock) { ... }] 确保同一时刻只有一个请求执行该代码块:两次同时发生的失败不会丢失(见 [Interlocked],第 6 章)。[Lock] 是 [.NET] 9 及更高版本的锁类型;
- 第 19–25 行:剩余的封锁时间;
- 第 29–42 行:记录一次失败;第三次失败时,该地址被封锁;
- 第 47–51 行:一次成功会将计数器重置为零。
文件 [Controllers/AuthController.cs]:
| using Example27.Auth;
using Microsoft.AspNetCore.Mvc;
namespace Example27.Controllers;
public class AuthController(AuthService auth, CaptchaService captchas, LimiterService limiter,
IConfiguration configuration) : Controller
{
[HttpGet("/")]
public IActionResult Home() => Redirect("/profile");
[HttpGet("login")]
public IActionResult Form() => LoginPage(null, null);
[HttpPost("login")]
public IActionResult Login(string? login, string? password, string? captchaId, string? captcha)
{
// 客户端的 IP 地址
var ip = HttpContext.Connection.RemoteIpAddress?.ToString() ?? "?";
// 1. 被封锁的地址根本不予理会
var seconds = limiter.BlockedSeconds(ip);
if (seconds > 0)
{
return LoginPage(login, $"Too many attempts: try again in {seconds} s.");
}
// 2. 先验证验证码(开销小),再验证密码(bcrypt,开销大)
if (!captchas.Check(captchaId, captcha))
{
limiter.Failure(ip);
return LoginPage(login, "The image code is incorrect.");
}
var user = auth.Validate(login, password);
if (user is null)
{
limiter.Failure(ip);
return LoginPage(login, "Incorrect login or password.");
}
limiter.Success(ip);
Response.Cookies.Append(AuthService.Cookie, auth.CreateToken(user), new CookieOptions
{
HttpOnly = true,
SameSite = SameSiteMode.Lax,
MaxAge = TimeSpan.FromMinutes(configuration.GetValue<int>("Jwt:DurationMinutes")),
});
return Redirect("/profile");
}
[HttpPost("logout")]
public IActionResult Logout()
{
Response.Cookies.Delete(AuthService.Cookie);
return Redirect("/login");
}
// 每次显示表单都会生成一个新的验证码
private ViewResult LoginPage(string? login, string? error)
{
ViewData["Login"] = login;
ViewData["Error"] = error;
return View("Login", captchas.Generate());
}
}
|
让我们对这段代码做些说明:
- 第 19 行:客户端的 IP 地址,由网络连接提供;
- 第 22–25 行:被封锁的地址根本不予理会;
- 第 28–31 行:先验证验证码,只有验证码正确才验证密码(一项计算量很大的 [bcrypt] 操作)。验证码错误也算一次失败;
- 第 57–61 行:每次显示表单时都会生成一个新的验证码,它成为视图的模型。
文件 [Views/Auth/Login.cshtml]:
| @model Captcha
<h1 class="h3">Login</h1>
<form method="post" action="/login">
<div class="mb-2">
<label class="form-label" for="login">Login</label>
<input class="form-control" id="login" name="login" value="@ViewData["Login"]" required>
</div>
<div class="mb-2">
<label class="form-label" for="password">Password</label>
<input class="form-control" type="password" id="password" name="password" required>
</div>
<div class="mb-3">
<label class="form-label" for="captcha">Copy the code of the image</label>
@* the SVG image, built by the server: inserted without escaping *@
<div class="mb-1">@Html.Raw(Model.Svg)</div>
@* the captcha identifier travels in a hidden field; the answer stays on the server *@
<input type="hidden" name="captchaId" value="@Model.Id">
<input class="form-control" id="captcha" name="captcha" autocomplete="off" required>
</div>
<button class="btn btn-primary" type="submit">Log in</button>
</form>
@if (ViewData["Error"] is string error)
{
<div class="alert alert-danger mt-3">@error</div>
}
<p class="text-muted small mt-3">Test accounts (password = login): marie (USER), admin (ADMIN).</p>
|
- 第 15 行:SVG 图像是文本(XML 格式):它被原样插入页面。[Html.Raw] 在这里是正当的:这是服务器生成的 HTML,而不是用户输入;
- 第 17 行:验证码的 ID 通过隐藏字段传递;而答案仍保留在服务器上。
登录页面,URL 为 http://localhost:5000/login:
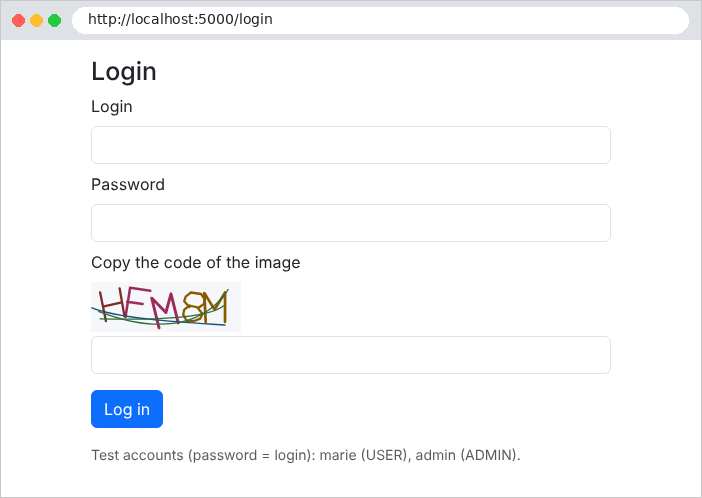
验证码输入错误:
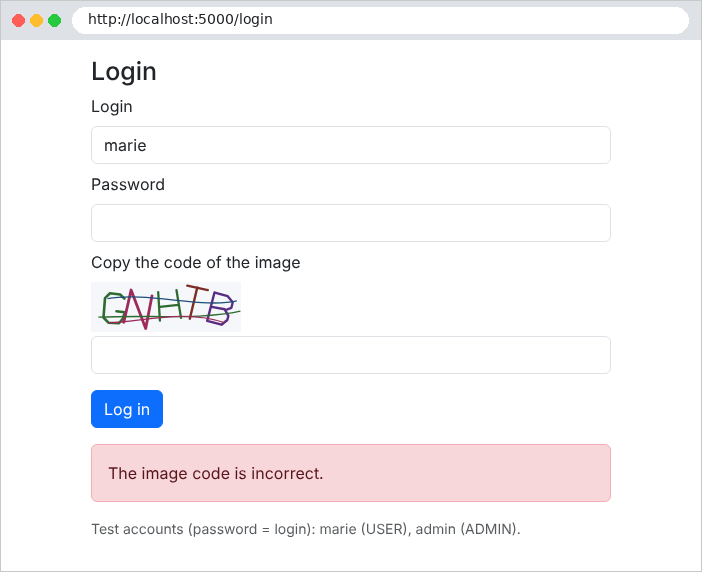
三次失败的尝试之后,即使密码正确也会被拒绝一分钟:
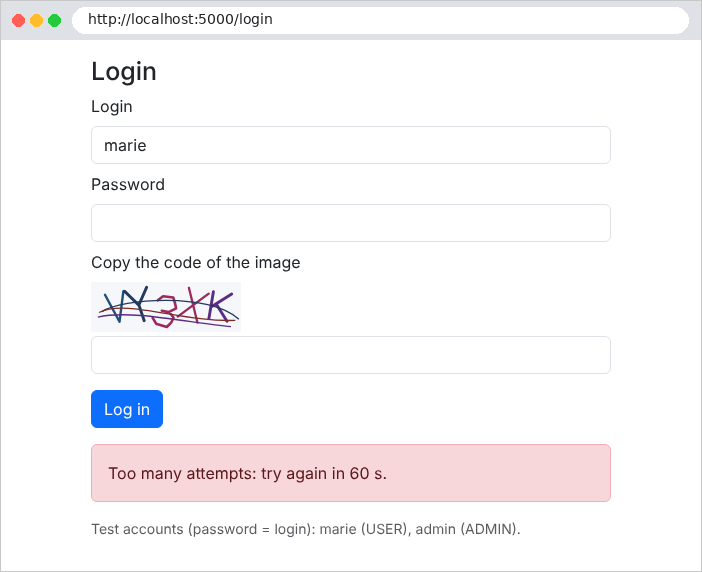
案例研究将这两项安全措施应用于其登录页面和账户创建流程,阈值可在文件 [appsettings.json] (节 [Protection])中调整。