7. Case Study: Managing a Product Database on the Web
The code for this case study is available |ICI|.
Objectives:
- write a class for managing a product database
- Write a web application based on this class
- introduce style sheets
- propose an initial development methodology for simple web applications
- load javascript into the client browser
Credits: The essence of this case study was drawn from the book "Les cahiers du programmeur - PHP/MySQL" by Jean-Philippe Leboeuf, published by Eyrolles.
7.1. Introduction
A retailer wants to manage the items he sells in his store. He already has a ACCESS application at home that does this job, but he is tempted by the world of the web. He has an account with an internet service provider that allows its users to install scripts in their personal folders. This enables them to create dynamic websites. In addition, these same clients have a MySQL account that allows them to create tables to serve data to their PHP scripts. Thus, the merchant has a MySQL account with the login "adarticles" and password "mdparticles." He has a "darticles" database over which he has full access rights. Our merchant therefore has everything he needs to put his product management system online. With your help—since you have web development skills—he is embarking on this venture.
7.2. The Database
Our merchant has created the following mockup of the web homepage interface he would like:
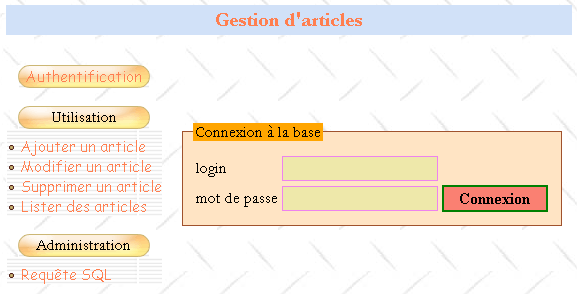
There would be two types of users:
- administrators who could perform all actions on the product table (add, modify, delete, view, etc.). They will be able to use all the items in the menu above. In particular, they will be able to issue any query SQL via the option [Requête SQL].
- Normal users (non-administrators) with restricted rights: rights to add, modify, delete, and view. They may have only some of these rights, such as view-only access.
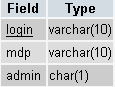
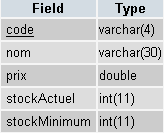
Because there are various types of database users with different rights, authentication is required. This is why the home page begins with this step. To determine who is who and who has the right to do what, two tables, USERS and DROITS, will be used. The table USERS would have the following structure:
 |
|
The table contents could be as follows:
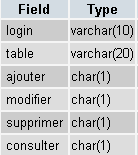
The table DROITS specifies the permissions for non-administrator users listed in the table USERS. Its structure is as follows:
 |
|
The table contents could be as follows:

Notes:
- A user U who is in table USERS but not in table DROITS has no rights.
- In our example, users will only have access to a single table, table ARTICLES. However, our forward-thinking merchant has nevertheless added the table field to the structure of table DROITS to allow for the possibility of adding new tables to the application in the future.
- Why manage permissions in our own tables when we assume we’ll be using a database named MySQL that is itself capable (and better equipped than we are) of managing these permissions in its own tables? Simply because our merchant does not have administrative rights to the MySQL database that would allow them to create users and grant them permissions. Let’s not forget that the MySQL database is hosted by an ISP and that the merchant is merely a user of that database with no administrative rights (fortunately). However, he does have full rights to a database called dbarticles, which he currently accesses using the login admarticles and the password mdparticles. This database contains all the application’s tables.
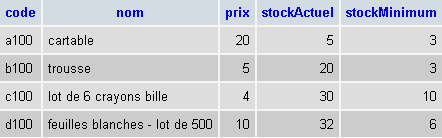
The ARTICLES table contains information about the items sold by the merchant. Its structure is as follows:
 |
|
Its content, initially used for testing purposes, could be as follows:
7.3. Project constraints
The merchant is migrating a local ACCESS application to a web application. He does not know what will become of it or how it will evolve. However, he would like the new application to be easy to use and scalable. For this reason, his IT consultant envisioned, during the design of the tables, that there could be:
- various users with different permissions: this will allow the merchant to delegate certain tasks to other people without giving them administrative rights
- in the future, tables other than table ARTICLES
The same consultant makes other suggestions:
- he knows that in software development, the presentation layer and the processing layer must be clearly separated. The architecture of a web application is often as follows:
 |
The user interface here is a web browser, but it could also be a standalone application that sends HTTP requests to the web service via the network and formats the results it receives. The application logic consists of scripts that process user requests, in this case PHP scripts. The data source is often a database, but it can also be a directory or a remote web service. The developer should maintain a high degree of independence between these three entities so that if one of them changes, the other two do not have to change, or only minimally. The merchant’s IT consultant then makes the following proposals:
- We will place the application’s business logic in a class PHP. Thus, the block [Logique applicative] above will consist of the following elements:
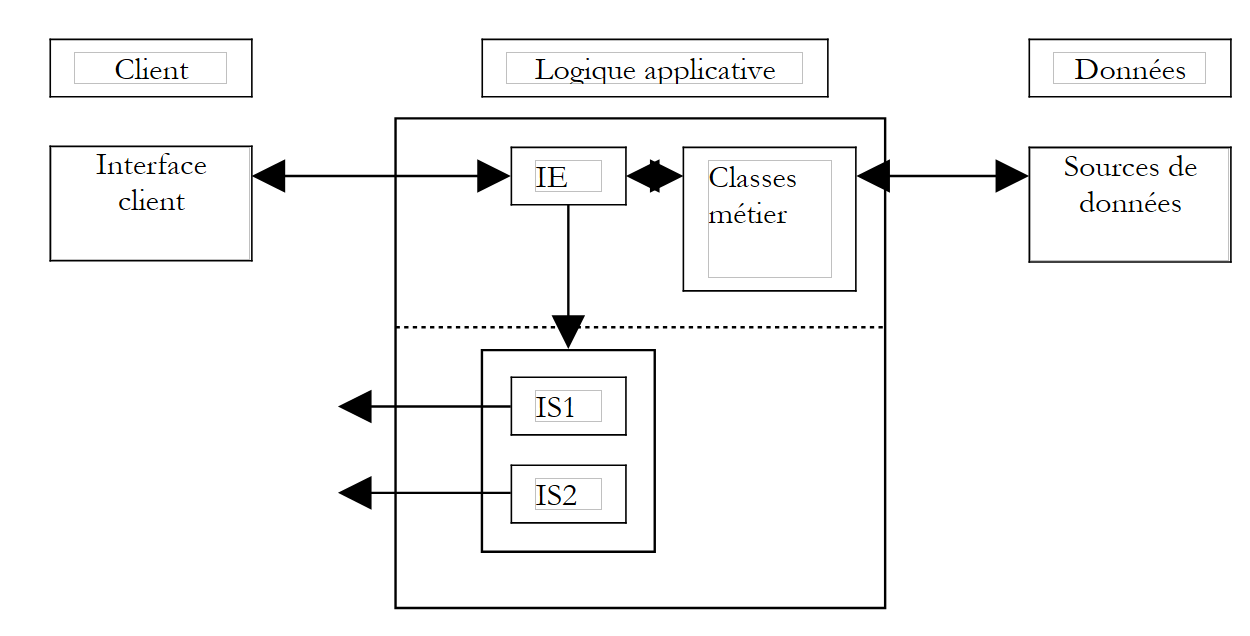 |
In the [Logique Applicative] block, we can distinguish
- the [IE=Interface d'Entrée] block, which is the application’s entry point. It is the same regardless of the client type.
- the block [Classes métier], which contains the classes necessary for the application’s logic. These are client-independent.
- the block of response page generators [IS1 IS2 ... IS=Interface de Sortie]. Each generator is responsible for formatting the results provided by the application logic for a given client type: code HTML for a browser or a phone (WAP), code XML for a standalone application, ...
This model ensures good independence from the clients. Whether the client changes or you want to update how results are presented, it is the [IS] output generators that will need to be created or adapted.
- In a web application, the separation between the presentation layer and the business logic layer can be improved by using style sheets. These govern the presentation of a web page within a browser. To change this presentation, simply modify the associated style sheet. There is no need to alter the business logic. We will therefore use a style sheet here.
- In the diagram above, the business class will act as the interface to the data source. By assumption, this source is a MySQL database. To allow for migration to another database, we will use the PEAR library, which provides database access classes independent of the actual database type. Thus, if our retailer becomes wealthy enough to install a Microsoft IIS web server in their company, they will be able to replace the MySQL database with SQL Server without having to (or with very little need to) change the business class.
7.4. The Items Class
The product class could be defined as follows:
<?php

     // articles class, working on an article database composed of the following tables
     // items: (code, name, price, stockActuel, stockMinimum)
     // users : (login, mdp, admin)
     // rights: (login, table, add, modify, delete, view)

     // it is the user of the class who must provide the login/mdp to perform any operation on the database
     // so he already has all rights to the base. This means that there is no need to take
     // special safety precautions here

     // libraries
  require_once 'DB.php';

  class articles{

           // attributes
    var $sDSN;                        // the connection chain
          var $sDatabase;            // base name
    var $oDB;                        // connection to base
    var $aErreurs;                // error list
    var $oRésultats;            // result of a select query
        var $connecté;                // boolean indicating whether or not you are connected to the database
        var $sQuery;                    // the last query executed
    var $sUser;                    // identity of connection user
    var $bAdmin;                    // true if the user is an administrator
    var $dDroits;                // the dictionary of its rights table ->> array(consult,add,delete,modify)

     // manufacturer
    function articles($dDSN,$sUser,$sMdp){

             // $dDSN: dictionary defining the link to be established
       // $dDSN['sgbd']: type of SGBD to be connected to
       // $dDSN['host']: name of the host machine hosting it
       // $dDSN['database']: name of the database to be connected to
       // $dDSN['admin']: the login of the owner of the database to be connected to
       // $dDSN['mdpadmin']: its password
       // $sUser: login of the user who wants to use the article database
       // $sMdp: password

       // creates in $oDB a connection to the database defined by $dDSN as $dDSN['admin']
       // if connection succeeds and user $sUser is authenticated
           // loads rights into $bAdmin and $dDroits user rights $sUser
           // sets $sDSN to the database connection string
           // sets $sDataBase to the name of the database to which you are connecting
         // sets $connecté to true
       // if connection fails or if user $sUser is not correctly identified
           // puts the appropriate error msg in the $aErreurs list
         // closes the connection if necessary
         // sets $connecté to false

  ...
    }//manufacturer

    // ------------------------------------------------------------------
    function connect(){
             // (re)connecting to the base
...
    }//connect

    // ------------------------------------------------------------------
    function disconnect(){
      // close the connection to the $sDSN database
...
    }//disconnect

    // -------------------------------------------------------------------
    function execute($sQuery,$bAdmin){
            // $sQuery: query to be executed
       // $bAdmin : true if requesting execution as administrator
...
    }//execute

    // --------------------------------------------------------------------------
    function addArticle($dArticle){
         // adds item $dArticle (code, name, price, stockActuel, stockMinimum) to the item table
   ...
    }//add

    // ----------------------------------------------------------------------
    function modifyArticle($dArticle){
             // modifies an item $dArticle (code, name, price, stockActuel, stockMinimum) in the item table
...
    }//update

    // ----------------------------------------------------------------------
    function deleteArticle($sCode){
             // deletes an item from the table of items
       // whose code is $sCode
...
    }//delete

    // ----------------------------------------------------------------------
    function vérifierArticle(&$dArticle){
         // checks the validity of an item $dArticle (code, name, price, stockActuel, stockMinimum)
...
    }//check

    // --------------------------------------------------------------------------
    function selectArticles($dQuery){
             // executes a select query on the item table
       // it has three components
       // list of columns in $dQuery['columns']
      // filtrage dans $dQuery['where']
       // order of presentation in $dQuery['orderby']
...
    }//selectArticles

        // --------------------------------
    function existeArticle($sCode){
         // returns TRUE if item code $sCode exists in the item table
...
    }//existeArticle

    // --------------------------------------
    function existeUser($sUser,$sMdp){
             // check existence of user $sUser with password $sMdp
       // render (int $iErreur, string $sAdmin, hashtable $dDroits)
       // $iErreur = -1 for any database operating error - the $aErreurs list is then filled in
       // $iErreur = 1 if user not found (absent or wrong password)
       // $iErreur = 2 if the user exists but has no rights in the rights table
       // $iErreur = 3 if the user exists and is an administrator
       // $iErreur = 0 if the user exists and is not an administrator
       // $sAdmin="y" if the user exists and is an administrator ($iErreur==3), otherwise it is equal to the empty string
       // $dDroits is the user's rights dictionary if he/she is not an administrator ($iErreur==0)
       // otherwise it's an empty array
       // dictionary keys are tables to which the user has rights
       // the value associated with this table is in turn a dictionary where the keys are the rights
       // (consult, add, modify, delete) and the values are the strings 'y' (yes) or 'n' (no) depending on the case
...
    }//existeUser

    // --------------------------------------
    function getCodes(){
         // makes the code table
....
    }//getCodes

  }//class
?>
Comments
- The articles class uses the PEAR::DB library for its database access, hence the command
This inclusion assumes that the script DB.php is located in one of the directories listed in the option or include_path configuration file of PHP.
- The constructor needs to know which database to connect to and under which identity. This information is provided in the $dDSN dictionary. Recall that the initial assumption was that the database was named dbarticles and belonged to a user named admarticles with the password mdparticles. Also recall that this application allows multiple users with different permissions. There is an ambiguity here that needs to be resolved. The connection is indeed established under the identity of admarticles, and ultimately all operations on the dbarticles database will be performed under this identity, since it is the only name known to SGBD and MySQL that has sufficient rights to manage the dbarticles database. To "simulate" the existence of different users, we will have the admarticles user operate with the permissions of the user whose login ($sUser) and password ($sMdp) are passed as parameters to the constructor. Thus, before performing an operation on the article database, we will verify that the user ($sUser, $sMdp) has the necessary permissions to do so. If so, the user admarticles will perform the operation on their behalf.
- The login and password for the article database administrator must be passed to the constructor. This is a sound precaution. If these two pieces of information were hard-coded into the class, any user of the class could easily impersonate the article database administrator. Indeed, a class named PHP is not protected. Also, the $bAdmin attribute of the class, which indicates whether the user ($sUser, $sMdp) for whom you are working is an administrator or not, could very well be set directly from the outside, as in the following example:
$oArticles=new articles($dDSN,$sUser,$sMdp)
// here $sUser has been recognized as a non-administrator user of the database
$oArticle->bAdmin=TRUE;
// now $sUser has become administrator
PHP is not JAVA or C# and a class PHP is merely a data structure slightly more advanced than a dictionary but does not offer the security of a true class where the attribute bAdmin would have been declared private or protected, making it impossible to modify from the outside. Because the user of the class must know the login and password of the product database administrator, only the administrator can use the class. The previous operation is therefore no longer of any interest to the user. The class is there solely to provide development conveniences. An important consequence is that there is no need to take security precautions. Once again, anyone using the article class is necessarily an administrator of the article database.
- The class handles database connection errors or any other errors in a unique way by populating the attribute $aErreurs with the error message(s). After each operation, the class user must therefore check this list.
- The methods addArticle, updateArticle, deleteArticle, and selectArticles are directly derived from the web interface mockup presented earlier. They correspond to the options in the menu shown. The methods addArticle and modifyArticle rely on the method vérifierArticle to verify that the article to be added or modified contains correct data. In the same vein, the existeArticle method ensures that you are not about to add an item that already exists. This method could be omitted if using an article table where the code is the primary key. In that case, SGBD itself will signal the failure of the addition due to a duplicate. It will likely do so with an error message that is difficult to read and in English.
- An item to be modified or deleted will be identified by its unique code. The getCodes method retrieves all these codes.
- The disconnect method closes the connection to the database, which was opened when the object was created. The connect method, which re-establishes a connection to the database, does not seem useful here. This allows the connection to be opened and closed at will using the same object. Its usefulness becomes apparent only in conjunction with the web application. The application will create an articles object and store it in a session. While the session can retain most of the object’s attributes across successive client-server exchanges, it cannot retain the attribute representing the open connection. Therefore, the connection must be reopened with each new client-server exchange. We will request a persistent connection so that the open connection is stored in a connection pool and remains open permanently. Thus, when the script requests a new connection, it will be retrieved from the connection pool. We therefore achieve the same result as if the session had been able to store the open connection.
- The existeUser method allows the constructor to determine whether the user $sUser, identified by the password $sMdp, actually exists. If so, the method determines whether the user is an administrator (as indicated in the USERS table) and stores this information in the $bAdmin attribute. If they are not an administrator, the method retrieves their permissions from the DROITS table and stores them in the $dDroits attribute, which is a double-indexed dictionary: $dDroits[$table][$droit] is 'y' if the user $sUser has permission $droit on the table $table, and is 'n' otherwise.
Write the articles class. Database access will be performed using the PEAR::DB library, which allows you to work independently of the exact database type.
7.5. The structure of the WEB application
Now that we have the "business" class for managing the product database, we can use it in various environments. Here, we propose using it in a web application. Let’s explore it through these different pages:
7.5.1. The application’s main page
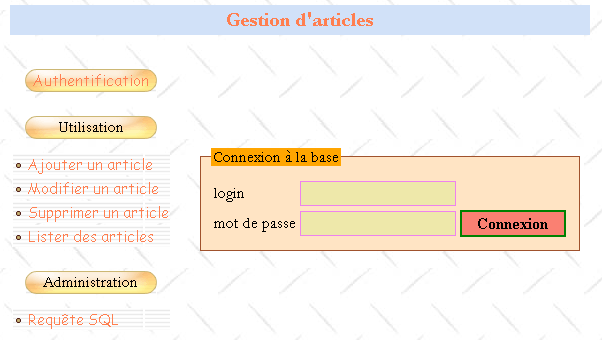
Let’s return to the home page we’ve already seen:
1234
All pages in the application will have the structure shown above: a table with two rows and three columns comprising four sections:
- Zone 1 forms the first row of the table. It is reserved for the title, possibly accompanied by an image. The three columns of the row are merged here.
- The second row has three areas, one per column:
- Zone 2 contains the menu options. It, in turn, contains a table with one column and several rows. The menu options are placed in the rows of the table.
- Zone 3 is empty and serves only to separate zones 2 and 4. We could have used a different approach to achieve this separation.
- Zone 4 is the one that contains the dynamic part of the page. This is the part that changes from one action to another, while the others remain the same.
The PHP script that generates this template page will be named main.php and could look like this:
<html>
  <head>
      <title>Gestion d'articles</title>
      <link type="text/css" href="<?php echo $dConfig['urlPageStyle'] ?>" rel="stylesheet" />
   </head>
  <body background="<?php echo $dConfig['urlBackGround'] ?>">
    <table>
      <tr height="60">
        <td colspan="3" align="left" valign="top" >
          <h1><?php echo $main["title"] ?></h1>
        </td>
      </tr>
      <tr>
        <td>
          <table>
            <tr>
              <td class="menutitle" >
                                    <a href="<?php echo  $main["liens"]["login"] ?>" ?>Authentification</a>
              </td>
            </tr>
            <tr>
                <td><br /></td>
            </tr>
            <tr>
              <td class="menutitle" >
                Utilisation
              </td>
            </tr>
            <tr height="10"></tr>
            <tr>
              <td class="menublock" >
                <img alt="-" src="../images/radio.gif" />
                <a href="<?php echo  $main["liens"]["addArticle"] ?>" ?>
                  Ajouter un article
                </a>
                 </td>
            </tr>
            <tr>
              <td class="menublock" >
                <img alt="-" src="../images/radio.gif" />
                <a href="<?php echo $main["liens"]["updateArticle"] ?>">
                  Modifier un article
                </a>
                    </td>
            </tr>
              <td class="menublock" >
                <img alt="-" src="../images/radio.gif" />
                <a href="<?php echo $main["liens"]["deleteArticle"] ?>">
                  Supprimer un article
                </a>
              </td>
            </tr>
            <tr>
              <td class="menublock" >
                <img alt="-" src="../images/radio.gif" />
                <a href="<?php echo $main["liens"]["selectArticle"] ?>">
                  Lister des articles
                </a>
              </td>
            </tr>
            <tr>
                <td><br /></td>
            </tr>
            <tr>
              <td class="menutitle" >
                Administration
              </td>
            </tr>
            <tr height="10"></tr>
            <tr>
              <td class="menublock" >
                <img alt="-" src="../images/radio.gif" />
                <a href="<?php echo $main["liens"]["sql"] ?>" >
                  Requête SQL
                </a>
              </td>
            </tr>
          </table>
        </td>
            <td>
            <img alt="/" src="../images/pix.gif" width="10" height="1" />
            </td>
            <td>
            <fieldset>
              <legend><?php echo $main["légende"] ?></legend>
            <?php
                include $main["contenu"];
            ?>
          </fieldset>
        </td>
      </tr>
    </table>
  </body>
</html>
The configured sections of the page have been highlighted in the listing above. The template page is configured in several ways:
- by a dictionary $main with the following keys:
- title: title to be placed in zone 1 of the page
- links: dictionaries of links to be generated in the menu column. These links are associated with the menu options in zone 2
- content: url of the page to display in zone 4
- via a dictionary $dConfig that collects information from an application configuration file named config.php
- by classes that are part of the stylesheet used by the page:
The page uses the following style classes here:
- menutitle: for a main menu item
- menublock: for a secondary menu item
Changing any of these parameters changes the page's appearance. For example, changing $main['title'] will change the title of section 1.
7.5.2. Standard processing of a customer request
The customer interacts with the application using the links in area 2 of the standard page. These links will be of the following type:
refers to the current action from among the following:
| |||||||||||
an action can be performed in several steps - refers to the current step | |||||||||||
session token when the session has started - allows the server to retrieve information stored in the session during previous exchanges |
Similarly, the action attribute in forms will have the same format. For example, on the home page there is a login form in section 4. The HTML tag for this form is defined as follows:
The client’s request is processed by the application’s main script, named apparticles.php. Its job is to construct the response to the client. It will always proceed in the same way:
- using the action name and the current phase, it will delegate the request to a specialized function. This function will process the request and generate the appropriate response page. For each client request, there may be several possible response pages: page1, page2, ..., pagen. These pages contain information that must be calculated by the function. These are therefore parameterized pages. They will be generated by the scripts page1.php, page2.php, ..., pagen.php.
- For consistency, the variable parts of the pages to be displayed in area 4 of the template page will also be placed in the dictionary $main.
Suppose that, in response to a request, the server must send the page pagex.php to the client. It will proceed as follows:
- it will place the values required for the page pagex.php into the dictionary $main
- it will place in $main['contenu']—which designates the URL of the page to be displayed in zone 4 of the template page—the URL of pagex.php
- it will request the display of the template page with the instruction
The template page will then be displayed with the code from the pagex.php script in zone 4, which will be evaluated to generate the content of zone 4. Recall that this is a simple cell in a table. Therefore, the HTML code generated by pagex.php must not begin with the tags <HTML>, <HEAD>, <BODY>, .... These have already been issued at the beginning of the template page. Here is an example of what the login.php script that generates section 4 of the home page might look like:
<form name="frmLogin" method="post" action="<?php echo $main["post"] ?>">
    <table>
        <tr>
            <td>login</td>
            <td><input type="text" value="<?php echo $main["login"] ?>" name="txtLogin" class="text"></td>
        </tr>
        <tr>
            <td>mot de passe</td>
            <td><input type="password" value="" name="txtMdp" class="text"></td>
      <td><input type="submit" value="Connexion" class="submit"></td>
        </tr>
    </table>
</form>
We can see that the page:
- is reduced to a form
- is configured by both the $main dictionary and the stylesheet.
7.5.3. The configuration file
It is always best to configure applications as much as possible to avoid having to modify the code simply because, for example, you decided to change the path of a script or an image. The main application, apparticles.php, will therefore load a configuration file named config.php upon startup:
In this file, we will include configuration directives for PHP and initializations of global variables:
<?php

     // configuration of php
  ini_set("register_globals","off");
  ini_set("display_errors","off");
  ini_set("expose_php","off");
    ini_set("session.use_cookies","0");    // no cookies

     // item base configuration
    $dConfig["DSN"]=array(
        "sgbd"=>"mysql",
        "admin"=>"admarticles",
        "mdpadmin"=>"mdparticles",
        "host"=>"localhost",
        "database"=>"dbarticles"
    );

   // url pages
    $dConfig['urlBackGround']="../images/standard.jpg";
  $dConfig["urlPageStyle"]="mystyle.css";
  $dConfig["urlAppArticles"]="apparticles.php";
  $dConfig["urlPageMain"]="main.php";
  $dConfig["urlPageLogin"]="login.php";
  $dConfig["urlPageErreurs"]="erreurs.php";
  $dConfig["urlPageInfos"]="infos.php";
  $dConfig["urlPageAddArticle"]="addarticle.php";
  $dConfig["urlPageUpdateArticle1"]="updatearticle1.php";
  $dConfig["urlPageUpdateArticle2"]="updatearticle2.php";
  $dConfig["urlPageDeleteArticle1"]="deletearticle1.php";
  $dConfig["urlPageDeleteArticle2"]="deletearticle2.php";
  $dConfig["urlPageSelectArticle1"]="selectarticle1.php";
  $dConfig["urlPageSelectArticle2"]="selectarticle2.php";
  $dConfig["urlPageSQL1"]="sql1.php";
  $dConfig["urlPageSQL2"]="sql2.php";
  $dConfig["urlPageSQL3"]="sql3.php";

   // main page links
  $main["liens"]["login"]="$sUrlAppArticles?action=authentifier&phase=0";
  $main["liens"]["addArticle"]="$sUrlAppArticles?action=addArticle&phase=0";
  $main["liens"]["updateArticle"]="$sUrlAppArticles?action=updateArticle&phase=0";
  $main["liens"]["deleteArticle"]="$sUrlAppArticles?action=deleteArticle&phase=0";
  $main["liens"]["selectArticle"]="$sUrlAppArticles?action=selectArticle&phase=0";
  $main["liens"]["sql"]="$sUrlAppArticles?action=sql&phase=0";

   // we store $main in the configuration
  $dConfig["main"]=$main;
?>
7.5.4. The stylesheet associated with the template page
We saw that the server’s response had a unique format: main.php. You may have noticed that this script produces a raw page devoid of presentation effects. This is a good thing for several reasons:
- The developer does not have to worry about the visual presentation of the page they are creating. After all, they may not necessarily have the skills to create visually appealing pages. This allows them to focus entirely on the code.
- Script maintenance is simplified. If scripts included presentation attributes, neither the code structure nor the presentation structure would be clearly visible. The visual design of the pages is often delegated to a graphic designer. The designer would likely not want to have to search through a script they do not understand to find the presentation attributes they need to modify.
However, the visual appearance of the pages must be carefully considered. After all, this is what attracts users to a website. Here, the presentation is delegated to a stylesheet. The page main.php specifies in its code the stylesheet to use for displaying it:
  <head>
      <title>Gestion d'articles</title>
      <link type="text/css" href="<?php echo $dConfig['urlPageStyle'] ?>" rel="stylesheet" />
   </head>
The stylesheet used in this document is as follows:
BODY {
    background : url(../images/standard.jpg);
    border : 2px none #FFDAB9;
    font-family : Garamond;
    font-size : 16px;
    margin-left : 0px;
    padding-left : 20px;
}

INPUT {
    background : #EEE8AA;
    border : 1px solid #EE82EE;
    font-family : Garamond;
    font-size : 18px;
}

INPUT.submit{
    font-family : "Times New Roman";
    font-size : 16px;
    background : #FA8072;
    border : 2px double Green;
    font-weight : bold;
    text-align : center;
    vertical-align : middle;
    cursor : pointer;
}

TD.menutitle{
    background-image : url(../images/menugelgd.gif);
    height : 23px;
    text-align : center;
    vertical-align : middle;
    background : url(../images/menugelgd.gif) no-repeat center;
}

TD.menublock{
    background : url(../images/bandegrismenugd.gif) repeat-x;
    text-align : left;
    vertical-align : middle;
}

A {
    font-family : "Comic Sans MS";
    color : #FF7F50;
    font-size : 15px;
    text-decoration : none;
}

A:HOVER {
    background : #FFA07A;
    color : Red;
}

FIELDSET {
    border : 1px solid #A0522D;
    background : #FFE4C4;
    margin : 10px 10px 10px 10px;
    padding-left : 10px;
    padding-right : 10px;
    padding-bottom : 10px;
}

LEGEND{
    background : #FFA500;
}

TH {
    background : #228B22;
    text-align : center;
    vertical-align : middle;
}

TD.libellé{
    border : 1px solid #008B8B;
    color : #339966;
}

H1 {
    font : bold 20px/30px Garamond;
    color : #FF7F50;
    background : #D1E1F8;
    background-attachment : fixed;
    text-align : center;
    vertical-align : middle;
    font-family : Garamond;
}

SELECT.TEXT {
    background : #6495ED;
    text-align : center;
    color : Aqua;
}
We won’t go into the details of this stylesheet. We’ll accept it as is. A little later, we’ll see how to build and modify it. There is software available for that. Nevertheless, let’s outline the role of the presentation attributes used in the sheet:
Attribute: | controls the presentation of the HTML tag: |
<BODY> | |
<H1> (Header1) | |
<A> (Anchor) | |
sets the anchor's presentation attributes when the user hovers over it | |
<FIELDSET> - this tag is not recognized by all browsers | |
<LEGEND> - this tag is not recognized by all browsers | |
<INPUT> | |
<INPUT class="TEXT"> | |
<INPUT class="SUBMIT"> | |
<TH> (Table Header) | |
<TD class="menutitle"> (Table Data) | |
<TD class="menublock"> | |
<TD class="label"> |
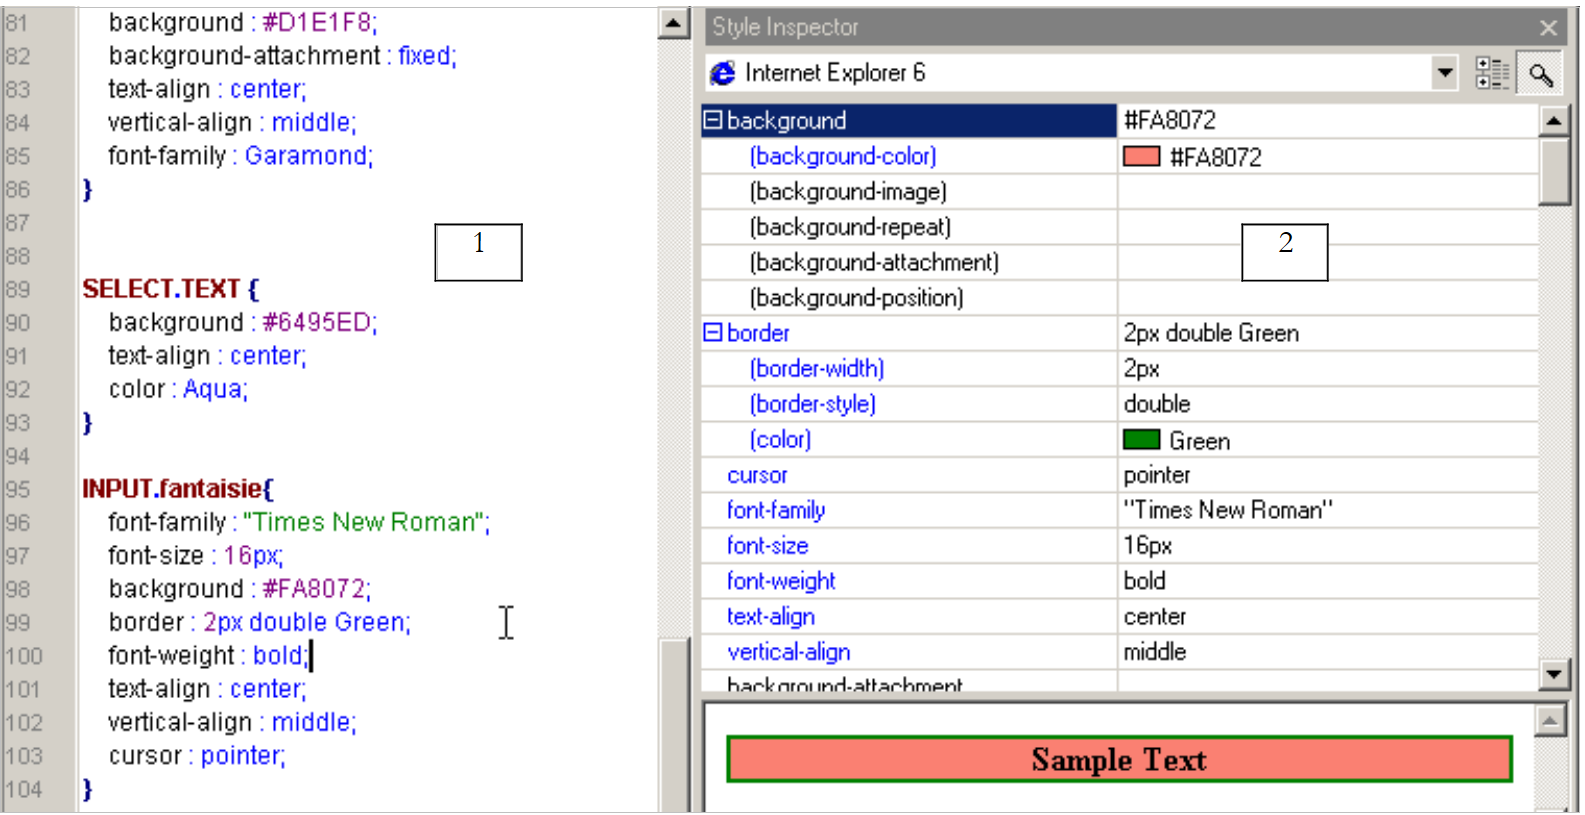
Let's look at an example of how these formatting rules can be written. In this example, we will use the TopStyle Lite software, available for free at URL http://www.bradsoft.com. Once the style sheet is loaded, a window with three sections appears:
- a text editing area. Presentation attributes can be defined manually provided you know the rules for writing style sheets, which follow a standard called CSS (Cascading Style Sheets).
- Area 2 displays the editable properties of the attribute currently being created. This is the simplest method. It eliminates the need to know the exact names of the numerous presentation attributes
- Area 3 displays the visual appearance of the attribute currently being created
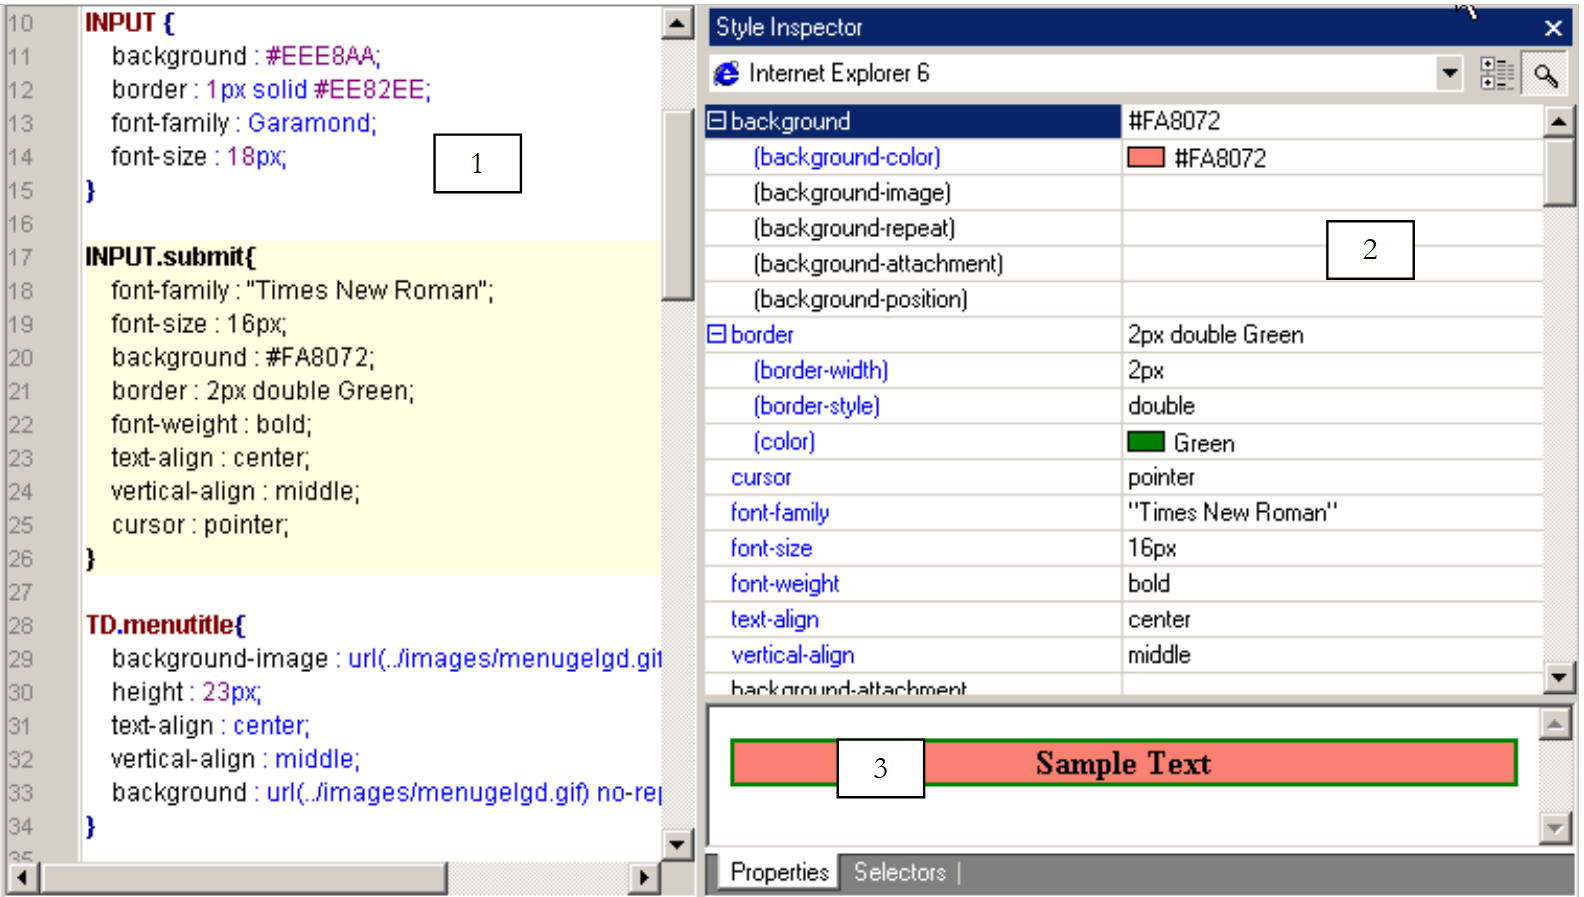 |
In area 1 above, copy and paste the INPUT.submit attribute into a INPUT.fantaisie attribute. This attribute will set the presentation of the HTML tag <INPUT class="fantasy">
 |
Let’s use Zone 2 to modify some of the properties of the INPUT.fantaisie attribute:
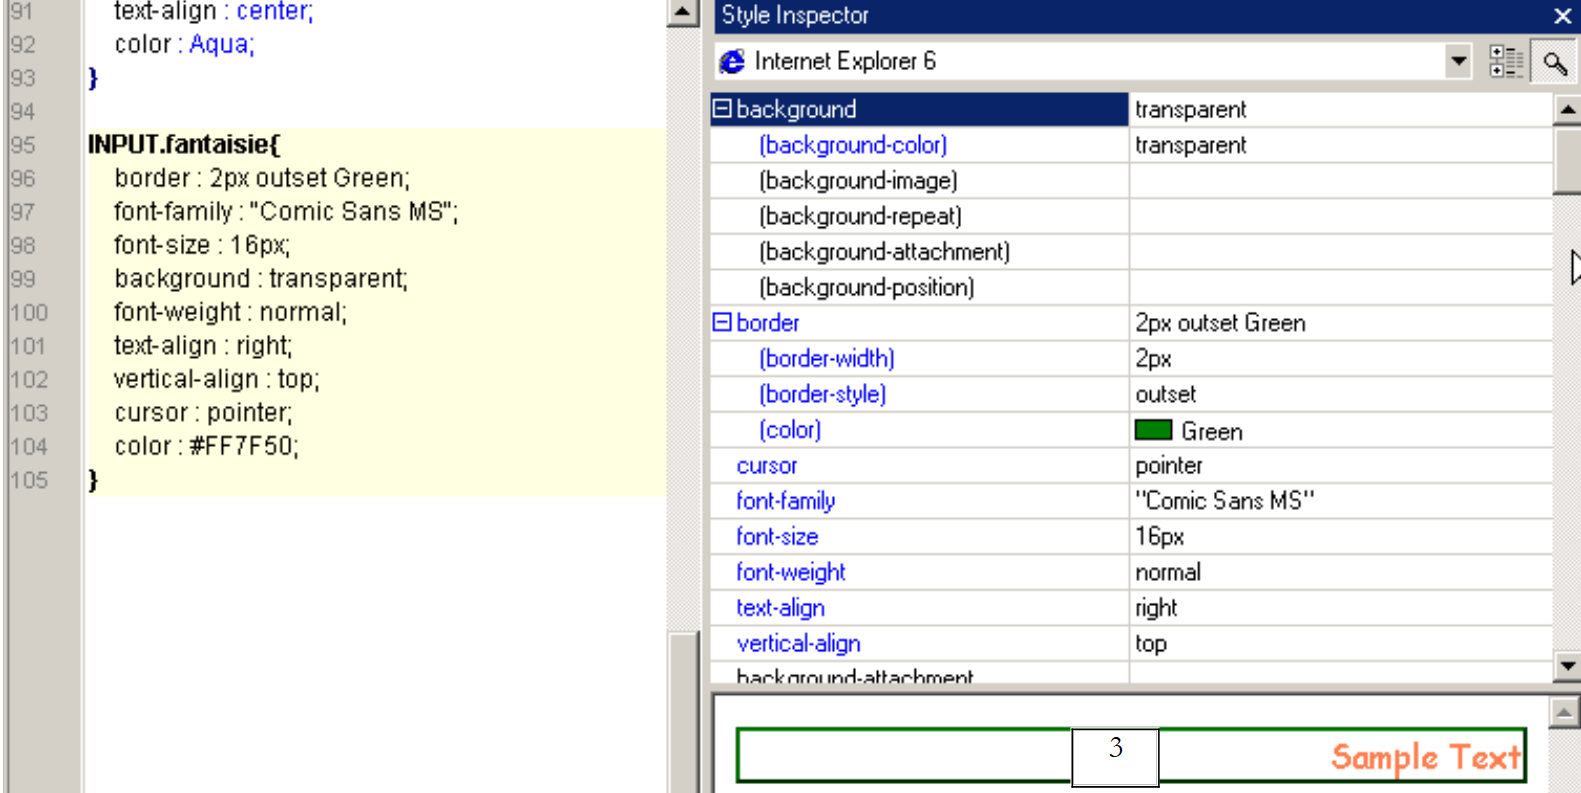 |
From now on, any <INPUT ... class="fantaisie"> tag found on a page associated with the previous stylesheet will be displayed as shown in the example in section 3 above.
Style sheets are very useful. Using them allows you to change the "look" of a web application by modifying only one thing: its style sheet. Style sheets are not supported by older browsers. The <link ..> directive below will be ignored by some of them:
  <head>
      <title>Gestion d'articles</title>
      <link type="text/css" href="<?php echo $dConfig['urlPageStyle'] ?>" rel="stylesheet" />
   </head>
In our application, this will result in the following home page:
This is a minimal page with no graphical elements. It could be worse. Some browser versions recognize style sheets but interpret them incorrectly. This can result in a distorted and unusable page. This raises the question of the client browser type. There are techniques that help determine the client browser type. They are not entirely reliable. We could then write different style sheets for different browsers or even write a version without a style sheet for browsers that ignore them. This, of course, complicates the development process. This significant issue has been ignored here.
With style sheets, we can provide a personalized experience for our app’s users. We could present them with a page offering several possible layout styles. They could choose the one that suits them best. This choice could be saved in a database. When the user logs in again, we could then launch the app with the style sheet they selected.
7.5.5. The application’s input module
The clients will only be aware of the application’s input module: apparticles.php. The general outline of its operation is as follows:
- The client’s request is retrieved and analyzed. It may or may not be configured. When it is parameterized, the expected parameters are as follows: action=[action]&phase=[phase]&PHPSESSID=[PHPSESSID]
- If the request is not configured or if the retrieved parameters do not match the expected ones, the server responds by sending the authentication page (username, password). Once the user has successfully authenticated, a session is created. This session is used to store information throughout the client-server exchanges.
- If a request is correctly recognized, it is processed by a module that depends on both the action and the current phase.
- All database access is performed through the articles.php business class.
- The processing of a request always ends with the main.php, in which the URL of the page to be placed in zone 4 of the template page has been specified in $main['contenu'].
The skeleton of the script apparticles.php could be as follows:
<?php
     // item table management
  include "config.php";
  include "articles.php";

  // action to be taken
  $sAction=$_POST["action"] ? $_POST["action"] : $_GET["action"] ? $_GET["action"] : "authentifier";
  $sAction=strtolower($sAction);
   // possible phase
  $sPhase=$_POST["phase"] ? $_POST["phase"] : $_GET["phase"] ? $_GET["phase"] : "0";

  // session
  session_start();
  $dSession=$_SESSION["session"];

     // is there a session in progress?
  if(! isset($dSession)){
      // user authentication
    if($sAction=="authentifier" && $sPhase=="0") authentifier_0($dConfig);
    if($sAction=="authentifier" && $sPhase=="1") authentifier_1($dConfig);
    if($sAction=="authentifier" && $sPhase=="2") authentifier_2($dConfig);
     // incorrect request
    authentifier_0($dConfig);
  }//if - no session

     // retrieve the session
  $dSession=unserialize($dSession);

     // processing the request
     // ----- authentication
  if($sAction=="authentifier" && $sPhase=="0") authentifier_0($dConfig);
  if($sAction=="authentifier" && $sPhase=="1") authentifier_1($dConfig);
  if($sAction=="authentifier" && $sPhase=="2") authentifier_2($dConfig);
     // ----- add article
  if($sAction=="addarticle" && $sPhase=="0") addArticle_0($dConfig,$dSession);
  if($sAction=="addarticle" && $sPhase=="1") addArticle_1($dConfig,$dSession);
  if($sAction=="addarticle" && $sPhase=="2") addArticle_2($dConfig,$dSession);
     // ----- article update
  if($sAction=="updatearticle" && $sPhase=="0") updateArticle_0($dConfig,$dSession);
  if($sAction=="updatearticle" && $sPhase=="1") updateArticle_1($dConfig,$dSession);
  if($sAction=="updatearticle" && $sPhase=="2") updateArticle_2($dConfig,$dSession);
  if($sAction=="updatearticle" && $sPhase=="3") updateArticle_3($dConfig,$dSession);
     // ----- article deletion
  if($sAction=="deletearticle" && $sPhase=="0") deleteArticle_0($dConfig,$dSession);
  if($sAction=="deletearticle" && $sPhase=="1") deleteArticle_1($dConfig,$dSession);
  if($sAction=="deletearticle" && $sPhase=="2") deleteArticle_2($dConfig,$dSession);
    // ----- article consultation
  if($sAction=="selectarticle" && $sPhase=="0") selectArticle_0($dConfig,$dSession);
  if($sAction=="selectarticle" && $sPhase=="1") selectArticle_1($dConfig,$dSession);
  if($sAction=="selectarticle" && $sPhase=="2") selectArticle_2($dConfig,$dSession);
     // ----- send request SQL
  if($sAction=="sql" && $sPhase=="0") sql_0($dConfig,$dSession);
  if($sAction=="sql" && $sPhase=="1") sql_1($dConfig,$dSession);
  if($sAction=="sql" && $sPhase=="2") sql_2($dConfig,$dSession);


    // erroneous action - authentication page is presented
  session_destroy();
  authentifier_0($dConfig,"0");
...
?>
Note the following points:
- Functions handling a specific client request end by generating the response page and with an exit statement that terminates the execution of the script apparticles.php. In other words, you do not "return" from these functions.
- The functions accept one or two parameters:
- $dConfig is a dictionary containing information from the configuration file config.php. All functions use it.
- $dSession is a dictionary containing session information. It exists only when the session has been created, i.e., after the user has successfully authenticated. This is why the authentication functions do not have this parameter.
7.5.6. The error page
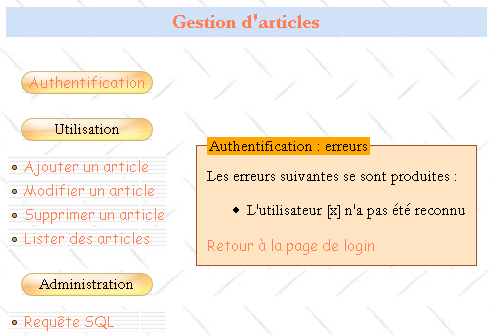
Every software application must be able to properly handle errors that may occur. A web application is no exception to this rule. Here, when an error occurs, we will place the following error page (php) in zone 4 of the template page:
Les erreurs suivantes se sont produites :
<ul>
    <?php
        for($i=0;$i<count($main["erreurs"]);$i++){
            echo "<li>".$main["erreurs"][$i]."</li>\n";
        }//for
    ?>
</ul>
<a href="<?php echo $main["href"] ?>"><?php echo $main["lien"] ?></a>
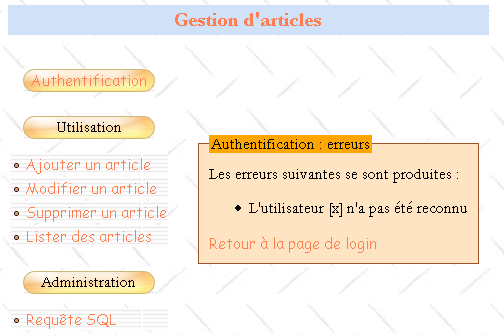
It displays the list of errors defined in $main['erreurs']. Additionally, it may provide a back link, typically to the page that preceded the error page. This link will be defined by a label $main['lien'] and a URL $main['href']. To remove this link, simply enter an empty string in $main['lien']. Here is an example of an error page in the event that the user logs in incorrectly:
7.5.7. The information page
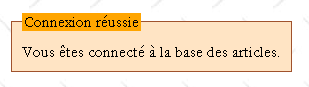
Sometimes you may want to provide the user with simple information, such as a successful login. To do this, use the following infos.php page:
To display information in response to a client request,
- place the information in $main['infos']
- place the URL from infos.php into $main['contenu']
Here is an example of the information returned when the user has logged in successfully:
7.6. How the application works
We now have a good idea of the general structure of the application to be written. We still need to outline the user’s flow through the application, the actions they can perform, and the responses they receive from the server. Once this is done, we can write the functions that handle the various requests from a client. In the following, we will describe how the application works through the pages presented to the user in response to certain actions. We will specify the following points each time:
the user’s initial action that led to the displayed response | |
the parameters sent by the client browser to the server in response to the user’s manual action | |
the script that generates section 4 of the template page |
7.6.1. Authentication
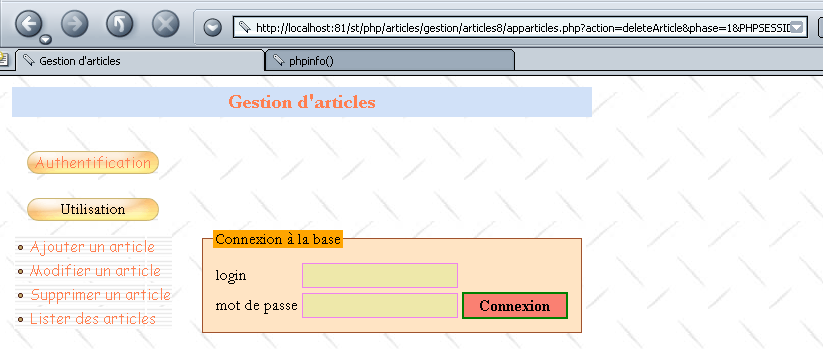
Before being able to use the application, the user must log in using the following page:
1 - Initial request for URL from articles.php 2 - Use of the option Authentication menu 3 - Direct request for the URL and php files with incorrect parameters | |
1 - no parameters 2 - action=authenticate?phase=0 3 - a list of incorrect parameters | |
login.php |
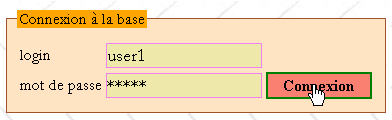
On the home page, the link [Ajouter un article] has the following format: action=addarticle?phase=0. The other links have the same format with action=(authenticate, updatearticle, deletearticle, selectarticle, sql). The user fills out the form and clicks the [Connexion] button:
The response is as follows:
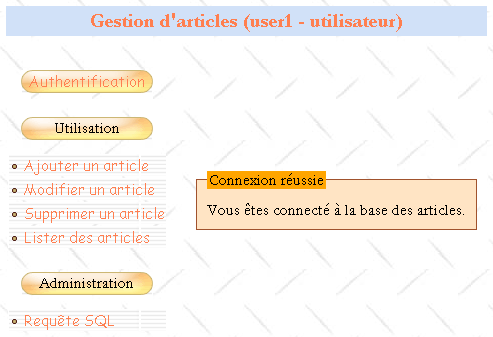
[Connexion] button | |
action=authenticate?phase=1 | |
infos.php |
The page title has been modified to indicate the user's login and their administrator/user rights. Additionally, all links in area 2 have been modified to reflect the fact that a session has started. The parameter PHPSESSID=[PHPSESSID] has been added to them.
If the server was unable to identify the client, the client will receive a different response:
button [Connexion] | |
action=authenticate?phase=1 | |
errors.php |
The link [Retour à la page de login] is a link to URL articles.php?action=authenticate&phase=2&txtLogin=x. This link takes the client back to the login page, where the login field is populated with the value of the txtLogin parameter:
link [Retour à la page de login] | |
action=authenticate?phase=2&txtLogin=x | |
login.php |
7.6.2. Add an article
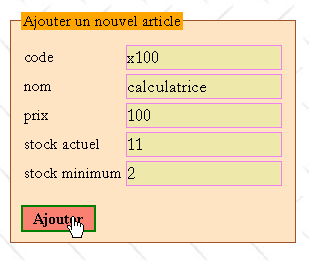
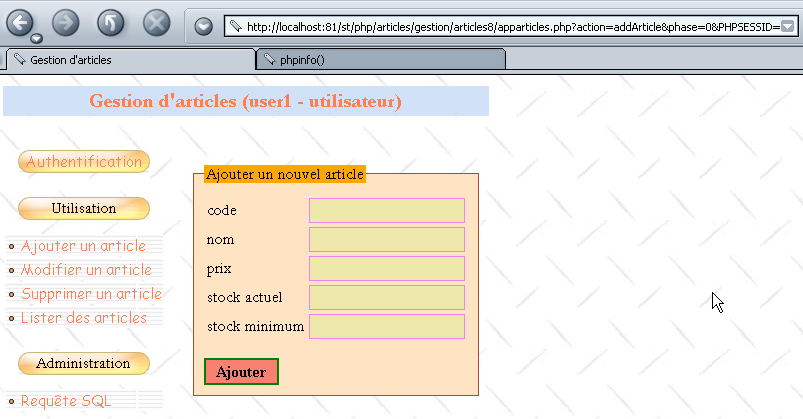
The menu link [Ajouter un article] brings the following page to zone 4 of the template page:
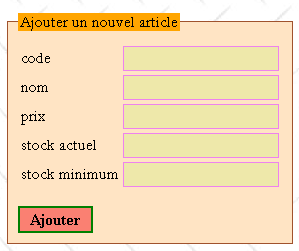
link [Ajouter un article] | |
action=addArticle?phase=0&PHPSESSID=[PHPSESSID] | |
addarticle.php |
The user fills in the fields and submits everything to the server using the [Ajouter] button, which is of type submit. No validation is performed on the client side. The server handles this. It may return an error page in response, as shown in the example below:
Request | Response |
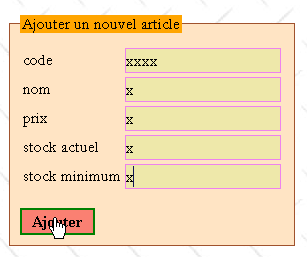 | 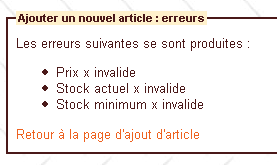 |
[Ajouter] button | |
action=addArticle?phase=1&PHPSESSID=[PHPSESSID] | |
errors.php |
The link [Retour à la page d'ajout d'article] allows you to return to the entry page:
Request | Response |
| |
link [Retour à la page d'ajout d'article] | |
action=addArticle?phase=2&PHPSESSID=[PHPSESSID] | |
article.php |
If the addition is successful, the user receives a confirmation message:
Request | Response |
 | 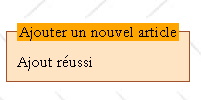 |
button [Ajouter] | |
action=addArticle?phase=1&PHPSESSID=[PHPSESSID] | |
infos.php |
7.6.3. Viewing articles
The menu link [Lister des articles] brings the following page into zone 4 of the template page:
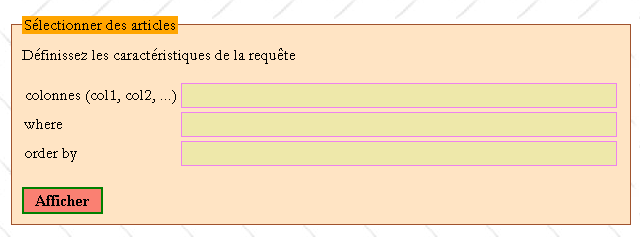
menu link [Lister des articles] | |
action=selectArticle?phase=0&PHPSESSID=[PHPSESSID] | |
select1.php |
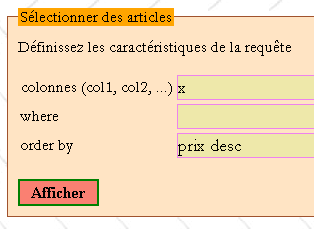
A SELECT query like **[colonnes] FROM articles WHERE [where] ORDER BY [orderby]** will be executed on the articles table, where [colonnes], [where], and [orderby] are the contents of the fields above. For example:
Request |
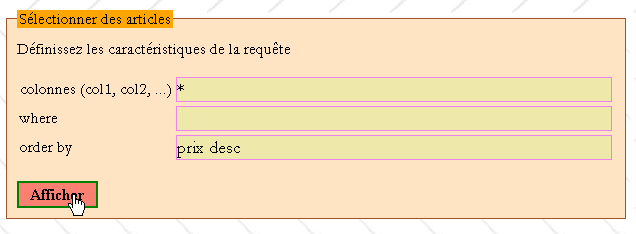 |
Response |
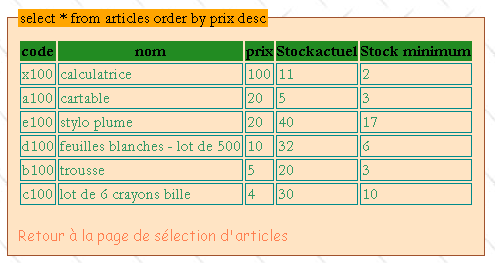 |
button [Afficher] | |
action=selectArticle?phase=1&PHPSESSID=[PHPSESSID] | |
select2.php |
The request may be invalid, in which case the client receives an error page:
Request |
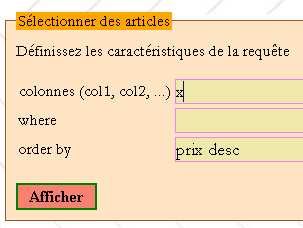 |
Response |
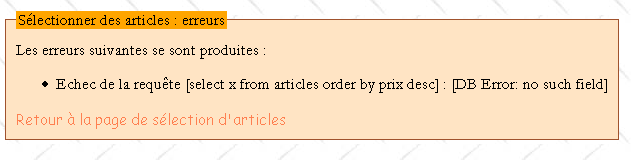 |
In both cases (whether there are errors or not), the link [Retour à la page de sélection d'articles] allows you to return to the page select1.php:
Request |
 |
Response |
 |
link [Retour à la page de sélection d'articles] | |
action=selectArticle?phase=2&PHPSESSID=[PHPSESSID] | |
select1.php |
7.6.4. Editing articles
The menu link [Modifier un article] brings the following page into zone 4 of the template page:
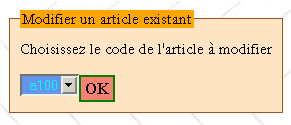
menu link [Modifier un article] | |
action=updateArticle?phase=0&PHPSESSID=[PHPSESSID] | |
updatearticle1.php |
Select the article code to be modified from the drop-down list and enter [OK] to modify the article with that code:
Request | Response |
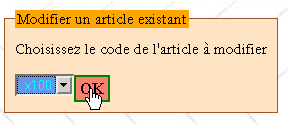 |  |
[OK] button | |
action=updateArticle?phase=1&PHPSESSID=[PHPSESSID] | |
updatearticle2.php |
Once the product page to be edited is displayed, the user can make changes:
Request | Response |
 | 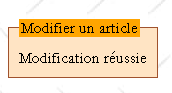 |
button [Modifier] | |
action=updateArticle?phase=2&PHPSESSID=[PHPSESSID] | |
infos.php |
The user may make errors during editing:
Request | Response |
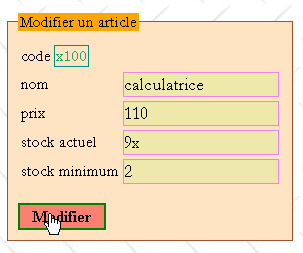 |  |
The link [Retour à la page de modification d'article] allows you to return to the entry page:
link [Retour à la page de modification d'article] | |
action=updateArticle?phase=3&PHPSESSID=[PHPSESSID] | |
updatearticle2.php |
7.6.5. Deleting an article
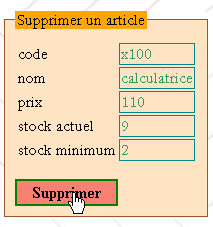
The menu link [Supprimer un article] brings the following page to zone 4 of the template page:
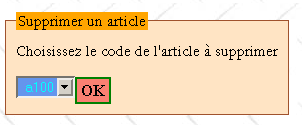
menu link [Supprimer un article] | |
action=deleteArticle?phase=0&PHPSESSID=[PHPSESSID] | |
deletearticle1.php |
The user selects the code of the item to be deleted from a drop-down list:
Request | Response |
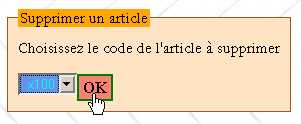 |  |
button [OK] | |
action=deleteArticle?phase=1&PHPSESSID=[PHPSESSID] | |
deletearticle2.php |
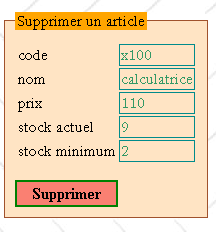
The user confirms the deletion of the article with the button [Supprimer]:
Request | Response |
 | 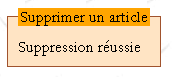 |
Button [Supprimer] | |
action=deleteArticle?phase=2&PHPSESSID=[PHPSESSID] | |
infos.php |
7.6.6. Administrator request submissions
The menu link [Requête SQL] brings the following page to zone 4 of the template page:
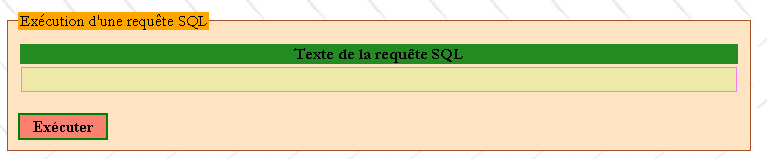
menu link [Requête SQL] | |
action=sql?phase=0&PHPSESSID=[PHPSESSID] | |
sql1.php |
Enter the text of the query SQL in the input field and use the button [Exécuter] to execute it. Only an administrator can issue these queries, as shown in the following example:
Request | Response |
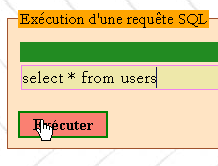 | 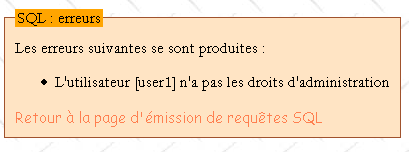 |
[Exécuter] button | |
action=sql?phase=1&PHPSESSID=[PHPSESSID] | |
errors.php |
The link [Retour à la page d'émission de requêtes SQL] takes you back to the input page:
link [Retour à la page d'émission de requêtes SQL] | |
action=sql?phase=2&PHPSESSID=[PHPSESSID] | |
sql1.php |
If you are an administrator and the request is syntactically correct:
Request |
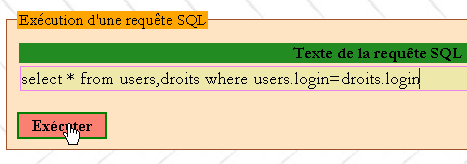 |
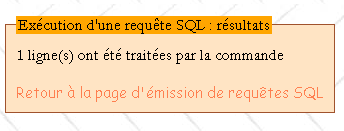
you get the result of the query:
Response |
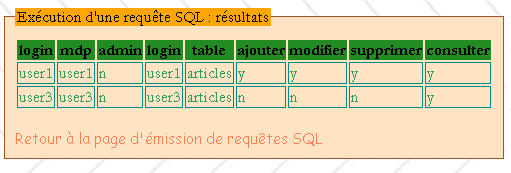 |
button [Exécuter] | |
action=sql?phase=1&PHPSESSID=[PHPSESSID] | |
sql2.php |
You can send requests to update tables:
Request |
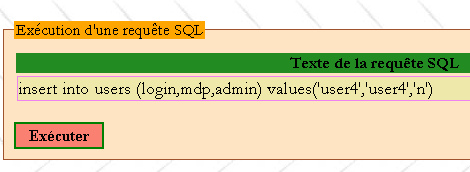 |
Response |
 |
button [Exécuter] | |
action=sql?phase=1&PHPSESSID=[PHPSESSID] | |
infos.php |
7.6.7. Work to be done
Write the scripts and functions required for the application:
username | type | role |
script | the entry point for processing requests from clients | |
function | processes the request with parameters action=authenticate&phase=0 | |
function | processes the request with parameters action=authenticate&phase=1 | |
function | processes the request with parameters action=authenticate&phase=2 | |
function | processes the request with parameters action=addArticle&phase=0 | |
function | processes the request with parameters action=addArticle&phase=1 | |
function | processes the request with parameters action=addArticle&phase=2 | |
function | processes the request with parameters action=updatearticle&phase=0 | |
function | processes the request with parameters action=updatearticle&phase=1 | |
function | processes the request with parameters action=updatearticle&phase=2 | |
function | processes the request with parameters action=updatearticle&phase=3 | |
function | processes the request with parameters action=deletearticle&phase=0 | |
function | processes the request with parameters action=deletearticle&phase=1 | |
function | processes the request with parameters action=deletearticle&phase=2 | |
function | processes the request with parameters action=selectarticle&phase=0 | |
function | processes the request with parameters action=selectarticle&phase=1 | |
function | processes the request with parameters action=selectarticle&phase=2 | |
function | processes the request with parameters action=sql&phase=0 | |
function | processes the request with parameters action=sql&phase=1 | |
function | processes the request with parameters action=sql&phase=2 | |
script | generates the template page | |
script | generates the login page | |
script | generates the error page | |
script | generates the information page | |
script | generates the page for adding an article | |
script | generates page 1 for editing an article | |
script | generates page 2 of the article edit | |
script | generates page 1 of the article deletion | |
script | generates page 2 of the article deletion | |
script | generates page 1 of the article selection | |
script | generates page 2 of the article selection | |
script | generates page 1 of the query output | |
script | generates page 2 of the query output |
7.7. Enhancing the application
At this point, we have an application that does what it’s supposed to do with acceptable usability. We’re going to improve it in several areas:
- SGBD
- its security
- its appearance
- its performance
7.7.1. Changing the database type
Our study assumed that the SGBD used was MySQL. Change to SGBD and show that the only modification needed is in the definition of the variable $dDSN in the configuration file config.php.
7.7.2. Improving Security
When developing a web application, you should never assume that the client is a browser and that the request it sends us is controlled by the form we sent it prior to that request. Any program can act as a client for a web application and therefore send any request—whether parameterized or not—to the application. The application must therefore verify everything.
If we look at the code for the script **apparticles.php**, we see
- that no action other than authentication can take place without a session. A session exists only if the user has successfully authenticated. Recall that a session is identified by a fairly long string of characters called the session token, which has the following form: 176a43609572907333118333edf6d1fb. This token can be sent to the application in various ways, for example by using a configured URL:
apparticles.php?PHPSESSID=176a43609572907333118333edf6d1fb.
A program that repeatedly requests the previous URL by randomly varying the token in the hope of finding the correct one would likely take many days to generate the correct combination, given the sheer number of possible combinations. By that time, since the session has a limited duration, it will most likely have expired. Another risk is that the token, transmitted in plain text over the network, could be intercepted. This is a real risk. An encrypted connection between the server and its client can therefore be used.
- Once the session is started, only certain actions are allowed. A token configured as action=cheat&phase=0&URL would be rejected because the action 'cheat' is not an allowed action. When the parameters (action, phase) are not recognized, our application responds with the authentication page.
However, the application does not check whether the authorized actions are performed in the correct order. For example, the following two actions:
- action=addArticle&phase=0&PHPSESSID=[PHPSESSID]
- action=updateArticle&phase=1&PHPSESSID=[PHPSESSID]
are two authorized actions. However, action 2 is not authorized to follow action 1.
How can we track the sequence of URL requests made by the client browser?
We can use two variables: $_SERVER['REQUEST_URI] and $_SERVER['HTTP_REFERER], which are two pieces of information sent by the browsers clients in their headers HTTP headers.
$_SERVER['REQUEST_URI]: This is the URI requested by the client. For example
$_SERVER['HTTP_REFERER]: This is the URL that was displayed in the browser before the new URL that the browser is currently requesting (the previous URI). For example, if the browser that displayed the previously mentioned URI makes a new request to a server, the server’s $_SERVER['HTTP_REFERER'] variable will have the value
To verify that two actions in our application follow one another in order, we can proceed as follows:
During action 1:
- we note the requested URI (URI1) and store it in the session
During action 2:
- retrieve the HTTP-REFERER from action 2. From this, derive the URI (URI2) from the URL that was previously displayed in the browser making the request.
- We retrieve the URI URI1 that was stored in the session and which is the URI of the action previously requested from the server
- If action 2 follows action 1, then URI2 must equal URI1. If this is not the case, the requested action is denied, and the authentication page is displayed.
- We record the URI and URI2 from the current action in the session for verification of the next action. And so on.
Here is an example. After authentication, we select the link [Ajouter un article]:
The URL for this page is:
http://localhost:81/st/php/articles/gestion/articles8/apparticles.php?action=addArticle&phase=0&PHPSESSID=006a63e6027f16c70b63cdae93405eeb
Directly in the browser's [Adresse] field, we modify the URL as follows:
http://localhost:81/st/php/articles/gestion/articles8/apparticles.php?action=deleteArticle&phase=1&PHPSESSID=006a63e6027f16c70b63cdae93405eeb
We then get the authentication page:
This warrants an explanation. When requesting a URL by typing its ID directly into the browser’s address bar, the browser does not send the HTTP_REFERER header. Our application therefore cannot find the URI from the previous action, URI, which it had stored in the session. It then returns the authentication page in response.
This mechanism works for browsers but not at all for a programmed client. The client can send whatever HTTP_REFERER header it wants. It can therefore "cheat" by claiming it has gone through a certain step when it has not. It is therefore necessary to ensure that the sequence of steps is followed. Thus, if the requested action is action=addArticle&phase=1 (entry), then the previous action must necessarily be action=deleteArticle&phase=0 (initial request for the entry page) or action=addArticle&phase=2 (return to entry after an incorrect addition). Similarly, if the requested action is action=addArticle&phase=2 (add), then the previous action must be action=addArticle&phase=1 (entry). We can force the user to follow these sequences.
While the first mechanism is general and can be applied to any application, the second requires application-specific coding and is more complex: all possible user actions and their sequences must be reviewed. These can be stored in a dictionary as shown in the following code:
  // authentication
  $dPrec['authentifier']['0']=array();
  $dPrec['authentifier']['1']=array(
        array('action'=> 'authenticate','phase'=> '0'),
    array('action'=> 'authenticate','phase'=> '2')
  );
  $dPrec['authentifier']['2']=array(
        array('action'=> 'authenticate','phase'=> '1'),
  );

   // add article
  $dPrec['addarticle']['0']=array();
  $dPrec['addarticle']['1']=array(
        array('action'=> 'addarticle','phase'=> '0'),
    array('action'=> 'addarticle','phase'=> '2')
  );
  $dPrec['addarticle']['2']=array(
        array('action'=> 'addarticle','phase'=> '1'),
  );

   // article modification
  $dPrec['updatearticle']['0']=array();
  $dPrec['updatearticle']['1']=array(
        array('action'=> 'updatearticle','phase'=>'0'),
  );
  $dPrec['updatearticle']['2']=array(
        array('action'=> 'updatearticle','phase'=>'1'),
    array('action'=> 'updatearticle','phase'=> '3')
  );
  $dPrec['updatearticle']['3']=array(
        array('action'=> 'updatearticle','phase'=> '2'),
  );

   // article deletion
  $dPrec['deletearticle']['0']=array();
  $dPrec['deletearticle']['1']=array(
        array('action'=> 'deletearticle','phase'=>'0'),
  );
  $dPrec['deletearticle']['2']=array(
        array('action'=> 'deletearticle','phase'=>'1'),
  );

      // article selection
  $dPrec['selectarticle']['0']=array();
  $dPrec['selectarticle']['1']=array(
        array('action'=> 'selectarticle','phase'=>'0'),
    array('action'=> 'selectarticle','phase'=>'2')
  );
  $dPrec['selectarticle']['2']=array(
        array('action'=> 'selectarticle','phase'=>'1'),
  );

      // administrator request
  $dPrec['sql']['0']=array();
  $dPrec['sql']['1']=array(
        array('action'=>'sql','phase'=>'0'),
    array('action'=> 'sql','phase'=> '2')
  );
  $dPrec['sql']['2']=array(
        array('action'=> 'sql','phase'=> '1'),
  );
$dPrec['action']['phase'] is an array containing the actions that can precede the action and the phase that serve as the dictionary's index. These preceding actions are also represented by a dictionary with two keys: 'action' and 'phase'. If an action can be preceded by any action, then $dPrec['action']['phase'] will be an empty array. The absence of an action in the dictionary means that it is not permitted. Consider the "authenticate" action above:
  // authentication
  $dPrec['authentifier']['0']=array();
  $dPrec['authentifier']['1']=array(
        array('action'=> 'authenticate','phase'=> '0'),
    array('action'=> 'authenticate','phase'=> '2')
  );
  $dPrec['authentifier']['2']=array(
        array('action'=> 'authenticate','phase'=> '1'),
  );
The code above means that the action action=authenticate&phase=0 can be preceded by any action, that action=authenticate&phase=1 can be preceded by either action=authenticate&phase=0 or action=authenticate&phase=2, and that action=authenticate&phase=2 can be preceded by the action action=authenticate&phase=1.
Write the following function:
  // ---------------------------------------------------------------
  function enchainementOK(&$dConfig, &$dSession, $sAction, $sPhase){
       // checks whether the current action ($sAction, $sPhase) can follow the previous action
         // stored in $dSession['previous']
         // the dictionary of authorized sequences is in $dConfig['précédents']
         // returns TRUE if chaining is possible, FALSE otherwise
....
This function allows the main application to verify that the sequence of actions is correct:
<?php
     // item table management
  include "config.php";
  include "articles.php";

  // session
  session_start();
  $dSession=$_SESSION["session"];

   // action to be taken
  $sAction=$_POST["action"] ? $_POST["action"] : $_GET["action"] ? $_GET["action"] : "authentifier";
  $sAction=strtolower($sAction);
   // possible action phase
  $sPhase=$_POST["phase"] ? $_POST["phase"] : $_GET["phase"] ? $_GET["phase"] : "0";

     // is there a session in progress?
  if(! isset($dSession)){
      // user authentication
    if($sAction=="authentifier" && $sPhase=="0") authentifier_0($dConfig);
    if($sAction=="authentifier" && $sPhase=="1") authentifier_1($dConfig);
    if($sAction=="authentifier" && $sPhase=="2") authentifier_2($dConfig);
     // abnormal action
    authentifier_0($dConfig);
  }//if - no session

     // retrieve the session
  $dSession=unserialize($dSession);

     // is the sequence of actions normal?
  if( ! enchainementOK($dConfig,$dSession,$sAction,$sPhase)){
     // abnormal sequence
    authentifier_0($dConfig);
  }//if

     // stock processing
  if($sAction=="authentifier"){
   if($sPhase=="0") authentifier_0($dConfig);
   if($sPhase=="1") authentifier_1($dConfig);
   if($sPhase=="2") authentifier_2($dConfig);
  }//if
  if($sAction=="addarticle"){
...
7.7.3. Updating the "look"
Remember that one of the requirements established during the design of this application was that it had to be scalable. Suppose that after a few weeks, we realize that the application’s usability needs to be improved. Modify the application so that the structure and layout of the template page are changed. The changes will be made in two places:
- in the main.php script, which defines the structure of the template page. Update this script.
- in the style sheet that determines the application’s “look.” Change this.
7.7.4. Improve performance
For now, we have opted for a thin-client browser: it does nothing but display content. We can make it perform processing by including scripts in the web pages we send to it. These scripts can be written in various languages, notably vbscript and javascript. Internet Explorer and Netscape dominate the browser market in a ratio of roughly 60/40. Furthermore, IE is only available on Windows and not on Unix, for example, where Netscape is the dominant browser. Netscape does not natively execute vbscript scripts, whereas both browsers execute javascript scripts. Since Netscape still holds a significant share of the browser market, vbscript scripts should be avoided. Therefore, javascript is generally used in client-side scripts.
Processing tasks that do not require server intervention are delegated to client-side scripts. In our application, it would be beneficial for the client browser to send a request to the server only after verifying it. Thus, there is no point in sending an authentication request to the server if the user has left the [login] field blank in the authentication form. It is preferable to notify the user that their request is incorrect:
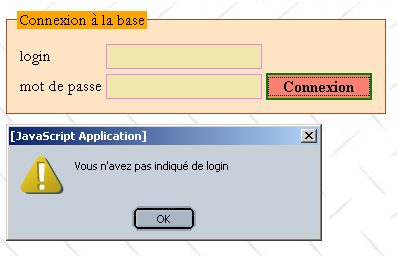
Note that this will not prevent the server from verifying that the login field is not empty, since its client is not necessarily a browser, and thus the previous verification may not have been performed. Assuming that the client is a browser poses a major security risk to the application.
Review the various points at which the browser sends information to the server, and where this information can be verified, write one or more javascript functions that will allow the browser to verify the validity of the information before sending it to the server.
To revisit the previous example, the login.php script that generates the authentication page becomes the following:
<script language="javascript">
    function check(){
       // check that there is a login
    with(document.frmLogin){
        champs=/^\s*$/.exec(txtLogin.value);
      if(champs!=null){
          // no login
        alert("Vous n'avez pas indiqué de login");
        txtLogin.focus();
        return;
      }//if
       // the data is there - we send it to the server
      submit();
    }//with
  }//check
</script>

<form name="frmLogin" method="post" action="<?php echo $main["post"] ?>">
    <table>
        <tr>
            <td>login</td>
            <td><input type="text" value="<?php echo $main["login"] ?>" name="txtLogin" class="text"></td>
        </tr>
        <tr>
            <td>mot de passe</td>
            <td><input type="password" value="" name="txtMdp" class="text"></td>
      <td><input type="button" onclick="check()" value="Connexion" class="submit"></td>
        </tr>
    </table>
</form>
7.8. Further Reading
To conclude, here are a few ideas for expanding on this case study:
- It would be interesting to see if the template page for this application could be turned into a class. This class could then be used in other applications.
- Our application is well-suited for browser-type clients applications but less so for "Standalone Application" type clients applications. These must:
- establish a tcp connection with the server
- "communicate" with it
- analyze its responses to find the desired information, since the standalone client will likely not be interested in the presentation code intended for browsers
It would be beneficial for our application to generate XML rather than HTML. Its clients could then be used interchangeably by browsers (recent ones, at least) or standalone applications. The latter would have no trouble finding the information they are looking for, since the server’s XML response would contain no presentation information, only content.
- We would certainly need to consider simultaneous access to the article database. There are at least two points to clarify:
- Does the SGBD used by the application correctly handle simultaneous access to the same article? For example, what happens if two users edit the same article at the same time (they click the [Modifier] button simultaneously)? This likely depends on the underlying SGBD.
- Currently, our application does not support concurrent access. However, the database should remain in a consistent state, although unexpected behavior may occur. Consider the following sequence of events:
- User U1 enters to edit an item
- User U2 enters the delete screen for the same item shortly after
- Each of these actions requires client-server communication. Depending on how each user works, User U2 may finish their work before User U1. When U1 finishes their edits and saves them using [Modifier], they will receive the information page in response, with SGBD indicating that [0 ligne(s) ont été modifiées], because the page they wanted to edit has been deleted in the meantime. The user will likely be surprised. From a usability standpoint, it would probably be better to display a page that more clearly indicates the error. Furthermore, one could consider granting the user exclusive access to an article as soon as they begin editing it. Another user attempting to edit the same article would be informed that another edit is in progress. This will pose a problem if the first user delays in saving their changes: others will be blocked. Solutions need to be found here, and these will depend largely on the capabilities of the SGBD being used. Oracle, for example, has more capabilities in this area than MySQL.