8. 身份验证与授权
对于每个请求,都会出现两个不同的问题:
- 用户是谁?这就是身份验证:用户已经用用户名和密码表明了身份,之后的每个请求都必须证明它来自该用户;
- 用户是否有权访问这个页面?这就是授权:在案例研究中,只有角色为 ADMIN 的用户才能管理医生和客户。
由于服务器是无状态的(第 6 章),身份证明必须随每个请求一起发送。这里使用 JWT 令牌 ([JSON Web Token]):登录之后,服务器生成一个包含用户身份的令牌,并用一个密钥对其签名。令牌存储在 Cookie 中;浏览器在每个请求中把它发回;服务器验证签名。用户可以读取自己的令牌,但无法修改它:任何修改都会使签名失效。
在 [Spring] 中,这两个问题由 [Spring Security] 处理,它是 [Spring] 家族中不同于 [Spring MVC] 的一个项目。[Spring Security] 是一条Servlet 过滤器链 (参见第 7 章),位于 [DispatcherServlet] 之前:每个请求在到达 [Spring MVC] 之前都要经过它。
- 身份验证由一个过滤器处理,它在请求中查找令牌、验证令牌,并推导出已通过身份验证的用户——一个存储在请求的 [Authentication] 对象中的 安全上下文。对于 JWT 令牌,这个过滤器由 [resource server](“资源服务器”)组件提供,它属于 [Spring Security],其名称源自 [OAuth2] 协议:资源服务器是接受由另一个服务器(这里是它自己)生成的令牌的服务器;
- 授权由另一个过滤器处理,它应用以 [Java] 为每个 URL 编写的规则(“此地址是公开的”“此地址需要已通过身份验证的用户”),以及应用于控制器的注解([@PreAuthorize],示例 26)。
本章的示例多使用一个启动器:[spring-boot-starter-security-oauth2-resource-server]。它包含 [Spring Security]、其“资源服务器”组件,以及 [Nimbus JOSE + JWT] 库,该库用于生成和验证令牌。密码哈希([bcrypt])属于 [Spring Security]:无需再声明其他库。[Maven] 会在首次编译时下载这些库;因此需要互联网连接。
8.1. 示例 25:登录、令牌、受保护的页面
| 25-jwt/
├── src/
│ └── main/
│ ├── java/
│ │ └── example25/
│ │ ├── auth/
│ │ │ ├── AuthService.java
│ │ │ ├── JwtProperties.java
│ │ │ └── UsersService.java
│ │ ├── config/
│ │ │ ├── SecurityConfig.java
│ │ │ └── WebConfig.java
│ │ ├── controllers/
│ │ │ ├── AuthController.java
│ │ │ └── ProfileController.java
│ │ └── Example25Application.java
│ └── resources/
│ ├── templates/
│ │ ├── auth/
│ │ │ └── login.html
│ │ ├── profile/
│ │ │ └── profile.html
│ │ └── layout.html
│ └── application.properties
└── pom.xml
|
文件 [pom.xml]:
| <?xml version="1.0" encoding="UTF-8"?>
<project xmlns="http://maven.apache.org/POM/4.0.0"
xmlns:xsi="http://www.w3.org/2001/XMLSchema-instance"
xsi:schemaLocation="http://maven.apache.org/POM/4.0.0 https://maven.apache.org/xsd/maven-4.0.0.xsd">
<modelVersion>4.0.0</modelVersion>
<parent>
<groupId>course.springmvc</groupId>
<artifactId>examples</artifactId>
<version>1.0</version>
</parent>
<artifactId>example25</artifactId>
<dependencies>
<!-- Thymeleaf 视图 -->
<dependency>
<groupId>org.springframework.boot</groupId>
<artifactId>spring-boot-starter-thymeleaf</artifactId>
</dependency>
<!-- Spring Security,使用 JWT 令牌进行身份验证(令牌的创建和检查) -->
<dependency>
<groupId>org.springframework.boot</groupId>
<artifactId>spring-boot-starter-security-oauth2-resource-server</artifactId>
</dependency>
</dependencies>
</project>
|
- 第 15–18 行:[Thymeleaf] 视图;
- 第 20–23 行:[Spring Security] 以及基于 JWT 令牌的身份验证。只要项目中存在 [Spring Security] ,[Spring Boot] 默认就会保护应用程序中的所有 URL。设定我们自己规则的是下面所示的配置类 [SecurityConfig]。
[application.properties] 文件:
| # 服务器的监听端口(默认为 8080)
server.port=5000
# Spring Boot 的错误响应不包含调用栈
spring.web.error.include-stacktrace=never
# 用于签署 JWT 令牌的密钥(至少 32 个字符),以及令牌的有效期
jwt.secret=a-secret-key-of-at-least-32-characters-for-example-25
jwt.duration-minutes=60
|
- 第 6–7 行:两个应用程序专用的属性:用于签署令牌的密钥及其有效期。任何知道该密钥的人都可以生成有效的令牌:在生产环境中,它不存储在项目文件中;而是由环境变量([JWT_SECRET],其优先级高于文件)或密钥保管库提供。所用算法(HMAC-SHA256)要求密钥至少为 32 字节(256 位):[Nimbus] 拒绝使用更短的密钥进行签名。
文件 [auth/JwtProperties.java]:
| package example25.auth;
import org.springframework.boot.context.properties.ConfigurationProperties;
// application.properties 中的 [jwt.*] 属性,存放在一个 record 中:
// jwt.secret -> secret;jwt.duration-minutes -> durationMinutes
@ConfigurationProperties("jwt")
public record JwtProperties(String secret, int durationMinutes) {
}
|
- 第 7–8 行:注解 [@ConfigurationProperties("jwt")] 指示 [Spring Boot] 用以 [jwt.] 开头的属性填充此 record:[jwt.secret] 进入 [secret] 组件,而 [jwt.duration-minutes] 进入 [durationMinutes] 组件(连字符和大写字母都会被忽略:这就是 宽松绑定 ,属于 [Spring Boot] 的特性)。值 [60] 被转换为 [int];如果值不是数字,应用程序会在启动时立即终止,并给出清晰的错误消息。该 record 会成为一个 Bean,可以像其他任何服务一样通过注入来接收。它通过 [@EnableConfigurationProperties] 注解在 [SecurityConfig] (见下文)中声明。
我们本可以使用 [@Value("${jwt.secret}")] 注解读取每个属性;而 record 把同一主题的属性组织在一起,并为每个属性指定类型。
文件 [auth/UsersService.java]:
| package example25.auth;
import java.util.List;
import java.util.Optional;
import org.springframework.security.crypto.password.PasswordEncoder;
import org.springframework.stereotype.Service;
// 用户,存放在内存中(下一章会把它们放入数据库)
@Service
public class UsersService {
public record User(String login, String name, String role, String passwordHash) {
}
private final List<User> users;
// PasswordEncoder:密码的哈希(bcrypt,参见 SecurityConfig)
public UsersService(PasswordEncoder hashing) {
// 绝不保存密码本身,只保存其哈希
users = List.of(
new User("marie", "Marie Pélissier", "USER", hashing.encode("marie")),
new User("admin", "Administrator", "ADMIN", hashing.encode("admin")));
}
public Optional<User> find(String login) {
return users.stream().filter(u -> u.login().equals(login)).findFirst();
}
}
|
- 第 13–14 行:用户及其角色,以嵌套在服务内部的 record 的形式表示;
- 第 19–24 行:密码从不被存储;只保留其哈希——由单向函数计算出的哈希值。可以验证某个密码是否与哈希值匹配,但无法从哈希值恢复出密码。该服务通过注入接收一个 [PasswordEncoder],它是 [Spring Security] 中用于密码哈希的接口,并用它为两个测试账户生成哈希(第 22 行);
- 第 26–28 行:按登录名搜索用户会返回一个 [Optional<User>]——一个要么持有用户、要么为空的容器。列表被当作流 ([stream()])来遍历:[filter] 只保留满足条件的元素,而 [findFirst] 返回第一个元素(放在 [Optional] 中)。
文件 [auth/AuthService.java]:
| package example25.auth;
import java.time.Duration;
import java.time.Instant;
import java.util.Optional;
import org.springframework.http.ResponseCookie;
import org.springframework.security.crypto.password.PasswordEncoder;
import org.springframework.security.oauth2.jose.jws.MacAlgorithm;
import org.springframework.security.oauth2.jwt.JwsHeader;
import org.springframework.security.oauth2.jwt.JwtClaimsSet;
import org.springframework.security.oauth2.jwt.JwtEncoder;
import org.springframework.security.oauth2.jwt.JwtEncoderParameters;
import org.springframework.stereotype.Service;
import example25.auth.UsersService.User;
@Service
public class AuthService {
// 承载令牌的 Cookie 的名称
public static final String COOKIE = "token";
private final UsersService users;
private final PasswordEncoder hashing;
private final JwtEncoder encoder;
private final JwtProperties properties;
public AuthService(UsersService users, PasswordEncoder hashing, JwtEncoder encoder,
JwtProperties properties) {
this.users = users;
this.hashing = hashing;
this.encoder = encoder;
this.properties = properties;
}
// 用户,或者在登录名未知或密码错误时为“空”
public Optional<User> validate(String login, String password) {
if (login == null || password == null) {
return Optional.empty();
}
return users.find(login).filter(u -> hashing.matches(password, u.passwordHash()));
}
// 用户的 JWT 令牌,用密钥签署
public String createToken(User user) {
Instant now = Instant.now();
// 令牌的内容:“claims”(关于用户的声明)
JwtClaimsSet claims = JwtClaimsSet.builder()
.subject(user.login())
.claim("name", user.name())
.claim("role", user.role())
.issuedAt(now)
.expiresAt(now.plus(duration()))
.build();
// 头:签名算法(HMAC-SHA256)
JwsHeader header = JwsHeader.with(MacAlgorithm.HS256).build();
return encoder.encode(JwtEncoderParameters.from(header, claims)).getTokenValue();
}
// 承载令牌的 Cookie:页面的 JavaScript 无法读取它
public ResponseCookie cookie(String token) {
return ResponseCookie.from(COOKIE, token).path("/").httpOnly(true).sameSite("Lax").maxAge(duration()).build();
}
private Duration duration() {
return Duration.ofMinutes(properties.durationMinutes());
}
}
|
我们来解释这段代码:
- 第 22 行:携带令牌的 Cookie 的名称;
- 第 29–35 行:该服务通过构造函数接收用户服务、密码编码器、令牌编码器 [JwtEncoder]、以及属性 [jwt.*]。后面这三个 Bean 在 [SecurityConfig] 中声明;
- 第 38–43 行:登录名和密码验证。[Optional.filter] 在条件为 false 时清空容器:只有登录名存在并且当 [hashing.matches(password, hash)] 认可该密码时,结果才包含该用户;
- 第 49–55 行:令牌的内容,即声明 (关于用户的陈述)。[subject] (声明 [sub])是用户标识符的约定名称。我们在这里包含页面所需的内容(姓名、角色),这样就不必在每个请求时都查询数据库。[issuedAt] 和 [expiresAt] 提供声明 [iat] (创建日期)和 [exp] (过期日期);
- 第 57 行:令牌的头部,它指定签名算法:HMAC-SHA256,记为 [HS256];
- 第 58 行:编码器生成已签名的令牌;[getTokenValue()] 将其转换为文本形式;
- 第 62–64 行:携带令牌的 Cookie,由 [ResponseCookie] 类生成,该类来自 [Spring]:[httpOnly(true)] 阻止页面上的 [JavaScript] 读取它,这样即使页面上执行了恶意脚本,令牌也受到保护;[sameSite("Lax")] 阻止浏览器在来自其他站点的 POST 请求中携带它(见下文的 [CSRF] 防护);[maxAge] 将 Cookie 的有效期设置为与令牌的有效期一致。
[config/SecurityConfig.java] 文件是本示例的核心。它的第一部分声明了安全所需的 Bean:
| package example25.config;
import java.nio.charset.StandardCharsets;
import javax.crypto.SecretKey;
import javax.crypto.spec.SecretKeySpec;
import org.springframework.boot.context.properties.EnableConfigurationProperties;
import org.springframework.context.annotation.Bean;
import org.springframework.context.annotation.Configuration;
import org.springframework.http.ResponseCookie;
import org.springframework.security.config.annotation.web.builders.HttpSecurity;
import org.springframework.security.config.http.SessionCreationPolicy;
import org.springframework.security.crypto.bcrypt.BCryptPasswordEncoder;
import org.springframework.security.crypto.password.PasswordEncoder;
import org.springframework.security.oauth2.jose.jws.MacAlgorithm;
import org.springframework.security.oauth2.jwt.JwtDecoder;
import org.springframework.security.oauth2.jwt.JwtEncoder;
import org.springframework.security.oauth2.jwt.NimbusJwtDecoder;
import org.springframework.security.oauth2.jwt.NimbusJwtEncoder;
import org.springframework.security.oauth2.server.resource.authentication.JwtAuthenticationConverter;
import org.springframework.security.oauth2.server.resource.authentication.JwtGrantedAuthoritiesConverter;
import org.springframework.security.oauth2.server.resource.web.BearerTokenResolver;
import org.springframework.security.web.AuthenticationEntryPoint;
import org.springframework.security.web.SecurityFilterChain;
import org.springframework.web.util.WebUtils;
import example25.auth.AuthService;
import example25.auth.JwtProperties;
import jakarta.servlet.http.Cookie;
// Spring Security 的配置
@Configuration
@EnableConfigurationProperties(JwtProperties.class)
public class SecurityConfig {
// 用于签署和检查令牌的密钥(对称的 HMAC-SHA256 算法)
@Bean
public SecretKey jwtKey(JwtProperties properties) {
return new SecretKeySpec(properties.secret().getBytes(StandardCharsets.UTF_8), "HmacSHA256");
}
// 令牌的构建(Nimbus 库,由 Spring Security 引入)
@Bean
public JwtEncoder jwtEncoder(SecretKey key) {
return NimbusJwtEncoder.withSecretKey(key).algorithm(MacAlgorithm.HS256).build();
}
// 令牌的检查:签名和过期日期
@Bean
public JwtDecoder jwtDecoder(SecretKey key) {
return NimbusJwtDecoder.withSecretKey(key).macAlgorithm(MacAlgorithm.HS256).build();
}
// 密码的哈希:bcrypt,代价因子为 10
@Bean
public PasswordEncoder passwordEncoder() {
return new BCryptPasswordEncoder(10);
}
|
- 第 33 行:一个配置类,它的 [@Bean] 方法创建 Bean(参见示例 06);
- 第 34 行:将 [JwtProperties] record 注册为 Bean,由 [application.properties] 填充;
- 第 38–41 行:签名密钥,由 [jwt.secret] 属性的文本生成。签署和验证令牌使用同一个密钥:该算法是对称的。[@Bean] 方法可以接受其他 Bean 作为参数:这里是属性 [jwt.*];
- 第 44–47 行:令牌编码器,使用密钥进行签名。[NimbusJwtEncoder] 依赖于 [Nimbus] 库;
- 第 50–53 行:解码器,用于验证收到的每个令牌:首先验证签名(使用同一个密钥),然后验证过期时间(对时钟不同步允许 60 秒的容差)。身份验证过滤器对每个携带令牌的请求都会使用它;
- 第 56–59 行:使用 [bcrypt] 算法进行密码哈希,“成本”为 10:[bcrypt] 有意设计得很慢(2¹⁰ 个计算轮次),以阻止任何人尝试数百万个密码。同一密码的两个哈希值是不同的(会加入一个随机“盐”):由 [matches] 负责验证它们。
第二部分描述安全过滤器链:
| // 安全过滤器链:谁可以访问什么,以及如何
// 识别用户
@Bean
public SecurityFilterChain securityFilters(HttpSecurity http) throws Exception {
http
// 1. 访问规则,按顺序检查
.authorizeHttpRequests(access -> access
.requestMatchers("/", "/login", "/error", "/bootstrap/**").permitAll()
.anyRequest().authenticated())
// 2. 通过 JWT 令牌进行身份验证(OAuth2“资源服务器”)
.oauth2ResourceServer(jwt -> jwt
.bearerTokenResolver(tokenFromCookie())
.authenticationEntryPoint(toLogin())
.jwt(config -> config.jwtAuthenticationConverter(converter())))
// 3. 没有令牌却请求受保护的页面:转到登录页面
.exceptionHandling(errors -> errors.authenticationEntryPoint(toLogin()))
// 4. 登出(POST /logout):删除 Cookie,然后转到 /login
.logout(logout -> logout.logoutUrl("/logout").deleteCookies(AuthService.COOKIE)
.logoutSuccessUrl("/login"))
// 5. 服务器是无状态的:没有 HTTP 会话
.sessionManagement(session -> session.sessionCreationPolicy(SessionCreationPolicy.STATELESS))
// 6. 没有防 CSRF 令牌:SameSite=Lax Cookie 已经保护了
// 来自其他站点的 POST 请求
.csrf(csrf -> csrf.disable());
return http.build();
}
// 令牌从 Cookie 中读取(而不是从 Authorization 头中读取)
private static BearerTokenResolver tokenFromCookie() {
return request -> {
Cookie cookie = WebUtils.getCookie(request, AuthService.COOKIE);
return cookie == null ? null : cookie.getValue();
};
}
// 没有已通过身份验证的用户(没有令牌、令牌无效或已过期):
// 我们删除可能存在的 Cookie 并重定向到登录页面
private static AuthenticationEntryPoint toLogin() {
return (request, response, exception) -> {
if (WebUtils.getCookie(request, AuthService.COOKIE) != null) {
response.addHeader("Set-Cookie", ResponseCookie.from(AuthService.COOKIE, "").path("/").maxAge(0).build().toString());
}
response.sendRedirect("/login");
};
}
// 从令牌到已通过身份验证的用户:[name] 声明是其姓名,
// [role] 声明是其角色;Spring Security 以 ROLE_ 前缀书写角色
private static JwtAuthenticationConverter converter() {
JwtGrantedAuthoritiesConverter roles = new JwtGrantedAuthoritiesConverter();
roles.setAuthoritiesClaimName("role");
roles.setAuthorityPrefix("ROLE_");
JwtAuthenticationConverter converter = new JwtAuthenticationConverter();
converter.setJwtGrantedAuthoritiesConverter(roles);
converter.setPrincipalClaimName("name");
return converter;
}
}
|
我们来分析这段代码:
- 第 4–5 行:一个类型为 [SecurityFilterChain] 的 Bean:即安全过滤器链。[Spring Boot] 提供一个 [HttpSecurity] 对象,我们在构建过滤器链(第 26 行)之前逐个方法地对其进行配置。每个方法接收一个 lambda 来配置设置的一部分;
- 第 8–10 行:URL 的访问规则,按以下顺序检查:[/]、[/login]、[/error] ([Spring Boot] 的错误页面)以及 [Bootstrap] 的文件是公开的([permitAll()]);任何其他 URL([anyRequest()])都需要已通过身份验证的用户。因此 [/profile] 页面受到保护,而无需在其控制器中写任何代码;
- 第 12–15 行:基于 JWT 令牌的身份验证。默认情况下,资源服务器在请求的 [Authorization: Bearer ...] 标头中查找令牌:[JavaScript] 客户端或移动应用就是这样工作的。浏览器不会自己添加这个标头:因此要指示它从 Cookie 中获取令牌(第 13 行)。第 15 行改变了令牌映射到用户的方式(参见第 50–58 行);
- 第 14 行和第 17 行:身份验证入口点 ([authentication entry point])在请求受保护页面而没有已通过身份验证的用户时被调用。默认情况下,响应是没有内容的 401 错误:这对 [JavaScript] 客户端很有用,但会让用户感到困惑。这里改为将用户重定向到登录页面。这里声明了两次:当请求包含被资源服务器过滤器拒绝的令牌时,该过滤器会直接调用它自己的入口点(第 14 行);第 17 行则涵盖了请求受保护页面而没有令牌的情形;
- 第 19–20 行:注销由 [Spring Security] 自身通过一个过滤器([LogoutFilter])处理,该过滤器拦截 [POST /logout]:它删除令牌 Cookie([deleteCookies])并重定向到 [/login]。无需任何控制器动作;
- 第 22 行:[STATELESS]:[Spring Security] 不创建(HTTP)会话(参见第 6 章),也不使用会话来保留用户。每个请求都仅凭令牌来识别用户;
- 第 25 行:[CSRF] 防护([Cross-Site Request Forgery],跨站请求伪造)被禁用。[CSRF] 攻击是指恶意网站诱使受害者的浏览器向我们的站点发送 POST 表单:浏览器会携带 Cookie,请求就会被视为已通过身份验证。默认情况下,[Spring Security] 要求每个 POST 表单都带有一个防 CSRF 令牌——一个恶意网站无法得知的隐藏字段。在这里,[SameSite=Lax] Cookie 就足够了:浏览器不会在源自其他站点的 POST 请求中携带它,因此该请求到达时没有已通过身份验证的用户。然而,任何携带 Cookie 的 GET 请求都不得修改任何数据(参见示例 21):[Lax] Cookie 会随来自其他站点的链接一起发送;
- 第 30–35 行:令牌解析器 ([BearerTokenResolver]):一个单方法接口,这里写成 lambda,它返回请求的令牌,或者 [null]。[WebUtils.getCookie] 按名称查找 Cookie;
- 第 39–46 行:入口点:重定向到 [/login] (第 44 行)。如果请求包含 [token] Cookie,则说明令牌无效(签名无效)或已过期:通过将其重置为空值且有效期为零来清除该 Cookie(第 41–43 行)。如果没有这一步,浏览器会在请求 [GET /login] 时再次发送被拒绝的令牌,过滤器又会拒绝它——从而导致重定向循环;
- 第 50–58 行:从令牌到已通过身份验证的用户。对于 [Spring Security],用户的权限是权限项 ([authorities]):简单的字符串。默认情况下,资源服务器从令牌的 [scope] 声明中读取它们,并带有前缀 [SCOPE_]。这里改为从 [role] 声明中读取(第 52 行),并带有前缀 [ROLE_] (第 53 行),这是 [Spring Security] 对角色所期望的前缀:令牌中的角色 [USER] 变成权限项 [ROLE_USER]。第 56 行指明,用户名([Authentication.getName()])是声明 [name],而不是 [sub]。
启动时,[Spring Security] 放入链中的过滤器会被写入控制台,前提是请求了日志级别 [DEBUG](针对类 [DefaultSecurityFilterChain]):
| ../mvnw spring-boot:run -Dspring-boot.run.arguments=--logging.level.org.springframework.security.web.DefaultSecurityFilterChain=debug
|
| ... DEBUG ... o.s.s.web.DefaultSecurityFilterChain : Will secure any request with filters: DisableEncodeUrlFilter, WebAsyncManagerIntegrationFilter, SecurityContextHolderFilter, HeaderWriterFilter, LogoutFilter, OAuth2ProtectedResourceMetadataFilter, BearerTokenAuthenticationFilter, RequestCacheAwareFilter, SecurityContextHolderAwareRequestFilter, AnonymousAuthenticationFilter, SessionManagementFilter, ExceptionTranslationFilter, AuthorizationFilter
|
值得注意的是,可以识别出以下过滤器:
- [HeaderWriterFilter],它向每个响应添加安全标头([X-Content-Type-Options: nosniff]、[X-Frame-Options: DENY]、[Cache-Control: no-cache, no-store...]):本章的响应中没有包含这些标头;
- [LogoutFilter],它处理 [/logout];
- [BearerTokenAuthenticationFilter],资源服务器过滤器:它读取令牌(使用我们的解析器),验证令牌(使用解码器),并把已通过身份验证的用户放入安全上下文;
- [AnonymousAuthenticationFilter]:没有令牌时,用户是“匿名”的;
- [ExceptionTranslationFilter],它把拒绝访问转换为 HTTP 响应:对匿名用户是入口点,对已通过身份验证的用户是 403 错误(示例 26);
- [AuthorizationFilter],最后一个过滤器,它应用 [authorizeHttpRequests] 中的规则。
[controllers/AuthController.java] 文件:
| package example25.controllers;
import java.util.Optional;
import org.springframework.http.HttpHeaders;
import org.springframework.stereotype.Controller;
import org.springframework.ui.Model;
import org.springframework.web.bind.annotation.GetMapping;
import org.springframework.web.bind.annotation.PostMapping;
import org.springframework.web.bind.annotation.RequestParam;
import example25.auth.AuthService;
import example25.auth.UsersService.User;
import jakarta.servlet.http.HttpServletResponse;
@Controller
public class AuthController {
private final AuthService auth;
public AuthController(AuthService auth) {
this.auth = auth;
}
@GetMapping("/")
public String home() {
return "redirect:/profile";
}
@GetMapping("/login")
public String form() {
return "auth/login";
}
@PostMapping("/login")
public String login(@RequestParam(required = false) String login,
@RequestParam(required = false) String password, HttpServletResponse response, Model model) {
Optional<User> user = auth.validate(login, password);
if (user.isEmpty()) {
// 故意含糊的消息:我们不说明是登录名错误还是密码错误
model.addAttribute("error", "Incorrect login or password.");
model.addAttribute("login", login);
return "auth/login";
}
// 令牌,存放在 Cookie 中
response.addHeader(HttpHeaders.SET_COOKIE, auth.cookie(auth.createToken(user.get())).toString());
return "redirect:/profile";
}
}
|
我们来分析这段代码:
- 第 35–44 行:登录。参数是可选的([required = false]):缺失的参数默认为 [null],并由 [AuthService.validate] 拒绝。如果登录失败,会重新显示表单,并给出一条有意含糊的消息:如果说明“该登录名不存在”,就会帮助攻击者找到有效的登录名;
- 第 46 行:如果成功,Cookie 会作为 [Set-Cookie] 标头添加到响应中,然后重定向到个人资料页面;
- 没有 [/logout] 动作:注销由 [LogoutFilter] 过滤器处理,甚至在请求到达 [Spring MVC] 之前。
文件 [controllers/ProfileController.java]:
| package example25.controllers;
import org.springframework.security.core.Authentication;
import org.springframework.security.core.annotation.AuthenticationPrincipal;
import org.springframework.security.oauth2.jwt.Jwt;
import org.springframework.stereotype.Controller;
import org.springframework.ui.Model;
import org.springframework.web.bind.annotation.GetMapping;
// 仅限已通过身份验证的用户:参见 SecurityConfig(anyRequest().authenticated())
@Controller
public class ProfileController {
// Authentication:由令牌认证的用户;
// @AuthenticationPrincipal Jwt:令牌本身,已经过检查
@GetMapping("/profile")
public String profile(Authentication user, @AuthenticationPrincipal Jwt token, Model model) {
model.addAttribute("name", user.getName());
model.addAttribute("admin", user.getAuthorities().stream()
.anyMatch(a -> a.getAuthority().equals("ROLE_ADMIN")));
model.addAttribute("claims", token.getClaims());
return "profile/profile";
}
}
|
- 第 10 行:控制器上没有安全注解:来自 [anyRequest().authenticated()] 的规则,位于 [SecurityConfig] 中,已经保护了 [/profile];
- 第 17 行:动作可以接收已通过身份验证的用户作为参数,类型为 [Authentication],它由资源服务器过滤器存储在安全上下文中。注解 [@AuthenticationPrincipal] 提供对该用户主体的访问:对于通过 JWT 进行的身份验证,它就是令牌本身(类型为 [Jwt]),该令牌已经过验证;
- 第 18 行:用户的名称,即声明 [name] (参见 [setPrincipalClaimName]);
- 第 19–20 行:用户是管理员吗?我们在用户的权限项中检查是否有权限 [ROLE_ADMIN] ;
- 第 21 行:令牌的声明,以字典形式表示([Map<String, Object>])。
文件 [templates/profile/profile.html]:
| <!doctype html>
<html xmlns:th="http://www.thymeleaf.org" th:replace="~{layout :: page(~{::main})}">
<body>
<main>
<h1 class="h3" th:text="|Hello ${name}|">Hello</h1>
<p>Your role: <b th:text="${admin} ? 'administrator' : 'user'">user</b>.</p>
<p>The content of your token:</p>
<table class="table table-sm w-auto">
<!--/* 对字典的循环:每个元素都有键和值 */-->
<tr th:each="claim : ${claims}"><td><code th:text="${claim.key}">sub</code></td><td th:text="${claim.value}">marie</td></tr>
</table>
<!--/* 登出:一个只有按钮的 POST 表单 */-->
<form method="post" action="/logout">
<button class="btn btn-outline-secondary" type="submit">Log out</button>
</form>
</main>
</body>
</html>
|
- 第 10 行:[th:each] 也可以遍历字典:每个元素都有一个键([claim.key])和一个值([claim.value]);
- 第 13–15 行:注销,通过一个只剩下按钮的 POST 表单。
文件 [templates/auth/login.html]:
| <!doctype html>
<html xmlns:th="http://www.thymeleaf.org" th:replace="~{layout :: page(~{::main})}">
<body>
<main>
<h1 class="h3">Login</h1>
<form method="post" action="/login">
<div class="mb-2">
<label class="form-label" for="login">Login</label>
<input class="form-control" id="login" name="login" th:value="${login}" required>
</div>
<div class="mb-3">
<label class="form-label" for="password">Password</label>
<input class="form-control" type="password" id="password" name="password" required>
</div>
<button class="btn btn-primary" type="submit">Log in</button>
</form>
<div class="alert alert-danger mt-3" th:if="${error != null}" th:text="${error}">error</div>
<p class="text-muted small mt-3">Test accounts (password = login): marie (USER), admin (ADMIN).</p>
</main>
</body>
</html>
|
- 第 9 行:登录失败后重新显示输入的用户名;密码绝不会重新显示;
- 第 17 行:错误消息(如果有的话)。
模板 [templates/layout.html] 和类 [config/WebConfig.java],它们提供来自 [Bootstrap] 的文件,URL 为 [/bootstrap/...],与之前的示例中相同(参见示例 15 和第 1 章)。
8.1.1. 运行
没有 Cookie 时,受保护的页面会重定向到登录页面:
| curl -i http://localhost:5000/profile
|
| HTTP/1.1 302
Location: http://localhost:5000/login
Content-Length: 0
|
([Tomcat] 不包含通常跟在 302 代码后面的文本 [Found], :它是可选的。)
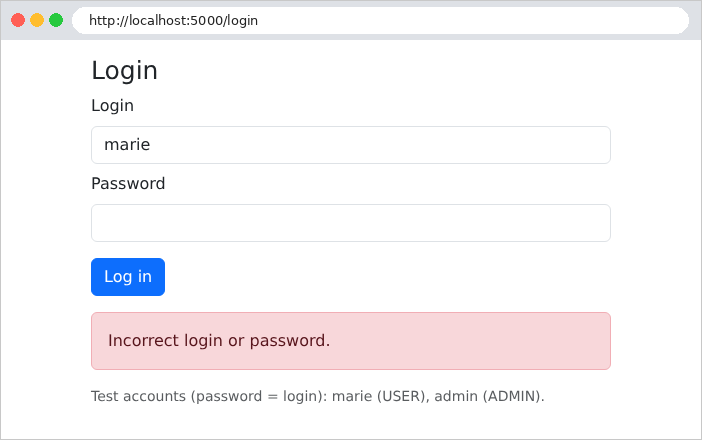
错误的密码:
登录成功,用 [curl] 查看:
| curl -i -c cookies.txt -d "login=marie&password=marie" http://localhost:5000/login
|
| HTTP/1.1 302
Set-Cookie: token=eyJraWQiOiJLQzBjVllOZXdUWWFTY1FWM21EV1ZEbFQ0bDZWYmFfUTNSNjB6cmNtWmQ0IiwiYWxnIjoiSFMyNTYifQ.eyJuYW1lIjoiTWFyaWUgUMOpbGlzc2llciIsInN1YiI6Im1hcmllIiwicm9sZSI6IlVTRVIiLCJleHAiOjE3OTAzNTgzNTYsImlhdCI6MTc5MDM1NDc1Nn0.ZsCOrkYPuZFYu2xPtIx3JGpKBQCOJP9dqF8fzkwpLmo; Path=/; Max-Age=3600; Expires=Fri, 25 Sep 2026 17:45:56 GMT; HttpOnly; SameSite=Lax
Location: http://localhost:5000/profile
Content-Length: 0
|
令牌由用句点分隔的三部分组成:头部、内容和签名。前两部分只是用 [base64url] 编码。解码后的头部:
| {"kid":"KC0cVYNewTYaScQV3mDWVDlT4l6Vba_Q3R60zrcmZd4","alg":"HS256"}
|
它包含签名算法([alg])和密钥标识符([kid],[key id]):当服务器使用多个密钥时,[kid] 告诉它是哪个密钥签署了令牌。[NimbusJwtEncoder] 自行根据密钥计算它(它是密钥的 SHA-256 指纹,依据 [JWK Thumbprint] 标准):它不会泄露任何关于密钥的信息。解码后的内容:
| {
"name": "Marie Pélissier",
"sub": "marie",
"role": "USER",
"exp": 1790358356,
"iat": 1790354756
}
|
我们找到了由 [createToken] 生成的声明。日期 [exp] 和 [iat] 以自 1970 年 1 月 1 日起的秒数表示。令牌没有加密:其中不包含任何机密。在浏览器中,位于 URL http://localhost:5000/profile:
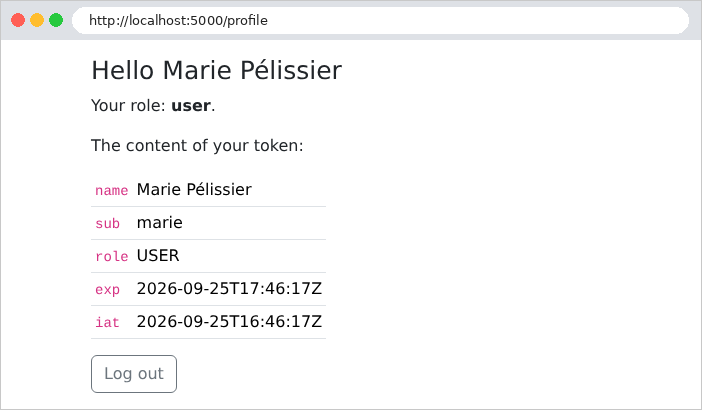
在页面上,日期 [exp] 和 [iat] 以 ISO 8601 格式显示:解码器把它们转换成了 [Instant] 对象(通用时间中的一个时刻,因此末尾有 [Z])。可以看出令牌的有效期为一小时。
现在让我们尝试修改令牌,给自己赋予角色 ADMIN:我们解码内容,把 [USER] 替换为 [ADMIN],再重新编码……但没有密钥就无法重新计算签名:
| curl -i -b "token=eyJraWQiOi...(modified content)...(old signature)" http://localhost:5000/profile
|
| HTTP/1.1 302
Set-Cookie: token=; Path=/; Max-Age=0; Expires=Thu, 01 Jan 1970 00:00:00 GMT
Location: http://localhost:5000/login
Content-Length: 0
|
签名不再与内容匹配:解码器拒绝该令牌,过滤器调用入口点,入口点清除 Cookie 并重定向到登录页面。注销:
| curl -i -b cookies.txt -X POST http://localhost:5000/logout
|
| HTTP/1.1 302
Set-Cookie: token=; Expires=Thu, 01 Jan 1970 00:00:10 GMT; Path=/
Location: http://localhost:5000/login
Content-Length: 0
|
[LogoutFilter] 过滤器通过将 Cookie 重置为空并设置过期的到期日期来清除它。请注意,由于 [CSRF] 防护被禁用,[Spring Security] 也接受通过 GET 注销([curl -i http://localhost:5000/logout] 会返回相同的响应):这里是安全的(最坏的情况是恶意链接让用户注销),但我们的页面始终使用 POST 让用户注销。
8.2. 示例 26:角色
示例 26 建立在示例 25 的基础上,并添加了一个仅限角色 ADMIN 的页面。该角色已经是已通过身份验证用户的一项权限([ROLE_ADMIN]):只需要将其作为要求即可。文件 [controllers/AdminController.java]:
| package example26.controllers;
import org.springframework.security.access.prepost.PreAuthorize;
import org.springframework.security.core.Authentication;
import org.springframework.stereotype.Controller;
import org.springframework.ui.Model;
import org.springframework.web.bind.annotation.GetMapping;
// 整个控制器仅限 ADMIN 角色:必须已通过身份验证,并且
// 具有 ADMIN 角色(令牌的“role”声明,参见 SecurityConfig)
@Controller
@PreAuthorize("hasRole('ADMIN')")
public class AdminController {
@GetMapping("/admin")
public String admin(Authentication user, Model model) {
model.addAttribute("name", user.getName());
return "admin/admin";
}
}
|
- 第 12 行:注解 [@PreAuthorize] 设置一个条件,在调用该控制器的每个动作之前检查。该条件是用 [SpEL] 语言([Spring Expression Language])编写的表达式:[hasRole('ADMIN')] 在用户具有 [ROLE_ADMIN] 权限时为 true(前缀 [ROLE_] 由 [hasRole] 添加)。匿名用户首先会被重定向到登录页面(入口点);没有该角色的已通过身份验证用户会收到 403 响应,“Access Denied”。[hasAnyRole('ADMIN', 'DOCTOR')] 则会接受这两种角色中的任何一种。
为了让 [@PreAuthorize] 被考虑在内,类 [SecurityConfig] 多了一个注解:
| // Spring Security 的配置。
// @EnableMethodSecurity:启用控制器的 @PreAuthorize 注解
@Configuration
@EnableMethodSecurity
@EnableConfigurationProperties(JwtProperties.class)
public class SecurityConfig {
|
- 第 4 行:[@EnableMethodSecurity] 启用方法安全。[Spring] 随后会把每个其方法带有 [@PreAuthorize] 的 Bean 包装在一个代理中:这是一个代表 Bean 接收调用的中间对象,它检查条件,然后调用实际的方法,或者抛出 [AccessDeniedException] 异常。我们将在下一章结合事务再次讨论这种代理机制。
过滤器链有两处发生了变化:
| .oauth2ResourceServer(jwt -> jwt
.bearerTokenResolver(tokenFromCookie())
.authenticationEntryPoint(toLogin())
.accessDeniedHandler(accessDenied())
.jwt(config -> config.jwtAuthenticationConverter(converter())))
// 3. 没有令牌却请求受保护的页面:转到登录页面;
// 角色不足:返回 403 响应,由 ErrorPageController 转换为页面
.exceptionHandling(errors -> errors.authenticationEntryPoint(toLogin())
.accessDeniedHandler(accessDenied()))
|
- 第 4 行和第 9 行:拒绝访问处理器 ([access denied handler])。由 [@PreAuthorize] 抛出的异常经由 [Spring MVC]向上传播到过滤器 [ExceptionTranslationFilter],由它把异常交给这个处理器。资源服务器的处理器会返回没有内容的 403 响应,其中包含一个 [WWW-Authenticate] 标头,供 [JavaScript] 客户端使用。与入口点一样,这里在两处进行了替换。
处理器本身位于文件末尾:
| // 角色不足:403 错误响应,由服务器转发到 /error
private static AccessDeniedHandler accessDenied() {
return (request, response, exception) -> response.sendError(HttpServletResponse.SC_FORBIDDEN);
}
|
- 第 2–4 行:我们的处理器只是使用 [sendError(403)]。然后 [Tomcat] 服务器把请求转发到 URL [/error] (参见示例 24),也就是转发给错误处理器。这就是 [/error] 出现在公开 URL 之中的原因:被转发的请求同样要经过过滤器链。
文件 [controllers/ErrorPageController.java]:
| package example26.controllers;
import org.springframework.boot.webmvc.error.ErrorController;
import org.springframework.stereotype.Controller;
import org.springframework.ui.Model;
import org.springframework.web.bind.annotation.RequestMapping;
import jakarta.servlet.RequestDispatcher;
import jakarta.servlet.http.HttpServletRequest;
import jakarta.servlet.http.HttpServletResponse;
// 错误响应(403、404 等)的页面:参见示例 24
@Controller
public class ErrorPageController implements ErrorController {
@RequestMapping("/error")
public String error(HttpServletRequest request, HttpServletResponse response, Model model) {
Object code = request.getAttribute(RequestDispatcher.ERROR_STATUS_CODE);
int status = code instanceof Integer c ? c : 500;
response.setStatus(status);
model.addAttribute("code", status);
return "error";
}
}
|
- 第 14–16 行:错误页面控制器,与示例 24 中相同:它实现了 [ErrorController] 接口,该接口属于 [Spring Boot],从而取代了默认的错误页面;
- 第 18–21 行:错误响应的状态码(403、404 等)是请求的一个属性;它被复制到响应和视图模板中。
视图 [templates/error.html]:
| <!doctype html>
<html xmlns:th="http://www.thymeleaf.org" th:replace="~{layout :: page(~{::main})}">
<body>
<main>
<div class="alert alert-danger">
<h1 class="h4" th:text="|Error ${code}|">Error 403</h1>
<p class="mb-0" th:text="${code == 403} ? 'Access denied: this page is reserved for administrators.' : 'An error occurred.'">message</p>
</div>
<p><a href="/profile">Back to the profile</a></p>
</main>
</body>
</html>
|
- 第 7 行:针对 403 错误的特定消息,以及针对其他错误的通用消息。
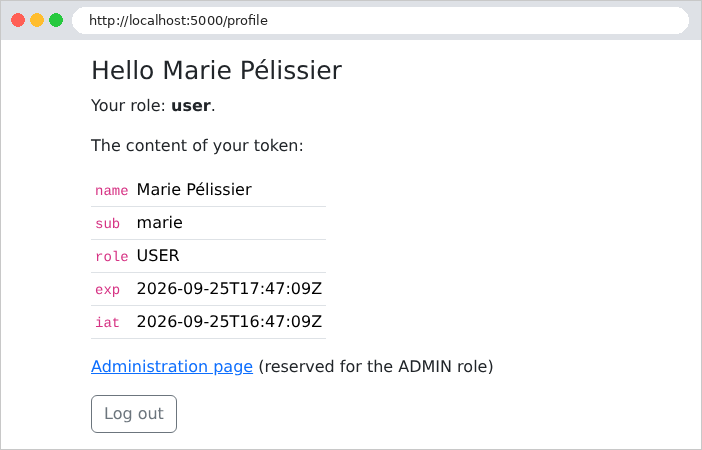
最后,个人资料页面多了一个链接,指向 [/admin]。用户 [marie] (角色 USER)试图从她的个人资料页打开管理页面:
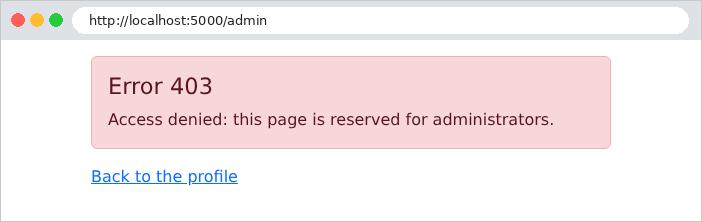
[admin] 进行同样的尝试:
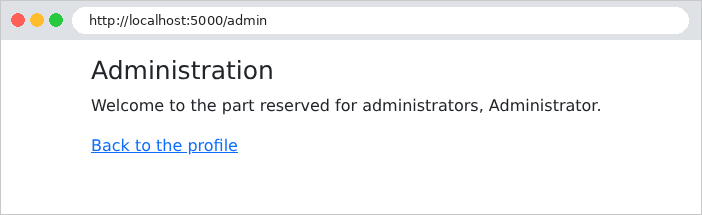
使用 [curl],我们看到 403 错误:
| curl -i -c cookies.txt -d "login=marie&password=marie" http://localhost:5000/login
curl -i -b cookies.txt http://localhost:5000/admin
|
| HTTP/1.1 403
Content-Type: text/html;charset=UTF-8
<!doctype html>
<html lang="en">
<head>
<meta charset="utf-8">
<title>Authentication</title>
<link rel="stylesheet" href="/bootstrap/css/bootstrap.min.css">
</head>
<body>
<div class="container py-3" style="max-width: 34rem">
<main>
<div class="alert alert-danger">
<h1 class="h4">Error 403</h1>
<p class="mb-0">Access denied: this page is reserved for administrators.</p>
</div>
<p><a href="/profile">Back to the profile</a></p>
</main>
</div>
</body>
</html>
|
案例研究有三种角色(ADMIN、DOCTOR、USER),并且恰好使用了这些机制:规则 [anyRequest().authenticated()] 保护除登录页面和账户创建页面之外的所有页面;[@PreAuthorize("hasRole('ADMIN')")] 把医生和客户管理的访问权限限制给管理员;[@PreAuthorize("hasRole('USER')")] 把患者专区的访问权限限制给患者。403 页面就在那里显示。
8.3. 示例 27:验证码与尝试次数限制
登录页面会吸引机器人:这些程序会尝试数千种不同的用户名/密码组合。有两种互补的防护措施:
- 验证码(CAPTCHA):一幅变形字符的图像,人类可以轻松阅读,但简单的机器人无法识别;
- 尝试次数限制:失败几次之后,该 IP 地址会被封锁一段时间。
示例 27 将这两种防护措施添加到示例 25 中。文件 [auth/CaptchaService.java]:
| package example27.auth;
import java.time.Duration;
import java.time.Instant;
import java.util.Map;
import java.util.UUID;
import java.util.concurrent.ConcurrentHashMap;
import org.springframework.stereotype.Service;
// 单例:待验证的验证码保存在服务器的内存中
@Service
public class CaptchaService {
// 一个验证码:其标识符及其图片(SVG)
public record Captcha(String id, String svg) {
}
// 期望的答案及其过期日期
private record Expected(String text, Instant expires) {
}
private static final Duration LIFETIME = Duration.ofMinutes(10);
// 标识符 -> 期望的答案。
// ConcurrentHashMap:可供多个同时发生的请求使用的字典
private final Map<String, Expected> pending = new ConcurrentHashMap<>();
public Captcha generate() {
String text = CaptchaDrawing.randomText(5);
String id = UUID.randomUUID().toString(); // 随机的标识符,无法猜测
pending.put(id, new Expected(text, Instant.now().plus(LIFETIME)));
return new Captcha(id, CaptchaDrawing.svg(text));
}
// 验证码在任何情况下都会被消费:一张图片只使用一次
public boolean check(String id, String input) {
Expected expected = id == null ? null : pending.remove(id);
return expected != null && input != null
&& expected.expires().isAfter(Instant.now())
&& expected.text().equalsIgnoreCase(input.trim());
}
}
|
我们来解释这段代码:
- 第 11–13 行:服务是一个单例 Bean(参见示例 06):只有一个实例,由所有请求共享。因此,待处理的验证码由服务器保存在内存中;
- 第 16–21 行:两个 record:发送到页面的验证码(ID 和图像),以及由服务器存储的预期答案;
- 第 27 行:预期答案以随机标识符为键存储。页面只包含图像和标识符:答案永远不会离开服务器。该服务会被不同线程执行的并发请求使用:[ConcurrentHashMap] 是专为此目的设计的字典;
- 第 29–34 行:随机生成的五个字符的文本字符串,存储十分钟,并渲染为图像。[UUID.randomUUID()] 生成一个无法猜测的 128 位随机标识符;
- 第 37–42 行:验证过程会消耗该验证码([remove] 将其从字典中移除并返回被移除的值):一幅图像只能使用一次;机器人无法重复使用它已经找到的答案。过期的验证码会被拒绝;大小写不影响结果([equalsIgnoreCase])。
图像由 [auth/CaptchaDrawing.java] 类处理,该类取自案例研究。无需任何库:图像采用 [SVG] 格式([Scalable Vector Graphics]),这是一种由文本(XML)构成的矢量图像格式,浏览器可以显示它。文件的开头部分:
| // 验证码的绘制:手工构建的 SVG 图片(XML 文本)
final class CaptchaDrawing {
private static final int WIDTH = 150;
private static final int HEIGHT = 50;
// SecureRandom:“密码学”随机数生成器,
// 不可预测(不像 Random,其序列可能被猜出)
private static final SecureRandom RANDOM = new SecureRandom();
// “字体”:每个字符是一组笔画的列表,每个笔画是 4 x 6 网格中的
// 点序列 (x, y)(y 轴朝下)。
// 过于容易互相混淆的字符已被排除(0 O、1 I L)。
private static final Map<Character, double[][]> FONT = new LinkedHashMap<>();
static {
|
- 第 2 行:一个 [final] 类(不能被继承),没有关键字 [public]:它只对其所在包 [example27.auth] 中的类可见;
- 第 9 行:随机数由 [SecureRandom] 生成,这是一个密码学生成器:即使知道之前的输出,其输出序列也是不可预测的。[Random] 则不然,它的序列只需几次取值就能被重构出来:机器人就可以预测后续的验证码;
- 第 11–14 行:每个字符由小网格中的一组笔画描述。容易混淆的字符(0 和 O、1、I 和 L)被排除在外。文件的其余部分(此处未列出)在 [static { ... }] 块中填充这个字典,该块在类加载时执行一次。
图像的绘制:
| static String svg(String text) {
StringBuilder svg = new StringBuilder();
svg.append("<svg xmlns=\"http://www.w3.org/2000/svg\" width=\"%d\" height=\"%d\" viewBox=\"0 0 %d %d\">"
.formatted(WIDTH, HEIGHT, WIDTH, HEIGHT));
svg.append("<rect width=\"100%\" height=\"100%\" fill=\"#f5f7fa\"/>");
// 字符:每个字符都经过放大、倾斜、移位,每个点还
// 被随机地略微移动
double step = (WIDTH - 20) / (double) text.length();
for (int i = 0; i < text.length(); i++) {
double scale = random(4.6, 5.6); // 网格单位的大小,以像素为单位
double angle = random(-0.35, 0.35); // 旋转角度,以弧度为单位(约 ±20°)
double cx = 10 + step * (i + 0.5) + random(-3, 3); // 字符的中心
double cy = HEIGHT / 2.0 + random(-4, 4);
StringBuilder d = new StringBuilder();
for (double[] stroke : FONT.get(text.charAt(i))) {
for (int k = 0; k < stroke.length; k += 2) {
// 网格点,以 (2, 3) 为中心,经过扭曲、旋转、放置
double x = (stroke[k] - 2 + random(-0.2, 0.2)) * scale;
double y = (stroke[k + 1] - 3 + random(-0.2, 0.2)) * scale;
double px = cx + x * Math.cos(angle) - y * Math.sin(angle);
double py = cy + x * Math.sin(angle) + y * Math.cos(angle);
d.append(k == 0 ? 'M' : 'L').append(number(px)).append(' ').append(number(py)).append(' ');
}
}
svg.append("<path d=\"%s\" fill=\"none\" stroke=\"%s\" stroke-width=\"%s\" stroke-linecap=\"round\" stroke-linejoin=\"round\"/>"
.formatted(d.toString().trim(), color(), number(random(2.2, 3))));
}
// 3 条噪声笔画:穿过图片的曲线
for (int n = 0; n < 3; n++) {
svg.append("<path d=\"M%s %s C%s %s %s %s %s %s\" fill=\"none\" stroke=\"%s\" stroke-width=\"1.3\"/>"
.formatted(number(random(0, 20)), number(random(5, 45)),
number(random(30, 60)), number(random(0, 50)), number(random(90, 120)), number(random(0, 50)),
number(random(130, 150)), number(random(5, 45)), color()));
}
svg.append("</svg>");
return svg.toString();
}
// 带小数点的数字,与服务器的语言无关
// (在法语中,"%.1f" 会写成 "12,5",SVG 无法读取)
private static String number(double value) {
return String.format(Locale.ROOT, "%.1f", value);
}
|
- 第 3–5 行:SVG 图像是一个尺寸为 150 x 50 像素的 [<svg>] 元素,背景为浅色(一个 [<rect>] 矩形)。["...".formatted(...)] 把文本中的 [%d] 和 [%s] 替换为给定的值,就像 [String.format] 一样;
- 第 9–28 行:每个字符变成一条路径 [<path>]:由线段连接的一系列点([M]:移动到该点;[L]:向该点绘制线段)。每个字符都会被放大、倾斜并随机偏移,其每个点也会被轻微移动:同一文本的两幅图像永远不会完全相同;
- 第 31–36 行:三条干扰曲线([C]:贝塞尔曲线)穿过图像,以迷惑字符识别程序;
- 第 43–45 行:无论服务器的语言如何,数字都用小数点书写([Locale.ROOT]):在法语中,[%.1f] 会写成逗号,而 SVG 不识别逗号。
文件 [auth/LimiterService.java]:
| package example27.auth;
import java.time.Duration;
import java.time.Instant;
import java.util.HashMap;
import java.util.Map;
import org.springframework.stereotype.Service;
// 单例:统计每个 IP 地址的登录失败次数
@Service
public class LimiterService {
private static final int MAX_FAILURES = 3;
private static final Duration BLOCK_DURATION = Duration.ofMinutes(1);
private static class Counter {
int failures;
Instant blockedUntil = Instant.MIN;
}
private final Map<String, Counter> counters = new HashMap<>();
// synchronized:多个同时发生的请求,同一时刻只有一个访问
// 剩余的封锁秒数(0:未被封锁)
public synchronized long blockedSeconds(String ip) {
Counter c = counters.get(ip);
if (c == null) {
return 0;
}
Duration remaining = Duration.between(Instant.now(), c.blockedUntil);
return remaining.isNegative() || remaining.isZero() ? 0 : (remaining.toMillis() + 999) / 1000;
}
public synchronized void failure(String ip) {
Counter c = counters.computeIfAbsent(ip, key -> new Counter());
c.failures++;
if (c.failures >= MAX_FAILURES) {
c.blockedUntil = Instant.now().plus(BLOCK_DURATION);
c.failures = 0; // 封锁结束后,我们从零重新开始
}
}
public synchronized void success(String ip) {
counters.remove(ip);
}
}
|
- 第 14–15 行:失败三次会将该 IP 地址封锁一分钟;
- 第 17–20 行:某个地址的计数器:失败次数,以及封锁的结束日期(初始为 [Instant.MIN],即很久很久以前);
- 第 22 行:计数器字典由所有请求共享。它是一个简单的 [HashMap],不支持并发访问:因此每个方法都是 [synchronized]。该关键字确保同一时刻只有一个线程执行对象的某个 [synchronized] 方法:两次同时发生的失败不会同时出现(参见第 6 章的 [AtomicInteger]);
- 第 27–34 行:剩余的封锁时间,向上取整到下一秒;
- 第 36–43 行:记录一次失败;第三次失败时,该地址被封锁。[computeIfAbsent] 返回该地址的计数器,如果它不存在,则先创建它;
- 第 45–47 行:一次成功会清除计数器。
文件 [controllers/AuthController.java]:
| package example27.controllers;
import java.util.Optional;
import org.springframework.http.HttpHeaders;
import org.springframework.stereotype.Controller;
import org.springframework.ui.Model;
import org.springframework.web.bind.annotation.GetMapping;
import org.springframework.web.bind.annotation.PostMapping;
import org.springframework.web.bind.annotation.RequestParam;
import example27.auth.AuthService;
import example27.auth.CaptchaService;
import example27.auth.LimiterService;
import example27.auth.UsersService.User;
import jakarta.servlet.http.HttpServletRequest;
import jakarta.servlet.http.HttpServletResponse;
@Controller
public class AuthController {
private final AuthService auth;
private final CaptchaService captchas;
private final LimiterService limiter;
public AuthController(AuthService auth, CaptchaService captchas, LimiterService limiter) {
this.auth = auth;
this.captchas = captchas;
this.limiter = limiter;
}
@GetMapping("/")
public String home() {
return "redirect:/profile";
}
@GetMapping("/login")
public String form(Model model) {
return loginPage(model, null, null);
}
@PostMapping("/login")
public String login(@RequestParam(required = false) String login,
@RequestParam(required = false) String password, @RequestParam(required = false) String captchaId,
@RequestParam(required = false) String captcha, HttpServletRequest request,
HttpServletResponse response, Model model) {
// 客户端的 IP 地址
String ip = request.getRemoteAddr();
// 1. 被封锁的地址甚至不予理会
long seconds = limiter.blockedSeconds(ip);
if (seconds > 0) {
return loginPage(model, login, "Too many attempts: try again in " + seconds + " s.");
}
// 2. 先验证验证码(开销小),再验证密码(bcrypt,开销大)
if (!captchas.check(captchaId, captcha)) {
limiter.failure(ip);
return loginPage(model, login, "The image code is incorrect.");
}
Optional<User> user = auth.validate(login, password);
if (user.isEmpty()) {
limiter.failure(ip);
return loginPage(model, login, "Incorrect login or password.");
}
limiter.success(ip);
response.addHeader(HttpHeaders.SET_COOKIE, auth.cookie(auth.createToken(user.get())).toString());
return "redirect:/profile";
}
// 每次显示表单都会构建一个新的验证码
private String loginPage(Model model, String login, String error) {
model.addAttribute("login", login);
model.addAttribute("error", error);
model.addAttribute("captcha", captchas.generate());
return "auth/login";
}
}
|
我们来解释这段代码:
- 第 48 行:客户端的 IP 地址,由网络连接提供;
- 第 51–54 行:被封锁的地址甚至不会被理会;
- 第 56–59 行:先验证验证码,只有验证码正确才验证密码(一项计算开销很大的 [bcrypt] 操作)。验证码错误算作一次失败;
- 第 71–76 行:每次显示表单时,都会生成一个新的验证码并放入视图模板中。这同样适用于第一次显示(第 37–40 行)。
文件 [templates/auth/login.html]:
| <!doctype html>
<html xmlns:th="http://www.thymeleaf.org" th:replace="~{layout :: page(~{::main})}">
<body>
<main>
<h1 class="h3">Login</h1>
<form method="post" action="/login">
<div class="mb-2">
<label class="form-label" for="login">Login</label>
<input class="form-control" id="login" name="login" th:value="${login}" required>
</div>
<div class="mb-2">
<label class="form-label" for="password">Password</label>
<input class="form-control" type="password" id="password" name="password" required>
</div>
<div class="mb-3">
<label class="form-label" for="captcha">Copy the code of the image</label>
<!--/* SVG 图片,由服务器构建:不经转义直接插入 */-->
<div class="mb-1" th:utext="${captcha.svg}">image</div>
<!--/* 验证码标识符通过隐藏字段传递;答案保留在服务器上 */-->
<input type="hidden" name="captchaId" th:value="${captcha.id}">
<input class="form-control" id="captcha" name="captcha" autocomplete="off" required>
</div>
<button class="btn btn-primary" type="submit">Log in</button>
</form>
<div class="alert alert-danger mt-3" th:if="${error != null}" th:text="${error}">error</div>
<p class="text-muted small mt-3">Test accounts (password = login): marie (USER), admin (ADMIN).</p>
</main>
</body>
</html>
|
- 第 18 行:SVG 图像是文本(来自 XML):它被原样插入页面。[th:utext] ([unescaped text])会不转义地插入文本:字符 [<] 和 [>] 仍然是标签(如果使用 [th:text],它们会变成 [<] 和 [>],页面就会显示图像的代码)。[th:utext] 在这里是合适的:它是服务器生成的 HTML,而不是用户输入;
- 第 20 行:验证码 ID 通过隐藏字段传递;而答案则保留在服务器上;
- 第 21 行:[autocomplete="off"]:浏览器不会建议以前的输入,这些输入对验证码毫无意义。
文件 [config/SecurityConfig.java] 与示例 25 中的完全相同(而不是示例 26 中的那个:这里既没有 [@EnableMethodSecurity] 也没有拒绝访问处理器,因为没有页面是专为特定角色保留的)。特别是,访问规则 [/login] 保持不变:登录页面仍然是公开的,验证码由控制器验证,而不是由 [Spring Security] 验证。
登录页面,位于 URL http://localhost:5000/login:
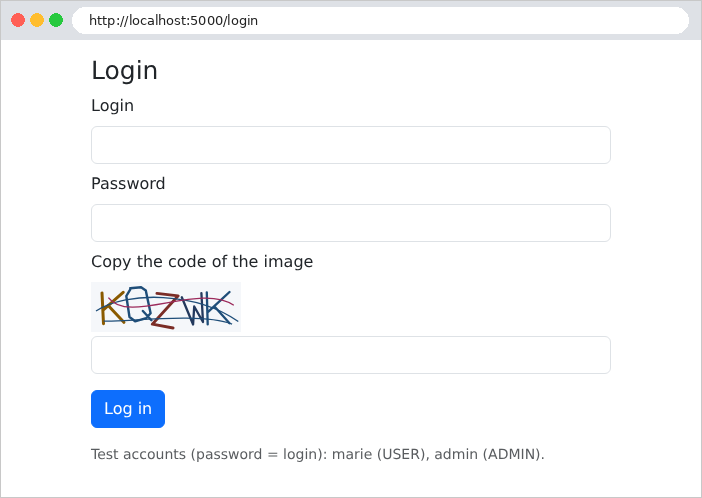
验证码输入错误:
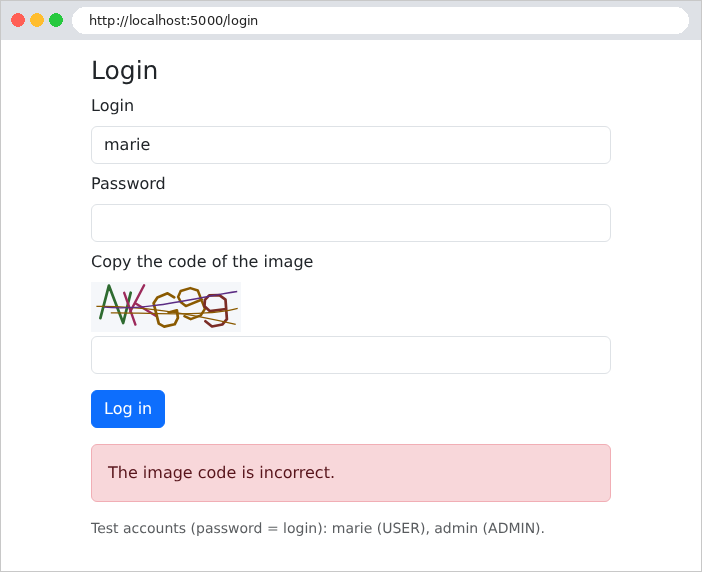
已生成一个新的验证码。再次提交已经用过的验证码——即使输入正确——也会得到相同的消息:答案在首次验证时就已从字典中移除。失败三次之后,即使密码正确、验证码也正确,也会被拒绝一分钟:
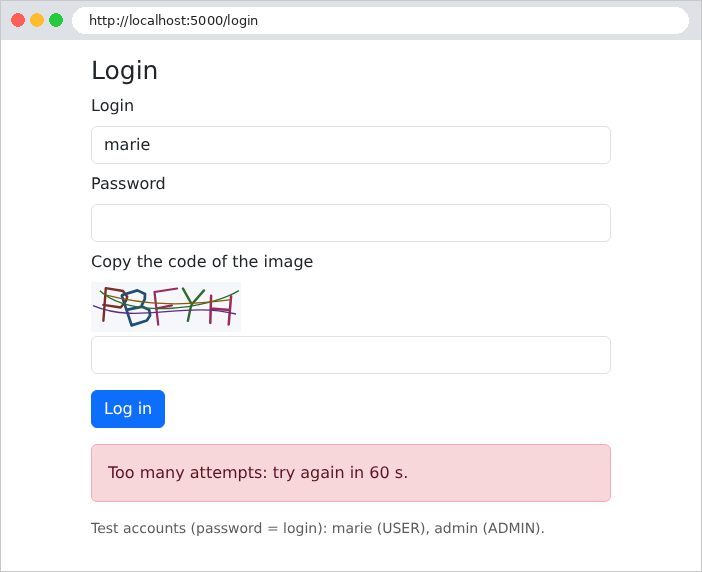
案例研究将这两项安全措施应用于其登录页面和账户创建流程,阈值可在文件 [application.properties] (属性 [rdvmedecins.protection.*])中调整。