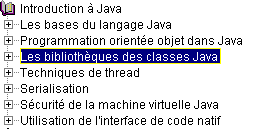
5. 图形用户界面
本节旨在展示如何使用 Java 构建图形用户界面。首先,我们将了解用于构建图形用户界面的基础类。起初,我们不会使用任何自动生成工具。随后,我们将使用 JBuilder——一款由 Borland/Inprise 开发的工具,它能简化 Java 应用程序的开发,特别是图形用户界面的构建。
5.1. 图形用户界面的基础
5.1.1. 一个简单的窗口
请看以下代码:
// imported classes
import javax.swing.*;
import java.awt.*;

    // the form class
  public class form1 extends JFrame {

      // the manufacturer
      public form1() {
            // window title
            this.setTitle("Mon premier formulaire");
            // window dimensions
            this.setSize(new Dimension(300,100));
      }//manufacturer

      // test function
      public static void main(String[] args) {
            // the form is displayed
            new form1().setVisible(true);
      }
  }//class
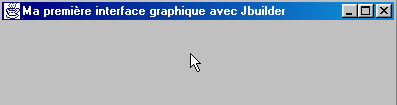
执行上述代码将显示以下窗口:
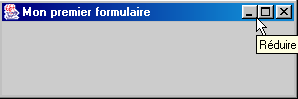
图形用户界面通常继承自 JFrame 基类:
public class form1 extends JFrame {
JFrame 基类定义了一个基本窗口,包含关闭、最大化/最小化按钮、可调整大小等功能,并处理这些图形对象上的事件。在此,我们通过设置窗口标题、宽度(300 像素)和高度(100 像素)来对基类进行特化。这些设置在构造函数中完成:
      // le constructeur
      public form1() {
            // titre de la fenêtre
            this.setTitle("Mon premier formulaire");
            // dimensions de la fenêtre
            this.setSize(new Dimension(300,100));
      }//constructeur
窗口标题通过 setTitle 方法设置,窗口尺寸通过 setSize 方法设置。该方法接受一个 Dimension 对象(宽度、高度)作为参数,其中 width 和 height 分别表示窗口的宽度和高度,单位为像素。
main方法通过以下方式启动图形应用程序:
new form1().setVisible(true);
随后创建了一个 form1 类型的窗体(new form1())并将其显示出来(setVisible(true)),之后应用程序会监听窗体上发生的事件(点击、鼠标移动等),并执行由窗体处理的那些事件。 在此,我们的窗体除了由 JFrame 基类处理的事件(关闭按钮点击、最大化/最小化、窗口调整大小、窗口移动等)之外,不处理任何其他事件。
当通过以下命令在 DOS 窗口中运行该程序进行测试时:
来执行 form1.class 文件时,我们会发现,当关闭显示的窗口后,我们无法“重新获得”DOS窗口的控制权,仿佛程序尚未结束。事实确实如此。该程序的执行过程如下:
- 最初,会启动一个执行线程来执行 main 方法
- 当该方法创建表单并显示它时,会创建第二个线程专门处理与该表单相关的事件
- 创建完成后,在我们的示例中,main方法的线程终止,仅保留GUI执行线程。
- 当窗口关闭时,它会消失,但不会中断其运行的线程
- 目前,我们只能通过在启动程序的 DOS 窗口中按下 Ctrl-C 来强制终止该线程。
让我们验证两个独立线程的存在:一个用于运行 main 方法,另一个用于运行 GUI 窗口:
// imported classes
import javax.swing.*;
import java.awt.*;
import java.io.*;

// the form class
 public class form1 extends JFrame {

// the manufacturer
 public form1() {
   // window title
   this.setTitle("Mon premier formulaire");
   // window dimensions
   this.setSize(new Dimension(300,100));
}//manufacturer

// test function
 public static void main(String[] args) {
   // follow-up
   System.out.println("Début du thread main");
   // the form is displayed
   new form1().setVisible(true);
   // follow-up
   System.out.println("Fin du thread main");
}//hand
}//class
执行结果如下:

我们可以看到,主线程已经结束,而窗口仍然显示着。关闭窗口并不会终止该窗口运行的线程。要停止该线程,请在 DOS 窗口中再次按下 Ctrl-C。
作为本示例的总结,请注意导入的包:
- javax.swing 用于 JFrame 类
- java.awt 用于 Dimension 类
5.1.2. 处理事件
在前面的示例中,我们需要自行处理窗口的关闭操作,以便在关闭发生时应用程序停止运行——但目前并非如此。要实现这一点,我们需要创建一个对象来“监听”窗口上发生的事件,并检测“窗口关闭”事件。该对象被称为“监听器”或事件处理程序。 针对图形用户界面组件上可能发生的各种事件,存在不同类型的监听器。对于 JFrame 组件,该监听器称为 WindowListener,它是一个定义了以下方法的接口(参见 Java 文档)
方法摘要 | ||
void | windowActivated(WindowEvent e) 该窗口成为活动窗口 | |
void | windowClosed(WindowEvent e) 窗口已关闭 | |
void | windowClosing(WindowEvent e) 用户或程序请求关闭窗口 | |
void | windowDeactivated(WindowEvent e) 该窗口不再是活动窗口 | |
void | windowDeiconified(WindowEvent e) 窗口从最小化状态切换到正常状态 | |
void | windowIconified(WindowEvent e) 窗口从正常状态切换为最小化状态 | |
void | windowOpened(WindowEvent e) 窗口首次显示 | |
因此共有七个可处理的事件。所有处理程序都会接收一个 WindowEvent 对象作为参数,但我们暂时忽略它。这里需要关注的是窗口关闭事件,该事件必须由 windowClosing 方法处理。要处理此事件,我们可以使用匿名类创建一个 WindowListener 对象,如下所示:
   // création d'un gestionnaire d'événements
   WindowListener win=new WindowListener(){
     public void windowActivated(WindowEvent e){}
     public void windowClosed(WindowEvent e){}
     public void windowClosing(WindowEvent e){System.exit(0);}
     public void windowDeactivated(WindowEvent e){}
     public void windowDeiconified(WindowEvent e){}
     public void windowIconified(WindowEvent e){}
     public void windowOpened(WindowEvent e){}
   };//définition win
实现 WindowListener 接口的事件处理程序必须定义该接口的全部七个方法。由于我们仅需处理窗口关闭事件,因此仅为 windowClosing 方法编写代码。当其他事件发生时,系统会通知我们,但我们不会采取任何行动。当收到窗口关闭通知(windowClosing)时,我们将执行什么操作?我们将终止应用程序:
public void windowClosing(WindowEvent e){System.exit(0);}
现在我们有一个能够处理一般窗口事件的对象。如何将其与特定窗口关联起来呢?JFrame 类提供了一个 addWindowListener(WindowListener win) 方法,允许我们将“窗口”事件处理程序与指定的窗口关联。因此,在窗口构造函数中,我们将编写如下代码:
   // création d'un gestionnaire d'événements
   WindowListener win=new WindowListener(){
     public void windowActivated(WindowEvent e){}
     public void windowClosed(WindowEvent e){}
     public void windowClosing(WindowEvent e){System.exit(0);}
     public void windowDeactivated(WindowEvent e){}
     public void windowDeiconified(WindowEvent e){}
     public void windowIconified(WindowEvent e){}
     public void windowOpened(WindowEvent e){}
   };//définition win
   // ce gestionnaire d'événements va gérer les évts de la fenêtre courante
   this.addWindowListener(win);
完整的程序如下:
// imported classes
import javax.swing.*;
import java.awt.*;
import java.io.*;
import java.awt.event.*;

// the form class
 public class form2 extends JFrame {

// the manufacturer
 public form2() {
   // window title
   this.setTitle("Mon premier formulaire");
   // window dimensions
   this.setSize(new Dimension(300,100));
   // creation of an event manager
   WindowListener win=new WindowListener(){
     public void windowActivated(WindowEvent e){}
     public void windowClosed(WindowEvent e){}
     public void windowClosing(WindowEvent e){System.exit(0);}
     public void windowDeactivated(WindowEvent e){}
     public void windowDeiconified(WindowEvent e){}
     public void windowIconified(WindowEvent e){}
     public void windowOpened(WindowEvent e){}
   };//definition win
   // this event handler will manage the events of the current window
   this.addWindowListener(win);
}//manufacturer

// test function
 public static void main(String[] args) {
   // the form is displayed
   new form2().setVisible(true);
}//hand
}//class
java.awt.event 包中包含 WindowListener 接口。当我们运行该程序并关闭弹出的窗口时,会在启动程序的 DOS 窗口中看到程序已执行完毕,而此前并非如此。
在我们的程序中,创建负责处理窗口事件的对象有些繁琐,因为我们被迫为那些不想处理的事件也定义方法。 在这种情况下,我们可以不用 WindowListener 接口,而改用 WindowAdapter 类。该类实现了 WindowListener 接口,并提供了七个空方法。通过继承 WindowAdapter 类并仅重写我们需要的方法,我们可以达到与使用 WindowListener 接口相同的效果,同时无需定义那些不需要的方法。该过程
- 定义事件处理程序
- 将处理程序与窗口关联
在我们的示例中可以按以下方式进行:
   // création d'un gestionnaire d'événements
   WindowAdapter win=new WindowAdapter(){
     public void windowClosing(WindowEvent e){System.exit(0);}
   };//définition win
   // ce gestionnaire d'événements va gérer les évts de la fenêtre courante
   this.addWindowListener(win);
这里我们使用了一个继承自 WindowAdapter 类的匿名类,并重写了其 windowClosing 方法。程序代码如下:
// imported classes
import javax.swing.*;
import java.awt.*;
import java.io.*;
import java.awt.event.*;

// the form class
 public class form2 extends JFrame {

// the manufacturer
 public form2() {
   // window title
   this.setTitle("Mon premier formulaire");
   // window dimensions
   this.setSize(new Dimension(300,100));
   // creation of an event manager
   WindowAdapter win=new WindowAdapter(){
     public void windowClosing(WindowEvent e){System.exit(0);}
   };//definition win
   // this event handler will manage the events of the current window
   this.addWindowListener(win); }//manufacturer

// test function
 public static void main(String[] args) {
   // the form is displayed
   new form2().setVisible(true);
}//hand
}//class
它与前面的程序产生相同的结果,但编写起来更简单。
5.1.3. 带按钮的表单
现在,让我们在窗口中添加一个按钮:
// imported classes
import javax.swing.*;
import java.awt.*;
import java.io.*;
import java.awt.event.*;
// the form class
public class form3 extends JFrame {
// a button
JButton btnTest=null;
Container conteneur=null;
// the manufacturer
public form3() {
// window title
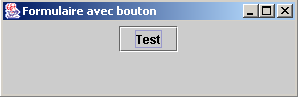
this.setTitle("Formulaire avec bouton");
// window dimensions
this.setSize(new Dimension(300,100));
// creation of an event manager
WindowAdapter win=new WindowAdapter(){
public void windowClosing(WindowEvent e){System.exit(0);}
};//definition win
// this event handler will manage the events of the current window
this.addWindowListener(win);
// retrieve the window container
conteneur=this.getContentPane();
// select a layout manager for components in this container
conteneur.setLayout(new FlowLayout());
// create a button
btnTest=new JButton();
// we set the wording
btnTest.setText("Test");
// add the button to the container
conteneur.add(btnTest);
}//manufacturer
// test function
public static void main(String[] args) {
// the form is displayed
new form3().setVisible(true);
}//hand
}//class
JFrame 窗口有一个容器,其中可以放置图形组件(按钮、复选框、下拉列表等)。可以通过 JFrame 类的 getContentPane 方法访问该容器:
  Container conteneur=null;
..........
    // on récupère le conteneur de la fenêtre
    conteneur=this.getContentPane();
任何组件都可以通过 Container 类的 add 方法放入容器中。因此,要将组件 C 放入上面的容器对象中,我们编写:
该组件在容器中的位置在哪里? 存在多种名为 XXXLayout 的组件布局管理器,其中 XXX 可以是 Border、Flow 等。每个布局管理器都有其独特的特性。例如,FlowLayout 管理器会从表单顶部开始,将组件排列成一行。当一行已满时,组件会被放置到下一行。要将布局管理器与 JFrame 窗口关联,请按以下形式使用 JFrame 类的 setLayout 方法:
因此,在我们的示例中,为了将 FlowLayout 布局管理器与窗口关联,我们编写了:
    // on choisit un gestionnaire de mise en forme des composants dans ce conteneur
    conteneur.setLayout(new FlowLayout());
您可以选择不使用布局管理器,并编写如下代码:
在这种情况下,我们必须以 (x,y,width,height) 的形式指定组件在容器内的精确坐标,其中 (x,y) 表示组件左上角在容器内的坐标。这是我们今后最常使用的方法。
现在我们已经了解了如何将组件添加到容器中(add)以及如何确定其位置(setLayout)。剩下的就是确定
哪些组件可以放置在容器中。在此,我们将放置一个由 javax.swing.JButton 类实现的按钮:
  JButton btnTest=null;
..........
    // on crée un bouton
    btnTest=new JButton();
    // on fixe son libellé
    btnTest.setText("Test");
    // on ajoute le bouton au conteneur
    conteneur.add(btnTest);
运行此程序时,将显示以下窗口:
如果你调整上方表单的大小,容器的布局管理器会自动被调用以重新定位组件:

这就是布局管理器的主要优势:在容器大小发生变化时,保持组件布局的一致性。让我们使用空布局管理器来看看其中的区别。现在,按钮是根据以下指令放置在容器中的:
// on choisit un gestionnaire de mise en forme des composants dans ce conteneur
conteneur.setLayout(null);
// on crée un bouton
btnTest=new JButton();
// on fixe son libellé
btnTest.setText("Test");
// on fixe son emplacement et ses dimensions
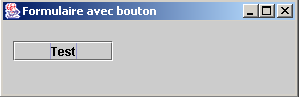
btnTest.setBounds(10,20,100,20);
// on ajoute le bouton au conteneur
conteneur.add(btnTest);
在此,我们将按钮显式放置在表单的 (10,20) 位置,并将其尺寸设置为宽 100 像素、高 20 像素。新窗口如下所示:
如果调整窗口大小,按钮仍会保持在原位。

如果我们点击“Test”按钮,则不会发生任何事情。这是因为我们尚未为该按钮关联事件处理程序。要了解某个组件支持哪些类型的事件处理程序,我们可以查看其类定义中的 addXXXListener 方法,这些方法允许我们将事件处理程序与组件关联起来。javax.swing.JButton 类继承自 javax.swing.AbstractButton 类,该类包含以下方法:
方法摘要 | ||
void | addActionListener(ActionListener l) | |
void | addChangeListener(ChangeListener l) | |
void | 添加项目监听器(ItemListener l) | |
在此,您需要查阅文档以确定哪个事件处理程序负责处理按钮点击事件。它是 ActionListener 接口。该接口仅定义了一个方法:
方法摘要 | ||
void | actionPerformed(ActionEvent e) | |
该方法接收一个 ActionEvent 参数,我们暂时忽略它。要处理程序中 btntest 按钮的点击事件,我们首先需要为其关联一个事件监听器:
        btnTest.addActionListener(new ActionListener()
         {
                public void actionPerformed(ActionEvent evt){
                  btnTest_clic(evt);
              }
            }//anonymous class
    );//evt manager
在此,actionPerformed 方法调用了 btnTest_clic 方法,我们将其定义如下:
public void btnTest_clic(ActionEvent evt){
  // console monitoring
System.out.println("clic sur bouton");
}//btnTest_click
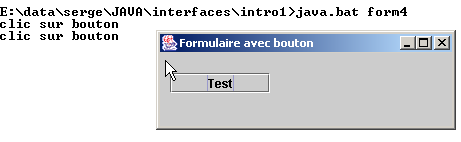
每次用户点击“Test”按钮时,都会向控制台输出一条消息。如下面的执行结果所示:
完整的程序如下:
// imported classes
import javax.swing.*;
import java.awt.*;
import java.io.*;
import java.awt.event.*;

// the form class
 public class form4 extends JFrame {

     // a button
  JButton btnTest=null;
  Container conteneur=null;

  // the manufacturer
  public form4() {
     // window title
    this.setTitle("Formulaire avec bouton");
     // window dimensions
    this.setSize(new Dimension(300,100));
    // creation of an event manager
    WindowAdapter win=new WindowAdapter(){
     public void windowClosing(WindowEvent e){System.exit(0);}
    };//definition win
     // this event handler will manage the events of the current window
    this.addWindowListener(win);
     // retrieve the window container
    conteneur=this.getContentPane();
     // select a layout manager for components in this container
    conteneur.setLayout(null);
    // create a button
    btnTest=new JButton();
    // we set the wording
    btnTest.setText("Test");
    // determine its location and dimensions
    btnTest.setBounds(10,20,100,20);
     // we associate it with an event manager
    btnTest.addActionListener(new ActionListener()
        {
            public void actionPerformed(ActionEvent evt){
              btnTest_clic(evt);
          }
        }//anonymous class
    );//evt manager
     // add the button to the container
    conteneur.add(btnTest);
  }//manufacturer

    public void btnTest_clic(ActionEvent evt){
       // console monitoring
    System.out.println("clic sur bouton");
  }//btnTest_click

  // test function
 public static void main(String[] args) {
    // the form is displayed
   new form4().setVisible(true);
}//hand
}//class
5.1.4. 事件处理程序
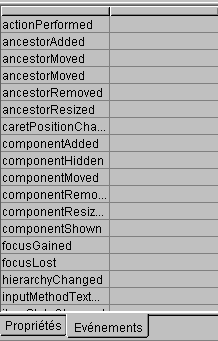
我们将主要介绍的 Swing 组件包括窗口 (JFrame)、按钮 (JButton)、复选框 (JCheckBox)、 单选按钮(JButtonRadio)、下拉列表(JComboBox)、列表(JList)、滚动条(JScrollBar)、标签(JLabel)、单行文本框(JTextField)或多行文本框(JTextArea)、菜单(JMenuBar)以及菜单项(JMenuItem)。
下表列出了部分事件处理程序及其关联的事件。
处理程序 | 组件 | 注册方法 | 事件 |
ActionListener | JButton、JCheckbox、JButtonRadio、JMenuItem | public void addActionListener(ActionListener) | 单击按钮、复选框、单选按钮或菜单项 |
JTextField | |||
ItemListener | JComboBox、JList | public void addItemListener(ItemListener) | 所选项目已更改 |
InputMethodListener | JTextField, JTextArea | public void addMethodInputListener(InputMethodListener) | 输入字段中的文本已更改或输入光标已移动 |
CaretListener | JTextField、JTextArea | public void addCaretListener(CaretListener) | 输入光标位置已发生变化 |
AdjustmentListener | JScrollBar | public void addAdjustmentListener(AdjustmentListener) | 滑块值已更改 |
MouseMotionListener | public void addMouseMotionListener(MouseMotionListener) | 鼠标已移动 | |
WindowListener | JFrame | public void addWindowListener(WindowListener) | 窗口事件 |
鼠标监听器 | public void addMouselistener(MouseListener) | 鼠标事件(点击、进入/离开组件区域、按下按钮、释放) | |
焦点监听器 | public void addFocusListener(FocusListener) | 焦点事件(获得、失去) | |
KeyListener | public void addKeyListener(KeyListener) | 键盘事件(按键输入、按下、释放) |
组件 | 注册事件处理程序的方法 |
JButton | public void addActionListener(ActionListener) |
JCheckbox | public void addItemListener(ItemListener) |
JCheckboxMenuItem | public void addItemListener(ItemListener) |
JComboBox | public void addItemListener(ItemListener) public void addActionListener(ActionListener) |
容器 | public void addContainerListener(ContainerListener) |
JComponent | public void addComponentListener(ComponentListener) public void addFocusListener(FocusListener) public void addKeyListener(KeyListener) public void addMouseListener(MouseListener) public void addMouseMotionListener(MouseMotionListener) |
JFrame | public void addWindowListener(WindowListener) |
JList | public void addItemListener(ItemListener) |
JMenuItem | public void addActionListener(ActionListener) |
JPanel | 作为容器 |
JScrollPane | 作为容器 |
JScrollBar | public void addAdjustmentListener(AdjustmentListener) |
JTextComponent | public void addInputMethodListener(InputMethodListener) public void addCaretListener(CaretListener) |
JTextArea | 类似于 JTextComponent |
JTextField | 作为 JTextComponent public void addActionListener(ActionListener) |
除 TextXXX 类型之外的所有组件都继承自 JComponent 类,因此也拥有该类相关的方法。
5.1.5. 事件处理方法
下表列出了各种事件处理程序必须实现的方法。
接口 | 方法 |
ActionListener | public void actionPerformed(ActionEvent) |
调整监听器 | public void adjustmentValueChanged(AdjustmentEvent) |
组件监听器 | public void 组件隐藏(组件事件) public void 组件移动(组件事件) public void 组件调整大小(ComponentEvent) public void 组件显示(ComponentEvent) |
容器监听器 | public void 组件添加(容器事件) public void 组件移除(容器事件) |
焦点监听器 | public void 获得焦点(FocusEvent) public void 失去焦点(FocusEvent) |
项监听器 | public void 项目状态变更(项目事件) |
键盘监听器 | public void keyPressed(KeyEvent) public void keyReleased(KeyEvent) public void 按键输入(KeyEvent) |
鼠标监听器 | public void mouseClicked(MouseEvent) public void mouseEntered(MouseEvent) public void mouseExited(MouseEvent) public void mousePressed(MouseEvent) public void mouseReleased(MouseEvent) |
鼠标移动监听器 | public void mouseDragged(MouseEvent) public void 鼠标移动(MouseEvent) |
文本监听器 | public void textValueChanged(TextEvent) |
InputMethodListener | public void 输入法文本变更(InputMethodEvent) public void 光标位置变更(InputMethodEvent) |
光标监听器 | public void 光标更新(光标事件) |
窗口监听器 | public void 窗口激活(WindowEvent) public void 窗口关闭(WindowEvent) public void 窗口关闭(WindowEvent) public void windowDeactivated(WindowEvent) public void 窗口恢复(WindowEvent) public void 窗口最小化(WindowEvent) public void 窗口打开(WindowEvent) |
5.1.6. 适配器类
正如我们在 WindowListener 接口中所见,存在一些名为 XXXAdapter 的类,它们通过空方法实现了 XXXListener 接口。由此派生的事件处理程序只需实现 XXXListener 接口中的一小部分方法——具体而言,即应用程序所必需的方法。
假设我们要处理 Frame 组件 f1 上的鼠标点击事件。我们可以使用以下方式将其与事件处理程序关联:
并编写如下代码:
    public class gestionnaireSouris implements MouseListener{
         // we write the 5 methods of the MouseListener interface
        // mouseClicked, ..., mouseReleased)
    }// end of class
由于我们只想处理鼠标点击事件,因此最好这样写:
public class gestionnaireSouris extends MouseAdapter{
        // we write a single method that handles mouse clicks
        public void mouseClicked(MouseEvent evt){
        …
        }
}// end of class
下表列出了各种事件处理程序的适配器类:
事件处理程序 | 适配器 |
ComponentListener | ComponentAdapter |
容器监听器 | 容器适配器 |
焦点监听器 | 焦点适配器 |
KeyListener | KeyAdapter |
鼠标监听器 | 鼠标适配器 |
鼠标运动监听器 | 鼠标移动适配器 |
WindowListener | 窗口监听器窗口适配器 |
5.1.7. 结论
我们刚刚介绍了在 Java 中创建图形用户界面的基本概念:
- 创建窗口
- 创建组件
- 使用布局管理器将组件与窗口关联
- 将事件处理程序与组件关联
现在,我们将不再像刚才那样“手动”构建图形用户界面,而是使用 JBuilder——一款由 Borland/Inprise 开发的 Java 开发工具(4.0 及以上版本)。我们将使用 java.swing 库中的组件,该库目前由 Java 的创建者 Sun 公司推荐。
5.2. 使用 JBuilder 构建图形用户界面
5.2.1. 我们的第一个 JBuilder 项目
为了熟悉JBuilder,让我们构建一个非常简单的应用程序:一个空窗口。
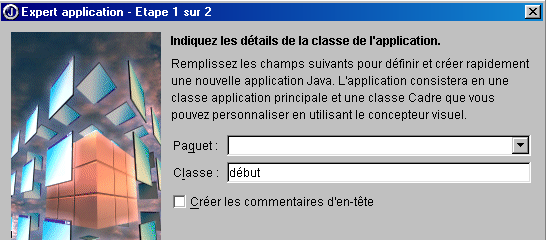
- 启动 JBuilder,选择“文件/新建项目”。随后将显示向导的第一页:
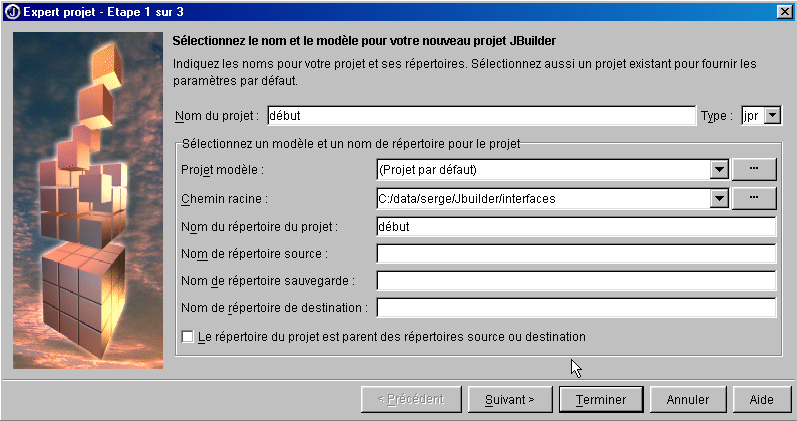
- 填写以下字段:
项目名称 | start 这将在“项目目录名称”字段中指定的文件夹内创建一个名为 start.jpr 的项目文件 |
根路径 | 指定即将创建的项目文件夹所在的文件夹。 |
项目目录名称 | 指定所有项目文件将存放的文件夹名称。该文件夹将创建在“根路径”字段中指定的目录下 |
源文件(.java、.html 等)、目标文件(.class 等)和备份文件可以放置在不同的目录中。如果将这些字段留空,它们将被放置在与项目相同的目录中。
点击 [下一步]
- 系统将显示一个确认界面,用于确认上一步所做的选择
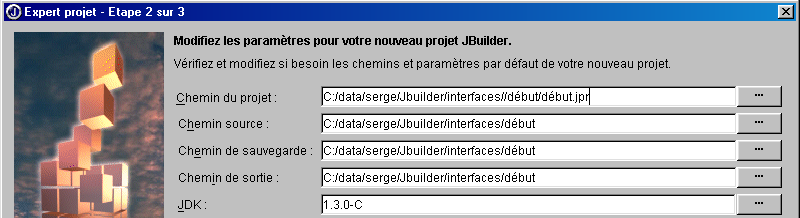
点击 [下一步]
- 新屏幕会要求您描述您的项目:
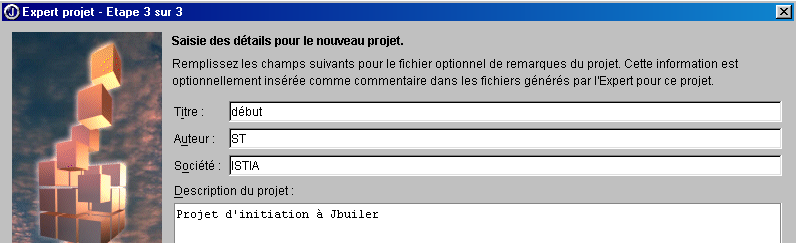
点击 [完成]
- 请确认“视图/项目”选项已勾选。您应该能在左侧窗格中看到项目结构。
- 现在,让我们在这个项目中构建一个图形用户界面。选择“文件/新建/应用程序”选项:
在“类”字段中,输入要创建的类的名称。这里,我们使用了与项目相同的名称。
点击 [下一步]
- 随后将显示以下界面:
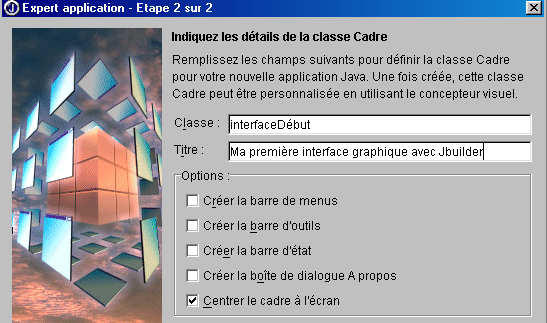
类 | interfaceStart 这是将要创建的窗口所对应的类名 |
标题 | 这是将显示在窗口标题栏中的文本 |
请注意,在上文中,我们已指定应用程序启动时窗口应居中显示在屏幕上。
点击 [完成]
- 这时 JBuilder 就派上用场了。
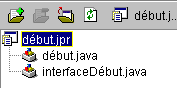
- 它会为我们命名的两个类(应用程序类和 GUI 类)生成相应的 .java 源文件。这两个文件会出现在左侧窗口的项目结构中
- 要查看这两个类的生成的代码,只需双击相应的 .java 文件即可。我们稍后会再回到生成的代码。
- 请确保已勾选“视图/结构”选项。这样您就可以查看当前所选类的结构(双击 .java 文件)。例如,以下是 début 类的结构:
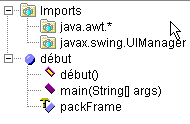
在此我们将了解:
-
导入的库(imports)
-
存在一个构造函数 start()
-
存在一个静态方法 main()
-
存在一个 packFrame 属性
了解类的结构有什么好处?
-
您可以对其有一个整体的了解。如果您的类比较复杂,这会非常有用。
-
您可以在类结构窗口中点击某个方法,直接查看其代码。同样,如果您的类有数百行代码,这非常有用。您无需逐行滚动查找所需的代码。
JBuilder 生成的代码已可直接使用。点击“运行/运行项目”或按 F9 键,您将看到所请求的窗口:
此外,点击窗口的关闭按钮时,它会正常关闭。我们刚刚构建了第一个图形用户界面。我们可以使用“文件/关闭项目”选项来保存项目:
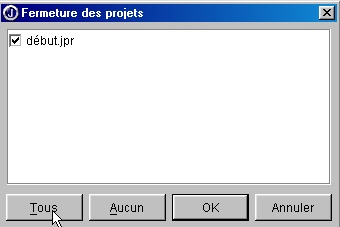
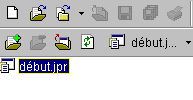
点击“全部”,将选中上图窗口中的所有项目。点击“确定”即可关闭它们。如果我们好奇地使用 Windows 资源管理器导航至项目文件夹(即项目设置开始时向向导指定的那个文件夹),会发现其中包含以下文件:
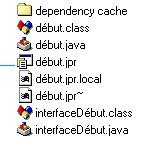
在本示例中,我们指定了所有文件(.java源文件、.class输出文件、.jpr备份文件)应与.jpr项目文件位于同一文件夹中。
5.2.2. JBuilder 为图形界面生成的文件
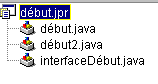
现在让我们看看 JBuilder 生成的 .java 源文件。了解如何解读生成的内容非常重要,因为大多数情况下我们需要在现有代码基础上进行补充。首先打开项目:选择“文件/打开项目”,然后选中 debut.jpr 项目。我们将看到之前构建的项目。
5.2.2.1. 主类
在显示项目文件列表的窗口中双击 début.java 的名称,查看该类。我们看到以下代码:
import javax.swing.UIManager;
import java.awt.*;

public class début {
  boolean packFrame = false;

   /**Building the application*/
  public début() {
    interfaceDébut frame = new interfaceDébut();

     //Validate frames with predefined sizes
     //Compact frames with preferred size information - e.g. from their layout
    if (packFrame) {
      frame.pack();
    }
    else {
      frame.validate();
    }
    //Center window
    Dimension screenSize = Toolkit.getDefaultToolkit().getScreenSize();
    Dimension frameSize = frame.getSize();
    if (frameSize.height > screenSize.height) {
      frameSize.height = screenSize.height;
    }
    if (frameSize.width > screenSize.width) {
      frameSize.width = screenSize.width;
    }
    frame.setLocation((screenSize.width - frameSize.width) / 2, (screenSize.height - frameSize.height) / 2);
    frame.setVisible(true);
  }
   /**Main method*/
  public static void main(String[] args) {
    try {
      UIManager.setLookAndFeel(UIManager.getSystemLookAndFeelClassName());
    }
    catch(Exception e) {
      e.printStackTrace();
    }
    new début();
  }
}
让我们来分析一下生成的代码:
- main 函数设置窗口的外观(setLookAndFeel),并创建一个 début 类的实例。
- 随后执行 début() 构造函数。它创建了一个 Window 类的 Frame 实例(new interfaceDébut())。该实例已构建但尚未显示。
- 随后,根据各组件的可用信息调整窗口大小(frame.validate)。接着,窗口通过显示自身并响应用户输入,开始独立运行。
- 该窗口位于屏幕中央,因为我们在使用向导配置窗口时提出了此要求。
让我们看看如果将 début.java 代码精简到最基本的形式(就像本章开头那样)会发生什么。让我们创建一个新类。选择“文件/新建类”:
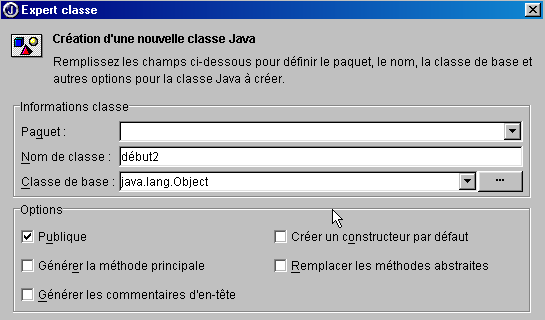
将新类命名为“start2”,然后点击[完成]。项目中会出现一个新文件:
début2.java 文件已被简化为最简单的形式:
让我们按以下方式完善该类:
public class début2 {
   // main function
  public static void main(String args[]){
    // creates the
    new interfaceDébut().show();    // or new interfaceDébut.setVisible(true);
  }//hand
}//class start2
main 函数创建了一个 interfaceDébut 窗口的实例并将其显示出来(show)。在运行项目之前,我们需要指定包含待执行 main 函数的类现在是 début2 类。右键单击 début.jpr 项目,选择“属性”选项,然后进入“执行”选项卡:
21
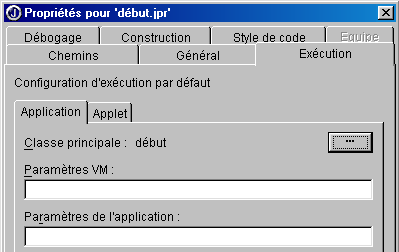
此处显示主类为début(1)。点击按钮(2)以选择其他主类:
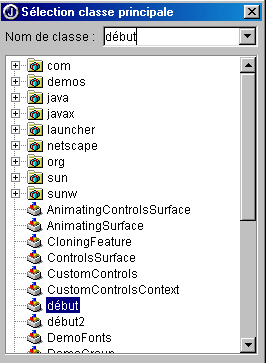
选择“début2”,然后点击[确定]。
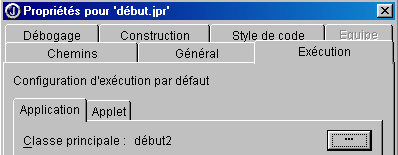
单击 [确定] 确认此选择,然后通过选择“运行/运行项目”或按 F9 键来运行该项目。此时显示的窗口与“start”类生成的窗口相同,只是由于此处未指定,该窗口并未居中显示。从现在起,我们将不再展示 JBuilder 生成的 main 类,因为它总是执行相同的操作:创建一个窗口。从现在起,我们将重点关注窗口类。
5.2.2.2. 窗口类
现在让我们看看为 interfaceDébut 类生成的代码:
import java.awt.*;
import java.awt.event.*;
import javax.swing.*;

public class interfaceDébut extends JFrame {
  JPanel contentPane;
  BorderLayout borderLayout1 = new BorderLayout();

  /**Building the frame*/
  public interfaceDébut() {
    enableEvents(AWTEvent.WINDOW_EVENT_MASK);
    try {
      jbInit();
    }
    catch(Exception e) {
      e.printStackTrace();
    }
  }
   /**Initialize component*/
  private void jbInit() throws Exception  {
    contentPane = (JPanel) this.getContentPane();
    contentPane.setLayout(borderLayout1);
    this.setSize(new Dimension(400, 300));
    this.setTitle("Ma première interface graphique avec Jbuilder");
  }
   /**Replaced, so we can get out when the window is closed*/
  protected void processWindowEvent(WindowEvent e) {
    super.processWindowEvent(e);
    if (e.getID() == WindowEvent.WINDOW_CLOSING) {
      System.exit(0);
    }
  }
}
5.2.2.2.1. 导入的库
这些是 java.awt、java.awt.event 和 javax.swing 包。在 Java 的早期版本中,只有前两个包可用于构建图形用户界面。javax.swing 包是较新的。在此,它对于本示例中使用的 JFrame 窗口是必需的。
5.2.2.2.2. 属性
JPanel 是一种容器类型,可以在其中放置组件。BorderLayout 是可用于在容器内放置组件的布局管理器之一。在所有示例中,我们都不会使用布局管理器,而是亲自将组件放置在容器内的特定位置。为此,我们将使用 null 布局管理器。
5.2.2.2.3. 窗口构造函数
/**Building the frame*/
public interfaceDébut() {
enableEvents(AWTEvent.WINDOW_EVENT_MASK);
try {
jbInit();
}
catch(Exception e) {
e.printStackTrace();
}
}
/**Initialize component*/
private void jbInit() throws Exception {
contentPane = (JPanel) this.getContentPane();
contentPane.setLayout(borderLayout1);
this.setSize(new Dimension(400, 300));
this.setTitle("Ma première interface graphique avec Jbuilder");
}
- 构造函数首先声明将处理窗口上的事件(enableEvents),然后调用 jbInit 方法。
- 获取窗口(JFrame)的容器(JPanel)(getContentPane)
- 设置布局管理器(setLayout)
- 设置窗口大小(setSize)
- 设置窗口标题(setTitle)
5.2.2.2.4. 事件处理程序
/**Replaced, so we can get out when the window is closed*/
protected void processWindowEvent(WindowEvent e) {
super.processWindowEvent(e);
if (e.getID() == WindowEvent.WINDOW_CLOSING) {
System.exit(0);
}
构造函数已表明该类将处理窗口事件。processWindowEvent 方法负责执行此任务。它首先将接收到的 WindowEvent 传递给其父类(JFrame);然后,如果事件是 WINDOW_CLOSING(由点击窗口的关闭按钮触发),则终止应用程序。
5.2.2.2.5. 结论
该窗口类的代码与本章开头示例中的代码有所不同。如果我们使用的是 JBuilder 以外的 Java 代码生成器,生成的代码可能会截然不同。在实际操作中,我们将直接采用 JBuilder 生成的代码来构建窗口,以便能够完全专注于编写图形用户界面的事件处理程序。
5.2.3. 绘制GUI
5.2.3.1. 一个示例
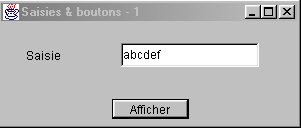
在上一个示例中,我们没有在窗口中放置任何组件。现在,让我们构建一个包含按钮、标签和输入字段的窗口:
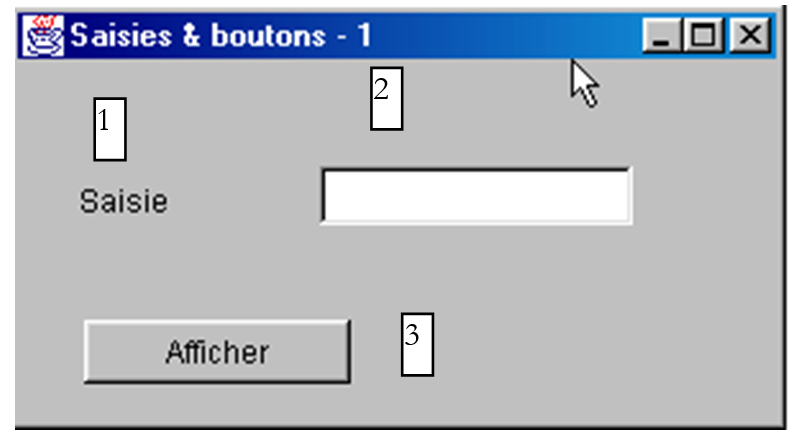
字段如下:
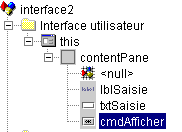
编号 | 姓名 | 类型 | 角色 |
1 | lblInput | JLabel | 一个标签 |
2 | txtInput | JTextField | 一个输入框 |
3 | cmdDisplay | JButton | 用于在对话框中显示txtSaisie文本框的内容 |
按照与上一个项目相同的步骤,构建 interface2.jpr 项目,但暂时不要在窗口中添加任何组件。
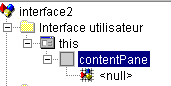
在上方的窗口中,从窗口中选择 interface2.java 类。该窗口右侧有一个带标签的文件夹:
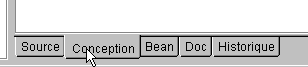
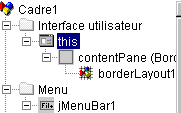
“源代码”选项卡可访问 interface2.java 类的源代码。“设计”选项卡允许您直观地构建窗口。请选择此选项卡。现在您会看到窗口容器,它将容纳您放置其中的组件。目前该容器为空。左侧窗口显示了类结构:
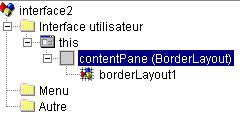
此 | 代表窗口 |
contentPane | 是其容器,我们将在此容器中放置组件,并指定这些组件在容器内的布局模式(默认使用BorderLayout) |
borderLayout1 | 布局管理器的实例 |
选择此对象。其属性窗口将随即显示在右侧:
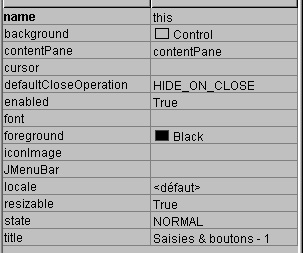
其中一些属性值得注意:
background | 用于设置窗口的背景颜色 |
foreground | 用于设置窗口中文字和按钮的颜色 |
JMenuBar | 用于将菜单与窗口关联 |
title | 为窗口设置标题 |
resizable | 用于设置窗口类型 |
font | 用于设置窗口中文字的字体 |
在仍选中该对象的情况下,您可以通过拖动容器周围的锚点来调整屏幕上显示的容器的大小:
现在我们可以将组件拖放到上面的容器中了。在操作之前,我们将先更改布局管理器。请在结构窗口中选中 contentPane 对象:
然后,在该对象的属性窗口中,选择“布局”属性,并从可用选项中选择“null”作为值:
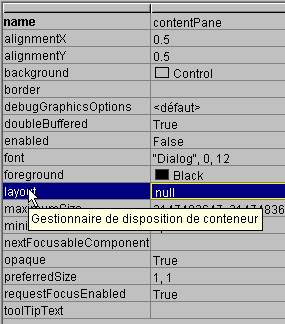
由于没有布局管理器,我们可以自由地在容器内放置组件。现在是时候选择它们了。
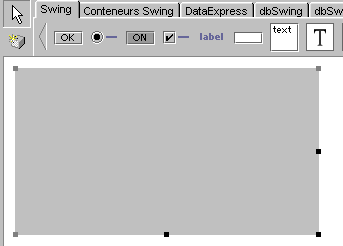
当选中“设计”窗格时,组件会显示在设计窗口顶部的标签式文件夹中:

要构建图形用户界面,我们有 Swing 组件 (1) 和 AWT 组件 (2)。这里我们将使用 Swing 组件。在上方组件栏中,选择一个 JLabel 组件 (3)、一个 JTextField 组件 (4) 和一个 JButton 组件 (5),并将它们放置在设计窗口的容器中。
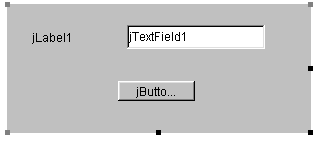
现在,让我们自定义这三个组件:
- 标签(JLabel)jLabel1
选中该组件以打开其“属性”窗口。在“属性”窗口中,修改以下属性:名称:lblSaisie,文本:Saisie
- 文本框(JTextField)jTextfield1
选中该组件以打开其属性窗口。在窗口中,修改以下属性:名称:txtSaisie,文本:留空
- 按钮(JButton):名称:cmdAfficher,文本:Display
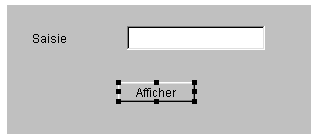
现在我们得到如下窗口:
以及以下结构:
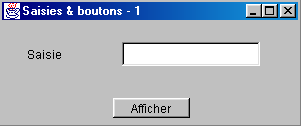
我们可以运行(F9)项目,初步查看窗口的运行效果:
关闭窗口。我们还需要编写与“显示”按钮点击事件相关的过程。选中该按钮以打开其“属性”窗口。该窗口包含两个选项卡:“属性”和“事件”。选择“事件”。
窗口左侧列出了该按钮可能发生的事件。点击按钮对应的是 actionPerformed 事件。右侧列显示了在发生相应事件时被调用的过程名称。点击 actionPerformed 事件右侧的单元格:

JBuilder 会为每个事件处理程序生成默认名称,格式为 ComponentName_EventName,本例中为 cmdDisplay_actionPerformed。您可以删除默认名称并输入其他名称。要访问 cmdDisplay_actionPerformed 处理程序的代码,只需双击上方的名称即可。随后系统会自动跳转到类的源代码窗格,并定位到事件处理程序代码的骨架处:
剩下的就是完善这段代码了。在此,我们希望显示一个对话框,其中包含 txtSaisie 字段的内容:
void cmdAfficher_actionPerformed(ActionEvent e) {
JOptionPane.showMessageDialog(this, "texte saisi="+txtSaisie.getText(),
"Vérification de la saisie",JOptionPane.INFORMATION_MESSAGE);
}
JOptionPane 是 javax.swing 库中的一个类。它允许您显示带有图标的消息,或向用户请求信息。在此,我们使用了该类的静态方法:

parentComponent | 对话框的“父”容器对象:此处为 this。 |
message | 要显示的对象。此处为输入字段的内容 |
title | 对话框的标题 |
messageType | 要显示的消息类型。决定消息旁边的框中将显示的图标。可能的值: INFORMATION_MESSAGE, QUESTION_MESSAGE, ERROR_MESSAGE, WARNING_MESSAGE, PLAIN_MESSAGE |
现在运行我们的应用程序(F9):

5.2.3.2. 窗口类代码
import java.awt.*;
import java.awt.event.*;
import javax.swing.*;
import java.beans.*;
import javax.swing.event.*;
public class interface2 extends JFrame {
JPanel contentPane;
JLabel lblSaisie = new JLabel();
JTextField txtSaisie = new JTextField();
JButton cmdAfficher = new JButton();
/**Building the frame*/
public interface2() {
enableEvents(AWTEvent.WINDOW_EVENT_MASK);
try {
jbInit();
}
catch(Exception e) {
e.printStackTrace();
}
}
/**Initialize component*/
private void jbInit() throws Exception {
lblSaisie.setText("Saisie");
lblSaisie.setBounds(new Rectangle(25, 23, 71, 21));
contentPane = (JPanel) this.getContentPane();
contentPane.setLayout(null);
this.setSize(new Dimension(304, 129));
this.setTitle("Saisies & boutons - 1");
txtSaisie.setBounds(new Rectangle(120, 21, 138, 24));
cmdAfficher.setText("Afficher");
cmdAfficher.setBounds(new Rectangle(111, 77, 77, 20));
cmdAfficher.addActionListener(new java.awt.event.ActionListener() {
public void actionPerformed(ActionEvent e) {
cmdAfficher_actionPerformed(e);
}
});
contentPane.add(lblSaisie, null);
contentPane.add(txtSaisie, null);
contentPane.add(cmdAfficher, null);
}
/**Replaced, so we can get out when the window is closed*/
protected void processWindowEvent(WindowEvent e) {
super.processWindowEvent(e);
if (e.getID() == WindowEvent.WINDOW_CLOSING) {
System.exit(0);
}
}
void cmdAfficher_actionPerformed(ActionEvent e) {
JOptionPane.showMessageDialog(this, "texte saisi="+txtSaisie.getText(), "Vérification de la saisie",JOptionPane.INFORMATION_MESSAGE);
}
}
5.2.3.2.1. 属性
JPanel contentPane;
JLabel lblSaisie = new JLabel();
JTextField txtSaisie = new JTextField();
JButton cmdAfficher = new JButton();
这里我们有一个 JPanel 组件容器和三个组件。
5.2.3.2.2. 构造函数
/**Building the frame*/
public interface2() {
enableEvents(AWTEvent.WINDOW_EVENT_MASK);
try {
jbInit();
}
catch(Exception e) {
e.printStackTrace();
}
}
/**Initialize component*/
private void jbInit() throws Exception {
lblSaisie.setText("Saisie");
lblSaisie.setBounds(new Rectangle(25, 23, 71, 21));
contentPane = (JPanel) this.getContentPane();
contentPane.setLayout(null);
this.setSize(new Dimension(304, 129));
this.setTitle("Saisies & boutons - 1");
txtSaisie.setBounds(new Rectangle(120, 21, 138, 24));
cmdAfficher.setText("Afficher");
cmdAfficher.setBounds(new Rectangle(111, 77, 77, 20));
cmdAfficher.addActionListener(new java.awt.event.ActionListener() {
public void actionPerformed(ActionEvent e) {
cmdAfficher_actionPerformed(e);
}
});
contentPane.add(lblSaisie, null);
contentPane.add(txtSaisie, null);
contentPane.add(cmdAfficher, null);
}
interface2 的构造函数与我们之前学习的图形界面的构造函数类似。区别在于 jbInit 方法:窗口的构建代码取决于其中放置的组件。我们可以通过添加自己的注释来复用 jbInit 代码:
private void jbInit() throws Exception {
// the window itself (size, title)
this.setSize(new Dimension(304, 129));
this.setTitle("Saisies & boutons - 1");
// the component container
contentPane = (JPanel) this.getContentPane();
// no formatting manager for this container
contentPane.setLayout(null);
// label lblSaisie (label, position, size)
lblSaisie.setText("Saisie");
lblSaisie.setBounds(new Rectangle(25, 23, 71, 21));
// input field (position, size)
txtSaisie.setBounds(new Rectangle(120, 21, 138, 24));
// display button (label, position, size)
cmdAfficher.setText("Afficher");
cmdAfficher.setBounds(new Rectangle(111, 77, 77, 20));
// button event manager
cmdAfficher.addActionListener(new java.awt.event.ActionListener() {
public void actionPerformed(ActionEvent e) {
cmdAfficher_actionPerformed(e);
}
});
// add the 3 components to the container
contentPane.add(lblSaisie, null);
contentPane.add(txtSaisie, null);
contentPane.add(cmdAfficher, null);
}//jbInit
有两点值得注意:
- 这段代码本可以手动编写。这意味着构建图形用户界面并不需要依赖 JBuilder。
- cmdAfficher 按钮的事件处理程序的设置方式。cmdAfficher 组件的事件处理程序本可以使用 `cmdAfficher.addActionListener(new handler())` 进行声明,其中 `handler` 是一个具有公共 `actionPerformed` 方法的类,该方法负责处理“显示”按钮的点击事件。在此,JBuilder 使用了一个匿名类的实例作为处理程序:
new java.awt.event.ActionListener() {
public void actionPerformed(ActionEvent e) {
cmdAfficher_actionPerformed(e);
}
创建了一个 ActionListener 接口的新实例,并当场定义了其 actionPerformed 方法。该方法仅调用 interface2 类的某个方法。所有这些操作只是为了在窗口所在的同一类中定义窗口组件的事件处理程序而采取的一种变通方案。我们也可以采用其他方式实现:
这会导致系统在 this(即窗口类)中查找 actionPerformed 方法。第二种方法看似更简单,但第一种方法具有优势:它允许为不同的按钮设置不同的处理程序,而第二种方法则无法做到这一点。在后一种情况下,唯一的 actionPerformed 方法必须处理来自不同按钮的点击事件,因此必须先识别是哪一个按钮触发了事件,然后才能开始处理。
5.2.3.2.3. 事件处理程序
我们看到了一些我们已经讨论过的:
/**Replaced, so we can get out when the window is closed*/
protected void processWindowEvent(WindowEvent e) {
super.processWindowEvent(e);
if (e.getID() == WindowEvent.WINDOW_CLOSING) {
System.exit(0);
}
}
// click on View button
void cmdAfficher_actionPerformed(ActionEvent e) {
JOptionPane.showMessageDialog(this, "texte saisi="+txtSaisie.getText(), "Vérification de la saisie",JOptionPane.INFORMATION_MESSAGE);
}
5.2.3.3. 结论
从所研究的两个项目中,我们可以得出结论:一旦使用JBuilder构建了图形用户界面,开发者的任务就是为该图形用户界面编写需要处理的事件的事件处理程序。
5.2.4. 寻求帮助
使用 Java 时,您经常需要帮助,特别是因为可用的类数量非常庞大。以下是查找类相关帮助的一些技巧。从菜单中选择“帮助/帮助主题”选项。
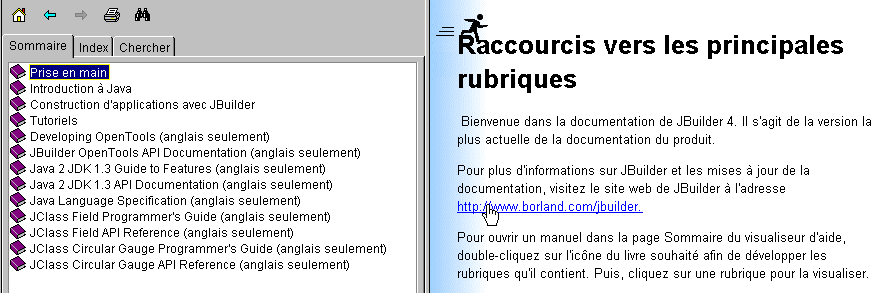
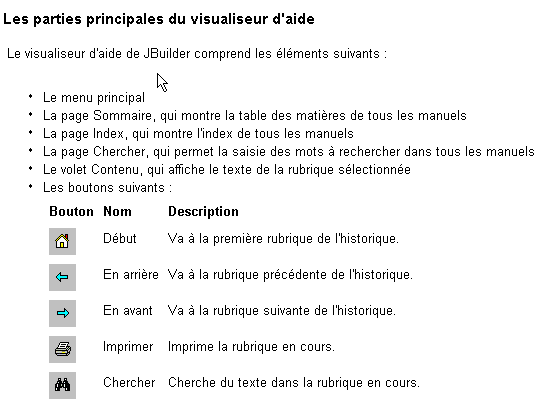
“帮助”屏幕通常包含两个窗口:
- 左侧窗口用于输入搜索内容,包含“目录”、“索引”和“搜索”三个选项卡。
- 右侧窗口用于显示搜索结果
关于如何使用 JBuilder 帮助系统,系统提供了相关帮助。在 JBuilder 帮助中,选择“帮助/使用帮助”选项。这将说明如何使用帮助系统。例如,它将向您展示帮助查看器的各个组成部分:
让我们仔细看看“目录”和“索引”页面。
5.2.4.1. 帮助:目录
5.2.4.1.1. 目录:Java 入门
在这里,您将了解 Java 的基础知识,但不仅限于此,正如本节涵盖的主题列表所示:
5.2.4.1.2. 目录:教程
如果我们在上面的目录中选择“教程”选项,右侧窗口将显示可用的教程列表:

基础教程对于入门 JBuilder 特别有用。除了上面显示的这些之外,还有许多其他教程,当您想要开发应用程序时,先查看是否有相关的教程可以提供帮助会很有用。
5.2.4.1.3. 目录:JDK
选择“Java 2 JDK 1.3”选项后,您即可访问所有 JDK 库。通常,如果您需要查找特定类的信息却不知道它位于哪个库中,这里并不是合适的查询地点。不过,如果您想对 Java 库有一个总体了解,这个选项会很有用。
5.2.4.2. 帮助:索引
在“帮助”窗口的左侧窗格中选择“索引”选项卡。此选项可帮助您查找有关某个类的帮助信息。例如,假设您想了解 Swing JTextField 输入字段的方法。请在搜索文本框中输入 JTextField:
![]()
帮助将返回以您输入的文本开头的索引条目:
您只需双击感兴趣的条目(本例中为 JTextField 类)。该类的帮助内容随即会在右侧窗口中显示:
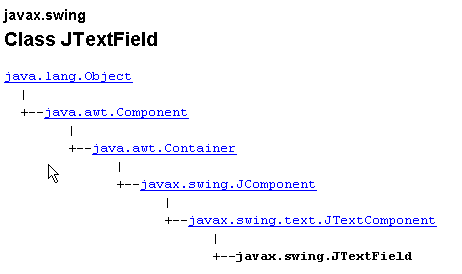
随后将提供该类的完整描述。
5.2.5. 一些 Swing 组件
接下来,我们将展示一些使用最常见 Swing 组件的应用程序,以探讨这些组件的主要方法和属性。对于每个应用程序,我们将展示其图形界面以及相关代码,特别是事件处理程序的代码。
5.2.5.1. JLabel 和 JTextField 组件
我们之前已经接触过这两个组件。JLabel 是一个文本组件,而 JTextField 是一个输入字段组件。它们的两个主要方法是
String getText() | 用于获取输入框的内容或标签的文本 |
void setText(String text) | 用于设置字段或标签中的文本 |
JTextField 常用的事件如下:
actionPerformed | 表示用户已通过按下 Enter 键确认所输入的文本 |
caretUpdate | 表示用户移动了输入光标 |
inputMethodChanged | 表示用户已修改输入字段 |
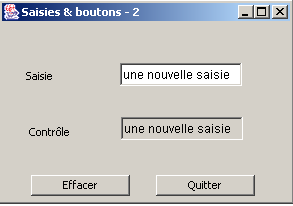
以下是一个使用 caretUpdate 事件来跟踪输入字段中变化的示例:
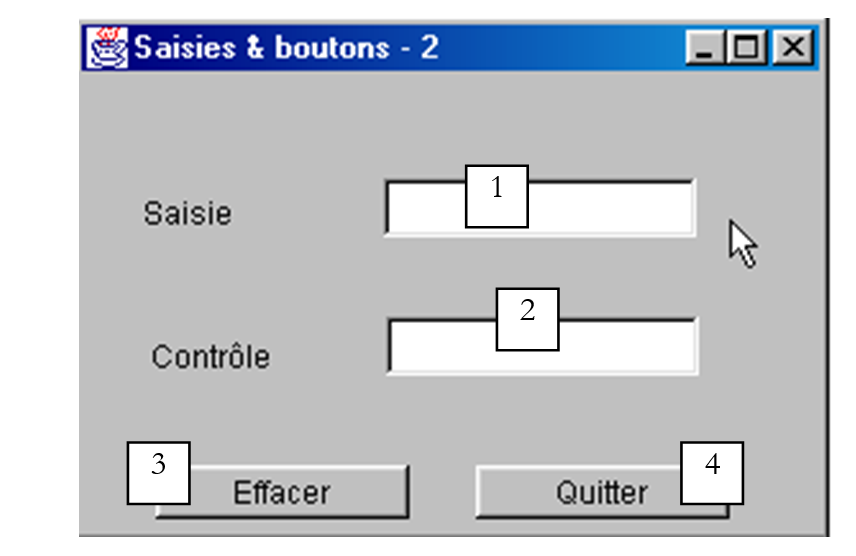
否。 | 类型 | 名称 | 角色 |
1 | JTextField | txtInput | 输入字段 |
2 | JTextField | txtControl | 实时显示来自 1 的文本 |
3 | JButton | cmdClear | 用于清除字段 1 和 2 |
4 | JButton | cmdExit | 以退出应用程序 |
该应用程序的相关代码如下:
import java.awt.*;
....
public class Cadre1 extends JFrame {
JPanel contentPane;
JTextField txtSaisie = new JTextField();
JLabel jLabel1 = new JLabel();
JLabel jLabel2 = new JLabel();
JTextField txtControle = new JTextField();
JButton CmdEffacer = new JButton();
JButton CmdQuitter = new JButton();
/**Building the frame*/
public Cadre1() {
enableEvents(AWTEvent.WINDOW_EVENT_MASK);
try {
jbInit();
}
catch(Exception e) {
e.printStackTrace();
}
}
/**Initialize component*/
private void jbInit() throws Exception {
....
txtSaisie.addCaretListener(new javax.swing.event.CaretListener() {
public void caretUpdate(CaretEvent e) {
txtSaisie_caretUpdate(e);
}
});
...
CmdEffacer.addActionListener(new java.awt.event.ActionListener() {
public void actionPerformed(ActionEvent e) {
CmdEffacer_actionPerformed(e);
}
});
...
CmdQuitter.addActionListener(new java.awt.event.ActionListener() {
public void actionPerformed(ActionEvent e) {
CmdQuitter_actionPerformed(e);
}
});
....
}
/**Replaced, so we can get out when the window is closed*/
protected void processWindowEvent(WindowEvent e) {
...
}
void txtSaisie_caretUpdate(CaretEvent e) {
// the input cursor has moved
txtControle.setText(txtSaisie.getText());
}
void CmdQuitter_actionPerformed(ActionEvent e) {
// quit the application
System.exit(0);
}
void CmdEffacer_actionPerformed(ActionEvent e) {
// delete the contents of the input field
txtSaisie.setText("");
}
}
以下是一个执行示例:
5.2.5.2. JComboBox 组件
JComboBox 组件是一个结合了下拉列表和输入字段的控件:用户既可以从(2)中选择项目,也可以在(1)中输入文本。默认情况下,JComboBox 不可编辑。您必须显式调用 setEditable(true) 方法才能使其可编辑。要了解有关 JComboBox 类的更多信息,请在帮助索引中输入 JComboBox。
可以通过多种方式创建 JComboBox 对象:
new JComboBox() | 创建一个空的下拉列表框 |
new JComboBox (Object[] items) | 创建一个包含对象数组的下拉列表 |
new JComboBox(Vector items) | 与上述相同,但使用对象向量 |
下拉列表通常包含字符串,因此它能包含对象这一事实可能令人感到意外。从视觉上来看,确实如此。如果一个 JComboBox 包含一个对象 obj,它会显示字符串 obj.toString()。请记住,每个对象都继承了 Object 类的 toString 方法,该方法返回一个“代表”该对象的字符串。
JComboBox 类的常用方法如下:
void addItem(Object anObject) | 向下拉列表中添加一个对象 |
int getItemCount() | 返回下拉列表中的项目数量 |
Object getItemAt(int i) | 返回组合框中的第 i 个对象 |
void insertItemAt(Object anObject, int i) | 将 anObject 插入到下拉列表的第 i 个位置 |
int getSelectedIndex() | 返回下拉列表中选中项的索引 |
Object getSelectedItem() | 返回下拉列表中选中的项目 |
void setSelectedIndex(int i) | 在组合框中选中第 i 个项目 |
void setSelectedItem(Object anObject) | 在组合框中选中指定的对象 |
void removeAllItems() | 清空下拉列表 |
void removeItemAt(int i) | 从下拉列表中移除索引号为 i 的项目 |
void removeItem(Object anObject) | 从下拉列表中移除指定的对象 |
void setEditable(boolean val) | 将下拉列表设为可编辑(val=true)或不可编辑(val=false) |
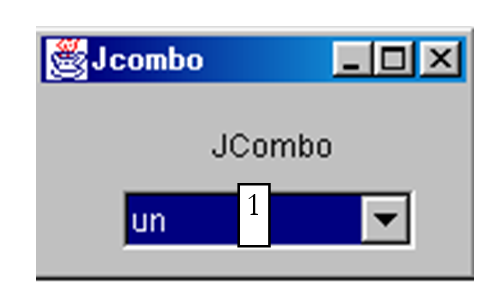
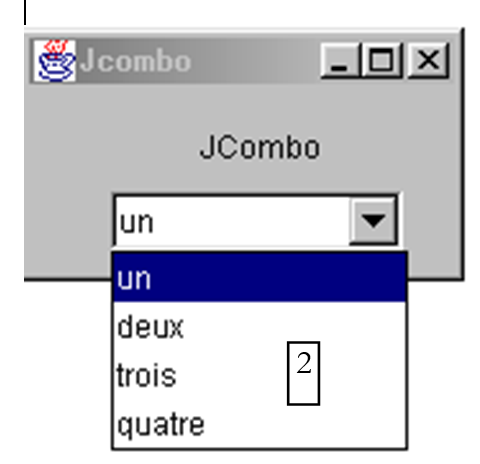
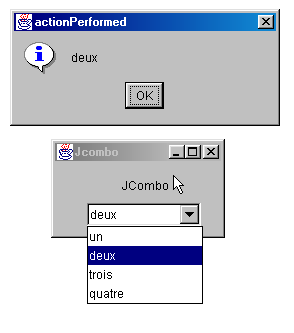
当从下拉列表中选中一个项目时,会触发 actionPerformed 事件,该事件可用于检测组合框内的选中项变化。在下面的应用程序中,我们利用此事件来显示从列表中选中的项目。
此处仅展示与窗口相关的代码。
public class Cadre1 extends JFrame {
JPanel contentPane;
JComboBox jComboBox1 = new JComboBox();
JLabel jLabel1 = new JLabel();
/**Building the frame*/
public Cadre1() {
enableEvents(AWTEvent.WINDOW_EVENT_MASK);
try {
jbInit();
}
catch(Exception e) {
e.printStackTrace();
}
// treatment - fill the combo
String[] infos={"un","deux","trois","quatre"};
for(int i=0;i<infos.length;i++)
jComboBox1.addItem(infos[i]);
}
/**Initialize component*/
private void jbInit() throws Exception {
....
jComboBox1.addActionListener(new java.awt.event.ActionListener() {
public void actionPerformed(ActionEvent e) {
jComboBox1_actionPerformed(e);
}
});
....
}
void jComboBox1_actionPerformed(ActionEvent e) {
// a new element has been selected - it is displayed
JOptionPane.showMessageDialog(this,jComboBox1.getSelectedItem(),
"actionPerformed",JOptionPane.INFORMATION_MESSAGE);
}
}
5.2.5.3. JList 组件
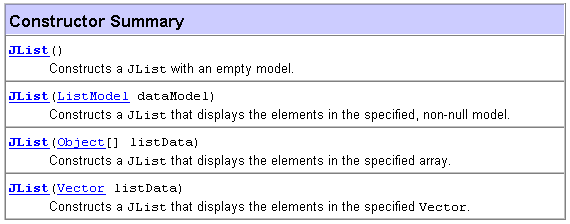
Swing 中的 JList 组件比 AWT 库中的同类组件更为复杂。两者有两个重要区别:
- 列表的内容由一个独立于列表本身的对象进行管理。在此,我们将使用 DefaultListModel 对象,它的工作原理类似于 Vector,但会在内容发生变化时通知 JList 对象,以便列表的视觉显示相应更新。
- 列表默认不支持滚动。您必须将列表放置在 ScrollPane 容器中,该容器才支持滚动功能。
在源代码中,列表可以定义如下:
// the vector of list values
DefaultlistModel valeurs=new DefaultListModel();
// the list itself, to which we associate the vector of its values
JList jList1 = new JList(valeurs);
// the scrolling container in which the list is placed to obtain a scrolling list
JScrollPane jScrollPane1 = new JScrollPane(jList1);
为了将 jList1 列表放入 jScrollPane1 容器中,JBuilder 生成的代码采用了不同的处理方式:
- 在窗口属性中声明容器
- 然后,在 jbInit 代码中,将列表添加到容器中
要向上述 JList1 列表中添加值,只需将其添加到其 values 数组中:
随后您将看到以下窗口:
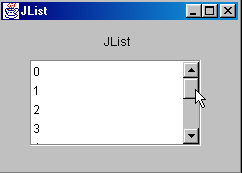
这个界面是如何构建的?
- 从组件的“Swing 容器”页面中选择一个 JScrollPane 组件,将其拖拽到窗口中,并调整其大小至所需尺寸
- 从组件的“Swing”页面中选择一个 JList 组件,并将它拖放到 JScrollPane 容器中,它将占据整个空间。
需要对 JBuilder 生成的代码稍作修改,以生成以下代码:
public class interfaceAppli extends JFrame {
JPanel contentPane;
JLabel jLabel1 = new JLabel();
DefaultListModel valeurs=new DefaultListModel();
JList jList1 = new JList(valeurs);
JScrollPane jScrollPane1 = new JScrollPane();
JLabel jLabel2 = new JLabel();
/**Building the frame*/
public interfaceAppli() {
enableEvents(AWTEvent.WINDOW_EVENT_MASK);
try {
jbInit();
}
catch(Exception e) {
e.printStackTrace();
}
// treatment
// include the list in the scrollPane
// init list
for(int i=0;i<10;i++)
valeurs.addElement(""+i);
}
/**Initialize component*/
private void jbInit() throws Exception {
....
// the jList1 list is associated with the jcrollPane1 container
jScrollPane1.getViewport().add(jList1, null);
}
/**Replaced, so we can get out when the window is closed*/
protected void processWindowEvent(WindowEvent e) {
....
}
}
现在,让我们通过在帮助索引中搜索 JList 来探索 JList 类的常用方法。JList 对象可以通过多种方式进行构造:
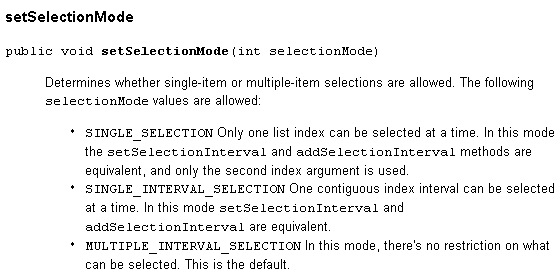
其中一种简单的方法就是我们之前使用过的:创建一个空的 DefaultListModel V,然后通过 new JList(V) 将其与要创建的列表关联起来。列表的内容并非由 JList 对象管理,而是由包含列表值的对象管理。如果内容是使用基于 Vector 类的 DefaultListModel 对象构建的,则可以使用 Vector 类的方法向列表中添加、插入和删除元素。 列表可以支持单选或多选。这通过 setSelectionMode 方法进行设置:
可通过 getSelectionMode 方法获取当前选择模式:
![]()
可通过以下方法获取所选项目:

我们知道如何使用 JList(DefaultListModel)构造函数将值向量与列表关联。反之,我们可以通过以下方式从 JList 中获取 DefaultListModel 对象:

现在我们已经掌握了足够的知识,可以编写以下应用程序:
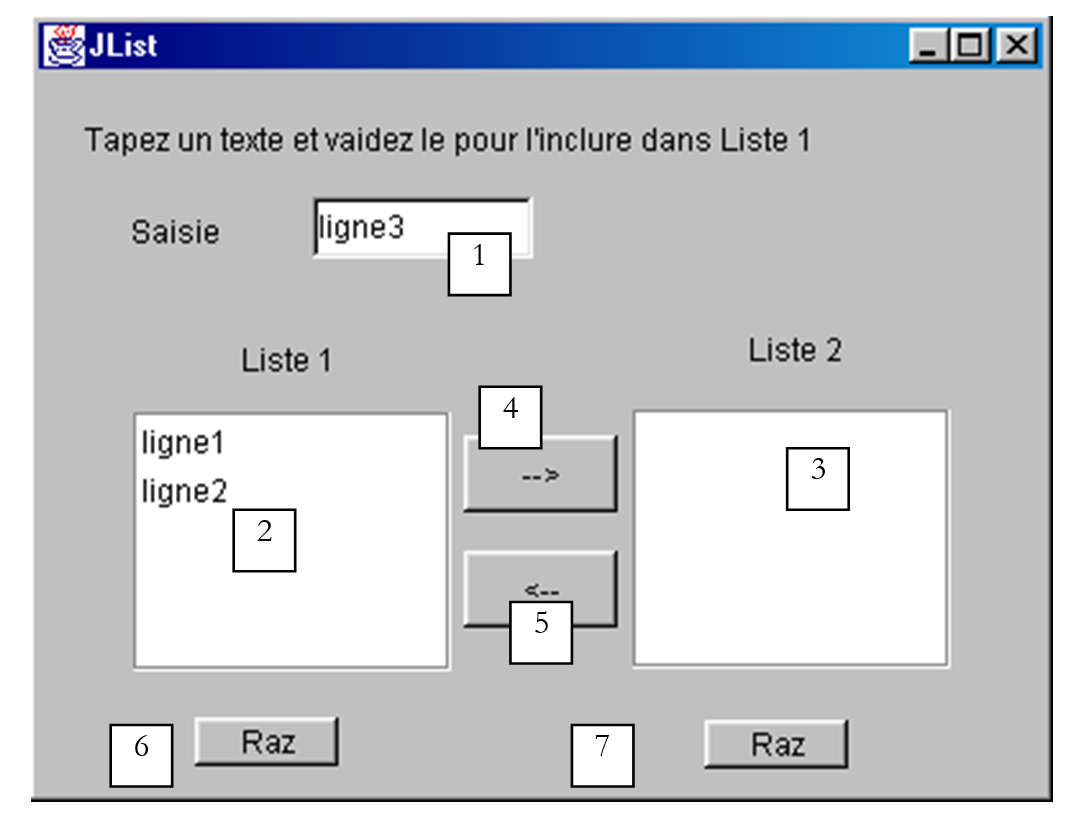
该窗口的组件如下:
编号 | 类型 | 名称 | 作用 |
1 | JTextField | txtInput | 输入字段 |
2 | JList | jList1 | 容器中的列表jScrollPane1 |
3 | JList | jList2 | 位于 jScrollPane2 容器中的列表 |
4 | JButton | cmd1To2 | 将列表 1 中选中的项目转移到列表 2 |
5 | JButton | cmd2To1 | 执行相反的操作 |
6 | JButton | cmdRaz1 | 清空列表 1 |
7 | JButton | cmdRaz2 | 清除列表 2 |
用户在字段 (1) 中输入文本并提交。这将触发输入字段的 actionPerformed 事件,该事件用于将输入的文本添加到列表 1 中。以下是此第一个函数的代码:
public class interfaceAppli extends JFrame {
JPanel contentPane;
JLabel jLabel1 = new JLabel();
JLabel jLabel2 = new JLabel();
JLabel jLabel3 = new JLabel();
JTextField txtSaisie = new JTextField();
JButton cmd1To2 = new JButton();
JButton cmd2To1 = new JButton();
DefaultListModel v1=new DefaultListModel();
DefaultListModel v2=new DefaultListModel();
JList jList1 = new JList(v1);
JList jList2 = new JList(v2);
JScrollPane jScrollPane1 = new JScrollPane();
JScrollPane jScrollPane2 = new JScrollPane();
JButton cmdRaz1 = new JButton();
JButton cmdRaz2 = new JButton();
JLabel jLabel4 = new JLabel();
/**Building the frame*/
public interfaceAppli() {
enableEvents(AWTEvent.WINDOW_EVENT_MASK);
try {
jbInit();
}
catch(Exception e) {
e.printStackTrace();
}
}//interfaceAppli
/**Initialize component*/
private void jbInit() throws Exception {
...
txtSaisie.addActionListener(new java.awt.event.ActionListener() {
public void actionPerformed(ActionEvent e) {
txtSaisie_actionPerformed(e);
}
});
...
// Jlist1 is placed in the jScrollPane1 container
jScrollPane1.getViewport().add(jList1, null);
// Jlist2 is placed in the jScrollPane2 container
jScrollPane2.getViewport().add(jList2, null);
...
}
/**Replaced, so we can get out when the window is closed*/
protected void processWindowEvent(WindowEvent e) {
...
}
void txtSaisie_actionPerformed(ActionEvent e) {
// the input text has been validated
// we recover it free of its start and end spaces
String texte=txtSaisie.getText().trim();
// if it's empty, we don't want it
if(texte.equals("")){
// error msg
JOptionPane.showMessageDialog(this,"Vous devez taper un texte",
"Erreur",JOptionPane.WARNING_MESSAGE);
// end
return;
}//if
// if it is not empty, it is added to the values in list 1
v1.addElement(texte);
// and empty the input field
txtSaisie.setText("");
}/// txtSaisie_actionperformed
}//class
将选定项目从一个列表转移到另一个列表的代码如下:
void cmd1To2_actionPerformed(ActionEvent e) {
// transfer items selected in list 1 to list 2
transfert(jList1,jList2);
}//cmd1To2
void cmd2To1_actionPerformed(ActionEvent e) {
// transfer selected items in jList2 to jList1
transfert(jList2,jList1);
}//cmd2TO1
private void transfert(JList L1, JList L2){
// transfer items selected in list 1 to list 2
// retrieve the array of indices of the elements selected in L1
int[] indices=L1.getSelectedIndices();
// anything to do?
if (indices.length==0) return;
// we retrieve the values of L1
DefaultListModel v1=(DefaultListModel)L1.getModel();
// and L2
DefaultListModel v2=(DefaultListModel)L2.getModel();
for(int i=indices.length-1;i>=0;i--){
// the values selected in L1 are added to L2
v2.addElement(v1.elementAt(indices[i]));
// l1 elements copied into L2 must be deleted from L1
v1.removeElementAt(indices[i]);
}//for
}//transfer
与 Raz 按钮相关的代码非常简单:
void cmdRaz1_actionPerformed(ActionEvent e) {
// empty list 1
v1.removeAllElements();
}//cmd Raz1
void cmdRaz2_actionPerformed(ActionEvent e) {
// empty list 2
v2.removeAllElements();
}///cmd Raz2
5.2.5.4. JCheckBox 复选框,JButtonRadio 单选按钮
我们建议编写以下应用程序:
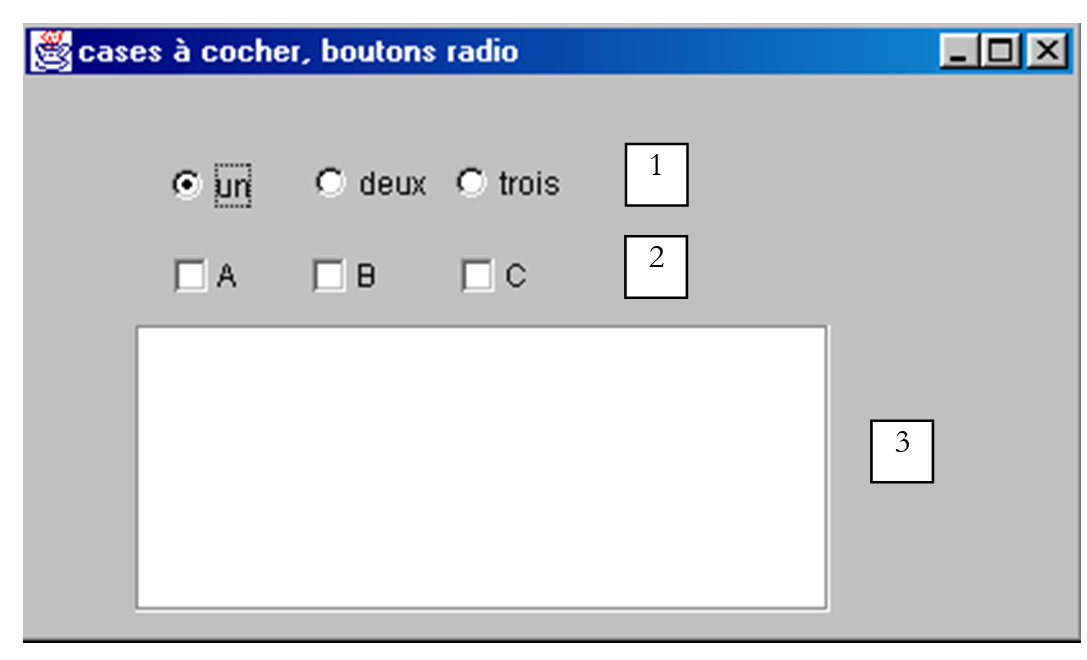
窗口组件如下:
编号 | 类型 | 名称 | 作用 |
1 | JButtonRadio | jButtonRadio1 jButtonRadio2 jButtonRadio3 | 属于 buttonGroup1 组的 3 个单选按钮 |
2 | JCheckBox | jCheckBox1 jCheckBox2 jCheckBox3 | 3 个复选框 |
3 | JList | jList1 | 容器中的列表jScrollPane1 |
4 | 按钮组 | buttonGroup1 | 不可见组件——用于将三个单选按钮分组,以便当其中一个被选中时,其余的会被取消选中。 |
可以按以下方式创建一组单选按钮:
- 将每个单选按钮放置到位,无需考虑分组问题
- 在容器中放置一个 Swing ButtonGroup 组件。该组件为非可见组件,因此不会在窗口设计器中显示。但在其结构中可见:
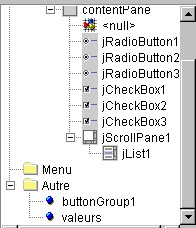
在上图的“其他”分支中,您可以查看窗口的非可视属性。创建单选按钮组后,即可将每个单选按钮与该组关联。要执行此操作,请选择单选按钮的属性:
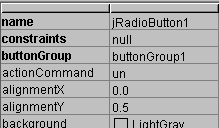
在单选按钮的 buttonGroup 属性中,输入您希望将该单选按钮放入的组名称,此处为 buttonGroup1。对所有 3 个单选按钮重复此步骤。
单选按钮和复选框的主要方法是 isSelected() 方法,该方法用于指示复选框或按钮是否被选中。可通过 getText() 获取组件关联的文本,并通过 setText(String text) 进行设置。可使用 setSelected(boolean value) 方法选中复选框或单选按钮。
当单击单选按钮或复选框时,会触发 actionPerformed 事件。在下面的代码中,我们利用此事件来跟踪单选按钮和复选框值的变更:
public class interfaceAppli extends JFrame {
JPanel contentPane;
JRadioButton jRadioButton1 = new JRadioButton();
JRadioButton jRadioButton2 = new JRadioButton();
JRadioButton jRadioButton3 = new JRadioButton();
JCheckBox jCheckBox1 = new JCheckBox();
JCheckBox jCheckBox2 = new JCheckBox();
JCheckBox jCheckBox3 = new JCheckBox();
ButtonGroup buttonGroup1 = new ButtonGroup();
JScrollPane jScrollPane1 = new JScrollPane();
DefaultListModel valeurs=new DefaultListModel();
JList jList1 = new JList(valeurs);
/**Building the frame*/
public interfaceAppli() {
enableEvents(AWTEvent.WINDOW_EVENT_MASK);
try {
jbInit();
}
catch(Exception e) {
e.printStackTrace();
}
}
/**Initialize component*/
private void jbInit() throws Exception {
jRadioButton1.setSelected(true);
jRadioButton1.setText("un");
jRadioButton1.setBounds(new Rectangle(57, 31, 49, 23));
jRadioButton1.addActionListener(new java.awt.event.ActionListener() {
public void actionPerformed(ActionEvent e) {
afficheRadioButtons(e);
}
});
jRadioButton2.setBounds(new Rectangle(113, 30, 49, 23));
jRadioButton2.addActionListener(new java.awt.event.ActionListener() {
public void actionPerformed(ActionEvent e) {
afficheRadioButtons(e);
}
});
jRadioButton2.setText("deux");
jRadioButton3.setBounds(new Rectangle(168, 30, 49, 23));
jRadioButton3.addActionListener(new java.awt.event.ActionListener() {
public void actionPerformed(ActionEvent e) {
afficheRadioButtons(e);
}
});
jRadioButton3.setText("trois");
// radio buttons are grouped together
buttonGroup1.add(jRadioButton1);
buttonGroup1.add(jRadioButton2);
buttonGroup1.add(jRadioButton3);
// checkboxes
jCheckBox1.setText("A");
jCheckBox1.setBounds(new Rectangle(58, 69, 32, 17));
jCheckBox1.addActionListener(new java.awt.event.ActionListener() {
public void actionPerformed(ActionEvent e) {
afficheCases(e);
}
});
jCheckBox2.setBounds(new Rectangle(112, 69, 40, 17));
jCheckBox2.addActionListener(new java.awt.event.ActionListener() {
public void actionPerformed(ActionEvent e) {
afficheCases(e);
}
});
jCheckBox2.setText("B");
jCheckBox3.setText("C");
jCheckBox3.setBounds(new Rectangle(170, 69, 37, 17));
jCheckBox3.addActionListener(new java.awt.event.ActionListener() {
public void actionPerformed(ActionEvent e) {
afficheCases(e);
}
});
....
}
/**Replaced, so we can get out when the window is closed*/
protected void processWindowEvent(WindowEvent e) {
...
}
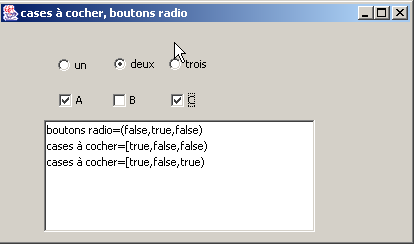
private void afficheRadioButtons(ActionEvent e){
// displays the values of the 3 radio buttons
valeurs.addElement("boutons radio=("+jRadioButton1.isSelected()+","+
jRadioButton2.isSelected()+","+jRadioButton3.isSelected()+")");
}//afficheRadioButtons
void afficheCases(ActionEvent e) {
// displays checkbox values
valeurs.addElement("cases à cocher=["+jCheckBox1.isSelected()+","+
jCheckBox2.isSelected()+","+jCheckBox3.isSelected()+")");
}//afficheCases
}//class
以下是一个执行示例:
5.2.5.5. JScrollBar 组件
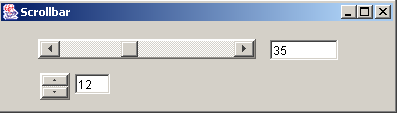
让我们创建以下应用程序:
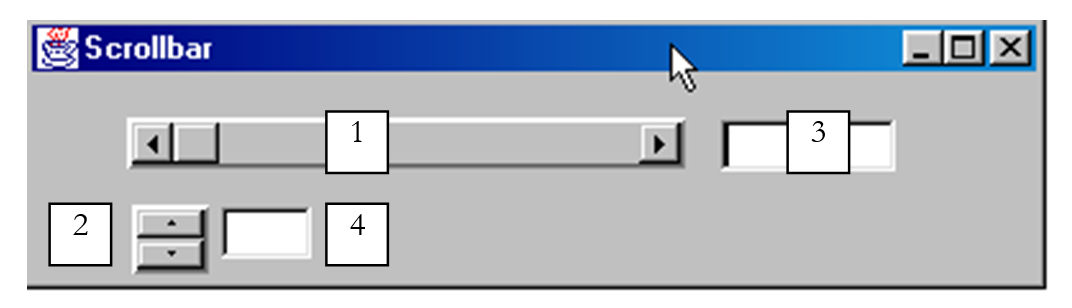
编号 | 类型 | 名称 | 角色 |
1 | JScrollBar | jScrollBar1 | 一个水平滚动条 |
2 | JScrollBar | jScrollBar2 | 一个垂直滑块 |
3 | JTextField | txtvalueHS | 显示水平滑块 1 的值——也允许您设置此值 |
4 | JTextField | txtVSvalue | 显示垂直滑块 2 的值——也允许您设置此值 |
- JScrollBar 滑块允许用户从滑块“条”所代表的整数值范围内选择一个值,光标会沿着该条移动。
- 对于水平滑块,左端代表范围的最小值,右端代表最大值,光标代表当前选定的值。对于垂直滑块,最小值由顶端表示,最大值由底端表示。 (min,max) 对的默认值为 (0,100)。
- 点击滑块两端会根据点击的端点,将值增加或减少一个增量(正或负),具体增量由 unitIncrement 参数定义,其默认值为 1。
- 点击滑块两侧会根据点击的端点,使数值增加或减少一个增量(正或负),该增量称为 blockIncrement,默认值为 10。
- 这五个值(min、max、value、unitIncrement、blockIncrement)可通过方法 getMinimum()、getMaximum()、getValue()、getUnitIncrement() 和 getBlockIncrement() 获取,这些方法均返回整数;也可通过方法 setMinimum(int min)、setMaximum(int max)、 setValue(int val)、setUnitIncrement(int uInc) 和 setBlockIncrement(int bInc) 进行设置
使用 JScrollBar 组件时需要注意几点。首先,它位于 Swing 组件面板中:
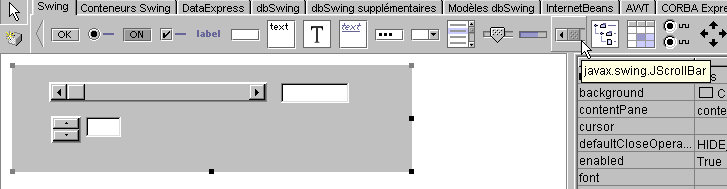
将其拖放到容器中时,默认显示为垂直方向。您可以通过下方的 orientation 属性将其设置为水平方向:
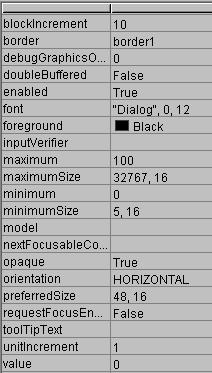
在上方的属性表中,您可以看到可以访问 JScrollBar 的 minimum、maximum、value、unitIncrement 和 blockIncrement 属性。因此,您可以在设计时设置这些属性。当您将滚动条放置在容器上时,其“滚动条”不会显示:
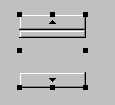
您可以通过为组件添加边框来解决此问题。这可以通过其 border 属性实现,该属性可取多种值:
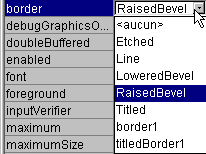
以下是 RaisedBevel 的示例:
![]()
当您点击垂直滑块的顶端时,其数值会减小。这可能会让普通用户感到意外,因为他们通常会预期数值“增加”。我们通过将 unitIncrement 和 blockIncrement 设置为负值来解决这个问题。
如何跟踪滑块的变化?当其值发生变化时,会触发 adjustmentValueChanged 事件。只需将一个过程与该事件关联,即可在滚动条的值发生每次变化时收到通知。
本应用程序的相关代码如下:
....
public class cadreAppli extends JFrame {
JPanel contentPane;
JScrollBar jScrollBar1 = new JScrollBar();
Border border1;
JTextField txtValeurHS = new JTextField();
JScrollBar jScrollBar2 = new JScrollBar();
JTextField txtValeurVS = new JTextField();
TitledBorder titledBorder1;
/**Building the frame*/
public cadreAppli() {
enableEvents(AWTEvent.WINDOW_EVENT_MASK);
try {
jbInit();
}
catch(Exception e) {
e.printStackTrace();
}
}
/**Initialize component*/
private void jbInit() throws Exception {
...
// a border for scrollbars
border1 = BorderFactory.createBevelBorder(BevelBorder.RAISED,Color.white,Color.white,new Color(134, 134, 134),new Color(93, 93, 93));
// no border title
titledBorder1 = new TitledBorder("");
jScrollBar1.setOrientation(JScrollBar.HORIZONTAL);
jScrollBar1.setBorder(BorderFactory.createRaisedBevelBorder());
jScrollBar1.setAutoscrolls(true);
jScrollBar1.setBounds(new Rectangle(37, 17, 218, 20));
jScrollBar1.addAdjustmentListener(new java.awt.event.AdjustmentListener() {
public void adjustmentValueChanged(AdjustmentEvent e) {
jScrollBar1_adjustmentValueChanged(e);
}
});
txtValeurHS.addActionListener(new java.awt.event.ActionListener() {
public void actionPerformed(ActionEvent e) {
txtValeurHS_actionPerformed(e);
}
});
jScrollBar2.setBounds(new Rectangle(39, 51, 30, 27));
jScrollBar2.addAdjustmentListener(new java.awt.event.AdjustmentListener() {
public void adjustmentValueChanged(AdjustmentEvent e) {
jScrollBar2_adjustmentValueChanged(e);
}
});
jScrollBar2.setAutoscrolls(true);
jScrollBar2.setUnitIncrement(-1);
jScrollBar2.setBorder(BorderFactory.createRaisedBevelBorder());
txtValeurVS.addActionListener(new java.awt.event.ActionListener() {
public void actionPerformed(ActionEvent e) {
txtValeurVS_actionPerformed(e);
}
});
......
}
/**Replaced, so we can get out when the window is closed*/
protected void processWindowEvent(WindowEvent e) {
...
}
void jScrollBar1_adjustmentValueChanged(AdjustmentEvent e) {
// the value of scrollbar 1 has changed
txtValeurHS.setText(""+jScrollBar1.getValue());
}
void jScrollBar2_adjustmentValueChanged(AdjustmentEvent e) {
// scrollbar 2 value has changed
txtValeurVS.setText(""+jScrollBar2.getValue());
}
void txtValeurHS_actionPerformed(ActionEvent e) {
// set the horizontal scrollbar value
setValeur(jScrollBar1,txtValeurHS);
}
void txtValeurVS_actionPerformed(ActionEvent e) {
// set the vertical scrollbar value
setValeur(jScrollBar2,txtValeurVS);
}
private void setValeur(JScrollBar jS, JTextField jT){
// sets the scrollbar value jS with the field text jT
int valeur=0;
try{
valeur=Integer.parseInt(jT.getText());
jS.setValue(valeur);
}
catch (Exception e){
// error is displayed
afficher(""+e);
}//try-catch
}//setValeur
void afficher(String message){
// displays a message in a box
JOptionPane.showMessageDialog(this,message,"Menus",JOptionPane.INFORMATION_MESSAGE);
}//display
}
以下是一个执行示例:
5.2.5.6. JTextArea 组件
JTextArea 组件是一个支持输入多行文本的组件,这与仅支持输入单行文本的 JTextField 组件不同。如果将该组件放置在可滚动容器(JScrollPane)中,便会形成一个可滚动的文本输入框。例如,在电子邮件应用程序中,用户通常会在 JTextArea 组件中输入待发送邮件的正文,这就是此类组件的应用场景。 标准方法包括:String getText() 用于获取文本区域的内容,setText(String text) 用于设置文本区域中的文本,以及 append(String text) 用于将文本追加到文本区域中已有的文本之后。请看以下应用程序:
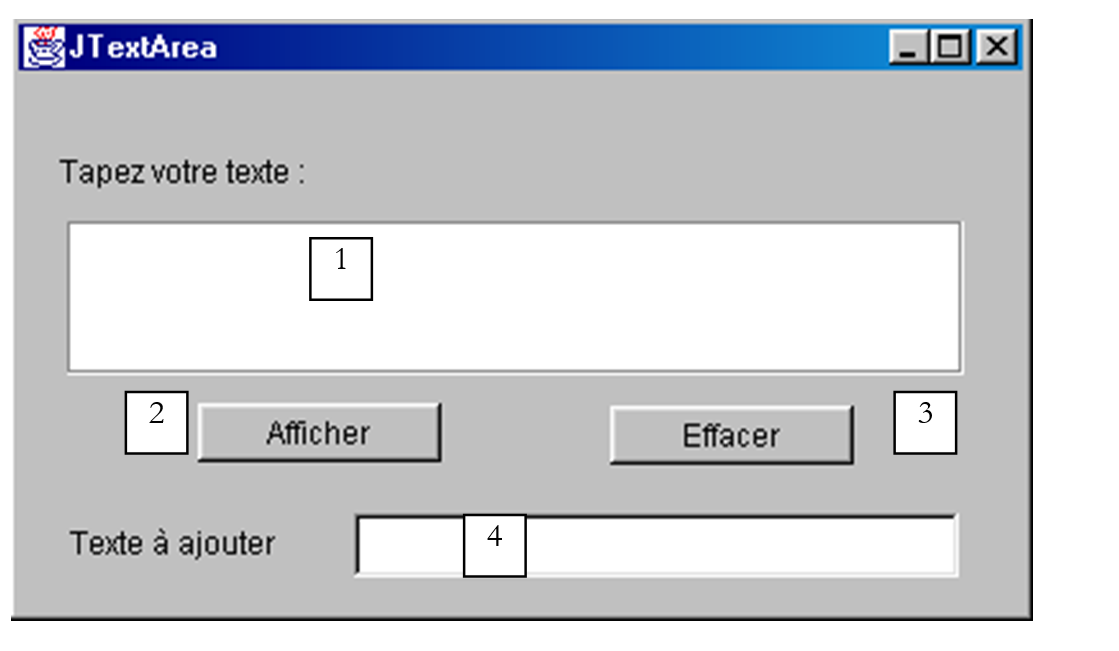
编号 | 类型 | 名称 | 角色 |
1 | JTextArea | txtText | 多行文本区域 |
2 | JButton | cmdDisplay | 在对话框中显示 1 的内容 |
3 | JButton | cmdClear | 清除 1 的内容 |
4 | JTextField | txtAdd | 在按下回车键进行验证时,将文本添加到 1 中的文本中。 |
5 | JScrollPane | jScrollPane1 | 可滚动容器,文本框 1 已放置其中以创建可滚动的文本框。 |
相关代码如下:
.....
public class cadreAppli extends JFrame {
JPanel contentPane;
JLabel jLabel1 = new JLabel();
JButton cmdAfficher = new JButton();
JScrollPane jScrollPane1 = new JScrollPane();
JTextArea txtTexte = new JTextArea();
JLabel jLabel2 = new JLabel();
JTextField txtAjout = new JTextField();
JButton cmdEffacer = new JButton();
/**Building the frame*/
public cadreAppli() {
enableEvents(AWTEvent.WINDOW_EVENT_MASK);
try {
jbInit();
}
catch(Exception e) {
e.printStackTrace();
}
}
/**Initialize component*/
private void jbInit() throws Exception {
cmdAfficher.addActionListener(new java.awt.event.ActionListener() {
public void actionPerformed(ActionEvent e) {
cmdAfficher_actionPerformed(e);
}
});
txtAjout.addActionListener(new java.awt.event.ActionListener() {
public void actionPerformed(ActionEvent e) {
txtAjout_actionPerformed(e);
}
});
cmdEffacer.addActionListener(new java.awt.event.ActionListener() {
public void actionPerformed(ActionEvent e) {
cmdEffacer_actionPerformed(e);
}
});
.......
jScrollPane1.getViewport().add(txtTexte, null);
}
/**Replaced, so we can get out when the window is closed*/
protected void processWindowEvent(WindowEvent e) {
........
}
void cmdAfficher_actionPerformed(ActionEvent e) {
// displays the contents of TextArea
afficher(txtTexte.getText());
}
void afficher(String message){
// displays a message in a box
JOptionPane.showMessageDialog(this,message,"Suivi",JOptionPane.INFORMATION_MESSAGE);
}// display
void cmdEffacer_actionPerformed(ActionEvent e) {
txtTexte.setText("");
}//cmdEffacer_actionPerformed
void txtAjout_actionPerformed(ActionEvent e) {
// add text
txtTexte.append(txtAjout.getText());
// raz addition
txtAjout.setText("");
}//
}
5.2.6. 鼠标事件
在容器中绘制图形时,了解鼠标位置非常重要,例如在点击时显示一个点。鼠标的移动会在其移动的容器中触发事件。以下是 JBuilder 为 JPanel 容器提供的事件示例:
mouseClicked | 鼠标点击 |
mouseDragged | 鼠标正在移动,左键被按下 |
鼠标进入 | 鼠标刚进入容器的区域 |
mouseExited | 鼠标刚离开容器区域 |
mouseMoved | 鼠标正在移动 |
mousePressed | 鼠标左键被按下 |
mouseReleased | 鼠标左键已释放 |
以下是一个程序,可帮助您更好地理解各种鼠标事件何时发生:
编号 | 类型 | 名称 | 角色 |
1 | JTextField | txtPosition | 用于在容器中显示鼠标位置(可能为 MouseMoved) |
2 | JList | lstDisplay | 用于显示除 MouseMoved 以外的鼠标事件 |
3 | JButton | cmdClear | 用于清除 2 的内容 |
运行此程序时,单击按钮将显示以下内容:

事件按列表从上到下的顺序堆叠。因此,上图的截图显示,一次点击会触发三个事件,顺序如下:
- 按下按钮时触发 MousePressed 事件
- 当按钮松开时触发 MouseReleased
- MouseClicked,这表示前两个事件的序列被视为一次点击。这可能是双击。但上文中的信息 clickCount=1 表明这是一次单击。
现在,如果你点击按钮,移动鼠标,然后松开按钮:
这里我们可以看到三个事件:
- MousePressed:当按钮最初被按下时
- MouseDragged:在按住按钮的同时移动鼠标时触发
- MouseReleased:当您松开按钮时
在上面的两个示例中,我们可以看到鼠标事件携带了各种信息,包括鼠标坐标(x,y),例如上文第一行中的 (408,65)。
如果继续这样分析,我们会发现,一旦鼠标离开容器或移至其某个组件上方,MouseExited 事件就会被触发。在后一种情况下,容器会收到 MouseExited 事件,而该组件会收到 MouseEntered 事件。当鼠标离开组件返回容器时,情况则会相反。
双击时会发生什么?
我们收到的事件与单击时完全相同。唯一的区别在于,该事件携带了 clickCount=2 的信息(见上文),这表明确实发生了双击。
该应用程序的相关代码如下:
public class Cadre1 extends JFrame {
JPanel contentPane;
JLabel jLabel1 = new JLabel();
JTextField txtPosition = new JTextField();
JScrollPane jScrollPane1 = new JScrollPane();
DefaultListModel valeurs=new DefaultListModel();
JList lstAffichage = new JList(valeurs);
JButton cmdEffacer = new JButton();
/**Building the frame*/
public Cadre1() {
enableEvents(AWTEvent.WINDOW_EVENT_MASK);
try {
jbInit();
}
catch(Exception e) {
e.printStackTrace();
}
}
/**Initialize component*/
private void jbInit() throws Exception {
contentPane.addMouseMotionListener(new java.awt.event.MouseMotionAdapter() {
public void mouseMoved(MouseEvent e) {
contentPane_mouseMoved(e);
}
public void mouseDragged(MouseEvent e) {
contentPane_mouseDragged(e);
}
});
contentPane.addMouseListener(new java.awt.event.MouseAdapter() {
public void mouseEntered(MouseEvent e) {
contentPane_mouseEntered(e);
}
public void mouseExited(MouseEvent e) {
contentPane_mouseExited(e);
}
public void mousePressed(MouseEvent e) {
contentPane_mousePressed(e);
}
public void mouseClicked(MouseEvent e) {
contentPane_mouseClicked(e);
}
public void mouseReleased(MouseEvent e) {
contentPane_mouseReleased(e);
}
});
cmdEffacer.addActionListener(new java.awt.event.ActionListener() {
public void actionPerformed(ActionEvent e) {
cmdEffacer_actionPerformed(e);
}
});
jScrollPane1.getViewport().add(lstAffichage, null);
...............
}
/**Replaced, so we can get out when the window is closed*/
protected void processWindowEvent(WindowEvent e) {
.........
}
void contentPane_mouseMoved(MouseEvent e) {
txtPosition.setText("("+e.getX()+","+e.getY()+")");
}
void contentPane_mouseDragged(MouseEvent e) {
afficher(e);
}
void contentPane_mouseEntered(MouseEvent e) {
afficher(e);
}
void afficher(MouseEvent e){
// displays the event in the lstAffichage list
valeurs.insertElementAt(e,0);
}
void contentPane_mouseExited(MouseEvent e) {
afficher(e);
}
void contentPane_mousePressed(MouseEvent e) {
afficher(e);
}
void contentPane_mouseClicked(MouseEvent e) {
afficher(e);
}
void contentPane_mouseReleased(MouseEvent e) {
afficher(e);
}
void cmdEffacer_actionPerformed(ActionEvent e) {
// deletes the list
valeurs.removeAllElements();
}
}
5.2.7. 创建带菜单的窗口
现在让我们看看如何使用 JBuilder 创建一个带有菜单的窗口。我们将创建以下窗口:
创建一个以空白窗口为起点的项目。从“Swing 容器”组件列表中,选择 JMenuBar 组件(见下图 1),并将其拖放到正在设计的窗口上。

设计窗口中没有显示任何内容,但 JMenuBar 组件出现在窗口的结构面板中:
双击上方的 jMenuBar1 元素,即可在设计模式下访问菜单:
1 | 插入菜单项 |
2 | 插入分隔符 |
3 | 插入嵌套菜单 |
4 | 删除菜单项 |
5 | 禁用菜单项 |
6 | 复选框菜单项 |
7 | 切换单选按钮 |
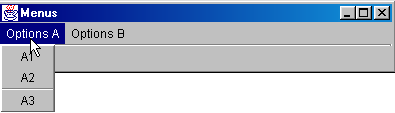
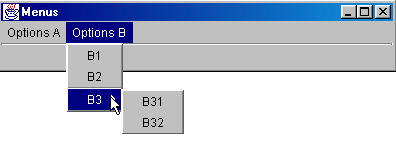
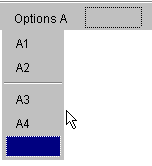
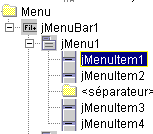
要创建第一个菜单项,请在上面的框 A 中输入“选项 A”,然后在下方按以下顺序输入:A1、A2、分隔符、A3、A4。
然后在其旁边:
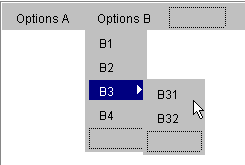
使用工具 3 来标明 B3 是一个嵌套子菜单。
随着菜单的设计,窗口的逻辑结构也在不断演变:

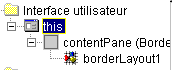
如果现在运行应用程序,我们会看到一个没有菜单的空窗口。我们需要将创建的菜单与窗口关联起来。为此,在窗口结构中,选择“this”对象:
随后,您将能够访问 this 的属性:
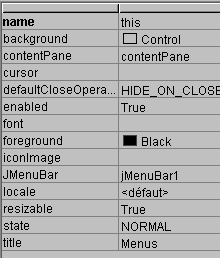
其中之一是 JMenuBar,它用于设置与该窗口关联的菜单。点击 JMenuBar 右侧的单元格。您创建的所有菜单都会显示出来。这里,我们只有 jMenuBar1。请选择它。
运行应用程序(F9):

现在我们有了一个菜单,但菜单选项目前还无法执行任何操作。菜单选项被视为组件:它们具有属性与事件。在菜单结构中,选择 jMenuItem1 选项:
现在您可以访问其属性和事件了:
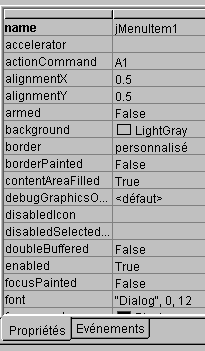
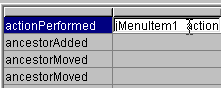
选择“事件”页面,并单击 actionPerformed 事件右侧的单元格:这是在您单击菜单项时触发的事件。系统默认提供了一个处理程序。双击该程序以查看其代码:
我们将编写以下简单代码:
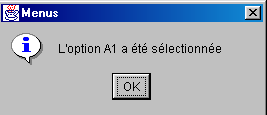
void jMenuItem1_actionPerformed(ActionEvent e) {
afficher("L'option A1 a été sélectionnée");
}
void afficher(String message){
// displays a message in a box
JOptionPane.showMessageDialog(this,message,"Menus",JOptionPane.INFORMATION_MESSAGE);
}//display
运行应用程序并选择选项 A1,将看到以下消息:
该应用程序的相关代码如下:
.....
public class Cadre1 extends JFrame {
  JPanel contentPane;
  BorderLayout borderLayout1 = new BorderLayout();
JMenuBar jMenuBar1 = new JMenuBar();
JMenu jMenu1 = new JMenu();
JMenuItem jMenuItem1 = new JMenuItem();
JMenuItem jMenuItem2 = new JMenuItem();
JMenuItem jMenuItem3 = new JMenuItem();
JMenuItem jMenuItem4 = new JMenuItem();
JMenu jMenu2 = new JMenu();
JMenuItem jMenuItem5 = new JMenuItem();
JMenuItem jMenuItem6 = new JMenuItem();
JMenu jMenu3 = new JMenu();
JMenuItem jMenuItem7 = new JMenuItem();
JMenuItem jMenuItem8 = new JMenuItem();
JMenuItem jMenuItem9 = new JMenuItem();
/**Building the frame*/
public Cadre1() {
enableEvents(AWTEvent.WINDOW_EVENT_MASK);
try {
jbInit();
}
catch(Exception e) {
e.printStackTrace();
}
}
/**Initialize component*/
private void jbInit() throws Exception {
// the window is associated with a menu
this.setJMenuBar(jMenuBar1);
jMenu1.setText("Options A");
jMenuItem1.setText("A1");
jMenuItem1.addActionListener(new java.awt.event.ActionListener() {
public void actionPerformed(ActionEvent e) {
jMenuItem1_actionPerformed(e);
}
});
jMenuItem2.setText("A2");
jMenuItem3.setText("A3");
jMenuItem4.setText("A4");
jMenu2.setText("Options B");
jMenuItem5.setText("B1");
jMenuItem6.setText("B2");
jMenu3.setText("B3");
jMenuItem7.setText("B31");
jMenuItem8.setText("B32");
jMenuItem9.setText("B4");
jMenuBar1.add(jMenu1);
jMenuBar1.add(jMenu2);
jMenu1.add(jMenuItem1);
jMenu1.add(jMenuItem2);
jMenu1.addSeparator();
jMenu1.add(jMenuItem3);
jMenu1.add(jMenuItem4);
jMenu2.add(jMenuItem5);
jMenu2.add(jMenuItem6);
jMenu2.add(jMenu3);
jMenu2.add(jMenuItem9);
jMenu3.add(jMenuItem7);
jMenu3.add(jMenuItem8);
}
/**Replaced, so we can get out when the window is closed*/
protected void processWindowEvent(WindowEvent e) {
....
}
void jMenuItem1_actionPerformed(ActionEvent e) {
afficher("L'option A1 a été sélectionnée");
}
void afficher(String message){
// displays a message in a box
JOptionPane.showMessageDialog(this,message,"Menus",JOptionPane.INFORMATION_MESSAGE);
}//display
}
5.3. 对话框
5.3.1. 消息框
我们已经使用过 JOptionPane 类来显示消息。因此,以下代码:
import javax.swing.*;
public class dialog1 {
public static void main(String arg[]){
JOptionPane.showMessageDialog(null,"Un message","Titre de la boîte",JOptionPane.INFORMATION_MESSAGE);
}
}
显示以下对话框:
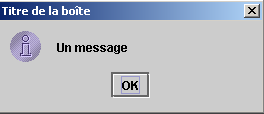
关闭此窗口后,它会消失,但其运行的执行线程并未停止。这种现象通常不会发生。在应用程序中使用对话框时,通常会在某个时刻使用 System.exit(n) 语句来停止所有线程。 在接下来的示例中,我们将牢记这一点,因为所有示例都基于相同的模型。在 DOS 环境中,可以通过 Ctrl-C 中断应用程序。在 JBuilder 中,请使用“运行/重置程序”选项(Ctrl-F2)。此外,此处 showMessageDialog 的第一个参数为 null。通常情况并非如此;通常应为 this,其中 this 指代应用程序的主窗口。
5.3.2. 外观与操作体验
上文中的对话框外观可能有所不同。您可以使用 javax.swing.UIManager 类来配置其外观。在评论 JBuilder 为我们的第一个窗口生成的代码时,我们曾遇到过一条未作详细说明的语句:
UIManager 类(UI 代表用户界面)的 setLookAndFeel 方法允许您设置图形界面的外观。UIManager 类提供了一个方法,可用于确定界面的各种可能“外观”:
static UIManager.LookAndFeelInfo[] | getInstalledLookAndFeels() |
该方法返回一个 LookAndFeelInfo 对象数组。该类有一个方法:
String | getClassName() |
该方法返回“实现”给定外观与感觉的类名。让我们尝试以下程序:
import javax.swing.*;
public class LookAndFeels {
// displays available looks and feels
public static void main(String[] args) {
// iste of installed look and feels
UIManager.LookAndFeelInfo[] lf=UIManager.getInstalledLookAndFeels();
// display
for(int i=0;i<lf.length;i++){
System.out.println(lf[i].getClassName());
}//for
}//hand
}//class
它会产生以下结果:
javax.swing.plaf.metal.MetalLookAndFeel
com.sun.java.swing.plaf.motif.MotifLookAndFeel
com.sun.java.swing.plaf.windows.WindowsLookAndFeel
因此,似乎有三种“不同的”“外观”。让我们重新审视我们的消息显示程序,尝试一下这些不同的外观:
import javax.swing.*;
public class LookAndFeel2 {
// displays available looks and feels
public static void main(String[] args) {
// list of installed look and feels
UIManager.LookAndFeelInfo[] lf=UIManager.getInstalledLookAndFeels();
// display
for(int i=0;i<lf.length;i++){
// appearance manager
try{
UIManager.setLookAndFeel(lf[i].getClassName());
}catch(Exception ex){
System.err.println(ex.getMessage());
}//catch
// message
JOptionPane.showMessageDialog(null,"Un message",lf[i].getClassName(),JOptionPane.INFORMATION_MESSAGE);
}//for
}//hand
}//class
执行后会显示以下内容:
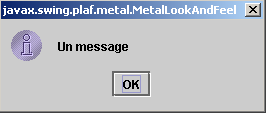 | 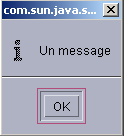 |  |
从右向左依次对应“主题”Metal、Pattern、Windows。
5.3.3. 确认框
JOptionPane 类提供了一个 showConfirmDialog 方法,用于显示带有“是”、“否”和“取消”按钮的确认对话框。showConfirmDialog 方法有多个重载版本。我们将探讨其中之一:
static int | showConfirmDialog(Component parentComponent, Object message, String title, int optionType) |
parentComponent | 对话框的父组件。通常为窗口,或值为 null |
message | 要显示的消息 |
标题 | 对话框的标题 |
optionType | JOptionPane.YES_NO_OPTION:是、否按钮 JOptionPane.YES_NO_CANCEL_OPTION:是、否、取消按钮 |
该方法返回的结果是:
JOptionPane.YES_OPTION | 用户点击了“是” |
JOptionPane.NO_OPTION | 用户点击了“否” |
JOptionPane.CANCEL_OPTION | 用户点击了“取消” |
JOptionPane.CLOSED_OPTION | 用户关闭了对话框 |
以下是一个示例:
import javax.swing.*;
public class confirm1 {
public static void main(String[] args) {
// displays confirmation boxes
int réponse;
affiche(JOptionPane.showConfirmDialog(null,"Voulez-vous continuer ?","Confirmation",JOptionPane.YES_NO_OPTION));
affiche(JOptionPane.showConfirmDialog(null,"Voulez-vous continuer ?","Confirmation",JOptionPane.YES_NO_CANCEL_OPTION));
}//hand
private static void affiche(int réponse){
// indicates the type of response
switch(réponse){
case JOptionPane.YES_OPTION :
System.out.println("Oui");
break;
case JOptionPane.NO_OPTION :
System.out.println("Non");
break;
case JOptionPane.CANCEL_OPTION :
System.out.println("Annuler");
break;
case JOptionPane.CLOSED_OPTION :
System.out.println("Fermeture");
break;
}//switch
}//poster
}//class
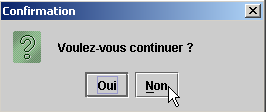 | 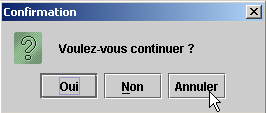 |
在控制台中,会显示“No”和“Cancel”这两条消息。
5.3.4. 输入框
JOptionPane 类还允许您使用 showInputDialog 方法输入数据。这里同样有几个重载方法。我们介绍其中之一:
static String | showInputDialog(Component parentComponent, Object message, String title, int messageType) |
这些参数与我们之前多次见到的相同。该方法返回用户输入的字符串。以下是一个示例:
import javax.swing.*;
public class input1 {
public static void main(String[] args) {
// input
System.out.println("Chaîne saisie ["+
JOptionPane.showInputDialog(null,"Quel est votre nom","Saisie du nom",JOptionPane.QUESTION_MESSAGE )
+ "]");
}//hand
}//class
输入对话框显示:
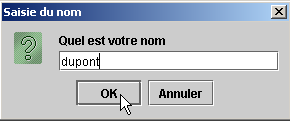
控制台输出:
5.4. 选择框
接下来,我们将探讨 Java 2 中的一些预定义文件选择对话框:
JFileChooser | 一个用于从文件树中选择文件的文件选择对话框 |
JColorChooser | 一个用于选择颜色的选择对话框 |
5.4.1. JFileChooser 选择对话框
我们将构建以下应用程序:
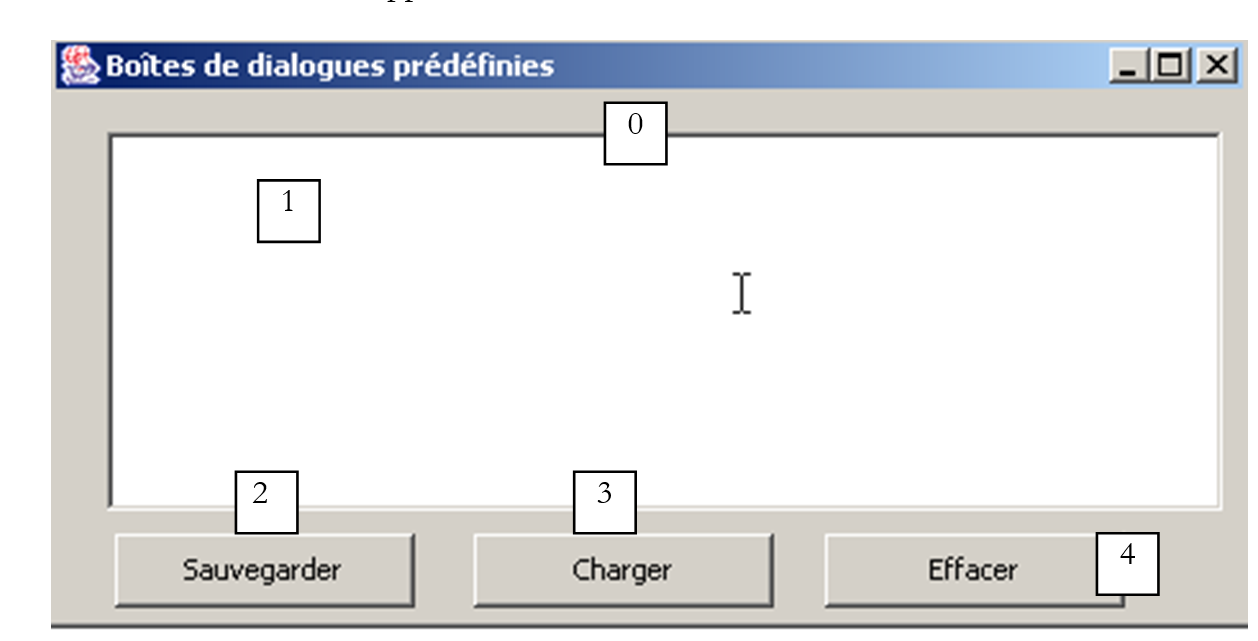
控件如下:
编号 | 类型 | 名称 | 角色 |
0 | JScrollPane | jScrollPane1 | 文本框 1 的可滚动容器 |
1 | JTextArea 本身位于 JScrollPane 内 | txtText | 用户输入或从文件加载的文本 |
2 | JButton | btnSave | 将 1 中的文本保存到文本文件中 |
3 | JButton | btnLoad | 允许您将文本文件的内容加载到 1 中 |
4 | JButton | btnClear | 清除 1 的内容 |
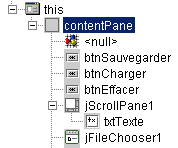
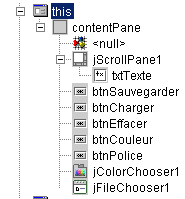
使用了一个非视觉控件:jFileChooser1。该控件是从 JBuilder Swing 容器调色板中选择的:

我们将该组件拖放到设计窗口中,但位于表单外部。它会出现在组件列表中:
现在我们将提供相关的程序代码以供概览:
import java.awt.*;
import java.awt.event.*;
import javax.swing.*;
import javax.swing.filechooser.FileFilter;
import java.io.*;
public class dialogues extends JFrame {
// frame components
JPanel contentPane;
JButton btnSauvegarder = new JButton();
JButton btnCharger = new JButton();
JButton btnEffacer = new JButton();
JScrollPane jScrollPane1 = new JScrollPane();
JTextArea txtTexte = new JTextArea();
JFileChooser jFileChooser1 = new JFileChooser();
// file filters
javax.swing.filechooser.FileFilter filtreTxt = null;
//Building the frame
public dialogues() {
enableEvents(AWTEvent.WINDOW_EVENT_MASK);
try {
jbInit();
// other initializations
moreInit();
}
catch(Exception e) {
e.printStackTrace();
}
}
// moreInit
private void moreInit(){
// window construction initializations
// filter *.txt
filtreTxt = new javax.swing.filechooser.FileFilter(){
public boolean accept(File f){
// do we accept f?
return f.getName().toLowerCase().endsWith(".txt");
}//accept
public String getDescription(){
// filter description
return "Fichiers Texte (*.txt)";
}//getDescription
};
// we add the filter
jFileChooser1.addChoosableFileFilter(filtreTxt);
// we also want to filter all files
jFileChooser1.setAcceptAllFileFilterUsed(true);
// set the start directory of the FileChooser box to the current directory
jFileChooser1.setCurrentDirectory(new File("."));
}
//Initialize component
private void jbInit() throws Exception {
.......................
}
//Replaced, so we can get out when the window is closed
protected void processWindowEvent(WindowEvent e) {
......................
}
}
void btnCharger_actionPerformed(ActionEvent e) {
// file selection using a JFileChooser object
// we set the initial filter
jFileChooser1.setFileFilter(filtreTxt);
// the selection box is displayed
int returnVal = jFileChooser1.showOpenDialog(this);
// did the user choose anything?
if(returnVal == JFileChooser.APPROVE_OPTION) {
// put the file in the text field
lireFichier(jFileChooser1.getSelectedFile());
}//if
}//btnCharger_actionPerformed
// lireFichier
private void lireFichier(File fichier){
// displays the contents of the text file file in the text field
// delete the text field
txtTexte.setText("");
// some data
BufferedReader IN=null;
String ligne=null;
try{
// open file in read mode
IN=new BufferedReader(new FileReader(fichier));
// read the file line by line
while((ligne=IN.readLine())!=null){
txtTexte.append(ligne+"\n");
}//while
// close file
IN.close();
}catch(Exception ex){
// an error has occurred
txtTexte.setText(""+ex);
}//catch
}
// delete
void btnEffacer_actionPerformed(ActionEvent e) {
// delete the text box
txtTexte.setText("");
}
// save
void btnSauvegarder_actionPerformed(ActionEvent e) {
// saves the contents of the text box to a file
// we set the initial filter
jFileChooser1.setFileFilter(filtreTxt);
// the backup selection box is displayed
int returnVal = jFileChooser1.showSaveDialog(this);
// did the user choose anything?
if(returnVal == JFileChooser.APPROVE_OPTION) {
// we write the contents of the text box to file
écrireFichier(jFileChooser1.getSelectedFile());
}//if
}
// lireFichier
private void écrireFichier(File fichier){
// writes the contents of the text box to file
// some data
PrintWriter PRN=null;
try{
// open file for writing
PRN=new PrintWriter(new FileWriter(fichier));
// write the contents of the text box
PRN.print(txtTexte.getText());
// close file
PRN.close();
}catch(Exception ex){
// an error has occurred
txtTexte.setText(""+ex);
}//catch
}
对于 btnEffacer_Click、lireFichier 和 écrireFichier 方法的代码,我们将不予评论,因为它们没有引入任何新内容。我们将重点关注 JFileChooser 类及其使用方法。该类比较复杂——有点“乱”。在此,我们仅使用以下方法:
addChoosableFilter(FileFilter) | 设置可供选择的文件类型 |
setAcceptAllFileFilterUsed(boolean) | 指定是否提供“所有文件”类型供选择 |
File getSelectedFile() | 用户选中的文件(File) |
int showSaveDialog() | 显示保存对话框的方法。返回 int 类型的结果。值 jFileChooser.APPROVE_OPTION 表示用户已做出有效选择。否则,表示用户已取消选择或发生错误。 |
setCurrentDirectory | 用于设置用户开始浏览文件系统的初始目录 |
setFileFilter(FileFilter) | 用于设置当前过滤器 |
showSaveDialog 方法会显示一个类似于以下所示的选择对话框:
1 | 使用 addChoosableFilter 方法构建的下拉列表。该列表包含所谓的“选择过滤器”,由 FileFilter 类表示。开发者需要自行定义这些过滤器并将其添加到列表中 1. |
2 | 当前目录,若曾调用 setCurrentDirectory 方法,则采用该方法设定的目录;否则,当前目录将默认设置为 Windows 系统中的“我的文档”文件夹或 Unix 系统中的主目录。 |
3 | 用户选定或直接输入的文件名。可通过 getSelectedFile() 方法获取 |
4 | “保存”/“取消”按钮。若点击“保存”按钮,showSaveDialog 方法将返回结果 jFileChooser.APPROVE_OPTION |
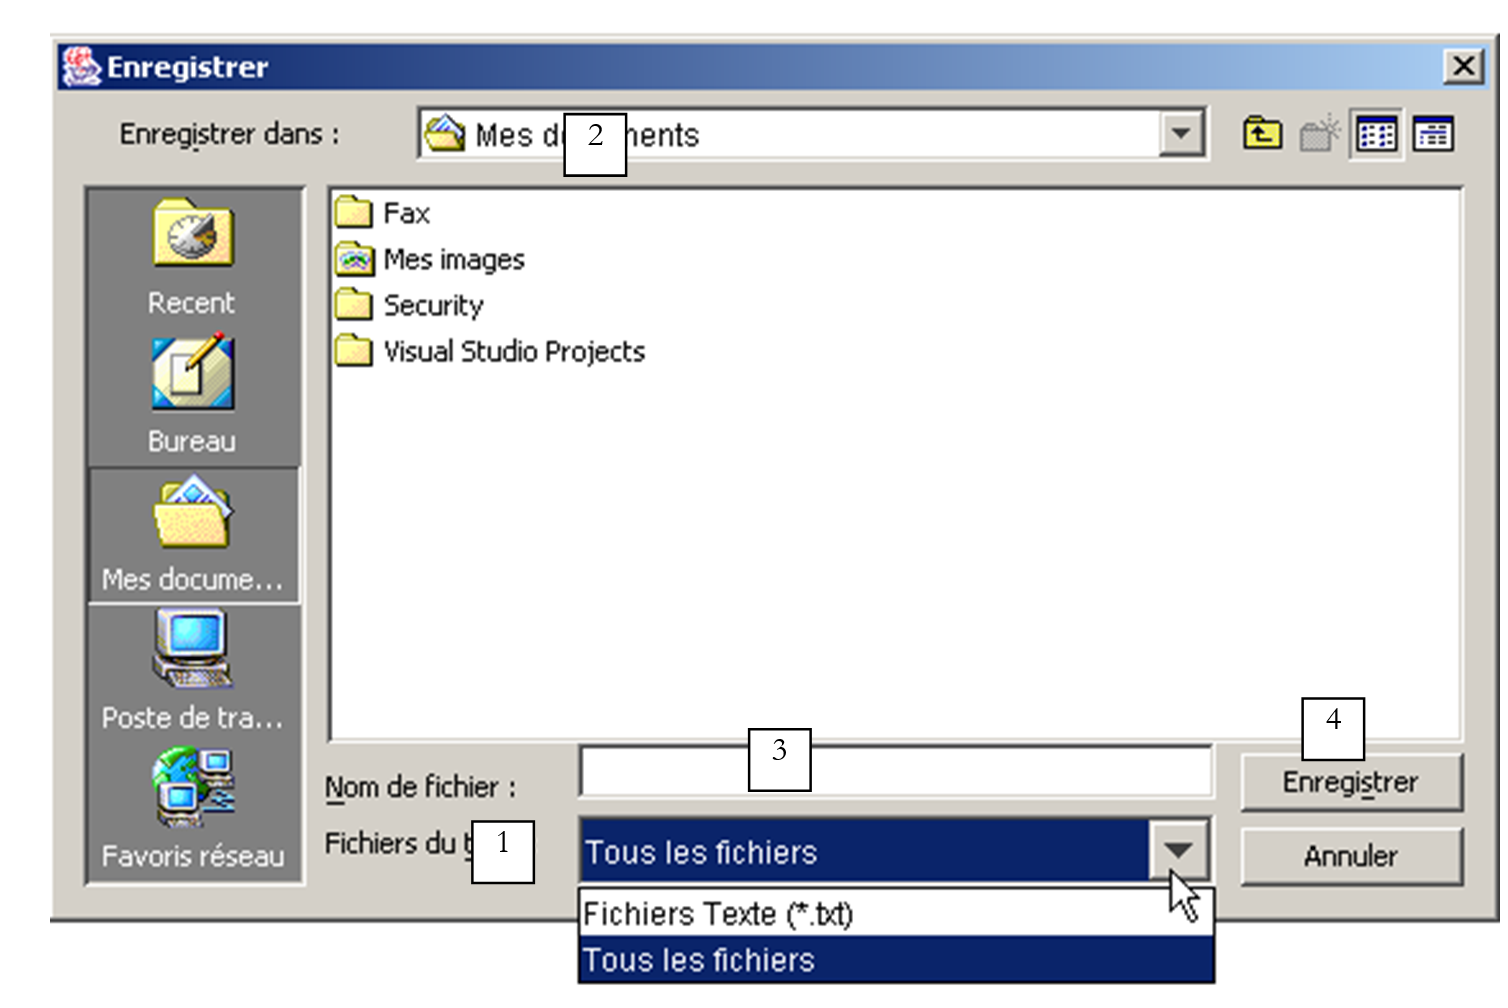
下拉列表 1 中的文件筛选器是如何构建的?这些筛选器是通过以下方法添加到列表 1 中的:
addChoosableFilter(FileFilter) | 该方法用于设置可供选择的文件类型 |
JFileChooser 类的。我们还需要了解 FileFilter 类。这实际上是 javax.swing.filechooser.FileFilter 类,它是一个抽象类——也就是说,该类无法被实例化,只能被继承。其定义如下:
FileFilter() | 构造函数 |
boolean accept(File) | 表示文件 f 是否符合过滤器条件 |
String getDescription() | 过滤器描述字符串 |
让我们举个例子。我们希望下拉列表 1 提供一个用于选择 *.txt 文件的过滤器,其描述为“文本文件 (*.txt)”。
- 我们需要创建一个从 FileFilter 类派生的类
- 使用布尔方法 accept(File f),如果文件 f 的名称以 .txt 结尾,则返回 true
- 使用 String getDescription() 方法将描述设置为“文本文件 (*.txt)”
该过滤器可在应用程序中按以下方式定义:
javax.swing.filechooser.FileFilter filtreTxt = new javax.swing.filechooser.FileFilter(){
public boolean accept(File f){
// do we accept f?
return f.getName().toLowerCase().endsWith(".txt");
}//accept
public String getDescription(){
// filter description
return "Fichiers Texte (*.txt)";
}//getDescription
};
该过滤器将通过以下语句添加到 jFileChooser1 对象的过滤器列表中:
所有这些操作以及其他一些初始化工作都在 moreInit 方法中完成,该方法在窗口创建时执行(参见上方的完整程序)。“保存”按钮的代码如下:
void btnSauvegarder_actionPerformed(ActionEvent e) {
// saves the contents of the text box to a file
// we set the initial filter
jFileChooser1.setFileFilter(filtreTxt);
// the backup selection box is displayed
int returnVal = jFileChooser1.showSaveDialog(this);
// did the user choose anything?
if(returnVal == JFileChooser.APPROVE_OPTION) {
// we write the contents of the text box to file
écrireFichier(jFileChooser1.getSelectedFile());
}//if
}
操作顺序如下:
- 我们将活动筛选器设置为 *.txt,以便用户主要搜索此类文件。此外还存在“所有文件”筛选器,该筛选器是在 moreInit 过程 中添加的。因此我们共有两个筛选器。
- 文件选择对话框随即显示。此时控制权移交给用户,用户可通过该对话框从文件系统中选择文件。
- 当用户退出选择框时,我们会检查返回值以判断是否需要保存文本框。如果需要,则必须将其保存到通过 getSelectedFile 方法获取的文件中。
“加载”按钮相关的代码与“保存”按钮的代码非常相似。
void btnCharger_actionPerformed(ActionEvent e) {
// file selection using a JFileChooser object
// we set the initial filter
jFileChooser1.setFileFilter(filtreTxt);
// the selection box is displayed
int returnVal = jFileChooser1.showOpenDialog(this);
// did the user choose anything?
if(returnVal == JFileChooser.APPROVE_OPTION) {
// put the file in the text field
lireFichier(jFileChooser1.getSelectedFile());
}//if
}//btnCharger_actionPerformed
有两个区别:
- 为了显示文件选择对话框,我们使用 showOpenDialog 方法,而不是 showSaveDialog 方法。显示的对话框与 showSaveDialog 方法显示的对话框类似。
- 如果用户成功选择了文件,我们会调用 readFile 方法,而不是 writeFile 方法。
5.4.1.1. JColorChooser 和 JFontChooser 选择对话框
我们延续前面的示例,添加两个新按钮:
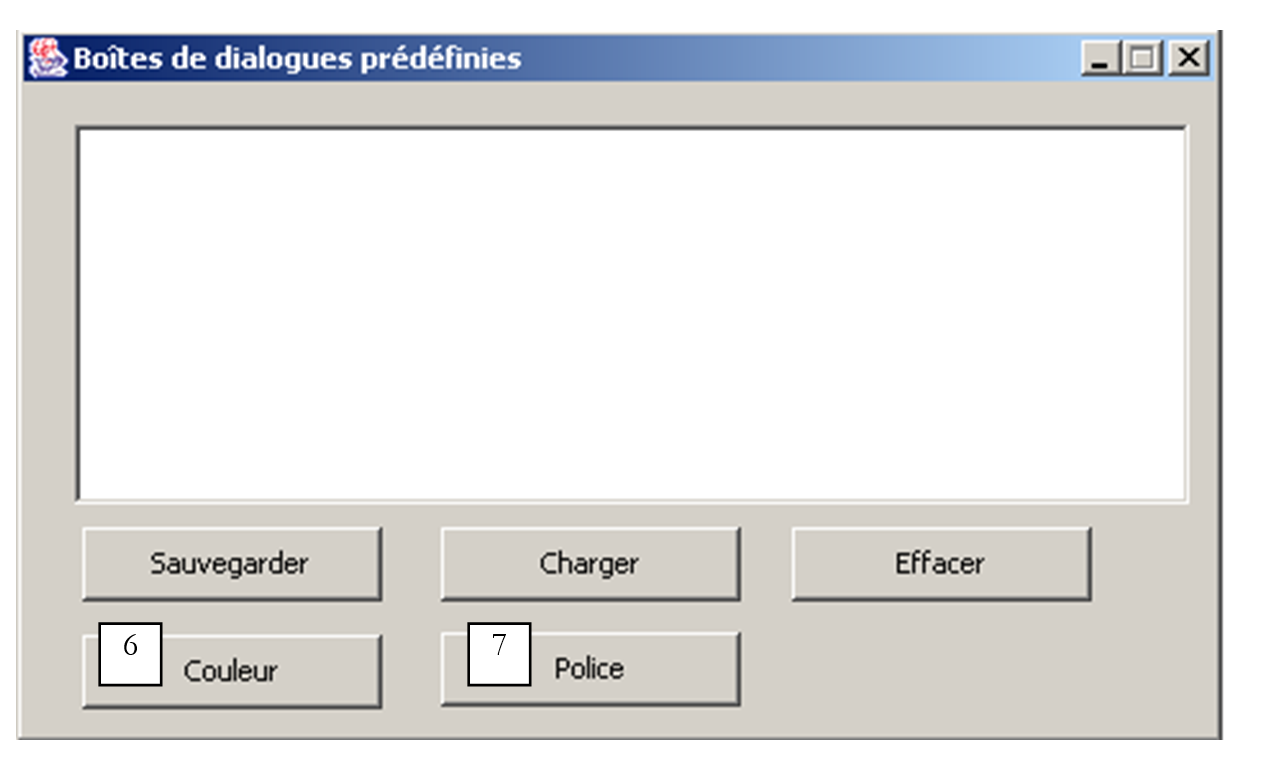
否 | 类型 | 名称 | 角色 |
6 | JButton | btnColor | 用于设置 TextBox 的文本颜色 |
7 | JButton | btnFont | 用于设置文本框的字体 |
JColorChooser 组件用于显示颜色选择对话框,可在 JBuilder 的 Swing 组件列表中找到:

我们将该组件拖放到设计窗口中,但位于表单外部。虽然它在表单中不可见,但仍然存在于窗口的组件列表中:
JColorChooser 类非常简单。我们使用 int 类型的 showDialog 方法来显示颜色选择对话框:
static Color | showDialog(Component component, String title, Color initialColor) |
Component component | 颜色选择器的父组件,通常是一个 JFrame 窗口 |
String title | 选择框标题栏中的标题 |
颜色 initialColor | 颜色选择器中最初选中的颜色 |
如果用户选择了颜色,该方法返回一个颜色;否则,返回 null。与“颜色”按钮关联的代码如下:
void btnCouleur_actionPerformed(ActionEvent e) {
// choice of text color using JColorChooser component
Color couleur;
if((couleur=jColorChooser1.showDialog(this,"Choix d'une couleur",Color.BLACK))!=null){
// set the color of the characters in the text box
txtTexte.setForeground(couleur);
}//if
}
Color 类定义在 java.awt.Color 中。该类中定义了各种常量,包括表示黑色的 Color.BLACK。显示的选择对话框如下所示
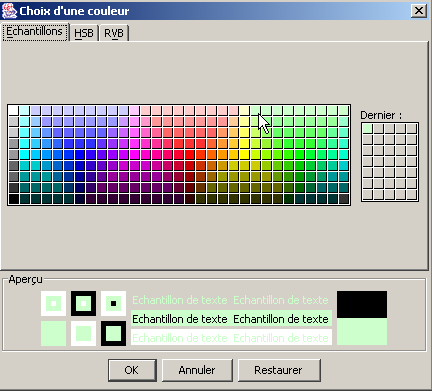
有趣的是,Swing 库并未提供用于选择字体的类。所幸,网上有现成的 Java 资源可用。通过搜索关键词“JFontChooser”(这似乎是此类类的合理名称),我们找到了几种选项。下面的示例将让我们有机会配置 JBuilder,使其使用初始设置中未包含的包。
检索到的包名为 swingextras.jar,已放置在 <jdk>\jre\lib\perso 文件夹中,其中 <jdk> 指 JBuilder 所用 JDK 的安装目录。该包也可以放置在其他任何位置。
 |  |
让我们来看看 SwingExtras.jar 包的内容:
它包含该包中所含组件的 Java 源代码。此外,还包含这些类本身:
从该归档文件中可以看出,JFontChooser 类的实际全名为 com.lamatek.swingextras.JFontChooser。如果您不想写全名,则需要在程序开头添加以下内容:
编译器和 Java 虚拟机将如何找到这个新包?对于直接使用 JDK 的情况,这已在前文说明,读者可在关于 Java 包的章节中查阅详情。在此,我们将详细介绍在 JBuilder 中使用的方法。包的配置位于“选项/配置 JDK”菜单中:
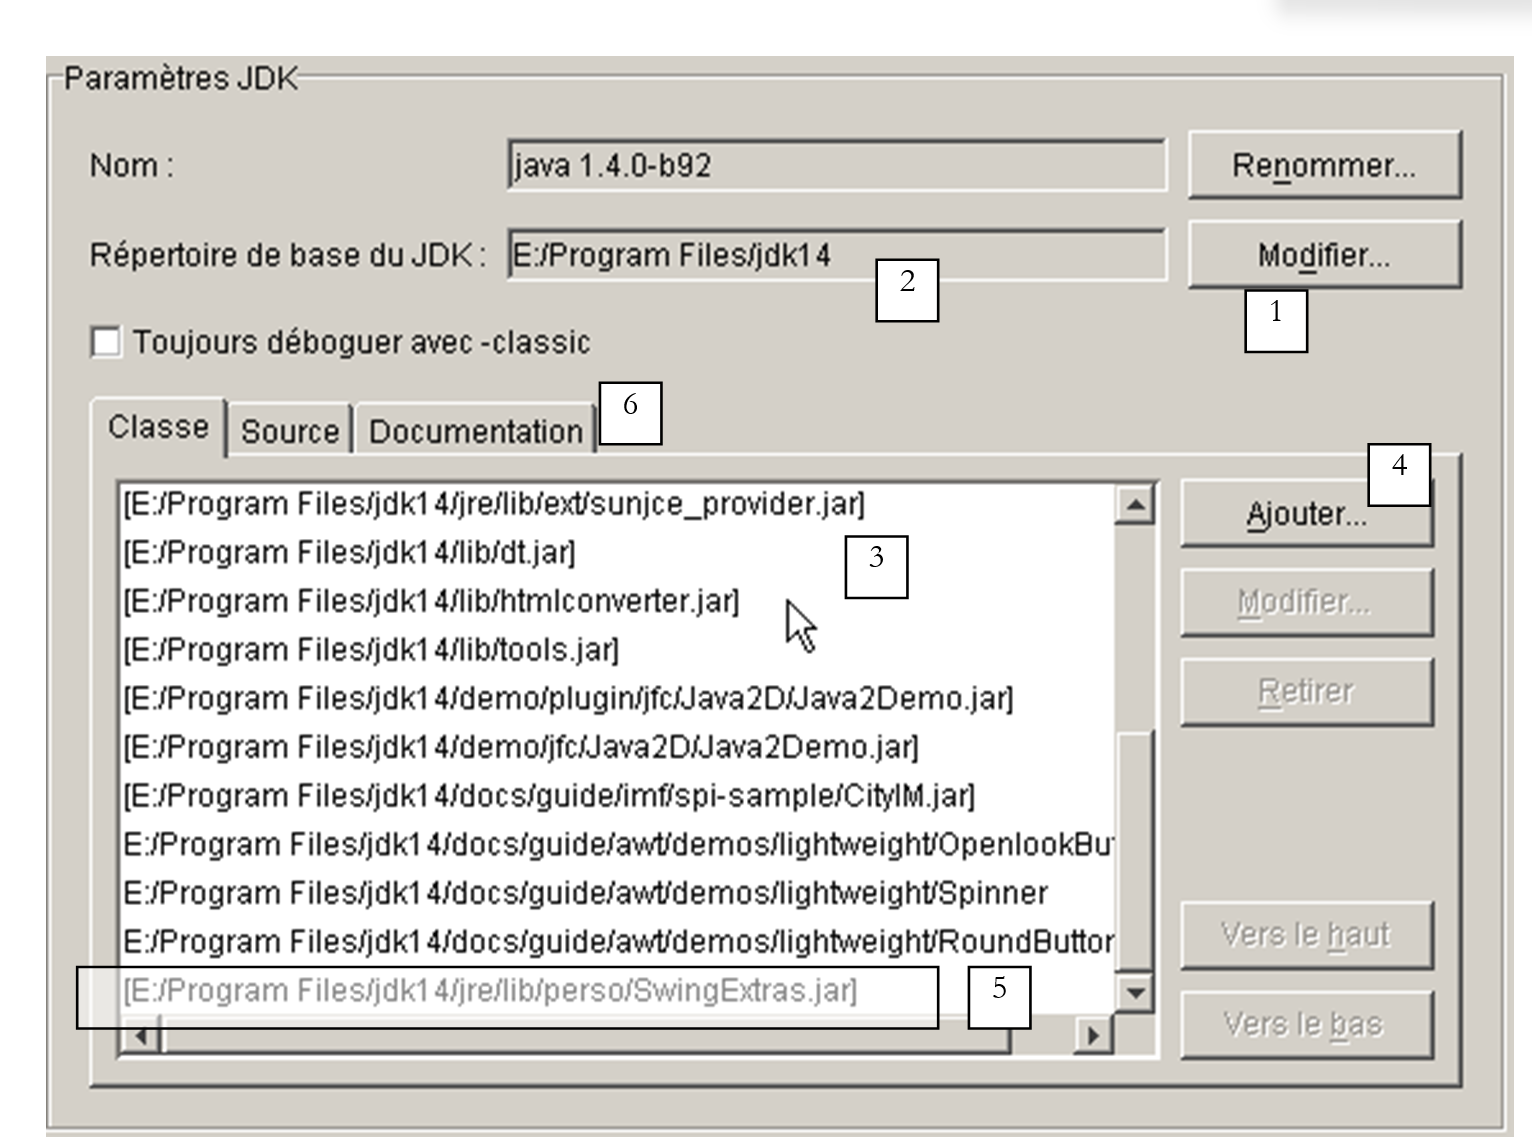
1 | “编辑”按钮 (1) 允许您告知 JBuilder 使用哪个 JDK。在此示例中,JBuilder 随附了 JDK 1.3.1。当 JDK 1.4 发布时,它是独立于 JBuilder 安装的,我们通过“编辑”按钮指定其安装目录,从而告知 JBuilder 从现在起使用 JDK 1.4 |
2 | JBuilder当前使用的JDK的基目录 |
3 | JBuilder 使用的 Java 归档文件 (.jar) 列表。您可以通过“添加”按钮 (4) 添加更多文件 |
4 | “添加”按钮 (4) 允许您添加新的包,JBuilder 将使用这些包进行程序的编译和运行。此处我们使用该按钮添加了 SwingExtras.jar 包 (5) |
现在,JBuilder 已正确配置为使用 JFontChooser 类。但是,我们需要访问该类的定义才能正确使用它。swingextras.jar 归档文件中包含一些 HTML 文件,可以将其提取出来使用。但这其实没有必要。JBuilder 可以直接访问 .jar 文件中包含的 Java 文档。要做到这一点,请配置上方的“文档”选项卡 (6)。随后会出现以下新窗口:
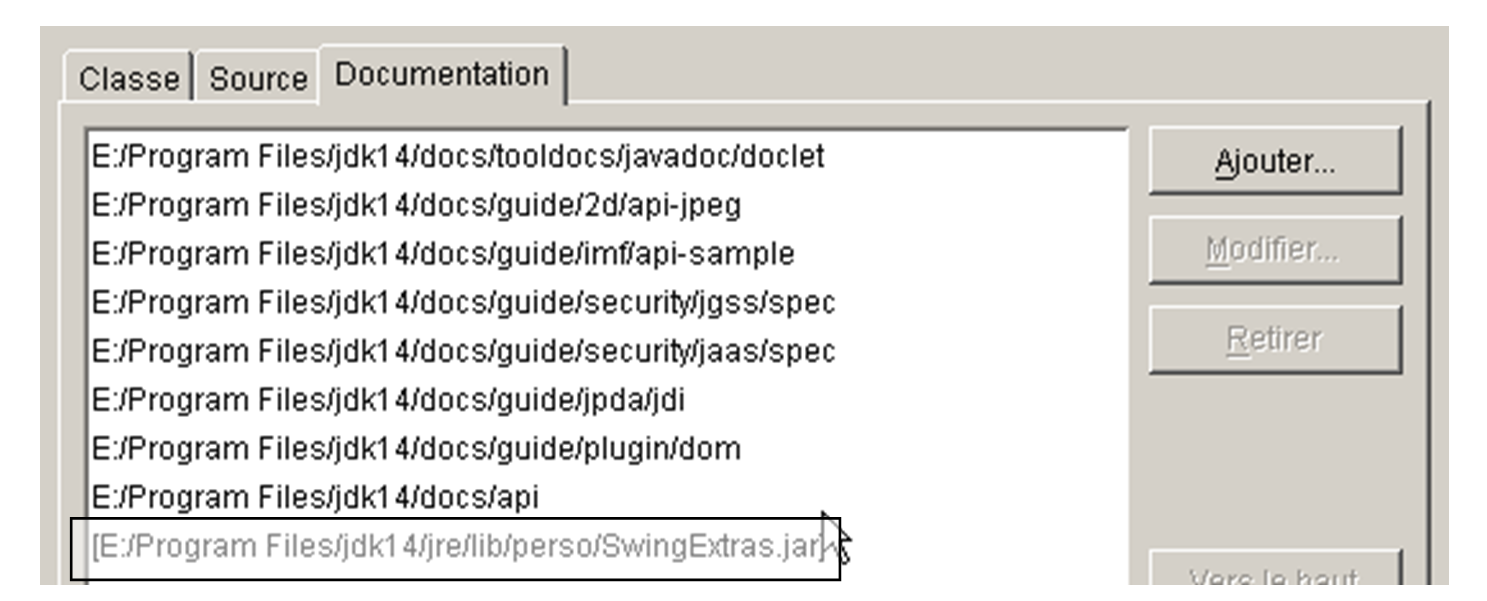
通过“添加”按钮,我们可以指定对 SwingExtras.jar 文件进行文档扫描。完成此操作后,我们可以看到确实可以访问 SwingExtras.jar 的文档。这带来了以下几个好处:
- 如果您开始输入 import 语句
你会发现 JBuilder 提供了帮助:

已成功找到 com.lamatek 包。
- 现在,在以下程序中:
如果你在关键字 JFontChooser 上按 F1 键,你会看到该类的帮助信息:
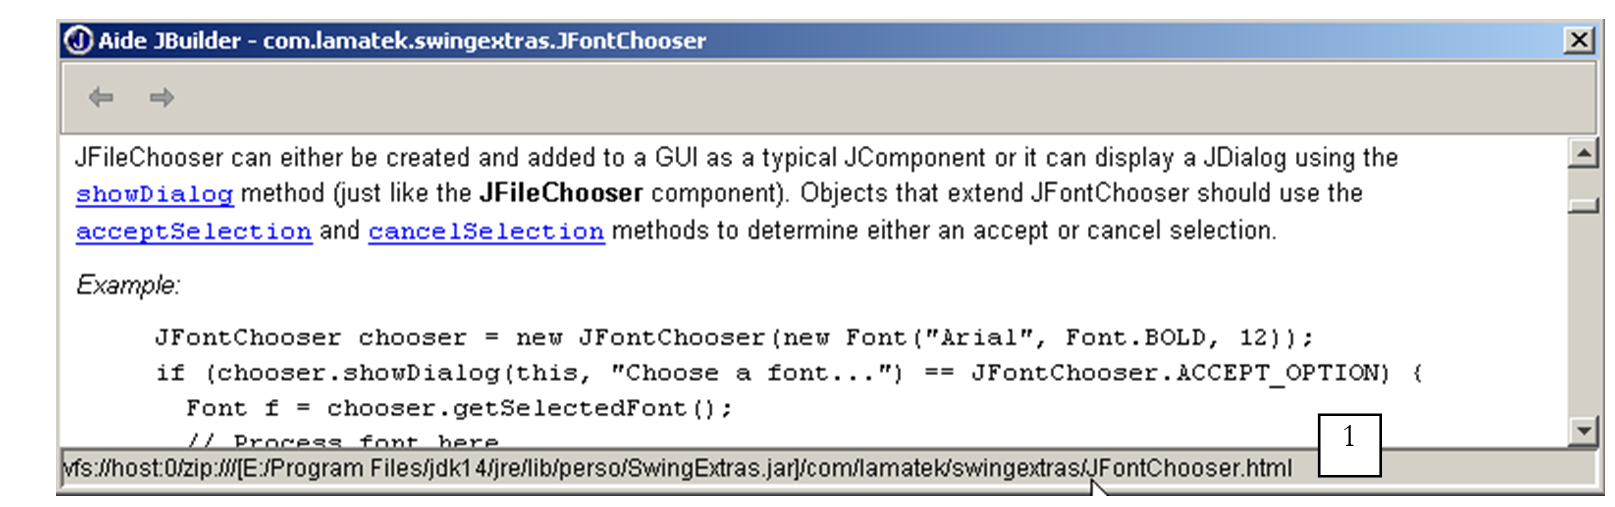
从状态栏 1 中可以看出,确实正在使用来自 swingextras.jar 包的一个 HTML 文件。上面的示例已经足够清晰,足以让我们为应用程序中的“字体”按钮编写代码:
void btnPolice_actionPerformed(ActionEvent e) {
// choice of text font using JFontChooser component
jFontChooser1 = new JFontChooser(new Font("Arial", Font.BOLD, 12));
if (jFontChooser1.showDialog(this, "Choix d'une police") == JFontChooser.ACCEPT_OPTION) {
// change the font in the text box
txtTexte.setFont(jFontChooser1.getSelectedFont());
}//if
}
上面 showDialog 方法显示的选择对话框如下所示:
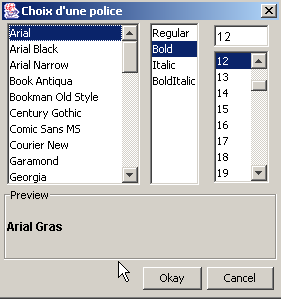
5.5. 税费计算图形化应用程序
我们回到 IMPOTS 应用程序,该应用程序我们已经讲解过两次。现在我们将为其添加一个图形用户界面:
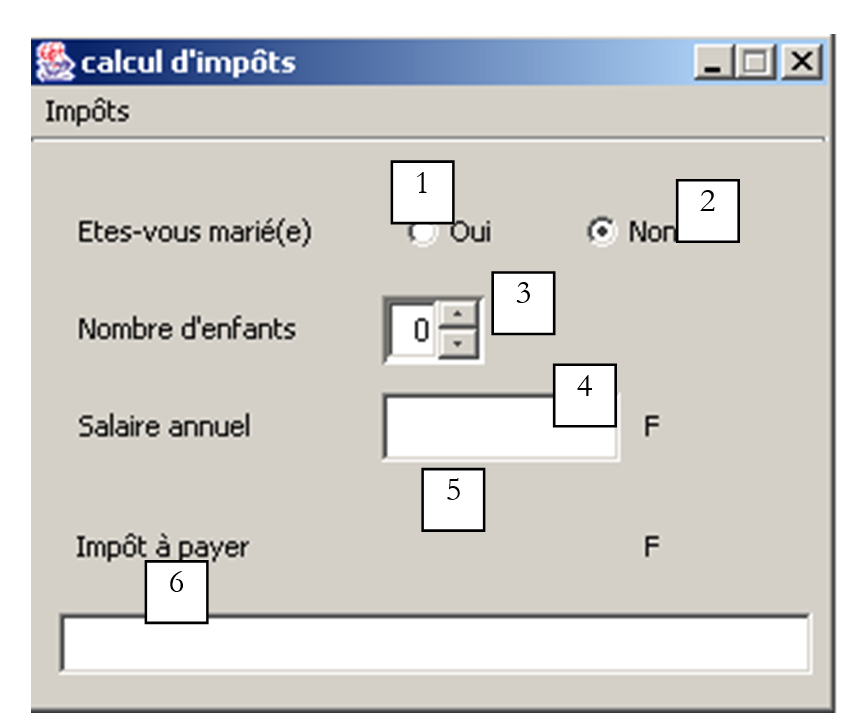
控件如下所示
编号 | 类型 | 名称 | 角色 |
1 | JRadioButton | rdYes | 已婚时勾选 |
2 | JRadioButton | rdNo | 未婚时选中 |
3 | JSpinner | spinChildren | 纳税人子女的数量 最小值=0,最大值=20,增量=1 |
4 | JTextField | txtSalary | 纳税人年薪(法郎) |
5 | JLabel | lblTaxes | 应缴税额 |
6 | JTextField | txtStatus | 状态消息字段 - 不可编辑 |
菜单如下:
主选项 | 次要选项 | 名称 | 角色 |
税费 | |||
初始化 | mnuInitialize | 从文本文件中加载计算所需的数据 | |
计算 | mnuCalculate | 在所有必要数据齐全且正确的情况下,计算应缴税款 | |
清除 | mnuClear | 将表单重置为初始状态 | |
退出 | mnuExit | 关闭应用程序 |
操作规则
- 只要薪资字段为空,“计算”菜单将保持禁用状态
- 如果在运行计算时,发现薪资有误,系统将报告错误:
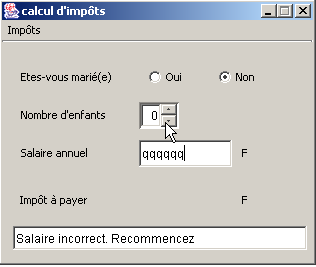
程序如下所示。它使用了在“类”一章中创建的 *impots* 类。此处未复制 JBuilder 自动生成的部分代码。
import java.awt.*;
import java.awt.event.*;
import javax.swing.*;
import javax.swing.filechooser.FileFilter;
import java.io.*;
import java.util.*;
import javax.swing.event.*;
public class frmImpots extends JFrame {
// window components
JPanel contentPane;
JMenuBar jMenuBar1 = new JMenuBar();
JMenu jMenu1 = new JMenu();
JMenuItem mnuInitialiser = new JMenuItem();
JMenuItem mnuCalculer = new JMenuItem();
JMenuItem mnuEffacer = new JMenuItem();
JMenuItem mnuQuitter = new JMenuItem();
JLabel jLabel1 = new JLabel();
JFileChooser jFileChooser1 = new JFileChooser();
JTextField txtStatus = new JTextField();
JRadioButton rdOui = new JRadioButton();
JRadioButton rdNon = new JRadioButton();
JLabel jLabel2 = new JLabel();
JLabel jLabel3 = new JLabel();
JTextField txtSalaire = new JTextField();
JLabel jLabel4 = new JLabel();
JLabel jLabel5 = new JLabel();
JLabel lblImpots = new JLabel();
JLabel jLabel7 = new JLabel();
ButtonGroup buttonGroup1 = new ButtonGroup();
JSpinner spinEnfants=null;
FileFilter filtreTxt=null;
// class attributes
double[] limites=null;
double[] coeffr=null;
double[] coeffn=null;
impots objImpots=null;
//Building the frame
public frmImpots() {
enableEvents(AWTEvent.WINDOW_EVENT_MASK);
try {
jbInit();
}
catch(Exception e) {
e.printStackTrace();
}
// other initializations
moreInit();
}
// form initialization
private void moreInit(){
// calculate menu disabled
mnuCalculer.setEnabled(false);
// inhibited input zones
txtSalaire.setEditable(false);
txtSalaire.setBackground(Color.WHITE);
// status field
txtStatus.setBackground(Color.WHITE);
// spinner Children - between 0 and 20 children
spinEnfants=new JSpinner(new SpinnerNumberModel(0,0,20,1));
spinEnfants.setBounds(new Rectangle(137,60,40,27));
contentPane.add(spinEnfants);
// filter *.txt for selection box
filtreTxt = new javax.swing.filechooser.FileFilter(){
public boolean accept(File f){
// do we accept f?
return f.getName().toLowerCase().endsWith(".txt");
}//accept
public String getDescription(){
// filter description
return "Fichiers Texte (*.txt)";
}//getDescription
};
// add the *.txt filter
jFileChooser1.addChoosableFileFilter(filtreTxt);
// we also want to filter all files
jFileChooser1.setAcceptAllFileFilterUsed(true);
// set the box's start directory FileChooser
jFileChooser1.setCurrentDirectory(new File("."));
}//moreInit
//Initialize component
private void jbInit() throws Exception {
................
}
//Replaced, so we can get out when the window is closed
protected void processWindowEvent(WindowEvent e) {
.....................
}
void mnuQuitter_actionPerformed(ActionEvent e) {
// quit the application
System.exit(0);
}
void mnuInitialiser_actionPerformed(ActionEvent e) {
// load the data file
// selected with the JFileChooser1 selection box
jFileChooser1.setFileFilter(filtreTxt);
if (jFileChooser1.showOpenDialog(this)!=JFileChooser.APPROVE_OPTION)
return;
// process the selected file
try{
// dATA READING
lireFichier(jFileChooser1.getSelectedFile());
// create impots object
objImpots=new impots(limites,coeffr,coeffn);
// confirmation
txtStatus.setText("Données chargées");
// salary can be modified
txtSalaire.setEditable(true);
// no more chgt possible
mnuInitialiser.setEnabled(false);
}catch(Exception ex){
// problem
txtStatus.setText("Erreur : " + ex.getMessage());
// end
return;
}//catch
}
private void lireFichier(File fichier) throws Exception {
// data tables
ArrayList aLimites=new ArrayList();
ArrayList aCoeffR=new ArrayList();
ArrayList aCoeffN=new ArrayList();
String[] champs=null;
// open file in read mode
BufferedReader IN=new BufferedReader(new FileReader(fichier));
// read the file line by line
// they are of the limit form coeffr coeffn
String ligne=null;
int numLigne=0; // line number courannte
while((ligne=IN.readLine())!=null){
// one more line
numLigne++;
// break down the line into fields
champs=ligne.split("\\s+");
// 3 fields?
if(champs.length!=3)
throw new Exception("ligne " + numLigne + "erronée dans fichier des données");
// we retrieve the three fields
aLimites.add(champs[0]);
aCoeffR.add(champs[1]);
aCoeffN.add(champs[2]);
}//while
// close file
IN.close();
// data transfer to bounded arrays
int n=aLimites.size();
limites=new double[n];
coeffr=new double[n];
coeffn=new double[n];
for(int i=0;i<n;i++){
limites[i]=Double.parseDouble((String)aLimites.get(i));
coeffr[i]=Double.parseDouble((String)aCoeffR.get(i));
coeffn[i]=Double.parseDouble((String)aCoeffN.get(i));
}//for
}
void mnuCalculer_actionPerformed(ActionEvent e) {
// tAX CALCULATION
// salary verification
int salaire=0;
try{
salaire=Integer.parseInt(txtSalaire.getText().trim());
if(salaire<0) throw new Exception();
}catch (Exception ex){
// error msg
txtStatus.setText("Salaire incorrect. Recommencez");
// focus on wrong field
txtSalaire.requestFocus();
// back to interface
return;
}
// no. of children
Integer InbEnfants=(Integer)spinEnfants.getValue();
// tAX CALCULATION
lblImpots.setText(""+objImpots.calculer(rdOui.isSelected(),InbEnfants.intValue(),salaire));
// delete status msg
txtStatus.setText("");
}
void txtSalaire_caretUpdate(CaretEvent e) {
// the salary has changed - update the calculate menu
mnuCalculer.setEnabled(! txtSalaire.getText().trim().equals(""));
}
void mnuEffacer_actionPerformed(ActionEvent e) {
// raz du formulaire
rdNon.setSelected(true);
spinEnfants.getModel().setValue(new Integer(0));
txtSalaire.setText("");
mnuCalculer.setEnabled(false);
lblImpots.setText("");
}
}
这里我们使用了一个仅从 JDK 1.4 开始才提供的组件——JSpinner。它是一个旋转选择器,在此示例中允许用户设置子节点的数量。在用于测试的 JBuilder 6 中,该 Swing 组件并未出现在 Swing 组件工具栏中。但这并不妨碍其使用,尽管操作起来比工具栏中已有的组件要稍微复杂一些。 实际上,您无法在设计时将 JSpinner 组件拖放到表单上。必须在运行时进行操作。让我们看看实现这一功能的代码:
// spinner Children - between 0 and 20 children
spinEnfants=new JSpinner(new SpinnerNumberModel(0,0,20,1));
spinEnfants.setBounds(new Rectangle(137,60,40,27));
contentPane.add(spinEnfants);
第一行创建了 JSpinner 组件。该组件可用于多种用途,而不仅仅是像这里这样作为整数旋转控件。JSpinner 构造函数的参数是一个数字旋转控件模型,该模型接受四个参数(value、min、max、increment)。该组件的结构如下:
![]()
value | 组件中显示的初始值 |
min | 组件中可显示的最小值 |
最大 | 组件中可显示的最大值 |
增量 | 使用组件的上下箭头时,显示值的增量 |
组件的值是通过其 getValue 方法获取的,该方法返回 Object 类型。因此,需要进行一些类型转换才能获得我们需要的整数:
// nbre d'enfants
Integer InbEnfants=(Integer)spinEnfants.getValue();
// calcul de l'impôt
lblImpots.setText(""+objImpots.calculer(rdOui.isSelected(),
InbEnfants.intValue(),salaire));
定义好 JSpinner 组件后,将其放置在窗口中:
首先,用户必须使用“初始化”菜单选项,该选项将通过构造函数创建一个税项对象
。请注意,该构造函数曾在“类”一章中作为示例进行过定义。如有需要,请参阅该章。构造函数所需的三个数组将从格式如下所示的文本文件中读取数据:
12620.0 | 0 | 0 |
13190 | 0.05 | 631 |
15,640 | 0.1 | 1,290.5 |
24,740 | 0.15 | 2,072.5 |
31,810 | 0.2 | 3,309.5 |
39,970 | 0.25 | 4900 |
48,360 | 0.3 | 6,898.5 |
55,790 | 0.35 | 9,316.5 |
92,970 | 0.4 | 12,106 |
127,860 | 0.45 | 16,754.5 |
151,250 | 0.50 | 23,147.5 |
172,040 | 0.55 | 30,710 |
195,000 | 0.60 | 39,312 |
0 | 0.65 | 49062 |
每行包含三个数字,数字之间至少有一个空格。该文本文件由用户通过 JFileChooser 组件选择。一旦创建了 *impots* 对象,剩下的就是让用户输入所需的三项信息:已婚与否、子女数量、年薪,然后调用 impots 类的 calculate 方法。该操作可以重复多次。 *impots* 对象本身仅在使用 *Initialize* 选项时创建一次。
5.6. 编写小程序
5.6.1. 简介
一旦编写了带有图形用户界面的应用程序,将其转换为 Applet 就相当简单。该程序存储在机器 A 上,可以通过网络由机器 B 上的 Web 浏览器下载。 因此,原始应用程序可在众多用户之间共享,这也是将应用程序转换为 Applet 的主要优势。然而,并非所有应用程序都能通过这种方式转换:为了避免给在浏览器中运行 Applet 的用户带来问题,Applet 环境受到限制:
- 小程序无法读取或写入用户的磁盘
- 它只能与浏览器下载该小程序的机器进行通信。
这些都是重大的限制。例如,这意味着需要从文件或数据库读取信息的应用程序,必须通过位于下载源服务器上的中继应用程序来请求这些信息。
一个简单 Web 应用程序的一般结构如下:
- 客户端通常通过浏览器向 Web 服务器请求一个 HTML 文档。该文档可能包含一个小程序,该小程序将在客户端浏览器显示的 HTML 文档中作为独立的图形应用程序运行。
- 该小程序可以访问数据,但仅限于位于 Web 服务器上的数据。它无法访问运行它的客户端机器上的资源,也无法访问网络中除下载源之外的其他机器上的资源。
5.6.2. JApplet 类
5.6.2.1. 定义
如果一个应用程序是 java.applet.Applet 类或 javax.swing.JApplet 类的实例,则可以通过 Web 浏览器下载该应用程序。 后者继承自前者,而前者又继承自 Panel 类,Panel 类则继承自 Container 类。由于 Applet 或 JApplet 实例属于 Container 类型,因此它可以包含按钮、复选框、列表等组件(Component)。以下是关于不同方法作用的一些说明:
方法 | 作用 |
public void destroy(); | 销毁 Applet 实例 |
public AppletContext getAppletContext(); | 获取 Applet 的执行上下文(包含其所在的 HTML 文档、同一文档中的其他 Applet 等) |
public String getAppletInfo(); | 返回一个包含 Applet 信息的字符串 |
public AudioClip getAudioClip(URL url); | 加载由 URL 指定的音频文件 |
public AudioClip getAudioClip(URL url, String name); | 加载由 URL/name 指定的音频文件 |
public URL getCodeBase(); | 返回小程序的 URL |
public URL getDocumentBase(); | 返回包含该小程序的 HTML 文档的 URL |
public Image getImage(URL url); | 获取由 URL 指定的图像 |
public Image getImage(URL url, String name); | 获取由 URL 和名称指定的图像 |
public String getParameter(String name); | 获取包含该小程序的 HTML 文档中 <applet> 标签所含的“name”参数的值。 |
public void init(); | 当小程序首次启动时,此方法由浏览器调用 |
public boolean isActive(); | 小程序状态 |
public void play(URL url); | 播放由 URL 指定的声音文件 |
public void play(URL url, String name); | 播放由 URL/name 指定的声音文件 |
public void resize(Dimension d); | 设置小程序框架的大小 |
public void resize(int width, int height); | 同上 |
public final void setStub(AppletStub stub); | |
public void showStatus(String msg); | 在小程序的状态栏中显示一条消息 |
public void start(); | 每次显示包含该小程序的文档时,浏览器都会调用此方法 |
public void stop(); | 当用户切换到其他文档(更改 URL)而放弃包含该 Applet 的文档时,浏览器会调用此方法 |
JApplet 类对 Applet 类进行了多项改进,最显著的是它能够包含 JMenuBar 组件(即菜单),而 Applet 类原本无法做到这一点。
5.6.2.2. 执行 Applet:init、start 和 stop 方法
当浏览器加载一个小程序时,它会调用该小程序的三个方法:
init | 当小程序首次加载时会调用此方法。因此,该方法应包含应用程序所需的初始化操作。 |
start | 当包含小程序的文档成为浏览器的当前文档时,会调用此方法。因此,当用户加载小程序时,init 和 start 方法将按此顺序执行。当用户离开该文档查看其他文档时,将执行 stop 方法。当用户稍后返回时,将执行 start 方法。 |
stop | 每当用户离开包含小程序的文档时,都会调用此方法。 |
对于许多小程序而言,仅需实现 init 方法即可。只有当应用程序启动了在后台并行且持续运行的任务(线程)时(通常用户并不知情),才需要 start 和 stop 方法。当用户离开文档时,应用程序的可见部分会消失,但这些后台任务仍会继续运行。这种情况通常是不必要的。 因此,我们利用浏览器对 stop 方法的调用来停止这些任务。如果用户返回文档,则利用浏览器对 start 方法的调用重新启动它们。
以一个在图形界面中包含时钟的小程序为例。该时钟由一个后台任务(线程)维护。当用户在浏览器中离开该小程序的页面时,继续运行时钟已无意义,因为它已不可见:因此,在小程序的 stop 方法中,我们将停止管理时钟的线程。 在 start 方法中,我们会重新启动该线程,这样当用户返回 Applet 页面时,看到的时钟显示就会是最新的。
5.6.3. 将图形应用程序转换为小程序
这里我们假设这种转换是可行的,即它符合 Applet 的执行限制。应用程序由其某个类的 *main* 方法启动:
此类应用程序可按以下方式转换为小程序:
import java.applet.JApplet;
…
public class application extends JApplet{
…
public void init(){
…
}
…
}// end of class
请注意以下几点:
- Application 类现在继承自 JApplet 类
- main 方法已被 init 方法取代。
作为示例,让我们重新回顾一个我们曾学习过的应用程序:列表管理。
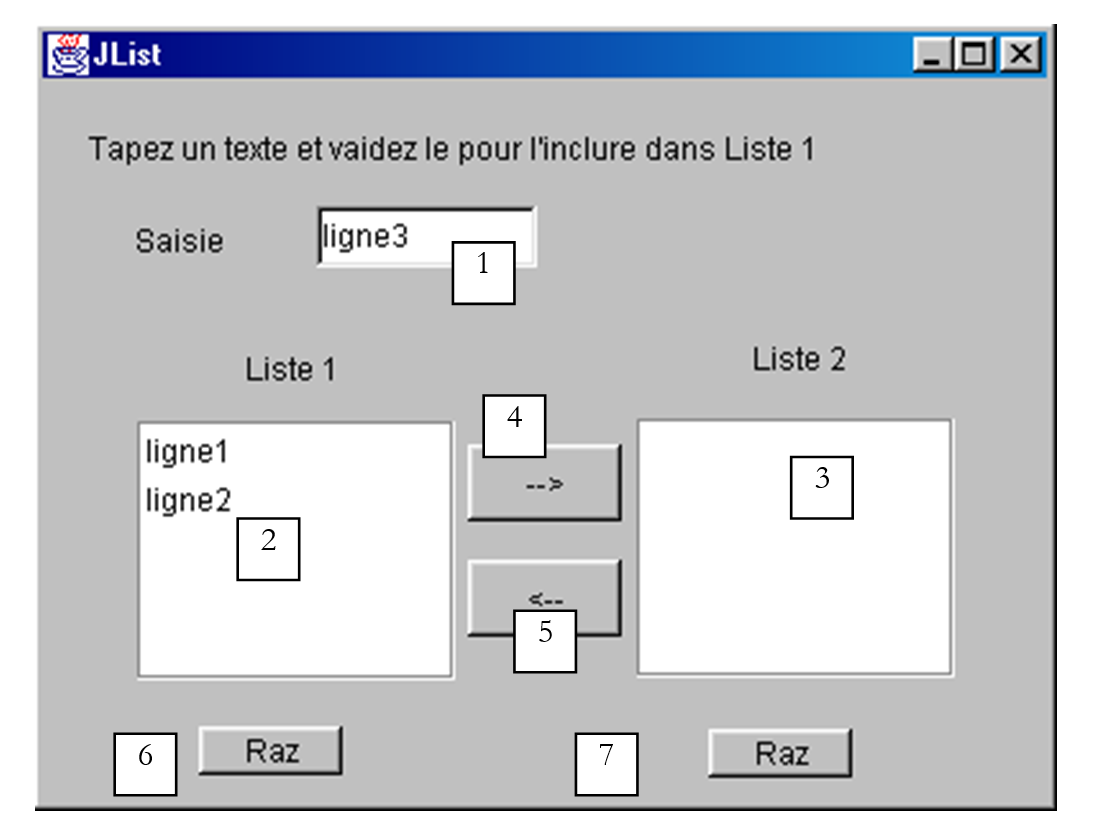
该窗口的组成部分如下:
编号 | 类型 | 名称 | 作用 |
1 | JTextField | txtInput | 输入字段 |
2 | JList | jList1 | 容器中的列表jScrollPane1 |
3 | JList | jList2 | 位于 jScrollPane2 容器中的列表 |
4 | JButton | cmd1To2 | 将列表 1 中选中的项目转移到列表 2 |
5 | JButton | cmd2To1 | 执行相反的操作 |
6 | JButton | cmdRaz1 | 清空列表 1 |
7 | JButton | cmdRaz2 | 清除列表 2 |
应用程序的框架如下:
public class interfaceAppli extends JFrame {
JPanel contentPane;
JLabel jLabel1 = new JLabel();
JLabel jLabel2 = new JLabel();
JLabel jLabel3 = new JLabel();
JTextField txtSaisie = new JTextField();
JButton cmd1To2 = new JButton();
JButton cmd2To1 = new JButton();
DefaultListModel v1=new DefaultListModel();
DefaultListModel v2=new DefaultListModel();
JList jList1 = new JList(v1);
JList jList2 = new JList(v2);
JScrollPane jScrollPane1 = new JScrollPane();
JScrollPane jScrollPane2 = new JScrollPane();
JButton cmdRaz1 = new JButton();
JButton cmdRaz2 = new JButton();
JLabel jLabel4 = new JLabel();
/**Building the frame*/
public interfaceAppli() {
enableEvents(AWTEvent.WINDOW_EVENT_MASK);
try {
jbInit();
}
catch(Exception e) {
e.printStackTrace();
}
}//interfaceAppli
/**Initialize component*/
private void jbInit() throws Exception {
...
txtSaisie.addActionListener(new java.awt.event.ActionListener() {
public void actionPerformed(ActionEvent e) {
txtSaisie_actionPerformed(e);
}
});
...
// Jlist1 is placed in the jScrollPane1 container
jScrollPane1.getViewport().add(jList1, null);
// Jlist2 is placed in the jScrollPane2 container
jScrollPane2.getViewport().add(jList2, null);
...
}
/**Replaced, so we can get out when the window is closed*/
protected void processWindowEvent(WindowEvent e) {
...
}
void txtSaisie_actionPerformed(ActionEvent e) {
.............
}//class
  void cmdRaz1_actionPerformed(ActionEvent e) {
    // empty list 1
    v1.removeAllElements();
  }//cmd Raz1

  void cmdRaz2_actionPerformed(ActionEvent e) {
    // empty list 2
    v2.removeAllElements();
  }///cmd Raz2
要将应用程序类转换为 Applet,请按以下步骤操作:
- 修改之前的 interfaceAppli 类,使其不再继承 JFrame,而是继承 JApplet:
- 删除设置 JFrame 窗口标题的语句。JApplet 没有标题栏
- 将构造函数改为 init 方法,并在该方法中移除窗口事件处理(WindowListener 等)。Applet 是一个无法调整大小或关闭的容器。
   /**Building the frame*/
  public init() {
    // enableEvents(AWTEvent.WINDOW_EVENT_MASK);
    try {
      jbInit();
    }
    catch(Exception e) {
      e.printStackTrace();
    }
  }//interfaceAppli
- 必须删除或注释掉 processWindowEvent 方法
   /**Replaced, so we can get out when the window is closed*/
  //protected void processWindowEvent(WindowEvent e) {
  //  super.processWindowEvent(e);
  //  if (e.getID() == WindowEvent.WINDOW_CLOSING) {
  //    System.exit(0);
  //  }
  // }
以下是完整的 Applet 代码,不包括由 JBuilder 自动生成的部分
import java.awt.*;
import java.awt.event.*;
import javax.swing.*;

public class interfaceAppli extends JApplet {
  JPanel contentPane;
  JLabel jLabel1 = new JLabel();
  JLabel jLabel2 = new JLabel();
  JLabel jLabel3 = new JLabel();
  JTextField txtSaisie = new JTextField();
  JButton cmd1To2 = new JButton();
  JButton cmd2To1 = new JButton();
  DefaultListModel v1=new DefaultListModel();
  DefaultListModel v2=new DefaultListModel();
  JList jList1 = new JList(v1);
  JList jList2 = new JList(v2);
  JScrollPane jScrollPane1 = new JScrollPane();
  JScrollPane jScrollPane2 = new JScrollPane();
  JButton cmdRaz1 = new JButton();
  JButton cmdRaz2 = new JButton();
  JLabel jLabel4 = new JLabel();

   /**Building the frame*/
  public void init() {
    // enableEvents(AWTEvent.WINDOW_EVENT_MASK);
    try {
      jbInit();
    }
    catch(Exception e) {
      e.printStackTrace();
    }
  }//interfaceAppli

   /**Initialize component*/
  private void jbInit() throws Exception  {
    //setIconImage(Toolkit.getDefaultToolkit().createImage(interfaceAppli.class.getResource("[Votre icône]")));
    contentPane = (JPanel) this.getContentPane();
    contentPane.setLayout(null);
    this.setSize(new Dimension(400, 308));
    // this.setTitle("JList");
    jScrollPane1.setBounds(new Rectangle(37, 133, 124, 101));
    jScrollPane2.setBounds(new Rectangle(232, 132, 124, 101));
.............
  }

  void txtSaisie_actionPerformed(ActionEvent e) {
     // the input text has been validated
     // we recover it free of its start and end spaces
    String texte=txtSaisie.getText().trim();
     // if it's empty, we don't want it
    if(texte.equals("")){
      // error msg
      JOptionPane.showMessageDialog(this,"Vous devez taper un texte",
        "Erreur",JOptionPane.WARNING_MESSAGE);
      // end
      return;
    }//if
    // if it is not empty, it is added to the values in list 1
    v1.addElement(texte);
     // and empty the input field
    txtSaisie.setText("");
  }

  void cmd1To2_actionPerformed(ActionEvent e) {
    // transfer items selected in list 1 to list 2
    transfert(jList1,jList2);
  }//cmd1To2

  private void transfert(JList L1, JList L2){
      // transfer items selected in list 1 to list 2
       // retrieve the array of indices of the elements selected in L1
      int[] indices=L1.getSelectedIndices();
      // anything to do?
      if (indices.length==0) return;
      // we retrieve the values of L1
      DefaultListModel v1=(DefaultListModel)L1.getModel();
      // and L2
      DefaultListModel v2=(DefaultListModel)L2.getModel();
      for(int i=indices.length-1;i>=0;i--){
        // the values selected in L1 are added to L2
        v2.addElement(v1.elementAt(indices[i]));
        // l1 elements copied into L2 must be deleted from L1
        v1.removeElementAt(indices[i]);
      }//for
  }//transfer

  private void affiche(String message){
    // poster message
      JOptionPane.showMessageDialog(this,message,
        "Suivi",JOptionPane.INFORMATION_MESSAGE);
  }// poster

  void cmd2To1_actionPerformed(ActionEvent e) {
    // transfer selected items in jList2 to jList1
      transfert(jList2,jList1);
  }//cmd2TO1

  void cmdRaz1_actionPerformed(ActionEvent e) {
    // empty list 1
    v1.removeAllElements();
  }//cmd Raz1

  void cmdRaz2_actionPerformed(ActionEvent e) {
    // empty list 2
    v2.removeAllElements();
  }//cmd Raz2

}//class
您可以编译此小程序的源代码。这里,我们将使用 JDK 进行编译,而不使用 JBuilder。
E:\data\serge\Jbuilder\interfaces\JApplets\1>javac.bat interfaceAppli.java

E:\data\serge\Jbuilder\interfaces\JApplets\1>dir
12/06/2002  16:40                6 148 interfaceAppli.java
12/06/2002  16:41                  527 interfaceAppli$1.class
12/06/2002  16:41                  525 interfaceAppli$2.class
12/06/2002  16:41                  525 interfaceAppli$3.class
12/06/2002  16:41                  525 interfaceAppli$4.class
12/06/2002  16:41                  525 interfaceAppli$5.class
12/06/2002  16:41                4 759 interfaceAppli.class
可以使用 JDK 的 AppletViewer 程序(该程序允许运行小程序)或 Web 浏览器来测试该应用程序。为此,您必须创建一个名为 appli.htm 的 HTML 文档,其中将包含该小程序:
<html>
    <head>
        <title>listes swing</title>
    </head>
    <body>
        <applet
        code="interfaceAppli.class"
      width="400"
      height="300">
        </applet>
    </body>
</html>
这是一个标准的 HTML 文档,除了包含 applet 标签外。它使用了三个参数:
code="interfaceAppli.class" | 要加载以运行小程序的已编译 Java 类的名称 |
width="400" | 文档中 Applet 框架的宽度 |
height="300" | 文档中 Applet 框架的高度 |
创建 appli.htm 文件后,可以使用 JDK 中的 appletviewer 程序或 Web 浏览器加载该文件。在 DOS 窗口中,在包含 appli.htm 文件的文件夹内输入以下命令:
**appletviewer appli.htm**
此处假设包含 appletviewer.exe 可执行文件的目录已在 DOS 窗口的 PATH 环境变量中;否则,您需要指定 appletviewer.exe 可执行文件的完整路径。随后将出现以下窗口:
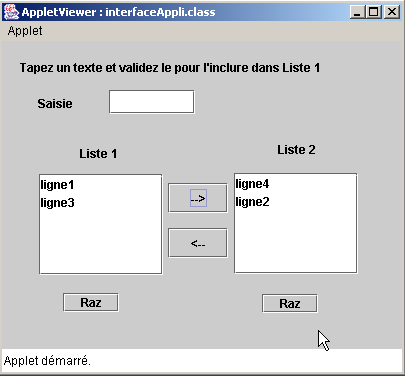
使用 Applet/Quit 选项停止小程序的执行。现在让我们使用浏览器测试该小程序。浏览器必须使用 Java 2 虚拟机来显示 Swing 组件。直到最近(2001 年),这一要求曾造成过问题,因为 Sun 发布的 JDK 未能被浏览器厂商及时采用。 最终,Sun 通过提供名为“Java 插件”的应用程序解决了这一问题,该插件使 Internet Explorer 和 Netscape Navigator 能够使用 Sun 发布的最新 JRE(JRE = Java 运行时环境)。以下测试是在安装了 Java 1.4 插件的 IE 5.5 浏览器上进行的。
测试 interfaceAppli.class 小程序的一种方法是双击 HTML 文件 appli.htm,将其直接加载到浏览器中。此时,浏览器无需 Web 服务器的协助,即可显示该 HTML 页面及其小程序:
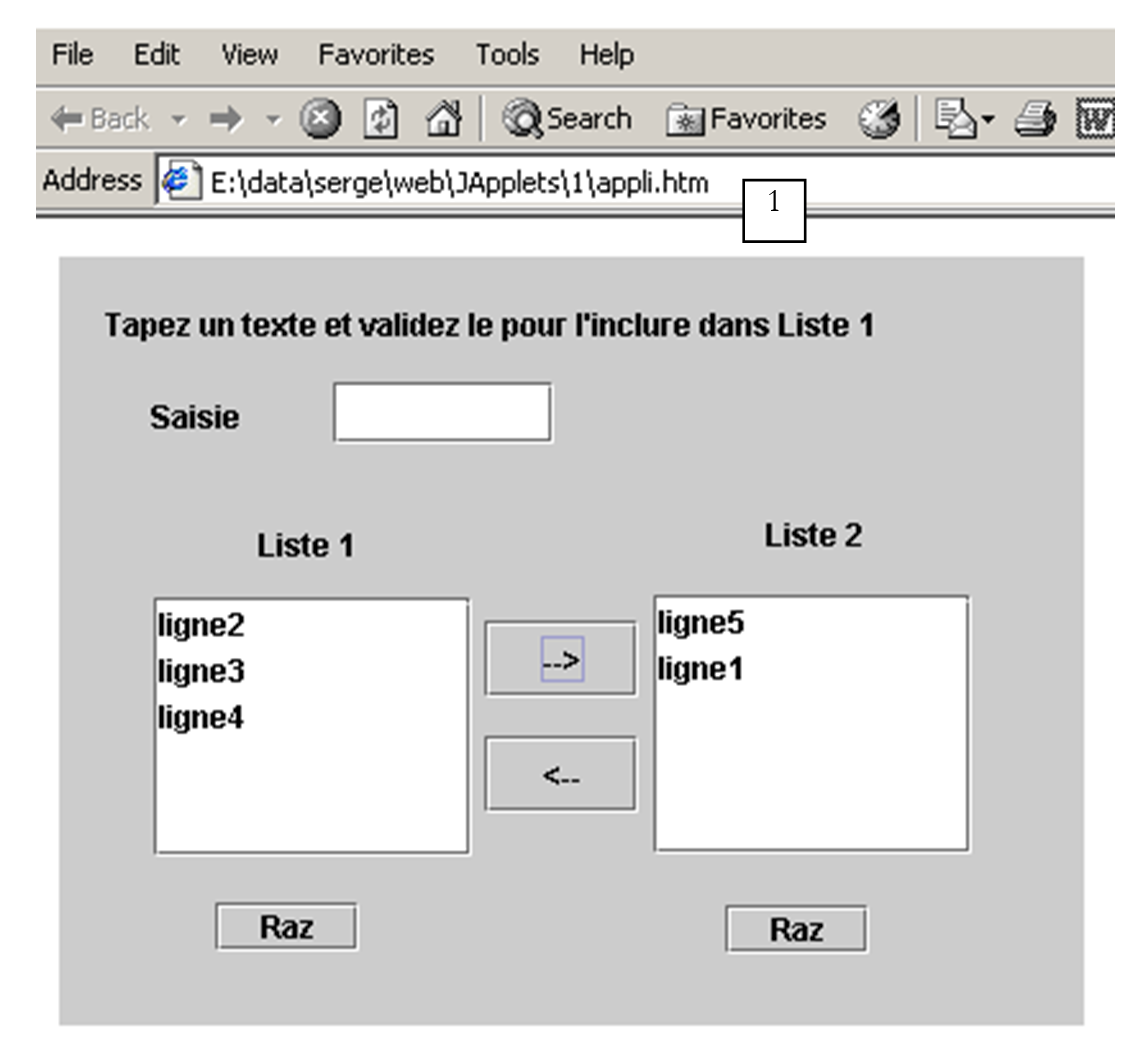
从 URL (1) 可见,该文件是直接加载到浏览器中的。在下面的示例中,appli.htm 文件是从运行在本地机器 81 端口的 Apache Web 服务器上请求的:
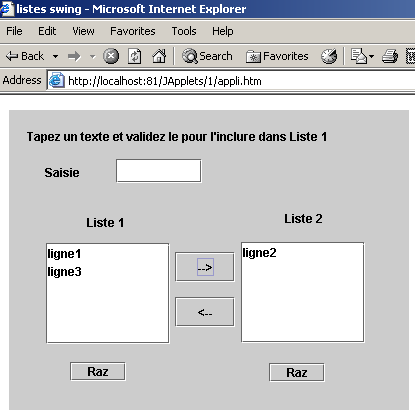
5.6.4. HTML 文档中的 <applet> 标签
我们已经看到,在 HTML 文档中,小程序通过 <applet> 标签进行引用。该标签可以具有多种属性:
<applet
    code=
    width=
    height=
    codebase=
    align=
    hspace=
    vspace=
alt=
>
    <param name1=nom1 value=val1>
    <param name2=nom2 value=val2>
    texte
>
</applet>
这些参数的含义如下:
参数 | 含义 |
code | 必填 - 要执行的 .class 文件名 |
宽度 | 必填 - 文档中 Applet 的宽度 |
高度 | 必填 - 高度 … |
codebase | 可选 - 包含待执行小程序的目录的 URL。如果未指定 codebase,则将在引用该小程序的 HTML 文档所在的目录中搜索该小程序 |
align | 可选 - 小程序在文档中的位置(LEFT、RIGHT、CENTER) |
hspace | 可选 - 小程序周围的水平间距,以像素为单位 |
vspace | 可选 - 小程序周围的垂直边距,以像素为单位 |
alt | 可选 - 如果浏览器无法加载小程序,则显示的替代文本 |
param | 可选 - 传递给小程序的参数,用于指定其名称(name)和值(value)。小程序可通过 val1=getParameter("name1") 获取参数 name1 的值 您可以使用任意数量的参数 |
text | 可选 - 将在无法执行小程序的浏览器中显示,例如因未安装 Java 虚拟机而无法执行的情况。 |
让我们通过一个示例来说明如何向小程序传递参数:
<html>
    <head>
        <title>paramètres applet</title>
    </head>
    <body>
        <applet code="interfaceParams.class" width="400" height="300">
      <param name="param1" value="val1">
      <param name="param2" value="val2">
        </applet>
    </body>
</html>
interfaceParams 小程序的 Java 代码是按照前面所述生成的。我们构建了一个 JBuilder 应用程序,然后进行了上述提到的几处修改:
import java.awt.*;
import java.awt.event.*;
import javax.swing.*;

public class interfaceParams extends JApplet {
  JPanel contentPane;
  JScrollPane jScrollPane1 = new JScrollPane();
  JLabel jLabel1 = new JLabel();
  DefaultListModel params=new DefaultListModel();
  JList lstParams = new JList(params);

  //Building the frame
  public void init() {
    // enableEvents(AWTEvent.WINDOW_EVENT_MASK);
    try {
      jbInit();
    }
    catch(Exception e) {
      e.printStackTrace();
    }
     // other initializations
    moreInit();
  }

   // initializations
  public void moreInit(){
     // displays applet parameter values
    params.addElement("nom=param1 valeur="+getParameter("param1"));
    params.addElement("nom=param2 valeur="+getParameter("param2"));
  }//more Init

   //Initialize component
  private void jbInit() throws Exception  {
............
    this.setSize(new Dimension(205, 156));
    //this.setTitle("Applet parameters");
    jScrollPane1.setBounds(new Rectangle(19, 53, 160, 73));
............
 }
}
使用 AppletViewer 运行:
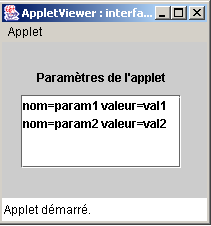
5.6.5. 从小程序访问远程资源
许多应用程序需要访问存储在文件或数据库中的信息。我们已经注意到,小程序无法访问其运行所在机器上的资源。这是一项常识性的安全措施。 否则,就可能有人编写出能“窥探”用户硬盘的小程序。不过,小程序确实可以访问其下载来源服务器的资源,例如文件。这就是我们接下来要探讨的内容。
5.6.5.1. URL 类
任何 Java 应用程序均可使用 java.net.URL 类(URL = 统一资源定位符)读取网络中某台机器上的文件。URL 通过以下形式标识网络资源、其所在的机器,以及用于检索该资源的协议和通信端口:
协议:端口//主机/文件
因此,URL http://www.ibm.com/index.html 指向位于 www.ibm.com 机器上的 index.html 文件。该文件可通过 HTTP 协议访问。端口未指定:浏览器将使用 80 端口,这是 HTTP 服务的默认端口。
让我们来仔细看看 URL 类中的某些元素:
public URL(String spec) | 根据“协议:端口//主机/文件”格式的字符串创建 URL 实例——如果字符串的语法不符合 URL 规范,则抛出异常 |
public String getFile() | 从 URL 中的 "protocol:port//machine/file" 字符串中获取文件字段 |
public String getHost() | 从 URL 的 "protocol:port//machine/file" 部分中提取 "machine" 字段 |
public String getPort() | 从 URL 字符串 "protocol:port//machine/file" 中获取 port 字段 |
public String getProtocol() | 从 URL 字符串 "protocol:port//machine/file" 中获取协议字段 |
public URLConnection openConnection() | 使用协议 getProtocol() 打开与远程机器 getHost() 上的端口 getPort() 的连接,以便读取文件 getFile()。如果无法打开连接,则抛出异常 |
public final InputStream openStream() | openConnection().getInputStream() 的快捷方式。获取一个输入流,用于读取 getFile() 返回的文件内容。若无法获取该流,则抛出异常 |
public String toString() | 显示 URL 实例的标识 |
这里有两个我们感兴趣的方法:
- public URL(String spec) 用于指定待处理的文件
- public final InputStream openStream() 用于处理该文件
5.6.5.2. 示例:一个控制台-
我们将编写一个不带图形用户界面的 Java 程序,用于在屏幕上显示作为参数传递给它的 URL 的内容。调用示例如下:
该程序相对简单:
import java.net.*;             // for the URL class
import java.io.*;                // for streams

public class urlcontenu{

// displays contents of URL passed as argument
// this content must be text to be ˆtre lisible

  public static void main (String arg[]){
    // argument verification
    if(arg.length==0){
      System.err.println("Syntaxe pg url");
      System.exit(0);
    }

    try{
      // creation of URL
      URL url=new URL(arg[0]);
      // content reading
      try{
        // input stream creation
        BufferedReader is=new BufferedReader(new InputStreamReader(url.openStream()));
        try{
          // read text lines in the input stream
          String ligne;
          while((ligne=is.readLine())!=null)
            System.out.println(ligne);
        } catch (Exception e){
            System.err.println("Erreur lecture : " +e);
        }
        finally{
          try { is.close(); } catch (Exception e) {}
        }
      } catch (Exception e){
          System.err.println("Erreur openStream : " +e);
      }
    } catch (Exception e){
      System.err.println("Erreur création URL : " +e);
    }
  }// fine hand
}// end of class
在确认确实存在参数后,我们尝试使用该参数创建一个 URL:
// création de l'URL
      URL url=new URL(arg[0]);
如果参数不符合 URL 语法规范(协议:端口//主机/文件),则此创建操作可能会失败。如果 URL 语法正确,我们将尝试创建一个输入流,以便从中读取文本行。URL 提供的输入流URL.openStream() 提供了一个 InputStream,这是一种基于字符的流:读取是按字符进行的,您必须自行组装成行。 要读取文本行,必须使用 BufferedReader 或 DataInputStream 类的 readLine 方法。此处我们选择了 BufferedReader。剩下的就是将 URL 的 InputStream 转换为 BufferedReader 流。这通过创建一个中间的 InputStreamReader 流来实现:
BufferedReader is=new BufferedReader(new InputStreamReader(url.openStream()));
此流的创建可能会失败。我们需要处理相应的异常。一旦获得流,剩下的就是从中读取文本行并将其显示在屏幕上。
            String ligne;
         while((ligne=is.readLine())!=null)
                System.out.println(ligne);
同样,读取操作可能会抛出异常,必须进行处理。以下是一个请求本地 URL 的程序运行示例:
E:\data\serge\Jbuilder\interfaces\JApplets\3>java urlcontenu http://localhost
<html>

<head>


<title>Bienvenue dans le Serveur Web personnel</title>
</head>

<body bgcolor="#FFFFFF" link="#0080FF" vlink="#0080FF"
topmargin="0" leftmargin="0">

<table border="0" cellpadding="0" cellspacing="0" width="100%"
bgcolor="#000000">
............
                </table>
                </center></div></td>
            </tr>
        </table>
        </td>
    </tr>
</table>
</body>
</html>
5.6.5.3. 图形用户界面的一个示例
图形界面将如下所示:
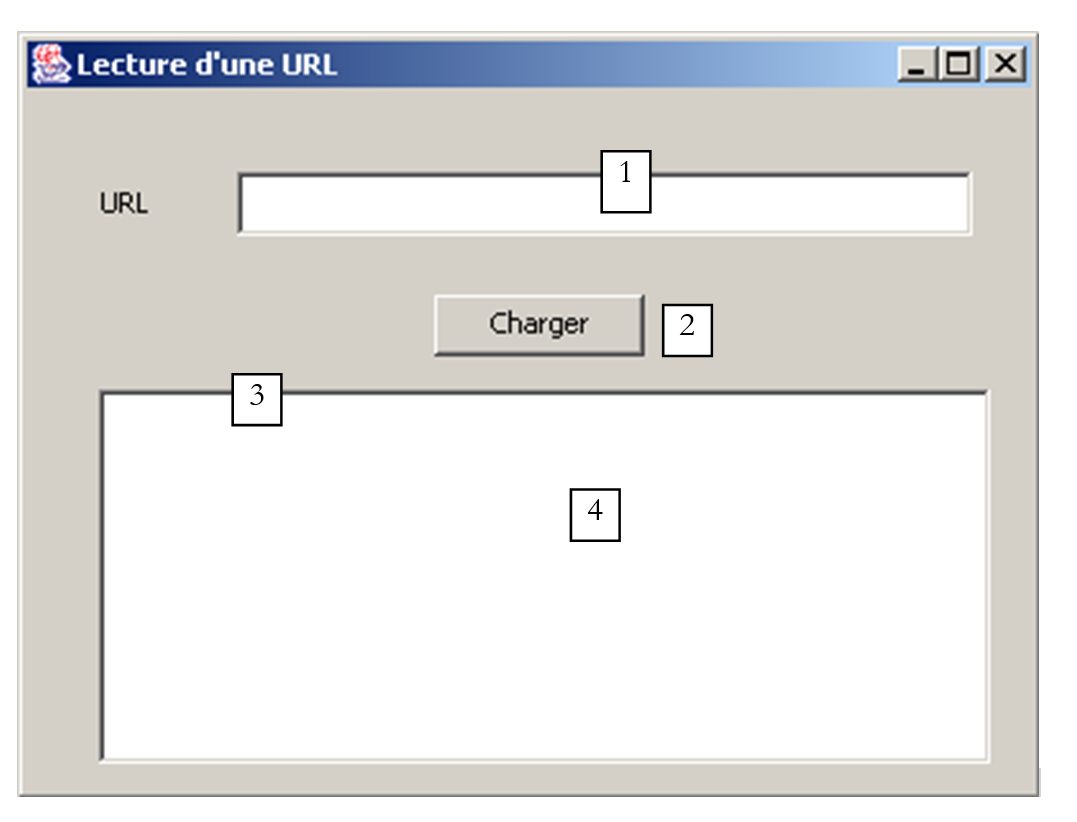
数字 | 名称 | 类型 | 角色 |
1 | txtURL | JTextField | 要读取的URL |
2 | btnLoad | JButton | 用于开始加载 URL 的按钮 |
3 | JScrollPane1 | JScrollPane | 可滚动面板 |
4 | lstURL | JList | 显示请求 URL 内容的列表 |
执行后,我们得到的结果与控制台程序类似:
该应用程序的相关代码如下:
import java.awt.*;
import java.awt.event.*;
import javax.swing.*;
import javax.swing.event.*;
import java.net.*;
import java.io.*;

public class interfaceURL extends JFrame {
  JPanel contentPane;
  JLabel jLabel1 = new JLabel();
  JTextField txtURL = new JTextField();
  JButton btnCharger = new JButton();
  JScrollPane jScrollPane1 = new JScrollPane();
  DefaultListModel lignes=new DefaultListModel();
  JList lstURL = new JList(lignes);

  //Building the frame
  public interfaceURL() {
..............
  }

   //Initialize component
  private void jbInit() throws Exception  {
..............
  }

   //Replaced, so we can get out when the window is closed
  protected void processWindowEvent(WindowEvent e) {
...................
  }

  void txtURL_caretUpdate(CaretEvent e) {
    // sets the state of the Load button
    btnCharger.setEnabled(! txtURL.getText().trim().equals(""));
  }

  void btnCharger_actionPerformed(ActionEvent e) {
    // displays contents of URL in list
    try{
      afficherURL(txtURL.getText().trim());
    }catch(Exception ex){
       // error display
      JOptionPane.showMessageDialog(this,"Erreur : " + ex.getMessage(),"Erreur",JOptionPane.ERROR_MESSAGE);
    }//try-catch
  }

  private void afficherURL(String strURL) throws Exception {
    // displays contents of URL strURL in list
     // no exceptions are handled specifically. They are simply reassembled

     // creation of URL
    URL url=new URL(strURL);
     // input stream creation
    BufferedReader IN=new BufferedReader(new InputStreamReader(url.openStream()));
    // read text lines in the input stream
    String ligne;
    while((ligne=IN.readLine())!=null)
      lignes.addElement(ligne);
     // close reading flow
    IN.close();
  }
}
5.6.5.4. 一个小程序
如前所述,前面的图形应用程序已被转换为一个小程序。该小程序嵌入在一个名为 appliURL.htm 的 HTML 文档中:
<html>
  <head>
    <title>Applet lisant une URL</title>
  </head>
  <body>
    <h1>Applet lisant une URL</h1>
    <applet
      code="appletURL.class"
      width="400"
      height="300"
    >
    </applet>
  </body>
</html>
在上例中,浏览器向运行在 81 端口的 Apache Web 服务器请求了 URL http://localhost:81/Japplets/2/appliURL.htm。随后,该小程序在浏览器中显示出来。在此示例中,我们再次请求 URL http://localhost:81/Japplets/2/appliURL.htm,以验证我们确实获取到了之前创建的 appliURL.htm 文件。 现在,让我们尝试加载一个不属于提供该小程序的机器(此处为 localhost)的 URL:
该 URL 请求被拒绝。这里我们遇到了与小程序相关的限制:它们只能访问其下载所在机器上的网络资源。小程序有一种方法可以绕过此限制,即把网络请求委托给位于其下载所在机器上的服务器程序。该程序将代表小程序进行网络请求,并将结果发回给它。这被称为代理程序。
5.7. 税款计算小程序
现在,我们将把 IMPOTS 图形应用程序转换为一个小程序。这一点尤为重要:任何拥有浏览器和 Java 1.4 插件(得益于 JSpinner 组件)的互联网用户都将能够使用该应用程序。 我们的应用程序因此变得全球化……这一修改不仅需要进行如今已成标准的简单图形应用程序到小程序的转换,还需要更多工作。该应用程序使用了一个名为“Initialize”的菜单选项,用于读取本地文件的内容。然而,如果我们将其视为一个 Web 应用程序,就会发现这种方法不再适用:
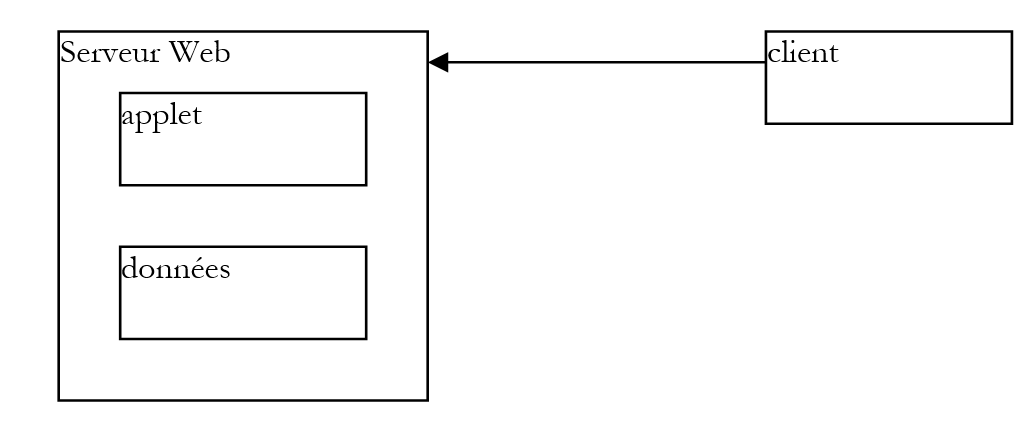
显然,定义税率区间的数据将存储在 Web 服务器上,而非每台客户端机器上。需要从 Web 服务器读取的文件将放置在此处与小程序相同的文件夹中,而“初始化”选项需要从该位置获取该文件。之前的示例展示了如何实现这一点。此外,在本地选择数据文件时,我们曾使用过 JFileChooser 组件,但在此处已不再需要。
包含该小程序的 HTML 文档如下所示:
<html>
  <head>
    <title>Applet de calcul d'impôts</title>
  </head>
  <body>
    <h2>Calcul d'impôts</h2>
    <applet
      code="appletImpots.class"
      width="320"
      height="270"
    >
<param name="data" value="impots.txt">
请注意 data 参数,其值为包含税率区间数据的文件名。HTML 文档、appletImpots 类、impots 类以及 impots.txt 文件均位于 Web 服务器上的同一文件夹中:
E:\data\serge\web\JApplets\impots>dir
12/06/2002  13:24                  247 impots.txt
13/06/2002  10:17                  654 appletImpots$2.class
13/06/2002  10:17                  653 appletImpots$3.class
13/06/2002  10:17                  653 appletImpots$4.class
13/06/2002  10:17                  651 appletImpots$5.class
13/06/2002  10:06                  651 appletImpots$6.class
13/06/2002  10:17                8 655 appletImpots.class
13/06/2002  10:17                  657 appletImpots$1.class
13/06/2002  10:24                  286 appletImpots.htm
13/06/2002  10:17                1 305 impots.class
小程序代码如下(我们仅标出了与图形应用程序相比的更改部分):
...........
import java.net.*;
import java.applet.Applet;

public class appletImpots extends JApplet {
  // window components
  JPanel contentPane;
............................

   // class attributes
  double[] limites=null;
  double[] coeffr=null;
  double[] coeffn=null;
  impots objImpots=null;
  String urlDATA=null;

  //Building the frame
  public void init() {
    //enableEvents(AWTEvent.WINDOW_EVENT_MASK);
    try {
      jbInit();
    }
    catch(Exception e) {
      e.printStackTrace();
    }
     // other initializations
    moreInit();
  }

   // form initialization
  private void moreInit(){
     // calculate menu disabled
    mnuCalculer.setEnabled(false);
................
     // retrieve the name of the tax scale file
    String nomFichier=getParameter("data");
    // mistake?
    if(nomFichier==null){
       // error msg
      txtStatus.setText("Le paramètre data de l'applet n'a pas été initialisé");
       // we block the Initialize option
      mnuInitialiser.setEnabled(false);
      // end
      return;
    }//if
     // set the URL of the data
    urlDATA=getCodeBase()+"/"+nomFichier;
  }//moreInit

   //Initialize component
  private void jbInit() throws Exception  {
...................
  }

  void mnuQuitter_actionPerformed(ActionEvent e) {
    // quit the application
    System.exit(0);
  }

  void mnuInitialiser_actionPerformed(ActionEvent e) {
    // load the data file
    try{
       // dATA READING
      lireDATA();
       // create impots object
      objImpots=new impots(limites,coeffr,coeffn);
................
  }

  private void lireDATA() throws Exception {
     // data tables
    ArrayList aLimites=new ArrayList();
    ArrayList aCoeffR=new ArrayList();
    ArrayList aCoeffN=new ArrayList();
    String[] champs=null;

     // open file in read mode
    BufferedReader IN=new BufferedReader(new InputStreamReader(new URL(urlDATA).openStream()));
    // read the file line by line
....................
  }

  void mnuCalculer_actionPerformed(ActionEvent e) {
    // tAX CALCULATION
......................
  }

  void txtSalaire_caretUpdate(CaretEvent e) {
..........
  }

  void mnuEffacer_actionPerformed(ActionEvent e) {
...............
  }
}
在此,我们仅针对因待读取的数据文件现位于远程机器而非本地机器这一事实所导致的变更进行说明:
读取数据文件的 URL 是通过以下代码获取的:
     // retrieve the name of the tax scale file
    String nomFichier=getParameter("data");
    // mistake?
    if(nomFichier==null){
       // error msg
      txtStatus.setText("Le paramètre data de l'applet n'a pas été initialisé");
       // we block the Initialize option
      mnuInitialiser.setEnabled(false);
      // end
      return;
    }//if
     // set the URL of the data
    urlDATA=getCodeBase()+"/"+nomFichier;
请注意,文件名“impots.txt”是通过小程序的data参数传递的:
上面的代码首先获取 data 参数的值,同时处理可能出现的任何错误。如果包含 Applet 的 HTML 文档的 URL 是 http://localhost:81/JApplets/impots/appletImpots.htm,那么 impots.txt 文件的 URL 将是 http://localhost:81/JApplets/impots/impots.txt。我们需要构建这个 URL。 Applet 的 getCodeBase() 方法会返回包含该 Applet 的 HTML 文档的下载目录 URL,因此在本例中即为 http://localhost:81/JApplets/impots。因此,以下语句构建了数据文件的 URL:
在 lireFichier() 方法中(该方法用于读取 URL urlData 的内容),我们可以看到创建了用于读取数据的输入流:
     // open file in read mode
    BufferedReader IN=new BufferedReader(new InputStreamReader(new URL(urlDATA).openStream()));
从这一刻起,已无法区分数据是来自远程文件还是本地文件。以下是该小程序的运行示例:
5.8. 结论
本章介绍了
- 介绍了如何使用 JBuilder
- 最常用的 Swing 组件
- 以及小程序开发
我们应该注意的是,
- JBuilder生成的代码其实可以手动编写。一旦通过某种方式获得了这些代码,仅需一个简单的JDK即可运行,此时JBuilder便不再是必需的。
- 使用JBuilder这类工具可以显著提高工作效率:
- 虽然可以手动编写 JBuilder 生成的代码,但这往往非常耗时且收益甚微,因为应用程序的逻辑通常位于其他地方。
- 生成的代码具有指导意义。阅读并研究它,是了解首次使用的组件的某些方法和属性的好方法。
- JBuilder 支持跨平台开发。因此,在不同平台之间切换时,您所掌握的技能依然适用。能够编写在 Windows 和 Linux 系统上均可运行的程序,当然是一个非常重要的生产力因素。但这归功于 Java 本身,而非 JBuilder。
5.9. Linux 上的 JBuilder
前面的所有示例均已在 Windows 98 上经过测试。有人可能会疑惑,编写的程序是否可以直接移植到 Linux 上。只要目标 Linux 机器上安装了各程序所使用的类,它们就可以直接运行。例如,如果您已在 Linux 上安装了 JBuilder,那么所需的类已经存在于您的机器上。以下是一个示例,展示了当我们在 Linux 上使用 JBuilder 4 运行包含 JList 组件的程序时会发生什么:
下文将介绍在 Linux 机器上安装 JBuilder 4 Foundation 的过程。在 Win9x 机器上安装该软件非常简单,且与本文所述流程类似。虽然后续版本的安装方式可能会有所不同,但本文档仍可能提供一些有用的信息。
您可以在 Inprise 网站 http://www.inprise.com/jbuilder 上获取 JBuilder。
该页面提供了 Windows 和 Linux 等系统的下载链接。接下来,我们将介绍如何在运行 KDE 图形界面的 Linux 机器上安装 JBuilder。
点击“JBuilder 4 for Linux”链接后,将出现一个表单。填写完毕后,您将收到两个文件:
jb4docs_fr.tar.gz:JBuilder 4 文档和示例
jb4fndlinux_fr.tar.gz:JBuilder 4 Foundation。这是商用版 JBuilder 4 的精简版,但足以满足教学需求。
系统将通过电子邮件向您发送软件激活密钥。该密钥可让您使用 JBuilder 4,并在首次使用时被要求输入。若您遗失此密钥,可返回上述网址并点击“获取激活密钥”链接。接下来我们将假设您已以 root 用户身份登录,且当前所在目录中包含上述两个 tar.gz 文件。请解压这两个文件:
[ls -l]
drwxr-xr-x    3 nobody   nobody       4096 oct 10  2000 docs
drwxr-xr-x    3 nobody   nobody       4096 déc  5 13:00 foundation
[ls -l foundation]
-rw-r--r--    1 nobody   nobody       1128 déc  5 13:00 deploy.txt
-rwxr-xr-x    1 nobody   nobody   69035365 déc  5 13:00 fnd_linux_install.bin
drwxr-xr-x    2 nobody   nobody       4096 déc  5 13:00 images
-rw-r--r--    1 nobody   nobody      15114 déc  5 13:00 index.html
-rw-r--r--    1 nobody   nobody      23779 déc  5 13:00 license.txt
-rw-r--r--    1 nobody   nobody      75739 déc  5 13:00 release_notes.html
-rw-r--r--    1 nobody   nobody      31902 déc  5 13:00 whatsnew.html
[ls -l docs]
-rw-r--r--    1 nobody   nobody       1128 oct 10  2000 deploy.txt
-rwxr-xr-x    1 nobody   nobody   40497874 oct 10  2000 doc_install.bin
drwxr-xr-x    2 nobody   nobody       4096 oct 10  2000 images
-rw-r--r--    1 nobody   nobody       9210 oct 10  2000 index.html
-rw-r--r--    1 nobody   nobody      23779 oct 10  2000 license.txt
-rw-r--r--    1 nobody   nobody      75739 oct 10  2000 release_notes.html
-rw-r--r--    1 nobody   nobody      31902 oct 10  2000 whatsnew.html
在这两个生成的目录中,.bin 文件即为安装文件。此外,请使用网页浏览器查看每个目录中的 index.html 文件。这些文件提供了安装这两款产品的说明。让我们先从安装 JBuilder Foundation 开始:
第一个安装界面出现。接下来将出现更多界面:
确认。随后将显示说明画面:
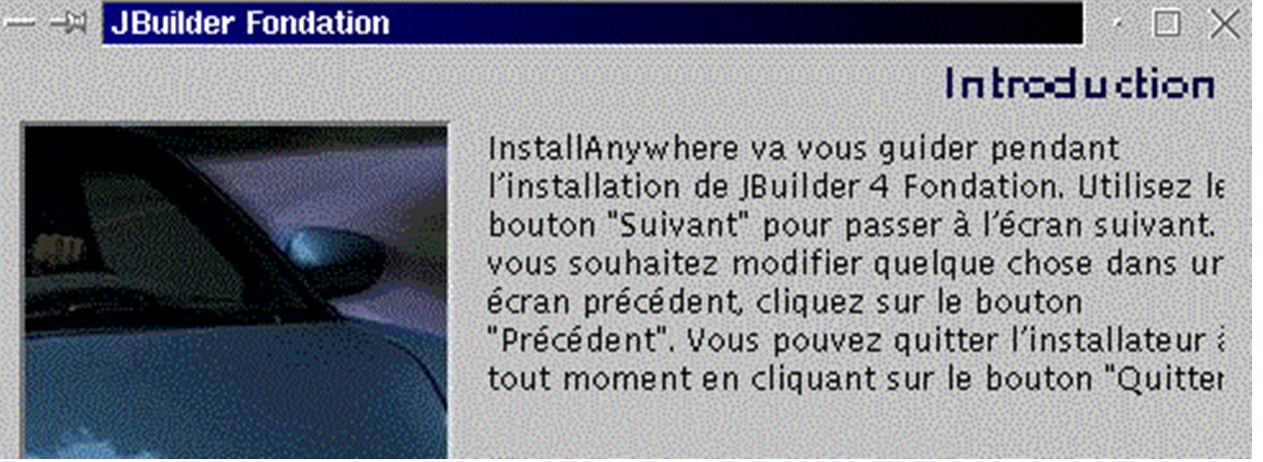
点击[下一步]。
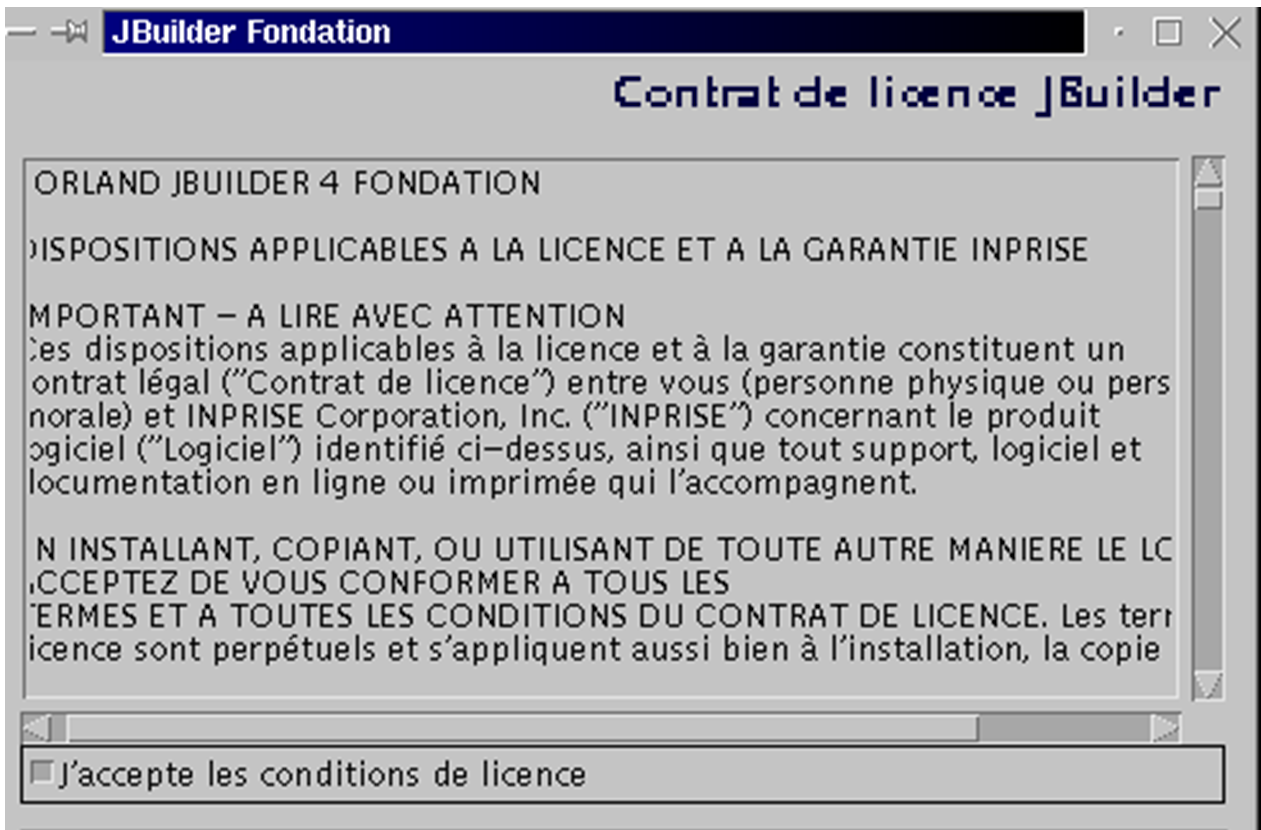
接受许可协议,然后点击[下一步]。
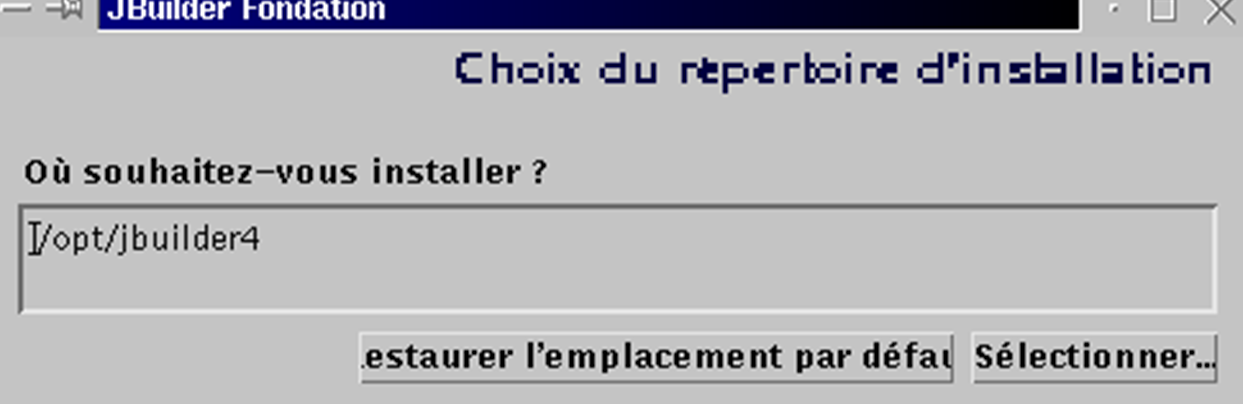
接受 JBuilder 的建议安装位置(请记下该路径,稍后会用到),然后单击 [下一步]。安装过程很快就会完成。
现在我们可以进行首次测试了。在 KDE 中,启动文件管理器,进入 JBuilder 可执行文件目录:/opt/jbuilder4/bin(如果您将 JBuilder 安装在 /opt/jbuilder4 目录下):
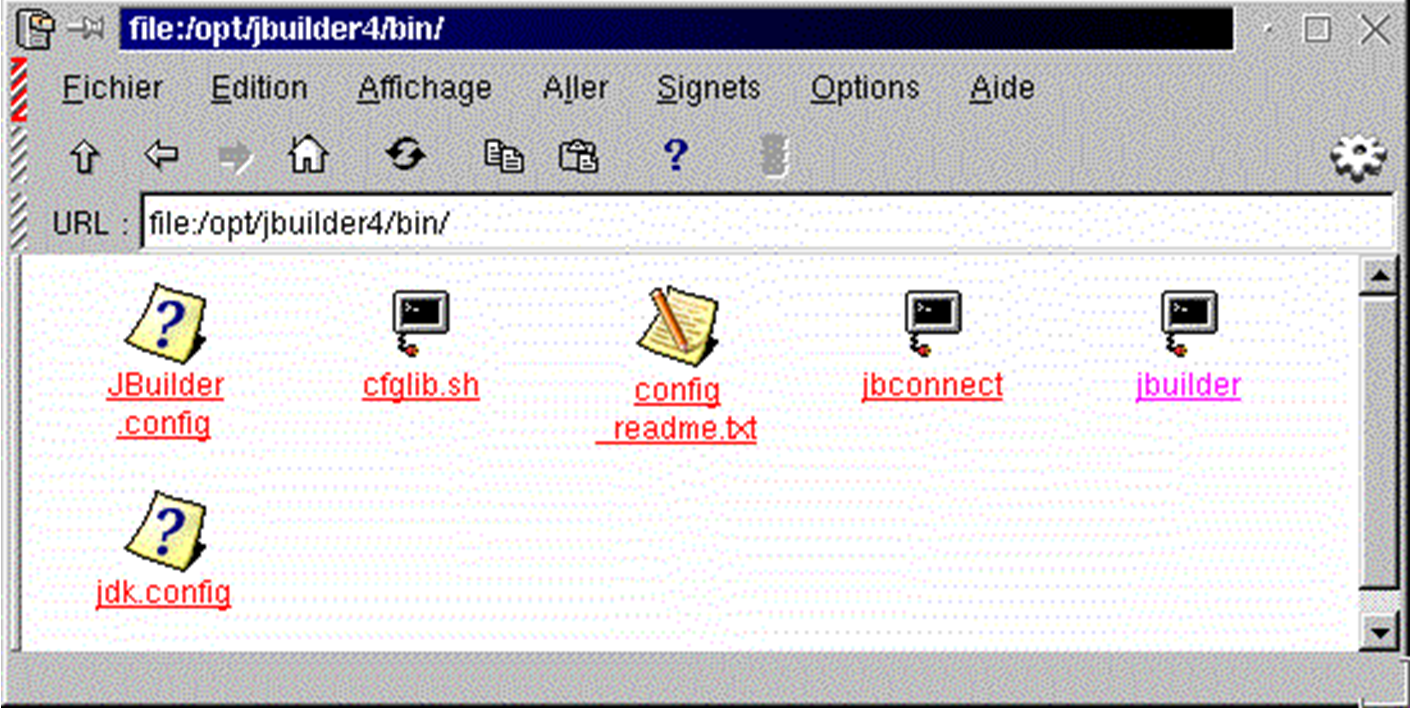
点击上方的 JBuilder 图标。由于这是您第一次使用 JBuilder,您需要输入激活密钥:
填写“姓名”和“公司”字段。点击[添加]输入您的激活密钥。请注意,该密钥应已通过电子邮件发送给您;若您遗失了密钥,可从下载 JBuilder 4 的网址处找回(参见安装过程开头)。激活密钥被接受后,将显示许可条款:

点击“确定”后,您将返回之前看到的信息输入窗口:
点击“确定”以完成此步骤,该步骤仅在首次执行时运行。随后将显示 JBuilder 开发环境:
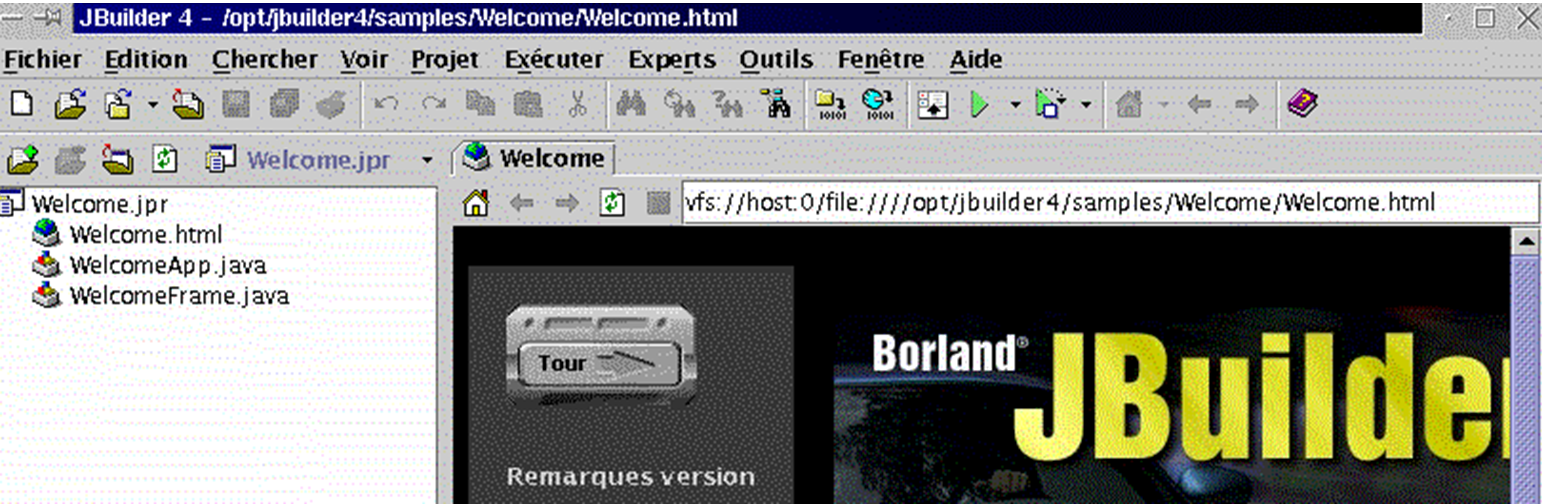
现在请退出 JBuilder 以安装文档。这将安装若干用于 JBuilder 帮助文件的文件,目前该帮助文件尚不完整。请返回您解压 JBuilder tar.gz 文件的目录。安装程序位于 docs 目录中。请导航至该目录:
[cd docs]
[ls -l]
-rw-r--r--    1 nobody   nobody       1128 oct 10  2000 deploy.txt
-rwxr-xr-x    1 nobody   nobody   40497874 oct 10  2000 doc_install.bin
drwxr-xr-x    2 nobody   nobody       4096 oct 10  2000 images
-rw-r--r--    1 nobody   nobody       9210 oct 10  2000 index.html
-rw-r--r--    1 nobody   nobody      23779 oct 10  2000 license.txt
-rw-r--r--    1 nobody   nobody      75739 oct 10  2000 release_notes.html
-rw-r--r--    1 nobody   nobody      31902 oct 10  2000 whatsnew.html
安装文件名为 doc_install.bin,但您不能直接运行它。若直接运行,安装将失败且您无法理解原因。 请在浏览器中阅读 index.html 文件,以获取安装过程的详细说明。安装程序需要一个 Java 虚拟机(JVM);具体来说,需要一个名为 java 的程序,该程序必须位于您机器的 PATH 环境变量中。请注意,PATH 是一个 Unix 变量,其值采用 rep1:rep2:...:repn 的形式,指定了在查找可执行文件时必须搜索的目录 repi。 在此,安装程序请求执行一个 Java 程序。根据您安装的 Java 虚拟机数量,您可能拥有该程序的多个版本。从逻辑上讲,我们将使用 JBuilder 4 提供的版本,该版本位于 /opt/jbuilder4/jdk1.3/bin。要将此目录添加到 PATH 变量中:
[echo $PATH]
/usr/local/sbin:/usr/sbin:/sbin:/usr/local/sbin:/usr/local/bin:/sbin:/bin:/usr/sbin:/usr/bin:/usr/X11R6/bin:/root/bin
[export PATH=/opt/jbuilder4/jdk1.3/bin/:$PATH]
[echo $PATH]
/opt/jbuilder4/jdk1.3/bin/:/usr/local/sbin:/usr/sbin:/sbin:/usr/local/sbin:/usr/local/bin:/sbin:/bin:/usr/sbin:/usr/bin:/usr/X11R6/bin:/root/bin
现在我们可以开始安装文档了:
这是图形化安装:

它与 JBuilder Foundation 的安装过程非常相似。因此,这里不再赘述。但有一个界面您绝不能错过:
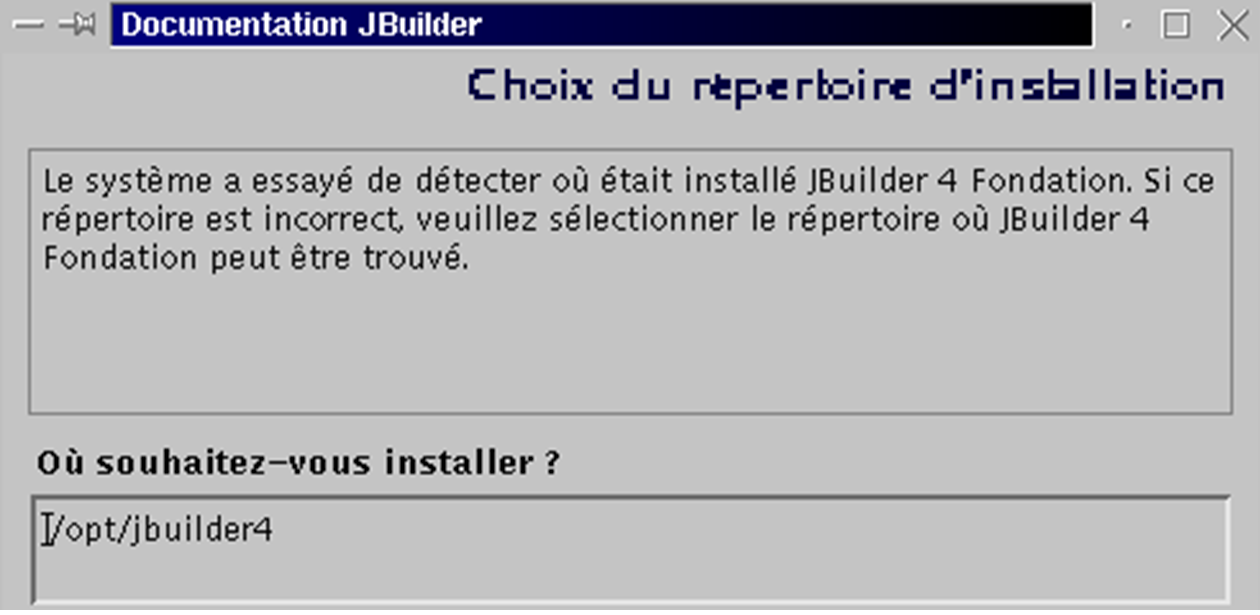
安装程序通常会自动检测到您安装 JBuilder Foundation 的位置。因此,除非默认设置有误,否则请勿更改。
文档安装完成后,我们就可以进行另一项 JBuilder 测试了。如上所述启动应用程序。JBuilder 打开后,选择“帮助”>“帮助主题”。在左侧窗格中,单击“教程”链接:
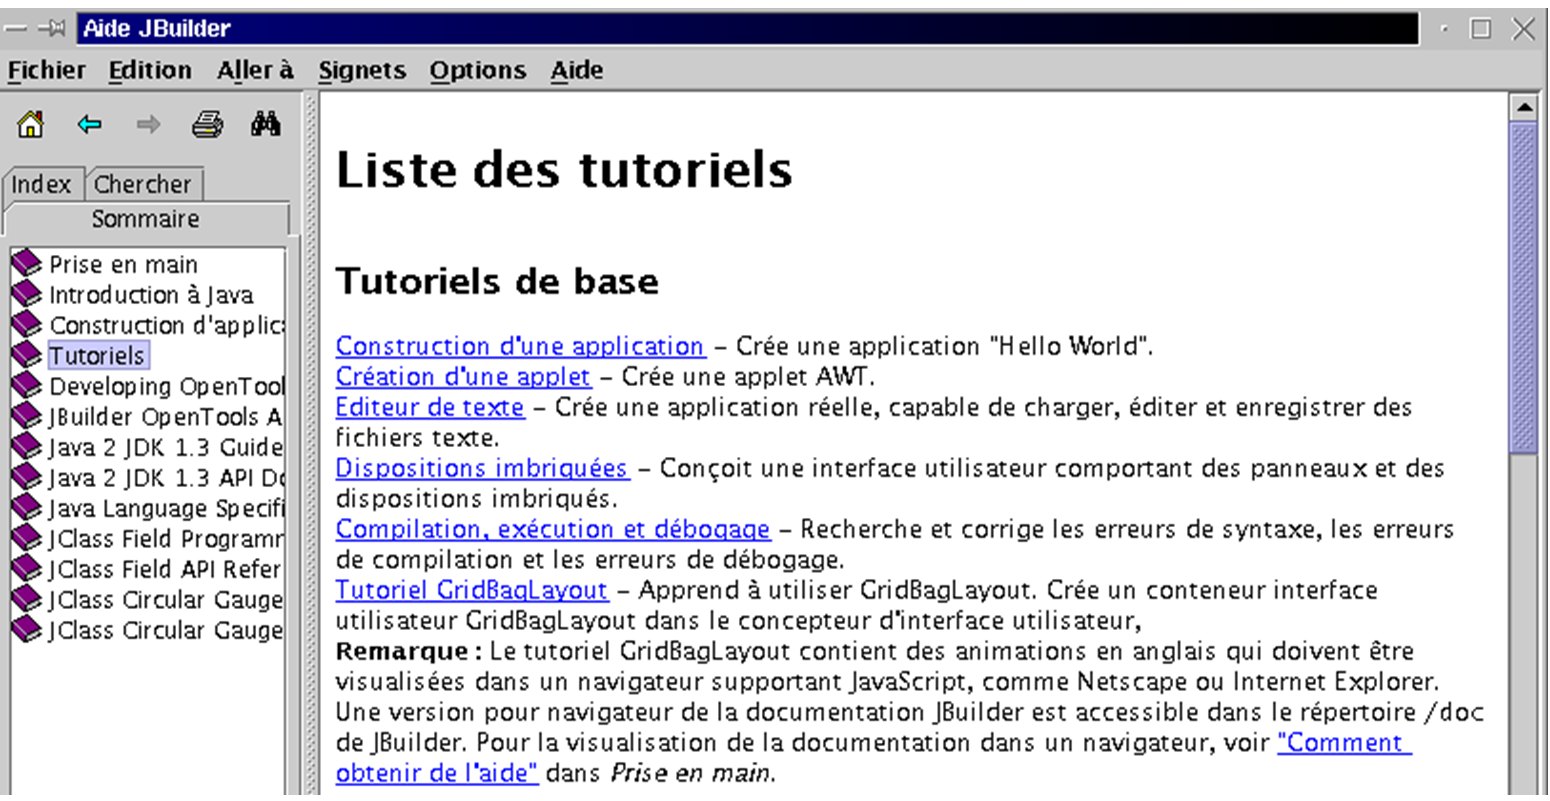
JBuilder 附带了一套教程,可帮助您入门 Java 编程。下面,我们将按照上述提到的“构建应用程序”教程进行操作。
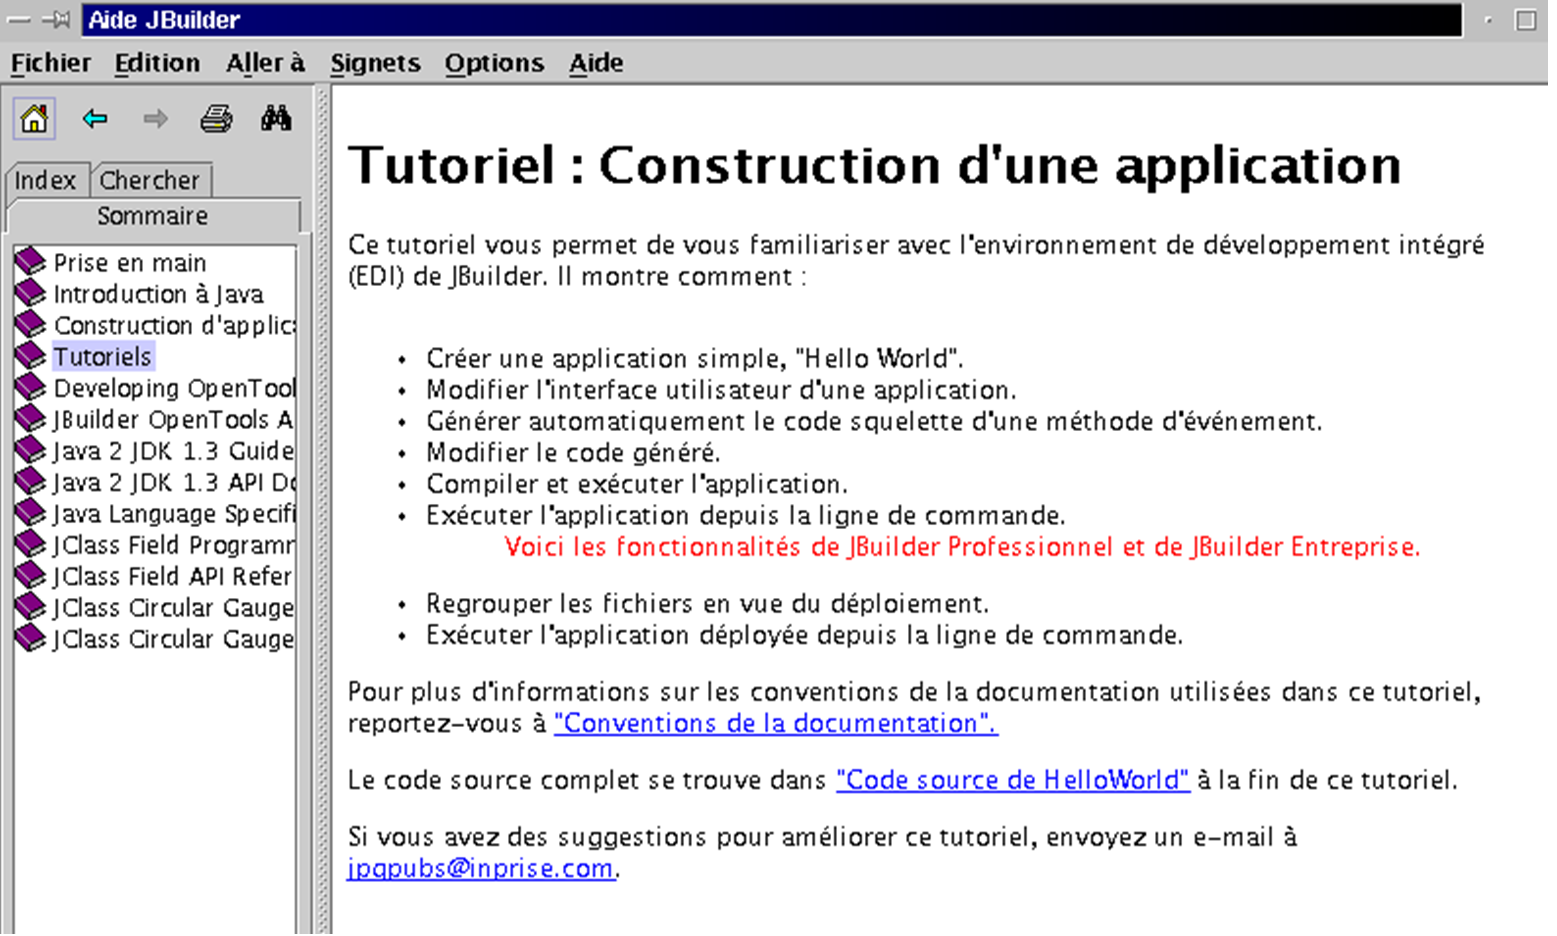
在 JBuilder 中,选择“文件”>“新建项目”。向导将引导您完成三个界面:

我们将创建一个标题为“Hello, everyone.”的简单窗口。我们将此项目命名为“hello”。本示例由 root 用户运行。随后,JBuilder 会建议将所有项目归类到 root 登录目录下的“jbproject”目录中。“hello”项目将被放置在“jbproject”目录内的“hello”目录中(“项目目录名称”字段)。点击 [下一步]。
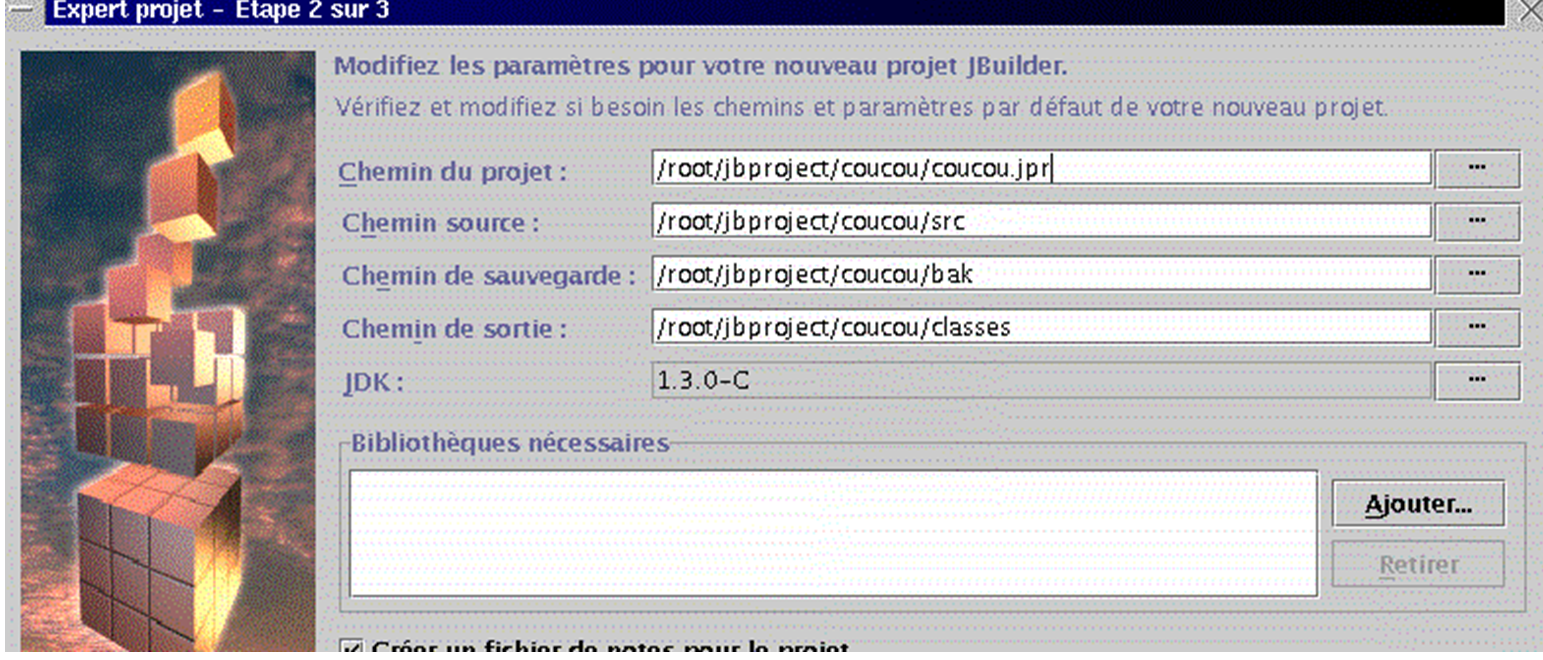
第二个界面是项目中各种路径的摘要。无需进行任何更改。点击 [下一步]。
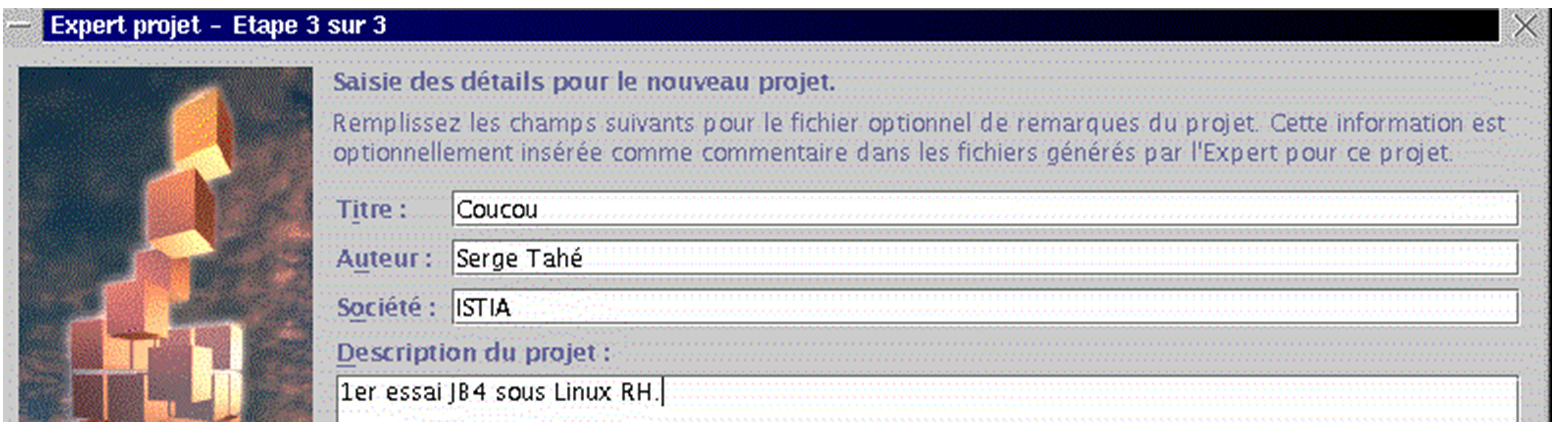
第三个屏幕要求您自定义项目。填写详细信息后,点击 [完成]。
现在请转到“文件”/“新建”:
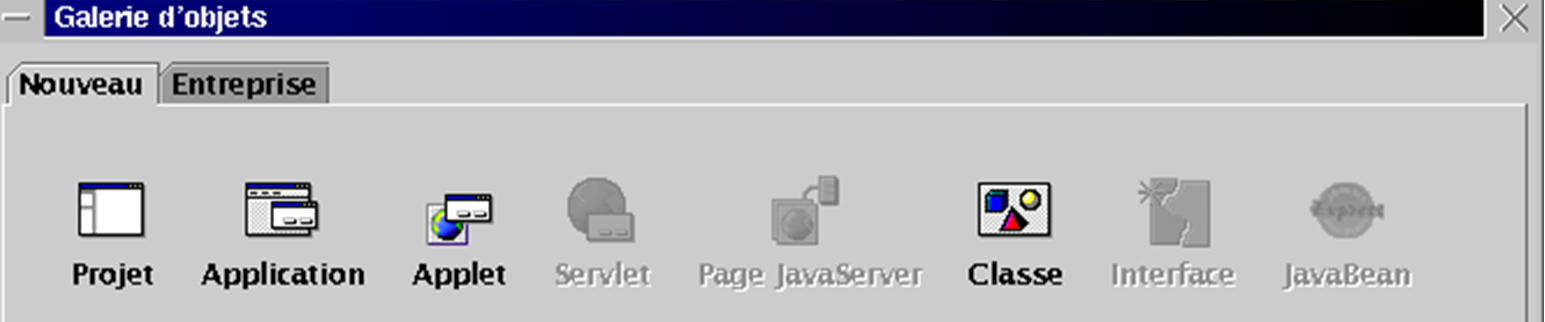
选择“应用程序”,然后点击“确定”。一个新的向导将显示两个界面:
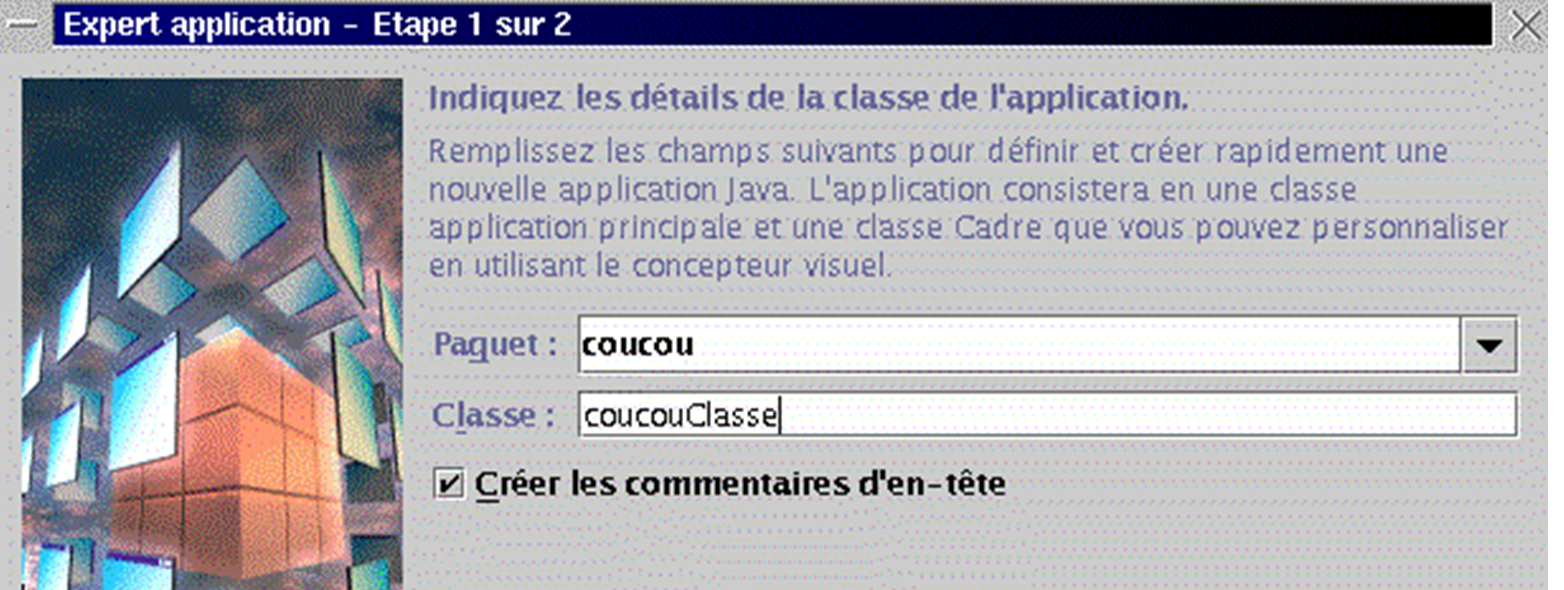
“包”字段使用项目名称。“类”字段要求输入项目的主类名称。使用上面的名称并点击[下一步]:
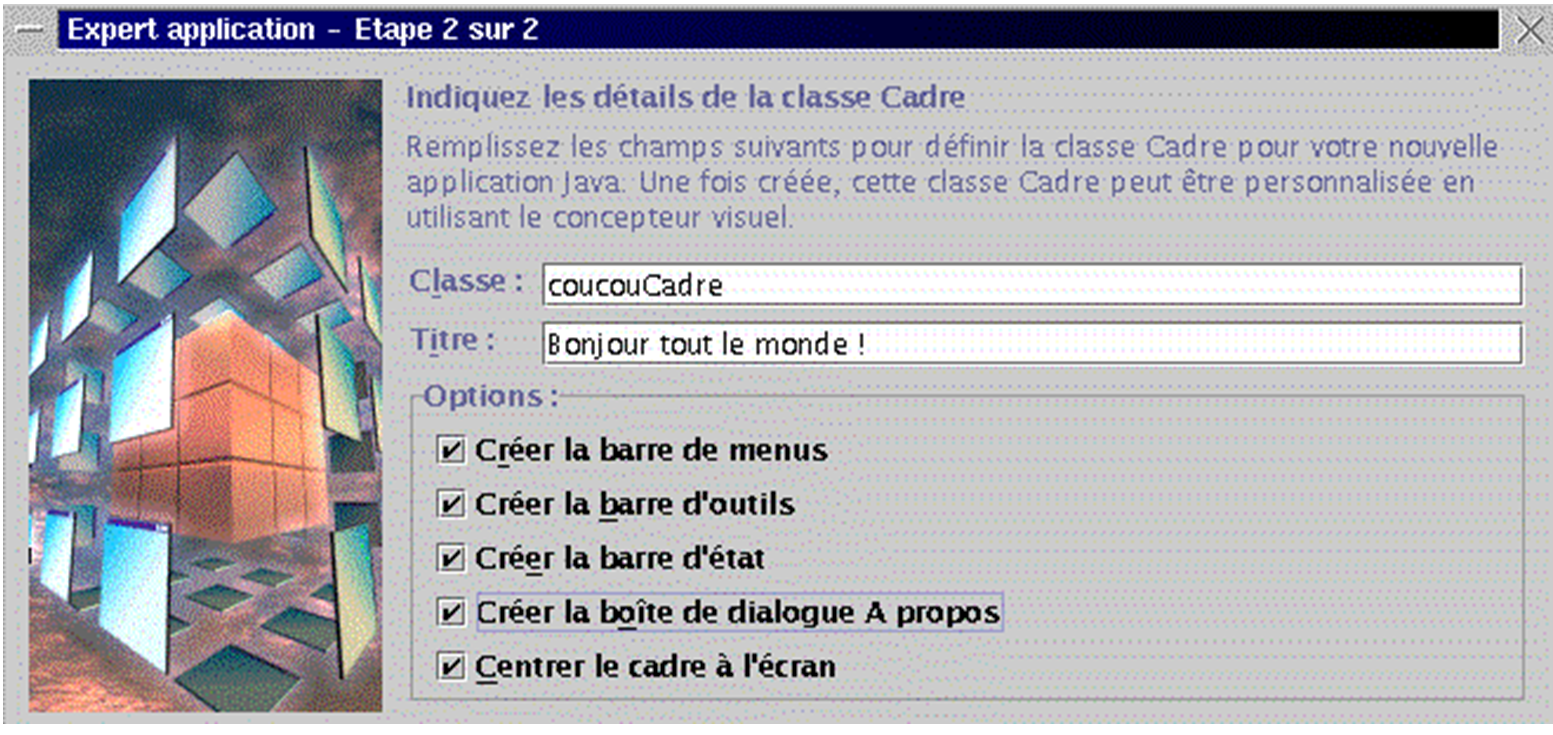
本应用程序包含一个用于应用程序窗口的第二个 Java 类。请为该类命名。标题字段是您希望为该窗口设置的标题。选项窗格提供了窗口的相关选项。请全选这些选项,然后单击 [完成]。随后您将返回 JBuilder 环境,该环境已根据您为项目提供的信息进行了更新:
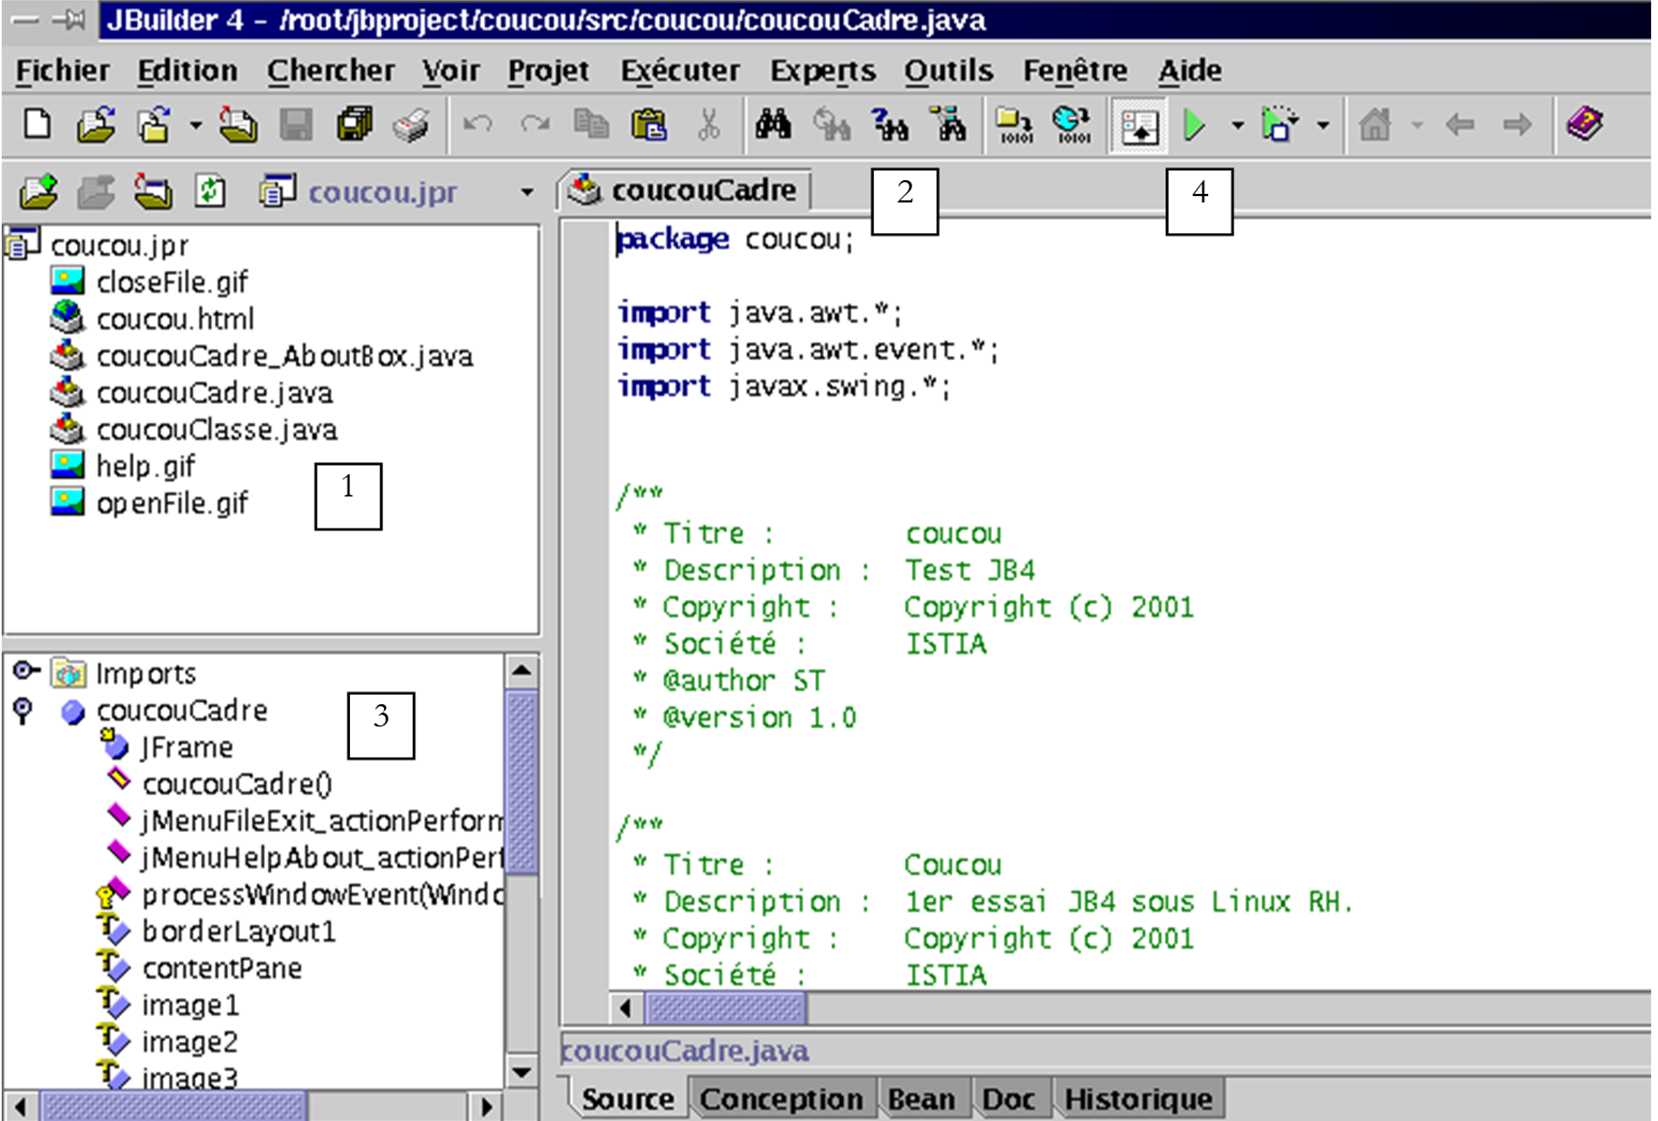
在左上角的窗口(1)中,您可以看到构成该项目的文件列表。其中包括我们刚刚命名的两个 .java 类。在右侧窗口(2)中,您可以看到 coucouCadre 类的 Java 代码。左下角的窗口显示了项目的结构(类、方法、属性)。项目已准备就绪,可以运行。 点击上方的按钮 4,或选择“运行/运行项目”,或按 F9 键。您应看到以下窗口:
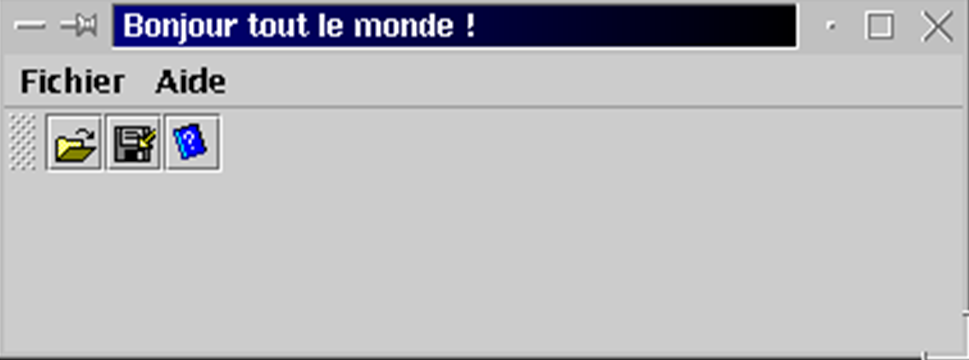
点击“帮助”选项,您将看到在创建向导中提供的信息。我们不再深入讲解。现在是时候开始学习教程了。
在结束之前,让我们演示一下:您不仅可以使用 JBuilder 及其图形界面,还可以使用它自带并安装在 /opt/jbuilder4/jdk1.3 目录下的 JDK。请创建以下 essai1.java 文件:
import java.io.*;

public class essai1{
    public static void main(String args[]){
        System.out.println("coucou");
        System.exit(0);
    }
}
让我们使用 JBuilder JDK 进行编译并运行: