7. 线程
7.1. 引言
当应用程序启动时,它会在一个称为线程的执行流中运行。表示线程的类是 java.lang.Thread 类,它具有以下属性和方法:
返回当前正在运行的线程 | |
设置线程的名称 | |
线程名称 | |
指示线程是否处于活动状态(true)或非活动状态(false) | |
启动线程的执行 | |
在前面的 start 方法执行完毕后自动执行的方法 | |
将线程的执行暂停 n 毫秒 | |
阻塞操作——等待线程完成后才继续执行下一条指令 |
最常用的构造函数如下:
创建对一个异步任务的引用。该任务此时仍处于非活动状态。创建的任务必须具有 run 方法:通常会使用从 Thread 派生的类。 | |
与上述相同,但作为参数传递的 Runnable 对象实现了 run 方法。 |
让我们看一个简单的应用程序,演示主执行线程的存在——即类的主函数运行的那个线程:
// use of threads

import java.io.*;
import java.util.*;

public class thread1{
    public static void main(String[] arg)throws Exception {
         // init current thread
        Thread main=Thread.currentThread();
         // display
        System.out.println("Thread courant : " + main.getName());
         // we change the name
        main.setName("myMainThread");
         // check
        System.out.println("Thread courant : " + main.getName());

         // infinite loop
        while(true){
        // time recovery
      Calendar calendrier=Calendar.getInstance();
      String H=calendrier.get(Calendar.HOUR_OF_DAY)+":"
      +calendrier.get(Calendar.MINUTE)+":"
      +calendrier.get(Calendar.SECOND);
             // display
            System.out.println(main.getName() + " : " +H);
             // temporary shutdown
            Thread.sleep(1000);
        }//while
    }//hand
}//class
屏幕输出:
Thread courant : main
Thread courant : myMainThread
myMainThread : 15:34:9
myMainThread : 15:34:10
myMainThread : 15:34:11
myMainThread : 15:34:12
Terminer le programme de commandes (O/N) ? o
上例说明了以下几点:
- main 函数在线程中运行正常
- 我们可以通过 Thread.currentThread() 访问该线程的属性
- sleep 方法的作用。在此,执行 main 方法的线程在每次显示之间会暂停 1 秒。
7.2. 创建执行线程
在某些应用程序中,代码片段可能在不同的执行线程中“同时”运行。当我们说线程同时运行时,通常只是一个宽泛的说法。如果机器只有一个处理器(这种情况至今仍很常见),则线程会共享该处理器:它们轮流在短暂的一瞬间(几毫秒)访问处理器。这正是产生并行执行错觉的原因。 分配给一个线程的时间长短取决于多种因素,包括其优先级——该优先级有默认值,但也可以通过编程方式设置。当一个线程拥有处理器时,它通常会使用分配给它的全部时间。不过,它也可以提前释放处理器:
- 通过等待某个事件(wait、join)
- 通过休眠指定时间(sleep)
- 线程 T 可以通过多种方式创建
- 通过继承 Thread 类并重写其 run 方法。
- 在类中实现 Runnable 接口,并使用 new Thread(Runnable) 构造函数。Runnable 是一个仅定义了一个方法的接口:public void run()。因此,上述构造函数的参数可以是任何实现了此 run 方法的类实例。
在下面的示例中,使用一个继承自 Thread 类的匿名类来创建线程:
此处的 run 方法只是调用了 display 方法。
- 线程 T 的执行由 T.start() 启动:该方法属于 Thread 类,会在自动调用 Thread 或 Runnable 接口的 run 方法之前执行一系列初始化操作。执行 T.start() 语句的程序不会等待任务 T 完成:它会立即继续执行下一条语句。 此时,我们有两个任务正在并行运行。它们通常需要能够相互通信,以了解待处理的共享工作的状态。这就是线程同步的问题。
- 线程一旦启动,便会自主运行。当其正在执行的 run 函数完成工作后,线程便会停止。
- 我们可以使用 T.join() 等待线程 T 执行完毕。这是一条阻塞指令:执行该指令的程序将被阻塞,直到任务 T 完成工作。这也是一种同步手段。
让我们来分析以下程序:
// use of threads
import java.io.*;
import java.util.*;
public class thread2{
public static void main(String[] arg) {
// init current thread
Thread main=Thread.currentThread();
// give a name to the current thread
main.setName("myMainThread");
// start of hand
System.out.println("début du thread " +main.getName());
// creation of execution threads
Thread[] tâches=new Thread[5];
for(int i=0;i<tâches.length;i++){
            // create thread i
            tâches[i]=new Thread() {
          public void run() {
            affiche();
        }
      };//def tasks[i]
// set the thread name
tâches[i].setName(""+i);
// start execution of thread i
tâches[i].start();
}//for
// end of hand
System.out.println("fin du thread " +main.getName());
}//Main
public static void affiche() {
// time recovery
Calendar calendrier=Calendar.getInstance();
String H=calendrier.get(Calendar.HOUR_OF_DAY)+":"
+calendrier.get(Calendar.MINUTE)+":"
+calendrier.get(Calendar.SECOND);
// display start of execution
System.out.println("Début d'exécution de la méthode affiche dans le Thread " +
Thread.currentThread().getName()+ " : " + H);
// sleep for 1 s
try{
Thread.sleep(1000);
}catch (Exception ex){}
// time recovery
calendrier=Calendar.getInstance();
H=calendrier.get(Calendar.HOUR_OF_DAY)+":"
+calendrier.get(Calendar.MINUTE)+":"
+calendrier.get(Calendar.SECOND);
// display end of run
System.out.println("Fin d'exécution de la méthode affiche dans le Thread "
+Thread.currentThread().getName()+ " : " + H);
}// poster
}//class
主线程(即执行 main 函数的线程)会创建另外 5 个线程,负责执行静态的 display 方法。结果如下:
début du thread myMainThread
Début d'exécution de la méthode affiche dans le Thread 0 : 15:48:3
fin du thread myMainThread
Début d'exécution de la méthode affiche dans le Thread 1 : 15:48:3
Début d'exécution de la méthode affiche dans le Thread 2 : 15:48:3
Début d'exécution de la méthode affiche dans le Thread 3 : 15:48:3
Début d'exécution de la méthode affiche dans le Thread 4 : 15:48:3
Fin d'exécution de la méthode affiche dans le Thread 0 : 15:48:4
Fin d'exécution de la méthode affiche dans le Thread 1 : 15:48:4
Fin d'exécution de la méthode affiche dans le Thread 2 : 15:48:4
Fin d'exécution de la méthode affiche dans le Thread 3 : 15:48:4
Fin d'exécution de la méthode affiche dans le Thread 4 : 15:48:4
这些结果非常有参考价值:
- 首先,我们可以看到线程的启动并不阻塞。main 方法并行启动了 5 个线程的执行,并在它们之前完成了执行。该操作
会启动线程 tasks[i] 的执行,但一旦完成,程序会立即继续执行下一条语句,而不会等待该线程结束。
- 所有创建的线程都必须执行 display 方法。执行顺序是不可预测的。尽管在示例中,执行顺序似乎遵循了线程启动的顺序,但无法由此得出普遍结论。此处的操作系统拥有 6 个线程和一个处理器。它将根据自身的规则将处理器分配给这 6 个线程。
- 结果显示了 sleep 方法的影响。在示例中,线程 0 最先执行 display 方法。它先显示“开始执行”消息,随后执行 sleep 方法,该方法使其暂停 1 秒。此后,它将失去处理器,处理器将供其他线程使用。 示例表明线程 1 将获得该处理器。线程 1 将遵循与其他线程相同的执行路径。当线程 0 的 1 秒睡眠期结束时,其执行即可恢复。系统将处理器分配给它,它便能完成 display 方法的执行。
让我们修改程序,在 *main* 方法结尾添加以下指令:
         // end of hand
        System.out.println("fin du thread " +main.getName());
     // application shutdown
    System.exit(0);
运行新程序的结果如下:
début du thread myMainThread
Début d'exécution de la méthode affiche dans le Thread 0 : 16:5:45
Début d'exécution de la méthode affiche dans le Thread 1 : 16:5:45
Début d'exécution de la méthode affiche dans le Thread 2 : 16:5:45
Début d'exécution de la méthode affiche dans le Thread 3 : 16:5:45
fin du thread myMainThread
Début d'exécution de la méthode affiche dans le Thread 4 : 16:5:45
一旦 main 方法执行以下语句:
它会停止应用程序的所有线程,而不仅仅是主线程。主方法可能希望在终止自身之前,等待其创建的线程执行完毕。这可以通过使用 Thread 类的 join 方法来实现:
     // waiting for all threads
        for(int i=0;i<tâches.length;i++){
            // we wait for thread i
            tâches[i].join();
    }//for

         // end of hand
        System.out.println("fin du thread " +main.getName());
     // application shutdown
    System.exit(0);
这将产生以下结果:
début du thread myMainThread
Début d'exécution de la méthode affiche dans le Thread 0 : 16:11:9
Début d'exécution de la méthode affiche dans le Thread 1 : 16:11:9
Début d'exécution de la méthode affiche dans le Thread 2 : 16:11:9
Début d'exécution de la méthode affiche dans le Thread 3 : 16:11:9
Début d'exécution de la méthode affiche dans le Thread 4 : 16:11:9
Fin d'exécution de la méthode affiche dans le Thread 0 : 16:11:10
Fin d'exécution de la méthode affiche dans le Thread 1 : 16:11:10
Fin d'exécution de la méthode affiche dans le Thread 2 : 16:11:10
Fin d'exécution de la méthode affiche dans le Thread 3 : 16:11:10
Fin d'exécution de la méthode affiche dans le Thread 4 : 16:11:10
fin du thread myMainThread
7.3. 线程的优势
既然我们已经指出了默认线程(即执行 Main 方法的那个)的存在,并且知道如何创建其他线程,那么让我们来探讨一下线程对我们的好处,以及为什么我们要在这里介绍它们。 有一种应用程序非常适合使用线程:互联网上的客户端-服务器应用程序。在这种应用程序中,位于机器 S1 上的服务器响应来自远程机器 C1、C2、...、Cn 上客户端的请求。
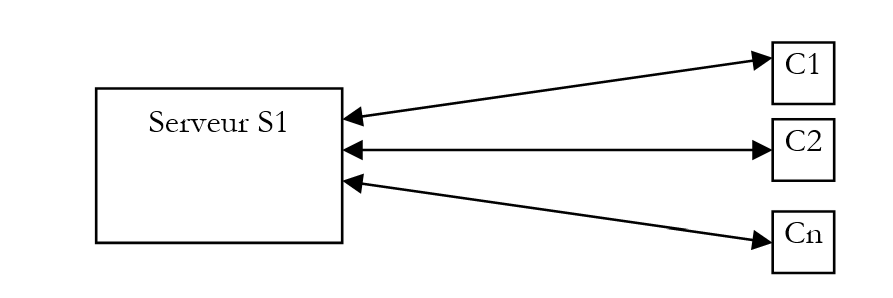
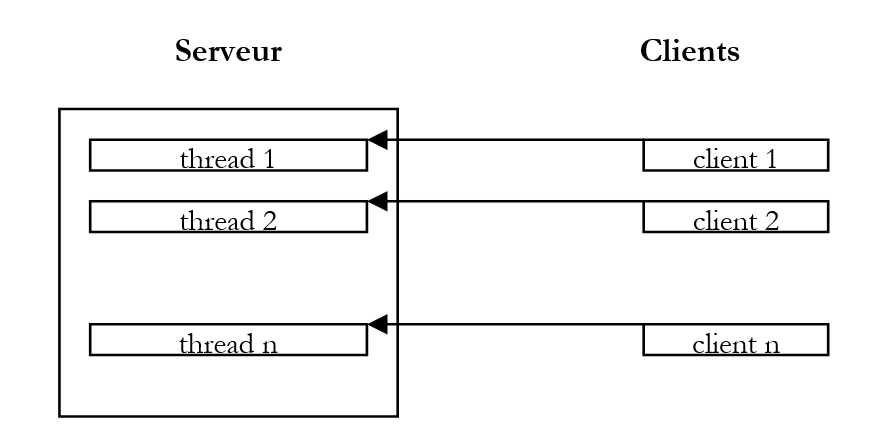
我们每天都在使用遵循这种模式的互联网应用程序:Web 服务、电子邮件、论坛浏览、文件传输……在上图中,服务器 S1 必须同时为客户端 C1、C2、……、Cn 提供服务。以向客户端传输文件的 FTP(文件传输协议)服务器为例,我们知道文件传输有时可能需要数小时。 当然,单个客户端独占服务器如此长时间是绝无可能的。通常的做法是,服务器创建与客户端数量相等的执行线程。每个线程随后负责处理特定的客户端。由于处理器在机器上的所有活动线程之间循环共享,服务器在每个客户端上花费的时间都很短,从而确保了服务的并发性。
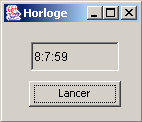
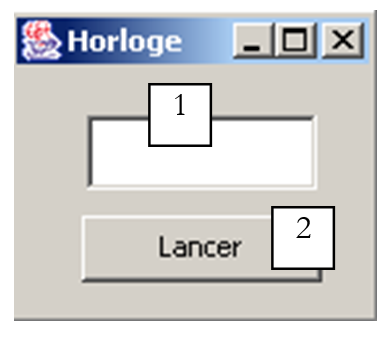
7.4. 一款图形时钟应用
请看以下应用程序,它会显示一个窗口,其中包含一个时钟和一个用于停止或重启时钟的按钮:
 | 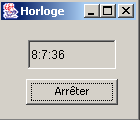 |  |
为了使时钟正常运行,必须有一个进程每秒更新一次时间。同时,还需监听窗口中发生的事件:当用户点击“停止”按钮时,时钟必须停止。这里有两个并行且异步的任务:用户可能在任何时候点击按钮。
设想时钟尚未启动时用户点击“开始”按钮的情况。这属于典型的事件,人们可能会认为由运行该窗口的线程中的某个方法来管理时钟。然而,当 GUI 应用程序中的某个方法正在运行时,其所属线程将不再监听 GUI 事件。这些事件发生后会被放入队列中,待当前运行的方法结束之后再由应用程序处理。 在我们的时钟示例中,该方法将始终处于运行状态,因为只有点击“停止”按钮才能终止它。然而,该事件只有在方法执行完毕后才会被处理。我们陷入了一个死循环。
解决此问题的方案是:当用户点击“开始”按钮时,启动一个任务来管理时钟,但应用程序仍可继续监听窗口中发生的事件。这样,我们将有两个独立的任务并行运行:
- 时钟管理
- 监听窗口事件
让我们回到我们的图形时钟:
 |
|
使用 JBuilder 构建的应用程序源代码如下:
import java.awt.*;
import java.awt.event.*;
import javax.swing.*;
import java.util.*;

public class interfaceHorloge extends JFrame {
  JPanel contentPane;
  JTextField txtHorloge = new JTextField();
  JButton btnGoStop = new JButton();

  // instance attributes
  boolean finHorloge=true;

   //Building the frame
  public interfaceHorloge() {
    enableEvents(AWTEvent.WINDOW_EVENT_MASK);
    try {
      jbInit();
    }
    catch(Exception e) {
      e.printStackTrace();
    }
  }

  private void runHorloge(){
    // we don't stop until we're told to stop
    while( ! finHorloge){
       // time recovery
      Calendar calendrier=Calendar.getInstance();
      String H=calendrier.get(Calendar.HOUR_OF_DAY)+":"
      +calendrier.get(Calendar.MINUTE)+":"
      +calendrier.get(Calendar.SECOND);
       // it is displayed in the T
      txtHorloge.setText(H);
       // waiting for a second
      try{
        Thread.sleep(1000);
      } catch (Exception e){
        // output with error
        System.exit(1);
      }//try
    }// while
  }// runHorloge

   //Initialize component
  private void jbInit() throws Exception  {
...................
  }

   //Replaced, so we can get out when the window is closed
  protected void processWindowEvent(WindowEvent e) {
.............
  }

  void btnGoStop_actionPerformed(ActionEvent e) {
    // start/stop clock
     // retrieve the button label
    String libellé=btnGoStop.getText();
    // launch?
    if(libellé.equals("Lancer")){
      // create the thread in which the clock will run
      Thread thHorloge=new Thread(){
        public void run(){
          runHorloge();
        }
      };//def thread
       // authorize the thread to start
      finHorloge=false;
       // change the button label
      btnGoStop.setText("Arrêter");
      // start the thread
      thHorloge.start();
      // end
      return;
    }//if
    // stop
    if(libellé.equals("Arrêter")){
      // the thread is told to stop
      finHorloge=true;
       // change the button label
      btnGoStop.setText("Lancer");
       // end
      return;
    }//if
  }
}
当用户点击“开始”按钮时,会使用一个匿名类创建一个线程:
该线程的 run 方法调用了应用程序的 runHorloge 方法。完成此操作后,线程即被启动:
随后将执行 runHorloge 方法:
  private void runHorloge(){
    // we don't stop until we're told to stop
    while( ! finHorloge){
       // time recovery
      Calendar calendrier=Calendar.getInstance();
      String H=calendrier.get(Calendar.HOUR_OF_DAY)+":"
      +calendrier.get(Calendar.MINUTE)+":"
      +calendrier.get(Calendar.SECOND);
       // it is displayed in the T
      txtHorloge.setText(H);
       // waiting for a second
      try{
        Thread.sleep(1000);
      } catch (Exception e){
        // output with error
        System.exit(1);
      }//try
    }// while
  }// runHorloge
该方法的工作原理如下:
- 在txtHorloge文本框中显示当前时间
- 暂停 1 秒
- 在检查布尔变量 finHorloge 的状态后,重新执行步骤 1;当用户点击“停止”按钮时,该变量将被设为 true。
7.5. 一个 时钟小程序
我们使用标准方法将前面的图形应用程序转换为小程序,并创建以下 HTML 文档 appletHorloge.htm:
<html>
  <head>
    <title>Applet Horloge</title>
  </head>
  <body>
      <h2>Une applet horloge</h2>
    <applet
      code="appletHorloge.class"
      width="150"
      height="130"
    ></applet>
    </center>
  </body>
</html>
当我们双击此文档将其直接加载到IE中时,会看到以下显示效果:
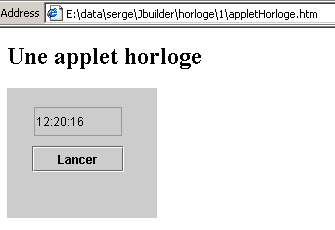
在此示例中,小程序所需的所有元素都位于同一个文件夹中:
E:\data\serge\Jbuilder\horloge\1>dir
13/06/2002  12:17                3 174 appletHorloge.class
13/06/2002  12:17                  658 appletHorloge$1.class
13/06/2002  12:17                  512 appletHorloge$2.class
13/06/2002  12:20                  245 appletHorloge.htm
我们的小程序可以进一步改进。我们提到,当小程序加载时,会执行 init 方法,如果存在 start 方法,则随后执行该方法。此外,当用户离开页面时,如果存在 stop 方法,则会执行该方法。当用户返回小程序页面时,会再次调用 start 方法。 当小程序实现视觉动画线程时,通常会利用其 start 和 stop 方法来启动和停止这些线程。毕竟,当动画被隐藏时,视觉动画线程确实没有必要在后台继续运行。
因此,我们在小程序中添加了以下 start 和 stop 方法:
  public void stop(){
    // the page is hidden
     // follow-up
    System.out.println("Page stop");
     // the page is hidden - stop the thread
    finHorloge=true;
  }

  public void start(){
     // the page reappears
     // follow-up
    System.out.println("Page start");
     // restart a new clock thread if necessary
    if(btnGoStop.getText().equals("Arrêter")){
      // change the wording
      btnGoStop.setText("Lancer");
       // and act as if the user had clicked on it
      btnGoStop_actionPerformed(null);
    }//if
  }//start
此外,我们在线程的 run 方法中添加了一个检查,用于确定其何时开始和停止:
  private void runHorloge(){
    // follow-up
    System.out.println("Thread horloge lancé");
    // we don't stop until we're told to stop
    while( ! finHorloge){
       // time recovery
      Calendar calendrier=Calendar.getInstance();
      String H=calendrier.get(Calendar.HOUR_OF_DAY)+":"
      +calendrier.get(Calendar.MINUTE)+":"
      +calendrier.get(Calendar.SECOND);
       // it is displayed in the T
      txtHorloge.setText(H);
       // waiting for a second
      try{
        Thread.sleep(1000);
      } catch (Exception e){
        // output with error
        return;
      }//try
    }// while
    // follow-up
    System.out.println("Thread horloge terminé");
  }// runHorloge
现在我们使用 AppletViewer 运行该小程序:
E:\data\serge\Jbuilder\horloge\1>appletviewer appletHorloge.htm
Page start    // applet launched - page displayed
Thread horloge lancé    // the thread is launched accordingly
Page stop    // iconized applet
Thread horloge terminé    // the thread is stopped accordingly
Page start    // applet redisplayed
Thread horloge lancé    // the thread is restarted
Thread horloge terminé    // press stop button
Thread horloge lancé    // press start button
Page stop    // icon applet
Thread horloge terminé    // thread arrested accordingly
Page start    // applet redisplay
Thread horloge lancé    // thread relaunched accordingly
在 AppletViewer 中,当 AppletViewer 窗口可见时会触发开始事件,当窗口被最小化时会触发停止事件。上述结果表明,当 HTML 文档被隐藏时,如果线程处于活动状态,它确实会被停止。
7.6. 任务同步
在之前的示例中,存在两个任务:
- 由应用程序本身代表的主任务
- 负责时钟的任务
这两个任务之间的协调由主任务负责,它通过设置一个布尔变量来停止时钟线程。现在我们将探讨任务对共享资源的并发访问问题,该问题也被称为“资源共享”。为说明这一点,我们将首先分析一个示例。
7.6.1. 一个未同步的计数器
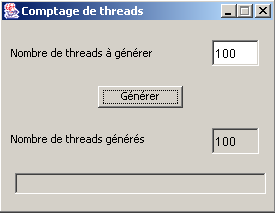
请看以下图形界面:
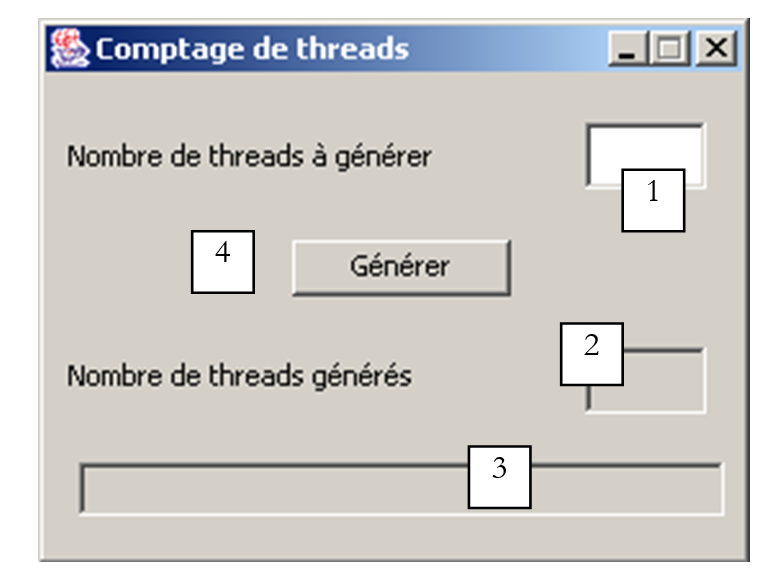
否。 | 类型 | 名称 | 角色 |
1 | JTextField | txtAGenerate | 指定要生成的线程数 |
2 | JTextField (不可编辑) | txtGenerated | 显示生成的线程数 |
3 | JTextField (不可编辑) | txtStatus | 提供有关遇到的错误以及应用程序本身的信息 |
4 | JButton | btnGenerate | 启动线程生成 |
该应用程序的工作原理如下:
- 用户在字段 1 中指定要生成的线程数
- 通过按钮 4 开始生成这些线程
- 各线程读取字段2的值,将其递增,并显示新值。初始时,该字段的值为0。
生成的线程共享一个资源:字段2的值。此处旨在演示此类情况下可能遇到的问题。以下是一个执行示例:
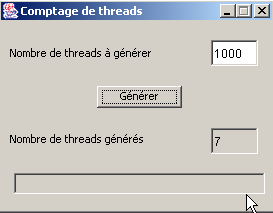
我们可以看到,虽然请求生成1,000个线程,但实际仅统计到7个。应用程序的相关代码如下:
import java.awt.*;
import java.awt.event.*;
import javax.swing.*;

public class interfaceSynchro extends JFrame {
  JPanel contentPane;
  JLabel jLabel1 = new JLabel();
  JTextField txtAGénérer = new JTextField();
  JButton btnGénérer = new JButton();
  JTextField txtStatus = new JTextField();
  JTextField txtGénérés = new JTextField();
  JLabel jLabel2 = new JLabel();

   // instance variables
    Thread[] tâches=null;   // threads
    int[] compteurs=null;   // meters

   //Building the frame
  public interfaceSynchro() {
..........
  }

   //Initialize component
  private void jbInit() throws Exception  {
......................
  }

   //Replaced, so we can get out when the window is closed
  protected void processWindowEvent(WindowEvent e) {
..................
  }

  void btnGénérer_actionPerformed(ActionEvent e) {
     //thread generation

     // read the number of threads to generate
    int nbThreads=0;
    try{
      // read the field containing the number of threads
      nbThreads=Integer.parseInt(txtAGénérer.getText().trim());
      // positive >
      if(nbThreads<=0) throw new Exception();
    }catch(Exception ex){
       //error
      txtStatus.setText("Nombre invalide");
       // we start again
      txtAGénérer.requestFocus();
      return;
    }//catch

     // initially no threads generated
    txtGénérés.setText("0");  // task cpteur at 0

     // threads are generated and launched
    tâches=new Thread[nbThreads];
    compteurs=new int[nbThreads];
    for(int i=0;i<tâches.length;i++){
      // create thread i
      tâches[i]=new Thread() {
          public void run() {
          incrémente();
        }
      };//thread i
       // define its name
      tâches[i].setName(""+i);
      // start execution
      tâches[i].start();
    }//for
  }//generate

   // increment
  private void incrémente(){
     // retrieve the thread number
    int iThread=0;
    try{
      iThread=Integer.parseInt(Thread.currentThread().getName());
    }catch(Exception ex){}
     // read the job counter value
    try{
      compteurs[iThread]=Integer.parseInt(txtGénérés.getText());
    } catch (Exception e){}
     // increment it
    compteurs[iThread]++;

     // wait 100 milliseconds - the thread will then lose the processor
    try{
      Thread.sleep(100);
    } catch (Exception e){
      System.exit(0);
    }

     // the new counter is displayed
    txtGénérés.setText("");
    txtGénérés.setText(""+compteurs[iThread]);
    // follow-up
    System.out.println("Thread " + iThread + " : " + compteurs[iThread]);
  }// increment

}// class
让我们来分析一下这段代码:
- 该窗口声明了两个实例变量:
tasks 数组将包含生成的线程。counters 数组将与 tasks 数组相关联。每个任务都将拥有自己的计数器,用于从 GUI 中获取 txtGenerated 字段的值。
- 点击“生成”按钮时,将执行 btnGenerate_actionPerformed 方法。
- 该方法首先获取要生成的线程数量。如果该数字无效,则会报告错误。随后生成请求的线程,并注意将它们的引用记录在一个数组中,同时为每个线程分配一个编号。生成的线程的 run 方法会调用该类的 increment 方法。所有线程均被启动(start)。与线程关联的计数器数组也会被创建。
- increment 方法:
- 读取 txtGénérés 字段的当前值,并将其存储在当前运行线程所属的计数器中
- 暂停 100 毫秒,以故意使处理器空闲
- 在 txtGenerated 字段中显示新值
现在让我们解释一下为什么线程计数不正确。假设需要生成 2 个线程。它们以不可预测的顺序执行。 其中一个线程先运行,并从计数器中读取值 0。随后它将计数器设为 1,但并未向窗口写入“ ”,而是主动暂停 100 毫秒。随后它失去处理器控制权,处理器被分配给另一个线程。该线程的操作方式与前一个相同:它读取窗口的计数器,并获取仍保留其中的 0。 它将计数器设为 1,并像前一个线程一样暂停 100 毫秒。随后处理器被分配回第一个线程:该线程将值 1 写入窗口计数器并终止。此时处理器被分配给第二个线程,该线程也写入 1。最终结果不正确。
问题出在哪里?第二个线程读取了错误的值,因为第一个线程在完成其任务(即更新窗口中的计数器)之前就被中断了。这引出了程序中关键资源和关键区段的概念:
- 关键资源是指一次只能由一个线程持有的资源。在此,关键资源即窗口中的计数器 2。
- 程序中的临界区是指线程执行流中访问临界资源的一段指令序列。我们必须确保在此临界区期间,只有该线程能够访问该资源。
7.6.2. 按方法同步计数
在上一个示例中,每个线程都执行了窗口的增量方法。增量方法的声明如下:
现在我们采用不同的声明方式:
**synchronized** 关键字表示每次只能有一个线程执行 increment 方法。请考虑以下写法:
- 窗口对象 F 在 btnGenerate_actionPerformed 中创建线程
- 由 F 创建的两个线程 T1 和 T2
这两个线程均由 F 创建并启动。因此,它们都会执行 F.run 方法。假设 T1 先到达。它执行 F.run,然后执行 F.increment(这是一个同步方法)。它读取计数器值 0,将其递增,然后暂停 100 毫秒。随后处理器被移交给 T2,T2 依次执行 F.run 然后执行 F.increment。 此时,T2 被阻塞,因为线程 T1 正在执行 F.increment,而 synchronized 关键字确保了每次只有一个线程可以执行 F.increment。T2 随后在未能读取计数器值的情况下失去了处理器控制权。100 毫秒后,T1 重新获得处理器控制权,显示计数器值为 1,退出 F.increment 并随后退出 F.run,最终终止。 随后 T2 重新获得处理器,此时可以执行 F.incremente,因为 T1 已不再执行该方法。T2 读取计数器值 1,将其递增,并暂停 100 毫秒。100 毫秒后,它重新获得处理器,显示计数器值 2,并同样终止。这次,获得的值是正确的。以下是一个经过测试的示例:
7.6.3. 通过对象同步的计数
在上一个示例中,对 txtGénérés 计数器的访问是由一个方法同步的。如果创建线程的窗口名为 F,我们也可以说 F.incremente 方法代表了一项资源,该资源应仅由单个线程在同一时间使用。因此,它是一项关键资源。对该资源的同步访问是由 synchronized 关键字确保的:
也可以说,关键资源就是对象 F 本身。这比关键资源是 F.increment 的情况更为严格。事实上,在后一种情况下,如果线程 T1 执行了 F.increment,线程 T2 虽然无法执行 F.increment,但可以执行对象 F 的其他方法,无论这些方法是否被同步。 当对象 F 本身是关键资源时,一旦线程 T1 执行该对象的某个同步代码段,该对象的所有其他同步代码段对其他线程都将不可访问。 因此,如果线程 T1 执行了同步方法 F.increment,那么线程 T2 不仅无法执行 F.increment,也无法执行 F 的任何其他同步代码段,即使没有其他线程正在使用这些代码段。因此,这是一种限制性更强的方法。
那么,假设窗口成为关键资源。此时,我们应编写如下代码:
// increment
private void incrémente(){
// review section
synchronized(this){
// retrieve the thread number
int iThread=0;
try{
iThread=Integer.parseInt(Thread.currentThread().getName());
}catch(Exception ex){}
// read the job counter value
try{
compteurs[iThread]=Integer.parseInt(txtGénérés.getText());
} catch (Exception e){}
// increment it
compteurs[iThread]++;
// wait 100 milliseconds - the thread will then lose the processor
try{
Thread.sleep(100);
} catch (Exception e){
System.exit(0);
}
// the new counter is displayed
txtGénérés.setText("");
txtGénérés.setText(""+compteurs[iThread]);
}//synchronized
}// increment
所有线程都使用 this 窗口进行同步。运行时,我们得到与之前相同的正确结果。实际上,我们可以对所有线程都已知的任何对象进行同步。例如,以下是另一种方法,它也能得到相同的结果:
   // instance variables
    Thread[] tâches=null;   // threads
    int[] compteurs=null;   // meters
Object synchro=new Object(); // a thread synchronization object
// increment
private void incrémente(){
// review section
synchronized(synchro){
..............
}//synchronized
}// increment
该窗口创建了一个 Object 类型的对象,用于线程同步。与基于 this 对象进行同步的方法相比,此方法更具灵活性。在此情况下,如果线程 T1 正处于 increment 的同步段内,而线程 T2 希望执行同一 this 对象的另一个同步段(但该段由 synchro 以外的对象进行同步),则 T2 能够正常执行。
7.6.4. 基于事件的同步
这次,我们使用一个布尔变量 canPass 来指示线程是否可以进入临界区。一个没有同步的版本可能如下所示:
while(! peutPasser);        // on attend que peutPasser passe à vrai
peutPasser=false;            // aucun autre thread ne doit passer
section critique;            // ici le thread est tout seul
peutPasser=true;            // un autre thread peut passer dans la section critique
第一个语句中,线程在等待 canPass 变为 true 时进行循环,这种做法效率低下:该线程不必要地占用了处理器资源。这被称为“主动等待”。我们可以按以下方式改进代码:
while(! peutPasser){        // wait for peutPasser to change to true
   Thread.sleep(100);    // off for 100 ms
}
peutPasser=false;            // no other thread may pass
section critique;            // here the thread is all alone
peutPasser=true;            // another thread can enter the critical section
此处的等待循环更优:如果线程无法通过,它将休眠100毫秒,然后再次检查是否可以通过。在此期间,处理器将被分配给系统中的其他线程。
实际上这两种方法都是错误的:它们无法防止两个线程同时进入临界区。假设线程 T1 检测到 canPass 为真。它将执行下一条指令,将 canPass 设为 false 以阻塞其他线程。然而,它很可能就在那一刻被抢占,无论是因为其处理器时间片已到期,还是因为优先级更高的任务请求了处理器,抑或是其他原因。 结果是它失去了处理器控制权。稍后它将重新获得控制权。在此期间,其他任务将获得处理器控制权,其中可能包括一个在等待 peutPasser 变为 true 时循环等待的线程 T2。它也会发现 peutPasser 为 true(第一个线程来不及将其设为 false),并同样进入临界区。而这本不该发生。
该序列
while(! peutPasser){            // wait for peutPasser to change to true
   try{
        Thread.sleep(100);    // off for 100 ms
    } catch (Exception e) {}
}// while
peutPasser=false;                // no other thread may pass
是一个必须通过同步机制进行保护的关键区。基于前面的示例,我们可以编写如下代码:
    synchronized(synchro){
        while(! peutPasser){            // wait for peutPasser to change to true
            try{
                Thread.sleep(100);    // off for 100 ms
            } catch (Exception e) {}
        }//while
        peutPasser=false;                // no other thread may pass
    }// synchronized
    section critique;                    // here the thread is all alone
    peutPasser=true;                    // another thread can enter the critical section
此示例运行正常。我们可以通过避免线程在定期检查布尔值 canPass 时处于半活动等待状态来改进它。与其每 100 毫秒醒来一次检查 canPass 的状态,不如让它进入睡眠状态,并在 canPass 为 true 时请求被唤醒。我们将其编写如下:
synchronized(synchro){
    if (! peutPasser) {
        try{
            synchro.wait();            // if we can't get through then we wait
        } catch (Exception e){
            …
        }
    }
    peutPasser=false;            // no other thread may pass
}// synchronized
synchro.wait() 操作只能由当前作为 synchro 对象“所有者”的线程执行。在此,该线程是 sequence:
synchronized(synchro){
    …
}// synchronized
这确保了线程拥有该 synchro 对象。通过 synchro.wait() 操作,线程会释放对同步锁的所有权。这是为什么呢?通常是因为它缺乏继续工作的资源。因此,与其阻塞其他正在等待 synchro 资源的线程,它会释放该资源并等待自己所缺的资源。 在我们的示例中,它等待布尔变量 canPass 变为 true。它将如何收到此事件的通知?如下所示:
synchronized(synchro){
    if (! peutPasser) {
        try{
            synchro.wait();            // if we can't get through then we wait
        } catch (Exception e){
            …
        }
    }
    peutPasser=false;            // no other thread may pass
}// synchronized
section critique...
synchronized(synchro){
      synchro.notify();
    }
让我们考虑第一个获取同步锁的线程,暂且称之为 T1。假设它发现 canPass 布尔值为 true(因为它是第一个线程),于是将其设为 false,随后退出由 sync 对象锁定的临界区。 此时,另一个线程可以进入临界区检查 canPass 的值。它会发现该值为 false,于是开始等待事件(wait)。在此过程中,它释放了对同步对象的持有权。随后,另一个线程可以进入临界区:由于 canPass 为 false,它同样会进入等待状态。因此,可能会有多个线程在同步对象上等待事件。
让我们回到已获得访问权限的线程 T1。它执行临界区,随后发出信号,表示另一个线程现在可以继续执行。其操作顺序如下:
synchronized(synchro){
      synchro.notify();
    }
它必须首先使用 synchronized 语句重新获得同步对象的控制权。这应该不成问题,因为它竞争的线程即使暂时获得了同步对象,也必须通过 wait 操作将其释放,因为它们会发现 peutPasser 为 false。 因此,我们的线程 T1 最终将获得 synchro 对象的所有权。一旦完成,它将通过 synchro.notify 操作发出信号,表示必须唤醒被 synchro.wait 阻塞的某个线程。随后,它再次释放对同步对象的所有权,该对象随后被分配给某个等待中的线程。 该线程将从导致其暂停的 wait 语句之后的指令开始继续执行。随后,它将执行临界区,并发出 synchro.notify 来释放另一个线程。如此循环往复。
让我们通过之前学过的计数示例来看看它是如何工作的。
  void btnGénérer_actionPerformed(ActionEvent e) {
     //thread generation

     // read the number of threads to generate
    int nbThreads=0;
    try{
      // read the field containing the number of threads
      nbThreads=Integer.parseInt(txtAGénérer.getText().trim());
      // positive >
      if(nbThreads<=0) throw new Exception();
    }catch(Exception ex){
       //error
      txtStatus.setText("Nombre invalide");
       // we start again
      txtAGénérer.requestFocus();
      return;
    }//catch

     // RAZ job counter
    txtGénérés.setText("0");  // task cpteur at 0
    // 1st thread can pass
    peutPasser=true;
     // threads are generated and launched
    tâches=new Thread[nbThreads];
    compteurs=new int[nbThreads];
    for(int i=0;i<tâches.length;i++){
      // create thread i
      tâches[i]=new Thread() {
          public void run() {
          synchronise();
        }
      };//thread i
       // define its name
      tâches[i].setName(""+i);
      // start execution
      tâches[i].start();
    }//for
  }//generate
现在,线程不再执行 increment 方法,而是执行以下 synchronize 方法:
   // thread synchronization step
  public void synchronise(){
     // request access to the critical section
    synchronized(synchro){
      try{
        // can we get through?
        if(! peutPasser){
          System.out.println(Thread.currentThread().getName()+ " en attente");
          synchro.wait();
        }
         // we have passed - we forbid other threads to pass
        peutPasser=false;
      } catch(Exception e){
        txtStatus.setText(""+e);
                    return;
      }//try
    }// synchronized

    // review section
    System.out.println(Thread.currentThread().getName()+ " passé");
    incrémente();

     // we're done - we release any thread blocked at the entrance to the critical section
    peutPasser=true;
    System.out.println(Thread.currentThread().getName()+ " terminé");
    synchronized(synchro){
      synchro.notify();
    }// synchronized
  } // synchronize
synchronize 方法的目的是逐个处理线程。它使用一个名为 synchro 的同步变量来实现这一点。increment 方法不再受 synchronized 关键字的保护:
   // increment
  private void incrémente(){
     // retrieve the thread number
    int iThread=0;
    try{
      iThread=Integer.parseInt(Thread.currentThread().getName());
    }catch(Exception ex){}
     // read the job counter value
    try{
      compteurs[iThread]=Integer.parseInt(txtGénérés.getText());
    } catch (Exception e){}
     // increment it
    compteurs[iThread]++;
     // wait 100 milliseconds - the thread will then lose the processor
    try{
      Thread.sleep(100);
    } catch (Exception e){
      System.exit(0);
    }
     // the new counter is displayed
    txtGénérés.setText("");
    txtGénérés.setText(""+compteurs[iThread]);
  }// increment
对于 5 个线程,结果如下:
0 passé
1 en attente
2 en attente
3 en attente
4 en attente
0 terminé
1 passé
1 terminé
2 passé
2 terminé
3 passé
3 terminé
4 passé
4 terminé
设 T0 至 T4 为应用程序生成的五个线程。T0 最先获取同步锁,并发现 peutPasser 被设为 true。它将 peutPasser 设为 false 并继续执行:这就是发送第一条消息的目的。极有可能,它会继续执行临界区,具体来说是 increment 方法。 在此方法中,它将休眠 100 毫秒(sleep)。因此,它释放了处理器。处理器随后被分配给另一个线程 T1,该线程随即获取了同步对象的所有权。它发现无法继续执行,于是进入等待状态(wait)。随后,它释放了同步对象的所有权以及处理器。处理器被分配给线程 T2,后者遭遇了同样的命运。 在 T0 暂停的 100 毫秒内,线程 T1 至 T4 因此被挂起。这就是 4 条“等待”消息的含义。100 毫秒后,T0 重新获得处理器并完成其工作:这就是“0 完成”消息的含义。随后它释放其中一个被阻塞的线程并终止。 随后,释放的处理器被分配给一个空闲线程:即刚刚被释放的那个线程。在此处,它是 T1。线程 T1 随后进入临界区:这就是消息“1 通过”的含义。它完成所需操作后暂停 100 毫秒。此时处理器可供其他线程使用,但所有线程都在等待某个事件:因此没有线程能获取处理器。 100 毫秒后,线程 T1 重新获取处理器并终止:这就是消息“1 passed”的含义。线程 T1 到 T4 将与 T1 表现一致:这就是三组消息“passed”、“finished”的含义。