1. Introduction
The document’s PDF is |HERE|.
The document’s codes are |HERE|.
This document is a product of Anthropic’s AI Claude. Its purpose is to adapt the document “An Example of a Client/Server – AngularJS 1.x / Spring 4” in two ways:
- the AngularJS 1.x client is replaced by a [Flutter] 3 client;
- the Java Spring MVC web framework is replaced by the web framework [NestJS];
Claude from Anthropic (AI) did most of the work (90%):
- Code generation: Claude generated all of the code. I simply tested it by following the generated course;
- Course generation in ODT format: Claude generated several versions at my request. This is where I was primarily involved.
Note 1: If the reader’s primary goal is to “learn NestJS,” an overview of this web framework is available in the document Introduction to the TypeScript Language and the NestJS Web Framework Through Examples. In this document, the NestJS server is treated as a black box. You’ll be shown how to use it, but its code is not described.
Note 2: Flutter’s programming language is Dart. Readers interested in learning the basics of the Dart language can read the course “Introduction to the Dart Language Through Examples” (2026).
Note 3: Claude often refers to the Angular, React, and Vue.js frameworks. Claude has written three courses on these frameworks and remembers them well. That is why he references them:
- [An Angular/NestJS Client/Server Example (2026)];
- [A React/NestJS Client/Server Example (2026)];
- [A Vue.js/NestJS Client/Server Example (2026)];
Note 4: If you feel that Claude’s explanations aren’t sufficient, reach out to Claude to ask for clarification on a specific point in his course. This often helps.
Serge Tahé, September 2026
==
This document is a follow-up to the course “A Client/Server Example - AngularJS 1.x / Spring 4,” written in 2014. That original document built a small application for scheduling medical appointments (“[RdvMedecins]”) using a Spring 4 / Spring Data / Spring MVC server and an AngularJS 1.x client.
Twelve years later, the two frameworks used have evolved significantly—or have even been replaced in common use:
- on the server side, [NestJS] has established itself as one of the most widely used Node.js/TypeScript frameworks for building structured web applications, with a philosophy similar to that of Spring (modules, controllers, services, dependency injection) but within the JavaScript/TypeScript ecosystem;
- On the client side, AngularJS 1.x was completely rewritten starting in 2016 under the name [Angular] (versions 2, 4, 5… up to version 22) - The approach taken by the [Angular] / [NestJS] variant in this course: A Client/Server Example—Angular / NestJS (2026). This document takes a different approach: [Flutter] (created by Google, first stable version in December 2018), a “cross-platform” framework: from a single codebase written in the [Dart] language, it generates mobile, desktop, and web applications—whose interface is described not by HTML templates, but by a widget tree (see Chapter 3).
The goal of this document is to revisit the original case study—the same application, the same features, the same database—and to rebuild it using current tools, while maintaining as much of the same instructional progression as the 2014 document as possible.
1.1. A Step-by-Step Reconstruction
The original document was about 300 pages long and covered, in addition to the application’s core functionality—role-based authentication (Spring Security)—twelve progressive examples for learning AngularJS 1.x step by step. Reconstructing all of this content at once would be both time-consuming and difficult to digest.
This document therefore covers the first two steps of the reconstruction:
- the application’s general architecture (unchanged in principle);
- the database (unchanged, except for the addition of the [users] table);
- the installation of the complete [NestJS] server provided with this document, whose appointment viewing and booking/cancellation features are tested using Postman—its code is not covered here, as this document is dedicated to [Flutter];
- token-based authentication (JWT) and role-based access control (ADMIN/USER) for this server, equivalent to the Spring Security layer in the original document—we will only learn how to use it, first via Postman and then via the client;
- the corresponding [Flutter] client, with the same features: a login screen, an interface tailored to the logged-in user’s role ([Material Design]), and the ability to switch the interface between French and English ([TranslationsService]).
Two features of the original document are, at this stage, excluded from this document: the original client’s “debug” mode (display of the raw template for the current view), which has been deliberately omitted from this port (see Chapter 6 for the rationale behind this decision), and the configuration of an artificial network delay, which has been deferred to a later stage.
1.2. Who This Document Is Intended For
This document assumes no prior knowledge of either [NestJS] or [Flutter]. Each new concept (decorator, dependency injection, component, signal, etc.) is explained as it appears, in as much detail as possible—even for readers who have never written a single line of TypeScript or Dart.
However, some basic knowledge is helpful for getting the most out of this document:
- a basic understanding of the Dart language (variables, functions, arrays, objects);
- a basic understanding of HTTP interactions in a web application (GET/POST methods, JSON format);
- common tags in the HTML language;
- using the command line (cd, npm install…).
You do not need to be familiar with the TypeScript language (used on the server side) beforehand: it is a superset of JavaScript that adds a type system, which is explained throughout the document whenever it is used. The same applies to the [Dart] language, used on the client side, which is introduced in Chapter 3. Interested readers may consult the document *Introduction to the Dart Language Through Examples* (2026), which explains Dart in detail.
1.3. The Application Architecture
The overall architecture of the application has not changed since the original document:
- a web server provides the client with a single interface, built on the Component model (view + associated logic), which relies on services to communicate with the server—a browser for clients [Angular]/[React]/[Vue.js] from this course, or, for this client [Flutter], either a browser, a mobile operating system, or a desktop operating system (see Chapter 5);
- the user interacts with the views displayed in the browser. Their actions sometimes require a request to the server [NestJS], which processes the request and returns a response JSON (JavaScript Object Notation); this response is used to update the view presented to the user.
The application under consideration will have the following architecture:
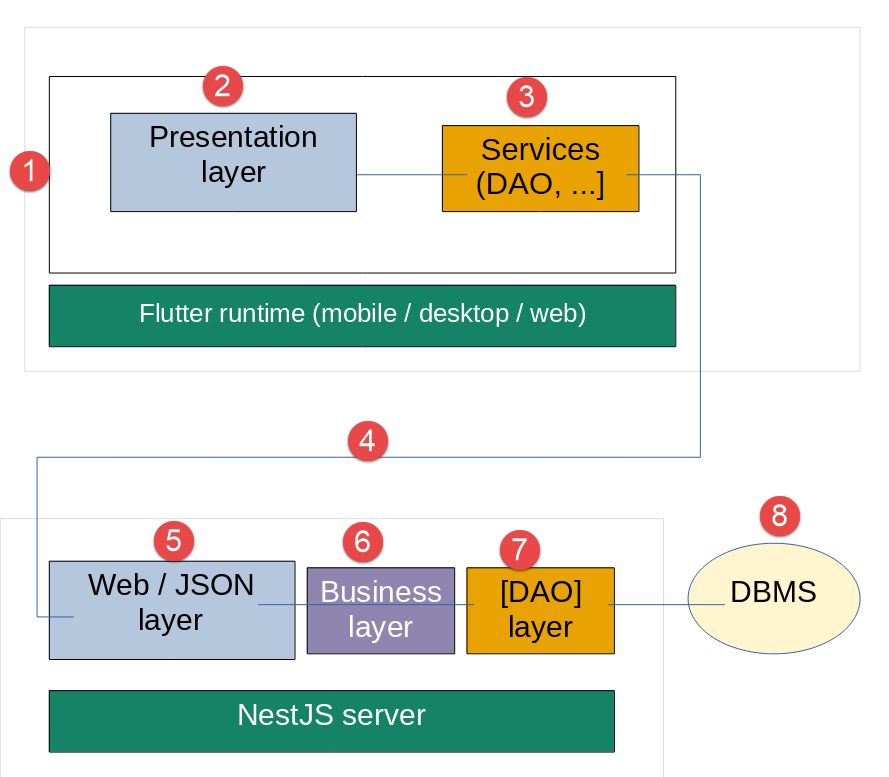
- In [1], the user of the [Flutter] application queries the [Presentation] layer [2] of that application;
- to perform the action requested by the user, the [Presentation] layer [2] may query the [Services] layer [3];
- To provide the requested service, the [3] layer may need to query [4], the remote JSON server implemented by [NestJS];
- Depending on the request received in [5], the [6-8] layers may be queried;
- the server’s response travels back up layers [2-8] in reverse order;
- the view displayed to the user, [1], reflects this response;
Note: If you’re confused by the project’s architecture, refer back to this diagram. Note that the DBMS is used by the server, not by the client.
1.4. Tools Used
This document uses the following tools (their installation is detailed in Chapters 1 and 2):
- Node.js (version 22 or later) and its package manager npm—the equivalent, within the JavaScript ecosystem, of what Java + Maven were for the original Spring server;
- Visual Studio Code (VSCode), a free code editor, along with its TypeScript extensions—the equivalent of Spring Tool Suite (STS) and WebStorm used in the original document;
- the [Flutter] SDK (which includes the [Dart] SDK) is installed once, system-wide—unlike [Vite], used by previous web clients in this course, which required no system-wide installation;
- [MySQL] 8 for the database (the original document used [MySQL] 5—the relational schema itself does not change);
- [Android Studio] (along with its [Android] SDK and its command-line tools), to compile the application on an [Android] phone, the mobile target for this course—detailed installation instructions are in Chapter 1;
- Postman (or any other HTTP client), to test the server URLs that respond to POST requests (/addAppointment, /deleteAppointment)—a web browser can only test GET requests.
1.5. Application Features
The “business” features of the [RdvMedecins] application remain unchanged from the original document; access control, however, is slightly more robust than in the original (see the table below):
- A medical practice employs several doctors, each with their own consultation time slots;
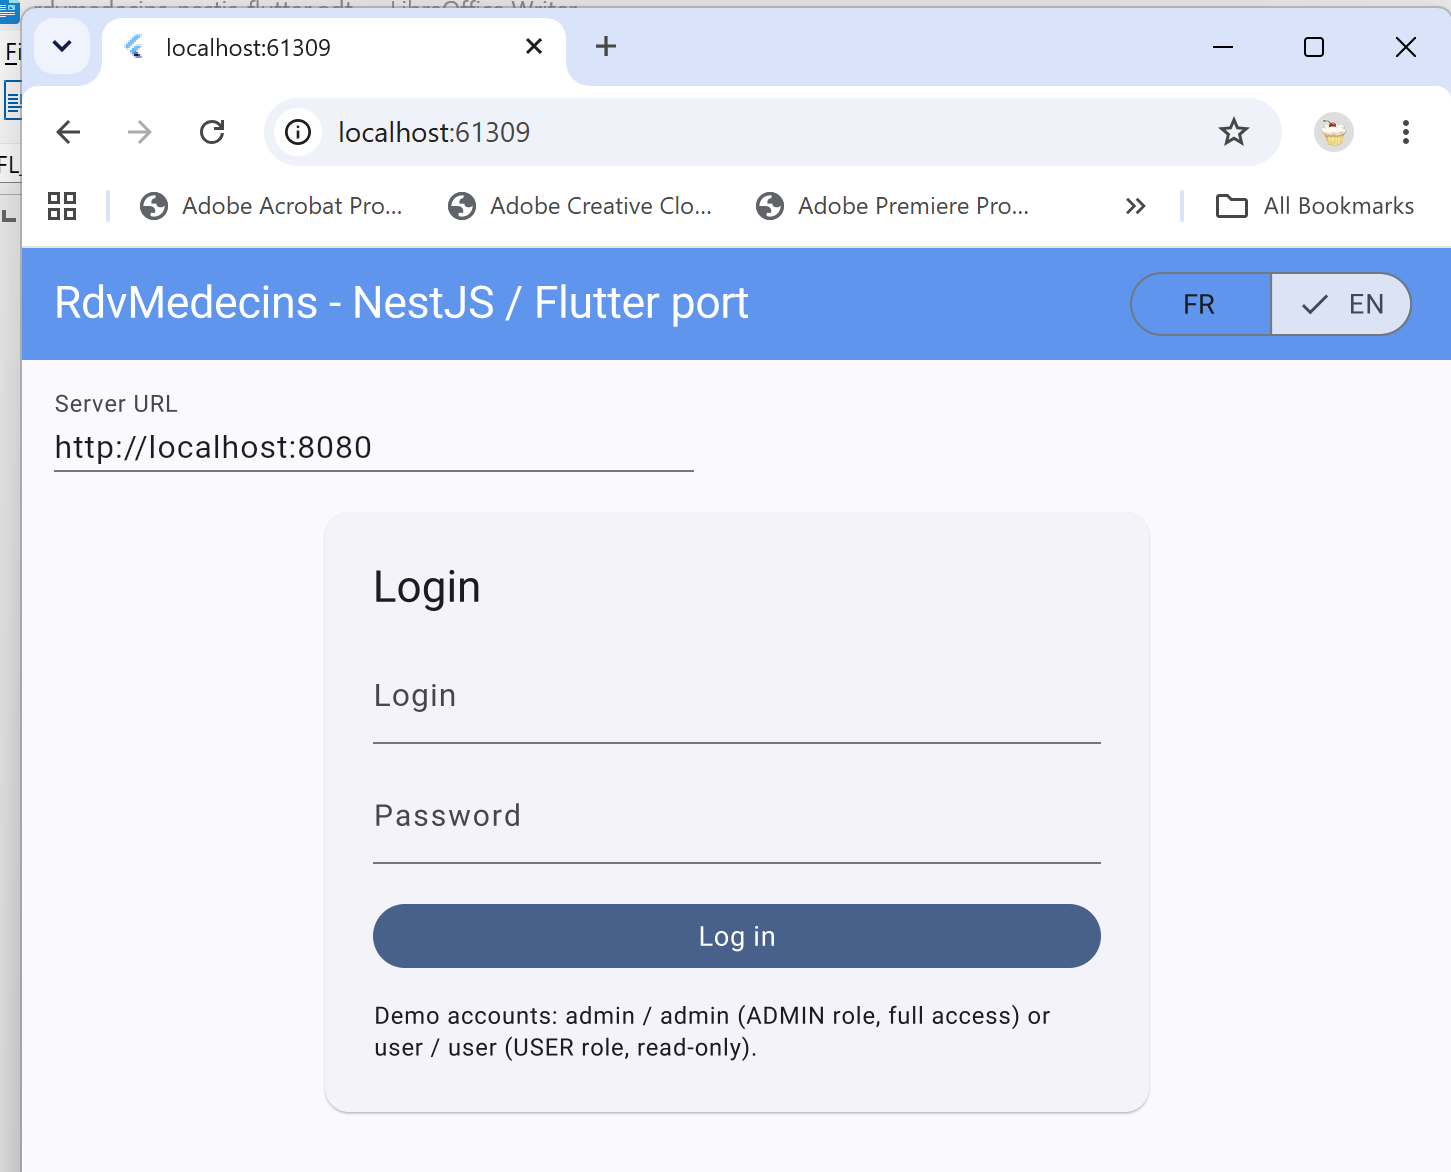
- a user must log in (username/password) to access the application;
- Once logged in, the user can select a doctor and a day, and view the doctor’s schedule for that day: each time slot appears either available or booked;
- a user with the role ADMIN can also book an available time slot for a patient of their choice and cancel an existing appointment;
- A user with the role USER can view the schedules but cannot book or cancel (read-only access)—a deliberate difference from the original document, where the role USER was used solely to illustrate a denial of access and could not view anything at all (see Chapter 2, section “Creating the Database,” for the rationale behind this choice).
1.6. What Has Changed, What Has Not Changed
Original document (2014) | This document (2026) | |
[MySQL] 5, tables MEDECINS/CLIENTS/CRENEAUX/RV | [MySQL] 8, same tables, same columns, same constraints (now with English names) | |
Java, Spring 4, Spring Data (JPA/Hibernate), Spring MVC | TypeScript, [NestJS], [TypeORM], same exposed URLs | |
JavaScript, AngularJS 1.x, Bower | Dart, [Flutter] (Material widgets, package [provider]), pub | |
Bootstrap 3 | None ([Material Design] integrated into the [Flutter] widgets) | |
Spring Security, HTTP Basic, roles in 3 tables; only ADMIN uses the application | Passport/JWT ([@nestjs/passport], [@nestjs/jwt]), a signed token presented with each request, roles in a single column, ADMIN full access and USER read-only | |
angular-translate library | [TranslationsService] (handmade, embedded dictionaries) |
1.7. Organization of this document
- Setting up the work environment—install the tools and create the [Flutter] project.
- Installing the server [NestJS]—install Laragon and the database [MySQL], configure, start, and test the server, then run the client [Flutter] for the first time.
- Introduction to [Flutter]—the basics of the framework (widgets, StatelessWidget/StatefulWidget, provider), with a review of concepts already covered in [Angular], [React] and [Vue.js].
- The [Flutter] client for the [RdvMedecins] application—the client architecture, each of its files (including the login screen), and a step-by-step walkthrough of the entire application.
- Porting the [Flutter] application to mobile, desktop, and web—how a single source code compiles to these three target families, and what you need to know for each of them (network, mobile-specific restrictions).
- Conclusion and next steps.