Skip to content

8. 身份验证与授权

每个请求都会引出两个不同的问题:

  • 用户是谁?这就是身份验证:用户已使用用户名和密码表明身份,之后的每个请求都必须证明它来自该用户;
  • 他们有权访问此页面吗?这就是授权:在案例研究中,只有角色为 ADMIN 的用户才能管理医生和客户。

身份证明必须随每个请求一起提交。[Symfony] 通常把已登录的用户存储在它的会话 中(参见作用域一节),这是 Web 应用程序最简单的解决方案。而案例研究在其所有版本([ASP.NET Core MVC]、[Spring MVC]、[NestJS]、[Flask]、[Laravel])中,改为使用令牌 (JWT,JSON Web Token),我们这里也将使用它:登录后,服务器生成一个包含用户身份的令牌,并用密钥对其进行签名(这就是示例 23 中签名 Cookie 背后的原理)。令牌存储在 Cookie 中;浏览器在每个请求中把它发回;服务器验证签名。用户可以读取自己的令牌,但不能修改它:任何修改都会使签名失效。其格式是标准化的(RFC 7519),所有编程语言都能理解,并且令牌包含其过期日期。最重要的是,服务器无需存储任何内容:任何知道密钥的服务器都可以验证令牌。

[Symfony] 拥有一个全面的安全组件,由 SecurityBundle 集成,我们将原样使用其中的各个元素:

  • 应用程序的 URL 分布在各个防火墙 (firewalls)中,每个防火墙都有自己的用户身份验证方法;
  • 身份验证由认证器 (authenticators)处理:这些对象为每个请求确定用户的身份。[Symfony] 提供了其中的几种(登录表单、会话、API 令牌等);我们将编写自己的认证器,它读取 JWT 令牌。应用程序的其余部分只看到结果:已通过身份验证的用户,由 [#[CurrentUser]]、[$this->getUser()] 提供,在视图中则由 [app.user] 提供;
  • 用户由用户提供者提供,其密码由 PasswordHasher 组件进行哈希处理(算法 [bcrypt]);
  • 授权是基于角色的:页面保护由访问控制规则([access_control])或动作的 [#[IsGranted]] 属性来描述;视图使用 [is_granted] 检查权限;
  • 登录尝试次数由 RateLimiter 组件限制(示例 27)。

所有这些都由内核事件监听器完成(上一章):防火墙监听 [kernel.request] (优先级 8),[#[IsGranted]] 在 [kernel.controller_arguments] 上被读取,而拒绝访问是异常,在 [kernel.exception] 上处理。

令牌的生成和验证由 [firebase/php-jwt] 库处理,它是 [PHP] 中最常用的 JWT 库,由示例中的 [composer.json] 文件安装。(有一个广泛使用的令牌 Bundle——JWT 和 [LexikJWTAuthenticationBundle]——专为 API 设计;对于 Web 应用程序,只需几行代码就足够了,而且它们能更好地说明这一机制。)

8.1. 示例 25:登录、令牌、受保护页面

25-jwt/
├── .env
├── config/
│   ├── bundles.php
│   └── packages/
│       ├── framework.yaml
│       └── security.yaml
├── src/
│   ├── Controller/
│   │   ├── AuthController.php
│   │   └── ProfileController.php
│   └── Security/
│       ├── AuthService.php
│       ├── TokenAuthenticator.php
│       ├── User.php
│       └── UsersService.php
├── templates/
│   ├── auth/
│   │   └── login.html.twig
│   ├── layout.html.twig
│   └── profile/
│       └── profile.html.twig
└── ...

8.1.1. 配置:.env、bundles.php 和 framework.yaml

令牌使用密钥签名,该密钥不能硬编码。现在是真正把配置与代码分离的时候了。特定于某次安装的设置位于文件 [.env] (示例 01)中,它现在包含三行新内容(一行注释,后面是两个变量):

1
2
3
4
5
6
# .env:示例 25 的配置(见示例 01)
APP_ENV=dev
APP_SECRET=6144ddf9f821deebee2291ab7742d7a9
# 签署 JWT 令牌的密钥(至少 32 个字符),以及它们的有效期
JWT_SECRET=a-secret-key-of-at-least-32-characters-for-example-25
JWT_DURATION_MINUTES=60

标准要求所使用的算法(HMAC-SHA256)的密钥至少为 256 位,即 32 字节;库会拒绝任何更短的密钥。代码本身并不直接读取 [.env] 文件:[Dotenv] 组件(示例 01)已把它转换为环境变量,容器会把这些变量提供给请求它们的服务(我们将在 [AuthService] 服务中看到这一点)。真正的环境变量优先于 [.env] 文件:在 [Linux] 或 [macOS] 下,可以像下面这样使用不同的密钥启动应用程序:

JWT_SECRET="another-key-of-at-least-thirty-two-characters" php -d variables_order=EGPCS -S localhost:8000 -t public

而在 [Windows] (PowerShell)下:

$env:JWT_SECRET="another-key-of-at-least-thirty-two-characters"
php -d variables_order=EGPCS -S localhost:8000 -t public

(选项 [-d variables_order=EGPCS] 指示 [PHP] 用环境变量填充数组 [$_ENV] ,其默认配置并不总是这样做。)在生产环境中,密钥通常托付给 [Symfony] 保险库 (secrets vault,命令 [bin/console secrets:set]),它把密钥加密后存储在项目中。

SecurityBundle 被添加到 Bundle 列表中:

1
2
3
4
5
6
7
8
<?php
// config/bundles.php:应用程序的 Bundle;SecurityBundle 集成了
// 安全组件(身份验证、授权)
return [
    Symfony\Bundle\FrameworkBundle\FrameworkBundle::class => ['all' => true],
    Symfony\Bundle\TwigBundle\TwigBundle::class => ['all' => true],
    Symfony\Bundle\SecurityBundle\SecurityBundle::class => ['all' => true],
];

这里使用会话只是为了登录表单的防 CSRF 令牌(示例 21):

1
2
3
4
5
6
7
8
# config/packages/framework.yaml:FrameworkBundle 的配置
framework:
    secret: '%env(APP_SECRET)%'
    # 会话:它只用于登录表单的防 CSRF 令牌
    session:
        handler_id: null
        save_path: '%kernel.project_dir%/var/sessions/%kernel.environment%'
    csrf_protection: true

8.1.2. 安全配置:config/packages/security.yaml

# config/packages/security.yaml:SecurityBundle 的配置
security:
    # User 类用户的密码哈希:bcrypt
    password_hashers:
        App\Security\User:
            algorithm: bcrypt

    # 用户提供者(PROVIDER):根据登录名查找用户的对象
    providers:
        users:
            id: App\Security\UsersService

    # 防火墙(FIREWALLS):每个防火墙保护与其模式匹配的 URL
    firewalls:
        # Bootstrap 文件:不设安全防护
        resources:
            pattern: ^/bootstrap/
            security: false
        # 所有其他 URL
        main:
            # stateless:用户不存储在会话中,而是
            # 在每次请求时根据其令牌重新找到
            stateless: true
            provider: users
            # 身份验证器:它在每次请求时读取 Cookie 中的令牌
            custom_authenticators:
                - App\Security\TokenAuthenticator

    # 访问控制(ACCESS CONTROL):以 /profile 开头的 URL 需要已通过身份验证的
    # 用户;其他 URL 是公开的
    access_control:
        - { path: ^/profile, roles: IS_AUTHENTICATED }
  • 第 4–6 行:来自 [User] 类的用户的密码哈希算法:[bcrypt]。(值 [auto] 会选择可用的最佳算法,并且能够验证来自其他算法的哈希);
  • 第 9–11 行:用户提供者——根据用户 ID 查找用户的服务(这里是我们的类 [UsersService])。[Symfony] 提供了几种:[memory] (写在此文件中的列表)、[entity] (数据库表;见案例研究)等;
  • 第 14–27 行:防火墙。每个防火墙适用于与其模式([pattern])匹配的 URL,并选择第一个匹配的条目。第一个 [resources] 涵盖 [Bootstrap] 的文件(示例 15),不带安全机制([security: false]):为提供样式表而去查找用户是没有必要的。第二个 [main] 没有特定的限定:它涵盖所有其他 URL;
  • 第 23 行:该防火墙是无状态的 (stateless):已通过身份验证的用户不会存储在会话中;每个请求都根据其令牌来识别用户;
  • 第 26–27 行:防火墙的认证器,即我们的类 [TokenAuthenticator];
  • 第 31–32 行:访问控制:一个按顺序检查的规则列表,其中第一个与 URL 对应的规则生效。以 [/profile] 开头的 URL 规则要求已通过身份验证的用户([IS_AUTHENTICATED]);其他规则是公开的。

在标准项目中,该文件由 [Symfony Flex] 在安装 Bundle([composer require security])时写入,而 [bin/console make:user] 命令来自 [MakerBundle] ,会写出用户类及其提供者。

8.1.3. 用户:src/Security/User.php 和 UsersService.php

<?php
// src/Security/User.php:一个用户。UserInterface:Symfony 期望已验证用户
// 具备的接口;PasswordAuthenticatedUserInterface:
// 拥有密码的用户

namespace App\Security;

use Symfony\Component\Security\Core\User\PasswordAuthenticatedUserInterface;
use Symfony\Component\Security\Core\User\UserInterface;

readonly class User implements UserInterface, PasswordAuthenticatedUserInterface
{
    public function __construct(
        public string $login,
        public string $name,
        // 角色:USER 或 ADMIN
        public string $role,
        // 密码的哈希(对于从令牌读取的用户则为空)
        public string $passwordHash = '',
        // 对该用户进行身份验证的令牌的内容
        public array $claims = [],
    ) {
    }

    // 用户的标识符:其登录名
    public function getUserIdentifier(): string
    {
        return $this->login;
    }

    // 角色,按 Symfony 的含义:以 ROLE_ 开头的字符串
    public function getRoles(): array
    {
        return ['ROLE_'.$this->role];
    }

    public function getPassword(): string
    {
        return $this->passwordHash;
    }
}
  • 第 11 行:一个用户。[Symfony] 要求已认证用户实现 [UserInterface] 接口:通过其方法获取用户的 ID 和角色。[PasswordAuthenticatedUserInterface] 接口则增加了哈希密码。在典型的应用程序中,用户表对应的 [Doctrine] 实体(下一章)会实现这些方法;
  • 第 13–23 行:登录名、姓名、角色、密码哈希,以及验证该用户身份的令牌内容(对于从用户列表中取得的用户,该项为空)。服务器绝不存储密码,即使是加密形式也不行:如果数据库被盗,密码也会随之被盗(而且很多人在所有地方都使用同一个密码)。它存储的是哈希函数的结果,哈希函数是一种单向函数:你可以计算出密码的哈希值,但无法从哈希值还原出密码。要验证输入的密码,只需计算其哈希值并与存档的哈希值比较;
  • 第 32–35 行:角色,按 [Symfony] 的定义:以 [ROLE_] 开头的字符串。案例研究中的角色 [USER] 会变成 [ROLE_USER]。
<?php
// src/Security/UsersService.php:用户,存放在内存中(示例 28
// 和案例研究会把它们放入数据库)。UserProviderInterface:按 Symfony 的含义,
// 是用户提供者(PROVIDER)(见 config/packages/security.yaml)

namespace App\Security;

use Symfony\Component\Security\Core\Exception\UnsupportedUserException;
use Symfony\Component\Security\Core\Exception\UserNotFoundException;
use Symfony\Component\Security\Core\User\UserInterface;
use Symfony\Component\Security\Core\User\UserProviderInterface;

class UsersService implements UserProviderInterface
{
    // 我们绝不保存密码,只保存其 bcrypt 哈希,它由以下命令
    // 一次性计算得出:php -r "echo password_hash('marie', PASSWORD_BCRYPT);"
    private const USERS = [
        'marie' => ['Marie Pélissier', 'USER', '$2y$10$2DnOgGBiVcyc07su9rj2E.EvOoyPFzHN/h9PLKDuoW5P7UGtclW6W'],
        'admin' => ['Administrator', 'ADMIN', '$2y$10$m5o9euCi0EdgoZkLVw.UsO58RxJcqhMBfVrlLMCIOh2LyGSjuN29K'],
    ];

    public function find(string $login): ?User
    {
        if (! isset(self::USERS[$login])) {
            return null;
        }
        [$name, $role, $hash] = self::USERS[$login];
        return new User($login, $name, $role, $hash);
    }

    // UserProviderInterface 的三个方法
    public function loadUserByIdentifier(string $identifier): UserInterface
    {
        return $this->find($identifier) ?? throw new UserNotFoundException();
    }

    // 存储在会话中、用于重新加载的用户:这里从不调用,
    // 因为防火墙是无状态的
    public function refreshUser(UserInterface $user): UserInterface
    {
        throw new UnsupportedUserException();
    }

    public function supportsClass(string $class): bool
    {
        return $class === User::class;
    }
}
  • 第 17–20 行:两个硬编码的测试用户(示例 28 和案例研究会把它们存储在数据库中):每个登录名对应姓名、角色和密码哈希。哈希使用 bcrypt 算法生成,该算法专为密码设计。它有两个显著特点。它被有意设计得慢,且慢的程度可调(cost,此处设为 10:2^10 个计算周期,体现在哈希中的 [$10$]):只需几十毫秒,用户察觉不到,但会让黑客尝试数十亿个密码的代价极其高昂。它还会加盐:哈希之前,会把随机生成的盐值 与密码混合,并存储在哈希本身之中(即 [$10$] 之后的 22 个字符);因此,两个密码相同的用户会得到不同的哈希。这些哈希是一次性计算好的,使用 [password_hash] 函数(来自 [PHP] ,第 16 行),或使用 [bin/console security:hash-password] 命令(来自 [Symfony]):由于应用程序在每次请求时都会重新构建,每次请求都重新计算会白白浪费时间。[bcrypt] 只考虑密码的前 72 个字节:案例研究对此做了处理;
  • 第 22–29 行:某个登录名对应的用户,或 [null]。[isset] 检查某个键是否存在;赋值 [[$name, $role, $hash] = ...] 对数组进行解构:每个变量接收对应的元素;
  • 第 32–47 行:[UserProviderInterface] 接口的三个方法,它们使该类成为用户提供者:[loadUserByIdentifier] 返回与某个标识符关联的用户,或抛出 [UserNotFoundException] 异常;[refreshUser] 重新加载存储在会话中的用户(对于无状态防火墙则不需要);[supportsClass] 指明所提供用户的类。当左侧表达式的计算结果为 [??] 时,运算符 [throw] 会抛出异常,其后跟随 [null]。

8.1.4. 认证服务:src/Security/AuthService.php

<?php
// src/Security/AuthService.php:密码和 JWT 令牌的检查

namespace App\Security;

use Firebase\JWT\JWT;
use Firebase\JWT\Key;
use Symfony\Component\DependencyInjection\Attribute\Autowire;
use Symfony\Component\PasswordHasher\Hasher\UserPasswordHasherInterface;
use Throwable;

class AuthService
{
    // 携带令牌的 Cookie 的名称
    public const COOKIE = 'token';

    public function __construct(
        private UsersService $users,
        // 密码哈希服务(见 config/packages/security.yaml)
        private UserPasswordHasherInterface $hasher,
        // #[Autowire(env: ...)]:环境变量的值(.env 文件);
        // int: 前缀将其转换为整数
        #[Autowire(env: 'JWT_SECRET')] private string $secret,
        #[Autowire(env: 'int:JWT_DURATION_MINUTES')] public readonly int $durationMinutes,
    ) {
    }

    // 用户,如果登录名未知或密码错误则为 null。
    // isPasswordValid 使用已存储哈希的盐值对输入的密码进行哈希,
    // 然后比较两个结果
    public function validate(?string $login, ?string $password): ?User
    {
        if (! $login || $password === null) {
            return null;
        }
        $user = $this->users->find($login);
        if ($user === null || ! $this->hasher->isPasswordValid($user, $password)) {
            return null;
        }
        return $user;
    }

    // 用户的 JWT 令牌,使用密钥签名(HMAC-SHA256)
    public function createToken(User $user): string
    {
        $now = time();
        // 令牌的内容:“claims”(关于用户的声明)
        $claims = [
            'sub' => $user->login,
            'name' => $user->name,
            'role' => $user->role,
            'iat' => $now,
            'exp' => $now + $this->durationMinutes * 60,
        ];
        return JWT::encode($claims, $this->secret, 'HS256');
    }

    // 由签名和过期日期
    // 均有效的令牌所描述的用户;否则为 null(伪造的、过期的或无法读取的令牌)
    public function check(string $token): ?User
    {
        try {
            // decode 返回一个对象;(array) 将其转换为关联数组
            $claims = (array) JWT::decode($token, new Key($this->secret, 'HS256'));
        } catch (Throwable) {
            return null;
        }
        return new User($claims['sub'], $claims['name'], $claims['role'], claims: $claims);
    }
}
  • 第 17–26 行:该服务接收用户提供者、密码哈希服务([UserPasswordHasherInterface],应用在 [security.yaml] 中选定的算法)以及两个配置值。属性 [#[Autowire(env: 'NAME')]] 提供某个环境变量的值;前缀可对其进行转换:[int:] 转换为整数(还有其他前缀:[bool:]、[json:]、[base64:]等)。有效期是一个只读的公共属性:控制器会使用它;
  • 第 31–41 行:验证用户名和密码。[isPasswordValid] 使用存储的哈希盐值对输入的密码进行哈希,并比较两个哈希值。未知的用户名和错误的密码会得到相同的结果,即 [null];
  • 第 44–56 行:令牌生成。令牌包含一个关于用户的声明数组(claims)。其中一些有标准化的名称:[sub] (subject),即用户 ID;[iat] (issued at),即创建日期;[exp] (expiration),即过期日期。日期以自 1970 年 1 月 1 日以来经过的秒数表示([time()] 函数,来自 [PHP])。其他字段是可选的:此处为姓名和角色。[JWT::encode] 生成令牌,并使用 [HS256] 算法对其签名(HMAC-SHA256,一种使用共享密钥的签名);
  • 第 60–69 行:令牌验证。[JWT::decode] 验证签名和过期日期,然后返回声明(一个对象,由 [(array)] 转换为数组)。任何异常(伪造、过期或格式错误的令牌)都会引发异常;[catch (Throwable)] 会捕获所有异常([Throwable] 是 [PHP] 中所有异常和错误的接口;当变量不被使用时,变量名可以省略)。[Key] 对象将密钥与一种算法关联起来:如果令牌指定了不同的算法(或根本没有指定,即 [none]),就会被拒绝。有效的令牌会变成一个没有哈希的 [User],连同它的声明(名为 [claims] 的参数)。

8.1.5. 认证器:src/Security/TokenAuthenticator.php

<?php
// src/Security/TokenAuthenticator.php:防火墙的身份验证器(AUTHENTICATOR)(见
// config/packages/security.yaml):在每次请求时,它根据 [token] Cookie 中的
// JWT 令牌确定用户是谁

namespace App\Security;

use Symfony\Component\HttpFoundation\RedirectResponse;
use Symfony\Component\HttpFoundation\Request;
use Symfony\Component\HttpFoundation\Response;
use Symfony\Component\Security\Core\Authentication\Token\TokenInterface;
use Symfony\Component\Security\Core\Exception\AuthenticationException;
use Symfony\Component\Security\Core\Exception\CustomUserMessageAuthenticationException;
use Symfony\Component\Security\Http\Authenticator\AbstractAuthenticator;
use Symfony\Component\Security\Http\Authenticator\Passport\Badge\UserBadge;
use Symfony\Component\Security\Http\Authenticator\Passport\Passport;
use Symfony\Component\Security\Http\Authenticator\Passport\SelfValidatingPassport;
use Symfony\Component\Security\Http\EntryPoint\AuthenticationEntryPointInterface;

class TokenAuthenticator extends AbstractAuthenticator implements AuthenticationEntryPointInterface
{
    public function __construct(private AuthService $auth)
    {
    }

    // 仅当请求携带令牌 Cookie 时,身份验证器才会起作用;
    // 否则,访问者仍然是匿名的
    public function supports(Request $request): ?bool
    {
        return $request->cookies->has(AuthService::COOKIE);
    }

    // 用户的通行证(PASSPORT):他们是谁(徽章),以及如何检查。
    // 令牌已经检查过:通行证自行验证(SelfValidatingPassport)
    public function authenticate(Request $request): Passport
    {
        $user = $this->auth->check($request->cookies->get(AuthService::COOKIE));
        if ($user === null) {
            throw new CustomUserMessageAuthenticationException('invalid token');
        }
        // 徽章:登录名,以及返回用户的函数(这里是令牌中的
        // 用户,无需查询用户列表)
        return new SelfValidatingPassport(new UserBadge($user->login, fn () => $user));
    }

    // 有效的令牌:null,请求继续前往操作
    public function onAuthenticationSuccess(Request $request, TokenInterface $token, string $firewallName): ?Response
    {
        return null;
    }

    // 无效的令牌(过期、伪造):转到 /login,并删除 Cookie
    public function onAuthenticationFailure(Request $request, AuthenticationException $exception): ?Response
    {
        $response = new RedirectResponse('/login');
        $response->headers->clearCookie(AuthService::COOKIE);
        return $response;
    }

    // 入口点(ENTRY POINT):对请求受保护页面的匿名访问者给出的
    // 响应;这里是重定向到登录页面
    public function start(Request $request, ?AuthenticationException $authException = null): Response
    {
        return new RedirectResponse('/login');
    }
}

对于每个通过防火墙的请求,[Symfony] 会按以下顺序调用认证器的方法:

  • 第 28–31 行:[supports]:认证器是否参与此请求?如果请求包含令牌 Cookie,则参与。否则什么也不会发生:访问者仍然是匿名的;
  • 第 35–44 行:[authenticate] 构造一个通行证:用户的身份(一个徽章,[UserBadge]),以及要验证的凭据。标准登录表单会把输入的密码放入通行证中,由 [Symfony] 自行验证。这里的凭据是令牌,已经由 [AuthService] 验证过:通行证自行验证([SelfValidatingPassport])。徽章包含登录名和一个用于识别用户的函数:在本例中,就是令牌所描述的用户,无需查询用户列表(如果没有这个函数,[Symfony] 就会向提供者请求用户)。无效的令牌会引发身份验证异常;
  • 第 47–50 行:[onAuthenticationSuccess]:身份验证成功。返回 [null] 会让请求带着已认证的用户继续进入操作。(登录表单在此处会重定向到主页);
  • 第 53–58 行:[onAuthenticationFailure]:身份验证失败(令牌过期或被伪造)。响应会重定向到登录页,并顺便清除 Cookie:[clearCookie] 会向响应中添加一个空的、已过期的 Cookie;
  • 第 62–65 行:[start] 是 [AuthenticationEntryPointInterface] 接口的方法:防火墙的入口点,即发送给请求受保护页面的匿名访问者的响应。在本例中,是重定向到登录页。

认证器不拒绝访问:它判定用户是谁,或者判定用户是匿名的。这就是身份验证。拒绝访问由访问控制负责。

8.1.6. 控制器

<?php
// src/Controller/AuthController.php:登录和注销

namespace App\Controller;

use App\Security\AuthService;
use Symfony\Bundle\FrameworkBundle\Controller\AbstractController;
use Symfony\Component\HttpFoundation\Cookie;
use Symfony\Component\HttpFoundation\Request;
use Symfony\Component\HttpFoundation\Response;
use Symfony\Component\HttpKernel\Exception\AccessDeniedHttpException;
use Symfony\Component\Routing\Attribute\Route;

class AuthController extends AbstractController
{
    public function __construct(private AuthService $auth)
    {
    }

    #[Route('/', methods: ['GET'])]
    public function home(): Response
    {
        return $this->redirect('/profile');
    }

    #[Route('/login', methods: ['GET'])]
    public function form(): Response
    {
        return $this->render('auth/login.html.twig');
    }

    #[Route('/login', methods: ['POST'])]
    public function login(Request $request): Response
    {
        // 表单的防 CSRF 令牌(见示例 21)
        if (! $this->isCsrfTokenValid('login', $request->getPayload()->getString('_csrf_token'))) {
            throw new AccessDeniedHttpException('invalid anti-CSRF token');
        }
        $login = $request->getPayload()->getString('login');
        $user = $this->auth->validate($login, $request->getPayload()->getString('password'));
        if ($user === null) {
            // 故意含糊的消息:我们不说明是登录名还是密码有误
            return $this->render('auth/login.html.twig', ['login' => $login,
                'error' => 'Incorrect login or password.']);
        }
        // Cookie 中的令牌:页面的 JavaScript 无法读取它
        // (httpOnly);它不会随来自其他站点的 POST 请求一起发送
        // (sameSite);它会在令牌过期的同时消失
        $response = $this->redirect('/profile');
        $response->headers->setCookie(Cookie::create(AuthService::COOKIE, $this->auth->createToken($user))
            ->withExpires(time() + $this->auth->durationMinutes * 60)
            ->withHttpOnly(true)
            ->withSameSite(Cookie::SAMESITE_LAX));
        return $response;
    }

    // 注销:仅限 POST(放在另一个站点上的简单链接,无法
    // 在用户不知情的情况下使其注销);我们删除 Cookie
    #[Route('/logout', methods: ['POST'])]
    public function logout(Request $request): Response
    {
        if (! $this->isCsrfTokenValid('logout', $request->getPayload()->getString('_csrf_token'))) {
            throw new AccessDeniedHttpException('invalid anti-CSRF token');
        }
        $response = $this->redirect('/login');
        $response->headers->clearCookie(AuthService::COOKIE);
        return $response;
    }
}
  • 第 36–38 行:登录表单与所有表单一样,受到防伪造请求的保护(示例 21);
  • 第 40–45 行:登录流程。如果失败,表单会连同输入的用户名和一条故意含糊的消息重新显示:如果说“用户名未知”,就会向黑客泄露哪些用户名是存在的;
  • 第 49–54 行:如果成功,令牌会存储在 Cookie 中,并将用户重定向到受保护的页面(PRG 模式)。该 Cookie 是 [httpOnly] 的:页面的 [JavaScript] 无法读取它,从而保护令牌免受脚本注入(XSS);它是 [SameSite=Lax] 的:浏览器不会在源自其他站点的 POST 请求中发送它,从而保护应用程序免受 CSRF 攻击;它的过期日期([withExpires],此处为自 1970 年以来的秒数)与令牌的相同。在生产环境中使用 HTTPS 时,我们还会添加 [withSecure(true)]:该 Cookie 绝不会通过未加密的连接发送;
  • 第 59–68 行:注销会删除 Cookie([clearCookie])。这是一个受防 CSRF 令牌保护的 POST 操作:放在其他站点或图片中的指向 [/logout] 的简单链接,无法在用户不知情的情况下让其注销。请注意令牌的一个局限:令牌本身在过期前一直有效。拿到其副本的人仍然可以使用它。这就是要限制其有效期的原因。

[Symfony] 也可以自行处理基于表单的登录([form_login] 认证器)和注销([logout] 防火墙选项);但它们把用户存储在会话中,而我们想要的是令牌。

<?php
// src/Controller/ProfileController.php:专供已验证用户使用的页面
// (见 config/packages/security.yaml 中的 access_control)

namespace App\Controller;

use App\Security\User;
use Symfony\Bundle\FrameworkBundle\Controller\AbstractController;
use Symfony\Component\HttpFoundation\Response;
use Symfony\Component\Routing\Attribute\Route;
use Symfony\Component\Security\Http\Attribute\CurrentUser;

class ProfileController extends AbstractController
{
    // #[CurrentUser]:请求中已验证的用户,即由
    // 身份验证器找到的用户
    #[Route('/profile', methods: ['GET'])]
    public function display(#[CurrentUser] User $user): Response
    {
        return $this->render('profile/profile.html.twig', ['user' => $user]);
    }
}
  • 第 18 行:[#[CurrentUser]] 属性提供已认证的用户,即由认证器确定的用户。该操作受 [access_control] 规则(来自 [security.yaml])保护:保证会收到一个用户。我们也可以通过 [$this->getUser()] 获得它。

8.1.7. 视图

{% extends 'layout.html.twig' %}

{% block content %}
  <h1 class="h3">Login</h1>
  <form method="post" action="/login">
    <input type="hidden" name="_csrf_token" value="{{ csrf_token('login') }}">
    <div class="mb-2">
      <label class="form-label" for="login">Login</label>
      <input class="form-control" id="login" name="login" value="{{ login ?? '' }}" required>
    </div>
    <div class="mb-3">
      <label class="form-label" for="password">Password</label>
      <input class="form-control" type="password" id="password" name="password" required>
    </div>
    <button class="btn btn-primary" type="submit">Log in</button>
  </form>
  {% if error is defined %}
    <div class="alert alert-danger mt-3">{{ error }}</div>
  {% endif %}
  <p class="text-muted small mt-3">Test accounts (password = login): marie (USER), admin (ADMIN).</p>
{% endblock %}
  • 第 6 行:表单的防 CSRF 令牌(示例 21);
  • 第 9 行:失败后重新显示输入的登录名([??]:当变量 [login] 不存在时为空字符串)。
{% extends 'layout.html.twig' %}

{% block content %}
  <h1 class="h3">Hello {{ user.name }}</h1>
  <p>Your role: <b>{{ user.role == 'ADMIN' ? 'administrator' : 'user' }}</b>.</p>
  <p>The content of your token:</p>
  <table class="table table-sm w-auto">
    {% for key, value in user.claims %}
      <tr><td><code>{{ key }}</code></td><td>{{ value }}</td></tr>
    {% endfor %}
  </table>
  {# 注销:一个只剩按钮的 POST 表单 #}
  <form method="post" action="/logout">
    <input type="hidden" name="_csrf_token" value="{{ csrf_token('logout') }}">
    <button class="btn btn-outline-secondary" type="submit">Log out</button>
  </form>
{% endblock %}
  • 第 8–10 行:令牌的内容,仅作演示用途显示。来自 [for] 的循环,在 [Twig] 中可以遍历关联数组的键和值([for key, value in ...]);
  • 第 13–16 行:注销,通过一个只有单个按钮的表单实现。

已认证的用户在所有视图中也可通过名称 [app.user] 获得。

8.1.8. 执行

让我们在未登录的情况下请求受保护的页面 [/profile] :

curl -i http://localhost:8000/profile
1
2
3
4
HTTP/1.1 302 Found
...
Location: /login
...

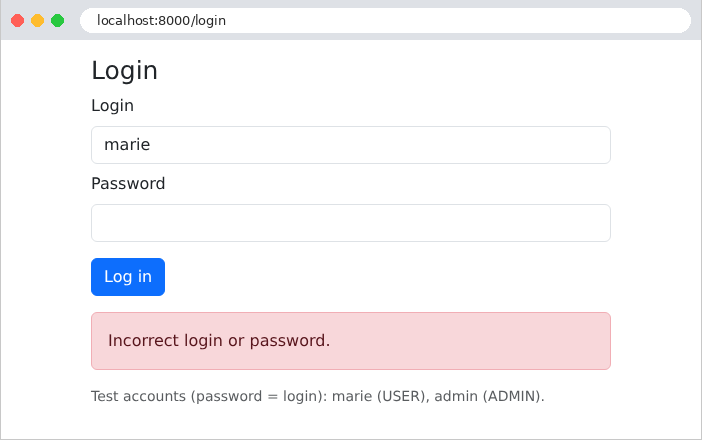
密码错误:

Image

登录成功。使用 [curl] 时,必须先请求表单以获取防 CSRF 令牌和会话 Cookie(示例 21),然后在保留所收到的 Cookie 的情况下提交表单:

curl -c token.txt -b token.txt http://localhost:8000/login
curl -i -c token.txt -b token.txt -d "_csrf_token=...&login=marie&password=marie" http://localhost:8000/login
1
2
3
4
HTTP/1.1 302 Found
Location: /profile
Set-Cookie: token=eyJ0eXAiOiJKV1QiLCJhbGciOiJIUzI1NiJ9.eyJzdWIiOiJtYXJpZSIsIm5hbWUiOiJNYXJpZSBQXHUwMGU5bGlzc2llciIsInJvbGUiOiJVU0VSIiwiaWF0IjoxNzkwNTAyNzM3LCJleHAiOjE3OTA1MDYzMzd9.ijkEBdAyfFX9yFEyHOLAi-WhkFvShYW4mxoPIG2LqOI; expires=Sun, 27 Sep 2026 10:52:17 GMT; Max-Age=3600; path=/; httponly; samesite=lax
...

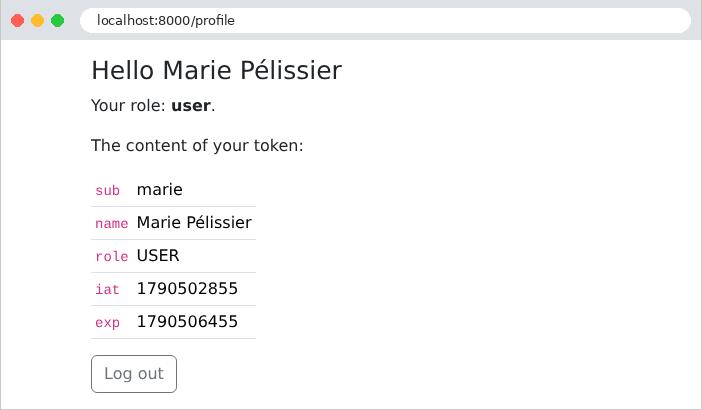
令牌由三部分组成,以句点分隔,每一部分都经过 Base64 编码:头部、内容和签名。前两部分无需任何密钥即可解码:

{"typ":"JWT","alg":"HS256"}
{"sub":"marie","name":"Marie P\u00e9lissier","role":"USER","iat":1790502737,"exp":1790506337}

([é] 在 JSON 中以转义形式 [\u00e9] 书写。)过期时间是创建后一小时(3600 秒)。在浏览器中,个人资料页面显示的就是同样的内容:
Image

一个恶意用户修改了自己的令牌:他在内容中把角色 ***[USER]*** 替换为 ***[ADMIN]***,对这一部分重新进行 Base64 编码,并保留原来的签名。服务器重新计算被修改内容的签名,结果与之不再匹配:

curl -i -b "token=eyJ0eXAiOiJKV1QiLCJhbGciOiJIUzI1NiJ9.<modified content>.ijkEBdAyfFX9yFEyHOLAi-WhkFvShYW4mxoPIG2LqOI" http://localhost:8000/profile
1
2
3
4
HTTP/1.1 302 Found
Location: /login
Set-Cookie: token=deleted; expires=Sat, 27 Sep 2025 09:52:20 GMT; Max-Age=0; path=/; httponly
...

伪造的令牌被拒绝并删除(值 [deleted] 和已过期的日期指示浏览器删除该 Cookie)。要生成有效的签名,就必须知道密钥——因此保持密钥机密并选择一个长而随机的密钥非常重要。

8.2. 示例 26:角色

示例 26 添加了一个仅限 ADMIN 角色访问的管理页面。只显示新增或修改的文件。

8.2.1. 配置:config/packages/security.yaml

# config/packages/security.yaml:SecurityBundle 的配置(见示例 25)
security:
    password_hashers:
        App\Security\User:
            algorithm: bcrypt

    providers:
        users:
            id: App\Security\UsersService

    # 角色的层级(HIERARCHY):管理员同时拥有用户的权限
    role_hierarchy:
        ROLE_ADMIN: ROLE_USER

    firewalls:
        resources:
            pattern: ^/bootstrap/
            security: false
        main:
            stateless: true
            provider: users
            custom_authenticators:
                - App\Security\TokenAuthenticator
            # 已验证的用户,但不具备所请求的权限:我们的 403 页面
            access_denied_handler: App\Security\AccessDenied

    # /profile:任何已验证的用户;/admin 由其控制器的 #[IsGranted]
    # 属性保护;我们本可以在这里写成:
    # - { path: ^/admin, roles: ROLE_ADMIN }
    access_control:
        - { path: ^/profile, roles: IS_AUTHENTICATED }
  • 第 12–13 行:角色层级:角色 [ROLE_ADMIN] 包含角色 [ROLE_USER]。因此,管理员拥有用户的所有权限,而无需同时被分配两个角色;
  • 第 25 行:防火墙的拒绝访问处理器 ([access_denied_handler]):该类负责生成响应,发送给请求无权查看的页面的已认证用户;
  • 第 27–31 行:页面 [/admin] 本来可以在此处用一条额外的规则来保护;这里我们改为在其控制器中保护它,以演示另一种方法。

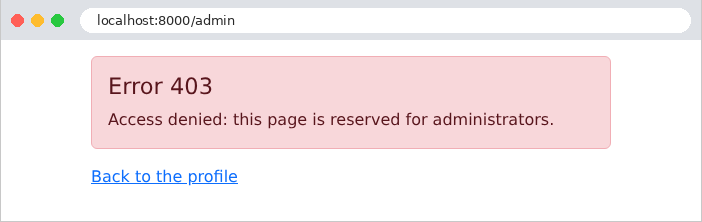
两种拒绝响应之间的区别很重要:请求受保护页面的匿名访问者会被重定向到防火墙的入口点(登录页,示例 25);没有所需角色的已认证用户会收到 403 错误(Forbidden):登录是没有意义的,因为他们已经通过了身份验证。

8.2.2. 拒绝访问:src/Security/AccessDenied.php

<?php
// src/Security/AccessDenied.php:对请求被禁止页面的已验证(AUTHENTICATED)用户
// 给出的响应(见 security.yaml 中的 access_denied_handler)

namespace App\Security;

use Symfony\Component\HttpFoundation\Request;
use Symfony\Component\HttpFoundation\Response;
use Symfony\Component\Security\Core\Exception\AccessDeniedException;
use Symfony\Component\Security\Http\Authorization\AccessDeniedHandlerInterface;
use Twig\Environment;

class AccessDenied implements AccessDeniedHandlerInterface
{
    public function __construct(private Environment $twig)
    {
    }

    public function handle(Request $request, AccessDeniedException $accessDeniedException): ?Response
    {
        return new Response($this->twig->render('errors/403.html.twig'), Response::HTTP_FORBIDDEN);
    }
}
  • 第 13 行:该类实现了 [AccessDeniedHandlerInterface] 接口,其唯一的方法 [handle], 返回拒绝响应;
  • 第 21 行:403 错误页面,由 [Twig] 生成(与示例 24 中的 [ErrorPage] 监听器类似),状态码为 403([Response::HTTP_FORBIDDEN],[Response] 类的一个常量)。

如果没有这个处理器,拒绝访问会导致 [AccessDeniedHttpException] 异常,用户会看到 [Symfony] 的 403 错误页面(在调试模式下会显示详细信息)。[templates/errors/403.html.twig] 页面是一个标准的错误页面,带有返回个人资料的链接。

8.2.3. 控制器:src/Controller/AdminController.php

<?php
// src/Controller/AdminController.php:专供 ADMIN 角色使用的页面

namespace App\Controller;

use App\Security\User;
use Symfony\Bundle\FrameworkBundle\Controller\AbstractController;
use Symfony\Component\HttpFoundation\Response;
use Symfony\Component\Routing\Attribute\Route;
use Symfony\Component\Security\Http\Attribute\CurrentUser;
use Symfony\Component\Security\Http\Attribute\IsGranted;

class AdminController extends AbstractController
{
    // #[IsGranted]:只有用户具有 ADMIN 角色时才会执行该操作
    #[Route('/admin', methods: ['GET'])]
    #[IsGranted('ROLE_ADMIN')]
    public function display(#[CurrentUser] User $user): Response
    {
        return $this->render('admin/admin.html.twig', ['name' => $user->name]);
    }
}
  • 第 17 行:[#[IsGranted]] 属性只允许拥有所需权限的用户执行该操作,在本例中是 [ROLE_ADMIN] 角色。匿名访问者会被重定向到入口点;没有该角色的已认证用户会被拒绝访问。当该属性应用于类时,它会保护该类的所有操作。

控制器自身不执行任何检查。在代码中,可以使用 [$this->isGranted('ROLE_ADMIN')] (返回布尔值)或 [$this->denyAccessUnlessGranted('ROLE_ADMIN')] (抛出拒绝异常)来检查权限。对于比角色更细粒度的规则(“用户只能编辑自己的预约”),[Symfony] 允许你定义“投票器” (voters):这些类用于判定某项权限,[#[IsGranted]] 和 [is_granted] 会像查询角色一样查询这些权限。

8.2.4. 个人资料视图

{% extends 'layout.html.twig' %}

{% block content %}
  <h1 class="h3">Hello {{ user.name }}</h1>
  <p>Your role: <b>{{ user.role == 'ADMIN' ? 'administrator' : 'user' }}</b>.</p>
  {# is_granted:用户是否具有该角色?仅在这种情况下才显示该块 #}
  {% if is_granted('ROLE_ADMIN') %}
    <p><a href="/admin">The administration area</a></p>
  {% else %}
    <p><a href="/admin">The administration area</a> (which is forbidden to you)</p>
  {% endif %}
  <p>The content of your token:</p>
  <table class="table table-sm w-auto">
    {% for key, value in user.claims %}
      <tr><td><code>{{ key }}</code></td><td>{{ value }}</td></tr>
    {% endfor %}
  </table>
  {# 注销:一个只剩按钮的 POST 表单 #}
  <form method="post" action="/logout">
    <input type="hidden" name="_csrf_token" value="{{ csrf_token('logout') }}">
    <button class="btn btn-outline-secondary" type="submit">Log out</button>
  </form>
{% endblock %}
  • 第 7–11 行:来自 [is_granted] 的函数 [Twig] 用于检查用户的权限。这样可以避免显示会导致错误的链接;不过,这仅仅是为了方便:真正的保护来自操作本身。

8.2.5. 执行

角色为 USER 的 Marie 点击了通往管理页面的链接:
Image

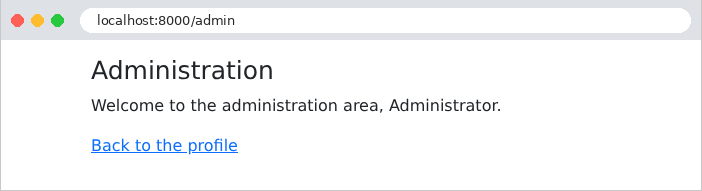
而管理员则可以访问该页面:

Image

使用 [curl]:角色为 USER 的用户(按示例 25 的方式登录,Cookie 存储在文件 [token.txt] 中),随后是一个匿名访问者:

curl -i -b token.txt http://localhost:8000/admin
curl -i http://localhost:8000/admin
HTTP/1.1 403 Forbidden
...
        <div class="alert alert-danger">
    <h1 class="h4">Error 403</h1>
    <p class="mb-0">Access denied: this page is reserved for administrators.</p>
  </div>
...
HTTP/1.1 302 Found
...
Location: /login
...

逐个路由进行保护有一个缺陷:一旦遗漏了某个路由,该页面就会对所有人开放。案例研究将颠倒这一逻辑:所有 URL 页面默认都受到保护,通过一条通用的 [access_control] 规则实现,只有少数 URL 页面(登录页、注册页)例外。

8.3. 示例 27:验证码和尝试次数限制

登录表单是攻击目标:程序每分钟可以尝试数千个密码(暴力破解攻击)。两种保护措施相辅相成:

  • 验证码 (Completely Automated Public Turing test to tell Computers and Humans Apart):一张包含扭曲代码的图片,人类很容易读懂,但程序很难识别;
  • 尝试次数限制:失败三次之后,客户端的 IP 地址会被封锁一分钟。

示例 27 以示例 25 为基础,并增加了这两项安全措施。

8.3.1. 验证码图片:src/Security/CaptchaDrawing.php

<?php
// src/Security/CaptchaDrawing.php:验证码的绘制,一个手工
// 构建的 SVG 图像(XML 文本)

namespace App\Security;

class CaptchaDrawing
{
    public const WIDTH = 150;

    public const HEIGHT = 50;

    // “字体”:每个字符是一组笔画的列表,每个笔画是 4 x 6 网格中
    // x、y 点的序列(y 轴向下)。
    // 彼此太容易混淆的字符:已排除(0 O、1 I L)。
    private const FONT = [
        'A' => [[0, 6, 2, 0, 4, 6], [0.8, 3.8, 3.2, 3.8]],
        'B' => [[0, 0, 0, 6, 3, 6, 4, 5, 4, 4, 3, 3, 0, 3], [0, 0, 3, 0, 4, 1, 4, 2, 3, 3]],
        'C' => [[4, 1, 3, 0, 1, 0, 0, 1, 0, 5, 1, 6, 3, 6, 4, 5]],
        'D' => [[0, 0, 0, 6, 2.5, 6, 4, 4.5, 4, 1.5, 2.5, 0, 0, 0]],
        'E' => [[4, 0, 0, 0, 0, 6, 4, 6], [0, 3, 3, 3]],
        'F' => [[4, 0, 0, 0, 0, 6], [0, 3, 3, 3]],
        'G' => [[4, 1, 3, 0, 1, 0, 0, 1, 0, 5, 1, 6, 3, 6, 4, 5, 4, 3.5, 2.5, 3.5]],
        'H' => [[0, 0, 0, 6], [4, 0, 4, 6], [0, 3, 4, 3]],
        'J' => [[4, 0, 4, 5, 3, 6, 1, 6, 0, 5]],
        'K' => [[0, 0, 0, 6], [4, 0, 0, 3.5], [1.3, 2.6, 4, 6]],
        'M' => [[0, 6, 0, 0, 2, 3.5, 4, 0, 4, 6]],
        'N' => [[0, 6, 0, 0, 4, 6, 4, 0]],
        'P' => [[0, 6, 0, 0, 3, 0, 4, 1, 4, 2, 3, 3, 0, 3]],
        'Q' => [[1, 0, 3, 0, 4, 1, 4, 5, 3, 6, 1, 6, 0, 5, 0, 1, 1, 0], [2.5, 4.5, 4, 6.3]],
        'R' => [[0, 6, 0, 0, 3, 0, 4, 1, 4, 2, 3, 3, 0, 3], [2, 3, 4, 6]],
        'S' => [[4, 1, 3, 0, 1, 0, 0, 1, 0, 2, 1, 3, 3, 3, 4, 4, 4, 5, 3, 6, 1, 6, 0, 5]],
        'T' => [[0, 0, 4, 0], [2, 0, 2, 6]],
        'U' => [[0, 0, 0, 5, 1, 6, 3, 6, 4, 5, 4, 0]],
        'V' => [[0, 0, 2, 6, 4, 0]],
        'W' => [[0, 0, 1, 6, 2, 2.5, 3, 6, 4, 0]],
        'X' => [[0, 0, 4, 6], [4, 0, 0, 6]],
        'Y' => [[0, 0, 2, 3, 4, 0], [2, 3, 2, 6]],
        'Z' => [[0, 0, 4, 0, 0, 6, 4, 6]],
        '2' => [[0, 1, 1, 0, 3, 0, 4, 1, 4, 2, 0, 6, 4, 6]],
        '3' => [[0, 1, 1, 0, 3, 0, 4, 1, 4, 2, 3, 3, 1.5, 3], [3, 3, 4, 4, 4, 5, 3, 6, 1, 6, 0, 5]],
        '4' => [[3, 6, 3, 0, 0, 4, 4, 4]],
        '5' => [[4, 0, 0, 0, 0, 3, 3, 3, 4, 4, 4, 5, 3, 6, 1, 6, 0, 5]],
        '6' => [[4, 1, 3, 0, 1, 0, 0, 1, 0, 5, 1, 6, 3, 6, 4, 5, 4, 4, 3, 3, 0, 3]],
        '7' => [[0, 0, 4, 0, 1.5, 6]],
        '8' => [[1, 3, 0, 2, 0, 1, 1, 0, 3, 0, 4, 1, 4, 2, 3, 3, 1, 3, 0, 4, 0, 5, 1, 6, 3, 6, 4, 5,
            4, 4, 3, 3]],
        '9' => [[4, 3, 1, 3, 0, 2, 0, 1, 1, 0, 3, 0, 4, 1, 4, 5, 3, 6, 1, 6, 0, 5]],
    ];

    // 几种深色,在浅色背景上易于阅读
    private const COLORS = ['#1f4e79', '#7b2d26', '#2e6b30', '#5b2c83', '#8a5a00', '#23395d', '#9c2a5b'];

    // 一段随机文本。random_int 是“加密级”生成器,
    // 不可预测(不同于 rand 或 mt_rand,其序列可能被猜出)
    public static function randomText(int $length): string
    {
        $alphabet = array_keys(self::FONT);
        $text = '';
        for ($i = 0; $i < $length; $i++) {
            $text .= $alphabet[random_int(0, count($alphabet) - 1)];
        }
        return $text;
    }

    // 一个随机的浮点数,介于 $minimum 和 $maximum 之间
    private static function random(float $minimum, float $maximum): float
    {
        return $minimum + ($maximum - $minimum) * random_int(0, PHP_INT_MAX) / PHP_INT_MAX;
    }

    private static function color(): string
    {
        return self::COLORS[random_int(0, count(self::COLORS) - 1)];
    }

    public static function svg(string $text): string
    {
        $l = self::WIDTH;
        $h = self::HEIGHT;
        $pieces = ["<svg xmlns=\"http://www.w3.org/2000/svg\" width=\"$l\" height=\"$h\" viewBox=\"0 0 $l $h\">",
            '<rect width="100%" height="100%" fill="#f5f7fa"/>'];

        // 字符:每个都经过放大、倾斜、平移,并且每个点
        // 都随机地略微移动
        $step = ($l - 20) / strlen($text);
        foreach (str_split($text) as $i => $character) {
            $scale = self::random(4.6, 5.6);    // 网格单位的大小,以像素为单位
            $angle = self::random(-0.35, 0.35);   // 旋转,以弧度为单位(约 ±20°)
            $cx = 10 + $step * ($i + 0.5) + self::random(-3, 3);    // 字符的中心
            $cy = $h / 2 + self::random(-4, 4);
            foreach (self::FONT[$character] as $stroke) {
                $d = [];
                for ($k = 0; $k < count($stroke); $k += 2) {
                    // 网格中的点,以 (2, 3) 为中心,经过扭曲、旋转并放置
                    $x = ($stroke[$k] - 2 + self::random(-0.2, 0.2)) * $scale;
                    $y = ($stroke[$k + 1] - 3 + self::random(-0.2, 0.2)) * $scale;
                    $px = $cx + $x * cos($angle) - $y * sin($angle);
                    $py = $cy + $x * sin($angle) + $y * cos($angle);
                    $d[] = sprintf('%s%.1f %.1f', $k === 0 ? 'M' : 'L', $px, $py);
                }
                $pieces[] = sprintf('<path d="%s" fill="none" stroke="%s" stroke-width="%.1f" '
                    .'stroke-linecap="round" stroke-linejoin="round"/>',
                    implode(' ', $d), self::color(), self::random(2.2, 3));
            }
        }

        // 3 条干扰线:穿过图像的曲线
        for ($n = 0; $n < 3; $n++) {
            $pieces[] = sprintf('<path d="M%.1f %.1f C%.1f %.1f %.1f %.1f %.1f %.1f" fill="none" '
                .'stroke="%s" stroke-width="1.3"/>',
                self::random(0, 20), self::random(5, 45), self::random(30, 60), self::random(0, 50),
                self::random(90, 120), self::random(0, 50), self::random(130, 150), self::random(5, 45),
                self::color());
        }
        $pieces[] = '</svg>';
        return implode('', $pieces);
    }
}

该图片采用 SVG 格式(Scalable Vector Graphics):一种用 XML(即文本)描述的矢量图形,由服务器在不借助图形库的情况下生成,浏览器直接在页面上显示。这个类是纯 [PHP],不含任何特定于框架的内容:它与本课程的 [Laravel] 版本相同。

  • 第 16–49 行:一种极简的“字体”:每个字符是一组笔画的列表,每个笔画是 4 × 6 网格中 [x, y] 坐标的列表。容易混淆的字符([0] 与 [O]、[1]、[I] 以及 [L])已被排除;
  • 第 56–64 行:从字体中的字符里选出的随机字符串([array_keys],即表中的键)。[PHP] 的函数 [rand] 和 [mt_rand] 产生可预测的数字序列(只要知道几个值,就能猜出后面的值):它们适用于模拟,不适用于安全场景。[random_int] 是一个加密级生成器;它是不可预测的;
  • 第 67–70 行:一个随机浮点数,由一个随机整数生成([PHP_INT_MAX] 是 [PHP] 中最大的整数);
  • 第 77–118 行:绘制过程。每个字符被随机缩放、旋转和移动,其每个点还会轻微偏移;每条线变成 SVG 的一个元素 [<path>] ([M]:移动,[L]:直线)。三条曲线([C]:贝塞尔曲线)穿过图像,以干扰识别程序。[sprintf] 函数用于格式化字符串:[%s] 向其中插入字符串,[%.1f] 则插入保留一位小数的数字。[str_split] 把字符串拆分为字符。

类 [Captcha] 将验证码的 ID 与其图片组合在一起:

<?php
// src/Security/Captcha.php:一个验证码:其标识符及其图像(SVG)

namespace App\Security;

readonly class Captcha
{
    public function __construct(
        public string $id,
        public string $svg,
    ) {
    }
}

8.3.2. 验证码服务:src/Security/CaptchaService.php

<?php
// src/Security/CaptchaService.php:待处理的验证码,由服务器保存在
// 缓存中(见示例 20)

namespace App\Security;

use Psr\Cache\CacheItemPoolInterface;

class CaptchaService
{
    // 验证码的有效期,以秒为单位
    private const LIFETIME = 600;

    public function __construct(private CacheItemPoolInterface $cache)
    {
    }

    public function generate(): Captcha
    {
        $text = CaptchaDrawing::randomText(5);
        // 一个无法猜测的随机标识符:由加密生成器(random_bytes)生成的
        // 12 个字节,以十六进制(bin2hex)写出
        $id = bin2hex(random_bytes(12));
        // 缓存中的预期答案,保存 10 分钟(expiresAfter):
        // 之后缓存会自行将其遗忘
        $item = $this->cache->getItem("captcha.$id");
        $this->cache->save($item->set($text)->expiresAfter(self::LIFETIME));
        return new Captcha($id, CaptchaDrawing::svg($text));
    }

    // 验证码在任何情况下都会被消耗:一张图像只使用一次
    public function check(?string $id, ?string $answer): bool
    {
        // 格式错误的标识符不能作为缓存的键
        if ($id === null || ! ctype_xdigit($id) || $answer === null) {
            return false;
        }
        $item = $this->cache->getItem("captcha.$id");
        // deleteItem:无论答案是否正确,都会从缓存中删除该答案
        $this->cache->deleteItem("captcha.$id");
        if (! $item->isHit()) {
            return false;    // 未知的标识符,或已过期的验证码
        }
        // strcasecmp 对两个相等的字符串返回 0,不区分大小写
        return strcasecmp($item->get(), trim($answer)) === 0;
    }
}
  • 第 18–29 行:一个新的验证码:随机文本、随机且无法猜测的标识符,以及图片。对于每个标识符,服务器会把预期的答案在缓存中存储十分钟(示例 20):缓存项的 [expiresAfter] 方法以秒为单位设置其生存期。超过这个时间后,缓存会自动丢弃它。页面只会收到标识符和图片:答案绝不会离开服务器;
  • 第 32–46 行:验证。标识符来自客户端:我们首先验证它是否由十六进制数字组成([ctype_xdigit]),因为某些字符([{}()/\@:])在缓存键中是禁止使用的,使用它们会抛出异常。读取该缓存项后,将其从缓存中移除([deleteItem]):无论成功与否,验证码在所有情况下都会被消耗。否则,程序就可以对同一张图片尝试所有可能的答案。比较时忽略大小写([strcasecmp] 对于两个相同的字符串返回 0,不区分大写和小写字母)以及输入两侧的空格([trim])。

8.3.3. 尝试次数限制:config/packages/framework.yaml

# config/packages/framework.yaml:FrameworkBundle 的配置
framework:
    secret: '%env(APP_SECRET)%'
    # 会话:它只用于登录表单的防 CSRF 令牌
    session:
        handler_id: null
        save_path: '%kernel.project_dir%/var/sessions/%kernel.environment%'
    csrf_protection: true
    # 锁(见示例 20):限制器使用它们来准确计数
    # 同时进行的尝试
    lock: 'flock://%kernel.project_dir%/var/lock'
    # 速率限制器(RateLimiter 组件);这个名为 [login] 的限制器,
    # 每 60 秒的窗口内接受 3 个“令牌”
    rate_limiter:
        login:
            policy: fixed_window
            limit: 3
            interval: '60 seconds'
  • 第 11 行:锁(示例 20):限制器使用它们来确保两个同时到达的请求不会扭曲其计数;
  • 第 14–18 行:一个速率限制器,名为 [login]。速率限制器分发“令牌”(与 JWT 令牌无关):每个受限的操作消耗一个令牌,当没有剩余令牌时,该操作就会被拒绝。[fixed_window] 策略(固定窗口)在每个 60 秒的周期内授予 3 个令牌,周期从消耗第一个令牌时开始计算。还有其他策略:[sliding_window] (滑动窗口,更均匀)、[token_bucket] (以给定速率填充的桶)。计数器存储在应用程序缓存中。

对于每个声明的限制器,[Symfony] 会创建一个限制器工厂服务([RateLimiterFactoryInterface]),通过注入获得,参数名由限制器的名称后接 [Limiter] 组成:[$loginLimiter]。

8.3.4. 控制器:src/Controller/AuthController.php

<?php
// src/Controller/AuthController.php:登录(带验证码和尝试
// 次数限制)和注销

namespace App\Controller;

use App\Security\AuthService;
use App\Security\CaptchaService;
use Symfony\Bundle\FrameworkBundle\Controller\AbstractController;
use Symfony\Component\HttpFoundation\Cookie;
use Symfony\Component\HttpFoundation\Request;
use Symfony\Component\HttpFoundation\Response;
use Symfony\Component\HttpKernel\Exception\AccessDeniedHttpException;
use Symfony\Component\RateLimiter\RateLimiterFactoryInterface;
use Symfony\Component\Routing\Attribute\Route;

class AuthController extends AbstractController
{
    // $loginLimiter:[login] 限制器的工厂(见 config/packages/framework.yaml);
    // 参数的名称指明了所用的限制器
    public function __construct(
        private AuthService $auth,
        private CaptchaService $captchas,
        private RateLimiterFactoryInterface $loginLimiter,
    ) {
    }

    #[Route('/', methods: ['GET'])]
    public function home(): Response
    {
        return $this->redirect('/profile');
    }

    #[Route('/login', methods: ['GET'])]
    public function form(): Response
    {
        return $this->loginPage();
    }

    #[Route('/login', methods: ['POST'])]
    public function login(Request $request): Response
    {
        $inputs = $request->getPayload();
        if (! $this->isCsrfTokenValid('login', $inputs->getString('_csrf_token'))) {
            throw new AccessDeniedHttpException('invalid anti-CSRF token');
        }
        $login = $inputs->getString('login');
        // 此客户端的限制器:其失败计数器的键是它的 IP 地址
        $limiter = $this->loginLimiter->create($request->getClientIp());

        // 1. 被阻止的地址甚至不会被处理;consume(0) 查看
        // 计数器,但不消耗任何内容
        $state = $limiter->consume(0);
        if ($state->getRemainingTokens() === 0) {
            $seconds = $state->getRetryAfter()->getTimestamp() - time();
            return $this->loginPage($login, "Too many attempts: try again in $seconds s.");
        }
        // 2. 先验证验证码(开销小),再验证密码(bcrypt,开销大);
        // consume():再记一次失败
        if (! $this->captchas->check($inputs->getString('captchaId'), $inputs->getString('captcha'))) {
            $limiter->consume();
            return $this->loginPage($login, 'The image code is incorrect.');
        }
        $user = $this->auth->validate($login, $inputs->getString('password'));
        if ($user === null) {
            $limiter->consume();
            return $this->loginPage($login, 'Incorrect login or password.');
        }
        // 登录成功会清除失败记录
        $limiter->reset();
        $response = $this->redirect('/profile');
        $response->headers->setCookie(Cookie::create(AuthService::COOKIE, $this->auth->createToken($user))
            ->withExpires(time() + $this->auth->durationMinutes * 60)
            ->withHttpOnly(true)
            ->withSameSite(Cookie::SAMESITE_LAX));
        return $response;
    }

    #[Route('/logout', methods: ['POST'])]
    public function logout(Request $request): Response
    {
        if (! $this->isCsrfTokenValid('logout', $request->getPayload()->getString('_csrf_token'))) {
            throw new AccessDeniedHttpException('invalid anti-CSRF token');
        }
        $response = $this->redirect('/login');
        $response->headers->clearCookie(AuthService::COOKIE);
        return $response;
    }

    // 每次显示表单都会生成一个新的验证码
    private function loginPage(?string $login = null, ?string $error = null): Response
    {
        return $this->render('auth/login.html.twig', ['login' => $login, 'error' => $error,
            'captcha' => $this->captchas->generate()]);
    }
}
  • 第 21–26 行:控制器接收限制器 [login] 的工厂;
  • 第 49 行:该客户端的限制器 [create(key)] 返回一个在此键下拥有独立计数器的限制器——在本例中,键是客户端的 IP 地址([getClientIp()]);
  • 第 53–57 行:被封锁的地址甚至不会被理会。[consume(0)] 在不消耗任何令牌的情况下查询限制器;它返回的 [RateLimit] 对象提供剩余令牌数([getRemainingTokens()])以及该操作再次被允许的日期([getRetryAfter()]),由此可以推算出需要等待的秒数;
  • 第 60–68 行:验证码在密码之前验证;验证验证码几乎没有成本,而 [bcrypt] 则是有意设计得很慢。因此,输入错误验证码的程序不会触发 [bcrypt]。每次失败(无论是验证码错误还是密码错误)都会消耗一个令牌([consume()],默认消耗一个)。第三次失败后,不再有剩余令牌:该地址会被封锁,直到 60 秒窗口结束,窗口从第一次失败开始计算;
  • 第 70 行:登录成功会清除失败的尝试记录([reset()]);
  • 第 91–95 行:每次显示表单时,都会生成一个新的验证码,即使是在尝试失败之后。

SecurityBundle 还提供了内置的登录限制([login_throttling] 防火墙选项),它适用于其自带的登录认证器([form_login]等),而不适用于我们的操作。要限制某个路由的请求数量,我们可以以同样的方式使用限制器,既可以放在操作内部,也可以放在 [kernel.request] 的监听器中。我们选择只统计失败的尝试,以免给正常登录的用户造成不便。

8.3.5. 视图:templates/auth/login.html.twig

{% extends 'layout.html.twig' %}

{% block content %}
  <h1 class="h3">Login</h1>
  <form method="post" action="/login">
    <input type="hidden" name="_csrf_token" value="{{ csrf_token('login') }}">
    <div class="mb-2">
      <label class="form-label" for="login">Login</label>
      <input class="form-control" id="login" name="login" value="{{ login }}" required>
    </div>
    <div class="mb-2">
      <label class="form-label" for="password">Password</label>
      <input class="form-control" type="password" id="password" name="password" required>
    </div>
    <div class="mb-3">
      <label class="form-label" for="captcha">Copy the code of the image</label>
      {# SVG 图像,由服务器构建:不经转义直接插入(raw 过滤器) #}
      <div class="mb-1">{{ captcha.svg|raw }}</div>
      {# 验证码标识符通过隐藏字段传递;答案保留在服务器上 #}
      <input type="hidden" name="captchaId" value="{{ captcha.id }}">
      <input class="form-control" id="captcha" name="captcha" autocomplete="off" required>
    </div>
    <button class="btn btn-primary" type="submit">Log in</button>
  </form>
  {% if error %}
    <div class="alert alert-danger mt-3">{{ error }}</div>
  {% endif %}
  <p class="text-muted small mt-3">Test accounts (password = login): marie (USER), admin (ADMIN).</p>
{% endblock %}
  • 第 18 行:SVG 图片按原样插入页面,不做转义(过滤器 [raw],示例 14)。这是合理的:这段 HTML 由服务器生成,不包含任何用户输入;
  • 第 20 行:验证码 ID,放在隐藏字段中;
  • 第 21 行:浏览器不会为该字段提供任何之前输入过的建议。

8.3.6. 执行
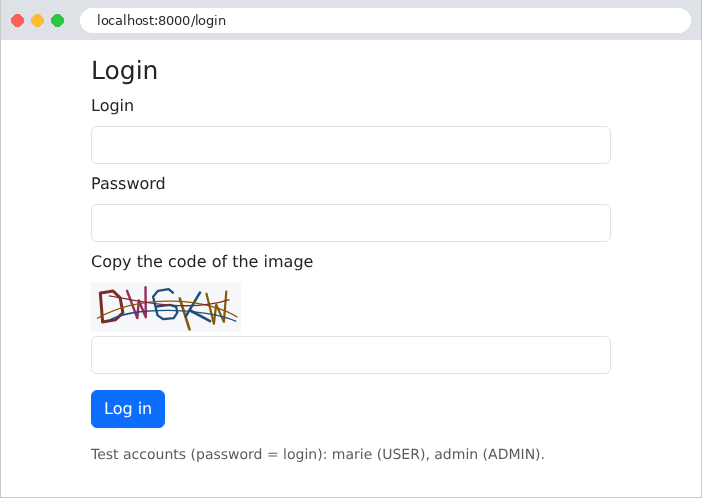
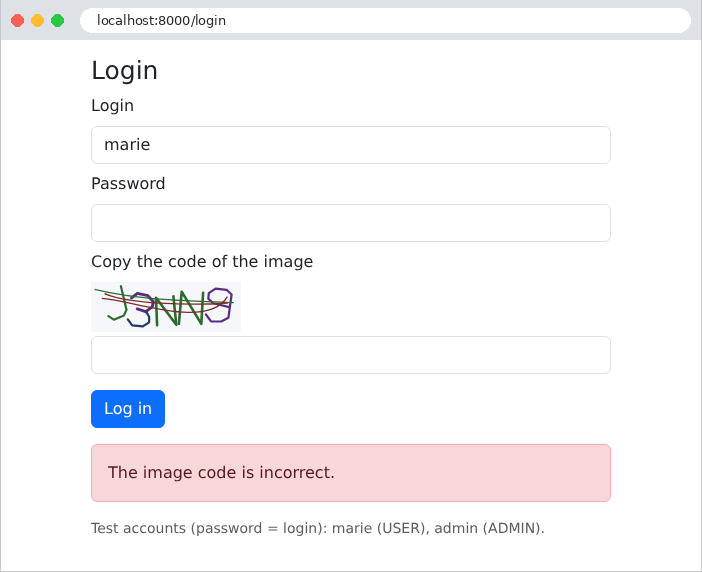
Image

验证码抄写错误:

Image

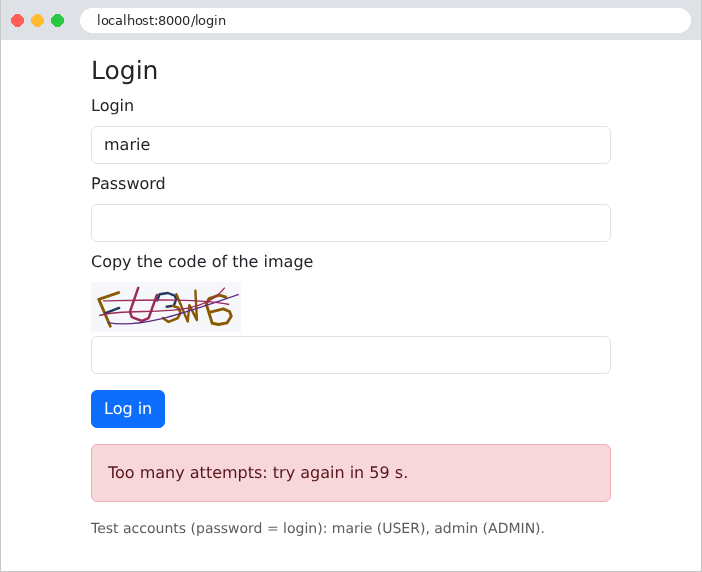
失败三次之后,该地址被封锁:

Image

使用 [curl],用一个编造的验证码 ID 尝试四次(与示例 25 一样,先获取会话 Cookie 和防 CSRF 令牌):

curl -b cookies.txt -d "_csrf_token=...&login=marie&password=marie&captchaId=abc&captcha=XXXXX" http://localhost:8000/login
1
2
3
4
      <div class="alert alert-danger mt-3">The image code is incorrect.</div>
      <div class="alert alert-danger mt-3">The image code is incorrect.</div>
      <div class="alert alert-danger mt-3">The image code is incorrect.</div>
      <div class="alert alert-danger mt-3">Too many attempts: try again in 60 s.</div>

即使密码正确,第四次尝试也会在不经处理的情况下被拒绝。