9. 与服务器通信
现在必须启动 JSON [RdvMedecins] 服务器(端口 8080),如上一章所述,最好使用验证码测试模式([CAPTCHA_TEST=test]),这样你可以对任何图片都回答“test”。
示例 22 至 25 共用几个文件,位于项目的 [src/app/common/] 文件夹中:服务器地址([config.ts])、响应类型([types.ts])、错误类([api-error.ts])、请求服务([api.ts])和登录栏([login-bar.ts])。它们会在各个示例中随着相关性的出现而逐步介绍。
9.1. 示例 22:第一个 HTTP 请求
9.1.1. 服务器在哪里?
对于由服务器自己提供的 Web 客户端,这个问题不会出现:请求使用相对地址([/api/captcha])发往与页面相同的源。安装在手机上的应用没有可用的源:它的页面由 [Capacitor] 自身从 https://localhost 提供。你必须提供完整的服务器地址,而这个地址取决于应用运行的位置:
| // =========================================================================
// src/app/common/config.ts - JSON 服务器在哪里(WHERE)?
// -------------------------------------------------------------------------
// 对于由服务器自己提供服务的 Web 应用,这个问题并不存在:
// 请求发往与页面相同(SAME)的源
// (相对地址,/api/...)。但移动(MOBILE)应用没有
// 可用的源(在 Android 上,页面由 Capacitor 从
// https://localhost 提供):必须给它服务器的完整地址。
// - 在 Web 开发(ng serve)中,Angular 的开发
// 服务器会把 /api 请求转发给 JSON 服务器(文件
// proxy.conf.json):使用相对地址就够了;
// - Android 模拟器通过
// 地址 10.0.2.2 看到运行它的电脑(对它来说 localhost 是模拟器自身);
// - 连接到与电脑相同 Wi-Fi 网络的真实手机必须
// 使用电脑在该网络上的地址(192.168.1.20……):
// 在构建应用程序时提供:
// ng build --define "SERVER='http://192.168.1.20:8080'"
// 或者修改下面的 androidServer 常量。
// =========================================================================
import { Capacitor } from '@capacitor/core';
// Android 应用程序的服务器地址,在没有强制指定其他地址时使用:
// 从模拟器看到的电脑地址
const androidServer = 'http://10.0.2.2:8080';
// 构建时由 --define "SERVER='...'" 给出的值
// (ng build、ng serve)。该选项会在编译后的代码中把单词
// SERVER 替换为给定的值。没有它,SERVER 就不存在:typeof
// 让我们可以在不引发错误的情况下检查它
declare const SERVER: string | undefined;
const forcedServer = typeof SERVER === 'string' ? SERVER : '';
export const config = {
// Capacitor.isNativePlatform():在 Android(或 iOS)应用中为 true,
// 在浏览器中为 false;Capacitor.getPlatform():'android'、'ios' 或 'web'
serverUrl:
forcedServer !== ''
? forcedServer
: !Capacitor.isNativePlatform()
? '' // Web:同源,使用相对地址
: Capacitor.getPlatform() === 'android'
? androidServer
: 'http://localhost:8080',
};
|
- 第 21 行:[Capacitor],[@capacitor/core] 中提供应用所运行平台信息的对象。它可以在任何地方使用,包括在浏览器中;
- 第 25 行:默认地址是 [Android] 的。模拟器是一台拥有自己网络的独立机器:对模拟器而言,[localhost] 指的是模拟器自身。特殊地址 [10.0.2.2] 指的是运行它的电脑;
- 第 31–32 行:在应用构建期间由 [--define] 选项(来自 [Angular])强制指定的地址:[ng build --define "SERVER='http://192.168.1.20:8080'"]。编译时会把代码中的标识符 [SERVER] 替换为给定的值(一个字符串,因此带有单引号)。没有这个选项时,[SERVER] 并不存在:[declare const] 告知 [TypeScript] 编译器,[SERVER] 是一个它看不到其声明的标识符,而 [typeof SERVER] 使你可以在不引发错误的情况下测试它是否存在。这与 [--dart-define] 和 [String.fromEnvironment] 在 [Flutter] 中的做法完全对应;
- 第 34–45 行:否则,使用特定于平台的地址。[Capacitor.isNativePlatform()] 在 [Android] (或 [iOS])应用中为 true,但在浏览器中为 false;[Capacitor.getPlatform()] 返回 'android'、'ios' 或 'web':
- 在浏览器中(第 41 行):相对 URL(''),也就是与应用相同的源;
- 在 [Android] 中(第 43 行):第 25 行的地址;
- 其他情况(第 44 行,[iOS],本课程不涉及):[localhost]。
连接到与服务器电脑相同 Wi-Fi 网络的真实手机,必须使用电脑在该网络上的地址([ipconfig] 命令,来自 [Windows] ,可以提供它):你可以在编译时通过 [--define] 传入它,或者修改第 25 行的常量。电脑的防火墙还必须允许 8080 端口上的传入连接。
9.1.2. Android 项目设置
[Flutter] 客户端修改了 [android/app/src/main/AndroidManifest.xml] 文件中的两行:使用网络的权限,以及以未加密 HTTP(“明文”)通信的授权。使用 [Capacitor] 时,不需要修改这个文件:
- 权限 [android.permission.INTERNET] 已经在由 [Android] 项目创建的 [npx cap add android] 中声明:[Capacitor] 应用就是一个网页,因此它总是需要网络访问;
- 明文 HTTP 的权限是位于项目根目录的 [capacitor.config.ts] 文件中的一项设置:
| // =========================================================================
// capacitor.config.ts - Capacitor 配置
// -------------------------------------------------------------------------
// Capacitor 将 Web 应用(ng build 生成的文件夹)
// 变成 Android 应用:它把 Web 应用包装在一个 Android Studio 项目中
// (android/ 文件夹),并由“WebView”显示,WebView 即
// 手机上 Chrome 浏览器的引擎。命令(见示例 01,“运行”):
// npx cap add android (只需一次:创建 android/ 文件夹)
// ng build (构建 Web 应用)
// npx cap sync android (将其复制到 Android 项目中)
// npx cap run android (在模拟器或手机上运行)
// =========================================================================
import type { CapacitorConfig } from '@capacitor/cli';
const config: CapacitorConfig = {
// 应用在手机(以及 Play Store)上的唯一标识符
appId: 'fr.stahe.examples',
// 显示在图标下方的名称
appName: 'Ionic Examples',
// 已编译 Web 应用所在的文件夹(ng build)
webDir: 'dist/examples_ionic/browser',
server: {
// 允许向开发用 JSON 服务器(示例 22 至 25)发送未加密的 HTTP 请求
// (http://10.0.2.2:8080)
cleartext: true,
},
plugins: {
// CapacitorHttp:应用的 HTTP 请求不再由 WebView 发出,
// 而是由 Android 的原生代码发出。后果(见
// 示例 22 和 23):没有 CORS 检查(JSON 服务器无需
// 做任何放行配置),并且 Cookie(身份验证令牌所在的 Cookie)由
// Android 存储并自动回传
CapacitorHttp: {
enabled: true,
},
},
};
export default config;
|
- 第 23–27 行:[server.cleartext: true]。从 [Android] 9 版本起,应用程序只被允许使用 HTTPS 通信。我们的开发服务器使用 HTTP:我们予以允许。[npx cap sync android] 命令会把这项设置带到 [Android] 项目中([android:usesCleartextTraffic="true"] 属性,添加到 [Capacitor] 与应用程序清单合并的清单中)。在生产环境中,服务器将使用 HTTPS,这项设置也就不再需要;
- 第 28–37 行:[CapacitorHttp] 插件。应用程序的 HTTP 请求([Angular] 的 HTTP 客户端发出的请求,以及 [fetch] 发出的请求)不再由 WebView 发送,而是由 [Android] 的原生代码发送。对于浏览器来说,应用程序(https://localhost)和服务器(http://10.0.2.2:8080)会被视为两个不同的源:浏览器会要求服务器提供 CORS 授权,而服务器并不授予,并且会拒绝带上令牌 Cookie。原生代码没有这些规则。然而,应用的 [TypeScript] 代码并不改变:重定向请求的是 [Capacitor] 。
9.1.3. 那么在浏览器中呢?
开发期间,应用程序在电脑的浏览器中运行:[ng serve] 在 8100 端口提供它,而 JSON 服务器在 8080 端口。同样,这里有两个源,而 [CapacitorHttp] 在浏览器中不起作用。解决办法是使用代理,在 [angular.json] 中配置(目标 [serve] 的选项 ["proxyConfig": "proxy.conf.json"]):
| {
"/api": {
"target": "http://localhost:8080",
"secure": false,
"changeOrigin": false,
"logLevel": "warn"
}
}
|
- 第 2 行:任何地址以 [/api] 开头的请求……
- 第 3 行:……都会由 [Angular] 开发服务器转发给 JSON 服务器,而它的响应会被送回浏览器。对于浏览器而言,应用程序和 API 的源是相同的(http://localhost:8100):没有 CORS,Cookie 也会被带上。这正是 [React] 课程中 [Vite] 代理的作用,也是 [Flutter] 课程中 [web_dev_config.yaml] 文件的作用;
- 第 4 行:[secure: false]:不要求目标提供有效的 HTTPS 证书(反正它用的是 HTTP);第 6 行:只显示代理的警告。
9.1.4. 请求
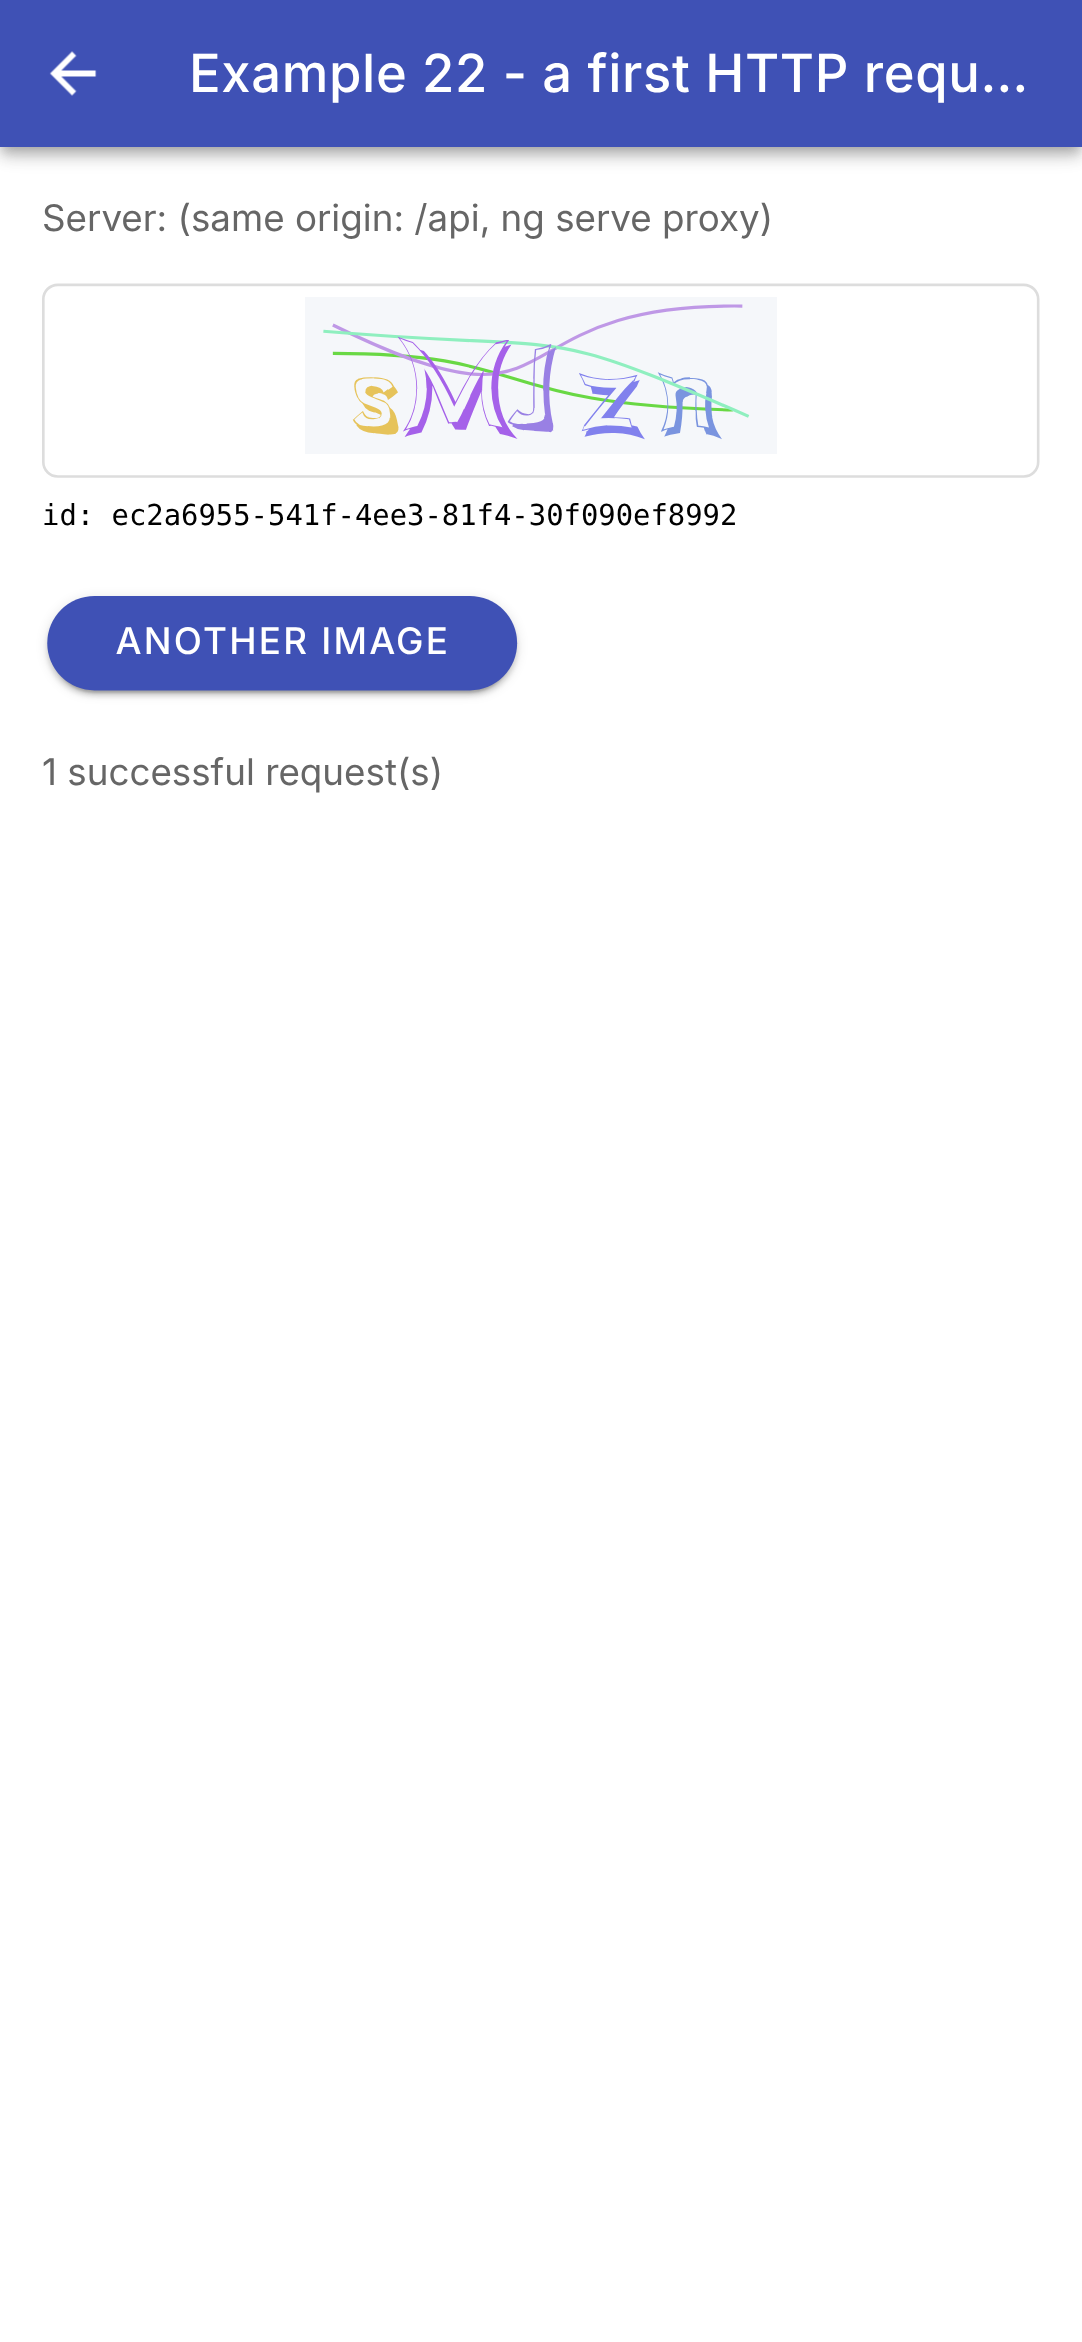
向服务器请求一个验证码:[GET /api/captcha],它响应 [{ "id": "...", "svg": "<svg ...>" }]。
| // =========================================================================
// src/app/ex22-http/ex22.page.ts - 向服务器发出的第一个 HTTP 请求
// -------------------------------------------------------------------------
// RdvMedecins JSON 服务器必须正在运行(端口 8080)。我们向它请求
// 一个验证码:GET /api/captcha -> { "id": "...", "svg": "<svg ...>" }。
//
// - HttpClient:Angular 的 HTTP 客户端(由 main.ts 中的 provideHttpClient()
// 提供给整个应用程序)。http.get<T>(address) 返回
// 一个 Observable:当我们订阅(SUBSCRIBE)它(subscribe)时才会发出请求,
// 响应稍后到达,其 JSON 响应体已经被解码;
// - 错误响应(4xx、5xx)或没有响应,会到达
// 订阅的 error 函数;
// - 服务器的地址取决于应用程序运行的位置
// (浏览器、Android 模拟器、手机):见 common/config.ts;
// - 需要显示三种状态:加载中、成功、出错;
// - 验证码的图片是 SVG:<img> 标签可以显示它。
// =========================================================================
import { HttpClient, HttpErrorResponse } from '@angular/common/http';
import { Component, DestroyRef, inject, signal } from '@angular/core';
import {
IonBackButton, IonButton, IonButtons, IonCard, IonCardContent, IonContent, IonHeader, IonNote, IonProgressBar,
IonTitle, IonToolbar,
} from '@ionic/angular';
import { Subscription } from 'rxjs';
import { config } from '../common/config';
import { Captcha, captchaImage } from '../common/types';
@Component({
selector: 'app-ex22',
imports: [
IonHeader, IonToolbar, IonButtons, IonBackButton, IonTitle, IonContent, IonProgressBar, IonCard, IonCardContent,
IonButton, IonNote,
],
templateUrl: './ex22.page.html',
styles: `
.error { --background: #ffebee; --color: #333; margin: 12px 0; }
.image { border: 1px solid #ddd; border-radius: 6px; padding: 4px; text-align: center; }
.image img { height: 60px; }
.id { font-family: monospace; font-size: 11px; margin: 8px 0; }
`,
})
export class Ex22Page {
private readonly http = inject(HttpClient);
readonly server = config.serverUrl || '(same origin: /api, ng serve proxy)';
readonly captchaImage = captchaImage;
// 屏幕的状态:信号
readonly captcha = signal<Captcha | null>(null);
readonly loading = signal(true);
readonly error = signal<string | null>(null);
readonly requestCount = signal(0);
// 对正在进行的请求的订阅(如果有的话)
private request?: Subscription;
constructor() {
this.load(); // 第一个请求,在页面一创建时就发出
// 页面被销毁(返回按钮):正在进行的请求被放弃
inject(DestroyRef).onDestroy(() => this.request?.unsubscribe());
}
load(): void {
// 取消订阅一个仍在进行中的请求会取消(CANCELS)它:它现在已无用的响应
// 将永远不会被处理(不会有“过期”响应)
this.request?.unsubscribe();
this.loading.set(true);
this.error.set(null);
// <Captcha>:所期望的 JSON 响应体的类型(对
// 编译器的一个承诺:运行时不会检查任何东西)
this.request = this.http.get<Captcha>(`${config.serverUrl}/api/captcha`).subscribe({
// next:响应已到达(代码 2xx),其 JSON 响应体已被解码
next: (captcha) => {
this.captcha.set(captcha);
this.requestCount.update((n) => n + 1);
this.loading.set(false);
},
// error:错误响应(4xx、5xx),或根本没有响应
// (服务器已停止、地址错误:此时 status 为 0)
error: (e: HttpErrorResponse) => {
this.error.set(e.status === 0 ? 'no response (status 0)' : `the server responded ${e.status}`);
this.captcha.set(null);
this.loading.set(false);
},
});
}
}
|
| <!-- ======================================================================
ex22.page.html - a captcha requested from the server
====================================================================== -->
<ion-header>
<ion-toolbar color="primary">
<ion-buttons slot="start">
<ion-back-button defaultHref="/" />
</ion-buttons>
<ion-title>Example 22 - a first HTTP request</ion-title>
</ion-toolbar>
</ion-header>
<ion-content class="ion-padding">
<ion-note>Server: {{ server }}</ion-note>
<!-- 请求期间显示一个“不确定”进度条 -->
@if (loading()) {
<ion-progress-bar type="indeterminate" class="ion-margin-top" />
}
@if (error(); as error) {
<ion-card class="error">
<ion-card-content>
Unable to get a captcha: {{ error }}.<br />
Is the RdvMedecins JSON server running (port 8080)?
</ion-card-content>
</ion-card>
}
@if (captcha(); as captcha) {
@if (!loading()) {
<!-- SVG 图片,以 data: 地址的形式提供(见 common/types.ts) -->
<div class="image ion-margin-top">
<img [src]="captchaImage(captcha)" alt="captcha" />
</div>
<div class="id">id: {{ captcha.id }}</div>
}
}
<!-- 请求期间禁用 -->
<ion-button class="ion-margin-top" shape="round" [disabled]="loading()" (click)="load()">Another image</ion-button>
<p><ion-note>{{ requestCount() }} successful request(s)</ion-note></p>
</ion-content>
|
- 第 19 行(.ts):[HttpClient],[Angular] 的 HTTP 客户端。它由 [provideHttpClient()] 在 [main.ts] 中提供给整个应用程序,页面通过 [inject(HttpClient)] 获得它(第 44 行);
- 第 45 行(.ts):服务器地址,显示在屏幕顶部;空地址表示“同源”;
- 第 49–52 行(.ts):屏幕状态,用信号表示:收到的验证码(或 [null])、三种请求状态(进行中、出错、成功),以及成功请求的数量;
- 第 55 行(.ts):对当前请求的订阅 ([Subscription]);
- 第 57–61 行(.ts):页面一加载就发出第一个请求。[DestroyRef] 在页面关闭(返回按钮)时发出信号:随后取消对当前请求的订阅;
- 第 63–86 行(.ts):请求:
- 第 71 行(.ts):[this.http.get<Captcha>(address)] 并不会立即发送请求;它返回响应的一个 [Observable] (示例 19)。请求在进行订阅 ([subscribe])时才会发出。类型 [<Captcha>] 是所期望的 JSON 响应体的类型:这是对编译器的一个承诺,在运行时并不会被验证;
- 第 73–77 行(.ts):如果状态码为 2xx,[next] 会接收响应。它的 JSON 响应体已经被解码:它是一个 [JavaScript] 对象([Flutter] 的 [http] 包返回的是文本,必须再传给 [jsonDecode]);
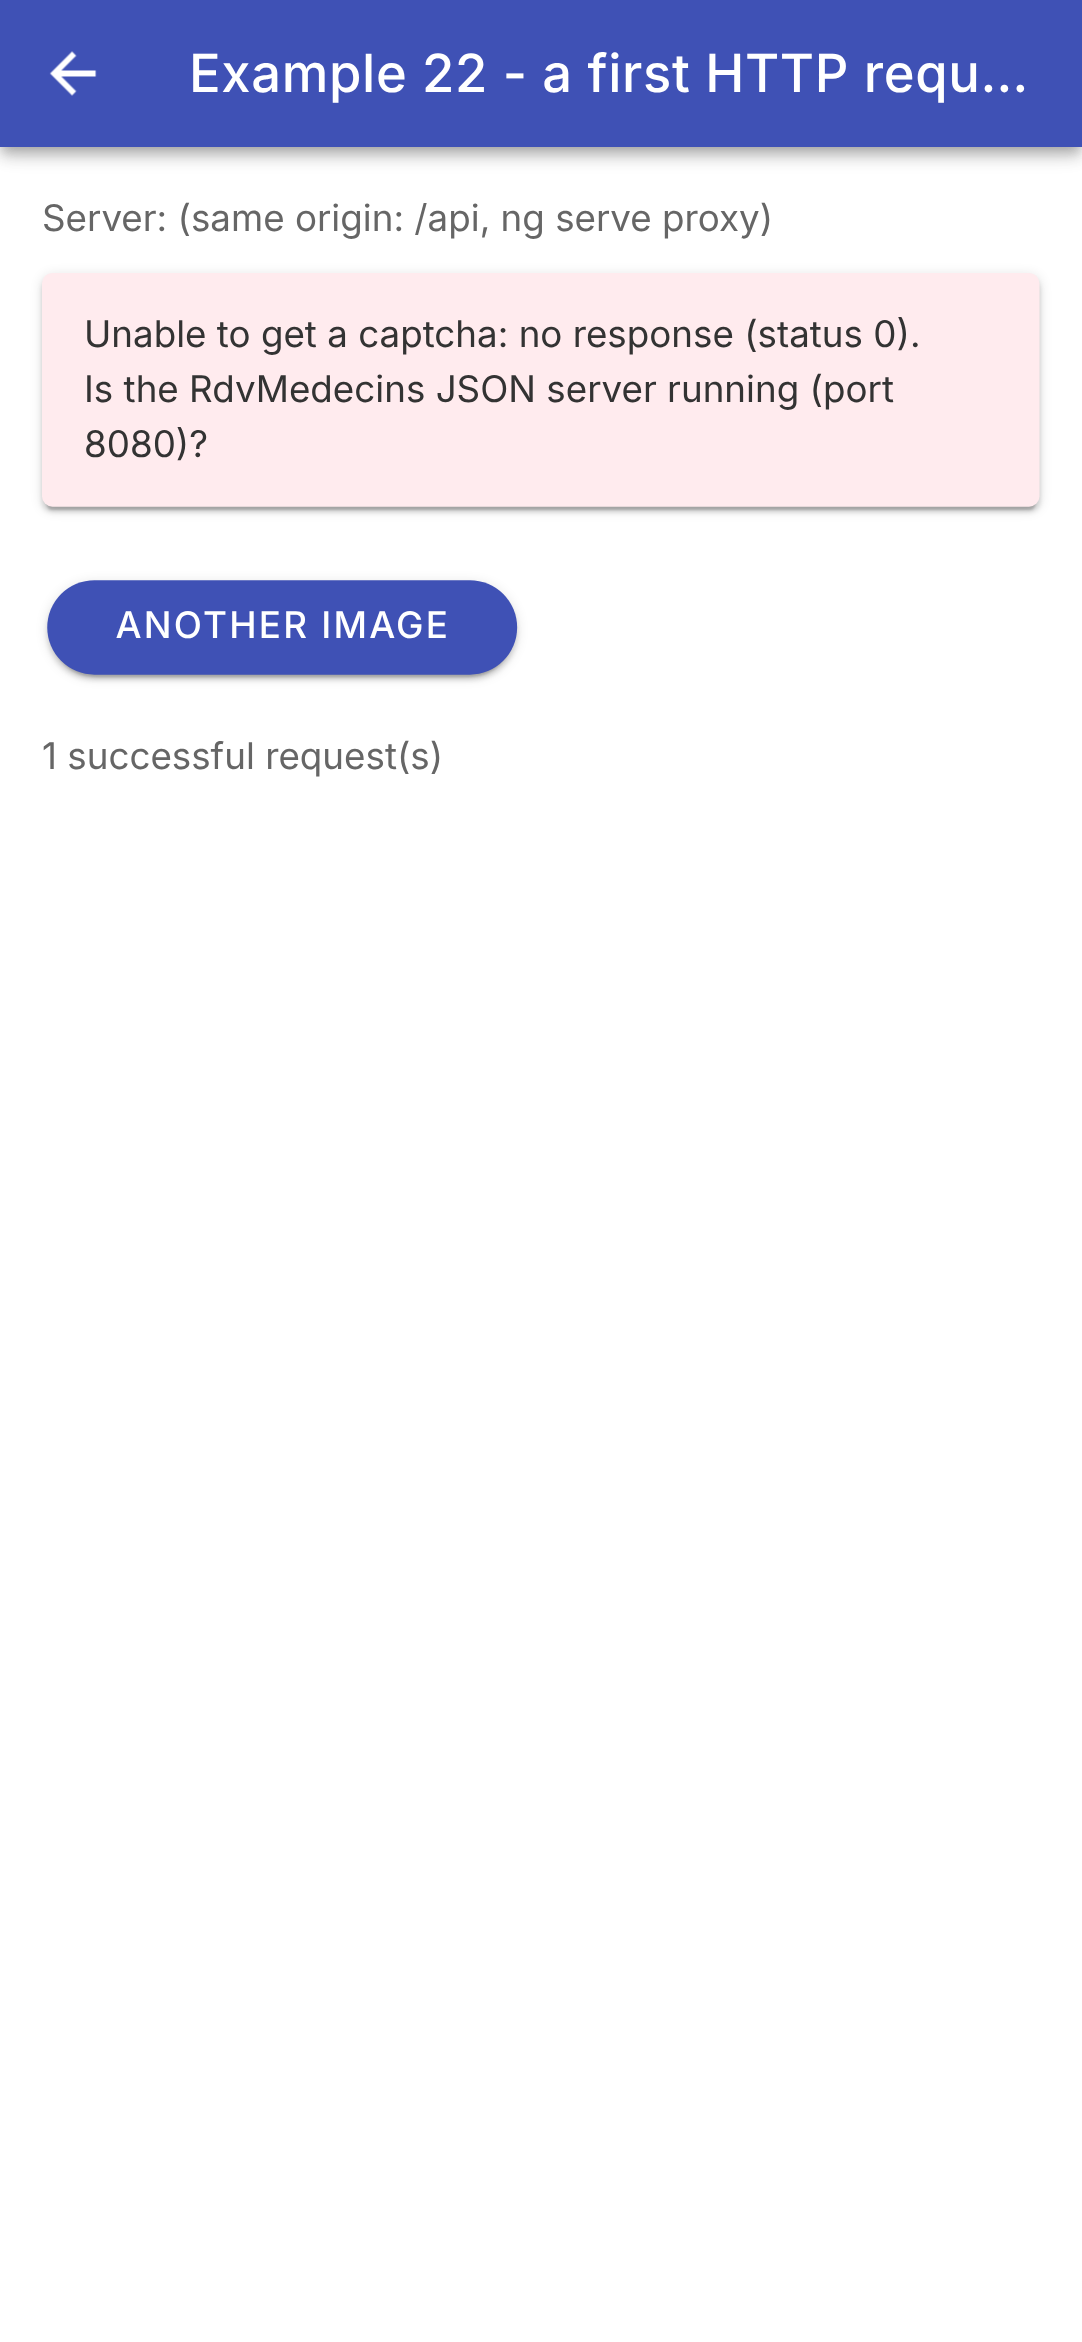
- 第 80–84 行(.ts):[error] 接收一个 [HttpErrorResponse],表示错误响应(4xx、5xx)或没有响应(服务器宕机、地址错误、网络中断)。可以通过 [e.status] 来区分它们,当服务器没有响应时它为 0。这不同于 [http.get] 和 [Flutter],它们把 4xx 或 5xx 响应当作普通响应处理,需要检查代码;
- 第 66 行(.ts):如果上一个请求尚未完成,就放弃它:取消订阅 HTTP 请求会取消它 (浏览器会中断它),它的响应永远不会被处理。这正是 [Observable] 相对于 [Promise] 展现出优势之处,后者无法被取消:[Flutter] 示例必须给请求编号才能忽略过时的响应;
- 第 18–20 行(html):请求期间的进度条([<ion-progress-bar type="indeterminate">]);
- 第 22–29 行(html):错误,显示在一张卡片中;
- 第 31–39 行(html):验证码。[@if (captcha(); as captcha)] 在信号值不为 [null] 时为它指定一个名称;
- 第 35 行(html):验证码图片是文本形式的 SVG。[<img>] 标签可以显示它,前提是以 URL 的形式提供;这就是 [captchaImage] 函数(位于 [common/types.ts] 中)的作用:
| // SVG 文本 -> 可用于 <img [src]> 的“data:”地址:图片
// 就在地址之中(IN)。由 <img> 显示的 SVG 图片无法运行
// 任何脚本:即使其内容可疑,也没有风险
export function captchaImage(c: Captcha): string {
return `data:image/svg+xml;charset=utf-8,${encodeURIComponent(c.svg)}`;
}
|
- 第 32 行:[data:] 地址包含文件本身:它的类型([image/svg+xml]),后跟它的内容,由 [encodeURIComponent] 编码,以便它能出现在地址中。为什么不直接用 [[innerHTML]] 把 SVG 文本插入页面?[Angular] 会拒绝它:SVG 可能包含脚本,而 [Angular] 会“清理”以这种方式插入的任何 HTML,移除它不认为安全的标签,包括 [<svg>]。我们可以强制通过([DomSanitizer.bypassSecurityTrustHtml]),但图片更简单,也没有风险:由 [<img>] 显示的图片从不执行任何脚本。在 [Flutter] 中,渲染 SVG 的是 [flutter_svg] 包;
- 第 42 行(html):“另一张图片”按钮在请求期间被禁用。
在浏览器中,通过 [ng serve] 代理访问;此时服务器没有响应(本截图中,是由截图脚本使请求失败,效果就像服务器已停止一样):
[Chrome] 的开发者工具(F12)中的“Network”选项卡会显示应用程序发出的每个 HTTP 请求及其请求头和请求体:此处为 [GET http://localhost:8100/api/captcha],经由代理发送。在手机上,可以从电脑上通过地址 [chrome://inspect] 检查应用程序(参见“部署”一章);经过 [CapacitorHttp]的请求——也就是经过原生代码的请求——在那里不太容易看到。
[Angular] 的 HTTP 客户端从 19 版开始还提供 [httpResource()]:它是 GET 请求版的 [resource()] ,对应示例 19。你向它提供地址,它返回一个信号对象([isLoading()]、[value()]、[error()]、[reload()]):本示例中对这三种状态的全部管理只需一行即可完成。对于第一个请求,我们选择自己编写这些状态;案例研究将使用 [resource()]。
9.2. 示例 23:登录、Cookie 和会话
9.2.1. Cookie 是怎么回事?
服务器把 JWT 令牌存放在 Cookie 中。此时,[Flutter] 客户端必须把它的 HTTP 客户端替换为另一个能读取每个响应中的 [Set-Cookie] 头、管理这些 Cookie(并将其保存在设备上),并在每个请求的 [Cookie] 头中把它们发回的客户端:[Flutter] 应用没有浏览器替它完成这些工作。
而 [Ionic] 应用则无需编写任何代码:
- 在电脑的浏览器中,是由浏览器保存 Cookie 并将其发回,就像对待任何其他网站一样。[ng serve] 代理使应用程序和 API 具有相同的源:[SameSite=Strict] Cookie 会被接受并发回。应用程序代码无法读取或写入这个 Cookie([HttpOnly]);
- 对于 [Android],[CapacitorHttp] 插件(示例 22)会让请求经过原生代码。[Capacitor] 在应用启动时,会把 [Android] 的 Cookie 管理器(WebView 使用的那个)设置为原生请求的管理器:收到的 Cookie 会保存在其中,并随后续发往同一服务器的请求发回。它们会保留在设备上(我们的 Cookie 的生命周期由 [Max-Age=7200]设定;只有没有过期时间的“会话”Cookie 才会在应用启动时被删除):关闭并重新打开应用后,你仍保持登录状态。
因此,令牌从不由应用程序的代码操作,也不会以明文形式保存在设备上([Flutter] 客户端把它保存在 [shared_preferences] 中)。
9.2.2. 命令
| // =========================================================================
// src/app/ex23-login/command.ts - 一个操作(ACTION)、它的状态、它的结果
// -------------------------------------------------------------------------
// 异步操作(登录、保存……)有一个状态,屏幕
// 必须显示出来:它是否正在运行(按钮被禁用)?它是否
// 以错误(消息)结束?这是架构指南(例如 Flutter 的指南)中的
// “Command”模式,精简到了最基本的部分:
//
// readonly loginCommand = new Command();
// this.loginCommand.execute(() => this.logIn()); // 启动该操作
// loginCommand.running(), loginCommand.error() // 它的状态
//
// 它的状态由信号(SIGNALS)构成:读取它们的模板会在
// 命令开始和结束时更新。
// =========================================================================
import { signal } from '@angular/core';
export class Command {
private readonly _running = signal(false);
private readonly _error = signal<unknown>(null);
readonly running = this._running.asReadonly();
readonly error = this._error.asReadonly();
// 执行该操作,前提是没有另一个操作正在运行
async execute(action: () => Promise<void>): Promise<void> {
if (this._running()) return; // 不允许重复提交(双击按钮)
this._running.set(true);
this._error.set(null);
try {
await action();
} catch (e) {
this._error.set(e); // 错误会被保留(KEPT),以便显示
} finally {
// finally:在所有(ALL)情况下都会执行,无论成功还是出错
this._running.set(false);
}
}
clearError(): void {
this._error.set(null);
}
}
|
异步操作(登录、保存等)有一个必须显示在屏幕上的状态:是进行中(按钮被禁用)吗?是以错误(消息)结束吗?这就是架构指南中的“Command(命令)”模式([Flutter] 就是这样称呼它的),此处已精简到只剩要点。[React] 课程为此使用了 [React] 19 的“actions”([useActionState])。
- 第 19–23 行:一个简单的类(每个屏幕用 [new] 创建自己的实例),其状态由两个私有信号组成,并以只读方式公开。读取 [running()] 或 [error()] 的模板会在命令开始和结束时更新:这正是 [ChangeNotifier] 和 [ListenableBuilder] 在 [Flutter] 中所起的作用;
- 第 26–38 行:执行一个操作:如果另一个操作正在进行,则什么也不做(第 27 行:防止按钮被按两次导致重复提交);否则,将命令设为“进行中”;发生异常时,记录错误以便显示(第 33 行);无论何种情况([finally],第 34–37 行),命令都不再处于进行中。错误的类型为 [unknown]:在 [JavaScript] 中,任何值都可以被抛出,因此 [TypeScript] 并不知道 [catch] 捕获到的是什么。
9.2.3. 屏幕
| // =========================================================================
// src/app/ex23-login/ex23.page.ts - 登录 RdvMedecins 服务器
// -------------------------------------------------------------------------
// 1. 启动时:GET /api/auth/me - 我们是否已经登录?
// (应用程序可能曾被停止;而服务器这边,会读取提交给它的
// Cookie);
// 2. 登录:POST /api/auth/login,JSON 请求体 { login, password,
// captchaId, captcha }。成功时,服务器会发送 JWT 令牌的
// Cookie(Set-Cookie 头);
// 3. 受保护的请求:GET /api/doctors。Cookie 随之发送;
// 4. 退出登录:POST /api/auth/logout - 服务器删除 Cookie。
// 那么 Cookie 呢?代码无需做任何事(NOTHING):在浏览器中,由
// 浏览器存储它并把它发回;在 Android 上,由原生代码
// (CapacitorHttp 插件,见 capacitor.config.ts)处理。
// =========================================================================
import { HttpClient, HttpErrorResponse } from '@angular/common/http';
import { Component, inject, signal } from '@angular/core';
import { FormsModule } from '@angular/forms';
import {
IonBackButton, IonButton, IonButtons, IonCard, IonCardContent, IonContent, IonHeader, IonInput, IonNote, IonText,
IonTitle, IonToolbar,
} from '@ionic/angular';
import { firstValueFrom } from 'rxjs';
import { config } from '../common/config';
import { Captcha, captchaImage } from '../common/types';
import { Command } from './command';
// 本示例所需的少量消息(示例 25 将使用字典)
const messages: Record<string, string> = {
'LOGIN.ERROR': 'Incorrect login or password.',
'ERRORS.WRONG_CAPTCHA': 'The characters you typed do not match the image.',
'ERRORS.TOO_MANY_ATTEMPTS': 'Too many failed attempts. Try again later.',
};
// POST /api/auth/login 和 GET /api/auth/me 的返回内容,以及 GET /api/doctors 的一行数据
interface User {
login: string;
name: string;
role: string;
}
interface Doctor {
id: number;
title: string;
firstName: string;
lastName: string;
}
@Component({
selector: 'app-ex23',
imports: [
FormsModule, IonHeader, IonToolbar, IonButtons, IonBackButton, IonTitle, IonContent, IonCard, IonCardContent,
IonInput, IonButton, IonText, IonNote,
],
templateUrl: './ex23.page.html',
styles: `
.captcha { display: flex; align-items: center; margin-top: 12px; }
.captcha img { height: 50px; }
.error { --background: #ffebee; --color: #333; }
h3 { font-size: 14px; font-weight: bold; margin: 12px 0 4px; }
`,
})
export class Ex23Page {
private readonly http = inject(HttpClient);
readonly captchaImage = captchaImage;
readonly user = signal<User | null>(null); // null:无人登录
readonly doctors = signal<Doctor[]>([]);
readonly captcha = signal<Captcha | null>(null);
readonly ready = signal(false); // 初始检查是否已完成?
readonly serverError = signal<string | null>(null);
readonly loginCommand = new Command();
// 表单的字段,通过 [(ngModel)] 绑定
readonly login = signal('admin');
readonly password = signal('');
readonly captchaAnswer = signal('');
constructor() {
this.checkSession();
}
private url(path: string): string {
return `${config.serverUrl}/api${path}`;
}
// 一个 GET 请求,我们需要其 JSON 响应体。非
// 2xx 的响应(或没有响应)会使 Promise 以 HttpErrorResponse 被拒绝
private read<T>(path: string): Promise<T> {
return firstValueFrom(this.http.get<T>(this.url(path)));
}
// 一个 POST:请求体对象会以 JSON 发送(content-type: application/json 头)
private post<T>(path: string, body: object): Promise<T> {
return firstValueFrom(this.http.post<T>(this.url(path), body));
}
async loadCaptcha(): Promise<void> {
this.captcha.set(await this.read<Captcha>('/captcha'));
this.captchaAnswer.set('');
}
private async loadDoctors(): Promise<void> {
this.doctors.set(await this.read<Doctor[]>('/doctors'));
}
// 1. 谁已登录?200 -> 用户;401 -> 无人
private async checkSession(): Promise<void> {
try {
this.user.set(await this.read<User>('/auth/me'));
await this.loadDoctors();
} catch (e) {
// instanceof:类型测试;e.status:状态码(0:无响应)
if (e instanceof HttpErrorResponse && e.status === 401) {
await this.loadCaptcha();
} else if (e instanceof HttpErrorResponse && e.status !== 0) {
this.serverError.set(`The server responded ${e.status}.`);
} else {
this.serverError.set(`Is the RdvMedecins JSON server running (${config.serverUrl || 'port 8080'})?`);
}
}
this.ready.set(true);
}
// “登录”按钮:由 Command 执行该操作并保存其错误
submit(): void {
this.loginCommand.execute(() => this.logIn());
}
// 2. 登录
private async logIn(): Promise<void> {
try {
const user = await this.post<User>('/auth/login', {
login: this.login().trim(),
password: this.password(),
captchaId: this.captcha()?.id,
captcha: this.captchaAnswer(),
});
this.password.set('');
this.user.set(user);
await this.loadDoctors();
} catch (e) {
if (!(e instanceof HttpErrorResponse)) throw e;
// e.error:错误响应的 JSON 请求体,{ statusCode, key, ... }
const key: string = e.error?.key ?? 'ERRORS.SERVER_UNREACHABLE';
await this.loadCaptcha(); // 每张图片只使用一次
// Command 将保留的错误
throw new Error(`${e.status} - ${messages[key] ?? key}`);
}
}
// 命令所保留的错误消息
errorMessage(): string {
const error = this.loginCommand.error();
return error instanceof Error ? error.message : String(error);
}
// 4. 注销
async logOut(): Promise<void> {
await this.post('/auth/logout', {});
this.user.set(null);
this.doctors.set([]);
await this.loadCaptcha();
}
}
|
| <!-- ======================================================================
ex23.page.html - login, session, logout
====================================================================== -->
<ion-header>
<ion-toolbar color="primary">
<ion-buttons slot="start">
<ion-back-button defaultHref="/" />
</ion-buttons>
<ion-title>Example 23 - logging in to the server</ion-title>
</ion-toolbar>
</ion-header>
<ion-content class="ion-padding">
@if (!ready()) {
<ion-note>Checking the session...</ion-note>
} @else if (user(); as u) {
<!-- 已登录 -->
<ion-card>
<ion-card-content>
<div>Logged in: <strong>{{ u.name }}</strong> ({{ u.login }}), role {{ u.role }}</div>
<!-- 3. 受保护的请求:Cookie 随之发送 -->
<h3>GET /api/doctors</h3>
@for (m of doctors(); track m.id) {
<div>• {{ m.title }} {{ m.firstName }} {{ m.lastName }}</div>
}
<p class="ion-margin-top"><ion-note>Stop then restart the application: you stay logged in.</ion-note></p>
<ion-button fill="outline" shape="round" (click)="logOut()">Log out</ion-button>
</ion-card-content>
</ion-card>
} @else if (serverError() === null) {
<!-- 未登录:显示表单 -->
<ion-card>
<ion-card-content>
<ion-input label="Login" labelPlacement="floating" [(ngModel)]="login" />
<ion-input label="Password" labelPlacement="floating" type="password" [(ngModel)]="password" />
<div class="captcha">
@if (captcha(); as c) {
<img [src]="captchaImage(c)" alt="captcha" />
}
<ion-button fill="clear" size="small" (click)="loadCaptcha()">Another image</ion-button>
</div>
<ion-input label="Copy the characters of the image" labelPlacement="floating" autocorrect="off"
autocapitalize="off" [(ngModel)]="captchaAnswer" />
<!-- 按钮跟随命令的状态 -->
<ion-button class="ion-margin-top" shape="round" [disabled]="loginCommand.running()"
(click)="submit()">
{{ loginCommand.running() ? 'Logging in...' : 'Log in' }}
</ion-button>
@if (loginCommand.error() !== null) {
<p><ion-text color="danger">{{ errorMessage() }}</ion-text></p>
}
<p><ion-note>Accounts: admin, pelissier, martin... (password = login).</ion-note></p>
</ion-card-content>
</ion-card>
}
@if (serverError(); as message) {
<ion-card class="error">
<ion-card-content>{{ message }}</ion-card-content>
</ion-card>
}
</ion-content>
|
屏幕经历会话的四个阶段:启动时,谁已登录?登录;安全请求;以及注销。
- 第 29–34 行(.ts):本示例所需的少量消息(示例 25 将使用字典);
- 第 36–47 行(.ts):所用响应的格式,由两个接口描述(示例 24 将把这些类型存放在 [common/types.ts] 中);
- 第 67–76 行(.ts):状态:已登录的用户([null]:无人登录)、医生、验证码、初始验证是否完成、服务器错误、登录命令以及表单字段;
- 第 86–95 行(.ts):两个快捷方法。[firstValueFrom(observable)] (来自 [RxJS])订阅请求返回的 [Observable] ,并返回一个包含其第一个值(即响应)的 [Promise] :随后可以用 [await] 等待它,使代码自上而下阅读。如果请求失败,[Promise] 会连同 [HttpErrorResponse] 一起被拒绝,而 [await] 会将其作为异常抛出。对于 POST(第 94 行),请求体是一个对象:HTTP 客户端会把它发送为 JSON,并带上服务器要求的 [Content-Type: application/json] 头(否则:415);
- 第 107–122 行(.ts):1. 启动时,谁已登录?[GET /api/auth/me]:200,返回用户(随后是医生列表);401(第 113 行),无人登录:为表单加载验证码。[e instanceof HttpErrorResponse] 是一个类型检查:在其为真的分支中,[TypeScript] 知道 [e] 具有 [status]。其他错误码(第 115–116 行)或根本没有响应(第 117–119 行,[status] 为 0):显示一条消息;
- 第 125–127 行(.ts):“登录”按钮把操作委托给命令;
- 第 130–149 行(.ts):2. 登录:[POST /api/auth/login]。如果成功,浏览器(或 [Android])已保存 Cookie:保留该用户,并加载医生。如果登录失败,[e.error] 是错误响应的请求体,已经解码:其中包含消息键(第 144 行;[?.] 和 [??]:若请求体中没有消息键,则使用备用键)。随后加载一张新图片(每张只使用一次),然后触发一个错误,其消息将被显示(第 147 行):由命令捕获并保存它。不是 [HttpErrorResponse] 的异常(属于异常情况)会原样重新抛出(第 142 行);
- 第 152–155 行(.ts):命令保留的错误消息;
- 第 158–163 行(.ts):4. 注销:[POST /api/auth/logout];服务器删除 Cookie(它发送一个已经过期的空 Cookie),浏览器随之忘记它;
- 第 15–16 行(html):在初始验证尚未完成期间;
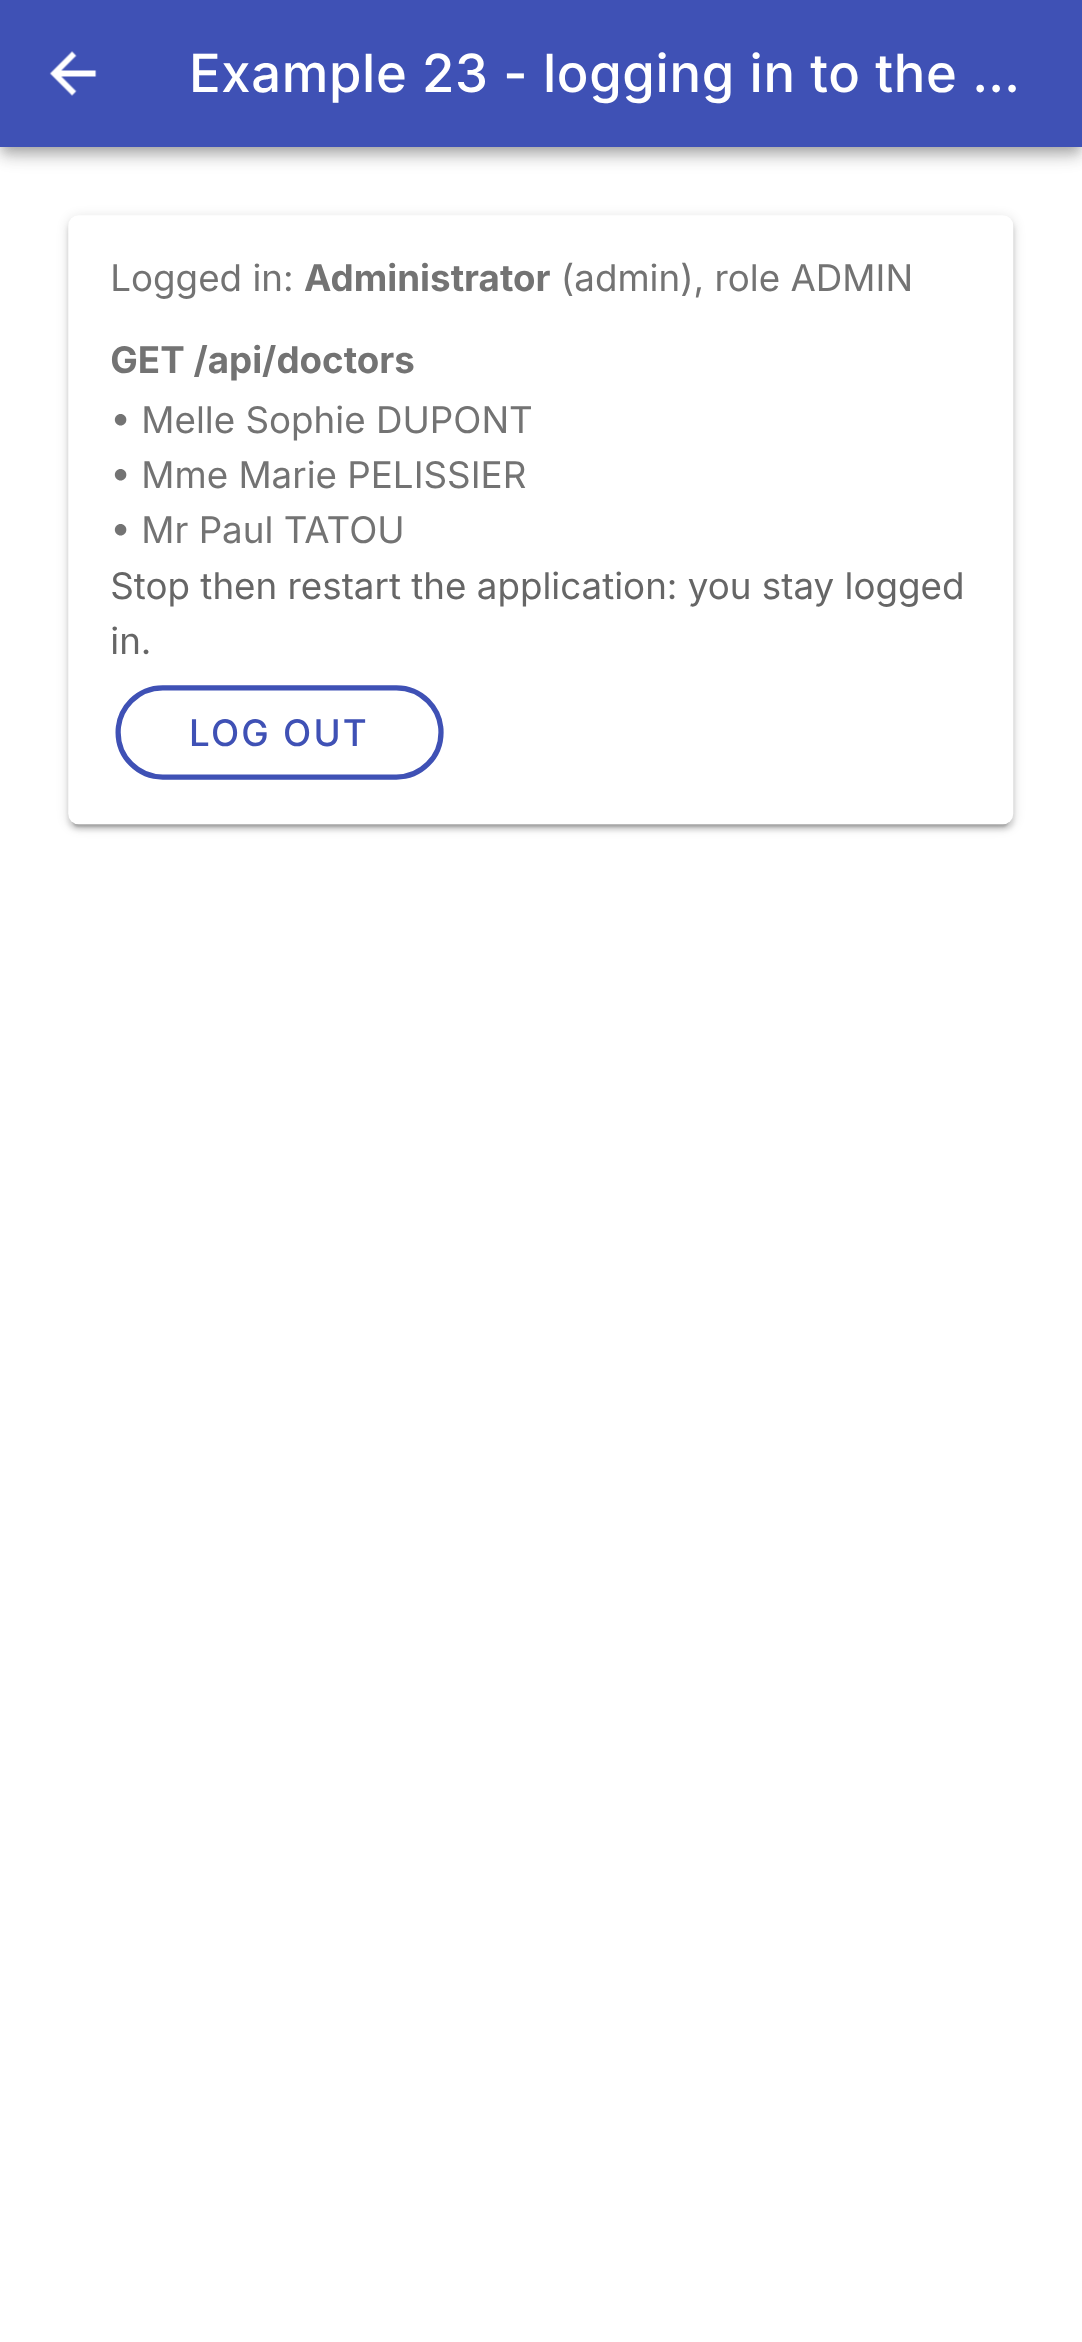
- 第 17–30 行(html):3. 已登录:用户和医生列表([GET /api/doctors],一个受保护的请求:Cookie 未写一行代码就被带上了);
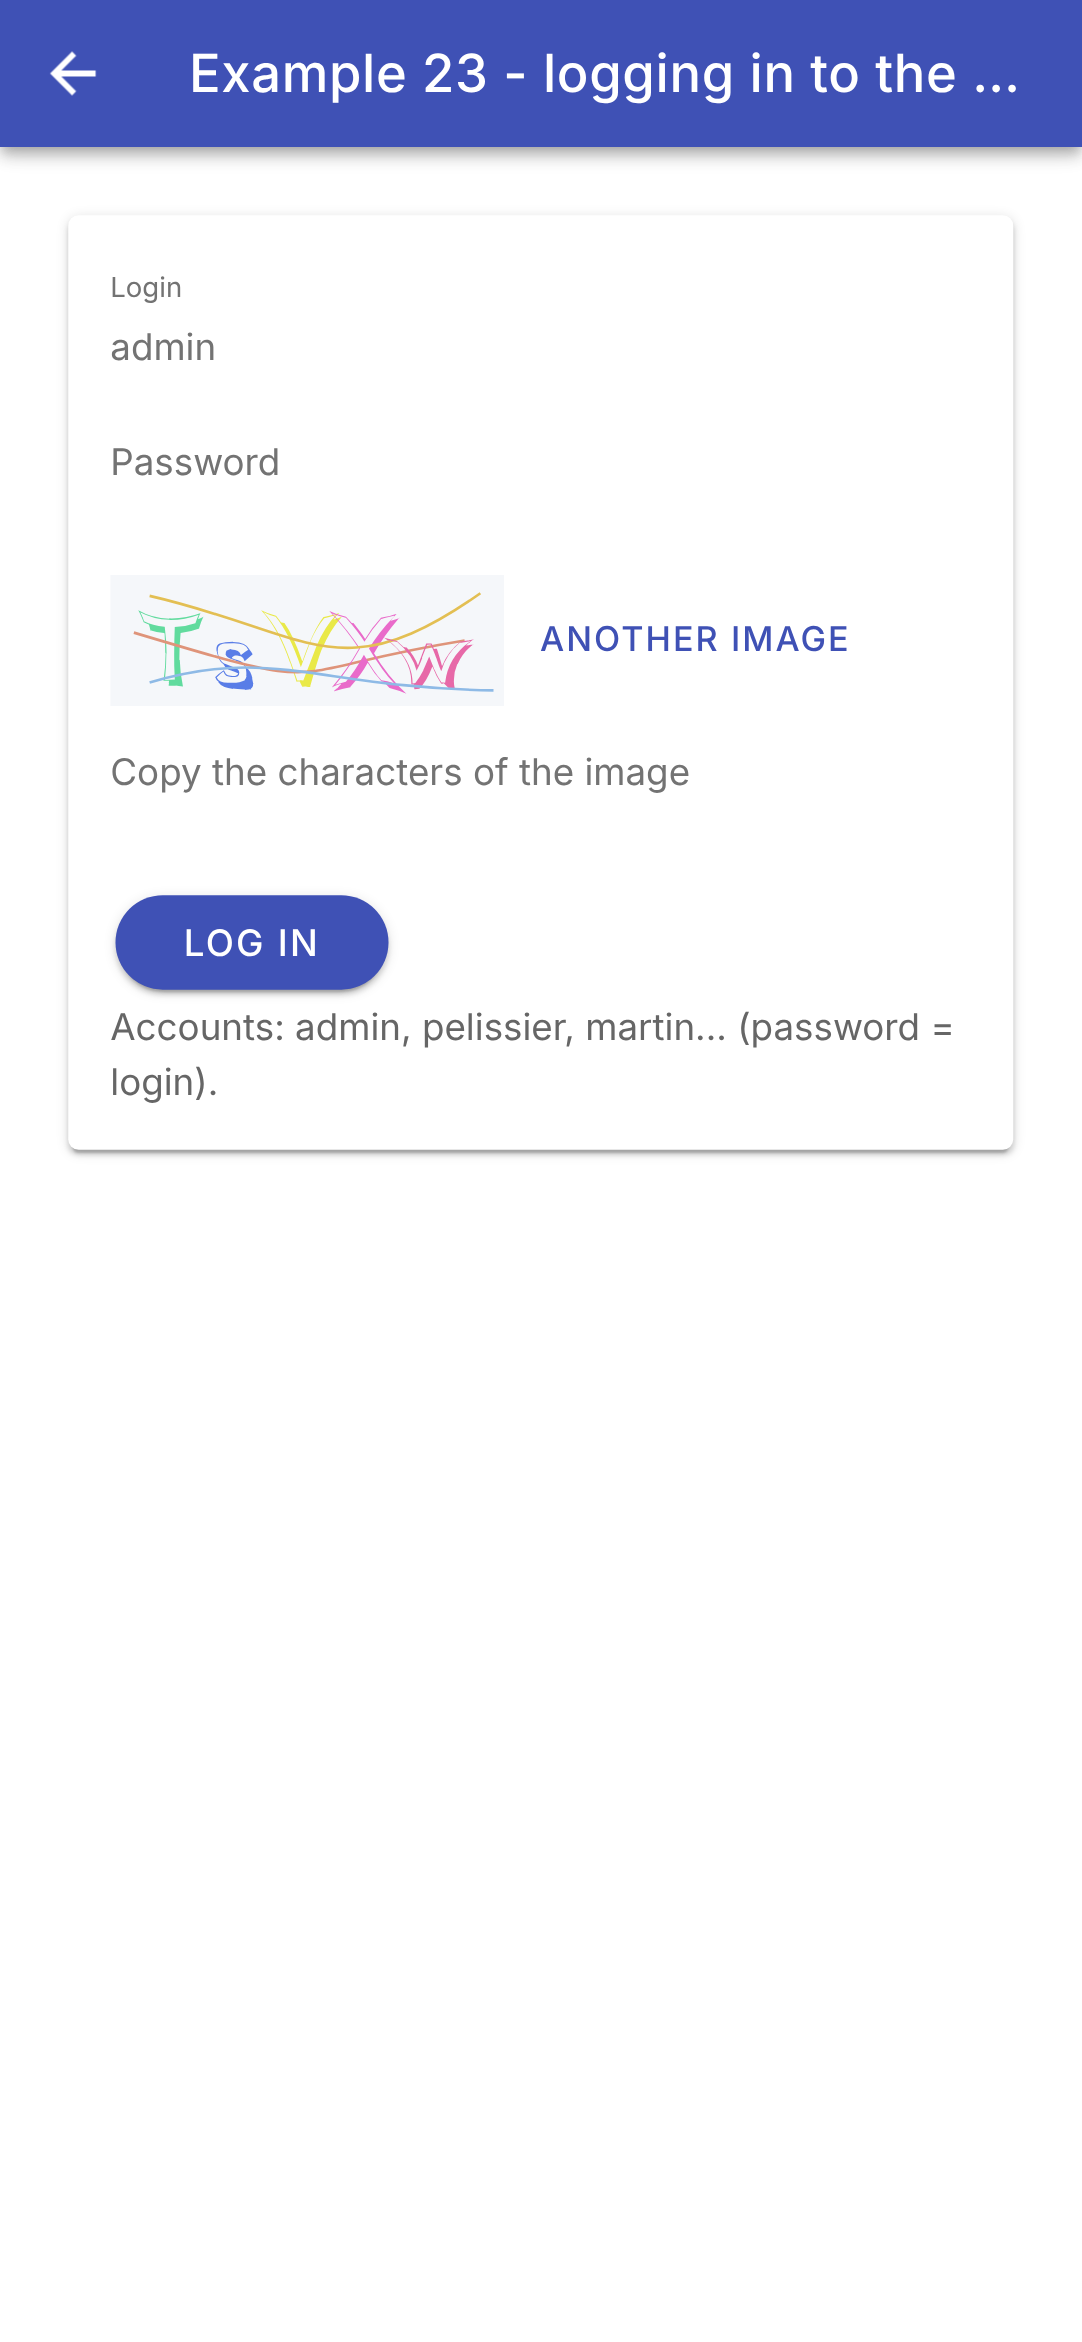
- 第 31–55 行(HTML):未登录:表单。这些字段通过 [[(ngModel)]] 与信号关联(示例 05);验证码的显示方式与示例 22 相同(第 38–40 行);
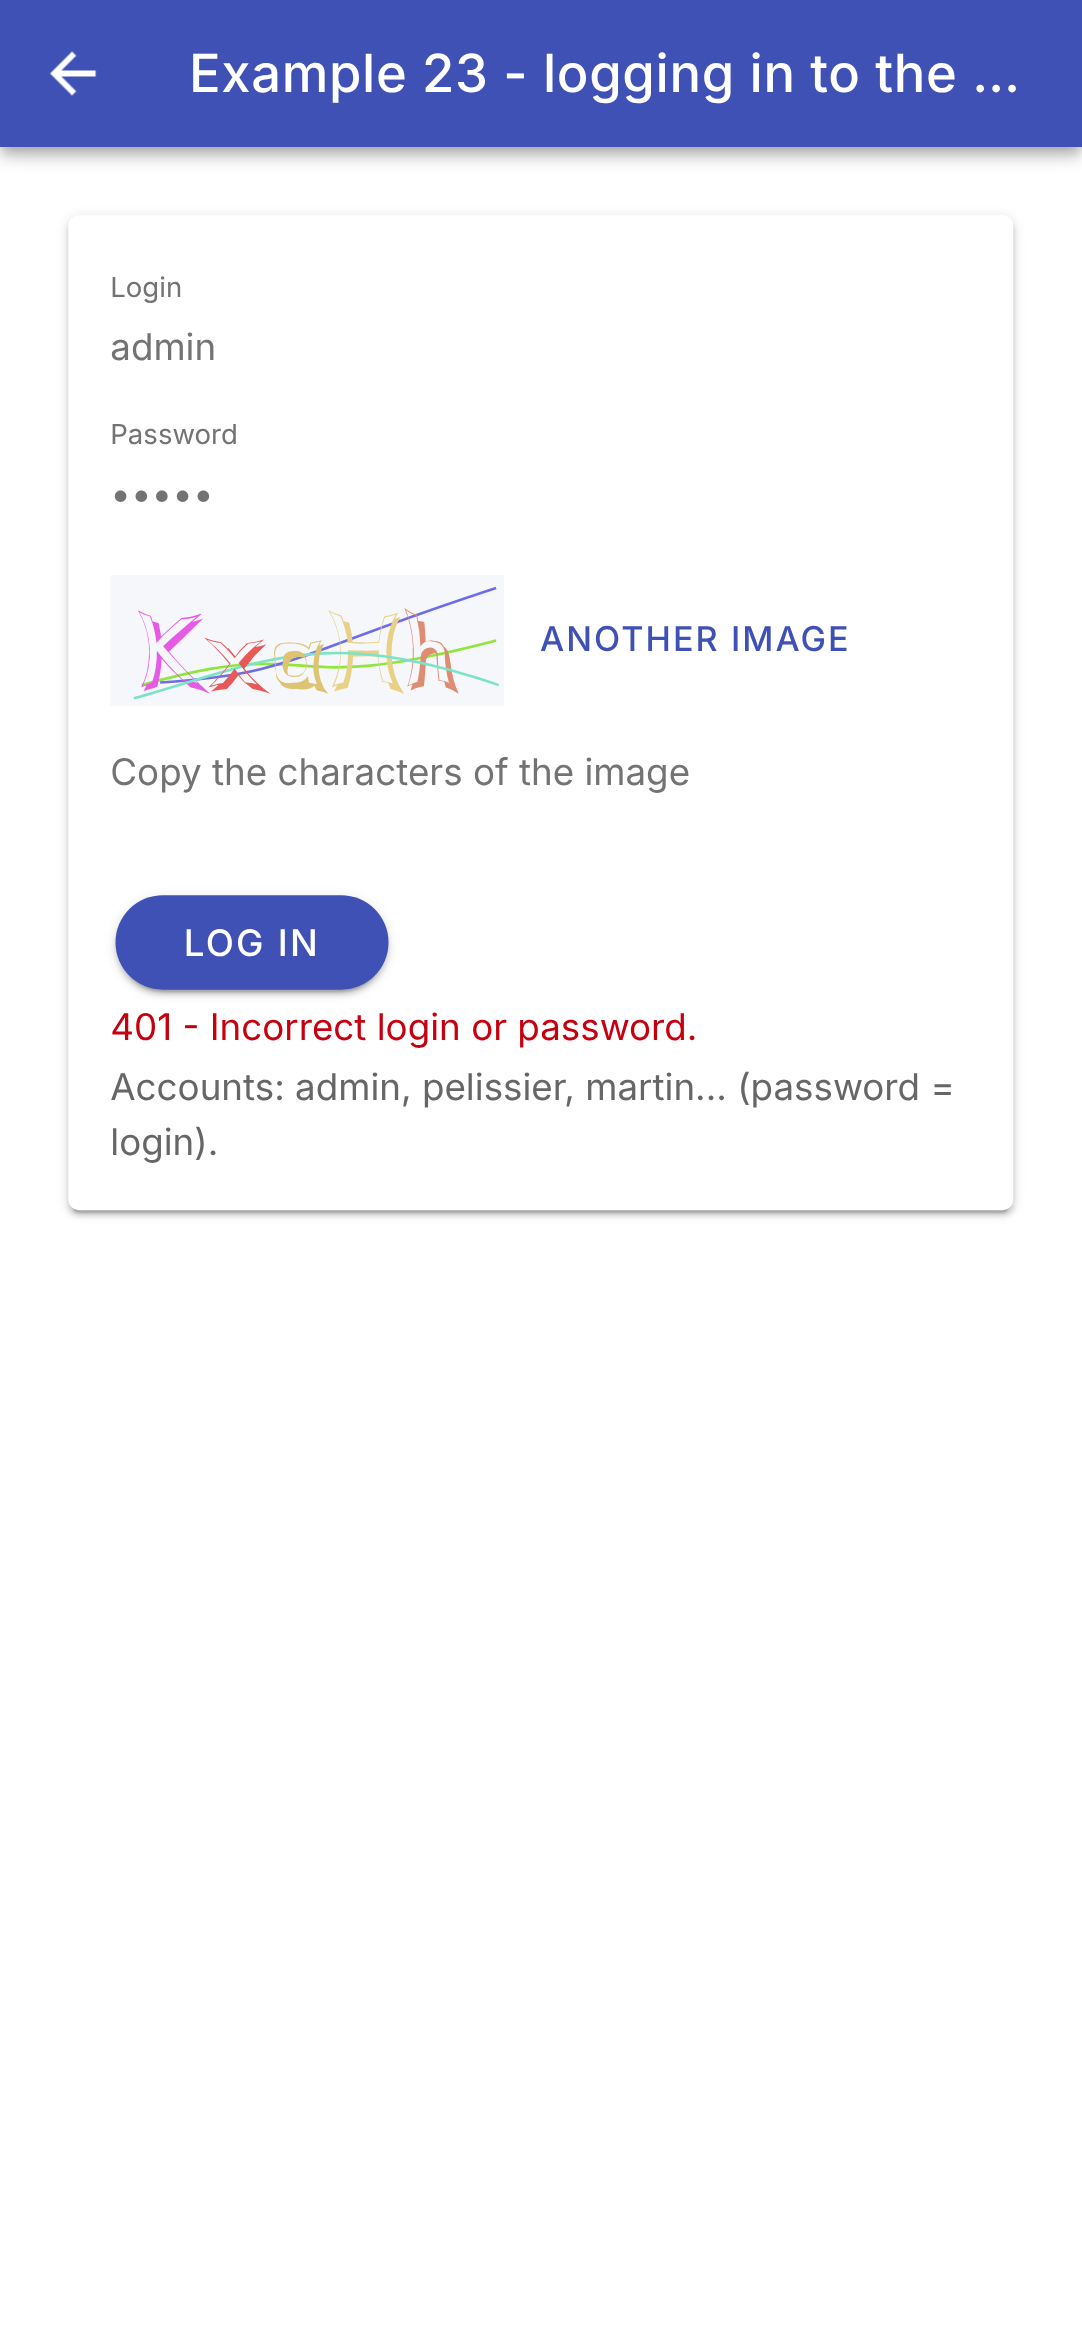
- 第 46–52 行(html):按钮反映请求的状态:请求发送期间被禁用并显示“正在登录……”;任何错误消息都显示在其下方;
- 第 58–62 行(html):服务器没有响应。
登录界面;密码错误;登录成功:
重新加载浏览器页面(在手机上则关闭并重新打开应用):它会以已登录状态打开。由浏览器(或 [Android])保存的 Cookie 会被发送到 [GET /api/auth/me],服务器则返回用户的凭据信息。令牌两小时后过期:[GET /api/auth/me] 此后会返回 401 响应,登录界面将重新出现。
9.3. 示例 24:API 访问层
在示例 23 中,每个请求都重复了相同的步骤。本示例把它们组织成三层,案例研究将再次用到。
9.3.1. 类型
| // =========================================================================
// src/app/common/types.ts - 与 RdvMedecins API 交换的 JSON 对象
// (参见黑盒一章,其中描述了每条路由)
// -------------------------------------------------------------------------
// 把服务器的响应翻译成 TypeScript 类型。它们
// 只是描述:在编译时消失,在运行时
// 不检查任何内容。它们让编译器
// 能够检查代码只使用存在的字段,且
// 类型正确(并让编辑器提示字段名称)。
// =========================================================================
// 字符串的“联合类型”:只允许这三个值
export type Role = 'ADMIN' | 'DOCTOR' | 'USER';
// POST /api/auth/login, GET /api/auth/me
export interface User {
login: string;
name: string; // 显示名称:"Marie PELISSIER"
role: Role;
}
// GET /api/captcha
export interface Captcha {
id: string;
svg: string; // 图片,SVG 格式(文本)
}
// SVG 文本 -> 可用于 <img [src]> 的“data:”地址:图片
// 就在地址之中(IN)。由 <img> 显示的 SVG 图片无法运行
// 任何脚本:即使其内容可疑,也没有风险
export function captchaImage(c: Captcha): string {
  return `data:image/svg+xml;charset=utf-8,${encodeURIComponent(c.svg)}`;
}
// 一个人的姓名,仅此而已
export interface Identity {
title: string;
firstName: string;
lastName: string;
}
// 一位医生或一位客户(GET /api/doctors, GET /api/clients...)
// “extends”:Person 拥有 Identity 的所有字段,外加其他字段
export interface Person extends Identity {
id: number;
version: number; // 乐观锁:更新时需要一并发回
login?: string; // 可选(?):仅 ADMIN 可见
}
// "Mme Alice DURAND"
export function fullName(i: Identity): string {
return `${i.title} ${i.firstName} ${i.lastName}`;
}
// GET /api/schedule 的一行:一个时间段,以及已登录用户的权限
export interface ScheduleSlot {
id: number;
startHour: number;
startMinute: number;
endHour: number;
endMinute: number;
free: boolean;
patient: Identity | null; // null:空闲,或被其他患者占用
mine: boolean; // 已登录患者的预约
bookable: boolean;
appointmentId: number | null; // 如果用户可以取消,则设置
}
// "8:00 - 8:20"
export function timeRange(c: ScheduleSlot): string {
const hm = (h: number, m: number) => `${h}:${String(m).padStart(2, '0')}`;
return `${hm(c.startHour, c.startMinute)} - ${hm(c.endHour, c.endMinute)}`;
}
// GET /api/schedule?doctorId=...&day=...
export interface Schedule {
doctor: Person;
day: string; // "yyyy-MM-dd"
slots: ScheduleSlot[];
info: string | null; // 翻译键(已有预约的患者)
}
|
用 [TypeScript] 描述的服务器响应。它们只是描述:接口在编译时会被消除,在运行时不执行任何检查。它们让编译器能够验证代码只使用存在的字段且类型正确,并让编辑器能够提示字段名称。
- 第 13 行:字符串联合类型:类型为 [Role] 的变量只能被赋值为这三个字符串之一。编译器会拒绝 [role === 'ADMN'];
- 第 16–20 行:已登录的用户([POST /api/auth/login]、[GET /api/auth/me]);
- 第 44–48 行:一个人(医生或客户)。[extends Identity]:它拥有 [Identity] 的所有字段(第 36–40 行),外加其他字段;[login?]:可选字段(只有 ADMIN 才包含它);
- 第 56–67 行:一个日程条目。[Identity | null]、[number | null]:与 ["strict": true] 和 [TypeScript] 一起,这要求在使用这些值之前先对其进行检测;
- 第 51–53、70–73 行:格式化函数:“Mme Alice DURAND”、“8:00 – 8:20”。它们不是方法:从服务器收到的对象是普通的 [JavaScript] 对象,没有类;
- 第 76–81 行:医生某一天的日程。
这是与 [Flutter] 客户端的一个根本区别。在 [Dart] 中,解码后的 JSON 没有类型([dynamic]):每个类都有一个构造函数 [fromJson],它通过 验证收到的 JSON 的格式(借助 [Dart] 3 的过滤功能,即“模式匹配”),并将其转换为对象。在这里,编译器完全相信我们告诉它的内容([http.get<Schedule>(...)]):只有当显示时遇到缺失的字段,才会发现意外的响应。对于由我们掌控的服务器,这是通行的做法。对于外部 API,我们会使用“模式”库([Zod]、[Valibot])来验证响应,它在运行时完成原先 [Dart] 中的过滤所做的工作。
9.3.2. 错误
| // =========================================================================
// src/app/common/api-error.ts - 所有 API 错误共用的一个类
// -------------------------------------------------------------------------
// RdvMedecins 服务器的所有错误响应都具有相同的结构:
// { "statusCode": 409, "key": "ERRORS.LOGIN_TAKEN", "params": {...}, "fields": {...} }
// 但是,请求也可能以其他方式失败:根本没有响应
// (网络中断、服务器已停止、地址错误),或者响应并非来自
// 我们的服务器(代理的错误页面)。Angular 的 HTTP
// 客户端把所有这些失败都报告为 HttpErrorResponse;我们
// 把它转换为同一个类 ApiError,它携带服务器
// 发送的翻译键(以及参数和每个字段的
// 错误,如果有的话)。
// =========================================================================
import { HttpErrorResponse } from '@angular/common/http';
// 一个对象 { name: text }
export type Texts = Record<string, string>;
// “extends Error”:一个完整的 JavaScript 错误,我们可以抛出
// (throw)和捕获(catch)它;message 为 "409 ERRORS.LOGIN_TAKEN"
export class ApiError extends Error {
constructor(
readonly statusCode: number, // 0:服务器没有响应
readonly key: string, // 例如:'ERRORS.LOGIN_TAKEN'
readonly params: Texts = {},
readonly fields: Texts = {},
) {
super(`${statusCode} ${key}`);
this.name = 'ApiError';
}
// Angular HTTP 客户端的错误响应 -> 一个 ApiError
static fromResponse(response: HttpErrorResponse): ApiError {
// 状态码 0:无响应(网络中断、服务器已停止、地址错误)
if (response.status === 0) {
return new ApiError(0, 'ERRORS.SERVER_UNREACHABLE');
}
// error:响应的请求体,如果是 JSON 则已解码
const body: unknown = response.error;
if (isObject(body) && typeof body['key'] === 'string') {
return new ApiError(response.status, body['key'], texts(body['params']), texts(body['fields']));
}
// 没有键:由代理或网络代替服务器作出了响应
return new ApiError(
response.status,
response.status >= 500 ? 'ERRORS.SERVER_UNREACHABLE' : 'ERRORS.SERVER_ERROR',
);
}
}
// 一个“类型守卫”:如果函数返回 true,TypeScript 就知道
// value 是一个可以读取其属性的对象
function isObject(value: unknown): value is Record<string, unknown> {
return typeof value === 'object' && value !== null && !Array.isArray(value);
}
// 一个 JSON 对象 { "name": "ERRORS..." } -> Texts(否则为空)
function texts(json: unknown): Texts {
if (!isObject(json)) return {};
return Object.fromEntries(Object.entries(json).map(([key, value]) => [key, String(value)]));
}
|
服务器的所有错误响应都具有相同的格式。但是,请求也可能以其他方式失败:根本没有响应,或者响应并非来自我们的服务器。[Angular] 的 HTTP 客户端把所有这些失败都报告为 [HttpErrorResponse];我们把它们转换为同一个类 [ApiError]。
- 第 18 行:[Record<string, string>]:属性均为字符串的对象;
- 第 22–31 行:[extends Error]:一个完整的 [JavaScript] 错误,可以被抛出([throw])和捕获([catch]),并带有其调用栈。以 [readonly] 为前缀的构造函数参数会声明并初始化字段(这是 [TypeScript] 的简写形式):状态码(0:无响应)、翻译键、其参数,以及每个字段的错误。错误消息(第 29 行)为“401 LOGIN.ERROR”,便于快速显示;
- 第 34–49 行:将 [HttpErrorResponse] → [ApiError]。状态码 0:无响应(第 36–38 行)。否则,[response.error] 是响应的请求体,如果是 JSON 则已解码(第 40 行);如果它带有字符串类型的键 [key],说明是我们的服务器作出了响应(第 41–42 行)。否则,是某个中间环节(代理、网络)代替它作出了响应(第 45–48 行);
- 第 54–56 行:一个类型守卫 ([value is Record<string, unknown>])——这是一个函数,其结果 [true] 会告知编译器其参数的类型。在 [isObject(body)] 之后,它知道 [body] 是一个可以读取其属性的对象。这就是 [Dart] 中的“if-case”语句一步完成的事情;
- 第 59–62 行:JSON 对象 { "name": "ERRORS..." } → 文本(如果不是对象则为空)。
9.3.3. 请求
| // =========================================================================
// src/app/common/api.ts - 向 API 发出请求,只需一行
// -------------------------------------------------------------------------
// 在示例 23 中,每个请求都重复了相同的步骤:服务器
// 地址、/api 前缀、把 Observable 转换为 Promise、读取
// 错误响应体……我们在这里把它们归并到一个服务中:
//
// const doctors = await this.api.get<Person[]>('/doctors');
// await this.api.post('/appointments', { day, slotId: 3 });
//
// - 成功时,Promise 返回解码后的 JSON 请求体;
// - 失败时,它以 ApiError 被拒绝。
// 所有请求都经过 request 方法:所有请求共有的问题
// 都应在此处处理(参见案例研究和
// 401 响应)。供示例 24 和 25 使用。
// =========================================================================
import { HttpClient, HttpErrorResponse } from '@angular/common/http';
import { inject, Injectable } from '@angular/core';
import { firstValueFrom } from 'rxjs';
import { config } from './config';
import { ApiError } from './api-error';
export type Method = 'GET' | 'POST' | 'PUT' | 'DELETE';
// providedIn: 'root':整个应用程序只有一个实例
@Injectable({ providedIn: 'root' })
export class Api {
private readonly http = inject(HttpClient);
// <T>:期望的响应类型,由调用方选择
async request<T>(method: Method, url: string, body?: unknown): Promise<T> {
try {
// http.request 返回一个 Observable;firstValueFrom 把它转换为
// Promise(请求在此刻发送)。请求体对象会
// 以 JSON 发送(content-type: application/json 头,服务器对
// POST 要求有它);JSON 响应会被解码(如果响应体为空则为 null)
return await firstValueFrom(this.http.request<T>(method, `${config.serverUrl}/api${url}`, { body }));
} catch (e) {
// HTTP 客户端把任何失败(4xx、5xx、无响应)都报告为
// HttpErrorResponse:我们对其进行转换。其余的(异常情况)原样通过
throw e instanceof HttpErrorResponse ? ApiError.fromResponse(e) : e;
}
}
get<T>(url: string): Promise<T> {
return this.request<T>('GET', url);
}
// POST 总是带有 JSON 请求体:默认为 {}
post<T>(url: string, body: unknown = {}): Promise<T> {
return this.request<T>('POST', url, body);
}
put<T>(url: string, body: unknown): Promise<T> {
return this.request<T>('PUT', url, body);
}
delete<T>(url: string, body?: unknown): Promise<T> {
return this.request<T>('DELETE', url, body);
}
}
|
一个服务 (示例 14),一次性完成示例 23 中重复的操作:
- 第 27 行:[@Injectable({ providedIn: 'root' })]:整个应用程序只有一个实例,在第一次请求时创建;
- 第 32–44 行:所有请求都通过这个方法处理:服务器地址和前缀 [/api]、JSON 请求体([http.request] 接受所有方法,甚至允许 DELETE 带请求体)、用 [firstValueFrom] 得到解码并等待后的响应(第 38 行)、转换为 [ApiError] 的错误(第 42 行)。响应类型 [<T>] 由调用方选择([api.get<Person[]>('/doctors')])。所有请求共有的问题都会在这里处理(参见案例研究,以及会话过期时的 401 响应,它由客户端 HTTP 拦截器 处理);
- 第 46–61 行:四个快捷方法。POST 总是带有 JSON 请求体:默认为 [{}] (第 51 行)。
9.3.4. 登录栏
| // =========================================================================
// src/app/common/login-bar.ts - 登录 / 注销,集中在一个栏中
// -------------------------------------------------------------------------
// 示例 23 中的表单,精简为一个栏,并使用
// Api 服务重写。每当已登录用户发生变化(包括
// 启动时,在查询 GET /api/auth/me 之后),该组件都会发出 userChange 事件
// 并带上已登录的用户(或 null):
//
// <app-login-bar (userChange)="onUserChange($event)" />
//
// Api 服务通过依赖注入(inject)获得。
// =========================================================================
import { Component, inject, output, signal } from '@angular/core';
import { FormsModule } from '@angular/forms';
import { IonButton, IonCard, IonCardContent, IonIcon, IonInput, IonLabel, IonText } from '@ionic/angular';
import { addIcons } from 'ionicons';
import { logInOutline, person } from 'ionicons/icons';
import { Api } from './api';
import { ApiError } from './api-error';
import { Captcha, captchaImage, User } from './types';
@Component({
selector: 'app-login-bar',
imports: [FormsModule, IonCard, IonCardContent, IonInput, IonButton, IonIcon, IonLabel, IonText],
templateUrl: './login-bar.html',
styles: `
ion-card { --background: #eceff1; margin: 0 0 8px; }
ion-card-content { padding: 8px 12px; }
.line { display: flex; align-items: center; gap: 8px; }
.line > ion-input, .line > ion-label { flex: 1; }
img { height: 40px; }
.error { font-size: 13px; }
`,
})
export class LoginBar {
private readonly api = inject(Api);
readonly captchaImage = captchaImage;
// 向父组件发出的事件:已登录的用户,或 null
readonly userChange = output<User | null>();
readonly user = signal<User | null>(null);
readonly captcha = signal<Captcha | null>(null);
readonly login = signal('admin');
readonly password = signal('');
readonly captchaAnswer = signal('');
readonly error = signal<string | null>(null);
constructor() {
addIcons({ person, logInOutline });
this.start();
}
private change(u: User | null): void {
this.user.set(u);
this.userChange.emit(u);
}
private async newCaptcha(): Promise<void> {
this.captcha.set(await this.api.get<Captcha>('/captcha'));
this.captchaAnswer.set('');
}
// 启动时:我们是否已经登录?
private async start(): Promise<void> {
try {
this.change(await this.api.get<User>('/auth/me'));
} catch {
this.change(null); // 401:无人登录
try {
await this.newCaptcha();
} catch {
this.error.set('Is the JSON server running (port 8080)?');
}
}
}
async logIn(): Promise<void> {
this.error.set(null);
try {
const u = await this.api.post<User>('/auth/login', {
login: this.login().trim(),
password: this.password(),
captchaId: this.captcha()?.id,
captcha: this.captchaAnswer(),
});
this.password.set('');
this.change(u);
} catch (e) {
// e.message:"401 LOGIN.ERROR"(示例 25 将翻译这个键)
this.error.set(e instanceof ApiError ? e.message : String(e));
await this.newCaptcha();
}
}
async logOut(): Promise<void> {
await this.api.post('/auth/logout');
this.change(null);
await this.newCaptcha();
}
}
|
| <!-- ======================================================================
login-bar.html - the logged-in user, or a small form
====================================================================== -->
<ion-card>
<ion-card-content>
@if (user(); as u) {
<div class="line">
<ion-icon name="person" />
<ion-label>{{ u.name }} ({{ u.role }})</ion-label>
<ion-button fill="clear" size="small" (click)="logOut()">Log out</ion-button>
</div>
} @else {
<div class="line">
<ion-input label="login" labelPlacement="floating" [(ngModel)]="login" />
<ion-input label="password" labelPlacement="floating" type="password" [(ngModel)]="password" />
</div>
<div class="line">
<!-- 验证码的 SVG 图片,由我们自己的服务器生成(参见示例 22) -->
@if (captcha(); as c) {
<img [src]="captchaImage(c)" alt="captcha" />
}
<ion-input label="captcha" labelPlacement="floating" autocorrect="off" autocapitalize="off"
[(ngModel)]="captchaAnswer" (keyup.enter)="logIn()" />
<ion-button fill="clear" aria-label="Log in" (click)="logIn()">
<ion-icon slot="icon-only" name="log-in-outline" />
</ion-button>
</div>
@if (error(); as message) {
<ion-text color="danger"><div class="error">{{ message }}</div></ion-text>
}
}
</ion-card-content>
</ion-card>
|
示例 23 中的表单,精简为一个栏,并使用 [Api] 服务重写。每当已登录用户发生变化(包括启动时),该组件都会发出 [userChange] 事件。
- 第 37 行(.ts):通过注入获得的 [Api] 服务(相当于 [provider] 在 [Flutter] 中的作用);
- 第 41 行(.ts):[output<User | null>()]:组件向其父组件发出的事件(示例 11),父组件通过 [(userChange)="..."] 订阅它;
- 第 55–58 行(.ts):用户变更:我们保留该用户并通知父组件([emit]);
- 第 66–77 行(.ts):启动时,谁已登录?[await this.api.get<User>('/auth/me')]:只需一行。任何错误都意味着“无人登录”:随后加载验证码;如果这也失败,说明服务器没有响应。不带变量的 [catch] :错误本身并未被使用;
- 第 79–95 行(.ts):登录流程,只需几行:错误以 [ApiError] 的形式出现,并显示其消息(“401 LOGIN.ERROR”:示例 25 将解释这个键);
- 第 7–12 行(html):已登录:用户及其角色,以及“注销”按钮;
- 第 13–31 行(HTML):表单,占两行([display: flex]);在验证码字段中按 Enter 键会提交表单([(keyup.enter)],第 24 行);该按钮只有一个图标,其名称供屏幕阅读器使用([aria-label])。
9.3.5. API 访问层
| // =========================================================================
// src/app/ex24-api-layer/rdvmedecins.ts - API 访问层
// -------------------------------------------------------------------------
// API 的每个路由对应一个带类型的方法。各屏幕不知道地址、
// HTTP 客户端或 JSON 格式:它们调用返回带类型对象
// (Person、Schedule……)的方法。
// 它相当于服务器端 DAO 层的客户端对应物:如果 API
// 发生变化(地址、字段名),我们只需修改这个文件。
// 架构指南把这一层称为“仓库(repository)”。
// =========================================================================
import { HttpParams } from '@angular/common/http';
import { inject, Injectable } from '@angular/core';
import { Api } from '../common/api';
import { Schedule, Person } from '../common/types';
@Injectable({ providedIn: 'root' })
export class RdvMedecins {
private readonly api = inject(Api);
getDoctors(): Promise<Person[]> {
return this.api.get<Person[]>('/doctors');
}
getClients(): Promise<Person[]> {
return this.api.get<Person[]>('/clients');
}
// HttpParams 构造出 "doctorId=1&day=2030-01-15",并对需要的内容进行编码
getSchedule(doctorId: number, day: string): Promise<Schedule> {
const params = new HttpParams().set('doctorId', doctorId).set('day', day);
return this.api.get<Schedule>(`/schedule?${params.toString()}`);
}
// clientId?:可选参数。...(condition && object):
// 只有在提供了 clientId 时,才会把 clientId 属性放入请求体
async book(day: string, slotId: number, clientId?: number | null): Promise<void> {
await this.api.post('/appointments', { day, slotId, ...(clientId != null && { clientId }) });
}
async cancelAppointment(appointmentId: number): Promise<void> {
await this.api.delete(`/appointments/${appointmentId}`);
}
}
|
每个 API 路由对应一个带类型的方法。各屏幕不知道地址、HTTP 客户端或 JSON 格式:它们调用返回带类型对象的方法。如果 API 发生变化(地址、字段名),只需修改这个文件。架构指南把这一层称为“仓库(repository)”。
- 第 19 行:该层依赖 [Api] 服务,通过注入获得:[Angular] 自行组装各层,而 [Flutter] 客户端的 [main] 则是逐个创建它们([RdvMedecins(api)]);
- 第 31 行:[HttpParams] 通过对必要数据进行编码,生成字符串“doctorId=1&day=2030-01-15”;
- 第 38 行:[clientId] 只有在提供时才放入请求体。[...(condition && object)]:如果条件为假,则展开 [false],这不会添加任何内容;否则,展开对象 [{ clientId }] ([{ clientId: clientId }] 的简写形式)。在 [?clientId] 中,对应 [Dart] 3.8 里的写法。[clientId != null] (使用 [!=] 而不是 [!==])同时排除 [null] 和 [undefined]。
9.3.6. 视图模型
| // =========================================================================
// src/app/ex24-api-layer/schedule-model.ts - 屏幕的“视图模型”
// -------------------------------------------------------------------------
// 架构指南建议把以下两者分开:
// - 视图:模板及其类,负责显示并传递
// 用户的操作;
// - 视图模型(ViewModel):一个服务,用信号保存屏幕的状态
// (所选医生、日期、收到的日程……),
// 以及各个操作(选择、预约、取消),并调用
// API 访问层。
// 视图不再包含任何逻辑:读起来很简单;视图模型
// 没有模板:测试起来很简单。
// 它由页面提供(providers: [ScheduleModel]):随页面
// 创建,也随页面销毁。
//
// 它还完成了我们不想为每个屏幕重写的工作:
// - 缓存:每个已读取的(医生,日期)的日程都会被保存;回到
// 该日程时会立即显示它,同时在后台重新读取;
// - 忽略过时的响应(参见示例 19)。
// =========================================================================
import { computed, inject, Injectable, signal } from '@angular/core';
import { ApiError } from '../common/api-error';
import { Schedule, ScheduleSlot, timeRange, Person, User } from '../common/types';
import { RdvMedecins } from './rdvmedecins';
// 一个日期 -> "2026-10-07"(本地日期;toISOString 会给出格林尼治的日期)
export function formatDay(d: Date): string {
const twoDigits = (n: number) => String(n).padStart(2, '0');
return `${d.getFullYear()}-${twoDigits(d.getMonth() + 1)}-${twoDigits(d.getDate())}`;
}
// 明天:今天的日期加一天
function tomorrow(): Date {
const d = new Date();
d.setDate(d.getDate() + 1);
return d;
}
export interface Message {
success: boolean;
text: string;
}
@Injectable()
export class ScheduleModel {
private readonly rdvmedecins = inject(RdvMedecins);
// —— 状态 ——
readonly user = signal<User | null>(null);
readonly doctors = signal<Person[]>([]);
readonly clients = signal<Person[]>([]);
readonly doctorId = signal<number | null>(null);
readonly day = signal(formatDay(tomorrow()));
readonly clientId = signal<number | null>(null);
readonly schedule = signal<Schedule | null>(null);
readonly loading = signal(false);
readonly message = signal<Message | null>(null);
private readonly cache = new Map<string, Schedule>();
private readNumber = 0;
// —— 计算值 ——
readonly loggedIn = computed(() => this.user() !== null);
readonly isManager = computed(() => this.loggedIn() && this.user()?.role !== 'USER');
// —— 各个操作 ——
async changeUser(u: User | null): Promise<void> {
this.user.set(u);
this.doctors.set([]);
this.clients.set([]);
this.schedule.set(null);
this.doctorId.set(null);
this.message.set(null);
this.cache.clear(); // 权限已变化:我们忘记一切
if (u === null) return;
this.doctors.set(await this.rdvmedecins.getDoctors());
// USER 会收到 403
if (this.isManager()) this.clients.set(await this.rdvmedecins.getClients());
}
chooseDoctor(id: number): void {
this.doctorId.set(id);
this.message.set(null);
this.readSchedule();
}
chooseDay(day: string): void {
this.day.set(day);
this.message.set(null);
this.readSchedule();
}
chooseClient(id: number | null): void {
this.clientId.set(id);
}
book(c: ScheduleSlot): Promise<void> {
return this.act(
() => this.rdvmedecins.book(this.day(), c.id, this.isManager() ? this.clientId() : null),
`Slot ${timeRange(c)} booked.`,
);
}
cancel(c: ScheduleSlot): Promise<void> {
return this.act(() => this.rdvmedecins.cancelAppointment(c.appointmentId!), `Appointment of ${timeRange(c)} cancelled.`);
}
// 一个操作,然后总是重新读取日程:以服务器为准
private async act(action: () => Promise<void>, success: string): Promise<void> {
try {
await action();
this.message.set({ success: true, text: success });
} catch (e) {
this.message.set({ success: false, text: e instanceof ApiError ? e.message : String(e) });
}
await this.readSchedule();
}
private async readSchedule(): Promise<void> {
const id = this.doctorId();
if (id === null) return;
const key = `${id}/${this.day()}`;
const number = ++this.readNumber;
// 先读缓存(或什么都没有),然后读取
this.schedule.set(this.cache.get(key) ?? null);
this.loading.set(true);
try {
const read = await this.rdvmedecins.getSchedule(id, this.day());
if (number !== this.readNumber) return; // 已启动了一次更新的读取
this.cache.set(key, read);
this.schedule.set(read);
} catch (e) {
if (number !== this.readNumber) return;
this.schedule.set(null);
this.message.set({ success: false, text: e instanceof ApiError ? e.message : String(e) });
}
this.loading.set(false);
}
}
|
架构指南建议把视图 (模板及其类,负责显示并传递用户操作)与视图模型 (一个服务,包含屏幕的状态及其操作,并调用 API 访问层)分开。视图中不再包含任何逻辑;视图模型没有模板:无需屏幕即可对其进行测试。
- 第 28–38 行:服务器格式的日期(“2026-10-07”)以及明天。我们不使用 [toISOString()],因为它返回的是格林尼治标准时间的日期:在巴黎凌晨 0:30,它仍然是前一天;
- 第 45 行:[@Injectable()],不带 [providedIn]:该服务不是提供给整个应用程序,而是由在其 [providers] 中声明它的页面提供(参见屏幕)。它随该页面一起创建和销毁;
- 第 50–58 行:屏幕的状态,用信号表示;
- 第 60–61 行:缓存:每个已读取的(医生,日期)的日程都会被存储;返回时会立即显示它,同时重新读取。以及最近一次读取的编号,用于忽略过时的响应(参见示例 19)。这几行代码就实现了 [TanStack Query] 库在 [React] 课程中所做的事情;
- 第 64–65 行:计算值([computed]):是否已登录?是否为管理员(ADMIN 或 DOCTOR)?
- 第 68–80 行:新用户:我们忽略一切(权限已变化),然后读取医生,对于 ADMIN 和 DOCTOR,还读取客户(USER 会收到 403);
- 第 98–107 行:预约、取消。[c.appointmentId!] 中的 [!] (第 106 行)告诉编译器该值不是 [null]:“取消”按钮只在这种情况下才会显示;
- 第 110–118 行:一个操作,之后总是重新读取日程:以服务器的数据为准;
- 第 120–139 行:读取日程:先读缓存,或者什么都没有(第 126 行),然后是服务器的响应,除非期间已发起了更新的读取(第 130 行)。
9.3.7. 屏幕
| // =========================================================================
// src/app/ex24-api-layer/ex24.page.ts - 使用 API 访问层的日程
// -------------------------------------------------------------------------
// 登录(顶部栏),选择医生和日期:
// 显示日程。ADMIN 和 DOCTOR 可以为患者预约和
// 取消;患者(martin……)为自己预约。每个操作
// 都以重新读取日程结束。
// 三层,自下而上:
// Api (common/api.ts) HTTP 请求、错误;
// RdvMedecins (rdvmedecins.ts) API 每个路由对应一个带类型的方法;
// ScheduleModel (schedule-model.ts) 屏幕的状态和操作;
// 以及视图(这个类及其模板),它只显示模型。
// =========================================================================
import { Component, inject } from '@angular/core';
import {
IonBackButton, IonButton, IonButtons, IonCard, IonCardContent, IonChip, IonContent, IonDatetime, IonHeader,
IonIcon, IonItem, IonLabel, IonList, IonModal, IonProgressBar, IonSelect, IonSelectOption, IonText, IonTitle,
IonToolbar,
} from '@ionic/angular';
import { addIcons } from 'ionicons';
import { addCircleOutline, calendarOutline, closeCircleOutline } from 'ionicons/icons';
import { LoginBar } from '../common/login-bar';
import { timeRange, fullName } from '../common/types';
import { ScheduleModel } from './schedule-model';
@Component({
selector: 'app-ex24',
imports: [
IonHeader, IonToolbar, IonButtons, IonBackButton, IonTitle, IonContent, IonSelect, IonSelectOption, IonButton,
IonIcon, IonModal, IonDatetime, IonCard, IonCardContent, IonProgressBar, IonText, IonList, IonItem, IonLabel,
IonChip, LoginBar,
],
templateUrl: './ex24.page.html',
// 视图模型由页面提供:每个页面一个实例,随页面销毁
providers: [ScheduleModel],
styles: `
.day { display: flex; align-items: center; }
ion-modal.calendar { --width: fit-content; --height: fit-content; --border-radius: 8px; }
.message { margin: 8px 0; }
.success { --background: #e8f5e9; --color: #333; }
.failure { --background: #ffebee; --color: #333; }
.schedule-title { font-weight: bold; font-size: 14px; margin: 8px 0; }
.time-range { flex: 0 0 90px; font-size: 13px; }
.free { --background: #c8e6c9; }
.mine { --background: #c5cae9; }
.other { --background: #e0e0e0; }
ion-item ion-icon { font-size: 26px; }
`,
})
export class Ex24Page {
readonly model = inject(ScheduleModel);
readonly timeRange = timeRange;
readonly fullName = fullName;
constructor() {
addIcons({ calendarOutline, addCircleOutline, closeCircleOutline });
}
// ion-datetime 返回 "2026-10-07"(presentation="date"),如果可以
// 选择多个日期则返回数组:我们只保留一个字符串
chooseDay(value: string | string[] | null | undefined): void {
if (typeof value === 'string') this.model.chooseDay(value.substring(0, 10));
}
}
|
| <!-- ======================================================================
ex24.page.html - the view: it only displays the view model
====================================================================== -->
<ion-header>
<ion-toolbar color="primary">
<ion-buttons slot="start">
<ion-back-button defaultHref="/" />
</ion-buttons>
<ion-title>Example 24 - an API access layer</ion-title>
</ion-toolbar>
</ion-header>
<ion-content class="ion-padding">
<!-- 登录栏通知视图模型 -->
<app-login-bar (userChange)="model.changeUser($event)" />
@if (model.loggedIn()) {
<ion-select placeholder="-- choose a doctor --" interface="popover" class="doctor-choice" aria-label="doctor"
[value]="model.doctorId()" (ionChange)="model.chooseDoctor($event.detail.value)">
@for (m of model.doctors(); track m.id) {
<ion-select-option [value]="m.id">{{ fullName(m) }}</ion-select-option>
}
</ion-select>
<div class="day">
Day: {{ model.day() }}
<ion-button id="calendar24" fill="clear" aria-label="choose the day">
<ion-icon slot="icon-only" name="calendar-outline" />
</ion-button>
</div>
<ion-modal class="calendar" trigger="calendar24">
<ng-template>
<ion-datetime presentation="date" locale="en-US" [firstDayOfWeek]="1" [showDefaultButtons]="true"
doneText="OK" cancelText="Cancel" [value]="model.day()" (ionChange)="chooseDay($event.detail.value)" />
</ng-template>
</ion-modal>
<!-- ADMIN 和 DOCTOR:为其预约的患者 -->
@if (model.isManager()) {
<ion-select interface="popover" class="patient-choice" aria-label="patient" [value]="model.clientId()"
(ionChange)="model.chooseClient($event.detail.value)">
<ion-select-option [value]="null">-- patient to book --</ion-select-option>
@for (c of model.clients(); track c.id) {
<ion-select-option [value]="c.id">{{ fullName(c) }}</ion-select-option>
}
</ion-select>
}
@if (model.message(); as message) {
<ion-card class="message" [class.success]="message.success" [class.failure]="!message.success">
<ion-card-content>{{ message.text }}</ion-card-content>
</ion-card>
}
@if (model.loading()) {
<ion-progress-bar type="indeterminate" />
}
@if (model.schedule(); as schedule) {
<!-- info:当患者已有一个即将到来的预约时,服务器发送的键 -->
@if (schedule.info) {
<ion-text color="primary"><div>{{ schedule.info }}</div></ion-text>
}
<div class="schedule-title">Schedule of {{ schedule.day }} - {{ fullName(schedule.doctor) }}</div>
<ion-list lines="none">
<!-- 每个时间段一行:时间范围、占用者、允许的按钮 -->
@for (c of schedule.slots; track c.id) {
<ion-item>
<ion-label class="time-range">{{ timeRange(c) }}</ion-label>
@if (c.free) {
<ion-chip class="free">Free</ion-chip>
} @else {
<ion-chip [class.mine]="c.mine" [class.other]="!c.mine">
{{ c.patient ? fullName(c.patient) : 'Booked' }}
</ion-chip>
}
<!-- 按钮遵循服务器计算出的权限 -->
@if (c.bookable) {
<ion-button slot="end" fill="clear" color="success" aria-label="Book" (click)="model.book(c)">
<ion-icon slot="icon-only" name="add-circle-outline" />
</ion-button>
} @else if (c.appointmentId !== null) {
<ion-button slot="end" fill="clear" color="danger" aria-label="Cancel" (click)="model.cancel(c)">
<ion-icon slot="icon-only" name="close-circle-outline" />
</ion-button>
}
</ion-item>
}
</ion-list>
}
}
</ion-content>
|
- 第 36 行(.ts):[providers: [ScheduleModel]]:页面把视图模型提供给自身及其包含的组件。另外两层([Api]、[RdvMedecins])则提供给整个应用程序([providedIn: 'root']);
- 第 52 行(.ts):视图获取视图模型;它没有其他状态;
- 第 53–54 行(.ts):格式化函数,使模板可以访问(模板只能看到其类的成员);
- 第 62–64 行(.ts):[ion-datetime] 返回所选日期(“2026-10-07”),如果可以选择多个日期则返回数组:只保留一个字符串;
- 第 16 行(html):登录栏通知视图模型;[$event] 是返回的值,要么是用户,要么是 [null];
- 第 19–24 行(HTML):医生选择:一个 [<ion-select>] ,其列表在弹出窗口中打开([interface="popover"]);其值从视图模型读取,每次选择([ionChange])都会触发视图模型的一个操作;
- 第 26–37 行(HTML):日期,以及模态窗口中的日历(如示例 21):[ion-datetime],使用美式英语,每周从星期一开始;其“OK”和“Cancel”按钮([showDefaultButtons])关闭窗口,“OK”确认日期([ionChange]);
- 第 40–48 行(HTML):对于 ADMIN 和 DOCTOR,为其预约的患者;
- 第 50–57 行(html):最近一次操作的消息(绿色或红色:[[class.success]] 在条件为真时添加 CSS 类),以及读取期间的进度条;
- 第 61–63 行(html):[info],当患者已有一个即将到来的预约时由服务器发送的键。它按原样显示:示例 25 将教你如何解码这些键;
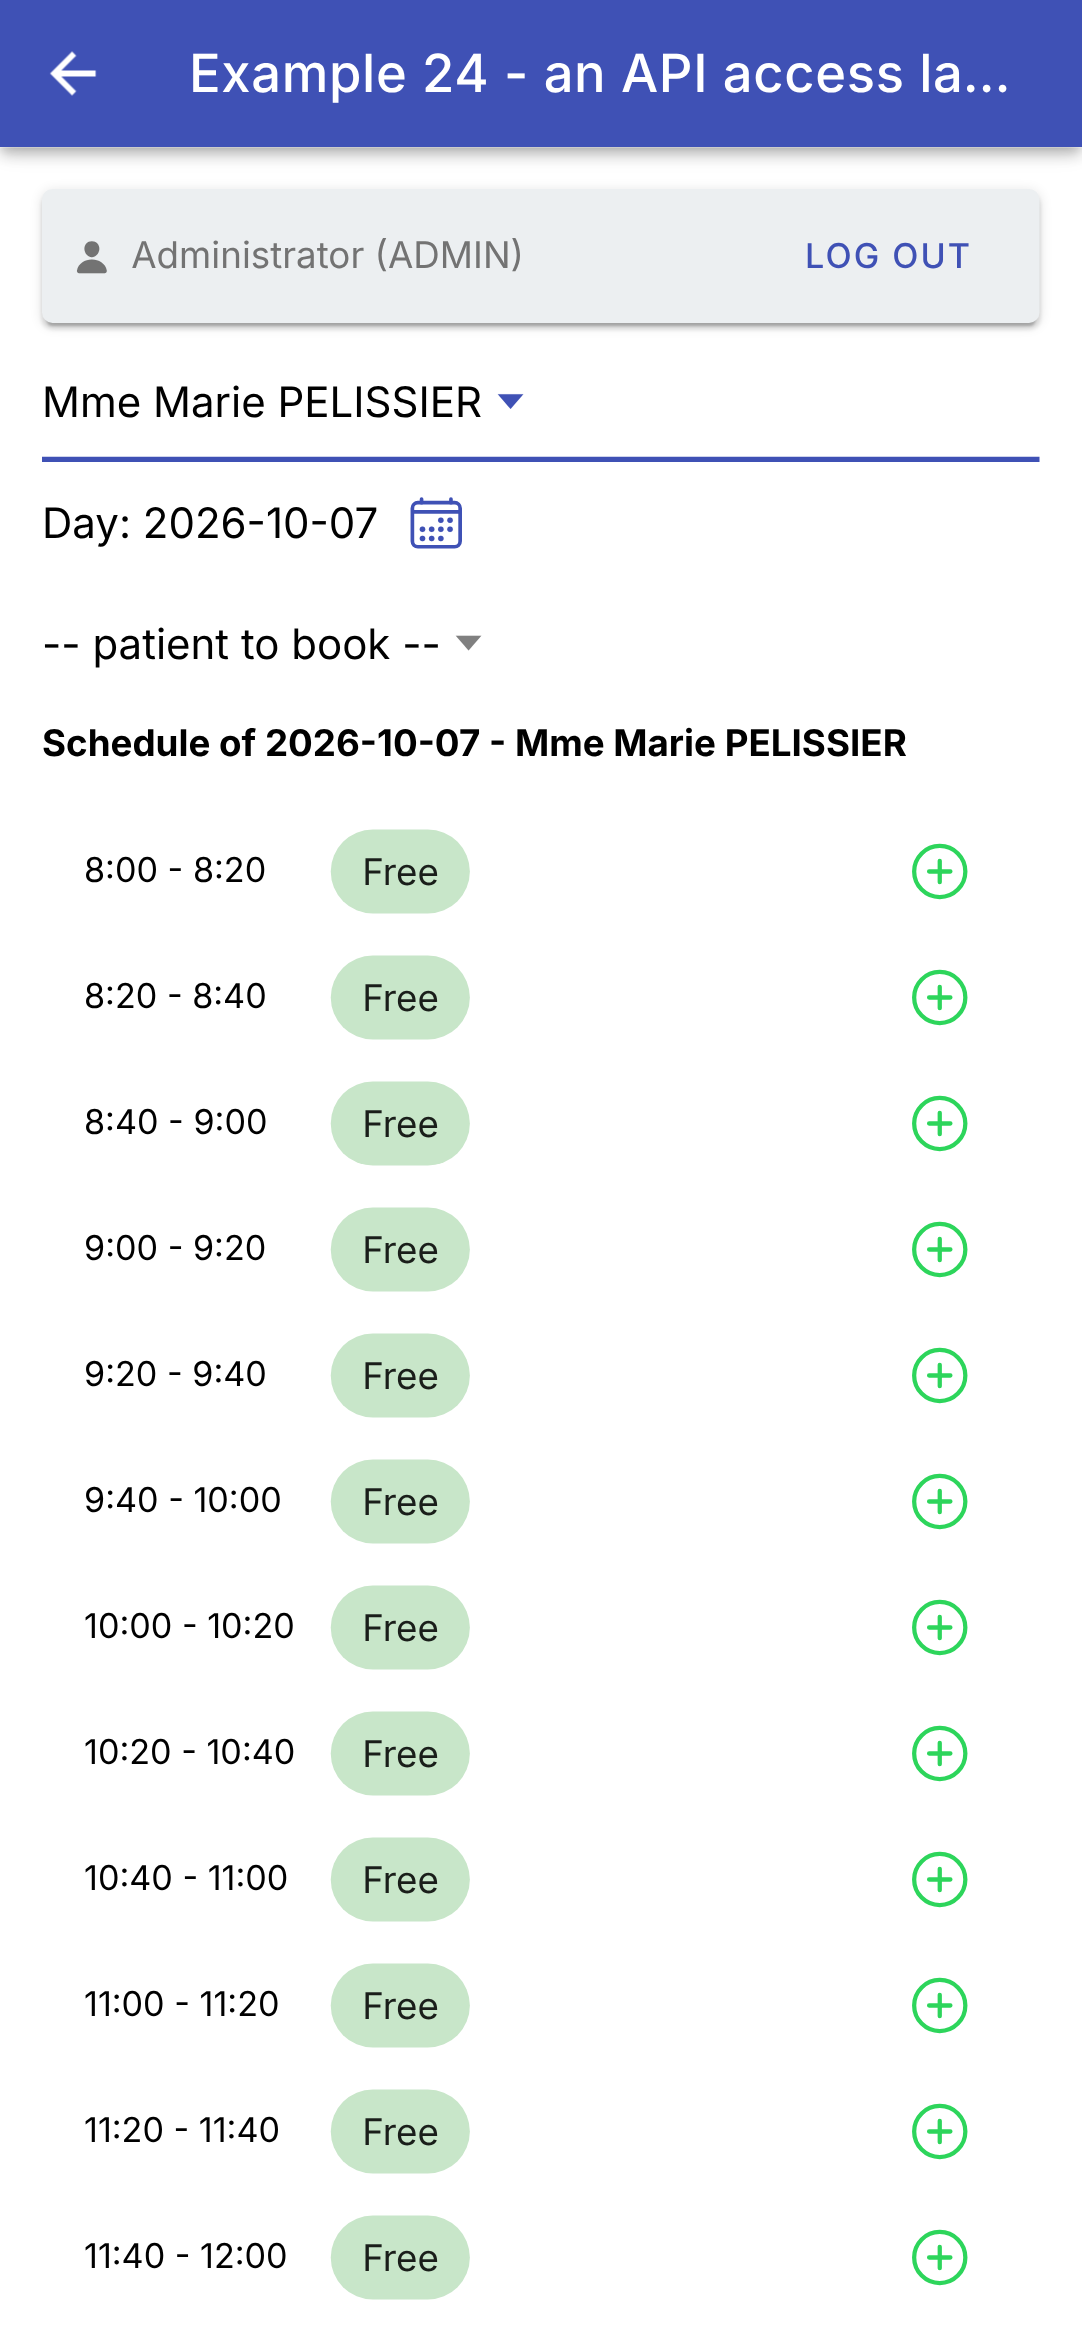
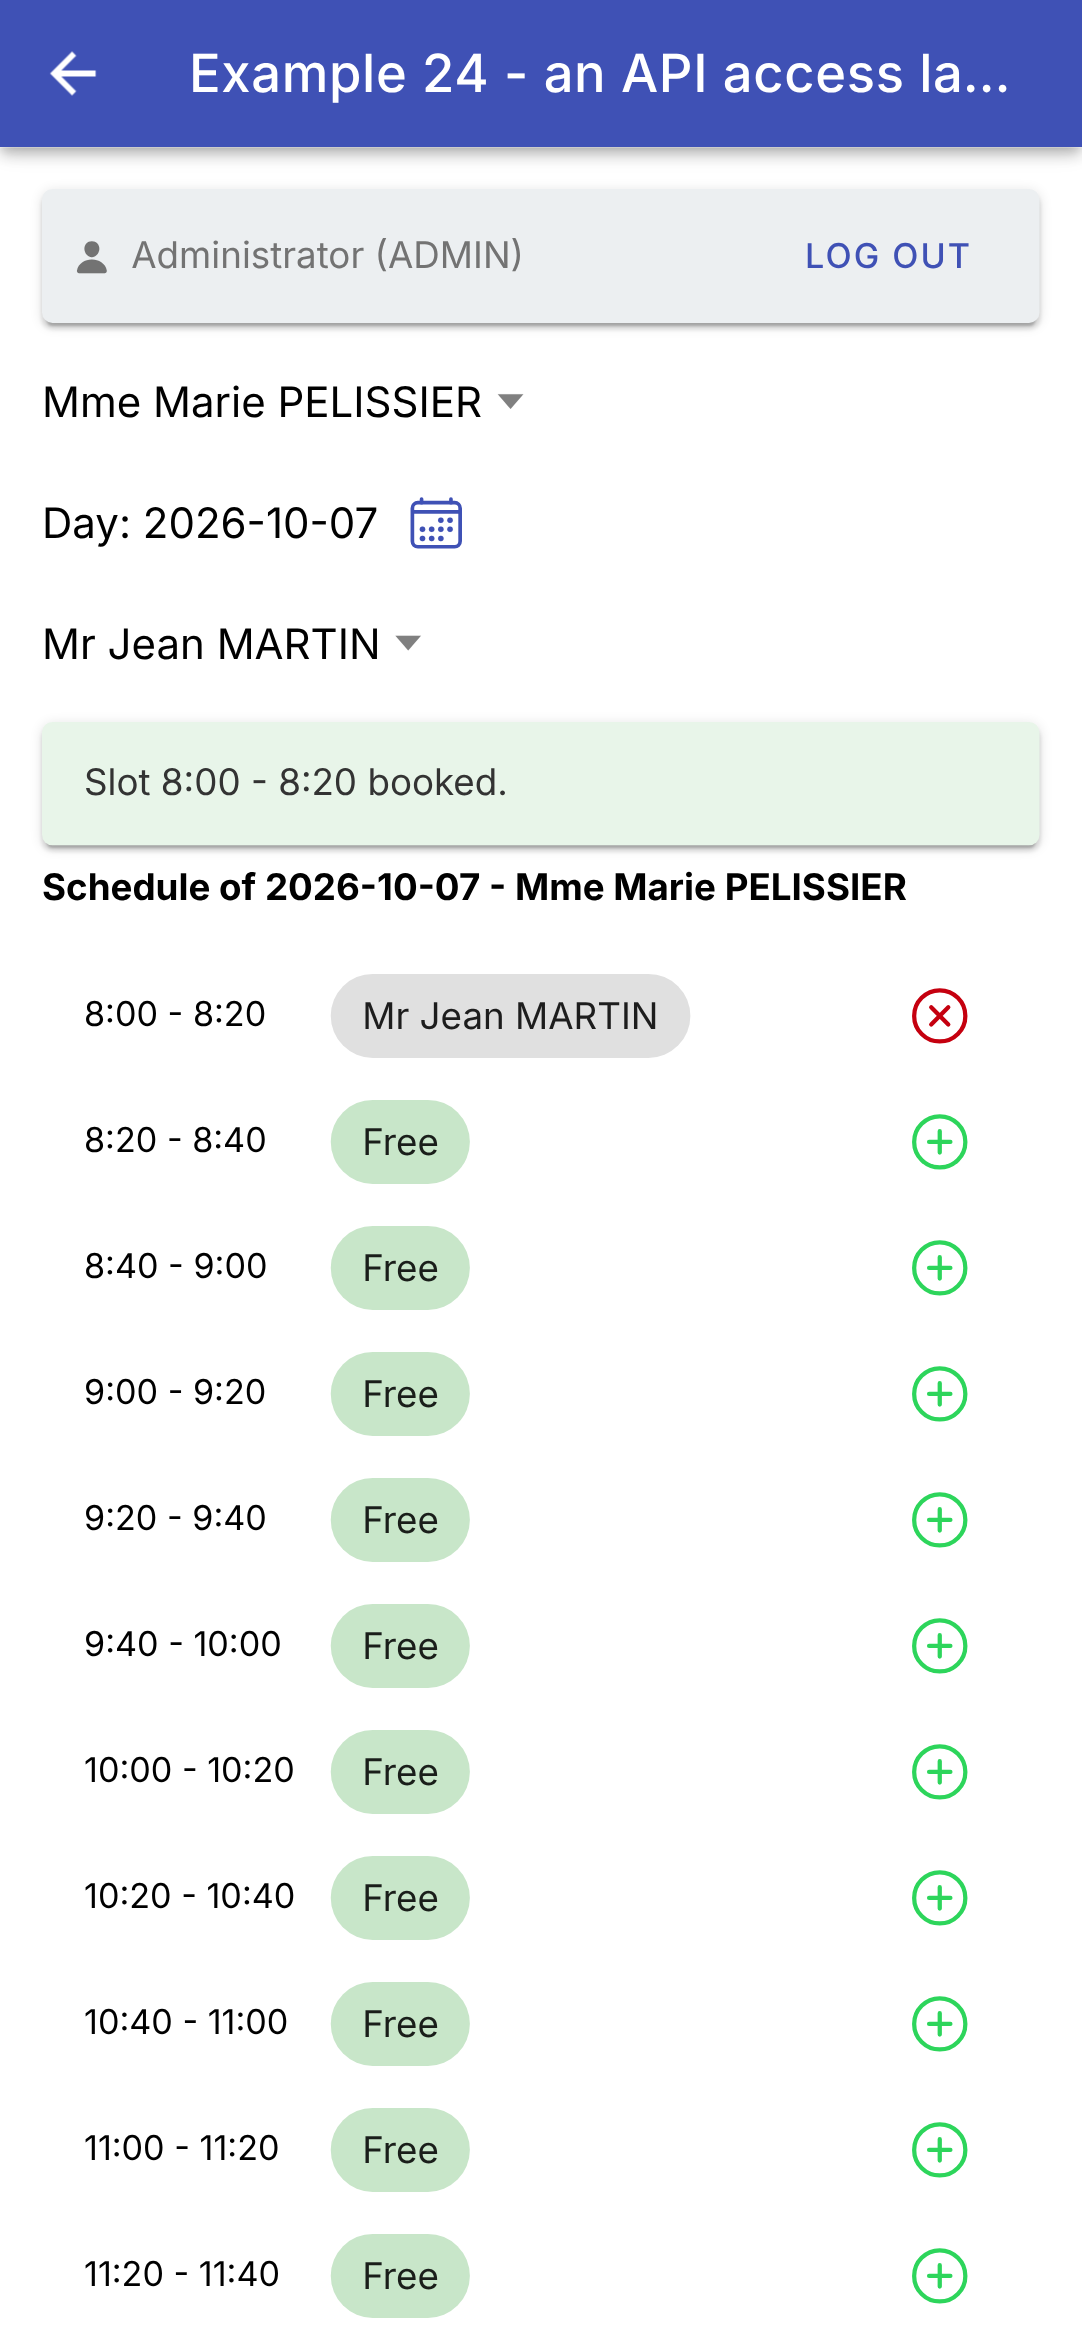
- 第 67–88 行(HTML):每个时间段一行:时间、一个标有“空闲”或患者姓名的 [<ion-chip>] (“标签”)(如果是已登录患者的预约则为靛蓝色),以及相应的按钮。按钮遵循服务器计算出的权限([bookable]、[appointmentId]):屏幕本身不做任何决定。
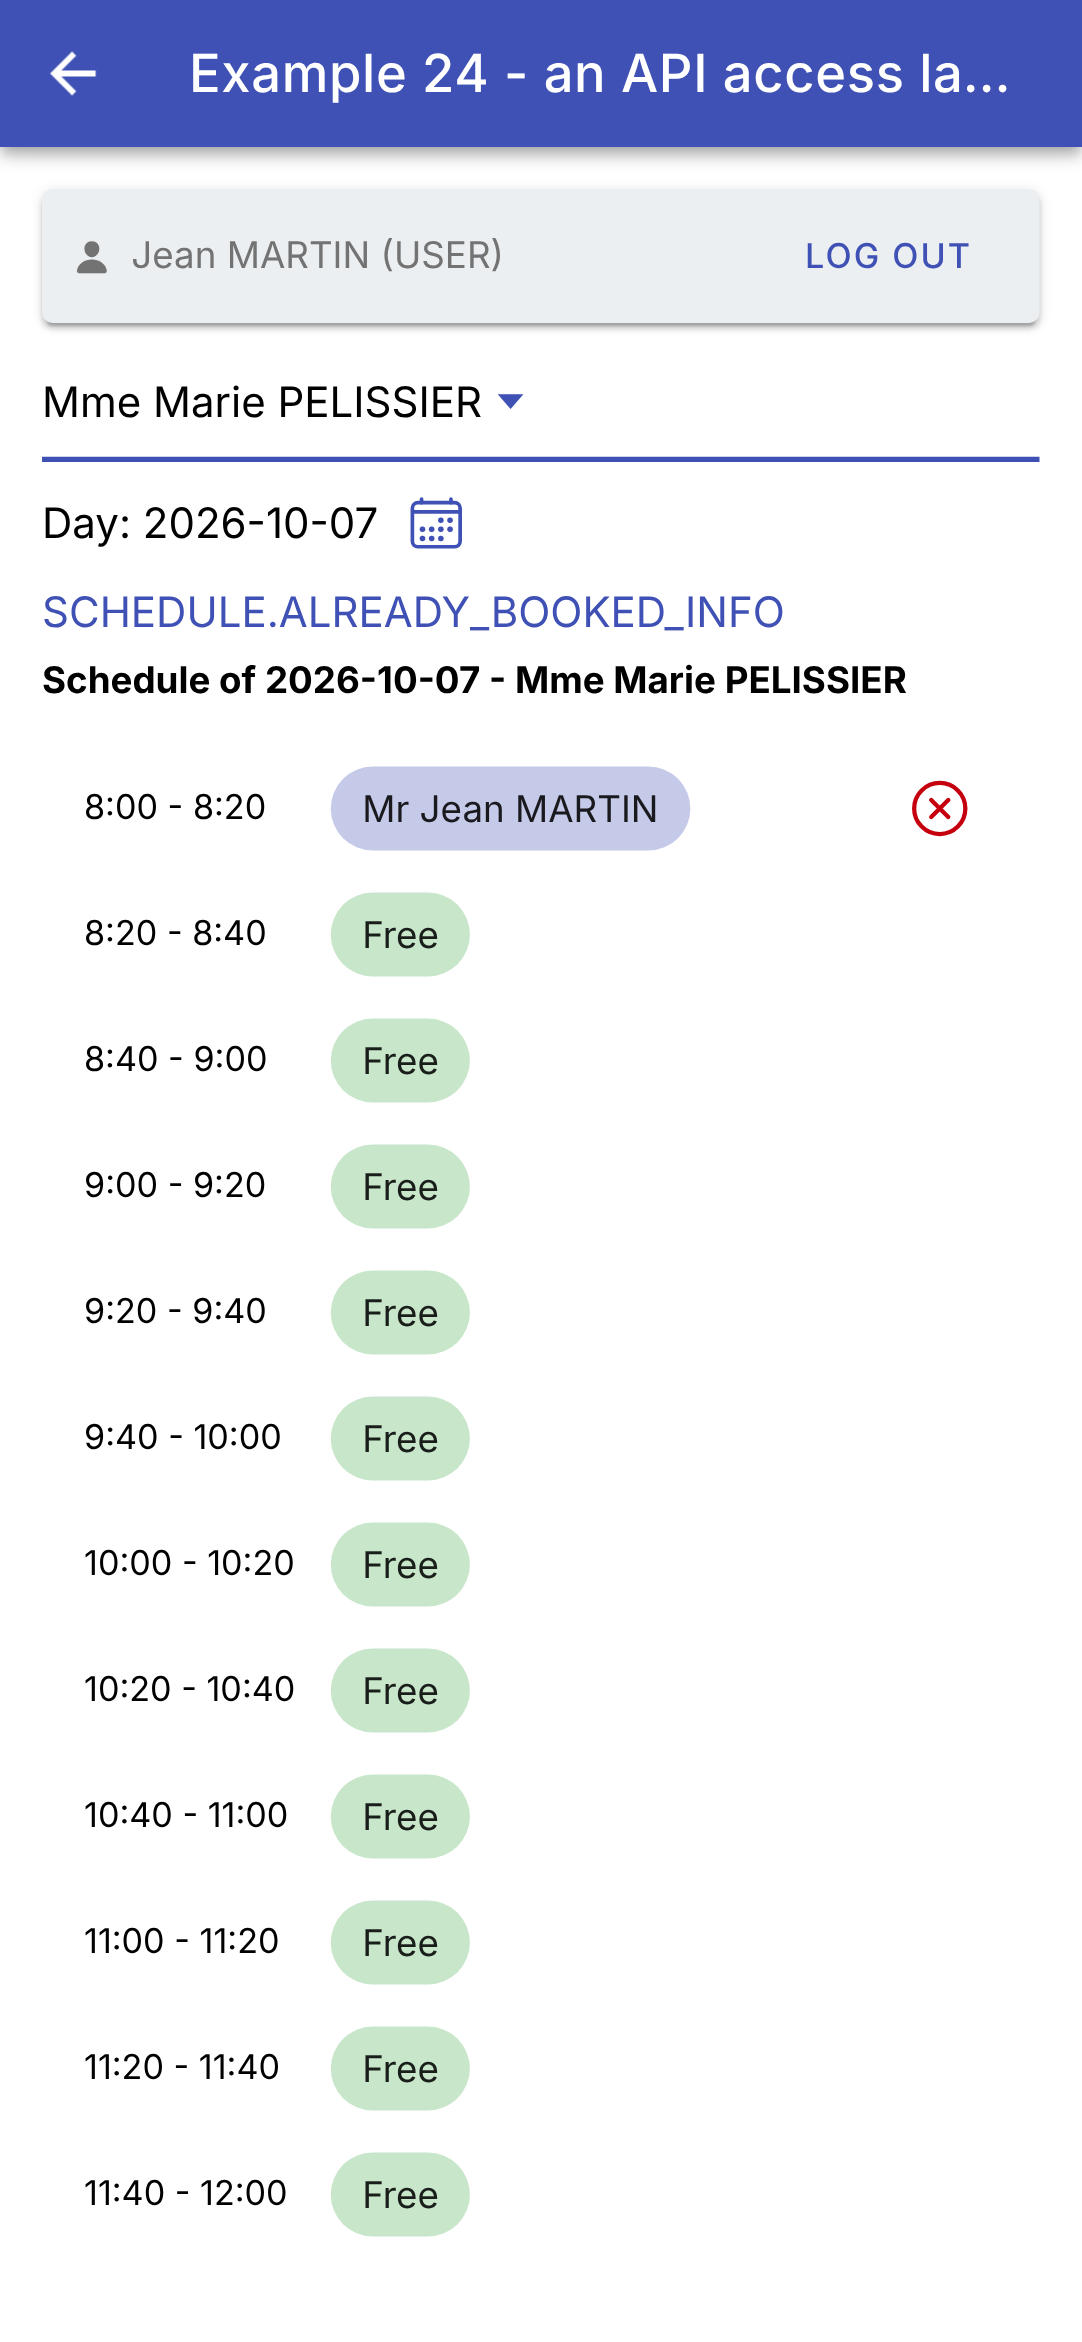
以 [admin] 身份登录,查看 PELISSIER 女士次日的日程;一个时间段为 Jean MARTIN 先生预留;以 [martin] (角色 USER)身份登录,同一日程:
患者 [martin] 看到了自己的预约(靛蓝色,带取消按钮);键 [SCHEDULE.ALREADY_BOOKED_INFO] 表示他已有一个即将到来的预约:因此没有其他时间段可供预约。其他患者的预约会显示为“已预约”,不带姓名:服务器不会把它发送给该用户。
9.4. 示例 25:服务器返回的错误
9.4.1. 字典
| {
"FORM": {
"TITLE_ADD": "Ajouter un client",
"TITLE_EDIT": "Modifier un client",
"TITLE": "Titre",
"FIRSTNAME": "Prénom",
"LASTNAME": "Nom",
"LOGIN": "Login",
"PASSWORD": "Mot de passe",
"SAVE": "Enregistrer",
"CANCEL": "Annuler",
"EDIT": "Modifier",
"DELETE": "Supprimer",
"DELETE_CONFIRM": "Supprimer le client {{name}}, son compte et ses rendez-vous ?",
"ADDED": "Le client {{name}} a été ajouté (login : {{login}}).",
"UPDATED": "Le client {{name}} a été modifié.",
"DELETED": "Le client {{name}} a été supprimé.",
"ADMIN_ONLY": "Connectez-vous avec le compte admin : seul le rôle ADMIN gère les clients.",
"PAGE_TITLE": "Exemple 25 - les erreurs du serveur",
"NEW": "Nouveau client"
},
"ERRORS": {
"INVALID_FORM": "Le formulaire contient des erreurs.",
"INVALID_TITLE": "Choisissez un titre dans la liste.",
"FIRSTNAME_REQUIRED": "Le prénom est obligatoire.",
"FIRSTNAME_TOO_LONG": "Le prénom ne doit pas dépasser 20 caractères.",
"LASTNAME_REQUIRED": "Le nom est obligatoire.",
"LASTNAME_TOO_LONG": "Le nom ne doit pas dépasser 20 caractères.",
"INVALID_LOGIN": "30 caractères au plus : lettres minuscules non accentuées, chiffres, point, tiret, souligné.",
"PASSWORD_TOO_LONG": "Le mot de passe ne doit pas dépasser 72 caractères.",
"LOGIN_TAKEN": "Ce login est déjà utilisé par un autre compte.",
"PATIENT_ALREADY_EXISTS": "Un client portant ce prénom et ce nom existe déjà.",
"PATIENT_NOT_FOUND": "Ce client n'existe pas (ou plus).",
"CONCURRENT_UPDATE": "Cette fiche a été modifiée entre-temps par un autre utilisateur. Rechargez-la avant de recommencer.",
"FORBIDDEN": "Votre rôle ne vous permet pas cette action.",
"AUTH_REQUIRED": "Connectez-vous d'abord.",
"SESSION_EXPIRED": "Votre session a expiré : reconnectez-vous.",
"SERVER_UNREACHABLE": "Le serveur ne répond pas.",
"SERVER_ERROR": "Une erreur inattendue s'est produite.",
"WRONG_CAPTCHA": "Les caractères recopiés ne correspondent pas à l'image."
}
}
|
服务器的错误消息是键 (“ERRORS.LASTNAME_REQUIRED”):由字典负责翻译。这些就是 [Flutter] 示例中的字典,原封不动;英文字典 [ex25-en.json] 具有相同的键。与示例 21 中的字典一样,它们位于项目的 [public/i18n/] 文件夹中,该文件夹会随应用程序原样交付。
9.4.2. 屏幕
| // =========================================================================
// src/app/ex25-server-errors/ex25.page.ts - 显示服务器的错误
// -------------------------------------------------------------------------
// 客户管理(管理员账户)。这个表单有意
// 在手机上不做任何验证:所有内容都发送到
// 服务器,若被拒绝,服务器会返回一个 JSON 错误(由 common/api.ts 转换为
// ApiError):
//
// 400 { key: 'ERRORS.INVALID_FORM', fields: { lastName: 'ERRORS.LASTNAME_REQUIRED' } }
// 409 { key: 'ERRORS.PATIENT_ALREADY_EXISTS', fields: { firstName: ..., lastName: ... } }
// 409 { key: 'ERRORS.CONCURRENT_UPDATE' } (乐观锁)
//
// 每个字段的错误(ApiError.fields)会交给其表单
// 控件(setErrors):ion-input 在字段下方显示它(errorText)。
// 其消息是服务器发送的键,由屏幕进行翻译
// (示例 21 的字典)。修改字段会清除其错误。
// 试试:空姓名、称谓“Dr”、同名者(Alice DURAND)、
// 已被占用的登录名(martin)、在两台设备上修改同一条记录……
// =========================================================================
import { Component, inject, signal } from '@angular/core';
import { NonNullableFormBuilder, ReactiveFormsModule } from '@angular/forms';
import {
IonBackButton, IonButton, IonButtons, IonCard, IonCardContent, IonCardHeader, IonCardTitle, IonContent, IonHeader,
IonIcon, IonInput, IonItem, IonLabel, IonList, IonNote, IonPopover, IonSelect, IonSelectOption, IonText, IonTitle,
IonToolbar,
} from '@ionic/angular';
import { addIcons } from 'ionicons';
import { createOutline, languageOutline, trashOutline } from 'ionicons/icons';
import { Api } from '../common/api';
import { LoginBar } from '../common/login-bar';
import { ApiError, Texts } from '../common/api-error';
import { fullName, Person, User } from '../common/types';
import { injectConfirmation } from '../ex16-confirmation/confirmation';
import { languages, Translations } from '../ex21-i18n/translations';
import { Command } from '../ex23-login/command';
// 表单的字段,以及要翻译的消息(一个键及其参数)
type Field = 'title' | 'firstName' | 'lastName' | 'login' | 'password';
interface Success {
key: string;
params: Texts;
}
@Component({
selector: 'app-ex25',
imports: [
ReactiveFormsModule, IonHeader, IonToolbar, IonButtons, IonBackButton, IonTitle, IonButton, IonIcon, IonPopover,
IonContent, IonList, IonItem, IonLabel, IonCard, IonCardHeader, IonCardTitle, IonCardContent, IonSelect,
IonSelectOption, IonInput, IonText, IonNote, LoginBar,
],
templateUrl: './ex25.page.html',
// 页面的翻译,使用字典 ex25-fr.json 和 ex25-en.json
providers: [{ provide: Translations, useFactory: () => new Translations('ex25') }],
styles: `
.warning { --background: #fff8e1; --color: #333; }
.message { margin-top: 12px; }
.status { font-size: 12px; }
`,
})
export class Ex25Page {
private readonly api = inject(Api);
private readonly confirm = injectConfirmation();
readonly tr = inject(Translations);
readonly languages = languages;
readonly titles = ['Mr', 'Mme', 'Melle', 'Dr']; // "Dr":服务器会拒绝它
readonly fullName = fullName;
readonly user = signal<User | null>(null);
readonly clients = signal<Person[]>([]);
// 表单:没有任何验证规则,一切由服务器检查
readonly form = inject(NonNullableFormBuilder).group({
title: ['Mr'],
firstName: [''],
lastName: [''],
login: [''],
password: [''],
});
// null:新建;否则为被修改客户的 id,以及随其记录一起读取的版本
readonly editedId = signal<number | null>(null);
private version = 0;
// 最近一次错误的通用消息,以及成功消息
readonly pageError = signal<ApiError | null>(null);
readonly success = signal<Success | null>(null);
// 向服务器发送:一个 Command(示例 23),它会告知是否正在运行
readonly sending = new Command();
constructor() {
addIcons({ languageOutline, createOutline, trashOutline });
this.tr.start();
}
isAdmin(): boolean {
return this.user()?.role === 'ADMIN';
}
private async reload(): Promise<void> {
this.clients.set(await this.api.get<Person[]>('/clients'));
}
async onUserChange(u: User | null): Promise<void> {
this.user.set(u);
this.clients.set([]);
if (u?.role === 'ADMIN') await this.reload();
}
// 服务器返回的字段错误,已翻译('':无错误)
fieldError(field: Field): string {
const key = this.form.controls[field].errors?.['server'];
return typeof key === 'string' ? this.tr.t(key) : '';
}
private clearMessages(): void {
this.pageError.set(null);
this.success.set(null);
}
newForm(): void {
this.editedId.set(null);
this.version = 0;
// 重置:起始值,并且不再有错误
this.form.reset();
this.clearMessages();
}
edit(c: Person): void {
this.editedId.set(c.id);
// 随记录读取的版本会随修改一并发回:如果有人
// 在此期间修改了该记录,服务器会返回 409 CONCURRENT_UPDATE
this.version = c.version;
this.form.reset({ title: c.title, firstName: c.firstName, lastName: c.lastName, login: c.login ?? '', password: '' });
this.clearMessages();
}
// “保存”按钮
submit(): void {
this.sending.execute(() => this.save());
}
private async save(): Promise<void> {
this.clearMessages();
const input = { ...this.form.getRawValue(), version: this.version };
const id = this.editedId();
try {
const client =
id === null
? await this.api.post<Person>('/clients', input)
: await this.api.put<Person>(`/clients/${id}`, input);
this.newForm(); // 表单已清空,消息已清除……
// ……除了这一条
this.success.set({
key: id === null ? 'FORM.ADDED' : 'FORM.UPDATED',
params: { name: `${client.firstName} ${client.lastName}`, login: client.login ?? '' },
});
await this.reload();
} catch (e) {
if (!(e instanceof ApiError)) throw e;
this.pageError.set(e); // 通用消息
// 每个字段的错误:交给其控件,该控件
// 随之变为无效(ng-invalid);markAsTouched 把它标记为“已接触”
// (ng-touched):Ionic 随后会显示其 errorText
for (const [field, key] of Object.entries(e.fields)) {
const control = this.form.get(field);
control?.setErrors({ server: key });
control?.markAsTouched();
}
}
}
async remove(c: Person): Promise<void> {
const name = `${c.firstName} ${c.lastName}`;
if (!(await this.confirm(this.tr.t('FORM.DELETE_CONFIRM', { name })))) return;
this.clearMessages();
try {
await this.api.delete(`/clients/${c.id}`);
this.success.set({ key: 'FORM.DELETED', params: { name } });
} catch (e) {
if (e instanceof ApiError) this.pageError.set(e);
}
await this.reload();
}
}
|
| <!-- ======================================================================
ex25.page.html - the management of the clients, and the server's errors
====================================================================== -->
<ion-header>
<ion-toolbar color="primary">
<ion-buttons slot="start">
<ion-back-button defaultHref="/" />
</ion-buttons>
<ion-title>{{ tr.t('FORM.PAGE_TITLE') }}</ion-title>
<!-- 语言:一个菜单,位于弹出窗口中(ion-popover) -->
<ion-buttons slot="end">
<ion-button id="language25" aria-label="language">
<ion-icon slot="icon-only" name="language-outline" />
</ion-button>
</ion-buttons>
<ion-popover trigger="language25" [dismissOnSelect]="true">
<ng-template>
<ion-list>
@for (l of languages; track l) {
<ion-item [button]="true" (click)="tr.changeLanguage(l)">{{ l.toUpperCase() }}</ion-item>
}
</ion-list>
</ng-template>
</ion-popover>
</ion-toolbar>
</ion-header>
<ion-content class="ion-padding">
<app-login-bar (userChange)="onUserChange($event)" />
@if (user() !== null && !isAdmin()) {
<ion-card class="warning">
<ion-card-content>{{ tr.t('FORM.ADMIN_ONLY') }}</ion-card-content>
</ion-card>
}
@if (isAdmin()) {
<ion-list>
@for (c of clients(); track c.id) {
<ion-item>
<ion-label>
{{ fullName(c) }}
<p>{{ c.login }}</p>
</ion-label>
<ion-button slot="end" fill="clear" color="dark" [attr.aria-label]="tr.t('FORM.EDIT')"
(click)="edit(c)">
<ion-icon slot="icon-only" name="create-outline" />
</ion-button>
<ion-button slot="end" fill="clear" color="danger" [attr.aria-label]="tr.t('FORM.DELETE')"
(click)="remove(c)">
<ion-icon slot="icon-only" name="trash-outline" />
</ion-button>
</ion-item>
}
</ion-list>
<ion-card>
<ion-card-header>
<ion-card-title>{{ tr.t(editedId() === null ? 'FORM.TITLE_ADD' : 'FORM.TITLE_EDIT') }}</ion-card-title>
</ion-card-header>
<ion-card-content>
<!-- 没有 (ngSubmit):“保存”按钮调用 submit() -->
<form [formGroup]="form">
<!-- errorText: the error of the field returned by the server, translated. Ionic
displays it when the control is invalid (ion-invalid) and touched (ion-touched) -->
<ion-select [label]="tr.t('FORM.TITLE')" labelPlacement="floating" interface="popover"
formControlName="title" [errorText]="fieldError('title')">
@for (t of titles; track t) {
<ion-select-option [value]="t">{{ t }}</ion-select-option>
}
</ion-select>
<ion-input [label]="tr.t('FORM.FIRSTNAME')" labelPlacement="floating" formControlName="firstName"
[errorText]="fieldError('firstName')" />
<ion-input [label]="tr.t('FORM.LASTNAME')" labelPlacement="floating" formControlName="lastName"
[errorText]="fieldError('lastName')" />
<ion-input [label]="tr.t('FORM.LOGIN')" labelPlacement="floating" formControlName="login"
[errorText]="fieldError('login')" />
<ion-input [label]="tr.t('FORM.PASSWORD')" labelPlacement="floating" type="password"
formControlName="password" [errorText]="fieldError('password')" />
</form>
<ion-button class="ion-margin-top" shape="round" [disabled]="sending.running()" (click)="submit()">
{{ tr.t('FORM.SAVE') }}
</ion-button>
<ion-button class="ion-margin-top" shape="round" fill="outline" (click)="newForm()">
{{ tr.t('FORM.CANCEL') }}
</ion-button>
@if (success(); as s) {
<div class="message"><ion-text color="success">{{ tr.t(s.key, s.params) }}</ion-text></div>
}
<!-- 通用消息,以及 HTTP 状态码,便于理解 -->
@if (pageError(); as e) {
<div class="message">
<ion-text color="danger">{{ tr.t(e.key, e.params) }}</ion-text>
<ion-note class="status"> ({{ e.message }})</ion-note>
</div>
}
</ion-card-content>
</ion-card>
}
</ion-content>
|
客户管理(管理员账户)。这个表单在手机上不做任何验证:所有内容都发送到服务器,若被拒绝,服务器会返回一个错误 JSON,由 [Api] 服务 将其转换为 [ApiError]。
- 第 34–36 行(.ts):该页面复用了前面示例中的三个工具,从各自的文件夹导入:示例 16 的确认框、示例 21 的翻译,以及示例 23 的命令([Flutter] 客户端也是这样做的)。示例 21 中的 [Translations] 类正是为此而写:它不是单例服务,而是一个由其字典的前缀 配置的类。第 54 行使用 [ex25-fr.json] 和 [ex25-en.json] 字典为本页面创建它的一个实例。为什么不把它移到 [common/] 中?在实际应用中它适合放在那里;而在本课程中,各示例是按顺序阅读的,示例 21 仍然是介绍它的那一个;
- 第 63 行(.ts):示例 16 中的确认函数([AlertController]);
- 第 66 行(.ts):称谓“Dr”,服务器会拒绝它:参见 [ERRORS.INVALID_TITLE];
- 第 73–79 行(.ts):响应式表单(示例 08),没有任何验证规则;
- 第 81–82 行(.ts):被修改的客户([null]:表示新建),以及随其记录一起获取的版本;
- 第 85–88 行(.ts):最近一次错误的通用消息、成功消息(一个键及其参数,在显示时进行翻译:它们会随语言切换而变化),以及提交,即一个 [Command] (示例 23);
- 第 110–113 行(.ts):字段的错误消息。错误以名称 [server] 存储在字段的验证逻辑中(见下文);其值是服务器发送的键,会被翻译;
- 第 120–126 行(.ts):新客户:[form.reset()] 恢复默认值(该表单是“非空”的,示例 08)并清除所有错误;
- 第 128–135 行(.ts):编辑客户:表单接收客户的记录。从记录中读取的版本 会随修改一并更新:如果在此期间有人修改了该记录,服务器将返回 409 [CONCURRENT_UPDATE] (乐观锁);
- 第 142–170 行(.ts):保存:[POST /api/clients] (创建)或 [PUT /api/clients/:id] (更新),带上表单的值和版本(第 144 行)。如果成功,表单被清空,并显示成功消息(第 151–156 行)。如果被拒绝,[ApiError] 会显示通用消息(第 160 行)以及每个字段的错误(第 164–168 行):
- [control.setErrors({ server: key })] 在字段验证期间返回一个错误:该字段变为无效(类 [ng-invalid]);
- [control.markAsTouched()] 将其标记为“已接触”(类 [ng-touched]),就好像已经离开过该字段一样;
- [Ionic] 会把这两个类——[ion-invalid] 和 [ion-touched]——复制到字段上(示例 07):然后它会在字段下方显示其 [errorText] 的文本,并将其以红色突出显示;
- 而编辑该字段会清除错误,无需写一行代码:每次按键,[Angular] 都会根据字段的规则重新验证该字段……而它没有任何规则。手动设置的错误就消失了。在 [onChanged] 是 [Flutter] 客户端中不得不为每个字段编写的内容;
- 第 172–183 行(.ts):确认后删除(确认消息会被翻译,并以客户姓名作为参数);
- 第 11–25 行(html):语言:顶部栏中的一个按钮,用于打开 [<ion-popover>] (与按钮关联的弹出窗口,其 [id] 由 [trigger] 指定);[dismissOnSelect] 会在第一次选择后将其关闭。这就是 [PopupMenuButton] 在 [Flutter] 中的对应物;
- 第 32–36 行(html):已登录但不是 ADMIN 的用户:显示一条警告;
- 第 38–56 行(html):客户列表,带有“编辑”和“删除”按钮;
- 第 64–81 行(HTML):表单。每个字段都与其控件关联([formControlName]);它们的标签会被翻译;[[errorText]] 接收经过翻译的服务器错误(第 67–68 行:[<ion-select>] 也有 [errorText])。该表单没有 [(ngSubmit)]:“保存”按钮直接调用命令(第 83–85 行);
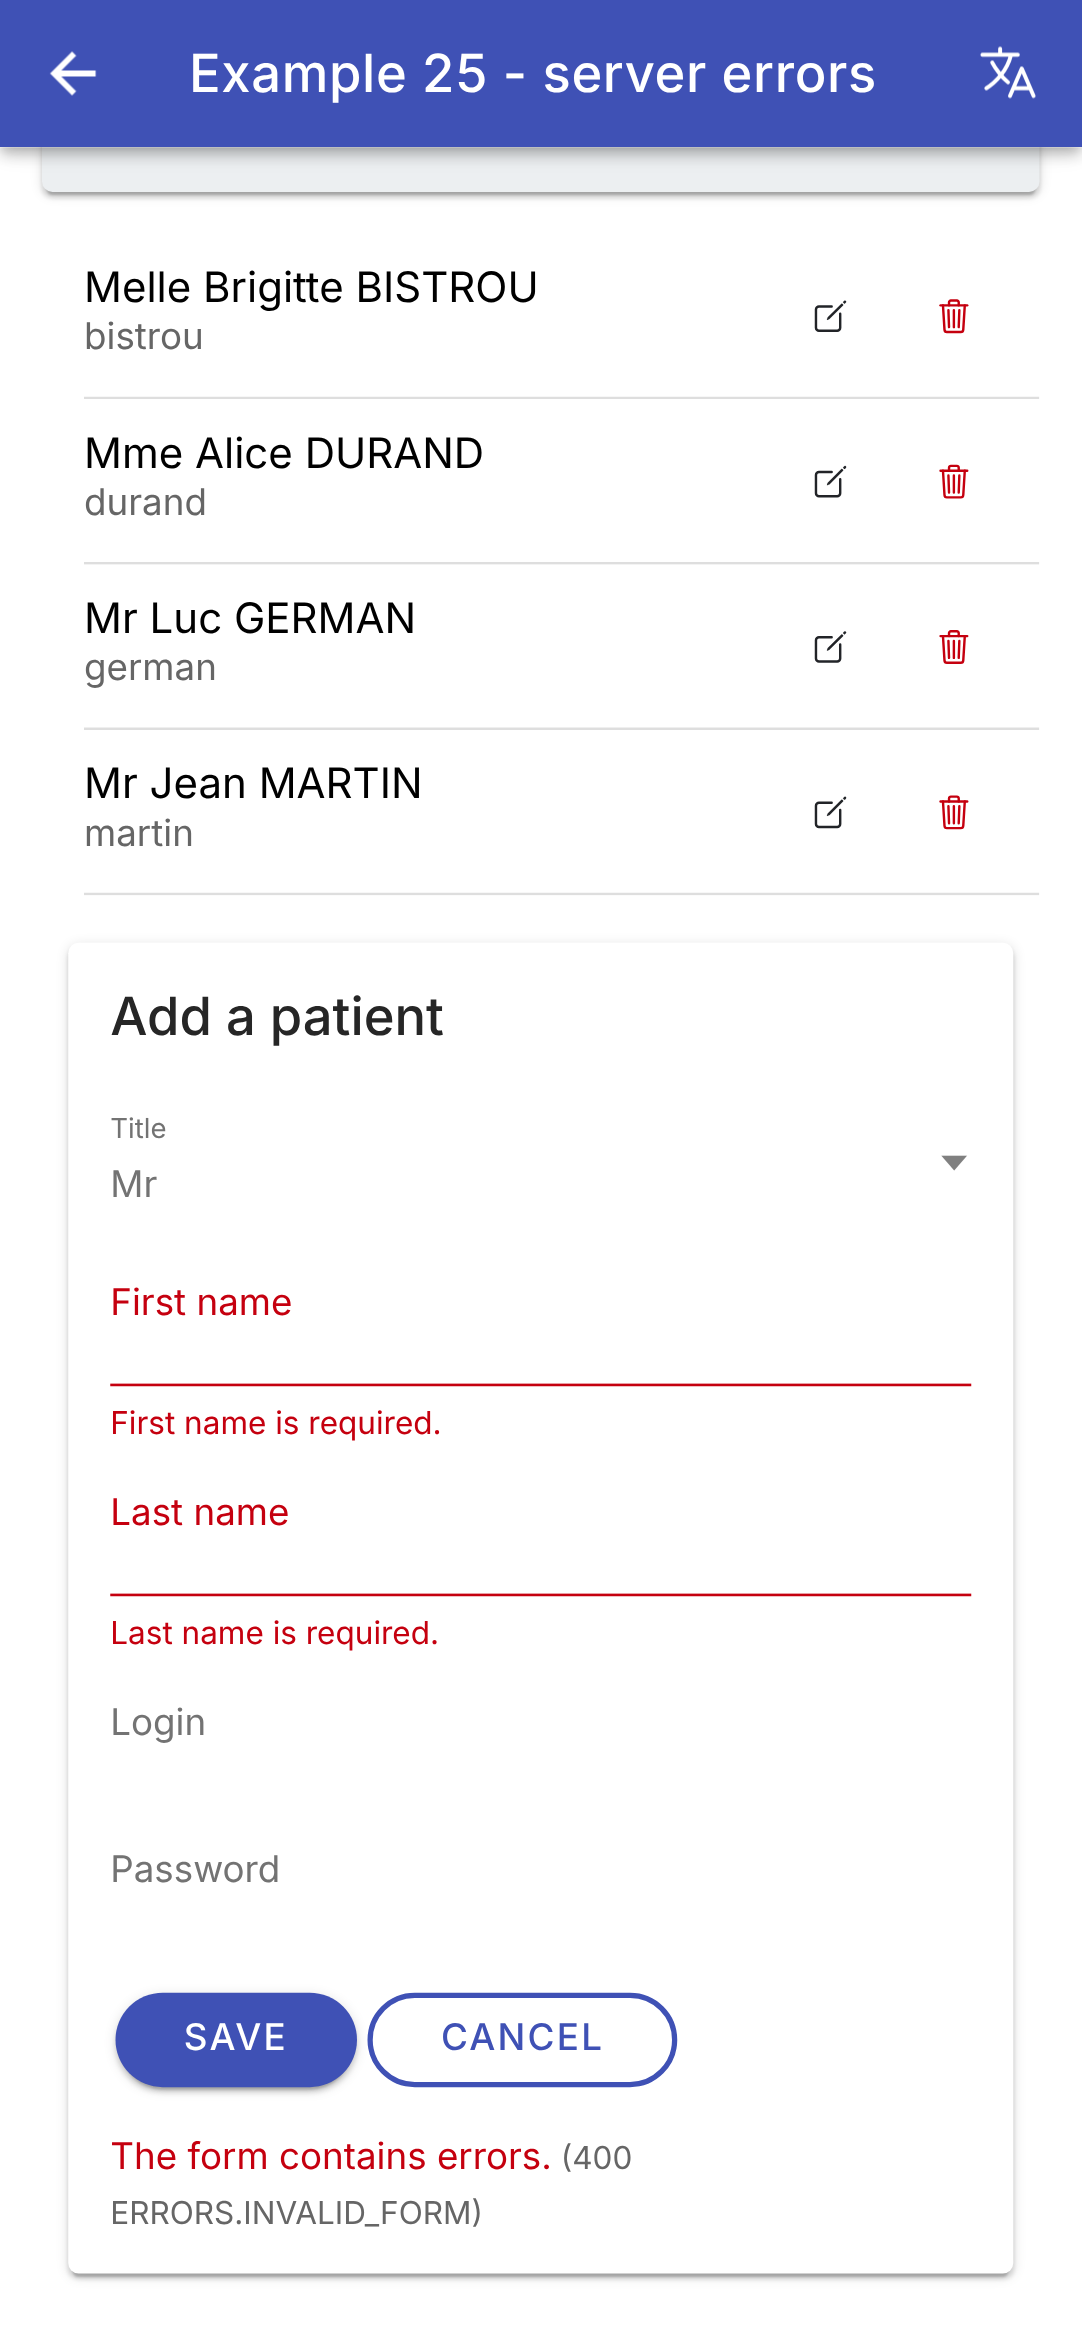
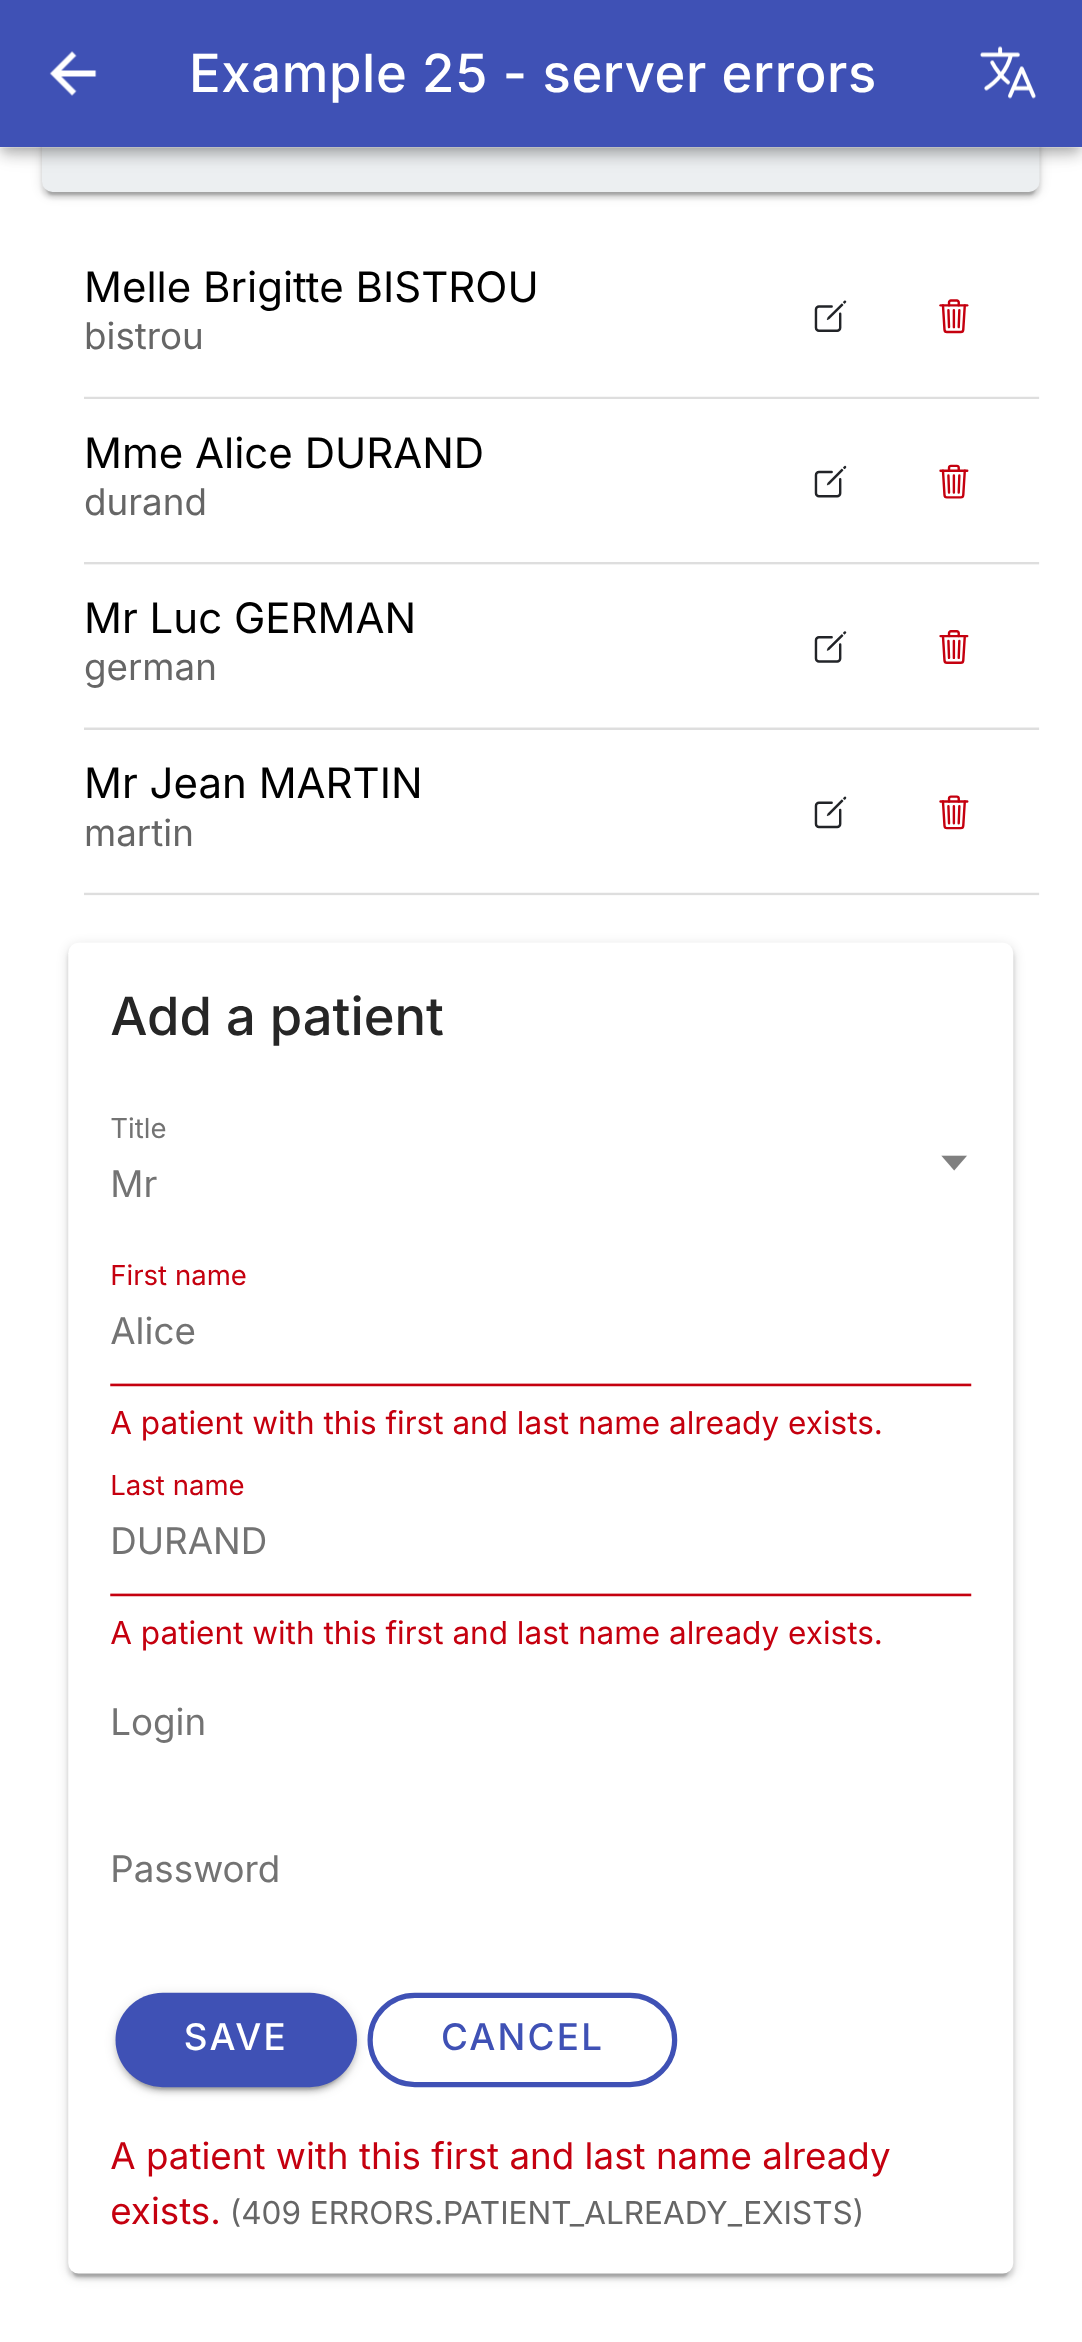
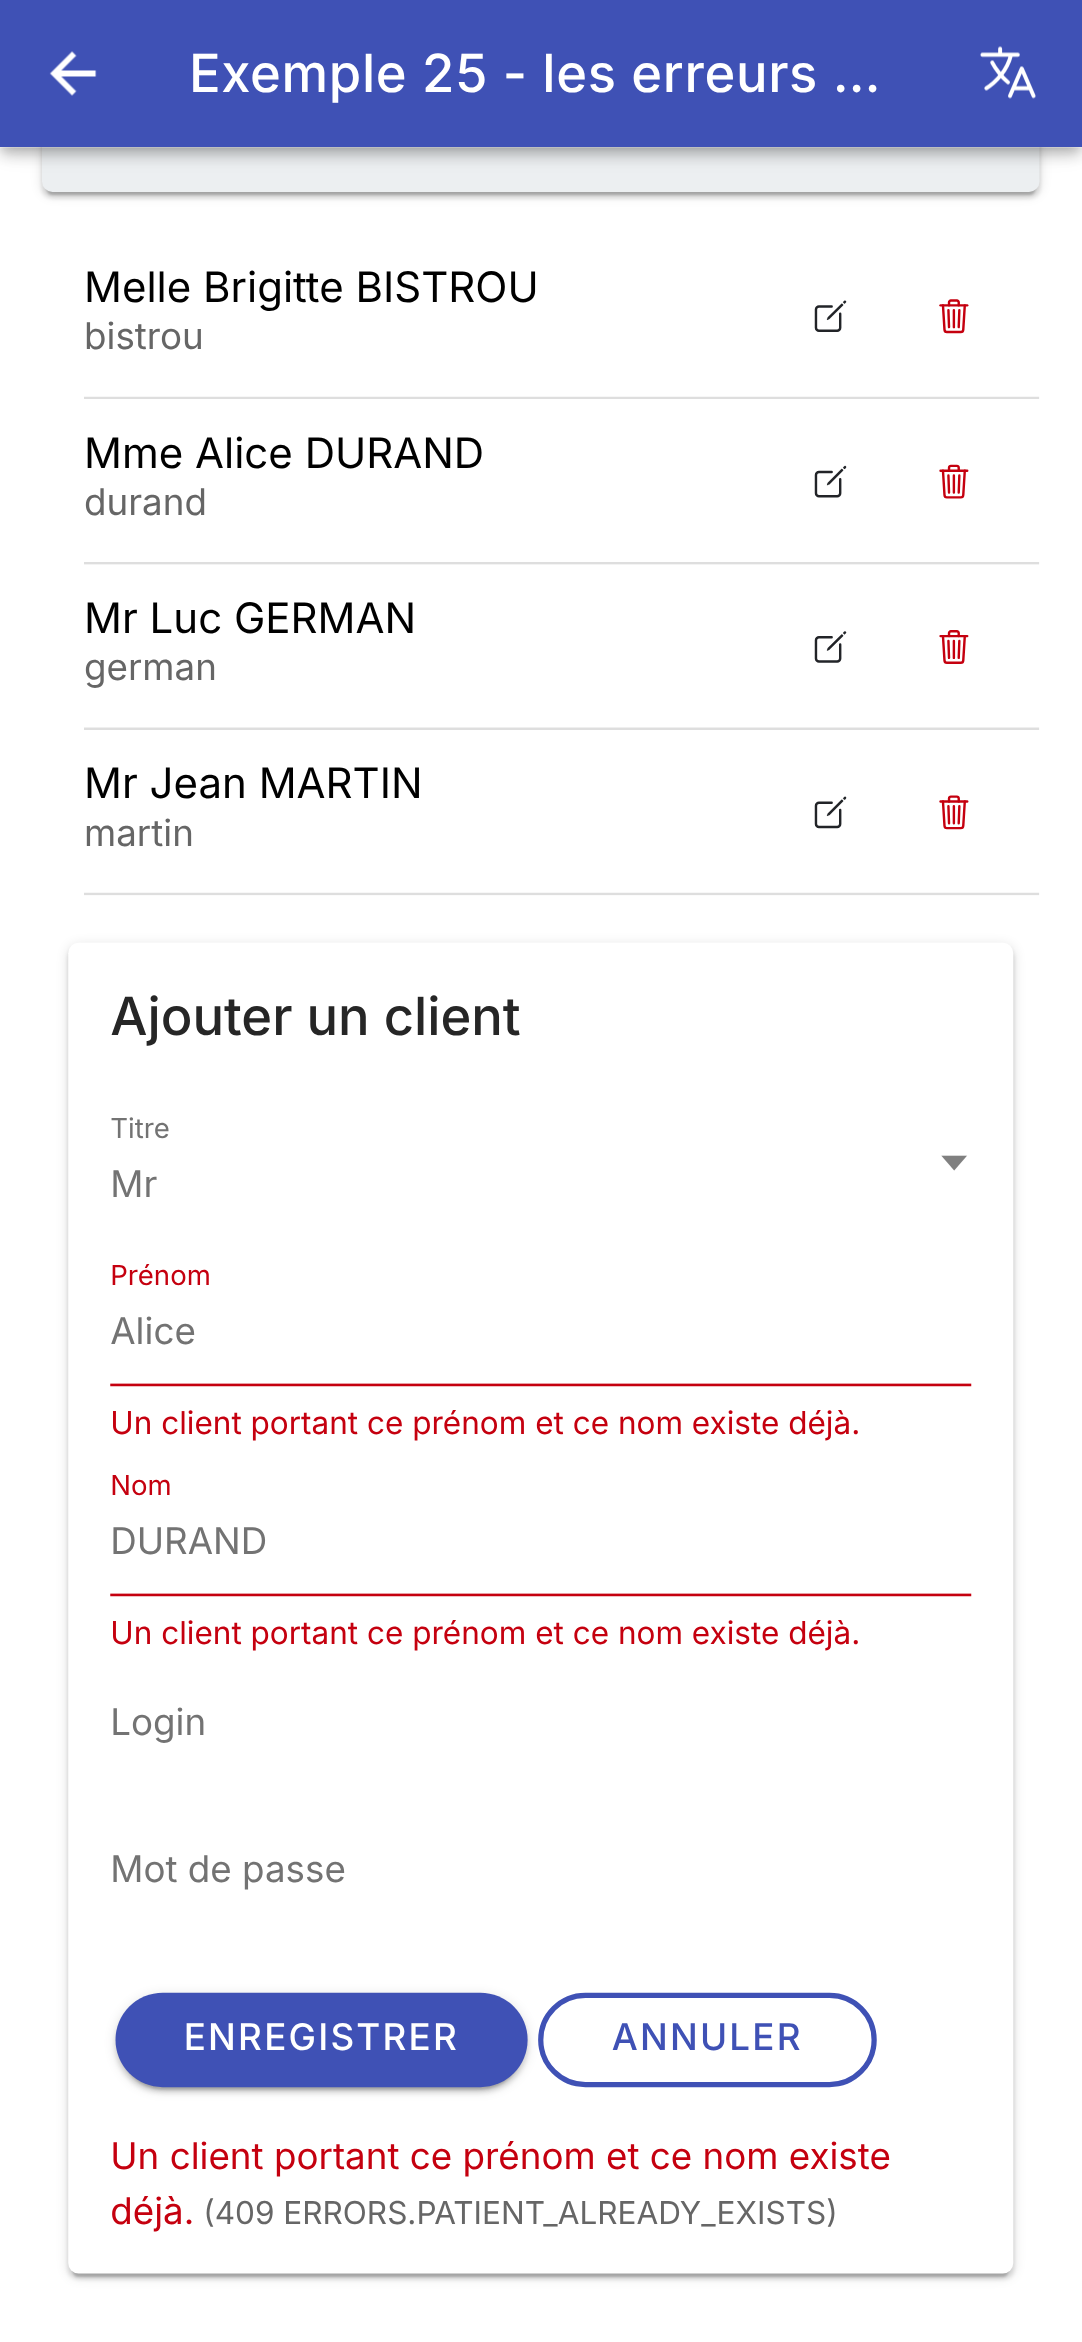
- 第 90–99 行(HTML):成功消息和通用错误消息,已翻译;为清晰起见,HTTP 状态码和键以小号字显示。
空表单;同名者(“Alice DURAND”);同一界面的法语版:
切换语言会重新翻译整个屏幕,包括已经显示的错误:屏幕保存的是服务器发送的键 ——而不是文本——并在每次显示屏幕时翻译它们。还可以试试:称谓“Dr”、已被占用的用户名([martin])、无效的用户名(“Jean M”),或者在两台设备上(或在两个浏览器标签页中,或在应用中和用 [curl])编辑同一条记录。
其原理与案例研究中的所有表单相同:规则只存在于一个地方——服务器;应用程序以用户的语言显示服务器的响应。当然,你完全可以在手机上也验证字段(示例 08),以便更快地回应用户;但是,服务器必须重新验证所有内容,最终以它的判定为准。
比较这两个客户端,可以看出 [Ionic] 在多大程度上依赖浏览器:HTTP 客户端直接返回 [JavaScript] 对象(JSON 是 [JavaScript] 的原生语言),令牌 Cookie 无需写一行代码即可传递,而且请求可以被取消。作为代价,[TypeScript] 不会在运行时验证响应的格式,而 [Dart] 的过滤则自然地做到了这一点。[Angular] 的 [RdvMedecins] 客户端(课程 [Angular])的写法与这些示例完全一样:同样的 [HttpClient]、同样的服务、同样的响应式表单;只有显示组件不同,这里是 [Ionic] 的组件,模仿 [Android] 手机的组件。