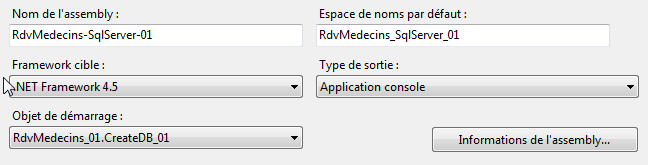
3. 基于 SQL Server Express 2012 的案例研究
3.1. Introduction
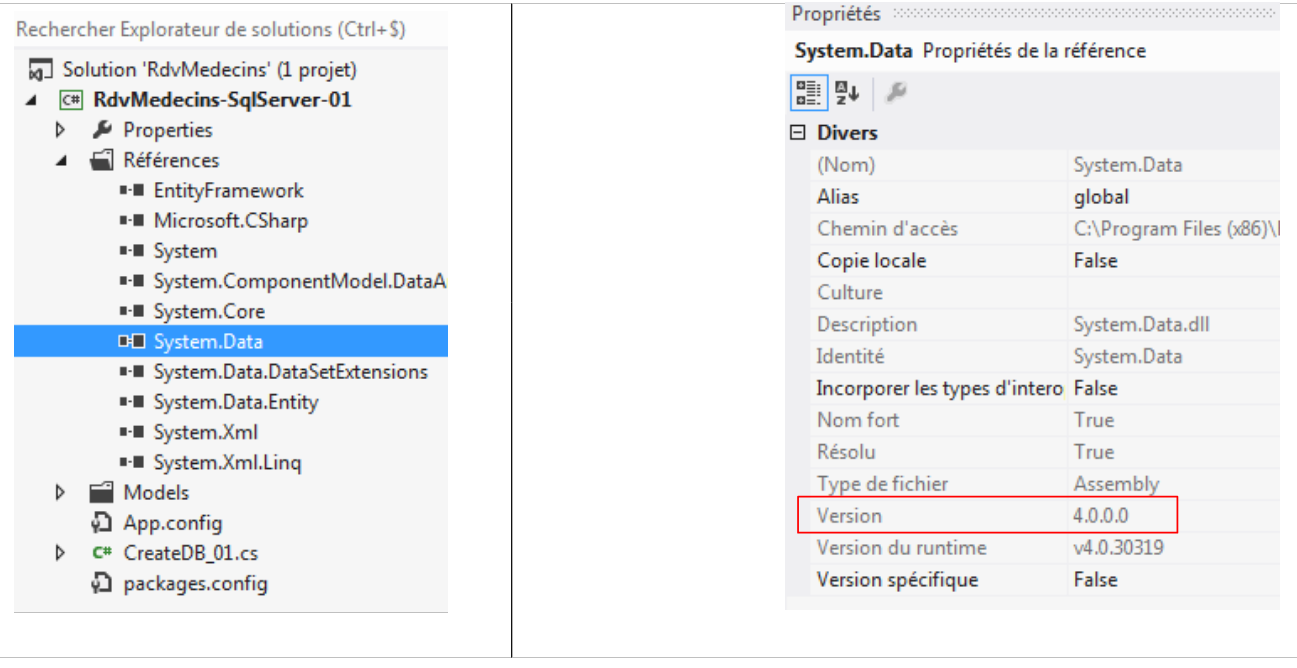
网上关于Entity Framework的示例,绝大多数都是基于SQL Server的。这很正常。SGBD很可能是全球企业中最广泛使用的版本,而NET则在企业中较为常见。 我们将顺应这一趋势。随后,示例将扩展至第1.2节中提到的所有数据库。
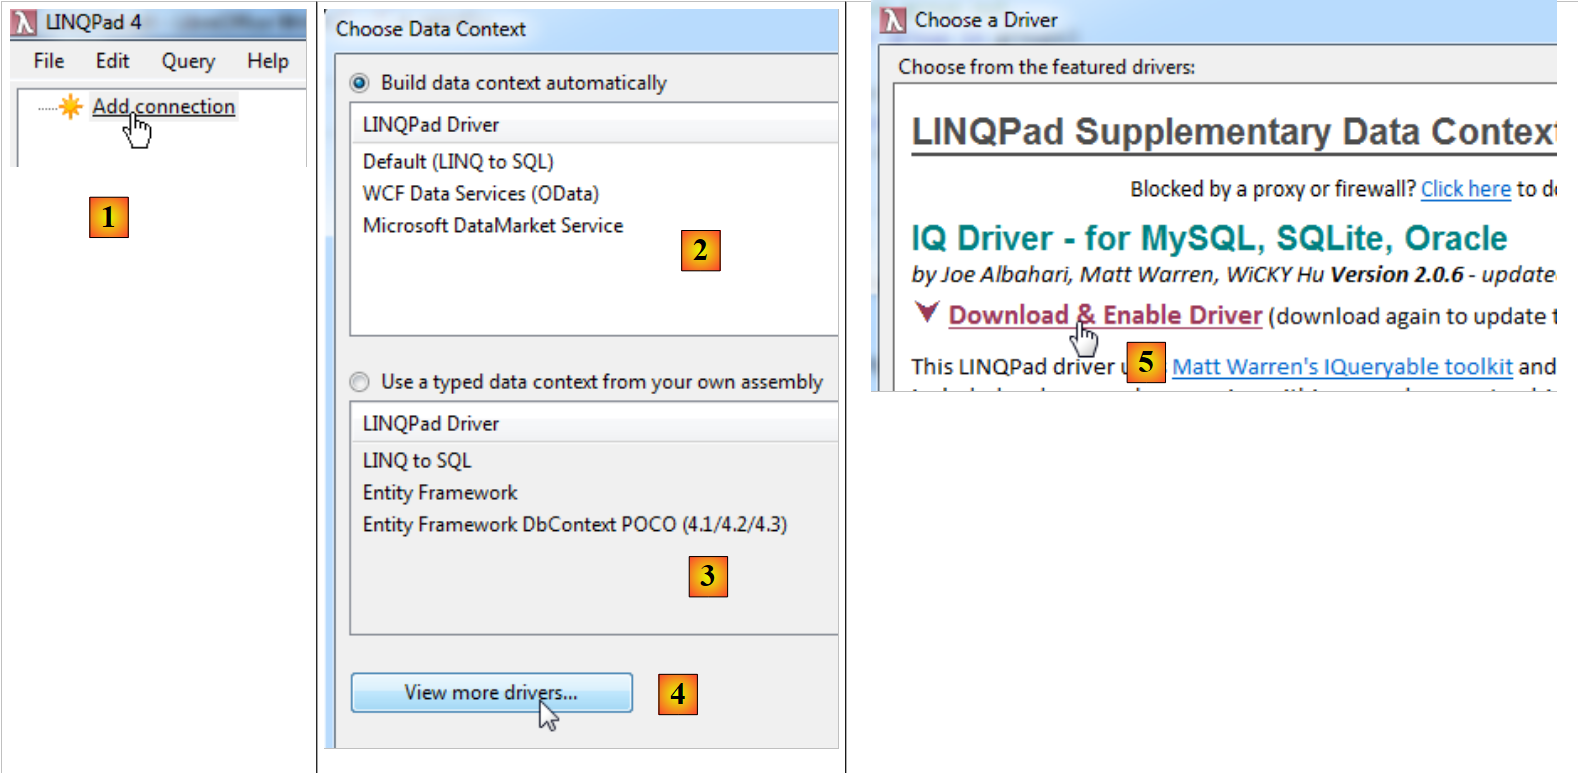
3.2. 工具安装
本文将不详细描述工具的安装过程。因为这需要大量屏幕截图,而这些截图很快就会过时。这是一项(诚然并非总是容易的)任务,我们将留给读者自行完成。
我们需要安装以下工具:
- SGBD SQL Server Express 2012:[http://www.microsoft.com/fr-fr/download/details.aspx?id=29062]。请下载“With Tools”版本,该版本随附 SGBD 管理工具:
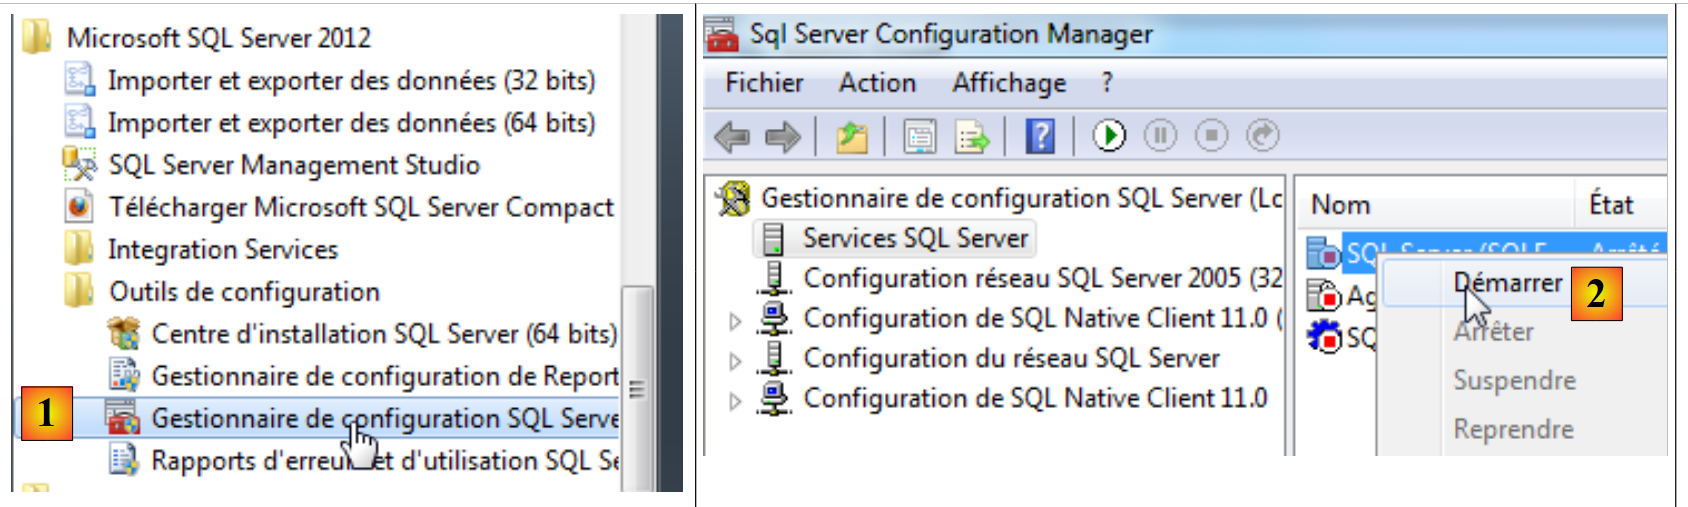
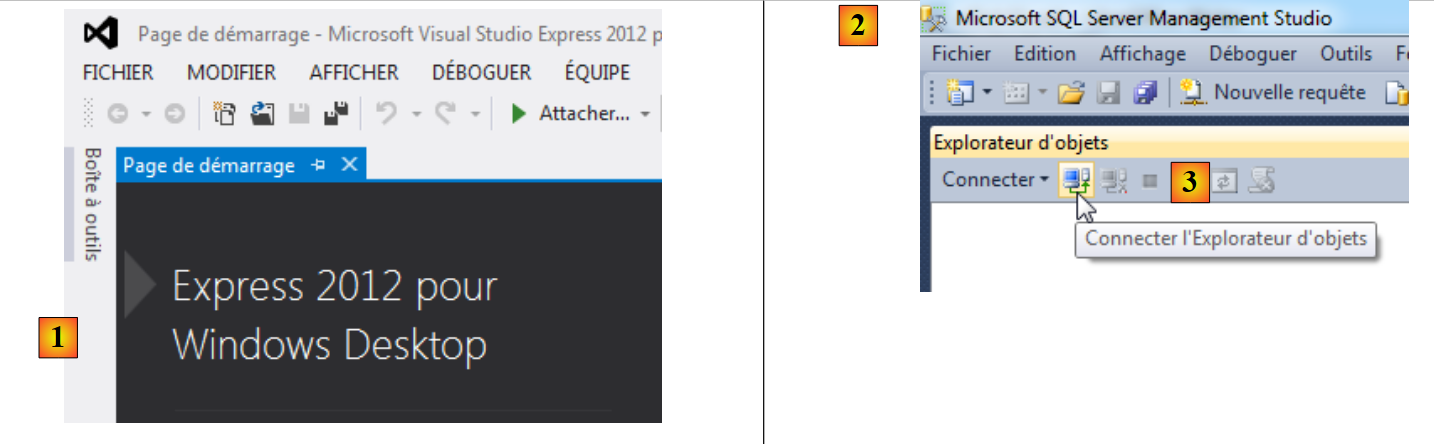
安装 SGBD 后,我们启动它:
 |
 |
- [1]:在“开始”菜单中,启动“SQL Server 配置管理器”;
- [2]:在此管理器中启动服务器;
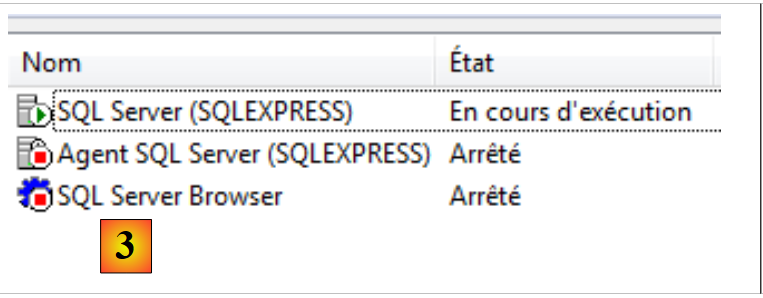
- [3]:服务器已启动。
现在我们启动 SQL Server 的管理工具:
 |
- [1]:在“开始”菜单中,启动“SQL Server Management Studio”;
- [2]:管理工具。
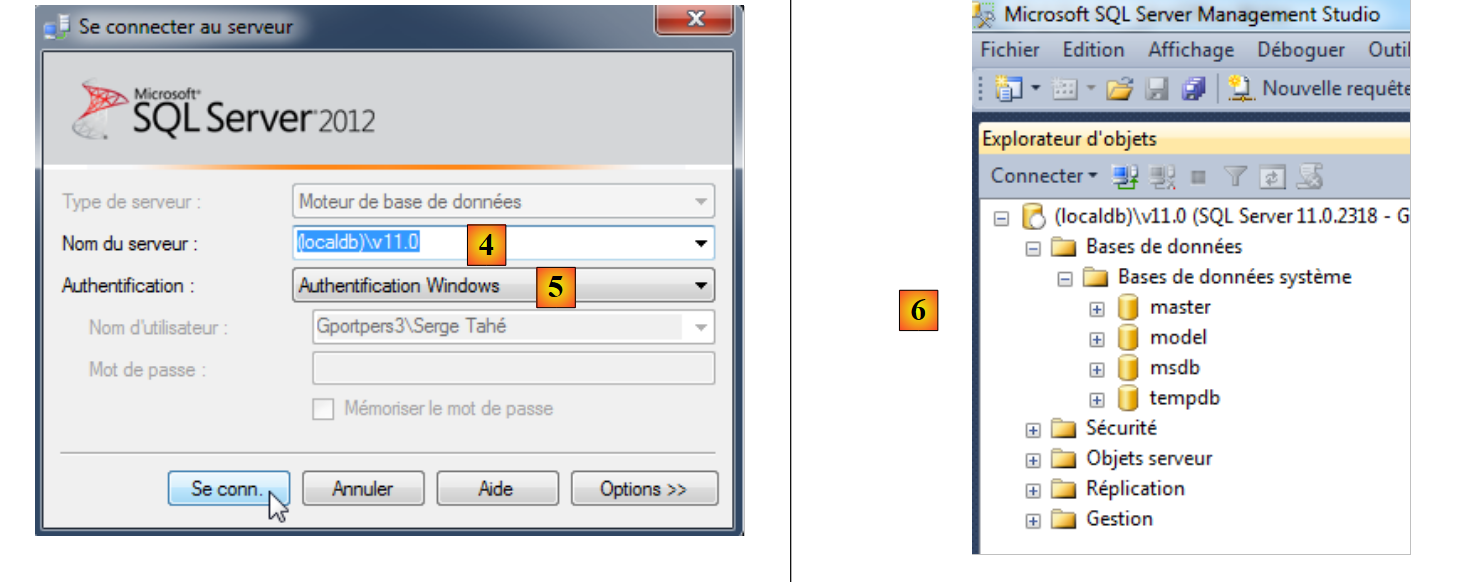
我们将连接到服务器:
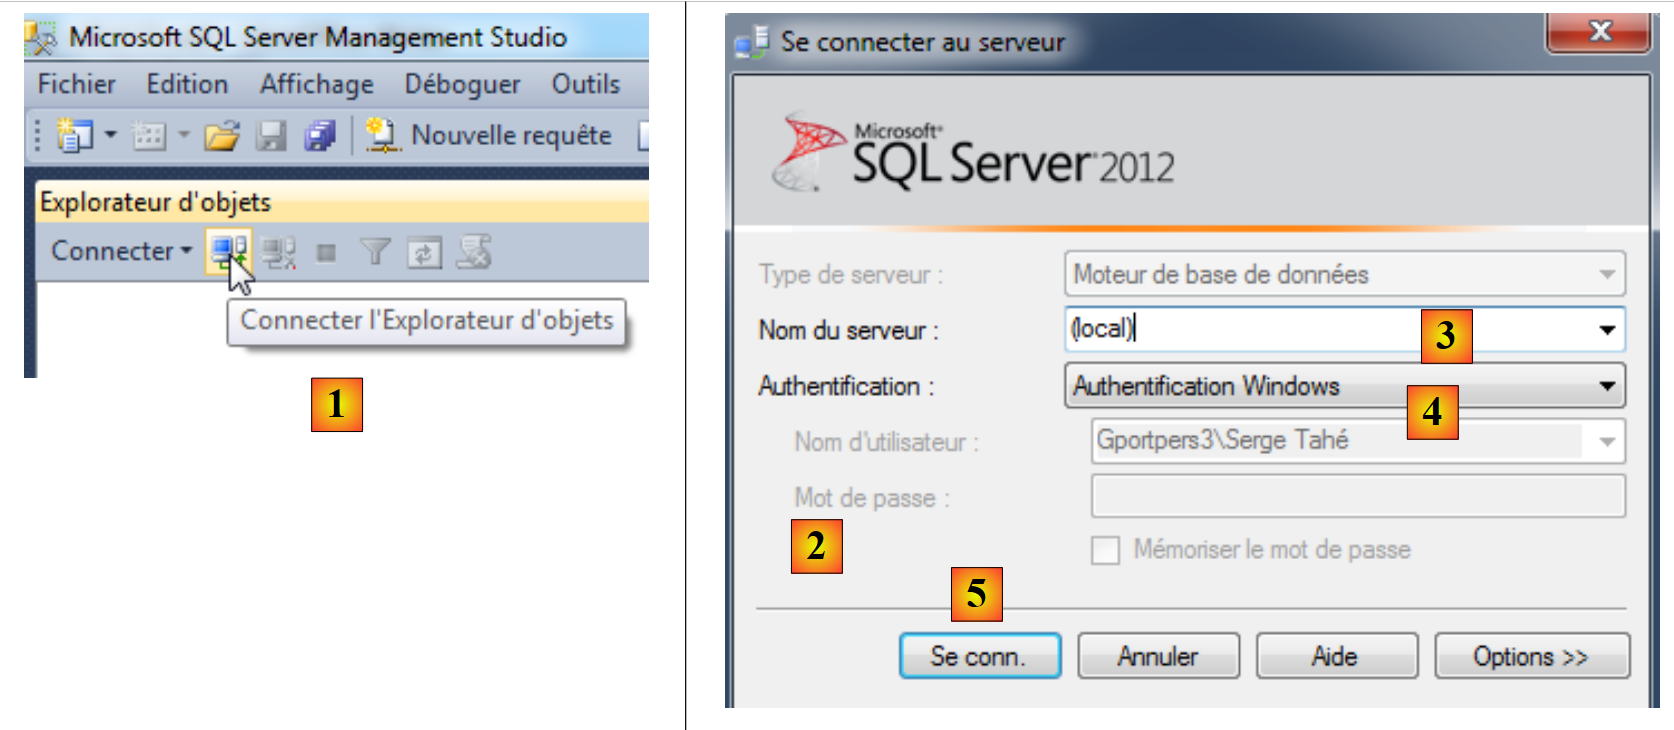 |
- 在 [1] 中,连接对象资源管理器;
- 在 [2] 中,输入连接参数:
- [3]:服务器(本地)(注意必须添加括号)指安装在该机器上的服务器,
- [4]:选择 Windows 身份验证。必须是该计算机的管理员才能成功连接,
- [5]:建立连接;
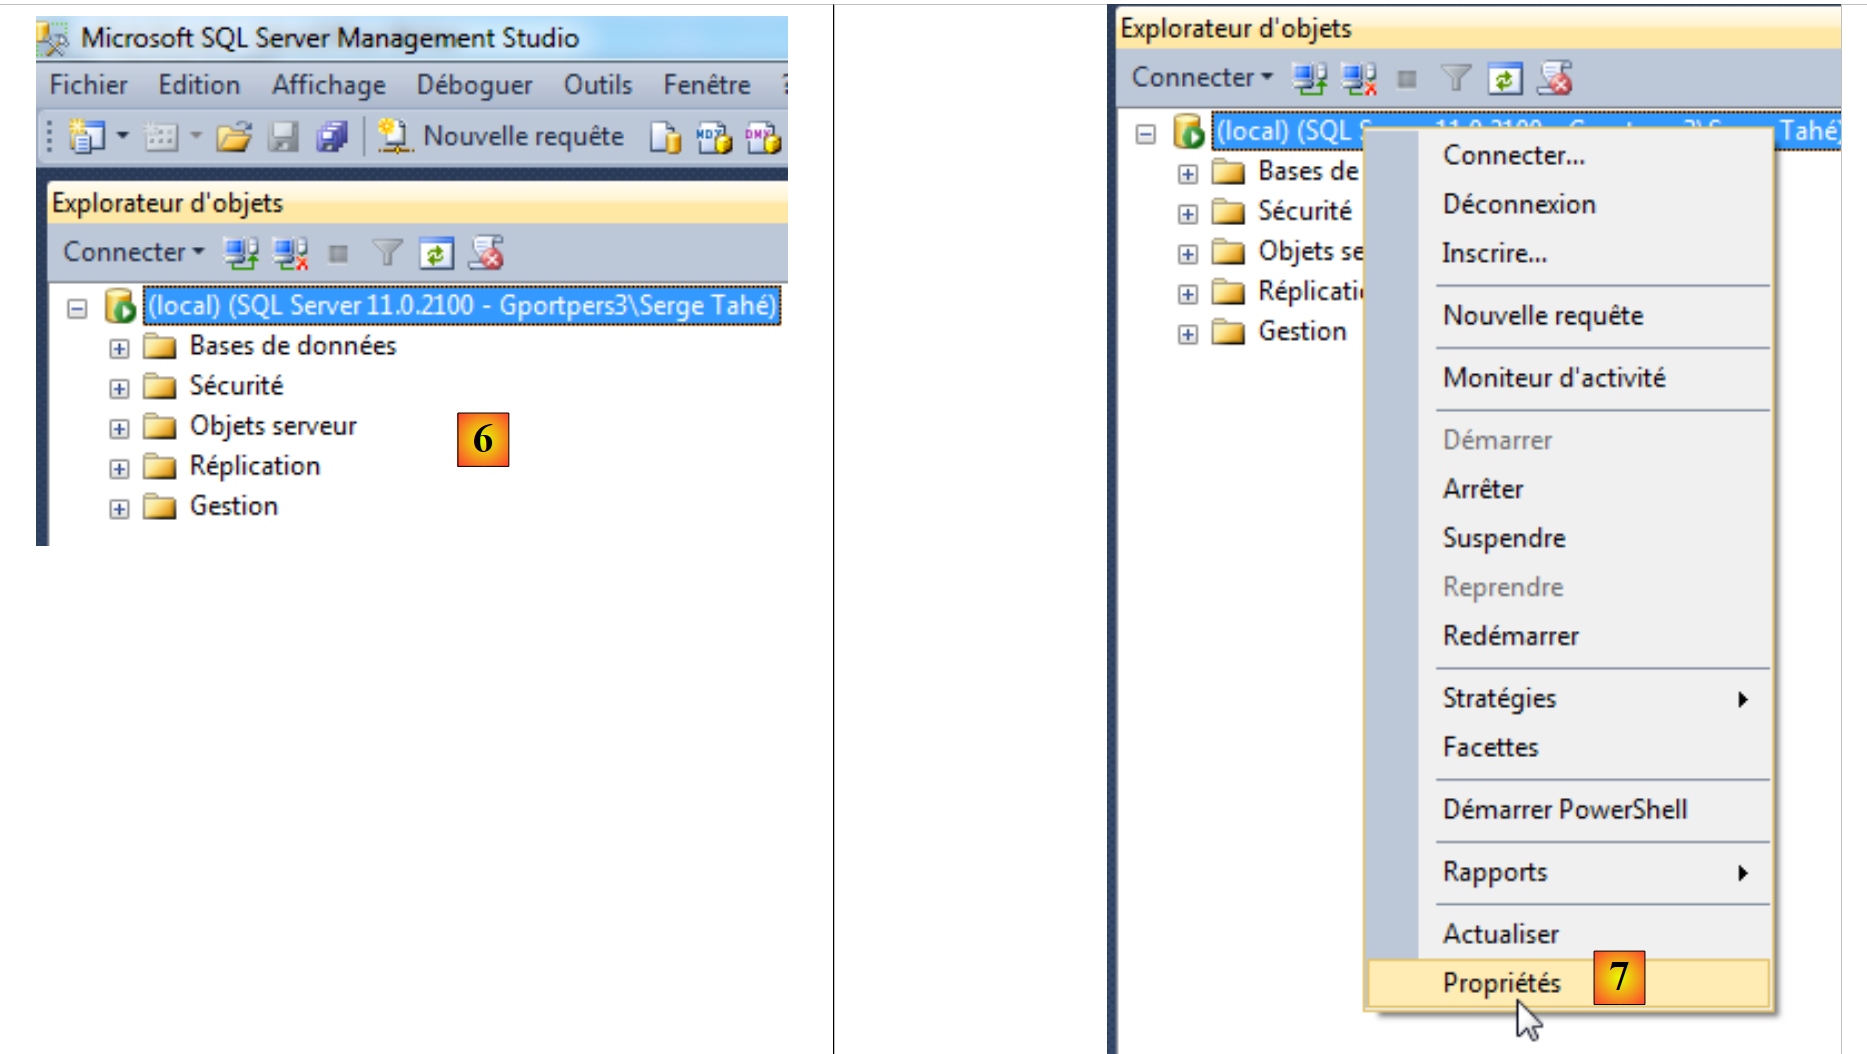 |
- [6]:已连接;
- [7]:需要修改服务器的某些属性;
 |
- [8]:要求提供两种身份验证模式:
- Windows 身份验证(如前所述)。拥有相应权限的 Windows 用户即可登录,
- SQL 服务器身份验证。用户必须属于 SGBD 中注册的用户;
完成上述设置后,即可验证服务器属性;
- [9]:编辑用户 sa(系统管理员)的属性;
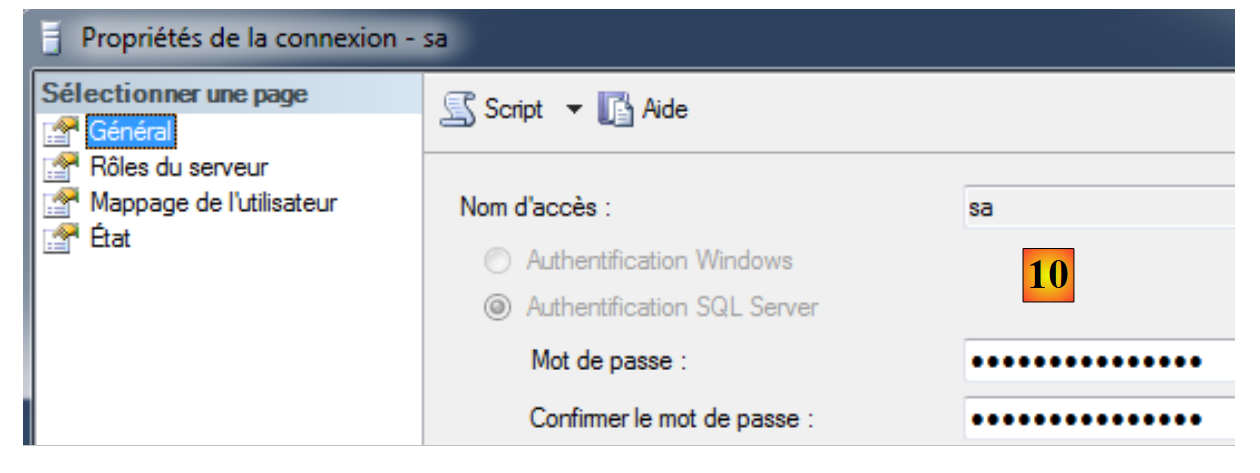 |
- 在 [10] 中,为其设置密码。在本文档后续内容中,该密码为 sqlserver2012;
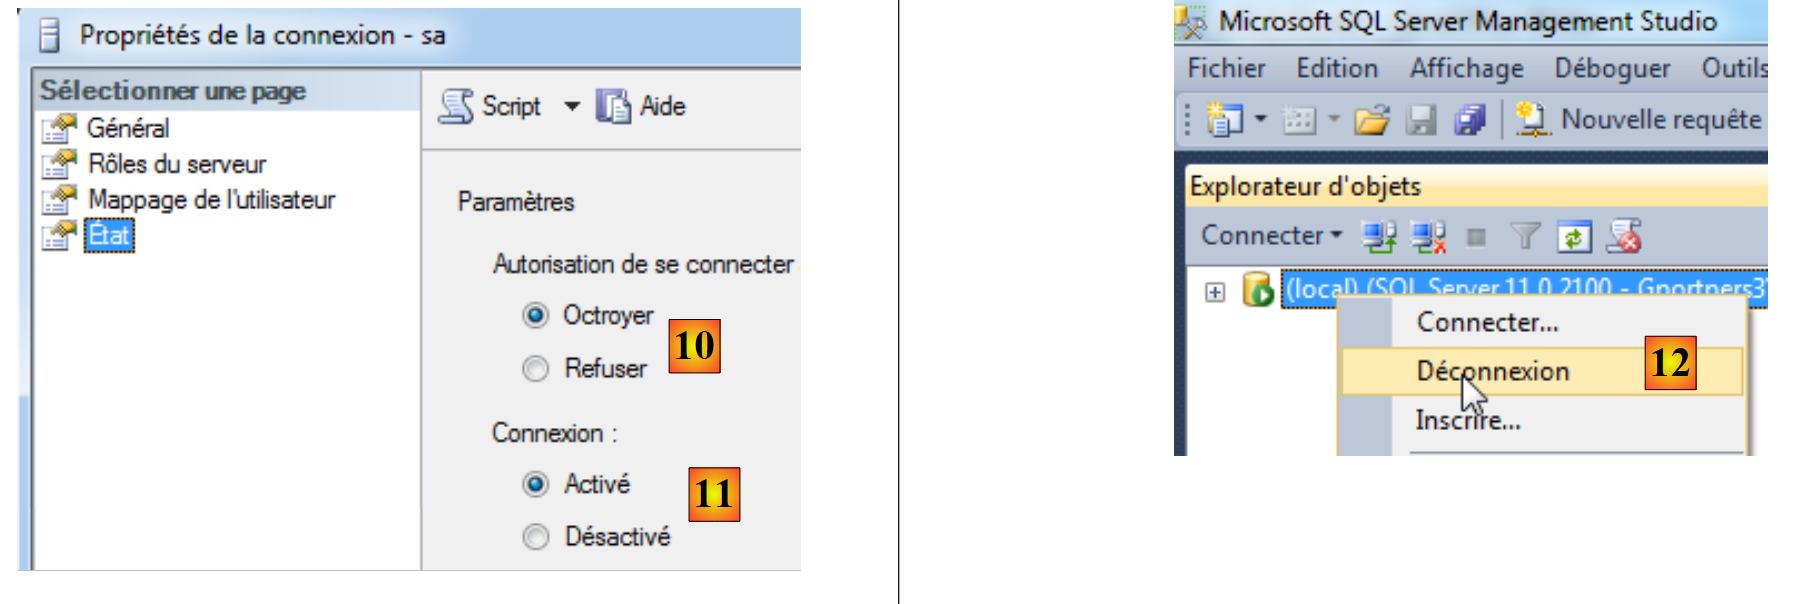 |
- 在 [10] 中,授予其登录权限;
- 在 [11] 中,连接已启用。至此,向导即可确认;
- 在 [12] 中,从服务器断开连接。
现在,我们使用登录名 sa/sqlserver2012 重新连接:
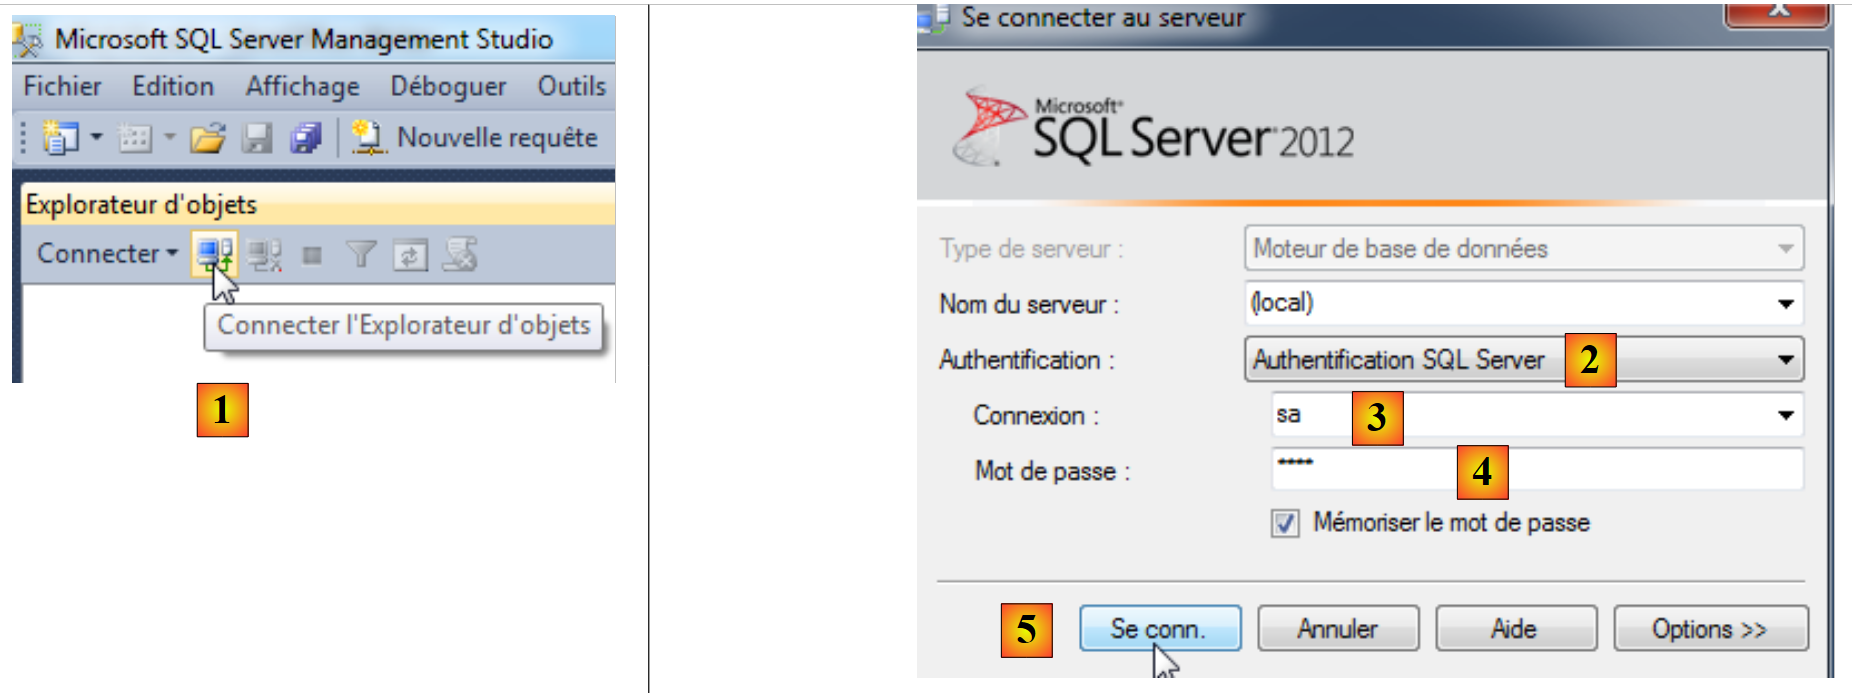 |
- 在 [1] 中,重新连接;
- 在 [2] 中,进行 SQL 服务器身份验证;
- 在 [3] 中,用户名为 sa;
- 在 [4] 中,其密码为 sqlserver2012;
- 在 [5] 中,进行登录;
 |
- 在 [6] 中,已成功登录。
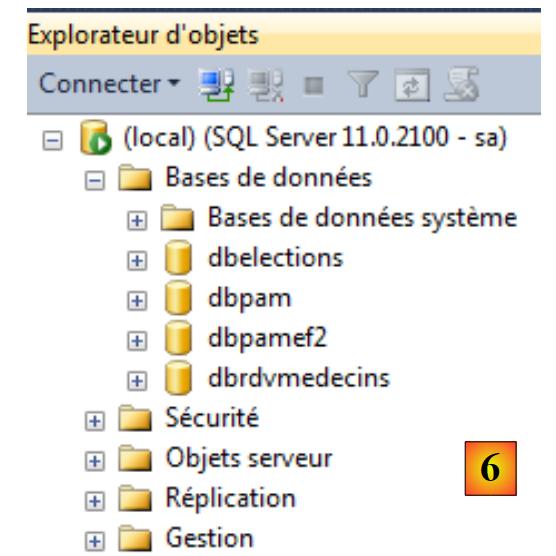
现在我们将创建一个演示数据库:
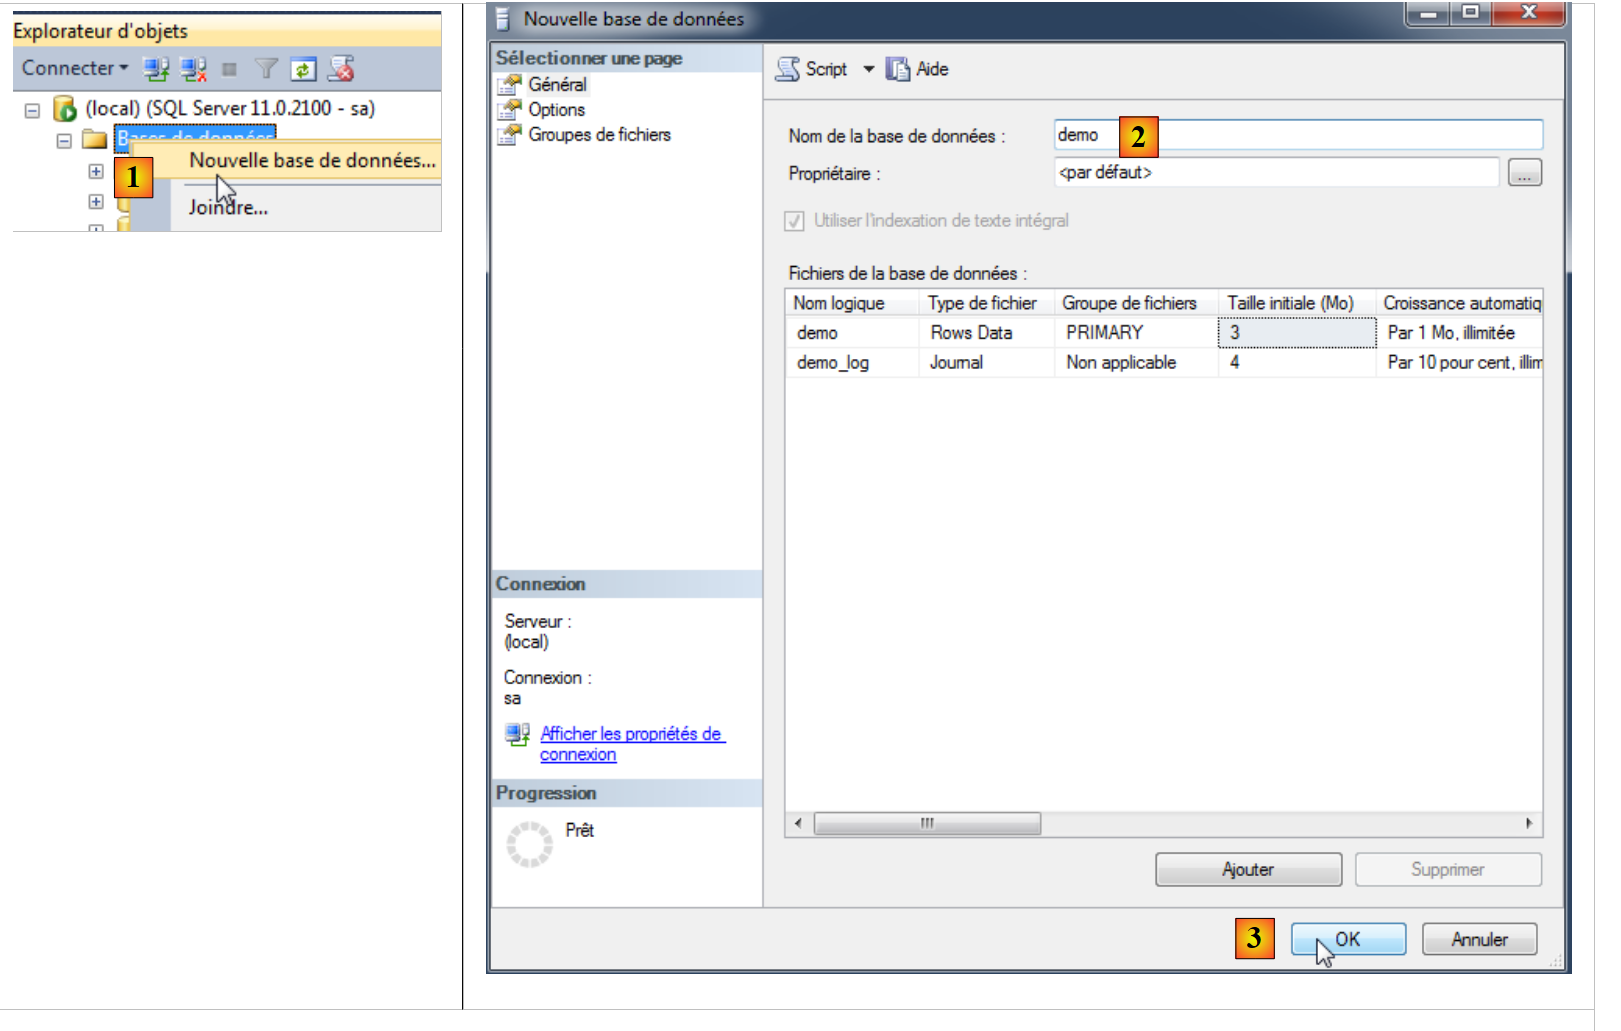 |
- 在 [1] 中,创建一个新的 BD;
- 在 [2] 中,将其命名为 demo;
- 在 [3] 中,我们进行确认;
 |
- 在 [4] 中,数据库已创建;
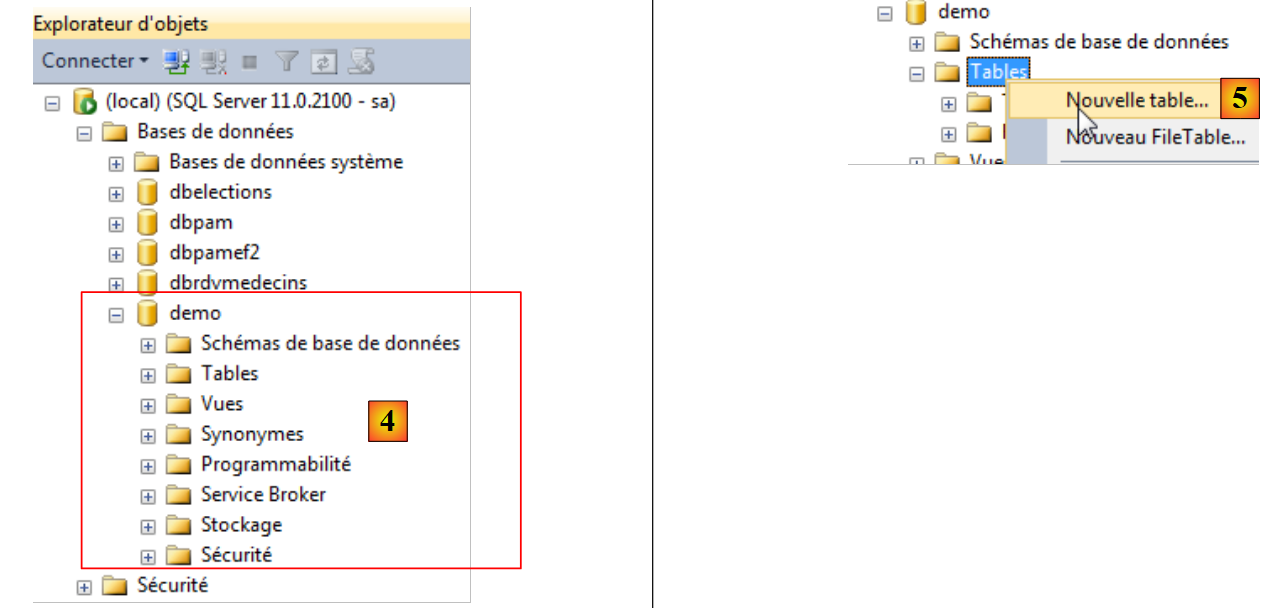
- 在 [5] 中,在数据库中创建一个新表 demo;
 |
 |
 |
 |
- 在 [6] 中,定义了一个包含两列的表 ID 和 NOM;
- 在 [7] 中,将列 [ID] 设为主键;
- 在 [8] 中,主键用钥匙符号表示;
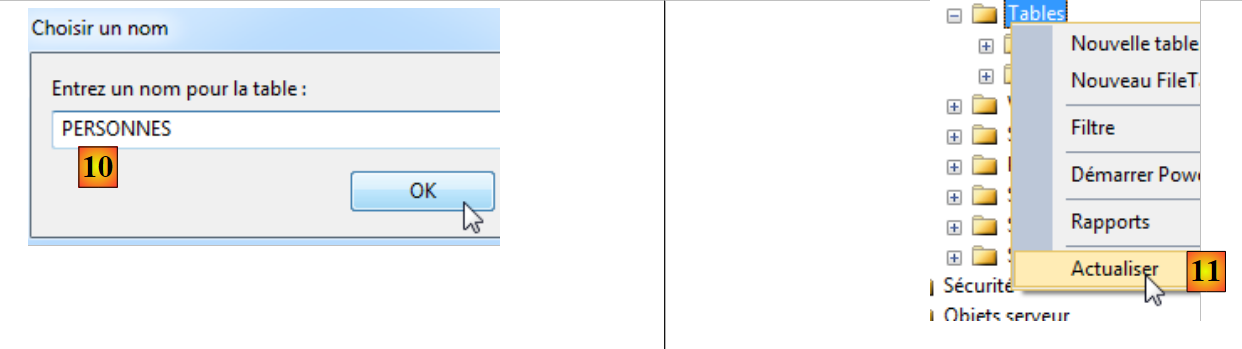
- 在 [9] 中,保存该表;
- 在 [10] 中,为其命名;
- 在 [11] 中,为了使该表出现在数据库 [demo] 中,必须刷新数据库;
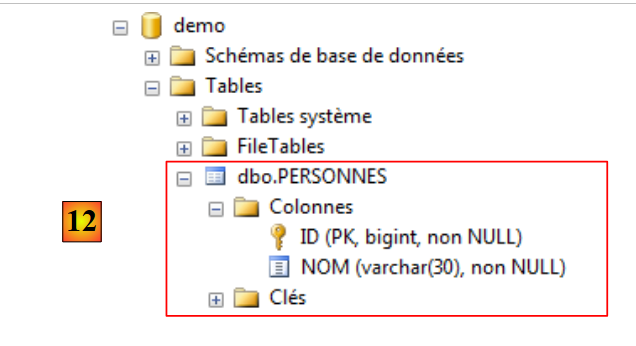
- 在 [12] 中,表 [PERSONNES] 已成功创建。
目前,我们对 SQL Server 管理工具的使用已经了解得足够多了。
3.3. 嵌入式服务器 (localdb)\v11.0
VS Express 2012 附带了一个 SQL 嵌入式服务器。 此处假设已安装 VS Express 2012。启动 VS 2012 [1]:
 |
启动 SQL Server 2012 管理工具 [2] 并登录 [3]。
 |
- 在 [4] 中,连接到服务器 (localdb)\v11.0;
- 在 [5] 中,使用 Windows 身份验证;
- 在 [6] 中,连接成功后会显示服务器上的数据库。我们可以像之前一样创建一个新数据库。
在 VS 2012 中,我们将不使用该嵌入式服务器。
3.4. 基于实体创建数据库
Entity Framework 5 Code First 支持基于实体创建数据库。接下来我们将演示这一过程。使用 VS Express 2012,我们创建第一个 C# 控制台项目:
 |
 |
- 在 [1] 中,是项目的定义;
- [2],即创建的项目。
所有项目都需要 Entity Framework 5 的 (DLL)。我们将它添加进去:
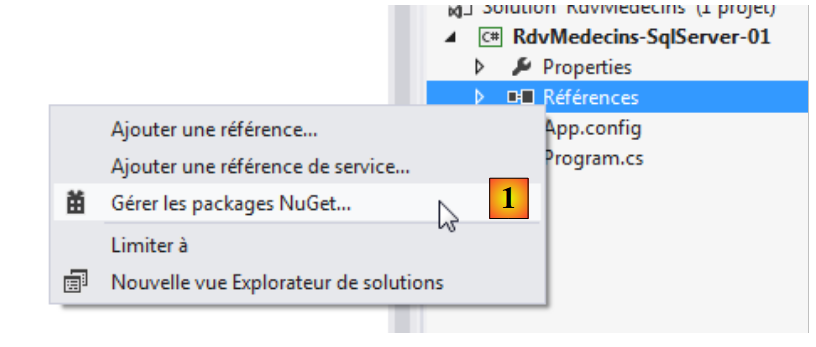 |
- 在 [1] 中,NuGet 工具可用于下载依赖项;
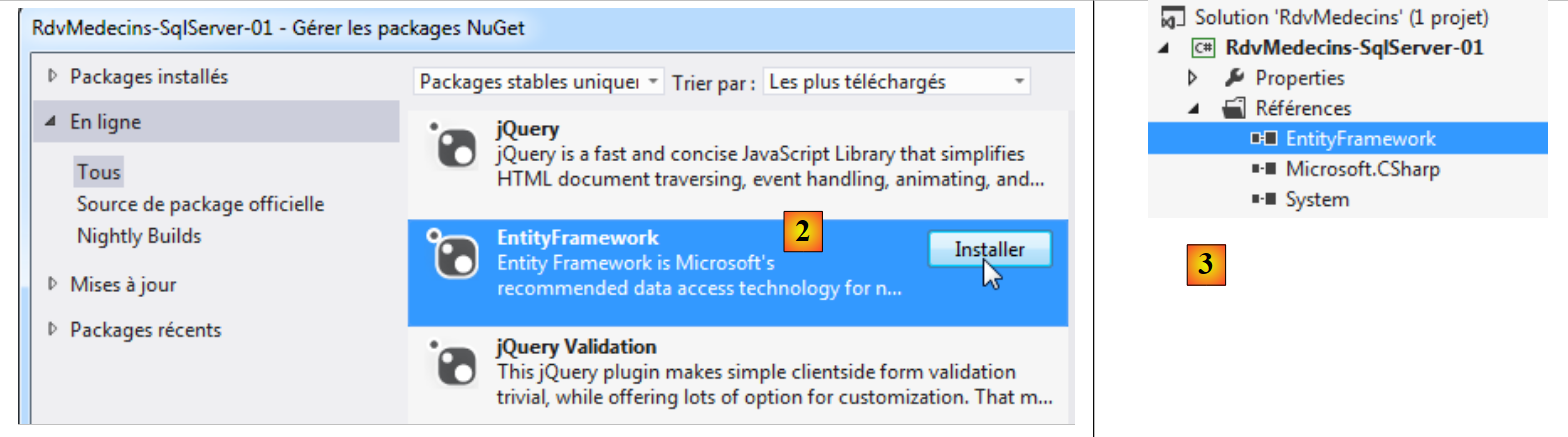 |
- 将其更改为 [2],下载 Entity Framework 依赖项;
- 在 [3] 中,引用已添加到项目中。
查看已添加引用属性可了解更多信息:
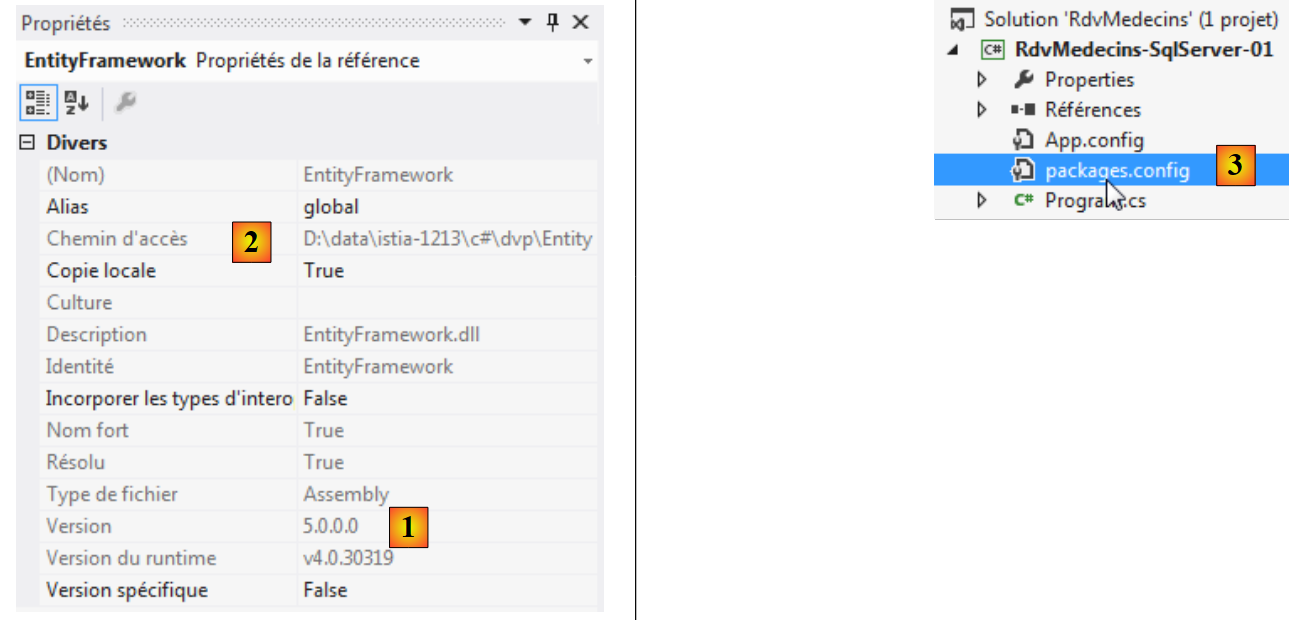 |
- 在 [1] 中,显示了 DLL 的版本。需要的是 5 版;
- 在 [2] 中,其在文件系统中的位置: <solution>\packages\EntityFramework.5.0.0\lib\net45\EntityFramework.dll其中 <solution> 是 VS 解决方案的文件夹。 NuGet 添加的所有包都将放入 <solution>/packages 文件夹;
- 在 [3] 中,创建了一个名为 [packages.config] 的文件。其内容如下:
<?xml version="1.0" encoding="utf-8"?>
<packages>
  <package id="EntityFramework" version="5.0.0" targetFramework="net45" />
</packages>
该文件列出了由 NuGet 导入的包。
回到 VS 项目,并在该项目中创建一个名为 [Models] 的文件夹:
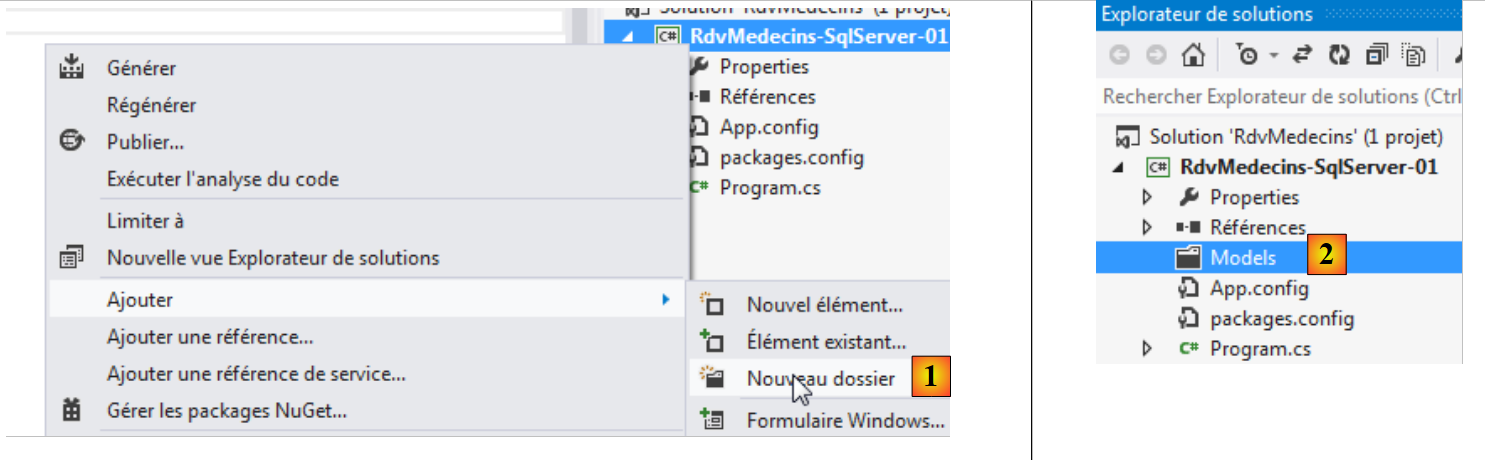 |
- 在 [1] 中,向项目添加文件夹;
- 在 [2] 中,该文件将命名为 [Models]。
此后我们将延续这一习惯,将实体定义放置在文件夹 [Models] 中。
为了构建我们的实体,我们将借助项目 NHibernate 中使用的数据库定义 MySQL 5。回顾一下实体 EF 的作用:
 |
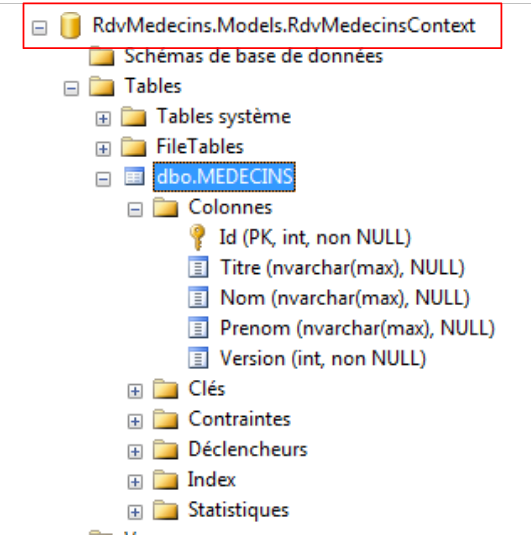
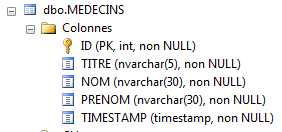
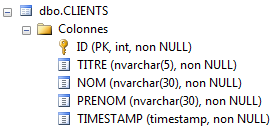
实体必须反映数据库中的表。数据访问层使用这些实体,而不是直接操作表。让我们从表 [MEDECINS] 开始:
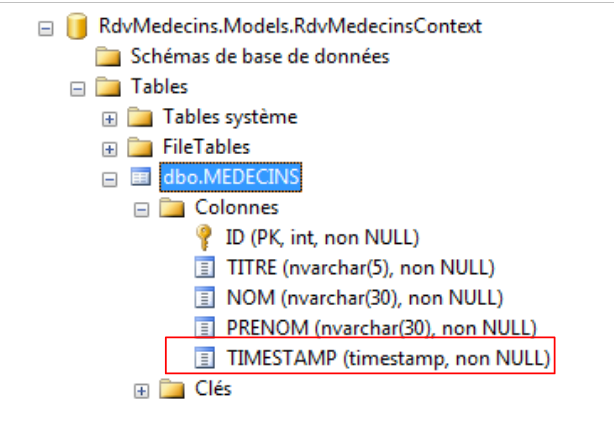
3.4.1. 实体 [Medecin]
它包含由应用程序 [RdvMedecins] 管理的医生信息。
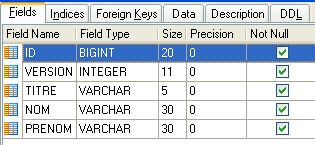 |  |
- ID:医生标识号——该表的主键
- VERSION:表中该行的版本标识号。每次对该行进行修改时,该数字都会增加 1。
- NOM:医生姓名
- PRENOM:其名字
- TITRE:其称谓(小姐、女士、先生)
我们可以从以下 [Medecin] 类开始:
using System;

[Table("MEDECINS", Schema = "dbo")]
  namespace RdvMedecins.Entites
{
  public class Medecin
  {
    // 数据
    public int Id { get; set; }
    public string Titre { get; set; }
    public string Nom { get; set; }
    public string Prenom { get; set; }
}
- 第 3 行:类 [Medecin] 关联到数据库中的表 [MEDECINS]。该表位于名为“dbo”的模式中。
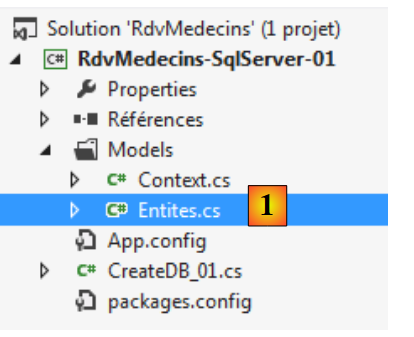
我们将该类放入文件 [Entites.cs] [1] 中。所有实体都将放置在此处。
 |
仍在 [Models] 文件夹中,我们创建以下 [Context.cs] 文件:
using System.Data.Entity;
using RdvMedecins.Entites;

namespace RdvMedecins.Models
{

  // 上下文
  public class RdvMedecinsContext : DbContext
  {
    // 医生
    public DbSet<Medecin> Medecins { get; set; }
  }

  // 数据库初始化
  public class RdvMedecinsInitializer : DropCreateDatabaseAlways<RdvMedecinsContext>
  {
  }
}
- 第 8 行:类 [RdvMedecinsContext] 将表示持久化上下文 c.-à-d。 由 ORM 管理的所有实体。它必须继承自类 [System.Data.Entity.DbContext];
- 第11行:字段[Medecins]将表示持久化上下文中类型为[Medecin]的实体。 其类型为 DbSet<Medecin>。通常 [DbSet] 的数量与数据库中的表数量相同,即每张表对应一个;
- 第15行:定义了一个[RdvMedecinsInitializer]类来初始化已创建的数据库。此处它继承自[DropCreateDataBaseAlways]类,顾名思义,该类会在数据库已存在时将其删除,然后重新创建。 这在 BD 的开发阶段非常实用。类 [DropCreateDataBaseAlways] 的参数是与数据库关联的持久化上下文类型。初始化类可以使用 [DropCreateDataBaseAlways] 以外的其他父类:
- [DropCreateDatabaseIfModelChanges]:若实体发生变更则重建数据库,
- [CreateDatabaseIfNotExists]:若数据库不存在则创建;
接下来我们需要编写一个主程序。它将如下所示:[CreateDB_01.cs]:
using System;
using System.Data.Entity;
using RdvMedecins.Models;

namespace RdvMedecins_01
{
  class CreateDB_01
  {
    static void Main(string[] args)
    {
      // 创建数据库
      Database.SetInitializer(new RdvMedecinsInitializer());
      using (var context = new RdvMedecinsContext())
      {
        context.Database.Initialize(false);
      }
    }
  }
}
- 第12行:[System.Data.Entity.DataBase]是一个提供静态方法的类,用于管理与持久化上下文关联的数据库。静态方法[SetInitializer]用于指定数据库的初始化类。这不会触发初始化;
- 第13行:要使用持久化上下文,必须先实例化它。此处正是如此。使用using子句是为了确保在子句结束时自动关闭该上下文。因此,在第17行,该上下文被关闭;
- 第15行:显式启动与持久化上下文[RdvMedecinsContext]关联的数据库生成。参数false表示,如果该上下文已执行过此操作,则不再执行。 在此处,同样可以使用 true。
在处理数据库时,连接参数通常会写入文件 [App.config]。请注意,目前该文件中尚未包含这些参数:
<?xml version="1.0" encoding="utf-8"?>
<configuration>
  <configSections>
    <!-- 有关 Entity Framework 配置的更多信息,请访问 http://go.microsoft.com/fwlink/?LinkID=237468 -->
    <section name="entityFramework" type="System.Data.Entity.Internal.ConfigFile.EntityFrameworkSection, EntityFramework, Version=5.0.0.0, Culture=neutral, PublicKeyToken=b77a5c561934e089" requirePermission="false" />
  </configSections>
  <startup>
    <supportedRuntime version="v4.0" sku=".NETFramework,Version=v4.5" />
  </startup>
  <entityFramework>
    <defaultConnectionFactory type="System.Data.Entity.Infrastructure.SqlConnectionFactory, EntityFramework" />
  </entityFramework>
</configuration>
当我们在项目引用中添加 Entity Framework 依赖项时,上述内容已被写入 [App.config] 文件中。
在启动 SQL Server Express 之后(这一点很重要),请运行该项目(Ctrl-F5):
 |  |
运行应无错误完成。现在打开 SQL Server 的管理工具并刷新页面:
 |
可以看到,已创建了一个名称为类全称 [RdvMedecinsContext] 的数据库,其中包含一个名为 [dbo.MEDECINS] (这是我们为其命名的名称),其列名与实体 [Medecin] 的字段名一致。 如果代码已成功执行,但上述数据库未显示,则需查看嵌入式服务器 (localdb)\v11.0(参见第 19 页)。 在 VS 2012 Pro 版本中,若在代码执行时 SQL 服务器未处于活动状态,则会使用该服务器。而在 VS 2012 Express 版本中则不会。
让我们来查看表 [MEDECINS] 的结构:
- 该表采用了实体 [Medecin] 的字段名称;
- [Id] 列为主键。这是 EF 的约定:如果实体 E 有一个 Id 或 Eid 字段(MedecinId),则该列在关联表中为主键;
- 表中各列的类型与实体字段的类型一致;
- 对于标题、姓氏、名字列,使用了类型 [nvarchar(max)]。我们可以更精确地定义:标题为 5 个字符,姓氏和名字各为 30 个字符;
- “标题”、“姓”和“名”列可能具有 NULL 值。我们将对此进行修改。
让我们查看主键 [Id] 的属性:
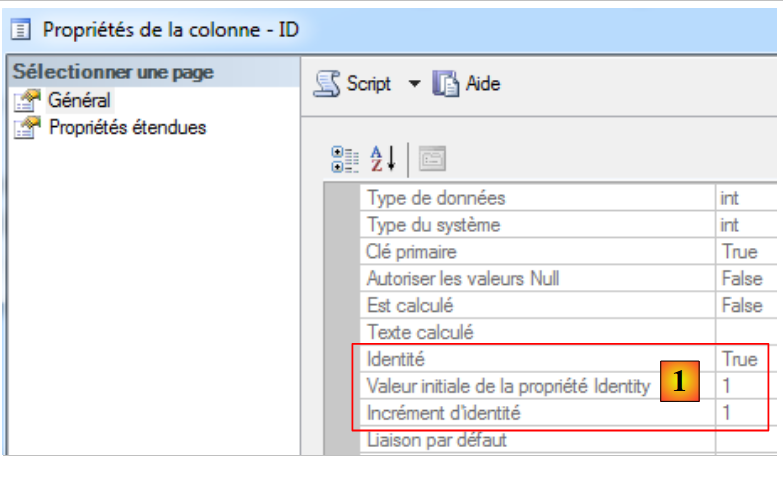 |
在 [1] 中,我们可以看到主键的类型为 [Identité],这意味着其值是由 SQL 服务器自动生成的。我们将对所有 SGBD 采用这一策略。
我们将通过使用注释来减少对 EF 约定规则的依赖。[Entites.cs] 中的实体代码如下:
using System;
using System.ComponentModel.DataAnnotations;
using System.ComponentModel.DataAnnotations.Schema;

namespace RdvMedecins.Entites
{
  [Table("MEDECINS", Schema = "dbo")]
  public class Medecin
  {
    // 数据
    [Key]
    [Column("ID")]
    public int Id { get; set; }
    [Required]
    [MaxLength(5)]
    [Column("TITRE")]
    public string Titre { get; set; }
    [Required]
    [MaxLength(30)]
    [Column("NOM")]
    public string Nom { get; set; }
    [Required]
    [MaxLength(30)]
    [Column("PRENOM")]
    public string Prenom { get; set; }
    [Required]
    [Column("VERSION")]
    public int Version { get; set; }
  }
}
- 第 2 行和第 3 行:注解位于命名空间 [System.ComponentModel.DataAnnotations](Key、Required、MaxLength)和 [System.ComponentModel.DataAnnotations.Schema](Column)中。 其他注释位于 URL 和 [http://msdn.microsoft.com/en-us/data/gg193958.aspx] 中;
- 第 11 行:[Key] 表示主键;
- 第12行:[Column] 设定了与该字段对应的列名;
- 第14行:[Required] 表示该字段为必填字段(SQL NOT NULL);
- 第15行:[MaxLength] 设定字符串的最大长度,[MinLength] 设定其最小长度;
使用这个新的 [Medecin] 实体定义运行该项目。生成的数据库如下:
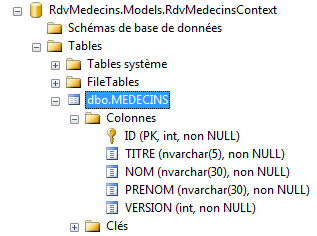 |
- 各列名称均按设定显示;
- 注释 [Required] 已被转换为 SQL、NOT 和 NULL;
- 注释 [MaxLength(N)] 已被转换为类型 SQL nvarchar(N)。
在应用程序 NHibernate 中,列 [VERSION] 的作用是防止对同一张表中同一行的并发访问。其原理如下:
- 进程 P1 在时间戳 T1 读取了表 [MEDECINS] 中的行 L。该行的版本号为 V1;
- 进程 P2 在时间点 T2 读取了表 [MEDECINS] 中的同一行 L。 该行当前版本为 V1,因为进程 P1 尚未提交其修改;
- 进程 P1 提交了对行 L 的修改。行 L 的版本号随即变为 V2=V1+1;
- 进程 P2 确认了对行 L 的修改。 此时,进程 ORM 抛出异常,因为进程 P2 持有的行 L 的版本 V1 与数据库中查找到的版本 V2 不一致。
这被称为乐观并发访问管理。在 EF 5 中,承担此角色的字段必须具有 [Timestamp] 或 [ConcurrencyCheck] 其中一个属性。 SQL Server 具有 [timestamp] 类型。具有此类型的列,其值会在每次插入/修改行时由 SQL Server 自动生成。 此类列可用于管理访问并发。以之前的示例为例,进程 P2 将发现一个与之前读取值不同的 timestamp,因为在此期间,进程 P1 所做的修改已对其进行了变更。
我们的实体 [Medecin] 演变如下:
using System;
using System.ComponentModel.DataAnnotations;
using System.ComponentModel.DataAnnotations.Schema;

namespace RdvMedecins.Entites
{
[Table("MEDECINS", Schema = "dbo")]
public class Medecin
  {
    // 数据
    [Key]
    [Column("ID")]
    public int Id { get; set; }
    [Required]
    [MaxLength(5)]
    [Column("TITRE")]
    public string Titre { get; set; }
    [Required]
    [MaxLength(30)]
    [Column("NOM")]
    public string Nom { get; set; }
    [Required]
    [MaxLength(30)]
    [Column("PRENOM")]
    public string Prenom { get; set; }
    [Column("TIMESTAMP")]
    [Timestamp]
    public byte[] Timestamp { get; set; }
  }
}
- 第 26-28 行:新增一列,其属性为第 27 行的 [Timestamp]。字段类型必须为 byte[](第 28 行)。字段名称可以任意命名。 不为其添加 [Required] 属性,因为该值并非由应用程序提供,而是由 SGBD 本身提供。
如果使用此新实体运行项目,数据库将发生如下变化:
 |
我们还有最后一点需要解决。持久化上下文“知道”某个实体需要插入数据库,因为此时其主键为空。正是数据库插入操作会为主键赋予一个值。 在此,赋予主键 [Id] 的类型 int 并不合适,因为该类型无法接受值 null。 因此,我们为其赋予类型 int?,该类型既接受值 int,也接受指针 null。因此,将使用的实体 [Medecin] 如下所示:
public class Medecin
  {
    // 数据
    [Key]
    [Column("ID")]
    public int? Id { get; set; }
    ...
接下来我们需要探讨如何在实体中表示表之间的外键概念。
3.4.2. 实体 [Creneau]
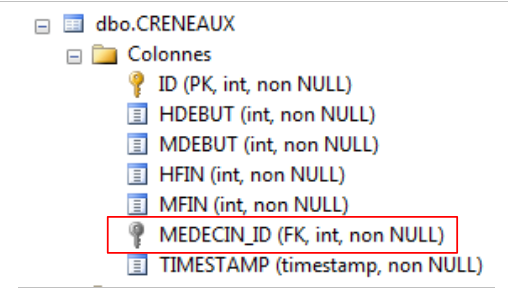
表 [CRENEAUX] 列出了 RV 可能出现的时段:
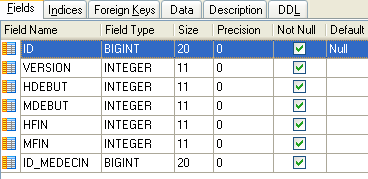 |
 |
- ID:标识时间段的编号——该表的主键
- VERSION:表中该行的版本标识号。每次对该行进行修改时,该数字会递增1。
- ID_MEDECIN:标识该时段所属医生的编号——MEDECINS(ID)列的外键。
- HDEBUT:时段开始时间
- MDEBUT:时段开始分钟
- HFIN:时段结束时间
- MFIN:时段结束分钟
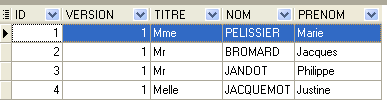
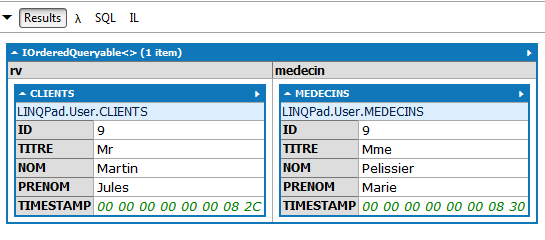
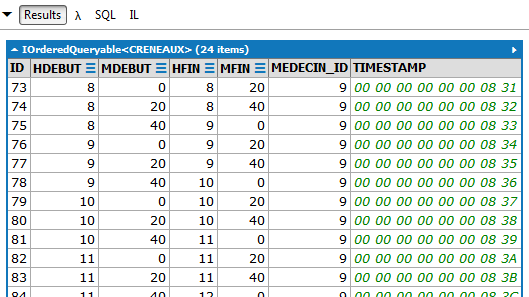
例如,表 [CRENEAUX](参见上文 [1])的第二行显示,第 2 号时段于 8 点 20 分开始,8 点 40 分结束,并归属于第 1 号医生 (玛丽女士 PELISSIER)。
根据已知信息,我们可以在 [Entites.cs] 中将实体 [Creneau] 定义如下:
[Table("CRENEAUX", Schema = "dbo")]
  public class Creneau
  {
    // 数据
    [Key]
    [Column("ID")]
    public int? Id { get; set; }
    [Required]
    [Column("HDEBUT")]
    public int Hdebut { get; set; }
    [Required]
    [Column("MDEBUT")]
    public int Mdebut { get; set; }
    [Required]
    [Column("HFIN")]
    public int Hfin { get; set; }
    [Required]
    [Column("MFIN")]
    public int Mfin { get; set; }
    [Required]
    public virtual Medecin Medecin { get; set; }
    [Column("TIMESTAMP")]
    [Timestamp]
    public byte[] Timestamp { get; set; }
}
唯一的新内容在于第20-21行。 表 [CRENEAUX] 拥有指向表 [MEDECINS] 的外键这一事实,在实体 [Creneau] 中通过存在对实体 [Medecin] 的引用体现出来, 第21行。字段名称无关紧要,只有类型才重要。 该属性必须使用关键字 virtual 声明为虚拟属性。实际上,EF 需要重新定义所有所谓的导航属性,即那些对应于外键且允许在表之间切换的属性。
为了测试新实体,我们需要在 [Context.cs] 中进行一些修改:
using System.Data.Entity;
using RdvMedecins.Entites;

namespace RdvMedecins.Models
{

  // 上下文
  public class RdvMedecinsContext : DbContext
  {
    // 实体
    public DbSet<Medecin> Medecins { get; set; }
    public DbSet<Creneau> Creneaux { get; set; }
  }

  // 数据库初始化
  public class RdvMedecinsInitializer :  DropCreateDatabaseIfModelChanges<RdvMedecinsContext>
  {
  }
}
第 12 行反映了上下文需要管理一个额外的实体。当我们运行该项目时,将获得以下新的数据库:
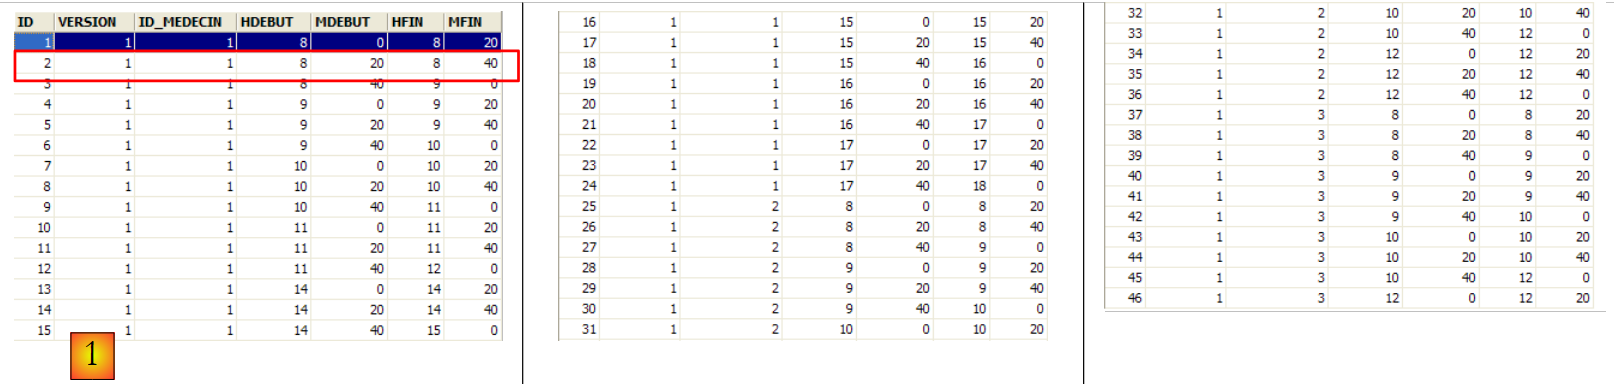
 |
表 [CRENEAUX] 已成功创建,新增内容是出现了外键 [1] 和 [2]。 其名称由实体(Medecin)中对应字段的名称生成,并在末尾添加后缀“_Id”。为了了解该外键的属性,我们尝试将其修改为 [3]。
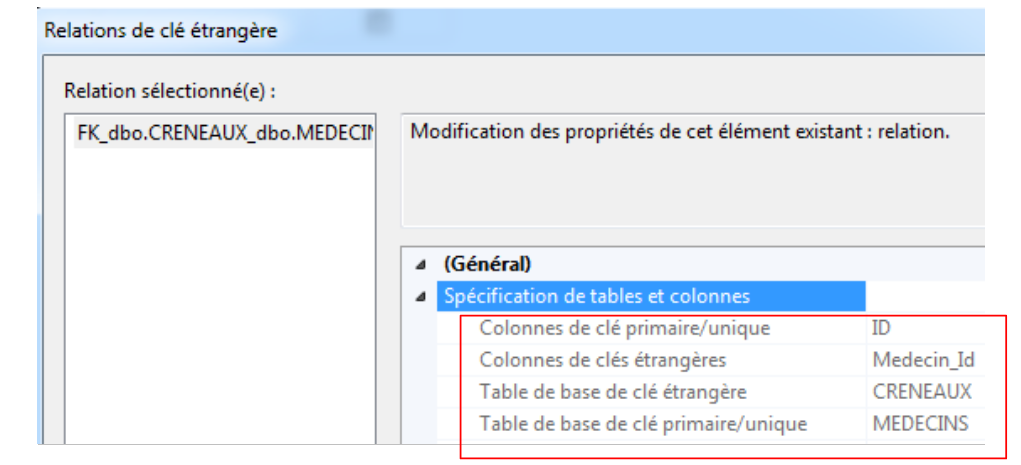 |
上图显示,[Medecin_Id]是表[CRENEAUX]的外键,且它引用了表[MEDECINS]的主键[ID]。
如果为现有数据库创建实体,外键列的名称未必是 [Medecin_Id]。对于其他列,我们之前看到注释 [Column] 可以解决这个问题。奇怪的是,对于外键,情况要复杂得多。 操作步骤如下:
public class Creneau
  {
    // 数据
    ...
    [Required]
    [Column("MEDECIN_ID")]
    public int MedecinId { get; set; }
    [Required]
    [ForeignKey("MedecinId")]
    public virtual Medecin Medecin { get; set; }
    ...
}
- 第 5-7 行:创建一个与外键类型(int)相同的字段。通过 [Column] 属性,指定在实体关联表中将作为外键的列名;
- 第9行:在类型为[Medecin]的字段上添加注释[ForeignKey]。该注释的参数是与表中外键列关联的字段名称(而非列名)。
本次执行项目将创建以下表:
 |
如上所示,外键列确实采用了我们指定的名称。需要注意的是,以下字段:
    [Required]
    [Column("MEDECIN_ID")]
    public int MedecinId { get; set; }
    [Required]
    [ForeignKey("MedecinId")]
public virtual Medecin Medecin { get; set; }
仅生成了一列,即 [MEDECIN_ID] 列。尽管如此,[MedecinId] 字段的存在仍至关重要。 在读取 [CRENEAUX] 表中的一行时,该行将获取 [MEDECIN_ID] 列的值,即 [MEDECINS] 表中外键的值。这通常非常有用。
上文中的字段 [Medecin] 反映了将实体 [Creneau] 与实体 [Medecin] 关联起来的“多对一”关系。 多个 [Creneau] 对象与同一个 [Medecin] 对象相关联。 反向关系(即一个 [Medecin] 对象关联多个 [Creneau] 对象)可通过在 [Medecin] 实体中添加一个额外字段来建模:
public class Medecin
  {
    // 数据
    [Key]
    [Column("ID")]
    public int? Id { get; set; }
    ...
    public ICollection<Creneau> Creneaux { get; set; }
    [Column("TIMESTAMP")]
    [Timestamp]
    public byte[] Timestamp { get; set; }
第 8 行,我们添加了字段 [Creneaux],该字段是 [Creneau] 对象的集合。通过该字段,我们可以访问该医生的所有时间段。
当再次运行该项目时,可以发现表 [MEDECINS] 没有变化:
 |
未添加任何列。[CRENEAUX]表与[MEDECINS]表之间存在的外部键关系,足以让EF生成与其相关的字段:
  public class Medecin
  {
    ...
    public ICollection<Creneau> Creneaux { get; set; }
    ...
  }
  public class Creneau
  {
    ...
    [Required]
    [Column("MEDECIN_ID")]
    public int MedecinId { get; set; }
    [Required]
    [ForeignKey("MedecinId")]
    public virtual Medecin Medecin { get; set; }
    ...
  }
我们已经掌握了要点。接下来我们可以完成另外两个实体的创建。
3.4.3. 实体 [Client] 和 [Rv]
基于已掌握的知识,我们可以编写实体 [Client] 和 [Rv]。实体 [Client] 包含由应用程序 [RdvMedecins] 管理的客户信息。
 |  |
- ID:客户标识号——该表的主键
- VERSION:表中该行的版本标识号。每次对该行进行修改时,该数字都会增加 1。
- NOM:客户姓名
- PRENOM:客户名字
- TITRE:其称谓(小姐、女士、先生)
实体 [Client] 可能如下所示:
  [Table("CLIENTS", Schema = "dbo")]
  public class Client
  {
    // 数据
    [Key]
    [Column("ID")]
    public int? Id { get; set; }
    [Required]
    [MaxLength(5)]
    [Column("TITRE")]
    public string Titre { get; set; }
    [Required]
    [MaxLength(30)]
    [Column("NOM")]
    public string Nom { get; set; }
    [Required]
    [MaxLength(30)]
    [Column("PRENOM")]
    public string Prenom { get; set; }
    // 客户预约
    public ICollection<Rv> Rvs { get; set; }
    [Column("TIMESTAMP")]
    [Timestamp]
    public byte[] Timestamp { get; set; }
}
类 [Client] 与类 [Medecin] 几乎完全相同。 可以将其从同一个父类派生出来。新内容出现在第21行。这反映了客户可能有多个预约的事实,并源于从表[RVS]到表[CLIENTS]的外键关系。
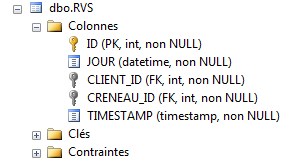
实体 [Rv] 表示一个预约:
 |
- ID:唯一标识 RV 的编号——主键
- JOUR:RV的日期
- ID_CRENEAU:RV的时段——作为外键关联至[CRENEAUX]表中[ID]列,同时确定了时段和相关医生。
- ID_CLIENT:预订对象的客户编号——表[CLIENTS]中[ID]列的外键
实体 [Rv] 可能如下所示:
[Table("MEDECINS", Schema = "dbo")]
  public class Rv
  {
    // 数据
    [Key]
    [Column("ID")]
    public int? Id { get; set; }
    [Required]
    [Column("JOUR")]
    public DateTime Jour { get; set; }
    [Column("CLIENT_ID")]
    public int ClientId { get; set; }
    [ForeignKey("ClientId")]
    [Required]
    public virtual Client Client { get; set; }
    [Column("CRENEAU_ID")]
    public int CreneauId { get; set; }
    [ForeignKey("CreneauId")]
    [Required]
    public virtual Creneau Creneau { get; set; }
    [Column("TIMESTAMP")]
    [Timestamp]
    public byte[] Timestamp { get; set; }
}
- 第5-7行:主键;
- 第8-10行:预约日期;
- 第 11-12 行:表 [RVS] 到表 [CLIENTS] 的外键;
- 第13-15行:预约客户;
- 第16-17行:表[RVS]到表[CRENEAUX]的外键;
- 第18-20行:预约的时间段;
- 第21-23行:并发访问管理字段。
第17行显示了一种多对一关系:一个时间段可以对应多个预约(非同一天)。这种反向关系可在实体[Creneau]中体现:
public class Creneau
  {
    // 时段的 Rvs
    public ICollection<Rv> Rvs { get; set; }
    ...
}
第4行,该时间段内已预约的预约集合。
执行项目后,生成的数据库如下:
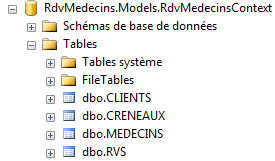 |
表 [MEDECINS] 和 [CRENEAUX] 未发生变化。表 [CLIENTS] 和 [RVS] 如下所示:
 |  |
这正是预期的结果。我们还有一些细节需要处理:
- 管理数据库名称。此处由 EF 生成;
- 向数据库中填充数据。
3.4.4. 确定数据库名称
为了固定由 EF 生成的数据库名称,我们将使用在 [App.config] 中定义的连接字符串。该配置文件的修改如下:
<?xml version="1.0" encoding="utf-8"?>
<configuration>
  <configSections>
    <!-- 有关 Entity Framework 配置的更多信息,请访问 http://go.microsoft.com/fwlink/?LinkID=237468 -->
    <section name="entityFramework" type="System.Data.Entity.Internal.ConfigFile.EntityFrameworkSection, EntityFramework, Version=5.0.0.0, Culture=neutral, PublicKeyToken=b77a5c561934e089" requirePermission="false" />
  </configSections>
  <startup>
    <supportedRuntime version="v4.0" sku=".NETFramework,Version=v4.5" />
  </startup>
  <entityFramework>
    <defaultConnectionFactory type="System.Data.Entity.Infrastructure.SqlConnectionFactory, EntityFramework" />
  </entityFramework>

  <!-- 数据库连接字符串 -->
  <connectionStrings>
    <add name="RdvMedecinsContext"
         connectionString="Data Source=localhost;Initial Catalog=rdvmedecins-ef;User Id=sa;Password=sqlserver2012;"
         providerName="System.Data.SqlClient" />
  </connectionStrings>
  <!-- 工厂提供程序 -->
  <system.data>
    <DbProviderFactories>
      <add name="SqlClient Data Provider"
       invariant="System.Data.SqlClient"
       description=".Net Framework Data Provider for SqlServer"
       type="System.Data.SqlClient.SqlClientFactory, System.Data,
     Version=4.0.0.0, Culture=neutral, PublicKeyToken=b77a5c561934e089"
    />
    </DbProviderFactories>
  </system.data>

</configuration>
- 第 15-19 行:数据库连接字符串;
- 第 16 行:[name] 的属性采用了用于持久化上下文的 [RdvMedecinsContext] 类名。这一点非常重要,请务必记住。可以在上下文构造函数中绕过此限制:
    // 构造函数
    public RdvMedecinsContext()
      : base("monContexte")
    {
    }
在这种情况下,可能会出现 name= "monContexte "。这是我们在文档后续部分将看到的。
- 第17行:连接字符串。[Data Source]:存放SGBD的服务器名称,[Initial Catalog]: 数据库名称,即此处的 [rdvmedecins-ef],[User Id]:连接的所有者,[Password]:其密码。读者需根据自身环境调整此字符串;
- 第21-29行:定义了一个[DbProviderFactory]。 我不清楚这是什么。如果从名称判断,这可能是一个用于生成 [ADO.NET] 层的类,该层将 EF 与 SGBD 分隔开:
 |
实际上,这些代码行对 SQL Server 来说是多余的,但我不得不为其他 SGBD 添加它们。所以我把它们放在这里以备查。它们不会造成干扰。 唯一需要注意的是第27行的版本号。这是项目参考中包含的DLL和[System.Data]的版本:
 |
好了。我们准备就绪。运行项目后,我们将得到以下 [rdvmedecins-ef] 基础文件:
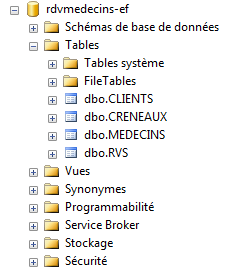 |
这将是我们最终的数据库。接下来只需向其中填充数据即可。
3.4.5. 填充数据库
可以使用数据库初始化类向其中插入数据:
public class RdvMedecinsInitializer : DropCreateDatabaseIfModelChanges<RdvMedecinsContext>
{
// 数据库初始化
public class RdvMedecinsInitializer : DropCreateDatabaseAlways<RdvMedecinsContext>
{
protected override void Seed(RdvMedecinsContext context)
{
base.Seed(context);
// 正在初始化数据库
// 客户
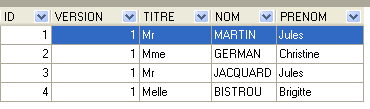
Client[] clients ={
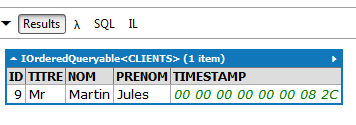
new Client { Titre = "Mr", Nom = "Martin", Prenom = "Jules" },
new Client { Titre = "Mme", Nom = "German", Prenom = "Christine" },
new Client { Titre = "Mr", Nom = "Jacquard", Prenom = "Jules" },
new Client { Titre = "Melle", Nom = "Bistrou", Prenom = "Brigitte" }
};
foreach (Client client in clients)
{
context.Clients.Add(client);
}
// 医生
Medecin[] medecins ={
new Medecin { Titre = "Mme", Nom = "Pelissier", Prenom = "Marie" },
new Medecin { Titre = "Mr", Nom = "Bromard", Prenom = "Jacques" },
new Medecin { Titre = "Mr", Nom = "Jandot", Prenom = "Philippe" },
new Medecin { Titre = "Melle", Nom = "Jacquemot", Prenom = "Justine" }
};
foreach (Medecin medecin in medecins)
{
context.Medecins.Add(medecin);
}
// 预约时段
Creneau[] creneaux ={
new Creneau{ Hdebut=8,Mdebut=0,Hfin=8,Mfin=20,Medecin=medecins[0]},
new Creneau{ Hdebut=8,Mdebut=20,Hfin=8,Mfin=40,Medecin=medecins[0]},
new Creneau{ Hdebut=8,Mdebut=40,Hfin=9,Mfin=0,Medecin=medecins[0]},
new Creneau{ Hdebut=9,Mdebut=0,Hfin=9,Mfin=20,Medecin=medecins[0]},
new Creneau{ Hdebut=9,Mdebut=20,Hfin=9,Mfin=40,Medecin=medecins[0]},
new Creneau{ Hdebut=9,Mdebut=40,Hfin=10,Mfin=0,Medecin=medecins[0]},
new Creneau{ Hdebut=10,Mdebut=0,Hfin=10,Mfin=20,Medecin=medecins[0]},
new Creneau{ Hdebut=10,Mdebut=20,Hfin=10,Mfin=40,Medecin=medecins[0]},
new Creneau{ Hdebut=10,Mdebut=40,Hfin=11,Mfin=0,Medecin=medecins[0]},
new Creneau{ Hdebut=11,Mdebut=0,Hfin=11,Mfin=20,Medecin=medecins[0]},
new Creneau{ Hdebut=11,Mdebut=20,Hfin=11,Mfin=40,Medecin=medecins[0]},
new Creneau{ Hdebut=11,Mdebut=40,Hfin=12,Mfin=0,Medecin=medecins[0]},
new Creneau{ Hdebut=14,Mdebut=0,Hfin=14,Mfin=20,Medecin=medecins[0]},
new Creneau{ Hdebut=14,Mdebut=20,Hfin=14,Mfin=40,Medecin=medecins[0]},
new Creneau{ Hdebut=14,Mdebut=40,Hfin=15,Mfin=0,Medecin=medecins[0]},
new Creneau{ Hdebut=15,Mdebut=0,Hfin=15,Mfin=20,Medecin=medecins[0]},
new Creneau{ Hdebut=15,Mdebut=20,Hfin=15,Mfin=40,Medecin=medecins[0]},
new Creneau{ Hdebut=15,Mdebut=40,Hfin=16,Mfin=0,Medecin=medecins[0]},
new Creneau{ Hdebut=16,Mdebut=0,Hfin=16,Mfin=20,Medecin=medecins[0]},
new Creneau{ Hdebut=16,Mdebut=20,Hfin=16,Mfin=40,Medecin=medecins[0]},
new Creneau{ Hdebut=16,Mdebut=40,Hfin=17,Mfin=0,Medecin=medecins[0]},
new Creneau{ Hdebut=17,Mdebut=0,Hfin=17,Mfin=20,Medecin=medecins[0]},
new Creneau{ Hdebut=17,Mdebut=20,Hfin=17,Mfin=40,Medecin=medecins[0]},
new Creneau{ Hdebut=17,Mdebut=40,Hfin=18,Mfin=0,Medecin=medecins[0]},
new Creneau{ Hdebut=8,Mdebut=0,Hfin=8,Mfin=20,Medecin=medecins[1]},
new Creneau{ Hdebut=8,Mdebut=20,Hfin=8,Mfin=40,Medecin=medecins[1]},
new Creneau{ Hdebut=8,Mdebut=40,Hfin=9,Mfin=0,Medecin=medecins[1]},
new Creneau{ Hdebut=9,Mdebut=0,Hfin=9,Mfin=20,Medecin=medecins[1]},
new Creneau{ Hdebut=9,Mdebut=20,Hfin=9,Mfin=40,Medecin=medecins[1]},
new Creneau{ Hdebut=9,Mdebut=40,Hfin=10,Mfin=0,Medecin=medecins[1]},
new Creneau{ Hdebut=10,Mdebut=0,Hfin=10,Mfin=20,Medecin=medecins[1]},
new Creneau{ Hdebut=10,Mdebut=20,Hfin=10,Mfin=40,Medecin=medecins[1]},
new Creneau{ Hdebut=10,Mdebut=40,Hfin=11,Mfin=0,Medecin=medecins[1]},
new Creneau{ Hdebut=11,Mdebut=0,Hfin=11,Mfin=20,Medecin=medecins[1]},
new Creneau{ Hdebut=11,Mdebut=20,Hfin=11,Mfin=40,Medecin=medecins[1]},
new Creneau{ Hdebut=11,Mdebut=40,Hfin=12,Mfin=0,Medecin=medecins[1]},
};
foreach (Creneau creneau in creneaux)
{
context.Creneaux.Add(creneau);
}
// 预约
context.Rvs.Add(new Rv { Jour = new System.DateTime(2012, 10, 8), Client = clients[0], Creneau = creneaux[0] });
}
}
}
- 第6行:初始化在方法[Seed]中进行。该方法存在于父类中,此处对其进行了重定义。参数是应用程序的持久化上下文[RdvMedecinsContext];
- 第 8 行:该参数被传递给父类;父类很可能打开了传入的持久化上下文,因为后续不再需要再次打开该上下文;
- 第 11-16 行:创建 4 个客户端;
- 第 17-20 行:将这些客户端添加到持久化上下文中,更准确地说,是添加到其医生列表中。请注意实现此功能的 [Add] 方法。此处需回顾上下文的定义:
  public class RdvMedecinsContext : DbContext
  {
    // 实体
    public DbSet<Medecin> Medecins { get; set; }
    public DbSet<Creneau> Creneaux { get; set; }
    public DbSet<Client> Clients { get; set; }
public DbSet<Rv> Rvs { get; set; }
...
据说客户现在已被绑定到上下文中,即它们现在由 EF 管理。此前它们是未绑定的。它们作为对象存在,但并未由 EF 管理;
- 第21-27行:创建4名医生;
- 第28-31行:将它们放入持久化上下文中;
- 第33-70行:创建时间段。第34-57行对应医生 medecins[0],第58-69行对应医生 medecins[1]。其余医生没有时间段;
- 第71-74行:将这些时段放入持久化上下文中;
- 第76行:为第一位客户创建一个预约,使用第一个时间段,并将其放入持久化上下文中。
运行项目后,将得到以下数据库:
 | 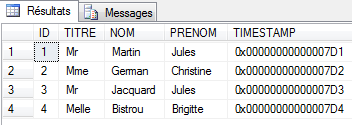 |
上图显示了已填充的表 [CLIENTS]。
3.4.6. 实体修改
目前,类 [Medecin] 和 [Client] 几乎完全相同。实际上,如果移除为管理 EF 5 的持久化而添加的字段,它们就完全一致。 我们将让它们继承自类 [Personne]。因此,这两个实体将变为如下所示:
// 个人
  public abstract class Personne
  {
    // 数据
    [Key]
    [Column("ID")]
    public int? Id { get; set; }
    [Required]
    [MaxLength(5)]
    [Column("TITRE")]
    public string Titre { get; set; }
    [Required]
    [MaxLength(30)]
    [Column("NOM")]
    public string Nom { get; set; }
    [Required]
    [MaxLength(30)]
    [Column("PRENOM")]
    public string Prenom { get; set; }
    [Column("TIMESTAMP")]
    [Timestamp]
    public byte[] Timestamp { get; set; }

    // 签名
    public override string ToString()
    {
      return String.Format("[{0},{1},{2},{3},{4}]", Id, Titre, Prenom, Nom, dump(Timestamp));
    }
    // 短签名
    public string ShortIdentity()
    {
      ...
    }

    // 实用程序
    private string dump(byte[] timestamp)
    {
      ...
    }

  }

  [Table("MEDECINS", Schema = "dbo")]
  public class Medecin : Personne
  {
    // 医生的就诊时段
    public ICollection<Creneau> Creneaux { get; set; }
    // 签名
    public override string ToString()
    {
      return String.Format("Medecin {0}", base.ToString());
    }
  }

[Table("CLIENTS", Schema = "dbo")]
    public class Client : Personne
  {
    // 患者预约
    public ICollection<Rv> Rvs { get; set; }
    // 签名
    public override string ToString()
    {
      return String.Format("Client {0}", base.ToString());
    }
  }
运行项目后,生成的数据库结构相同。EF 5 将继承链中最低层的各个类分别映射到不同的表中。实际上,EF 5 采用了不同的表生成策略来表示实体继承关系。 本文将不对此进行详细介绍。读者可参考例如“ Entity Framework Code First Inheritance:Table Per Hierarchy and Table Per Type”一文,详见URL [http://www.codeproject.com/Articles/393228/Entity-Framework-Code-First-Inheritance-Table-Per]。
接下来我们将使用该版本的实体。
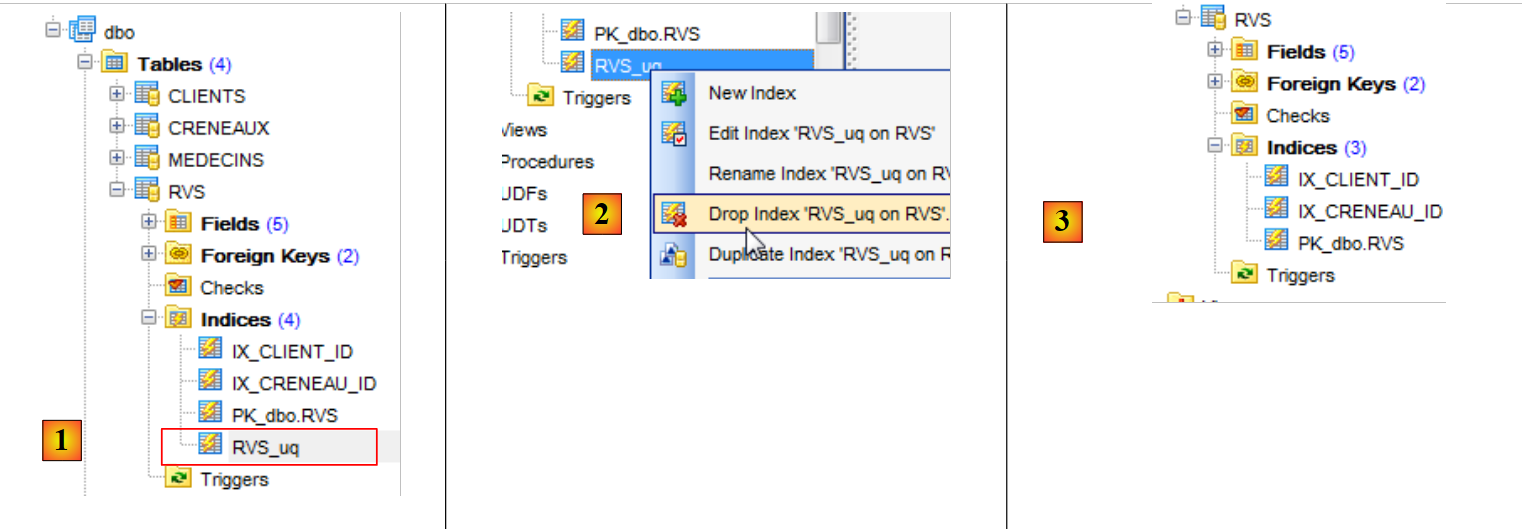
3.4.7. 向数据库添加约束
还有一处细节需要处理。约会表 [RVS] 如下所示:
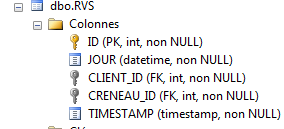 |
该表必须具备唯一性约束:对于某一天,某位医生的时段只能被预约一次。就表结构而言,这意味着 (JOUR,CRENEAU_ID) 这对组合必须是唯一的。 我不确定该约束能否直接在代码中实现,无论是针对实体还是上下文。虽然可能可以,但我尚未验证。我们将采取另一种方法。我们将使用 SQL Server 管理客户端来添加此约束。
在“SQL Server Management Studio”中,我未找到除执行创建该约束的命令SQL之外的简便方法:
 |
- 在 [1] 中,为数据库 [rdvmedecins-ef] 创建查询 SQL;
- 在 [2] 中,生成创建唯一性约束的查询 SQL;
- 在 [3] 中,执行该查询在表 [RVS] 中创建了一个新索引。
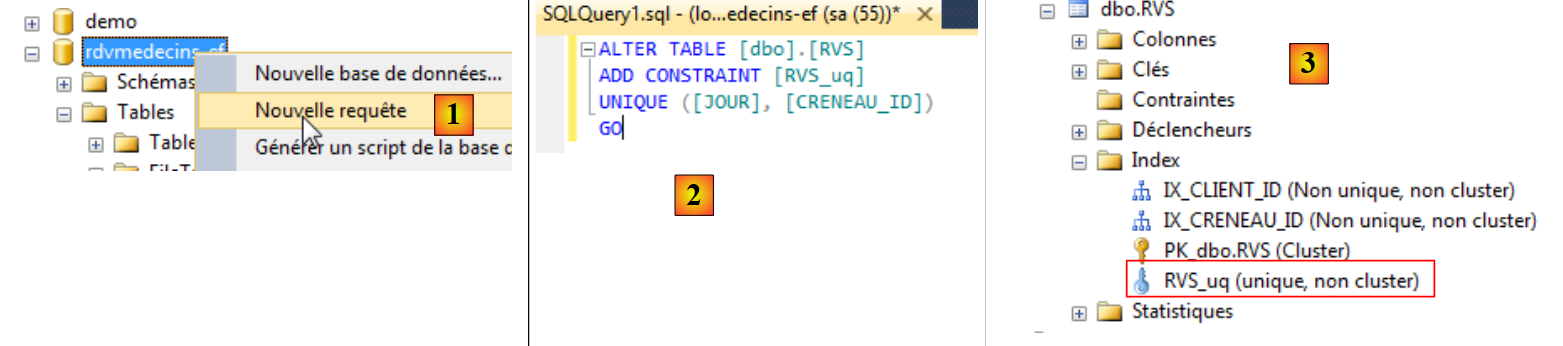
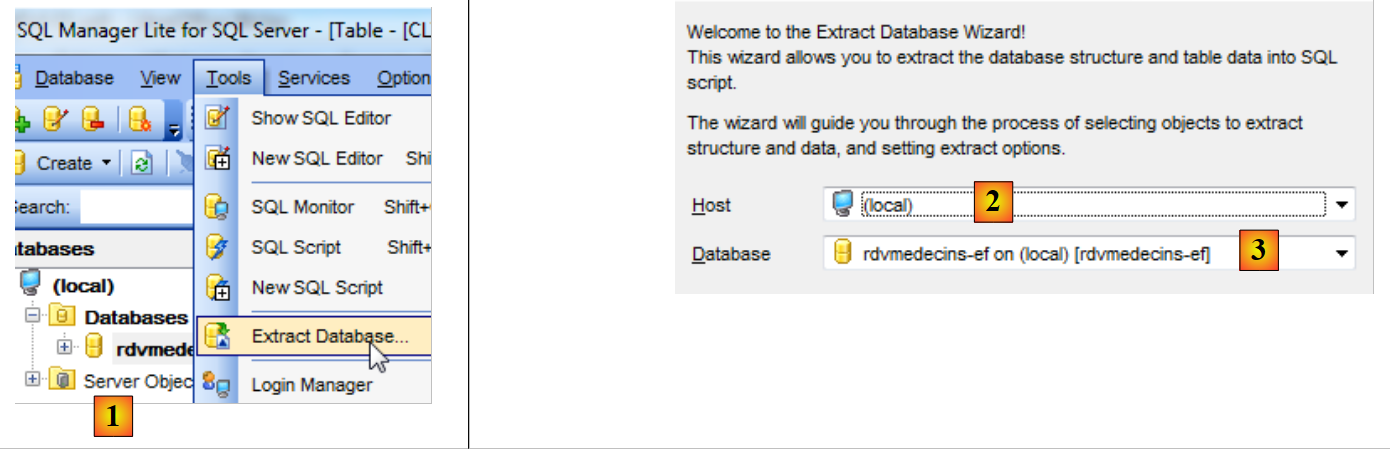
还有其他用于管理 SQL Server 的工具。 这里我们将使用 EMS SQL Manager for SQL Server Freeware [http://www.sqlmanager.net/fr/products/mssql/manager/download] 工具。安装完成后,我们启动它:
 |
- 在 [1] 中,保存数据库;
- 在 [2] 中,连接到(本地)服务器;
- 在 [3] 中,使用 SQL Server 进行身份验证;
- 在 [4] 中,使用 sa 身份;
- 在 [5] 中,使用密码 sqlserver2012;
- 在 [6] 中,进入下一步;
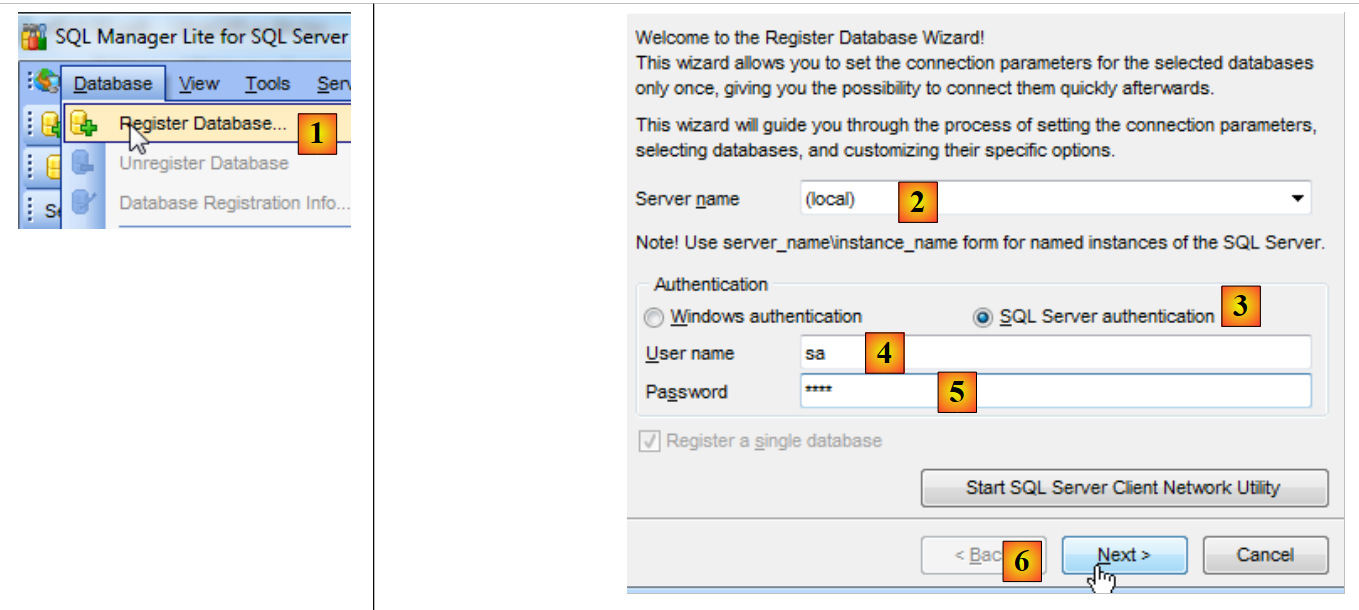
 |
- 在 [7] 中,选择数据库 [rdvmedecins-ef];
- 在 [8] 步骤中,完成向导;
- 在 [9] 时,数据库出现在数据库树中。连接到该数据库 [10];
- 在 [11] 步骤中,连接成功。
“SQL Manager Lite for SQL Server”可用于在表[RVS]上创建唯一性约束。
 |
- 在 [1] 中,可以看到我们之前创建的唯一性约束;
- 在 [2] 中,将其删除;
- 在 [3] 中,该唯一性约束对应的索引已消失。
重新创建已删除的约束:
 |
- 在 [1] 中,为表 [RVS] 创建一个新索引;
- 将其重命名为 [2];
- 在 [3] 上,这是一个唯一性约束;
- 在 [4] 中,针对列 JOUR 和 CRENEAU_ID;
DDL 选项卡为我们提供了即将执行的代码 SQL:
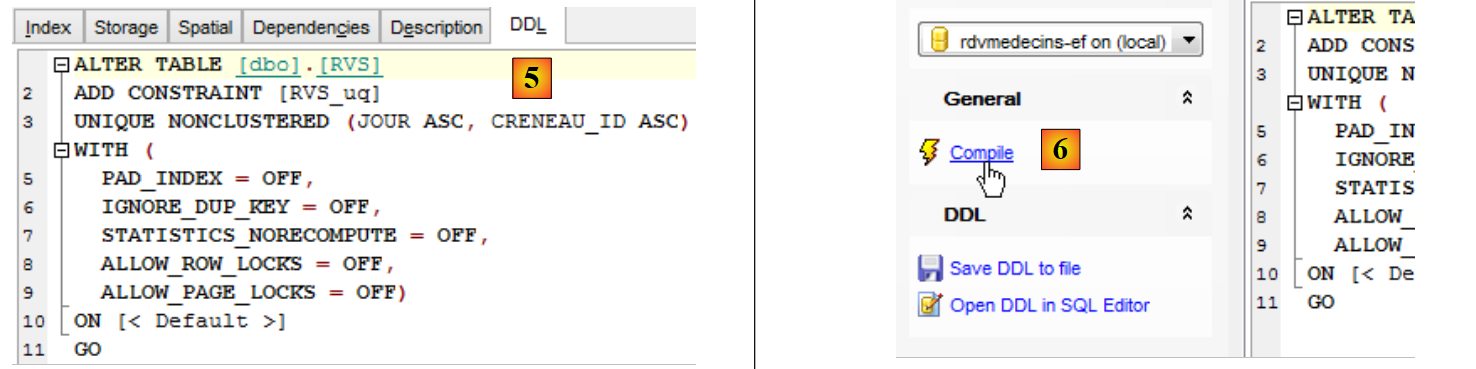 |
- 在 [6] 中,编译命令 SQL;
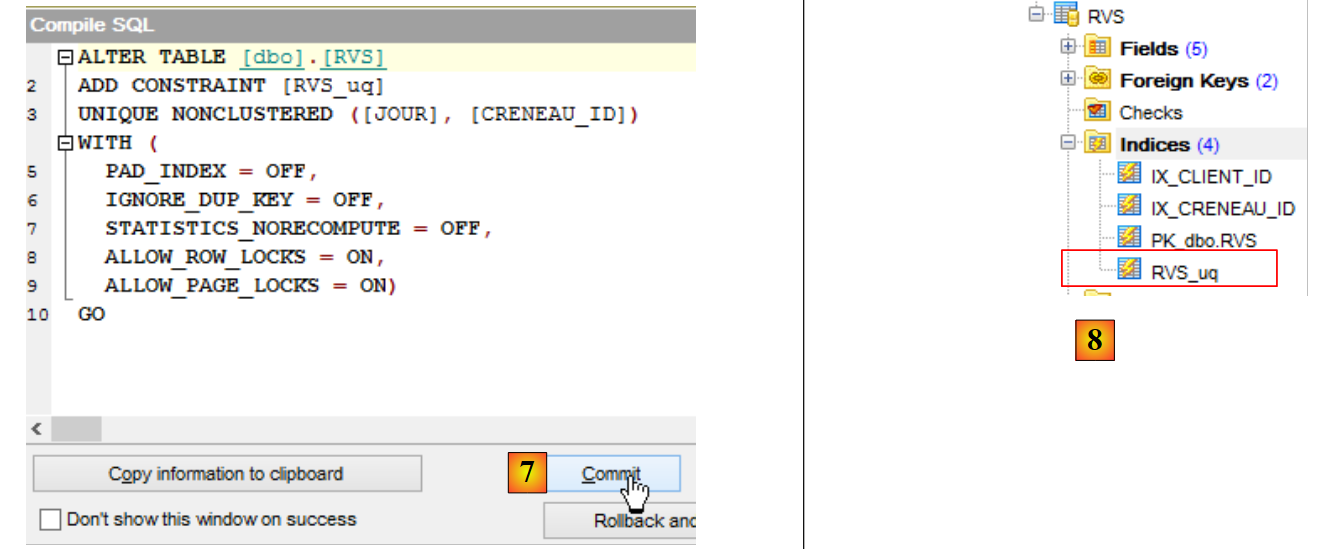 |
- 在 [7] 中,进行确认;
- 生成 [8],新索引已生成。
“SQL Manager Lite for SQL server”提供的界面与“SQL Server Management Studio”提供的界面类似。 对于 SGBD Oracle、PostgreSQL、Firebird 以及 MySQL,也可以找到类似的界面。因此,我们将继续使用这一系列 SGBD 管理工具。
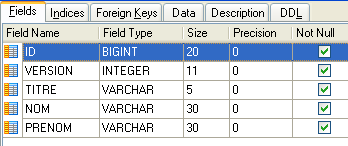
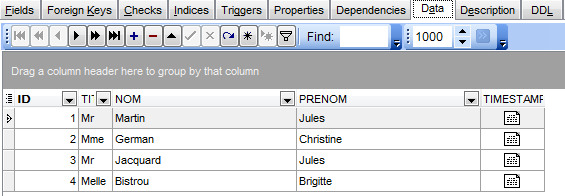
要查看某张表中的信息,只需双击该表即可:
 |
所选表的信息显示在各个标签页中。上图所示为表 [CLIENTS] 的标签页 [Fields]。标签页 [Data] 显示了该表的内容:
3.4.8. 最终数据库
我们已获得最终数据库。我们将导出其脚本 SQL,以便在需要时能够重新生成该数据库。
 |
- 为 [1],向导开始;
- 导出为 [2],即服务器;
- [3],即将导出的数据库;
 |
- 在 [4] 中,指定用于保存脚本的文件名 SQL;
- 在 [5] 中,指定其编码;
- 在 [6] 中,指定要提取的内容(表、约束、数据);
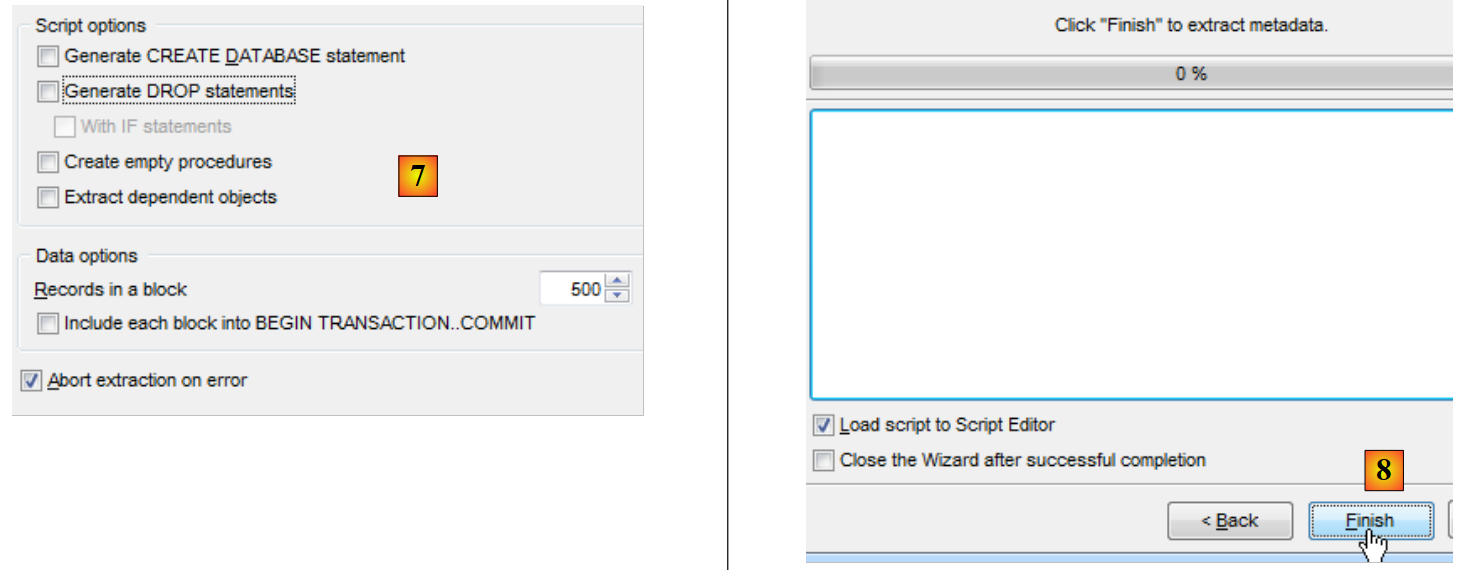 |
- 在 [7] 中,您可以优化即将生成的脚本;
- 在 [8] 中,完成向导。
脚本已生成并加载到脚本编辑器中。您可以查看生成的代码 SQL。我们将根据此脚本重建数据库。
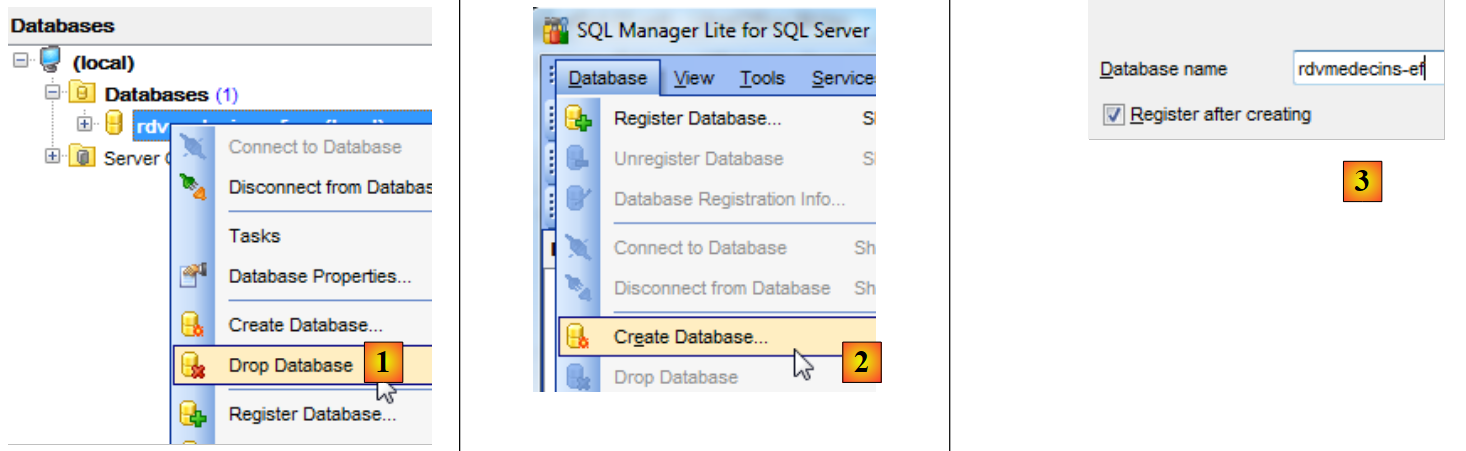 |
- 在 [1] 中,删除数据库;
- 在 [2] 和 [3] 中,重新创建数据库;
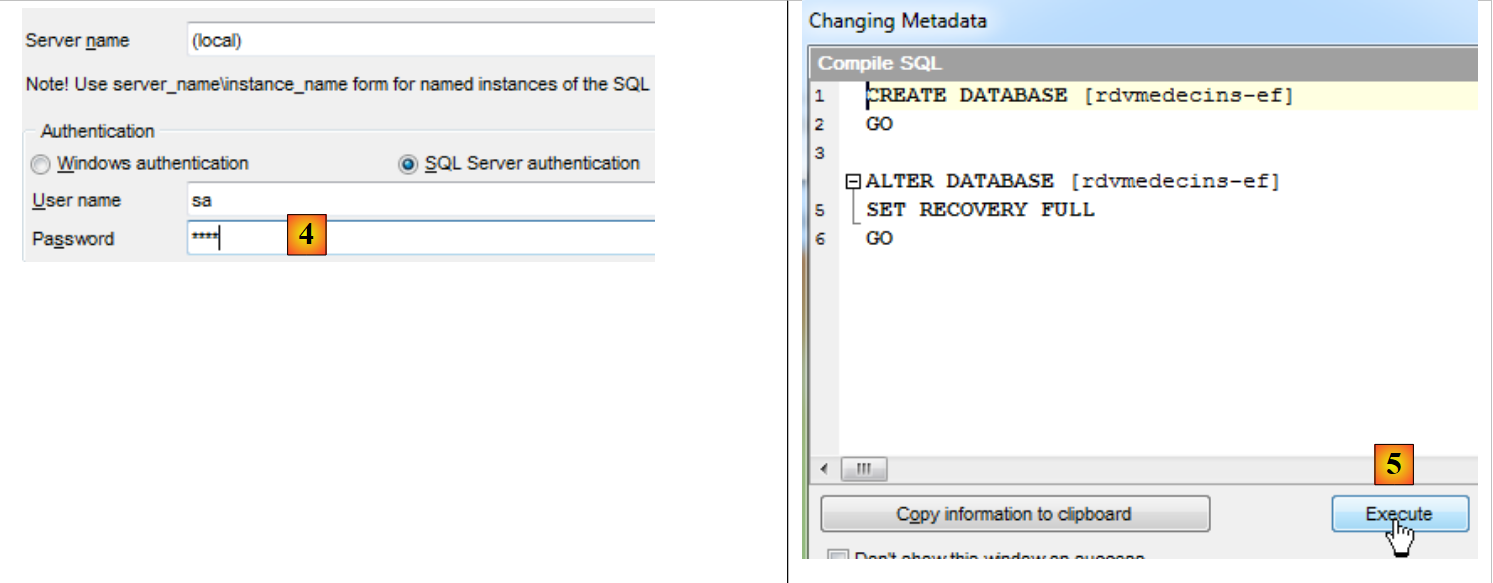 |
- 在 [4] 中,进行身份验证;
- 在 [5] 中,执行用于创建数据库的脚本 SQL;
 |
- 在 [6] 中,将其保存到“SQL Manager”中;
- 在 [7] 中,连接到刚刚创建的数据库;
 |
- 在 [8] 中,该数据库目前尚无表;
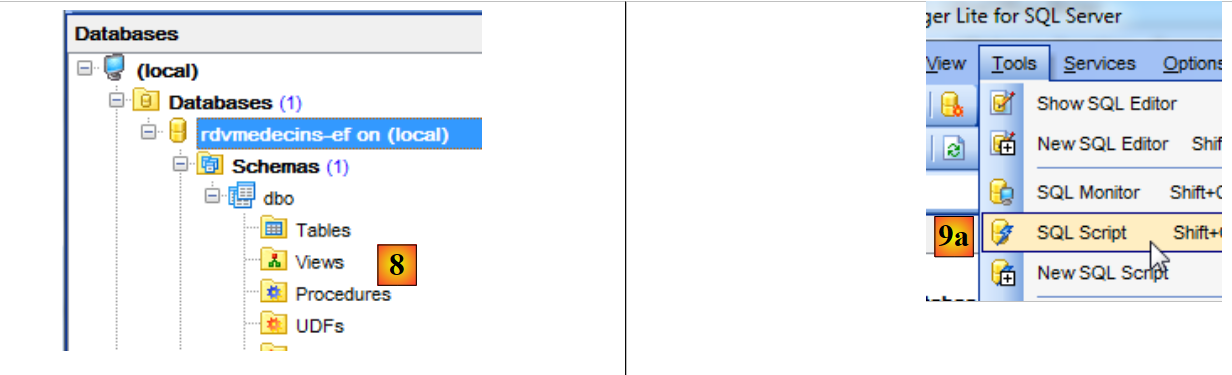
- 在 [9a] 中,打开脚本编辑器 SQL;
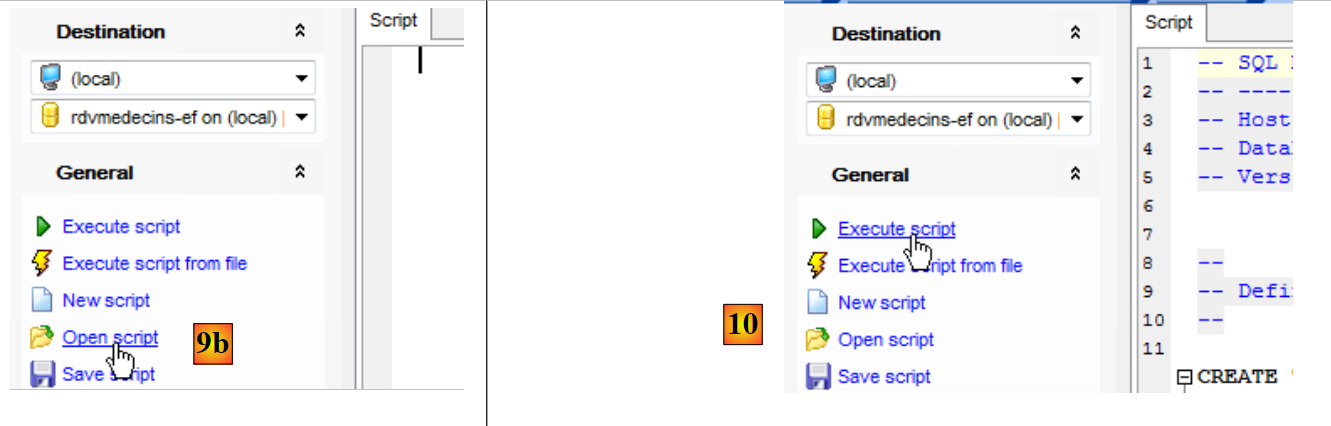 |
- 在 [9b] 中,打开之前创建的脚本 SQL;
- 在 [10] 中,执行该脚本;
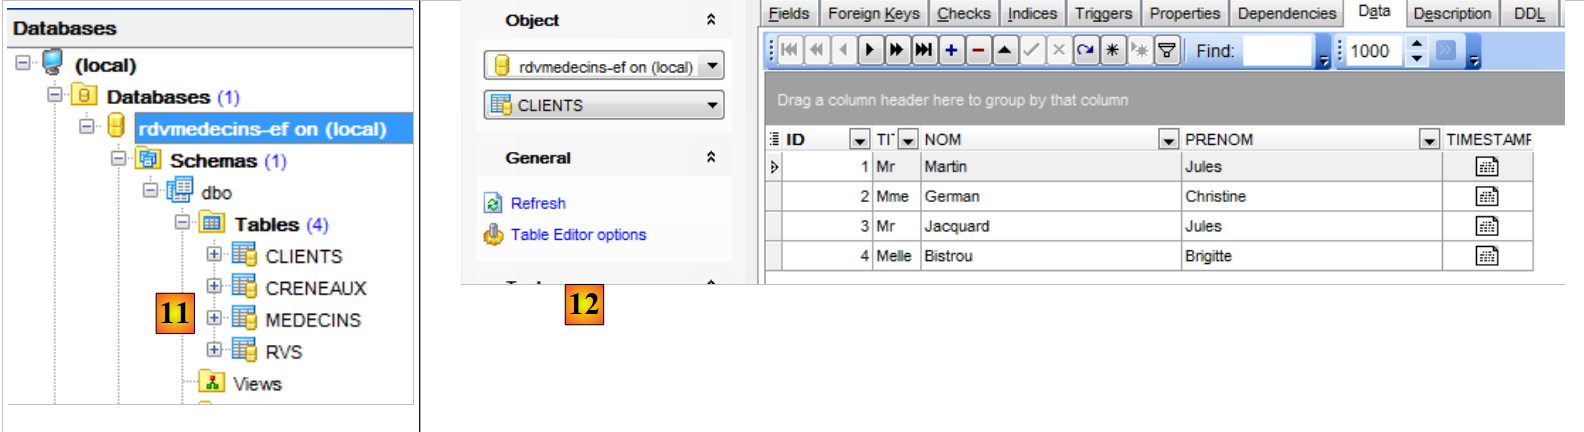 |
- 在 [11] 中,已创建表格;
- 在 [12] 中,表已填充;
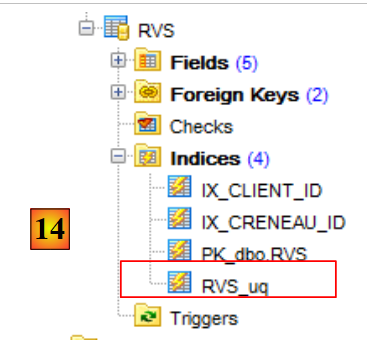 |
- 在 [14] 中,我们看到了之前为表 [RVS] 创建的唯一性约束。
接下来我们将基于该现有数据库进行操作。若数据库被破坏或损坏,我们已掌握其重建方法。
3.5. 使用 Entity Framework 操作数据库
我们将:
- 向数据库中添加、删除、修改数据;
- 使用 LINQ to Entities 查询数据库;
- 管理对数据库同一条记录的并发访问;
- 理解延迟加载(Lazy Loading)与立即加载(Eager Loading)的概念;
- 了解持久化上下文对数据库的更新是在事务中进行的。
3.5.1. 从持久化上下文中删除条目
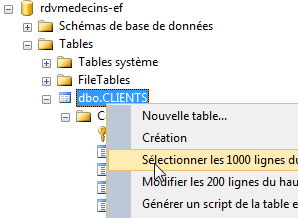
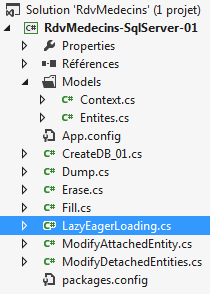
数据库已填充完毕。我们将清空它。在当前项目 [1] 中创建一个新类 [Erase.cs]:
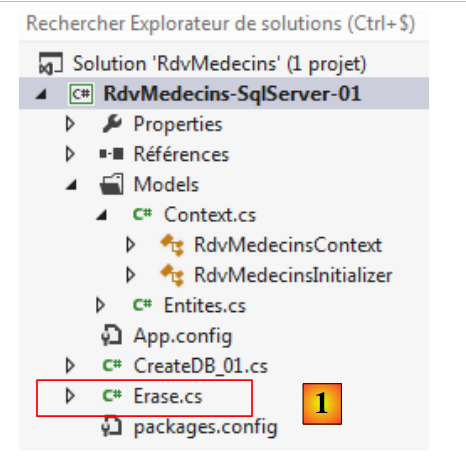 |
[Erase] 类如下:
using RdvMedecins.Models;

namespace RdvMedecins_01
{
  class Erase
  {
    static void Main(string[] args)
    {
      using (var context = new RdvMedecinsContext())
      {
        // 清空当前数据库
        // 客户
        foreach (var client in context.Clients)
        {
          context.Clients.Remove(client);
        }
        // 医生
        foreach (var medecin in context.Medecins)
        {
          context.Medecins.Remove(medecin);
        }
        // 保存持久化上下文
        context.SaveChanges();
      }
    }
  }
}
- 第 9 行:对持久化上下文的操作始终在 [using] 子句中进行。这确保在退出 [using] 时,上下文已被关闭;
- 第13行:遍历[context.Clients]客户端上下文。数据库中的所有客户端都将被放入持久化上下文中;
- 第 15 行:针对每个客户,执行 [Remove] 操作将其从上下文中移除。实际上,它们仍处于上下文中,但处于“已删除”状态;
- 第18-21行:对医生执行相同的操作;
- 第23行:将持久化上下文保存至数据库。
在将上下文保存至数据库时,上下文中:
- 主键为空的,将执行 SQL INSERT 操作;
- 处于“已删除”状态的,将执行操作 SQL DELETE;
- 处于“已修改”状态的,将执行操作 SQL UPDATE;
正如我们稍后将看到的,这些 SQL 操作是在事务内部执行的。如果其中任何一个操作失败,之前所做的一切都将被撤销。
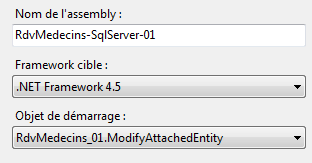
让我们将程序 [Erase] 设为项目 [1] 的新启动对象,然后执行该项目。
 |
检查数据库。我们会发现所有表都是空的 [2]。这令人惊讶,因为我们原本只是要求删除医生和客户。正是由于外键机制的作用,其他表才被级联清空。
[CRENEAUX]表指向[MEDECINS]表的外键定义由EF 5提供程序定义如下:
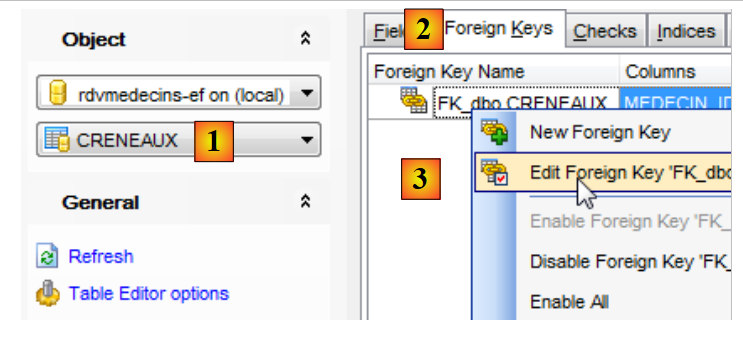 |
- 在 [1] 中,选择表 [CRENEAUX];
- 在 [2] 中,选择外键选项卡;
- 在 [3] 中,编辑唯一的外部键;
 |
- 在 [4] 中,在 DDL 选项卡下,查看 SQL 的外键约束定义;
- 在[5]中,ON、DELETE和CASCADE这三个子句规定:删除某位医生时,将一并删除与其关联的时段。
表 [RVS] 的外键约束定义方式与此类似:
- 第 1-6 行:删除客户时,也将删除与其关联的预约;
- 第 1-6 行:删除一个时段将同时删除所有与其关联的预约。
3.5.2. 向持久化上下文中添加元素
现在数据库已清空,我们将重新填充数据。我们将程序 [Fill.cs] [1] 添加到项目中。
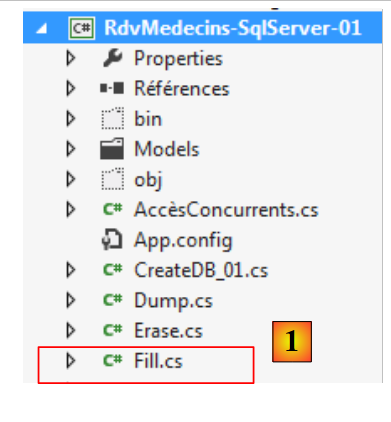 |
程序 [Fill.cs] 如下:
using RdvMedecins.Entites;
using RdvMedecins.Models;

namespace RdvMedecins_01
{
  class Fill
  {
    static void Main(string[] args)
    {
      using (var context = new RdvMedecinsContext())
      {
        // 清空当前数据库
        foreach (var client in context.Clients)
        {
          context.Clients.Remove(client);
        }
        foreach (var medecin in context.Medecins)
        {
          context.Medecins.Remove(medecin);
        }
        // 重置数据库
        // 客户
        Client[] clients ={
        new Client { Titre = "Mr", Nom = "Martin", Prenom = "Jules" },
        new Client { Titre = "Mme", Nom = "German", Prenom = "Christine" },
        new Client { Titre = "Mr", Nom = "Jacquard", Prenom = "Jules" },
        new Client { Titre = "Melle", Nom = "Bistrou", Prenom = "Brigitte" }
     };
        foreach (Client client in clients)
        {
          context.Clients.Add(client);
        }
        // 医生
        Medecin[] medecins ={
        new Medecin { Titre = "Mme", Nom = "Pelissier", Prenom = "Marie" },
        new Medecin { Titre = "Mr", Nom = "Bromard", Prenom = "Jacques" },
        new Medecin { Titre = "Mr", Nom = "Jandot", Prenom = "Philippe" },
        new Medecin { Titre = "Melle", Nom = "Jacquemot", Prenom = "Justine" }
     };
        foreach (Medecin medecin in medecins)
        {
          context.Medecins.Add(medecin);
        }
        // 时间段
        Creneau[] creneaux ={
        new Creneau{ Hdebut=8,Mdebut=0,Hfin=8,Mfin=20,Medecin=medecins[0]},
        new Creneau{ Hdebut=8,Mdebut=20,Hfin=8,Mfin=40,Medecin=medecins[0]},
        new Creneau{ Hdebut=8,Mdebut=40,Hfin=9,Mfin=0,Medecin=medecins[0]},
        new Creneau{ Hdebut=9,Mdebut=0,Hfin=9,Mfin=20,Medecin=medecins[0]},
        new Creneau{ Hdebut=9,Mdebut=20,Hfin=9,Mfin=40,Medecin=medecins[0]},
        new Creneau{ Hdebut=9,Mdebut=40,Hfin=10,Mfin=0,Medecin=medecins[0]},
        new Creneau{ Hdebut=10,Mdebut=0,Hfin=10,Mfin=20,Medecin=medecins[0]},
        new Creneau{ Hdebut=10,Mdebut=20,Hfin=10,Mfin=40,Medecin=medecins[0]},
        new Creneau{ Hdebut=10,Mdebut=40,Hfin=11,Mfin=0,Medecin=medecins[0]},
        new Creneau{ Hdebut=11,Mdebut=0,Hfin=11,Mfin=20,Medecin=medecins[0]},
        new Creneau{ Hdebut=11,Mdebut=20,Hfin=11,Mfin=40,Medecin=medecins[0]},
        new Creneau{ Hdebut=11,Mdebut=40,Hfin=12,Mfin=0,Medecin=medecins[0]},
        new Creneau{ Hdebut=14,Mdebut=0,Hfin=14,Mfin=20,Medecin=medecins[0]},
        new Creneau{ Hdebut=14,Mdebut=20,Hfin=14,Mfin=40,Medecin=medecins[0]},
        new Creneau{ Hdebut=14,Mdebut=40,Hfin=15,Mfin=0,Medecin=medecins[0]},
        new Creneau{ Hdebut=15,Mdebut=0,Hfin=15,Mfin=20,Medecin=medecins[0]},
        new Creneau{ Hdebut=15,Mdebut=20,Hfin=15,Mfin=40,Medecin=medecins[0]},
        new Creneau{ Hdebut=15,Mdebut=40,Hfin=16,Mfin=0,Medecin=medecins[0]},
        new Creneau{ Hdebut=16,Mdebut=0,Hfin=16,Mfin=20,Medecin=medecins[0]},
        new Creneau{ Hdebut=16,Mdebut=20,Hfin=16,Mfin=40,Medecin=medecins[0]},
        new Creneau{ Hdebut=16,Mdebut=40,Hfin=17,Mfin=0,Medecin=medecins[0]},
        new Creneau{ Hdebut=17,Mdebut=0,Hfin=17,Mfin=20,Medecin=medecins[0]},
        new Creneau{ Hdebut=17,Mdebut=20,Hfin=17,Mfin=40,Medecin=medecins[0]},
        new Creneau{ Hdebut=17,Mdebut=40,Hfin=18,Mfin=0,Medecin=medecins[0]},
        new Creneau{ Hdebut=8,Mdebut=0,Hfin=8,Mfin=20,Medecin=medecins[1]},
        new Creneau{ Hdebut=8,Mdebut=20,Hfin=8,Mfin=40,Medecin=medecins[1]},
        new Creneau{ Hdebut=8,Mdebut=40,Hfin=9,Mfin=0,Medecin=medecins[1]},
        new Creneau{ Hdebut=9,Mdebut=0,Hfin=9,Mfin=20,Medecin=medecins[1]},
        new Creneau{ Hdebut=9,Mdebut=20,Hfin=9,Mfin=40,Medecin=medecins[1]},
        new Creneau{ Hdebut=9,Mdebut=40,Hfin=10,Mfin=0,Medecin=medecins[1]},
        new Creneau{ Hdebut=10,Mdebut=0,Hfin=10,Mfin=20,Medecin=medecins[1]},
        new Creneau{ Hdebut=10,Mdebut=20,Hfin=10,Mfin=40,Medecin=medecins[1]},
        new Creneau{ Hdebut=10,Mdebut=40,Hfin=11,Mfin=0,Medecin=medecins[1]},
        new Creneau{ Hdebut=11,Mdebut=0,Hfin=11,Mfin=20,Medecin=medecins[1]},
        new Creneau{ Hdebut=11,Mdebut=20,Hfin=11,Mfin=40,Medecin=medecins[1]},
        new Creneau{ Hdebut=11,Mdebut=40,Hfin=12,Mfin=0,Medecin=medecins[1]},
      };
        foreach (Creneau creneau in creneaux)
        {
          context.Creneaux.Add(creneau);
        }
        // 预约
        context.Rvs.Add(new Rv { Jour = new System.DateTime(2012, 10, 8), Client = clients[0], Creneau = creneaux[0] });
        // 保存持久化上下文
        context.SaveChanges();
      }
    }
  }
}
- 第 10 行:打开持久化上下文;
- 第13-20行:将表[CLIENTS]和[MEDECINS]中的行放入持久化上下文,随后从其中删除。我们刚才看到这会将数据库完全清空;
- 第22-88行:向持久化上下文中添加了数据项。这些数据项的主键均为NULL,因此将被插入数据库;
- 第 90 行:对上下文所做的更改与数据库同步。 随后将执行一系列 SQL 和 DELETE 操作,接着执行一系列 SQL 和 INSERT 操作;
将程序 [Fill] 设为项目 [1] 的新启动对象,然后执行该项目。
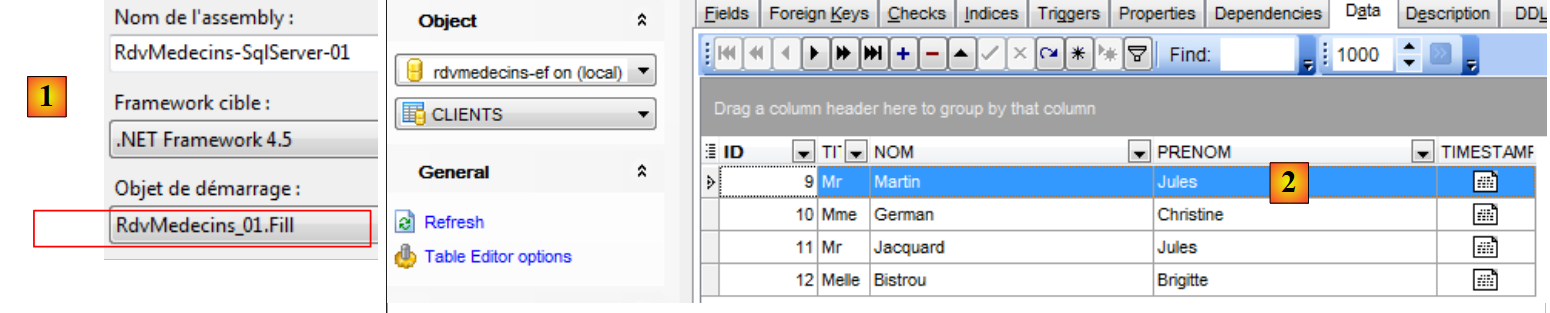 |
在 [2] 中可以看到表已填充完毕。
3.5.3. 显示数据库内容
现在我们将使用查询 LINQ to Entity 来显示数据库内容。 LINQ(语言 INtegrated 查询)于 2007 年随 .NET 3.5 框架一同推出。 它作为 .NET 和 c.a.d 语言的扩展而出现,已集成到该语言中,其语法由编译器进行验证。 它允许使用与数据库查询语言 SQL(结构化查询语言)相似的语法来查询不同的集合。LINQ 存在不同版本:
- LINQ to Object,用于查询内存中的集合;
- LINQ to XML,用于查询 XML;
- LINQ 转换为 Entity,用于查询数据库;
LINQ 的存在依赖于对 .NET 语言所做的众多扩展。这些扩展可在 LINQ 之外使用。 本文将不作详细介绍,仅提供两处参考资料,读者可从中查阅关于 LINQ 的深入说明:
- 《LINQ in Action》,作者:Fabrice Marguerie、Steve Eichert、Jim Wooley,Manning出版社;
- 《LINQ 口袋参考手册》,作者:Joseph 和 Ben Albahari,O'Reilly 出版社。
我读过第一本,觉得非常出色。第二本我虽未读过,但在《LINQ》出版时,读过同两位作者合著的《C# 3.0 in a nutshell》。 我认为这本书远超我平时阅读的书籍的平均水平。看来这两位作者的其他著作也处于同等水准。此外,我们将使用 LINQPad,这是由约瑟夫·阿尔巴哈里编写的 LINQ 学习工具。
我们将显示数据库中的实体。为此,我们在它们的类中添加了两个显示方法。首先从实体 [Medecin] 开始:
// 医生
  public class Medecin
  {
    // 数据
    [Key]
    [Column("ID")]
    public int? Id { get; set; }
    [Required]
    [MaxLength(5)]
    [Column("TITRE")]
    public string Titre { get; set; }
    [Required]
    [MaxLength(30)]
    [Column("NOM")]
    public string Nom { get; set; }
    [Required]
    [MaxLength(30)]
    [Column("PRENOM")]
    public string Prenom { get; set; }
    // 医生的时段
    public ICollection<Creneau> Creneaux { get; set; }
    [Column("TIMESTAMP")]
    [Timestamp]
    public byte[] Timestamp { get; set; }

    // 签名
    public override string ToString()
    {
      return String.Format("Medecin[{0},{1},{2},{3},{4}]", Id, Titre, Prenom, Nom, dump(Timestamp));
    }
    // 简短签名
    public string ShortIdentity()
    {
      return ToString();
    }

    // 用途
    private string dump(byte[] timestamp){
      string str = "";
      foreach (byte b in timestamp)
      {
        str += b;
      }
      return str;
    }
  }
- 第 27-30 行:该类的 ToString 方法。请注意,它不会显示第 21 行的集合;
- 第 32-37 行:方法 ShortIdentity,其功能与上述方法相同。
在此我们需要解释“延迟加载(Lazy Loading)”和“立即加载(Eager Loading)”的概念,以便评估前两个方法的影响。我们已经看到,一个实体可能依赖于另一个实体。这种依赖有两种类型:
- 一对多,如上文所述,一名医生关联多个时段;
- 多对一,如下面的实体 [Creneau] 所示,其中多个时段关联到同一位医生;
public class Creneau
  {
    // 数据
    ...
    [Required]
    [Column("MEDECIN_ID")]
    public int MedecinId { get; set; }
    [Required]
    [ForeignKey("MedecinId")]
    public virtual Medecin Medecin { get; set; }
    ...
  }
当依赖项与其关联的实体同时加载时,称为“Eager Loading”(立即加载)。 否则,则称为延迟加载(Lazy Loading):依赖项仅在首次被引用时才加载。默认情况下,EF 5 使用延迟加载:依赖项不会与实体同时加载。
让我们来看一下上文中的 [ToString] 方法:
    // 医生接诊时段
    public ICollection<Creneau> Creneaux { get; set; }

    // 签名
    public override string ToString()
    {
      return String.Format("Medecin[{0},{1},{2},{3},{4}]", Id, Titre, Prenom, Nom, dump(Timestamp));
    }
    // 简短签名
    public string ShortIdentity()
    {
      return ToString();
}
方法 [ToString] 不会显示第 2 行中的依赖项 [Creneaux]。如果显示了该依赖项,就会强制在执行该方法之前加载该医生的所有时段。 正是为了避免这种耗时的加载操作,才未将该依赖关系包含在实体的签名中。通常,我们会在每个实体中包含两个签名:
- 一个方法 ToString,用于显示该实体及其可能的多对一依赖关系。如前所述,这将触发依赖关系的加载;
- 一个名为ShortIdentity的方法,该方法不会引用任何依赖项。因此,不会加载任何依赖项;
其他实体的显示方法如下:
实体 [Client]:
  public class Client
  {
    // 数据
    ...
    // 患者的预约
    public ICollection<Rv> Rvs { get; set; }

    // 签名
    public override string ToString()
    {
      return String.Format("Client[{0},{1},{2},{3},{4}]", Id, Titre, Prenom, Nom, dump(Timestamp));
    }
    // 短签名
    public string ShortIdentity()
    {
      return ToString();
    }

}
- 第 9-12 行:方法 [ToString] 不显示第 6 行的依赖项;
实体 [Creneau]:
public class Creneau
  {
    ...
    [Required]
    [Column("MEDECIN_ID")]
    public int MedecinId { get; set; }
    [Required]
    [ForeignKey("MedecinId")]
    public virtual Medecin Medecin { get; set; }
    // 时段确认
    public ICollection<Rv> Rvs { get; set; }

    // 签名
    public override string ToString()
    {
      return String.Format("Creneau[{0},{1},{2},{3},{4}, {5}]", Id, Hdebut, Mdebut, Hfin, Mfin, Medecin, dump(Timestamp));
    }
    // 短签名
    public string ShortIdentity()
    {
      return String.Format("Creneau[{0},{1},{2},{3},{4}, {5}, {6}]", Id, Hdebut, Mdebut, Hfin, Mfin, Timestamp, MedecinId, dump(Timestamp));
    }
  }
- 第 16 行:方法 [ToString] 引用了第 9 行的依赖项。这将强制加载该依赖项;
- 第 11 行:[Rvs] 依赖项未被引用。它将不会被加载;
- 第 21-22 行:方法 [ShortIdentity] 不再引用第 9 行中的引用 [Medecin]。因此,该引用将不会被加载。
实体 [Rv]:
public class Rv
  {
    // 数据
    ...
    [Column("CLIENT_ID")]
    public int ClientId { get; set; }
    [ForeignKey("ClientId")]
    [Required]
    public virtual Client Client { get; set; }
    [Column("CRENEAU_ID")]
    public int CreneauId { get; set; }
    [ForeignKey("CreneauId")]
    [Required]
    public virtual Creneau Creneau { get; set; }

    // 签名
    public override string ToString()
    {
      return String.Format("Rv[{0},{1},{2},{3},{4}]", Id, Jour, Client, Creneau, dump(Timestamp));
    }
    // 短签名
    public string ShortIdentity()
    {
      return String.Format("Rv[{0},{1},{2},{3},{4}]", Id, Jour, ClientId, CreneauId, dump(Timestamp));
    }

  }
- 第 17-20 行:方法 [ToString] 引用了第 9 行和第 14 行的依赖项。这将强制加载它们;
- 第 17-20 行:方法 [ShortIdentity] 避免了这种情况,因此这些依赖项将不会被加载。
综上所述,需特别关注实体的 [ToString] 方法。若不加以注意,当表存在大量依赖时,显示该表可能会导致数据库的一半数据被加载。
基于上述说明,我们编写如下新的 [Dump.cs] 代码:
using RdvMedecins.Entites;
using RdvMedecins.Models;
using System;
using System.Linq;

namespace RdvMedecins_01
{
  class Dump
  {
    static void Main(string[] args)
    {
      // 数据库转储
      using (var context = new RdvMedecinsContext())
      {
        // 客户
        Console.WriteLine("Clients--------------------------------------");
        var clients = from client in context.Clients select client;
        foreach (Client client in clients)
        {
          Console.WriteLine(client);
        }
        // 医生
        Console.WriteLine("Médecins--------------------------------------");
        var medecins = from medecin in context.Medecins select medecin;
        foreach (Medecin medecin in medecins)
        {
          Console.WriteLine(medecin);
        }
        // 预约时段
        Console.WriteLine("Créneaux horaires--------------------------------------");
        var creneaux = from creneau in context.Creneaux select creneau;
        foreach (Creneau creneau in creneaux)
        {
          Console.WriteLine(creneau);
        }
        // 预约
        Console.WriteLine("Rendez-vous--------------------------------------");
        var rvs = from rv in context.Rvs select rv;
        foreach (Rv rv in rvs)
        {
          Console.WriteLine(rv);
        }
      }
    }
  }
}
我们将重点讲解第17至21行代码,这些代码负责显示[Client]实体。此处的说明同样适用于其他实体。
        // 客户
        Console.WriteLine("Clients--------------------------------------");
        var clients = from client in context.Clients select client;
        foreach (Client client in clients)
        {
          Console.WriteLine(client);
}
- 第 3 行:关键字 var 随 C# 3.0 引入。它允许省略变量的具体类型声明,编译器会根据赋值表达式的类型推导出该变量的类型;
- 第 3 行:赋值给变量 clients 的表达式是一个 LINQ to Entity 查询。其中包含从 SQL 语言移植到 LINQ 中的关键字。 此处的语法如下:
from variable in DbSet select variable
LINQ 的更通用语法为
from variable in collection select variable
将遍历该集合,并对其中的每个元素进行变量求值。此操作仅在第 3 行中的变量 [clients] 通过第 4-7 行的 for / each 循环进行枚举时才会执行。 在此之前,变量 [clients] 仅为一个未求值的查询;
- 第 4 行:查询 [clients] 被遍历。这将强制执行该查询。表 [CLIENTS] 中的行将依次被引入持久化上下文;
- 第 6 行:使用实体 [Client] 的方法 [ToString] 进行显示。没有加载任何依赖项;
接下来看代码的后续行:
- 第 24-28 行:将表 [MEDECINS] 的行引入持久化上下文并显示。没有依赖项加载;
- 第 31-35 行:将表 [CRENEAUX] 的行引入持久化上下文并显示。 我们看到,该实体的 [ToString] 方法显示了依赖关系 [Medecin]。但该依赖关系已加载完毕。因此不会再次加载;
- 第 38-42 行:将表 [RVS] 的行导入持久化上下文并显示。 我们看到,该实体的 [ToString] 方法显示了 [Client] 和 [Creneau] 这两个依赖项。但这些依赖项已加载完毕。因此不会进行新的加载。
需要注意的是,显示顺序并非无关紧要。 如果我们希望先显示实体 [Rv],那么该实体的 [ToString] 方法将触发与这些约会相关的 [Client] 和 [Creneau] 实体的加载。 其余实体则不会被加载,而会在后续的另一项显示操作中加载。这会影响性能。前面的代码需要四条 SQL 命令才能显示所有实体。 现在假设我们首先查询约会表 [RVS]。此时需要先对表 [RVS] 执行一个初始查询 SQL。 随后,实体 [Rv] 的方法 [ToString] 可能会触发相关实体 [Client] 和 [Creneau] 的加载。 每个实体都需要一个 SQL 查询。假设存在 N2 个客户和 N3 个时段,且所有这些实体都在表 [RVS] 中被引用, 显示该表将需要 1 + N2 + N3 + SQL 次查询。因此,其性能不如所研究的版本。 若要显示表 [RVS] 及其依赖关系,则需要进行表连接。这可以通过 LINQ 来实现。 我们将在后续示例中详细说明。目前,请注意:我们必须关注作为代码 LINQ 底层的查询 SQL。
配置项目以运行新代码 [1] 和 [2],然后执行:
 |
控制台显示如下:
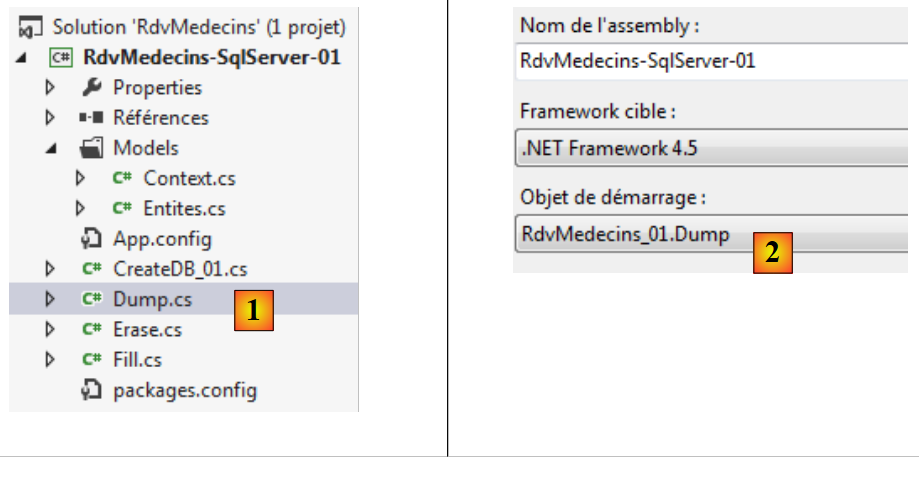
3.5.4. 使用 LINQPad 学习 LINQ
在上文中,我们使用了 LINQ to Entity 查询来显示数据库表中的内容。Joseph Albahari 编写了一个用于学习 LINQ 各种形式的程序。现在我们来介绍它。
LINQPad可在以下URL中获取:[http://www.linqpad.net/]。安装完成后,我们启动[1]:
 |
初学者可以通过“示例”选项卡中的 [Samples] 和 [2] 进行入门学习,这些选项卡提供了大量示例。 选择示例 [3],它将显示在另一个窗口 [4] 中。该示例的完整代码如下:
// 现在来看一个简单的 LINQ-to-objects 查询表达式(注意没有分号):

from word in "The quick brown fox jumps over the lazy dog".Split()
orderby word.Length
select word


// 请随意编辑此内容……(没人盯着看!)系统会提示您将任何
// 更改时,系统会提示您将其保存到单独的文件中。
//
// 提示:  您可以通过高亮显示查询的一部分,然后按 F5 来执行该部分。
第 3-5 行是一个 LINQ 到对象的查询示例。LINQ 查询遵循以下语法:
from variable in collection orderby élément1 select élément2
- 变量表示集合中的当前元素。在本例中,该集合是拆分字符串所得的单词列表;
- 集合按 orderby 参数 élément1 排序。在本例中,单词集合将按其长度排序;
- select 关键字指定要从集合的当前元素 variable 中提取的内容。在本例中,即为该单词。
执行此查询 LINQ:
 |
- 在 [1] 中:表达式 LINQ 由 [F5] 执行,或通过执行按钮执行;
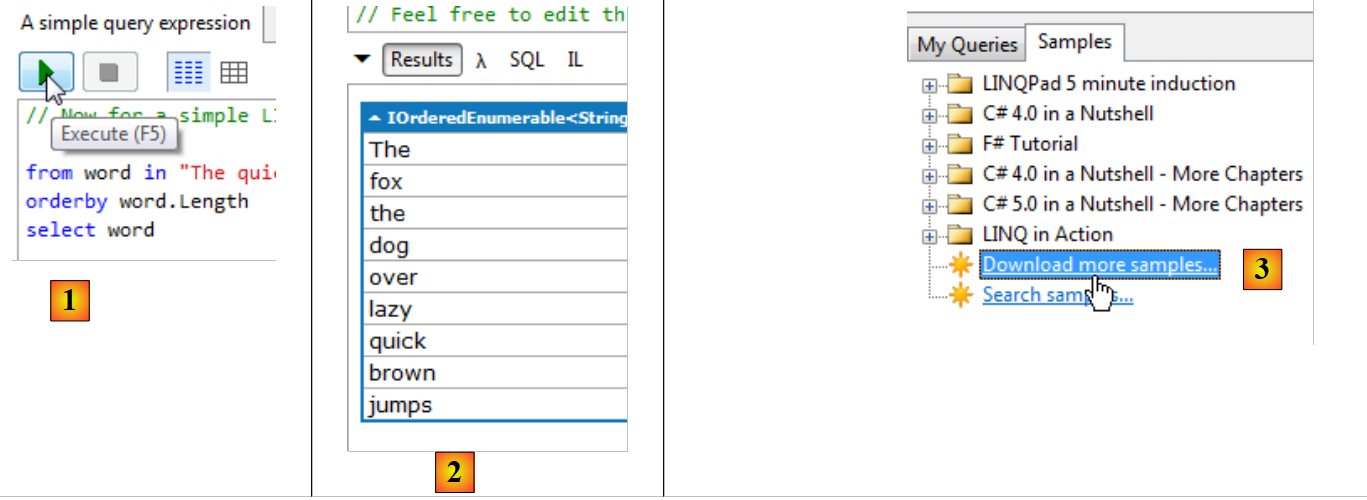
- 在 [2] 中:显示。单词按其长度顺序显示。这个简单的示例展示了 LINQ 的强大功能;
- 在 [3] 中,可以下载其他示例,特别是来自《LINQ in action》一书中的示例 [4];
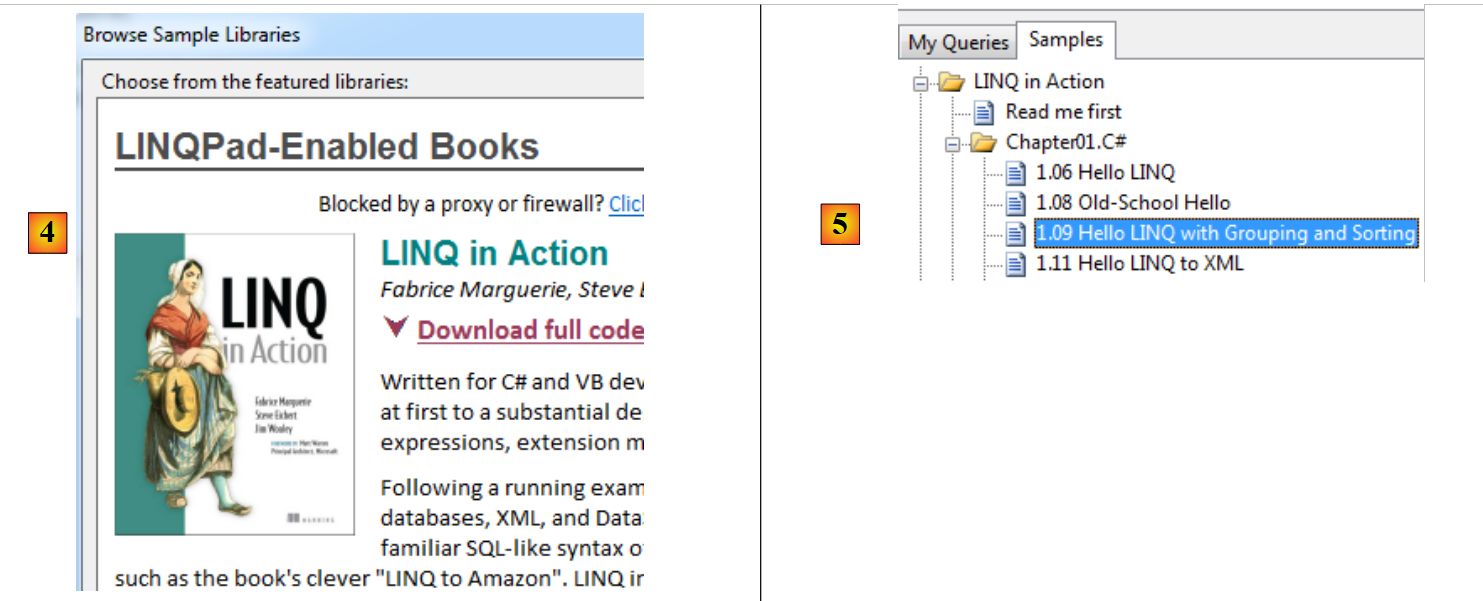 |
- 在 [5] 中,我们选取了书中的一例;
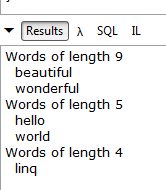
string[] words = { "hello", "wonderful", "linq", "beautiful", "world" };

// 按长度分组单词
var groups =
  from word in words
  orderby word ascending
  group word by word.Length into lengthGroups
  orderby lengthGroups.Key descending
  select new { Length = lengthGroups.Key, Words = lengthGroups };

// 打印每个组
foreach (var group in groups)
{
  Console.WriteLine("Words of length " + group.Length);
  foreach (string word in group.Words)
    Console.WriteLine("  " + word);
}
- 第4行:一个新的查询 LINQ,带有新的关键词;
- 第5行:所查询的集合是第1行中的词表;
- 第6行:集合按单词的字母顺序进行排序;
- 第7行:集合被按(关键字 into)聚合到一个新的集合 lengthGroups 中。lengthGroups.Key 代表聚合因子(关键字 by),此处即单词的长度。 lengthGroups 集合了具有相同分组因子(即相同长度)的单词;
- 第8行:集合lengthGroups按聚合键降序排序,即按单词长度由大到小排序;
- 第 9 行:从该集合中生成具有两个字段的新对象(匿名类):
- Length:单词的长度,
- Words:具有该长度的单词;
在此,我们可以特别看到第 4 行中 var 关键字的意义。由于第 9 行使用了匿名类,因此无法指定变量 groups 的类型。 编译器会为该匿名类分配一个内部名称,并据此为变量 groups 进行类型推导。随后,它就能判断变量 groups 是否被正确使用
- 第12行:遍历第4行的查询。只有此时才会对其进行求值。需注意,其执行将生成一个对象集合,具体定义见第9行;
- 第14行:显示当前元素的Length属性,即单词长度;
- 第15-17行:显示属性Words集合中的每个元素,即所有具有先前显示的长度的单词。
执行此查询时,我们在 LINQPad 中得到以下结果:
 |
既然我们已经了解了一些 [LINQ to Object] 查询的示例,接下来让我们看看 [LINQ to Entity] 查询,这些查询将使我们能够查询数据库。 首先,我们将连接到我们已创建并填充数据的那台 SQL 服务器数据库:
 |
- 在 [1] 中,我们添加了一个数据库连接;
- 在 [2] 中,配置数据源的访问方式。要访问 SQL Server 数据库,我们将使用 [LINQPad Driver];
- 在 [3] 中,还可以从 assembly .exe 或 .dll 文件中获取已定义的持久化上下文 [DbContext](选项 3)。 遗憾的是,截至今日(2012年10月8日),Entity Framework 5 尚未获得支持;
- 在 [4] 中,可以下载除 SQL Server 以外的其他 SGBD 的驱动程序;
- 在 [5] 中,将下载适用于 SGBD、MySQL 和 Oracle 的驱动程序;
 |
- 在 [6] 中,下载的驱动程序;
- 在 [7] 中,我们将连接到 SQL 服务器;
 |
- 在 [8] 中,数据库位于(本地)名称服务器上;
- 在 [9] 中,使用 sa / sqlserver2012 凭据进行连接;
- 在 [10] 中,连接到我们创建的 [rdvmedecins-ef] 数据库;
- 在 [11] 中,可以测试连接;
- 在 [12] 中,完成向导;
- 在 [13] 中,该连接会显示在 LINQPad 中。
这些实体是根据表 [rdvmedecins-ef] 创建的。具体如下:
 |
- 在 [1] 中,[CLIENTS] 代表 [Client] 中的所有实体。每个实体具有:
- 属性(ID、TITRE、NOM、PRENOM、TIMESTAMP),
- 与 [CLIENTRVS] 建立一对多关系;
- 其中 [2]、[CRENEAUXes] 代表 [Creneau] 的所有实体。每个实体具有:
- 属性(ID、HDEBUT、MDEBUT、 HFIN、MFIN、MEDECIN_ID、TIMESTAMP),
- 一个一对多关系 [CRENEAURVS],
- 一个多对一关系 [MEDECIN];
- 在 [3] 中,实体 [MEDECINS] 代表所有 [Medecin] 实体。每个实体具有:
- 属性(ID、TITRE、NOM、PRENOM、TIMESTAMP),
- 与 [MEDECINCRENEAUXes] 建立一对多关系;
- 在 [4] 中,实体 [RVS] 代表所有 [Rv] 实体。每个实体具有:
- 属性(ID、JOUR、CLIET_ID、CRENEAU_ID、TIMESTAMP),
- 多对一关系 [CLIENT],
- 一个多对一关系 [CRENEAU]。
请注意,上述属性的名称与我们迄今为止使用的名称不同。这并不重要。我们只是想学习数据库查询的基本原理。
让我们看看如何查询这个实体数据库。例如,我们想要按 TITRE 和 NOM 排序的医生列表:
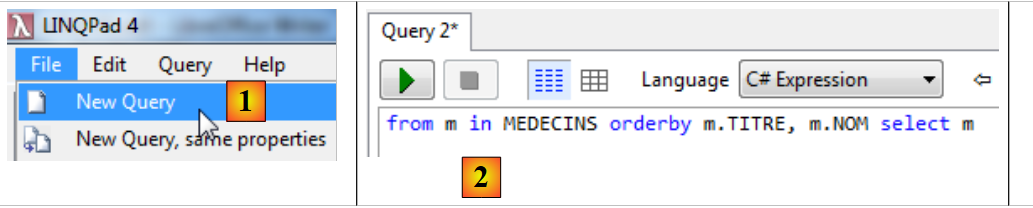 |
- 在 [1] 中,创建一个新查询;
- 在 [2] 中,查询文本;
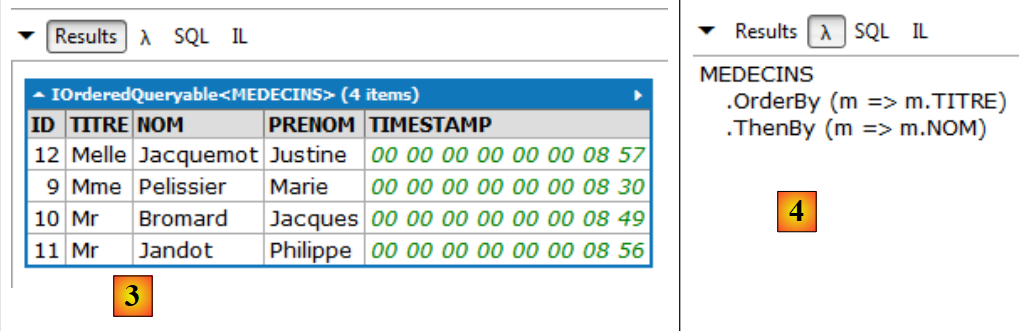 |
- 在 [3] 中,查询结果;
- 在 [4] 中,使用 lambda 表达式的相同查询。包含 lambda 表达式的查询比文本查询更难读懂,因此可能有人希望避免使用。然而,它们有时是必不可少的,因为它们能实现文本查询无法实现的功能。 一个 lambda 表达式表示一个具有输入参数 a 和输出参数 b 的函数,其形式为 a=>b。 上述方法 OrderBy 接受一个 lambda 函数作为唯一参数。该函数为其提供用于对集合进行排序的参数。因此,MEDECINS.OrderBy(m=>m.TITRE) 即为按头衔排序的医生列表。 应将该语句理解为对集合的流水线处理。医生集合作为输入传递给方法 OrderBy,该方法将依次处理 [Medecin] 中的各个实体。 在 lambda 表达式 m=>m.TITRE 中,m 代表 lambda 函数的输入。我们可以随意命名它。在此处,lambda 函数的输入将是一个 [Medecin] 实体。 函数 m=>m.TITRE 的含义如下:如果我将 m 作为输入(一个 [Medecin] 实体),那么我的输出就是 m.TITRE,即医生的姓名。 MEDECINS.OrderBy(m=>m.TITRE) 本身又是一个集合,即按头衔排序的医生集合。 这个新集合可以作为另一个方法的输入,例如方法 ThenBy。该方法遵循相同的原理,用于指定集合排序的额外参数。
阅读与我们通常输入的文本代码等效的 lambda 代码是学习它的好方法;
 |
- 在 [5] 中,系统向数据库发出的命令为 SQL。同样,我们需要仔细阅读这段代码。它有助于评估 LINQ 查询的实际成本。
接下来,我们将展示几个 LINQ 查询的示例。 每次示例中,我们都会展示显示的结果以及等效的 lambda 代码和 SQL 代码。要理解这些请求,需要回顾连接各实体之间的多对一关系。正是通过这些关系,我们才能在各个实体之间进行导航。这些被称为导航属性。
 |
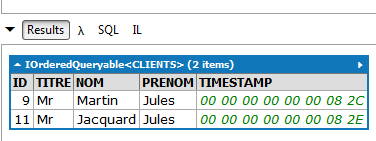
// 按姓名降序排列的、头衔为“先生”的客户
结果:
 |
LINQ | |
Lambda | |
SQL | |
// 所有与该医生相关的时段
(部分)结果:
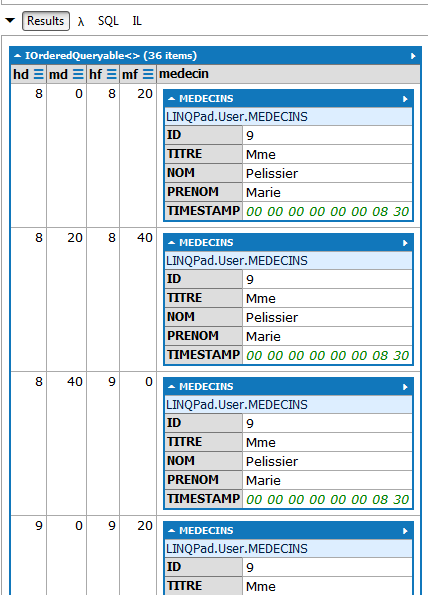 |
LINQ | |
Lambda | 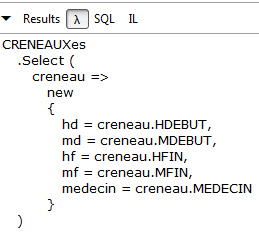 |
SQL | |
// 所有与该客户和医生相关的预约
结果:
 |
LINQ | |
Lambda |  |
SQL | |
// 没有预约的医生
结果:
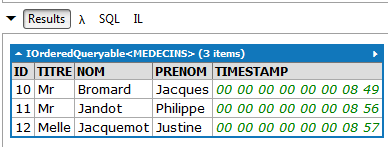 |
LINQ | |
Lambda | 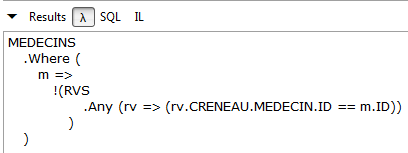 |
SQL | |
此请求不存在 LINQ 查询。必须使用 lambda 表达式。该表达式的含义如下: 我获取医生集合(MEDECINS),并通过 WHERE 子句筛选出那些在预约集合(RVS)中无法找到其对应预约(rv)的医生(m)。
// 佩利西耶女士的预约时段
(部分)结果:
 |
LINQ | |
Lambda |  |
SQL | |
// 佩利西耶女士2012年10月8日的预约次数
结果:
 |
LINQ | |
Lambda | |
SQL | |
// 2012年10月8日与佩利西耶女士预约的客户名单
结果:
 |
LINQ | |
Lambda |  |
SQL | |
// 每位医生负责的时段数量
结果:
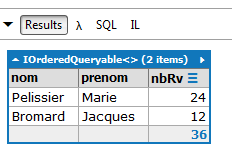 |
LINQ | |
Lambda | 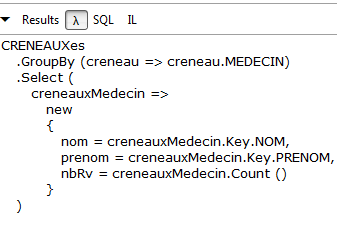 |
SQL | |
3.5.5. 修改与持久化上下文关联的实体
我们已经了解了持久化上下文的以下操作:
- 向上下文添加元素([dbContext].[DbSet].Add);
- 从上下文中删除元素([dbContext].[DbSet].Remove);
- 使用 LINQ 查询上下文。
当需要将上下文与数据库同步时,编写 [dbContext].SaveChanges()。
 |  |
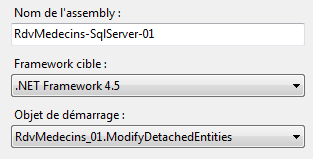
代码 [ModifyAttachedEntity] 演示了如何修改与上下文关联的实体:
using System;
using System.Data;
using System.Linq;
using RdvMedecins.Entites;
using RdvMedecins.Models;

namespace RdvMedecins_01
{
  class ModifyAttachedEntity
  {
    static void Main(string[] args)
    {
      Client client1, client2, client3;
      // 第一个上下文
      using (var context = new RdvMedecinsContext())
      {
        // 清空当前数据库
        foreach (var client in context.Clients)
        {
          context.Clients.Remove(client);
        }
        foreach (var medecin in context.Medecins)
        {
          context.Medecins.Remove(medecin);
        }
        // 添加客户
        client1 = new Client { Nom = "xx", Prenom = "xx", Titre = "xx" };
        context.Clients.Add(client1);
        // 跟踪
        Console.WriteLine("client1--avant");
        Console.WriteLine(client1);
        // 保存上下文
        context.SaveChanges();
        // 后续
        Console.WriteLine("client1--après");
        Console.WriteLine(client1);
      }
      // 第二个上下文
      using (var context = new RdvMedecinsContext())
      {
        // 从客户2中获取客户1
        client2 = context.Clients.Find(client1.Id);
        // 跟踪
        Console.WriteLine("client2");
        Console.WriteLine(client2);
        // 修改客户2
        client2.Nom = "yy";
        // 保存上下文
        context.SaveChanges();
      }
      // 第三个上下文
      using (var context = new RdvMedecinsContext())
      {
        // 从客户3中获取客户2
        client3 = context.Clients.Find(client2.Id);
        // 后续
        Console.WriteLine("client3");
        Console.WriteLine(client3);
      }
    }
  }
}
- 第 15 行:打开应用程序上下文;
- 第 18-25 行:清空上下文。确切地说,所有实体从数据库导入上下文后,状态均变为“已删除”。需注意,此时数据库尚未发生变化。只要上下文未与数据库同步,数据库内容就不会改变。 回顾一下,删除实体 [Medecin] 和 [Client] 即可通过级联删除机制清空数据库;
- 第27-28行:向数据库中添加了一个新客户;
- 第30-31行:在将其保存至数据库前进行显示;
- 第33行:将上下文与数据库同步。标记为“已删除”状态的实体将作为操作 SQL DELETE 的对象, 新增的实体将执行操作 SQL INSERT;
- 第35-36行:与数据库同步后显示客户信息;
控制台显示的结果如下:
需注意以下几点:
- 在与数据库同步之前,客户既没有主键,也没有 timestamp,
- 同步后,它拥有了这些。在此重申,主键已配置为由 SQL Server 生成。同样,该 SGBD 会自动生成时间戳;
- 第 37 行:持久化上下文被关闭。其中包含的实体变为“脱离”状态。它们作为对象依然存在,但不再是与持久化上下文关联的实体;
- 第 39 行:启动一个新的空上下文;
- 第 42 行:通过主键直接从数据库中检索客户。随后将其引入上下文。若未找到,Find 方法将返回指针 null;
- 第48-49行:显示该客户;
结果如下:
- 第 47 行:对其进行修改;
- 第49行:将上下文与数据库同步。EF将检测到自被引入以来,上下文中的某些元素已被修改。 针对这些元素,它将在数据库中生成 SQL 和 UPDATE 命令。因此,此处的同步将仅包含一个 UPDATE 命令;
- 第 50 行:第二个上下文被关闭。原先与该上下文关联的实体 client2 现已与其脱离;
- 第 52 行:打开一个空的第三个上下文;
- 第 55 行:将数据库中的唯一客户端再次移入该上下文。目的是验证在前一个上下文中对其所做的修改是否已同步到数据库;
- 第 57-58 行:显示该客户。结果如下:
客户名称已在数据库中成功修改。值得注意的是,其 timestamp 字段已更新。
- 第59行:关闭上下文。顺便提一下,与前两次不同,此前无需将上下文与数据库(SaveChanges)进行同步,因为上下文并未被修改。
3.5.6. 脱离实体的管理
让我们回到案例研究中所述应用程序的分层架构:
 |
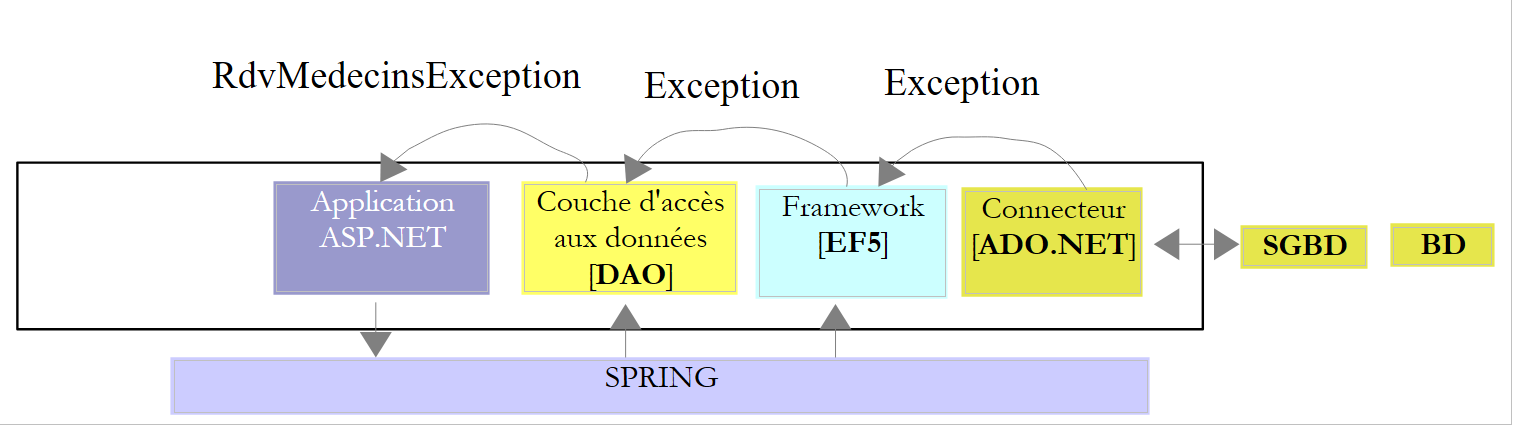
[DAO]层使用ORM和EF5来访问数据。 我们拥有该层的基础构建模块。每个方法都会打开一个持久化上下文,在其上执行必要的操作(插入、修改、删除、查询),然后关闭它。 由 [DAO] 层管理的实体将向上传递至 Web 层 ASP.NET。在此层中,这些实体处于持久化上下文之外,因此处于脱离状态。在 Web 层中,用户可以修改这些实体(添加、修改、删除)。 当这些实体返回 [DAO] 层时,它们仍然处于脱离状态。然而,[DAO] 层必须将用户所做的修改同步到数据库中。因此,它必须处理这些脱离的实体。让我们来看三种可能的情况:
添加脱离的实体
这是添加操作的常规情况。只需将脱离的实体添加(Add)到上下文中,并确保其主键等于 null。
修改脱离实体
可以使用以下代码:
- 方法 [DbContext].Entry(独立实体) 将把该实体放入上下文中;
- 该实体的状态将设为“已修改”,以便其成为 SQL UPDATE 命令的对象。
删除脱离的实体
可使用以下代码:
- 第 1 行:将主键与脱离实体相同的主体放入上下文中;
- 第 2 行:将其删除:
需要注意的是,这需要在开头使用 SELECT,随后跟上 DELETE,而通常情况下仅使用 DELETE 即可。也可以参照修改独立实体的示例,写成:
由于我无法对数据库中执行的 SQL 操作启用日志记录,因此无法确定哪种方法更值得推荐。
以下是一个示例:
 |  |
程序 [ModifyDetachedEntities] 的代码如下:
using System;
using System.Data;
using RdvMedecins.Entites;
using RdvMedecins.Models;

namespace RdvMedecins_01
{
  class ModifyDetachedEntities
  {
    static void Main(string[] args)
    {
      Client client1;

      // 清空当前数据库
      Erase();
      // 添加客户
      using (var context = new RdvMedecinsContext())
      {
        // 创建客户
        client1 = new Client { Titre = "x", Nom = "x", Prenom = "x" };
        // 将客户添加到上下文中
        context.Clients.Add(client1);
        // 保存上下文
        context.SaveChanges();
      }
      // 显示数据库
      Dump("1-----------------------------");
      // 客户1不在上下文中 - 修改上下文
      client1.Nom = "y";
      // 新建上下文
      using (var context = new RdvMedecinsContext())
      {
        // 此处为空上下文
        // 将客户1以修改后的状态放入上下文
        context.Entry(client1).State = EntityState.Modified;
        // 保存上下文
        context.SaveChanges();
      }
      // 显示基础信息
      Dump("2-----------------------------");
      // 删除上下文外的实体
      using (var context = new RdvMedecinsContext())
      {
        // 此时,有一个新的空上下文
        // 将 client1 放入已删除状态的上下文中
        context.Entry(client1).State = EntityState.Deleted;
        // 保存上下文
        context.SaveChanges();
      }
      // 显示数据库
      Dump("3-----------------------------");
    }

    static void Erase()
    {
      // 清空数据库
      using (var context = new RdvMedecinsContext())
      {
        foreach (var client in context.Clients)
        {
          context.Clients.Remove(client);
        }
        foreach (var medecin in context.Medecins)
        {
          context.Medecins.Remove(medecin);
        }
        // 保存上下文
        context.SaveChanges();
      }
    }

    static void Dump(string str)
    {
      Console.WriteLine(str);
      // 显示数据库
      using (var context = new RdvMedecinsContext())
      {
        foreach (var rv in context.Rvs)
        {
          Console.WriteLine(rv);
        }
        foreach (var creneau in context.Creneaux)
        {
          Console.WriteLine(creneau);
        }
        foreach (var client in context.Clients)
        {
          Console.WriteLine(client);
        }
        foreach (var medecin in context.Medecins)
        {
          Console.WriteLine(medecin);
        }
      }
    }
  }
}
- 第 15 行:清空数据库;
- 第 17-25 行:向数据库中添加一位客户;
- 第27行:显示数据库内容;
- 在第25行之后,持久化上下文已不存在。因此,不再有关联的实体。实体client1已进入“未关联”状态;
- 第29行:修改脱离实体的名称;
- 第31行:打开一个新的空上下文;
- 第35行:将脱离的实体client1以“已修改”状态放入上下文中;
- 第37行:上下文与数据库同步;
- 第 38 行:关闭上下文;
- 第 40 行:显示数据库;
客户名称已在数据库中成功修改。请注意,timestamp 已更新;
- 第42行:打开一个新的空上下文;
- 第 46 行:将分离实体 client1 以“已删除”状态放入上下文中;
- 第 48 行:上下文与数据库同步;
- 第 49 行:关闭上下文;
- 第 51 行:显示数据库;
该实体已在数据库中成功删除。
现在,我们来看实体的两种依赖加载模式:延迟加载(Lazy Loading)和立即加载(Eager Loading)。
3.5.7. 延迟加载与立即加载
让我们回顾一下四个实体中多对一依赖关系图:
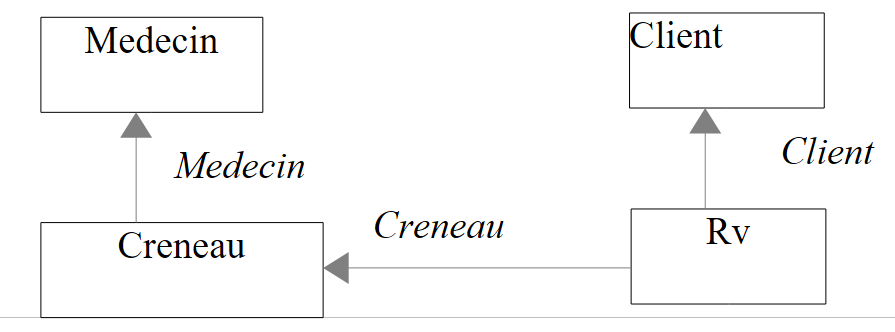 |
在上图中,实体 [Creneau] 具有一个指向实体 [Medecin] 的导航属性 [Creneau.Medecin]。 这被称为依赖关系。我们之前提到还存在一对多依赖关系,接下来要解释的原则同样适用于它们。
默认情况下,EF 5 处于延迟加载模式:当它从数据库将一个实体加载到持久化上下文中时,不会同时加载其依赖关系。这些依赖关系将在首次被使用时才被加载。 这是合乎常理的措施。若非如此,根据上述依赖关系,将“预约”引入上下文时,将同时引入:
- 与预约相关的 [Creneau] 实体;
- 与这些时段相关的实体 [Medecin];
- 与约会相关的 [Clients] 实体。
但有时,我们需要一个实体及其关联。我们将演示这两种加载模式。
 |  |
[LazyEagerLoading] 的代码如下:
using RdvMedecins.Entites;
using RdvMedecins.Models;
using System;
using System.Linq;

namespace RdvMedecins_01
{
  class LazyEagerLoading
  {
    // 实体
    static Medecin[] medecins;
    static Client[] clients;
    static Creneau[] creneaux;

    static void Main(string[] args)
    {
      // 初始化数据库
      InitBase();
      Console.WriteLine("Initialisation terminée");
      // 预加载
      Creneau creneau;
      int idCreneau = (int)creneaux[0].Id;
      using (var context = new RdvMedecinsContext())
      {
        // 时段编号 0
        creneau = context.Creneaux.Include("Medecin").Single<Creneau>(c => c.Id == idCreneau);
        Console.WriteLine(creneau.ShortIdentity());
      }
      // 显示依赖关系
      try
      {
        Console.WriteLine("Médecin={0}", creneau.Medecin);
      }
      catch (Exception e)
      {
        Console.WriteLine("L'erreur 1 suivante s'est produite : {0}", e);
      }
      // 延迟加载 - 默认模式
      using (var context = new RdvMedecinsContext())
      {
        // 第 0 个时间段
        creneau = context.Creneaux.Single<Creneau>(c => c.Id == idCreneau);
        Console.WriteLine(creneau.ShortIdentity());
      }
      // 显示依赖
      try
      {
        Console.WriteLine("Médecin={0}", creneau.Medecin);
      }
      catch (Exception e)
      {
        Console.WriteLine("L'erreur 2 suivante s'est produite : {0}", e);
      }

    }

    static void InitBase()
    {
      // 初始化数据库
      using (var context = new RdvMedecinsContext())
      {
        // 清空当前数据库
        ...
        // 初始化数据库
        // 客户
        clients = new Client[] {
        new Client { Titre = "Mr", Nom = "Martin", Prenom = "Jules" },
        new Client { Titre = "Mme", Nom = "German", Prenom = "Christine" },
        new Client { Titre = "Mr", Nom = "Jacquard", Prenom = "Jules" },
        new Client { Titre = "Melle", Nom = "Bistrou", Prenom = "Brigitte" }
     };
...
        // 预约
        context.Rvs.Add(new Rv { Jour = new System.DateTime(2012, 10, 8), Client = clients[0], Creneau = creneaux[0] });
        // 保存持久化上下文
        context.SaveChanges();
      }
    }
  }
}
- 第18行:基于已知的、此前一直使用的数据库。此操作完成后,第11-13行的数组将填充独立的实体;
- 第21-22行:关注第一个时段及其对应的医生;
- 第23行:进入新上下文;
- 第26行:将时段及其依赖关系(eager loading)放入上下文中。由于这不是默认模式,因此必须显式请求该依赖关系。Include方法可实现此功能。其参数是引入上下文的实体中依赖关系的名称。 将实体引入上下文的查询使用了lambda表达式。Single方法允许指定条件以返回单个实体。此处,我们在数据库中查询实体[Creneau],其主键对应第0号时段;
- 第27行:显示检索到的实体。回顾实体中使用的两个写入方法:
// 签名
    public override string ToString()
    {
      return String.Format("Creneau[{0},{1},{2},{3},{4}, {5},{6}]", Id, Hdebut, Mdebut, Hfin, Mfin, Medecin, dump(Timestamp));
    }

   // 短签名
    public string ShortIdentity()
    {
      return String.Format("Creneau[{0},{1},{2},{3},{4}, {5}, {6}]", Id, Hdebut, Mdebut, Hfin, Mfin, MedecinId, dump(Timestamp));
    }
- 第2-5行:方法[ToString]显示依赖关系[Medecin]。如果该依赖关系尚未存在于上下文中,则会从数据库中检索并将其添加进去;
- 第 8-11 行:方法 [ShortIdentity] 不会显示依赖项 [Medecin]。因此,如果该依赖项不在上下文中,则不会在数据库中进行查找;
此时,控制台显示如下:
- 第 28 行:上下文已关闭;
- 第 30-37 行:尝试写入该实体的依赖项 [Medecin]。回顾懒加载(Lazy Loading)的工作原理:如果依赖项不存在,则会在首次使用时加载。在此处,该依赖项通常是存在的。显示内容如下:
- 第39-44行:在新的上下文中,系统会再次从数据库中检索时间段0,并将其引入当前上下文。在此处,并未显式请求依赖项[Medecin]。因此,该依赖项将不会被加载(延迟加载);
- 第43行:该时段的简短标识显示如下:
在此处,显示该实体时必须使用 ShortIdentity 而非 ToString。 如果使用 ToString,系统将显示依赖项 [Medecin],并为此在数据库中进行查询。但这并非我们所期望的。
- 第 44 行:上下文已关闭;
- 第46-53行:尝试显示该实体的依赖关系。必须在脱离上下文的情况下进行此操作,否则系统会从数据库中检索并找到该依赖关系。此处已脱离上下文。 实体 [Creneau] 已被分离,其依赖项 [Medecin] 不存在(延迟加载)。接下来会发生什么?屏幕显示如下:
EF 发现依赖项 [Medecin] 不存在。它试图加载该依赖项,但由于上下文已关闭,此操作无法进行。 我们将记录此 [System.ObjectDisposedException] 异常,因为它典型地反映了在未打开的上下文中加载依赖项的情况。
现在让我们来探讨实体访问的并发问题。
3.5.8. 实体访问竞争
让我们回顾一下实体 [Client] 的定义:
public class Client
  {
    // 数据
    [Key]
    [Column("ID")]
    public int? Id { get; set; }
    [Required]
    [MaxLength(5)]
    [Column("TITRE")]
    public string Titre { get; set; }
    [Required]
    [MaxLength(30)]
    [Column("NOM")]
    public string Nom { get; set; }
    [Required]
    [MaxLength(30)]
    [Column("PRENOM")]
    public string Prenom { get; set; }
    // 客户备注
    public ICollection<Rv> Rvs { get; set; }
    [Column("TIMESTAMP")]
    [Timestamp]
    public byte[] Timestamp { get; set; }

    // 签名
    ...
  }
我们将关注第 23 行中的字段 [Timestamp]。我们知道其值是由 SGBD 生成的。 我们还提到,第22行中的注释[Timestamp]使得EF 5使用该注释字段来管理对实体的访问竞争。让我们回顾一下什么是访问竞争管理:
- 进程 P1 在时间点 T1 读取表 [MEDECINS] 中的行 L。该行具有事务 ID timestamp TS1;
- 进程 P2 在时间点 T2 读取了表 [MEDECINS] 中的同一行 L。 该行具有 timestamp TS1 状态,因为进程 P1 尚未提交其修改;
- 进程 P1 提交了对行 L 的修改。行 L 的 timestamp 状态随即变为 TS2;
- 进程 P2 确认了对行 L 的修改。ORM 随即抛出异常,因为进程 P2 对应的第 L 行中,timestamp 和 TS1 与数据库中检索到的 timestamp 和 TS2。
这被称为乐观并发访问管理。在 EF 5 中,承担此角色的字段必须具有 [Timestamp] 或 [ConcurrencyCheck] 其中一个属性。 SQL 服务器具有 [timestamp] 类型。具有此类型的列,其值会在插入/修改行时由 SQL 服务器自动生成。此类列可用于管理并发访问。
我们将通过两个线程同时修改数据库中同一实体 [Client] 来说明这种访问竞争。项目演变如下:
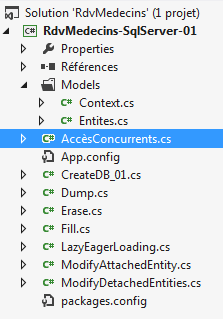 | 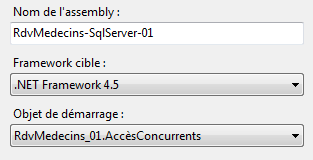 |
程序 [AccèsConcurrents] 的代码如下:
using System;
using System.Data;
using System.Linq;
using System.Threading;
using RdvMedecins.Entites;
using RdvMedecins.Models;

namespace RdvMedecins_01
{

  // 与线程交换的对象
  class Data
  {
    public int Duree { get; set; }
    public string Nom { get; set; }
    public Client Client { get; set; }
  }

  // 测试程序
  class AccèsConcurrents
  {

    static void Main(string[] args)
    {
      Client client1;
      using (var context = new RdvMedecinsContext())
      {
        // 主线程
        Thread.CurrentThread.Name = "main";
        // 清空当前数据库
        foreach (var client in context.Clients)
        {
          context.Clients.Remove(client);
        }
        foreach (var medecin in context.Medecins)
        {
          context.Medecins.Remove(medecin);
        }
        // 添加一个客户端
        client1 = new Client { Nom = "xx", Prenom = "xx", Titre = "xx" };
        context.Clients.Add(client1);
        // 跟踪
        Console.WriteLine("{0} client1--avant sauvegarde du contexte", Thread.CurrentThread.Name);
        Console.WriteLine(client1.ShortIdentity());
        // 保存
        context.SaveChanges();
        // 跟踪
        Console.WriteLine("{0} client1--après sauvegarde du contexte", Thread.CurrentThread.Name);
        Console.WriteLine(client1.ShortIdentity());
      }
      // 将使用两个线程修改客户1
      // 线程 t1
      Thread t1 = new Thread(Modifie);
      t1.Name = "t1";
      t1.Start(new Data { Duree = 5000, Nom = "yy", Client = client1 });
      // 线程 t2
      Thread t2 = new Thread(Modifie);
      t2.Name = "t2";
      t2.Start(new Data { Duree = 5000, Nom = "zz", Client = client1 });
      // 等待两个线程结束
      Console.WriteLine("Thread {0} -- début attente fin des deux threads", Thread.CurrentThread.Name);
      t1.Join();
      t2.Join();
      Console.WriteLine("Thread {0} -- fin attente fin des deux threads", Thread.CurrentThread.Name);
      // 显示修改结果——只有一个修改成功
      using (var context = new RdvMedecinsContext())
      {
        // 将 client1 赋值给 client2
        Client client2 = context.Clients.Find(client1.Id);
        Console.WriteLine("Thread {0} client2", Thread.CurrentThread.Name);
        Console.WriteLine("Thread {0} {1}", Thread.CurrentThread.Name, client2.ShortIdentity());
      }
    }

    // 线程
    static void Modifie(object infos)
    {
 ...
}
- 第 26 行:启动一个空上下文;
- 第29行:为当前线程命名,以便将其与后续将创建的两个线程区分开来;
- 第 31-38 行:将实体 [Medecin] 和 [Client] 置于“已删除”状态;
- 第40-41行:将一个客户端放入上下文中;
- 第 43-44 行:在上下文同步之前将其显示出来;
- 第46行:与数据库同步上下文:状态为“已删除”的实体将从数据库中删除。放入上下文的实体[Client]将被插入数据库。这将成为数据库中的唯一条目;
- 第47-49行:在上下文同步后显示客户端。此时,屏幕显示如下:
请注意,在上下文同步后,客户拥有一个主键和一个 timestamp;
- 第 50 行:关闭上下文;
- 第53行:线程t1与第84行的方法[Modifie]相关联。这意味着当该线程启动时,将执行方法[Modifie];
- 第 54 行:为线程 t1 命名;
- 第 55 行:启动线程 t1。向其传递参数,参数形式为第 12-17 行定义的结构体 [Data]:
- 持续时间:线程将在结束执行前 Durée 秒停止;
- 客户:数据库中待更新的客户引用,
- 名称:要赋予该客户的名称;
- 第 57-59 行:第二个线程的操作与此相同。最终,两个线程将尝试在数据库中修改同一个客户的名称;
- 第60-63行:启动两个线程后,主线程等待它们执行完毕;
- 第 62 行:等待线程 t1 结束;
- 第63行:等待线程t2结束;
- 第64行:无法确定两个线程将以何种顺序结束。可以确定的是,在第64行时它们已经结束;
- 第66-72行:在新的上下文中,从数据库中查询客户端以查看其状态。
现在让我们看看两个线程 t1 和 t2 具体执行什么操作。它们执行以下方法 [Modifie]:
static void Modifie(object infos)
    {
      // 获取参数
      Data data = (Data)infos;
      try
      {
        using (var context = new RdvMedecinsContext())
        {
          Console.WriteLine("Début Thread {0}", Thread.CurrentThread.Name);
          // 从 client2 中获取 client1
          Client client2 = context.Clients.Find(data.Client.Id);
          Console.WriteLine("Thread {0} client2", Thread.CurrentThread.Name);
          Console.WriteLine("Thread {0} {1}", Thread.CurrentThread.Name, client2.ShortIdentity());
          // 修改 client2
          client2.Nom = data.Nom;
          // 稍等片刻
          Thread.Sleep(data.Duree);
          // 保存更改
          context.SaveChanges();
        }
      }
      catch (Exception e)
      {
        // 异常
        Console.WriteLine("Thread {0} {1}", Thread.CurrentThread.Name, e);
      }
      // 线程结束
      Console.WriteLine("Fin Thread {0}", Thread.CurrentThread.Name);
    }
- 第 4 行:获取线程参数(时长、名称、客户);
- 第 7 行:建立新上下文;
- 第 11 行:将客户引入上下文;
- 第12-13行:用于查看客户状态;
- 第15行:更改其名称;
- 第17行:线程暂停 Duree 毫秒。这会产生一个有趣的效果。 该线程释放了正在执行它的处理器,为另一个线程腾出了空间。在本例中,我们有三个线程:main、t1 和 t2。线程 main 处于暂停状态,等待线程 t1 和 t2 结束。 假设线程 t1 最先获得处理器,它现在将处理器让给线程 t2。这将导致线程 t2 读取的内容与线程 t1 完全相同,即同一个带有相同 timestamp 的客户;
- 第 19 行:上下文与数据库同步。假设线程 t1 再次率先恢复运行。它将保存名为“yy”的客户端。之所以能做到这一点,是因为它拥有与数据库中相同的 timestamp。 由于此次更新,SGBD将修改timestamp。当线程t2随后唤醒时,它将获得一个timestamp的客户,该值与当前数据库中的不同。其更新请求将被拒绝。
屏幕显示如下:
- 第 4 行:数据库中的客户;
- 第 9 行:线程 t2 读取到的客户数据;
- 第11行:线程t1读取到的客户信息。因此两个线程读取的内容相同;
- 第12行:线程t2首先结束。因此它成功完成了更新。名称应已变为“zz”;
- 第13行:线程t1抛出类型为[System.Data.OptimisticConcurrencyException]的异常。EF检测到其timestamp不正确;
- 第 21 行:线程 t1 也随之结束;
- 第22行:主线程结束了等待;
- 第 24 行:主线程将客户端显示在数据库中。确实是线程 t2 获胜。名称为“zz”。请注意 timestamp 已发生变化。
现在,让我们探讨另一个方面:负责协调持久化上下文与数据库同步的交易。
3.5.9. 事务中的同步
表 [CRENEAUX] 具有我们手动添加的唯一性约束(参见第 2.2.4 节,第 12 页):
我们将按以下方式操作:同时为同一位医生、同一天和同一时间段添加两个预约。让我们看看会发生什么。
项目演变如下:
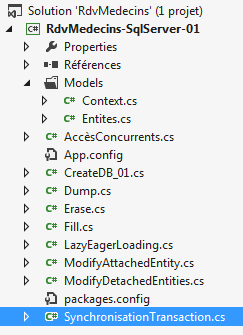 |  |
程序代码 [SynchronisationTransaction] 如下:
using System;
using System.Linq;
using RdvMedecins.Entites;
using RdvMedecins.Models;

namespace RdvMedecins_01
{

  // 测试程序
  class SynchronisationTransaction
  {

    static void Main(string[] args)
    {
      using (var context = new RdvMedecinsContext())
      {
        // 清空当前数据库
        foreach (var client in context.Clients)
        {
          context.Clients.Remove(client);
        }
        foreach (var medecin in context.Medecins)
        {
          context.Medecins.Remove(medecin);
        }
        context.SaveChanges();
      }

      // 创建客户
      Client client1 = new Client { Nom = "xx", Prenom = "xx", Titre = "xx" };
      // 创建医生
      Medecin medecin1 = new Medecin { Nom = "xx", Prenom = "xx", Titre = "xx" };
      // 为该医生创建一个时段
      Creneau creneau1 = new Creneau { Hdebut = 8, Mdebut = 20, Hfin = 8, Mfin = 40, Medecin = medecin1 };
      // 为该医生和该客户创建两个预约,同一天,同一时段
      Rv rv1 = new Rv { Client = client1, Creneau = creneau1, Jour = new DateTime(2012, 10, 18) };
      Rv rv2 = new Rv { Client = client1, Creneau = creneau1, Jour = new DateTime(2012, 10, 18) };
      try
      {
        // 将所有数据存入持久化上下文
        using (var context = new RdvMedecinsContext())
        {
          context.Clients.Add(client1);
          context.Creneaux.Add(creneau1);
          context.Medecins.Add(medecin1);
          context.Rvs.Add(rv1);
          context.Rvs.Add(rv2);
          // 保存上下文——此处应抛出异常
          // 因为底层的 BD 具有唯一性约束,禁止
          // 在同一天、同一时间段内存在两个 RDV
          context.SaveChanges();
        }
      }
      catch (Exception e)
      {
        Console.WriteLine("Erreur : {0}", e);
      }
      // 如果保存操作发生在事务中,则数据库中不应插入任何数据
      // 由于前面的异常,此时数据库中不应有任何插入操作——我们正在验证

      using (var context = new RdvMedecinsContext())
      {
        // 检查客户
        Console.WriteLine("Clients--------------------------------------");
        var clients = from client in context.Clients select client;
        foreach (Client client in clients)
        {
          Console.WriteLine(client);
        }
        // 医生
        Console.WriteLine("Médecins--------------------------------------");
        var medecins = from medecin in context.Medecins select medecin;
        foreach (Medecin medecin in medecins)
        {
          Console.WriteLine(medecin);
        }
        // 时间段
        Console.WriteLine("Créneaux horaires--------------------------------------");
        var creneaux = from creneau in context.Creneaux select creneau;
        foreach (Creneau creneau in creneaux)
        {
          Console.WriteLine(creneau);
        }
        // 预约
        Console.WriteLine("Rendez-vous--------------------------------------");
        var rvs = from rv in context.Rvs select rv;
        foreach (Rv rv in rvs)
        {
          Console.WriteLine(rv);
        }
      }
    }
  }
}
- 第 15-27 行:使用持久化上下文清空数据库;
- 第 30 行:创建 [Client] 对象;
- 第 32 行:创建 [Medecin] 对象;
- 第 34 行:创建 [Creneau] 对象;
- 第 36 行:创建 [Rv] 对象;
- 第 37 行:创建第二个与前一个相同的 [Rv] 对象;
- 第 41 行:打开一个新上下文;
- 第 43-47 行:将之前创建的对象附加到新上下文中。请注意,考虑到依赖关系,我们本可以减少 Add 操作的次数。 但 EF 将优化需发送至数据库的 SQL 和 INSERT 指令;
- 第51行:上下文已与数据库同步。如注释所示,由于表[RVS]上的唯一性约束,两个约会中的任意一个插入操作都将失败。但更重要的是,如果同步发生在事务中,所有操作都必须回滚。因此不应进行任何插入操作。 数据库必须保持为空;
- 第 53 行:上下文已关闭;
- 第61-90行:显示数据库内容。数据库应为空。
屏幕显示如下:
- 第1行:因违反表[RVS]上的唯一性约束而引发异常;
- 第 9-12 行:数据库确实为空。因此,上下文与数据库的同步是在事务中完成的。
EF 5 中无疑还有其他值得探索的内容。但我们已掌握足够的信息,可以回到对多层架构的研究中。读者可在本文档开头找到相关文章和书籍的参考文献,以便深入了解 EF 5。
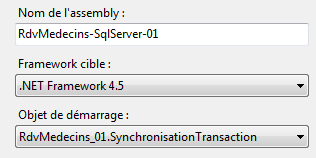
3.6. 基于 EF 5 的多层架构研究
我们回到第2段所述的案例研究。这是一个ASP.NET Web应用程序,其结构如下:
 |
我们将首先构建数据访问层 [DAO]。该层将基于 EF5。
3.6.1. 新项目
我们在当前解决方案 [1] 中创建一个新的 2012 版 VS 控制台项目:
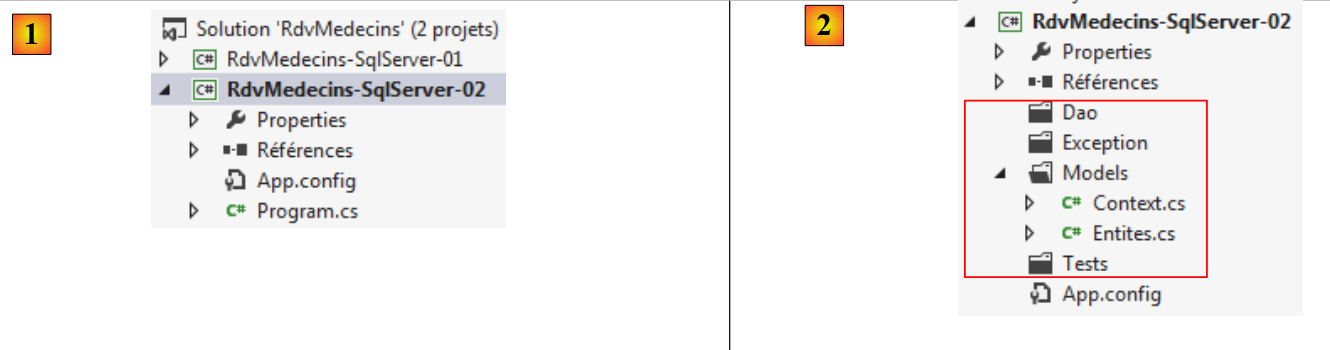 |
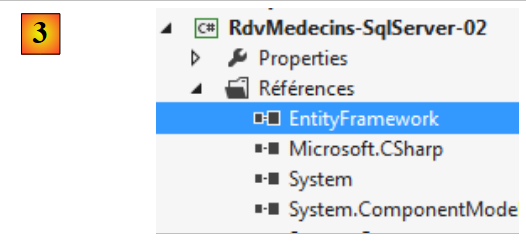
我们在此添加四个名为 [2] 的文件夹,用于存放我们的代码。文件夹 [Entites] 是从上一个项目中复制过来的 [Entites] 文件夹。 复制完成后,由于缺少正确的引用,系统报错了。我们需要添加对 Entity Framework 5 的引用。为此,我们将按照第 21 页第 3.4 节中所述的方法进行操作。引用列表如下所示:[3]:
 |
至此,项目不应再出现编译错误。我们还需从前一个项目中复制配置数据库连接的文件 [App.config]:
<?xml version="1.0" encoding="utf-8"?>
<configuration>
  <configSections>
    <!-- 有关 Entity Framework 配置的更多信息,请访问 http://go.microsoft.com/fwlink/?LinkID=237468 -->
    <section name="entityFramework" type="System.Data.Entity.Internal.ConfigFile.EntityFrameworkSection, EntityFramework, Version=5.0.0.0, Culture=neutral, PublicKeyToken=b77a5c561934e089" requirePermission="false" />
  </configSections>
  <startup>
    <supportedRuntime version="v4.0" sku=".NETFramework,Version=v4.5" />
  </startup>
  <entityFramework>
    <defaultConnectionFactory type="System.Data.Entity.Infrastructure.SqlConnectionFactory, EntityFramework" />
  </entityFramework>

  <!-- 数据库连接字符串 -->
  <connectionStrings>
    <add name="monContexte"
         connectionString="Data Source=localhost;Initial Catalog=rdvmedecins-ef;User Id=sa;Password=sqlserver2012;"
         providerName="System.Data.SqlClient" />
  </connectionStrings>
  <!-- 工厂提供程序 -->
  <system.data>
    <DbProviderFactories>
      <add name="SqlClient Data Provider"
       invariant="System.Data.SqlClient"
       description=".Net Framework Data Provider for SqlServer"
       type="System.Data.SqlClient.SqlClientFactory, System.Data,
     Version=4.0.0.0, Culture=neutral, PublicKeyToken=b77a5c561934e089"
    />
    </DbProviderFactories>
  </system.data>

</configuration>
3.6.2. Exception类
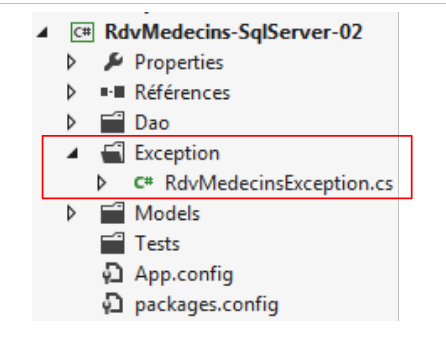
我们将使用该项目专有的异常类。该类将由 [DAO] 层输出:
 |
[DAO] 层将捕获所有向上传递至该层的异常,并将其封装为 [RdvMedecinsException] 类型的异常。该异常定义如下:
using System;

namespace RdvMedecins.Exceptions
{
  public class RdvMedecinsException : Exception
  {

    // 属性
    public int Code { get; set; }

    // 构造函数
    public RdvMedecinsException()
      : base()
    {
    }

    public RdvMedecinsException(string message)
      : base(message)
    {
    }

    public RdvMedecinsException(int code, string message)
      : base(message)
    {
      Code = code;
    }

    public RdvMedecinsException(int code, string message, Exception ex)
      : base(message, ex)
    {
      Code = code;
    }

    // 标识
    public override string ToString()
    {
      if (InnerException == null)
      {
        return string.Format("RdvMedecinsException[{0},{1}]", Code, base.Message);
      }
      else
      {
        return string.Format("RdvMedecinsException[{0},{1},{2}]", Code, base.Message, base.InnerException.Message);
      }
    }
  }
}
- 第 5 行:该类继承自 [Exception] 类;
- 第 9 行:向其基类添加了一个错误代码;
- 第 12-32 行:各个构造函数都集成了 [Code] 字段。
该项目演变如下:
 |
3.6.3. [DAO]层
 |
[DAO]层为[ASP.NET]层提供接口。要识别该层,需查看应用程序的网页:
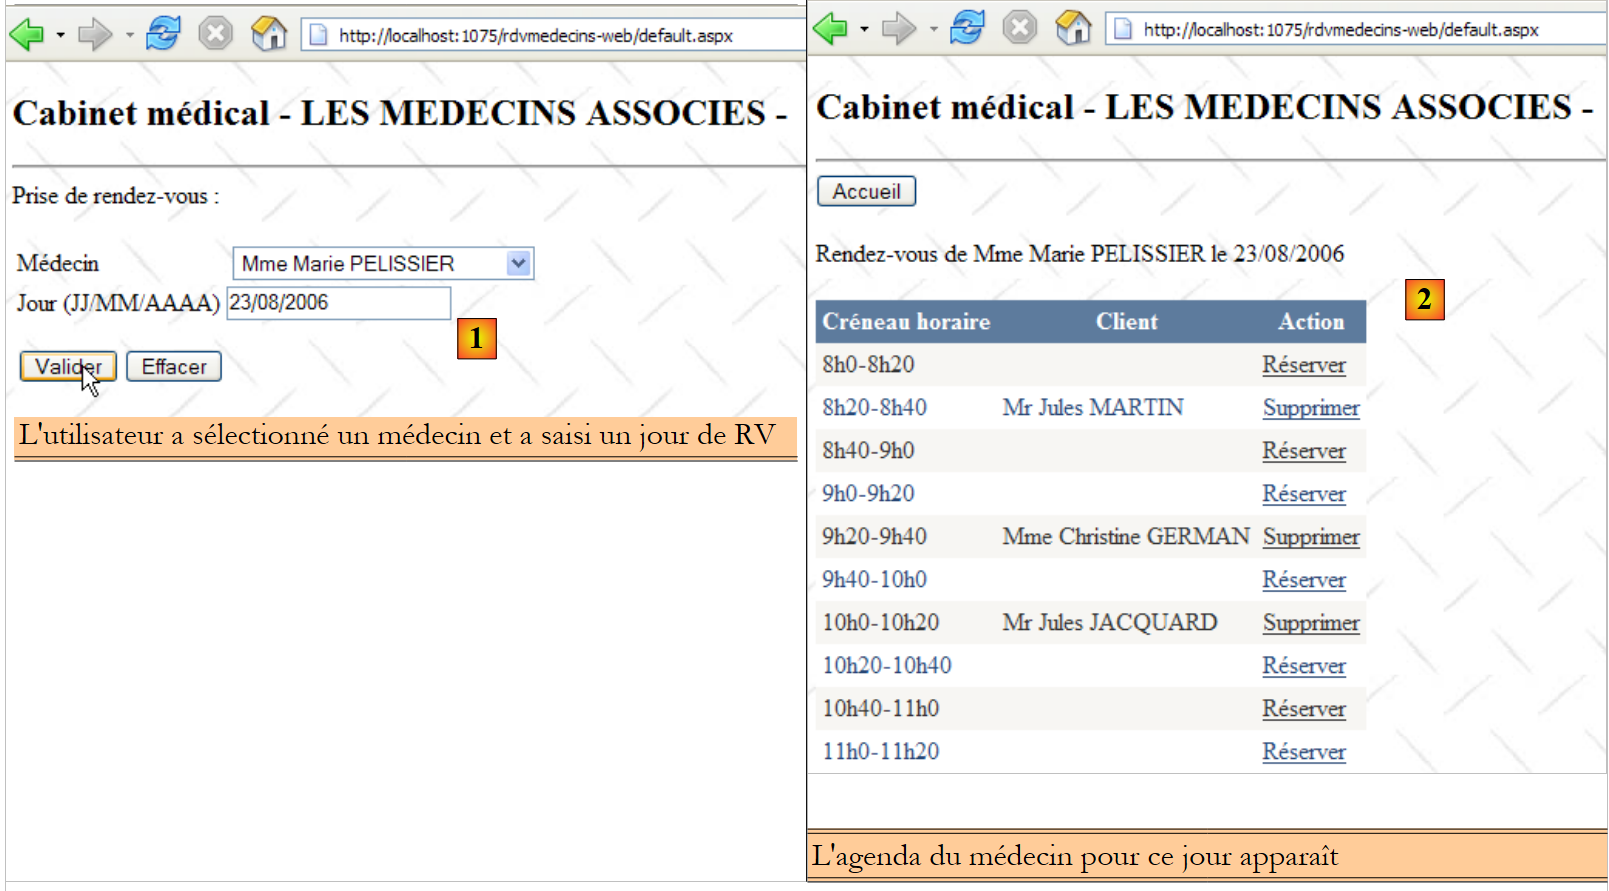 |
- 在上文的 [1] 中,下拉列表已填充了医生列表。该列表将由 [DAO] 层提供;
- 在 [2] 中,[DAO] 层将提供;
- 某位医生在特定日期的预约列表,
- 该医生可预约的时间段列表,
- 所选医生的补充信息;
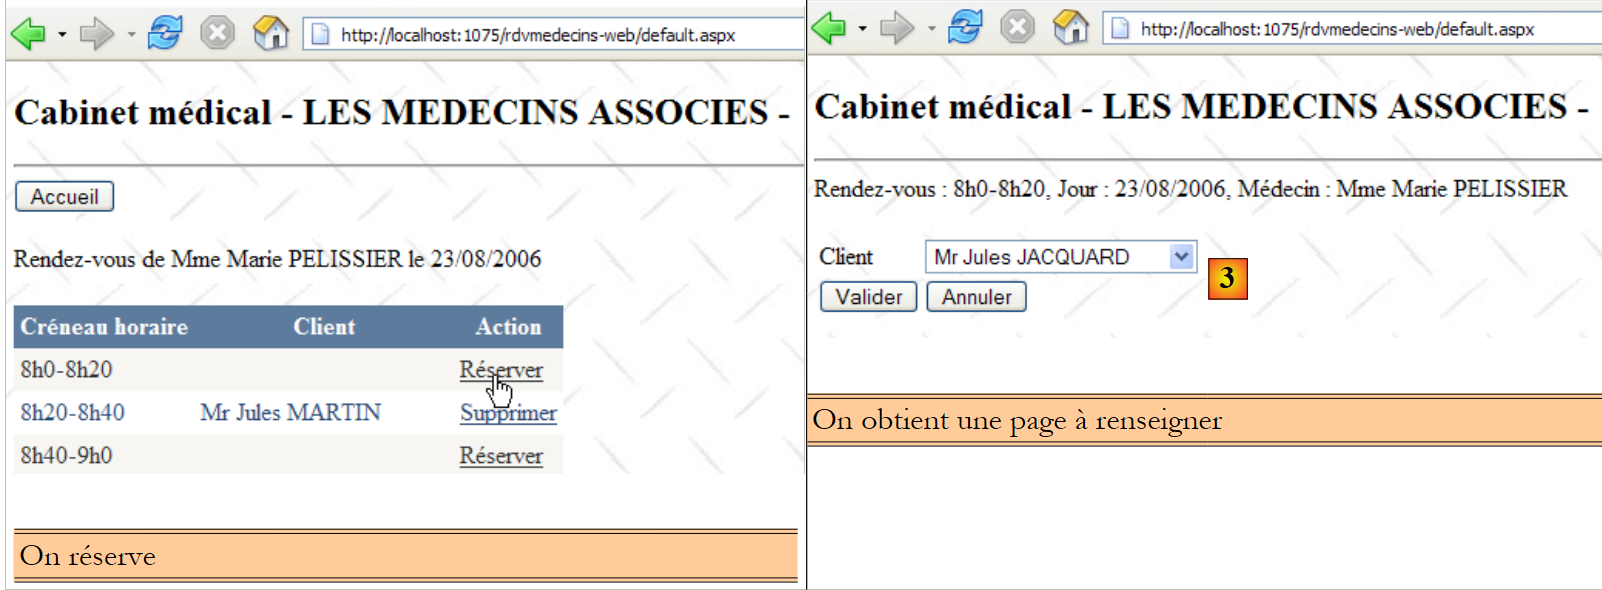 |
- 在 [3] 中,客户下拉列表将由 [DAO] 层提供;
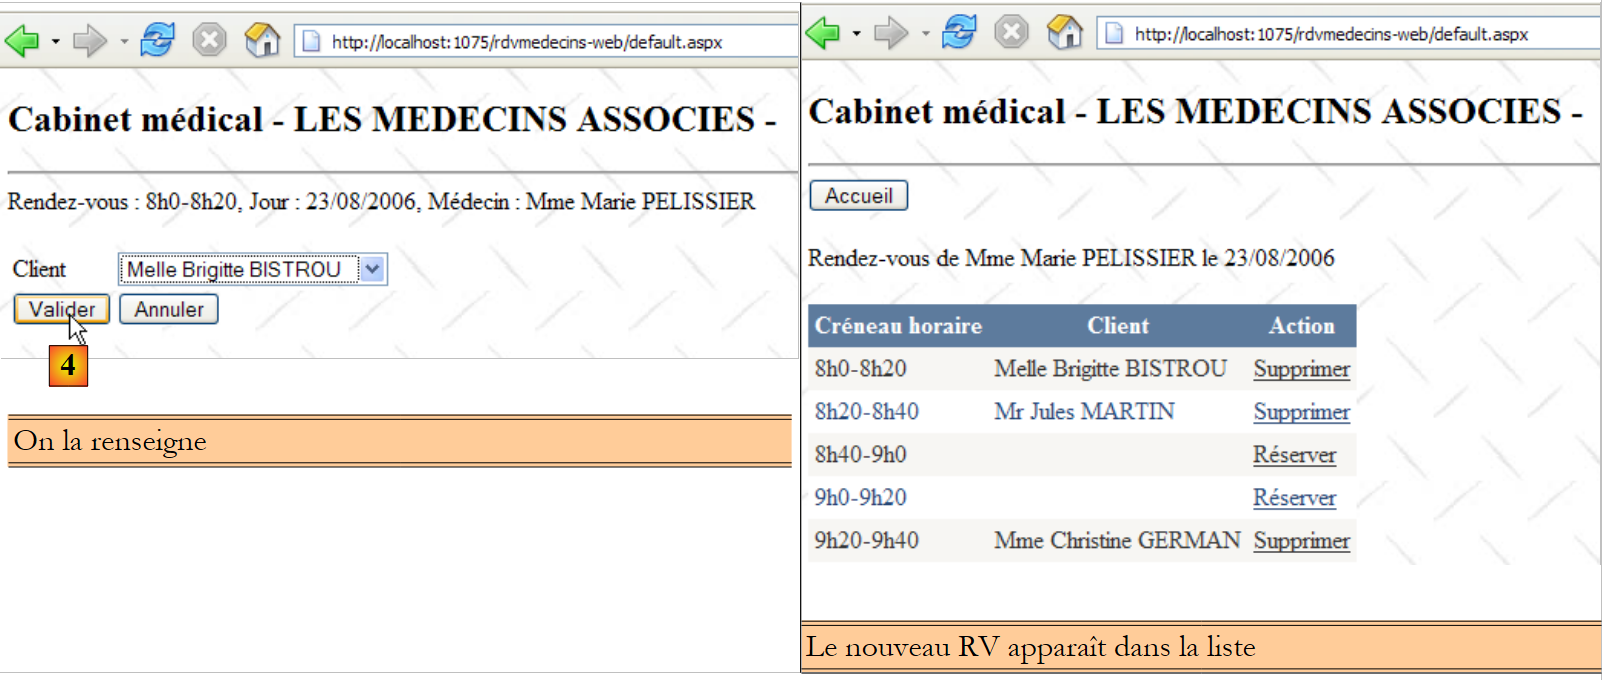 |
- 在 [4] 中,用户确认预约。[DAO] 层必须能够将其添加到数据库中。它还必须能够提供所选客户的补充信息;
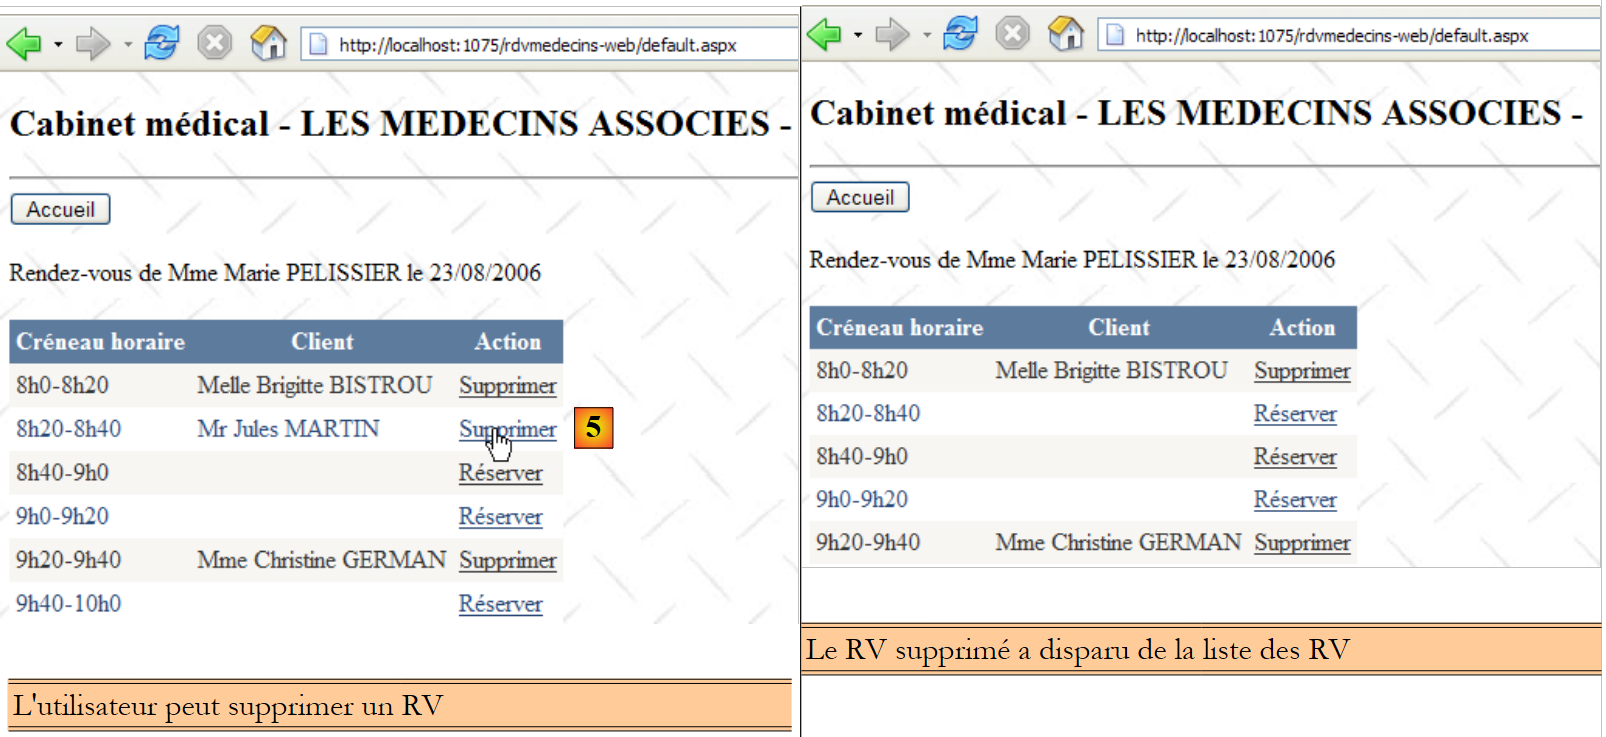 |
- 在 [5] 中,用户删除一个预约。[DAO] 层必须支持此操作。
基于上述信息,[DAO] 层中的 [IDao] 接口可能如下所示:
using System;
using System.Collections.Generic;
using RdvMedecins.Entites;

namespace RdvMedecins.Dao
{
  public interface IDao
  {
    // 客户列表
    List<Client> GetAllClients();
    // 医生列表
    List<Medecin> GetAllMedecins();
    // 某位医生的时段列表
    List<Creneau> GetCreneauxMedecin(int idMedecin);
    // 特定医生在特定日期的RV列表
    List<Rv> GetRvMedecinJour(int idMedecin, DateTime jour);
    // 添加一个 RV
    int AjouterRv(DateTime jour, int idCreneau, int idClient);
    // 删除一个 RV
    void SupprimerRv(int idRv);
    // 通过主键查找实体 T
    T Find<T>(int id) where T : class;
  }
}
第10至20行的方法源于上述分析。第22行的方法旨在解决延迟加载(Lazy Loading)带来的问题。若在[ASP.NET]层需要某个实体的依赖项,将通过此方法从数据库中获取。
该接口的 [Dao] 实现如下:
using System;
using System.Collections.Generic;
using System.Linq;
using RdvMedecins.Entites;
using RdvMedecins.Exceptions;
using RdvMedecins.Models;

namespace RdvMedecins.Dao
{
  public class Dao : IDao
  {

    //客户列表
    public List<Client> GetAllClients()
    {
      // 客户列表
      List<Client> clients = null;
      try
      {
        // 打开持久化上下文
        using (var context = new RdvMedecinsContext())
        {
          // 客户列表
          clients = context.Clients.ToList();
        }

      }
      catch (Exception ex)
      {
        throw new RdvMedecinsException(1, "GetAllClients", ex);
      }
      // 返回结果
      return clients;
    }

    // 医生列表
    public List<Medecin> GetAllMedecins()
    {
      // 医生列表
      List<Medecin> medecins = null;
      try
      {
        // 打开持久化上下文
        using (var context = new RdvMedecinsContext())
        {
          // 医生列表
          medecins = context.Medecins.ToList();
        }

      }
      catch (Exception ex)
      {
        throw new RdvMedecinsException(2, "GetAllMedecins", ex);
      }
      // 返回结果
      return medecins;
    }

    // 某位医生的时段列表
    public List<Creneau> GetCreneauxMedecin(int idMedecin)
    {
   ...
    }

    // 某医生在特定日期的RV列表
    public List<Rv> GetRvMedecinJour(int idMedecin, DateTime jour)
    {
 ...
    }

    // 添加一个 RV
    public int AjouterRv(DateTime jour, int idCreneau, int idClient)
    {
 ...
    }

    // 删除一个 RV
    public void SupprimerRv(int idRv)
    {
...
    }

    // 查找客户
    public Client FindClient(int id)
    {
...
    }

    // 查找空档
    public Creneau FindCreneau(int id)
    {
 ...
    }

    // 查找医生
    public Medecin FindMedecin(int id)
    {
....
    }

    // 查找预约
    public Rv FindRv(int id){
...
    }

  }
}
下面详细说明 [GetAllClients] 方法,该方法需返回所有客户的列表:
- 第 18-31 行:客户查询在 try/catch 块中进行。后续所有方法也将采用相同的方式;
- 第 21 行:打开一个新的上下文;
- 第24行:将[Client]实体加载到上下文中并放入列表。
方法 [GetAllMedecins] 用于返回所有医生的列表,其实现方式与此类似(第 37-57 行)。
方法 [GetCreneauxMedecin] 如下:
// 查看特定医生的可用时段列表
    public List<Creneau> GetCreneauxMedecin(int idMedecin)
    {
      // 时段列表
      try
      {
        // 打开持久化上下文
        using (var context = new RdvMedecinsContext())
        {
          // 获取医生及其接诊时段
          Medecin medecin = context.Medecins.Include("Creneaux").Single(m => m.Id == idMedecin);
          // 医生排班列表
          return medecin.Creneaux.ToList<Creneau>();
        }
      }
      catch (Exception ex)
      {
        throw new RdvMedecinsException(3, "GetCreneauxMedecin", ex);
      }
    }
- 第 9 行:打开一个新的持久化上下文;
- 第 11 行:根据主键查找医生。要求包含依赖关系 [Creneaux],该依赖关系是该医生的时段集合。如果医生不存在,Single 方法将抛出异常;
- 第13行:返回时间段列表。
方法 [GetRvMedecinJour] 应返回某位医生在指定日期内的预约列表。其代码可能如下:
// 某医生在特定日期内的RV列表
    public List<Rv> GetRvMedecinJour(int idMedecin, DateTime jour)
    {
      // 预约列表
      List<Rv> rvs = null;

      try
      {
        // 打开持久化上下文
        using (var context = new RdvMedecinsContext())
        {
          // 获取医生
          Medecin medecin = context.Medecins.Find(idMedecin);
          if (medecin == null)
          {
            throw new RdvMedecinsException(10, string.Format("Médecin [{0}] inexistant", idMedecin));
          }
          // 预约列表
          rvs = context.Rvs.Where(r => r.Creneau.Medecin.Id == idMedecin && r.Jour == jour).ToList();
        }
      }
      catch (Exception ex)
      {
        throw new RdvMedecinsException(4, "GetRvMedecinJour", ex);
      }
      // 返回结果
      return rvs;
    }
- 第13行:将具有主键的医生引入上下文;
- 第14-17行:如果不存在,则抛出异常;
- 第19行:执行查询LINQ以获取该医生的预约信息;
方法 [AjouterRv] 需向数据库添加一个预约,并返回所插入条目的主键。其代码可能如下:
// 添加一个 RV
    public int AjouterRv(DateTime jour, int idCreneau, int idClient)
    {
      // 新增预约编号
      int idRv;
      try
      {
        // 打开持久化上下文
        using (var context = new RdvMedecinsContext())
        {
          // 获取时段
          Creneau creneau = context.Creneaux.Find(idCreneau);
          if (creneau == null)
          {
            throw new RdvMedecinsException(5, string.Format("Créneau [{0}] inexistant", idCreneau));
          }
          // 获取客户
          Client client = context.Clients.Find(idClient);
          if (client == null)
          {
            throw new RdvMedecinsException(6, string.Format("Client [{0}] inexistant", idCreneau));
          }
          // 创建时段
          Rv rv = new Rv { Jour = jour, Client = client, Creneau = creneau };
          // 添加到上下文中
          context.Rvs.Add(rv);
          // 保存上下文
          context.SaveChanges();
          // 获取已添加预约的主键
          idRv = (int)rv.Id;
        }
      }
      catch (Exception ex)
      {
        throw new RdvMedecinsException(7, "AjouterRv", ex);
      }
      // 结果
      return idRv;
    }
- 第 12 行:在数据库中查找该预约的时间段;
- 第13-16行:若未找到,则抛出异常;
- 第 18 行:在数据库中查找该预约的客户;
- 第19-22行:若未找到,则抛出异常;
- 第24行:使用必要信息构建一个[Rv]对象;
- 第 26 行:将其添加到持久化上下文中;
- 第28行:将持久化上下文与数据库同步。此时,该预约将被写入数据库;
- 第30行:我们知道在与数据库同步后,插入项的主键已可用。获取所添加约会的该主键;
- 第 31 行:关闭持久化上下文。
方法 [SupprimerRv] 需根据传入的主键删除一个约会。
// 删除一个 RV
    public void SupprimerRv(int idRv)
    {
      try
      {
        // 打开持久化上下文
        using (var context = new RdvMedecinsContext())
        {
          // 获取 Rv
          Rv rv = context.Rvs.Find(idRv);
          if (rv == null)
          {
            throw new RdvMedecinsException(5, string.Format("Rv [{0}] inexistant", idRv));
          }
          // 删除 Rv
          context.Rvs.Remove(rv);
          // 保存上下文
          context.SaveChanges();
        }
      }
      catch (Exception ex)
      {
        throw new RdvMedecinsException(8, "SupprimerRv", ex);
      }
    }
- 第 7 行:新建持久化上下文;
- 第 10 行:将待删除的约会引入上下文;
- 第11-15行:若不存在,则抛出异常;
- 第16行:将其从上下文中删除;
- 第18行:将上下文与数据库同步;
- 第19行:关闭上下文。
方法 [Find<T>] 允许通过主键在数据库中查询类型为 T 的实体。其代码可能如下所示:
public T Find<T>(int id)  where T : class
    {
      try
      {
        // 打开持久化上下文
        using (var context = new RdvMedecinsContext())
        {
          return context.Set<T>().Find(id);
        }
      }
      catch (Exception ex)
      {
        throw new RdvMedecinsException(20, "Find<T>", ex);
      }
    }
- 第 8 行:Set<T> 方法用于获取一个 DbSet<T> 对象,可对其应用常规方法。
该项目的演变如下:
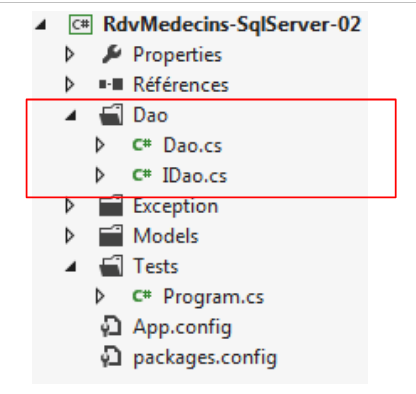 |
3.6.4. [DAO] 层的测试
我们将编写一个用于测试 [DAO] 层的测试程序。测试架构如下:
 |
一个控制台程序请求 [Spring.net] 实例化 [DAO] 层。完成此操作后,它将测试 [DAO] 层接口的各项功能。 与其使用控制台程序,不如编写一个类似 NUnit 的测试程序更为理想。[DAO] 层的测试程序可能如下所示:
using System;
using System.Collections.Generic;
using RdvMedecins.Dao;
using RdvMedecins.Entites;
using RdvMedecins.Exceptions;
using Spring.Context.Support;

namespace RdvMedecins.Tests
{
  class Program
  {
    public static void Main()
    {
      IDao dao = null;
      try
      {
        // 通过 Spring 实例化 [DAO] 层
        dao = ContextRegistry.GetContext().GetObject("rdvmedecinsDao") as IDao;

        // 显示客户
        List<Client> clients = dao.GetAllClients();
        DisplayClients("Liste des clients :", clients);

        // 显示医生
        List<Medecin> medecins = dao.GetAllMedecins();
        DisplayMedecins("Liste des médecins :", medecins);

        // 医生编号0的时间段列表
        List<Creneau> creneaux = dao.GetCreneauxMedecin((int)medecins[0].Id);
        DisplayCreneaux(string.Format("Liste des créneaux horaires du médecin {0}", medecins[0]), creneaux);

        // 某医生在指定日期的预约列表
        DisplayRvs(string.Format("Liste des RV du médecin {0}, le 23/11/2013 :", medecins[0]), dao.GetRvMedecinJour((int)medecins[0].Id, new DateTime(2013, 11, 23)));

        // 为第1号医生在第0号时段添加一个RV
        Console.WriteLine(string.Format("Ajout d'un RV au médecin {0} avec client {1} le 23/11/2013", medecins[0], clients[0]));
        int idRv1 = dao.AjouterRv(new DateTime(2013, 11, 23), (int)creneaux[0].Id, (int)clients[0].Id);
        Console.WriteLine("Rdv ajouté");
        DisplayRvs(string.Format("Liste des RV du médecin {0}, le 23/11/2013 :", medecins[0]), dao.GetRvMedecinJour((int)medecins[0].Id, new DateTime(2013, 11, 23)));

        // 在已占用时段中添加预约 - 应引发异常
        int idRv2;
        Console.WriteLine("Ajout d'un RV dans un créneau déjà occupé");
        try
        {
          idRv2 = dao.AjouterRv(new DateTime(2013, 11, 23), (int)creneaux[0].Id, (int)clients[0].Id);
          Console.WriteLine("Rdv ajouté");
          DisplayRvs(string.Format("Liste des RV du médecin {0}, le 23/11/2013 :", medecins[0]), dao.GetRvMedecinJour((int)medecins[0].Id, new DateTime(2013, 11, 23)));
        }
        catch (RdvMedecinsException ex)
        {
          Console.WriteLine(string.Format("L'erreur suivante s'est produite : {0}", ex));
        }

        // 删除一个预约
        Console.WriteLine(string.Format("Suppression du RV n° {0}", idRv1));
        dao.SupprimerRv(idRv1);
        DisplayRvs(string.Format("Liste des RV du médecin {0}, le 23/11/2013 :", medecins[0]), dao.GetRvMedecinJour((int)medecins[0].Id, new DateTime(2013, 11, 23)));
      }
      catch (Exception ex)
      {
        Console.WriteLine(string.Format("L'erreur suivante s'est produite : {0}", ex));
      }
      //暂停
      Console.ReadLine();
    }

    // 辅助方法 - 显示列表
    public static void DisplayClients(string Message, List<Client> clients)
    {
      Console.WriteLine(Message);
      foreach (Client c in clients)
      {
        Console.WriteLine(c.ShortIdentity());
      }
    }
    public static void DisplayMedecins(string Message, List<Medecin> medecins)
    {
...
    }
    public static void DisplayCreneaux(string Message, List<Creneau> creneaux)
    {
...
    }
    public static void DisplayRvs(string Message, List<Rv> rvs)
    {
...
    }
  }
}
- 第 14 行:对 [DAO] 层的引用。为了使测试与该层的实际实现无关,此引用采用 [IDao] 接口类型,而非 [Dao] 类类型;
- 第 18 行:[DAO] 层由 Spring 实例化。我们稍后将详细说明实现此功能的必要配置。我们将 Spring 返回的对象引用强制转换为 [IDao] 接口类型的引用;
- 第 21-22 行:显示客户;
- 第 25-26 行:显示医生;
- 第29-30行:显示医生编号0的预约时段列表;
- 第33行:显示医生0在2013年11月23日的预约。此时应无任何预约;
- 第37行:为医生0添加2013年11月23日的预约;
- 第39行:显示医生0在2013年11月23日的预约。此时应有一个预约;
- 第46行:再次添加同一预约。应触发异常;
- 第57行:删除之前添加的唯一预约;
- 第58行:显示医生编号0在2013年11月23日的预约。此时应无任何预约。
3.6.5. Spring.net的配置
在上述测试程序中,我们快速浏览了实例化 [DAO] 层的语句:
dao = ContextRegistry.GetContext().GetObject("rdvmedecinsDao") as IDao;
类 [ContextRegistry] 是位于命名空间 [Spring.Context.Support] 下的 Spring 类。为了能够使用 Spring,我们需要将其 DLL 添加到项目引用中。操作步骤如下:
 |
- 在 [1] 中,使用工具 [NuGet] 搜索包;
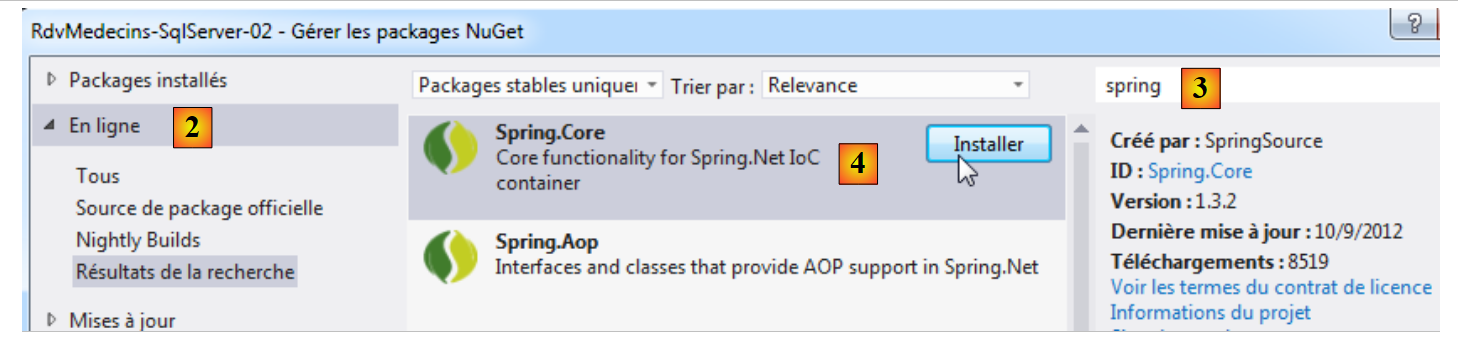 将 |
- 将 [2] 转换为 [1],在线搜索相关包;
- 在 [3] 中,将关键词 spring 输入搜索框;
- 在 [4] 中,显示描述中包含该关键词的软件包。这里,[Spring.Core] 符合我们的需求。我们安装它。
项目的引用信息如下所示:
 |
包 [Spring.Core] 依赖于包 [Common.Logging]。后者也已加载。至此,项目不应再出现错误。
但这并不意味着它就能正常运行。我们需要先在文件 [App.config] 中配置 Spring。这是该项目中最棘手的部分。新的文件 [App.config] 如下所示:
<?xml version="1.0" encoding="utf-8"?>
<configuration>
  <configSections>
    <!-- 有关 Entity Framework 配置的更多信息,请访问 http://go.microsoft.com/fwlink/?LinkID=237468 -->
    <section name="entityFramework" type="System.Data.Entity.Internal.ConfigFile.EntityFrameworkSection, EntityFramework, Version=5.0.0.0, Culture=neutral, PublicKeyToken=b77a5c561934e089" requirePermission="false" />
    <!-- spring -->
    <sectionGroup name="spring">
      <section name="context" type="Spring.Context.Support.ContextHandler, Spring.Core" />
      <section name="objects" type="Spring.Context.Support.DefaultSectionHandler, Spring.Core" />
    </sectionGroup>
    <!-- 通用日志-->
    <section name="logging" type="Common.Logging.ConfigurationSectionHandler, Common.Logging" />
  </configSections>
  <startup>
    <supportedRuntime version="v4.0" sku=".NETFramework,Version=v4.5" />
  </startup>
  <!-- Entity Framework -->
  <entityFramework>
    <defaultConnectionFactory type="System.Data.Entity.Infrastructure.LocalDbConnectionFactory, EntityFramework">
      <parameters>
        <parameter value="v11.0" />
      </parameters>
    </defaultConnectionFactory>
  </entityFramework>
  <!-- 连接字符串 -->
  <connectionStrings>
    <add name="monContexte" connectionString="Data Source=localhost;Initial Catalog=rdvmedecins-ef;User Id=sa;Password=sqlserver2012;" providerName="System.Data.SqlClient" />
  </connectionStrings>
  <system.data>
    <DbProviderFactories>
      <add name="SqlClient Data Provider" invariant="System.Data.SqlClient" description=".Net Framework Data Provider for SqlServer" type="System.Data.SqlClient.SqlClientFactory, System.Data, Version=4.0.0.0, Culture=neutral, PublicKeyToken=b77a5c561934e089" />
    </DbProviderFactories>
  </system.data>
  <!-- Spring 配置 -->
  <spring>
    <context>
      <resource uri="config://spring/objects" />
    </context>
    <objects xmlns="http://www.springframework.net">
      <object id="rdvmedecinsDao" type="RdvMedecins.Dao.Dao,RdvMedecins-SqlServer-02" />
    </objects>
  </spring>
  <!-- 配置common.logging -->
  <logging>
    <factoryAdapter type="Common.Logging.Simple.ConsoleOutLoggerFactoryAdapter, Common.Logging">
      <arg key="showLogName" value="true" />
      <arg key="showDataTime" value="true" />
      <arg key="level" value="DEBUG" />
      <arg key="dateTimeFormat" value="yyyy/MM/dd HH:mm:ss:fff" />
    </factoryAdapter>
  </logging>
</configuration>
首先,我们移除所有已知的内容:Entity Framework、连接字符串、ProviderFactory。文件修改如下:
<?xml version="1.0" encoding="utf-8"?>
<configuration>
  <configSections>
    <!-- 有关 Entity Framework 配置的更多信息,请访问 http://go.microsoft.com/fwlink/?LinkID=237468 -->
    <section name="entityFramework" ... />
    <!-- spring -->
    <sectionGroup name="spring">
      <section name="context" type="Spring.Context.Support.ContextHandler, Spring.Core" />
      <section name="objects" type="Spring.Context.Support.DefaultSectionHandler, Spring.Core" />
    </sectionGroup>
    <!-- 通用日志-->
    <sectionGroup name="common">
      <section name="logging" type="Common.Logging.ConfigurationSectionHandler, Common.Logging" />
    </sectionGroup>
  </configSections>
...
  <!-- Spring 配置 -->
  <spring>
    <context>
      <resource uri="config://spring/objects" />
    </context>
    <objects xmlns="http://www.springframework.net">
      <object id="rdvmedecinsDao" type="RdvMedecins.Dao.Dao,RdvMedecins-SqlServer-02" />
    </objects>
  </spring>
  <!-- 配置common.logging -->
  <common>
    <logging>
      <factoryAdapter type="Common.Logging.Simple.ConsoleOutLoggerFactoryAdapter, Common.Logging">
        <arg key="showLogName" value="true" />
        <arg key="showDataTime" value="true" />
        <arg key="level" value="DEBUG" />
        <arg key="dateTimeFormat" value="yyyy/MM/dd HH:mm:ss:fff" />
      </factoryAdapter>
    </logging>
  </common>
</configuration>
- 第 3-15 行:定义配置部分;
- 第 8 行:定义将管理文件 XML 中 <spring><context> 部分的类(第 19-21 行);
- 第 9 行:定义将管理文件 XML 中 <spring><objects> 部分的类(第 22-24 行);
- 第 13 行:定义了用于管理文件 XML 中 <common><logging> 部分的类(第 27-36 行);
- 第 7-14 行:内容固定。在其他项目中无需更改;
- 第18-25行:Spring配置。除第22-24行(定义Spring将实例化的对象)外,其余部分保持不变;
- 第 23 行:对象定义。id 属性可自由命名,即对象的标识符。type 属性以“类全名,包含该类的 Assembly”的形式指定待实例化的类。 此处的类是实现 [DAO] 层的类:[RdvMedecins.Dao.Dao]。要了解其程序集,需查看项目属性:
 |
在 [1] 中,需提供该程序集的名称;
- 第27-36行:"Common Logging"的配置保持不变。可能需要修改第32行的日志级别。调试阶段结束后,可将日志级别调整为INFO。
最终,Spring 的配置文件虽然乍看复杂,但实际上很简单。只需修改:
- 第22-24行,用于定义待实例化的对象;
- 第32行:日志级别。
在测试程序中,实例化 [DAO] 层的语句如下:
dao = ContextRegistry.GetContext().GetObject("rdvmedecinsDao") as IDao;
[ContextRegistry] 是 Spring 中的一个类,它利用了在 [Web.config] 或 [App.config] 文件中进行的 Spring 配置。在此,它将利用 [App.config] 文件中的以下部分:
  <spring>
    <context>
      <resource uri="config://spring/objects" />
    </context>
    <objects xmlns="http://www.springframework.net">
      <object id="rdvmedecinsDao" type="RdvMedecins.Dao.Dao,RdvMedecins-SqlServer-02" />
    </objects>
</spring>
- ContextRegistry.GetContext() 利用第 2-4 行的上下文。第 3 行表示 Spring 对象在配置文件的 [spring/objects] 部分中定义。该部分位于第 5-7 行;
- ContextRegistry.GetContext().GetObject("rdvmedecinsDao") 利用第 5-7 行所在的章节。 它返回一个指向具有 id="rdvmedecinsDao" 属性的对象的引用。该对象在第 6 行中定义。随后,Spring 将使用无参构造函数实例化由 type 属性定义的类。因此该构造函数必须存在。完成此操作后,创建的对象引用将返回给调用代码。 如果代码中再次请求该对象,Spring 仅返回对第一个创建的对象的引用。这就是被称为单例(Singleton)的设计模式。
对象的创建过程可能更为复杂。可以使用带参数的构造函数,或在对象创建后指定初始化某些字段。 有关此主题的更多信息,可阅读文章“Spring教程 IOC 适用于 .NET”,位于 URL [http://tahe.developpez.com/dotnet/springioc/]。
完成上述操作后,即可运行应用程序。屏幕显示结果如下:
结果符合预期。现在我们可以认为我们的 [DAO] 层是有效的。本教程到此可以结束。到目前为止,我们已经展示了:
- Entity Framework 5 的基础知识;
- 一个基于该 ORM 的 [DAO] 层。
让我们回顾本文开头描述的案例研究。我们从一个具有以下架构的现有应用程序开始:
 |
我们希望将其转换为:
 |
其中 EF5 已取代 NHibernate。我们刚刚构建了 [DAO2] 层。实际上,它的接口与 [DAO1] 层并不相同,后者的接口更为精简:
  public interface IDao
  {
    // 客户列表
    List<Client> GetAllClients();
    // 医生列表
    List<Medecin> GetAllMedecins();
    // 某位医生的时段列表
    List<Creneau> GetCreneauxMedecin(int idMedecin);
    // 特定医生在特定日期的 RV 列表
    List<Rv> GetRvMedecinJour(int idMedecin, DateTime jour);
    // 添加一个 RV
    int AjouterRv(DateTime jour, int idCreneau, int idClient);
    // 删除一个 RV
    void SupprimerRv(int idRv);
  }
[DAO2] 层在此接口中新增了以下方法:
// 通过主键查找实体 T
T Find<T>(int id) where T : class;
添加该方法是因为 ORM EF 5 默认采用延迟加载模式。实体进入 [ASP.NET] 层时不包含其依赖项。 上述方法允许我们在需要时检索这些依赖项,而在某些情况下我们确实需要它们。NHibernate 默认同样采用延迟加载模式,但我曾将其用于立即加载模式。实体连同其依赖项一起进入 [ASP.NET] 层。
我们将完成 ASP.NET / NHibernate 应用程序向 ASP.NET / EF 5 版本的移植工作。 但由于这已不再涉及 EF5,因此我们将不再对 Web 代码进行讲解。我们仅说明如何部署该 Web 应用程序并进行测试。该应用程序可在本教程的网站上获取。
3.6.6. 基于 [DAO] 层生成 DLL
在以下架构中:
 |
[ASP.NET]层将能够访问其右侧的DLL层。因此,我们将基于[DAO]层构建DLL层。
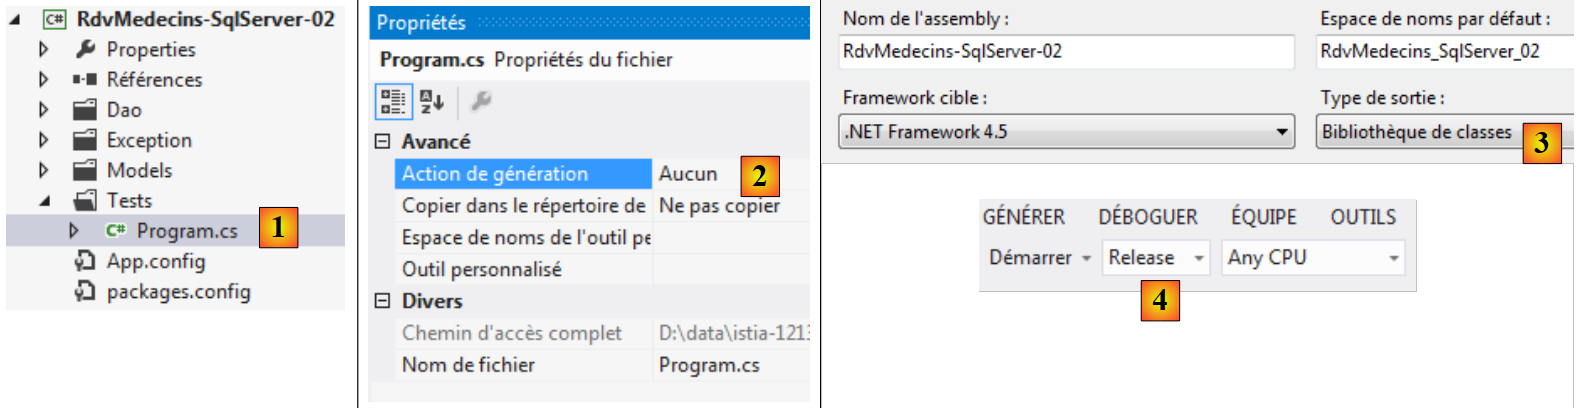 |
- 在 [1] 中,我们选中测试程序;而在 [2] 中,我们不将其包含在即将生成的 DLL 中;
- 在 [3] 中,于项目属性中指定要创建的程序集为 DLL;
- 在 [4] 中,通过 VS 的菜单,指定将生成类型为 [Release] 的程序集,其包含的信息少于类型为 [Debug] 的程序集;
 |
- 在 [5] 中,将重新生成项目的程序集。此时将生成 DLL;
- 在 [6] 中,显示项目中的所有文件;
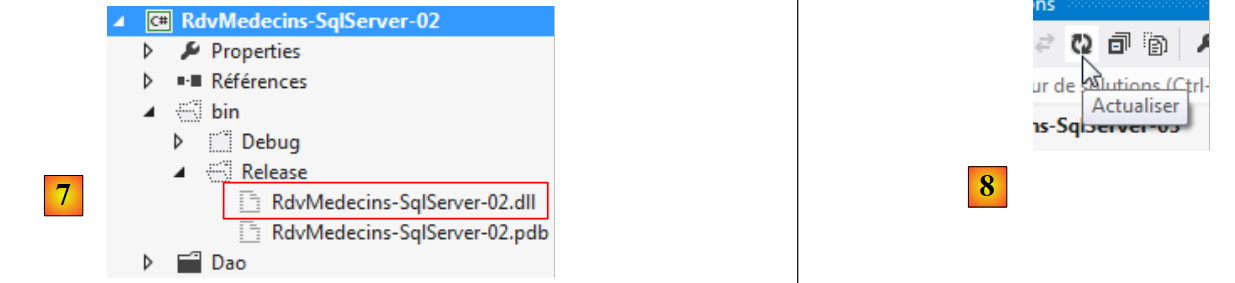 |
- 在 [7] 中,生成 [DAO] 层项目的 DLL。Web 项目 ASP.NET 将使用此文件;
- 在 [8] 中,我们刷新了项目的显示;
 |
- 在 [9] 中,[Release] 文件夹中的 DLL 文件被整合到外部文件夹 [lib] 中(该文件夹位于 [10] 之外)。 Web项目将从该位置获取其引用。
3.6.7. [ASP.NET]层
我们将在此说明如何将应用程序 [ASP.NET / NHibernate] 移植到应用程序 [ASP.NET / EF 5]。 我们将使用 Visual Studio Express 2012 for Web 进行操作,该软件可在 URL [http://www.microsoft.com/visualstudio/fra/downloads] 上免费获取。
我们将基于使用 VS 2010 创建的现有 Web 项目进行操作。
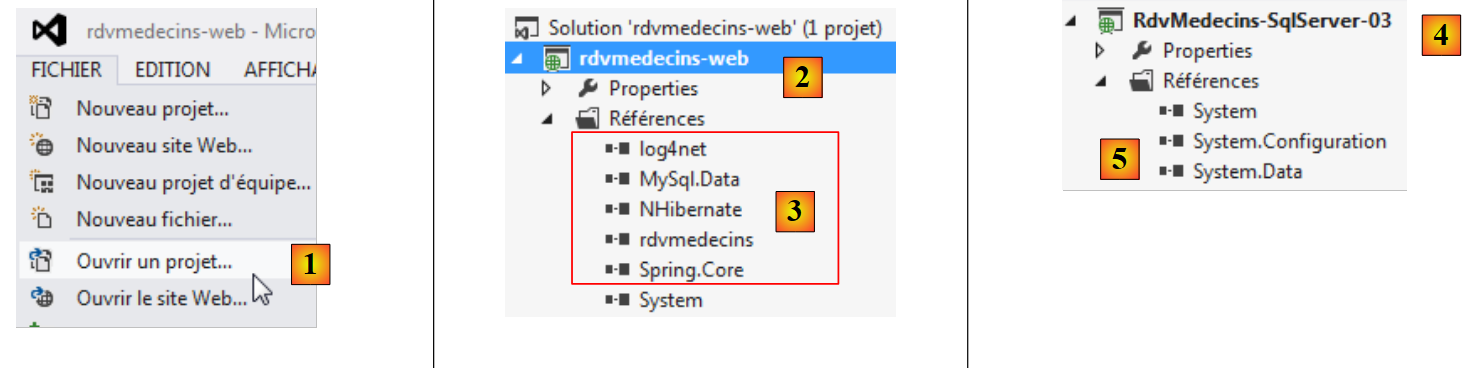 |
- 在 [1] 中,打开现有项目:
- 在 [2] 中,加载的项目具有以下引用 [3]:
- [NHibernate] 是框架 NHibernate 中的 DLL,
- [Spring.Core] 是框架 Spring.net 下的 DLL,
- [log4net] 是 log4net 日志框架中的 DLL。该框架被 Spring.net 使用,
- [MySql.Data] 是 SGBD 和 MySQL 的驱动程序 ADO.NET,
- [rdvmedecins] 是基于 NHibernate 构建的 [DAO] 层的 DLL;
- 在 [4] 中,我们更改了项目名称;而在 [5] 中,我们删除了之前的引用;
 |
- 在 [6] 中,我们向项目添加引用;
- 在 [7] 中,我们在向导中使用 [Parcourir] 选项;
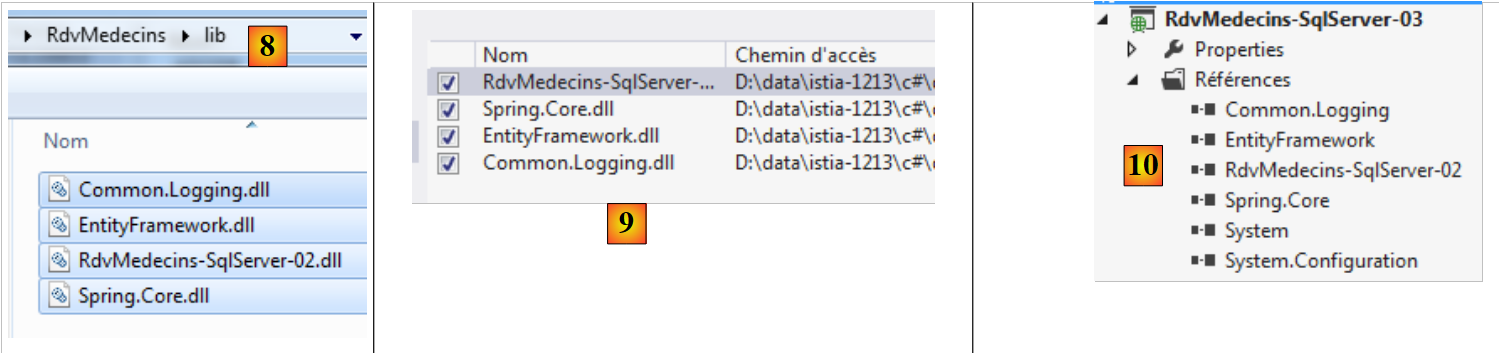 |
- 在 [8] 中,我们选中项目 2 中所有先前已放入文件夹 [lib] 的 DLL 文件;
- 在[9]中,生成一份汇总表并进行确认;
- 在[10]中,该网页项目及其新引用。
完成上述操作后,项目结构如下:
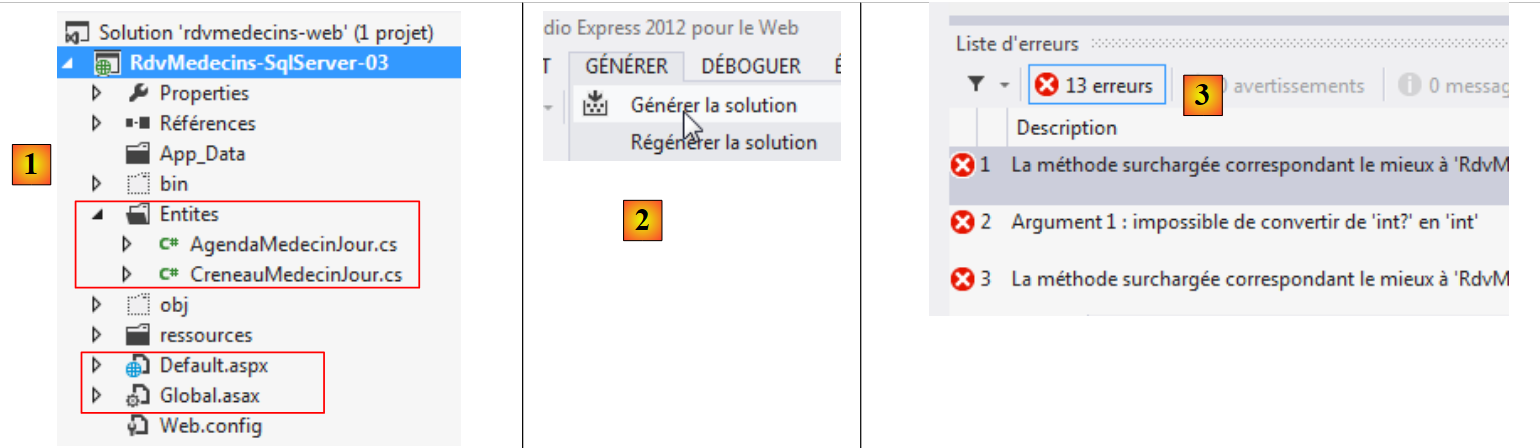 |
- 在 [1] 中,网页管理代码分布在两个文件 [Global.asax] 和 [Default.aspx] 中。辅助代码已放置在 [Entites] 文件夹中。 最后,应用程序由文件 [Web.config] 进行配置;
- 在 [2] 中,我们生成项目的程序集;
- 而在 [3] 中,出现了错误。
让我们来分析这些错误,例如以下这个:
![]()
及其说明:
![]()
[medecin.Id] 的类型是 int?而方法 [GetCreneauxMedecin] 的类型是 int。因此需要使用 cast。 由于项目 ASP.NET / NHibernate 项目中的实体主键类型为 int,而 ASP.NET / EF 项目中的主键类型为 int?。修正所有此类错误并重新生成项目后,错误便消失了。
在运行项目之前,我们还有一处细节需要处理:由 Spring 框架实例化 [DAO] 层。该操作在 [Global.asax] 中完成:
protected void Application_Start(object sender, EventArgs e)
    {
      // 将数据库中的某些数据缓存
      try
      {
        // [dao] 层的实例化
        Dao = ContextRegistry.GetContext().GetObject("rdvmedecinsDao") as IDao;
        ...
      }
      catch (Exception ex)
      {...
      }
    }
在 [DAO] 层的测试程序中,该程序通过以下方式实例化了 [DAO] 层:
dao = ContextRegistry.GetContext().GetObject("rdvmedecinsDao") as IDao;
这两种方法是相同的。需要指出的是,[DAO] 层的实例化是基于在 [App.config] 中进行的配置。 随后,我们将Web项目中的当前内容[Web.config]替换为[DAO]层项目中[App.config]的内容,以实现相同的配置。
现在我们可以进行首次运行了。主页显示为 [1]:
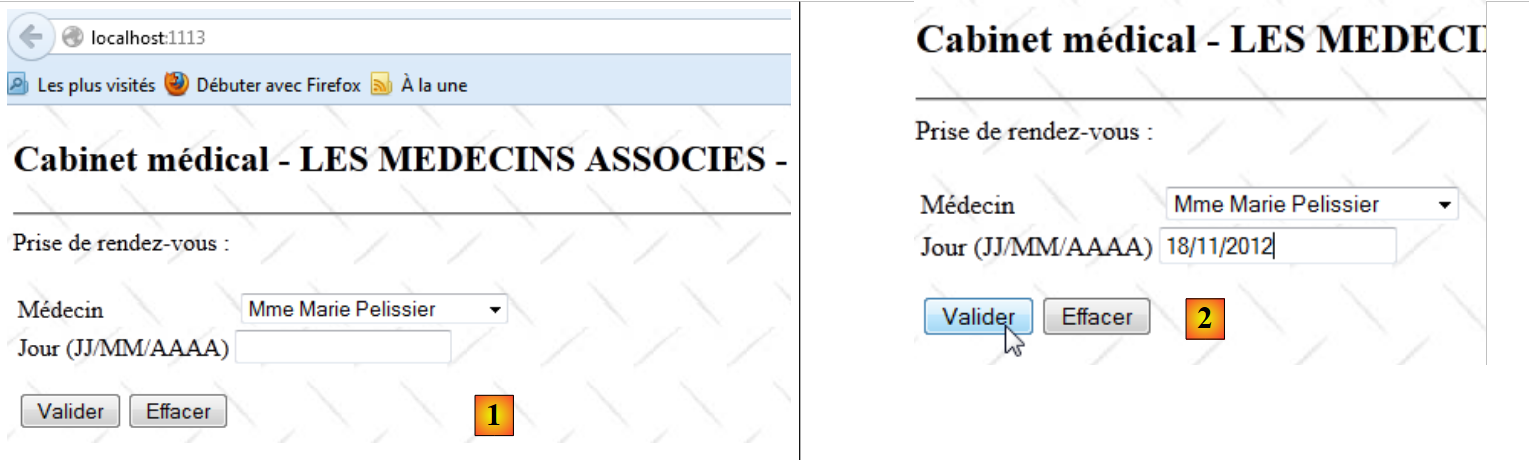 |
- 在 [2] 中,输入一个预约日期并确认;
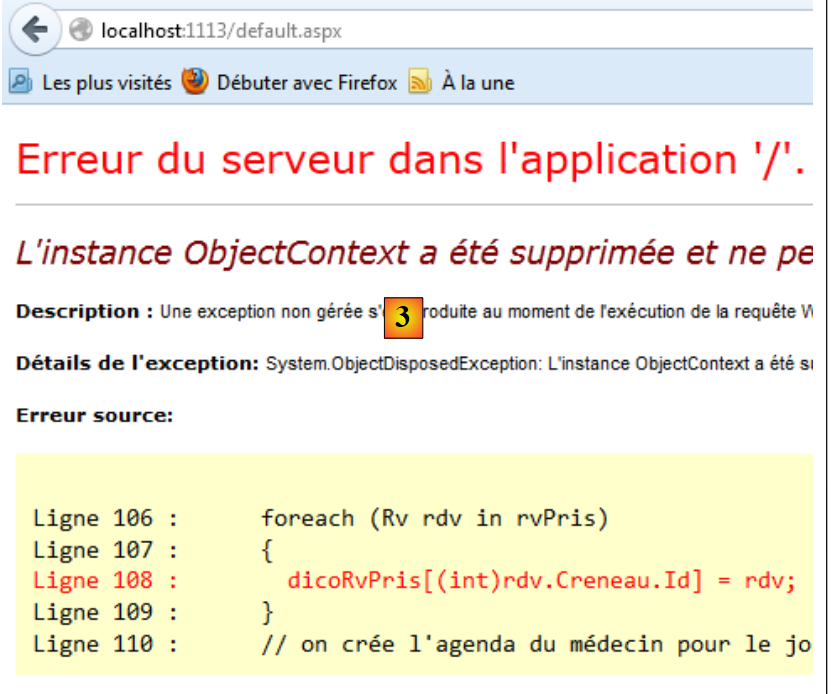 |
- 在 [3] 页面中,出现错误。
查看页面显示的错误信息,发现报告的异常是延迟加载(Lazy Loading)异常:尝试加载对象的依赖项时,管理该对象的持久化上下文已被关闭。 该对象现在处于“脱离”状态。此错误是由于 NHibernate 被用作 Eager Loading 模式,而 EF 默认采用 Lazy Loading 工作模式所致。在上面的红色标注行中:
- rdv 代表一个 [Rv] 对象,该对象在加载时未包含其依赖项;
- 为了求值 rdv.Creneau.Id,应用程序尝试加载依赖项 rdv.Creneau。但由于已不在该上下文中,因此无法加载,从而引发异常。
此处的解决方案很简单。在第 108 行,我们创建了一个字典条目,其键为预约时段的主键。而实体 [Rv] 恰好封装了关联时段的主键。因此,我们编写如下代码:
dicoRvPris[(int)rdv.CreneauId] = rdv;
我们再次尝试执行。这次出现的错误如下:
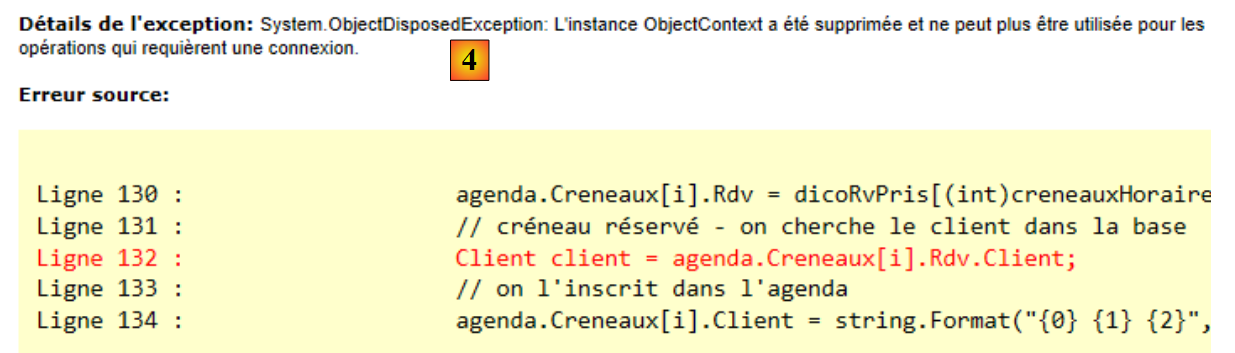 |
该错误性质相似。第 132 行,试图在 ASP.NET 层中加载 [Rv] 对象的依赖项 [Client],这超出了上下文范围。 必须从数据库中检索对象 [Client]。为解决此问题,已在接口 [IDao] 中添加了以下方法:
    // 通过主键查找实体 T
    T Find<T>(int id) where T : class;
该方法将支持检索依赖项。因此,上述错误的代码行将重写为如下形式:
Client client = Global.Dao.Find<Client>(agenda.Creneaux[i].Rdv.ClientId);
再次需要指出的是,实体包含其外键具有重要意义。在此,实体 [Rv] 使我们能够访问关联依赖项 [Creneau] 的外键。完成这两项修正后,应用程序即可正常运行。 欢迎读者测试本文网站示例下载区中的 [RdvMedecins-SqlServer-03] 应用程序。
3.7. Conclusion
我们已成功完成了 ASP.NET / NHibernate 应用程序的移植:
 |
迁移至 ASP.NET / EF 5 应用程序:
 |
虽然该架构本应让我们能够完整保留 [ASP.NET] 层,但出于以下两个原因,我们不得不对其进行修改:
- 实体类型并不完全一致。NHibernate实体的主键类型为int,而EF 5的主键类型为int?。这导致我们不得不将cast引入Web代码中;
- 两个 ORM 实体的加载模式也不相同:NHibernate 采用 Eager Loading,而 EF 5 采用 Lazy Loading。 这促使我们为 [DAO] 层的接口添加了一个通用方法,用于通过主键检索实体。
尽管如此,移植过程相当简单,这再次证明了分层架构以及使用 Spring 或其他依赖注入框架进行依赖注入的合理性(如果还需要证明的话)。
接下来,我们将评估 SGBD 的变更对原有架构的影响。我们将把所有原有项目迁移到另外四个 SGBD 实例上:
- Oracle Database Express Edition 11g Release 2;
- MySQL 5.5.28;
- PostgreSQL 9.2.1;
- Firebird 2.1.
代码将不再更改。仅以下内容会发生变化:
- 实体中用于控制实体访问竞争的字段定义;
- 配置文件 [App.config] 或 [Web.config];
我们将仅对发生变更的内容进行说明。