4. 模板与表单
到目前为止,视图都是自己生成响应:文本、JSON,以及写成字符串的少量 HTML 标签。在 MVC 应用中,生成页面是 V 的职责,[Django] 为此调用模板:一个描述页面的文件,其中有占位符,用于视图传给它的数据——即模板上下文(MVC 的 M 模型;见引言)。
[Django] 有自己的模板引擎和自己的模板语言 DTL(Django Template Language)。它也可以使用其他引擎,例如 [Jinja2],即 [Flask] 所使用的引擎(设置 [TEMPLATES]);本文档重点介绍所有 [Django] 应用都会使用的 DTL。模板是一个文本文件,这里是 HTML(从扩展名 [.html] 可知),存放在名为 [templates] 的文件夹中,其中有三种标签会在服务器上被解释:
- [{{ variable }}]:上下文变量的值,插入页面中;
- [{% tag %}]:控制引擎的标签:条件([{% if %}])、循环([{% for %}])、模板继承([{% extends %}]、[{% block %}])、包含([{% include %}])、生成 URL([{% url %}])等等;
- [{# comment #}]:不会出现在生成页面中的注释。它只能写在一行内;多行注释写在 [{% comment %}] 和 [{% endcomment %}] 标签之间。
其余所有内容都会原样复制。表达式不是用 [Python] 编写的,而是用 DTL 这种有意受到限制的语言编写:[model.title] 指字典中的键 [title] ,或对象的属性 [title] ,或列表中的元素 [title] ([Django] 按此顺序尝试),而且如果它是方法,[Django] 会不带任何参数地调用它;过滤器转换一个值([name|upper] 把名称转为大写);标签执行操作。仅此而已:DTL 没有算术运算符,没有带参数的函数调用,也没有赋值。这是有意为之:[Django] 的创建者希望模板由平面设计师来编写,避免应用逻辑悄悄混入页面。因此,计算要在 [Python] 中完成——在视图中或上下文对象的方法中——而模板只是显示结果。受其启发的 [Twig] ([Symfony])和 [Jinja2] ([Flask])的语言则更为宽松:它们可以执行计算([total / count])并调用带参数的函数。最后,模板不会在每次请求时重新解析:首次使用时,[Django] 会解析它并把它转换为节点列表——一个 [Python] 对象——保存在内存中并在之后重复使用(在调试模式下,如果模板被修改,则会重新解析)。我们来看看这个列表是什么样子。
4.1. 示例 13:第一个模板
| 13-first-view/
├── config/
│ ├── settings.py
│ ├── urls.py
│ └── ...
├── pages/
│ ├── __init__.py
│ ├── urls.py
│ ├── viewmodels.py
│ └── views.py
├── templates/
│ └── pages/
│ ├── index.html
│ └── unknown.html
└── manage.py
|
4.1.1. 配置:config/settings.py
模板引擎通过设置 [TEMPLATES] 来配置:
| # config/settings.py:示例 13 的配置
from pathlib import Path
BASE_DIR = Path(__file__).resolve().parent.parent
DEBUG = True
SECRET_KEY = "django-insecure-_ph!-_ox*o_&n8o2i=ykjwic(j9!mwf!cc2(()%nzdrs9ssai_"
ALLOWED_HOSTS = []
LANGUAGE_CODE = "en"
TIME_ZONE = "Europe/Paris"
ROOT_URLCONF = "config.urls"
WSGI_APPLICATION = "config.wsgi.application"
INSTALLED_APPS = [
"pages",
]
# 模板引擎:这里只有一个,即 Django 的引擎(DTL,Django Template
# Language),它在项目的 templates 文件夹中查找模板
TEMPLATES = [
{
"BACKEND": "django.template.backends.django.DjangoTemplates",
"DIRS": [BASE_DIR / "templates"],
},
]
|
- 第 19–24 行:[TEMPLATES] 是模板引擎的列表,每个引擎由一个字典描述。这里只有一个:[BACKEND] 指向引擎 [Django](DTL);[DIRS] 是它搜索模板的文件夹列表:项目的 [templates] 文件夹。配置还可以指示引擎到 [templates] 文件夹中查找模板,这些文件夹属于配置 [INSTALLED_APPS] 中的每个应用([APP_DIRS: True],示例 18):可复用的应用就是这样提供自己的模板的。
模板存放在名为 [pages] 的子文件夹中,该子文件夹以应用命名:这是标准做法,可以避免两个应用各自有一个 [index.html] 模板而互相覆盖。
4.1.2. 模板上下文:pages/viewmodels.py
| # pages/viewmodels.py:视图的模型,即 Python 视图传给模板的数据
from dataclasses import dataclass
@dataclass(frozen=True)
class PageModel:
title: str
message: str
time: str
|
模板的上下文是一个 [Python] 字典。这里它只有一个条目 [model],是类 [PageModel] 的一个不可变对象(见示例 03),其中包含模板要显示的三条信息。并不要求用类来定义模板的上下文:也可以向模板传递三个独立的变量。不过,类可以说明模板所期望的内容,并让编辑器能够检查视图的代码。案例研究将采用这种方式,每个重要页面都有自己的模板类。
4.1.3. 视图:pages/views.py
| # pages/views.py:返回由模板构建的页面的视图
from django.shortcuts import render
from django.utils import timezone
from django.views.decorators.http import require_GET
from .viewmodels import PageModel
# render:模板引擎根据模板构建页面
# templates/pages/index.html 以及上下文(一个由提供给模板的变量
# 组成的字典,这里只有一个变量 model);生成的页面是响应的
# 正文
@require_GET
def index(request):
model = PageModel(
"My first template",
"This page was built by Django, on the server.",
# 时间,使用应用的时区(TIME_ZONE 设置)
timezone.localtime().strftime("%H:%M:%S"))
return render(request, "pages/index.html", {"model": model})
# 同一个模板配合另一个模型;或另一个模板,带 404 状态码
@require_GET
def hello(request, name):
if name == "unknown":
# status:响应的状态码
return render(request, "pages/unknown.html", {"name": name}, status=404)
model = PageModel(
f"Hello {name}",
"This time, the title of the page comes from the URL.",
timezone.localtime().strftime("%H:%M:%S"))
return render(request, "pages/index.html", {"model": model})
|
- 第 16–20 行:视图构造模型。来自 [timezone.localtime()] 的 [django.utils.timezone] 模块,返回应用时区下的当前时间(设置 [TIME_ZONE],[Europe/Paris]);[strftime] 对其进行格式化:[%H] 表示小时,[%M] 表示分钟,[%S] 表示秒;
- 第 21 行:快捷函数 [render] (来自 [django.shortcuts] 模块,示例 04)让模板引擎生成页面。它接收请求、模板名称(文件路径,相对于某个模板文件夹)和上下文:一个字典,其中每个键都成为一个模板变量——这里只有一个:[model]。[render] 返回一个 [HttpResponse] 对象,其响应体是渲染后的页面(类型为 [text/html]);
- 第 27–29 行:另一个模板,带有不同的变量([name])。[render] 的 [status] 参数指定响应码:这里是 404,用于自定义错误页面;
- 第 30–34 行:与视图 [index] 相同的模板,但模型不同。这就是把视图与模板分离的好处:同一个模板可以用于多个视图。
路由([pages/urls.py])把 [/] 与视图 [index] 关联,并把 [/hello/<str:name>] 与视图 [hello] 关联。
4.1.4. 模板:templates/pages/index.html
| <!doctype html>
<html lang="en">
<head>
<meta charset="utf-8">
{# {{ ... }}:变量的值,插入到页面中 #}
<title>{{ model.title }}</title>
</head>
<body>
<h1>{{ model.title }}</h1>
<p>{{ model.message }}</p>
<p>Page built at {{ model.time }}.</p>
</body>
</html>
|
- 第 5 行:DTL 的注释;
- 第 6 行:[{{ model.title }}] 插入 [title] 属性的值,该属性属于变量 [model]。点是 DTL 的访问运算符,而 [Python] 会视情况写成 [model.title] 或 [model["title"]], 。
由 [{{ }}] 插入的所有内容都会被转义:字符 [<]、[>]、[&]、["]和 ['] 会被替换为它们的 HTML 实体。这就是函数 [format_html] 在示例 09 中所起的作用,但这次是自动的:因此模板不可能无意中把用户提供的 HTML 插入页面。
4.1.5. 模板:templates/pages/unknown.html
| <!doctype html>
<html lang="en">
<head>
<meta charset="utf-8">
<title>Unknown</title>
</head>
<body>
<h1>Nobody is called [{{ name }}] here.</h1>
</body>
</html>
|
模板不一定要接收对象:变量 [name] 是一个字符串。
4.1.6. 执行
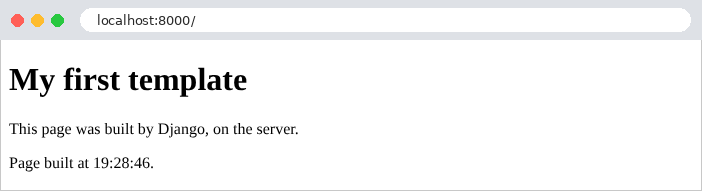
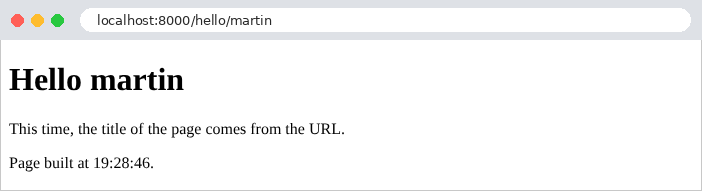
显示的时间是应用时区的时间。原始响应展示了引擎的工作方式:[{{ }}] 标签已被替换为它们的值,注释已经消失(留下一个带缩进的空行)。
| curl -i http://localhost:8000/
|
| HTTP/1.1 200 OK
Content-Type: text/html; charset=utf-8
<!doctype html>
<html lang="en">
<head>
<meta charset="utf-8">
<title>My first template</title>
</head>
<body>
<h1>My first template</h1>
<p>This page was built by Django, on the server.</p>
<p>Page built at 19:28:44.</p>
</body>
</html>
|
“自定义”错误页面,随后是包含 HTML 和撇号的名称([<b>martin'],经过 URL 编码):
| curl -i http://localhost:8000/hello/unknown
curl "http://localhost:8000/hello/%3Cb%3Emartin'"
|
| HTTP/1.1 404 Not Found
Content-Type: text/html; charset=utf-8
<!doctype html>
<html lang="en">
<head>
<meta charset="utf-8">
<title>Unknown</title>
</head>
<body>
<h1>Nobody is called [unknown] here.</h1>
</body>
</html>
<!doctype html>
...
<title>Hello <b>martin'</title>
</head>
<body>
<h1>Hello <b>martin'</h1>
<p>This time, the title of the page comes from the URL.</p>
...
|
标签 [<b>] 被转义了,视图和模板都无需做任何事(撇号也被转义了:['])。最后来看 [Django] 在内存中存储的模板。命令 [python manage.py shell] 会打开一个 [Python] 控制台,其中 [Django] 已就绪;选项 [-c] 使其执行几条指令:
| python manage.py shell -c "from django.template.loader import get_template; print(*get_template('pages/index.html').template.nodelist, sep='\n')"
|
| <TextNode: '<!doctype html>\n<html lan'>
<TextNode: '\n <title>'>
<Variable Node: model.title>
<TextNode: '</title>\n</head>\n<body>\n '>
<Variable Node: model.title>
<TextNode: '</h1>\n <p>'>
<Variable Node: model.message>
<TextNode: '</p>\n <p>Page built at '>
<Variable Node: model.time>
<TextNode: '.</p>\n</body>\n</html>\n'>
|
模板已变成一个节点列表:文本片段([TextNode],其显示内容被截断),原样复制;以及变量([VariableNode]),其值在上下文中查找,然后被转义。注释没有留下任何节点。生成页面就是遍历这个列表并重新拼装文本片段。因此,模板只不过是编写生成 HTML 的 [Python] 函数的一种更安全、更易读的方式。
4.2. 示例 14:模板语言
本示例把 DTL 的主要结构组合到一个模板中。
4.2.1. 模型和视图
模板模型由三个不可变数据类描述:
| # basics/viewmodels.py:示例 14 的模板的模型
from dataclasses import dataclass
@dataclass(frozen=True)
class Address:
street: str
city: str
@dataclass(frozen=True)
class Product:
name: str
price: float
in_stock: bool
@dataclass(frozen=True)
class BasicsModel:
title: str
name: str
# str | None:一个字符串,或 None
nickname: str | None
html: str
logged_in: bool
currency: str
products: list[Product]
cart: list[Product]
address: Address
# @property:像属性一样读取的方法(model.total)。模板
# 语言不能做计算:计算在 Python 中完成
@property
def total(self) -> float:
return sum(p.price for p in self.products)
@property
def average_price(self) -> float:
return self.total / len(self.products)
|
- 第 24 行:[str | None]:一个字符串,或 [None] (示例 06);
- 第 28–29 行:[Product] 对象的列表;
- 第 34–40 行:由于 DTL 无法执行计算,模板所需的计算(总价、平均价格)是模型的方法。装饰器 [@property] 把方法变成属性:读取时像属性一样,不带括号([model.total]),DTL 就是这样看待它的。为简单起见,这里的价格是 [float] 类型(示例 06 说明了为什么我们更喜欢整数美分)。
模型包含各种类型的值:字符串、[None]、布尔值、对象列表、空列表,以及包含其他对象的对象。
| # basics/views.py:使用 Django 模板语言主要结构的模板
from django.shortcuts import render
from django.views.decorators.http import require_GET
from .viewmodels import Address, BasicsModel, Product
@require_GET
def index(request):
# 具名参数:每个值按名称与一个属性相关联
model = BasicsModel(
title="Template basics",
name="Martin",
nickname=None,
html="<b>this is HTML</b>",
logged_in=True,
currency="€",
products=[
Product("Keyboard", 25, True),
Product("Mouse", 12.5, False),
Product("Screen", 149, True),
],
cart=[],
address=Address("12 rue des Lilas", "Angers"))
return render(request, "basics/index.html", {"model": model})
|
视图使用命名参数构造模型(见示例 02):每个值前面都有它所对应的属性名称,这使得尽管参数很多,调用仍然易读。
4.2.2. 模板:templates/basics/index.html
| <!doctype html>
<html lang="en">
<head>
<meta charset="utf-8">
<title>{{ model.title }}</title>
</head>
<body>
<h1>{{ model.title }}</h1>
{% comment %}
1. 显示模型的一个值;None 显示为……None;default 过滤器
替换空值(None、""、0、空列表……)。单行注释可以写成 Django 模板注释;
这一条跨多行,写在 comment 与 endcomment 之间
{% endcomment %}
<p>1. Name: {{ model.name }} - nickname: [{{ model.nickname }}] [{{ model.nickname|default:"none" }}]</p>
{# 2. {{ }} 会转义 HTML;safe 过滤器按原样插入 #}
<p>2a. {{ model.html }}</p>
<p>2b. {{ model.html|safe }}</p>
{# 3. 一个条件 #}
{% if model.logged_in %}
<p>3. You are logged in.</p>
{% else %}
<p>3. You are not logged in.</p>
{% endif %}
{# 4. 一个循环:forloop 变量描述循环的状态 #}
<p>4. Our products:</p>
<ul>
{% for product in model.products %}
<li>no. {{ forloop.counter0 }}: {{ product.name }}, {{ product.price }} {{ model.currency }}
{{ product.in_stock|yesno:"(in stock),(sold out)" }}
{% if forloop.first %} - the first{% endif %}
{% if forloop.last %} - the last, seen by {{ model.name }}{% endif %}
</li>
{% endfor %}
</ul>
{# 5. 空列表:for 循环的 empty 块 #}
<p>5. Your cart:
{% for p in model.cart %}<span>{{ p.name }}</span>{% empty %} it is empty.{% endfor %}
</p>
{% comment %}
6. with:一个模板变量;length 过滤器统计商品数量;
floatformat 对数字四舍五入,并按语言(LANGUAGE_CODE 设置)书写
{% endcomment %}
{% with count=model.products|length %}
<p>6. {{ count }} products, for a total of {{ model.total }} {{ model.currency }};
average price: {{ model.average_price|floatformat:2 }} {{ model.currency }}</p>
{% endwith %}
{# 7. 对象中的对象,以及一个转换为大写的过滤器 #}
<p>7. Address: {{ model.address.street }}, {{ model.address.city|upper }}</p>
{# 8. verbatim:Django 原样复制、不予解释的文本 #}
<p>8. Braces displayed as they are: {% verbatim %}{{ model.name }}{% endverbatim %}</p>
</body>
</html>
|
- 第 9–13 行:多行注释;
- 第 14 行:值 [None] 显示为…… [None]:这是 [None] 的文本表示。过滤器 [default] 用默认值替换“空”值([None]、空字符串、0、空列表等)。过滤器通过竖线应用,并可以在冒号后带一个可选参数:[value|filter:"parameter"]。上下文中完全不存在的变量([model.unknown])会显示为空字符串,而不会报错;
- 第 16–17 行:[{{ }}] 会转义 HTML(2a);而过滤器 [safe] 则原样插入值,不进行转义(2b)。[safe] 只用于应用自己生成的 HTML,绝不能用于用户输入。[{% autoescape off %}] 标签会对模板的整个区段禁用转义;
- 第 19–23 行:条件:[{% if %}]、[{% elif %}]、[{% else %}]、[{% endif %}]。每个块都由一个 [{% end... %}] 标签关闭。条件可以使用运算符 [==]、[!=]、[<]、[>]、[<=]、[>=]、[in]、[not]、[and]、[or];
- 第 27–33 行:循环 [{% for ... in ... %}] …… [{% endfor %}]。在循环内部,特殊变量 [forloop] 描述循环的状态:[forloop.counter0] (迭代序号,从 0 开始)、[forloop.counter] (从 1 开始)、[forloop.first]、[forloop.last] (在第一次和最后一次迭代时为真)、[forloop.revcounter] (剩余的迭代次数)。循环外部的变量([model.name]、[model.currency]) 仍然可以访问;
- 第 29 行:[yesno] 过滤器根据值为真还是为假来选择文本:它的两段文本(第三段可选的文本用于 [None])以逗号分隔。这相当于 DTL 中的条件表达式;
- 第 37 行:[for] 循环可以有一个 [{% empty %}] 块,在列表为空时执行。这比用 [{% if %}] 测试列表长度更简单;
- 第 43–46 行:[{% with %}] 标签创建一个变量,其有效范围到 [{% endwith %}] 为止:这里是产品的数量,由 [length] 过滤器计算(列表中元素的个数或字符串中字符的个数);
- 第 44–45 行:模型的计算属性。过滤器 [floatformat] 对数字进行舍入——[floatformat:2]——保留两位小数。它按照应用语言([LANGUAGE_CODE])的惯例格式化数字:小数点按英语的方式格式化。插入页面的所有数字都是这样格式化的:[Django] 根据当前语言格式化数字和日期(在法语中,[12.5] 会变成 [12,5]);
- 第 48 行:点号可以穿过多层对象([model.address.city]),过滤器 [upper] 把字符串转为大写(并能正确处理带重音的字符);
- 第 50 行:[{% verbatim %}] 标签原样复制其内容而不加解释:当页面包含用于 [JavaScript] 框架的花括号时,这很有用。
DTL 有大约六十个过滤器([lower]、[capfirst]、[title]、[truncatechars]、[join]、[slice]、[first]、[last]、[date]、[time]、[linebreaks]、[urlize]、[pluralize]、[add]、[divisibleby]、[escape]、[json_script]……)和大约 三十个标签([if]、[for]、[with]、[url]、[now]、[cycle]、[firstof]、[include]、[extends]、[block]、[load]、[csrf_token]、[spaceless]……);[Django] 的应用会添加更多([static]、[translate]……),应用也可以编写自己的(示例 16)。
4.2.3. 执行
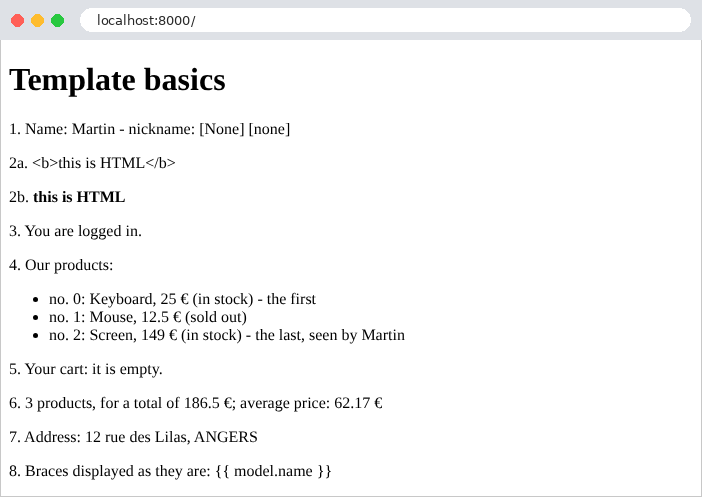
生成的页面:
| curl http://localhost:8000/
|
| <!doctype html>
<html lang="en">
<head>
<meta charset="utf-8">
<title>Template basics</title>
</head>
<body>
<h1>Template basics</h1>
<p>1. Name: Martin - nickname: [None] [none]</p>
<p>2a. <b>this is HTML</b></p>
<p>2b. <b>this is HTML</b></p>
<p>3. You are logged in.</p>
<p>4. Our products:</p>
<ul>
<li>no. 0: Keyboard, 25 €
(in stock)
- the first
</li>
<li>no. 1: Mouse, 12.5 €
(sold out)
...
<p>5. Your cart:
it is empty.
</p>
<p>6. 3 products, for a total of 186.5 €;
average price: 62.17 €</p>
<p>7. Address: 12 rue des Lilas, ANGERS</p>
<p>8. Braces displayed as they are: {{ model.name }}</p>
</body>
</html>
|
注释和标签已经消失,但它们留下了空格和换行:[Django] 不会去除任何空白。这没有影响:浏览器会忽略这些空白。([{% spaceless %}] 标签可以去除模板某个区段中 HTML 标签之间的空白。)数字是按英语的方式写出的([12.5]、[186.5]),尽管模板并没有要求这样做。
4.3. 示例 15:父模板、片段、静态文件
网站的各个页面通常共享相同的结构:页眉、导航栏、页脚以及相同的样式表。与其在每个模板中重复这一结构,不如在父模板(也称为布局)中只写一次,由各个页面继承它。本示例还使用 [Bootstrap](使用最广泛的 CSS 框架)来进行布局。
| 15-layout/
├── config/
│ ├── contexts.py
│ ├── settings.py
│ └── ...
├── pages/
│ ├── __init__.py
│ ├── viewmodels.py
│ └── views.py
├── static/
│ └── css/
│ └── styles.css
├── templates/
│ ├── fragments/
│ │ └── navbar.html
│ ├── pages/
│ │ ├── home.html
│ │ ├── raw.html
│ │ └── team.html
│ ├── layout.html
│ └── macros.html
└── manage.py
|
4.3.1. 静态文件
HTML 页面会引用其他文件:样式表、[JavaScript] 脚本和图像。这些由服务器原样发送的文件称为静态文件。在 [Django] 中,它们存放在 [static] 文件夹中(项目文件夹和应用文件夹),由 [django.contrib.staticfiles] 应用管理。配置如下:
| # config/settings.py:示例 15 的配置
from pathlib import Path
BASE_DIR = Path(__file__).resolve().parent.parent
DEBUG = True
SECRET_KEY = "django-insecure-u0g1t-=6%v^*y#i*czmc@ge#-yk6m!jj13lte=0yw_pa6y+2m4"
ALLOWED_HOSTS = []
LANGUAGE_CODE = "en"
TIME_ZONE = "Europe/Paris"
ROOT_URLCONF = "config.urls"
WSGI_APPLICATION = "config.wsgi.application"
INSTALLED_APPS = [
# 管理静态文件(样式表、
# 图像、脚本)的 Django 应用:{% static %} 标签,以及由 runserver 提供它们
"django.contrib.staticfiles",
"pages",
]
TEMPLATES = [
{
"BACKEND": "django.template.backends.django.DjangoTemplates",
"DIRS": [BASE_DIR / "templates"],
"OPTIONS": {
# 上下文处理器:向所有模板的
# 上下文添加变量的函数;request:当前请求
"context_processors": [
"django.template.context_processors.request",
"config.contexts.site",
],
},
},
]
# 静态文件的 URL:{% static 'css/styles.css' %} -> /static/css/styles.css
STATIC_URL = "static/"
# Django 查找静态文件的文件夹:示例自己的文件夹,以及
# Bootstrap 的文件夹,由示例 15 到 28 共享
STATICFILES_DIRS = [
BASE_DIR / "static",
BASE_DIR.parent / "common" / "static",
]
|
- 第 14–19 行:[django.contrib.staticfiles] 应用,是 [Django] 自带的应用之一;
- 第 21–34 行:模板引擎,带有两个上下文处理器,稍后介绍;
- 第 37 行:[STATIC_URL],静态文件 URL 的前缀:文件 [css/styles.css] 将可通过 URL [/static/css/styles.css] 访问;
- 第 40–43 行:[STATICFILES_DIRS],项目的静态文件文件夹列表(此外还有各应用的 [static] 文件夹)。第一个是本示例自己的文件夹。第二个是 [examples/common/static] 文件夹,其中包含 [Bootstrap]:我们不在每个示例中都包含一份副本,而是让示例 15 到 28 共享它(见引言)。[Django] 会按顺序在所有这些文件夹中搜索文件,并返回找到的第一个。
在调试模式下,开发服务器使用 [staticfiles] 应用自己提供静态文件:以 [/static/] 开头的 URL 不由应用的路由处理,而由静态文件处理程序处理。在生产环境([DEBUG = False])中,它不再这样做:这不是 [Python] 应用的职责。这时,命令 [python manage.py collectstatic] 会把项目和各应用中的所有静态文件复制到同一个文件夹(设置 [STATIC_ROOT])中,由 Web 服务器([nginx]、[Apache]……)直接提供服务,或者由 [WhiteNoise] 这样的库提供服务(见案例研究)。
| /* 除 Bootstrap 之外的一些额外设置 */
body {
background-color: #f5f7fa;
}
/* 布局的页脚 */
.footer {
margin-top: 2rem;
font-size: 0.85rem;
color: #6c757d;
}
/* 错误消息,位于页面底部,使用浅粉色背景 */
.error-area {
margin-top: 1.5rem;
padding: 0.75rem 1rem;
background-color: #fdecef;
border: 1px solid #f5c2c7;
border-radius: 0.375rem;
color: #842029;
}
|
在 [Bootstrap] 之外再增加几条 CSS 规则:浅灰色背景、页脚样式,以及后续示例中将使用的错误区域样式。
4.3.2. 父模板:templates/layout.html
| <!doctype html>
{# 页面的父模板:各页面扩展它,并填充它的块 #}
{% load static %}
<html lang="en">
<head>
<meta charset="utf-8">
<meta name="viewport" content="width=device-width, initial-scale=1">
{# block:页面可以填充的一个槽位;此处带有默认内容 #}
<title>{% block title %}Home{% endblock %} - {{ site_name }}</title>
{# static:静态文件的 URL #}
<link rel="stylesheet" href="{% static 'bootstrap/css/bootstrap.min.css' %}">
<link rel="stylesheet" href="{% static 'css/styles.css' %}">
</head>
<body>
<div class="container py-3">
{# 插入 fragments/navbar.html 模板 #}
{% include "fragments/navbar.html" %}
<main>
{# 视图所请求页面的内容插入在此处 #}
{% block content %}{% endblock %}
</main>
{# request:当前请求;site_name:全局变量(见 config/contexts.py) #}
<footer class="footer">Page [{{ request.path }}] - © {% now "Y" %} {{ site_name }}</footer>
</div>
</body>
</html>
|
- 第 3 行:[{% load static %}] 加载一个标签库:即 [staticfiles] 应用的标签库,它提供 [{% static %}] 标签。不属于 DTL 核心的标签和过滤器存放在库中,模板在使用它们之前必须先加载这些库;
- 第 7 行:[viewport] 标签指示移动浏览器按屏幕宽度显示页面,这正是 [Bootstrap] 所期望的;
- 第 9 行:[{% block %}] 标签标记一个具名的插槽,继承该模板的页面可以通过定义同名的块来填充它。写在 [{% block title %}] 和 [{% endblock %}] 之间的内容是该占位符的默认内容,未定义此块的页面会使用它。[site_name] 是一个在所有模板中都存在的全局变量(见下面的 [config/contexts.py]);
- 第 11–12 行:[{% static 'path' %}] 生成静态文件的 URL:[STATIC_URL] 后接路径。手工书写文件的 URL([/static/css/styles.css])同样可行,但如果你修改 [{% static %}] 所依据的 [STATIC_URL](例如从另一个站点提供这些文件),或者为了缓存而在文件名中加入其内容的哈希值(案例研究),它就会自动适应;
- 第 17 行:[{% include %}] 插入另一个模板的内容,这里是导航栏。被包含的模板可以看到包含它的模板中的变量;
- 第 20 行:占位符,每个页面用自己的内容填充它;
- 第 23 行:变量 [request] 是当前请求([request.path]:所请求 URL 的路径)。得益于上下文处理器 [request] (见下文),它存在于所有模板中。标签 [{% now "Y" %}] 按以下格式写出当前日期:[Y],即四位数的年份。
[container] 是 [Bootstrap] 的类,用于使内容居中并限制其宽度;[py-3] 添加垂直内边距:[Bootstrap] 提供了数百个此类的类,它们在 [class] 属性中组合使用。
4.3.3. 全局变量:config/contexts.py
| # config/contexts.py:一个上下文处理器
# Django 为每个带 request 渲染的模板(render(request, ...))调用它;
# 它返回的字典会添加到上下文中:site_name 是全局变量,
# 存在于所有模板中
def site(request):
return {"site_name": "My site"}
|
上下文处理器是一个函数,它接收请求,并返回一个变量字典,这些变量会被添加到所有模板的上下文中。[Django] 每次使用请求生成模板时(如 [render(request, ...)] 的情形),都会调用 [context_processors] 设置(文件 [config/settings.py] 的第 28–31 行)中的处理器。[django.template.context_processors.request] 处理器随 [Django] 一同提供,它添加变量 [request];我们自己的处理器添加 [site_name]。[Django] 的其他应用也提供各自的处理器:消息(示例 20)、语言(示例 22)……每生成一个模板都会调用一次处理器:它必须很快。
4.3.4. 导航栏:templates/fragments/navbar.html
| {# 片段:页面的一部分,通过 include 插入 #}
<nav class="navbar navbar-expand bg-light rounded mb-3 px-3">
<span class="navbar-brand">{{ site_name }}</span>
<div class="navbar-nav">
{# url:路由的 URL,通过其名称指定 #}
<a class="nav-link" href="{% url 'home' %}">Home</a>
<a class="nav-link" href="{% url 'team' %}">Team</a>
<a class="nav-link" href="{% url 'raw' %}">Page without parent template</a>
</div>
</nav>
|
片段:页面的一部分,本身没有意义。类 [navbar]、[navbar-brand] 和 [nav-link] 是 [Bootstrap] 中导航栏的类。链接由 [{% url %}] 标签(第 6 行)根据路由名称生成(示例 04):[{% url 'team' %}] 得到 [/team]。路由参数跟在名称之后:[{% url 'contacts_details' contact.id %}] (示例 21)。
4.3.5. 具名片段:templates/macros.html
| {# 具名片段(partialdef):可复用的页面片段,存放在同一个文件中 #}
{# 一张 Bootstrap 卡片,带有姓名和角色 #}
{% partialdef card %}
<div class="card">
<div class="card-body">
<h5 class="card-title">{{ name }}</h5>
<p class="card-text">{{ role }}</p>
</div>
</div>
{% endpartialdef %}
|
- 第 4–11 行:[{% partialdef %}] 标签自 [Django] 6.0 起引入,用于定义具名片段(partial):模板的一部分,这里是一张卡片([card]),来自 [Bootstrap]。一个文件可以包含多个这样的片段。以这种方式定义的片段不会在其书写的位置显示:它会在别处显示,方法是使用 [{% include "macros.html#card" %}] (文件名、井号、片段名),或者在同一个文件内使用 [{% partial card %}]。该片段显示两个变量 [name] 和 [role],它们将在包含时提供给它。
学过 [Symfony] 课程的学生会认出本课程是如何使用 [Twig] 的宏的。有一个区别:[Twig] 的宏只能看到自己的参数;被包含的片段除了传给它的变量之外,还能看到包含它的模板中的所有变量。关键字 [only] ([{% include "..." with name="..." only %}])把它限制为只能看到后者。对于需要 [Python] 代码的更复杂的组件,则要编写包含标签(示例 16)。
4.3.6. 页面
| {# 此页面扩展父模板:它只提供各个块的内容 #}
{% extends "layout.html" %}
{% block content %}
<h1>Welcome</h1>
<p>This page only contains its own content: the header, the navigation
bar and the footer come from the parent template <code>layout.html</code>.</p>
{# macros.html 文件中的 [card] 片段,两个变量就地写出 #}
{% include "macros.html#card" with name="A fragment" role="included with variables written in place" %}
{% endblock %}
|
- 第 2 行:页面继承父模板:[Django] 生成父页面,并用该页面定义的块替换父模板中的块。[{% extends %}] 必须是模板中的第一个标签(只有注释 [{# #}] 可以出现在它之前)。在继承另一个模板的模板中,所有内容都必须位于块内:写在块之外的文本不会出现在生成的页面中;
- 第 4–10 行:[content] 块,填充同名的插槽。该页面没有定义 [title] 块:该插槽保留其默认内容“Home”;
- 第 9 行:包含片段 [card],在关键字 [with] 之后指定两个变量。片段中的 HTML 不会被再次转义:[Django] 知道它已经是安全的 HTML(不过,其中的变量在片段内已被转义)。
| {% extends "layout.html" %}
{% block title %}Our team{% endblock %}
{% block content %}
<h1>Our team</h1>
<div class="row g-3">
{% for member in members %}
<div class="col-md-4">
{# 片段的变量可以是任意表达式 #}
{% include "macros.html#card" with name=member.name role=member.role %}
</div>
{% endfor %}
</div>
{% endblock %}
|
- 第 3 行:块 [title],写在单独一行;
- 第 7–14 行:每位团队成员一张卡片,放在 [Bootstrap] 的网格中([row]、[col-md-4]:在中等或大屏幕上为三列,在窄屏幕上为一列);
- 第 11 行:传给片段的变量可以是任意表达式。
父模板中的块也可以被补充而不是被替换:写在页面块中的 [{{ block.super }}] 会插入该块在父模板中的内容。模板可以继承一个本身又继承了另一个模板的模板:继承的层数可以根据需要任意增加。视图不包含新的功能:
| # pages/views.py:三个页面
from django.shortcuts import render
from django.views.decorators.http import require_GET
from .viewmodels import Member
@require_GET
def home(request):
return render(request, "pages/home.html")
@require_GET
def team(request):
members = [
Member("Marie Pélissier", "Director"),
Member("Jacques Bromard", "Developer"),
Member("Philippe Jandot", "Graphic designer"),
]
return render(request, "pages/team.html", {"members": members})
@require_GET
def raw(request):
return render(request, "pages/raw.html")
|
最后,第三个页面不使用父模板:
| <!doctype html>
{# 此模板不扩展父模板:它是一个完整的页面 #}
<html lang="en">
<head>
<meta charset="utf-8">
<title>Raw page</title>
</head>
<body>
<p>This page does not use the parent template: neither Bootstrap, nor navigation bar.</p>
<p><a href="{% url 'home' %}">Back to the home page</a></p>
</body>
</html>
|
4.3.7. 执行
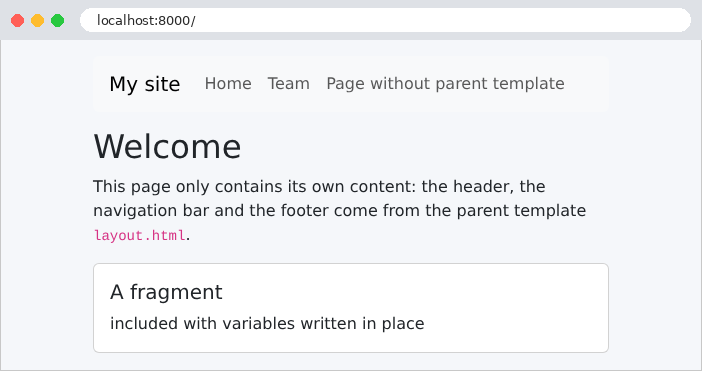
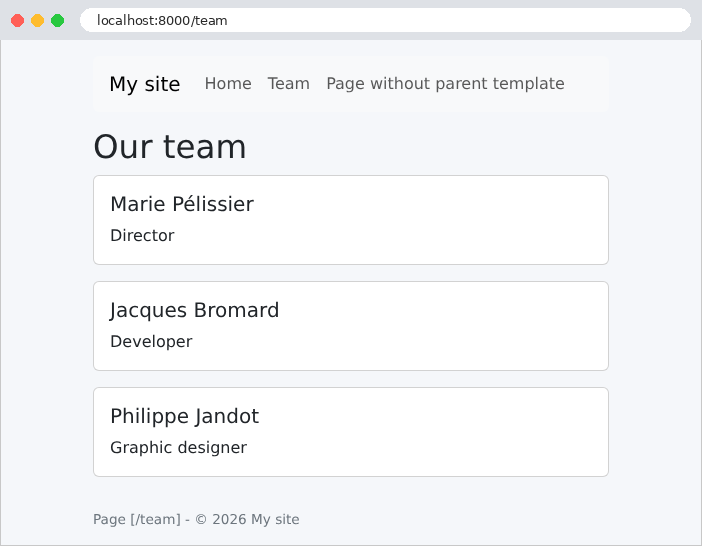
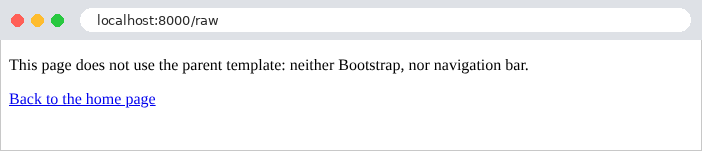
由于截图较窄,团队卡片是上下堆叠的。浏览器中显示的团队页面如下:
| curl http://localhost:8000/team
|
| <!doctype html>
<html lang="en">
<head>
<meta charset="utf-8">
<meta name="viewport" content="width=device-width, initial-scale=1">
<title>Our team - My site</title>
<link rel="stylesheet" href="/static/bootstrap/css/bootstrap.min.css">
<link rel="stylesheet" href="/static/css/styles.css">
</head>
<body>
<div class="container py-3">
<nav class="navbar navbar-expand bg-light rounded mb-3 px-3">
<span class="navbar-brand">My site</span>
<div class="navbar-nav">
<a class="nav-link" href="/">Home</a>
<a class="nav-link" href="/team">Team</a>
<a class="nav-link" href="/raw">Page without parent template</a>
</div>
</nav>
<main>
<h1>Our team</h1>
<div class="row g-3">
<div class="col-md-4">
<div class="card">
<div class="card-body">
<h5 class="card-title">Marie Pélissier</h5>
<p class="card-text">Director</p>
</div>
</div>
</div>
...
</div>
</main>
<footer class="footer">Page [/team] - © 2026 My site</footer>
</div>
</body>
</html>
|
浏览器收到的是一个完整的页面:父模板、导航栏片段、页面和卡片都是在服务器上组装的。样式表的 URL 由 [{% static %}] 计算得出:这些是 该站点特有的 URL。你可以验证样式表是否被正确提供([-I] 选项让 [curl] 在发送 HEAD 请求时只显示响应头):
| curl -I http://localhost:8000/static/bootstrap/css/bootstrap.min.css
curl -I http://localhost:8000/static/css/styles.css
|
| HTTP/1.1 200 OK
Content-Type: text/css
Content-Length: 232111
Content-Disposition: inline; filename="bootstrap.min.css"
Last-Modified: Sun, 27 Sep 2026 16:41:12 GMT
HTTP/1.1 200 OK
Content-Type: text/css
Content-Length: 435
Content-Disposition: inline; filename="styles.css"
Last-Modified: Sun, 27 Sep 2026 16:42:11 GMT
|
第一个文件来自 [common/static] 文件夹,第二个来自示例中的 [static] 文件夹:对浏览器来说,两者没有区别。内容类型是根据文件扩展名推断的([text/css]):如果样式表被声明为其他类型,浏览器会拒绝它。最后,尝试访问静态文件夹之外的内容:
| curl -s -o /dev/null -w "%{http_code}\n" "http://localhost:8000/static/..%2F..%2Fconfig%2Fsettings.py"
|
([-s -o /dev/null -w "%{http_code}\n"] 选项只显示响应码;在 [Windows] 下,则使用 [-o NUL])。该 URL 选项请求示例中的 [config/settings.py] 文件,并向上回退两级文件夹([/] 文件被编码为 [%2F],这样 [curl] 和浏览器都不会自行简化路径)。[Django] 拒绝了该请求:控制台显示异常 [SuspiciousFileOperation],消息为“The joined path (...) is located outside of the base path component.”。代码 500 表示出现了未处理的异常;关键在于该文件没有被发送。
4.4. 示例 16:扩展模板语言
模板常常需要格式化值:带货币符号的金额、完整书写的日期,或大写文本。这些代码不属于视图(视图不处理展示),而 DTL 又不允许在模板中编写它们(见本章引言)。因此,它们是用 [Python] 编写的,放在标签和过滤器库中:一个为模板语言添加自己的过滤器和标签的模块。根据数据生成 HTML 片段的组件——包含标签——同样用 [Python] 编写。
| 16-extensions/
├── config/
│ ├── middleware.py
│ ├── settings.py
│ └── ...
├── pages/
│ ├── templatetags/
│ │ ├── __init__.py
│ │ └── formats.py
│ ├── __init__.py
│ ├── viewmodels.py
│ └── views.py
├── static/
│ └── css/
│ └── styles.css
├── templates/
│ ├── fragments/
│ │ └── navbar.html
│ ├── pages/
│ │ ├── home.html
│ │ └── products.html
│ ├── tags/
│ │ ├── badge.html
│ │ └── link.html
│ └── layout.html
└── manage.py
|
4.4.1. 库:pages/templatetags/formats.py
标签库是包含在应用的 [templatetags] 包中的一个模块(该应用必须在 [INSTALLED_APPS] 中声明);模块名([formats])就是模板在 [{% load formats %}] 中使用的名称:
| # pages/templatetags/formats.py:模板语言的扩展库,
# 由 {% load formats %} 加载:两个过滤器和两个标签
from babel.dates import format_date
from babel.numbers import format_currency
from django import template
from django.utils.translation import get_language
# 注册该库的过滤器和标签的对象
register = template.Library()
# 一个过滤器:{{ product.price_cents|money }} 或 {{ ...|money:"USD" }}。
# 以分为单位的金额,用某种货币,按当前语言的格式显示:
# 114990 -> 英文为 "€1,149.90",法文为 "1 149,90 €"。Babel
# 库了解每个国家的惯例
@register.filter
def money(cents, currency="EUR"):
return format_currency(cents / 100, currency, locale=get_language())
# 以完整文字表示的日期,使用当前语言:"Sunday, September 27, 2026"
@register.filter
def long_date(day):
return format_date(day, format="full", locale=get_language())
# 一个包含标签:{% link 'products' '/products' 'Products' %} 显示
# tags/link.html 模板,其上下文由该函数返回。
# takes_context:该函数同时接收调用它的模板的上下文
@register.inclusion_tag("tags/link.html", takes_context=True)
def link(context, route, path, text):
# 导航栏的一个链接,若当前页面位于 [path] 路径之下,
# 则获得 [active] 类
active = context["request"].path.startswith(path)
return {"route": route, "text": text, "active": active}
# Bootstrap 徽章:商品有库存时为绿色,否则为红色
@register.inclusion_tag("tags/badge.html")
def badge(stock):
return {"stock": stock}
|
- 第 4–5 行:来自 [Babel] 库的两个函数(见引言),该库了解各国书写数字、金额和日期的惯例(它使用 Unicode 项目 CLDR 的数据);
- 第 7 行:[get_language] 返回当前请求的活动语言([fr]、[en]);我们稍后会看到是谁设置它的;
- 第 10 行:对象 [register],即一个 [template.Library],用于存放模块的过滤器和标签。变量名是固定写死的:[Django] 就是在这里查找它们的;
- 第 17–19 行:过滤器是一个函数,由装饰器 [@register.filter] 以其自己的名称 [money] 注册。它的第一个参数是被过滤的值;第二个可选参数是模板中过滤器的参数([price|money:"USD"]):这里是货币,用其国际代码表示([EUR]、[USD])。该过滤器格式化以美分接收的金额(见示例 06)。格式取决于语言:法语中是 [1 149,90 €] (用空格分隔千位、小数用逗号、货币符号在金额之后);英语中是 [€1,149.90];
- 第 23–25 行:日期格式化:格式 [full] 完整写出日期,包括星期几([Sunday, September 27, 2026]);
- 第 31–36 行:由 [@register.inclusion_tag] 定义的包含标签:一个计算上下文的函数,和一个显示该上下文的模板(这里是 [tags/link.html])。在模板中,[{% link 'products' '/products' 'Products' %}] 用这三个参数调用该函数,然后插入模板,该模板由函数返回的字典构建。使用 [takes_context=True] 时,函数的第一个参数接收调用它的模板的上下文:它在其中找到请求,并判断链接是否指向当前页面([startswith] 检查字符串的开头);
- 第 40–42 行:第二个包含标签,不使用上下文:一个徽章。
库还可以提供“简单”标签([@register.simple_tag]),它们返回一个值;以及完整标签,它们解析自己的内容(如 [{% if %}]):这种情况不太常见。两个包含标签的模板如下:
| <a class="nav-link{% if active %} active{% endif %}" href="{% url route %}">{{ text }}</a>
|
| {% if stock > 0 %}<span class="badge text-bg-success">{{ stock }} in stock</span>{% else %}<span class="badge text-bg-danger">sold out</span>{% endif %}
|
当前页面的链接会被 [Bootstrap] 赋予类 [active] ,从而高亮显示。[{% url route %}] 为名称存放在变量中的路由生成 URL。徽章根据库存显示为绿色([text-bg-success])或红色([text-bg-danger])。包 [templatetags] 同样有其文件 [__init__.py];没有它,它就不是一个包。
4.4.2. 每个请求的语言:config/middleware.py
| # config/middleware.py:每个请求的语言
from django.utils import translation
class SetLanguage:
def __init__(self, get_response):
self.get_response = get_response
# URL 的 ?lang=fr 参数,否则为英语
def __call__(self, request):
language = "fr" if request.GET.get("lang") == "fr" else "en"
# activate:活动语言,Django 用它来格式化
# 数字和日期,并翻译其消息
translation.activate(language)
return self.get_response(request)
|
每个请求都有一个活动语言,默认情况下与 [LANGUAGE_CODE] 设置中指定的语言相同。这里,URL 的 [?lang=fr] 参数选择法语;英语是默认语言。 一个中间件组件(示例 03)在每个视图之前使用 [translation.activate] 函数设置它:这就是 [get_language] 将返回的语言——[Django] 用来格式化数字和日期并翻译自己消息(如表单错误消息)的语言。活动语言专属于处理该请求的执行线程:两个同时进行的请求可以有不同的语言。它不会在两次请求之间重置;这就是中间件要为每个请求设置它的原因,即使是英语也不例外。国际化一章将用 [Django] 的 [LocaleMiddleware] 取代这个中间件,并使用同一种语言来翻译文本。
4.4.3. 配置:config/settings.py
| # config/settings.py:示例 16 的配置
from pathlib import Path
BASE_DIR = Path(__file__).resolve().parent.parent
DEBUG = True
SECRET_KEY = "django-insecure-yw&p(@e00b!)6xtfnoy-goyep6e*8jhvk_o0aj8a&pizr94xrq"
ALLOWED_HOSTS = []
LANGUAGE_CODE = "en"
TIME_ZONE = "Europe/Paris"
ROOT_URLCONF = "config.urls"
WSGI_APPLICATION = "config.wsgi.application"
# 应用的语言
LANGUAGES = [
("fr", "Français"),
("en", "English"),
]
INSTALLED_APPS = [
"django.contrib.staticfiles",
# pages 应用包含一个 templatetags 文件夹:它对模板语言的扩展
# 可通过 {% load formats %} 使用
"pages",
]
MIDDLEWARE = [
"config.middleware.SetLanguage",
]
TEMPLATES = [
{
"BACKEND": "django.template.backends.django.DjangoTemplates",
"DIRS": [BASE_DIR / "templates"],
"OPTIONS": {
"context_processors": [
"django.template.context_processors.request",
],
},
},
]
STATIC_URL = "static/"
STATICFILES_DIRS = [
BASE_DIR / "static",
BASE_DIR.parent / "common" / "static",
]
|
- 第 15–18 行:应用的语言;
- 第 20–25 行:必须声明 [pages] 应用;[Django] 会在 [templatetags] 包所在的 [INSTALLED_APPS] 应用中搜索这些包;
- 第 27–29 行:语言中间件。
4.4.4. 视图:pages/views.py
| # pages/views.py:两个页面
from datetime import date
from django.shortcuts import render
from django.views.decorators.http import require_GET
from .viewmodels import Product
@require_GET
def home(request):
return render(request, "pages/home.html", {"today": date.today()})
@require_GET
def products(request):
items = [
Product("keyboard", 2500, 12),
Product("mouse", 1250, 0),
Product("screen", 114990, 3),
]
# 计算在这里用 Python 完成:模板只需显示结果
total = sum(p.price_cents * p.stock for p in items)
return render(request, "pages/products.html", {"products": items, "stock_total": total})
|
视图把原始值传给模板:日期([date.today()],今天的日期)和以美分表示的金额。格式化由模板负责。不过,库存总额是一个计算:它在 [Python] 中计算(第 24 行),因为 DTL 无法执行计算。[Product] 类包含名称、价格(以美分表示;见示例 06)和库存数量。
4.4.5. 模板
| {% load formats %}
<nav class="navbar navbar-expand bg-light rounded mb-3 px-3">
<span class="navbar-brand">Extensions</span>
<div class="navbar-nav">
{# 1. 写在模板中的条件;resolver_match:当前请求的路由 #}
<a class="nav-link{% if request.resolver_match.url_name == 'home' %} active{% endif %}" href="{% url 'home' %}">Home</a>
{# 2. 我们的 [link] 标签 #}
{% link 'products' '/products' 'Products' %}
{# 3. url 构建路由的路径;URL 参数手动添加 #}
<a class="nav-link" href="{% url 'products' %}?lang=fr">Produits (fr)</a>
</div>
</nav>
|
- 第 1 行:片段自己加载它所需的库:[{% load %}] 的库不会传递给被包含的模板,也不会传递给继承父模板的模板。每个模板加载各自的库;
- 第 6 行:与 [link] 标签相同,直接写在模板中,并带有条件。[request.resolver_match] 描述当前请求的路由解析结果:[url_name] 是路由的名称。该标签避免了为每个链接重复书写条件;
- 第 8 行:标签调用,带有三个以空格分隔的参数;
- 第 10 行:[{% url %}] 只生成路径:URL 的参数需要手动添加([?lang=fr])。
| {% extends "layout.html" %}
{% load i18n formats %}
{% block title %}Home{% endblock %}
{% block content %}
<h1>Home</h1>
{# 我们的 long_date 过滤器 #}
<p>Today is {{ today|long_date }}.</p>
{# 当前语言,由 SetLanguage 中间件设置 #}
{% get_current_language as language %}
<p>Formatting language: {{ language }}
(<a href="{% url 'home' %}?lang=fr">in French</a>, <a href="{% url 'home' %}">in English</a>)</p>
{% endblock %}
|
- 第 2 行:页面加载了两个库:[i18n],即 [Django] 的国际化库,以及我们自己的库;
- 第 8 行:我们的过滤器 [long_date];
- 第 10–11 行:来自 [{% get_current_language as language %}] 标签,属于 [i18n] 库,它把活动语言存入一个模板变量。
| {% extends "layout.html" %}
{% load formats %}
{% block title %}Products{% endblock %}
{% block content %}
<h1>Products</h1>
<table class="table table-sm w-auto">
<thead><tr><th>Product</th><th>Price</th><th>Price in dollars</th><th>Stock</th></tr></thead>
<tbody>
{% for product in products %}
<tr>
{# 一个 Django 过滤器(upper),然后是我们的 money 过滤器,先不带参数,再带参数 #}
<td>{{ product.name|upper }}</td>
<td>{{ product.price_cents|money }}</td>
<td>{{ product.price_cents|money:"USD" }}</td>
{# 我们的 [badge] 标签构建徽章的 HTML #}
<td>{% badge product.stock %}</td>
</tr>
{% endfor %}
</tbody>
</table>
<p>Stock total: {{ stock_total|money }}</p>
{% endblock %}
|
- 第 13 行:一个 [Django] 过滤器;
- 第 14–15 行:我们的 [money] 过滤器,先使用其默认货币,再带参数使用;
- 第 17 行:对 [badge] 标签的调用;
- 第 22 行:库存总额,由视图计算。
父模板 [layout.html] 是示例 15 中父模板的简化版本;它的 [lang] 属性接收活动语言([<html lang="{{ language }}">],位于 [{% get_current_language as language %}] 之后)。
4.4.6. 执行
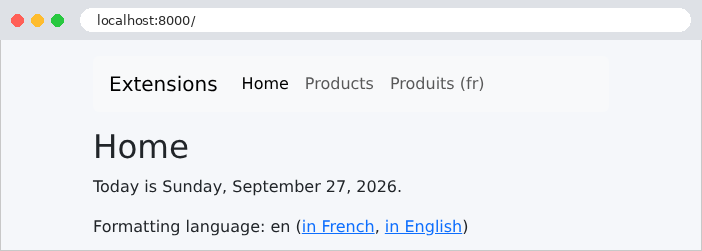
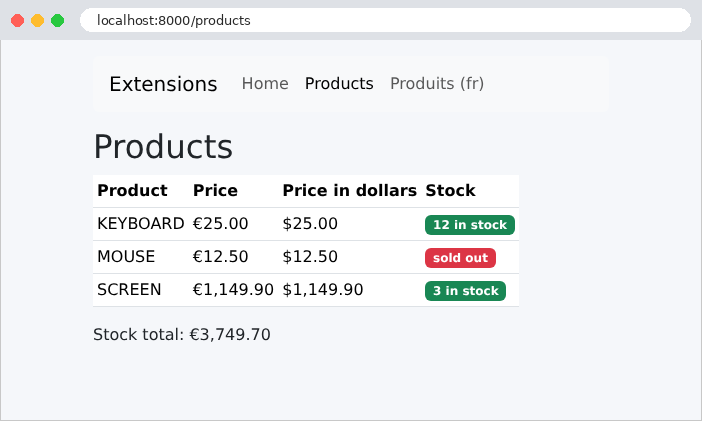
同一页面,带上参数 [?lang=fr]。只有数字的格式发生变化:文本本身是硬编码在模板中的。国际化一章还会翻译文本。
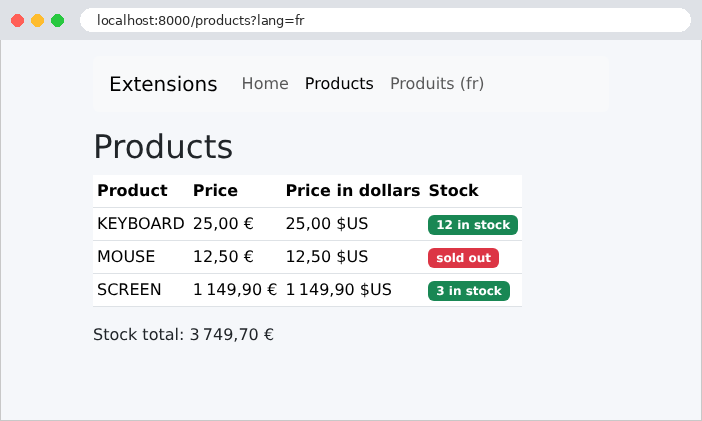
HTML 摘录生成如下内容:
| curl "http://localhost:8000/products?lang=fr"
|
| ...
<a class="nav-link" href="/">Home</a>
<a class="nav-link active" href="/products">Products</a>
<a class="nav-link" href="/products?lang=fr">Produits (fr)</a>
...
<tr>
<td>SCREEN</td>
<td>1 149,90 €</td>
<td>1 149,90 $US</td>
<td><span class="badge text-bg-success">3 in stock</span>
</td>
</tr>
...
|
4.5. 示例 17:GET 表单
HTML 表单根据其 [method] 属性,以两种方式之一将字段发送到服务器:
- [method="get"]:字段作为参数添加到 URL 中([/search?keyword=le&genre=novel])。执行查询的表单(搜索或筛选)使用这种方法。包含结果的 URL 可以放心地加入书签、分享或重新加载;
- [method="post"]:字段包含在请求体中(参见示例 11)。修改数据的表单(注册、添加或删除)使用这种方法。
第一个表单是图书搜索。它直接用 HTML 手工编写在模板中:后面的示例将使用 [Django] 的表单模板。
4.5.1. 模板:books/viewmodels.py
| # books/viewmodels.py:一本书,以及搜索模板的模型
from dataclasses import dataclass
@dataclass(frozen=True)
class Book:
title: str
author: str
genre: str
# 模板的模型:输入(用于再次显示)、体裁、结果
@dataclass(frozen=True)
class SearchModel:
keyword: str
genre: str
genres: list[str]
results: list[Book]
|
- 第 14–19 行:模板包含用户的输入(表单将显示它)、建议的类型列表以及结果。
4.5.2. 视图:books/views.py
| # books/views.py:通过 GET 发送的搜索表单
from django.shortcuts import render
from django.views.decorators.http import require_GET
from .viewmodels import Book, SearchModel
# 模块的常量:数据,为示例直接写在代码中
GENRES = ["novel", "poetry", "drama"]
BOOKS = [
Book("Le Rouge et le Noir", "Stendhal", "novel"),
Book("Les Fleurs du mal", "Baudelaire", "poetry"),
Book("Madame Bovary", "Flaubert", "novel"),
Book("Alcools", "Apollinaire", "poetry"),
Book("Le Cid", "Corneille", "drama"),
]
# GET / 和 GET /search?keyword=...&genre=...:表单及其结果
@require_GET
def search(request):
keyword = request.GET.get("keyword", "")
genre = request.GET.get("genre", "")
word = keyword.lower()
# 列表推导式:满足条件的书
results = [book for book in BOOKS
if (word == "" or word in book.title.lower() or word in book.author.lower())
and (genre == "" or book.genre == genre)]
return render(request, "books/search.html", {
"model": SearchModel(keyword, genre, GENRES, results),
})
|
- 第 9–16 行:两个模块常量:类型列表和图书列表。在真实的应用程序中,它们将来自数据库;
- 第 20–21 行:一个由两条路由引用的视图([config/urls.py]:[""] 和 ["search"],分别命名为 [books_home] 和 [books_search])。首次访问([/])时没有参数,显示所有图书;
- 第 22–23 行:将表单字段作为 URL 参数读取(示例 07),默认值为空字符串;
- 第 24–28 行:使用带条件的列表推导式([if])进行筛选:如果关键字为空,或出现在书名或作者中(两侧均转为小写:[lower()] 能正确处理带重音的字符),并且类型为空或与图书的类型匹配,则该书被选中。条件可以跨多行,用括号括起来;
- 第 29–31 行:模板。
4.5.3. 模板:templates/books/search.html
| {% extends "layout.html" %}
{% block content %}
<h1 class="h3">Book search</h1>
{# method="get":字段通过 URL 发送(?keyword=...&genre=...) #}
<form method="get" action="{% url 'books_search' %}" class="row g-2 align-items-end mb-3">
<div class="col-auto">
<label class="form-label" for="keyword">Title or author</label>
{# value:字段重新显示所输入的内容(由 {{ }} 转义) #}
<input class="form-control" id="keyword" name="keyword" value="{{ model.keyword }}">
</div>
<div class="col-auto">
<label class="form-label" for="genre">Genre</label>
<select class="form-select" id="genre" name="genre">
<option value="">(all)</option>
{% for genre in model.genres %}
{# 布尔属性 selected,条件为真时写出,否则省略 #}
<option value="{{ genre }}"{% if genre == model.genre %} selected{% endif %}>{{ genre }}</option>
{% endfor %}
</select>
</div>
<div class="col-auto">
<button class="btn btn-primary" type="submit">Search</button>
</div>
</form>
<p>{{ model.results|length }} book(s) found.</p>
<ul>
{% for book in model.results %}
<li><i>{{ book.title }}</i>, {{ book.author }} ({{ book.genre }})</li>
{% endfor %}
</ul>
{% endblock %}
|
- 第 6 行:[<form>] 标签。[action] 属性是表单提交的目标 URL;[method="get"] 将字段放在 URL 中。[Bootstrap] 的类使字段排列在同一行;
- 第 8 行:一个标签。其 [for] 属性指定它所描述的字段的标识符([id]):点击标签会把光标置于该字段中,屏幕阅读器也会将标签与字段一起朗读;
- 第 10 行:一个输入字段。其属性 [name] 是发送到服务器的参数名:这是表单与视图之间的联系([request.GET.get("keyword", "")])。属性 [value] 是显示的值:即重新显示的上一次输入(并由 [{{ }}] 转义,这在属性中至关重要:否则,包含引号 ["] 的输入会提前结束该属性);
- 第 14–20 行:一个下拉列表。每个 [<option>] 都有一个发送到服务器的值([value])和显示的文本。第一个选项的值为空,表示“所有类型”;
- 第 18 行:上一次请求中选中的选项被赋予属性 [selected]。这是一个布尔属性:只要存在即可,不需要值。条件为真时设置它,否则不设置任何内容;
- 第 23 行:提交按钮;
- 第 26 行:结果数量。
4.5.4. 执行
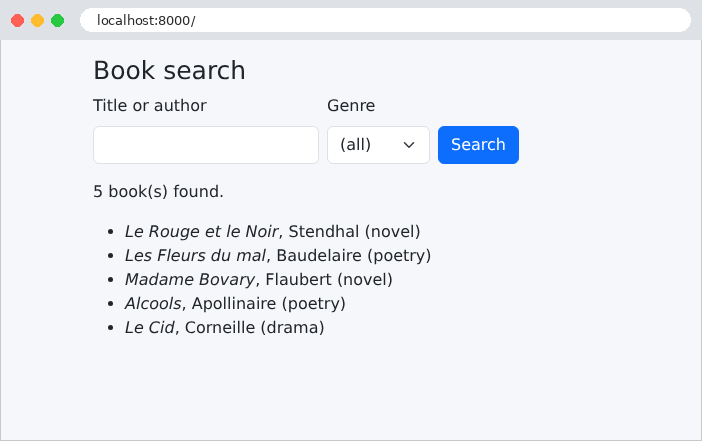
我们输入 [le] 并选择类型 [novel]:
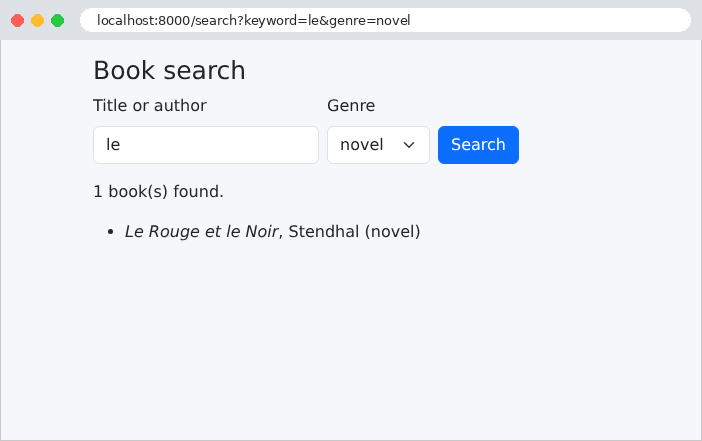
结果页面的 URL 包含表单字段:[/search?keyword=le&genre=novel]。表单的响应:
| curl "http://localhost:8000/search?keyword=le&genre=novel"
|
| ...
<input class="form-control" id="keyword" name="keyword" value="le">
...
<select class="form-select" id="genre" name="genre">
<option value="">(all)</option>
<option value="novel" selected>novel</option>
<option value="poetry">poetry</option>
<option value="drama">drama</option>
</select>
...
<p>1 book(s) found.</p>
<ul>
<li><i>Le Rouge et le Noir</i>, Stendhal (novel)</li>
</ul>
...
|
“Madame Bovary”未被选中:“le”既不出现在书名中,也不出现在作者姓名中。
4.6. 示例 18:表单字段
此示例展示了 HTML 表单中的所有字段类型,这次通过 POST 发送。它演示了如何连同当前值一起重新显示每种字段类型、浏览器如何发送每个字段的值,以及服务器如何验证收到的值确实是可用选项之一。像示例 17 那样全部手工编写既耗时又重复。我们在上一章中用来验证参数的 [Django] 表单也可以用于显示:每个字段都有一个小部件(widget)——一个创建其 HTML 输入字段及当前值的对象——表单会重新显示输入内容和所有错误。这是 [Symfony] 课程中委托给其 Form 组件、[Flask] 课程中委托给 [WTForms] 的功能的完整版本。
| 18-fields/
├── config/
│ ├── rendering.py
│ ├── settings.py
│ └── ...
├── form/
│ ├── __init__.py
│ ├── forms.py
│ ├── lists.py
│ └── views.py
├── static/
│ └── ...
├── templates/
│ ├── django/
│ │ └── forms/
│ │ └── widgets/
│ │ ├── input_option.html
│ │ └── multiple_input.html
│ ├── form/
│ │ └── form.html
│ ├── forms/
│ │ └── field.html
│ └── layout.html
└── manage.py
|
| # form/lists.py:表单提供的列表。在真实的
# 应用中,它们会来自数据库
# 每个列表:(发送的值, 显示的文本) 对
TITLES = [("Mr", "Mr"), ("Mme", "Mme"), ("Melle", "Melle")]
COUNTRIES = [("fr", "France"), ("be", "Belgium"), ("ch", "Switzerland"), ("ca", "Canada")]
HOBBIES = [("reading", "reading"), ("music", "music"), ("sport", "sport"), ("cinema", "cinema")]
LANGUAGES = [("French", "French"), ("English", "English"), ("Spanish", "Spanish"),
("German", "German")]
|
表单的下拉列表(称谓、国家、爱好、语言)是模块中的常量:在真实的应用程序中,它们将来自数据库。每个列表由(值,文本)对组成:值是发送到服务器的内容,文本是显示的内容(示例 08)。一对值写在括号中:它是一个元组,即不可修改的值序列。
| # form/forms.py:表单的描述:其字段、类型和控件
from django import forms
from . import lists
# 我们表单的父类:它为每个输入区域提供
# 合适的 Bootstrap CSS 类
class BootstrapForm(forms.Form):
def __init__(self, *args, **kwargs):
super().__init__(*args, **kwargs)
# fields:表单的字段,保存在字典 {名称: 字段} 中
for field in self.fields.values():
widget = field.widget
if isinstance(widget, (forms.RadioSelect, forms.CheckboxSelectMultiple)):
css_class = "form-check-input"
elif isinstance(widget, forms.Select):
css_class = "form-select"
else:
css_class = "form-control"
# attrs:输入区域的 HTML 属性
widget.attrs["class"] = css_class
# 表单的字段,按显示顺序排列。字段(forms.XxxField)
# 负责转换和验证值;控件(forms.XxxInput 等)负责绘制输入区域
class FieldsForm(BootstrapForm):
# 单选按钮:一个选项列表,由 RadioSelect 控件绘制;
# error_messages:"必填字段"错误的消息
title = forms.ChoiceField(choices=lists.TITLES, widget=forms.RadioSelect,
error_messages={"required": "The title is required."})
# 一个输入区域;required=False:该字段不是必填的
name = forms.CharField(required=False)
# 密码:不会在页面中再次显示
password = forms.CharField(label="Password", required=False, widget=forms.PasswordInput)
# 日期:一个 <input type="date"> 字段;其值是 Python 的 date
birth_date = forms.DateField(label="Date of birth", required=False,
widget=forms.DateInput(attrs={"type": "date"}))
# 复选框:一个多选的选项列表
hobbies = forms.MultipleChoiceField(choices=lists.HOBBIES, required=False,
widget=forms.CheckboxSelectMultiple)
# 下拉列表:ChoiceField 的默认控件
country = forms.ChoiceField(choices=lists.COUNTRIES)
# 多选列表,显示为四行
languages = forms.MultipleChoiceField(label="Spoken languages", choices=lists.LANGUAGES,
required=False,
widget=forms.SelectMultiple(attrs={"size": 4}))
comment = forms.CharField(required=False, widget=forms.Textarea(attrs={"rows": 2}))
# 隐藏字段
token = forms.CharField(widget=forms.HiddenInput)
|
- 第 10–23 行:我们表单的父类,它为每个输入字段分配相应的类(源自 [Bootstrap] 的 CSS)。它重新定义了构造函数([__init__]),该构造函数接收与 [forms.Form] 相同的参数([*args]、[**kwargs],示例 08),并首先调用它([super().__init__(...)])。表单的 [fields] 属性随后是其字段的字典;每个字段都有自己的小部件([field.widget]),其字典 [attrs] 包含输入字段的 HTML 属性。[isinstance] 接受一个类的元组:该小部件是否属于其中某个类?单选按钮和复选框使用类 [form-check-input],列表使用 [form-select],其他使用 [form-control];
- 第 28–51 行:字段,按其显示顺序排列。必须区分两个对象:字段([forms.XxxField])负责转换并验证值,如上一章所述;其小部件([forms.XxxInput]、[forms.Select]……)负责绘制输入字段。每个字段都有一个默认小部件,可由参数 [widget] 替换。默认情况下,字段的标签是其名称经格式化后的结果([password] 会变成“Password”,[name] 变成“Name”);参数 [label] 可指定标签;
- 第 31–32 行:[ChoiceField] 是一个下拉列表。使用 [RadioSelect] 小部件时,它变成一组单选按钮(只能选一项)。[error_messages] 参数(示例 09)用于显示“必填字段”的错误消息;
- 第 34 行:一个 [CharField] (默认小部件:[TextInput],即 [<input type="text">]),可选。必填字段([required=True],默认值)会生成 HTML 属性 [required],由浏览器检查(示例 19);
- 第 36 行:密码(小部件 [PasswordInput],即 [<input type="password">]),它绝不会回传到页面:显示时其字段始终为空;
- 第 38–39 行:日期([DateField]),其值将是 [date] 类型的 [Python] 对象。[DateInput] 小部件接收 [type="date"] 属性:即 [<input type="date">] 字段,浏览器会为其显示日历。无论浏览器以何种格式显示,这种字段与服务器交换值时都使用 [yyyy-mm-dd] 格式([DateField] 接受这种格式);
- 第 41–42 行:一个 [MultipleChoiceField] (示例 10),由 [CheckboxSelectMultiple] 小部件绘制:复选框;
- 第 44 行:一个使用默认小部件 [ChoiceField] 的 [Select]:下拉列表;
- 第 46–48 行:一个使用默认小部件的 [MultipleChoiceField] ,即 [SelectMultiple]:多选列表,显示为四行(由 [size] HTML 属性指定,通过 [attrs] 设置);
- 第 49 行:一个文本框([Textarea]),占两行;
- 第 51 行:一个隐藏字段([HiddenInput])。
[Django] 还提供 [EmailField] (示例 19)、[IntegerField]、[DecimalField]、[URLField]、[BooleanField] (单个复选框)、[FileField]、[ImageField]、[SlugField]、[UUIDField]、[JSONField]……以及其他小部件:[EmailInput]、[NumberInput]、[CheckboxInput]、[ClearableFileInput]、[SelectDateWidget] (三个列表:日、月、年)……
4.6.3. 字段布局:config/rendering.py 和表单模板
[Django] 表单是使用模板自动生成的:整个表单一个模板,每个完整字段(标签、输入字段、提示、错误消息)一个模板,每种小部件类型一个模板。[Django] 在 [django.forms] 应用中提供了所有这些模板,采用中性布局。为了实现 [Bootstrap] 的布局,我们替换其中的一部分。首先,[Django] 必须像对待其他模板一样,在 [TEMPLATES] 配置所定义的文件夹中查找表单模板:这就是表单渲染器的作用:
| # config/rendering.py:表单的渲染引擎
from django.forms.renderers import TemplatesSetting
# TemplatesSetting:一个渲染引擎,它像项目的其他模板一样查找自己的模板
# (TEMPLATES 设置):项目 templates 文件夹中的模板
# 因此可以替换 Django 自带的模板
class BootstrapRenderer(TemplatesSetting):
# 完整字段的模板:标签、输入区域、帮助、错误
field_template_name = "forms/field.html"
|
- 第 9 行:[TemplatesSetting] 是使用项目的模板引擎查找其模板的表单渲染器:因此,项目 [templates] 文件夹中的模板可以替换 [Django] 中同名的模板。我们的类继承了这一行为;
- 第 11 行:[field_template_name] 属性指定完整字段的模板:我们自己的模板 [forms/field.html]。
配置:
| # config/settings.py:示例 18 的配置
from pathlib import Path
BASE_DIR = Path(__file__).resolve().parent.parent
DEBUG = True
SECRET_KEY = "django-insecure-b13ls-fk@*cj%i9(=5e1aa_eg(j0&*2cs)oc=j+qo&(!v06l^y"
ALLOWED_HOSTS = []
LANGUAGE_CODE = "en"
TIME_ZONE = "Europe/Paris"
ROOT_URLCONF = "config.urls"
WSGI_APPLICATION = "config.wsgi.application"
INSTALLED_APPS = [
"django.contrib.staticfiles",
# Django 表单的模板(每种字段一个模板)
"django.forms",
"form",
]
MIDDLEWARE = [
# 对所有 POST 请求的防 CSRF 保护(见后文)
"django.middleware.csrf.CsrfViewMiddleware",
]
TEMPLATES = [
{
"BACKEND": "django.template.backends.django.DjangoTemplates",
"DIRS": [BASE_DIR / "templates"],
# APP_DIRS:Django 还会在每个应用的 templates 文件夹中查找模板,
# 包括 django.forms
"APP_DIRS": True,
},
]
# 表单的渲染引擎:我们自己的引擎,它使用
# Bootstrap 5 的类来绘制字段(见 config/rendering.py)
FORM_RENDERER = "config.rendering.BootstrapRenderer"
STATIC_URL = "static/"
STATICFILES_DIRS = [
BASE_DIR / "static",
BASE_DIR.parent / "common" / "static",
]
|
- 第 17 行:应用 [django.forms],它在其文件夹 [Django] 中提供来自 [templates] 的表单模板;
- 第 21–24 行:防 CSRF 保护中间件(见下文);
- 第 32 行:[APP_DIRS: True]:[Django] 还会在每个已声明应用的 [templates] 文件夹中查找模板,包括 [django.forms]。[DIRS] 文件夹会被优先检查:我们的模板优先于 [Django] 中的模板;
- 第 38 行:[FORM_RENDERER] 设置指定我们的渲染引擎。
完整字段的模板:
| {# 一个完整的字段,带有 Bootstrap 类;field:要绘制的字段 #}
{% if field.use_fieldset %}
{# 一组单选按钮或复选框:一个 fieldset 及其 legend #}
<fieldset class="mb-3">
<legend class="form-label fs-6 mb-1">{{ field.label }}</legend>
{{ field }}
{% else %}
<div class="mb-3">
<label class="form-label" for="{{ field.id_for_label }}">{{ field.label }}</label>
{{ field }}
{% endif %}
{% if field.help_text %}<div class="form-text" id="{{ field.auto_id }}_helptext">{{ field.help_text }}</div>{% endif %}
{% if field.errors %}<div class="invalid-feedback d-block" id="{{ field.auto_id }}_error">{% for error in field.errors %}{{ error }}{% if not forloop.last %}<br>{% endif %}{% endfor %}</div>{% endif %}
{% if field.use_fieldset %}</fieldset>{% else %}</div>{% endif %}
|
模板接收要渲染的字段 [field] (一个 [BoundField] 对象:与表单绑定的字段,因而与其值和错误相关联):
- 第 2–6 行:一组单选按钮或复选框([field.use_fieldset] 适用于这些小部件)被 [<fieldset>] 包围,其标题([<legend>])是该组的标签:这正是屏幕阅读器所期望的;
- 第 8–10 行:其他字段带有 [<label>],通过其标识符与输入字段关联([id_for_label]:[id_name],默认是 [id_] 后跟字段名)。[{{ field }}] 使用其小部件的模板定义输入字段;
- 第 12 行:字段的帮助文本(字段的参数 [help_text] ),如果有的话;
- 第 13 行:字段的错误([field.errors]),使用来自 [Bootstrap] 的类([invalid-feedback]:红色文本,[d-block]:始终可见)。它的标识符 [id_name_error] 正是 [Django] 在输入字段的 [aria-describedby] 属性中指定的标识符,以便屏幕阅读器将消息与字段一起朗读;
- 第 14 行:结束第一部分中打开的标签的闭合标签。
最后,替换 [Django] 中的两个小部件模板,使单选按钮和复选框以与 [Bootstrap] 相同的方式并排显示:
| {# 替换 Django 的模板:一组并排的单选按钮或复选框 #}
<div id="{{ widget.attrs.id }}">{% for group, options, index in widget.optgroups %}{% for option in options %}
<div class="form-check form-check-inline">{% include option.template_name with widget=option %}</div>{% endfor %}{% endfor %}
</div>
|
| {# 替换 Django 的模板:一个单选按钮或一个复选框,后面跟着它的标签 #}
{% include "django/forms/widgets/input.html" %}
<label class="form-check-label" for="{{ widget.attrs.id }}">{{ widget.label }}</label>
|
它们的名称和路径与所替换的 [Django] 模板完全相同([django/forms/widgets/...],位于库的 [django/forms/templates] 文件夹中):
- [multiple_input.html] 绘制该组:对于每个选项([widget.optgroups]:分组后的选项;我们没有子组),生成一个 [<div class="form-check form-check-inline">] ,其中包含使用该选项自己的模板([option.template_name])绘制的选项;
- [input_option.html] 渲染一个选项:输入字段([<input type="radio">] 或 [<input type="checkbox">],使用来自 [Django] 和 [input.html] 的模板),后面跟着它的标签。
所有这些只需编写一次:示例 19、21 和 28 以及案例研究都会用到这些文件。现成的库,如 [django-crispy-forms] 及其包 [crispy-bootstrap5],或 [django-bootstrap5],也能做同样的事;我们选择演示其机制。
| # form/views.py:使用所有类型字段的表单
from django.shortcuts import render
from django.views.decorators.http import require_http_methods
from .forms import FieldsForm
# 初始值(每个字段一个,多值字段为列表)
INITIAL_VALUES = {"title": "Mme", "country": "fr", "languages": ["French"], "token": "A7X2"}
# GET:带初始值的表单;POST:发送的字段会被
# 读取、验证,然后由同一个表单再次显示
@require_http_methods(["GET", "POST"])
def form(request):
if request.method == "GET":
# initial:在尚未发送任何内容时显示的值
return render(request, "form/form.html",
{"form": FieldsForm(initial=INITIAL_VALUES)})
# 绑定到所发送数据的表单:它转换并验证这些数据
form = FieldsForm(request.POST)
valid = form.is_valid()
data = None
if valid:
# cleaned_data:由各字段转换后的值;列表(多值
# 字段)写成文本,其值以逗号分隔
data = {key: ", ".join(value) if isinstance(value, list) else value
for key, value in form.cleaned_data.items()}
# 浏览器实际发送的内容,逐字段列出;lists():
# (名称, 该字段所有值的列表) 对
received = "\n".join(f"{name} = [{', '.join(values)}]" for name, values in request.POST.lists())
return render(request, "form/form.html", {
"form": form,
"received": received,
"valid": valid,
"data": data,
})
|
- 第 9 行:表单的初始值:一个字典,每个字段一个值(多值字段为列表);
- 第 14 行:一个视图同时处理两种方法:GET 显示表单,POST 处理表单;
- 第 16–19 行:在 GET 中,是一个未绑定的表单(没有数据),带有其初始值(参数 [initial]):它不会被验证,也不会显示任何错误;
- 第 21–22 行:在 POST 中,是一个绑定到所提交字段([request.POST])的表单,然后进行验证([is_valid],见上一章):每个字段转换其值(日期、列表等),验证所选内容确实在所提供的选项之中,并应用其约束;
- 第 24–28 行:如果表单有效,其数据([cleaned_data])会被转换为人类可读的字典(使用 [{key: value for ...}] 语法):列表被写成文本,其元素以逗号分隔([", ".join(...)]);
- 第 31 行:在本示例中,展示浏览器实际发送的内容。[lists()] 方法属于 [QueryDict] (示例 10),它遍历(名称,所有值的列表)对。字符串 [\n] 表示换行符;
- 第 32–37 行:将绑定的表单传递给模板,模板将显示它,以及用户的输入和所有错误。
| {% extends "layout.html" %}
{% block content %}
<h1 class="h3">A complete form</h1>
<form method="post" action="{% url 'form' %}" style="max-width: 40rem">
{# 防 CSRF 令牌:一个隐藏字段,由 CsrfViewMiddleware 中间件检查 #}
{% csrf_token %}
{# as_field_group:一个完整的字段(标签、输入区、错误) #}
{{ form.title.as_field_group }}
<div class="row g-2">
<div class="col">{{ form.name.as_field_group }}</div>
<div class="col">{{ form.password.as_field_group }}</div>
<div class="col">{{ form.birth_date.as_field_group }}</div>
</div>
{{ form.hobbies.as_field_group }}
<div class="row g-2">
<div class="col">{{ form.country.as_field_group }}</div>
<div class="col">{{ form.languages.as_field_group }}</div>
</div>
{{ form.comment.as_field_group }}
{# 隐藏字段:只有输入区,没有标签 #}
{{ form.token }}
<button class="btn btn-primary" type="submit">Send</button>
</form>
{# received:如果表单已提交,则存在于上下文中 #}
{% if received %}
<h2 class="h5 mt-3">What the server received</h2>
<pre class="bg-light p-2 border">{{ received }}</pre>
<p>Valid form: {{ valid|yesno:"yes,no" }}</p>
<ul>
{# errors:字典 {字段: 错误列表};items:其键值对 #}
{% for field, errors in form.errors.items %}
{% for error in errors %}<li>{{ field }}: {{ error }}</li>{% endfor %}
{% endfor %}
</ul>
{% if valid %}
<p>The data of the form:</p>
<ul>
{% for key, value in data.items %}
<li>{{ key }}: {{ value }}</li>
{% endfor %}
</ul>
{% endif %}
{% endif %}
{% endblock %}
|
- 第 5 行:[<form>] 标签,手工输入:[Django] 表单不会生成它;
- 第 7 行:[{% csrf_token %}] 标签创建一个包含防 CSRF 令牌的隐藏字段(见下文);
- 第 9 行:[{{ form.title }}] 指的是 [title] 字段,位于表单中(一个 [BoundField]);其方法 [as_field_group] 使用模板 [forms/field.html] 完整渲染它:标签、输入字段(含其当前值)和错误消息;
- 第 10–20 行:其他字段,按照 [Bootstrap] 的网格类排列;
- 第 22 行:隐藏字段,只渲染其输入字段;
- 第 26 行:变量 [received] 仅在提交之后才存在;缺失的变量视为“假”;
- 第 32–34 行:错误。[form.errors] 是一个字典,使用 [items] (不带括号,如同在 DTL 中)对其进行遍历:对每个字段,得到其错误列表;
- 第 39–41 行:对字典的循环,同时遍历键和值。
我们本可以只用一行写出整个表单:[{{ form }}],它使用表单模板(渲染引擎设置 [form_template_name])按顺序渲染所有字段。逐个处理字段,则可以按自己的需要安排它们。
4.6.6. CSRF 保护
CSRF 攻击(Cross-Site Request Forgery,跨站请求伪造)是指恶意站点诱骗受害者的浏览器向我们的应用程序发送表单。浏览器会在请求中带上我们应用程序的 Cookie——从而带上已登录用户的会话——因此请求看起来是合法的。解决方案:我们应用程序中的每个表单都包含一个随机令牌,恶意站点无法得知该令牌。
[Django] 通过中间件组件 [CsrfViewMiddleware] (文件 [config/settings.py] 的第 23 行)将此保护应用于整个应用程序。生成页面时,[{% csrf_token %}] 标签会写入隐藏字段 [csrfmiddlewaretoken],中间件则随响应发送一个名为 [csrftoken] 的 Cookie,其中包含一个密钥。对于任何修改数据的请求(POST、PUT、PATCH、DELETE),在调用视图之前,中间件会验证所发送的令牌(位于 [csrfmiddlewaretoken] 字段中,或者对于通过 [X-CSRFToken] 头部、经由 [JavaScript] 发送的请求)是否与 Cookie 的密钥匹配。恶意站点无法读取我们站点的 Cookie,也无法查看我们的页面:因此它无法生成有效的令牌。如果验证失败,视图不会被调用:[Django] 会自行响应 403 错误。这与 [Symfony] 有很大区别,后者的 Form 组件会为每个表单验证令牌,并让操作决定后续如何处理:使用 [Django],所有 POST 请求都受到保护,视图不可能忘记启用保护。[@csrf_exempt] 装饰器可使视图免于这种验证(例如,用于由其他服务器调用的 API)。
4.6.7. 执行
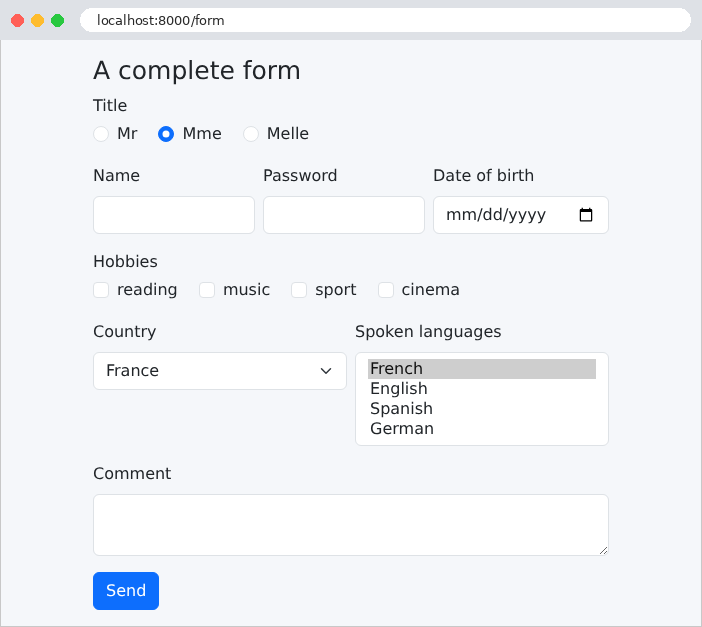
初始值是可见的:“Mme”单选按钮、国家“France”和语言“French”。生成的 HTML(摘录):
| <form method="post" action="/form" style="max-width: 40rem">
<input type="hidden" name="csrfmiddlewaretoken" value="HuaIyQ2pbEWYQCG1mTPuWEDSd9zjBvCQhGfposguhAGFVRfIl5gRe39M2HPOHKnm">
<fieldset class="mb-3">
<legend class="form-label fs-6 mb-1">Title</legend>
<div id="id_title">
<div class="form-check form-check-inline">
<input type="radio" name="title" value="Mr" class="form-check-input" required id="id_title_0">
<label class="form-check-label" for="id_title_0">Mr</label>
</div>
<div class="form-check form-check-inline">
<input type="radio" name="title" value="Mme" class="form-check-input" required id="id_title_1" checked>
<label class="form-check-label" for="id_title_1">Mme</label>
</div>
...
<input type="checkbox" name="hobbies" value="reading" class="form-check-input" id="id_hobbies_0">
...
<select name="languages" size="4" class="form-select" id="id_languages" multiple>
<option value="French" selected>French</option>
<option value="English">English</option>
...
<input type="hidden" name="token" value="A7X2" class="form-control" id="id_token">
<button class="btn btn-primary" type="submit">Send</button>
</form>
|
[Django] 已写好所有内容:标识符([id_title_1])、与字段关联的标签、字段名(所有复选框的名称都是 [hobbies]:浏览器将发送重复的参数,示例 10)、当前值对应的属性 [checked] 和 [selected] 、必填字段的属性 [required] ,以及 [Bootstrap] 的类。第一个隐藏字段包含防 CSRF 令牌;它在每个页面上都不同(它被一个随机数“掩码”,这样网络窃听者就无法通过比较多个页面来猜出密钥)。让我们填写表单并提交:
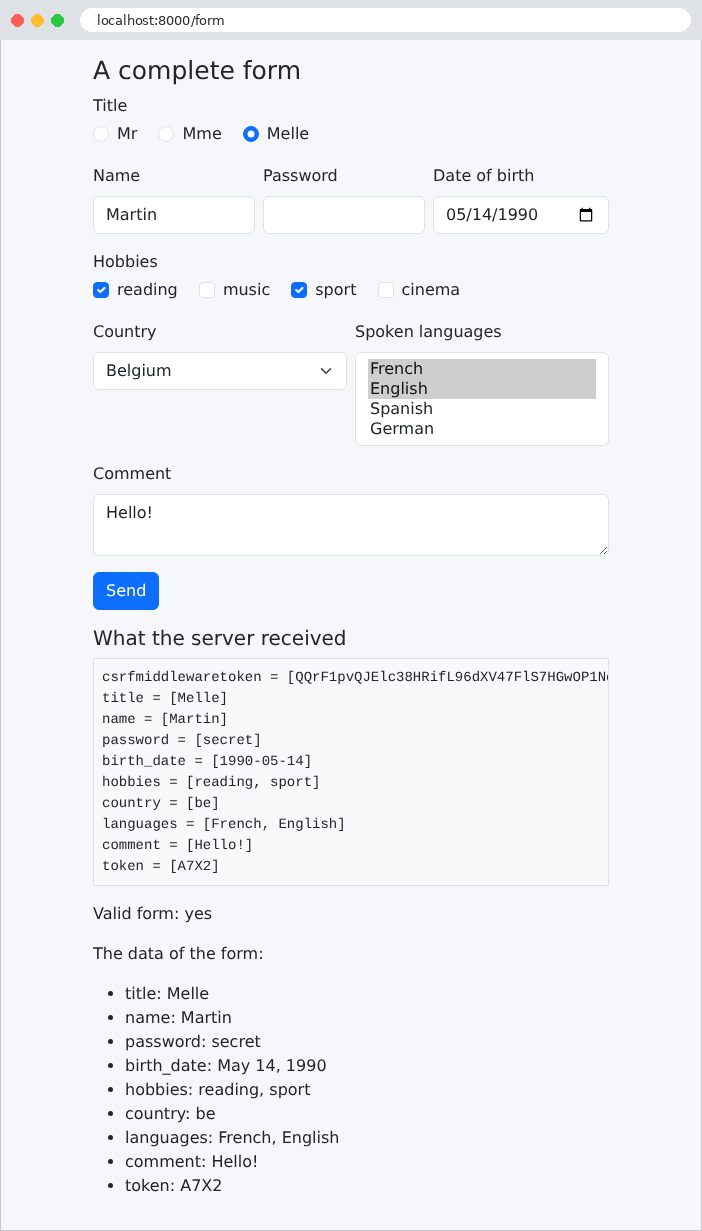
页面显示了服务器收到的内容:每个字段一个参数,复选框和下拉列表有多个值;密码已发送,但不会再次显示在其字段中。浏览器按照自己的设置显示日期,但以 [yyyy-mm-dd] 格式发送;模板按英文风格对其进行了格式化,[May 14, 1990],与它显示的所有日期一样。隐藏字段 [token] 被原样发送回来:这就是在用户看不见的情况下来回传递信息的方式(案例研究用它来传递记录的版本号)。但是,隐藏字段并不是受保护的字段:用户可以使用浏览器的 开发者工具修改它,服务器必须像验证其他字段一样验证它。防 CSRF 令牌也包含在收到的字段中;它不属于表单数据。
现在让我们使用 [curl] 提交一个表单,不带令牌,并使用一个未列出的国家:
| curl -i -d "name=Martin&country=xx" http://localhost:8000/form
|
| HTTP/1.1 403 Forbidden
Content-Type: text/html; charset=utf-8
<!DOCTYPE html>
<html lang="en">
...
<title>403 Forbidden</title>
...
|
请求没有越过中间件:视图没有被调用,服务器控制台对此有所提示:
| Forbidden (CSRF cookie not set.): /form
[27/Sep/2026 19:30:21] "POST /form HTTP/1.1" 403 2908
|
在浏览器中,[Django] 的错误页面会说明拒绝的原因(在调试模式下):
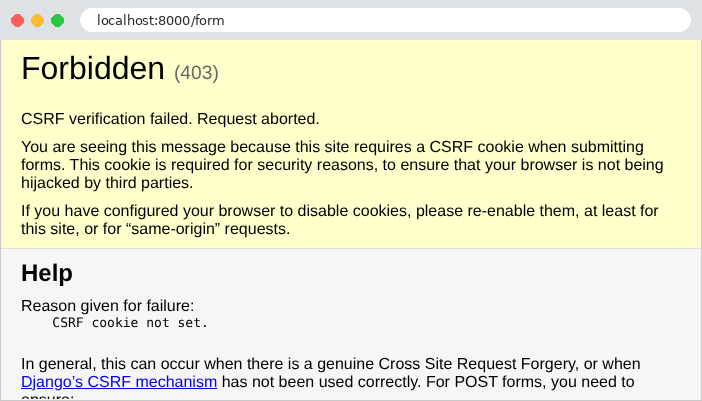
为了让令牌被接受,[curl] 必须像浏览器一样行事:先请求表单,保留 [csrftoken] Cookie(选项 [-c],它将收到的 Cookie 保存到文件中),然后重新发送该 Cookie(选项 [-b])以及从页面中读取的令牌:
| curl -c cookies.txt http://localhost:8000/form
curl -b cookies.txt -d "csrfmiddlewaretoken=k4ZfzHvE...yBD&name=Martin&country=xx&token=A7X2" http://localhost:8000/form
|
| ...
<pre class="bg-light p-2 border">csrfmiddlewaretoken = [k4ZfzHvER4iJYcaDFRMsYh0OizTJGRMw2AtHYeGuGelfF3DZahfrxLcwUbVn0yBD]
name = [Martin]
country = [xx]
token = [A7X2]</pre>
<p>Valid form: no</p>
<ul>
<li>title: The title is required.</li>
<li>country: Select a valid choice. xx is not one of the available choices.</li>
</ul>
...
|
(该令牌来自第一次请求所收到的页面)。这一次视图被调用了,表单因两个原因无效:没有发送标题,并且国家 [xx] 不在选项之中。这最后一项检查由 [ChoiceField] 字段自身执行,无需我们提出要求:恶意用户可以发送任何内容,而不仅仅是页面所建议的内容。在这里,视图以 200 状态码返回无效的表单;下一个示例将选择更合适的状态码。
4.7. 示例 19:表单验证
一个注册表单,其中每个字段都有自己的约束。如果发生错误,表单会连同用户的输入重新显示,并在每个无效字段下方显示一条消息。我们还添加了一条适用于两个字段的规则:密码与其确认密码必须一致。
| 19-form-validation/
├── config/
│ ├── rendering.py
│ ├── settings.py
│ └── ...
├── registration/
│ ├── __init__.py
│ ├── forms.py
│ └── views.py
├── static/
│ └── ...
├── templates/
│ ├── forms/
│ │ └── field.html
│ ├── registration/
│ │ ├── registration.html
│ │ └── welcome.html
│ └── layout.html
└── manage.py
|
文件 [config/settings.py]、[config/rendering.py], and [templates/forms/field.html] 与示例 18 中的相同。
| # registration/forms.py:注册表单,其字段及约束
from django import forms
# 示例 18 的父类:Bootstrap CSS 类
class BootstrapForm(forms.Form):
def __init__(self, *args, **kwargs):
super().__init__(*args, **kwargs)
for field in self.fields.values():
field.widget.attrs["class"] = "form-control"
class RegistrationForm(BootstrapForm):
# max_length:由服务器检查的约束,Django 也会将其写入
# 页面(maxlength 属性),供浏览器使用
name = forms.CharField(max_length=20, error_messages={
"required": "The name is required.",
"max_length": "The name must not exceed 20 characters."})
# EmailField:有效的地址,带完整域名(example.com,而不是 example)
email = forms.EmailField(label="Email address", error_messages={
"required": "The email address is required.",
"invalid": "Invalid email address."})
# IntegerField:整数;不是整数的输入会产生 invalid 错误
age = forms.IntegerField(label="Age", min_value=18, max_value=120, error_messages={
"required": "The age is required.",
"invalid": "An integer is expected.",
"min_value": "The age must be between 18 and 120 years.",
"max_value": "The age must be between 18 and 120 years."})
password = forms.CharField(label="Password", min_length=6, widget=forms.PasswordInput,
error_messages={
"required": "The password is required.",
"min_length": "The password must have at least 6 characters."})
confirmation = forms.CharField(label="Confirmation", widget=forms.PasswordInput,
error_messages={"required": "The confirmation is required."})
# clean:对整个表单的验证,在每个字段的验证之后进行。
# 两个字段就是在这里进行比较的
def clean(self):
data = super().clean()
password = data.get("password")
confirmation = data.get("confirmation")
# 这两个字段都通过了各自的验证,但内容不同
if password and confirmation and password != confirmation:
# add_error:一个错误,附加到确认字段上
self.add_error("confirmation", "The confirmation does not match the password.")
return data
|
- 第 7–11 行:来自示例 18 的父类,经过简化:所有字段都是输入字段;
- 第 17–19 行:姓名为必填,且不得超过 20 个字符。每个错误都根据其代码分配有各自的消息(示例 09)。参数 [max_length] 有两个作用:字段检查长度(在服务器端),并且其小部件设置 HTML 属性 [maxlength],在浏览器中限制输入([min_length] 的作用相同,对应属性 [minlength]);
- 第 21–23 行:[EmailField] 验证地址是否有效,并要求使用完全限定域名([example.com],而不是 [example])。其小部件 [EmailInput] 生成一个 [<input type="email">],浏览器可以对其进行验证;
- 第 25–29 行:[IntegerField] 生成一个 [<input type="number">],其属性 [min] 和 [max] 分别源自 [min_value] 和 [max_value],并将输入转换为整数。不是整数的输入会产生错误 [invalid];
- 第 30–35 行:密码(至少 6 个字符)及其确认密码,两个使用 [CharField] 字段 [PasswordInput] 小部件。一个参数可以跨多行;
- 第 39–47 行:方法 [clean] 在验证完每个字段(及其方法 [clean_<field>],示例 12)之后验证整个表单。[super().clean()] 返回 [cleaned_data],其中只包含有效的字段:如果密码已被拒绝(太短),[data.get("password")] 就等于 [None] 。只有当两个字段都有效时才进行比较;如果二者不同,[add_error] 会将错误附加到 [confirmation] 字段([add_error(None, "...")] 则会将其附加到表单本身:一个“通用”错误,由 [non_field_errors()] 返回)。这就是验证适用于多个字段的规则的方法。
4.7.2. 视图:registration/views.py
| # registration/views.py:由服务器验证的表单
from django.shortcuts import render
from django.views.decorators.http import require_http_methods
from .forms import RegistrationForm
# GET /register:表单;?html5=true:我们让浏览器在发送之前
# 验证它。POST /register:发送的表单
@require_http_methods(["GET", "POST"])
def register(request):
html5 = request.GET.get("html5") == "true"
if request.method == "POST":
form = RegistrationForm(request.POST)
# is_valid:每个字段都能被转换并符合其约束,并且
# clean 方法没有报告任何错误
if form.is_valid():
return render(request, "registration/welcome.html",
{"registration": form.cleaned_data})
# 无效的表单,连同输入和错误一起再次显示,并带有
# 422 状态码(Unprocessable Content)
return render(request, "registration/registration.html",
{"form": form, "html5": html5}, status=422)
# 首次显示:一个空表单
return render(request, "registration/registration.html",
{"form": RegistrationForm(), "html5": html5})
|
- 第 13 行:参数 [?html5=true] 启用浏览器验证(见下文);
- 第 15–20 行:一个绑定到所提交字段的表单。如果它有效,欢迎页面将接收其数据(下一个示例将说明,POST 成功后最好进行重定向);
- 第 23–24 行:否则,重新显示表单,显示输入内容和所有错误,并返回状态码 422(Unprocessable Content:“请求格式正确,但其内容无效”);
- 第 26–27 行:首次显示时,显示一个空的未绑定表单。
因此,无效的表单由 POST 视图自身重新显示,并保留输入内容和错误:这是 [Django] 以及 [Symfony] 使用的标准做法。其他框架,如 [Laravel],则是响应一次重定向到表单页面,同时在会话中保存输入内容和错误,供下一次请求使用。
4.7.3. 模板
| {% extends "layout.html" %}
{% block content %}
<h1 class="h3">Registration</h1>
{% if html5 %}
<p>Browser validation <b>enabled</b> - <a href="{% url 'register' %}">disable it</a></p>
{% else %}
<p>Browser validation <b>disabled</b> - <a href="{% url 'register' %}?html5=true">enable it</a></p>
{% endif %}
{# novalidate:浏览器忽略 required、min 等属性,原样提交表单 #}
<form method="post" {% if not html5 %}novalidate{% endif %}>
{% csrf_token %}
{# 遍历表单的循环:其各个字段,每个字段带有标签和错误 #}
{% for field in form %}
{{ field.as_field_group }}
{% endfor %}
<button class="btn btn-primary" type="submit">Register</button>
</form>
{% endblock %}
{% block page_bottom %}
{# errors:表单的错误;提交前为空,或者一切有效时为空 #}
{% if form.errors %}
<div class="error-area" role="alert">The form contains errors.</div>
{% endif %}
{% endblock %}
|
- 第 5–9 行:用于启用或禁用浏览器验证的链接;
- 第 11 行:[novalidate] 属性禁用浏览器验证:表单按原样提交,只由服务器进行验证。这正是我们首先想要观察的。该表单没有 [action] 属性:它会提交到当前页面的 URL;
- 第 14–16 行:对表单本身的循环:它按声明的顺序遍历其字段,每个字段都被完整渲染;
- 第 21–26 行:[page_bottom] 块,由父模板定义(见下文)。[form.errors] 在提交之前或所有内容都有效时为空。如果表单包含错误,则会在一个字段中显示一条通用消息,其样式由 [static/css/styles.css] 定义(示例 15)。[role="alert"] 属性向屏幕阅读器标示这一点。
| <!doctype html>
{% load static %}
<html lang="en">
<head>
<meta charset="utf-8">
<meta name="viewport" content="width=device-width, initial-scale=1">
<title>Registration</title>
<link rel="stylesheet" href="{% static 'bootstrap/css/bootstrap.min.css' %}">
<link rel="stylesheet" href="{% static 'css/styles.css' %}">
</head>
<body>
<div class="container py-3" style="max-width: 34rem">
<main>
{% block content %}{% endblock %}
</main>
{# 第二个块,位于页面底部 #}
{% block page_bottom %}{% endblock %}
</div>
</body>
</html>
|
- 第 17 行:第二个块 [page_bottom],默认为空:一个模板可以拥有任意多个块。
| {% extends "layout.html" %}
{% block content %}
{# registration:表单经过验证的数据(cleaned_data) #}
<h1 class="h3">Welcome {{ registration.name }}</h1>
<p>Your registration is saved: address <b>{{ registration.email }}</b>,
age <b>{{ registration.age }}</b> years.</p>
{% endblock %}
|
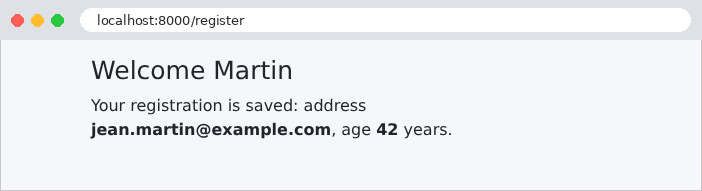
[registration] 是已验证数据的字典:姓名中的空格已被删除(见下文),年龄是整数。
4.7.4. 执行
让我们提交一个满是错误的表单:由空格组成的姓名、没有完整域名的地址、年龄 12、过短的密码,以及不同的确认密码:
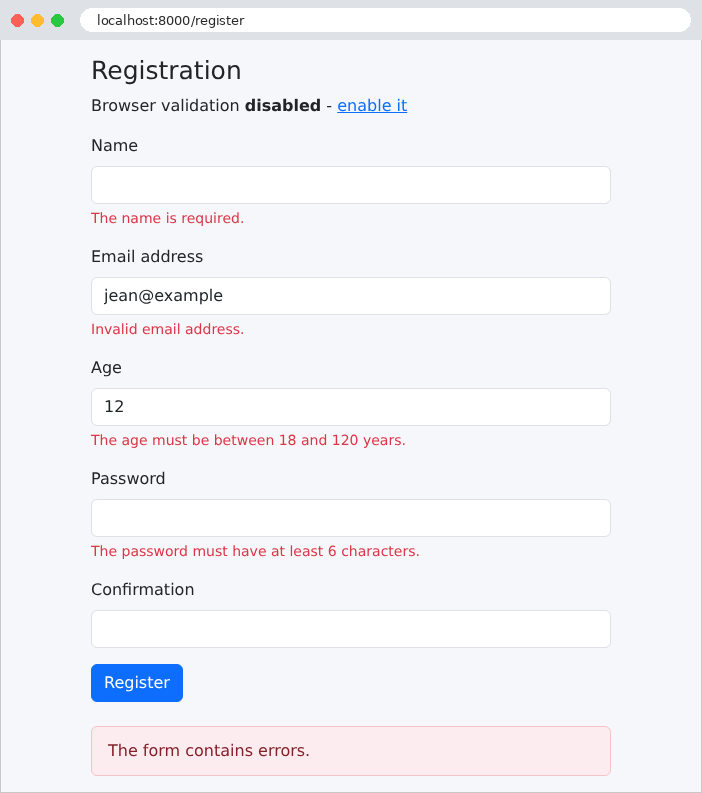
输入内容被保留(密码除外),每个错误都标示在其对应字段的下方。由空格组成的姓名被标示为缺失:***[CharField] 会删除每个输入两侧的空格(参数 ***[strip]***,示例 08),并重新显示清理后的值。然而,确认密码虽然与密码不同,却没有任何错误:由于密码已被拒绝,[clean]* 方法没有对它们进行比较。URL 是表单的 URL,[/register]:该页面是由视图响应 POST 而显示的。使用 [curl],像示例 18 那样提供防 CSRF 令牌,还可以发送浏览器不会发送的内容——非数字的年龄:
| curl -i -b cookies.txt -d "csrfmiddlewaretoken=...&name=Martin&email=jean.martin@example.com&age=abc&password=secret123&confirmation=secret123" http://localhost:8000/register
|
| HTTP/1.1 422 Unprocessable Content
...
<label class="form-label" for="id_age">Age</label>
<input type="number" name="age" value="abc" min="18" max="120" class="form-control" required aria-invalid="true" aria-describedby="id_age_error" id="id_age">
<div class="invalid-feedback d-block" id="id_age_error">An integer is expected.</div>
...
|
我们看到输入内容被重新显示,还有 HTML5 属性([required]、[min]、[max])、错误消息 [invalid],以及属性 [aria-invalid] 和 [aria-describedby]——[Django] 会自动将它们添加到有错误的字段上——它们为屏幕阅读器将字段与其消息关联起来。
4.7.5. 浏览器验证
让我们移除 [novalidate] 属性,方法是点击“启用”链接(参数 [?html5=true])。随后,浏览器会在提交表单之前检查属性 [required]、[type="email"]、[min]、[max]、[maxlength]……并在第一个有错误的字段下方的提示框中显示它自己的消息(“请填写此字段”“值必须大于或等于 18”等):只要还有错误,表单就不会被提交。[Django] 根据字段自动生成了这些属性:对每个必填字段生成 [required] ,根据 [maxlength] 和 [minlength] 生成 [max_length] 和 [min_length],根据 [min] 和 [max] 生成 [min_value] 和 [max_value],根据小部件生成 [type="email"] 和 [type="number"] 。因此它们始终符合服务器的约束。只有 [clean] 方法的规则(确认密码)不由浏览器处理。
这种验证对用户很方便:它是即时的,无需与服务器往返。但它不能取代服务器的验证:用户可以禁用它,而像 [curl] 这样的程序则完全忽略它。规则是绝对的:服务器始终进行验证;浏览器验证只是额外的便利。
终于,输入正确了。两侧带有空格输入的姓名已被表单清理:
4.8. 示例 20:Post/Redirect/Get 模式
当 POST 视图以一个页面作为响应时,该页面是 POST 的结果。如果用户重新加载它(按下 [F5]),浏览器会在显示一条很少有人阅读的警告之后重新发送 POST:命令被发送两次,消息也被发布两次。Post/Redirect/Get 模式(PRG)可以避免这个问题:成功的 POST 视图不渲染页面,而是以重定向(示例 04)作为响应,指向一个 GET 页面,浏览器会立即请求该页面。重新加载此页面只是重新执行 GET。
仍有一个问题:GET 页面想要显示一条消息(“任务已添加”),但知道这条消息的是 POST 视图,而它无法向尚未发生的请求传递变量。解决方案:闪现消息(flash message),由 POST 视图发布,保留到被读取为止,显示一次后即被丢弃。[Django] 通过其 [django.contrib.messages] 应用提供这些功能。
4.8.1. 配置:config/settings.py
| # config/settings.py:示例 20 的配置
from pathlib import Path
BASE_DIR = Path(__file__).resolve().parent.parent
DEBUG = True
SECRET_KEY = "django-insecure-a%lgt@s)1dxed4be^y25kc))1tt@7_%yytqt!xgh_v4=485(+k"
ALLOWED_HOSTS = []
LANGUAGE_CODE = "en"
TIME_ZONE = "Europe/Paris"
ROOT_URLCONF = "config.urls"
WSGI_APPLICATION = "config.wsgi.application"
INSTALLED_APPS = [
"django.contrib.staticfiles",
# 闪现消息:由一个请求留下、由下一个请求显示的消息
"django.contrib.messages",
"tasks",
]
MIDDLEWARE = [
"django.middleware.csrf.CsrfViewMiddleware",
# 闪现消息的中间件:它在请求开始时读取这些消息,并在
# 请求结束时存储它们
"django.contrib.messages.middleware.MessageMiddleware",
]
# 闪现消息在两个请求之间的存储位置:Cookie(见
# 课程中的"闪现消息存储在哪里?")
MESSAGE_STORAGE = "django.contrib.messages.storage.cookie.CookieStorage"
TEMPLATES = [
{
"BACKEND": "django.template.backends.django.DjangoTemplates",
"DIRS": [BASE_DIR / "templates"],
"OPTIONS": {
"context_processors": [
# messages 变量:要显示的闪现消息
"django.contrib.messages.context_processors.messages",
],
},
},
]
STATIC_URL = "static/"
STATICFILES_DIRS = [
BASE_DIR / "static",
BASE_DIR.parent / "common" / "static",
]
|
- 第 17 行:消息应用;
- 第 21–26 行:其中间件 [MessageMiddleware],在每个请求开始时读取待处理的消息,并在结束时存储尚未读取的消息(以及所有新消息);
- 第 30 行:[MESSAGE_STORAGE] 设置决定消息在两次请求之间存储在何处:这里是存储在 Cookie 中(见下文)。默认情况下,[Django] 首先尝试 Cookie,如果消息太大,再使用会话(见作用域一章);我们的示例没有会话;
- 第 37–40 行:消息上下文处理器:它使变量 [messages] 对所有模板可用。
4.8.2. 服务:tasks/service.py
| # tasks/service.py:任务列表,由所有用户共享
import threading
# 服务器进程在内存中从一个请求持续到下一个请求:
# 模块的变量与它同寿命。因此该列表由所有用户的所有
# 请求共享(服务器停止时丢失)
_tasks = ["Read chapter 3"]
# 服务器同时处理多个请求,使用多个执行线程
# (thread):锁保证同一时刻只有一个线程修改列表
_lock = threading.Lock()
def list_tasks() -> list[str]:
# 一个副本:调用方无法修改服务自己的列表
with _lock:
return list(_tasks)
def add(label: str) -> None:
# with:锁在这里获取,并在离开代码块时释放,即使发生了异常
with _lock:
_tasks.append(label)
|
任务列表由所有用户共享,并且必须在请求之间持续存在。我们在示例 01 和 06 中见过这一点:在 [Python] 中,服务器在请求之间一直驻留在内存中。因此,一个简单的模块变量就足够了。学过 [Symfony] 课程的读者会记得,在 [PHP] 中,列表必须存储在缓存或文件中。
- 第 8 行:列表,一个模块变量。它在服务器进程运行期间一直存在:服务器关闭或重启(开发期间代码更改后)时它会丢失。而且,如果生产服务器运行多个进程(这是标准做法:例如每个处理器一个进程),每个进程都会有自己的列表。因此,真实的应用程序会将列表存储在数据库中(第 7 章);
- 第 12 行:开发服务器同时处理多个请求,每个请求在各自的线程中。两个同时进行的更新可能会冲突。锁([threading.Lock])确保同一时刻只有一个线程执行它所保护的代码;
- 第 15–18 行:该函数返回列表的副本,副本是在锁的保护下创建的;
- 第 21–24 行:语句 [with] 获取锁,执行代码块,然后释放锁——无论何种情况,即使异常中断了代码块。可由 [with] 使用的对象称为上下文管理器;文件是另一个例子([with open(...) as f:] 在代码块结束时关闭文件)。
该服务是一个模块,而不是一个类:其函数通过 [service.list_tasks()] and [service.add(...)] 调用。在 [Python] 中,这是让整个应用程序共享单个对象的最简单方法(示例 06)。
4.8.3. 视图:tasks/views.py
| # tasks/views.py:Post / Redirect / Get 模式
from django.contrib import messages
from django.shortcuts import redirect, render
from django.views.decorators.http import require_http_methods, require_POST
from . import service
# GET /tasks:列表和添加表单;POST /tasks:添加操作,遵循
# Post / Redirect / Get 模式
@require_http_methods(["GET", "POST"])
def tasks(request):
if request.method == "GET":
return render(request, "tasks/tasks.html", {"tasks": service.list_tasks()})
label = request.POST.get("label", "").strip()
if label == "" or len(label) > 40:
# 无效的输入:我们不重定向,直接再次显示页面
return render(request, "tasks/tasks.html", {
"tasks": service.list_tasks(),
"label": label,
"error": "The label must have 1 to 40 characters."})
service.add(label)
# 一条"闪现"消息:它会在重定向之后保留下来,供下一个请求使用
messages.success(request, f"The task [{label}] has been added.")
# 不返回页面:重定向到 GET 页面
return redirect("tasks")
# POST /tasks/without-prg:反例(对 POST 直接以页面作为响应)
@require_POST
def add_without_prg(request):
service.add(request.POST.get("label", "").strip() or "(untitled)")
return render(request, "tasks/tasks.html", {"tasks": service.list_tasks(), "without_prg": True})
|
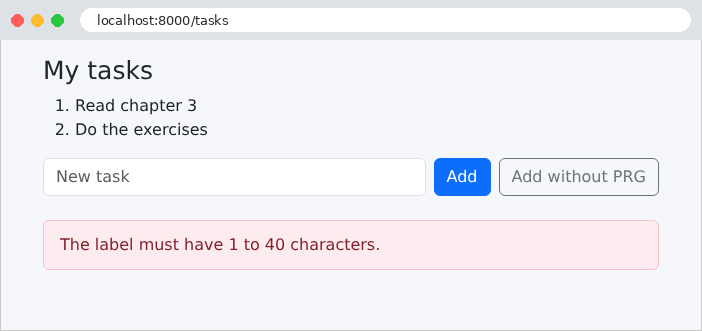
- 第 16–22 行:为使示例简洁,输入是手工验证的([strip] 会删除两侧的空格)。无效的输入不经重定向直接重新显示:由于没有任何内容被修改,因此无需防范重复提交;
- 第 25 行:[messages.success] 显示“成功”级别的闪现消息(还有 [debug]、[info]、[warning]、和 [error]:级别使消息可以以不同方式显示);
- 第 27 行:重定向到名为 [tasks] 的 GET 页面(示例 04);
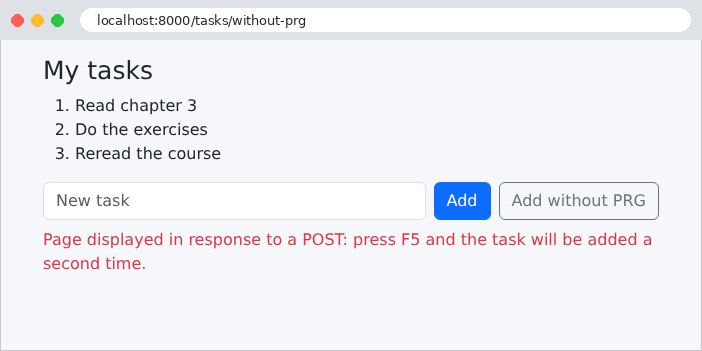
- 第 31–34 行:反例:响应 POST 的页面。运算符 [or] 在其左操作数为“真”(此处为非空字符串)时返回左操作数,否则返回右操作数。
4.8.4. 模板
| <!doctype html>
{% load static %}
<html lang="en">
<head>
<meta charset="utf-8">
<meta name="viewport" content="width=device-width, initial-scale=1">
<title>Tasks</title>
<link rel="stylesheet" href="{% static 'bootstrap/css/bootstrap.min.css' %}">
<link rel="stylesheet" href="{% static 'css/styles.css' %}">
</head>
<body>
<div class="container py-3" style="max-width: 40rem">
{# 闪现消息:只读取一次,随后消失 #}
{% for message in messages %}
<div class="alert alert-success" role="status">{{ message }}</div>
{% endfor %}
<main>
{% block content %}{% endblock %}
</main>
</div>
</body>
</html>
|
- 第 14–16 行:[messages] 包含待处理的闪现消息。遍历它们会将它们标记为已读:中间件将在请求结束时删除它们;闪现消息只显示一次。[alert alert-success] 是 [Bootstrap] 的类,用绿色框显示消息。每条消息还有一个级别([message.level])和标签([message.tags]:[success]……),它们决定其呈现方式。
| {% extends "layout.html" %}
{% block content %}
<h1 class="h3">My tasks</h1>
<ol>
{% for task in tasks %}
<li>{{ task }}</li>
{% endfor %}
</ol>
<form method="post" action="{% url 'tasks' %}" class="d-flex gap-2">
{% csrf_token %}
<input class="form-control" name="label" value="{{ label }}" placeholder="New task">
<button class="btn btn-primary text-nowrap" type="submit">Add</button>
{# formaction:此按钮将同一个表单发送到另一个地址 #}
<button class="btn btn-outline-secondary text-nowrap" type="submit" formaction="{% url 'tasks_without_prg' %}">Add without PRG</button>
</form>
{% if error %}
<div class="error-area" role="alert">{{ error }}</div>
{% endif %}
{% if without_prg %}
<p class="text-danger mt-2">Page displayed in response to a POST: press F5 and the task will be added a second time.</p>
{% endif %}
{% endblock %}
|
- 第 11 行:防 CSRF 令牌:[CsrfViewMiddleware] 中间件处于启用状态([config/settings.py] 文件的第 22 行);
- 第 12 行:变量 [label] 只有在输入无效之后才存在:缺失的变量显示为空字符串;
- 第 15 行:按钮的 [formaction] 属性将表单提交到与其 [action] 属性不同的地址:因此,同一个表单可以触发两个不同的视图;
- 第 17–22 行:反例中的错误消息和警告。
4.8.5. 闪现消息存储在哪里?
在 POST 请求与随后的 GET 请求之间,消息必须存储在某个地方。我们选择了 Cookie。让我们使用 [curl] 来检查它,将 Cookie 保存到文件中(选项 [-c] 和 [-b],示例 18),并且先请求页面以获取防 CSRF 令牌:
| curl -i -b cookies.txt -c cookies.txt -d "csrfmiddlewaretoken=...&label=Do%20the%20exercises" http://localhost:8000/tasks
|
| HTTP/1.1 302 Found
Content-Type: text/html; charset=utf-8
Location: /tasks
Set-Cookie: messages=W1siX19qc29uX21lc3NhZ2UiLDAsMjUsIlRoZSB0YXNrIFtEbyB0aGUgZXhlcmNpc2VzXSBoYXMgYmVlbiBhZGRlZC4iLCIiXV0:1xAsjI:xIWL3aUp2CbHdwZRyfv13cVIN1QG9baN2Ss020Pzyl0; HttpOnly; Path=/; SameSite=Lax
|
POST 的响应是一次重定向(状态码 302,头部 [Location]),并附带 Cookie [messages]。该 Cookie 是 [HttpOnly] (页面上的 [JavaScript] 无法读取它)并且是 [SameSite=Lax](浏览器不会在来自其他站点的 POST 请求中发送它)。其值由三部分组成,以冒号分隔:数据、日期(以 62 进制编码)和签名。数据是消息列表,采用 JSON 格式并经过 base-64 编码(此处未压缩:[Django] 仅在压缩能使数据变短时才压缩,压缩后的值以句点开头)。解码后得到:
| [["__json_message",0,25,"The task [Do the exercises] has been added.",""]]
|
它显示了消息级别(25:success)及其文本。因此,Cookie 的内容并不是秘密:任何人都可以解码。但它是有签名的:签名基于数据和应用程序的密钥([SECRET_KEY],示例 01)计算得出。如果浏览器发回被修改过的 Cookie,签名就不再匹配,[Django] 会忽略它:用户无法伪造虚假消息。让我们发回该 Cookie,跟随重定向:
| curl -i -b cookies.txt -c cookies.txt http://localhost:8000/tasks
|
| HTTP/1.1 200 OK
Content-Type: text/html; charset=utf-8
Vary: Cookie
Set-Cookie: messages=""; expires=Thu, 01 Jan 1970 00:00:00 GMT; Max-Age=0; Path=/; SameSite=Lax
...
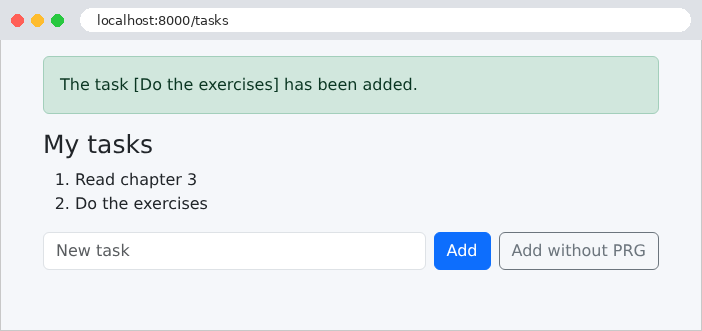
<div class="alert alert-success" role="status">The task [Do the exercises] has been added.</div>
...
<li>Read chapter 3</li>
<li>Do the exercises</li>
...
|
消息被显示;中间件发现它已被读取,便删除该 Cookie(一个在 1970 年就已过期的空 Cookie)。再次发出 GET 请求,就不会再显示该消息。[Vary: Cookie] 头部提醒 缓存:响应取决于请求的 Cookie。与此同时,任务列表存储在服务器的内存中。
4.8.6. 执行
添加任务:浏览器跟随了重定向;URL 栏中的地址对应 GET 页面,可以放心地重新加载。
无效的输入,连同其错误消息一起重新显示:
反例:该页面是对 POST 的响应,其 URL 为 [/tasks/without-prg]。如果点击 [F5],浏览器会询问是否要重新提交表单;如果同意,任务将被第二次添加。
4.9. 示例 21:链接、按钮和确认
HTTP 协议的一条原则:GET 请求不会改变任何东西。浏览器、搜索引擎以及预加载页面的工具会不经用户许可随意跟随链接。因此,“删除”链接([<a href="/contacts/2/delete">])会很危险:爬取网站的机器人会把一切都删除。在 Web 应用程序中:
- 查看通过链接([<a href>])完成,它发送 GET 请求;
- 编辑(保存、复制、删除)通过放在表单中的按钮完成,并受防 CSRF 令牌保护。
此示例管理一个联系人列表,并在每次删除之前显示确认窗口。
| 21-links-buttons/
├── config/
│ ├── middleware.py
│ ├── rendering.py
│ ├── settings.py
│ └── ...
├── contacts/
│ ├── __init__.py
│ ├── forms.py
│ ├── service.py
│ ├── viewmodels.py
│ └── views.py
├── static/
│ ├── css/
│ │ └── styles.css
│ └── js/
│ └── app.js
├── templates/
│ ├── contacts/
│ │ ├── details.html
│ │ └── list.html
│ ├── forms/
│ │ └── field.html
│ ├── fragments/
│ │ └── confirmation.html
│ └── layout.html
└── manage.py
|
4.9.1. 方法模拟:config/middleware.py
HTML 表单只能发送 GET 和 POST 请求。然而,HTTP 协议支持其他方法:用于删除的 DELETE,以及用于更新的 PUT 和 PATCH。许多框架绕过了这一限制:包含隐藏字段 [_method](值为 [DELETE](或 [PUT]、[PATCH]))的 POST 表单被视为该方法的请求。这称为方法伪装(method spoofing)。[Symfony] 将其作为一个选项提供;[Django] 则没有。让我们将其实现为中间件:
| # config/middleware.py:表单的 HTTP 方法,被其 _method 字段替换
# HTML 表单只能发送 GET 和 POST。包含隐藏的 _method 字段(DELETE、PUT、PATCH)
# 的 POST 表单,会被当作该方法的请求处理
class MethodOverride:
METHODS = {"DELETE", "PUT", "PATCH"}
def __init__(self, get_response):
self.get_response = get_response
def __call__(self, request):
return self.get_response(request)
# process_view:Django 在路由之后、视图之前调用它(并且在位于本中间件之前的各中间件的
# process_view 之后,包括检查 POST 的
# 防 CSRF 令牌的那个)。返回 None:请求继续向下处理
def process_view(self, request, view_func, view_args, view_kwargs):
if request.method == "POST":
method = request.POST.get("_method", "").upper()
if method in self.METHODS:
request.method = method
return None
|
- 第 6 行:一个类属性:被接受方法的集合([set],用花括号括起来);
- 第 11–12 行:[__call__] 不做任何处理,直接传递请求;
- 第 17–22 行:方法 [process_view]:[Django] 在路由之后、调用视图之前调用它,并传入所选的视图及其参数(生命周期一章将详细介绍)。如果请求是一个 POST,且其 [_method] 字段指向被接受的方法之一,中间件就会替换请求中的方法。返回 [None] 会让请求继续沿其路径前进。
为什么用 [process_view],而不用 [__call__]?因为防 CSRF 保护。[CsrfViewMiddleware] 中间件在它自己的方法 [process_view] 中执行验证,由于它在 [MIDDLEWARE] 配置中位于我们的中间件之前,所以它先于我们的中间件被调用。因此,令牌是在我们将 POST 请求转换为 DELETE 之前,针对 POST 请求验证的。这正是 [config/settings.py] 文件中的注释所说明的:
| # config/settings.py:示例 21 的配置
from pathlib import Path
BASE_DIR = Path(__file__).resolve().parent.parent
DEBUG = True
SECRET_KEY = "django-insecure-0c(8)1yo+s15vc6372!f@+0f@jpe2n+3)g34z*%s=h@ikzos9a"
ALLOWED_HOSTS = []
LANGUAGE_CODE = "en"
TIME_ZONE = "Europe/Paris"
ROOT_URLCONF = "config.urls"
WSGI_APPLICATION = "config.wsgi.application"
INSTALLED_APPS = [
"django.contrib.staticfiles",
"django.contrib.messages",
"django.forms",
"contacts",
]
# 顺序很重要:只有在检查防 CSRF 令牌之后,才替换 HTTP 方法(MethodOverride)
# (见 config/middleware.py)
MIDDLEWARE = [
"django.middleware.csrf.CsrfViewMiddleware",
"django.contrib.messages.middleware.MessageMiddleware",
"config.middleware.MethodOverride",
]
MESSAGE_STORAGE = "django.contrib.messages.storage.cookie.CookieStorage"
TEMPLATES = [
{
"BACKEND": "django.template.backends.django.DjangoTemplates",
"DIRS": [BASE_DIR / "templates"],
"APP_DIRS": True,
"OPTIONS": {
"context_processors": [
"django.contrib.messages.context_processors.messages",
],
},
},
]
FORM_RENDERER = "config.rendering.BootstrapRenderer"
STATIC_URL = "static/"
STATICFILES_DIRS = [
BASE_DIR / "static",
BASE_DIR.parent / "common" / "static",
]
|
- 第 23–27 行:三个中间件组件:防 CSRF 保护、消息(示例 20)和方法模拟,按此顺序;
- 第 44 行:来自示例 18 的表单渲染引擎。
| # contacts/service.py:联系人,由所有人共享,保存在内存中(见示例 20)
import threading
from .viewmodels import Contact
_contacts = [
Contact(1, "Marie Durand", "01 23 45 67 89"),
Contact(2, "Paul Martin", "06 12 34 56 78"),
Contact(3, "Philippe Jandot", "02 98 76 54 32"),
]
_last_id = 3
_lock = threading.Lock()
def list_contacts() -> list[Contact]:
with _lock:
return list(_contacts)
# 联系人,若不存在则为 None
def read(id: int) -> Contact | None:
with _lock:
return next((c for c in _contacts if c.id == id), None)
def update(id: int, name: str, phone: str) -> Contact | None:
with _lock:
# enumerate:列表的 (位置, 元素) 对
for i, contact in enumerate(_contacts):
if contact.id == id:
# 联系人是不可变的(frozen):我们构建一个新的联系人,
# 替换列表中的旧联系人
_contacts[i] = Contact(id, name, phone)
return _contacts[i]
return None
def add(name: str, phone: str) -> Contact:
# global:该函数修改模块的 _last_id 变量(没有这个关键字,
# 赋值会创建一个局部变量)
global _last_id
with _lock:
_last_id += 1
contact = Contact(_last_id, name, phone)
_contacts.append(contact)
return contact
def delete(id: int) -> Contact | None:
with _lock:
for i, contact in enumerate(_contacts):
if contact.id == id:
# pop 删除第 i 个元素,并返回它
return _contacts.pop(i)
return None
|
联系人存储在内存中,与示例 20 中的任务一样。每个联系人都是一个不可变对象 [Contact] (一个 ID、一个姓名、一个电话号码,文件 [contacts/viewmodels.py])。关于 [Python] 的几点说明:
- 第 12 行:最后分配的标识符;
- 第 27–36 行:联系人是不可变的;我们创建一个新联系人,替换列表中旧的那个。[enumerate] 以(位置,元素)对的形式遍历列表;
- 第 39–47 行:给模块变量赋值的函数必须使用 [global] 声明它(第 42 行):没有这个关键字,赋值 [_last_id += 1] 会为该函数创建一个局部变量(并且在这里会失败,因为它在赋值之前就读取了其值)。读取模块变量,或修改它所引用的列表([_contacts.append(...)]),则不需要这样做;
- 第 55 行:[pop(i)] 从列表中删除位置 [i] 处的元素并返回它;
- 对于不存在的联系人,这些函数返回 [None] :由视图决定如何响应。
| # contacts/forms.py:联系人详情页的表单
from django import forms
class ContactForm(forms.Form):
name = forms.CharField(widget=forms.TextInput(attrs={"class": "form-control"}))
phone = forms.CharField(label="Phone", widget=forms.TextInput(attrs={"class": "form-control"}))
|
两个字段都是必填的,并具有来自“[form-control]”的类“[Bootstrap]”,该类直接分配给它们的小部件。按钮不属于“[Django]”表单:它们硬编码在模板中。
| # contacts/views.py:链接(GET)和按钮(POST、DELETE)
from django.contrib import messages
from django.http import Http404
from django.shortcuts import redirect, render
from django.views.decorators.http import require_GET, require_http_methods
from . import service
from .forms import ContactForm
# 联系人,若不存在则返回 404 响应
def contact_or_404(contact):
if contact is None:
raise Http404("unknown contact")
return contact
# 链接(<a href>):一个 GET 请求,不修改任何内容
@require_GET
def list_contacts(request):
return render(request, "contacts/list.html", {"contacts": service.list_contacts()})
# GET /contacts/2:详情页;POST /contacts/2:它的两个按钮之一;
# DELETE /contacts/2:删除(一个 POST 及其 _method 字段)
@require_http_methods(["GET", "POST", "DELETE"])
def contact(request, id):
if request.method == "DELETE":
return delete(request, id)
contact = contact_or_404(service.read(id))
if request.method == "GET":
form = ContactForm(initial={"name": contact.name, "phone": contact.phone})
return render(request, "contacts/details.html", {"contact": contact, "form": form})
form = ContactForm(request.POST)
if not form.is_valid():
return render(request, "contacts/details.html", {"contact": contact, "form": form})
name = form.cleaned_data["name"]
phone = form.cleaned_data["phone"]
# 被点击的按钮是唯一发送其名称的按钮:"duplicate" 在 request.POST 中,
# 若是它发送了表单,则为 true
if "duplicate" in request.POST:
copy = service.add(f"{name} (copy)", phone)
messages.success(request, f"The contact [{copy.name}] has been created.")
else:
service.update(id, name, phone)
messages.success(request, f"The contact [{name}] has been edited.")
return redirect("contacts")
# 删除;防 CSRF 令牌已经由 CsrfViewMiddleware 检查过
def delete(request, id):
contact = contact_or_404(service.delete(id))
messages.success(request, f"The contact [{contact.name}] has been deleted.")
return redirect("contacts")
|
- 第 13–16 行:一个工具函数——不存在的联系人返回 404 响应以终止视图;
- 第 20–22 行:列表的 GET 视图,它不修改任何内容;
- 第 27–48 行:联系人的记录。在 GET 中,它显示填充了联系人信息的表单;在 POST 中,它处理表单;在 DELETE 中,它删除联系人。因此,同一个 URL [/contacts/2] 用于查看、保存和删除。装饰器 [require_http_methods] 在调用视图时检查,即在 [process_view] 之后:因此它确实看到的是 DELETE 方法;
- 第 35–37 行:无效的表单被重新显示;
- 第 42–47 行:一个表单可以有多个提交按钮。提交表单时,浏览器除了发送字段之外,还会发送被点击按钮的名称(属性 [name]),并且只发送该按钮的名称。[in] 检查字典中是否存在某个键:如果表单是通过 ["duplicate" in request.POST] 按钮提交的,则 [duplicate] button 为真。根据所按的按钮,视图复制或保存联系人;
- 第 48 行:两种情况下都采用 PRG 流程(示例 20),并带有闪现消息;
- 第 52–55 行:删除。它无需验证防 CSRF 令牌:[CsrfViewMiddleware] 已事先完成了验证。缺失或无效的令牌会以 403 错误终止请求。
4.9.5. 模板
| {% extends "layout.html" %}
{% block content %}
<h1 class="h3">Contacts</h1>
<table class="table align-middle">
<tbody>
{% for contact in contacts %}
<tr>
<td>{{ contact.name }}</td>
<td>{{ contact.phone }}</td>
<td class="text-end">
{# view:一个简单的链接;url 将 id 放入路径:/contacts/2 #}
<a class="btn btn-sm btn-outline-primary" href="{% url 'contacts_details' contact.id %}">View</a>
{# delete:一个表单,其提交将需要确认 #}
<form method="post" class="d-inline" action="{% url 'contacts_details' contact.id %}"
data-confirmation="Delete the contact {{ contact.name }}?">
{% csrf_token %}
{# DELETE 方法,HTML 表单无法发送 #}
<input type="hidden" name="_method" value="DELETE">
<button class="btn btn-sm btn-outline-danger" type="submit">Delete</button>
</form>
</td>
</tr>
{% endfor %}
</tbody>
</table>
{% endblock %}
|
- 第 13 行:一个链接,通过 [Bootstrap] 的类([btn]……)呈现为按钮:外观与 HTTP 方法无关。[{% url 'contacts_details' contact.id %}] 将 ID 放入路径中:[/contacts/2];
- 第 15–21 行:每个“删除”按钮对应一个表单,除了令牌和方法之外没有其他字段。[d-inline] 类使其与链接显示在同一行。[data-confirmation] 属性包含确认消息:[data-...] 属性不被赋予特定含义,供页面上的 [JavaScript] 使用;
- 第 17 行:防 CSRF 令牌;
- 第 19 行:隐藏字段 [_method],它会把这个 POST 变成 DELETE 请求。
| {% extends "layout.html" %}
{% block content %}
<h1 class="h3">Contact no. {{ contact.id }}</h1>
<form method="post">
{% csrf_token %}
{{ form.name.as_field_group }}
{{ form.phone.as_field_group }}
{# 同一个表单有两个提交按钮;name:按钮的名称,被点击时才会发送 #}
<div class="d-flex gap-2">
<button class="btn btn-primary" type="submit" name="save">Save</button>
<button class="btn btn-outline-primary" type="submit" name="duplicate">Duplicate</button>
<a class="btn btn-link" href="{% url 'contacts' %}">Back to the list</a>
</div>
</form>
{% endblock %}
|
- 第 11–12 行:两个表单提交按钮,每个都有自己的名称;
- 第 13 行:返回列表的链接。
4.9.6. 确认窗口
浏览器可以显示确认框(函数 [JavaScript] [confirm]),但它不太美观,而且外观取决于浏览器。这里我们使用 [Bootstrap] 的模态窗口,通过几行 [JavaScript] 来显示。该窗口是一个片段,包含在父模板中,因此存在于所有页面上,只是处于隐藏状态:
| {# 整个页面只有一个窗口,起初隐藏(d-none) #}
<div id="confirmation-modal" class="d-none">
<div class="modal-backdrop fade show"></div>
<div class="modal fade show d-block" tabindex="-1" role="alertdialog" aria-modal="true">
<div class="modal-dialog modal-dialog-centered">
<div class="modal-content">
<div class="modal-header">
<h5 class="modal-title">Confirmation</h5>
</div>
<div class="modal-body">
<p class="mb-0" id="confirmation-modal-message"></p>
</div>
<div class="modal-footer">
<button type="button" class="btn btn-secondary" data-action="no">No, go back</button>
<button type="button" class="btn btn-danger" data-action="yes">Yes, confirm</button>
</div>
</div>
</div>
</div>
</div>
|
- 第 2 行:[d-none] 类(来自 [Bootstrap])隐藏该元素;
- 第 3–4 行:灰色背景以及随后的窗口,由 [Bootstrap] 的类绘制;
- 第 11 行:消息的位置;
- 第 14–15 行:两个按钮,类型为 [button] (而不是 [submit]:它们不提交任何表单),通过各自的 [data-action] 属性加以区分。
| <!doctype html>
{% load static %}
<html lang="en">
<head>
<meta charset="utf-8">
<title>Contacts</title>
<link rel="stylesheet" href="{% static 'bootstrap/css/bootstrap.min.css' %}">
<link rel="stylesheet" href="{% static 'css/styles.css' %}">
</head>
<body>
<div class="container py-3" style="max-width: 40rem">
{% for message in messages %}
<div class="alert alert-success" role="status">{{ message }}</div>
{% endfor %}
<main>
{% block content %}{% endblock %}
</main>
</div>
{# 确认窗口,存在于所有页面中 #}
{% include "fragments/confirmation.html" %}
{# 脚本位于页面末尾:它所查找的元素已经存在 #}
<script src="{% static 'js/app.js' %}"></script>
</body>
</html>
|
- 第 12–14 行:闪现消息(示例 20);
- 第 20 行:窗口,包含在所有页面中;
- 第 22 行:脚本,放在页面底部:运行时,它要查找的元素已经存在。它是一个静态文件,存放在 [static/js] 文件夹中。
脚本 [static/js/app.js]:
| // 对带有 data-confirmation="..." 属性的表单进行确认
// 没有 JavaScript 时,这些表单会直接发送,不经确认。
(() => {
const modal = document.getElementById('confirmation-modal');
const message = document.getElementById('confirmation-modal-message');
let pending = null; // 用户确认后要发送的表单
// 1. 我们拦截需要确认的表单的提交
document.querySelectorAll('form[data-confirmation]').forEach((form) => {
form.addEventListener('submit', (event) => {
event.preventDefault(); // 提交被暂停
pending = form;
message.textContent = form.dataset.confirmation;
modal.classList.remove('d-none'); // 窗口出现
});
});
// 2. 窗口的两个按钮
modal.addEventListener('click', (event) => {
const action = event.target.dataset.action;
if (action === 'yes') {
pending.submit(); // 提交,不再次触发 'submit' 事件
} else if (action === 'no') {
modal.classList.add('d-none');
pending = null;
}
});
})();
|
- 第 3 行:代码被包含在一个立即执行的匿名函数中;其变量不会干扰页面上其他脚本的变量;
- 第 4–6 行:窗口、消息位置,以及等待确认的表单;
- 第 9–16 行:对于每个具有 [data-confirmation] 属性的表单,拦截其 [submit] 事件(在提交表单时触发)。[preventDefault()] 中止提交;表单被搁置,其消息([dataset.confirmation],即 [data-confirmation] 属性的值)显示在出现的窗口中;
- 第 19–27 行:窗口中点击的唯一处理程序:[event.target] 是被点击的元素;其属性 [data-action] 指明它是哪个按钮。“是”使用 [submit()] 方法提交待处理的表单,与点击按钮不同,该方法不会触发 [submit] 事件(否则窗口会再次出现);“否”则隐藏窗口。
没有 [JavaScript] 时,表单只是不经确认直接提交:页面仍然可用。这就是渐进增强:[JavaScript] 增添了便利,但应用程序并不依赖它。
4.9.7. 执行
联系人列表:
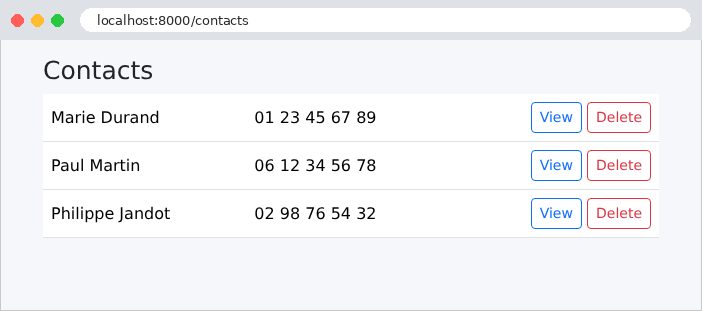
点击“删除”会显示确认窗口:
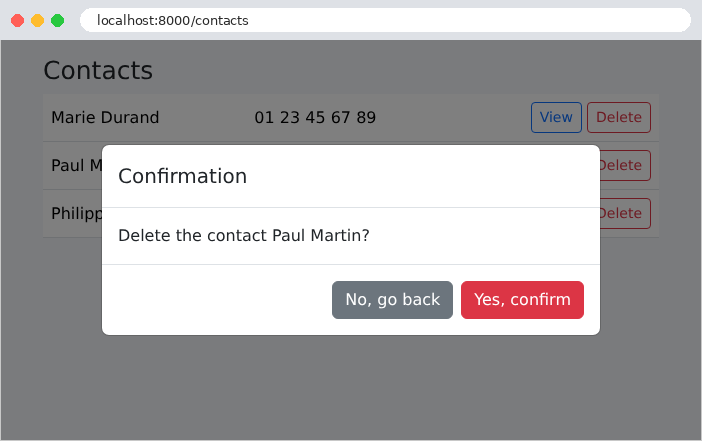
确认之后,(模拟的)DELETE 请求、重定向以及弹出消息:
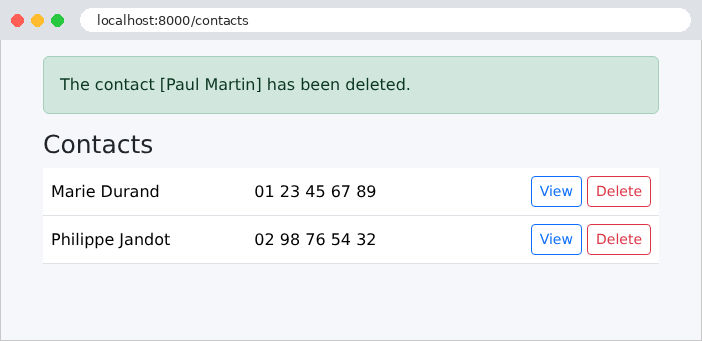
联系人的资料,带有其两个发送按钮:
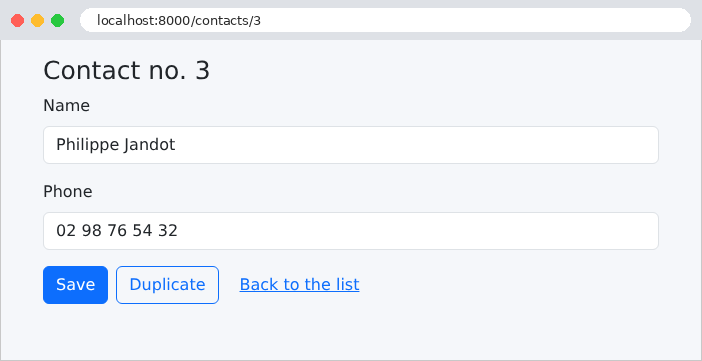
没有防 CSRF 令牌的请求会被拒绝,不存在的联系人则返回 404 错误:
| curl -i -X POST -d "_method=DELETE" http://localhost:8000/contacts/3
curl -i http://localhost:8000/contacts/9
|
| HTTP/1.1 403 Forbidden
Content-Type: text/html; charset=utf-8
...
HTTP/1.1 404 Not Found
Content-Type: text/html; charset=utf-8
...
|
错误页面仍然是 [Django] 调试模式下的详细页面。请求生命周期一章将展示如何用自定义页面替换它们。