4. The J2EE web service for appointments
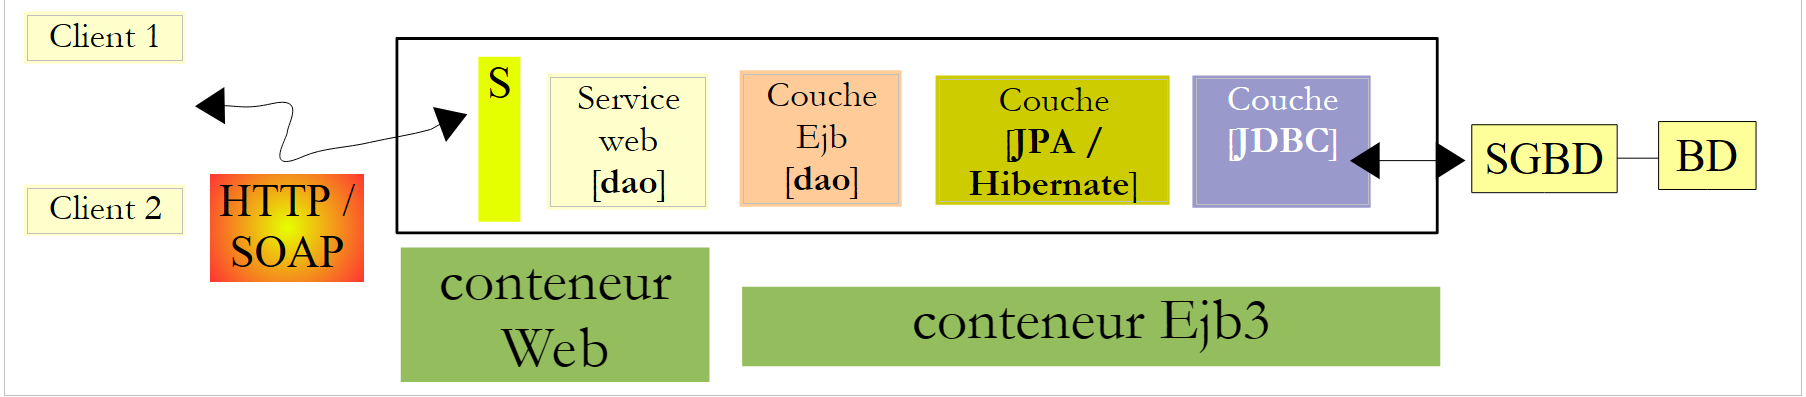
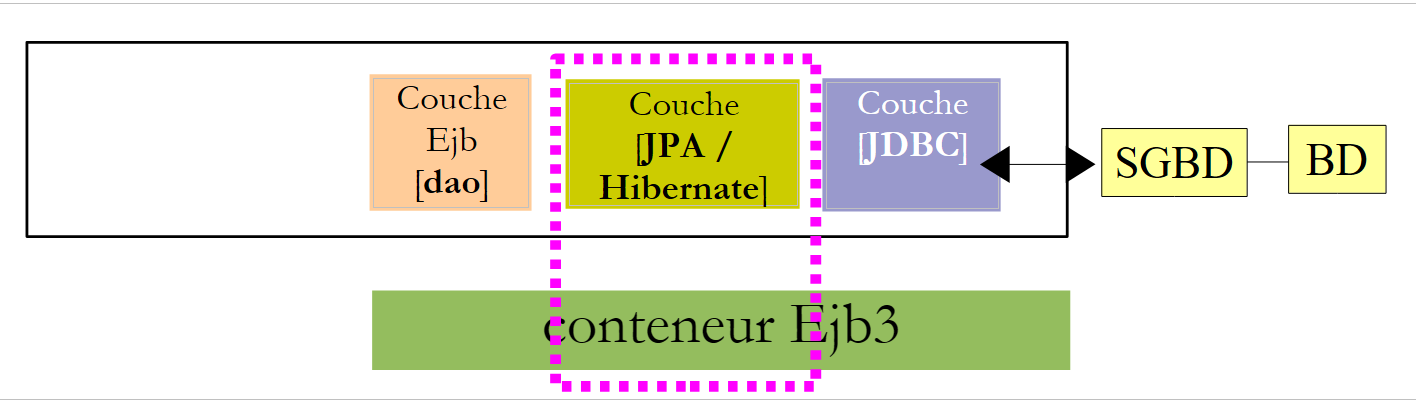
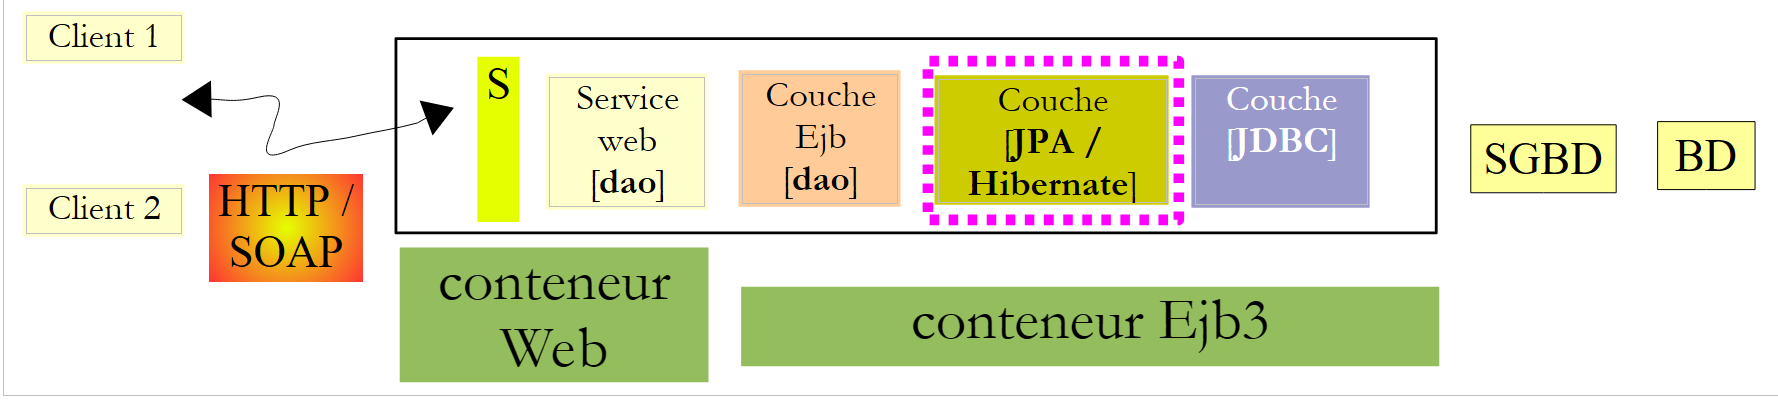
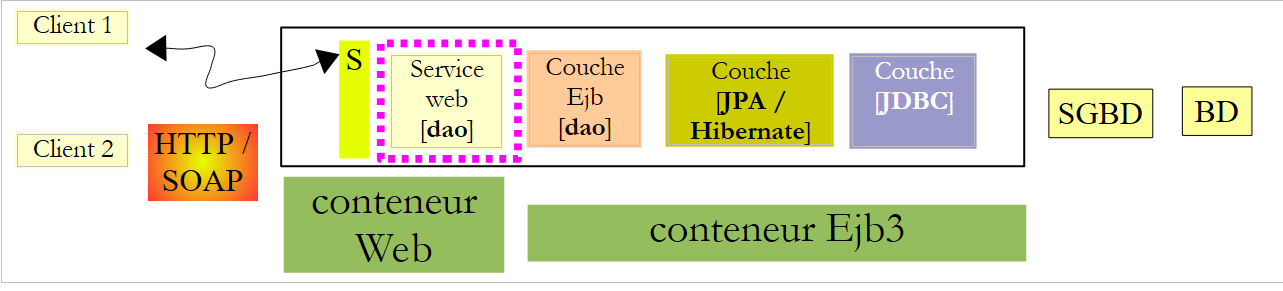
Let’s return to the architecture of the application to be built:
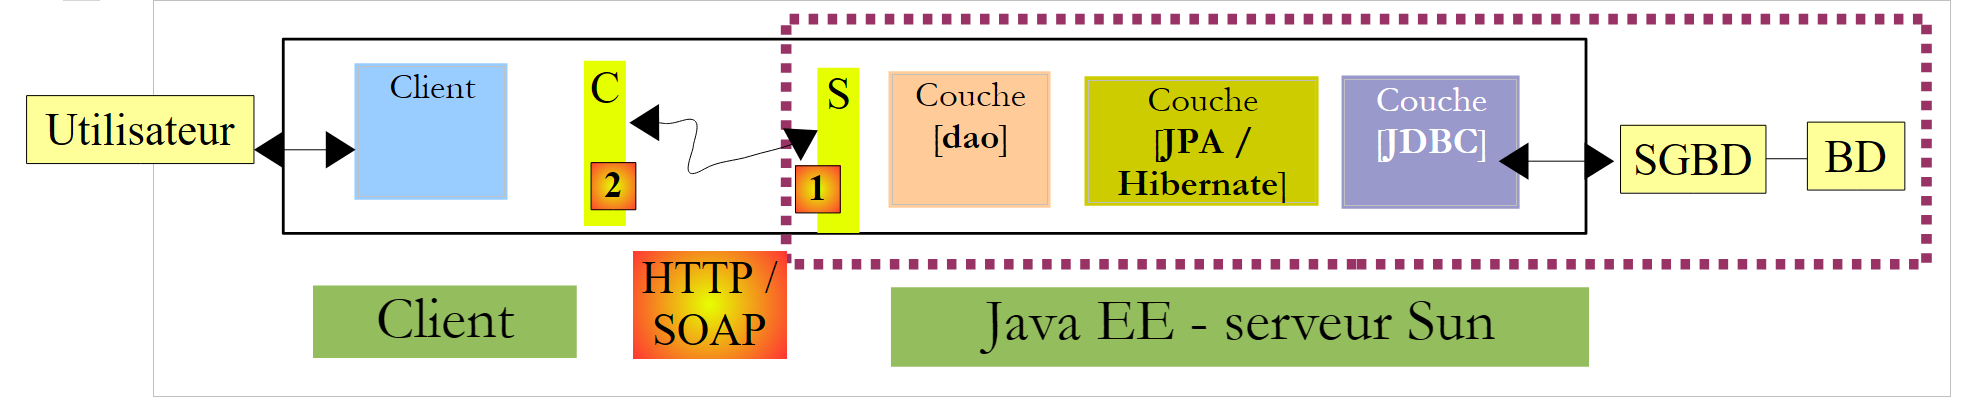 |
In this section, we focus on building the J2EE [1] web service running on a Sun server / Glassfish.
4.1. The database
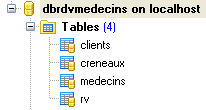
The database, which we will call [dbrdvmedecins] , is a MySQL5 database with four tables:
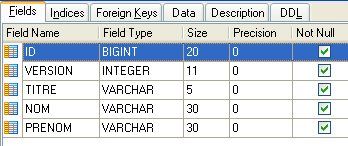
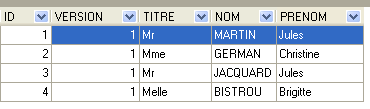
4.1.1. The [MEDECINS] table
It contains information about the doctors managed by the [RdvMedecins] application.
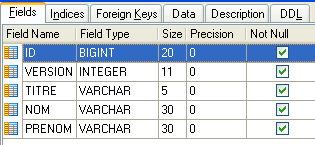 | 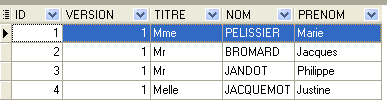 |
- ID: ID number of the doctor—primary key of the table
- VERSION: ID number for the version of the row in the table. This number is incremented by 1 each time a change is made to the row.
- NOM: the doctor’s last name
- PRENOM: their first name
- TITRE: their title (Ms., Mrs., Mr.)
4.1.2. The [CLIENTS] table
The clients values for the various doctors are stored in the [CLIENTS] table:
 |  |
- ID: customer ID number—primary key of the table
- VERSION: number identifying the version of the row in the table. This number is incremented by 1 each time a change is made to the row.
- NOM: the customer's last name
- PRENOM: first name
- TITRE: their title (Ms., Mrs., Mr.)
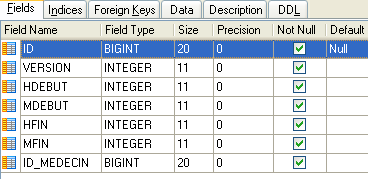
4.1.3. The [CRENEAUX] table
It lists the time slots where RV entries are possible:
 |
 |
- ID: ID number for the time slot—primary key of the table (row 8)
- VERSION: number identifying the version for the row in the table. This number is incremented by 1 each time a change is made to the row.
- ID_MEDECIN: ID number for the doctor to whom this time slot belongs – foreign key on column MEDECINS (ID).
- HDEBUT: slot start time
- MDEBUT: slot start minutes
- HFIN: slot end hour
- MFIN: slot end minutes
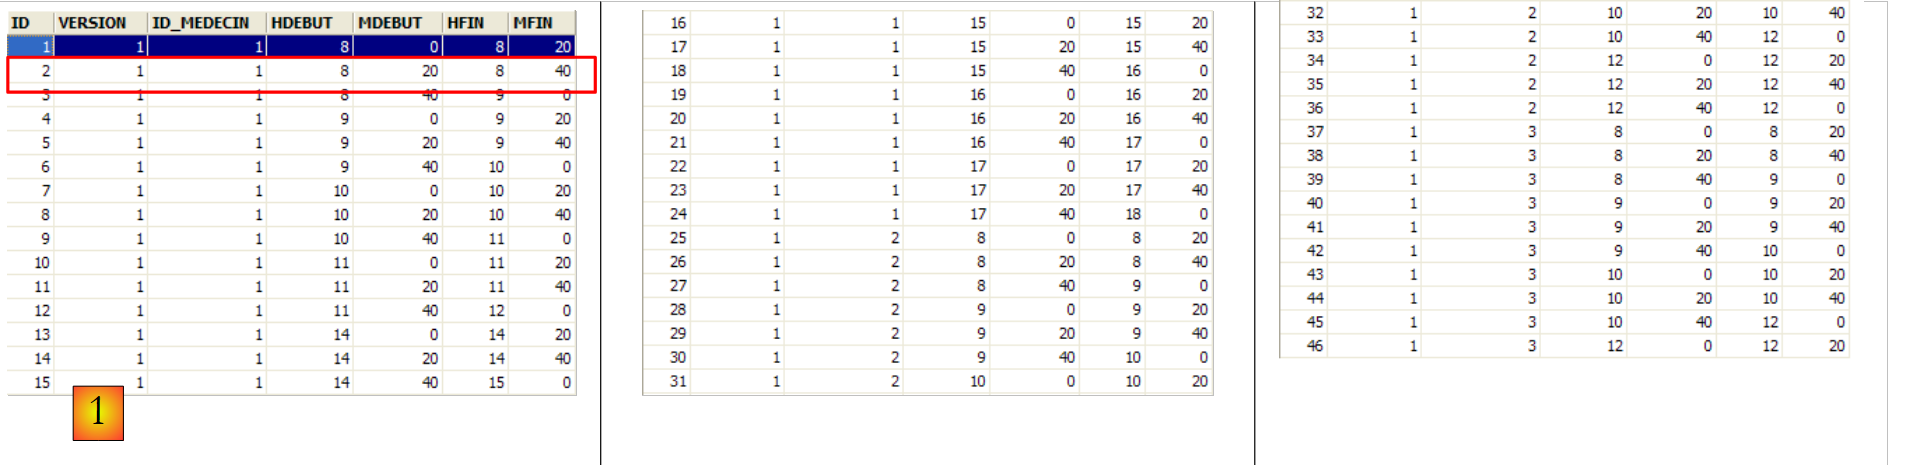
The second row of table [CRENEAUX] (see [1] above) indicates, for example, that slot No. 2 begins at 8:20 a.m. and ends at 8:40 a.m. and belongs to doctor No. 1 (Dr. Marie PELISSIER).
4.1.4. The table [RV]
lists the RV entries for each doctor:
 |
- ID: ID number that uniquely identifies the RV – primary key
- JOUR: day of the RV
- ID_CRENEAU: time slot for RV – foreign key on the [ID] field in the [CRENEAUX] table – determines both the time slot and the doctor in question.
- ID_CLIENT: customer ID for whom the reservation is made – foreign key on the [ID] field of the [CLIENTS] table
This table has a uniqueness constraint on the values of the joined columns (JOUR, ID_CRENEAU):
If a row in table [RV] has the value (JOUR1, ID_CRENEAU1) for the columns (JOUR, ID_CRENEAU), this value cannot appear anywhere else. Otherwise, this would mean that two RV entries were recorded at the same time for the same doctor. From a Java programming perspective, the database driver JDBC triggers a SQLException when this occurs.
The id line equal to 3 (see [1] above) means that a RV was booked for slot #20 and client #4 on 08/23/2006. The table [CRENEAUX] tells us that slot no. 20 corresponds to the time slot 4:20 PM – 4:40 PM and belongs to doctor no. 1 (Ms. Marie PELISSIER). Table [CLIENTS] tells us that client #4 is Ms. Brigitte BISTROU.
4.2. Generating the Database
Create the database MySql [dbrdvmedecins] using the tool of your choice. To create the tables and populate them, you can use the script [createbd.sql], which will be provided to you. Its contents are as follows:
4.3. Server-side architecture components
Let’s return to the architecture of the application to be built:
 |
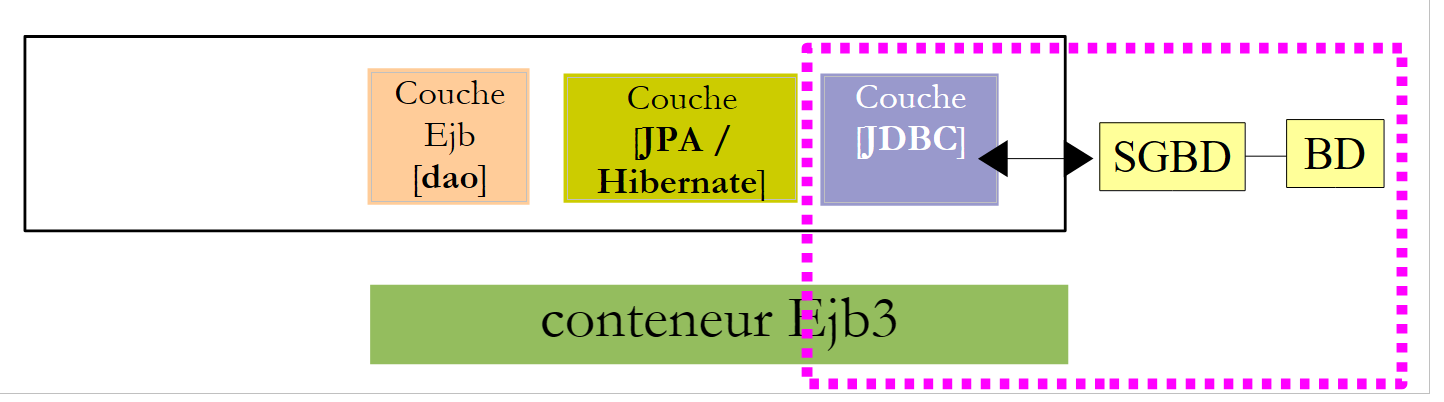
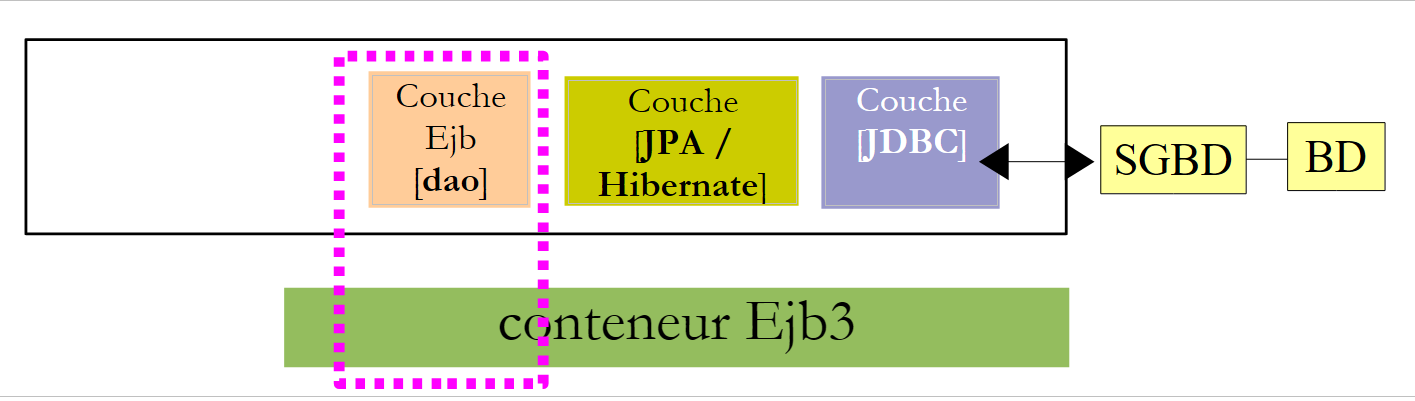
On the server side, the application will consist of:
- a JPA layer that allows working with BD using objects
- an EJB responsible for managing operations with the JPA layer
- a web service responsible for exposing the EJB interface to remote clientss in the form of a web service.
Elements (b) and (c) implement the [dao] layer shown in the previous diagram. It is known that an application can access a remote EJB via the RMI and JNDI protocols. In practice, this limits the clients to Java clients. A web service uses a standardized communication protocol that various languages implement: .NET, Php, C++, ... This is what we want to demonstrate here using a .NET client.
For a brief introduction to web services, see the [ref1] course, paragraph 14, page 109.
A web service can be implemented in two ways:
- using a class annotated with @WebService that runs in a web container
 |
- by an EJB annotated with @WebService that runs in an EJB container
 |
 |
We will use the first solution here:
In the course [ref1], paragraph 14, page 109, you will find an example using the second solution.
4.4. Hibernate configuration of the Glassfish server
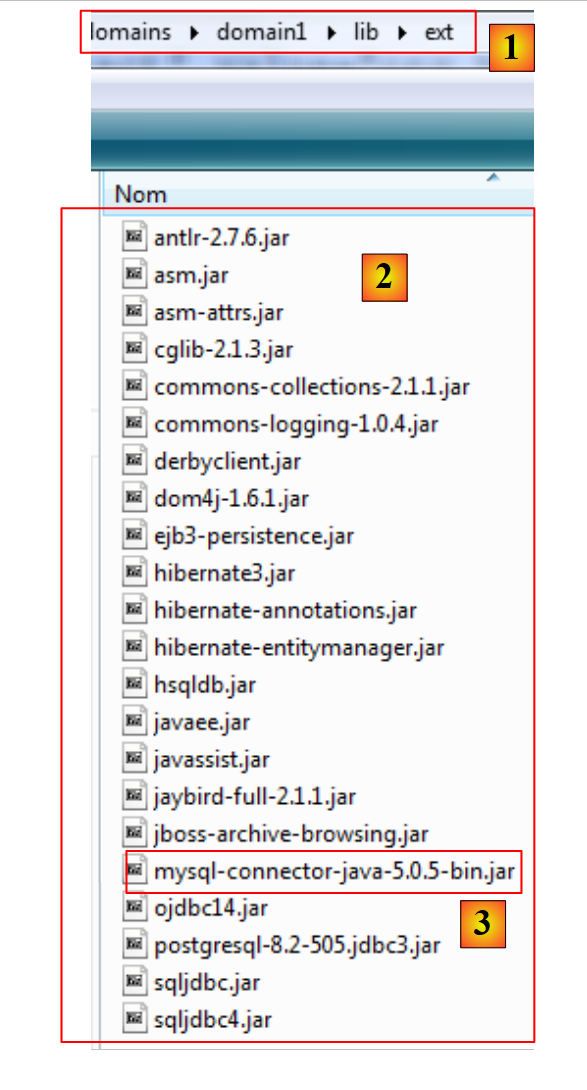
According to version, the Glassfish V2 server included with Netbeans may not have the Hibernate libraries required by the JPA/Hibernate layer. If, later in the tutorial, you find that Glassfish does not provide a JPA/ Hibernate implementation, or if an exception occurs during service deployment indicating that the Hibernate libraries cannot be found, you must add the libraries to the [<glassfish>/domains/domain1/lib/ext] folder and then restart the Glassfish server:
 |
|
The Hibernate libraries are included in the ZIP file that accompanies the tutorial.
4.5. The automatic generation tools from Netbeans
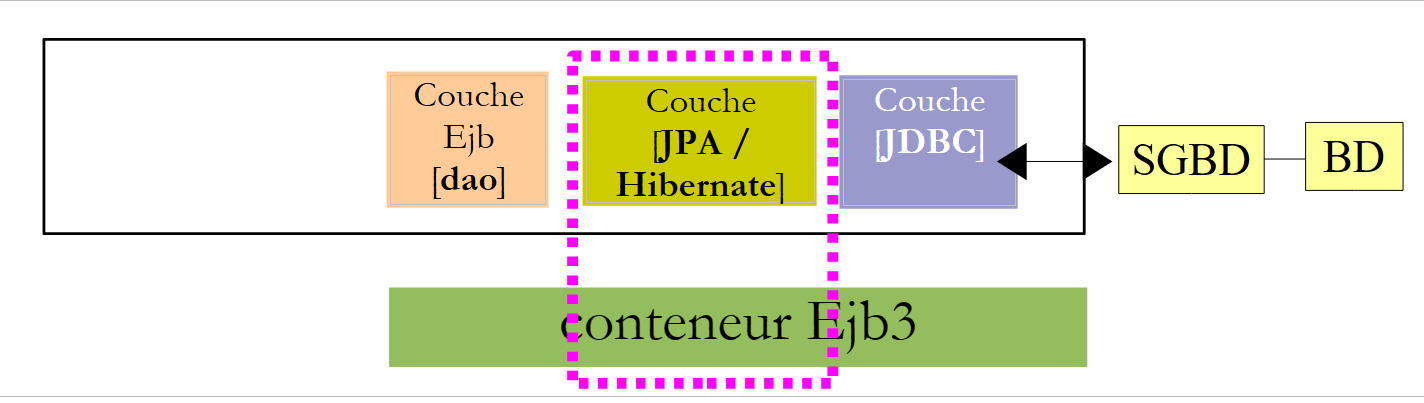
Let’s return to the architecture we need to build:
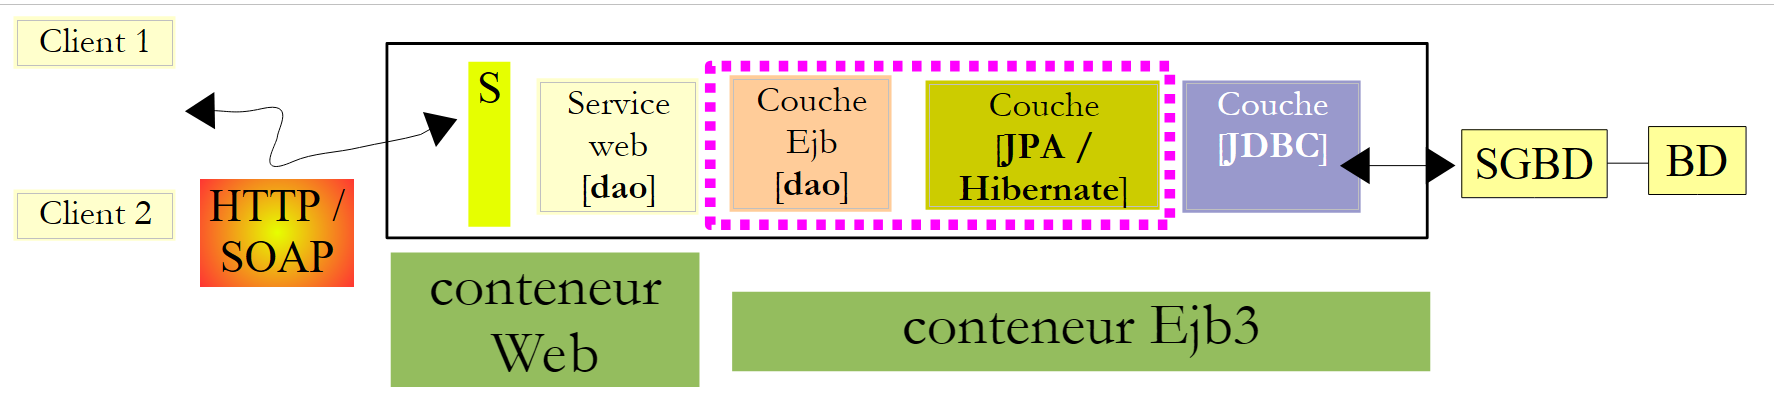 |
With Netbeans, it is possible to automatically generate the [JPA] layer and the [Ejb] layer that controls access to the generated JPA entities. It is useful to understand these automatic generation methods because the generated code provides valuable insights into how to write JPA entities or the EJB code that uses them.
We will now describe some of these automatic generation tools. To understand the generated code, you need a solid understanding of the JPA and [ref1] entities, as well as the EJB and [ref2] entities.
Creating a Netbeans connection to the database
- Run SGBD and MySQL 5 so that BD is available
- Create a Netbeans connection to the [dbrdvmedecins] database
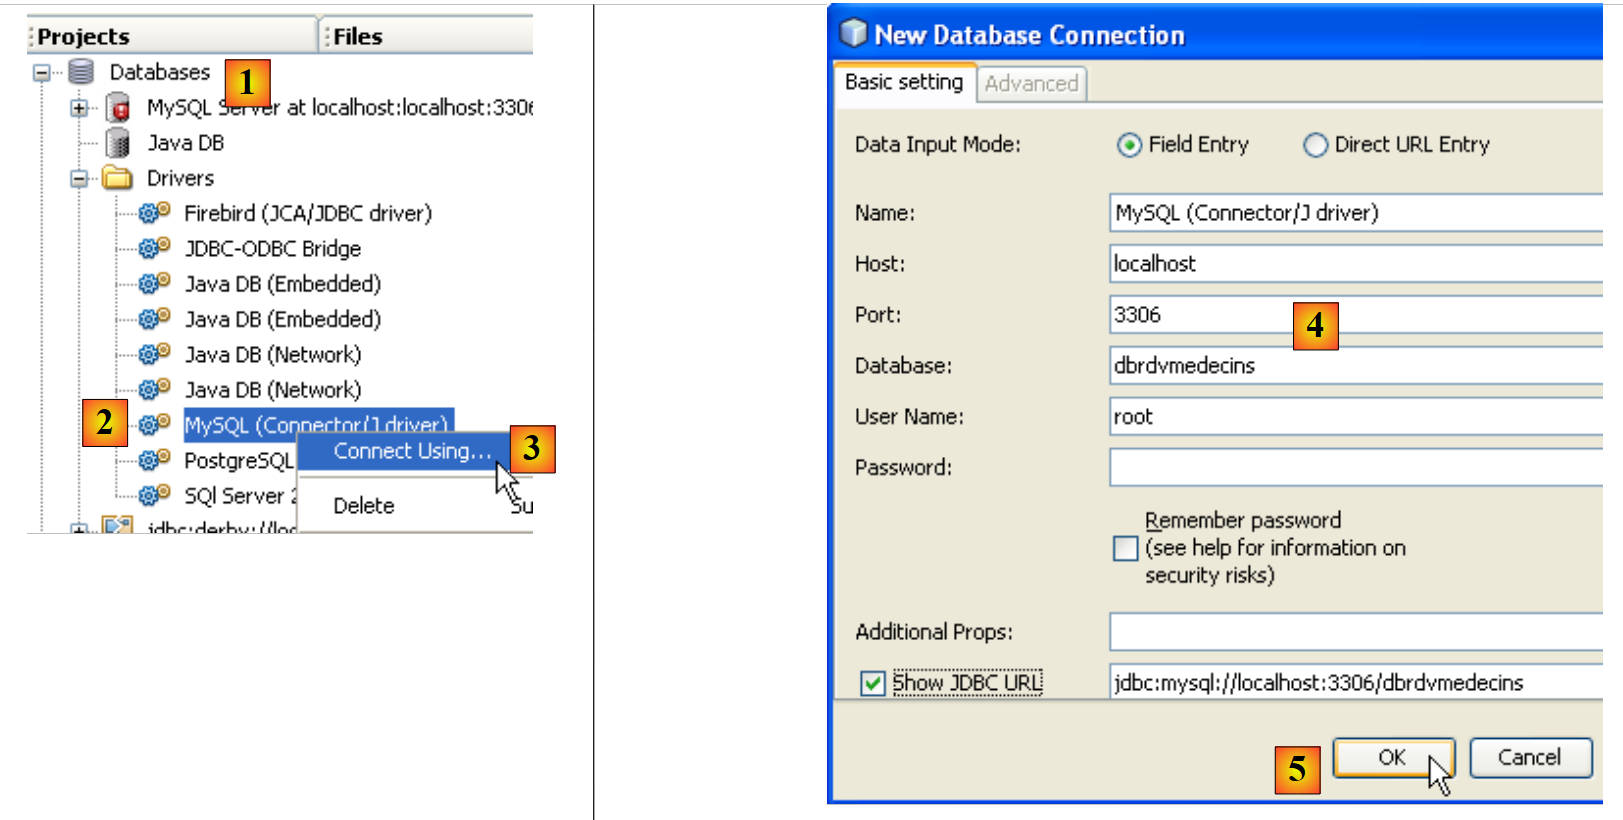 |
- In the [Files] tab, in the [Databases] [1] branch, select the Jdbc driver MySQL [2]
- then select the option [3] "Connect Using" option to create a connection to a MySQL
- in [4], enter the requested information
- then confirm in [5]
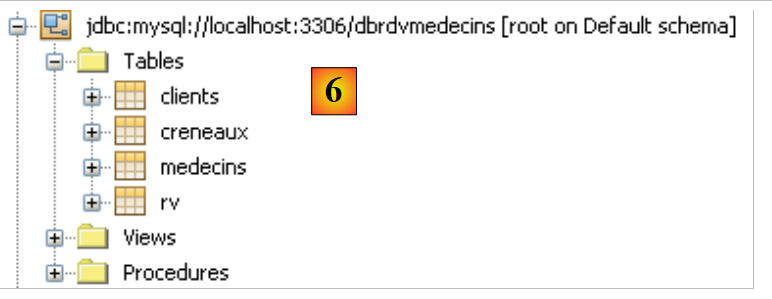 |
- in [6], the connection is created. You can see the four tables in the connected database.
Creating an EJB project
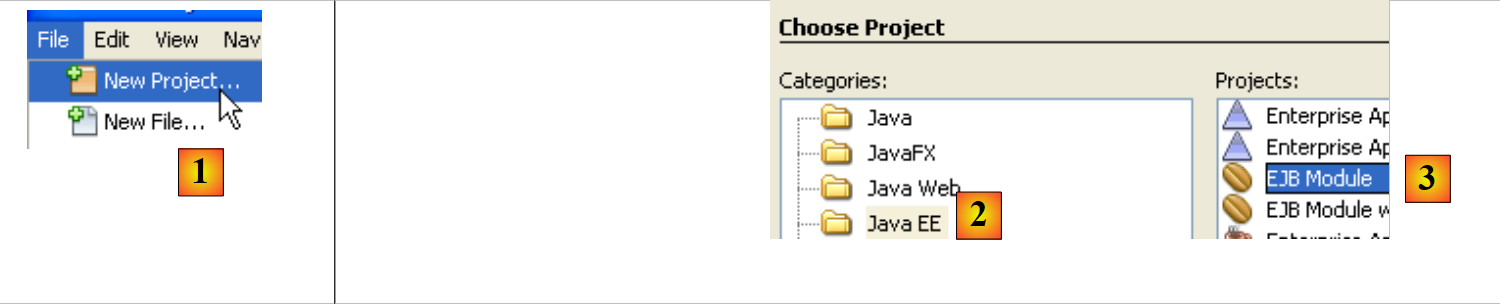 |
- in [1], create a new application, an EJB module
- In [2], select the category [Java EE] and in [3] the type [EJB Module]
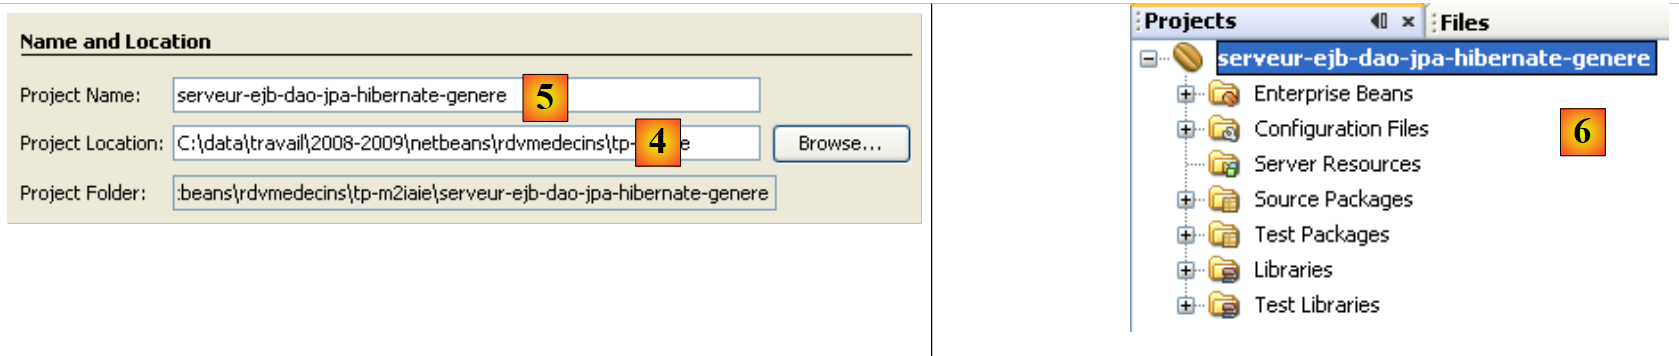 |
- In [4], select a folder for the project and in [5], give it a name—then finish the wizard
- in [6] the generated project
Adding a resource JDBC to the server Glassfish
We will add a resource JDBC to the server Glassfish.
 |
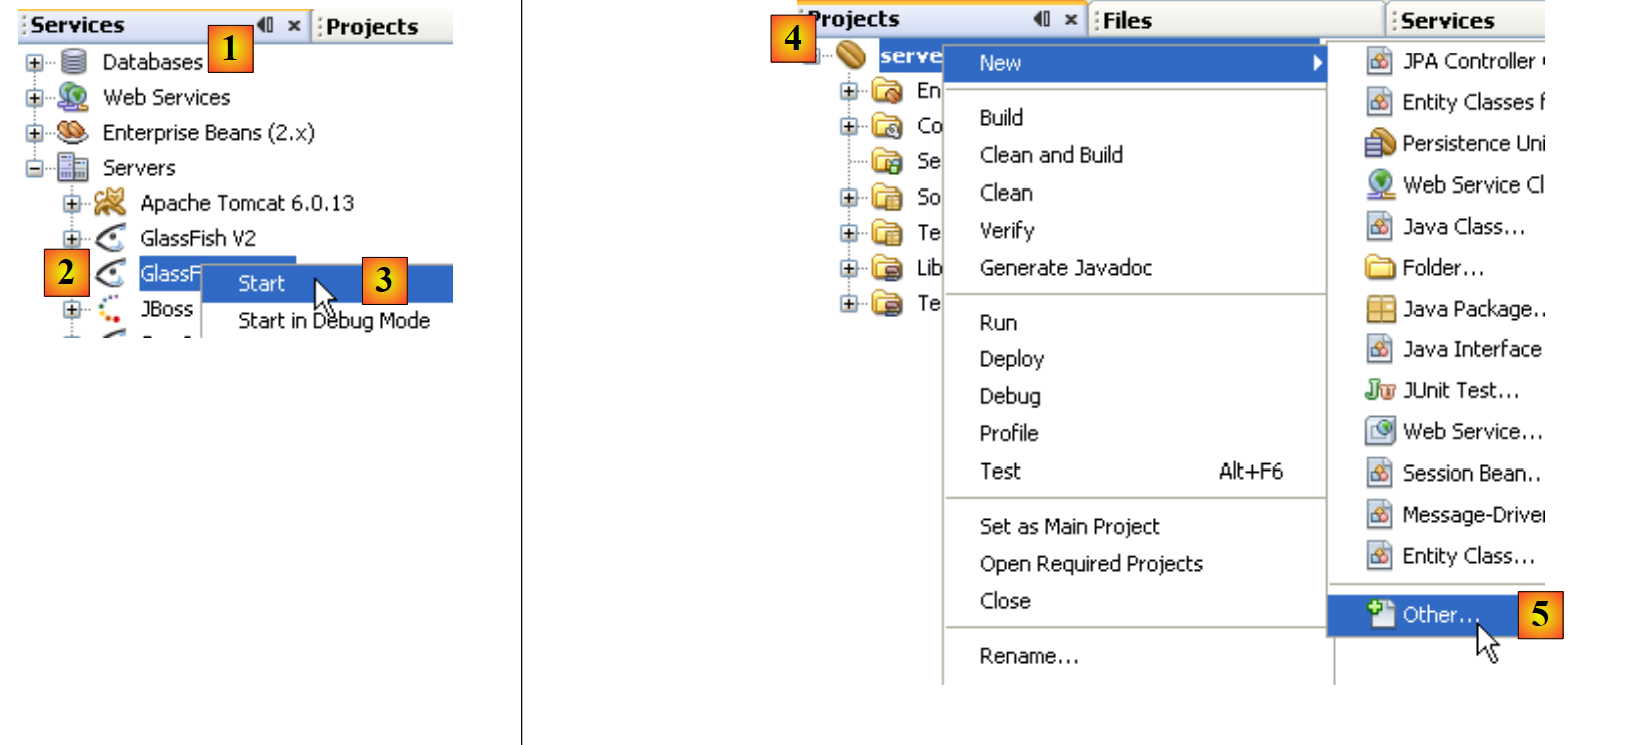 |
- In the [Services] tab, start the Glassfish [2, 3] server
- In the [Projects] tab, right-click on the EJB project and in [5] select the option [New / Other] option to add an element to the project.
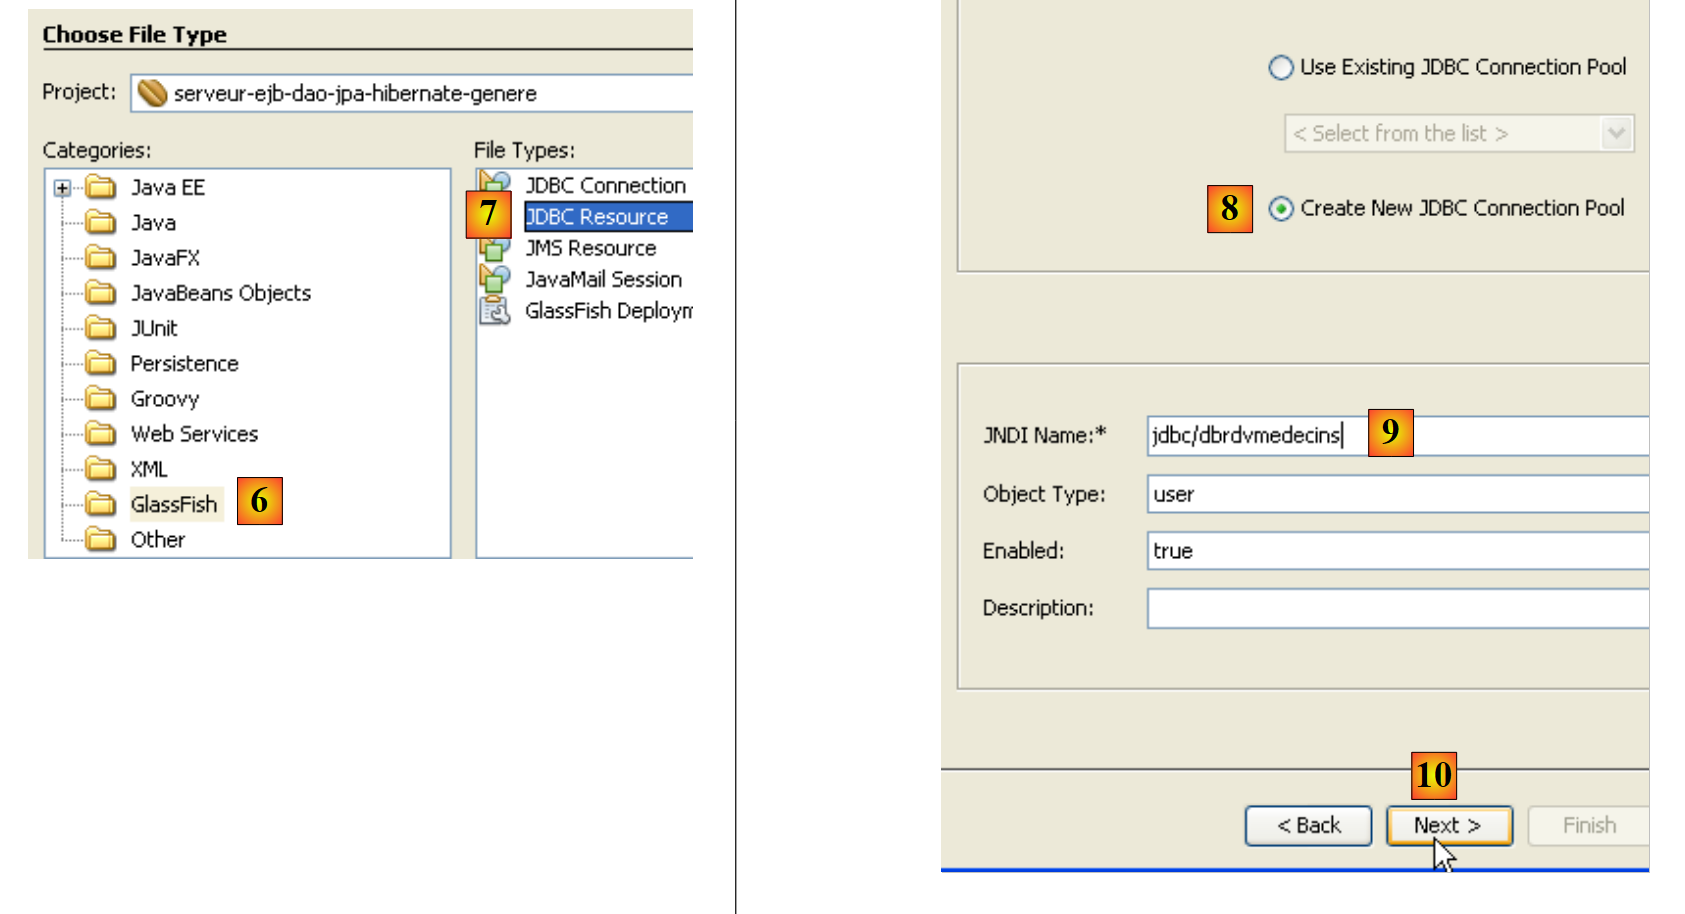
- In [6], select the category [Glassfish] and in [7] indicate that you want to create a resource JDBC by selecting the type [JDBC Resource]
- in [8], specify that this JDBC resource will use its own connection pool
- In [9], give the resource a name
- in [10], proceed to the next step
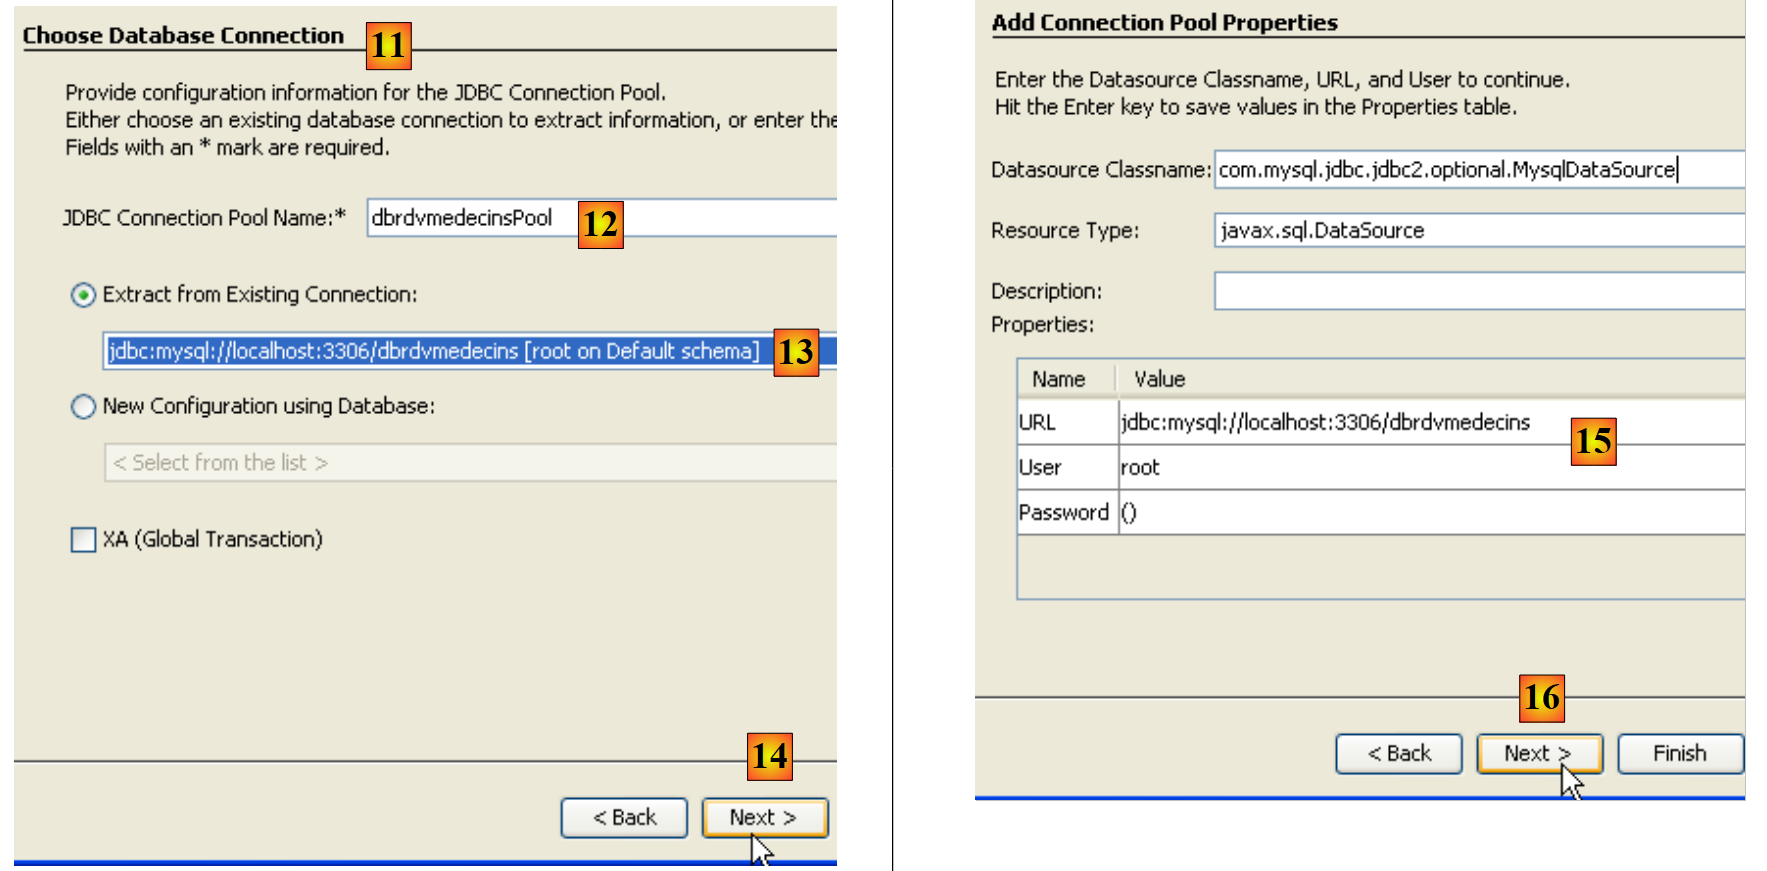 |
- in [11], define the characteristics of the connection pool for resource JDBC
- in [12], name the connection pool
- In [13], select the connection Netbeans [dbrdvmedecins] created previously
- to [14], proceed to the next step
- in [15], there is normally nothing to change on this page. The properties of the connection to the database MySQL [dbrdvmedecins] were derived from those of the connection Netbeans [dbrdvmedecins] created previously
- in [16], proceed to the next step
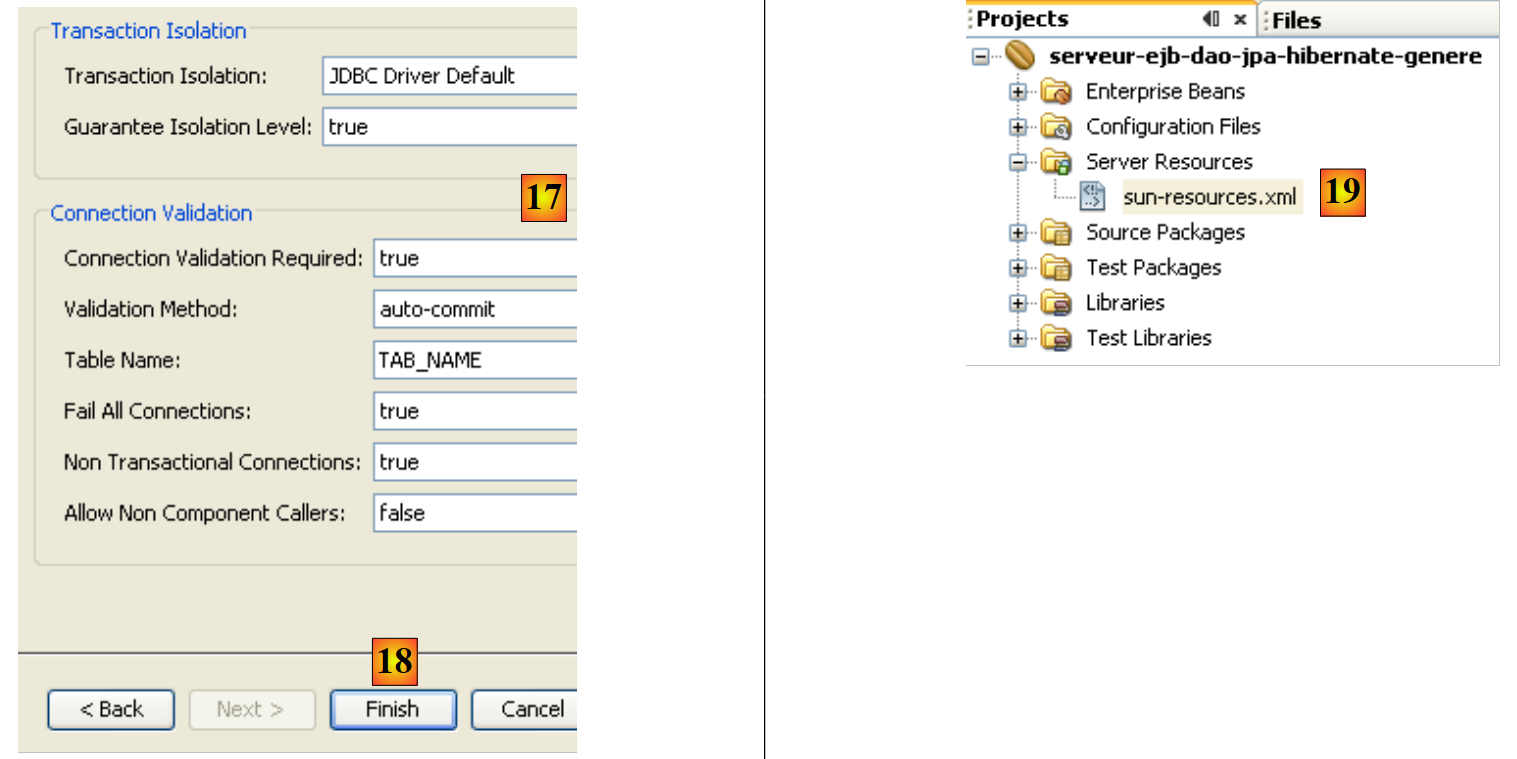 |
- to [17], keep the default values
- in [18], finish the wizard. This creates the file [sun-resources.xml] [19], whose content is as follows:
The file above contains all the information entered in the wizard in XML format. It will be used by the IDE Netbeans to instruct the Glassfish server to create the "jdbc/dbrdvmedecins" resource defined on line 4.
Creating a persistence unit
The persistence unit [persistence.xml] configures the JPA layer: it specifies the JPA implementation used (Toplink, Hibernate, ...) and configures it.
 |
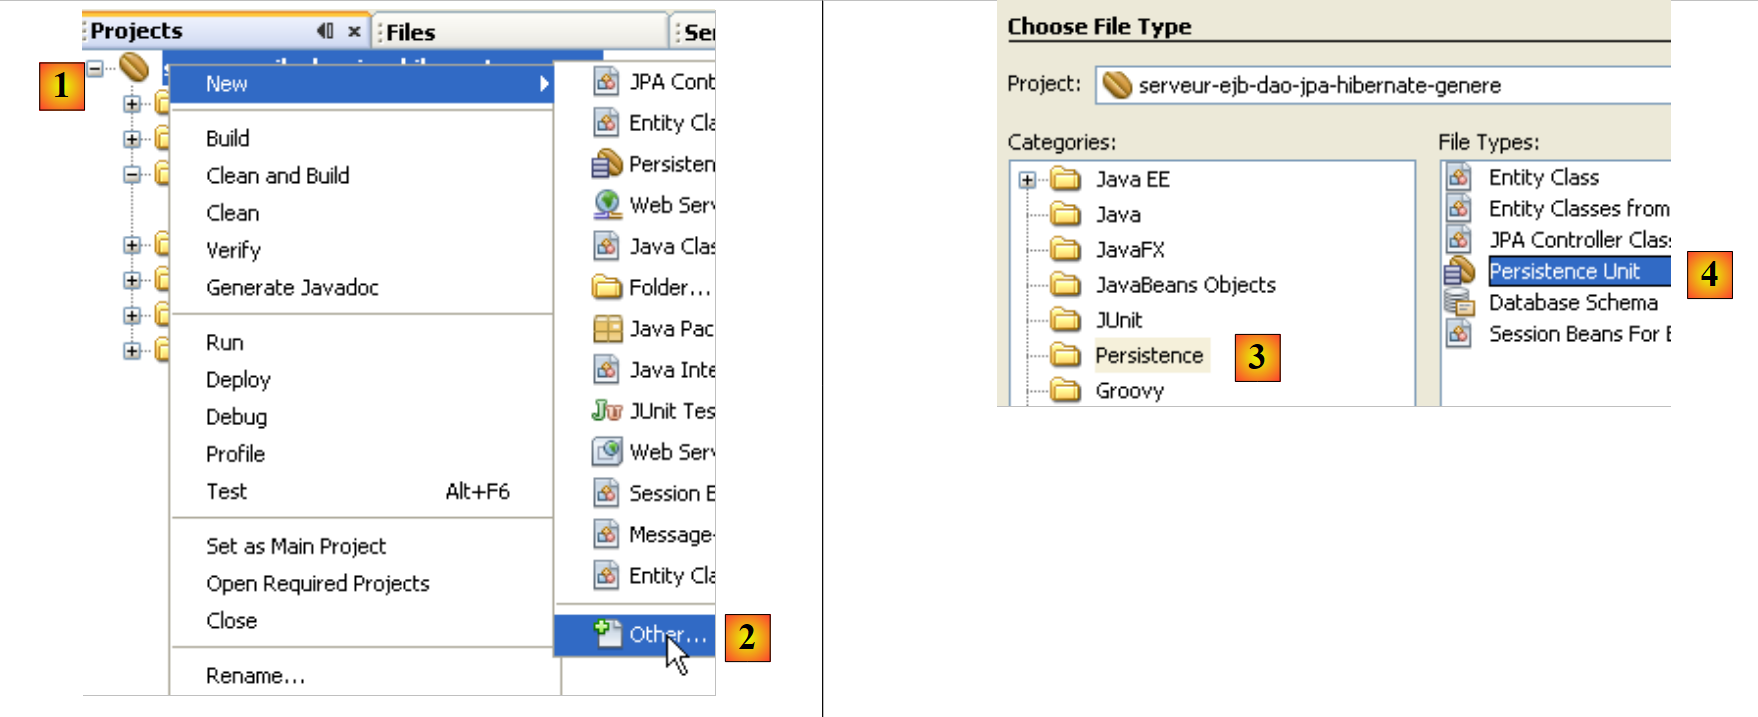 |
- In [1], right-click on the EJB project and select [New / Other] In [2]
- In [3], select the category [Persistence], then in [4], specify that you want to create a persistence unit JPA
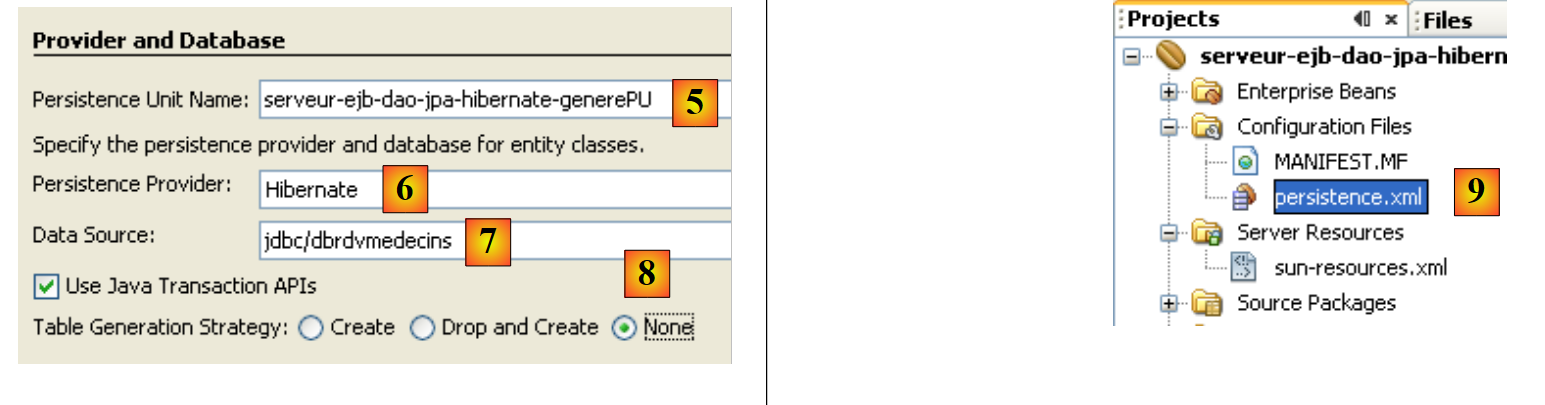 |
- In [5], give the created persistence unit a name
- In [6], choose [Hibernate] as the implementation JPA
- in [7], select the resource Glassfish "jdbc/dbrdvmedecins" that was just created
- in [8], specify that no action should be performed on the database when instantiating the JPA layer
- Finish the wizard
- In [9], the file [persistence.xml] created by the wizard
Its content is as follows:
Once again, it converts the information provided in the wizard into the XML format. This file is insufficient for working with the "dbrdvmedecins" database. We would need to tell Hibernate which SGBD type to manage. This will be done later.
Creating the JPA
 |
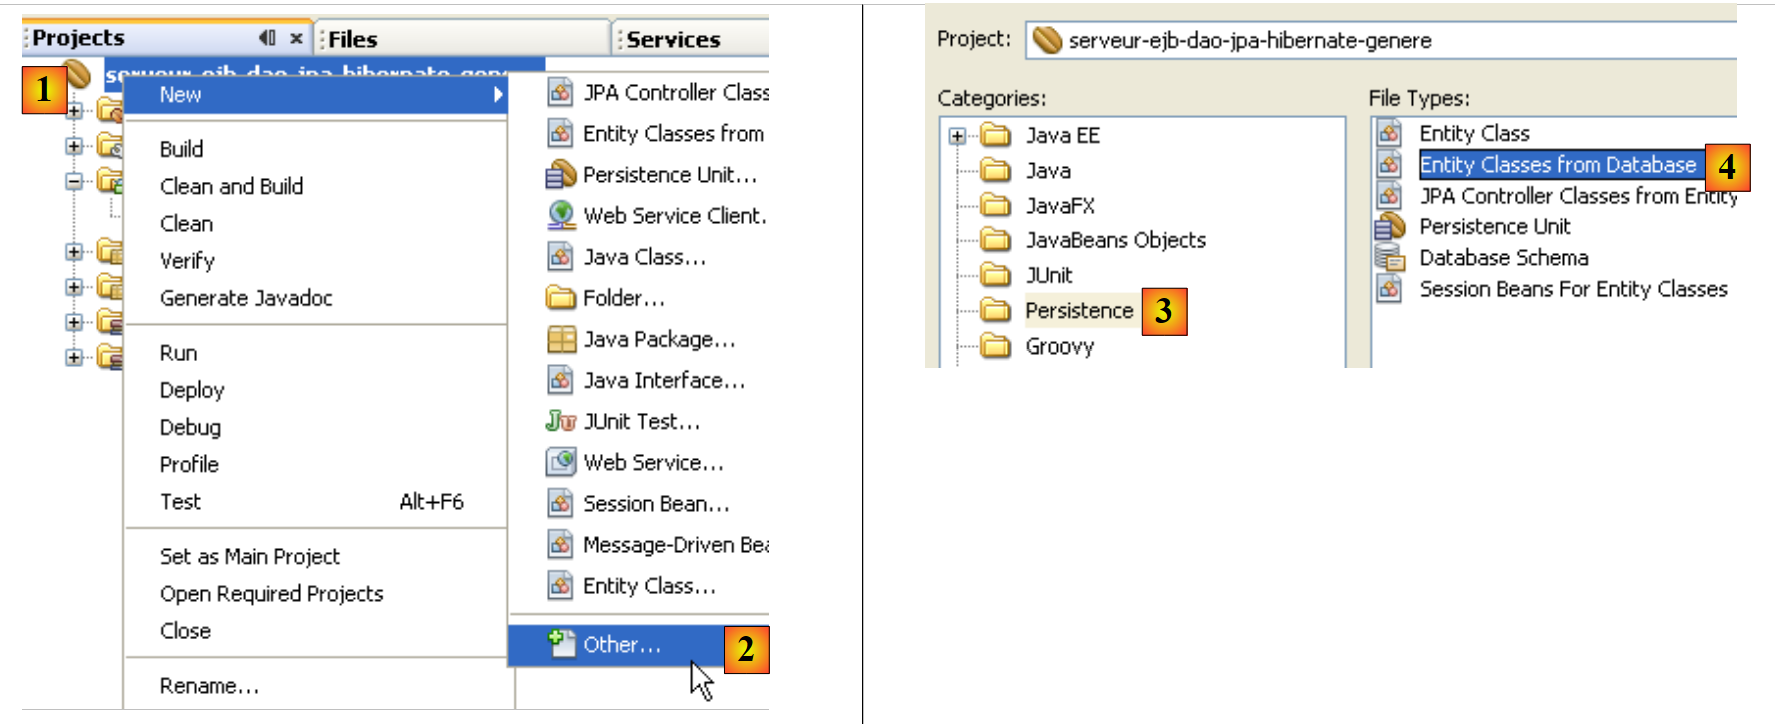 |
- In [1], right-click on the project and in [2] select the option [New / Other]
- in [3], select the category [Persistence], then in [4], specify that you want to create entities JPA from an existing database.
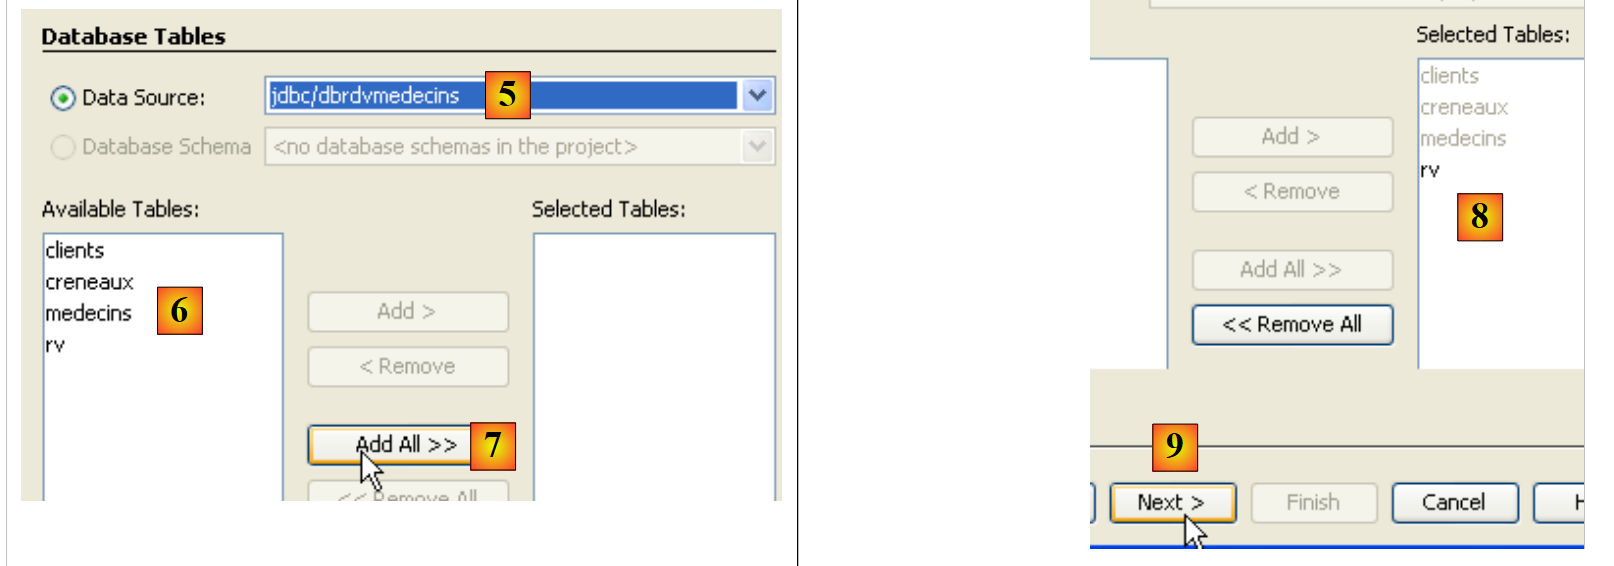 |
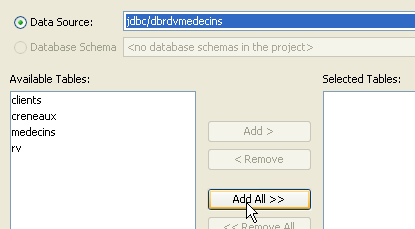
- In [5], select the source JDBC "jdbc/dbrdvmedecins" that we created
- In [6], the four tables from the associated database
- in [7,8], include them all in the generation of entities JPA
- in [9], continue with the wizard
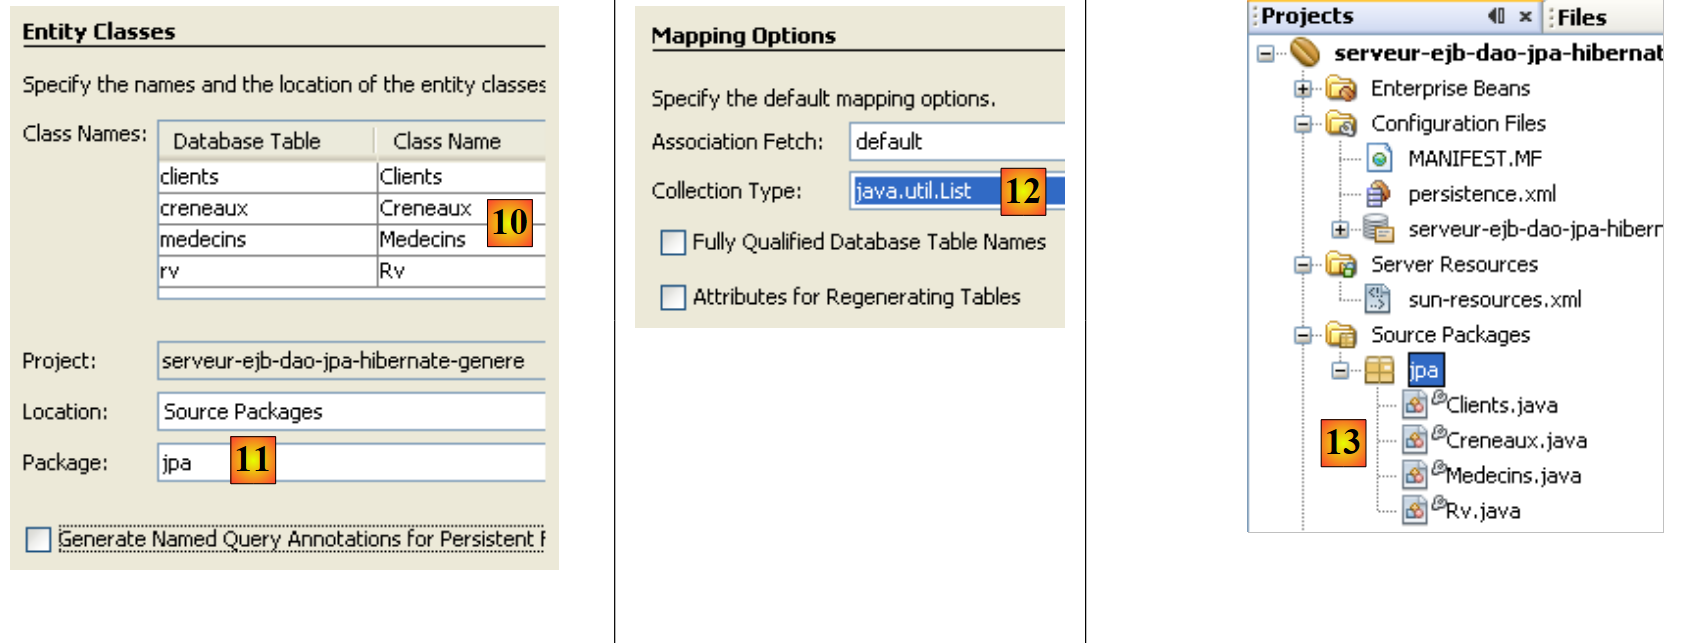 |
- in [10], the JPA entities that will be generated
- in [11], name the package for the JPA entities
- in [12], choose the Java type that will encapsulate the lists of objects returned by the layer JPA
- finish the wizard
- in [13], the four generated JPA entities, one for each database table.
Here is an example of the code for the [Rv] entity, which represents a row in the [rv] table of the [dbrdvmedecins] database.
Creating the EJB layer for accessing entities JPA
 |
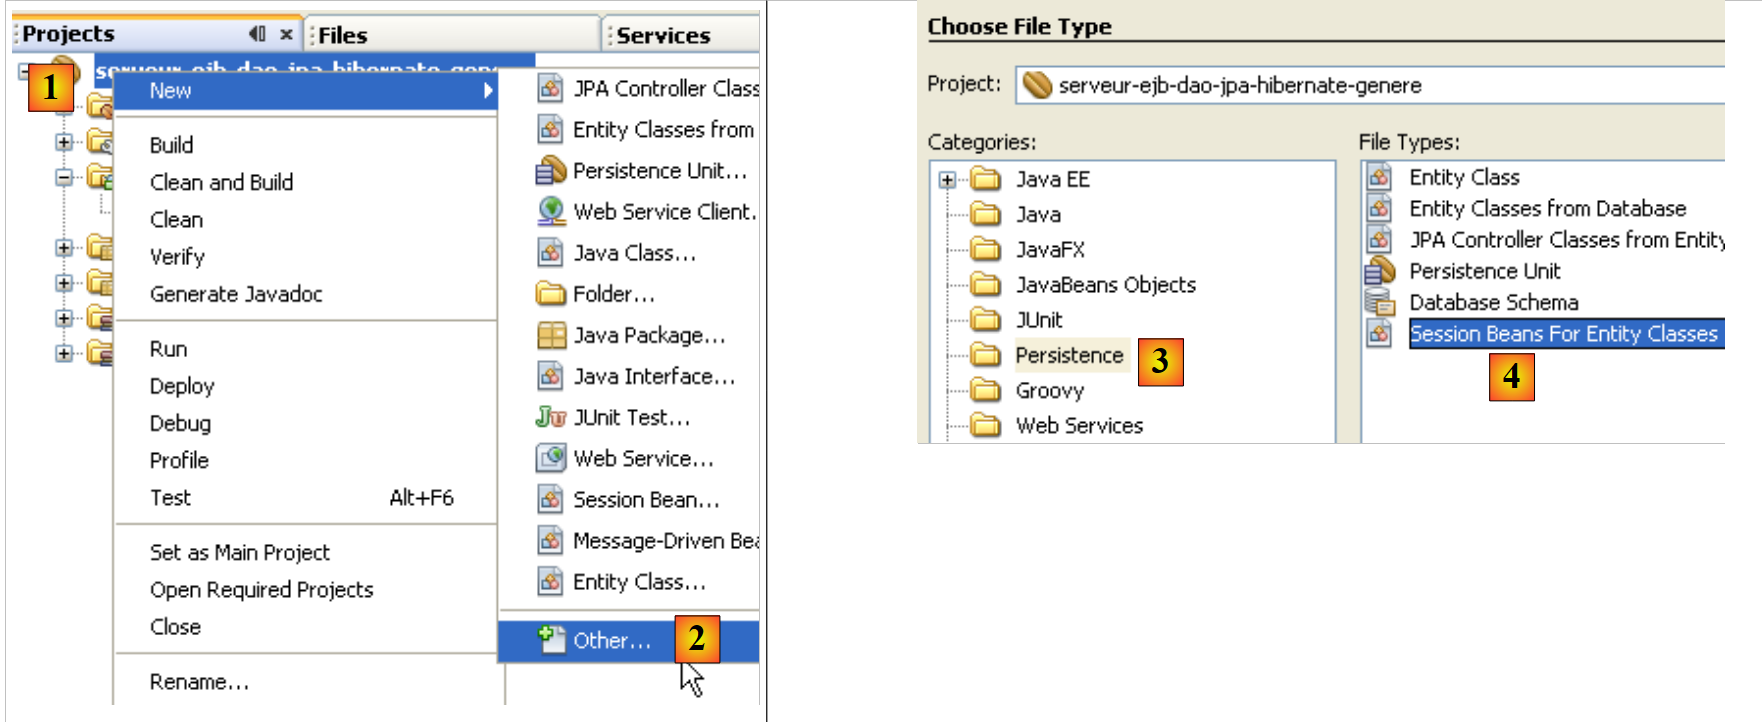 |
- In [1], right-click on the project and in [2], select option [New / Other]
- in [3], select the category [Persistence], then in [4] the type [Session Beans for Entity Classes]
 |
- In [5], the JPA entities created previously are displayed
- In [6], select them all
- in [7], they have been selected
- in [8], continue with the wizard
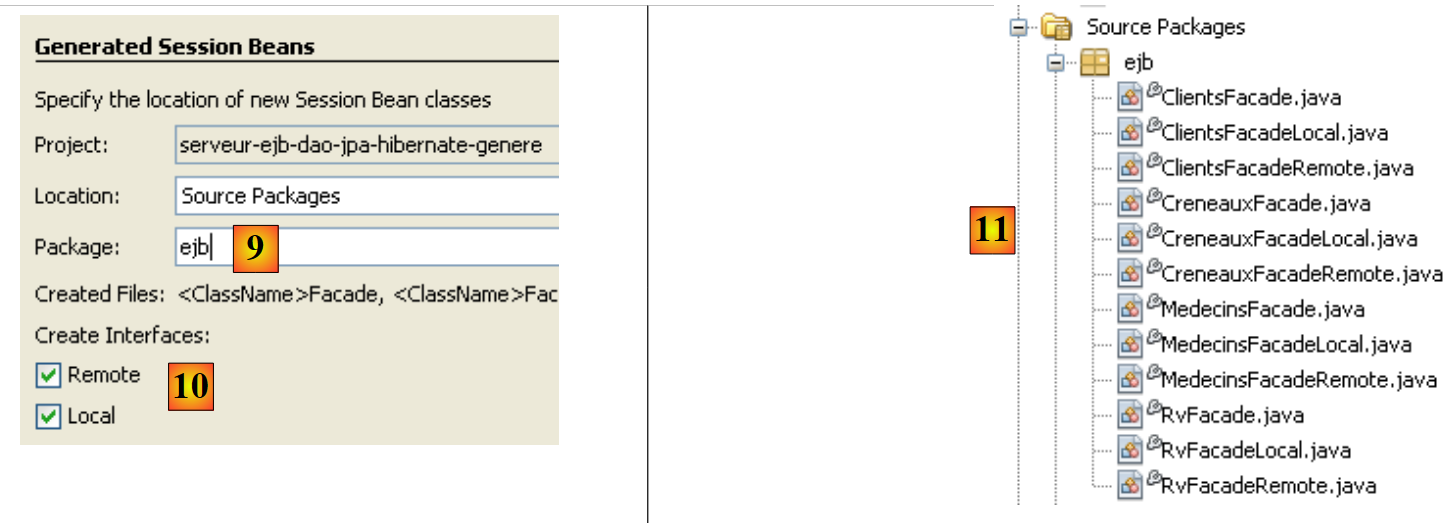 |
- In [9], give a name to the package for the EJBs that will be generated
- in [10], specify that the EJBs must implement both a local and a remote interface
- Finish the wizard
- in [11], the generated EJBs
Here, for example, is the code for the EJB that manages access to the entity [Rv], and thus to the table [rv] in the database [dbrdvmedecins]:
As mentioned, automatic code generation can be very useful for getting a project started and learning about the JPA and EJB entities. In the following sections, we will rewrite the JPA and EJB layers with our own code, but the reader will find information there that we have just covered in the automatic generation of the layers.
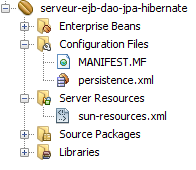
4.6. The Netbeans project of the EJB module
We create a new empty EJB module (see section 4.5):
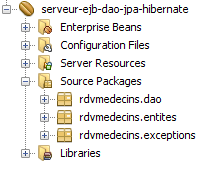
- The [rdvmedecins.entites] package contains the entities of the JPA layer
- the [rdvmedecins.dao] package implements the EJB for the [dao] layer
- The [rdvmedecins.exceptions] package implements an application-specific exception class
In the following, we assume that the reader has followed all the steps in Section 4.5. Some of these steps will need to be repeated.
4.6.1. Configuring the JPA layer
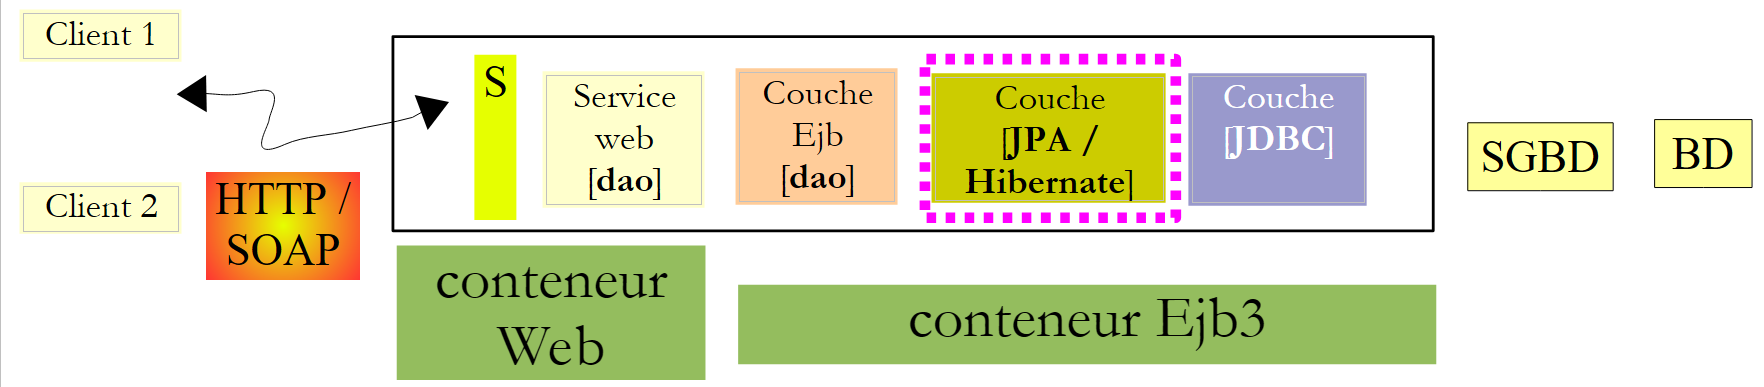
Let’s review the architecture of our client/server application:
 |
The Netbeans project:
The [JPA] layer is configured by the [persistence.xml] and [sun-resources.xml] files above. These two files are generated by wizards we have already encountered:
- The generation of the [sun-resources.xml] file was described in section 4.5.
- The generation of the file [persistence.xml] was described in section 4.5.
The generated file [persistence.xml] must be modified as follows:
- Line 3: The transaction type is JTA: Transactions will be managed by the Glassfish EJB3 container
- Line 4: A JPA/Hibernate implementation is used. To this end, the Hibernate library has been added to the Glassfish server (see section 4.4).
- Line 5: The JTA data source used by the JPA layer has the name JNDI "jdbc/dbrdvmedecins".
- Line 8: This line is not generated automatically. It must be added manually. It tells Hibernate that the SGBD being used is MySQL5.
The "jdbc/dbrdvmedecins" data source is configured in the following [sun-resources.xml] file:
- Lines 8–10: The JDBC properties of the data source (database name Url, user name, and password). The database MySQL dbrdvmedecins is the one described in section 4.1.
- Line 7: the characteristics of the connection pool associated with this data source
4.6.2. The entities of the JPA layer
Let’s review the architecture of our client/server application:
 |
The Netbeans project:
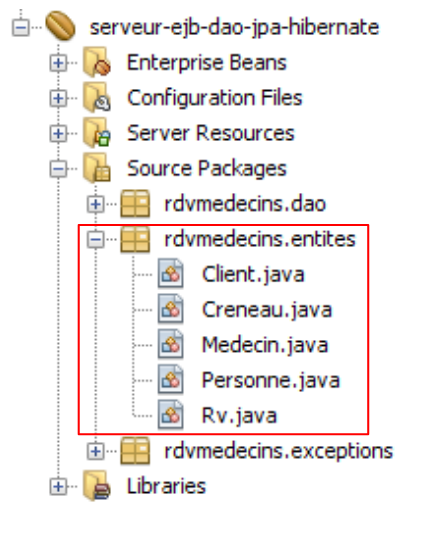 |
The [rdvmedecins.entites] package implements the [Jpa] layer.
In Section 4.5, we saw how to automatically generate an application’s JPA entities. We will not use this technique here but will define the entities ourselves. However, these will incorporate much of the code generated in Section 4.5. Here, we want the entities [Medecin] and [Client] to be child classes of a class [Personne].
The Person class is used to represent doctors and clients:
- Line 3: Note that the [Personne] class is not itself an entity (@Entity). It will be the parent class of entities. The @MappedSuperClass annotation indicates this situation.
The [Client] entity encapsulates the rows of the [clients] table. It derives from the previous [Personne] class:
- Line 3: The class [Client] is a JPA entity
- line 4: it is associated with the table [clients]
- line 5: it derives from the [Personne] class
The entity [Medecin], which encapsulates the rows of the table [medecins], follows the same pattern:
The entity [Creneau] encapsulates the rows of the table [creneaux]:
- Lines 15–17 model the "one-to-many" relationship between the [creneaux] table and the [medecins] table in the database.
The [Rv] entity encapsulates the rows of the [rv] table:
- Lines 15–17 model the "one-to-many" relationship between the [rv] table and the [clients] table in the database, and lines 18–20 model the "one-to-many" relationship between the [rv] table and the [creneaux] table
4.6.3. The exception class
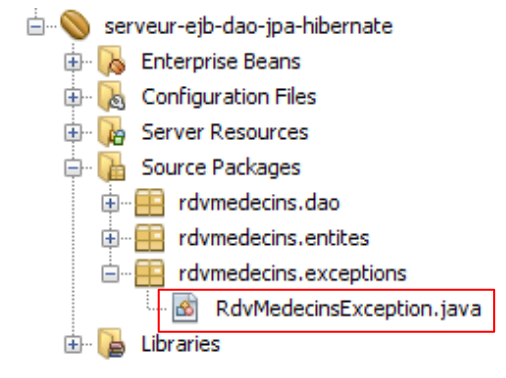 |
The application's exception class [RdvMedecinsException] is as follows:
- line 6: the class derives from the [RuntimeException] class. The compiler therefore does not require it to be handled with try/catch blocks.
- line 5: the @ApplicationException annotation ensures that the exception will not be "caught" by a [EjbException] exception.
To understand the @ApplicationException annotation, let’s revisit the server-side architecture:
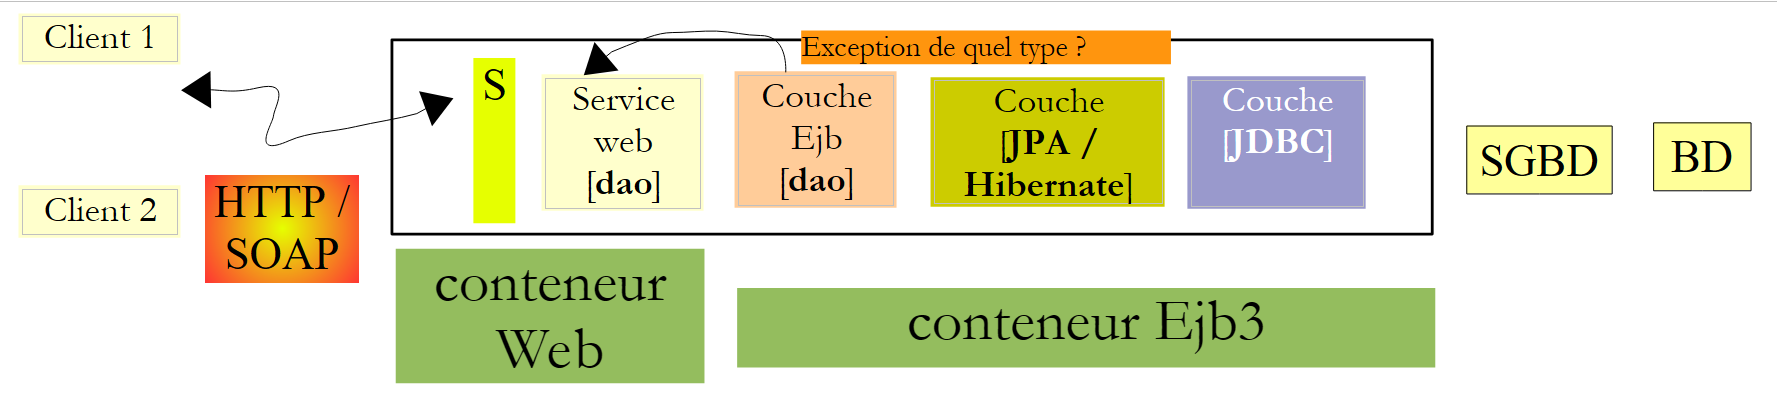 |
The [RdvMedecinsException] exception will be thrown by the EJB methods of the [dao] layer within the EJB3 container and intercepted by it. Without the @ApplicationException annotation, the EJB3 container encapsulates the occurred exception within a [EjbException] exception and rethrows it. You may not want this encapsulation and may want to allow an exception of type [RdvMedecinsException] to escape from the Ejb3 container. This is what the @ApplicationException annotation allows. Furthermore, the (rollback=true) attribute of this annotation instructs the EJB3 container that if an exception of type [RdvMedecinsException] occurs within a method executed as part of a transaction with a SGBD, the transaction must be rolled back. In technical terms, this is called rolling back the transaction.
4.6.4. The EJB of the [dao] layer
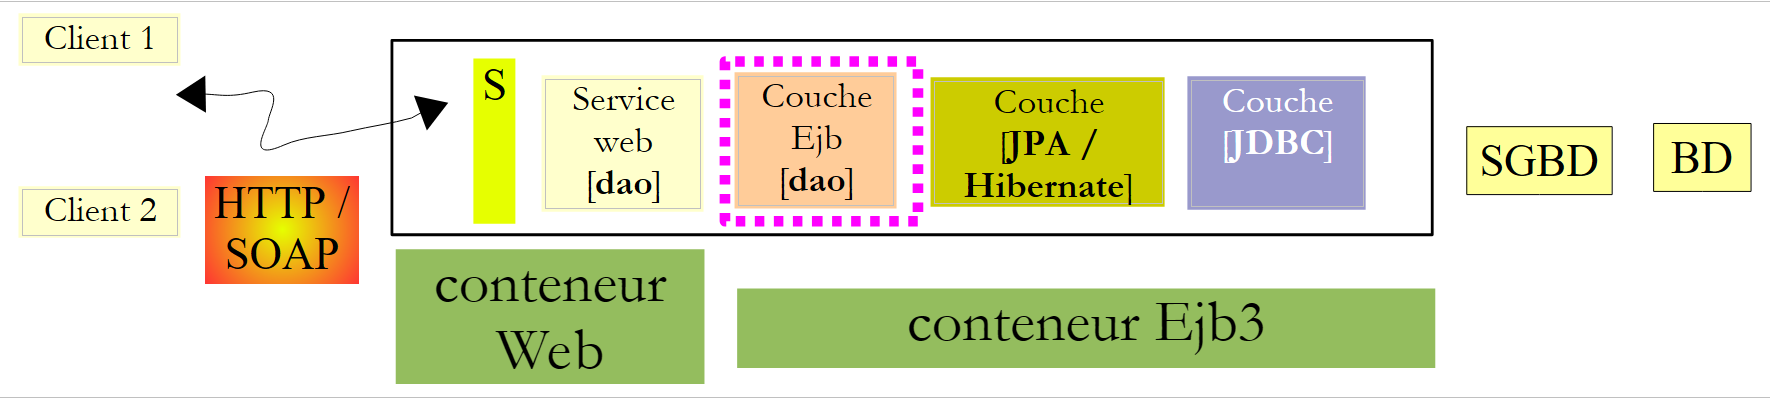 |
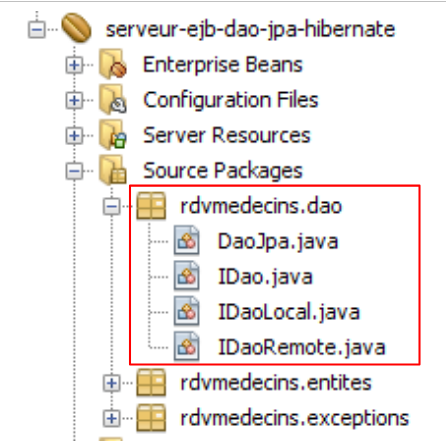 |
The Java interface [IDao] of the [dao] layer is as follows:
The EJB's local interface [IDaoLocal] simply extends the previous interface [IDao]:
The same applies to the remote interface [IDaoRemote]:
The EJB [DaoJpa] implements both the local and remote interfaces:
- Line 3 indicates that the remote EJB is named "rdvmedecins.dao"
- Line 4 indicates that all methods of the EJB are executed within a transaction managed by the EJB3 container.
- Line 5 shows that the EJB implements the local and remote interfaces.
The complete EJB code is as follows:
1 2 3 4 5 6 7 8 9 10 11 12 13 14 15 16 17 18 19 20 21 22 23 24 25 26 27 28 29 30 31 32 33 34 35 36 37 38 39 40 41 42 43 44 45 46 47 48 49 50 51 52 53 54 55 56 57 58 59 60 61 62 63 64 65 66 67 68 69 70 71 72 73 74 75 76 77 78 79 80 81 82 83 84 85 86 87 88 89 90 91 92 93 94 95 96 97 98 99 100 101 102 103 104 105 106 107 108 | |
- line 8: the EntityManager object that manages access to the persistence context. When the class is instantiated, this field will be initialized by the EJB container using the @PersistenceContext annotation on line 7.
- line 15: JPQL query that returns all rows of the [clients] table as a list of [Client] objects.
- Line 22: Similar query for doctors
- Line 32: A query JPQL performing a join between tables [creneaux] and [medecins]. It is parameterized by the doctor’s id.
- Line 43: A query JPQL performing a join between the tables [rv], [creneaux], and [medecins] and having two parameters: the doctor's id and the day from Rv.
- Lines 55–57: creation of a Rv, followed by its persistence in the database.
- Line 67: Deletes a Rv record from the database.
- Line 76: performs a SELECT query on the database to find a specific customer
- Line 85: Same for a doctor
- Line 94: same for a Rv
- Line 103: same for a time slot
- All operations using the persistence context from line 9 are likely to encounter a problem with the database. Therefore, they are all enclosed in a try/catch block. Any exception is encapsulated in the "custom" exception RdvMedecinsException.
Once compiled, the EJB module generates a .jar file:
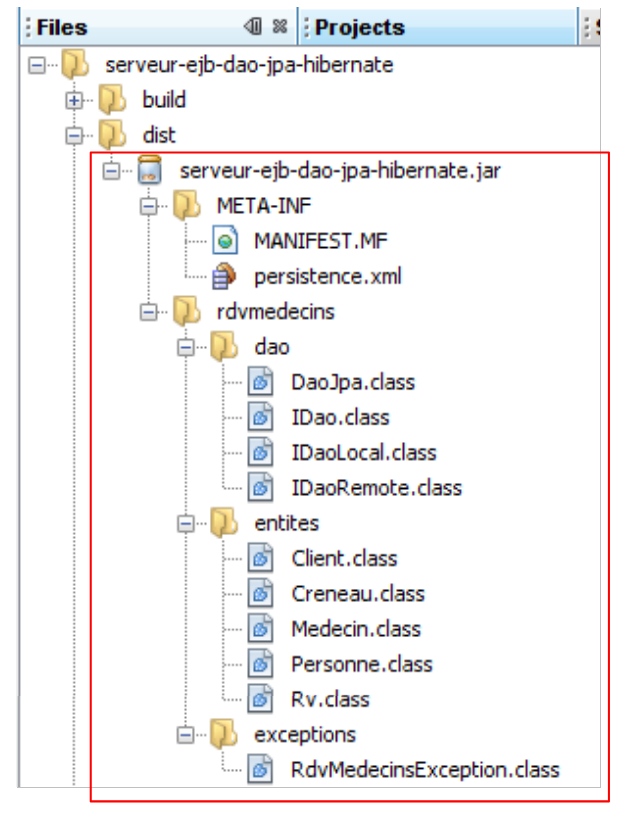 |
4.7. Deploying the [dao] layer EJB with Netbeans
Netbeans allows you to easily deploy the previously created EJB to the Glassfish server.
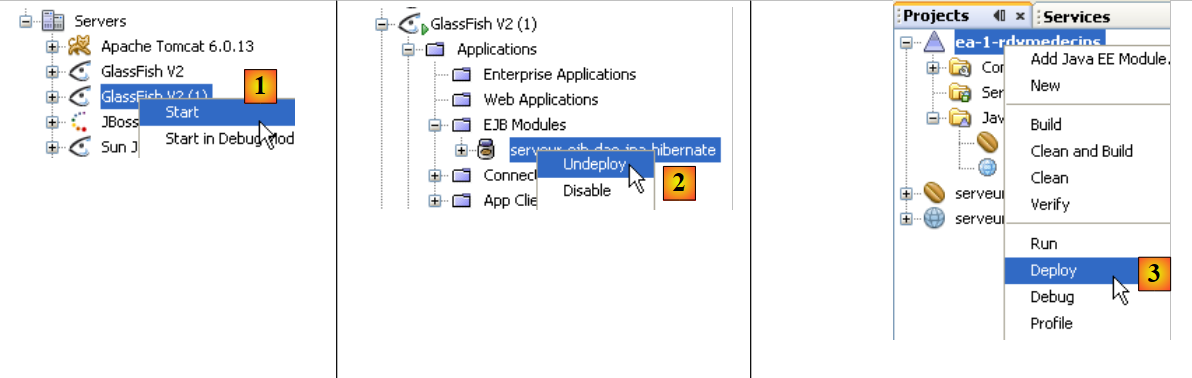
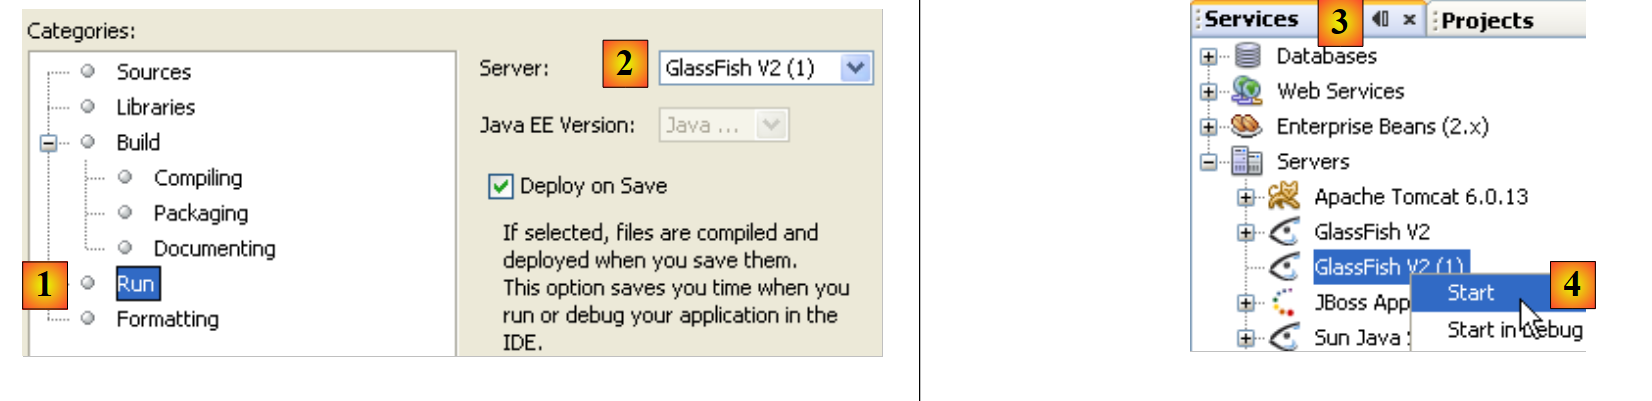 |
- In the EJB project properties, check the [1] runtime options.
- In [2], the name of the server on which the EJB will be deployed
- In the [Services] tab, [3], launch it [4].
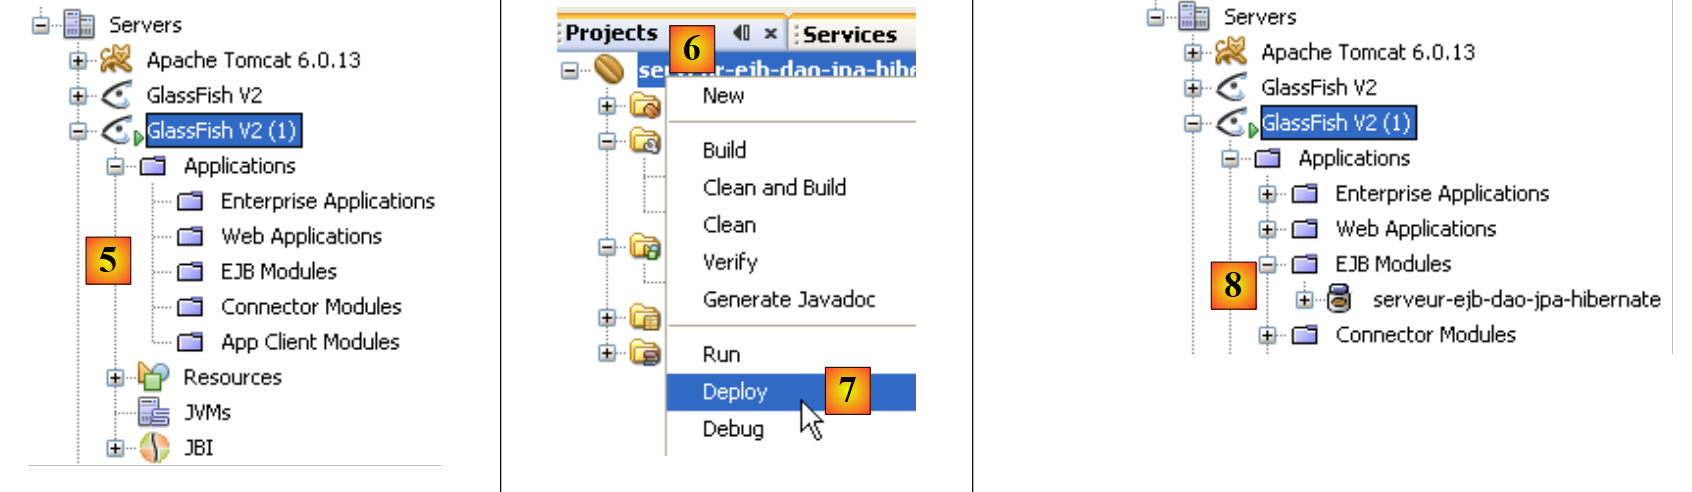 |
- In [5], the Glassfish server once launched. It does not yet have an EJB module.
- Start the MySQL server and ensure that the [dbrdvmedecins] database is online. To do this, you can use the Netbeans connection created in section 4.5.
- In the [Projects] [6] tab, deploy the [7] EJB module: SGBD and MySQL5 must be running so that the JDBC resource "jdbc/dbrdvmedecins" used by the EJB is accessible.
- In [8], the deployed EJB appears in the Glassfish server tree
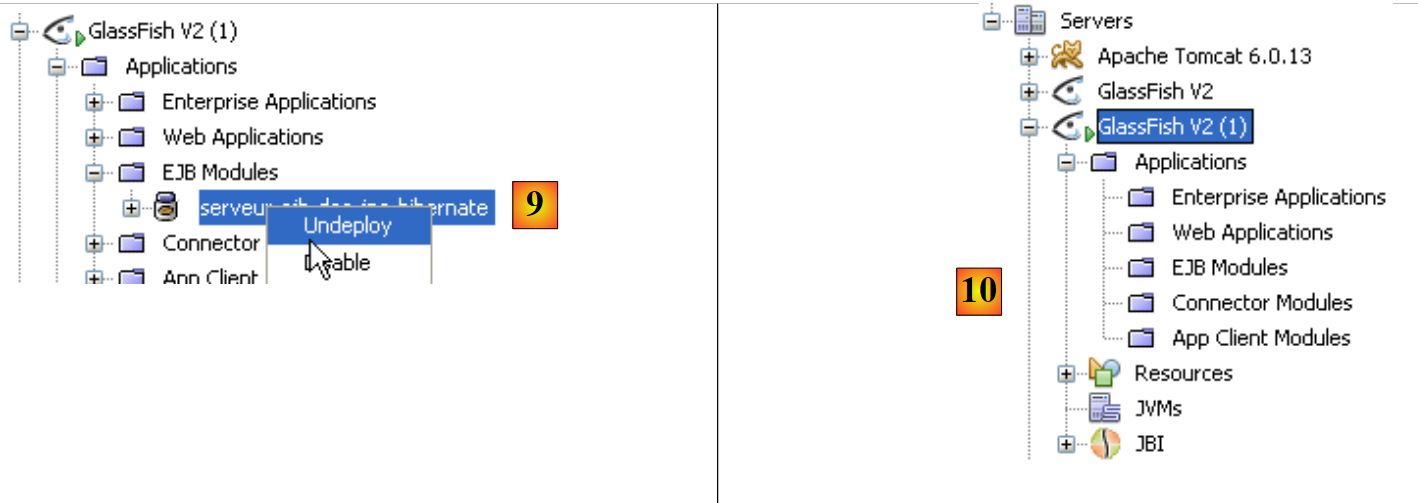 |
- In [9], the deployed EJB is removed
- In [10], the EJB no longer appears in the tree structure of the Glassfish server.
4.8. Deploying the EJB from layer [dao] to Glassfish
Here we show how to deploy an EJB to the Glassfish server from its .jar archive.
- Start the MySQL server and ensure that the [dbrdvmedecins] database is online. To do this, you can use the Netbeans connection created in section 4.5.
Let’s review the JPA configuration of the EJB module that will be deployed. This configuration is defined in the [persistence.xml] file:
Line 5 indicates that the JPA layer uses a data source named JTA, c.a.d, managed by the EJB3 container, named "jdbc/dbrdvmedecins".
In Section 4.5, we saw how to create this JDBC resource from Netbeans. Here we show how to do this directly with Glassfish. We follow the procedure described in section 13.1.2, page 79 of [ref1].
We begin by deleting the resource so that we can recreate it. We do this from Netbeans:
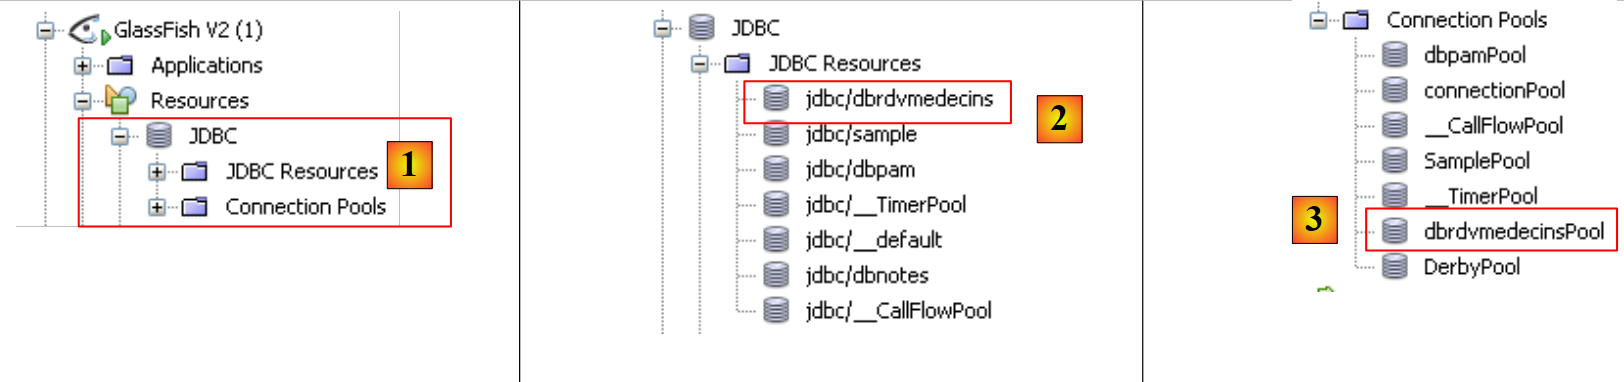 |
- in [1], the resources JDBC from server Glassfish
- in [2], the "jdbc/dbrdvmedecins" resource of our EJB
- in [3], the connection pool for this resource JDBC
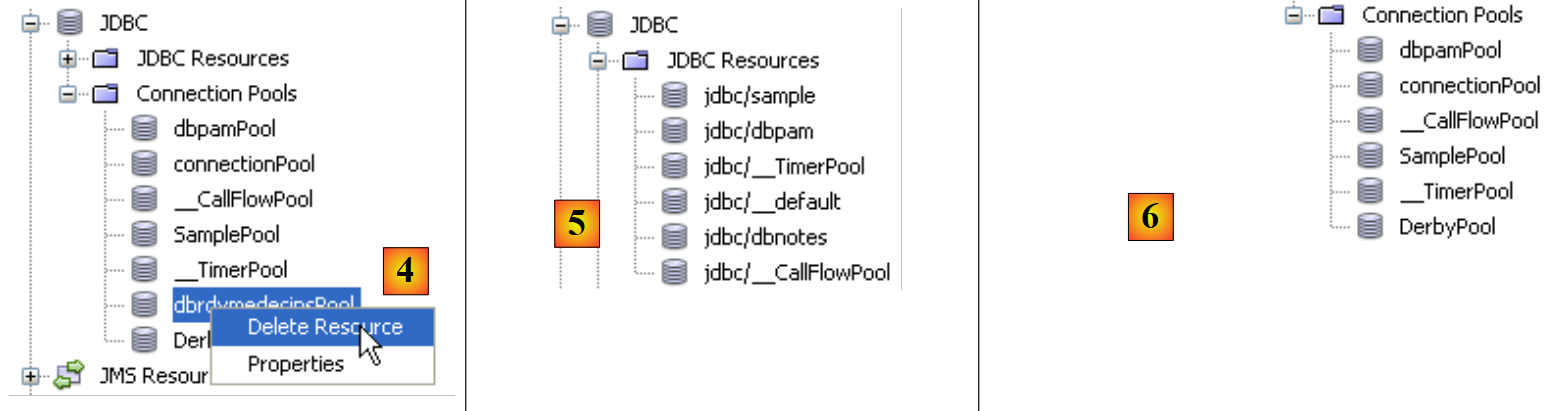 |
- to [4], we delete the connection pool. This will result in the deletion of all resources JDBC that use it, including the "jdbc/dbrdvmedecins" resource.
- In [5] and [6], the resource JDBC and the connection pool have been destroyed.
Now, we use the Glassfish server administration console to create the JDBC resource and deploy the EJB.
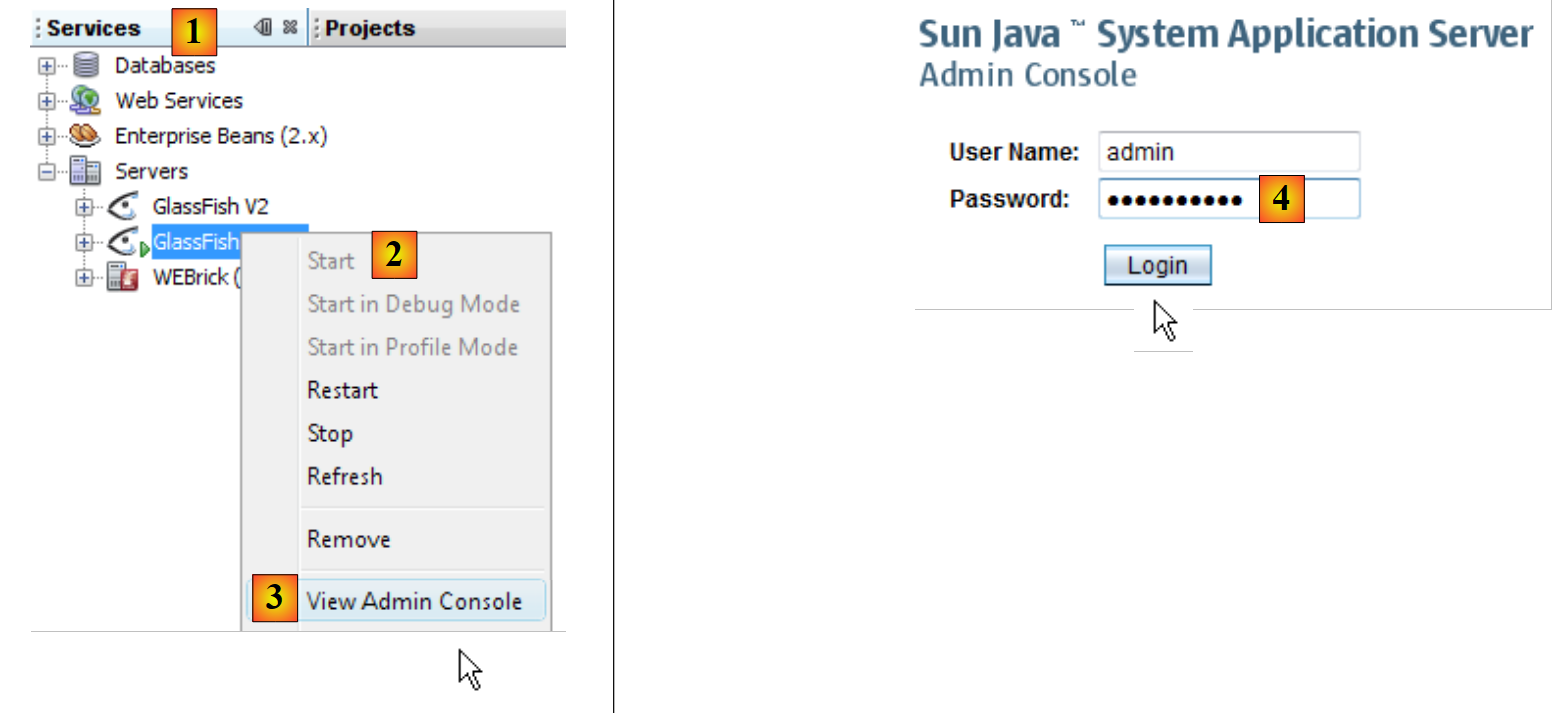 |
- In the [services] tab of [1], start the Glassfish [2] server, then access its administration console
- in [4], log in as an administrator (password: adminadmin if you did not change it during installation or afterward).
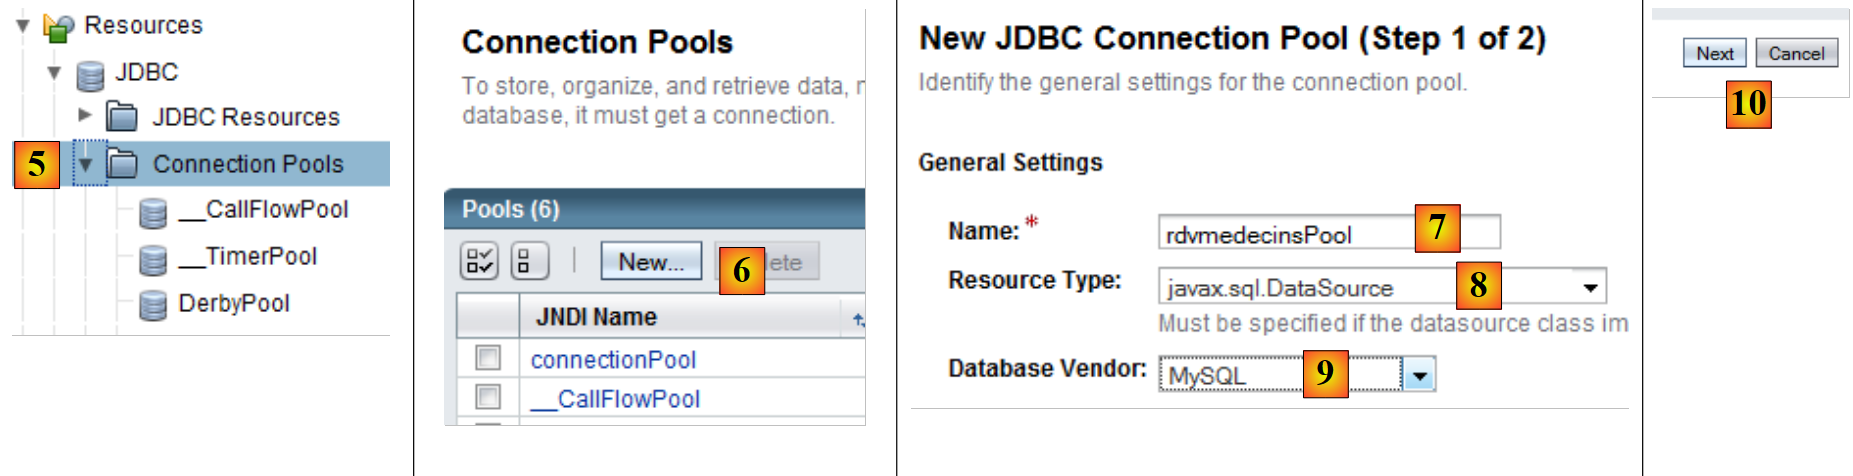 |
- In [5], select the [Connection Pools] branch of the Glassfish resources
- In [6], create a new connection pool. Note that a connection pool is a technique used to limit the number of times connections to a SGBD are opened and closed. When the server starts, N connections—a number defined by configuration—are opened with the SGBD. These open connections are then made available to the EJBs that request them to perform an operation with the SGBD. As soon as the operation is complete, the EJB returns the connection to the pool. The connection is never closed. It is shared among the various threads that access SGBD
- in [7], name the pool
- in [8], the class modeling the data source is the class [javax.sql.DataSource]
- in [9], the SGBD that holds the data source is here MySQl.
- In [10], proceed to the next step
 |
- In [11], the "Connection Validation Required" attribute ensures that before providing a connection, the pool verifies that it is operational. If it is not, it creates a new one. This allows an application to continue functioning after a temporary outage with SGBD. During the outage, no connections are available, and exceptions are thrown to the client. Once the outage is over, the clients instances that continue to request connections receive them again: thanks to the "Connection Validation Required" attribute, all connections in the pool will be recreated. Without this attribute, the pool would detect that the initial connections have been terminated but would not attempt to recreate new ones.
- In [12], the "Read Committed" isolation level is requested for transactions. This level ensures that a transaction T2 cannot read data modified by a transaction T1 until the latter is fully completed.
- In [13], we specify that all transactions must use the isolation level defined in [12]
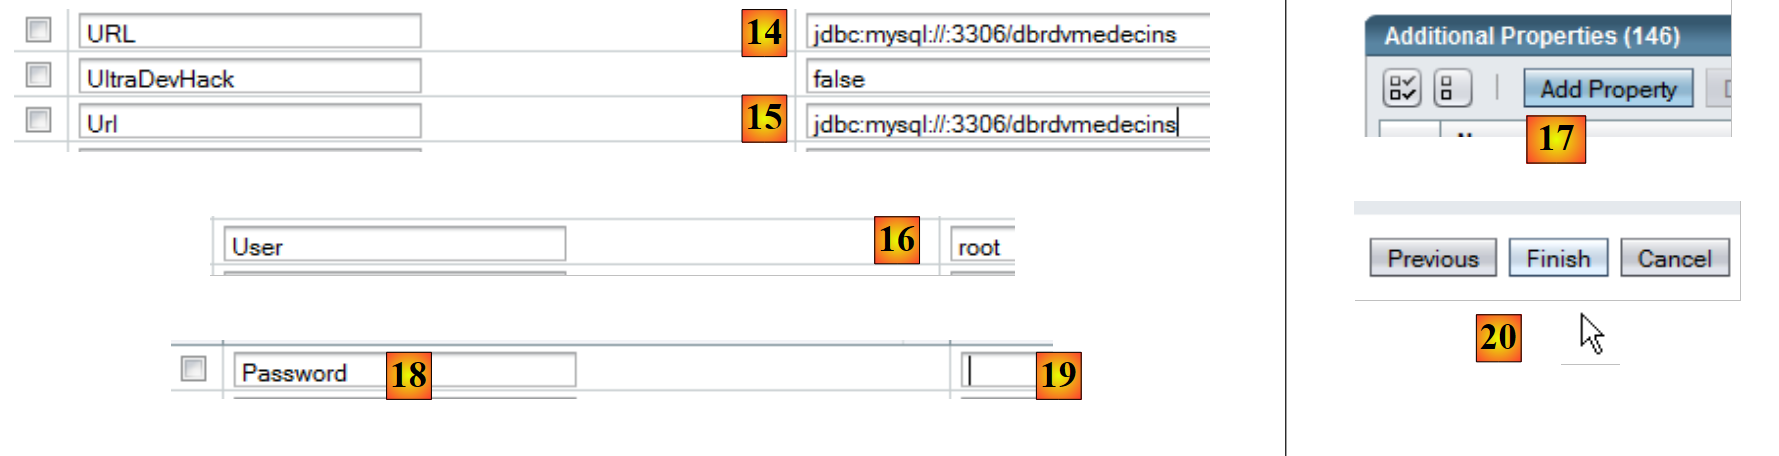 |
- In [14] and [15], specify the Url of the BD whose pool manages the connections
- in [16], the user will be root
- In [17], add a property
- in [18], add the "Password" property with the value () in [19]. Although the screenshot [19] does not show it, you must not enter an empty string but rather () (opening parenthesis, closing parenthesis) to indicate an empty password. If the root user of your SGBD MySQL has a non-empty password, enter that password.
- In [20], complete the connection pool creation wizard for the MySQL [dbrdvmedecins] database.
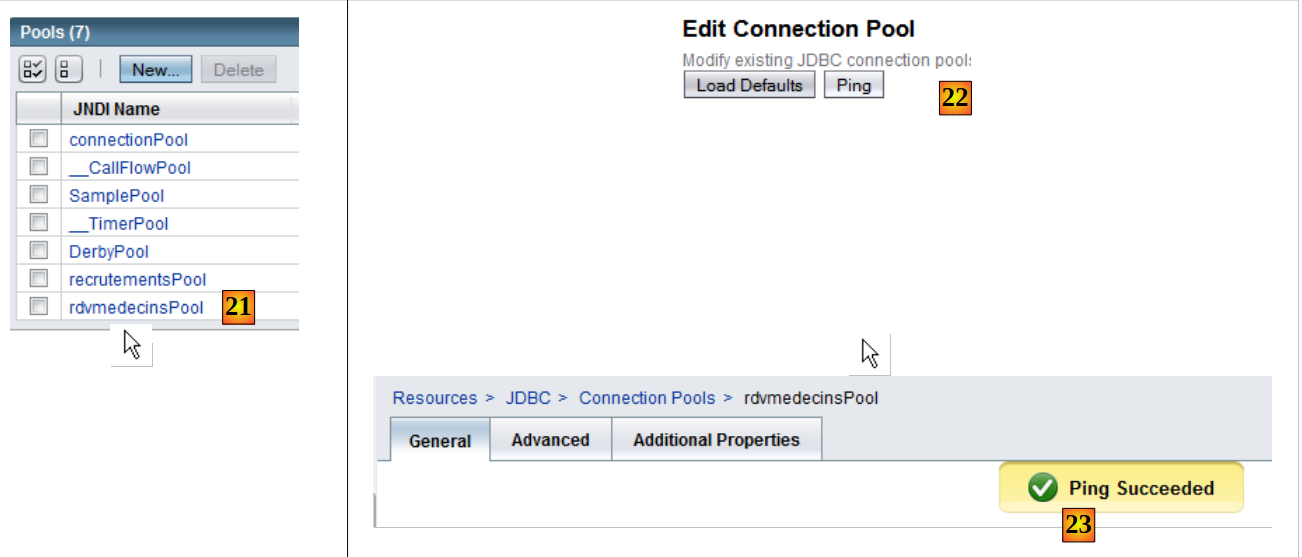 |
- In [21], the pool has been created. Click on its link.
- In [22], the [Ping] button allows you to create a connection to the [dbrdvmedecins] database
- In [23], if everything goes well, a message indicates that the connection was successful
Once the connection pool is created, you can create a JDBC resource:
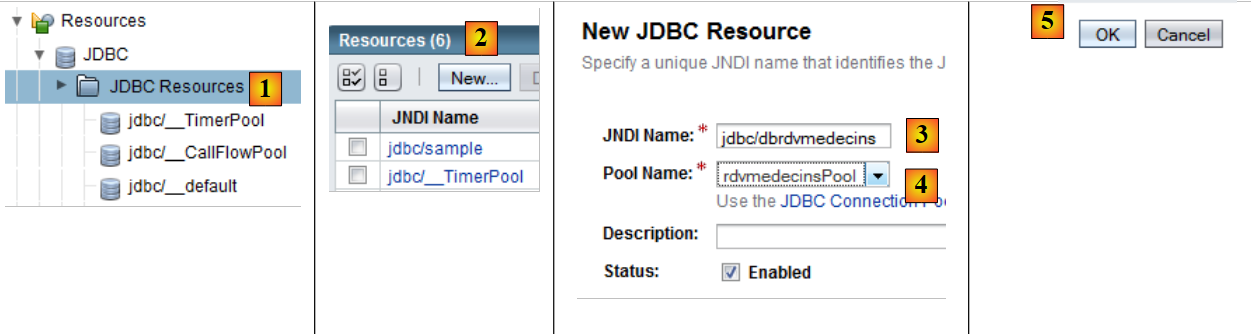 |
- In [1], select the [JDBC Resources] branch from the server object tree
- In [2], create a new resource JDBC
- In [3], name the resource JDBC. This name must match the name used in the [persistence.xml] file:
- In [4], specify the connection pool that the new resource JDBC should use: the one you just created
- In [5], complete the creation wizard
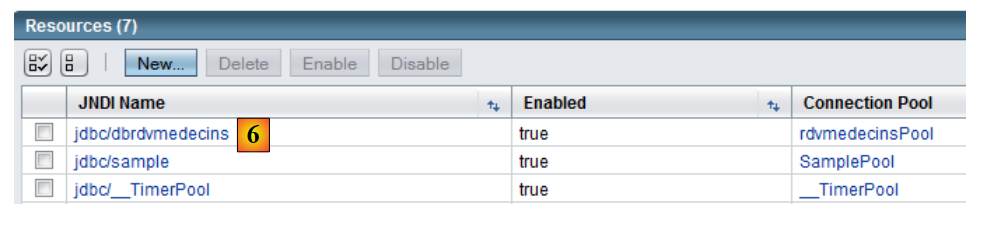 |
- In [6], the new resource JDBC
Now that the JDBC resource has been created, we can deploy the jar archive of the EJB:
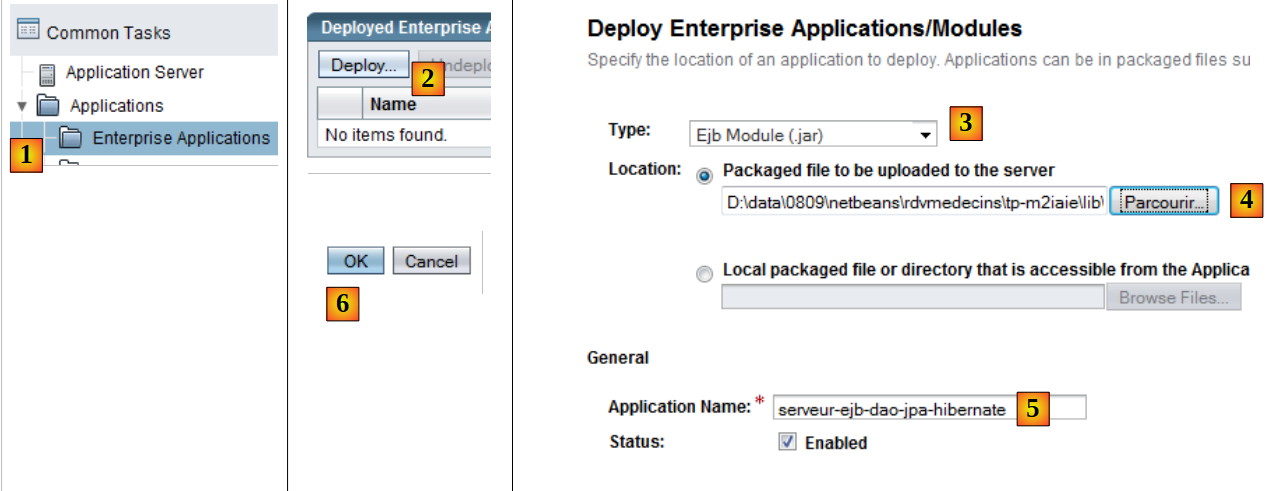 |
- In [1], select the branch [Enterprise Applications]
- In [2], using the [Deploy] button, indicate that you want to deploy a new application
- In [3], specify that the application is an EJB module
- In [4], select the jar for the EJB [serveur-ejb-dao-jpa-hibernate.jar] that was provided to you for TP.
- In [5], you can change the name of the EJB module if you wish
- In [6], complete the EJB module deployment wizard
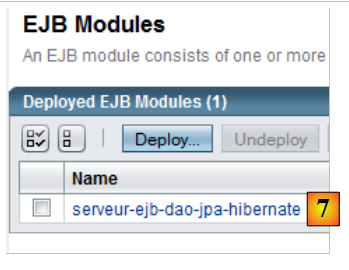 |
- In [7], the EJB module has been deployed. It is now ready for use.
4.9. Testing the EJB in the [dao] layer
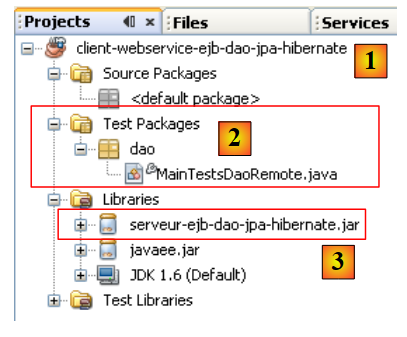
Now that the EJB in the [dao] layer of our application has been deployed, we can test it. We will do so using the following Java client:
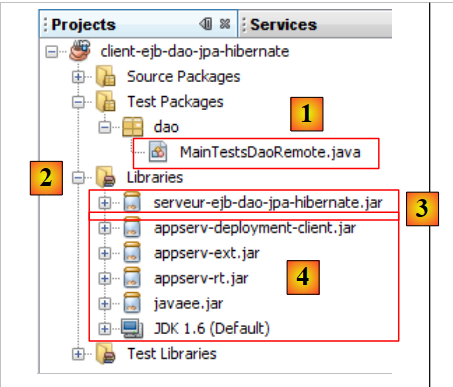 |
The [MainTestsDaoRemote] [1] class is a test class JUnit 4. The libraries in [2] consist of, on the one hand:
- the jar EJB of the [dao] [3] layer (see section 4.6.4).
- the Glassfish and [4] libraries required for the remote clients EJBs.
The test class is as follows:
- Line 13: Note the instantiation of the remote EJB proxy. We use its name JNDI "rdvmedecins.dao".
- The test methods use the methods exposed by the EJB (see Section 4.6.4).
If all goes well, the tests should pass:
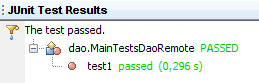
Now that the EJB of the [dao] layer is operational, we can proceed to make it publicly available via a web service.
4.10. The Web Service of the [dao] Layer
For a brief introduction to the concept of web services, see section 14, page 111 of [ref1].
Let’s return to the server architecture of our client/server application:
 |
We are focusing above on the web service of the [dao] layer. The sole purpose of this service is to make the EJB interface of the [dao] layer available to multi-platform clients applications capable of communicating with a web service.
Recall that there are two ways to implement a web service:
- using a class annotated with @WebService that runs in a web container
 |
- via an EJB annotated with @WebService that runs in an EJB container
 |
We are using the first solution here. In the IDE Netbeans, we need to build an enterprise project with two modules:
- the EJB module that will run in the EJB container: the EJB of the [dao] layer.
- the web module that will run in the web container: the web service we are currently building.
We will build this business project in two ways.
4.10.1. Project Netbeans - Version 1
First, we build a Netbeans project of the "Web Application" type:
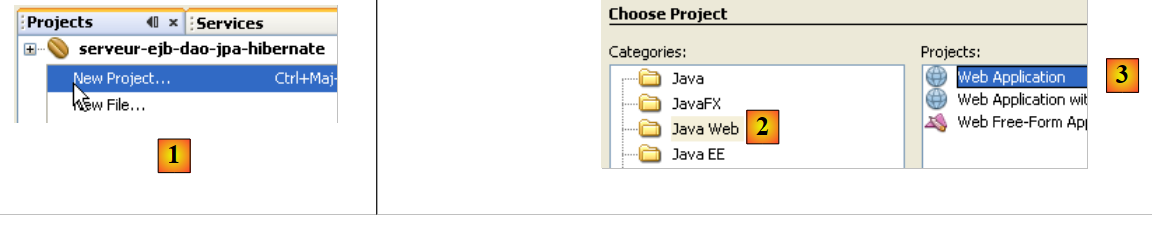 |
- In [1], we create a new project in the "Java Web" category [2] of the "Web Application" type [3].
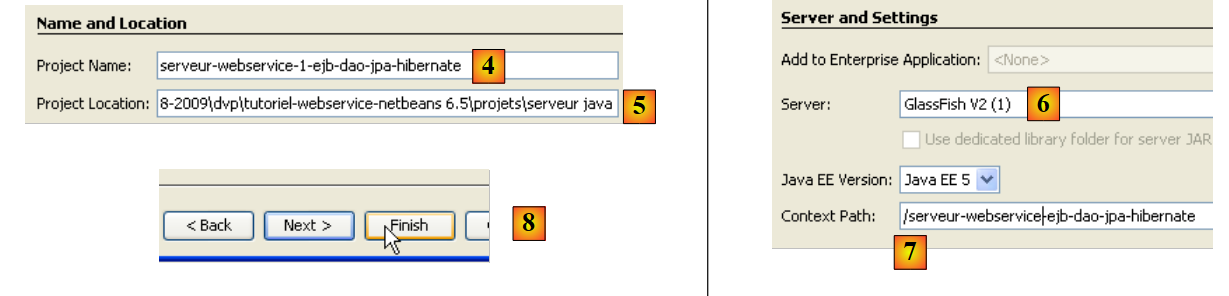 |
- In [4], name the project, and in [5], specify the folder where it should be generated
- In [6], you set the application server that will run the web application
- In [7], you set the application context
- In [8], you validate the project configuration.
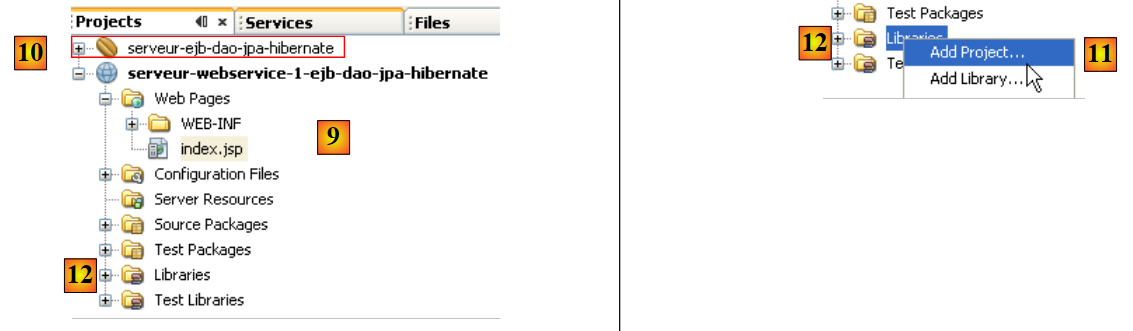 |
- In [9], the generated project. The web service we are building will use the EJB from the previous project [10]. Therefore, it needs to reference the .jar from the EJB module [10].
- In [11], add a project named Netbeans to the libraries of the web project [12]
 |
- In [13], select the EJB module folder in the file system and confirm.
 |
- In [14], the EJB module has been added to the web project libraries.
In [15], we implement the web service with the following [WsDaoJpa] class:
- Line 4: The [WsdaoJpa] class implements the [IDao] interface. Recall that this interface is defined in the EJB archive of the [dao] layer as follows:
- Line 3: The @WebService annotation makes the [WsDaoJpa] class a web service.
- Lines 6–7: The EJB reference from the [dao] layer will be injected by the application server into the field on line 7. Note that it is always the local implementation (IDaoLocal in this case) that is injected. This injection is possible because the web service runs in the same JVM as the EJB.
- All methods of the web service are tagged with the @WebMethod annotation to make them visible to remote clients. A method not tagged with the @WebMethod annotation would be internal to the web service and not visible to remote clients clients. Each method M of the web service simply calls the corresponding method M of the EJB injected on line 7.
The creation of this web service is reflected by a new branch in the Netbeans project:
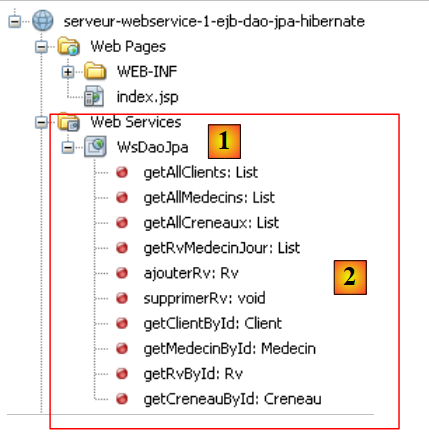 |
In [1], we see the WsDaoJpa web service, and in [2], the methods it exposes to remote clients.
Let’s review the architecture of the web service under development:
 |
The components of the web service we are going to deploy are:
- [1]: the web module we just built
- [2]: the EJB module we built in a previous step and on which the web service depends
To deploy them together, we need to combine the two modules into a Netbeans "enterprise" project:
 |
In [1], we create a new enterprise project named [2, 3].
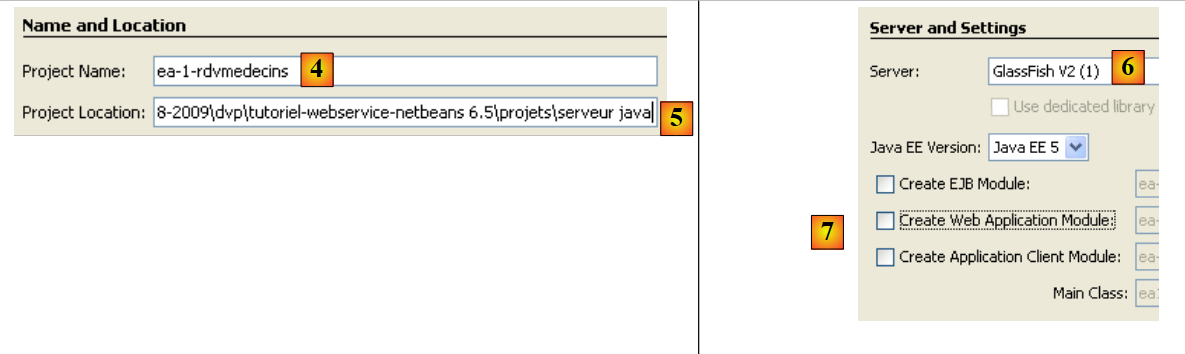 |
- In [4,5], name the project and specify its creation directory
- In [6], select the application server on which the enterprise application will be deployed
- In [7], an enterprise project can have three components: web application, EJB module, and client application. Here, the project is created without any components. These will be added later.
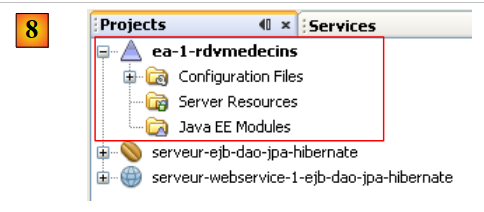 |
- In [8], the newly created enterprise application.
 |
- In [9], right-click on [Java EE Modules] and add a new module
- In [10], only the modules currently open in Netbeans and IDE are displayed. Here we select the web module [serveur-webservice-1-ejb-dao-jpa-hibernate] and the EJB module [serveur-ejb-dao-jpa-hibernate] that we have built.
- In [11], the two modules added to the enterprise project.
We still need to deploy this enterprise application on the Glassfish server. Next, the SGBD and MySQL servers must be started so that the JDBC data source "jdbc/dbrdvmedecins" used by the EJB module is accessible.
 |
- In [1], the Glassfish server is started
- If the EJB module [serveur-ejb-dao-jpa-hibernate] is deployed, it is unloaded by [2]
- In [3], the e-business application is deployed
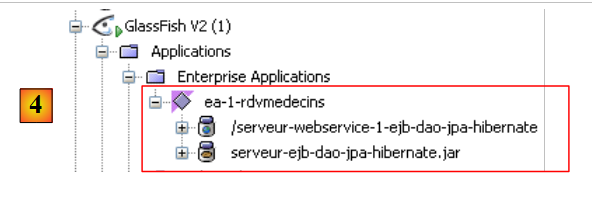 |
- In [4], it is deployed. We can see that it contains both modules: Web and EJB.
4.10.2. Project Netbeans - version 2
We will now show how to deploy the web service when you do not have the source code for the EJB module but only its .jar archive.
The new Netbeans project for the web service will be as follows:
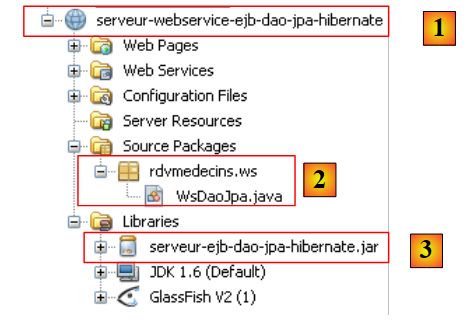 |
The notable elements of the project are as follows:
- [1]: the web service is implemented by a Netbeans project of type [Web Application].
- [2]: the web service is implemented by the [WsDaoJpa] class already discussed
- [3]: the EJB archive of the [dao] layer, which allows the [WsDaoJpa] class to access the definitions of the various classes, interfaces, and entities in the [dao] and [jpa] layers.
We then build the enterprise project required to deploy the web service:
 |
- [1], we create an enterprise application [ea-rdvmedecins], initially without any modules.
- In [2], we add the previous web module [serveur-webservice-ejb-dao-jpa-hibernate]
- In [3], the result.
As is, the enterprise application [ea-rdvmedecins] cannot be deployed to the server Glassfish from Netbeans. An error occurs. You must then manually deploy the EAR archive of the [ea-rdvmedecins] application:
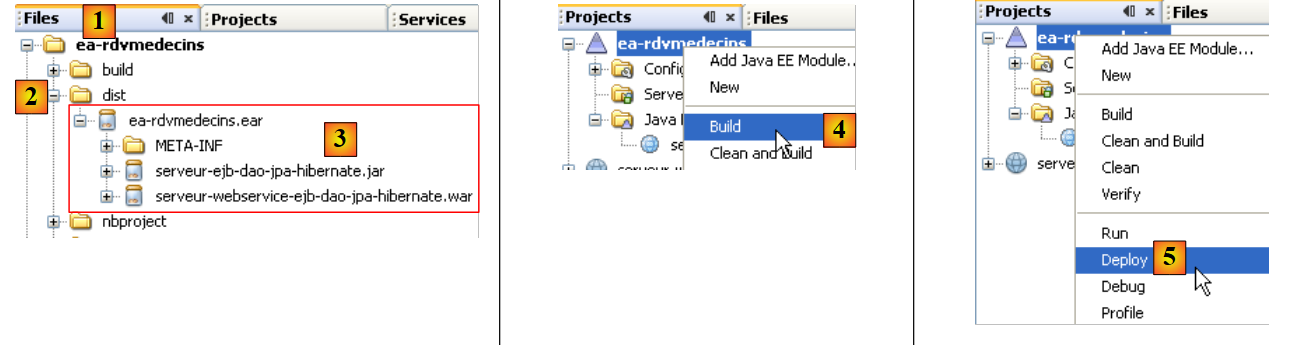 |
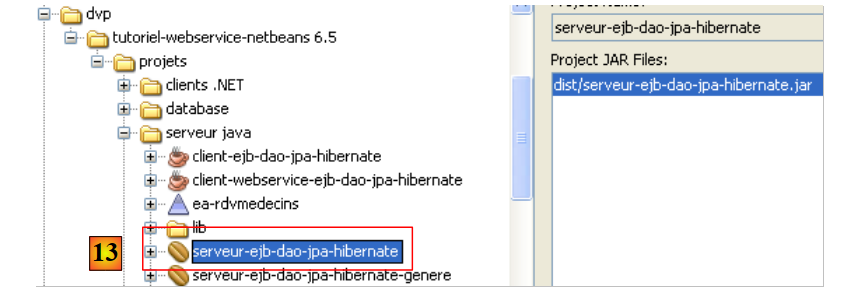
- The [ea-rdvmedecins.ear] archive is located in the [dist] [2] folder under the [Files] tab of Netbeans.
- In this [3] archive, we find the two components of the enterprise application:
- the EJB archive [serveur-ejb-dao-jpa-hibernate]. This archive is present because it was part of the libraries referenced by the web service.
- the web service archive [serveur-webservice- ejb-dao-jpa-hibernate].
- The [ea-rdvmedecins.ear] archive is created by a simple build ([4]) of the enterprise application.
- In [5], the deployment operation fails.
To deploy the [ea-rdvmedecins.ear] archive of the enterprise application, we proceed as shown when deploying the [serveur-ejb-dao-jpa-hibernate.jar] EJB archive in section 4.2. We use the Glassfish server administration web client again. We will not repeat steps already described.
First, we will begin by "unloading" the enterprise application deployed in section 4.10.1:
 |
- [1]: select the [Enterprise Applications] branch of the Glassfish server
- In [2], select the enterprise application to unload, then in [3], unload it
- In [4], the enterprise application has been unloaded
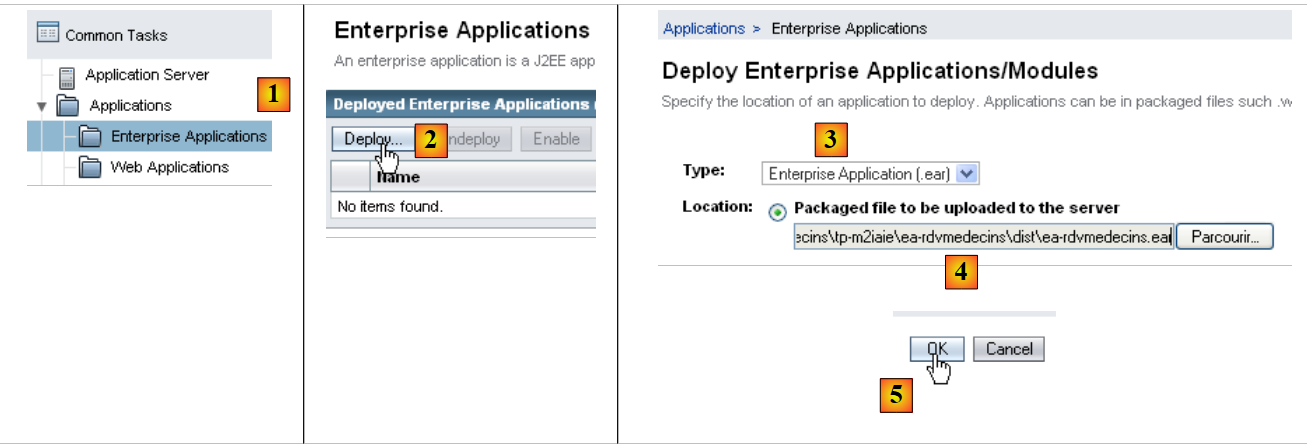 |
- In [1], select the [Enterprise Applications] branch of the Glassfish server
- In [2], deploy a new enterprise application
- In [3], select the type [Enterprise Application]
- to [4], specify the .ear file for the Netbeans project [ea-rdvmedecins]
- in [5], deploy this archive
 |
- to [6], the application has been deployed
- in [7], the web service [WsDaoJpa] appears in the [Web Services] branch of the Glassfish server. Select it.
- In [8], various details about the web service are available. The most relevant information for a client is [9]: the uri of the web service.
- In [10], you can test the web service
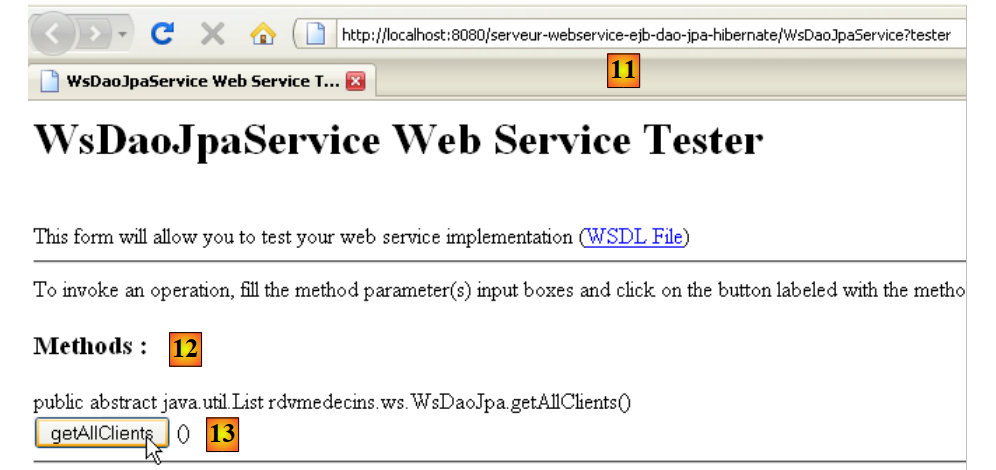 |
- In [11], the web service's uri URL, to which the ?test parameter has been added. This uri displays a test page. All methods (@WebMethod) exposed by the web service are displayed and can be tested. Here, we are testing the [13] method, which requests the list of clients.
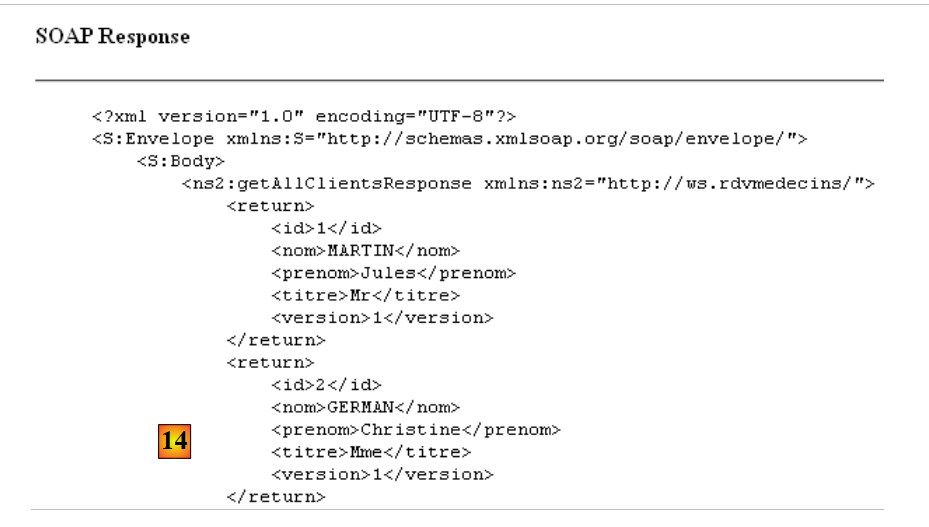 |
- In [14], we are only showing a partial view of the response page. However, we can see that the getAllClients method did indeed return the list of clients. The screenshot shows that it sends its response in a XML format.
A web service is fully described by a file named XML:
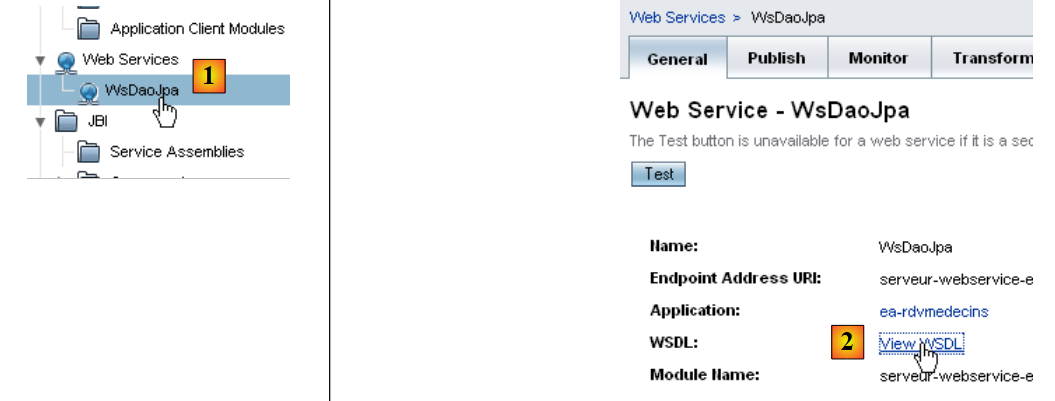 |
- in [1] in the Glassfish server administration web tool, select the [WsDaoJpa] web service
- in [2], follow the link [View WSDL]
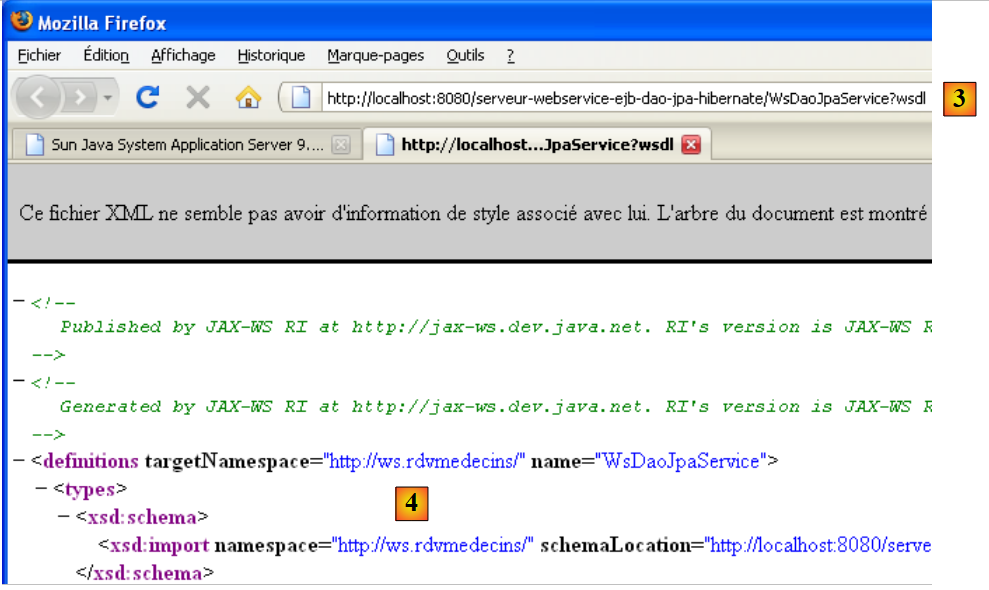 |
- in [3]: the uri of the WSDL file. This is important information to know. It is necessary to configure the clients of this web service.
- In [4], the description of the web service. We will not comment on this complex content.
4.10.3. JUnit tests for the web service
We create a Netbeans project to "run" the tests previously run with an EJB client, this time using a client for the recently deployed web service. Here, we follow an approach similar to the one described in section 14.2.1, page 115 of [ref1].
 |
- in [1], a classic Java project
- in [2], the test class
- in [3], the client uses the EJB archive to access the definitions of the [dao] layer interface and the JPA entities. Note that this archive is located in the [dist] subfolder of the EJB module folder.
To access the remote web service, proxy classes must be generated:
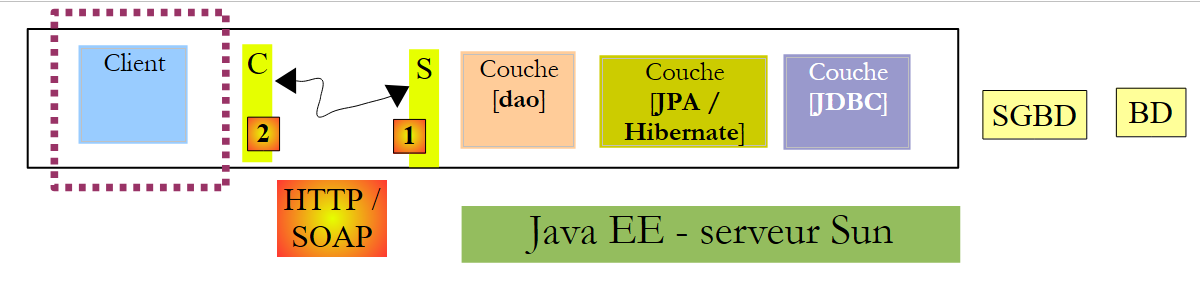 |
In the diagram above, the [2] and [C=Client] layers communicate with the [1] and [S=Serveur] layers. To communicate with the [S] layer, the [C] client must establish a network connection with the [S] layer and communicate with it using a specific protocol. The network connections are TCP connections, and the transport protocol is HTTP. The [S] layer, which represents the web service, is implemented by a Java servlet executed by the Glassfish server. We did not write this servlet. Its generation is automated by Glassfish based on the @Webservice and @WebMethod annotations in the [WsDaoJpa] class that we wrote. Similarly, we will automate the generation of the client’s [C] layer. The [C] layer is sometimes referred to as a proxy layer for the remote web service, with the term “proxy” denoting an intermediary element in a software chain. Here, the C proxy acts as the intermediary between the client we are going to write and the web service we have deployed.
With Netbeans 6.5, the C proxy can be generated as follows (for the rest of the process, the web service must be active on the Glassfish server):
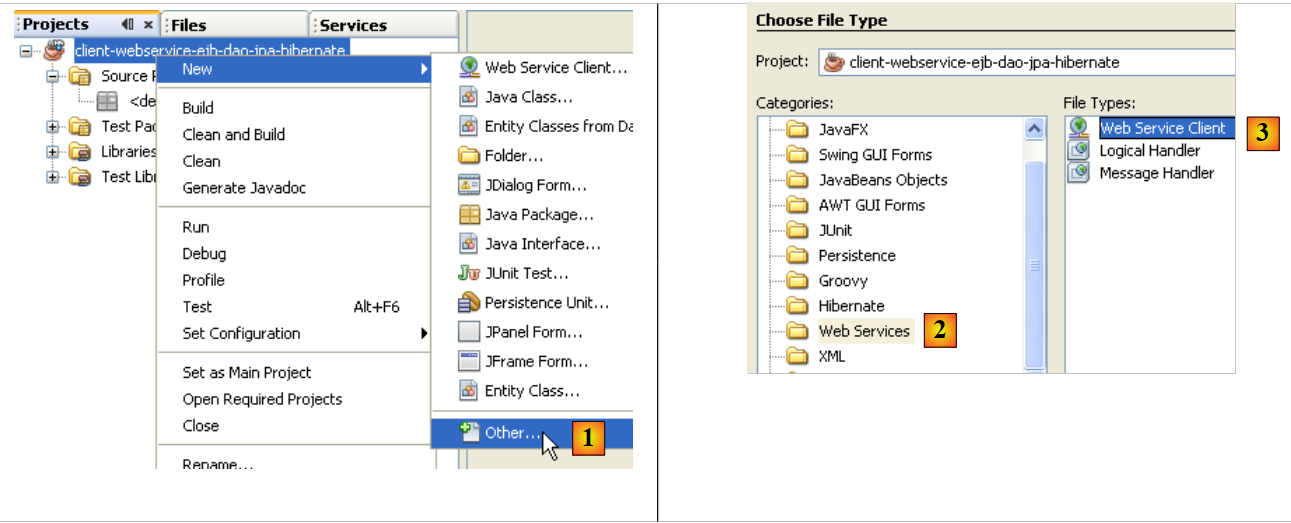 |
- In [1], add a new element to the Java project
- In [2], select the [Web services] branch
- In [3], select [Web Service Client]
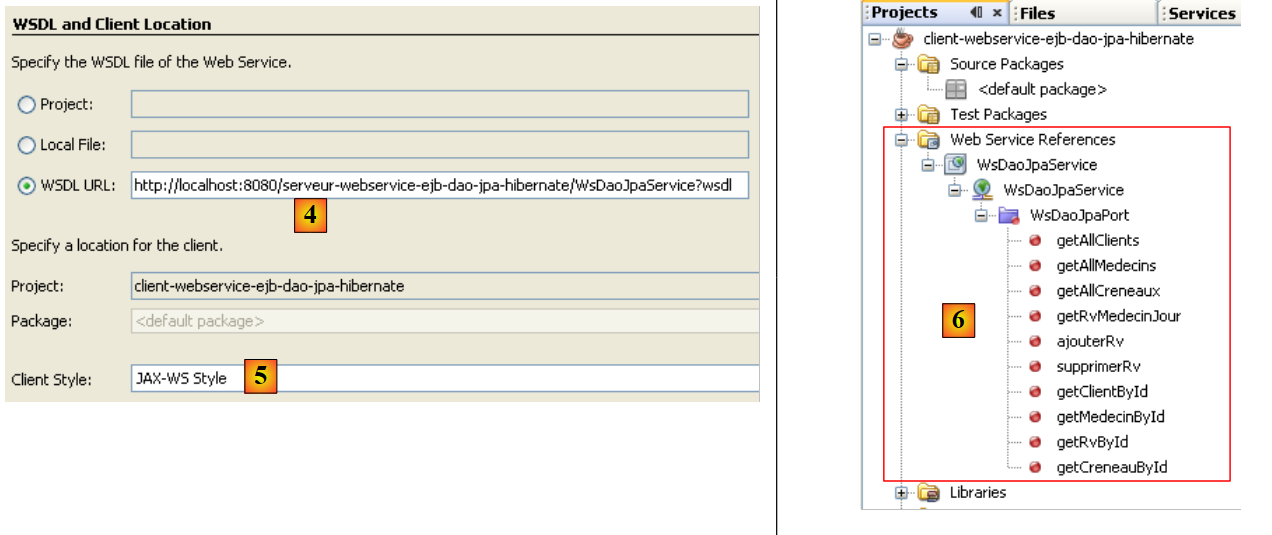 |
- in [4], provide the uri from the WSDL file of the web service. This uri was presented in section 4.10.2.
- In [5], leave the default value [JAX-WS]. The other possible value is [JAX-RPC]
- After validating the web service proxy creation wizard, the Netbeans project was enhanced with a branch [Web Service References] [6]. This branch shows the methods exposed by the remote web service.
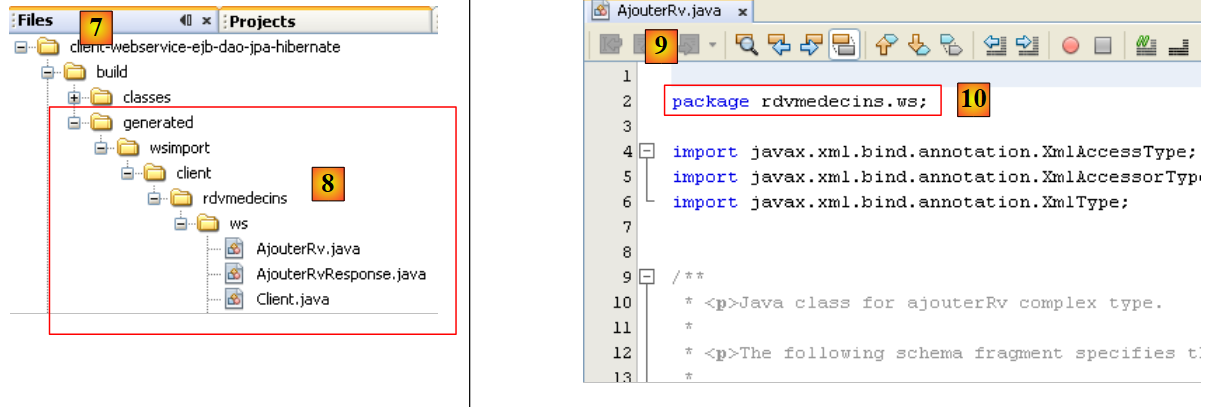 |
- In the [Files] [7] tab, Java source code has been added [8]. It corresponds to the generated C proxy.
- In [9], the code for one of the classes is shown. We can see in [10] that they have been placed in a package [rdvmedecins.ws]. We will not comment on the code for these classes, which is again quite complex.
For the Java client we are building, the generated C proxy acts as an intermediary. To access the M method of the remote web service, the Java client calls the M method of the C proxy. The Java client thus calls local methods (executed in the same JVM), and transparently to it, these local calls are translated into remote calls.
We still need to know how to call the C proxy’s M methods. Let’s return to our test class JUnit:
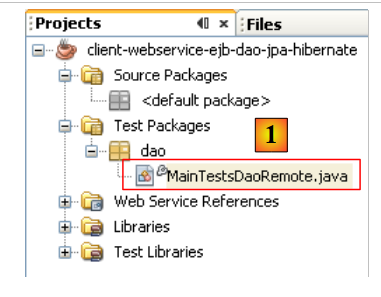 |
In [1], the test class [MainTestsDaoRemote] is the one already used when testing the EJB in the [dao] layer:
- line [13], the test test1 remains unchanged.
- line [9], the content of method [init] has been deleted.
At this stage, the project contains errors because the test method [test1] uses the entities [Client], [Medecin], [Creneau], and [Rv], which are no longer in the same packages as before. They are in the generated C proxy package. We remove the relevant import statements and regenerate them using the Fix Imports operation.
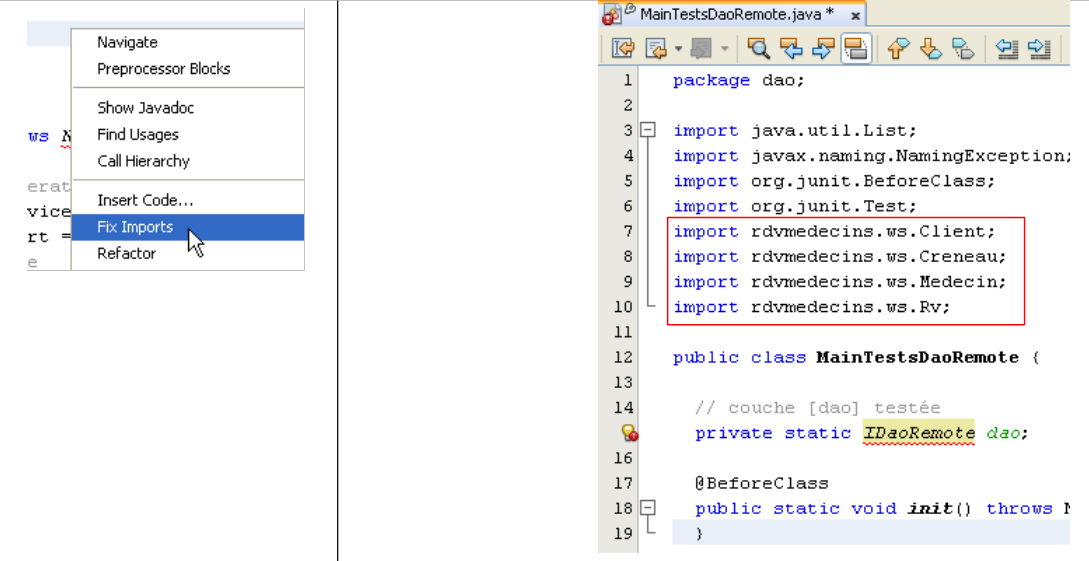 |
Let’s return to the code for the [MainTestsDaoRemote] test class:
The [init] method on line 10 must initialize the reference to the [dao] layer on line 7. We need to know how to use the generated C proxy in our code. Netbeans helps us with this.
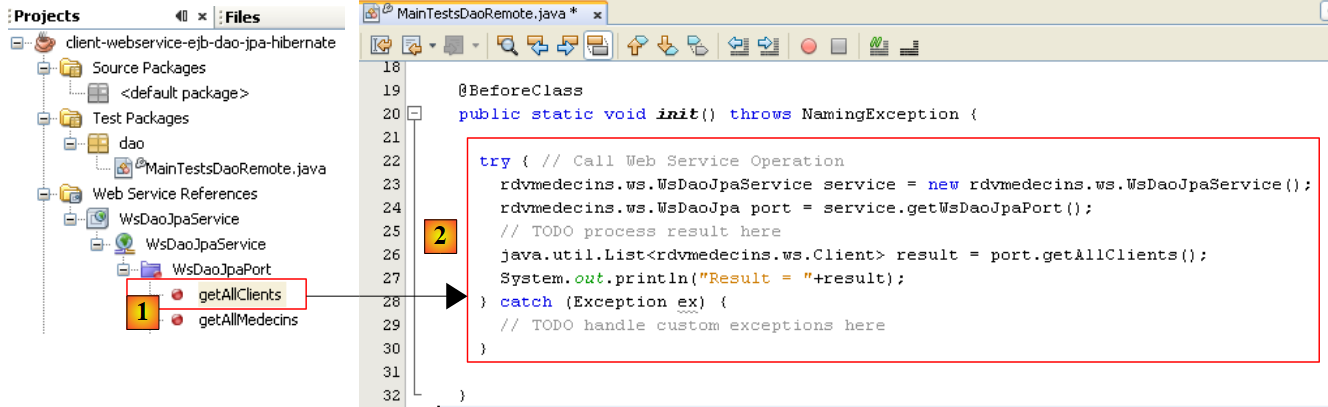 |
- Select the [getAllClients] method of the web service in [1] using the mouse, then drag this method and drop it into the [init] method of the test class.
The result is [2]. This code skeleton shows us how to use the generated C proxy:
- The line [5] shows us that the method [getAllClients] is a method of the object of type [WsDaoJpa] defined on line 3. The type [WsDaoJpa] is an interface with the same methods as those exposed by the remote web service.
- In line [3], the object [WsDaoJpa port] is obtained from another object of type [WsDaoJpaService] defined in line 2. The type [WsDaoJpaService] represents the locally generated C proxy.
- Access to the remote web service may fail, so the entire code is enclosed in a try/catch block.
- The C proxy objects are in the [rdvmedecins.ws] package
Once this code is understood, we see that the local reference to the remote web service can be obtained using the following code:
The code for the JUnit test class then becomes the following:
We are now ready for testing:
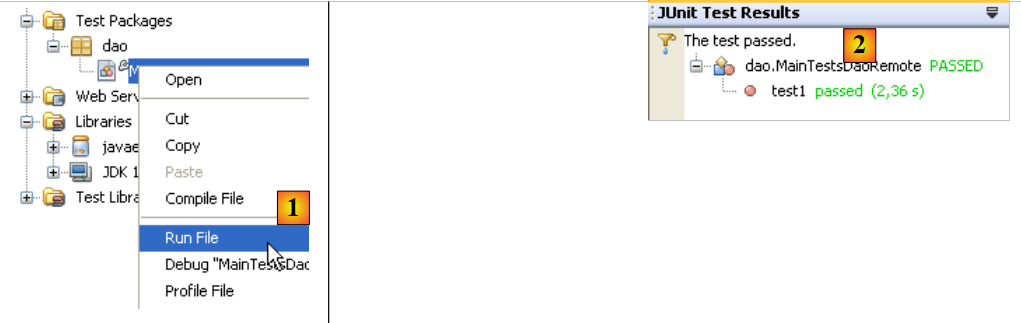 |
In [1], the JUnit test is executed. In [2], it passes. If we look at the console output for Netbeans, we find lines like the following:
Liste des clients :
rdvmedecins.ws.Client@1982fc1
rdvmedecins.ws.Client@676437
rdvmedecins.ws.Client@1e4853f
rdvmedecins.ws.Client@1e808ca
On the server side, the [Client] entity has a toString method that displays the various fields of a [Client] object. During automatic C proxy generation, the entities are created in the C proxy but with only the private fields accompanied by their get / set methods. Thus, the toString method was not generated in the [Client] entity of the C proxy. This explains the previous display. This does not detract from the JUnit test: it was successful. We will now consider the web service to be operational.